Plant Descriptions – Tabernaemontana pandacaqui – Thespesia populneoides
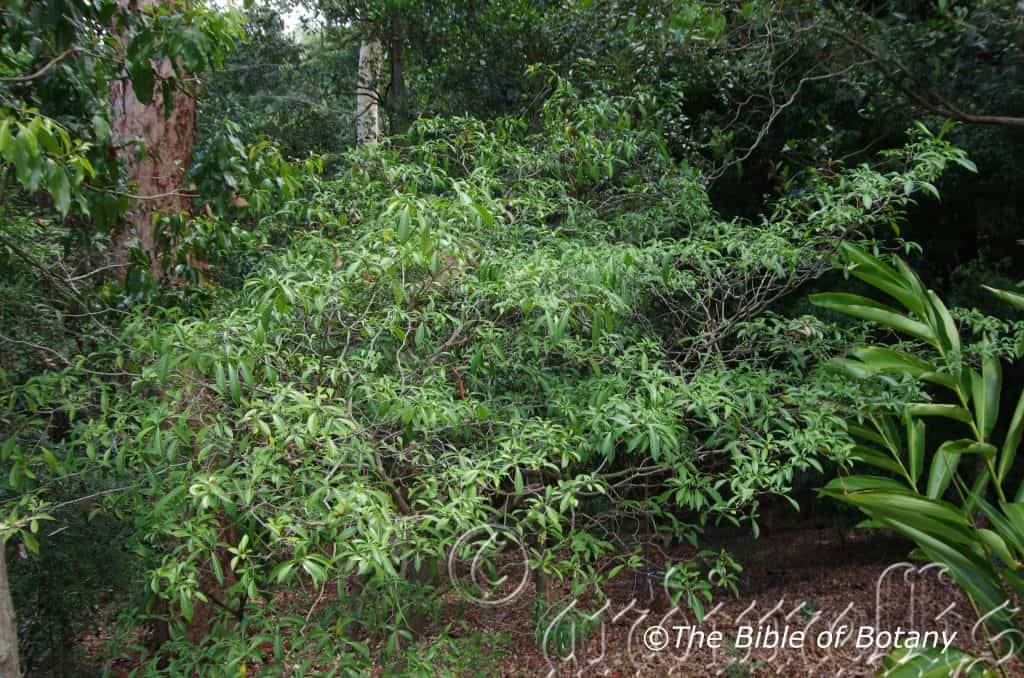
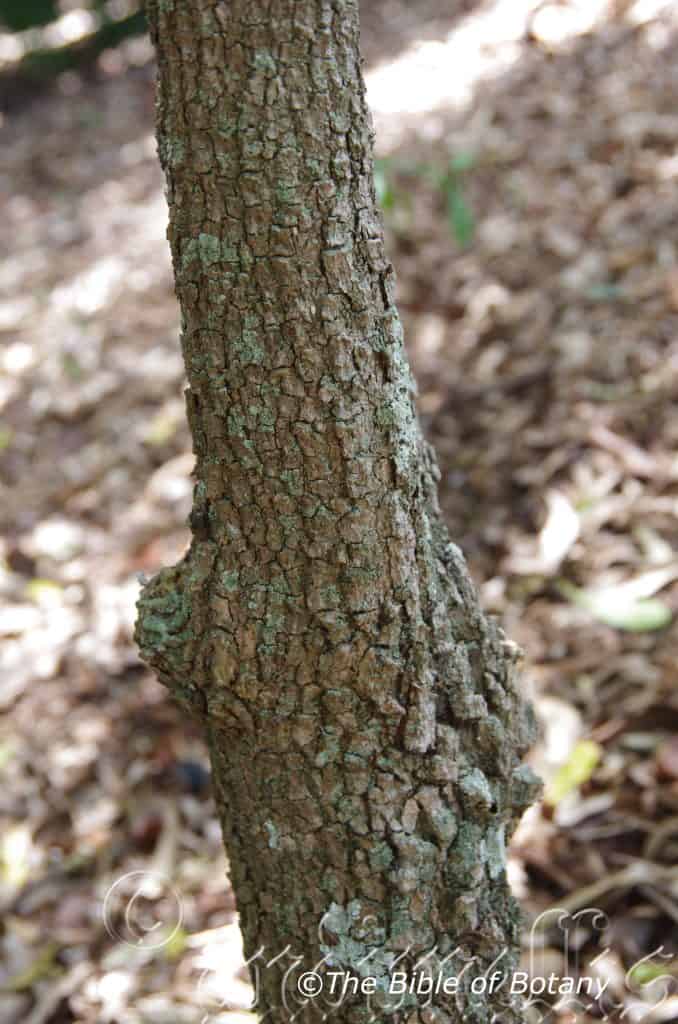
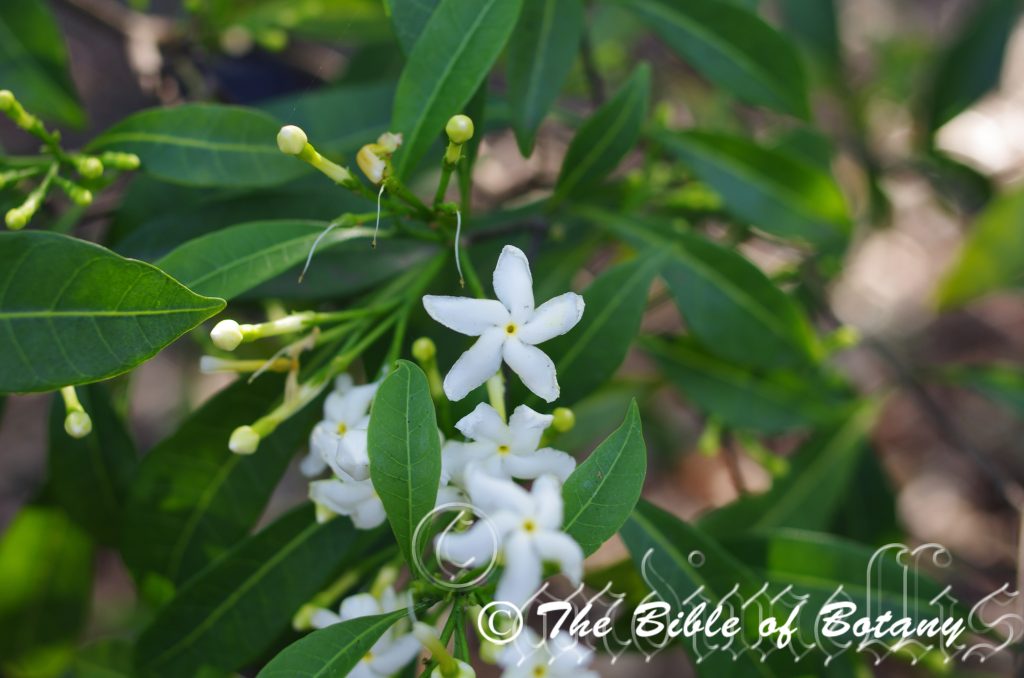
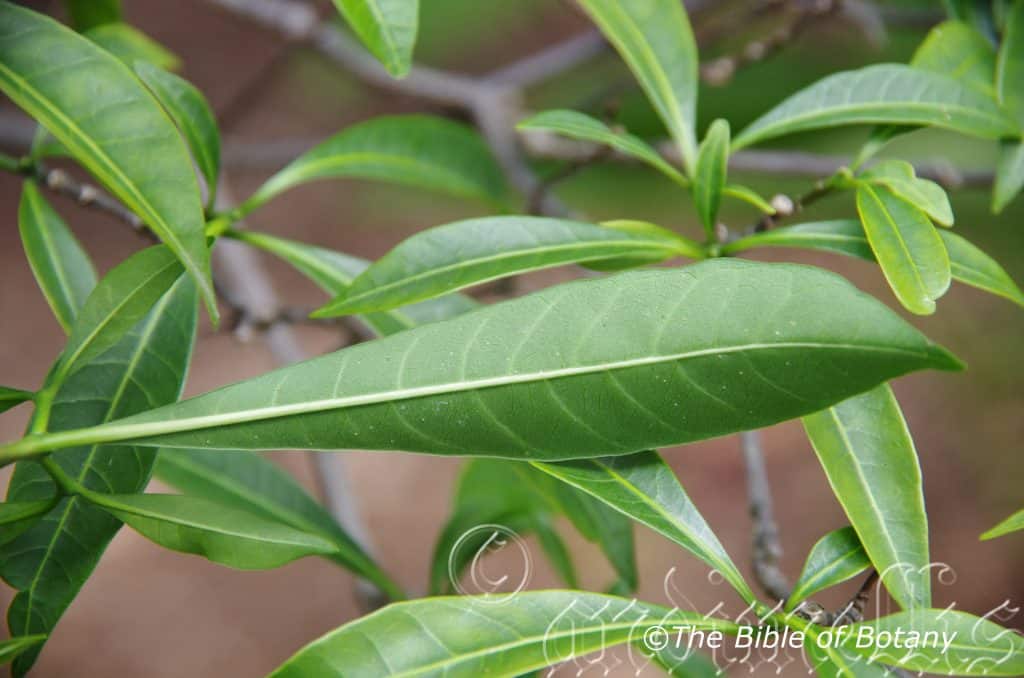
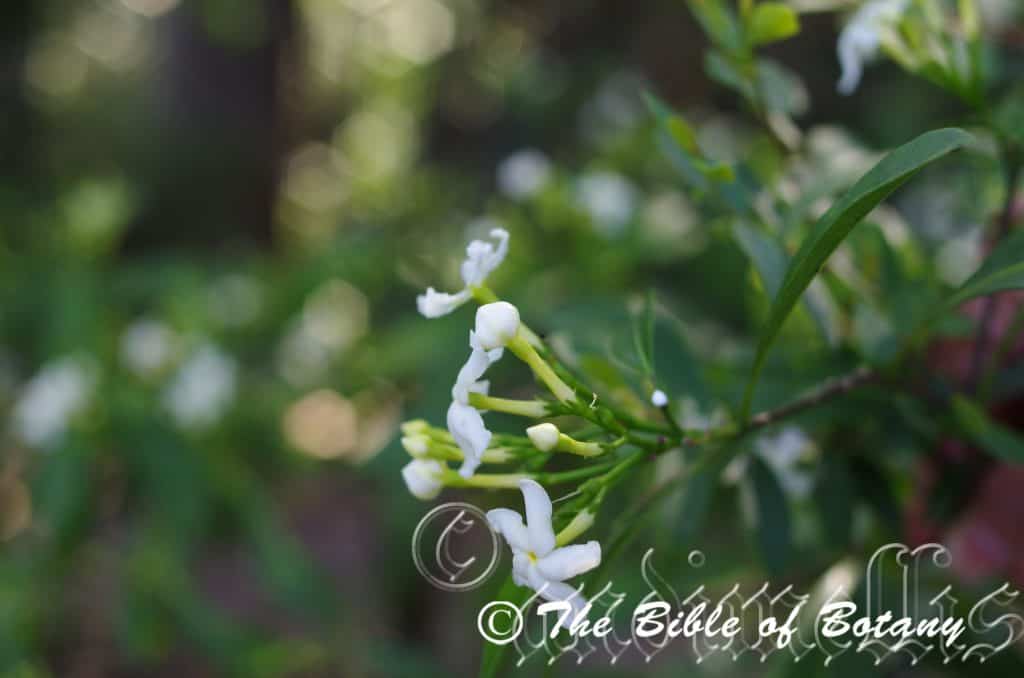
Tabernaemontana pandacaqui
Taeniophyllum muelleri
Tapeinochilos ananassae
Tasmannia insipida
Tasmannia stipitata
Tecomanthe hillii
Tecticornia indica
Telmatoblechnum indicum
Telopea aspera
Telopea speciossima
Tephrosia brachyodon
Tephrosia filipes
Tephrosia gaudium-solis
Terminalia arenicola
Terminalia arostrata
Terminalia catappa
Terminalia microcarpa
Terminalia muelleri
Terminalia platyphylla
Ternstroemia cherryi
Tetracera nordtiana
Tetragonia tetragonioides
Tetrarrhena juncea
Tetrastigma nitens
Tetratheca juncea
Tetratheca thymifolia
Teucrium argutum
Teucrium corymbosum
Thaleropia queenslandica
Thelychiton falcorostrus
Thelychiton kingianus
Thelychiton speciosus
Thelymitra angustifolia
Thelymitra fragrans
Thelymitra ixioides
Thelymitra malvina
Thelymitra pauciflora
Thelymitra purpurata
Themeda australis
Themeda triandra
Thespesia populneoides
Mount Cootha Botanical Gardens Qld.
Mount Cootha Botanical Gardens Qld.
Mount Cootha Botanical Gardens Qld.
Mount Cootha Botanical Gardens Qld.
Mount Cootha Botanical Gardens Qld.

Mount Cootha Botanical Gardens Qld.
Tabernaemontana pandacaqui
Classification:
Unranked: Eudicots
Unranked: Asterids
Order: Gentianales
Family: Apocynaceae
Subfamily: Rauvolfioideae
Tribe: Tabernaemontaneae
Subtribe: Tabernaemontanae
Genus: From Taberna, which is Latin for a single room shop, covered by a barrel vault with a window above it to let light into a wooden attic for storage and a wide doorway within great indoor markets of ancient Rome and Montana which is Latin for a mountain. It refers to plants, which prefer to grow in the mountains and have fruits which appear to have a large entrance along one side.
Species: From Pandacaqui, which is Latinized for the Philippines. It refers to plants, which were first found and named from the Philippines.
Common Name: Banana Bush or Ya Yang Bush.
Distribution:
Tabernaemontana pandacaqui is found east from Darwin to Groote Eylandt in north and coastal Northern Territory.
In the east it is found south from the Torres Strait Islands in far north Queensland to the Manning River in coastal, central New South Wales. It is found on and east of the Great Dividing Range.
It is also found in Borneo, China South and Central, China Southeast, Fiji, Jawa, Lesser Sunda Islands, Malaya, Maluku, Marianas, New Caledonia, New Guinea, Papua, Philippines, Samoa, Society Islands, Sulawesi, Taiwan, Thailand, Tonga, Tuamotu and Vanuatu.
https://avh.ala.org.au/occurrences/search?taxa=Tabernaemontana+pandacaqui+#tab_mapView
Habitat Aspect Climate:
Tabernaemontana pandacaqui prefers dappled shade to dense shade. It grows in moist, warm, well developed sub-tropical rainforests, cool well developed tropical rainforests, littoral rainforests, gallery forests, riparian forests or monsoonal rainforests. The altitude ranges from 5 meters ASL to 1300 meters ASL.
The temperatures range from minus 3 degrees in July to 36 degrees in January.
The rainfall ranges from lows of 900mm to 3200mm average per annum.
Soil Requirements:
Tabernaemontana pandacaqui prefers better quality sandy loams to medium clays with a high proportion of forest litter. The soils are usually derived from decomposed sandstones, shales, brown basalts or black basalts. The altitude ranges from 1 meters ASL to 390 meters ASL. The soils pH ranges from 5pH to 7pH. It does not tolerate waterlogged soils however plants in riparian zones may be inundated for short periods during storms. Non saline soils to moderately saline soils are tolerated.
Height & Spread:
Wild Plants:1m to 2.5m by 1m to 1.5m.
Characteristics:
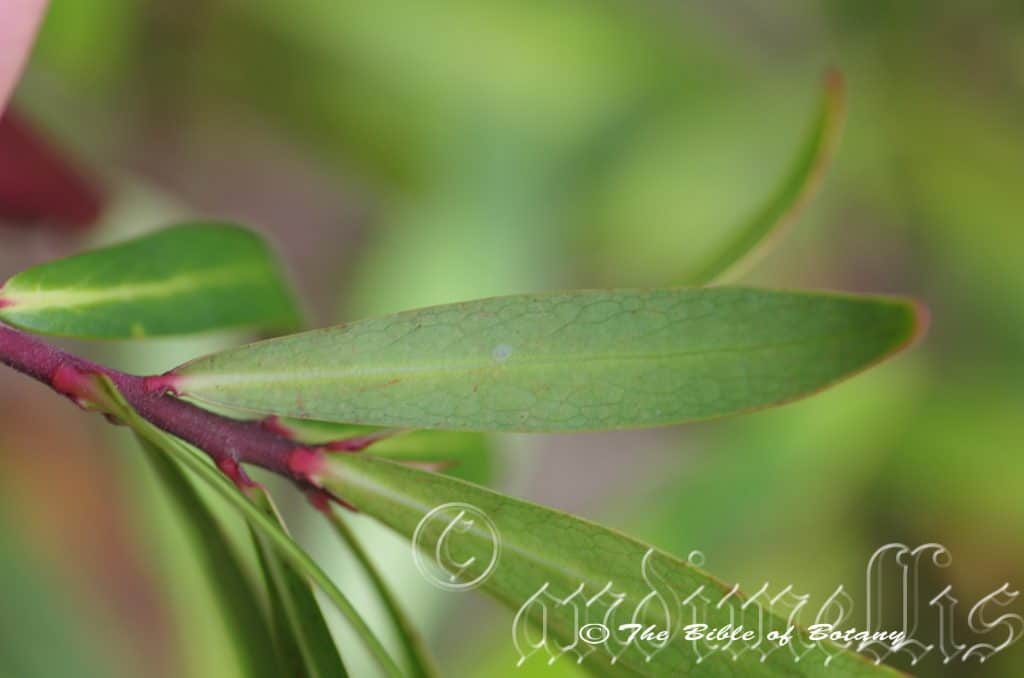
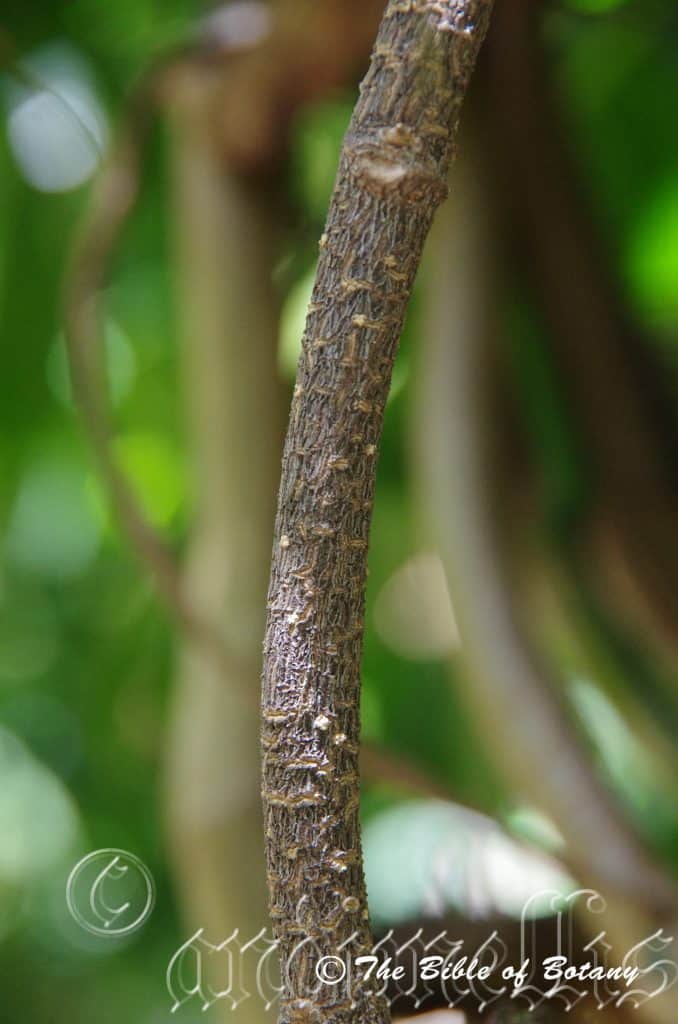
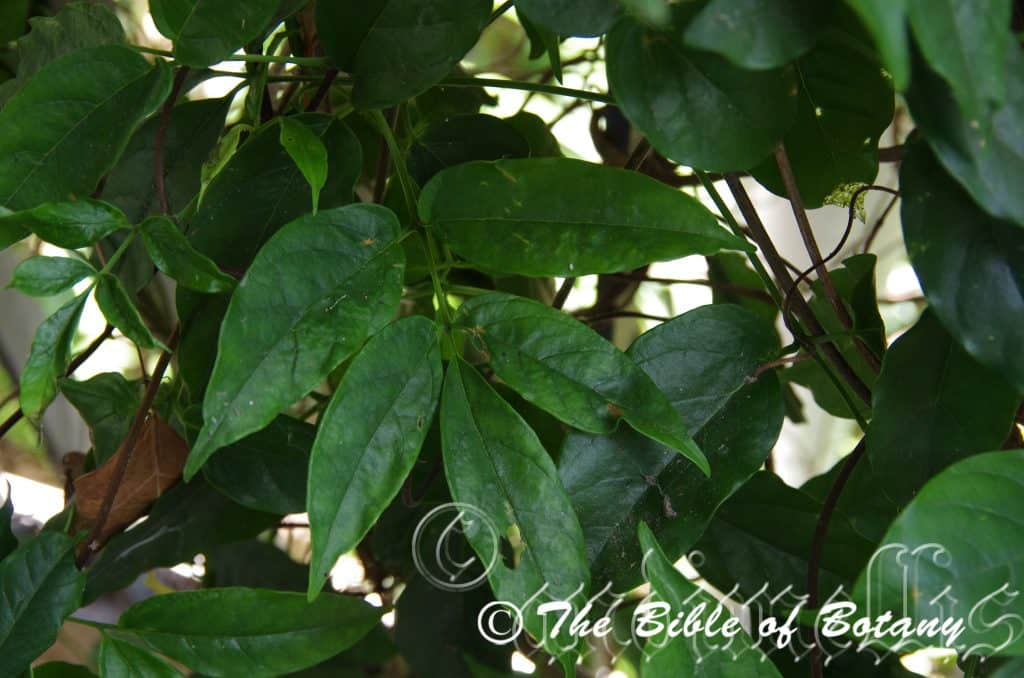
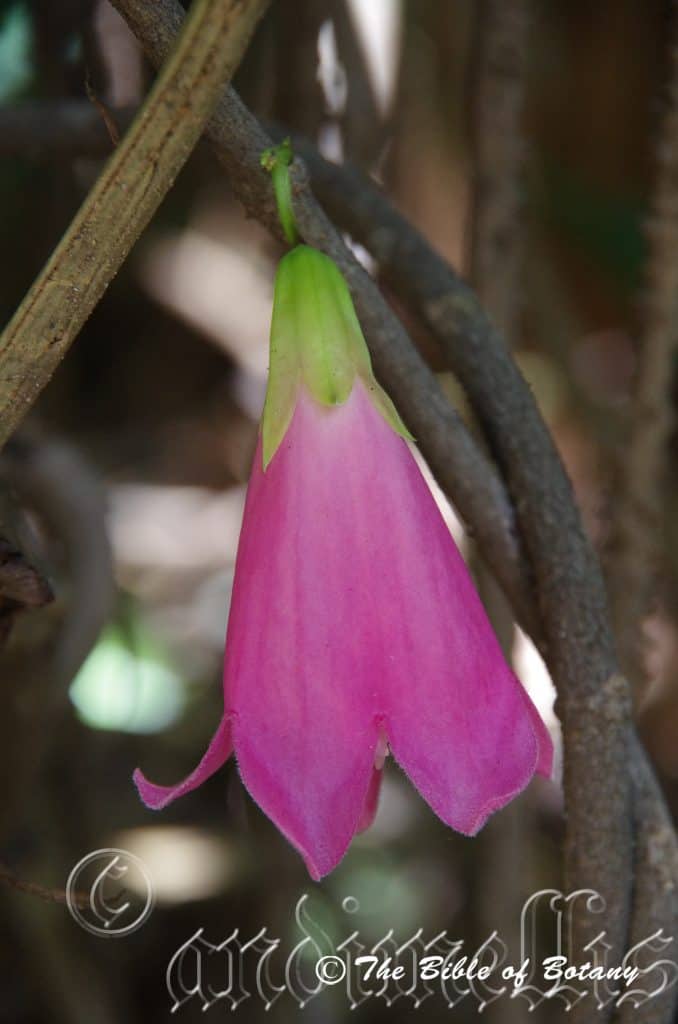
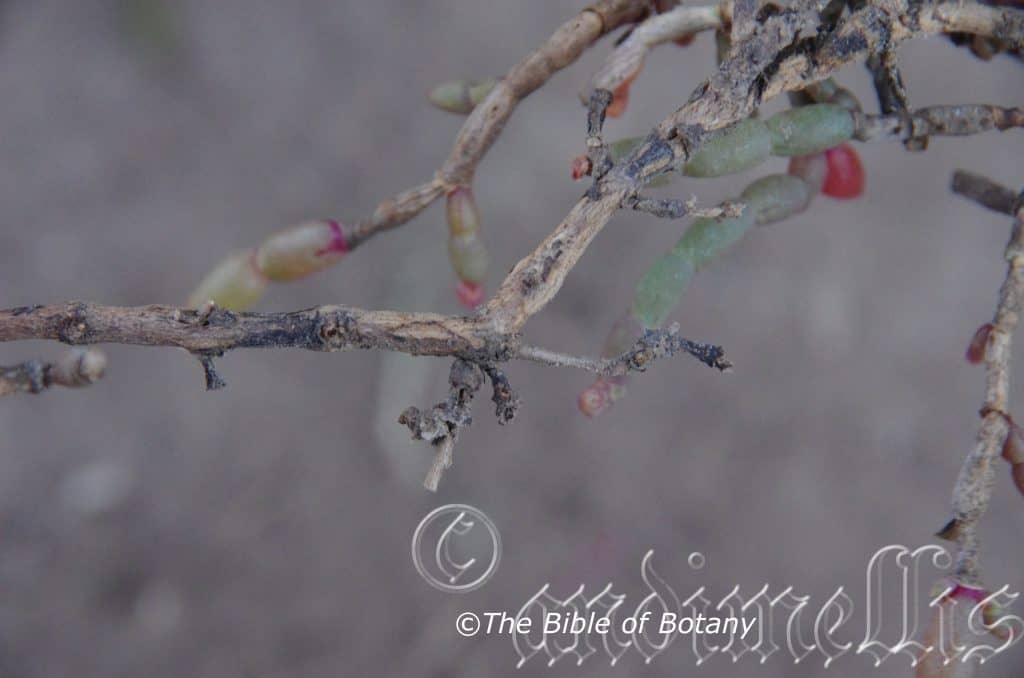
Tabernaemontana pandacaqui grows as a small conical shrub with slender, erect, pale grey, glabrous stems. The branchlets are pale grey and become pale lime-green to pale grass-green green on the new growth. The branchlets are sparsely covered in lighter coloured lenticels and exude milky latex when damaged.
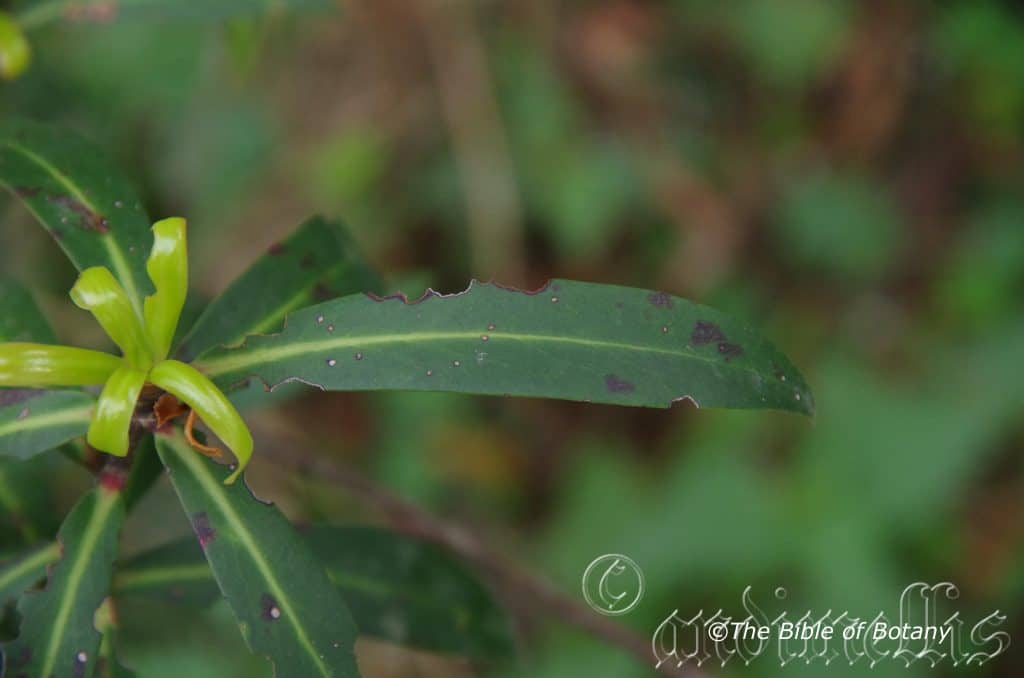
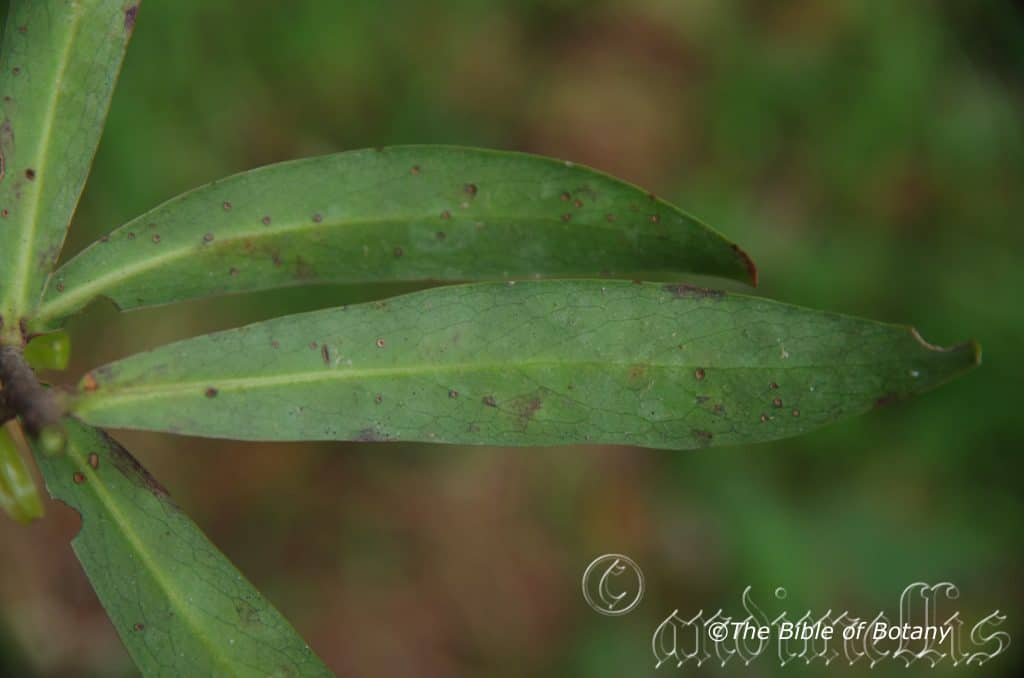
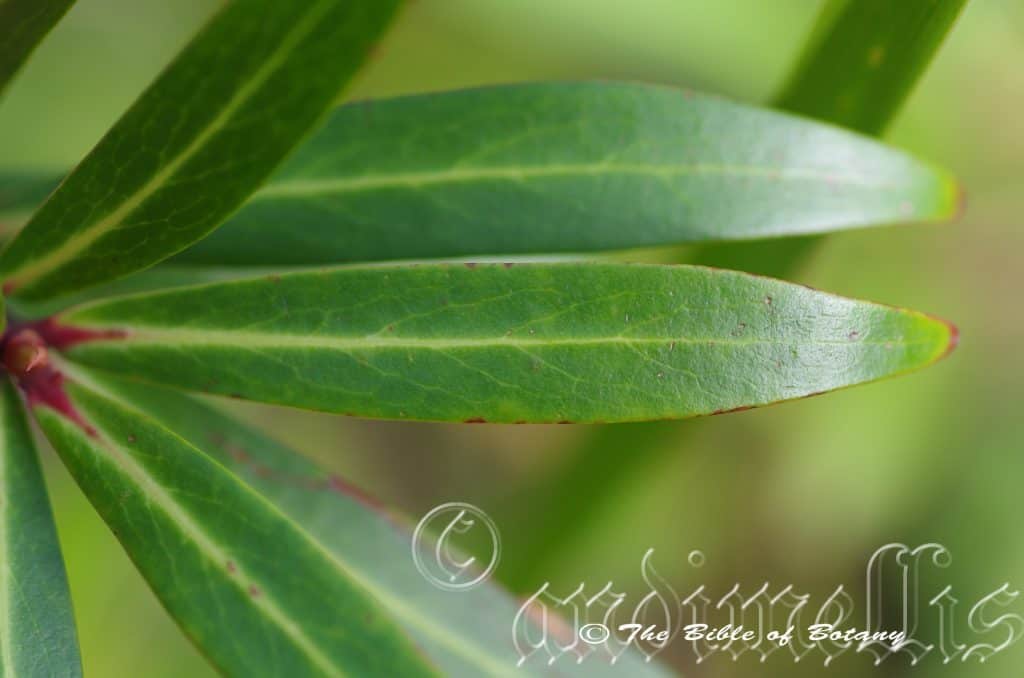
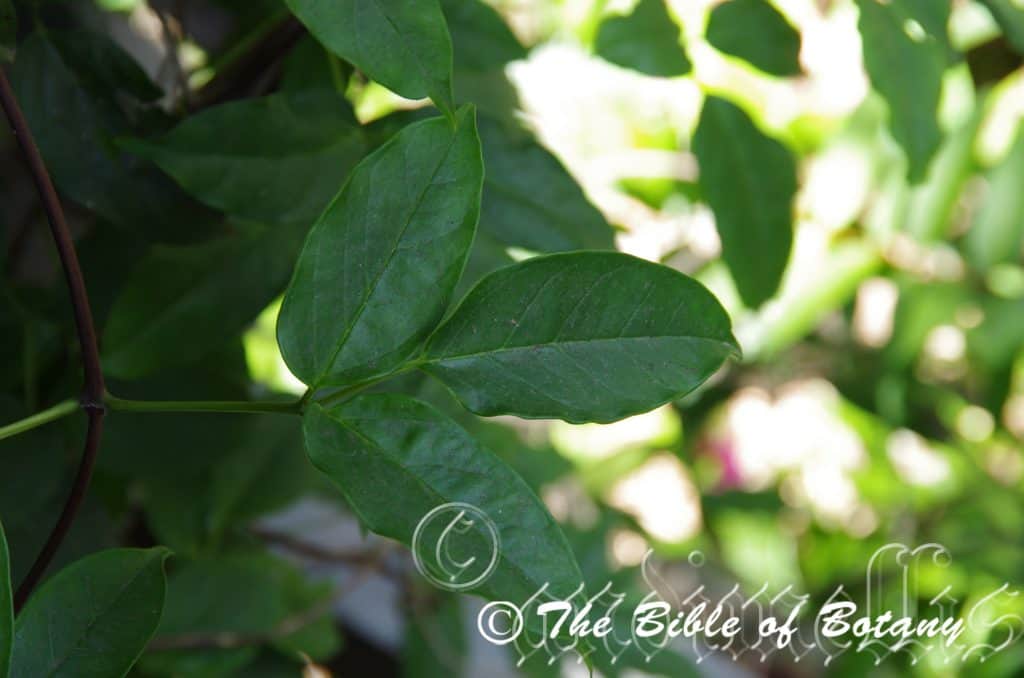
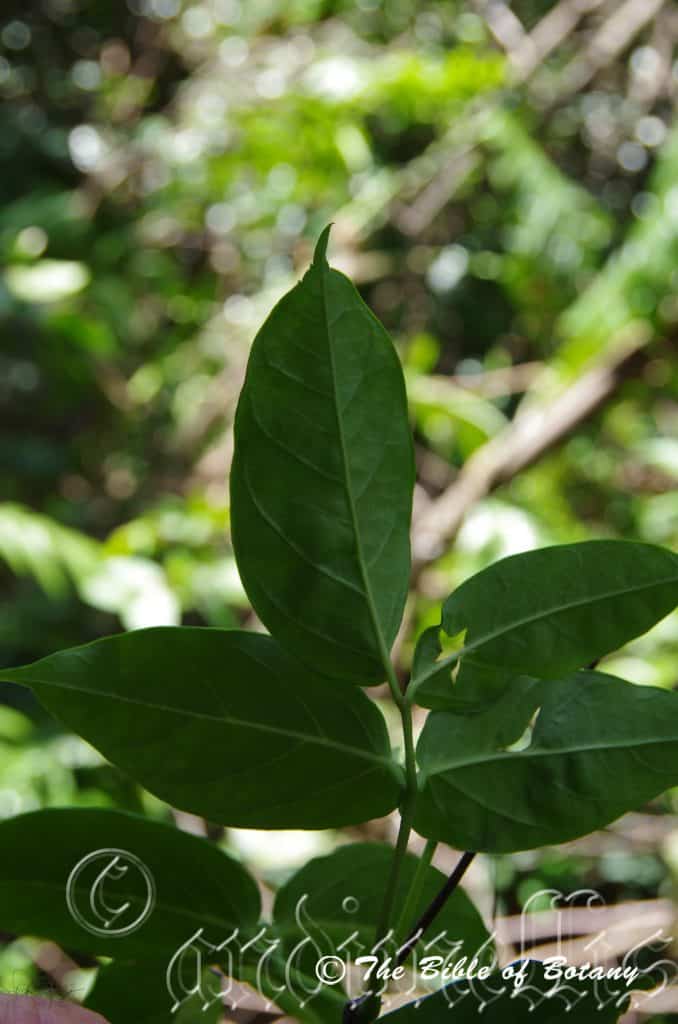
The opposite, elliptical to oblanceolate leaves of Tabernaemontana pandacaqui measure 40mm to 120mm in length by 15mm to 50mm in width. The stipules enclose the new seasons buds and are located between the petiole and the branchlets. The petioles are deep grass-green often tinged with deep purple near the base and measure 2mm to 15mm in length. The bases are cuneate to tapering to be shortly attenuate while the apexes are short to long acuminate. The concolourous laminas are grass-green to deep grass-green, dull to semi glossy, glabrous and thin. The leaf margins are entire, flat and decurve near the apex. The mid vein and 3 to 6 pairs of alternate laterals are prominent on the lower laminas and extend to the margins. The laminas are convex between the lateral veins.
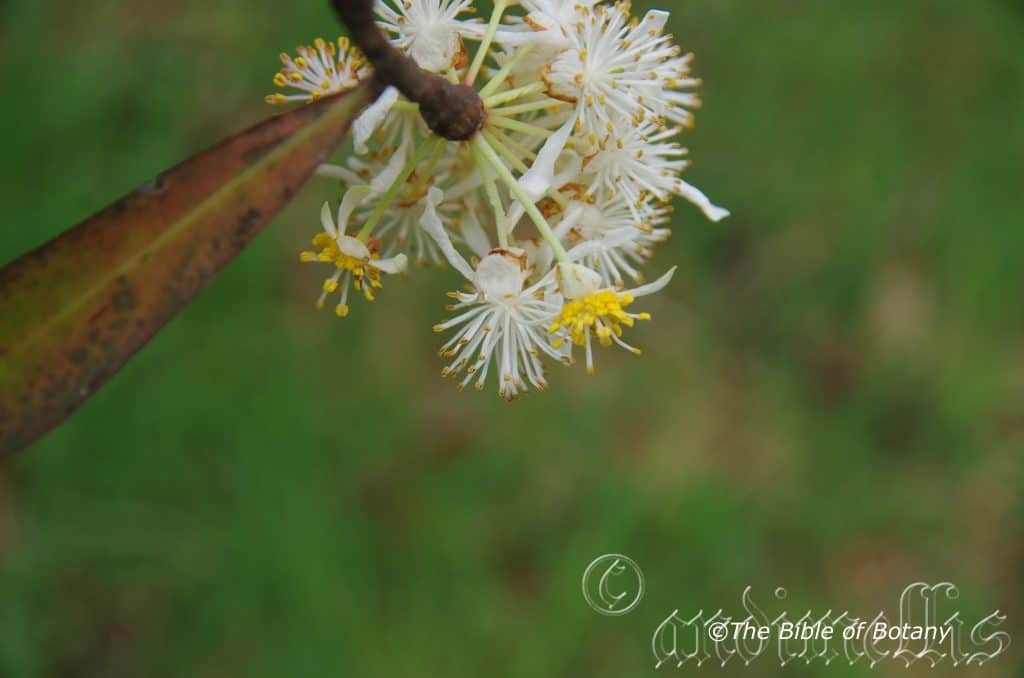
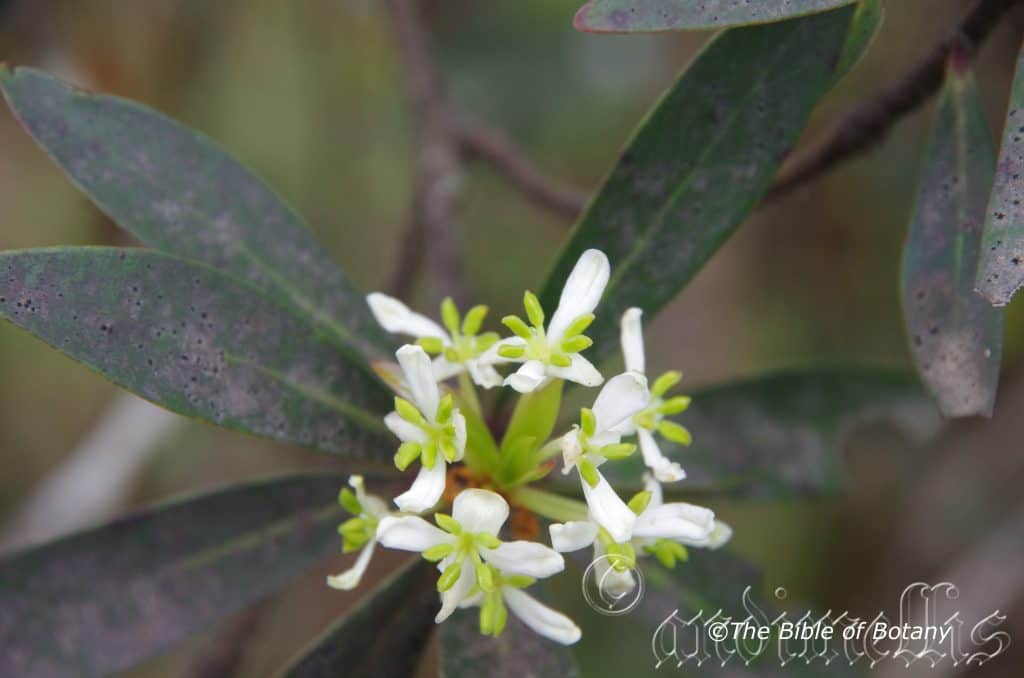
Inflorescences of Tabernaemontana pandacaqui are born on short erect to semi erect cymes from the leaf axils. The slender, grass-green Peduncles, pedunculates and pedicels are glabrous or covered in very fine resinous lumps. The peduncles measure 30mm to 50mm in length while the pedunculates measure 10mm to 25mm in length and the pedicels measure 20mm to 45mm in length.
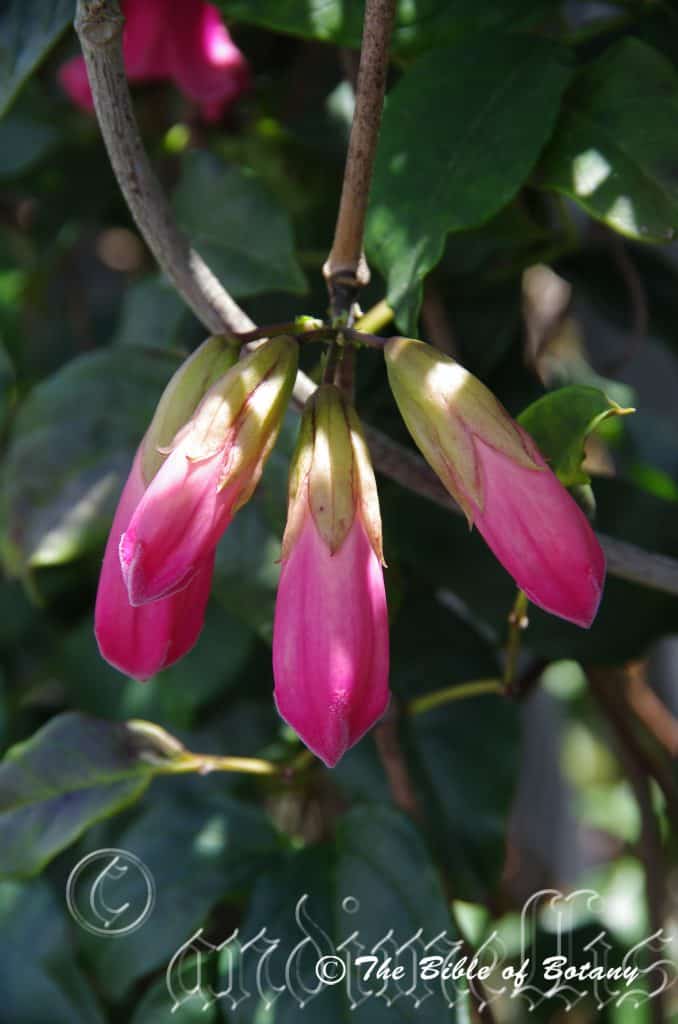
The 5 fawn to pale brown calyxes lobes are erect, glabrous and measure 4mm to 8mm in length. The pale lime-green, cream or pale yellow calyxes measure 2.5mm to 3.5mm in length while the 5 linear, lime-green lobes measure 0.3mm to 0.6mm in length.
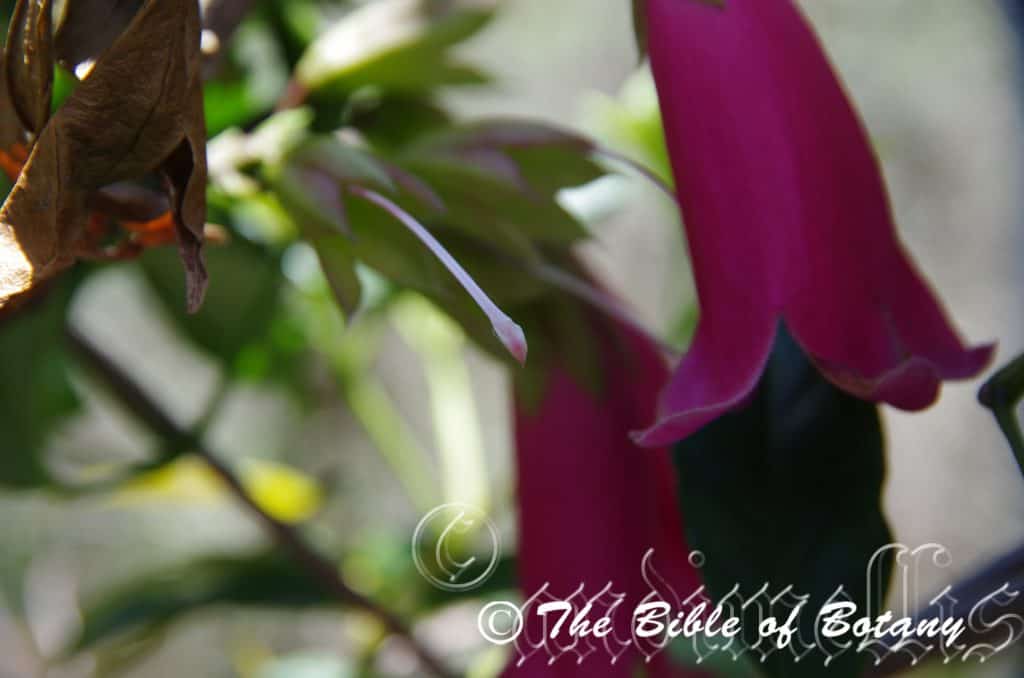
The corolla tubes are long and slender, white externally and lemon-yellow internally and measure 9mm to 16mm in length by 1.8mm to 2.5mm near the base and 1.6mm to 2mm near the apex. The 5 pure white lobes are very variable being flounced asymmetrical They vary greatly in width, twisted or spiraling from the center, margins entire, flat, crisped or undulating and are divaricate with the apexes decurve or recurved. The lobes apexes are obtuse to long acuminate or caudate. The lobes measure 6mm to 14mm in length
The inserted stamens are attached to the middle section of the corolla and are free for their entire length. The filaments are white and more slender than the white anthers.
The white styles and green ovary are glabrous while the retuse stigma is covered in minute white papillose hairs. The pistil measures 10mm to 17mm in length. Tabernaemontana pandacaqui sweet scented flowers appear from early September through to early March.
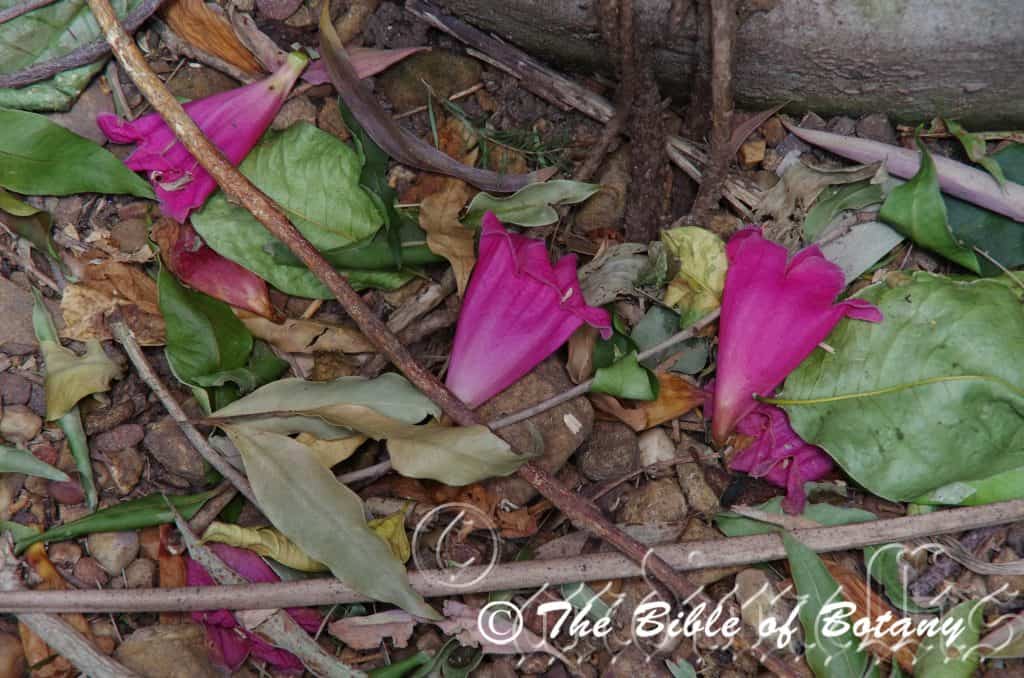
The fruits of Tabernaemontana pandacaqui are asymmetrical, narrowly ovoidal to narrowly ellipsoidal follicles with an acuminate apex. The angulated follicles are glabrous and measure 15mm to 40mm in length by 8mm to 15mm in diameter. The lime-green capsules turn bright banana yellow externally and bright banana yellow internally when ripe to expose the black seeds enclosed in a deep red-pink to deep red sticky pulp. The calyx lobes are usually persistent on the ripe fruit. The black, spherical seeds measure 4mm to 6mm in length by 3mm to 3.5mm in diameter. The fruit ripen from November to early May.
Wildlife:
Tabernaemontana pandacaqui does not appear to have any predators.
The plants are subject to science at the moment because of the large number and quantities of alkaloids present in all parts of the plant.
Cultivation:
Tabernaemontana pandacaqui is a beautiful medium shrub that should be more widely grown in association with small rainforest gardens. It is ideal at the edge of a rainforest or a moist sheltered positions in a garden. In cultivation it will grow from 1.5 meters to 2 meters in height by 1 meter to 1.5 meters in diameter when grown in the open shady position.
It grows exceptionally well on better quality deeper, light sandy loams to medium clay soils where deep leaf litter keeps the soil cool and moisture at an even level. If these requirements are met it can cope with temperatures as low as minus 3 degrees when in a sheltered position away from frosts and up to 38 degrees. The shrubs at Nana Glen never suffered tip burn but were very slow to recover each spring when temperatures reached minus 5 degrees even with surrounding trees offering protection from the frosts. It is moderately drought resistant surviving rainfalls as low as 850mm in drought years even in their first year.
Add to the above, if it is given an adequate supply of water and a little native organic fertilizer on a regular basis it will respond superbly with excellent flowering and fruit set over several months. Plants at nana Glen responded wonderfully after being tip pruned and fertilized with very good flowering the following season.
Whether it is in flower or not this plant will catch your attention and the viewer will be transfixed on the display. When it is not in flower you need other plants to help highlight its shape and deep green foliage. Small prostrate ferns with deep bright deep glossy green fronds or pale blue-green fronds are best. The prostrate growth of Viola hederacea with its white and deep purple flowers will offset and compliment the foliage beautifully. This is one plant that benefits the gardener if mass planted in small numbers of 3 to 5 plants as when it is in flower, the sweet perfume will linger through the garden for a considerable distance. Added to this the beauty of the opposite banana shape capsules makes the plants all the more delightful. Plant them at 1 meter to 1.5 meter centers.
It also makes a great shrub for that hard to plant section that is always covered in shade and moisture on the southern side of a home.
Propagation:
Seeds: The seeds of Tabernaemontana pandacaqui can be removed easily from the fruits.
Sow fresh seeds directly into a seed raising mix in early spring once the last frosts have finished for the year. Keep the seeds moist not wet. Cover the seeds with 4mm to 5mm of a light open mix with plenty of perlite. Do not over water as the seeds will rot off before germination takes place. Place the trays in a warm shaded area with 50mm shade cloth in the bush house. When the seedlings are 20 to 25 mm tall, prick them out and plant them into 50mm native tubes using a good organic mix. Seedlings usually appear in the 2 to 3 weeks and are relatively hardy and quick to establish themselves in a nursery.
As the seedlings roots reach the bottom of the tubes plant them out into their permanent position. Once it is potted up plants drop leaves at the first sign of stress so are difficult to maintain and have the plants harden off before transplanting into their permanent positions. Deaths at this stage however are relatively rare.
Fertilize using seaweed, fish emulsion or organic chicken pellets soaked in water on an alternate basis. Fertilize every two months until the plants are established then twice annually in early September and March to maintain better colour, health, vitality and flowering.
Cuttings:
Tabernaemontana pandacaqui is unknown from cuttings however I would suspect that it would be relatively easy to strike. Use 100mm to 200mm long semi hardwood cuttings from good flowering plants, from the present season’s growth. Take them in warmer months of the year. Remove half the leaves from the bottom section being careful not to tear the bark.
1 Prepare the cutting mix by adding two thirds sharp clean river sand, one third peat or one third perlite. These ingredients must be sterilized,
2 Select good material from non diseased plants,
3 Select semi green stems for cuttings. Look for a stem with two or three nodes,
4 Place the cutting on a flat, hard surface, and make a clean cut down one side of the cutting at the base for 10mm with a sharp sterile knife or razor blade. – This scarification of the node will increase the chances of roots emerging from this spot. Now remove all but one or two the leaves, leaving the apex leaves in tact. If the leaves are very large in proportion to the stem, cut off the apical halves.
5 Fill a saucer with water, and place a little medium strength rooting hormone into another container like a milk bottle top. Dip the node end of the cutting into the water and then into the rooting hormone. Tap off any excess hormone,
6 Use a small dipple stick or old pencil to poke a hole into the soilless potting mix. Ensure the hole is slightly larger than the stem diameter and be careful not to wipe the rooting hormone off the cuttings base. Place 2 to 4 cuttings in each of the 50mm native tubes,
7 I like to place the tubes in bucket with holes drilled in the bottom to allow excess water to drain out. A plastic bag that fits over the bucket is ideal to help maintain temperature and moisture. Place in a semi shaded, warm position like under 50mm shade cloth.
8 When the cuttings have struck, open the bag to allow air circulation for a few days to a week,
9 Once hardened off remove the cuttings from the bag and allow to further hardening for a few more days to a week,
10 Transplant into a good potting mix to grow on.
Fertilize using seaweed, fish emulsion or organic chicken pellets soaked in water on an alternate basis. Fertilize every two months until the plants are established then annually in September to October to maintain better colour, health, vitality and flowering.
Further Comments from Readers:
“Hi reader, it seems you use The Bible of Botany a lot. That’s great as we have great pleasure in bringing it to you! It’s a little awkward for us to ask, but our first aim is to purchase land approximately 1,600 hectares to link several parcels of N.P. into one at The Pinnacles NSW Australia, but we need your help. We’re not salespeople. We’re amateur botanists who have dedicated over 30 years to saving the environment in a practical way. We depend on donations to reach our goal. If you donate just $5, the price of your coffee this Sunday, We can help to keep the planet alive in a real way and continue to bring you regular updates and features on Australian plants all in one Botanical Bible. Any support is greatly appreciated. Thank you.”
In the spirit of reconciliation we acknowledge the Bundjalung, Gumbaynggirr and Yaegl and all aboriginal nations throughout Australia and their connections to land, sea and community. We pay our respect to their Elders past, present and future for the pleasures we have gained.
Taeniophyllum muelleri
Classification:
Unranked: Monocots
Order: Asparagales
Family: Orcidaceae
Subfamily: Epidendroideae
Tribe: Vandeae
Subtribe: Aeridinae
Genus: From Tainiola which is Ancient Greek for a fillet, a band or a ribbon and Phullon which is Ancient Greek for a leaf. It refers to leaves which are shaped like a ribbon, however the reference to this orchid is not clear.
Species: Is named in honour of Ferdinand Von Mueller; 1825-1896, who was a German born Australian Botanist who named over 2000 new species and was director of the Melbourne Botanic Gardens.
Common Name:
Distribution:
Taeniophyllum muelleri is found south from the tip of Cape York Peninsula in far north east Queensland to Cascades on Upsalls Creek, near Swans Crossing west of Kendall in central eastern New South Wales
It is also found on Norfolk Island.
https://avh.ala.org.au/occurrences/search?taxa=Taeniophyllum+muelleri#tab_mapView
Habitat:
Aspect / Climate:
Taeniophyllum muelleri prefers medium shade to light dappled sun light. It grows on the outer branches and branchlets on the coast and coastal ranges. It grows in warm sheltered areas of open forests, humid gullies and stream side vegetation in littoral rainforests, riparian rainforests and well developed rainforests. The altitude ranges from 50 meters ASL to 1200 meters ASL in the north and from 5 meters ASL to 300 meters ASL in New South Wales.
The temperatures range from minus 2 degrees in July to 38 degrees in January.
The rainfall ranges from lows of 1200mm to 3200mm average per annum.
Soil Requirements:
Taeniophyllum muelleri grows as an epiphytic orchid or rarely as lithophytic orchid.
Height & Spread:
Wild Plants: 0.01m to 0.05m by 0.02m to several meters.
Characteristics:
Taeniophyllum muelleri grows with terete photosynthetic roots. The tangled roots measure 20mm to 70mm in length by 1mm to 2mm in diameter. The plants are usually interconnected to form large clonal colonies which reproduce by the proliferation of apical buds on the roots. The green stems measure 8mm to 12mm in length.
The leaves are absent in this genus and species.
The inflorescences are spikes born from the short stem. There are 3 to 15 individual flowers on a spike. The spikes measure 5mm to 50mm in length. The peduncle, rachis and pedicels are glabrous. The peduncle measures 2mm to 15mm in length while the rachis measures 3mm to 30mm in length and the pedicels measure 1mm to 1.5mm in length which includes the ovary. The yellowish-green to greenish-yellow porrect, resupinate flowers open 1 at a time. The subtending bracts are covered in soft, white puberulent hairs. The floral bracts are mid green and are sparsely covered in soft, white puberulent hairs.
The narrow triangular dorsal sepal are united at the base and measure 2.5mm to 3mm in length by 0.6mm to 0.7mm in width near the base. The narrow triangular lateral sepals are united at the base and measure 2.5mm to 3mm in length by 0.5mm to 0.7mm in width near the base. The narrow triangular lateral petals are united at the base and measure 2mm to 2.5mm in length by 1mm to 1.5mm in width near the base. The pyriform labellum measures 3mm in length by 1mm in width while the spur measures 1mm to 1.2mm in length. The column is porrect and measures 0.8mm to 1mm in length. The flowers appear from June to October.
Taeniophyllum muelleri’s fruits are porrect, ellipsoidal to cylindrical capsules. The pale green capsules turn pale yellow when ripe. The capsules measure 8mm to 10mm in length by 3mm to 3.5mm in diameter.
Wildlife:
Taeniophyllum muelleri’s wildlife is unknown to the author.
All native orchids are protected plant species. It is illegal to remove naturally growing orchid plants from the bush and a license is required for the removal of seed capsule.
Cultivation:
Taeniophyllum muelleri is an unusual orchid in that it does not have leaves and produces all its energy needs through its roots.
If you are fortunate enough to have this orchid growing on your property then it is worth the trouble to marking the area out to save it. It is probably best to remove the capsules as they begin to dehisce. Mix the seeds into a natural agar solution. Paint the solution onto the outer branches of nearby host trees that are devoid of orchids. With a little luck some young orchids will grow naturally over the following 12 months.
Propagation:
Seeds: All orchids that are declared rare, vulnerable or endangered are protected by Federal and State Laws and must not be removed from the wild unless you are a land developer, mining company or main Roads department etc. This includes bulbs, roots, leaves and flowers. No part of any plant can be removed from Federal, State or Local Government land without the prior permission of the authority and this includes the spore.
1. Obtain relevant materials.
The first step in growing orchid from seed will be sourcing and having at the ready all materials that will be required in the propagation process.
This includes all of the following:
Unripe orchid seed capsule. If there are 2 capsules secure the second capsule immediately after the first capsule splits or if only one capsule as soon as it changes colour.
Orchid gelling medium with agar which can be purchased from an orchid society or a specialist nursery.
Distilled water
Cooking pot
Spoon
Oven-safe glass or polypropylene containers with lids
Sealable bags
Clean, sterilized cutting board
Rubber gloves
Paper towels
Tweezers or forceps
70 percent ethanol
Bleach
Scalpel or sharp knife
Planting pot
Orchid compost
Length of wire metal
Plastic spray bottle.
deep petri dishes or sterile jars.
2. Prepare agar medium
The agar medium is a special orchid gelling mixture that distilled water will be added to distilled water.
To prepare the medium, mix equal parts of orchid gelling medium with distilled water in a cooking pot.
Place the pot on a stove and bring the mixture to boil for while stirring continuously for two minutes.
Pour the mixture into the petri dishes glass or propylene containers while ensuring not to fill the containers above 20 percent of their volume.
Loosely replace the lids to the containers. Sterilize the containers by heating them up in a microwave oven for between 2 to 3 minutes.
Spray 70 percent ethanol into a sealable bag to create a sterile environment. Transfer the heated containers into the sealable bag.
Allow the containers to cool a bit before tightening their lids and then sealing the bag. Leave the containers to stand for a few days until the mixture solidifies.
3. Prepare seed capsule and work surface
Place an open pot of water on a stove and bring to boil. Place the cutting board in the oven and sterilize.
Put on rubber gloves and sterilize the forceps, and scalpel with 70 percent ethanol.
Insert the seed capsule into a bowel filled with bleach for about fifteen minutes.
Sterilize seed capsule again with 70 percent ethanol and place on grill.
Using the sterilized scalpel, cut open the seed capsule to reveal the seeds. Using a scalpel or sharp knife, scrape out the seeds from the capsule unto an ethanol soaked paper towel.
4. Flasking of the seed
Take out the petri dishes or glass jars containers holding the agar medium. Over the steam, open up the containers and transfer seeds from the ethanol soaked paper towel into the individual containers using the sterilized forceps.
The amount of seeds will determine the number of containers required. Replace the lid of the containers and place them on a window sill that receives indirect sunlight.
5. Wait and exercise patience
All that can be done at this point is to wait until the seeds germinate. The amount of time that this might take varies and is dependent on the particular species.
Generally, the time can range from a few months to a few years. During this period of waiting, ensure the containers are free from contamination to ensure that germination is not disrupted.
6. Emergence of protocorms
Protocorms are tuber-shaped bodies with rhizoids that are produced by the young seedlings of various orchids. Protocorms represent the embryonic form of the orchid plant.
Their emergence after the period of waiting at an affirmation that everything in the propagation process is on track.
7. Trans flask orchid seedlings is done after they have developed roots
Upon the emergence of the protocorms, consistently observe the growth of the seedlings. At the point when the seedlings appear to overcrowd the flask, transflasking should be carried out, typically within 30 and 60 days.
* This is done by removing individual seedlings using sterilized tweezers from the original containers and placing them in new containers also filled, in a proportion similar to the original, with agar medium. 6 to 8 in a standard petri dish or 1 or 2 to a test tube
8. Transplant seedlings into planting pots
On the presumption that there are no disruptions to the plant growth, the seedlings will eventually outgrow the containers.
At this point, it is to be transplanted into planting pots. A good rule of thumb to determine when it is ready to be transplanted is when the seedlings have developed roots that have grown up to the length of one-quarter of an inch.
To transplant, prepare a planting pot or other container for receiving the seedling by majorly filling it up with coarse fir bark and possibly some slightly moist orchid compost mixture containing perlite, fine charcoal, redwood bark shavings, etc.
To extract the seedlings, submerge the containers in warm water to help loosen the agar gel.
Once the agar medium is softened, twist a piece of metal to form a loop and in turn, use it to carefully pull out the seedlings from the container. It is best done if the agar and seedling can be removed together.
The seedlings can be further rinsed in lukewarm water to remove any excess agar mixture still stuck to them.
Following this, the seedlings can now be planted into the prepared pot with at least 50mm of space between each individual seedling.
9. Positioning the orchid
The seedling once fully transplanted should be placed in a location that is warm with good indirect sun light.
Slowly position the pots into an area that closely assimilates the conditions it will be growing under.
The choice as to whether the plant should be exposed to full sun or in direct sunlight will be dependent on the particular orchid specie.
10. Subsequent care of the plant
After the first week, the seedling can be misted several times a day and watered just once a week.
A guide in watering the plant will be using the dryness of the fir back that is, water the plant until the fir back is completely moistened and wait till it has completely dried out before watering again.
Fertilize using seaweed, fish emulsion or organic chicken pellets soaked in water on an alternate basis. Fertilize every two months until the plants are established then annually in September to October to maintain better colour, health, vitality and flowering.
Further Comments from Readers:
“Hi reader, it seems you use The Bible of Botany a lot. That’s great as we have great pleasure in bringing it to you! It’s a little awkward for us to ask, but our first aim is to purchase land approximately 1,600 hectares to link several parcels of N.P. into one at The Pinnacles NSW Australia, but we need your help. We’re not salespeople. We’re amateur botanists who have dedicated over 30 years to saving the environment in a practical way. We depend on donations to reach our goal. If you donate just $5, the price of your coffee this Sunday, We can help to keep the planet alive in a real way and continue to bring you regular updates and features on Australian plants all in one Botanical Bible. Any support is greatly appreciated. Thank you.”
In the spirit of reconciliation we acknowledge the Bundjalung, Gumbaynggirr and Yaegl and all aboriginal nations throughout Australia and their connections to land, sea and community. We pay our respect to their Elders past, present and future for the pleasures we have gained.
Tapeinochilos ananassae
Classification
Unranked: Monocots
Unranked: Commelinids
Order: Zingiberales
Family: Costaceae
Genus: From Tapeinos, which is Ancient Greek for mean, humble or base and Chelos, which is Ancient Greek for a lip. It refers to flowers which have a rather short lip.
Species: From Ananas, which is Latinized from the vernacular for the Peruvian word of the Pineapple family or many of the Bromilades. It refers to flowers, or fruits, which resemble those of the pineapple genus, Ananas.
Common Name: Red Ginger or Backscratcher.
Distribution:
Tapeinochilos ananassae is found on and east of the Great Dividing Range south from the Lockhart River to Rockingham Bay in far north eastern Queensland.
It is also found in eastern Indonesia, Papua and New Guinea.
https://avh.ala.org.au/occurrences/search?taxa=Tapeinochilos+ananassae#tab_mapView
Habitat:
Aspect / Climate:
Tapeinochilos ananassae prefers dense shade to light shade. It grows in moist, warm, well developed tropical rainforests, gallery forests, littoral rainforests or riparian forests. The altitude ranges from 5 meters ASL to 300 meters ASL.
The temperatures range from 10 degrees in July to 36 degrees in January.
The rainfall ranges from lows of 1500mm to 3200mm average per annum.
Soil Requirements:
Tapeinochilos ananassae prefers sandy loams to medium clays with a high proportion of forest litter. The soils are usually derived from better quality decomposed sandstones, brown basalts, black basalts or granites. The soils pH ranges from 5pH to 6pH. It does not tolerate waterlogged soils however plants in riparian zones may be inundated for short periods during storms. Non saline soils to moderately saline soils are tolerated.
Height & Spread:
Wild Plants: 2m to 4m by 2.5m to 4m.
Characteristics:
The stems of Tapeinochilos ananassae are tall, bamboo like that measure 2000mm to 4000mm in length by 14mm to 20mm in diameter. The straight canes curl near the apex forming a semi-circle or circle. It is deep sea-green, glabrous stems are covered with a fawn papery sheath exposing only the old leaf nodes. The growth habit is typical ginger or Alpinia. They grow from an underground rhizome or from the nodes when the stems lie parallel to the ground or touch the ground.
The oblong, oblanceolate to narrow elliptical leaves of Tapeinochilos ananassae measure 150mm to 380mm in length by 50mm to 120mm in width. The bases are tapering to the petiole while the apexes are long acuminate to cuspidate. The discolourous laminas are sea-green, semi glossy and glabrous on the upper lamina while the lower lamina is silver and covered in pale grey villous hairs. The leaf margins are entire while the laminas are flat and decurve near the apex. The mid vein is strongly prominent on the lower lamina and is distinctly visible from the upper lamina. The lateral veins diverge along the main vein and run parallel to each other and are slightly prominent on the lower lamina and faintly visible from the upper lamina. The petiole forms a sheath which measures 20mm to 40mm in length while the ligules measure 0.2mm to 0.4mm in length.
The inflorescences of Tapeinochilos ananassae are born clustered cone from the terminal leafless bamboo shoot. The peduncle stem from the ground measures 40mm to 200mm in height by 17mm to 25mm in diameter. The cone like spike measure 70mm to 200mm in length by 70mm to 100mm near the base tapering to 50mm to 60mm near the apex. The Inflorescence comprises of 36 to 66 bright scarlet-red floral bracts. The bracts lower lip recurves upwards from the middle towards the margins while the acute apex decurve strongly. The lower lips measure 33mm to 40mm in length by 15mm to 27mm in width.
The 3 orange-yellow to yellow, dimorphic calyx lobes have 1 lobe much smaller than the other 2.The lobes measure 24mm to 30mm in length by 7mm to 10mm in width. The 3 deep maroon-black to deep burgundy petals are covered in yellowish blotches often with a maroon to deep burgundy smaller blotch in the center. The dimorphic petals are united at the base with the lower larger petal often lobed. The margins are entire and crisped. The petals measure 15mm to 30mm in length by 8mm to 12mm in width. The tepals turn black following anthesis.
The inserted filaments are free for their entire length. The back of the yellow anthers are covered in yellowish-white appressed sericeous hairs.
The yellow style and stigma are glabrous while the ovary is green. The bilobed stigma is much wider than the style. Tapeinochilos ananassae flowers appear from early September through to early March.
Tapeinochilos ananassae fruits are trilobed berries within the floral bract which turn deep brown-black. The berries are glabrous and measure 30mm to 35mm in length while the lobes measure 7mm to 8mm in length by 6mm to 8mm in width. The green berries turn black when ripe. The calyx lobes are persistent on the ripe fruit. The black seeds are flattened ellipsoidal and hard. The pericarp is a white and fleshy.
Wildlife:
Tapeinochilos ananassae do not appear to have any predators.
Cultivation:
Tapeinochilos ananassae is truly a magnificent understory plant for shaded moist positions in the rainforest garden or on the southern and eastern sides of buildings. It makes an ideal rain forest or riverine gully specimen in warmer locations. In cultivation it grows from 2 meters to 3 meters in height by 2 meters to 6 meters in diameter when grown in an open semi shaded position.
It grows exceptionally well on lighter soils where deep leaf litter keeps the soil cool and moisture at an even level. If these requirements are met it can cope with temperatures as low as 2 degrees and up to 36 degrees. It is moderately drought resistant once established.
Add to the above, if it is given an adequate supply of water, a little native fertilizer on a regular basis pruned heavily once it has died back the plants will respond with good flowering over a long period. Spent flowers should be removed. The plants need to be dug up every 2 or 3 years and reset after segregating the largest and healthiest rhizomes. Before replanting the soil should be turned over and dressed with a good quality 100mm granulated cold water grown kelp mixed at the rate of 350 grams per square meter before planting.
This is a striking member of the ginger family for around a pool or courtyard where shade can be provided. Try to plant 2 or 3 in a straight row for a very formal look or use curves for the natural look. The choice of companion plants with bright yellow to cream flowers will contrast the large deep red florets beautifully. It would not matter whether fine or large leaf plants are used provided they have a horizontal form, for an all year contrast. The slender vertical growth habit would make small areas look longer but will dwarf small areas bringing the roof line down so it is best used where an open roof prevails.
It looks spectacular when grown indoors or on verandas in large tubs but make sure it has room to expand and the potting mix is of the highest quality. Grown near paths, along shaded driveways, in large rockeries or in the rainforest they will give spectacular displays once established but take the time to prepare the soil so health and vigour of the plants are maintained. Formal gardens or around fish or frog ponds can also benefit from the vertical canes of Tapeinochilos ananassae.
In formal or Japanese Gardens it can be used as the fill in plant to the rear or as the main feature plant behind a larger water feature. Imagine a pond with fish swimming. Behind it is a planting of Tapeinochilos ananassae, the reflection would be very strong yet calming and cool. This is very powerful yet formal and relaxing. They can partially surround such a scene and still look effective.
Propagation:
Seeds: The seeds of Tapeinochilos ananassae can be removed easily from the fruits.
Sow freshly treated seeds directly into a seed raising mix, keeping them moist not wet. Do not over water as the seeds will rot off before germination takes place. Place the trays in a cool shaded area with 50mm shade cloth in the bush house. When the seedlings are 20mm to 25mm tall, prick them out and plant them into 50mm native tubes using a good organic mix.
As the seedlings roots reach the bottom of the tubes plant them out into their permanent position. Do not delay.
Division: When growing from divisions remove the plant from the soil preferably after the plants have died back for the winter. Ut the rhizomes into 3 or 4 equal parts, ensuring each section has at least one eye. Remove unwanted dead leaves and any old small clumps that look weak or dead. Plants can be divided further but ensure each division has a several strong eyes and healthy rhizome. Place the rhizomes in a pot with a good mix to over winter and keep just moist to dry. Replant ensuring the soil is at the same level as before, as soon as the first shoots appear plant them into their permanent position which has been previously prepared as above. Water and fertilize. New shoots will appear within two weeks.
Fertilize using seaweed, fish emulsion or organic chicken pellets soaked in water on an alternate basis. Fertilize every two months until the plants are established then annually in September to October to maintain better colour, health, vitality and flowering.
Further Comments from Readers:
“Hi reader, it seems you use The Bible of Botany a lot. That’s great as we have great pleasure in bringing it to you! It’s a little awkward for us to ask, but our first aim is to purchase land approximately 1,600 hectares to link several parcels of N.P. into one at The Pinnacles NSW Australia, but we need your help. We’re not salespeople. We’re amateur botanists who have dedicated over 30 years to saving the environment in a practical way. We depend on donations to reach our goal. If you donate just $5, the price of your coffee this Sunday, We can help to keep the planet alive in a real way and continue to bring you regular updates and features on Australian plants all in one Botanical Bible. Any support is greatly appreciated. Thank you.”
In the spirit of reconciliation we acknowledge the Bundjalung, Gumbaynggirr and Yaegl and all aboriginal nations throughout Australia and their connections to land, sea and community. We pay our respect to their Elders past, present and future for the pleasures we have gained.
Point Lookout National Park Ebor NSW
Point Lookout National Park Ebor NSW
Point Lookout National Park Ebor NSW
Point Lookout National Park Ebor NSW
Point Lookout National Park Ebor NSW

Point Lookout National Park Ebor NSW
Point Lookout National Park Ebor NSW
Point Lookout National Park Ebor NSW
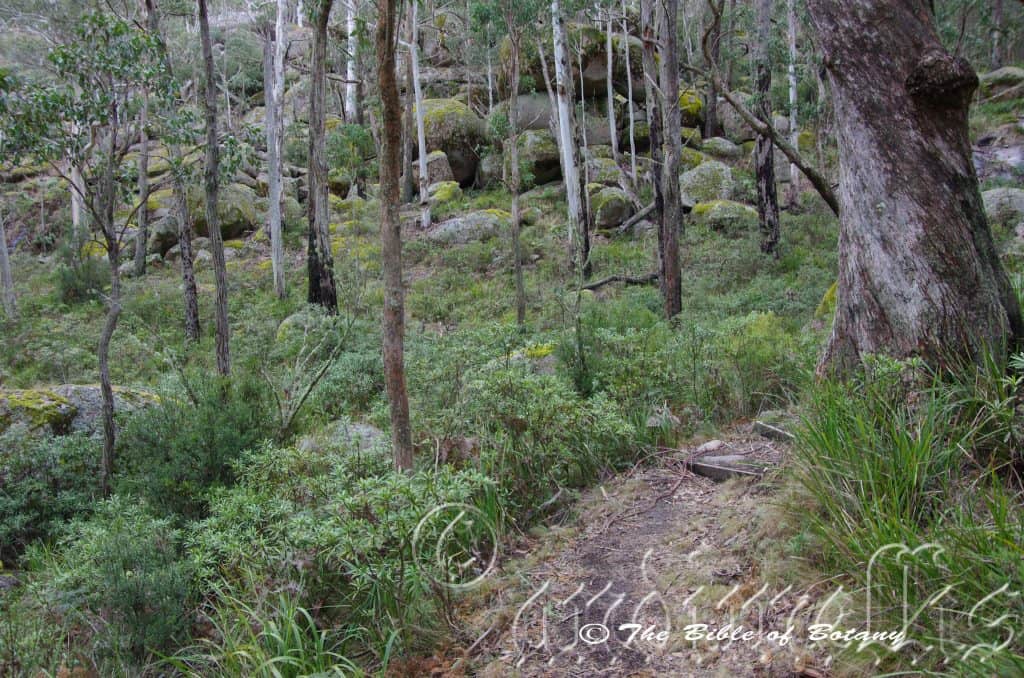
Tasmannia insipida
Classification:
Unranked: Magnoliids
Order: Canellales
Family: Winteraceae
Genus: Is named in honour of Abel Janszoon Tasman; 1603-1659, who circumnavigated the south coast of Tasmania.
Species: From In, which is Latin for in, into or anti and Sapida, which is Latin for without distinction or bland. It refers to the taste of the fruits, which are rather bland or having very little flavour.
Common Name: Dorrigo Pepper.
Distribution:
Tasmannia insipida is found on the Great Dividing Range south from Mount Misery south east of Cooktown in far north eastern Queensland to Moyura in southeastern New South Wales.
https://avh.ala.org.au/occurrences/search?taxa=Tasmannia+insipida#tab_mapView
Habitat Aspect Climate:
Tasmannia insipida prefers dense shade to dappled sunlight. It grows in moist, warm, well developed sub-tropical rainforests, moist cool tropical rainforests or moist gallery forests. The altitude ranges from 300 meters ASL to 1450 meters ASL.
The temperatures range from minus 4 degrees in July to 36 degrees in January.
The rainfall ranges from lows of 900mm to 3200mm average per annum.
Soil Requirements:
Tasmannia insipida prefers sandy loams to medium clays with a high proportion of forest litter. The soils are derived from better quality decomposed, brown basalts, black basalts, granites, metamorphic rocks or sandstones. The soils pH ranges from 5pH to 7pH. It does not tolerate waterlogged soils however plants in riparian zones may be inundated for short periods during storms. Non saline soils to moderately saline soils are tolerated.
Height & Spread:
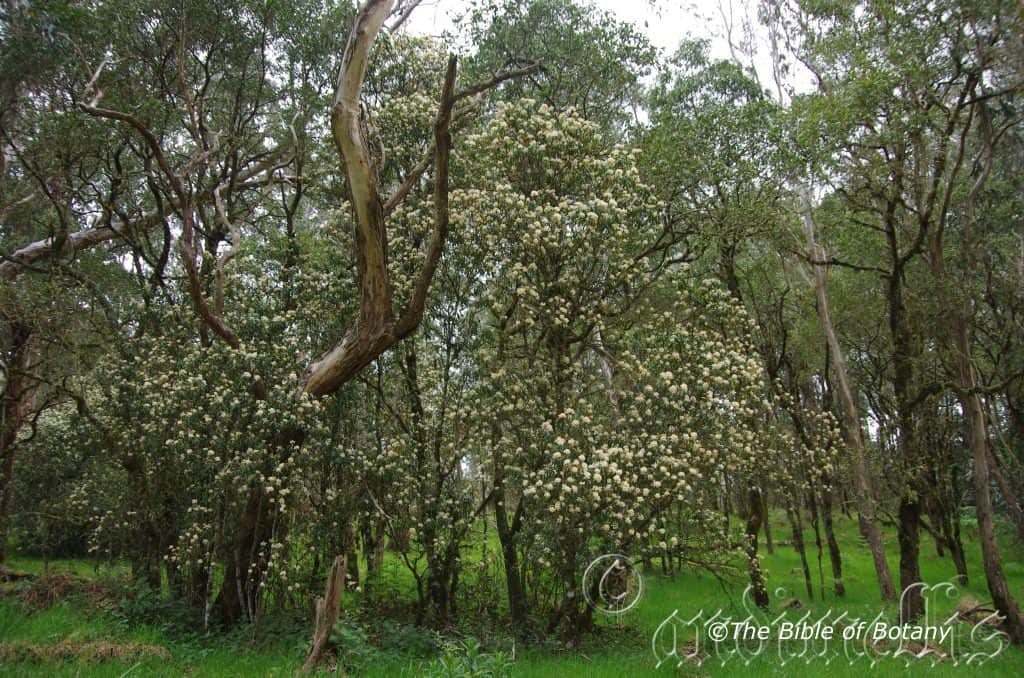
Wild Plants: 1.5m to 6m by 1.5m to 4m usually 2m to 3m.
Characteristics:
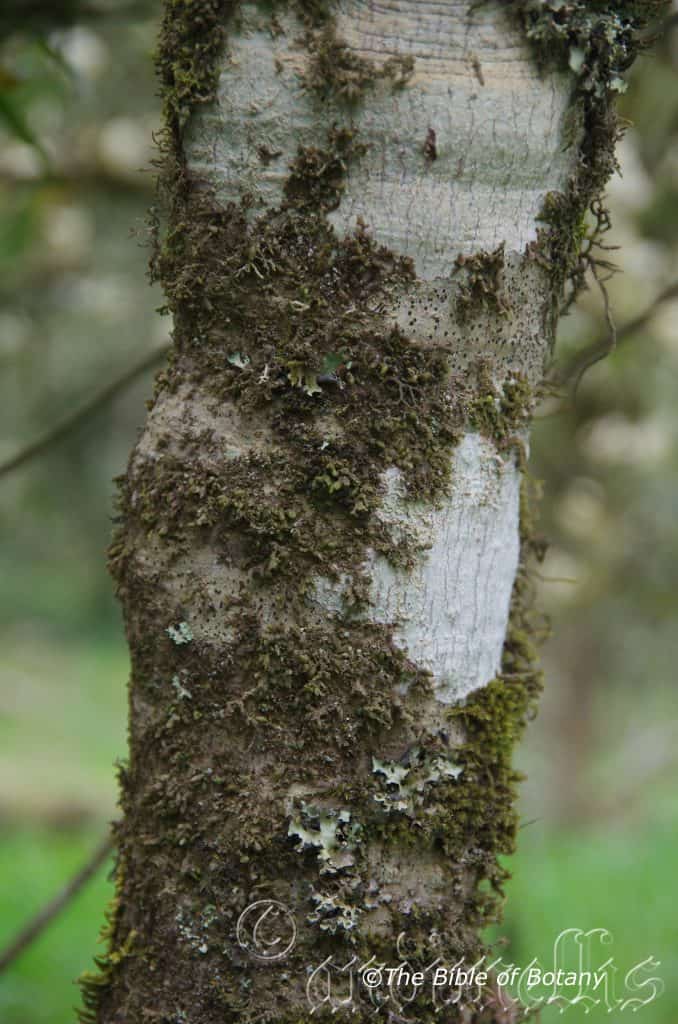
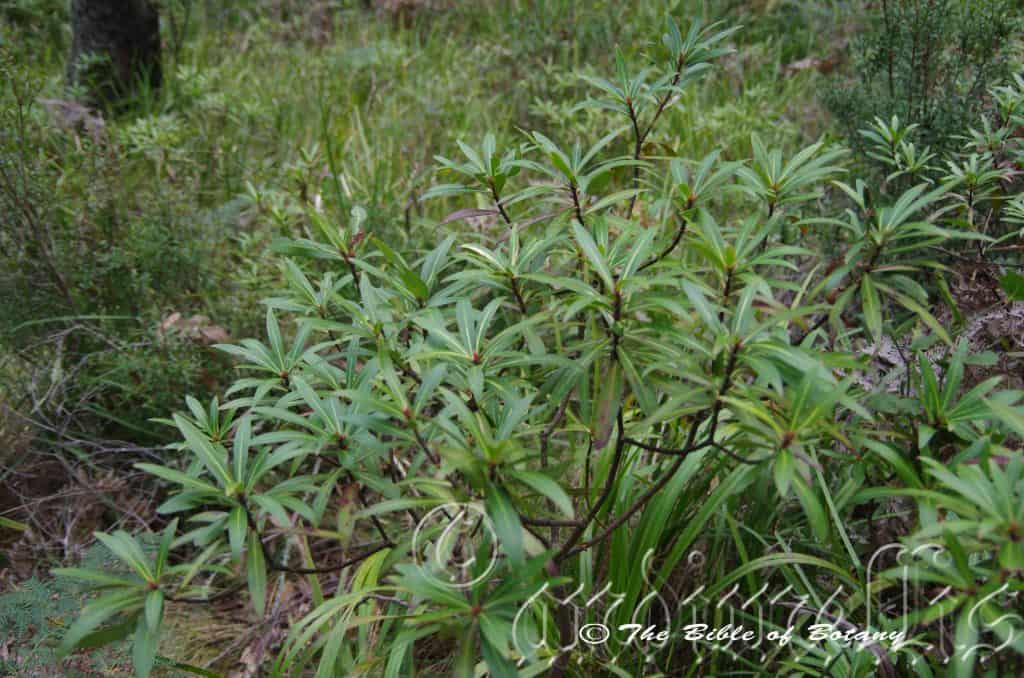
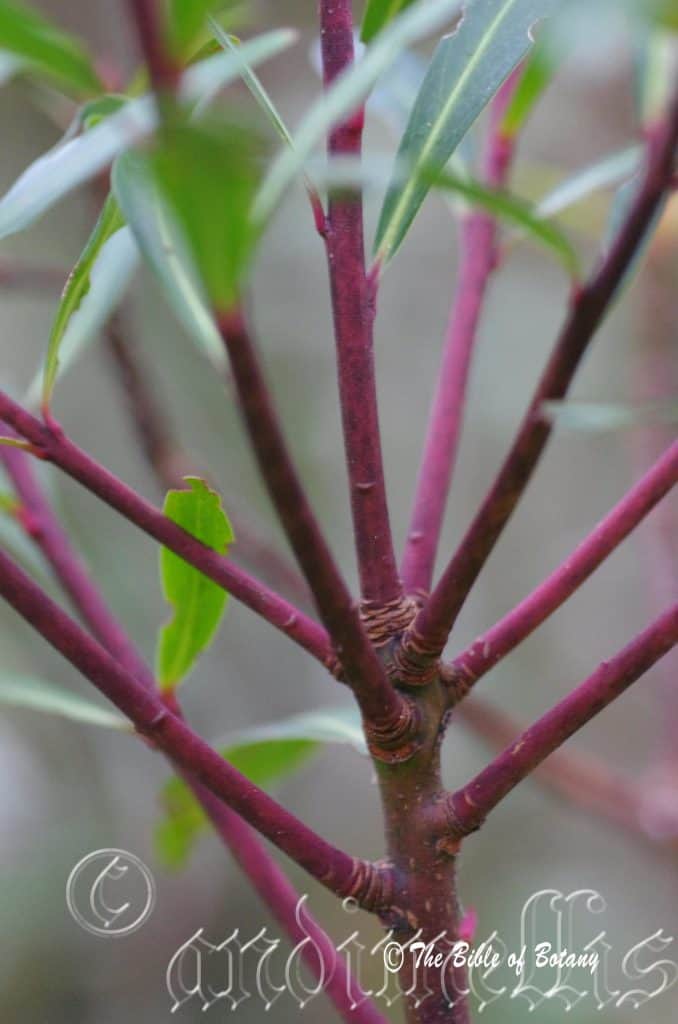
Tasmannia insipida grows as a small tree with a straight, deep green to green with reddish markings or burgundy-red, glabrous trunk. The branchlets are deep burgundy or deep green with burgundy markings.
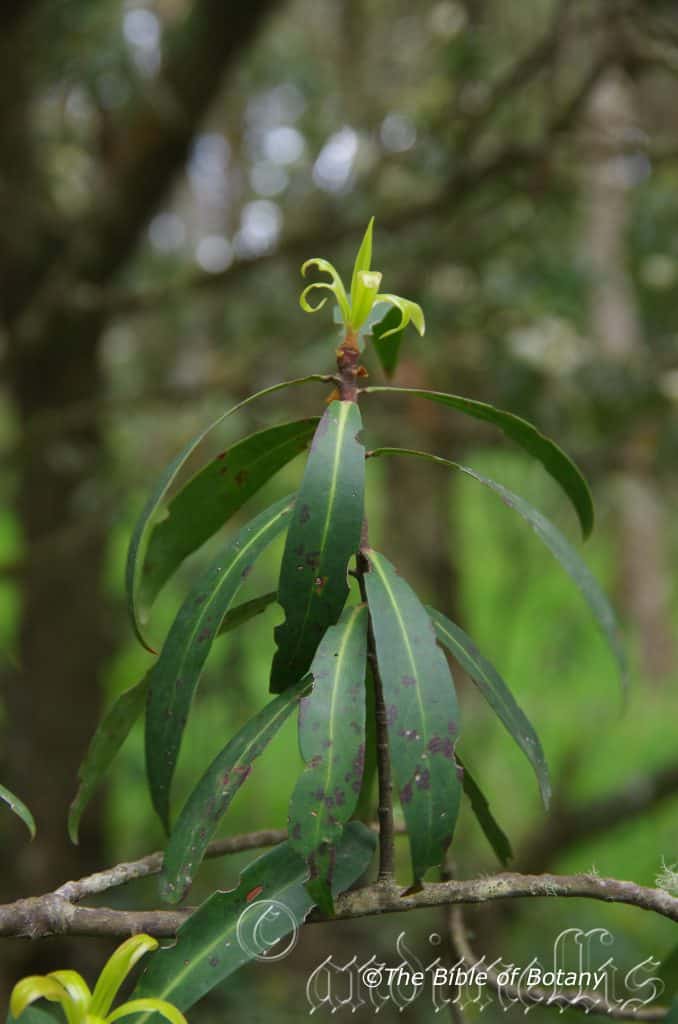
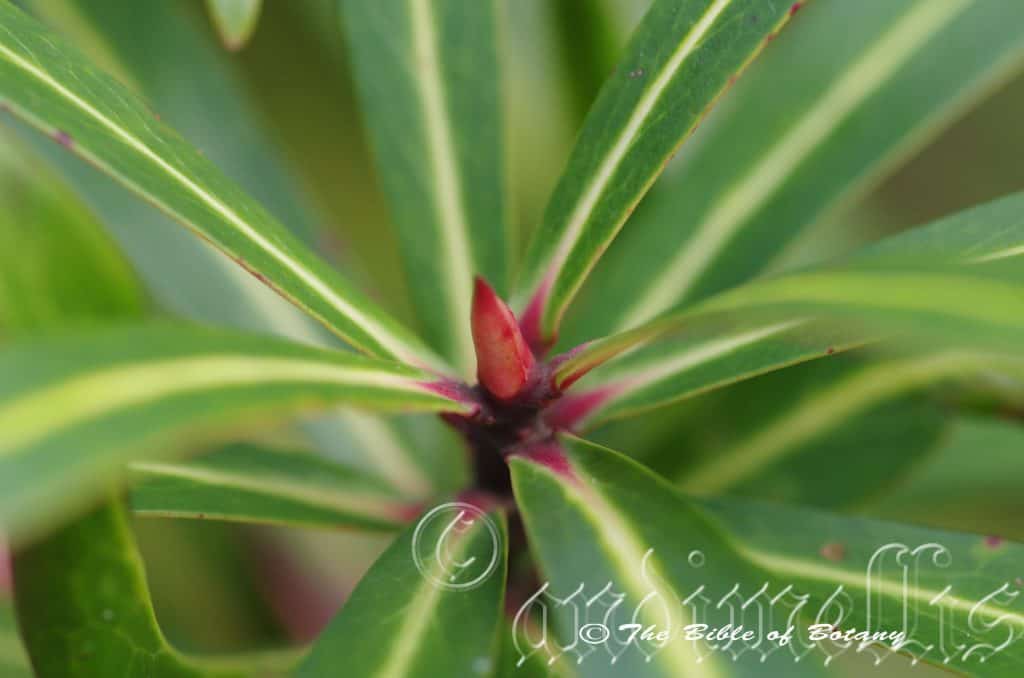
The lanceolate to linear lanceolate or elliptical-lanceolate leaves of Tasmannia insipida are clustered in whorls near the ends of the branchlets and measure 80mm to 200mm in length by 20mm to 50mm in width. The bases are tapering ending in a truncate to slightly auriculate base while the apexes are narrowly to broadly acuminate. The discolourous laminas are deep grass-green to deep sea-green, semi glossy to glossy and glabrous on the upper lamina while the lower laminas are paler. The leaves are chartaceous. The leaf margins are entire, flat to undulating and decurve closer to the apex. The mid veins are slightly prominent on the lower laminas and are depressed on the upper lamina while the lateral veins form distinct, faint loops well inside the margins on both laminas. The petiole measures 2mm to 4mm in length.
Inflorescences of Tasmannia insipida are dioecious and are born on simple umbels from the terminals. The deep green peduncles and pale creamy green pedicels are glabrous. The peduncles measure 1mm to 3mm in length while the flattened pedicels measure 15mm to 47mm in length on the male flowers and 8mm to 28mm on the female flowers.
The 2 pale green with pale red markings sepals are orbicular. The concave sepals measure 5mm to 10mm in length by 5mm to 10mm in width. The 2 pale creamy yellow to pale creamy green petals are lanceolate to oblanceolate. The petals measure 12mm to 17mm in length by 1.5mm to 2.5mm in width on the male flowers and measure 10mm to 15mm in length by 3mm to 3.5mm in width on the female flowers.
The 25 to 65 exserted stamens are arranged in a spiral formation surrounding the apex of the rudimentary ovary. It is free for their entire length and measure 3.5mm to 5mm in length. The stout, filaments are very pale green while the adnately fixed anthers are yellow with yellow pollen. The oblong anthers measure 0.8mm to 1mm in length by 0.4mm to 0.6mm in width.
The white style and stigma are glabrous while the ovary is green. The pistils measure 0mm to 0.5mm in length. Tasmannia insipida flowers appear from August through to early November.
The fruits of Tasmannia insipida are ovoidal berries have 2 distinct depressed longitudinal grooves one on each side. The berries are glabrous and measure 12mm to 20mm in length by 22mm to 52mm in diameter. The green capsules turn deep burgundy-maroon or at times white mottled burgundy-maroon externally and deep burgundy-maroon internally when ripe. The calyx lobes and pistil are not persistent on the ripe fruit. The 8 to 25 glossy, black, tadpole shaped seeds measure 3mm to 4mm in length by 1.6mm to 2.4mm in diameter. The fruit ripen from December to May.
Wildlife:
Tasmannia insipida do not appear to have any predators though the leaves are frequently damaged by unknown insect larvae. The fruits are frequently eaten out internally.
The leaves, fruits and seeds have a taste reminiscent of pepper and can be used similarly to the exotic black pepper. One mature plant would suffice the average family’s needs.
Cultivation:
Tasmannia insipida is a small tree or medium shrub that can be grown in association with dry rainforest specie. It is ideal in the centre of a bush garden. In cultivation it will grow from 3 meters to 5 meters in height by 2 meters to 3 meters in diameter when grown in the open.
It grows better on lighter soils where deep leaf litter keeps the soil cool and moisture at an even level. If these requirements are met it can cope with temperatures at least as low as minus 5 degrees and up to 36 degrees. It is moderately drought resistant once established.
The plants don’t seem to react to increased levels of soil moisture or native fertilizer to the extent that plants seem to resent coastal areas. This is the case around Grafton and Coffs Harbour which are close to its natural habitat around Dorrigo and Ebor.
It is probably best grown in drier rockeries away from the coast where winter temperatures drop below or near zero.
Tasmannia insipida would make a good contribution where good quality loam or rocky terrain gardens on mountain slopes. Here it can be used as the main feature scattered throughout the boulders. When you use it in an area that is strewn with large boulders do not over crowd the scene as the boulders are a formidable part of the scene. Tasmannia insipida is well suited to such conditions so use contours to display the plants. Boulder country is almost always rising and falling in contour and have sharp rises. Plants should be planted sparingly with short annuals between to give vibrant colour. Make the scene so you can see over the tallest ones with the exception of one or two plants at the most. The idea is to achieve a feeling of harshness. This can be achieved with using Tasmannia insipida’s long, deep green lanceolate leaves contrasting with finer pale green or soft grey to glaucous coloured foliage. If large deep green leaf plants are wanted try using them as prostrate plants. Use a lot of procumbent plants like Hibbertia scandens to make the rocks look larger and the spaces between the plants bigger. Mix them with other smaller shrubs so none of them dominate the scene but blend in to give a mosaic of foliage colours that you oversee. Here I immediately think of Actinotis helianthi or Grevillea thelemanniana for two great contrasting foliages however Actinotis species may be a little over powering.
Propagation:
Seeds: The seeds of Tasmannia insipida can be removed easily from the fruits.
The seeds need scarifying before sowing. This is best achieved by placing the seeds in a dry calico bag and placing it in the vegetable compartment of the refrigerator for several weeks before sowing.
Sow freshly treated seeds directly into a seed raising mix, keeping them moist not wet. Do not over water as the seeds will rot off before germination takes place. Place the trays in a cool shaded area with 50mm shade cloth in the bush house. When the seedlings are 20mm to 25mm tall, prick them out and plant them into 50mm native tubes using a good organic mix.
As the seedlings roots reach the bottom of the tubes plant them out into their permanent position. Do not delay.
Fertilize using Seaweed, fish emulsion or organic chicken pellets soaked in water and apply the liquid on an alternate basis. Fertilize every 2 months until the plants are well established then annually in September to October to maintain better health, vitality flowering and fruiting.
Further Comments from Readers:
“Hi reader, it seems you use The Bible of Botany a lot. That’s great as we have great pleasure in bringing it to you! It’s a little awkward for us to ask, but our first aim is to purchase land approximately 1,600 hectares to link several parcels of N.P. into one at The Pinnacles NSW Australia, but we need your help. We’re not salespeople. We’re amateur botanists who have dedicated over 30 years to saving the environment in a practical way. We depend on donations to reach our goal. If you donate just $5, the price of your coffee this Sunday, We can help to keep the planet alive in a real way and continue to bring you regular updates and features on Australian plants all in one Botanical Bible. Any support is greatly appreciated. Thank you.”
In the spirit of reconciliation we acknowledge the Bundjalung, Gumbaynggirr and Yaegl and all aboriginal nations throughout Australia and their connections to land, sea and community. We pay our respect to their Elders past, present and future for the pleasures we have gained.
Cathedral Rocks National Park Ebor NSW
Cathedral Rocks National Park Ebor NSW
Cathedral Rocks National Park Ebor NSW
Cathedral Rocks National Park Ebor NSW
Cathedral Rocks National Park Ebor NSW
Cathedral Rocks National Park Ebor NSW
Tasmannia stipitata
Classification
Unranked: Magnoliids
Order: Canellales
Family: Winteraceae
Genus: Is named in honour of Abel Janszoon Tasman; 1603-1659, who circumnavigated the south coast of Tasmania.
Species: From Stipitatus, which is Latin for a secondary leaf. It refers to small stalks or slender supports as the petiole of a fern fronds, the stem supporting the pileus of a mushroom, or a stalk like elongation of the receptacle of a flowers.
Common Name: Northern Pepper Bush.
Distribution:
Tasmannia stipitata is found on the Great Dividing Range south from Stanthorpe in southern Queensland’s granite belt to the Barrington Tops National Park in northern New South Wales.
https://avh.ala.org.au/occurrences/search?taxa=Tasmannia+stipitata#tab_mapView
Habitat Aspect Climate:
Tasmannia stipitata prefers dense shade to light dappled shade. It grows in moist, warm, well developed temperate rainforests. The altitude ranges from 380 meters ASL to 1450 meters ASL.
The temperatures range from minus 3 degrees in July to 36 degrees in January.
The rainfall ranges from lows of 1500mm to 3200mm average per annum.
Soil Requirements:
Tasmannia stipitata prefers sandy loams to light fatty clays with a high proportion of leaf litter, The soils are usually derived from better quality decomposed granites or at times brown basalts. The soils pH ranges from 4.5pH to 6pH. It does not tolerate waterlogged soils however plants in riparian zones may be inundated for short periods during storms. Non saline soils to moderately saline soils are tolerated.
Height & Spread:
Wild Plants: 1.5m to 2.5m by 1.5m to 3m.
Characteristics:
Tasmannia stipitata grows as a small open erect shrub with reddish to brownish-red stems. The branchlets glossy and glabrous.
The narrow lanceolate to narrow elliptical leaves of Tasmannia stipitata are clustered in loose whorls near the ends of the branchlets and disjunct along the branchlets. The measure 80mm to 130mm in length by 10mm to 20mm in width. The bases are cuneate while the apexes are acute. The discolourous laminas are deep grass-green where they grow in the sun to deep sea-green where more shade is experienced. The leaves are semi glossy to glossy and glabrous on the upper lamina while the lower laminas are paler. The leaves are chartaceous. The leaf margins are entire, while the laminas slightly recurve from the mid vein to the margins and decurve closer to the apex. The mid veins are slightly prominent on the lower laminas and are distinctly visible on the upper lamina while the lateral veins form distinct, faint loops well inside the margins on both laminas. The petiole measures 4mm to 7mm in length.
Inflorescences of Tasmannia stipitata are dioecious and are born on simple umbels or clustered from the terminals. The deep green peduncles and pale creamy green pedicels are glabrous. The peduncles measure 1mm to 3mm in length while the terete pedicels measure 20mm to 40mm in length on the male flowers and 20mm to 35mm on the female flowers.
The 2 pale green with pale red markings sepals are orbicular. The concave sepals measure 4.5mm to 9mm in length by 5mm to 9mm in width. The 2 pale creamy yellow to pale creamy green petals are lanceolate to oblanceolate. The petals measure 10mm to 15mm in length by 2mm to 3mm in width on the male flowers and measure 8mm to 12mm in length by 3mm to 3.5mm in width on the female flowers.
The 26 to 56 exserted stamens radiate out from the apex of the rudimentary ovary. It is free for their entire length and measure 3.5mm to 5mm in length. The stout, filaments are cream while the adnately fixed anthers are yellow with yellow pollen. The oblong anthers measure 0.8mm to 1mm in length by 0.4mm to 0.6mm in width.
The white style and stigma are glabrous while the 2mm ovary is green. The styles measure 0mm to 0.5mm in length. Tasmannia stipitata flowers appear from early September through to early November.
The fruits of Tasmannia stipitata are oblong berries. The berries are glabrous and measure 4mm to 8mm in length by 3mm to 5mm in diameter. The 2 to 5 green capsules on each pedicel turn blue-mauve when ripe. The stalks enlarge to 4mm to 8mm in length. The calyx lobes are not persistent on the ripe fruit. The 3 to 5 glossy brown seeds are flattened ellipsoidal and woody. There is a cream to white longitudinal scar on one side. The fruit ripen from November to early February.
Wildlife:
Tasmannia stipitata do not appear to have any predators though the leaves are frequently damaged by unknown insect larvae. The fruits are frequently eaten out internally.
The leaves, fruits and seeds have a taste reminiscent of pepper and can be used similarly to the exotic black pepper. One mature plant would suffice the average family’s needs.
Cultivation:
Tasmannia stipitata is a small to medium shrub that can be grown in association with dry rainforest specie in a cold location. It is ideal in the centre of a bush garden. In cultivation it will grow from 1 meter to 2 meters in height by 1 meter to 2 meters in diameter when grown in the open.
It grows better on lighter soils where deep leaf litter keeps the soil cool and moisture at an even level. If these requirements are met it can cope with temperatures as low as minus 5 degrees and up to 36 degrees. It is moderately drought resistant once established.
The plant does not seem to react to increased levels of soil moisture or native fertilizer to the extent that plants seem to resent coastal areas. This is the case around Grafton and Coffs Harbour which are close to its natural habitat around Dorrigo and Ebor.
It is probably best grown in drier rockeries away from the coast.
Tasmannia stipitata would make a good contribution to sandy or rocky terrain gardens on mountain slopes. Here it can be used as the main feature scattered throughout the boulders. When you use it in an area that is strewn with large boulders do not over crowd the scene as the boulders are a formidable part of the scene. Tasmannia stipitata is well suited to such conditions so use contours to display the plants. Boulder country are almost always rising and falling in contour and have sharp rises. Plants must be planted sparingly with short annuals between to give vibrant colour. Make the scene so you can see over the tallest ones with the exception of one or two plants at the most. The idea is to achieve a feeling of harshness. This can be achieved with using Tasmannia insipida‘s long, deep green lanceolate leaves contrasting with finer pale green or soft grey to glaucous coloured foliage. If large deep green leaf plants are wanted try using them as prostrate plants. Use a lot of procumbent plants like Hibbertia scandens or Cissus antarctica, Cissus hypoglauca, Cissus sterculiifolia, Cayratia clematidea or Cayratia eurynema to make the rocks look larger and the spaces between the plants bigger. Mix them with other smaller shrubs so none of them dominate the scene but blend in to give a mosaic of foliage colours that you oversee. Actinotis helianthi or Grevillea thelemanniana for two great contrasting foliages.
When planted on slopes it can be densely planted out below with prostrate Leptospermum species, Grevillea species or other procumbent plants for a great display. Do not rely on Tasmannia stipitata to make a dense display as it has a more open growth habit. Leaves that are about to be discarded can be harvested and dried and dried as a substitute for pepper.
Because of its open habit and its natural habitat being poor sandy soils on slopes it would make a good bonsai plant.
Propagation:
Seeds: The seeds of Tasmannia stipitata can be removed easily from the fruits.
The seeds need scarifying before sowing. This is best achieved by placing the seeds in a dry calico bag and placing it in the vegetable compartment of the refrigerator for several weeks before sowing.
Sow freshly treated seeds directly into a seed raising mix, keeping them moist not wet. Do not over water as the seeds will rot off before germination takes place. Place the trays in a cool shaded area with 50mm shade cloth in the bush house. When the seedlings are 20mm to 25mm tall, prick them out and plant them into 50mm native tubes using a good organic mix.
As the seedlings roots reach the bottom of the tubes plant them out into their permanent position. Do not delay.
Fertilize using seaweed, fish emulsion or organic chicken pellets soaked in water on an alternate basis. Fertilize every two months until the plants are established then annually in early September to October to maintain better colour, health, vitality and flowering.
Further Comments from Readers:
“Hi reader, it seems you use The Bible of Botany a lot. That’s great as we have great pleasure in bringing it to you! It’s a little awkward for us to ask, but our first aim is to purchase land approximately 1,600 hectares to link several parcels of N.P. into one at The Pinnacles NSW Australia, but we need your help. We’re not salespeople. We’re amateur botanists who have dedicated over 30 years to saving the environment in a practical way. We depend on donations to reach our goal. If you donate just $5, the price of your coffee this Sunday, We can help to keep the planet alive in a real way and continue to bring you regular updates and features on Australian plants all in one Botanical Bible. Any support is greatly appreciated. Thank you.”
In the spirit of reconciliation we acknowledge the Bundjalung, Gumbaynggirr and Yaegl and all aboriginal nations throughout Australia and their connections to land, sea and community. We pay our respect to their Elders past, present and future for the pleasures we have gained.
Roma Street Floral Gardens Brisbane Qld.
Roma Street Floral Gardens Brisbane Qld.
Roma Street Floral Gardens Brisbane Qld.
Roma Street Floral Gardens Brisbane Qld.
Roma Street Floral Gardens Brisbane Qld.
Roma Street Floral Gardens Brisbane Qld.
Roma Street Floral Gardens Brisbane Qld.
Roma Street Floral Gardens Brisbane Qld.
Tecomanthe hillii
Classification:
Unranked: Eudicots
Unranked: Asterids
Order: Lamiales
Family: Bignoniaceae
Tribe: Tecomeae
Genus: From Tecoma, which is Latinized from the vernacular name of the Mexican plant with that name and Anthos, which is Ancient Greek for the male reproductive organ of a flower or the flower. It refers to flowers which are similar in appearance to the Tecoma genus but having more prominent anthers in the flowers.
Species: Is named in honour of Leslie J. Hill; 1908-2003, who was a botanical philanthropist and collector of South African succulents.
Subspecies: Tecomanthe hillii subsp. hillii. Is named in honour of Leslie J. Hill; 1908-2003, who was a botanical philanthropist and collector of South African succulents.
Variety: Tecomanthe hillii variety roaring meg. Is the locality name where the plants are found in far north eastern Queensland. It appears that this population will be included in the named species in the future.
Common Name: Fraser Island Creeper or Roaring Meg.
Distribution:
Tecomanthe hillii subsp. hillii is found south from Woodgate to Maroochydore including Fraser Island in central coastal Queensland.
Tecomanthe hillii variety roaring meg is found north of Cooktown on the Tablelands and around Mount Finnegan in far north Queensland.
https://avh.ala.org.au/occurrences/search?taxa=Tecomanthe+hillii#tab_mapView
Habitat Aspect Climate:
Tecomanthe hillii prefers dense shade to dappled sun
light close. It grows in well developed, moist, sub-tropical rainforests or well developed moist littoral rainforests. The altitude ranges from 5 meters ASL to 1000 meters ASL.
The temperatures range from 2 degrees in July to 36 degrees in January.
The rainfall ranges from lows of 1250mm to 2000mm average per annum.
Soil Requirements:
Tecomanthe hillii prefers peaty sands, sandy loams to light sandy clays with high proportion of leaf litter. The soils are usually derived from better quality alluvial deposits or accumulated peaty sands behind the frontal dunes. The soils pH ranges from 4.5pH to 7pH. It does not tolerate waterlogged soils however continual soil moisture is maintained from capillary action in the soils. Non saline soils to moderately saline soils are tolerated.
Height & Spread:
Wild Plants: 4m to 12m by 3m to 6m.
Characteristics:
Tecomanthe hillii grows as a twinning creeper with mid grey to deep grey-brown, scabrous, scaly bark with paler coloured lenticels. The smaller stems are deep olive-brown to sea-green, semi glossy and are sparsely covered in lighter coloured lenticels.
The opposite, disjunct, pinnate leaves of Tecomanthe hillii measure 55mm to 100mm in length by 100mmm to 180mm in width overall. The 3 to 7 usually 5 individual leaflets are asymmetrical, broad elliptical, elliptical to oblong. The leaflets measure 45mm to 90mm in length by 15mm to 35mm in width. The terminal leaflet is the longest. The base is oblique being cuneate on one side and rounded on the other while the apex is acuminate, long acuminate to cuspidate or even caudate. The concolourous laminas are deep grass-green where they grow in the sun to deep sea-green where more shade is experienced. The leaflets are semi glossy to dull and glabrous. The leaf margins are entire.
The mid veins are prominent on the lower laminas and are distinctly visible on the upper lamina while the lateral veins form distinct, faint loops inside the margins on both laminas. The petiolules, rachises and petioles are olive-green, olive-yellow or grass-green and glabrous. The petiolules measure 40mm to 112mm in length while the rachises measure 26mm to 70mm in length and the petioles measure 1mm to 4.5mm in length. The petiolules and rachises are deeply channeled while the petiole of the terminal leaflet is longer than the lateral petioles and measure 3mm to 7mm in length.
The inflorescences of Tecomanthe hillii are born in dense clusters on a short cauliflorous raceme. The deep olive-green to deep olive-burgundy peduncles, racemes and pedicels are glabrous. The peduncles measure 6mm to 12mm in length while the racemes measure 6mm to 12mm in length and the pedicels measure 10mm to 15mm in length.
The pale green, pale lemon-green or deep red to deep burgundy or deep maroon calyxes and calyx lobes are erect and glabrous. The calyx tubes measure 18mm to 30mm in length while the lobes measure 9mm to 12mm in length.
The corollas are pale pink to deep carmine-pink externally and are very pale pink to being the external colour internally with white or paler lobes. The corollas are often striped longitudinally internally. The corollas are glabrous while the lobes are sparsely covered in white hirsute hairs externally. The corollas measure 55mm to 70mm in length by 26mm to 32mm in diameter at the base of the lobes. The 5 lobes are semi-erect to divaricate and dimorphic. The 3 lower lobes apexes are acute while the 2 upper lobes apexes are obtuse or mucronate. The lobes measure 12mm to 16mm in length.
The 5 inserted stamens are free for their entire length and measure 38mm to 44mm in length. The filiform filaments are white to deep pink and measure 30mm to 36mm in length. The anthers are pale fawn, oblong, are shortly cohering and measure 6mm to 8mm in length by 2mm to 2.6mm in width. The staminodes measures 16mm to 20mm in length.
The white style and stigma are glabrous while the ovary is green. The pistil measures 50mm to 55mm in length including the 4.5mm to 5mm stigma.
The pale green disc surrounds the ovary. Tecomanthe hillii flowers appear from early August through to early November.
Tecomanthe hillii‘s fruits are flattened, oblong capsules. The large capsules are glabrous and measure 180mm to 260mm in length by 50mm to 62mm in diameter and 30mm to 40mm in depth. The green capsules turn deep grey-black externally and deep grey internally when ripe. The calyx lobes are persistent on the ripe fruit. The numerous orbicular, flat seeds are brown with or without a wing or hairs on one end. The fruit ripen from November to early March.
Subspecies Differences:
Tecomanthe hillii subsp. hillii’s altitude ranges from 3 meters ASL to 75 meters ASL. The chartaceous laminas are dull, glabrous and recurve from the mid vein to the margins and decurve on the apical half.
Tecomanthe hillii variety roaring meg’s altitude ranges from 5 meters ASL to 1000 meters ASL. The laminas are semi glossy to glossy, glabrous and recurve slightly from the mid vein to the margins and decurve on the apical third.
Wildlife:
Tecomanthe hillii’s do not appear to have any predators. The flowers surprisingly for its size is pollinated by some of the smallest insects around including butterflies moths, native bees like Tetragonula carbonaria and the Blue banded bee Amegilla cingulata and nectar eating birds.
Cultivation:
Tecomanthe hillii is a superb large liana for sturdy structures or existing large trees in the garden. It can be grown in gardens from the tropical north south to warm temperate climates that only have mild frosts on an occasional basis. It can be grown in association with moist or dry rainforest specie. It is ideal at the edge of a rainforest in full sun so its spectacular flowers can be viewed regularly. Shade grown plants have a tendency to grow towards the sun and only produce good flowering in the presence of sunlight. In cultivation it will grow from 4 meter to 8 meters in height by 3 meter to 4 meters in diameter when grown in the open or taller and narrower in grown in a forest situation.
It grows better on lighter sandy soils to light sandy clays where deep leaf litter keeps the soil cool and moisture at an even level. If these requirements are met it can cope with temperatures as low as minus 2 degrees and up to 40 degrees. It is not drought resistant and will discard its leaves readily if the soils dry out.
The plants react favourably to increased levels of soil moisture and an annual application of our native fertilizer to the extent that plants in coastal areas bloom prolifically on an annual basis over a long time. This is certainly the case around Grafton and Coffs Harbour which display weather characteristics similar to its natural habitat.
Cutting grown plants make excellent pot plants on trellises or ladder work. It makes an excellent patio plants but beware it is vigorous and as soon as it contacts an axillary support will envelope it very quickly making it difficult to remove. This habit makes them ideal for large sunny courtyards or pergolas where their annual flowering will leave a carpet of pink on the floor below.
Propagation:
Seeds: The seeds of Tecomanthe hillii can be removed easily from the fruits.
Sow fresh seeds directly into a seed raising mix, covering them with 5mm to 7mm of the mix. Keep them moist not wet. Do not over water as the seeds will rot off before germination takes place. Place the trays in a cool shaded area with 50mm shade cloth in the bush house. When the seedlings are 20mm to 25mm tall, prick them out and plant them into 50mm native tubes using a good organic mix.
As the seedlings roots reach the bottom of the tubes plant them out into their permanent position. Do not delay.
Cuttings: Fortunately Tecomanthe hillii cuttings are relatively easy to strike. Use 100mm to 200mm long semi hard wood to old wood cuttings from the present season or previous season’s growth. Take them in warmer months of the year. Remove half the leaves from the bottom section being careful not to tear the bark.
1 Prepare the cutting mix by adding two thirds sharp clean river sand, one third peat or one third perlite. These ingredients must be sterilized,
2 Select good material from non diseased plants,
3 Select semi green stems for cuttings. Look for a stem with two or three nodes,
4 Place the cutting on a flat, hard surface, and make a clean cut down one side of the cutting at the base for 10mm with a sharp sterile knife or razor blade. – This scarification of the node will increase the chances of roots emerging from this spot. Now remove all but one or two the leaves, leaving the apex leaves in tact. If the leaves are very large in proportion to the stem, cut off the apical halves.
5 Fill a saucer with water, and place a little weak strength rooting hormone into another container like a milk bottle top. Dip the node end of the cutting into the water and then into the rooting hormone. Tap off any excess hormone,
6 Use a small dipple stick or old pencil to poke a hole into the soilless potting mix. Ensure the hole is slightly larger than the stem diameter and be careful not to wipe the rooting hormone off the cuttings base. Place 2 to 4 cuttings in each of the 50mm native tubes,
7 I like to place the tubes in bucket with holes drilled in the bottom to allow excess water to drain out. A plastic bag that fits over the bucket is ideal to help maintain temperature and moisture. Place in a semi shaded, warm position like under 50mm shade cloth.
8 When the cuttings have struck, open the bag to allow air circulation for a few days to a week,
9 Once hardened off remove the cuttings from the bag and allow to further hardening for a few more days to a week,
10 Transplant into a good potting mix to grow on.
Fertilize using Seaweed, fish emulsion or organic chicken pellets soaked in water and apply the liquid on an alternate basis. Fertilize every 2 months until the plants are well established then annually in September to October to maintain better health, vitality flowering and fruiting.
Further Comments from Readers:
“Hi reader, it seems you use The Bible of Botany a lot. That’s great as we have great pleasure in bringing it to you! It’s a little awkward for us to ask, but our first aim is to purchase land approximately 1,600 hectares to link several parcels of N.P. into one at The Pinnacles NSW Australia, but we need your help. We’re not salespeople. We’re amateur botanists who have dedicated over 30 years to saving the environment in a practical way. We depend on donations to reach our goal. If you donate just $5, the price of your coffee this Sunday, We can help to keep the planet alive in a real way and continue to bring you regular updates and features on Australian plants all in one Botanical Bible. Any support is greatly appreciated. Thank you.”
In the spirit of reconciliation we acknowledge the Bundjalung, Gumbaynggirr and Yaegl and all aboriginal nations throughout Australia and their connections to land, sea and community. We pay our respect to their Elders past, present and future for the pleasures we have gained.
Magnetic Island Qld.
Magnetic Island Qld.
Magnetic Island Qld.
Tecticornia indica
Classification:
Unranked: Eudicots
Order: Caryophyllales
Family: Amaranthaceae
Subfamily: Salicornioides
Genus: From Tectum, which is Latin for a shelter or cover and Keras, which is Ancient Greek or later Cornus, which is Latin for a cherry, cornel, horn or dogwood. It refers to organs or structures, which have a small horn on the fruit that covers one end.
Species: From Indica, which is Latin for India. It refers to the type specimen being found in India.
Subspecies: Tecticornia indica subsp. bidens. From Bi, which is Latin for two and Odos, which is Ancient Greek or later Dontis, which is Latin for a tooth. It refers to the stem segments having two teeth like projections.
Subspecies: Tecticornia indica subsp. indica. From Indica, which is Latin for India. It refers to the type specimen being found in India.
Subspecies: Tecticornia indica subsp. julacea. From Julacea, which is Latin for ament or a catkin. It refers to the petals, which are more catkin like but not a true catkin.
Subspecies: Tecticornia indica subsp. leiostachya. From Leio, which is Latin for smooth and stikhus which is Ancient Greek for a spike. It refers to the flowers which are are born on a short spike.
Common Name: Samphire, Mungily.
Distribution:
Tecticornia indica subsp. bidens is found in the southern half of Western Australia, the lower quarter of the Northern Territory, all of South Australia and the north eastern corner of Victoria.
Tecticornia indica subsp. indica is found along the coastal strip from Burrup Conservation Park in central coastal Western Australia to Facing Island near Port Curtis in central coastal Queensland.
Tecticornia indica subsp. julacea is found along the coastal strip from Onslo in central coastal Western Australia to Mud Island in Moreton Bay in south eastern Queensland.
Tecticornia indica subsp. leiostachya is found throughout most of mainland Australia except for the eastern half of New South Wales and the eastern two thirds of Victoria.
It is also found in Angola, Bangladesh, East Timor, India, Indonesia, Jawa, Kenya, KwaZulu-Natal, Lesser Sunda Islands, Malaysia, Mauritania, Mozambique, New Guinee, Channel Islands, Pakistan, Papua, Senegal, Shi Lanka, Somalia, Sri Lanka, Tanzania and Vietnam.
https://avh.ala.org.au/occurrences/search?taxa=Tecticornia+indica#tab_mapView
Habitat Aspect Climate:
Tecticornia indica prefers light shade to full sun. It is widespread on both coastal and inland saline flats. The altitude ranges from 0 meters ASL to 600 meters ASL.
The temperatures range from minus 2 degrees in July to 48 degrees in January.
The rainfall ranges from lows of 150mm to 3000mm average per annum.
Soil Requirements:
Tecticornia indica prefers course, white sands to white or pale grey sandy loams mud deposits or fine alluvial silts. The soils are usually derived from alluvial deposits or tidal washes. The soils pH ranges from 5pH to 8pH. It is not tolerant of waterlogged soils however seasonal inundations are acceptable. Non saline soils to extremely saline soils are tolerated as are salt laden winds.
Height & Spread:
Wild Plants: 100mm to 200mm by 100mm to 450mm.
Characteristics:
The jointed stems of Tecticornia indica are slender, cylindrical, grey-green, succulent, glabrous, and usually with a few branches. The perennial, mature plants are decumbent to erect, usually scrambling over nearby ground covers.
The minute leaf lobes are often hyaline with a sparse covering of ciliolate margins.
The inflorescences of Tecticornia indica are born from the nodal jointed sections. The long succulent spikes that measure 5mm to 40mm in length. The pale yellow individual flowers are usually fused to each other and to the upper bract and measure 3mm in width.
The usually succulent berries are corky, while the pale fawn, glossy seeds are glabrous. The ovoid to orbicular seeds measure 1mm to 1.5mm in length by 0.8mm in diameter and have a membranous outer covering.
Collect spikes that are dry and brown. The seeds are hidden in the segments of the stems.
Wildlife:
Tecticornia indica‘s wildlife is unknown to the author.
Cultivation:
Tecticornia indica would make a great addition for homes that are adjacent to mudflats or are adjacent to salt pans in arid areas.
It would be worthwhile trying as a hanging basket plant as it is fast growing and has unusual stems.
It would do well in small rockeries, where it receives full sun all day and is allowed to dry out between waterings. Here it can be mixed with other sun loving arid or semi arid perennials. Plants I have tried to grow here do well until the wet season arrives.
Propagation:
Seeds: The seeds of Tecticornia indica need to be collected by taking the whole spike when they are dry and brown as the seeds are hidden in the segments of the stems. Place the spikes in a tray and leave to dry for 1 to 2 weeks. Rub the spikes gently between your fingers to dislodge the seeds. Be careful as the seeds are very small. Store the seeds with a desiccant such as dried silica beads or dry rice, in an airtight container in a cool and dry place.
Sow fresh seeds or in the following spring directly but sparingly onto a seed raising mix. Just cover them and keep them moist not wet. Do not over water as the seeds are susceptible to various fungi and will damp off before germination takes place. Place the trays in a warm sunny area protected from winds but where the air flow is constant. When the seedlings are 20mm to 25mm tall, prick them out and plant them into 50mm native tubes using a good well drained organic mix. For both the seed raising mix and potting mix I like to include I part decomposed sharp granite sand for aeration and drainage.
As the seedlings roots reach the bottom of the tubes plant them out into their permanent position. Plant at 0.6meter intervils.
Fertilize using Seaweed, fish emulsion or organic chicken pellets soaked in water and apply the liquid on an alternate basis. Fertilize every 2 months until the plants are well established then annually in September to October to maintain better health, vitality flowering and fruiting.
Further Comments from Readers:
“Hi reader, it seems you use The Bible of Botany a lot. That’s great as we have great pleasure in bringing it to you! It’s a little awkward for us to ask, but our first aim is to purchase land approximately 1,600 hectares to link several parcels of N.P. into one at The Pinnacles NSW Australia, but we need your help. We’re not salespeople. We’re amateur botanists who have dedicated over 30 years to saving the environment in a practical way. We depend on donations to reach our goal. If you donate just $5, the price of your coffee this Sunday, We can help to keep the planet alive in a real way and continue to bring you regular updates and features on Australian plants all in one Botanical Bible. Any support is greatly appreciated. Thank you.”
In the spirit of reconciliation we acknowledge the Bundjalung, Gumbaynggirr and Yaegl and all aboriginal nations throughout Australia and their connections to land, sea and community. We pay our respect to their Elders past, present and future for the pleasures we have gained.
South Port Qld.
The Pinnacles NSW
The Pinnacles NSW

South Port Qld.
The Pinnacles NSW
The Pinnacles NSW
The Pinnacles NSW
South Port Qld.
The Pinnacles NSW
The Pinnacles NSW
The Pinnacles NSW
The Pinnacles NSW
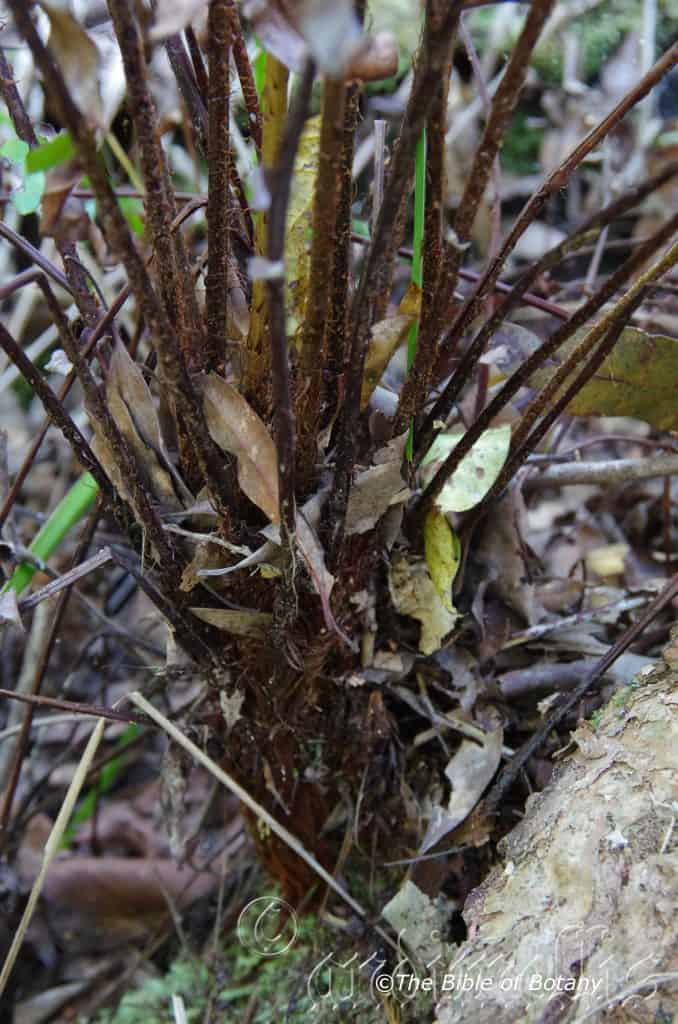
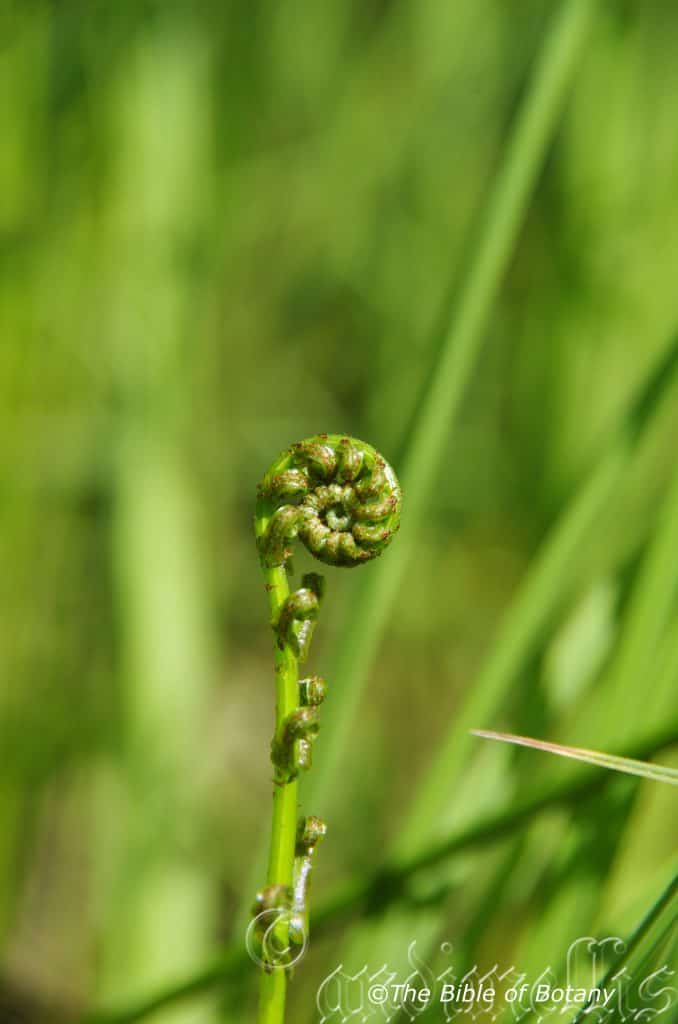
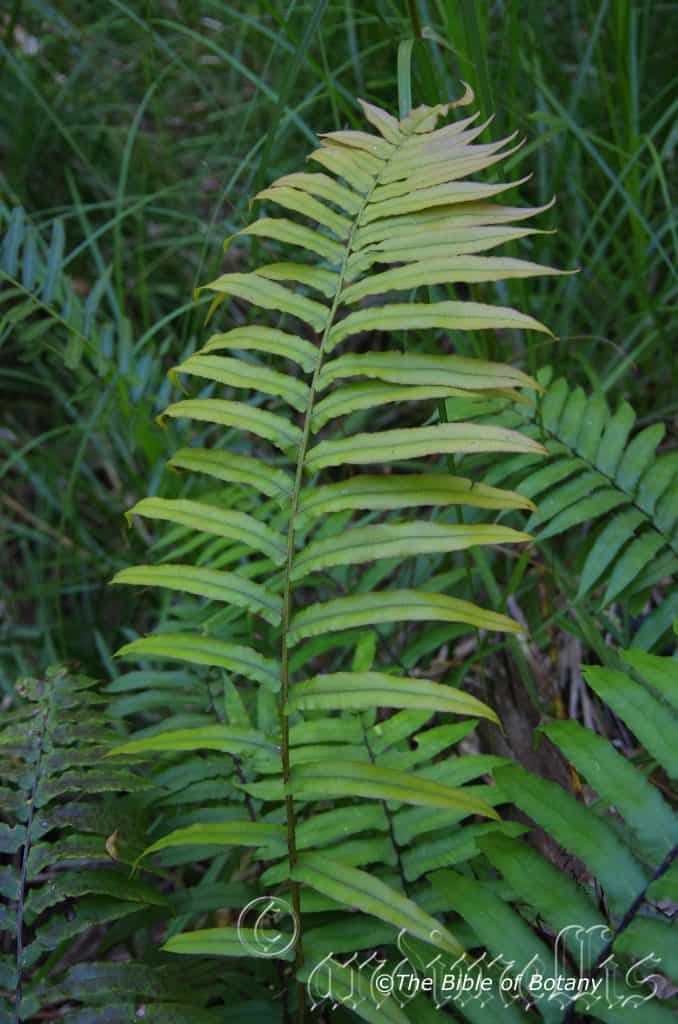
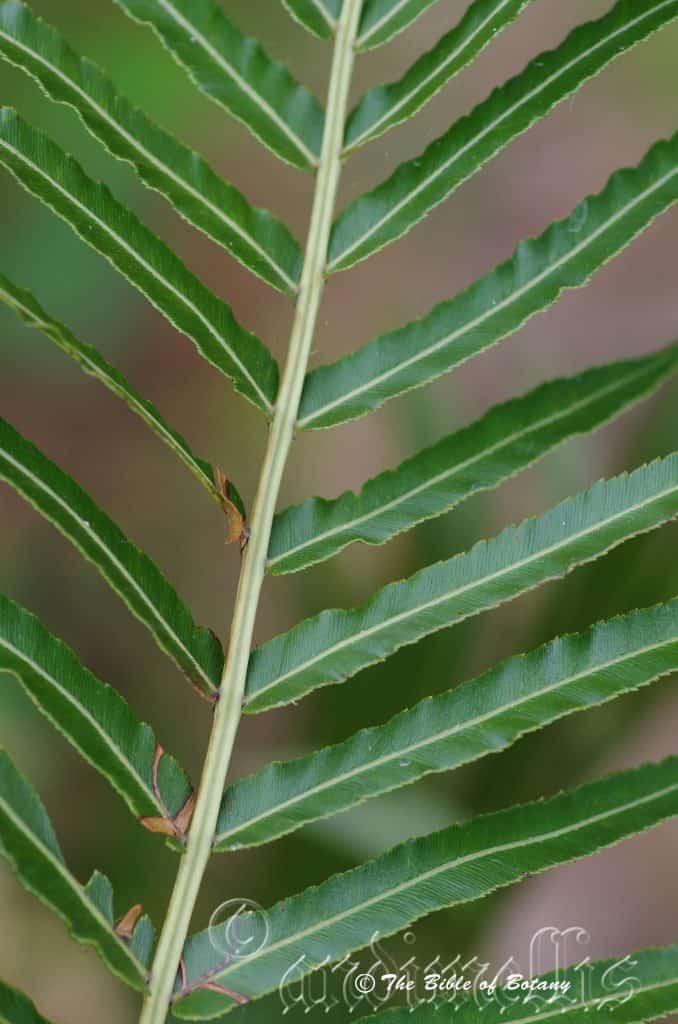
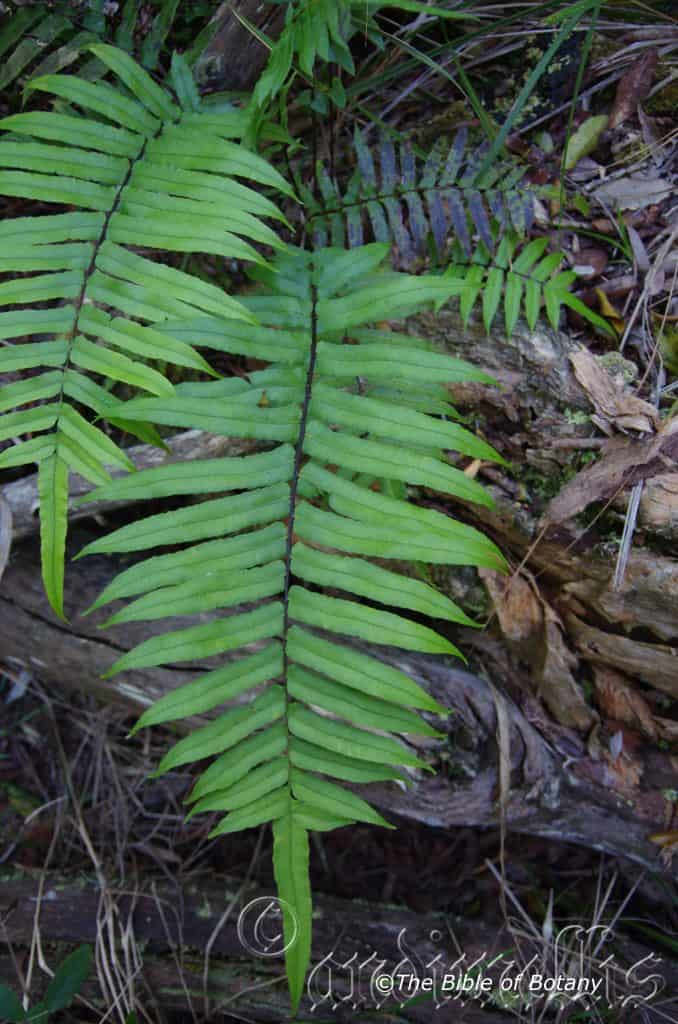
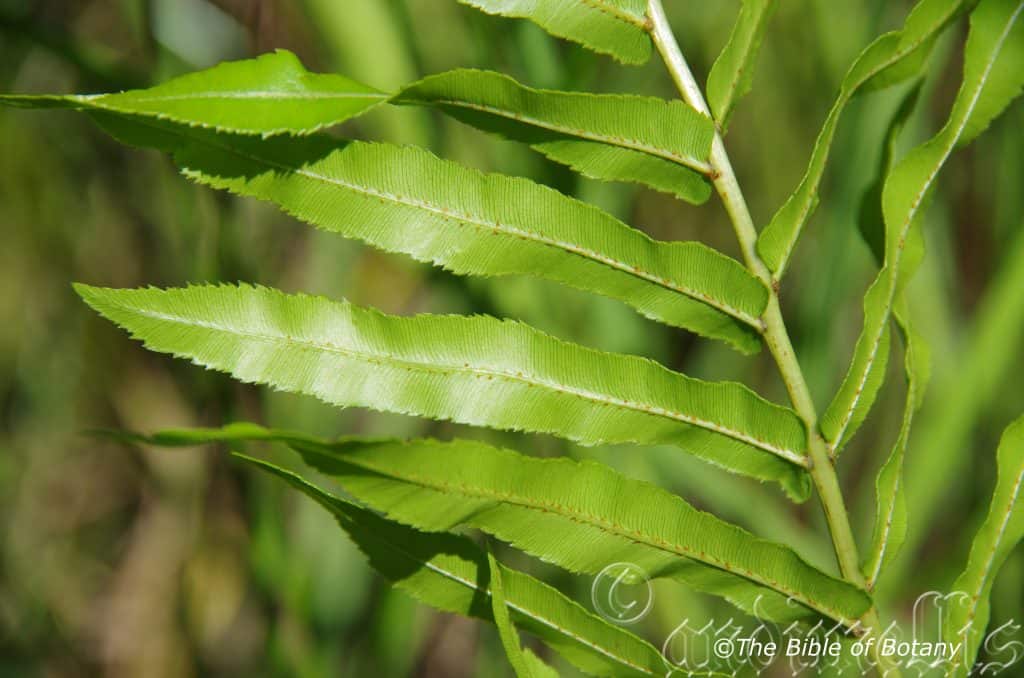
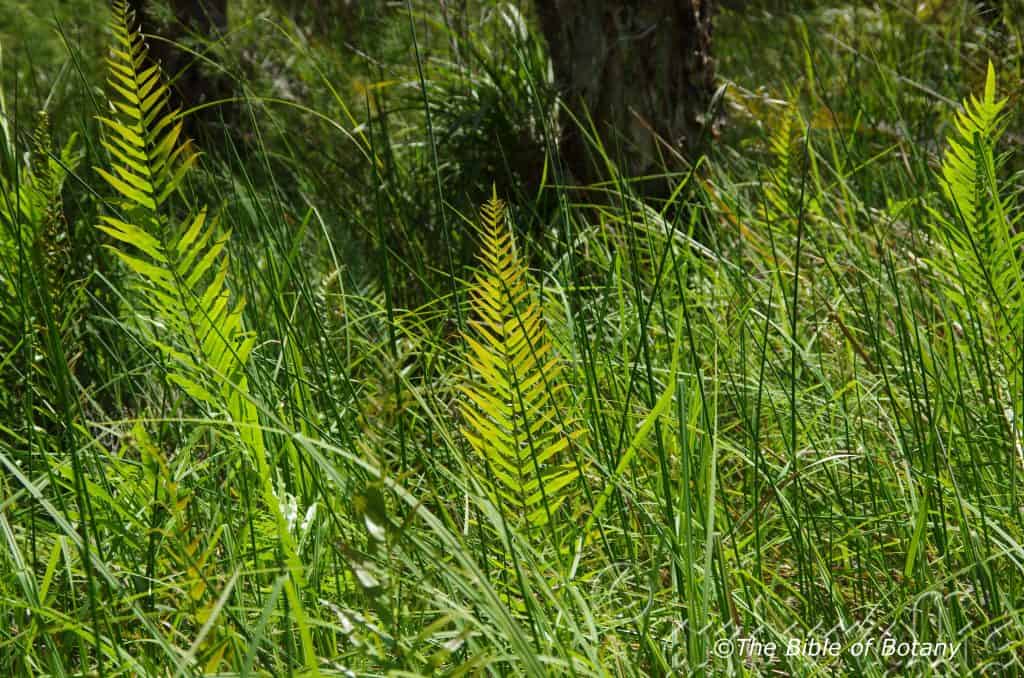
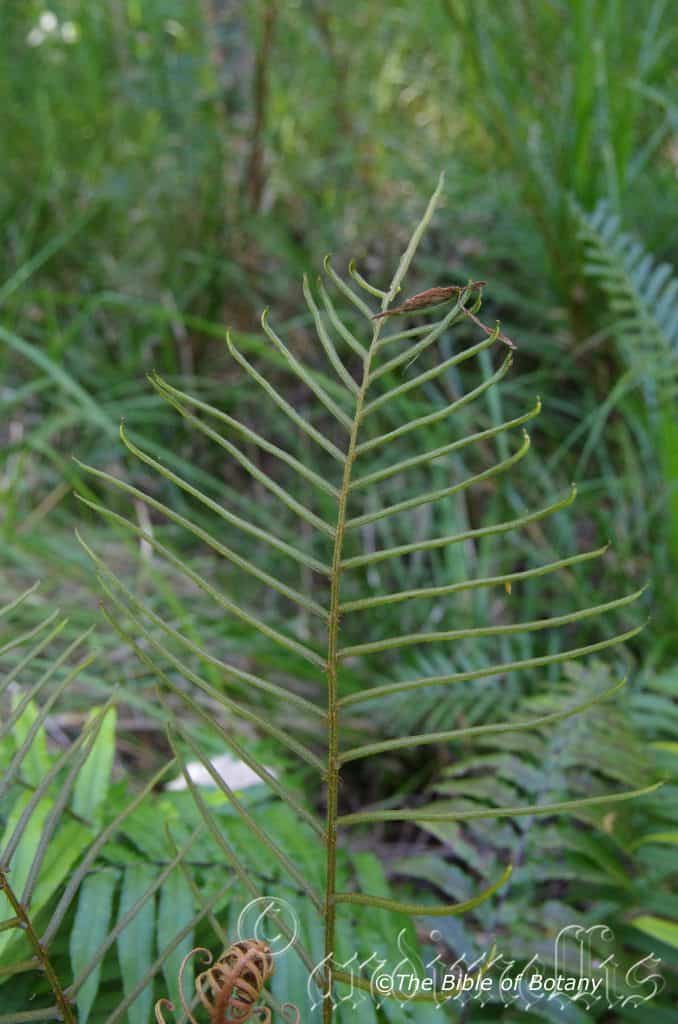
Telmatoblechnum indicum
Classification:
Unranked: Polypodiophyta
Class: Polypodiosida
Order: Polypodiales
Suborder: Aspleniineae
Family: Blechnaceae
Subfamily: Stenochlaenoideae
Genus: From Telma, which is Ancient Greek for standing in water and Blockhon, which is Ancient Greek for the ancient name of ferns with a hard appearance. It refers to a group of ferns that resemble the Blechnum genus and prefer very wet swampy environments.
Species: From Indicum, which is Latin for India. It refers to the type specimen originating from India India.
Common Name:
Distribution:
Telmatoblechnum indicum is found around the coastline from the Pilbara region in far north western Western Australia to Jervis Bay in south eastern New South Wales.
It is also found in Argentina Northeast, Bahamas, Belize, Bolivia, Borneo, Brazil, Cayman Islands, south eastern China, Colombia, Costa Rica, Cuba, Ecuador, El Salvador, Florida, French Guiana, Guatemala, Guyana, Haiti, Honduras, Jamaica, Jawa, Leeward Islands, Malaya, Maluku, Mexico Gulf, Mexico Southeast, New Caledonia, New Guinea, Nicaragua, Panama, Papua, Paraguay, Peru, Puerto Rico, Sulawesi, Sumatera, Suriname, Thailand, Trinidad-Tobago, Vanuatu, Venezuela, Vietnam, and Windward Island.
https://avh.ala.org.au/occurrences/search?taxa=Telmatoblechnum+indicum#tab_mapView
Habitat Aspect Climate:
Telmatoblechnum indicum prefers light shade to full sun. It grows in coastal swamps and wallums. The altitude ranges from 5 meters ASL to 50 meters ASL.
The temperatures range from 2 degrees in July to 40 degrees in January.
The rainfall ranges from lows of 850mm to 3000mm average per annum.
Soil Requirements:
Telmatoblechnum indicum prefers course, white sands to white or pale grey peaty sandy loams. The soils are usually derived from accumulated beach sands. The soils pH ranges from 5pH to 7.5pH. It is tolerant of waterlogged soils with the rhizomes being in water or in soils with high water tables and capillary action keeping the surface soils moist throughout the year. Non saline soils to slightly saline soils are tolerated.
Height & Spread:
Wild Plants: 450mm to 750mm by 300mm to 800m.
Characteristics:
The erect rhizomes of Telmatoblechnum indicum are straight, somewhat scabrous, and often with a couple of branches. The rhizomes are deep brown and moderately to densely covered in mid brown scales.
The erect similar in size and shape fronds are clustered, mostly pinnate and measure 300mm to 700mm in length. The shiny green margins of the pinnae are equally, finely toothed for their entire length.
The sterile fronds pinnae measure 50mm to 120mm in length by 8mm to 12mm in width. The pinnae are distinctly stalked for at least a third of the lamina’s length. The fertile frond’s pinnae are marginally smaller.
Wildlife:
Telmatoblechnum indicum‘s wildlife is unknown to the author.
Cultivation:
Telmatoblechnum indicum is a beautiful large fern for wet areas in the garden. The ferns will become stunted with the fronds turning brown and dry if moisture is withdrawn for any reason.
It is most at home in a wallum setting on sandy loams.
Add to the above, if it is given a little native fish emulsion or seaweed fertilizer on an annual basis the plants will respond accordingly.
It often reaches its full potential in just 2 years.
Propagation:
Spores: All ferns that are declared rare, vulnerable or endangered are protected by Federal and State Laws and must not be removed from the wild unless you are a land developer, forestry, mining company or main Roads department etc. This includes bulbs, roots, leaves and flowers. No part of any plant can be removed from Federal, State or Local Government land without the prior permission of the authority and this includes the spore.
The spores of Telmatoblechnum indicum can be removed easily from the fronds as the fertile fronds begin to brown off. Cut and place a frond in a paper bag for a week or so in a cool shady place.
Most people are put off at the thought of growing ferns from spore. Like all plants that produce their offspring from seed or spore the methods are basically the same. Remember nature has been doing this for millions of years and has been very successful. I have had excellent results growing over 200 different species of Australian ferns so don’t be afraid. Give it a go.
Step 1. Select spore from the fern fronds. Wait until the fern is just starting to release its spore. Rinse the fronds under clean running water and dry. This is to wash off any other spores from rogue ferns that may have settled onto the fronds. (There is nothing worse than having common brake or common soft bracken contaminating a prized tree fern or epiphyte.)
Step 2. Place the dry fronds in a clean brown paper bag and keep them in a cool dark place like the linen closet for about a week to ten days before you are ready to sow the spore. The exception to this rule applies to ferns, which produce green spores. These must be sown immediately that they are released. Todea Barbara is a good example of a fern, which produces green spore.
Step 3. Take a large ice cream container, a small ice cream container and a clean clear plastic bag large enough to seal the large ice cream container and three or four milk bottle tops.
Step 4. Punch or drill 6 to 10 5mm holes in the bottom of the small ice cream container.
Step 5. Wash both containers, tops and plastic bag so that they are very clean and sterile.
Step 6. Use a clean fine seed raising mi. We used 30mm fine sand, 30mm peat and 30mm perlite and 10mm vermiculite. We used crushed basalt, crusher dust and peat in a 50:50 ratio for epiphytes. Moisten the mix enough that water does not run out when the mix is squeezed between the fingers.
Step 7. Place the moisten mix (Enough to half fill the small ice cream container) in the microwave oven with a large glass of water for 7 or 8 minutes, until the water is boiling. Allow them to cool in the oven. You will need the water later so do not tip it out.
Step 8. Take the brown paper bag out of the linen closet. Shake the bag and remove the fronds. You should have a yellow, brown, black or rarely greenish brown or ochre powder or very fine, small round pin head size spore depending on the specie involved.
Step 9. Remove the mixture from the oven once it has cooled and place it in the small ice cream container and level.
Step 10. Sprinkle the spore sparsely over the mixture in the small ice cream container.
Step 11. Place the milk bottle tops in the large ice cream container with the flat surface facing down. Place the small ice cream container in the large ice cream container so that it is sitting on the milk bottle tops.
Step 12. Remove the water from the microwave and pour it into the larger ice cream container so there is 25mm to 30mm of water in the bottom.
Step 13. Place the ice cream containers in the plastic bag and seal. Step 14. Place the contents and bag in a warm shady place preferably 50mm to 70mm shade depending on the specie. Shade houses and some window sills are ideal.
Step 15. The surface should turn green within a week to two weeks. The prothallus will then develop. From the prothallus the first true fronds will appear. Wait until the ferns are 20mm to 35mm in height before you attempt to transplant them. Once they are ready open the bag up slightly and allow the air to flow around the little ferns. Every 3 to 5 days open the bag a little further so the ferns get use to their new environment. Allow them a week to two weeks to harden off before you transplant them following the removal of the plastic bag. Carefully prick them out into 50mm standard squat tubes as you would any seedling.
Do not try to transplant them as single plants as they are still a little delicate still.
Once the smaller ones again reach 50mm to 70mm you may wish to divide the stronger and hardier individual plants into smaller clumps in 100mm squat pots.
Fertilize using Seaweed, fish emulsion or organic chicken pellets soaked in water and apply the liquid on an alternate basis. Fertilize every 2 months until the plants are well established then annually in September to October to maintain better health, vitality flowering and fruiting.
Further Comments from Readers:
“Hi reader, it seems you use The Bible of Botany a lot. That’s great as we have great pleasure in bringing it to you! It’s a little awkward for us to ask, but our first aim is to purchase land approximately 1,600 hectares to link several parcels of N.P. into one at The Pinnacles NSW Australia, but we need your help. We’re not salespeople. We’re amateur botanists who have dedicated over 30 years to saving the environment in a practical way. We depend on donations to reach our goal. If you donate just $5, the price of your coffee this Sunday, We can help to keep the planet alive in a real way and continue to bring you regular updates and features on Australian plants all in one Botanical Bible. Any support is greatly appreciated. Thank you.”
In the spirit of reconciliation we acknowledge the Bundjalung, Gumbaynggirr and Yaegl and all aboriginal nations throughout Australia and their connections to land, sea and community. We pay our respect to their Elders past, present and future for the pleasures we have gained.
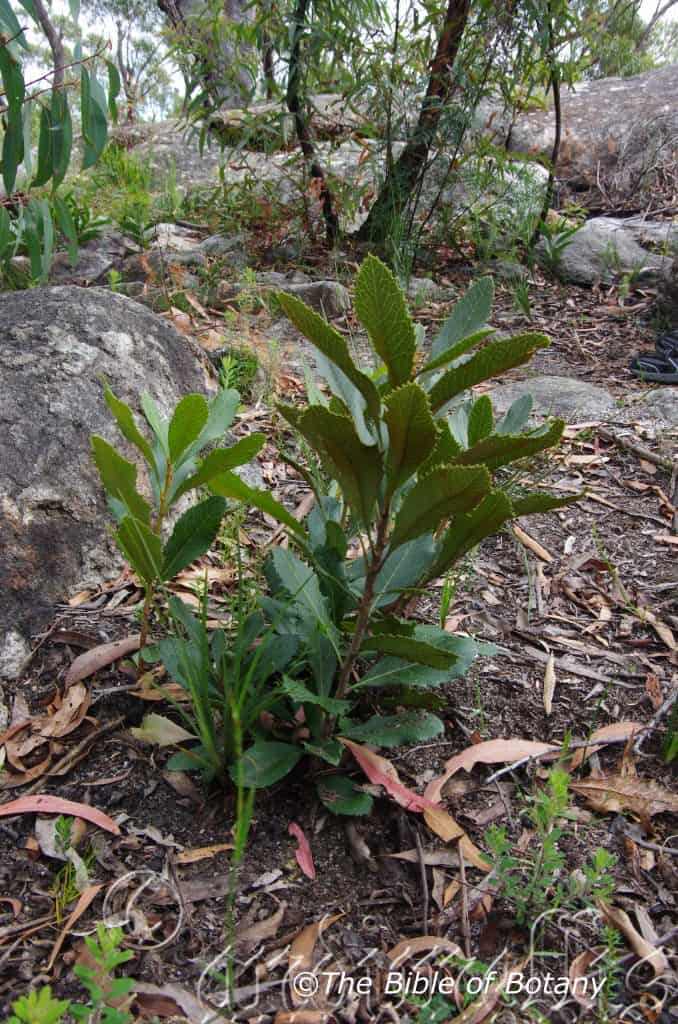
Washpool National Park NSW
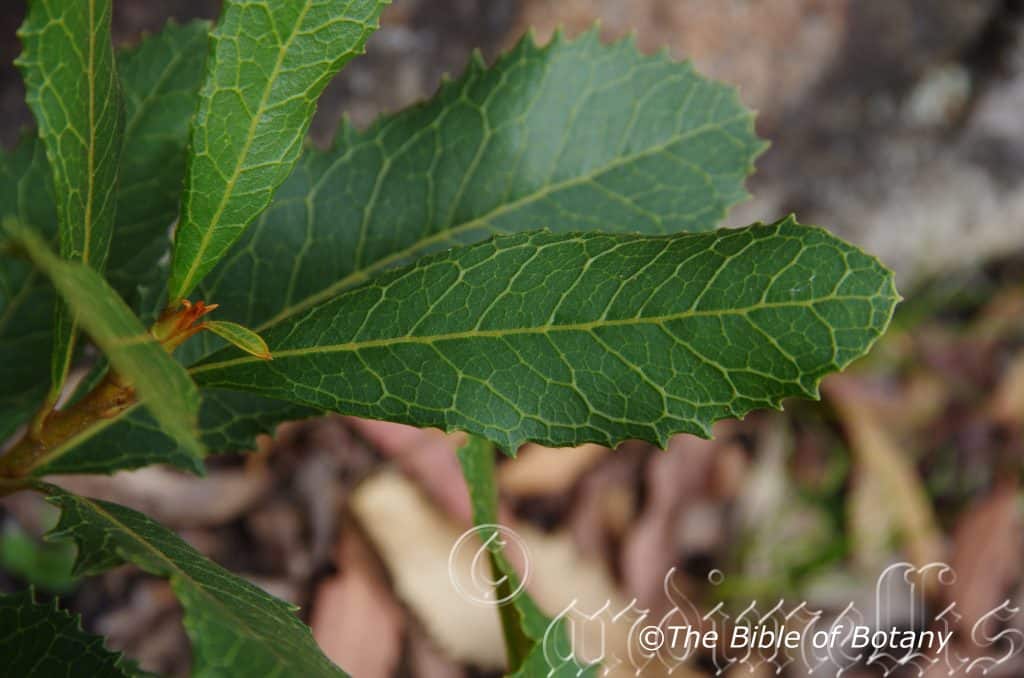
Washpool National Park NSW

Washpool National Park NSW
Telopea aspera
Classification:
Unranked: Eudicots
Order: Proteales
Family: Proteaceae
Genus: From Tele, which is Ancient Greek for a long distance or far away and Optikus, which is Ancient Greek or Opticus which is Latin for of seeing or to view. It usually refers to flowers, which are able to be seen from a long distance.
Species: From Asper, which is Ancient Greek for rough like a rasp. It refers to surfaces usually the leaves phyllodes or fronds or at times the stems, which are rather rough.
Common Name: Gibraltar Range Waratah or Northern Waratah.
Distribution:
Telopea aspera is restricted to a small area on the Gibraltar Range between Grafton and Glen Innes.
https://avh.ala.org.au/occurrences/search?taxa=Telopea+aspera#tab_mapView
Habitat Aspect Climate:
Telopea aspera prefers light shade to full sun. It grows in cool mountainous areas in open dry sclerophyll forests. It is very difficult to distinguish from Telopea speciosissima. The altitude ranges from 900 meters ASL to 1500 meters ASL.
The temperatures range from minus 6 degrees in July to 37 degrees in January.
The rainfall ranges from lows of 650mm to 950mm average per annum.
Soil Requirements:
Telopea aspera prefers course, white sands to white or pale grey sandy loams with forest litter with scattered boulders. The soils are usually derived from partially decomposed granites. The soils pH ranges from 5pH to 5.5pH. It does not tolerant of waterlogged soils and the root runs are consistently cool. Non saline soils to slightly saline soils are tolerated.
Height & Spread:
Wild Plants: 1m to 3m by 0.6m to 1.5m.
Characteristics:
The 1 to 5 erect stems of Telopea aspera are slender, straight, pale grey, scabrous, and usually with few branches. The branches are brown and are only turn deep grass-green to olive green near the apex where the last leaf growth occurs or the terminal flower head develops. The stems are moderately to densely covered in rusty-brown farinaceous lumps. A lignotuber forms below the ground.
The alternate elliptical to obovate-elliptical leaves of Telopea aspera measure 80mm to 280mm in length by 20mm to 65mm in width. The bases are cuneate while the apexes are broadly acute to truncate. The concolourous laminas are deep sea-green, dull to semi glossy and glabrous on the upper lamina while the lower lamina is covered in rusty-brown hirsute hairs especially near the mid vein. The margins have 3 pairs to 11 pairs of broad teeth mainly on the apical half. The laminas recurve slightly from the mid vein to the margins and on the apex half to the apex. The mid vein is strongly prominent while the main laterals are prominent on both laminas. The short, stout petioles are swollen at the base and measures 18mm to 33mm in length.
The conflorescences of Telopea aspera are born from terminal shoots. The bright red to bright crimson or rarely white flowers measure 100mm to 140mm in diameter. There are 100 to 240 individual flowers on a conflorescences. The rusty-brown peduncle and grass-green to deep olive-green rachises are glabrous. The peduncles measure 30mm to 50mm in length while the rachises measure 35mm to 50mm in length and the individual flowers are sessile. The bracts are bright scarlet-red to bright crimson-red, number 7 to 15 and measure 45mm to 70mm in length by 7mm to 12mm in width. The bright scarlet-red to bright crimson-red perianth tubes are glabrous and measure 30mm to 38mm in length. The strongly recurved perianth segment splits longitudinally along the lower side to form a deep “U” shaped valley. The bright scarlet-red to bright crimson-red perianth segment’s apexes form 4 dimorphic lobes. The outer lobes are longer and wider than the 2 inner lobes while all the lobes have acute apexes. The lobes measure 2mm to 3mm in length while the lobes measure 8mm to 11mm in length by 5mm to 7.5mm in width.
The exserted, sessile anthers are the same colour as the perianth and are located on the inner side of the perianth lobes.
The bright scarlet-red to bright crimson-red styles and stigmas are glabrous while the ovary is green. The pistil measures 62mm to 76mm in length. Telopea aspera’s flowers appear from early November through to January.
The fruits of Telopea aspera are globose to obovoid follicle. The large follicles are glabrous and measure 80mm to 150mm in length by 15mm to 20mm in diameter. The green capsules turn deep grey-brown externally and pale a paler deep grey-brown internally when ripe. The styles are persistent on the ripe fruit. The winged brown seeds are flattened ellipsoidal and fleshy. They appear at the base of the follicles with the apex wings hanging downwards. The flattened ovate seeds measure 3mm to 4mm in diameter while the wings measure 16mm to 24mm by 3.5mm to 4.5mm in width. The fruit ripen from November to early February.
Confusing Species:
Telopea aspera has leaves, in which the lower lamina is moderately covered in rusty-brown hirsute hairs. There are 6 to 22 teeth evenly spaced along the margins.
Telopea speciosissima‘s southern populations are glabrous while the northern populations are sparsely covered in fine rusty-brown hirsute hairs. The margins are entire or have 2 to 6 teeth on the apical half.
Wildlife:
Telopea aspera’s do not appear to have any predators though the ripe fallen follicles seeds are at times eaten by an unknown weevil.
The flowers are attended by several small to medium honey eaters including the brown honeyeater Lichmera indistincta.
Cultivation:
Telopea aspera is a magnificent small shrub that should be grown more often in cultivation where pure sand or sandy loam is derived from decomposed sandstone or granite. In cultivation it will grow from 2 meters to 3 meters in height by 1.5 meters to 3 meters in diameter when grown in the open. I would only recommend growing Telopea aspera in full sun or very light dappled shade.
Remember the plants dislike wet soils and the drainage must be excellent so all excess water drains quickly. If these requirements are met it can cope with temperatures as low as minus 5 degrees and up to 40 degrees. It is very drought resistant once established in their climatic zone. Do not attempt to grow them in areas of rainfall greater than 1250 where drainage is not excellent.
Add to the above, if it is given a little native fish emulsion or seaweed fertilizer on an annual basis the plants do respond with outstanding flowering and may even set copious quantities of seed which are fetching high prices.
It often reaches its full potential in just 2 to 3 years and flower from the third year from seed.
Imagine a front yard; in September, welcoming you and friends at the front gate with Telopea aspera, Telopea speciosissima and Leptospermum polygalifolia mass planted. The contrasting foliage, coupled with a proliferation of white blooms, giving way to the large, various coloured crimson-red blooms over a period of weeks with a total flowering period of 4 months. The Sydney Swans supporters would be very proud of your garden and natural selection of colour.
Propagation:
Seeds: The seeds of Telopea aspera can be removed easily from the follicles.
Sow fresh seeds directly but sparingly onto a seed raising mix. Just cover them and keep them moist not wet. Do not over water as the seeds are susceptible to various fungi and will damp off before germination takes place. Place the trays in a warm sunny area protected from winds but where the air flow is constant. When the seedlings are 20mm to 25mm tall, prick them out and plant them into 50mm native tubes using a good well drained organic mix. For both the seed raising mix and potting mix I like to include I part decomposed sharp granite sand for aeration and drainage.
As the seedlings roots reach the bottom of the tubes plant them out into their permanent position. Do not delay. Alternatively seeds can be planted directly into peat jiffy pots. When the roots appear through the pots plant them out into their permanent positions and water in well with our recommended fertilizer.
Fertilize using seaweed or fish emulsion. Fertilize every two months until the plants are established then twice annually in early September and March to maintain better colour, health, vitality and flowering.
Avoid synthetic fertilizers as they will most likely contain calcium and phosphorous which is toxic to most Proteacea.
Cuttings:
Unfortunately Telopea aspera cuttings are very difficult to grow from cutting but must be used if a specific colour is required or the white form is wanted.
Use 100mm to 250mm long tip cuttings or lateral shoots from the present season’s growth. Take them in warmer months of the year. Remove half the leaves from the bottom section being careful not to tear the bark.
1 Prepare the cutting mix by adding two thirds sharp clean river sand, one third peat or one third perlite. These ingredients must be sterilized,
2 Select good material from non diseased plants,
3 Select semi green stems for cuttings. Look for a stem with two or three nodes,
4 Place the cutting on a flat, hard surface, and make a clean cut down one side of the cutting at the base for 10mm with a sharp sterile knife or razor blade. – This scarification of the node will increase the chances of roots emerging from this spot. Now remove all but one or two the leaves, leaving the apex leaves in tact. If the leaves are very large in proportion to the stem, cut off the apical halves.
5 Fill a saucer with water, and place a little medium strength rooting hormone into another container like a milk bottle top. Dip the node end of the cutting into the water and then into the rooting hormone. Tap off any excess hormone,
6 Use a small dipple stick or old pencil to poke a hole into the soilless potting mix. Ensure the hole is slightly larger than the stem diameter and be careful not to wipe the rooting hormone off the cuttings base. Place 2 to 4 cuttings in each of the 50mm native tubes,
7 I like to place the tubes in bucket with holes drilled in the bottom to allow excess water to drain out. A plastic bag that fits over the bucket is ideal to help maintain temperature and moisture. Place in a semi shaded, warm position like under 50mm shade cloth.
8 When the cuttings have struck, open the bag to allow air circulation for a few days to a week,
9 Once hardened off remove the cuttings from the bag and allow to further hardening for a few more days to a week,
10 Transplant into a good potting mix to grow on.
Fertilize using seaweed, fish emulsion or organic chicken pellets soaked in water on an alternate basis. Fertilize every two months until the plants are established then annually in early September to October to maintain health, vitality and better flowering.
Further Comments from Readers:
“Hi reader, it seems you use The Bible of Botany a lot. That’s great as we have great pleasure in bringing it to you! It’s a little awkward for us to ask, but our first aim is to purchase land approximately 1,600 hectares to link several parcels of N.P. into one at The Pinnacles NSW Australia, but we need your help. We’re not salespeople. We’re amateur botanists who have dedicated over 30 years to saving the environment in a practical way. We depend on donations to reach our goal. If you donate just $5, the price of your coffee this Sunday, We can help to keep the planet alive in a real way and continue to bring you regular updates and features on Australian plants all in one Botanical Bible. Any support is greatly appreciated. Thank you.”
In the spirit of reconciliation we acknowledge the Bundjalung, Gumbaynggirr and Yaegl and all aboriginal nations throughout Australia and their connections to land, sea and community. We pay our respect to their Elders past, present and future for the pleasures we have gained.
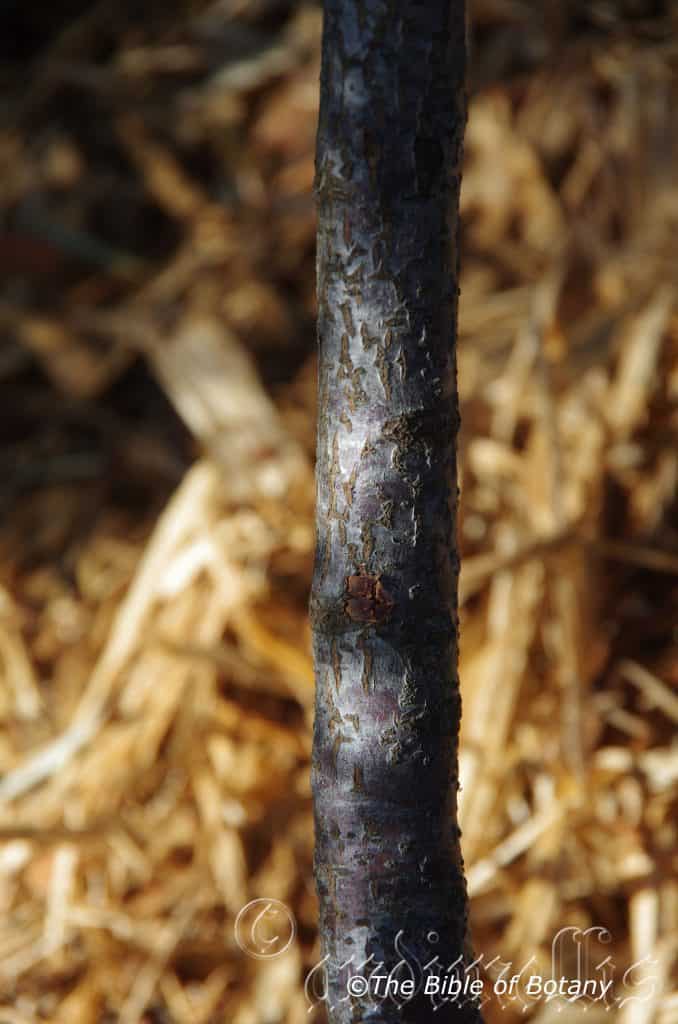
National Botanic Gardens ACT
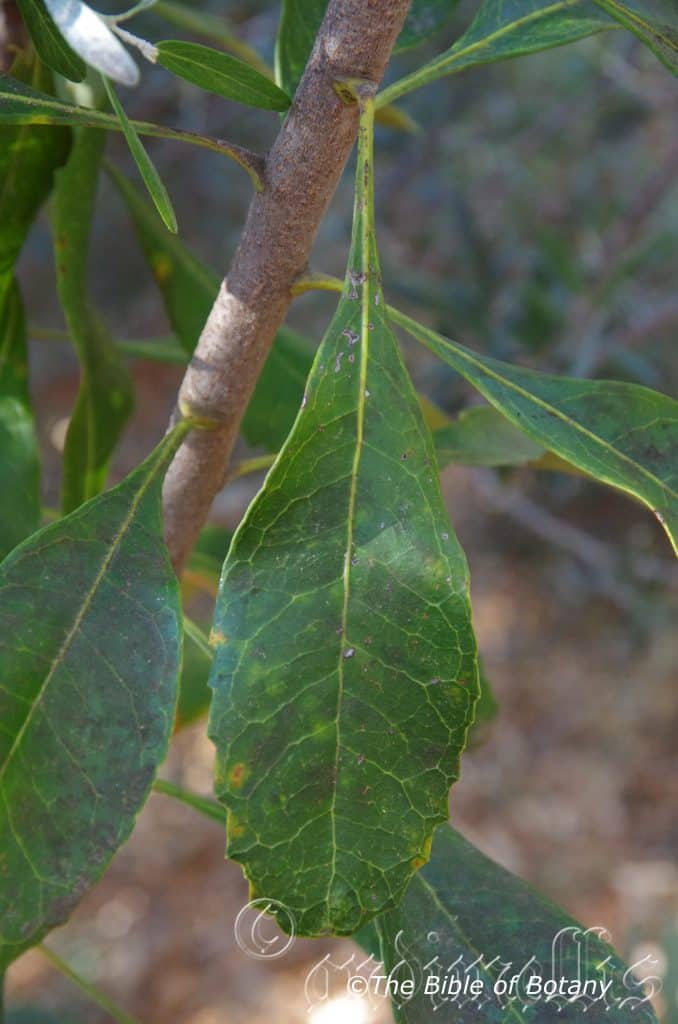
National Botanic Gardens ACT
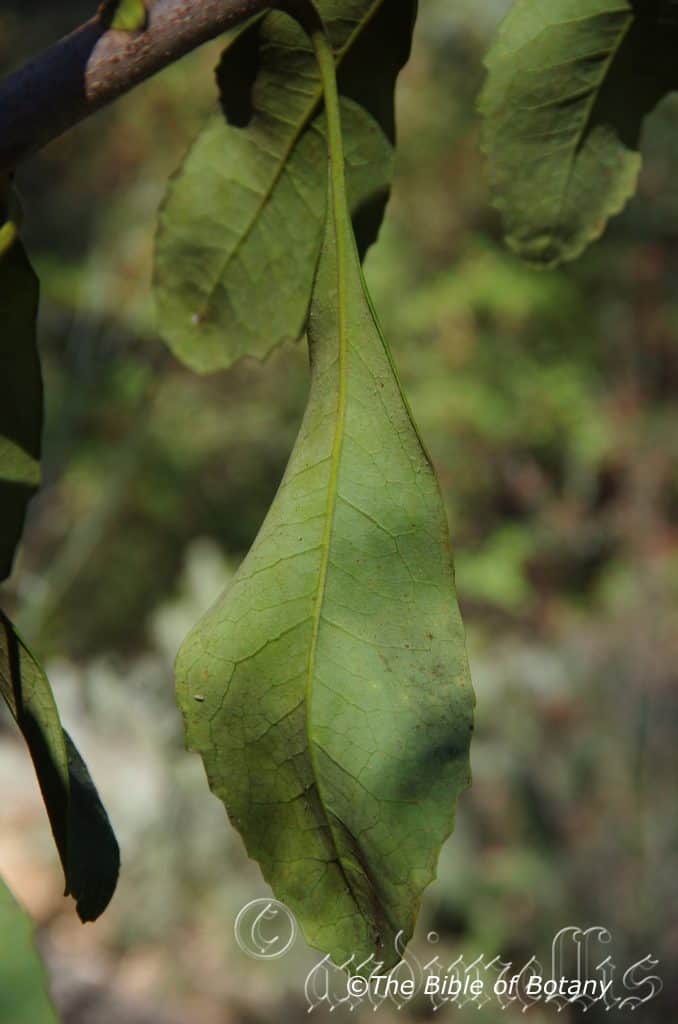
National Botanic Gardens ACT
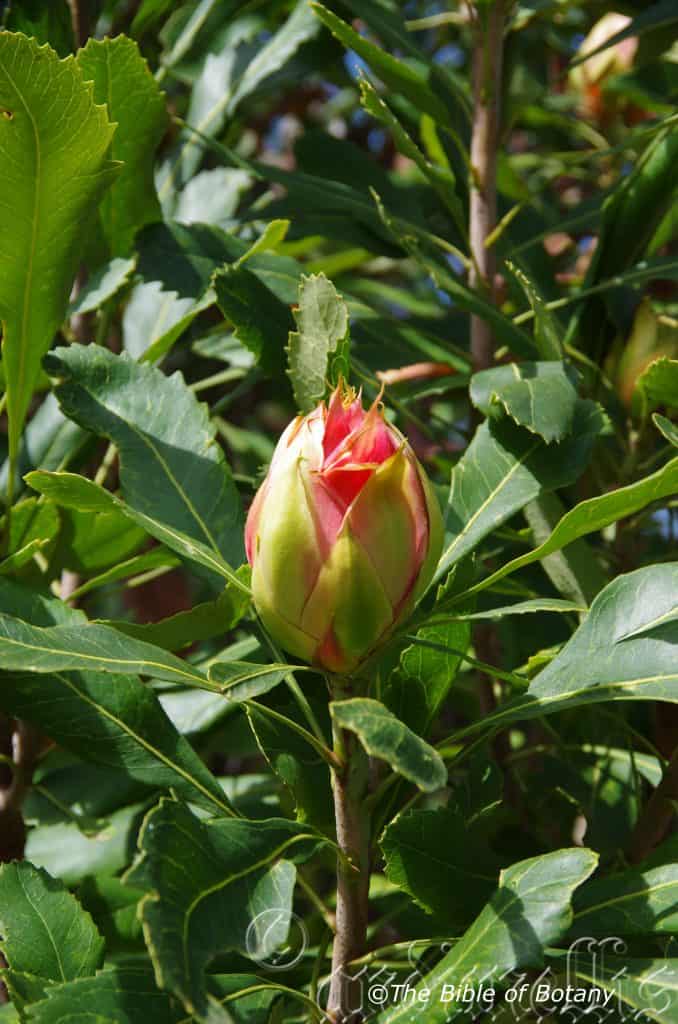
National Botanic Gardens ACT
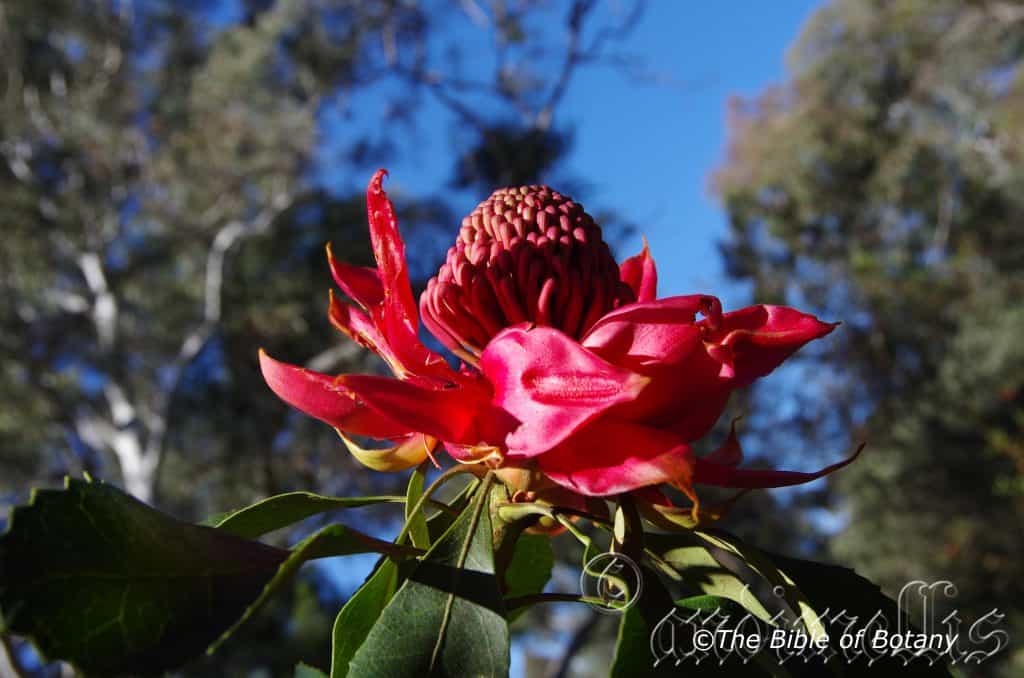
National Botanic Gardens ACT
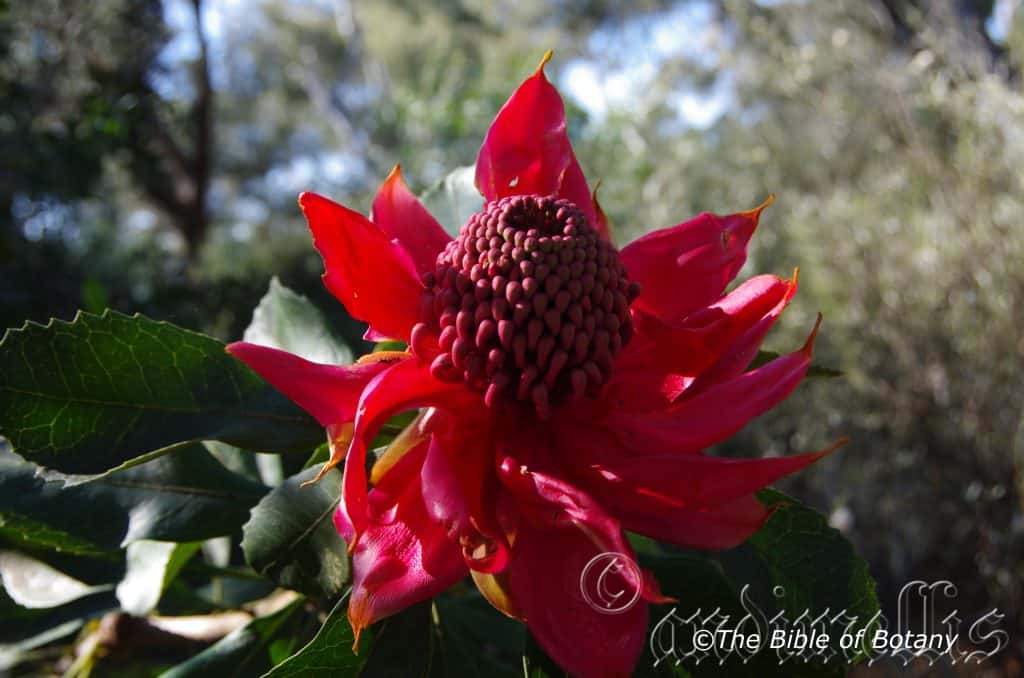
National Botanic Gardens ACT
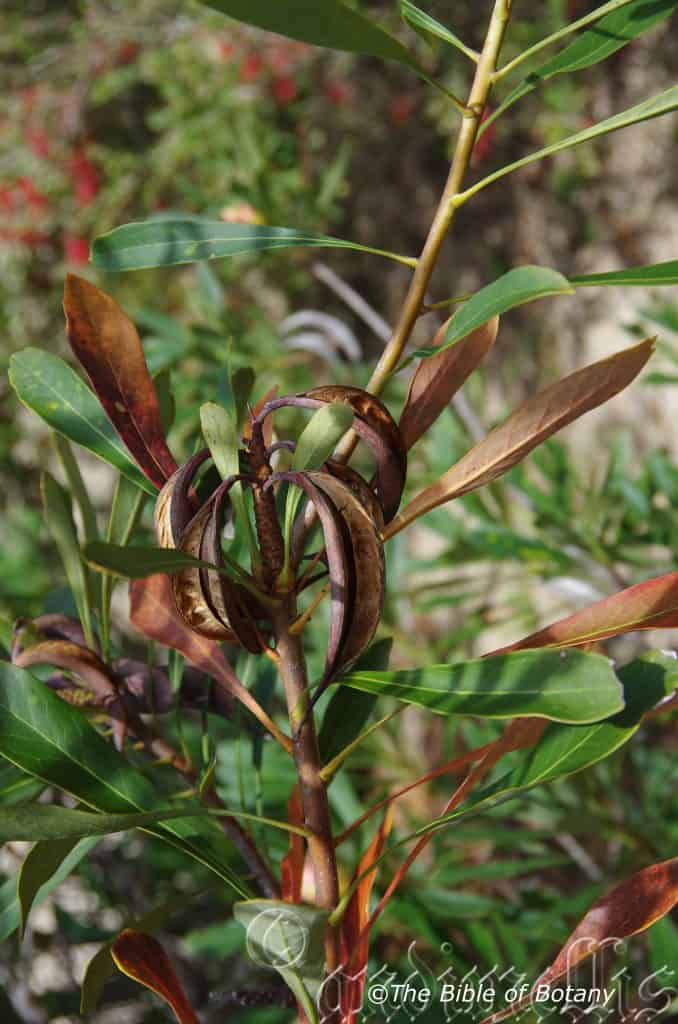
National Botanic Gardens ACT
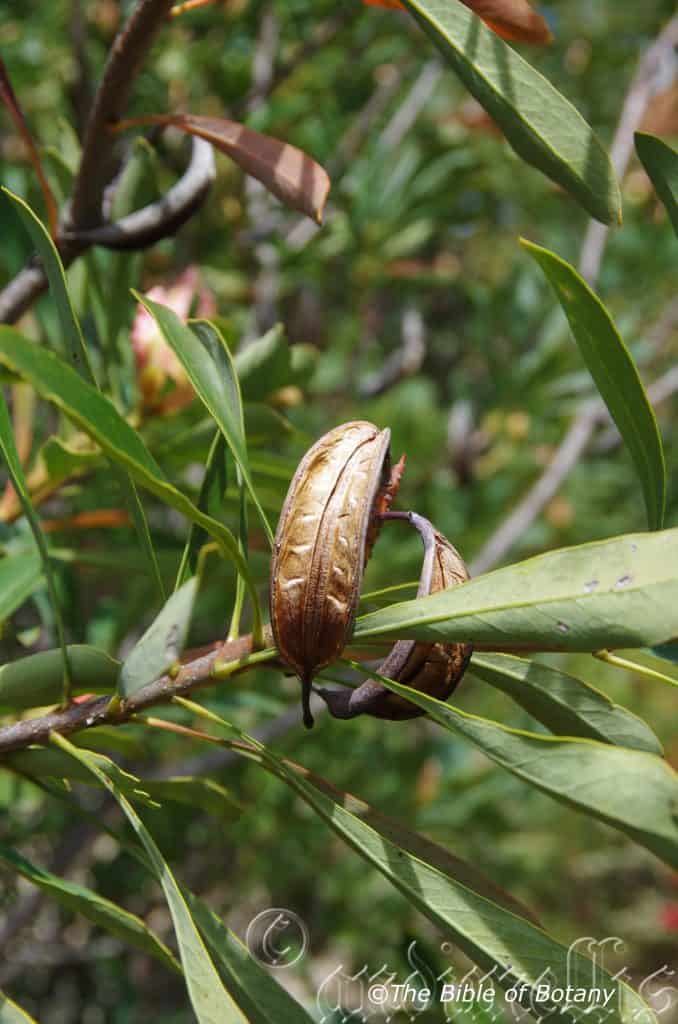
National Botanic Gardens ACT
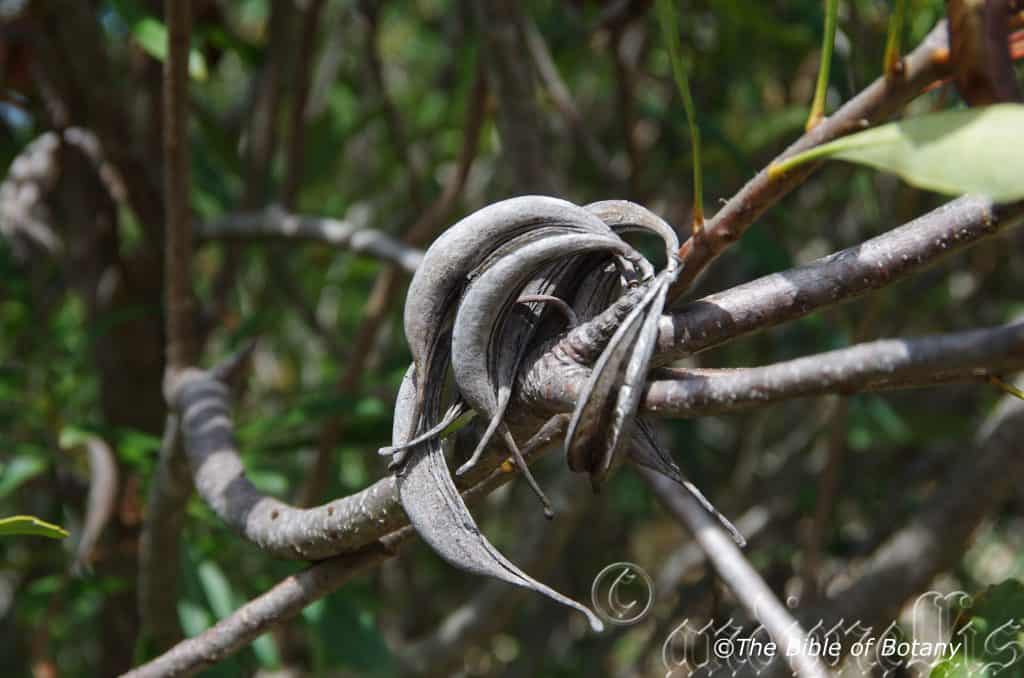
National Botanic Gardens ACT
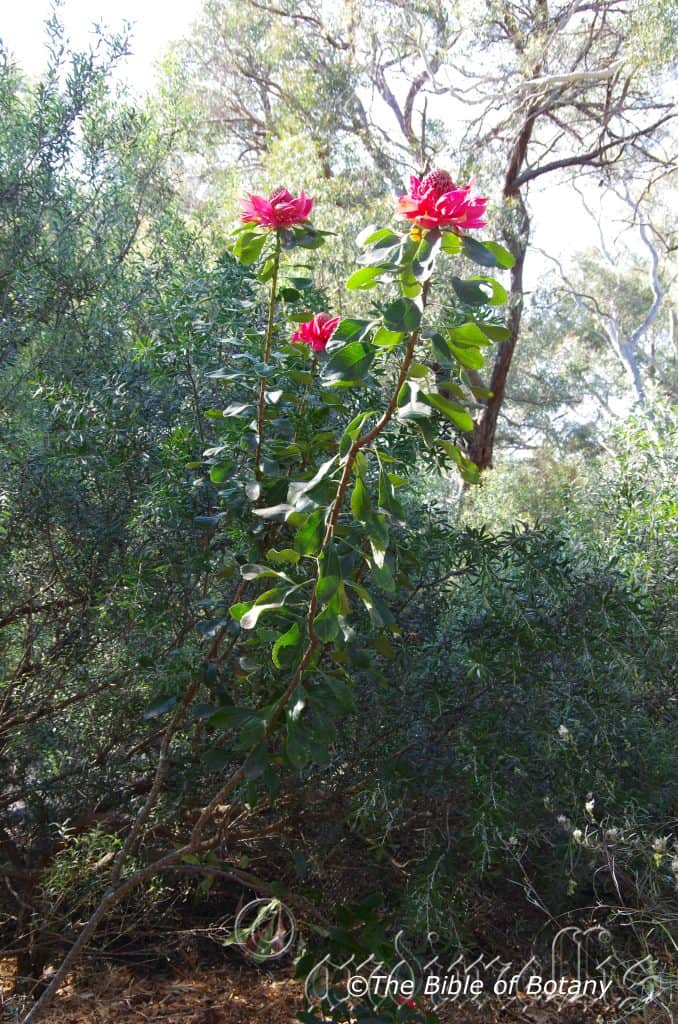
National Botanic Gardens ACT
Telopea speciossima
Floral emblem of New South Wales
Classification:
Unranked: Eudicots
Order: Proteales
Family: Proteaceae
Genus: From Tele, which is Ancient Greek for a long distance or far away and Optik’s, which is Ancient Greek or Opticus which is Latin for of seeing or to view. It usually refers to flowers, which are able to be seen from a long distance.
Species: From Speciosum, which is Latin for to have the appearance of and -Issima which is Latin for the superlative or the most. It refers to plant, structures usually the flowers, which display an appearance of being the most or best looking, handsome, beautiful splendid, brilliant or showy species in the genus.
Common Name: Waratah.
Distribution:
Telopea speciosissima is found south from Watagan Mountains and the Blue Mountains to Ulludulla in central New South Wales east of the Great Dividing Range.
https://avh.ala.org.au/occurrences/search?taxa=Telopea+speciossima#tab_mapview
Habitat Aspect Climate:
Telopea speciosissima prefers dappled light to full sun. It grows in the cool mountainous areas in open dry sclerophyll forests. The altitude ranges from 150 meters ASL to 750 meters ASL.
The temperatures range from minus 6 degrees in July to 37 degrees in January.
The rainfall ranges from lows of 700mm to 1600mm average per annum.
Soil Requirements:
Telopea speciosissima prefers brown to orange sandy loams to light fatty clays over sandstone with high proportion of forest litter. The soils are usually derived from partially decomposed to decomposed sandstones. The soils pH ranges from 4.5pH to 6pH. It does not tolerate waterlogged soils. Non saline soils to moderately saline soils are tolerated.
Height & Spread:
Wild Plants: 1m to 3m by 1m to 2.5m.
Characteristics:
Telopea speciosissima grows as a medium erect shrub with a few slender, straight, pale grey, scabrous, and usually with few branches. The branches are brown and are only turn deep grass-green to olive green near the apex where the last leaf growth occurs or the terminal flower head develops. The stems are moderately to densely covered in rusty-brown farinaceous lumps. A lignotuber forms below the ground.
The alternate elliptical to obovate-elliptical leaves of Telopea speciosissima measure 80mm to 280mm in length by 20mm to 65mm in width. The short, stout petioles are swollen at the base and measures 18mm to 33mm in length. The bases are cuneate while the apexes are broadly acute to truncate. The concolourous laminas are deep sea-green, dull to semi glossy and glabrous on the upper lamina while the lower lamina is covered in rusty-brown hirsute hairs especially near the mid vein. The leaf margins are entire or have 1 pair to 3 pairs of broad teeth mainly on the apex half of the leaf margins. The laminas recurve slightly from the mid vein to the margins and on the apex half to the apex. The mid vein is strongly prominent while the main laterals are prominent on both laminas.
The conflorescences of Telopea speciosissima are born from a terminal shoot. The bright red to bright crimson or rarely white flowers measure 100mm to 140mm in diameter. There are 100 to 240 individual flowers to a conflorescences. The rusty-brown peduncle and grass-green to deep olive-green rachises are glabrous. The peduncles measure 30mm to 50mm in length while the rachises measure 35mm to 50mm in length and the individual flowers are sessile. The bracts are bright scarlet-red to bright crimson-red, number 7 to 15 and measure 45mm to 70mm in length by 7mm to 12mm in width. The bright scarlet-red to bright crimson-red or rarely white perianth tubes are glabrous and measure 30mm to 38mm in length. The strongly recurved perianth segment splits longitudinally along the lower side to form a deep “U” shaped valley. The bright scarlet-red to bright crimson-red or rarely white perianth segment’s apexes form 4 dimorphic lobes. The outer lobes are longer and wider than the 2 inner lobes while all the lobes have acute apexes. The lobes measure 2mm to 3mm in length while the lobes measure 8mm to 11mm in length by 5mm to 7.5mm in width.
The exserted, sessile anthers are the same colour as the perianth and are located on the inner side of the perianth lobes.
The bright scarlet-red to bright crimson-red or rarely white style are glabrous while the ovary is green. The stigmas are bright scarlet-red to bright crimson-red or white irrespective of the style colour. The pistil measures 62mm to 76mm in length. Telopea speciosissima‘s flowers appear from early November through to January.
Telopea speciosissima fruits are globose to obovoid follicle. The large follicles are glabrous and measure 80mm to 150mm in length by 15mm to 20mm in diameter. The green capsules turn deep grey-brown externally and pale a paler deep grey-brown internally when ripe. The styles are persistent on the ripe fruit. The winged brown seeds are flattened ellipsoidal and fleshy. They appear at the base of the follicles with the apex wings hanging downwards. The flattened ovate seeds measure 3mm to 4mm in diameter while the wings measure 16mm to 24mm by 3.5mm to 4.5mm in width. The fruit ripen from November to early February.
Confusing Specie:
Telopea speciosissima southern populations are glabrous while the northern populations are sparsely covered in fine rusty-brown hirsute hairs. The margins are entire or have 2 to 6 teeth on the apical half.
Telopea aspera has leaves, in which the lower lamina is moderately covered in rusty-brown hirsute hairs. There are 6 to 22 teeth evenly spaced along the margins.
Wildlife:
Telopea speciosissima do not appear to have any predators though the ripe fallen follicles seeds are at times eaten by an unknown weevil.
The flowers are attended by several small to medium honey eaters including the brown honeyeater Lichmera indistincta.
Cultivation:
Telopea speciosissima is a magnificent small shrub that could be grown more in cultivation where pure sands or sandy loams are derived from decomposed sandstone or accumulated sands behind the frontal dunes. In cultivation it will grow from 2 meters to 3 meters in height by 1.5 meters to 3 meters in diameter when grown in the open. I would only grow Telopea speciosissima in full sun or very light dappled shade.
It grows exceptionally well on lighter soils where deep leaf litter keeps the soil cool and moisture at an even level. Remember the plants dislike wet soils and the drainage must be excellent so all excess water drains quickly. If these requirements are met it can cope with temperatures as low as minus 5 degrees and up to 40 degrees. It is very drought resistant once established in their climatic zone. Do not attempt to grow it in areas of rainfall greater than 1250 unless the drainage is excellent.
Add to the above, if it is given a little native fish emulsion or seaweed fertilizer on an annual basis the plants do respond with outstanding flowering and may even set copious quantities of seed which is fetching high prices.
It often reaches its full potential in just 3 to 5 years and flowers from the third year from seed.
Imagine a front yard; in September, welcoming you and your friends at the front gate with Telopea aspera, Telopea speciosissima and Leptospermum polygalifolia mass planted. The contrasting foliages, coupled with a proliferation of white blooms, giving way to the large, various coloured crimson-red blooms over a period of weeks with a total flowering period of 4 months. The Sydney Swans colours would be very proud of your garden and natural selection of colour.
Propagation:
Seeds: The seeds of Telopea speciosissima can be removed easily from the follicles.
Sow fresh seeds directly but sparingly onto a seed raising mix. Just cover them and keep them moist not wet. Do not over water as the seeds are susceptible to various fungi and will damp off before germination takes place. Place the trays in a warm sunny area protected from winds but where the air flow is constant. When the seedlings are 20mm to 25mm tall, prick them out and plant them into 50mm native tubes using a good well drained organic mix. For both the seed raising mix and potting mix I like to include I part decomposed sharp granite sand for aeration and drainage.
As the seedlings roots reach the bottom of the tubes plant them out into their permanent position. Do not delay. Alternatively seeds can be planted directly into peat jiffy pots. When the roots appear through the pots plant them out into their permanent positions and water in well with our recommended fertilizer.
Fertilize using seaweed or fish emulsion. Fertilize every two months until the plants are established then twice annually in early September and March to maintain better colour, health, vitality and flowering.
Avoid synthetic fertilizers as they will most likely contain calcium and phosphorous which is toxic to most Proteacea.
Cuttings:
Unfortunately Telopea speciosissima cuttings are very difficult to grow from cutting but must be used if a specific colour is required or the white form is wanted.
Use 100mm to 250mm long tip cuttings or lateral shoots from the present season’s growth. Take them in warmer months of the year. Remove half the leaves from the bottom section being careful not to tear the bark.
1 Prepare the cutting mix by adding two thirds sharp clean river sand, one third peat or one third perlite. These ingredients must be sterilized,
2 Select good material from non diseased plants,
3 Select semi green stems for cuttings. Look for a stem with two or three nodes,
4 Place the cutting on a flat, hard surface, and make a clean cut down one side of the cutting at the base for 10mm with a sharp sterile knife or razor blade. – This scarification of the node will increase the chances of roots emerging from this spot. Now remove all but one or two the leaves, leaving the apex leaves in tact. If the leaves are very large in proportion to the stem, cut off the apical halves.
5 Fill a saucer with water, and place a little medium strength rooting hormone into another container like a milk bottle top. Dip the node end of the cutting into the water and then into the rooting hormone. Tap off any excess hormone,
6 Use a small dipple stick or old pencil to poke a hole into the soilless potting mix. Ensure the hole is slightly larger than the stem diameter and be careful not to wipe the rooting hormone off the cuttings base. Place 2 to 4 cuttings in each of the 50mm native tubes,
7 I like to place the tubes in bucket with holes drilled in the bottom to allow excess water to drain out. A plastic bag that fits over the bucket is ideal to help maintain temperature and moisture. Place in a semi shaded, warm position like under 50mm shade cloth.
8 When the cuttings have struck, open the bag to allow air circulation for a few days to a week,
9 Once hardened off remove the cuttings from the bag and allow to further hardening for a few more days to a week,
10 Transplant into a good potting mix to grow on.
Fertilize using Seaweed, fish emulsion or organic chicken pellets soaked in water and apply the liquid on an alternate basis. Fertilize every 2 months until the plants are well established then annually in September to October to maintain better health, vitality flowering and fruiting.
Further Comments from Readers:
“Hi reader, it seems you use The Bible of Botany a lot. That’s great as we have great pleasure in bringing it to you! It’s a little awkward for us to ask, but our first aim is to purchase land approximately 1,600 hectares to link several parcels of N.P. into one at The Pinnacles NSW Australia, but we need your help. We’re not salespeople. We’re amateur botanists who have dedicated over 30 years to saving the environment in a practical way. We depend on donations to reach our goal. If you donate just $5, the price of your coffee this Sunday, We can help to keep the planet alive in a real way and continue to bring you regular updates and features on Australian plants all in one Botanical Bible. Any support is greatly appreciated. Thank you.”
In the spirit of reconciliation we acknowledge the Bundjalung, Gumbaynggirr and Yaegl and all aboriginal nations throughout Australia and their connections to land, sea and community. We pay our respect to their Elders past, present and future for the pleasures we have gained.
Tephrosia brachyodon
Classification:
Unranked: Eudicots
Class: Rosids
Order: Fabales
Family: Fabaceae
Subfamily: Faboideae
Tribe: Millettieae
Genus: From Tephra, which is Ancient Greek for the ash from a volcanic eruption. It refers to leaves or phyllodes and their hairs, which are ash-grey in colour.
Species: From Brachus, which is Ancient Greek for short and Odonto/Dontos, which is Ancient Greek for a tooth or teeth. It refers to a structure or organ, which has small or very fine teeth.
Common Name:
Distribution:
Tephrosia brachyodon is mainly found north of a line from Broome in central coastal Western Australia to the South Australian Northern Territory border then east to Jericho in central Queensland then south to Wellington and east to Gloucester on the central coast in New South Wales. It is found further south in Western Australia along the De Grey River and the Gascoyne River.
https://avh.ala.org.au/occurrences/search?taxa=Tephrosia+brachyodon#tab_mapView
Habitat Aspect Climate:
Tephrosia brachyodon prefers dappled light to full sun. It grows in open woodlands in riparian zones of seasonal creeks and streams in semi-arid or arid districts. The altitude ranges from 150 meters ASL to 750 meters ASL.
The temperatures range from minus 6 degrees in July to 37 degrees in January.
The rainfall ranges from lows of 700mm to 1600mm average per annum.
Soil Requirements:
Tephrosia brachyodon prefers sandy loams, light clays, medium clays or light to heavy silts. The soils are usually derived from decomposed sandstones or granites. The soils pH ranges from 5pH to 6.5pH. It does not tolerate waterlogged soils. Non saline soils to moderately saline soils are tolerated.
Height & Spread:
Wild Plants: 0.2m to 0.4m by 0.3m to 0.5m.
Characteristics:
Tephrosia brachyodon grows as a sub shrub with brownish-tan stems. The newer growth is olive-green to grass-green and sparsely to densely covered in white to pale grey, silky sericeous to tomentose hairs.
The alternate oblong in outline leaves measure 50mm to 160mm in length by 30mm to 62mm in width. The odd pinnate or even pinnate leaves have 5 to 34 individual opposite to sub opposite leaflets. The petioles, rachis and petiolules are sparsely to densely covered in white to pale grey, soft sericeous hairs. The petioles measure 3mm to 12mm in length while the rachises measure 17mm to 138mm in length and the petiolules measure 0.5mm to 2mm in length. The small stipules are subulate. The lanceolate, oblong or at times elliptical leaflets measure 15mm to 30mm in length by 3mm to 8mm in width.
The bases are broad cuneate to rounded while the apexes are broad acute to almost obtuse. The concolourous laminas are mid green to mid blue-green dull and glabrous on the upper laminas while the lower laminas are moderately to densely covered in white to pale grey sericeous hairs. The laminas are flat to slightly recurve upwards from the mid vein to the margins and gently decurve downwards near the base or near the apex. The new growth laminas leaflets are conduplicate. The margins are entire. The mid vein is slightly prominent
The inflorescences are racemes born from the leaf axils. There are 8 to 20 individual flowers on a raceme. The mid green to mid blue-green raceme is covered in white to pale grey sericeous hairs. The peduncles measure 30mm to 80mm in length while the rachises measure 70mm to 170mm in length and the individual petioles measure 4mm to 5mm in length.
The mid green to mid blue-green or reddish-brown calyxes and calyx lobes are moderately to densely covered in white to pale grey sericeous hairs externally and are glabrous internally. The calyxes measure 2.5mm to 3.5mm in length while the lobes measure 0.8mm to 1.5mm in length.
The broad ovate standards are pale pink to deep pink or purple with a paler aurora around the base and measure 4mm to 7mm in height by 5mm to 9mm in width.
The sub lanceolate to hemi lanceolate wing petals are wide spreading especially on the lower section. The pale pink to deep pink or purple wings measure 5mm to 8mm in length by 5mm to 9mm in width.
The broad oblong keel petals are pale pink to deep pink or purple with a white basal half. The keels measure 4mm to 7mm in length by 5mm to 9mm in width. The flowers appear throughout the year under favourable conditions.
Tephrosia brachyodon fruits are linear compressed pods. The pods measure 25mm to 40mm in length by 3mm to 4mm in diameter. The green capsules turn fawn, are sparsely covered in white to pale grey sericeous hairs externally and pale fawnish-yellow internally when ripe. The styles are persistent on the ripe fruit. The 3 to 6 brown seeds are flattened ellipsoidal.
Wildlife:
Tephrosia brachyodon wildlife is unknown to the author.
Cultivation:
Tephrosia brachyodon is a lovely small shrub that could be grown more in semi-arid and arid gardens. In cultivation it grows from 0.4 meters to 0.6 meters in height by 0.5 meters to 0.7 meters in diameter when grown in the open.
It grows exceptionally well on lighter soils where deep leaf litter keeps the soil cool and moisture at an even level. Remember the plants dislike wet soils and the drainage must be excellent so all excess water drains quickly. If these requirements are met it can cope with temperatures as low as minus 3 degrees and up to 42 degrees. It is very drought resistant once established in its climatic zone. Do not attempt to grow it in areas of rainfall greater than 1250 even if the drainage is excellent as it seems to be short lived.
Add to the above, if is given a little native fish emulsion or seaweed fertilizer on an annual basis the plants do respond with outstanding flowering and may even set copious quantities of seed which are fetching high prices.
Propagation:
Seeds: The seeds can be removed easily from the follicles. Treat the seeds by placing them into a container of hot water not boiling and allow the seeds to soak for 6 to 8 hours. The seeds that have not swollen repeat the exercise again.
Sow freshly treated seeds directly but sparingly onto a seed raising mix. Just cover them and keep them moist not wet. Do not over water as the seeds are susceptible to various fungi and will damp off before germination takes place. Place the trays in a warm sunny area protected from winds but where the air flow is constant. When the seedlings are 20mm to 25mm tall, prick them out and plant them into 50mm native tubes using a good well drained organic mix.
As the seedlings roots reach the bottom of the tubes plant them out into their permanent position. Do not delay. Alternatively seeds can be planted directly into peat jiffy pots. When the roots appear through the pots plant them out into their permanent positions and water in well with our recommended fertilizer.
Fertilize using Seaweed, fish emulsion or organic chicken pellets soaked in water and apply the liquid on an alternate basis. Fertilize every 2 months until the plants are well established then annually in September to October to maintain better health, vitality flowering and fruiting.
Further Comments from Readers:
“Hi reader, it seems you use The Bible of Botany a lot. That’s great as we have great pleasure in bringing it to you! It’s a little awkward for us to ask, but our first aim is to purchase land approximately 1,600 hectares to link several parcels of N.P. into one at The Pinnacles NSW Australia, but we need your help. We’re not salespeople. We’re amateur botanists who have dedicated over 30 years to saving the environment in a practical way. We depend on donations to reach our goal. If you donate just $5, the price of your coffee this Sunday, We can help to keep the planet alive in a real way and continue to bring you regular updates and features on Australian plants all in one Botanical Bible. Any support is greatly appreciated. Thank you.”
In the spirit of reconciliation we acknowledge the Bundjalung, Gumbaynggirr and Yaegl and all aboriginal nations throughout Australia and their connections to land, sea and community. We pay our respect to their Elders past, present and future for the pleasures we have gained.
Tephrosia filipes
Classification:
Unranked: Eudicots
Class: Rosids
Order: Fabales
Family: Fabaceae
Subfamily: Faboideae
Tribe: Millettieae
Genus: From Tephra, which is Ancient Greek for the ash from a volcanic eruption. It refers to leaves or phyllodes and their hairs, which are ash-grey in colour.
Species: From Filum, which is Latin for a thread or a thin cord. It refers to the culms being very fine or thread like.
Common Name:
Distribution:
Tephrosia filipes is found north of a line from Koolan Island off the Kimberley Coast to Leake Gorge in north western, Western Australia to near Belyando Crossing then south to the Carnarvon Gorge in central Queensland and south east to Coutts Crossing in north eastern New South Wales.
There is an isolated population in the Macdonald Ranges in southern, Northern Territory.
https://avh.ala.org.au/occurrences/search?taxa=Tephrosia+filipes#tab_mapView
Habitat Aspect Climate:
Tephrosia filipes prefer dappled shade to full sun. It grows in dry sclerophyll forests. The altitude ranges from 5 meters ASL to 850 meters ASL.
The temperatures range from minus 2 degrees in July to 40 degrees in January.
The rainfall ranges from lows of 300mm to 2400mm average per annum.
Soil Requirements:
Tephrosia filipes prefers heavier loam, medium clays or light silts to heavy silts and podzolic soils. The soils are usually derived from decomposed sandstones, granites, metamorphic rocks, brown basalts, black basalts or accumulated beach sands. The soils pH ranges from 4.5pH to 7pH. It does not tolerate waterlogged soils. Non saline soils to moderately saline soils are tolerated as are salt laden winds.
Height & Spread:
Wild Plants: 0.1m to 0.2m by 0.3m to 0.4m.
Characteristics:
Tephrosia filipes grows as a straggly, sub shrub with ascending or decumbent stems. The stems brownish stems are glabrous while the new growth stems are mid blue-green and sparsely to densely covered in white to pale grey, silky sericeous hairs.
The alternate oblong in outline leaves measure 20mm to 50mm in length by 17mm to 33mm in width. The even pinnate leaves have 12 to 38 individual sub opposite to opposite leaflets. The petioles, rachis and petiolules are sparsely to densely covered in white to pale grey, soft pubescent hairs. The petioles measure 3mm to 15mm in length while the rachises measure 12mm to 50mm in length and the petiolules measure 1mm to 2mm in length. The small stipules are linear. The linear to narrow lanceolate leaflets measure 7mm to 16mm in length by 1mm to 2.5mm in width.
The bases are broad cuneate while the apexes are acute. The discolourous laminas are mid blue-green, dull and glabrous to sparsely to moderately covered in white to pale grey pubescent hairs on the upper laminas while the lower laminas are sparsely to moderately covered in white to pale grey pubescent hairs. The laminas are moderately to strongly conduplicate while and straight. The margins are entire. The mid vein is slightly prominent.
The inflorescences are short racemes born from the leaf axils or terminals. There are 2 to 6 individual flowers on a raceme. The olive-green to reddish-brown racemes are sparsely covered in white to pale grey sericeous hairs. The peduncles measure 30mm to 65mm in length while the rachises measure 10mm to 35mm in length and the individual petioles measure 0.5mm to 1.5mm in length.
The mid reddish-brown tinged green to green tinged reddish-brown calyxes and calyx lobes are glabrous to sparsely covered in white to pale grey sericeous hairs externally and are glabrous internally. The cupuliform calyxes measure 2mm to 3mm in length while the minute lobes are subulate and measure 0.5mm to 1mm in length. The mid reddish-brown tinged green to green tinged reddish-brown, linear bract measures 3mm to 3.5mm in length.
The ovate standards are purple to deep red with or without a splash of colour at the base. The standards measure 5mm to 6mm in height by 6mm to 7.5mm in width.
The ovate wing petals loosely encircle the keel petals. The purple to deep red wings measure 6mm to 7mm in length by 4mm to 4.5mm in width.
The ovate keel petals are purple to deep red but deeper than the wings or standards. The keels measure 5mm to 5.5mm in length by 4.5mm to 5mm in width. The flowers appear throughout the year under favourable conditions.
The fruits are linear compressed pods. The pods measure 15mm to 20mm in length by 2mm to 3mm in diameter. The green capsules turn fawn, are sparsely covered in white to pale grey sericeous hairs externally and pale fawnish-yellow internally when ripe. The styles are persistent on the ripe fruit. The 5 to 9 brown seeds are flattened ellipsoidal.
Wildlife:
Tephrosia filipes wildlife is unknown to the author.
Cultivation:
Tephrosia filipes is a lovely small shrub that could be grown more in semi-arid and arid gardens. In cultivation it grows from 0.2 meters to 0.3 meters in height by 0.4 meters to 0.7 meters in diameter when grown in the open.
It grows exceptionally well on lighter soils where deep leaf litter keeps the soil cool and moisture at an even level. Remember the plants dislike wet soils and the drainage must be excellent so all excess water drains quickly. If these requirements are met it can cope with temperatures as low as minus 3 degrees and up to 42 degrees. It is very drought resistant once established in their climatic zone.
This plant is best pruned in the early stages or cluster planted to give a bushier affect. Mass plantings are best achieved by planting them at 0.2 meters to 0.4 meter centers.
Add to the above, if is given a little native fish emulsion or seaweed fertilizer on an annual basis the plants do respond with outstanding flowering and may even set copious quantities of seed which are fetching high prices.
Propagation:
Seeds: The seeds can be removed easily from the follicles. Treat the seeds by placing them into a container of hot water not boiling and allow the seeds to soak for 6 to 8 hours. The seeds that have not swollen repeat the exercise again.
Sow freshly treated seeds directly but sparingly onto a seed raising mix. Just cover them and keep them moist not wet. Do not over water as the seeds are susceptible to various fungi and will damp off before germination takes place. Place the trays in a warm sunny area protected from winds but where the air flow is constant. When the seedlings are 20mm to 25mm tall, prick them out and plant them into 50mm native tubes using a good well drained organic mix.
As the seedlings roots reach the bottom of the tubes plant them out into their permanent position. Do not delay. Alternatively seeds can be planted directly into peat jiffy pots. When the roots appear through the pots plant them out into their permanent positions and water in well with our recommended fertilizer.
Fertilize using Seaweed, fish emulsion or organic chicken pellets soaked in water and apply the liquid on an alternate basis. Fertilize every 2 months until the plants are well established then annually in September to October to maintain better health, vitality flowering and fruiting.
Further Comments from Readers:
“Hi reader, it seems you use The Bible of Botany a lot. That’s great as we have great pleasure in bringing it to you! It’s a little awkward for us to ask, but our first aim is to purchase land approximately 1,600 hectares to link several parcels of N.P. into one at The Pinnacles NSW Australia, but we need your help. We’re not salespeople. We’re amateur botanists who have dedicated over 30 years to saving the environment in a practical way. We depend on donations to reach our goal. If you donate just $5, the price of your coffee this Sunday, We can help to keep the planet alive in a real way and continue to bring you regular updates and features on Australian plants all in one Botanical Bible. Any support is greatly appreciated. Thank you.”
In the spirit of reconciliation we acknowledge the Bundjalung, Gumbaynggirr and Yaegl and all aboriginal nations throughout Australia and their connections to land, sea and community. We pay our respect to their Elders past, present and future for the pleasures we have gained.
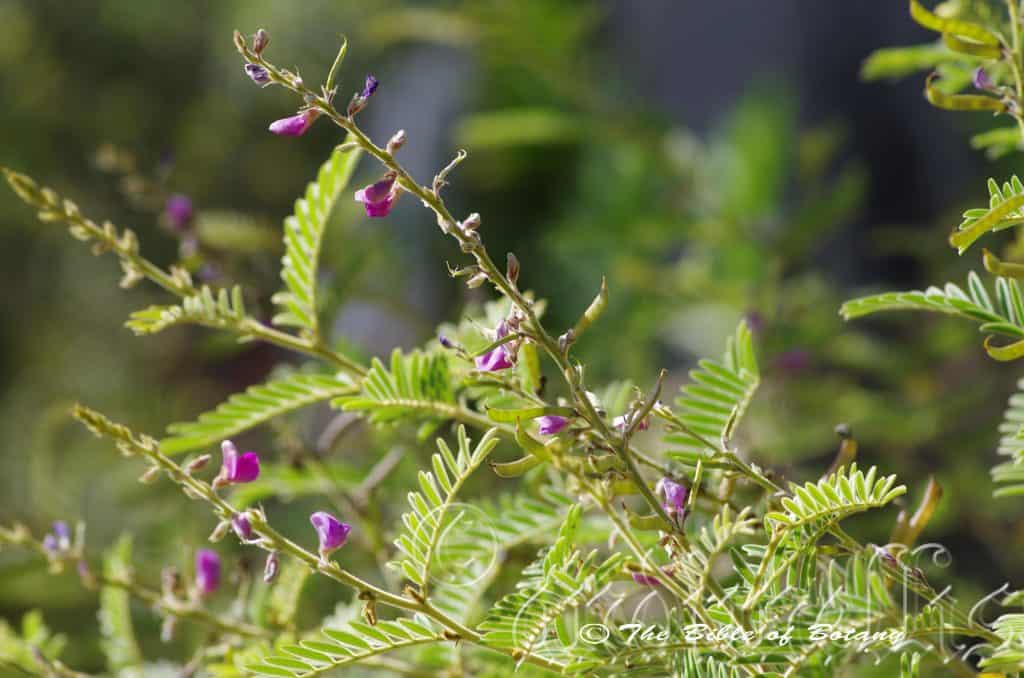
Anderson Botanic Gardens Townsville Qld.
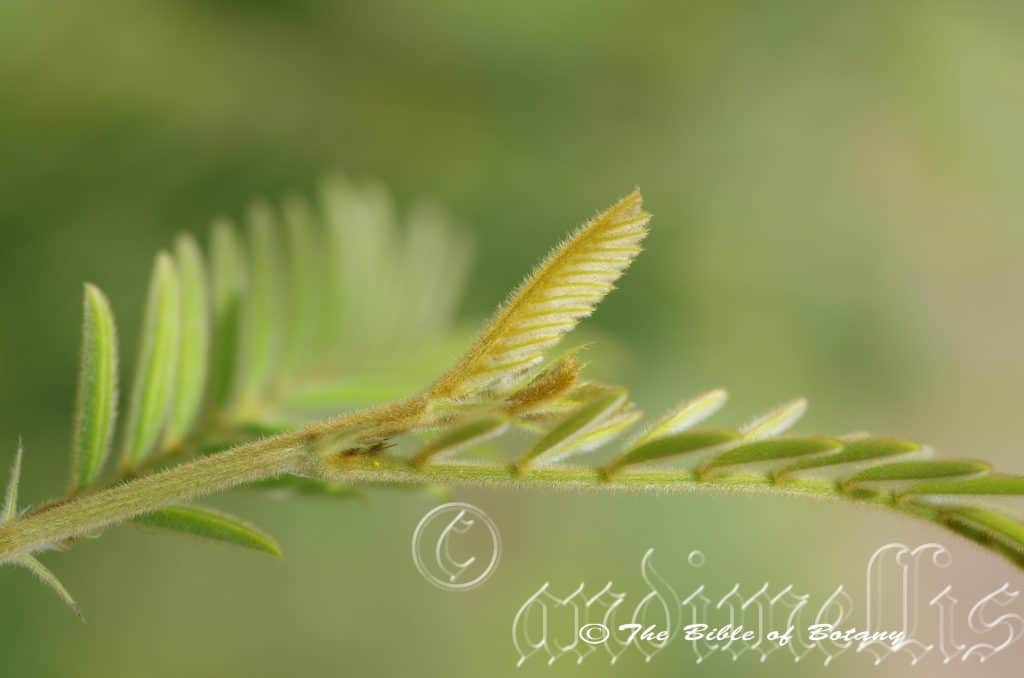
Anderson Botanic Gardens Townsville Qld.
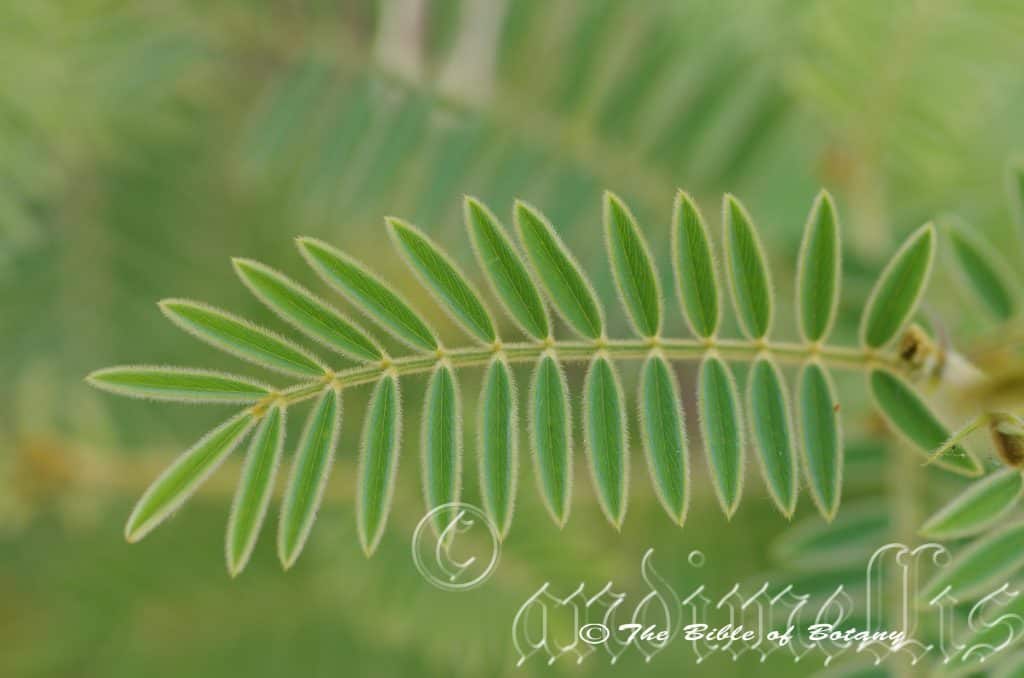
Anderson Botanic Gardens Townsville Qld.
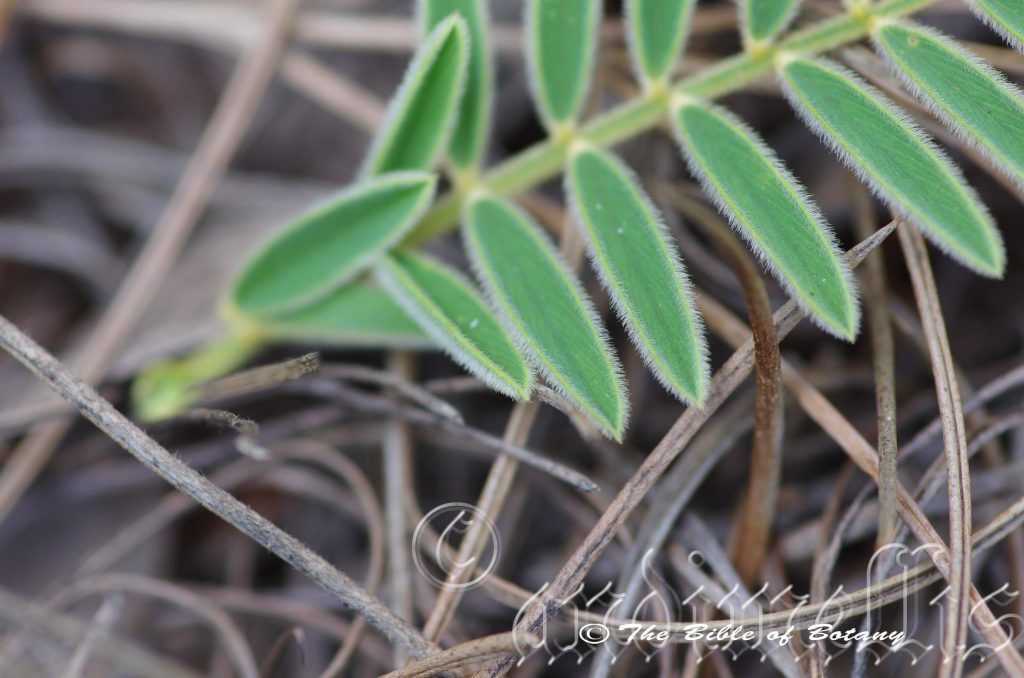
Anderson Botanic Gardens Townsville Qld.
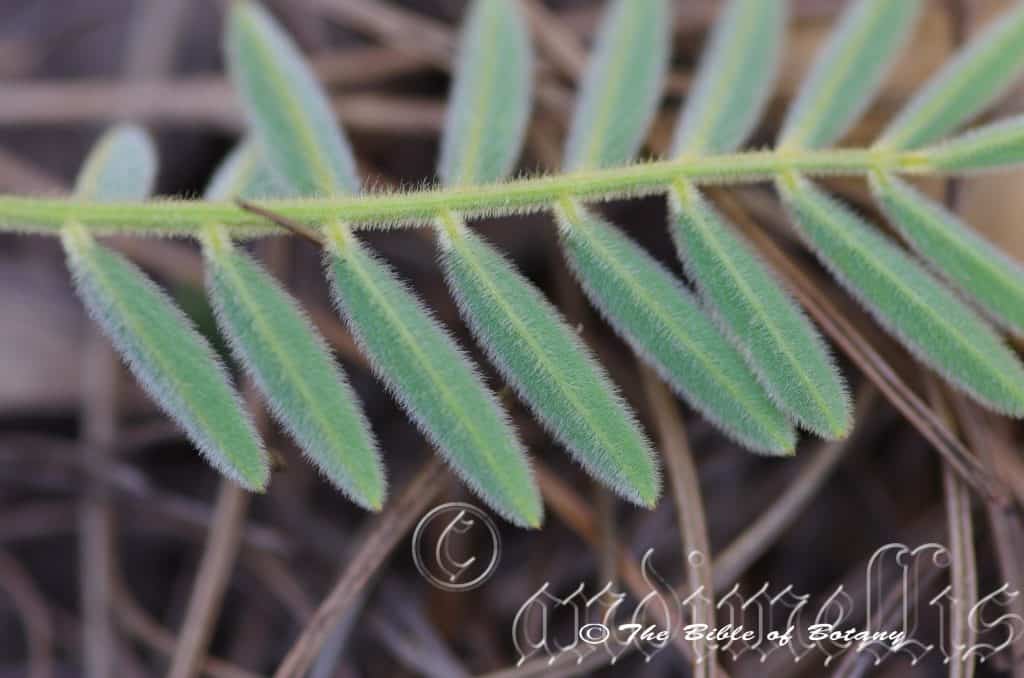
Anderson Botanic Gardens Townsville Qld.
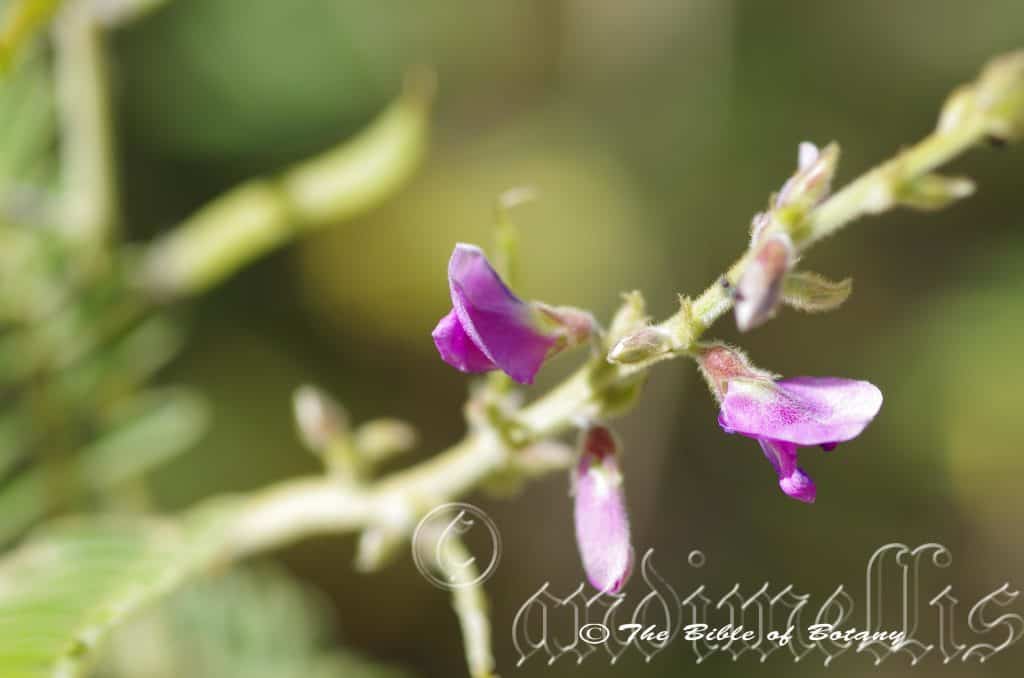
Anderson Botanic Gardens Townsville Qld.
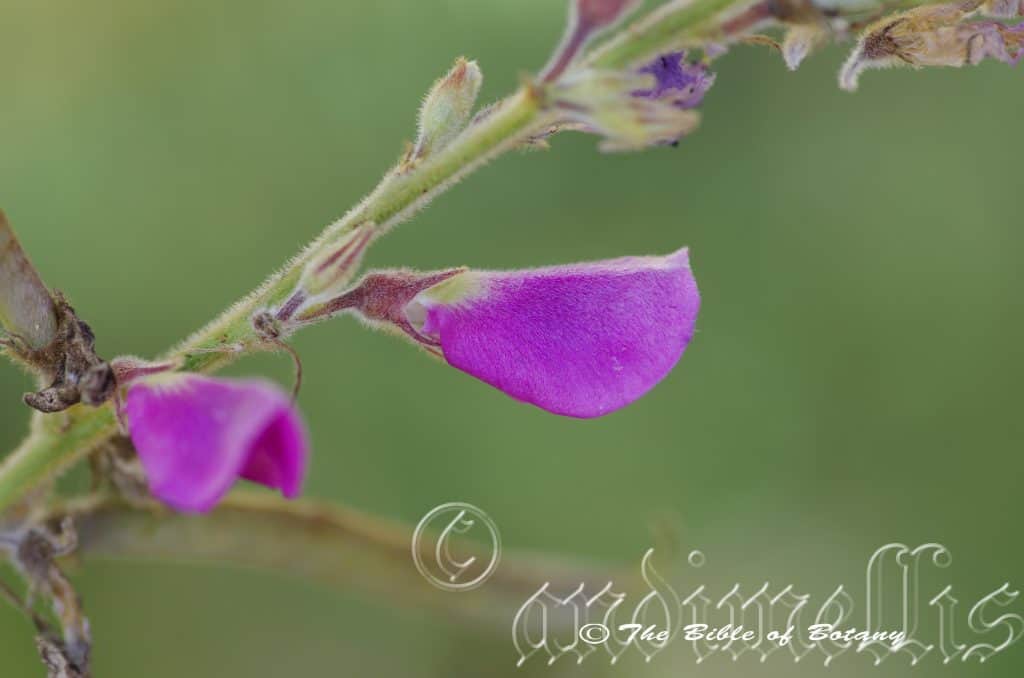
Anderson Botanic Gardens Townsville Qld.
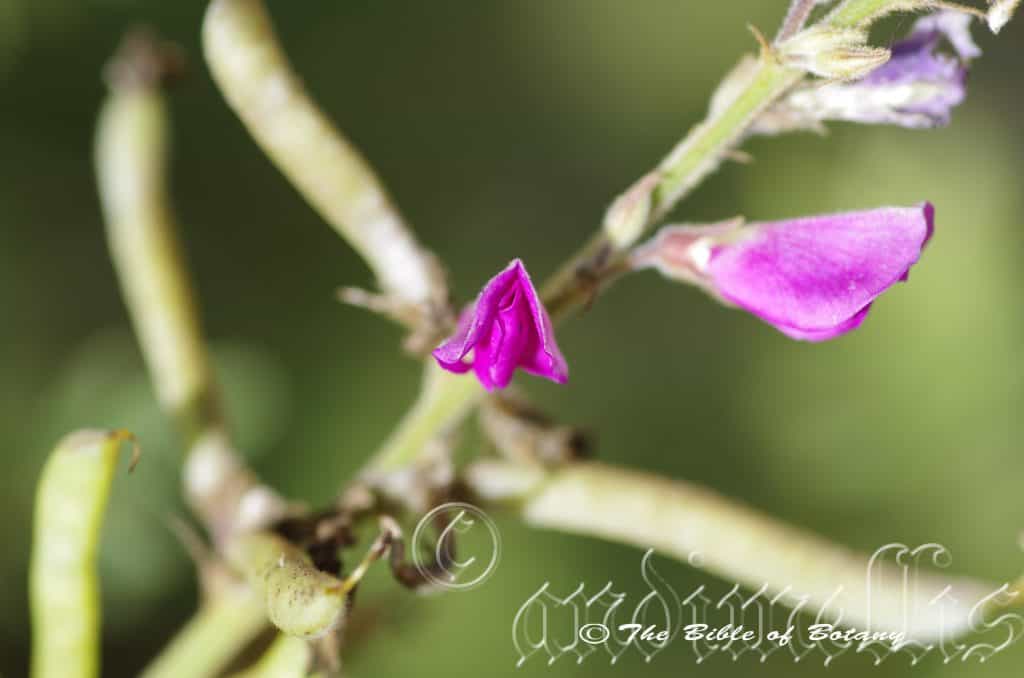
Anderson Botanic Gardens Townsville Qld.
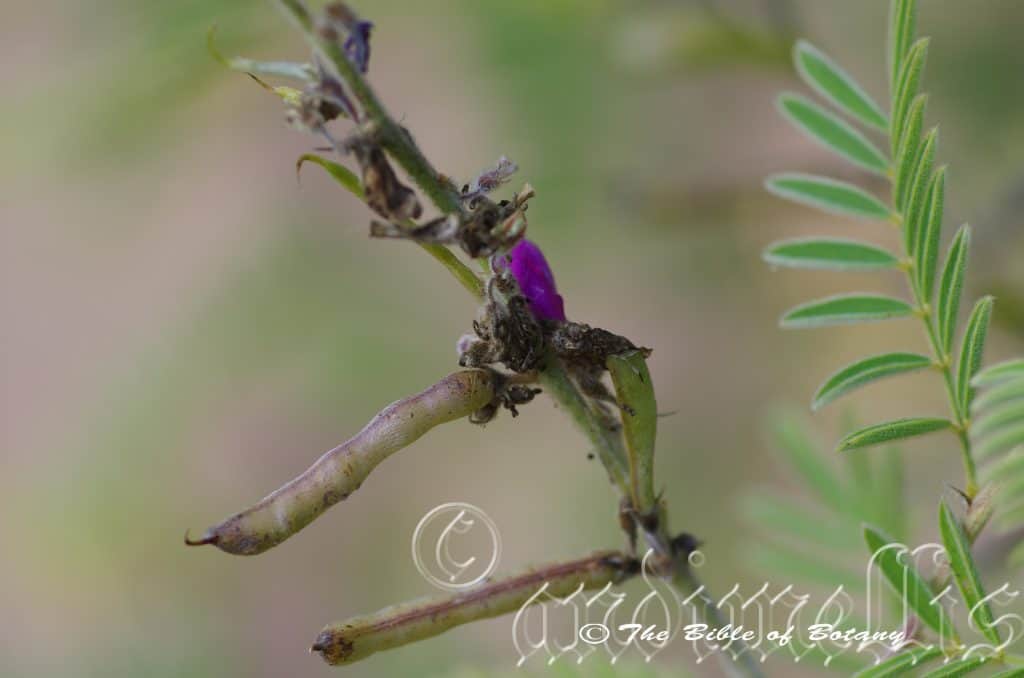
Anderson Botanic Gardens Townsville Qld.
Tephrosia gaudium-solis
Classification:
Unranked: Eudicots
Class: Rosids
Order: Fabales
Family: Fabaceae
Subfamily: Faboideae
Tribe: Millettieae
Genus: From Tephra, which is Ancient Greek for the ash from a volcanic eruption. It refers to leaves or phyllodes and their hairs, which are ash-grey in colour.
Species: From Gēthéō, which is Ancient Greek or later Gaudium, which is Latin for I take pleasure or to rejoice and Sōlum, which is Latin for alone, solitude, solitary or uninhabited. It refers to plants, which prefer growing in solitude. As a matter of interest Gaudium often coupled with solis is the start of all British diplomas and bachelor degree celebrations.
Common Name:
Distribution:
Tephrosia gaudium-solis distribution is widespread throughout arid areas of Australia. It is found between Exmouth Gulf in central west coast of Western Australia to Poole in far north western New South Wales, Yo Yo Creek, on the Morven-Augathella Road in south western Queensland, west of Townsville in central northern Queensland, Christies Corner in the upper Daley River catchment in the Northern Territory and to Nickol Bay in central west coast of Western Australia.
It is also found on Mornington Island in the Gulf of Carpentaria in far north Queensland and Monte Bello and Barrow Islands off the coasts central west coast of Western Australia.
https://avh.ala.org.au/occurrences/search?taxa=Tephrosia+gaudium-solis#tab_mapView
Habitat Aspect Climate:
Tephrosia gaudium-solis prefers dappled sun light to full sun. It grows in dry sclerophyll forests. The altitude ranges from 5 meters ASL to 650 meters ASL.
The temperatures probably range from 4 degrees in July to 42 degrees in January.
The rainfall ranges from lows of 300mm to 1600mm average per annum.
Soil Requirements:
Tephrosia gaudium-solis prefers sandy loams, light clays or gravelly screes. The soils are usually derived from decomposed sandstones, granites or meta-granites rocks. The soils pH probably ranges from 5pH to 6.5pH. It does not tolerate waterlogged soils. Non saline soils to moderately saline soils are tolerated as are salt laden winds.
Height & Spread:
Wild Plants: 1m to 1.5m by 1m to 1.5m.
Characteristics:
Tephrosia gaudium-solis grows as an open, sub shrub with ascending stems. The lime-green stems are moderately covered in golden brown hirsute hairs. The new growth and smaller stems are mid lime-green to grass-green and moderately to densely covered in 4 longitudinal rows of long, golden to golden-brown, appressed or semi appressed hirsute to velutinous hairs and erect hirsute to velutinous hairs.
The alternate oblong in outline leaves measure 65mm to 90mm in length. The odd pinnate leaves have 16 to 23 individual opposite leaflets. The petioles and rachis are moderately to densely covered in 4 longitudinal rows of long, golden-brown, appressed or semi appressed hirsute to velutinous hairs and erect hirsute to velutinous hairs while the petiolules are densely covered in golden to golden-brown velutinous hairs. The petiole measures 6mm to 12mm in length while the rachis measures 60mm to 75mm in length and the lateral petiolules measure 1mm to 1.5mm in length and the terminal petiolule measures 2mm to 3.5mm in length. The narrow lanceolate to narrow triangular stipules are moderately to densely covered in golden to golden-brown velutinous hairs and measure 5mm to 7mm in length.
The oblong leaflets measure 17mm to 22mm in length by 5mm to 7mm in width. The bases are rounded while the apexes are acute. The concolourous laminas are mid blue-green to mid lime-green, dull and glabrous on the upper laminas while the lower laminas are moderately to densely covered in golden, golden-brown or white appressed velutinous hairs. The laminas are straight and recurve upwards from the midvein to the margins. The margins are entire and densely covered in long, golden to white ciliate hairs. The obtuse mid vein is strongly prominent on the lower laminas while the 22 to 25 yellowish-green lateral veins are slightly prominent on the upper laminas and are set at 55 to 60 degrees from the mid vein. They extend to the slightly thickened yellowish-green margin.
The inflorescences are short racemes born from the terminals. There are 2 to 6 individual flowers on a raceme. The lime-green peduncles, racemes and pedicles are moderately to densely covered in golden, golden-brown or white velutinous hairs. The peduncles measure 20mm to 24mm in length while the rachises measure 180mm to 220mm in length and the individual petioles measure 3mm to 4mm in length.
The mid lime-green to mid blue-green calyxes and calyx lobes are tinged purple to reddish-purple, are moderately to densely covered in golden, golden-brown or white velutinous hairs externally and are glabrous internally. The cupuliform calyxes measure 3.5mm to 4mm in length while the 5 linear lobes measure 3.5mm to 4mm in length. The purple to carmine-purple corolla measures 14mm to 16mm in length.
The broad spathulate to ovate standard is purple to carmine-purple and is moderately covered in white pilose hairs externally and is sparsely to moderately covered in white pilose hairs internally. The standard measures 14mm to 16mm in height by 14mm to 16mm in width.
The pleated, ovate wing petals encircle the keel petals. The purple to carmine-purple wings measure 14mm to 16mm in length by 7mm to 8mm in width.
The pleated, ovate keel petals encircle the keel petals. The pale yellowish-green based keels are purple to carmine-purple on the apical half and are sparsely covered in soft, white puberulent hairs externally and glabrous internally. The keels measure 7mm to 8mm in length by 6mm to 7mm in width. The flowers photographed were taken in late July though they had been flowering for at least a month and had racemes in the developing stage. The flowers appear from February to April however odd flowers appear throughout the year which is influenced by rainfall.
The 10 stamen’s filaments are fused to form a tube with an opening slit down one side. The dimorphic stamens alternate with one long and one short.
The ovary is sparsely to moderately covered in white hirtellus hairs. There are 5 to 7 ovules in an ovary.
Tephrosia gaudium-solis’s fruits are linear cylindrical pods. The pods measure 40mm to 44mm in length by 2mm to 3mm in diameter. The green pods turn fawnish-grey and are moderately covered in white to appressed velutinous hairs externally. The styles are persistent on the ripe fruit. It is slightly compressed between the seeds and have a strong groove on the upper surface where they dehisce. The 5 to 7 brown seeds are flattened and ellipsoidal.
Wildlife:
Tephrosia gaudium-solis‘s wildlife is unknown to the author.
Cultivation:
Tephrosia gaudium-solis is a beautiful small shrub that can be grown in semi-arid and arid gardens on sandy type soils. In cultivation it grows from 1 meter to 1.5 meters in height by 1 meter to 1.5 meters in diameter when grown in the open. The plants in the Anderson Botanic gardens in Townsville were flowering superbly in early August when I was there. The curator informed me that it regularly flowers throughout the year in cultivation.
It grows well on lighter soils where deep leaf litter keeps the soil cool and moisture at an even level. Remember the plant dislike wet soils and the drainage must be excellent so all excess water drains quickly.
It does best pruned in the early stages or mass planted to give a bushier affect. Imagine a a sunny corner in the garden with mass planted. Mass plantings are best achieved by planting them at 0.8 meters to 1 meter centers.
Add to the above, if is given a little native fish emulsion or seaweed fertilizer is added on planting out the plants may respond with outstanding flowering and may even set copious quantities of seed for the following season.
Propagation:
Seeds: The seeds of Tephrosia gaudium-solis can be removed easily from the pods. Treat the seeds by placing them into a container of hot water not boiling and allow the seeds to soak for 6 to 8 hours. The seeds that have not swollen repeat the exercise again.
Sow freshly treated seeds directly but sparingly onto a seed raising mix. Just cover them and keep them moist not wet. Do not over water as the seeds are susceptible to various fungi and will damp off before germination takes place. Place the trays in a warm sunny area protected from winds but where the air flow is constant. When the seedlings are 20mm to 25mm tall, prick them out and plant them into 50mm native tubes using a good well drained organic mix.
As the seedlings roots reach the bottom of the tubes plant them out into their permanent position. Do not delay. Alternatively seeds can be planted directly into peat jiffy pots. When the roots appear through the pots plant them out into their permanent positions and water in well with our recommended fertilizer.
Fertilize using seaweed, fish emulsion or organic chicken pellets soaked in water on an alternate basis. Fertilize every two months until the plants are established then annually in early September to October to maintain better colour, health, vitality and flowering.
Further Comments from Readers:
“Hi reader, it seems you use The Bible of Botany a lot. That’s great as we have great pleasure in bringing it to you! It’s a little awkward for us to ask, but our first aim is to purchase land approximately 1,600 hectares to link several parcels of N.P. into one at The Pinnacles NSW Australia, but we need your help. We’re not salespeople. We’re amateur botanists who have dedicated over 30 years to saving the environment in a practical way. We depend on donations to reach our goal. If you donate just $5, the price of your coffee this Sunday, We can help to keep the planet alive in a real way and continue to bring you regular updates and features on Australian plants all in one Botanical Bible. Any support is greatly appreciated. Thank you.”
In the spirit of reconciliation we acknowledge the Bundjalung, Gumbaynggirr and Yaegl and all aboriginal nations throughout Australia and their connections to land, sea and community. We pay our respect to their Elders past, present and future for the pleasures we have gained.
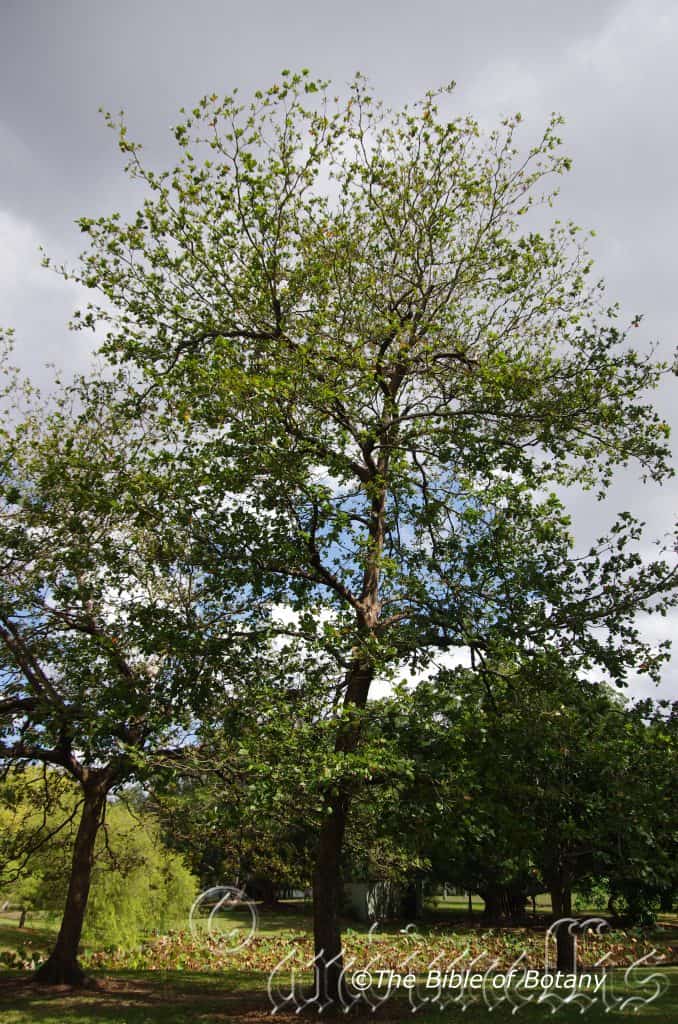
Anderson Botanic Gardens Townsville Qld.
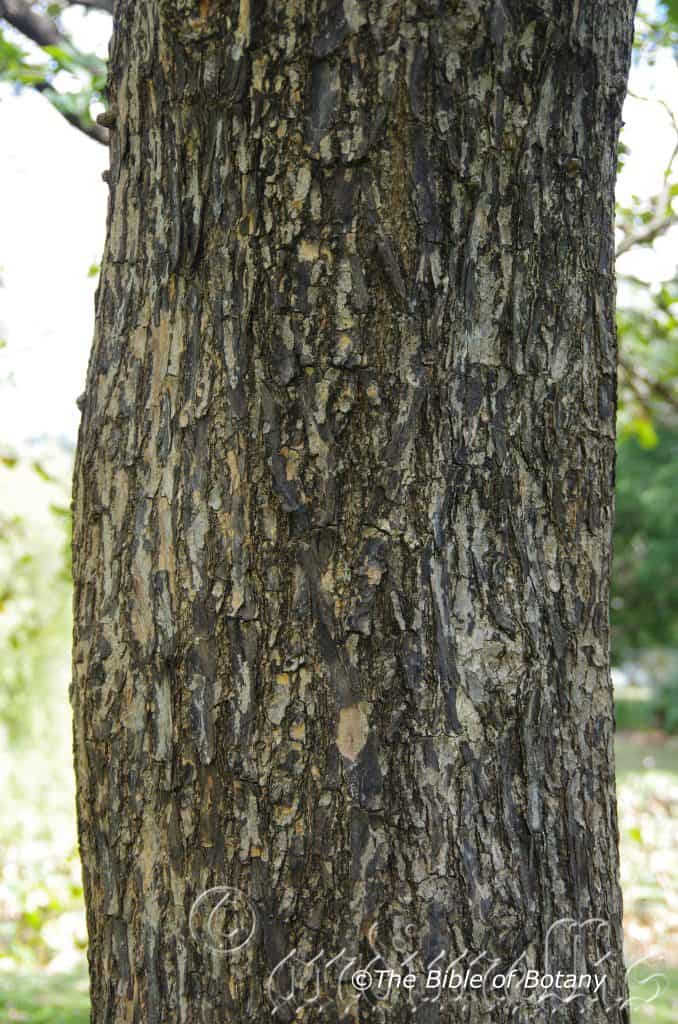
Anderson Botanic Gardens Townsville Qld.
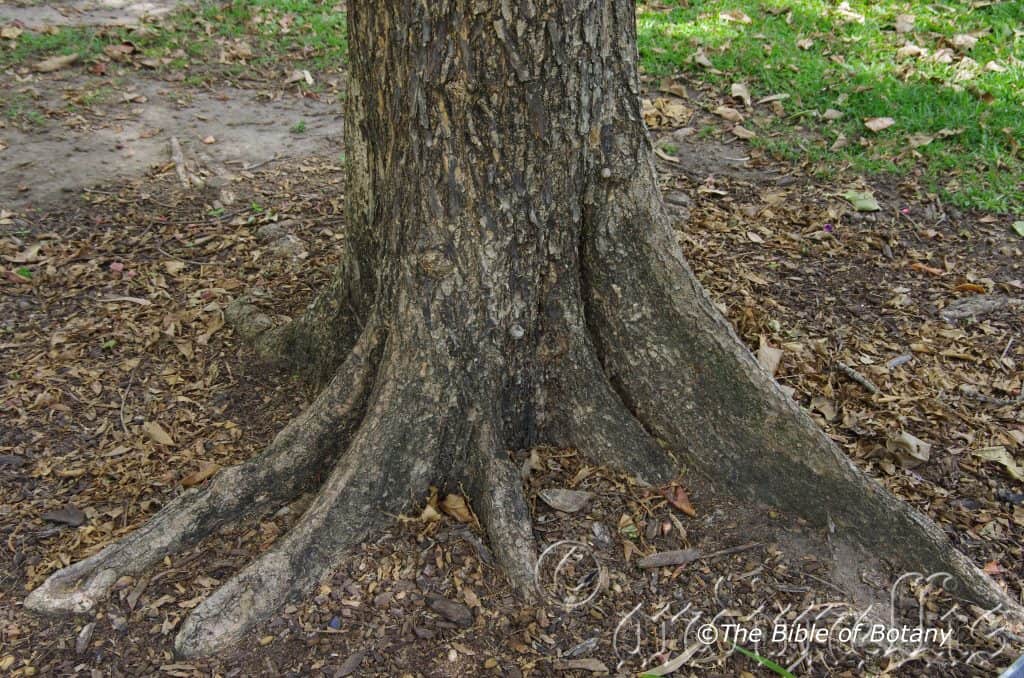
Anderson Botanic Gardens Townsville Qld.
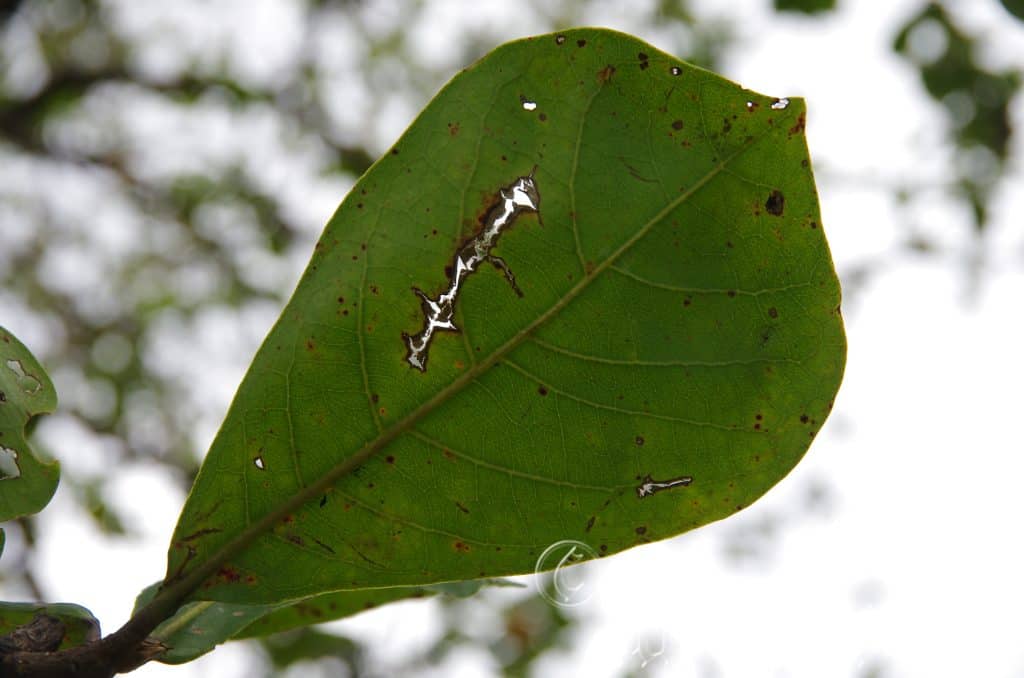
Anderson Botanic Gardens Townsville Qld.
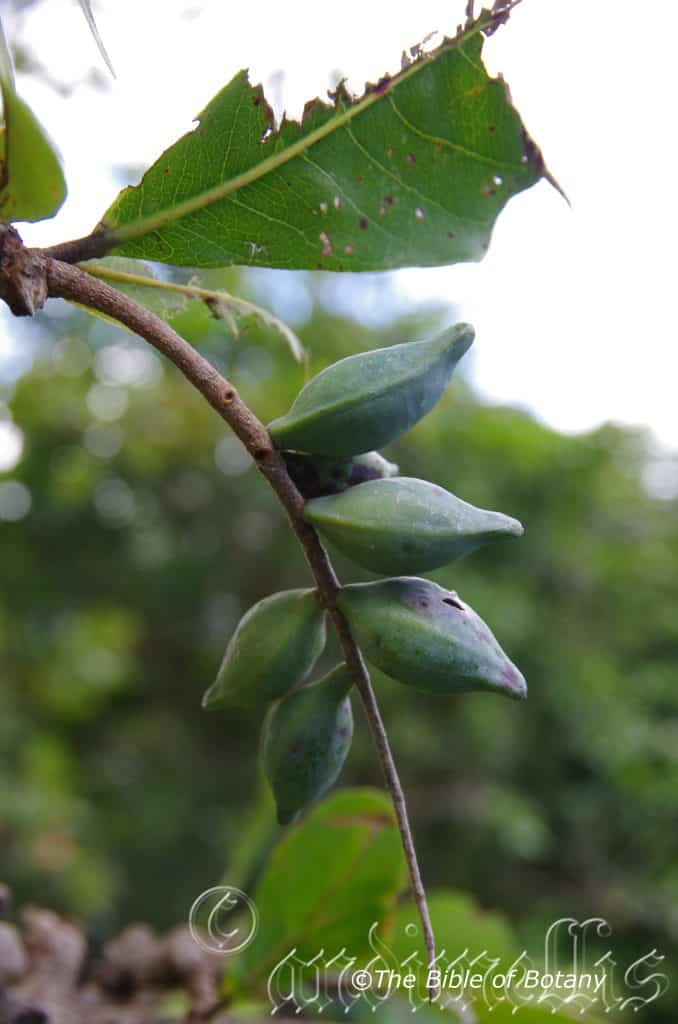
Anderson Botanic Gardens Townsville Qld.
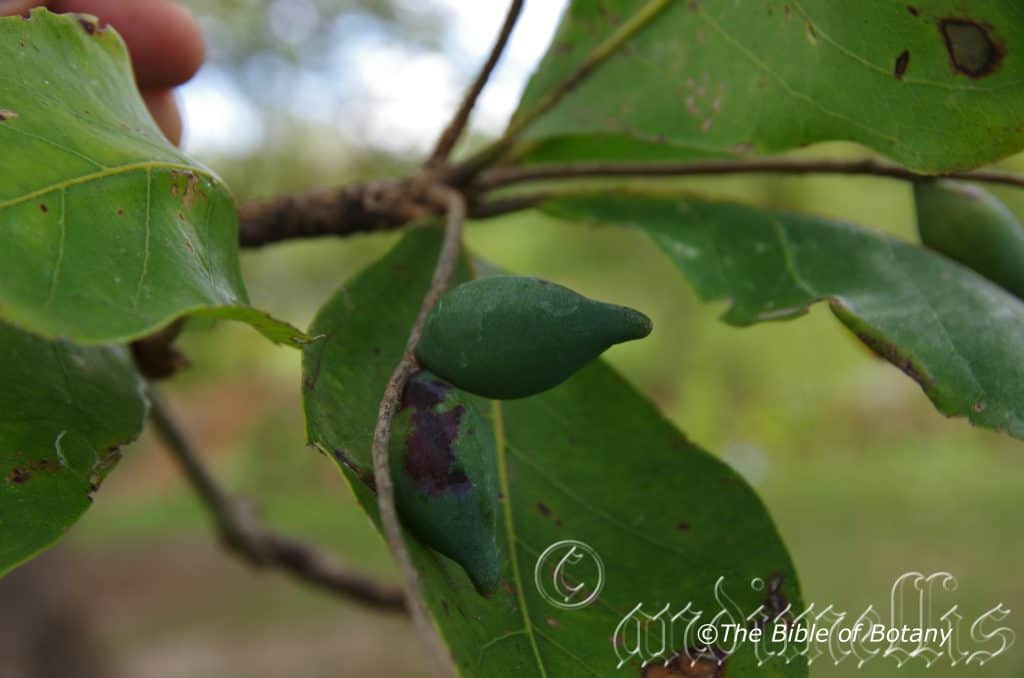
Anderson Botanic Gardens Townsville Qld.
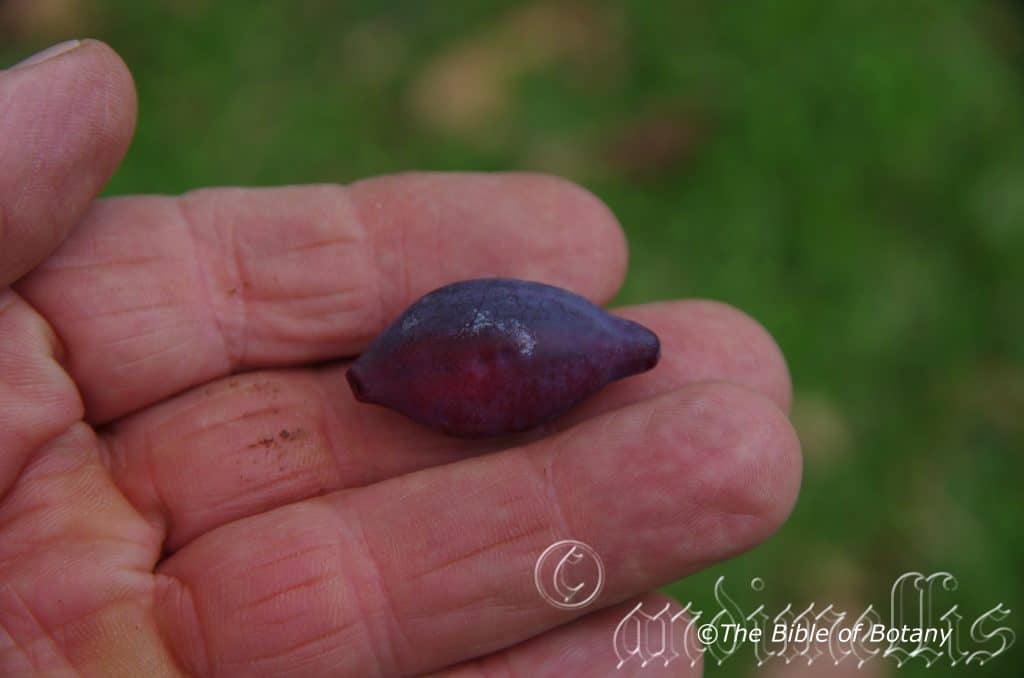
Anderson Botanic Gardens Townsville Qld.
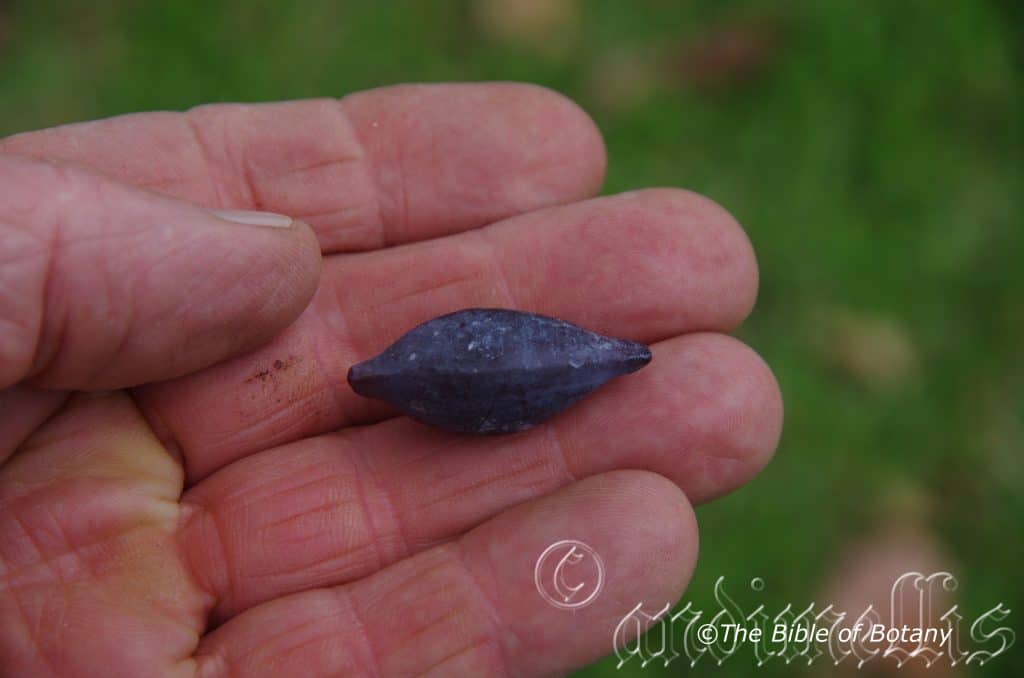
Anderson Botanic Gardens Townsville Qld.
Terminalia arenicola
Classification:
Unranked: Eudicots
Class: Rosids
Order: Myrtales
Family: Combretaceae
Genus: From Terminus, which is Latin for the end or the limit of. It refers to flowers, being positioned at the end of the stems.
Species: From Arena, which is Latin for sand and Kola, which is Ancient Greek or Cola, which is Latin for to dwell or reside at. It refers to plants, which prefer sandy flat, habitats.
Common Name: Beach Almond or Brown Damson
Distribution:
Terminalia arenicola is found south from Cape Melville National Park to Caloundra in coastal Queensland. It is also found on the tip of Cape York Peninsula and the Torres Strait Islands.
https://avh.ala.org.au/occurrences/search?taxa=Terminalia+arenicola#tab_mapView
Habitat Aspect Climate:
Terminalia arenicola prefers full sun to glaring reflected light off the ocean. It grows frontal dunes, estuaries and littoral rainforests close to the coast. The altitude ranges from 1 meter ASL to 11 meters ASL.
The temperatures range from 10 degrees in July to 37 degrees in January.
The rainfall ranges from lows of 800mm to 3200mm average per annum.
Soil Requirements:
Terminalia arenicola prefer white course sands to white sandy loams. The soils are derived from accumulated beach sands and accumulated corals sands. The soils pH ranges from 6.5pH to 8pH. It does not tolerate waterlogged soils however soil moisture is assured through capillary action. Non saline soils to extremely saline soils are tolerated.
Height & Spread:
Wild Plants: 8m to 10m by 8m to 10m.
Characteristics:
Terminalia arenicola grows as a small tree with a short, straight, grey, scabrous, very scaly and flaky bark on the trunk. The branches are pale grey and only becoming green near the apex where the newer leaf growth occurs. The branchlets are sparsely covered in white appressed pubescent hairs. The trees are deciduous towards the end of the dry season.
The crowded, broadly ovate to obdeltoid leaves of Terminalia arenicola measure 100mm to 200mm in length by 60mm to 140mm in width. The petiole measures 4mm to 15mm in length. The variable bases are cuneate to rounded and symmetrical or very slightly oblique while the variable apexes are acuminate, obtuse or truncate. The discolourous laminas are deep sea-green, semi glossy to glossy and glabrous on the upper lamina while the lower laminas are almost glaucous with a few scattered, fawn, appressed, pulverulent hairs along the veins. The leaf margins are entire while the laminas are slightly recurve towards the apex. Foveola have a tuft of fawn hairs surrounding the orifice. The mid vein is strongly prominent while the main laterals are slightly prominent on both laminas and are yellow.
Inflorescences of Terminalia arenicola are born along a raceme from the terminals. The pale yellow-green peduncles, rachises and cream pedicels are glabrous to sparsely to moderately covered in fawn appressed pubescent hairs. The peduncles measure 25mm to 36mm in length while the rachises measure 55mm to 80mm in length while the pedicels measure 4mm to 6.5mm in length.
The individual inflorescences measure 6mm to 7mm in diameter. There are 45 to 80 individual flowers on a raceme. The narrowly triangular, caducous bracts measure 1mm to 1.4mm in length. The pale green, calyx and deltoid calyx lobes are glabrous or very sparsely covered in white appressed puberulent to pilose hairs. The calyxes measure 0.5mm to 1mm in length while the lobes measure 2.5mm in length by 2mm in width. The corollas and corolla lobes are pale cream to pale creamy green and are sparsely covered in fawn appressed puberulent hairs. The lobes measure 2mm to 3mm in length. The inner corolla and disc are densely covered in fawn villous hairs which completely surround the base of the style and filaments.
The 10 exserted filaments are free for their entire length and measure 2mm in length. The filaments are cream at the base and white near the fawn anthers.
The white style and stigma are glabrous while the ovary is pale green. The pistil measures 2mm to 2.2mm in length. Terminalia arenicola rancid smelling flowers appear throughout the year.
The succulent fruits of Terminalia arenicola are beaked obovoid drupes. The drupes are glabrous with or without faint longitudinal ridges and measure 25mm to 40mm in length by 17mm to 25mm in width and 14mm to 18mm in depth. The green drupes turn deep red to purple-black externally and burgundy-red internally when ripe. The calyx lobes are not persistent on the ripe fruit. The single semi-glossy brown seeds are ellipsoidal, dry fleshy nuts which are rounded at the base and taper towards the apex. The seeds measure 10mm to 14mm in length by 6mm to 8mm in diameter.
Wildlife:
Terminalia arenicola support many native insects when in flower while the fallen fruits are usually somewhat infested with Queensland fruit fly.
The common oak blue butterfly Hypochrysops narcissus, the Copper jewel Hypochrysops apelles, the Emperor moth Syntherata janetta, the Brown awl butterfly Badamia exclamationis, the Dull oak blue butterfly Ophiusa coronata all feed on the leaves of Terminalia arenicola.
The fruits are also eaten by the grey headed flying fox Pteropus poliocephalus and red headed flying foxes Pteropus scapulatus, cassowaries Casuarius casuarius and larger fruitigrove birds. Large caches of nuts have been observed under and near the trees suggesting native rats store and consume the nuts.
The fruit’s flesh is reasonably thick and has a slightly acidic plum taste while the seeds despite being difficult to extract apparently are reminiscent of the exotic almond in flavour.
Cultivation:
Terminalia arenicola is a magnificent medium tree that should be grown in association with other littoral rainforest specie on very sandy sites. I would recommend the trees for planting in semi-arid areas below septic sullage trenches for shade and cooling. It excels at the edge of a littoral forest or deep in the center of the forest on deep sandy soils. It also makes a terrific park tree offering quick growth, and excellent shade provided the soils are sandy or sandy loams with a little additional moisture and an annual application of our recommended fertilizer. It is susceptible to being blown over when grown on heavier soils in cultivation especially when it is grown as a specimen tree in a park like situation with strong nitrogenous fertilizers where it becomes top heavy.
In cultivation it grows from 8 meters to 10 meters in height by 5 meters to 6 meters in diameter when grown in the open or taller and narrower if grown closer together as a forest tree.
It grows exceptionally well on lighter soils where deep leaf litter keeps the soil cool and moisture at an even level. If these requirements are met it can cope with temperatures as low as 5 degrees and up to 36 degrees. It is moderately drought resistant once established but prefer even moisture in the soil at all times otherwise leaf drop will be evident.
This may well be a good tree for producing good quantities of edible fruits in the northern part of Australia where rainfalls are over 500mm a year and the soils are heavy grey or black clays.
To grow the trees as a commercial crop it should be looked at carefully if this specie or Terminalia canescens or a mixture of trees is the better option for your area and soil. Assuming a production output of 2.2 tons of fruit is returned a year per hectare then each tree needs to return 22 kilograms of fruit per tree planted at 10 by 8 meter centers. Commercial exotic Almond orchards in South Australia are returning 2.85 tons per hectare. The native trees would have to return 6,000 nuts at the same price to be commercially viable on a large scale. It appears that; from looking at wild trees, that the trees would probably produce less than this so a premium price would be needed to make them productive. Weighted in favour of this is that the land input would be far cheaper and running costs would be cheaper than with the exotic Prunus almond. It would be assumed that a niche market would deliver at least an equivalent price or better meaning far fewer nuts would need to be produced to make the orchard sustainable.
The equivalent of around 1.5 to 1.8 kilograms of pure nitrogen would be required for mature producing trees. This is easily managed through cover crops or with the addition of good quality blood and bone in the early years. Nuts contain Zinc, so zinc would also need to be monitored but this can easily be added through good composts containing seaweed extracts or spraying seaweed extracts directly onto your cover crops between the rows or onto the foliage of the trees at the beginning of the growing season. Sea weed fertilizers are excellent soil conditioners which will deliver better fruit set and better fruit quality as potassium is an essential ingredient of good quality nuts. I used to fertilize my cover crops and never worried about my orchard trees after the initial years following planting. (Citrus) The trees are not related to the exotic almond however they do have similar shapes and the fruits apparently taste similar.
Propagation:
Seeds: The seeds of Terminalia arenicola can be removed easily from the fruits.
Sow fresh seeds directly into a seed raising mix, keeping them moist not wet. Do not over water as the seeds will rot off before germination takes place. Place the trays in a cool shaded area with 50mm shade cloth in the bush house. When the seedlings are 20mm to 25mm tall, prick them out and plant them into 50mm native tubes using a good organic mix.
As the seedlings roots reach the bottom of the tubes plant them out into their permanent position. Do not delay.
Fertilize using seaweed, fish emulsion or organic chicken pellets soaked in water on an alternate basis. Fertilize every two months until the plants are established then annually in early September to October to maintain better colour, health, vitality and flowering.
Further Comments from Readers:
“Hi reader, it seems you use The Bible of Botany a lot. That’s great as we have great pleasure in bringing it to you! It’s a little awkward for us to ask, but our first aim is to purchase land approximately 1,600 hectares to link several parcels of N.P. into one at The Pinnacles NSW Australia, but we need your help. We’re not salespeople. We’re amateur botanists who have dedicated over 30 years to saving the environment in a practical way. We depend on donations to reach our goal. If you donate just $5, the price of your coffee this Sunday, We can help to keep the planet alive in a real way and continue to bring you regular updates and features on Australian plants all in one Botanical Bible. Any support is greatly appreciated. Thank you.”
In the spirit of reconciliation we acknowledge the Bundjalung, Gumbaynggirr and Yaegl and all aboriginal nations throughout Australia and their connections to land, sea and community. We pay our respect to their Elders past, present and future for the pleasures we have gained.
Terminalia arostrata
Classification:
Unranked: Eudicots
Class: Rosids
Order: Myrtales
Family: Combretaceae
Genus: From Terminus, which is Latin for the end or the limit of. It refers to flowers, being positioned at the end of the stems.
Species: From A, which is Ancient Greek/Latin for without or not having and Rostratum, which is Latin for a small beak like appendage. It refers to leaves or fruits, which have a blunt rounded apex instead of a rostrate apex as is the norm with other species in the genus.
Common Name: Brown Damson.
Distribution:
Terminalia arostrata is found east from along the Ord River in far north western, Western Australia to the Daly River, the Gregory National Park and the Victoria River catchments in the north west of the Northern Territory, east to Else National Park and the Roper River.
It is also found in several disjunct populations from near Normanton to Cloncurry and on the Leichhardt River in far north western Queensland.
https://avh.ala.org.au/occurrences/search?taxa=Terminalia+arostrata#tab_mapView
Habitat Aspect Climate:
Terminalia arostrata prefers full sun. It grows in hot, dry, open plains and on alluvial flats. The altitude ranges from 2 meters ASL to 807 meters ASL.
The temperatures range from 10 degrees in July to 42 degrees in January.
The rainfall ranges from lows of 400mm to 1600mm average per annum.
Soil Requirements:
Terminalia arostrata prefers medium silts, heavy silts or gravelly silts. The silts are derived from brown basalts or black basalt. The soils pH ranges from 5pH to 6.5pH. It does not tolerate waterlogged soils however plants in riparian zones may be inundated for short periods during storms. Non saline soils to moderately saline soils are tolerated.
Height & Spread:
Wild Plants: 4m to 12m by 6m to 13m.
Characteristics:
Terminalia arostrata grows as a small tree with a straight, grey-brown, deeply furrowed and tessellated trunk. The pendulant branchlets are glabrous to covered in white pulverulent hairs. The trees are deciduous or semi deciduous towards the end of the dry season.
The semi crowded, narrowly elliptical to narrowly oblong leaves of Terminalia arostrata measure 30mm to 120mm in length by 15mm to 35mm in width. The bases are tapering to attenuate while the apexes are obtuse or retuse. The concolourous laminas are grass-green, semi glossy to dull and glabrous on the upper lamina while the lower lamina is paler. The leaf margins are entire while the laminas recurve strongly towards the apex. The mid vein and main laterals are slightly prominent on both laminas and are yellow. The petiole measures 10mm to 60mm in length.
The dioecious inflorescences of Terminalia arostrata are born along a raceme from the terminals. The pale yellow-green peduncles, rachises and cream pedicels are glabrous to sparsely covered in fawn appressed puberulent hairs. The peduncles measure 25mm to 36mm in length while the rachises measure 55mm to 80mm in length while the pedicels measure 4mm to 6.5mm in length.
The individual inflorescences measure 3mm to 8mm in length by 5mm to 6mm in diameter in the male flowers and 4.5mm to 5.5mm in length by 6mm to 7mm in diameter in the female flowers. There are 30 to 60 individual flowers on a raceme. The narrowly triangular, caducous bracts measure 1mm to 1.2mm in length. The pale green, calyx and deltoid calyx lobes are glabrous or very sparsely covered in white appressed puberulent to pilose hairs. The calyxes measure 0.5mm to 1mm in length while the lobes measure 2mm in length by 2mm in width. The corollas and corolla lobes are pale cream to pale creamy green and are glabrous. The lobes measure 2mm to 3mm in length. The inner corolla and disc are densely covered in fawn villous hairs which completely surround the base of the style and filaments.
The 10 exserted filaments are free for their entire length and measure 3mm to 3.2mm in length. The filaments are cream at the base and white near the cream anthers.
The white style and stigma are glabrous while the ovary is pale green. The pistil measures 2.8mm to 3mm in length. Terminalia arostrata flowers appear in July or October to November.
The succulent fruits of Terminalia arostrata are poorly beaked globular drupes. The drupes are glabrous with 2 to 7 faint longitudinal ridges and measure 25mm to 35mm in length by 17mm to 25mm in width and 14mm to 18mm in depth. The green drupes turn deep purple to black externally and burgundy-red internally when ripe. The calyx lobes are not persistent on the ripe fruit. The single semi-glossy brown seeds are ellipsoidal, dry fleshy nuts which are rounded at the base and taper towards the apex. The seeds measure 8mm to 12mm in length by 6mm to 8mm in diameter.
Wildlife:
Terminalia arostrata‘s support many native insects and native bees when in flower while the fallen fruits are usually infested with Queensland fruit fly.
The common oak blue butterfly Hypochrysops narcissus, Copper jewel Hypochrysops apelles, Emperor moth Syntherata janetta, Brown awl Badamia exclamationis, and the Dull oak blue Ophiusa coronata, all feed on the leaves of Terminalia arostrata.
The fruits are also eaten by the little red headed flying foxes Pteropus scapulatus, larger fruit grove birds and native rats.
I have not had the opportunity to eat the fruit or nuts however the fruit’s flesh is reasonably thick and apparently has a slightly acidic plum taste while the seeds are less difficult to extract than other species in the genus and are reminiscent of peanuts in flavour.
Cultivation:
Terminalia arostrata is a magnificent small shrub that should be grown in association with other semi-arid gardens. It maybe suitable for planting in semi-arid areas below septic sullage trenches for shade and cooling. It is ideal at the edge of a forest or deep in the center of the forest on the western slopes. It also makes a terrific park tree offering quick growth, and excellent shade provided the soils are sandy to sandy loams. The tree is susceptible to being blown over when grown quickly on heavier soils in cultivation especially when it is grown as specimen trees in a park like situation.
In cultivation it will grow from 8 meters to 10 meters in height by 8 meters to 10 meters in diameter when grown in the open or taller and narrower if grown closer together as a forest tree.
It grows exceptionally well on lighter soils where deep leaf litter keeps the soil cool and moisture at an even level. If these requirements are met it can cope with temperatures as low as 5 degrees and up to 36 degrees. It is moderately drought resistant once established but prefer even moisture in the soil at all times otherwise leaf drop will be evident.
Add to the above, if it is given an adequate supply of water and a little native fertilizer on an annual basis the plants should respond with good flowering and fruit over a long period.
To grow the trees as a commercial crop it should be looked at carefully if this specie, Terminalia arostrata or a mixture of Terminalia species is the better option for your area and soil. Assuming a production output of 2.2 tonnes of meat is returned a year per hectare then each tree needs to return 22 kilograms of meat per tree planted at 10 by 10 meter centers. Commercial exotic Almond orchards in South Australia are returning 2.85 tonnes per hectare. The native tree would have to return 6,000 nuts at the same price to be commercially viable on a large scale. It would be assumed that a niche market would deliver at least an equivalent price or better meaning far fewer nuts would need to be produced initially. Looking at wild trees it would be difficult to see it producing this quantity however cheaper land prices in arid areas may well offset the costs of planting more trees.
The equivalent of around 1.5 to 1.8 kilograms of pure nitrogen would be required for mature producing trees. This is easily managed through cover crops or with the addition of good quality blood and bone in the early years. Nuts contain Zinc, so zinc would also need to be monitored but this can easily be added through good composts containing seaweed extracts or spraying seaweed extracts directly onto your cover crops between the rows or onto the foliage of the trees at the beginning of the growing season. Seaweed fertilizers are excellent soil conditioners which will deliver better fruit set and better fruit quality as potassium is an essential ingredient of good quality nuts. I used to fertilize my cover crops and never worried about my orchard trees after the initial years following planting. (Citrus) The trees are not related to the exotic almond however they do have similar shapes and the fruits taste similar.
Propagation:
Seeds: The seeds of Terminalia arostrata can be removed easily from the fruits.
Sow fresh seeds directly into a seed raising mix, keeping them moist not wet. Do not over water as the seeds will rot off before germination takes place. Place the trays in a cool shaded area with 50mm shade cloth in the bush house. When the seedlings are 20mm to 25mm tall, prick them out and plant them into 50mm native tubes using a good organic mix.
As the seedlings roots reach the bottom of the tubes plant them out into their permanent position. Do not delay.
Fertilize using seaweed, fish emulsion or organic chicken pellets soaked in water on an alternate basis. Fertilize every two months until the plants are established then annually in early September to October to maintain better colour, health, vitality and flowering.
Further Comments from Readers:
“Hi reader, it seems you use The Bible of Botany a lot. That’s great as we have great pleasure in bringing it to you! It’s a little awkward for us to ask, but our first aim is to purchase land approximately 1,600 hectares to link several parcels of N.P. into one at The Pinnacles NSW Australia, but we need your help. We’re not salespeople. We’re amateur botanists who have dedicated over 30 years to saving the environment in a practical way. We depend on donations to reach our goal. If you donate just $5, the price of your coffee this Sunday, We can help to keep the planet alive in a real way and continue to bring you regular updates and features on Australian plants all in one Botanical Bible. Any support is greatly appreciated. Thank you.”
In the spirit of reconciliation we acknowledge the Bundjalung, Gumbaynggirr and Yaegl and all aboriginal nations throughout Australia and their connections to land, sea and community. We pay our respect to their Elders past, present and future for the pleasures we have gained.
Terminalia catappa
Classification:
Unranked: Eudicots
Class: Rosids
Order: Myrtales
Family: Combretaceae
Genus: From Terminus, which is Latin for the end or the limit of. It refers to flowers, being positioned at the end of the stems.
Species: From Catappa, which is Latinized from the Malaysian word for the Indian almond tree and nut. It refers to trees and or fruits, which resemble the commercial almond.
Common Name: Beach Almond or Indian Almond.
Distribution:
Terminalia catappa is found from near Lake Peter John along the coast to Mingimbi in the In the Northern Territory.
In the east it is found in several disjunct populations south from the Torres Strait Islands and the tip of Cape York Peninsula to the Iron Range National Park then from Cooktown to Mackay and the Whitsunday Islands in coastal Queensland.
It is also found in Africa, east Asia, Cambodia, China, Indonesia, Malaysia, Myanmar, New Guinea, Papua and many of the Pacific Islands.
https://avh.ala.org.au/occurrences/search?taxa=Terminalia+catappa#tab_mapView
Habitat Aspect Climate:
Terminalia catappa prefers full sun to glaring reflected light off the ocean. It grows on hot, dry exposed frontal dunes, estuaries or littoral rainforests. The altitude ranges from 1 meter ASL to 25 meters ASL.
The temperatures range from 10 degrees in July to 37 degrees in January.
The rainfall ranges from lows of 800mm to 3200mm average per annum.
Soil Requirements:
Terminalia catappa usually prefers course white or yellow sands to fine white or yellowish sandy loams. The sands are usually derived from accumulated beach sands or accumulated corals sands. The soils pH ranges from 6.5pH to 7.5pH. It does not tolerate waterlogged soils however plants in riparian zones may be inundated for short periods during storms. Non saline soils to extremely saline soils are tolerated as are salt laden winds.
Height & Spread:
Wild Plants: 15m to 40m by 12m to 15m.
Characteristics:
Terminalia catappa grows as a small tree with short, fluted, grey-brown, scabrous buttress. The branches are pale grey-brown and only becoming green near the apex where the newer leaf growth occurs. The branchlets and buds are densely covered in brown hirsute hairs. The trees are deciduous towards the end of the dry season with the leaves turning bright red before dropping.
The crowded, broadly ovate to oblanceolate leaves of Terminalia catappa measure 160mm to 250mm in length by 100mm to 150mm in width. The bases are cuneate while the apexes are obtuse with an acuminate tip. The discolourous laminas are deep sea-green, semi glossy and glabrous on the upper lamina while the lower lamina is almost glaucous with a few scattered, fawn, appressed, pulverulent hairs along the veins. The leaf margins are entire and slightly undulating while the laminas are flat, slightly recurve or decurve from the midvein to the margins and are flat or slightly recurve or decurve towards the apex. Foveole have a tuft of brown hairs surrounding the orifice. The mid vein is strongly prominent while the main laterals are slightly prominent on both laminas, are yellow-green and form a loop inside the margins. The petiole measures 4mm to 10mm in length.
Inflorescences of Terminalia catappa are born along a raceme from the terminals. The pale yellow-green peduncles, rachises and cream pedicels are glabrous to sparsely covered in fawn appressed pulverulent hairs. The peduncles measure 25mm to 36mm in length while the rachises measure 55mm to 80mm in length while the pedicels measure 4mm to 6.5mm in length.
The individual inflorescences measure 6mm to 7mm in diameter. There are 45 to 80 individual flowers on a raceme. The bracts are acuminate, caducous and measure 0.5mm to 0.8mm in length. The pale green, calyx and deltoid calyx lobes are glabrous or very sparsely covered in brown or white appressed hirsute hairs. The calyxes measure 0.5mm to 1mm in length while the lobes measure 2.5mm in length by 2mm in width. The corollas and corolla lobes are pale white or cream and are sparsely covered in white or brown hirsute hairs externally. The lobes measure 1.5mm in length by 1.5mm in width. The inner corolla and disc are densely covered in white villous hairs which completely surround the base of the style and filaments.
The 10 exserted filaments are free for their entire length and form 2 distinct rings. The filaments measure 3mm to 3.2mm in length. The filaments are white while the anthers are white to cream.
The white style and stigma are glabrous while the ovary is pale green. The pistil measures 2mm to 2.2mm in length. Terminalia catappa’s flowers appear throughout the year.
The succulent fruits of Terminalia catappa are compressed ellipsoidal drupes. The drupes are glabrous with strong longitudinal ridge and measure 50mm to 80mm in length by 25mm to 50mm in width and 30mm to 35mm in depth. The green drupes turn deep yellow-red to orange-red to purple-black externally and burgundy-red internally when ripe. The calyx lobes are not persistent on the ripe fruit. The single semi-glossy brown seeds are ellipsoidal to oblong fleshy broadly cuneate at the base and rounded at the apex. The seeds measure 20mm to 28mm in length by 8mm to 12mm in diameter.
Wildlife:
Terminalia catappa‘s support many native insects and native bees when in flower while the fallen fruits are usually infested with Queensland fruit fly.
The common oak blue butterfly Hypochrysops narcissus, Copper jewel Hypochrysops apelles, Emperor moth Syntherata janetta, Brown awl Badamia exclamationis, and the Dull oak blue Ophiusa coronata, all feed on the leaves of Terminalia arostrata.
The fruits are also eaten by the grey headed flying fox Pteropus poliocephalus and red headed flying foxes Pteropus scapulatus, Cassowaries Casuarius casuarius, and larger fruitigrove birds. Large caches of nuts have been observed under and near the trees suggesting native rats store and consume the nuts.
Apparently the fruit’s outer flesh is reasonably thick, stringy and varies from being sweet to being slightly acidic taste while the seeds are easier to extract than in other species, extract apparently are reminiscent of the exotic almond in flavour.
Cultivation:
Terminalia catappa is a magnificent small tree that should be grown in association with other littoral rainforest specie on very sandy sites. I would recommend the trees for planting in semi-arid areas below septic sullage trenches for shade and cooling. It is ideal at the edge of a forest garden or as a specimen tree. It would also make a very good park tree offering quick growth, and excellent shade provided the soils are sandy to sandy loams. This tree may be susceptible to being blown over when grown on heavier soils in cultivation especially when it is grown as specimen trees in a park like situation.
In cultivation it will grow from 10 meters to 12 meters in height by 12 meters to 15 meters in diameter when grown in the open or taller and narrower if grown closer together as a forest tree.
It grows exceptionally well on lighter soils where deep leaf litter keeps the soil cool and moisture at an even level. If these requirements are met it can cope with temperatures as low as 5 degrees and up to 36 degrees. It is moderately drought resistant once established but prefer even moisture in the soil at all times otherwise leaf drop will be evident.
Add to the above, if it is given an adequate supply of water and a little native fertilizer on an annual basis the plants should respond with good flowering and fruit over a long period. Juvenile trees in horticultural gardens are responding excellently to organic fertilizers and practices indicating that commercial yields are very realistic compared to the exotic Almond.
To grow the trees as a commercial crop it should be looked at carefully if this specie, Terminalia catappa or a mixture of trees is the better option for your area and soil. Assuming a production output of 2.2 tons of meat is returned a year per hectare then each tree needs to return 22 kilograms of meat per tree planted at 10 by 10 meter centers. Commercial exotic Almond orchards in South Australia are returning 2.85 tons per hectare. The native trees would have to return 4,000 nuts at the same price to be commercially viable on a large scale. It would be assumed that a niche market would deliver at least an equivalent price or better meaning far fewer nuts would need to be produced. This tree may produce equivalent or better quantities of nuts as the exotic almond to which it is not related.
The equivalent of around 1.5 to 1.8 kilograms of pure nitrogen would be required for mature producing trees. This is easily managed through cover crops or with the addition of good quality blood and bone in the early years. Nuts contain Zinc, so zinc would also need to be monitored but this can easily be added through good composts containing seaweed extracts or spraying seaweed extracts directly onto your cover crops between the rows or onto the foliage of the trees at the beginning of the growing season. Sea weed fertilizers are excellent soil conditioners which will deliver better fruit set and better fruit quality as potassium is an essential ingredient of good quality nuts. I fertilized my cover crops and never worried about my orchard trees after the initial years following planting. (Citrus)
Propagation:
Seeds: The seeds of Terminalia catappa can be removed easily from the fruits.
Sow fresh seeds directly into a seed raising mix, keeping them moist not wet. Do not over water as the seeds will rot off before germination takes place. Place the trays in a cool shaded area with 50mm shade cloth in the bush house. When the seedlings are 20mm to 25mm tall, prick them out and plant them into 50mm native tubes using a good organic mix.
As the seedlings roots reach the bottom of the tubes plant them out into their permanent position. Do not delay.
Fertilize using seaweed, fish emulsion or organic chicken pellets soaked in water on an alternate basis. Fertilize every two months until the plants are established then annually in early September to October to maintain better colour, health, vitality and flowering.
Further Comments from Readers:
“Hi reader, it seems you use The Bible of Botany a lot. That’s great as we have great pleasure in bringing it to you! It’s a little awkward for us to ask, but our first aim is to purchase land approximately 1,600 hectares to link several parcels of N.P. into one at The Pinnacles NSW Australia, but we need your help. We’re not salespeople. We’re amateur botanists who have dedicated over 30 years to saving the environment in a practical way. We depend on donations to reach our goal. If you donate just $5, the price of your coffee this Sunday, We can help to keep the planet alive in a real way and continue to bring you regular updates and features on Australian plants all in one Botanical Bible. Any support is greatly appreciated. Thank you.”
In the spirit of reconciliation we acknowledge the Bundjalung, Gumbaynggirr and Yaegl and all aboriginal nations throughout Australia and their connections to land, sea and community. We pay our respect to their Elders past, present and future for the pleasures we have gained.
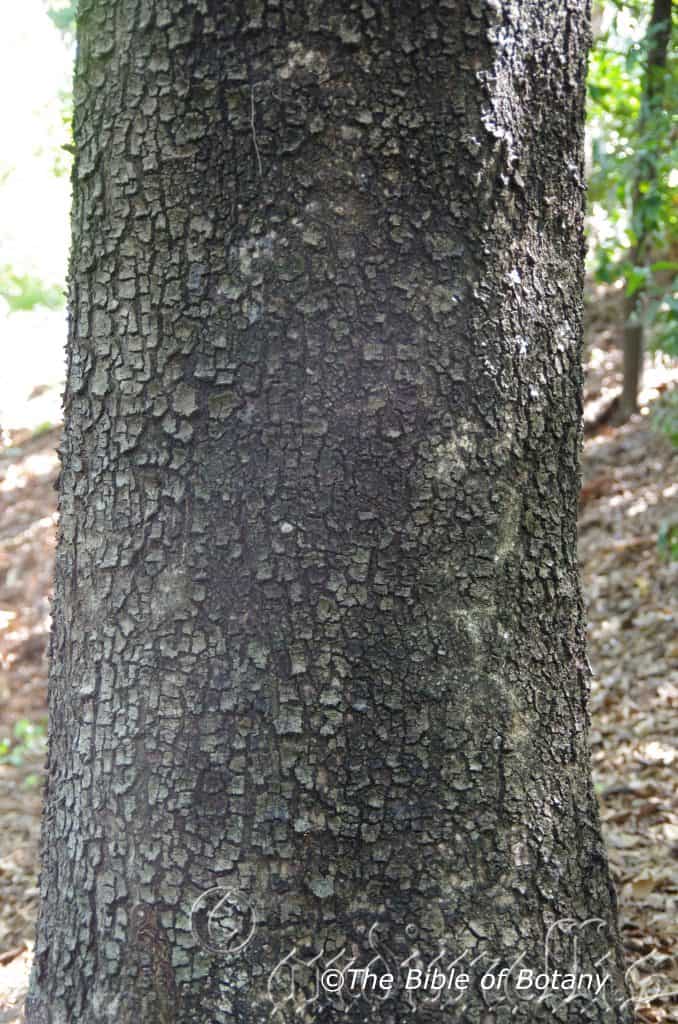
Mount Cootha Botanic Gardens Qld.
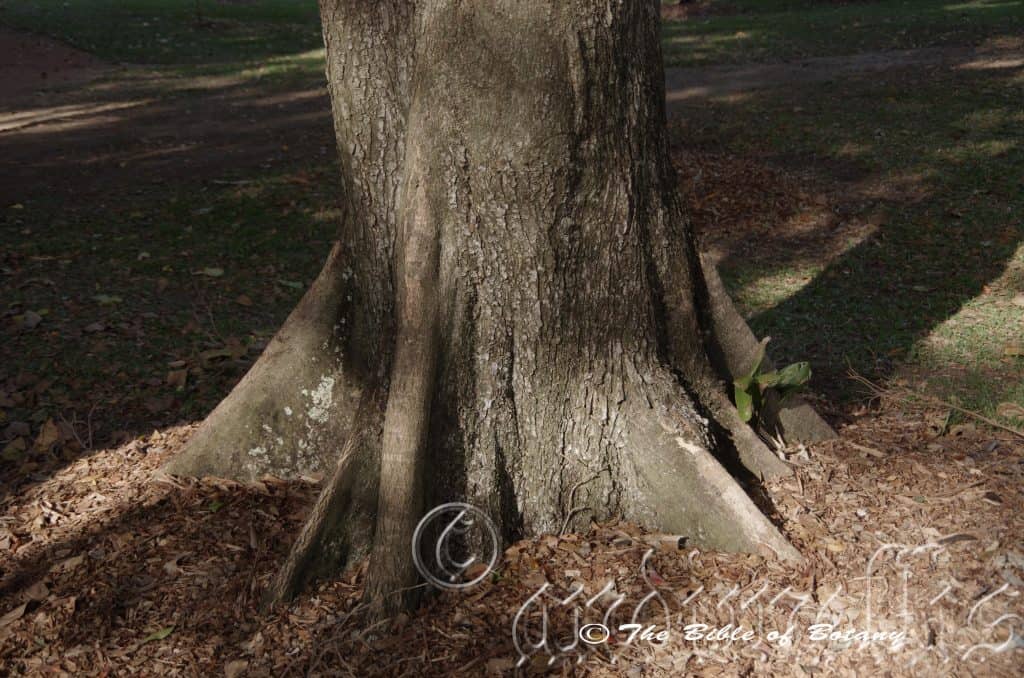
Anderson Botanic Gardens Townsville Qld.
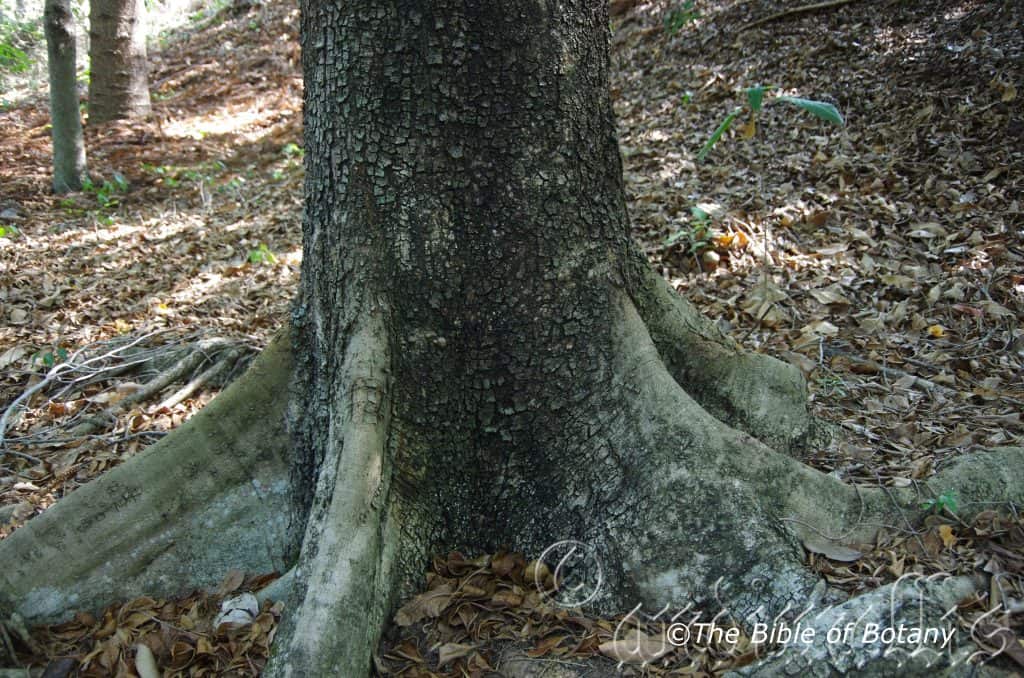
Mount Cootha Botanic Gardens Qld.
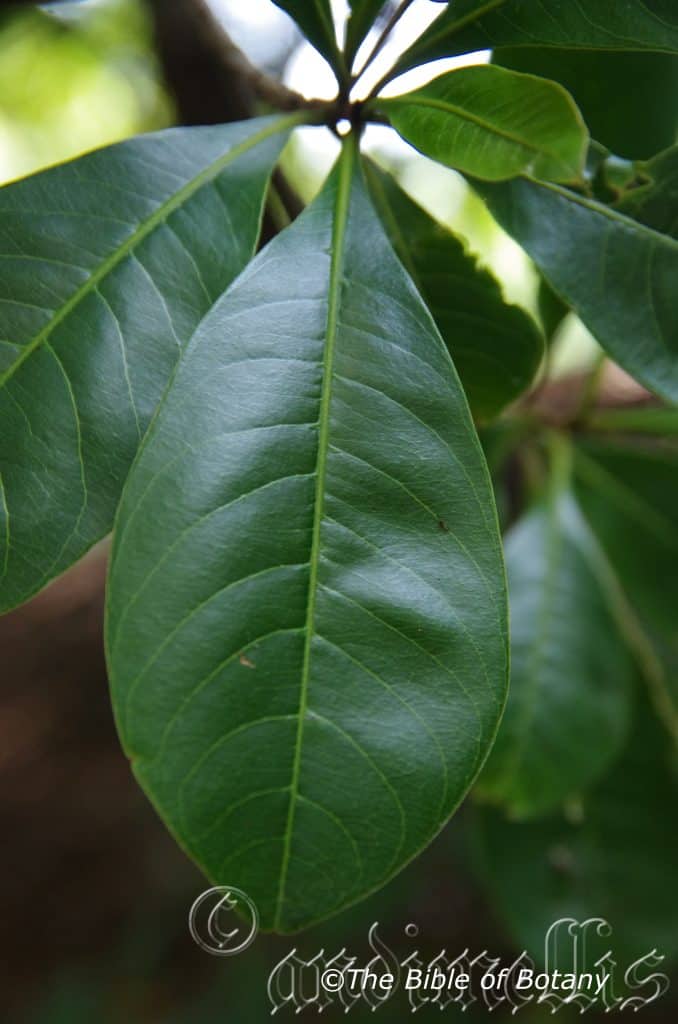
Mount Cootha Botanic Gardens Qld.
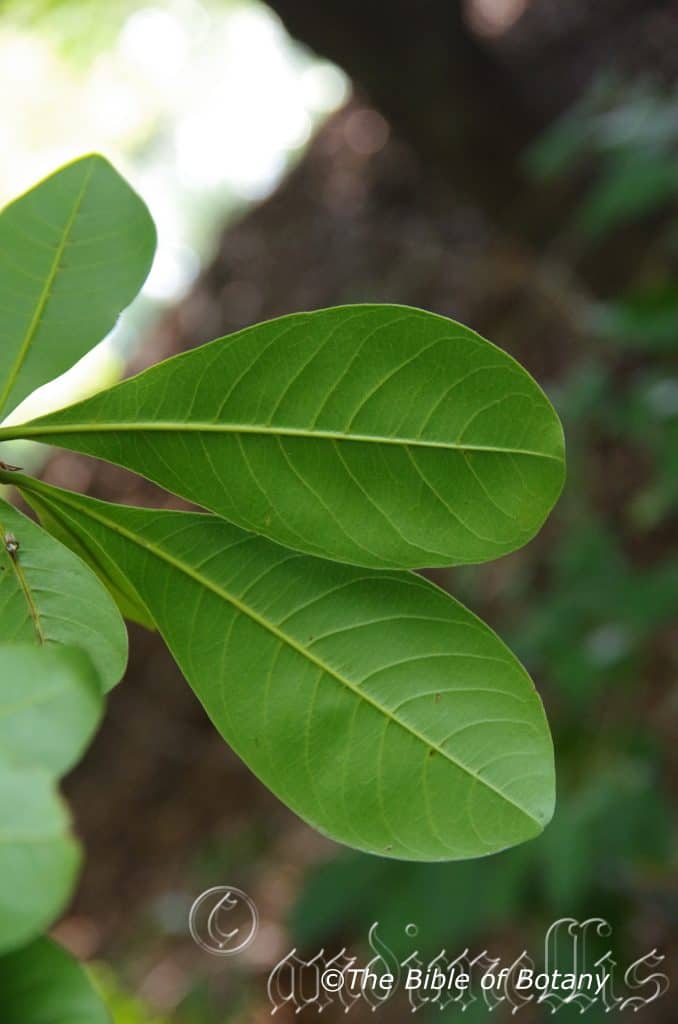
Mount Cootha Botanic Gardens Qld.
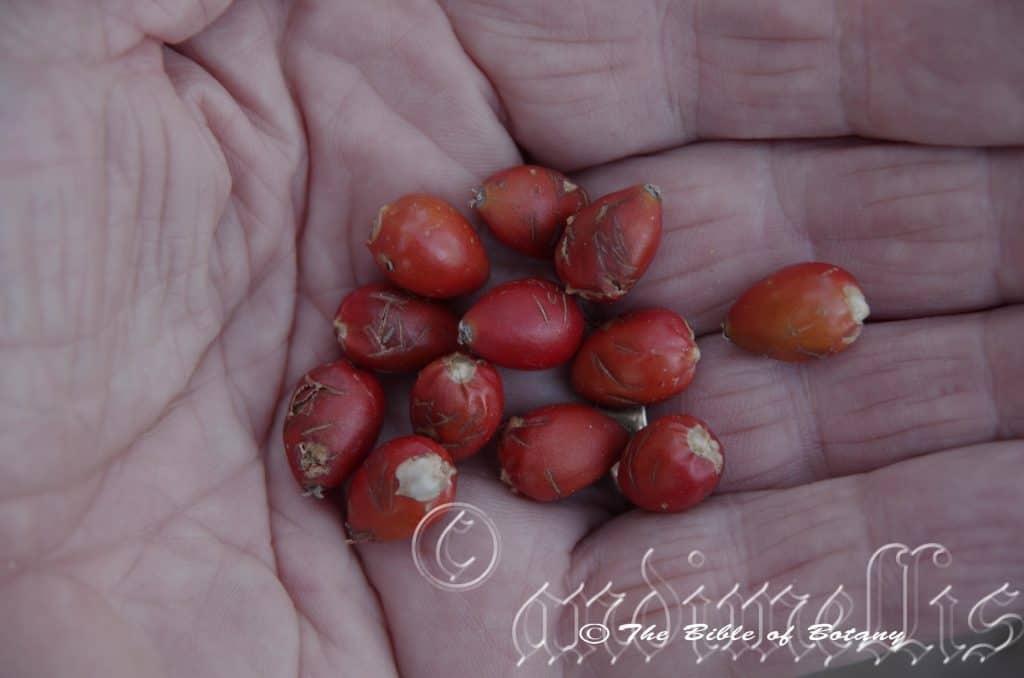
Anderson Botanic Gardens Townsville Qld.
Terminalia microcarpa
Classification:
Unranked: Eudicots
Class: Rosids
Order: Myrtales
Family: Combretaceae
Genus: From Terminus, which is Latin for the end or the limit of. It refers to flowers, being positioned at the end of the stems.
Species: From mikro which is Ancient Greek for small or tiny and karpos, which is Ancient Greek for a fruit. It refers to fruits which are smaller compared to other species in the genus.
Common Name: Bandicoot Damson, Sovereign Wood, Damson Plum or Damson.
Distribution:
Terminalia microcarpa is found in a line north west from Dampier in central coastal Western Australia to Numbulwar in far north eastern Northern Territory. It is found south from Cape York Peninsula to Rockhampton in central coastal Queensland. It is mainly found on and east of the Great Dividing Range to the coast.
It is also found in Bismarck Archipelago, Borneo, Jawa, Lesser Sunda Islands, Maluku, New Guinea, Papua, Philippines, Solomon Islands., Sulawesi and Sumatra.
https://avh.ala.org.au/occurrences/search?taxa=Terminalia+microcarpa#tab_mapView
Habitat Aspect Climate:
Terminalia microcarpa prefers full sun to glaring reflected light off the ocean. It usually grows in beach forests, littoral rainforests but has also been recorded in monsoonal forests. The altitude usually ranges from 5 meter ASL to 750 meters ASL.
The temperatures range from 6 degrees in July to 45 degrees in January.
The rainfall ranges from lows of 1000mm to 3600mm average per annum.
Soil Requirements:
Terminalia microcarpa usually prefers course white or yellow sands to fine white or yellowish sandy loams. The sands are usually derived from accumulated beach sands, accumulated corals sands or at times decomposed sandstone. The soils pH ranges from 6.5pH to 8pH. It does not tolerate waterlogged soils however plants in estuarial zones may be inundated for short periods during storms. Non saline soils to very saline soils are tolerated as are salt laden winds.
Height & Spread:
Wild Plants: 18m to 30m by 12m to 15m.
Characteristics:
Terminalia microcarpa grows as a medium tree with a short, fluted, grey-brown, scabrous trunk with a wide buttress base. Outer dead bark usually quite hard. The branches are brown and only becoming green near the apex where the newer leaf growth occurs. The branchlets and buds are glabrous to slightly roughened. The trees are leafless for a period at the end of the dry season usually between September or October.
The crowded, alternate elliptical to oblong leaves of Terminalia microcarpa measure 60mm to 135mm in length by 30mm to 60mm in width. The terete petiole measures 9mm to 15mm in length. The bases are cuneate and are at times attenuate, while the apexes are acuminate. The concolourous or discolourous laminas are mid green, semi glossy and glabrous on the upper laminas, while the lower lamina is slightly paler and at times sparsely covered in white pubescent hairs. The laminas are flat and recurve gently upwards from the mid vein to the margins and decurve at the apical quarter. The margins are entire. Small oil dots are visible with a lens, while the domatia are foveolas. The obtuse mid vein is paler than the lamina and is prominent on both laminas, while the laterals are more prominent on the lower lamina. The lateral veins form loops well inside the margins. The old leaves turn red prior to being discarded.
The inflorescences of Terminalia microcarpa are born in racemes from the upper leaf axis. The peduncles measure 12mm to 15mm in length while the rachises measure 50mm to 60mm in length while the pedicels measure 1mm to 1.5mm in length. The narrow deltoid, caducous bracts measure 1mm to 2mm in length. The perianth tube is moderately covered in sericeous externally, while the deltoid lobes measure 1mm to 2mm in length by 1.5mm to 2.5mm in width. The apex is narrow acute or acuminate and glabrous or are sparsely covered in sericeous hairs internally. The cream staminal filaments are glabrous and measure 2mm to 3mm in length. The cream disk is covered in white villous hairs as is the style. The flowers appear from September to November.
Terminalia microcarpa‘s fruits are slightly compressed, ovoid, succulent drupes with a small rostrate beak. The drupes are usually glabrous or at times have a few long, white hirsute hairs. The drupes measure 12mm to 20mm in length by 9mm to 14mm in diameter. The green drupes turn deep reddish to deep purplish externally and deep greenish-purple internally when ripe. The single seed measures 8mm to 10mm in length by 2mm to 3mm in diameter.
The mature fruits are glabrous to sparsely covered in white sericeous hairs and measure 13mm to 18mm in length by 8mm to 10mm in width. The seed measure 7mm to 8mm in length by 2mm in width.
Wildlife:
Terminalia microcarpa supports many native insects when in flower while the fallen fruits are usually heavily infested with Queensland fruit fly.
The common oak blue butterfly Hypochrysops narcissus, the Copper jewel Hypochrysops apelles, the Emperor moth Syntherata janetta, the Brown awl butterfly Badamia exclamationis, the Dull oak blue butterfly Ophiusa coronata all feed on the leaves of Terminalia arenicola.
The fruits are also eaten by the grey headed flying fox Pteropus poliocephalus, and red headed flying foxes Pteropus scapulatus, Cassowaries Casuarius casuarius, and larger fruitigrove birds. Large caches of nuts have been observed under and near the trees suggesting native rats store and consume the fruits.
Apparently the fruit’s outer flesh is reasonably thick, and is described as sweet and plum-like. They are enjoyed both fresh and processed into jams, jellies, or wines. The nuts are not consumed.
Cultivation:
Terminalia microcarpa is a beautiful small shrub that can be grown in association with other littoral rainforest specie on very sandy sites. I would recommend the trees for planting in semi-arid areas below septic sullage trenches for shade and cooling. It is ideal at the edge of a forest or as a larger specimen tree. in parks, offering quick growth, and excellent shade provided the soils are sandy to sandy loams. The trees maybe susceptible to being blown over when grown on heavier soils in cultivation especially when it is grown as specimen tree in a park like situation.
In cultivation it grows from 12 meters to 18 meters in height by 8 meters to 12 meters in diameter when grown in the open or taller and narrower if grown closer together as a forest tree.
It grows exceptionally well on lighter soils where deep leaf litter keeps the soil cool and moisture at an even level. If these requirements are met it may cope with temperatures to zero degrees and up to 40 degrees. It is moderately drought resistant once established especially in its natural growing zones.
It is grown in the Philippines as a commercial crop for the juicy fruits. as a commercial crop it should be looked at carefully if this specie, Terminalia muelleri or a mixture of trees is the better option for your area and soil. Assuming a production output of 2.2 tons of meat is returned a year per hectare then each tree needs to return 22 kilograms of meat per tree planted at 10 by 10 meter centers. Commercial exotic Almond orchards in South Australia are returning 2.85 tons per hectare. The native trees would have to return 6,000 nuts at the same price to be commercially viable on a large scale. It would be assumed that a niche market would deliver at least an equivalent price or better meaning far fewer nuts would need to be produced. Looking at wild trees it would be difficult to see them produce this quantity however cheaper land prices in arid areas may well offset the costs of planting more trees.
The equivalent of around 1.5 to 1.8 kilograms of pure nitrogen would be required for mature producing trees. This is easily managed through cover crops or with the addition of good quality blood and bone in the early years. Nuts contain Zinc, so zinc would also need to be monitored but this can easily be added through good composts containing seaweed extracts or spraying seaweed extracts directly onto your cover crops between the rows or onto the foliage of the trees at the beginning of the growing season. Sea weed fertilizers are excellent soil conditioners which will deliver better fruit set and better fruit quality as potassium is an essential ingredient of good quality nuts. I used to fertilize my cover crops and never worried about my orchard trees after the initial years following planting. (Citrus) The trees are not related to the exotic almond however it does have similar shapes and the fruits aparently taste similar.
Propagation:
Seeds: The seeds of Terminalia microcarpa can be removed easily from the fruits.
Sow freshly washed seeds directly into a seed raising mix, keeping them moist not wet. Do not over water as the seeds will rot off before germination takes place. Place the trays in a cool shaded area with 50mm shade cloth in the bush house. When the seedlings are 40mm to 50mm tall, prick them out and plant them into 50mm native tubes using a good organic mix.
As the seedlings roots reach the bottom of the tubes plant them out into their permanent position. Do not delay.
Fertilize using seaweed, fish emulsion or organic chicken pellets soaked in water on an alternate basis. Fertilize every two months until the plants are established then annually in early September to October to maintain better colour, health, vitality and flowering. High nitrogenous fertilizers should be avoided when grown on heavier soils.
Further Comments from Readers:
“Hi reader, it seems you use The Bible of Botany a lot. That’s great as we have great pleasure in bringing it to you! It’s a little awkward for us to ask, but our first aim is to purchase land approximately 1,600 hectares to link several parcels of N.P. into one at The Pinnacles NSW Australia, but we need your help. We’re not salespeople. We’re amateur botanists who have dedicated over 30 years to saving the environment in a practical way. We depend on donations to reach our goal. If you donate just $5, the price of your coffee this Sunday, We can help to keep the planet alive in a real way and continue to bring you regular updates and features on Australian plants all in one Botanical Bible. Any support is greatly appreciated. Thank you.”
In the spirit of reconciliation we acknowledge the Bundjalung, Gumbaynggirr and Yaegl and all aboriginal nations throughout Australia and their connections to land, sea and community. We pay our respect to their Elders past, present and future for the pleasures we have gained.
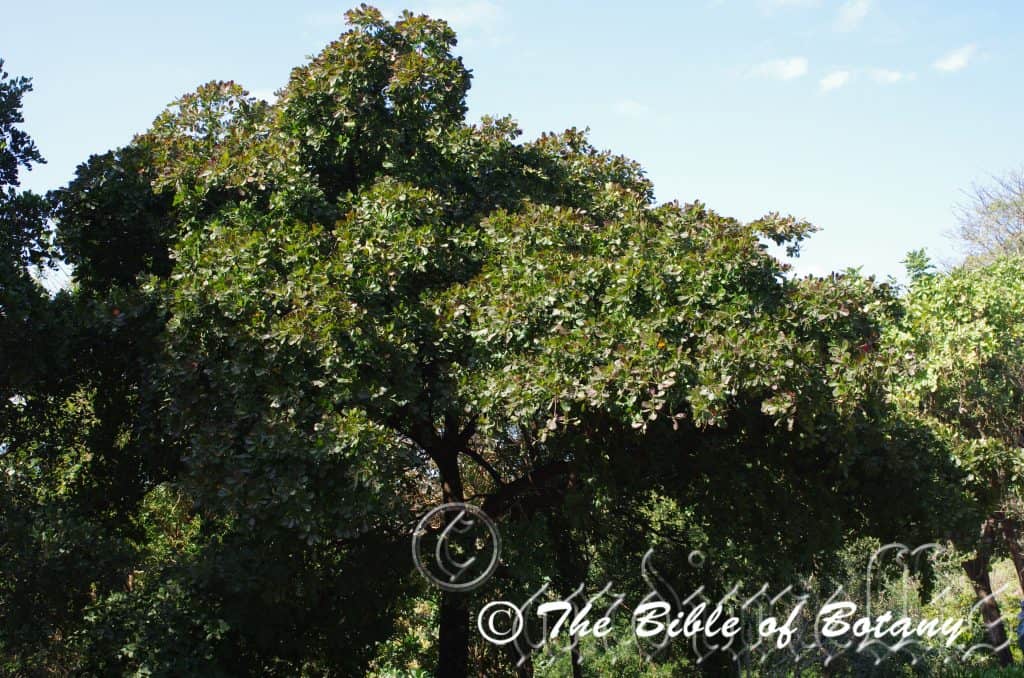
Mount Cootha Botanic Gardens Qld.

Mount Cootha Botanic Gardens Qld.

Mount Cootha Botanic Gardens Qld.
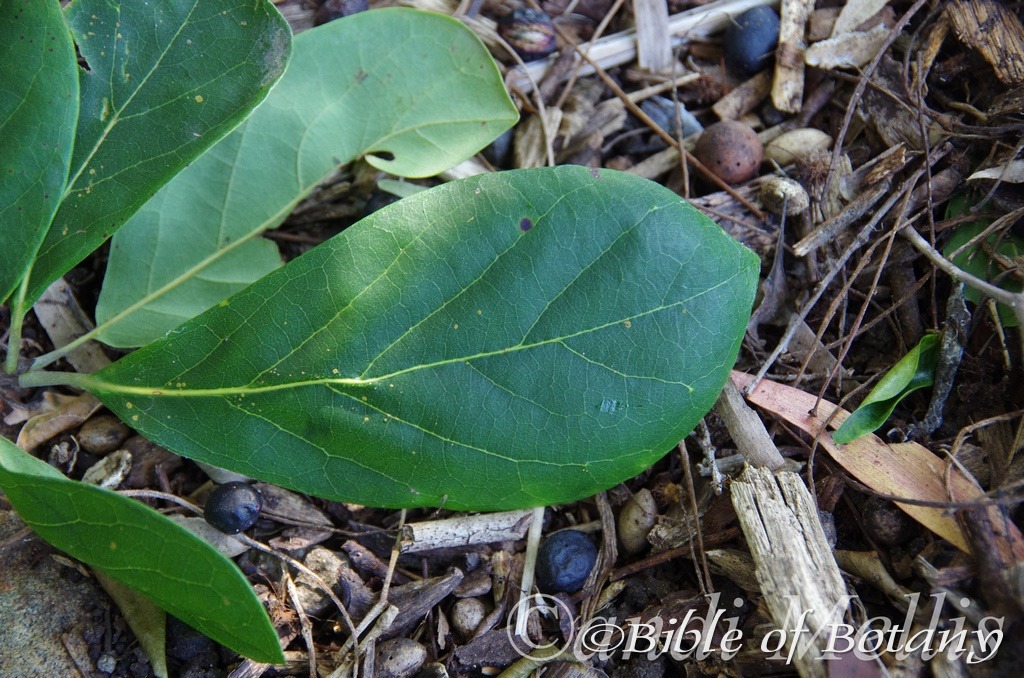
Mount Cootha Botanic Gardens Qld.
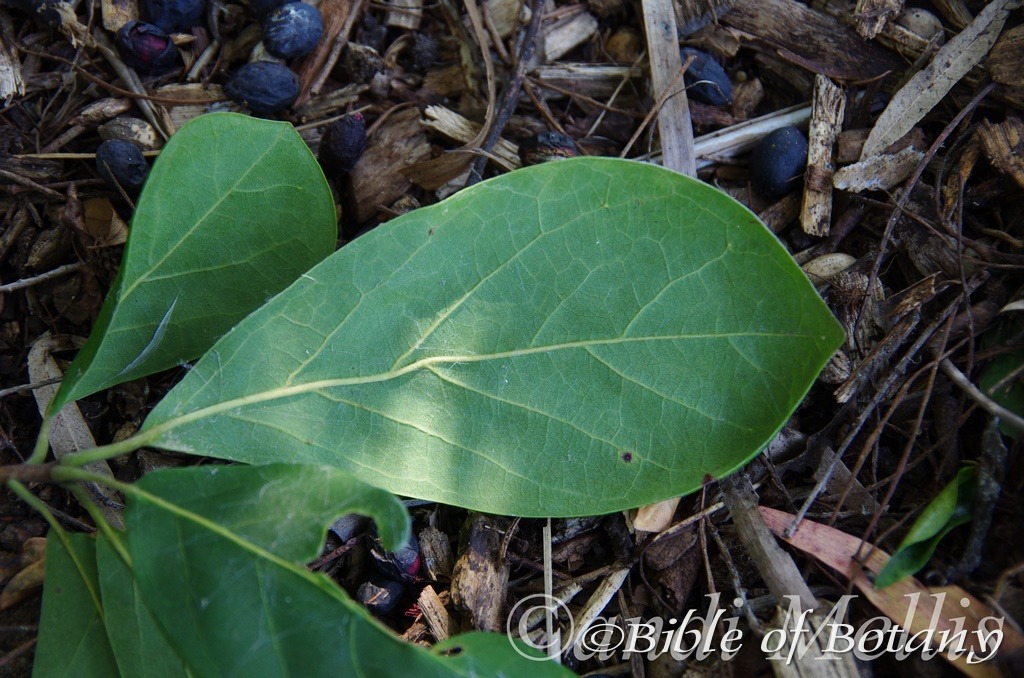
Mount Cootha Botanic Gardens Qld.
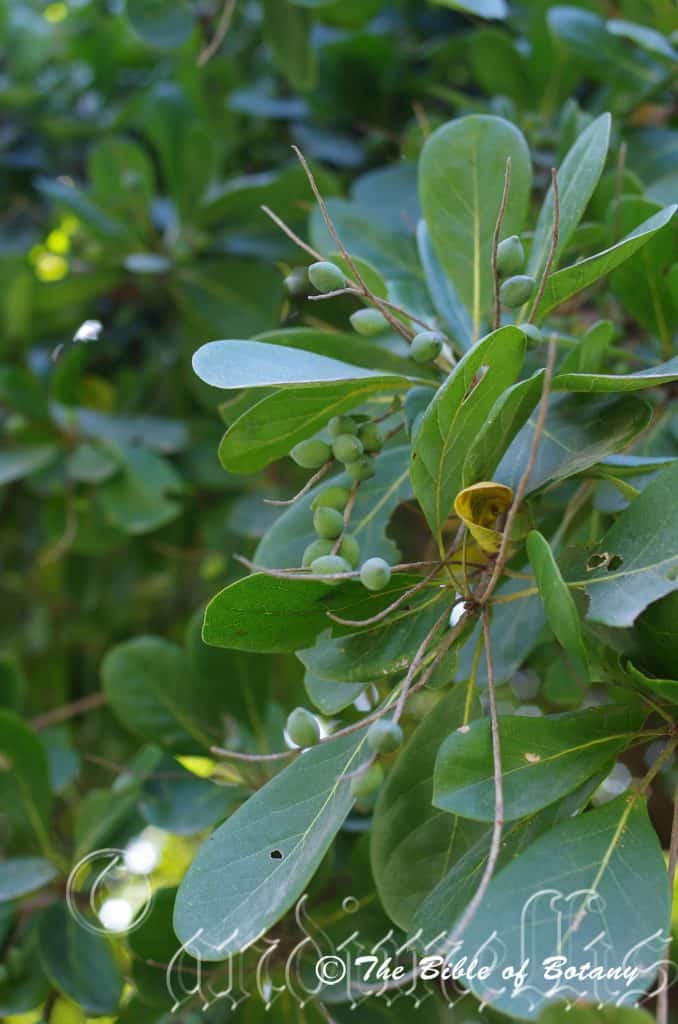
Mount Cootha Botanic Gardens Qld.
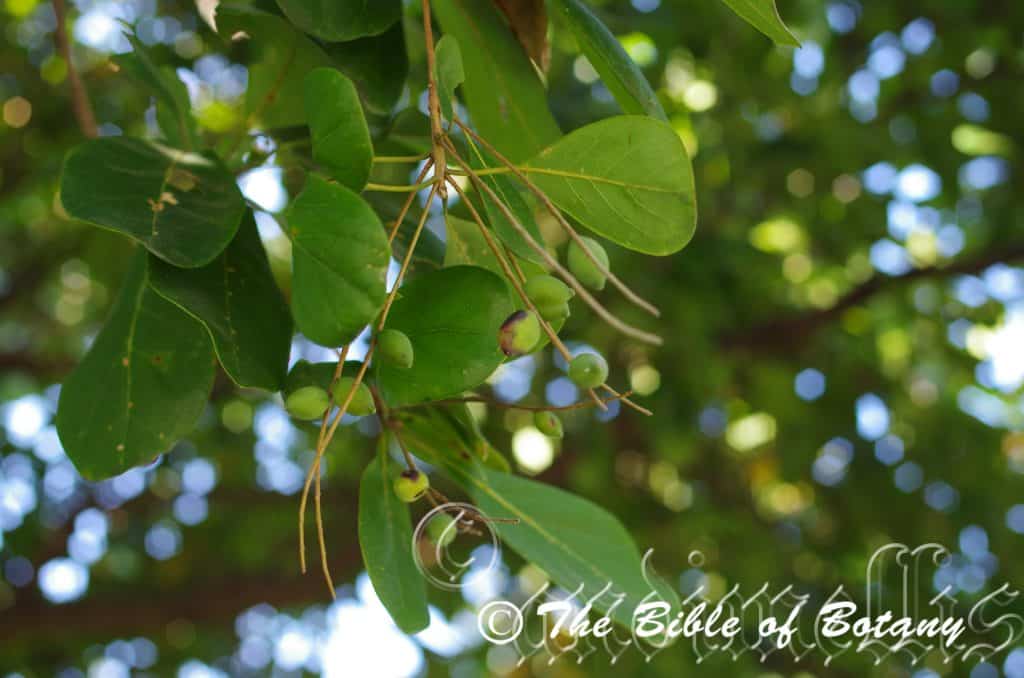
Mount Cootha Botanic Gardens Qld.
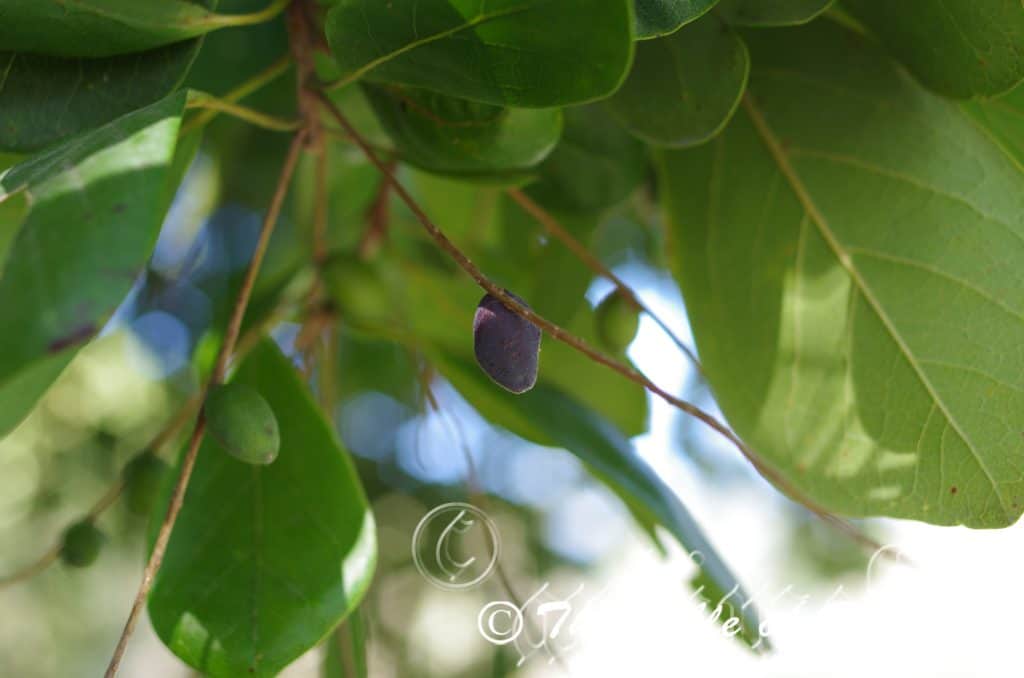
Mount Cootha Botanic Gardens Qld.
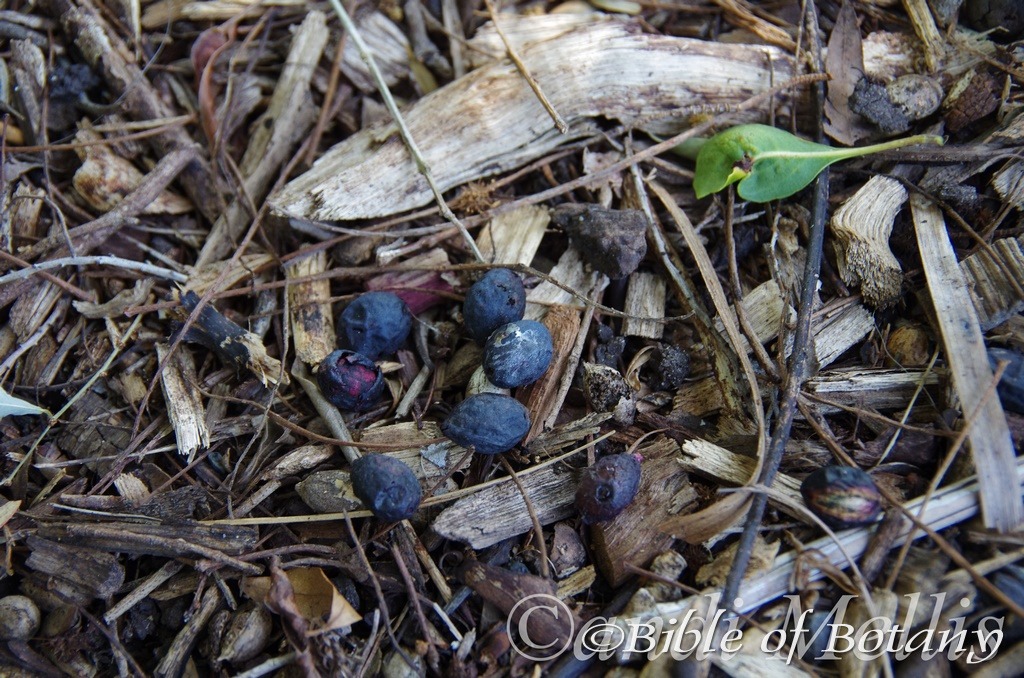
Mount Cootha Botanic Gardens Qld.
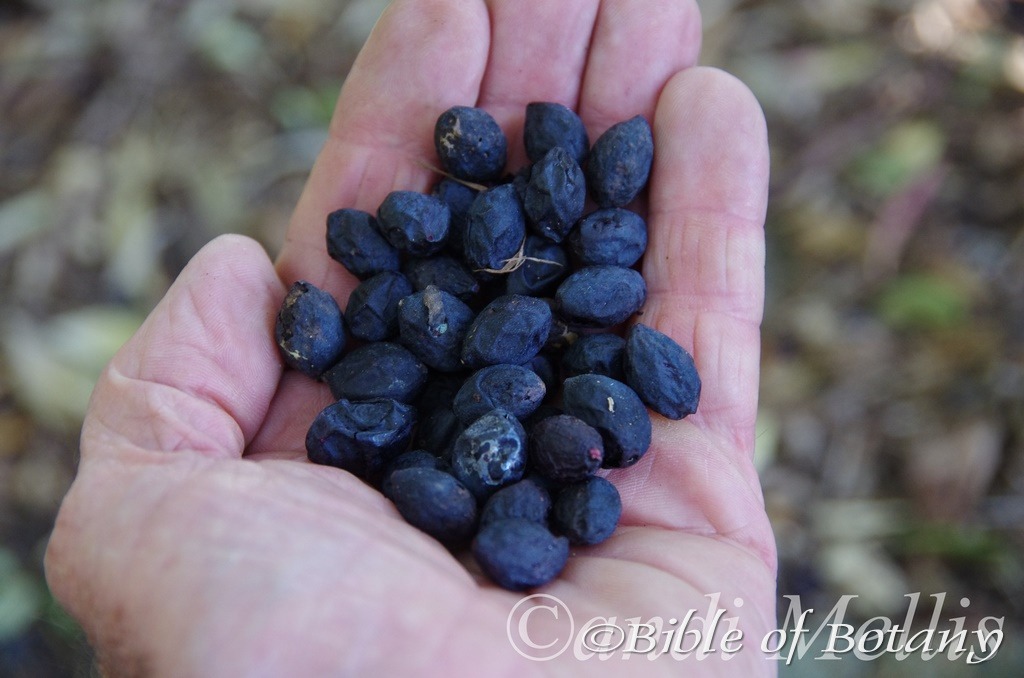
Mount Cootha Botanic Gardens Qld.
Terminalia muelleri
Classification:
Unranked: Eudicots
Class: Rosids
Order: Myrtales
Family: Combretaceae
Genus: From Terminus, which is Latin for the end or the limit of. It refers to flowers, being positioned at the end of the stems.
Species: Is named in honour of Ferdinand Von Mueller; 1825-1896, who was a German born Australian Botanist who named over 2000 new species and was director of the Melbourne Botanic Gardens.
Common Name: Mueller’s Damson or Australian Almond.
Distribution:
Terminalia muelleri is found south from the Torres Strait Island to Slade Point Mackay with a further population further south in the Byfield National Park in coastal Queensland.
https://avh.ala.org.au/occurrences/search?taxa=Terminalia+muelleri#tab_mapView
Habitat Aspect Climate:
Terminalia muelleri prefers full sun to glaring reflected light off the ocean. It usually grows in beach forests, littoral rainforests on sand dunes, but it has also been collected on the Paluma Range at at 570 meters ASL. The altitude usually ranges from 1 meter ASL to 100 meters ASL.
The temperatures range from 6 degrees in July to 37 degrees in January.
The rainfall ranges from lows of 1200mm to 3200mm average per annum.
Soil Requirements:
Terminalia muelleri usually prefers course white or yellow sands to fine white or yellowish sandy loams. The sands are usually derived from accumulated beach sands, accumulated corals sands are at times decomposed sandstone. The soils pH ranges from 6.5pH to 8pH. It does not tolerate waterlogged soils however plants in estuarial zones may be inundated for short periods during storms. Non saline soils to very saline soils are tolerated as are salt laden winds.
Height & Spread:
Wild Plants: 10m to 12m by 18m to 10m.
Characteristics:
Terminalia muelleri grows as a small tree with a short, fluted, grey-brown, scabrous and wide buttresses trunk. The branches are reddish-maroon and only becoming green near the apex where the newer leaf growth occurs. The branchlets and buds are glabrous. Seedling leaves and stem are moderately to densely covered in short, white hirsute hairs.
The crowded, ovate to oblanceolate leaves of Terminalia muelleri measure 50mm to 150mm in length by 25mm to 80mm in width. The petiole measures 8mm to 15mm in length. The bases are cuneate, broad cuneate to almost rounded and are often attenuate while the apexes are obtuse to broad acute. The discolourous laminas are deep green, dull and glabrous on the upper laminas while the lower laminas are much paler to grass-green. The laminas decurve gently to strongly downwards from the mid vein to the margins in an arch while the margins are entire. There are usually 2 prominent glands near the base on either side of the midrib. There are several domatia which are tufts of hairs covering small foveola in the axis of the mid vein and main lateral veins. The oil glands are minute. The obtuse mid vein is strongly prominent while the main laterals are prominent on the lower laminas and are yellowish. The lateral veins form loops close to the margins. It is usually deciduous or at times partially deciduous for a short period at the end of the dry season in late October or early November.
The inflorescences of Terminalia muelleri are born along several racemes from the terminals. The 2 to 10 racemes each have 12 to 22 individual flowers. The pale yellow-green to yellowish tinged red peduncles and rachis are moderately covered in white hirsute hairs. The white to cream pedicels are covered in short, white erect and appressed hirsute hairs. The peduncles measure 20mm to 30mm in length while the rachises measure 35mm to 110mm in length while the pedicels measure 1mm to 1.5mm in length.
The caducous linear bracts measure 1mm in length. The appressed perianth tube is covered in short, white erect and appressed pulverulent hairs. The 5 glabrous lobes are broad triangular and measure 2mm to 2.2mm in length. The golden honey coloured disc is densely covered in long white villous hairs.
The usually 6 or at times 7 exserted white filaments are glabrous. The filaments measure 3mm to 3.5mm in length while the pale yellow, basifixed anthers measure 0.7mm to 0.9mm in length.
The white style and stigma are glabrous while the ovary is golden honey colour. The pistil measures 3.2mm to 3.6mm in length. The flowers appear from November to February.
Terminalia muelleri‘s fruits are ovoid to ellipsoidal, succulent drupes with a small rostrate beak. The drupes are usually glabrous or at times have a few long, white hirsute hairs. The drupes measure 12mm to 20mm in length by 9mm to 14mm in diameter. The green drupes turn deep reddish to deep purplish externally and deep greenish internally when ripe. The single measures 8mm to 10mm in length by 2mm to 3mm in diameter.
Wildlife:
Terminalia muelleri‘s support many native insects when in flower. The leaves are the food source for the Nagia linteola, and the Teleclita dryinopa, moths.
The fruits are also eaten by the grey headed and red headed flying foxes, Cassowaries Casuarius casuarius, and larger fruit grove birds. Large caches of nuts have been observed under and near the trees suggesting native rats store and consume the nuts.
I have not had the opportunity to eat the fruit however it apparently is not particularly palatable and the nuts are too small to eat.
Cultivation:
Terminalia muelleri is a beautiful small shrub that can be grown in association with other littoral rainforest specie on very sandy sites. It is suitable for planting in semi-arid areas below septic sullage trenches for shade and cooling. It is ideal at the edge of a forest or as a lone specimen tree. It also makes a reasonable park tree offering quick growth, and good shade in the warmer months being deciduous at the end of the dry season, provided the soils are sandy to sandy loams. The tree maybe susceptible to being blown over when grown on heavier soils in cultivation especially when it is grown as specimen tree in a park like situation. It makes a good tree for gardens close to the coast with saline winds.
In cultivation it grows from 7 meters to 9 meters in height by 6 meters to 8 meters in diameter when grown in the open or taller and narrower if grown closer together as a forest tree.
It grows exceptionally well on lighter soils where deep leaf litter keeps the soil cool and moisture at an even level. If these requirements are met it may cope with temperatures to zero degrees and up to 40 degrees. It is moderately drought resistant once established especially in its natural growing zones.
Add to the above, if it is given an adequate supply of water and a little native fertilizer on an annual basis the plants should respond with good flowering and fruit over a long period. High nitrogenous fertilizers should be avoided when grown on heavier soils.
Propagation:
Seeds: The seeds of Terminalia muelleri can be removed easily from the fruits. Sow freshly washed seeds directly into a seed raising mix, keeping them moist not wet. Do not over water as the seeds will rot off before germination takes place. Germination takes 100 to 180 days. Place the trays in a cool shaded area with 50% shade cloth in the bush house. When the seedlings are 50mm to 70mm tall, prick them out and plant them into 50mm native tubes using a good organic mix.
As the seedlings roots reach the bottom of the tubes plant them out into their permanent position. Do not delay.
Fertilize using seaweed, fish emulsion or organic chicken pellets soaked in water on an alternate basis. Fertilize every two months until the plants are established then annually in early September to October to maintain better colour, health, vitality and flowering.
Further Comments from Readers:
“Hi reader, it seems you use The Bible of Botany a lot. That’s great as we have great pleasure in bringing it to you! It’s a little awkward for us to ask, but our first aim is to purchase land approximately 1,600 hectares to link several parcels of N.P. into one at The Pinnacles NSW Australia, but we need your help. We’re not salespeople. We’re amateur botanists who have dedicated over 30 years to saving the environment in a practical way. We depend on donations to reach our goal. If you donate just $5, the price of your coffee this Sunday, We can help to keep the planet alive in a real way and continue to bring you regular updates and features on Australian plants all in one Botanical Bible. Any support is greatly appreciated. Thank you.”
In the spirit of reconciliation we acknowledge the Bundjalung, Gumbaynggirr and Yaegl and all aboriginal nations throughout Australia and their connections to land, sea and community. We pay our respect to their Elders past, present and future for the pleasures we have gained.
Terminalia platyphylla
Classification:
Unranked: Eudicots
Order: Myrtales
Family: Combretaceae
Genus: From Terminus, which is Latin for the end or the limit of. It refers to flowers, being positioned at the end of the stems.
Species: From Platy, which is Ancient Greek for flat and broad and Phullon/Phyllon, which is Ancient Greek for a leaf. It refers to leaves, which are distinctly flat.
Common Name: Flat Leaf Damson.
Distribution:
Terminalia platyphylla is mainly found east from the Kimberley Coast and the Fitzroy River in far north west, Western Australia across the Northern Territory to Ayr in north eastern coastal Queensland. It reaches its peak in Kakadu National Park.
https://avh.ala.org.au/occurrences/search?taxa=Terminalia+platyphylla#tab_mapView
Habitat Aspect Climate:
Terminalia platyphylla prefers full sun to light dappled shade. It grows in littoral rainforests, vine forests, along river and creek estuaries to open exposed headlands. The altitude ranges from 2 meter ASL to 600 meters ASL.
The temperatures range from 10 degrees in July to 37 degrees in January.
The rainfall ranges from lows of 800mm to 3200mm average per annum.
Soil Requirements:
Terminalia platyphylla usually prefers coarse white or cream beach sands to white to pale grey fine sandy loams. The soils are derived from accumulated beach sands, accumulated corals sands or decomposed granite, sandstone or pumice stone. The soils pH ranges from 6.5pH to 7.5pH. It does not tolerate waterlogged soils however the soils have good capillary action to maintain soil moisture. Non saline soils to very saline soils are tolerated as are salt laden winds.
Height & Spread:
Wild Plants:5m to 10m by 5m to 9m.
Characteristics:
The trunks of Terminalia platyphylla are tall, straight, and grey-brown, irregularly deeply and widely fissured and cross fissured, rough and with the ridges marginally tessellated. The branches are pale grey-brown, rough and finely furrowed. The pendulous branchlets are pale grass-green to grey-green, glabrous densely covered in pale grey or white silky pulverulent hairs.
The alternate to semi crowded, elliptical to obovate leaves of Terminalia platyphylla measure 70mm to 220mm in length by 50mm to 140mm in width. The bases are broad cuneate tapering to a slight oblique swelling on the petiole while the apexes are obtuse-truncate to truncate. The coriaceous, concolourous laminas are grass-green to grey-green, dull and glabrous to sparsely covered in white or pale grey tortuous hairs on the upper lamina while the lower lamina is sparsely to moderately covered in white or pale grey tortuous, pilose or at times both tortuous and pilose hairs. The leaf margins are entire, flat or undulating while the laminas recurve slightly to strongly from the mid vein to the margins and decurve from near the base. The mid vein is strongly prominent for its entire length on the lower lamina and for half its length on the upper lamina. The main laterals are slightly prominent on the lower laminas. The petiole measures 15mm to 24mm in length.
Inflorescences of Terminalia platyphylla are born along a raceme from the terminals. The pale yellow-green peduncles, rachises and cream pedicels are glabrous to moderately covered in white to pale grey pubescent hairs. The peduncles measure 14mm to 36mm in length while the rachises measure 30mm to 170mm in length while the pedicels measure 1.5mm to 2.5mm in length.
The individual male inflorescences measure 3mm to 5mm in length while the perfect inflorescences measure 5.5mm to 7mm in length. Both types of flowers measure 5mm to 7mm in diameter. There are 90 to 160 individual flowers on a raceme. The bracts are triangular, caducous and measure 1mm to 1.2mm in length. The grey-green, calyx and deltoid calyx lobes are glabrous or very sparsely covered in grey or white puberulent hairs. The calyxes measure 0.5mm to 1mm in length while the lobes measure 2.5mm in length by 2mm in width. The corollas and corolla lobes are white or cream. The corolla tube is glabrous or sparsely covered in white to pale grey puberulent hairs externally and is glabrous internally. The lobes are glabrous or sparsely covered in white to pale grey puberulent hairs externally and internally. The lobes measure 1.5mm in length by 1.5mm in width. The discs are densely covered in white villous hairs which completely surround the base of the style and filaments.
The 10 exserted filaments are free for their entire length and form 2 distinct rings. The filaments measure 4mm to 4.2mm in length. The filaments are white while the anthers are yellow.
The white styles are covered in villous hairs while the stigmas are glabrous while the ovary is pale green. The pistil measures 2mm to 2.2mm in length. Terminalia platyphylla’s flowers appear throughout the year. Terminalia platyphylla flowers appear from January to April however flowers can appear through to October in favourable seasons.
The succulent fruits of Terminalia platyphylla are cylindrical to broadly spindle drupes. The drupes are glabrous with 2 longitudinal ridge and measure 20mm to 40mm in length by 7mm to 15mm in width. The green drupes turn purple externally and burgundy-red internally when ripe. The calyx lobes are not persistent on the ripe fruit. The single semi-glossy brown seeds are ellipsoidal to oblong fleshy broadly cuneate at the base and rounded at the apex. The seeds measure 12mm to 15mm in length by 3mm to 4mm in diameter.
Wildlife:
Terminalia platyphylla support many native insects when in flower while the fallen fruits are usually heavily infested with Queensland fruit fly.
The fruits are also eaten by the grey headed and red headed flying foxes, Pteropus poliocephalus, Cassowaries, Casuarius casuarius and larger fruit grove birds.
The common oak blue butterfly, (Hypochrysops narcissus) Copper jewel Hypochrysops apelles, Emperor moth, Syntherata janetta, Brown awl Badamia exclamationis, and the Dull oak blue Ophiusa coronata, all feed on the leaves of Terminalia arenicola.
I have not had the opportunity to eat the pulp however the flesh is apparently slightly acid to somewhat sour. The seeds are generally too small to eat..
Cultivation:
Terminalia platyphylla is a magnificent medium tree that should be grown in association with other littoral rainforest specie on very sandy sites. It suitable for planting in semi-arid areas below septic sullage trenches or drainage lines from out buildings for shade and cooling. It is ideal at the edge of a forest. It also makes terrific park trees offering quick growth, and excellent shade provided the soils are deep, sandy to sandy loams. The tree is susceptible to being blown along the coast over when grown on heavier soils in cultivation especially when it is grown as specimen trees in a park like situation.
In cultivation it grows from 5 meters to 7 meters in height by 5 meters to 6 meters in diameter when grown in the open.
It grows exceptionally well on lighter soils where deep leaf litter keeps the soil cool and moisture at an even level. If these requirements are met it can cope with temperatures as low as 5 degrees and up to 44 degrees. It is moderately drought resistant once established but prefer even moisture in the soil at all times otherwise leaf drop will be evident.
Add to the above, if it is given an adequate supply of water and a little native fertilizer on an annual basis the plants should respond with good flowering and fruit over a long period.
The fact that this tree is smaller and can be lightly pruned may make it more suitable to use in horticulture or use to graft the other more vigorous species onto. To grow the tree as a commercial crop it should be looked at carefully to see if the trees are suitable for your area and soil. Assuming a production output of 2.2 tonnes of meat is returned a year per hectare then each tree needs to return 22 kilograms of meat per tree planted at 10 by 10 meter centers. Commercial exotic Almond orchards in South Australia are returning 2.85 tonnes per hectare. The native trees would have to return 4,000 nuts at the same price to be commercially viable on a large scale. It would be assumed that a niche market would deliver at least an equivalent price or better meaning far fewer nuts would need to be produced. This tree may produce equivalent quantities of nuts as the exotic almond to which it is not related.
The equivalent of around 1.5 to 1.8 kilograms of pure nitrogen would be required for mature producing trees. This is easily managed through cover crops or with the addition of good quality blood and bone in the early years. Nuts contain Zinc, so zinc would also need to be monitored but this can easily be added through good composts containing seaweed extracts or spraying seaweed extracts directly onto your cover crops between the rows or onto the foliage of the trees at the beginning of the growing season. Sea weed fertilizers are excellent soil conditioners which will deliver better fruit set and better fruit quality as potassium is an essential ingredient of good quality nuts. I used to fertilize my cover crops and never worried about my orchard trees after the initial years following planting. (Citrus)
Propagation:
Seeds The seeds of Terminalia platyphylla can be removed easily from the fruits.
Sow fresh seeds directly into a seed raising mix, keeping them moist not wet. Do not over water as the seeds will rot off before germination takes place. Place the trays in a cool shaded area with 50mm shade cloth in the bush house. When the seedlings are 20mm to 25mm tall, prick them out and plant them into 50mm native tubes using a good organic mix.
As the seedlings roots reach the bottom of the tubes plant them out into their permanent position. Do not delay.
Fertilize using seaweed, fish emulsion or organic chicken pellets soaked in water on an alternate basis. Fertilize every two months until the plants are established then annually in early September to October to maintain better colour, health, vitality and flowering.
Further Comments from Readers:
“Hi reader, it seems you use The Bible of Botany a lot. That’s great as we have great pleasure in bringing it to you! It’s a little awkward for us to ask, but our first aim is to purchase land approximately 1,600 hectares to link several parcels of N.P. into one at The Pinnacles NSW Australia, but we need your help. We’re not salespeople. We’re amateur botanists who have dedicated over 30 years to saving the environment in a practical way. We depend on donations to reach our goal. If you donate just $5, the price of your coffee this Sunday, We can help to keep the planet alive in a real way and continue to bring you regular updates and features on Australian plants all in one Botanical Bible. Any support is greatly appreciated. Thank you.”
In the spirit of reconciliation we acknowledge the Bundjalung, Gumbaynggirr and Yaegl and all aboriginal nations throughout Australia and their connections to land, sea and community. We pay our respect to their Elders past, present and future for the pleasures we have gained.
xxxxxxxxxxxxxxxxxxxxxxxxxxxxxxxxxxxxxxxxxxxxxxxTernstroemia cherryi
Classification:
Unranked: Eudicots
Class: Asterids
Order: Ericeales
Family: Pentaphylaceae
Genus: Is named in honour of Christopher Ternstroem; 1703-1746, who was sent to China by Linnaeus to collect plants but died in Vietnam on the way.
Species: Is named in honour of Cherry.
Common Name: Beach Cherry.
Distribution:
Ternstroemia cherryi is found along the banks of rivers and streams in northern Kakadu in the west to Maningrida in the east in the northern central Northern Territory.
It is found south from New Guinea, the Torres Strait Islands and the tip of Cape York Peninsula to near Innisfail in far north east Queensland.
https://avh.ala.org.au/occurrences/search?taxa=Ternstroemia+cherryi#tab_mapView
Habitat Aspect Climate:
Ternstroemia cherryi prefers full shade to light dappled sun. It grows as an under story small tree in well-developed coastal rainforests or well developed tropical rainforests especially where there are breaks in the canopy in well-developed rainforests. The altitude ranges from 5 meters ASL to 800 meters ASL.
The temperatures range from 10 degrees in July to 36 degrees in January.
The rainfall ranges from lows of 1600mm to 3200mm average per annum.
Soil Requirements:
Ternstroemia cherryi prefers fine sands to light clays. The soils pH ranges from 5.5pH to 7pH. It tolerates seasonal wet soils. Non saline soils to very saline soils are tolerated as are salt laden winds.
Height & Spread:
Wild Plants: 20m to 25m by 10m to 12m.
Characteristics:
Ternstroemia cherryi grows as a medium tree with straight, pale fawnish-grey bark that is covered in raised lenticels. The branches are divaricate, straight, pale fawnish-grey, and covered in scars of fallen leaves and lichens. The branchlets are pale grey and covered in old leaf scars and lichens. Young stems are grass-green near the apex where the new leaf growth occurs and glabrous.
The opposite, whirls of 3 to 5 are crowded near the apexes of the stems and branchlets. The broad ovate to broad elliptical leaves of Ternstroemia cherryi measure 60mm to 160mm in length by 30mm to 60mm in width. The bases are broad cuneate while the apexes are broadly acute or broadly acuminate. The discolourous laminas are deep grass-green, semi glossy and glabrous on the upper lamina while the lower lamina is paler and dull. The leaf margins are entire and flat while the laminas recurve from the midvein to the margins and decurve near the apex. The mid veins are strongly prominent on the lower laminas. The petiole measures 5mm to 13mm in length.
The unisexual inflorescences of Ternstroemia cherryi are born singularly from between the leaf axils. The grass-green pedicels are slim, glabrous and measure 6mm to 30mm in length. The 5 grass-green calyx’s lobes are dimorphic, semi erect and glabrous. The 3 smaller outer lobes measure 1mm to 2.5mm in length while the 2 inner lobes measure 2.5mm to 4mm in length. The 5 cream to pale creamy yellow petals are very unusual. It is thick, waxy and united near the base. The apexes are orbicular-spathulate while the bases are broadly linear. The bases measure 3mm to 4.5mm in length by 5mm to 6mm in width and are strongly ribbed while the apexes measure 6mm to 7.5mm in diameter. The apexes are strongly recurved and papillose.
The 120 to 200 exserted filaments are free for their entire length. The filaments are cream to pale yellow measure 1mm to 1.5mm in length while the anthers are yellow.
The creamy yellow style and stigma are glabrous while the ovary is green. The pistil measures 1mm to 1.5mm in length. The flowers appear from September to February.
Ternstroemia cherryi fruits are globose to obovoidal berries. The berries are glabrous and measure 30mm to 50mm in length by 25mm to 35mm in diameter. The green capsules turn yellow to orange-yellow externally and pale creamy yellow to creamy yellow and red or deep burgundy internally when ripe. The calyx lobes are persistent at the base of the ripe fruit. The 6 to 8 glossy pinkish seeds are flattened and cylindrical. The seeds measure 12mm to 18mm in length by 6mm to 9mm across and are surrounded by a red aril.
Wildlife:
Ternstroemia cherryi do not appear to have any predators though the ripe fallen fruits are usually heavily infested with Queensland fruit fly. The fruits are also eaten by the grey headed and red headed flying foxes and native rats and probably fruit grove birds. The fruits usually hang for a long time indicating they may not be a favourite fruit.
The fruit is rather sugary sweet without much flavour.
Cultivation:
Ternstroemia cherryi is a great medium shrub that could be grown in association with other rainforest specie. It is ideal at the edge of a rainforest or deep in the center of the rainforest where adequate light penetrates to the floor. In cultivation it will grow from 3 meters to 5 meters in height by 2.5 meters to 4 meters in diameter when grown in the open or taller and narrower if grown closer together as a small rainforest tree.
It grows well on lighter soils where deep leaf litter keeps the soil cool and moisture at an even level. If these requirements are met it can cope with temperatures as low as 5 degrees and up to 36 degrees. It is not drought resistant and will discard leaves rapidly when stressed.
Propagation:
Seeds: The seeds of Ternstroemia cherryi can be removed easily from the fruits.
Sow fresh seeds directly into a seed raising mix, keeping them moist not wet. Do not over water as the seeds will rot off before germination takes place. Place the trays in a cool shaded area with 50mm shade cloth in the bush house. When the seedlings are 20mm to 25mm tall, prick them out and plant them into 50mm native tubes using a good organic mix.
As the seedlings roots reach the bottom of the tubes plant them out into their permanent position. Do not delay.
Fertilize using seaweed, fish emulsion or organic chicken pellets soaked in water on an alternate basis. Fertilize every two months until the plants are established then annually in early September to October to maintain better colour, health, vitality and flowering.
Further Comments from Readers:
“Hi reader, it seems you use The Bible of Botany a lot. That’s great as we have great pleasure in bringing it to you! It’s a little awkward for us to ask, but our first aim is to purchase land approximately 1,600 hectares to link several parcels of N.P. into one at The Pinnacles NSW Australia, but we need your help. We’re not salespeople. We’re amateur botanists who have dedicated over 30 years to saving the environment in a practical way. We depend on donations to reach our goal. If you donate just $5, the price of your coffee this Sunday, We can help to keep the planet alive in a real way and continue to bring you regular updates and features on Australian plants all in one Botanical Bible. Any support is greatly appreciated. Thank you.”
In the spirit of reconciliation we acknowledge the Bundjalung, Gumbaynggirr and Yaegl and all aboriginal nations throughout Australia and their connections to land, sea and community. We pay our respect to their Elders past, present and future for the pleasures we have gained.
xxxxxxxxxxxxxxxxxxxxxxxxxxxxxxxxxxxxxxxxxxxxTetracera nordtiana
Classification:
Unranked: Eudicots.
Unranked: Core Eudicots
Order: Dillenales
Family: Dilleniaceae
Genus: From Tetra, which is Ancient Greek for four and Keras, which is Ancient Greek for a horn. It refers to plants which have four chambers in the fruits with each chamber having a distinct horn.
Species: Maybe named in honour of Leonie Nordton.
Variety: Tetracera nordtiana var. nordtiana is named in honour of Nordton.
Variety: Tetracera nordtiana var. moluccana is from the Latinized vernacular for the plants found in Molaccana.
Variety: Tetracera nordtiana var. wuthiana is unknown, but is derived from a person’s name, likely honoring a botanist or collector of the time.
Common Name: Fire Vine or Small leaf Fire Vine.
Distribution:
Tetracera nordtiana var. nordtiana is found south from the tip of Cape York Peninsula to Paluma Range National Park in far north eastern coastal Queensland. It is found on and east of the Great Dividing Range.
Tetracera nordtiana var. moluccana is found south from the Daintree National Park to the Herbert River in far north eastern coastal Queensland. It is found on and east of the Great Dividing Range. It is also found in New Guinee.
Tetracera nordtiana var. wuthiana is found south from the tip of Cape York Peninsula to Paluma Range National Park in far north eastern coastal Queensland. It is found on and east of the Great Dividing Range.
It is also found in Maluku, New Guinea and Sulawesi
https://avh.ala.org.au/occurrences/search?taxa=Tetracera+nordtiana#tab_mapView
Habitat Aspect Climate:
Tetracera nordtiana prefers full shade to light dappled sun. It grows on slopes in well-developed rainforests. Near rivers and roadsides the plants grow as a sub shrub often flowering at this stage when quite young. The altitude ranges from 5 meter ASL to 1100 meters ASL.
The temperatures range from 7 degrees in July to 36 degrees in January.
The rainfall ranges from lows of 1600mm to 3200mm average per annum.
Soil Requirements:
Tetracera nordtiana prefers better quality sandy loams to medium clays. The soils are usually derived from brown basalts, black basalts, sandstones, granites or metamorphic rocks. The soils pH ranges from 5pH to 6pH. It does not tolerate waterlogged soils however plants in riparian zones may be inundated for short periods during storms. Non saline soils to moderately saline soils are tolerated.
Height & Spread:
Wild Plants: 2m to 7m by 3m to 5m.
Characteristics:
Tetracera nordtiana grows as a tree top, twinning liana with to 50mm diameter stems. The pale grey to pale grey-brown bark is shallow with longitudinal furrows. The smaller stems are reddish-brown turning olive-green and becoming grass-green to mid green near the apex. It is covered in short, rigid stellate hairs which makes the surfaces like sandpaper.
The alternate leaves are often along one side of the stem. The ovate, elliptical or obovate leaves of Tetracera nordtiana measure 60mm to 200mm in length by 40mm to 75mm in width. The bases are cuneate while the apexes are acute. The discolourous laminas are deep grass-green, dull to semi glossy and glabrous on older leaves but covered in short, rigid stellate hairs when young on the upper laminas while the lower laminas are paler. The leaf margins are regularly toothed with 12 to 18 pairs of teeth at the end of the lateral veins. The margins are flat or slightly undulating while the laminas are flat or recurve slightly from the midvein to the margins and decurve slightly close to the apex. The mid vein is strongly prominent while the main laterals are prominent on the lower laminas and are distinctly visible on the upper laminas. The petioles are grooved on the upper surfaces and measure 10mm to 35mm in length.
Inflorescences of Tetracera nordtiana are born on loose or dense panicles from the leaf axils. The panicles measure 30mm to 200mm in length by 60mm to 100mm in diameter. The pale green to deep green peduncles, rachises, peduncules and pedicels are glabrous to sparsely covered in short, rigid, white stellate hairs. The peduncles measure 20mm to 80mm in length, the rachises measure 20mm to 140mm in length while the peduncules measure 10mm to 30mm in length and the pedicels measure 5mm to 7mm in length.
The 6 dimorphic pale green almost white sepals are orbicular, divaricate, and glabrous and measure 3mm to 5.5mm in diameter. The caducous white petals measure 8mm to 9mm in length.
The 25 to 40 exserted filaments are free for their entire length and form a ring at the base surrounding the papillose disc. The filaments measure 3.5mm to 4.5mm in length. The white, filiform, filaments spread like a fan near the apexes for 1mm to 1.3mm and host 2 to 4 small creamy fawn anthers.
The 2 to 4 green pistils are glabrous while the ovaries are green and covered in appressed hirsute hairs. The pistil measures 3mm to 3.5mm in length. Tetracera nordtiana flowers measure 7mm to 10mm in diameter, are sweetly scented and appear from late October to early February.
The fruits of Tetracera nordtiana are ovoidal carpels. The 2 to 4 carpels are covered in fawn appressed hirsute hairs and measure 5mm to 8mm in length by 3mm to 5mm in diameter. The green capsules turn very pale grey externally and white internally when ripe. The calyx lobes are persistent on the ripe fruit. The single glossy black seeds are ovoidal and fleshy. The deep crimson to deep scarlet red arils have 5 or more fimbriate lobes. The fruits ripen from early February to March and hold on the vines till late May.
Wildlife:
Tetracera nordtiana do not appear to have any predators though the ripe fallen fruits are usually heavily infested with Queensland fruit fly. The fruits are also eaten by the grey headed and red headed flying foxes and native rats.
Cultivation:
Tetracera nordtiana can be grown as a small sub shrub or large vine that should be grown in association with other rainforest specie. It is ideal at the edge of a rainforest where it can be pruned to form a small sub shrub or deep in the center of the rainforest and allowed to grow to the top of the highest trees where it will dangle freely from the outer branches. In cultivation it will grow from 20 meters to 30 meters in height by 8 meters to 10 meters in diameter when grown in the midst of a rainforest tree or 1 meter to 2 meters by 2 meters to 3 meters as a sub shrub. As a sub shrub it must be regularly pruned to prevent them finding a way to climb over other shrubs and trees in the vicinity.
It grows well on all better quality soils where deep leaf litter keeps the soil cool and moisture at an even level. If these requirements are met it can cope with temperatures as low as 3 degrees and up to 36 degrees. It is moderately drought resistant once established in their climatic zone.
It often reaches its full potential in just 5 to 6 years and flowers from the fifth year from seed.
This plant makes a very good topiary specimens. It will quickly cover a large fence or pergola and responds rapidly following being pruned into shape.
Propagation:
Seeds: The seeds of Tetracera nordtiana can be removed easily from the fruits.
Sow freshly treated seeds directly into a seed raising mix, keeping them moist not wet. Do not over water as the seeds will rot off before germination takes place. Place the trays in a cool shaded area with 50mm shade cloth in the bush house. When the seedlings are 20mm to 25mm tall, prick them out and plant them into 50mm native tubes using a good organic mix.
As the seedlings roots reach the bottom of the tubes plant them out into their permanent position. Do not delay.
Fertilize using Seaweed, fish emulsion or organic chicken pellets soaked in water and apply the liquid on an alternate basis. Fertilize every 2 months until the plants are established then on an annual basis in September to October to maintain good health, vigour and better flowering.
Further Comments from Readers:
“Hi reader, it seems you use The Bible of Botany a lot. That’s great as we have great pleasure in bringing it to you! It’s a little awkward for us to ask, but our first aim is to purchase land approximately 1,600 hectares to link several parcels of N.P. into one at The Pinnacles NSW Australia, but we need your help. We’re not salespeople. We’re amateur botanists who have dedicated over 30 years to saving the environment in a practical way. We depend on donations to reach our goal. If you donate just $5, the price of your coffee this Sunday, We can help to keep the planet alive in a real way and continue to bring you regular updates and features on Australian plants all in one Botanical Bible. Any support is greatly appreciated. Thank you.”
In the spirit of reconciliation we acknowledge the Bundjalung, Gumbaynggirr and Yaegl and all aboriginal nations throughout Australia and their connections to land, sea and community. We pay our respect to their Elders past, present and future for the pleasures we have gained.
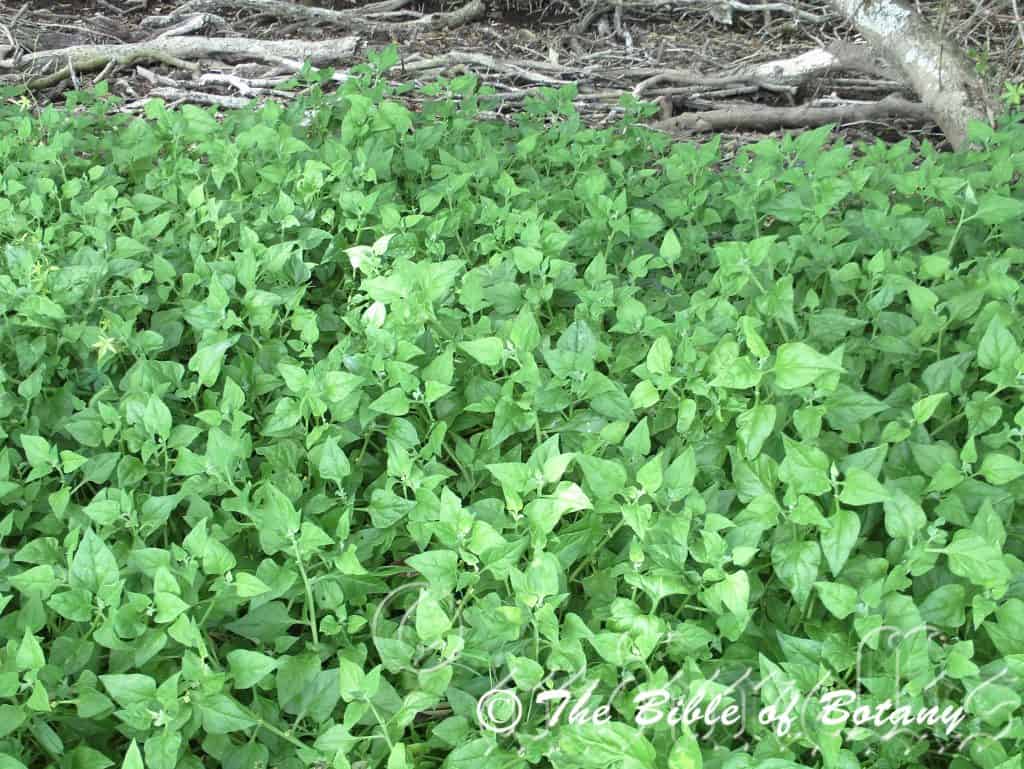
Wynumm foreshore Qld.
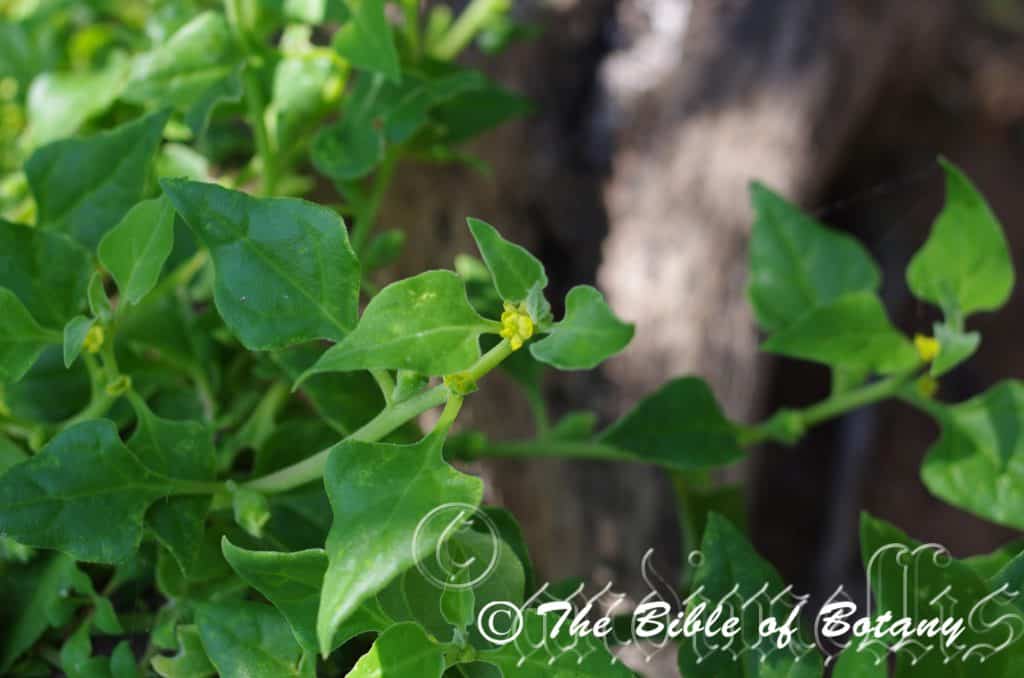
Wynumm foreshore Qld.
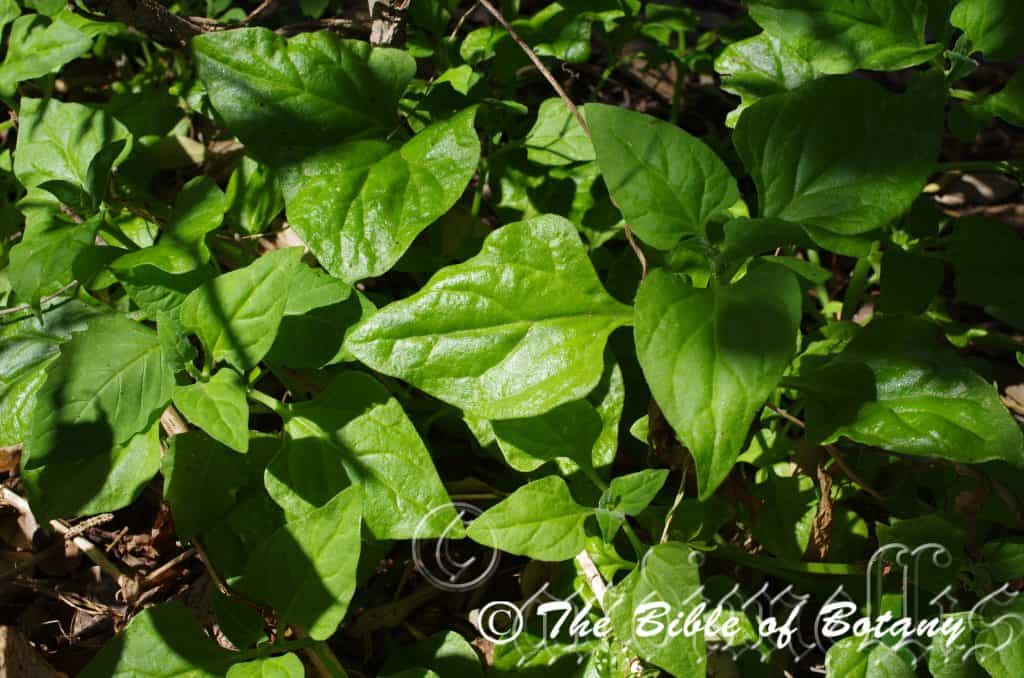
Wynumm foreshore Qld.
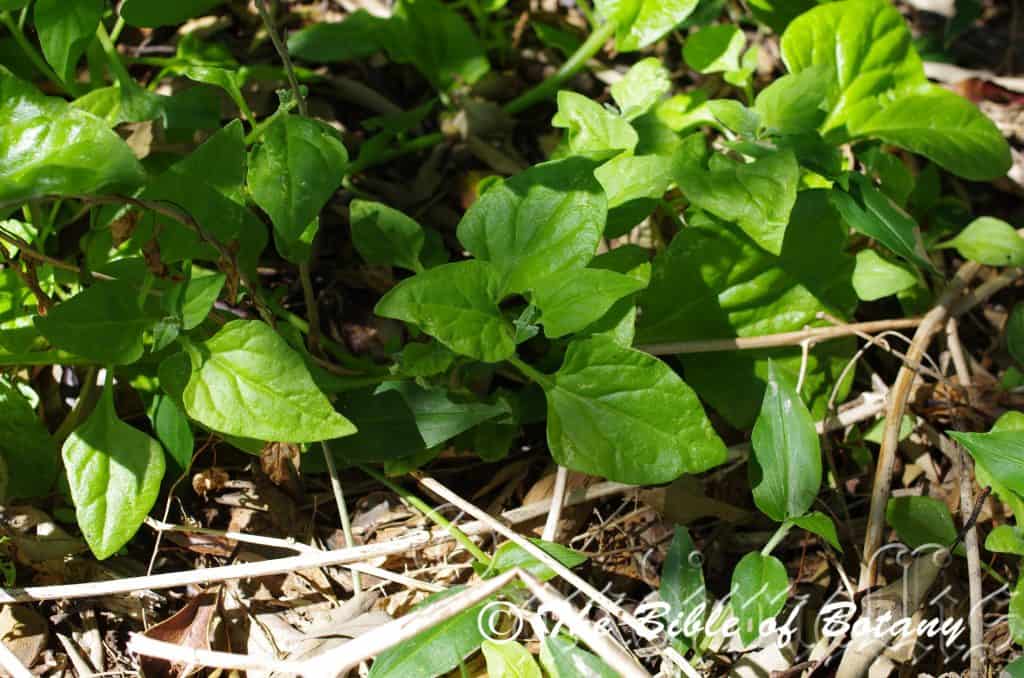
Wynumm foreshore Qld.
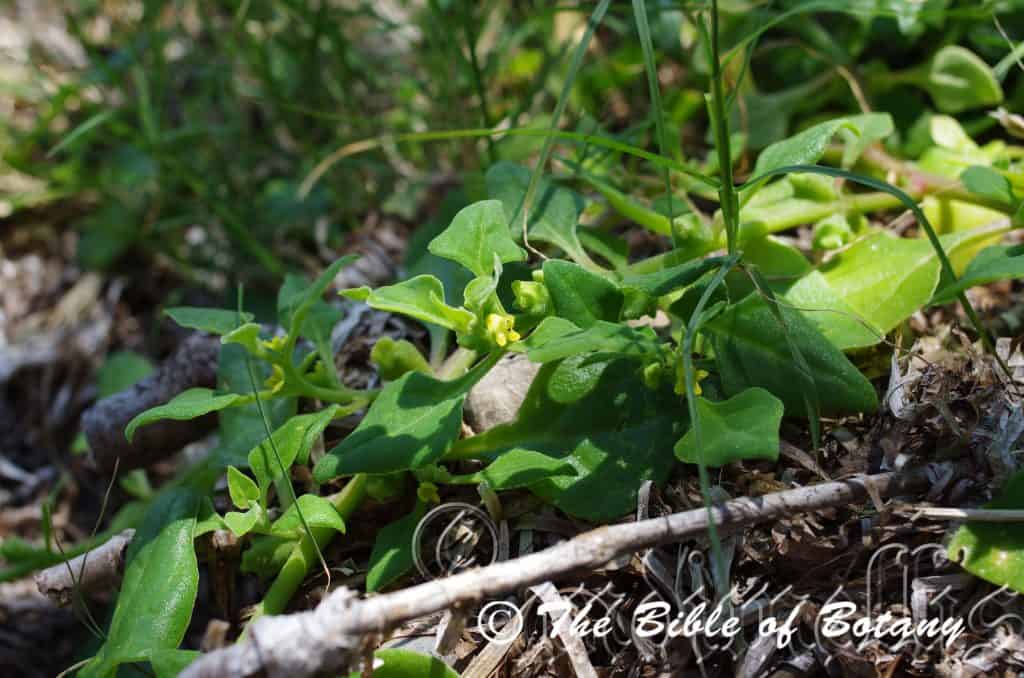
Wynumm foreshore Qld.
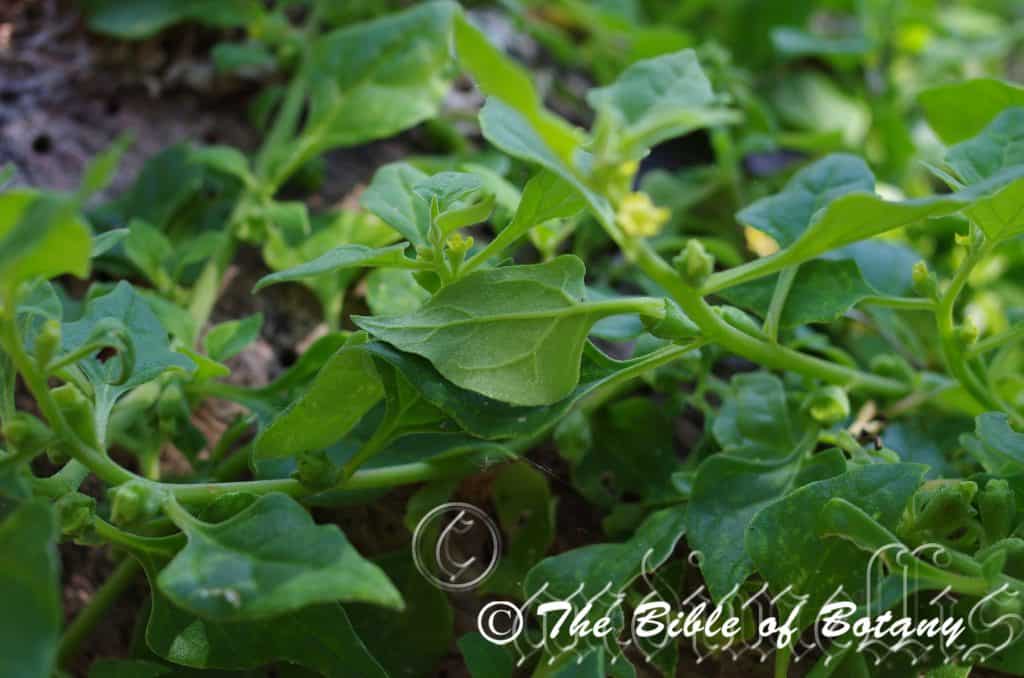
Wynumm foreshore Qld.
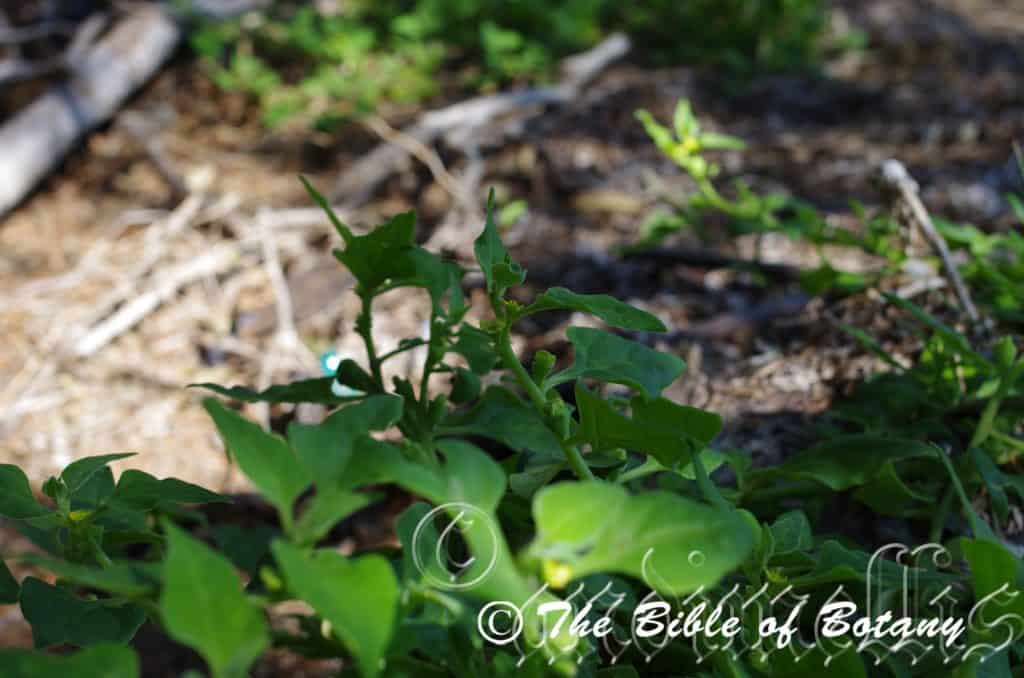
Wynumm foreshore Qld.
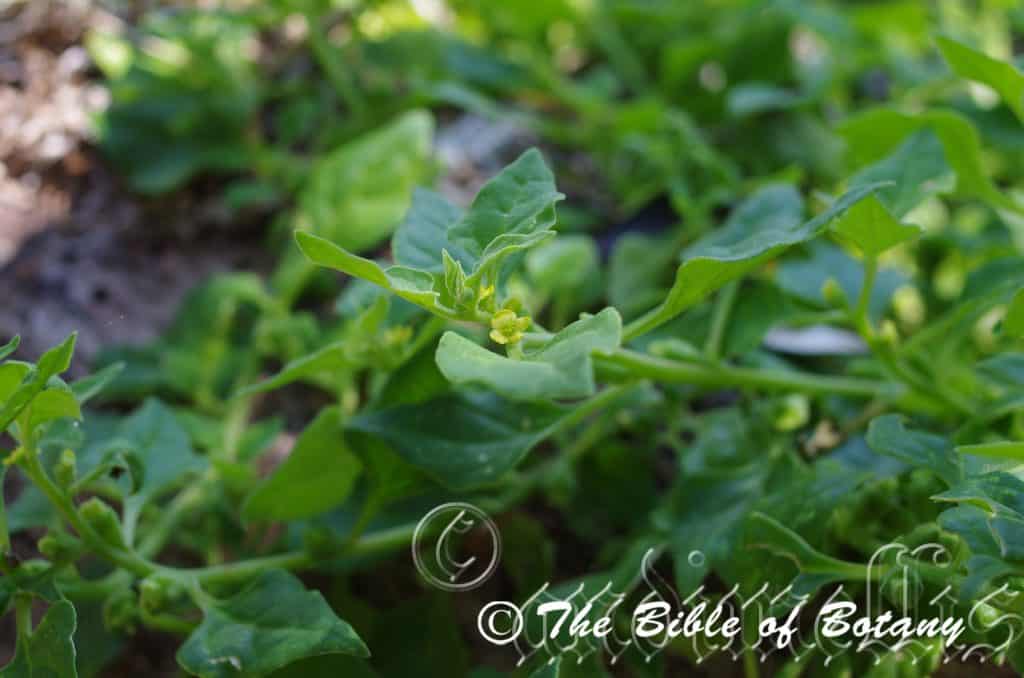
Wynumm foreshore Qld.
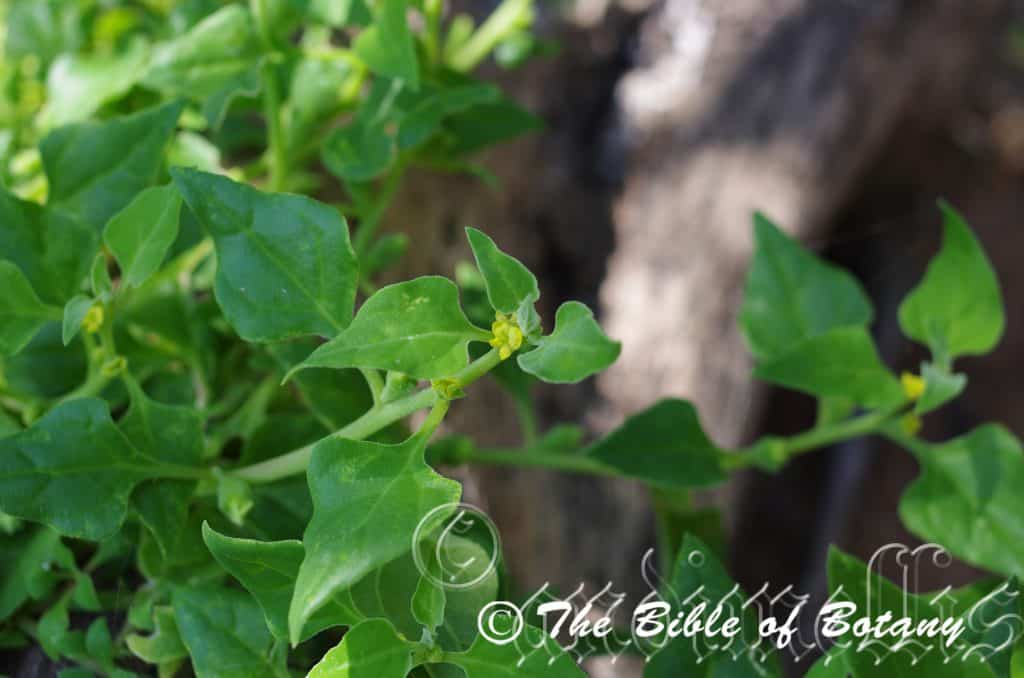
Wynumm foreshore Qld.
xxxxxxxxxxxxxxxxxxxxxxxxxxxxxxxxxxxxxxxxxxxxxxxTetragonia-tetragonioides
Classification:
Unranked: Eudicots
Order: Caryophyllales
Family: Aizoaceae
Subfamily: Aizooideae
Genus: From Tetra, which is Ancient Greek for four and Gona/Gonos, which is Ancient Greek for an angle or bent knee. It refers to structures or organs usually the leaves, which have four distinct angles.
Species: From Tetra, which is Ancient Greek for four and Gona/Gonos, which is Ancient Greek for an angle or bent knee and Eidos, which is Ancient Greek for alike or similar to. It refers to fruits, which resemble and are typical of the Tetragonia genus in that they have four distinct angles or sides.
Common Name: New Zealand Spinach or Warrigal Greens. In the Aboriginal language it is known as Warrigal.
Distribution:
Tetragonia tetragonioides is a widespread species in the south eastern half of Australia. It is found east from saline marshes and lakes in South Australia to the east coast from the Whitsunday Islands in central coastal Queensland to Hobart in Tasmania.
It is also found in New Zealand and many of the Island Nations of the Pacific Ocean including Fiji, New Caledonia.
https://avh.ala.org.au/occurrences/search?taxa=Tetragonia+tetragonioides#tab_mapView
Habitat Aspect Climate:
Tetragonia tetragonioides prefers light dappled shade to full sun. It grows as a prostrate ground cover close to the tidal zone along the coastal salt marshes in estuaries or saline inland lakes. The altitude ranges from 1 meter BSL to 35 meters ASL.
The temperatures range from minus 3 degrees in July to 38 degrees in January.
The rainfall ranges from lows of 200mm to 2000mm average per annum.
Soil Requirements:
Tetragonia tetragonioides prefers coarse sands, fine sands, sandy loam s, light silts to medium silts. The soils are derived from sandstones, alluvium deposits, accumulated beach sands or accumulated silts. The soils pH ranges from 6.5pH to 7.5pH. It does not tolerate waterlogged soils however plants in riparian zones may be inundated for short periods during storms. Non saline soils to extremely saline soils are tolerated as are salt laden winds.
Height & Spread:
Wild Plants: 0.2m to 0.5m by 1m to 2m. Plants may spread over hundreds of square meters under ideal conditions.
Characteristics:
Tetragonia tetragonioides grows as a small prostrate ground cover with fleshy, pale green and succulent stems and leaves. The stems are covered in small white papillose glands.
The opposite to crowded leaves of Tetragonia tetragonioides are rhombic to lanceolate and measure 70mm to 100mm in length by 20mm to 50mm in width. The bases are broad cuneate to tapering attenuate, truncate or rounded while the apexes are broadly acute to broadly acuminate. The concolourous laminas are blue-green to lime-green to grass-green, dull, thinly succulent and papillose. The leaf margins are entire, flat and curve downwards near the apex. The mid vein and main laterals are slightly prominent on both laminas. The petioles are covered in white papillose glands and are flattened at the base. The base is wide spreading while the petioles measures 5mm to 10mm in length.
Inflorescences of Tetragonia tetragonioides are born singularly from the leaf axils. The pale blue-green to grass-green pedicels are covered in white papillose glands and measure 0.6mm to 1mm in length by 0.8mm to 10mm in diameter. The perianths and the 4 or 5 perianth lobes are blue-green to grass-green externally and bright yellow internally. The perianths measure 0.8mm to 1.2mm in length while the perianth lobes measure 1.8mm to 2.2mm in length.
The 10 inserted filaments are free for their entire length and measure 1.5mm to 2mm in length. The filaments are bright yellow while the anthers are also bright yellow.
The white bright yellow style and stigma are glabrous while the ovary is grass-green. The pistil measures 1.5mm to 2mm in length. Tetragonia tetragonioides flowers appear all year with a peak in late September to late October and again early February to mid-March depending on rain.
The fruits of Tetragonia tetragonioides are sub globose, tetragonal berries. The berries are glabrous, leathery to almost woody and have 4 wings. They measure 8mm to 10mm in length by 10mm to 12mm across at the apex. The green capsules turn pale brown to mid grey external and internally when ripe. The calyx lobes are persistent on the ripe fruit. The small, pyriform seeds are pale brown. The fruits ripen all year but mainly in the warmer months and after good local rains.
Wildlife:
I have only observed 1 species of butterfly Spoladea recurvalis, on the Tetragonia tetragonioides but have been informed reliably that the common cabbage white, Pieris rapae also feeds on the plants occasionally.
The leaves and stems taste similar to salted spinach and can be eaten in the same way as ordinary spinach or Asian vegetables. The salt flavour is consistent even if the plants are grown well away from saline conditions. Care should be taken if you are on an oxalic free or low oxalic acid diet as the leaves and stems are high in oxalic acid. Most of the oxalic acid can be removed by blanching. Place the leaves and stems in boiling water for 1 minute then discard the water. Rinse and cook as normal by steaming or in stir fry.
Cultivation:
Tetragonia tetragonioides is a good garden addition for small gardens or vegetable patches. It is ideal for any sunny position on any soil as long as some moisture can be retained in the soil at all times. In cultivation it will grow from 0.2 meters to 0.3 meters in height by 1.2 meters to 2 meters in diameter when grown in the open.
It grows exceptionally well on lighter soils where some leaf litter keeps the soil cool and moisture at an even level. If these requirements are met it can cope with temperatures as low as minus 3 degrees and up to 40 degrees. It is moderately drought resistant.
It makes an interesting subject next to a path or between rocks on a sunny bank as a fill in plant.
Tetragonia tetragonioides should be treated as an annual with new plants set out on an annual basis.
Propagation:
Seeds: The seeds of Tetragonia tetragonioides can be removed easily from the fruits. Sow fresh seeds directly into a seed raising mix, keeping them moist not wet. Do not over water as the seeds will rot off before germination takes place. Place the trays in a cool shaded area with 50mm shade cloth in the bush house. When the seedlings are 20mm to 25mm tall, prick them out and plant them into 50mm native tubes using a good organic mix.
As the seedlings roots reach the bottom of the tubes plant them out into their permanent position. Do not delay.
Cuttings: Use 100mm long half ripened material when growing from cuttings from the present season’s growth, which have at least 2 pairs of nodes. They can be taken at any time of the year except where it is very cold or frosts occur. Remove half the leaves from the base being careful not to tear the bark. Place the cuttings in a sterile mix and keep moist. Place the tray or tubes in a warm sunny position where the temperatures remain between 12 and 30 degrees. Cuttings should strike in 2 or 3 weeks. When the cuttings have obviously struck and have developed good roots treat them as for seedlings. I have struck older cuttings by placing them in a plastic bag and leaving them on the dash board of the car for a week and on returning had a bag full of new shoots with roots.
Fertilize using seaweed, fish emulsion or organic chicken pellets soaked in water on an alternate basis. Fertilize every two months until the plants are established then annually in early September to October to maintain better colour, health, vitality and flowering.
Further Comments from Readers:
“Hi reader, it seems you use The Bible of Botany a lot. That’s great as we have great pleasure in bringing it to you! It’s a little awkward for us to ask, but our first aim is to purchase land approximately 1,600 hectares to link several parcels of N.P. into one at The Pinnacles NSW Australia, but we need your help. We’re not salespeople. We’re amateur botanists who have dedicated over 30 years to saving the environment in a practical way. We depend on donations to reach our goal. If you donate just $5, the price of your coffee this Sunday, We can help to keep the planet alive in a real way and continue to bring you regular updates and features on Australian plants all in one Botanical Bible. Any support is greatly appreciated. Thank you.”
In the spirit of reconciliation we acknowledge the Bundjalung, Gumbaynggirr and Yaegl and all aboriginal nations throughout Australia and their connections to land, sea and community. We pay our respect to their Elders past, present and future for the pleasures we have gained.
xxxxxxxxxxxxxxxxxxxxxxxxxxxxxxxxxxxxxxxxxxxxxTetrarrhena juncea
Classification:
Unranked: Monocot
Class: Commelinids
Order: Poales
Family: Poaceae
Genus: From Tetra, which is Ancient Greek for four and Ahrenn, which is Ancient Greek for a man. It refers to flowers, which have four stamens.
Species: From Juncus, which is Ancient Greek for a rush or Jingere, which is Latin for to tie or bind. It refers to plants, which thrive wet places with reed like foliage which was used for weaving and tie articles together.
Common Name: Wiry Rice Grass.
Distribution:
Tetrarrhena juncea is found south from the Lamington National Park in southern Queensland to the Grampians in South western Victoria with a further population further west on Mount Gambier in southern South Australia.
In Tasmania it is found from Brickmakers Bay in the north west to Mount Maurice Forest Reserve.
https://avh.ala.org.au/occurrences/search?taxa=Tetrarrhena+juncea#tab_mapView
Habitat Aspect Climate:
Tetrarrhena juncea prefers full sun to light dappled shade. It grows in open woodlands or in native grasslands along the coast. The altitude ranges from 5 meters BSL to 870 meters ASL.
The temperatures range from minus 3 degrees in August to 38 degrees in January.
The rainfalls range from lows of 800mm to an average of 3000mm.
Soil Requirements:
Tetrarrhena juncea prefers to grow on deep sandy loams to medium clays. The soils are usually derived from decomposed sandstones, granites, brown basalts, black basalts, metamorphic rocks, alluvial deposits or accumulated peaty beach sands. The soils pH ranges from 4.5pH to 7pH. It does not tolerate waterlogged soils. Non saline soils to moderately saline soils are tolerated.
Height & Spread:
Wild Plants: 0.6m to 1.5m by 0.5m to 0.9mm.
Characteristics:
Tetrarrhena juncea grows as an erect tufted perennial with many wiry stems. The stems are smooth and glabrous. The ligule is a short ciliate or glabrous membranous rim. Tetrarrhena juncea linear leaves are grow from the culms and measure 10mm to 500mm in length by 1mm to 7mm in width. The bases are sheathed around the stem while the apexes are narrow acute. The concolourous laminas are deep grass-green and slightly scabrous. The laminas are flat.
The inflorescence are narrow racemes that measure 60mm to 100mm by 4mm to 6mm in diameter. There are 10 to 16 disjunct but evenly spaced spikelets along the raceme.
The spikelets measure 5mm to 7mm in length. The spikelets are sessile to very shortly pedicellata.
The similar glumes are membranous lower glumes have an acute or obtuse apex. There are 1 to 3 keels with 2 or 9 nerves.
The lower 2 or 3 lemmas are empty, without keels and have 7 faint nerves. The fertile lemmas are without keels and have 7 nerves. The lemmas are without awns. The palea has a single keel with a single nerve acute and is membranous. The flowers appear from November to December.
There are filiform filaments are white while the large versatile anthers are creamy yellow.
The fruits are ellipsoidal to fusiform grains. The grains turn pale creamy-fawn when ripe and measure 3mm to 4mm in length.
Wildlife:
Tetrarrhena juncea wildlife is unknown to the author.
Seeds and leaves are apparently nutrient rich for stock but cannot be overgrazed and unfortunately supply little by way of volume.
Propagation:
Seeds: Tetrarrhena juncea seeds can be sown directly onto a seed raising mix. Do not cover the seeds but pat them down on the surface as it is light sensitive. Place the tray in a warm sunny position. When the seedlings are 30mm to 50mm tall, prick them out and plant them into 50mm native tubes using a good organic mix.
Once the seedlings reach 100mm to 150mm in height they can be planted out into their permanent position.
It can also be planted using a seed spreader.
Fertilize using seaweed, fish emulsion or organic chicken pellets soaked in water on an alternate basis. Fertilize every two months until the plants are established then annually in early September to October to maintain better colour, health, vitality and flowering.
Further Comments from Readers:
“Hi reader, it seems you use The Bible of Botany a lot. That’s great as we have great pleasure in bringing it to you! It’s a little awkward for us to ask, but our first aim is to purchase land approximately 1,600 hectares to link several parcels of N.P. into one at The Pinnacles NSW Australia, but we need your help. We’re not salespeople. We’re amateur botanists who have dedicated over 30 years to saving the environment in a practical way. We depend on donations to reach our goal. If you donate just $5, the price of your coffee this Sunday, We can help to keep the planet alive in a real way and continue to bring you regular updates and features on Australian plants all in one Botanical Bible. Any support is greatly appreciated. Thank you.”
In the spirit of reconciliation we acknowledge the Bundjalung, Gumbaynggirr and Yaegl and all aboriginal nations throughout Australia and their connections to land, sea and community. We pay our respect to their Elders past, present and future for the pleasures we have gained.
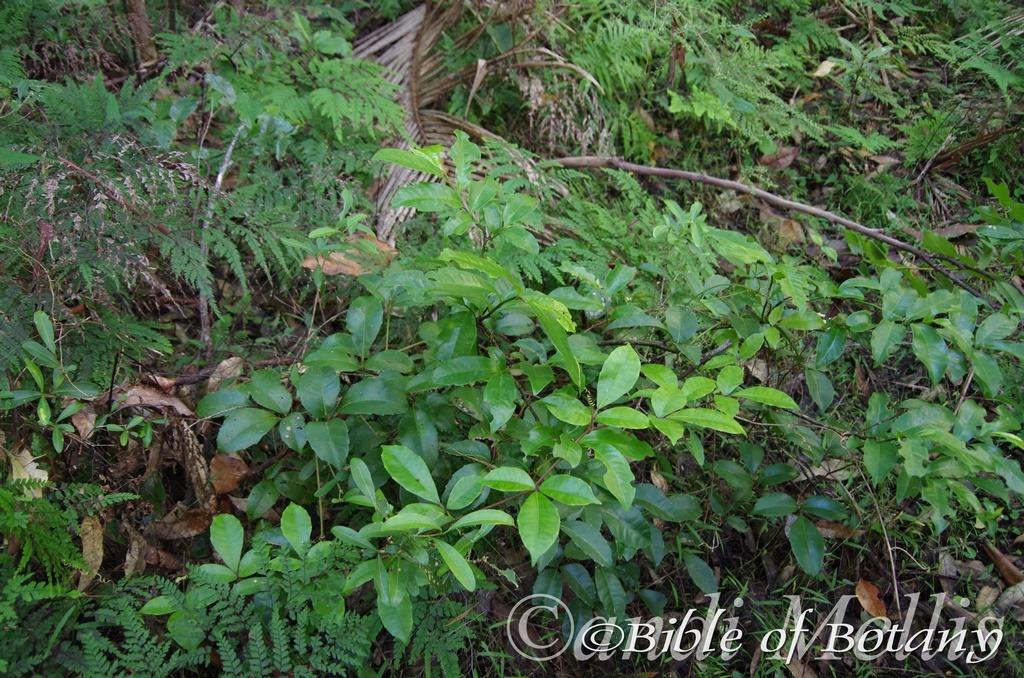
Pigeon Gully National Park NSW

Pigeon Gully National Park NSW

Pigeon Gully National Park NSW
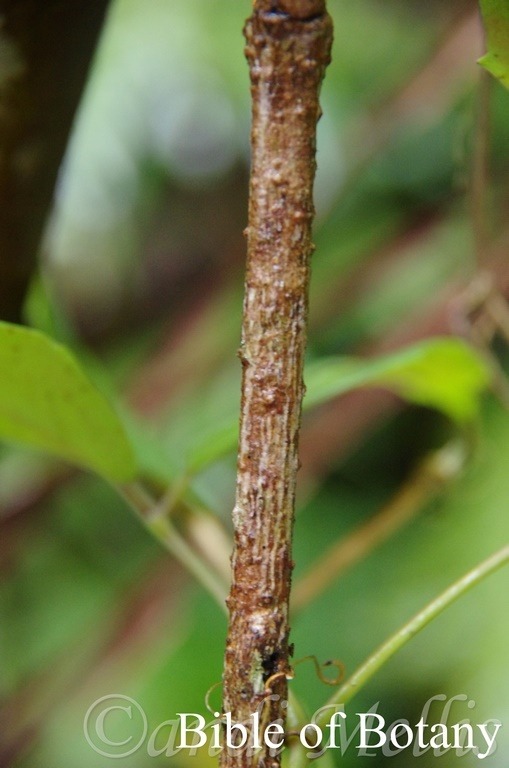
Wombat Creek Conservation Park NSW
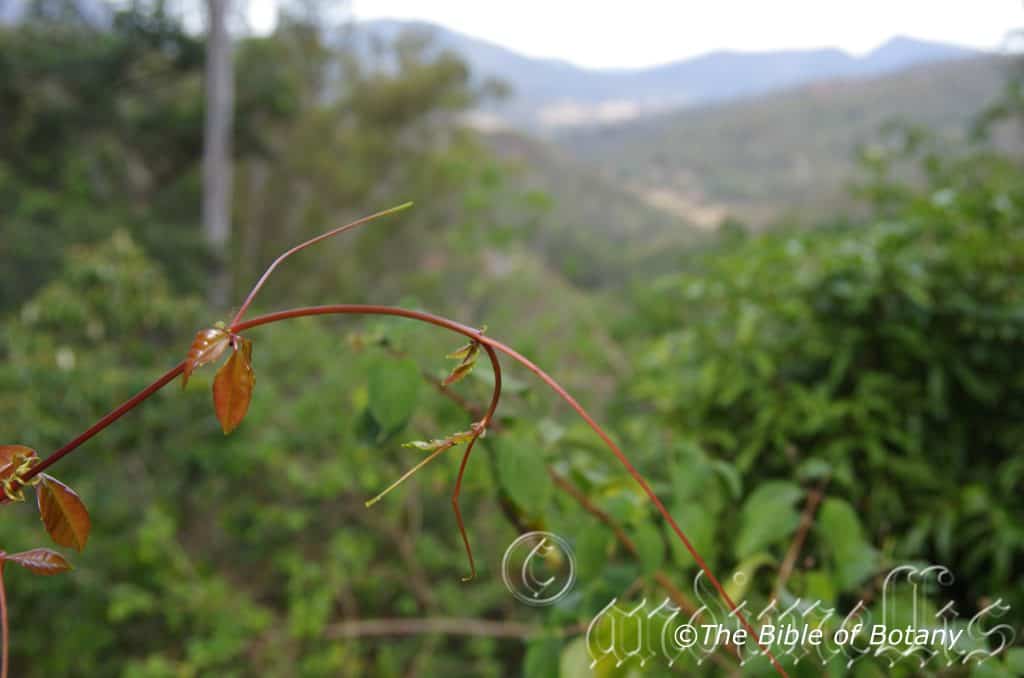
Border Ranges National Park NSW
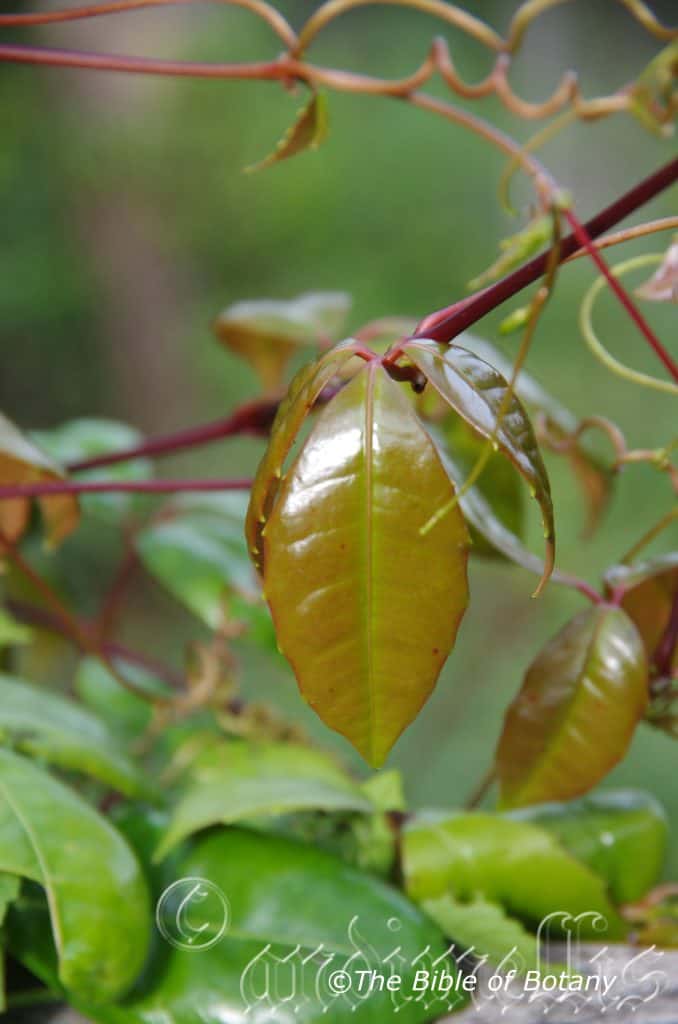
Border Ranges National Park NSW
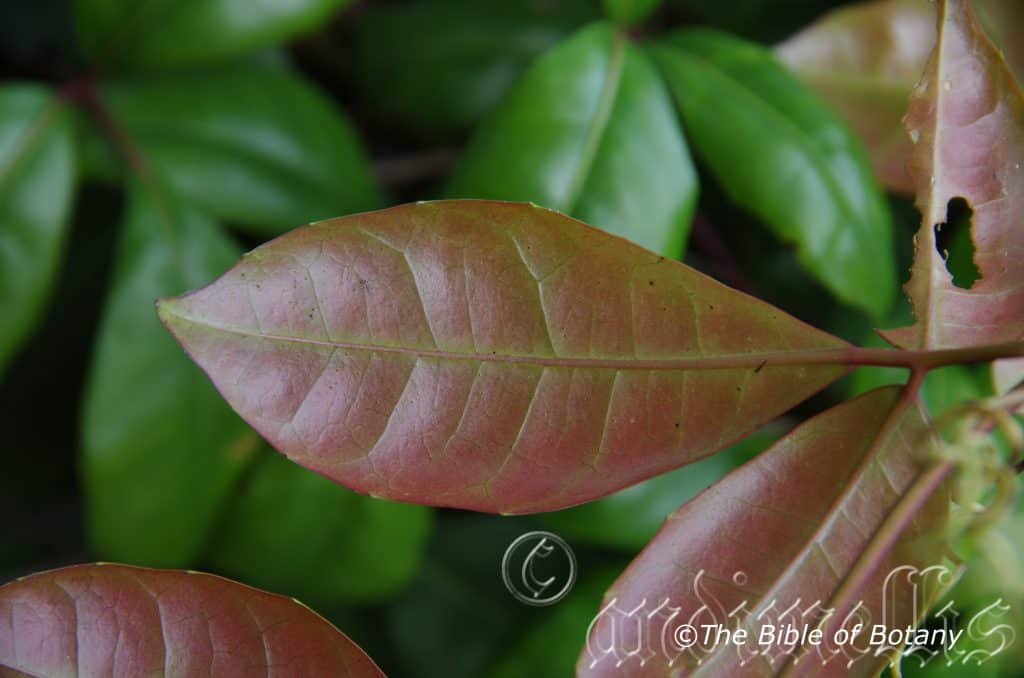
Border Ranges National Park NSW
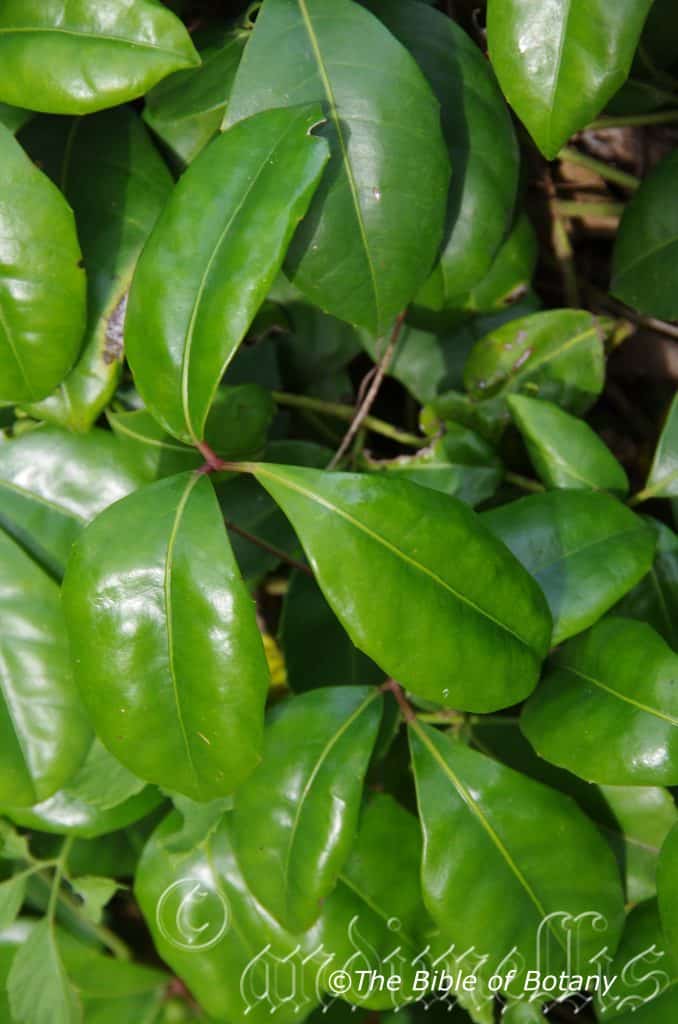
Border Ranges National Park NSW
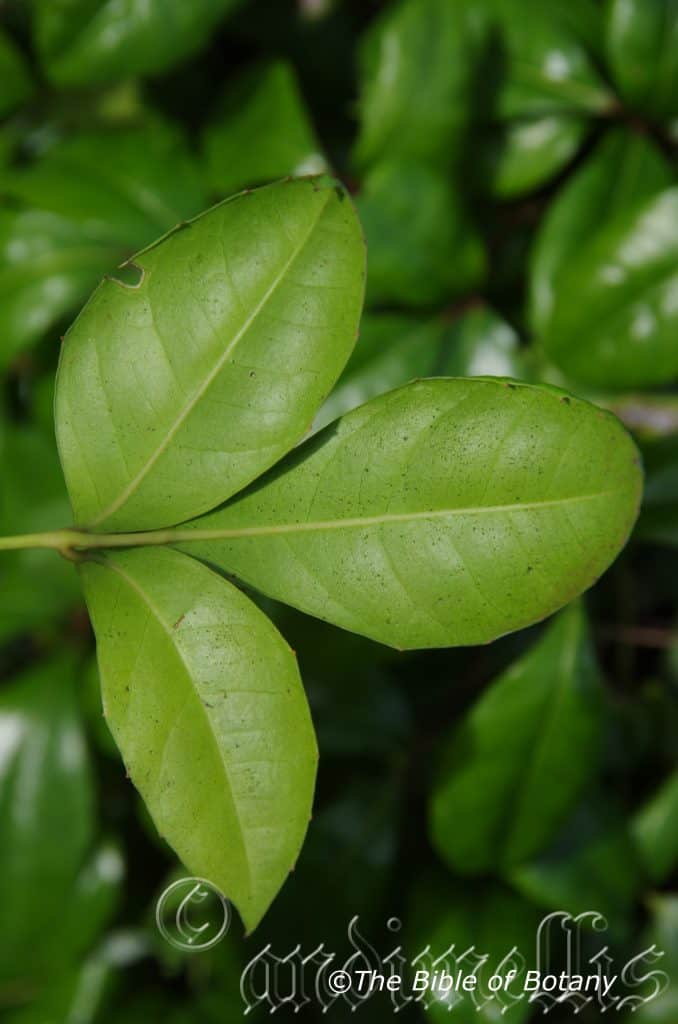
Border Ranges National Park NSW

Wombat Creek Conservation Park NSW
Pigeon Gully National Park NSW

Wombat Creek Conservation Park NSW
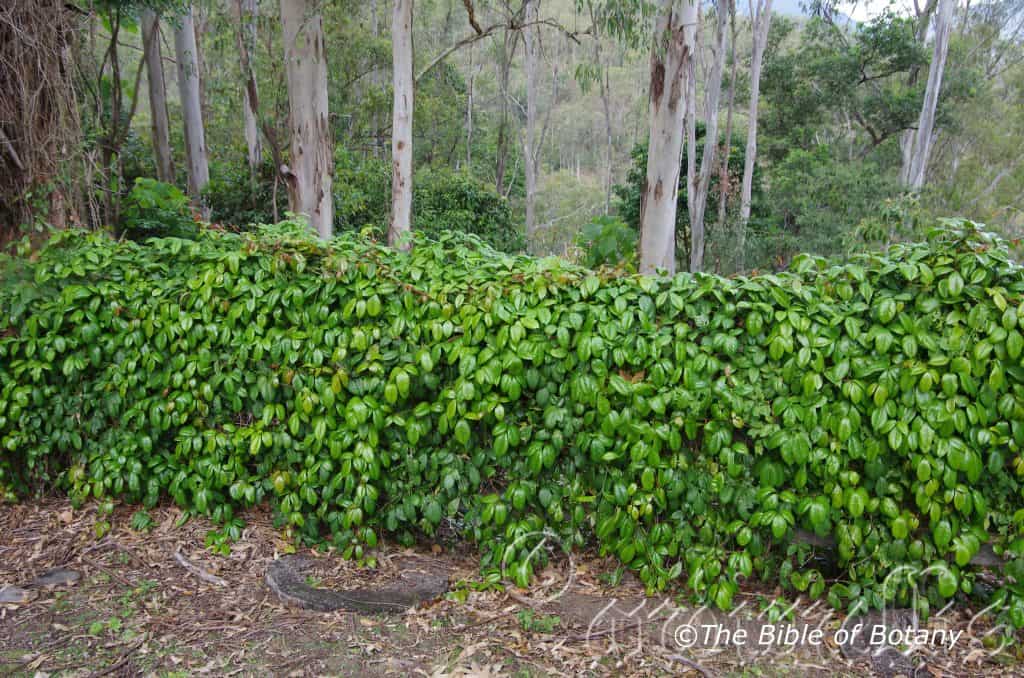
Border Ranges National Park NSW
xxxxxxxxxxxxxxxxxxxxxxxxxxxxxxxxxxxxxxxxxxxxTetrastigma nitens
Classification:
Unranked: Eudicots
Class: Rosids
Order: Vitales
Family: Vitacaceae
Subfamily: Vitoideae
Genus: From Tetra, which is Ancient Greek for four, Stig, which is Greek/Latin for a twig or stem and Ma, which is Greek/Latin for to cause a resulting action. It refers to flowers, which have four stigmas.
Species: From Nitere/Nitidus, which is Latin for shiny, bright or polished. It refers to leaves and stems which are bright and shiny.
Common Name: Three Leaf Grape or Shinning Leaf Grape.
Distribution:
Tetrastigma nitens is mainly found on the eastern side of the Great Dividing Range south from Cooktown on Cape York Peninsula to Gosford in central coastal New South Wales.
https://avh.ala.org.au/occurrences/search?taxa=Tetrastigma+nitens#tab_mapView
Habitat:
Aspect / Climate:
Tetrastigma nitens prefers full shade to light dappled sun. It grows on slopes in well-developed rainforests or where there are breaks in the canopy in well-developed rainforests close to the coast. The altitude ranges from 3 meter ASL to 800 meters ASL.
The temperatures range from minus 2 degrees in July to 36 degrees in January.
The rainfall ranges from lows of 900mm to 3200mm average per annum.
Soil Requirements:
Tetrastigma nitens prefers better quality sandy loams to medium clays. The soils are usually derived from brown or black basalts, shale, sandstone, metamorphic rocks or limestone. The soils pH ranges from 6pH to 8pH. It does not tolerate waterlogged soils. Non saline soils to high end of moderately saline soils are tolerated as are salt laden winds.
Height & Spread:
Wild Plants: 12m to 30m by 5m to 8m.
Characteristics:
Tetrastigma nitens grows as an under story liana or high in the foliage of rainforest trees. It has deep red-brown with deep longitudinal furrows. The stems are twinning, pale grey olive-green to pale brown olive-green, and covered in raised farinaceous lumps. The smaller stems are pale reddish pink to rusty red and glabrous. The simple or 2 branched tendrils are leaf opposed.
The alternate, trifoliate leaves of Tetrastigma nitens measure 80mm to 185mm in length by 60mm to 170mm in width overall. The leaflets are broadly elliptical to obovate and measure 55mm to 140mm in length by 25mm to 80mm in width. The small stipules are caducous. The petioles and petiolules are deep green to olive-green. The petioles measure 0.5mm to 50mm in length while the petiolules measures 2mm to 20mm in length with the center petiolule being the longest. The bases are cuneate while the apexes are acute to acuminate. The concolourous laminas are sea-green, semi glossy to dull and glabrous. The leaf margins are coarsely toothed, while the laminas recurve from the mid vein to the margins or when flat may decurve slightly at the margins. The laminas decurve to the apexes. The mid vein and main laterals are prominent on the lower laminas and are often purplish-pink. It is distinctly visible on the upper laminas.
The dioecious inflorescences of Tetrastigma nitens are born on compound or helicoid cymes from the leaf axils. The pale green, deep green, reddish-green or red peduncles, rachises, pedunculata’s and pedicels are glabrous to sparsely covered in short white hirtellous hairs. The inflorescences measure 20mm to 60mm in length by 20mm to 45mm in width overall while the pedicels measure 3.5mm to 5.5mm in length.
The male flowers measure 5mm to 7mm in diameter. The pale green, pale yellow or reddish calyx and calyx lobes if present on the calyxes are minute, erect, and covered in short white hirtellus hairs. The pale green, pale yellow or reddish petals are narrowly ovate to narrowly elliptical, strongly recurved and concaved near the apexes. The petals which are covered in short white hirtellous hairs externally and are glabrous internally measure 2.5mm to 3mm in length by 1mm to 1.5mm in width.
The 4 exserted filaments are free for their entire length, opposite the petals on a pseudo ovary, almost divaricate and measure 2mm to 2.6mm in length. The filaments are white, creamy green, creamy yellow or creamy red and taper from the base to the yellow anthers. The oblong anthers measure 0.4mm to 0.5mm in length by 0.3mm in width.
The female flowers measure 4mm to 6mm in diameter. The pale green, pale yellow or reddish calyx and calyx lobes are minute, obtuse, erect, and covered in short white hirtellus hairs. The pale green, pale yellow or reddish petals are narrowly ovate to narrowly elliptical, strongly recurved and slightly concaved near the apexes. The petals which are covered in short white hirtellous hairs externally and are glabrous internally measure 2.5mm to 4mm in length by 1mm to 1.2mm in width.
The 4 staminodes are opposite the petals and measure 0.4mm to 0.5mm. The white style and stigma are glabrous while the ovary is green. The broadly conical pistil is mid green, semi glossy and measures 1mm to 1.4mm in length by 1.5mm to 1.8mm in diameter. Tetrastigma nitens flowers appear from late November to early February.
The fruits of Tetrastigma nitens are globose to obovoidal berries. The large berries are glabrous and covered in white film and measure 12mm to 16mm in length by 11mm to 13mm in diameter. The green berries turn deep purple black externally and pale translucent green internally when ripe. The calyx lobes are persistent on the ripe fruit. The 2 to 4 grey seeds are flattened ellipsoidal and fleshy. The seeds measure 7mm to 8mm in length by 4mm to 6mm in diameter. The fruits ripen from early January to March and hold on the vines till eaten by birds.
Wildlife:
Tetrastigma nitens is the host to a number of small butterflies and native bees when in flower. Fruits are eaten by Bower Birds, Cat Birds, Honey Eaters, Native Bush Rats, Native Mice, Possums and small wallabies. The leaves are also eaten by Wallabies and are host to the harlequin moth Agarista agricola, which is considered a pest in the viticulture industry. While being a pest to the viticulture industry this moth is very beautiful and is an Australian native moth.
The fruit was eaten by aborigines. They apparently have a sweet, pleasant taste similar to grapes. Many plants produce silicon rods which can cause irritation to the tongue and throat after eating. If this occurs there are three things you can do. One is to learn how to eat the fruits without breaking the silicon rods and I can assure you this is an art that takes some time to perfect. Two select forms that do not contain the irritations and select cuttings for propagating purposes. Three don’t eat the fruit which is difficult to pass up when you see a plant covered in fruit and you love grapes.
Jams and conserves can be made from the fruits. The fruits contain good quantities of pectin so a thick jam or jelly can be made easily. The silicon rods or irritating chemicals are not a problem as these are broken and destroyed during the boiling process. In my opinion the jam is of excellent quality rich dark and pleasant to the palate but not overly sweet like most jams.
Cultivation:
Tetrastigma nitens is a vigorous large ground cover or creeper for larger areas, fences, in court yards, near water features or trellises. It needs some shade and even moisture to look at its best and to maintain a dense look. In the garden it can fill that difficult spot in the shade, on heavy soils or where there is hot sun and dense shade variation over the different seasons.
Tetrastigma nitens is a very good plant for indoors tolerating darker positions than most plants. They do not like central heating of any kind and will show its dissatisfaction by aborting its leaves. Rotate the plant so a different side faces the light every couple of days to a week. This will ensure the plant grows evenly and not to one side.
It is particularly useful scrambling over large mounds where they can attract and feed the birds. If used in this manner be aware of cats as low lying plants will attract the birds but leave them venerable and exposed to cat attack.
It often reaches its full potential of 5 meters by 5 meters in just 3 years and flowers from the second or third year. It flowers best following a wet winter. Cissus hypoglauca is almost as good as Cissus hypoglauca for producing good quantities of quality fruit year after year.
This specie makes an excellent hedge row being dense and evergreen.
Plants must be pruned annually to maintain a smaller compact bushy plant. If this is not done in favourable soils and weather they will very quickly form the giant liana it is known for if they can reach a support to climb on.
Tetrastigma nitens responds very quickly to regular tip pruning or aggressive pruning on an annual basis which is best carried out immediately after any late frosts or in mid-September.
These plants can be attacked on a regular basis by the Harlequin moth. If and when this occurs wait until the larvae pupate then prune back about 50mm of the stems, water well and fertilize two or three days later.
Propagation:
Seeds: Tetrastigma nitens seeds require no treatment before sowing.
Sow into a seed raising mix and cover the fresh seeds with 5mm of the mix. Water in well and keep moist. Place the tray where some sun light is available.
When the seedlings are 25mm to 40mm tall, prick them out and plant them into 50mm native tubes using a seed raising mix.
Once the seedlings reach 150mm to 200mm in height plant them out into their permanent position. Mass plantings can be achieved by planting them at 3 meter to 3.5 meter centers. For trellis or low fence planting, plant at 3.5 to 4 meter centers.
Cuttings:
Fortunately Tetrastigma nitens cuttings are easy to strike and need to be taken where good fruiting forms are required. Use 100mm to 200mm long semi hardwood or hardwood cuttings from present season’s growth. Take them in warmer months of the year. Remove half the leaves from the bottom section being careful not to tear the bark.
1 Prepare the cutting mix by adding two thirds sharp clean river sand, one third peat or one third perlite. These ingredients must be sterilized,
2 Select good material from non diseased plants,
3 Select semi green stems for cuttings. Look for a stem with two or three nodes,
4 Place the cutting on a flat, hard surface, and make a clean cut down one side of the cutting at the base for 10mm with a sharp sterile knife or razor blade. – This scarification of the node will increase the chances of roots emerging from this spot. Now remove all but one or two the leaves, leaving the apex leaves in tact. If the leaves are very large in proportion to the stem, cut off the apical halves.
5 Fill a saucer with water, and place a little medium strength rooting hormone into another container like a milk bottle top. Dip the node end of the cutting into the water and then into the rooting hormone. Tap off any excess hormone,
6 Use a small dipple stick or old pencil to poke a hole into the soilless potting mix. Ensure the hole is slightly larger than the stem diameter and be careful not to wipe the rooting hormone off the cuttings base. Place 2 to 4 cuttings in each of the 50mm native tubes,
7 I like to place the tubes in bucket with holes drilled in the bottom to allow excess water to drain out. A plastic bag that fits over the bucket is ideal to help maintain temperature and moisture. Place in a semi shaded, warm position like under 50mm shade cloth.
8 When the cuttings have struck, open the bag to allow air circulation for a few days to a week,
9 Once hardened off remove the cuttings from the bag and allow to further hardening for a few more days to a week,
10 Transplant into a good potting mix to grow on.
Fertilize using seaweed, fish emulsion or organic chicken pellets soaked in water on an alternate basis. Fertilize every two months until the plants are established then twice annually in early September or March to maintain health, vitality and better flowering.
Indoor or Potted On:
Sawdust or sand mixes are too well draining unless the sawdust has completely composted down where it exhibits a texture like plasticine to the touch. Moisture can be squeezed out between the fingers yet it remains moist. I find this a great basis to start with.
Mix equal parts of the well decomposed saw dust with the above feel with perlite and vermiculite. To this add two parts sharp clean sand, one part compost and one part good crusher dust from a basalt rock quarries. Preferably black basalt but both are good. Make sure the sand comes from a source that does not have salt.
The decomposed Sawdust in this condition creates the moisture retention and holds nutrient in. The perlite and vermiculite make the mix neutral and both have great water holding capacity without shrinkage with age. The sand creates good drainage and is good for good healthy root development. The crusher dust adds vital minerals which the plants need.
Indoor plants need good light and ventilation without drying breezes or wind and to be watered with rainwater to avoid accumulation of toxic salts.
Fertilize using seaweed, fish emulsion or organic chicken pellets soaked in water on an alternate basis. Fertilize every two months until the plants are established then annually in September to October to maintain better colour, health, vitality and flowering.
Further Comments from Readers:
“Hi reader, it seems you use The Bible of Botany a lot. That’s great as we have great pleasure in bringing it to you! It’s a little awkward for us to ask, but our first aim is to purchase land approximately 1,600 hectares to link several parcels of N.P. into one at The Pinnacles NSW Australia, but we need your help. We’re not salespeople. We’re amateur botanists who have dedicated over 30 years to saving the environment in a practical way. We depend on donations to reach our goal. If you donate just $5, the price of your coffee this Sunday, We can help to keep the planet alive in a real way and continue to bring you regular updates and features on Australian plants all in one Botanical Bible. Any support is greatly appreciated. Thank you.”
In the spirit of reconciliation we acknowledge the Bundjalung, Gumbaynggirr and Yaegl and all aboriginal nations throughout Australia and their connections to land, sea and community. We pay our respect to their Elders past, present and future for the pleasures we have gained.
xxxxxxxxxxxxxxxxxxxxxxxxxxxxxxxxxxxxxxxxxxxxxxxxTetratheca juncea
Classification:
Unranked: Eudicots
Unranked: Rosids
Order: Oxalidales
Family: Eleocarpaceae
Genus: From Tetra, which is Ancient Greek for four and Theke, which is Ancient Greek or Theca, which is Latin for a box or case. It refers to fruits, which have four individual carpels that resemble little boxes.
Species: From Juncus, which is Ancient Greek for a rush or Jingere, which is Latin for to tie or bind. It refers to plants, which thrive wet places with reed like foliage which was used for weaving and tie articles together.
Common Name: Pink Reed Bells.
Distribution:
Tetratheca juncea is restricted to a small area on the eastern side of the Great Dividing Range from Bulludella to Cooks River with a disjunct population on the Edwards Plain Flora Reserve in coastal New South Wales.
https://avh.ala.org.au/occurrences/search?taxa=Tetratheca+juncea#tab_mapView
Habitat Aspect Climate:
Tetratheca juncea prefers light dappled shade to full sun. It grows in dry sclerophyll forests, dry wallum heaths, and moist wallum heaths along the coast or on ridge tops marshes. The altitude ranges from 5 meter ASL to 500 meters ASL.
The temperatures range from minus 2 degrees in July to 34 degrees in January.
The rainfall ranges from lows of 900mm to 3200mm average per annum.
Soil Requirements:
Tetratheca juncea prefers better quality sandy loams to medium clays. The soils are derived from orange, red or brown sands or white peaty sands. The soils are derived from decomposed sandstone or accumulated beach sands. The soils pH ranges from 5pH to 7.5pH. It does not tolerate waterlogged soils. Non saline soils to the high end of moderately saline soils are tolerated as are salt laden winds.
Height & Spread:
Wild Plants: 0.2m to 2m by 0.5m to 2m.
Characteristics:
The weak stems on Tetratheca juncea are straight, thin, bright sea-green, glabrous and have 2 or 3 narrow wings. The plants develop small whitish tubers beneath the ground.
The alternate, triangular leaves of Tetratheca juncea are usually reduced to small scales that measure 2mm to 3mm in length by 2mm to 3mm in width. At times the leaves are narrowly elliptical and measure 15mm to 20mm in length by 5mm to 6mm in width. The concolourous laminas are mid sea-green, dull and glabrous on the upper lamina while the lower lamina is paler and dull. The leaf margins are entire, flat or slightly recurved. The mid vein and main laterals are slightly prominent on the lower laminas. The petioles measure 0mm to 0.5mm in length.
The inflorescences of Tetratheca juncea are born singularly or paired from the leaf axils. The lipstick pink pedicels are glabrous and measure 6mm to 10mm in length. The 4 burgundy-red orbicular sepals measure 1mm to 1.5mm in diameter. The deep lilac to deep pink petals are broadly lanceolate to obovate and measure 8mm to 11mm in length by 6mm to 9mm in width.
The inserted 6 short filaments are free for their entire length. The anthers are deep maroon-burgundy. The long, angulated anthers are furrowed between the angled sides.
The deep red-pink style, stigma and ovary are glabrous. The flowers appear from July to December.
Tetratheca juncea fruits are beaked, obovate capsules. The capsules are glabrous and measure 6mm to 8mm in length by 2.5mm to 4mm in diameter. The green capsules turn grey when ripe. There are 2 grey-black seeds in each capsule.
Wildlife:
Tetratheca juncea wildlife is unknown to the author.
Cultivation:
Tetratheca juncea is a magnificent small prostrate shrub that should be grown in association with other dry or moist rainforest species. It is ideal at the edge of rainforest gardens or in the centre where bright colours are required. In cultivation it grows from 0.5 meter to 1 meter in height by 1 meter to 1.8 meters in diameter when grown in the open.
It grows well on light sandy loams where deep leaf litter keeps the soil cool and moisture at an even level. If these requirements are met it can cope with temperatures as low as zero degrees and up to 36 degrees. It is not drought resistant and require consistent moisture to flower and set seed.
Tetratheca juncea would make outstanding contribution to a small, moist heath garden. Here it can be scattered throughout the heath scene. When you design a flat heath garden which Tetratheca juncea is well suited don’t use contours to display the plants as heath lands are almost always flat or have a slight rise. It should be planted close together and be short so you can see over the tallest ones with the exception of one or two plants at the most. These will be feature plants. The idea is to achieve a feeling of expansive flatness. This can be achieved with using the Tetratheca juncea green linear leaves and having them contrasting with finer pale green or soft grey to glaucous coloured foliages. Use a lot of procumbent plants like Carpobrotus edulis or any of Hibbertia species except Hibbertia scandens. Mix them with other smaller shrubs so none of them dominate the scene but blend in to give a mosaic of foliage colours that you oversee. Here I immediately think of Actinotis helianthi or Pattersonia specie, Hibbertia linearis, Scaevola specie or even Viola betonicifolia for a few great contrasting foliages. Tetratheca juncea is a spectacular flowering plant and its colour will dominate when mass planted so place it towards the front or in the center. Do not overcrowd it as it needs room to expand and more aggressive plants will crowd it out.
Tetratheca juncea would also make a good contribution to a sandy or rocky terrain rock garden. Here it can be used as fill in plants, scattered throughout the boulders. When you use them in area that is strewn with large boulders do not over crowd the scene as the boulders are a formidable part of the scene. Tetratheca juncea is well suited to such conditions so use contours to display the plants. Boulder country are almost always rising and falling in contour and have sharp rises. Plants must be planted sparingly with short red or yellow flowering annuals between to give vibrant colour.
Propagation:
Seeds: The seeds of Tetratheca juncea can be removed easily from the fruits but are difficult to attain.
Place the seeds in a calico bag and place them in the vegetable crisper of the fridge for several weeks prior to sowing.
Sow freshly treated seeds directly into a seed raising mix, keeping them moist not wet. Do not over water as the seeds will rot off before germination takes place. Place the trays in a cool sunny position. When the seedlings are 20mm to 25mm tall, prick them out and plant them into 50mm native tubes using a good organic mix.
As the seedlings roots reach the bottom of the tubes plant them out into their permanent position. Do not delay.
Fertilize using Seaweed, fish emulsion or organic chicken pellets soaked in water and apply the liquid on an alternate basis. Fertilize every 2 months until the plants are established then on an annual basis in September to October to maintain good health, vigour and better flowering.
Further Comments from Readers:
“Hi reader, it seems you use The Bible of Botany a lot. That’s great as we have great pleasure in bringing it to you! It’s a little awkward for us to ask, but our first aim is to purchase land approximately 1,600 hectares to link several parcels of N.P. into one at The Pinnacles NSW Australia, but we need your help. We’re not salespeople. We’re amateur botanists who have dedicated over 30 years to saving the environment in a practical way. We depend on donations to reach our goal. If you donate just $5, the price of your coffee this Sunday, We can help to keep the planet alive in a real way and continue to bring you regular updates and features on Australian plants all in one Botanical Bible. Any support is greatly appreciated. Thank you.”
In the spirit of reconciliation we acknowledge the Bundjalung, Gumbaynggirr and Yaegl and all aboriginal nations throughout Australia and their connections to land, sea and community. We pay our respect to their Elders past, present and future for the pleasures we have gained.
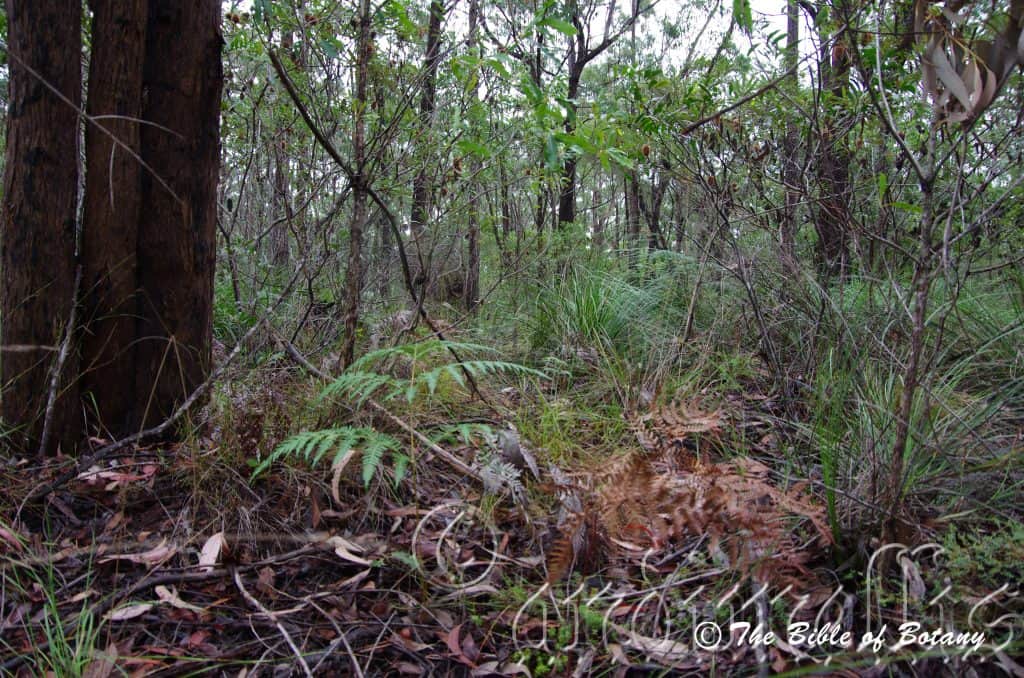
Author’s Garden The Pinnacles NSW
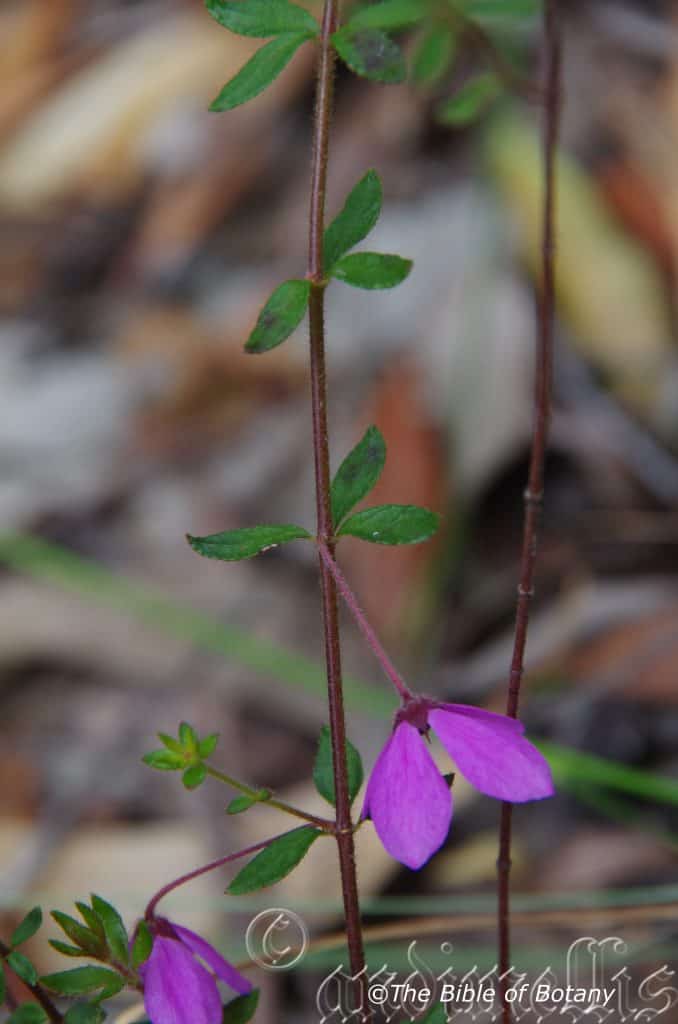
Author’s Garden The Pinnacles NSW
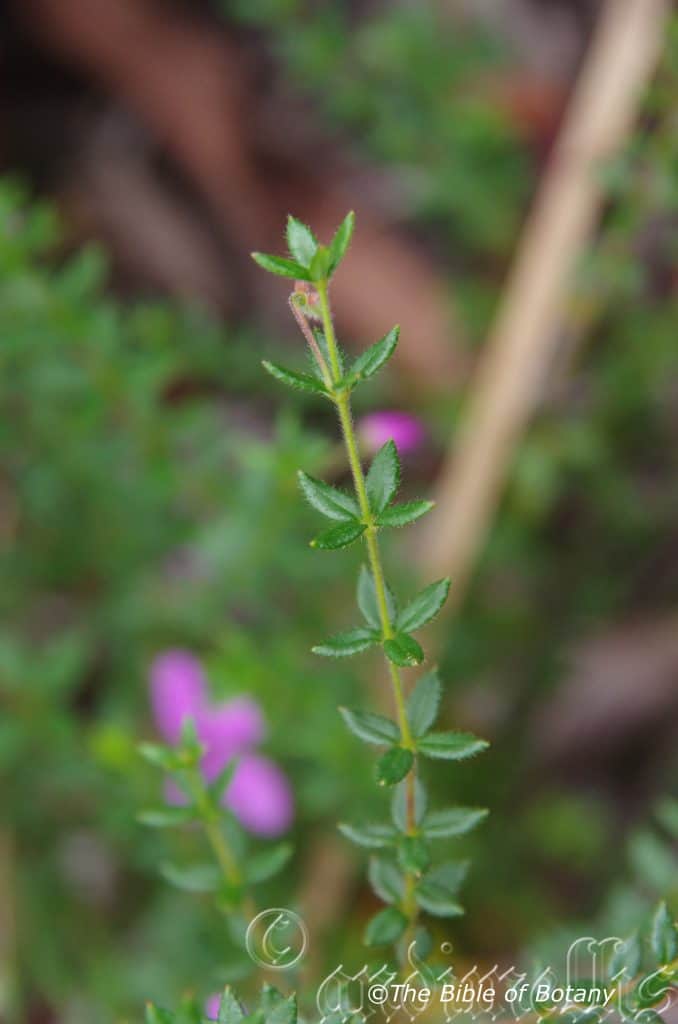
Author’s Garden The Pinnacles NSW
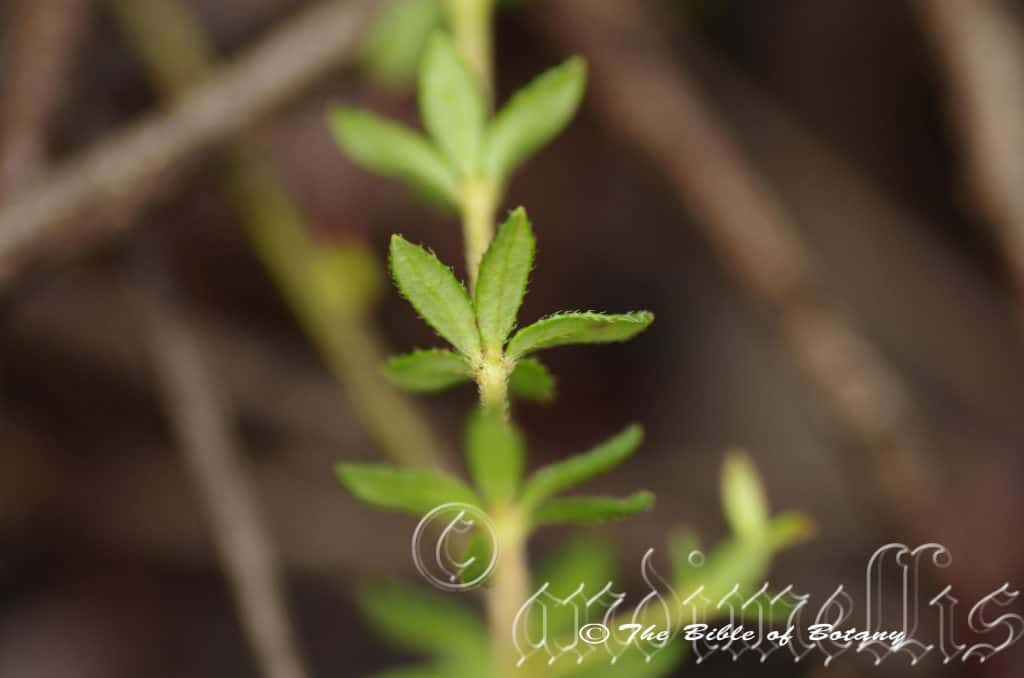
Author’s Garden The Pinnacles NSW
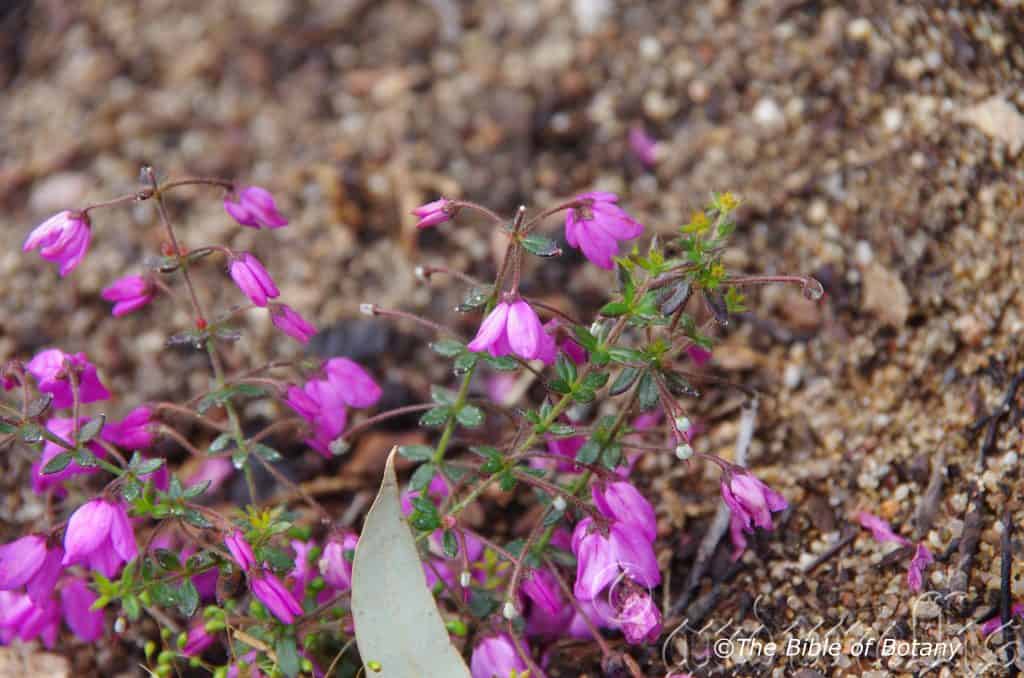
Author’s Garden The Pinnacles NSW
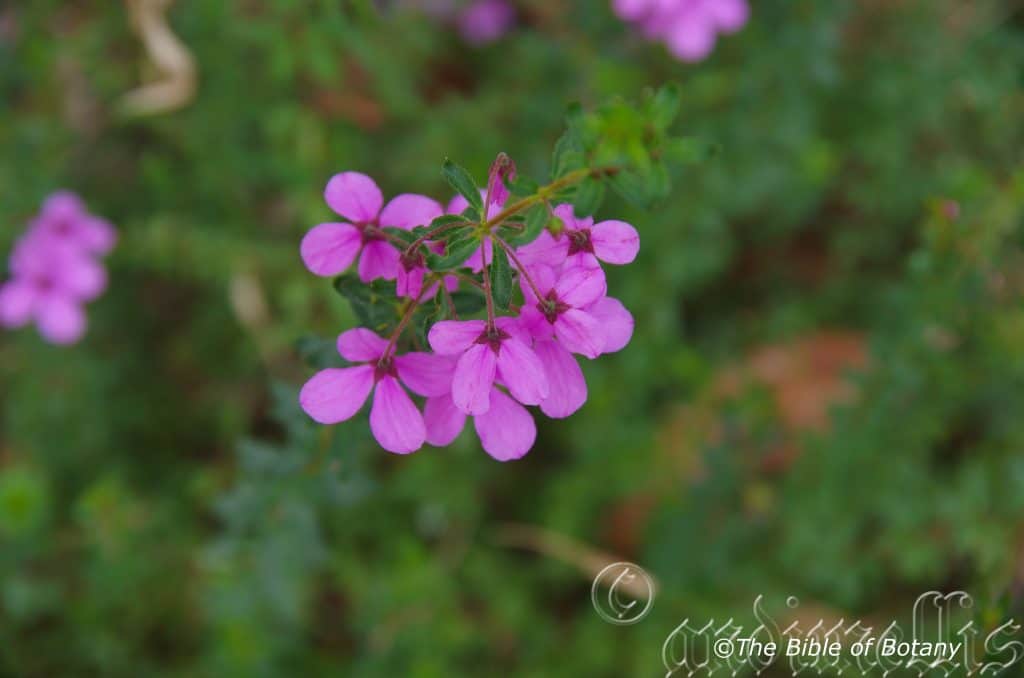
Author’s Garden The Pinnacles NSW
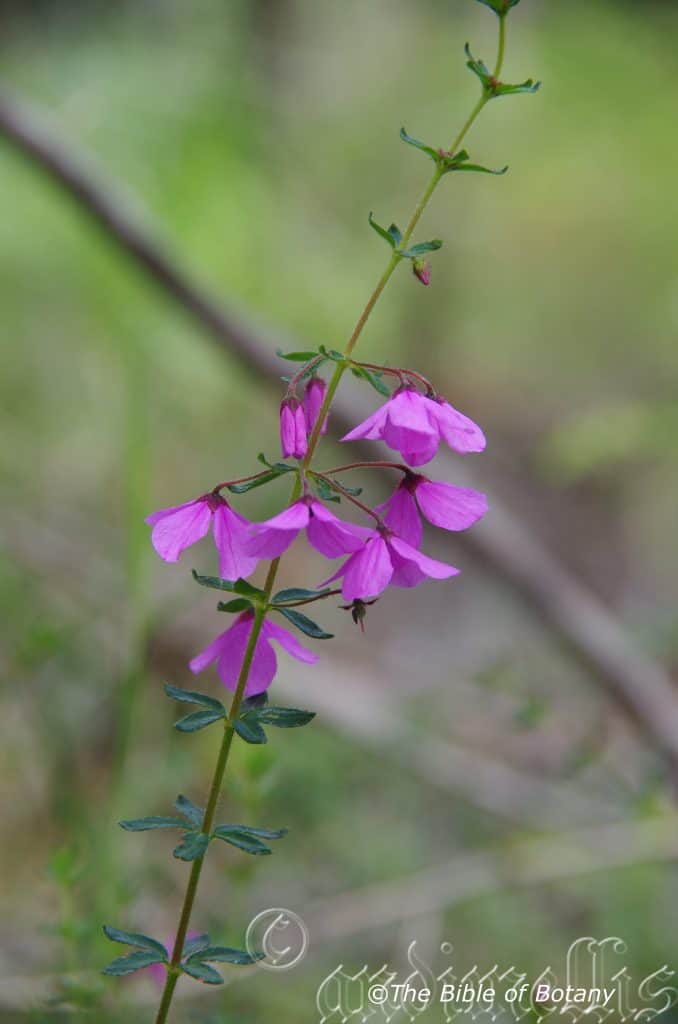
Author’s Garden The Pinnacles NSW
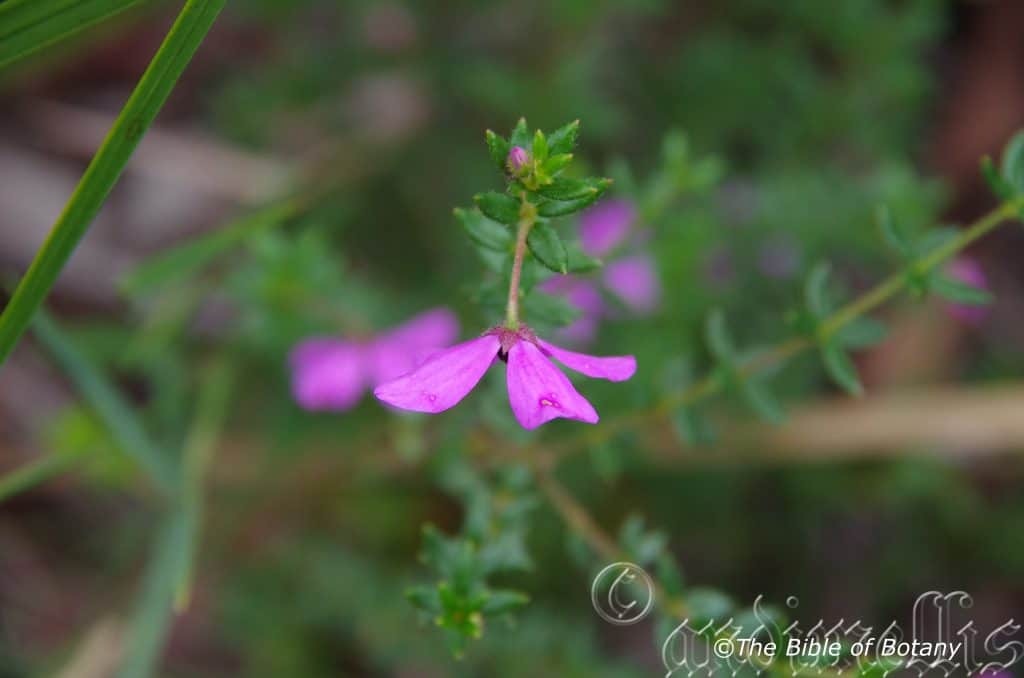
Author’s Garden The Pinnacles NSW
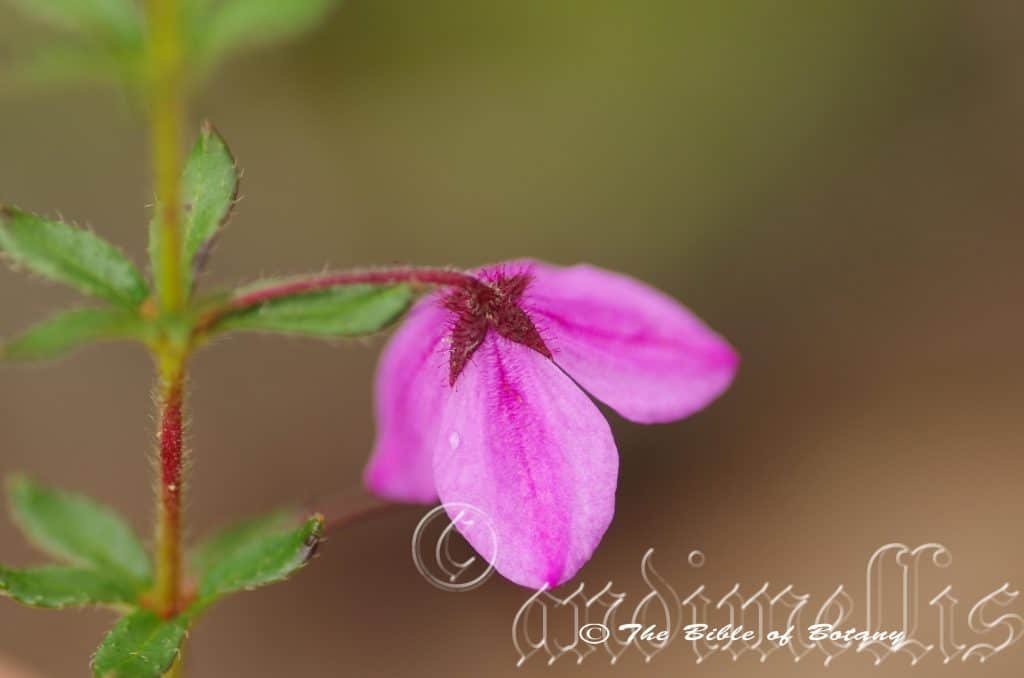
Author’s Garden The Pinnacles NSW
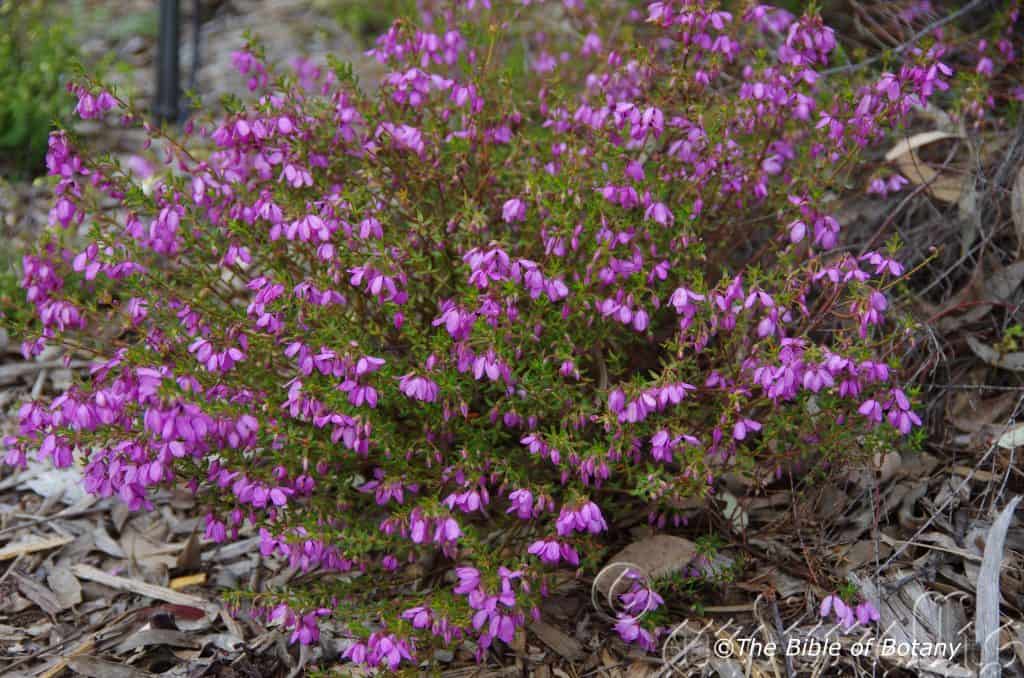
Author’s Garden The Pinnacles NSW
xxxxxxxxxxxxxxxxxxxxxxxxxxxxxxxxxxxxxxxxxTetratheca thymifolia
Classification:
Unranked: Eudicots
Unranked: Rosids
Order: Oxalidales
Family: Eleocarpaceae
Genus: From Tetra, which is Ancient Greek for four and Theke, which is Ancient Greek or Theca, which is Latin for a box or case. It refers to fruits, which have four individual carpels that resemble little boxes.
Species: From Thymom, which is Ancient Greek or later Thymum, which is Latin for the herb mint and Folium, which is Latin for foliage. It refers to leaves, which resemble the Mediterranean Thyme.
Common Name: Black Eye Susan or Pink Bells.
Distribution:
Tetratheca thymifolia is found south from Woodgate and Maryborough in south eastern Queensland to near Mallacoota in coastal north eastern Victoria.
https://avh.ala.org.au/occurrences/search?taxa=Tetratheca+thymifolia#tab_mapView
Habitat Aspect Climate:
Tetratheca thymifolia prefers light dappled shade to full sun. It grows in dry sclerophyll forests to moist wallum heaths along the coast or on ridge tops. The altitude ranges from 5 meter ASL to 1350 meters ASL.
The temperatures range from minus 5 degrees in July to 36 degrees in January.
The rainfall ranges from lows of 750mm to 2000mm average per annum.
Soil Requirements:
Tetratheca thymifolia prefers better quality sandy loams to medium clays. The soils are usually derived from orange, red or brown sandstone, granites, brown basalts, black basalts, metamorphic rocks, limestone or accumulated peaty beach sands behind the frontal dunes. The soils pH ranges from 5pH to 8pH. It does not tolerate waterlogged soils however plants in riparian zones may be inundated for short periods during storms. Non saline soils to moderately saline soils are tolerated.
Height & Spread:
Wild Plants: 0.2m to 1m by 0.5m to 1m.
Characteristics:
Tetratheca thymifolia grows as mall perennial shrub with semi divaricate to arching, thin, and bright sea-green and are sparsely covered in course white hirtellous hairs on longitudinal ridges.
The leaves of Tetratheca thymifolia are usually in whirls of 3 to 5 rarely 6 but may be alternate or rarely opposite are broadly elliptical to narrowly elliptical to broadly linear or rarely ovate. The leaves are glabrous to sparsely covered in white hirsute hairs. They measure 3mm to 20mm in length by 2mm to 8mm in width. The discolourous laminas are mid sea-green and dull on the upper laminas while the lower laminas are paler. The leaf margins are entire, revolute and recurve slightly towards the apexes. The mid veins are slightly prominent on the lower laminas. The petioles measure 0.5mm to 1mm in length.
Inflorescences of Tetratheca thymifolia are born singularly or paired from the leaf axils. The green to green tinged red pedicels are glabrous to sparsely covered in white hirsute hairs and measure 5mm to 23mm in length. The 4 green to green tinged deep red elliptical sepals measure 2mm to 5mm in length. The deep lilac to lip stick pink petals is deep burgundy around the base. The petals are broadly elliptical to broadly obovate and measure 8mm to 16mm in length by 6mm to 13mm in width.
The inserted 6 short filaments are free for their entire length. The anthers are deep maroon-burgundy. The long, angulated anthers are furrowed between the angled sides.
The deep red-pink style, stigma and ovary are glabrous. The flowers appear from September through to November.
The fruits of Tetratheca thymifolia are irregularly beaked, cordate to cuneate to depressed globose capsules. The capsules are glabrous and measure 4mm to 6mm in length by 2.5mm to 3mm in diameter. The green capsules turn grey when ripe. The grey-black seeds are flattened ellipsoidal and woody and measure 2.5mm to 3mm in length.
Wildlife:
Tetratheca thymifolia wildlife is unknown to the author.
Cultivation:
Tetratheca thymifolia is a magnificent small semi prostrate shrub that can be grown in association with other dry heath land specie. It is ideal at the edge of heath gardens or in the centre where bright colours are required. In cultivation it grows from 0.5 meter to 0.8 meter in height by 1 meter to 1.5 meters in diameter when grown in the open.
It grows exceptionally well on light sandy loams where deep leaf litter keeps the soil cool and moisture at an even level. If these requirements are met it can cope with temperatures as low as minus 3 degrees and up to 36 degrees. It is not drought tolerant and require consistent moisture to flower and set seed.
If it has even soil moisture during the warmer months and a little native fertilizer on an annual basis in early spring it will respond with exceptional flowering and fruit over a very long period.
Tetratheca thymifolia would make outstanding contribution to a small, moist heath garden. Here it can be scattered throughout the heath scene. When you design a flat heath garden which Tetratheca thymifolia is well suited don’t use contours to display the plants as heath lands are almost always flat or have a slight rise. It is probably best used in small groups planted close together. This can be achieved with using the Tetratheca thymifolia bright pink flowers and having them contrasting with finer pale green or soft grey to glaucous coloured foliages. Use a lot of procumbent plants like Carpobrotus edulis or Hibbertia specie. Actinotis helianthi or Chrysocephalum apiculatum where the yellow and pink make for a striking display. Tetratheca thymifolia beautiful flowering and colour will dominate when in flower so place it towards the rear or in the center. Do not overcrowd it as it needs room to expand and more aggressive plants will crowd it out.
Tetratheca thymifolia would make a good contribution to a sandy or rocky terrain rock garden. Here it can be used as fill in plants, scattered throughout the boulders. When you use them in area that is strewn with large boulders do not over crowd the scene as the boulders are a formidable part of the scene. Tetratheca thymifolia is well suited to such conditions so use contours to display the plants. Boulder country are almost always rising and falling in contour and have sharp rises. Plants must be planted sparingly with short red or yellow flowering annuals between to give vibrant colour. Make the scene so you can see over the tallest ones with the exception of one or two plants at the most in the background or mid ground. The idea is to achieve a feeling of expansive harshness. This can be achieved with using Tetratheca thymifolia mid green leaves contrasting with broader pale green or soft grey to glaucous coloured foliages. If large deep green leaf plants are wanted try using them as prostrate plants. Use a lot of procumbent plants like Hibbertia to make the rocks look larger and the spaces between the plants bigger. Mix them with other smaller shrubs so none of them dominate the scene but blend in to give a mosaic of foliage colours that you oversee. Actinotis helianthi or Pattersonia specie, Hibbertia linearis, Scaevola specie or even Viola betonicifolia for a few great contrasting foliages. Tetratheca juncea are spectacular flowering plants and its colour will dominate when mass planted so place it towards the front or in the center. Do not overcrowd it as it needs room to expand and more aggressive plants will crowd it out.
Propagation:
Seeds: The seeds of Tetratheca thymifolia can be removed easily from the fruits but are difficult to attain.
Place the seeds in a calico bag and place them in the vegetable crisper of the fridge for several weeks prior to sowing.
Sow freshly treated seeds directly into a seed raising mix, keeping them moist not wet. Do not over water as the seeds will rot off before germination takes place. Place the trays in a cool sunny position. When the seedlings are 20mm to 25mm tall, prick them out and plant them into 50mm native tubes using a good organic mix.
As the seedlings roots reach the bottom of the tubes plant them out into their permanent position. Do not delay.
Fertilize using Seaweed, fish emulsion or organic chicken pellets soaked in water and apply the liquid on an alternate basis. Fertilize every 2 months until the plants are established then on an annual basis in September to October to maintain good health, vigour and better flowering.
Further Comments from Readers:
“Hi reader, it seems you use The Bible of Botany a lot. That’s great as we have great pleasure in bringing it to you! It’s a little awkward for us to ask, but our first aim is to purchase land approximately 1,600 hectares to link several parcels of N.P. into one at The Pinnacles NSW Australia, but we need your help. We’re not salespeople. We’re amateur botanists who have dedicated over 30 years to saving the environment in a practical way. We depend on donations to reach our goal. If you donate just $5, the price of your coffee this Sunday, We can help to keep the planet alive in a real way and continue to bring you regular updates and features on Australian plants all in one Botanical Bible. Any support is greatly appreciated. Thank you.”
In the spirit of reconciliation we acknowledge the Bundjalung, Gumbaynggirr and Yaegl and all aboriginal nations throughout Australia and their connections to land, sea and community. We pay our respect to their Elders past, present and future for the pleasures we have gained.
xxxxxxxxxxxxxxxxxxxxxxxxxxxxxxxxxxxxxxxxxxxxxxTeucrium argutum
Classification:
Unknown: Eudicots
Class: Asterids
Order: Lamiales
Family: Lamiaceae
Subfamily: Ajugoideae
Genus: Is named in honour of Teuker the first king of the Trojans.
Species: From Arguta which is Latin for sharp or pungent tooth. It refers to a structure or organ, which has many sharp teeth like appendages.
Common Name: Germander.
Distribution:
Teucrium argutum is found south from Cooktown in far north eastern Queensland to Wollongong in central coastal New South Wales. It is found on the Western Plains, on and east of the Great Dividing Range to the coast.
https://avh.ala.org.au/occurrences/search?taxa=Teucrium+argutum#tab_mapView
Habitat Aspect Climate:
Teucrium argutum prefers light dappled shade to full sun. It grows in dry sclerophyll forest, along river banks, stream riparian zones or in pastures. The altitude ranges from 5 meter ASL to 800meters ASL.
The temperatures range from minus 2 degrees in July to 38 degrees in January.
The rainfall ranges from lows of 300mm to 3000mm average per annum.
Soil Requirements:
Teucrium argutum usually prefers light clays to heavy clays or at times peaty sands and heavy silts. The soils are usually derived from brown basalts, black basalts, metamorphic rocks, limestone or at times peaty sands accumulated behind the frontal dunes or alluvial deposits. The soils pH ranges from 5pH to 7pH. It does not tolerate waterlogged soils. Non saline soils to moderately saline soils are tolerated.
Height & Spread:
Wild Plants: 0.2m to 0.5m by 0.2m to 0.4m.
Characteristics:
Teucrium argutum grows as a scrambling perennial herb often suckering form the base. The branches are densely covered in retrorse to spreading, translucent, multicellular hairs and sessile glands.
The thick decussate, broad ovate to broad triangular leaves measure 18mm to 50mm in length by 12mm to 20mm in width. The petioles measure 4mm to 17mm in length. The bases are truncate to rounded-truncate while the apexes are sub-acute to acute. The discolourous laminas are mid green to deep green, dull and covered in retrorse to spreading, translucent, multicellular hairs and sessile glands on the upper laminas while the lower laminas are paler. The laminas decurve gently downwards from the base to the apexes. The margins are regular toothed to crenate. The obtuse mid vein and lateral veins are strongly prominent on the lower laminas and are deeply sunken on the upper laminas.
The inflorescences are born on a leafy raceme from the terminals. The flowers are born in the axils of the bracts. The green to deep green peduncle, rachis and pedicel are densely covered in retrorse to spreading, translucent, multicellular hairs and stalked glands. The peduncles measure 10mm to 20mm in length while the rachis measures 50mm to 90mm in length and the pedicels 0.5mm to 2mm in length. The leaf like bracts and bracteoles are entire or with an occasional tooth.
The sepals are fused for half their length and are moderately covered with spreading non-glandular hairs and subsessile glands near the base. The sepals measure 4mm to 7mm in length overall while the acute lobes measure 2.2mm to 3.4mm in length. The deep pinkish purple corolla measures 8mm to 10mm in length.
The exserted filaments are free for their entire length and measure 5mm to 7mm in length. The filaments decurve downwards near the apex. The dorsifixed anthers are bilocularis.
The pink, bifid style and stigma are glabrous and measure 6mm to 8mm in length. The flowers appear from December through to January.
The fruits are compressed globose capsules. The green capsules turn grey when ripe. The grey-black seeds are flattened and ellipsoidal.
Wildlife:
Teucrium argutum wildlife is unknown to the author.
Cultivation:
Teucrium argutum is a small perennial herb that should be grown in association with other heath land or bushland specie annuals. In cultivation it grows from 0.4 meters to 0.6 meters in height by 0.4 meter to 0.5 meters in diameter when grown in the open.
It grows exceptionally well on light sandy loams where deep leaf litter keeps the soil cool and moisture at an even level. If these requirements are met they can cope with temperatures as low as 1 degree and up to 36 degrees. It is not drought resistant and requires consistent moisture to flower and set seed.
Flowering is improved if the spent flowering spikes are removed when flowering has ceased and prior to seed set.
Teucrium argutum would make an outstanding contribution to a small, moist heath garden. Here it can be scattered throughout the heath scene. When you design a flat heath garden which it is well suited don’t use contours to display the plants as heath lands are almost always flat or have a slight rise. Plants must be planted close together and be short so you can see over the tallest ones with the exception of one or two plants at the most. These will be feature plants. The idea is to achieve a feeling of expansive flatness. This can be achieved with using its green linear leaves and having them contrasting with finer pale green or soft grey to glaucous coloured foliages. Use a lot of procumbent plants like Hibbertia linearis or Hibbertia obtusifolia. Mix it with other smaller shrubs so none of them dominate the scene but blend in to give a mosaic of foliage colours that you oversee. Actinotis helianthi, Lechenaultia biloba, Lechenaultia formosa or Isotoma specie for a few great contrasting foliages. Tetratheca thymifolia spectacular flowering and colour will dominate when in flower so place it towards the rear or in the center. Do not overcrowd it as it needs room to expand and more aggressive plants will crowd it out.
It also makes a good contribution to a sandy or rocky terrain rock garden. Here they can be used as fill in plants, scattered throughout the boulders. When you use them in area that is strewn with large boulders do not over crowd the scene as the boulders are a formidable part of the scene. Tetratheca thymifolia is well suited to such conditions so use contours to display the plants. Boulder country are almost always rising and falling in contour and have sharp rises. Plants must be planted sparingly with short red or yellow flowering annuals between to give vibrant colour. Use plants like Isopogon mnoraifolius. Isopogon anemonifolius, Isopogon cuneatus or small open growing Hakea specie like Hakea florulenta so as not to detract from Teucrium argutum when it is in flower.
Propagation:
Seeds: The seeds can be removed easily from the fruits but are difficult to attain.
Place the seeds in a calico bag and place them in the vegetable crisper of the fridge for several weeks prior to sowing.
Sow freshly treated seeds directly into a seed raising mix, keeping them moist not wet. Do not over water as the seeds will rot off before germination takes place. Place the trays in a cool sunny position. When the seedlings are 20mm to 25mm tall, prick them out and plant them into 50mm native tubes using a good organic mix.
As the seedlings roots reach the bottom of the tubes plant them out into their permanent position. Do not delay.
Cuttings: Fortunately Teucrium argutum cuttings are very easy to strike. Use 80mm to 120mm long cuttings from the present season’s growth. Take them in warmer months of the year. Remove half the leaves from the bottom section being careful not to tear the bark.
1 Prepare the cutting mix by adding two thirds sharp clean river sand, one third peat or one third perlite. These ingredients must be sterilized,
2 Select good material from non diseased plants,
3 Select semi green stems for cuttings. Look for a stem with two or three nodes,
4 Place the cutting on a flat, hard surface, and make a clean cut down one side of the cutting at the base for 10mm with a sharp sterile knife or razor blade. – This scarification of the node will increase the chances of roots emerging from this spot. Now remove all but one or two the leaves, leaving the apex leaves in tact. If the leaves are very large in proportion to the stem, cut off the apical halves.
5 Hormones are not required,,
6 Use a small dipple stick or old pencil to poke a hole into the soilless potting mix. Ensure the hole is slightly larger than the stem diameter and be careful not to damage the base,
7 I like to place the tubes in bucket with holes drilled in the bottom to allow excess water to drain out. A plastic bag that fits over the bucket is ideal to help maintain temperature and moisture. Place in a semi shaded, warm position like under 50mm shade cloth.
8 When the cuttings have struck, open the bag to allow air circulation for a few days to a week,
9 Once hardened off remove the cuttings from the bag and allow to further hardening for a few more days to a week,
10 Transplant into a good potting mix to grow on.
Fertilize using seaweed, fish emulsion or organic chicken pellets soaked in water on an alternate basis. Fertilize every two months until the plants are established then annually in early September to October to maintain better colour, health, vitality and flowering.
Further Comments from Readers:
“Hi reader, it seems you use The Bible of Botany a lot. That’s great as we have great pleasure in bringing it to you! It’s a little awkward for us to ask, but our first aim is to purchase land approximately 1,600 hectares to link several parcels of N.P. into one at The Pinnacles NSW Australia, but we need your help. We’re not salespeople. We’re amateur botanists who have dedicated over 30 years to saving the environment in a practical way. We depend on donations to reach our goal. If you donate just $5, the price of your coffee this Sunday, We can help to keep the planet alive in a real way and continue to bring you regular updates and features on Australian plants all in one Botanical Bible. Any support is greatly appreciated. Thank you.”
In the spirit of reconciliation we acknowledge the Bundjalung, Gumbaynggirr and Yaegl and all aboriginal nations throughout Australia and their connections to land, sea and community. We pay our respect to their Elders past, present and future for the pleasures we have gained.
xxxxxxxxxxxxxxxxxxxxxxxxxxxxxxxxxxxxxxxxxxTeucrium corymbosum
Classification:
Unknown: Eudicots
Class: Asterids
Order: Lamiales
Family: Lamiaceae
Subfamily: Ajugoideae
Genus: Is named in honour of Teuker the first king of the Trojans.
Species: From Korymbus, which is Ancient Greek or Corymbosum, which is Latin for a cluster of flowers. It refers to flowers, where the stems branch from different levels on the stalk’s axis but ultimately terminate at the same level.
Common Name: Forest Germander.
Distribution:
Teucrium corymbosum is found south and east of a line from Mount Jukes National Park, Cudmore National Park and Glenmorgan in central Queensland to the Grampians in Victoria and Mount Bruny Island in south eastern Tasmania.
In South Australia it is found along the Murray River and in an area between Fern chasm Creek north of Port August to the Gawler Ranges, Yardea on southern Eyre Peninsula, Waterfall Creek near Baroota Reservoir and Wilpena Creek.
https://avh.ala.org.au/occurrences/search?taxa=Teucrium+corymbosum#tab_mapView
Habitat Aspect Climate:
Teucrium corymbosum prefers light dappled shade to full sun. It grows in dry sclerophyll forest especially in partially cleared areas, savannah grasslands or along dry creek beds. The altitude ranges from 1 meter ASL to 1400 meters ASL.
The temperatures range from minus 3 degrees in July to 41 degrees in January.
The rainfall ranges from lows of 100mm to 3000mm average per annum.
Soil Requirements:
Teucrium corymbosum prefers light sandy loams to heavy clays or at times peaty sands or heavy silts. The soils are usually derived from decomposed sandstone, granites, alluvial deposits or at times peaty sands accumulated behind the frontal dunes, brown basalts, or black basalts. The soils pH ranges from 4.5pH to 6.5pH. It does not tolerate waterlogged soils. Non saline soils to moderately saline soils are tolerated.
Height & Spread:
Wild Plants: 1m to 1.5m by 0.8m to 1.2m.
Characteristics:
The thick decussate, narrow ovate leaves measure 18mm to 110mm in length by 6mm to 20mm in width. The petioles measure 1mm to 12mm in length. The bases are cuneate while the apexes are sub-acute to acute. The discolourous laminas are mid green to deep grass-green, semi glossy and glabrous on the upper laminas while the lower laminas are paler and are densely covered with sessile glands and white retrorse hairs. The laminas arch upwards from the mid vein to the margins and decurve gently downwards from the base to the apexes. The margins are regular toothed to crenate. The obtuse mid vein and lateral veins are strongly prominent on the lower laminas and are deeply sunken on the upper laminas.
Teucrium corymbosum grows as a perennial herb. The stems densely covered with sessile glands and short antrorse hirsute hairs.
The inflorescences are usually leafy, branched panicles born from the terminals. The flowers are born in the axils of the bracts. There are 3 to 9 individual flowers on a raceme. The green to deep green peduncle, rachis and pedicel are densely covered with sessile glands and white retrorse hairs. The peduncles measure 18mm to 24mm in length while the rachis measures 10mm to 12mm in length and the pedicels 3mm to 10mm in length. The leaf like bracts and bracteoles are entire or with an occasional tooth.
The 5 green sepals are fused for half their length and are densely covered with sessile glands and simple retrorse hairs. The sepals measure 3mm to 5mm in length overall while the acute lobes measure 1.5mm to 2.5mm in length. The mauve corolla measures 8mm to 12mm in length. The mauve lobes are covered in white ciliate hairs.
The exserted filaments are free for their entire length and measure 8mm to 11mm in length. The filaments decurve downwards near the apex. The fawn, dorsifixed anthers are bilocularis.
The pink, bifid style and stigma are glabrous and measure 6mm to 8mm in length. The flowers appear from December through to January.
The fruits are irregularly beaked, cordate to cuneate to depressed globose capsules. The capsules are glabrous and measure 4mm to 6mm in length by 2.5mm to 3mm in diameter. The green capsules turn grey when ripe. The grey-black seeds are flattened ellipsoidal and woody and measure 2.5mm to 3mm in length.
Wildlife:
Teucrium corymbosum wildlife is unknown to the author.
Cultivation:
Teucrium corymbosum is a small perennial that can be grown in association with other heath land or bushland specie. In cultivation it grows as a compact small plant from 0.4 meters to 0.6 meters in height by 0.4 meter to 0.5 meters in diameter when grown in the open.
It grows well on course sandy soils, and if a compost is added will keep the soil cool and moisture at an even level. This will ensure it can cope with temperatures as low as 1 degree and up to 36 degrees. It is not drought resistant therefore requires consistent moisture to flower at its best and set seed. The plants respond well to tip pruning displaying its unusual flowers over a longer period. Flowering is improved if the spent flowers are removed on a regular basis.
Teucrium corymbosum would make a good contribution to a small, to medium moist heath garden where it is the main plant. It can be planted close together to completely cover the bed as a feature plant in the garden. The use of procumbent plants like Hibbertia linearis or Hibbertia obtusifolia, Lechenaultia biloba, Lechenaultia formosa or Isotoma specie will add size to Teucrium corymbosum, contrast foliages and mixed colours in flowering. Teucrium corymbosum spectacular flowering and colour will dominate when in flower so place it towards the rear or in the center.
Teucrium corymbosum also makes a good contribution to sandy rockeries or steep sloping terrains. Here it can be used as fill in plants, scattered throughout the boulders. When you use it in area that is strewn with large boulders do not over crowd the scene as the boulders are a formidable part of the scene. It is well suited to such conditions so use contours to display the plants. Boulder country are almost always rising and falling in contour and have sharp rises. Plants must be planted sparingly with short red or yellow flowering annuals between to give vibrant colour.
Propagation:
Seeds: The seeds can be removed easily from the fruits but are difficult to attain.
Place the seeds in a calico bag and place them in the vegetable crisper of the fridge for several weeks prior to sowing.
Sow freshly treated seeds directly into a seed raising mix, keeping them moist not wet. Do not over water as the seeds will rot off before germination takes place. Place the trays in a cool sunny position. When the seedlings are 20mm to 25mm tall, prick them out and plant them into 50mm native tubes using a good organic mix.
As the seedlings roots reach the bottom of the tubes plant them out into their permanent position. Do not delay.
Cuttings: Use 80mm long hardened material from the current season’s growth. Take them in mid-autumn. Remove half the leaves from the bottom section being careful not to tear the bark. Take a 10mm slice off the bark from the bottom of the cutting on one side. Using a weak rooting hormone, dip the cutting in and place it in a moist sterile seed raising mix. Place the trays in a warm sheltered position in the hot house. When the cuttings have obviously struck and have developed good roots treat them as for seedlings.
Fertilize using seaweed, fish emulsion or organic chicken pellets soaked in water on an alternate basis. Fertilize every two months until the plants are established then twice annually in early September to October to maintain better colour, health, vitality and flowering.
Further Comments from Readers:
“Hi reader, it seems you use The Bible of Botany a lot. That’s great as we have great pleasure in bringing it to you! It’s a little awkward for us to ask, but our first aim is to purchase land approximately 1,600 hectares to link several parcels of N.P. into one at The Pinnacles NSW Australia, but we need your help. We’re not salespeople. We’re amateur botanists who have dedicated over 30 years to saving the environment in a practical way. We depend on donations to reach our goal. If you donate just $5, the price of your coffee this Sunday, We can help to keep the planet alive in a real way and continue to bring you regular updates and features on Australian plants all in one Botanical Bible. Any support is greatly appreciated. Thank you.”
In the spirit of reconciliation we acknowledge the Bundjalung, Gumbaynggirr and Yaegl and all aboriginal nations throughout Australia and their connections to land, sea and community. We pay our respect to their Elders past, present and future for the pleasures we have gained.
xxxxxxxxxxxxxxxxxxxxxxxxxxxxxxxxxxxxxxxxxxxxxxThaleropia queenslandica
Classification:
Unranked: Eudicots
Unranked: Rosids
Order: Myrtales
Family: Myrtaceae
Subfamily: Myrtoideae
Tribe: Tristanieae
Genus: From Thalia, which is Ancient Greek for flourishing in bloom. It refers to magnificent yellow blooms, which cover the whole plant.
Species: From Queensland, which is Latinized for the state of Queensland. It refers to species which were first discovered in Queensland or are restricted to Queensland.
Common Name: Yellow Satin Ash.
Distribution:
Thaleropia queenslandica is found on the Great Dividing Range south from Barron Gorge National Park to Girrigun National Park west of Cardwell in north eastern Queensland.
https://avh.ala.org.au/occurrences/search?taxa=Thaleropia+queenslandica#tab_mapView
Habitat Aspect Climate:
Thaleropia queenslandica prefers full shade to full sun. It grows in moist, well developed tropical rainforests. The altitude ranges from 800 meter ASL to 1200 meters ASL.
The temperatures range from 6 degrees in July to 36 degrees in January.
The rainfall ranges from lows of 1850mm to 3200mm average per annum.
Soil Requirements:
Thaleropia queenslandica prefers better quality light clays to medium clays. The soils are usually derived from decomposed black basalts. The soils pH ranges from 6.5pH to 7.5pH. It does not tolerate waterlogged soils however plants in riparian zones may be inundated for short periods during storms. Non saline soils to moderately saline soils are tolerated.
Height & Spread:
Wild Plants: 20m to 25m by 7m to 10m.
Characteristics:
The trunk or irregular large stems on Thaleropia queenslandica are pale grey to pale grey-brown with a patchwork of colour. The small stems are pale grey to pale grey-brown tending more to rusty-brown closer to the apexes where it is glabrous and semi glossy. The new growth is densely covered in caducous rusty red to rusty brown hirsute hairs.
The alternate to almost opposite, elliptical or ovate leaves of Thaleropia queenslandica measure 33mm to 50mm in length by 16mm to 22mm in width. The stipules are filiform and measure 0.5mm in length. The bases are broad cuneate rounded while the apexes are broad acute to very long acuminate. The discolourous laminas are deep sea-green, semi glossy to glossy and glabrous on the upper lamina while the lower lamina is much paler and dull. The new growth is maroon-red and densely covered in caducous rusty red to rusty brown hirsute hairs especially along the midvein and leaf margins. The leaf margins are entire and slightly undulating, while the laminas recurve from the midvein to the margins decurve near the apexes. The mid veins are prominent on the upper laminas. The petioles measure 5mm to 10mm in length.
Inflorescences of Thaleropia queenslandica are born on compound corymbs from the terminals. The green peduncles, pedunculates, rachises and pedicels are glabrous. The peduncles measure 30mm to 45mm in length, pedunculates measure 7mm to 12mm in length while the rachises measure 13mm to 25mm in length and the pedicels measure 5mm to 8mm in length. The 5 deep green calyx lobes are orbicular and are covered in white tortuous hairs. The calyxes measure 2mm to 2.2mm in diameter while the short flat stalks measure 0.6mm in length by 0.5mm across. The pale deep yellow to deep golden yellow petals are orbicular with flat or undulating margins. The petals are glabrous on the inner surface and covered in white puberulent hairs externally and measure 3mm to 4mm in diameter.
The 5 exserted filaments are free for their entire length and measure 2mm to 4mm in length. The filaments are bright yellow to deep golden-yellow and taper close to the junction with the deep green anthers. The filaments measure 5.5mm to 6.5mm in length.
The deep bright yellow to golden-yellow style and stigma are glabrous while the ovary is green. The pistil measures 6mm to 7mm in length and arises from a large flat yellow base on the green hypanthia. Thaleropia queenslandica flowers appear from early October to late December.
The fruits of Thaleropia queenslandica are conical capsules. The capsules are glabrous and measure 3mm to 4mm in length by 4mm to 4.5mm in diameter. The green capsules turn deep grey-brown when ripe. The calyx lobes are persistent at the apex of the capsules. The numerous brown seeds are flattened pyriform and woody. The seeds measure 0.5mm to 0.6mm in length by 0.2mm to 0.3mm in diameter.
Wildlife:
Thaleropia queenslandica does not appear to have any predators. Most medium to small honey eaters are attracted to the flowers.
Cultivation:
Thaleropia queenslandica is a magnificent large shrub or small tree that can be grown in association with other dry or moist rainforest specie. It is ideal at the edge of a rainforest garden or used as a specimen shade tree. It also make good park tree offering quick growth, and good shade but it is on the small size. In cultivation it grows much smaller than its wild rainforest parents growing from 5 meters to 8 meters in height by 2.5 meters to 4 meters in diameter when grown in the open or taller if grown closer together as a rainforest tree.
It grows exceptionally well on most soils where deep leaf litter keeps the soil cool and moisture at an even level. If these requirements are met it can cope with temperatures as low as 5 degrees and up to 36 degrees. It is moderately drought resistant once established but will abort some leaves if stressed.
For mass plantings in large gardens space the plants at least 5 meters to 6 meters centers if you are considering it as a small tree in a hedge row.
The tree makes a very good accent trees in front of low set commercial, industrial sheds or school buildings where it will break up hard rigid architectural lines and give warmth and breadth to a building. In front of a building it gives balance especially where it can be grown in curves meandering to the entry doors or for something formal grown in a straight lines from the front of the nature strip to the front door.
Try using it in a large sunny courtyard, where the only other feature is a large rock, stump or formal or informal frog or fish pond or the area is void. Next to such features their small leaves, small flowers and small fruit are never overpowering but certainly noticed. I am surprised that it has never been used in commercial entrances and foyers to break the ice and give a feeling of business as usual but somehow make the business more relaxing. If the court yard is to dark the trees will have a tendency to grow tall and lanky so make sure there is plenty of light.
Propagation:
Seeds: The seeds of Thaleropia queenslandica can be removed easily from the fruits. Sow fresh seeds directly into a seed peaty seed raising mix covering them to a depth of 2mm to 3mm. Keep them moist not wet. Do not over water as the seeds will rot off before germination takes place. Place the trays in a warm shaded area with 50mm shade cloth in the bush house. When the seedlings are 30mm to 50mm tall, prick them out and plant them into 50mm native tubes using a good organic mix. After a week begin to move the trays into a sunnier position.
As the seedlings roots reach the bottom of the tubes plant them out into their permanent position. Do not delay.
Fertilize using seaweed, fish emulsion or organic chicken pellets soaked in water on an alternate basis. Fertilize every two months until the plants are established then twice annually in September to October to maintain better colour, health, vitality and flowering.
Further Comments from Readers:
“Hi reader, it seems you use The Bible of Botany a lot. That’s great as we have great pleasure in bringing it to you! It’s a little awkward for us to ask, but our first aim is to purchase land approximately 1,600 hectares to link several parcels of N.P. into one at The Pinnacles NSW Australia, but we need your help. We’re not salespeople. We’re amateur botanists who have dedicated over 30 years to saving the environment in a practical way. We depend on donations to reach our goal. If you donate just $5, the price of your coffee this Sunday, We can help to keep the planet alive in a real way and continue to bring you regular updates and features on Australian plants all in one Botanical Bible. Any support is greatly appreciated. Thank you.”
In the spirit of reconciliation we acknowledge the Bundjalung, Gumbaynggirr and Yaegl and all aboriginal nations throughout Australia and their connections to land, sea and community. We pay our respect to their Elders past, present and future for the pleasures we have gained.
Author’s Garden The Pinnacles NSW
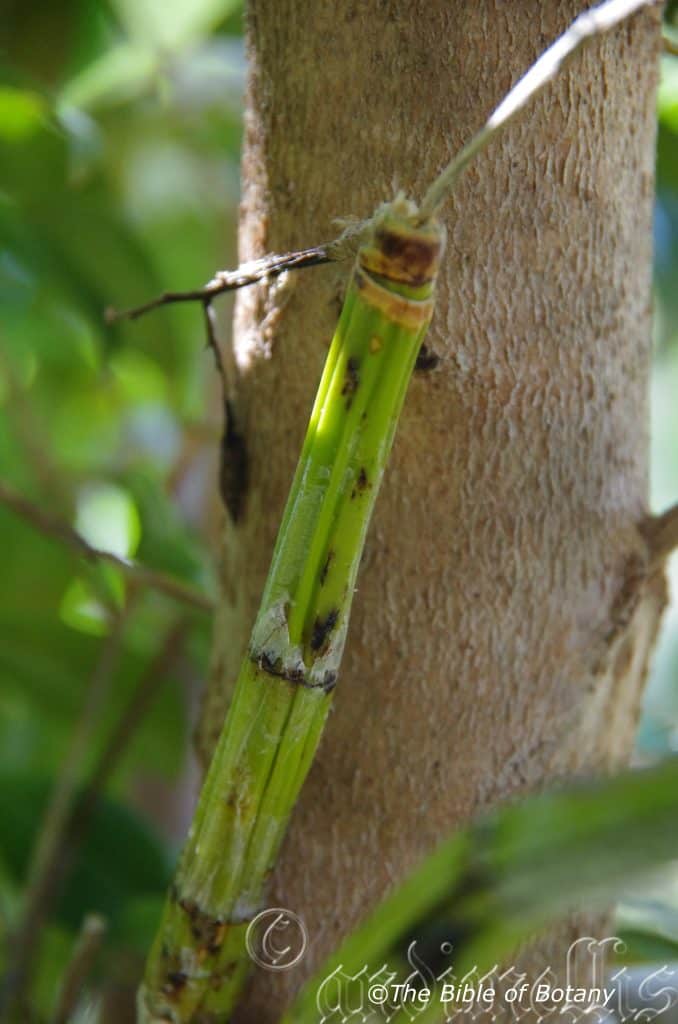
Author’s Garden The Pinnacles NSW
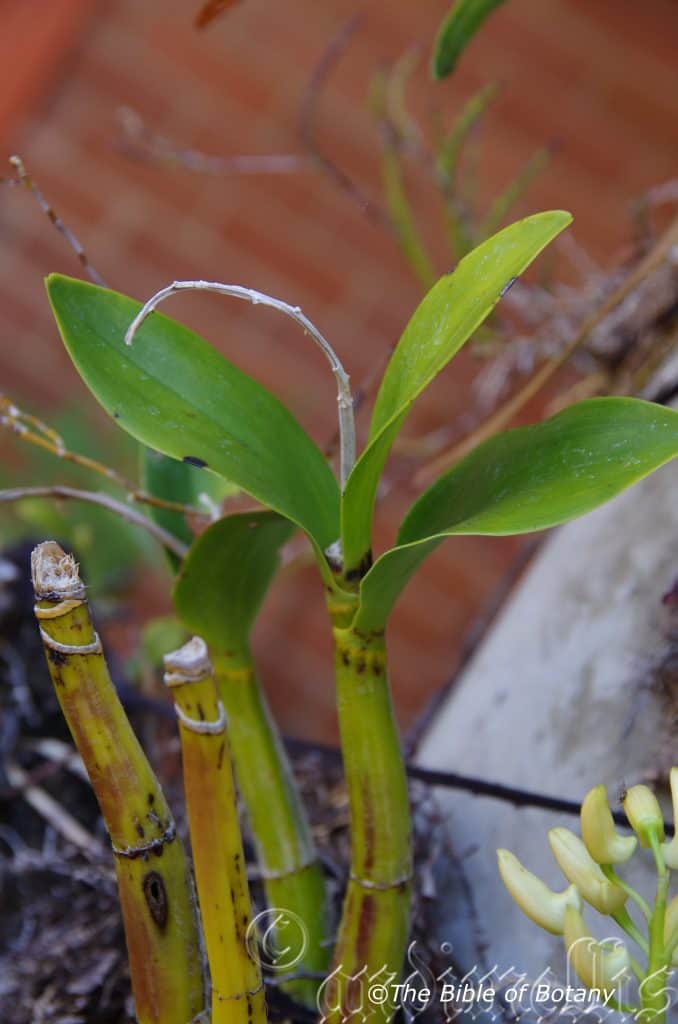
National Botanic Gardens ACT
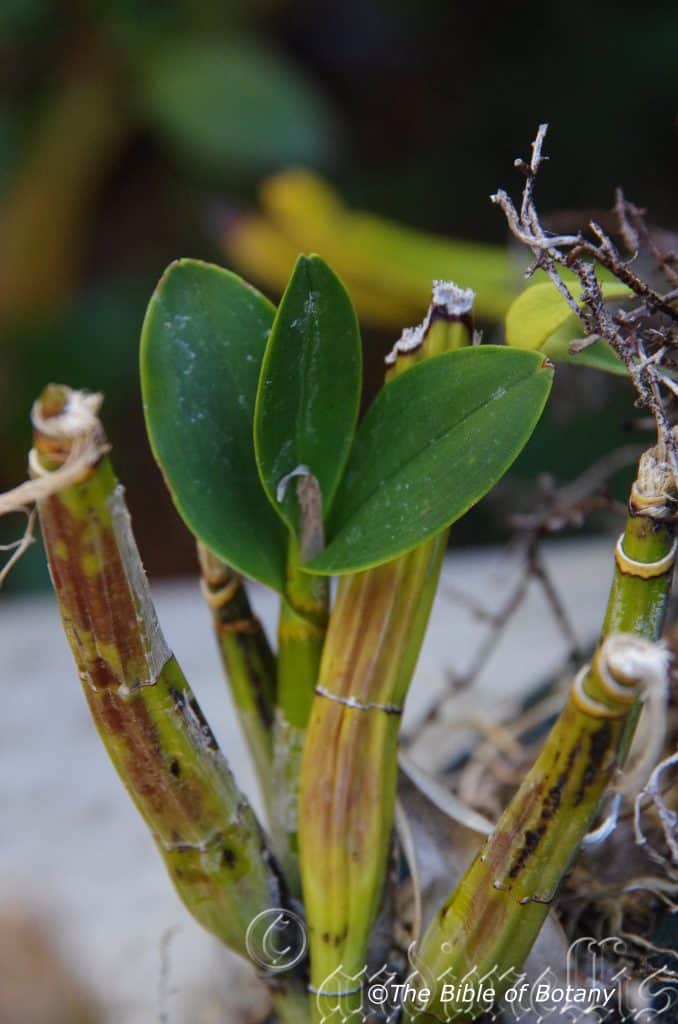
National Botanic Gardens ACT
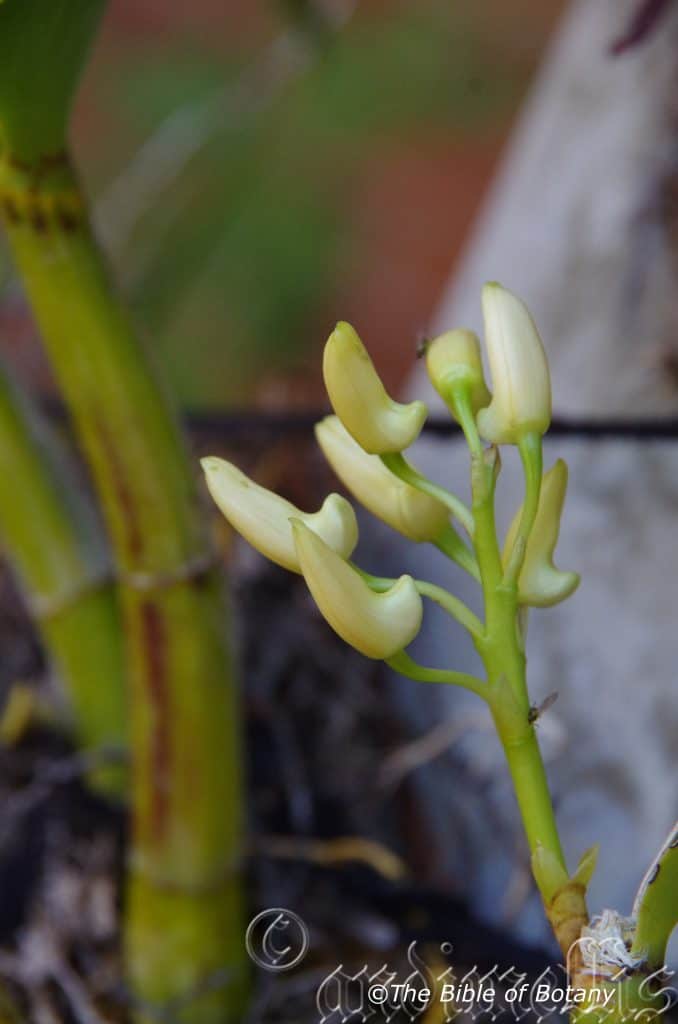
National Botanic Gardens ACT
xxxxxxxxxxxxxxxxxxxxxxxxxxxxxxxxxxxxxxxxxThelychiton falcorostrus
Classification:
Class: Eenzaadlobbigen
Order: Asparagales
Family: Orcidaceae
Subfamily: Epidendroideae
Tribe: Dendrobieae
Sub Tribe: Grastidiinae
Genus: From Theles/Thelion, which are Ancient Greek for a nipple or Thelys, which is Ancient Greek for only giving birth to female offspring and Chiton, which is Ancient Greek for a tunic. It refers to columns on orchids, which completely surround the pistol like the ancient Greek ladies wearing their full length tunics. (Chiton dresses).
Species: From Falcatum, which is Latin for a scythe or sickle shape and Rostrate/Rostrum which is Latin for a beak, to bear a beak or to have a beak like appendage. It refers to organs, which have a falcate appendage.
Common Name: Beech Orchid.
Distribution:
Thelychiton falcorostrus is found south from the McPherson Ranges in far southern Queensland to the Barrington Tops in central eastern New South Wales along the Great Dividing Range.
https://avh.ala.org.au/occurrences/search?taxa=Thelychiton+falcorostrus#tab_mapView
Habitat Aspect Climate:
Thelychiton falcorostrus prefers medium shade to dappled shade in temperate rainforests. The altitude ranges from 800 meters ASL to 1300 meters ASL.
The temperatures range from minus 3 degrees in July to 32 degrees in January.
The rainfall ranges from lows of 800mm to 1600mm average per annum. The rainfall is seasonal mainly summer and autumn with dry winters and springs. Orographic precipitation is common in its habitats.
Soil Requirements:
Thelychiton falcorostrus has a preference for sheltered positions chiefly growing as an epiphyte on Nothofagus moorei.
Height & Spread:
Wild Plants: 0.3m x 0.5m to 0.6m x 75m.
Characteristics:
Thelychiton falcorostrus grows on short rhizomes with short, plump, spreading pseudo bulb stems as an epiphyte. The succulent pseudo bulbs are cylindrical and have a thick base that taper towards the apex. They measure 120mm to 500mm in length by 10mm to 16mm in diameter near the base. The spongy white roots radiate out from the base of the pseudo bulb. In very wet weather the pseudo bulbs may root and develop a cane from near the apex of an old cane.
The 3 to 5 semi erect to divaricate, narrow elliptical, to oblanceolate leaves of Thelychiton falcorostrus are glabrous and semi glossy. The conduplicate deep sea-green leaves measure 60mm to 140mm in length by 15mm to 30mm in width. The leaf margins are entire while the apex is broadly acute to obtuse-acute with an emarginated notch.
Inflorescences of Thelychiton falcorostrus are a long raceme with 4 to 20 flowers. It is born from the terminal axils. The erect to semi pendulant rachis measure 80mm to 160mm long while the pedicles measure 20mm to 30mm long including the 2.5mm to 4mm ovary which appears to be part of the pedicel but is slightly swollen and deeper in colour. The white to cream dorsal sepal is narrowly oblong and measure 16mm to 25mm in length by 4mm to 9mm in width with an acute apex.
The white to cream, slightly falcate lateral sepals measure 20mm to 30mm in length by 6mm to 12mm in width at the base with an acute apex.
The two lateral petals white to cream dorsal sepal is narrowly oblong and measure 16mm to 25mm in length by 5mm to 11mm in width with an acute apex. Both the sepals and petals margins are entire. The sepals and lateral petals curve slightly forward from the ovary.
The labellum is roughly orbicular from the half way point with a reflex apex with the sides curving strongly upwards from the base to the mid-point. The margins are entire. The white to cream labellum have purple and yellow markings and measure 10mm to 15mm in length by 7mm to 12mm in width. The column is 3mm long while the foot varies from 5mm to 8mm in height. The white keel on the labellum is white or cream.
The column foot measures 6mm to 7mm in length while the column itself measures 3mm to 4mm in length. Thelychiton falcorostrus flowers occur from August to October.
The seed pods are 25mm to 30mm long by 20mm to 26mm wide and dry to a light semi glossy olive brown colour with deep reddish brown longitudinal stripes.
Wildlife:
Thelychiton falcorostrus is the host to numerous small native bees when in flower. It will also play host to the Dendrobium beetle.
All native orchids are protected plant species. It is illegal to remove naturally growing orchid plants from the bush and a license is required for the removal of seed capsule.
Cultivation:
All orchids are protected by law and the collection of plants including seed from the wild without the appropriate authority form National Parks or the relevant department.
Thelychiton falcorostrus is a beautiful orchid which is rather hardy and easy to grow and to propagate at least as far south as sale in Victoria along the coast. It does very well either in the bush house in a very course Cymbidium mix. The orchids grew well on our property at Nana Glen growing naturally on to Casuarina cunninghamii and Casuarina torulosa.
Trees with mass plantings of mixed small Thelychiton plus Thelychiton falcorostrus add interest and curiosity over a long period especially when in it is in flower. Bare trunks can be made to look spectacularly different.
To increase flowering water the plants weekly once established if it does not rain and fertilize monthly with a watering can with our recommended mix from September to March. Withdraw watering during winter to once every two weeks at the same time.
Be ever so vigilant for Steyhopachys formosa the Orchid enthusiast’s nightmare. This beetle can inflict a lot of damage in just one season. Plants attached to trees or rocks are less likely to be phased by Dendrobium beetle because of natural predators like birds, bats and frogs.
Control of the beetle is simple just squash it. It is slow movers and though like all beetles can fly try to use hiding as a means of escape. The pupae are just as easy to eliminate. Check the base of all your orchids on a regular basis and again destroy any pupae. These look like small patches of white toothpaste squeezed from the tube. The larvae are the most difficult and will usually need a systemic spray or great concentration to find the small holes on the canes as they bore their way through from the inside. Eggs are yellowish and measure about 1.5mm in length.
The beetle eats buds, flowers, new shoots and developing seed pods. Larvae consume the canes.
Photo with more information can be obtained from the Brisbane Orchid Society
(Stethopachys formosa)
Propagation:
Seeds: All orchids that are declared rare, vulnerable or endangered are protected by Federal and State Laws and must not be removed from the wild unless you are a land developer, mining company or main Roads department etc. This includes bulbs, roots, leaves and flowers. No part of any plant can be removed from Federal, State or Local Government land without the prior permission of the authority and this includes the spore.
1. Obtain relevant materials.
The first step in growing orchid from seed will be sourcing and having at the ready all materials that will be required in the propagation process.
This includes all of the following:
Unripe orchid seed capsule. If there are 2 capsules secure the second capsule immediately after the first capsule splits or if only one capsule as soon as it changes colour.
Orchid gelling medium with agar which can be purchased from an orchid society or a specialist nursery.
Distilled water
Cooking pot
Spoon
Oven-safe glass or polypropylene containers with lids
Sealable bags
Clean, sterilized cutting board
Rubber gloves
Paper towels
Tweezers or forceps
70 percent ethanol
Bleach
Scalpel or sharp knife
Planting pot
Orchid compost
Length of wire metal
Plastic spray bottle.
deep petri dishes or sterile jars.
2. Prepare agar medium
The agar medium is a special orchid gelling mixture that distilled water will be added to distilled water.
To prepare the medium, mix equal parts of orchid gelling medium with distilled water in a cooking pot.
Place the pot on a stove and bring the mixture to boil for while stirring continuously for two minutes.
Pour the mixture into the petri dishes glass or propylene containers while ensuring not to fill the containers above 20 percent of their volume.
Loosely replace the lids to the containers. Sterilize the containers by heating them up in a microwave oven for between 2 to 3 minutes.
Spray 70 percent ethanol into a sealable bag to create a sterile environment. Transfer the heated containers into the sealable bag.
Allow the containers to cool a bit before tightening their lids and then sealing the bag. Leave the containers to stand for a few days until the mixture solidifies.
3. Prepare seed capsule and work surface
Place an open pot of water on a stove and bring to boil. Place the cutting board in the oven and sterilize.
Put on rubber gloves and sterilize the forceps, and scalpel with 70 percent ethanol.
Insert the seed capsule into a bowel filled with bleach for about fifteen minutes.
Sterilize seed capsule again with 70 percent ethanol and place on grill.
Using the sterilized scalpel, cut open the seed capsule to reveal the seeds. Using a scalpel or sharp knife, scrape out the seeds from the capsule unto an ethanol soaked paper towel.
4. Flasking of the seed
Take out the petri dishes or glass jars containers holding the agar medium. Over the steam, open up the containers and transfer seeds from the ethanol soaked paper towel into the individual containers using the sterilized forceps.
The amount of seeds will determine the number of containers required. Replace the lid of the containers and place them on a window sill that receives indirect sunlight.
5. Wait and exercise patience
All that can be done at this point is to wait until the seeds germinate. The amount of time that this might take varies and is dependent on the particular species.
Generally, the time can range from a few months to a few years. During this period of waiting, ensure the containers are free from contamination to ensure that germination is not disrupted.
6. Emergence of protocorms
Protocorms are tuber-shaped bodies with rhizoids that are produced by the young seedlings of various orchids. Protocorms represent the embryonic form of the orchid plant.
Their emergence after the period of waiting at an affirmation that everything in the propagation process is on track.
7. Trans flask orchid seedlings is done after they have developed roots
Upon the emergence of the protocorms, consistently observe the growth of the seedlings. At the point when the seedlings appear to overcrowd the flask, transflasking should be carried out, typically within 30 and 60 days.
* This is done by removing individual seedlings using sterilized tweezers from the original containers and placing them in new containers also filled, in a proportion similar to the original, with agar medium. 6 to 8 in a standard petri dish or 1or 2 to a test tube
8. Transplant seedlings into planting pots
On the presumption that there are no disruptions to the plant growth, the seedlings will eventually outgrow the containers.
At this point, they are to be transplanted into planting pots. A good rule of thumb to determine when they are ready to be transplanted is when the seedlings have developed roots that have grown up to the length of one-quarter of an inch.
To transplant, prepare a planting pot or other container for receiving the seedling by majorly filling it up with coarse fir bark and possibly some slightly moist orchid compost mixture containing perlite, fine charcoal, redwood bark shavings, etc.
To extract the seedlings, submerge the containers in warm water to help loosen the agar gel.
Once the agar medium is softened, twist a piece of metal to form a loop and in turn, use it to carefully pull out the seedlings from the container. It is best done if the agar and seedling can be removed together.
The seedlings can be further rinsed in lukewarm water to remove any excess agar mixture still stuck to them.
Following this, the seedlings can now be planted into the prepared pot with at least 50mm of space between each individual seedling.
9. Positioning the orchid
The seedling once fully transplanted should be placed in a location that is warm with good indirect sun light.
Slowly position the pots into an area that closely assimilates the conditions it will be growing under.
The choice as to whether the plant should be exposed to full sun or in direct sunlight will be dependent on the particular orchid specie.
10. Subsequent care of the plant
After the first week, the seedling can be misted several times a day and watered just once a week.
A guide in watering the plant will be using the dryness of the fir back that is, water the plant until the fir back is completely moistened and wait till it has completely dried out before watering again.
Fertilize using Seaweed, fish emulsion or organic chicken pellets soaked in water and apply the liquid on an alternate basis. Fertilize every 2 months until the plants are established then on an annual basis in September to October to maintain good health, vigour and better flowering.
Further Comments from Readers:
“Hi reader, it seems you use The Bible of Botany a lot. That’s great as we have great pleasure in bringing it to you! It’s a little awkward for us to ask, but our first aim is to purchase land approximately 1,600 hectares to link several parcels of N.P. into one at The Pinnacles NSW Australia, but we need your help. We’re not salespeople. We’re amateur botanists who have dedicated over 30 years to saving the environment in a practical way. We depend on donations to reach our goal. If you donate just $5, the price of your coffee this Sunday, We can help to keep the planet alive in a real way and continue to bring you regular updates and features on Australian plants all in one Botanical Bible. Any support is greatly appreciated. Thank you.”
In the spirit of reconciliation we acknowledge the Bundjalung, Gumbaynggirr and Yaegl and all aboriginal nations throughout Australia and their connections to land, sea and community. We pay our respect to their Elders past, present and future for the pleasures we have gained.
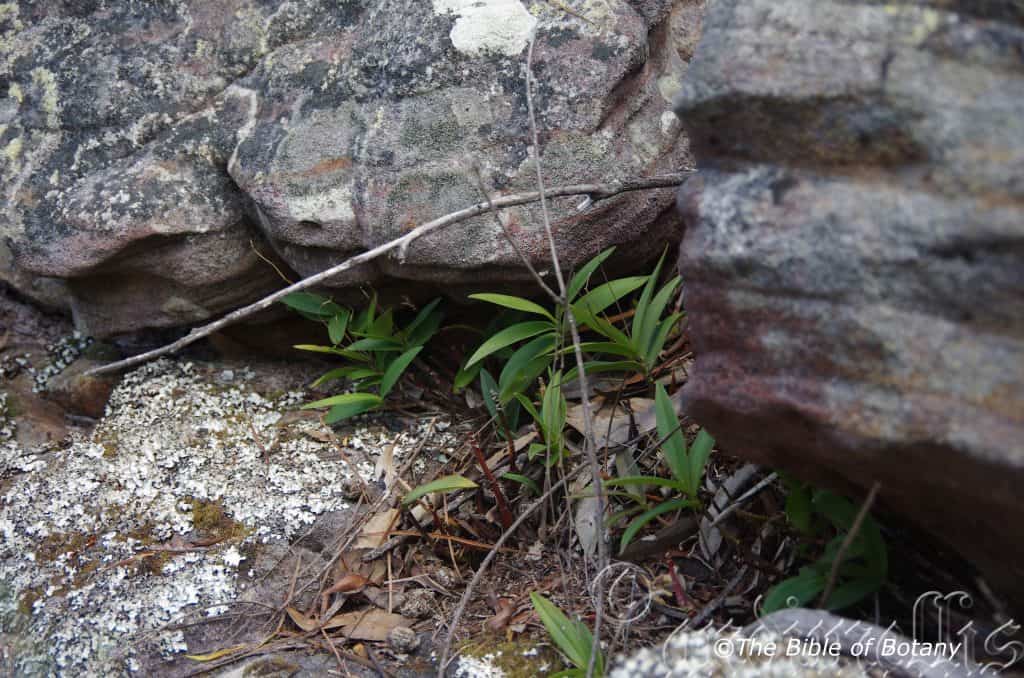
Clarence Valley NSW
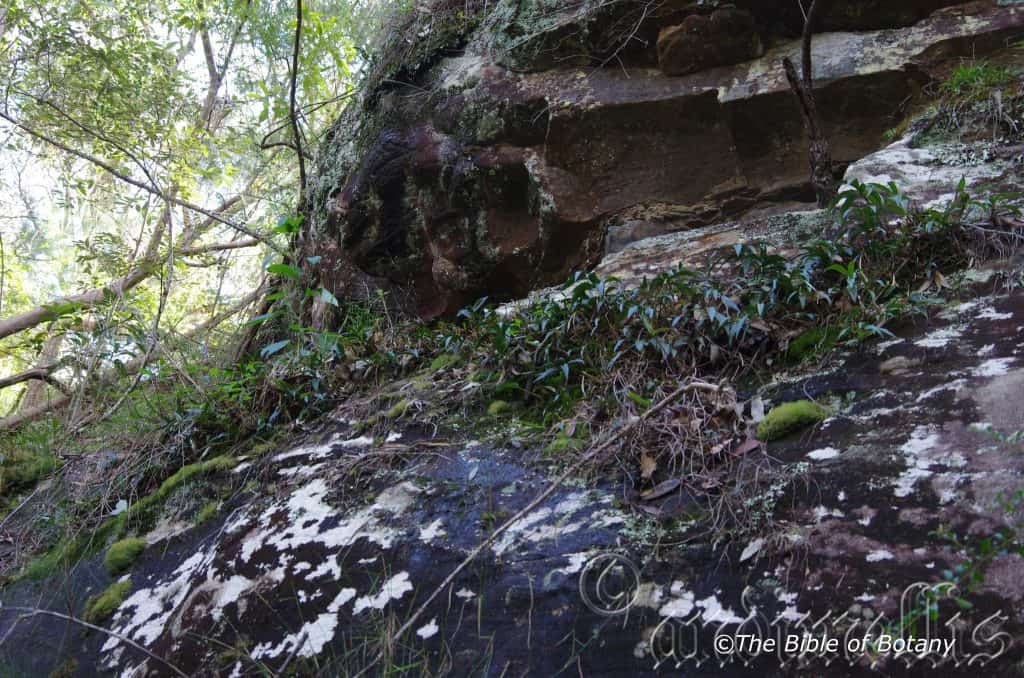
Clarence Valley NSW
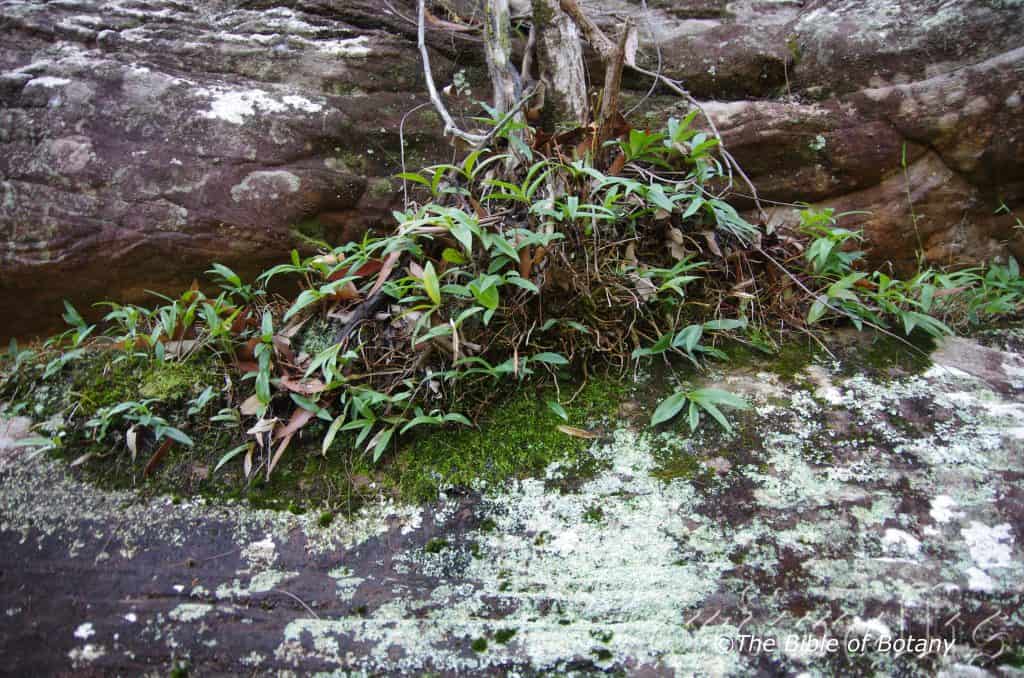
Clarence Valley NSW
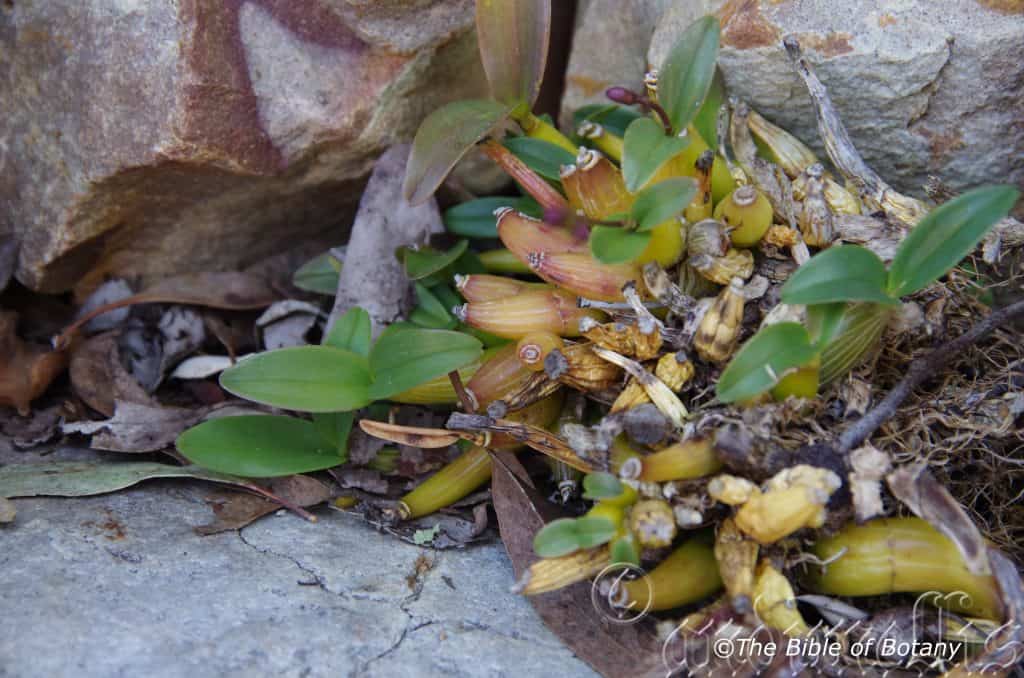
National Botanic Gardens ACT
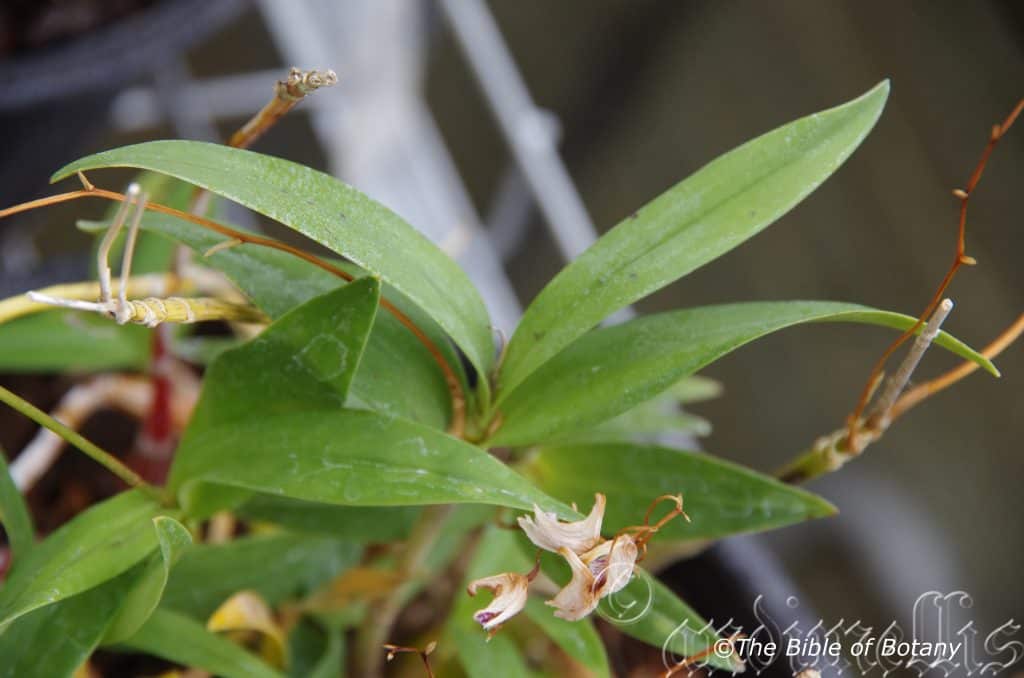
National Botanic Gardens ACT
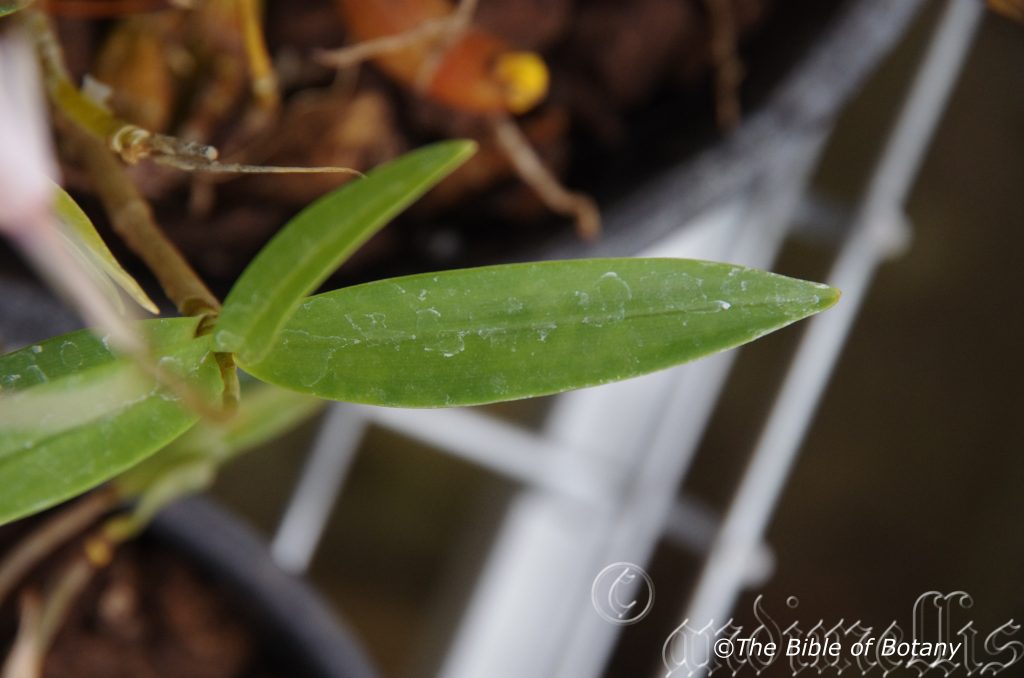
National Botanic Gardens ACT
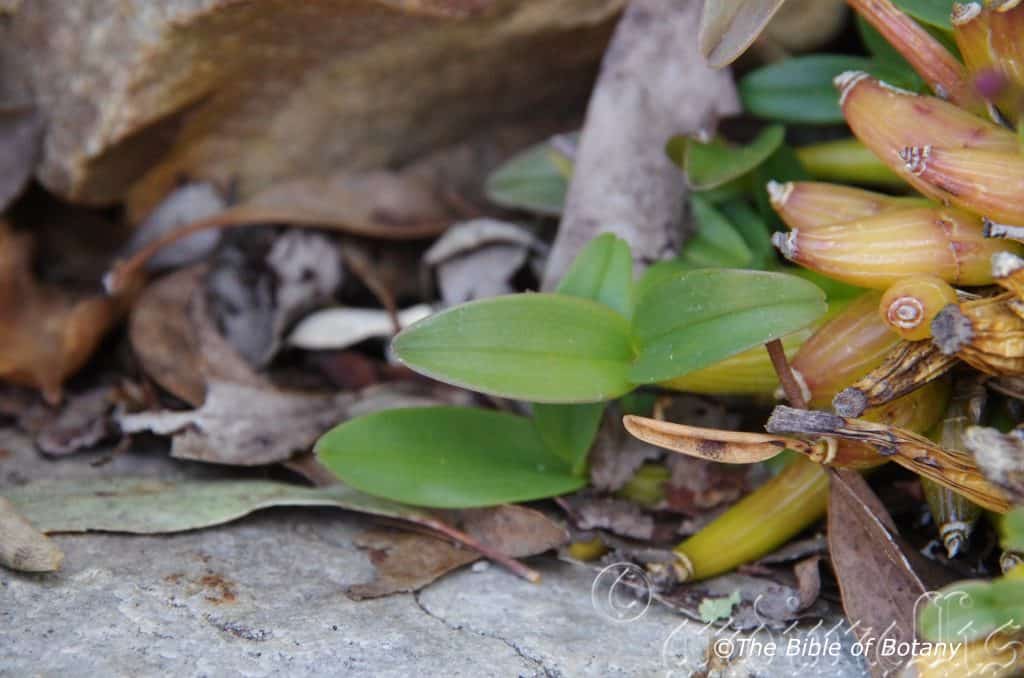
National Botanic Gardens ACT
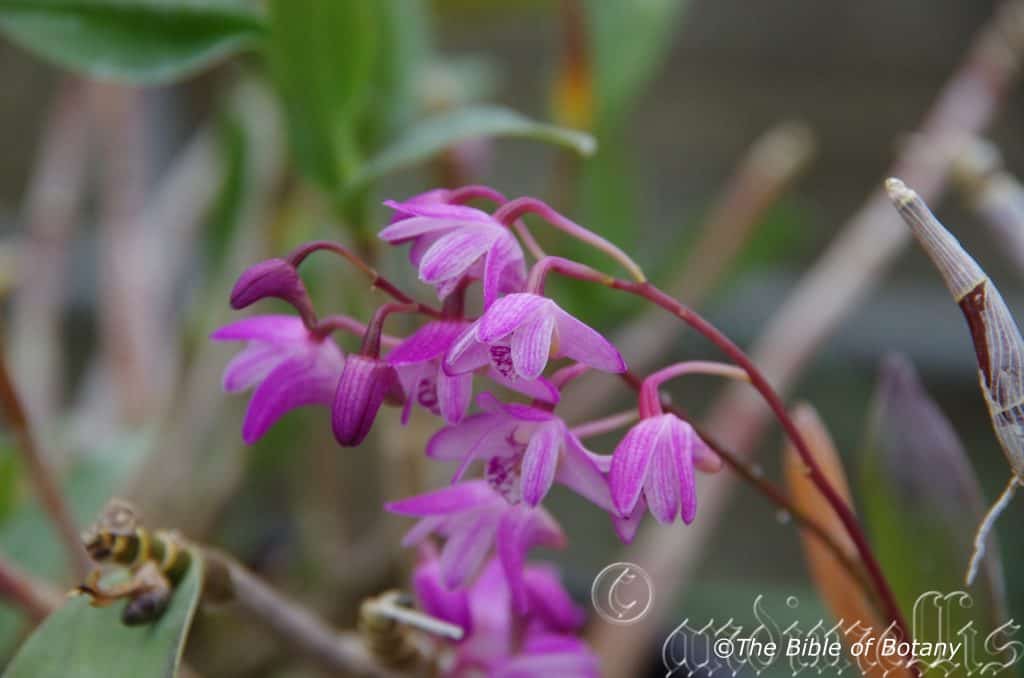
National Botanic Gardens ACT
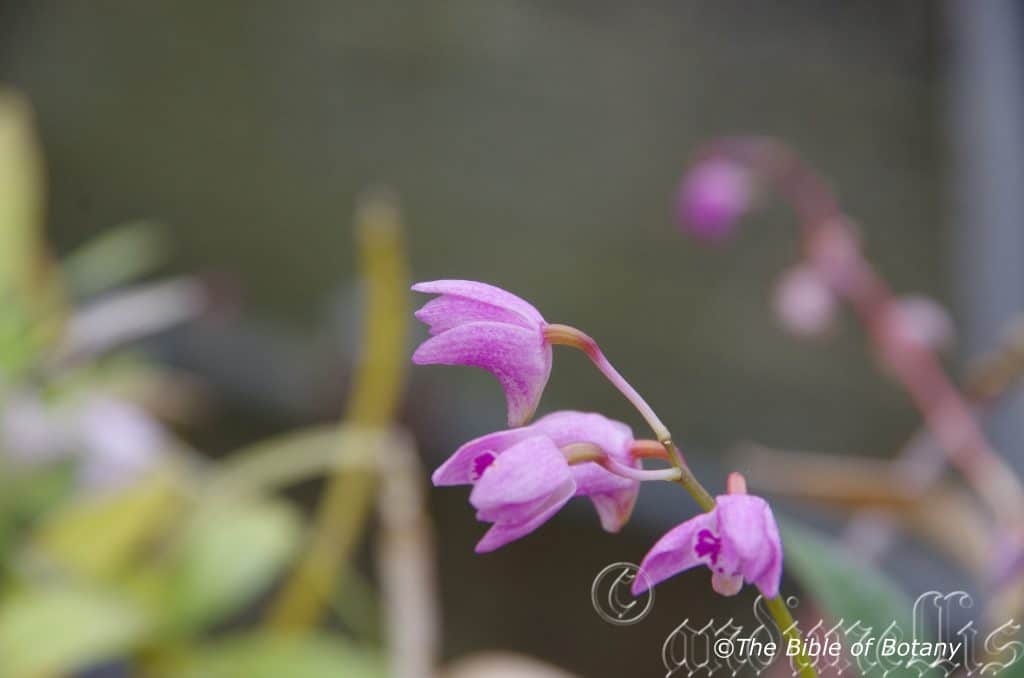
National Botanic Gardens ACT
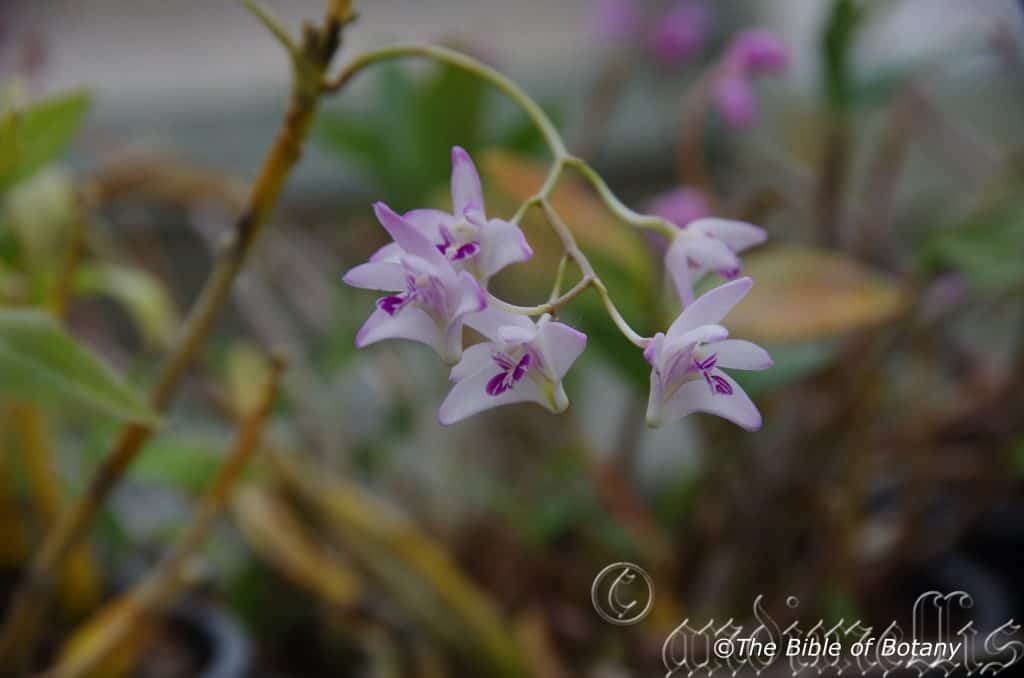
National Botanic Gardens ACT
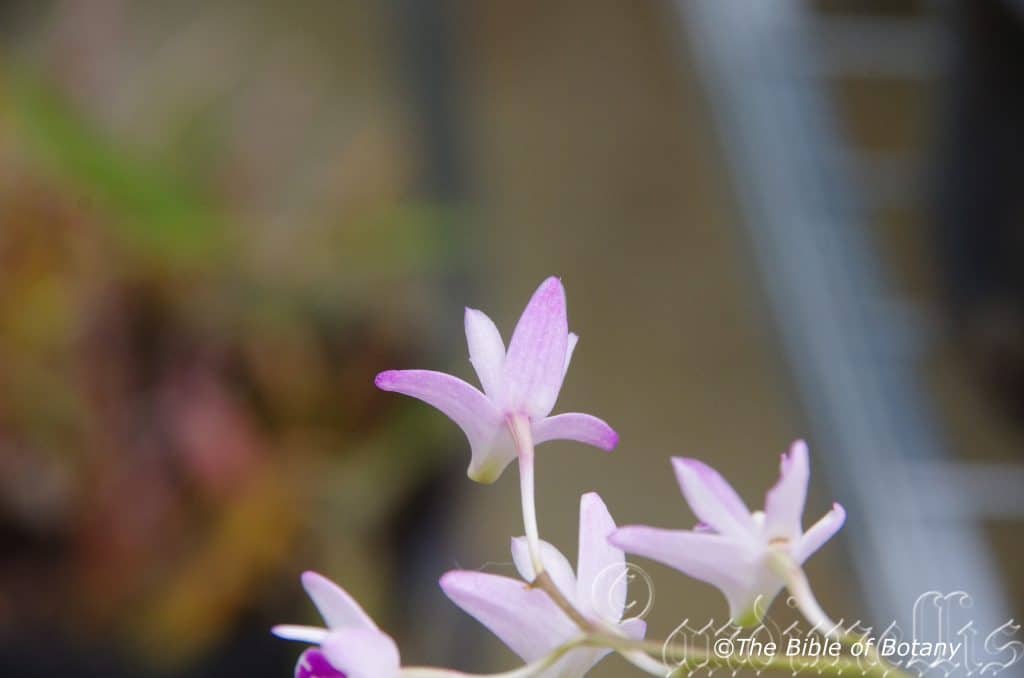
National Botanic Gardens ACT
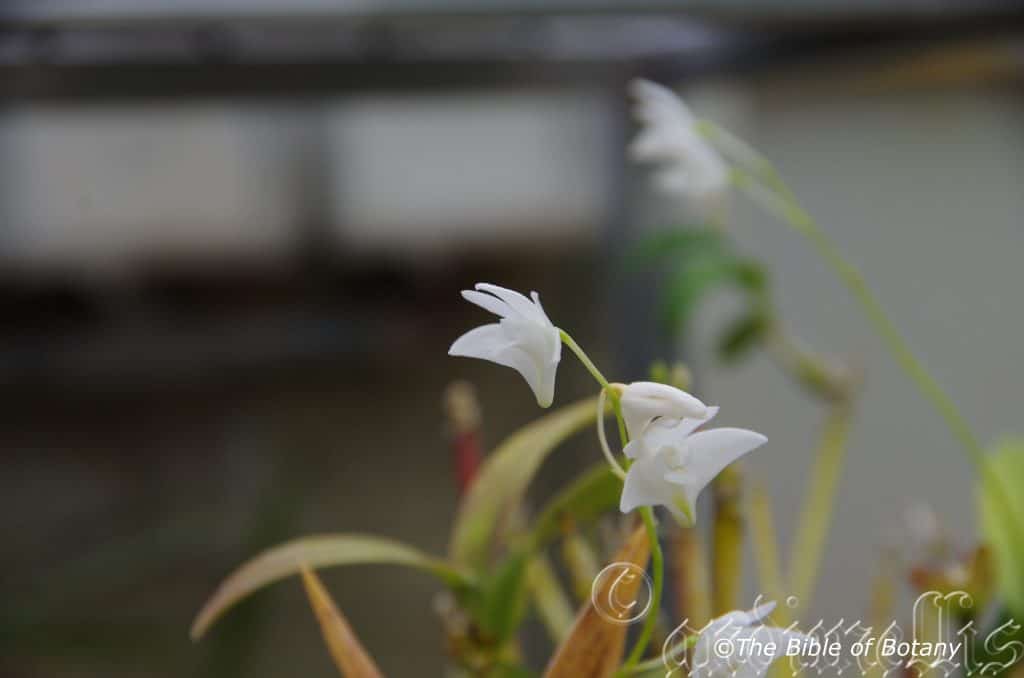
Clarence Valley NSW
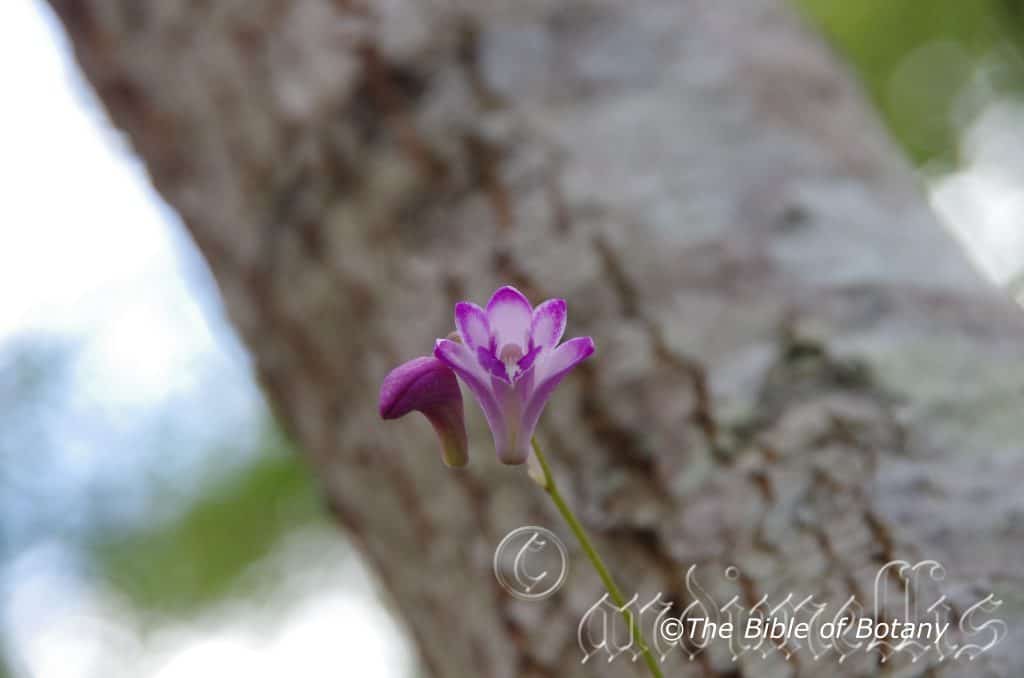
Clarence Valley NSW
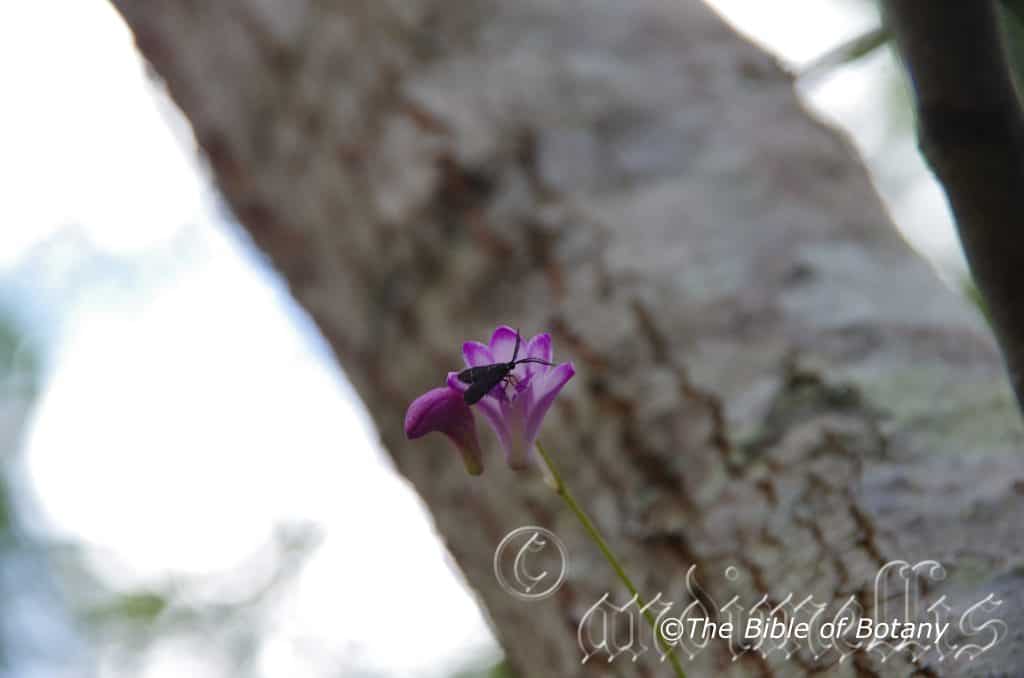
Clarence Valley NSW
xxxxxxxxxxxxxxxxxxxxxxxxxxxxxxxxxxxxxxxxxxThelychiton kingianus
Classification:
Class: Eenzaadlobbigen
Order: Asparagales
Family: Orcidaceae
Subfamily: Epidendroideae
Tribe: Dendrobieae
Sub Tribe: Grastidiinae
Genus: From Theles/Thelion, which are Ancient Greek for a nipple or Thelys, which is Ancient Greek for only giving birth to female offspring and Chiton, which is Ancient Greek for a tunic. It refers to columns on orchids, which completely surround the pistol like the ancient Greek ladies wearing their full length tunics. (Chiton dresses).
Species: Is named in honour of Captain Phillip Parker King; 1791-1856, who was a coastal surveyor and collector of plants.
Common Name: Pink Spider Orchid.
Distribution:
Thelychiton kingianus is found south from the Carnarvon Gorge National Park in central Queensland to the Hunter River in New South Wales. It is mainly found on the eastern side of the Great Dividing Range and in Carnarvon Gorge.
https://avh.ala.org.au/occurrences/search?taxa=Thelychiton+kingianus#tab_mapView
Habitat Aspect Climate:
Thelychiton kingianus prefers dappled shade but can be found growing in full sun on exposed rocks, cliff faces or in the crevices or rocks where leaf litter collects and decomposes. The altitude ranges from 5 meter ASL to 900 meters ASL.
The temperatures range from 1 degrees in July to 38 degrees in January.
The rainfall ranges from lows of 800mm to 1600mm average per annum. The rainfall is seasonal mainly summer and autumn with dry winters and springs and dry atmospheric conditions during these periods.
Soil Requirements:
Thelychiton kingianus is a lithophyte that has a preference for exposed positions on rocks, crevices, faults on cliff faces or as an epiphyte on trees. The pH ranges from pH5.6 to pH6.
Height & Spread:
Wild Plants: 0.3m x 0.3m to 0.6m x 5m. (These large masses are most probably more than one plant)
Characteristics:
Thelychiton kingianus grows as a large clumped orchid with short rhizomes and short plump pseudo bulb stems. The pseudo bulbs have a thick base and taper like an urn for 35mm to 55mm of the overall length and measure 60mm to 300mm in length by 12mm to 24mm in diameter at the widest point. The spongy white roots radiate out from the base of the pseudo bulb. In very wet weather the pseudo bulbs may root and develop a cane from near the apex of an old cane.
The broadly lanceolate to narrow elliptical, conduplicate, leaves of Thelychiton kingianus are glabrous semi glossy and number 3 to 6 on each cane. The divaricate deep sea-green leaves measure 30mm to 100mm in length by 10mm to 20mm in width. The leaf margins are entire while the apex is narrowly acute to broadly acute.
Inflorescences of Thelychiton kingianus are a long raceme with 2 to 15 flowers. It is born from the terminal axis. The pendant rachis vary from 70mm to 150mm long while the peduncles measure 15mm to 20mm long including the 2mm to 3mm ovary which appears to be part of the pedicel but is slightly swollen. The pale pink to deep rose pinks, lilac, or purple dorsal sepal is oblong and measure 10mm to 18mm in length by 4mm to 7mm in width with an acute apex.
The pale pink to deep rose pinks, lilac, or purple lateral, falcate sepals measure 15mm to 18mm in length by 6mm to 8mm in width at the base with an acute apex.
The two pale pink to deep rose pinks, lilac, or purple lateral petals are narrow oblong to spathulate and measure 13mm to 15mm in length by 4mm to 5mm in width with a broad acute apex. Both the sepals and petals margins are entire. The sepals and lateral petals curve slightly forward from the ovary.
The labellum is roughly orbicular from the half way point with a reflex apex with the sides curving strongly upwards from the base to the mid-point near the apex. The margins are entire. The labellum measure 8mm to 15mm in length by 7mm to 12mm in width.
The keel is green in colour, while the labellum and disc are mottled in darker shades of the base colour. The column foot measures 2mm to 3mm in length while the column itself measures 5mm to 8mm in length. Thelychiton kingianus flowers occur from July to October.
The seed pods are 25mm to 30mm long by 20mm to 26mm wide and dry to a light semi glossy olive brown colour with deep reddish brown longitudinal stripes.
Wildlife:
Thelychiton kingianus is the host to numerous small native bees when in flower. It will also play host to the Dendrobium beetle.
All native orchids are protected plant species. It is illegal to remove naturally growing orchid plants from the bush and a license is required for the removal of seed capsule.
Cultivation:
All orchids are protected by law and the collection plants or collecting seed from the wild without the appropriate authority form National Parks or the relevant department is illegal. Fortunately this orchid has proven itself in cultivation and many orchid enthusiasts have it growing and propagate the species for sale.
Thelychiton kingianus is a beautiful small orchid which is rather hardy and easy to grow and to propagate at least as far south as Sale in Victoria along the coast. It does very well either in the bush house in a very course Cymbidium mix or attached to rocks and crevices. When the orchids have been found growing as an epiphyte it is almost always growing on Casuarina species or on sheltered rocks.
Rocks with mass plantings of mixed Thelychiton kingianus add interest and curiosity over a long period especially when in flower. Bare rocks can be made to look spectacularly different and but do not attempt to mix the different colours as it looks hotchpotch and very cheap. Placed around pools or fish ponds on the back of rocks and in crevices enhances the look especially when mixed with small ferns. I have seen Thelychiton kingianus used to great effect in a rock garden with other small prostrate desert plants in light shade. Don’t be boring think outside the square and use your imagination as this is one orchid that will take those harsh conditions and yet still bloom to perfection when the chips are down.
To increase flowering water the plants weekly once established and fertilize monthly with a watering can with our recommended mix on a monthly basis from September to March. Withdraw watering during winter to once every two weeks at the same time.
Be ever so vigilant for Steyhopachys formosa the Orchid enthusiast’s nightmare. This beetle can inflict a lot of damage in just one season. Plants attached to trees or rocks are less likely to be phased by Dendrobium beetle because of natural predators like birds, bats and frogs.
Control of the beetle is simple just squash it. It is slow movers and though like all beetles can fly try to use hiding as a means of escape. The pupae are just as easy to eliminate. Check the base of all your orchids on a regular basis and again destroy any pupae. These look like small patches of white toothpaste squeezed from the tube. The larvae are the most difficult and will usually need a systemic spray or great concentration to find the small holes on the canes as they bore their way through from the inside. Eggs are yellowish and measure about 1.5mm in length.
The beetle eats buds, flowers, new shoots and developing seed pods. Larvae consume the canes.
Photo with more information can be obtained from the Brisbane Orchid Society.
(Stethopachys formosa)
Propagation:
Seeds: All orchids that are declared rare, vulnerable or endangered are protected by Federal and State Laws and must not be removed from the wild unless you are a land developer, mining company or main Roads department etc. This includes bulbs, roots, leaves and flowers. No part of any plant can be removed from Federal, State or Local Government land without the prior permission of the authority and this includes the spore.
1. Obtain relevant materials.
The first step in growing orchid from seed will be sourcing and having at the ready all materials that will be required in the propagation process.
This includes all of the following:
Unripe orchid seed capsule. If there are 2 capsules secure the second capsule immediately after the first capsule splits or if only one capsule as soon as it changes colour.
Orchid gelling medium with agar which can be purchased from an orchid society or a specialist nursery.
Distilled water
Cooking pot
Spoon
Oven-safe glass or polypropylene containers with lids
Sealable bags
Clean, sterilized cutting board
Rubber gloves
Paper towels
Tweezers or forceps
70 percent ethanol
Bleach
Scalpel or sharp knife
Planting pot
Orchid compost
Length of wire metal
Plastic spray bottle.
deep petri dishes or sterile jars.
2. Prepare agar medium
The agar medium is a special orchid gelling mixture that distilled water will be added to distilled water.
To prepare the medium, mix equal parts of orchid gelling medium with distilled water in a cooking pot.
Place the pot on a stove and bring the mixture to boil for while stirring continuously for two minutes.
Pour the mixture into the petri dishes glass or propylene containers while ensuring not to fill the containers above 20 percent of their volume.
Loosely replace the lids to the containers. Sterilize the containers by heating them up in a microwave oven for between 2 to 3 minutes.
Spray 70 percent ethanol into a sealable bag to create a sterile environment. Transfer the heated containers into the sealable bag.
Allow the containers to cool a bit before tightening their lids and then sealing the bag. Leave the containers to stand for a few days until the mixture solidifies.
3. Prepare seed capsule and work surface
Place an open pot of water on a stove and bring to boil. Place the cutting board in the oven and sterilize.
Put on rubber gloves and sterilize the forceps, and scalpel with 70 percent ethanol.
Insert the seed capsule into a bowel filled with bleach for about fifteen minutes.
Sterilize seed capsule again with 70 percent ethanol and place on grill.
Using the sterilized scalpel, cut open the seed capsule to reveal the seeds. Using a scalpel or sharp knife, scrape out the seeds from the capsule unto an ethanol soaked paper towel.
4. Flasking of the seed
Take out the petri dishes or glass jars containers holding the agar medium. Over the steam, open up the containers and transfer seeds from the ethanol soaked paper towel into the individual containers using the sterilized forceps.
The amount of seeds will determine the number of containers required. Replace the lid of the containers and place them on a window sill that receives indirect sunlight.
5. Wait and exercise patience
All that can be done at this point is to wait until the seeds germinate. The amount of time that this might take varies and is dependent on the particular species.
Generally, the time can range from a few months to a few years. During this period of waiting, ensure the containers are free from contamination to ensure that germination is not disrupted.
6. Emergence of protocorms
Protocorms are tuber-shaped bodies with rhizoids that are produced by the young seedlings of various orchids. Protocorms represent the embryonic form of the orchid plant.
Their emergence after the period of waiting at an affirmation that everything in the propagation process is on track.
7. Trans flask orchid seedlings is done after they have developed roots
Upon the emergence of the protocorms, consistently observe the growth of the seedlings. At the point when the seedlings appear to overcrowd the flask, transflasking should be carried out, typically within 30 and 60 days.
* This is done by removing individual seedlings using sterilized tweezers from the original containers and placing them in new containers also filled, in a proportion similar to the original, with agar medium. 6 to 8 in a standard petri dish or 1or 2 to a test tube
8. Transplant seedlings into planting pots
On the presumption that there are no disruptions to the plant growth, the seedlings will eventually outgrow the containers.
At this point, they are to be transplanted into planting pots. A good rule of thumb to determine when they are ready to be transplanted is when the seedlings have developed roots that have grown up to the length of one-quarter of an inch.
To transplant, prepare a planting pot or other container for receiving the seedling by majorly filling it up with coarse fir bark and possibly some slightly moist orchid compost mixture containing perlite, fine charcoal, redwood bark shavings, etc.
To extract the seedlings, submerge the containers in warm water to help loosen the agar gel.
Once the agar medium is softened, twist a piece of metal to form a loop and in turn, use it to carefully pull out the seedlings from the container. It is best done if the agar and seedling can be removed together.
The seedlings can be further rinsed in lukewarm water to remove any excess agar mixture still stuck to them.
Following this, the seedlings can now be planted into the prepared pot with at least 50mm of space between each individual seedling.
9. Positioning the orchid
The seedling once fully transplanted should be placed in a location that is warm with good indirect sun light.
Slowly position the pots into an area that closely assimilates the conditions it will be growing under.
The choice as to whether the plant should be exposed to full sun or in direct sunlight will be dependent on the particular orchid specie.
10. Subsequent care of the plant
After the first week, the seedling can be misted several times a day and watered just once a week.
A guide in watering the plant will be using the dryness of the fir back that is, water the plant until the fir back is completely moistened and wait till it has completely dried out before watering again.
Do not fertilize until the seedlings have fully established themselves.
Further Comments from Readers:
“Hi reader, it seems you use The Bible of Botany a lot. That’s great as we have great pleasure in bringing it to you! It’s a little awkward for us to ask, but our first aim is to purchase land approximately 1,600 hectares to link several parcels of N.P. into one at The Pinnacles NSW Australia, but we need your help. We’re not salespeople. We’re amateur botanists who have dedicated over 30 years to saving the environment in a practical way. We depend on donations to reach our goal. If you donate just $5, the price of your coffee this Sunday, We can help to keep the planet alive in a real way and continue to bring you regular updates and features on Australian plants all in one Botanical Bible. Any support is greatly appreciated. Thank you.”
In the spirit of reconciliation we acknowledge the Bundjalung, Gumbaynggirr and Yaegl and all aboriginal nations throughout Australia and their connections to land, sea and community. We pay our respect to their Elders past, present and future for the pleasures we have gained.
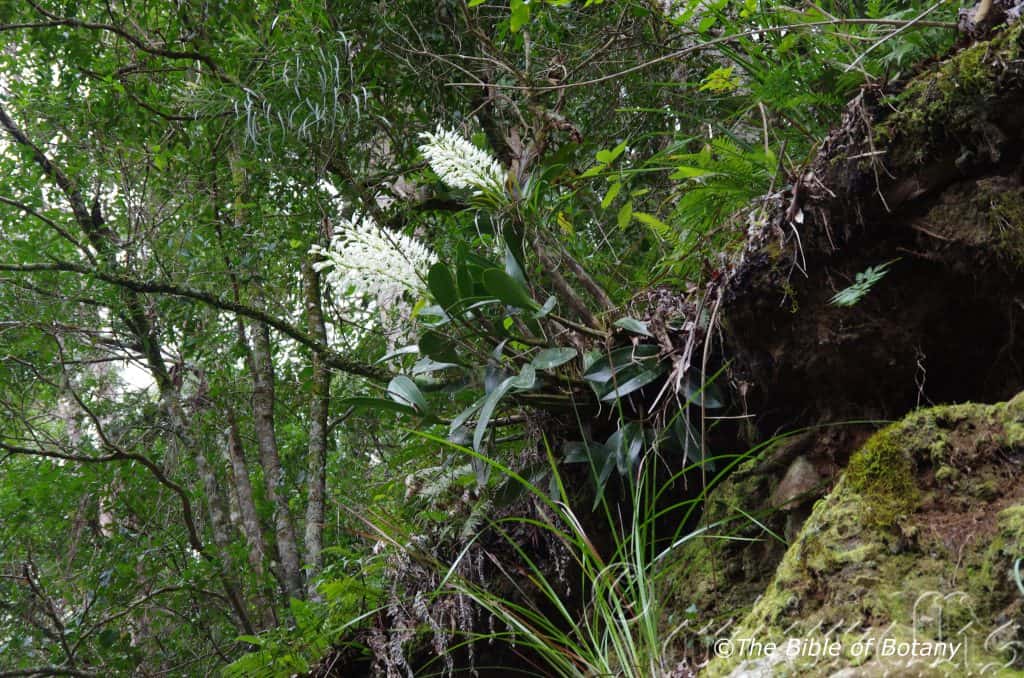
Richmond Shire NSW
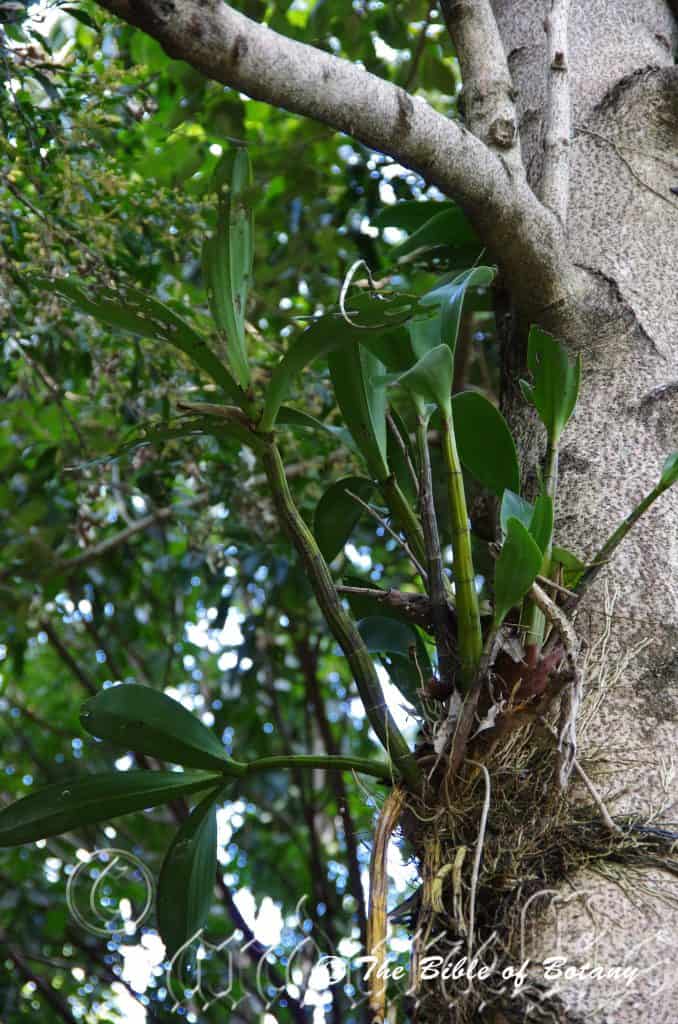
Richmond Shire NSW
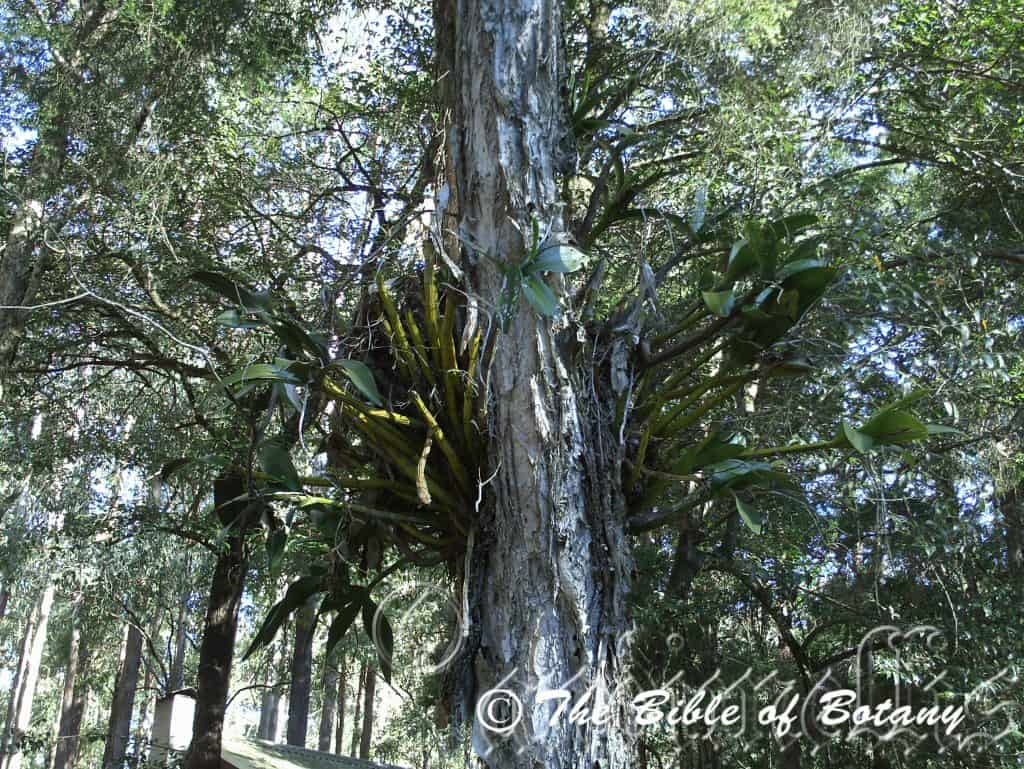
Timbertown Wauchope NSW
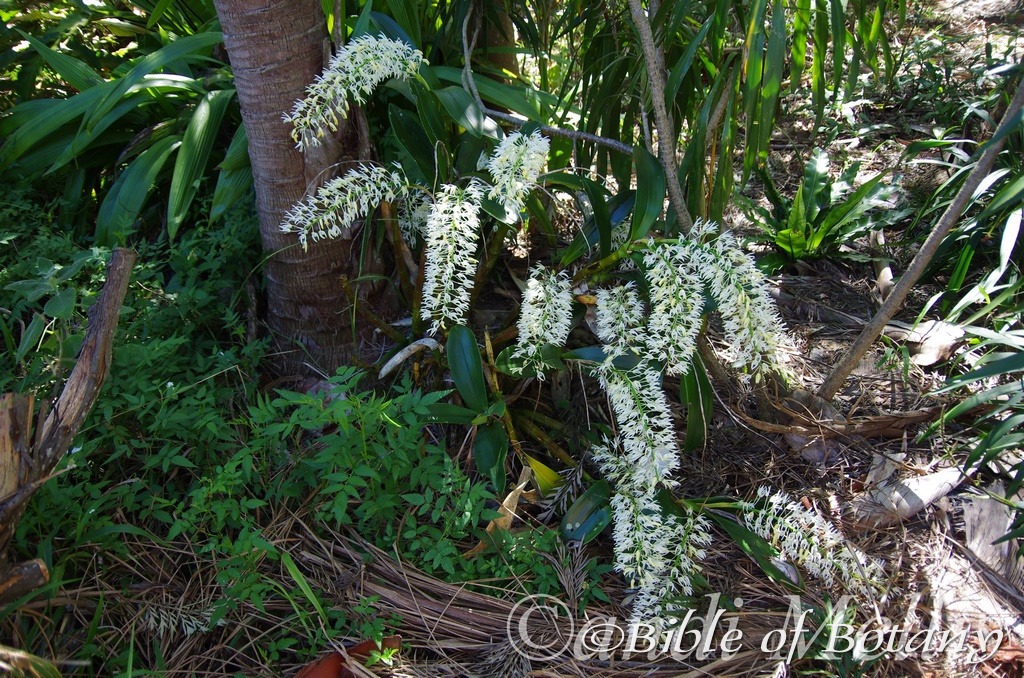
Author’s Garden the Pinnacles NSW

Brisbane Qld.
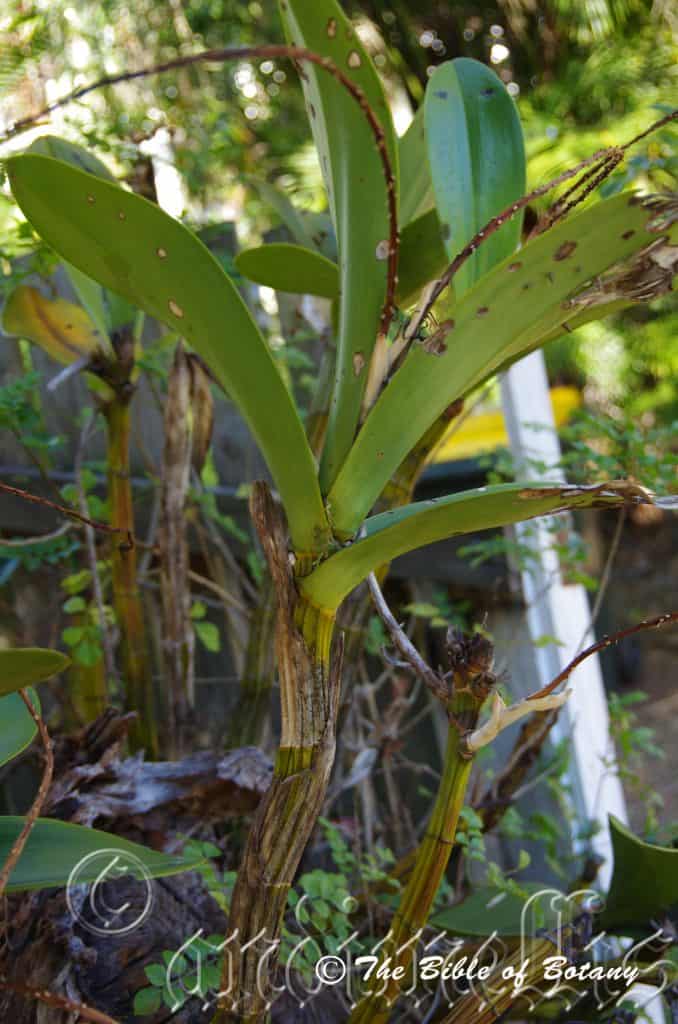
Brisbane Qld.
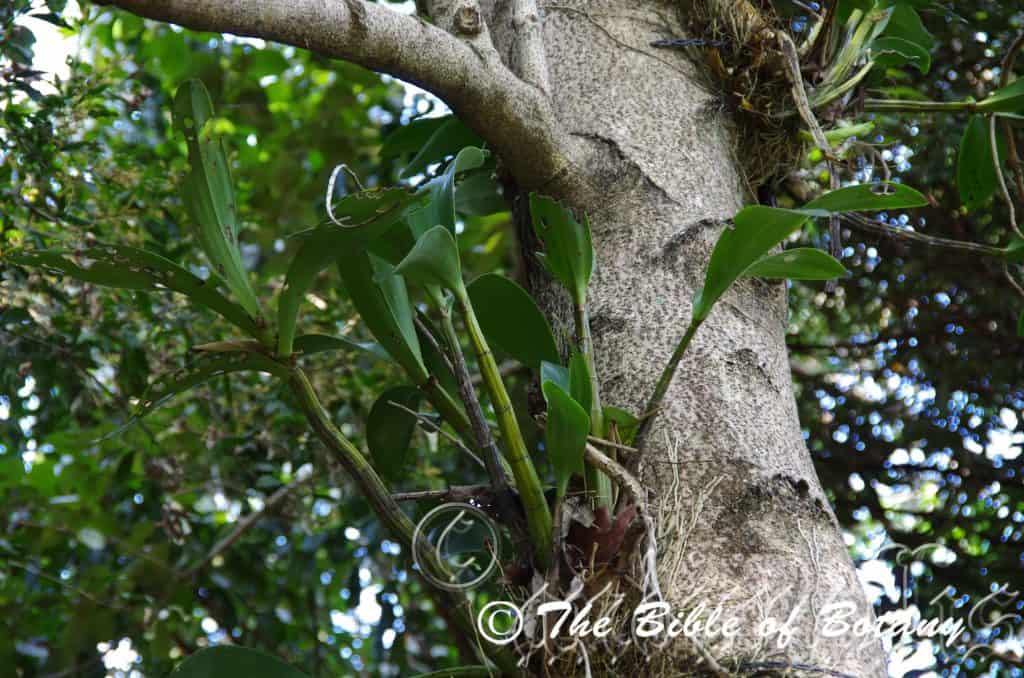
Mount Cootha Botanic Gardens Qld.
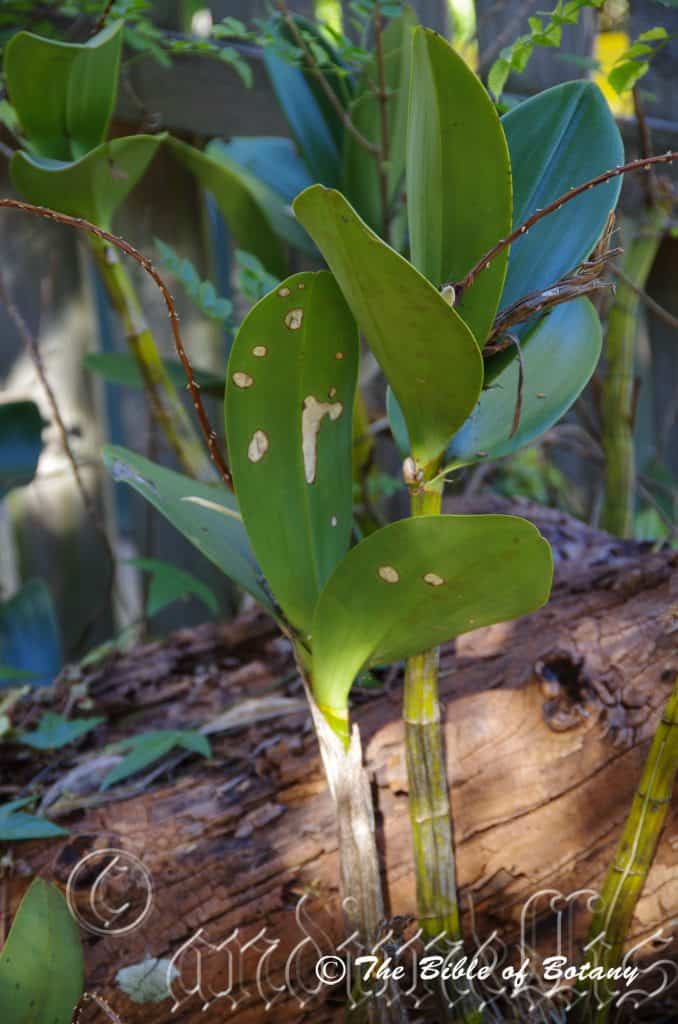
Brisbane Qld.
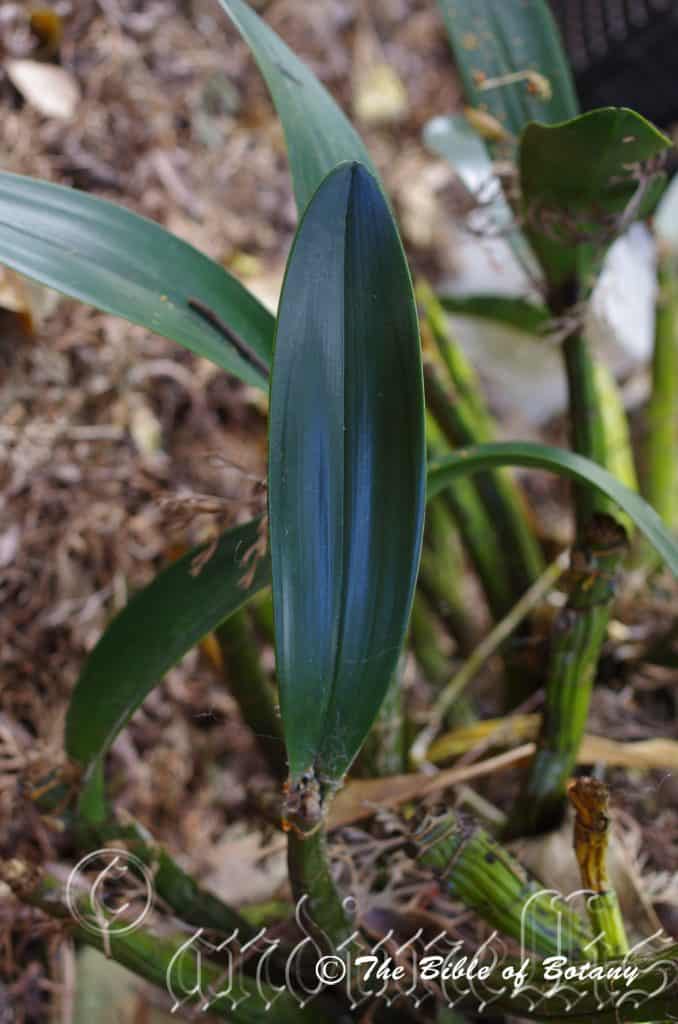
Brisbane Qld.

Brisbane Qld.
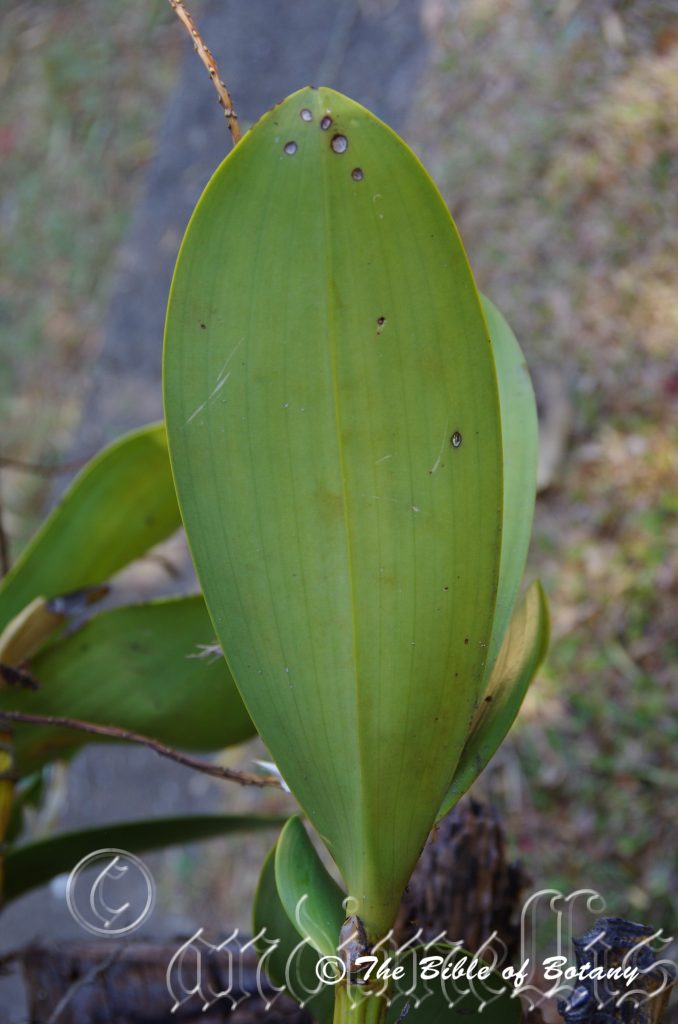
Brisbane Qld.

Author’s Garden the Pinnacles NSW
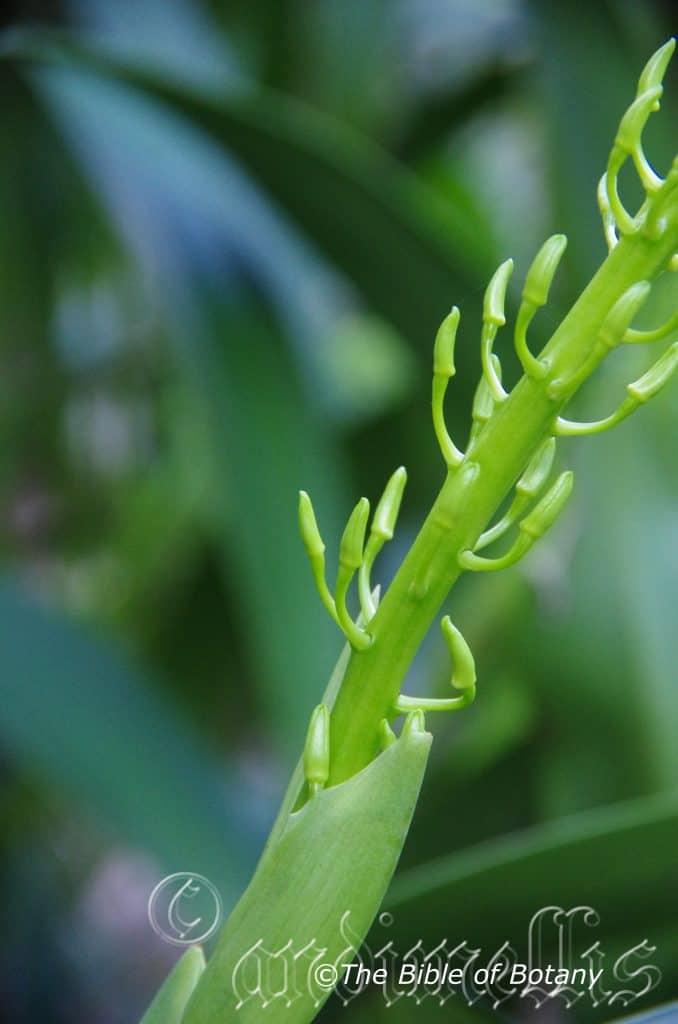
Author’s Garden the Pinnacles NSW
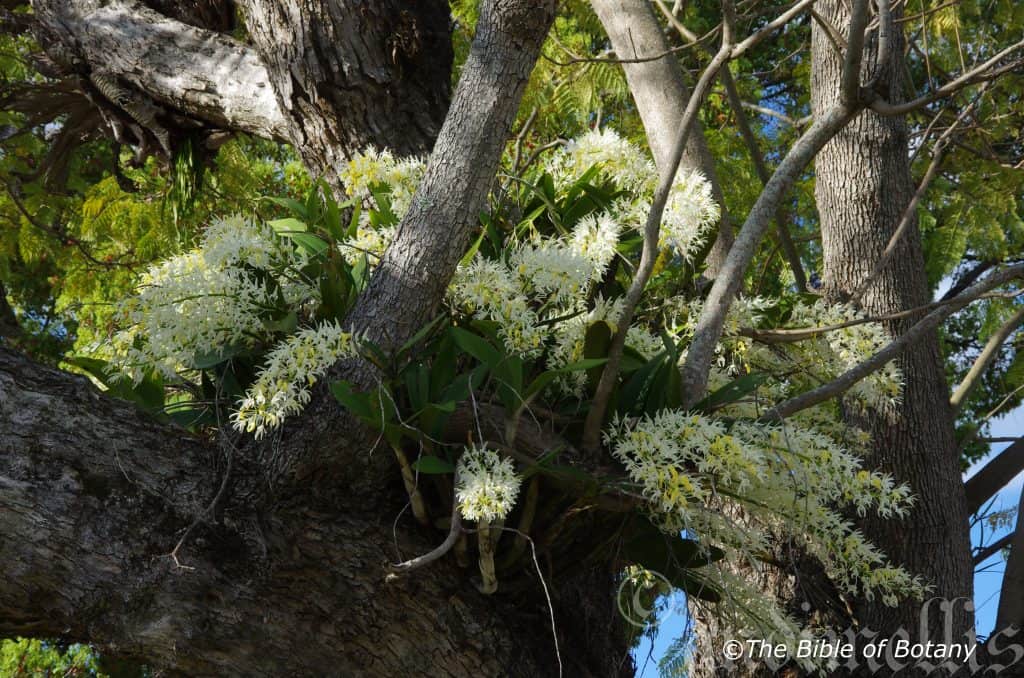
Clarence Valley NSW
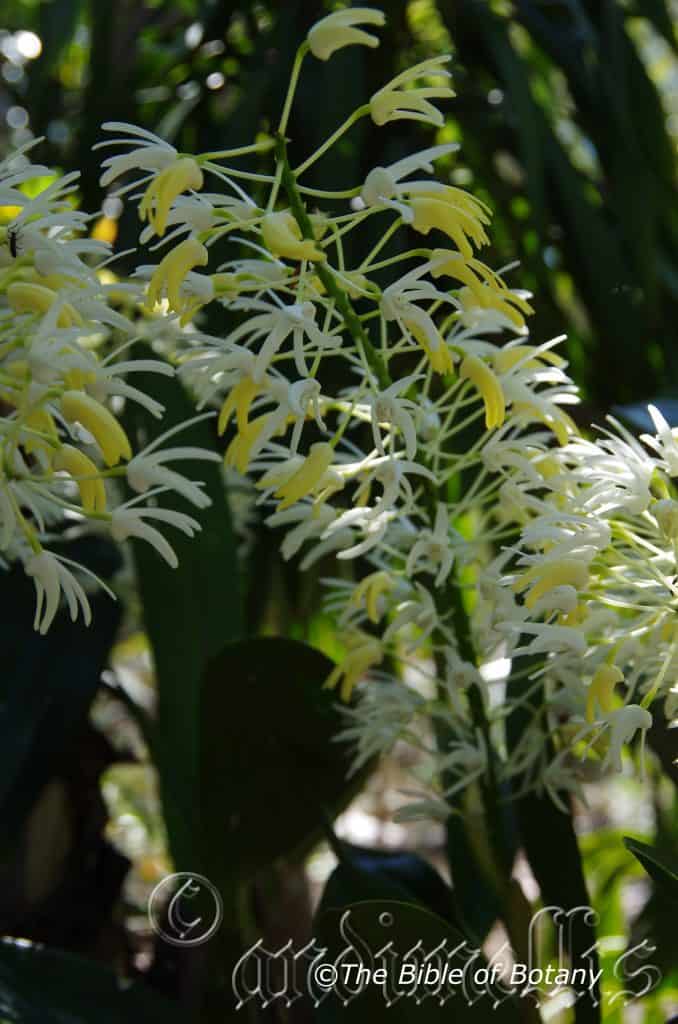
Clarence Valley NSW
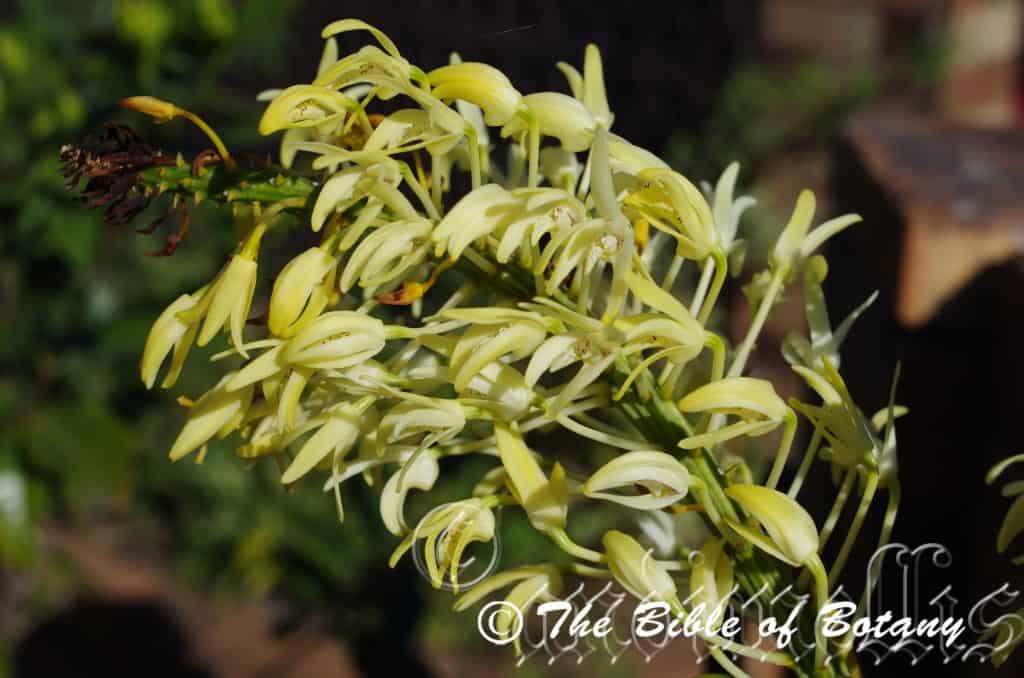
National Botanic Gardens ACT
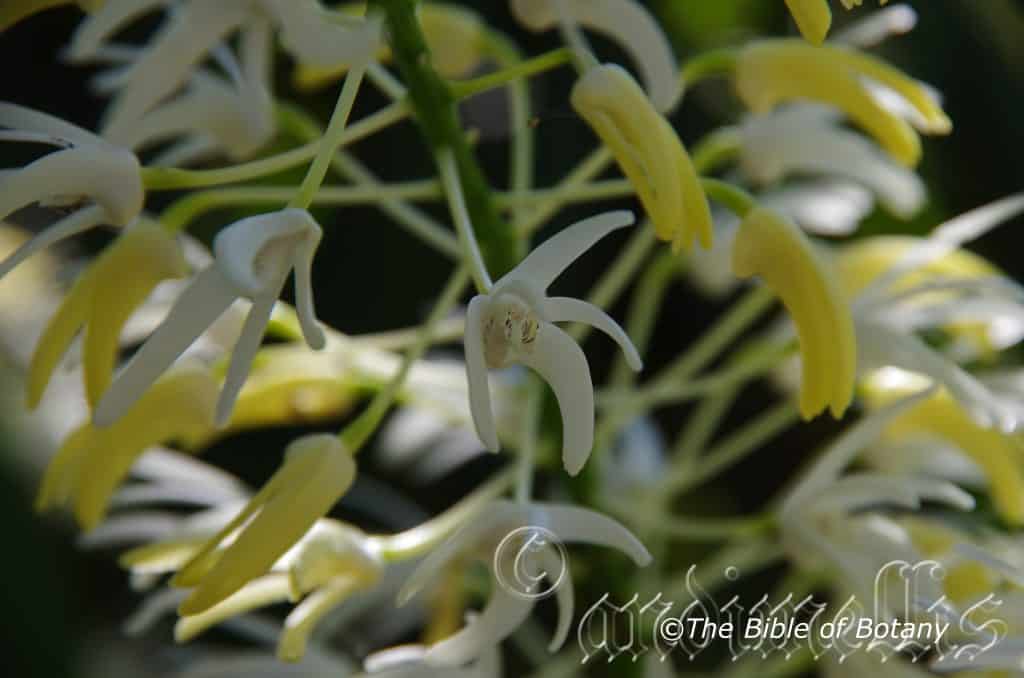
Clarence Valley NSW
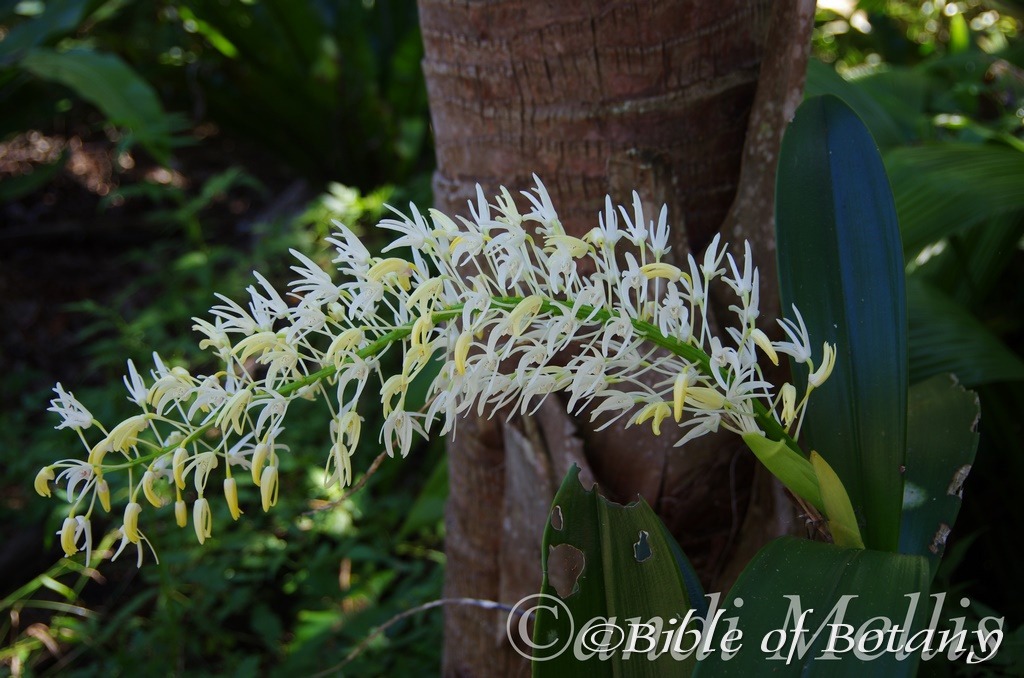
Author’s Garden the Pinnacles NSW
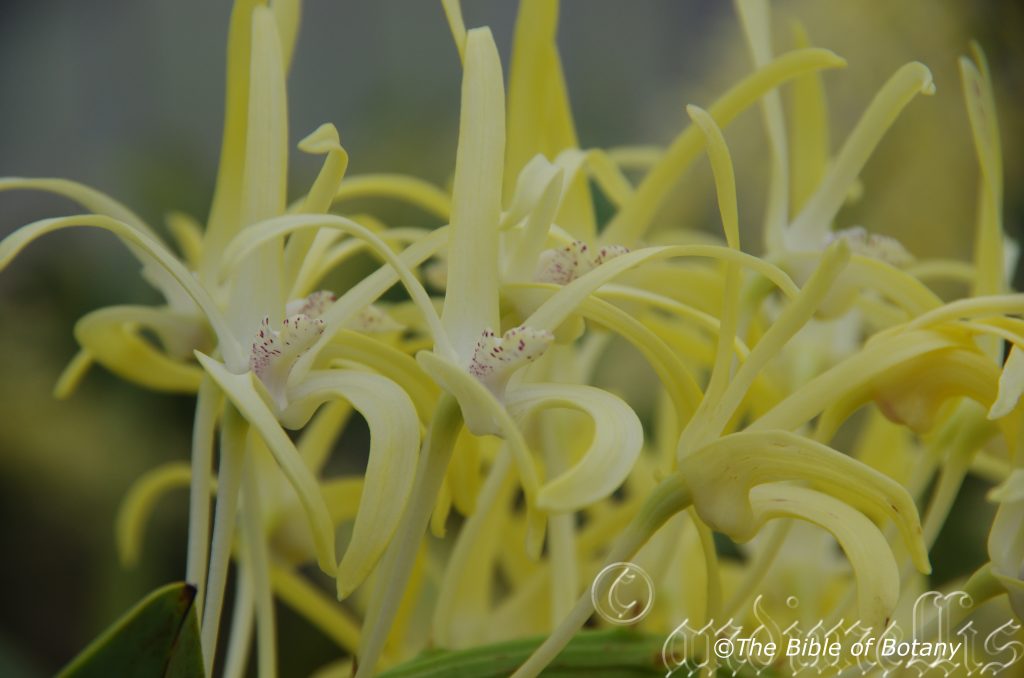
National Botanic Gardens ACT
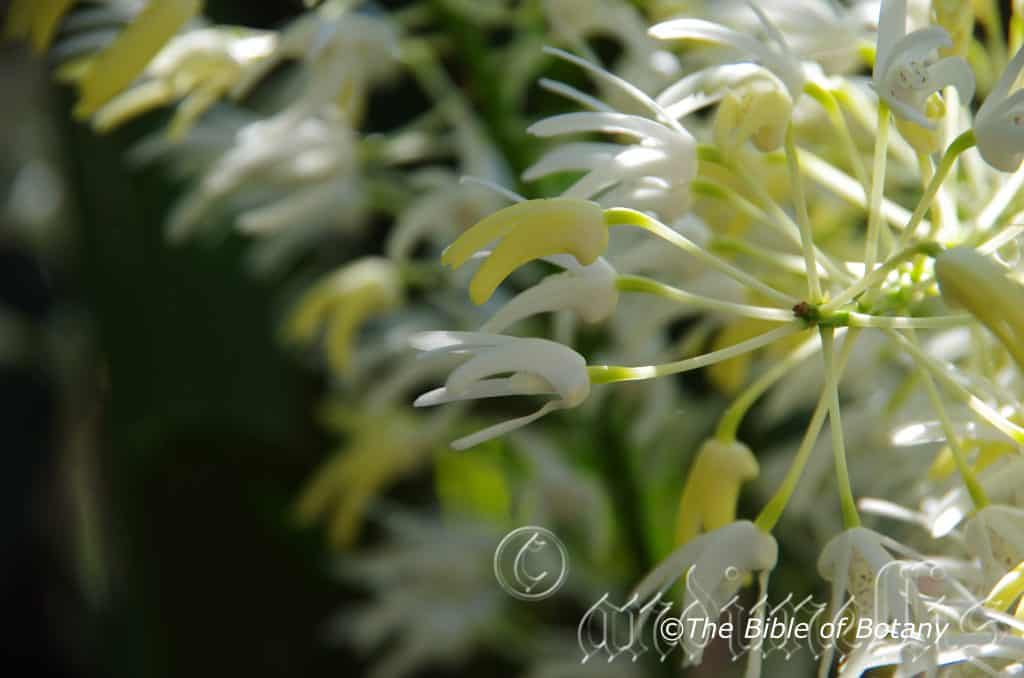
Clarence Valley NSW
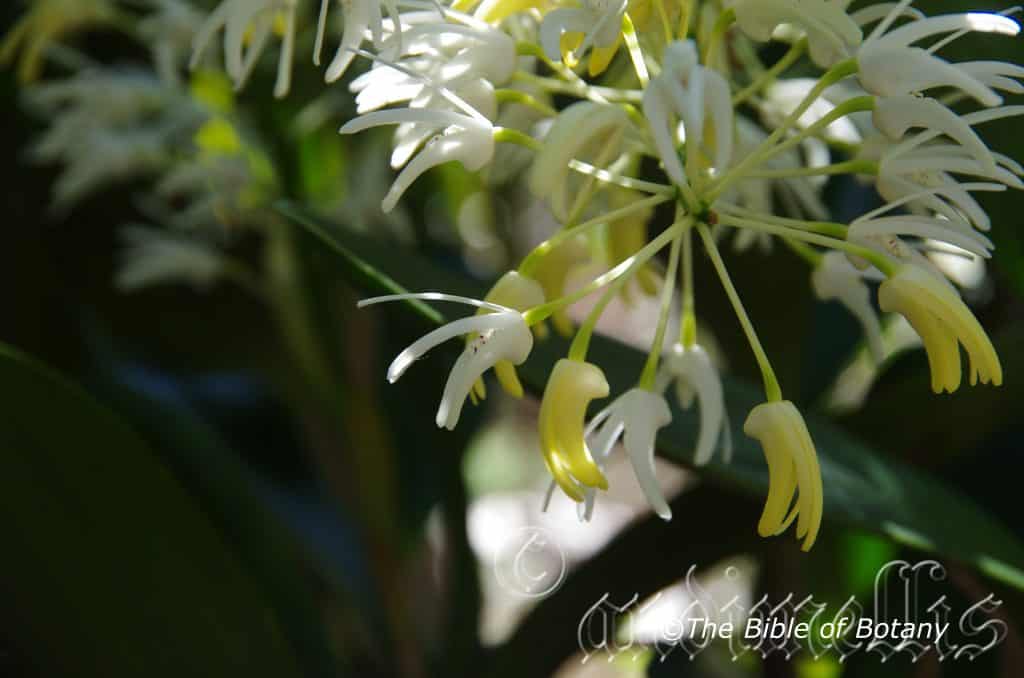
Clarence Valley NSW
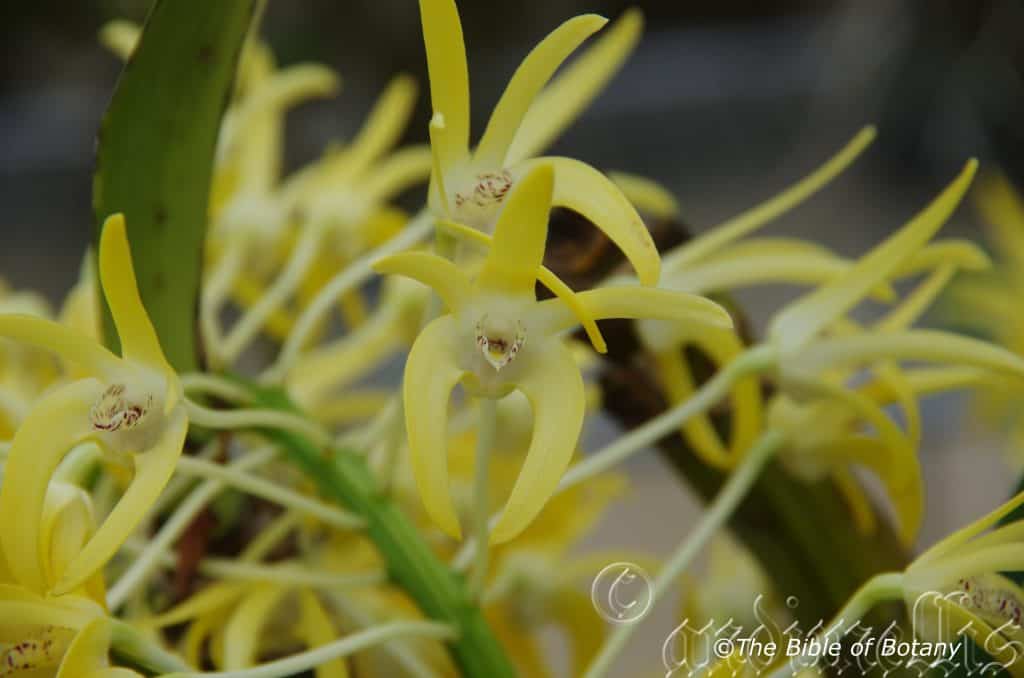
National Botanic Gardens ACT

Clarence Valley NSW
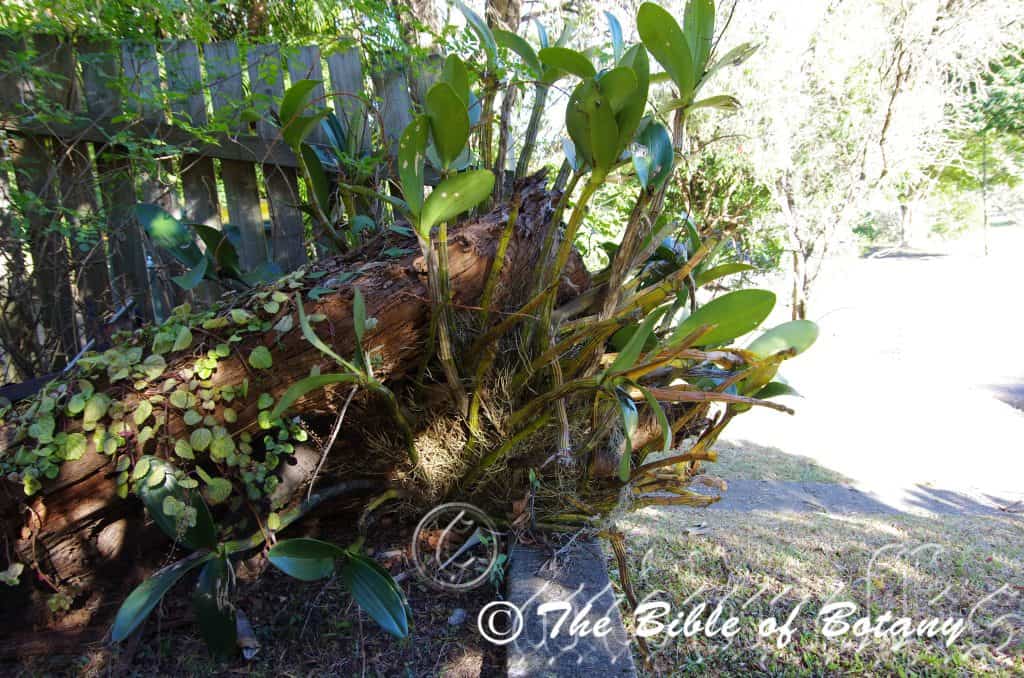
Brisbane Qld.
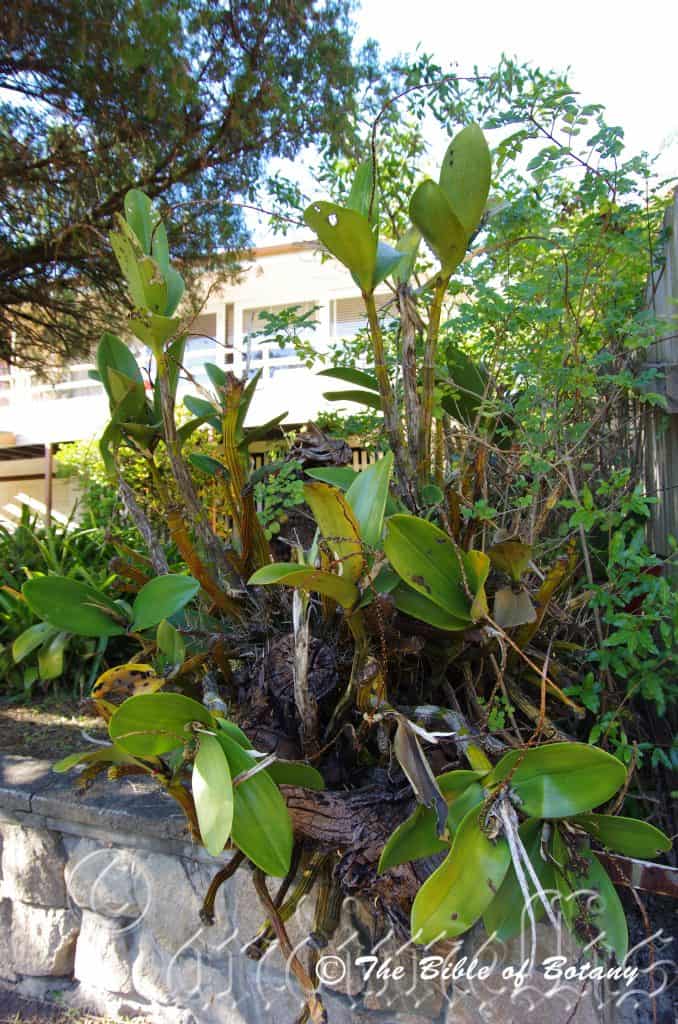
Brisbane Qld.
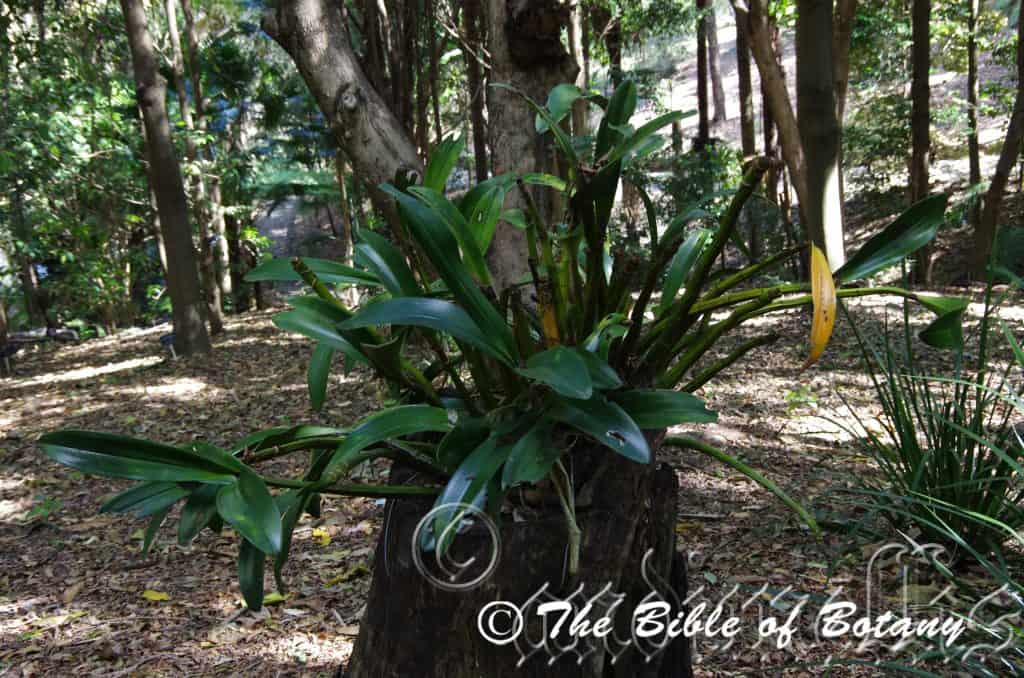
Mount Cootha Botanic Gardens Qld.

Clarence Valley NSW.
xxxxxxxxxxxxxxxxxxxxxxxxxxxxxxxxxxxxxxxxxxxxxxxxThelychiton speciosus
Classification:
Class: Eenzaadlobbigen
Order: Asparagales
Family: Orcidaceae
Subfamily: Epidendroideae
Tribe: Dendrobieae
Sub Tribe: Grastidiinae
Genus: From Theles/Thelion, which are Ancient Greek for a nipple or Thelys, which is Ancient Greek for only giving birth to female offspring and Chiton, which is Ancient Greek for a tunic. It refers to columns on orchids, which completely surround the pistol like the ancient Greek ladies wearing their full length tunics. (Chiton dresses).
Species: From Speciosus, which is Latin for to have the appearance of. It refers to plants, structures or at times organs, which display an appearance of being good-looking, handsome, beautiful splendid, brilliant or showier than other species in the genus.
Common Name: King Orchid.
Distribution:
Thelychiton speciosum is found south from Cairns in far north eastern Queensland to near Orbost in north eastern Gippsland in Victoria. It is mainly found on and east of the Great Dividing Range.
https://avh.ala.org.au/occurrences/search?taxa=Thelychiton+speciosus#tab_mapView
Habitat Aspect Climate:
Thelychiton speciosum prefers dappled shade to partial shade. It grows on exposed rocks, cliff faces or in the crevices of rocks where leaf litter collects and decomposes. On occasions it grows as an epiphyte on the trunks of large trees in in dry rainforests. The altitude ranges from 5 meter ASL to 1000 meters ASL.
The temperatures range from minus 1 degree in July to 38 degrees in January.
The rainfall ranges from lows of 850mm to 2600mm average per annum. The rainfall is seasonal mainly summer and autumn with dry winters and springs where higher humidity is retained for most of the year and orographic precipitation is common before and after the wet season.
Soil Requirements:
Thelychiton speciosum is a lithophyte so it has a preference for protected positions on rocks, crevices, faults on cliff faces and very occasionally as an epiphyte on trees.
Height & Spread:
Wild Plants:1m x 1m to 1.5m x 3m.
Characteristics:
Thelychiton speciosum is an extremely variable species with 9 different subspecies. As such I will give a description that covers the typical species. It grows on short rhizomes with short erect to spreading pseudo bulb stems which grows as a lithophyte or as an epiphyte on rainforest trees or adjacent to rainforests in wet Eucalyptus forests. The cylindrical canes are thickest near the base and taper towards the apex. They measure 80mm to 1000mm in length by 20mm to 60mm in diameter at the widest point. The spongy white roots radiate out from the base of the canes or in very wet weather can become aerial growing vertically upwards. In very wet weather the canes may root and develop a cane from the apex of an old cane.
The elliptical to oblong, conduplicate, leaves are glabrous, leathery and semi glossy and number 2 to 5 on each cane. The divaricate to erect deep sea-green leaves measure 40mm to 250mm in length by 20mm to 80mm in width. The leaf margins are entire while the apex varies greatly from broadly acute, obtuse, emarginated, retuse to mucronate.
Inflorescences are a long raceme with 20 to 200 flowers. It is born from the terminal axis. The green pendant rachis vary from 200mm to 700mm long while the peduncles measure 25mm to 400mm in length including the 4mm to 5mm ovary which appears to be part of the pedicel but is slightly swollen and greener. The dorsal sepals are oblong and measure 16mm to 40mm in length by 3mm to 7mm in width with an obtuse apex.
The lateral sickle shaped, decurve sepals measure 14mm to 35mm in length by 4mm to 9mm in width at the base with an obtuse apex.
The two lateral petals are narrow elliptical and measure 14mm to 34mm long by 3mm to 4mm in width with the widest point being 55mm to 70mm from the base. The apex is obtuse with a mucronate notch. Both sepals and petals are entire. The sepals and petals curve forward from the ovary.
The labellum’s margins curve strongly upwards (90 degrees) from the base to the apex which is mucronate. The margins are two lobed and undulating. The labellum measures 8mm to 153mm in length by 7mm to 13mm in width and is streaked purple.
The columns measure 3mm to 6mm in length while the foot measures 4mm to 8mm in length. The sepals, petals and labellum’s colours vary from brilliant glistening whites to deep yellows. Thelychiton kingianus flowers appear from late August to mid-spring.
The seed pods are 25mm to 30mm long by 20mm to 26mm wide and dry to a light semi glossy olive brown colour with deep reddish brown longitudinal stripes.
Wildlife:
Thelychiton speciosum is the host to numerous small native bees when in flower. It will also play host to the Dendrobium beetle. The leaves, new shoots and flowers are eaten by possums and wallabies.
All native orchids are protected plant species. It is illegal to remove naturally growing orchid plants from the bush and a license is required for the removal of seed capsule.
Cultivation:
All orchids are protected by law and the collection plants or collecting seed from the wild without the appropriate authority form National Parks or the relevant department is illegal. Fortunately this orchid has proven itself in cultivation and many orchid enthusiasts have it growing and propagate the species for sale.
Thelychiton speciosum is a magnificent orchid which is rather hardy and easy to grow and to propagate at least as far south as Melbourne in Victoria along the coast provided frost free winters can is guaranteed. It does very well either in the bush house in a very course Cymbidium mix or attached to rocks and crevices. When the orchids have been found growing as an epiphyte it is frequently growing on Sloanea, Elaeocarpus, Ficus species and other giants of the rainforests. Naturally occurring boulders with mass plantings of Thelychiton speciosum add interest and curiosity over a long period especially when in flower.
Bare rocks can be made to look spectacularly different. Mixing the different colours adds even more interest to the large tropical garden pool, court yard or sheltered rockery. Placed around pools or fish ponds on the back of rocks in the crevices enhances the look especially good when mixed with small ferns. Because of their bare look when not in flower ferns help to create that lush look and detract from the bare canes in the off season. However when in flower, it is instantly recognized without being overpowering. Don’t be boring think outside the square and use your imagination as this is one orchid that will take those harsh conditions and yet still bloom to perfection when the chips are down.
To increase flowering water the plants weekly once established and fertilize monthly with a watering can with our recommended mix on a monthly basis from September to March. Withdraw watering during winter to once every two weeks at the same time if it does not rain.
Be ever so vigilant for Steyhopachys formosa the Orchid enthusiast’s nightmare. This beetle can inflict a lot of damage in just one season. Plants attached to trees are less likely to be phased by Dendrobium beetle because of natural predators like birds, bats and frogs.
Control of the beetle is simple just squash it. It is slow movers and though like all beetles can fly try to use hiding as a means of escape. The pupae are just as easy to eliminate. Check the base of all your orchids on a regular basis and again destroy any pupae. These look like small patches of white toothpaste squeezed from the tube. The larvae are the most difficult and will usually need a systemic spray or great concentration to find the small holes on the canes as they bore their way through from the inside. Eggs are yellowish and measure about 1.5mm in length.
The beetle eats buds, flowers, new shoots and developing seed pods. Larvae consume the canes.
Photo with more information can be obtained from the Brisbane Orchid Society.
(Stethopachys formosa)
Propagation:
Seeds: All orchids that are declared rare, vulnerable or endangered are protected by Federal and State Laws and must not be removed from the wild unless you are a land developer, mining company or main Roads department etc. This includes bulbs, roots, leaves and flowers. No part of any plant can be removed from Federal, State or Local Government land without the prior permission of the authority and this includes the spore.
1. Obtain relevant materials
The first step in growing orchid from seed will be sourcing and having at the ready all materials that will be required in the propagation process.
This includes all of the following:
Unripe orchid seed capsule. If there are 2 capsules secure the second capsule immediately after the first capsule splits or if only one capsule as soon as it changes colour.
Orchid gelling medium with agar which can be purchased from an orchid society or a specialist nursery.
Distilled water
Cooking pot
Spoon
Oven-safe glass or polypropylene containers with lids
Sealable bags
Clean, sterilized cutting board
Rubber gloves
Paper towels
Tweezers or forceps
70 percent ethanol
Bleach
Scalpel or sharp knife
Planting pot
Orchid compost
Length of wire metal
Plastic spray bottle.
deep petri dishes or sterile jars.
2. Prepare agar medium
The agar medium is a special orchid gelling mixture that distilled water will be added to distilled water.
To prepare the medium, mix equal parts of orchid gelling medium with distilled water in a cooking pot.
Place the pot on a stove and bring the mixture to boil for while stirring continuously for two minutes.
Pour the mixture into the petri dishes glass or propylene containers while ensuring not to fill the containers above 20 percent of their volume.
Loosely replace the lids to the containers. Sterilize the containers by heating them up in a microwave oven for between 2 to 3 minutes.
Spray 70 percent ethanol into a sealable bag to create a sterile environment. Transfer the heated containers into the sealable bag.
Allow the containers to cool a bit before tightening their lids and then sealing the bag. Leave the containers to stand for a few days until the mixture solidifies.
3. Prepare seed capsule and work surface
Place an open pot of water on a stove and bring to boil. Place the cutting board in the oven and sterilize.
Put on rubber gloves and sterilize the forceps, and scalpel with 70 percent ethanol.
Insert the seed capsule into a bowel filled with bleach for about fifteen minutes.
Sterilize seed capsule again with 70 percent ethanol and place on grill.
Using the sterilized scalpel, cut open the seed capsule to reveal the seeds. Using a scalpel or sharp knife, scrape out the seeds from the capsule unto an ethanol soaked paper towel.
4. Flasking of the seed
Take out the petri dishes or glass jars containers holding the agar medium. Over the steam, open up the containers and transfer seeds from the ethanol soaked paper towel into the individual containers using the sterilized forceps.
The amount of seeds will determine the number of containers required. Replace the lid of the containers and place them on a window sill that receives indirect sunlight.
5. Wait and exercise patience
All that can be done at this point is to wait until the seeds germinate. The amount of time that this might take varies and is dependent on the particular species.
Generally, the time can range from a few months to a few years. During this period of waiting, ensure the containers are free from contamination to ensure that germination is not disrupted.
6. Emergence of protocorms
Protocorms are tuber-shaped bodies with rhizoids that are produced by the young seedlings of various orchids. Protocorms represent the embryonic form of the orchid plant.
Their emergence after the period of waiting at an affirmation that everything in the propagation process is on track.
7. Trans flask orchid seedlings is done after they have developed roots
Upon the emergence of the protocorms, consistently observe the growth of the seedlings. At the point when the seedlings appear to overcrowd the flask, transflasking should be carried out, typically within 30 and 60 days.
* This is done by removing individual seedlings using sterilized tweezers from the original containers and placing them in new containers also filled, in a proportion similar to the original, with agar medium. 6 to 8 in a standard petri dish or 1or 2 to a test tube
8. Transplant seedlings into planting pots
On the presumption that there are no disruptions to the plant growth, the seedlings will eventually outgrow the containers.
At this point, they are to be transplanted into planting pots. A good rule of thumb to determine when they are ready to be transplanted is when the seedlings have developed roots that have grown up to the length of one-quarter of an inch.
To transplant, prepare a planting pot or other container for receiving the seedling by majorly filling it up with coarse fir bark and possibly some slightly moist orchid compost mixture containing perlite, fine charcoal, redwood bark shavings, etc.
To extract the seedlings, submerge the containers in warm water to help loosen the agar gel.
Once the agar medium is softened, twist a piece of metal to form a loop and in turn, use it to carefully pull out the seedlings from the container. It is best done if the agar and seedling can be removed together.
The seedlings can be further rinsed in lukewarm water to remove any excess agar mixture still stuck to them.
Following this, the seedlings can now be planted into the prepared pot with at least 50mm of space between each individual seedling.
9. Positioning the orchid
The seedling once fully transplanted should be placed in a location that is warm with good indirect sun light.
Slowly position the pots into an area that closely assimilates the conditions it will be growing under.
The choice as to whether the plant should be exposed to full sun or in direct sunlight will be dependent on the particular orchid specie.
10. Subsequent care of the plant
After the first week, the seedling can be misted several times a day and watered just once a week.
A guide in watering the plant will be using the dryness of the fir back that is, water the plant until the fir back is completely moistened and wait till it has completely dried out before watering again.
Fertilize using Seaweed, fish emulsion or organic chicken pellets soaked in water and apply the liquid on an alternate basis. Fertilize every 2 months until the plants are established then on an annual basis in September to October to maintain good health, vigour and better flowering.
Further Comments from Readers:
“Hi reader, it seems you use The Bible of Botany a lot. That’s great as we have great pleasure in bringing it to you! It’s a little awkward for us to ask, but our first aim is to purchase land approximately 1,600 hectares to link several parcels of N.P. into one at The Pinnacles NSW Australia, but we need your help. We’re not salespeople. We’re amateur botanists who have dedicated over 30 years to saving the environment in a practical way. We depend on donations to reach our goal. If you donate just $5, the price of your coffee this Sunday, We can help to keep the planet alive in a real way and continue to bring you regular updates and features on Australian plants all in one Botanical Bible. Any support is greatly appreciated. Thank you.”
In the spirit of reconciliation we acknowledge the Bundjalung, Gumbaynggirr and Yaegl and all aboriginal nations throughout Australia and their connections to land, sea and community. We pay our respect to their Elders past, present and future for the pleasures we have gained.
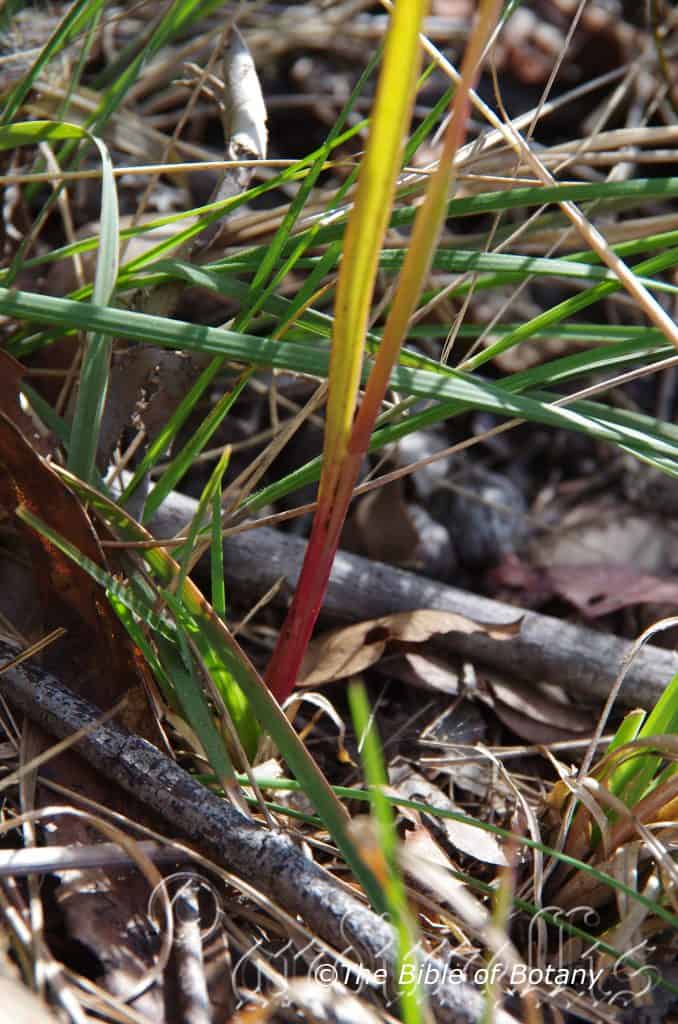
The Pinnacles NSW
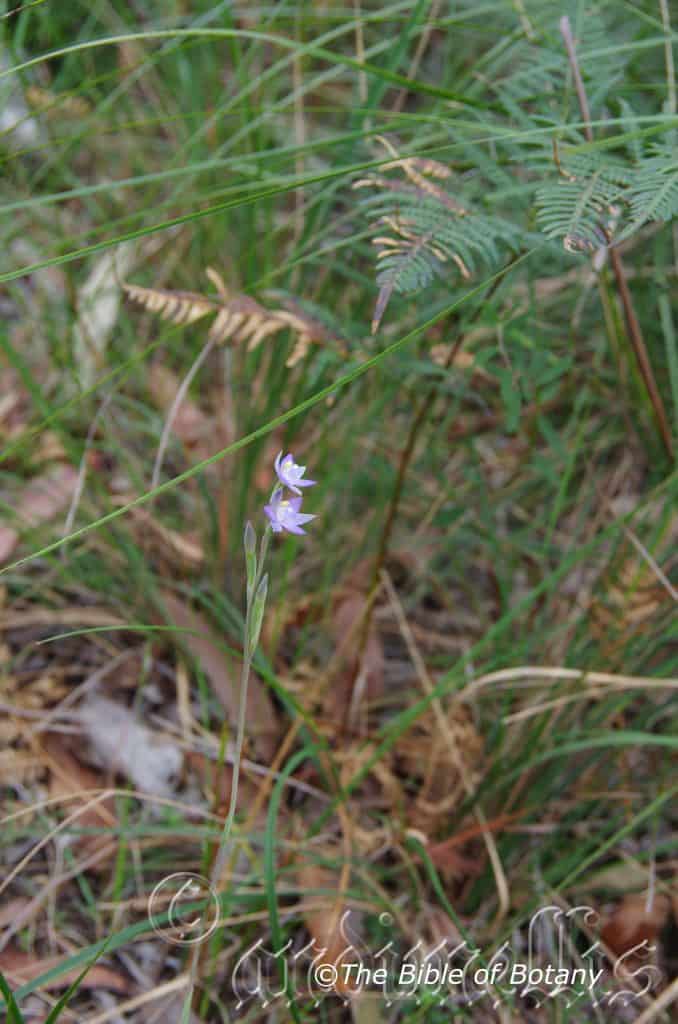
The Pinnacles NSW
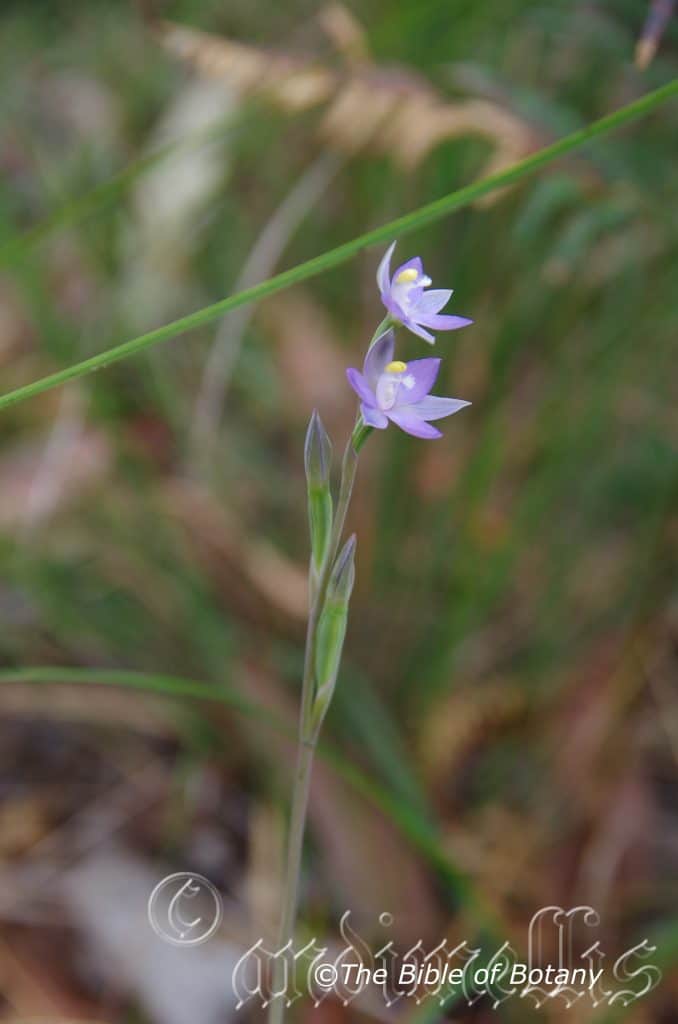
The Pinnacles NSW
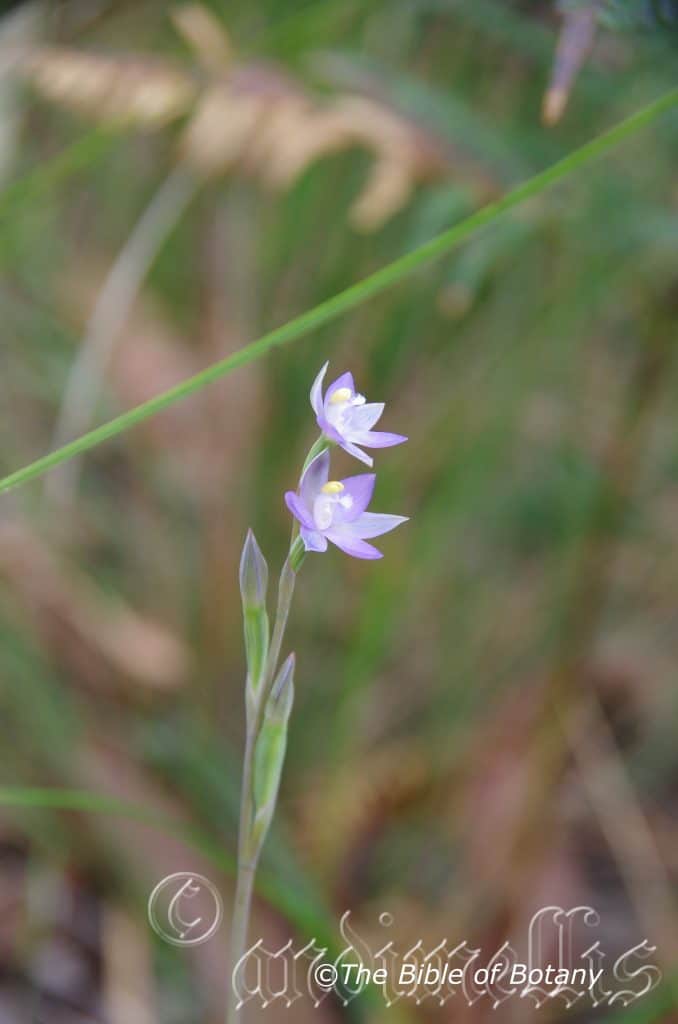
The Pinnacles NSW
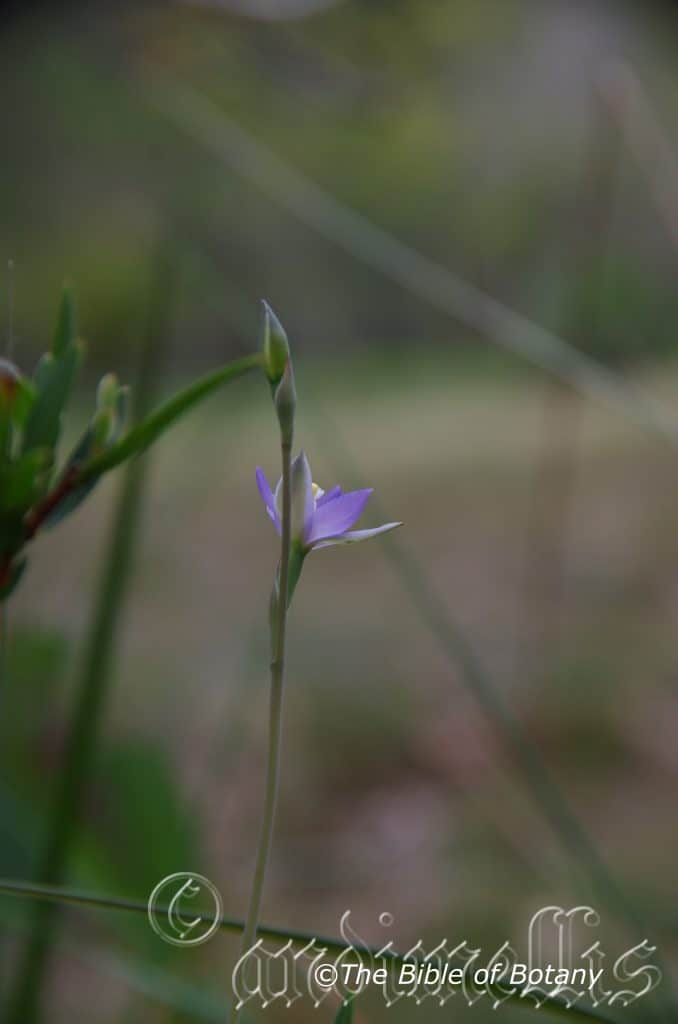
The Pinnacles NSW
xxxxxxxxxxxxxxxxxxxxxxxxxxxxxxxxxxxxxxxxxxxxxxThelymitra angustifolia
Classification:
Class: Monocots
Order: Asparagales
Family: Orcidaceae
Subfamily: Orcidoideae
Tribe: Diurideae
Subtribe: Thelymitrinae
Genus: Thelys, which is Ancient Greek for only giving birth to female offspring and Mitre, which is Ancient Greek for a hooded cape or cap. It refers to a hood over the column or anthers.
Species: From Angusta, which is Latin for narrow and Folium, which is Latin for foliage. It usually refers to leaves or at times the calyx lobes or petals, which are narrower than other species in the genus.
Common Name: Sun Orchid.
Distribution:
Thelymitra angustifolia is found south from Douglas on Cape York Peninsula with a disjunct population on the Blackdown Tablelands in eastern Queensland to the Triplaria Flora Reserve near Nowra in central eastern New South Wales. It is found on the eastern edge of the Western Plains, on the Western Slopes, on and east of The Great Dividing Range to the coast.
https://avh.ala.org.au/occurrences/search?taxa=Thelymitra+angustifolia#tab_mapView
Habitat Aspect Climate:
Thelymitra angustifolia prefers medium shade to light dappled sun light. It grows adjacent to rainforest in dry rainforests, wet sclerophyll forests, in moist open forests and woodlands or in moist to wet savannah. The altitude ranges from 5 meters ASL to 700 meters ASL.
The temperatures range from minus 2 degrees in July to 38 degrees in January.
The rainfall ranges from lows of 540mm to 2600mm average per annum.
Soil Requirements:
Thelymitra angustifolia prefers to grow in light sandy loams to light clays or at times peaty sands or medium silts. The soils are usually derived from decomposed sandstone, granites, alluvial deposits or at times peaty sands accumulated behind the frontal dunes, brown basalts, or black basalts. The soils pH ranges from 6pH to 7pH. It does not tolerate waterlogged soils. Non saline soils to moderately saline soils are tolerated.
Height & Spread:
Wild Plants: 0.5m to 0.6m by 0.02m to 0.03.
Characteristics:
Thelymitra angustifolia grows as a terrestrial herb with 2 obvoid , fleshy tubers.
Thelymitra angustifolia solitary, basal, erect, chartaceous, narrow lanceolate leaf measures 150mm to 500mm in length by 5mm to 11mm in width.
The bases are clasping while the apexes are acute to acuminate. The concolourous laminas are pale grass green.
The inflorescences are born on a long, erect spike from below the ground on the pseudobulbs or tuberous root. The spikes measure 200mm to 600mm in length. There are 2 to 10 individual, resupinate flowers on a spike. The deep bright purplish-blue flowers are porrect and 18mm to 29mm in diameter.
The linear to elliptical dorsal sepal measures 8mm to 14mm in length by 3mm to 6mm in width.
The linear to narrow elliptical lateral sepals measure 9mm to 15mm in length by 2.5mm to 5mm in width.
The linear to narrow elliptical lateral petals measure 9mm to 15mm in length by 2.5mm to 5mm in width.
The labellum is lobed to crisped and measure 9mm to 14mm in length by 2.5mm to 5mm in width. The column measures 4.5mm to 6mm in length by 2.2mm to 3.2mm in width. The hood is deeply emarginate. The column lobes are converging and measure 1mm to 1.5mm in length. The 2 lateral column lobes are porrect and end in a prominent globose tuft of white hairs. The flowers appear from August to October.
The fruits are erect ellipsoidal capsules. The pale grass-green capsules turn creamy fawn when ripe.
Wildlife:
Thelymitra angustifolia wildlife is unknown to the author.
Cultivation:
All orchids are protected by law and the collection plants or collecting seed from the wild without the appropriate authority form National Parks or the relevant department is illegal. Fortunately this orchid has proven itself in cultivation and many orchid enthusiasts have it growing and propagate the species for sale.
Thelymitra angustifolia is one of the beautiful sun orchids which is hardy, easier to grow and to propagate in frost free zones or where frosts are very light. It does very well either in the bush house or in the garden in areas close to where it is found naturally where a thin layer of grass or other fine mulch is replenished on a needs basis.
It is possible to grow it and maintain it in the garden for many years. It prefers and flourishes in periods when the springs and summers are moist, the autumns are wet and the winters are dry. If you are fortunate enough to have this orchid growing naturally then it is a matter of letting it do its own thing.
When growing this orchid in pots it is best done in a sandy and gravelly mix with peat in equal proportions. The soils are usually mildly acidic so beware of any alkaloid materials. Sphagnum moss makes an ideal surface layer on pots.
The best method of watering the plants is to mimic nature. When the first good spring rains come commence watering the plants on a regular basis or when the first shoots appear. Once flowering has ceased restrain from watering and allow the orchids to again become dormant.
Longevity in this genus is largely unknown, but probably varies between 5 and 20 years along with other similar ground orchids.
Propagation:
Seeds: All orchids that are declared rare, vulnerable or endangered are protected by Federal and State Laws and must not be removed from the wild unless you are a land developer, mining company or main Roads department etc. This includes bulbs, roots, leaves and flowers. No part of any plant can be removed from Federal, State or Local Government land without the prior permission of the authority and this includes the spore.
1. Obtain relevant materials
The first step in growing orchid from seed will be sourcing and having at the ready all materials that will be required in the propagation process.
This includes all of the following:
Unripe orchid seed capsule. If there are 2 capsules secure the second capsule immediately after the first capsule splits or if only one capsule as soon as it changes colour.
Orchid gelling medium with agar which can be purchased from an orchid society or a specialist nursery.
Distilled water
Cooking pot
Spoon
Oven-safe glass or polypropylene containers with lids
Sealable bags
Clean, sterilized cutting board
Rubber gloves
Paper towels
Tweezers or forceps
70 percent ethanol
Bleach
Scalpel or sharp knife
Planting pot
Orchid compost
Length of wire metal
Plastic spray bottle.
deep petri dishes or sterile jars.
2. Prepare agar medium
The agar medium is a special orchid gelling mixture that distilled water will be added to distilled water.
To prepare the medium, mix equal parts of orchid gelling medium with distilled water in a cooking pot.
Place the pot on a stove and bring the mixture to boil for while stirring continuously for two minutes.
Pour the mixture into the petri dishes glass or propylene containers while ensuring not to fill the containers above 20 percent of their volume.
Loosely replace the lids to the containers. Sterilize the containers by heating them up in a microwave oven for between 2 to 3 minutes.
Spray 70 percent ethanol into a sealable bag to create a sterile environment. Transfer the heated containers into the sealable bag.
Allow the containers to cool a bit before tightening their lids and then sealing the bag. Leave the containers to stand for a few days until the mixture solidifies.
3. Prepare seed capsule and work surface
Place an open pot of water on a stove and bring to boil. Place the cutting board in the oven and sterilize.
Put on rubber gloves and sterilize the forceps, and scalpel with 70 percent ethanol.
Insert the seed capsule into a bowel filled with bleach for about fifteen minutes.
Sterilize seed capsule again with 70 percent ethanol and place on grill.
Using the sterilized scalpel, cut open the seed capsule to reveal the seeds. Using a scalpel or sharp knife, scrape out the seeds from the capsule unto an ethanol soaked paper towel.
4. Flasking of the seed
Take out the petri dishes or glass jars containers holding the agar medium. Over the steam, open up the containers and transfer seeds from the ethanol soaked paper towel into the individual containers using the sterilized forceps.
The amount of seeds will determine the number of containers required. Replace the lid of the containers and place them on a window sill that receives indirect sunlight.
5. Wait and exercise patience
All that can be done at this point is to wait until the seeds germinate. The amount of time that this might take varies and is dependent on the particular species.
Generally, the time can range from a few months to a few years. During this period of waiting, ensure the containers are free from contamination to ensure that germination is not disrupted.
6. Emergence of protocorms
Protocorms are tuber-shaped bodies with rhizoids that are produced by the young seedlings of various orchids. Protocorms represent the embryonic form of the orchid plant.
Their emergence after the period of waiting at an affirmation that everything in the propagation process is on track.
7. Transflask orchid seedlings is done after they have developed roots
Upon the emergence of the protocorms, consistently observe the growth of the seedlings. At the point when the seedlings appear to overcrowd the flask, transflasking should be carried out, typically within 30 and 60 days.
* This is done by removing individual seedlings using sterilized tweezers from the original containers and placing them in new containers also filled, in a proportion similar to the original, with agar medium. 6 to 8 in a standard petri dish or 1or 2 to a test tube
8. Transplant seedlings into planting pots
On the presumption that there are no disruptions to the plant growth, the seedlings will eventually outgrow the containers.
At this point, they are to be transplanted into planting pots. A good rule of thumb to determine when they are ready to be transplanted is when the seedlings have developed roots that have grown up to the length of one-quarter of an inch.
To transplant, prepare a planting pot or other container for receiving the seedling by majorly filling it up with coarse fir bark and possibly some slightly moist orchid compost mixture containing perlite, fine charcoal, redwood bark shavings, etc.
To extract the seedlings, submerge the containers in warm water to help loosen the agar gel.
Once the agar medium is softened, twist a piece of metal to form a loop and in turn, use it to carefully pull out the seedlings from the container. It is best done if the agar and seedling can be removed together.
The seedlings can be further rinsed in lukewarm water to remove any excess agar mixture still stuck to them.
Following this, the seedlings can now be planted into the prepared pot with at least 50mm of space between each individual seedling.
9. Positioning the orchid
The seedling once fully transplanted should be placed in a location that is warm with good indirect sun light.
Slowly position the pots into an area that closely assimilates the conditions it will be growing under.
The choice as to whether the plant should be exposed to full sun or in direct sunlight will be dependent on the particular orchid specie.
10. Subsequent care of the plant
After the first week, the seedling can be misted several times a day and watered just once a week.
A guide in watering the plant will be using the dryness of the fir back that is, water the plant until the fir back is completely moistened and wait till it has completely dried out before watering again.
Fertilize using Seaweed, fish emulsion or organic chicken pellets soaked in water and apply the liquid on an alternate basis. Fertilize every 2 months until the plants are established then on an annual basis in September to October to maintain good health, vigour and better flowering.
Further Comments from Readers:
“Hi reader, it seems you use The Bible of Botany a lot. That’s great as we have great pleasure in bringing it to you! It’s a little awkward for us to ask, but our first aim is to purchase land approximately 1,600 hectares to link several parcels of N.P. into one at The Pinnacles NSW Australia, but we need your help. We’re not salespeople. We’re amateur botanists who have dedicated over 30 years to saving the environment in a practical way. We depend on donations to reach our goal. If you donate just $5, the price of your coffee this Sunday, We can help to keep the planet alive in a real way and continue to bring you regular updates and features on Australian plants all in one Botanical Bible. Any support is greatly appreciated. Thank you.”
In the spirit of reconciliation we acknowledge the Bundjalung, Gumbaynggirr and Yaegl and all aboriginal nations throughout Australia and their connections to land, sea and community. We pay our respect to their Elders past, present and future for the pleasures we have gained.
xxxxxxxxxxxxxxxxxxxxxxxxxxxxxxxxxxxxxxxxxxxxxThelymitra fragrans
Classification:
Class: Monocots
Order: Asparagales
Family: Orcidaceae
Subfamily: Orcidoideae
Tribe: Diurideae
Subtribe: Thelymitrinae
Genus: Thelys, which is Ancient Greek for only giving birth to female offspring and Mitre, which is Ancient Greek for a hooded cape or cap. It refers to a hood over the column.
Species: From Fragrantia, which is Latin for fragrant. It refers to plants usually the flowers or leaves, which have a sweet scent. Here it refers to the flowers being more fragrant than other species in the genus.
Common Name: Fragrant Sun Orchid.
Distribution:
Thelymitra fragrans is found south from the tip of Cape York Peninsula in far north east Queensland to the Sutherland shire south of Sydney in eastern New South Wales. It grows mainly on the coastal ranges of the Great Dividing Range in the higher rainfall areas.
https://avh.ala.org.au/occurrences/search?taxa=Thelymitra+fragrans#tab_mapView
Habitat Aspect Climate:
Thelymitra fragrans prefers medium shade to light dappled sun light. It grows on the outer branches and branchlets in sheltered areas of open forests, littoral rainforests, riparian rainforests or well developed rainforests. The altitude ranges from 10 meters ASL to 800 meters ASL.
The temperatures range from minus 2 degrees in July to 38 degrees in January.
The rainfall ranges from lows of 1200mm to 3200mm average per annum.
Soil Requirements:
Thelymitra fragrans prefers light sandy loams to light clays or at times peaty sands or medium silts. The soils are usually derived from decomposed sandstone, granites, alluvial deposits or at times peaty sands accumulated behind the frontal dunes, brown basalts, or black basalts. The soils pH ranges from 4.5pH to 6pH. It does not tolerate waterlogged soils. Non saline soils to moderately saline soils are tolerated.
Height & Spread:
Wild Plants: 160mm to 275mm by 25mm to 40mm.
Characteristics:
Thelymitra fragrans grows as a terrestrial orchid with 2 obvoid, fleshy tubers.
The narrow lanceolate leaf measures 150mm to 270mm in length by 15mm to 22mm in width. The bases are clasping while the apexes are narrow acute. The concolourous leaves are grass-green, glabrous and semi glossy.
The inflorescences are born on a single erect, spike from the ground. The spike measures 200mm to 350mm in length.
There are 2 to 11 individual, resupinate flowers on a spike. The deep bright purplish-blue flowers are porrect and 18mm to 29mm in diameter.
The linear to elliptical dorsal sepal measures 8mm to 14mm in length by 2.5mm to 5mm in width. The linear to narrow elliptical lateral sepals measure 8mm to 14mm in length by 2.5mm to 5mm in width. The linear to narrow elliptical lateral petals measure 8mm to 14mm in length by 3mm to 6mm in width.
The elliptical to narrow spathulate labellum measures 8mm to 14mm in length by 2.5mm to 5mm in width. The column measures 4.5mm to 6mm in length by 2.2mm to 3.2mm in width. The hood is deeply emarginate. The narrow column lobes strongly converge and measure 1mm to 1.5mm in length. The 2 lateral column lobes are porrect and end in a prominent globose tuft of white hairs. The fragrant flowers appear from August to October.
The fruits are ellipsoidal pods. The pale lime-green pods turn creamy fawn when ripe.
Wildlife:
Thelymitra fragrans wildlife is unknown to the author.
Cultivation:
All orchids are protected by law and the collection plants or collecting seed from the wild without the appropriate authority form National Parks or the relevant department is illegal. Fortunately this orchid has proven itself in cultivation and many orchid enthusiasts have it growing and propagate the species for sale.
Thelymitra fragrans is another beautiful sun orchid which is hardy and easier to grow and to propagate in areas close to where it grows naturally. It does very well either in the bush house or in the garden where a thin layer of grass mulch is replenished on an annual basis.
It is a beautiful yet easy orchid to succeed with in cultivation. It is possible to grow it and maintain it in the garden for many years. It prefers and flourishes in periods when the springs and summers are moist, the autumns are wet and the winters are dry. If you are fortunate enough to have the orchids growing naturally then it is a matter of letting it do its own thing.
When growing this orchid in pots it is best done in a sandy and gravelly mix with peat in equal proportions. The soils are usually quite acidic so beware of any alkaloid materials. Sphagnum moss makes an ideal surface layer on pots.
The best method of watering the plants is to mimic nature. When the first good spring rains come commence watering the plants on a weekly basis or when the first shoots appear. Once flowering has ceased restrain from watering and allow the orchids to again become dormant.
Longevity in this genus is largely unknown, but probably varies between 5 and 20 years along with other similar ground orchids.
If you are fortunate enough to have this orchid growing on your property then it is worth the trouble to marking the area to save it. Continually replenish the leaf litter and keep the area moist from the start of the wet season to after flowering.
Propagation:
Seeds: All orchids that are declared rare, vulnerable or endangered are protected by Federal and State Laws and must not be removed from the wild unless you are a land developer, mining company or main Roads department etc. This includes bulbs, roots, leaves and flowers. No part of any plant can be removed from Federal, State or Local Government land without the prior permission of the authority and this includes the spore.
1. Obtain relevant materials of Thelymitra fragrans.
The first step in growing orchid from seed will be sourcing and having at the ready all materials that will be required in the propagation process.
This includes all of the following:
Unripe orchid seed capsule. If there are 2 capsules secure the second capsule immediately after the first capsule splits or if only one capsule as soon as it changes colour.
Orchid gelling medium with agar which can be purchased from an orchid society or a specialist nursery.
Distilled water
Cooking pot
Spoon
Oven-safe glass or polypropylene containers with lids
Sealable bags
Clean, sterilized cutting board
Rubber gloves
Paper towels
Tweezers or forceps
70 percent ethanol
Bleach
Scalpel or sharp knife
Planting pot
Orchid compost
Length of wire metal
Plastic spray bottle.
deep petri dishes or sterile jars.
2. Prepare agar medium
The agar medium is a special orchid gelling mixture that distilled water will be added to distilled water.
To prepare the medium, mix equal parts of orchid gelling medium with distilled water in a cooking pot.
Place the pot on a stove and bring the mixture to boil for while stirring continuously for two minutes.
Pour the mixture into the petri dishes glass or propylene containers while ensuring not to fill the containers above 20 percent of their volume.
Loosely replace the lids to the containers. Sterilize the containers by heating them up in a microwave oven for between 2 to 3 minutes.
Spray 70 percent ethanol into a sealable bag to create a sterile environment. Transfer the heated containers into the sealable bag.
Allow the containers to cool a bit before tightening their lids and then sealing the bag. Leave the containers to stand for a few days until the mixture solidifies.
3. Prepare seed capsule and work surface
Place an open pot of water on a stove and bring to boil. Place the cutting board in the oven and sterilize.
Put on rubber gloves and sterilize the forceps, and scalpel with 70 percent ethanol.
Insert the seed capsule into a bowel filled with bleach for about fifteen minutes.
Sterilize seed capsule again with 70 percent ethanol and place on grill.
Using the sterilized scalpel, cut open the seed capsule to reveal the seeds. Using a scalpel or sharp knife, scrape out the seeds from the capsule unto an ethanol soaked paper towel.
4. Flasking of the seed
Take out the petri dishes or glass jars containers holding the agar medium. Over the steam, open up the containers and transfer seeds from the ethanol soaked paper towel into the individual containers using the sterilized forceps.
The amount of seeds will determine the number of containers required. Replace the lid of the containers and place them on a window sill that receives indirect sunlight.
5. Wait and exercise patience
All that can be done at this point is to wait until the seeds germinate. The amount of time that this might take varies and is dependent on the particular species.
Generally, the time can range from a few months to a few years. During this period of waiting, ensure the containers are free from contamination to ensure that germination is not disrupted.
6. Emergence of protocorms
Protocorms are tuber-shaped bodies with rhizoids that are produced by the young seedlings of various orchids. Protocorms represent the embryonic form of the orchid plant.
Their emergence after the period of waiting at an affirmation that everything in the propagation process is on track.
7. Trans flask orchid seedlings is done after they have developed roots
Upon the emergence of the protocorms, consistently observe the growth of the seedlings. At the point when the seedlings appear to overcrowd the flask, transflasking should be carried out, typically within 30 and 60 days.
* This is done by removing individual seedlings using sterilized tweezers from the original containers and placing them in new containers also filled, in a proportion similar to the original, with agar medium. 6 to 8 in a standard petri dish or 1or 2 to a test tube
8. Transplant seedlings into planting pots
On the presumption that there are no disruptions to the plant growth, the seedlings will eventually outgrow the containers.
At this point, they are to be transplanted into planting pots. A good rule of thumb to determine when they are ready to be transplanted is when the seedlings have developed roots that have grown up to the length of one-quarter of an inch.
To transplant, prepare a planting pot or other container for receiving the seedling by majorly filling it up with coarse fir bark and possibly some slightly moist orchid compost mixture containing perlite, fine charcoal, redwood bark shavings, etc.
To extract the seedlings, submerge the containers in warm water to help loosen the agar gel.
Once the agar medium is softened, twist a piece of metal to form a loop and in turn, use it to carefully pull out the seedlings from the container. It is best done if the agar and seedling can be removed together.
The seedlings can be further rinsed in lukewarm water to remove any excess agar mixture still stuck to them.
Following this, the seedlings can now be planted into the prepared pot with at least 50mm of space between each individual seedling.
9. Positioning the orchid
The seedling once fully transplanted should be placed in a location that is warm with good indirect sun light.
Slowly position the pots into an area that closely assimilates the conditions it will be growing under.
The choice as to whether the plant should be exposed to full sun or in direct sunlight will be dependent on the particular orchid specie.
10. Subsequent care of the plant
After the first week, the seedling can be misted several times a day and watered just once a week.
A guide in watering the plant will be using the dryness of the fir back that is, water the plant until the fir back is completely moistened and wait till it has completely dried out before watering again.
Fertilize using Seaweed, fish emulsion or organic chicken pellets soaked in water and apply the liquid on an alternate basis. Fertilize every 2 months until the plants are established then on an annual basis in September to October to maintain good health, vigour and better flowering.
Further Comments from Readers:
“Hi reader, it seems you use The Bible of Botany a lot. That’s great as we have great pleasure in bringing it to you! It’s a little awkward for us to ask, but our first aim is to purchase land approximately 1,600 hectares to link several parcels of N.P. into one at The Pinnacles NSW Australia, but we need your help. We’re not salespeople. We’re amateur botanists who have dedicated over 30 years to saving the environment in a practical way. We depend on donations to reach our goal. If you donate just $5, the price of your coffee this Sunday, We can help to keep the planet alive in a real way and continue to bring you regular updates and features on Australian plants all in one Botanical Bible. Any support is greatly appreciated. Thank you.”
In the spirit of reconciliation we acknowledge the Bundjalung, Gumbaynggirr and Yaegl and all aboriginal nations throughout Australia and their connections to land, sea and community. We pay our respect to their Elders past, present and future for the pleasures we have gained.
xxxxxxxxxxxxxxxxxxxxxxxxxxxxxxxxxxxxxxxxxxxxxxxThelymitra ixioides
Classification:
Class: Monocots
Order: Asparagales
Family: Orcidaceae
Subfamily: Orcidoideae
Tribe: Diurideae
Subtribe: Thelymitrinae
Genus: Thelys, which is Ancient Greek for only giving birth to female offspring and Mitre, which is Ancient Greek for a hooded cape or cap. It refers to a hood over the column.
Species: From Ixia, which is Ancient Greek for a sticky secretion and Eidos/Oides, which is Ancient Greek for alike or similar to. It refers to stems, leaves, bracts and calyxes, which resembles that found in the Ixodia genus.
Variety: Thelymitra ixioides var. ixioides. From Ixia, which is Ancient Greek for a sticky secretion and Eidos/Oides, which is Ancient Greek for alike or similar to. It refers to stems, leaves, bracts and calyxes, which resembles that found in the Ixodia genus.
Variety: Thelymitra ixioides var. typica. From Typikus which is the Ancient Greek or Typiculis, which is Ancient Latin or later Typicus, which is Modern Latin for typical, average looking or normal. It refers to characteristics of species, which are very typical of the genus or a subspecies or variety that is typical of the species.
Variety: Thelymitra ixioides var. truncata. From Truncata, which is Latin for to maim as in to have the limbs cut off. It refers to structures or organs that have no appendages.
Common Name:
Distribution:
Thelymitra ixioides var. ixioides is found south from Bundaberg in southern coastal Queensland to Wollongong in central coastal New South Wales with a disjunct population on Mornington Peninsular, French Island and Deal island in the Kent Island group in Bass Strait. It is found on and east of the Great Dividing Range to the coast.
Thelymitra ixioides var. typica is found south from Maryborough in southern coastal Queensland to the Lower Ayre Peninsular in south eastern South Australia and Tasmania including the Bass Strait Islands. It is found on the central Western Plains, on and east of the Great Dividing Range to the coast.
Thelymitra ixioides var. truncata is restricted to the Wentworth Falls district west of Sydney in New South Wales.
https://avh.ala.org.au/occurrences/search?taxa=Thelymitra+ixioides#tab_mapView
Habitat Aspect Climate:
Thelymitra ixioides prefers light dappled sun light to full sun. It grows in open sclerophyll forests, mountain heaths or alpine heaths. The altitude ranges from 10 meters ASL to 800 meters ASL.
The temperatures range from minus 5 degrees in July to 40 degrees in January.
The rainfall ranges from lows of 700mm to 2000mm average per annum.
Soil Requirements:
Thelymitra ixioides prefers to grow in light sandy loams to light clays or at times peaty sands or medium silts. The soils are usually derived from decomposed sandstone, granites, alluvial deposits or at times peaty sands accumulated behind the frontal dunes, brown basalts, or black basalts. The soils pH ranges from 4.5pH to 6pH. It does not tolerate waterlogged soils. Non saline soils to moderately saline soils are tolerated.
Height & Spread:
Wild Plants: 0.01m to 0.05m by 0.02m to 0.04m.
Characteristics:
Thelymitra ixioides grows as a small terrestrial orchid.
The linear to lanceolate leaf measures 120mm to 200mm in length by 6mm to 10mm in width. The bases are clasping while the apexes are narrow acute. The concolourous laminas are deep green often reddish to base and glabrous.
The inflorescences are born on a single spike from below the ground. The spikes measure 350mm to 600mm in length. There are 3 to 9 individual flowers on a spike. The deep bright purplish-blue to deep violet-blue flowers are porrect and are usually covered in a few to many deeper spots or blotches. The flowers measure 16mm to 20mm in diameter.
The linear, elliptical to broad elliptical dorsal sepal measures 8mm to 10mm in length by 3mm to 6mm in width.
The linear to elliptical to broad elliptical lateral sepals measures 8mm to 10mm in length by 3mm to 6mm in width.
The broad elliptical to ovate lateral petals measures 8mm to 10mm in length by 3mm to 8mm in width.
The labellum is elliptical and measures 8mm to 10mm in length by 3mm to 5mm in width. The column measures 4mm to 5mm in length by 2.2mm to 3.2mm in width. The hood is deeply emarginate. The narrow column lobes strongly converge and measure 1.8mm to 2mm in length. The 2 lateral column lobes are porrect and end in a prominent globose tuft of white, mauve to pink hairs. The flowers appear from June to October.
The fruits are ellipsoidal pods. The pale grass-green pods turn creamy fawn when ripe.
Wildlife:
Thelymitra ixioides wildlife is unknown to the author.
Cultivation:
All orchids are protected by law and the collection plants or collecting seed from the wild without the appropriate authority form National Parks or the relevant department is illegal. Fortunately this orchid has proven itself in cultivation and many orchid enthusiasts have it growing and propagate the species for sale.
Thelymitra ixioides is a beautiful orchid which is hardy and easy to grow and to propagate at least as far south as Hobart in Tasmania, along the coast in lightly frosted zones. It does very well either in the bush house or in the garden where a thin layer of grass or a fine mulch is replenished on a needs basis.
It is a beautiful yet easy orchid to succeed with in cultivation. It is possible to grow it and maintain it in the garden for many years. It prefers and flourishes in periods when the springs and summers are moist, the autumns are wet and the winters are dry. If you are fortunate enough to have the orchids growing naturally then it is a matter of letting it do its own thing.
When growing this orchid in pots it is best done in a sandy and gravelly mix with peat in equal proportions. The soils are usually quite acidic so beware of any alkaloid materials. Sphagnum moss makes an ideal surface layer on pots.
The best method of watering the plants is to mimic nature. When the first good spring rains come commence watering the plants on a weekly basis or when the first shoots appear. Once flowering has ceased restrain from watering and allow the orchids to again become dormant.
Longevity in this genus is largely unknown, but probably varies between 5 and 20 years along with other similar ground orchids.
If you are fortunate enough to have this orchid growing on your property then it is worth the trouble to mark the area to save it. Continually replenish the leaf litter and keep the area moist from the start of the wet season to after flowering.
Propagation:
Seeds: All orchids that are declared rare, vulnerable or endangered are protected by Federal and State Laws and must not be removed from the wild unless you are a land developer, mining company or main Roads department etc. This includes bulbs, roots, leaves and flowers. No part of any plant can be removed from Federal, State or Local Government land without the prior permission of the authority and this includes the spore.
1. Obtain relevant materials of Thelymitra ixioides.
The first step in growing orchid from seed will be sourcing and having at the ready all materials that will be required in the propagation process.
This includes all of the following:
Unripe orchid seed capsule. If there are 2 capsules secure the second capsule immediately after the first capsule splits or if only one capsule as soon as it changes colour.
Orchid gelling medium with agar which can be purchased from an orchid society or a specialist nursery.
Distilled water
Cooking pot
Spoon
Oven-safe glass or polypropylene containers with lids
Sealable bags
Clean, sterilized cutting board
Rubber gloves
Paper towels
Tweezers or forceps
70 percent ethanol
Bleach
Scalpel or sharp knife
Planting pot
Orchid compost
Length of wire metal
Plastic spray bottle.
deep petri dishes or sterile jars.
2. Prepare agar medium
The agar medium is a special orchid gelling mixture that distilled water will be added to distilled water.
To prepare the medium, mix equal parts of orchid gelling medium with distilled water in a cooking pot.
Place the pot on a stove and bring the mixture to boil for while stirring continuously for two minutes.
Pour the mixture into the petri dishes glass or propylene containers while ensuring not to fill the containers above 20 percent of their volume.
Loosely replace the lids to the containers. Sterilize the containers by heating them up in a microwave oven for between 2 to 3 minutes.
Spray 70 percent ethanol into a sealable bag to create a sterile environment. Transfer the heated containers into the sealable bag.
Allow the containers to cool a bit before tightening their lids and then sealing the bag. Leave the containers to stand for a few days until the mixture solidifies.
3. Prepare seed capsule and work surface
Place an open pot of water on a stove and bring to boil. Place the cutting board in the oven and sterilize.
Put on rubber gloves and sterilize the forceps, and scalpel with 70 percent ethanol.
Insert the seed capsule into a bowel filled with bleach for about fifteen minutes.
Sterilize seed capsule again with 70 percent ethanol and place on grill.
Using the sterilized scalpel, cut open the seed capsule to reveal the seeds. Using a scalpel or sharp knife, scrape out the seeds from the capsule unto an ethanol soaked paper towel.
4. Flasking of the seed
Take out the petri dishes or glass jars containers holding the agar medium. Over the steam, open up the containers and transfer seeds from the ethanol soaked paper towel into the individual containers using the sterilized forceps.
The amount of seeds will determine the number of containers required. Replace the lid of the containers and place them on a window sill that receives indirect sunlight.
5. Wait and exercise patience
All that can be done at this point is to wait until the seeds germinate. The amount of time that this might take varies and is dependent on the particular species.
Generally, the time can range from a few months to a few years. During this period of waiting, ensure the containers are free from contamination to ensure that germination is not disrupted.
6. Emergence of protocorms
Protocorms are tuber-shaped bodies with rhizoids that are produced by the young seedlings of various orchids. Protocorms represent the embryonic form of the orchid plant.
Their emergence after the period of waiting at an affirmation that everything in the propagation process is on track.
7. Transflask orchid seedlings is done after they have developed roots
Upon the emergence of the protocorms, consistently observe the growth of the seedlings. At the point when the seedlings appear to overcrowd the flask, transflasking should be carried out, typically within 30 and 60 days.
* This is done by removing individual seedlings using sterilized tweezers from the original containers and placing them in new containers also filled, in a proportion similar to the original, with agar medium. 6 to 8 in a standard petri dish or 1or 2 to a test tube
8. Transplant seedlings into planting pots
On the presumption that there are no disruptions to the plant growth, the seedlings will eventually outgrow the containers.
At this point, they are to be transplanted into planting pots. A good rule of thumb to determine when they are ready to be transplanted is when the seedlings have developed roots that have grown up to the length of one-quarter of an inch.
To transplant, prepare a planting pot or other container for receiving the seedling by majorly filling it up with coarse fir bark and possibly some slightly moist orchid compost mixture containing perlite, fine charcoal, redwood bark shavings, etc.
To extract the seedlings, submerge the containers in warm water to help loosen the agar gel.
Once the agar medium is softened, twist a piece of metal to form a loop and in turn, use it to carefully pull out the seedlings from the container. It is best done if the agar and seedling can be removed together.
The seedlings can be further rinsed in lukewarm water to remove any excess agar mixture still stuck to them.
Following this, the seedlings can now be planted into the prepared pot with at least 50mm of space between each individual seedling.
9. Positioning the orchid
The seedling once fully transplanted should be placed in a location that is warm with good indirect sun light.
Slowly position the pots into an area that closely assimilates the conditions it will be growing under.
The choice as to whether the plant should be exposed to full sun or in direct sunlight will be dependent on the particular orchid specie.
10. Subsequent care of the plant
After the first week, the seedling can be misted several times a day and watered just once a week.
A guide in watering the plant will be using the dryness of the fir back that is, water the plant until the fir back is completely moistened and wait till it has completely dried out before watering again.
Fertilize using Seaweed, fish emulsion or organic chicken pellets soaked in water and apply the liquid on an alternate basis. Fertilize every 2 months until the plants are established then on an annual basis in September to October to maintain good health, vigour and better flowering.
Further Comments from Readers:
“Hi reader, it seems you use The Bible of Botany a lot. That’s great as we have great pleasure in bringing it to you! It’s a little awkward for us to ask, but our first aim is to purchase land approximately 1,600 hectares to link several parcels of N.P. into one at The Pinnacles NSW Australia, but we need your help. We’re not salespeople. We’re amateur botanists who have dedicated over 30 years to saving the environment in a practical way. We depend on donations to reach our goal. If you donate just $5, the price of your coffee this Sunday, We can help to keep the planet alive in a real way and continue to bring you regular updates and features on Australian plants all in one Botanical Bible. Any support is greatly appreciated. Thank you.”
In the spirit of reconciliation we acknowledge the Bundjalung, Gumbaynggirr and Yaegl and all aboriginal nations throughout Australia and their connections to land, sea and community. We pay our respect to their Elders past, present and future for the pleasures we have gained.
xxxxxxxxxxxxxxxxxxxxxxxxxxxxxxxxxxxxxxxxxxThelymitra malvina
Classification:
Class: Monocots
Order: Asparagales
Family: Orcidaceae
Subfamily: Orcidoideae
Tribe: Diurideae
Subtribe: Thelymitrinae
Genus: Thelys, which is Ancient Greek for only giving birth to female offspring and Mitre, which is Ancient Greek for a hooded cape or cap. It refers to a hood over the column.
Species: From Malvinus, which is Latin for lilac or lavender colour. It refers to flowers, which are various shades of lilac or purple.
Common Name: Mauve Tufted Sun Orchid.
Distribution:
Thelymitra malvina from near Cairns in far north east Queensland to Hobart in south eastern Tasmania including the Bass Strait Islands and west as far as Mount Gambier in south eastern South Australia. It grows mainly on the coastal fringe.
https://avh.ala.org.au/occurrences/search?taxa=Thelymitra+malvina#tab_mapView
Habitat Aspect Climate:
Thelymitra malvina prefers medium light dappled sun light to full sun. It grows in tall open Eucalyptus forests, adjacent to moist rainforests and moist coastal heaths. It prefers open drainage shallow wide lines. The altitude ranges from 5 meters ASL to 600 meters ASL.
The temperatures range from minus 2 degrees in July to 38 degrees in January.
The rainfall ranges from lows of 500mm to 3000mm average per annum.
Soil Requirements:
Thelymitra malvina prefers to grow in light sandy loams to light fatty clays or medium silts. The soils are usually derived from decomposed sandstone or accumulated peaty sands from behind the frontal dunes. The soils pH ranges from 4.5pH to 6pH. It does not tolerate waterlogged soils however constant soil moisture is required. Non saline soils to moderately saline soils are tolerated.
Height & Spread:
Wild Plants: 0.01m to 0.05m by 0.02m to 0.04m.
Characteristics:
Thelymitra malvina grows as an erect terrestrial orchid.
Leaf linear to lanceolate leaf measures 100mm to 300mm in length by 6mm to 20mm in width. The bases are clasping while the apexes are narrow acute. The concolourous laminas are deep green to glaucous-green and glabrous.
The inflorescences are born on a single spike from below the ground. The spikes measure 280mm to 650mm in length. There are 2 to 20 individual flowers on a spike. The deep mauve to bright purplish-blue, white to deep pink flowers is usually deeper in colour on the external surfaces. The flowers measure 16mm to 22mm in diameter.
The linear, elliptical to broad elliptical dorsal sepal measures 8mm to 11mm in length by 3mm to 6mm in width. The linear to elliptical to broad elliptical lateral sepals measures 8mm to 11mm in length by 3mm to 6mm in width. The elliptical to broad elliptical lateral petals measures 8mm to 12mm in length by 4mm to 6mm in width.
The labellum is elliptical and measures 8mm to 11mm in length by 3mm to 6mm in width. The column measures 5mm to 6mm in length by 3mm to 3.5mm in width. The obtuse hood’s apex is deep yellow. The short, stout column lobes converge and measure 0.8mm to 1mm in length. The 2 lateral lobes are porrect and end in prominent globose tuft of mauve hairs. The fragrant flowers appear from June to October.
The fruits are ellipsoidal pods. The pale grass-green pods turn creamy fawn when ripe.
Wildlife:
Thelymitra malvina’s wildlife is unknown to the author.
Cultivation: All orchids are protected by law and the collection plants or collecting seed from the wild without the appropriate authority form National Parks or the relevant department is illegal. Fortunately this orchid has proven itself in cultivation and many orchid enthusiasts have it growing and propagate the species for sale.
This is another beautiful sun orchid which is hardy, easier to grow and to propagate than most orchids. It does very well either in the bush house or in the garden where a thin layer of grass mulch is replenished on a needs basis.
It is a beautiful yet easy orchid to succeed with in cultivation. It is possible to grow it and maintain it in the garden for many years. It prefers and flourishes in periods when the springs and summers are moist, the autumns are wet and the winters are dry. If you are fortunate enough to have this orchid growing naturally then it is a matter of letting it do its own thing.
When growing this orchid in pots it is best done in a sandy and gravelly mix with peat in equal proportions. The soils are usually quite acidic so beware of any alkaloid materials. Sphagnum moss makes an ideal surface layer on pots.
The best method of watering the plants is to mimic nature. When the first good spring rains come commence watering the plants on a weekly basis or when the first shoots appear. Once flowering has ceased restrain from watering and allow the orchids to again become dormant.
Longevity in this genus is largely unknown, but probably varies between 5 and 20 years along with other similar ground orchids.
If you are fortunate enough to have this orchid growing on your property then it is worth the trouble to marking the area to save it. Continually replenish the leaf litter and keep the area moist from the start of the wet season to after flowering.
Propagation:
Seeds: All orchids that are declared rare, vulnerable or endangered are protected by Federal and State Laws and must not be removed from the wild unless you are a land developer, mining company or main Roads department etc. This includes bulbs, roots, leaves and flowers. No part of any plant can be removed from Federal, State or Local Government land without the prior permission of the authority and this includes the spore.
1. Obtain relevant materials of Thelymitra malvina.
The first step in growing orchid from seed will be sourcing and having at the ready all materials that will be required in the propagation process.
This includes all of the following:
Unripe orchid seed capsule. If there are 2 capsules secure the second capsule immediately after the first capsule splits or if only one capsule as soon as it changes colour.
Orchid gelling medium with agar which can be purchased from an orchid society or a specialist nursery.
Distilled water
Cooking pot
Spoon
Oven-safe glass or polypropylene containers with lids
Sealable bags
Clean, sterilized cutting board
Rubber gloves
Paper towels
Tweezers or forceps
70 percent ethanol
Bleach
Scalpel or sharp knife
Planting pot
Orchid compost
Length of wire metal
Plastic spray bottle.
deep petri dishes or sterile jars.
2. Prepare agar medium
The agar medium is a special orchid gelling mixture that distilled water will be added to distilled water.
To prepare the medium, mix equal parts of orchid gelling medium with distilled water in a cooking pot.
Place the pot on a stove and bring the mixture to boil for while stirring continuously for two minutes.
Pour the mixture into the petri dishes glass or propylene containers while ensuring not to fill the containers above 20 percent of their volume.
Loosely replace the lids to the containers. Sterilize the containers by heating them up in a microwave oven for between 2 to 3 minutes.
Spray 70 percent ethanol into a sealable bag to create a sterile environment. Transfer the heated containers into the sealable bag.
Allow the containers to cool a bit before tightening their lids and then sealing the bag. Leave the containers to stand for a few days until the mixture solidifies.
3. Prepare seed capsule and work surface
Place an open pot of water on a stove and bring to boil. Place the cutting board in the oven and sterilize.
Put on rubber gloves and sterilize the forceps, and scalpel with 70 percent ethanol.
Insert the seed capsule into a bowel filled with bleach for about fifteen minutes.
Sterilize seed capsule again with 70 percent ethanol and place on grill.
Using the sterilized scalpel, cut open the seed capsule to reveal the seeds. Using a scalpel or sharp knife, scrape out the seeds from the capsule unto an ethanol soaked paper towel.
4. Flasking of the seed
Take out the petri dishes or glass jars containers holding the agar medium. Over the steam, open up the containers and transfer seeds from the ethanol soaked paper towel into the individual containers using the sterilized forceps.
The amount of seeds will determine the number of containers required. Replace the lid of the containers and place them on a window sill that receives indirect sunlight.
5. Wait and exercise patience
All that can be done at this point is to wait until the seeds germinate. The amount of time that this might take varies and is dependent on the particular species.
Generally, the time can range from a few months to a few years. During this period of waiting, ensure the containers are free from contamination to ensure that germination is not disrupted.
6. Emergence of protocorms
Protocorms are tuber-shaped bodies with rhizoids that are produced by the young seedlings of various orchids. Protocorms represent the embryonic form of the orchid plant.
Their emergence after the period of waiting at an affirmation that everything in the propagation process is on track.
7. Trans flask orchid seedlings is done after they have developed roots
Upon the emergence of the protocorms, consistently observe the growth of the seedlings. At the point when the seedlings appear to overcrowd the flask, transflasking should be carried out, typically within 30 and 60 days.
* This is done by removing individual seedlings using sterilized tweezers from the original containers and placing them in new containers also filled, in a proportion similar to the original, with agar medium. 6 to 8 in a standard petri dish or 1or 2 to a test tube
8. Transplant seedlings into planting pots
On the presumption that there are no disruptions to the plant growth, the seedlings will eventually outgrow the containers.
At this point, they are to be transplanted into planting pots. A good rule of thumb to determine when they are ready to be transplanted is when the seedlings have developed roots that have grown up to the length of one-quarter of an inch.
To transplant, prepare a planting pot or other container for receiving the seedling by majorly filling it up with coarse fir bark and possibly some slightly moist orchid compost mixture containing perlite, fine charcoal, redwood bark shavings, etc.
To extract the seedlings, submerge the containers in warm water to help loosen the agar gel.
Once the agar medium is softened, twist a piece of metal to form a loop and in turn, use it to carefully pull out the seedlings from the container. It is best done if the agar and seedling can be removed together.
The seedlings can be further rinsed in lukewarm water to remove any excess agar mixture still stuck to them.
Following this, the seedlings can now be planted into the prepared pot with at least 50mm of space between each individual seedling.
9. Positioning the orchid
The seedling once fully transplanted should be placed in a location that is warm with good indirect sun light.
Slowly position the pots into an area that closely assimilates the conditions it will be growing under.
The choice as to whether the plant should be exposed to full sun or in direct sunlight will be dependent on the particular orchid specie.
10. Subsequent care of the plant
After the first week, the seedling can be misted several times a day and watered just once a week.
A guide in watering the plant will be using the dryness of the fir back that is, water the plant until the fir back is completely moistened and wait till it has completely dried out before watering again.
Fertilize using Seaweed, fish emulsion or organic chicken pellets soaked in water and apply the liquid on an alternate basis. Fertilize every 2 months until the plants are established then on an annual basis in September to October to maintain good health, vigour and better flowering.
Further Comments from Readers:
“Hi reader, it seems you use The Bible of Botany a lot. That’s great as we have great pleasure in bringing it to you! It’s a little awkward for us to ask, but our first aim is to purchase land approximately 1,600 hectares to link several parcels of N.P. into one at The Pinnacles NSW Australia, but we need your help. We’re not salespeople. We’re amateur botanists who have dedicated over 30 years to saving the environment in a practical way. We depend on donations to reach our goal. If you donate just $5, the price of your coffee this Sunday, We can help to keep the planet alive in a real way and continue to bring you regular updates and features on Australian plants all in one Botanical Bible. Any support is greatly appreciated. Thank you.”
In the spirit of reconciliation we acknowledge the Bundjalung, Gumbaynggirr and Yaegl and all aboriginal nations throughout Australia and their connections to land, sea and community. We pay our respect to their Elders past, present and future for the pleasures we have gained.
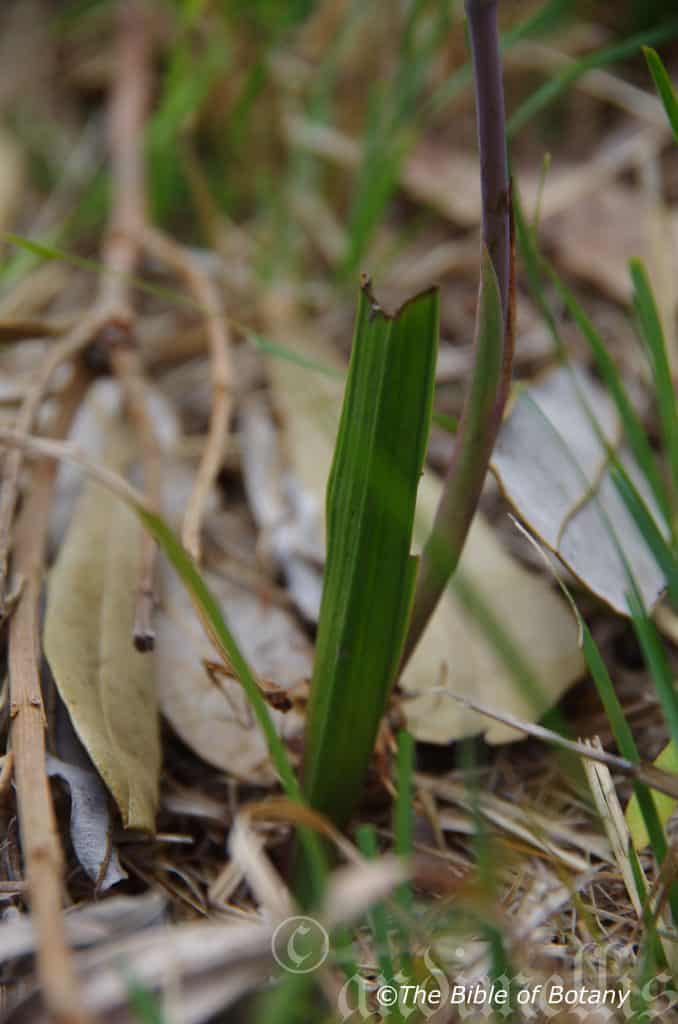
Clarence Valley NSW

Clarence Valley NSW
xxxxxxxxxxxxxxxxxxxxxxxxxxxxxxxxxxxxxxxxxxxxxThelymitra pauciflora
Classification:
Unranked: Monocots
Order: Asparagales
Family: Orcidaceae
Subfamily: Orcidoideae
Tribe: Diurideae
Subtribe: Thelymitrinae
Genus: Thelys, which is Ancient Greek for only giving birth to female offspring and Mitre, which is Ancient Greek for a hooded cape or cap. It refers to a hood over the column.
Species: From Pauci, which is Latin for a few and Floris, which is Latin for a flower or Flos, which is the Roman goddess of spring and flowers. It refers to plants, which produce fewer flowers or which are poorer bloomers than other species in the genus.
Common Name: Slender Sun Orchid.
Distribution:
Thelymitra pauciflora is found south from the Swan River to Walpole Nature Reserve in south west Western Australia.
In the east it is found south from near Cooktown in far north east Queensland to the eastern side of Eyre Peninsula in southern South Australia. It is found on the eastern edge of the Western Plains, on and east of the Great Dividing Range to the coast.
It is also found on the Bass Strait Islands and the eastern two thirds of Tasmania.
https://avh.ala.org.au/occurrences/search?taxa=Thelymitra+pauciflora#tab_mapView
Habitat Aspect Climate:
Thelymitra pauciflora prefers medium shade to light dappled sun light. It grows in moist areas of dry sclerophyll forests. The altitude ranges from 10 meters ASL to 1380 meters ASL.
The temperatures range from minus 5 degrees in July to 38 degrees in January.
The rainfall ranges from lows of 800mm to 2100mm average per annum.
Soil Requirements:
Thelymitra pauciflora prefers light sandy loams to light fatty clays or medium silts. The soils are usually derived from decomposed sandstone, granites, brown basalts, black basalts, metamorphic rocks or alluvial deposits. The soils pH ranges from 4.5pH to 6pH. It does not tolerate waterlogged soils however constant soil moisture is required. Non saline soils to moderately saline soils are tolerated.
Height & Spread:
Wild Plants: 30mm to 400mm by 10mm to 30mm when in flower.
Characteristics:
Thelymitra pauciflora grows as an erect, small, terrestrial orchid.
The linear to lanceolate leaf measures 100mm to 200mm in length by 12mm to 20mm in width. The thick coriaceous leaf is ribbed. The apexes are narrow acute. The concolourous lamina is pale dull green to dull glaucous-green and glabrous. The margins are entire while the veins are parallel.
The inflorescences are born on a single spike from below the ground. The spikes measure 280mm to 500mm in length. There are 3 to 15 individual flowers on a spike. The mauve to slate-blue or white to deep pink or purplish flowers are usually deeper in colour on the extremities. The flowers measure 15mm to 18mm in diameter.
The linear, elliptical to broad elliptical dorsal sepal measures 7mm to 8mm in length by 4.5mm to 5mm in width.
The linear to elliptical to broad elliptical lateral sepals measures 8mm to 9mm in length by 5mm to 5.5mm in width.
The elliptical to broad elliptical lateral petals measures 8mm to 9mm in length by 5mm to 5.5mm in width.
The labellum is elliptical and measures 9mm to 10mm in length by 1.8mm to 3.5mm in width. The column measures 4.5mm to 5mm in length by 2.5mm to 3mm in width. The obtuse hood’s apex is yellow. The column lobes converge slightly at their apexes and measure 1.2mm to 1.6mm in length. The 2 lateral lobes are porrect and end in a prominent globose tuft of white to mauve hairs. The faintly, fragrant flowers appear from August to January.
The fruits are erect, ellipsoidal pods. The pale glaucous-green pods are ribbed and turn creamy fawn when ripe.
Wildlife:
Thelymitra pauciflora is the host to 1 or maybe a few small native wasps.
Cultivation: All orchids are protected by law and the collection plants or collecting seed from the wild without the appropriate authority form National Parks or the relevant department is illegal. Fortunately this orchid has proven itself in cultivation and many orchid enthusiasts have it growing and propagate the species for sale.
Thelymitra pauciflora is another beautiful sun orchid which is hardier and easier to grow and to propagate than most orchids and a good one for beginner orchid enthusiasts. It does very well either in the bush house or in the garden where a thin layer of grass mulch is replenished on an annual basis.
It is a beautiful yet easy orchid to succeed with in cultivation. It is possible to grow it and maintain it in the garden for many years. It prefers and flourishes in periods when the springs and summers are moist, the autumns are wet and the winters are dry. If you are fortunate enough to have the orchids growing naturally then it is a matter of letting them do their own thin.
When growing this orchid in pots it is best done in a sandy and gravelly mix with peat in equal proportions. The soils are usually quite acidic so beware of any alkaloid materials. Sphagnum moss makes an ideal surface layer on pots.
The best method of watering the plants is to mimic nature. When the first good spring rains come commence watering the plants on a weekly basis or when the first shoots appear. Once flowering has ceased restrain from watering and allow the orchids to again become dormant.
Longevity in this genus is largely unknown, but probably varies between 5 and 20 years along with other similar ground orchids.
If you are fortunate enough to have this orchid growing on your property then it is worth the trouble to marking the area to save it. Continually replenish the leaf litter and keep the area moist from the start of the wet season to after flowering.
Propagation:
Seeds: All orchids that are declared rare, vulnerable or endangered are protected by Federal and State Laws and must not be removed from the wild unless you are a land developer, mining company or main Roads department etc. This includes bulbs, roots, leaves and flowers. No part of any plant can be removed from Federal, State or Local Government land without the prior permission of the authority and this includes the spore.
1. Obtain relevant materials of Thelymitra pauciflora.
The first step in growing orchid from seed will be sourcing and having at the ready all materials that will be required in the propagation process.
This includes all of the following:
Unripe orchid seed capsule. If there are 2 capsules secure the second capsule immediately after the first capsule splits or if only one capsule as soon as it changes colour.
Orchid gelling medium with agar which can be purchased from an orchid society or a specialist nursery.
Distilled water
Cooking pot
Spoon
Oven-safe glass or polypropylene containers with lids
Sealable bags
Clean, sterilized cutting board
Rubber gloves
Paper towels
Tweezers or forceps
70 percent ethanol
Bleach
Scalpel or sharp knife
Planting pot
Orchid compost
Length of wire metal
Plastic spray bottle.
deep petri dishes or sterile jars.
2. Prepare agar medium
The agar medium is a special orchid gelling mixture that distilled water will be added to distilled water.
To prepare the medium, mix equal parts of orchid gelling medium with distilled water in a cooking pot.
Place the pot on a stove and bring the mixture to boil for while stirring continuously for two minutes.
Pour the mixture into the petri dishes glass or propylene containers while ensuring not to fill the containers above 20 percent of their volume.
Loosely replace the lids to the containers. Sterilize the containers by heating them up in a microwave oven for between 2 to 3 minutes.
Spray 70 percent ethanol into a sealable bag to create a sterile environment. Transfer the heated containers into the sealable bag.
Allow the containers to cool a bit before tightening their lids and then sealing the bag. Leave the containers to stand for a few days until the mixture solidifies.
3. Prepare seed capsule and work surface
Place an open pot of water on a stove and bring to boil. Place the cutting board in the oven and sterilize.
Put on rubber gloves and sterilize the forceps, and scalpel with 70 percent ethanol.
Insert the seed capsule into a bowel filled with bleach for about fifteen minutes.
Sterilize seed capsule again with 70 percent ethanol and place on grill.
Using the sterilized scalpel, cut open the seed capsule to reveal the seeds. Using a scalpel or sharp knife, scrape out the seeds from the capsule unto an ethanol soaked paper towel.
4. Flasking of the seed
Take out the petri dishes or glass jars containers holding the agar medium. Over the steam, open up the containers and transfer seeds from the ethanol soaked paper towel into the individual containers using the sterilized forceps.
The amount of seeds will determine the number of containers required. Replace the lid of the containers and place them on a window sill that receives indirect sunlight.
5. Wait and exercise patience
All that can be done at this point is to wait until the seeds germinate. The amount of time that this might take varies and is dependent on the particular species.
Generally, the time can range from a few months to a few years. During this period of waiting, ensure the containers are free from contamination to ensure that germination is not disrupted.
6. Emergence of protocorms
Protocorms are tuber-shaped bodies with rhizoids that are produced by the young seedlings of various orchids. Protocorms represent the embryonic form of the orchid plant.
Their emergence after the period of waiting at an affirmation that everything in the propagation process is on track.
7. Trans flask orchid seedlings is done after they have developed roots
Upon the emergence of the protocorms, consistently observe the growth of the seedlings. At the point when the seedlings appear to overcrowd the flask, transflasking should be carried out, typically within 30 and 60 days.
* This is done by removing individual seedlings using sterilized tweezers from the original containers and placing them in new containers also filled, in a proportion similar to the original, with agar medium. 6 to 8 in a standard petri dish or 1or 2 to a test tube
8. Transplant seedlings into planting pots
On the presumption that there are no disruptions to the plant growth, the seedlings will eventually outgrow the containers.
At this point, they are to be transplanted into planting pots. A good rule of thumb to determine when they are ready to be transplanted is when the seedlings have developed roots that have grown up to the length of one-quarter of an inch.
To transplant, prepare a planting pot or other container for receiving the seedling by majorly filling it up with coarse fir bark and possibly some slightly moist orchid compost mixture containing perlite, fine charcoal, redwood bark shavings, etc.
To extract the seedlings, submerge the containers in warm water to help loosen the agar gel.
Once the agar medium is softened, twist a piece of metal to form a loop and in turn, use it to carefully pull out the seedlings from the container. It is best done if the agar and seedling can be removed together.
The seedlings can be further rinsed in lukewarm water to remove any excess agar mixture still stuck to them.
Following this, the seedlings can now be planted into the prepared pot with at least 50mm of space between each individual seedling.
9. Positioning the orchid
The seedling once fully transplanted should be placed in a location that is warm with good indirect sun light.
Slowly position the pots into an area that closely assimilates the conditions it will be growing under.
The choice as to whether the plant should be exposed to full sun or in direct sunlight will be dependent on the particular orchid specie.
10. Subsequent care of the plant
After the first week, the seedling can be misted several times a day and watered just once a week.
A guide in watering the plant will be using the dryness of the fir back that is, water the plant until the fir back is completely moistened and wait till it has completely dried out before watering again.
Do not fertilize until the seedlings have fully established themselves. Fertilize using Seaweed, fish emulsion or organic chicken pellets soaked in water and apply the liquid on an alternate basis. Fertilize every 2 months until the plants are established then on an annual basis in September to October to maintain good health, vigour and better flowering.
Further Comments from Readers:
“Hi reader, it seems you use The Bible of Botany a lot. That’s great as we have great pleasure in bringing it to you! It’s a little awkward for us to ask, but our first aim is to purchase land approximately 1,600 hectares to link several parcels of N.P. into one at The Pinnacles NSW Australia, but we need your help. We’re not salespeople. We’re amateur botanists who have dedicated over 30 years to saving the environment in a practical way. We depend on donations to reach our goal. If you donate just $5, the price of your coffee this Sunday, We can help to keep the planet alive in a real way and continue to bring you regular updates and features on Australian plants all in one Botanical Bible. Any support is greatly appreciated. Thank you.”
In the spirit of reconciliation we acknowledge the Bundjalung, Gumbaynggirr and Yaegl and all aboriginal nations throughout Australia and their connections to land, sea and community. We pay our respect to their Elders past, present and future for the pleasures we have gained.
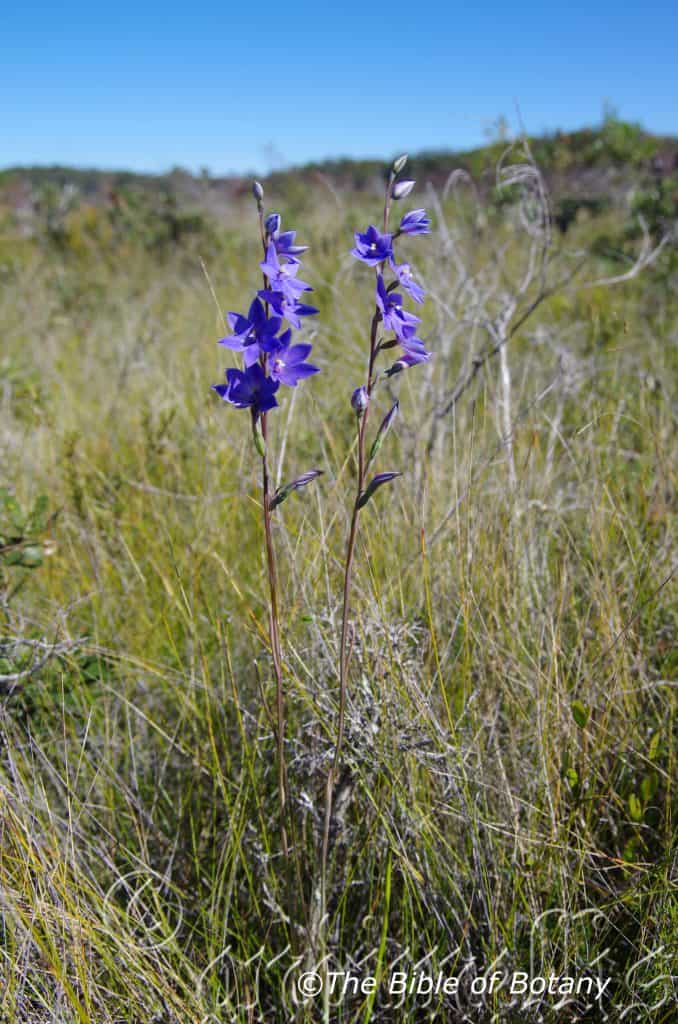
Clarence Valley NSW
Clarence Valley NSW
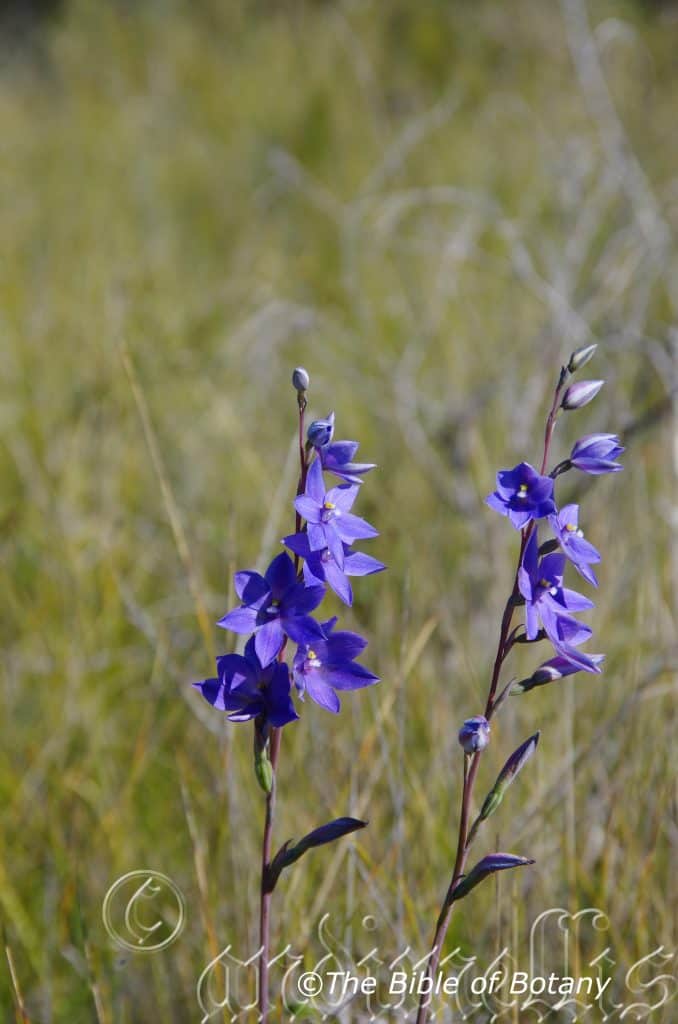
Clarence Valley NSW
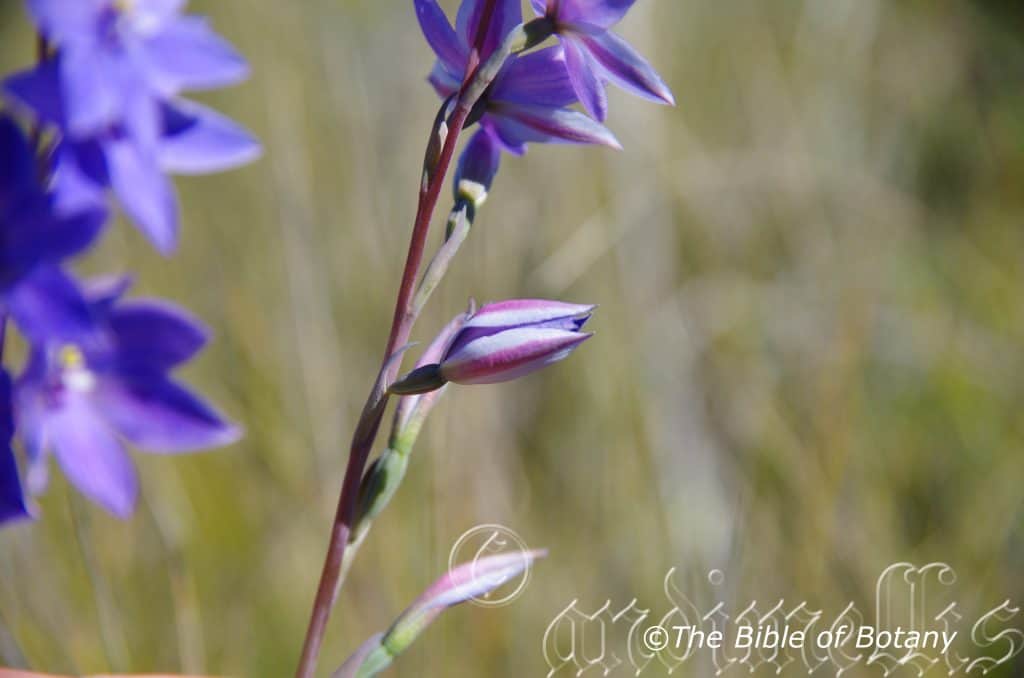
Clarence Valley NSW
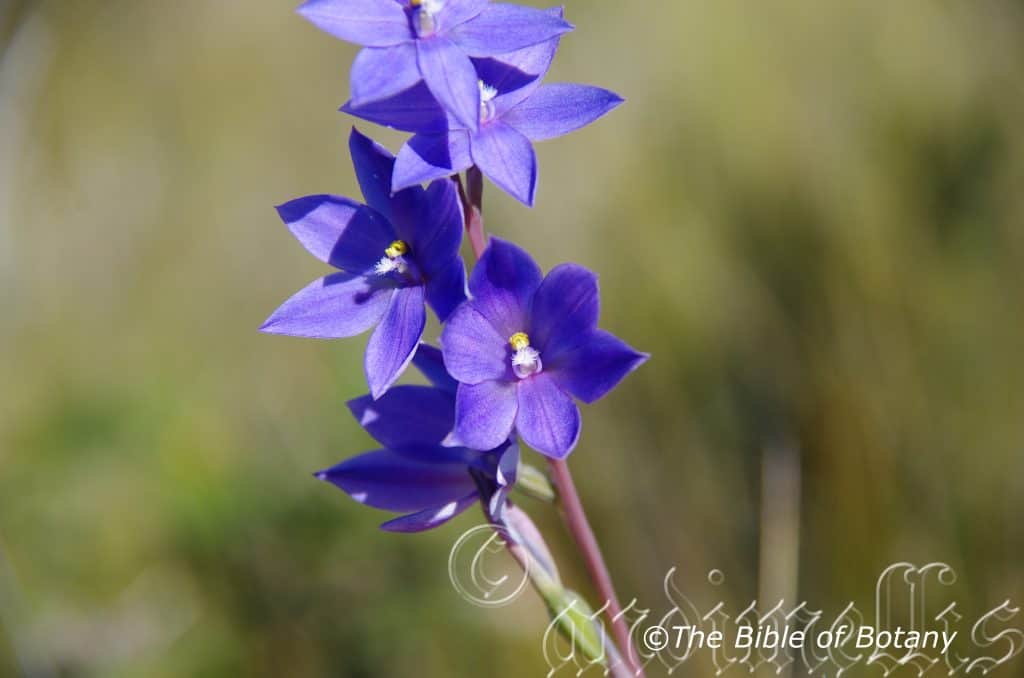
Clarence Valley NSW
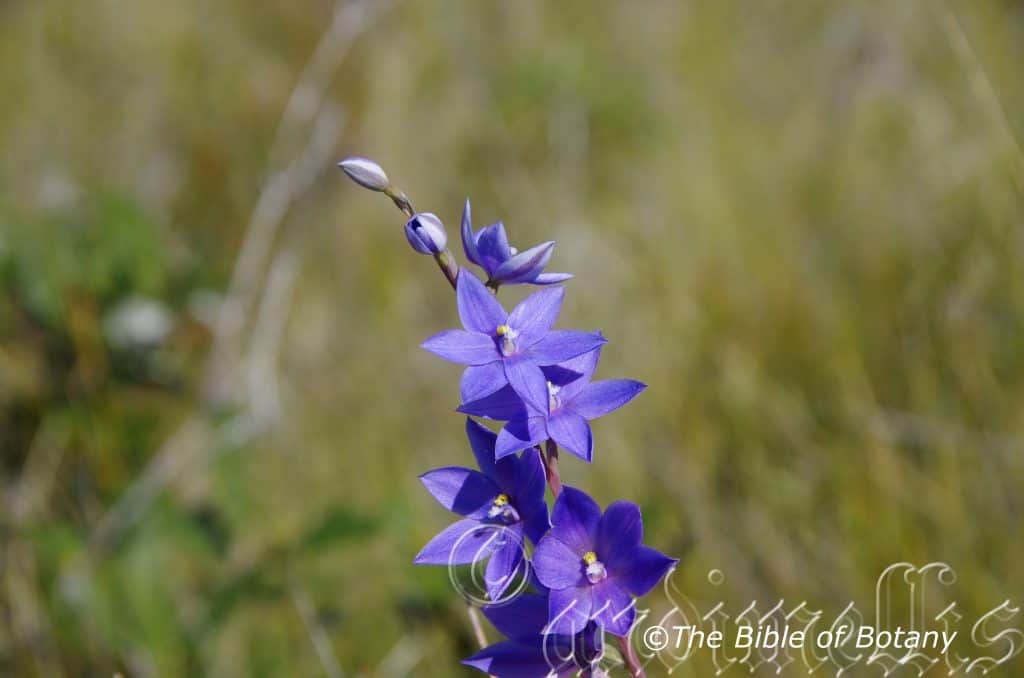
Clarence Valley NSW
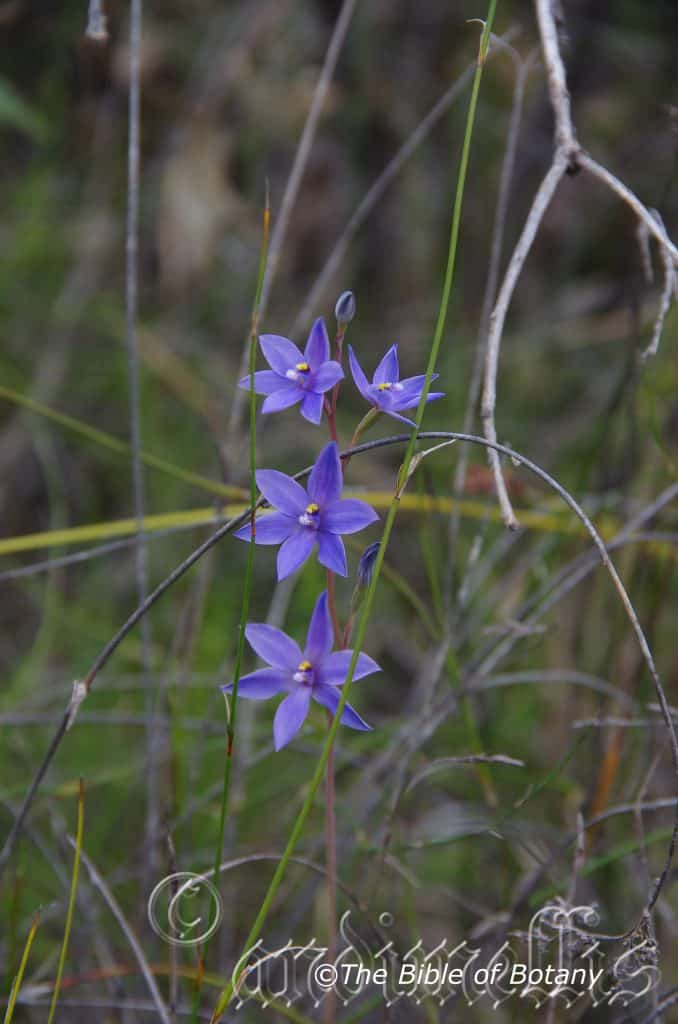
Clarence Valley NSW
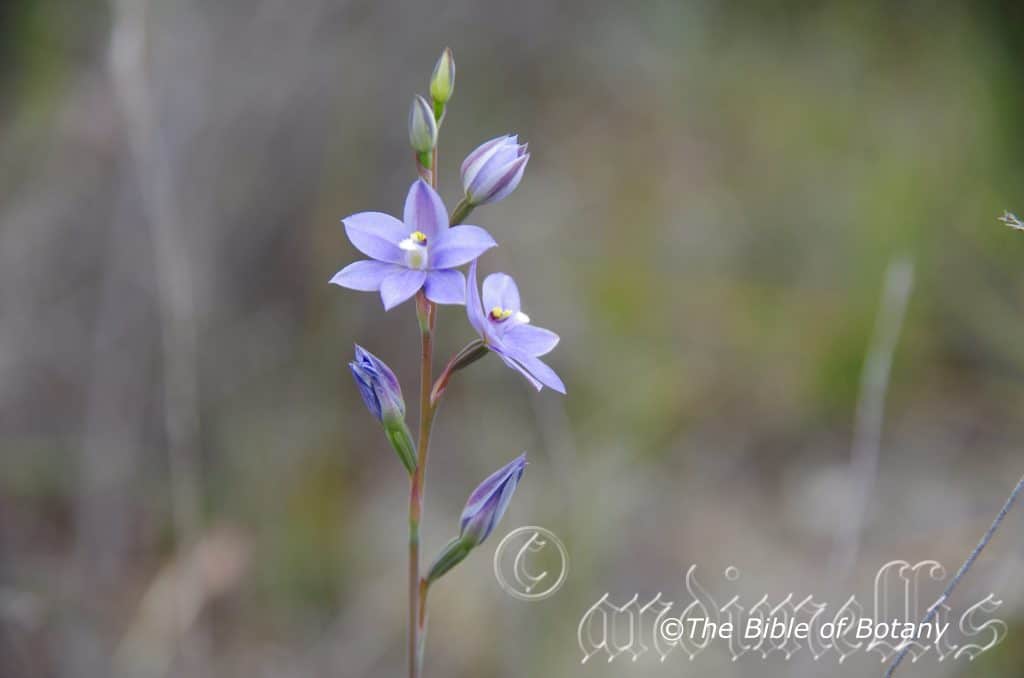
Clarence Valley NSW
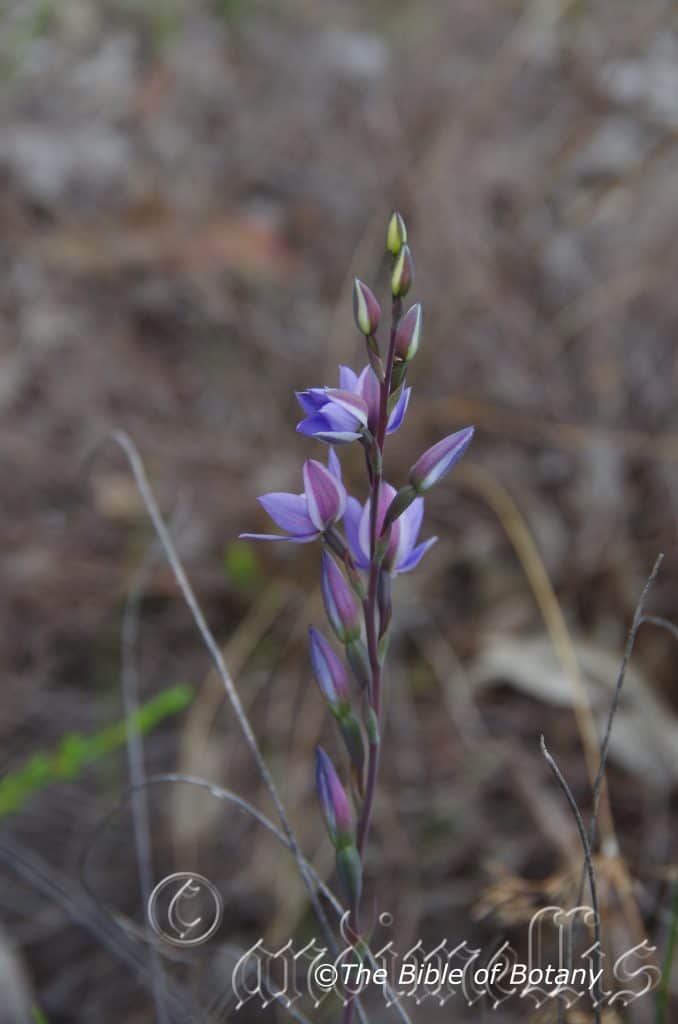
Clarence Valley NSW
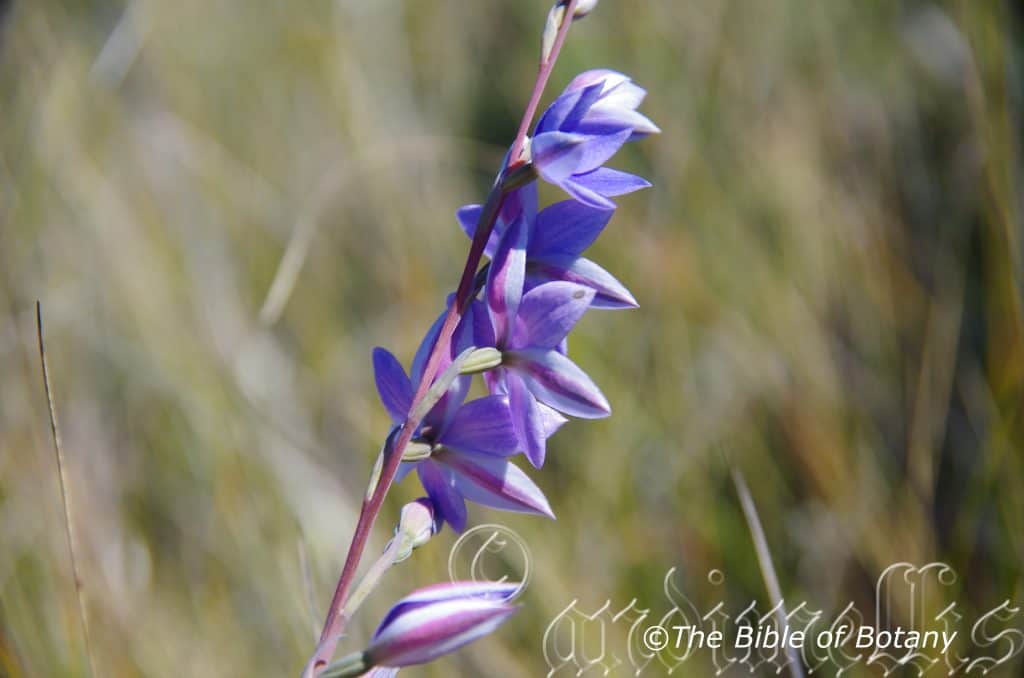
Clarence Valley NSW
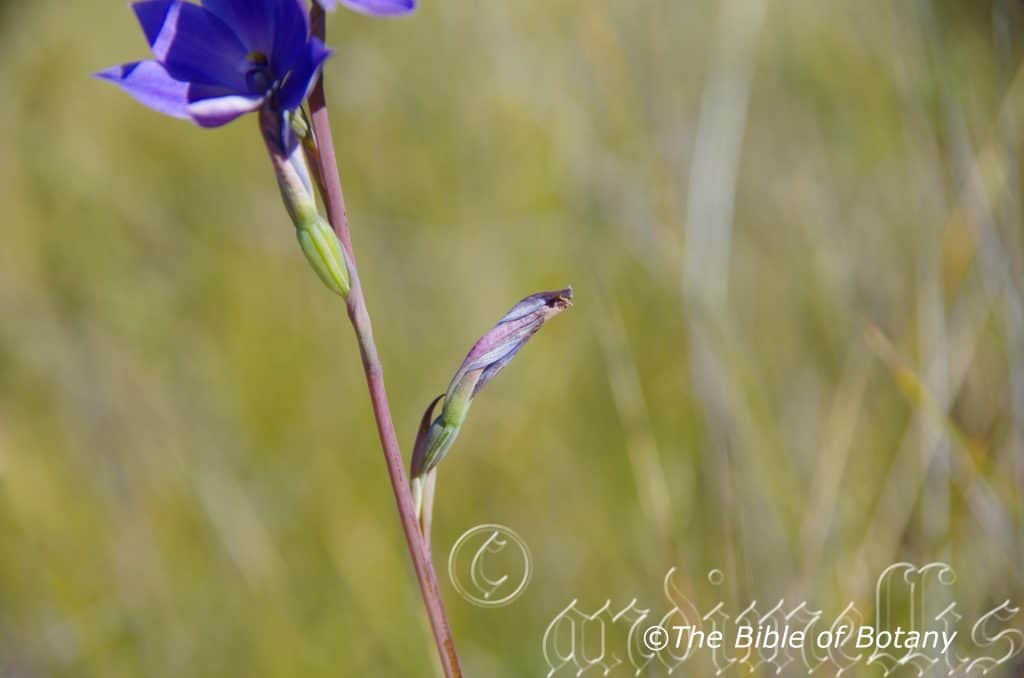
Clarence Valley NSW
xxxxxxxxxxxxxxxxxxxxxxxxxxxxxxxxxxxxxxxxxxxxxxThelymitra purpurata
Classification:
Unranked: Monocots
Order: Asparagales
Family: Orcidaceae
Subfamily: Orcidoideae
Tribe: Diurideae
Subtribe: Thelymitrinae
Genus: Thelys, which is Ancient Greek for only giving birth to female offspring and Mitre, which is Ancient Greek for a hooded cape or cap. It refers to a hood over the column.
Species: From Purpurea, which is Latin for purple. It refers to organs usually the flowers or leaves, which are purplish, deep reddish-purple or purple.
Common Name: Wallum Sun Orchid.
Distribution:
Thelymitra purpurata is found south from Fraser Island and Maryborough in south eastern coastal Queensland to south of Newcastle in central eastern coastal New South Wales
https://avh.ala.org.au/occurrences/search?taxa=Thelymitra+#tab_mapView
Habitat Aspect Climate:
Thelymitra purpurata prefers light dappled sun light to full sun. It grows in or adjacent to coastal wallums. The altitude ranges from 10 meters ASL to 800 meters ASL.
The temperatures range from minus 2 degrees in July to 38 degrees in January.
The rainfall ranges from lows of 800mm to 2100mm average per annum.
Soil Requirements:
Thelymitra purpurata prefers sand to light sandy loams to gravely or gritty light fatty clays. The soils are usually derived from decomposed granites or accumulated white to grey, peaty beach sands. The soils pH ranges from 4.5pH to 6pH. It does not tolerate waterlogged soils however constant soil moisture is required. Non saline soils to moderately saline soils are tolerated.
Height & Spread:
Wild Plants: 400mm to 600mm by 20mm to 30mm when in flower.
Characteristics:
Thelymitra purpurata grows as an erect, small, terrestrial orchid.
The linear to lanceolate leaf measures 150mm to 240mm in length by 7mm to 11mm in width. The apexes are narrow acute. The coriaceous, concolourous lamina is deep dull green and glabrous. The margins are entire while the veins are parallel.
The inflorescences born on a single spike from below the ground. The spikes measure 350mm to 600mm in length. There are 4 to 10 individual flowers on a spike. The mauve to slate-blue or white to deep pink or deep purple flowers are usually deeper in colour on the extremities. The flowers measure 24mm to 28mm in diameter.
The broad elliptical to narrow ovate dorsal sepal measures 12mm to 14mm in length by 5.5mm to 6.5mm in width.
The elliptical lateral sepals measures 12mm to 14mm in length by 6mm to 7mm in width.
The broad elliptical to narrow ovate lateral petals measures 11mm to 13mm in length by 7mm to 8mm in width.
The elliptical labellum measures 10mm to 12mm in length by 5mm to 6mm in width. The column measures 4.5mm to 5mm in length by 2.5mm to 3mm in width. The obtuse hood’s apex is deep yellow mottled royal blue. The column lobes converge, strongly at their apexes and measure 1.2mm to 1.5mm in length. The 2 lateral lobes are porrect and end in a prominent globose tuft of white hairs. The fragrant flowers appear from August to September.
The fruits are erect, ellipsoidal pods. The pale green pods turn creamy fawn when ripe.
Wildlife:
Thelymitra purpurata’s wildlife is unknown to the author.
Cultivation: All orchids are protected by law and the collection plants or collecting seed from the wild without the appropriate authority form National Parks or the relevant department is illegal. Fortunately this orchid has proven itself in cultivation and many orchid enthusiasts have it growing and propagate the species for sale.
Thelymitra purpurata is another beautiful sun orchid which is not as hardy and easy to grow and to propagate compared to other orchids in the genus. It does well either in the bush house or in a wet garden where a thin layer of mulch can be maintained.
If you are lucky enough to have it growing on your block try to protect the area where it is. The less the disturbance the better. It will grow in the garden for many years. It prefers and flourishes in periods when the springs and summers are moist, the autumns are wet and the soil remains wet even in winter.
When growing this orchid in pots it is best done in a sandy and gravelly mix with peat in equal proportions. The soils are usually quite acidic so beware of any alkaloid materials. Sphagnum moss makes an ideal surface layer on pots.
The best method of watering the plants is to mimic nature. When the first good spring rains come commence watering the plants on a weekly basis or when the first shoots appear. Once flowering has ceased restrain from watering and allow the orchids to again become dormant.
Longevity in this genus is largely unknown, but probably varies between 5 and 20 years along with other similar ground orchids.
If you are fortunate enough to have this orchid growing on your property then it is worth the trouble to marking the area to save it. Continually replenish the leaf litter and keep the area moist from the start of the wet season to after flowering.
Propagation:
Seeds: All orchids that are declared rare, vulnerable or endangered are protected by Federal and State Laws and must not be removed from the wild unless you are a land developer, mining company or main Roads department etc. This includes bulbs, roots, leaves and flowers. No part of any plant can be removed from Federal, State or Local Government land without the prior permission of the authority and this includes the spore.
1. Obtain relevant materials of Thelymitra purpurata.
The first step in growing orchid from seed will be sourcing and having at the ready all materials that will be required in the propagation process.
This includes all of the following:
Unripe orchid seed capsule. If there are 2 capsules secure the second capsule immediately after the first capsule splits or if only one capsule as soon as it changes colour.
Orchid gelling medium with agar which can be purchased from an orchid society or a specialist nursery.
Distilled water
Cooking pot
Spoon
Oven-safe glass or polypropylene containers with lids
Sealable bags
Clean, sterilized cutting board
Rubber gloves
Paper towels
Tweezers or forceps
70 percent ethanol
Bleach
Scalpel or sharp knife
Planting pot
Orchid compost
Length of wire metal
Plastic spray bottle.
deep petri dishes or sterile jars.
2. Prepare agar medium
The agar medium is a special orchid gelling mixture that distilled water will be added to distilled water.
To prepare the medium, mix equal parts of orchid gelling medium with distilled water in a cooking pot.
Place the pot on a stove and bring the mixture to boil for while stirring continuously for two minutes.
Pour the mixture into the petri dishes glass or propylene containers while ensuring not to fill the containers above 20 percent of their volume.
Loosely replace the lids to the containers. Sterilize the containers by heating them up in a microwave oven for between 2 to 3 minutes.
Spray 70 percent ethanol into a sealable bag to create a sterile environment. Transfer the heated containers into the sealable bag.
Allow the containers to cool a bit before tightening their lids and then sealing the bag. Leave the containers to stand for a few days until the mixture solidifies.
3. Prepare seed capsule and work surface
Place an open pot of water on a stove and bring to boil. Place the cutting board in the oven and sterilize.
Put on rubber gloves and sterilize the forceps, and scalpel with 70 percent ethanol.
Insert the seed capsule into a bowel filled with bleach for about fifteen minutes.
Sterilize seed capsule again with 70 percent ethanol and place on grill.
Using the sterilized scalpel, cut open the seed capsule to reveal the seeds. Using a scalpel or sharp knife, scrape out the seeds from the capsule unto an ethanol soaked paper towel.
4. Flasking of the seed
Take out the petri dishes or glass jars containers holding the agar medium. Over the steam, open up the containers and transfer seeds from the ethanol soaked paper towel into the individual containers using the sterilized forceps.
The amount of seeds will determine the number of containers required. Replace the lid of the containers and place them on a window sill that receives indirect sunlight.
5. Wait and exercise patience
All that can be done at this point is to wait until the seeds germinate. The amount of time that this might take varies and is dependent on the particular species.
Generally, the time can range from a few months to a few years. During this period of waiting, ensure the containers are free from contamination to ensure that germination is not disrupted.
6. Emergence of protocorms
Protocorms are tuber-shaped bodies with rhizoids that are produced by the young seedlings of various orchids. Protocorms represent the embryonic form of the orchid plant.
Their emergence after the period of waiting at an affirmation that everything in the propagation process is on track.
7. Trans flask orchid seedlings is done after they have developed roots
Upon the emergence of the protocorms, consistently observe the growth of the seedlings. At the point when the seedlings appear to overcrowd the flask, transflasking should be carried out, typically within 30 and 60 days.
* This is done by removing individual seedlings using sterilized tweezers from the original containers and placing them in new containers also filled, in a proportion similar to the original, with agar medium. 6 to 8 in a standard petri dish or 1or 2 to a test tube
8. Transplant seedlings into planting pots
On the presumption that there are no disruptions to the plant growth, the seedlings will eventually outgrow the containers.
At this point, they are to be transplanted into planting pots. A good rule of thumb to determine when they are ready to be transplanted is when the seedlings have developed roots that have grown up to the length of one-quarter of an inch.
To transplant, prepare a planting pot or other container for receiving the seedling by majorly filling it up with coarse fir bark and possibly some slightly moist orchid compost mixture containing perlite, fine charcoal, redwood bark shavings, etc.
To extract the seedlings, submerge the containers in warm water to help loosen the agar gel.
Once the agar medium is softened, twist a piece of metal to form a loop and in turn, use it to carefully pull out the seedlings from the container. It is best done if the agar and seedling can be removed together.
The seedlings can be further rinsed in lukewarm water to remove any excess agar mixture still stuck to them.
Following this, the seedlings can now be planted into the prepared pot with at least 50mm of space between each individual seedling.
9. Positioning the orchid
The seedling once fully transplanted should be placed in a location that is warm with good indirect sun light.
Slowly position the pots into an area that closely assimilates the conditions it will be growing under.
The choice as to whether the plant should be exposed to full sun or in direct sunlight will be dependent on the particular orchid specie.
10. Subsequent care of the plant
After the first week, the seedling can be misted several times a day and watered just once a week.
A guide in watering the plant will be using the dryness of the fir back that is, water the plant until the fir back is completely moistened and wait till it has completely dried out before watering again.
Do not fertilize until the seedlings have fully established themselves. Fertilize using Seaweed, fish emulsion or organic chicken pellets soaked in water and apply the liquid on an alternate basis. Fertilize every 2 months until the plants are established then on an annual basis in September to October to maintain good health, vigour and better flowering.
Further Comments from Readers:
“Hi reader, it seems you use The Bible of Botany a lot. That’s great as we have great pleasure in bringing it to you! It’s a little awkward for us to ask, but our first aim is to purchase land approximately 1,600 hectares to link several parcels of N.P. into one at The Pinnacles NSW Australia, but we need your help. We’re not salespeople. We’re amateur botanists who have dedicated over 30 years to saving the environment in a practical way. We depend on donations to reach our goal. If you donate just $5, the price of your coffee this Sunday, We can help to keep the planet alive in a real way and continue to bring you regular updates and features on Australian plants all in one Botanical Bible. Any support is greatly appreciated. Thank you.”
In the spirit of reconciliation we acknowledge the Bundjalung, Gumbaynggirr and Yaegl and all aboriginal nations throughout Australia and their connections to land, sea and community. We pay our respect to their Elders past, present and future for the pleasures we have gained.
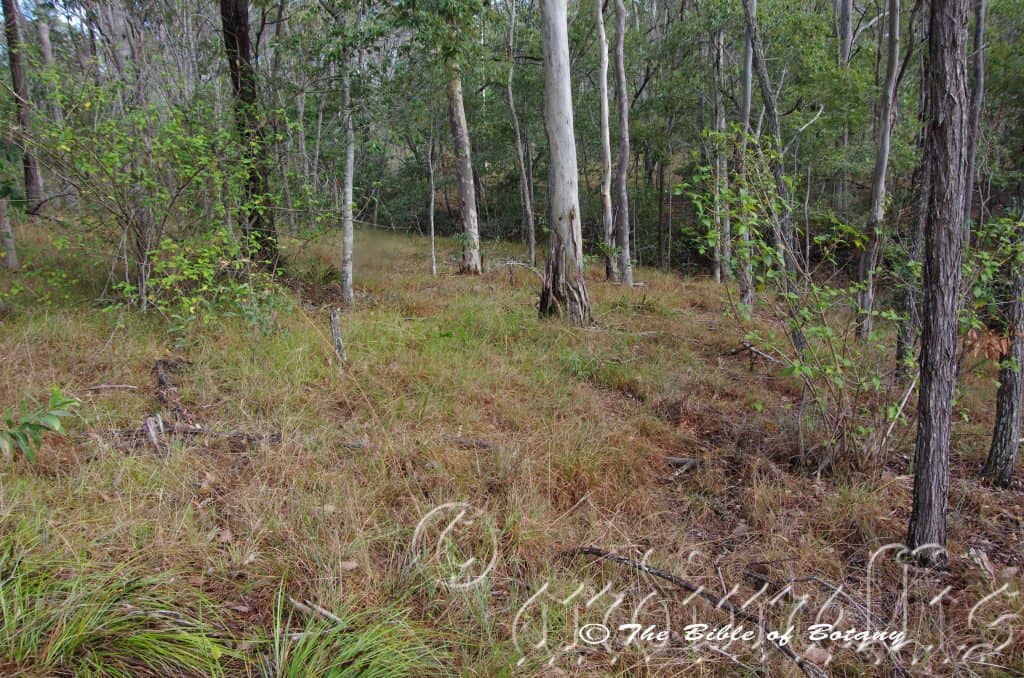
Nana Glen NSW
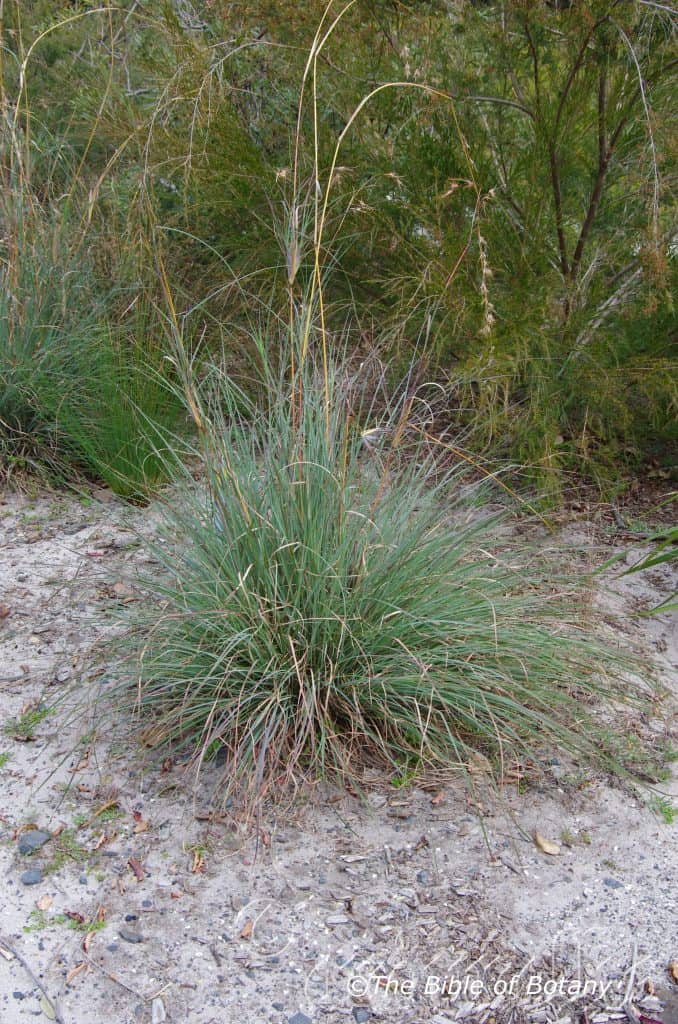
NCBG Coffs Harbour NSW
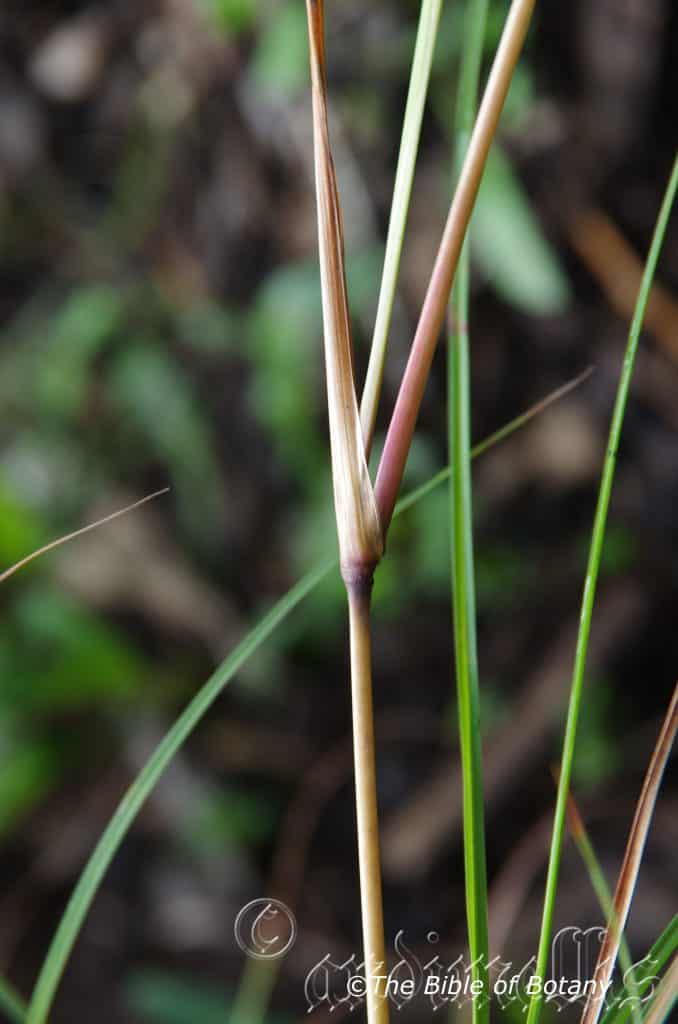
Rosser Gardens Benowa Qld.
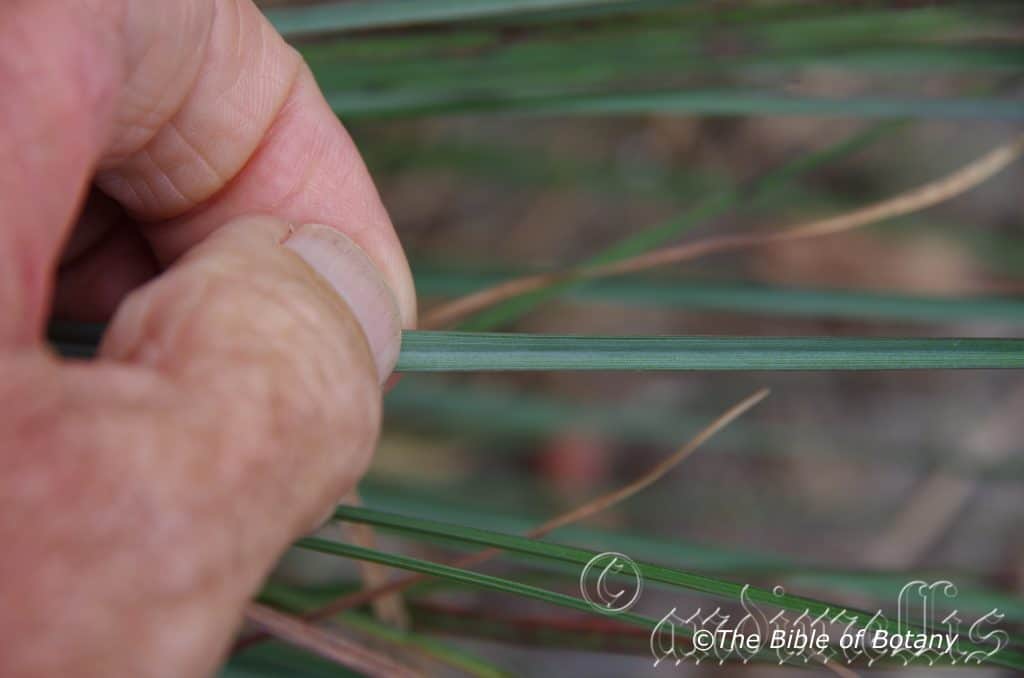
NCBG Coffs Harbour NSW
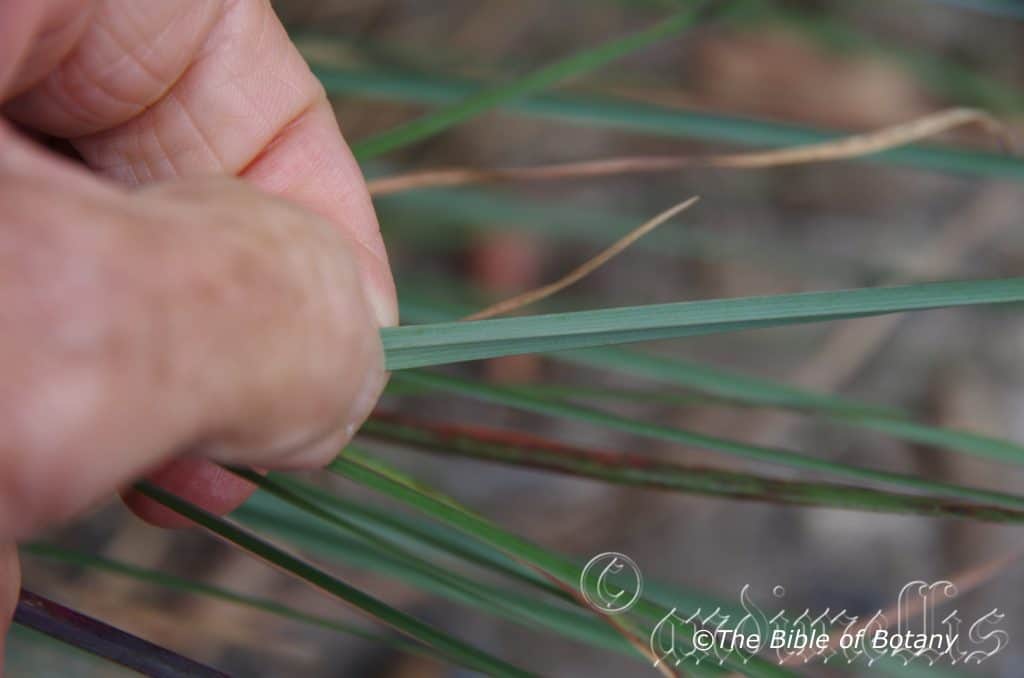
NCBG Coffs Harbour NSW
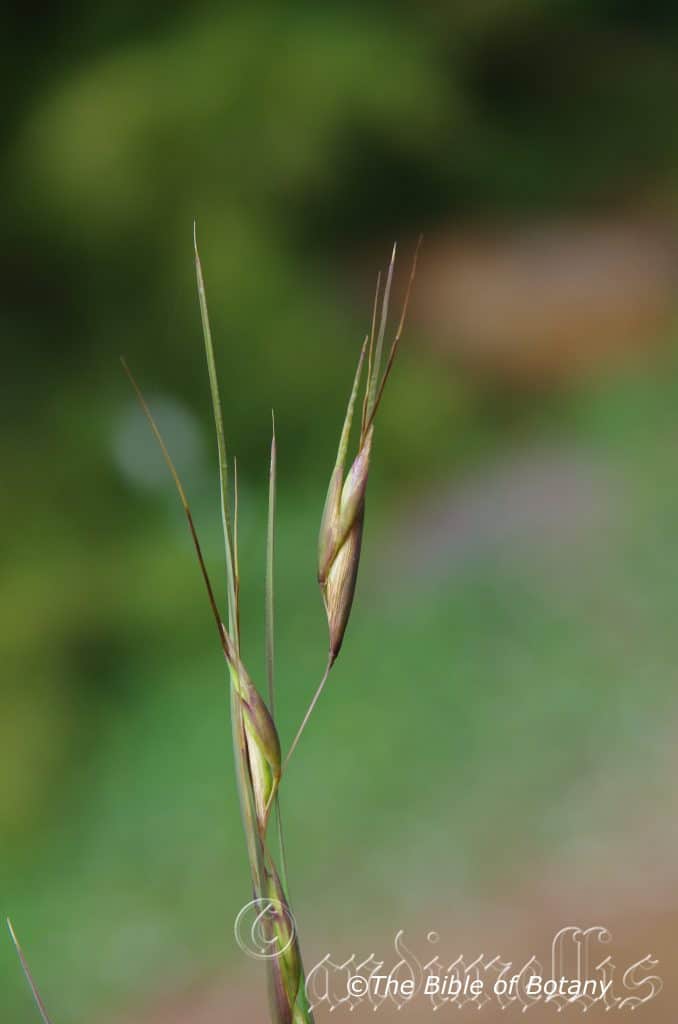
Rosser Gardens Benowa Qld.
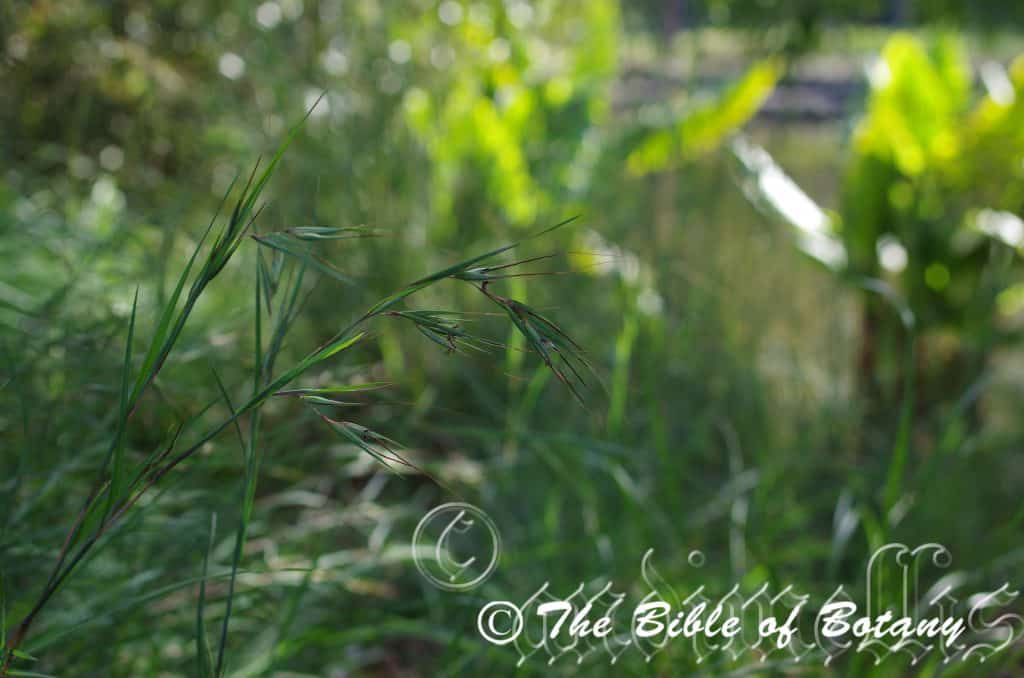
Rosser Gardens Benowa Qld.
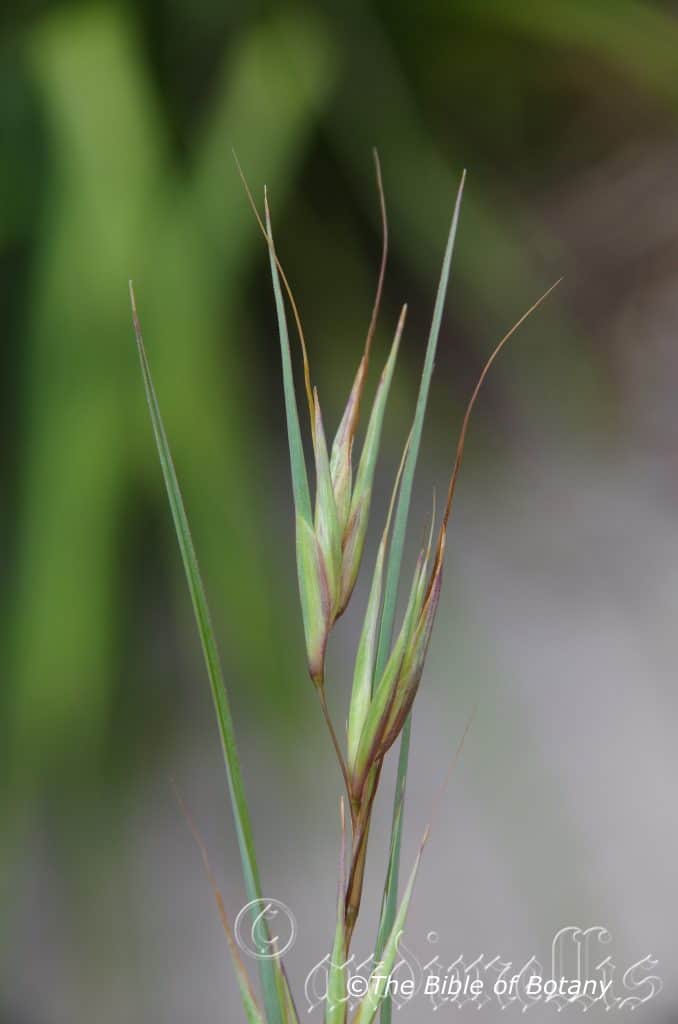
NCBG Coffs Harbour NSW
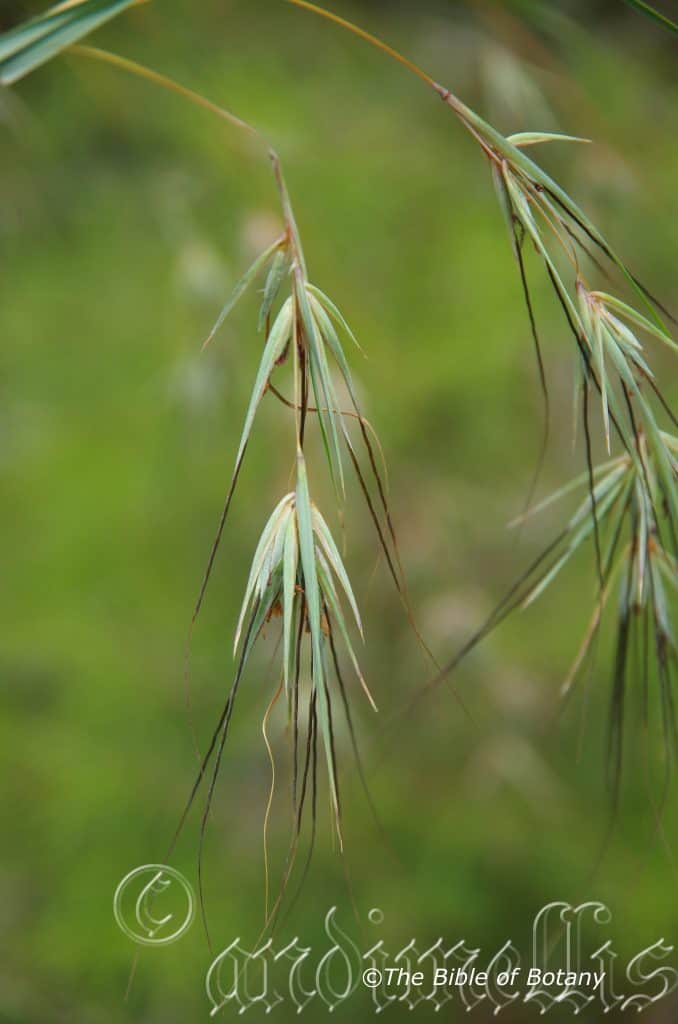
NCBG Coffs Harbour NSW
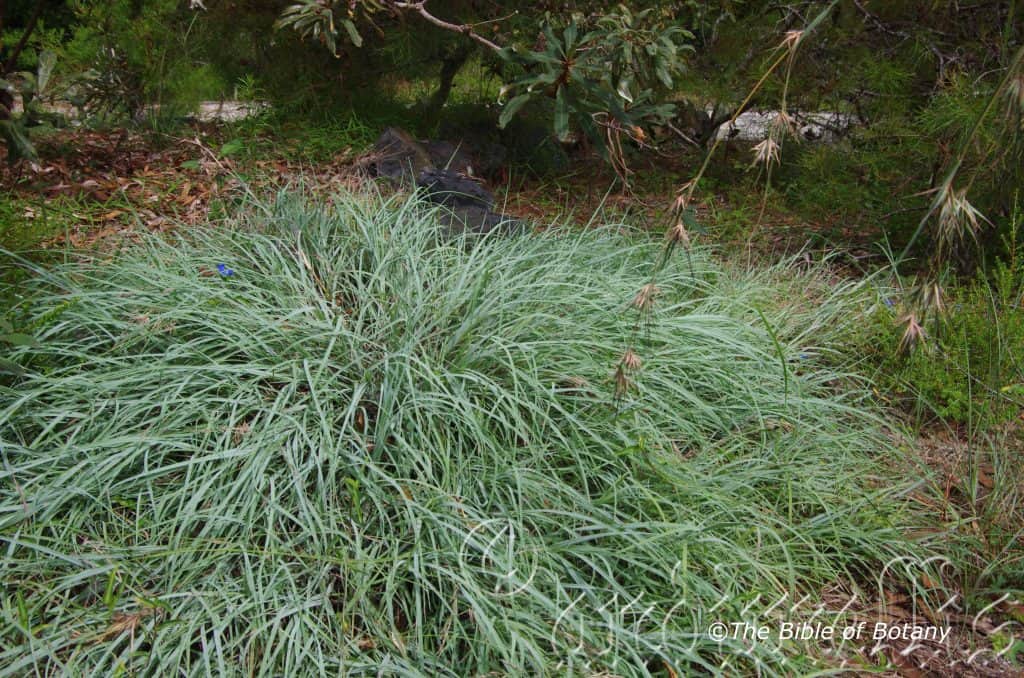
NCBG Coffs Harbour NSW
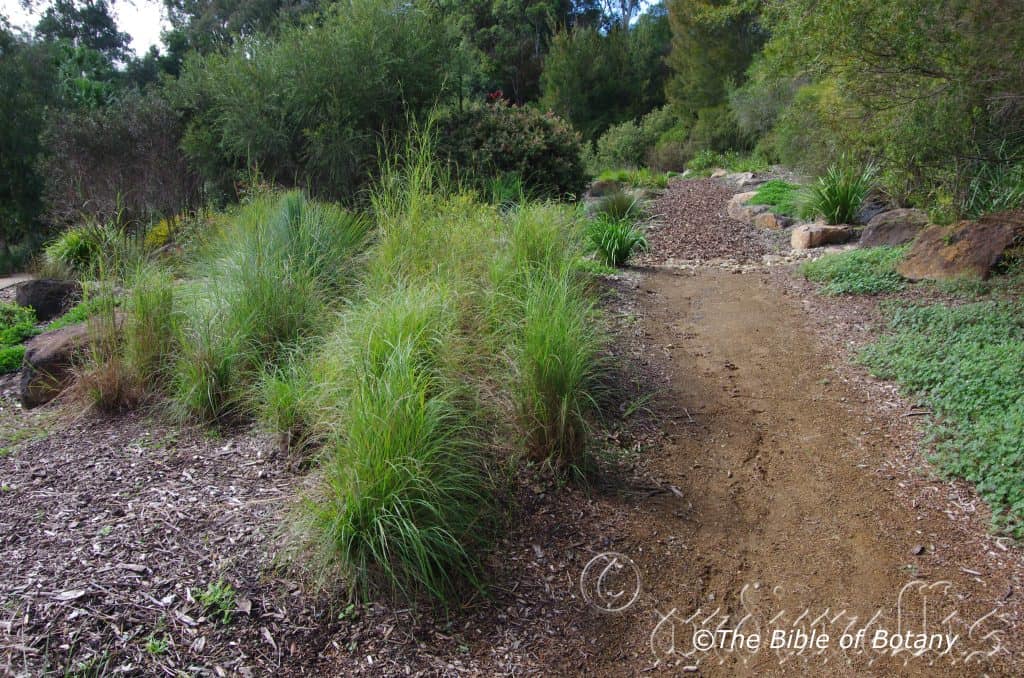
Rosser Gardens Benowa Qld.
xxxxxxxxxxxxxxxxxxxxxxxxxxxxxxxxxxxxxxxxxxxxxxxxThemeda triandra
Classification:
Unranked: Monocots
Unranked: Commelinids
Order: Poales
Family: Poaceae
Subfamily: Panicoideae
Tribe: Andropogneae
Genus: From Thaeme, which is Latinized from the Arabic vernacular for ephemeral depressions. It refers to an area of land which is seasonally flooded or very wet where these grasses prefer to grow.
Species: From Treis/Tria, which are Ancient Greek or later Tri, which is Latin for three and Andros, which is Ancient Greek for a man. It refers to flowers, which have three prominent stamens.
There is some confusion within the species as to whether the African and Australian species are in fact two separate specie. New South Wales still refers to this grass as Themeda australis. In this column I will refer to it as Themeda triandra as per the National recognition of the species.
Common Name: Kangaroo Grass or Durawi Grass.
Distribution:
Themeda triandra is found throughout Australia except for the true deserts and those zones with temperatures consistently below minus 3 degrees in the winter. It is probably more widespread than the maps indicates especially through central Australia where many of the sightings are only recorded along known road ways.
It is also found in Algeria, Andaman Island, Angola, Assam, Bangladesh, Botswana, Burkina, Burundi, Cameroon, Cape Provinces, Cape Verde, Caprivi Strip, Central African Republic, Chad, China Djibouti, East Himalaya, Egypt, Eritrea, Ethiopia, Free State, Ghana, Guinea, Hainan, India, Indonesia, Ivory Coast, Japan, Jawa, Kenya, Korea, KwaZulu-Natal, Laos, Lebanon-Syria, Lesotho, Lesser Sunda Island, Madagascar, Malawi, Malaya, Mali, Maluku, Morocco, Mozambique, Myanmar, Namibia, Nansei-shoto, Nepal, New Guinea, Nicobar Island, Nigeria, Oman, Papua, Pakistan, Philippines, Rwanda, Saudi Arabia, Senegal, Socotra, Somalia, Sri Lanka, Sudan, Sulawesi, Sumatera, Swaziland, Taiwan, Tanzania, Tasmania, Thailand, Tibet, Tunisia, Turkey, Uganda, Vietnam, West Himalaya, Yemen, Zambia, Zaire and Zimbabwe.
https://avh.ala.org.au/occurrences/search?taxa=Themeda+australis#tab_mapView
Habitat Aspect Climate:
Themeda triandra prefers dappled light shade to full sun. It grows in well developed, moist, rainforests, dry sclerophyll forests to open woodlands, grassland savannahs including arid areas where some moisture is retained in shallow depressions or along creek or drainage lines. The soils pH ranges from 6.5pH to 7.5pH. It does not tolerate waterlogged soils however plants in riparian zones may be inundated for short periods during storms. Non saline soils to moderately saline soils are tolerated. The altitude ranges from 5 meters ASL to 1100 meters ASL.
The temperatures range from minus 5 degrees in July to 42 degrees in January.
The rainfall ranges from lows of 100mm to 2700mm average per annum.
Soil Requirements:
Themeda triandra prefers soils that are sandy loams to medium clays. The soils are usually derived from decomposed basalts, granites, rhyolite, laterites, sandstones, metamorphic rocks, brown basalts, black basalts and shale. The soils pH ranges from 4.5pH to 6pH. It tolerates seasonal waterlogged soils. Non saline soils to moderately saline soils are tolerated.
Height & Spread:
Wild Plants: 0.6m to 1.2m by 0.5m to 1m.
Characteristics:
The stems of Themeda triandra are tall, straight, pale creamy pinkish-brown and slightly scabrous.
The alternate, long linear leaves of Themeda australis are pale blue green glabrous or sparsely covered in white hirsute hairs. The leaves measure 200mm to 550mm in length by 2mm to 5mm in width. The leaf sheaths are glabrous or covered white hirsute hairs. The leaf ligules have a row of white, ciliate hairs along the upper lamina margin and measure less than 1.2mm in length.
Inflorescences of Themeda triandra are born on a long spike. The inflorescences measure 100mm to 250mmin length. The subtending sheaths to the lower culms become shorter as they rise on the spike. The involucral spikelets are acute to accumulate and measure 6mm to 12mm in length.
The male lower glumes have 11 parallel nerves while the upper glumes have 3 parallel nerves. The bisexual spikelets lower glumes have 7 to 9 parallel nerves while the upper glumes have 3 parallel nerves. The upper lemma awn measures 40mm to 60mm in length. Themeda australis flowers appear from early September through to early March.
Wildlife:
Themeda triandra is a favourite food amongst the many species of macropods. (Kangaroos and wallabies)
Cultivation:
Themeda triandra is a fast growing grass for most pastures, along creek banks and estuaries especially in poorly drained areas. Themeda australis yields
good quantities of mulch but must be let go to flower at least once a year. This was the grass that our orchard was based on in the early years as it was prolific on the poorly drained, phosphorus deficient, cattle compressed, over grazed and over leached soils we inherited. The grass reacted and grew well in a mixed pasture of white clover.
As a clumped grass that looks rather attractive when grown as a specimen plant. It can be cut back after flowering, where it will rejuvenate quickly.
Propagation:
Seeds: The seeds of Themeda triandra can be removed easily from the plants. After seeding has commenced it is just a matter of running the tractor or other device through the grass and the seeds and trash will accumulate on any open bag or cloth.
Seed can be spread directly over the pasture as soon as the last frosts have abated and the first rain has started.
Fertilize using Seaweed, fish emulsion or organic chicken pellets soaked in water and apply the liquid when the seedlings are planted out to maintain good health, vigour and better flowering.
Further Comments from Readers:
“Hi reader, it seems you use The Bible of Botany a lot. That’s great as we have great pleasure in bringing it to you! It’s a little awkward for us to ask, but our first aim is to purchase land approximately 1,600 hectares to link several parcels of N.P. into one at The Pinnacles NSW Australia, but we need your help. We’re not salespeople. We’re amateur botanists who have dedicated over 30 years to saving the environment in a practical way. We depend on donations to reach our goal. If you donate just $5, the price of your coffee this Sunday, We can help to keep the planet alive in a real way and continue to bring you regular updates and features on Australian plants all in one Botanical Bible. Any support is greatly appreciated. Thank you.”
In the spirit of reconciliation we acknowledge the Bundjalung, Gumbaynggirr and Yaegl and all aboriginal nations throughout Australia and their connections to land, sea and community. We pay our respect to their Elders past, present and future for the pleasures we have gained.
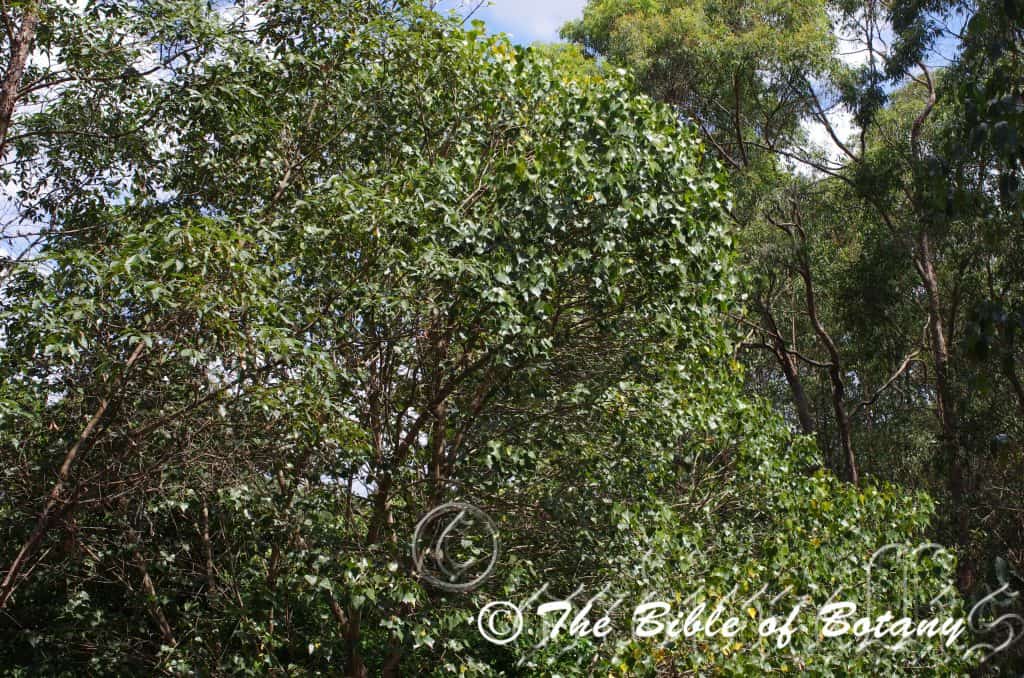
Mount Cootha Botanical Gardens Qld.
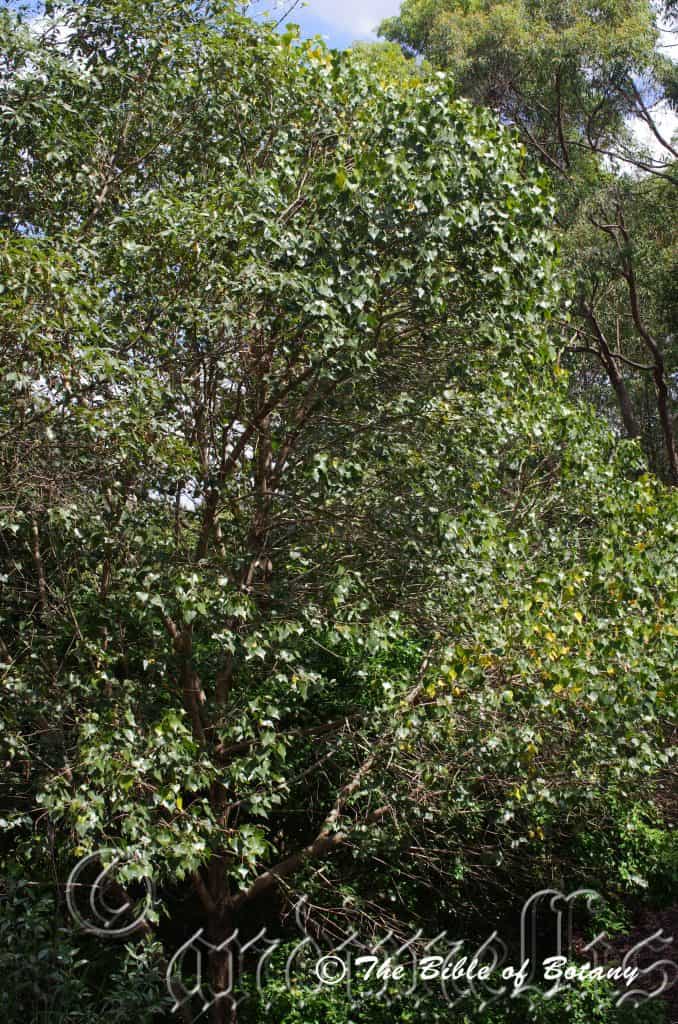
Mount Cootha Botanical Gardens Qld.
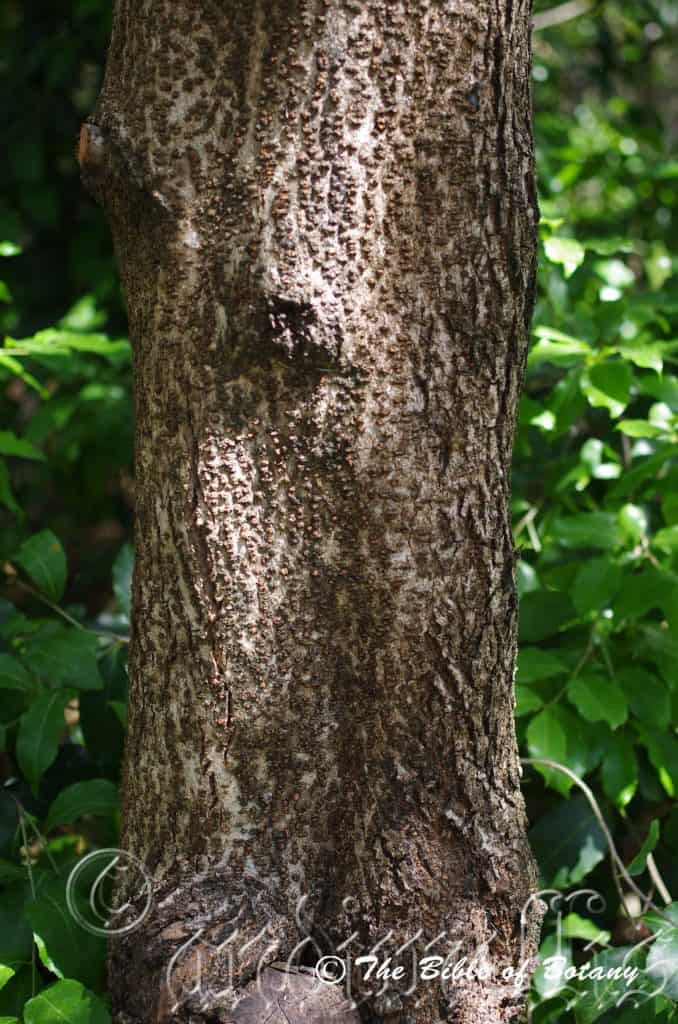
Mount Cootha Botanical Gardens Qld.
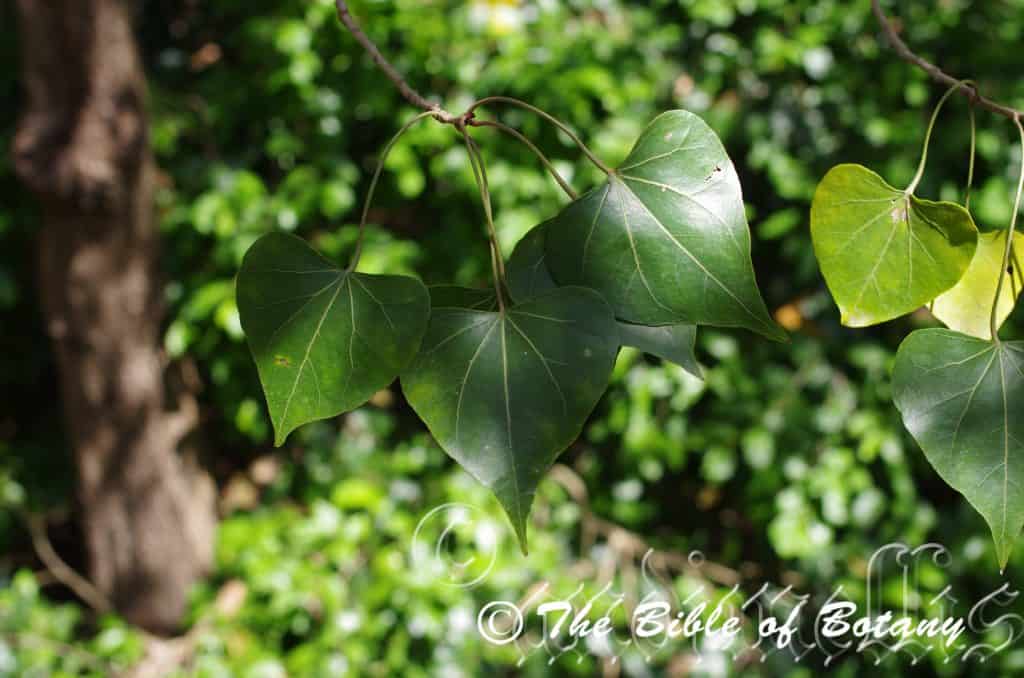
Mount Cootha Botanical Gardens Qld.
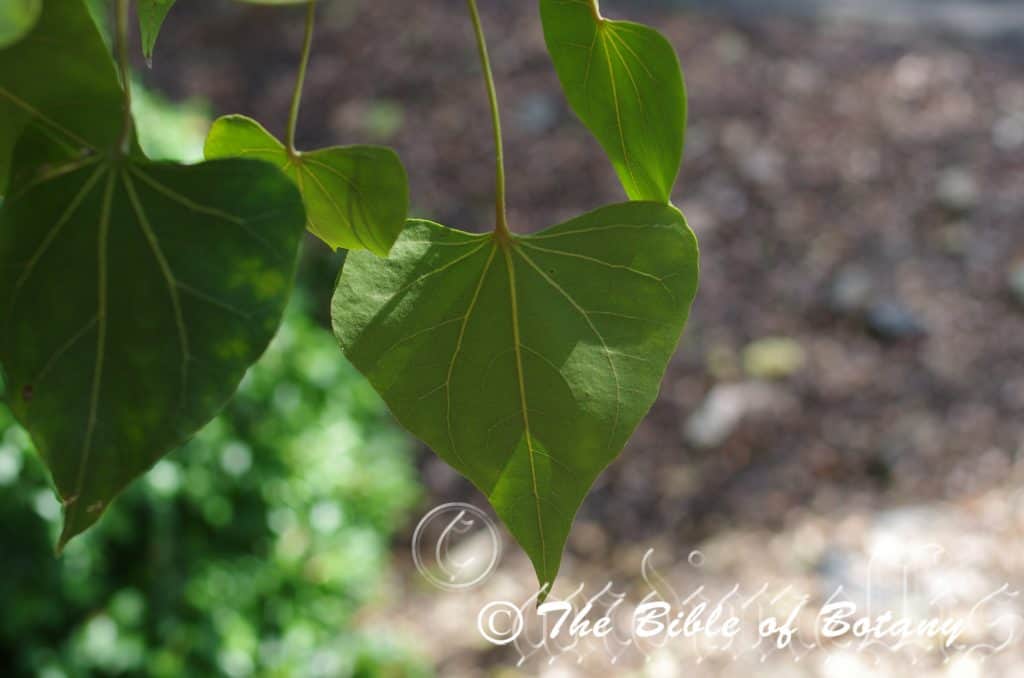
Mount Cootha Botanical Gardens Qld.
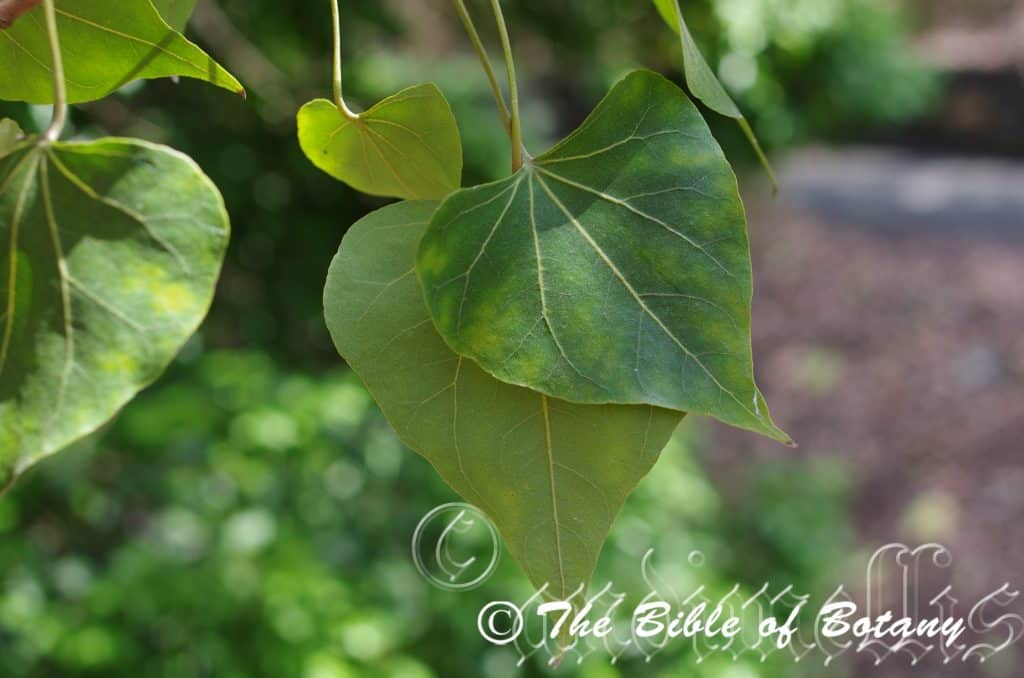
Mount Cootha Botanical Gardens Qld.
xxxxxxxxxxxxxxxxxxxxxxxxxxxxxxxxxxxxxxxxxxxxThespesia populneoides
Classification:
Class: Equisetopsida.
Subclass: Magnoliidae.
Superorder: Rosannae
Order: Malvales
Family: Malvaceae
Subfamily: Malvoideae
Tribe: Gossypieae
Genus: From Thespesia, which is Ancient Greek for divine. It refers to flowers, which have a divine beauty particularly in relation to the colours.
Species: From Popler, which is old English for the Poplar tree and Eidos/Oides, which is Ancient Greek for alike or similar to. It refers to leaves, which resemble the European Populus genus.
Common Name: Tulip Tree, Indian Tulip Tree, Portia Tree or Pacific Rosewood.
Distribution:
Thespesia populneoides is found across the northern fifth of Australia. On the east coast it is found south from the Torres Strait Islands, offshore Islands, New Guinea and Papua coasts then from Cape Bossut in central coastal Queensland to Moreton Island in southern coastal Queensland.
It is also found in Aldabra, Andaman Island, Assam, Bangladesh, Bismarck Archipelago, Borneo, Cambodia, Caroline Island, China Southeast, Cocos Keeling Islands, Djibouti, Eritrea, Fiji, Gilbert Island, Hainan, Hawaii, India, Indonesia, Jawa, Kenya, Laccadive Island, Lesser Sunda Island, Madagascar, Malaya, Maldives, Maluku, Marianas, Marquesas, Mauritius, Mozambique, Myanmar, Nansei-shoto, Nauru, New Caledonia, New Guinea, Nicobar Island, Niue, Oman, Papua, Philippines, Pitcairn Island, Rodrigues, Samoa, Seychelles, Society Island, Solomon Island, South China Sea, Sri Lanka, Sudan, Sulawesi, Sumatera, Taiwan, Tanzania, Thailand, Tonga, Tuamotu, Tubuai Island, Vanuatu, Vietnam, Wake Island and Wallis-Futuna Island.
https://avh.ala.org.au/occurrences/search?taxa=Thespesia+populneoides#tab_mapView
Habitat Aspect Climate:
Thespesia populneoides prefers dappled light shade to full sun. It usually grows in exposed estuarine positions along tidal creeks or streams or at times behind mangrove forests. The altitude ranges from 3 meter ASL to 60 meters ASL.
The temperatures range from 3 degrees in July to 42 degrees in January.
The rainfall ranges from lows of 350mm to 3200mm average per annum.
Soil Requirements:
Thespesia populneoides prefers course sand to sandy loams, mud to heavy silts. The soils are usually derived from alluvial deposits, accumulated beach sands often with mud or accumulated coral sands. The soils pH ranges from 6.5pH to 8pH. It does not tolerate waterlogged soils however season inundations from king tides or flooding are tolerated. Non saline soils to extremely saline soils are tolerated as are salt laden winds.
Height & Spread:
Wild Plants:10m to 15m by 8m to 20m
Characteristics:
Thespesia populneoides grows as a wide spreading medium tree with brown to deep brown Bark. The trunk and larger branches are densely covered in large, rough, raised lenticels. The rough smaller branches are pale grey-brown to mid grey-brown and only becoming green near the apex where the newer leaf growth occurs. The new growth is very sparsely covered in brownish hairs.
The crowded cordate to deltoid leaves of Thespesia populneoides measure 60mm to 170mm in length by 45mm to 110mm in width. The linear stipules measure 2mm to 3mm in length. The olive-green petioles gently bend downwards so that the leaves more or less hang perpendicular to the branch. The petioles measure 50mm to 120mm in length. The bases are usually cordate or at times truncate while the apexes are long acuminate. The discolourous laminas are deep green to deep olive-green, dull and glabrous on the upper laminas awhile the lower laminas are much paler. The laminas are flat while the leaf margins are minutely, broad crenate to entire. The obtuse mid vein and 6 or 8 main lateral veins from the base are prominent on both laminas with 6 to 12 pinnate lateral veins being slightly prominent on both laminas. The mid vein is very sparsely to sparsely covered in brownish hairs.
The inflorescences of Thespesia populneoides are born singularly from the leaf axils. The glabrous, green pedicels measure 25mm to 100mm in length. The cupuliform calyx enlarge as the flower bud develops and opens. The pale yellow to mid yellow 5 ovate petals are red at the base and turn pinkish orange after anthesis. The undulating to slightly crisped obtuse apexes measure 60mm to 70mm in length.
The numerous, yellow stamens are fused on the apical half of the thick, erect style. The yellow filaments are divaricate and measure 7mm to 8mm in length. The reniform, yellow anthers measure 2mm to 2.5mm in diameter.
The 5 locule ovary each has 4 ovules. The yellow style and 5 fid stigma are glabrous while the hypanthium is green. The pistil measures 6mm to 10mm in length. The flowers appear from late August to May.
Thespesia populneoides fruits are depressed spherical capsules. The capsules are glabrous and measure 16mm to 27mm in length by 24mm to 46mm in diameter. The green capsules turn deep grey almost black when ripe. The calyxes are persistent on the ripe fruit as is the ruminants of the style base. The olive-brown, flattened reniform seeds are densely covered in brown hirsute hairs and measure 13mm to 15mm by 8mm to 10mm in width.
Confusing Species:
Thespesia populneoides new growth is very sparsely to sparsely covered in brownish hairs. The linear stipules measure 2mm to 3mm in length. The pedicel usually measures 2mm in diameter. The style and stigma are yellow.
Hibiscus tiliaceus has new growth, which is glabrous. The broad elliptical to deltoid stipules measure 9mm to 20mm in length by 6mm to 16mm in width. The style is yellow while the stigma is deep reddish maroon to deep burgundy.
Wildlife:
Thespesia populneoides is attacked by the White Mealy Bug Maconellicoccus hirsutus.
Cultivation:
Thespesia populneoides is a very beautiful tree which is particularly suitable for medium size gardens to the largest gardens in coastal or semi-arid areas. It is an excellent colourful addition for tropical or subtropical gardens that experience strong coastal winds and tidal surges. As a garden subject it will grow to 7 meter to 10 meters in height by 9 meters to 12 meters in diameter. Hard pruning can be done once the plants are established but some set back will occur in flowering. This tree has been extensively planted in the past as a street tree only to be butchered by power authorities. It is fast growing and is cold tolerant to temperatures at least as low as 2 degrees. Frosts will kill young unprotected plants and trees affected by frost rarely recover.
It is best suited to areas that have poor drainage like in depressions and around sullage trenches. Place it at the bottom of slopes or retaining walls where moisture lies or seeps out. This is a great tree for coastal properties with saline soils. It makes an ideal park tree as it has a wide spread and dense canopy however it should be planted in semi protected areas as branches tend to splinter in high wind areas.
This tree makes an excellent host tree for all epiphytic ferns and orchids especially those that are found along the coast or at lower elevations.
Propagation:
Seeds: Thespesia populneoides seeds can be sown directly into a seed raising mix. Cover them with 5mm of fine sand and keep moist not wet. Place the tray in a warm sunny position. When the seedlings are 20mm to 30mm tall, prick them out and plant them into 50mm native tubes using a good organic mix.
Once the seedlings reach 150mm to 200mm in height they can be planted out into their permanent position.
Cuttings: Fortunately Thespesia populneoides cuttings are relatively easy to strike. Use 100mm to 200mm long cuttings from the present season’s growth for best results. Take them in warmer months of the year. Remove half the leaves from the bottom section being careful not to tear the bark.
1 Prepare the cutting mix by adding two thirds sharp clean river sand, one third peat or one third perlite. These ingredients must be sterilized,
2 Select good material from non diseased plants,
3 Select semi green stems for cuttings. Look for a stem with two or three nodes,
4 Place the cutting on a flat, hard surface, and make a clean cut down one side of the cutting at the base for 10mm with a sharp sterile knife or razor blade. – This scarification of the node will increase the chances of roots emerging from this spot. Now remove all but one or two the leaves, leaving the apex leaves in tact. If the leaves are very large in proportion to the stem, cut off the apical halves.
5 Fill a saucer with water, and place a little medium strength rooting hormone into another container like a milk bottle top. Dip the node end of the cutting into the water and then into the rooting hormone. Tap off any excess hormone,
6 Use a small dipple stick or old pencil to poke a hole into the soilless potting mix. Ensure the hole is slightly larger than the stem diameter and be careful not to wipe the rooting hormone off the cuttings base. Place 2 to 4 cuttings in each of the 50mm native tubes,
7 I like to place the tubes in bucket with holes drilled in the bottom to allow excess water to drain out. A plastic bag that fits over the bucket is ideal to help maintain temperature and moisture. Place in a semi shaded, warm position like under 50mm shade cloth.
8 When the cuttings have struck, open the bag to allow air circulation for a few days to a week,
9 Once hardened off remove the cuttings from the bag and allow to further hardening for a few more days to a week,
10 Transplant into a good potting mix to grow on.
Fertilize using seaweed, fish emulsion or organic chicken pellets soaked in water on an alternate basis. Fertilize every two months until the plants are established then annually in September to October to maintain better colour, health, vitality and flowering.
Further Comments from Readers:
“Hi reader, it seems you use The Bible of Botany a lot. That’s great as we have great pleasure in bringing it to you! It’s a little awkward for us to ask, but our first aim is to purchase land approximately 1,600 hectares to link several parcels of N.P. into one at The Pinnacles NSW Australia, but we need your help. We’re not salespeople. We’re amateur botanists who have dedicated over 30 years to saving the environment in a practical way. We depend on donations to reach our goal. If you donate just $5, the price of your coffee this Sunday, We can help to keep the planet alive in a real way and continue to bring you regular updates and features on Australian plants all in one Botanical Bible. Any support is greatly appreciated. Thank you.”
In the spirit of reconciliation we acknowledge the Bundjalung, Gumbaynggirr and Yaegl and all aboriginal nations throughout Australia and their connections to land, sea and community. We pay our respect to their Elders past, present and future for the pleasures we have gained.
All information is included in good faith and has been thoroughly researched prior to printing. The website or the author does not warrant or guarantee the accuracy of any information on these pages, nor does the website or the author accept any responsibility for any loss arising from the use of the information found within. The views and opinions are strictly those of the author or those members who chose to actively participate in the contents herein.