Plant Descriptions – Sacciolepis indica – Schoenoplectus validus
Sacciolepis indica
Salacia chinensis
Salvia plebeian
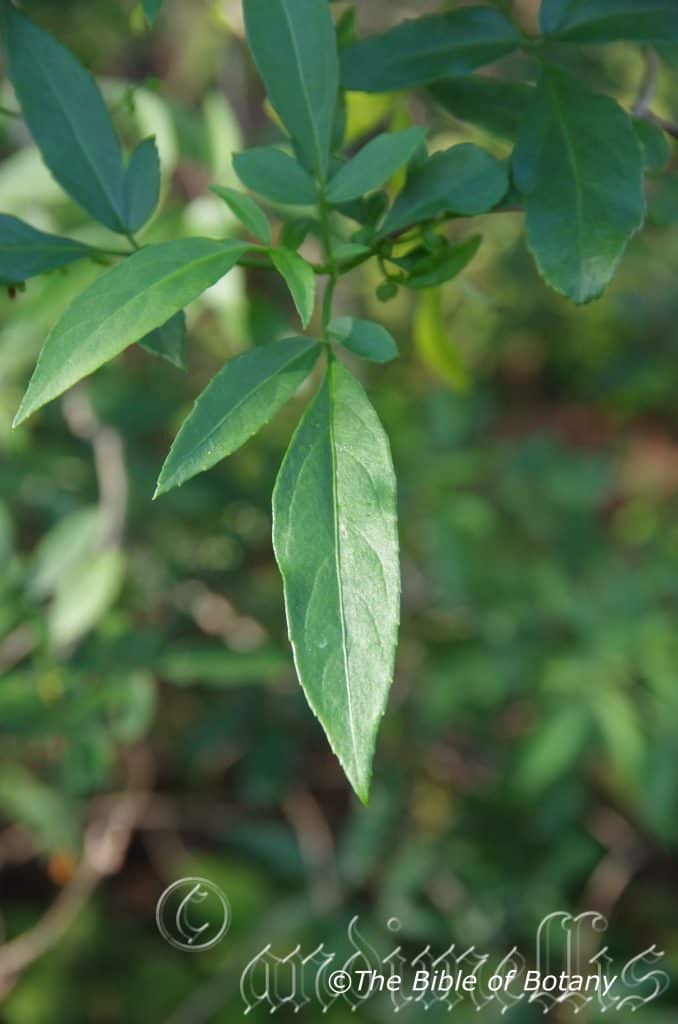
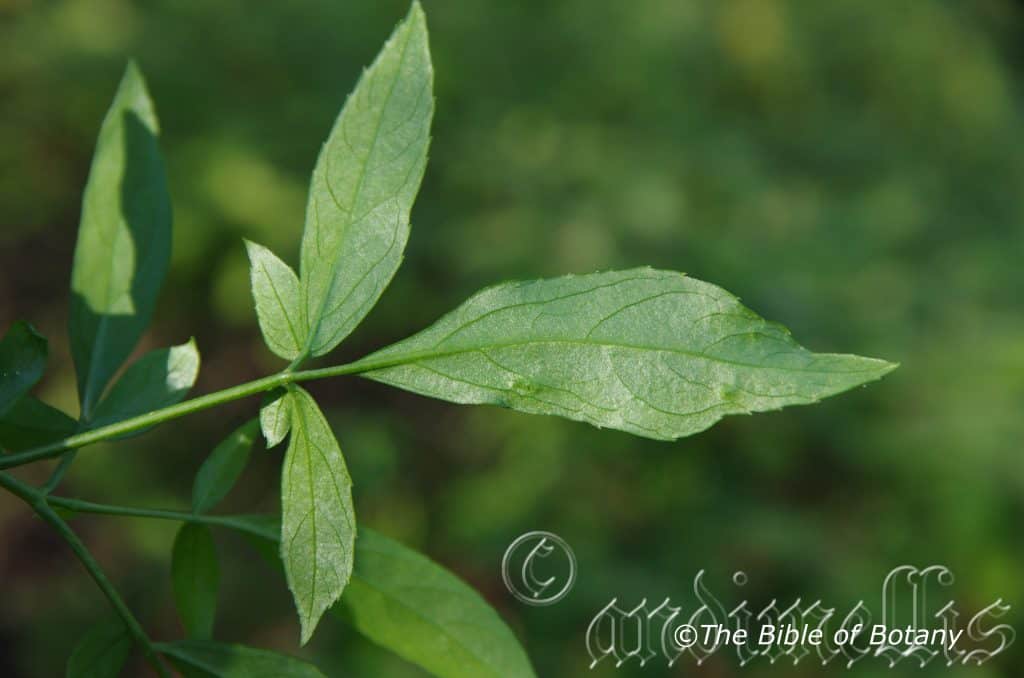
Sambucus australasica
Samolus repens
Santalum obtusifolium
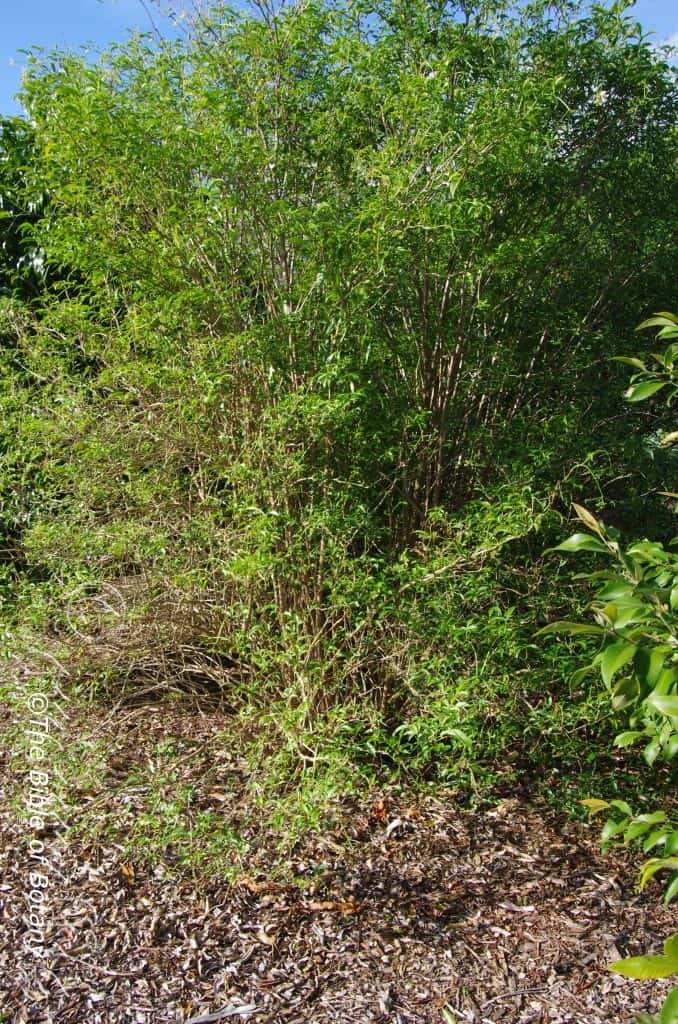
Sannantha angusta
Sannantha collina
Sannantha similis
Santalum obtusifolium
Sarcochilus aequalis
Sarcochilus australis
Sarcochilus ceciliae
Sarcochilus falcatus
Sarcochilus fitzgeraldii
Sarcochilus hillii
Sarcochilus parviflorus
Sarcochilus spathulatus
Sarcocornia quinqueflora
Sarcomelicope simplicifolia
Sarcopetalum harveyanum
Sarcopteryx stipata
Sarcotoechia lanceolata
Sarcotoechia serrata
Sauropus albiflorus
Sauropus hirtellus
Scaevola aemula
Scaevola albida
Scaevola calendulacea
Scaevola calliptera
Scaevola hookeri
Scaevola oxyclona
Scaevola ramosissima
Scaevola tomentosa
Schefflera actinophylla
Schelhammera undulata
Schistotylus purpuratus
Schizachyrium fragile
Schizaea bifida
Schizaea dichotoma
Schizaea rupestris
Schizomeria ovata
Schoenoplectus mucronatus
Schoenoplectus subulatus
Schoenoplectus tabernaemontani
Schoenoplectus validus
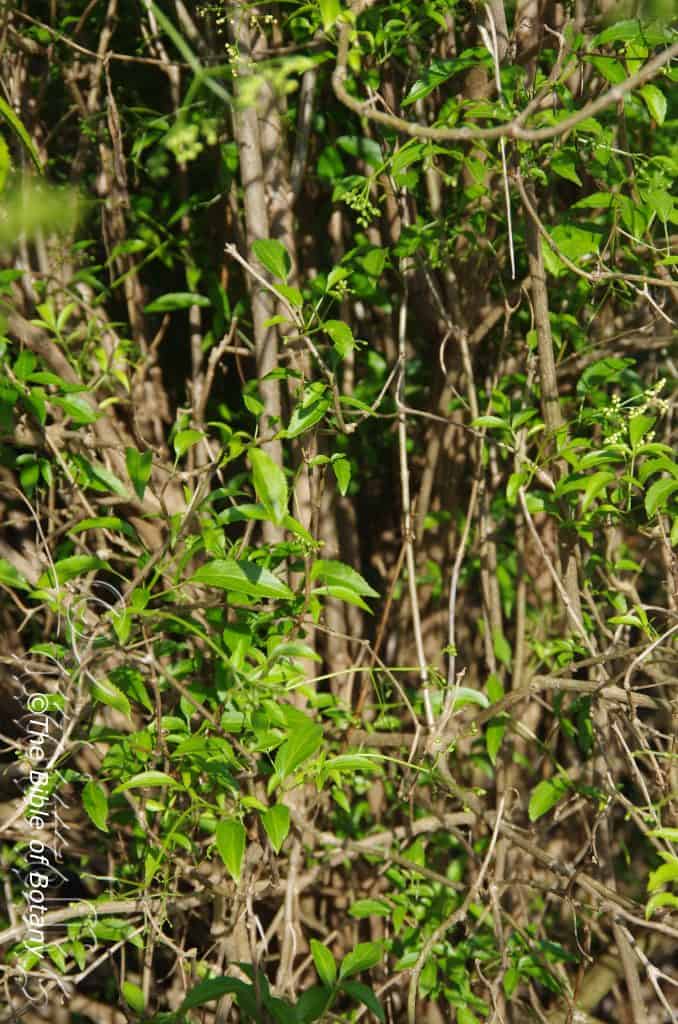
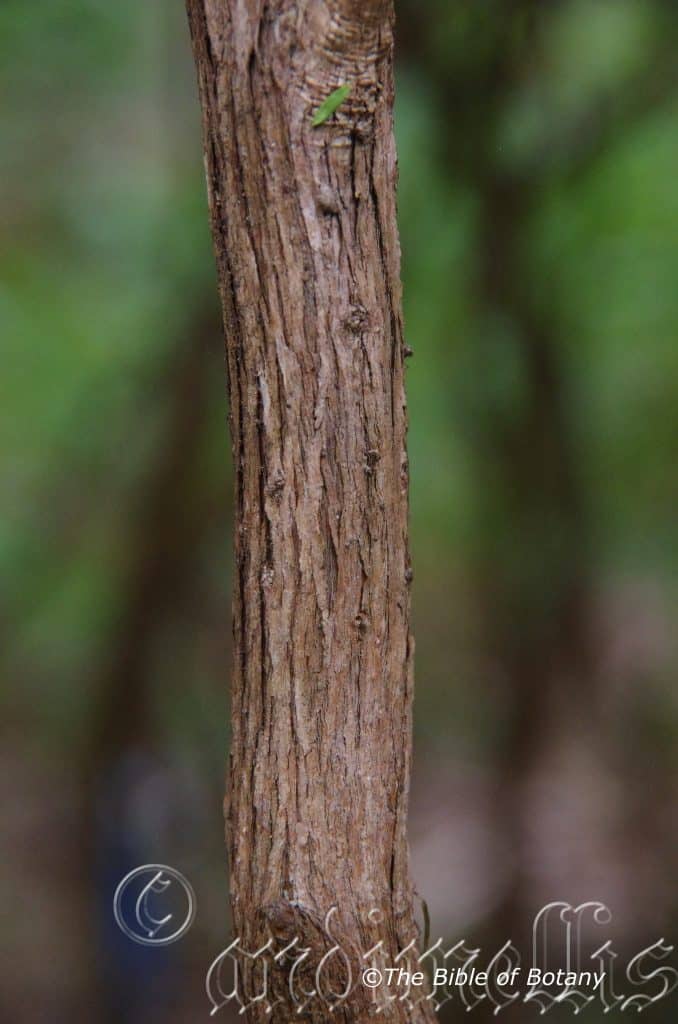
Pillar Valley NSW

Pillar Valley NSW
Pillar Valley NSW
Sacciolepis indica
Classification:
Class: Equisetopsida
Subclass: Magnoliidae
Superorder: Lilianae
Order: Poales
Family: Poaceae
Genus: From Sákkos, which is Ancient Greek or Saccus, which is Latin for a small bag, pouch or purse and Lepís, which is Ancient Greek for a scale. It refers to organs, which are inflated and covered in scales.
Species: From India, which is Latinized for India. It refers to the type specimen, which was first discovered from India or being endemic to India.
Sub specie:
Common Name: Indian Cupscale Grass.
Distribution:
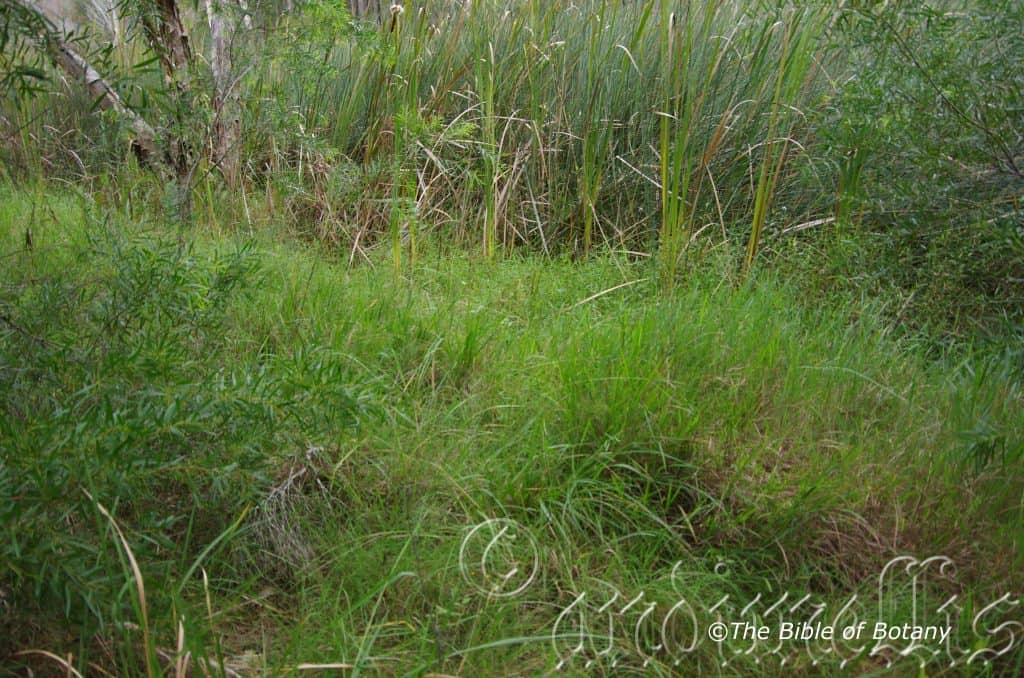
Sacciolepis indica is found from Bobby’s Creek north of Beagle Bay in north western coastal Western Australia to Seven Mile Beach in southern coastal New South Wales. It is found within 270 kilometers of the coast except for a population in the Belyando Shire and another in the Carnarvon Gorge National Park.
https://avh.ala.org.au/occurrences/search?taxa=Sacciolepis+indica#tab_mapView
Habitat Aspect Climate:
Sacciolepis indica prefers partial shade to dappled sun light. It grows as a helophytic species in wet situations in shallow depressions, drainage lines in open woodlands, open forests or heaths especially in mud of freshwater swamps. The altitude ranges from 10 meters ASL to 650 meters ASL.
The temperatures range from minus 3 degrees in August to 42 degrees in January.
Rainfalls range from lows of 400mm to 3200mm average per annum.
Soil Requirements:
Sacciolepis indica prefers better quality light silts to heavy silts or light clays to medium clays. The soils are usually derived from decomposed sandstones, granites, metamorphic rocks, brown basalts, black basalts laterites or accumulated peaty beach sands. The soils pH ranges from 4.5pH to 6pH. It tolerates waterlogged soils often growing in shallow water for short periods. Non saline soils to moderately saline soils are tolerated.
Height & Spread:
Wild Plants: 0.6m to 1m by 0.6m to 1m
Characteristics:
Sacciolepis indica is an erect or decumbent rhizomatosous or tufted or caespitose perennial grass with smooth, glabrous culms. The culms measure 200mm to 600mm in length by 1.5mm to 3.2mm in diameter. The 3 or 4 nodes along the culms are glabrous and form arial roots in wet weather. The sheaths often become loose from the culms as they mature. The sheaths are smooth, glabrous to slightly scabrous. The sheath auricles present or absent. The ligule is a short fringed membrane with ciliolate hairs that measure 0.2mm to 0.5mm in length.
The long linear leaves measure 20mm to 250mm in length by 1mm to 7mm in width. The concolourous laminas are mid grass-green and slightly scabrous. The margins are entire and inrolled to involute. The apexes are acute.
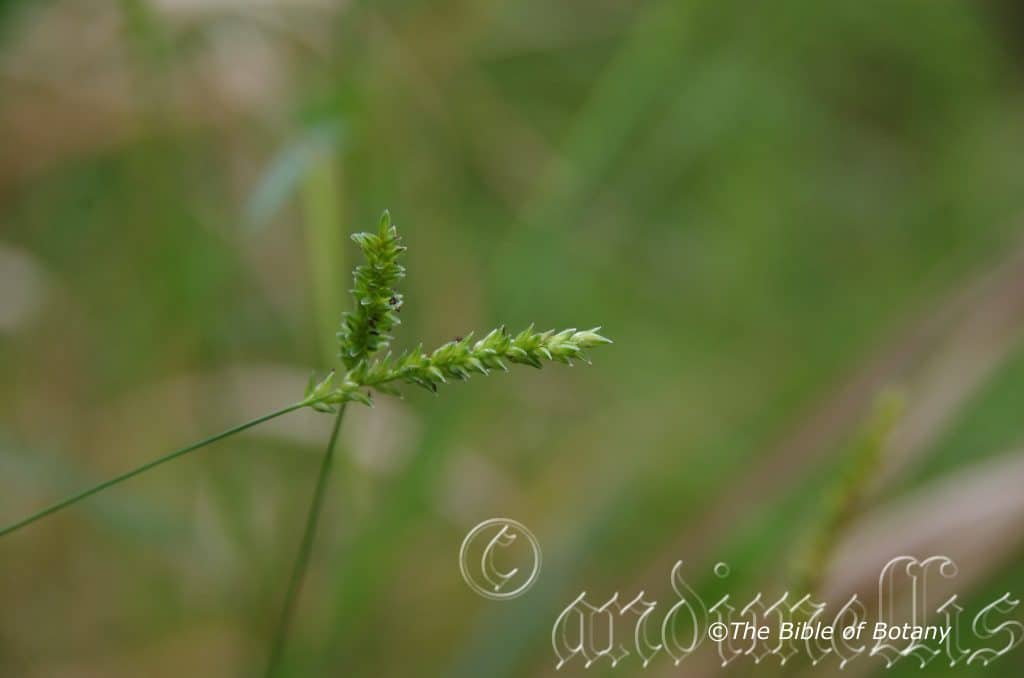
The inflorescences are paniculate with filiform branches which are usually dense or contracted and usually spicate. The rachises, peduncles and pedicels are glabrous. The linear, lanceolate-ovate or panicles have numerous spikelets. The panicles measure 10mm to 30mm in length.
The pale green, purplish or pale green tinged purple spikelets on the pedicels measure 0.3mm to 1mm in length. There are 2 florets on a spikelet which measure 3mm to 3.5mmin length. The oblique awls on the spikelets are laterally compressed to subterete with 2 flowers. The upper floret is fertile while the lower one is barren or rarely male. The spikelets are glabrous or sparsely covered in short white hirtellous or puberulent hairs.
The dissimilar glumes are thinner than the lemmas. The lower glumes are ovate and keeless with 3 or 7 nerves. The lower glumes measure 0.5mm to 2.7mm in length with firm hyaline margins. The upper glumes are elliptical and keeless with 5 to 13 nerves. The upper glumes measure 2.2mm to 3.5mm in length with firm hyaline margins.
The single fertile floret is laterally compressed. The acute lemmas are strongly convex and are much firmer than the glumes being papery to sub crustaceous. The margins are sparsely covered in long white ciliate and pilose hairs. It is entire with an acute muticous apex. The lemmas are keeless with 3 to 5 obscure nerves, glabrous, glossy with flat tucked or untucked margins.
The palea are rather long, entire, initially smooth and glabrous and at times become indurated and white in fruit white in fruit. The paleas are keeless with 2 obscure nerves, glabrous and glossy. There are 2 lodicules.
The filiform white filament measures 2.5mm to 3.7mm in length while the 3 anthers are deep burgundy and measure 0.5mm to 0.7mm in length. The flowers appear from December to February but can appear sporadically throughout the year under ideal conditions.
The fruits are narrow, compressed dorsiventral grains with a short hilum and long embryo. The green grains turn fawnish-yellow when ripe. The grains measure 1.1mm to 1.4mm in length.
Confusing Species:
Sacciolepis indica’s spiklets measure 3mm to 3.5mm in length. The spikelets are glabrous or sparsely covered in white hirtellous or puberulent hairs. The spikelets are pedicelled. The flowers appear from December to February but can appear sporadically throughout the year under ideal conditions.
Sacciolepis myosuroides’s spiklets measure 1mm to 2mm in length. The spikelets are glabrous. The spikelets are sessile. The flowers appear from April to September.
Wildlife:
Sacciolepis indica wildlife is unknown to the author. The seeds are usually distributed by animals by sticking to their fur.
Cultivation:
Sacciolepis indica is a large, dense, compact, erect, tufted grass for large gardens above the high water mark of dams or above the water lines of slow moving water courses where it can form large colonies. It can be slashed and will recover very quickly but is not suitable for long term heavy grazing.
It is ideally suited for growing in full sun to lightly shaded areas on flats where it is free draining but maintains soil moisture for extended periods following good rain.
It is probably a preferred fodder crop looking at its rich soft growth. Its qualities are not tested or known to the author as a food source of grazing stock but has been observed as a stand by grass for native animals when pressure mounts on surrounding grasses in times of drought. It has a strong dense root system which probably makes it ideal as a soil stabilizer in wet soggy ground though it does pull easy in softer ground.
It is an excellent grass for bank restoration projects adding copious quantities of mulch and ground stabilization.
Propagation:
Seeds: Collect seeds after the grains turn white and begin to fall to the ground.
Sow the seeds directly into a seed raising mix and place the tray beneath 20mm shade cloth. When the seedlings are 25mm to 40mm tall, prick them out and plant them into 50mm native tubes using a seed raising mix.
Once the seedlings reach 100mm to 150mm in height plant them out into their permanent position.
Alternatively the seeds can be sown with a grain planter for larger areas.
Fertilize using seaweed, fish emulsion or organic chicken pellets soaked in water on an alternate basis. Fertilize every two months until the plants are established then annually in early September to October to maintain better colour, health, vitality and flowering.
Further Comments from Readers:
“Hi reader, it seems you use The Bible of Botany a lot. That’s great as we have great pleasure in bringing it to you! It’s a little awkward for us to ask, but our first aim is to purchase land approximately 1,600 hectares to link several parcels of N.P. into one at The Pinnacles NSW Australia, but we need your help. We’re not salespeople. We’re amateur botanists who have dedicated over 30 years to saving the environment in a practical way. We depend on donations to reach our goal. If you donate just $5, the price of your coffee this Sunday, We can help to keep the planet alive in a real way and continue to bring you regular updates and features on Australian plants all in one Botanical Bible. Any support is greatly appreciated. Thank you.”
In the spirit of reconciliation we acknowledge the Bundjalung, Gumbaynggirr and Yaegl and all aboriginal nations throughout Australia and their connections to land, sea and community. We pay our respect to their Elders past, present and future for the pleasures we have gained.
Salacia chinensis
Classification:
Unranked: Eudicots
Unranked: Rosids
Order: Celestales
Family: Celastreceae
Genus: From Salacia, which is Roman for the wife of Neptune the God of the sea. It refers to plants, which have habitats close to the ocean.
Species: From Qing 清 which is Latinized from the Chinese word for the Qing Dynasty 清代 and Anum/Ensis, which is Latin for to originate from. It refers to plants, which were first discovered and named from China or more precisely from within the boundaries of the old Ching Dynasty.
Sub specie:
Common Name: Lolly Berry.
Distribution:
Salacia chinensis is found in 4 disjunct populations in Australia. It is found east along the northern coast line and coastal estuaries of the Northern Territory from Coburg Peninsula in the west including Croker Island to Nhulunbuy.
In the east it is found south from the Torres Strait Islands and the tip of Cape York Peninsula to near Cape Grafton. The southern population is found south from the Daintree National Park to Innisfail.
There is an isolated population on the Kimberley coast of Western Australia.
It is found on the Andaman Islands, Assam, Bangladesh, Bismarck Archipelago, Borneo, Bougainville, Cambodia, Caroline Islands, Southeast China, East Himalaya, India, Jawa, Laos, Lesser Sunda Islands, Malayasia, Maluku, Myanmar, New Guinea, Nicobar Islands, Papua, Philippines, Solomon Islands, Sri Lanka, Sulawesi, Sumatera, Thailand and Vietnam.
https://avh.ala.org.au/occurrences/search?taxa=Salacia+chinensis#tab_mapView
Habitat Aspect Climate:
Salacia chinensis prefers light dappled shade to full sun. It grows on the edges of tropical rainforests, littoral rainforests, monsoonal rainforests or Melaleuca forests behind the mangroves. The altitude ranges from 2 meters ASL to 60 meters ASL.
The temperatures range from 10 degrees in July to 40degrees in January.
The rainfalls range from lows of 1500mm to 3200mm average per annum.
Soil Requirements:
Salacia chinensis prefers sandy loams to medium gritty clays. The soils are usually derived from decomposed sandstones, granites quartzites or well leached podsolics. The soils pH ranges from 5pH to 6.5pH. It does not tolerate waterlogged soils. Non saline soils to very saline soils are tolerated.
Height & Spread:
Wild Plants: 5m to 10m by 5m to 6m
Characteristics:
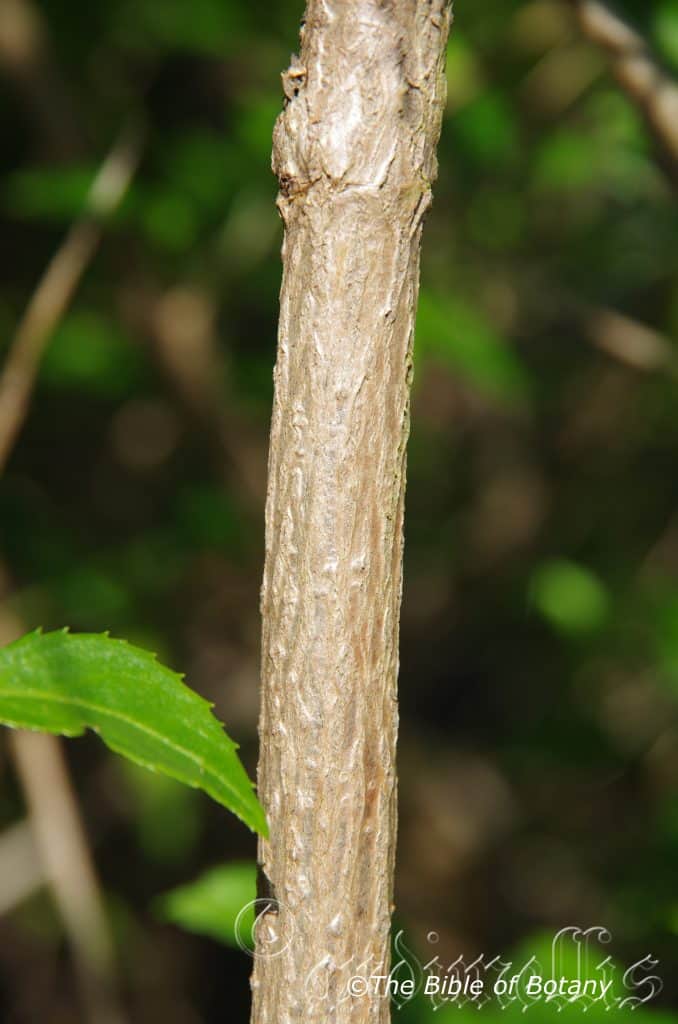
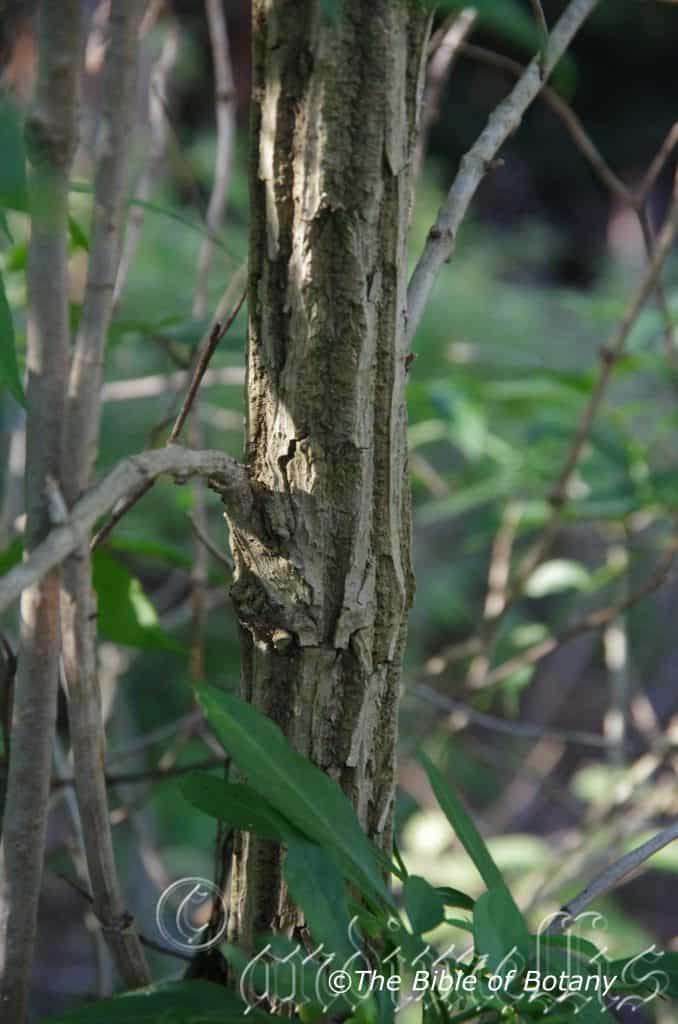
Salacia chinensis grows as a small tree with straight or twisted, deep pinkish-brown, scabrous branches. The branchlets are deep reddish brown to grey and sparsely covered with paler color lenticels. Salacia chinensis usually grows as a climber but can also be a small tree or shrub. Special lateral branchlets will form primitive tendrils on the vine and sub shrub forms.
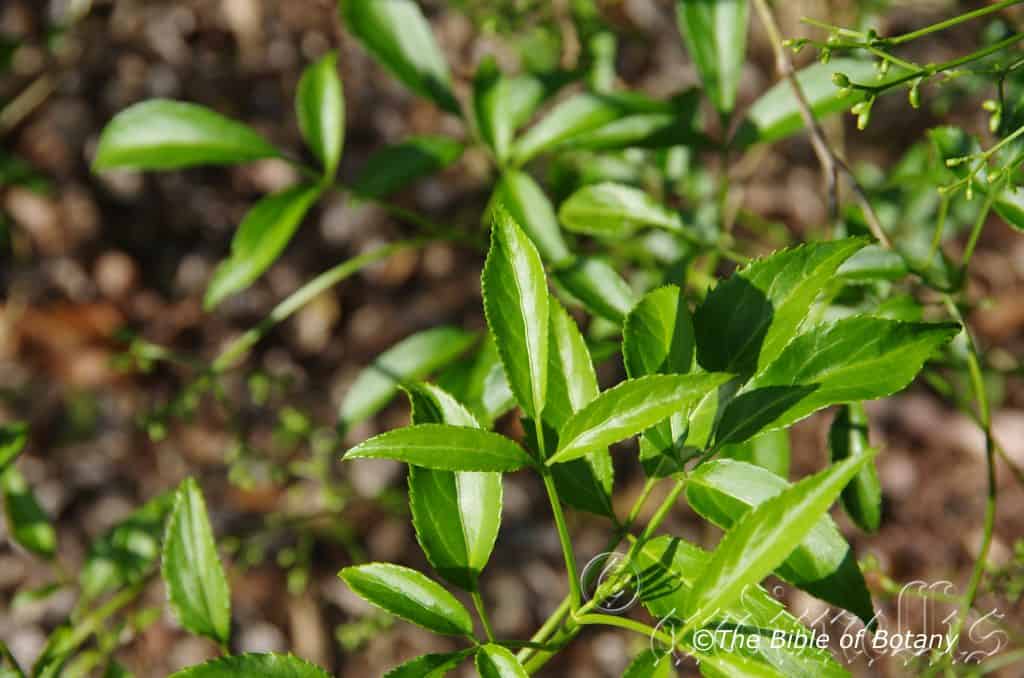
The opposite but sometimes sub opposite ovate to oblong-ovate leaves of Salacia chinensis measure 40mm to 200mm in length by 15mm to 120mm in width. The base is rounded and symmetrical to slightly asymmetrical while the apex is acute. The discolourous laminas are deep sea-green, dull to semi glossy and glabrous on the upper lamina while the lower lamina is slightly paler and dull. The leaf margins are entire, flat and are slightly recurved from the mid vein to the margins and slightly decurved near the apex. The mid vein and main laterals are prominent on the lower lamina and distinctly visible on the upper lamina. The lateral veins form distinct loops well inside the margins while the upper lamina is convex between the lateral veins. The 2 stipules are minute and measure less than 0.6mm in length. The petioles are grooved on the upper surface and measure 5mm to 15mm in length.
The inflorescences of Salacia chinensis are born singularly from the leaf axils. The individual flowers measure 5mm to 7mm in diameter. The green pedicels are glabrous and measure 5mm to 12mm in length. The 5 deep green calyx lobes are divaricate to decurved, glabrous and measure 0.5mm to 0.7mm in length. The 5 yellow or yellow-green petals are strongly imbricate measure 2.5mm to 4.5mm in length while the lobes measure 2.5mm to 4.5mm in width.
The 5 Staminal filaments are strap like, broadest at the base and taper to the apex. The stamens are attached to the inside of the disk.
The yellow green style and stigma are glabrous while the ovary is greenish-brown, immersed in a translucent fleshy disc. The 2 ovule, ovary measures 1.6mm to 3mm in diameter. The conical style measures 0.8mm to 1mm in length. Salacia chinensis’s flowers emit a strong sickly odour and appear from early October through to late December.
The fruits of Salacia chinensis are sub globose to bulb shaped berries. The berries are glabrous and measure 17mm to 28mm in length by 13mm to 23mm in diameter. The green capsules turn pale pinkish-red when ripe. The strongly decurved calyx lobes are persistent on the ripe fruit. The single seed is spherical to slightly globose and measures 10mm to 14mm in diameter.
Wildlife:
Salacia chinensis’s do not appear to have any predators though the ripe fruits are eagerly sought out by fruitigrove birds.
The leaves are eaten by the Australian Plane Butterfly, Phaedyma shepherdi.
Cultivation:
Salacia chinensis is a magnificent small tree, medium shrub or creeper for tropical and sub tropical areas which should be grown in association with other rainforest specie. It is ideal at the edge of a rainforest or deep in the center of the rainforest. It also make great park trees offering quick growth, and good shade. In cultivation it is very variable so stock should be selected for the qualities you require. It will grow from 5 meters by 5 meters as a vine or much taller and narrower if grown closer together as a rainforest liana. As a tree they will grow from 8 meters to 10 meters in height by 5 meters to 6 meters in diameter when grown in the open.
It grows exceptionally well on lighter soils where deep leaf litter keeps the soil cool and moisture at an even level. If these requirements are met it can cope with temperatures as low as minus 5 degrees and up to 36 degrees. It is moderately drought resistant.
Add to the above, if it is given an adequate supply of water and a little native fertilizer on a regular basis the plants should respond with good flowering and fruit over a long period.
It often reach their full potential in just 12 to 15 years and flower from the seventh or eighth year from seed.
I have seen this tree used as bonsai plant in China so the native gene pool would probably be just as good.
Propagation:
Seeds: The seeds of Salacia chinensis can be removed easily from the fruits. Select seeds from plants with the desired characteristics. That is a tree, shrub, vine, fruit size, fruit color or quantity.
Sow fresh seeds directly into a seed raising mix, keeping them moist not wet. Do not over water as the seeds will rot off before germination takes place. Place the trays in a warm shaded area with 50mm shade cloth in the bush house. When the seedlings are 20 to 25 mm tall, prick them out and plant them into 50mm native tubes using a good organic mix.
As the seedlings roots reach the bottom of the tubes plant them out into their permanent position. Do not delay.
Cuttings: The ease of growing from cuttings is not known to the author. Try cuttings form hardwood of good fruit producing trees. Try 100mm to 200mm long from the present season’s growth. Take them in warmer months of the year. Remove half the leaves from the bottom section being careful not to tear the bark.
1 Prepare the cutting mix by adding two thirds sharp clean river sand, one third peat or one third perlite. These ingredients must be sterilized,
2 Select good material from non diseased plants,
3 Select semi green stems for cuttings. Look for a stem with two or three nodes,
4 Place the cutting on a flat, hard surface, and make a clean cut down one side of the cutting at the base for 10mm with a sharp sterile knife or razor blade. – This scarification of the node will increase the chances of roots emerging from this spot. Now remove all but one or two the leaves, leaving the apex leaves in tact. If the leaves are very large in proportion to the stem, cut off the apical halves.
5 Fill a saucer with water, and place a little medium strength rooting hormone into another container like a milk bottle top. Dip the node end of the cutting into the water and then into the rooting hormone. Tap off any excess hormone,
6 Use a small dipple stick or old pencil to poke a hole into the soilless potting mix. Ensure the hole is slightly larger than the stem diameter and be careful not to wipe the rooting hormone off the cuttings base. Place 2 to 4 cuttings in each of the 50mm native tubes,
7 I like to place the tubes in bucket with holes drilled in the bottom to allow excess water to drain out. A plastic bag that fits over the bucket is ideal to help maintain temperature and moisture. Place in a semi shaded, warm position like under 50mm shade cloth.
8 When the cuttings have struck, open the bag to allow air circulation for a few days to a week,
9 Once hardened off remove the cuttings from the bag and allow to further hardening for a few more days to a week,
10 Transplant into a good potting mix to grow on.
Fertilize using seaweed, fish emulsion or organic chicken pellets soaked in water on an alternate basis. Fertilize every two months until the plants are established then annually in early September to October to maintain better colour, health, vitality and flowering.
Further Comments from Readers:
“Hi reader, it seems you use The Bible of Botany a lot. That’s great as we have great pleasure in bringing it to you! It’s a little awkward for us to ask, but our first aim is to purchase land approximately 1,600 hectares to link several parcels of N.P. into one at The Pinnacles NSW Australia, but we need your help. We’re not salespeople. We’re amateur botanists who have dedicated over 30 years to saving the environment in a practical way. We depend on donations to reach our goal. If you donate just $5, the price of your coffee this Sunday, We can help to keep the planet alive in a real way and continue to bring you regular updates and features on Australian plants all in one Botanical Bible. Any support is greatly appreciated. Thank you.”
In the spirit of reconciliation we acknowledge the Bundjalung, Gumbaynggirr and Yaegl and all aboriginal nations throughout Australia and their connections to land, sea and community. We pay our respect to their Elders past, present and future for the pleasures we have gained.
Clearview Beach Qld.
Clearview Beach Qld.
Salsola australis
Classification:
Unranked: Eudicots
Unranked: Rosids
Order: Cearyophyllales
Family: Amaranthaceae
Subfamily: salsoloideae
Tribe: Salsoleae
Genus: From Háls, which is Ancient Greek or much later Sals, which is Late Latin for for salt and Hḗlios, which is Ancient Greek or Sōl, which is Latin for the sun. It refers herbal type plants, which have leaves that exude salt crystals that in return glisten in the sun.
Species: From australis, which is Latin for southern. It refers to plants, which were first discovered or are endemic to Australia.
Common Name: Salt Bush
Distribution:
Salsola australis is found in throughout central Australia and along the coastal sand dunes on the tip of Cape York Peninsula to Winsons Promontory and the Western Bass Strait Islands in the south.
It is also found on New Caladonia and New Zealand.
https://avh.ala.org.au/occurrences/search?taxa=Salsola+australis#tab_mapView
Habitat Aspect Climate:
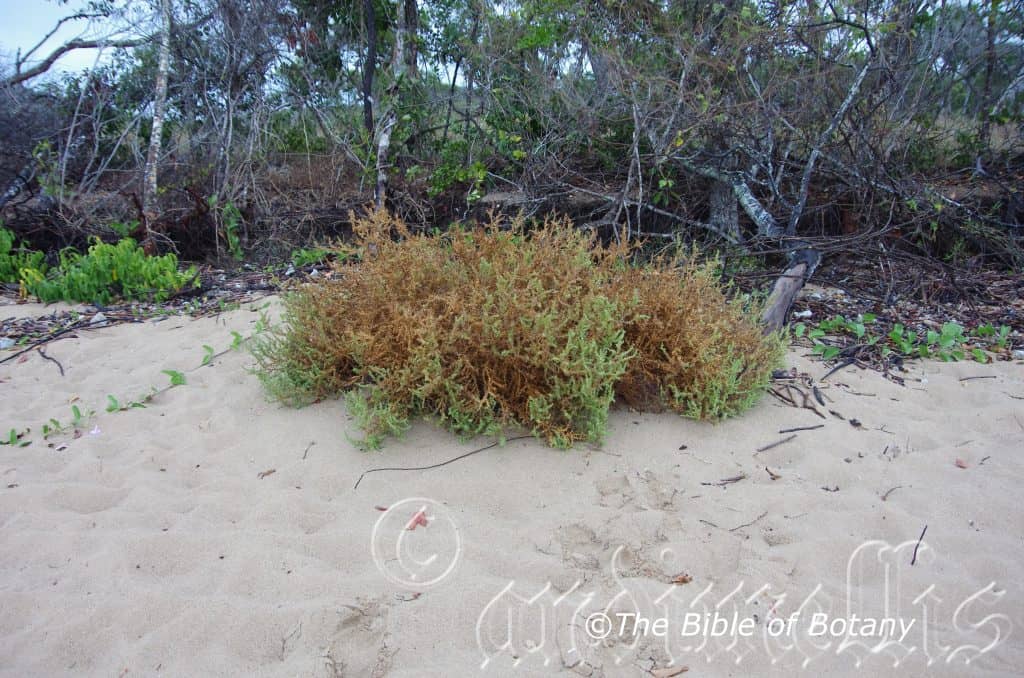
Salsola australis prefers light dappled shade to full sun. It grows on sand dunes, adjacent to littoral rainforests, monsoonal and semi arid and arid dunes in central Australia. The altitude ranges from minus 11 meters ASL to 800 meters ASL.
The temperatures range from 0 degrees in July to 50 degrees in January.
The rainfalls range from lows of 200mm to 2800mm average per annum.
Soil Requirements:
Salsola australis prefers sandy loams to medium gritty clays. The soils are usually derived from decomposed sandstones, granites, quartzites, well leached sandy podzolics, accumulated beach sands, accumulated desert sands, dry alluvial deposits and screes. The soils pH ranges from 4.5pH to 8.5pH. It does not tolerate waterlogged soils. Non saline soils to extremely saline soils are tolerated as are salt laden winds.
Height & Spread:
Wild Plants: 0.5m to 1m by 0.5m to 1.5m
Characteristics:
Salsola australis grows as a short erect or hemispherical herbaceous annual or biennial shrub. The branches and stems are glabrous.
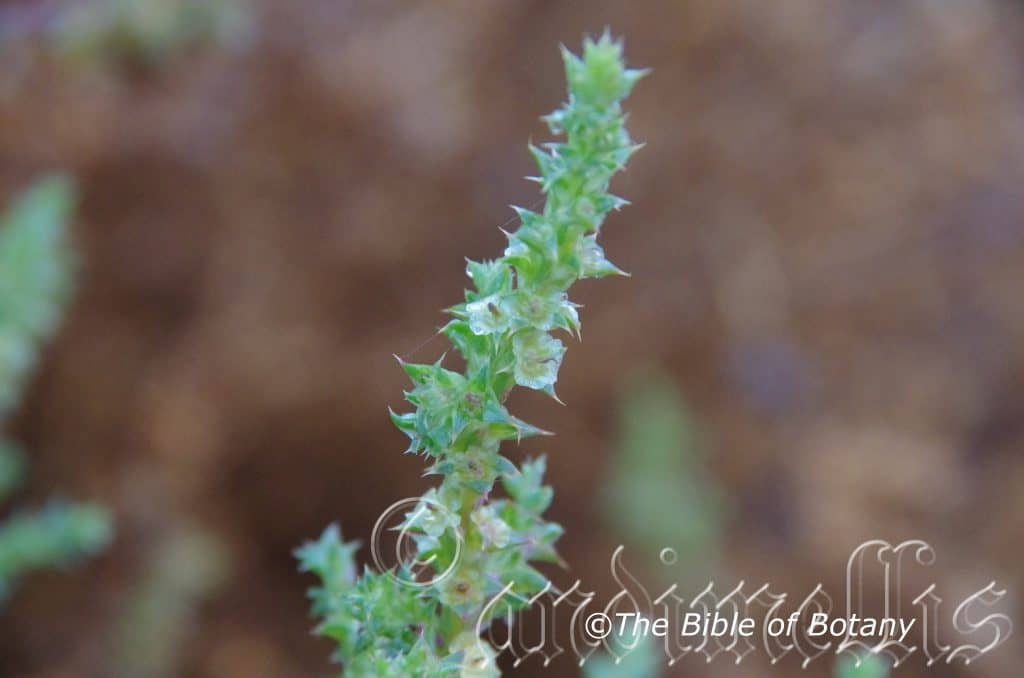
The crowded, narrow deltoid leaves of Salsola australis measure 20mm to 48mm in length by 4mm to 12mm in width. The base is truncate, while the apex has a rigid spine. The concolourous laminas are a soft pale blue-green, dull to semi glossy and glabrous on the upper lamina while the lower lamina is dull. The leaf margins are entire, flattened and recurve upwards from the mid vein to the margins. The mid vein and main laterals are indistinct on both laminas.
The inflorescences of Salsola australis are solitary but sometimes crowded towards the ends of the branches in dense spike-like clusters. The sepals are continuous and surround the perianth and fruit and measure 2.5mm to 3mm in length. The individual perianth segments measure 3mm to 4mm in diameter. The anthers measure 0.5mm to 0.7mm in length.
Salsola australis’s flowers are opertunistic and can appear in all months of the year when conditions are favourable.
The fruits of Salsola australis’s perianth measures 4mm to 7mm in diameter, with fan-like wings that measure 3mm to 4mm in length. 3 are longer than the other 2. The fruit usually remaining attached, breaking off during windy periods.
Wildlife:
Salsola australis is unknown to the author.
Cultivation:
Salsola australis is a magnificent small herb for tropical and semi arid gardens, which should be grown in association with other desert type plants. It is ideal at the edge of a billabong scene and makes a great addition to small and medium size rockeries and sandy banks. It must be grown in the open with full sun for most of the day. Here its pale blue-green foliage will contrast with most other arid plants.
It grows exceptionally well on various sands. It is very drought resistant. Add to the above, if it is given a little additional water and a little native fertilizer on a regular basis the plants should respond with good flowering over a long period.
It often reaches its full potential in just 2 years and flowers from the second year from seed.
Propagation:
Seeds: The seeds of Salsola australis can be removed easily from the fruits. Select seeds from plants with the desired characteristics. That is a tree, shrub, vine, fruit size, fruit color or quantity.
Sow fresh seeds directly into a seed raising mix, keeping them moist not wet. Do not over water as the seeds will rot off before germination takes place. Place the trays in a warm shaded area with 50mm shade cloth in the bush house. When the seedlings are 20 to 25 mm tall, prick them out and plant them into 50mm native tubes using a good organic mix.
As the seedlings roots reach the bottom of the tubes plant them out into their permanent position. Do not delay.
Cuttings: Salsola australis is very easy to strike from cuttings and best replaced every 2 years. Try cuttings form hardwood of good fruit producing trees. Try 80mm to 100mm long from the present season’s growth. Take them in warmer months of the year. Remove half the leaves from the bottom section being careful not to tear the bark.
1 Prepare the cutting mix by adding two thirds sharp clean river sand, one third peat or one third perlite. These ingredients must be sterilized,
2 Select good material from non diseased plants,
3 Select semi green stems for cuttings. Look for a stem with two or three nodes,
4 Place the cutting on a flat, hard surface, and make a clean cut down one side of the cutting at the base for 10mm with a sharp sterile knife or razor blade. – This scarification of the node will increase the chances of roots emerging from this spot. Now remove all but one or two the leaves, leaving the apex leaves in tact. If the leaves are very large in proportion to the stem, cut off the apical halves.
5 Fill a saucer with water, and place a little medium strength rooting hormone into another container like a milk bottle top. Dip the node end of the cutting into the water and then into the rooting hormone. Tap off any excess hormone,
6 Use a small dipple stick or old pencil to poke a hole into the soilless potting mix. Ensure the hole is slightly larger than the stem diameter and be careful not to wipe the rooting hormone off the cuttings base. Place 2 to 4 cuttings in each of the 50mm native tubes,
7 I like to place the tubes in bucket with holes drilled in the bottom to allow excess water to drain out. A plastic bag that fits over the bucket is ideal to help maintain temperature and moisture. Place in a semi shaded, warm position like under 50mm shade cloth.
8 When the cuttings have struck, open the bag to allow air circulation for a few days to a week,
9 Once hardened off remove the cuttings from the bag and allow to further hardening for a few more days to a week,
10 Transplant into a good potting mix to grow on.
Fertilize using seaweed, fish emulsion or organic chicken pellets soaked in water on an alternate basis. Fertilize every two months until the plants are established then annually in early September to October to maintain better colour, health, vitality and flowering.
Further Comments from Readers:
“Hi reader, it seems you use The Bible of Botany a lot. That’s great as we have great pleasure in bringing it to you! It’s a little awkward for us to ask, but our first aim is to purchase land approximately 1,600 hectares to link several parcels of N.P. into one at The Pinnacles NSW Australia, but we need your help. We’re not salespeople. We’re amateur botanists who have dedicated over 30 years to saving the environment in a practical way. We depend on donations to reach our goal. If you donate just $5, the price of your coffee this Sunday, We can help to keep the planet alive in a real way and continue to bring you regular updates and features on Australian plants all in one Botanical Bible. Any support is greatly appreciated. Thank you.”
In the spirit of reconciliation we acknowledge the Bundjalung, Gumbaynggirr and Yaegl and all aboriginal nations throughout Australia and their connections to land, sea and community. We pay our respect to their Elders past, present and future for the pleasures we have gained.
Salvia plebeia
Classification:
Unranked: Eudicots
Unranked: Asterids
Order: Lamiales
Family: Lamiaceae
Genus: From Salvius, which is Latin for the sage plants. It refers to old world sage plants known as Salvia.
Species: From Plebei, which is Latin for belong to the common people. It probably refers to the fact that plants in the genus were eaten as part of a staple diet by the poor or common people in arid locations.
Common Name: Australian Sage or Native Sage.
Distribution:
Salvia plebeia is found in several disjunct populations from west of Cardwell in north Queensland and south from the Fitzroy River in central Queensland to near Orbost in north eastern Victoria. It looks similar to the exotic Sages thus it is often treated as a weed.
https://avh.ala.org.au/occurrences/search?taxa=Salvia+plebeia#tab_mapView
Habitat Aspect Climate:
Salvia plebeia prefers medium shade to full sun. It grows adjacent to all types of rainforests, gallery forests and moist Eucalyptus forests. It often grows as a lithophyte or at times as an epiphyte near waterfalls wet rainforests or on mature Platycerium and Davallia solida. The altitude ranges from 5 meters ASL to 240 meters ASL.
The temperatures range from 2 degrees in July to 36 degrees in January.
The rainfalls range from lows of 500mm to 2600mm average per annum.
Soil Requirements:
Salvia plebeia prefers sandy loams to gravelly or gritty medium clays. The soils are usually derived from decomposed sandstones, granites brown basalts, black basalts or metamorphic rocks. The soils ph ranges from 5pH to 7pH. It is not tolerant of waterlogged soils however continuous moisture is often available. Non saline soils to moderately saline soils are tolerated.
Height & Spread:
Wild Plants: 0.2m to 1m by 0.5m to 0.8m.
Characteristics:
The 4 angled stems of Salvia plebeia are erect, pinkish-green and scabrous. The branchlets are pale grey green and covered in pale grey, retorse hirsute hairs.
The opposite, narrow-ovate to narrow-elliptical leaves of Salvia plebeia measure 20mm to 70mm in length by 0.8mm to 20mm in width. The base is cuneate to asymmetrical while the apex is sub acute to obtuse. The concolourous laminas are blue green, dull and glabrous to densely covered in pale grey antrorse hirsute hairs and sessile glands. The leaf margins are crenate. The mid vein and main laterals are slightly prominent on the lower lamina while the upper lamina is flat and is slightly convex between the lateral veins. The petioles are densely covered in pale grey retorse hirsute hairs and measure 10mm to 40mm in length.
Inflorescences of Salvia plebeia are thryses born from the terminals. There are 2 to 10 flowers in each flower bract. The elliptical, horizontal bracts have an abrupt acute apex and are persistent. The grey green rachis pedicels and calyx are densely covered in pale grey antrorse hirsute hairs. The rachise measures 80mm to 150mm in length while the pedicels measure 3mm to 4.5mm in length. The pale green to pale grey green, calyx measure 2mm to 3.5mm in length including the 5 minute lobes. The corollas are lavender, deep purple-blue or violet externally and near the apex becoming white with yellow markings internally. The corollas measure 3mm to 5.5mm in length including the 1mm to 2mm lower lobes and 0.6mm to 1.2mm upper lobes.
The staminal filaments are united near the base to form a saddle on the disc. The stamens are white.
The white style and stigma are glabrous while the ovary is green. The central disc has 4 small lobes with the pistil emerging from the depression in the middle. Salvia plebeia’s flowers appear throughout the year.
The fruits of Salvia plebeia are globose to obovoidal nutlets. The nutlets are longitudinally ribbed and covered in pale grey glandular and non glandular hairs. They measure 2mm to 2.5mm in length by 1.5mm to 2mm in diameter. The green capsules turn deep grey to black when ripe. The calyx lobes are persistent on the ripe fruit and expand to 6.5mm to 7.5mm in length. The 3 to 5 glossy black seeds are flattened ellipsoidal in shape.
Wildlife:
Salvia plebeia’s flowers are very attractive to many butterflies as a food source and native bees like Tetragonula carbonaria and the Blue banded bee Amegilla cingulata.
Cultivation:
Salvia plebeia is a beautiful medium perennial that should be grown in association with other rainforest and wet Eucalyptus specie. It is ideal at the edge of a rainforest or deep in the center of the rainforest where there is a small opening. In cultivation it will grow from 0.6 meters to 1 meter in height by 0.5 meters to 0.8 meters in diameter when grown in the open.
It grows exceptionally well on all soils where deep leaf litter keeps the soil cool, the moisture at an even level and free from weed competition. If these requirements are met they can cope with temperatures as low as minus 3 degrees and up to 36 degrees. It is moderately drought resistant once established.
Add to the above, if it is given an adequate supply of water and a little native fertilizer on a regular basis the plants will respond with good flowering over a long period.
It is best suited to areas that are waterlogged or have poor drainage like in depressions and around sullage trenches. Place it at the bottom of slopes or retaining walls where moisture lies or seeps out. It must be pruned to maintain a bushy appearance and for the plants to send up more flowering stems. I have found by pruning the flowering stems back just prior to the last few flowers buds opening the plants will send up new flowering stems immediately. Spent flowers should be removed immediately they end their flowering to promote more blooms unless seed collecting is required.
It is great in small rockeries as a fill in plant. Here it can be planted in small groups of 2 or 3 or as a stand alone plant to create a harsh barren look with other arid plants. If it is surrounded by shorter plants with fine or large foliages that are deep green or pale green then year round contrast can be created with a strong accent in the center of the bed. Deep red or orange flowers will also create that dominate affect at the center giving height and strength to the bed whether it is in flower or not in flower the dominance in foliage will stand unchallenged. Use plants with paler green leaves and white flowers to make this plant your main feature in the bed.
Propagation:
Seeds: The seeds of Salvia plebeia can be removed easily from the fruits.
Sow freshly treated seeds directly into a seed raising mix, keeping them moist not wet. Do not over water as the seeds will rot off before germination takes place. Place the trays in a cool shaded area with 50mm shade cloth in the bush house. When the seedlings are 20 to 25 mm tall, prick them out and plant them into 50mm native tubes using a good organic mix.
As the seedlings roots reach the bottom of the tubes plant them out into their permanent position. Do not delay.
Cuttings: Fortunately Salvia plebeia cuttings strike easy. Use 80mm to 120mm or longer tip cuttings or lateral shoots from the present season’s growth. Take them in warmer months of the year. Remove half the leaves from the bottom section being careful not to tear the bark.
1 Prepare the cutting mix by adding two thirds sharp clean river sand, one third peat or one third perlite. These ingredients must be sterilized,
2 Select good material from non diseased plants,
3 Select semi green stems for cuttings. Look for a stem with two or three nodes,
4 Place the cutting on a flat, hard surface, and make a clean cut down one side of the cutting at the base for 10mm with a sharp sterile knife or razor blade. – This scarification of the node will increase the chances of roots emerging from this spot. Now remove all but one or two the leaves, leaving the apex leaves in tact. If the leaves are very large in proportion to the stem, cut off the apical halves.
5 Fill a saucer with water, and place a little medium strength rooting hormone into another container like a milk bottle top. Dip the node end of the cutting into the water and then into the rooting hormone. Tap off any excess hormone,
6 Use a small dipple stick or old pencil to poke a hole into the soilless potting mix. Ensure the hole is slightly larger than the stem diameter and be careful not to wipe the rooting hormone off the cuttings base. Place 2 to 4 cuttings in each of the 50mm native tubes,
7 I like to place the tubes in bucket with holes drilled in the bottom to allow excess water to drain out. A plastic bag that fits over the bucket is ideal to help maintain temperature and moisture. Place in a semi shaded, warm position like under 50mm shade cloth.
8 When the cuttings have struck, open the bag to allow air circulation for a few days to a week,
9 Once hardened off remove the cuttings from the bag and allow to further hardening for a few more days to a week,
10 Transplant into a good potting mix to grow on.
Fertilize using seaweed, fish emulsion or organic chicken pellets soaked in water on an alternate basis. Fertilize every two months until the plants are established then annually in early September to October to maintain better colour, health, vitality and flowering.
Further Comments from Readers:
“Hi reader, it seems you use The Bible of Botany a lot. That’s great as we have great pleasure in bringing it to you! It’s a little awkward for us to ask, but our first aim is to purchase land approximately 1,600 hectares to link several parcels of N.P. into one at The Pinnacles NSW Australia, but we need your help. We’re not salespeople. We’re amateur botanists who have dedicated over 30 years to saving the environment in a practical way. We depend on donations to reach our goal. If you donate just $5, the price of your coffee this Sunday, We can help to keep the planet alive in a real way and continue to bring you regular updates and features on Australian plants all in one Botanical Bible. Any support is greatly appreciated. Thank you.”
In the spirit of reconciliation we acknowledge the Bundjalung, Gumbaynggirr and Yaegl and all aboriginal nations throughout Australia and their connections to land, sea and community. We pay our respect to their Elders past, present and future for the pleasures we have gained.
Rosser Gardens Benowa Qld.
Rosser Gardens Benowa Qld.
Mount Cootha Botanic Gardens Qld.
Rosser Gardens Benowa Qld.
Mount Cootha Botanic Gardens Qld.
MCBG Brisbane Qld.
RBG Gold Coast Qld.
RBG Gold Coast Qld.
Mount Cootha Botanic Gardens Qld.
Mount Cootha Botanic Gardens Qld.
Mount Cootha Botanic Gardens Qld.
Rosser Gardens Benowa Qld.
Sambucus australasica
Classification:
Unranked: Eudicots
Unranked: Asterids
Order: Dipsacales
Family: Adoxaceae
Genus: From Sambyke, which is Ancient Greek or Sambuca, which is Latin for elderberry. It refers to the plants, which have a close relationship to the European elderberry.
Species: From Terra Australis, which is Latin for land of the south. It refers to plants, which were first discovered from the land down under.
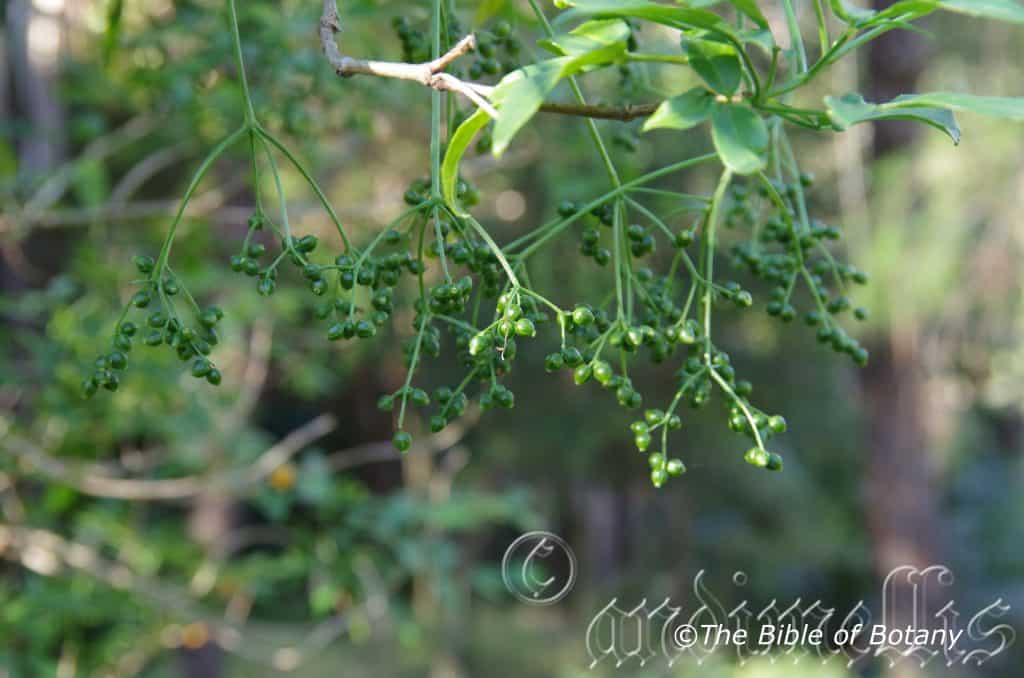
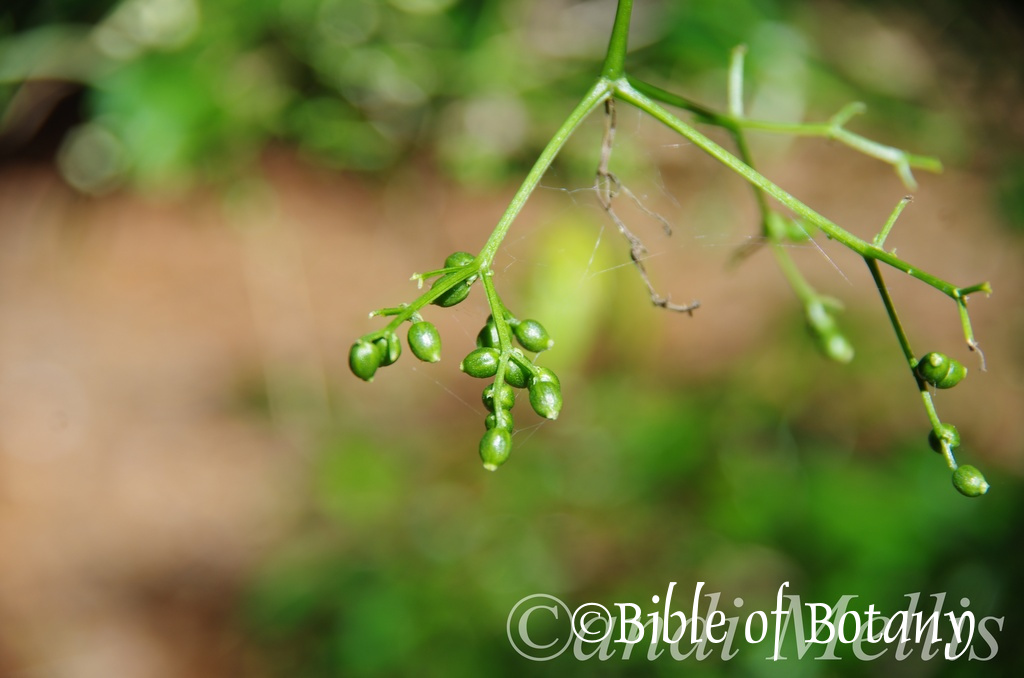
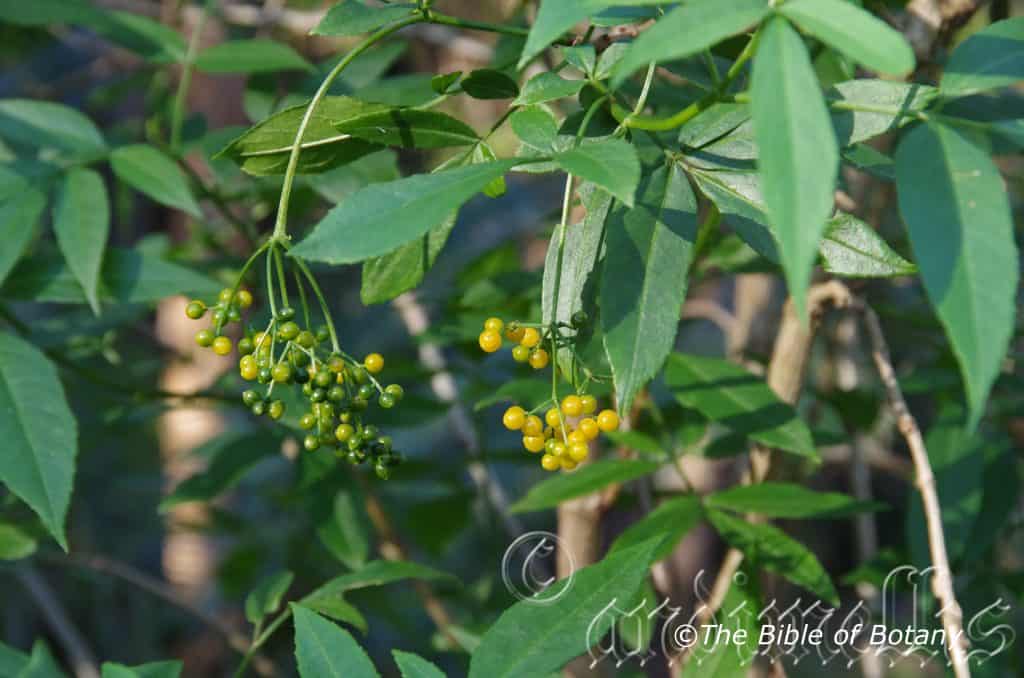
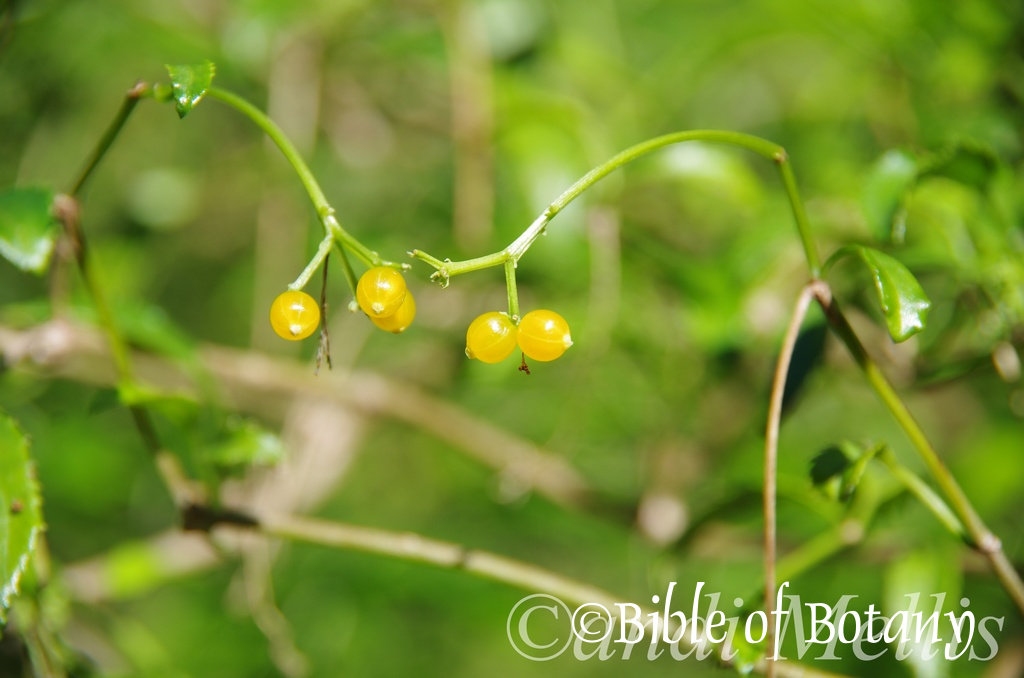
Common Name: Native Elderberry or Yellow Elderberry.
Distribution:
Sambucus australasica is found in several disjunct populations south from the Atherton Tablelands in north Queensland to near Orbost in north eastern Victoria. It is found on and east of the Great Dividing Range.
https://avh.ala.org.au/occurrences/search?taxa=Sambucus+australasica#tab_mapView
Habitat Aspect Climate:
Sambucus australasica prefers dappled shade to full sun. It grows adjacent to warm moist tropical rainforests, littoral rainforests, warm sub tropical rainforests or warm temperate rainforests. The altitude ranges from 800 meters ASL to 1000 meters ASL in far north Queensland and down to 10 meters ASL in the southern parts of its range.
The temperatures range from 2 degrees in July to 36 degrees in January.
The rainfalls range from lows of 500mm to 2600mm average per annum.
Soil Requirements:
Sambucus australisica prefers light gritty clays to medium clays. The soils are usually derived from decomposed sandstones, brown basalts, black basalts, metamorphic rocks or at times granites. The soils pH ranges from 4.5pH to 6pH. It does not tolerate of waterlogged soils however continuous moisture is always available. Non saline soils to moderately saline soils are tolerated.
Height & Spread:
Wild Plants: 2.5m to 4m by 2m to 3.5m.
Characteristics:
Sambucus australisica grows as a medium open to bushy shrub with pinkish-brown, scabrous, scaly stems that are sparsely covered in paler colored lenticels. The branchlets are pale creamy pinkish-brown and only becoming green near the apex where the newer leaf growth occurs. The stems are hollow and pithy.
The opposite pinnate leaves of Sambucus australisica have 3 or 5 leaflets and measure 60mm to 250mm in length by 50mm to 210mm in width. The lateral, narrow-elliptical leaflets measure 20mm to 80mm in length by 5mm to 25mm in width while the terminal leaflets tend to be more oblanceolate and measure 25mm to 100mm in length by 10mm to 30mm in width. The caduceus stipules measure 1.5mm to 2.5mm in length. The petioles and rachises are grooved on the upper surface and measure 20mm to 100mm in length. The lateral petiolules measure 2mm to 5mm in length while the terminal petiolule measures 6mm to 12mm in length. The bases are cuneate to broad cuneate on the lateral leaflets while the terminal leaflet is narrowly cuneate to attenuate. The apexes are acuminate on the lateral leaflets and broadly acuminate on the terminal leaflet. The concolourous laminas are deep green, semi glossy and glabrous. The flat leaflet’s margins are coarsely toothed with 14 to 24 teeth. The mid vein and main laterals are slightly prominent on the lower laminas.
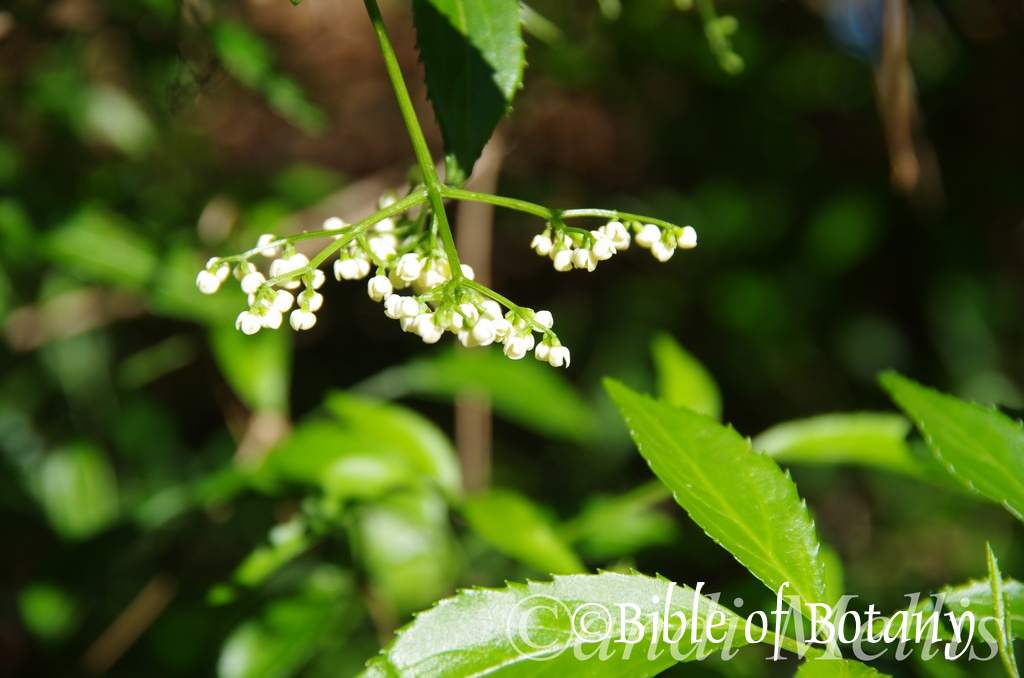
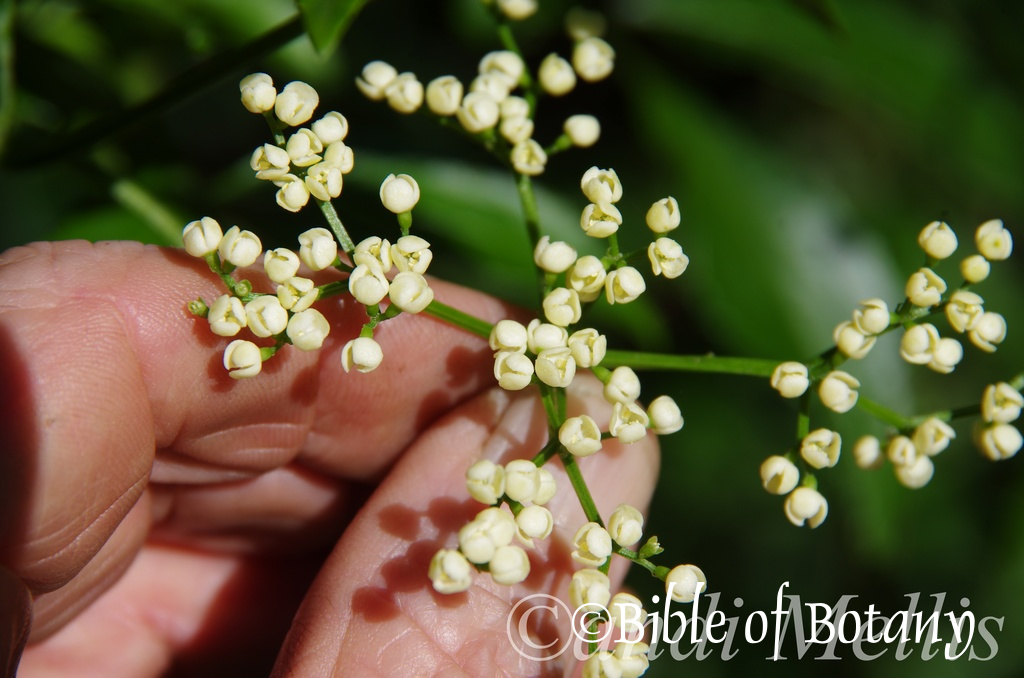
Inflorescences of Sambucus australisica are born as compound corymbs of 5 branches from the terminals. The flowers measure 100mm to 200mm in diameter. The green rachises are glabrous. The pale green calyxes are glabrous and measure 2.5mm to 3mm in length including the 5 minute lobes. The pure white corollas measure 2mm to 3mm in length while the pure white orbicular lobes measure 2.5mm to 3mm in length and diameter.
The 5 pure white divaricate filaments are free for their entire length and measure 3.5mm to 4mm in length. The oblong anthers are adnately fixed with each half measuring 1mm to 1.2mm in length by 0.1mm in diameter.
The white style and stigma are glabrous while the ovary is pale yellow green. The pistil measures 0.2mm to 0.2mm in length. Sambucus australisica’s almost carrion scented flowers appear from early October through to late March.
The fruits of Sambucus australisica are globose to obovoidal berries. The berries are glabrous and measure 5mm to 6mm in length by 5mm to 6mm in diameter. The green berries turn yellow externally and pale creamy yellow to creamy yellow internally when ripe. The calyx lobes are not persistent on the ripe fruit. The 3 to 5 glossy brown seeds are flattened and ellipsoidal.
Wildlife:
Sambucus australisica’s do not appear to have any predators though the flowers are a constant stream of insects including native bees like the little colony bee, Tetragonula carbonaria and the Blue banded bee Amegilla cingulata, butterflies, native flies, including the hover flies.
The ripe fruits are very attractive to small, medium and large honey eaters.
Cultivation:
Sambucus australisica is a magnificent large shrub that should be grown in association with other rainforest specie or moist Eucalyptus forests. It is ideal at the edge of a rain forest where they will develop into a bushy shrub in full sun. In cultivation it will grow from 2.5 meters to 3 meters in height by 2.5 meters to 3 meters in diameter when grown in the open or taller, narrower and less bushy if grown closer together as a rainforest understory plant.
It is not particular when it comes to soil types, however deeper soils with deep leaf litter is where it does best. If these requirements are met it can cope with temperatures as low as minus 5 degrees and up to 36 degrees. It is moderately drought resistant but will drop leaf. A light pruning with a boost in soil moisture will see the plants recover quickly.
Add to the above, if it is given an adequate supply of water and a little native fertilizer on a regular basis the plants should respond with good flowering and fruit over a long period.
It often reaches its full potential in just 2 to 3 years and flower from the third or fourth year from seed.
It is best suited to areas that are waterlogged or have poor drainage like in depressions and around sullage trenches. Place them at the bottom of slopes or retaining walls where moisture lies or seeps out. It must be pruned to maintain a bushy appearance and for the plants to send up more flowering stems. I have found by pruning the flowering stems back just prior to the last few flowers buds opening the plants will send up new flowering stems very quickly. I also pruned it during the coldest month of the year to help stimulate more growth and flowering.
It can be trimmed and make ideal hedges and native corridor subjects. Plants should be planted using 2 meter centers when using them as hedges or 1 meter centers if a quick hedge is required.
It is a fantastic addition to the garden for attracting beneficial insects particularly lady beetles, hover flies and lace wings.
Propagation:
Seeds: The seeds of Sambucus australisica can be removed easily from the fruits.
Sow freshly treated seeds directly into a seed raising mix, keeping them moist not wet. Do not over water as the seeds will rot off before germination takes place. Place the trays in a cool shaded area with 50mm shade cloth in the bush house. When the seedlings are 20mm to 25mm tall, prick them out and plant them into 50mm native tubes using a good organic mix.
As the seedlings roots reach the bottom of the tubes plant them out into their permanent position. Do not delay.
Cuttings:
At times seed production is erratic but fortunately Sambucus australisica cuttings strike easy. Use 100mm to 200mm long tip cuttings or lateral shoots from the present season’s growth. Take them in warmer months of the year. Remove half the leaves from the bottom section being careful not to tear the bark.
1 Prepare the cutting mix by adding two thirds sharp clean river sand, one third peat or one third perlite. These ingredients must be sterilized,
2 Select good material from non diseased plants,
3 Select semi green stems for cuttings. Look for a stem with two or three nodes,
4 Place the cutting on a flat, hard surface, and make a clean cut down one side of the cutting at the base for 10mm with a sharp sterile knife or razor blade. – This scarification of the node will increase the chances of roots emerging from this spot. Now remove all but one or two the leaves, leaving the apex leaves in tact. If the leaves are very large in proportion to the stem, cut off the apical halves.
5 Fill a saucer with water, and place a little medium strength rooting hormone into another container like a milk bottle top. Dip the node end of the cutting into the water and then into the rooting hormone. Tap off any excess hormone,
6 Use a small dipple stick or old pencil to poke a hole into the soilless potting mix. Ensure the hole is slightly larger than the stem diameter and be careful not to wipe the rooting hormone off the cuttings base. Place 2 to 4 cuttings in each of the 50mm native tubes,
7 I like to place the tubes in bucket with holes drilled in the bottom to allow excess water to drain out. A plastic bag that fits over the bucket is ideal to help maintain temperature and moisture. Place in a semi shaded, warm position like under 50mm shade cloth.
8 When the cuttings have struck, open the bag to allow air circulation for a few days to a week,
9 Once hardened off remove the cuttings from the bag and allow to further hardening for a few more days to a week,
10 Transplant into a good potting mix to grow on.
Fertilize using seaweed, fish emulsion or organic chicken pellets soaked in water on an alternate basis. Fertilize every two months until the plants are established then annually in early September to October to maintain better colour, health, vitality and flowering.
Further Comments from Readers:
“Hi reader, it seems you use The Bible of Botany a lot. That’s great as we have great pleasure in bringing it to you! It’s a little awkward for us to ask, but our first aim is to purchase land approximately 1,600 hectares to link several parcels of N.P. into one at The Pinnacles NSW Australia, but we need your help. We’re not salespeople. We’re amateur botanists who have dedicated over 30 years to saving the environment in a practical way. We depend on donations to reach our goal. If you donate just $5, the price of your coffee this Sunday, We can help to keep the planet alive in a real way and continue to bring you regular updates and features on Australian plants all in one Botanical Bible. Any support is greatly appreciated. Thank you.”
In the spirit of reconciliation we acknowledge the Bundjalung, Gumbaynggirr and Yaegl and all aboriginal nations throughout Australia and their connections to land, sea and community. We pay our respect to their Elders past, present and future for the pleasures we have gained.
Samolus repens
Classification:
Unranked: Equisetopsida
Unranked: Magnoliidae
Superorder: Asteranae
Order: Ericales
Family: Somalaceae
Genus: From Samolus, which is Latinized probably from the vernacular Celtic name of the plants.
Species: From Repens, which is Latin for creeping. It refers to plants, which have a habit of creeping along the ground’s surface.
Common Name: Creeping Brookweed.
Distribution:
Samolus repens is found south and west of a line from north of the De Grey River in coastal Western Australia to the Oakover River, Sullivans Creek, the delta of the Greenup River then around the coast to Poverty Point at Tin Can Outlet in southern coastal Queensland including all the off shore Islands.
In South Australia it is found from Port Augusta to around Lake Eyre, bounded by Freeling Springs to Lake Cadlbarrawirracanna and the Old Finniss Springs and Dalhousie Springs area in Witjira National Park in the central north.
It is found on the Bass Strait Islands and circumnavigates the Tasmanian coastline.
https://avh.ala.org.au/occurrences/search?taxa=Samolus+repens#tab_mapView
Habitat Aspect Climate:
Samolus repens prefers full sun. It grows along the coast and along estuaries, saline creeks, seasonal springs or salt lakes. The altitude ranges from 12 meters BSL to 503 meters ASL.
The temperatures range from minus 3 degrees in July to 38 degrees in January.
The rainfalls range from lows of 150mm to 2000mm average per annum.
Soil Requirements:
Samolus repens prefers coarse sands, light gritty clays or vertosol soils. The soils are usually derived from decomposed sandstones, accumulated beach sands or alluvial deposits. The soils pH ranges from 4.5pH to 6pH. It tolerates waterlogged soils. Non saline soils to extremely saline soils are tolerated.
Height & Spread:
Wild Plants: 0.02m to 0.06m by 0.2m to 0.7m
Characteristics:
Samolus repens grows as an erect or creeping herb with 50mm to 600mm stems. The fleshy, glabrous stems are dull grass-green often with a reddish or purplish tinge to reddish-brown and are usually wrinkled or warty.
The alternate, elliptical, broad elliptical, narrow ovate or narrow spathulate leaves measure 6mm to 12mm in length by 2mm to 8mm in width. The glabrous petioles measure 0.5mm to 1mm in length. The symmetrical or asymmetrical bases taper to the petiole or are cuneate while the apexes are obtuse to broad acute-obtuse. The fleshy discolourous laminas are mid grass-green, semi glossy and glabrous on the upper laminas while the lower laminas are slightly paler to much paler. The laminas are flat and are flat and retrorse or antrorse at the margins and decurve downwards at the petiole and base. The margins are entire. The mid vein is not prominent on either lamina.
The inflorescences are born on leafy racemes from the terminals or sub terminal. The white, white tinged pastel blue or white tinged pastel pink flowers measure 11mm to 15mm in diameter. The floral bract is elliptical, measures 4.5mm to 8mm in length and is situated at the base of the pedicel. The 5 elliptical to narrow lanceolate sepals are green to greenish-red and measure 2mm to 3mm in length. The 5 petals are weakly united at the base for 1mm to 3.5mm in length while the spreading sections measure 5mm to 7mm in length.
There are 5 white, alternate staminodes that taper from the base to the apexes and measure 3mm to 4mm in length. The 5 opposite, white filaments of the stamens measure 2.5mm to 3mm in length. The oblong purple adnately fixed anthers measure 0.6mm to 0.7mm in length by 0.5 to 0.7mm in width in width at the time of dehiscing.
The white style and stigma are glabrous while the semi inferior ovary is pale yellow-green to pale olive-green. The style measures 0.8mm to 1.2mm in length. The flowers appear from early September to late April.
The fruits are globose to obovoidal capsules. The capsules are glabrous and measure 2mm to 3mm in length by 2mm to 3mm in diameter. The green capsules turn grey-brown to grey when ripe. The sepals are persistent on the ripe fruit. The capsules split apically into 5 valves to release the minute brown seeds.
Wildlife:
Samolus repens’s wildlife is unknown to the author.
Cultivation:
Samolus repens is a magnificent small ground cover that should be grown in association with other rockery plants. It is ideal at the edge of salt pans near the coast where salt laden winds are a problem in full sun. In cultivation it will grow from 0.5 meters to 0.6 meters in height by 0.8 meters to 1.2 meters in diameter when grown in the open.
It grows exceptionally well on most soil types which are hot and exposed. If these requirements are met with a little native fertilizer it can cope with temperatures as low as minus 3 degrees and up to 44 degrees. It is moderately drought resistant once established.
It is best suited to areas that are saline or have poor drainage but not waterlogged. Place them at the top of retaining walls where moisture seeps out quickly. It must be pruned in the early stages to maintain a bushy appearance and for the plants to send up more flowering stems. Remove spent flowers to increase the number of flowers produced and the period in which the flowers will bloom.
Propagation:
Seeds: The seeds can be removed easily from the mature capsules. Collect the capsules and place them into a brown paper bag so that the remaining seeds are collected as it is dehisced inside.
Sow freshly collected seeds directly into a seed raising mix, keeping them moist not wet. Do not over water as the seeds may rot off before germination takes place. Place the trays in a warm sunny area beneath 20mm shade cloth in the bush house. When the seedlings are 20mm to 25mm tall, prick them out, nip the growing tips and plant them into 50mm native tubes using a good organic mix.
As the seedlings roots reach the bottom of the tubes plant them out into their permanent position. Again nip the tips out to induce more lateral shoots.
Cuttings: Fortunately the cuttings strike easily and can be treated as runners for small numbers. Use 100mm to 200mm long shoots from the present season’s growth. Take them in warmer months of the year. Remove half the leaves from the bottom section being careful not to tear the bark.
1 Prepare the cutting mix by adding two thirds sharp clean river sand, one third peat or one third perlite. These ingredients must be sterilized,
2 Select good material from non diseased plants,
3 Select semi green stems for cuttings. Look for a stem with two or three nodes,
4 Place the cutting on a flat, hard surface, and make a clean cut down one side of the cutting at the base for 10mm with a sharp sterile knife or razor blade. – This scarification of the node will increase the chances of roots emerging from this spot. Now remove all but one or two the leaves, leaving the apex leaves in tact. If the leaves are very large in proportion to the stem, cut off the apical halves.
5 Fill a saucer with water, and place a little medium strength rooting hormone into another container like a milk bottle top. Dip the node end of the cutting into the water and then into the rooting hormone. Tap off any excess hormone,
6 Use a small dipple stick or old pencil to poke a hole into the soilless potting mix. Ensure the hole is slightly larger than the stem diameter and be careful not to wipe the rooting hormone off the cuttings base. Place 2 to 4 cuttings in each of the 50mm native tubes,
7 I like to place the tubes in bucket with holes drilled in the bottom to allow excess water to drain out. A plastic bag that fits over the bucket is ideal to help maintain temperature and moisture. Place in a semi shaded, warm position like under 50mm shade cloth.
8 When the cuttings have struck, open the bag to allow air circulation for a few days to a week,
9 Once hardened off remove the cuttings from the bag and allow to further hardening for a few more days to a week,
10 Transplant into a good potting mix to grow on.
Fertilize using seaweed, fish emulsion or organic chicken pellets soaked in water on an alternate basis. Fertilize every two months until the plants are established then annually in early September to October to maintain better colour, health, vitality and flowering.
Further Comments from Readers:
“Hi reader, it seems you use The Bible of Botany a lot. That’s great as we have great pleasure in bringing it to you! It’s a little awkward for us to ask, but our first aim is to purchase land approximately 1,600 hectares to link several parcels of N.P. into one at The Pinnacles NSW Australia, but we need your help. We’re not salespeople. We’re amateur botanists who have dedicated over 30 years to saving the environment in a practical way. We depend on donations to reach our goal. If you donate just $5, the price of your coffee this Sunday, We can help to keep the planet alive in a real way and continue to bring you regular updates and features on Australian plants all in one Botanical Bible. Any support is greatly appreciated. Thank you.”
In the spirit of reconciliation we acknowledge the Bundjalung, Gumbaynggirr and Yaegl and all aboriginal nations throughout Australia and their connections to land, sea and community. We pay our respect to their Elders past, present and future for the pleasures we have gained.
Samolus valerandii
Classification:
Unranked: Equisetopsida
Unranked: Magnoliidae
Superorder: Asteranae
Order: Ericales
Family: Somalaceae
Genus: From Samolus, which is Latinized probably from the vernacular Celtic name of the plants.
Species: Is named in honour of 16th century botanist Valerand Dourez of Lyon, who was a botanical pharmacist.
Common Name: Common Creeping Brookweed or Water Pimpernel.
Distribution:
Samolus valerandii is found in 3 isolated populations. In Western Australia it is found along the coast south from Gingin to Scott National Park.
In the east it is found south from Wards Canyon in Carnarvon National Park to and Koolkoorum Creek in southern coastal Queensland to the Hume River and Clifton Morass in central and south eastern Victoria.
In South Australia it is found in the central north at Dalhousie Springs in Witjira National Park.
It is a widespread species of water pimpernel native to a very wide area across Europe, Africa, Asia Minor, Asia, north America and south America.
https://avh.ala.org.au/occurrences/search?taxa=Samolus+valerandii#tab_mapView
Habitat Aspect Climate:
Samolus valerandii prefers full sun to light dappled shade. It grows in moist situations in open woodlands, open forests or exposed situations near waterways. The altitude ranges from 12 meters BSL to 503 meters ASL.
The temperatures range from minus 3 degrees in July to 40 degrees in January.
The rainfalls range from lows of 150mm to 2000mm average per annum.
Soil Requirements:
Samolus valerandii prefers coarse sands, light gritty clays. The soils are usually derived from decomposed sandstones, granites, accumulated beach sands or alluvial deposits. The soils pH ranges from 4.5pH to 6pH. It tolerates waterlogged soils. Non saline soils to very saline soils are tolerated.
Height & Spread:
Wild Plants: 0.2m to 0.3m by 0.2m to 0.3m
Characteristics:
Samolus valerandii grows as a small tussock herb with smooth, glabrous stems. The pale green to pale grass-green stems measure 100mm to 250mm in length
The basal and cauline, oblanceolate leaves measure 20mm to 100mm in length by 8mm to 20mm in width. The cauline leaves are smaller than the basal leaves. The bases taper to the petiole or are cuneate while the apexes are obtuse to broad acuminate. The pale green, glabrous basal petioles measure 30mm to 70mm in length while the cauline leaf petioles measure 2mm to 10mm in length. The concolourous laminas are pale green to pale grass-green dull to semi glossy and glabrous. The laminas are flat and decurve downwards near the apexes while the margins are entire. The mid vein is prominent on the lower laminas and is clearly visible from the upper lamina.
The inflorescences are born on terminal leafless racemes or with leaves subtending the lower most flowers only. The flowers measure 3mm to 5mm in diameter. The floral bract measures 0.8mm to 1.2mm in length and situated midway along the pedicel. The pale green sepals measure 0.3mm to 0.5mm in length. The white petals measure 1.5mm to 2mm in length.
The 5 pure white filaments measure 0.3mm to 0.5mm in length. The bright yellow, sagittate anthers are opposite the petals.
The white style and stigma are glabrous while the ovary is pale yellow green. The pistil measures 0.2mm to 0.2mm in length. The flowers appear from October to May.
The fruits are globose to obovoidal capsules. The capsules are glabrous and measure 5mm to 6mm in length by 5mm to 6mm in diameter. The green berries turn yellow externally and pale creamy yellow to creamy yellow internally when ripe. The calyx lobes are not persistent on the ripe fruit. The 3 to 5 glossy brown seeds are flattened and ellipsoidal.
Wildlife:
Samolus valerandi’s wildlife is unknown to the author.
Cultivation:
Samolus valerandi is a magnificent small ground cover that should be grown in association with other rockery plants. It is ideal at the edge of salt pans near the coast where salt laden winds are a problem in full sun. In cultivation it will grow from 0.5 meters to 0.6 meters in height by 0.8 meters to 1.2 meters in diameter when grown in the open.
It grows well on most soil types which are hot and exposed. If these requirements are met with a little native fertilizer it can cope with temperatures as low as minus 3 degrees and up to 44 degrees. It is moderately drought resistant once established.
It is best suited to areas that are saline or have poor drainage but not waterlogged. Place it at the top of retaining walls where moisture seeps out quickly. It must be pruned in the early stages to maintain a bushy appearance and for the plants to send up more flowering stems. Remove spent flowers to increase the number of flowers produced and the period in which the flowers will bloom.
Samolus valerandi makes an excellent aquarium plant where good is available.
Propagation:
Seeds: The seeds can be removed easily from the mature capsules. Collect the capsules and place them into a brown paper bag so that the remaining seeds are dispersed inside.
Sow freshly collected seeds directly into a seed raising mix, keeping them moist not wet. Do not over water as the seeds may rot off before germination takes place. Place the trays in a warm sunny area beneath 20mm shade cloth in the bush house. When the seedlings are 20mm to 25mm tall, prick them out, nip the growing tips and plant them into 50mm native tubes using a good organic mix.
As the seedlings roots reach the bottom of the tubes plant them out into their permanent position. Again nip the tips out to induce more lateral shoots.
Cuttings: Cuttings strike easy and do not require any special attention. The mix is best made from equal parts peat sharp washed sand and vermiculite or perlite. This is fairly moisture retentive. Use 60mm to 70mm long fully ripened material when growing from cuttings from the present season’s growth. Take them in mid-autumn or early spring. Remove the leaves from the bottom half being careful not to tear the bark. A rooting hormone is not required. Keep the mix moist to wet. When the cuttings have obviously struck and have developed good roots treat them as for seedlings.
Fertilize using seaweed, fish emulsion or organic chicken pellets soaked in water on an alternate basis. Fertilize every two months until the plants are established then twice annually in early September and March to maintain better colour, health, vitality and flowering.
Further Comments from Readers:
“Hi reader, it seems you use The Bible of Botany a lot. That’s great as we have great pleasure in bringing it to you! It’s a little awkward for us to ask, but our first aim is to purchase land approximately 1,600 hectares to link several parcels of N.P. into one at The Pinnacles NSW Australia, but we need your help. We’re not salespeople. We’re amateur botanists who have dedicated over 30 years to saving the environment in a practical way. We depend on donations to reach our goal. If you donate just $5, the price of your coffee this Sunday, We can help to keep the planet alive in a real way and continue to bring you regular updates and features on Australian plants all in one Botanical Bible. Any support is greatly appreciated. Thank you.”
In the spirit of reconciliation we acknowledge the Bundjalung, Gumbaynggirr and Yaegl and all aboriginal nations throughout Australia and their connections to land, sea and community. We pay our respect to their Elders past, present and future for the pleasures we have gained.
NCBG Coffs Harbour NSW
Pillar Valley NSW
NCBG Coffs Harbour NSW
Pillar Valley NSW
NCBG Coffs Harbour NSW

NCBG Coffs Harbour NSW
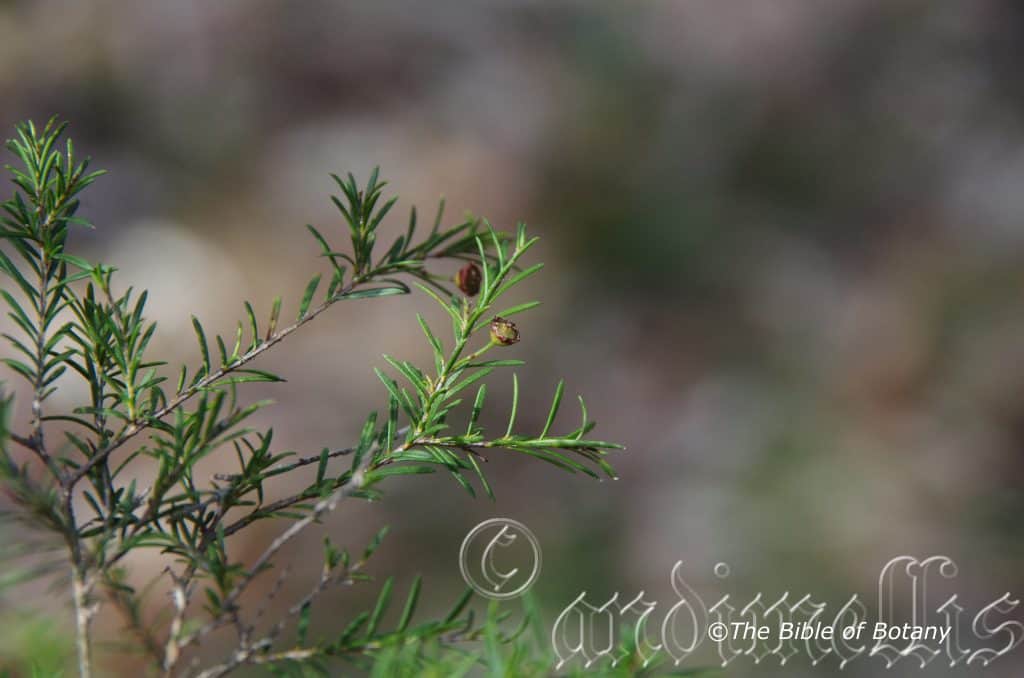
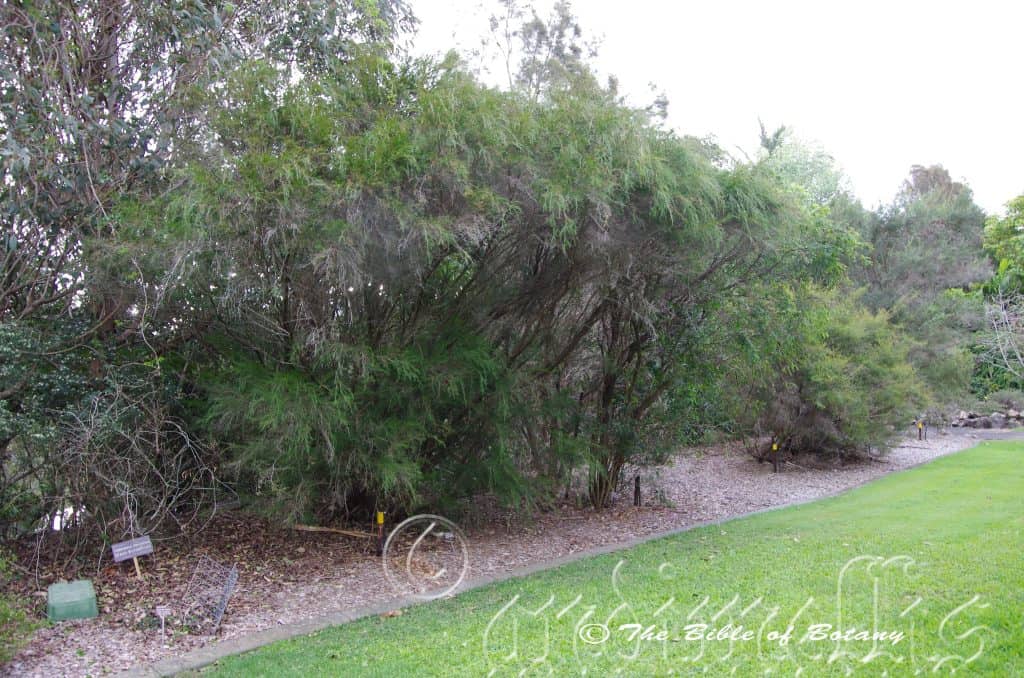
Sannantha angusta
Classification:
Unranked: Eudicots
Class: Rosids
Order: Myrtales
Family: Myrtaceae
Subfamily: Myrtoideae
Genus: May be from Sánnas, which is Ancient Greek or Sannae which is Latin for to grimace and ántha/ánthos, which are Ancient Greek for the male reproductive organ of the flower or the flower. It may refer to anthers, being in uneven numbers around the disc.
Species: From Angusta, which is Latin for narrow. It refers to leaves, which are narrow but not linear.
Common Name:
Distribution:
Sannantha angusta is widespread on the Great Dividing Range to the coast, especially on the eastern coastal ranges in 2 isolated populations. In the north it is found south from Walsh’s Pyramid to Alligator Creek Camp Ground in far north Queensland.
The southern populations are found south from Bungaree National Park near Crows Nest in southern Queensland to the Maria River in coastal north eastern New South Wales.
https://avh.ala.org.au/occurrences/search?taxa=Sannantha+angusta#tab_mapView
Habitat Aspect Climate:
Sannantha angusta prefers full sun to light dappled shade. It usually grows in dry eucalyptus forests or moist Eucalyptus forests close to watercourses on deep sandy soils. The altitude ranges from 10 meters ASL to 980 meters ASL.
The temperatures range from minus 3 degrees in July to 40 degrees in January.
The rainfalls range from lows of 100mm to 2000mm average per annum.
Soil Requirements:
Sannantha angusta prefers coarse sands, light gritty clays. The soils are usually derived from decomposed sandstones, granites, accumulated beach sands or alluvial deposits. The soils pH ranges from 4.5pH to 6pH. It tolerates seasonal waterlogged soils. Non saline soils to moderately saline soils are tolerated.
Height & Spread:
Wild Plants: 1.5m to 4.5m by 2m to 3m.
Characteristics:
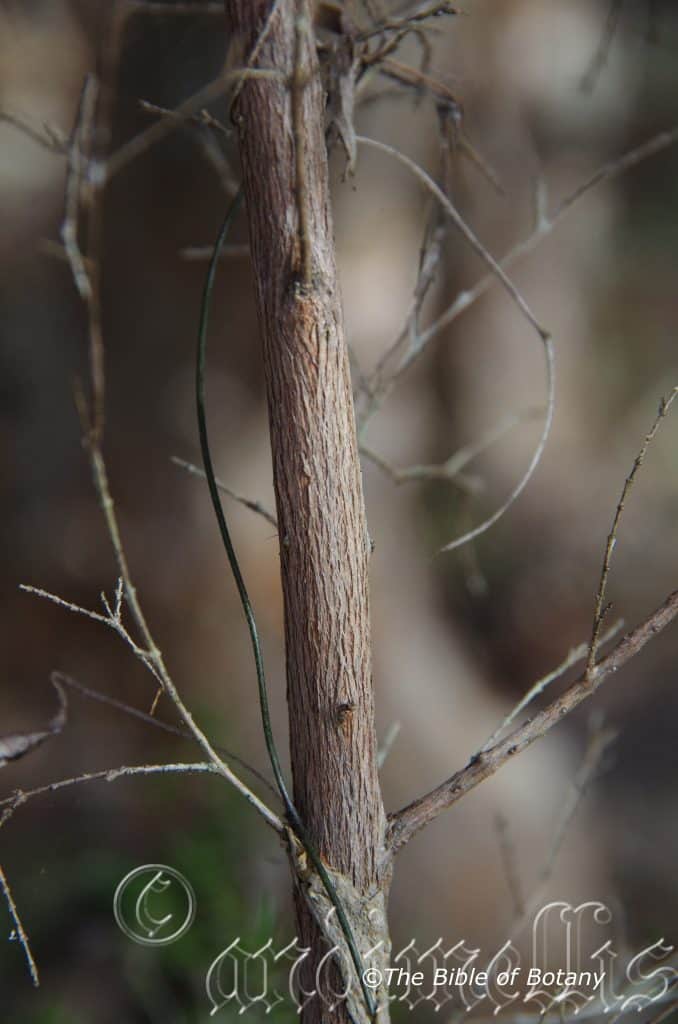
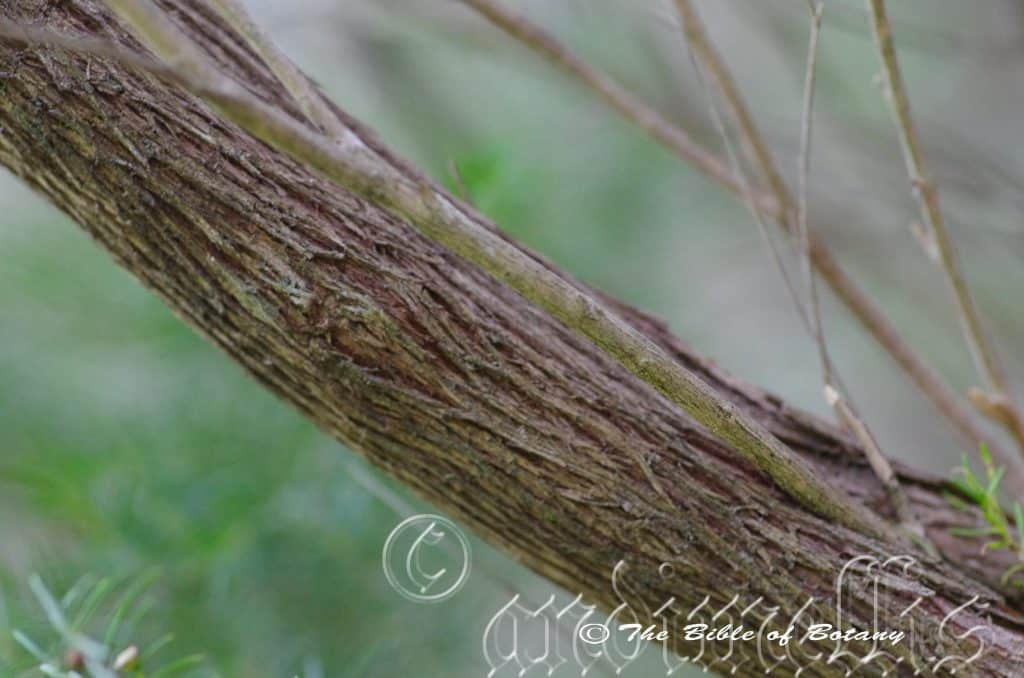
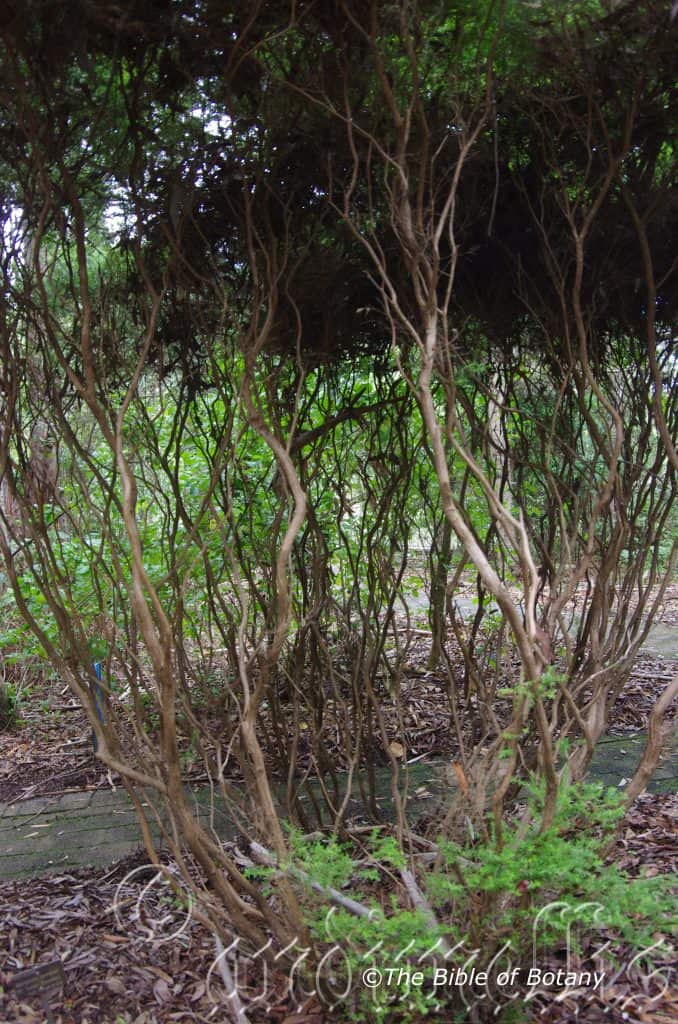
Sannantha angusta grows as a small tree or small to medium shrub with a slightly flanged trunk and angulated stems. The pale greyish–brown stems are slightly flaky.
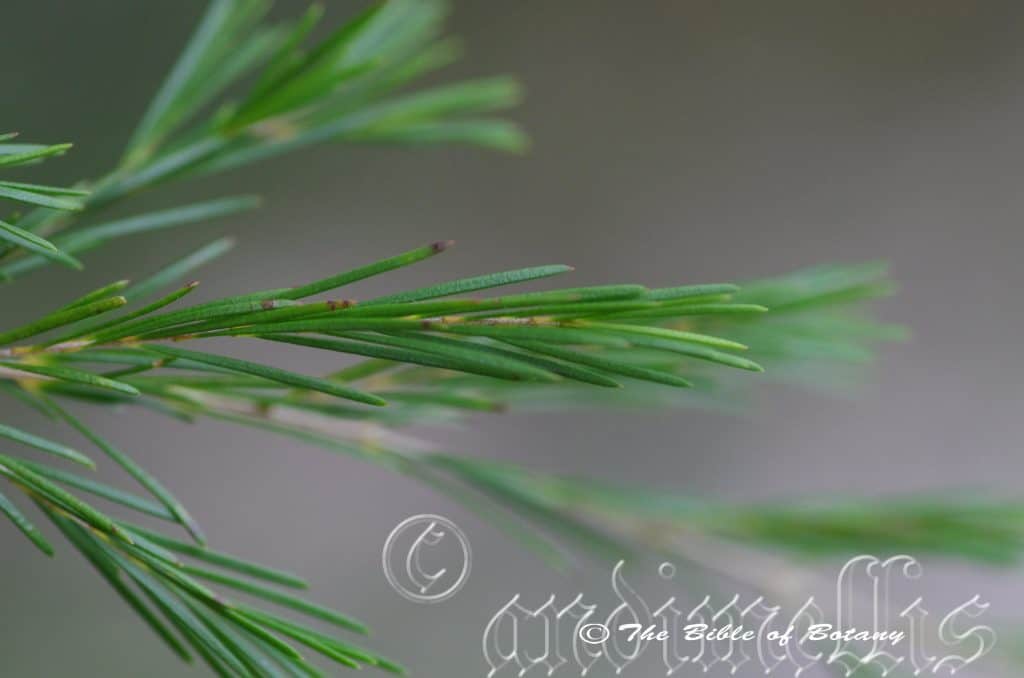
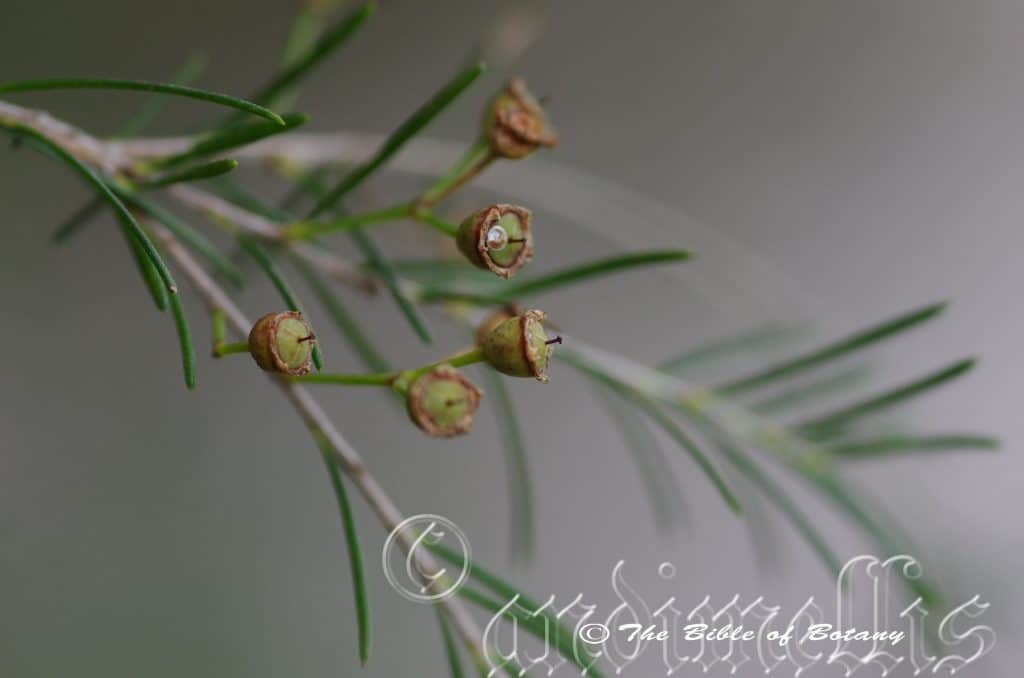
The alternate lanceolate to elliptic leaves measure 10mm to 30mm in length by 2.5mm to 6mm in width. The petioles measure 0.8mm to 1.5mm in length. The bases taper to the petiole while the apexes are obtuse to acute. The discolourous laminas are deep green, semi glossy, glabrous and sparsely covered in distinct oil glands on the upper laminas while the lower laminas are paler and are moderately covered in oil glands. The laminas are flat and decurve gently downwards from the bases to the apexes. The margins are entire. The mid vein is prominent on the lower lamina and is deeply impressed on the upper lamina.
The inflorescences are born in along short, leafy, lateral racemes with 3 to 9 individual flowers. The peduncles measure 3mm to 13mm in length while the pedicels measure 3mm to 7mm in length. The green linear, bracteoles measure 0.9mm to 1.2mm in length.
The pale grass-green to pale lime-green hypanthium is conical smooth and glabrous. The calyx lobes are compound with the inner lobes measuring 0.5mm to 0.6mm length while the outer lobes measure 0.2mm to 0.3mm in length. The hypanthium measures 1.6mm to 2.5mm in length by 3mm to 4mm in diameter. The white petals are broad ovate to orbicular and measure 2.5mm to 3.7mm in length.
The 8 to 15 white stamens measure 1.2mm to 1.8mm in length. The spherical anthers are white to fawnish.
The white style and stigma are glabrous while the ovary is pastel green. The style measures 0.2mm to 0.4mm in length. The flowers appear from October to January.
The fruits are broad conical, coriaceous capsules. The capsules are glabrous and measure 2mm to 3mm in length by 2.5mm to 3.5mm in diameter. The green capsules turn grey when ripe. The flattened “D” shaped seeds are brownish-tan.
Confusing Species:
Sannantha angusta’s foliage is longer and narrower and measures 10mm to 30mm in length by 1.5mm to 4mm in width. The base of the flower petals are spathulate.
Sannantha collina’s foliage is shorter and measures 8mm to 20mm in length by 4mm to 7mm in width. The base of the flower petals are spathulate.
Sannantha similis’s foliage is longer and broader and measures 10mm to 30mm in length by 2.5mm to 6mm in width. The base of the flower petals is rounded.
Wildlife:
Sannantha angusta’s flowers are very attractive to many types of insects including native bees, butterflies, native pollen flies and hover flies which in return attract many small honey eaters and insectivorous birds to the garden.
Cultivation:
Sannantha angusta is a magnificent large shrub or small tree that is suitable for small gardens. It is ideal at the edge of a bush garden or as specimen tree in a small heath garden in full sun. In cultivation it will grow from 3 meters to 3.5 meters in height by 3 meters to 3.5 meters in diameter when grown in the open as a shrub or from 4 meters to 4.5 meters in height by 2.5 meters to 3 meters in diameter as a small, single trunk tree.
It grows well on all soil types where deep leaf litter keeps the soil cool and moisture at an even level. If these requirements are met it can cope with temperatures as low as minus 5 degrees and up to 36 degrees once established. It is moderately drought resistant.
Add to the above, if it is given an adequate supply of water and a little native fertilizer on a regular basis the plants should respond with excellent flowering over a long period.
It is best suited to areas that have poor drainage like in depressions and around sullage trenches. Place it at the bottom of slopes or retaining walls where moisture lies or seeps out. It must be pruned in the early stages to maintain a bushy shrub.
It can be trimmed, where it makes a very good hedge and native corridor for native birds. Plants should be planted using 2.5 meter to 3 meter centers when used as a hedge.
It is an ideal plant in the garden for attracting beneficial insects particularly lady beetles, hover flies and lace wings.
It makes a good bonsai plant and is easy to work.
Propagation:
Seeds: The seeds can be removed easily from the mature fruits.
Sow freshly collected seeds directly into a seed raising mix, keeping them moist. Do not over water as the seeds may rot off before germination takes place. Place the trays in a warm sunny area or beneath 20mm shade cloth in the bush house. When the seedlings are 20mm to 25mm tall, prick them out and plant them into 50mm native tubes using a good organic mix.
As the seedlings roots reach the bottom of the tubes, nip the tips out if shrubs are requires or nip the lateral stems if a tree is required and plant them out into their permanent position.
Cuttings: Fortunately the cuttings strike rather easy. Use 100mm to 200mm long tip cuttings or lateral shoots from the present season’s growth. Take them in warmer months of the year. Remove half the leaves from the bottom section being careful not to tear the bark.
1 Prepare the cutting mix by adding two thirds sharp clean river sand, one third peat or one third perlite. These ingredients must be sterilized,
2 Select good material from non diseased plants,
3 Select semi green stems for cuttings. Look for a stem with two or three nodes,
4 Place the cutting on a flat, hard surface, and make a clean cut down one side of the cutting at the base for 10mm with a sharp sterile knife or razor blade. – This scarification of the node will increase the chances of roots emerging from this spot. Now remove all but one or two the leaves, leaving the apex leaves in tact. If the leaves are very large in proportion to the stem, cut off the apical halves.
5 Fill a saucer with water, and place a little medium strength rooting hormone into another container like a milk bottle top. Dip the node end of the cutting into the water and then into the rooting hormone. Tap off any excess hormone,
6 Use a small dipple stick or old pencil to poke a hole into the soilless potting mix. Ensure the hole is slightly larger than the stem diameter and be careful not to wipe the rooting hormone off the cuttings base. Place 2 to 4 cuttings in each of the 50mm native tubes,
7 I like to place the tubes in bucket with holes drilled in the bottom to allow excess water to drain out. A plastic bag that fits over the bucket is ideal to help maintain temperature and moisture. Place in a semi shaded, warm position like under 50mm shade cloth.
8 When the cuttings have struck, open the bag to allow air circulation for a few days to a week,
9 Once hardened off remove the cuttings from the bag and allow to further hardening for a few more days to a week,
10 Transplant into a good potting mix to grow on.
Fertilize using seaweed, fish emulsion or organic chicken pellets soaked in water on an alternate basis. Fertilize every two months until the plants are established then annually in early September to October to maintain better colour, health, vitality and flowering.
Further Comments from Readers:
“Hi reader, it seems you use The Bible of Botany a lot. That’s great as we have great pleasure in bringing it to you! It’s a little awkward for us to ask, but our first aim is to purchase land approximately 1,600 hectares to link several parcels of N.P. into one at The Pinnacles NSW Australia, but we need your help. We’re not salespeople. We’re amateur botanists who have dedicated over 30 years to saving the environment in a practical way. We depend on donations to reach our goal. If you donate just $5, the price of your coffee this Sunday, We can help to keep the planet alive in a real way and continue to bring you regular updates and features on Australian plants all in one Botanical Bible. Any support is greatly appreciated. Thank you.”
In the spirit of reconciliation we acknowledge the Bundjalung, Gumbaynggirr and Yaegl and all aboriginal nations throughout Australia and their connections to land, sea and community. We pay our respect to their Elders past, present and future for the pleasures we have gained.
NCBG Coffs Harbour NSW
NCBG Coffs Harbour NSW
NCBG Coffs Harbour NSW
Sannantha bidwillii
Classification:
Unranked: Eudicots
Class: Rosids
Order: Myrtales
Family: Myrtaceae
Subfamily: Myrtoideae
Genus: May be from Sánnas, which is Ancient Greek or Sannae which is Latin for to grimace and ántha/ánthos, which are Ancient Greek for the male reproductive organ of the flower or the flower. It may refer to anthers, being in uneven numbers around the disc.
Species: Is named in honour of John Carne Bidwill; 1815-1853, who was an English born Australian horticulturalist and botanist.
Common Name:
Distribution:
Sannantha bidwillii is found south from Shoalwater Bay to the Glasshouse Mountains in central and souther coastal Queensland.
https://avh.ala.org.au/occurrences/search?taxa=Sannantha+bidwillii#tab_mapView
Habitat Aspect Climate:
Sannantha bidwillii prefers full sun to light dappled shade. It grows in moist situations in eucalypt forest of coastal lowlands often adjacent to heathlands. The altitude ranges from 5 meters BSL to 200 meters ASL.
The temperatures range from minus 3 degrees in July to 40 degrees in January.
The rainfalls range from lows of 800mm to 1700mm average per annum.
Soil Requirements:
Sannantha bidwillii prefers deep coarse to fine sands. The soils are usually derived from decomposed sandstones, granites, accumulated beach sands or alluvial deposits. The soils pH ranges from 5pH to 6pH. It tolerates waterlogged soils. Non saline soils to moderately saline soils are tolerated.
Height & Spread:
Wild Plants: 2m to 3m by 1m to 2m.
Characteristics:
The stems of Sannantha bidwillii grow near vertical as a small tree or small to medium shrub with a slightly flanged trunk and angulated stems. The pale fawnish–brown stems are slightly flaky, while the main stems or trunk is fawnish–brown with longitudinal flaky bark.
The crowded to opposite, lanceolate to elliptic leaves measure 6mm to 8.5mm in length by 2mm to 3mm in width. The petioles are subsessile to 0.5mm in length. The bases are rounded, while the apexes are acute with or without a sort mucronate tip. The concolourous laminas are deep green to mid olive-green, semi glossy, glabrous and sparsely covered in minute oil glands on the upper laminas while the lower laminas are dull. The laminas are flat and decurve gently downwards on the apical half. The margins are entire. The mid vein is slightly prominent on the lower lamina and is indistinguishable on the upper lamina.
The inflorescences are born along short, leafy, lateral racemes, usually with 3 individual flowers clustered near the apex. The peduncles measure 6mm to 8mm in length while the pedicels measure 2.5mm to 3.5mm in length. The green linear, bracteoles measure 0.9mm to 1.2mm in length.
The pale grass-green to pale lime-green hypanthium is conical smooth and glabrous. The calyx lobes measure 0.2mm to 0.3mm in length. The hypanthium measures 1mm to 1.5mm in length by 1mm to 1.5mm in diameter. The white petals are broad ovate to orbicular and measure 3mm to 3.5mm in diameter.
The 8 white stamens are in a pattern of 1:2:1:2:2 and measure 1.2mm to 1.5mm in length. The spherical anthers are white to fawnish turning brown when dehiscing. The green, stout style and white stigma are glabrous while the ovary is pastel green. The style measures 0.2mm to 0.4mm in length. The flowers appear from December to February.
The fruits are broad conical, coriaceous capsules. The glabrous capsules measure 2mm to 3mm in length by 2.5mm to 3.5mm in diameter. The green capsules turn deep maroon before drying grey when ripe.
Wildlife:
Sannantha bidwillii’s flowers are very attractive to many types of insects including the native colony bees like Tetragonula carbonaria, butterflies, native pollen flies and hover flies which in return attract many small honey eaters and insectivorous birds to the garden.
Cultivation:
Sannantha bidwillii is a magnificent small shrub that is suitable for small gardens. It is ideal at the edge of a bush garden in a small heath garden in full sun or light shade. In cultivation it will grow from 0.5 meters to 2 meters in height by 1 meters to 2 meters in diameter when grown in the open.
It grows exceptionally well on deep sandy soils where leaf litter keeps the soil cool and moisture at an even level. If these requirements are met it can cope with temperatures as low as minus 2 degrees and up to 44 degrees once established. It is moderately drought resistant but will have a tendency to drop leaves.
Add to the above, if it is given an adequate supply of water and a little native fertilizer on a regular basis the plants respond with excellent flowering over a longer period.
It is best suited to areas that have poor drainage like in depressions and around sullage trenches. Place it at the bottom of slopes or retaining walls where moisture lies or seeps out. It can be pruned in the early stages to maintain a bushy shrub.
It can be trimmed and it makes a very good low hedge or used in a formal border plant. Plants should be planted using 1.5 meter to 2 meter centers when used as a low hedge.
It is an ideal plant in the garden for attracting beneficial insects particularly lady beetles, hover flies and lace wings.
It makes a good bonsai plant and is easy to work.
Propagation:
Seeds: The seeds can be removed easily from the ripe capsules by placing in a dry paper bag for a week to 10 days.
Sow freshly collected seeds directly into a seed raising mix, keeping them moist. Do not over water as the seeds may rot off before germination takes place. Place the trays in a warm sunny area or beneath 20mm shade cloth in the bush house. When the seedlings are 20mm to 25mm tall, prick them out and plant them into 50mm native tubes using a good organic mix.
As the seedlings roots reach the bottom of the tubes, nip the tips out if shrubs are requires or nip the lateral stems if a tree is required and plant them out into their permanent position.
Cuttings: Fortunately cuttings strike relatively easy. Use 100mm to 200mm long tip cuttings or lateral shoots from the present season’s growth. Take them in warmer months of the year. Remove half the leaves from the bottom section being careful not to tear the bark.
1 Prepare the cutting mix by adding two thirds sharp clean river sand, one third peat or one third perlite. These ingredients must be sterilized,
2 Select good material from non diseased plants,
3 Select semi green stems for cuttings. Look for a stem with two or three nodes,
4 Place the cutting on a flat, hard surface, and make a clean cut down one side of the cutting at the base for 10mm with a sharp sterile knife or razor blade. – This scarification of the node will increase the chances of roots emerging from this spot. Now remove all but one or two the leaves, leaving the apex leaves in tact. If the leaves are very large in proportion to the stem, cut off the apical halves.
5 Fill a saucer with water, and place a little medium strength rooting hormone into another container like a milk bottle top. Dip the node end of the cutting into the water and then into the rooting hormone. Tap off any excess hormone,
6 Use a small dipple stick or old pencil to poke a hole into the soilless potting mix. Ensure the hole is slightly larger than the stem diameter and be careful not to wipe the rooting hormone off the cuttings base. Place 2 to 4 cuttings in each of the 50mm native tubes,
7 I like to place the tubes in bucket with holes drilled in the bottom to allow excess water to drain out. A plastic bag that fits over the bucket is ideal to help maintain temperature and moisture. Place in a semi shaded, warm position like under 50mm shade cloth.
8 When the cuttings have struck, open the bag to allow air circulation for a few days to a week,
9 Once hardened off remove the cuttings from the bag and allow to further hardening for a few more days to a week,
10 Transplant into a good potting mix to grow on.
Fertilize using seaweed, fish emulsion or organic chicken pellets soaked in water on an alternate basis. Fertilize every two months until the plants are established then annually in early September to October to maintain better colour, health, vitality and flowering.
Further Comments from Readers:
“Hi reader, it seems you use The Bible of Botany a lot. That’s great as we have great pleasure in bringing it to you! It’s a little awkward for us to ask, but our first aim is to purchase land approximately 1,600 hectares to link several parcels of N.P. into one at The Pinnacles NSW Australia, but we need your help. We’re not salespeople. We’re amateur botanists who have dedicated over 30 years to saving the environment in a practical way. We depend on donations to reach our goal. If you donate just $5, the price of your coffee this Sunday, We can help to keep the planet alive in a real way and continue to bring you regular updates and features on Australian plants all in one Botanical Bible. Any support is greatly appreciated. Thank you.”
In the spirit of reconciliation we acknowledge the Bundjalung, Gumbaynggirr and Yaegl and all aboriginal nations throughout Australia and their connections to land, sea and community. We pay our respect to their Elders past, present and future for the pleasures we have gained.
Sannantha collina
Classification:
Unranked: Equisetopsida
Unranked: Magnoliidae
Superorder: Rosanae
Order: Myrtales
Family: Myrtaceae
Genus: May be from Sánnas, which is Ancient Greek or Sannae which is Latin for to grimace and ántha/ánthos, which are Ancient Greek for the male reproductive organ of the flower or the flower. It may refer to anthers, being in uneven numbers around the disc.
Species: From Collīnum/Collīnī, which are Latin for hills. It refers to plants, which prefer to grow on hilly terrains.
Common Name:
Distribution:
Sannantha collina is found on and east of the Great Dividing Range south from Mount Aberdeen near Bowen in central coastal Queensland to Port MacQuarrie in central coastal New South Wales.
https://avh.ala.org.au/occurrences/search?taxa=Sannantha+collina#tab_mapView
Habitat Aspect Climate:
Sannantha collina prefers full sun to light dappled shade. It grows in moist situations in open woodlands, open forests or exposed situations near waterways. The altitude ranges from 25 meters BSL to 1110 meters ASL.
The temperatures range from minus 3 degrees in July to 36 degrees in January.
The rainfalls range from lows of 800mm to 2000mm average per annum.
Soil Requirements:
Sannantha collina prefers coarse sands, light gritty clays. The soils are usually derived from decomposed sandstones, granites, accumulated beach sands or alluvial deposits. The soils pH ranges from 4.5pH to 6pH. It tolerates waterlogged soils. Non saline soils to moderately saline soils are tolerated.
Height & Spread:
Wild Plants: 2m to 4m by 2m to 3m.
Characteristics:
The multiple stems grow to form a medium shrub with a slightly flanged trunk and angulated stems. The pale greyish–brown stems are slightly flaky.
The alternate, lanceolate to elliptic leaves measure 8mm to 20mm in length by 4mm to 7mm in width. The petioles measure 0.8mm to 1.5mm in length. The bases taper to the petiole while the apexes are obtuse to acute. The discolourous laminas are deep green, semi glossy, glabrous and sparsely covered in distinct oil glands on the upper laminas while the lower laminas are paler and are moderately covered in oil glands. The laminas are flat and decurve gently downwards from the bases to the apexes. The margins are entire. The mid vein is prominent on the lower lamina and is deeply impressed on the upper lamina.
The inflorescences are born in along short, leafy, lateral racemes with 3 to 9 individual flowers clustered near the apex. The peduncles measure 3mm to 13mm in length while the pedicels measure 3mm to 7mm in length. The green linear, bracteoles measure 0.9mm to 1.2mm in length.
The pale grass-green to pale lime-green hypanthium is conical smooth and glabrous. The calyx lobes are compound with the inner lobes measuring 0.5mm to 0.6mm length while the outer lobes measure 0.2mm to 0.3mm in length. The hypanthium measures 1.6mm to 2.5mm in length by 3mm to 4mm in diameter. The white petals are broad ovate to orbicular and are somewhat cuneate at the base and measure 2.5mm to 3.7mm in length.
The 8 to 15 white stamens measure 1.2mm to 1.8mm in length. The spherical anthers are white to fawnish. The white style and stigma are glabrous while the ovary is pastel green. The style measures 0.2mm to 0.4mm in length. The flowers appear from October to January
The fruits are broad conical, coriaceous capsules. The capsules are glabrous and measure 2mm to 3mm in length by 2.5mm to 3.5mm in diameter. The green capsules turn grey when ripe. The flattened “D” shaped seeds are brownish-tan.
Confusing Species:
Sannantha collina’s foliage is shorter and measures 8mm to 20mm in length by 4mm to 7mm in width. The flowers are clustered at the ends of the racemes. The base of the flower petals are spathulate.
Sannantha angusta’s foliage is longer and narrower and measures 10mm to 30mm in length by 1.5mm to 4mm in width. The base of the flower petals are spathulate.
Sannantha similis’s foliage is longer and broader and measures 10mm to 30mm in length by 2.5mm to 6mm in width. The base of the flower petals is rounded.
Wildlife:
Sannantha collina’s flowers are very attractive to many types of insects including native bees, butterflies, native pollen flies and hover flies which in return attract many small honey eaters and insectivorous birds to the garden.
Cultivation:
Sannantha collina is a good large shrub or small tree that is suitable for small gardens. It is ideal at the edge of a bush garden or as specimen tree in a small heath garden in full sun. In cultivation it will grow from 3 meters to 3.5 meters in height by 3 meters to 3.5 meters in diameter when grown in the open as a shrub or from 4 meters to 4.5 meters in height by 2.5 meters to 3 meters in diameter as a small, single trunk tree.
It grows exceptionally well on all soil types where deep leaf litter keeps the soil cool and moisture at an even level. If these requirements are met it can cope with temperatures as low as minus 5 degrees and up to 36 degrees once established. It is moderately drought resistant.
Add to the above, if it is given an adequate supply of water and a little native fertilizer on a regular basis the plants should respond with excellent flowering over a long period.
It is best suited to areas that have poor drainage like in depressions and around sullage trenches. Place it at the bottom of slopes or retaining walls where moisture lies or seeps out. It must be pruned in the early stages to maintain a bushy shrub.
It can be trimmed where it makes a very good hedge row and native corridor for native birds. Plants should be planted using 2.5 meter to 3 meter centers when used as a hedge.
It is an ideal plant in the garden for attracting beneficial insects particularly lady beetles, hover flies and lace wings.
It makes a good bonsai plant and is easy to work.
Propagation:
Seeds: The seeds can be removed easily from the mature capsules by placing the capsules in a dry paper bag for a week to 10 days.
Sow freshly collected seeds directly into a seed raising mix, keeping them moist. Do not over water as the seeds may rot off before germination takes place. Place the trays in a warm sunny area or beneath 20mm shade cloth in the bush house. When the seedlings are 20mm to 25mm tall, prick them out and plant them into 50mm native tubes using a good organic mix.
As the seedlings roots reach the bottom of the tubes, nip the tips out if shrubs are requires or nip the lateral stems if a tree is required and plant them out into their permanent position.
Cuttings: Fortunately cuttings strike rather easy. Use 100mm to 200mm long tip cuttings or lateral shoots from the present season’s growth. Take them in warmer months of the year. Remove half the leaves from the bottom section being careful not to tear the bark.
1 Prepare the cutting mix by adding two thirds sharp clean river sand, one third peat or one third perlite. These ingredients must be sterilized,
2 Select good material from non diseased plants,
3 Select semi green stems for cuttings. Look for a stem with two or three nodes,
4 Place the cutting on a flat, hard surface, and make a clean cut down one side of the cutting at the base for 10mm with a sharp sterile knife or razor blade. – This scarification of the node will increase the chances of roots emerging from this spot. Now remove all but one or two the leaves, leaving the apex leaves in tact. If the leaves are very large in proportion to the stem, cut off the apical halves.
5 Fill a saucer with water, and place a little medium strength rooting hormone into another container like a milk bottle top. Dip the node end of the cutting into the water and then into the rooting hormone. Tap off any excess hormone,
6 Use a small dipple stick or old pencil to poke a hole into the soilless potting mix. Ensure the hole is slightly larger than the stem diameter and be careful not to wipe the rooting hormone off the cuttings base. Place 2 to 4 cuttings in each of the 50mm native tubes,
7 I like to place the tubes in bucket with holes drilled in the bottom to allow excess water to drain out. A plastic bag that fits over the bucket is ideal to help maintain temperature and moisture. Place in a semi shaded, warm position like under 50mm shade cloth.
8 When the cuttings have struck, open the bag to allow air circulation for a few days to a week,
9 Once hardened off remove the cuttings from the bag and allow to further hardening for a few more days to a week,
10 Transplant into a good potting mix to grow on.
Fertilize using seaweed, fish emulsion or organic chicken pellets soaked in water on an alternate basis. Fertilize every two months until the plants are established then annually in early September to October to maintain better colour, health, vitality and flowering.
Further Comments from Readers:
“Hi reader, it seems you use The Bible of Botany a lot. That’s great as we have great pleasure in bringing it to you! It’s a little awkward for us to ask, but our first aim is to purchase land approximately 1,600 hectares to link several parcels of N.P. into one at The Pinnacles NSW Australia, but we need your help. We’re not salespeople. We’re amateur botanists who have dedicated over 30 years to saving the environment in a practical way. We depend on donations to reach our goal. If you donate just $5, the price of your coffee this Sunday, We can help to keep the planet alive in a real way and continue to bring you regular updates and features on Australian plants all in one Botanical Bible. Any support is greatly appreciated. Thank you.”
In the spirit of reconciliation we acknowledge the Bundjalung, Gumbaynggirr and Yaegl and all aboriginal nations throughout Australia and their connections to land, sea and community. We pay our respect to their Elders past, present and future for the pleasures we have gained.
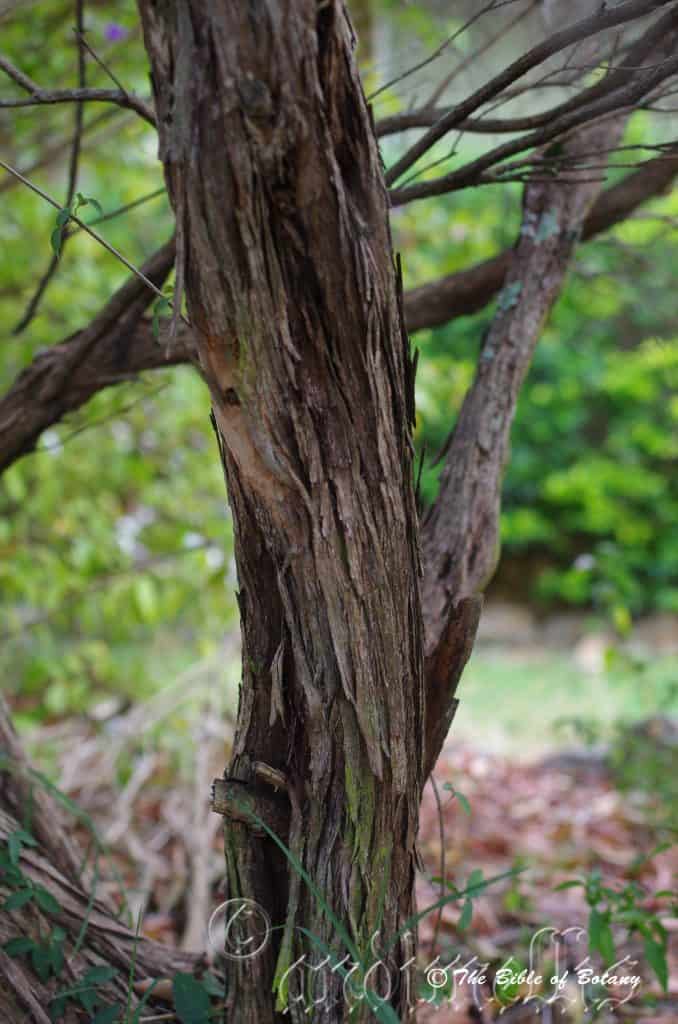
Ashgrove Qld.
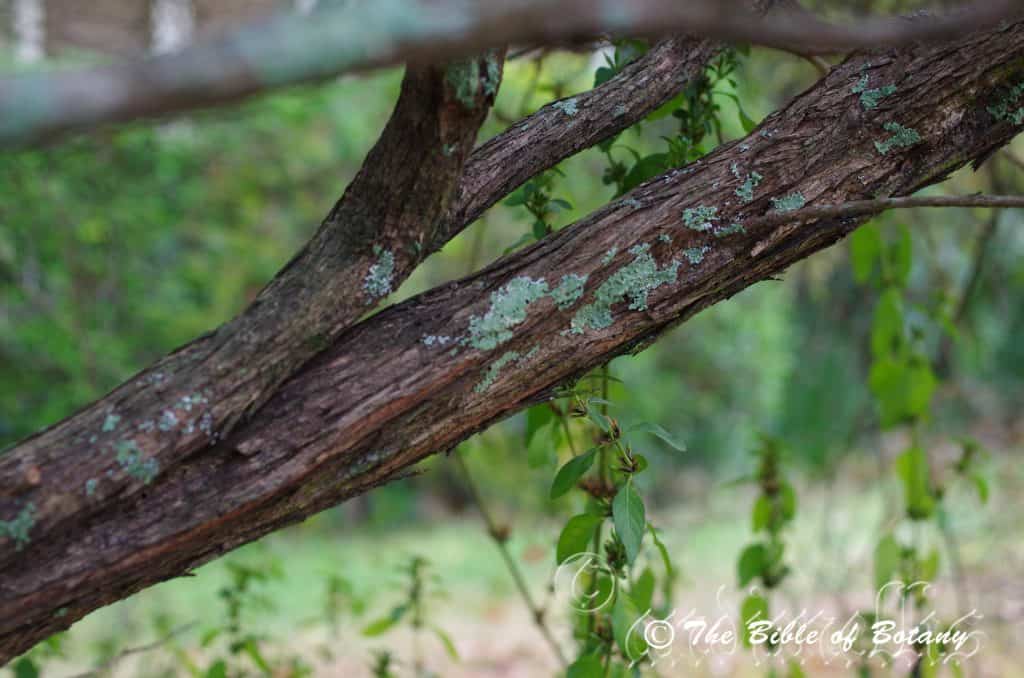
Ashgrove Qld.
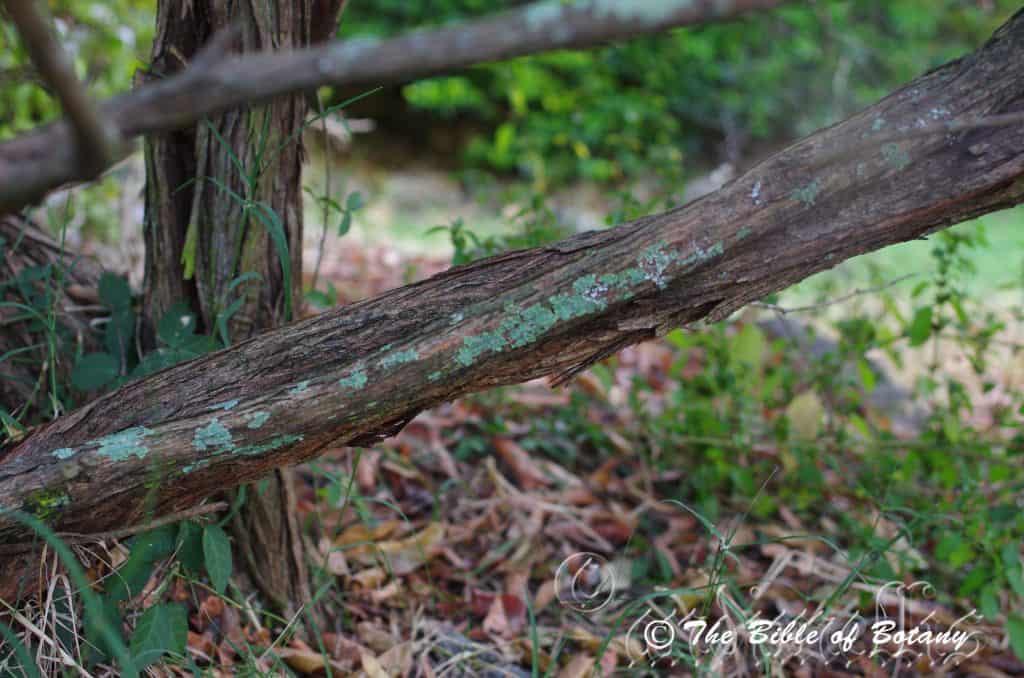
Ashgrove Qld.
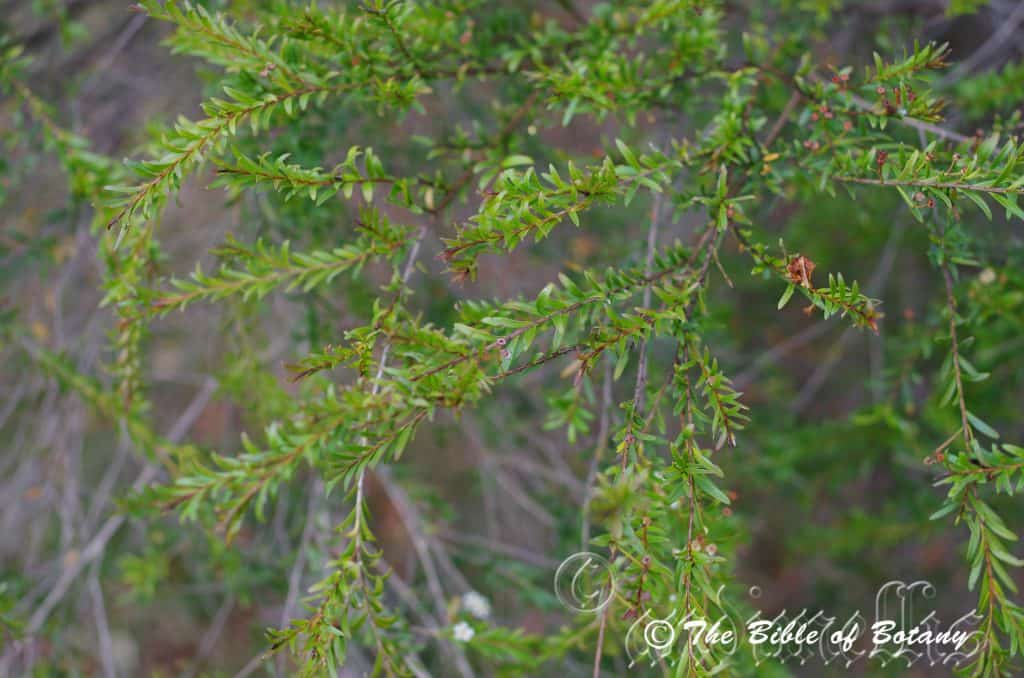
Ashgrove Qld.
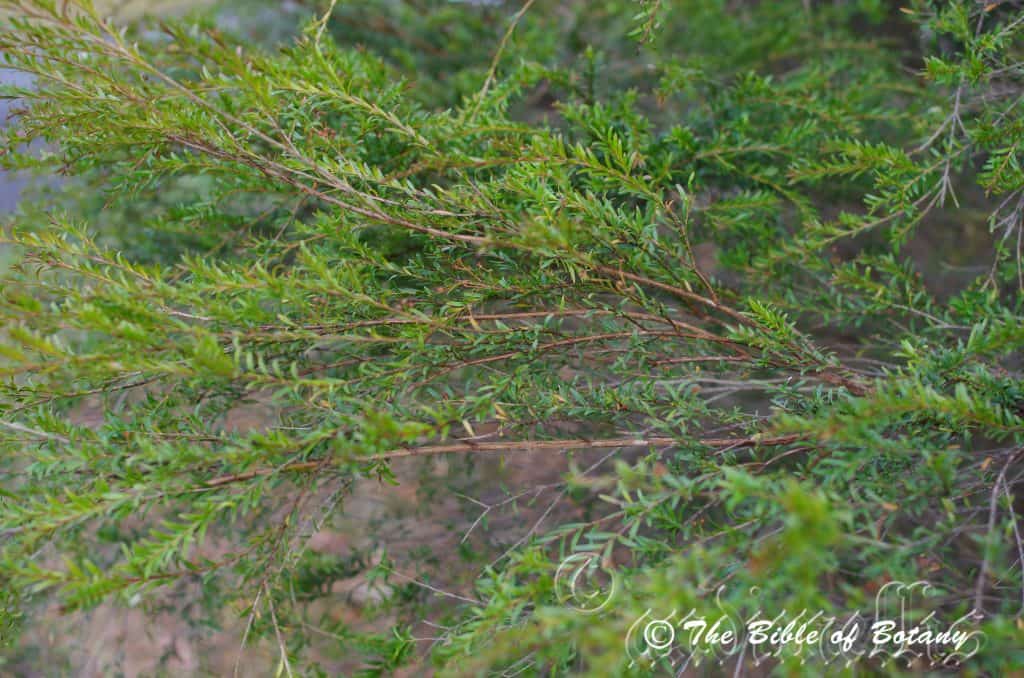
Ashgrove Qld.
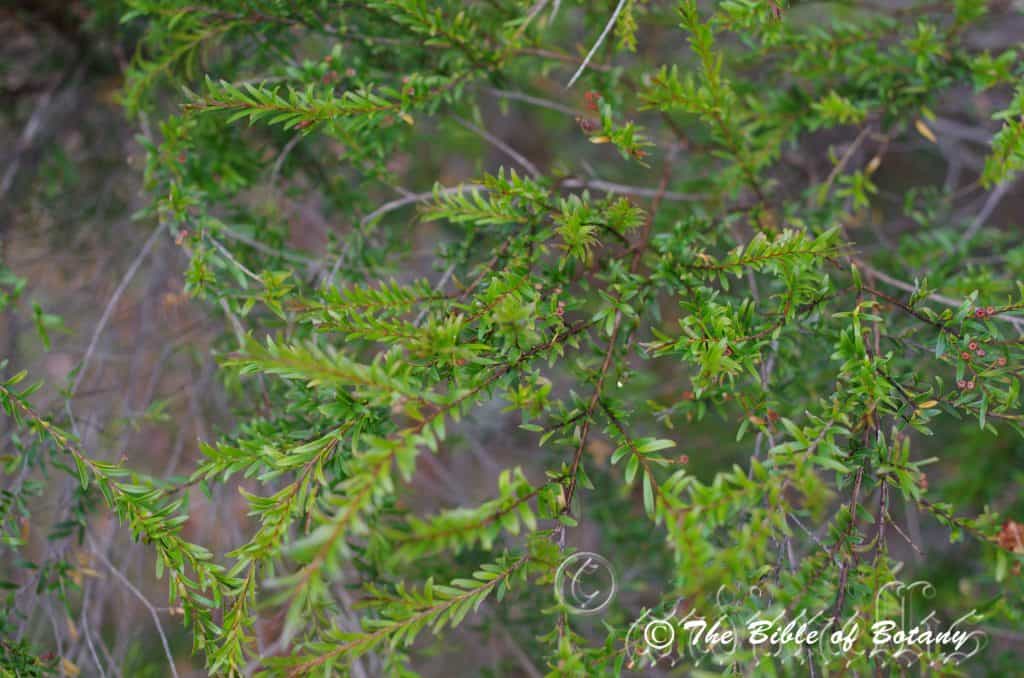
Ashgrove Qld.
Sannantha pluriflora
Classification:
Unranked: Eudicots
Unranked: Rosids
Order: Myrtales
Family: Myrtaceae
Genus: May be from Sánnas, which is Ancient Greek or Sannae which is Latin for to grimace and ántha/ánthos, which are Ancient Greek for the male reproductive organ of the flower or the flower. It may refer to anthers, being in uneven numbers around the disc.
Species: From Plūrāle, which is Latin for more than one and Flōra, which is Latin for a flower or Flos, which is Roman for the goddess of spring and flowers. It refers flowers, which are more prevelant than other species in the genus.
Common Name:
Distribution:
Sannantha pluriflora is found on and east of the Great Dividing Range to the coast south from Maryborough in southern coastal Queensland to Bairnsdale in central coastal Victoria.
There is a disjunct population much further north in Wild River Gorge near Hernberton and west of the Great Dividing Range near Forbes in New South Wales.
https://avh.ala.org.au/occurrences/search?taxa=Sannantha+pluriflora#tab_mapView
Habitat Aspect Climate:
Sannantha pluriflora prefers full sun to light dappled shade. It grows in moist situations in open woodlands, open forests or exposed situations along water courses. The altitude ranges from 12 meters ASL to 510 meters ASL.
The temperatures range from minus 3 degrees in July to 40 degrees in January.
The rainfalls range from lows of 150mm to 2000mm average per annum.
Soil Requirements:
Sannantha pluriflora prefers coarse sands, light gritty clays. The soils are usually derived from decomposed sandstones, granites, accumulated beach sands or alluvial deposits. The soils pH ranges from 4.5pH to 6pH. It tolerates waterlogged soils. Non saline soils to very saline soils are tolerated.
Height & Spread:
Wild Plants: 2m to 3m by 2m to 3m
Characteristics:
The multiple stems grow nearly vertical to form a dense small tree or medium shrub with a slightly flanged trunk and angulated stems. The deep greyish–brown larger stems have long longitudinal flakes of bark.
The alternate, lanceolate to elliptic leaves measures 10mm to 30mm in length by 1mm to 6mm in width. The petioles measure 0.8mm to 1.5mm in length. The bases are cuneate, while the apexes are obtuse to acute. The concolourous laminas are mid green, dull, glabrous and sparsely covered in distinct oil glands on the upper laminas while the lower laminas are moderately covered in oil glands. The laminas are flat and decurve gently downwards from the bases to the apexes. The margins are entire. The mid vein is slightly prominent on the lower lamina and distinctly impressed on the upper lamina.
The inflorescences are born in small clusters of 3 to 7 or rarely 9 individual flowers from the leaf axils. The peduncles measure 5mm to 13mm in length while the pedicels measure 3mm to 7mm in length. The green, linear, bracteoles measure 0.9mm to 1.2mm in length.
The pale grass-green to pale lime-green hypanthium is conical smooth and glabrous. The calyx lobes are compound with the inner lobes measuring 0.5mm to 0.7mm length while the outer lobes measure 0.25mm to 0.35mm in length. The corolla measures 8mm to 10mm in diameter. The white, broad ovate to orbicular petals measure 2.5mm to 3.7mm in length.
The 8 to 15 white stamens measure 1.2mm to 1.8mm in length. The spherical anthers are white to fawnish. The green style and white stigma are glabrous while the ovary is pastel green. The style measures 0.2mm to 0.4mm in length. The flowers appear from October to January
The fruits are broad conical, coriaceus capsules. The capsules are glabrous and measure 2.5mm to 4mm in length by 2.5mm to 4mm in diameter. The green capsules turn grey when ripe. The flattened “D” shaped seeds are brownish-tan.
Wildlife:
Sannantha pluriflora’s flowers are very attractive to many types of insects including native bees, butterflies, native pollen flies and hover flies which in return attract many small honey eaters and insectivorous birds to the garden.
Cultivation:
Sannantha pluriflora is a magnificent large shrub or small tree that is suitable for small gardens. It is ideal at the edge of a bush garden or as specimen tree in a small heath garden in full sun. In cultivation it will grow from 1 meter to 3.5 meters in height by 1 meter to 3.5 meters in diameter when grown in the open as a shrub or from 4 meters to 4.5 meters in height by 2.5 meters to 3 meters in diameter as a small, single trunk tree.
It grows well on all soil types where deep leaf litter keeps the soil cool and moisture at an even level. If these requirements are met it can cope with temperatures as low as minus 5 degrees and up to 36 degrees once established. It is moderately drought resistant.
Add to the above, if it is given an adequate supply of water and a little native fertilizer on a regular basis the plants should respond with excellent flowering over a long period.
It is best suited to areas that have poor drainage like in depressions and around sullage trenches. Place it at the bottom of slopes or retaining walls where moisture lies or seeps out. It must be pruned in the early stages to maintain a bushy shrub.
It can be trimmed and it makes a very good hedge row and native corridor for native birds. Plants should be planted using 2.5 meter to 3 meter centers when used as a hedge.
It is an ideal plant in the garden for attracting beneficial insects particularly lady beetles, hover flies and lace wings.
It makes a good bonsai plant and is easy to work.
Propagation:
Seeds: The seeds can be removed easily from the ripe capsules by placing the capsules in a dry paper bag for a week to 10 days.
Sow freshly collected seeds directly into a seed raising mix, keeping them moist. Do not over water as the seeds may rot off before germination takes place. Place the trays in a warm sunny area or beneath 20mm shade cloth in the bush house. When the seedlings are 20mm to 25mm tall, prick them out and plant them into 50mm native tubes using a good organic mix.
As the seedlings roots reach the bottom of the tubes, nip the tips out if shrubs are requires or nip the lateral stems if a tree is required and plant them out into their permanent position.
Cuttings: Fortunately cuttings strike rather easy. Use 100mm to 200mm long tip cuttings or lateral shoots from the present season’s growth. Take them in warmer months of the year. Remove half the leaves from the bottom section being careful not to tear the bark.
1 Prepare the cutting mix by adding two thirds sharp clean river sand, one third peat or one third perlite. These ingredients must be sterilized,
2 Select good material from non diseased plants,
3 Select semi green stems for cuttings. Look for a stem with two or three nodes,
4 Place the cutting on a flat, hard surface, and make a clean cut down one side of the cutting at the base for 10mm with a sharp sterile knife or razor blade. – This scarification of the node will increase the chances of roots emerging from this spot. Now remove all but one or two the leaves, leaving the apex leaves in tact. If the leaves are very large in proportion to the stem, cut off the apical halves.
5 Fill a saucer with water, and place a little medium strength rooting hormone into another container like a milk bottle top. Dip the node end of the cutting into the water and then into the rooting hormone. Tap off any excess hormone,
6 Use a small dipple stick or old pencil to poke a hole into the soilless potting mix. Ensure the hole is slightly larger than the stem diameter and be careful not to wipe the rooting hormone off the cuttings base. Place 2 to 4 cuttings in each of the 50mm native tubes,
7 I like to place the tubes in bucket with holes drilled in the bottom to allow excess water to drain out. A plastic bag that fits over the bucket is ideal to help maintain temperature and moisture. Place in a semi shaded, warm position like under 50mm shade cloth.
8 When the cuttings have struck, open the bag to allow air circulation for a few days to a week,
9 Once hardened off remove the cuttings from the bag and allow to further hardening for a few more days to a week,
10 Transplant into a good potting mix to grow on.
Fertilize using seaweed, fish emulsion or organic chicken pellets soaked in water on an alternate basis. Fertilize every two months until the plants are established then annually in early September to October to maintain better colour, health, vitality and flowering.
Further Comments from Readers:
“Hi reader, it seems you use The Bible of Botany a lot. That’s great as we have great pleasure in bringing it to you! It’s a little awkward for us to ask, but our first aim is to purchase land approximately 1,600 hectares to link several parcels of N.P. into one at The Pinnacles NSW Australia, but we need your help. We’re not salespeople. We’re amateur botanists who have dedicated over 30 years to saving the environment in a practical way. We depend on donations to reach our goal. If you donate just $5, the price of your coffee this Sunday, We can help to keep the planet alive in a real way and continue to bring you regular updates and features on Australian plants all in one Botanical Bible. Any support is greatly appreciated. Thank you.”
In the spirit of reconciliation we acknowledge the Bundjalung, Gumbaynggirr and Yaegl and all aboriginal nations throughout Australia and their connections to land, sea and community. We pay our respect to their Elders past, present and future for the pleasures we have gained.
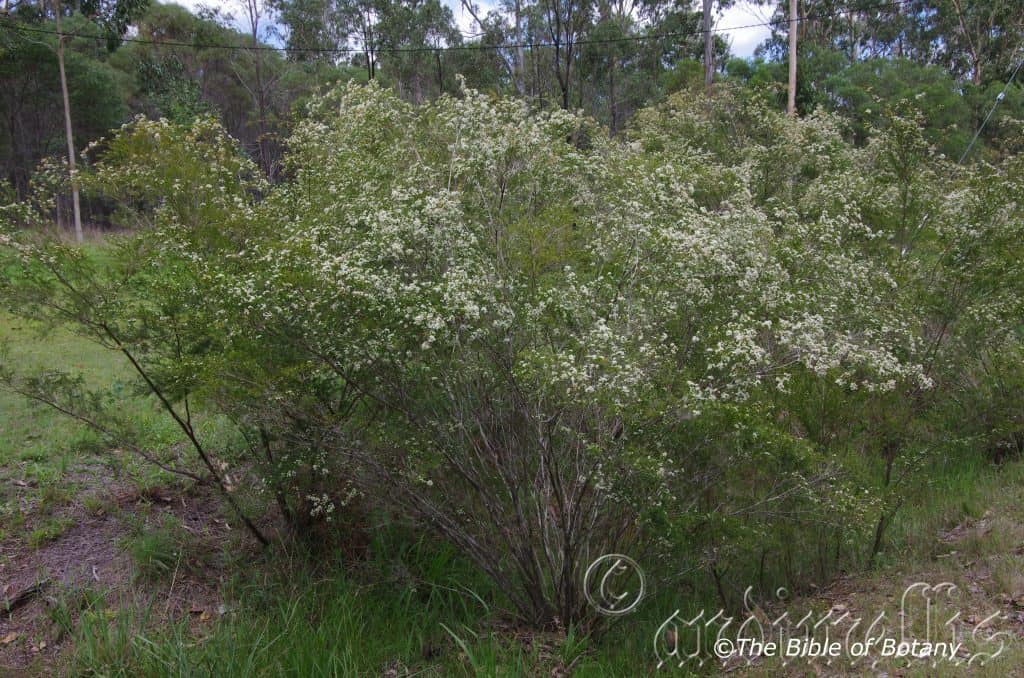
Banyabba Creek NSW
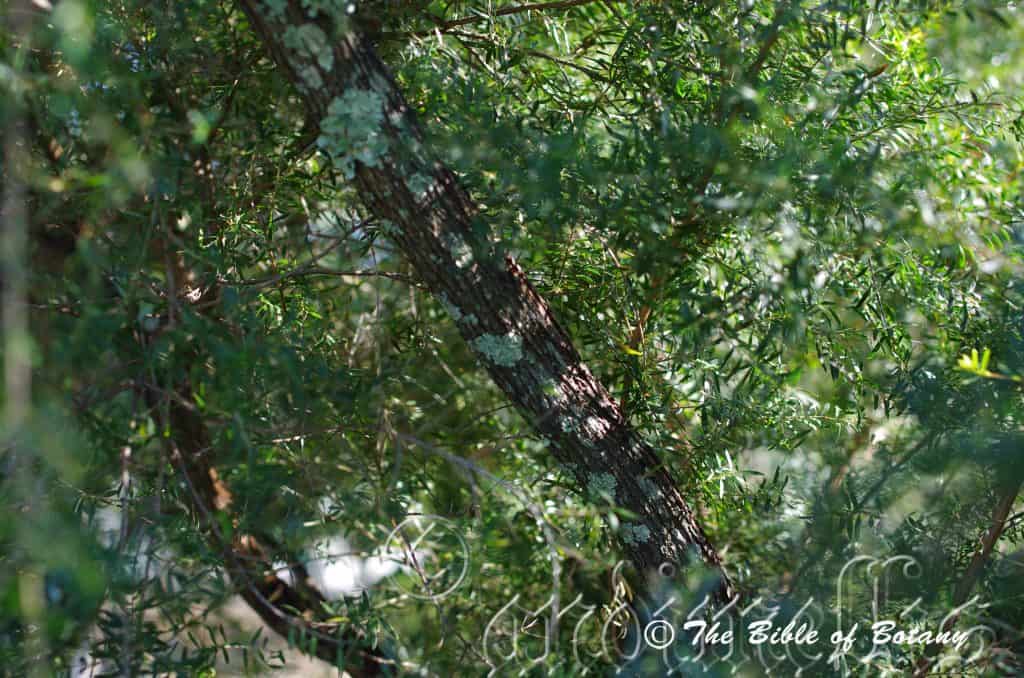
Mount Cootha Botanical Gardens Qld.
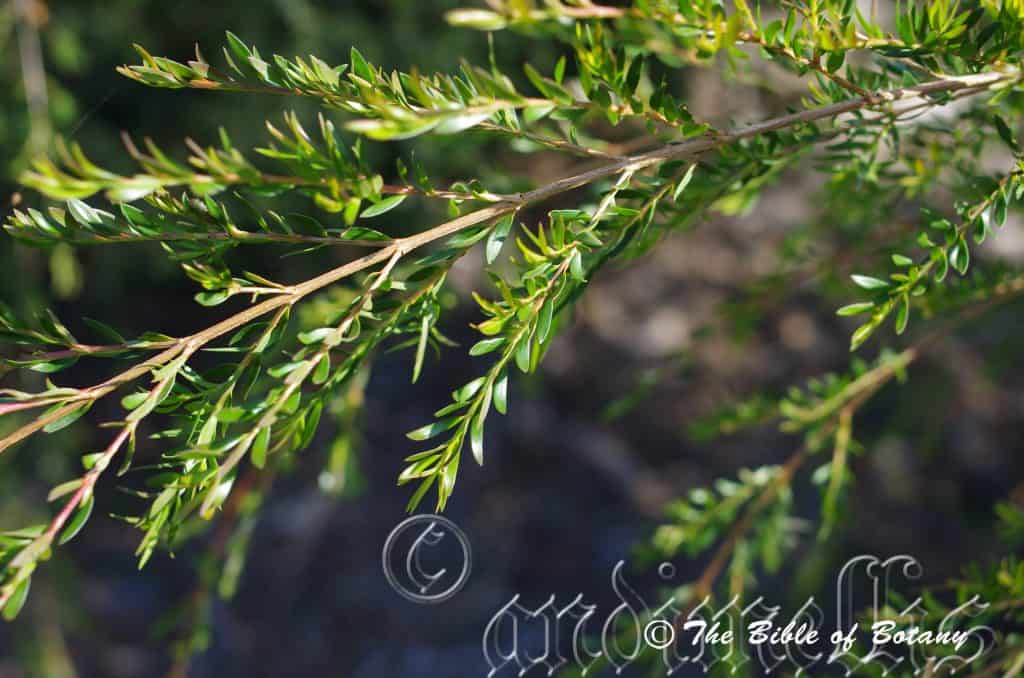
Mount Cootha Botanical Gardens Qld.
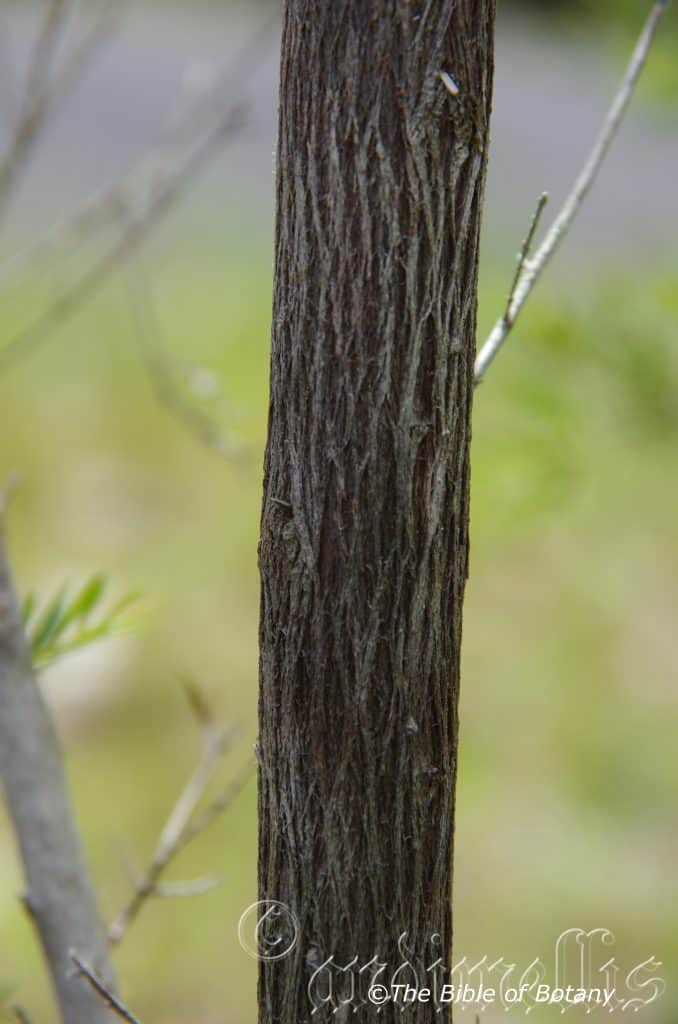
South Grafton NSW
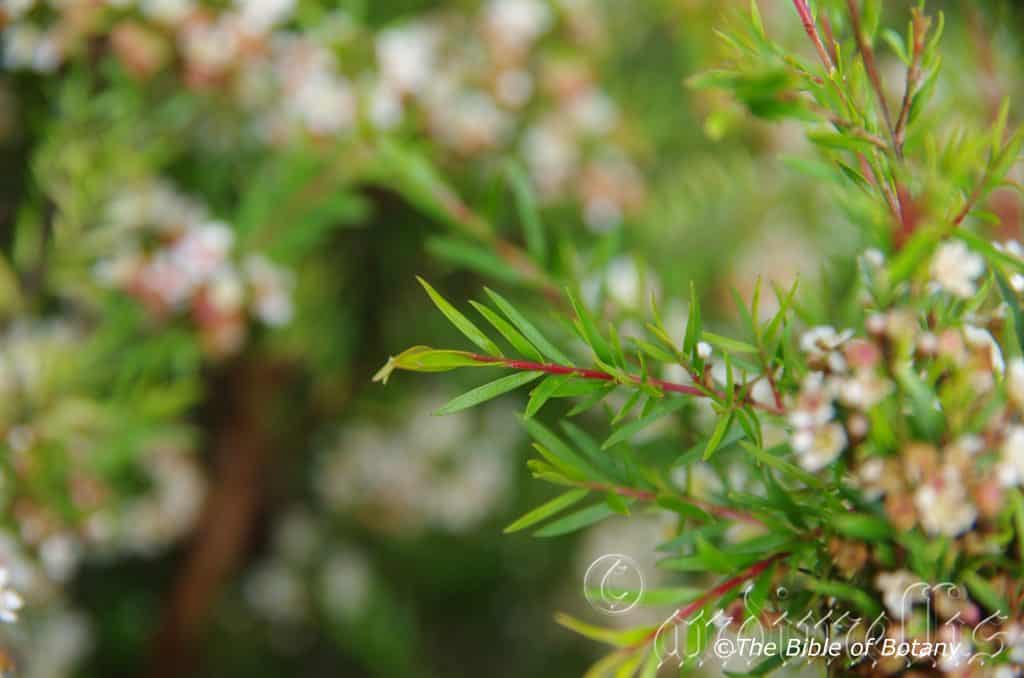
Author’s Garden The Pinnacles NSW
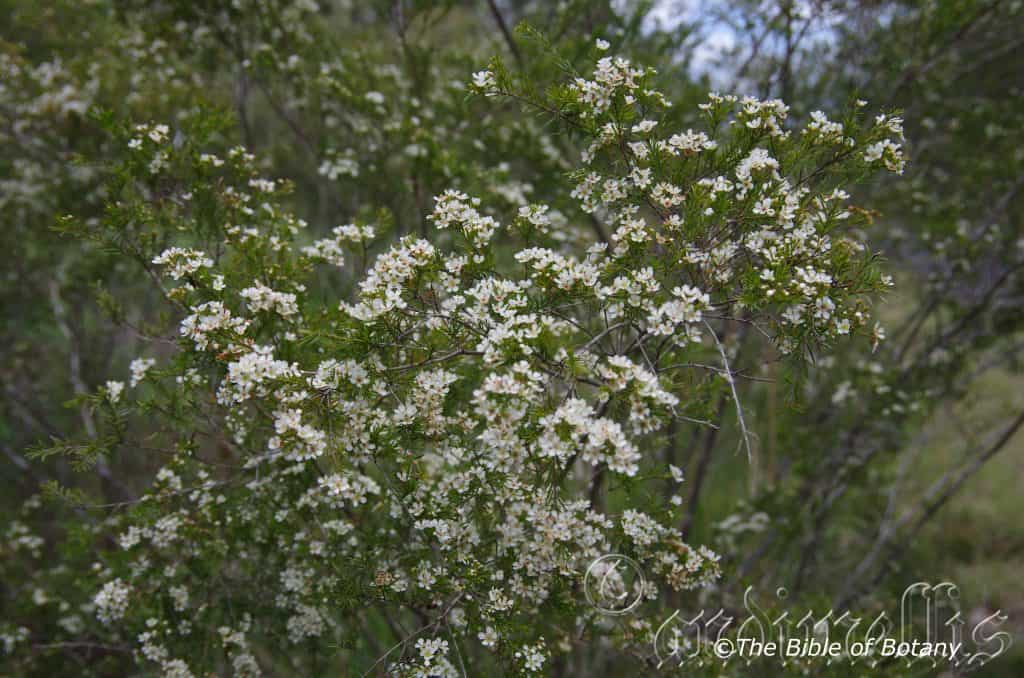
Mount Cootha Botanical Gardens Qld.
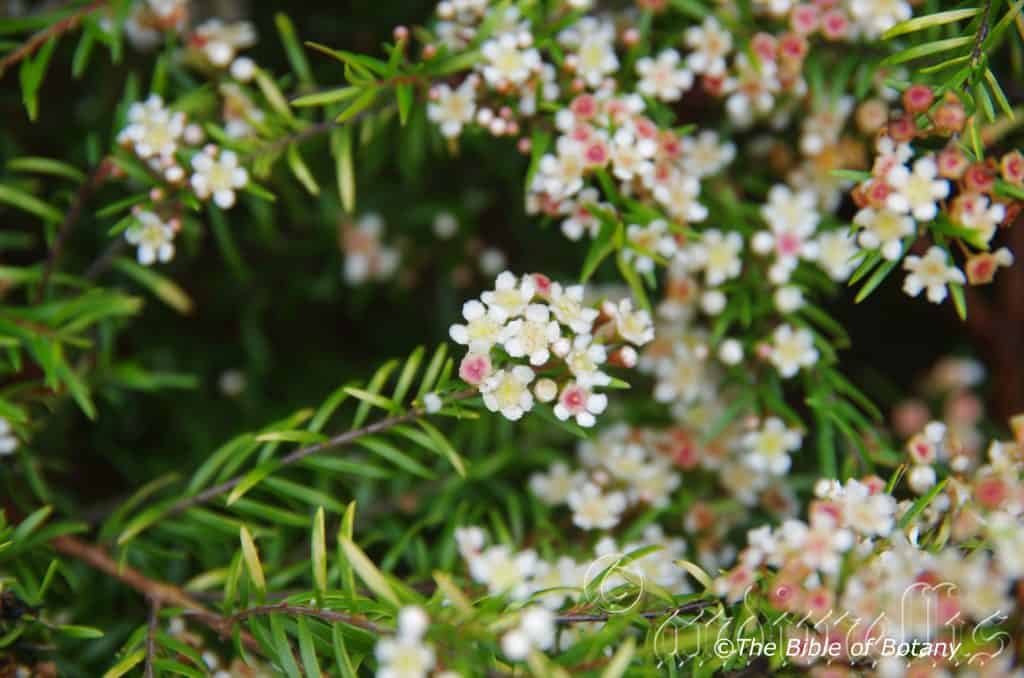
Mount Cootha Botanical Gardens Qld.

Mount Cootha Botanical Gardens Qld.
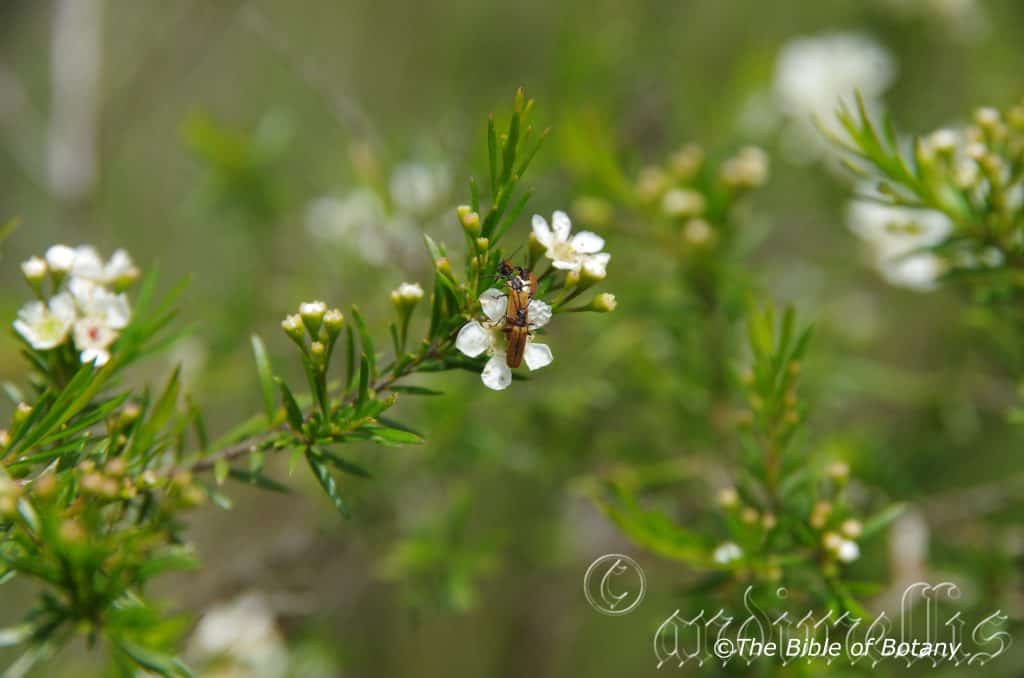
Author’s Garden The Pinnacles NSW
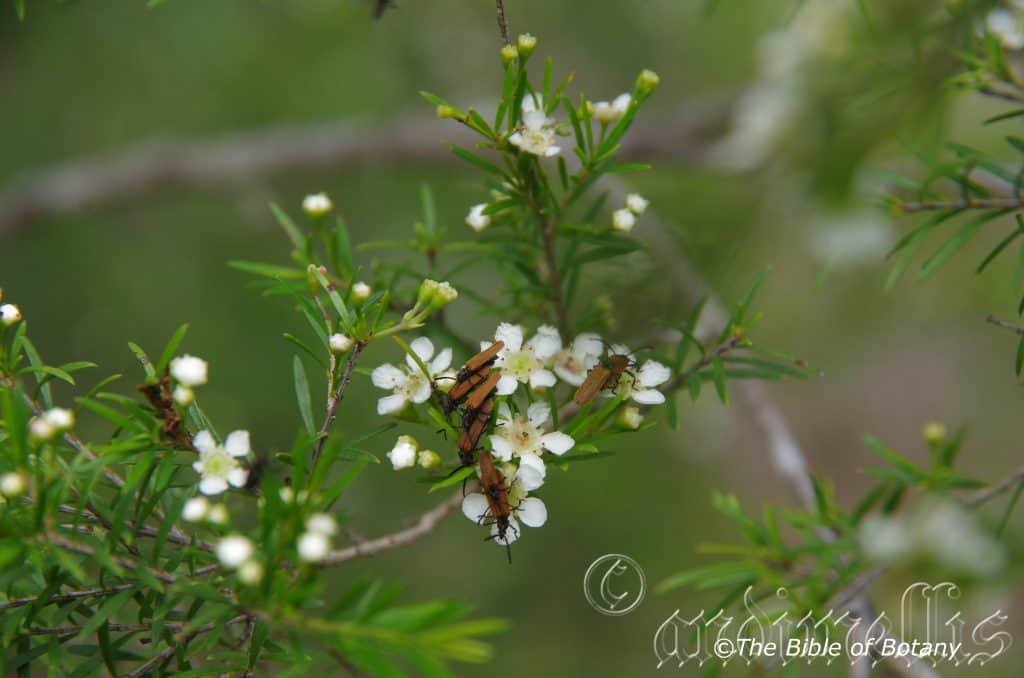
Author’s Garden The Pinnacles NSW
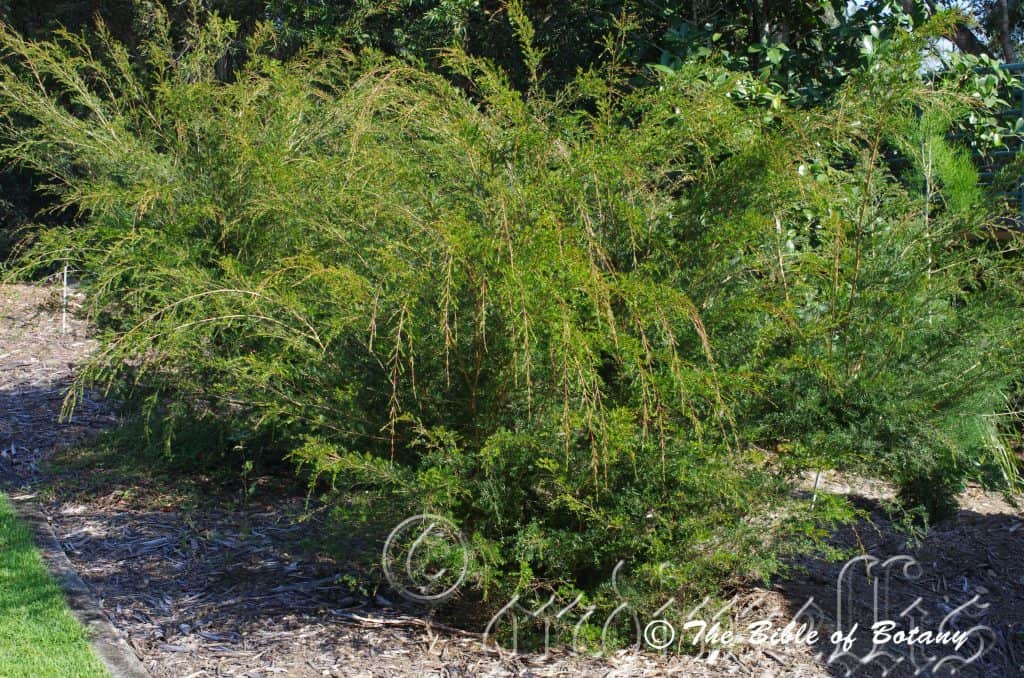
Mount Cootha Botanical Gardens Qld.
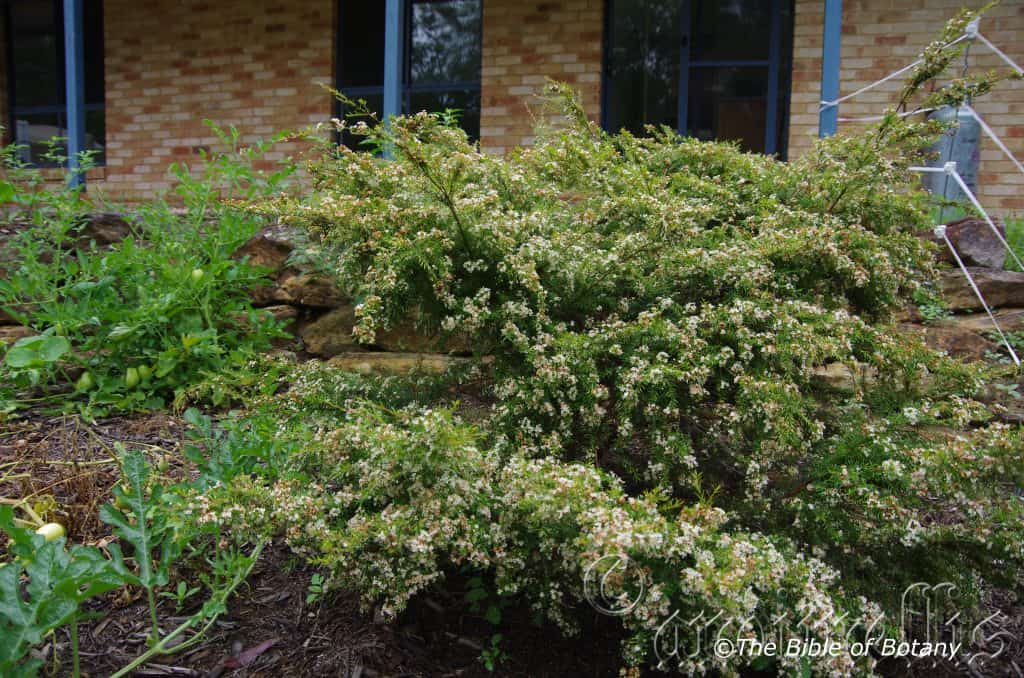
Author’s Garden The Pinnacles NSW
Sannantha similis
Classification:
Unranked: Equisetopsida
Unranked: Magnoliidae
Superorder: Rosanae
Order: Myrtales
Family: Myrtaceae
Genus: May be from Sánnas, which is Ancient Greek or Sannae which is Latin for to grimace and ántha/ánthos, which are Ancient Greek for the male reproductive organ of the flower or the flower. It may refer to anthers, being in uneven numbers around the disc.
Species: From Simili, which is Ancient Greek for alike or similar to. It refers to structures or organs, which have the appearance that is similar or very typical of another species or genus.
Common Name:
Distribution:
Sannantha similis is found on and east of the Great Dividing Range south from Buderum in southern coastal Queensland to Black Hill between Maitland and Newcastle in central coastal New South Wales.
https://avh.ala.org.au/occurrences/search?taxa=Sannantha+similis#tab_mapView
Habitat Aspect Climate:
Sannantha similis prefers full sun to light dappled shade. It grows in moist situations in open woodlands, open forests or exposed situations near waterways. The altitude ranges from 12 meters BSL to 503 meters ASL.
The temperatures range from minus 3 degrees in July to 40 degrees in January.
The rainfalls range from lows of 150mm to 2000mm average per annum.
Soil Requirements:
Sannantha similis prefers coarse sands, light gritty clays. The soils are usually derived from decomposed sandstones, granites, accumulated beach sands or alluvial deposits. The soils pH ranges from 4.5pH to 6pH. It tolerates waterlogged soils. Non saline soils to very saline soils are tolerated.
Height & Spread:
Wild Plants: 2m to 4m by 2m to 3m
Characteristics:
The multiple stems grow to form a dense large shrub or small multi trunked tree with a slightly flanged trunk and angulated stems. The pale greyish–brown stems are slightly flaky.
The alternate, lanceolate to elliptic leaves measures 10mm to 30mm in length by 2.5mm to 6mm in width. The petioles measure 0.8mm to 1.5mm in length. The bases taper to the petiole while the apexes are obtuse to acute. The discolourous laminas are deep green, semi glossy, glabrous and sparsely covered in distinct oil glands on the upper laminas while the lower laminas are paler and are moderately covered in oil glands. The laminas are flat and decurve gently downwards from the bases to the apexes. The margins are entire. The mid vein is prominent on the lower lamina and is deeply impressed on the upper lamina.
The inflorescences are born in small clusters of 2 to 5 individual flowers from the leaf axils. The peduncles measure 3mm to 13mm in length while the pedicels measure 3mm to 7mm in length. The green linear, bracteoles measure 0.9mm to 1.2mm in length.
The pale grass-green to pale lime-green hypanthium is conical smooth and glabrous. The calyx lobes are compound with the inner lobes measuring 0.5mm to 0.6mm length while the outer lobes measure 0.2mm to 0.3mm in length. The hypanthium measures 1.6mm to 2.5mm in length by 3mm to 4mm in diameter. The white petals are broad ovate to orbicular and are somewhat cuneate at the base and measure 2.5mm to 3.7mm in length.
The 8 to 15 white stamens measure 1.2mm to 1.8mm in length. The spherical anthers are white to fawnish. The white style and stigma are glabrous while the ovary is pastel green. The style measures 0.2mm to 0.4mm in length. The flowers appear from October to January
The fruits are broad conical, coriaceous capsules. The capsules are glabrous and measure 2mm to 3mm in length by 2.5mm to 3.5mm in diameter. The green capsules turn grey when ripe. The flattened “D” shaped seeds are brownish-tan.
Confusing Species:
Sannantha similis’s foliage is longer and broader and measures 10mm to 30mm in length by 2.5mm to 6mm in width. The base of the flower petals are rounded.
Sannantha angusta’s foliage is longer and narrower and measures 10mm to 30mm in length by 1.5mm to 4mm in width. The base of the flower petals are spathulate.
Sannantha collina’s foliage is shorter and measures 8mm to 20mm in length by 4mm to 7mm in width. The base of the flower petals are spathulate.
Wildlife:
Sannantha similis’s flowers are very attractive to many types of insects including native bees, butterflies, native pollen flies and hover flies which in return attract many small honeyeaters and insectivorous birds to the garden.
Cultivation:
Sannantha similis is a magnificent large shrub or small tree that is suitable for small gardens. It is ideal at the edge of a bush garden or as specimen tree in a small heath garden in full sun. In cultivation it will grow from 1 meter to 3.5 meters in height by 1 meter to 3.5 meters in diameter when grown in the open as a shrub or from 4 meters to 4.5 meters in height by 2.5 meters to 3 meters in diameter as a small, single trunk tree.
It grows well on all soil types where deep leaf litter keeps the soil cool and moisture at an even level. If these requirements are met it can cope with temperatures as low as minus 5 degrees and up to 36 degrees once established. It is moderately drought resistant.
Add to the above, if it is given an adequate supply of water and a little native fertilizer on a regular basis the plants should respond with excellent flowering over a long period.
It is best suited to areas that have poor drainage like in depressions and around sullage trenches. Place it at the bottom of slopes or retaining walls where moisture lies or seeps out. It must be pruned in the early stages to maintain a bushy shrub.
It can be trimmed and it makes a very good hedge row and native corridor for native birds. Plants should be planted using 2.5 meter to 3 meter centers when used as a hedge.
It is an ideal plant in the garden for attracting beneficial insects particularly lady beetles, hover flies and lace wings.
It makes a good bonsai plant and is easy to work.
Propagation:
Seeds: The seeds can be removed easily from the ripe capsules and placed in a dry paper bag for a week to 10 days.
Sow freshly collected seeds directly into a seed raising mix, keeping them moist. Do not over water as the seeds may rot off before germination takes place. Place the trays in a warm sunny area or beneath 20mm shade cloth in the bush house. When the seedlings are 20mm to 25mm tall, prick them out and plant them into 50mm native tubes using a good organic mix.
As the seedlings roots reach the bottom of the tubes, nip the tips out if shrubs are requires or nip the lateral stems if a tree is required and plant them out into their permanent position.
Cuttings: Fortunately cuttings strike rather easy. Use 100mm to 200mm long tip cuttings or lateral shoots from the present season’s growth. Take them in warmer months of the year. Remove half the leaves from the bottom section being careful not to tear the bark.
1 Prepare the cutting mix by adding two thirds sharp clean river sand, one third peat or one third perlite. These ingredients must be sterilized,
2 Select good material from non diseased plants,
3 Select semi green stems for cuttings. Look for a stem with two or three nodes,
4 Place the cutting on a flat, hard surface, and make a clean cut down one side of the cutting at the base for 10mm with a sharp sterile knife or razor blade. – This scarification of the node will increase the chances of roots emerging from this spot. Now remove all but one or two the leaves, leaving the apex leaves in tact. If the leaves are very large in proportion to the stem, cut off the apical halves.
5 Fill a saucer with water, and place a little medium strength rooting hormone into another container like a milk bottle top. Dip the node end of the cutting into the water and then into the rooting hormone. Tap off any excess hormone,
6 Use a small dipple stick or old pencil to poke a hole into the soilless potting mix. Ensure the hole is slightly larger than the stem diameter and be careful not to wipe the rooting hormone off the cuttings base. Place 2 to 4 cuttings in each of the 50mm native tubes,
7 I like to place the tubes in bucket with holes drilled in the bottom to allow excess water to drain out. A plastic bag that fits over the bucket is ideal to help maintain temperature and moisture. Place in a semi shaded, warm position like under 50mm shade cloth.
8 When the cuttings have struck, open the bag to allow air circulation for a few days to a week,
9 Once hardened off remove the cuttings from the bag and allow to further hardening for a few more days to a week,
10 Transplant into a good potting mix to grow on.
Fertilize using seaweed, fish emulsion or organic chicken pellets soaked in water on an alternate basis. Fertilize every two months until the plants are established then annually in early September to October to maintain better colour, health, vitality and flowering.
Further Comments from Readers:
“Hi reader, it seems you use The Bible of Botany a lot. That’s great as we have great pleasure in bringing it to you! It’s a little awkward for us to ask, but our first aim is to purchase land approximately 1,600 hectares to link several parcels of N.P. into one at The Pinnacles NSW Australia, but we need your help. We’re not salespeople. We’re amateur botanists who have dedicated over 30 years to saving the environment in a practical way. We depend on donations to reach our goal. If you donate just $5, the price of your coffee this Sunday, We can help to keep the planet alive in a real way and continue to bring you regular updates and features on Australian plants all in one Botanical Bible. Any support is greatly appreciated. Thank you.”
In the spirit of reconciliation we acknowledge the Bundjalung, Gumbaynggirr and Yaegl and all aboriginal nations throughout Australia and their connections to land, sea and community. We pay our respect to their Elders past, present and future for the pleasures we have gained.
Santalum obtusifolium
Classification:
Class: Equisetopsida
Subclass: Magnoliidae
Superorder: Santalanae
Order: Santalales
Family: Santalaceae
Genus: From Santalon, which is Latin from the vernacular of the Persian word for fragrant wood. It refers to the beautiful calming scent of the flowers or wood.
Species: From Obtūsum, which is Latin for rounded and Folium, which is Latin for foliage. It refers leaves, which have round or obtuse apexes.
Common Name: Sandalwood or Blunt Sandalwood.
Distribution:
Santalum obtusifolium is found south from Mundubbera in central eastern Queensland to Allen Head Jetty in north eastern Victoria. It is mainly found on and east of the Great Dividing Range except for several populations from Mount Korningbirry in central western New South Wales to Mudgee on the Western Slopes. There is also an isolated population much further north at Mount Carbine in far north Queensland.
https://avh.ala.org.au/occurrences/search?q=taxamm3Amm22Santalum+obtusifoliummm22#tab_mapView
Habitat Aspect Climate:
Santalum obtusifolium prefers dappled shade to full sun. It usually grows in dry sclerophyll forests or dry rainforests, often along creek banks or in open woodlands in seasonal rills, creeks and streams. The altitude ranges from 40 meters ASL to 910 meters ASL.
The temperatures range from minus 3 degrees in July to 42 degrees in January.
The rainfalls range from lows of 300mm to 3000mm average per annum.
Soil Requirements:
Santalum obtusifolium prefers sandy loams to medium clays. The soils are derived from decomposed sandstones, granites, brown basalts, black basalts and metamorphic rocks. The soils pH ranges from 4.5pH to 6pH. It is not tolerant of waterlogged soils however continuous moisture is always available and some inundation for short periods is common along seasonal rills and creeks. Non saline soils to moderately saline soils are tolerated.
Height & Spread:
Wild Plants: 1m to 2.5m by 1m to 2.5m
Characteristics:
Santalum obtusifolium grows as an erect shrub with pendulous branches and glaucous stems. The grey bark on older plants is fissured. The youngest stems and new growth are usually ridged, angular or at times striated. The plants are semi parasitic but to what extent they rely on the host I am not too sure.
The opposite, usually lanceolate to linear or at times elliptic leaves measure 20mm to 65mm in length by 2mm to 15mm in width. The petioles measure 1mm to 5mm in length. The bases taper to the attenuate petioles while the apexes are acute to obtuse. The discolourous laminas are deep green to deep bluish-green, semi glossy to glossy and glabrous on the upper laminas while the lower laminas are paler and duller. The laminas are flat and decurve gently downwards from the bases to the apexes. The margins are entire and recurved to revolute. The mid vein is strongly prominent on the lower lamina and is deeply impressed on the upper lamina.
The inflorescences are usually small umbels born from the leaf axils with 3 to 5 individual flowers. The pale yellow green rachis and pedicels are glabrous. The peduncle measures 4mm to 10mm in length while the pedicels measure 1mm to 1.5mm in length. The receptacle measure 2mm to 3mm in length. The disc with prominent oblong lobes is cream. The triangular, caducous tepals are cream to creamy-yellow and measure 1.5mm to 2mm in length.
The stamens form a ring around the edge of the hypanthium. The ovary is semi inferior. The pale lime-green to yellowish-green style has a 4 lobed glabrous stigma. The flowers appear from December to early January.
Santalum obtusifolium’s drupes are glabrous and measure 8mm to 11mm in length by 6mm to 8mm in diameter. The pale lime green capsules turn deep purple when ripe. The calyxes are persistent at the base while the style base is persistent at the apex of the ripe fruit.
Wildlife:
The ripe fruits are sought after by the Satin Bowerbird Ptilonorhynchus violaceus, the Regent Bowerbird Sericulus chrysocephalus, the Rose Crowned Pigeon Ptilinopus regina, the Green Catbird Ailuroedus crassirostris, the Figbird Sphecotheres vieilloti, and probably by many types of medium Honey Eaters and other fruitigrove birds.
The fruits are edible with a sweet oily texture with a flavour reminiscent of prunes.
Cultivation:
Santalum obtusifolium is a lovely medium shrub that is quite suitable for small gardens. It is ideal at the edge of a bush garden or as a neat hedge or a broad leaf heath plant for sunny to partially shady positions. In cultivation it will grow from 2 meters to 2.5 meters in height by 2 meters to 2.5 meters in diameter when grown in the open.
It grows well on light clays to medium where deep leaf litter keeps the soil cool and moisture at an even level. If these requirements are met it can cope with temperatures as low as minus 3 degrees and up to 39 degrees once established. It is moderately drought resistant.
Add to the above, if it is given an adequate supply of water and a little native fertilizer on a regular basis the plant should respond with excellent flowering and fruiting over a longer period and maintain a glossy look.
It is best suited to areas that have good drainage, on slopes or at the top of walls and banks. It must be pruned in the early stages to develop a bushy shrub.
It can be trimmed and it makes a very good hedge row and native corridor for native birds. Plants should be planted using 2.5 meter to 3 meter centers when used as a hedge.
It is an ideal plant in the garden for attracting various types of small birds.
Propagation:
Seeds: The seeds can be removed easily from the drupe by washing and hand removal or by consuming the flesh from the outside.
Sow fresh seeds directly into a seed raising mix, keeping them moist not wet. Do not over water as the seeds will rot off before germination takes place. Place the trays in a cool shaded area with 30mm to 50mm shade cloth in the bush house.
As the seedlings roots reach the bottom of the tubes plant them out into their permanent position with a suitable host shrub like Alternanthera sp. or Myoporum sp.. Do not delay. Plant them close to a permanent host tree like Cathormium umbellata or Toona ciliate as the plants are semi parasitic.
Fertilize using seaweed, fish emulsion or organic chicken pellets soaked in water on an alternate basis. Fertilize every two months until the plants are established then annually in early September to October to maintain better colour, health, vitality and flowering.
Further Comments from Readers:
“Hi reader, it seems you use The Bible of Botany a lot. That’s great as we have great pleasure in bringing it to you! It’s a little awkward for us to ask, but our first aim is to purchase land approximately 1,600 hectares to link several parcels of N.P. into one at The Pinnacles NSW Australia, but we need your help. We’re not salespeople. We’re amateur botanists who have dedicated over 30 years to saving the environment in a practical way. We depend on donations to reach our goal. If you donate just $5, the price of your coffee this Sunday, We can help to keep the planet alive in a real way and continue to bring you regular updates and features on Australian plants all in one Botanical Bible. Any support is greatly appreciated. Thank you.”
In the spirit of reconciliation we acknowledge the Bundjalung, Gumbaynggirr and Yaegl and all aboriginal nations throughout Australia and their connections to land, sea and community. We pay our respect to their Elders past, present and future for the pleasures we have gained.
Sarcochilus aequalis
Classification:
Unranked: Monocots
Order: Asparagales
Family: Orcidaceae
Subfamily: Epidendroideae
Tribe: Vandeae
Subtribe: Aeridinae
Genus: From Sárx/Sárxa, which is Ancient Greek for fleshy as per the edible flesh of a fruit and Cheilos, which is Ancient Greek for a lip. It refers to orchids which have a fleshy labellum, petals and sepals.
Species: From Aequalis, which is Latin for equal to. It refers to flowers, which are equal to any other flower in the genus or family around in beauty.
Common Name: Boulder Orchid.
Distribution:
Sarcochilus aequalis is restricted to a small area between Carrie Plateau, Wingham, the Comboyne Plateau and Kempsey in central coastal New South Wales. It is found on the Great Dividing Range.
https://avh.ala.org.au/occurrences/search?taxa=Sarcochilus+aequalis#tab_mapView
Habitat Aspect Climate:
Sarcochilus aequalis prefers medium shade to dappled sunlight. It grows on boulders, cliff faces or ledges in exposed situations in sclerophyll forests. Its altitude ranges from 420 meters ASL to 1200 meters ASL.
The temperatures range from minus 2 degrees in August to 36 degrees in January.
The rainfall ranges from lows of 1000mm to 1450mm average per annum. The plants are usually associated in areas of orographic precipitation.
Soil Requirements:
Sarcochilus aequalis usually grows as a lithophyte on rocks. The rocks are usually granites or brown basalts. The soils pH ranges from 5.5pH to 6pH. It does not tolerate waterlogged soil. Only none saline soils are tolerated.
Height & Spread:
Wild Plants: 0.15m to 0.3m by 0.15m to 0.3m.
Characteristics:
Sarcochilus aequalis grows as a semi erect epilithic, often forming large colonies of tufted shoots. The stems measure 50mm to 200mm in length.
The narrow oblong, linear or narrow triangular leaves measure 80mm to 200mm in length by 15mm to 20mm in width. The sessile bases are cauline while the apexes are broad acute to broad acuminate. The concolourous, laminas are deep green, glabrous and deeply channelled above. The laminas are gently convex from the mid vein to the margins and gently decurve downwards on the apical third. The margins are entire. The midvein is prominent on the lower laminas.
The inflorescences are raceme with 5 to 19 individual flowers and measure 60mm to 150mm in length. The peduncle rachis and pedicels are glabrous. The peduncle and rachis are equal in length while the pedicels measure 11mm to 17mm in length including the ovary. The flowers are born from the center of the rosette of leaves. The plants in a particular area flower synchronously. The dorsiventral dimensions of flowers is equal to the lateral dimension and measure 17mm to 22mm in length by 17mm to 22mm in width.
The glabrous dorsal sepal is cream, with reddish-brown spots at the base. The margins are entire. The elliptical to spathulate dorsal sepal measures 8mm to 12mm in length by 3mm to 5mm in width.
The glabrous lateral sepals are cream, with reddish-brown spots at the base. The margins are entire. The elliptical to spathulate lateral sepals measures 8mm to 10mm in length by 3mm to 5mm in width.
The glabrous lateral petals are cream, with reddish-brown spots at the base. The margins are entire. The elliptical to spathulate lateral petals measures 8mm to 10mm in length by 3mm to 5mm in width.
The white labellum is narrow oblong and projects forward. The labellum is creamy yellow with reddish markings and measures 2mm to 3.5mm in length. The column measures 1.5mm to 2mm in length. The column foot is set at right angles with 3 lateral lobes and measures 2.5mm to 3.5mm in length. The flowers appear from August to October.
The fruits are obloidal, porrect capsules. The green capsules turn grey-brown when ripe.
Wildlife:
Sarcochilus aequalis’s wildlife is unknown to the author.
Cultivation:
Sarcochilus aequalis is a beautiful flowering orchid which is rather hardy and easy to grow and to propagate at least as far south as Sale in Victoria along the coast. It does very well either in the bush house attached to a slab of cork, washed pumice stone in a pot or attached to Granitic boulders. Do not attach them to Eucalyptus trees or other trees as the barks contain resins which most Orchids detest.
It does best in terracotta pots or saucers using chunks of pumice stone or scoria in pots. Water is best applied on a weekly basis during the growing season and fortnightly in the non-growing season.
It is best grown beneath 50mm shade cloth or under a rainforest canopy.
Propagation:
Seeds: All orchids that are declared rare, vulnerable or endangered are protected by Federal and State Laws and must not be removed from the wild unless you are a land developer, mining company or main Roads department etc. This includes bulbs, roots, leaves and flowers. No part of any plant can be removed from Federal, State or Local Government land without the prior permission of the authority and this includes the spore.
1. Obtain relevant materials
The first step in growing orchid from seed will be sourcing and having at the ready all materials that will be required in the propagation process.
This includes all of the following:
Unripe orchid seed capsule. If there are 2 capsules secure the second capsule immediately after the first capsule splits or if only one capsule as soon as it changes colour.
Orchid gelling medium with agar which can be purchased from an orchid society or a specialist nursery.
Distilled water
Cooking pot
Spoon
Oven-safe glass or polypropylene containers with lids
Sealable bags
Clean, sterilized cutting board
Rubber gloves
Paper towels
Tweezers or forceps
70 percent ethanol
Bleach
Scalpel or sharp knife
Planting pot
Orchid compost
Length of wire metal
Plastic spray bottle.
deep petri dishes or sterile jars.
2. Prepare agar medium
The agar medium is a special orchid gelling mixture that distilled water will be added to distilled water.
To prepare the medium, mix equal parts of orchid gelling medium with distilled water in a cooking pot.
Place the pot on a stove and bring the mixture to boil for while stirring continuously for two minutes.
Pour the mixture into the petri dishes glass or propylene containers while ensuring not to fill the containers above 20 percent of their volume.
Loosely replace the lids to the containers. Sterilize the containers by heating them up in a microwave oven for between 2 to 3 minutes.
Spray 70 percent ethanol into a sealable bag to create a sterile environment. Transfer the heated containers into the sealable bag.
Allow the containers to cool a bit before tightening their lids and then sealing the bag. Leave the containers to stand for a few days until the mixture solidifies.
3. Prepare seed capsule and work surface
Place an open pot of water on a stove and bring to boil. Place the cutting board in the oven and sterilize.
Put on rubber gloves and sterilize the forceps, and scalpel with 70 percent ethanol.
Insert the seed capsule into a bowel filled with bleach for about fifteen minutes.
Sterilize seed capsule again with 70 percent ethanol and place on grill.
Using the sterilized scalpel, cut open the seed capsule to reveal the seeds. Using a scalpel or sharp knife, scrape out the seeds from the capsule unto an ethanol soaked paper towel.
4. Flasking of the seed
Take out the petri dishes or glass jars containers holding the agar medium. Over the steam, open up the containers and transfer seeds from the ethanol soaked paper towel into the individual containers using the sterilized forceps.
The amount of seeds will determine the number of containers required. Replace the lid of the containers and place them on a window sill that receives indirect sunlight.
5. Wait and exercise patience
All that can be done at this point is to wait until the seeds germinate. The amount of time that this might take varies and is dependent on the particular species.
Generally, the time can range from a few months to a few years. During this period of waiting, ensure the containers are free from contamination to ensure that germination is not disrupted.
6. Emergence of protocorms
Protocorms are tuber-shaped bodies with rhizoids that are produced by the young seedlings of various orchids. Protocorms represent the embryonic form of the orchid plant.
Their emergence after the period of waiting at an affirmation that everything in the propagation process is on track.
7. Transflask orchid seedlings is done after they have developed roots
Upon the emergence of the protocorms, consistently observe the growth of the seedlings. At the point when the seedlings appear to overcrowd the flask, transflasking should be carried out, typically within 30 and 60 days.
* This is done by removing individual seedlings using sterilized tweezers from the original containers and placing them in new containers also filled, in a proportion similar to the original, with agar medium. 6 to 8 in a standard petri dish or 1or 2 to a test tube
8. Transplant seedlings into planting pots
On the presumption that there are no disruptions to the plant growth, the seedlings will eventually outgrow the containers.
At this point, they are to be transplanted into planting pots. A good rule of thumb to determine when they are ready to be transplanted is when the seedlings have developed roots that have grown up to the length of one-quarter of an inch.
To transplant, prepare a planting pot or other container for receiving the seedling by majorly filling it up with coarse fir bark and possibly some slightly moist orchid compost mixture containing perlite, fine charcoal, redwood bark shavings, etc.
To extract the seedlings, submerge the containers in warm water to help loosen the agar gel.
Once the agar medium is softened, twist a piece of metal to form a loop and in turn, use it to carefully pull out the seedlings from the container. It is best done if the agar and seedling can be removed together.
The seedlings can be further rinsed in lukewarm water to remove any excess agar mixture still stuck to them.
Following this, the seedlings can now be planted into the prepared pot with at least 50mm of space between each individual seedling.
9. Positioning the orchid
The seedling once fully transplanted should be placed in a location that is warm with good indirect sun light.
Slowly position the pots into an area that closely assimilates the conditions it will be growing under.
The choice as to whether the plant should be exposed to full sun or in direct sunlight will be dependent on the particular orchid specie.
10. Subsequent care of the plant
After the first week, the seedling can be misted several times a day and watered just once a week.
A guide in watering the plant will be using the dryness of the fir back that is, water the plant until the fir back is completely moistened and wait till it has completely dried out before watering again.
Do not fertilize until the seedlings have fully established themselves.
Division: Division is the easiest method for amateurs to propagate Sarcochilus aequalis. At some point, the orchid will become root-bound in its pot or large enough to divide the clump on a tree or slab. The only tools required are sharp sterile knife a slab of cork or pumice stone and some hemp string. I prefer hemp string because it is totally natural but unfortunately is difficult to obtain.
The potted Sarcochilus aequalis: Remove sarcochilus aequalis from its pot and set it on a firm surface. Cut through the roots to create separate sections of the plant. Each piece should include 2 to 5 stems and a healthy root system. Repot using scoria or washed pumice stone from a salt free environment. Use a central stick to ensure the plant is tied securely so that it does not move.
Fertilize using seaweed, fish emulsion or organic chicken pellets soaked in water on an alternate basis as a foliar spray. Fertilize every two months until the plants are established then annually in early September to October to maintain better colour, health, vitality and flowering.
Further Comments from Readers:
“Hi reader, it seems you use The Bible of Botany a lot. That’s great as we have great pleasure in bringing it to you! It’s a little awkward for us to ask, but our first aim is to purchase land approximately 1,600 hectares to link several parcels of N.P. into one at The Pinnacles NSW Australia, but we need your help. We’re not salespeople. We’re amateur botanists who have dedicated over 30 years to saving the environment in a practical way. We depend on donations to reach our goal. If you donate just $5, the price of your coffee this Sunday, We can help to keep the planet alive in a real way and continue to bring you regular updates and features on Australian plants all in one Botanical Bible. Any support is greatly appreciated. Thank you.”
In the spirit of reconciliation we acknowledge the Bundjalung, Gumbaynggirr and Yaegl and all aboriginal nations throughout Australia and their connections to land, sea and community. We pay our respect to their Elders past, present and future for the pleasures we have gained.
Sarcochilus australis
Classification:
Unranked: Monocots
Order: Asparagales
Family: Orcidaceae
Subfamily: Epidendroideae
Tribe: Vandeae
Subtribe: Aeridinae
Genus: From Sárx/Sárxa, which is Ancient Greek for fleshy as per the edible flesh of a fruit and Cheilos, which is Ancient Greek for a lip. It refers to orchids which have a fleshy labellum, petals and sepals.
Species: From Terra Australis, which is Latin for land of the south. It refers to plants, which were first discovered from the land down under.
Common Name: Butterfly Orchid.
Distribution:
Sarcochilus australis is found south from the Cateract River in north eastern New South Wales to kelvedon in central eastern Tasmania and the northern part of Tasmania including the Bass Strait Islands.
https://avh.ala.org.au/occurrences/search?taxa=Sarcochilus+australis#tab_mapView
Habitat Aspect Climate:
Sarcochilus australis prefers medium shade to dappled sunlight. It grows on the outer branches of trees in moist littoral rainforests, moist sub-tropical rainforests, and moist gallery forests to moist temperate rainforest. Its altitude ranges from 10 meters ASL to 1000 meters ASL.
The temperatures range from minus 3 degrees in August to 36 degrees in January.
The rainfall ranges from lows of 800mm to 1400mm average per annum. The plants are usually associated in areas of orographic precipitation.
Soil Requirements:
Sarcochilus australis usually grows as an epiphyte on the outer limbs of rainforest trees.
Height & Spread:
Wild Plants: 0.2m to 0.3m by 0.1m to 0.16m.
Characteristics:
Sarcochilus australis grows as a semi pendent epiphyte on the trunks of trees and usually have 1 shoot. The stems measure 5mm to 70mm in length. The roots are thick and rasp like.
The 5 to 9 narrow oblong to narrow, elliptic leaves measure 20mm to 120mm in length by 3mm to 14mm in width. The sessile bases are cauline while the apexes are acute. The concolourous, laminas are olive-green and glabrous. The laminas are flat and decurve downwards from the bases to the apexes while the margins are entire. The midvein is prominent on the lower laminas and slightly channeled above.
The inflorescences are pendant racemes with 1 to 15 individual flowers and measure 15mm to 190mm in length. The peduncle, rachis and pedicels are glabrous. The peduncle measures 5mm to 30mm in length while the rachis measures 10mm to 160mm in length and the pedicels measure 3mm to 8mm in length including the ovary. The flowers are born from the center of the rosette of leaves. The plants in a particular area flower synchronously. The dorsiventral dimension of flower is conspicuously greater than lateral dimension.
The glabrous oblong dorsal sepal is usually deep grass-green and deep yellowish-green at the base, brownish and deep yellowish-green at the base or rarely yellowish throughout. The margins are entire. The dorsal sepal measures 6mm to 10mm in length by 3mm to 6mm in width.
The glabrous oblong lateral sepals is usually deep grass-green and deep yellowish-green at the base, brownish and deep yellowish-green at the base or rarely yellowish throughout. The margins are entire. The lateral sepals measures 4mm to 7mm in length by 2mm to 2.5mm in width.
The glabrous oblong lateral petals is usually deep grass-green and deep yellowish-green at the base, brownish and deep yellowish-green at the base or rarely yellowish throughout. The margins are entire. The lateral petals measures 4mm to 7mm in length by 2mm to 2.5mm in width.
The white labellum is narrow ovate to broad linear, is hinged to column foot and projects forward. The trilobed labellum measures 3.5 mm to 6mm in length with the third short mid lobe being acute and pinkish. The column measures 2mm to 3mm in length. The column foot is set at right angles to the column and measures 3mm to 4.5mm in length while the column foot’s lobes measure 3mm to 4.5mm in length. The flowers appear from October to December.
The fruits are obloidal, porrect capsules. The green capsules turn pale grey-brown when ripe.
Wildlife:
Sarcochilus australis’s wildlife is unknown to the author.
Cultivation:
All native orchids are protected plant species. It is illegal to remove naturally growing orchid plants from the bush and a license is required for the removal of seed capsule.
Sarcochilus australis is a beautiful flowering orchid which is rather hardy and easy to grow and to propagate at least as far south as Sale in Victoria along the coast. It does very well either in the bush house attached to a slab of cork, washed pumice stone in a pot or attached to Granitic boulders. Do not attach them to Eucalyptus trees or other trees as the barks contain resins which most Orchids detest.
Trees with mass plantings of mixed orchids look really spectacular and those that have several Sarcochilus australis can add interest and curiosity over a long period especially when in flower. Even the roots have some appeal as they cover the trunks. Ficus species, Ceropetalum species and Elaeocarpus species are good host trees as they are natural host for this orchid in the wild as are Cupaniopsis species.
It does best in terracotta pots or saucers using chunks of pumice stone or scoria in pots. Water is best applied on a weekly basis during the growing season and fortnightly in the non-growing season.
It is best grown beneath 50mm shade cloth or under a rainforest canopy.
Propagation:
Seeds: All orchids that are declared rare, vulnerable or endangered are protected by Federal and State Laws and must not be removed from the wild unless you are a land developer, mining company or main Roads department etc. This includes bulbs, roots, leaves and flowers. No part of any plant can be removed from Federal, State or Local Government land without the prior permission of the authority and this includes the spore.
1. Obtain relevant materials
The first step in growing orchid from seed will be sourcing and having at the ready all materials that will be required in the propagation process.
This includes all of the following:
Unripe orchid seed capsule. If there are 2 capsules secure the second capsule immediately after the first capsule splits or if only one capsule as soon as it changes colour.
Orchid gelling medium with agar which can be purchased from an orchid society or a specialist nursery.
Distilled water
Cooking pot
Spoon
Oven-safe glass or polypropylene containers with lids
Sealable bags
Clean, sterilized cutting board
Rubber gloves
Paper towels
Tweezers or forceps
70 percent ethanol
Bleach
Scalpel or sharp knife
Planting pot
Orchid compost
Length of wire metal
Plastic spray bottle.
deep petri dishes or sterile jars.
2. Prepare agar medium
The agar medium is a special orchid gelling mixture that distilled water will be added to distilled water.
To prepare the medium, mix equal parts of orchid gelling medium with distilled water in a cooking pot.
Place the pot on a stove and bring the mixture to boil for while stirring continuously for two minutes.
Pour the mixture into the petri dishes glass or propylene containers while ensuring not to fill the containers above 20 percent of their volume.
Loosely replace the lids to the containers. Sterilize the containers by heating them up in a microwave oven for between 2 to 3 minutes.
Spray 70 percent ethanol into a sealable bag to create a sterile environment. Transfer the heated containers into the sealable bag.
Allow the containers to cool a bit before tightening their lids and then sealing the bag. Leave the containers to stand for a few days until the mixture solidifies.
3. Prepare seed capsule and work surface
Place an open pot of water on a stove and bring to boil. Place the cutting board in the oven and sterilize.
Put on rubber gloves and sterilize the forceps, and scalpel with 70 percent ethanol.
Insert the seed capsule into a bowel filled with bleach for about fifteen minutes.
Sterilize seed capsule again with 70 percent ethanol and place on grill.
Using the sterilized scalpel, cut open the seed capsule to reveal the seeds. Using a scalpel or sharp knife, scrape out the seeds from the capsule unto an ethanol soaked paper towel.
4. Flasking of the seed
Take out the petri dishes or glass jars containers holding the agar medium. Over the steam, open up the containers and transfer seeds from the ethanol soaked paper towel into the individual containers using the sterilized forceps.
The amount of seeds will determine the number of containers required. Replace the lid of the containers and place them on a window sill that receives indirect sunlight.
5. Wait and exercise patience
All that can be done at this point is to wait until the seeds germinate. The amount of time that this might take varies and is dependent on the particular species.
Generally, the time can range from a few months to a few years. During this period of waiting, ensure the containers are free from contamination to ensure that germination is not disrupted.
6. Emergence of protocorms
Protocorms are tuber-shaped bodies with rhizoids that are produced by the young seedlings of various orchids. Protocorms represent the embryonic form of the orchid plant.
Their emergence after the period of waiting at an affirmation that everything in the propagation process is on track.
7. Transflask orchid seedlings is done after they have developed roots
Upon the emergence of the protocorms, consistently observe the growth of the seedlings. At the point when the seedlings appear to overcrowd the flask, transflasking should be carried out, typically within 30 and 60 days.
* This is done by removing individual seedlings using sterilized tweezers from the original containers and placing them in new containers also filled, in a proportion similar to the original, with agar medium. 6 to 8 in a standard petri dish or 1or 2 to a test tube
8. Transplant seedlings into planting pots
On the presumption that there are no disruptions to the plant growth, the seedlings will eventually outgrow the containers.
At this point, they are to be transplanted into planting pots. A good rule of thumb to determine when they are ready to be transplanted is when the seedlings have developed roots that have grown up to the length of one-quarter of an inch.
To transplant, prepare a planting pot or other container for receiving the seedling by majorly filling it up with coarse fir bark and possibly some slightly moist orchid compost mixture containing perlite, fine charcoal, redwood bark shavings, etc.
To extract the seedlings, submerge the containers in warm water to help loosen the agar gel.
Once the agar medium is softened, twist a piece of metal to form a loop and in turn, use it to carefully pull out the seedlings from the container. It is best done if the agar and seedling can be removed together.
The seedlings can be further rinsed in lukewarm water to remove any excess agar mixture still stuck to them.
Following this, the seedlings can now be planted into the prepared pot with at least 50mm of space between each individual seedling.
9. Positioning the orchid
The seedling once fully transplanted should be placed in a location that is warm with good indirect sun light.
Slowly position the pots into an area that closely assimilates the conditions it will be growing under.
The choice as to whether the plant should be exposed to full sun or in direct sunlight will be dependent on the particular orchid specie.
10. Subsequent care of the plant
After the first week, the seedling can be misted several times a day and watered just once a week.
A guide in watering the plant will be using the dryness of the fir back that is, water the plant until the fir back is completely moistened and wait till it has completely dried out before watering again.
Do not fertilize until the seedlings have fully established themselves.
Division: Division is the easiest method for amateurs to propagate Sarcochilus australis. At some point, the orchid will become root bound in its pot, too large for the slab of cork or may set a second growing stem that can be severed. The only tools required are a sharp sterile knife, a slab of cork or pumice stone and some hemp or nylon string. I prefer hemp string because it is totally natural but is difficult to obtain.
Potted Sarcochilus australis: Remove the Sarcochilus australis from its pot and set it on a firm surface. Cut through the roots to create separate sections of the plant. Each piece should include four to five stems and a large chunk of the root system. Repot using a central stick to ensure the plant is tied securely so that it does not move.
Slab plants: Take the slab and cut it down the middle ensuring each section has healthy terminal stems. Retie the new divisions cork or pumice stone onto a new piece of cork or pumice stone. Tie them so that they do not move. Do not over tighten as this cut’s off the flow of nutrients to the new leaves.
Treat plants that are growing naturally on a tree in the same way. First cut the plant in half then slice just below the roots into the outer layer of bark being careful not to damage the stems or the xylem and phloem layers of the tree Remove the section and retie it to another section of the tree or cork slab as desired.
Fertilize using seaweed, fish emulsion or organic chicken pellets soaked in water on an alternate basis as a foliar spray. Fertilize every two months until the plants are established then annually in early September to October to maintain better colour, health, vitality and flowering.
Further Comments from Readers:
“Hi reader, it seems you use The Bible of Botany a lot. That’s great as we have great pleasure in bringing it to you! It’s a little awkward for us to ask, but our first aim is to purchase land approximately 1,600 hectares to link several parcels of N.P. into one at The Pinnacles NSW Australia, but we need your help. We’re not salespeople. We’re amateur botanists who have dedicated over 30 years to saving the environment in a practical way. We depend on donations to reach our goal. If you donate just $5, the price of your coffee this Sunday, We can help to keep the planet alive in a real way and continue to bring you regular updates and features on Australian plants all in one Botanical Bible. Any support is greatly appreciated. Thank you.”
In the spirit of reconciliation we acknowledge the Bundjalung, Gumbaynggirr and Yaegl and all aboriginal nations throughout Australia and their connections to land, sea and community. We pay our respect to their Elders past, present and future for the pleasures we have gained.
Sarcochilus ceciliae
Classification:
Unranked: Monocots
Order: Asparagales
Family: Orcidaceae
Subfamily: Epidendroideae
Tribe: Vandeae
Subtribe: Aeridinae
Genus: From Sárx/Sárxa, which is Ancient Greek for fleshy as per the edible flesh of a fruit and Cheilos, which is Ancient Greek for a lip. It refers to orchids which have a fleshy labellum, petals and sepals.
Species: Is named in honour of Cecil Rollo Payton Andrews; 1870-1951, who was an English amateur botanist and collector of plants.
Common Name: Fairybells.
Distribution:
Sarcochilus ceciliae is found in 2 isolated populations on and east of the Great Dividing Range to the coast except for where it extends westward to Bauhinia in central Queensland. It is found south from Herberton in far north east Queensland to Bulli in central coastal New South Wales with a further population at Korumburra and in southern Victoria.
https://avh.ala.org.au/occurrences/search?taxa=Sarcochilus+ceciliae#tab_mapView
Habitat Aspect Climate:
Sarcochilus ceciliae prefers medium shade to dappled sunlight. It grows on boulders, cliff faces or ledges in exposed situations in sclerophyll forests. Its altitude ranges from 400 meters ASL to 1050 meters ASL.
The temperatures range from minus 2 degrees in August to 38 degrees in January.
The rainfall ranges from lows of 550mm to 3200mm average per annum. The plants are usually associated in areas of orographic precipitation.
Soil Requirements:
Sarcochilus ceciliae usually grows as a lithophyte on rocks. The rocks are usually granites or brown basalts. The soils pH ranges from 5.5pH to 6pH. It does not tolerate waterlogged soil. Only non saline soils are tolerated.
Height & Spread:
Wild Plants: 0.08m to 0.12m by 0.1m to 0.16m.
Characteristics:
Sarcochilus ceciliae grows as an erect epiphyte, lithophyte or rarely as a terrestrial herb with usually numerous tufted shoots. The stems measure 20mm to 100mm in length.
The linear leaves measure 25mm to 90mm in length by 3mm to 10mm in width. The sessile bases are caudate while the apexes are acuminate. The concolourous, laminas are deep green and glabrous. The laminas are channeled, usually spotted and decurve downwards from the bases. The margins are entire. The midvein is prominent on the lower laminas.
The glabrous broad elliptical to broad ovate dorsal sepal is usually pale pink but deep pinks are known while white flowers are rare. The margins are entire. The dorsal sepal measures 5mm to 6mm in length by 2.5mm to 3mm in width.
The glabrous ovate to obovate lateral sepals are usually pale pink but deep pinks are known while white flowers are rare. The margins are entire. The lateral sepals bases are fused to the column foot and measure 6mm to 7mm in length by 3mm to 4mm in width.
The glabrous narrowly oblong to narrow ovate lateral petals is usually pale pink but deep pinks are known while white flowers are rare. The margins are entire. The lateral petals measures 4.5mm to 5.5mm in length by 1.5mm to 2.5mm in width.
The usually pale pink to deep pink or rarely white porrect, labellum is narrow ovate to broad linear, is hinged to column foot. The trilobed labellum measures 4 mm to 4.5mm in length by 3mm to 3.3mm in width. The lateral lobes are erect with irregular, incomplete reddish stripes and measure 2.5mm to 3mm in length. It is fused with the lateral lobes. The column foot is at right angles to column and measures 2mm length. The short mid lobe is thick and sparsely covered in short, white puberulent hairs. The flowers appear from October to January.
The fruits are obloidal, porrect capsules. The green capsules turn grey-brown when ripe.
Wildlife:
Sarcochilus ceciliae’s wildlife is unknown to the author.
All native orchids are protected plant species. It is illegal to remove naturally growing orchid plants from the bush and a license is required for the removal of seed capsule.
Cultivation:
Sarcochilus ceciliae is a beautiful flowering orchid which is rather hardy and easy to grow and to propagate at least as far south as sale in Victoria along the coast. It does very well either in the bush house attached to a slab of cork or washed pumice stone or attached to most rainforest trees that do not shed their bark in a sheltered area. Do not attach them to Eucalyptus trees as the barks contain resins which most Orchids detest.
Trees with mass plantings of mixed orchids look really spectacular and those that have several Sarcochilus ceciliae add interest and curiosity over a long period especially when in flower. Even the roots have some appeal as it covers the trunks. Ficus species, Ceropetalum species and Elaeocarpus species are good host trees as they are the natural host for this orchid in the wild as are Cupaniopsis species closer to the coast.
It does best in terracotta pots or saucers using chunks of pumice stone or scoria in pots. Water is best applied on a weekly basis during the growing season and fortnightly in the non-growing season.
It is best grown beneath 50mm shade cloth or under a rainforest canopy.
Propagation:
Seeds: All orchids that are declared rare, vulnerable or endangered are protected by Federal and State Laws and must not be removed from the wild unless you are a land developer, mining company or main Roads department etc. This includes bulbs, roots, leaves and flowers. No part of any plant can be removed from Federal, State or Local Government land without the prior permission of the authority and this includes the spore.
1. Obtain relevant materials
The first step in growing orchid from seed will be sourcing and having at the ready all materials that will be required in the propagation process.
This includes all of the following:
Unripe orchid seed capsule. If there are 2 capsules secure the second capsule immediately after the first capsule splits or if only one capsule as soon as it changes colour.
Orchid gelling medium with agar which can be purchased from an orchid society or a specialist nursery.
Distilled water
Cooking pot
Spoon
Oven-safe glass or polypropylene containers with lids
Sealable bags
Clean, sterilized cutting board
Rubber gloves
Paper towels
Tweezers or forceps
70 percent ethanol
Bleach
Scalpel or sharp knife
Planting pot
Orchid compost
Length of wire metal
Plastic spray bottle.
deep petri dishes or sterile jars.
2. Prepare agar medium
The agar medium is a special orchid gelling mixture that distilled water will be added to distilled water.
To prepare the medium, mix equal parts of orchid gelling medium with distilled water in a cooking pot.
Place the pot on a stove and bring the mixture to boil for while stirring continuously for two minutes.
Pour the mixture into the petri dishes glass or propylene containers while ensuring not to fill the containers above 20 percent of their volume.
Loosely replace the lids to the containers. Sterilize the containers by heating them up in a microwave oven for between 2 to 3 minutes.
Spray 70 percent ethanol into a sealable bag to create a sterile environment. Transfer the heated containers into the sealable bag.
Allow the containers to cool a bit before tightening their lids and then sealing the bag. Leave the containers to stand for a few days until the mixture solidifies.
3. Prepare seed capsule and work surface
Place an open pot of water on a stove and bring to boil. Place the cutting board in the oven and sterilize.
Put on rubber gloves and sterilize the forceps, and scalpel with 70 percent ethanol.
Insert the seed capsule into a bowel filled with bleach for about fifteen minutes.
Sterilize seed capsule again with 70 percent ethanol and place on grill.
Using the sterilized scalpel, cut open the seed capsule to reveal the seeds. Using a scalpel or sharp knife, scrape out the seeds from the capsule unto an ethanol soaked paper towel.
4. Flasking of the seed
Take out the petri dishes or glass jars containers holding the agar medium. Over the steam, open up the containers and transfer seeds from the ethanol soaked paper towel into the individual containers using the sterilized forceps.
The amount of seeds will determine the number of containers required. Replace the lid of the containers and place them on a window sill that receives indirect sunlight.
5. Wait and exercise patience
All that can be done at this point is to wait until the seeds germinate. The amount of time that this might take varies and is dependent on the particular species.
Generally, the time can range from a few months to a few years. During this period of waiting, ensure the containers are free from contamination to ensure that germination is not disrupted.
6. Emergence of protocorms
Protocorms are tuber-shaped bodies with rhizoids that are produced by the young seedlings of various orchids. Protocorms represent the embryonic form of the orchid plant.
Their emergence after the period of waiting at an affirmation that everything in the propagation process is on track.
7. Transflask orchid seedlings is done after they have developed roots
Upon the emergence of the protocorms, consistently observe the growth of the seedlings. At the point when the seedlings appear to overcrowd the flask, transflasking should be carried out, typically within 30 and 60 days.
* This is done by removing individual seedlings using sterilized tweezers from the original containers and placing them in new containers also filled, in a proportion similar to the original, with agar medium. 6 to 8 in a standard petri dish or 1or 2 to a test tube
8. Transplant seedlings into planting pots
On the presumption that there are no disruptions to the plant growth, the seedlings will eventually outgrow the containers.
At this point, they are to be transplanted into planting pots. A good rule of thumb to determine when they are ready to be transplanted is when the seedlings have developed roots that have grown up to the length of one-quarter of an inch.
To transplant, prepare a planting pot or other container for receiving the seedling by majorly filling it up with coarse fir bark and possibly some slightly moist orchid compost mixture containing perlite, fine charcoal, redwood bark shavings, etc.
To extract the seedlings, submerge the containers in warm water to help loosen the agar gel.
Once the agar medium is softened, twist a piece of metal to form a loop and in turn, use it to carefully pull out the seedlings from the container. It is best done if the agar and seedling can be removed together.
The seedlings can be further rinsed in lukewarm water to remove any excess agar mixture still stuck to them.
Following this, the seedlings can now be planted into the prepared pot with at least 50mm of space between each individual seedling.
9. Positioning the orchid
The seedling once fully transplanted should be placed in a location that is warm with good indirect sun light.
Slowly position the pots into an area that closely assimilates the conditions it will be growing under.
The choice as to whether the plant should be exposed to full sun or in direct sunlight will be dependent on the particular orchid specie.
10. Subsequent care of the plant
After the first week, the seedling can be misted several times a day and watered just once a week.
A guide in watering the plant will be using the dryness of the fir back that is, water the plant until the fir back is completely moistened and wait till it has completely dried out before watering again.
Do not fertilize until the seedlings have fully established themselves.
Division: Division is the easiest method for amateurs to propagate Sarcochilus cecilia. At some point, the orchid will become root bound in its pot, too large for the slab of cork or may set a second growing stem that can be severed. The only tools required are a sharp sterile knife, a slab of cork or pumice stone and some hemp or nylon string. I prefer hemp string because it is totally natural but is difficult to obtain.
The potted Sarcochilus cecilia: Remove the Sarcochilus cecilia from its pot and set it on a firm surface. Cut through the roots to create separate sections of the plant. Each piece should include four to five stems and a large chunk of the root system. Repot using a central stick to ensure the plant is tied securely so that it does not move.
Slab plants: Take the slab and cut it down the middle ensuring each section has healthy terminal stems. Retie the new divisions cork or pumice stone onto a new piece of cork or pumice stone. Tie them so that they do not move. Do not over tighten as this cut’s off the flow of nutrients to the new leaves.
Treat plants that are growing naturally on a tree in the same way. First cut the plant in half then slice just below the roots into the outer layer of bark being careful not to damage the stems or the xylem and phloem layers of the tree Remove the section and retie it to another section of the tree or cork slab as desired.
Fertilize using seaweed, fish emulsion or organic chicken pellets soaked in water on an alternate basis as a foliar spray. Fertilize every two months until the plants are established then annually in early September to October to maintain better colour, health, vitality and flowering.
Further Comments from Readers:
“Hi reader, it seems you use The Bible of Botany a lot. That’s great as we have great pleasure in bringing it to you! It’s a little awkward for us to ask, but our first aim is to purchase land approximately 1,600 hectares to link several parcels of N.P. into one at The Pinnacles NSW Australia, but we need your help. We’re not salespeople. We’re amateur botanists who have dedicated over 30 years to saving the environment in a practical way. We depend on donations to reach our goal. If you donate just $5, the price of your coffee this Sunday, We can help to keep the planet alive in a real way and continue to bring you regular updates and features on Australian plants all in one Botanical Bible. Any support is greatly appreciated. Thank you.”
In the spirit of reconciliation we acknowledge the Bundjalung, Gumbaynggirr and Yaegl and all aboriginal nations throughout Australia and their connections to land, sea and community. We pay our respect to their Elders past, present and future for the pleasures we have gained.
Sarcochilus falcatus
Classification:
Unranked: Monocots
Order: Asparagales
Family: Orcidaceae
Subfamily: Epidendroideae
Tribe: Vandeae
Subtribe: Aeridinae
Genus: From Sárx/Sárxa, which is Ancient Greek for fleshy as per the edible flesh of a fruit and Cheilos, which is Ancient Greek for a lip. It refers to orchids which have a fleshy labellum, petals and sepals.
Species: From Falcatus, which is latin for a scythe or sickle shape. It refers to leaves, which have a distinct falcate shape like a scythe.
Common Name: Orange Blossom Orchid.
Distribution:
Sarcochilus falcatus is found in 2 isolated populations on and east of the Great Dividing Range with a further small population near Calliope. It is found south from Cooktown to Herberton in far north eastern Queensland and from Murgon in south eastern Queensland to the Cann River in north eastern Victoria.
https://avh.ala.org.au/occurrences/search?taxa=Sarcochilus+falcatus#tab_mapView
Habitat Aspect Climate:
Sarcochilus falcatus prefers medium shade to dappled sunlight. It grows in moist tropical rainforests, moist subtropical rainforests, moist gallery forests or moist warm temperate rainforests often in exposed positions on ridges and escarpments. Here the microclimates are frequently exposed to orographic precipitation. Its altitude ranges from 100 meters ASL to 1400 meters ASL.
The temperatures range from 2 degrees in August to 36 degrees in January.
The rainfall ranges from lows of 1100mm to 3200mm average per annum. The plants are usually associated in areas of orographic precipitation.
Soil Requirements:
Sarcochilus falcatus usually grows as an epiphyte on rainforest trees especially Acacia melanoxylon or rarely as a lithophyte on rocks.
Height & Spread:
Wild Plants: 0.05m to 0.1m by 0.06m to 0.3m.
Characteristics:
Sarcochilus falcatus usually grow as a semi pendent epiphyte or rarely as an epilith with 1 or rarely 2 or more shoots. The stems measure 10mm to 80mm in length.
The asymmetrically oblanceolate to narrow oblong leaves measure 20mm to 160mm in length by 8mm to 22mm in width. The sessile bases are caudate while the apexes are acute to acuminate. The concolourous, laminas are deep green and glabrous. The laminas are slightly channeled and decurve downwards on the apical third. The margins are entire and are often slightly undulating. The midvein is strongly prominent on the lower laminas.
The inflorescences are semi pendant racemes with 2 to 12 individual flowers and measure 10mm to 130mm in length. The peduncle, rachis and pedicels are glabrous. The peduncle measures 4mm to 65mm in length while the rachis measures 5mm to 80mm in length and the pedicels measure 8mm to 15mm in length including the ovary. The flowers are born from the center of the rosette of leaves. The plants in a particular area flower synchronously. The dorsiventral dimension of the flowers is about equal to lateral dimension and measure 20mm to 30mm in height by 20mm to 30mm in diameter.
The glabrous spathulate dorsal sepal is incurved in the middle of the spathulate and curves strongly backward at the apex. It is usually white or at times cream. The margins are entire. The dorsal sepal measures 10mm to 16mm in length by 5mm to 7mm in width.
The glabrous spathulate lateral sepals are usually white or at times cream. The margins are entire and retrorse. The lateral sepals measures 10mm to 16mm in length by 5mm to 7mm in width and are fused to the base of the column.
The glabrous spathulate lateral petals are usually white or at times cream. The margins are entire and retrorse. The lateral sepals measures 10mm to 16mm in length by 5mm to 7mm in width and are fused to the base of the column foot.
The white with orange, yellow, red or purple markings labellum is broad oblong with 2 lateral lobes. The labellum measures 4 mm to 6mm in length. The white lateral lobes are erect and covered in fine reddish-purple streaks and measure 6mm to 7mm in length by 4.5mm to 5mm in width. The yellow-orange mid lobe is short and thick. The column foot is at right angles to column and measures 3mm to 5mm in length while the column measures 2.5mm to 4mm in length. The flowers appear from June to October.
The fruits are obloidal, porrect to semi pendulant capsules that dehisce longitudinally. The green capsules turn grey-brown when ripe.
Wildlife:
Sarcochilus falcatus’s wildlife is unknown to the author.
Cultivation:
Sarcochilus falcatus is a beautiful flowering orchid which is rather hardy and easy to grow and to propagate at least as far south as sale in Victoria along the coast. It does very well either in the bush house attached to a slab of cork or washed pumice stone or attached to most rainforest trees that do not shed their bark in a sheltered area. Do not attach them to Eucalyptus trees as the barks contain resins which most Orchids detest.
Trees with mass plantings of mixed orchids look really spectacular and those that have several Sarcochilus falcatus add interest and curiosity over a long period especially when in flower. Even the roots have some appeal as they cover the trunks. Gmelina leichhardtii is the main host tree in nature however Elaeocarpus grandis is also a good host in the garden with various Cupaniopsis species.
It does best when mounted on slabs of cork. Water is best applied on a weekly basis during the growing season and fortnightly in the non-growing season.
It is best grown beneath 50mm shade cloth or under a rainforest canopy.
Propagation:
Seeds: All orchids that are declared rare, vulnerable or endangered are protected by Federal and State Laws and must not be removed from the wild unless you are a land developer, mining company or main Roads department etc. This includes bulbs, roots, leaves and flowers. No part of any plant can be removed from Federal, State or Local Government land without the prior permission of the authority and this includes the spore.
1. Obtain relevant materials
The first step in growing orchid from seed will be sourcing and having at the ready all materials that will be required in the propagation process.
This includes all of the following:
Unripe orchid seed capsule. If there are 2 capsules secure the second capsule immediately after the first capsule splits or if only one capsule as soon as it changes colour.
Orchid gelling medium with agar which can be purchased from an orchid society or a specialist nursery.
Distilled water
Cooking pot
Spoon
Oven-safe glass or polypropylene containers with lids
Sealable bags
Clean, sterilized cutting board
Rubber gloves
Paper towels
Tweezers or forceps
70 percent ethanol
Bleach
Scalpel or sharp knife
Planting pot
Orchid compost
Length of wire metal
Plastic spray bottle.
deep petri dishes or sterile jars.
2. Prepare agar medium
The agar medium is a special orchid gelling mixture that distilled water will be added to distilled water.
To prepare the medium, mix equal parts of orchid gelling medium with distilled water in a cooking pot.
Place the pot on a stove and bring the mixture to boil for while stirring continuously for two minutes.
Pour the mixture into the petri dishes glass or propylene containers while ensuring not to fill the containers above 20 percent of their volume.
Loosely replace the lids to the containers. Sterilize the containers by heating them up in a microwave oven for between 2 to 3 minutes.
Spray 70 percent ethanol into a sealable bag to create a sterile environment. Transfer the heated containers into the sealable bag.
Allow the containers to cool a bit before tightening their lids and then sealing the bag. Leave the containers to stand for a few days until the mixture solidifies.
3. Prepare seed capsule and work surface
Place an open pot of water on a stove and bring to boil. Place the cutting board in the oven and sterilize.
Put on rubber gloves and sterilize the forceps, and scalpel with 70 percent ethanol.
Insert the seed capsule into a bowel filled with bleach for about fifteen minutes.
Sterilize seed capsule again with 70 percent ethanol and place on grill.
Using the sterilized scalpel, cut open the seed capsule to reveal the seeds. Using a scalpel or sharp knife, scrape out the seeds from the capsule unto an ethanol soaked paper towel.
4. Flasking of the seed
Take out the petri dishes or glass jars containers holding the agar medium. Over the steam, open up the containers and transfer seeds from the ethanol soaked paper towel into the individual containers using the sterilized forceps.
The amount of seeds will determine the number of containers required. Replace the lid of the containers and place them on a window sill that receives indirect sunlight.
5. Wait and exercise patience
All that can be done at this point is to wait until the seeds germinate. The amount of time that this might take varies and is dependent on the particular species.
Generally, the time can range from a few months to a few years. During this period of waiting, ensure the containers are free from contamination to ensure that germination is not disrupted.
6. Emergence of protocorms
Protocorms are tuber-shaped bodies with rhizoids that are produced by the young seedlings of various orchids. Protocorms represent the embryonic form of the orchid plant.
Their emergence after the period of waiting at an affirmation that everything in the propagation process is on track.
7. Transflask orchid seedlings is done after they have developed roots
Upon the emergence of the protocorms, consistently observe the growth of the seedlings. At the point when the seedlings appear to overcrowd the flask, transflasking should be carried out, typically within 30 and 60 days.
* This is done by removing individual seedlings using sterilized tweezers from the original containers and placing them in new containers also filled, in a proportion similar to the original, with agar medium. 6 to 8 in a standard petri dish or 1or 2 to a test tube
8. Transplant seedlings into planting pots
On the presumption that there are no disruptions to the plant growth, the seedlings will eventually outgrow the containers.
At this point, they are to be transplanted into planting pots. A good rule of thumb to determine when they are ready to be transplanted is when the seedlings have developed roots that have grown up to the length of one-quarter of an inch.
To transplant, prepare a planting pot or other container for receiving the seedling by majorly filling it up with coarse fir bark and possibly some slightly moist orchid compost mixture containing perlite, fine charcoal, redwood bark shavings, etc.
To extract the seedlings, submerge the containers in warm water to help loosen the agar gel.
Once the agar medium is softened, twist a piece of metal to form a loop and in turn, use it to carefully pull out the seedlings from the container. It is best done if the agar and seedling can be removed together.
The seedlings can be further rinsed in lukewarm water to remove any excess agar mixture still stuck to them.
Following this, the seedlings can now be planted into the prepared pot with at least 50mm of space between each individual seedling.
9. Positioning the orchid
The seedling once fully transplanted should be placed in a location that is warm with good indirect sun light.
Slowly position the pots into an area that closely assimilates the conditions it will be growing under.
The choice as to whether the plant should be exposed to full sun or in direct sunlight will be dependent on the particular orchid specie.
10. Subsequent care of the plant
After the first week, the seedling can be misted several times a day and watered just once a week.
A guide in watering the plant will be using the dryness of the fir back that is, water the plant until the fir back is completely moistened and wait till it has completely dried out before watering again.
Do not fertilize until the seedlings have fully established themselves.
Division: Division is the easiest method for amateurs to propagate sarcochilus falcatus. At some point, the orchid will become root-bound in its pot or large enough to divide the clump on a tree or slab. The only tools required are sharp sterile knife a slab of cork or pumice stone and some hemp or nylon string. I prefer hemp string because it is totally natural but is difficult to obtain.
The potted Sarcochilus falcatus: Remove the Sarcochilus falcatus from its pot and set it on a firm surface. Cut through the roots to create separate sections of the plant. Each piece should include four to five stems and a large chunk of the root system. Repot using a mixture of scoria and pumice stone. Make sure the stones come from a saline free environment. Use a central stick to ensure the plant is tied securely so that it does not move.
Slab plants: Take the slab and cut it down the middle ensuring each section has healthy terminal stems. Retie the new divisions cork or pumice stone onto a new piece of cork or pumice stone. Tie them so that they do not move. Do not over tighten as this cut’s off the flow of nutrients to the new leaves.
Treat plants that are growing naturally on a tree in the same way. First cut the plant in half then slice just below the roots into the outer layer of bark being careful not to damage the stems or the xylem and phloem layers of the tree Remove the section and retie it to another section of the tree or cork slab as desired.
Fertilize using seaweed, fish emulsion or organic chicken pellets soaked in water on an alternate basis as a foliar spray. Fertilize every two months until the plants are established then annually in early September to October to maintain better colour, health, vitality and flowering.
Further Comments from Readers:
“Hi reader, it seems you use The Bible of Botany a lot. That’s great as we have great pleasure in bringing it to you! It’s a little awkward for us to ask, but our first aim is to purchase land approximately 1,600 hectares to link several parcels of N.P. into one at The Pinnacles NSW Australia, but we need your help. We’re not salespeople. We’re amateur botanists who have dedicated over 30 years to saving the environment in a practical way. We depend on donations to reach our goal. If you donate just $5, the price of your coffee this Sunday, We can help to keep the planet alive in a real way and continue to bring you regular updates and features on Australian plants all in one Botanical Bible. Any support is greatly appreciated. Thank you.”
In the spirit of reconciliation we acknowledge the Bundjalung, Gumbaynggirr and Yaegl and all aboriginal nations throughout Australia and their connections to land, sea and community. We pay our respect to their Elders past, present and future for the pleasures we have gained.

NCBG Coffs Harbour NSW
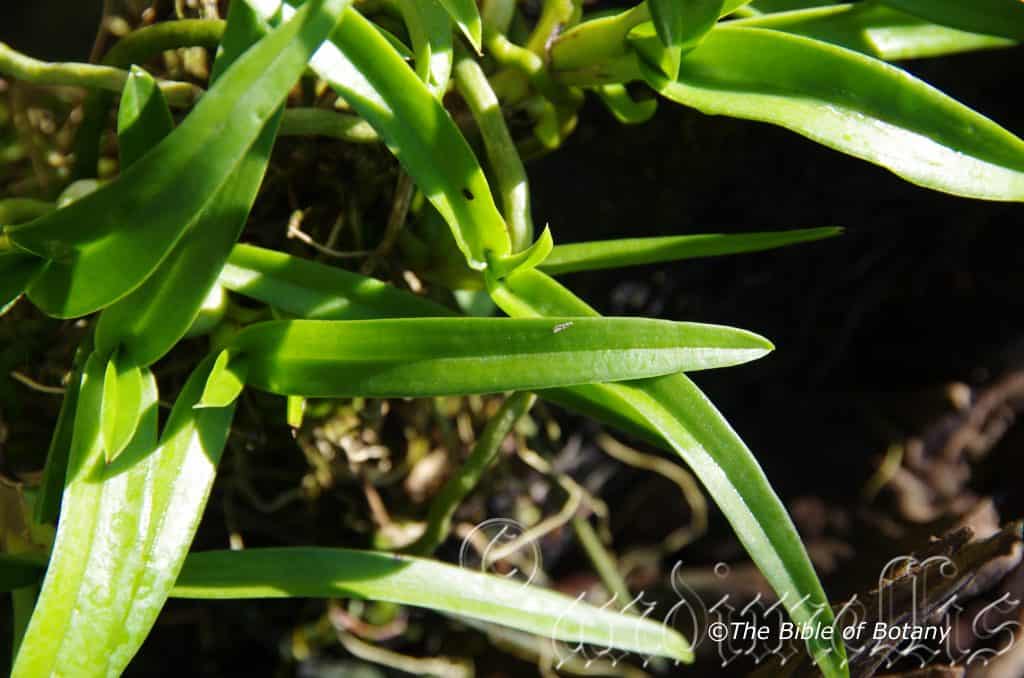
NCBG Coffs Harbour NSW
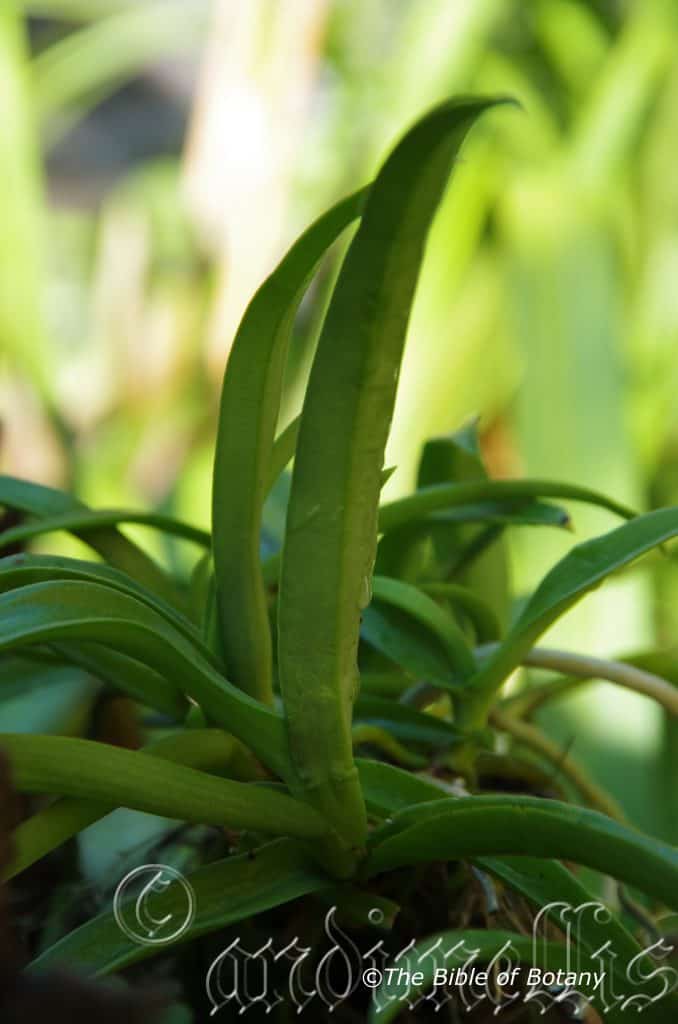
NCBG Coffs Harbour NSW
Sarcochilus Fitzgeraldii
Classification:
Unranked: Monocots
Order: Asparagales
Family: Orcidaceae
Subfamily: Epidendroideae
Tribe: Vandeae
Subtribe: Aeridinae
Genus: From Sárx/Sárxa, which is Ancient Greek for fleshy as per the edible flesh of a fruit and Cheilos, which is Ancient Greek for a lip. It refers to orchids which have a fleshy labellum, petals and sepals.
Species: Is probably named in honour of Robert D. Fitzgerald; 1830-1892, who was an Irish born Australian botanist who preferred to study Australian orchids but I have been unable to substantiated it.
Common Name: Ravine Orchid.
Distribution:
Sarcochilus fitzgeraldii is found in 3 disjunct populations on and east of the Great Dividing Range to the coast. It is found south from the Caboolture hinterland south eastern coastal Queensland to Jerseyville in central coastal New South Wales.
https://avh.ala.org.au/occurrences/search?taxa=Sarcochilus+fitzgeraldii#tab_mapView
Habitat Aspect Climate:
Sarcochilus fitzgeraldii prefers medium shade to dappled sunlight. It grows as a lithophyte or rarely as an epiphyte at the base of trees in moist subtropical rainforests or moist gallery forests close to streams. Its altitude ranges from 500 meters ASL to 700 meters ASL.
The temperatures range from minus 2 degrees in August to 36 degrees in January.
The rainfall ranges from lows of 1000mm to 2000mm average per annum. The plants are usually associated in areas of orographic precipitation.
Soil Requirements:
Sarcochilus fitzgeraldii usually grows as a lithophyte on rocks or rarely as an epiphyte at the base of tall rainforest trees. The rocks are usually granites and brown basalts. The soils pH ranges from 5.5pH to 6pH. It does not tolerate waterlogged soil. Only none saline soils are tolerated.
Height & Spread:
Wild Plants: 0.2m to 0.3m by 0.1m to 0.16m.
Characteristics:
Sarcochilus fitzgeraldii grows as a semi pendent epilith or rarely as an epiphyte. It often forms large, branching mats growing over boulders. The stems measure 80mm to 1000mm in length.
The 5 to 7 narrow oblong, linear to triangular leaves measure 60mm to 200mm in length by 10mm to 15mm in width. The sessile bases are caudate while the apexes are acute. The concolourous, laminas are deep green and glabrous. The laminas are slightly channeled and gently decurve downwards on the apical third. The margins are entire. The midvein is prominent on the lower laminas.
The inflorescences are semi pendant to pendant racemes with 4 to 15 individual flowers and measure 100mm to 200mm in length. The peduncle, rachis and pedicels are glabrous. The green peduncle measures 60mm to 140mm in length while the green rachis measures 40mm to 60mm in length and the white pedicels measure 13mm to 17mm in length including the ovary. The flowers are born from the center of the rosette of leaves. The plants in a particular area flower synchronously. The dorsiventral dimension of the flowers is about equal to lateral dimension.
The glabrous dorsal sepal is white to pink and usually with pink to crimson spots near the base or at times covering the whole sepal. The margins are entire while the apexes are obtuse-acute. The dorsal sepal is broad elliptical to broad spathulate and measures 10mm to 13mm in length by 5mm to 7mm in width.
The glabrous lateral sepals are white to pink and usually with pink to crimson spots near the base or at times covering the whole sepal. The margins are entire while the apexes are obtuse-acute. The lateral sepals are broad elliptical to broad spathulate and broader at the base than the dorsal sepal. They measures 10mm to 13mm in length by 5mm to 7mm in width.
The glabrous lateral petals are white to pink and usually with pink to crimson spots near the base or at times covering the whole sepal. The margins are entire while the apexes are obtuse-acute. The lateral petals are elliptical to oblong and measures 11mm to 14mm in length by 4mm to 6mm in width.
The white with orange, yellow, red or purple marked labellum is broad with 2 triangular lateral lobes. The labellum measures 5 mm to 6mm in length. The white lateral lobes are erect and densely covered in fine reddish-purple streaks and measure 2.2mm to 3mm in length by 2.2mm to 3mm in width. The yellow-orange triangular mid lobe is short and thick. The column foot is at right angles to column and measures 3mm to 5mm in length while the column measures 2mm to 2.5mm in length. The flowers appear from October to November.
The fruits are obloidal, porrect capsules. The green capsules turn grey-brown when ripe.
Wildlife:
Sarcochilus fitzgeraldii’s wildlife is unknown to the author.
All native orchids are protected plant species. It is illegal to remove naturally growing orchid plants from the bush and a license is required for the removal of seed capsule.
Cultivation:
Sarcochilus fitzgeraldii is a beautiful flowering orchid which is rather hardy and easy to grow and to propagate at least as far south as sale in Victoria along the coast. It does well either in the bush house attached to a slab of cork or washed pumice stone or attached to most rainforest trees that do not shed their bark in a sheltered area. Do not attach them to Eucalyptus trees as the barks contain resins which most Orchids detest.
Trees with mass plantings of mixed orchids look really spectacular and those that have several Sarcochilus fitzgeraldii add interest and curiosity over a long period especially when in flower. Even the roots have some appeal as they cover the trunks. Ficus species, Ceropetalum species, Backhousia species and Elaeocarpus species make good host trees in the garden for this orchid as do the Cupaniopsis species.
It does best in terracotta pots or saucers using chunks of pumice stone, scoria mixed with pine bark in pots or mounted on slabs of cork. Water is best applied on a weekly basis during the growing season and fortnightly in the non-growing season.
It is best grown beneath 50mm shade cloth or under a rainforest canopy.
Propagation:
Seeds: All orchids that are declared rare, vulnerable or endangered are protected by Federal and State Laws and must not be removed from the wild unless you are a land developer, mining company or main Roads department etc. This includes bulbs, roots, leaves and flowers. No part of any plant can be removed from Federal, State or Local Government land without the prior permission of the authority and this includes the spore.
1. Obtain relevant materials
The first step in growing orchid from seed will be sourcing and having at the ready all materials that will be required in the propagation process.
This includes all of the following:
Unripe orchid seed capsule. If there are 2 capsules secure the second capsule immediately after the first capsule splits or if only one capsule as soon as it changes colour.
Orchid gelling medium with agar which can be purchased from an orchid society or a specialist nursery.
Distilled water
Cooking pot
Spoon
Oven-safe glass or polypropylene containers with lids
Sealable bags
Clean, sterilized cutting board
Rubber gloves
Paper towels
Tweezers or forceps
70 percent ethanol
Bleach
Scalpel or sharp knife
Planting pot
Orchid compost
Length of wire metal
Plastic spray bottle.
deep petri dishes or sterile jars.
2. Prepare agar medium
The agar medium is a special orchid gelling mixture that distilled water will be added to distilled water.
To prepare the medium, mix equal parts of orchid gelling medium with distilled water in a cooking pot.
Place the pot on a stove and bring the mixture to boil for while stirring continuously for two minutes.
Pour the mixture into the petri dishes glass or propylene containers while ensuring not to fill the containers above 20 percent of their volume.
Loosely replace the lids to the containers. Sterilize the containers by heating them up in a microwave oven for between 2 to 3 minutes.
Spray 70 percent ethanol into a sealable bag to create a sterile environment. Transfer the heated containers into the sealable bag.
Allow the containers to cool a bit before tightening their lids and then sealing the bag. Leave the containers to stand for a few days until the mixture solidifies.
3. Prepare seed capsule and work surface
Place an open pot of water on a stove and bring to boil. Place the cutting board in the oven and sterilize.
Put on rubber gloves and sterilize the forceps, and scalpel with 70 percent ethanol.
Insert the seed capsule into a bowel filled with bleach for about fifteen minutes.
Sterilize seed capsule again with 70 percent ethanol and place on grill.
Using the sterilized scalpel, cut open the seed capsule to reveal the seeds. Using a scalpel or sharp knife, scrape out the seeds from the capsule unto an ethanol soaked paper towel.
4. Flasking of the seed
Take out the petri dishes or glass jars containers holding the agar medium. Over the steam, open up the containers and transfer seeds from the ethanol soaked paper towel into the individual containers using the sterilized forceps.
The amount of seeds will determine the number of containers required. Replace the lid of the containers and place them on a window sill that receives indirect sunlight.
5. Wait and exercise patience
All that can be done at this point is to wait until the seeds germinate. The amount of time that this might take varies and is dependent on the particular species.
Generally, the time can range from a few months to a few years. During this period of waiting, ensure the containers are free from contamination to ensure that germination is not disrupted.
6. Emergence of protocorms
Protocorms are tuber-shaped bodies with rhizoids that are produced by the young seedlings of various orchids. Protocorms represent the embryonic form of the orchid plant.
Their emergence after the period of waiting at an affirmation that everything in the propagation process is on track.
7. Transflask orchid seedlings is done after they have developed roots
Upon the emergence of the protocorms, consistently observe the growth of the seedlings. At the point when the seedlings appear to overcrowd the flask, transflasking should be carried out, typically within 30 and 60 days.
* This is done by removing individual seedlings using sterilized tweezers from the original containers and placing them in new containers also filled, in a proportion similar to the original, with agar medium. 6 to 8 in a standard petri dish or 1or 2 to a test tube
8. Transplant seedlings into planting pots
On the presumption that there are no disruptions to the plant growth, the seedlings will eventually outgrow the containers.
At this point, they are to be transplanted into planting pots. A good rule of thumb to determine when they are ready to be transplanted is when the seedlings have developed roots that have grown up to the length of one-quarter of an inch.
To transplant, prepare a planting pot or other container for receiving the seedling by majorly filling it up with coarse fir bark and possibly some slightly moist orchid compost mixture containing perlite, fine charcoal, redwood bark shavings, etc.
To extract the seedlings, submerge the containers in warm water to help loosen the agar gel.
Once the agar medium is softened, twist a piece of metal to form a loop and in turn, use it to carefully pull out the seedlings from the container. It is best done if the agar and seedling can be removed together.
The seedlings can be further rinsed in lukewarm water to remove any excess agar mixture still stuck to them.
Following this, the seedlings can now be planted into the prepared pot with at least 50mm of space between each individual seedling.
9. Positioning the orchid
The seedling once fully transplanted should be placed in a location that is warm with good indirect sun light.
Slowly position the pots into an area that closely assimilates the conditions it will be growing under.
The choice as to whether the plant should be exposed to full sun or in direct sunlight will be dependent on the particular orchid specie.
10. Subsequent care of the plant
After the first week, the seedling can be misted several times a day and watered just once a week.
A guide in watering the plant will be using the dryness of the fir back that is, water the plant until the fir back is completely moistened and wait till it has completely dried out before watering again.
Do not fertilize until the seedlings have fully established themselves.
Division: Division is the easiest method for amateurs to propagate Sarcochilus fitzgeraldii. At some point, the orchid will become root-bound in its pot or large enough to divide the clump on a tree or slab. The only tools required are sharp sterile knife a slab of cork or pumice stone and some hemp or nylon string. I prefer hemp string because it is totally natural but is difficult to obtain.
The potted Sarcochilus fitzgeraldii: Remove the Sarcochilus fitzgeraldii from its pot and set it on a firm surface. Cut through the roots to create separate sections of the plant. Each piece should include four to five stems and a large chunk of the root system. Repot using a mixture of scoria and pumice stone. Make sure the stones come from a saline free environment. Use a central stick to ensure the plant is tied securely so that it does not move.
Slab plants: Take the slab and cut it down the middle ensuring each section has healthy terminal stems. Retie the new divisions cork or pumice stone onto a new piece of cork or pumice stone. Tie them so that they do not move. Do not over tighten as this cut’s off the flow of nutrients to the new leaves.
Treat plants that are growing naturally on a tree in the same way. First cut the plant in half then slice just below the roots into the outer layer of bark being careful not to damage the stems or the xylem and phloem layers of the tree Remove the section and retie it to another section of the tree or cork slab as desired.
Fertilize using seaweed, fish emulsion or organic chicken pellets soaked in water on an alternate basis as a foliar spray. Fertilize every two months until the plants are established then annually in early September to October to maintain better colour, health, vitality and flowering.
Further Comments from Readers:
“Hi reader, it seems you use The Bible of Botany a lot. That’s great as we have great pleasure in bringing it to you! It’s a little awkward for us to ask, but our first aim is to purchase land approximately 1,600 hectares to link several parcels of N.P. into one at The Pinnacles NSW Australia, but we need your help. We’re not salespeople. We’re amateur botanists who have dedicated over 30 years to saving the environment in a practical way. We depend on donations to reach our goal. If you donate just $5, the price of your coffee this Sunday, We can help to keep the planet alive in a real way and continue to bring you regular updates and features on Australian plants all in one Botanical Bible. Any support is greatly appreciated. Thank you.”
In the spirit of reconciliation we acknowledge the Bundjalung, Gumbaynggirr and Yaegl and all aboriginal nations throughout Australia and their connections to land, sea and community. We pay our respect to their Elders past, present and future for the pleasures we have gained.
Sarcochilus hillii
Classification:
Unranked: Monocots
Order: Asparagales
Family: Orcidaceae
Subfamily: Epidendroideae
Tribe: Vandeae
Subtribe: Aeridinae
Genus: From Sárx/Sárxa, which is Ancient Greek for fleshy as per the edible flesh of a fruit and Cheilos, which is Ancient Greek for a lip. It refers to orchids which have a fleshy labellum, petals and sepals.
Specie: Is named in honour of Leslie J. Hill; 1908-2003, who was a botanical philanthropist and collector of South African succulents.
Common Name: Boulder Orchid.
Distribution:
Sarcochilus hillii is mainly found on and east of the Great Dividing Range to the coast south from Duaringa and Marlborough Plains in central coastal Queensland to Moruya in southern coastal New South Wales.
https://avh.ala.org.au/occurrences/search?taxa=Sarcochilus+hillii#tab_mapView
Habitat Aspect Climate:
Sarcochilus hillii prefers medium shade to dappled sunlight. It usually grows in moist gallery forests, moist littoral rainforests or moist riparian rainforest. Its altitude ranges from 5 meters ASL to 900 meters ASL.
The temperatures range from minus 4 degrees in August to 38 degrees in January.
The rainfall ranges from lows of 550mm to 1750mm average per annum.
Soil Requirements:
Sarcochilus hillii grows as an epiphyte and is especially common on Backhousia myrtifolia.
Height & Spread:
Wild Plants: 0.2m to 0.3m by 0.1m to 0.16m.
Characteristics:
Sarcochilus hillii grows as a semi-pendent epiphyte or rarely as a lithophyte with 1 or 2 or rarely more shoots. The stems measure 3mm to 17mm in length.
The 4 to 6 linear leaves measure 30mm to 120mm in length by 15mm to 30mm in width. The sessile bases are caudate while the apexes are acute. The concolourous, laminas are deep green and glabrous. The laminas are channelled, spotted and decurve downwards on the apical third. The margins are entire. The midvein is prominent on the lower laminas.
The inflorescences are semi pendant racemes with 2 to 10 individual flowers and measure 30mm to 100mm in length. The peduncle, rachis and pedicels are glabrous. The deep green, spotted purple peduncle measures 15mm to 50mm in length while the deep green, spotted purple, rachis measures 15mm to 50mm in length and the pale green pedicels measure 3mm to 6mm in length including the ovary. The flowers are born from the center of the rosette of leaves. The plants in a particular area flower synchronously. The dorsiventral dimension of the flowers is about equal to lateral dimension.
The glabrous oval to broad elliptical lateral sepals is white, pastel pink or pastel mauve. The margins are entire. The lateral sepals measures 8mm to 10mm in length by 5.5mm to 7mm in width.
The glabrous oval to broad elliptical lateral petals is white, pastel pink or pastel mauve. The margins are entire. The lateral petals measures 6mm to 8mm in length by 6mm to 8mm in width.
The glabrous oval to broad elliptical dorsal sepal is white, pastel pink or pastel mauve. The margins are entire. The dorsal sepal measures 6mm to 8mm in length by 3.5mm to 4.5mm in width.
The white, pastel pink or pastel mauve labellum is broad oblong with 2 lateral lobes on the column foot. The labellum measures 3 mm to 4.5mm in length by 1.5mm to 3mm in width. The white, pastel pink or pastel mauve lateral lobes are erect with rose pink markings near the base. The lateral lobes measure 2mm to 3mm in height. There are 2 thickened, oblong, bright yellow appendages on the lateral lobes that have acute apexes and measure 2.5mm to 3.5mm in height by 1mm in width. The column foot is at right angles to column and measures 3mm to 5mm in length while the column measures 2.5mm to 4mm in length. The mid lobe measures 1.5mm to 1.8mm in length and is densely covered in long, white, dimorphic hirsute hairs that extend beyond the apex and measure 1mm to 1.8mm in length. The flowers appear from October to December.
The fruits are obloidal, porrect capsules. The green capsules turn grey-brown when ripe.
Wildlife:
Sarcochilus hillii’s wildlife is unknown to the author.
Cultivation:
Sarcochilus hillii is a beautiful flowering orchid which is rather hardy and easy to grow and to propagate at least as far south as Victoria along the coast. It does well either in the bush house attached to a slab of cork or washed pumice stone or attached to most rainforest trees that do not shed their bark in a sheltered area. Do not attach them to Eucalyptus trees as the barks contain resins which most Orchids detest.
Trees with mass plantings of mixed orchids look really spectacular and those that have several Sarcochilus hillii add interest and curiosity over a long period especially when in flower. Even the roots have some appeal as they cover the trunks. Backhousia myrtifolia is the natural host for this orchid in the wild.
It does best when mounted on slabs of cork. Water is best applied on a weekly basis during the growing season and fortnightly in the non-growing season.
It is best grown beneath 50mm shade cloth or under a rainforest canopy.
Propagation:
Seeds: All orchids that are declared rare, vulnerable or endangered are protected by Federal and State Laws and must not be removed from the wild unless you are a land developer, mining company or main Roads department etc. This includes bulbs, roots, leaves and flowers. No part of any plant can be removed from Federal, State or Local Government land without the prior permission of the authority and this includes the spore.
1. Obtain relevant materials
The first step in growing orchid from seed will be sourcing and having at the ready all materials that will be required in the propagation process.
This includes all of the following:
Unripe orchid seed capsule. If there are 2 capsules secure the second capsule immediately after the first capsule splits or if only one capsule as soon as it changes colour.
Orchid gelling medium with agar which can be purchased from an orchid society or a specialist nursery.
Distilled water
Cooking pot
Spoon
Oven-safe glass or polypropylene containers with lids
Sealable bags
Clean, sterilized cutting board
Rubber gloves
Paper towels
Tweezers or forceps
70 percent ethanol
Bleach
Scalpel or sharp knife
Planting pot
Orchid compost
Length of wire metal
Plastic spray bottle.
deep petri dishes or sterile jars.
2. Prepare agar medium
The agar medium is a special orchid gelling mixture that distilled water will be added to distilled water.
To prepare the medium, mix equal parts of orchid gelling medium with distilled water in a cooking pot.
Place the pot on a stove and bring the mixture to boil for while stirring continuously for two minutes.
Pour the mixture into the petri dishes glass or propylene containers while ensuring not to fill the containers above 20 percent of their volume.
Loosely replace the lids to the containers. Sterilize the containers by heating them up in a microwave oven for between 2 to 3 minutes.
Spray 70 percent ethanol into a sealable bag to create a sterile environment. Transfer the heated containers into the sealable bag.
Allow the containers to cool a bit before tightening their lids and then sealing the bag. Leave the containers to stand for a few days until the mixture solidifies.
3. Prepare seed capsule and work surface
Place an open pot of water on a stove and bring to boil. Place the cutting board in the oven and sterilize.
Put on rubber gloves and sterilize the forceps, and scalpel with 70 percent ethanol.
Insert the seed capsule into a bowel filled with bleach for about fifteen minutes.
Sterilize seed capsule again with 70 percent ethanol and place on grill.
Using the sterilized scalpel, cut open the seed capsule to reveal the seeds. Using a scalpel or sharp knife, scrape out the seeds from the capsule unto an ethanol soaked paper towel.
4. Flasking of the seed
Take out the petri dishes or glass jars containers holding the agar medium. Over the steam, open up the containers and transfer seeds from the ethanol soaked paper towel into the individual containers using the sterilized forceps.
The amount of seeds will determine the number of containers required. Replace the lid of the containers and place them on a window sill that receives indirect sunlight.
5. Wait and exercise patience
All that can be done at this point is to wait until the seeds germinate. The amount of time that this might take varies and is dependent on the particular species.
Generally, the time can range from a few months to a few years. During this period of waiting, ensure the containers are free from contamination to ensure that germination is not disrupted.
6. Emergence of protocorms
Protocorms are tuber-shaped bodies with rhizoids that are produced by the young seedlings of various orchids. Protocorms represent the embryonic form of the orchid plant.
Their emergence after the period of waiting at an affirmation that everything in the propagation process is on track.
7. Transflask orchid seedlings is done after they have developed roots
Upon the emergence of the protocorms, consistently observe the growth of the seedlings. At the point when the seedlings appear to overcrowd the flask, transflasking should be carried out, typically within 30 and 60 days.
* This is done by removing individual seedlings using sterilized tweezers from the original containers and placing them in new containers also filled, in a proportion similar to the original, with agar medium. 6 to 8 in a standard petri dish or 1or 2 to a test tube
8. Transplant seedlings into planting pots
On the presumption that there are no disruptions to the plant growth, the seedlings will eventually outgrow the containers.
At this point, they are to be transplanted into planting pots. A good rule of thumb to determine when they are ready to be transplanted is when the seedlings have developed roots that have grown up to the length of one-quarter of an inch.
To transplant, prepare a planting pot or other container for receiving the seedling by majorly filling it up with coarse fir bark and possibly some slightly moist orchid compost mixture containing perlite, fine charcoal, redwood bark shavings, etc.
To extract the seedlings, submerge the containers in warm water to help loosen the agar gel.
Once the agar medium is softened, twist a piece of metal to form a loop and in turn, use it to carefully pull out the seedlings from the container. It is best done if the agar and seedling can be removed together.
The seedlings can be further rinsed in lukewarm water to remove any excess agar mixture still stuck to them.
Following this, the seedlings can now be planted into the prepared pot with at least 50mm of space between each individual seedling.
9. Positioning the orchid
The seedling once fully transplanted should be placed in a location that is warm with good indirect sun light.
Slowly position the pots into an area that closely assimilates the conditions it will be growing under.
The choice as to whether the plant should be exposed to full sun or in direct sunlight will be dependent on the particular orchid specie.
10. Subsequent care of the plant
After the first week, the seedling can be misted several times a day and watered just once a week.
A guide in watering the plant will be using the dryness of the fir back that is, water the plant until the fir back is completely moistened and wait till it has completely dried out before watering again.
Do not fertilize until the seedlings have fully established themselves.
Division: Division is the easiest method for amateurs to propagate Sarcochilus hillii. At some point, the orchid will become root-bound in its pot or large enough to divide the clump on a tree or slab. The only tools required are sharp sterile knife a slab of cork or pumice stone and some hemp or nylon string. I prefer hemp string because it is totally natural but is difficult to obtain.
The potted Sarcochilus hillii: Remove the Sarcochilus hillii from its pot and set it on a firm surface. Cut through the roots to create separate sections of the plant. Each piece should include four to five stems and a large chunk of the root system. Repot using a mixture of scoria and pumice stone. Make sure the stones come from a saline free environment. Use a central stick to ensure the plant is tied securely so that it does not move.
Slab plants: Take the slab and cut it down the middle ensuring each section has healthy terminal stems. Retie the new divisions cork or pumice stone onto a new piece of cork or pumice stone. Tie them so that they do not move. Do not over tighten as this cut’s off the flow of nutrients to the new leaves.
Treat plants that are growing naturally on a tree in the same way. First cut the plant in half then slice just below the roots into the outer layer of bark being careful not to damage the stems or the xylem and phloem layers of the tree Remove the section and retie it to another section of the tree or cork slab as desired.
Fertilize using seaweed, fish emulsion or organic chicken pellets soaked in water on an alternate basis as a foliar spray. Fertilize every two months until the plants are established then annually in early September to October to maintain better colour, health, vitality and flowering.
Further Comments from Readers:
“Hi reader, it seems you use The Bible of Botany a lot. That’s great as we have great pleasure in bringing it to you! It’s a little awkward for us to ask, but our first aim is to purchase land approximately 1,600 hectares to link several parcels of N.P. into one at The Pinnacles NSW Australia, but we need your help. We’re not salespeople. We’re amateur botanists who have dedicated over 30 years to saving the environment in a practical way. We depend on donations to reach our goal. If you donate just $5, the price of your coffee this Sunday, We can help to keep the planet alive in a real way and continue to bring you regular updates and features on Australian plants all in one Botanical Bible. Any support is greatly appreciated. Thank you.”
In the spirit of reconciliation we acknowledge the Bundjalung, Gumbaynggirr and Yaegl and all aboriginal nations throughout Australia and their connections to land, sea and community. We pay our respect to their Elders past, present and future for the pleasures we have gained.
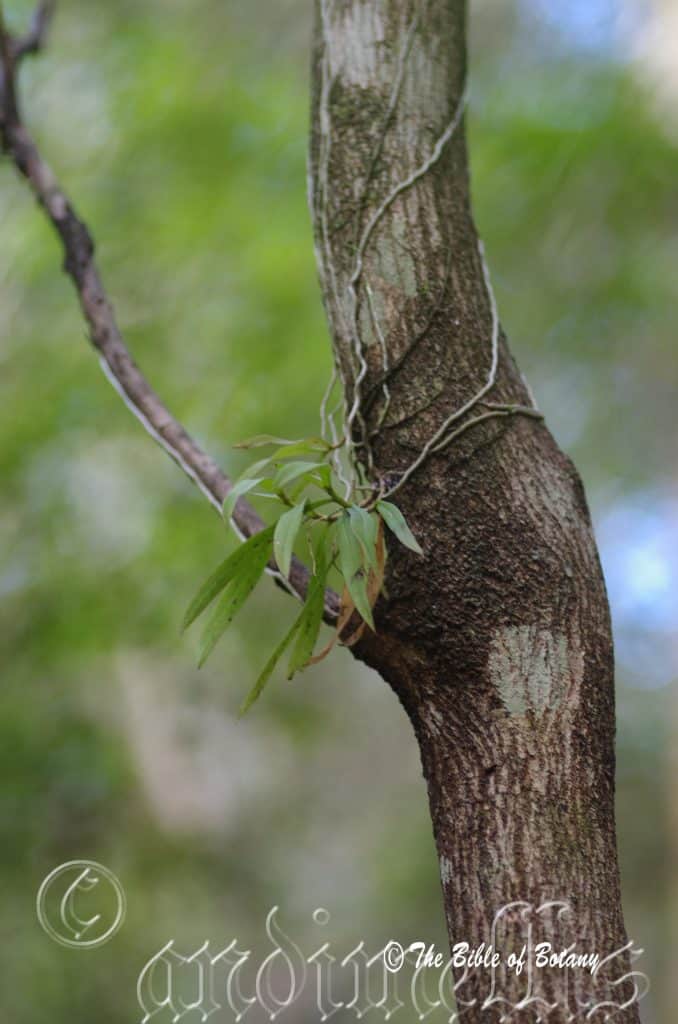
This particular plant was discovered on Backhousia myrtifolia on the 01.03.1991 The photo was taken on the 27.09.2018 Nana Glen NSW
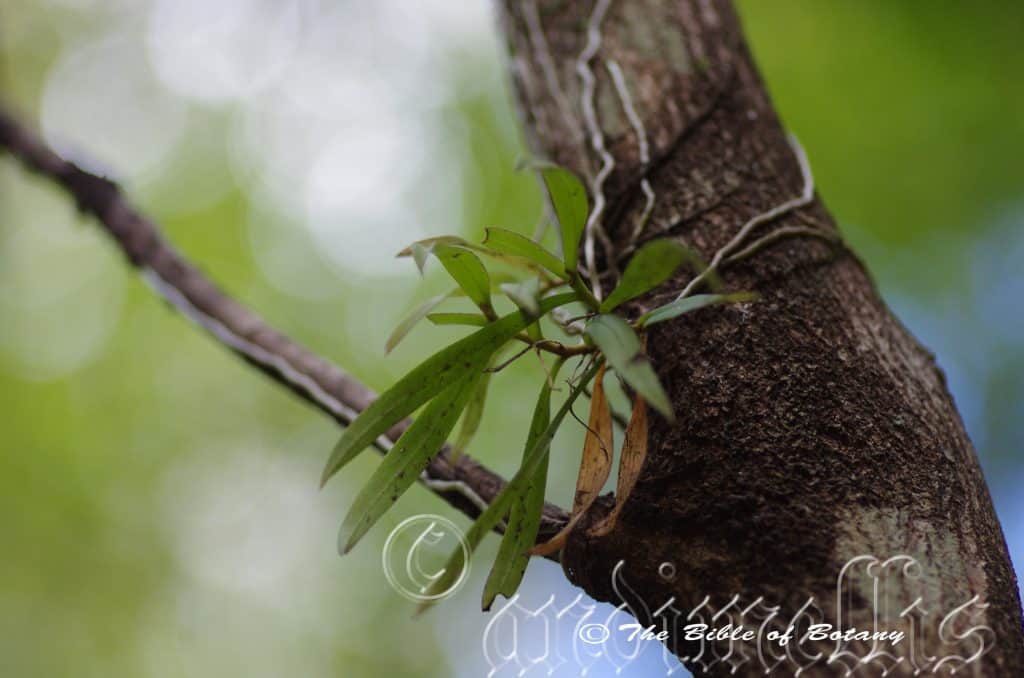
Nana Glen NSW
Sarcochilus parviflorus
Classification:
Unranked: Monocots
Order: Asparagales
Family: Orcidaceae
Subfamily: Epidendroideae
Tribe: Vandeae
Subtribe: Aeridinae
Genus: From Sárx/Sárxa, which is Ancient Greek for fleshy as per the edible flesh of a fruit and Cheilos, which is Ancient Greek for a lip. It refers to orchids which have a fleshy labellum, petals and sepals.
Species: From Paûros, which is Ancient Greek or Parvum which is Latin for small and Flōris which is Latin for a flower or Flōs from the Roman goddess of spring and flowers. It refers to flowers, which are somewhat smaller when compared to other species in the genus.
Common Name: Green Tree orchid and Lawyer Orchid.
Distribution:
Sarcochilus parviflorus is found south from Gladfield east of Warwick in south eastern Queensland to Tathra in the Bega Valley in southern coastal New South Wales.
https://avh.ala.org.au/occurrences/search?taxa=Sarcochilus+parviflorus#tab_mapView
Habitat Aspect Climate:
Sarcochilus parviflorus prefers medium shade to dappled sunlight. It grows in moist rainforests, gorges, gullies, moist gallery forests or moist humid areas in open forest. It is mainly found on and east of the Great Dividing Range to the coast. Its altitude ranges from 5 meters ASL to 600 meters ASL.
The temperatures range from minus 2 degrees in August to 36 degrees in January.
The rainfall ranges from lows of 820mm to 2000mm average per annum. The plants are usually associated in areas of orographic precipitation.
Soil Requirements:
Sarcochilus parviflorus usually grows as an epiphyte on trees or on rare occasions as a lithophyte on rocks. The rocks are usually granites or black basalts. The soils pH ranges from 5.5pH to 6pH. It does not tolerate waterlogged soil. Only none saline soils are tolerated.
Height & Spread:
Wild Plants: 0.05m to 0.07m by 0.15m to 0.25m.
Characteristics:
Sarcochilus parviflorus grows as a semi pendent epiphyte or rarely an epilith with 1 or 2 or rarely more shoots. The stems measure 0.5mm to 60mm in length.
The 3 to 6 asymmetrically ovate, obovate to oblong or narrow oblong leaves measure 25mm to 120mm in length by 10mm to 36mm in width. The sessile bases are caudate while the apexes are acute. The concolourous, laminas are deep grass-green to deep green and glabrous. The laminas are slightly channeled and are straight to decurve gently downwards from the base. The margins are entire. The midvein is prominent on the lower laminas.
The inflorescences are semi pendant racemes with 2 to 12 individual flowers and measure 20mm to 100mm in length. The peduncle is shorter or longer than the rachis and rachis which are mid green with faint paler, oblong, longitudinal spots and glabrous while the pedicels are pale green and glabrous. The peduncle measures 8mm to 65mm in length while the rachis measures 8mm to 65mm in length and the pedicels measure 6mm to 9mm in length including the ovary. The flowers are born from the center of the rosette of leaves. The plants in a particular area flower synchronously. The dorsiventral dimension of flower is shorter than the lateral dimension.
The glabrous slightly recurved dorsal sepal is narrow oblong, strongly dilated near the apex and is usually lime-green, yellowish-green or rarely yellow and paler at the base. The margins are entire. The dorsal sepal measures 6mm to 7mm in length by 1.1mm to 1.3mm in width near the base and 1.5mm to 1.8mm in width near the apex.
The glabrous slightly recurved lateral sepals are narrow oblong and dilated near the apex and are usually lime-green, yellowish-green or rarely yellow and paler at the base. The margins are entire. The lateral sepals measures 6mm to 7mm in length by 1mm to 1.2mm in width.
The glabrous slightly recurved lateral petals are narrow oblong and dilated near the apex and are usually lime-green, yellowish-green or rarely yellow and paler at the base. The margins are entire. The lateral petals measures 6mm to 7mm in length by 0.8mm to 1mm in width.
The lime-green, yellowish-green or rarely yellow labellum is broad oblong with 2 lateral lobes. The labellum measures 3mm to 3.5mm in length. The lime-green, yellowish-green or rarely yellow lateral lobes are finely streaked in tan or brownish internally and more coarsely streaked to blotch externally. The lateral lobes are erect and measure 2.5mm to 3mm in length by 1mm to 1.4mm in height. The column foot is at a very oblique angle to column and measures 2.5mm to 3mm in length while the column measures 2mm to 2.5mm in length. The pale lime-green, yellowish-green or rarely yellow mid lobe is short. The flowers appear from November to December.
The fruits are obloidal, porrect capsules. The green capsules turn deep grey-brown when ripe.
Wildlife:
Sarcochilus parviflorus’s wildlife is unknown to the author.
Cultivation:
Sarcochilus parviflorus is a beautiful flowering orchid which is rather hardy and easy to grow and to propagate at least as far south as sale in Victoria along the coast. It does very well either in the bush house attached to a slab of cork or washed pumice stone or attached to most rainforest trees that do not shed their bark in a sheltered area. Do not attach them to Eucalyptus trees as the barks contain resins which most Orchids detest.
Trees with mass plantings of mixed orchids look really spectacular and those that have several Sarcochilus parviflorus add interest and curiosity over a long period especially when in flower. Even the roots have some appeal as they cover the trunks. Ficus species, Ceropetalum species and Elaeocarpus species are good host trees in the garden for this orchid as are Cupaniopsis species and Melaleuca quinquenervia.
It does best when mounted on slabs of cork. Water is best applied on a weekly basis during the growing season and fortnightly in the non-growing season.
It is best grown beneath 50mm shade cloth or under a rainforest canopy.
Propagation:
Seeds: All orchids that are declared rare, vulnerable or endangered are protected by Federal and State Laws and must not be removed from the wild unless you are a land developer, mining company or main Roads department etc. This includes bulbs, roots, leaves and flowers. No part of any plant can be removed from Federal, State or Local Government land without the prior permission of the authority and this includes the spore.
1. Obtain relevant materials
The first step in growing orchid from seed will be sourcing and having at the ready all materials that will be required in the propagation process.
This includes all of the following:
Unripe orchid seed capsule. If there are 2 capsules secure the second capsule immediately after the first capsule splits or if only one capsule as soon as it changes colour.
Orchid gelling medium with agar which can be purchased from an orchid society or a specialist nursery.
Distilled water
Cooking pot
Spoon
Oven-safe glass or polypropylene containers with lids
Sealable bags
Clean, sterilized cutting board
Rubber gloves
Paper towels
Tweezers or forceps
70 percent ethanol
Bleach
Scalpel or sharp knife
Planting pot
Orchid compost
Length of wire metal
Plastic spray bottle.
deep petri dishes or sterile jars.
2. Prepare agar medium
The agar medium is a special orchid gelling mixture that distilled water will be added to distilled water.
To prepare the medium, mix equal parts of orchid gelling medium with distilled water in a cooking pot.
Place the pot on a stove and bring the mixture to boil for while stirring continuously for two minutes.
Pour the mixture into the petri dishes glass or propylene containers while ensuring not to fill the containers above 20 percent of their volume.
Loosely replace the lids to the containers. Sterilize the containers by heating them up in a microwave oven for between 2 to 3 minutes.
Spray 70 percent ethanol into a sealable bag to create a sterile environment. Transfer the heated containers into the sealable bag.
Allow the containers to cool a bit before tightening their lids and then sealing the bag. Leave the containers to stand for a few days until the mixture solidifies.
3. Prepare seed capsule and work surface
Place an open pot of water on a stove and bring to boil. Place the cutting board in the oven and sterilize.
Put on rubber gloves and sterilize the forceps, and scalpel with 70 percent ethanol.
Insert the seed capsule into a bowel filled with bleach for about fifteen minutes.
Sterilize seed capsule again with 70 percent ethanol and place on grill.
Using the sterilized scalpel, cut open the seed capsule to reveal the seeds. Using a scalpel or sharp knife, scrape out the seeds from the capsule unto an ethanol soaked paper towel.
4. Flasking of the seed
Take out the petri dishes or glass jars containers holding the agar medium. Over the steam, open up the containers and transfer seeds from the ethanol soaked paper towel into the individual containers using the sterilized forceps.
The amount of seeds will determine the number of containers required. Replace the lid of the containers and place them on a window sill that receives indirect sunlight.
5. Wait and exercise patience
All that can be done at this point is to wait until the seeds germinate. The amount of time that this might take varies and is dependent on the particular species.
Generally, the time can range from a few months to a few years. During this period of waiting, ensure the containers are free from contamination to ensure that germination is not disrupted.
6. Emergence of protocorms
Protocorms are tuber-shaped bodies with rhizoids that are produced by the young seedlings of various orchids. Protocorms represent the embryonic form of the orchid plant.
Their emergence after the period of waiting at an affirmation that everything in the propagation process is on track.
7. Transflask orchid seedlings is done after they have developed roots
Upon the emergence of the protocorms, consistently observe the growth of the seedlings. At the point when the seedlings appear to overcrowd the flask, transflasking should be carried out, typically within 30 and 60 days.
* This is done by removing individual seedlings using sterilized tweezers from the original containers and placing them in new containers also filled, in a proportion similar to the original, with agar medium. 6 to 8 in a standard petri dish or 1or 2 to a test tube
8. Transplant seedlings into planting pots
On the presumption that there are no disruptions to the plant growth, the seedlings will eventually outgrow the containers.
At this point, they are to be transplanted into planting pots. A good rule of thumb to determine when they are ready to be transplanted is when the seedlings have developed roots that have grown up to the length of one-quarter of an inch.
To transplant, prepare a planting pot or other container for receiving the seedling by majorly filling it up with coarse fir bark and possibly some slightly moist orchid compost mixture containing perlite, fine charcoal, redwood bark shavings, etc.
To extract the seedlings, submerge the containers in warm water to help loosen the agar gel.
Once the agar medium is softened, twist a piece of metal to form a loop and in turn, use it to carefully pull out the seedlings from the container. It is best done if the agar and seedling can be removed together.
The seedlings can be further rinsed in lukewarm water to remove any excess agar mixture still stuck to them.
Following this, the seedlings can now be planted into the prepared pot with at least 50mm of space between each individual seedling.
9. Positioning the orchid
The seedling once fully transplanted should be placed in a location that is warm with good indirect sun light.
Slowly position the pots into an area that closely assimilates the conditions it will be growing under.
The choice as to whether the plant should be exposed to full sun or in direct sunlight will be dependent on the particular orchid specie.
10. Subsequent care of the plant
After the first week, the seedling can be misted several times a day and watered just once a week.
A guide in watering the plant will be using the dryness of the fir back that is, water the plant until the fir back is completely moistened and wait till it has completely dried out before watering again.
Do not fertilize until the seedlings have fully established themselves.
Division: Division is the easiest method for amateurs to propagate Sarcochilus parviflorus. At some point, the orchid will become root-bound in its pot or large enough to divide the clump on a tree or slab. The only tools required are sharp sterile knife a slab of cork or pumice stone and some hemp or nylon string. I prefer hemp string because it is totally natural but is difficult to obtain.
The potted Sarcochilus parviflorus: Remove the Sarcochilus parviflorus from its pot and set it on a firm surface. Cut through the roots to create separate sections of the plant. Each piece should include four to five stems and a large chunk of the root system. Repot using a mixture of scoria and pumice stone. Make sure the stones come from a saline free environment. Use a central stick to ensure the plant is tied securely so that it does not move.
Slab plants: Take the slab and cut it down the middle ensuring each section has healthy terminal stems. Retie the new divisions cork or pumice stone onto a new piece of cork or pumice stone. Tie them so that they do not move. Do not over tighten as this cut’s off the flow of nutrients to the new leaves.
Treat plants that are growing naturally on a tree in the same way. First cut the plant in half then slice just below the roots into the outer layer of bark being careful not to damage the stems or the xylem and phloem layers of the tree Remove the section and retie it to another section of the tree or cork slab as desired.
Fertilize using seaweed, fish emulsion or organic chicken pellets soaked in water on an alternate basis as a foliar spray. Fertilize every two months until the plants are established then annually in early September to October to maintain better colour, health, vitality and flowering.
Further Comments from Readers:
“Hi reader, it seems you use The Bible of Botany a lot. That’s great as we have great pleasure in bringing it to you! It’s a little awkward for us to ask, but our first aim is to purchase land approximately 1,600 hectares to link several parcels of N.P. into one at The Pinnacles NSW Australia, but we need your help. We’re not salespeople. We’re amateur botanists who have dedicated over 30 years to saving the environment in a practical way. We depend on donations to reach our goal. If you donate just $5, the price of your coffee this Sunday, We can help to keep the planet alive in a real way and continue to bring you regular updates and features on Australian plants all in one Botanical Bible. Any support is greatly appreciated. Thank you.”
In the spirit of reconciliation we acknowledge the Bundjalung, Gumbaynggirr and Yaegl and all aboriginal nations throughout Australia and their connections to land, sea and community. We pay our respect to their Elders past, present and future for the pleasures we have gained.
Sarcochilus spathulatus
Classification:
Unranked: Monocots
Order: Asparagales
Family: Orcidaceae
Subfamily: Epidendroideae
Tribe: Vandeae
Subtribe: Aeridinae
Genus: From Sárx/Sárxa, which is Ancient Greek for fleshy as per the edible flesh of a fruit and Cheilos, which is Ancient Greek for a lip. It refers to orchids which have a fleshy labellum, petals and sepals.
Species: From Spatula, which is Latin to have the shape of a spoon. It refers to leaves or phyllodes, which somewhat resembles a spoon or ladle.
Common Name: Small Butterfly Orchid.
Distribution:
Sarcochilus spathulatus is found on and east of the Great Dividing Range to the coast. It is found south from the Maroochydore hinterland in south eastern coastal Queensland to Wyong in central coastal New South Wales.
https://avh.ala.org.au/occurrences/search?taxa=Sarcochilus+spathulatus#tab_mapView
Habitat Aspect Climate:
Sarcochilus spathulatus prefers medium shade to dappled sunlight. It grows in moist sub-tropical rainforests, moist gallery rainforests or dry rainforests. Its altitude ranges from 2 meters ASL to 1200 meters ASL.
The temperatures range from minus 3 degrees in August to 36 degrees in January.
The rainfall ranges from lows of 800mm to 2000mm average per annum. The plants are usually associated in areas of orographic precipitation.
Soil Requirements:
Sarcochilus spathulatus usually grows as an epiphyte on the outer limbs of trees or on the trunks of trees in drier situations.
Height & Spread:
Wild Plants: 0.02m to 0.03m by 0.1m to 0.14m.
Characteristics:
Sarcochilus spathulatus grows as a semi pendent epiphytic orchid usually with a single shoot. The stems measure 5mm to 3mm in length.
The 3 to 6 narrow ovate, narrow obovate to oblong leaves measure 15mm to 70mm in length by 5mm to 17mm in width. The leaves are sessile and taper to the caudate bases while the broad acuminate. The concolourous, laminas are deep grass-green to deep green often tinged purple and glabrous. The laminas are slightly channeled and decurve gently to strongly downwards from the base. The margins are entire. The midvein is prominent on the lower laminas.
The inflorescences are semi pendulant racemes with 1 to 7 individual flowers and measure 20mm to 75mm in length. The plants usually have 1 raceme however 2 are not unusual in good seasons on mature plants. The peduncle and rachis are deep green and glabrous while the pedicels are yellow-green and glabrous. The peduncle measures 9mm to 35mm in length while the rachis measures 11mm to 40mm in length and the pedicels measure 5mm to 8mm in length including the ovary. The flowers are born from the center of the rosette of leaves. The plants in a particular area flower synchronously. The dorsiventral dimension of the flower is about equal to lateral dimension.
The glabrous, narrow oblong dorsal sepal is dilated near the acuminate apex and is pale lime-green often faintly tinged purple or brownish. The margins are entire. The dorsal sepal measures 7mm to 9mm in length by 2.4mm to 2.6mm in width at the dilated section.
The slightly twisted, glabrous, narrow oblong lateral sepals, spread near the base and have an acute apex. It is pale lime-green often faintly tinged purple or brownish. The margins are entire. The lateral sepals measure 8mm to 10mm in length by 1.3mm to 1.5mm in width at the dilated section.
The glabrous, narrow oblong lateral petals taper slightly at the base, have obtuse apexes and are straight or twist to 90 degrees. It is pale lime-green often faintly tinged purple or brownish. The margins are entire. The dorsal sepals measure 5mm to 6mm in length by 1.3mm to 1.5mm in width at the dilated section.
The glabrous, white labellum is broad oblong with 3 lateral lobes on the column foot. The labellum measures 5 mm to 6mm in length. The white lateral lobes are erect, tinged pale brown and covered in fine reddish-purple spots with a reddish band around the apex of the column foot. The labellum measure 6mm to 7mm in length by 4.5mm to 5mm in width. The column measures 1.5mm to 2mm in length. The column foot is set at almost right angles to column and measures 3mm to 3.5mm in length while the column foot’s lobes are spathulate and measures 3.5mm to 4mm in length. The white mid lobe is short and wide with a truncate apex. The flowers appear from July to October.
The fruits are obloidal, porrect capsules. The green capsules turn deep grey-brown when ripe.
Wildlife:
Sarcochilus spathulatus’s wildlife is unknown to the author.
Cultivation:
Sarcochilus spathulatus is a beautiful flowering orchid which is rather hardy and easy to grow and to propagate at least as far south as Victoria along the coast. It does very well either in the bush house attached to a slab of cork or washed pumice stone or attached to most rainforest trees that do not shed their bark in a sheltered area. Do not attach them to Eucalyptus trees as the barks contain resins which most Orchids detest.
Trees with mass plantings of mixed orchids look really spectacular and those that have several Sarcochilus spathulatus add interest and curiosity over a long period especially when in flower. Even the roots have some appeal as they cover the trunks. Ficus species, Ceropetalum species, Melaleuca quinquenervia and Elaeocarpus species are good host trees as it is natural host for this orchid in the wild as are Cupaniopsis species.
It does best when mounted on slabs of cork. Water is best applied on a weekly basis during the growing season and fortnightly in the non-growing season.
It is best grown beneath 50mm shade cloth or under a rainforest canopy.
Propagation:
Seeds: All orchids that are declared rare, vulnerable or endangered are protected by Federal and State Laws and must not be removed from the wild unless you are a land developer, mining company or main Roads department etc. This includes bulbs, roots, leaves and flowers. No part of any plant can be removed from Federal, State or Local Government land without the prior permission of the authority and this includes the spore.
1. Obtain relevant materials
The first step in growing orchid from seed will be sourcing and having at the ready all materials that will be required in the propagation process.
This includes all of the following:
Unripe orchid seed capsule. If there are 2 capsules secure the second capsule immediately after the first capsule splits or if only one capsule as soon as it changes colour.
Orchid gelling medium with agar which can be purchased from an orchid society or a specialist nursery.
Distilled water
Cooking pot
Spoon
Oven-safe glass or polypropylene containers with lids
Sealable bags
Clean, sterilized cutting board
Rubber gloves
Paper towels
Tweezers or forceps
70 percent ethanol
Bleach
Scalpel or sharp knife
Planting pot
Orchid compost
Length of wire metal
Plastic spray bottle.
deep petri dishes or sterile jars.
2. Prepare agar medium
The agar medium is a special orchid gelling mixture that distilled water will be added to distilled water.
To prepare the medium, mix equal parts of orchid gelling medium with distilled water in a cooking pot.
Place the pot on a stove and bring the mixture to boil for while stirring continuously for two minutes.
Pour the mixture into the petri dishes glass or propylene containers while ensuring not to fill the containers above 20 percent of their volume.
Loosely replace the lids to the containers. Sterilize the containers by heating them up in a microwave oven for between 2 to 3 minutes.
Spray 70 percent ethanol into a sealable bag to create a sterile environment. Transfer the heated containers into the sealable bag.
Allow the containers to cool a bit before tightening their lids and then sealing the bag. Leave the containers to stand for a few days until the mixture solidifies.
3. Prepare seed capsule and work surface
Place an open pot of water on a stove and bring to boil. Place the cutting board in the oven and sterilize.
Put on rubber gloves and sterilize the forceps, and scalpel with 70 percent ethanol.
Insert the seed capsule into a bowel filled with bleach for about fifteen minutes.
Sterilize seed capsule again with 70 percent ethanol and place on grill.
Using the sterilized scalpel, cut open the seed capsule to reveal the seeds. Using a scalpel or sharp knife, scrape out the seeds from the capsule unto an ethanol soaked paper towel.
4. Flasking of the seed
Take out the petri dishes or glass jars containers holding the agar medium. Over the steam, open up the containers and transfer seeds from the ethanol soaked paper towel into the individual containers using the sterilized forceps.
The amount of seeds will determine the number of containers required. Replace the lid of the containers and place them on a window sill that receives indirect sunlight.
5. Wait and exercise patience
All that can be done at this point is to wait until the seeds germinate. The amount of time that this might take varies and is dependent on the particular species.
Generally, the time can range from a few months to a few years. During this period of waiting, ensure the containers are free from contamination to ensure that germination is not disrupted.
6. Emergence of protocorms
Protocorms are tuber-shaped bodies with rhizoids that are produced by the young seedlings of various orchids. Protocorms represent the embryonic form of the orchid plant.
Their emergence after the period of waiting at an affirmation that everything in the propagation process is on track.
7. Transflask orchid seedlings is done after they have developed roots
Upon the emergence of the protocorms, consistently observe the growth of the seedlings. At the point when the seedlings appear to overcrowd the flask, transflasking should be carried out, typically within 30 and 60 days.
* This is done by removing individual seedlings using sterilized tweezers from the original containers and placing them in new containers also filled, in a proportion similar to the original, with agar medium. 6 to 8 in a standard petri dish or 1or 2 to a test tube
8. Transplant seedlings into planting pots
On the presumption that there are no disruptions to the plant growth, the seedlings will eventually outgrow the containers.
At this point, they are to be transplanted into planting pots. A good rule of thumb to determine when they are ready to be transplanted is when the seedlings have developed roots that have grown up to the length of one-quarter of an inch.
To transplant, prepare a planting pot or other container for receiving the seedling by majorly filling it up with coarse fir bark and possibly some slightly moist orchid compost mixture containing perlite, fine charcoal, redwood bark shavings, etc.
To extract the seedlings, submerge the containers in warm water to help loosen the agar gel.
Once the agar medium is softened, twist a piece of metal to form a loop and in turn, use it to carefully pull out the seedlings from the container. It is best done if the agar and seedling can be removed together.
The seedlings can be further rinsed in lukewarm water to remove any excess agar mixture still stuck to them.
Following this, the seedlings can now be planted into the prepared pot with at least 50mm of space between each individual seedling.
9. Positioning the orchid
The seedling once fully transplanted should be placed in a location that is warm with good indirect sun light.
Slowly position the pots into an area that closely assimilates the conditions it will be growing under.
The choice as to whether the plant should be exposed to full sun or in direct sunlight will be dependent on the particular orchid specie.
10. Subsequent care of the plant
After the first week, the seedling can be misted several times a day and watered just once a week.
A guide in watering the plant will be using the dryness of the fir back that is, water the plant until the fir back is completely moistened and wait till it has completely dried out before watering again.
Do not fertilize until the seedlings have fully established themselves.
Division: Division is the easiest method for amateurs to propagate Sarcochilus spathulatus. At some point, the orchid will become root-bound in its pot or large enough to divide the clump on a tree or slab. The only tools required are sharp sterile knife a slab of cork or pumice stone and some hemp or nylon string. I prefer hemp string because it is totally natural but is difficult to obtain.
The potted Sarcochilus spathulatus: Remove the Sarcochilus spathulatus from its pot and set it on a firm surface. Cut through the roots to create separate sections of the plant. Each piece should include four to five stems and a large chunk of the root system. Repot using a mixture of scoria and pumice stone. Make sure the stones come from a saline free environment. Use a central stick to ensure the plant is tied securely so that it does not move.
Slab plants: Take the slab and cut it down the middle ensuring each section has healthy terminal stems. Retie the new divisions cork or pumice stone onto a new piece of cork or pumice stone. Tie them so that they do not move. Do not over tighten as this cut’s off the flow of nutrients to the new leaves.
Treat plants that are growing naturally on a tree in the same way. First cut the plant in half then slice just below the roots into the outer layer of bark being careful not to damage the stems or the xylem and phloem layers of the tree Remove the section and retie it to another section of the tree or cork slab as desired.
Fertilize using seaweed, fish emulsion or organic chicken pellets soaked in water on an alternate basis as a foliar spray. Fertilize every two months until the plants are established then annually in early September to October to maintain better colour, health, vitality and flowering.
Further Comments from Readers:
“Hi reader, it seems you use The Bible of Botany a lot. That’s great as we have great pleasure in bringing it to you! It’s a little awkward for us to ask, but our first aim is to purchase land approximately 1,600 hectares to link several parcels of N.P. into one at The Pinnacles NSW Australia, but we need your help. We’re not salespeople. We’re amateur botanists who have dedicated over 30 years to saving the environment in a practical way. We depend on donations to reach our goal. If you donate just $5, the price of your coffee this Sunday, We can help to keep the planet alive in a real way and continue to bring you regular updates and features on Australian plants all in one Botanical Bible. Any support is greatly appreciated. Thank you.”
In the spirit of reconciliation we acknowledge the Bundjalung, Gumbaynggirr and Yaegl and all aboriginal nations throughout Australia and their connections to land, sea and community. We pay our respect to their Elders past, present and future for the pleasures we have gained.
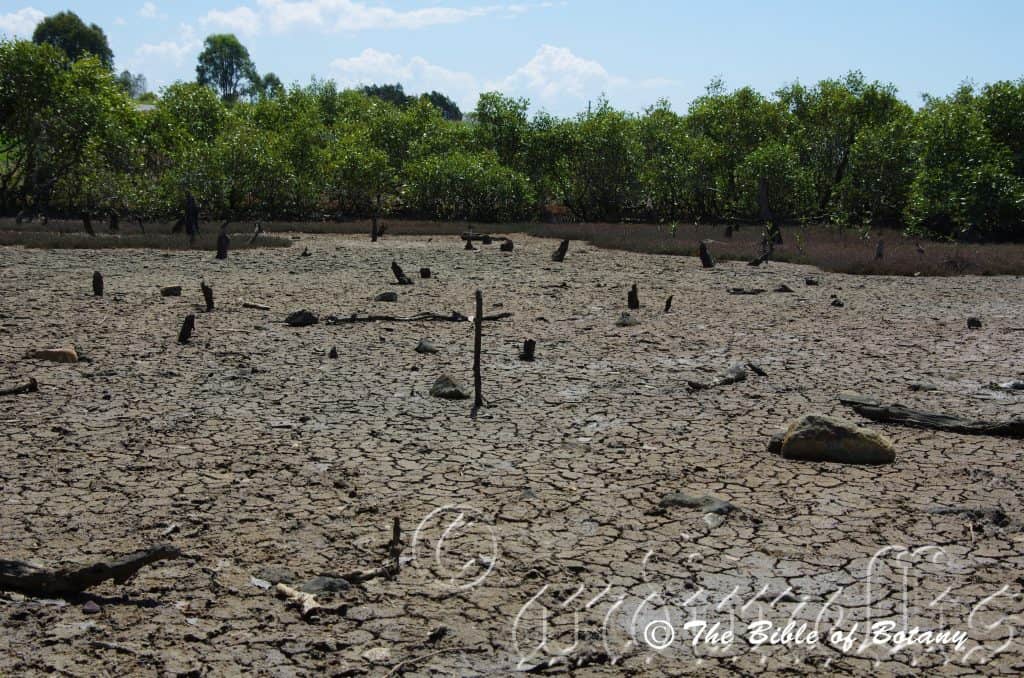
Wynumm North foreshore Qld.
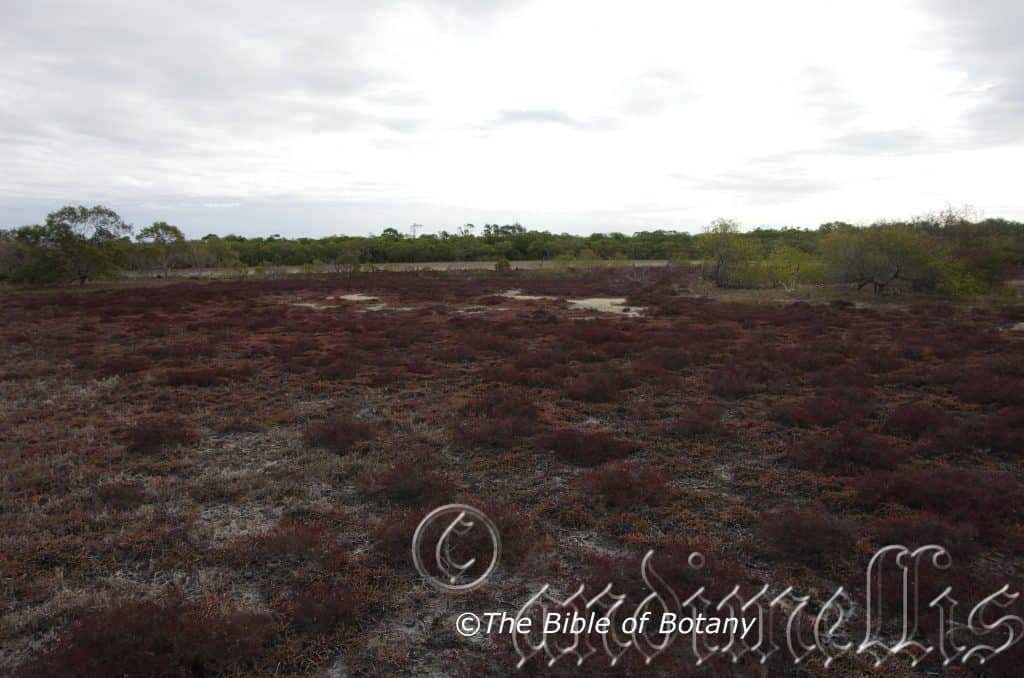
Toolakea Qld.
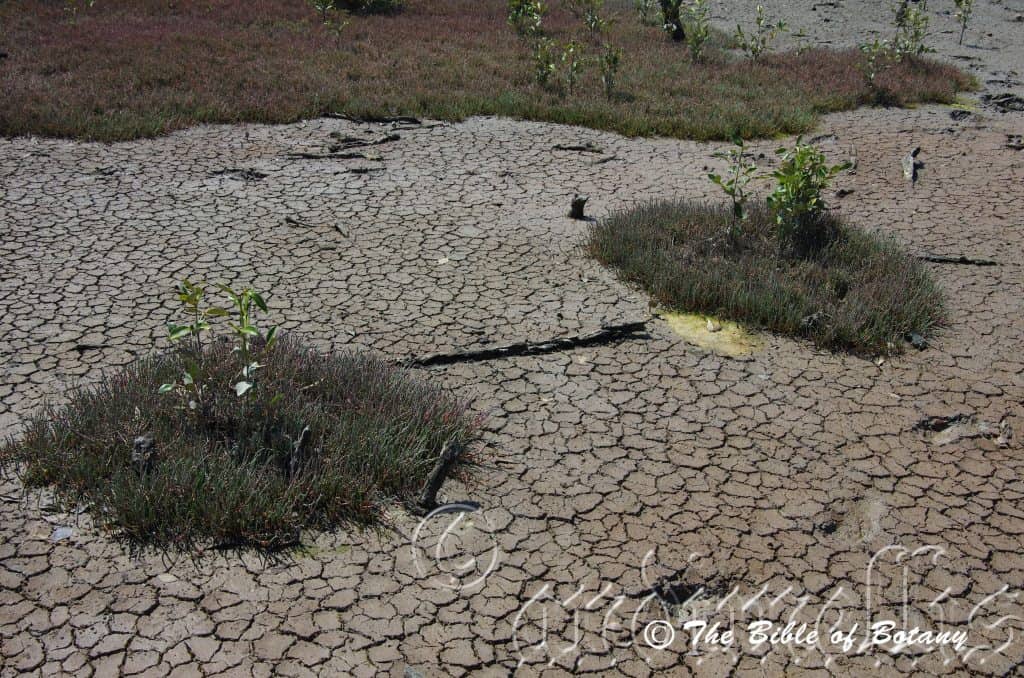
Wynumm North foreshore Qld.
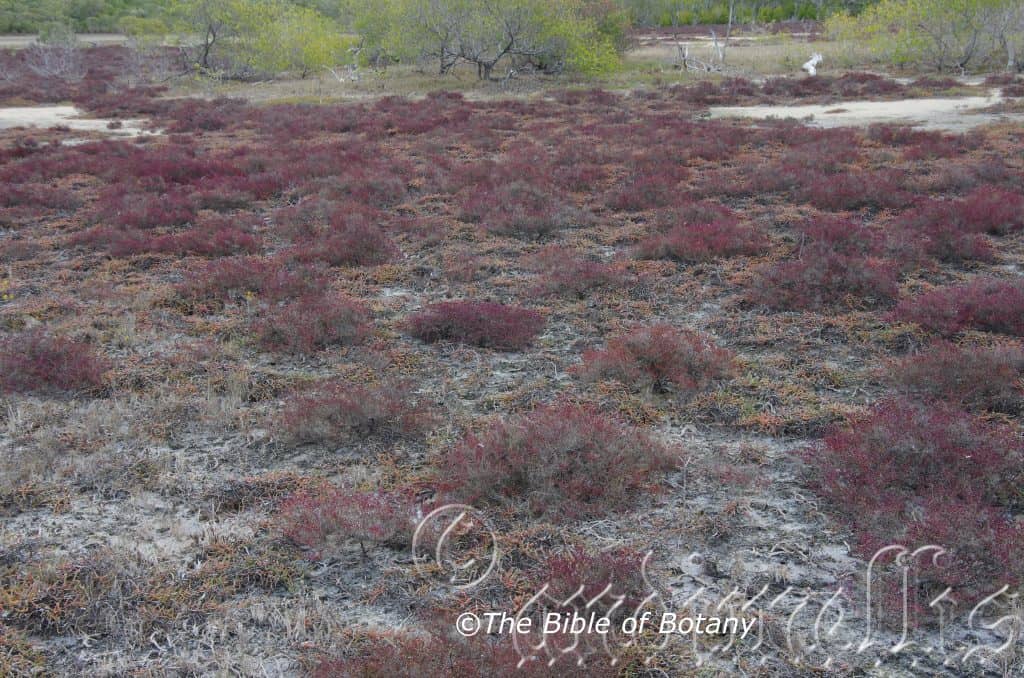
Toolakea Qld.
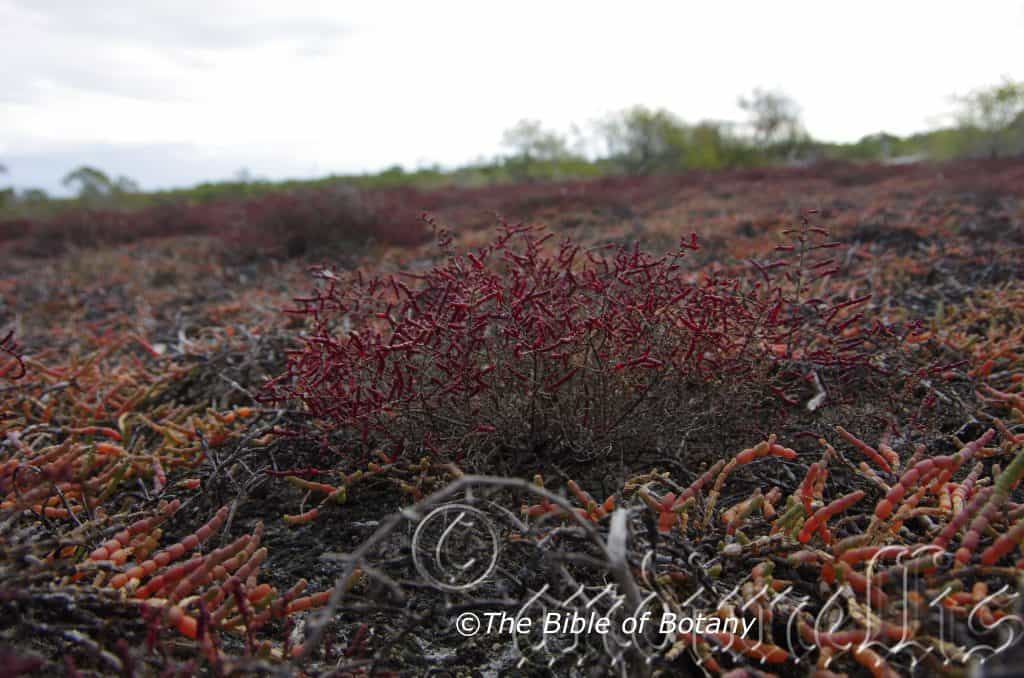
Toolakea Qld.

Toolakea Qld.
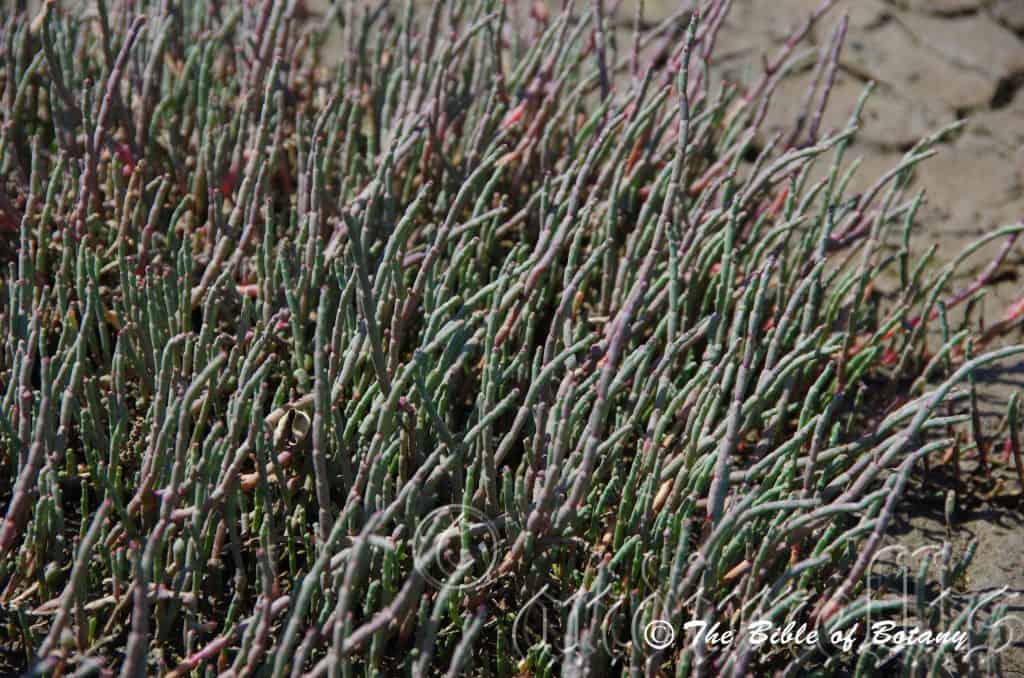
Wynumm North foreshore Qld.
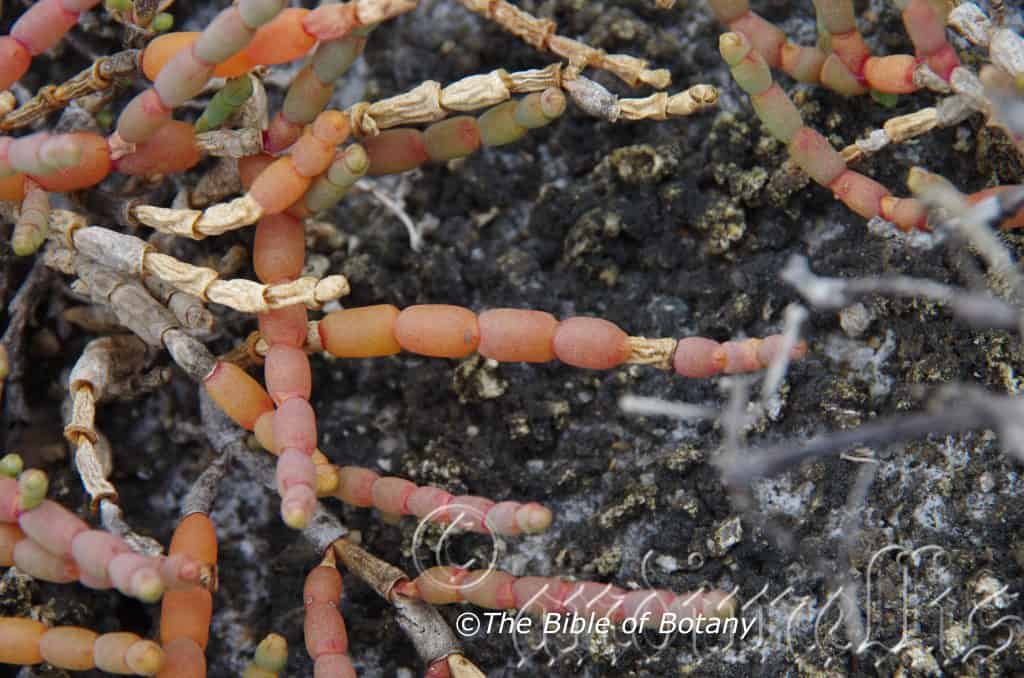
Toolakea Qld.
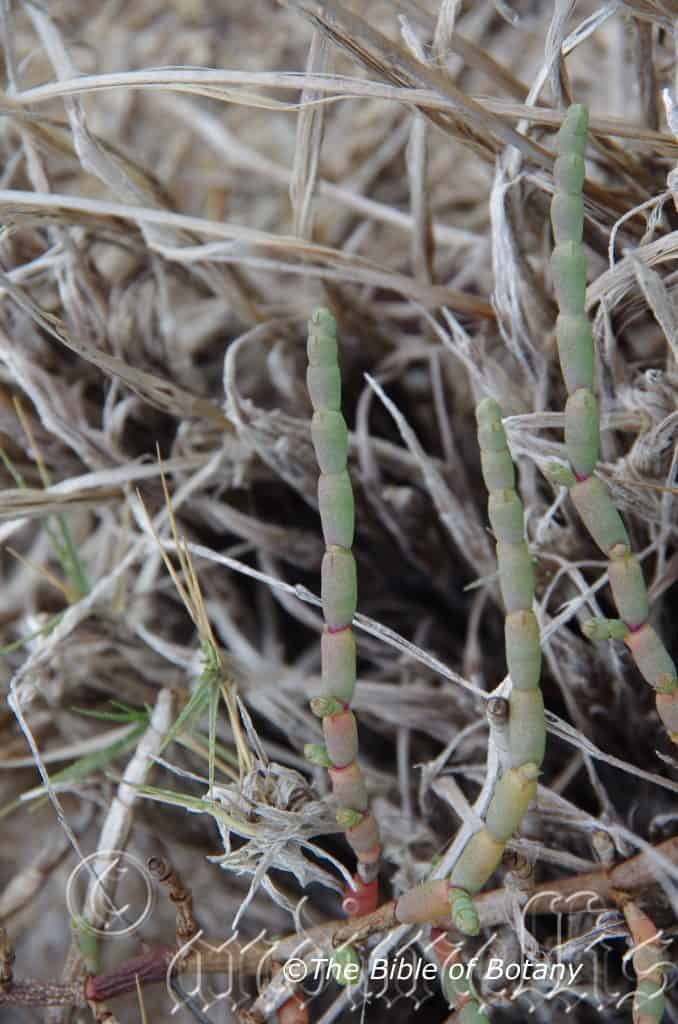
Toolakea Qld.
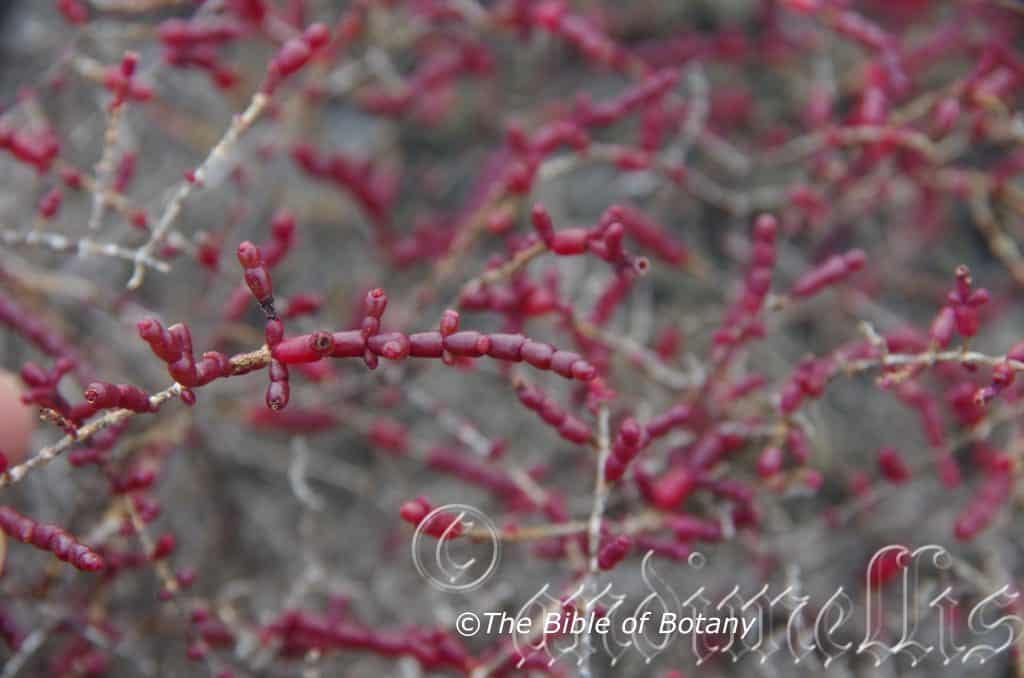
Toolakea Qld.
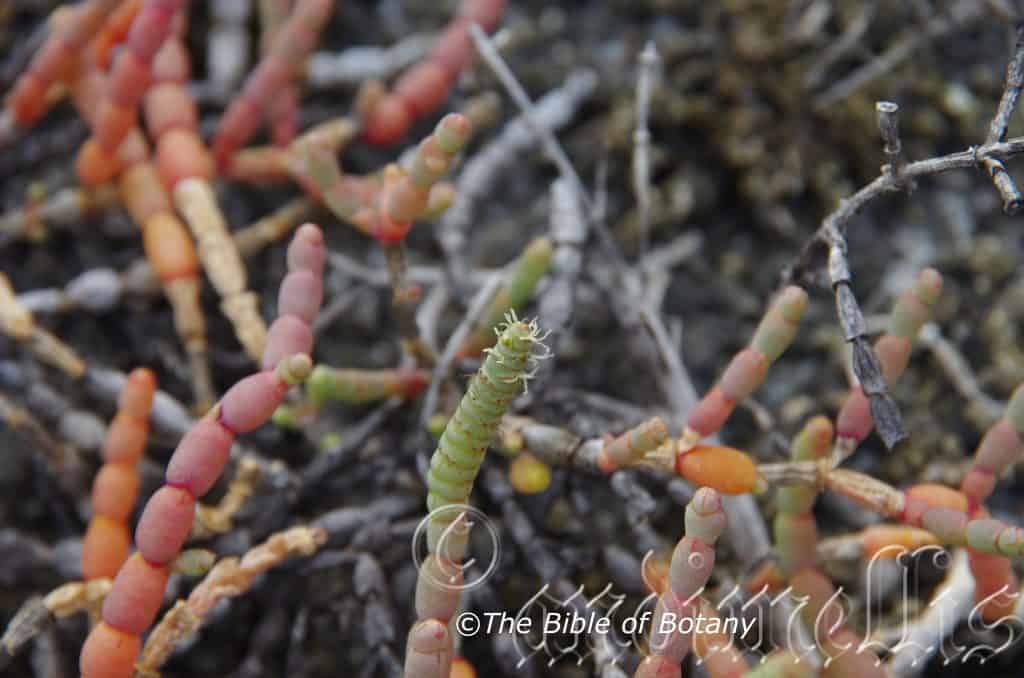
Toolakea Qld.
Sarcocornia quinqueflora
Classification:
Unranked: Eudicots
Unranked: Core Eudicots
Order: Caryophyllales
Family: Amaranthaceae
Subfamily: Salicorniodeae
Genus: From Sarko, which is Ancient Greek for fleshy and Kornis, which is Ancient Greek for a horn. It refers to flowers, which have somewhat fleshy horn like articles.
Species: From Quin, which is Latin for five and Que, which is Latin for times and Flōris which is Latin for a flower or Flōs which is Roman for the Goddess of spring and flowers. It refers to flower structures, which have a ratio of five.
Common Name: Samphire Glasswort.
Distribution:
Sarcocornia quinqueflora is found in a line south and west from New Beach to Port Dennison Marina then south east to Daw Island in the Recherche Archipelago in south western, Western Australia.
In the east it is found south from Cairncross Islet and Puddingpan Harbour in far north Queensland to Coorabie in western coastal South Australia including most the offshore Islands, Kangaroo Island, Bass Strait Islands, the Tasmanian coastline, Lord Howe Island and Norfolk Island.
In South Australia it extends further inland at Island Lagoon near Woomera and most the semi-arid and areas of northern western Victoria, ephemeral pools in Ethabuka reserve and the South Mitchell River on Cape York Peninsula.
Sarcocornia quinqueflora is distributed worldwide, especially in warm-temperate regions where a Mediterranean climate prevails, and to some extent in the subtropics. The distribution area covers North and South American countries, European countries around the Mediterranean basin and Atlantic coasts with mild winters, southern and northern Africa and south East Asia through Indonesia and the pacific Island Nations.
https://avh.ala.org.au/occurrences/search?taxa=Sarcocornia+quinqueflora#tab_mapView
Habitat Aspect Climate:
Sarcocornia quinqueflora prefers full sun to very light shade. It usually grows in coastal areas on tidal flats which are infrequently inundated by tides. The altitude ranges from 0 meters ASL to 435 meters ASL.
The temperatures range from minus 3 degrees in July to 40 degrees in January.
The rainfalls range from lows of 250mm to 3200mm average per annum.
Soil Requirements:
Sarcocornia quinqueflora prefers sandy muddy silts, fine silts to medium silty clays. The soils are usually derived from accumulated silts along the coast or alluvial deposits. The soils pH ranges from 4.5pH to 6pH. It is not tolerant of waterlogged soils however continuous moisture is always available. Non saline soils to extremely saline soils are tolerated.
Height & Spread:
Wild Plants: 0.1m to 0.5m by 1m to 2m
Characteristics:
Sarcocornia quinqueflora grows as a decumbent spreading perennial which roots at the nodes. The terete stems are bluish-grey, green or green tinged purple, yellow or red. The stems measure 5mm to 8mm in diameter. The smooth, glabrous articulated stems measure 5mm to 15mm in length by 2mm to 4mm in diameter.
The inflorescences are clusters born randomly along the articles or on spikes born from the nodes. The spikes measure 20mm to 40mm in length by 4mm to 5mm in diameter. The 5 to 9 flowers are in a single row and measure about 0.1mm in diameter. The perianth has a small creamy yellow, adaxial lobe and a minute creamy yellow, abaxial lobe.
The flowers are usually bisexual or at times are unisexual. The flowers appear from early December to late February.
The fruits are flattened spongy samaras. The perianth dries and falls with the fruit when ripe. The spherical seeds measure 1mm to 1.3mm in diameter. The seeds are often sparsely covered in trichomes especially around the periphery. The perisperm is absent in this genre.
Wildlife:
Sarcocornia quinqueflora’s fruits are eaten by the Orange–bellied Parrot (Neophema chrysogaster)
The articles and fruits are edible and are eaten immediately after blanching. The articles can be pickled and used similarly to cabbage. It is rather delicious and crunchy with a slight salt and pepper flavour.
Cultivation:
Sarcocornia quinqueflora is a great small native succulent that should be grown in association with other saline loving rockery plants or native succulents.
It is ideal at the edge of a saline heath garden. It also makes a great display between driveways and small garden beds on the northern side of a building. In cultivation it will grow from 0.1 meters to 0.3 meters in height by 0.5 meter to 1.2 meters in diameter when grown in the open in full sun.
It grows exceptionally well on lighter soils that are exposed to the elements where it can handle light to medium frosts and temperatures up to 44 degrees. It can cope with wet boggy conditions for short periods and accepts the occasional inundation with sea water.
Add to the above, if it is given an adequate supply of water and a little native fertilizer on a regular basis the plants will respond with better flowering and fruit over a long period and luscious looking, erect stems.
Try using it in sunny courtyards and other confined spaces that receive full sunlight for long periods. It can be used as the foundation plant in an arid garden scape where the only other feature is a large rock, stump or formal or informal frog or fish pond. Next to such features its stems, are never overpowering, but are certainly noticed while giving a cooling effect.
Desert landscapes are interesting and use strong accent curves accompanied by strong lines in foliage demarcations, colour, textures and heights even though the tallest plant in the bed maybe quite short.
Propagation:
Seeds:
The seeds can be removed easily from the mature fruits.
Sow fresh seeds directly into a seed raising mix, keeping them moist not wet. Do not over water as the seeds will rot off before germination takes place. Place the trays in a cool shaded area with 50mm shade cloth in the bush house. When the seedlings are 20mm to 25mm tall, plant them out into their permanent positions or repot them into 125mm squat pots.
Cuttings: Fortunately cuttings are very easy to strike. Use 100mm to 200mm long tip cuttings or lateral shoots from the present season’s growth. Take them in warmer months of the year. Remove half the leaves from the bottom section being careful not to tear the bark.
1 Prepare the cutting mix by adding two thirds sharp clean river sand, one third peat or one third perlite. These ingredients must be sterilized,
2 Select good material from non diseased plants,
3 Select semi green stems for cuttings. Look for a stem with two or three nodes,
4 Place the cutting on a flat, hard surface, and make a clean cut down one side of the cutting at the base for 10mm with a sharp sterile knife or razor blade. – This scarification of the node will increase the chances of roots emerging from this spot. Now remove all but one or two the leaves, leaving the apex leaves in tact. If the leaves are very large in proportion to the stem, cut off the apical halves.
5 hormones are not required,
6 Use a small dipple stick or old pencil to poke a hole into the soilless potting mix. Ensure the hole is slightly larger than the stem diameter and be careful not to damage the cutting’s base,
7 I like to place the tubes in bucket with holes drilled in the bottom to allow excess water to drain out. A plastic bag that fits over the bucket is ideal to help maintain temperature and moisture. Place in a semi shaded, warm position like under 50mm shade cloth.
8 When the cuttings have struck, open the bag to allow air circulation for a few days to a week,
9 Once hardened off remove the cuttings from the bag and allow to further hardening for a few more days to a week,
10 Transplant into a good potting mix to grow on.
Fertilize using seaweed, fish emulsion or organic chicken pellets soaked in water on an alternate basis. Fertilize every two months until the plants are established then annually in early September to October to maintain better colour, health, vitality and flowering.
Further Comments from Readers:
“Hi reader, it seems you use The Bible of Botany a lot. That’s great as we have great pleasure in bringing it to you! It’s a little awkward for us to ask, but our first aim is to purchase land approximately 1,600 hectares to link several parcels of N.P. into one at The Pinnacles NSW Australia, but we need your help. We’re not salespeople. We’re amateur botanists who have dedicated over 30 years to saving the environment in a practical way. We depend on donations to reach our goal. If you donate just $5, the price of your coffee this Sunday, We can help to keep the planet alive in a real way and continue to bring you regular updates and features on Australian plants all in one Botanical Bible. Any support is greatly appreciated. Thank you.”
In the spirit of reconciliation we acknowledge the Bundjalung, Gumbaynggirr and Yaegl and all aboriginal nations throughout Australia and their connections to land, sea and community. We pay our respect to their Elders past, present and future for the pleasures we have gained.
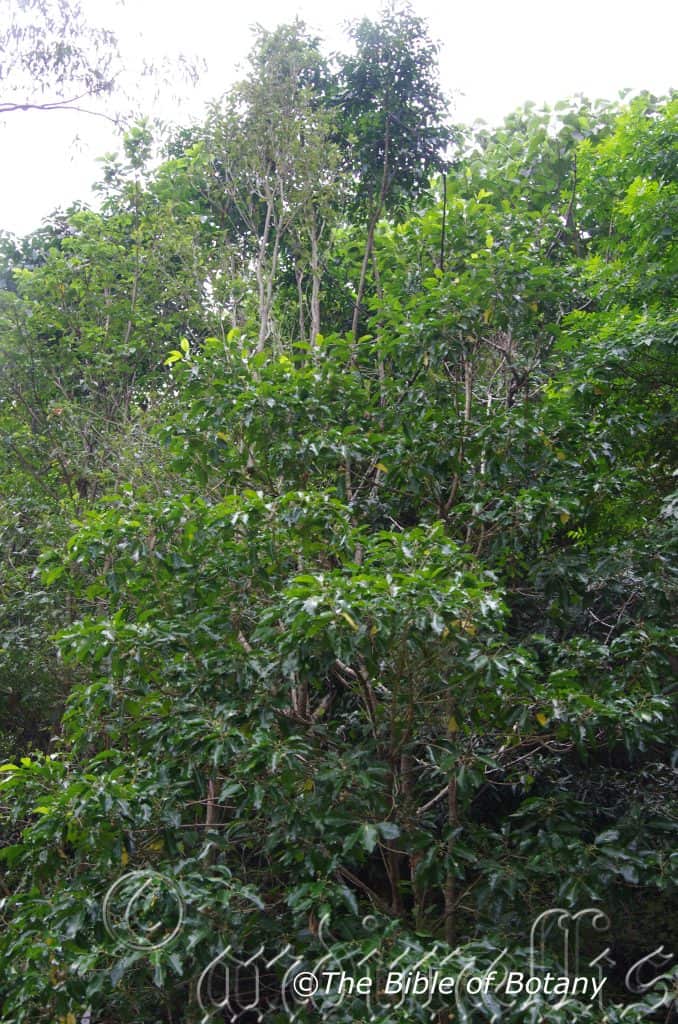
LBG Lismore NSW
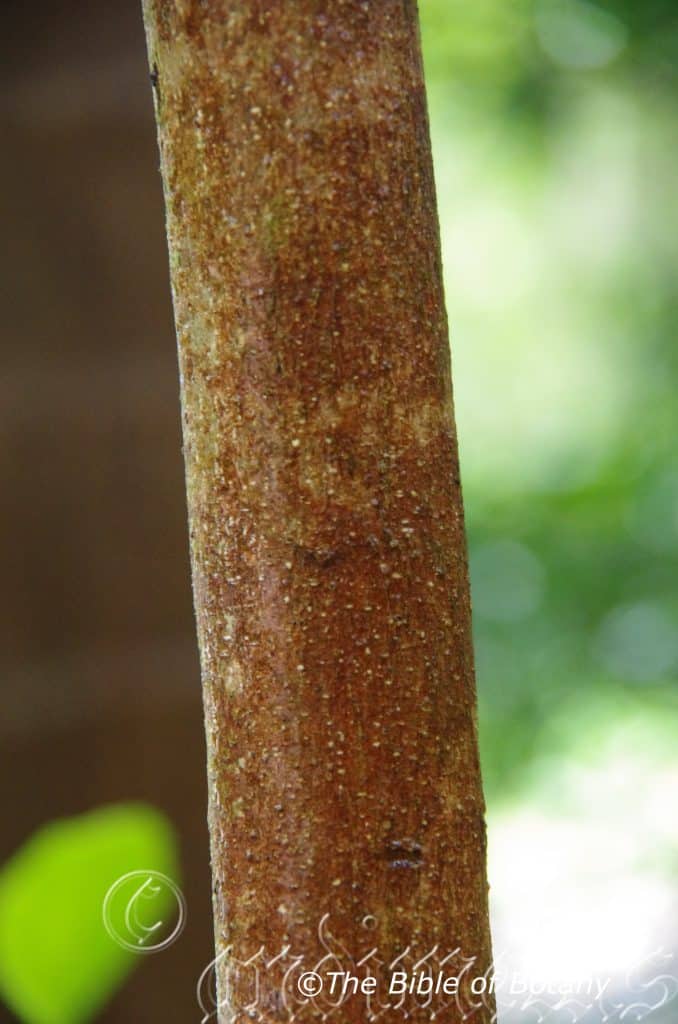
NCBG Coffs Harbour NSW
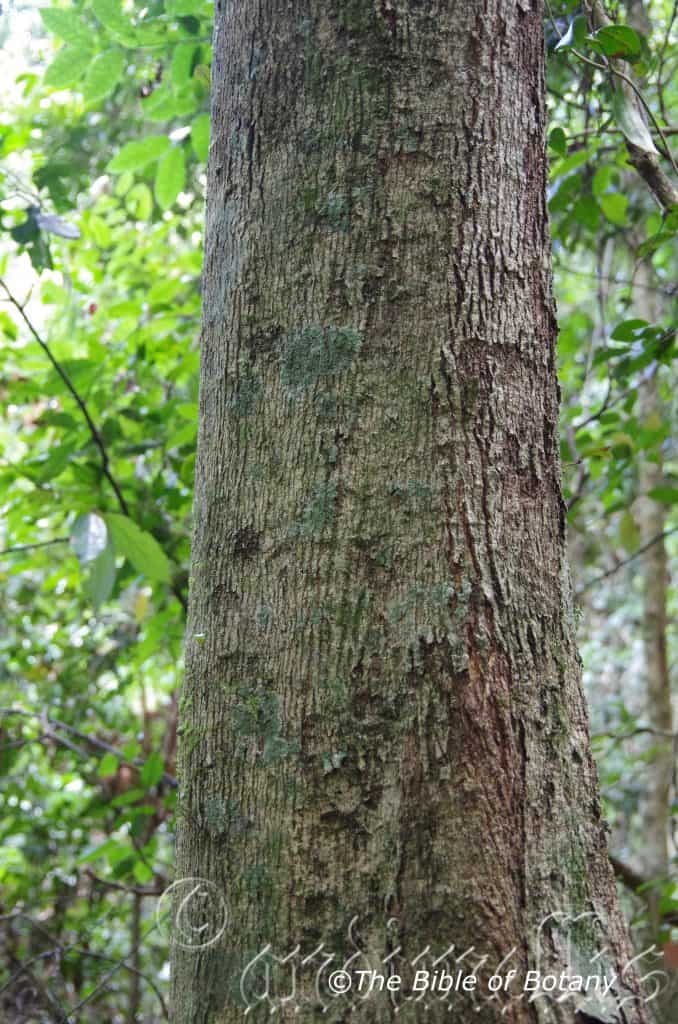
Border Ranges National Park NSW

Border Ranges National Park NSW
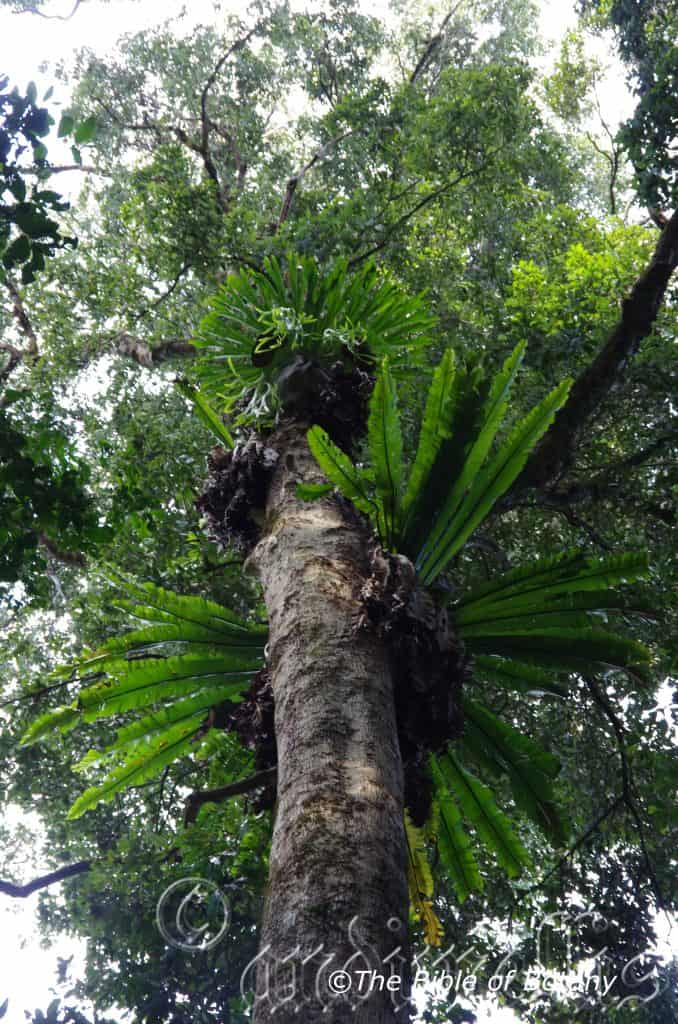
Border Ranges National Park NSW
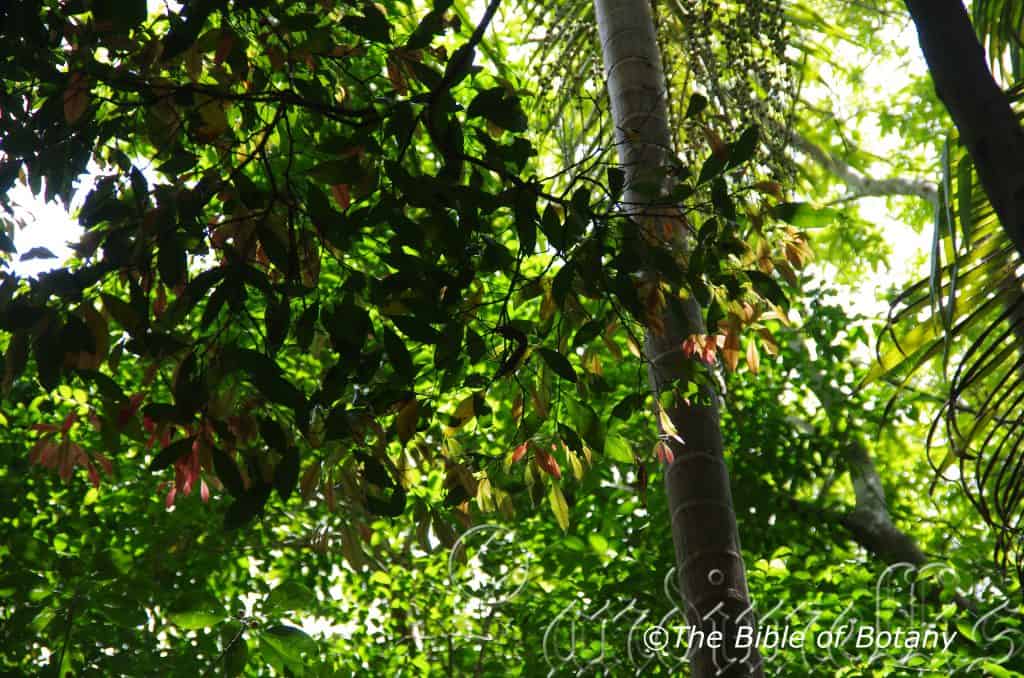
NCBG Coffs Harbour NSW
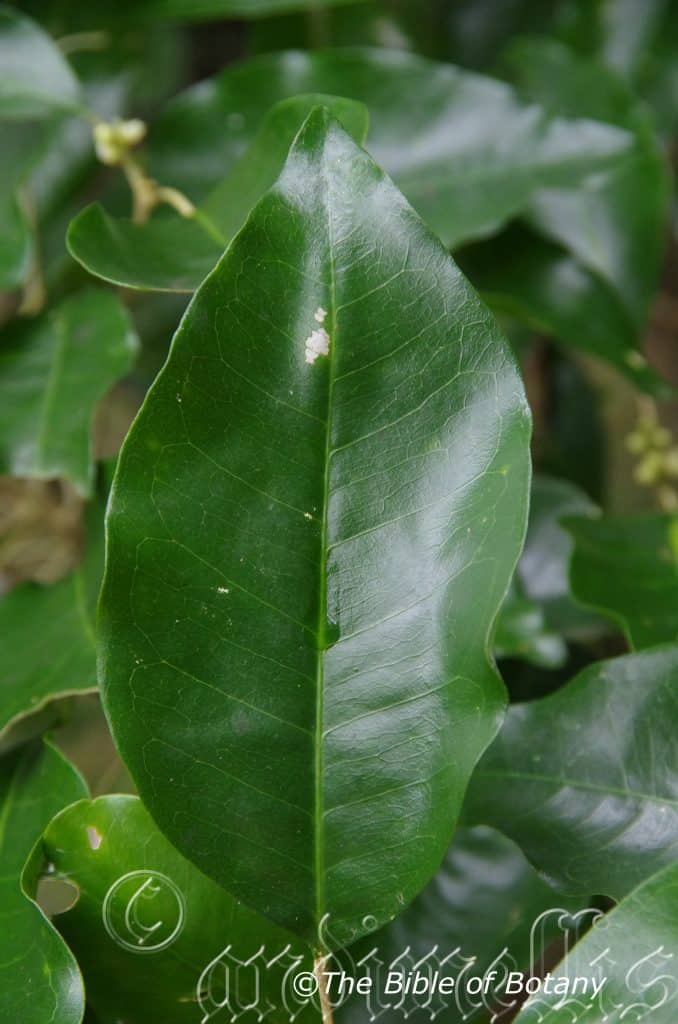
LBG Lismore NSW

NCBG Coffs Harbour NSW
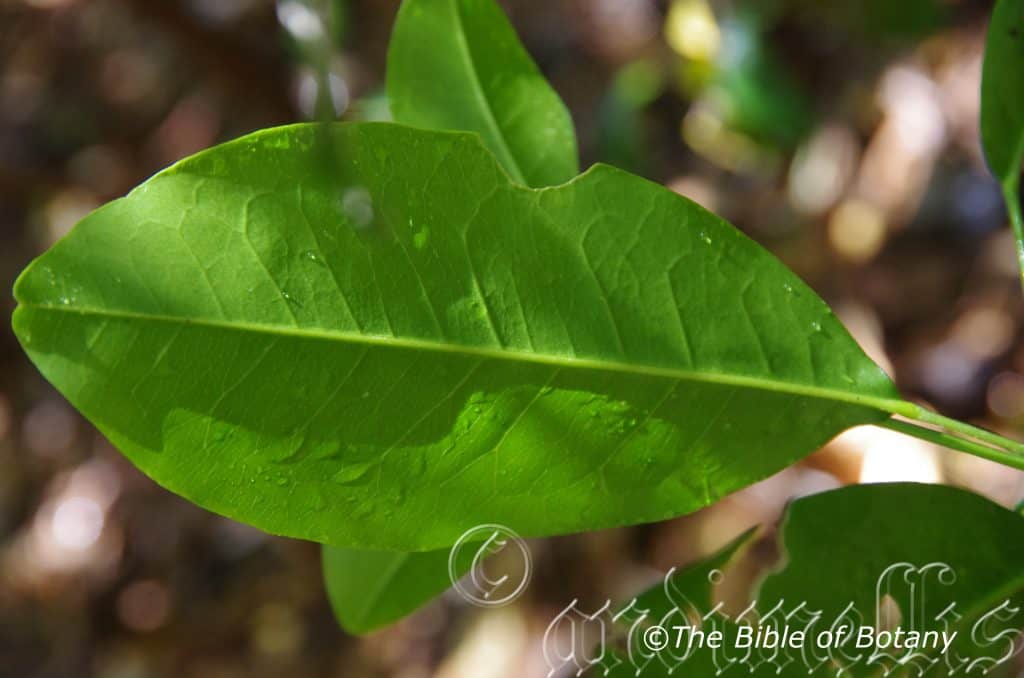
NCBG Coffs Harbour NSW
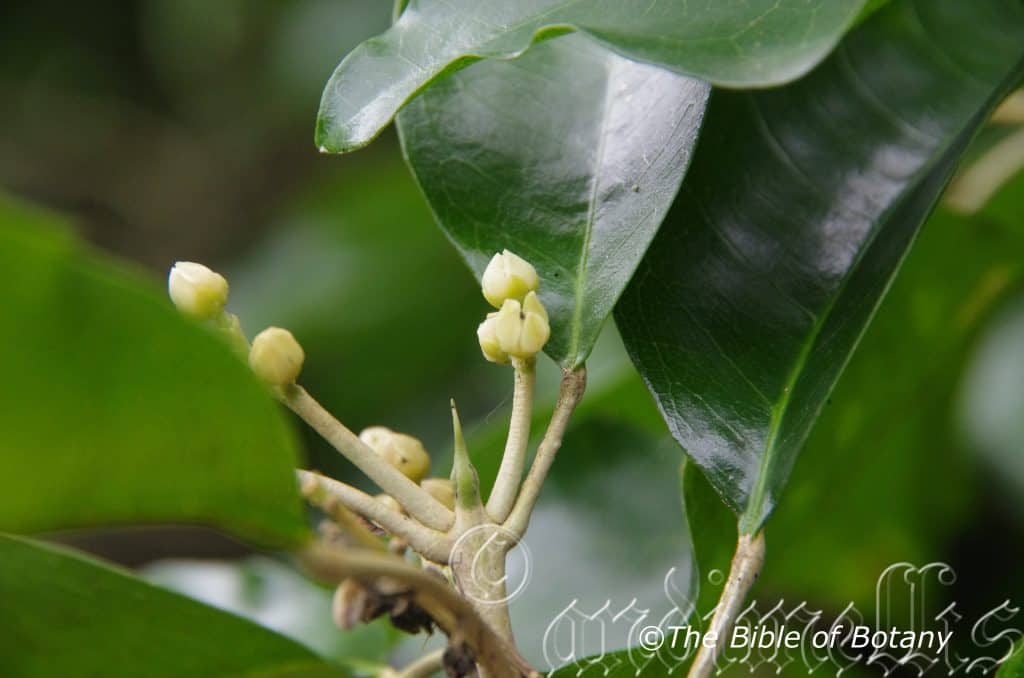
LBG Lismore NSW
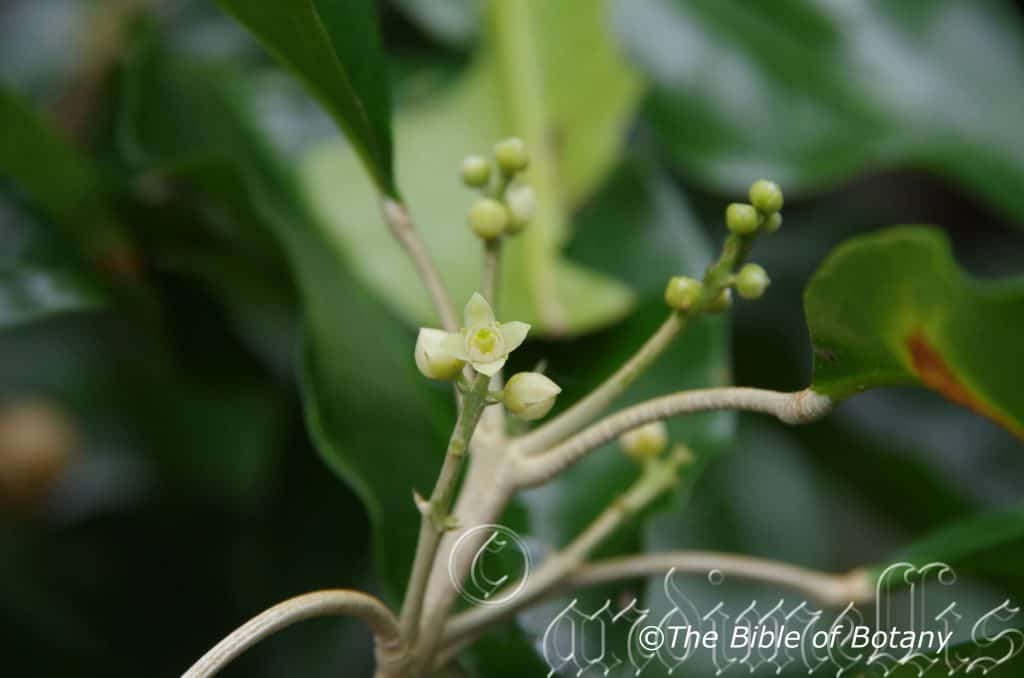
LBG Lismore NSW
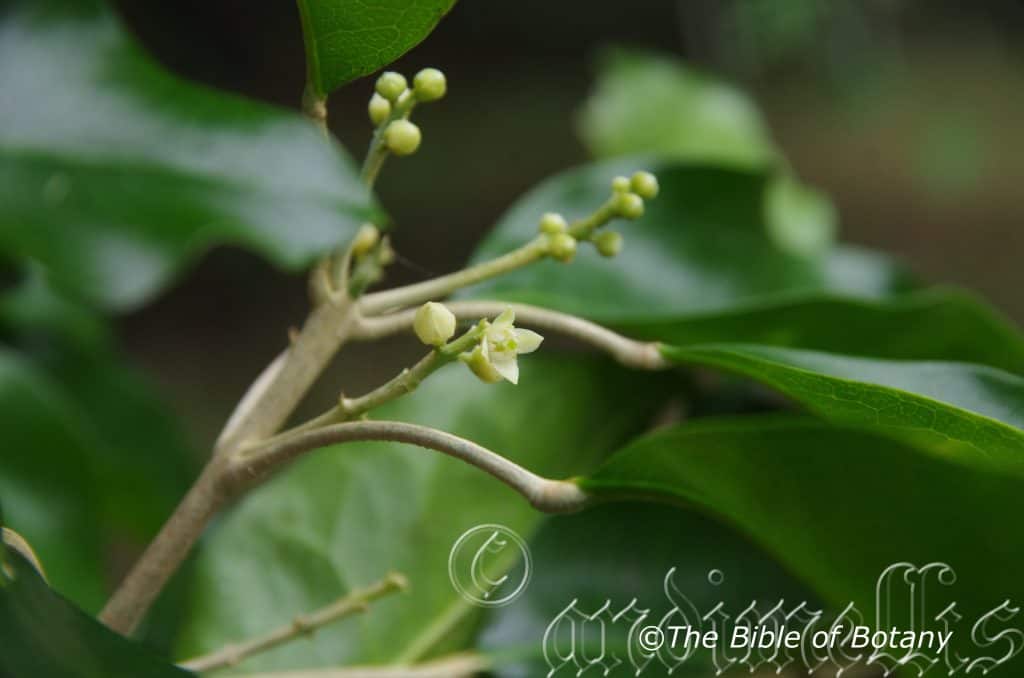
LBG Lismore NSW
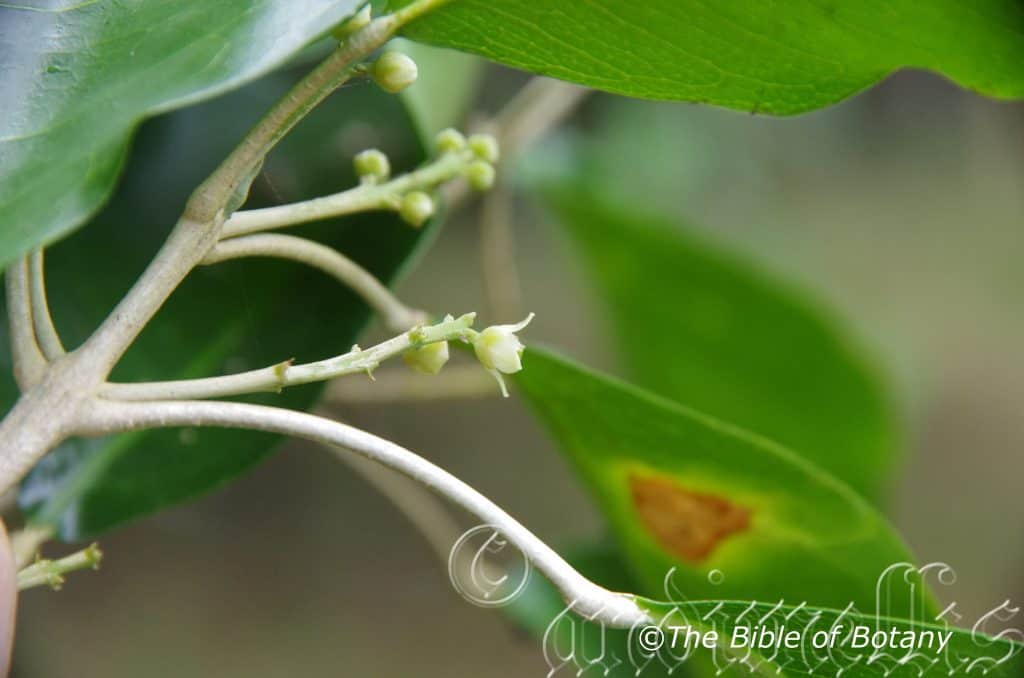
LBG Lismore NSW
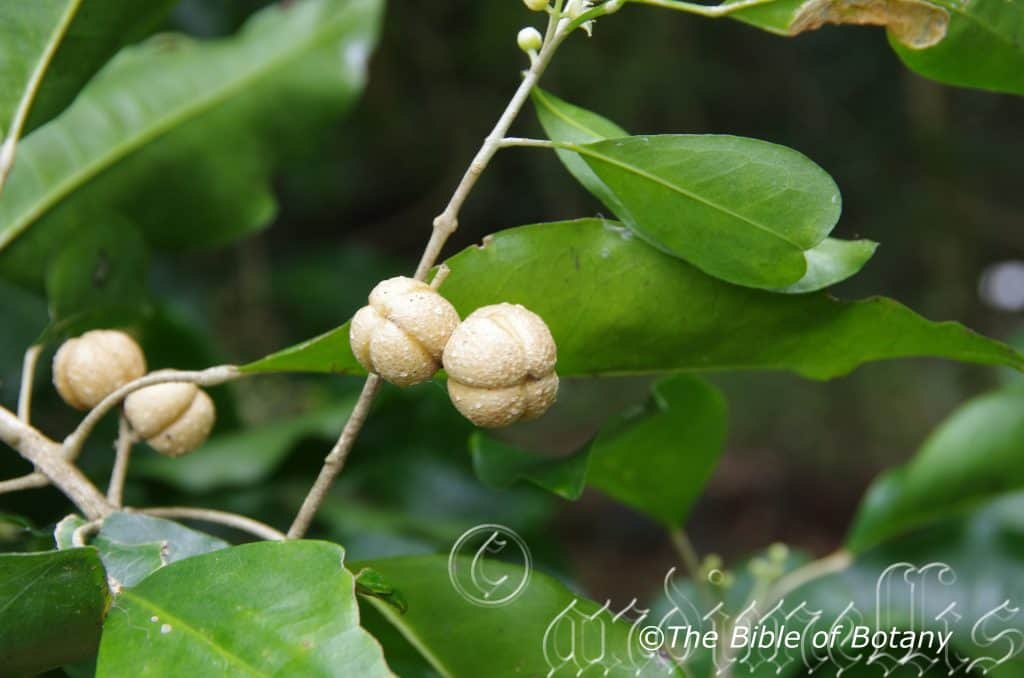
LBG Lismore NSW
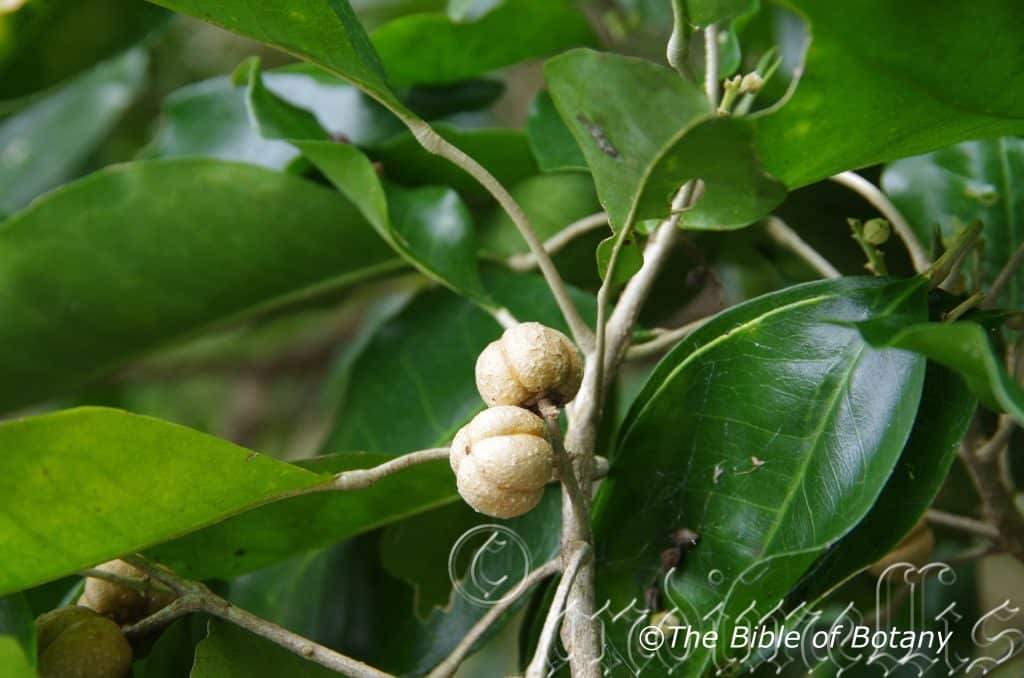
LBG Lismore NSW
Sarcomelicope simplicifolia
Classification:
Unranked: Eudicots
Unranked: Rosids
Order: Sapindales
Family: Rutaceae
Genus: From Sárx/Sárxa, which is Ancient Greek for fleshy as per the edible flesh of a fruit, Meli, which is Ancient Greek for honey and Kope, which is Ancient Greek for a division. It refers to several usually four thick nectary glands, which are near the ovaries.
Species: From Simplus, which is Latin for not complex or compound and Folium, which is Latin for foliage. It refers to plants which have simple leaves.
Common Name: Yellow Wood or Hard Aspen.
Distribution:
Sarcomelicope simplicifolia is found in a continuous strip south from the Atherton Tablelands in north Queensland to Mount Dromedary in southern New South Wales. It is found on and east of the Great Dividing Range.
https://avh.ala.org.au/occurrences/search?taxa=Sarcomelicope+simplicifolia#tab_mapView
Habitat Aspect Climate:
Sarcomelicope simplicifolia prefers dappled shade to full sun. It grows adjacent to well-developed cool tropical rainforests, dry warmer sub-tropical rainforests or littoral rainforests. The altitude ranges from 400 meters ASL to 1100 meters ASL in the north of its range and down to 50 meters ASL in the southern part of its range.
The temperatures range from minus 2 degrees in July to 36 degrees in January.
The rainfalls range from lows of 700mm to 3200mm average per annum.
Soil Requirements:
Sarcomelicope simplicifolia prefers sandy loams to medium clays. The soils are derived from decomposed sandstones, granites, brown basalts, black basalts or metamorphic rocks. The soils pH ranges from 4.5pH to 6pH. It is not tolerant of waterlogged soils however continuous moisture is always available. Non saline soils to moderately saline soils are tolerated.
Height & Spread:
Wild Plants: 12m to 18m by 6m to 9m.
Characteristics:
The trunk of Sarcomelicope simplicifolia is tall, straight, pinkish grey-brown, corky with scabrous scales and usually covered in lichens. The branches are pale grey and only becoming green near the apex where the newer leaf growth occurs. The branchlets are glabrous.
The opposite, elliptical-obovate to elliptical leaves of Sarcomelicope simplicifolia measure 75mm to 140mm in length by 25mm to 55mm in width. The petioles measure 10mm to 50mm in length. The bases are cuneate while the apexes are obtuse to broadly acute. The discolourous laminas are deep sea-green, semi glossy to glossy and glabrous on the upper lamina while the lower lamina is paler and duller. The leaf margins are entire and recurve towards the margins and decurve near the apex. The mid vein and main laterals are slightly prominent on the lower laminas. The leaves have an aromatic almost lemon scent when crushed.
The inflorescences of Sarcomelicope simplicifolia are born on a spike from the leaf axils. The pale yellow green rachis and pedicels are glabrous. The rachises measure 16mm to 60mm in length, while the pedicels measure 1mm to 2mm in length. The 4 pale lime green, elliptical sepals are erect, glabrous or sparsely covered in white pulverulent hairs and measure 1.6mm to 2mm in length. The pale lime green, elliptical petals measure 3.5mm to 4mm in length.
The male flowers have 8 dimorphic stamens which are free for their entire length. There are 4 short and 4 long filaments. The filaments are pale lime green with ciliate margins which are much broader than the anthers. The stamens are inserted outside a raised disc and measure 2mm to 2.5mm in length. The male flowers measure 3mm to 3.5mm in length.
The pale lime green style and stigma are glabrous while the ovary is pale lime green and covered in white pulverulent hairs. The pistil measures 3mm to 3.5mm in length. The female flowers measure 3mm to 3.5mm in length. Sarcomelicope simplicifolia’s flowers appear from early March through to late August.
Sarcomelicope simplicifolia fruits are sub globose to obovoidal drupes. The drupes are glabrous and measure 10mm to 15mm in length by 10mm to 15mm in diameter. The pale lime green capsules turn pale creamy yellow to white when ripe. The calyxes are persistent on the ripe fruit. The single glossy brown seed in each ovule measure 5mm to 7mm in length.
Wildlife:
Sarcomelicope simplicifolia’s fruits are sought after by Satin Bowerbird Ptilonorhynchus violaceus, Regent Bowerbird Sericulus chrysocephalus, Green Cat Bird Ailuroedus-crassirostris, and probably other fruitigrove birds and honey eaters.
Cultivation:
Sarcomelicope simplicifolia is a magnificent small tree that should be grown in association with other rainforest specie. It is ideal at the edge of a rainforest or deep in the center of the rainforest. It also makes a great park tree offering quick growth, and good shade. In cultivation it will grow from 12 meters to 15 meters in height by 8 meters to 12 meters in diameter when grown in the open or taller and narrower if grown closer together as a rainforest tree.
It grows exceptionally well on lighter soils where deep leaf litter keeps the soil cool and moisture at an even level. If these requirements are met itcan cope with temperatures as low as minus 5 degrees and up to 36 degrees. It is moderately drought resistant.
Add to the above, if it is given an adequate supply of water and a little native fertilizer on a regular basis the plants should respond with better flowering and fruit over a long period.
It often reaches its full potential in just 12 to 15 years and flower from the seventh or eighth year from seed.
The tree would make very good accent tree in front of low set commercial or industrial sheds where it will break up hard rigid architectural lines and give warmth and breadth to a building.
Try using it in a courtyard where the only other feature is a large rock, stump or formal or informal frog or fish pond. Next to such features their large leaves, small flowers and small fruit are never overpowering, but certainly noticed while giving a cooling effect. It has never been used in commercial entrances and foyers to break the ice and give a feeling of business as usual but somehow make the business more relaxing.
Propagation:
Seeds: The seeds of Sarcomelicope simplicifolia can be removed easily from the fruits.
Sow fresh seeds directly into a seed raising mix, keeping them moist not wet. Do not over water as the seeds will rot off before germination takes place. Place the trays in a cool shaded area with 50mm shade cloth in the bush house. When the seedlings are 20 to 25 mm tall, prick them out and plant them into 50mm native tubes using a good organic mix.
Fertilize using Seaweed, fish emulsion or organic chicken pellets soaked in water and apply the liquid on an alternate basis. Fertilize every two months.
As the seedlings roots reach the bottom of the tubes plant them out into their permanent position. Do not delay.
Fertilize using seaweed, fish emulsion or organic chicken pellets soaked in water on an alternate basis. Fertilize every two months until the plants are established then annually in early September to October to maintain better colour, health, vitality and flowering.
Further Comments from Readers:
“Hi reader, it seems you use The Bible of Botany a lot. That’s great as we have great pleasure in bringing it to you! It’s a little awkward for us to ask, but our first aim is to purchase land approximately 1,600 hectares to link several parcels of N.P. into one at The Pinnacles NSW Australia, but we need your help. We’re not salespeople. We’re amateur botanists who have dedicated over 30 years to saving the environment in a practical way. We depend on donations to reach our goal. If you donate just $5, the price of your coffee this Sunday, We can help to keep the planet alive in a real way and continue to bring you regular updates and features on Australian plants all in one Botanical Bible. Any support is greatly appreciated. Thank you.”
In the spirit of reconciliation we acknowledge the Bundjalung, Gumbaynggirr and Yaegl and all aboriginal nations throughout Australia and their connections to land, sea and community. We pay our respect to their Elders past, present and future for the pleasures we have gained.
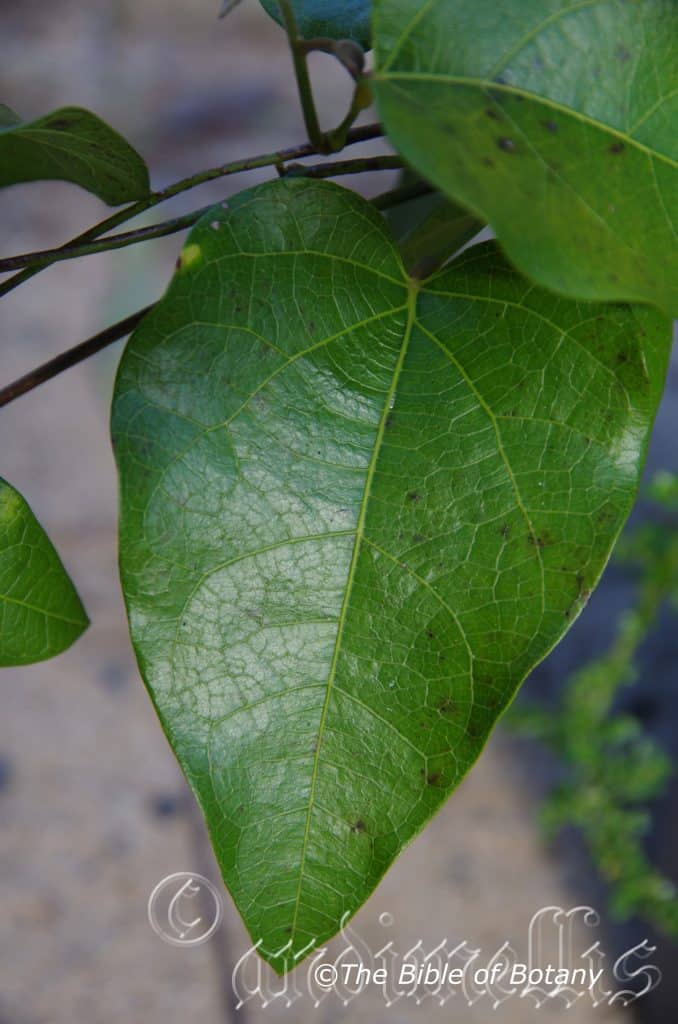
Author’s Garden The Pinnacles NSW
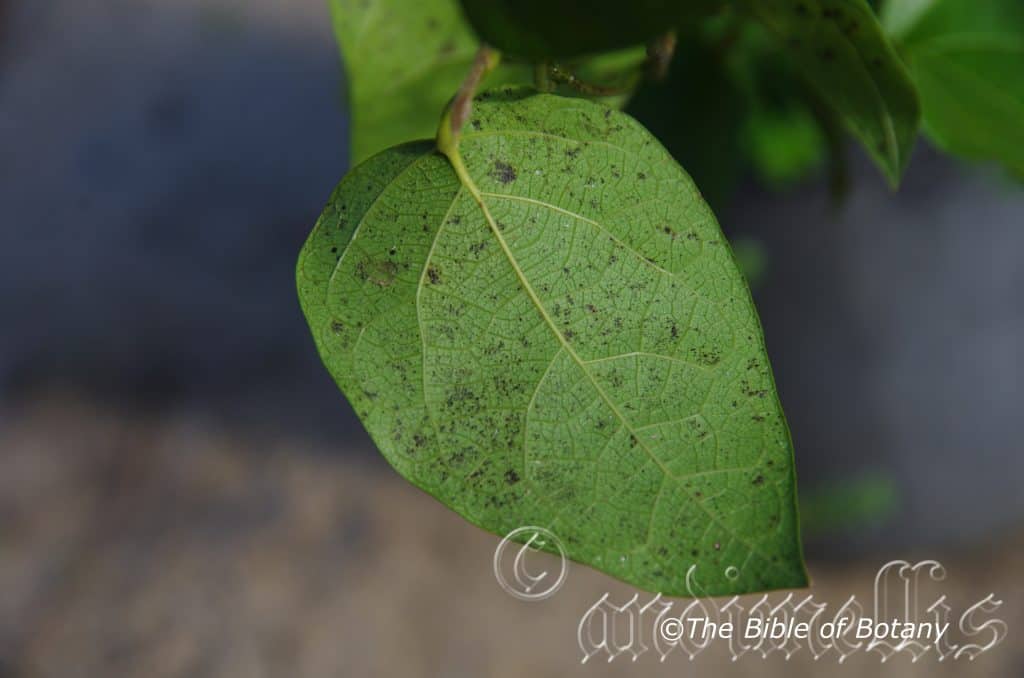
Author’s Garden The Pinnacles NSW
Sarcopetalum harveyanum
Classification:
Unranked: Eudicots
Order: Ranunculales
Family: Menispermaceae
Genus: From Sárx/Sárxa, which is Ancient Greek for fleshy as per the edible flesh of a fruit and Pétalon which is Ancient Greek for thin flat metal sheets or petal or petals. It refers to plants, with fleshy type petals.
Species: Is probably named in honour of Harvey; 1811–1866, who was an Irish botanist, seed collector, algologist (uncertain whether he was a doctor who specialized in pain or more likely a person who studies algae), botanical artist, illustrator and lithographer, who illustrated all his own work.
Common Name: Pearl Vine.
Distribution:
Sarcopetalum harveyanum is found in several disjunct populations mainly on and east of the Great Dividing Range including off shore Islands that have suitable habitats. It is found south from the upper Annan River Catchment on Mount Sampsan in north Queensland to Orbost in north eastern Victoria.
https://avh.ala.org.au/occurrences/search?taxa=Sarcopetalum+harveyanum#tab_mapView
Habitat Aspect Climate:
Sarcopetalum harveyanum prefers dappled shade to full sun. It grows in moist Eucalyptus forests, Gallery forests, dry rainforests, adjacent to well-developed cool tropical rainforests, moist sub-tropical rainforests, moist warmer temperate rainforests or littoral rainforests. The altitude ranges from 5 meters ASL to 1000 meters ASL.
The temperatures range from minus 2 degrees in July to 38 degrees in January.
The rainfalls range from lows of 900mm to 3200mm average per annum.
Soil Requirements:
Sarcopetalum harveyanum prefers sandy loams to medium clays. The soils are derived from decomposed sandstones, granites, brown basalts, black basalts, shales or metamorphic rocks. The soils pH ranges from 4.5pH to 6pH. It is not tolerant of waterlogged soils however continuous moisture is always available. Non saline soils to moderately saline soils are tolerated.
Height & Spread:
Wild Plants: 2m to 10m by 2m to 8m.
Characteristics:
Sarcopetalum harveyanum grows as a sprawling twiner on the forest floor or a tall rampant climber. As a twiner the stems are grass green glabrous and semi glossy. As a climber the stems are deep grey almost black with fine longitudinal furrows and thick cream verrucose lumps and lenticels.
The alternate, pendant, cordate, broad ovate or deltoid-ovate leaves measure 40mm to 160mm in length by 40mm to 150mm in width. The petioles are inserted near the base and measure 40mm to 100mm in length. The bases are deeply cordate, shallowly cordate or truncate while the apexes are tapering acute to tapering acuminate. The discolourous laminas are deep green to deep sea-green, semi glossy to glossy and glabrous on the upper laminas while the lower laminas are paler and dull. The laminas are flatland raised between the veins while the margins are usually entire or occasionally toothed. The 7 to 9 palmate veins are slightly prominent on both laminas.
The inflorescences are born cauliforously along the stems. The papillose racemes are mid green while the rachis and pedicels are glabrous.
The male rachises measure 60mm to 160mm in length, while the pedicels measure 3mm to 4mm in length. The deep green sepals are sub triangular and measure 1mm to 1.2mm in length. The cream to pastel pink, broad elliptical, fleshy petals measure 1.2mm to 2mm in length. The fused filaments (synandrium) measure 1 mm to 1.2mm in length while the anthers measure 0.4mm to 0.5mm in length.
The female rachises measure 30mm to 50mm in length, while the pedicels measure 1mm to 3mm in length. The flowers measure 2.5mm to 3mm in diameter. The triangular sepals measure 0.7mm to 0.8mm in length. The fleshy petals measure 1mm to 1.2mm in length. The 3 ovaries measure 1 mm in length while the bilobed recurved stigmas are sessile and measure about 1mm in length. The staminodes measure 0.5mm to 0.6mm in length. The flowers appear from early October to March.
The asymmetrical fruits are single or paired, laterally compressed globose drupes or at times pyriform drupes. The glossy, glabrous drupes measure 6mm to 10mm in length by 6mm to 9mm in diameter. The pale green drupes usually turn scarlet red or at times purple when ripe. The single glossy brown reniform seeds are rugose or coarsely spiny and measure 3mm to 5mm in length by 4mm to 7mm in diameter. The fruits ripen from May to August.
Wildlife:
Sarcopetalum harveyanum’s is the host plant for the unusual caterpillar of the Fruit Piercing Moth, Eudocima fullonia.
Cultivation:
Sarcopetalum harveyanum is a beautiful small ground covering creeper or large liana that is best grown in association with other rainforest specie. It is ideal at the edge of a rainforest or deep in the center of the rainforest. It also makes a nice vine for along shady fences. In cultivation it is highly unpredictable in growth from the small ground cover to a small liana but usually grows from 8 meters to 12 meters in height by 8 meters to 12 meters in width when grown in the open in a semi shaded position.
It grows well on lighter soils where deep leaf litter keeps the soil cool and moisture at an even level. If these requirements are met it can cope with temperatures as low as minus 3 degrees and up to 36 degrees once established. It is moderately drought resistant.
Add to the above, if it is given an adequate supply of water and a little native fertilizer on a regular basis the plants do respond with better flowering and fruit set which is a feature of the plants with the beautiful foliage.
It makes an interesting and beautiful climber in large urns when planted in groups of 3 or 4 plants to an urn or ewer or is trimmed from an early age.
Propagation:
Seeds: The seeds can be removed easily from the mature fruits. The seeds can be kept in the vegetable crisper for at least one season if necessary.
Sow fresh seeds directly into a seed raising mix and cover them to a depth of 3mm to 5mm. Keep them moist not wet as over watering will cause the seeds to rot off before germination takes place. Place the trays in a cool shaded area with 50mm shade cloth in the bush house. The seeds are slow to germinate and will take 4 to 16 weeks to sprout.
When the seedlings are 20mm to 25mm tall, prick them out and plant them into 50mm native tubes using a good organic mix.
As the seedlings roots reach the bottom of the tubes plant them out into their permanent position.
Fertilize using seaweed, fish emulsion or organic chicken pellets soaked in water on an alternate basis. Fertilize every two months until the plants are established then annually in early September to October to maintain better colour, health, vitality and flowering.
Further Comments from Readers:
“Hi reader, it seems you use The Bible of Botany a lot. That’s great as we have great pleasure in bringing it to you! It’s a little awkward for us to ask, but our first aim is to purchase land approximately 1,600 hectares to link several parcels of N.P. into one at The Pinnacles NSW Australia, but we need your help. We’re not salespeople. We’re amateur botanists who have dedicated over 30 years to saving the environment in a practical way. We depend on donations to reach our goal. If you donate just $5, the price of your coffee this Sunday, We can help to keep the planet alive in a real way and continue to bring you regular updates and features on Australian plants all in one Botanical Bible. Any support is greatly appreciated. Thank you.”
In the spirit of reconciliation we acknowledge the Bundjalung, Gumbaynggirr and Yaegl and all aboriginal nations throughout Australia and their connections to land, sea and community. We pay our respect to their Elders past, present and future for the pleasures we have gained.

NCBG Coffs Harbour NSW
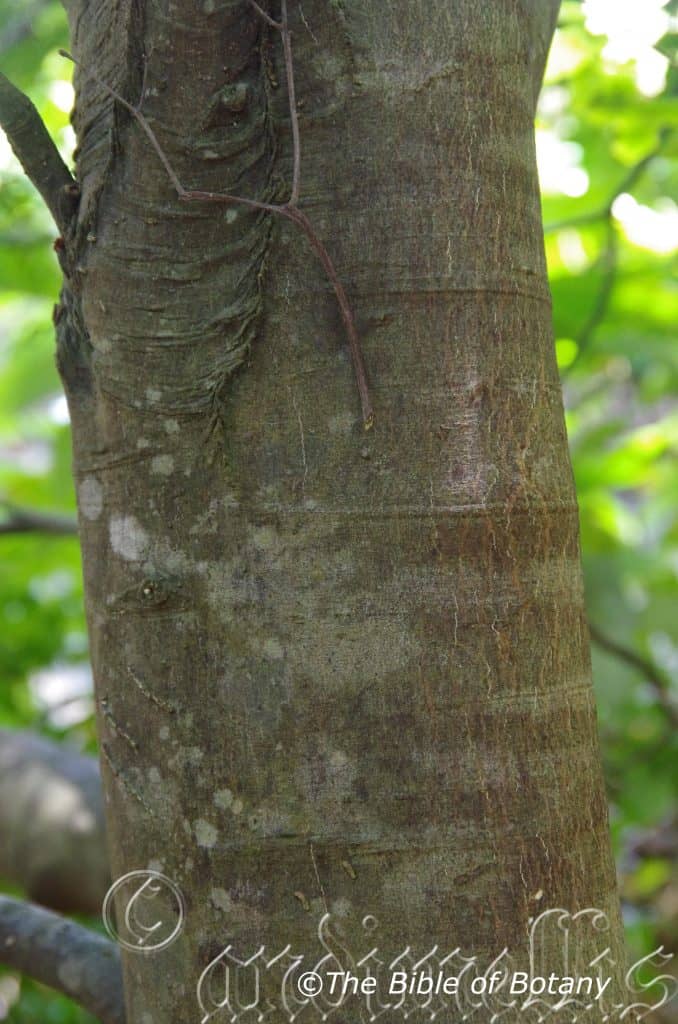
NCBG Coffs Harbour NSW
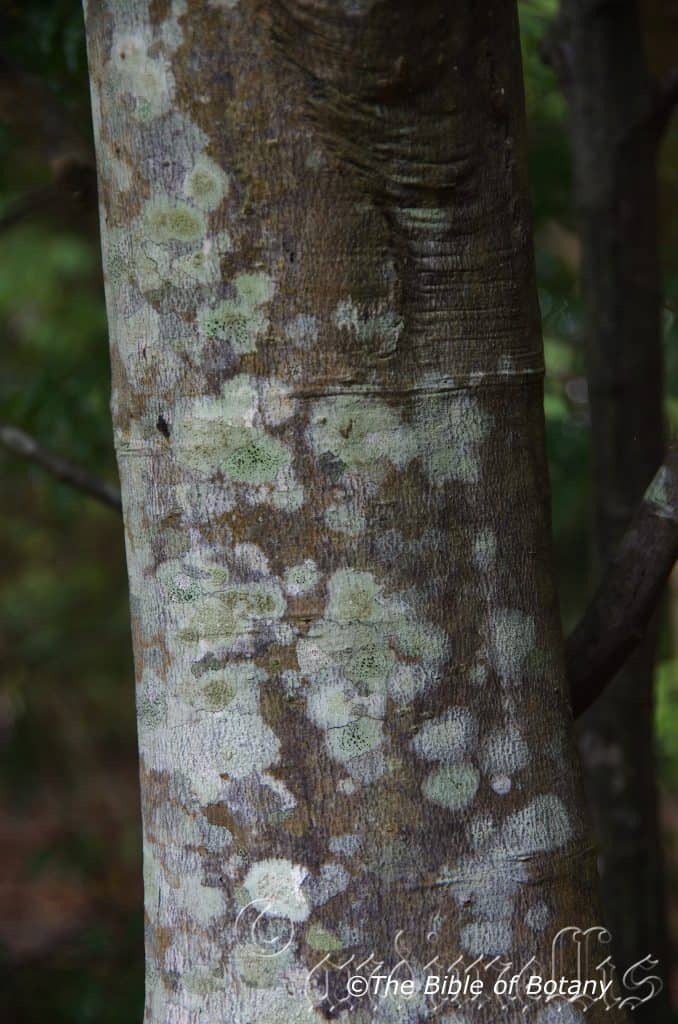
NCBG Coffs Harbour NSW
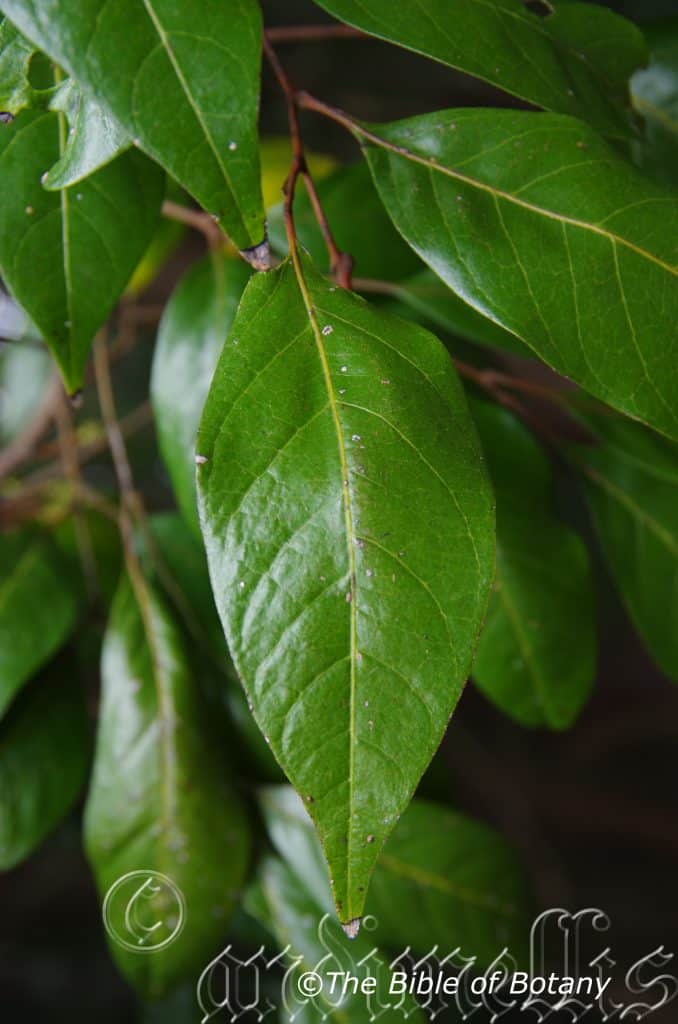
NCBG Coffs Harbour NSW
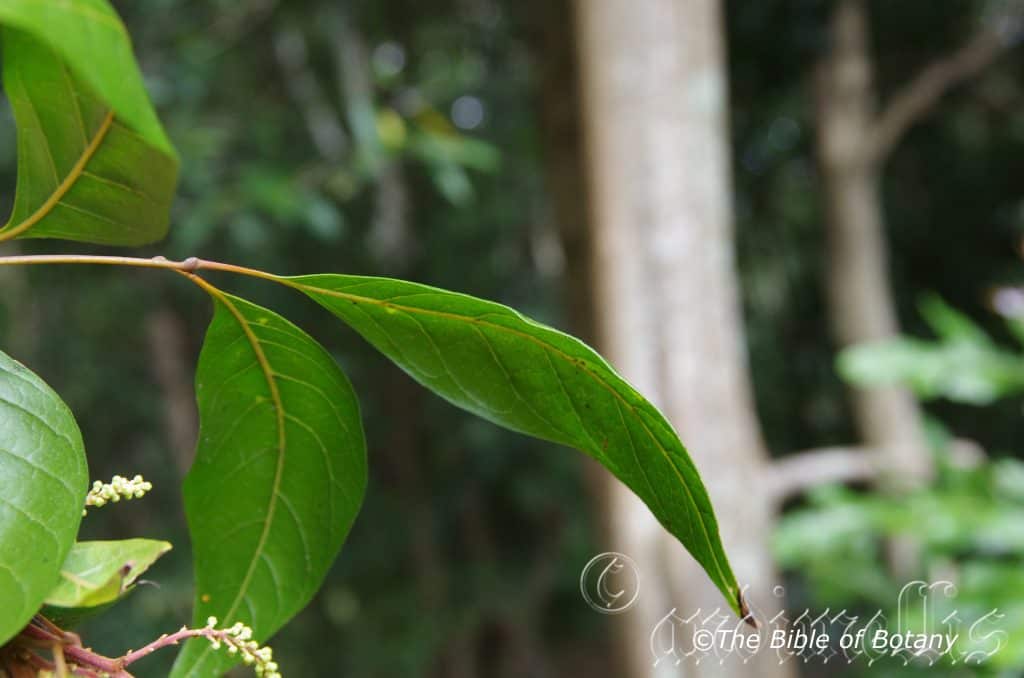
NCBG Coffs Harbour NSW
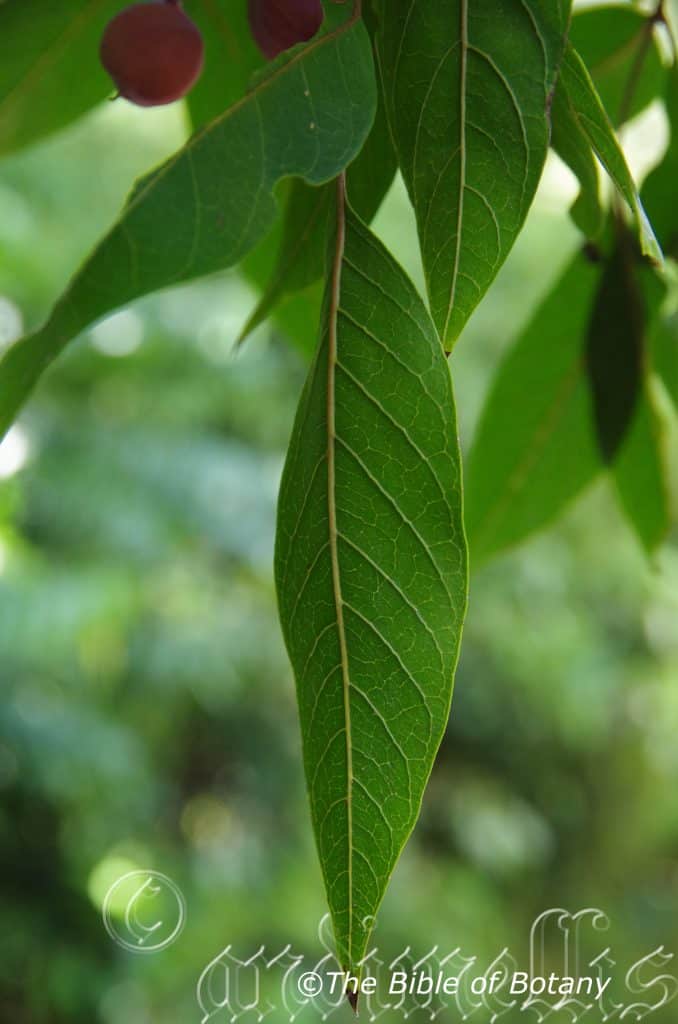
NCBG Coffs Harbour NSW
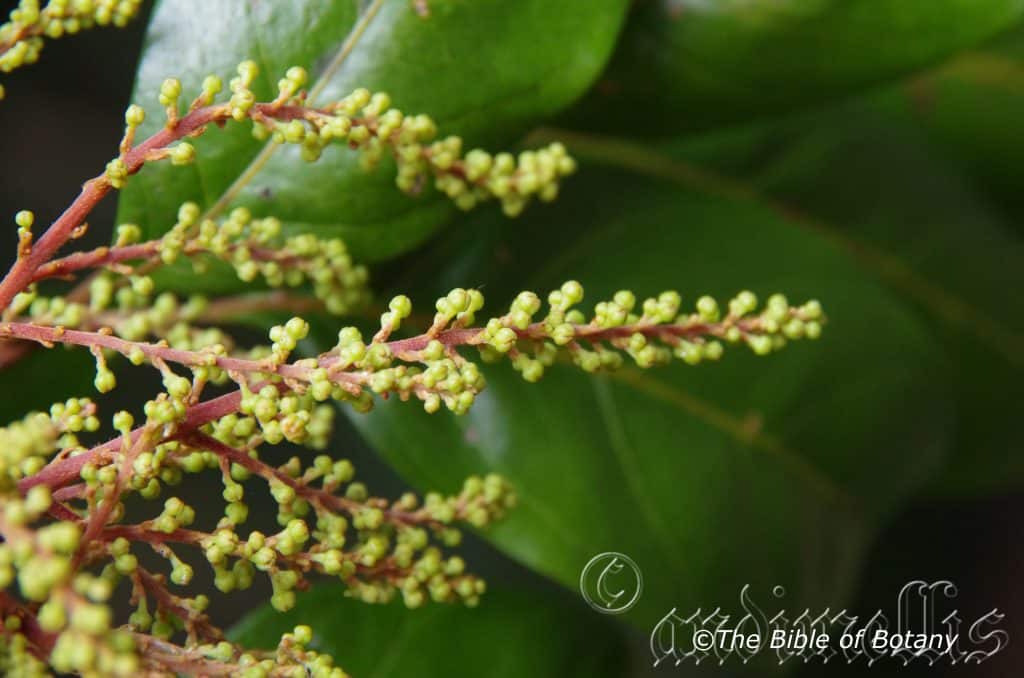
NCBG Coffs Harbour NSW
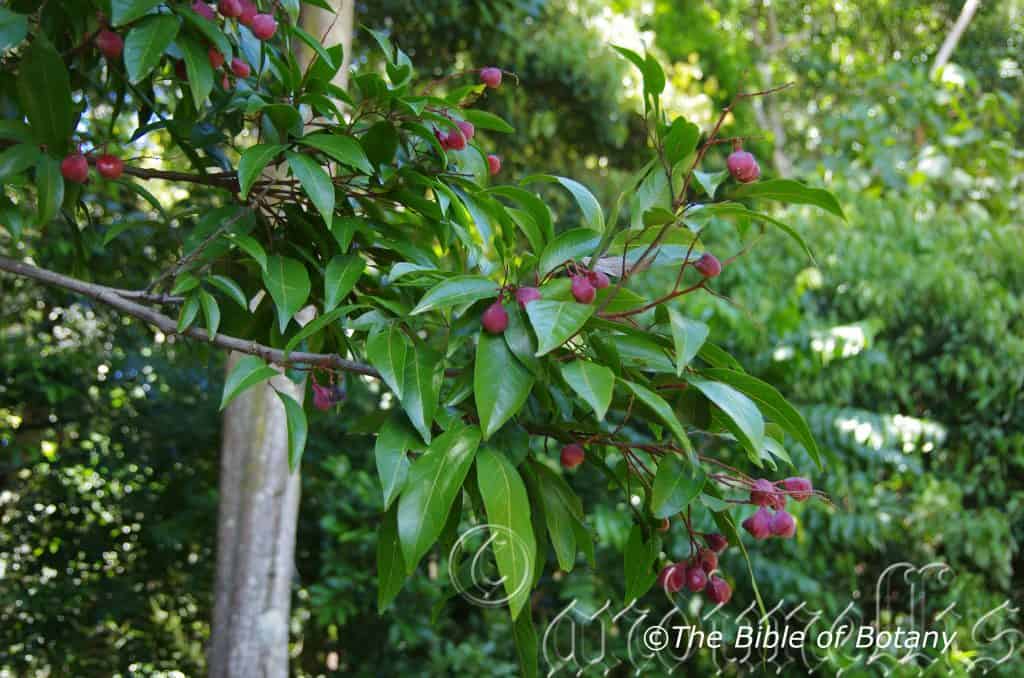
NCBG Coffs Harbour NSW
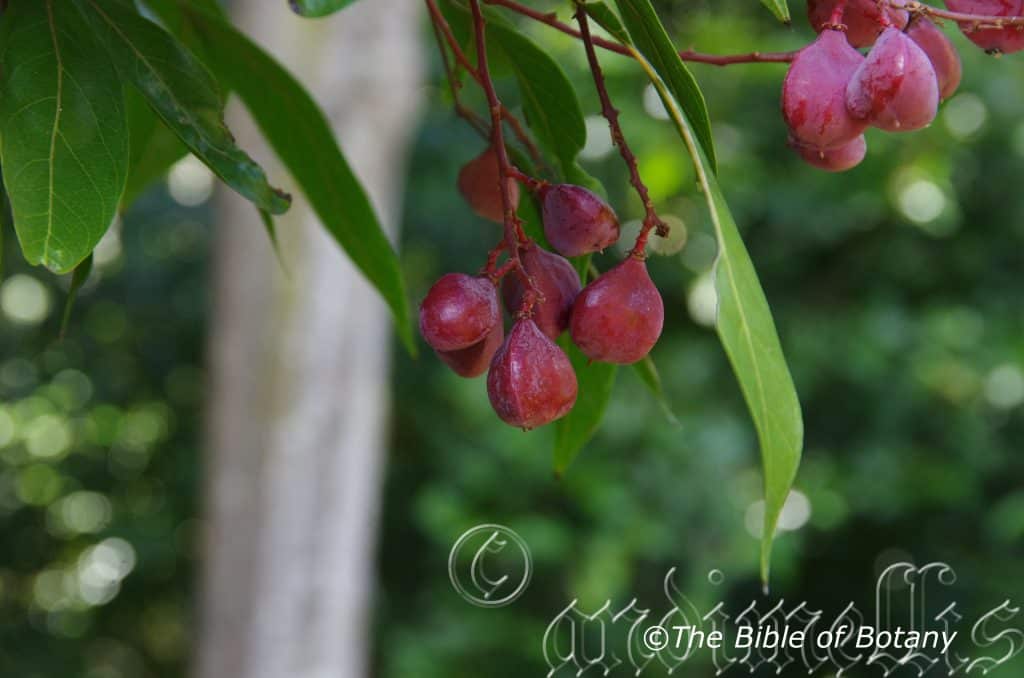
NCBG Coffs Harbour NSW
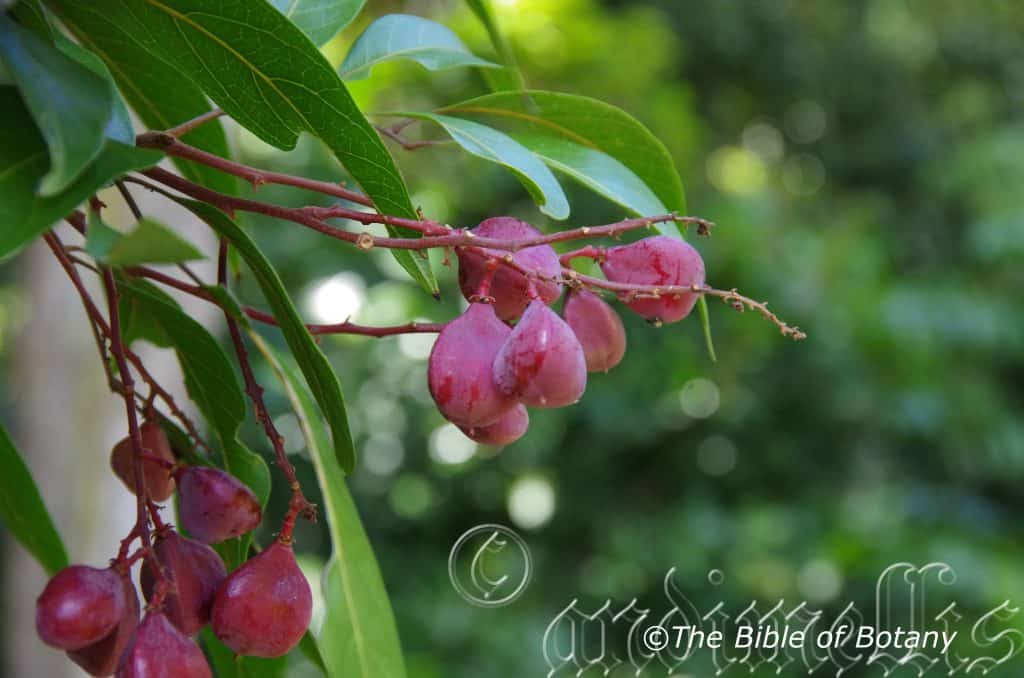
NCBG Coffs Harbour NSW
Sarcopteryx stipata
Classification:
Unranked: Eudicots
Class: Rosids
Order: Sapindales
Family: Sapindaceae
Subfamily: Sapindoideae
Genus: From Sárx/Sárxa, which is Ancient Greek for fleshy as per the edible flesh of a fruit and Pteron, which is Ancient Greek or later Pteryx, which is Latin for a wing. It refers to plants, which have fleshy fruits that are prominently ribbed.
Species: From Stipata, which is Latin for crowded, pressed closely together, or densely packed. It refers to to parts of a plant that are densely crowded together.
Common Name: Steelwood or Corduroy.
Distribution:
Sarcopteryx stipata is found south from Fraser Island in southern coastal Queensland to Mount Boss near Wauchope. It is found on and east of the Great Dividing Range.
https://avh.ala.org.au/occurrences/search?taxa=Sarcopteryx+stipata#tab_mapView
Habitat Aspect Climate:
Sarcopteryx stipata prefer dappled shade to full sun. It grows as an understory tree in well-developed cool tropical rainforests, tropical rainforests and warmer temperate rainforests. The altitude ranges from 420 meters ASL to 970 meters ASL.
The temperatures range from minus 4 degrees in July to 37 degrees in January.
The rainfalls range from lows of 1050mm to 3000mm average per annum.
Soil Requirements:
Sarcopteryx stipata prefer red soils light clays to medium clays. The soils are derived from decomposed black basalts. The soils pH ranges from 5pH to 6pH. It does not tolerate waterlogged soils however continuous moisture is always available. Non saline soils to moderately saline soils are tolerated.
Height & Spread:
Wild Plants: 8m to 10m by 4m to 6m
Characteristics:
Sarcopteryx stipata grows as a straight erect understory tree with brownish-grey bark. The branches are pale greyish-brown and glabrous while the small stems are pale greenish-brown glabrous to densely covered in soft, fawnish-brown pubescent hairs.
The opposite or sub opposite, leaves have 2 to 10 leaflets. The alternate lateral leaflets are elliptical and measure 65mm to 95mm in length by 15mm to 40mm in width. The petioles are swollen at the junction with the stems while the petiolules are swollen at the junction with the rachis. The petioles, rachis and petiolules are glabrous to densely covered in fine fawnish-brown pulverulent hairs. The petioles measure 20mm to 30mm in length while the rachis measures 8mm to 40mm in length and the petiolules measures 2mm to 4mm in length. The rachis extends beyond the last leaflet. The symmetrical or at times asymmetrical, oblique or not oblique bases are cuneate to attenuate while the apexes are acute.
The discolourous laminas are olive-green, semi glossy to dull and glabrous on the upper laminas while the lower laminas are paler, glabrous to sparsely covered in fine white puberulent hairs and at times have fine hairy domatia. The laminas are irregularly undulating, recurve upwards from the mid vein to the margins, decurve downwards on the apical half to close to the apex and are straight or twist up to 90 degrees. The margins are entire. The mid vein is strongly prominent while the lateral veins are slightly prominent on both laminas.
Inflorescences are born on a raceme like panicle from the leaf axils. The reddish-fawn peduncle, rachis and pedicels are sparsely to moderately covered in fine, reddish-brown pubescent hairs and measure 25mm to 130mm in length while the pedicels measure 1.5mm to 6mm in length.
The reddish-orange ovate calyxes are covered fine, reddish-brown pubescent hairs externally and are glabrous internally and measure 1.2mm to 2mm in length. The white petals are broad ovate, long clawed, 2-toothed, sparsely hairy on the claw and scale-like lower margin. The petals measure 1.2mm to 2mm in length.
The male flowers usually 8 or at times 6 stamens’ filaments are glabrous to sparsely covered in white hirtellous hairs. The dimorphic filaments are inserted around the domed disc and measure 0.5mm to 2mm in length.
The female flowers measure 2mm in diameter. The calyx lobes measure 1mm to 1.2mm in length. The turbinate petals measure 0.8mm to 1mmin length. The usually 8 or at times 6 staminodes are sparsely covered in long white hirtellous hairs. The ovary is sparsely to moderately covered in white pubescent hairs and measures 1 in diameter. The flowers appear throughout the year.
The fruits are trigonous to broad obovoidal capsules. The capsules are glabrous, covered in a white waxy film and measure 15mm to 25mm in length by 10mm to 20mm in diameter. The green cuspidate capsules and turn deep crimson-maroon to deep red and sparsely to moderately covered in fawnish-brown pubescent hairs externally and are pale red-orange internally when ripe. The calyx lobes are not persistent on the ripe fruit.
The usually 3 or rarely 4 glossy mid tan seeds are ovoidal and are seated in the deep cupuliform valves. The seeds measure 10mm to 11mm in length by 8mm 9mm in diameter. The yellow annular aril is located at the base of the seed.
Wildlife:
Sarcopteryx stipata’s fruits are eaten by most medium size to large fruitigrove birds.
Cultivation:
Sarcopteryx stipata is a magnificent small tree that can be grown in association with other rainforest tree specie or used in a park like scenario. It is ideal at the edge of a rainforest or deep in the center of the rainforest. As a park tree it offers relatively quick growth, and good shade when grown on deep better quality soils or those that have been organically enriched with a thick layer of mulch. In cultivation it will grow from 8 meters to 10 meters in height by 8 meters to 10 meters in diameter when grown in the open or taller and narrower if grown closer together as a rainforest tree.
It grows exceptionally where deep leaf litter keeps the soil cool and moisture at an even level. If these requirements are met they can cope with temperatures as low as low as minus 3 degrees and up to 36 degrees once it has established itself.
Add to the above, if it is given an adequate supply of water and a little native fertilizer on a regular basis the plants should respond with better flowering and fruit over a long period.
The tree would make an excellent accent tree in front of low set homes, commercial, industrial sheds or low set school buildings where they will break up hard rigid architectural lines and give warmth and breadth to a building.
Try using it in a large courtyard where the only other feature is a large rock, stump or formal or informal frog or fish pond. Next to such features its large leaves, small flowers and small fruit are never overpowering, but certainly noticed while giving a cooling effect.It has never been used in commercial entrances and foyers to break the ice and give a feeling of business as usual but somehow make the business more relaxing.
The bark is excellent for attaching epiphytic ferns and orchids to the trunk and larger branches.
Propagation:
Seeds: The seeds can be removed easily from the mature fruits.
Sow fresh seeds directly into a seed raising mix, keeping them moist not wet. Do not over water as the seeds will rot off before germination takes place. Place the trays in a cool shaded area with 50mm shade cloth in the bush house. When the seedlings are 20 to 25 mm tall, prick them out and plant them into 50mm native tubes using a good organic mix.
As the seedlings roots reach the bottom of the tubes plant them out into their permanent position. Do not delay.
Fertilize using seaweed, fish emulsion or organic chicken pellets soaked in water on an alternate basis. Fertilize every two months until the plants are established then annually in early September to October to maintain better colour, health, vitality and flowering.
Further Comments from Readers:
“Hi reader, it seems you use The Bible of Botany a lot. That’s great as we have great pleasure in bringing it to you! It’s a little awkward for us to ask, but our first aim is to purchase land approximately 1,600 hectares to link several parcels of N.P. into one at The Pinnacles NSW Australia, but we need your help. We’re not salespeople. We’re amateur botanists who have dedicated over 30 years to saving the environment in a practical way. We depend on donations to reach our goal. If you donate just $5, the price of your coffee this Sunday, We can help to keep the planet alive in a real way and continue to bring you regular updates and features on Australian plants all in one Botanical Bible. Any support is greatly appreciated. Thank you.”
In the spirit of reconciliation we acknowledge the Bundjalung, Gumbaynggirr and Yaegl and all aboriginal nations throughout Australia and their connections to land, sea and community. We pay our respect to their Elders past, present and future for the pleasures we have gained.
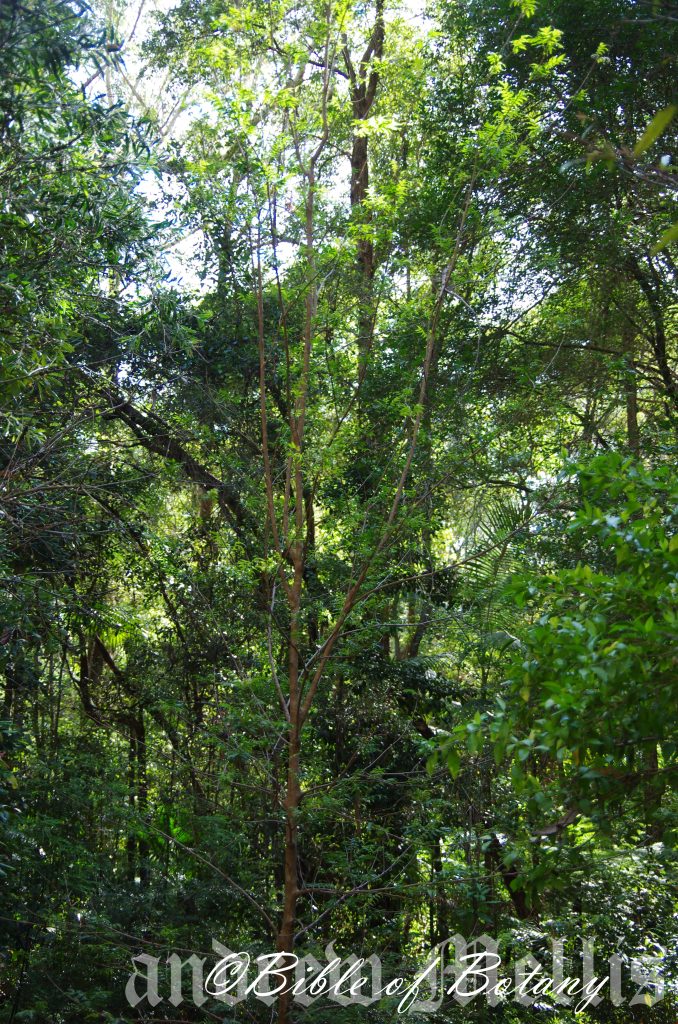
NCBG Coffs Harbour NSW
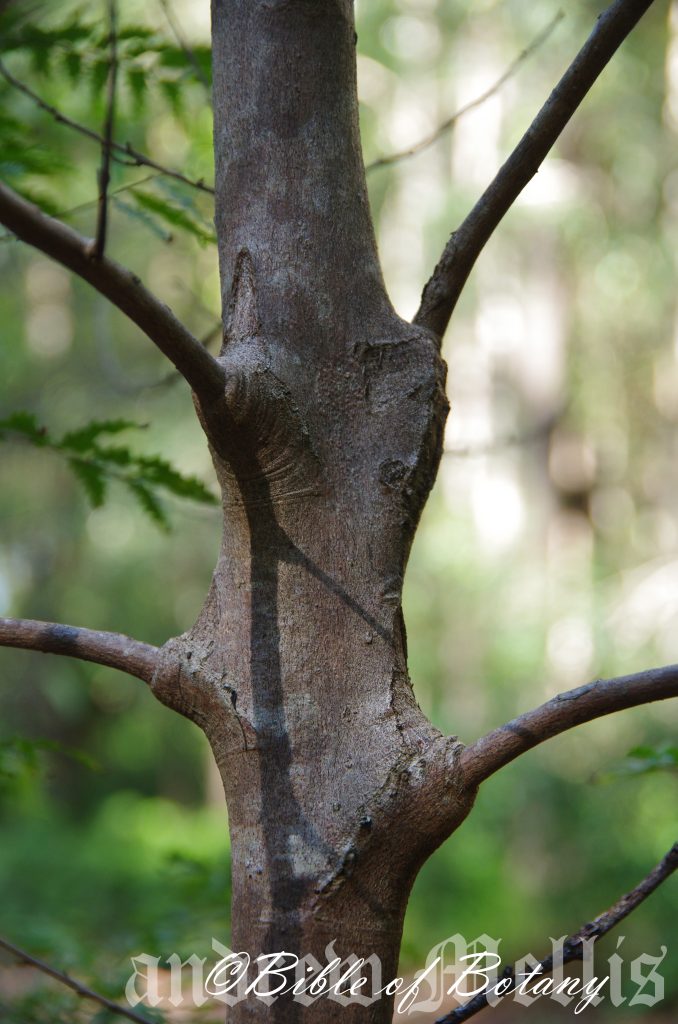
NCBG Coffs Harbour NSW
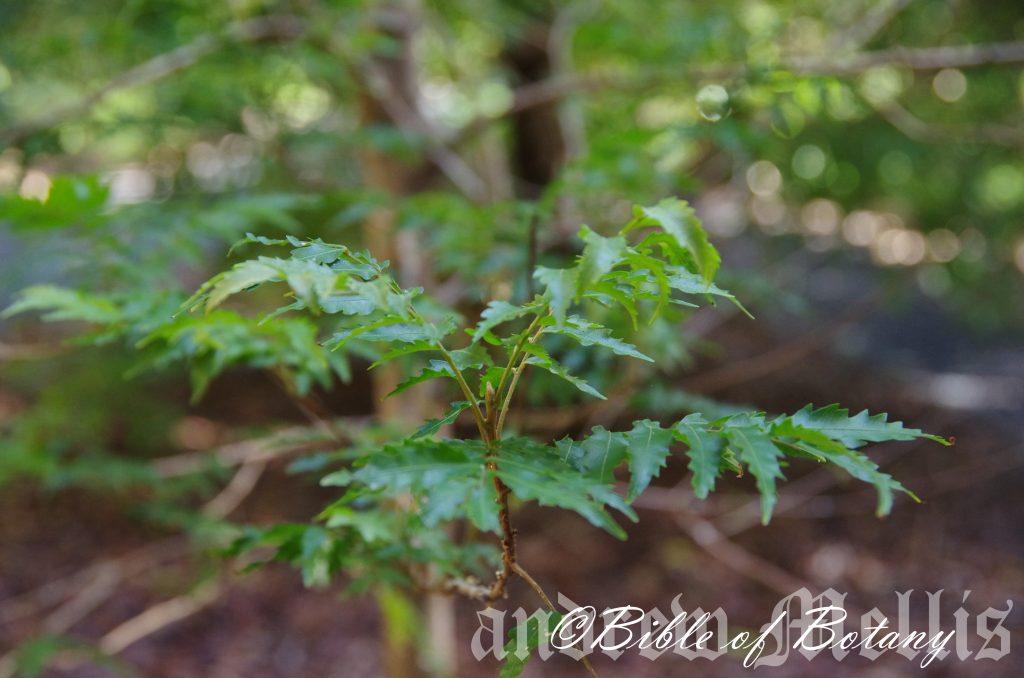
NCBG Coffs Harbour NSW
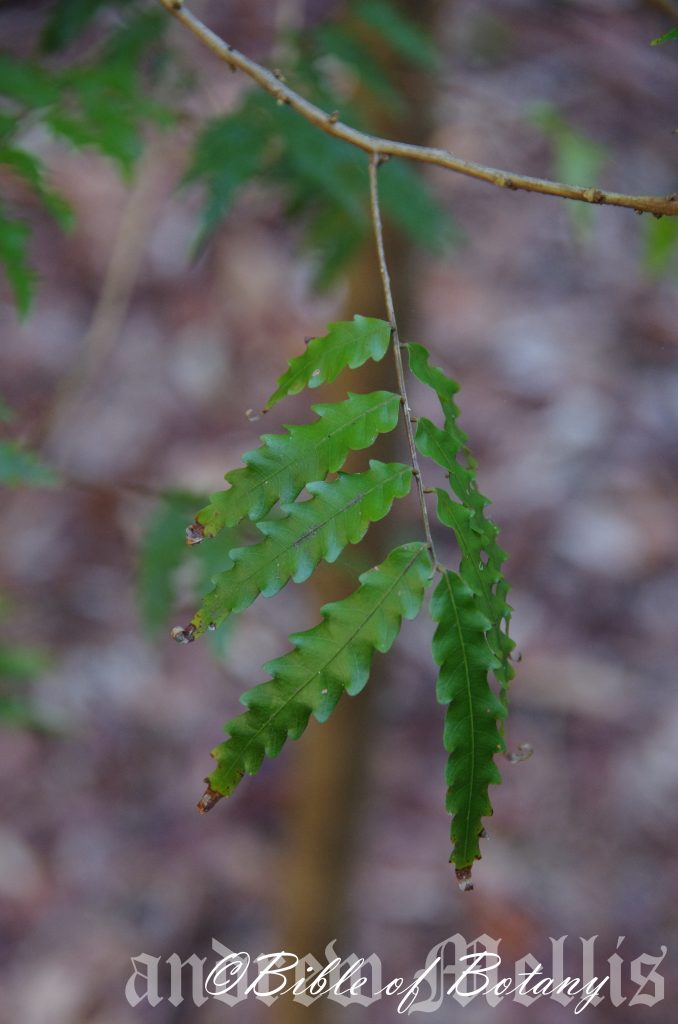
NCBG Coffs Harbour NSW
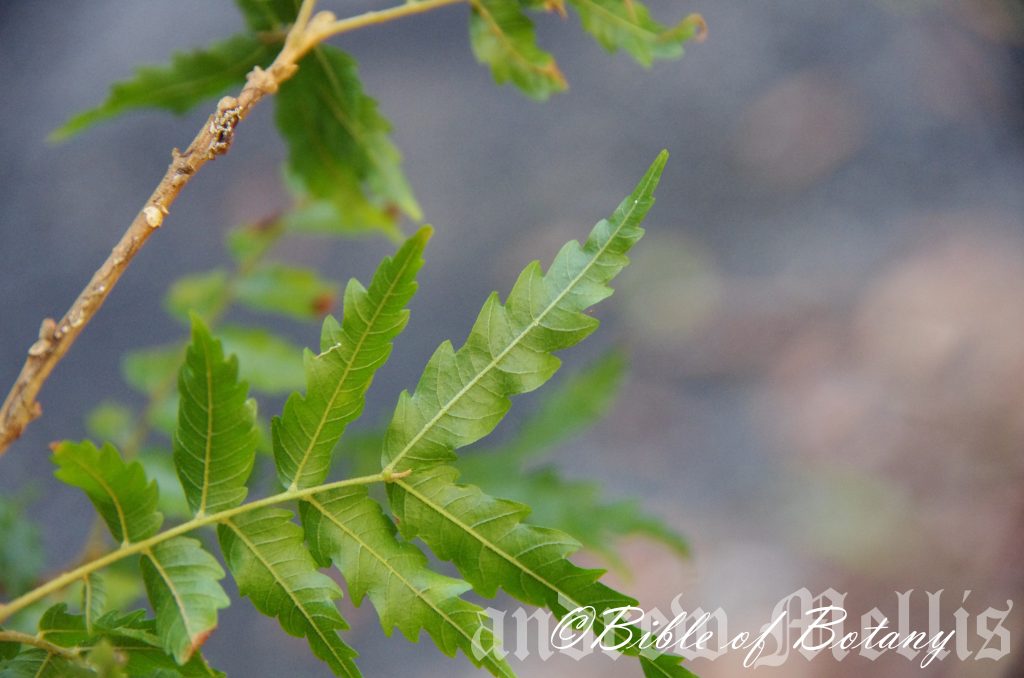
NCBG Coffs Harbour NSW
Sarcotoechia serrata
Classification:
Clade: Tracheophytes
Clade: Angiosperms
Class: Eudicots
Class: Rosids
Order: Sapindales
Family: Sapindaceae
Subfamily: Sapindioideae
Genus: From Sárx/Sárxa, which is Ancient Greek for fleshy as per the edible flesh of a fruit, Toichos, which is Ancient Greek for a wall and Chia, which is Latin for the Mexican edible seed. It may refer to the seeds being partitioned from the thick flesh.
Species: From Serra/Serras, which is Latin for the teeth of a saw. It refers to margins, which resemble the cutting edge of a saw.
Common Name: Fern Leaf Tamarind or Ferny Tamarind.
Distribution:
Sarcotoechia serrata is found on the Atherton Tablelands or the surrounding mountains in northern Queensland on the Great Dividing Range.
https://avh.ala.org.au/occurrences/search?taxa=Sarcotoechia+serrata#tab_mapView
Habitat Aspect Climate:
Sarcotoechia serrata prefers dappled shade to full sun. It grows in well-developed warm tropical rainforests. The altitude ranges from 650 meters ASL to 1000 meters ASL.
The temperatures range from 10 degrees in July to 36 degrees in January.
The rainfalls range from lows of 1600mm to 3000mm average per annum.
Soil Requirements:
Sarcotoechia serrata prefers red light clays to medium clays. The soils are usually derived from decomposed black basalts. The soils pH ranges from 5pH to 6pH. It does not tolerate waterlogged soils however continuous moisture is always available. Non saline soils to moderately saline soils are tolerated.
Height & Spread:
Wild Plants: 12m to 20m by 6m to 9m
Characteristics:
Sarcotoechia serrata grows as a tall tree with straight, grey-brown, scabrous, scaly, rough bark. The branchlets are tan to pale brown and only becoming deep sea-green to deep olive green near the apex where the newer leaf growth occurs. The branchlets are covered in pale brown villous hairs.
The alternate, compound leaves of Sarcotoechia serrata, measure 200mm to 300mm in length by 50mm to 110mm in width. The 6 to 14 alternate leaflets are lanceolate to narrow elliptical and measure 20mm to 55mm in length by 12mm to 25mm in width. The base leaflets are the shortest while the apex leaflet is the longest. The leaflets are asymmetrical. The base is broad cuneate while the apex is long, narrowly acute with an obtuse point. The discolourous laminas are deep sea-green, semi glossy and glabrous on the upper lamina while the lower lamina is paler and dull. The leaf margins are deeply toothed or almost lobed, flat and undulating. They decurve from the petiole to the apex. The mid vein is slightly prominent on the upper lamina and is visible from the lower lamina. The petioles and rachises are longitudinally grooved and measure 70mm to 100mm in length while the petiolules measure 0mm to 1.2mm in length.
The new growth is pale bright pink to pale pinkish-tan and covered in pale brown villous hairs which darken with age before being discarded.
Inflorescences of Sarcotoechia serrata are born along a vertical from the leaf axils. The pale green rachises are glabrous and measure 50mm to 100mm in length while the pedicels measure 3mm to 5mm in length. The fawn to pale brown calyx’s measure 1.8mm to 2.2mm in length overall including the 0.8mm to 1mm narrowly ovate lobes. The ovate to acuminate petals measure 1.8mm to 2.2mm in length.
The 8 inserted filaments are free for their entire length and measure 2.5mm to 3.5mm in length. The filaments are pale greenish-white and covered in white hirtellous hairs on the lower half.
The white style and stigma are glabrous while the ovary is creamy white and covered in white hirtellous hairs. The stigmas measure 0.8mm to 1mm in length atop the 1.3mm long by 1mm diameter columnar style. Sarcotoechia serrata’s flowers appear throughout the year.
The fruits of Sarcotoechia serrata are ellipsoidal to ovoidal capsules. The capsules are glabrous and measure 12mm to 23mm in length by 12mm to 25mm in diameter and are 2 lobed with 2 locules. The green capsules turn deep yellow orange externally and deep yellow orange internally with a silky feel when ripe. The calyx lobes are persistent on the ripe fruit. The 2 glossy red seeds are flattened ellipsoidal and fleshy. There is a creamy-white aril attached to the base of the seed.
Wildlife:
Sarcotoechia serrata’s do not appear to have any predators though the ripe fallen fruits are often eaten out by an unknown weevil. There is some evidence that the white Tail Rat Uromys caudimaculatus, and the Musky Rat Kangaroo Hypsiprymnodon moschatus, in northern Australia consume and hoard the seeds in openings well away from the parent tree. CSIRO 2002 Report on Hypsiprymnodon moschatus.
Cultivation:
Sarcotoechia serrata is a magnificent small tree that should be grown in association with other rainforest specie. It is ideal at the edge of a rainforest or deep in the center of the rainforest. It also makes a great park tree offering relatively quick growth, and good shade when grown on good quality soils are those that have been organically enriched. In cultivation it will grow from 12 meters to 15 meters in height by 8 meters to 12 meters in diameter when grown in the open or taller and narrower if grown closer together as a rainforest tree.
It grows exceptionally well on light clays to medium clay soils where deep leaf litter keeps the soil cool and moisture at an even level. If these requirements are met it can cope with temperatures as low as low as 1 degree and up to 36 degrees. It is moderately drought resistant.
Add to the above, if it is given an adequate supply of water and a little native fertilizer on a regular basis the plants should respond with better flowering and fruit over a long period.
It often reaches a good size in just 12 to 15 years and flowers from the seventh or eighth year from seed.
The trees would make a good accent trees in front of low set commercial or industrial sheds where it will break up hard rigid architectural lines and give warmth and breadth to a building. In front of high rise buildings where it gives balance especially where it could be grown in curves meandering to the entry doors or for something different used from the front of the path and meander back to the far corners with shrubs or flowers planted between the trees and the building and the trees and the nature strip.
Try using it in a large courtyard where the only other feature is a large rock, stump or formal or informal frog or fish pond. Next to such features their large leaves, small flowers and small fruit are never overpowering, but certainly noticed while giving a cooling effect. I am surprised that they have never been used in commercial entrances and foyers to break the ice and give a feeling of business as usual but somehow make the business more relaxing.
The bark is excellent for the attachment of all tropical epiphytic ferns and orchids to the trunk and larger branches.
Propagation:
Seeds: The seeds of Sarcotoechia serrata can be removed easily from the fruits.
Sow fresh seeds directly into a seed raising mix, keeping them moist not wet. Do not over water as the seeds will rot off before germination takes place. Place the trays in a cool shaded area with 50mm shade cloth in the bush house. When the seedlings are 20 to 25 mm tall, prick them out and plant them into 50mm native tubes using a good organic mix.
As the seedlings roots reach the bottom of the tubes plant them out into their permanent position. Do not delay.
Fertilize using seaweed, fish emulsion or organic chicken pellets soaked in water on an alternate basis. Fertilize every two months until the plants are established then annually in early September to October to maintain better colour, health, vitality and flowering.
Further Comments from Readers:
“Hi reader, it seems you use The Bible of Botany a lot. That’s great as we have great pleasure in bringing it to you! It’s a little awkward for us to ask, but our first aim is to purchase land approximately 1,600 hectares to link several parcels of N.P. into one at The Pinnacles NSW Australia, but we need your help. We’re not salespeople. We’re amateur botanists who have dedicated over 30 years to saving the environment in a practical way. We depend on donations to reach our goal. If you donate just $5, the price of your coffee this Sunday, We can help to keep the planet alive in a real way and continue to bring you regular updates and features on Australian plants all in one Botanical Bible. Any support is greatly appreciated. Thank you.”
In the spirit of reconciliation we acknowledge the Bundjalung, Gumbaynggirr and Yaegl and all aboriginal nations throughout Australia and their connections to land, sea and community. We pay our respect to their Elders past, present and future for the pleasures we have gained.
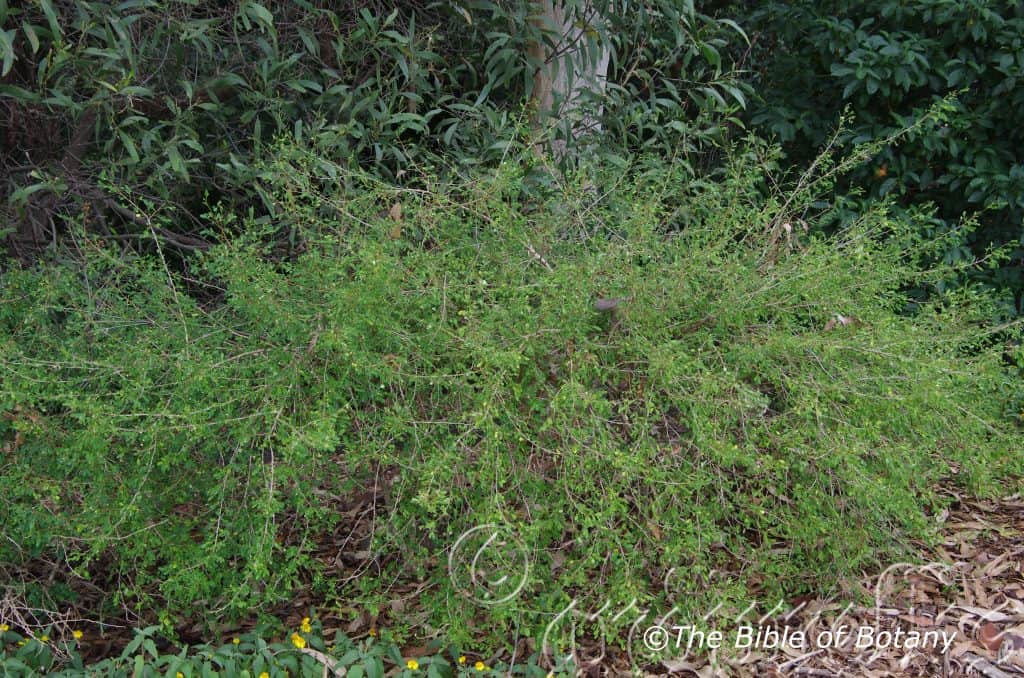
Mount Cootha Botanic Gardens Qld.
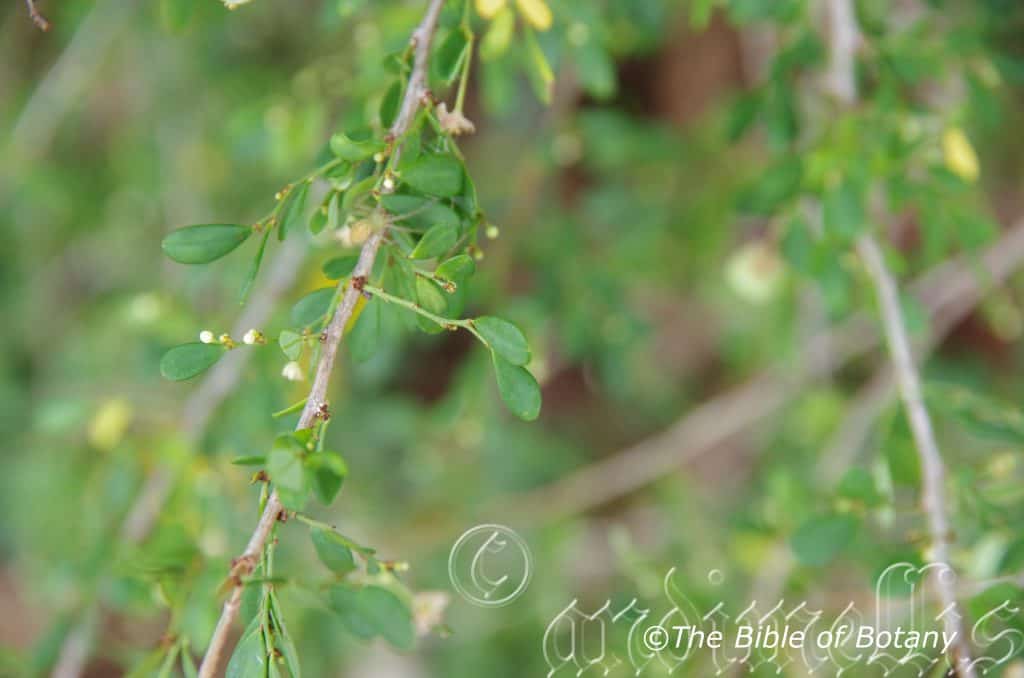
Mount Cootha Botanic Gardens Qld.
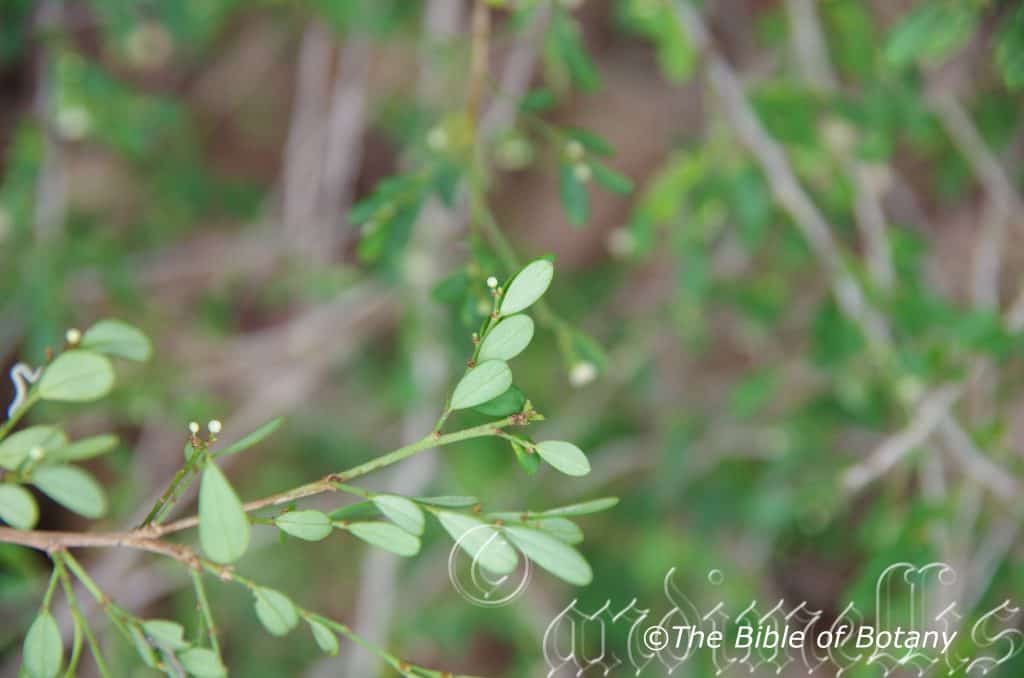
Mount Cootha Botanic Gardens Qld.
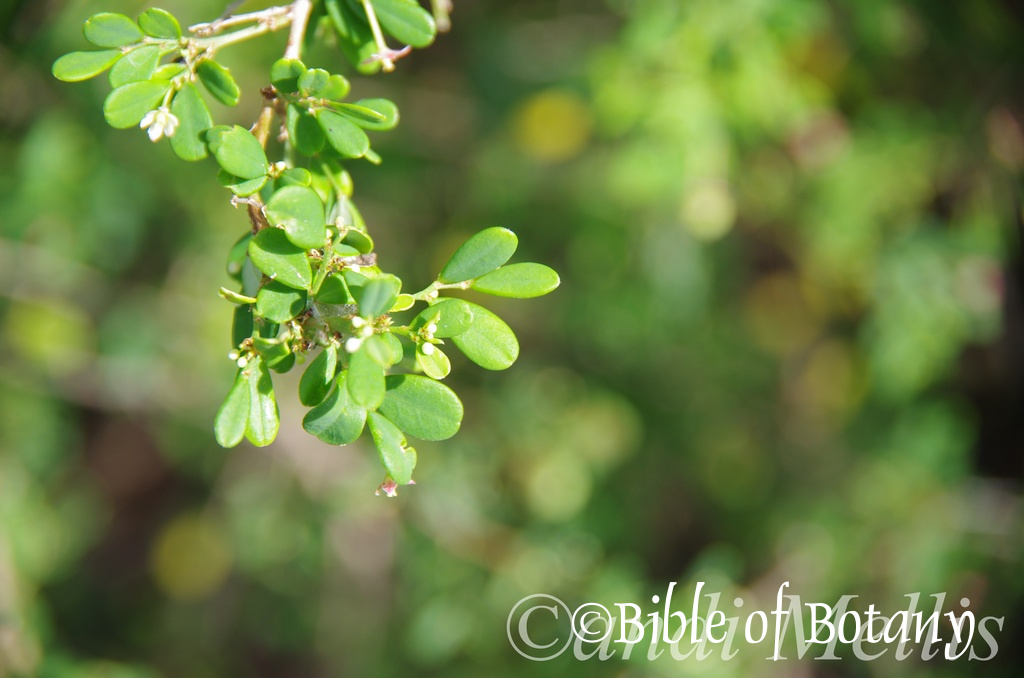
Mount Cootha Botanic Gardens Qld.
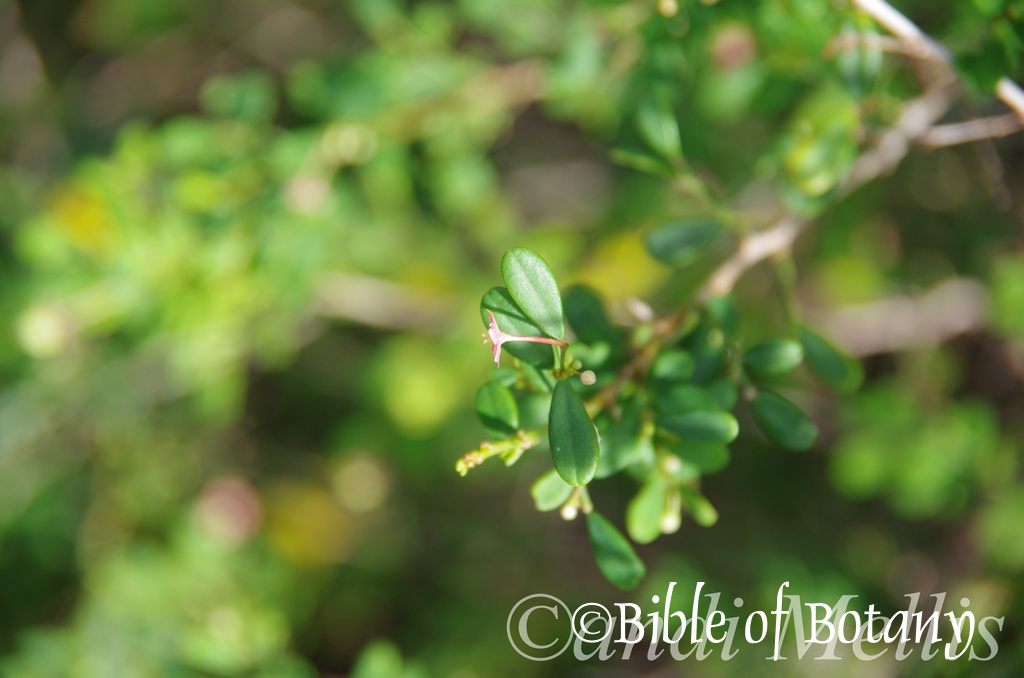
Mount Cootha Botanic Gardens Qld.
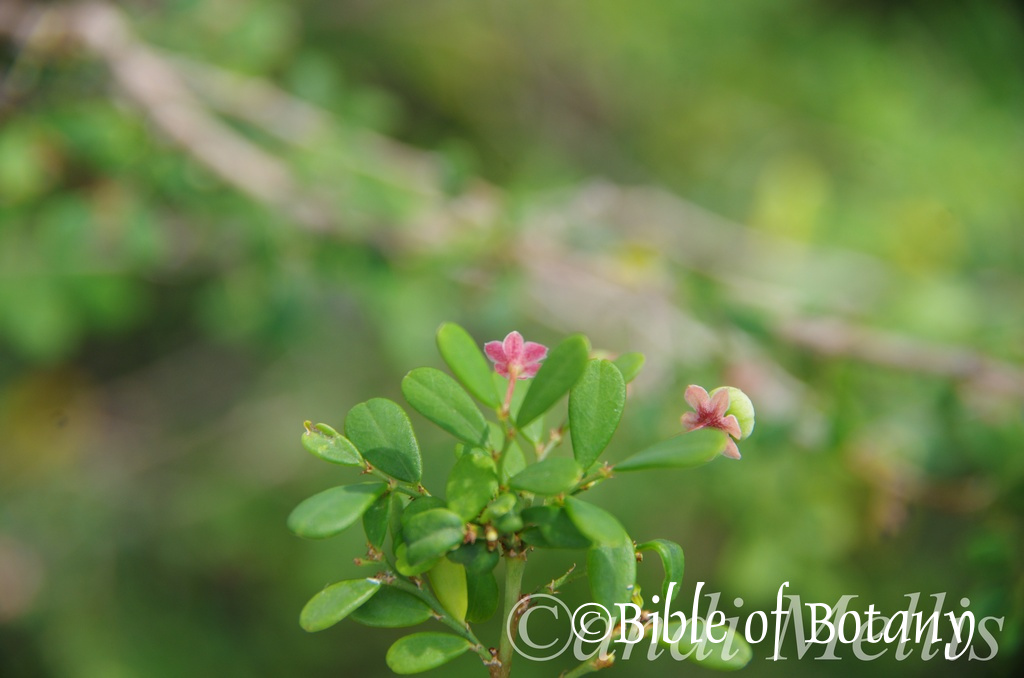
Mount Cootha Botanic Gardens Qld.
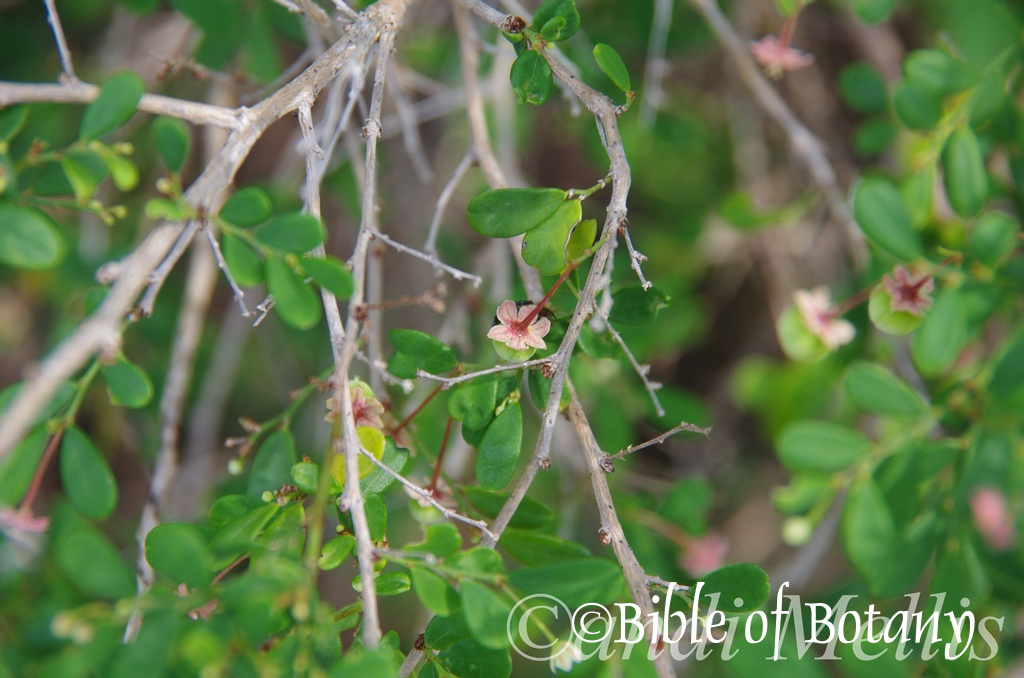
Mount Cootha Botanic Gardens Qld.
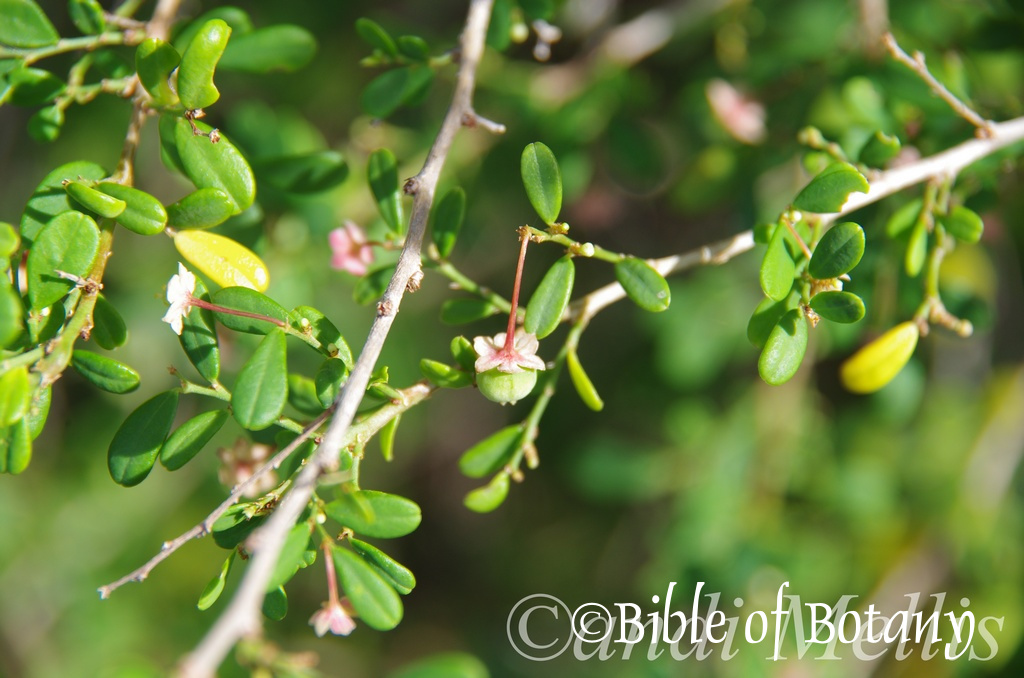
Mount Cootha Botanic Gardens Qld.
Sauropus albiflorus
Classification:
Class: Eudicots
Class: Rosids
Order: Malpighiales
Family: Phyllanthaceae
Genus: From Saurus, which is Latin for a dinosaur and Pous, which is Ancient Greek or Pedi, which is Latin for a foot or feet. It refers to the imprint of some early fossils indicating it may have been pressed into their positions by dinosaurs so may have their origins as old as the dinosaurs. Scientists are not in agreement with the fossils being that of Sauropus, however it makes a nice yarn at a B-B-Que. Some species are grown in China as a very good vegetable which yields good vitamin content and is known there as ma ne cai (马尼菜) Sauropus androgynus..
Species: From Albus, which is Latin for white and Flōris which is Latin for a flower or Flōs which is the Roman goddess for spring and flowers. It refers to flowers, which are pure white.
Common Name:
Distribution:
Sauropus albiflorus is found south from Mount Tozer in far north Queensland to Glen’s Creek near Nymboida in far north eastern New South Wales. It is mainly found on and east of the Great Dividing Range except for an isolated population on Black Soil Creek near Croydon.
https://avh.ala.org.au/occurrences/search?taxa=Sauropus+albiflorus#tab_mapView
Habitat Aspect Climate:
Sauropus albiflorus prefers dappled shade to full sun. It grows in moist or dry open forests, open woodlands and grasslands. The altitude ranges from 5 meters ASL to 750 meters ASL.
The temperatures range from minus 2 degrees in July to 40 degrees in January.
The rainfalls range from lows of 380mm to 1600mm average per annum.
Soil Requirements:
Sauropus albiflorus prefers red sandy loams, light gritty clays to medium clays. The soils are usually derived from decomposed black basalts, brown basalts, sandstones and granites. The soils pH ranges from 5pH to 6pH. It does not tolerate waterlogged soils. Non saline soils to moderately saline soils are tolerated.
Height & Spread:
Wild Plants: 2m to 4m by 1m to 3m.
Characteristics:
Sauropus albiflorus grows as a small open shrub with many curved brown, glabrous, bark. The branchlets are reddish-brown and only becoming deep sea-green to deep olive-green near the apex when the new leaves appear.
The leaves of Sauropus albiflorus are oblong and measure 5mm to 24mm in length by 2mm to 9mm in width. The triangular stipules measure 0.5mm to 1mm in length. The leaves are petiolate with the petioles usually measuring 1mm in length. The bases are attenuate and cuneate while the apexes are obtuse. The discolourous laminas are mid blue-green to deep sea-green, dull and glabrous on the upper lamina while the lower laminas are much paler at times almost glaucous in appearance. The laminas recurve upwards slightly from the midvein to the margin and are straight or decurve slightly on the apical third. The leaf margins are entire. The mid vein is prominent while the lateral veins are circular and slightly prominent on the lower lamina surface and are visible on the upper lamina.
The inflorescences of Sauropus albiflorus are born singularly or at times in pairs from the leaf axils and generally face downwards. The blue-green petioles are glabrous and measure 4mm to 5.5mm in length. The ovate petals are greenish-yellow to yellowish-green and measure 1mm to 1.2mm in length.
The pedicels of the male flowers measure 8mm to 12mmin length. The 6 stamens are surrounded by six glands and are alternate with the tepals. The tepals measure 1.5mm in length and are united at the base.
The pedicels of the female flowers measure 15mm to 22mm in length. The ovary is surrounded by a 6 lobed disk with the lobes being opposite the stamens. The tepals measure 2mm in length and are free. The 3 stigmas are usually bilobed.
The fruits of Sauropus albiflorus are globose, glabrous capsules. The green capsules turn black when ripe. The perianth and calyx lobes are persistent at the base and the pistil is persistent at the apex of the capsule. The single pale fawn seed is farinaceous.
Wildlife:
Sauropus albiflorus’s wildlife is unknown to the author.
Cultivation:
Sauropus albiflorus is a beautiful small shrub that is worthwhile trying in an open woodland or forest garden. It is ideal at the edge of a forest where it can gain access to more light. In cultivation it grows from 0.2 meters to 0.3 meters in height by 0.2 meters to 0.3 meters in diameter when grown in the open.
It prefers to grow on better quality light clays to medium clay soils where deep leaf litter keeps the soil cool and moisture at an even level. If these requirements are met it can cope with temperatures as low as low as 1 degree and up to 36 degrees. It is moderately drought tolerant.
Add to the above, if it is given an adequate supply of water and a little native fertilizer on a regular basis the plants should respond by developing more branches with better flowering and fruit over a long period.
Now here is some good news from the exotic plant Sauropus androgynous on its nutritional content and it is rather spectacular to say the least. The leaves contain 49mm protein, 18mm fibre, vitamins A, B & C, potassium 2.77mm; more than bananas which contain 1.48mm, calcium 2.77mm; dried skim milk is less than half that at 1.3mm, phosphorus .61mm; dried soybeans contain .55mm, magnesium .55mm; and iron. While the young leaves and shoots are edible after cooking to release the aniseed flavour large quantities eaten have been known to cause bronchiolitis obliterans in the lungs so caution should taken.
While Sauropus albiflorus has many benefits it is not to say that the Australian species within the genus or this species contains the drug papaverine or the other vitamins and minerals or if it has at what concentrations it is in. The papaverine alkaloid is approved for the treatment of spasms of the gastrointestinal tract, bile ducts and ureter and for use as a cerebral and coronary vasodilator in subarachnoid haemorrhage when combined with balloon angioplasty, and coronary artery bypass surgery to open up the capillaries. Papaverine may also be used as a smooth muscle relaxant in microsurgery where it is applied directly to blood vessels.
Erectile dysfunction has seen the wide use of papaverine used as an erectile dysfunction drug, alone or sometimes in combination. Papaverine, when injected in penile tissue causes direct smooth muscle relaxation and consequent filling of the corpus cavernosum with blood resulting in erection. A topical gel is also available for ED treatment.
Now for the bad news overdosing on Papaverine has been known to cause lung damage where lung transplants were needed to resolve the problem of burst and over enlarged lung capillaries.
Propagation:
Seeds: The seeds of Sauropus albiflorus can be removed easily from the fruits.
Sow fresh seeds directly into a seed raising mix, keeping them moist not wet. Do not over water as the seeds will rot off before germination takes place. Place the trays in a cool shaded area with 50mm shade cloth in the bush house. When the seedlings are 20mm to 30mm height, prick them out and plant them into 50mm native tubes using a good organic mix.
As the seedlings roots reach the bottom of the tubes plant them out into their permanent position. Do not delay.
Fertilize using seaweed, fish emulsion or organic chicken pellets soaked in water on an alternate basis. Fertilize every two months until the plants are established then annually in early September to October to maintain better colour, health, vitality and flowering.
Further Comments from Readers:
“Hi reader, it seems you use The Bible of Botany a lot. That’s great as we have great pleasure in bringing it to you! It’s a little awkward for us to ask, but our first aim is to purchase land approximately 1,600 hectares to link several parcels of N.P. into one at The Pinnacles NSW Australia, but we need your help. We’re not salespeople. We’re amateur botanists who have dedicated over 30 years to saving the environment in a practical way. We depend on donations to reach our goal. If you donate just $5, the price of your coffee this Sunday, We can help to keep the planet alive in a real way and continue to bring you regular updates and features on Australian plants all in one Botanical Bible. Any support is greatly appreciated. Thank you.”
In the spirit of reconciliation we acknowledge the Bundjalung, Gumbaynggirr and Yaegl and all aboriginal nations throughout Australia and their connections to land, sea and community. We pay our respect to their Elders past, present and future for the pleasures we have gained.
Sauropus hirtellus
Classification:
Class: Equisetopsida
Order: Malpighiales
Family: Phyllanthaceae
Genus: From Saurus, which is Latin for a dinosaur and Pous, which is Ancient Greek or Pedi, which is Latin for a foot or feet. It refers to the imprint of some early fossils indicating they may have been pressed into their positions by dinosaurs so may have their origins as old as the dinosaurs. Scientists are not in agreement with the fossils being that of Sauropus, however it makes a nice yarn at a B-B-Que. Some species are grown in China as a vegetable which yields good vitamin content and is known there as ma ne cai (马尼菜).
Species: From Hirsutus, which is Latin for a hairy and shaggy. It refers to plant structures or organs which are covered in short, bristly, course shaggy hairs.
Common Name:
Distribution:
Sauropus hirtellus is found south and east from Jerico and the Boyne River in central Queensland to Bogabri and in northern New South Wales.
It is also found in 2 isolated areas around a billabong near Camooweal and on the Leichardt River near Mount Isa indicating that it may be more widespread than reported.
https://avh.ala.org.au/occurrences/search?taxa=Sauropus+hirtellius#tab_mapView
Habitat Aspect Climate:
Sauropus hirtellus prefers dappled shade to full sun. It grows in moist or dry open forests, open woodlands and grasslands. The altitude ranges from 20 meters ASL to1100 meters ASL.
The temperatures range from minus 2 degrees in July to 40 degrees in January.
The rainfalls range from lows of 380mm to 1600mm average per annum.
Soil Requirements:
Sauropus hirtellus prefers red sandy loams, light gritty clays to medium clays. The soils are usually derived from decomposed black basalts, sandstones and granites. The soils pH ranges from 5pH to 6pH. It does not tolerate waterlogged soils. Non saline soils to moderately saline soils are tolerated.
Height & Spread:
Wild Plants: 0.3m to 0.6m by 0.5m to 0.6m.
Characteristics:
Sauropus hirtellus grows as a small open shrub with many curved brown, glabrous, bark. The branchlets are reddish-brown and only becoming deep sea-green to deep olive-green near the apex when the new leaves appear.
The 4 or at times 5 ranked leaves of Sauropus hirtellus are linear to oblanceolate and measure 5mm to 20mm in length by 1mm to 5mm in width. The leaves are sessile to petiolate. The bases taper to the petiole while the apexes are acuminate to narrow acute. The discolourous laminas are deep blue-green, dull and glabrous on the upper lamina while the lower lamina is paler. The laminas are straight or decurve slightly from the base to the apex or on the apical half. The leaf margins are entire. The mid vein is prominent on the lower lamina and is visible from the upper lamina.
The inflorescences of Sauropus hirtellus are born singularly from the leaf axils and generally face downwards. The blue-green petioles are glabrous and measure 4mm to 5.5mm in length. The ovate petals are greenish-yellow to yellowish-green and measure 1mm to 1.2mm in length. The female flower’s styles are very short.
The fruits of Sarcotoechia serrata are globose capsules. The capsules are glabrous and measure 8mm to 10mm in length by 7mm to 9mm in diameter. The green capsules turn black when ripe. The single pale fawn seed is farinaceous and measures 6mm to 6mm in length.
Wildlife:
Sauropus hirtellus’s wildlife is unknown to the author.
Cultivation:
Sauropus hirtellus is a beautiful small shrub that is worthwhile trying in an open woodland or open Eucalyptus forest garden. It is ideal at the edge of a forest where it can gain access to more light. In cultivation it grows from 0.2 meters to 0.3 meters in height by 0.2 meters to 0.3 meters in diameter when grown in the open.
It prefers to grow on better quality light clays to medium clay soils where deep leaf litter keeps the soil cool and moisture at an even level. If these requirements are met it can cope with temperatures as low as low as 1 degree and up to 36 degrees. It is moderately drought tolerant.
Add to the above, if it is given an adequate supply of water and a little native fertilizer on a regular basis the plants should respond by developing more branches with better flowering and fruit over a long period.
Now here is some good news from the exotic plant Sauropus androgynus on its nutritional content and it is rather spectacular to say the least. The leaves contains 49mm protein, 18mm fibre, vitamins A, B & C, potassium 2.77mm; more than bananas which contain 1.48mm, calcium 2.77mm; dried skim milk is less than half that at 1.3mm, phosphorus .61mm; dried soybeans contain .55mm, magnesium .55mm; and iron. It is not known whether the local species are edible or not so caution should be taken.
While Sauropus androgynus has many benefits it is not to say that the Australian species within the genus or this species contains the drug papaverine or the other vitamins and minerals or if it has at what concentrations it is in. The papaverine alkaloid is approved for the treatment of spasms of the gastrointestinal tract, bile ducts and ureter and for use as a cerebral and coronary vasodilator in subarachnoid haemorrhage when combined with balloon angioplasty, and coronary artery bypass surgery to open up the capillaries. Papaverine may also be used as a smooth muscle relaxant in microsurgery where it is applied directly to blood vessels.
Erectile dysfunction has seen the wide use of papaverine used as an erectile dysfunction drug, alone or sometimes in combination. Papaverine, when injected in penile tissue causes direct smooth muscle relaxation and consequent filling of the corpus cavernosum with blood resulting in erection. A topical gel is also available for ED treatment.
Now for the bad news overdosing on Papaverine has been known to cause lung damage where lung transplants were needed to resolve the problem of burst and over enlarged lung capillaries.
Propagation:
Seeds: The seeds of Sauropus hirtellus can be removed easily from the fruits.
Sow fresh seeds directly into a seed raising mix, keeping them moist not wet. Do not over water as the seeds will rot off before germination takes place. Place the trays in a cool shaded area with 50mm shade cloth in the bush house. When the seedlings are 20mm to 30mm height, prick them out and plant them into 50mm native tubes using a good organic mix.
As the seedlings roots reach the bottom of the tubes plant them out into their permanent position. Do not delay.
Fertilize using seaweed, fish emulsion or organic chicken pellets soaked in water on an alternate basis. Fertilize every two months until the plants are established then annually in early September to October to maintain better colour, health, vitality and flowering.
Further Comments from Readers:
“Hi reader, it seems you use The Bible of Botany a lot. That’s great as we have great pleasure in bringing it to you! It’s a little awkward for us to ask, but our first aim is to purchase land approximately 1,600 hectares to link several parcels of N.P. into one at The Pinnacles NSW Australia, but we need your help. We’re not salespeople. We’re amateur botanists who have dedicated over 30 years to saving the environment in a practical way. We depend on donations to reach our goal. If you donate just $5, the price of your coffee this Sunday, We can help to keep the planet alive in a real way and continue to bring you regular updates and features on Australian plants all in one Botanical Bible. Any support is greatly appreciated. Thank you.”
In the spirit of reconciliation we acknowledge the Bundjalung, Gumbaynggirr and Yaegl and all aboriginal nations throughout Australia and their connections to land, sea and community. We pay our respect to their Elders past, present and future for the pleasures we have gained.
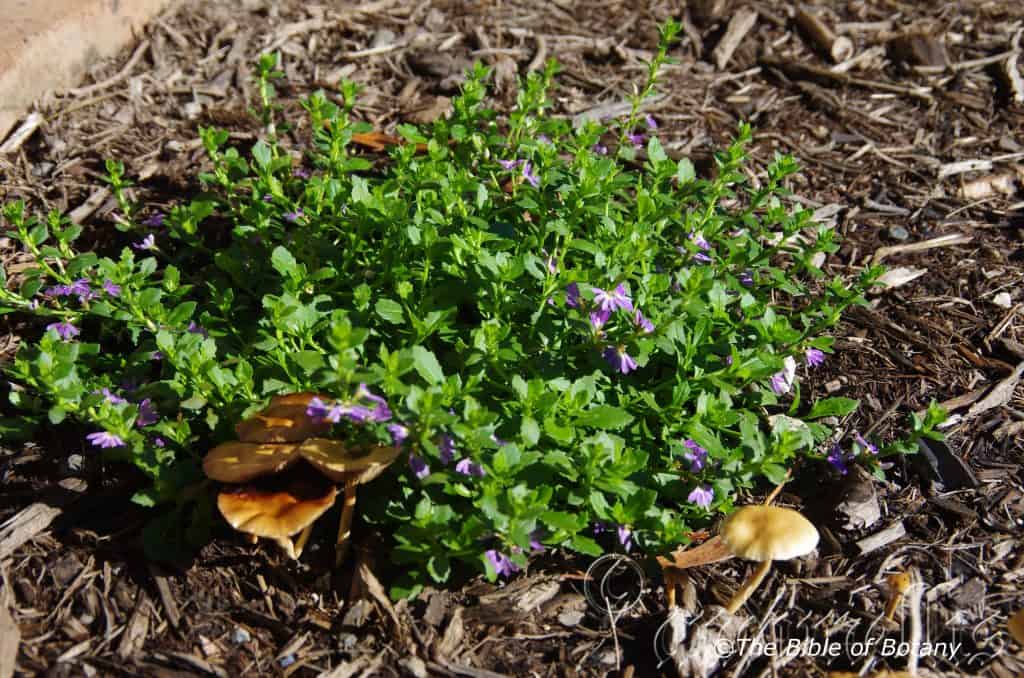
Author’s Garden The Pinnacles NSW
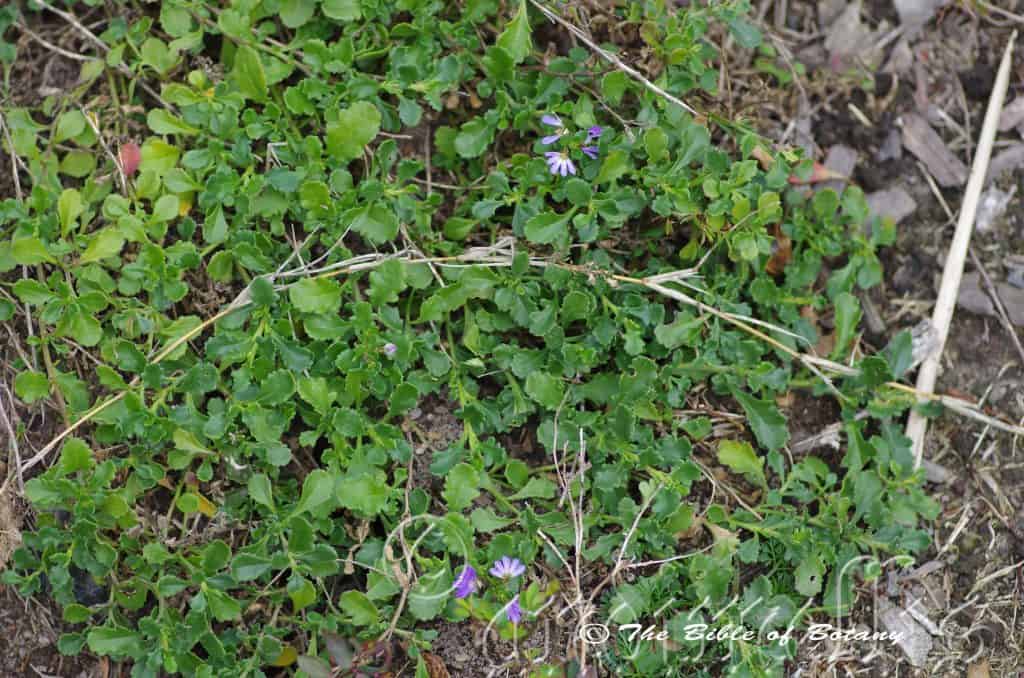
Woolli Back Dunes NSW
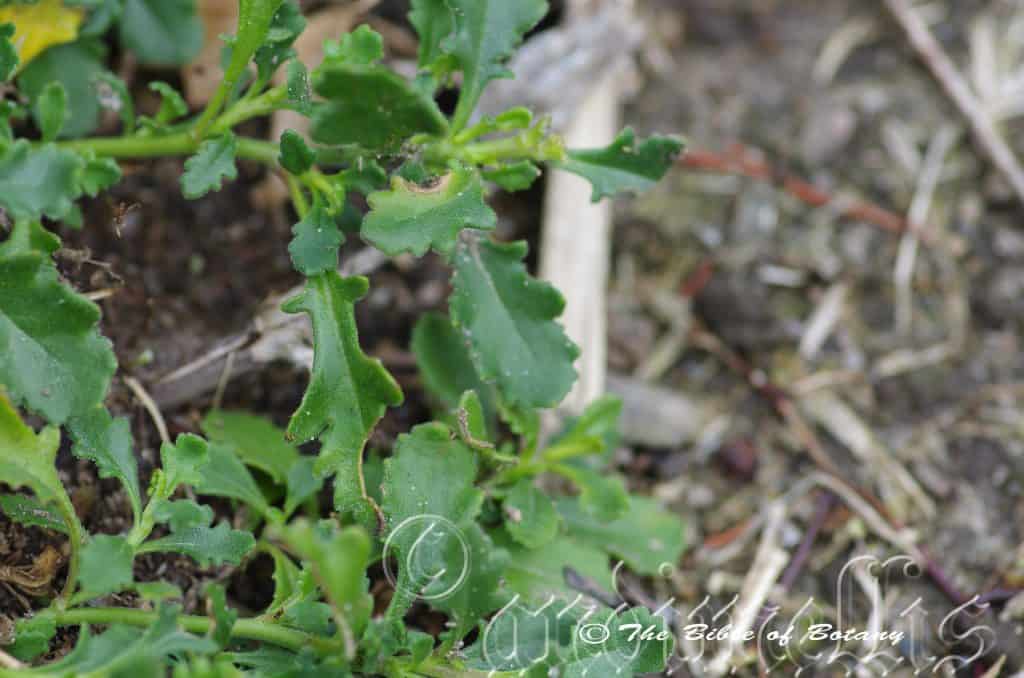
Woolli Back Dunes NSW
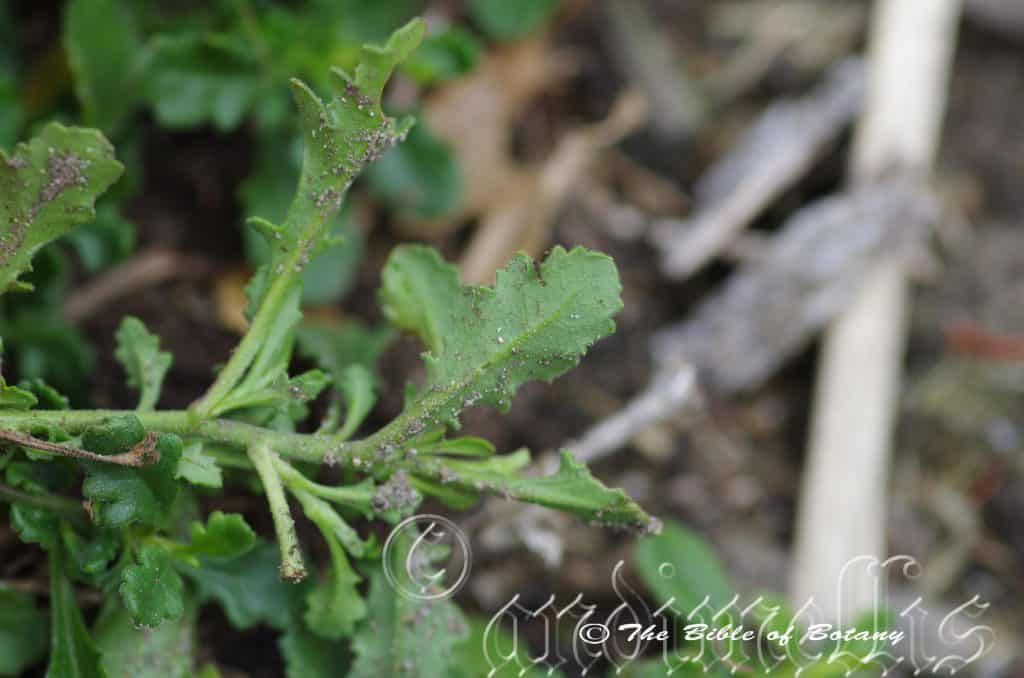
Woolli Back Dunes NSW
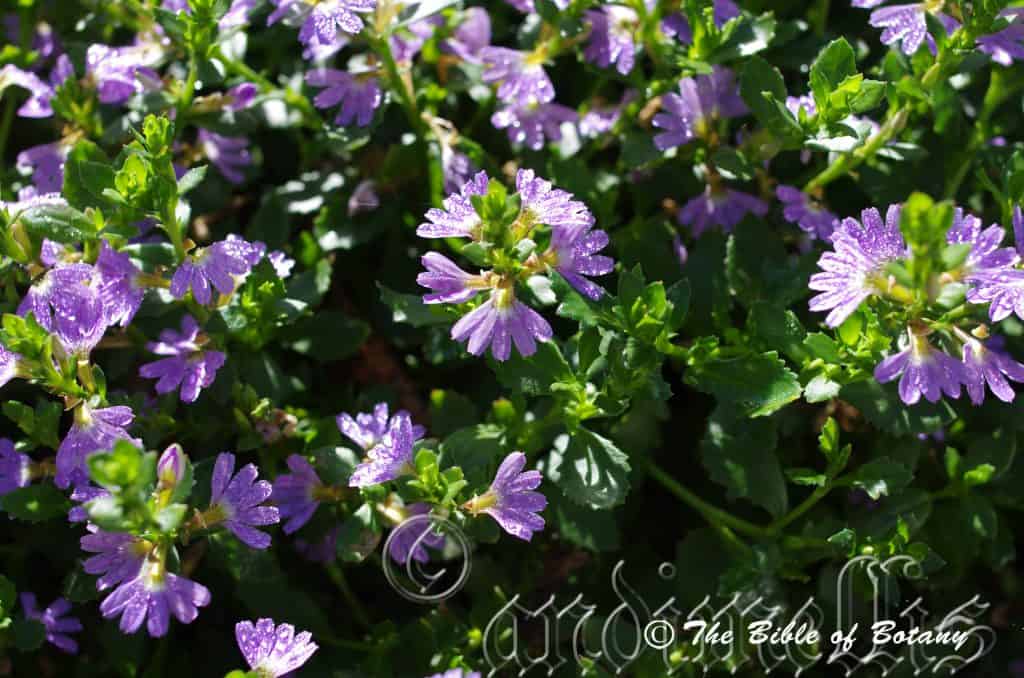
Griffith University Sunnybank Qld.
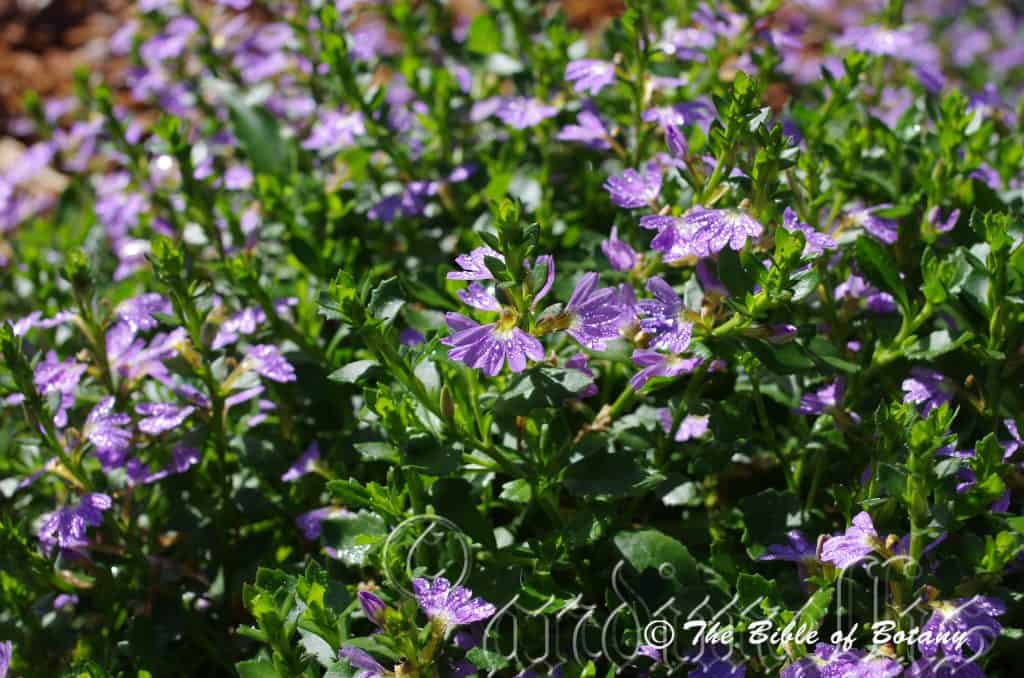
Griffith University Sunnybank Qld.
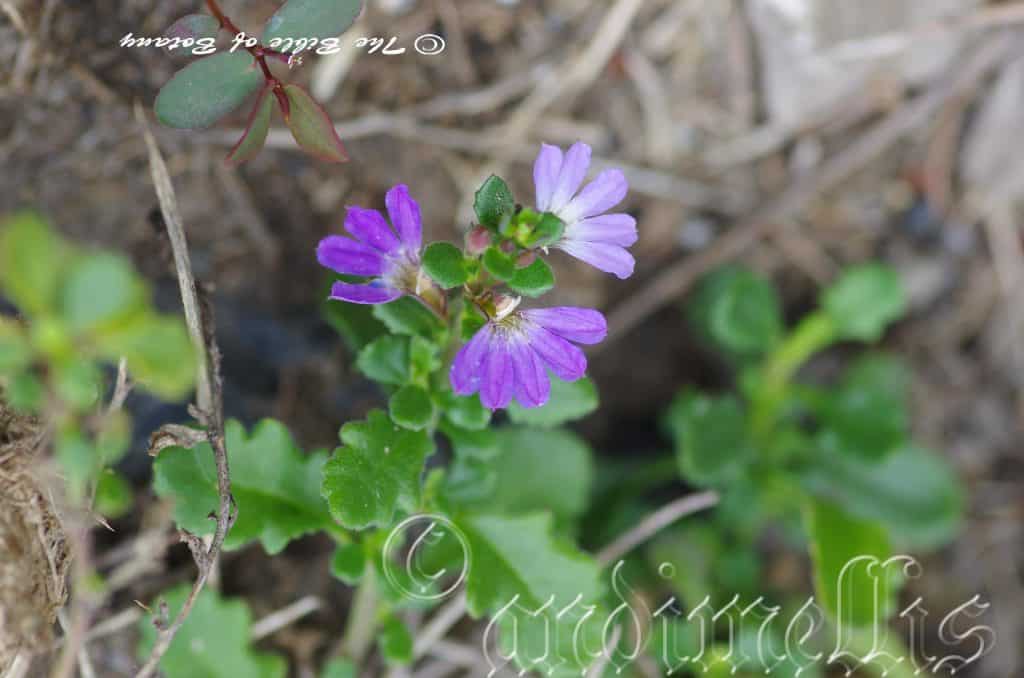
Woolli Back Dunes NSW
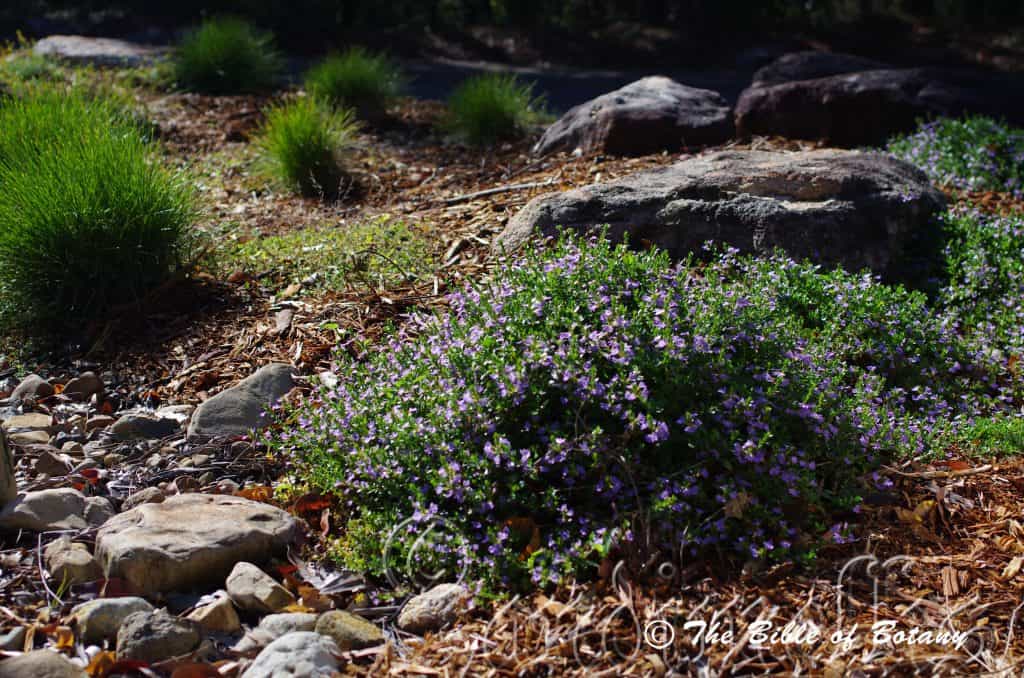
Griffith University Sunnybank Qld.
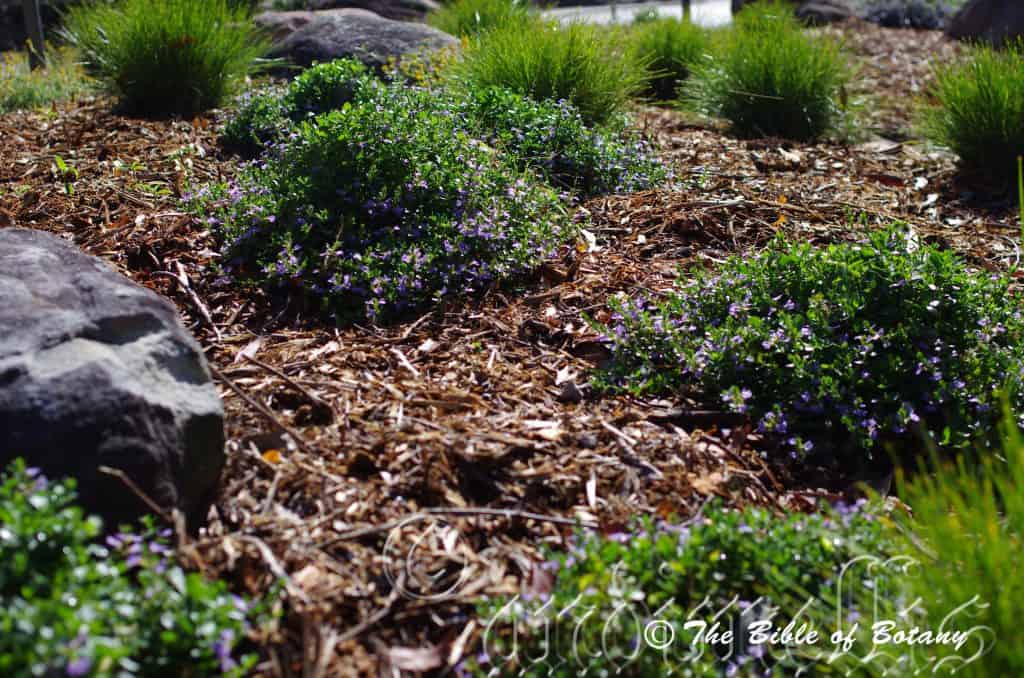
Griffith University Sunnybank Qld.
Scaevola aemula
Classification:
Class: Eudicots
Class: Asterids
Order: Asterales
Family: Goodeniaceae
Genus: From Scaevola, which is Latin for left handed. It refers to the legendry Gauis Mucius Scaevola, a legendary Roman assassin said to have burnt his right hand away as a show of bravery during the early years of the Roman Republic. It refers now to flowers, which resemble a single hand held out against the leaves.
Species: From Aemulus, which is Latin for emulative or to compete with. It refers to plants, which resemble another species or genus.
Common Name: Fan Flower.
Distribution:
Scaevola aemula is a widespread species in central and eastern Australia.
https://avh.ala.org.au/occurrences/search?taxa=Scaevola+aemula#tab_mapView
Habitat Aspect Climate:
Scaevola aemula prefers light dappled shade to full sun. It grows in dry Eucalyptus forests, open woodlands on slopes, plains, frontal dunes, back dunes or sandy clay pans in semi-arid areas. The altitude ranges from 0 meters ASL to 750 meters ASL.
The temperatures range from minus 2 degrees in July to 40 degrees in January.
The rainfalls range from lows of 200mm to 1600mm average per annum.
Soil Requirements:
Scaevola aemula prefers fine to course sandy soils to grainy light clays that are derived from decomposed sandstone, lateritic sands or accumulated beach sands. The soils pH ranges from 5pH to 8pH. It does not tolerate waterlogged soils. Non saline soils to very saline soils are tolerated.
Height & Spread:
Wild Plants: 0.1m to 0.5m by 0.6m to 1m.
Characteristics:
Scaevola aemula grows as an ascending perennial herb with straight, pale green to mid-burgundy, glabrous stems. The smaller stems are sparsely covered in course yellow hirtellous hairs.
The alternate, obovate to oblong obovate leaves of Scaevola aemula measure 10mm to 50mm in length by 4mm to 30mm in width. The base is cuneate to tapering while the apex is acute. The concolourous laminas are deep grass-green often with a purple tinge on the margins. It is succulent, semi glossy, glabrous to covered in white to pale yellow appressed or sericeous hairs on the upper lamina while the lower lamina not as glossy. The leaf margins entire or have 1to 6 pairs of fine teeth. It is flat, recurve slightly towards the margins from the midvein and decurve slightly near the apex. The mid vein is slightly prominent on the lower laminas. The 2 narrow elliptical to lanceolate, divaricate stipules grow from the stems immediately above the leaf nodes and measure 4mm to 7.5mm in length by 1mm to 2mm in width. The petioles are sessile to 1mm in length.
Inflorescences of Scaevola aemula are born short terminal spikes or are produced singularly from the leaf axils. The flowers are sessile. The ciliate, triangular sepal lobes are glabrous and fused at the base and measure 0.3mm to 0.5mm in length. The corollas are lime green to yellow green externally. There are 2 or 3 longitudinal burgundy stripes. It is greenish-yellow to bright yellow turning white internally as they approach the pale blue, to deep purple or rarely white lobes. It is sparsely covered in white appressed or sericeous hairs externally and purple hirtellous hairs internally. The corollas measure 17mm to 24mm in length including the 5 long spathulate lobes which measure 12mm to 18mm in length by 3mm to 4.5mm in width. The lobes wings are entire, flat to undulating and measure 1mm to 1.5mm in width, while the apex is caudate.
The 10 glabrous anthers indusium measure 1.2mm to 1.5mm in length and are covered in purplish hirtellous hairs at the base.
The green to greenish burgundy style and stigma are sparsely covered purplish hirtellous hairs while the ovary is lime green and covered in white puberulent and hirtellous hairs. Scaevola aemula’s flowers appear from early August through to late March.
The fruits of Scaevola aemula are ovoidal berries. The berries are covered in white puberulent and hirtellous hairs and measure 4mm to 5mm in length by 3.5mm to 4mm in diameter. The green capsules turn creamy yellow to deep yellow when ripe.
Wildlife:
Scaevola aemula’s flowers are attractive to native bees particularly early in the day.
Cultivation:
Scaevola aemula is a magnificent small prostrate or decumbent plant that is ideal in semi-arid gardens. In cultivation it grows from 0.2 meters to 0.5 meters in height by 0.5 meters to 1 meter in diameter when grown in the open.
It grows well on lighter sandy soils where a shallow layer of gravel mulch keeps the soil cool and moisture at an even level. If these requirements are met they can cope with temperatures as low as minus 3 degrees and up to 36 degrees. It is moderately drought resistant.
Add to the above, if it is given a little water with a little native fertilizer on a regular basis the plants will respond with superb flowering over a long period.
When you design a miniature desert garden, use contours to display the plants to their best. Plant a row of small shrubs on the top to represent the hills or a ridge or use them on the plains to give a feeling of expansive flatness with the hills in the distance. Another method would be to cover the hills in the distance with annuals that have soft grey foliage. This again would effectively represent the haze experienced in real life. It would have to be taller than those planted in valleys or on plains to give depth and height. Don’t make the ridge straight curve it or wind it around. Use dwarf tussock grasses or Lomandra species adjacent to Scaevola aemula to give height.
Place it near old stumps and roots to make the stumps or roots look larger and even more gnarled than they really are. Select an area of ground and let your hair down. Be imaginative and this is the plant that may just change your life. Remember this plant is suited to large or small desert type of gardens so be sparingly with the other plants when planting and remember that deserts are rolling flat plains not steep hills so it is best to use a gentle slope or a basin with a small pool at the bottom. A billabong affect is the go, not a waterfall or cascades.
Scaevola aemula would make a great contribution to a sandy or rocky terrain rock garden. Here it can be used as fill in plants, scattered throughout the boulders. When you use them in area that is strewn with large boulders do not over crowd the scene as the boulders are a formidable part of the scene. This Scaevola is well suited to such conditions so use pockets of them with bare ground in between to display the plants. Boulder country are almost always rising and falling in contour and have sharp rises. Plants must be planted sparingly with short annuals between to give vibrant colour. Make the scene so you can see over the tallest rocks with the exception of one or two at the most. The idea is to achieve a feeling of expansive bareness. This can be achieved with using Scaevola aemula’s deep green leaves contrasting with finer pale green or soft grey to glaucous coloured foliages. If large deep green leaf plants are wanted try using them as prostrate plants. Use a lot of procumbent plants like Hibbertia to make the rocks look larger and the spaces between the plants more expansive. Mix it with other smaller shrubs so none of them dominate the scene but blend in to give a mosaic of foliage colours that you oversee. Actinotis helianthi or Grevillea thelemanniana for two great contrasting foliages adjacent to the Scaevola aemula.
Propagation:
Seeds: Seeds of Scaevola aemula can be removed easily from the fruits however ripe fruits are often hard to find as the plants do not set a lot of seed.
Sow fresh seeds directly into a seed raising mix, keeping them moist not wet. Do not over water as the seeds will rot off before germination takes place. Place the trays in a cool shaded area with 50mm shade cloth in the bush house. When the seedlings are 20 to 25 mm tall, prick them out and plant them into 50mm native tubes using a good organic mix.
Fertilize using Seaweed, fish emulsion or organic chicken pellets soaked in water and apply the liquid on an alternate basis. Fertilize every two months.
As the seedlings roots reach the bottom of the tubes plant them out into their permanent position. Do not delay.
Cuttings: Fortunately Scaevola aemula cuttings strike easy. Use 100mm to 200mm long tip cuttings or lateral shoots from the present season’s growth. Take them in warmer months of the year. Remove half the leaves from the bottom section being careful not to tear the bark.
1 Prepare the cutting mix by adding two thirds sharp clean river sand, one third peat or one third perlite. These ingredients must be sterilized,
2 Select good material from non diseased plants,
3 Select semi green stems for cuttings. Look for a stem with two or three nodes,
4 Place the cutting on a flat, hard surface, and make a clean cut down one side of the cutting at the base for 10mm with a sharp sterile knife or razor blade. – This scarification of the node will increase the chances of roots emerging from this spot. Now remove all but one or two the leaves, leaving the apex leaves in tact. If the leaves are very large in proportion to the stem, cut off the apical halves.
5 Hormone is not required,
6 Use a small dipple stick or old pencil to poke a hole into the soilless potting mix. Ensure the hole is slightly larger than the stem diameter and be careful not to damage the base of the cuttings,
7 I like to place the tubes in bucket with holes drilled in the bottom to allow excess water to drain out. A plastic bag that fits over the bucket is ideal to help maintain temperature and moisture. Place in a semi shaded, warm position like under 50mm shade cloth.
8 When the cuttings have struck, open the bag to allow air circulation for a few days to a week,
9 Once hardened off remove the cuttings from the bag and allow to further hardening for a few more days to a week,
10 Transplant into a good potting mix to grow on.
Fertilize using seaweed, fish emulsion or organic chicken pellets soaked in water on an alternate basis. Fertilize every two months until the plants are established then annually in early September to October to maintain better colour, health, vitality and flowering.
Further Comments from Readers:
“Hi reader, it seems you use The Bible of Botany a lot. That’s great as we have great pleasure in bringing it to you! It’s a little awkward for us to ask, but our first aim is to purchase land approximately 1,600 hectares to link several parcels of N.P. into one at The Pinnacles NSW Australia, but we need your help. We’re not salespeople. We’re amateur botanists who have dedicated over 30 years to saving the environment in a practical way. We depend on donations to reach our goal. If you donate just $5, the price of your coffee this Sunday, We can help to keep the planet alive in a real way and continue to bring you regular updates and features on Australian plants all in one Botanical Bible. Any support is greatly appreciated. Thank you.”
In the spirit of reconciliation we acknowledge the Bundjalung, Gumbaynggirr and Yaegl and all aboriginal nations throughout Australia and their connections to land, sea and community. We pay our respect to their Elders past, present and future for the pleasures we have gained.

Mount Cootha Botanical Gardens Qld.

Mount Cootha Botanical Gardens Qld.
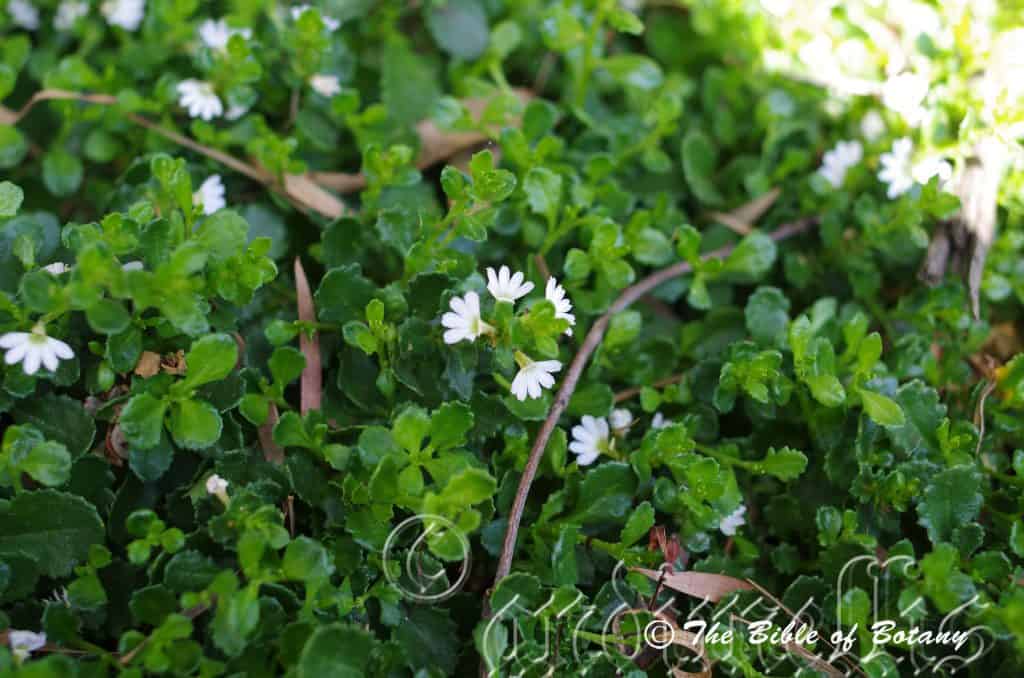
Mount Cootha Botanical Gardens Qld.
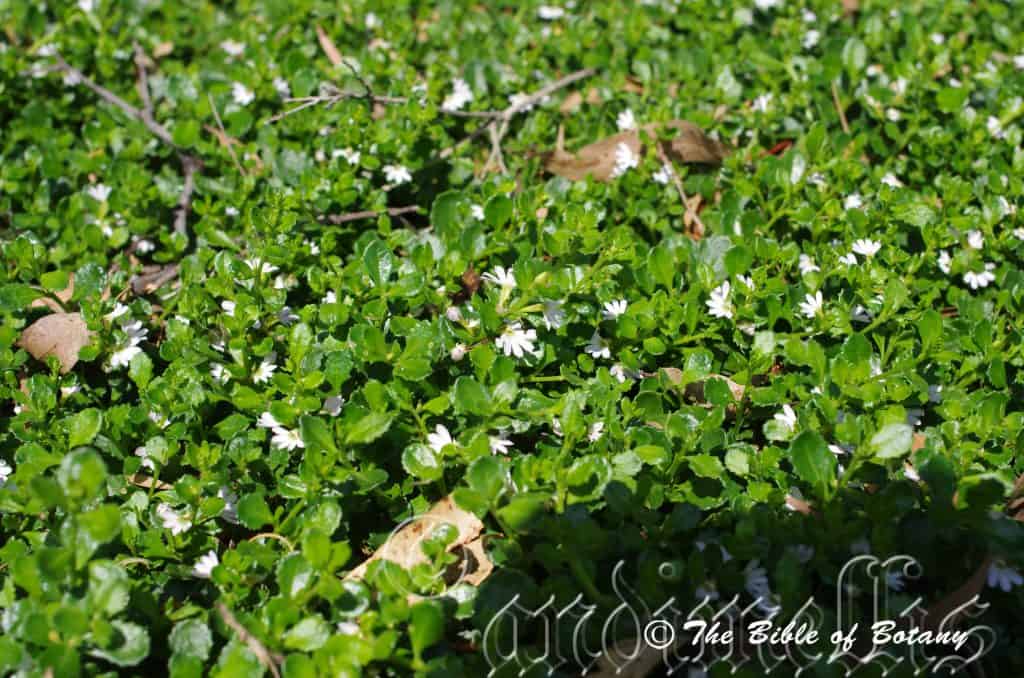
Mount Cootha Botanical Gardens Qld.
Scaevola albida
Classification:
Class: Equisetopsida
Subclass: Magnoliidae
Superorder: Asteranae
Order: Asterales
Family: Goodeniaceae
Genus: From Scaevola, which is Latin for left handed. It refers to the legendry Gaius Mucius Scaevola, a legendary Roman assassin said to have burnt his right hand away as a show of bravery during the early years of the Roman Republic. It refers now to flowers, which resemble a single hand held out against the leaves.
Species: From Albus, which is Latin for white. It refers to structures or organs, which are white, or off white in colour.
Variety: Scaevola albida var. albida. From Albus, which is Latin for white. It refers to structures or organs, which are white, or off white in colour.
Variety: Scaevola albida var. pallida. From Pallida, which is Latin for deficient or waning in colour. It refers to structures or organs, which are very pale in colour.
Common Name: Pale Fan Flower.
Distribution:
Scaevola albida var. albida and Scaevola albida var. pallida are found south from Banana in central eastern Queensland to Kangaroo Island in southern South Australia. It is also found further west at Streaky Bay and Uley and further north at Wilpena and Moomba in South Australia.
In Tasmania it is found on the Flinders Island group in Bass Strait Islands and between Hazard Bay and Tremma on the north west coast.
The two sub specie herbarium speciemens have yet to be mapped individually.
https://avh.ala.org.au/occurrences/search?taxa=Scaevola+albida#tab_mapView
Habitat Aspect Climate:
Scaevola albida prefers light dappled shade to full sun. It grows in both dry and moist sclerophyll forest and low growing coastal heaths or woodlands especially on the near coastal ranges. The altitude ranges from 5 meters ASL to 950 meters ASL.
The temperatures range from minus 3 degrees in July to 40 degrees in January.
The rainfalls range from lows of 200mm to 1600mm average per annum.
Soil Requirements:
Scaevola albida prefers fine to course sandy soils to grainy light fatty clays. The soils are derived from decomposed sandstone, lateritic sands, granites, metamorphic rocks or accumulated peaty beach sands. The soils pH ranges from 5pH to 7pH. It does not tolerate waterlogged soils. Non saline soils to very saline soils are tolerated.
Height & Spread:
Wild Plants: 0.1m to 0.5m by 0.6m to 1m
Characteristics:
Scaevola albida grows as a prostrate to ascending herb often with a woody base. The stems are glabrous or moderately covered in white pilose hairs.
The alternate, obovate to elliptic leaves of Scaevola albida measure 6mm to 50mm in length by 2mm to 25mm in width. The petioles are sessile to 1mm in length. The petioles measure 1mm to 3mm in length. The bases are cuneate, broad cuneate to rounded while the apexes are broad acute to broad acuminate. The discolourous laminas are deep grass-green to deep grey-green and densely covered in soft white sericeous hairs on the upper laminas and are paler on the lower laminas. The laminas are flat, gently recurve from the mid vein to the margins or are convex on the upper surface and are straight or decurve gently downwards on the apical half. The leaf margins are entire or prominently toothed. The mid vein and main lateral veins are slightly prominent on the lower laminas.
The inflorescences of Scaevola albida are born leafy spikes that measure 100mm to 250mm in length. The individual flowers are sessile. The ciliate, triangular sepal lobes are glabrous and fused at the base and measure 0.3mm to 0.5mm in length. The corollas are lime green to yellow green externally. There are 2 or 3 longitudinal burgundy stripes. It is greenish-yellow to bright yellow turning white internally as they approach the pale blue, to deep purple or rarely white lobes. It is sparsely covered in white appressed or sericeous hairs externally and purple hirtellous hairs internally. The corollas measure 17mm to 24mm in length including the 5 long spathulate lobes which measure 12mm to 18mm in length by 3mm to 4.5mm in width. The lobes wings are entire, flat to undulating and measure 1mm to 1.5mm in width, while the apex is caudate.
The flowers are produced within leaf like bracts. The bracteoles are narrow elliptic and measure 3mm to 9mm in length. The bracteoles are covered in white ciliate hairs. The ovate sepals are free and measure 0.5mm to 0.7 mm in length. The corolla tube is sparsely to moderately covered in white appressed hairs sericeous hairs externally and is sparsely covered in white hirsute hairs near the throat with them extending to papillate hairs at the apex. The yellowish-green to olive-green corolla tube measures 4.5mm to 6mm in length. The deep purple-blue to white broad linear to narrow lanceolate petals are apiculate at the apexes and measure 5mm to 7mm in length by 1.2mm to 1.6mm in width. The undulate to ruffled but not crisped petal wings measure 0.8mm to 1mm width.
The anthers are glabrous. The indusium has short white or purple bristles at the base that do not exceed those bristles on the lips. The flowers appear throughout the year with a peak in the warmer months.
Scaevola albida fruits are ellipsoidal berries. The berries are glabrous to sparsely covered in white puberulent hairs and measure 3mm to 4mm in length by 3mm to 3.5mm in diameter. The green capsules turn yellowish when ripe. The single seed is brown and rugose.
Confusing Subspecie Varieties:
Scaevola albida var. albida is a sub shrub to 500mm in height usually with ascending branches. The leaves measure 10mm to 50mm in length by 5mm to 22mm in width. The pale blue corolla measures 8mm to 12 mm in length. The style is moderately covered in white villous hairs.
Scaevola albida var. pallida is usually a prostrate shrub from 20mm to 200mm in height. The leaves measure 6mm to 20mm in length by 1mm to 7mm in width. The white to pastel blue corolla measures 5mm to 8mm in length. The style is glabrous.
Wildlife:
Scaevola albida’s flowers are attractive to native bees like Tetragonula carbonaria and the Blue banded bee Amegilla cingulata particularly early in the day.
Cultivation:
Scaevola albida is a magnificent prostrate plant that can cover a meter of ground very quickly in alpine areas. It can be grown in association with other sand stabilizing alpine plant specie. Water and plenty of it or at least keep the soil moist at all times is essential for healthy growth. Full sun in cold areas and full sun with partial shade is beneficial in warmer areas. It is not a plant for the subtropics but will do well in cool temperate areas. It is prone to dying suddenly at the end of the flowering season or if the plant has dried out then given plenty of water to compensate for the dryness. It is therefore recommended that several cuttings be made during the peak growing season to avoid any disappointments.
In cultivation it will grow from 0.05 meters to 0.15 meters in height by 0.5 meters to 1 meter in diameter when grown in an open sunny position.
It grows exceptionally well on lighter sandy soils where a shallow layer of gravel mulch keeps the soil cool and moisture at an even level. If these requirements are met it can cope with temperatures as low as minus 2 degrees and up to 36 degrees.
Add to the above, if it is given a little water with a little native fertilizer on a regular basis the plants will respond with superb flowering.
When you design a miniature desert garden or small rockery, use contours to display the plants to its best. Plant a row of sub shrubs on the top to represent the hills or a ridge. Planting it sparingly will give a feeling of expansive flatness with Scaevola albida planted between with other small procumbent plants like Hibbertia diffusa or Rhodanthe anthemoides.
In a larger rockery the taller sub shrubs can be planted sparingly throughout the middle of the bed to almost hide what is on the other side so that you can walk right around the bed and be treated to many different themes.
Place Scaevola albida near old stumps and roots to make the stumps or roots look larger and even more gnarled than they really are. Be imaginative and this is one plant that may just change your life. Remember this plant is suited to large or small desert type of gardens so be sparingly with the other plants when planting and remember that deserts are rolling flat plains not steep hills so it is best to use a gentle slope or a basin with a small pool at the bottom. A billabong affect is the go, not a waterfall or cascades.
Scaevola albida would make a great contribution to a sandy or rocky terrain rock garden. Here it can be used as fill in plants, scattered throughout the boulders. When you use them in area that is strewn with large boulders do not over crowd the scene as the boulders are a formidable part of the scene. Scaevola albida is well suited to such conditions so use pockets of it with bare ground in between to display the plants. Boulder country are almost always rising and falling in contour and have sharp rises. Plants must be planted sparingly with short annuals between to give vibrant colour. Make the scene so you can overseer the tallest rocks with the exception of one or two at the most. The idea is to achieve a feeling of expansive bareness. This can be achieved with using Scaevola albida’s deep green leaves contrasting with finer pale green or soft grey to glaucous coloured foliages. If large deep green leaf plants are wanted try using them as prostrate plants. Use a lot of procumbent plants like Hibbertia linearis or Leschenaultia formosa to make the rocks look larger and the spaces between the plants more expansive. Mix it with other larger herbs so none of them dominate the scene but blend in to give a mosaic of foliage colours that you oversee. Actinotis helianthi or Rhodanthe anthemoides and Rhodanthe chlorocephala for 3 great contrasting foliages adjacent to the Scaevola albida.
Propagation:
Seeds: The seeds of Scaevola albida can be removed easily from the fruits however ripe fruits are often hard to find as the plants do not set a lot of seed.
Sow fresh seeds directly into a seed raising mix, keeping them moist not wet. Do not over water as the seeds will rot off before germination takes place. Place the trays in a cool shaded area with 50mm shade cloth in the bush house. When the seedlings are 20 to 25 mm tall, prick them out and plant them into 50mm native tubes using a good organic mix.
Fertilize using Seaweed, fish emulsion or organic chicken pellets soaked in water and apply the liquid on an alternate basis. Fertilize every two months.
As the seedlings roots reach the bottom of the tubes plant them out into their permanent position. Do not delay.
Cuttings: Fortunately Scaevola albida cuttings strike easy. Use 80mm to 100mm long tip cuttings or lateral shoots from the present season’s growth. Take them in warmer months of the year. Remove half the leaves from the bottom section being careful not to tear the bark.
1 Prepare the cutting mix by adding two thirds sharp clean river sand, one third peat or one third perlite. These ingredients must be sterilized,
2 Select good material from non diseased plants,
3 Select semi green stems for cuttings. Look for a stem with two or three nodes,
4 Place the cutting on a flat, hard surface, and make a clean cut down one side of the cutting at the base for 10mm with a sharp sterile knife or razor blade. – This scarification of the node will increase the chances of roots emerging from this spot. Now remove all but one or two the leaves, leaving the apex leaves in tact. If the leaves are very large in proportion to the stem, cut off the apical halves.
5 Hormones are not required,
6 Use a small dipple stick or old pencil to poke a hole into the soilless potting mix. Ensure the hole is slightly larger than the stem diameter and be careful not to damage the base of the cuttings,
7 I like to place the tubes in bucket with holes drilled in the bottom to allow excess water to drain out. A plastic bag that fits over the bucket is ideal to help maintain temperature and moisture. Place in a semi shaded, warm position like under 50mm shade cloth.
8 When the cuttings have struck, open the bag to allow air circulation for a few days to a week,
9 Once hardened off remove the cuttings from the bag and allow to further hardening for a few more days to a week,
10 Transplant into a good potting mix to grow on.
Fertilize using seaweed, fish emulsion or organic chicken pellets soaked in water on an alternate basis. Fertilize every two months until the plants are established then annually in early September to October to maintain better colour, health, vitality and flowering.
Further Comments from Readers:
“Hi reader, it seems you use The Bible of Botany a lot. That’s great as we have great pleasure in bringing it to you! It’s a little awkward for us to ask, but our first aim is to purchase land approximately 1,600 hectares to link several parcels of N.P. into one at The Pinnacles NSW Australia, but we need your help. We’re not salespeople. We’re amateur botanists who have dedicated over 30 years to saving the environment in a practical way. We depend on donations to reach our goal. If you donate just $5, the price of your coffee this Sunday, We can help to keep the planet alive in a real way and continue to bring you regular updates and features on Australian plants all in one Botanical Bible. Any support is greatly appreciated. Thank you.”
In the spirit of reconciliation we acknowledge the Bundjalung, Gumbaynggirr and Yaegl and all aboriginal nations throughout Australia and their connections to land, sea and community. We pay our respect to their Elders past, present and future for the pleasures we have gained.
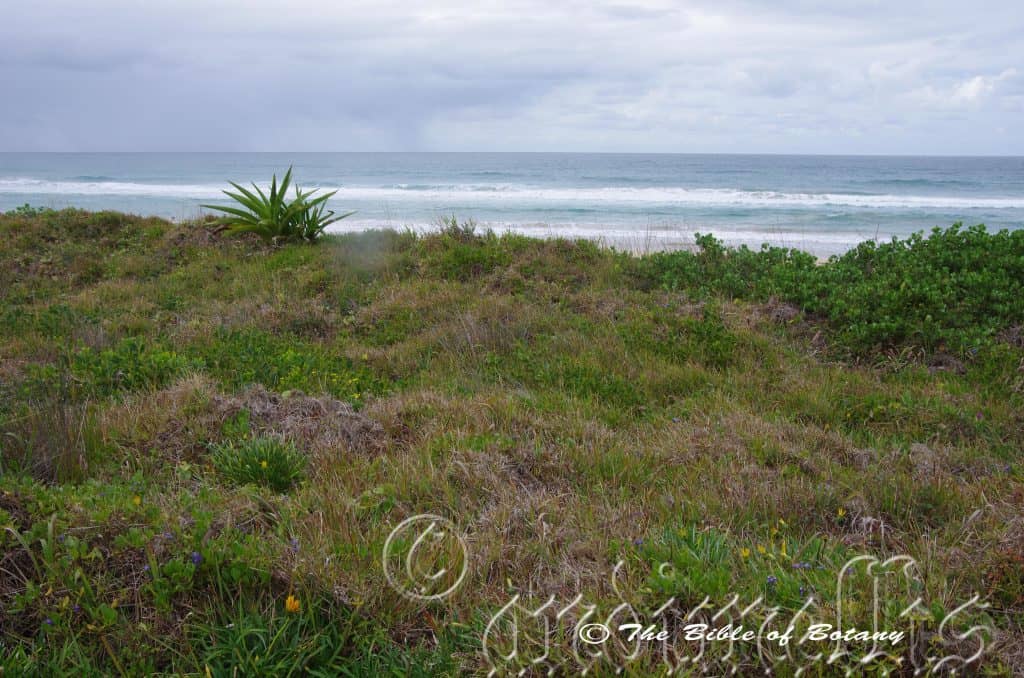
Woolli Frontal Dunes Woolli NSW
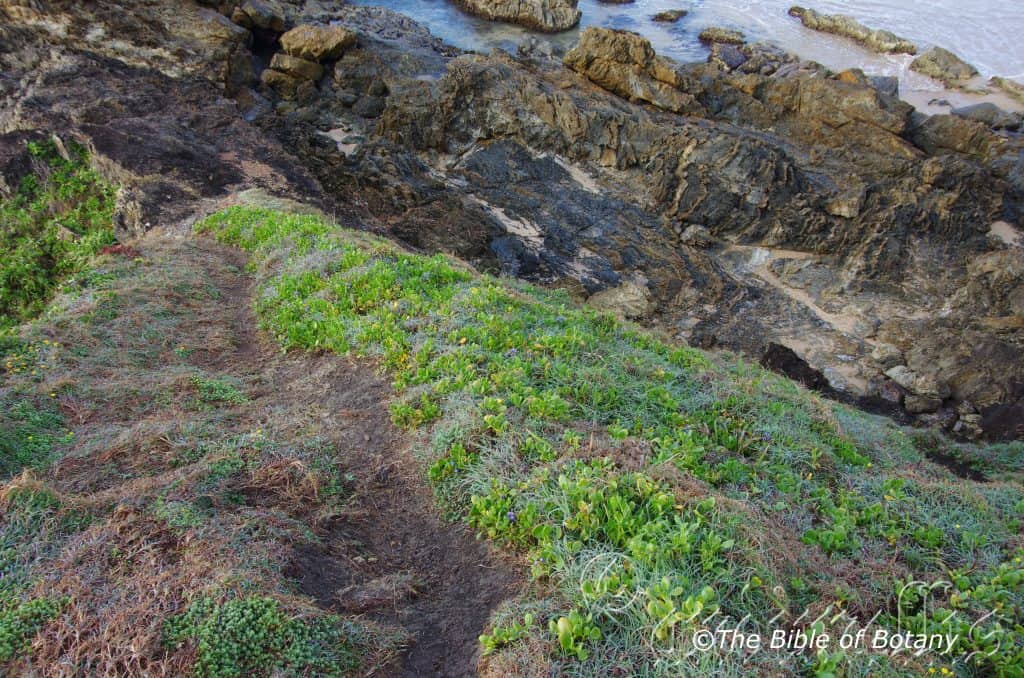
Moonee Beach Headland NSW
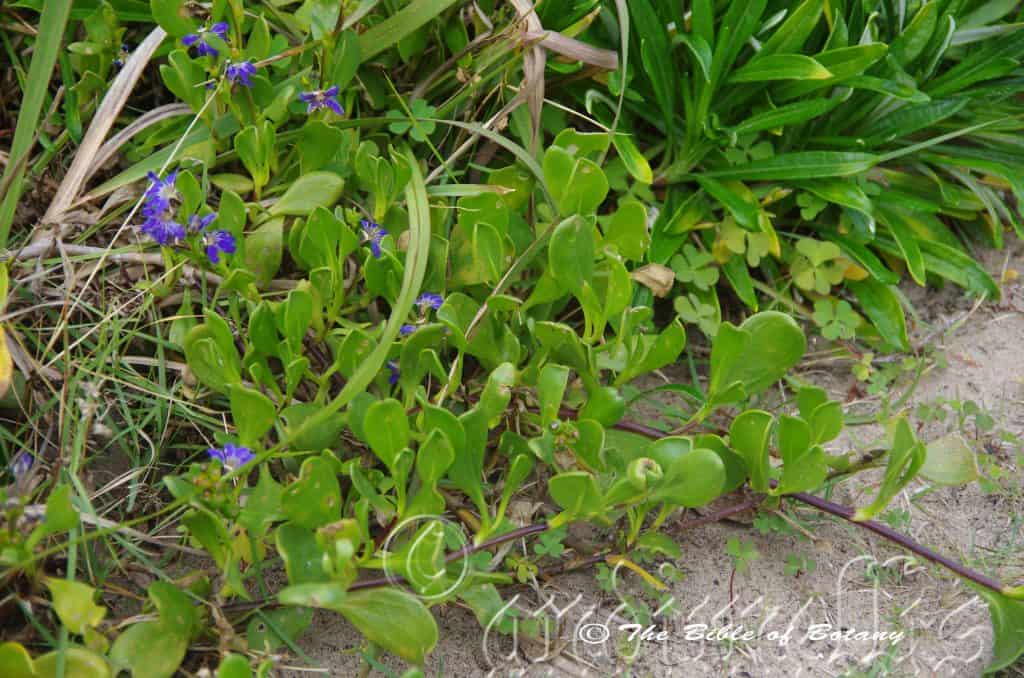
Woolli Frontal Dunes Woolli NSW
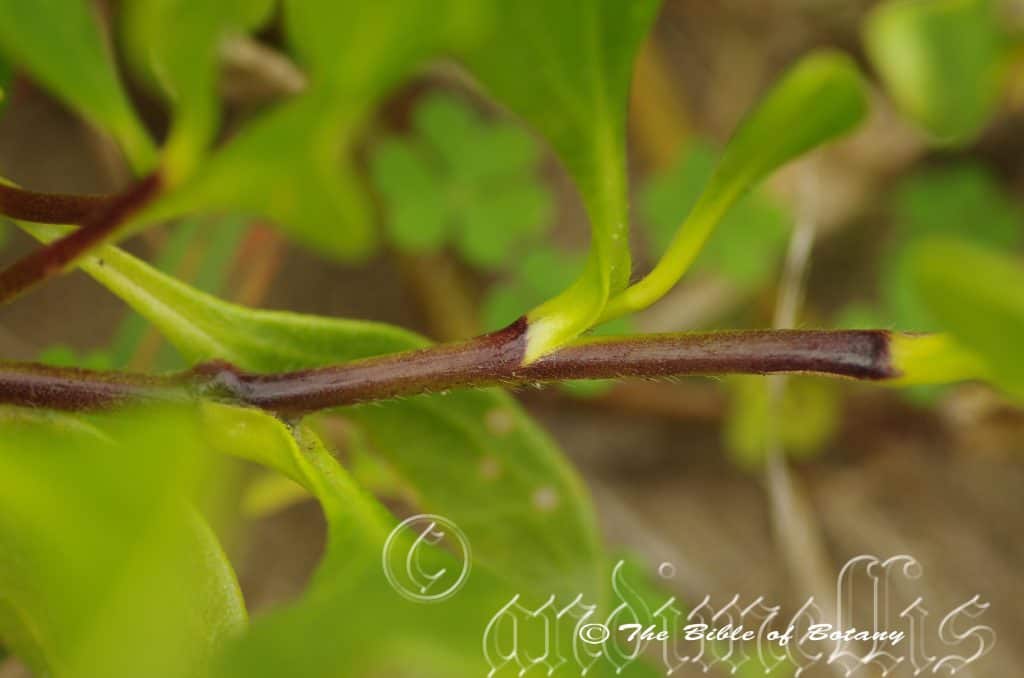
Woolli Frontal Dunes Woolli NSW
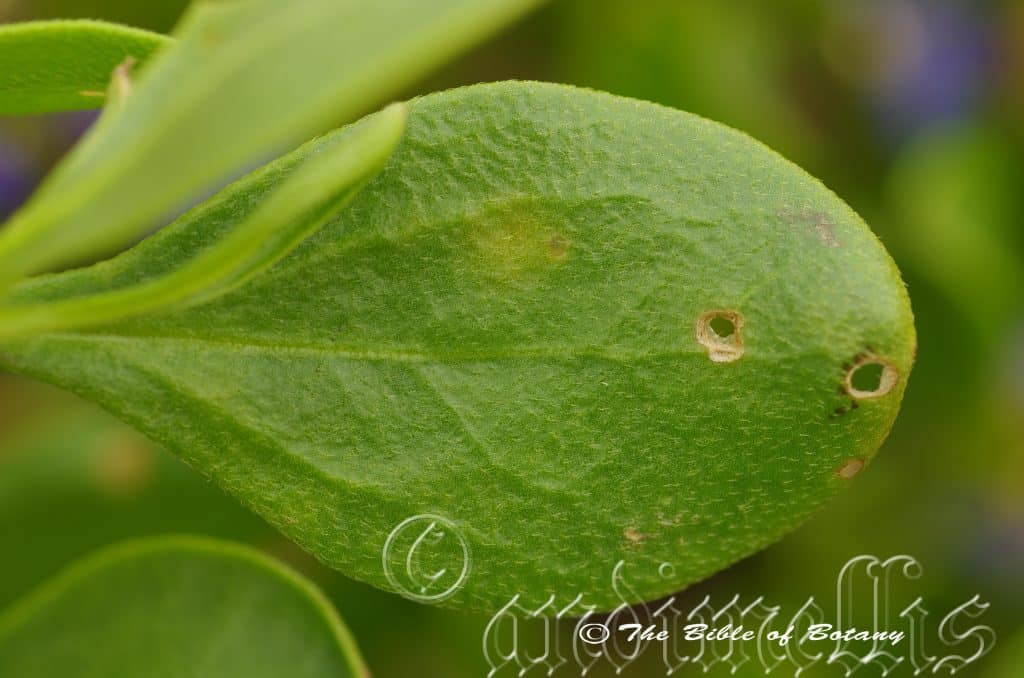
Woolli Frontal Dunes Woolli NSW
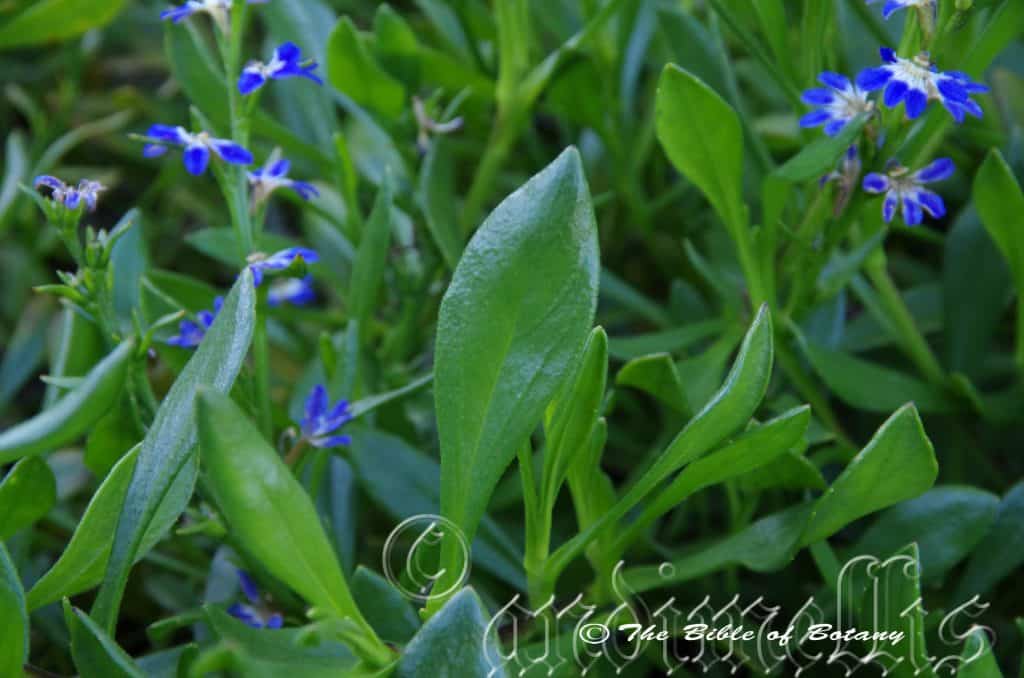
NCBG Coffs Harbour NSW
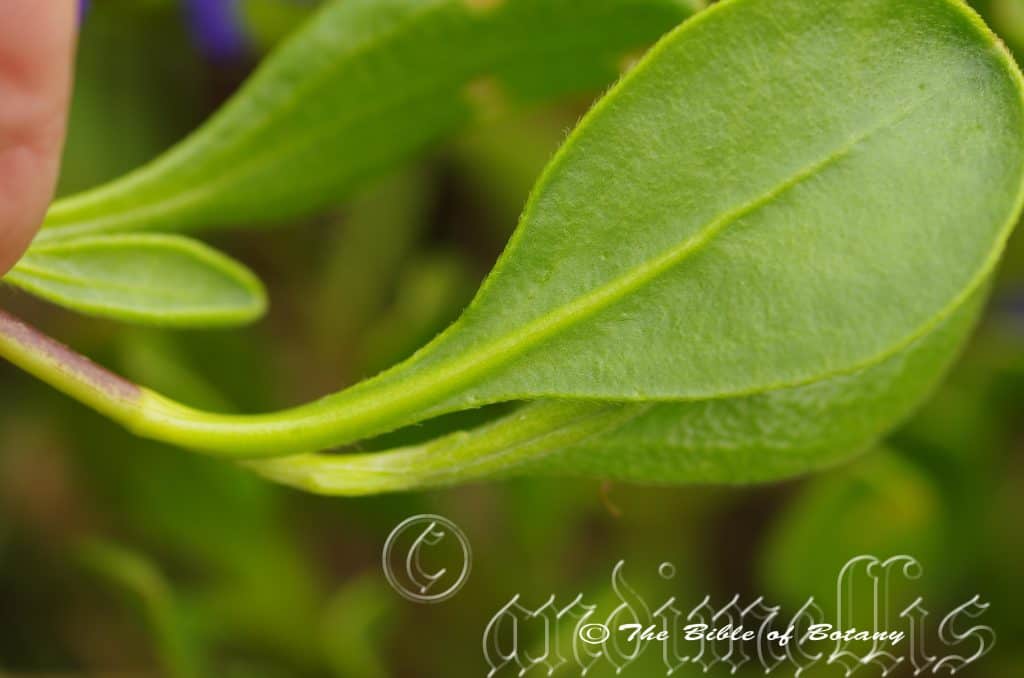
Woolli Frontal Dunes Woolli NSW
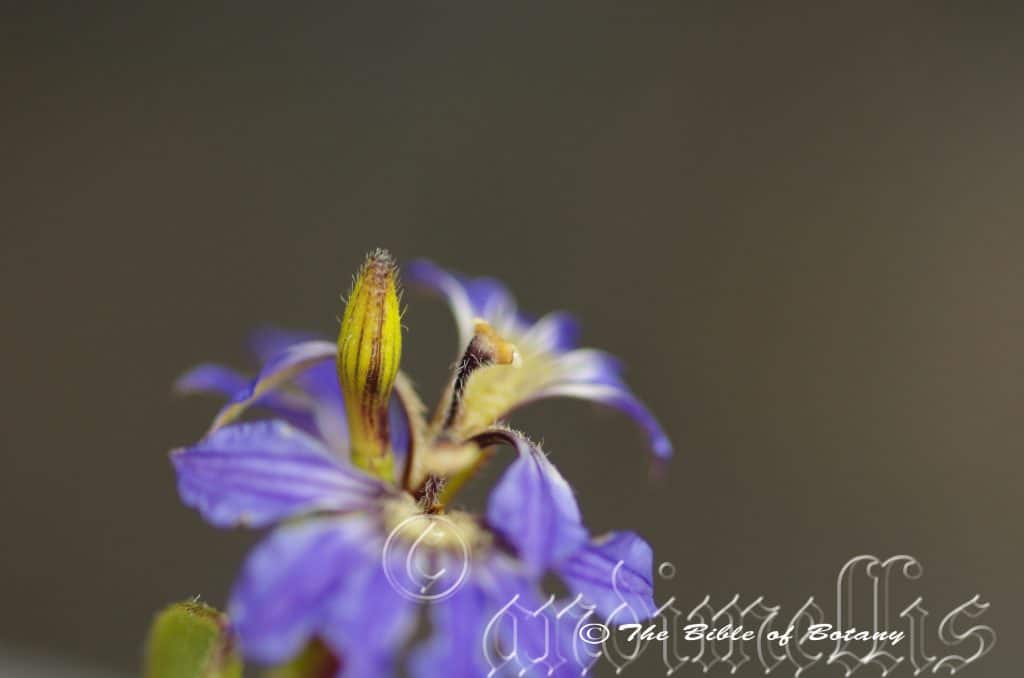
Woolli Frontal Dunes Woolli NSW
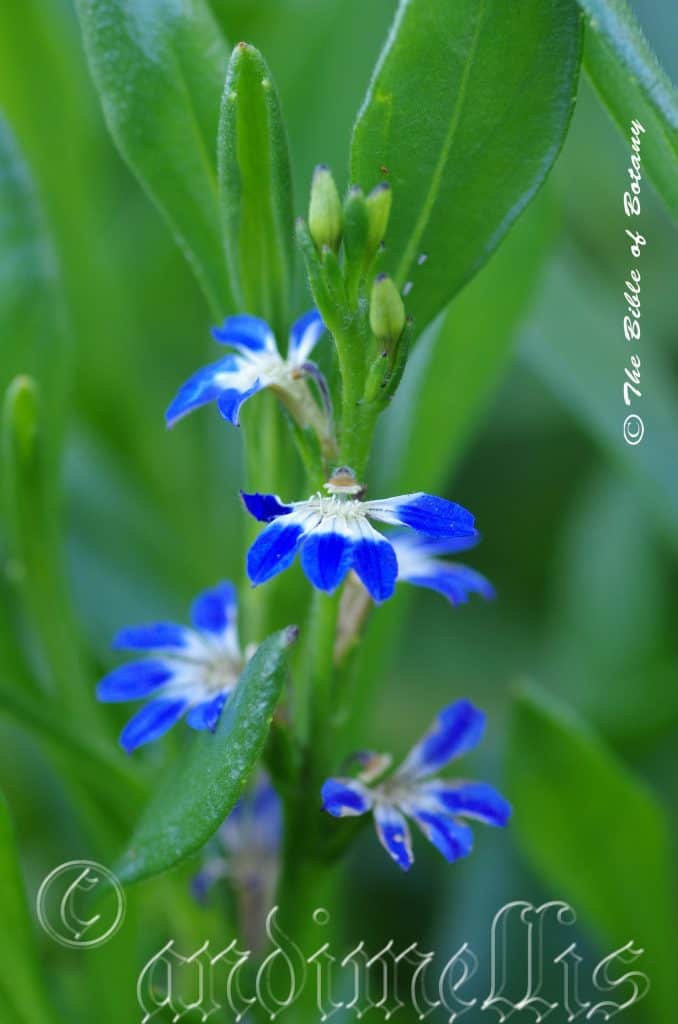
NCBG Coffs Harbour NSW
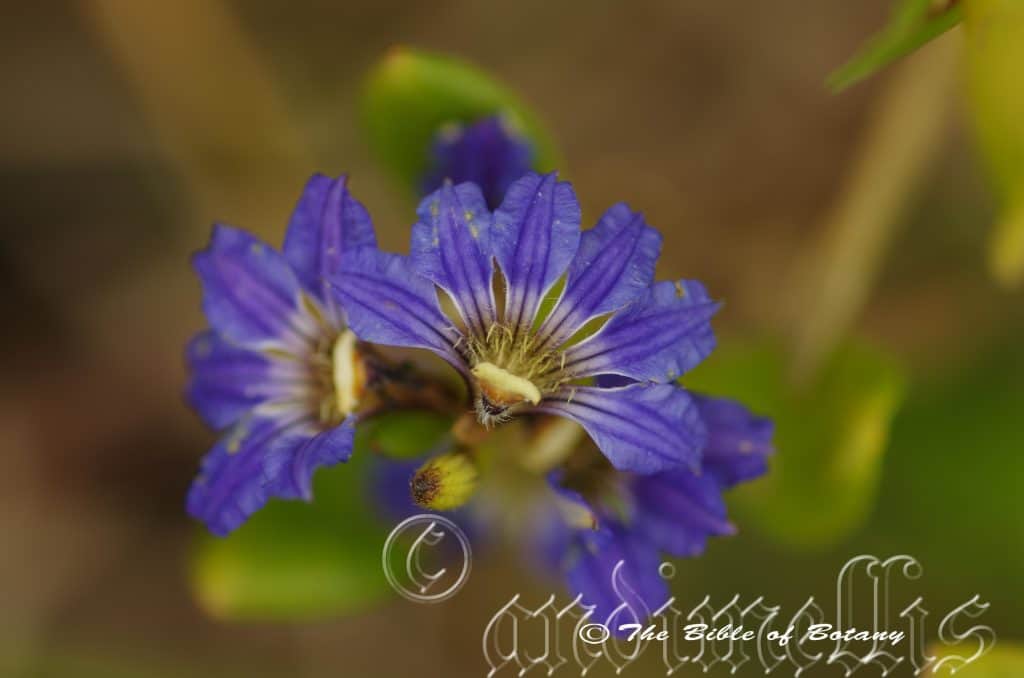
Woolli Frontal Dunes Woolli NSW
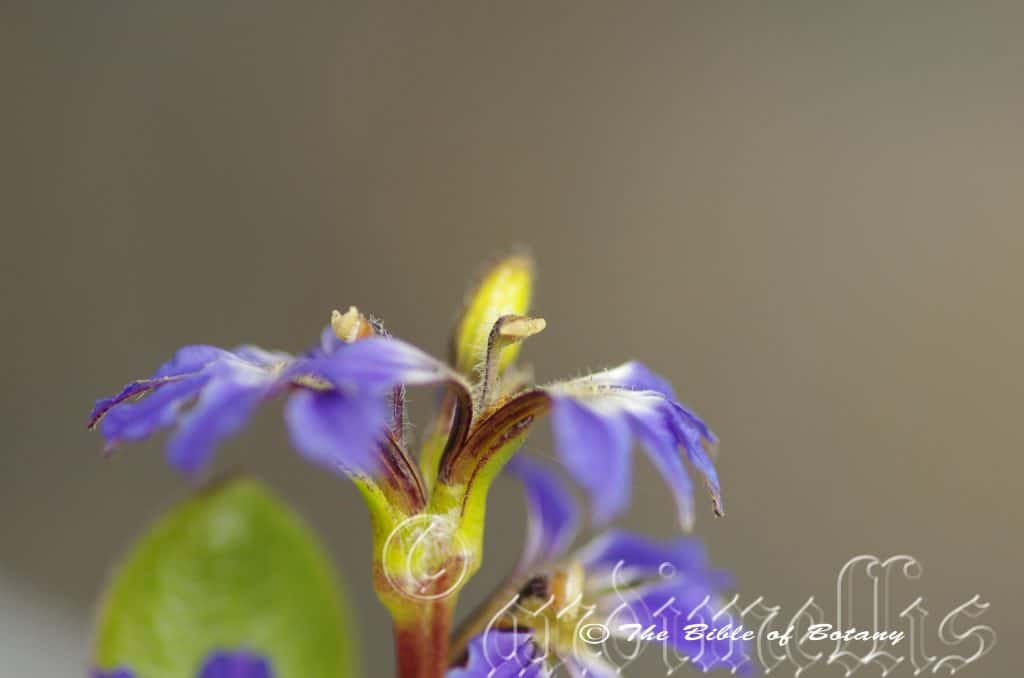
Woolli Frontal Dunes Woolli NSW
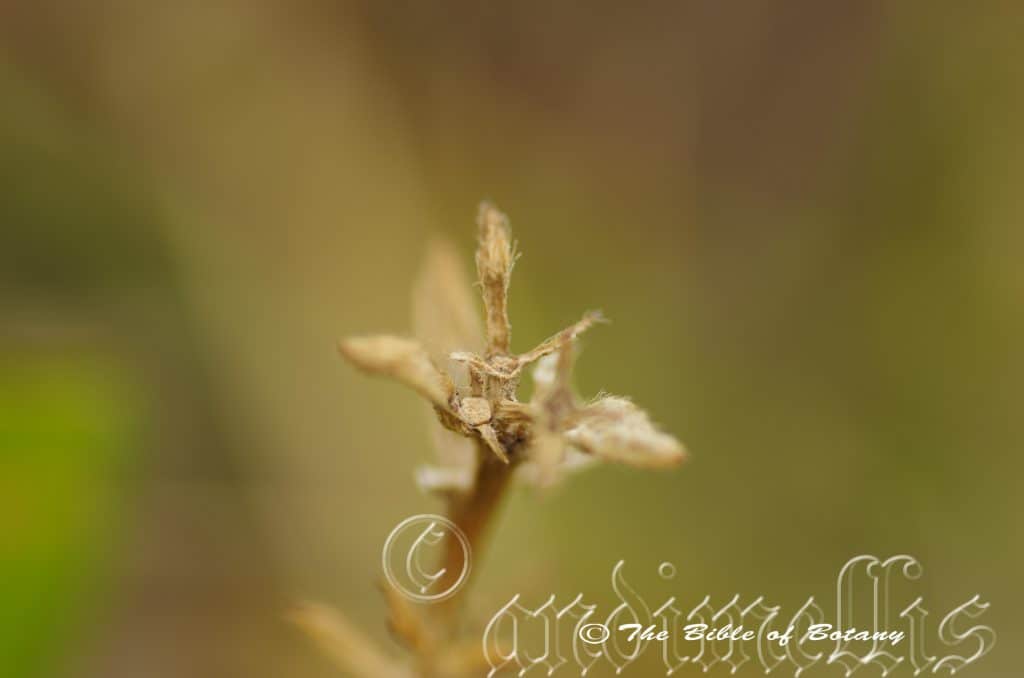
Woolli Frontal Dunes Woolli NSW
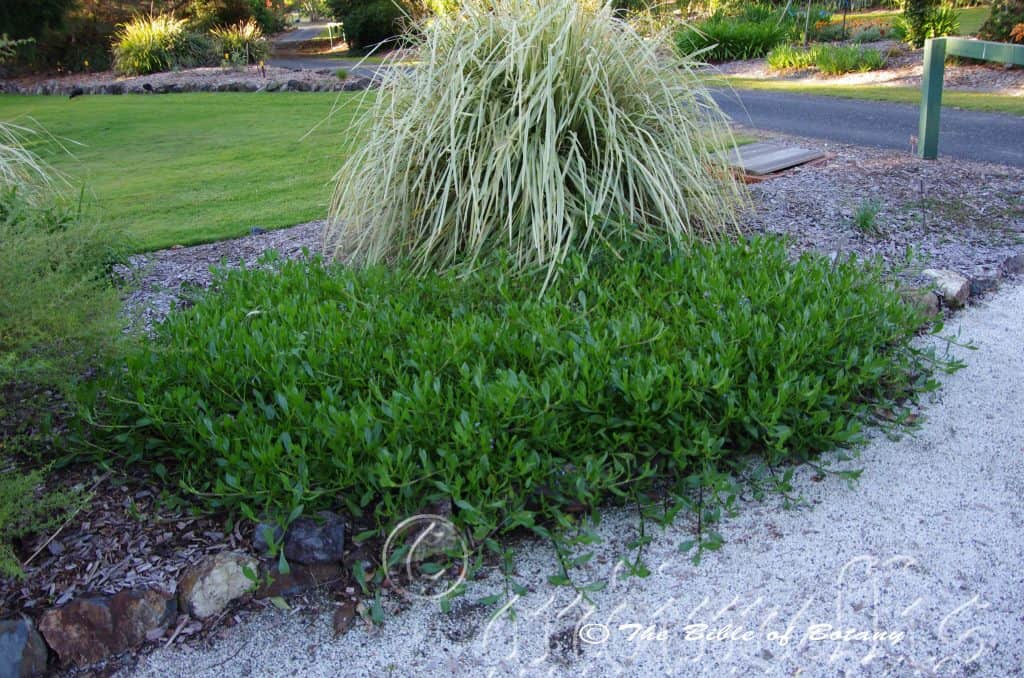
NCBG Coffs Harbour NSW
Scaevola calendulacea
Classification:
Class: Equisetopsida
Subclass: Magnoliidae
Superorder: Asteranae
Order: Asterales
Family: Goodeniaceae
Genus: From Scaevola, which is Latin for left handed. It refers to the legendry Gaius Mucius Scaevola, a legendary Roman assassin said to have burnt his right hand away as a show of bravery during the early years of the Roman Republic. It refers now to flowers, which resemble a single hand held out against the leaves.
Species: From kalendae, which is Latin for pertaining to the first day of the month. It refers to the plant’s long flowering season being similar to that of the Calandula genus.
Common Name: Dune Fan Flower.
Distribution:
Scaevola calendulacea is a widespread species coastal Australia, from Cape Jervis to Lake Alexandrina and north of Cape Jaffa in South Australia to Warnanbool in western Victoria.
It is found south from the Byfield National Park in central coastal Queensland to Wilson’s Promontory in southern Victoria. There are two further populations further north near Slade point north of Mackay and on Hamilton Island.
It is also found south from along the northern section of Frederick Henry Bay in Tasmania.
https://avh.ala.org.au/occurrences/search?taxa=Scaevola+calendulacea#tab_mapView
Habitat Aspect Climate:
Scaevola calendulacea prefers full sun. It mainly grows on the frontal dunes or at times back dunes or along river estuaries. The altitude ranges from 2 meters ASL to 15 meters ASL.
The temperatures range from 2 degrees in July to 44 degrees in January.
The rainfalls range from lows of 400mm to 2000mm average per annum.
Soil Requirements:
Scaevola calendulacea prefers white or grey sands to peaty sands. The soils are usually derived from accumulated beach sands or accumulated coral sands. The soils pH ranges from 5.5pH to 8pH. It is not tolerant of waterlogged soils. Moderately saline soils to extremely saline soils are tolerated.
Height & Spread:
Wild Plants: 0.3m to 0.4m by .08m to 2m.
Characteristics:
Scaevola calendulacea grows as a prostrate perennial with straight, glabrous, mid green with reddish markings on the stems. The apexes of the stems are sparsely covered in white appressed hirsute hairs.
The alternate, oblanceolate to obovate leaves of Scaevola calendulacea measure 50mm to 80mm in length by 15mm to 27mm in width. The petiole measures 5mm to 10mm in length. The bases are tapering while the apex are broad acute to obtuse. The discolourous laminas are mid olive-green to deep sea-green, semi glossy and glabrous to sparsely covered in white appressed or appressed sericeous hairs on the upper lamina while the lower lamina is slightly paler, dull and glabrous or sparsely covered in white appressed or appressed sericeous hairs. The leaf margins are entire, and decurve from the mid vein to the margins. The mid vein is depressed on the upper lamina and is strongly prominent on the lower lamina near the base and becomes less prominent as it approaches the apex.
Inflorescences of Scaevola calendulacea are born as terminal spikes from the terminals. The flowers are sessile on the 80mm spikes. The oblong to oblong-lanceolate bracts are erect and measure 6mm to 10mm in length by 3mm to 5mm in width. The linear to narrow elliptical inner bracts measure 3mm to 6mm in length. The sepals are glabrous, fused at the base and measure 1.5mm to 3mm in length including the 1mm to 2mm narrow triangular lobes. It is greenish-yellow to bright yellow turning white internally as they approach the pale blue, to deep purple or rarely white lobes. It is sparsely covered in white puberulent hairs externally and white hirtellous hairs internally. The corollas measure 12mm to 18mm in length including the 5 oblong lanceolate lobes which measure 8mm to 13mm in length by 4mm to 6mm in width. The lobes wings are entire, flat to undulating and measure 1mm to 2mm in width, while the apex is truncate with a mucronate tip. The wings and lobes are sky blue, deep blue to deep purplish-blue.
The 10 glabrous anthers indusium measure 2mm to 2.2mm in length and are sparsely covered in purplish hirtellous hairs near the base.
The burgundy style is sparsely covered in white pilose hairs. The white stigma and green ovary are glabrous. Scaevola calendulacea’s flowers appear throughout the year.
The fruits of Scaevola calendulacea are spherical drupes. The drupes are glabrous and measure 10mm to 12mm in length by 10mm to 12mm in diameter. The green berries turn creamy yellow then deep purple externally and pale creamy yellow internally when ripe. The calyx lobes are not persistent on the ripe fruit. The disc is sunken at the apex while the endocarp is finely tuberculate.
Wildlife:
Scaevola calendulacea support native bees like Tetragonula carbonaria and the Blue banded bee Amegilla cingulate along the coast. It is a terrific sand stabilizer on the frontal dunes and sandy estuaries.
Cultivation:
Scaevola calendulacea is a magnificent prostrate plant that can cover a meter of ground very quickly even in subalpine areas. It can be grown in association with other sand stabilizing alpine plant species. Water and plenty of it or at least keep the soil moist at all times is essential for healthy growth. Full sun in cold areas and full sun with partial shade is beneficial in warmer areas. It is not a plant for the subtropics but will do well in cool temperate areas. It is prone to dying suddenly at the end of the flowering season or if the plant has dried out then given plenty of water to compensate for the dryness. It is therefore recommended that several cuttings be made during the peak growing season to avoid any disappointments.
In cultivation it will grow from 0.2 meters to 0.4 meters in height by 1 meter to 2 meters in diameter when grown in the open.
It grows well on lighter sandy soils where a shallow layer of gravel mulch keeps the soil cool and moisture at an even level. If these requirements are met it can cope with temperatures as low as minus 3 degrees and up to 46 degrees. It is moderately drought resistant. Add to the above, if it is given a little water with a little native fertilizer on a regular basis the plants will respond with superb flowering over a long period.
Place it near large, old stumps and roots to make the stumps or roots look even more gnarled and older than they really are. Select an area of ground and let your hair down. Be imaginative and this is the plant that may just change your life. Remember this plant is suited to larger desert type of gardens so be sparingly with the other plants when planting and remember that deserts are rolling flat plains not steep hills so it is best to use a gentle slope or a basin with a small pool at the bottom. A billabong affect is the go, not a waterfall or cascades.
Scaevola calendulacea would make a good contribution to a dry heath garden. Here it can be used as the dominant ground cover with scattered taller plants throughout the heath scene. When you design a flat heath garden which this Scaevola is well suited don’t use contours to display the plants as heath lands are almost always flat or have a slight rise. Plants must be planted close together and be short so you can see over the tallest ones with the exception of one or two plants at the most. These will be feature plants. The idea is to achieve a feeling of expansive flatness. This can be achieved with using the Scaevola calandulacea’s green linear leaves in the foreground with contrasting with finer pale soft grey to glaucous coloured foliages to the rear. Mix the back ground plants with other smaller shrubs so none of them dominate the scene but blend in to give a mosaic of foliage colours that you oversee. Here I immediately think of Boronia ledifolia, Correa bauerlenii or Verticordia auriculata for two great contrasting foliages and spectacular flowering contrasts which will dominate despite being at the rear.
Propagation:
Seeds: Seeds of Scaevola calendulacea can be removed easily from the fruits.
Sow fresh seeds directly into a seed raising mix, keeping them moist not wet. Do not over water as the seeds will rot off before germination takes place. Place the trays in a cool shaded area with 50mm shade cloth in the bush house. When the seedlings are 20 to 25 mm tall, prick them out and plant them into 50mm native tubes using a good organic mix.
As the seedlings roots reach the bottom of the tubes plant them out into their permanent position.
Cuttings: Fortunately Scaevola calendulacea cuttings strike easy. Use 80mm to 100mm long tip cuttings or lateral shoots from the present season’s growth. Take them in warmer months of the year. Remove half the leaves from the bottom section being careful not to tear the bark.
1 Prepare the cutting mix by adding two thirds sharp clean river sand, one third peat or one third perlite. These ingredients must be sterilized,
2 Select good material from non diseased plants,
3 Select semi green stems for cuttings. Look for a stem with two or three nodes,
4 Place the cutting on a flat, hard surface, and make a clean cut down one side of the cutting at the base for 10mm with a sharp sterile knife or razor blade. – This scarification of the node will increase the chances of roots emerging from this spot. Now remove all but one or two the leaves, leaving the apex leaves in tact. If the leaves are very large in proportion to the stem, cut off the apical halves.
5 Hormones are not required,
6 Use a small dipple stick or old pencil to poke a hole into the soilless potting mix. Ensure the hole is slightly larger than the stem diameter and be careful not to damage the base of the cuttings,
7 I like to place the tubes in bucket with holes drilled in the bottom to allow excess water to drain out. A plastic bag that fits over the bucket is ideal to help maintain temperature and moisture. Place in a semi shaded, warm position like under 50mm shade cloth.
8 When the cuttings have struck, open the bag to allow air circulation for a few days to a week,
9 Once hardened off remove the cuttings from the bag and allow to further hardening for a few more days to a week,
10 Transplant into a good potting mix to grow on.
Fertilize using seaweed, fish emulsion or organic chicken pellets soaked in water on an alternate basis. Fertilize every two months until the plants are established then annually in early September to October to maintain better colour, health, vitality and flowering.
Further Comments from Readers:
“Hi reader, it seems you use The Bible of Botany a lot. That’s great as we have great pleasure in bringing it to you! It’s a little awkward for us to ask, but our first aim is to purchase land approximately 1,600 hectares to link several parcels of N.P. into one at The Pinnacles NSW Australia, but we need your help. We’re not salespeople. We’re amateur botanists who have dedicated over 30 years to saving the environment in a practical way. We depend on donations to reach our goal. If you donate just $5, the price of your coffee this Sunday, We can help to keep the planet alive in a real way and continue to bring you regular updates and features on Australian plants all in one Botanical Bible. Any support is greatly appreciated. Thank you.”
In the spirit of reconciliation we acknowledge the Bundjalung, Gumbaynggirr and Yaegl and all aboriginal nations throughout Australia and their connections to land, sea and community. We pay our respect to their Elders past, present and future for the pleasures we have gained.
Scaevola calliptera
Classification:
Class: Equisetopsida
Subclass: Magnoliidae
Superorder: Asteranae
Order: Asterales
Family: Goodeniaceae
Genus: From Scaevola, which is Latin for left handed. It refers to the legendry Gaius Mucius Scaevola, a legendary Roman assassin said to have burnt his right hand away as a show of bravery during the early years of the Roman Republic. It refers now to flowers, which resemble a single hand held out against the leaves.
Species: From Kallos/Kallis, which is Ancient Greek for beautiful or very beautiful and Pterá/Pterón, which are Ancient Greek for a wing. It refers to petals, which have much broader wings than other species in the genus.
Common Name: Dune Fan Flower.
Distribution:
Scaevola calliptera is a widespread species from the coast, inland to the Fitzgerald River National Park in the south east of Western Australia.
https://avh.ala.org.au/occurrences/search?taxa=Scaevola+calliptera#tab_mapView
Habitat Aspect Climate:
Scaevola calliptera prefers in light dappled shade to full sun. It grows behind the back dunes on flat plains or flat ridges in open woodlands and grasslands in dappled shade to full sun. The altitude ranges from 5 meters ASL to 300 meters ASL.
The temperatures range from 3 degrees in July to 37 degrees in January.
The rainfalls range from lows of 400mm to 1600mm average per annum.
Soil Requirements:
Scaevola calliptera prefers white or grey sands often with lateritic gravels to almost pure lateritic gravels that have been derived from decomposed sandstones or accumulated beach sands. The soils pH ranges from 4.5pH to 6.5pH. It does not tolerate waterlogged soils. Non saline soils to moderately saline soils are tolerated.
Height & Spread:
Wild Plants: 0.3m to 0.4m by 0.6m to 1m.
Characteristics:
Scaevola calliptera grows as a prostrate herb with straight, mid green to deep grass-green stems. The glabrous old stems are often tinged with reddish markings. The new growth and intermediate growth are covered in long and short, white hirsute and glandular hairs.
The alternate oblanceolate to narrowly oblong leaves of Scaevola calliptera measure 20mm to 60mm in length by 4mm to 25mm in width. The leaves are sessile. The bases taper to the stems and are attenuate while the apexes are acute. The concolourous laminas are mid grey-green, dull and moderately covered in long and short, white, hirsute hairs. The laminas are flat and strongly decurve downwards 90 degrees near the margins while the margins are entire or toothed. The mid vein is prominent on the lower lamina and is not visible from the upper lamina.
The inflorescences of Scaevola calliptera are born on racemes or thyrse. The leafy racemes or thyrse measure 50mm to 300mm in length. The peduncle measures 20mm to 75mm in length. The individual flowers are sessile. The elliptic to narrow oblong bracteoles are dentate and measure 10mm to 35mm in length. The sepals are linear and measure 6mm to 16mm in length.
The corolla tube measures 7mm to 12.5mm in length. The corollas are covered in long white hirsute hairs externally and are densely covered with long golden and deep purple hirsute beard internally near the base of the petals. The deep purple-blue to bluish broad linear to narrow lanceolate petals are apiculate at the apexes and measure 10mm to 17mm in length by 2mm to 3.5mm in width. The undulate to ruffled but not crisped petal wings measure 3mm to 5mm width. The barbulae margins are simple.
The 10 glabrous anthers and indusium measure 1mm in diameter.
The style is sparsely covered in golden hirsute hairs. The stigma is white. The flowers appear from September through to December or as late as January in favourable seasons.
Scaevola calliptera’s fruits are ellipsoidal drupes. The tuberculate drupes are sparsely covered in long and short, white hirsute hairs and measure 4.5mm to 6mm in length by 4mm to 5mm in diameter. The green berries turn creamy yellow then deep purple externally and pale creamy yellow internally when ripe. The calyx lobes are not persistent on the ripe fruit. The disc is sunken at the apex while the endocarp is finely tuberculate.
Confusing Species:
Scaevola calliptera’s stems and leaves are covered in erect hirsute and glandular hairs.
Scaevola striata’s stems and leaves are covered in appressed antrorse hairs.
Wildlife:
Scaevola calliptera flowers are attractive to native bees Tetragonula carbonaria and the Blue banded bee Amegilla cingulata.
Cultivation:
Scaevola calliptera is a magnificent prostrate plant that can cover a meter of ground very quickly in alpine areas. It can be grown in association with other sand stabilizing alpine plant species. Water and plenty of it or at least keep the soil moist at all times is essential for healthy growth. Full sun in cold areas and full sun with partial shade is beneficial in warmer areas. It is not a plant for the subtropics but will do well in cool temperate areas. It is prone to dying suddenly at the end of the flowering season or if the plant has dried out then given plenty of water to compensate for the dryness. It is therefore recommended that several cuttings be made during the peak growing season to avoid any disappointments.
In cultivation it will grow from 0.1 meters to 0.3 meters in height by 0.5 meter to 0.7 meters in diameter when grown in the open.
it grows well on lighter sandy soils where a shallow layer of gravel mulch keeps the soil cool and moisture at an even level. If these requirements are met it can cope with temperatures as low as minus 1 degree and up to 36 degrees. It is moderately drought resistant.
Add to the above, if it is given a little water with a little native fertilizer on a regular basis the plants will respond with superb flowering over a long period.
Place it near large, old stumps and roots to make the stumps or roots even more gnarled and older than they really are. Select an area of ground and let your hair down. Be imaginative and this is the plant that may just change your life. Scaevola calliptera is suited to smaller desert type gardens so be sparingly with the other plants when planting and remember that deserts are rolling flat plains not steep hills so it is best to use a gentle slope or a basin with a small pool at the bottom. A billabong affect is the go, not a waterfall or cascades.
Scaevola calliptera would make outstanding contribution to a dry heath garden. Here it can be used as the dominant ground cover with scattered taller plants throughout the heath scene. When you design a flat heath garden which this Scaevola is well suited don’t use contours to display the plants as heath lands are almost always flat or have a slight rise. Plants must be planted close together and be short so you can see over the tallest ones with the exception of one or two plants at the most. These will be feature plants. The idea is to achieve a feeling of expansive flatness. This can be achieved with using the Scaevola calliptera’s green linear leaves in the foreground with contrasting with finer pale soft grey to glaucous coloured foliages to the rear. Mix the back ground plants with other smaller shrubs so none of them dominate the scene but blend in to give a mosaic of foliage colours that you oversee. Here I immediately think of Boronia ledifolia, Correa baeuerlenii or Verticordia auriculata for two great contrasting foliages and spectacular flowering contrasts which will dominate despite being at the rear.
Propagation:
Seeds: The seeds of Scaevola calliptera can be removed easily from the fruits however fruits are often difficult to find.
Sow fresh seeds directly into a seed raising mix, keeping them moist not wet. Do not over water as the seeds will rot off before germination takes place. Place the trays in a cool shaded area with 50mm shade cloth in the bush house. When the seedlings are 20 to 25 mm tall, prick them out and plant them into 50mm native tubes using a good organic mix.
Fertilize using Seaweed, fish emulsion or organic chicken pellets soaked in water and apply the liquid on an alternate basis. Fertilize every two months.
As the seedlings roots reach the bottom of the tubes plant them out into their permanent position. Do not delay.
Cuttings: Fortunately Scaevola calliptera cuttings strike easy. Use 80mm to 100mm long tip cuttings or lateral shoots from the present season’s growth. Take them in warmer months of the year. Remove half the leaves from the bottom section being careful not to tear the bark.
1 Prepare the cutting mix by adding two thirds sharp clean river sand, one third peat or one third perlite. These ingredients must be sterilized,
2 Select good material from non diseased plants,
3 Select semi green stems for cuttings. Look for a stem with two or three nodes,
4 Place the cutting on a flat, hard surface, and make a clean cut down one side of the cutting at the base for 10mm with a sharp sterile knife or razor blade. – This scarification of the node will increase the chances of roots emerging from this spot. Now remove all but one or two the leaves, leaving the apex leaves in tact. If the leaves are very large in proportion to the stem, cut off the apical halves.
5 Hormones are not required,
6 Use a small dipple stick or old pencil to poke a hole into the soilless potting mix. Ensure the hole is slightly larger than the stem diameter and be careful not to damage the base of the cuttings,
7 I like to place the tubes in bucket with holes drilled in the bottom to allow excess water to drain out. A plastic bag that fits over the bucket is ideal to help maintain temperature and moisture. Place in a semi shaded, warm position like under 50mm shade cloth.
8 When the cuttings have struck, open the bag to allow air circulation for a few days to a week,
9 Once hardened off remove the cuttings from the bag and allow to further hardening for a few more days to a week,
10 Transplant into a good potting mix to grow on.
Fertilize using seaweed, fish emulsion or organic chicken pellets soaked in water on an alternate basis. Fertilize every two months until the plants are established then annually in early September to October to maintain better colour, health, vitality and flowering.
Further Comments from Readers:
“Hi reader, it seems you use The Bible of Botany a lot. That’s great as we have great pleasure in bringing it to you! It’s a little awkward for us to ask, but our first aim is to purchase land approximately 1,600 hectares to link several parcels of N.P. into one at The Pinnacles NSW Australia, but we need your help. We’re not salespeople. We’re amateur botanists who have dedicated over 30 years to saving the environment in a practical way. We depend on donations to reach our goal. If you donate just $5, the price of your coffee this Sunday, We can help to keep the planet alive in a real way and continue to bring you regular updates and features on Australian plants all in one Botanical Bible. Any support is greatly appreciated. Thank you.”
In the spirit of reconciliation we acknowledge the Bundjalung, Gumbaynggirr and Yaegl and all aboriginal nations throughout Australia and their connections to land, sea and community. We pay our respect to their Elders past, present and future for the pleasures we have gained.
Scaevola hookeri
Classification:
Class: Equisetopsida
Subclass: Magnoliidae
Superorder: Asteranae
Order: Asterales
Family: Goodeniaceae
Genus: From Scaevola, which is Latin for left handed. It refers to the legendry Gaius Mucius Scaevola, a legendary Roman assassin said to have burnt his right hand away as a show of bravery during the early years of the Roman Republic. It refers now to flowers, which resemble a single hand held out against the leaves.
Species: Is named in honour of Joseph Dalton Hooker; 1817–1911, was one of the greatest British botanists and explorers of all times.
Common Name: Alpine Fan Flower or Creeping Fan Flower.
Distribution:
Scaevola hookeri is found south from the Koonyum Range in south east Queensland to Mornington on Mornington Peninsula in southern Victoria with a disjunct population found further to the west in Wattle Range on the Narracoorte Coastal Plains of south eastern South Australia.
In Tasmania it is found on the Flinders Island group of Islands and over most the main land except for the mid Highlands and the Highlands of the south west.
https://avh.ala.org.au/occurrences/search?taxa=Scaevola+hookeri#tab_mapView
Habitat Aspect Climate:
Scaevola hookeri prefers full sun. It mainly grows on the frontal dunes and at times back dunes or along river estuaries. The altitude ranges from 50 meters ASL to 1550 meters ASL.
The temperatures range from minus 7 degrees in July to 32 degrees in January.
The rainfalls range from lows of 450mm to 1600mm average per annum.
Soil Requirements:
Scaevola hookeri prefers white or grey sands to peaty sands. The soils are usually derived from decomposed granite or sandstone. The soils pH ranges from 5.5pH to 6.5pH. It is not tolerant of waterlogged soils. Non saline soils to moderately saline soils are tolerated.
Height & Spread:
Wild Plants: 0.3m to 0.4m by .08m to 1.2m
Characteristics:
Scaevola hookeri grows as a stoloniferous, prostrate perennial herb often forming dense mats and rooting at the nodes. The stems are covered in white appressed hirsute hairs and measure 200mm to 600mm in length.
The alternate, crowded, ovate to oblong, fleshy leaves of Scaevola hookeri measure 6mm to 50mm in length by 2mm to 15mm in width. The petiole measures 0mm to 1mm in length. The bases are rounded, attenuate or taper to the stem while the apex is broad obtuse. The concolourous laminas are deep green to sea-green tinged maroon on the margins, glossy and glabrous to sparsely covered in white long, soft, spreading hirsute hairs. The laminas are flat to gently recurve upwards from the mid vein to the margins while the margins are entire. The mid vein is prominent on the lower lamina and is not visible from the upper lamina.
The inflorescences of Scaevola hookeri are born leafy racemes which measure 20mm to 100mm in length. The flowers are sessile on the racemes. The triangular bracts measure 2mm to 4mm in length while the elliptic to oblong bracteoles measure 4mm to 6mm in length. The bracteoles are entire or toothed.
The sepals are minute or obsolete. The split corolla tube measures 5mm to 8mm in length. The tube is covered in soft, white spreading hirsute hairs externally and sparsely covered in white puberulent hairs internally. The 5 white to pale blue petals are yellowish in throat and measure 5mm to 8mm in length. The wings measure 0.8mm to 1mm in width.
There are 10 glabrous anthers. The indusium is depressed, obovate and measures 1.5mm to 2 mm in width, with some stiff bristles on upper surface. The lips are glabrous to very sparsely covered in white puberulent hairs. The flowers appear from December to March.
Scaevola hookeri’s fruits are ovoidal drupes. The drupes are covered in white puberulent hairs and measure 2mm to 2.5mm in length by 2mm to 2.2mm in diameter. The green drupes turn yellowish when ripe. The calyx lobes are not persistent on the ripe fruit. The disc is sunken at the apex while the endocarp is finely tuberculate. The single seed is rugose.
Wildlife:
Scaevola hookeri support native bees like Tetragonula carbonaria and the Blue banded bee Amegilla cingulate along the coast. It is a terrific soil stabilizer in alpine areas.
Cultivation:
Scaevola hookeri is a magnificent prostrate plant that can cover a meter of ground very quickly in alpine areas. It can be grown in association with other sand stabilizing alpine plant species. Keep the soil moist at all times is essential for healthy growth. Full sun in cold areas and full sun with partial shade is beneficial in warmer areas. It is not a plant for the subtropics but will do well in cool temperate areas. It is prone to dying suddenly at the end of the flowering season or if the plant has dried out then given plenty of water to compensate for the dryness. It is therefore recommended that several cuttings be made during the peak growing season to avoid any disappointments.
In cultivation it will grow from 0.1 meters to 0.3 meters in height by 0.8 meters to 1.2 meters in diameter when grown in the open.
It grows well on lighter coarse sandy soils where a shallow layer of gravel mulch keeps the soil cool and moisture at an even level. If these requirements are met it can cope with temperatures as low as minus 8 degrees and up to 34 degrees. Add to the above, if it is given a little water with a little native fertilizer on a regular basis the plants will respond with superb flowering over a long period.
Scaevola hookeri would make a good contribution to a sandy or rocky terrain rock garden. Here it can be used as fill in plants, scattered throughout the boulders. When you use it in area that is strewn with large boulders do not over crowd the scene with other plants as the boulders are a formidable part of the scene. Scaevola hookeri is well suited to such conditions so use it to completely cover the ground in such areas which are difficult to mow or trim around. Boulder country are almost always rising and falling in contour and have sharp rises. Make the scene so you can see over the tallest rocks with the exception of one or two at the most. The idea is to achieve a feeling of expansive lushness. This can be achieved with using Scaevola hookeri’s deep green leaves contrasting with finer pale green or soft grey to glaucous coloured foliages scattered here and there. Mix them with other smaller shrubs so none of them dominate the scene but blend in to give a mosaic of foliage colours that you oversee. Here I immediately think of Actinotis helianthi or Grevillea thelemanniana for two great contrasting foliages. Actinotis helianthi will offer a great contrast to the foliage and give height when scattered between Scaevola hookeri.
Propagation:
Seeds: The seeds of Scaevola hookeri can be removed easily from the fruits.
Sow the fresh seeds directly into a seed raising mix, keeping them moist not wet. Do not allow the mix to dry out or the seeds will be killed off very quickly. Place the trays in a cool semi shaded area preferably beneath 50mm shade cloth in the bush house. When the seedlings are 20mm to 25mm tall, prick them out and plant them into 50mm native tubes using a good organic mix.
As the seedlings roots reach the bottom of the tubes plant them out into their permanent position. Do not delay.
Cuttings: Fortunately Scaevola hookeri cuttings strike easy. Use 80mm to 100mm long tip cuttings or lateral shoots from the present season’s growth. Take them in warmer months of the year. Remove half the leaves from the bottom section being careful not to tear the bark.
1 Prepare the cutting mix by adding two thirds sharp clean river sand, one third peat or one third perlite. These ingredients must be sterilized,
2 Select good material from non diseased plants,
3 Select semi green stems for cuttings. Look for a stem with two or three nodes,
4 Place the cutting on a flat, hard surface, and make a clean cut down one side of the cutting at the base for 10mm with a sharp sterile knife or razor blade. – This scarification of the node will increase the chances of roots emerging from this spot. Now remove all but one or two the leaves, leaving the apex leaves in tact. If the leaves are very large in proportion to the stem, cut off the apical halves.
5 Hormones are not required,
6 Use a small dipple stick or old pencil to poke a hole into the soilless potting mix. Ensure the hole is slightly larger than the stem diameter and be careful not to damage the base of the cuttings,
7 I like to place the tubes in bucket with holes drilled in the bottom to allow excess water to drain out. A plastic bag that fits over the bucket is ideal to help maintain temperature and moisture. Place in a semi shaded, warm position like under 50mm shade cloth.
8 When the cuttings have struck, open the bag to allow air circulation for a few days to a week,
9 Once hardened off remove the cuttings from the bag and allow to further hardening for a few more days to a week,
10 Transplant into a good potting mix to grow on.
Fertilize using seaweed, fish emulsion or organic chicken pellets soaked in water on an alternate basis. Fertilize every two months until the plants are established then annually in early September to October to maintain better colour, health, vitality and flowering.
Further Comments from Readers:
“Hi reader, it seems you use The Bible of Botany a lot. That’s great as we have great pleasure in bringing it to you! It’s a little awkward for us to ask, but our first aim is to purchase land approximately 1,600 hectares to link several parcels of N.P. into one at The Pinnacles NSW Australia, but we need your help. We’re not salespeople. We’re amateur botanists who have dedicated over 30 years to saving the environment in a practical way. We depend on donations to reach our goal. If you donate just $5, the price of your coffee this Sunday, We can help to keep the planet alive in a real way and continue to bring you regular updates and features on Australian plants all in one Botanical Bible. Any support is greatly appreciated. Thank you.”
In the spirit of reconciliation we acknowledge the Bundjalung, Gumbaynggirr and Yaegl and all aboriginal nations throughout Australia and their connections to land, sea and community. We pay our respect to their Elders past, present and future for the pleasures we have gained.
Scaevola ramosissima
Classification:
Class: Equisetopsida
Subclass: Magnoliidae
Superorder: Asteranae
Order: Asterales
Family: Goodeniaceae
Genus: From Scaevola, which is Latin for left handed. It refers to the legendry Gaius Mucius Scaevola, a legendary Roman assassin said to have burnt his right hand away as a show of bravery during the early years of the Roman Republic. It refers now to flowers, which resemble a single hand held out against the leaves.
Species: From Rāmōsum, which is Latin for a branch and -Issima, which is a Latin suffix pertaining to the superlative or the most. It refers to plants, which have the most branches of all the species in their genus.
Common Name: Purple Fan Flower or Snake Flower.
Distribution:
Scaevola ramosissima is a widespread species along the east coast south from Caloundra in southern coastal Queensland to Alberton in Victoria, west to the Blue Mountains in New South Wales. It is also found in several disjunct populations around the Byfield National Park and in Carnarvon Gorge in Queensland.
https://avh.ala.org.au/occurrences/search?taxa=Scaevola+ramosissima#tab_mapView
Habitat Aspect Climate:
Scaevola ramosissima prefers full sun. It grows mainly in coastal heaths or dry woodland heaths. The altitude ranges from 5 meters ASL to 500 meters ASL.
The temperatures range from 2 degrees in July to 36 degrees in January.
The rainfalls range from lows of 600mm to 1600mm average per annum.
Soil Requirements:
Scaevola ramosissima prefers sandy loams to light fatty clays. The soils are usually derived from decomposed sandstones or granites. The soils pH ranges from 5pH to 6pH. It does not tolerate waterlogged soils. Slightly saline soils to very saline soils are tolerated.
Height & Spread:
Wild Plants: 0.2m to 0.4m by 0.6m to 0.8m.
Characteristics:
Scaevola ramosissima grows as a small perennial with short, thin, grass-green to mid-green stems. The stems are sparsely covered in white to pale grey hirsute hairs and the odd glandular hair.
The alternate, linear to oblanceolate leaves of Scaevola ramosissima measure 20mm to 100mm in length by 2mm to 10mm in width. The leaves are sessile. The bases are tapering attenuate while the apex is narrow acute. The concolourous laminas are grass green to mid-green, dull and sparsely covered in long white hirsute hairs. The leaf margins are entire or with 1 to 4 fine teeth. The mid vein is slightly prominent on the lower lamina and is not visible from the upper lamina.
Inflorescences of Scaevola ramosissima are along a leafy thrice or small racemes from the leaf axils. The racemes and thyrse measure 20mm to 30mm in length. The grass green pedicels are glabrous to sparsely covered in thick white hirsute hairs and measure 20mm to 100mm in length. The triangular bracts measure 2mm to 4mm in length while the linear bracteoles measure 15mm to 25mm in length. The 5 grass green, linear calyx’s lobes are glabrous and sparsely covered in thick, white hirsute hairs on the lower surface. It is longer than the ovary and measure 3mm to 5mm in length. The pale green corollas turn maroon then to purple blue to violet as they approach the lobes. The corolla is covered in white hispid hirsute hairs externally and is covered in white, hispid hairs internally becoming dense near the throat with pilose hairs and the odd glandular hair. The corolla measure 15mm to 25mm in length including the lobes which measure 9mm to 16mm in length. The lobes wings are decurve, undulating and measure 1.5mm to 3mm in width. The basal half of the lobes is covered in white hirsute hairs.
The exserted 10 filaments are free for their entire length and measure 2mm to 4mm in length. The filaments are fawn and almost as wide as the anthers while the fawn anthers are linear. The anthers measure 1mm to 1.5mm in length
The pale green style turns maroon as it approaches the stigma. The style is glabrous on the basal half and is sparsely covered in white hirsute hairs while the stigma is densely covered in appressed pannate hairs. The pistil measures 5mm to 7mm in length including the 1.5mm to 2mm diameter stigma. Scaevola ramosissima’s flowers appear from early August through to late March.
The fruits of Scaevola ramosissima are ellipsoidal drupes. The drupes are striated with longitudinal wrinkles and covered in white hirsute hairs. They measure 4mm to 5mm in length by 2.5mm to 3.5mm in diameter. The green capsules turn creamy yellow when ripe. The calyx lobes are persistent on the ripe fruit. The 3 to 5 glossy brown seeds are flattened and ellipsoidal.
Wildlife:
Scaevola ramosissima’s flowers support native bees along the coast.
Cultivation:
Scaevola ramosissima is a beautiful prostrate plant that can cover a meter of ground very quickly. Keep the soil moist at all times is essential for healthy growth. Full sun in cold areas and full sun with partial shade is beneficial in warmer areas. It is not a plant for the subtropics but will do well in cool temperate areas. In cultivation it will grow from 0.1 meters to 0.3 meter in height by 0.5 meter to 0.7 meters in diameter when grown in the open.
It grows well on lighter sandy soils especially where lateritic pebbles are present in the soil. A thin layer of mulch will keep the soil temperatures cool and moisture at an even level. If these requirements are met it can cope with temperatures as low as minus 3 degrees and up to 40 degrees. It is moderately drought resistant but generally short lived in cultivation.
Scaevola ramosissima is suited to smaller woodland type gardens so it is very adaptable and can be used as a fill in plant, a main feature in mass plantings or to help highlight other features in the garden.
Propagation:
Seeds: The seeds of Scaevola ramosissima can be removed easily from the fruits.
Sow fresh seeds directly into a seed raising mix, keeping them moist not wet. Do not over water as the seeds will rot off before germination takes place. Place the trays in a cool shaded area with 50mm shade cloth in the bush house. When the seedlings are 20 to 25 mm tall, prick them out and plant them into 50mm native tubes using a good organic mix.
As the seedlings roots reach the bottom of the tubes plant them out into their permanent position. Do not delay.
Cuttings: Fortunately Scaevola ramosissima cuttings strike easy. Use 80mm to 100mm long tip cuttings or lateral shoots from the present season’s growth. Take them in warmer months of the year. Remove half the leaves from the bottom section being careful not to tear the bark.
1 Prepare the cutting mix by adding two thirds sharp clean river sand, one third peat or one third perlite. These ingredients must be sterilized,
2 Select good material from non diseased plants,
3 Select semi green stems for cuttings. Look for a stem with two or three nodes,
4 Place the cutting on a flat, hard surface, and make a clean cut down one side of the cutting at the base for 10mm with a sharp sterile knife or razor blade. – This scarification of the node will increase the chances of roots emerging from this spot. Now remove all but one or two the leaves, leaving the apex leaves in tact. If the leaves are very large in proportion to the stem, cut off the apical halves.
5 Hormones are not required,
6 Use a small dipple stick or old pencil to poke a hole into the soilless potting mix. Ensure the hole is slightly larger than the stem diameter and be careful not to damage the base of the cuttings,
7 I like to place the tubes in bucket with holes drilled in the bottom to allow excess water to drain out. A plastic bag that fits over the bucket is ideal to help maintain temperature and moisture. Place in a semi shaded, warm position like under 50mm shade cloth.
8 When the cuttings have struck, open the bag to allow air circulation for a few days to a week,
9 Once hardened off remove the cuttings from the bag and allow to further hardening for a few more days to a week,
10 Transplant into a good potting mix to grow on.
Fertilize using seaweed, fish emulsion or organic chicken pellets soaked in water on an alternate basis. Fertilize every two months until the plants are established then annually in early September to October to maintain better colour, health, vitality and flowering.
Further Comments from Readers:
“Hi reader, it seems you use The Bible of Botany a lot. That’s great as we have great pleasure in bringing it to you! It’s a little awkward for us to ask, but our first aim is to purchase land approximately 1,600 hectares to link several parcels of N.P. into one at The Pinnacles NSW Australia, but we need your help. We’re not salespeople. We’re amateur botanists who have dedicated over 30 years to saving the environment in a practical way. We depend on donations to reach our goal. If you donate just $5, the price of your coffee this Sunday, We can help to keep the planet alive in a real way and continue to bring you regular updates and features on Australian plants all in one Botanical Bible. Any support is greatly appreciated. Thank you.”
In the spirit of reconciliation we acknowledge the Bundjalung, Gumbaynggirr and Yaegl and all aboriginal nations throughout Australia and their connections to land, sea and community. We pay our respect to their Elders past, present and future for the pleasures we have gained.
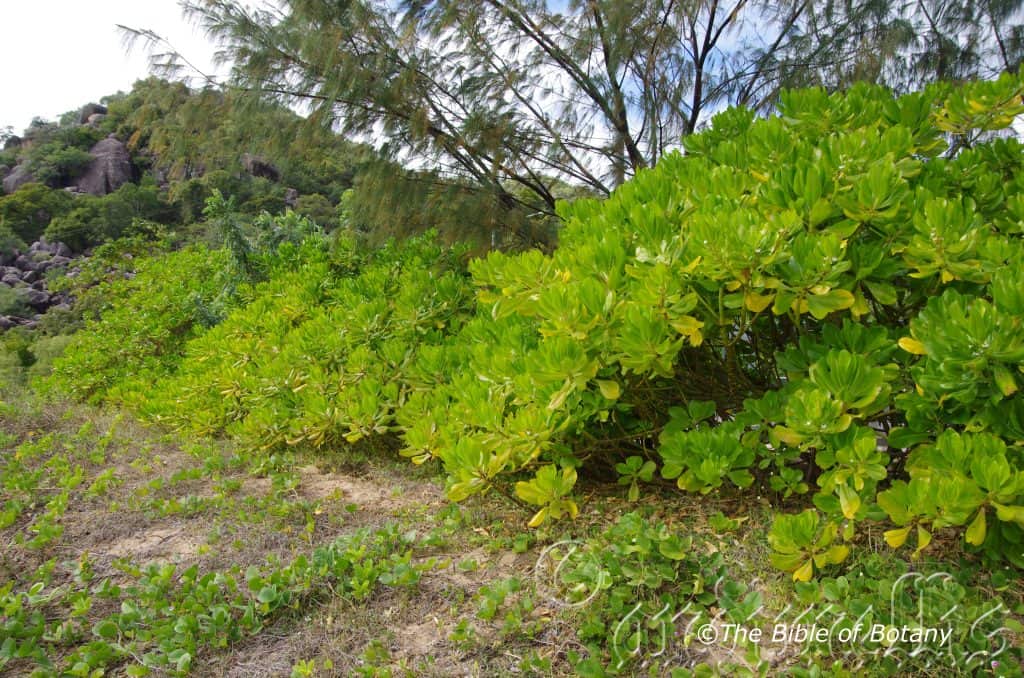
Northern Side of Magnetic Island Qld.
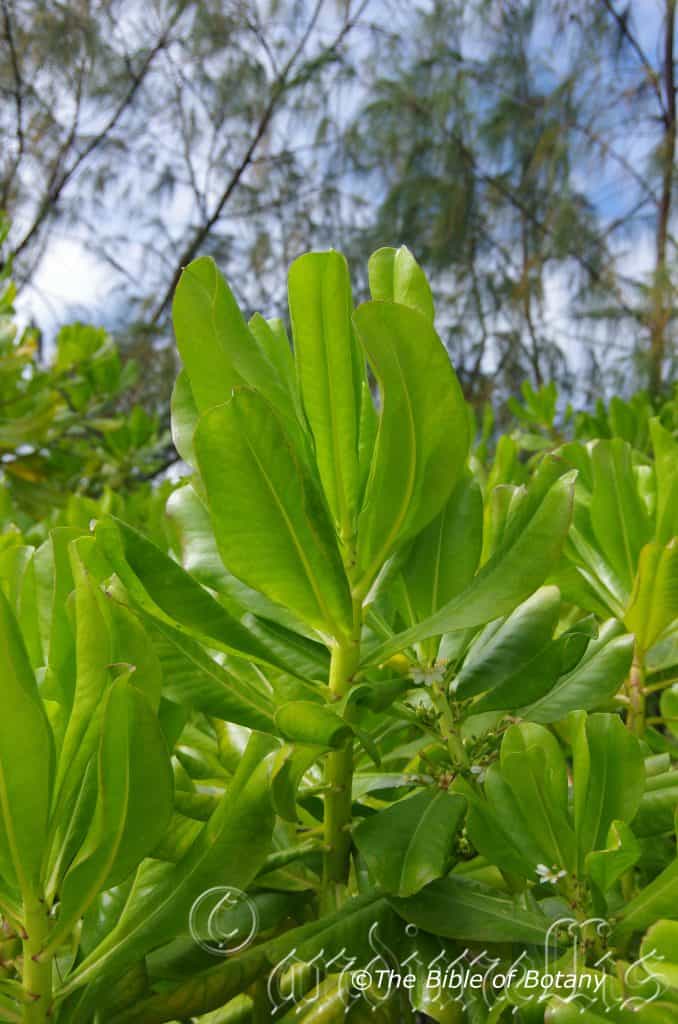
Northern Side of Magnetic Island Qld.
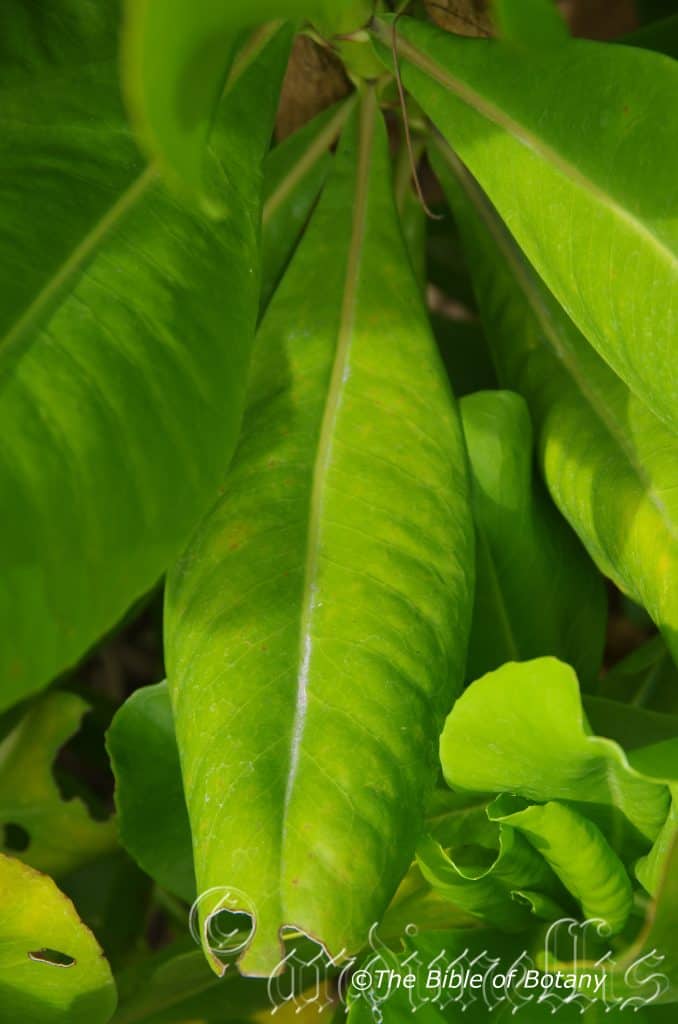
Northern Side of Magnetic Island Qld.
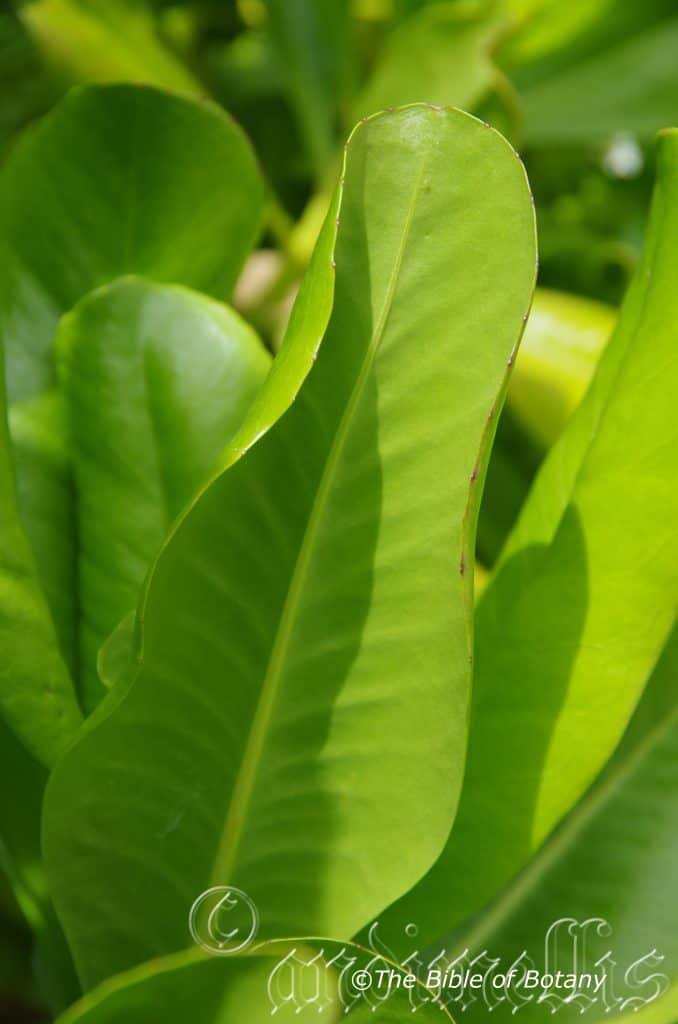
Northern Side of Magnetic Island Qld.
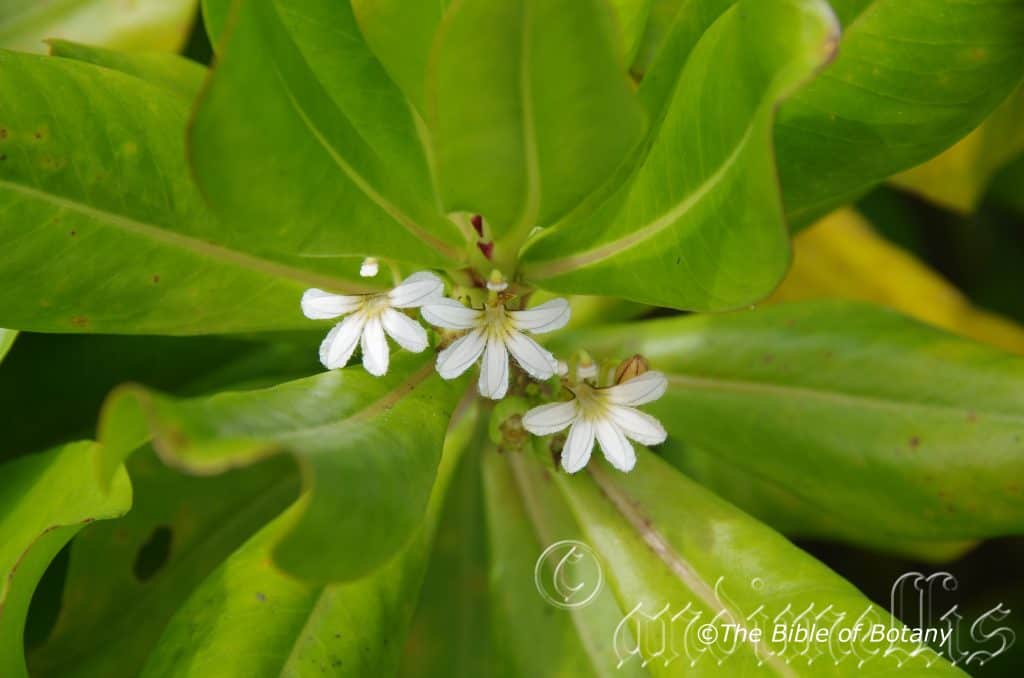
Northern Side of Magnetic Island Qld.
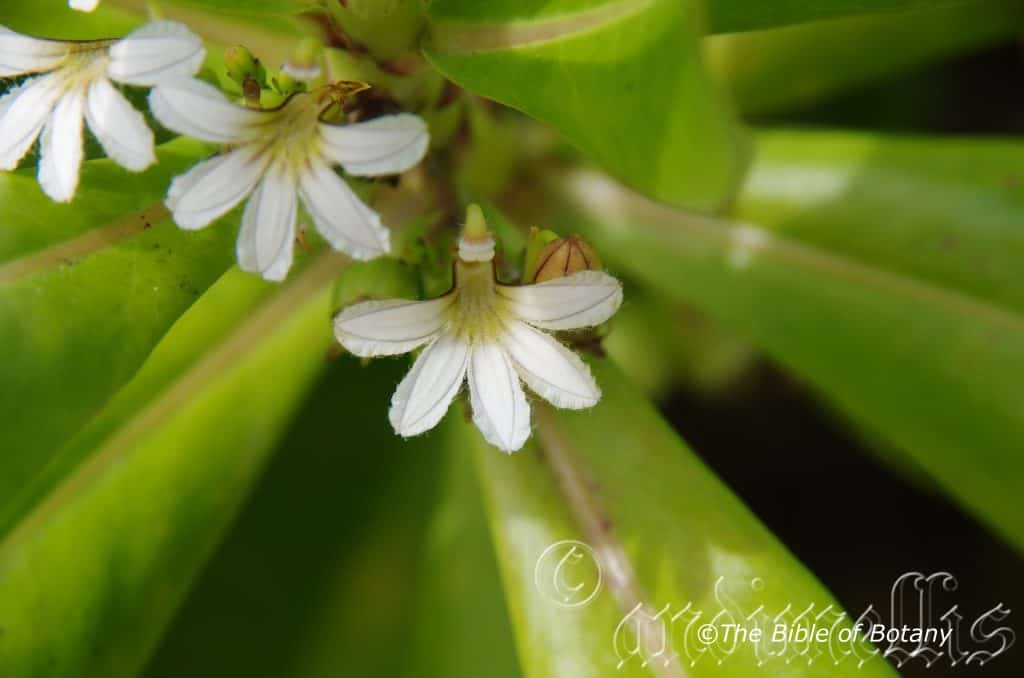
Northern Side of Magnetic Island Qld.
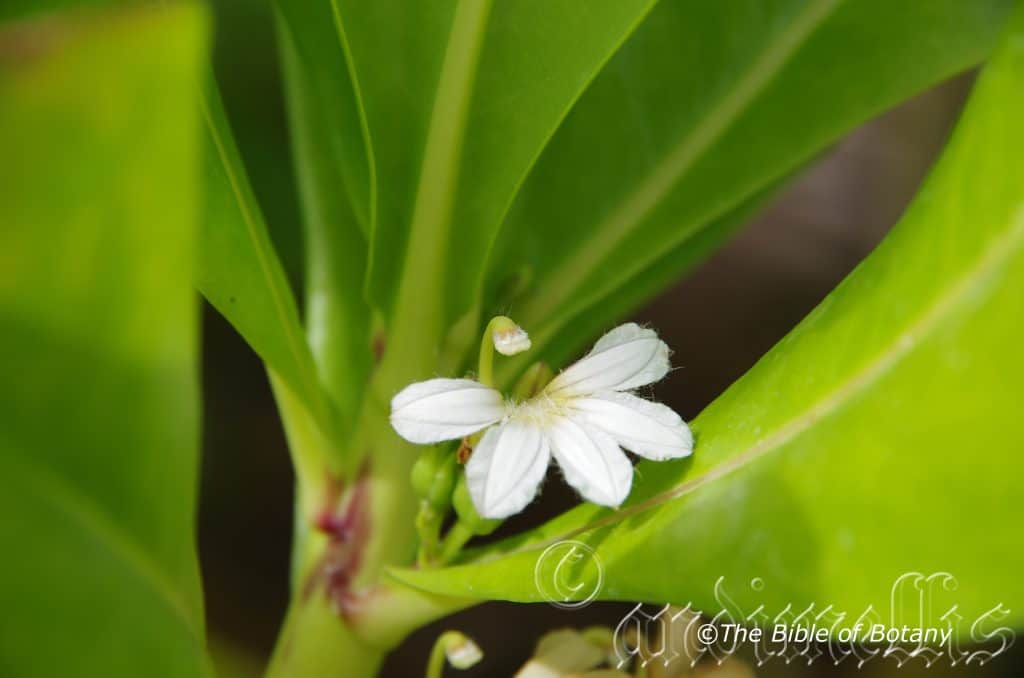
Northern Side of Magnetic Island Qld.
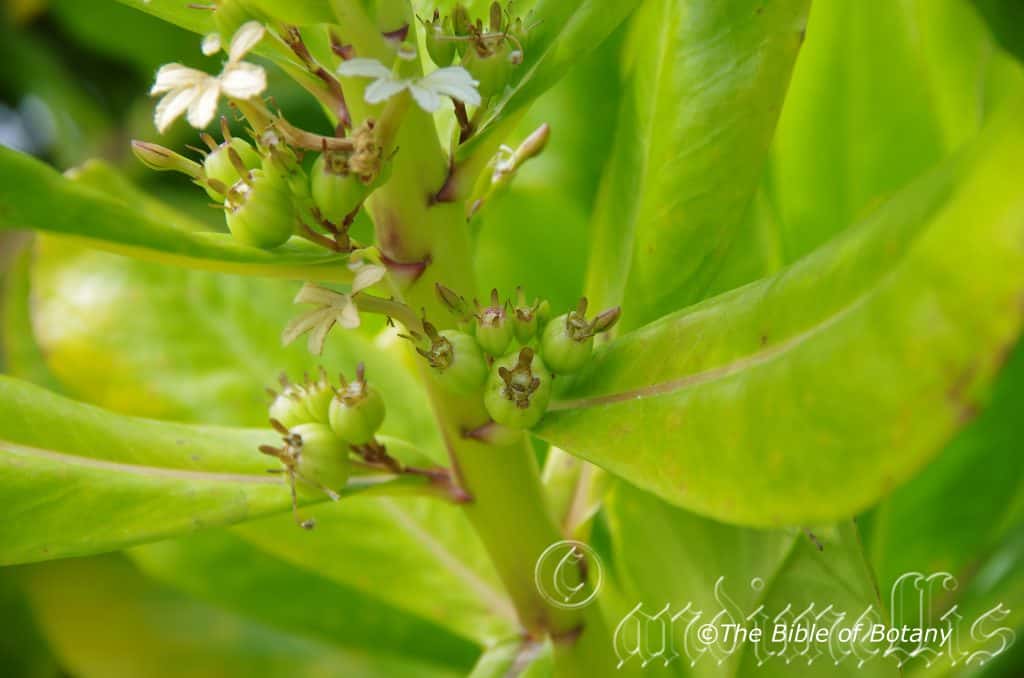
Northern Side of Magnetic Island Qld.
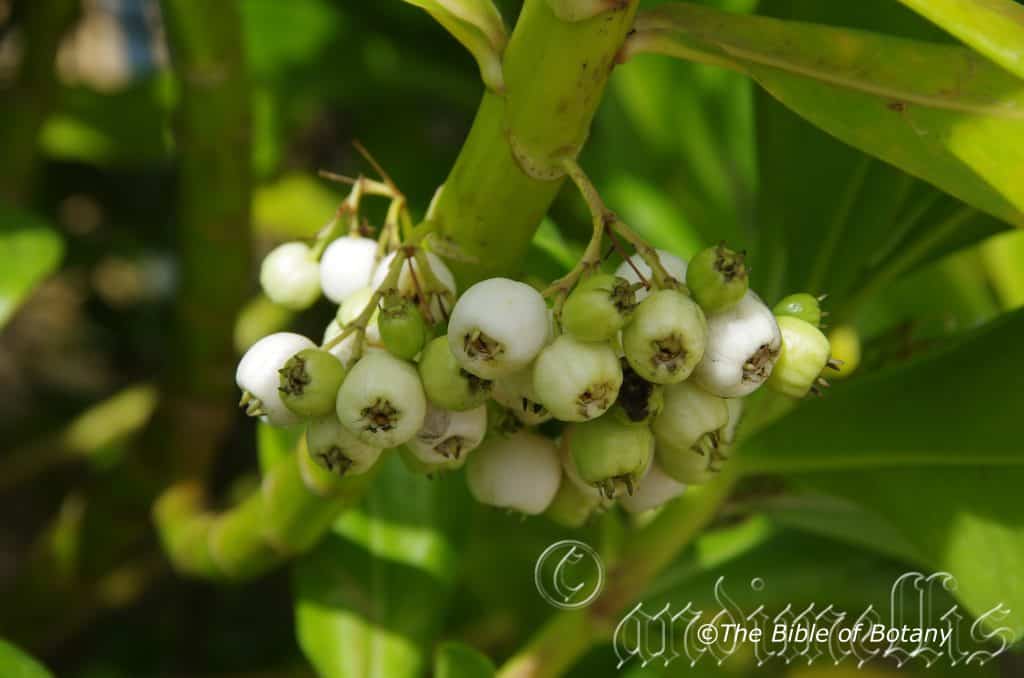
Northern Side of Magnetic Island Qld.
Scaevola tacccada
Classification:
Class: Equisetopsida
Subclass: Magnoliidae
Superorder: Asteranae
Order: Asterales
Family: Goodeniaceae
Genus: From Scaevola, which is Latin for left handed. It refers to the legendry Gaius Mucius Scaevola, a legendary Roman assassin said to have burnt his right hand away as a show of bravery during the early years of the Roman Republic. It refers now to flowers, which resemble a single hand held out against the leaves.
Species: From Taccada, which is Latinized from the Sri Lankan word for the plant. It refers to the plant being found in Sri Lanka.
Common Name:
Distribution:
Scaevola taccada is a widespread species found continuously along the coast from Chile Creek near Broome in north west Western Australia around to Wide Bay in south eastern Queensland.
There are 2 isolated populations. One in Western Australia between Coolgardie and Esperance and the other at Surfers Paradise in far south eastern coastal Queensland.
It is also found in Okinawa, Taiwan, Southern China, Vietnam, Malaysia, Philippines, Indonesia, East Timor, Polynesia, Melanesia, Micronesia, East Africa, Madagascar, Mauritius, Seychelles, Sri Lanka, Oman, Yemen, India, Maldives, Burma, Thailand, Cambodia, Chagos Islands, Comoros and Réunion.
https://avh.ala.org.au/occurrences/search?taxa=Scaevola+taccada#tab_mapView
Habitat Aspect Climate:
Scaevola taccada prefers full sun. It grows mainly in coastal heaths or dry woodland heaths. The altitude ranges from 1 meter ASL to 50 meters ASL.
The temperatures range from 3 degrees in July to 45 degrees in January.
The rainfalls range from lows of 600mm to 3200mm average per annum.
Soil Requirements:
Scaevola taccada prefers sandy loams to light fatty alluvials. The soils are usually derived from alluvial deposits or accumulated beach sands. The soils pH ranges from 5pH to 8pH. It does not tolerate waterlogged soils. Slightly saline soils to extremely saline soils are tolerated as are salt laden winds.
Height & Spread:
Wild Plants: 0.6m to 2m by 1m to 2.5m.
Characteristics:
Scaevola taccada grows as a small perennial with short, thin, grass-green to mid-green stems. The stems are sparsely covered in white to pale grey hirsute hairs and the odd glandular hair.
The alternate, linear to oblanceolate leaves of Scaevola taccada measure 20mm to 100mm in length by 2mm to 10mm in width. The leaves are sessile. The bases are tapering attenuate while the apex is narrow acute. The concolourous laminas are grass green to mid-green, dull and sparsely covered in long white hirsute hairs. The leaf margins are entire or with 1 to 4 fine teeth. The mid vein is slightly prominent on the lower lamina and is not visible from the upper lamina.
Inflorescences of Scaevola taccada are along a leafy thrice or small racemes from the leaf axils. The racemes and thyrse measure 20mm to 30mm in length. The grass green pedicels are glabrous to sparsely covered in thick white hirsute hairs and measure 20mm to 100mm in length. The triangular bracts measure 2mm to 4mm in length while the linear bracteoles measure 15mm to 25mm in length. The 5 grass green, linear calyx’s lobes are glabrous and sparsely covered in thick, white hirsute hairs on the lower surface. It is longer than the ovary and measure 3mm to 5mm in length. The pale green corollas turn maroon then to purple blue to violet as they approach the lobes. The corolla is covered in white hispid hirsute hairs externally and is covered in white, hispid hairs internally becoming dense near the throat with pilose hairs and the odd glandular hair. The corolla measure 15mm to 25mm in length including the lobes which measure 9mm to 16mm in length. The lobes wings are decurve, undulating and measure 1.5mm to 3mm in width. The basal half of the lobes is covered in white hirsute hairs.
The exserted 10 filaments are free for their entire length and measure 2mm to 4mm in length. The filaments are fawn and almost as wide as the anthers while the fawn anthers are linear. The anthers measure 1mm to 1.5mm in length
The pale green style turns maroon as it approaches the stigma. The style is glabrous on the basal half and is sparsely covered in white hirsute hairs while the stigma is densely covered in appressed pannate hairs. The pistil measures 5mm to 7mm in length including the 1.5mm to 2mm diameter stigma. Scaevola ramosissima’s flowers appear from early August through to late March.
The fruits of Scaevola taccada are ellipsoidal drupes. The drupes are striated with longitudinal wrinkles and covered in white hirsute hairs. They measure 4mm to 5mm in length by 2.5mm to 3.5mm in diameter. The green capsules turn creamy yellow when ripe. The calyx lobes are persistent on the ripe fruit. The 3 to 5 glossy brown seeds are flattened and ellipsoidal.
Wildlife:
Scaevola taccada’s flowers support native bees like Leioproctus muelleri in the west and north of Australia and Tetragonula carbonaria and the Blue banded bee Amegilla cingulate along the east coast.
Cultivation:
Scaevola taccada is a magnificent prostrate to low rounded shrub that can cover a meter of ground very quickly even in dryer areas. It can be grown in association with other sand stabilizing alpine plant species. Keep the soil moist at all times is essential for fast, healthy growth. It is a plant for the warmer subtropical to tropical gardens.
In cultivation it will grow from 0.8 meters to 2 meters in height by 1 meter to 3 meters in diameter when grown in the open. It grows far better on lighter sandy soils especially where lateritic pebbles are present in the soil. A thin layer of gravel mulch keeps the soil temperatures warm and moisture at an even level. If these requirements are met it can cope with temperatures as low as 5 degrees and up to 40 degrees. It is moderately drought resistant but generally short lived in cultivation.
Add to the above, if it is given a little water with a little native fertilizer on a regular basis the plants will respond with superb flowering over a long period.
Place it beneath Casuarina equisetifolia or Casuarina littoralis to help highlight it and the fine foliage of the Casuarina species.
Scaevola taccada would make a good contribution to a sandy beach scene. Plants like Actinotis helianthi, Grevillea gaudichaudi, Westringea fruiticosa or Anigozanthus flavida are four great contrasting foliages.
Propagation:
Seeds: The seeds of Scaevola taccada can be removed easily from the fruits. Sow fresh seeds directly into a seed raising mix, keeping them moist not wet. Do not over water as the seeds will rot off before germination takes place. Place the trays in a cool shaded area with 50mm shade cloth in the bush house. When the seedlings are 20 to 25 mm tall, prick them out and plant them into 50mm native tubes using a good organic mix.
As the seedlings roots reach the bottom of the tubes plant them out into their permanent position.
Cuttings: Fortunately Scaevola taccada cuttings strike easy. Use 80mm to 100mm long tip cuttings or lateral shoots from the present season’s growth. Take them in warmer months of the year. Remove half the leaves from the bottom section being careful not to tear the bark.
1 Prepare the cutting mix by adding two thirds sharp clean river sand, one third peat or one third perlite. These ingredients must be sterilized,
2 Select good material from non diseased plants,
3 Select semi green stems for cuttings. Look for a stem with two or three nodes,
4 Place the cutting on a flat, hard surface, and make a clean cut down one side of the cutting at the base for 10mm with a sharp sterile knife or razor blade. – This scarification of the node will increase the chances of roots emerging from this spot. Now remove all but one or two the leaves, leaving the apex leaves in tact. If the leaves are very large in proportion to the stem, cut off the apical halves.
5 Hormones are not required,
6 Use a small dipple stick or old pencil to poke a hole into the soilless potting mix. Ensure the hole is slightly larger than the stem diameter and be careful not to damage the base of the cuttings,
7 I like to place the tubes in bucket with holes drilled in the bottom to allow excess water to drain out. A plastic bag that fits over the bucket is ideal to help maintain temperature and moisture. Place in a semi shaded, warm position like under 50mm shade cloth.
8 When the cuttings have struck, open the bag to allow air circulation for a few days to a week,
9 Once hardened off remove the cuttings from the bag and allow to further hardening for a few more days to a week,
10 Transplant into a good potting mix to grow on.
Fertilize using seaweed, fish emulsion or organic chicken pellets soaked in water on an alternate basis. Fertilize every two months until the plants are established then annually in early September to October to maintain better colour, health, vitality and flowering.
Further Comments from Readers:
“Hi reader, it seems you use The Bible of Botany a lot. That’s great as we have great pleasure in bringing it to you! It’s a little awkward for us to ask, but our first aim is to purchase land approximately 1,600 hectares to link several parcels of N.P. into one at The Pinnacles NSW Australia, but we need your help. We’re not salespeople. We’re amateur botanists who have dedicated over 30 years to saving the environment in a practical way. We depend on donations to reach our goal. If you donate just $5, the price of your coffee this Sunday, We can help to keep the planet alive in a real way and continue to bring you regular updates and features on Australian plants all in one Botanical Bible. Any support is greatly appreciated. Thank you.”
In the spirit of reconciliation we acknowledge the Bundjalung, Gumbaynggirr and Yaegl and all aboriginal nations throughout Australia and their connections to land, sea and community. We pay our respect to their Elders past, present and future for the pleasures we have gained.
Scaevola tomentosa
Classification:
Class: Equisetopsida
Subclass: Magnoliidae
Superorder: Asteranae
Order: Asterales
Family: Goodeniaceae
Genus: From Scaevola, which is Latin for left handed. It refers to the legendry Gaius Mucius Scaevola, a legendary Roman assassin said to have burnt his right hand away as a show of bravery during the early years of the Roman Republic. It refers now to flowers, which resemble a single hand held out against the leaves.
Species: From Tōmentōsa, which is Latin for to be covered in long down. It refers to hairs, which are long, soft and wavy or matted.
Common Name:
Distribution:
Scaevola tomentosa is a widespread species along the west coast of Western Australia in several disjunct populations. It is found in a triangle from Exmouth in the north, south to north Beekeeper Nature Reserve and east to Wilun.
https://avh.ala.org.au/occurrences/search?taxa=Scaevola+tomentosa#tab_mapView
Habitat Aspect Climate:
Scaevola tomentosa prefers full sun. It grows mainly on coastal heaths and dry woodland heaths on plains, sand dunes or cliffs. The altitude ranges from 2 meters ASL to 150 meters ASL.
The temperatures range from 2 degrees in July to 40 degrees in January.
The rainfalls range from lows of 200mm to 500mm average per annum.
Soil Requirements:
Scaevola tomentosa generally prefers white sandy soils. The soils are derived from the accumulation of calcareous sands from coastal storm surges or decomposed sandstones or limestone. The soils pH ranges from 6.8pH to 8pH. It does not tolerate waterlogged soils. Slightly saline soils to very saline soils are tolerated as are salt laden winds.
Height & Spread:
Wild Plants: 0.2m to 1.8m by 0.6m to 2m.
Characteristics:
Scaevola tomentosa grows as a large subshrub with straight, grey-brown, scabrous, and finely farinaceous stems. The branchlets are pale grey only becoming green near the apex where the newer leaves occur. The green stems are moderately covered in white stellate-pubescent hairs with minute glandular hairs.
The narrow oblong-elliptic to narrowly oblong leaves of Scaevola tomentosa are crowded along the stems and measure 15mm to 50mm in length by 3mm to 15mm in width. The petioles measure 3mm to 5mm in length. The bases are cuneate while the apexes are acute. The discolourous laminas are mid grey-green to mid blue-green, dull, glabrous to sparsely covered in white tomentose hairs. The laminas are flat and straight while the margins are entire or dentate. The laminas are flat or become decurve close to the margins. The mid vein is slightly but broadly prominent on the lower lamina and is not visible or faintly from the upper lamina.
The inflorescences of Scaevola tomentosa are born singularly from the leaf axils. The mid grey-green to mid blue-green pedicels are sparsely covered in white tomentose hairs and measure 2mm to 14mm in length. The bracteoles are ovate and measure 8mm to 12mm in length. The sepals are cupuliform to sinuate and are sparsely covered in long white tomentose hairs. The corolla tube is gibbous at the base and curved backwards above the swelling. It is creamy yellow and moderately covered in white stellate-puberulent hairs externally and yellowish or orange-brown and covered in a yellowish hirsute beard internally. The corolla tube measures 9mm to 15mm in length. The 5 petals are broad linear and creamy yellow externally and yellowish or orange-brown internally and measure 6mm to 8mm in length. The wings measure 0.1mm to 1mm width or at times are obsolete. The barbulae are simple and measure 0.5mm in width.
There are 10 inserted anthers. The indusium is glabrous except lips. The flowers appear from early May to late October.
Scaevola tomentosa’s fruits are spherical drupes. The drupes are glabrous and measure 5mm to 6mm in length by 5mm to 6mm in diameter. The green drupes turn black when ripe. The calyx lobes are persistent on the ripe fruit. The single glossy brown seed is flattened ellipsoidal.
Wildlife:
Scaevola tomentosa are attractive to native bees like Tetragonula carbonaria and the Blue banded bee Amegilla cingulata along the coast.
It is a terrific sand stabilizer on the frontal and back dunes.
Cultivation:
Scaevola tomentosa is a magnificent medium, dome shaped or spreading plant that looks sensational mixed with other seaside heath plants of open habit with deep grass-green foliages or grey foliages. It should be grown in association with other sand stabilizing specie along the coast. In cultivation they will grow from 1 meter to 2 meters in height by 1 meter to 2 meters in diameter when grown in the open.
It grows exceptionally well on lighter sandy soils especially where lower rainfalls prevail or salt laden coastal winds are experienced with calcareous sand accumulations or on limestone cliffs and ridges. A thin layer of mulch will help to keep the soil temperatures cool and moisture at an even level. If these requirements are met it can cope with temperatures as low as 3 degrees and up to 40 degrees.
Place it beneath Casuarina equisetifolia or Casuarina littoralis to help highlight it and the fine foliage of the Casuarina species.
Scaevola taccada would make a good contribution to a sandy beach scene, with the addition of plants like Actinotis helianthi, Grevillea gaudichaudi, Westringea fruiticosa, Kunzea ambigua, or Anigozanthus flavida are fiver great contrasting foliages.
Carpobrotus edulis, Lomandra conferta or Billardiera cymosa would give a totally different scene either below the Casuarina species or just planted out with Scaevola tomentosa.
Propagation:
Seeds: The seeds of Scaevola tomentosa can be removed easily from the fruits.
Sow fresh seeds directly into a seed raising mix, keeping them moist not wet. Do not over water as the seeds will rot off before germination takes place. Place the trays in a cool shaded area with 50mm shade cloth in the bush house. When the seedlings are 20mm to 25mm tall, prick them out and plant them into 50mm native tubes using a good organic mix.
As the seedlings roots reach the bottom of the tubes plant them out into their permanent position. Do not delay.
Cuttings: Seeds may be difficult to obtain but fortunately cuttings strike very easily and new plants should be propagated on an annual or biannual basis to ensure continuity of flowering and vigour in the plants. Use firm, current season’s growth taken at any time of the year except in very hot weather.
Remove half the leaves from the bottom section being careful not to tear the bark. Using a weak rooting hormone; more as a disinfectant than a hormone, dip the cutting in and place it in a moist sterile seed raising mix. When the cuttings have obviously struck and have developed good roots treat them as for seedlings.
Another quick method is to layer the plants nicking the bottom of the layered section. Rooted plants can usually be completely severed after about 4 weeks and moved to their new location.
Fertilize every 2 months until the plants are established then annually in early September to October to maintain better colour, health, vitality and flowering.
Further Comments from Readers:
“Hi reader, it seems you use The Bible of Botany a lot. That’s great as we have great pleasure in bringing it to you! It’s a little awkward for us to ask, but our first aim is to purchase land approximately 1,600 hectares to link several parcels of N.P. into one at The Pinnacles NSW Australia, but we need your help. We’re not salespeople. We’re amateur botanists who have dedicated over 30 years to saving the environment in a practical way. We depend on donations to reach our goal. If you donate just $5, the price of your coffee this Sunday, We can help to keep the planet alive in a real way and continue to bring you regular updates and features on Australian plants all in one Botanical Bible. Any support is greatly appreciated. Thank you.”
In the spirit of reconciliation we acknowledge the Bundjalung, Gumbaynggirr and Yaegl and all aboriginal nations throughout Australia and their connections to land, sea and community. We pay our respect to their Elders past, present and future for the pleasures we have gained.
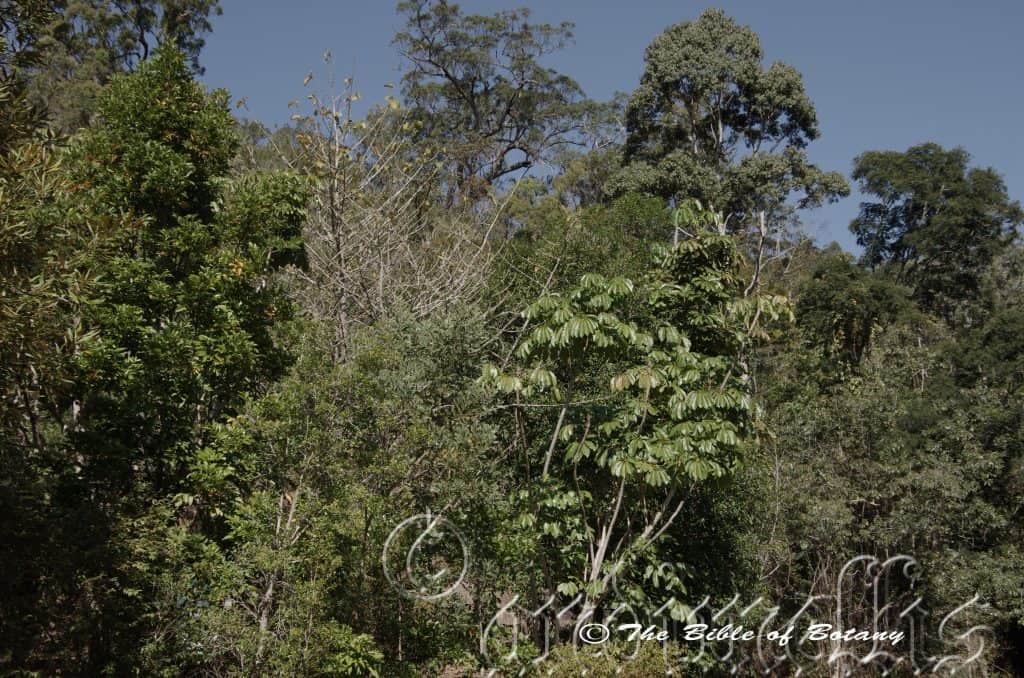
Crystal Creek Paluma Range National Park Qld.
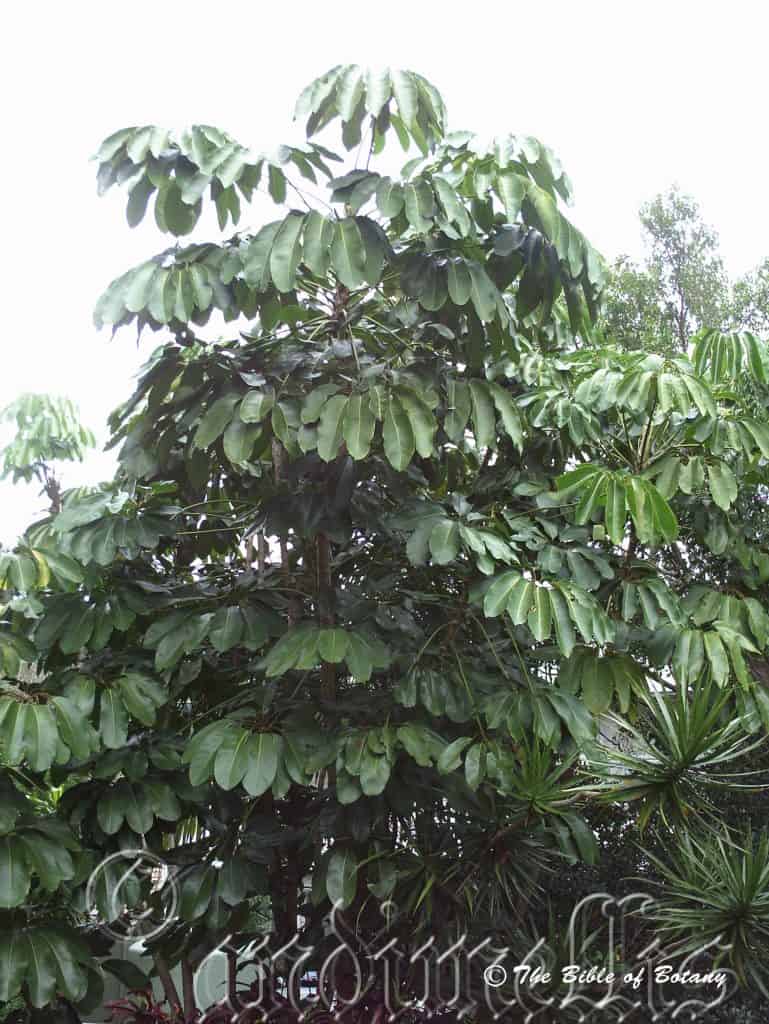
Grange Qld.
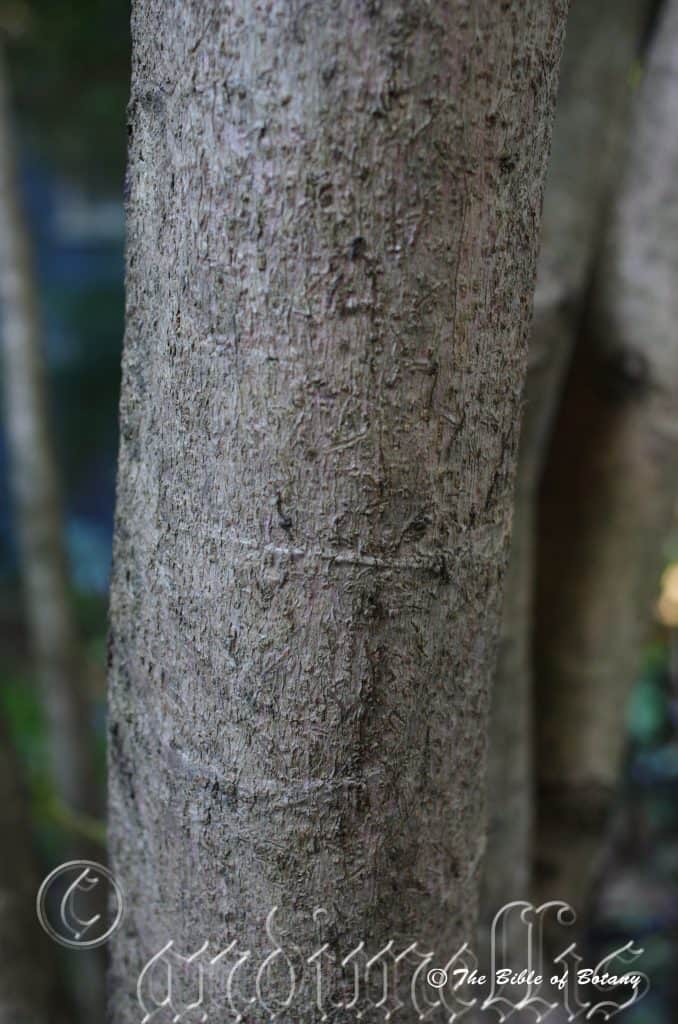
Grange Qld.
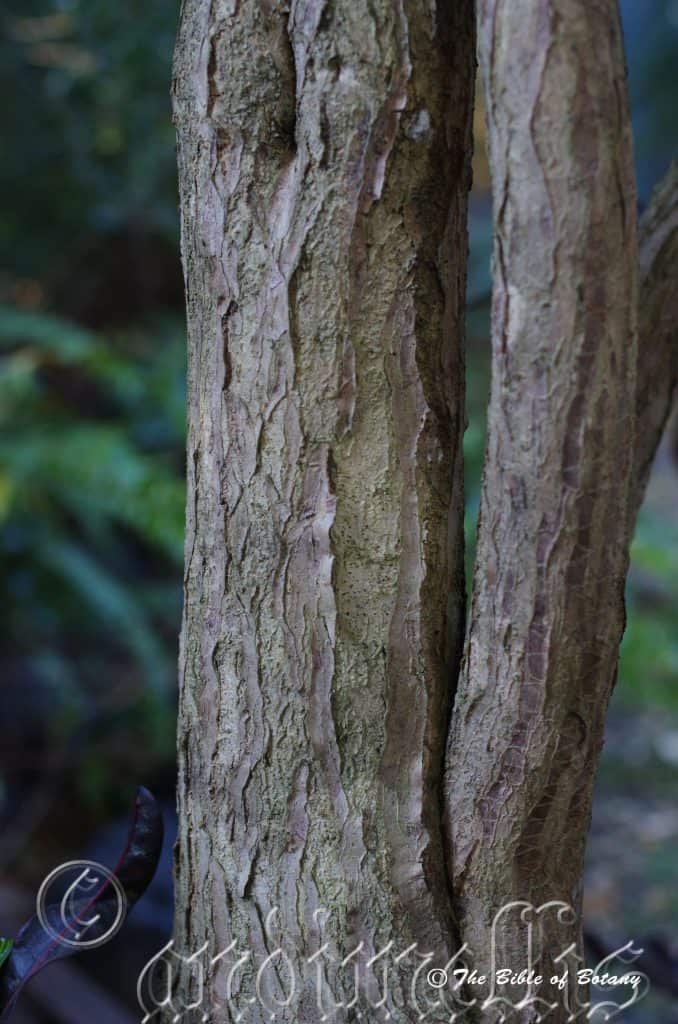
Grange Qld.
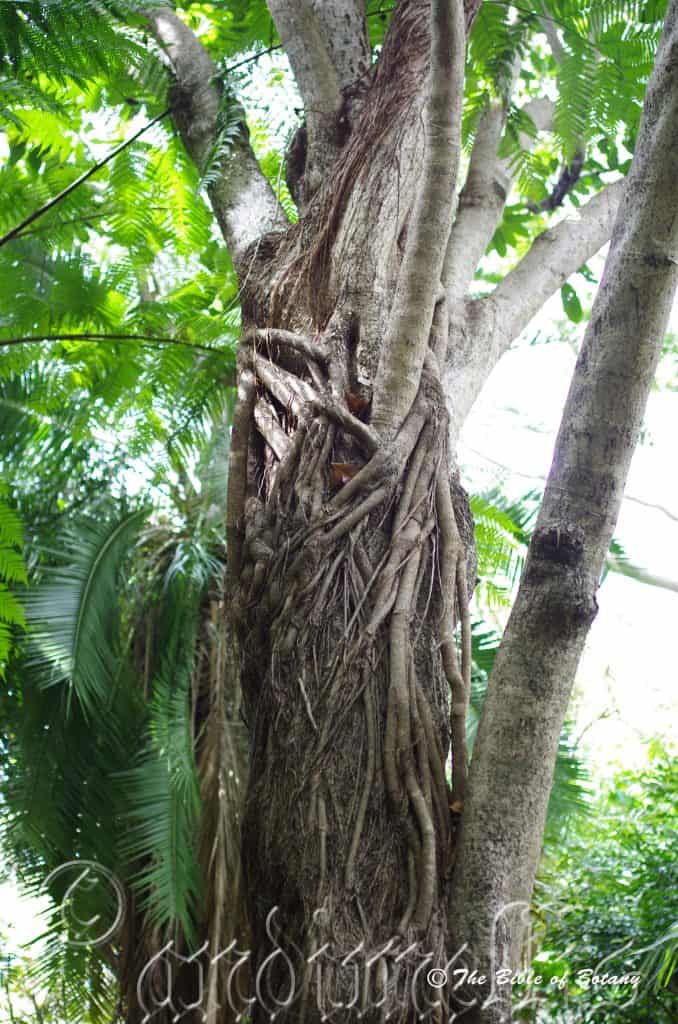
Mount Cootha Botanic Gardens Qld.
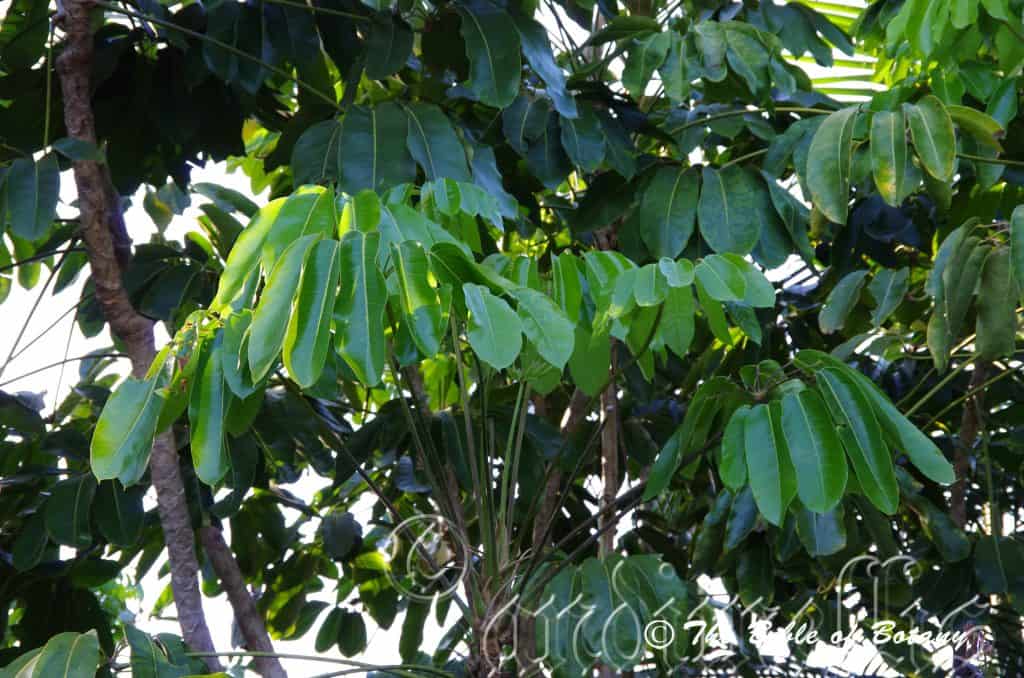
Grange Qld.
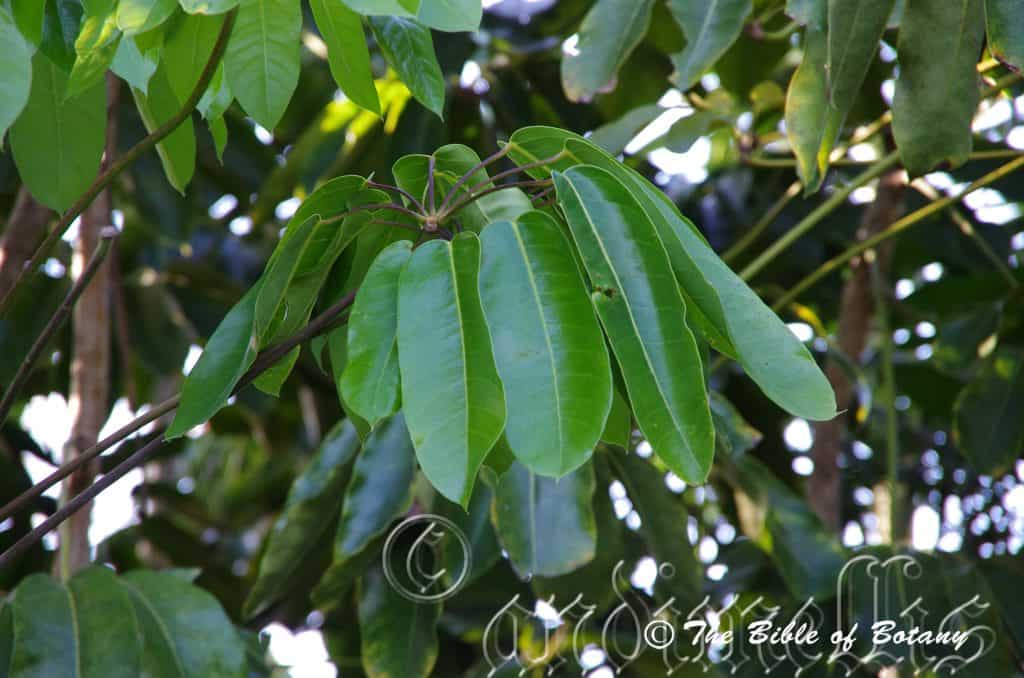
Grange Qld.

Grange Qld.
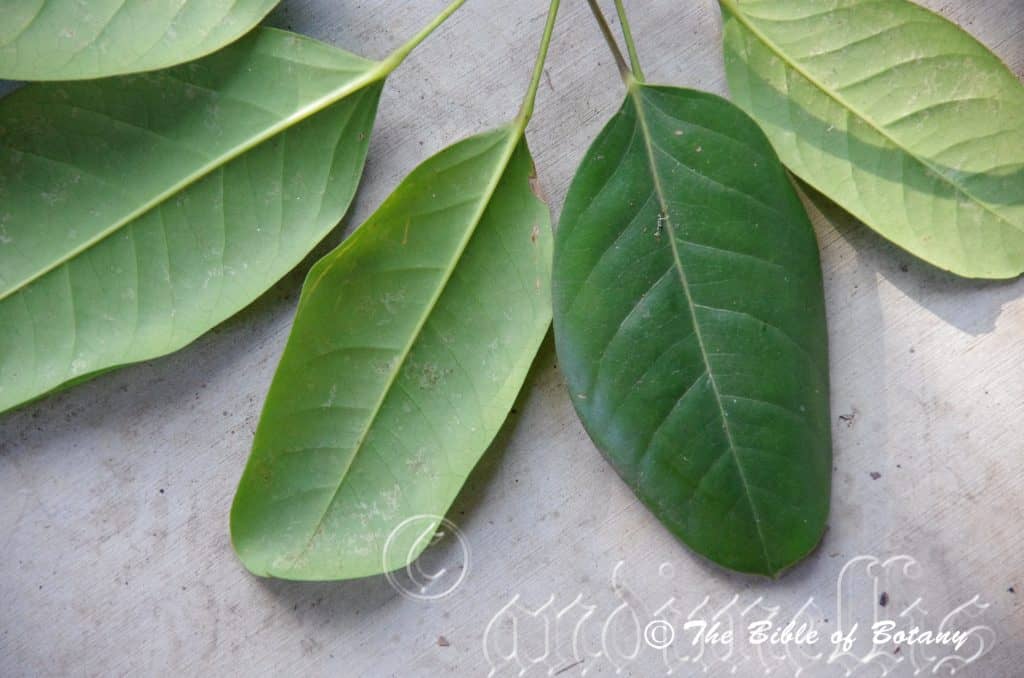
Grange Qld.
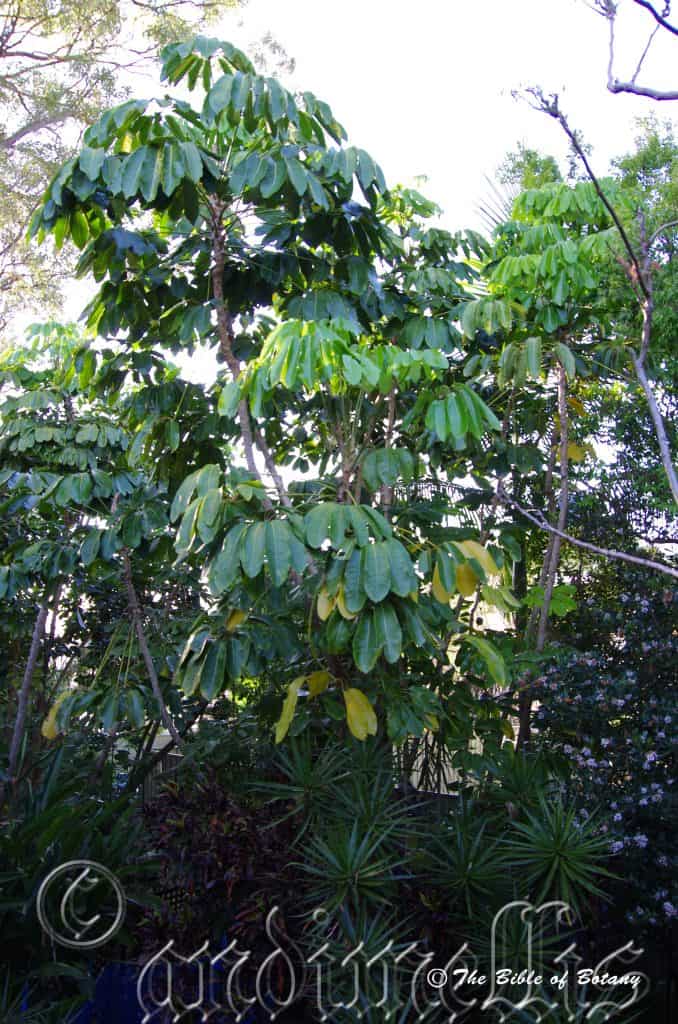
Grange Qld.
Schefflera actinophylla
Classification:
Unranked: Eudicots
Unranked: Asterids
Order: Apaiales
Family: Araliaceae
Subfamily: Araliodeae
Genus: Is named in honour of Jocob Christopher Scheffler who was a German botanist.
Species: From Actinos, which is Ancient Greek for a ray, and Phullon/Phýllon, which is Ancient Greek for a leaf. It refers to leaves or flowers, which radiate out from a central point.
Common Name: Umbrella Tree or Giant Umbrella Tree.
Distribution:
Schefflera actinophylla is a widespread species east from Gurig National Park south to Kakadu national Park then in a south easterly direction to the Roper River and Ngukur. It is also found on Groote Eylandt.
In the east it is found south from the Torres Strait Islands to the Byfield National Park and the Fitzroy River. It is found on and east of the Great Dividing Range to the coast.
Plants further south are garden escapees and should be treated as weeds.
It is also found in Papua, New Guinee and some of the eastern Islands Indonesia.
https://avh.ala.org.au/occurrences/search?taxa=Schefflera+actinophylla#tab_mapView
Habitat Aspect Climate:
Schefflera actinophyla prefers medium shade to dappled sunlight, growing mainly as an epiphyte, a lithophyte or small terrestrial tree. It grows in well-developed rainforests, dry rainforests, open wet Eucalyptus forests or littoral rainforests. The altitude ranges from 2 meters ASL to 1000 meters ASL.
The temperatures range from 8 degrees in July to 40 degrees in January.
The rainfalls range from lows of 750mm to 3200mm average per annum.
Soil Requirements:
Schefflera actinophylla is not particular to the type of soil it grows in. It can adapt to sandy soils close to the coast in high rainfall areas to heavy clays where it is a little drier. The soils are usually derived from decomposed sandstones, brown basalts, black basalts, metamorphic rocks, granites or at times accumulated beach sands or alluvial deposits. The soils pH ranges from 4.5pH to 7pH. It does not tolerate waterlogged soils. Non saline soils to very saline soils are tolerated.
Height & Spread:
Wild Plants: 8m to 12m by 3m to 16m.
Characteristics:
Schefflera actinophylla grows as a tall, slender usually single trunked tree with, pale grey-brown, scabrous to flaky bark. The branches are pale brown-grey only becoming green near the apex where the newer leaves occur. The branchlets are pale lime green and glossy. The smaller branches and branchlets have the scars from previous leaves and stipules.
The crowded compound leaves of Schefflera actinophylla with 6 to 12 leaflets radiating out from a central rachis. The oblong leaflets measure 150mm to 300mm in length by 75mm to 110mm in width. The rachis has a single appressed stipule on the lower surface at the base. The semicircular stipule surrounds the half encircles the rachis from the upper surface. The stipule measures 30mm to 45mm across with a stout caudate apex which measures 40mm to 55mm in length. The petioles measure 140mm to 280mm in length while the petiolules measure 45mm to 90mm in length. The bases are rounded while the apex is apiculate to cuspidate. The discolourous laminas are deep sea-green, semi glossy to glossy and glabrous on the upper lamina while the lower lamina is paler and semi glossy to dull. The leaf margins are entire, flat or slightly undulating. The laminas are flat, slightly decurve from the midvein to the margins or recurve from the midvein to the margins. The mid vein is strongly prominent on the lower lamina and is distinctly visible from the upper lamina while the lateral veins are slightly prominent on the lower lamina.
Inflorescences of Schefflera actinophylla are many crowded cymes from the terminals. The 7 to 16 pinkish brown to burgundy brown pedicels are glabrous and measures 400mm to 500mm in length and darken with age. The individual peduncules are pinkish brown to burgundy brown, glabrous and measure 40mm to 60mm in length. The individual flowers are sessile. The deep pink to deep crimson or scarlet red perianths split into 5 to 7 succulent longitudinal sections as the stamens expand to pale reveal a white inner surface. The sections of the perianth become divaricate before being discarded to reveal the deep orange red or deep pinkish orange disc. The perianth measure 4.5mm to 5.5mm in length by 4.5mm to 5.5mm in diameter prior to splitting.
The central disc is surrounded by 10 deep red to deep burgundy red stamens. The filaments are free for their entire length and measure 2.5mm to 3.5mm in length. The oblong dorsifixed anthers measure 1.5mm to 2mm in length by 0.7mm in width.
The crimson red stigma is sessile on the hemispherical disc stigma are glabrous while the ovary is green. Schefflera actinophylla’s flowers appear from early August through to late March.
The fruits of Schefflera actinophylla are obovoidal aggregates in complex heads. The aggregates are glabrous and measure 40mm to 50mm in length by 22mm to 28mm in diameter. The green aggregates turn deep purple black when ripe and measure 6mm to 8mm in length and diameter. The glossy, black, reniform seeds measure4.5mm to 5.5mm in length by 3mm in diameter.
Wildlife:
Schefflera actinophylla’s flowers support every, native nectar eating bird in its range. The plants are also visited by butterflies, native insects of every shape and size as well as native bees and wasps. It is terrific sand stabilizers on the frontal dunes and work just effectively on heavier soils in riparian zones.
Cultivation:
Schefflera actinophylla is a magnificent small tree that has fallen from grace due to its larger root system which can be damaging in areas where old pipes and services lie. It is in fact an ideal planted in association with other rainforest specie. It is an excellent plant whether planted at the edge of a rainforest or deep in the center of the rainforest. Planted in the ground as a lithophyte or epiphyte it makes a very attractive specimens. It also makes a reasonable park tree offering quick growth, and good shade. In cultivation it will grow from 8 meters to 10 meters in height by 8 meters to 10 meters in diameter when grown in the open or taller and much narrower if grown closer together as a rainforest tree.
It grows well on lighter soils where deep leaf litter keeps the soil cool and moisture at an even level. If these requirements are met they can cope with temperatures as low as minus 5 degrees and up to 36 degrees. It is moderately drought resistant once established.
Add to the above, if it is given an adequate supply of water and a little native fertilizer on a regular basis the plants will respond with good flowering and fruit over a long period attracting birds into the garden.
Do not plant it closer than 5 meters to underground services or foundations as the roots are rather aggressive.
Schefflera actinophylla makes a great bonsai plant for the beginner and several here in Chong Qing I believe are over 80 years old grown from seed.
It has shown some signs of being invasive in and south of Brisbane and around perth so some care should be taken if it is being planted near moist forests.
Propagation:
Seeds: The seeds of Schefflera actinophylla can be removed easily from the fruits.
Sow fresh seeds directly into a seed raising mix, keeping them moist not wet. Place the trays in a warm shaded area with 50mm shade cloth in the bush house. When the seedlings are 20 to 25 mm tall, prick them out and plant them into 50mm native tubes using a good organic mix.
Repot as soon as the roots reach the bottom of the tubes into their permanent positions or into larger tubs.
Fertilize using seaweed, fish emulsion or organic chicken pellets soaked in water on an alternate basis. Fertilize every two months until the plants are established then annually in early September to October to maintain better colour, health, vitality and flowering.
Further Comments from Readers:
“Hi reader, it seems you use The Bible of Botany a lot. That’s great as we have great pleasure in bringing it to you! It’s a little awkward for us to ask, but our first aim is to purchase land approximately 1,600 hectares to link several parcels of N.P. into one at The Pinnacles NSW Australia, but we need your help. We’re not salespeople. We’re amateur botanists who have dedicated over 30 years to saving the environment in a practical way. We depend on donations to reach our goal. If you donate just $5, the price of your coffee this Sunday, We can help to keep the planet alive in a real way and continue to bring you regular updates and features on Australian plants all in one Botanical Bible. Any support is greatly appreciated. Thank you.”
In the spirit of reconciliation we acknowledge the Bundjalung, Gumbaynggirr and Yaegl and all aboriginal nations throughout Australia and their connections to land, sea and community. We pay our respect to their Elders past, present and future for the pleasures we have gained.
Schelhammera undulata
Classification:
Unranked: Monocots
Order: Liliales
Family: Colchicaceae
Genus: Is named in honour of Gunther Schelhammer; 1649-1716, who was a German professor of medicine. He was a strong critic of any philosophy that purports any sort of divine intervention in natural phenomena, on the grounds that they all lead to the loss of meaning of experimental activity and assign a god as the inacceptable role. Man uses god as a role model when a hypothesis cannot be explained as the wish of the divine creator instead of looking at his own experimental failures or lack of present knowledge of the subject.
Species: From Undulāta, which is Latin for wavy. It refers to structures or organs usually leaf margins, which have margins which are wave like or undulating.
Common Name:
Distribution:
Schelhammera undulata is found in 3 isolated populations south from Gloucester in central coastal New South Wales to Orbost in coastal north eastern Victoria with a population further west on the Grampians and further north at Mummulgum between Casino to Lismore.
https://avh.ala.org.au/occurrences/search?taxa=Schelhammera+undulata#tab_mapView
Habitat Aspect Climate:
Schelhammera undulata prefers full sun to partial shade. It grows in open woodlands and open forests on moist soils, in short lived ephemeral pools, shallow depressions or poorly drained soils. The altitude ranges from 40 meters ASL to 457 meters ASL.
The temperatures range from minus 2 degrees in July to 36 degrees in January.
The rainfalls range from lows of 800mm to 1450mm average per annum.
Soil Requirements:
Schelhammera undulata prefers sandy loams to light fatty clays. The soils are derived from decomposed sandstones, granites or black basalts. The soils pH ranges from 5pH to 6pH. It is not tolerant of waterlogged soils. Non saline soils to moderately saline soils are tolerated.
Height & Spread:
Wild Plants: 0.15m to 0.2m by 0.3m to 0.4m.
Characteristics:
Schelhammera undulata grows as an erect perennial herb with ascending glabrous deep green stems. The plants form small white tubers beneath the ground or mulch where the forest litter is thick.
The alternate ovate to lanceolate leaves measure 20mm to 50mm in length by 7mm to 18mm in width. The caudate bases are cordate while the apex is tapering narrow acute. The discolourous laminas are deep green, glabrous and semi glossy on the upper laminas while the lower laminas are paler. The laminas are gently concaved from the mid vein to the margins and gently decurve on the basal third and often again on the apical third. The margins are entire and shallowly undulate. The mid vein is prominent on the lower lamina and is depressed on the upper lamina while the 10 to 18 parallel veins are slightly prominent on the lower lamina and are faintly visible on the upper lamina often with several being slightly depressed.
The inflorescences are born singularly from the leaf axils and terminally or a few flowered born in a terminal cyme. The deep green short peduncle and filiform pedicels are glabrous. The pedicels measure 10mm to 30mm in length. The 6 elliptical to oblong pink to mauve tepals are spreading. The tepals measure 7mm to 9mm in length including the 2mm to 4mm in width. The outer tepals are slightly wider than the inner tepals.
The 6 filaments are free and opposite the petals. The white filaments measure 5mm to 6mm in length. The dorsifixed anthers are deep pink to deep purple. The oblong anthers measure 4mm to 4.5mm in length by 1.2mm to 2mm in width.
The white style and trifid stigma are glabrous while the ovary is lime-green. The stigma is strongly involute while the pistil measures 12mm to 15mm in length. The flowers appear from early September to November.
The fruits are ovoidal capsules. The capsules are glabrous and covered in white film and measure 6mm to 9mm in length by 5mm to 8mm in diameter. The green capsules turn brown and are rugose when ripe. The few seeds are yellow-brown. The ripe fruits appear from December to early February.
Wildlife:
Schelhammera undulata are attractive to native bees along the coast. It is a terrific sand stabilizer on the frontal and back dunes.
Cultivation:
Schelhammera undulata is a beautiful small, dome shaped or spreading plant that looks sensational mixed with other plants of open habit, deep green foliages or grey foliages. It can be grown in association with other sand stabilizing species in semi-arid gardens or along the coast. I would be tempted to recommend this little sub shrub to be planted in tropical gardens. In cultivation it will grow from 0.4 meters to 0.5 meters in height by 0.4 meters to 0.5 meters in diameter when grown in the open.
It grows well on lighter sandy soils especially where the rainfalls range from 1200mm to 2000mm per year prevail or salt laden coastal winds are experienced. A thin layer of gravel mulch keeps the soil temperatures warm and moisture at an even level. If these requirements are met they can cope with temperatures as low as minus 3 degrees and up to 40 degrees. It is moderately drought resistant once established and can be cut back to make it bushier.
Add to the above, if it is given a little native fertilizer on a regular basis when it rains or a little extra water in arid areas the plants will respond with good flowering over a long period.
Schelhammera undulata is very suited to small or larger woodland landscapes where it an be used as a fill in plant or as the main feature in a smaller woodland heath garden. It is very adaptable and can be used to help highlight other features in the garden including contrasting hard feature lines.
It would make a good contribution to a sandy or rocky terrain rock garden. Here it can be scattered throughout the boulders. When you use it in an area that is strewn with large boulders do not over crowd the scene as the boulders are a formidable part of the scene. Schelhammera undulata is well suited to such conditions so use it to highlight the boulders and rocks. If too many are used it will diminish the whole affect so be careful not to overplant it amongst rocks.
This is where the horizontal growth habit of Schelhammera undulata’s pale blue green leaves and yellow orange flowers contrast and blending together. Use plants like Hibbertia dentata to make the rocks look larger and the spaces between the plants more expansive. Mix it with other smaller shrubs so none of them dominate the scene but blend in to give a mosaic of foliage colours that you oversee. Boronia ledifolia, Correa baeuerlenii or Verticordia auriculata are three great contrasting foliages and spectacular flowering contrasts which will dominate despite being at the rear.
Schelhammera undulata would make a good contribution to a dry heath garden. Here it can be used as the dominant ground cover with scattered taller fine leaf plants throughout the heath scene. When you design a flat heath garden which it is well suited don’t use contours to display the plants as heath lands are usually flat or have a slight rise.
This can be achieved with using the green linear leaves in the foreground with contrasting with finer pale soft grey to glaucous coloured foliage to the rear. Mix the back ground plants with other smaller shrubs so none of them dominate the scene but blend in to give a mosaic of foliage colours that you oversee. Actinotis helianthi or Verticordia auriculata are two good contrasting foliages and spectacular flowering contrasts which will dominate despite being at the rear. If Verticordia specie is used don’t plant it too close as the pink or red flowering forms could become too powerful when in flower. Another great contrasting plant would be the smaller hybrids of Grevillea banksii like Grevillea robin-gordon.
Propagation:
Seeds: The seeds of Schelhammera undulata can be removed easily from the fruits.
Sow fresh seeds directly into a seed raising mix, keeping them moist not wet. Do not over water as the seeds will rot off before germination takes place. Place the trays in a cool shaded area with 30mm shade cloth in the bush house. When the seedlings are 20mm to 25mm tall, prick them out and plant them into 50mm native tubes using a good organic mix.
As the seedlings roots reach the bottom of the tubes plant them out into their permanent position. Do not delay.
Fertilize using seaweed, fish emulsion or organic chicken pellets soaked in water on an alternate basis. Fertilize every two months until the plants are established then annually in early September to October to maintain better colour, health, vitality and flowering.
Further Comments from Readers:
“Hi reader, it seems you use The Bible of Botany a lot. That’s great as we have great pleasure in bringing it to you! It’s a little awkward for us to ask, but our first aim is to purchase land approximately 1,600 hectares to link several parcels of N.P. into one at The Pinnacles NSW Australia, but we need your help. We’re not salespeople. We’re amateur botanists who have dedicated over 30 years to saving the environment in a practical way. We depend on donations to reach our goal. If you donate just $5, the price of your coffee this Sunday, We can help to keep the planet alive in a real way and continue to bring you regular updates and features on Australian plants all in one Botanical Bible. Any support is greatly appreciated. Thank you.”
In the spirit of reconciliation we acknowledge the Bundjalung, Gumbaynggirr and Yaegl and all aboriginal nations throughout Australia and their connections to land, sea and community. We pay our respect to their Elders past, present and future for the pleasures we have gained.
Schistotylos purpuratus
Classification:
Unranked: Monocots
Order: Asparagales
Family: Orcidaceae
Subfamily: Epidendroideae
Tribe: OVandeae
Tribe: Aeridinae
Genus: From Schizein, which is Ancient Greek or Schistosa, which is Latin for to split or divide and Stŷlos which is Ancient Greek for a part of the female reproductive organ between the ovaries and the stigma. It refers to styles which divide frequently into many sectors thus they have many stigmas.
Species: From Purpurea, which is Latin for purple. It refers to an organs, which are purplish, deep reddish-purple or purple.
Common Name:
Distribution:
Schistotylus purpuratus is restricted to 4 small populations on the Great Dividing Range and coastal ranges south from Kyogle to Doyle’s River and the Great Lakes hinterland in northern and central coastal New South Wales.
https://avh.ala.org.au/occurrences/search?taxa=Schistotylus+purpuratus#tab_mapView
Habitat Aspect Climate:
Schistotylus purpuratus prefers medium shade to dappled sunlight. It usually grows on the outer branches or stems of dry rainforest trees or trees growing in swampy conditions. Its altitude ranges from 600 meters ASL to 900 meters ASL.
The temperatures range from minus 4 degrees in August to 38 degrees in January.
The rainfall ranges from lows of 1250mm to 1800mm average per annum.
Soil Requirements:
Schistotylus purpuratus grows as an epiphyte and is especially common on Backhousia myrtifolia.
Height & Spread:
Wild Plants: 0.02m to 0.035m by 0.05m to 0.12m.
Characteristics:
Schistotylus purpuratus grows as an epiphyte with 1 shoot which is often suspended by 1 or a few of the numerous, tangled roots. The orchid is pendent with green stems that measure 4mm to 30mm in length.
The linear to narrow-elliptic leaves measure 20mm to 60mm in length by 2mm to 3.5mm in width. The sessile bases are rounded while the apex is acute. The concolourous, laminas are deep sea-green often with purple spots and glabrous. The laminas are deeply channeled and decurve downwards on the apical half. The margins are entire. The midvein is prominent on the lower laminas.
The inflorescences are 3 to 8 individual flowers born along a pendant raceme. Plants in a particular area flower synchronously. The flowers are born from the center of a rosette of leaves. The racemes are olive-green with maroon-purple spots and blotches and measure 20mm to 40mm in length while the pedicels are olive-green with maroon-purple spots measure 3mm to 5mm in length including the angulated ovary. The individual flowers measure 40mm to 50mm in length by 40mm to 50mm in width. The flowers are strongly cupuliform. The dorsiventral dimension of flower is conspicuously greater than the lateral dimension.
The glabrous ovate dorsal sepal is olive-green with deep maroon-purple blotches. The margins are entire while the apex is acute. The dorsal sepal curves forward over the column and measures 3mm to 5mm in length by 2mm to 2.5mm in width.
The glabrous lateral sepals are strongly asymmetrical ovate to almost deltoid or at times ovate-spathulate. It is olive-green with deep maroon-purple blotches and white margins. The margins are entire. The lateral sepals measure 3mm to 5mm in length by 2mm to 2.5mm in width at the widest point.
The glabrous ovate-elliptical lateral petals are olive-green with deep maroon-purple blotches. The margins are entire. The lateral petals measures 2.5mm to 4mm in length by 1.5mm to 2mm in width.
The white or white with yellow markings labellum is narrow oblong to broad linear. The triangular mid lobe measures 1.2mm to 1.4mm in length. The falcate-triangular lateral lobes measure 0.8mm to 1mm in length. The white spur has an obtuse apex and decurve downwards at about the half way point. The spurs measures 3mm to 4mm in length. The column measures 2mm in length. The column measures 2.5mm to 3mm length. The intensely fragrant flowers appear from October to December.
The fruits are obloidal capsules. The green capsules turn grey-brown when ripe.
Wildlife:
Schistotylus purpuratus’s wildlife is unknown to the author.
All native orchids are protected plant species. It is illegal to remove naturally growing orchid plants from the bush and a license is required for the removal of seed capsule.
Cultivation:
Schistotylus purpuratus is a beautiful flowering orchid which is rather hardy and easy to grow and to propagate at least as far south as Victoria along the coast. It does very well either in the bush house attached to a slab of cork or washed pumice stone or attached to most rainforest trees that do not shed their bark in a sheltered area. Do not attach them to Eucalyptus trees as the barks contain resins which most Orchids detest.
Trees with mass plantings of mixed orchids look really spectacular and those that have several Schitostylus purpuratus add interest and curiosity over a long period especially when in flower. Even the roots have some appeal as they cover the trunks. Try it on the trunks and branches of Ficus specie, Ceropetalum specie, Melaleuca quinquenervia or Elaeocarpus specie.
Propagation:
Seeds: All orchids that are declared rare, vulnerable or endangered are protected by Federal and State Laws and must not be removed from the wild unless you are a land developer, mining company or main Roads department etc. This includes bulbs, roots, leaves and flowers. No part of any plant can be removed from Federal, State or Local Government land without the prior permission of the authority and this includes the spore.
1. Obtain relevant materials
The first step in growing orchid from seed will be sourcing and having at the ready all materials that will be required in the propagation process.
This includes all of the following:
Unripe orchid seed capsule. If there are 2 capsules secure the second capsule immediately after the first capsule splits or if only one capsule as soon as it changes colour.
Orchid gelling medium with agar which can be purchased from an orchid society or a specialist nursery.
Distilled water
Cooking pot
Spoon
Oven-safe glass or polypropylene containers with lids
Sealable bags
Clean, sterilized cutting board
Rubber gloves
Paper towels
Tweezers or forceps
70 percent ethanol
Bleach
Scalpel or sharp knife
Planting pot
Orchid compost
Length of wire metal
Plastic spray bottle.
deep petri dishes or sterile jars.
2. Prepare agar medium
The agar medium is a special orchid gelling mixture that distilled water will be added to distilled water.
To prepare the medium, mix equal parts of orchid gelling medium with distilled water in a cooking pot.
Place the pot on a stove and bring the mixture to boil for while stirring continuously for two minutes.
Pour the mixture into the petri dishes glass or propylene containers while ensuring not to fill the containers above 20 percent of their volume.
Loosely replace the lids to the containers. Sterilize the containers by heating them up in a microwave oven for between 2 to 3 minutes.
Spray 70 percent ethanol into a sealable bag to create a sterile environment. Transfer the heated containers into the sealable bag.
Allow the containers to cool a bit before tightening their lids and then sealing the bag. Leave the containers to stand for a few days until the mixture solidifies.
3. Prepare seed capsule and work surface
Place an open pot of water on a stove and bring to boil. Place the cutting board in the oven and sterilize.
Put on rubber gloves and sterilize the forceps, and scalpel with 70 percent ethanol.
Insert the seed capsule into a bowel filled with bleach for about fifteen minutes.
Sterilize seed capsule again with 70 percent ethanol and place on grill.
Using the sterilized scalpel, cut open the seed capsule to reveal the seeds. Using a scalpel or sharp knife, scrape out the seeds from the capsule unto an ethanol soaked paper towel.
4. Flasking of the seed
Take out the petri dishes or glass jars containers holding the agar medium. Over the steam, open up the containers and transfer seeds from the ethanol soaked paper towel into the individual containers using the sterilized forceps.
The amount of seeds will determine the number of containers required. Replace the lid of the containers and place them on a window sill that receives indirect sunlight.
5. Wait and exercise patience
All that can be done at this point is to wait until the seeds germinate. The amount of time that this might take varies and is dependent on the particular species.
Generally, the time can range from a few months to a few years. During this period of waiting, ensure the containers are free from contamination to ensure that germination is not disrupted.
6. Emergence of protocorms
Protocorms are tuber-shaped bodies with rhizoids that are produced by the young seedlings of various orchids. Protocorms represent the embryonic form of the orchid plant.
Their emergence after the period of waiting at an affirmation that everything in the propagation process is on track.
7. Transflask orchid seedlings is done after they have developed roots
Upon the emergence of the protocorms, consistently observe the growth of the seedlings. At the point when the seedlings appear to overcrowd the flask, transflasking should be carried out, typically within 30 and 60 days.
* This is done by removing individual seedlings using sterilized tweezers from the original containers and placing them in new containers also filled, in a proportion similar to the original, with agar medium. 6 to 8 in a standard petri dish or 1or 2 to a test tube
8. Transplant seedlings into planting pots
On the presumption that there are no disruptions to the plant growth, the seedlings will eventually outgrow the containers.
At this point, they are to be transplanted into planting pots. A good rule of thumb to determine when they are ready to be transplanted is when the seedlings have developed roots that have grown up to the length of one-quarter of an inch.
To transplant, prepare a planting pot or other container for receiving the seedling by majorly filling it up with coarse fir bark and possibly some slightly moist orchid compost mixture containing perlite, fine charcoal, redwood bark shavings, etc.
To extract the seedlings, submerge the containers in warm water to help loosen the agar gel.
Once the agar medium is softened, twist a piece of metal to form a loop and in turn, use it to carefully pull out the seedlings from the container. It is best done if the agar and seedling can be removed together.
The seedlings can be further rinsed in lukewarm water to remove any excess agar mixture still stuck to them.
Following this, the seedlings can now be planted into the prepared pot with at least 50mm of space between each individual seedling.
9. Positioning the orchid
The seedling once fully transplanted should be placed in a location that is warm with good indirect sun light.
Slowly position the pots into an area that closely assimilates the conditions it will be growing under.
The choice as to whether the plant should be exposed to full sun or in direct sunlight will be dependent on the particular orchid specie.
10. Subsequent care of the plant
After the first week, the seedling can be misted several times a day and watered just once a week.
A guide in watering the plant will be using the dryness of the fir back that is, water the plant until the fir back is completely moistened and wait till it has completely dried out before watering again.
Do not fertilize until the seedlings have fully established themselves, then fertilize annually in early September to October to maintain better colour, health, vitality and flowering.
Further Comments from Readers:
“Hi reader, it seems you use The Bible of Botany a lot. That’s great as we have great pleasure in bringing it to you! It’s a little awkward for us to ask, but our first aim is to purchase land approximately 1,600 hectares to link several parcels of N.P. into one at The Pinnacles NSW Australia, but we need your help. We’re not salespeople. We’re amateur botanists who have dedicated over 30 years to saving the environment in a practical way. We depend on donations to reach our goal. If you donate just $5, the price of your coffee this Sunday, We can help to keep the planet alive in a real way and continue to bring you regular updates and features on Australian plants all in one Botanical Bible. Any support is greatly appreciated. Thank you.”
In the spirit of reconciliation we acknowledge the Bundjalung, Gumbaynggirr and Yaegl and all aboriginal nations throughout Australia and their connections to land, sea and community. We pay our respect to their Elders past, present and future for the pleasures we have gained.
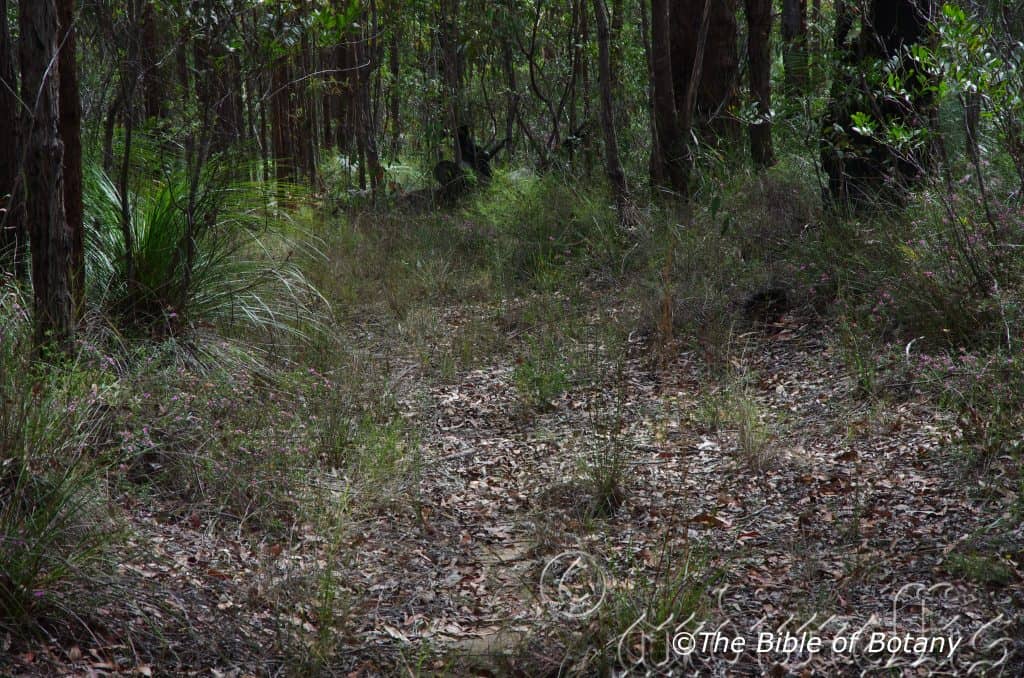
The Pinnacles NSW
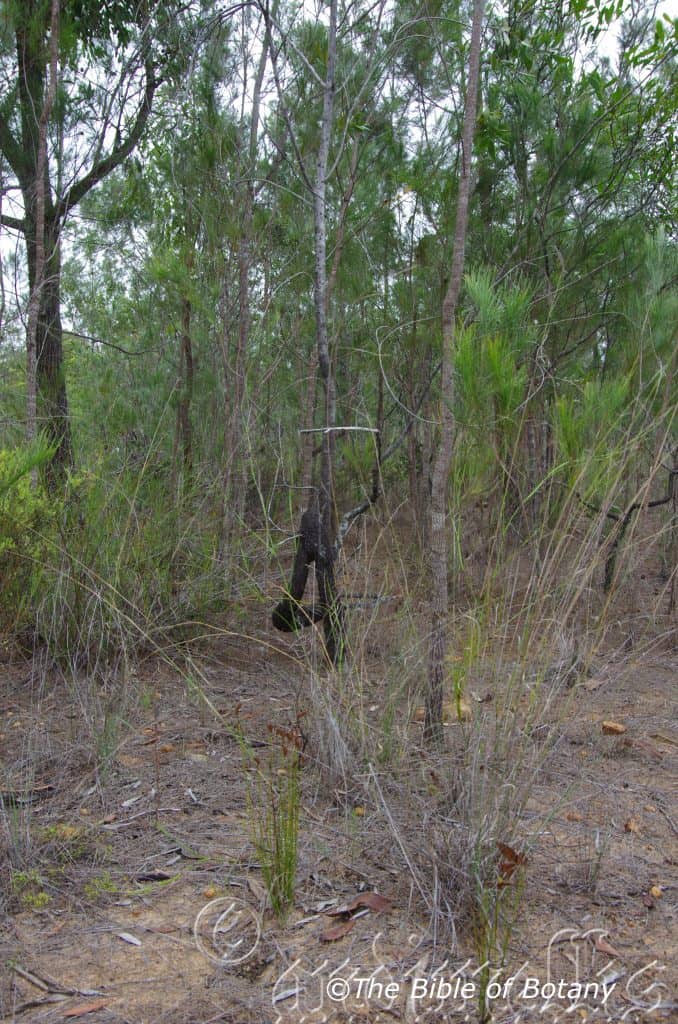
The Pinnacles NSW
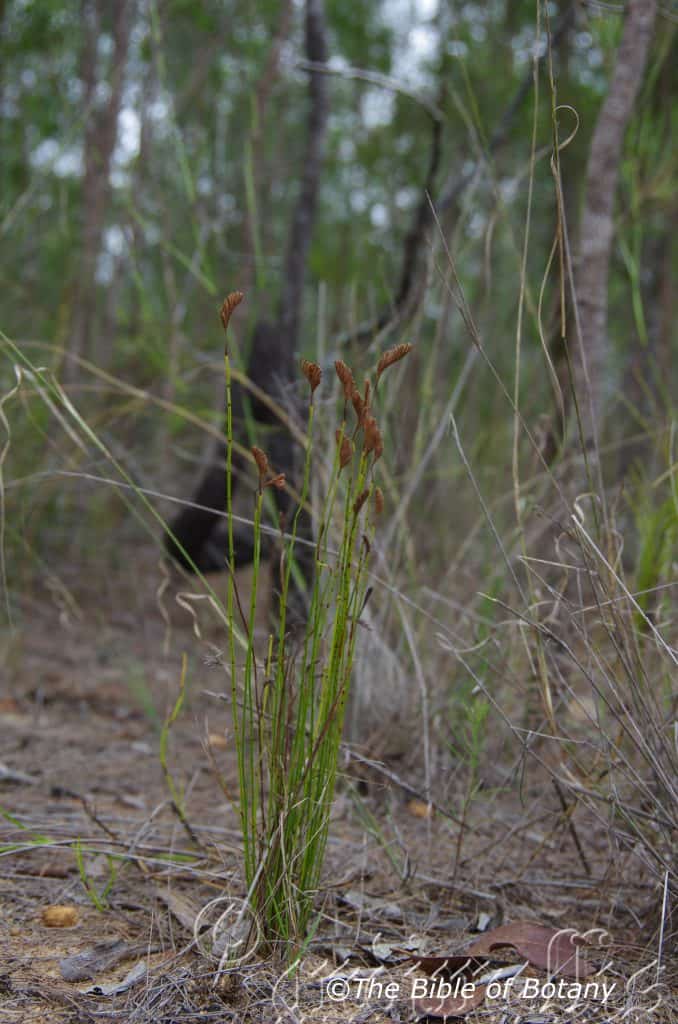
Fortis Creek National Park NSW
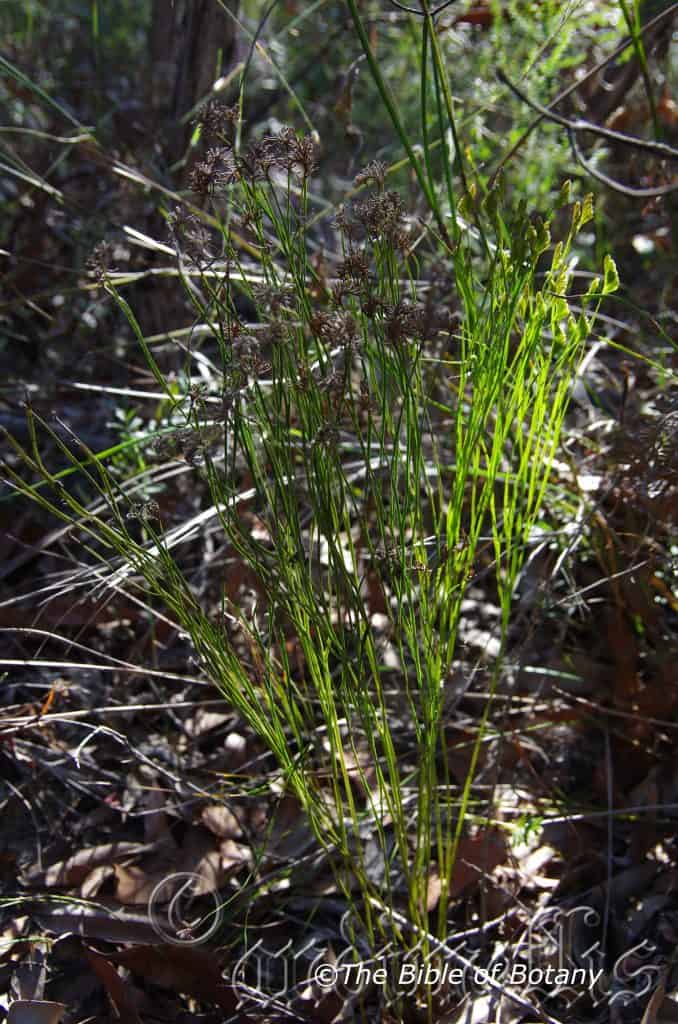
The Pinnacles NSW
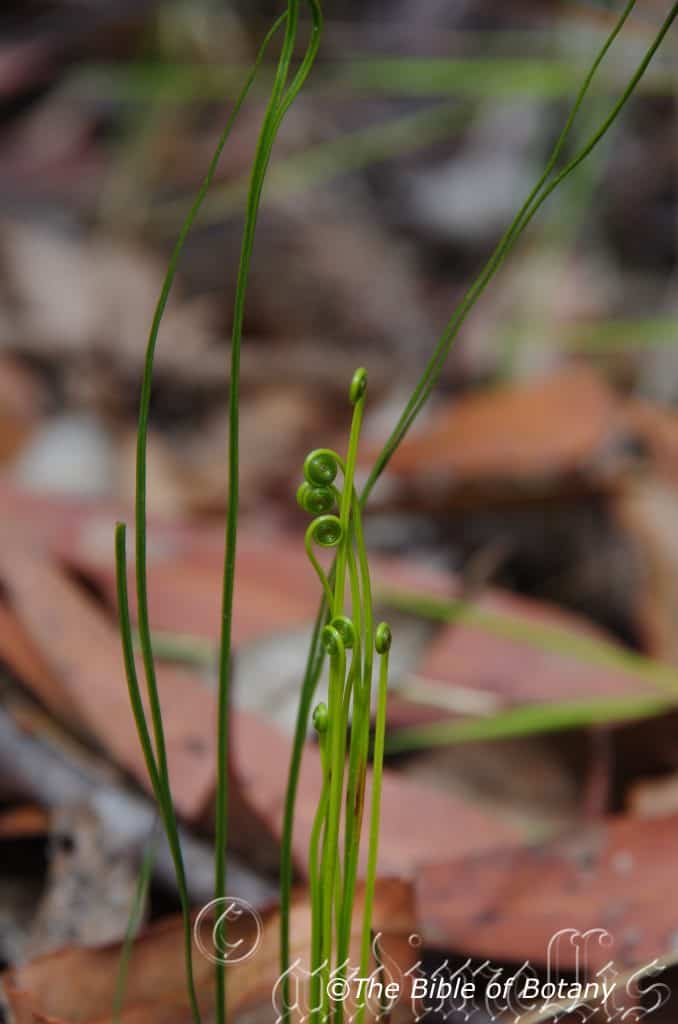
Fortis Creek National Park NSW
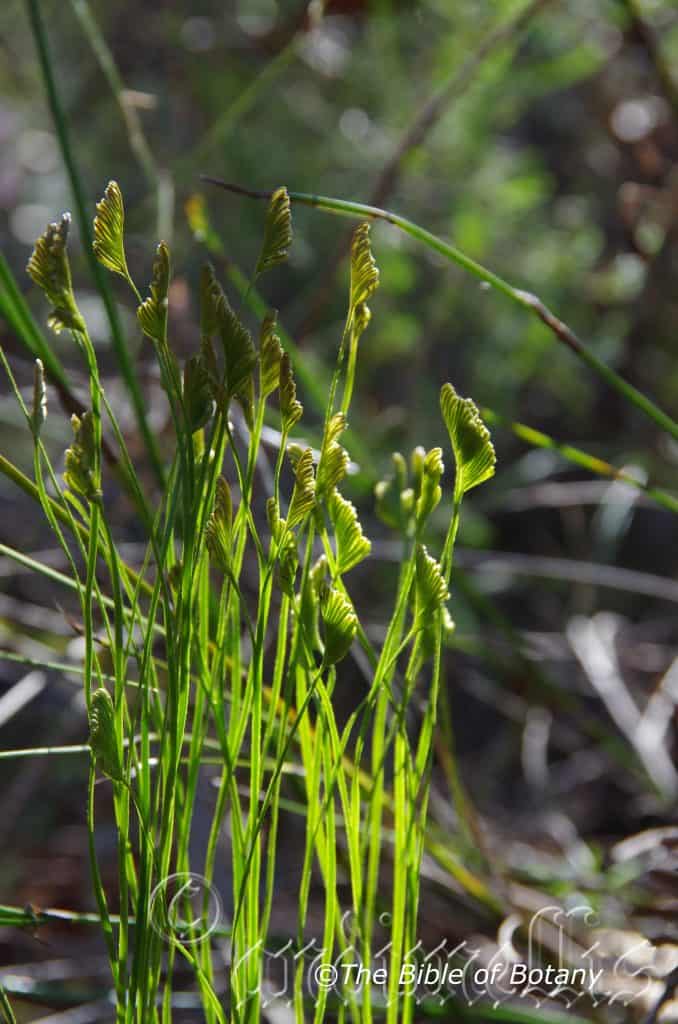
Fortis Creek National Park NSW
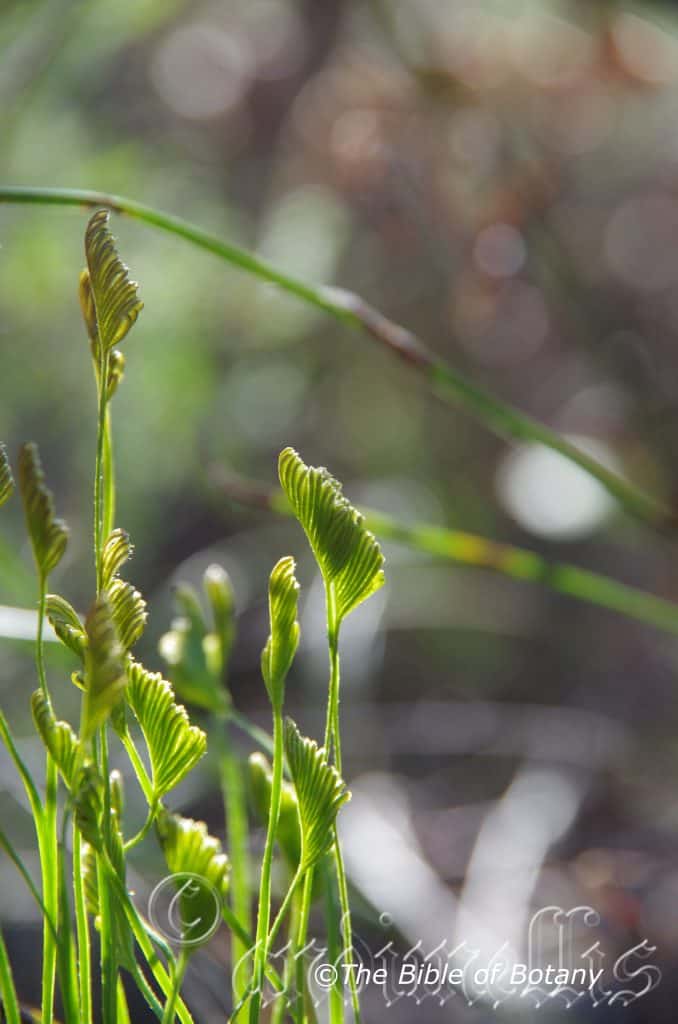
The Pinnacles NSW
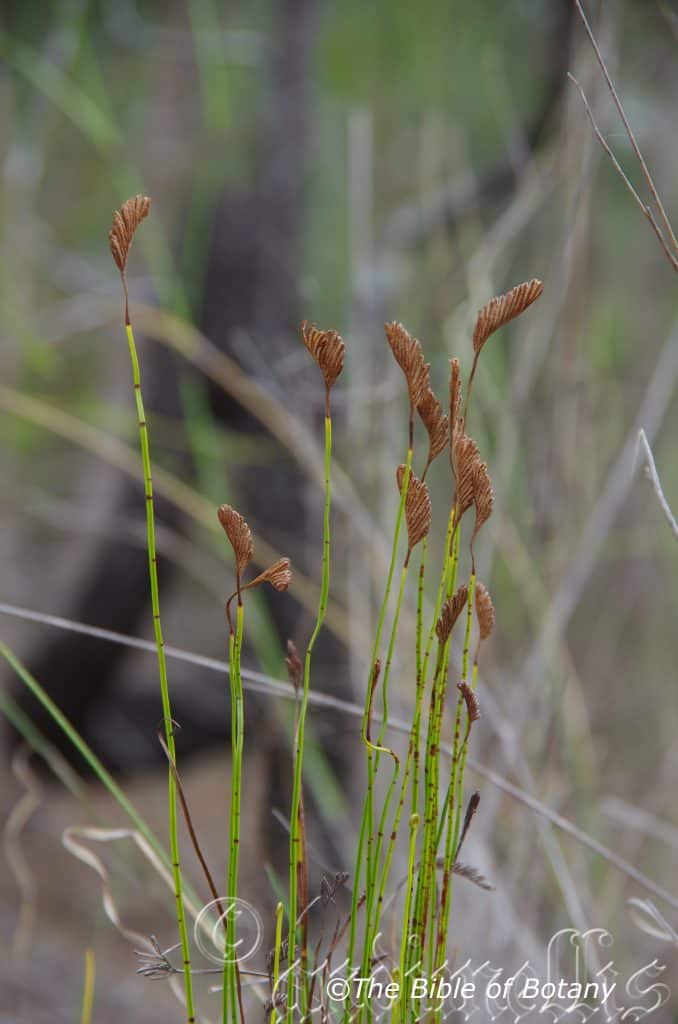
The Pinnacles NSW

The Pinnacles NSW
Schizaea bifida
Classification:
Unranked: Pteridiophyta
Class: Pteridopsida
Order: Polypodiales
Family: Pteridaceae
Genus: From Schizein, which is Ancient Greek or Schistosa, which is Latin for to split or divide. It refers to fronds, which have very deep clefts.
Species: From Bi/Bis, which is Greek/Latin for two and Fīdum, which is Latin for to divide into two clefts or clovens. It refers to structures or organs, which have more than two equal clefts generally to about halfway to the midrib.
Common Name: Forked Comb Fern.
Distribution:
Schizaea bifida is found mainly found on the western slopes and eastern slopes of the Great Dividing Range to the coast, south from Richardson’s Range near Shellburn Bay on Cape York Peninsula to the Narracoorte Coastal Plains in south eastern South Australia. It is found further west from south of Adelaide to Kangaroo Island.
In Tasmania it is found on the Bass Strait Islands and down the east coast of the main Island and further west from Milkshake Hills to Lake Llewellyn and George Town in the north and Queenstown and Sanctuary Bay in the central west.
https://avh.ala.org.au/occurrences/search?taxa=Schizaea+bifida#tab_mapView
Habitat Aspect Climate:
Schizaea bifida prefers dappled light to full shade. It grows in sclerophyll forests, coastal heath lands and lowland heathy swamps. The altitude ranges from 8 meters ASL to 915 meters ASL.
The temperatures range from minus 4 degree in July to 38 degrees in January.
The rainfall ranges from lows of 500mm to 3200mm average per annum.
Soil Requirements:
Schizaea bifida prefers to grow in sandy loams to light gritty clays. The soils are usually derived from decomposed granites, sandstones or accumulated beach sands. The soils pH ranges from 5.5pH to 6.7pH. It does not tolerate waterlogged soils. Non saline soils to slightly saline soils are tolerated.
Height & Spread:
Wild Plants: 0.25m to 0.35m by 0.2m to 0.3m.
Characteristics:
The rhizomes grows as a small fern with thin, shortly creeping rhizomes that are densely covered in glossy pale to deep brown hirsute hairs. The clustered stipes is erect, subterete, furrowed on 1 side or is flattened. It is glabrous, smooth to scabrid and measure 70mm to 550mm in height by 0.6mm to 1.2mm diameter.
The lamina of the sterile fronds measure 100mm to 350mm in height. The fronds are simple or irregularly divided into 2 to 32 segments. The first dichotomous pinnae form just below the middle section of the frond. The pinnae are shorter than fertile fronds and measure 7mm to 8mm in height by 1mm to 2mm in width.
The lamina of Schizea bifida fertile fronds measure 200mm to 550mm in height. The fronds are simple or irregularly divided into 1 to 3 segments with a triangular shape looking from the side. The segments are smooth to scabrous. The pinnae are longer than fertile fronds measure 10mm to 20mm in length while the pinnae measure 8mm to 10mm in height by 5mm to 10mm in width.
The sori are crowded over the frond. The golden yellow-brown sporangia are mixed with glossy pale brown and deep brown hairs.
Confusing Species:
Schizaea bifida’s sori and sporangia are golden yellow-brown and mixed with glossy pale brown and deep brown hairs.
Schizaea dichotoma’s sori and sporangia are golden yellow-brown and mixed with glossy pale brown hairs.
Schizaea rupestris’s sori and sporangia are golden yellow-brown and are not mixed with hairs.
Wildlife:
Schizaea bifida’s wildlife is unknown to the author.
Cultivation:
Schizaea bifida is an excellent fern for cultivation that look great when mass planted.
Schizaea bifida is very hardy and beautiful fern that is easy to grow, which just require a moist garden position where it can get light shade with some dappled sunlight and a gentle cool air flow. It is ideally suited to a Eucalyptus bush garden or a dry heath.
It always looks green and fresh giving a miniature prehistoric look.
Small to medium frog or fish ponds are made even more attractive when surrounded by this fern growing in mass. Its size makes for a balance setting where small to medium rocks are used with other small sclerophyll understory herbs are planted like Viola betonicifolia.
If it is grown as a potted bush house plant, ensure it gets plenty of light a breezy position and is allowed to dry out before applying more water.
Propagation:
Fern Spores: All ferns that are declared rare, vulnerable or endangered are protected by Federal and State Laws and must not be removed from the wild unless you are a land developer, forestry, mining company or main Roads department etc. This includes bulbs, roots, leaves and flowers. No part of any plant can be removed from Federal, State or Local Government land without the prior permission of the authority and this includes the spore.
Most people are put off at the thought of growing ferns from spore. Like all plants that produce their offspring from seed or spore the methods are basically the same. Remember nature has been doing this for millions of years and has been very successful. I have had excellent results growing over 200 different species of Australian ferns so don’t be afraid. Give it a go.
Step 1. Select spore from the fern fronds. Wait until the fern is just starting to release its spore. Rinse the fronds under clean running water and dry. This is to wash off any other spores from rogue ferns that may have settled onto the fronds. (There is nothing worse than having common brake or common soft bracken contaminating a prized tree fern or epiphyte.)
Step 2. Place the dry fronds in a clean brown paper bag and keep them in a cool dark place like the linen closet for about a week to ten days before you are ready to sow the spore. The exception to this rule applies to ferns, which produce green spores. These must be sown immediately that they are released. Todea Barbara is a good example of a fern, which produces green spore.
Step 3. Take a large ice cream container, a small ice cream container and a clean clear plastic bag large enough to seal the large ice cream container and three or four milk bottle tops.
Step 4. Punch or drill 6 to 10 5mm holes in the bottom of the small ice cream container.
Step 5. Wash both containers, tops and plastic bag so that they are very clean and sterile.
Step 6. Use a clean fine seed raising mi. We used 30mm fine sand, 30mm peat and 30mm perlite and 10mm vermiculite. We used crushed basalt, crusher dust and peat in a 50:50 ratio for epiphytes. Moisten the mix enough that water does not run out when the mix is squeezed between the fingers.
Step 7. Place the moisten mix (Enough to half fill the small ice cream container) in the microwave oven with a large glass of water for 7 or 8 minutes, until the water is boiling. Allow them to cool in the oven. You will need the water later so do not tip it out.
Step 8. Take the brown paper bag out of the linen closet. Shake the bag and remove the fronds. You should have a yellow, brown, black or rarely greenish brown or ochre powder or very fine, small round pin head size spore depending on the specie involved.
Step 9. Remove the mixture from the oven once it has cooled and place it in the small ice cream container and level.
Step 10. Sprinkle the spore sparsely over the mixture in the small ice cream container.
Step 11. Place the milk bottle tops in the large ice cream container with the flat surface facing down. Place the small ice cream container in the large ice cream container so that it is sitting on the milk bottle tops.
Step 12. Remove the water from the microwave and pour it into the larger ice cream container so there is 25mm to 30mm of water in the bottom.
Step 13. Place the ice cream containers in the plastic bag and seal. Step 14. Place the contents and bag in a warm shady place preferably 50mm to 70mm shade depending on the specie. Shade houses and some window sills are ideal.
Step 15. The surface should turn green within a week to two weeks. The prothallus will then develop. From the prthalus the first true fronds will appear. Wait until the ferns are 20mm to 35mm in height before you attempt to transplant them. Once they are ready open the bag up slightly and allow the air to flow around the little ferns. Every 3 to 5 days open the bag a little further so the ferns get use to their new environment. Allow them a week to two weeks to harden off before you transplant them following the removal of the plastic bag. Carefully prick them out into 50mm standard squat tubes as you would any seedling.
Do not try to transplant them as single plants as they are still a little delicate still.
Once the smaller ones again reach 50mm to 70mm you may wish to divide the stronger and hardier individual plants into smaller clumps in 100mm squat pots.
Step 16. We fertilized with seaweed, fish emulsion or organic chicken pellets soaked in water on an alternate basis until established. Fertilize every two months for one year even when in the ground, then annually in early September to October to maintain better colour, health, vitality and flowering.
Further Comments from Readers:
“Hi reader, it seems you use The Bible of Botany a lot. That’s great as we have great pleasure in bringing it to you! It’s a little awkward for us to ask, but our first aim is to purchase land approximately 1,600 hectares to link several parcels of N.P. into one at The Pinnacles NSW Australia, but we need your help. We’re not salespeople. We’re amateur botanists who have dedicated over 30 years to saving the environment in a practical way. We depend on donations to reach our goal. If you donate just $5, the price of your coffee this Sunday, We can help to keep the planet alive in a real way and continue to bring you regular updates and features on Australian plants all in one Botanical Bible. Any support is greatly appreciated. Thank you.”
In the spirit of reconciliation we acknowledge the Bundjalung, Gumbaynggirr and Yaegl and all aboriginal nations throughout Australia and their connections to land, sea and community. We pay our respect to their Elders past, present and future for the pleasures we have gained.
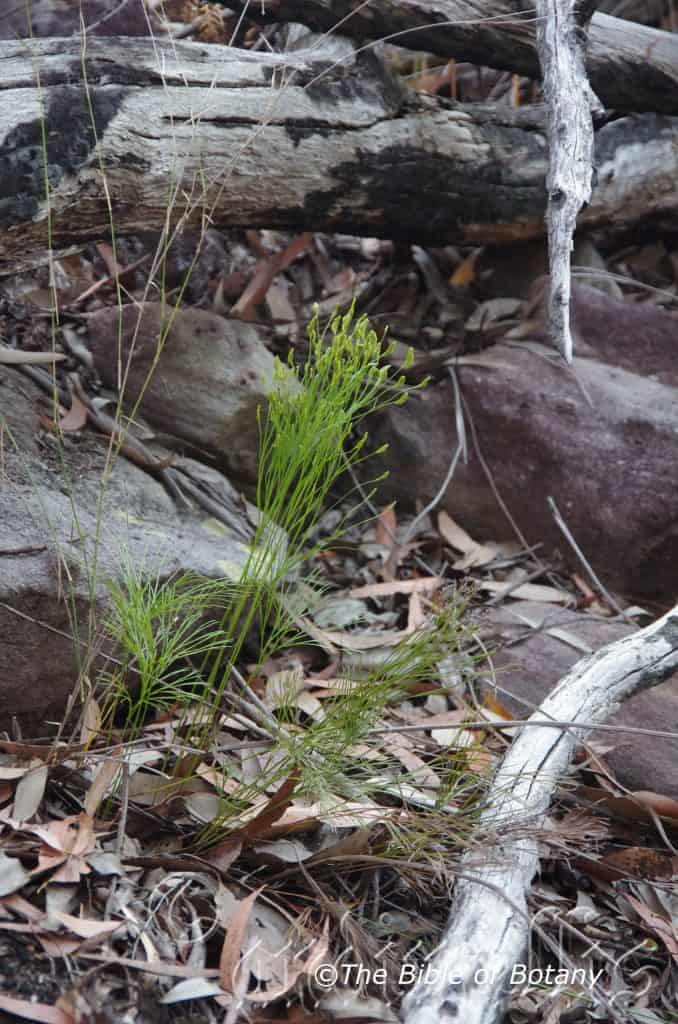
The Pinnacles NSW
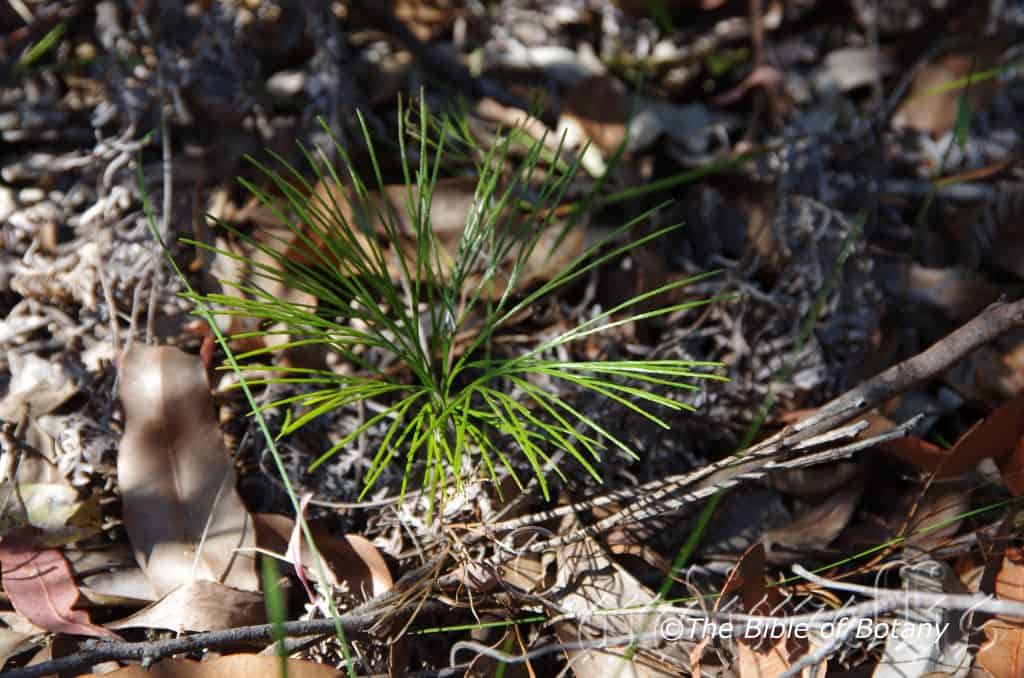
Fortis Creek National Park NSW
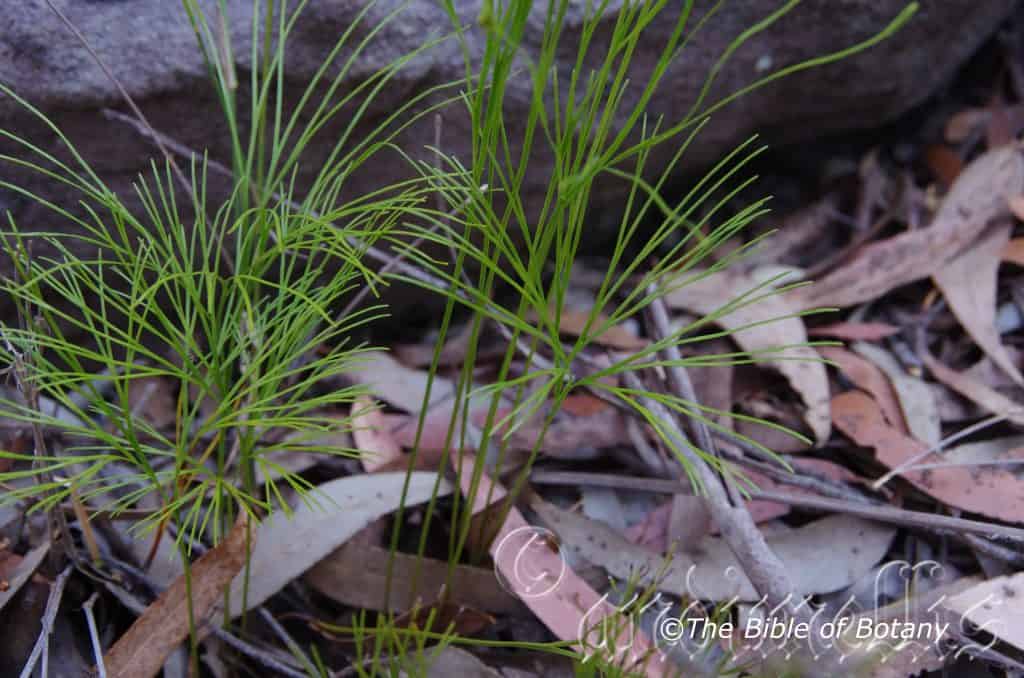
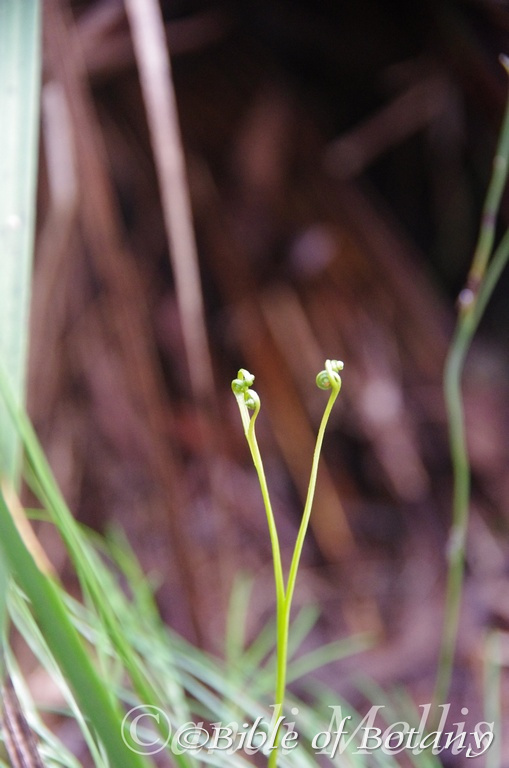
Author’s Garden The Pinnacles NSW

Author’s Garden The Pinnacles NSW
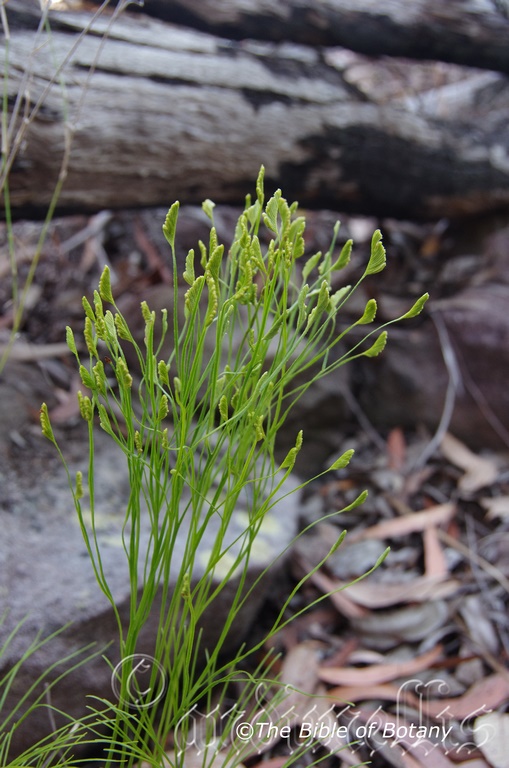
The Pinnacles NSW
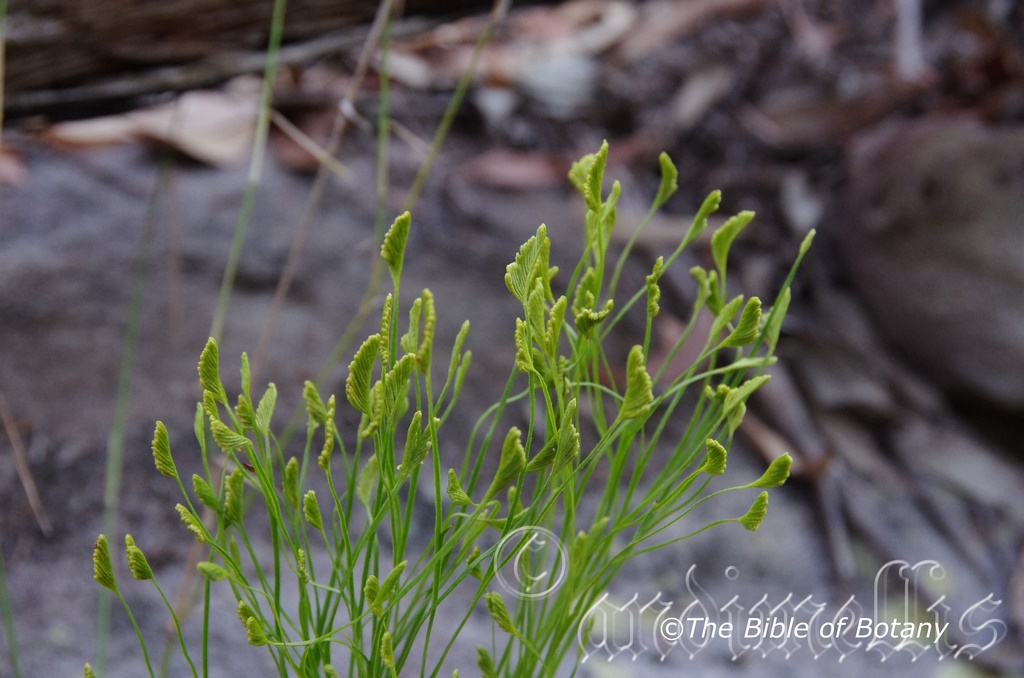
The Pinnacles NSW
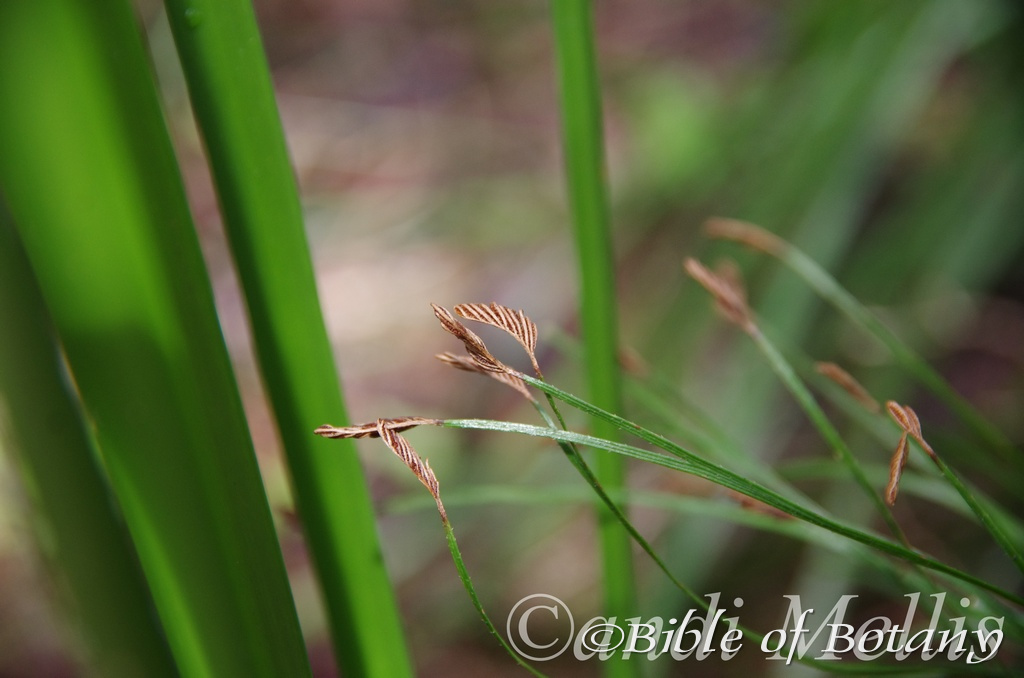
Author’s Garden The Pinnacles NSW
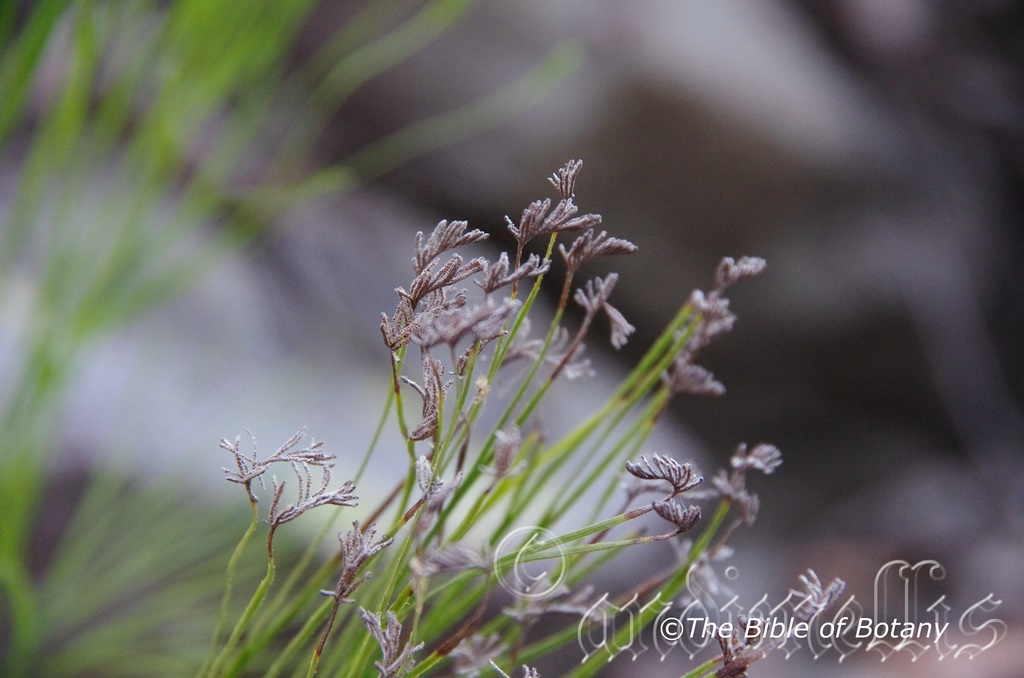
The Pinnacles NSW
Schizaea dichotoma
Classification:
Unranked: Pteridiophyta
Class: Pteridopsida
Order: Polypodiales
Family: Pteridaceae
Genus: From Schizein, which is Ancient Greek or Schistosa, which is Latin for to split or divide. It refers to fronds, which have very deep clefts.
Species: From Dikos, which is Ancient Greek for double and Khotomos which is Ancient Greek or Chotomos which is Latin for to fork. It refers branches, leaves, fronds or at times other organs, which divide like the prongs on a fork, equally two at a time.
Common Name: Branch Comb Fern.
Distribution:
Schizaea dichotoma is found in 3 disjunct populations including between the Prince River Region Nature Reserve, the convergence of the Prince Regent River and the Pitta River and the Artesian Range in far north western, Western Australia.
In the Northern territory it is found from between Darwin, Robin Falls on the Georges River, Katherine Gorge National Park and Elcho Island. It is also found on Bathurst Island, Melville Island and Groote Eyelandt.
In the east it is found south from the Torres Strait Islands and the northern third of Cape York Peninsula in far north Queensland then mainly east of the Great Dividing Range to the coast, south to the Sutherland Shire in central coastal New South Wales. It is also found on most of the larger off shore islands. Despite having a large area it is not common throughout its range.
https://avh.ala.org.au/occurrences/search?taxa=Schizaea+dichotoma#tab_mapView
Habitat Aspect Climate:
Schizaea dichotoma prefers dappled light to full shade. It grows in well-developed cool well developed tropical rainforests, warm well developed sub-tropical, temperate rainforests, littoral rainforests or moist Eucalyptus forests. The altitude ranges from 5 meters ASL to 300 meters ASL but has been collected at altitudes reaching 900 meters ASL.
The temperatures range from minus 3 degree in July to 40 degrees in January.
The rainfall ranges from lows of 1050mm to 3000mm average per annum.
Soil Requirements:
Schizaea dichotoma prefers to sandy loams. The soils are usually derived from decomposed granites or sandstones. The soils pH ranges from 5.5pH to 6pH. It does not tolerate waterlogged soils. Non saline soils to slightly saline soils are tolerated.
Height & Spread:
Wild Plants: 0.2m to 0.6m by 0.15m to 0.32m.
Characteristics:
Schizaea dichotoma grows as a small fern with thin, shortly creeping rhizomes that are densely covered in glossy pale brown hirsute hairs. The clustered stipes is sub erect to spreading and subterete. It is glabrous, smooth to slightly scabrous and measure 40mm to 600mm in height by 0.2mm to 0.6mm diameter.
The lamina of the sterile fronds measure 150mm to 300mm in height by 1mm to 1.5mm in diameter. The fronds are simple or irregularly divided into 20 to 32 segments. The first dichotomous pinnae form above the middle section of the fronds. The pinnae are shorter than fertile fronds and measure 7mm to 8mm in height by 1mm to 2mm in width.
The lamina of Schizea dichotoma fertile fronds measure 200mm to 500mm in height. The fronds are simple or irregularly divided into 3 to 3 segments with a triangular shape looking from the side. The segments are smooth to scabrous. The pinnae are longer than fertile fronds measure 10mm to 15mm in length while the pinnae measure 8mm to 16mm in height by 2mm to 8mm in width.
The sori are crowded while the sporangia are mixed with glossy pale brown hirsute hairs.
Confusing Species:
Schizaea dichotoma’s has a fan shape sterile fronds. The sori and sporangia are golden yellow-brown and mixed with glossy pale brown hairs.
Schizaea bifida has long forked sterile fronds. The sori and sporangia are golden yellow-brown and mixed with glossy pale brown and deep brown hairs.
Schizaea rupestrishas short grass like sterile fronds. The sori and sporangia are golden yellow-brown and are not mixed with hairs.
Wildlife:
Schizaea dichotoma’s wildlife is unknown to the author.
Cultivation:
Schizaea dichotoma are excellent ferns for cultivation that look great when mass planted.
Schizaea dichotoma is very hardy and is another of those easy to grow ferns that just require an average, moist garden position where it can get light shade with some dappled sunlight. It is ideally suited to a Eucalyptus bush garden or a dry heath.
It always looks green and fresh giving a miniature prehistoric look.
Small to medium frog or fish ponds are made even more attractive when surrounded by this fern growing in mass. Its size makes for a balance setting where small to medium rocks are used with other small sclerophyll understory herbs are planted like Viola betonicifolia.
If it is grown as a potted bush house plant, ensure it gets plenty of light a breezy position and is allowed to dry out before applying more water.
Propagation:
Fern Spores: All ferns that are declared rare, vulnerable or endangered are protected by Federal and State Laws and must not be removed from the wild unless you are a land developer, forestry, mining company or main Roads department etc. This includes bulbs, roots, leaves and flowers. No part of any plant can be removed from Federal, State or Local Government land without the prior permission of the authority and this includes the spore.
Most people are put off at the thought of growing ferns from spore. Like all plants that produce their offspring from seed or spore the methods are basically the same. Remember nature has been doing this for millions of years and has been very successful. I have had excellent results growing over 200 different species of Australian ferns so don’t be afraid. Give it a go.
Step 1. Select spore from the fern fronds. Wait until the fern is just starting to release its spore. Rinse the fronds under clean running water and dry. This is to wash off any other spores from rogue ferns that may have settled onto the fronds. (There is nothing worse than having common brake or common soft bracken contaminating a prized tree fern or epiphyte.)
Step 2. Place the dry fronds in a clean brown paper bag and keep them in a cool dark place like the linen closet for about a week to ten days before you are ready to sow the spore. The exception to this rule applies to ferns, which produce green spores. These must be sown immediately that they are released. Todea Barbara is a good example of a fern, which produces green spore.
Step 3. Take a large ice cream container, a small ice cream container and a clean clear plastic bag large enough to seal the large ice cream container and three or four milk bottle tops.
Step 4. Punch or drill 6 to 10 5mm holes in the bottom of the small ice cream container.
Step 5. Wash both containers, tops and plastic bag so that they are very clean and sterile.
Step 6. Use a clean fine seed raising mi. We used 30mm fine sand, 30mm peat and 30mm perlite and 10mm vermiculite. We used crushed basalt, crusher dust and peat in a 50:50 ratio for epiphytes. Moisten the mix enough that water does not run out when the mix is squeezed between the fingers.
Step 7. Place the moisten mix (Enough to half fill the small ice cream container) in the microwave oven with a large glass of water for 7 or 8 minutes, until the water is boiling. Allow them to cool in the oven. You will need the water later so do not tip it out.
Step 8. Take the brown paper bag out of the linen closet. Shake the bag and remove the fronds. You should have a yellow, brown, black or rarely greenish brown or ochre powder or very fine, small round pin head size spore depending on the specie involved.
Step 9. Remove the mixture from the oven once it has cooled and place it in the small ice cream container and level.
Step 10. Sprinkle the spore sparsely over the mixture in the small ice cream container.
Step 11. Place the milk bottle tops in the large ice cream container with the flat surface facing down. Place the small ice cream container in the large ice cream container so that it is sitting on the milk bottle tops.
Step 12. Remove the water from the microwave and pour it into the larger ice cream container so there is 25mm to 30mm of water in the bottom.
Step 13. Place the ice cream containers in the plastic bag and seal. Step 14. Place the contents and bag in a warm shady place preferably 50mm to 70mm shade depending on the specie. Shade houses and some window sills are ideal.
Step 15. The surface should turn green within a week to two weeks. The prothallus will then develop. From the prthalus the first true fronds will appear. Wait until the ferns are 20mm to 35mm in height before you attempt to transplant them. Once they are ready open the bag up slightly and allow the air to flow around the little ferns. Every 3 to 5 days open the bag a little further so the ferns get use to their new environment. Allow them a week to two weeks to harden off before you transplant them following the removal of the plastic bag. Carefully prick them out into 50mm standard squat tubes as you would any seedling.
Do not try to transplant them as single plants as they are still a little delicate still.
Once the smaller ones again reach 50mm to 70mm you may wish to divide the stronger and hardier individual plants into smaller clumps in 100mm squat pots.
Step 16. We fertilized with seaweed, fish emulsion or organic chicken pellets soaked in water on an alternate basis until established. Fertilize every two months for one year even when in the ground, then annually in early September to October to maintain better colour, health, vitality and flowering.
Further Comments from Readers:
“Hi reader, it seems you use The Bible of Botany a lot. That’s great as we have great pleasure in bringing it to you! It’s a little awkward for us to ask, but our first aim is to purchase land approximately 1,600 hectares to link several parcels of N.P. into one at The Pinnacles NSW Australia, but we need your help. We’re not salespeople. We’re amateur botanists who have dedicated over 30 years to saving the environment in a practical way. We depend on donations to reach our goal. If you donate just $5, the price of your coffee this Sunday, We can help to keep the planet alive in a real way and continue to bring you regular updates and features on Australian plants all in one Botanical Bible. Any support is greatly appreciated. Thank you.”
In the spirit of reconciliation we acknowledge the Bundjalung, Gumbaynggirr and Yaegl and all aboriginal nations throughout Australia and their connections to land, sea and community. We pay our respect to their Elders past, present and future for the pleasures we have gained.
Schizaea rupestris
Classification:
Unranked: Pteridiophyta
Class: Pteridopsida
Order: Polypodiales
Family: Pteridaceae
Genus: From Schizein, which is Ancient Greek or Schistosa, which is Latin for to split or divide. It refers to fronds, which have very deep clefts.
Species: From Rūpestre, which is Latin for a cliff or craggy outcrop. It refers to plants, which prefer to grow or were thought to favour only rocky crags on cliffs.
Common Name:
Distribution:
Schizaea rupestris is restricted to a small area in central coastal New South Wales and the nearby ranges between Gosford, Katoomba and Mount Tianjara with a single population further north in the Waihou Floral Reserve.
https://avh.ala.org.au/occurrences/search?taxa=Schizaea+rupestris#tab_mapView
Habitat Aspect Climate:
Schizaea rupestris prefer dappled light to full shade. It grows in moist Eucalyptus forests, on the edge of rainforests, monsoonal forests, vine forests or littoral rainforests. It is most frequently found growing on damp rocks and banks around waterfalls, banks of streams or in crevices at the bases of sandstone cliffs. It is usually growing in companionship with mosses, liverworts and small herbs.
The altitude ranges from 100 meters ASL to 450 meters ASL.
The temperatures range from minus 1 degree in July to 38 degrees in January.
The rainfall ranges from lows of 850mm to 1280mm average per annum.
Soil Requirements:
Schizaea rupestris prefers to grow as a lithophyte on porous type rocks. The soils are usually derived from partially decomposed red and reddish-brown sandstones. The soils pH ranges from 5.5pH to 6.7pH. It does not tolerate waterlogged soils. Non saline soils to slightly saline soils are tolerated.
Height & Spread:
Wild Plants:0.1m to 0.15m by 0.08m to 0.15m.
Characteristics:
Schizaea rupestris grows as a small fern with thin, shortly creeping rhizomes that are densely covered in glossy pale brown hirsute hairs. The clustered stipes is erect to sub erect and subterete. It is glabrous, smooth to glabrous and measure 50mm to 210mm in height by 1mm to 1.25mm diameter.
The lamina of the sterile fronds measure 50mm to 150mm in height. The fronds are simple or irregularly divided with the segments measuring 2mm to 7mm in length. The pinnae are shorter than fertile fronds and measure 3mm to 12mm in height by 1mm to 1.5mm in width.
The lamina of the fertile fronds measure 80mm to 210mm in height. The fronds are simple or irregularly divided with fewer segments than the sterile fronds. The segments measure 2mm to 7mm in length. The pinnae are longer than sterile fronds and measure 6mm to 16mm in height by 1mm to 1.5mm in width.
The sori of Schizaea rupestris are crowded over the frond while the sporangia are not mixed with hairs.
Confusing Species:
Schizaea rupestris’s sori and sporangia are golden yellow-brown and are not mixed with hairs.
Schizaea bifida’s sori and sporangia are golden yellow-brown and mixed with glossy pale brown and deep brown hairs.
Schizaea dichotoma’s sori and sporangia are golden yellow-brown and mixed with glossy pale brown hairs.
Wildlife:
Schizaea rupestris’s wildlife is unknown to the author.
Cultivation:
Schizaea rupestris is an excellent fern for cultivation that look good when mass planted. It is very hardy and is another of those easy to grow ferns that just require a moist garden position where it can get light shade with some dappled sunlight and a gentle cool air flow. It is ideally suited to a Eucalyptus bush garden or a dry heath.
It always looks green and fresh giving a miniature prehistoric look.
Small to medium frog or fish ponds are made even more attractive when surrounded by this fern growing in mass. Its size makes for a balance setting where small to medium rocks are used with other small sclerophyll understory herbs are planted like Viola betonicifolia.
If it is grown as a potted bush house plant, ensure it gets plenty of light a breezy position and is allowed to dry out before applying more water.
Propagation:
Fern Spores: All ferns that are declared rare, vulnerable or endangered are protected by Federal and State Laws and must not be removed from the wild unless you are a land developer, forestry, mining company or main Roads department etc. This includes bulbs, roots, leaves and flowers. No part of any plant can be removed from Federal, State or Local Government land without the prior permission of the authority and this includes the spore.
Most people are put off at the thought of growing ferns from spore. Like all plants that produce their offspring from seed or spore the methods are basically the same. Remember nature has been doing this for millions of years and has been very successful. I have had excellent results growing over 200 different species of Australian ferns so don’t be afraid. Give it a go.
Step 1. Select spore from the fern fronds. Wait until the fern is just starting to release its spore. Rinse the fronds under clean running water and dry. This is to wash off any other spores from rogue ferns that may have settled onto the fronds. (There is nothing worse than having common brake or common soft bracken contaminating a prized tree fern or epiphyte.)
Step 2. Place the dry fronds in a clean brown paper bag and keep them in a cool dark place like the linen closet for about a week to ten days before you are ready to sow the spore. The exception to this rule applies to ferns, which produce green spores. These must be sown immediately that they are released. Todea Barbara is a good example of a fern, which produces green spore.
Step 3. Take a large ice cream container, a small ice cream container and a clean clear plastic bag large enough to seal the large ice cream container and three or four milk bottle tops.
Step 4. Punch or drill 6 to 10 5mm holes in the bottom of the small ice cream container.
Step 5. Wash both containers, tops and plastic bag so that they are very clean and sterile.
Step 6. Use a clean fine seed raising mi. We used 30mm fine sand, 30mm peat and 30mm perlite and 10mm vermiculite. We used crushed basalt, crusher dust and peat in a 50:50 ratio for epiphytes. Moisten the mix enough that water does not run out when the mix is squeezed between the fingers.
Step 7. Place the moisten mix (Enough to half fill the small ice cream container) in the microwave oven with a large glass of water for 7 or 8 minutes, until the water is boiling. Allow them to cool in the oven. You will need the water later so do not tip it out.
Step 8. Take the brown paper bag out of the linen closet. Shake the bag and remove the fronds. You should have a yellow, brown, black or rarely greenish brown or ochre powder or very fine, small round pin head size spore depending on the specie involved.
Step 9. Remove the mixture from the oven once it has cooled and place it in the small ice cream container and level.
Step 10. Sprinkle the spore sparsely over the mixture in the small ice cream container.
Step 11. Place the milk bottle tops in the large ice cream container with the flat surface facing down. Place the small ice cream container in the large ice cream container so that it is sitting on the milk bottle tops.
Step 12. Remove the water from the microwave and pour it into the larger ice cream container so there is 25mm to 30mm of water in the bottom.
Step 13. Place the ice cream containers in the plastic bag and seal. Step 14. Place the contents and bag in a warm shady place preferably 50mm to 70mm shade depending on the specie. Shade houses and some window sills are ideal.
Step 15. The surface should turn green within a week to two weeks. The prothallus will then develop. From the prthalus the first true fronds will appear. Wait until the ferns are 20mm to 35mm in height before you attempt to transplant them. Once they are ready open the bag up slightly and allow the air to flow around the little ferns. Every 3 to 5 days open the bag a little further so the ferns get use to their new environment. Allow them a week to two weeks to harden off before you transplant them following the removal of the plastic bag. Carefully prick them out into 50mm standard squat tubes as you would any seedling.
Do not try to transplant them as single plants as they are still a little delicate still.
Once the smaller ones again reach 50mm to 70mm you may wish to divide the stronger and hardier individual plants into smaller clumps in 100mm squat pots.
Step 16. We fertilized with seaweed, fish emulsion or organic chicken pellets soaked in water on an alternate basis until established. Fertilize every two months for one year even when in the ground, then annually in early September to October to maintain better colour, health, vitality and flowering.
Further Comments from Readers:
“Hi reader, it seems you use The Bible of Botany a lot. That’s great as we have great pleasure in bringing it to you! It’s a little awkward for us to ask, but our first aim is to purchase land approximately 1,600 hectares to link several parcels of N.P. into one at The Pinnacles NSW Australia, but we need your help. We’re not salespeople. We’re amateur botanists who have dedicated over 30 years to saving the environment in a practical way. We depend on donations to reach our goal. If you donate just $5, the price of your coffee this Sunday, We can help to keep the planet alive in a real way and continue to bring you regular updates and features on Australian plants all in one Botanical Bible. Any support is greatly appreciated. Thank you.”
In the spirit of reconciliation we acknowledge the Bundjalung, Gumbaynggirr and Yaegl and all aboriginal nations throughout Australia and their connections to land, sea and community. We pay our respect to their Elders past, present and future for the pleasures we have gained.
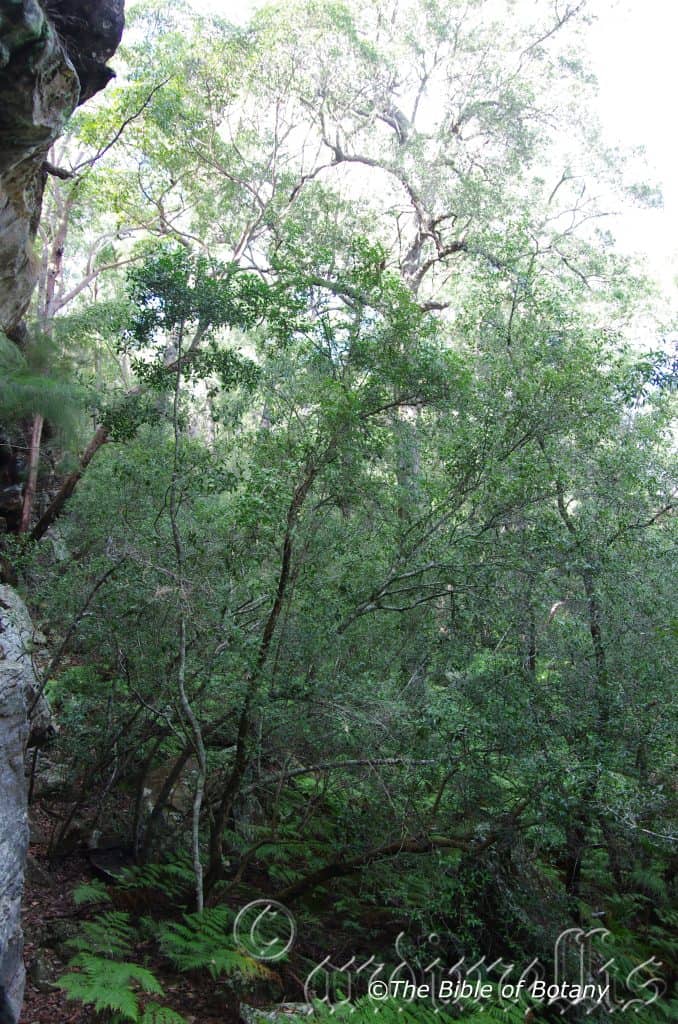
The Pinnacles NSW
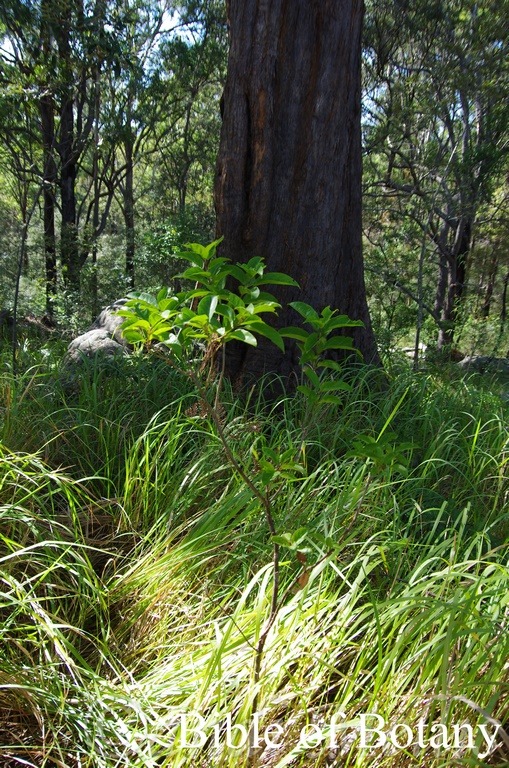
Sherwood Nature Reserve NSW
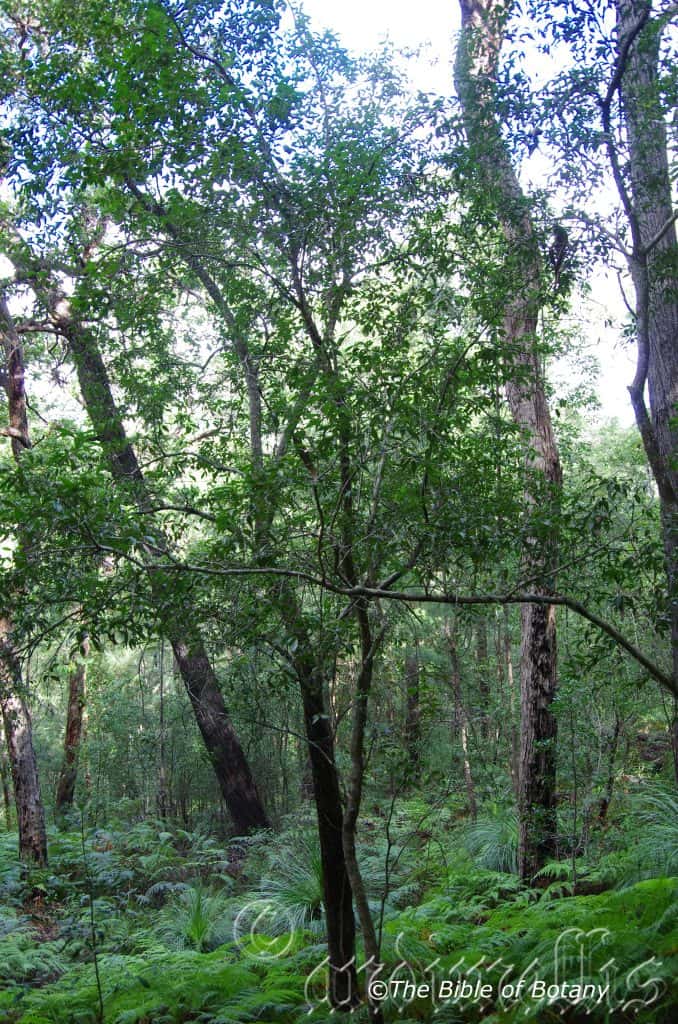
The Pinnacles NSW
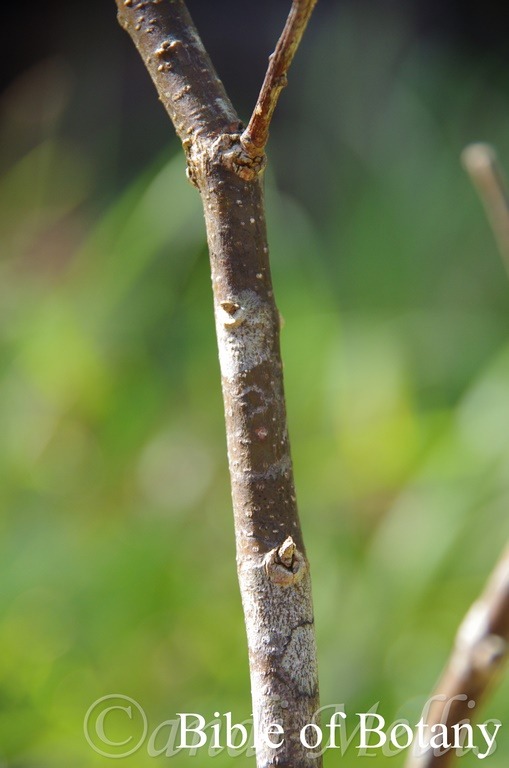
Sherwood Nature Reserve NSW
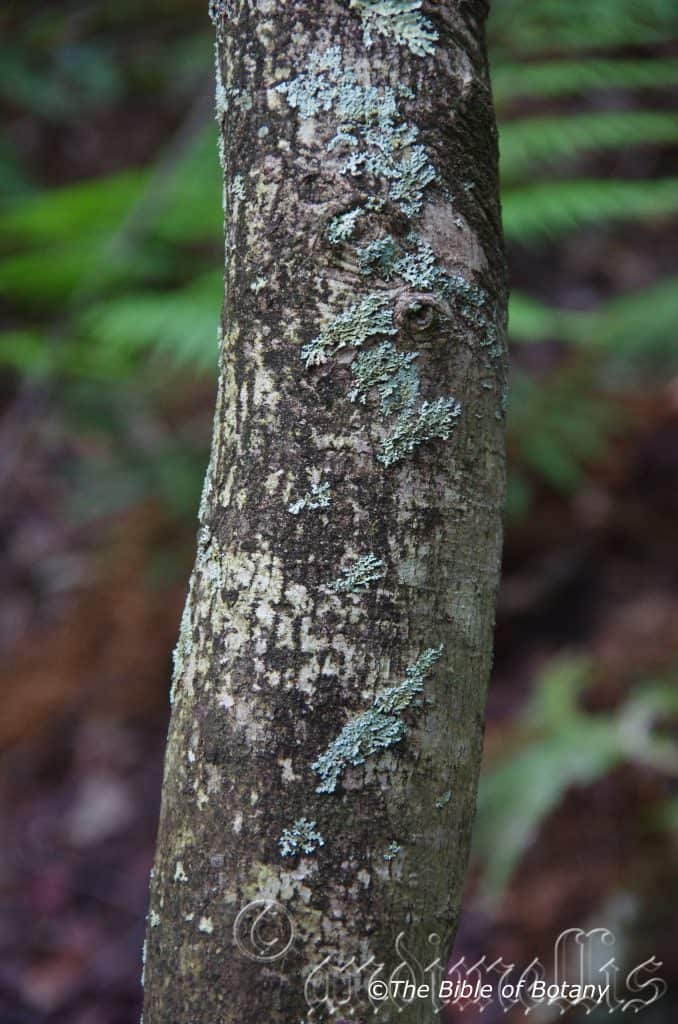
The Pinnacles NSW
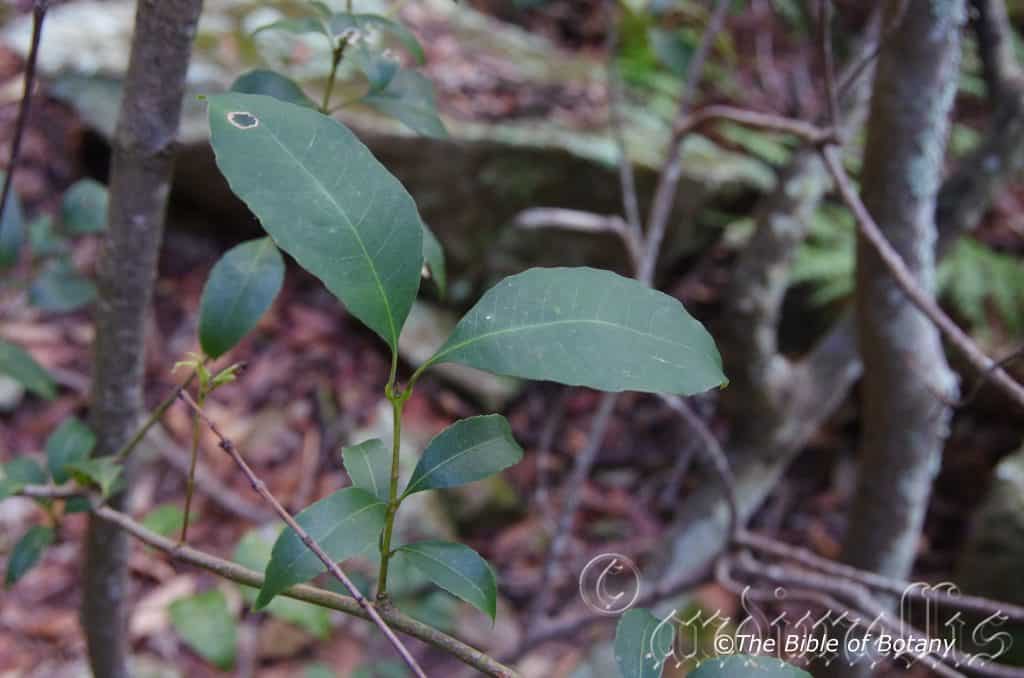
The Pinnacles NSW
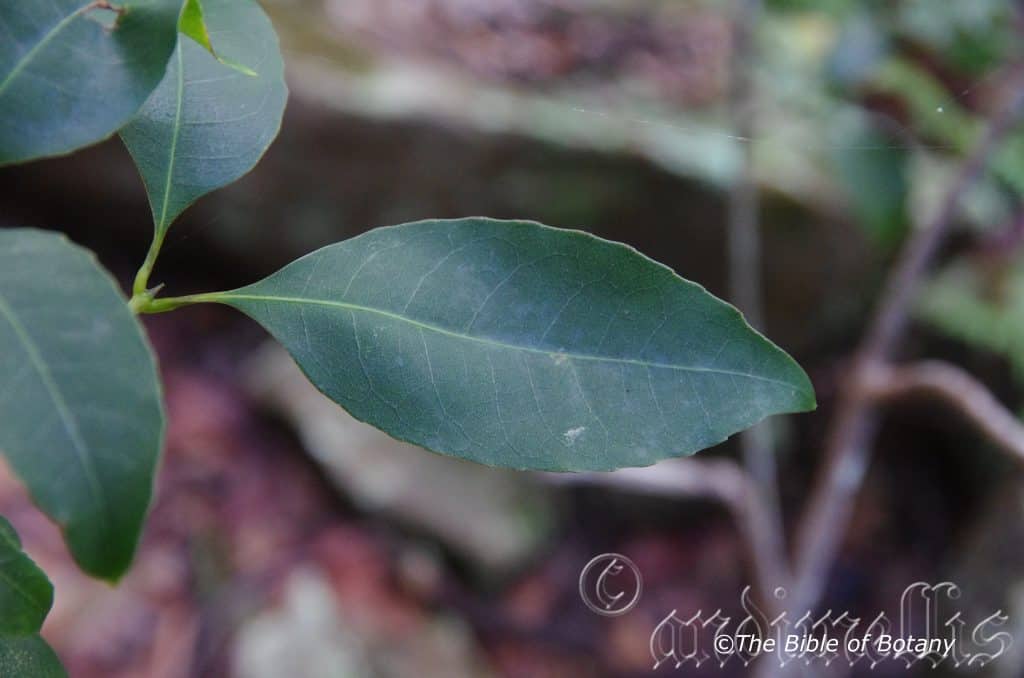
The Pinnacles NSW
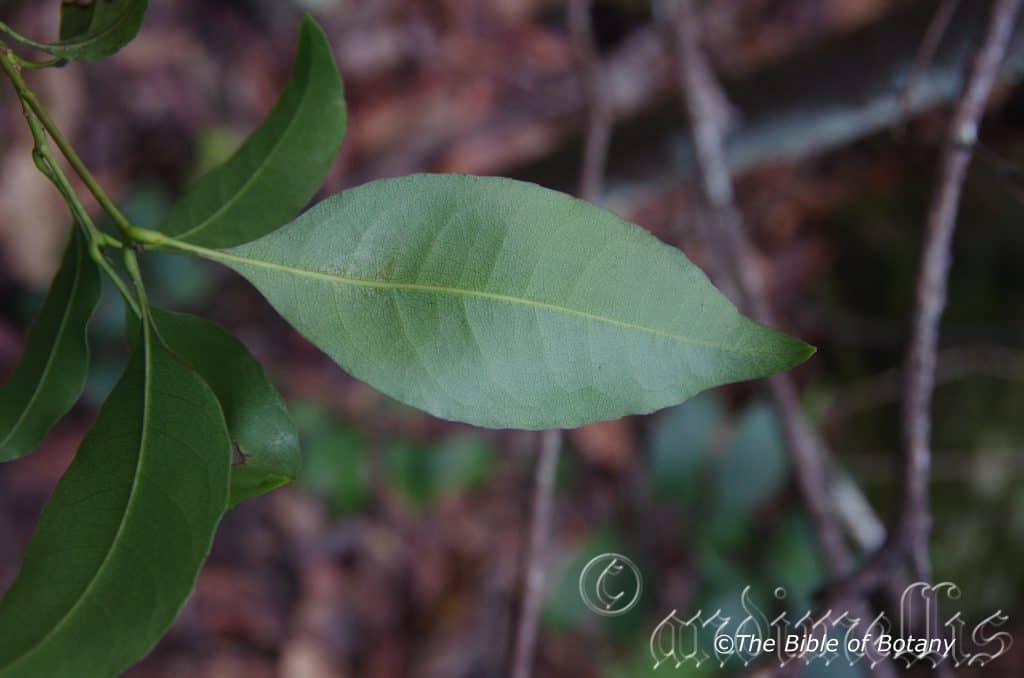
The Pinnacles NSW
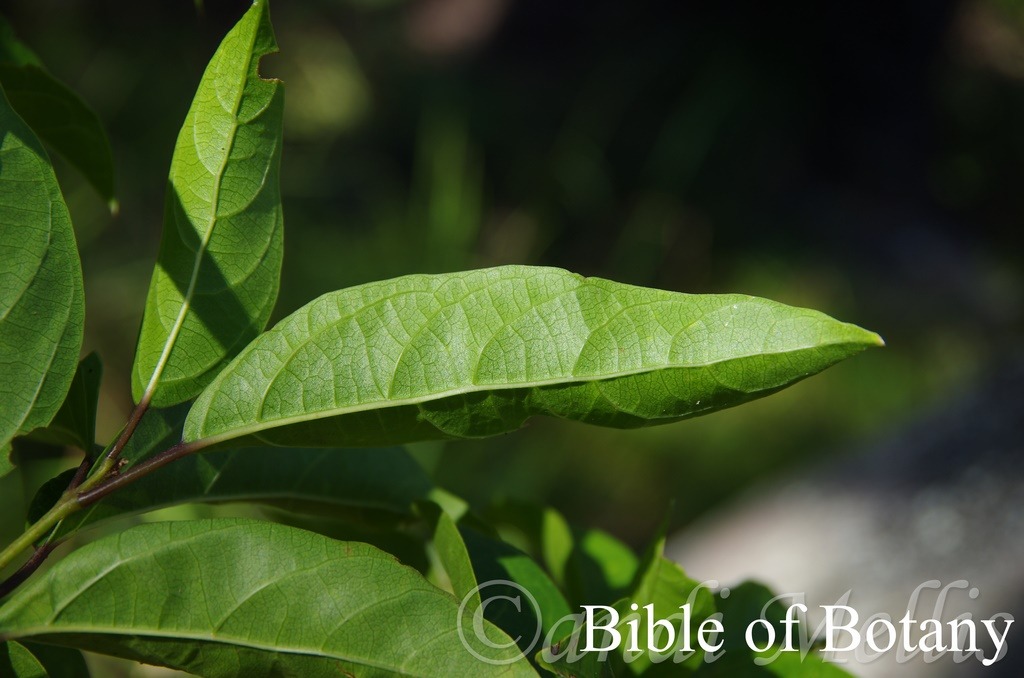
Sherwood Nature Reserve NSW
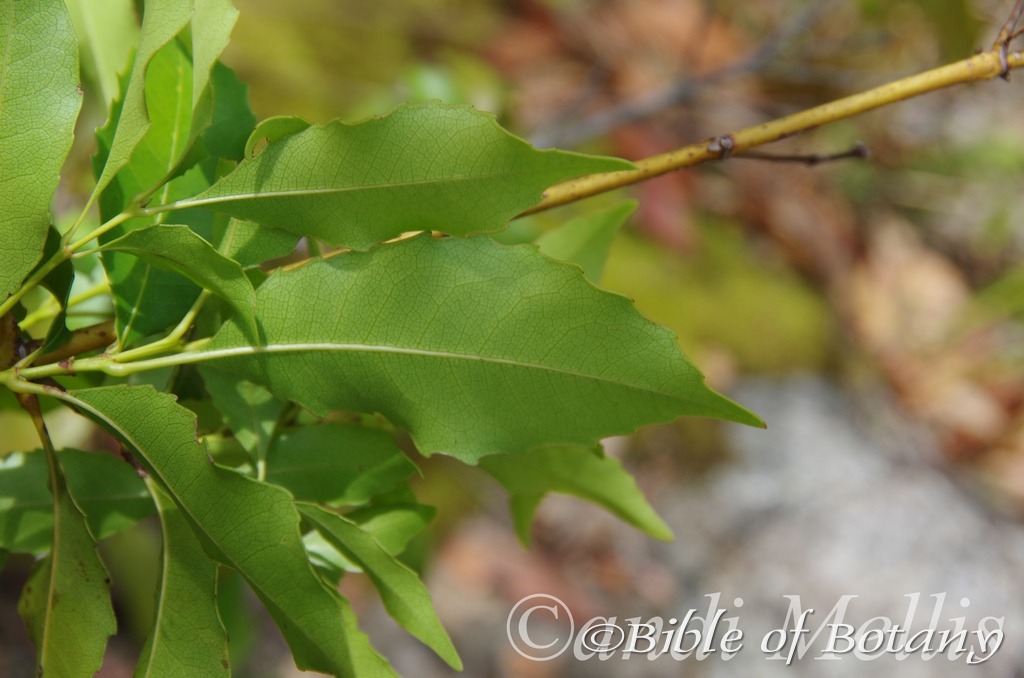
Ewingar National Park NSW
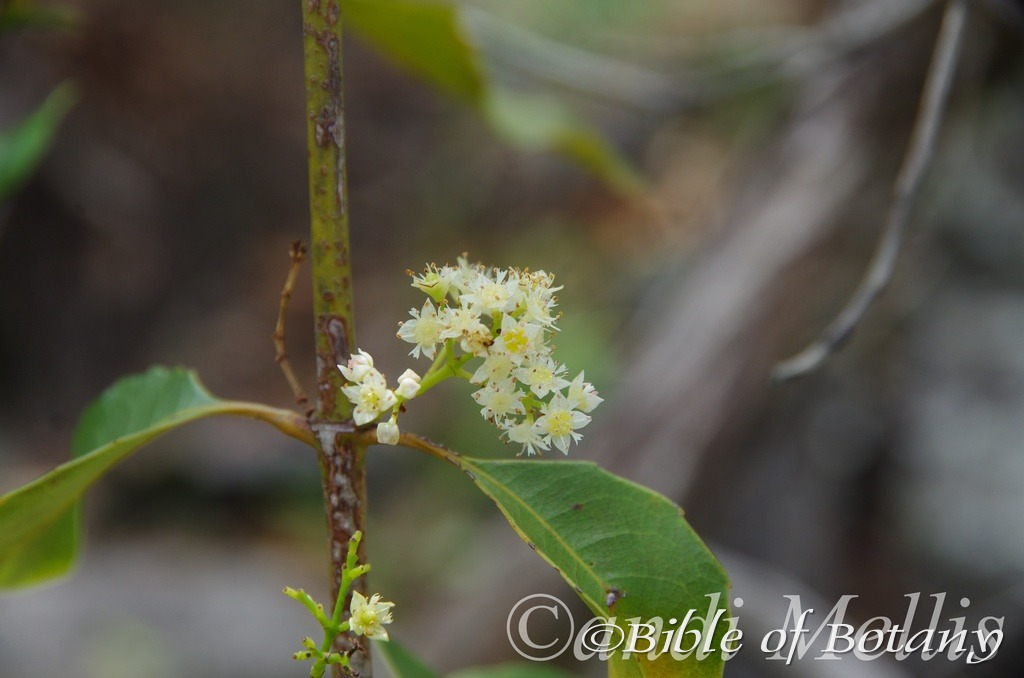
Fortis Creek National Park NSW
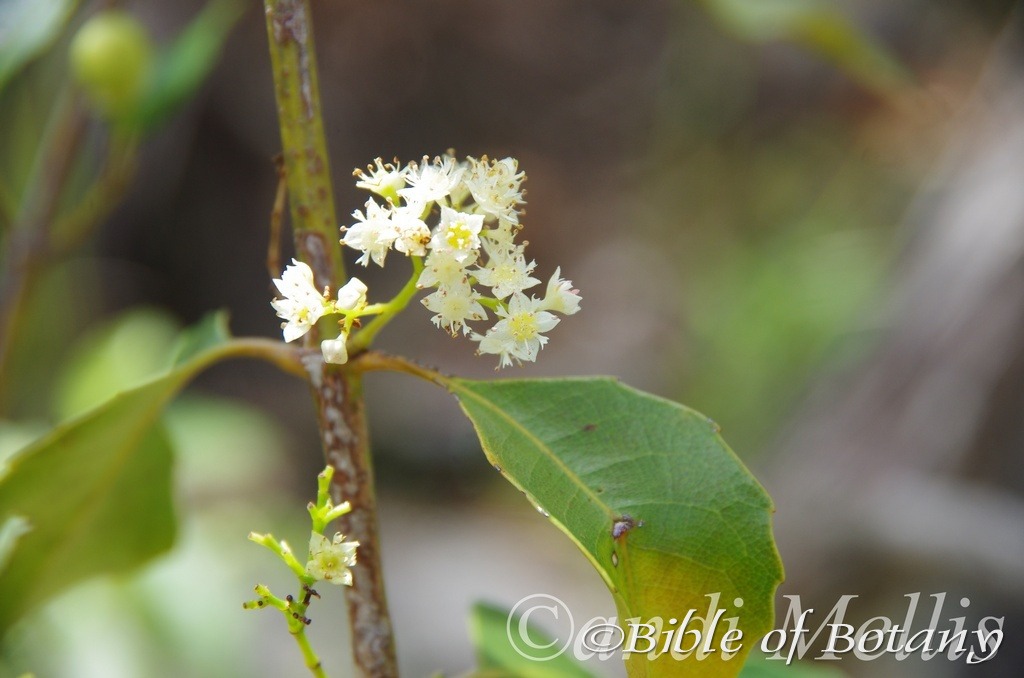
Fortis Creek National Park NSW
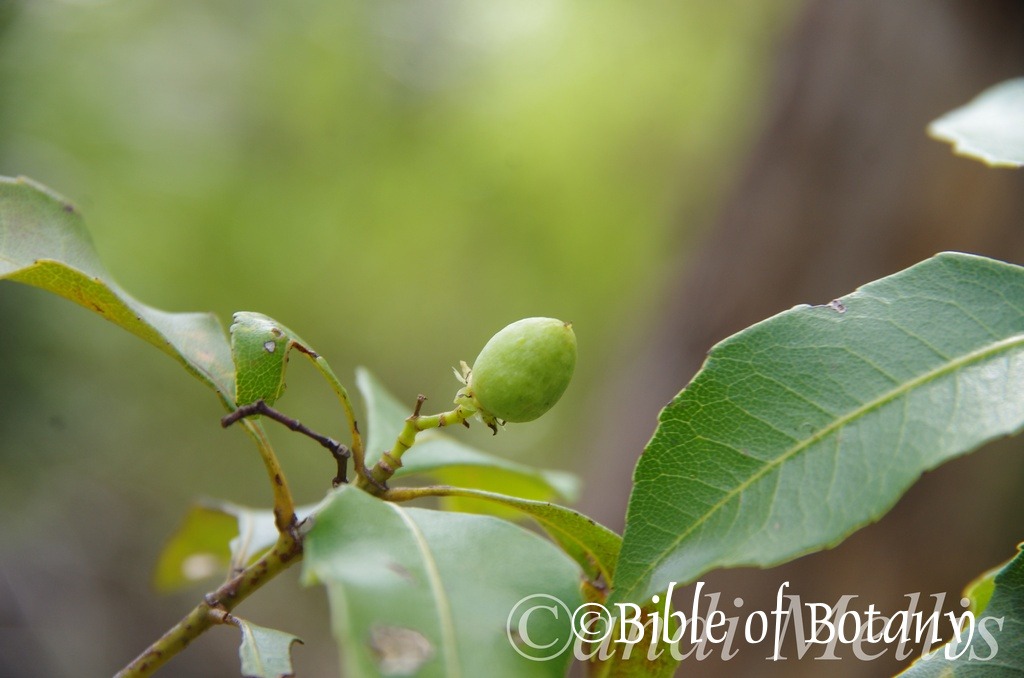
Fortis Creek National Park NSW
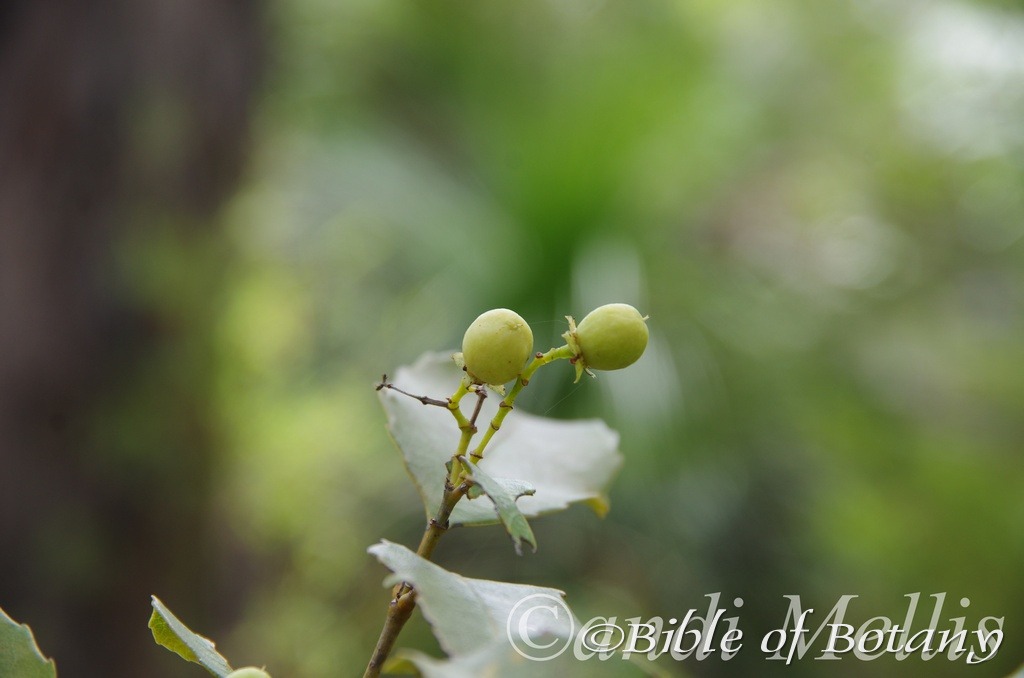
Fortis Creek National Park NSW
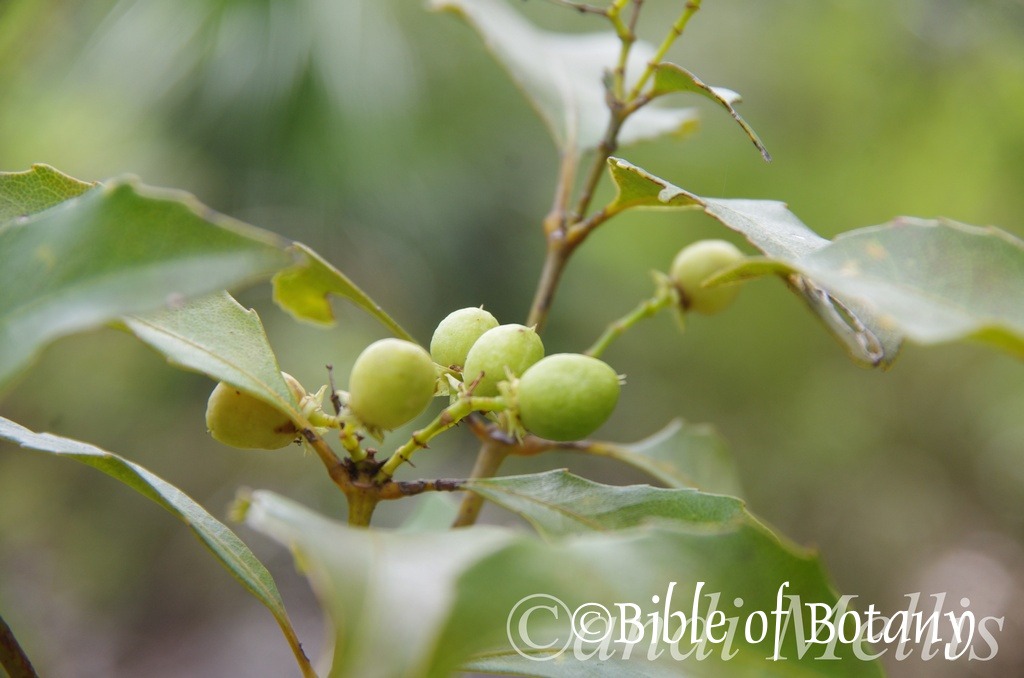
Fortis Creek National Park NSW
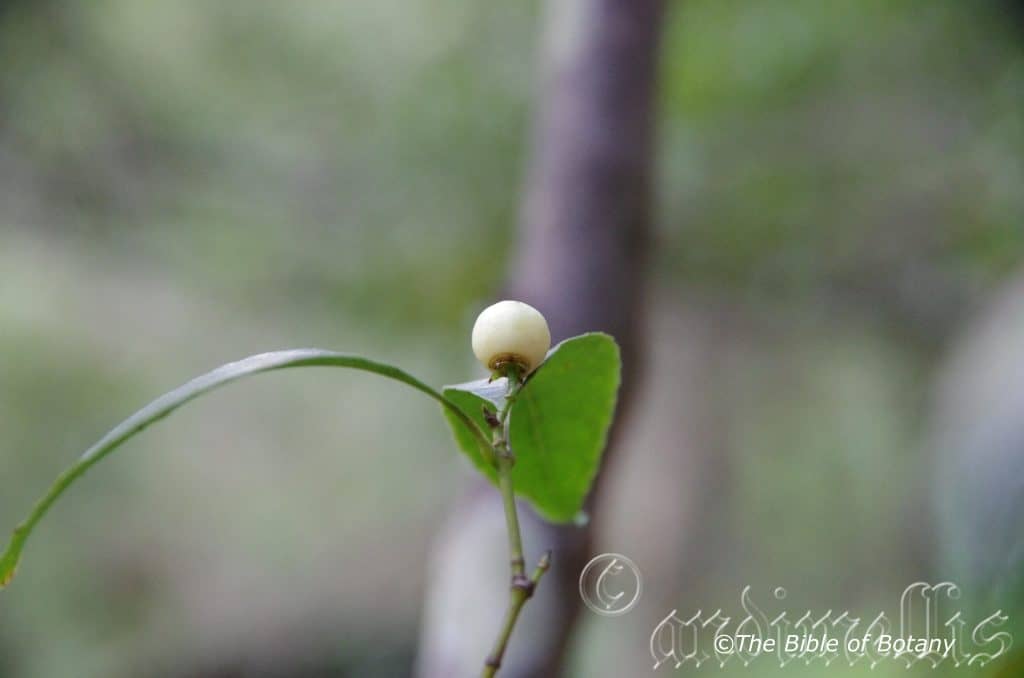
Fortis Creek National Park NSW
Schizomeria ovata
Classification:
Unranked: Eudicots
Unranked: Rosids
Order: Oxalidales
Family: Cunoniaceae
Genus: From Schizein, which is Ancient Greek or Schistosa, which is Latin for to split or divide and Meris, which is Ancient Greek for a part. It refers to the fruits, which split into 4 equal parts when ripe.
Species: From Ovatis, which is Latin for almost an egg shape. It usually refers to leaves or fruits, which have an ovate shape or form like an egg.
Common Name: White Cherry or White Birch.
Distribution:
Schizomeria ovata is found south from Fraser Island in southern coastal Queensland to Narooma in southern New South Wales. Further north it is found near Mackay and in the Paluma National Park. It is found on and east of the Great Dividing Range.
https://avh.ala.org.au/occurrences/search?taxa=Schizomeria+ovata#tab_mapView
Habitat Aspect Climate:
Schizomeria ovata prefers partial shade to full sun. It grows in warm well developed moist temperate rainforests, subtropical rainforests, moist cool tropical rainforests as well as moist Eucalyptus forests or gallery forests in riparian zones. The altitude ranges from 60 meters ASL to 800 meters ASL.
The temperatures range from minus 2 degrees in July to 36 degrees in January.
The rainfalls range from lows of 850mm to 3200mm average per annum.
Soil Requirements:
Schizomeria ovata prefers to grow on poorer soils sandy loams to medium clays. The soils are derived from decomposed brown basalts, shale or metamorphic rocks. The soils pH ranges from a PH of 4.5pH to pH. It is not tolerant of waterlogged soils however trees in riparian zones may experience short term inundations. Non saline soils to moderately saline soils are tolerated.
Height & Spread:
Wild Plants: 20m to 30m by 8m to 15m.
Characteristics:
Schizomeria ovata grows as a tall tree with straight, pale grey-brown, longitudinally fissured bark. The bark is hard and corky. The branches are pale grey brown and only becoming pale green near the apex where the newer leaf growth occurs. The branchlets are glabrous while the new growth is deep pink. All parts of the tree are generally covered in lichens and mosses when growing in their natural state.
The opposite, ovate to elliptical or at time obovate leaves of Schizomeria ovata measure 50mm to 150mm in length by 20mm to 50mm in width. The base is slightly obliquely cuneate while the apex is broadly acute to broadly acuminate. The discolourous laminas are deep sea-green, semi glossy, leathery and glabrous on the upper lamina while the lower lamina is paler and dull. The leaf margins are finely serrate to toothed, flat and slightly decurve towards the apex. The mid vein and main laterals are slightly prominent on both laminas. The 2 linear stipules measure 2mm to 3mm in length. The petiole measures 5mm to 30mm in length.
The inflorescences of Schizomeria ovata are born in loose umbels from the leaf axils. The umbels measure 50mm to 120mm in length. The pale green rachises are glabrous and measure 20mm to 90mm in length while the pedicels measure 30mm to 40mm in length and the peduncules measure 9mm to 12mm in length.
The 5 white calyx’s lobes are glabrous and measure 2mm to 3mm in length while the apexes are acute. The white petals measure 2mm to 3mm in length while the lobes apexes are deeply and irregularly divided 3 to 5 times to a depth of 0.5mm. The 10, lobed, yellow, gelatinous discs measure 4mm to 5mm in diameter.
The 10 filaments are free for their entire length and arise from the centre of a 10 lobed disc and measure 1.5mm to 2mm in length. The filaments are white and slender while the basifixed anthers are pale pinkish-fawn.
The white pistils from the ovary which swells to form a green domed in the centre of the disc reaches its greatest diameter at anthesis of 4mm to 5mm in diameter. The pistil measures 1.5mm to 2mm in length. Schizomeria ovata’s flowers appear from early September through to late November.
The fruits of Schizomeria are globose to obovoidal drupes. The drupes are glabrous and measure 10mm to 15mm in length by 8mm to 13mm in diameter. The green capsules turn white to pale creamy yellow when ripe. The calyx lobes are persistent on the ripe fruit. The 3 to 5 glossy brown seeds are flattened and ellipsoidal.
Wildlife:
Schizomeria ovata support native bees like Tetragonula carbonaria along the coast and other small pollen and nectar eating insects.
There fruits are eaten by most coastal honey eaters and all fruitigrove birds and bats.
It is a terrific sand stabilizer on the frontal dunes.
The fruits have a taste reminiscent of apples with a slight tangy acid taste to somewhat sour.
Cultivation:
Schizomeria ovata is a magnificent tall tree that should be grown in association with other rainforest specie. It is ideal at the edge of a rain forest or deep in the center of the rainforest. It also makes a great park trees offering quick growth, and good shade. In cultivation it will grow from 12 meters to 15 meters in height by 8 meters to 12 meters in diameter when grown in the open or taller and narrower if grown closer together as a rainforest tree.
It grows exceptionally well on lighter soils where deep leaf litter keeps the soil cool and moisture at an even level. If these requirements are met they can cope with temperatures as low as minus 5 degrees and up to 36 degrees. It is moderately drought resistant once established.
Add to the above, if it is given an adequate supply of water and a little native fertilizer on a regular basis the plants should respond with good flowering and fruit over a long period.
It often reaches its full potential in just 12 to 15 years and flower from the seventh or eighth year from seed.
The tree would make a very good accent trees in front of low set commercial or industrial sheds where they will break up hard rigid architectural lines and give warmth and breadth to a building. For something different they can be used from the front of the path and meander back to the far corners with shrubs or flowers planted between the trees and the building, and the trees and the nature strip.
Propagation:
Seeds: The seeds of Schizomeria ovata can be removed easily from the ripe fruits.
Sow fresh seeds directly into a seed raising mix, keeping them moist not wet. Do not over water as the seeds will rot off before germination takes place. Place the trays in a cool shaded area with 50mm shade cloth in the bush house. When the seedlings are 20 to 25 mm tall, prick them out and plant them into 50mm native tubes using a good organic mix.
As the seedlings roots reach the bottom of the tubes plant them out into their permanent position. Do not delay.
Fertilize using seaweed, fish emulsion or organic chicken pellets soaked in water on an alternate basis. Fertilize every two months until the plants are established then annually in early September to October to maintain better colour, health, vitality and flowering.
Further Comments from Readers:
“Hi reader, it seems you use The Bible of Botany a lot. That’s great as we have great pleasure in bringing it to you! It’s a little awkward for us to ask, but our first aim is to purchase land approximately 1,600 hectares to link several parcels of N.P. into one at The Pinnacles NSW Australia, but we need your help. We’re not salespeople. We’re amateur botanists who have dedicated over 30 years to saving the environment in a practical way. We depend on donations to reach our goal. If you donate just $5, the price of your coffee this Sunday, We can help to keep the planet alive in a real way and continue to bring you regular updates and features on Australian plants all in one Botanical Bible. Any support is greatly appreciated. Thank you.”
In the spirit of reconciliation we acknowledge the Bundjalung, Gumbaynggirr and Yaegl and all aboriginal nations throughout Australia and their connections to land, sea and community. We pay our respect to their Elders past, present and future for the pleasures we have gained.
Schizachyrium fragile
Classification:
Unranked: Monocots
Unranked: Commelinids
Order: Poales
Family: Poaceae
Subfamily: Panicoideae
Supertribe: Andropogonodae
Tribe: Andropogoneae
Subtribe: Andropogoninae
Genus: From Schizein, which is Ancient Greek or Schistosa, which is Latin for to split or divide and Chyrium, which is Latin for to do with chaff. It refers to chaff, which splits readily.
Species: From Fragilis, which is Latin for brittle. It refers to stems or leaves which are brittle.
Common Name: Fire Grass.
Distribution:
Schizachyrium fragile is found in the northern half of mainland Australia. It is found from Mount Richthofen to Millstream-Chichester National Park then north to Cooma Well and Halls Creek in Western Australia then south to Mount Liebig and east to Deep Well Homestead in the Northern Territory, to Cravens Peak Homestead Sandy Bore and north, north east to 132 kilometres south west of Croydon in Queensland then south to Armidale and east to the Clarence River on the east coast of New South Wales.
https://avh.ala.org.au/occurrences/search?taxa=Schizachyrium+fragile#tab_mapView
Habitat Aspect Climate:
Schizachyrium fragile prefers dappled shade to full sun. It grows in exposed areas in savannah woodlands or open Acacia woodlands or dry woodland heaths. The altitude ranges from 5 meters ASL to 1300 meters ASL. Note that the higher altitudes are further to the north than with southern plants.
The temperatures range from minus 3 degrees in August to 44 degrees in January.
Rainfalls range from lows of 400mm to 3000mm average per annum.
Soil Requirements:
Schizachyrium fragile prefers sandy, gravelly or stony loams to medium stony clays often exposed to the elements of nature. The soils are usually derived from decomposed sandstones, granites, accumulated peaty beach sands or at times metamorphic rocks, brown basalts, black basalts laterites. The soils pH ranges from 4.5pH to 8pH. It does not tolerate waterlogged soils though seasonal flooding may occur for short periods. Non saline soils to moderately saline soils are tolerated.
Height & Spread:
Wild Plants: 0.1m to 0.5m by 0.2m to 1m.
Characteristics:
Schizachyrium fragile grows as a delicate arching domed annual grass. The culms measure 100mm to 750mm in length by 0.8mm to 1.1mm in diameter. The sheaths are scaberulous and glabrous and cauline not forming a full circle around the culm. The ligule is a fringed membrane, ciliolate membranous hairs that measure 0.3mm to 0.6mm in length.
The long, linear leaves measure 20mm to 100mm in length by 1mm to 3mm in width. The bases are caudate while the apex is acute. The concolourous laminas are pale blue-green, scaberulous and glabrous. The margins are entire and flat or conduplicate.
The inflorescences are a solid or compound, panicle. The rachises, peduncles and pedicels are glabrous and fragile suspect to breaking at the nodes.
The spikelets are sessile while the companion spikelet in the cluster is pedicelled. The companion spikelets are represented by a single glume that measures 1mm to 3.5mm in length. The companion spikelet glume is awned. The fertile spikelets are paired with the lower floret barren or rarely male and the upper fertile florets comprising of a single basal sterile floret. The lanceolate, oblong or ovate, dorsally compressed fertile florets are without a rachilla extension and measure 5mm to 10mm in length.
The dissimilar glumes are firmer than fertile lemmas. The lower glumes are lanceolate, chartaceous with 2 keels and 5 nerves. The upper glumes are elliptical and without keels and have 5 nerves. One keel has a wing with 3 to 5 nerves. The lower glume’s surface is glabrous or covered in fine, soft, white puberulent hairs. The glumes measure 10mm to 17mm in length with firm membranous margins that are purplish. The lanceolate, chartaceous upper glumes are keeled with one of the keels having a wing with a keel and 1 to 3 nerves.
The basal sterile florets comprise of 1 barren floret without a significant palea. The lemma of lower sterile floret is membranous without a nerve. The Fertile lemmas are without keels and are nerveless and measure 3mm to 4mm in length.
The lemma’s apex is lobed with a single awn. The awn is from a sinus, and measures 9mm to 15mm in length overall. It has a twisted column which measures 5mm in length. The palea is absent on this species.
The 3 anthers are pale yellow. The flowers appear to be more reliant on local weather conditions. The flowers appear from December to February.
The fragile fruits are narrow ellipsoidal grains that will drop if brushed against. The green grains turn fawnish-yellow when ripe. The grains measure 2.1mm to 4mm in length.
Wildlife:
Schizachyrium fragile importance to granivorous birds in Australia cannot be overestimated. The simple fact that the racemes are fragile indicates strongly that that the seeds are bird or animal dispersed as they touch one seed several will break off and are scattered around the ground. The green seeds are often the trigger needed to bring birds into breeding season and give them the condition required to raise a brood. These birds include small parrots like the rare Golden Shouldered Parrot (Psephotus chrysopterygius), finches which include the Gouldian Finch (Erythrura gouldiae) and the Zebra Finch (Taeniopygia guttata) as well as small ground pigeons like the Crested Pigeon (Ocyphaps lophotes) and the Spinifex Pigeon (Geophaps plumifera) to mention a few.
It is probably also an important food source for Australian marsupial mice in semi-arid areas.
The leaves and stems are also an important source of food for the Swamp Wallaby (Wallabia bicolor), the Pretty Face Wallaby (Macropus parryi), the Grey Kangaroo (Macropus giganteus) and the Red Kangaroo (Macropus rufus).
Cultivation:
Schizachyrium fragile is a medium, compact, erect, tufted grass for small to large gardens above the high water mark of dams or above the water lines of slow moving water courses to dryer slopes and ridge top gardens where it can form small colonies. It can be slashed and will recover very quickly but is not suitable for long term heavy grazing.
It is ideally suited for growing in full sun to lightly shaded areas on flats where it is free draining but where the soils maintain soil moisture for extended periods the grasses thrive and display their beautiful blue hues longer than stressed plants that will go to seed sooner.
It is a preferred fodder crop is unknown to the author as a food source of grazing stock but has been observed as a stand by grass for native animals when pressure mounts on surrounding grasses in times of drought. It has a strong dense root system which probably makes it ideal as a soil stabilizer in wet soggy ground though it does pull easy in softer ground.
Propagation:
Seeds: Collect seeds after the nuts as they turn brown and begin to fall to the ground.
Sow the seeds directly into a seed raising mix and place the tray beneath 20mm shade cloth. When the seedlings are 25mm to 40mm tall, prick them out and plant them into 50mm native tubes using a seed raising mix.
Once the seedlings reach 100mm to 150mm in height plant them out into their permanent position. Mass plantings are best achieved with spacing’s of 500mm to 1000mm centers. In wild populations it was noted that plants planted close together were smaller and produced up to 3 times the fruiting stems as those on larger plants that were more widely spaced. It was not recorded if the production of seed was actually 3 times greater. (www.researchgate.net)
Alternatively the seeds can be sown with a grain planter for larger areas.
Fertilize using seaweed, fish emulsion or organic chicken pellets soaked in water on an alternate basis. Fertilize every two months until the plants are established then annually in early September to October to maintain better colour, health, vitality and flowering.
Further Comments from Readers:
“Hi reader, it seems you use The Bible of Botany a lot. That’s great as we have great pleasure in bringing it to you! It’s a little awkward for us to ask, but our first aim is to purchase land approximately 1,600 hectares to link several parcels of N.P. into one at The Pinnacles NSW Australia, but we need your help. We’re not salespeople. We’re amateur botanists who have dedicated over 30 years to saving the environment in a practical way. We depend on donations to reach our goal. If you donate just $5, the price of your coffee this Sunday, We can help to keep the planet alive in a real way and continue to bring you regular updates and features on Australian plants all in one Botanical Bible. Any support is greatly appreciated. Thank you.”
In the spirit of reconciliation we acknowledge the Bundjalung, Gumbaynggirr and Yaegl and all aboriginal nations throughout Australia and their connections to land, sea and community. We pay our respect to their Elders past, present and future for the pleasures we have gained.
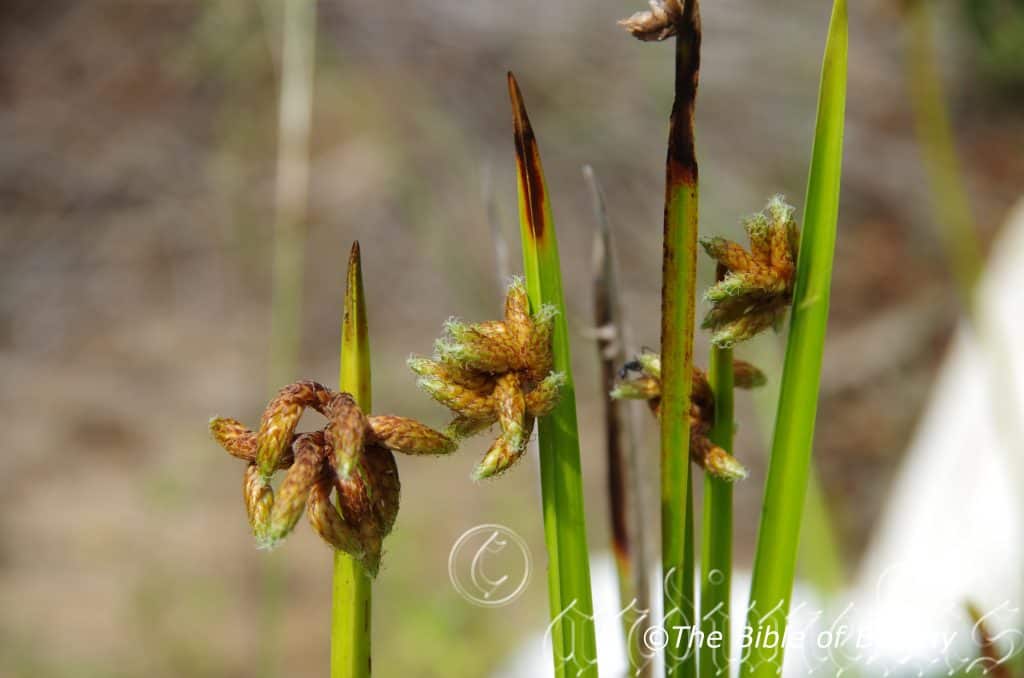
Author’s Garden The Pinnacles NSW
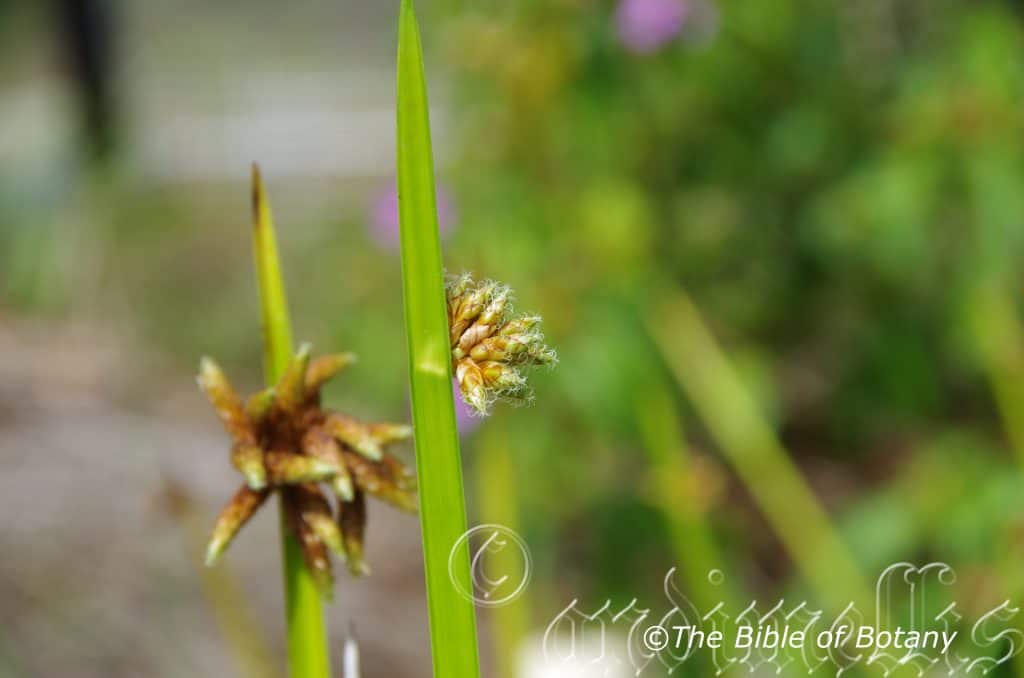
Author’s Garden The Pinnacles NSW
Schoenoplectus mucronatus
Classification:
Unranked: Monocots
Class: Commelinids
Order: Poales
Family: Cyperaceae
Genus: From Skhoînos, which is Ancient Greek for a sedge or reed and Plectos, which is Ancient Greek for plaited or twisted. It often refers to the culms, which are twisted.
Species: From Mūcrōnātus, which is Latin for a short sharp tip and Um which is Greek/Latin for a degree of. It refers to the apexes of a leaf, petal, sepal or bracts, which are generally obtuse with a short to relatively long appendage at the apex.
Common Name:
Distribution:
Schoenoplectus mucronatus is found north and west of a line from Beagle Bay Mission, Saddlers Creek, Mount John and Kununurra in northern Western Australia.
In the Northern Territory it is restricted to an area between the Bullo River, Pine Creek and Nathan springs off the Nathan River in the north with 1 isolated population on Alexandria Station at bore 47.
In western Queensland it is found along Loui Creek in Lawn Hill National Park and the Gregory River. In the east it is found south from Lakeland Downs on Cape York Peninsula in far north eastern Queensland to the Hackling River in central eastern New South Wales. It is mainly found on the Western Slopes, on and east of the Great Dividing Range to the coast with 3 isolated populations at Mirrool Creek near Griffith, Ainslie in the ACT, the Yarra River and Kilkunda in southern Victoria.
https://avh.ala.org.au/occurrences/search?taxa=Schoenoplectus+mucronatus#tab_mapView
Habitat Aspect Climate:
Schoenoplectus mucronatus prefers partial shade to dappled sun light. It grows on creek and stream meanders, in shallow depressions, drainage lines, shallow ephemeral pools in open woodlands, open forests, savannah woodland, heath plains or coastal heaths. The altitude ranges from 5 meters ASL to 1150 meters ASL.
The temperatures range from minus 3 degrees in August to 44 degrees in January.
Rainfalls range from lows of 450mm to 3200mm average per annum. In the drier regions the reeds are restricted to sites of more permanent ground water including sub surface ground water.
Soil Requirements:
Schoenoplectus mucronatus prefers silts, sandy loams to medium clays or light silts to medium silts. The soils are usually derived from decomposed sandstones, granites, accumulated peaty beach sands or at times metamorphic rocks, brown basalts, black basalts laterites or gritty podzolic soils. The soils pH ranges from 4.5pH to 8pH. It tolerates seasonal waterlogged soils often growing in shallow water for short periods. Non saline soils to moderately saline soils are tolerated as are salt laden winds.
Height & Spread:
Wild Plants: 0.5m to 1m by 0.5m to 1m.
Characteristics:
Schoenoplectus mucronatus grows as an erect, caespitose perennial reed with short spreading rhizomes. The erect, triquetrous culms measure 500mm to 1000mm in length by 2mm to 8mm in diameter. The culms are glabrous.
The linear leaves measure 5mm to 10mm in length by 1mm to 2.5mm in width on juvenile plants. The concolourous laminas are mid grass-green and glabrous. The bases are caudate while the apex is acute.
The inflorescences are solid conical head like spikelets with 3 to 25 spikes or occasionally proliferating with a few pedunculate spikelets. The involucral bract measures 10mm to 100mm in length and is usually 2 to 3 times the length of the inflorescence.
The oblong-ovoidal, acute spikelets measure 10mm to 20mm in length by 4mm to 6mm in diameter.
The similar glumes are acute with a mucronate tip and measure 3.5mm to 4mm in length. The pale red-brown to pale yellow-brown glumes are striated and glabrous. The 5 or 6 dimorphic hypogynous bristles are retrorsely scabrous and slightly longer than the nut.
The 3 anthers are pale yellow. The usually trifid or at times bifid style is white. The flowers appear from October to February.
The fruits are broad obovoidal, plano convex or trigonous with indistinct dorsally angled nuts. The green nuts turn deep brown to black and are slightly rugulose to smooth when ripe. The glossy nuts measure 1.7mm to 2.2mm in length by 1.5mm to 2mm in width.
Wildlife:
Schoenoplectus mucronatus is a vital habitat plant in swampy areas for many species of frogs and water fowl.
Cultivation:
Schoenoplectus mucronatus is a medium, compact, erect, tufted reed for medium to large water gardens or for use just below the high water mark of dam’s water lines of slow moving water courses where it can form small to large colonies. It can be slashed and will recover very quickly but is not suitable for long term grazing. In cultivation it will grow 0.8 meters to 1.2 meters in height by 0.6 meter to 0.8 meters in diameter when grown in the open.
It is ideally suited for growing in full sun to lightly shaded areas on flats where it is free draining but maintains soil moisture for extended periods following good rain.
It is not a preferred fodder crop and reduces the amount of preferred fodder available for domestic animals.
It has a strong dense rhizome system which makes it ideal as a soil stabilizer in wet soggy ground though it does pull easy in softer ground.
Propagation:
Seeds: Collect seeds after the nuts have turned brown and begin to fall to the ground.
Sow the seeds directly into a seed raising mix and place the tray beneath 20mm shade cloth. Keep the trays moist at all times. When the seedlings are 25mm to 40mm tall, prick them out and plant them into 50mm native tubes using a seed raising mix. Return the tubes to a sunny position and place them in trays and keep wet at all times.
Once the seedlings reach 100mm to 150mm in height plant them out into their permanent position. Mass plantings are best achieved with spacing’s of 500mm to 1000mm centers. Alternatively the seedlings can be planted into 200mm squat pots. Cover the surface with a layer of gravel and placed the pots in a fish or frog pond where the water level is at the same level as the top of the pots.
Fertilize using seaweed, fish emulsion or organic chicken pellets soaked in water on an alternate basis. Fertilize every two months until the plants are established then annually in early September to October to maintain better colour, health, vitality and flowering.
Further Comments from Readers:
“Hi reader, it seems you use The Bible of Botany a lot. That’s great as we have great pleasure in bringing it to you! It’s a little awkward for us to ask, but our first aim is to purchase land approximately 1,600 hectares to link several parcels of N.P. into one at The Pinnacles NSW Australia, but we need your help. We’re not salespeople. We’re amateur botanists who have dedicated over 30 years to saving the environment in a practical way. We depend on donations to reach our goal. If you donate just $5, the price of your coffee this Sunday, We can help to keep the planet alive in a real way and continue to bring you regular updates and features on Australian plants all in one Botanical Bible. Any support is greatly appreciated. Thank you.”
In the spirit of reconciliation we acknowledge the Bundjalung, Gumbaynggirr and Yaegl and all aboriginal nations throughout Australia and their connections to land, sea and community. We pay our respect to their Elders past, present and future for the pleasures we have gained.
Schoenoplectus subulatus
Classification:
Unranked: Monocots
Class: Commelinids
Order: Poales
Family: Cyperaceae
Genus: From Skhoînos, which is Ancient Greek for a sedge or reed and Plectos, which is Ancient Greek for plaited or twisted. It often refers to the culms, which are twisted.
Species: From Sūbulātum, which is Latin for an awl or awl shape. It refers to structures or organs, which resemble a spindle in form.
Common Name:
Distribution:
Schoenoplectus subulatus is found in several disjunct populations on the northern section of Australia within 240 kilometres of the coast. It is found from the Swan River Plains in southern Western Australia north around the coast to Wallagoot Lake near Bega in southern coastal New South Wales.
It is also found in the center of Australia in the Northern Territory between Picton Spring on the Dulcie Range to Bowens Gap and Dalhousie Springs in northern South Australia. In South Australia it is found between Welcome Bore near Coward Railway Siding to Moolooloo Station and Balcoonoona Creek Balcoonoona and the Todd River north of Port Lincoln and from Mount Compass to Tailem Bend in southern South Australia.
https://avh.ala.org.au/occurrences/search?taxa=Schoenoplectus+subulatus#tab_mapView
Habitat Aspect Climate:
Schoenoplectus subulatus prefers dappled shade to full sun. It grows in coastal and near coastal lakes, open swamps more permanent ephemeral pools, creek or stream meanders but usually not in estuarial zones. The altitude ranges from 1 meters ASL to 750 meters ASL.
The temperatures range from minus 3 degrees in August to 42 degrees in January.
Rainfalls range from lows of 400mm to 3200mm average per annum.
Soil Requirements:
Schoenoplectus subulatus prefers better quality sandy soils to stony medium clays, light silts to medium silts. The soils are usually derived from decomposed sandstones, granites or rarely accumulated beach sands. The soils pH ranges from 5pH to 7pH. It tolerates waterlogged soils. Non saline soils to extremely saline soils are tolerated as are salt laden winds.
Height & Spread:
Wild Plants: 0.6m to 1.5m by 0.5m to 1m.
Characteristics:
Schoenoplectus subulatus grows as a tall erect, perennial reed with short spreading rhizomes. The terete culms are trigonous below the inflorescence and measure 600mm to 1500mm in length by 3mm to 10mm in diameter. The culms are glabrous.
The linear leaves measure 5mm to 10mm in length by 1mm to 2.5mm in width on juvenile plants. The concolourous laminas are mid grass-green and glabrous. The bases are caudate while the apexes are acute.
The inflorescences are umbel like with 20mm to 80mm long branches. The smooth to scabrous branches have 1 to 3 spikelets per branch. The involucral bract measures 20mm to 100mm in length and is usually 2 to 3 times the length of the inflorescence.
The spikelets are oblong-ovoidal with an acute apex. The spikelets measure 8mm to 15mm in length by 3mm to 4mm in diameter.
The similar elliptical glumes are obtuse or slightly retuse at the apex and measure 3.5mm to 4mm in length. The pale red-brown glumes are glabrous while the margins are hyaline and covered in short, white ciliate hairs. The hypogynous bristles are flat or folded longitudinally, antrorsely plumose, about as long as nut.
The 3 anthers are pastel yellow. The bifid style is cream. The flowers appear from September to February.
Schoenoplectus subulatus fruits are ellipsoid to obovoid, unequally biconvex nuts. The smooth, green nuts turn greyish-brown to deep brown and glossy when ripe. The nuts measure 2mm to 2.5mm in length by 1.2mm to 1.5mm in diameter.
Wildlife:
Schoenoplectus subulatus is a vital habitat plant in swampy areas for many species of frogs and water fowl.
Cultivation:
Schoenoplectus subulatus is a large, compact, erect, tufted reed for medium to large water gardens or for use just below the high water mark of dam’s water lines of slow moving water courses where it can form small to large colonies. It can be slashed and will recover very quickly but is not suitable for long term grazing. In cultivation it will grow 1.3 meters to 1.6 meters in height by 0.8 meter to 1 meter in diameter when grown in the open.
It is ideally suited for growing in full sun to lightly shaded areas on flats where it is free draining but maintains soil moisture for extended periods following good rain.
It is not a preferred fodder crop and reduces the amount of preferred fodder available for domestic animals.
It has a strong dense rhizome system which makes it ideal as a soil stabilizer in wet soggy ground though it does pull easy in softer ground.
Propagation:
Seeds: Collect seeds after the nuts have turned brown and begin to fall to the ground.
Sow the seeds directly into a seed raising mix and place the tray beneath 20mm shade cloth. Keep the trays moist at all times. When the seedlings are 25mm to 40mm tall, prick them out and plant them into 50mm native tubes using a seed raising mix. Return the tubes to a sunny position and place them in trays and keep wet at all times
Once the seedlings reach 100mm to 150mm in height plant them out into their permanent position. Mass plantings are best achieved with spacing’s of 500mm to 1000mm centers. Alternatively the seedlings can be planted into 200mm squat pots. Cover the surface with a layer of gravel and placed the pots in a fish or frog pond where the water level is at the same level as the top of the pots.
Fertilize using seaweed, fish emulsion or organic chicken pellets soaked in water on an alternate basis. Fertilize every two months until the plants are established then annually in early September to October to maintain better colour, health, vitality and flowering.
Further Comments from Readers:
“Hi reader, it seems you use The Bible of Botany a lot. That’s great as we have great pleasure in bringing it to you! It’s a little awkward for us to ask, but our first aim is to purchase land approximately 1,600 hectares to link several parcels of N.P. into one at The Pinnacles NSW Australia, but we need your help. We’re not salespeople. We’re amateur botanists who have dedicated over 30 years to saving the environment in a practical way. We depend on donations to reach our goal. If you donate just $5, the price of your coffee this Sunday, We can help to keep the planet alive in a real way and continue to bring you regular updates and features on Australian plants all in one Botanical Bible. Any support is greatly appreciated. Thank you.”
In the spirit of reconciliation we acknowledge the Bundjalung, Gumbaynggirr and Yaegl and all aboriginal nations throughout Australia and their connections to land, sea and community. We pay our respect to their Elders past, present and future for the pleasures we have gained.
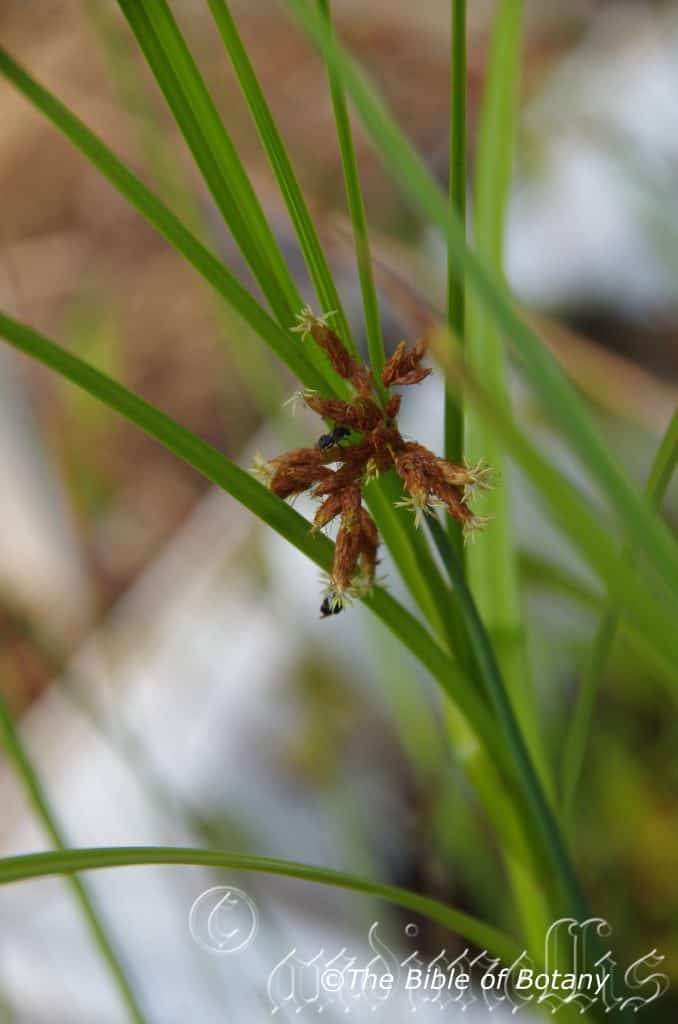
Author’s Garden The Pinnacles NSW
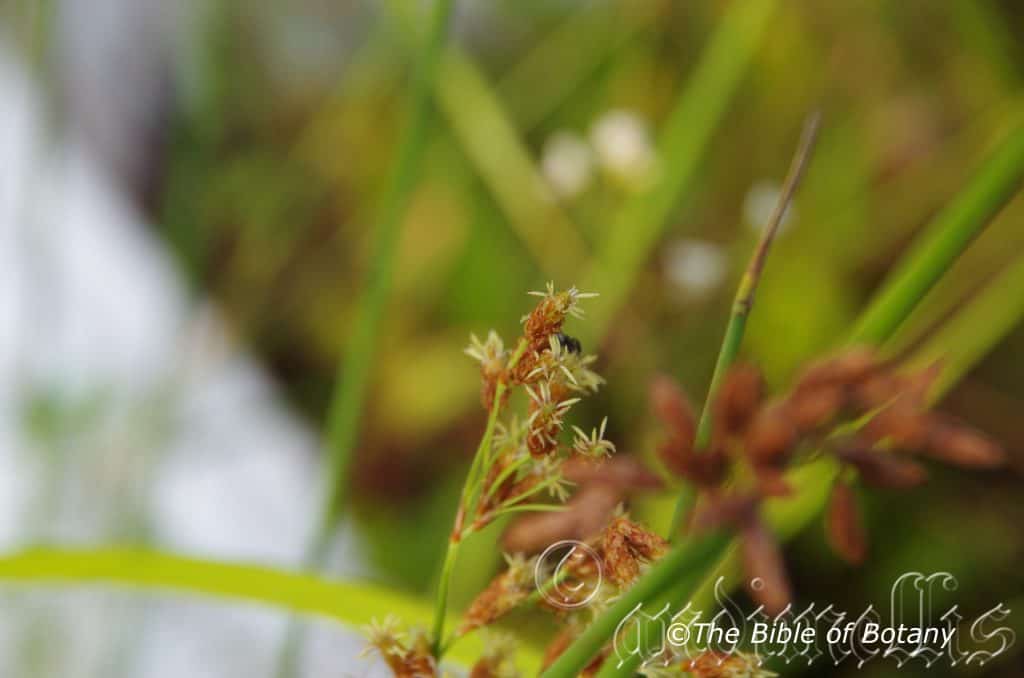
Author’s Garden The Pinnacles NSW

Author’s Garden The Pinnacles NSW
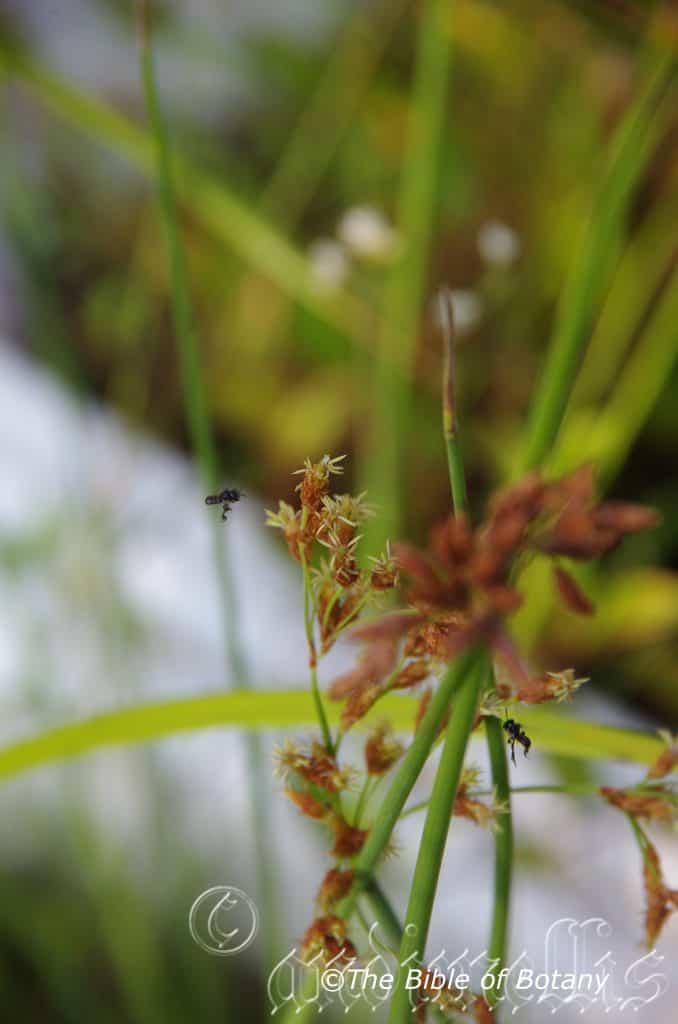
Tetragonula hockingsi Author’s Garden The Pinnacles NSW
Schoenoplectus tabernaemontani
Classification:
Unranked: Monocots
Class: Commelinids
Order: Poales
Family: Cyperaceae
Genus: From Skhoînos, which is Ancient Greek for a sedge or reed and Plectos, which is Ancient Greek for plaited or twisted. It often refers to the culms, which are twisted.
Species: Is named in honour of Jacobus Diether Theodorus, called Tabernaemontanus; 1525-1590, who was a German physician and an early botanist and herbalist. He was considered one of the “fathers of German botany” whose illustrated works in Neuw Kreuterbuch (Frankfurt, 1588) was the result of a lifetime’s botanizing and medical practice. The name as applied in Latin refers to his home town of Tabernae Montanae of which he was known.
Common Name: The local Gumbaynggirr know it as Bunday.
Distribution:
Schoenoplectus tabernaemontani is found east of a line from Cardwell in far north eastern coastal Queensland to Port Augusta and southern Eyre Peninsula in southern South Australia.
It is also found in the south west coastal corner of Western Australia south from Nambung National Park to Augusta and east to Unicup Nature Reserve in the south.
https://avh.ala.org.au/occurrences/search?q=taxa%3A%22Schoenoplectus+tabernaemontani%22#tab_mapView
Habitat Aspect Climate:
Schoenoplectus tabernaemontani prefers dappled shade to full sun. It grows in coastal and sub coastal wetlands as well as many wetland areas inland with unpredictable climatic conditions. It also grows along creeks, lakes or open swamps, in fresh and brackish water in coastal estuaries. The altitude ranges from 1 meters ASL to 1150 meters ASL.
The temperatures range from minus 4 degrees in August to 40 degrees in January.
Rainfalls range from lows of 200mm to 3200mm average per annum.
Soil Requirements:
Schoenoplectus tabernaemontani prefers better quality, sands, sandy loams to gritty medium clays, light silts to medium silts. The soils are usually derived from decomposed sandstones, granites, brown basalts, black basalts, metamorphic rocks, rarely accumulated beach sands or alluvial deposits. The soils pH ranges from 5pH to 8pH. It tolerates extended periods of seasonal waterlogged soils. Non saline soils to extremely saline soils are tolerated as are salt laden winds.
Height & Spread:
Wild Plants: 0.6m to 2m by 0.5m to 1.5m.
Characteristics:
Schoenoplectus tabernaemontani grows as a tall erect, perennial reed with short spreading rhizomes. The terete culms measure 60mm to 2000mm in length by 3mm to 10mm in diameter. The culms are glabrous.
The linear leaves measure 10mm to 100mm in length by 2mm to 4mm in width. The concolourous laminas are mid grass-green, glossy and glabrous. The bases are caudate while the apexes are acute.
The inflorescences are umbel like with 10mm to 80mm long branches. The scabrous branches have 1 to 4 spikelets per branch. The involucral bract measures 20mm to 50mm in length and is usually 2 to 3 times the length of the inflorescence. The involucral bracts much shorter than inflorescence measure 20mm to 50mm in length.
The spikelets are oblong to ovoid with acute apexes. They measure, 5mm to 11mm in length by 4mm to 5mm in diameter.
The similar elliptical glumes are reddish-brown and very short with a retuse apex. They measure 3mm to 4mm in length. The pale reddish-brown glumes are glabrous while the margins are covered in short, white ciliate hairs. The hypogynous bristles are retrorsely scabrous, slightly longer than or equalling nut.
The 3 anthers are pastel yellow. The bifid or trifid style is cream. The flowers appear from September to February.
The fruits are obovoid, plano-convex nuts. The smooth, glossy green nuts turn grey-brown to deep brown when ripe. The nuts measure 2mm to 2.5mm in length by 1.2mm to 1.5mm in diameter.
Wildlife:
Schoenoplectus tabernaemontani is a vital habitat plant in swampy areas for many species of frogs and water fowl. Tetragonula carbonaria
Cultivation:
Schoenoplectus tabernaemontani is a large, compact, erect, tufted reed for medium to large water gardens or for use just below the high water mark of dam’s water lines of slow moving water courses where it can form small to large colonies. It can be slashed and will recover very quickly but is not suitable for long term grazing. In cultivation it will grow 1.3 meters to 1.6 meters in height by 0.8 meter to 1 meter in diameter when grown in the open.
It is ideally suited for growing in full sun to lightly shaded areas on flats where it is free draining but maintains soil moisture for extended periods following good rain.
It is not a preferred fodder crop and reduces the amount of preferred fodder available for domestic animals.
It has a strong dense rhizome system which makes it ideal as a soil stabilizer in wet soggy ground though it does pull easy in softer ground.
Propagation:
Seeds: Collect seeds after the nuts have turned brown and begin to fall to the ground.
Sow the seeds directly into a seed raising mix and place the tray beneath 20mm shade cloth. Keep the trays moist at all times. When the seedlings are 25mm to 40mm tall, prick them out and plant them into 50mm native tubes using a seed raising mix. Return the tubes to a sunny position and place them in trays and keep wet at all times
Once the seedlings reach 100mm to 150mm in height plant them out into their permanent position. Mass plantings are best achieved with spacing’s of 1000mm to 1500mm centers. Alternatively the seedlings can be planted into 200mm squat pots. Cover the surface with a layer of gravel and placed the pots in a fish or frog pond where the water level is at the same level as the top of the pots.
Fertilize using seaweed, fish emulsion or organic chicken pellets soaked in water on an alternate basis. Fertilize every two months until the plants are established then annually in early September to October to maintain better colour, health, vitality and flowering.
Further Comments from Readers:
“Hi reader, it seems you use The Bible of Botany a lot. That’s great as we have great pleasure in bringing it to you! It’s a little awkward for us to ask, but our first aim is to purchase land approximately 1,600 hectares to link several parcels of N.P. into one at The Pinnacles NSW Australia, but we need your help. We’re not salespeople. We’re amateur botanists who have dedicated over 30 years to saving the environment in a practical way. We depend on donations to reach our goal. If you donate just $5, the price of your coffee this Sunday, We can help to keep the planet alive in a real way and continue to bring you regular updates and features on Australian plants all in one Botanical Bible. Any support is greatly appreciated. Thank you.”
In the spirit of reconciliation we acknowledge the Bundjalung, Gumbaynggirr and Yaegl and all aboriginal nations throughout Australia and their connections to land, sea and community. We pay our respect to their Elders past, present and future for the pleasures we have gained.
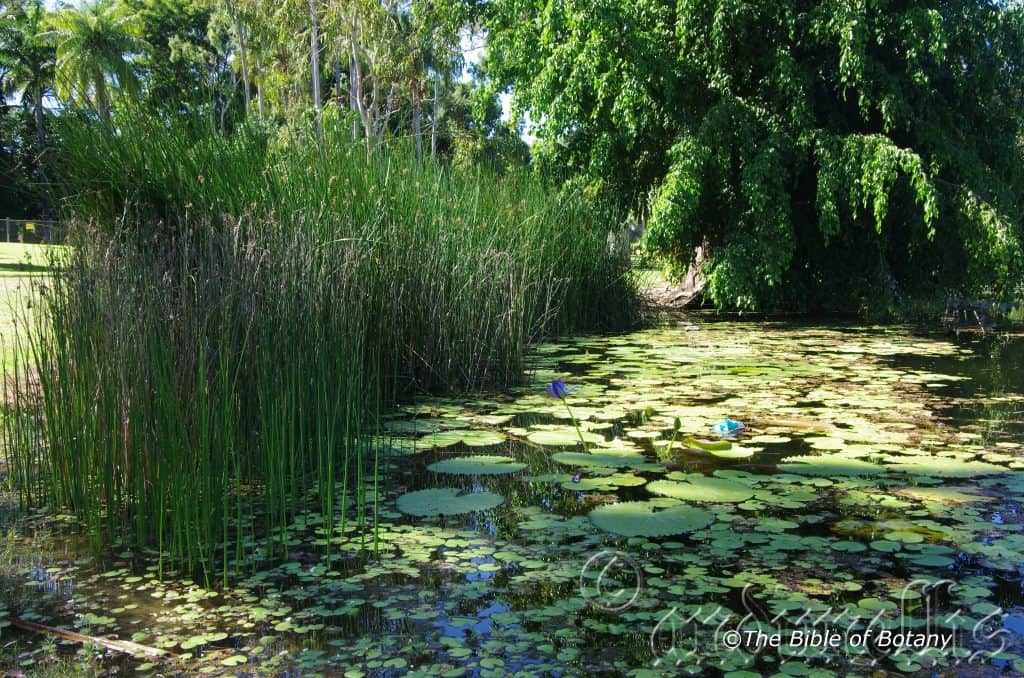
Palmatum Gardens Townsville Qld.
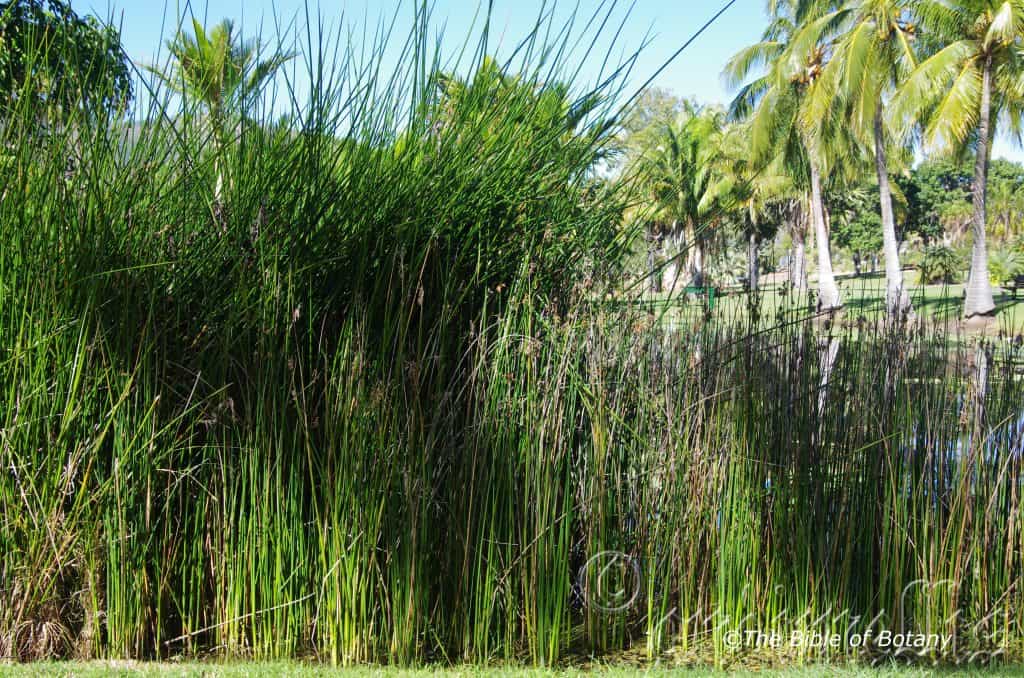
Palmatum Gardens Townsville Qld.
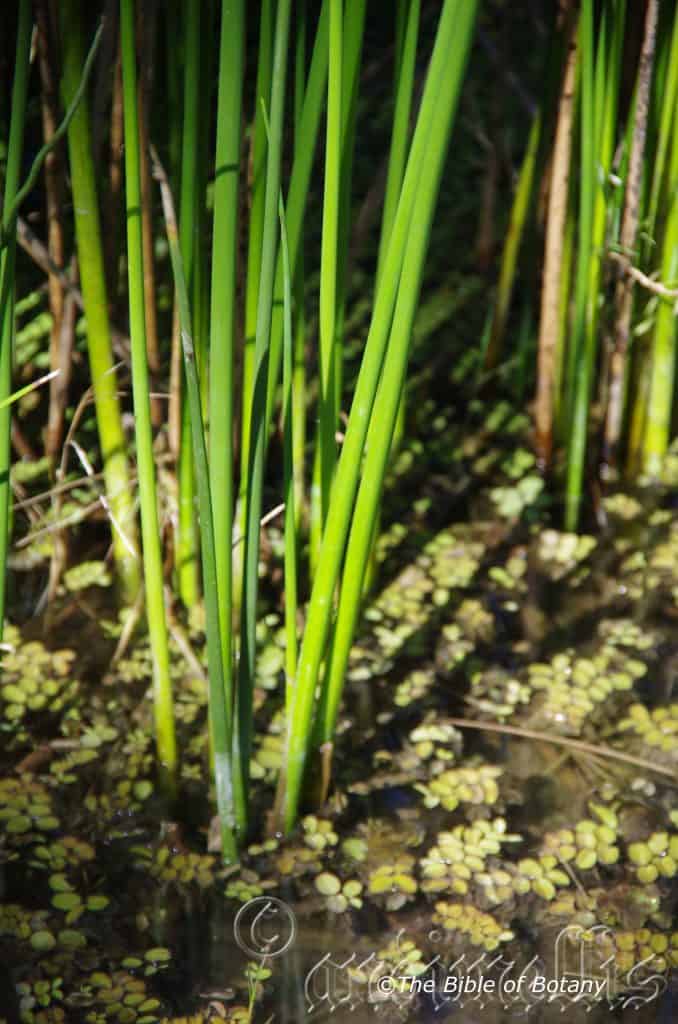
Palmatum Gardens Townsville Qld.
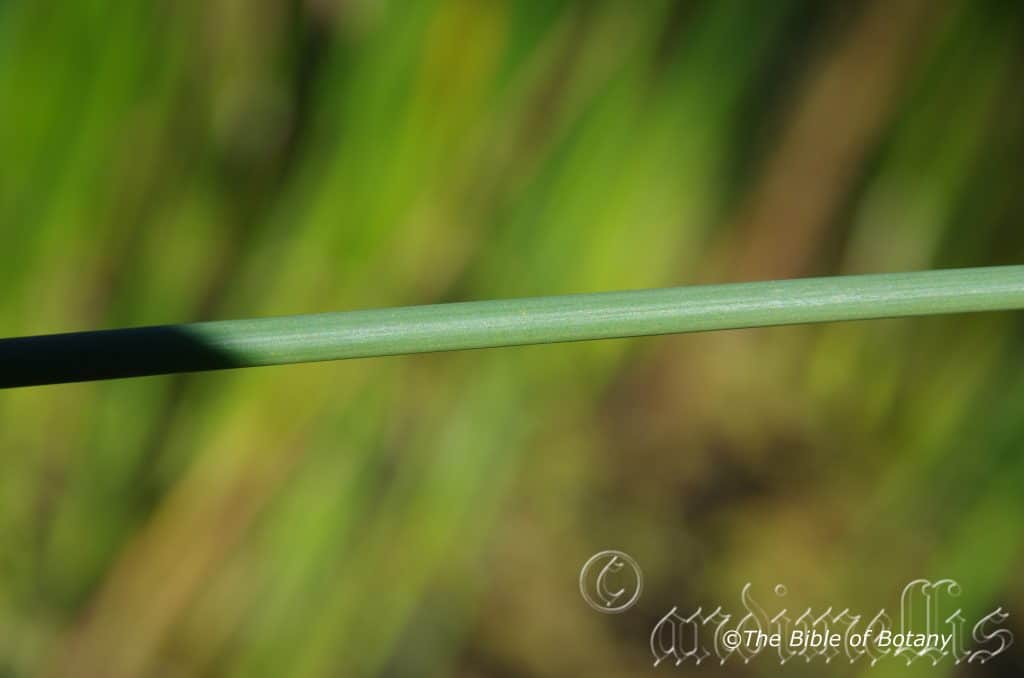
Palmatum Gardens Townsville Qld.
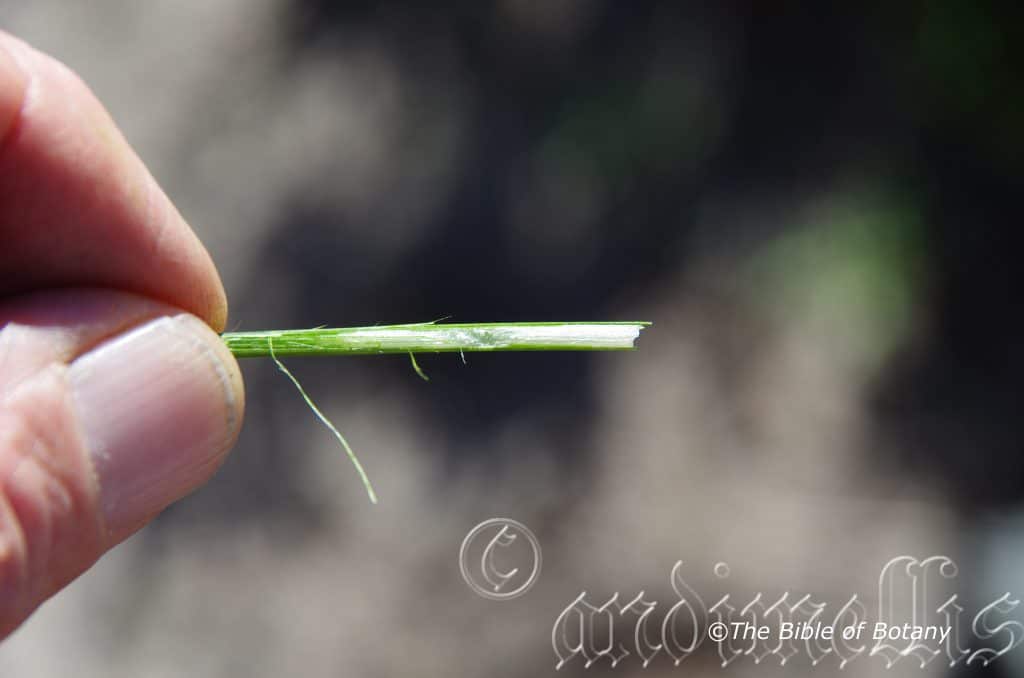
NCBG Coffs Harbour NSW

Palmatum Gardens Townsville Qld.

Palmatum Gardens Townsville Qld.
Schoenoplectus validus
Classification:
Unranked: Monocots
Class: Commelinids
Order: Poales
Family: Cyperaceae
Genus: From Skhoînos, which is Ancient Greek for a sedge or reed and Plectos, which is Ancient Greek for plaited or twisted. It often refers to the culms, which are twisted.
Species: From Valid, which is Latin for well developed. It refers to plants, which are better developed than other species in the genus.
Common Name: The local Gumbaynggirr know it as Bunday.
Distribution:
Schoenoplectus validus is found east of a line from Cardwell in far north eastern coastal Queensland to Port Augusta and southern Eyre Peninsula in southern South Australia.
It is also found in the south west coastal corner of Western Australia south from Nambung National Park to Augusta and east to Unicup Nature Reserve in the south.
https://avh.ala.org.au/occurrences/search?taxa=Schoenoplectus+validus#tab_mapView
Habitat Aspect Climate:
Schoenoplectus validus prefers dappled shade to full sun. It grows in coastal and sub coastal wetlands as well as many wetland areas inland with unpredictable climatic conditions. It also grows along creeks, lakes or open swamps, in fresh and brackish water in coastal estuaries. The altitude ranges from 1 meters ASL to 1150 meters ASL.
The temperatures range from minus 4 degrees in August to 40 degrees in January.
Rainfalls range from lows of 200mm to 3200mm average per annum.
Soil Requirements:
Schoenoplectus validus prefers better quality, sands, sandy loams to gritty medium clays, light silts to medium silts. The soils are usually derived from decomposed sandstones, granites, brown basalts, black basalts, metamorphic rocks, rarely accumulated beach sands or alluvial deposits. The soils pH ranges from 5pH to 8pH. It tolerates extended periods of seasonal waterlogged soils where the plant grows in water. Non saline soils to extremely saline soils are tolerated as are salt laden winds.
Height & Spread:
Wild Plants: 0.6m to 2m by 0.5m to 1.5m.
Characteristics:
Schoenoplectus validus grows as a tall erect, perennial reed with short spreading rhizomes. The terete culms measure 60mm to 2000mm in length by 3mm to 10mm in diameter. The culms are glabrous.
The linear leaves measure 10mm to 100mm in length by 2mm to 4mm in width. The concolourous laminas are mid grass-green, glossy and glabrous. The bases are caudate while the apexes are acute.
The inflorescences are umbel like with 10mm to 80mm long branches. The scabrous branches have 1 to 4 spikelets per branch. The involucral bract measures 20mm to 50mm in length and is usually 2 to 3 times the length of the inflorescence. The involucral bracts much shorter than inflorescence measure 20mm to 50mm in length.
The spikelets are oblong to ovoid with acute apexes. They measure, 5mm to 11mm in length by 4mm to 5mm in diameter.
The similar elliptical glumes are reddish-brown and very short with a retuse apex. They measure 3mm to 4mm in length. The pale reddish-brown glumes are glabrous while the margins are covered in short, white ciliate hairs. The hypogynous bristles are retrorsely scabrous, slightly longer than or equalling nut.
The 3 anthers are pastel yellow. The bifid or trifid style is cream. The flowers appear from September to February.
The fruits are obovoid, plano-convex nuts. The smooth, glossy green nuts turn grey-brown to deep brown when ripe. The nuts measure 2mm to 2.5mm in length by 1.2mm to 1.5mm in diameter.
Wildlife:
Schoenoplectus validus is a vital habitat plant in swampy areas for many species of frogs and water fowl.
Cultivation:
Schoenoplectus validus is a large, compact, erect, tufted reed for medium to large water gardens or for use just below the high water mark of dam’s water lines of slow moving water courses where it can form small to large colonies. It can be slashed and will recover very quickly but is not suitable for long term grazing. In cultivation it will grow 1.3 meters to 1.6 meters in height by 0.8 meter to 1 meter in diameter when grown in the open.
It is ideally suited for growing in full sun to lightly shaded areas on flats where it is free draining but maintains soil moisture for extended periods following good rain.
It is not a preferred fodder crop and reduces the amount of preferred fodder available for domestic animals.
It has a strong dense rhizome system which makes it ideal as a soil stabilizer in wet soggy ground though it does pull easy in softer ground.
Propagation:
Seeds: Collect seeds after the nuts have turned brown and begin to fall to the ground.
Sow the seeds directly into a seed raising mix and place the tray beneath 20mm shade cloth. Keep the trays moist at all times. When the seedlings are 25mm to 40mm tall, prick them out and plant them into 50mm native tubes using a seed raising mix. Return the tubes to a sunny position and place them in trays and keep wet at all times
Once the seedlings reach 100mm to 150mm in height plant them out into their permanent position. Mass plantings are best achieved with spacing’s of 1000mm to 1500mm centers.
Alternatively the seedlings can be planted into 200mm squat pots. Cover the surface with a layer of gravel and placed the pots in a fish or frog pond where the water level is at the same level as the top of the pots.
Fertilize using seaweed, fish emulsion or organic chicken pellets soaked in water on an alternate basis. Fertilize every two months until the plants are established then annually in early September to October to maintain better colour, health, vitality and flowering.
Further Comments from Readers:
“Hi reader, it seems you use The Bible of Botany a lot. That’s great as we have great pleasure in bringing it to you! It’s a little awkward for us to ask, but our first aim is to purchase land approximately 1,600 hectares to link several parcels of N.P. into one at The Pinnacles NSW Australia, but we need your help. We’re not salespeople. We’re amateur botanists who have dedicated over 30 years to saving the environment in a practical way. We depend on donations to reach our goal. If you donate just $5, the price of your coffee this Sunday, We can help to keep the planet alive in a real way and continue to bring you regular updates and features on Australian plants all in one Botanical Bible. Any support is greatly appreciated. Thank you.”
In the spirit of reconciliation we acknowledge the Bundjalung, Gumbaynggirr and Yaegl and all aboriginal nations throughout Australia and their connections to land, sea and community. We pay our respect to their Elders past, present and future for the pleasures we have gained.
All information is included in good faith and has been thoroughly researched prior to printing. The website or the author does not warrant or guarantee the accuracy of any information on these pages, nor does the website or the author accept any responsibility for any loss arising from the use of the information found within. The views and opinions are strictly those of the author or those members who chose to actively participate in the contents herein.