Oberonia complanata
Oberonia titania
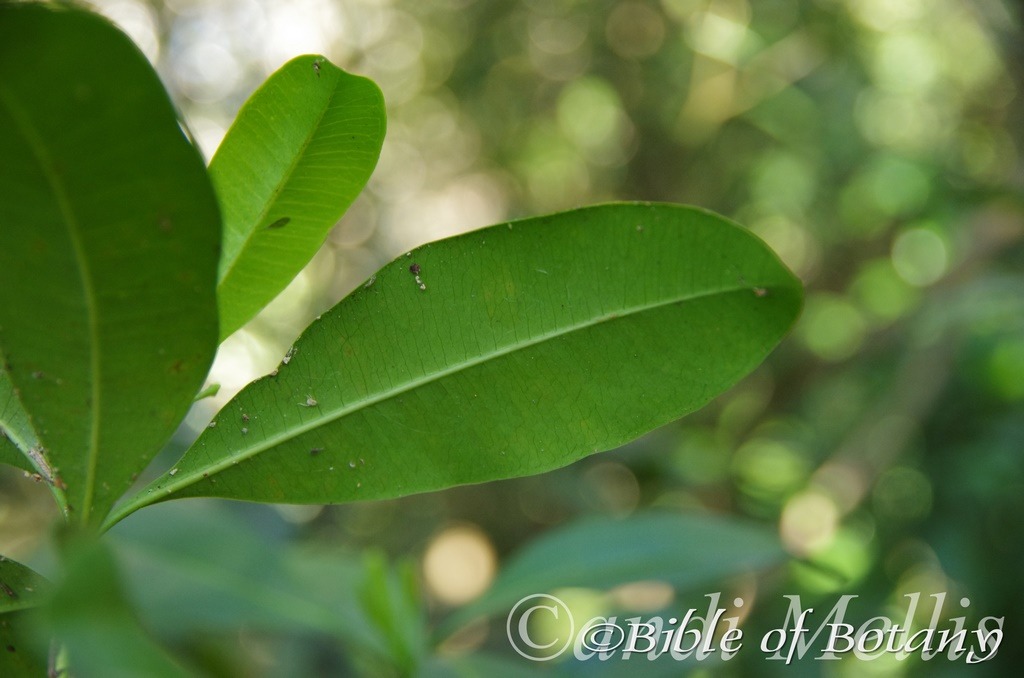
Ochrosia elliptica
Ochrosia moorei
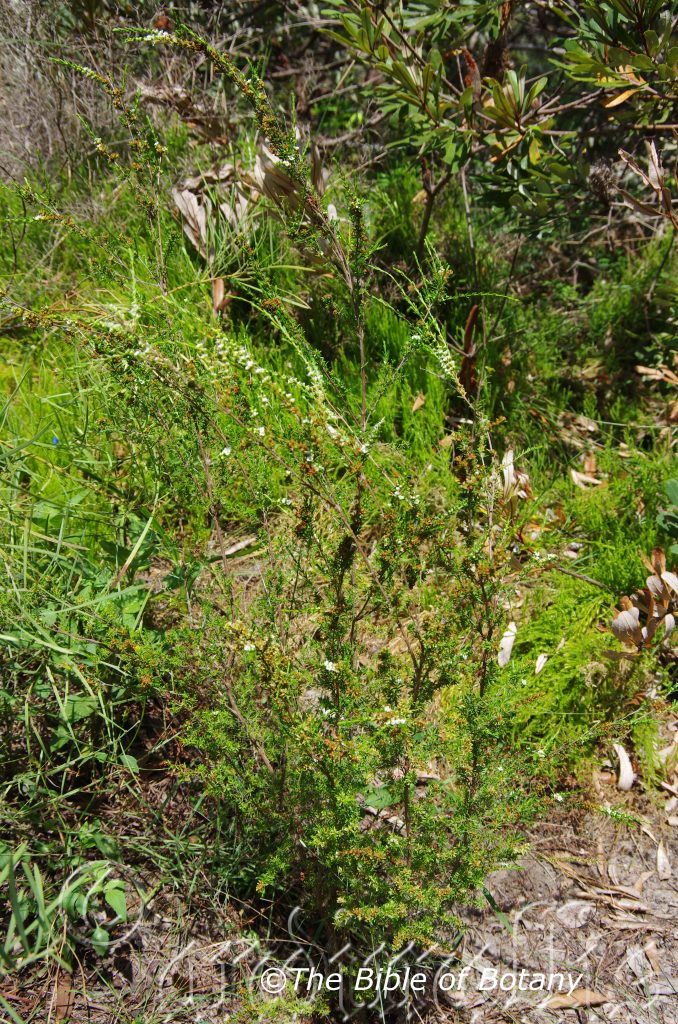
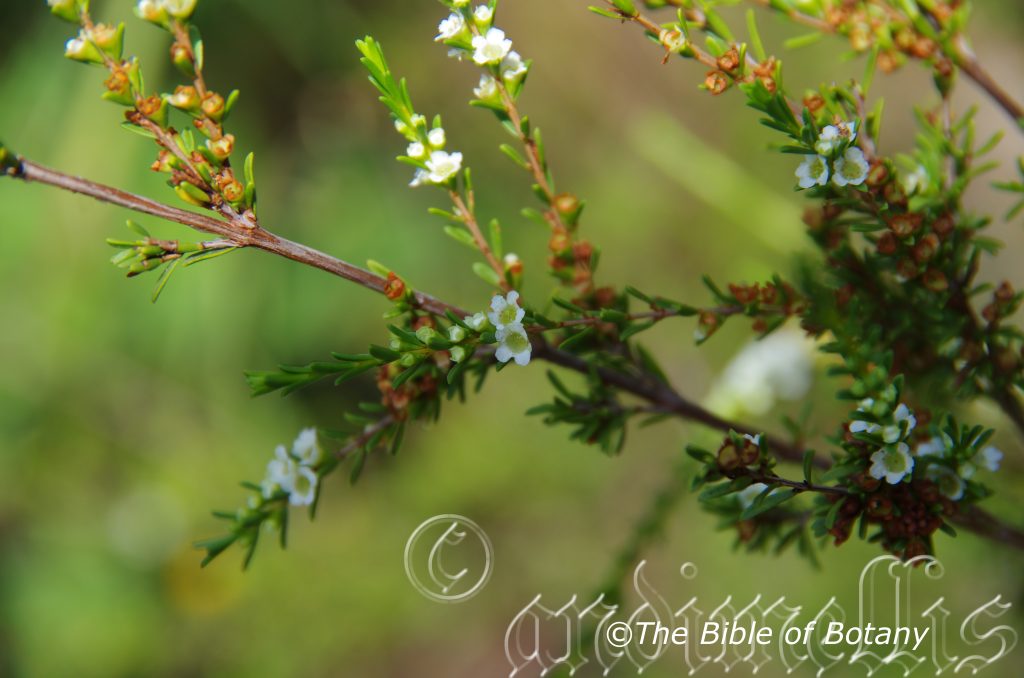
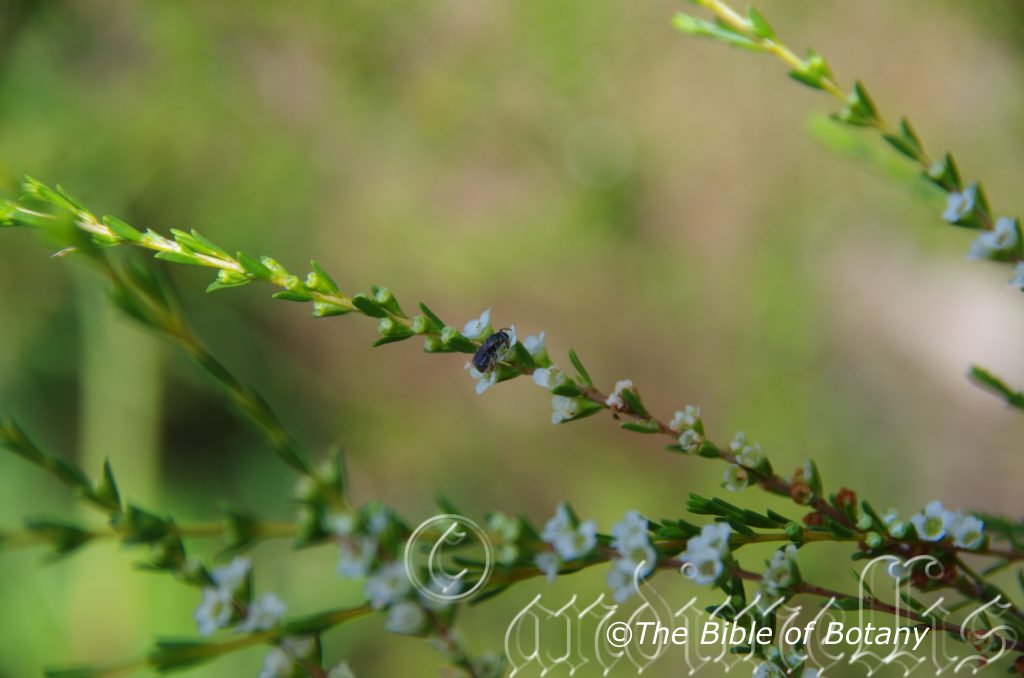
Ochrosperma citriodorum
Ochrosperma lineare
Olax angulata
Olax retusa
Olax stricta
Olea paniculata
Olearia argophylla
Olearia canescens
Olearia cydoniifolia
Olearia elliptica
Olearia erubescens
Olearia flocktoniae
Olearia nernstii
Olearia stilwelliae
Olearia viscidula
Opercularia hispida
Ophioglossum lusitanicum
Ophioglossum pendulum
Ophioglossum reticulatum
Oplismenus aemulus
Oplismenus hirtellus
Oplismenus imbicillis
Oplismenus undulatifolius
Orthosiphon aristatus
Oxylobium ellipticum
Oxylobium robustum
Oxytes brachypodium
Ozothamnus bidwillii
Ozothamnus diosmifolius
Ozothamnus obcordatus
Ozothamnus obovatus
Ozothamnus rufescens
Ozothamnus thyrsoideus
Ozothamnus whitei
Oberonia complanata
Classification:
Unranked: Monocots
Order: Asparagales
Family: Orcidaceae
Subfamily: Malaxideae
Tribe: Malaxidinae
Genus: From Oberon, which is Latinized from Shakespeare’s name for the king of the fairies in “A Midsummer Night’s Dream”. It refers to small ground orchids, which are considered to be the king of the ground orchids.
Species: From Com/con, which are Ancient Greek/Latin for coming together and planata, which is Latin for flat or to make level. It usually refers to plants, which have flattened stems.
Common Name:
Distribution:
Oberonia complanata is found south from the Lockhart River in far north Queensland to Coffs Harbour in New South Wales. It is found on and east of the Great Dividing Range.
https://avh.ala.org.au/occurrences/search?taxa=Oberonia+complanata#tab_mapView
Habitat Aspect Climate:
Oberonia complanata prefers medium shade to dappled shade. It grows in well-developed rainforest on the coastal ranges, littoral rainforests, coastal scrubs, gorges, moist sclerophyll forest or in mangrove forests. Its altitude ranges from 5 meters ASL to 720 meters ASL.
The temperatures range from 1 degree in August to 36 degrees in January. The rainfall ranges from
from lows of 1000mm to 3200mm average per annum.
Soil Requirements:
Oberonia complanata grows as an epiphyte on trees or at times are lithophytes. The soils pH ranges from 6pH to 6.5pH are preferred. The host trees tolerances to waterlogged soils varies greatly.
Height & Spread:
Wild Plants: 0.1m to 0.3m by 0.1m to 0.3m.
Characteristics:
Oberonia complanata grows as a slender epiphyte orchid with 1 to many shoots in a tight clump.
Oberonia complanata has 3 to 8 erect lanceolate to oblong leaves. The leaves measure 30mm to 150mm in length by 10mm to 15mm in width. The bases are clasping while the apexes are acute. The concolourous, coriaceous leaves are grass-green to lemon-green and glabrous.
The inflorescences are long stiff, pendulant spikes. The spikes usually have 150 to 300 minute, individual flowers. The spikes measure 80mm to 200mm in length. The ovary which appears to be part of the pedicel is slightly swollen at the base and measure 1.5mm to 2mm in overall length. The flowers are cream to greenish-cream except for the pollinia that is orange.
The glabrous dorsal sepal is ovate to triangular which has a blunt broad acute apex while the margins are entire. The dorsal sepal measures 0.8mm to 1mm in length by 0.5mm to 0.7mm in width.
The ovate to triangular lateral sepals are glabrous, with acute apexes. The sepals are strongly deflexed backwards while the margins are entire. The sepals measure 0.5mm to 1mm in length by 0.5mm to 0.7mm in width.
The narrow ovate lateral petals are glabrous, with narrow truncate apexes that are lacerated. The lateral petals measure 0.8mm to 1mm in length by 0.3mm to 0.5mm in width.
The labellum measures 1.5mm to 1.8mm in length by 1.5mm to 1.8mm in width. It is not distinctly lobed, has an obtuse apex with 2 short, triangular lobes and erose to lacerated margins. The flowers appear from September to February.
Oberonia complanata’s fruits are ellipsoidal capsules. The green capsules turn deep grey when ripe. The lateral sepals and petals are persistent on the capsules. The hexagonal cross section capsules have 2 flattened sides and measure 6mm to 8mm in length by 2mm to 2.2mm in width.
Wildlife:
Oberonia’complanata’s wildlife is unknown to the author.
Cultivation:
It is an unusual epiphytic orchid to grow in the garden but it needs a cool, moist, light to heavy shades position to survive and thrive. The best place is in a green house or bush house where the environment can be controlled better. It does well on slabs of cork or on slabs of old tree fern.
Propagation:
Seeds:
All ferns and orchids that are declared rare, vulnerable or endangered are protected by Federal and State Laws and must not be removed from the wild unless you are a land developer, mining company or main Roads department etc. This includes bulbs, roots, leaves and flowers. No part of any plant can be removed from Federal, State or Local Government land without the prior permission of the authority and this includes the spore.
The seeds are very difficult to acquire and require treatment before sowing. Really Orchid seeds are meant for professionals with time, equipment and space. However if you wish to persevere then here are the basics and you are learning from an amateur. Once the orchids are large enough to handle treat them similarly to other ground orchids.
1. Obtain relevant materials
The first step in growing orchid from seed will be sourcing and having at the ready all materials that will be required in the propagation process.
This includes all of the following:
Unripe orchid seed capsule. If there are 2 capsules secure the second capsule immediately after the first capsule splits or if only one capsule as soon as it changes colour.
Orchid gelling medium with agar which can be purchased from an orchid society or a specialist nursery.
Distilled water
Cooking pot
Spoon
Oven-safe glass or polypropylene containers with lids
Sealable bags
Clean, sterilized cutting board
Rubber gloves
Paper towels
Tweezers or forceps
70 percent ethanol
Bleach
Scalpel or sharp knife
Planting pot
Orchid compost
Length of wire metal
Plastic spray bottle.
deep petri dishes or sterile jars.
2. Prepare agar medium
The agar medium is a special orchid gelling mixture that distilled water will be added to distilled water.
To prepare the medium, mix equal parts of orchid gelling medium with distilled water in a cooking pot.
Place the pot on a stove and bring the mixture to boil for while stirring continuously for two minutes.
Pour the mixture into the petri dishes glass or propylene containers while ensuring not to fill the containers above 20 percent of their volume.
Loosely replace the lids to the containers. Sterilize the containers by heating them up in a microwave oven for between 2 to 3 minutes.
Spray 70 percent ethanol into a sealable bag to create a sterile environment. Transfer the heated containers into the sealable bag.
Allow the containers to cool a bit before tightening their lids and then sealing the bag. Leave the containers to stand for a few days until the mixture solidifies.
3. Prepare seed capsule and work surface
Place an open pot of water on a stove and bring to boil. Place the cutting board in the oven and sterilize.
Put on rubber gloves and sterilize the forceps, and scalpel with 70 percent ethanol.
Insert the seed capsule into a bowel filled with bleach for about fifteen minutes.
Sterilize seed capsule again with 70 percent ethanol and place on grill.
Using the sterilized scalpel, cut open the seed capsule to reveal the seeds. Using a scalpel or sharp knife, scrape out the seeds from the capsule unto an ethanol soaked paper towel.
4. Flasking of the seed
Take out the petri dishes or glass jars containers holding the agar medium. Over the steam, open up the containers and transfer seeds from the ethanol soaked paper towel into the individual containers using the sterilized forceps.
The amount of seeds will determine the number of containers required. Replace the lid of the containers and place them on a window sill that receives indirect sunlight.
5. Wait and exercise patience
All that can be done at this point is to wait until the seeds germinate. The amount of time that this might take varies and is dependent on the particular species.
Generally, the time can range from a few months to a few years. During this period of waiting, ensure the containers are free from contamination to ensure that germination is not disrupted.
6. Emergence of protocorms
Protocorms are tuber-shaped bodies with rhizoids that are produced by the young seedlings of various orchids. Protocorms represent the embryonic form of the orchid plant.
Their emergence after the period of waiting at an affirmation that everything in the propagation process is on track.
7. Transflask orchid seedlings is done after they have developed roots
Upon the emergence of the protocorms, consistently observe the growth of the seedlings. At the point when the seedlings appear to overcrowd the flask, transflasking should be carried out, typically within 30 and 60 days.
* This is done by removing individual seedlings using sterilized tweezers from the original containers and placing them in new containers also filled, in a proportion similar to the original, with agar medium. 6 to 8 in a standard petri dish or 1or 2 to a test tube
8. Transplant seedlings into planting pots
On the presumption that there are no disruptions to the plant growth, the seedlings will eventually outgrow the containers.
At this point, It is to be transplanted into planting pots. A good rule of thumb to determine when It is ready to be transplanted is when the seedlings have developed roots that have grown up to the length of one-quarter of an inch.
To transplant, prepare a planting pot or other container for receiving the seedling by majorly filling it up with coarse fir bark and possibly some slightly moist orchid compost mixture containing perlite, fine charcoal, redwood bark shavings, etc.
To extract the seedlings, submerge the containers in warm water to help loosen the agar gel.
Once the agar medium is softened, twist a piece of metal to form a loop and in turn, use it to carefully pull out the seedlings from the container. It is best done if the agar and seedling can be removed together.
The seedlings can be further rinsed in lukewarm water to remove any excess agar mixture still stuck to them.
Following this, the seedlings can now be planted into the prepared pot with at least 50mm of space between each individual seedling.
9. Positioning the orchid
The seedling once fully transplanted should be placed in a location that is warm with good indirect sun light.
Slowly position the pots into an area that closely assimilates the conditions it will be growing under.
The choice as to whether the plant should be exposed to full sun or in direct sunlight will be dependent on the particular orchid specie.
10. Subsequent care of the plant
After the first week, the seedling can be misted several times a day and watered just once a week.
A guide in watering the plant will be using the dryness of the fir back that is, water the plant until the fir back is completely moistened and wait till it has completely dried out before watering again.
Do not fertilize until the seedlings have fully established themselves.
Division:
Plants can be divided using older plants that have several shoots. Each shoot should have roots and be healthy. Remove the shoots by cutting them with a sharp clean, sterilised knife. Tie the new shoots firmly back onto a small slab of cork or small slab of old tree fern. Plants are slow to re-establish and should be kept moist with misting daily and in a cool, humid environment until fully established.
Fertilize using seaweed, fish emulsion or organic chicken pellets soaked in water on an alternate basis. Fertilize every two months until the plants are established then annually in early September to October to maintain health, vitality and better flowering.
Further Comments from Readers:
Hi reader, it seems you use The Bible of Botany a lot. That’s great as we have great pleasure in bringing it to you! It’s a little awkward for us to ask, but our first aim is to purchase land approximately 1,600 hectares to link several parcels of N.P. into one at The Pinnacles NSW Australia, but we need your help. We’re not salespeople. We’re amateur botanists who have dedicated over 30 years to saving the environment in a practical way. We depend on donations to reach our goal. If you donate just $5, the price of your coffee this Sunday, We can help to keep the planet alive in a real way and continue to bring you regular updates and features on Australian plants all in one Botanical Bible. Any support is greatly appreciated. Thank you.
In the spirit of reconciliation we acknowledge the Bundjalung, Gumbaynggirr and Yaegl and all aboriginal nations throughout Australia and their connections to land, sea and community. We pay our respect to their Elders past, present and future for the pleasures we have gained.
Oberonia titania
Classification:
Unranked: Monocots
Order: Asparagales
Family: Orcidaceae
Subfamily: Malaxideae
Tribe: Malaxidinae
Genus: From Oberon, which is Latinized from Shakespeare’s name for the king of the fairies in “A Midsummer Night’s Dream”. It refers to small ground orchids, which are considered the king of the ground orchids.
Specie: From Titania, which is Latinized from Shakespeare’s name for the Queen of the fairies in “A Midsummer Night’s Dream”. It refers to the species, which is considered the queen or best of the species in the genus.
Common Name:
Distribution:
Oberonia titania is found in 2 separate disjunct populations along the east coast close to the coast except for 2 isolated populations near Croydon in North West Queensland and Coonamble in central western New South Wales. It is found south from the Lockhart River in far north Queensland to the central Mackay Coast and south from Wide Bay to Wauchope in New South Wales.
https://avh.ala.org.au/occurrences/search?taxa=Oberonia+titania#tab_mapView
Habitat Aspect Climate:
Oberonia titania prefers medium shade to dappled shade. It grows in well-developed rainforest on the coastal ranges, littoral rainforests, Melaleuca swamps, gorges, moist sclerophyll forest or in mangrove forests. Its altitude ranges from 160 meters ASL to 1200 meters ASL.
The temperatures range from minus 2 degrees in August to 36 degrees in January.
The rainfall ranges from lows of 700mm to 3200mm average per annum.
Soil Requirements:
Oberonia titania grows as an epiphyte mainly on Araucaria bidwillii and Araucaria cunninghamii trees and at times is lithophytes. The soils pH ranges from 5.5pH to 7.6pH are preferred. The host trees tolerances to waterlogged soils varies greatly.
Height & Spread:
Wild Plants: 0.1m to 0.3m by 0.1m to 0.3m.
Characteristics:
Oberonia titania grows as a slender, tight clumped epiphytic orchid with 1 to several shoots in a clump.
Oberonia titania has 4 to 10 erect ovate to broad lanceolate leaves. The leaves measure 10mm to 80mm in length by 2mm to 8mm in width. The bases are clasping while the apexes are acute. The concolourous, coriaceous leaves are grass-green to pinkish-green and glabrous.
The inflorescences of Oberonia titania are long stiff, erect to pendulant spikes. The spikes usually have 50 to 350 minute, individual flowers. The spikes measure 50mm to 170mm in length. The ovary which appears to be part of the pedicel is slightly swollen at the base and measure 1mm to 1.5mm in overall length. The flowers are reddish-maroon except for the pollinia that is golden.
The glabrous dorsal sepal is oblong with an obtuse apex while the margins are entire. The dorsal sepal measures 0.7mm to 0.9mm in length by 0.2mm to 0.3mm in width.
The ovate to triangular lateral sepals are glabrous, with acute apexes. The sepals are strongly deflexed backwards while the margins are entire. The sepals measure 0.5mm to 0.8mm in length by 0.4mm to 0.7mm in width.
The broad ovate lateral petals are glabrous, with an acute apex while the margins are crenate. The lateral petals measure 0.7mm to 1mm in length by 0.7mm to 1mm in width.
The labellum measures 0.7mm to 1mm in length by 0.7mm to 1mm in width. It is distinctly tri lobed with the center lobe being ovate and the largest. The lateral lobes are broad triangular. The lobes margins are very finely erose to lacerate. The flowers appear from March to May and September to November.
Oberonia titania’s fruits are ellipsoidal capsules. The green capsules turn deep grey when ripe. The lateral sepals and petals are persistent on the capsules. The hexagonal cross section capsules have 2 flattened sides and measure 2mm to 2.5mm in length by 1.5mm to 1.8mm in width on a 1.5mm pedicel.
Wildlife:
Oberonia titania’s fertilization is carried out by at least 4 species of ants. Jones in Orchids of Australia and New Zealand 1975.
The orchids are also visited by native bees and several species of hover flies and pollen wasps. The exotic honey bee odour marks its flowers which prevents native bees from visiting the flowers like a first in best dress scenario.
Cultivation:
Oberonia titania is an unusual terrestrial orchid to grow in the garden. If you are lucky enough to have them growing It is worthwhile preserving with in situation. The best method to establish a colony is to mark the area with stakes where the plants are known to occur. Use local mulch to lightly top dress the area on an annual basis.
Orchid enthusiasts have found this orchid to be less temperamental than most ground orchids to keep in the bush house. Lyperanthus suaveolens can be grown in pots in a freely draining, sandy mix with organic matter incorporated. It requires good air circulation in a protected position beneath 30mm to 50mm shade cloth during the growing period from mid-winter to late summer. During the growing period the plants must be kept moist not wet at all times. After the leaves have died back to the tuber, the pots should be allowed to dry out completely and not watered until the following July.
Propagation:
Seeds: All orchids are declared rare, vulnerable or endangered are protected by Federal and State Laws and must not be removed from the wild unless you are a land developer, mining company or main Roads department etc. This includes bulbs, roots, leaves and flowers. No part of any plant can be removed from Federal, State or Local Government land without the prior permission of the authority and this includes the spore.
Oberonia titania’s seeds are very difficult to acquire and require treatment before sowing. Really Orchid seeds are meant for professionals with time, equipment and space. However if you wish to persevere then here are the basics and you are learning from an amateur. Once the orchids are large enough to handle treat them similarly to other ground orchids.
1. Obtain relevant materials
The first step in growing orchid from seed will be sourcing and having at the ready all materials that will be required in the propagation process.
This includes all of the following:
Unripe orchid seed capsule. If there are 2 capsules secure the second capsule immediately after the first capsule splits or if only one capsule as soon as it changes colour.
Orchid gelling medium with agar which can be purchased from an orchid society or a specialist nursery.
Distilled water
Cooking pot
Spoon
Oven-safe glass or polypropylene containers with lids
Sealable bags
Clean, sterilized cutting board
Rubber gloves
Paper towels
Tweezers or forceps
70 percent ethanol
Bleach
Scalpel or sharp knife
Planting pot
Orchid compost
Length of wire metal
Plastic spray bottle.
deep petri dishes or sterile jars.
2. Prepare agar medium
The agar medium is a special orchid gelling mixture that distilled water will be added to distilled water.
To prepare the medium, mix equal parts of orchid gelling medium with distilled water in a cooking pot.
Place the pot on a stove and bring the mixture to boil for while stirring continuously for two minutes.
Pour the mixture into the petri dishes glass or propylene containers while ensuring not to fill the containers above 20 percent of their volume.
Loosely replace the lids to the containers. Sterilize the containers by heating them up in a microwave oven for between 2 to 3 minutes.
Spray 70 percent ethanol into a sealable bag to create a sterile environment. Transfer the heated containers into the sealable bag.
Allow the containers to cool a bit before tightening their lids and then sealing the bag. Leave the containers to stand for a few days until the mixture solidifies.
3. Prepare seed capsule and work surface
Place an open pot of water on a stove and bring to boil. Place the cutting board in the oven and sterilize.
Put on rubber gloves and sterilize the forceps, and scalpel with 70 percent ethanol.
Insert the seed capsule into a bowel filled with bleach for about fifteen minutes.
Sterilize seed capsule again with 70 percent ethanol and place on grill.
Using the sterilized scalpel, cut open the seed capsule to reveal the seeds. Using a scalpel or sharp knife, scrape out the seeds from the capsule unto an ethanol soaked paper towel.
4. Flasking of the seed
Take out the petri dishes or glass jars containers holding the agar medium. Over the steam, open up the containers and transfer seeds from the ethanol soaked paper towel into the individual containers using the sterilized forceps.
The amount of seeds will determine the number of containers required. Replace the lid of the containers and place them on a window sill that receives indirect sunlight.
5. Wait and exercise patience
All that can be done at this point is to wait until the seeds germinate. The amount of time that this might take varies and is dependent on the particular species.
Generally, the time can range from a few months to a few years. During this period of waiting, ensure the containers are free from contamination to ensure that germination is not disrupted.
6. Emergence of protocorms
Protocorms are tuber-shaped bodies with rhizoids that are produced by the young seedlings of various orchids. Protocorms represent the embryonic form of the orchid plant.
Their emergence after the period of waiting at an affirmation that everything in the propagation process is on track.
7. Transflask orchid seedlings is done after they have developed roots
Upon the emergence of the protocorms, consistently observe the growth of the seedlings. At the point when the seedlings appear to overcrowd the flask, transflasking should be carried out, typically within 30 and 60 days.
* This is done by removing individual seedlings using sterilized tweezers from the original containers and placing them in new containers also filled, in a proportion similar to the original, with agar medium. 6 to 8 in a standard petri dish or 1or 2 to a test tube
8. Transplant seedlings into planting pots
On the presumption that there are no disruptions to the plant growth, the seedlings will eventually outgrow the containers.
At this point, It is to be transplanted into planting pots. A good rule of thumb to determine when It is ready to be transplanted is when the seedlings have developed roots that have grown up to the length of one-quarter of an inch.
To transplant, prepare a planting pot or other container for receiving the seedling by majorly filling it up with coarse fir bark and possibly some slightly moist orchid compost mixture containing perlite, fine charcoal, redwood bark shavings, etc.
To extract the seedlings, submerge the containers in warm water to help loosen the agar gel.
Once the agar medium is softened, twist a piece of metal to form a loop and in turn, use it to carefully pull out the seedlings from the container. It is best done if the agar and seedling can be removed together.
The seedlings can be further rinsed in lukewarm water to remove any excess agar mixture still stuck to them.
Following this, the seedlings can now be planted into the prepared pot with at least 50mm of space between each individual seedling.
9. Positioning the orchid
The seedling once fully transplanted should be placed in a location that is warm with good indirect sun light.
Slowly position the pots into an area that closely assimilates the conditions it will be growing under.
The choice as to whether the plant should be exposed to full sun or in direct sunlight will be dependent on the particular orchid specie.
10. Subsequent care of the plant
After the first week, the seedling can be misted several times a day and watered just once a week.
A guide in watering the plant will be using the dryness of the fir back that is, water the plant until the fir back is completely moistened and wait till it has completely dried out before watering again.
Do not fertilize until the seedlings have fully established themselves.
Division:
Plants can be divided using older plants that have several shoots. Each shoot should have roots and be healthy. Remove the shoots by cutting them with a sharp clean, sterilised knife. Tie the new shoots firmly back onto a small slab of cork or small slab of old tree fern. Plants are slow to re-establish and should be kept moist with misting daily and in a cool, humid environment until fully established.
Fertilize using seaweed, fish emulsion or organic chicken pellets soaked in water on an alternate basis. Fertilize every two months until the plants are established then annually in early September to October to maintain health, vitality and better flowering.
Further Comments from Readers:
Hi reader, it seems you use The Bible of Botany a lot. That’s great as we have great pleasure in bringing it to you! It’s a little awkward for us to ask, but our first aim is to purchase land approximately 1,600 hectares to link several parcels of N.P. into one at The Pinnacles NSW Australia, but we need your help. We’re not salespeople. We’re amateur botanists who have dedicated over 30 years to saving the environment in a practical way. We depend on donations to reach our goal. If you donate just $5, the price of your coffee this Sunday, We can help to keep the planet alive in a real way and continue to bring you regular updates and features on Australian plants all in one Botanical Bible. Any support is greatly appreciated. Thank you.
In the spirit of reconciliation we acknowledge the Bundjalung, Gumbaynggirr and Yaegl and all aboriginal nations throughout Australia and their connections to land, sea and community. We pay our respect to their Elders past, present and future for the pleasures we have gained.
Mount Cootha Botanic Gardens Qld.
Mount Cootha Botanic Gardens Qld.
Mount Cootha Botanic Gardens Qld.
Mount Cootha Botanic Gardens Qld.
Mount Cootha Botanic Gardens Qld.
Mount Cootha Botanic Gardens Qld.
Mount Cootha Botanic Gardens Qld.
Mount Cootha Botanic Gardens Qld.
Mount Cootha Botanic Gardens Qld.
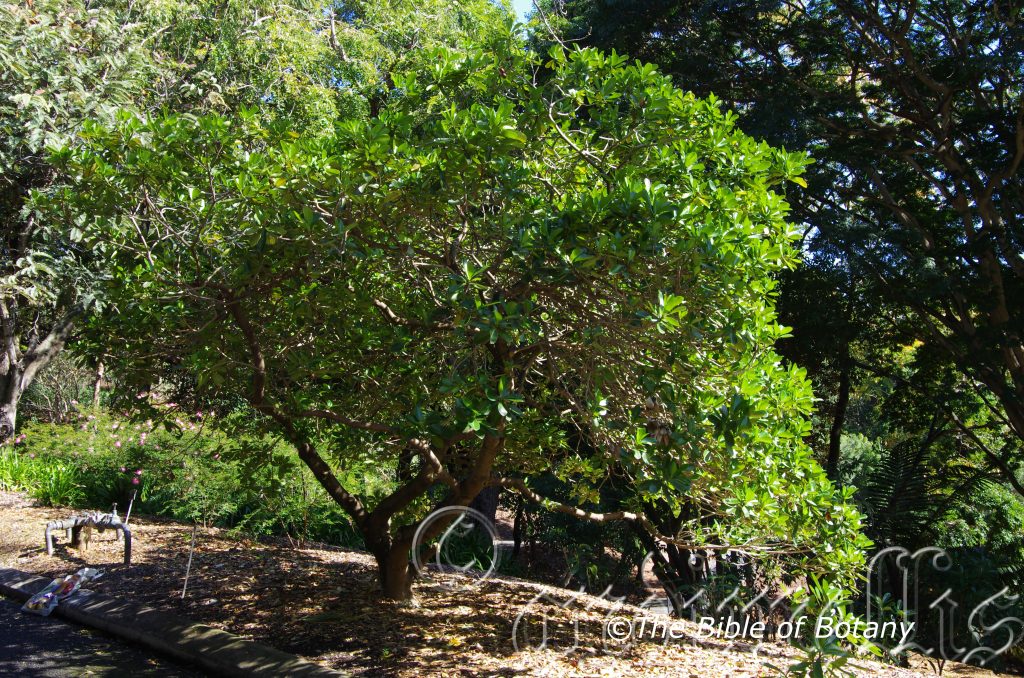
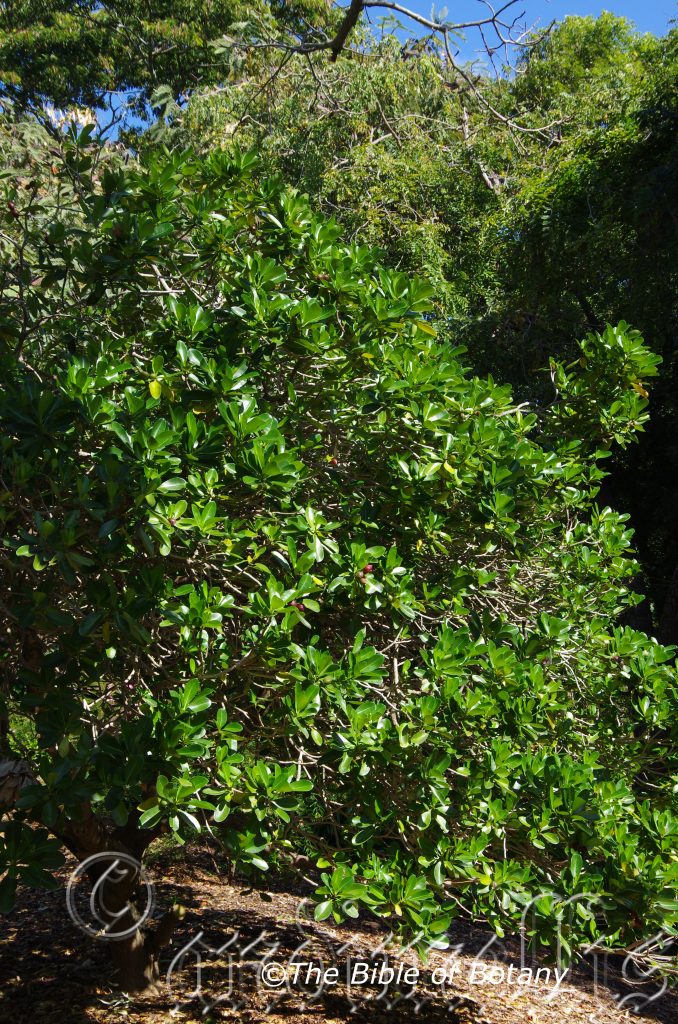
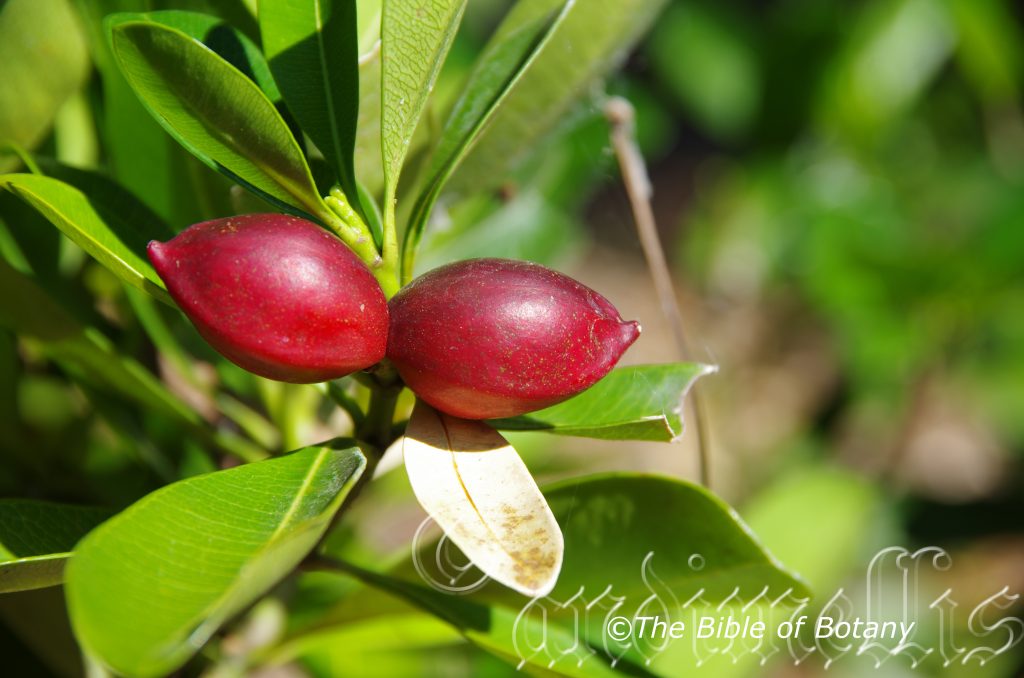
Ochrosia elliptica
Classification:
Unranked: Eudicots
Unranked: Rosids
Order: Gentianales
Family: Apocynaceae
Genus: From Ochra, which is Ancient Greek for yellowish, dull fawnish-gold, dull yellowish-brown. It refers to organs or structures, which are pale yellowish-brown. Here it refers to the pulp between the exocarp and the seed, which is deep yellow to yellowish-fawn.
Specie: From elliptica which is Latin for an egg shape. It refers to fruits, which have a a very strong elliptical form.
Common Name: Bloodhorn, Scarlet Wedge-apple or Ochrosia.
Distribution:
Ochrosia elliptica is found south from Oak Beach in far north east Queensland to Surfers Paradise in far south eastern Queensland. It is found on and east of the Great Dividing Range and many of the offshore Islands.
It is also found on Lord Howe Island and New Caledonia.
https://avh.ala.org.au/occurrences/search?taxa=Ochrosia+elliptica#tab_mapView
Habitat Aspect Climate:
Ochrosia elliptica prefers full sun to light dappled shade. It grows close to the coast in beach front forests or on the landward side of mangroves above the tidal reaches. The altitude ranges from 2 meter ASL to 140 meters ASL.
The temperatures range from 3 degree in August to 40 degrees in February.
The rainfalls range from lows of 750mm to an average 2100mm annually.
Soil Requirements:
Ochrosia elliptica prefers fine sand to coarse sand and deep silty muds. The soils are usually derived from accumulated beach sands or alluvial deposits. The soils pH. ranges from 4.5pH to 8pH. It does not tolerate waterlogged soils but grows where seasonal high water tables are present and offer some moisture for long periods. Moderately to high saline soils are tolerated as are salt laden winds.
Height & Spread:
Wild Plants: 2m to 3m by 2m to 4m.
Characteristics:
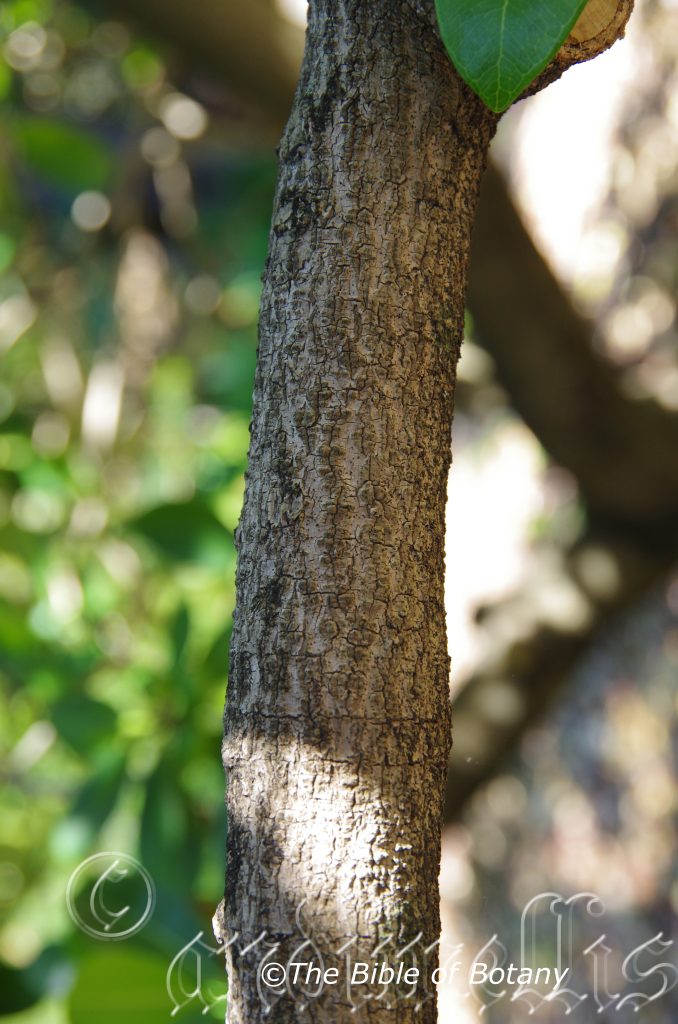
Ochrosia elliptica’s branches and trunk are pale grey-brown and corky. The branchlets are pale grey-brown with leaf scars present, while the stems are mid green and glabrous. The stems exude a white milky sap when damaged.
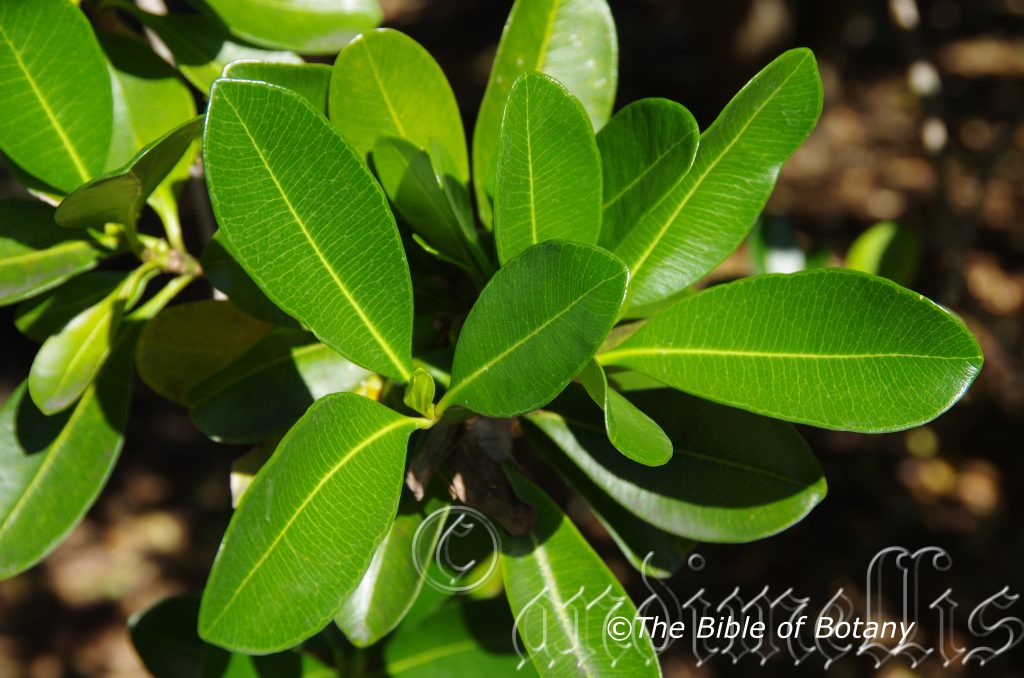
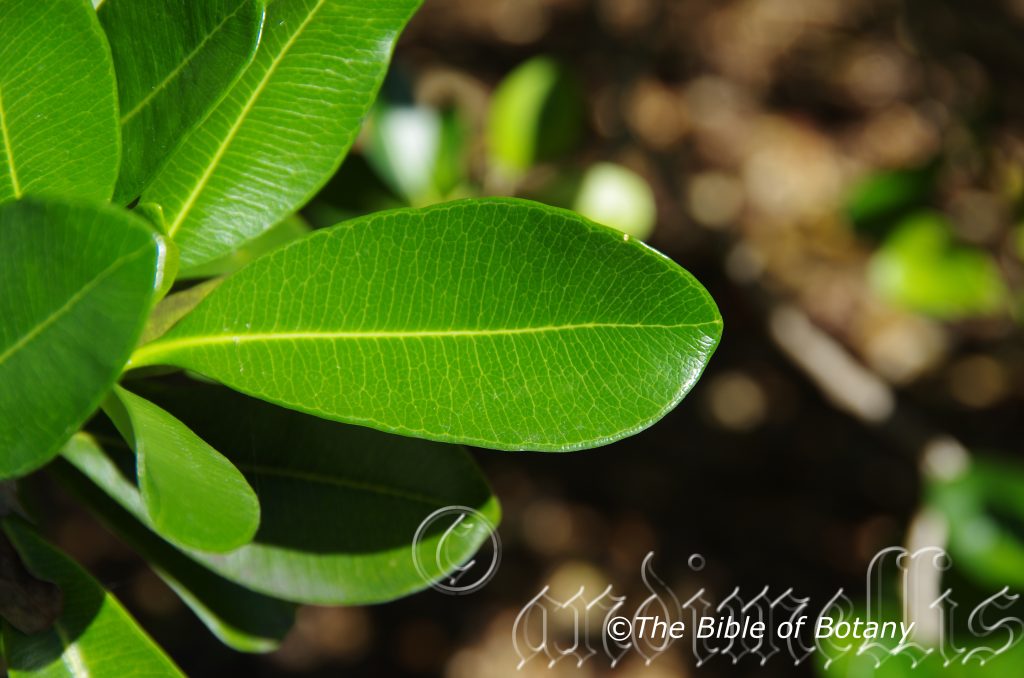
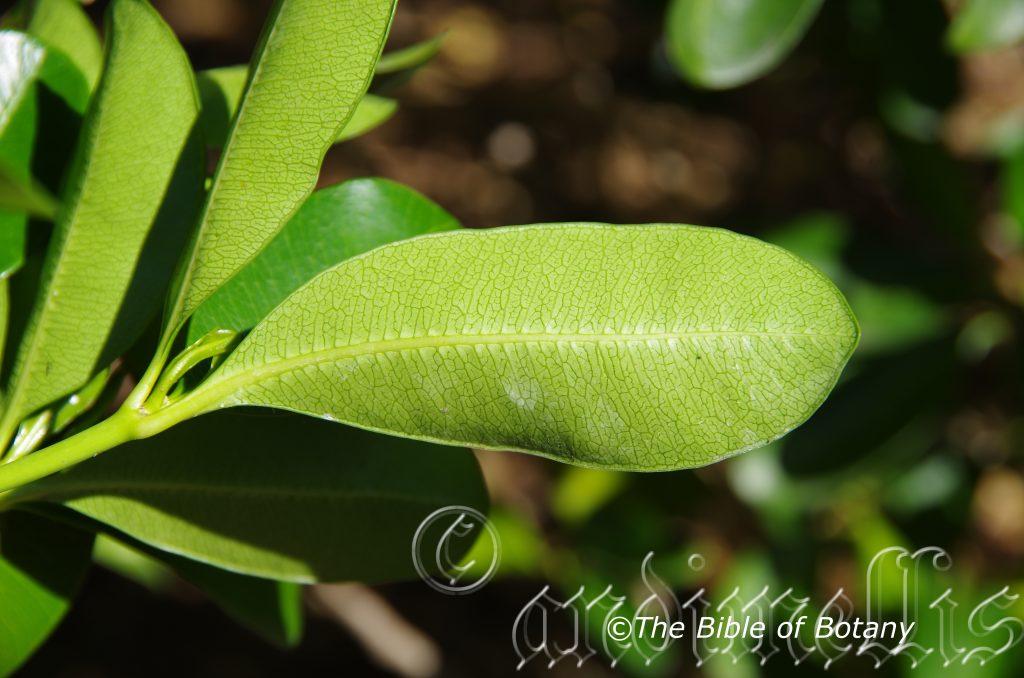
Ochrosia elliptica’s spreading, obovate leaves are in irregular whirls of 3 or 4 often with 2 opposite and the third one between the two. The leaves measure 110mm to 170mm in length by 35mm to 70mm in width. The terete petiole is channelled on the upper surface and measures 5mm to 12mm in length. The petiole exude a white milky sap when damaged. The bases are attenuate for some distance along the petiole, while the apexes are obtuse. The discolourous, coriaceous laminas are deep green, glossy and glabrous on the upper lamina, while the lower lamina is much paler. The laminas recurve upwards on the apical half almost forming a spoon, while the margins are entire and decurve downwards. The mid vein is strongly prominent on the lower lamina, while the 2 intramarginal veins run parallel at 0.8mm to 2mm from the margin. The 20 to 25 lateral veins on each side of the main vein are set at 75 to 80 degrees and yellowish on the upper lamina and greenish on the lower lamina.
The inflorescences of Ochrosia elliptica are born on short peduncle from the leaf axis with 2 to 8 individual white flowers. The glabrous cupular calyx and lobes measure 1mm to 2mm in length. The glabrous corolla tube is white externally and crimson internally and measures 12 to 13mm in length while the oblong, corolla lobes are contorted and measure 10mm to 19mm in length by 5mm to 11mm in width.
The inserted anthers are longer than the filaments and are 2mm from the corolla tubes mouth. They gradually taper to a point at the apex.
The ovules are attached to a comparatively large marginal placenta, while the 2 styles are free at their base and united at their apexes. The globular stigma has 2 small lobes at the apex. The flowers appear from October to January but may have the odd flower throughout the year.
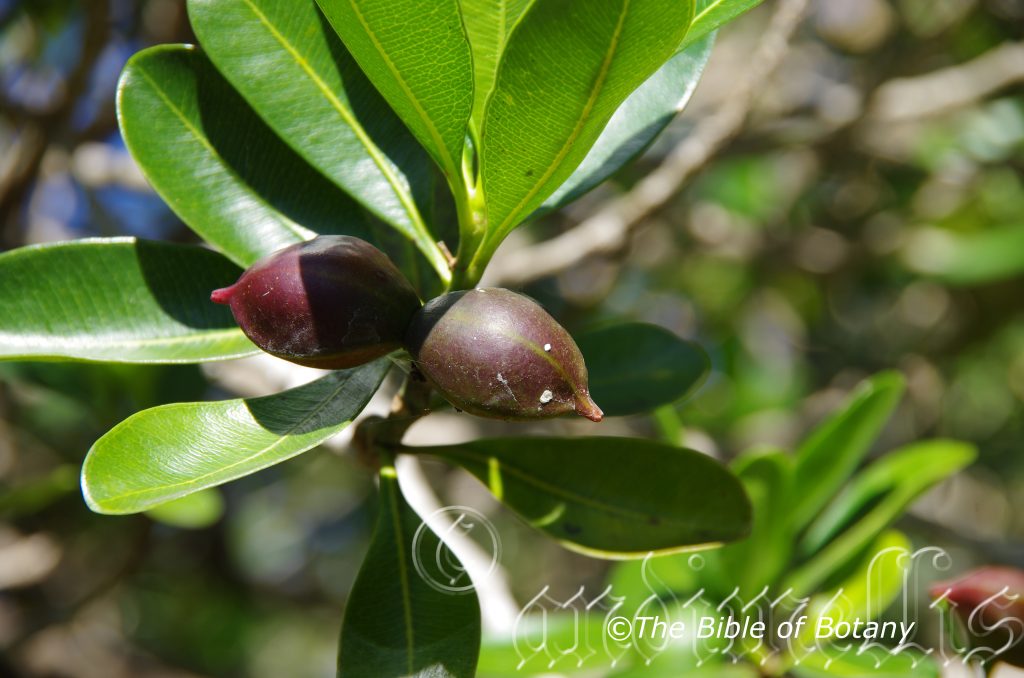
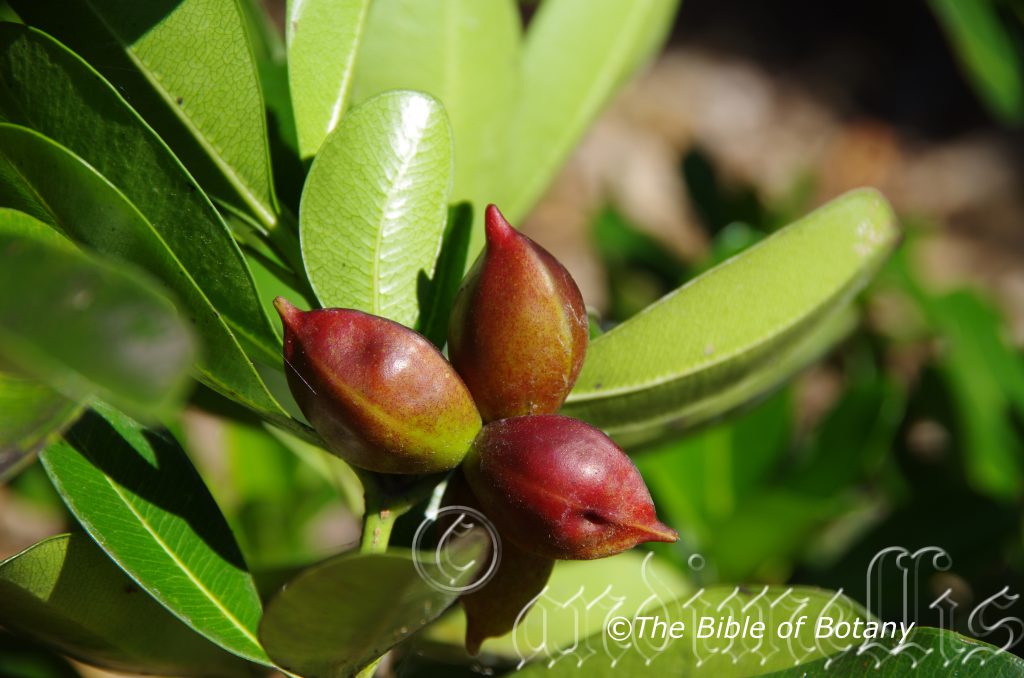
The pedicel exudes a white milky sap when damaged. The ellipsoidal glossy, green berries turn deep crimson to scarlet red when ripe and have 2 pronounced longitudinal ribs and 2 lesser ribs, which extend beyond the apex to form a beak. The beak measures 6mm to 8mm in length. The fruits measure 50mm to 60mm by 20mm to 30mm in width overall. The deep yellow endocarp is 6mm to 9mm thick.
Wildlife:
Ochrosia elliptica’s flowers are probably fertilized by ants.
Cultivation:
Ochrosia elliptica is a beautiful dense foliage small shrubs with green foliage that is still a rarity in small gardens. It would suit most small to large gardens in warm temperate, semi-arid, subtropical to tropical zones. As a garden subject it will grow from 0.5 meters to 0.6 meters in height by 0.8 meter to 1 meter in diameter when cultivated in the open on sandy loams. It is fast growing, drought cold tolerant down to at least minus 2 degrees once established.
It is very compact, dense foliage plants for a bush setting and will stand out because of its glossy green foliage when planted amongst other plants. To high light the colour, select larger leaf plants with pale green or grey leaves. It can be used in more formal or English style gardens because it has a naturally neat rounded appearance that needs very little attention.
The Plant makes an excellent patio or tub specimens and can be kept inside for many years if the ventilation and internal lighting is bright.
Ochrosia elliptica would make an excellent bonsai plants.
Propagation:
Seeds: Ochrosia elliptica seeds can be planted directly into a seed raising mix into 70mm native tubes. Cover them with 5mm to 10mm of fine sand and keep moist not wet. Place the tubes in a warm sunny position. When the seedlings are 120mm to 200mm tall they can be planted out into their permanent positions or repotted into larger containers.
Cuttings: Ochrosia elliptica strikes easily from cuttings so give it a go. Use 100mm to 150mm long hard wood or lateral shoots from the present season’s growth. Take them in warmer months of the year. Remove half the leaves from the bottom section being careful not to tear the bark.
1 Prepare the cutting mix by adding two thirds sharp clean river sand, one third peat or one third perlite. These ingredients must be sterilized,
2 Select good material from non diseased plants,
3 Select semi green stems for cuttings. Look for a stem with two or three nodes,
4 Place the cutting on a flat, hard surface, and make a clean cut down one side of the cutting at the base for 10mm with a sharp sterile knife or razor blade. – This scarification of the node will increase the chances of roots emerging from this spot. Now remove all but one or two the leaves, leaving the apex leaves in tact. If the leaves are very large in proportion to the stem, cut off the apical halves.
5 Fill a saucer with water, and place a little medium strength rooting hormone into another container like a milk bottle top. Dip the node end of the cutting into the water and then into the rooting hormone. Tap off any excess hormone,
6 Use a small dipple stick or old pencil to poke a hole into the soilless potting mix. Ensure the hole is slightly larger than the stem diameter and be careful not to wipe the rooting hormone off the cuttings base. Place 2 to 4 cuttings in each of the 50mm native tubes,
7 I like to place the tubes in bucket with holes drilled in the bottom to allow excess water to drain out. A plastic bagthat fits over the bucket is ideal to help maintain temperature and moisture. Place in a semi shaded, warm position like under 50mm shade cloth.
8 When the cuttings have struck, open the bag to allow air circulation for a few days to a week,
9 Once hardened off remove the cuttings from the bag and allow to further hardening for a few more days to a week,
10 Transplant into a good potting mix to grow on.
Fertilize using seaweed, fish emulsion or organic chicken pellets soaked in water on an alternate basis. Fertilize every two months until the plants are established then annually in early September to October to maintain health, vitality and better flowering.
Further Comments from Readers:
Hi reader, it seems you use The Bible of Botany a lot. That’s great as we have great pleasure in bringing it to you! It’s a little awkward for us to ask, but our first aim is to purchase land approximately 1,600 hectares to link several parcels of N.P. into one at The Pinnacles NSW Australia, but we need your help. We’re not salespeople. We’re amateur botanists who have dedicated over 30 years to saving the environment in a practical way. We depend on donations to reach our goal. If you donate just $5, the price of your coffee this Sunday, We can help to keep the planet alive in a real way and continue to bring you regular updates and features on Australian plants all in one Botanical Bible. Any support is greatly appreciated. Thank you.
In the spirit of reconciliation we acknowledge the Bundjalung, Gumbaynggirr and Yaegl and all aboriginal nations throughout Australia and their connections to land, sea and community. We pay our respect to their Elders past, present and future for the pleasures we have gained.
LBG Lismore NSW
LBG Lismore NSW
LBG Lismore NSW
LBG Lismore NSW
Ochrosia moorei
Classification:
Unranked: Eudicots
Unranked: Rosids
Order: Gentianales
Family: Apocynaceae
Genus: From Ochra, which is Ancient Greek for yellowish, dull fawnish-gold, dull yellowish-brown. It refers to organs or structures, which are pale yellowish-brown. Here it refers to the pulp between the exocarp and the seed, which is deep yellow to yellowish-fawn.
Species: Is named in honour of Charles Moore; 1820-1905, who was Director of the Sydney Botanic Gardens, a position he occupied until 5 May 1896. He undertook numerous collecting expeditions in eastern New South Wales.
Common Name: Southern Ochrosia.
Distribution:
Ochrosia moorei is found in a small area bounded by Tweed Heads west to Woodenbong in South eastern Queensland south Tabulum then east to Ballina in far north eastern New South Wales. to Surface Paradise in far south eastern Queensland. It is found on and east of the Great Dividing Range to the coast.
https://avh.ala.org.au/occurrences/search?taxa=Ochrosia+moorei#tab_mapView
Habitat Aspect Climate:
Ochrosia moorei prefers light dappled shade. It grows in sub tropical rainforests. The altitude ranges from 10 meters ASL to 1800 meters ASL.
The temperatures range from 3 degree in August to 40 degrees in February.
The rainfalls range from lows of 750mm to an average 1500mm annually.
Soil Requirements:
Ochrosia moorei prefers better quality loams. The soils are usually derived from decomposed black basalts or granite. The soils pH. ranges from 5pH to 8pH. It does not tolerate waterlogged soils but prefers soils with good moisture retention. Slightly saline to moderately saline soils are tolerated.
Height & Spread:
Wild Plants: 6m to 9m by 4m to 6m.
Characteristics:
Ochrosia moorei grows as an erect shrub or small tree. The branches and trunk are pale grey and smooth or with small lenels. The juvenile branches are grass green, semi glossy and glabrous. The stems exude a white milky sap when damaged. The shoots and terminal leaf buds enclosed in a sticky exudate.
Ochrosia elliptica’s spreading, oblanceolate to narrow-oblanceolate opposite leaves measure 60mm to 180mm in length by 20mm to 40mm in width. The terete, deep green petiole measures 2mm to 14mm in length. The bases gradually tapering to the petiole, while the apexes are accuminate. The discolourous, somewhat soft laminas are deep green, glossy and glabrous on the upper lamina, while the lower lamina is much paler. The laminas recurve downwards on the apical half, while the margins are entire and are slightly undulating. The mid vein is strongly prominent on the lower lamina, while there are 16 to 40 pairs secondary veins, which are at around 80 degrees to the mid vein. The lateral veins are faintly visible on both laminas.
The inflorescences of Ochrosia moorei are born on a long peduncle from the terminals with 2 to 6 individual white flowers. The glabrous cupular calyx and lobes measure 2.5mm to 3.5mm in length. The glabrous corolla tube is white and measures 7 to 9mm in length while the oblong, corolla lobes are contorted and measure 5mm to 6mm in length.
The inserted anthers are pale green. The flowers appear from November to January.
The ellipsoidal to ovoidal glossy, green drupes turn bright red to scarlet red when ripe. The drupe’s endocarp is hard, with smooth fine grooves or shallow ribs and measure 40mm to 80mm in length by 20mm to 25mm in diameter.
Wildlife:
Ochrosia moorei’s flowers are probably fertilized by ants.
Cultivation:
Ochrosia moorei can be grown as a beautiful dense foliage large shrub to 5 meters in height or as a single trunk tree to 9 meters when grown in the open. It would suit most medium to large gardens in warm temperate, semi-arid, subtropical to tropical gardens.
It is a very compact, dense foliage plant readily suitable to a bush setting and will stand out because of its glossy green foliage when planted amongst other plants. To highlight the colour, select smaller leaf plants with paler green or golden yellow leaves. Melaleuca bracteata golden gem foliage form would make a good contrast in foliage. It can be used in more formal or English style gardens because it has a naturally neat rounded appearance that needs very little attention.
It makes an excellent patio or tub specimens and can be kept inside for many years if the ventilation and internal lighting is bright.
Ochrosia moorei would make excellent bonsai plants.
Propagation:
Seeds: Ochrosia moorei seeds can be planted directly into a seed raising mix into 70mm native tubes. Cover them with 5mm to 10mm of fine sand and keep moist not wet. Place the tubes in a warm sunny position. When the seedlings are 120mm to 200mm tall they can be planted out into their permanent positions or re-potted into larger containers.
Fertilize using seaweed, fish emulsion or organic chicken pellets soaked in water on an alternate basis. Fertilize every two months until the plants are established then annually in early September to October to maintain health, vitality and better flowering.
Further Comments from Readers:
Hi reader, it seems you use The Bible of Botany a lot. That’s great as we have great pleasure in bringing it to you! It’s a little awkward for us to ask, but our first aim is to purchase land approximately 1,600 hectares to link several parcels of N.P. into one at The Pinnacles NSW Australia, but we need your help. We’re not salespeople. We’re amateur botanists who have dedicated over 30 years to saving the environment in a practical way. We depend on donations to reach our goal. If you donate just $5, the price of your coffee this Sunday, We can help to keep the planet alive in a real way and continue to bring you regular updates and features on Australian plants all in one Botanical Bible. Any support is greatly appreciated. Thank you.
In the spirit of reconciliation we acknowledge the Bundjalung, Gumbaynggirr and Yaegl and all aboriginal nations throughout Australia and their connections to land, sea and community. We pay our respect to their Elders past, present and future for the pleasures we have gained.
Ochrosperma citriodorum
Classification:
Unranked: Magnoliophyta
Class: Equisetopsida
Subclass: Magnoliidae
Superorder: Rosanae
Order: Myrtales
Family: Myrtaceae
Genus: From Ochra, which is Ancient Greek for yellowish, dull fawnish-gold, dull yellowish-brown and Spérma, which is Ancient Greek for a seed. It refers to seeds, which are pale yellowish-brown which is much paler than other species in the genus.
Specie: From Citrinus which is old Anglo-French for yellow and later Citrinus, which is Latin for Citrus and Odor, which is Latin for an odour, smell or scent. It refers to plant’s leaves which have a lemon scent.
Common Name:
Distribution:
Ochrosperma citriodorum is found south from Coolangatta in far south eastern coastal Queensland and from Tweed Heads to Port MacQuarrie in north eastern coastal New South Wales.
https://avh.ala.org.au/occurrences/search?taxa=Ochrosperma+citriodorum#tab_mapView
Habitat Aspect Climate:
Ochrosperma citriodorum prefers full sun to dappled shade. It grows close to the coast on back dunes, open heaths or open woodland heaths. The altitude ranges from 2 meter ASL to 12 meters ASL.
The temperatures range from 1 degree in August to 36 degrees in February.
The rainfalls range from lows of 1050mm to an average 2100mm annually.
Soil Requirements:
Ochrosperma citriodorum prefers fine sand and coarse sand. The soils are usually derived from accumulated beach sands. The soils pH. ranges from 5.5pH to 6.5pH. It does not tolerate waterlogged soils but grows where season high water tables are present and offer some moisture for long periods. Non saline soils to moderately saline soils are tolerated.
Height & Spread:
Wild Plants: 0.2m to 0.4m by 0.5m to 1m.
Characteristics:
The stems are pale brown, scaly or papery. The young branchlets are mid green.
Ochrosperma citriodorum’s usually decussate or at times opposite simple leaves are spreading, elliptic to obovate. They measure 1.5mm to 3mm in length by 0.5mm to 1.5mm in width. The petioles measure 0.4mm to 0.6mm in length. The bases are rounded to cuneate while the apexes are obtuse. The concolourous succulent laminas are mid green, to deep green, glossy and glabrous. The laminas are ovate in cross section and decurve downwards near the apexes while the margins are entire. The mid vein and lateral veins are obscure on both laminas.
The inflorescences are usually born singularly or at times in pairs on a common pedunculate pedicles from the leaf axils. The 5 mid green bracteoles measure 0.6mm to 0.7mm in length. The 5 succulent mid green sepals are triangular with acute to obtuse apexes and measure 0.5mm to 0.6mm in length. The conical hypanthium is bright lime-green and measures 2.5mm in length by 3.5mm in length by 2.5mm to 4mm in length diameter. The 5 white petals are obtuse and measure 1.2mm to 1.8mm in length by 1mm to 1.6mm in width.
The 5 greenish filaments are opposite the petals while the cream, sagittate anthers measure 0.4mm in length. The lime-green style is set deep into the hypanthium’s disc. The flowers appear from October to January but may have the odd flower throughout the year.
Ochrosperma citriodorum’s fruits are conical capsules. The lime-green capsules turn deep grey. The capsules measure 2mm to 2.5mm in length by 2mm to 2.5mm in diameter. The seeds are ochre-fawn.
Wildlife:
Ochrosperma citriodorum’s flowers are a great attraction for native bees, pollen flies and other small insects which in return attract many small insectivorous birds.
Cultivation:
Ochrosperma citriodorum is a beautiful dense foliage small shrubs with green foliage that is still a rarity in small gardens. It would suit most small to large gardens in warm temperate, semi-arid, subtropical to tropical zones. As garden subjects it will grow from 0.5 meters to 0.6 meters in height by 0.8 meter to 1 meter in diameter when cultivated in the open on sandy loams. It is fast growing, drought cold tolerant down to at least minus 2 degrees once established.
It is very compact, dense foliage plants for a bush setting and will stand out because of its glossy green foliage when planted amongst other plants. To highlight the colour, select larger leaf plants with pale green or grey leaves. It can be used in more formal or English style gardens because it has a naturally neat rounded appearance that needs very little attention.
The Plant makes a good patio or tub specimen and can be kept inside for many years if the ventilation and internal lighting is bright.
Ochrosperma citriodorum would make excellent bonsai plants.
Propagation:
Seeds: Ochrosperma citriodorum’s The seeds can be planted directly into a seed raising mix. Cover them with 5mm of fine sand and keep moist not wet. Place the tray in a warm sunny position. When the seedlings are 25mm to 50mm tall, prick them out and plant them into 50mm native tubes using a good organic mix.
Once the seedlings reach 100mm to 150mm in height It can be planted out into their permanent positions or repotted into larger containers.
Cuttings: Fortunately Ochrosperma citriodorum is easy to strike from cuttings so it is a good plant for beginners to try their skills on.
Use 80mm to 110mm long tip cuttings or lateral shoots from the present season’s growth. Take them in warmer months of the year. Remove half the leaves from the bottom section being careful not to tear the bark.
1 Prepare the cutting mix by adding two thirds sharp clean river sand, one third peat or one third perlite. These ingredients must be sterilized,
2 Select good material from non diseased plants,
3 Select semi green stems for cuttings. Look for a stem with two or three nodes,
4 Place the cutting on a flat, hard surface, and make a clean cut down one side of the cutting at the base for 10mm with a sharp sterile knife or razor blade. – This scarification of the node will increase the chances of roots emerging from this spot. Now remove all but one or two the leaves, leaving the apex leaves in tact. If the leaves are very large in proportion to the stem, cut off the apical halves.
5 Fill a saucer with water, and place a little medium strength rooting hormone into another container like a milk bottle top. Dip the node end of the cutting into the water and then into the rooting hormone. Tap off any excess hormone,
6 Use a small dipple stick or old pencil to poke a hole into the soilless potting mix. Ensure the hole is slightly larger than the stem diameter and be careful not to wipe the rooting hormone off the cuttings base. Place 2 to 4 cuttings in each of the 50mm native tubes,
7 I like to place the tubes in bucket with holes drilled in the bottom to allow excess water to drain out. A plastic bag that fits over the bucket is ideal to help maintain temperature and moisture. Place in a semi shaded, warm position like under 50mm shade cloth.
8 When the cuttings have struck, open the bag to allow air circulation for a few days to a week,
9 Once hardened off remove the cuttings from the bag and allow to further hardening for a few more days to a week,
10 Transplant into a good potting mix to grow on.
Fertilize using seaweed, fish emulsion or organic chicken pellets soaked in water on an alternate basis. Fertilize every two months until the plants are established then annually in early September to October to maintain health, vitality and better flowering.
Further Comments from Readers:
Hi reader, it seems you use The Bible of Botany a lot. That’s great as we have great pleasure in bringing it to you! It’s a little awkward for us to ask, but our first aim is to purchase land approximately 1,600 hectares to link several parcels of N.P. into one at The Pinnacles NSW Australia, but we need your help. We’re not salespeople. We’re amateur botanists who have dedicated over 30 years to saving the environment in a practical way. We depend on donations to reach our goal. If you donate just $5, the price of your coffee this Sunday, We can help to keep the planet alive in a real way and continue to bring you regular updates and features on Australian plants all in one Botanical Bible. Any support is greatly appreciated. Thank you.
In the spirit of reconciliation we acknowledge the Bundjalung, Gumbaynggirr and Yaegl and all aboriginal nations throughout Australia and their connections to land, sea and community. We pay our respect to their Elders past, present and future for the pleasures we have gained.
Wooli NSW
Wooli NSW
Wooli NSW
Ocrosperma lineare
Classification:
Unranked: Magnoliophyta
Class: Equisetopsida
Subclass: Magnoliidae
Superorder: Rosanae
Order: Myrtales
Family: Myrtaceae
Genus: From Ochra, which is Ancient Greek for yellowish, dull fawnish-gold, dull yellowish-brown and Spérma, which is Ancient Greek for a seed. It refers to seeds, which are pale yellowish-brown which is much paler than other species in the genus.
Specie: From Linearis, which is Latin for straight lines. It usually refers to leaves, which are narrower and where the veins appear in straight lines compared to other species or subspecies in the genus.
Common Name: Straggly Baeckea
Distribution:
Ochrosperma lineare is found along the coastal strip from Byfield in central coastal Queensland to Lemon Tree Passage in central coastal New South Wales with an isolated population near Inverell.
https://avh.ala.org.au/occurrences/search?taxa=Ochrosperma+lineare#tab_mapView
Habitat Aspect Climate:
Ochrosperma lineare prefers full sun to dappled shade. It grows in a variety of habitats including moist heaths, dry sclerophyll forest heaths, wallum flats, foredunes, headland heaths or swamp margins. The altitude ranges from 2 meter ASL to 40 meters ASL except for the Inverell population which is found at 528 meters ASL.
The temperatures range from minus 4 degrees in August to 39 degrees in February.
The rainfalls range from lows of 600mm to an average 2100mm annually.
Soil Requirements:
Ochrosperma lineare prefers fine sand and course sand. The soils are usually derived from accumulated beach sands or decomposed granite. The soils pH. ranges from 5.5pH to 7pH. It does not tolerate waterlogged soils but grows where seasonal high water tables are present and offer some moisture for long periods. Non saline soils to moderately saline soils are tolerated.
Height & Spread:
Wild Plants: 1m to 2m by 1.5m to 2m.
Characteristics:
Ochrosperma lineare grows as a small open shrub with pale pinkish-brown to pale brown, scaly or papery stems. The young branchlets are mid green and glabrous.
Ochrosperma lineare’s usually decussate or at times opposite simple leaves are semi appressed and overlap the pair of leaves above them. The leaves are linear to linear-lanceolate and measure 4mm to 8mm in length by 0.5mm to 1mm in width. The pale yellow, glabrous petioles measure 0.5mm to 0.8mm in length. The bases taper slightly to the petioles while the apexes are obtuse and pinkish. The concolourous succulent laminas are mid green, to deep grass-green, glossy and glabrous. The plano-convex laminas decurve very slightly at the apex and flatten out while the margins are entire. The mid vein and lateral veins are obscure on both laminas.
The inflorescences of are usually born singularly or at times in pairs on a common pedunculate pedicels from the leaf axils. The 5 mid green bracteoles measure 0.3mm to 0.5mm in length. The 5 succulent mid green sepals are triangular with acute to obtuse apexes and measure 0.5mm to 0.6mm in length. The conical hypanthium is bright lime-green and measures 2.5mm in length by 3.5mm in length by 2.5mm to 4mm in length diameter. The 5 white, pastel pink to rose pink petals are orbicular and measure 0.8mm to 1mm in length by 0.8mm to 1mm in width.
The 5 greenish filaments are opposite the petals while the cream, sagittate anthers measure 0.4mm in length. The reddish-maroon rigid, erect style is set deep into the hypanthium’s disc and measures 0.5mm in length. The flowers appear from September to early December but may have the odd flower throughout the year.
Ochrosperma lineare’s fruits are conical capsules. The lime-green capsules turn deep grey. The capsules measure 1.2mm to 2.5mm in length by 1.2mm to 2.2mm in diameter. The seeds are ochre-fawn.
Wildlife:
Ochrosperma lineare’s flowers are a great attraction for native bees, pollen flies and other small insects which in return attract many small insectivorous birds.
Cultivation:
Ochrosperma lineare is a beautiful open foliage small shrubs with green foliage that is still a rarity in small gardens. It would suit most small to large gardens in warm temperate, semi-arid, subtropical to tropical zones. As a garden subject it will grow from 1.5 meters to 2 meters in height by 1.5 meters to 2.5 meters in diameter when cultivated in the open on sandy loams. It is fast growing, drought and cold tolerant down to at least minus 2 degrees once established.
It has branches that are best placed on display. The natural twists and turns can highlight the gnarledness at eye level. Planted with annuals below can give all round colour or seasonal colour on the ground. Scaevola aemula, Goodenia species, Leischenalta species Actinotus helianthi, Xerochrysum bracteatum or Coronidium elatum are a few that immediately come to mind.
The Plant makes a good patio or tub specimens for the veranda or along a hard pool fence where both the branches and fence can be highlighted.
Ochrosperma lineare would make excellent bonsai plant.
Propagation:
Seeds: The seeds are easy to collect and can be planted directly into a seed raising mix. Cover them with 2mm to 5mm of fine sand and keep moist not wet. Place the tray in a warm sunny position.
When the seedlings are 25mm to 50mm tall, prick them out and plant them into 50mm native tubes using a good organic mix.
Once the seedlings reach 100mm to 150mm in height It can be planted out into their permanent positions or repotted into larger containers.
Cuttings: Ochrosperma lineare strikes relatively easy from cuttings. Use 80mm to 100mm long tip cuttings or lateral shoots from the present season’s growth. Take them in warmer months of the year. Remove half the leaves from the bottom section being careful not to tear the bark.
1 Prepare the cutting mix by adding two thirds sharp clean river sand, one third peat or one third perlite. These ingredients must be sterilized,
2 Select good material from non diseased plants,
3 Select semi green stems for cuttings. Look for a stem with two or three nodes,
4 Place the cutting on a flat, hard surface, and make a clean cut down one side of the cutting at the base for 10mm with a sharp sterile knife or razor blade. – This scarification of the node will increase the chances of roots emerging from this spot. Now remove all but one or two the leaves, leaving the apex leaves in tact. If the leaves are very large in proportion to the stem, cut off the apical halves.
5 Fill a saucer with water, and place a little medium strength rooting hormone into another container like a milk bottle top. Dip the node end of the cutting into the water and then into the rooting hormone. Tap off any excess hormone,
6 Use a small dipple stick or old pencil to poke a hole into the soilless potting mix. Ensure the hole is slightly larger than the stem diameter and be careful not to wipe the rooting hormone off the cuttings base. Place 2 to 4 cuttings in each of the 50mm native tubes,
7 I like to place the tubes in bucket with holes drilled in the bottom to allow excess water to drain out. A plastic bagthat fits over the bucket is ideal to help maintain temperature and moisture. Place in a semi shaded, warm position like under 50mm shade cloth.
8 When the cuttings have struck, open the bag to allow air circulation for a few days to a week,
9 Once hardened off remove the cuttings from the bag and allow to further hardening for a few more days to a week,
10 Transplant into a good potting mix to grow on.
Fertilize using seaweed, fish emulsion or organic chicken pellets soaked in water on an alternate basis. Fertilize every two months until the plants are established then annually in early September to October to maintain health, vitality and better flowering.
Further Comments from Readers:
Hi reader, it seems you use The Bible of Botany a lot. That’s great as we have great pleasure in bringing it to you! It’s a little awkward for us to ask, but our first aim is to purchase land approximately 1,600 hectares to link several parcels of N.P. into one at The Pinnacles NSW Australia, but we need your help. We’re not salespeople. We’re amateur botanists who have dedicated over 30 years to saving the environment in a practical way. We depend on donations to reach our goal. If you donate just $5, the price of your coffee this Sunday, We can help to keep the planet alive in a real way and continue to bring you regular updates and features on Australian plants all in one Botanical Bible. Any support is greatly appreciated. Thank you.
In the spirit of reconciliation we acknowledge the Bundjalung, Gumbaynggirr and Yaegl and all aboriginal nations throughout Australia and their connections to land, sea and community. We pay our respect to their Elders past, present and future for the pleasures we have gained.
Yuraygir National Park NSW
Yuraygir National Park NSW
Yuraygir National Park NSW
Yuraygir National Park NSW
Yuraygir National Park NSW
Yuraygir National Park NSW
Yuraygir National Park NSW
Yuraygir National Park NSW
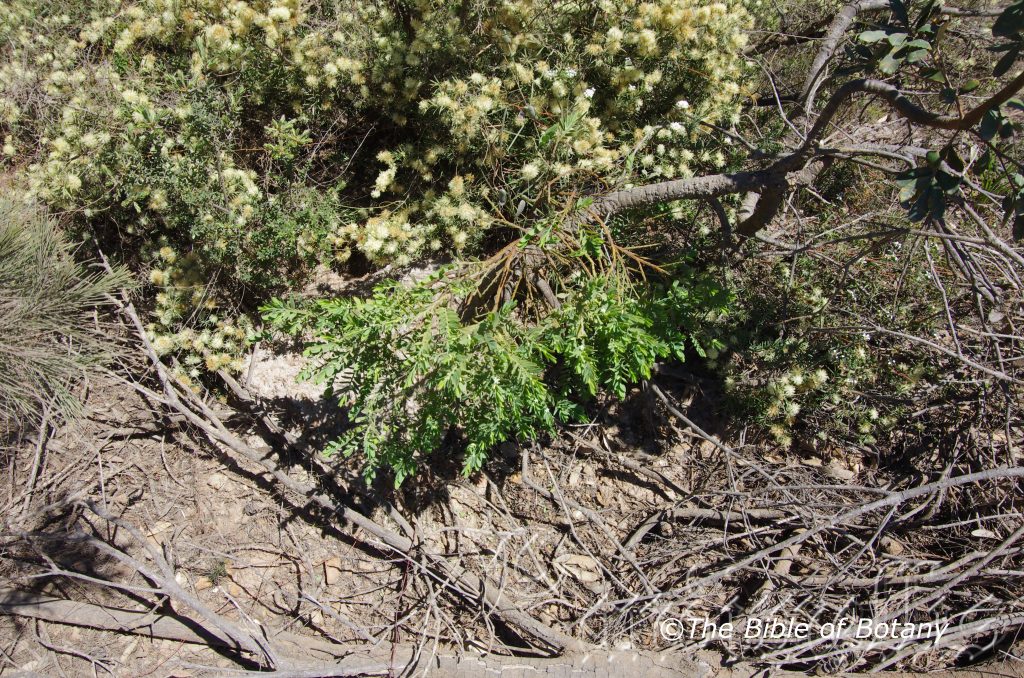
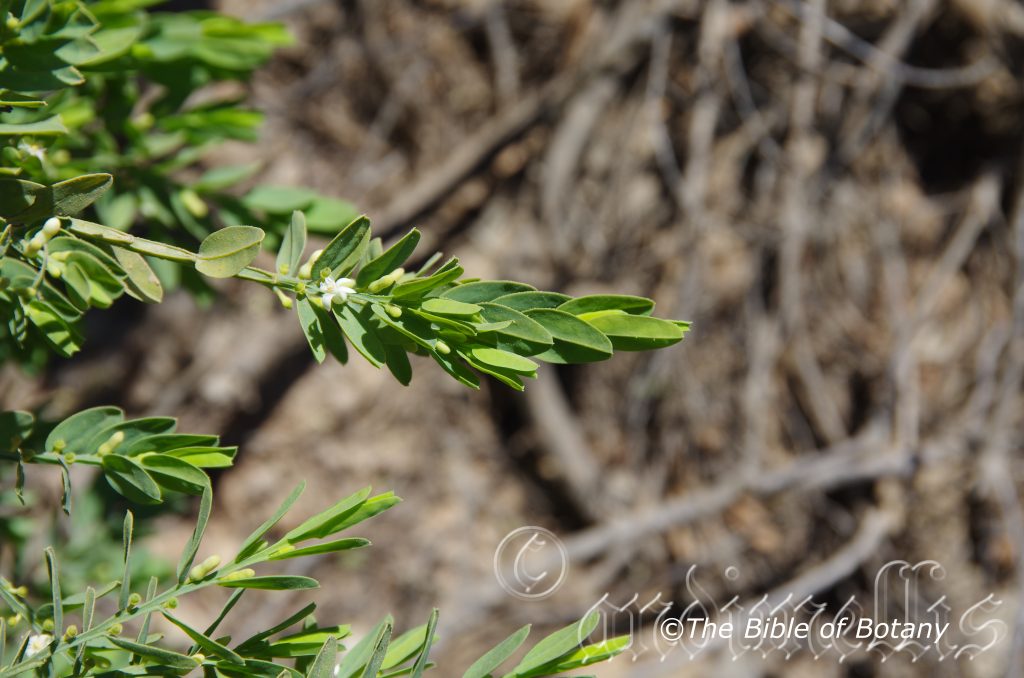
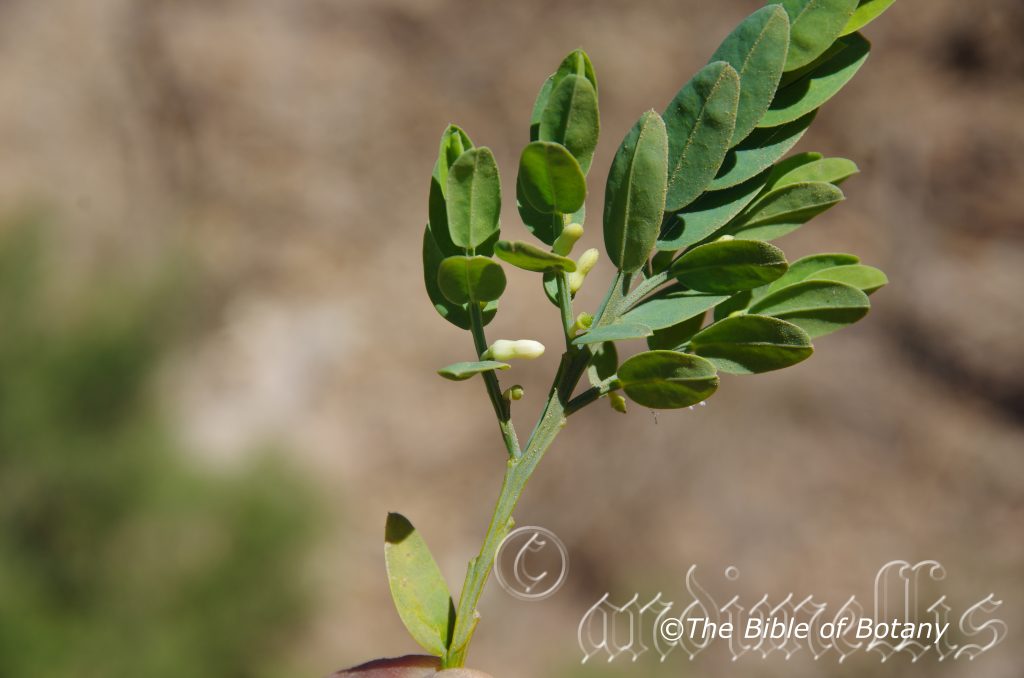
Olax angulata
Classification:
Class: Equisetopsida
Subclass: Magnoliidae
Superorder: Santalanae
Order: Santalales
Family: Olacacae
Genus: From Bolax, which is Ancient Greek for a furrow. It refers to the flowers having a small longitudinal furrow.
Species: From Angular, which is Ancient Greek for to have angles. It refers to structures or organs, which have distinct angles.
Subspecies: Olax angulata subsp. angulata. From Angular, which is Ancient Greek for to have angles. It refers to structures or organs, which have distinct angles.
The other subs species have recently been upgraded to specie level.
Common Name:
Distribution:
Olax angulata is restricted to a small area between Minnie Waters and Diggers Beach along the coast of the Clarence valley with a small disjunct population in Fortis Creek State Forest in New South Wales.
https://avh.ala.org.au/occurrences/search?taxa=Olax+angulata#tab_mapView
Characteristics:
Olax angulata prefers full sun to dappled shade. It grows in open woodlands, near swamps or moist wallums. The altitude ranges from 2 meter ASL to 828 meters ASL.
The temperatures range from minus 2 degrees in August to 38 degrees in February.
The rainfalls range from lows of 1050mm to an average 2000mm annually.
Soil Requirements:
Olax angulata prefers to grow on fine sand and course sand. The soils are usually derived from accumulated beach sands or decomposed reddish sandstone. The soils pH. ranges from 5.5pH to 7pH. It does not tolerate waterlogged soils but grows where season high water tables are present and offer some moisture for long periods. Non saline soils to moderately saline soils are tolerated.
Height & Spread:
Wild Plants: 0.6m to 1m by 0.8m to 1.3m.
Characteristics:
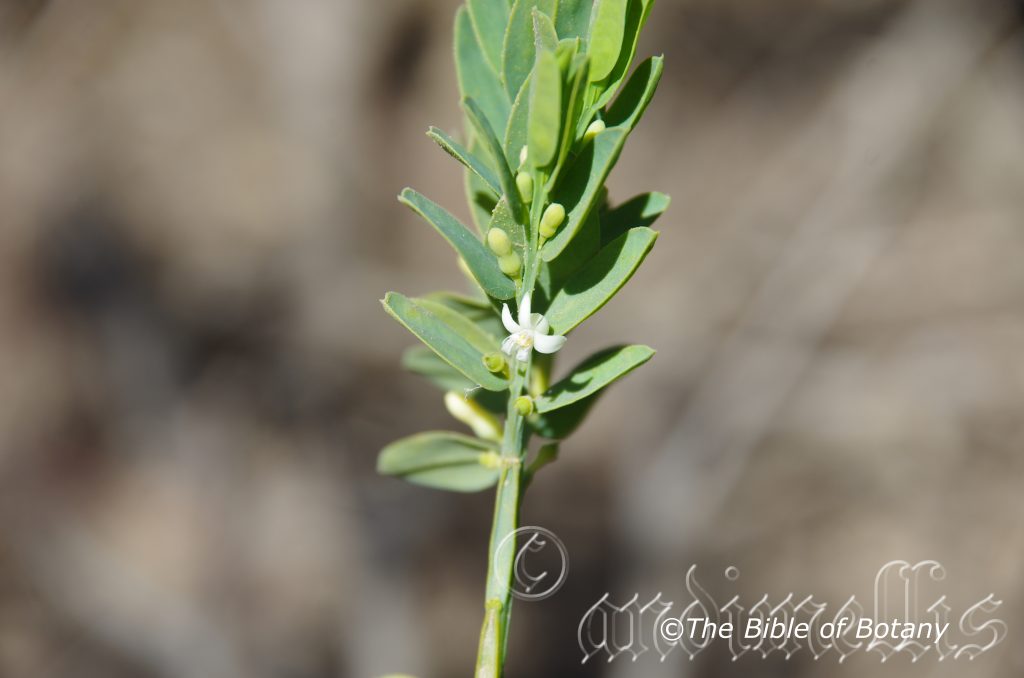
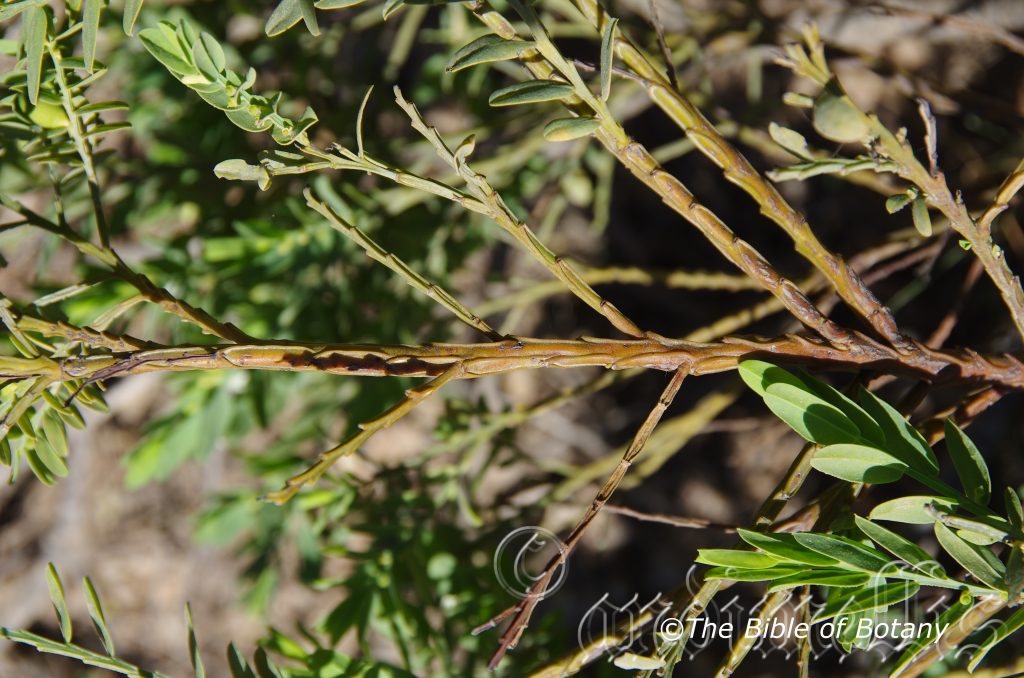
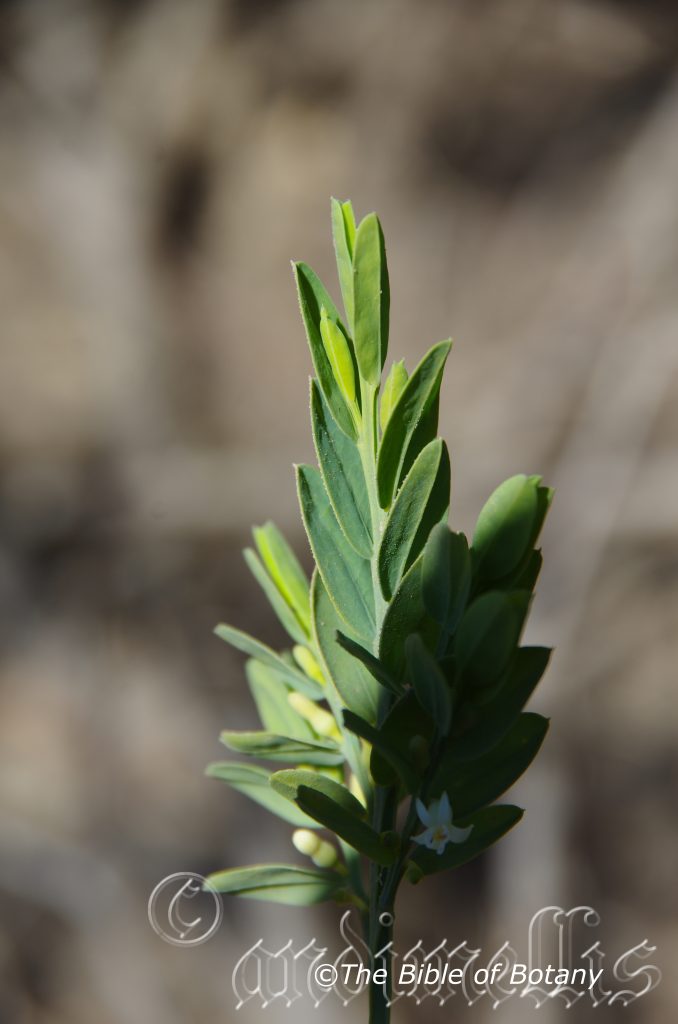
The stems grows as a small shrub with soft pale blue-green to pale grey-green, angulated glabrous, often glaucous stems. The young branchlets are similar to the mature stems.
The distichous, elliptic simple leaves measure 6mm to 25mm in length by 4mm to 7mm in width. The yellowish petioles measure 0mm to 0.5mm in length. The bases are rounded to rounded- truncate to the elongated stems below the junction with the stem while the apexes are obtuse or mucronate. The concolourous laminas are soft pale blue-green to pale grey-green, dull and glabrous. The laminas are flat or slightly convex from the mid vein to the margins and decurve downwards sharply at the apex. The margins are entire. The mid vein is strongly prominent on the lower lamina and is visible on the upper lamina while the lateral veins are obscure.
The inflorescences of Olax angulata are usually born singularly from the leaf axils. The pedicel measures 2mm to 3mm in length. The 5 mid green bracteoles measure 0.3mm to 0.5mm in length. The shallow cupuliform calyx is minute. The cylindrical hypanthium is dull lime-green and measures 5mm in length by 6mm in length by 2.5mm to 3mm in length diameter. The 5 free, white petals are oblong with obtuse to acute apexes and measure 5mm to 5.5mm in length by 2mm to 2.2mm in width.
The 3 white, filiform filaments are inserted and measure 2mm to 2.5mm in length while the bright yellow-orange, oblong anthers are exserted. The 5 white staminodes are inserted, are opposite the petals and measure 3mm to 3.5mm in length. The green rigid, erect style is set deep into the hypanthia’s disc and measures 0.5mm in length. The flowers appear from September to November.
Olax angulata’s fruits are ovoidal, glabrous drupes. The mid green drupes turn yellowish-green and semi glossy when ripe. The drupes measure 5mm to 9mm in length by 3mm to 7mm in diameter. The single spherical seed measure 9mm to 14mm in length by 6mm to 8mm in width.
Wildlife:
Olax angulata’s wildlife is unknown to the author.
Cultivation:
Olax angulata is a beautiful dense foliage upright shaped, open small shrub with blue-green foliage is still a rarity in small gardens. It would suit most small to large gardens in warm temperate, semi-arid, subtropical to tropical zones. As garden subjects it will grow from 0.8 meters to 1.2 meters in height by 0.6 meter to 1 meter in diameter when cultivated in the open or much taller and narrower when grown in a rainforest situation. It is fast growing, drought and cold tolerant with light frosts down to at minus 2 degrees once established.
It can be lightly pruned to make a smaller more compact shrub for a bush setting and will stand out because of its blue-green foliage when planted amongst other green or grey foliage plants. To highlight the colour, select larger leaf plants with deep green leaves. It can be used in more formal or English style gardens because it has a naturally neat rounded appearance when pruned that needs very little attention.
The Plant makes an excellent patio or tub specimens and can be kept on verandas for many years if the ventilation and internal lighting is bright.
Propagation:
Seeds: Olax angulata’s seeds can be planted directly into a seed raising mix. Cover them with 5mm of fine sand and keep moist not wet. Place the tray in a warm sunny position. When the seedlings are 25mm to 50mm tall, prick them out and plant them into 50mm native tubes using a good organic mix.
Once the seedlings reach 150mm to 200mm in height It can be planted out into their permanent positions or repotted into larger containers.
Cuttings: Olax angulata is easy to strike from cuttings. Use 80mm to 100mm long tip cuttings or lateral shoots from the present season’s growth. Take them in warmer months of the year. Remove half the leaves from the bottom section being careful not to tear the bark.
1 Prepare the cutting mix by adding two thirds sharp clean river sand, one third peat or one third perlite. These ingredients must be sterilized,
2 Select good material from non diseased plants,
3 Select semi green stems for cuttings. Look for a stem with two or three nodes,
4 Place the cutting on a flat, hard surface, and make a clean cut down one side of the cutting at the base for 10mm with a sharp sterile knife or razor blade. – This scarification of the node will increase the chances of roots emerging from this spot. Now remove all but one or two the leaves, leaving the apex leaves in tact. If the leaves are very large in proportion to the stem, cut off the apical halves.
5 Fill a saucer with water, and place a little medium strength rooting hormone into another container like a milk bottle top. Dip the node end of the cutting into the water and then into the rooting hormone. Tap off any excess hormone,
6 Use a small dipple stick or old pencil to poke a hole into the soilless potting mix. Ensure the hole is slightly larger than the stem diameter and be careful not to wipe the rooting hormone off the cuttings base. Place 2 to 4 cuttings in each of the 50mm native tubes,
7 I like to place the tubes in bucket with holes drilled in the bottom to allow excess water to drain out. A plastic bagthat fits over the bucket is ideal to help maintain temperature and moisture. Place in a semi shaded, warm position like under 50mm shade cloth.
8 When the cuttings have struck, open the bag to allow air circulation for a few days to a week,
9 Once hardened off remove the cuttings from the bag and allow to further hardening for a few more days to a week,
10 Transplant into a good potting mix to grow on.
Fertilize using seaweed, fish emulsion or organic chicken pellets soaked in water on an alternate basis. Fertilize every two months until the plants are established then annually in early September to October to maintain health, vitality and better flowering.
Further Comments from Readers:
Hi reader, it seems you use The Bible of Botany a lot. That’s great as we have great pleasure in bringing it to you! It’s a little awkward for us to ask, but our first aim is to purchase land approximately 1,600 hectares to link several parcels of N.P. into one at The Pinnacles NSW Australia, but we need your help. We’re not salespeople. We’re amateur botanists who have dedicated over 30 years to saving the environment in a practical way. We depend on donations to reach our goal. If you donate just $5, the price of your coffee this Sunday, We can help to keep the planet alive in a real way and continue to bring you regular updates and features on Australian plants all in one Botanical Bible. Any support is greatly appreciated. Thank you.
In the spirit of reconciliation we acknowledge the Bundjalung, Gumbaynggirr and Yaegl and all aboriginal nations throughout Australia and their connections to land, sea and community. We pay our respect to their Elders past, present and future for the pleasures we have gained.
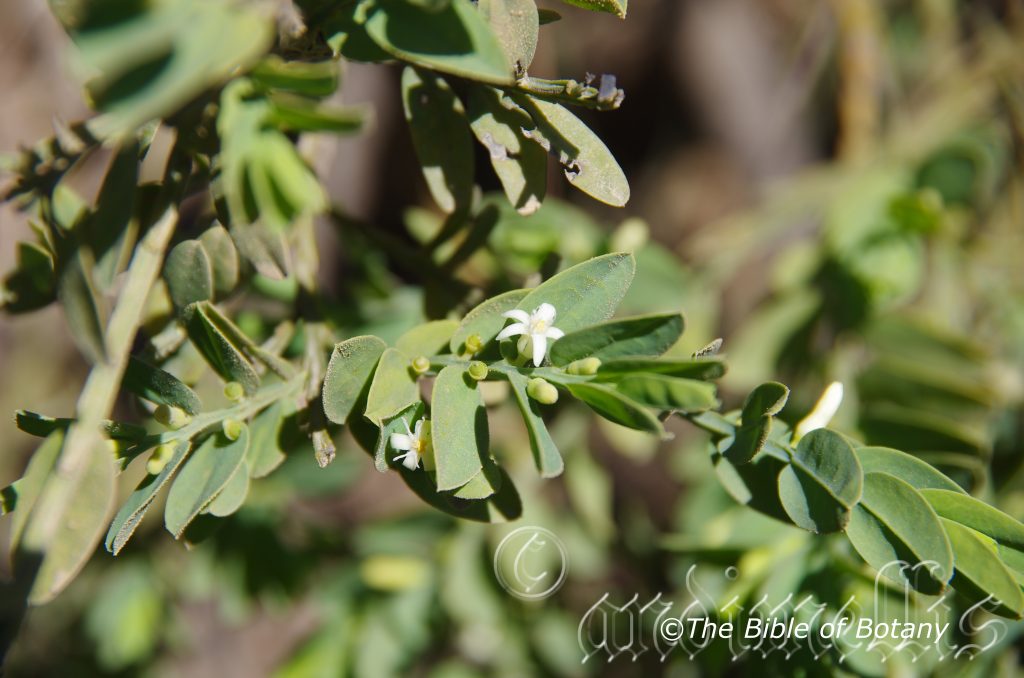
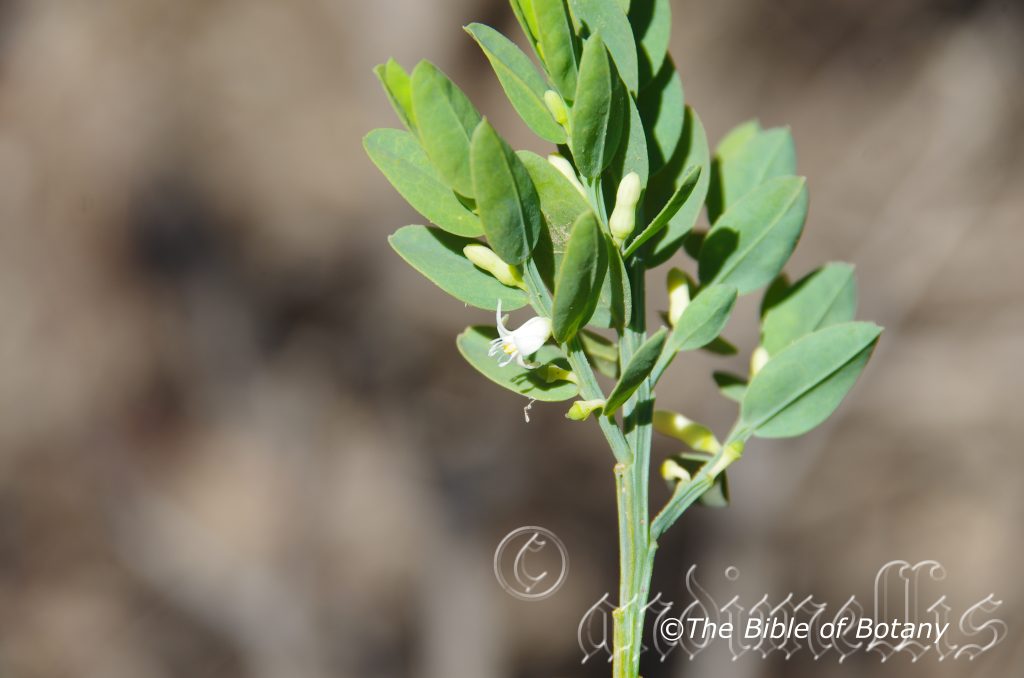
Olax retusa
Classification:
Class: Equisetopsida
Subclass: Magnoliidae
Superorder: Santalanae
Order: Santalales
Family: Olacacae
Genus: From Bolax, which is Ancient Greek for a furrow. It refers to the flowers having a small longitudinal furrow.
Species: From Retūsa, which is Latin for to make blunt. It refers to organs, usually the leaves or petals, which have obtuse apexes with a shallow notch as against emarginate which has a deep notch.
Common Name:
Distribution:
Olax retusa is found south from Bundaberg in southern coastal Queensland to Coffs Harbour in central coastal New South Wales including the larger offshore Islands of Fraser Island, Moreton Island and Stradbroke Island.
https://avh.ala.org.au/occurrences/search?taxa=Olax+retusa#tab_mapView
Habitat Aspect Climate:
Olax retusa prefers full sun to dappled shade. It grows in coastal heaths, scrubs, wallums or at times adjacent to coastal swamps. The altitude ranges from 2 meter ASL to 25 meters ASL.
The temperatures range from minus 6 degrees in August to 34 degrees in February.
The rainfalls range from lows of 850mm to an average 3000mm annually.
Soil Requirements:
Olax retusa prefers course sand, sandy loams to medium clays or fine to medium silts. The soils are usually derived from accumulated beach sands or at times accumulated beach sands mixed with sea shells. The soils pH. ranges from 5.5pH to 7.5pH. It does not tolerate waterlogged soils but grows where season high water tables are present and offer some moisture for long periods. Non saline soils to very saline soils are tolerated as are salt laden winds.
Height & Spread:
Wild Plants: 0.2m to 0.6m by 0.4m to 1m.
Characteristics:
The stems are pale grey and glabrous while the younger stems are yellowish, yellowish-green or olive and are glabrous or very finely scabrous. The usually single stemmed plants are usually multi stemmed from near the base after heath fires.
The distichous, oblong to rhomboid leaves overlap the leaves above them. The leaves measure 4mm to 12mm in length by 2mm to 3mm in width. The bases are rounded-truncate to truncate while the apexes are usually broadly to deeply retuse. The concolourous laminas are soft pale blue-green to pale greenish-yellow, dull and glabrous. The laminas recurve upwards from the mid vein to the margins. The margins are entire. The mid vein and lateral veins are obscure on both laminas.
The inflorescences of Olax retusa are usually born singularly from the leaf axils. The pedicel measures 1.5mm to 2mm in length. The shallow cupuliform calyx is minute. The cylindrical hypanthium is dull yellowish-green and measures 3.5mm to 4mm in length by 2.5mm to 3mm in length diameter. The 5 free, white petals are oblong with obtuse to acute, hooked apexes and measure 3.5mm to 4mm in length by 1.8mm to 2mm in width.
The 3 white, filiform filaments are exserted and measure 1.5mm to 2mm in length while the bright yellow-orange, oblong anthers are exserted. The 5 white staminodes are exserted, opposite the petals and measure 2mm to 2.5mm in length and are bifid. The yellowish rigid, erect style is set deep into the hypanthia’s disc and measures 0.5mm to in length. The flowers appear throughout the year with a peak from October to November.
Olax retusa’s fruits are ovoidal-ellipsoidal to ellipsoidal drupes. The mid yellowish-green drupes turn yellowish when ripe. The drupes measure 7mm to 10mm in length by 4mm to 5.5mm in diameter. The creamy fawn seeds are spherical.
Wildlife:
Olax retusa’s wildlife is unknown to the author.
Cultivation:
Olax retusa is a beautiful dense foliage upright shaped, open small shrub with blue-green foliage is still a rarity in small gardens. It would suit most small to large gardens in warm temperate, semi-arid, subtropical to tropical zones. As a garden subject it will grow from 0.5 meters to 0.8 meters in height by 0.4 meter to 0.6 meter in diameter when cultivated in open sunny position. It is fast growing, drought and cold tolerant with light frosts down to at minus 2 degrees once established.
It can be lightly pruned to make smaller more compact shrubs for a bush setting and will stand out because of its blue-green foliage when planted amongst other green or grey foliage plants. To highlight the colour, select larger leaf plants with deep green leaves. It can be used in more formal or English style gardens because they have a naturally neat rounded appearance when pruned that needs very little attention.
The Plant makes an excellent patio or tub specimens and can be kept on verandas for many years if the ventilation and internal lighting is bright.
Propagation:
Seeds: The seeds can be planted directly into a seed raising mix. Cover them with 5mm of fine sand and keep moist not wet. Place the tray in a warm sunny position. When the seedlings are 25mm to 50mm tall, prick them out and plant them into 50mm native tubes using a good organic mix.
Once the seedlings reach 150mm to 200mm in height It can be planted out into their permanent positions or repotted into larger containers.
Cuttings: Olax retusa strikes easy from cuttings. Use 100mm to 200mm long tip cuttings or lateral shoots from the present season’s growth. Take them in warmer months of the year. Remove half the leaves from the bottom section being careful not to tear the bark.
1 Prepare the cutting mix by adding two thirds sharp clean river sand, one third peat or one third perlite. These ingredients must be sterilized,
2 Select good material from non diseased plants,
3 Select semi green stems for cuttings. Look for a stem with two or three nodes,
4 Place the cutting on a flat, hard surface, and make a clean cut down one side of the cutting at the base for 10mm with a sharp sterile knife or razor blade. – This scarification of the node will increase the chances of roots emerging from this spot. Now remove all but one or two the leaves, leaving the apex leaves in tact. If the leaves are very large in proportion to the stem, cut off the apical halves.
5 Fill a saucer with water, and place a little medium strength rooting hormone into another container like a milk bottle top. Dip the node end of the cutting into the water and then into the rooting hormone. Tap off any excess hormone,
6 Use a small dipple stick or old pencil to poke a hole into the soilless potting mix. Ensure the hole is slightly larger than the stem diameter and be careful not to wipe the rooting hormone off the cuttings base. Place 2 to 4 cuttings in each of the 50mm native tubes,
7 I like to place the tubes in bucket with holes drilled in the bottom to allow excess water to drain out. A plastic bagthat fits over the bucket is ideal to help maintain temperature and moisture. Place in a semi shaded, warm position like under 50mm shade cloth.
8 When the cuttings have struck, open the bag to allow air circulation for a few days to a week,
9 Once hardened off remove the cuttings from the bag and allow to further hardening for a few more days to a week,
10 Transplant into a good potting mix to grow on.
Fertilize using seaweed, fish emulsion or organic chicken pellets soaked in water on an alternate basis. Fertilize every two months until the plants are established then annually in early September to October to maintain health, vitality and better flowering.
Further Comments from Readers:
Hi reader, it seems you use The Bible of Botany a lot. That’s great as we have great pleasure in bringing it to you! It’s a little awkward for us to ask, but our first aim is to purchase land approximately 1,600 hectares to link several parcels of N.P. into one at The Pinnacles NSW Australia, but we need your help. We’re not salespeople. We’re amateur botanists who have dedicated over 30 years to saving the environment in a practical way. We depend on donations to reach our goal. If you donate just $5, the price of your coffee this Sunday, We can help to keep the planet alive in a real way and continue to bring you regular updates and features on Australian plants all in one Botanical Bible. Any support is greatly appreciated. Thank you.
In the spirit of reconciliation we acknowledge the Bundjalung, Gumbaynggirr and Yaegl and all aboriginal nations throughout Australia and their connections to land, sea and community. We pay our respect to their Elders past, present and future for the pleasures we have gained.
Olax stricta
Classification:
Class: Equisetopsida
Subclass: Magnoliidae
Superorder: Santalanae
Order: Santalales
Family: Olacacae
Genus: From Bolax, which is Ancient Greek for a furrow. It refers to the flowers having a small longitudinal furrow.
Species: From Stricta, which is Latin for to draw tight. It refers to organs or structures, which are stiff and rigid.
Common Name:
Distribution:
Olax stricta is found east of a line from Marlborough to Mount Mooloolong, Ka Ka Mundi National Park and Pimpama in Queensland to Trewilga, Bendick Murrell National Park then east to the Blue Mountains in central coastal New South Wales and south to Croajingolong north eastern Victoria.
There is an isolated population further north near Wallangarra and west on Kings Tableland in Kings Gorge in the Northern Territory west of Alice Springs.
https://avh.ala.org.au/occurrences/search?taxa=Olax+stricta#tab_mapView
Habitat Aspect Climate:
Olax stricta prefers full sun to dappled shade. It grows in dry sclerophyll forest, open woodlands, dry heaths or moist heaths away from the coast or in shrub lands on the coastal back dunes. The altitude ranges from 5 meter ASL to 900 meters ASL.
The temperatures range from minus 4 degrees in August to 40 degrees in February.
The rainfalls range from lows of 850mm to an average 3000mm annually.
Soil Requirements:
Olax stricta prefers course sand, sandy loams to medium clays or fine to medium silts. The soils are usually derived from various types of decomposed sandstones or granites. The soils pH. ranges from 5pH to 6.5pH. It does not tolerate waterlogged soils. Non saline soils to very saline soils are tolerated as are salt laden winds.
Height & Spread:
Wild Plants: 1.5m to 2m by 1m to 1.6m.
Characteristics:
Olax stricta’s terete stems are brownish-orange and glabrous while the mid stems are yellowish-green or olive and glabrous. The new growth and young stem are bluish-green glabrous to covered in fine papillose lumps.
Olax stricta’s distichous, linear, oblong to narrow elliptic leaves overlap the leaves above them. The leaves measure 3mm to 12mm in length by 1mm to 2mm in width. The bases gently taper to be narrow cuneate while the apexes are cuspidate to acute-cuspidate and often. The concolourous laminas are soft pale blue-green to pale greenish-yellow, dull and glabrous. The laminas recurve upwards from the mid vein to the margins while the margins are entire. The mid vein and lateral veins are obscure on both laminas.
The inflorescences of Olax stricta are usually born singularly from the leaf axils. The pedicel measures 1.5mm to 2mm in length. The shallow cupuliform calyx is minute. The cylindrical hypanthium is dull yellowish-green and measures 3.5mm to 4mm in length by 2.5mm to 3mm in length diameter. The 5 white petals are free or fused and are oblong with obtuse to acute, hooked apexes and measure 3mm to 6mm in length by 1.8mm to 2.5mm in width.
The 3 white, filiform filaments are exserted and measure 1.5mm to 2mm in length while the bright yellow-orange, oblong anthers are exserted. The 5 white staminodes are exserted, opposite the petals and measure 2mm to 2.5mm in length and are not bifid on this species. The yellowish rigid, erect style is set deep into the hypanthia’s disc and measures 0.5mm to in length. The flowers appear from October to December.
Olax stricta’s fruits are ovoidal to ellipsoidal drupes. The mid green drupes turn deep purple black as they ripen. The drupes measure 4mm to 8mm in length by 5mm to 7mm in diameter. The creamy fawn seeds are spherical.
Wildlife:
Olax stricta’s wildlife is unknown to the author.
Cultivation:
Olax stricta is a beautiful dense foliage upright shaped small shrub with blue-green to yellow-green foliage is still a rarity in suburban gardens. It would suit most small to large gardens in warm temperate, semi-arid, subtropical to tropical zones on sandy or loamy soils. As garden subjects it will grow from 1.5 meters to 2 meters in height by 1.5 meter to 1.8 meter in diameter when cultivated in an open sunny position. It is fast growing, drought and cold tolerant with light frosts down to at minus 2 degrees once established.
It can be lightly pruned to make a smaller more compact shrub for a bush setting and will stand out because of its blue-green foliage when planted amongst other green or grey foliage plants. To highlight the colour, select larger leaf plants with deep green leaves. It can be used in more formal or English style gardens because it has a naturally neat rounded appearance when pruned that needs very little attention.
The Plant makes an excellent patio or tub specimen and can be kept on verandas for many years if the ventilation and internal lighting is bright.
Propagation:
Seeds: Olax stricta’s seeds can be planted directly into a seed raising mix. Cover them with 5mm of fine sand and keep moist not wet. Place the tray in a warm sunny position. When the seedlings are 25mm to 50mm tall, prick them out and plant them into 50mm native tubes using a good organic mix.
Once the seedlings reach 150mm to 200mm in height It can be planted out into their permanent positions or repotted into larger containers.
Cuttings: Olax stricta is easy to strike from cuttings. Use 100mm to 200mm long tip cuttings or lateral shoots from the present season’s growth. Take them in warmer months of the year. Remove half the leaves from the bottom section being careful not to tear the bark.
1 Prepare the cutting mix by adding two thirds sharp clean river sand, one third peat or one third perlite. These ingredients must be sterilized,
2 Select good material from non diseased plants,
3 Select semi green stems for cuttings. Look for a stem with two or three nodes,
4 Place the cutting on a flat, hard surface, and make a clean cut down one side of the cutting at the base for 10mm with a sharp sterile knife or razor blade. – This scarification of the node will increase the chances of roots emerging from this spot. Now remove all but one or two the leaves, leaving the apex leaves in tact. If the leaves are very large in proportion to the stem, cut off the apical halves.
5 Fill a saucer with water, and place a little medium strength rooting hormone into another container like a milk bottle top. Dip the node end of the cutting into the water and then into the rooting hormone. Tap off any excess hormone,
6 Use a small dipple stick or old pencil to poke a hole into the soilless potting mix. Ensure the hole is slightly larger than the stem diameter and be careful not to wipe the rooting hormone off the cuttings base. Place 2 to 4 cuttings in each of the 50mm native tubes,
7 I like to place the tubes in bucket with holes drilled in the bottom to allow excess water to drain out. A plastic bag that fits over the bucket is ideal to help maintain temperature and moisture. Place in a semi shaded, warm position like under 50mm shade cloth.
8 When the cuttings have struck, open the bag to allow air circulation for a few days to a week,
9 Once hardened off remove the cuttings from the bag and allow to further hardening for a few more days to a week,
10 Transplant into a good potting mix to grow on.
Fertilize using seaweed, fish emulsion or organic chicken pellets soaked in water on an alternate basis. Fertilize every two months until the plants are established then annually in early September to October to maintain health, vitality and better flowering.
Further Comments from Readers:
Hi reader, it seems you use The Bible of Botany a lot. That’s great as we have great pleasure in bringing it to you! It’s a little awkward for us to ask, but our first aim is to purchase land approximately 1,600 hectares to link several parcels of N.P. into one at The Pinnacles NSW Australia, but we need your help. We’re not salespeople. We’re amateur botanists who have dedicated over 30 years to saving the environment in a practical way. We depend on donations to reach our goal. If you donate just $5, the price of your coffee this Sunday, We can help to keep the planet alive in a real way and continue to bring you regular updates and features on Australian plants all in one Botanical Bible. Any support is greatly appreciated. Thank you.
In the spirit of reconciliation we acknowledge the Bundjalung, Gumbaynggirr and Yaegl and all aboriginal nations throughout Australia and their connections to land, sea and community. We pay our respect to their Elders past, present and future for the pleasures we have gained.
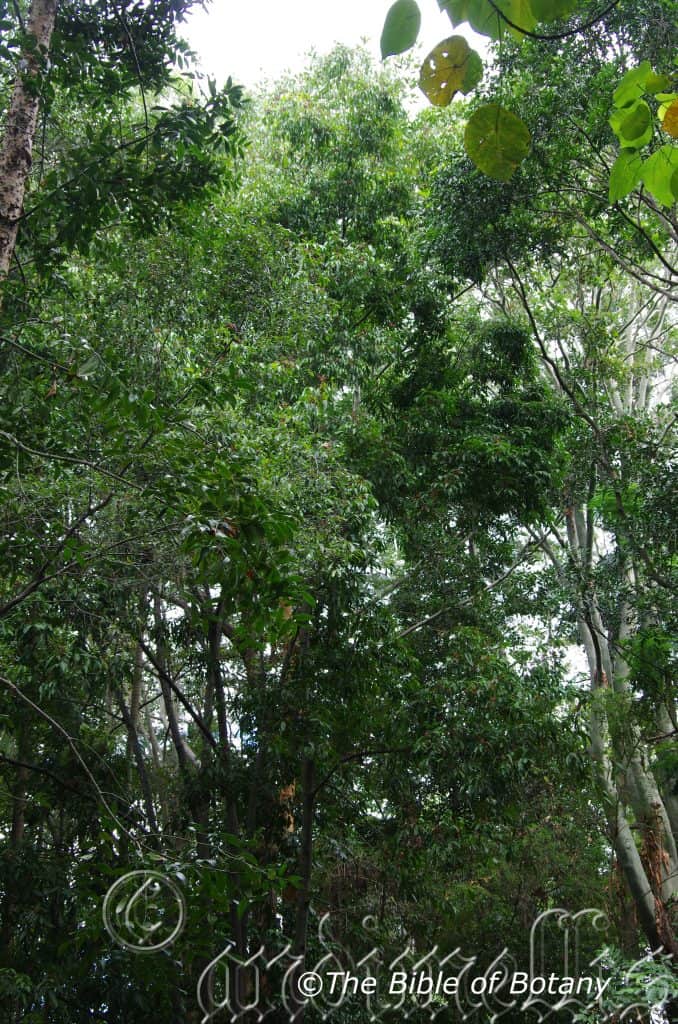
NCBG Coffs Harbour NSW
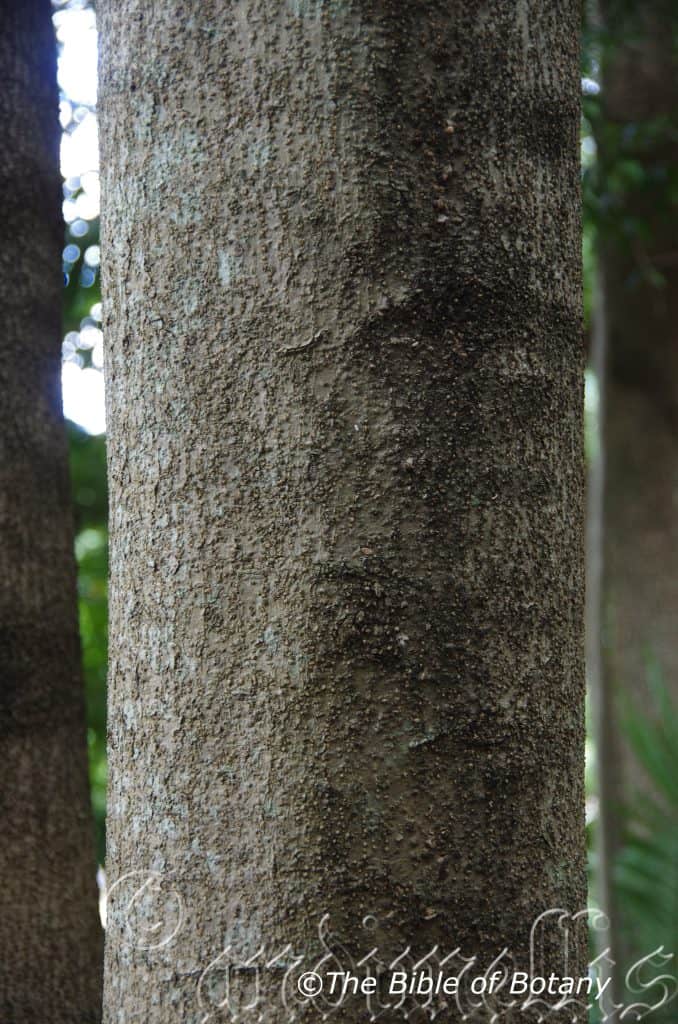
LBG Lismore NSW
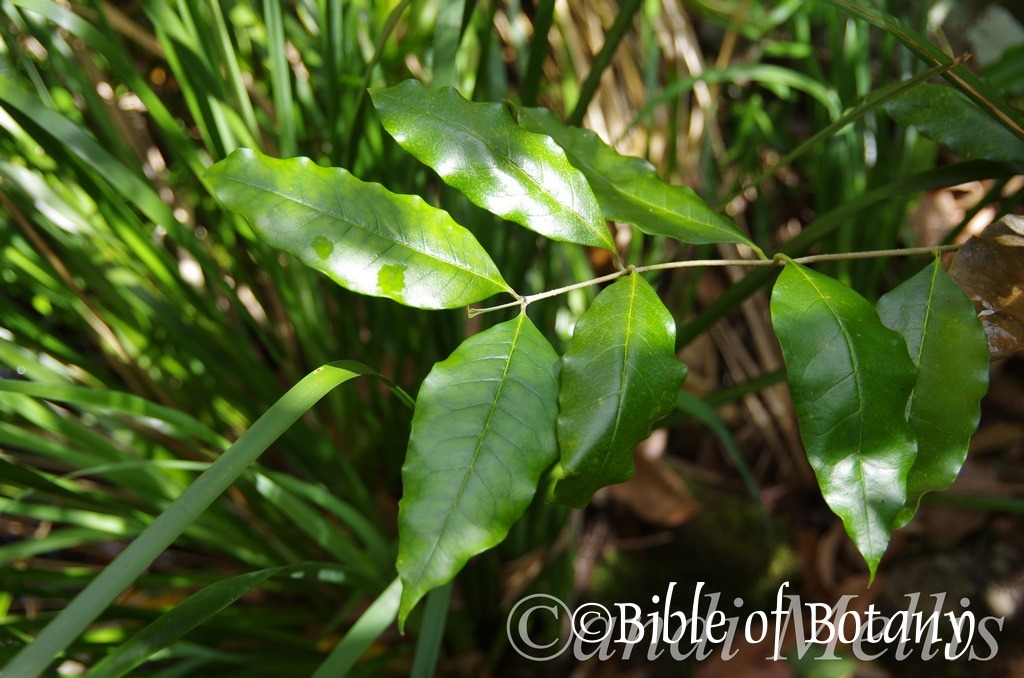
NCBG Coffs Harbour NSW
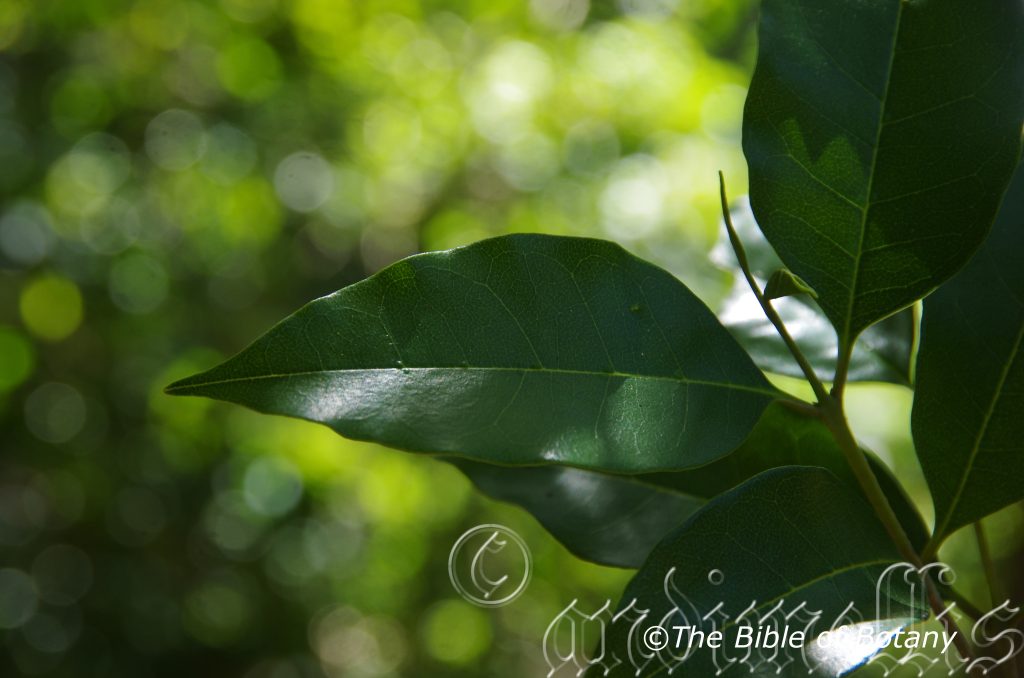
NCBG Coffs Harbour NSW
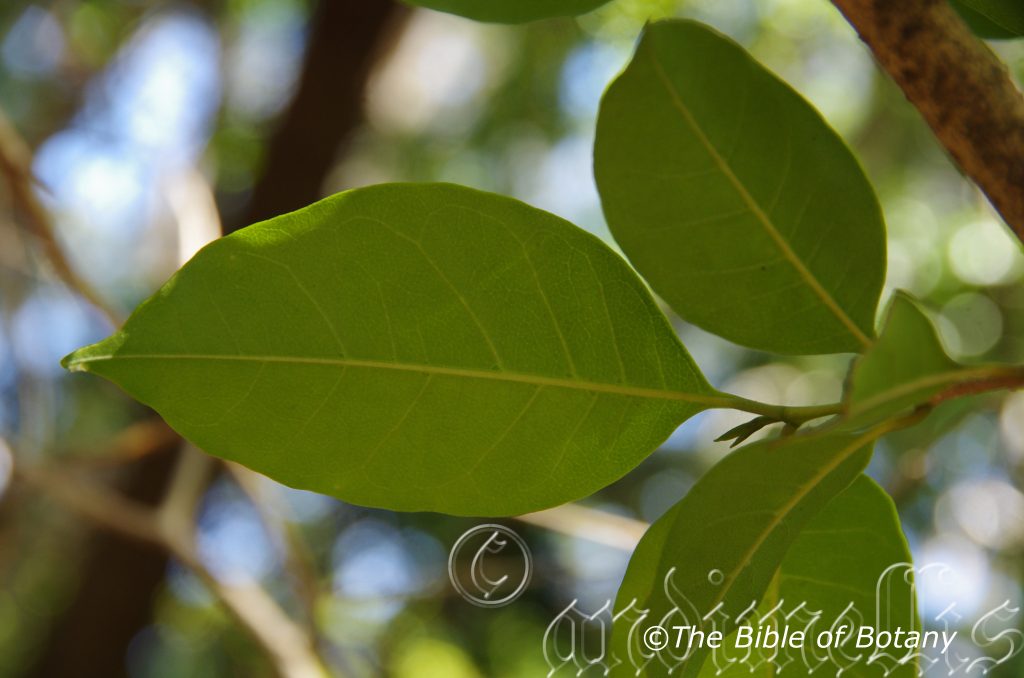
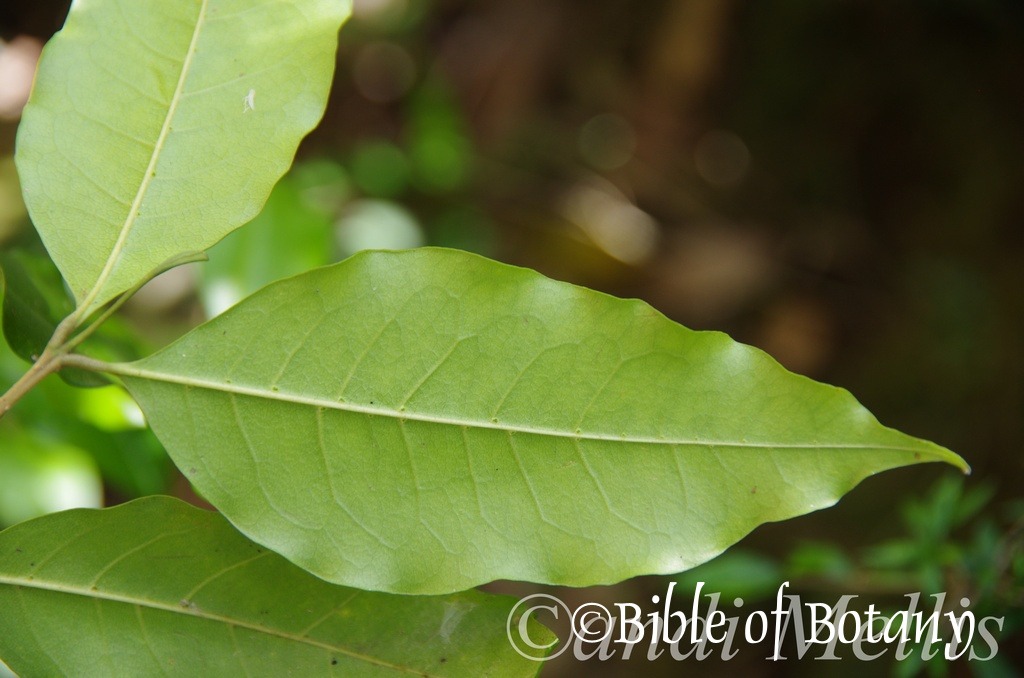
NCBG Coffs Harbour NSW
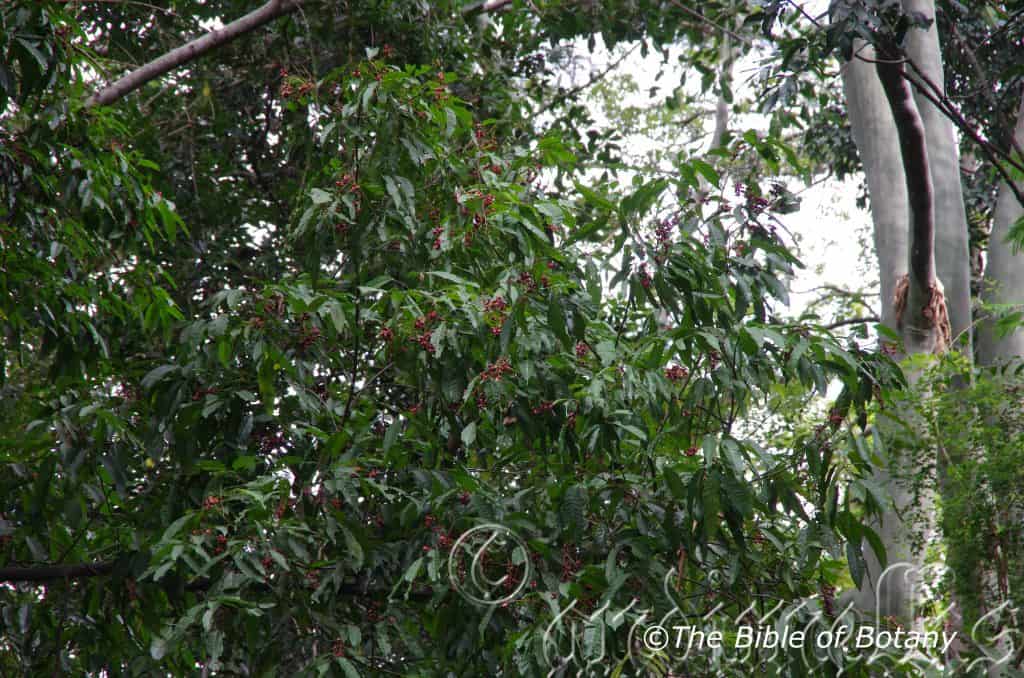
NCBG Coffs Harbour NSW
Olea paniculata
Classification:
Unranked: Magnoliophyta
Class: Magnoliopsida
Order: Lamiales
Family: Oleaceae
Genus: From Olea, which is Latin for the Mediterranean olive oil or at times the olive tree or the olive fruit. It refers to plants, which resembles the Mediterranean olive oil tree in some way.
Species: From Panos, which is Ancient Greek or Pānicula, which is Latin for a flower head. It refers to flowers, which are arranged in a head.
Common Name: Native Olive.
Distribution:
Olea paniculata is found on and east of the Great Dividing Range from Cohen on Cape York Peninsula to Newcastle in central coastal New South Wales. It mainly grows on and east of the Great Dividing Range to the coast.
https://avh.ala.org.au/occurrences/search?taxa=Olea+paniculata#tab_mapView
Habitat Aspect Climate:
Olea paniculata prefers full sun to dappled shade. It grows in or adjacent to riverine, riparian forests, dry rainforests or dry littoral rainforests. The altitude ranges from 2 meter ASL to 828 meters ASL.
The temperatures range from minus 6 degrees in August to 34 degrees in February.
The rainfalls range from lows of 850mm to an average 3000mm annually.
Soil Requirements:
Olea paniculata prefers to grow on coarse sand, sandy loams to medium clays or fine to medium silts. The soils are usually derived from decomposed brown basalts, black basalts, shales or metamorphic rocks often being laid down as alluvial silts. The soils pH. ranges from 5pH to 6.5pH. It does not tolerate waterlogged soils. Non saline soils to moderately saline soils are tolerated.
Height & Spread:
Wild Plants: 10m to 30m by 5m to 10m.
Characteristics:
Olea paniculata’s main trunk is deep grey to deep grey-brown, rough and scabrous and measures up to 900mm in diameter. Young branchlets are grey-brown turning pale olive green as they approach the leaves. The branchlets are covered in fairly large lenticels. The pale green stems are glabrous.
Olea paniculata has simple opposite leaves, which are ovate to elliptical and measure 50mm to 100mm in length by 15mm to 60mm in width. The petioles measure 8mm to 12mm in length. The bases are tapering cuneate while the apexes are narrow acute. The discolourous laminas are mid green, glossy and glabrous on the upper lamina while the lower lamina is paler with large domatia in the axils of the mid vein and the lateral veins. The undulating laminas are flat or recurve upwards or downwards from the mid vein to the margins and decurve downwards near the apex while the margins are entire. The mid vein is prominent on the lower lamina and is not visible on the upper lamina while the lateral veins are slightly prominent and the reticulum system is distinctly visible.
The inflorescence of Olea paniculata is a panicle born in the leaf axils. The panicles measure 50mm to 100mm in length. The calyx tubes are glaucous-green and measure 1.4mm to 1.8mm in length while the 4 lobes measure 0.2mm to 0.4mm in length. The 4 thick, white petals measure 2.5mm to 3mm in length by 1.5mm in width. The short stout pale green styles measure 0.6mm in length and have a strongly decurve 2 lobed stigma. The flowers appear from October to December.
Olea paniculata’s fruit is an ovoidal to ellipsoidal drupe. The mid green drupes turn deep purple black as they ripen. The drupes measure 10mm to 16mm in length by 8mm to 12mm in diameter. The creamy fawn ovoidal seeds measure 9mm to 14mm in length by 6mm to 8mm in width.
Wildlife:
The fruits are a great attraction for many fruitigrove birds. The fruits are consumed by the Australian king parrot Alisterus scapularis, brown cuckoo-dove Macropygia phasianella, topknot pigeon Lopholaimus antarcticus, rose-crowned fruit-dove Ptilinopus regina, wompoo fruit-dove Ptilinopus magnificus, white-headed pigeon Columba leucomela, Green Catbird Ailuroedus crassirostris, and Regent bowerbird Sericulus chrysocephalus, in Australia. Alex G Floyd. Rainforest Trees of Mainland Southeastern Australia. (2009).
I can add one more to Alex’s wonderful list and close observations in the Satin bowerbird Ptilonorhynchus violaceus, around Nana Glen.
If you can help with any wildlife associated with our plants no matter how small it seems it will lead to a better knowledge of our wonderful environment and habitats.
Cultivation:
Olea paniculata is a beautiful dense foliage upright shaped small shrub with green foliage and bird attraction is still a rarity in small gardens. It would suit most small to large gardens in warm temperate, semi-arid, subtropical to tropical zones. As garden subjects it will grow from 8 meters to 12 meters in height by 6 meter to 10 meters in diameter when cultivated in the open or much taller and narrower when grown in a rainforest situation. It is fast growing, drought cold tolerant down to at least minus 4 degrees once established.
It is very compact, dense foliage plant for a bush setting and will stand out because of its glossy green foliage when planted amongst other plants. To highlight the colour, select larger leaf plants with deep green leaves. It can be used in more formal or English style gardens because they have a naturally neat rounded appearance that needs very little attention.
The Plants make excellent patio or tub specimens and can be kept inside for many years if the ventilation and internal lighting is bright. Olea paniculata make good bonsai plants.
The plants yield high quality oil similar to the European olive but the yields are much lower. Maybe in the future with good selection yields can be greatly improved. The disadvantage may be the attraction of the plants to birds and flying foxes. When grown for the oil It can be treated similarly to the exotic Olea europea.
Propagation:
Seeds: Olea paniculata’s seeds can be planted directly into a seed raising mix. Cover them with 5mm of fine sand and keep moist not wet. Place the tray in a warm sunny position. When the seedlings are 25mm to 50mm tall, prick them out and plant them into 50mm native tubes using a good organic mix.
Once the seedlings reach 150mm to 200mm in height they can be planted out into their permanent positions or repotted into larger containers.
Cuttings: Olea paniculata is not the easiest to strike from cuttings. Try using 100mm to 200mm long tip cuttings or lateral shoots from the present season’s growth. Take them in warmer months of the year. Remove half the leaves from the bottom section being careful not to tear the bark.
1 Prepare the cutting mix by adding two thirds sharp clean river sand, one third peat or one third perlite. These ingredients must be sterilized,
2 Select good material from non diseased plants,
3 Select semi green stems for cuttings. Look for a stem with two or three nodes,
4 Place the cutting on a flat, hard surface, and make a clean cut down one side of the cutting at the base for 10mm with a sharp sterile knife or razor blade. – This scarification of the node will increase the chances of roots emerging from this spot. Now remove all but one or two the leaves, leaving the apex leaves in tact. If the leaves are very large in proportion to the stem, cut off the apical halves.
5 Fill a saucer with water, and place a little medium strength rooting hormone into another container like a milk bottle top. Dip the node end of the cutting into the water and then into the rooting hormone. Tap off any excess hormone,
6 Use a small dipple stick or old pencil to poke a hole into the soilless potting mix. Ensure the hole is slightly larger than the stem diameter and be careful not to wipe the rooting hormone off the cuttings base. Place 2 to 4 cuttings in each of the 50mm native tubes,
7 I like to place the tubes in bucket with holes drilled in the bottom to allow excess water to drain out. A plastic bag that fits over the bucket is ideal to help maintain temperature and moisture. Place in a semi shaded, warm position like under 50mm shade cloth.
8 When the cuttings have struck, open the bag to allow air circulation for a few days to a week,
9 Once hardened off remove the cuttings from the bag and allow to further hardening for a few more days to a week,
10 Transplant into a good potting mix to grow on.
Fertilize using seaweed, fish emulsion or organic chicken pellets soaked in water on an alternate basis. Fertilize every two months until the plants are established then annually in early September to October to maintain health, vitality and better flowering.
Further Comments from Readers:
Hi reader, it seems you use The Bible of Botany a lot. That’s great as we have great pleasure in bringing it to you! It’s a little awkward for us to ask, but our first aim is to purchase land approximately 1,600 hectares to link several parcels of N.P. into one at The Pinnacles NSW Australia, but we need your help. We’re not salespeople. We’re amateur botanists who have dedicated over 30 years to saving the environment in a practical way. We depend on donations to reach our goal. If you donate just $5, the price of your coffee this Sunday, We can help to keep the planet alive in a real way and continue to bring you regular updates and features on Australian plants all in one Botanical Bible. Any support is greatly appreciated. Thank you.
In the spirit of reconciliation we acknowledge the Bundjalung, Gumbaynggirr and Yaegl and all aboriginal nations throughout Australia and their connections to land, sea and community. We pay our respect to their Elders past, present and future for the pleasures we have gained.
Olearia argophylla
Classification:
Unranked: Eudicots
Class: Asterids
Order: Asterales
Family: Asteraceae
Genus: Is named in honour of Johann Gottfried Ölschläger; 1635-1711, who was a German horticulturist and author of a flora of Halle in Germany. His name was Latinized to the Latin form of Olearius.
Specie: From Aárgillos, which is Greek and later Latin for bright and silvery or white and Phullon/Phýllon, which are Greek for a leaf. It refers to lower lamina on leaves, which are silver to white in colour.
Common Name: Native Musk, Silver Shrub or Musk Daisy.
Distribution:
Olearia argophylla is mainly found on and east of the Great Dividing Range from Gaping Gill in the Blue Mountains in central eastern New South Wales to the Grampians and Tower Hill near Koroit in Victoria.
It is found further north in the Whian Whian National Park, the Washpool National Park, Guyra and Tallanganda in the Act.
It is also found on all of the Bass strait Islands and most of Tasmania.
Ihttps://avh.ala.org.au/occurrences/search?taxa=Olearia+argophylla#tab_mapView
Habitat Aspect Climate:
Oleria argophylla prefers full sun to dappled shade. It grows in, adjacent to or in openings along ridges, creeks and streams in moist rainforests and moist sclerophyll forests. The altitude ranges from 50 meter ASL to 1350 meters ASL.
The temperatures range from minus 4 degrees in August to 36 degrees in February.
The rainfalls range from lows of 650mm to an average 3200mm annually.
Soil Requirements:
Oleria argophylla prefers poor quality course sands, sandy loams, light clays and light silts. The soils are usually derived from partially decomposed to decomposed granites or at times sandstones or black basalts. The soils pH. ranges from 5pH to 6pH. It does not tolerate waterlogged soils. Non saline soils to moderately saline soils are tolerated.
Height & Spread:
Wild Plants: 6m to 9m by 3m to 6m.
Characteristics:
Oleria argophylla’s main stems are pale grey and scabrous. The branchlets and small stems are pale grey-green and glabrous while the smallest stems and new growth are densely covered in minute silver to pale grey sericeous hairs.
The alternate disjunct broad elliptical to rhomboidal leaves are scattered unevenly along the stems. The leaves measure 15mm to 185mm in length by 10mm to 90mm in width. The petioles measure 12mm to 25mm in length. The bases are tapering, cuneate to broad cuneate while the apexes are acute or at times narrow mucronate. The discolourous laminas are deep green, glossy and glabrous on the upper laminas while the lower laminas are densely covered in minute silver to pale grey tomentose hairs. The laminas are undulating and recurve upwards from the mid vein to the margins or at times are weakly to strongly convex from the mid vein to the margins while the apexes are strongly decurve. The margins are irregularly and finely toothed. The mid vein is strongly prominent on the lower lamina and is visible on the upper lamina being covered in minute silver to pale grey sericeous hairs on the basal half. The margins are irregularly toothed or at times entire.
The inflorescences are corymbs born from the terminals. The peduncules and pedicels are glabrous to covered in minute silver to pale grey sericeous hairs. The peduncles and peduncules measure 12mm to 30mm in length while the pedicels measure 10mm to 20mm in length. There are 3 to 8, white ray florets which are the most prominent parts of the flower. The linear to narrow elliptical ray florets measure 7mm to 12mm in length by 2.5mm to 3.5mm in width. There are 4 to 17 cream to yellow disc florets in the center of the ray florets. The flowers appear from September to April.
The fruits are linear glabrous achenes. The achene’s 26 to 43 bristles on the pappus are in 1 to 2 rows.
Wildlife:
Olearia argophylla’s flowers are attractive to small and medium size butterflies, native bees, pollen flies and hover flies.
Cultivation:
Olearia argophylla is a beautiful, densely foliaged dome shaped tree that is worthwhile growing for its beauty in small gardens. It would suit most small gardens in cool sub-tropical and warm temperate zones. As a garden subject it will grow from 5 meter to 7 meters in height by 4 meters to 5 meters in diameter when cultivated in the open or taller and narrower when enclosed in a rainforest situation. It is a good tree for starting a small suburban rainforest.
It is fast growing, drought and cold tolerant down to at least minus 4 degrees once established but should be protected from frosts.
In Native gardens it can be used for attracting butterflies, native bees, native pollen and hover flies or native beetles which in return will attract small insectivorous birds to the garden.
It is a very compact dense foliage plant for a bush setting and will stand out because of its large deep green leaves and proliferation of white flowers when planted amongst other plants. To further highlight the colour, select fine leaf plants with pale green leaves and pink, lilac or red flowers. It can be used in more formal or English style gardens because it has a naturally neat rounded appearance that needs very little attention. If used in rockeries which have been planted out to highlight other features like rocks, stumps or fish ponds it should be planted to the rear so as to balance the look because of its size.
Propagation:
Seeds: The seeds can be sown directly into a seed raising mix. Cover them with 5mm of fine sand and keep moist not wet. Place the tray in a warm semi shaded position preferably beneath 30mm to 60mm shade cloth. When the seedlings are 25mm to 50mm tall plant them into 50mm native tubes.
Once the seedlings reach 150mm to 200mm in height It can be planted out into their permanent positions or repotted into larger containers.
Fertilize using seaweed, fish emulsion or organic chicken pellets soaked in water on an alternate basis. Fertilize every two months until the plants are established then annually in early September to October to maintain health, vitality and better flowering.
Further Comments from Readers:
Hi reader, it seems you use The Bible of Botany a lot. That’s great as we have great pleasure in bringing it to you! It’s a little awkward for us to ask, but our first aim is to purchase land approximately 1,600 hectares to link several parcels of N.P. into one at The Pinnacles NSW Australia, but we need your help. We’re not salespeople. We’re amateur botanists who have dedicated over 30 years to saving the environment in a practical way. We depend on donations to reach our goal. If you donate just $5, the price of your coffee this Sunday, We can help to keep the planet alive in a real way and continue to bring you regular updates and features on Australian plants all in one Botanical Bible. Any support is greatly appreciated. Thank you.
In the spirit of reconciliation we acknowledge the Bundjalung, Gumbaynggirr and Yaegl and all aboriginal nations throughout Australia and their connections to land, sea and community. We pay our respect to their Elders past, present and future for the pleasures we have gained.
Olearia canescens
Classification:
Unranked: Eudicots
Class: Asterids
Order: Asterales
Family: Asteraceae
Genus: Is named in honour of Johann Gottfried Ölschläger; 1603-1671, who was a German horticulturist and author of a flora of Halle in Germany. His name was Latinized to the Latin form of Olearius.
Specie: From Cascus, which old Latin or Cānum, which is modern Latin for grey and hoary, to become old and grey. It refers to structures or organs, which are covered in straggly, unkempt, soft grey hairs.
Common Name:
Distribution:
Olearia canescens is found in 2 distinct disjunct populations. In north Queensland it is found between Herberton, Dip Creek and Danella Park with a population on the summit of Mount Aberdeen near Bowen. The southern plants are found around the Byfield National Park, Calliope, Tambo and Binna Burra in Queensland to Walcha in New South Wales.
https://avh.ala.org.au/occurrences/search?taxa=Olearia+canescens#tab_mapView
Habitat Aspect Climate:
Olearia canescens prefers full sun to dappled shade. It grows in open woodlands, open sclerophyll forest on flats or gentle slopes. The altitude ranges from 50 meter ASL to 950 meters ASL.
The temperatures range from minus 4 degrees in August to 40 degrees in February.
The rainfalls range from lows of 450mm to an average 1550mm annually.
Soil Requirements:
Olearia canescens prefers to grow on poor quality course sands, sandy loams, light clays, medium clays, light silts to medium silts and rock limestone. The soils are usually derived from various types of decomposed granites or at times sandstones, alluvial flats or limestone. The soils pH. ranges from 5pH to 8pH. It does not tolerate waterlogged soils. Non saline soils to moderately saline soils are tolerated.
Height & Spread:
Wild Plants: 1m to 2m by 1m to 1.5m.
Characteristics:
Olearia canescens’s main stems are pale grey and scabrous. The branchlets and small stems are pale grey-green and glabrous while the smallest stems and new growth are densely covered in minute white to silvery canescent hairs.
Olearia canescens’s alternate disjunct elliptic to ovate leaves are scattered unevenly along the stems. The leaves measure 10mm to 60mm in length by 3mm to 21mm in width. The petioles are grooved on the upper surface and are densely covered in minute white to silvery canescent hairs. The petioles measure 8mm to 15mm in length. The slightly oblique bases are cuneate to broad cuneate while the apexes are apex to obtuse-acute, finely mucronate. The discolourous laminas are deep green to sea-green and moderately to densely covered in pale grey minute canescent hairs on the upper laminas while the lower laminas are densely covered in minute silvery-grey canescent hairs. The laminas are slightly undulating, flat and decurve strongly downwards close to the margins and are convex on the upper laminas between the mid vein and the 10 to 14 lateral veins. The margins are entire. The mid vein and lateral veins are strongly prominent on the lower lamina and are visible on the upper lamina being covered in minute white to silvery canescent hairs especially on the basal half. The venation is alternate pinnate while the margins are entire.
The inflorescence of Olearia canescens are panicles born from the upper leaf axils or terminals. There are 2 to 16 flowers in a panicle. The peduncles measure 24mm to 31mm in length while the pedicels measure 12mm to 19mm in length while the pedicels measure 6mm to 35mm in length. The 8 to 15, white ray florets are the most prominent parts of the flower. The linear to narrow oblong ray florets measure 7mm to 9mm in length by 2mm to 2.5mm in width. There are 7 to 16 yellow disc florets in the center of the ray florets. The flowers appear from February to August.
Olearia canescens’s fruits flat, linear achene which are densely covered in minute silvery canescent hairs. The achene’s pappus has 35 to 43 long bristles in 2 rows and an outer row of short bristles.
Wildlife:
Olearia canescens’s flowers are attractive to small and medium size butterflies, native bees, pollen flies and hover flies.
Cultivation:
Olearia canescens is a beautiful dense foliage dome shaped annual or perennial with white and yellow flowers that is worthwhile growing for its beauty in small gardens. It would suit most small gardens in cool semi-arid, subtropical and temperate zones. As a garden subject it will grow from 1 meter to 1.8 meters in height by 0.8 meters to 1.5 meters in diameter when cultivated in the open.
It is fast growing, drought cold tolerant down to at least minus 4 degrees.
In Native gardens It can be used for attracting butterflies, native bees, native flies or native beetles.
It is very compact dense foliage plant for a bush setting and will stand out because of its colour and profusion of flowers when planted amongst other plants. To highlight the colour, select fine leaf plants with pale green leaves and pink, lilac or red flowers. It can be used in more formal or English style gardens because it has a naturally neat rounded appearance that needs very little attention. If used in rockeries which have been planted out to highlight other features like rocks, stumps or fish ponds it should be planted to the rear so as to balance the look because of its size. It can be tip pruned to keep them shorter. It is non-obtrusive easy to maintain yet highly visible when in flower or out of flower.
Propagation:
Seeds: Olearia canescens’s seeds can be sown directly into a seed raising mix. Cover them with 5mm of fine sand and keep moist not wet. Place the tray in a warm semi shaded position preferably beneath 30mm to 60mm shade cloth. When the seedlings are 25mm to 50mm tall plant them into 50mm native tubes.
Once the seedlings reach 150mm to 200mm in height It can be planted out into their permanent positions or repotted into larger containers.
Cuttings: Fortunately Olearia canescens cuttings strike easy. Use 100mm to 200mm long tip cuttings or lateral shoots from the present season’s growth. Take them in warmer months of the year. Remove half the leaves from the bottom section being careful not to tear the bark.
1 Prepare the cutting mix by adding two thirds sharp clean river sand, one third peat or one third perlite. These ingredients must be sterilized,
2 Select good material from non diseased plants,
3 Select semi green stems for cuttings. Look for a stem with two or three nodes,
4 Place the cutting on a flat, hard surface, and make a clean cut down one side of the cutting at the base for 10mm with a sharp sterile knife or razor blade. – This scarification of the node will increase the chances of roots emerging from this spot. Now remove all but one or two the leaves, leaving the apex leaves in tact. If the leaves are very large in proportion to the stem, cut off the apical halves.
5 Fill a saucer with water, and place a little medium strength rooting hormone into another container like a milk bottle top. Dip the node end of the cutting into the water and then into the rooting hormone. Tap off any excess hormone,
6 Use a small dipple stick or old pencil to poke a hole into the soilless potting mix. Ensure the hole is slightly larger than the stem diameter and be careful not to wipe the rooting hormone off the cuttings base. Place 2 to 4 cuttings in each of the 50mm native tubes,
7 I like to place the tubes in bucket with holes drilled in the bottom to allow excess water to drain out. A plastic bag that fits over the bucket is ideal to help maintain temperature and moisture. Place in a semi shaded, warm position like under 50mm shade cloth.
8 When the cuttings have struck, open the bag to allow air circulation for a few days to a week,
9 Once hardened off remove the cuttings from the bag and allow to further hardening for a few more days to a week,
10 Transplant into a good potting mix to grow on.
Fertilize using seaweed, fish emulsion or organic chicken pellets soaked in water on an alternate basis. Fertilize every two months until the plants are established then annually in early September to October to maintain health, vitality and better flowering.
Further Comments from Readers:
Hi reader, it seems you use The Bible of Botany a lot. That’s great as we have great pleasure in bringing it to you! It’s a little awkward for us to ask, but our first aim is to purchase land approximately 1,600 hectares to link several parcels of N.P. into one at The Pinnacles NSW Australia, but we need your help. We’re not salespeople. We’re amateur botanists who have dedicated over 30 years to saving the environment in a practical way. We depend on donations to reach our goal. If you donate just $5, the price of your coffee this Sunday, We can help to keep the planet alive in a real way and continue to bring you regular updates and features on Australian plants all in one Botanical Bible. Any support is greatly appreciated. Thank you.
In the spirit of reconciliation we acknowledge the Bundjalung, Gumbaynggirr and Yaegl and all aboriginal nations throughout Australia and their connections to land, sea and community. We pay our respect to their Elders past, present and future for the pleasures we have gained.
Olearia cydoniifolia
Classification:
Unranked: Eudicots
Class: Asterids
Order: Asterales
Family: Asteraceae
Genus: Is named in honour of Johann Gottfried Ölschläger; 1603-1671, who was a German horticulturist and author of a flora of Halle in Germany. His name was Latinized to the Latin form of Olearius.
Species: From Cydōnēa, which is Latin for the quince fruit and Folia, which is Latin for foliage. It refers to leaves, which resemble the Quince trees that are in the Cydonia genus.
Common Name:
Distribution:
Olearia cydoniifolia is found between the Lamington National Park, Mount Huntly near Warwick to Stanthorpe in southern Queensland to the Namoi River and the Aspley Falls, Stockyard Creek west of Kempsey and Limpinwood in north eastern New South Wales. It grows mainly on the Great Dividing Range.
https://avh.ala.org.au/occurrences/search?taxa=Olearia+cydoniifolia#tab_mapView
Habitat Aspect Climate:
Olearia cydoniifolia prefers full sun to dappled shade. It grows in moist sclerophyll forest, moist open woodlands and on margins of dry rainforest, chiefly on eastern escarpments or in gorges. The altitude ranges from 460 meters ASL to 1250 meters ASL except for the population at Lawrence which are found at ASL 10 meters ASL respectively.
The temperatures range from minus 4 degrees in August to 34 degrees in February.
The rainfalls range from lows of 800mm to an average 1200mm annually.
Soil Requirements:
Olearia cydoniifolia prefers poorer quality course sands, sandy loams, and light gritty clays. The soils are usually derived from decomposed granites or rarely alluvial soils. The soils pH. ranges from 5pH to 6.5pH. It does not tolerate waterlogged soils. Non saline soils to moderately saline soils are tolerated.
Height & Spread:
Wild Plants: 2m to 4m by 1.5m to 3m.
Characteristics:
Olearia cydoniifolia’s main stems are pale grey and scabrous. The branchlets and small stems are pale grey-green and glabrous while the smallest stems and new growth are densely covered in minute white to silvery canescent hairs.
Olearia cydoniifolia’s alternate disjunct elliptic leaves are scattered unevenly along the stems. The leaves measure 20mm to 115mm in length by 9mm to 53mm in width. The petiole is densely covered in minute white to silvery canescent hairs and measure 6mm to 15mm in length. The slightly oblique bases are cuneate to broad cuneate while the apexes are broad acute to narrow obtuse. The discolourous laminas are deep green to sea-green and glabrous to very sparsely covered in silvery-white puberulent hairs on the upper laminas while the lower laminas are densely covered in minute silvery-white to silvery canescent hairs. The laminas are flat and decurve gently downwards from the base to the apex while the margins are entire. The mid vein is strongly prominent on the lower lamina and is visible on the upper lamina while the lateral veins are slightly prominent on the lower laminas and are faintly visible form the upper laminas. The venation is alternate pinnate while the margins are entire.
The inflorescences of Olearia cydoniifolia is a loose corymbs born from the upper leaf axils and terminals. There are 3 to 9 flowers in a corymb. The peduncles and pedicels are covered in white to silvery canescent hairs. The peduncles measure 15mm to 21mm in length while the pedicels measure 12mm to 19mm in length while the pedicels measure 10mm to 15mm in length. The 6 to 10, white ray florets are the most prominent parts of the flower. The linear to narrow oblong ray florets measure 7mm to 10mm in length by 2mm to 3mm in width. There are 13 to 17 yellow disc florets in the center of the ray florets. The flowers appear from October to November.
Olearia cydoniifolia’s fruits are flat, linear glabrous achenes. The achenes’ pappus has 40 to 44 bristles in 2 rows.
Wildlife:
Olearia cydoniifolia’s flowers are attractive to small and medium size butterflies, native bees, pollen flies and hover flies.
Cultivation:
Olearia cydoniifolia is a beautiful dense foliaged dome shaped annual or perennial with white and yellow flowers that is worthwhile growing for its beauty in small gardens. It would suit most small gardens in cool semi-arid, sub-tropical and temperate zones. As a garden subject it will grow from 2.5 meter to 3 meters in height by 2.5 meters to 3 meters in diameter when cultivated in the open.
It is fast growing, drought cold tolerant down to at least minus 4 degrees. In Native gardens It can be used for attracting butterflies, native bees, native flies or native beetles.
It is a very compact dense foliage plant for a bush setting and will stand out because of its colour and profusion of flowers when planted amongst other plants. To highlight the colour, select fine leaf plants with pale green leaves and pink, lilac or red flowers. It can be used in more formal or English style gardens because it has a naturally neat rounded appearance that needs very little attention. If used in large rockeries which have been planted out to highlight other features like rocks, stumps or fish ponds it should be planted to the rear so as to balance the look because of its size. It can be tip pruned to keep them shorter. It is non-obtrusive easy to maintain yet highly visible when in flower or out of flower.
Propagation:
Seeds: Olearia cydoniifolia’s seeds can be sown directly into a seed raising mix. Cover them with 5mm of fine sand and keep moist not wet. Place the tray in a warm semi shaded position preferably beneath 30mm to 60mm shade cloth. When the seedlings are 25mm to 50mm tall plant them into 50mm native tubes.
Once the seedlings reach 150mm to 200mm in height It can be planted out into their permanent positions or repotted into larger containers.
Cuttings: Fortunately Olearia cydoniifolia cuttings strike relatively easy. Use 100mm to 200mm long tip cuttings or lateral shoots from the present season’s growth. Take them in warmer months of the year. Remove half the leaves from the bottom section being careful not to tear the bark.
1 Prepare the cutting mix by adding two thirds sharp clean river sand, one third peat or one third perlite. These ingredients must be sterilized,
2 Select good material from non diseased plants,
3 Select semi green stems for cuttings. Look for a stem with two or three nodes,
4 Place the cutting on a flat, hard surface, and make a clean cut down one side of the cutting at the base for 10mm with a sharp sterile knife or razor blade. – This scarification of the node will increase the chances of roots emerging from this spot. Now remove all but one or two the leaves, leaving the apex leaves in tact. If the leaves are very large in proportion to the stem, cut off the apical halves.
5 Fill a saucer with water, and place a little medium strength rooting hormone into another container like a milk bottle top. Dip the node end of the cutting into the water and then into the rooting hormone. Tap off any excess hormone,
6 Use a small dipple stick or old pencil to poke a hole into the soilless potting mix. Ensure the hole is slightly larger than the stem diameter and be careful not to wipe the rooting hormone off the cuttings base. Place 2 to 4 cuttings in each of the 50mm native tubes,
7 I like to place the tubes in bucket with holes drilled in the bottom to allow excess water to drain out. A plastic bag that fits over the bucket is ideal to help maintain temperature and moisture. Place in a semi shaded, warm position like under 50mm shade cloth.
8 When the cuttings have struck, open the bag to allow air circulation for a few days to a week,
9 Once hardened off remove the cuttings from the bag and allow to further hardening for a few more days to a week,
10 Transplant into a good potting mix to grow on.
Fertilize using seaweed, fish emulsion or organic chicken pellets soaked in water on an alternate basis. Fertilize every two months until the plants are established then annually in early September to October to maintain health, vitality and better flowering.
Further Comments from Readers:
Hi reader, it seems you use The Bible of Botany a lot. That’s great as we have great pleasure in bringing it to you! It’s a little awkward for us to ask, but our first aim is to purchase land approximately 1,600 hectares to link several parcels of N.P. into one at The Pinnacles NSW Australia, but we need your help. We’re not salespeople. We’re amateur botanists who have dedicated over 30 years to saving the environment in a practical way. We depend on donations to reach our goal. If you donate just $5, the price of your coffee this Sunday, We can help to keep the planet alive in a real way and continue to bring you regular updates and features on Australian plants all in one Botanical Bible. Any support is greatly appreciated. Thank you.
In the spirit of reconciliation we acknowledge the Bundjalung, Gumbaynggirr and Yaegl and all aboriginal nations throughout Australia and their connections to land, sea and community. We pay our respect to their Elders past, present and future for the pleasures we have gained.
Olearia elliptica
Classification:
Unranked: Eudicots
Class: Asterids
Order: Asterales
Family: Asteraceae
Genus: Is named in honour of Johann Gottfried Ölschläger; 1603-1671, who was a German horticulturist and author of a flora of Halle in Germany. His name was Latinized to the Latin form of Olearius.
Species: From Elleiptikós, which is Ancient Greek for an elliptical or ovate shape. It refers to organs usually the leaves which have an elliptical shape.
Subspecies: Olearia elliptica subsp. elliptica. From Elleiptikós, which is Ancient Greek for an elliptical or ovate shape. It refers to organs usually the leaves which have an elliptical shape.
Subspecies: Olearia elliptica subsp. praetermissa. From Prae, which is Latin for before or in front of and Missa, which is Latin for to miss or miss out on. It refers to plants, which do not stand out in the crowd, often being overlooked or missed.
Common Name:
Distribution:
Olearia elliptica subsp. elliptica is found south from Carnarvon National Park in central Queensland to Scone in central coastal New South Wales. It is mainly found on the Western Plains and on the Great Dividing Range but does extend to the coast.
Olearia elliptica subsp. praetermissa is found south from Elgin Vale in south east Queensland to Jervis Bay in southern New South Wales. It is also found on Lord Howe Island. It is mainly found on and east of the Great Dividing Range.
https://avh.ala.org.au/occurrences/search?taxa=Olearia+elliptica#tab_mapView
Habitat Aspect Climate:
Olearia elliptica prefers full sun to dappled shade. It grows in heath, open woodlands, sclerophyll forests, flat gullies or mountainous terrain. The altitude ranges from 20 meter ASL to 1250 meters ASL.
The temperatures range from minus 4 degrees in August to 34 degrees in February.
The rainfalls range from lows of 580mm to an average 1900mm annually.
Soil Requirements:
Olearia elliptica prefers better quality fine sands, sandy loams, light clays or light silts to heavy silts. The soils are usually derived from decomposed brown basalts, black basalts, sandstones or granites often being laid down as river meander silts or alluvial deposits. The soils pH. ranges from 4.5pH to 6.5pH. It does not tolerate waterlogged soils but prefers even soil moisture. Non saline soils to moderately saline soils are tolerated.
Height & Spread:
Wild Plants: 0.6m to 2m by 1m to 1.8m.
Characteristics:
Olearia elliptica’s grows as a small dense shrub with mid grey, scabrous stems. The branchlets and small stems are pale grey and glabrous while the smallest stems and new growth are deep purple to deep purplish-red and glabrous.
Olearia elliptica’s alternate disjunct narrow elliptical to broad elliptic leaves are scattered unevenly along the stems. The leaves measure 20mm to 115mm in length by 5mm to 58mm in width. The glabrous petioles measure 8mm to 12mm in length. The bases are cuneate and shortly attenuate while the apexes are acute or broad acuminate or at times narrow obtuse. The discolourous laminas are deep olive-green sea-green and viscid on the upper laminas while the lower laminas are paler and glabrous. The laminas are flat and decurve gently downwards from the base to the apex. The margins are entire or weakly revolute. The mid vein is strongly prominent on the lower lamina and is visible on the upper lamina while the lateral veins are slightly prominent on the lower laminas and are faintly visible form the upper laminas. The venation is alternating pinnate while the margins are entire.
The inflorescence of Olearia elliptica is a corymb born from the terminals. The corymbs have 24 to 54 individual flowers and measure 110mm to 260mm diameter. The peduncles and pedicels are mid purplish-red to deep purplish-red. The peduncles measure 26mm to 45mm in length while the pedicels measure 7mm to 30mm in length. The 8 to 23, white ray florets are the most prominent parts of the flower. The linear ray florets measure 6mm to 8mm in length by 2.5mm to 3mm in width. There are 8 to 30 yellow disc florets in the center of the ray florets. The flowers appear from November to May.
Olearia elliptica’s fruits are minutely strigose, linear achenes. The achene’s pappus has 20 long bristles in a single or double row with or without an outer row of short bristles.
Wildlife:
Olearia elliptica’s flowers are attractive to small and medium size butterflies, native bees, pollen flies and hover flies.
Cultivation:
Olearia elliptica is a beautiful dense foliaged dome shaped annual or perennial with white and yellow flowers that is worthwhile growing for its beauty in small gardens. It would suit most small gardens in cool semi-arid, sub-tropical and temperate zones. As a garden subject it will grow from 1 meter to 1.8 meters in height by 0.8 meters to 1.5 meters in diameter when cultivated in the open.
It is a fast growing, drought and cold tolerant down to at least minus 4 degrees.
In Native gardens It can be used for attracting butterflies, native bees, native flies or native beetles.
It is a very compact dense foliaged plant for a bush setting and will stand out because of its colour and profusion of flowers when planted amongst other plants. To highlight the colour, select fine leaf plants with pale green leaves and pink, lilac or red flowers.
It can be used in more formal or English style gardens because it has a naturally neat rounded appearance that needs very little attention. If used in rockeries which have been planted out to highlight other features like rocks, stumps or fish ponds it should be planted to the rear so as to balance the look because of its size. It can be tip pruned to keep them shorter. It is non-obtrusive easy to maintain yet highly visible when in flower or out of flower.
Propagation:
Seeds: Olearia elliptica’s seeds can be sown directly into a seed raising mix. Cover them with 5mm of fine sand and keep moist not wet. Place the tray in a warm semi shaded position preferably beneath 30mm to 60mm shade cloth. When the seedlings are 25mm to 50mm tall plant them into 50mm native tubes.
Once the seedlings reach 150mm to 200mm in height It can be planted out into their permanent positions or repotted into larger containers.
Cuttings: Fortunately Olearia elliptica cuttings strike easy. Use 100mm to 200mm long tip cuttings or lateral shoots from the present season’s growth. Take them in warmer months of the year. Remove half the leaves from the bottom section being careful not to tear the bark.
1 Prepare the cutting mix by adding two thirds sharp clean river sand, one third peat or one third perlite. These ingredients must be sterilized,
2 Select good material from non diseased plants,
3 Select semi green stems for cuttings. Look for a stem with two or three nodes,
4 Place the cutting on a flat, hard surface, and make a clean cut down one side of the cutting at the base for 10mm with a sharp sterile knife or razor blade. – This scarification of the node will increase the chances of roots emerging from this spot. Now remove all but one or two the leaves, leaving the apex leaves in tact. If the leaves are very large in proportion to the stem, cut off the apical halves.
5 Fill a saucer with water, and place a little medium strength rooting hormone into another container like a milk bottle top. Dip the node end of the cutting into the water and then into the rooting hormone. Tap off any excess hormone,
6 Use a small dipple stick or old pencil to poke a hole into the soilless potting mix. Ensure the hole is slightly larger than the stem diameter and be careful not to wipe the rooting hormone off the cuttings base. Place 2 to 4 cuttings in each of the 50mm native tubes,
7 I like to place the tubes in bucket with holes drilled in the bottom to allow excess water to drain out. A plastic bag that fits over the bucket is ideal to help maintain temperature and moisture. Place in a semi shaded, warm position like under 50mm shade cloth.
8 When the cuttings have struck, open the bag to allow air circulation for a few days to a week,
9 Once hardened off remove the cuttings from the bag and allow to further hardening for a few more days to a week,
10 Transplant into a good potting mix to grow on.
Fertilize using seaweed, fish emulsion or organic chicken pellets soaked in water on an alternate basis. Fertilize every two months until the plants are established then annually in early September to October to maintain health, vitality and better flowering.
Further Comments from Readers:
Hi reader, it seems you use The Bible of Botany a lot. That’s great as we have great pleasure in bringing it to you! It’s a little awkward for us to ask, but our first aim is to purchase land approximately 1,600 hectares to link several parcels of N.P. into one at The Pinnacles NSW Australia, but we need your help. We’re not salespeople. We’re amateur botanists who have dedicated over 30 years to saving the environment in a practical way. We depend on donations to reach our goal. If you donate just $5, the price of your coffee this Sunday, We can help to keep the planet alive in a real way and continue to bring you regular updates and features on Australian plants all in one Botanical Bible. Any support is greatly appreciated. Thank you.
In the spirit of reconciliation we acknowledge the Bundjalung, Gumbaynggirr and Yaegl and all aboriginal nations throughout Australia and their connections to land, sea and community. We pay our respect to their Elders past, present and future for the pleasures we have gained.
Olearia erubescens
Classification:
Unranked: Eudicots
Class: Asterids
Order: Asterales
Family: Asteraceae
Genus: Is named in honour of Johann Gottfried Ölschläger; 1603-1671, who was a German horticulturist and author of a flora of Halle in Germany. His name was Latinized to the Latin form of Olearius.
Specie: From Erubescentia, which is Ancient Greek for blushing. It is further derived from rubescere to turn red. It refers to plants, which have a reddish or pink flush in the flowers.
Common Name: Pink Tip Daisy Bush.
Distribution:
Olearia erubescens is found south along the Great Dividing Range from Sydney to Lithgow in central eastern New South Wales to Seymore and west to Stawell then south west to Mount Gambier and the Naracoorte coastal Plains in south eastern South Australia.
It is found on most of the eastern side of mainland Tasmania from Circular Head in the north west to in the south east of Recherche Bay. It is not found on the Bass Strait Islands.
https://avh.ala.org.au/occurrences/search?taxa=Olearia+erubescens#tab_mapView
Habitat Aspect Climate:
Olearia erubescens prefers full sun to dappled shade. It grows in dry sclerophyll forest, open Eucalyptus forests or open Eucalyptus woodlands. The altitude ranges from 20 meter ASL to 160 meters ASL.
The temperatures range from minus 5 degrees in August to 37 degrees in February.
The rainfalls range from lows of 600mm to an average 1600mm annually.
Soil Requirements:
Olearia erubescens prefers poorer quality course sands, fine sands, sandy loams, light gritty clays. The soils are usually derived from decomposed black basalts, metamorphic rocks, granites or sandstones often laid down as river meander alluvial flats. The soils pH. ranges from 5pH to 6.5pH. It does not tolerate waterlogged soils. Non saline soils to moderately saline soils are tolerated.
Height & Spread:
Wild Plants: 1m to 2m by 1m to 1.8m.
Characteristics:
Olearia erubescens grows as a small dense shrub with pale green, rough, scabrous stems. The young smaller stems and shoots are often red. The small stems are covered in fawn to golden-brown tomentose hairs.
Olearia erubescens’s alternate disjunct narrow elliptical to elliptic leaves are scattered or unevenly crowded along the stems. The leaves measure 15mm to 125mm in length by 3mm to 20mm in width. The glabrous petioles measure 6mm to 11mm in length. The slightly oblique bases are tapered, cuneate, cuneate-attenuate while the apexes obtuse-acute to mucronate. The discolourous laminas are sea-green and glabrous on the upper laminas while the lower laminas are paler and densely covered in silvery canescent hairs. The laminas are flat or recurve slightly from the mid vein to the margins while the margins are entire and maybe weakly revolute. The mid vein is prominent on the lower lamina and is visible on the upper lamina while the reticulate lateral veins are obscure.
The inflorescence of Olearia erubescens is a panicle born from the terminals. The peduncules measure 30mm to 55mm in length while the pedicels measure 7mm to 22mm in length. The 4 to 7, white ray florets are the most prominent parts of the flower. The linear ray florets measure 9mm to 12mm in length by 3mm to 4mm in width. There are 7 to 13 yellow disc florets in the center of the ray florets. The flowers appear from September to March.
Olearia erubescens’s fruits are linear glabrous achene. The achene’s pappus has 55 to 79 bristles in 2 rows.
Wildlife:
Olearia erubescens’s flowers are attractive to small and medium size butterflies, native bees, pollen flies and hover flies.
Cultivation:
Olearia erubescensis a beautiful, dense, foliage, dome shaped annual or perennial with white and yellow flowers that is worthwhile growing for its beauty in small gardens. It would suit most small gardens in cool semi-arid, sub-tropical and temperate zones. As a garden subject it will grow from 1.5 meter to 1.8 meters in height by 1 meter to 1.5 meters in diameter when cultivated in the open.
It is a fast growing, drought cold tolerant down to at least minus 5 degrees.
In Native gardens It can be used for attracting butterflies, native bees, native flies or native beetles which in turn will attract small insectivorous birds.
It is a very compact dense foliage plant that has a tendency to become straggly without a little TLC. Prune back to the start of the previous seasons growth after flowering to avoid plants becoming straggly. For a bush setting it will stand out because of its deep green foliage and particularly so when in flower. The profusion of flowers is hard to beat and will draw your attention even when planted amongst other plants. It works exceptionally well with red or orange flowering shrubs. To highlight the colour, select fine leaf plants with pale green leaves and pink, lilac or red flowers.
It can be used in more formal or English style gardens because It has a naturally neat rounded appearance that needs very little attention. If used in rockeries which have been planted out to highlight other features like rocks, stumps or fish ponds it should be planted to the rear so as to balance the look because of its size. It can be tip pruned to keep them shorter. It is non obtrusive easy to maintain yet highly visible when in flower or out of flower.
Propagation:
Seeds: Olearia erubescens’s seeds can be sown directly into a seed raising mix. Cover them with 5mm of fine sand and keep moist not wet. Place the tray in a warm semi shaded position preferably beneath 30mm to 60mm shade cloth. When the seedlings are 25mm to 50mm tall plant them into 50mm native tubes.
Once the seedlings reach 150mm to 200mm in height It can be planted out into their permanent positions or repotted into larger containers.
Cuttings: Fortunately Olearia erubescens cuttings strike relatively easy. Use 100mm to 200mm long tip cuttings or lateral shoots from the present season’s growth. Take them in warmer months of the year. Remove half the leaves from the bottom section being careful not to tear the bark.
1 Prepare the cutting mix by adding two thirds sharp clean river sand, one third peat or one third perlite. These ingredients must be sterilized,
2 Select good material from non diseased plants,
3 Select semi green stems for cuttings. Look for a stem with two or three nodes,
4 Place the cutting on a flat, hard surface, and make a clean cut down one side of the cutting at the base for 10mm with a sharp sterile knife or razor blade. – This scarification of the node will increase the chances of roots emerging from this spot. Now remove all but one or two the leaves, leaving the apex leaves in tact. If the leaves are very large in proportion to the stem, cut off the apical halves.
5 Fill a saucer with water, and place a little medium strength rooting hormone into another container like a milk bottle top. Dip the node end of the cutting into the water and then into the rooting hormone. Tap off any excess hormone,
6 Use a small dipple stick or old pencil to poke a hole into the soilless potting mix. Ensure the hole is slightly larger than the stem diameter and be careful not to wipe the rooting hormone off the cuttings base. Place 2 to 4 cuttings in each of the 50mm native tubes,
7 I like to place the tubes in bucket with holes drilled in the bottom to allow excess water to drain out. A plastic bag that fits over the bucket is ideal to help maintain temperature and moisture. Place in a semi shaded, warm position like under 50mm shade cloth.
8 When the cuttings have struck, open the bag to allow air circulation for a few days to a week,
9 Once hardened off remove the cuttings from the bag and allow to further hardening for a few more days to a week,
10 Transplant into a good potting mix to grow on.
Fertilize using seaweed, fish emulsion or organic chicken pellets soaked in water on an alternate basis. Fertilize every two months until the plants are established then annually in early September to October to maintain health, vitality and better flowering.
Further Comments from Readers:
Hi reader, it seems you use The Bible of Botany a lot. That’s great as we have great pleasure in bringing it to you! It’s a little awkward for us to ask, but our first aim is to purchase land approximately 1,600 hectares to link several parcels of N.P. into one at The Pinnacles NSW Australia, but we need your help. We’re not salespeople. We’re amateur botanists who have dedicated over 30 years to saving the environment in a practical way. We depend on donations to reach our goal. If you donate just $5, the price of your coffee this Sunday, We can help to keep the planet alive in a real way and continue to bring you regular updates and features on Australian plants all in one Botanical Bible. Any support is greatly appreciated. Thank you.
In the spirit of reconciliation we acknowledge the Bundjalung, Gumbaynggirr and Yaegl and all aboriginal nations throughout Australia and their connections to land, sea and community. We pay our respect to their Elders past, present and future for the pleasures we have gained.
Ulong-Dorrigo Road Ulong NSW
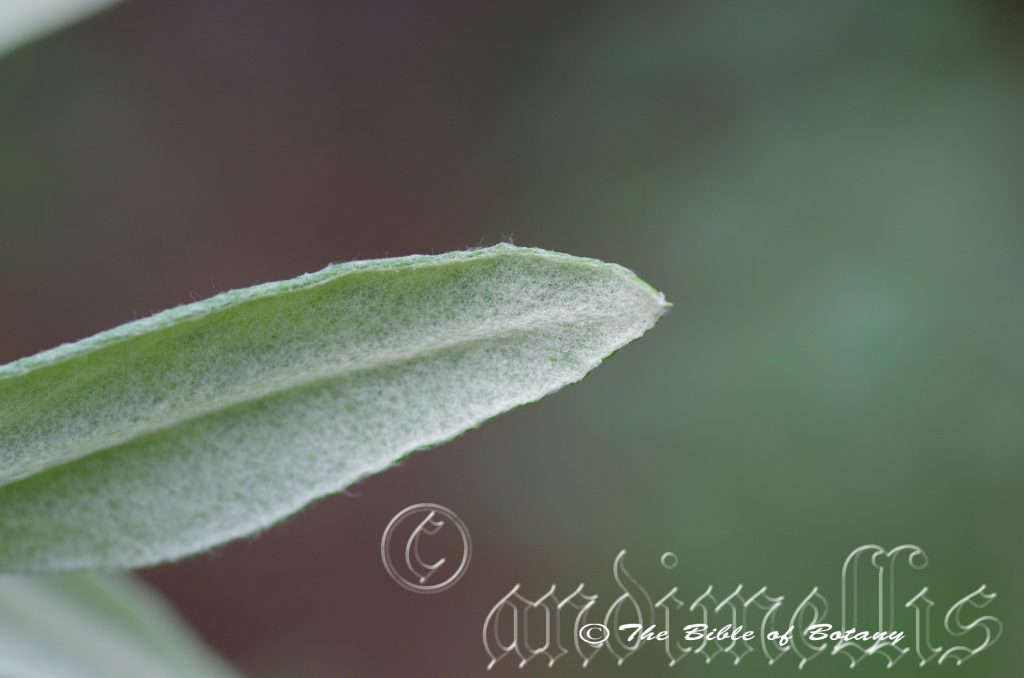
Ulong-Dorrigo Road Ulong NSW
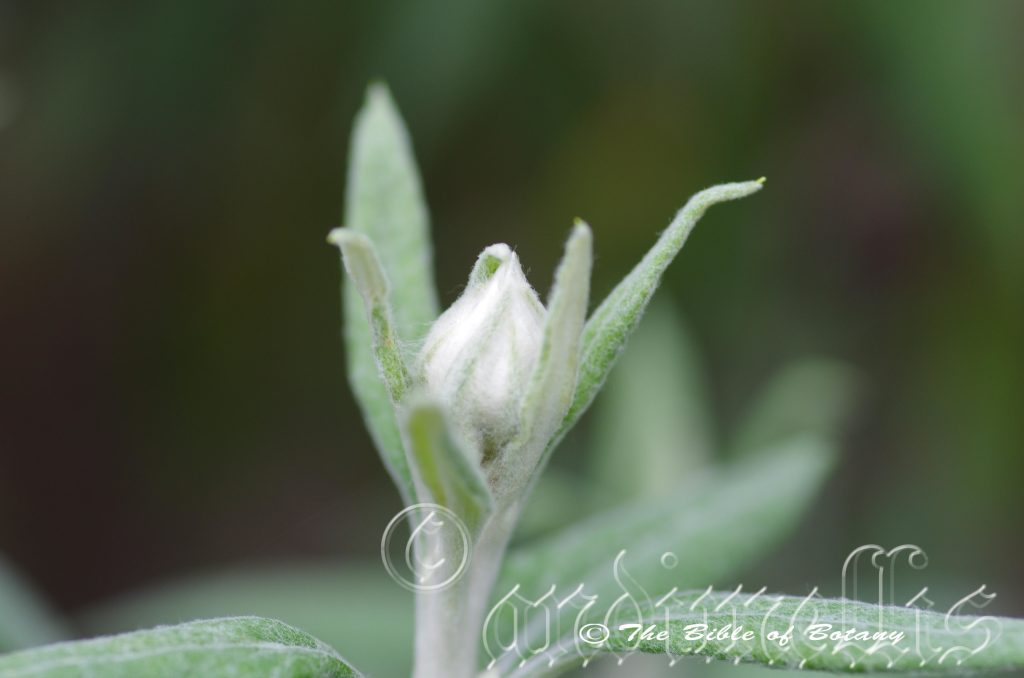
Ulong-Dorrigo Road Ulong NSW
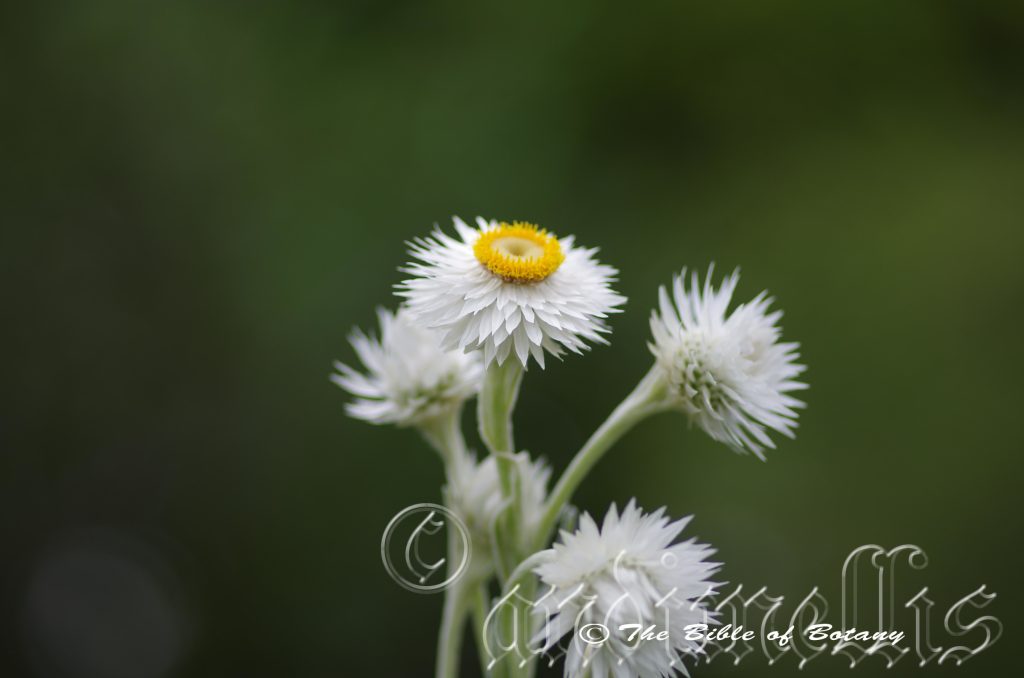
Ulong-Dorrigo Road Ulong NSW
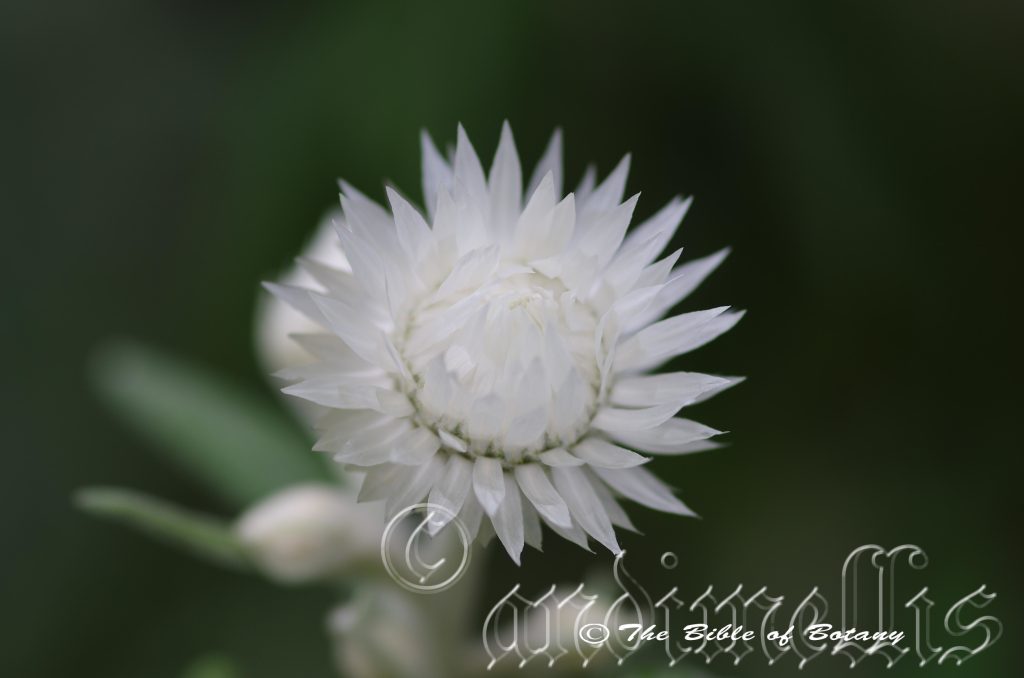
Ulong-Dorrigo Road Ulong NSW
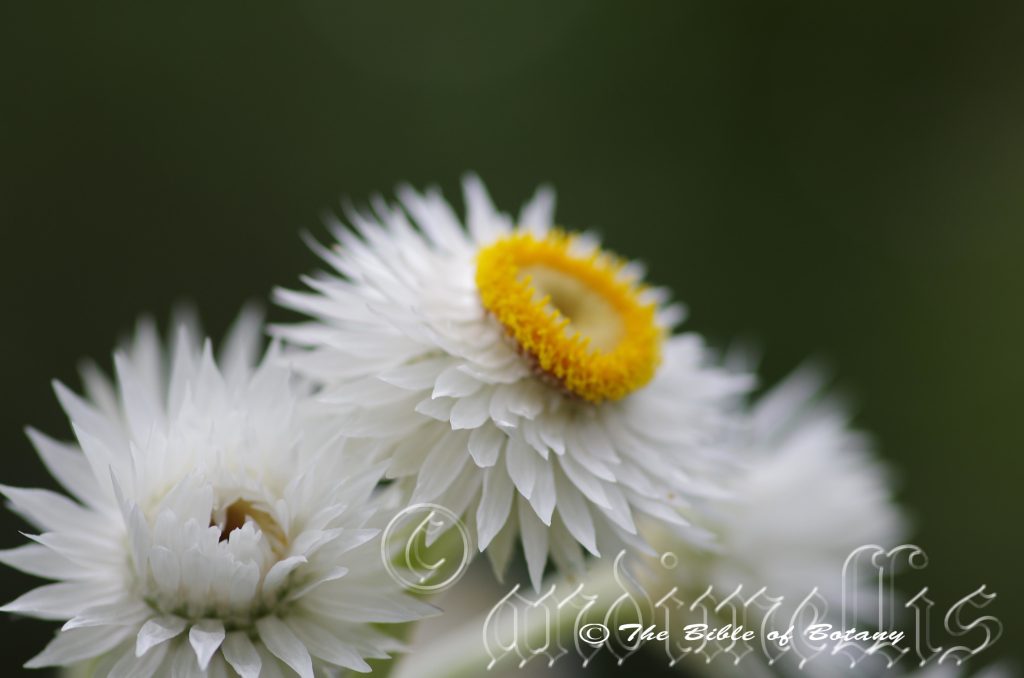
Ulong-Dorrigo Road Ulong NSW
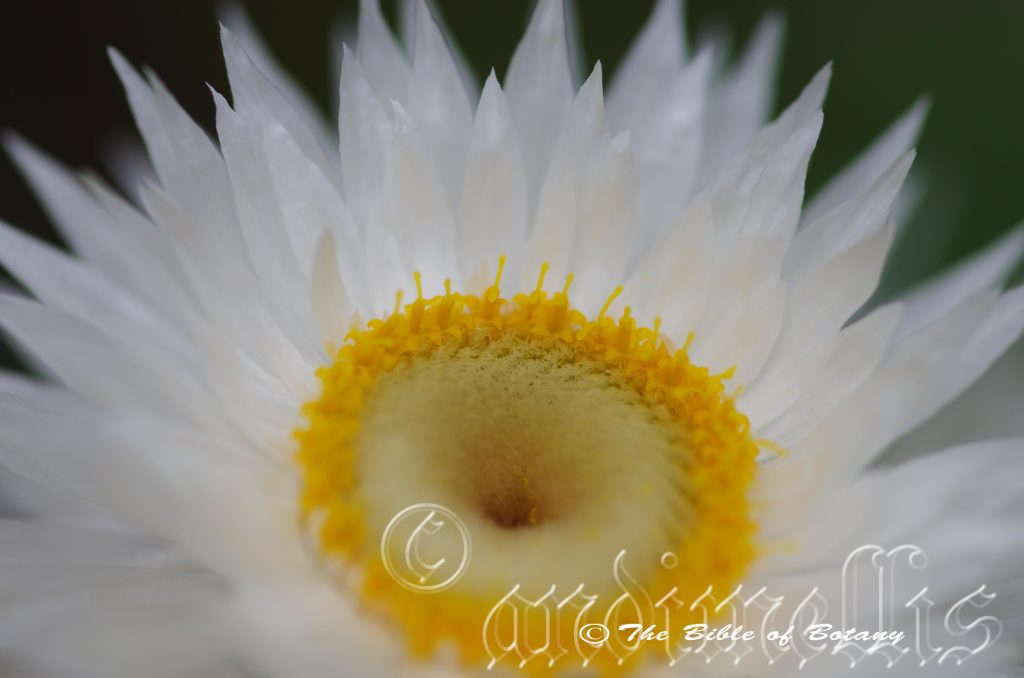
Ulong-Dorrigo Road Ulong NSW
Olearia flocktoniae
Classification:
Unranked: Eudicots
Class: Asterids
Order: Asterales
Family: Asteraceae
Genus: Is named in honour of Johann Gottfried Ölschläger; 1603-1671, who was a German horticulturist and author of a flora of Halle in Germany. His name was Latinized to the Latin form of Olearius.
Species: Is named in honour of Margaret Lilian Flockton; 1861-1953, who was an English born Australian artist and the first female lithographic botanical artist.
Common Name: Dorrigo Daisy.
Distribution:
Olearia flocktoniae is found on the Great Dividing Range from near the Bo Bo River to the Ben Bullen forestry track to near Ulong north of Dorrigo in far north eastern New South Wales.
https://avh.ala.org.au/occurrences/search?taxa=Olearia+flocktoniae#tab_mapView
Habitat Aspect Climate:
Olearia flocktoniae prefers full sun to dappled shade. It grows in or adjacent to recently disturbed sites in sheltered, wet, sclerophyll forests to warn temperate rainforest. It appears that the species disappears after 3 or 4 years from the disturbance indicating the seeds are very long lived in the soils. The altitude ranges from 480 meter ASL to 1070 meters ASL.
The temperatures range from minus 2 degrees in August to 35 degrees in February.
The rainfalls range from lows of 1100mm to an average 1750mm annually.
Soil Requirements:
Olearia flocktoniae prefers better quality sandy loams to medium clays. The soils are usually derived from decomposed black basalts or at times brown basalts. The soils pH. ranges from 5pH to 5.5pH. It does not tolerate waterlogged soils. Slightly saline soils to moderately saline soils are tolerated.
Height & Spread:
Wild Plants: 1m to 2m by 0.6m to 1m.
Characteristics:
Olearia flocktoniae’s stems are deep green and smooth. The juvenile and new growth is deep green and sparsely covered in fine, white puberulent hairs.
Olearia flocktoniae’s alternate, crowded, linear leaves measure 20mm to 90mm in length by 1mm to 5mm in width. The bases are sessile while the apexes are tapering to narrow acute. The concolourous laminas are deep grass-green to sea-green and moderately covered in fine, white pubescent hairs. The laminas are flat and decurve downwards from the base to the apex while the margins are revolute and entire. The mid vein and lateral veins are obscure.
The inflorescence of Olearia flocktoniae is a corymb born from the terminals. There are 6 to 20 individual heads in a corymb that measure 19mm to 25mm in diameter. The peduncles and pedicels are deep green to sea-green and sparsely covered in fine, white puberulent hairs. The peduncules measure 30mm to 52mm in length while the pedicels measure 20mm to 40mm in length. The 30 to 48, lilac to white or white tinged purple ray florets are the most prominent parts of the flower. The linear ray florets measure 8.5mm to 10mm in length by 1.5mm to 2mm in width. There are 39 to 49 yellow disc florets in the center of the ray florets. The flowers appear from February to March.
Olearia flocktoniae’s fruits are flat, linear achenes with a sparse covering of soft, white puberulent hairs. The achene’s pappus has 36 to 47 bristles in a single row.
Wildlife:
Olearia flocktoniae’s flowers are attractive to small and medium size butterflies, native bees, pollen flies and hover flies.
Cultivation:
Olearia flocktoniae is a beautiful dense foliaged dome shaped perennial with white and yellow flowers that is worthwhile growing for its beauty in small semi shaded gardens. It would suit most small gardens in cool subtropical and temperate zones. As a garden subject it will grow from 1.5 meter to 1.8 meters in height by 1 meter to 1.5 meters in diameter when cultivated in the open.
It is a fast growing, drought cold tolerant down to at least minus 5 degrees. In Native gardens It can be used for attracting butterflies, native bees, native flies or native beetles which in turn will attract small insectivorous birds.
It is an open foliaged plant that has a tendency to become straggly without a little TLC. Prune back to the start of the previous seasons growth after flowering to avoid plants becoming straggly. For a bush setting it will stand out because of its deep green foliage, particularly when in flower. It works exceptionally well with small red or orange flowering shrubs. To highlight the colour, select fine leaf plants with pale green leaves and pink, lilac or red flowers.
It can be used in more formal or English style gardens because it has a naturally neat rounded appearance that needs very little attention. If it is used in rockeries which have been planted out to highlight other features like rocks, stumps or fish ponds it should be planted to the rear so as to balance the look because of its size. It can be tip pruned to keep them shorter. It is non-obtrusive easy to maintain yet highly visible when in flower or out of flower.
Propagation:
Seeds: Olearia flocktoniae’s seeds can be sown directly into a seed raising mix. Cover them with 5mm of fine sand and keep moist not wet. Place the tray in a warm semi shaded position preferably beneath 30mm to 60mm shade cloth. When the seedlings are 25mm to 50mm tall plant them into 50mm native tubes.
Once the seedlings reach 150mm to 200mm in height It can be planted out into their permanent positions or repotted into larger containers.
Cuttings: Fortunately Olearia flocktoniae cuttings strike relatively easy. Use 100mm to 120mm long tip cuttings or lateral shoots from the present season’s growth. Take them in warmer months of the year. Remove half the leaves from the bottom section being careful not to tear the bark.
1 Prepare the cutting mix by adding two thirds sharp clean river sand, one third peat or one third perlite. These ingredients must be sterilized,
2 Select good material from non diseased plants,
3 Select semi green stems for cuttings. Look for a stem with two or three nodes,
4 Place the cutting on a flat, hard surface, and make a clean cut down one side of the cutting at the base for 10mm with a sharp sterile knife or razor blade. – This scarification of the node will increase the chances of roots emerging from this spot. Now remove all but one or two the leaves, leaving the apex leaves in tact. If the leaves are very large in proportion to the stem, cut off the apical halves.
5 Fill a saucer with water, and place a little medium strength rooting hormone into another container like a milk bottle top. Dip the node end of the cutting into the water and then into the rooting hormone. Tap off any excess hormone,
6 Use a small dipple stick or old pencil to poke a hole into the soilless potting mix. Ensure the hole is slightly larger than the stem diameter and be careful not to wipe the rooting hormone off the cuttings base. Place 2 to 4 cuttings in each of the 50mm native tubes,
7 I like to place the tubes in bucket with holes drilled in the bottom to allow excess water to drain out. A plastic bag that fits over the bucket is ideal to help maintain temperature and moisture. Place in a semi shaded, warm position like under 50mm shade cloth.
8 When the cuttings have struck, open the bag to allow air circulation for a few days to a week,
9 Once hardened off remove the cuttings from the bag and allow to further hardening for a few more days to a week,
10 Transplant into a good potting mix to grow on.
Fertilize using seaweed, fish emulsion or organic chicken pellets soaked in water on an alternate basis. Fertilize every two months until the plants are established then annually in early September to October to maintain health, vitality and better flowering.
Further Comments from Readers:
Hi reader, it seems you use The Bible of Botany a lot. That’s great as we have great pleasure in bringing it to you! It’s a little awkward for us to ask, but our first aim is to purchase land approximately 1,600 hectares to link several parcels of N.P. into one at The Pinnacles NSW Australia, but we need your help. We’re not salespeople. We’re amateur botanists who have dedicated over 30 years to saving the environment in a practical way. We depend on donations to reach our goal. If you donate just $5, the price of your coffee this Sunday, We can help to keep the planet alive in a real way and continue to bring you regular updates and features on Australian plants all in one Botanical Bible. Any support is greatly appreciated. Thank you.
In the spirit of reconciliation we acknowledge the Bundjalung, Gumbaynggirr and Yaegl and all aboriginal nations throughout Australia and their connections to land, sea and community. We pay our respect to their Elders past, present and future for the pleasures we have gained.
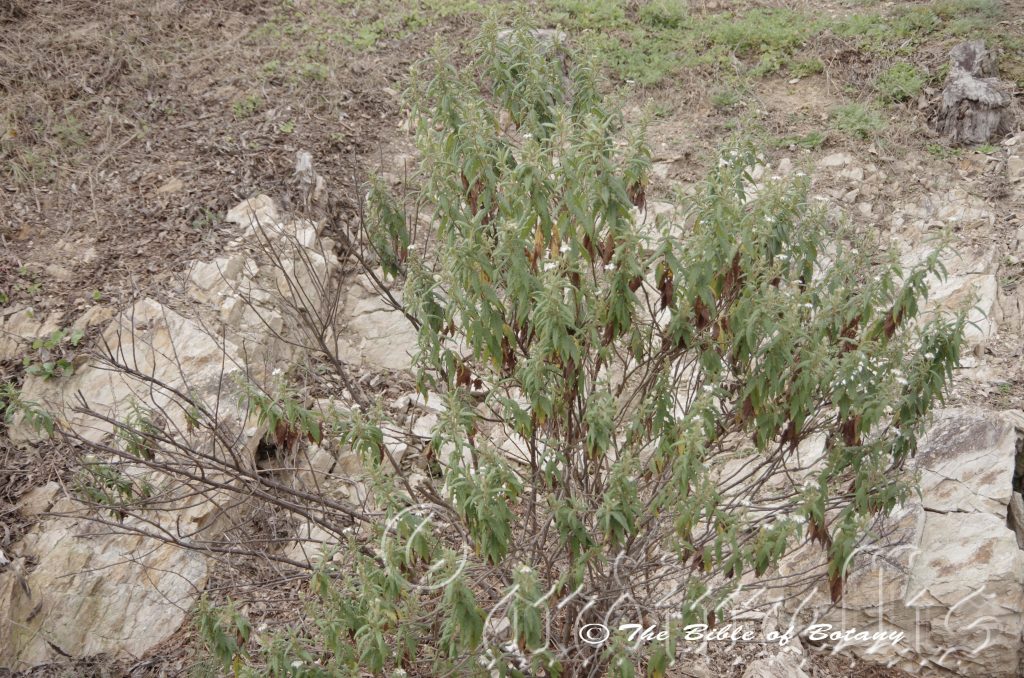
Rosser Park Benowa Qld.
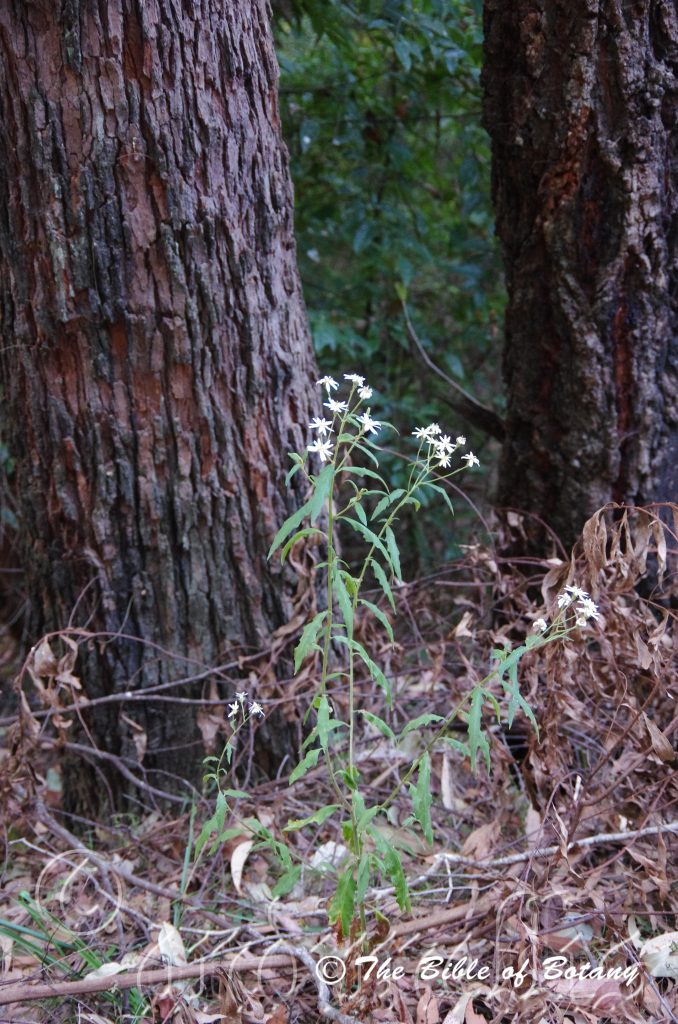
Kendall NSW

Rosser Park Benowa Qld.
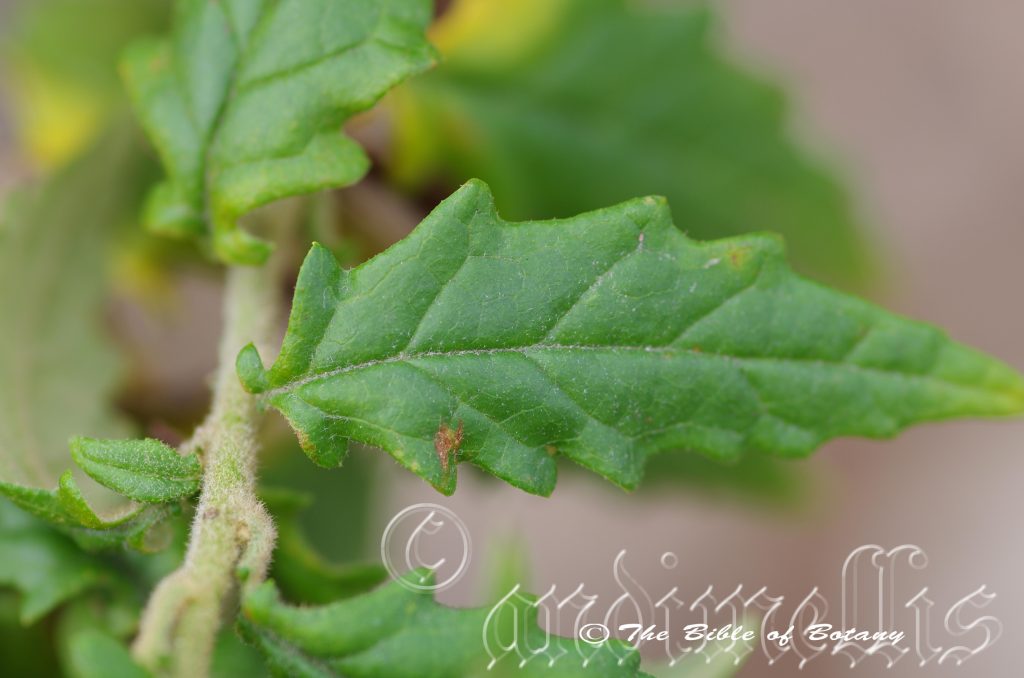
Rosser Park Benowa Qld.
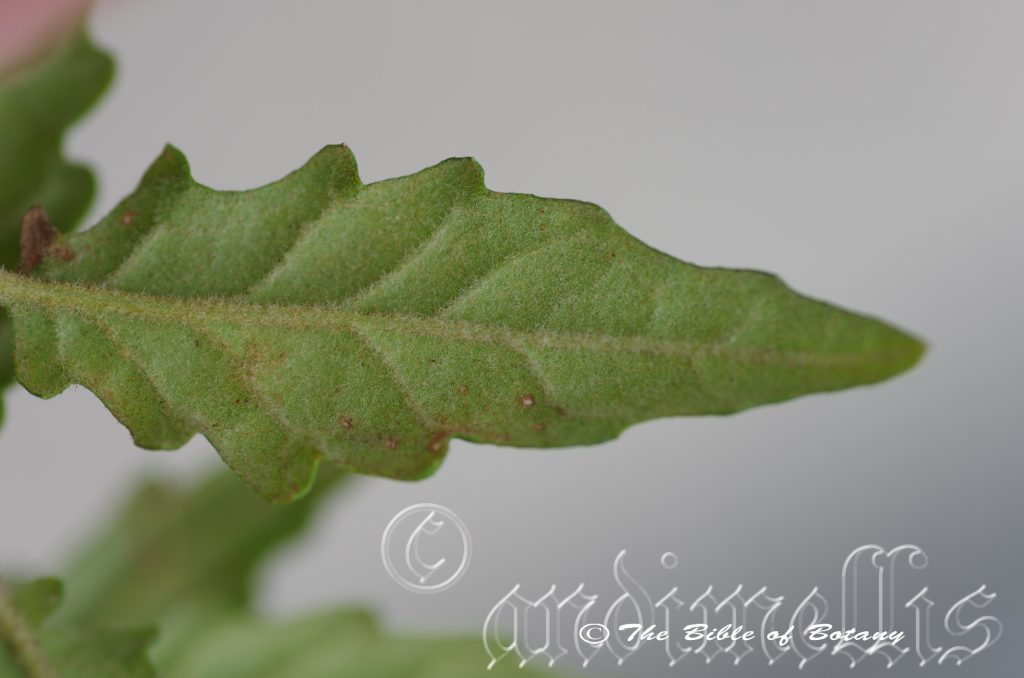
Rosser Park Benowa Qld.
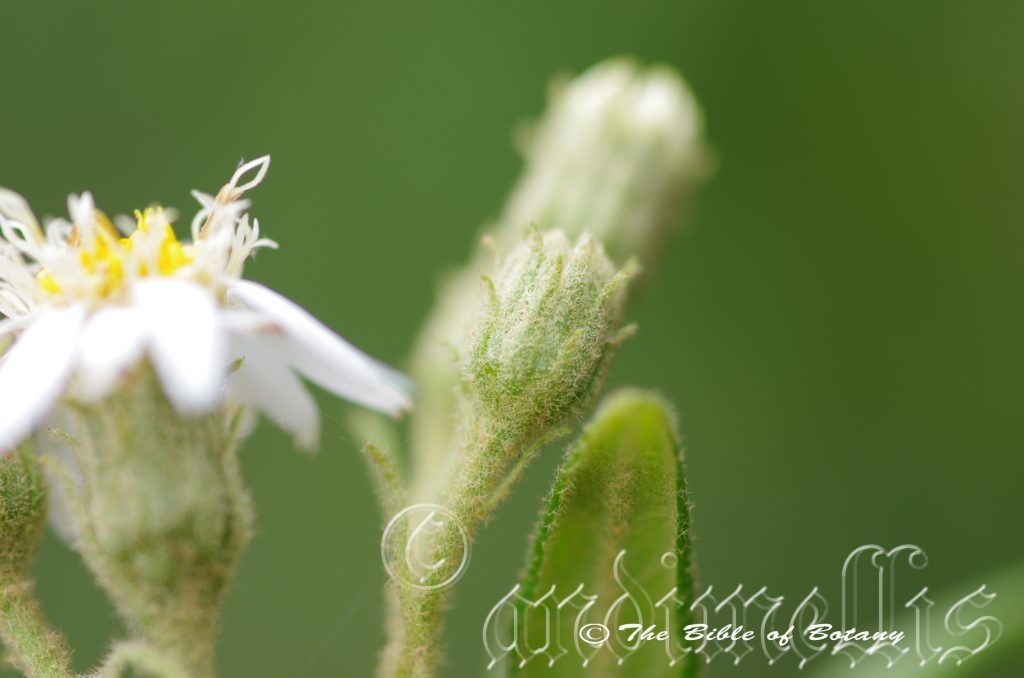
Rosser Park Benowa Qld.
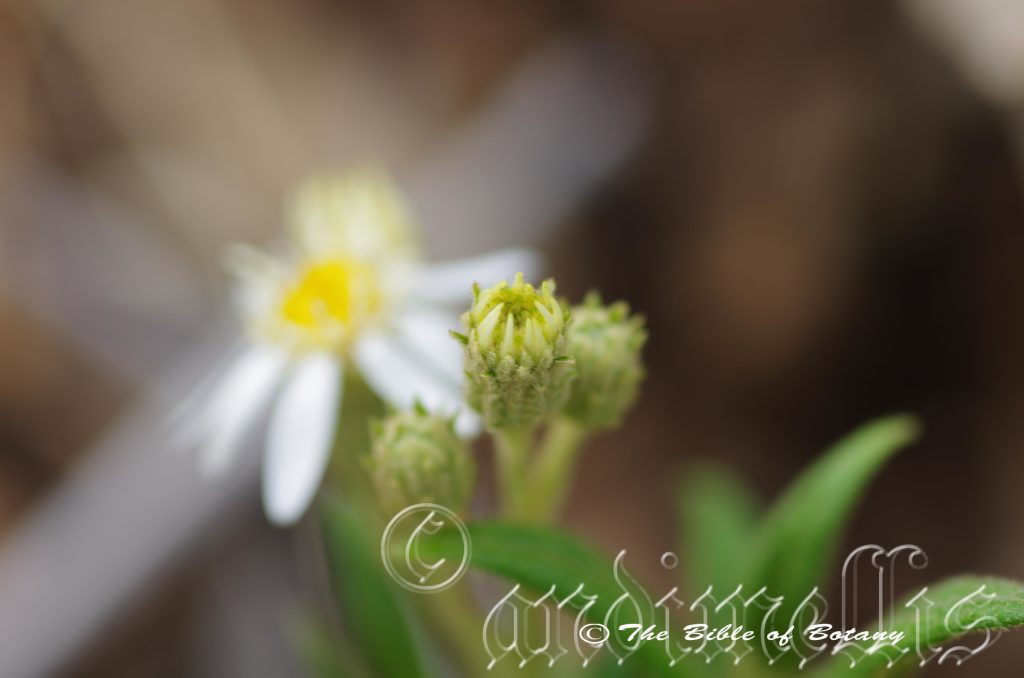
Rosser Park Benowa Qld.
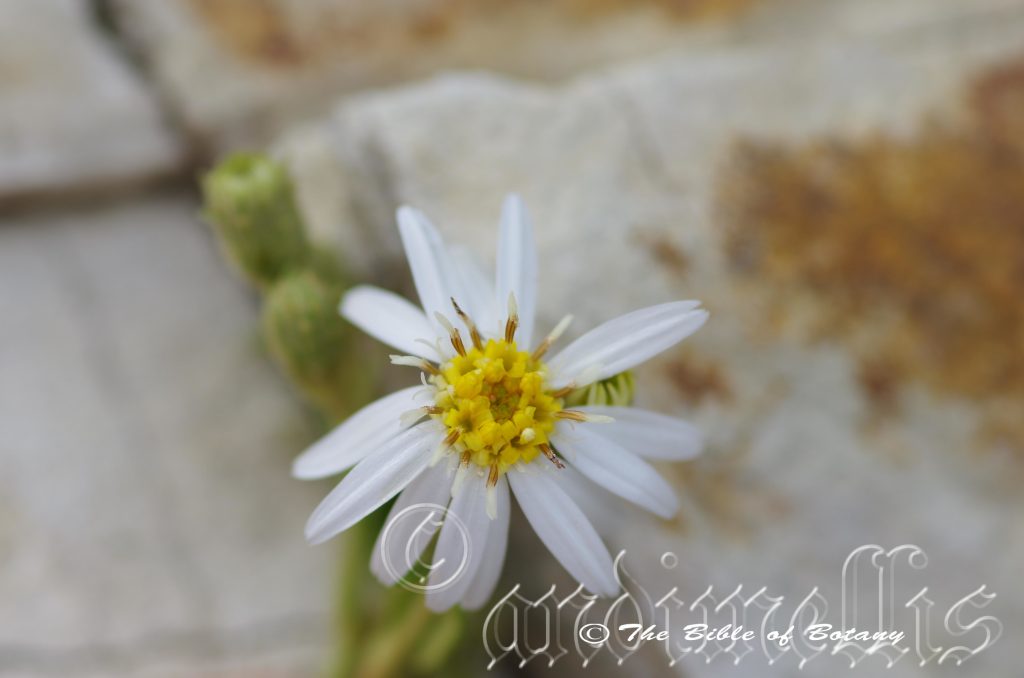
Rosser Park Benowa Qld.
Olearia nernstii
Classification:
Unranked: Eudicots
Class: Asterids
Order: Asterales
Family: Asteraceae
Genus: Is named in honour of Johann Gottfried Ölschläger; 1603-1671, who was a German horticulturist and author of a flora of Halle in Germany. His name was Latinized to the Latin form of Olearius.
Species: Is named in honour of Joseph Nearnst who was an Australian gardener and avid collector of herbarium samples from 1832-1878.
Common Name: Silver Daisy.
Distribution:
Olearia nernstii is found south from the Byfield National Park in central eastern Queensland to Newcastle in central coastal New South Wales.
It is found on and east of the Great Dividing Range.
https://avh.ala.org.au/occurrences/search?taxa=Olearia+nernstii#tab_mapView
Habitat Aspect Climate:
Olearia nernstii prefers full sun to dappled shade. It grows in or adjacent to riverine forests, dry rainforests, sclerophyll forests and open land. The altitude ranges from 20 meter ASL to 1250 meters ASL.
The temperatures range from minus 4 degrees in August to 34 degrees in February.
The rainfalls range from lows of 850mm to an average 3000mm annually.
Soil Requirements:
Olearia nernstii prefers poor quality course sands, sandy loams, light clays and light silts. The soils are usually derived from decomposed brown basalts, black basalts, shales or metamorphic rocks often being laid down as alluvial silts. The soils pH. ranges from 5pH to 6.5pH. It does not tolerate waterlogged soils. Non saline soils to moderately saline soils are tolerated.
Height & Spread:
Wild Plants: 1m to 2m by 0.8m to 1.2m.
Characteristics:
Olearia nernstii grows as a small dense perennial herb with pale grey-green, rough, scabrous stems. Young small stems are olive green turning pale olive green as they approach the leaves. The small stems are covered in off white, fawn to golden-brown tomentose hairs.
Olearia nernstii’s alternate narrow elliptical to oblong leaves are scattered unevenly along the stems and measure 25mm to 110mm in length by 8mm to 35mm in width. The petioles measure 6mm to 10mm in length. The slightly oblique bases are broadly cuneate while the apexes are acute with or without a mucronate tip. The discolourous laminas are deep sea-green and glabrous to being sparsely covered in fawn to golden brown tomentose hairs on the upper lamina while the lower lamina is paler and densely covered in brown tomentose hairs. The mid vein is slightly prominent on the lower lamina and is visible on the upper lamina. The margins are irregularly toothed or slightly prickly and flat.
The inflorescence of Olearia nernstii is a corymb born from the terminals. The corymbs peduncules measure 14mm to 30mm in length while the pedicels measure 6mm to 35mm in length. The 9 to 20, white ray florets are the most prominent parts of the flower. There are 15 to 40 yellow disc florets in the center of the ray florets. The linear ray florets measure 7mm to 10mm in length by 1.5mm to 2mm in width. The flowers appear from July to November.
Olearia nernstii’s fruit is a flat, linear glabrous achene. The achene’s pappus has 29 to 45 long bristles in 2 rows and an outer row of short bristles.
Wildlife:
Olearia nernstii’s flowers are attractive to small and medium size butterflies, native bees, pollen flies and hover flies.
Cultivation:
Olearia nernstii is a beautiful dense foliage dome shaped annual or perennial with white and yellow flowers that is worthwhile growing for its beauty in small gardens. It would suit most small gardens in cool semi-arid, subtropical and temperate zones. As a garden subject it will grow from 1 meter to 1.8 meters in height by 0.8 meters to 1.5 meters in diameter when cultivated in the open.
It is fast growing, drought cold tolerant down to at least minus 4 degrees. In native gardens It can be used for attracting butterflies, native bees, native flies or native beetles.
It is a very compact dense foliage plant for a bush setting and will stand out because of its colour and profusion of flowers when planted amongst other plants. To highlight the colour, select fine leaf plants with pale green leaves and pink, lilac or red flowers or plants with deep green foliage. It can be used in more formal or English style gardens because it has a naturally neat rounded appearance that needs very little attention. If used in rockeries, which have been planted out to highlight other features like rocks, stumps or fish ponds it should be planted to the rear so as to balance the look because of its size. It can be tip pruned to keep them shorter. It is non-obtrusive easy to maintain yet highly visible when in flower or out of flower.
Propagation:
Seeds: Olearia nernstii’s seeds can be sown directly into a seed raising mix. Cover them with 5mm of fine sand and keep moist not wet. Place the tray in a warm semi shaded position preferably beneath 30mm to 60mm shade cloth. When the seedlings are 25mm to 50mm tall plant them into 50mm native tubes.
Once the seedlings reach 150mm to 200mm in height It can be planted out into their permanent positions or repotted into larger containers.
Cuttings: Fortunately Olearia nernstii cuttings strike easy. Use 100mm to 120mm long tip cuttings or lateral shoots from the present season’s growth. Take them in warmer months of the year. Remove half the leaves from the bottom section being careful not to tear the bark.
1 Prepare the cutting mix by adding two thirds sharp clean river sand, one third peat or one third perlite. These ingredients must be sterilized,
2 Select good material from non diseased plants,
3 Select semi green stems for cuttings. Look for a stem with two or three nodes,
4 Place the cutting on a flat, hard surface, and make a clean cut down one side of the cutting at the base for 10mm with a sharp sterile knife or razor blade. – This scarification of the node will increase the chances of roots emerging from this spot. Now remove all but one or two the leaves, leaving the apex leaves in tact. If the leaves are very large in proportion to the stem, cut off the apical halves.
5 Fill a saucer with water, and place a little medium strength rooting hormone into another container like a milk bottle top. Dip the node end of the cutting into the water and then into the rooting hormone. Tap off any excess hormone,
6 Use a small dipple stick or old pencil to poke a hole into the soilless potting mix. Ensure the hole is slightly larger than the stem diameter and be careful not to wipe the rooting hormone off the cuttings base. Place 2 to 4 cuttings in each of the 50mm native tubes,
7 I like to place the tubes in bucket with holes drilled in the bottom to allow excess water to drain out. A plastic bag that fits over the bucket is ideal to help maintain temperature and moisture. Place in a semi shaded, warm position like under 50mm shade cloth.
8 When the cuttings have struck, open the bag to allow air circulation for a few days to a week,
9 Once hardened off remove the cuttings from the bag and allow to further hardening for a few more days to a week,
10 Transplant into a good potting mix to grow on.
Fertilize using seaweed, fish emulsion or organic chicken pellets soaked in water on an alternate basis. Fertilize every two months until the plants are established then annually in early September to October to maintain health, vitality and better flowering.
Further Comments from Readers:
Hi reader, it seems you use The Bible of Botany a lot. That’s great as we have great pleasure in bringing it to you! It’s a little awkward for us to ask, but our first aim is to purchase land approximately 1,600 hectares to link several parcels of N.P. into one at The Pinnacles NSW Australia, but we need your help. We’re not salespeople. We’re amateur botanists who have dedicated over 30 years to saving the environment in a practical way. We depend on donations to reach our goal. If you donate just $5, the price of your coffee this Sunday, We can help to keep the planet alive in a real way and continue to bring you regular updates and features on Australian plants all in one Botanical Bible. Any support is greatly appreciated. Thank you.
In the spirit of reconciliation we acknowledge the Bundjalung, Gumbaynggirr and Yaegl and all aboriginal nations throughout Australia and their connections to land, sea and community. We pay our respect to their Elders past, present and future for the pleasures we have gained.
Sherwood Forest Reserve North NSW
Sherwood Forest Reserve North NSW
Sherwood Forest Reserve North NSW
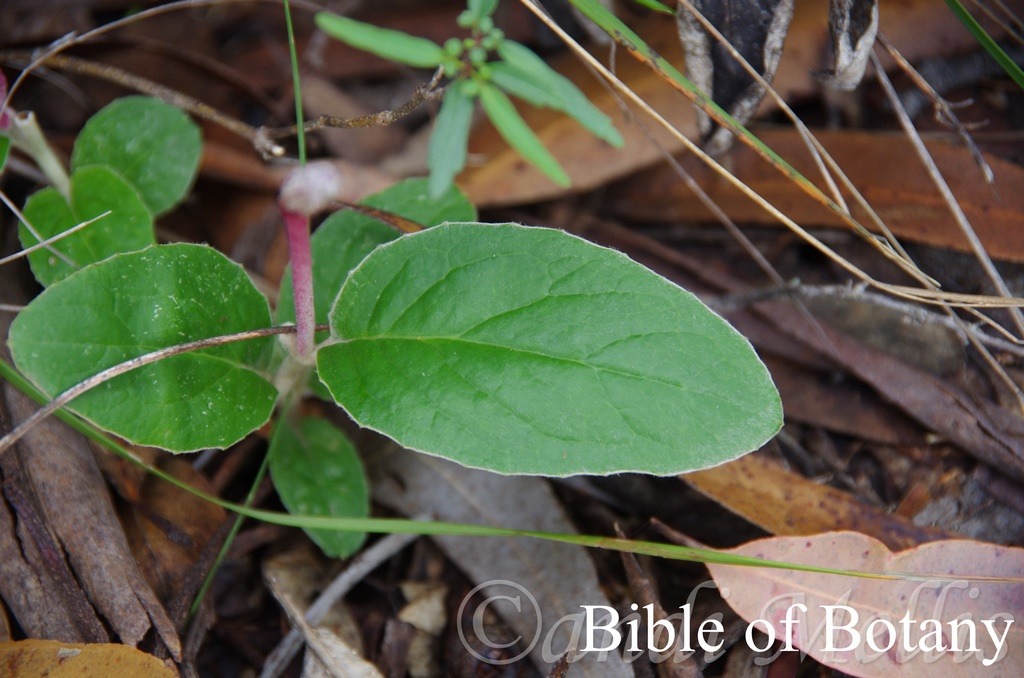
Sherwood Forest Reserve North NSW
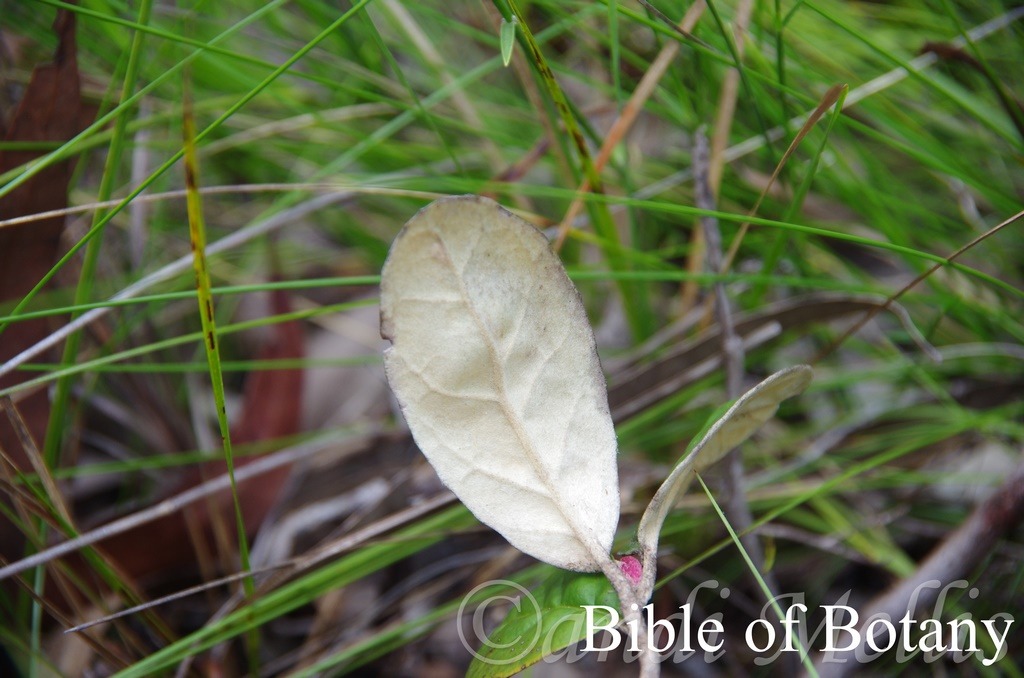
Sherwood Forest Reserve North NSW
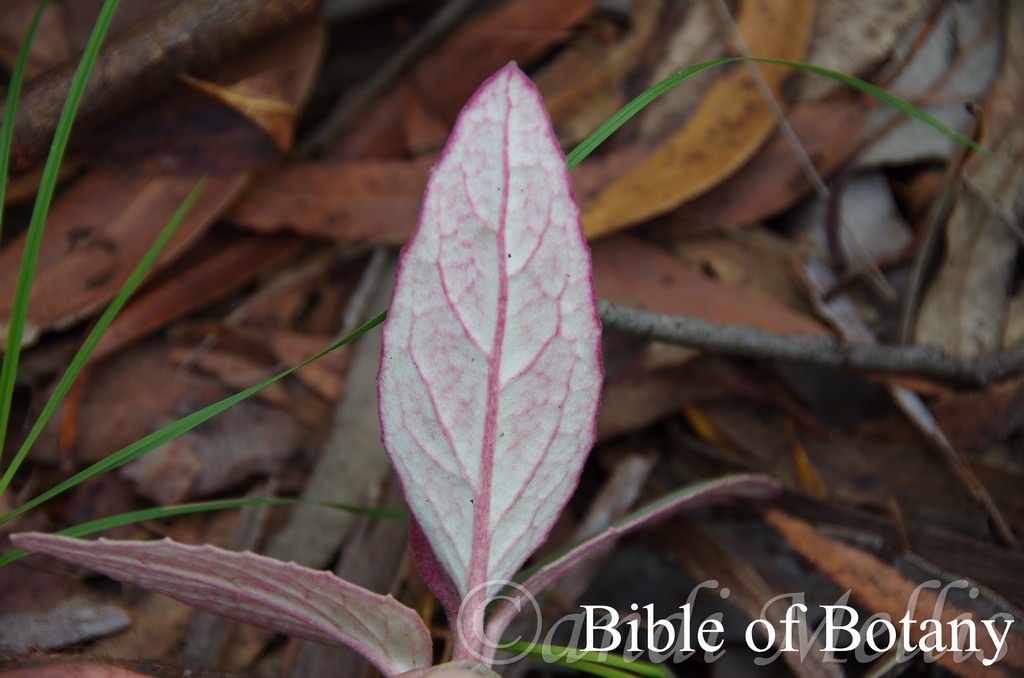
Sherwood Forest Reserve North NSW
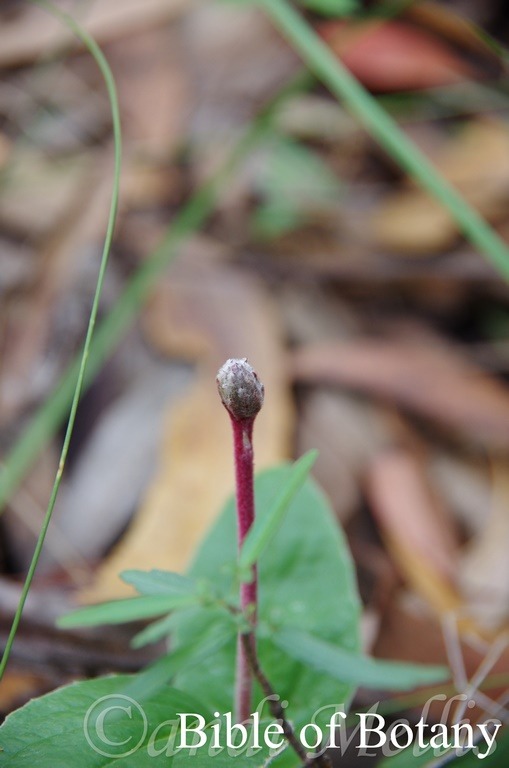
Sherwood Forest Reserve North NSW
Olearia stilwelliae
Classification:
Unranked: Eudicots
Class: Asterids
Order: Asterales
Family: Asteraceae
Genus: Is named in honour of Johann Gottfried Ölschläger; 1603-1671, who was a German horticulturist and author of a flora of Halle in Germany. His name was Latinized to the Latin form of Olearius.
Species: Is probably named in honour of Miss Sylvia Stilwell, who discovered the species alongside Mr. D.W.C. Shiress at Nana Glen, in New South Wales, Australia.
Common Name:
Distribution:
Olearia stilwelliae is restricted to a few disjunct populations including Mount Marsh, Mount Neville, Yuraygir National Park and Woolgoolga in north eastern New South Wales.
https://avh.ala.org.au/occurrences/search?taxa=Olearia+stilwelliae#tab_mapView
Habitat Aspect Climate:
Olearia stilwelliae prefers full sun to dappled shade. It grows in dry sclerophyll forest, open Eucalyptus forests or open Eucalyptus woodlands. The altitude ranges from 40 meter ASL to 460 meters ASL.
The temperatures range from minus 2 degrees in August to 39 degrees in February.
The rainfalls range from lows of 700mm to an average 1600mm annually.
Soil Requirements:
Olearia stilwelliae prefers poor quality white or orange course sands, gritty fine sands, sandy loams, light gritty clays. The soils are usually derived from decomposed sandstone or accumulated beach sands. The soils pH. ranges from 5pH to 6.5pH. It does not tolerate waterlogged soils. Non saline soils to moderately saline soils are tolerated as are salt laden winds.
Height & Spread:
Wild Plants: 0.4m to 0.6m by 0.4m to 0.6m.
Characteristics:
Olearia stilwelliae grows as a perennial herb with main fawn stems that are densely covered in fawn tomentose hairs. Juvenile and new growth stems are pinkish-fawn to reddish-carmine and densely covered in fawn tomentose hairs.
Olearia stilwelliae’s alternate elliptical to ovate leaves are scattered unevenly along the stems and are crowded near the apexes of the stems. They measure 25mm to 134mm in length by 16mm to 35mm in width. The petioles are initially reddish-carmine before turning fawn and are densely covered in fawn tomentose hairs.The petioles measure 16mm to 25mm in length. The bases are rounded-cuneate to broad cuneate while the apexes are broad acute to narrow obtuse. The discolourous laminas are mid green to grey-green or grey and densely covered in silvery-grey tomentose hairs on the upper laminas while the lower laminas are beige to fawnish-ochre and densely covered in fawn tomentose hairs. The laminas are flat to slightly recurved upwards from the mid vein to the margins and gently curve upwards then gently decurve downwards to the apex. The margins are usually irregularly toothed and slightly undulating or at times entire and slightly undulation. The mid vein and lateral veins are prominent on the lower lamina and are visible on the upper lamina. The venation is reticulate.
The inflorescences of Olearia stilwelliae are usually born singularly or rarely in pairs from the terminals. The heads measure 40mm to 48mm in diameter. The fawn pedicels are densely covered in fawn tomentose hairs and measure 250mm to 330mm in length. The 10 to 15, pastel pink white or white tinged purple or pink ray florets are the most prominent parts of the flower. The linear ray florets measure 15mm to 20mm in length by 4.5mm to 6mm in width. There are 35 to 45 yellowish to ochre-yellow disc florets in the center of the ray florets. The flowers appear from June to October.
Olearia stilwelliae’s fruits are flat, linear achenes that are densely covered in short, soft white tomentose hairs. The achene’s pappus has 77 to 100 bristles in 2 rows.
Wildlife:
Olearia stilwelliae’s flowers are attractive to small and medium size butterflies, native bees, pollen flies and hover flies.
Cultivation:
Olearia stilwelliae is a magnificent dense foliage, perennial that is worthwhile growing for its foliage in small, dry, sunny gardens close to the coast or coastal ranges. It would suit most rockery gardens in cool sub-tropical and warm temperate zones. As a garden subject it will grow from 0.5 meter to 0.5 meters in height by 0.4 meter to 0.5 meters in diameter when cultivated in an open sunny position.
It is a fast growing, drought and cold tolerant plant down to at least minus 3 degrees.
In native gardens it is best used in small to large rockeries that are not crowded but where it is surrounded by green foliage perennials.
For a bush setting it will stand out because of its unusual and interesting foliage and because of its small size is best used as a border plant. It works exceptionally well with small red or orange flowering shrubs. To highlight the colour, select fine leaf plants with pale green leaves and pink, lilac or red flowers and do not overcrowd the bed.
It can be used in more formal or English style gardens because it has a naturally neat rounded appearance that needs very little attention. If used in rockeries which have been planted out to highlight other features like rocks, stumps or fish ponds it should be planted to the rear so as to balance the look because of its size. It can be tip pruned to keep them shorter. It is non-obtrusive easy to maintain yet highly visible when in flower or out of flower.
Propagation:
Seeds: Olearia stilwelliae’s seeds can be sown directly into a seed raising mix. Cover them with 5mm of fine sand and keep moist not wet. Place the tray in a warm semi shaded position preferably beneath 20mm to 30mm shade cloth. When the seedlings are 25mm to 50mm tall plant them into 50mm native tubes.
Once the seedlings reach 150mm to 200mm in height It can be planted out into their permanent positions or repotted into larger containers.
Cuttings: Use 80mm to 100mm long half ripened material when growing from cuttings from the present season’s growth. Take them in mid-autumn or early spring. Remove half the leaves from the bottom section being careful not to tear the bark. Remove any flowers and buds. Take a 10mm slice off the bark from the bottom of the cutting on one side. Using an appropriate rooting hormone, dip the cutting in then place it in a moist sterile seed raising mix.
Place the trays under 30mm shade and keep the trays warm. Bottom heat is beneficial when striking the cuttings. Ideally temperatures should be maintained at between 22 to 24 degrees.
When the cuttings have obviously struck and have developed good roots treat them as for seedlings.
Fertilize using seaweed, fish emulsion or organic chicken pellets soaked in water on an alternate basis. Fertilize every two months until the plants are established then annually in early September to October to maintain health, vitality and better flowering.
Further Comments from Readers:
Hi reader, it seems you use The Bible of Botany a lot. That’s great as we have great pleasure in bringing it to you! It’s a little awkward for us to ask, but our first aim is to purchase land approximately 1,600 hectares to link several parcels of N.P. into one at The Pinnacles NSW Australia, but we need your help. We’re not salespeople. We’re amateur botanists who have dedicated over 30 years to saving the environment in a practical way. We depend on donations to reach our goal. If you donate just $5, the price of your coffee this Sunday, We can help to keep the planet alive in a real way and continue to bring you regular updates and features on Australian plants all in one Botanical Bible. Any support is greatly appreciated. Thank you.
In the spirit of reconciliation we acknowledge the Bundjalung, Gumbaynggirr and Yaegl and all aboriginal nations throughout Australia and their connections to land, sea and community. We pay our respect to their Elders past, present and future for the pleasures we have gained.
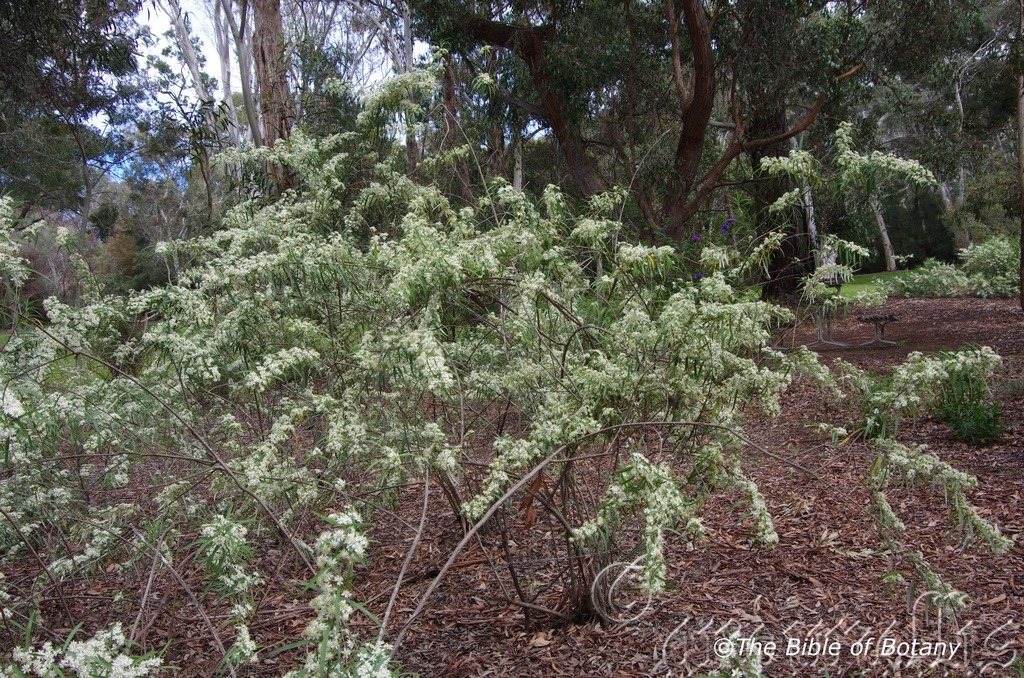
Canberra ACT
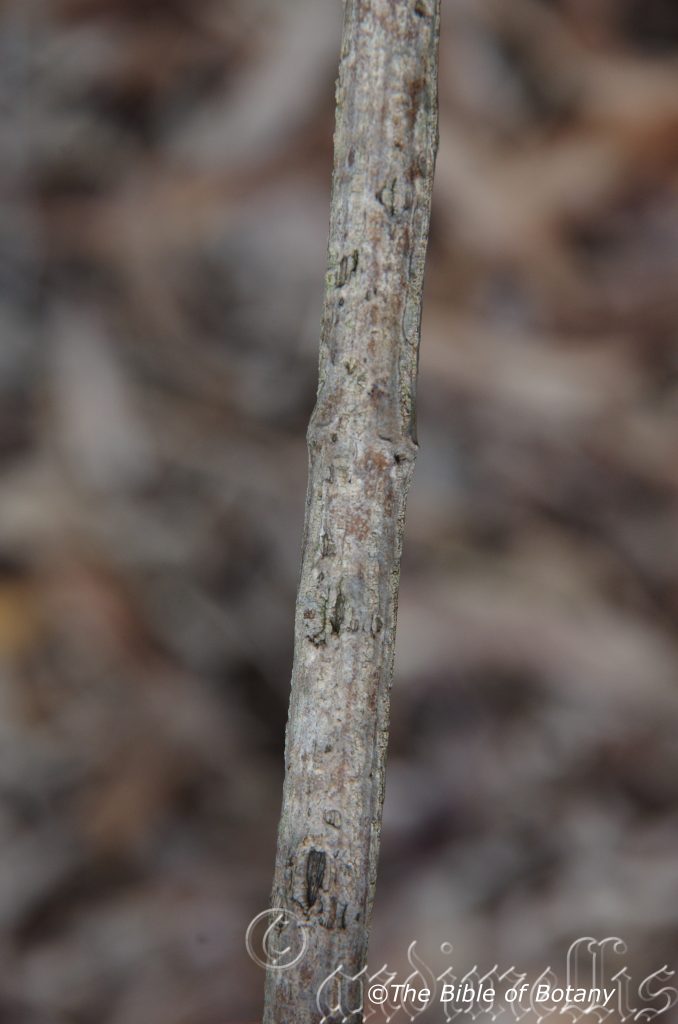
National Botanic Gardens ACT
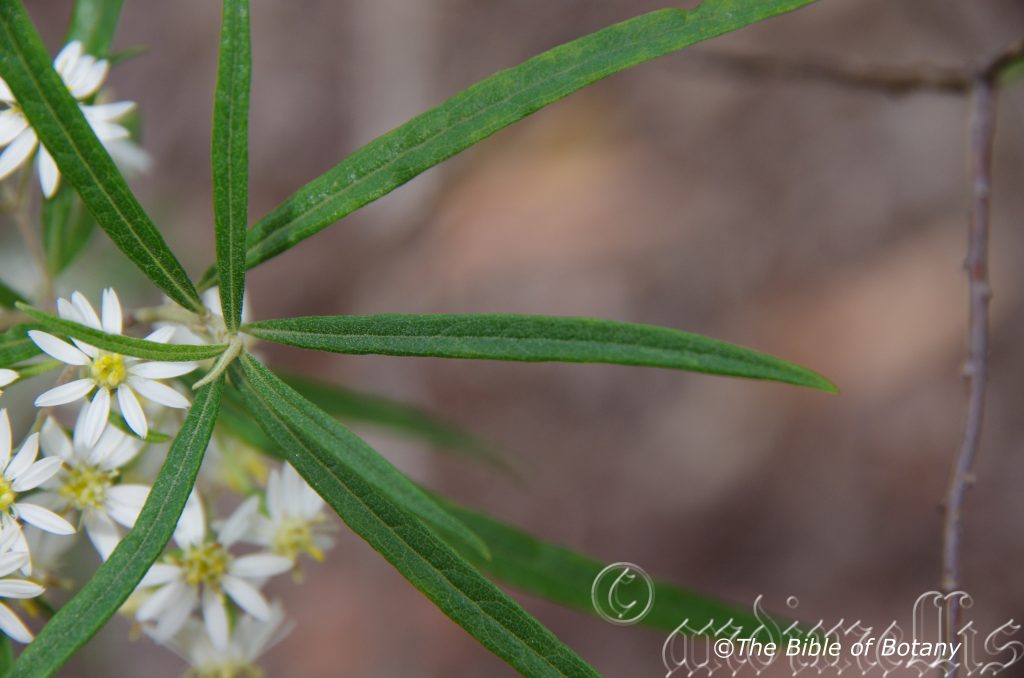
National Botanic Gardens ACT
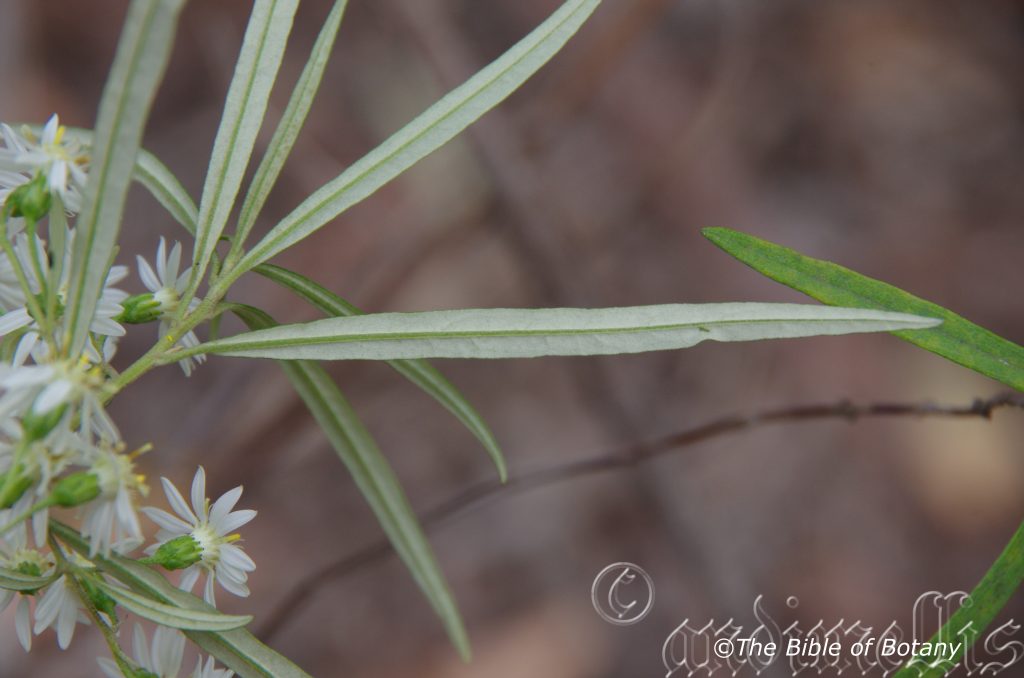
National Botanic Gardens ACT
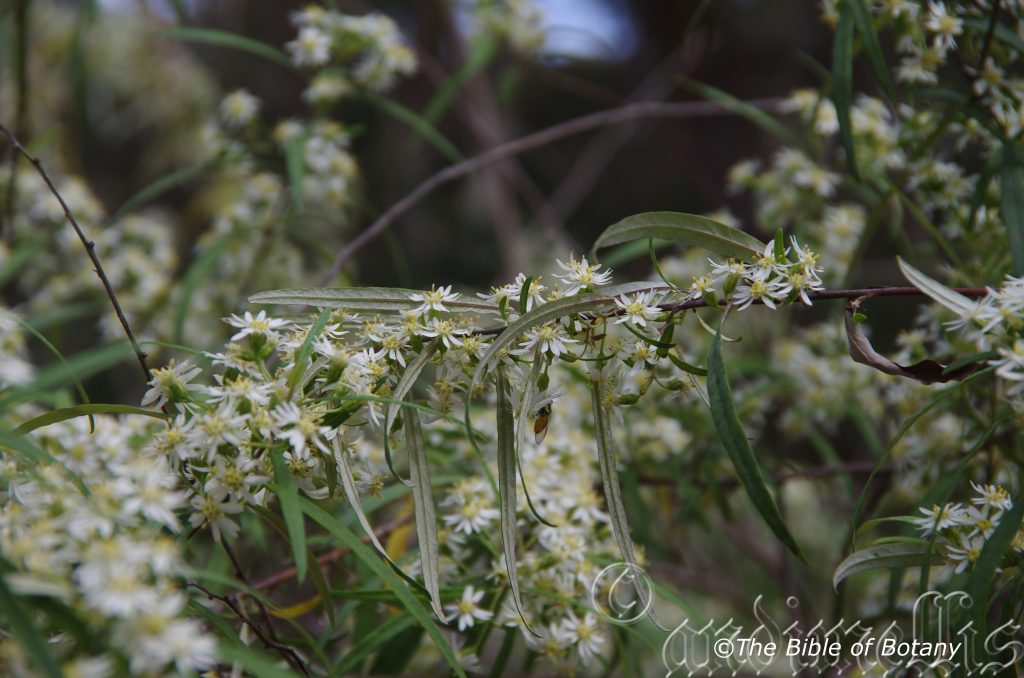
National Botanic Gardens ACT
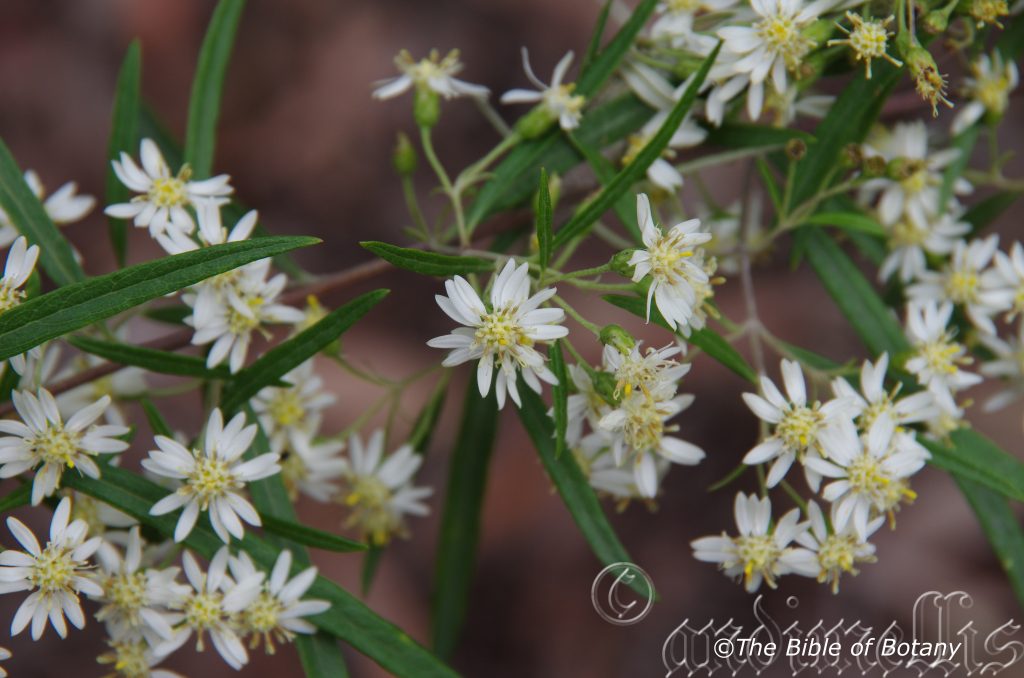
National Botanic Gardens ACT
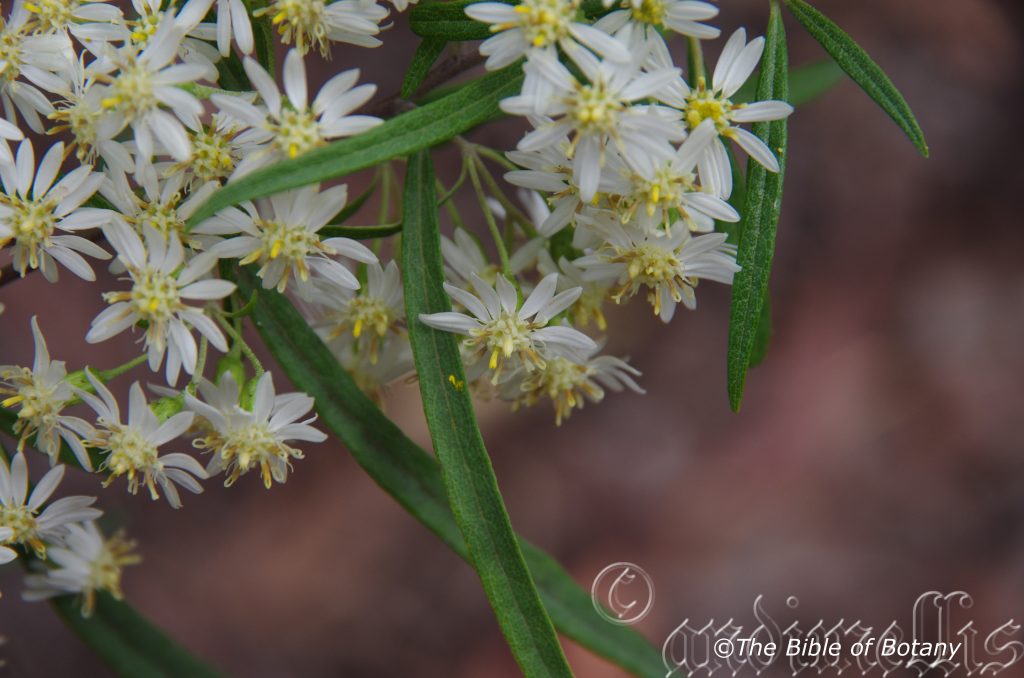
National Botanic Gardens ACT
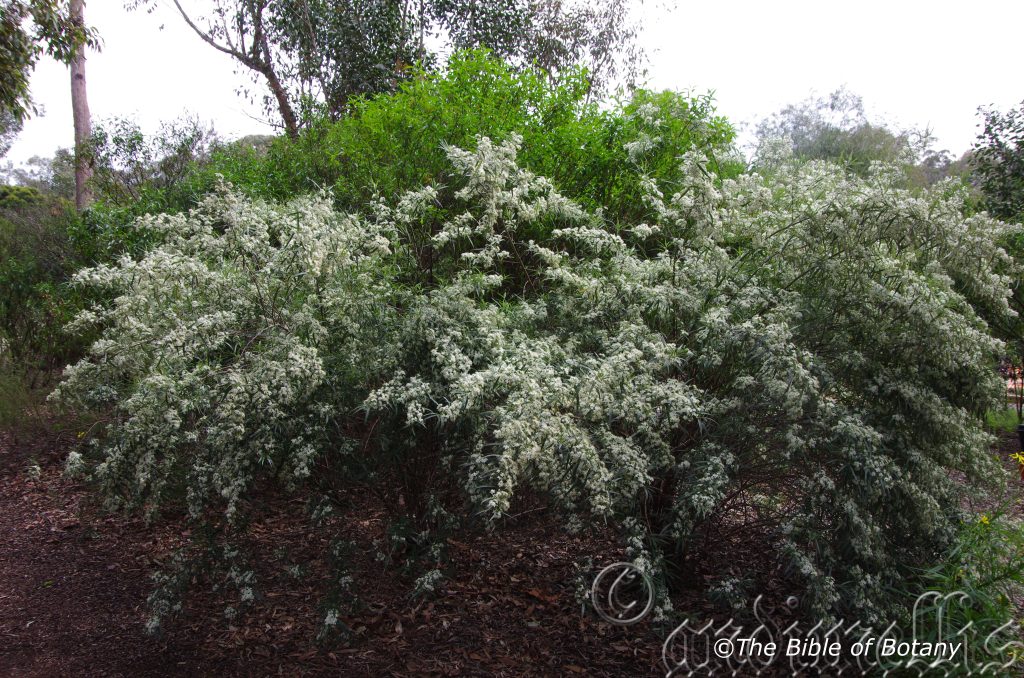
National Botanic Gardens ACT
Olearia viscidula
Classification:
Unranked: Eudicots
Class: Asterids
Order: Asterales
Family: Asteraceae
Genus: Is named in honour of Johann Gottfried Ölschläger; 1603-1671, who was a German horticulturist and author of flora of Halle in Germany. His name was Latinized to the Latin form of Olearius.
Specie: From Viscid, which is Latin for somewhat sticky. It refers to an organ or structure, which has a stick feel. Here it refers to the upper laminas, which are somewhat sticky.
Common Name:
Distribution:
Olearia viscidula is restricted to a few disjunct populations including Mount Marsh, Mount Neville, Yuraygir National Park and Woolgoolga in north eastern New South Wales.
https://avh.ala.org.au/occurrences/search?taxa=Olearia+viscidula#tab_mapView
Habitat Aspect Climate:
Olearia viscidula prefers full sun to dappled shade. It grows in dry sclerophyll forest, open Eucalyptus forests or open Eucalyptus woodlands. The altitude ranges from 40 meter ASL to 460 meters ASL.
The temperatures range from minus 2 degrees in August to 39 degrees in February.
The rainfalls range from lows of 700mm to an average 1600mm annually.
Soil Requirements:
Olearia viscidula prefers poor quality white or orange course sands, gritty fine sands, sandy loams, light gritty clays. The soils are usually derived from decomposed sandstone or accumulated beach sands. The soils pH. ranges from 5pH to 6.5pH. It does not tolerate waterlogged soils. Non saline soils to moderately saline soils are tolerated as are salt laden winds.
Height & Spread:
Wild Plants: 0.4m to 0.6m by 0.4m to 0.6m.
Characteristics:
Olearia viscidula grows as a perennial herb with main fawn stems that are densely covered in fawn tomentose hairs. Juvenile and new growth stems are pinkish-fawn to reddish-carmine and densely covered in fawn tomentose hairs.
Olearia viscidula’s alternate elliptical to ovate leaves are scattered unevenly along the stems and are crowded near the apexes of the stems. They measure 25mm to 134mm in length by 16mm to 35mm in width. The petioles are initially reddish-carmine before turning fawn and are densely covered in fawn tomentose hairs.The petioles measure 16mm to 25mm in length. The bases are rounded-cuneate to broad cuneate while the apexes are broad acute to narrow obtuse. The discolourous laminas are mid green to grey-green or grey and densely covered in silvery-grey tomentose hairs on the upper laminas while the lower laminas are beige to fawnish-ochre and densely covered in fawn tomentose hairs. The laminas are flat to slightly recurve upwards from the mid vein to the margins and gently curve upwards then gently decurve downwards to the apex. The margins are usually irregularly toothed and slightly undulating or at times entire and slightly undulation. The mid vein and lateral veins are prominent on the lower lamina and are visible on the upper lamina. The venation is reticulate.
The inflorescences of Olearia viscidula are usually born singularly or rarely in pairs from the terminals. The heads measure 40mm to 48mm in diameter. The fawn pedicels are densely covered in fawn tomentose hairs and measure 250mm to 330mm in length. The 10 to 15, pastel pink white or white tinged purple or pink ray florets are the most prominent parts of the flower. The linear ray florets measure 15mm to 20mm in length by 4.5mm to 6mm in width. There are 35 to 45 yellowish to ochre-yellow disc florets in the center of the ray florets. The flowers appear from June to October.
Olearia viscidula’s fruits are flat, linear achenes that are densely covered in short, soft white tomentose hairs. The achene’s pappus has 77 to 100 bristles in 2 rows.
Wildlife:
Olearia viscidula’s flowers are attractive to small and medium size butterflies, native bees, pollen flies and hover flies.
Cultivation:
Olearia viscidula is a lovely dense foliage perennial that is worthwhile growing for its foliage in small, dry, sunny gardens close to the coast or coastal ranges. It would suit most rockery gardens in cool sub-tropical and warm temperate zones. As a garden subject it will grow from 0.5 meter to 0.5 meters in height by 0.4 meter to 0.5 meters in diameter when cultivated in an open sunny position.
It is a fast growing, drought and cold tolerant plant down to at least minus 3 degrees. In a native garden it is best used in small to large rockeries that are not crowded but where it is surrounded by green foliage perennials.
For a bush setting it will stand out because of its unusual and interesting foliage and because of its small size is best used as a border plant. It works exceptionally well with small red or orange flowering shrubs. To high light the colour, select fine leaf plants with pale green leaves and pink, lilac or red flowers.
It can be used in more formal or English style gardens because they have a naturally neat rounded appearance that needs very little attention. If used in rockeries which have been planted out to highlight other features like rocks, stumps or fish ponds it should be planted to the rear so as to balance the look because of its size. It can be tip pruned to keep them shorter. It is non-obtrusive easy to maintain yet highly visible when in flower or out of flower.
Propagation:
Seeds: Olearia viscidula’s seeds can be sown directly into a seed raising mix. Cover them with 5mm of fine sand and keep moist not wet. Place the tray in a warm semi shaded position preferably beneath 20mm to 30mm shade cloth. When the seedlings are 25mm to 50mm tall plant them into 50mm native tubes.
Once the seedlings reach 150mm to 200mm in height It can be planted out into their permanent positions or repotted into larger containers.
Cuttings: Fortunately Olearia viscidula cuttings strike easy. Use 100mm to 120mm long tip cuttings or lateral shoots from the present season’s growth. Take them in warmer months of the year. Remove half the leaves from the bottom section being careful not to tear the bark.
1 Prepare the cutting mix by adding two thirds sharp clean river sand, one third peat or one third perlite. These ingredients must be sterilized,
2 Select good material from non diseased plants,
3 Select semi green stems for cuttings. Look for a stem with two or three nodes,
4 Place the cutting on a flat, hard surface, and make a clean cut down one side of the cutting at the base for 10mm with a sharp sterile knife or razor blade. – This scarification of the node will increase the chances of roots emerging from this spot. Now remove all but one or two the leaves, leaving the apex leaves in tact. If the leaves are very large in proportion to the stem, cut off the apical halves.
5 Fill a saucer with water, and place a little medium strength rooting hormone into another container like a milk bottle top. Dip the node end of the cutting into the water and then into the rooting hormone. Tap off any excess hormone,
6 Use a small dipple stick or old pencil to poke a hole into the soilless potting mix. Ensure the hole is slightly larger than the stem diameter and be careful not to wipe the rooting hormone off the cuttings base. Place 2 to 4 cuttings in each of the 50mm native tubes,
7 I like to place the tubes in bucket with holes drilled in the bottom to allow excess water to drain out. A plastic bag that fits over the bucket is ideal to help maintain temperature and moisture. Place in a semi shaded, warm position like under 50mm shade cloth.
8 When the cuttings have struck, open the bag to allow air circulation for a few days to a week,
9 Once hardened off remove the cuttings from the bag and allow to further hardening for a few more days to a week,
10 Transplant into a good potting mix to grow on.
Fertilize using seaweed, fish emulsion or organic chicken pellets soaked in water on an alternate basis. Fertilize every two months until the plants are established then annually in early September to October to maintain health, vitality and better flowering.
Further Comments from Readers:
Hi reader, it seems you use The Bible of Botany a lot. That’s great as we have great pleasure in bringing it to you! It’s a little awkward for us to ask, but our first aim is to purchase land approximately 1,600 hectares to link several parcels of N.P. into one at The Pinnacles NSW Australia, but we need your help. We’re not salespeople. We’re amateur botanists who have dedicated over 30 years to saving the environment in a practical way. We depend on donations to reach our goal. If you donate just $5, the price of your coffee this Sunday, We can help to keep the planet alive in a real way and continue to bring you regular updates and features on Australian plants all in one Botanical Bible. Any support is greatly appreciated. Thank you.
In the spirit of reconciliation we acknowledge the Bundjalung, Gumbaynggirr and Yaegl and all aboriginal nations throughout Australia and their connections to land, sea and community. We pay our respect to their Elders past, present and future for the pleasures we have gained.
Opercularia hispida
Classification:
Unranked: Tracheophyta
Class: Magnoliopsida
Superorder: Asteranae
Order: Gentianales
Family: Rubiaceae
Genus: From Operculum, which is Latin for a cover or lid. It refers to the caps on the buds of certain trees, which cover the petals and sexual organs or the shape of a flower head resembling a cap.
Species: From Hispidus, which is Latin for short, bristly, course hairs. It refers to a structure or organ, which has short, bristly course hairs.
Common Name:
Distribution:
Opercularia hispida is found south from Mount Zero near Townsville in northern Queensland to Wilson’s Promontory in south eastern Victoria. It is found on the Western Slopes, on and east of the Great Dividing Range to the coast. It is also found in Carnarvon National Park.
It is also found east of Victor Harbour near Mount Compass in south eastern South Australia and in Freycinet National Park on the Tasmanian central east coast.
https://avh.ala.org.au/occurrences/search?taxa=Opercularia+hispida#tab_mapView
Habitat Aspect Climate:
Opercularia hispida prefers full sun to light dappled shade. It grows amongst rocks, boulders and along creek and stream beds on moisture retentive soils. The altitude ranges from 20 meter ASL to 1350 meters ASL.
The temperatures range from minus 5 degrees in August to 38 degrees in February.
The rainfalls range from lows of 500mm to an average 2000mm annually.
Soil Requirements:
Opercularia hispida prefers poor quality course sands, sandy loams, light clays and light silts to medium silts. The soils are usually derived from decomposed brown basalts, black basalts, shales, metamorphic rocks, granites or sandstones often being laid down as alluvial silts. The soils pH. ranges from 5pH to 6.5pH. It does not tolerate waterlogged soils. Non saline soils to moderately saline soils are tolerated.
Height & Spread:
Wild Plants: 0.1m to 0.5m by 0.3m to 0.6m.
Characteristics:
Opercularia hispida grows as a prostrate or semi erect perennial with grass-green stems. The numerous stems arise from a central tap root. The small stems are sparsely covered in white tomentose and or hirsute hairs.
Opercularia hispida’s opposite disjunct to crowded ovate to lanceolate leaves are usually decussate and measure 10mm to 35mm in length by 4mm to 10mm in width. The petioles measure 1mm to 8mm in length. The slightly oblique bases are rounded while the apexes are acute to rounded-acute acute. The concolourous asymmetrical laminas are grass-green to deep grass-green and sparsely to moderately covered in white hispid hairs. The laminas recurve upwards on the basal fifth then are flat for the remainder of the lamina while the margins are entire and sparsely covered in long white ciliate hairs. The mid vein is prominent on the basal half and slightly prominent on the apical half of the lower lamina and is visible on the upper lamina. The lateral veins are obscure.
The inflorescences of Opercularia hispida are compound spherical; flowering heads on recurved peduncles born from the leaf axils. The peduncles are sparsely covered in long white hirsute and or tomentose hairs. The peduncules measure 2mm to 15mm in length while the pedicels measure 0.5mm to 1.5mm in length. The deep green calyx lobes measure 0.5mm to 1mm in length. The pale grass-green corolla measures 1.5mm to 3mm in length while the 4 dimorphic lobes measure 0.5mm to 1.5mm in length.
The pale maroon filaments are dull and measure 6mm to 8mm in length while the deep maroon obloidal-sagittate adnately fixed anthers measure 0.8mm to 1mm in length. The pistil is mid purple and measures 6mm to 8mm in length.
Opercularia hispida’s fruits are flat, linear glabrous achenes. The achene’s pappus has 29 to 45 long bristles in 2 rows and an outer row of short bristles.
The spherical fruiting head measures 4mm to 10mm in diameter. The fruits are minutely covered in white hirsute hairs. The seeds are strongly transversely rugose and finely pitted between the wrinkles.
Wildlife:
Opercularia hispida’s wildlife is unknown to the author.
Cultivation:
Opercularia hispida has no real particular charm for the gardener at this point of time as almost all gardners treat it as a weed.
Propagation:
Seeds: Opercularia hispida’s seeds directly into a seed raising mix. Cover them with 5mm of fine sand and keep moist not wet. Place the tray in a warm sunny position. When the seedlings are 25mm to 50mm tall, prick them out and plant them out into their permanent position.
Fertilize using seaweed, fish emulsion or organic chicken pellets soaked in water on an alternate basis. Fertilize every two months until the plants are established then annually in early September to October to maintain health, vitality and better flowering.
Further Comments from Readers:
Hi reader, it seems you use The Bible of Botany a lot. That’s great as we have great pleasure in bringing it to you! It’s a little awkward for us to ask, but our first aim is to purchase land approximately 1,600 hectares to link several parcels of N.P. into one at The Pinnacles NSW Australia, but we need your help. We’re not salespeople. We’re amateur botanists who have dedicated over 30 years to saving the environment in a practical way. We depend on donations to reach our goal. If you donate just $5, the price of your coffee this Sunday, We can help to keep the planet alive in a real way and continue to bring you regular updates and features on Australian plants all in one Botanical Bible. Any support is greatly appreciated. Thank you.
In the spirit of reconciliation we acknowledge the Bundjalung, Gumbaynggirr and Yaegl and all aboriginal nations throughout Australia and their connections to land, sea and community. We pay our respect to their Elders past, present and future for the pleasures we have gained.
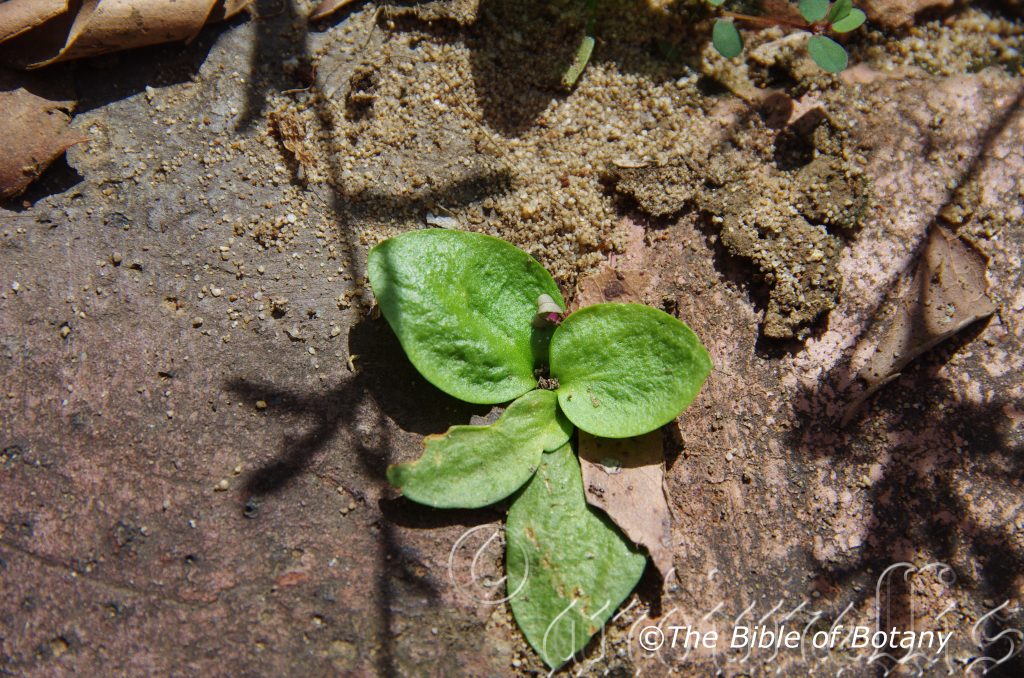
Author’s Garden The PInnacles NSW
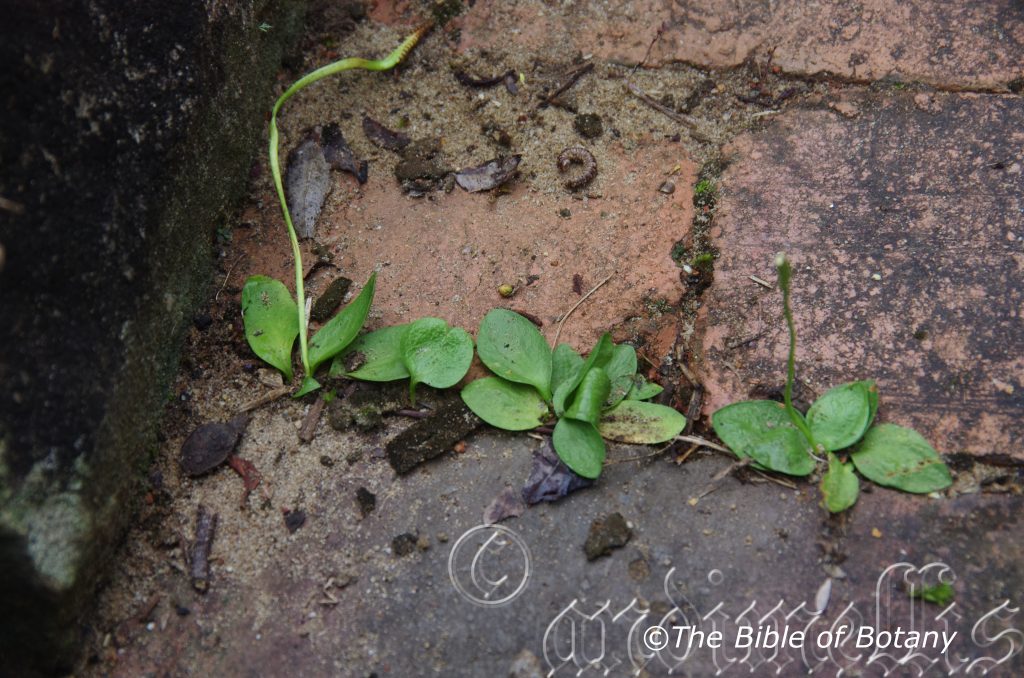
Author’s Garden The PInnacles NSW
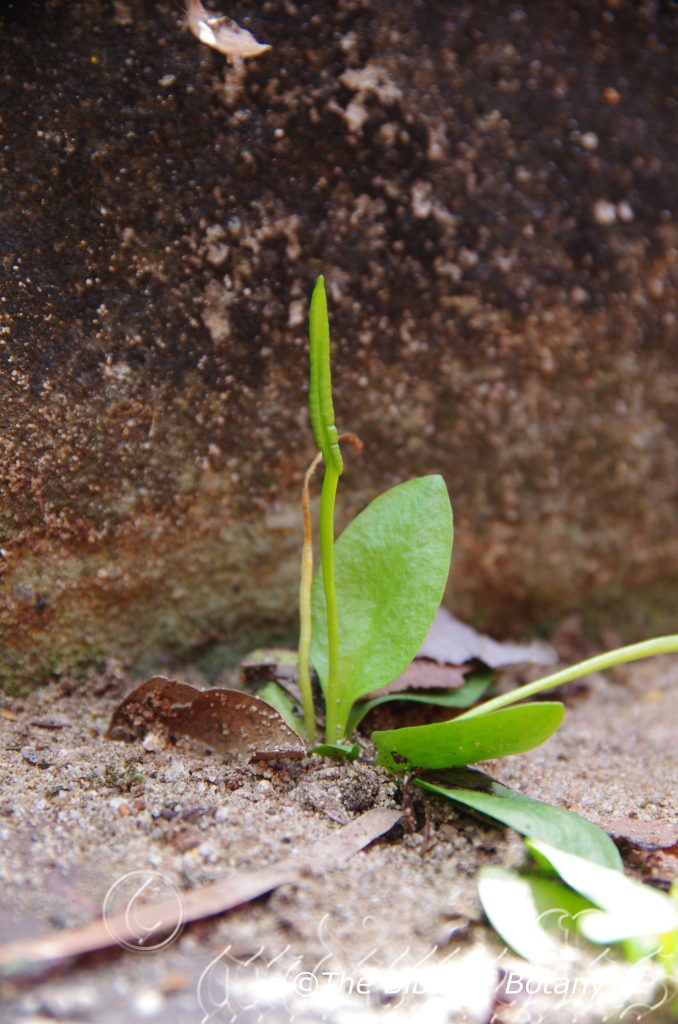
Author’s Garden The PInnacles NSW
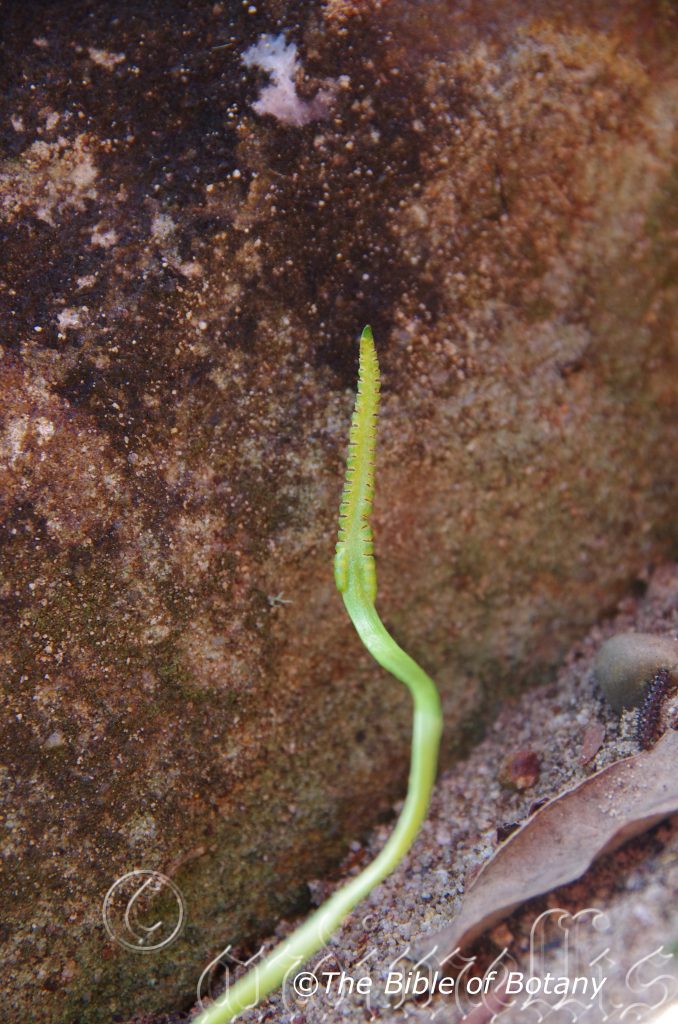
Author’s Garden The PInnacles NSW
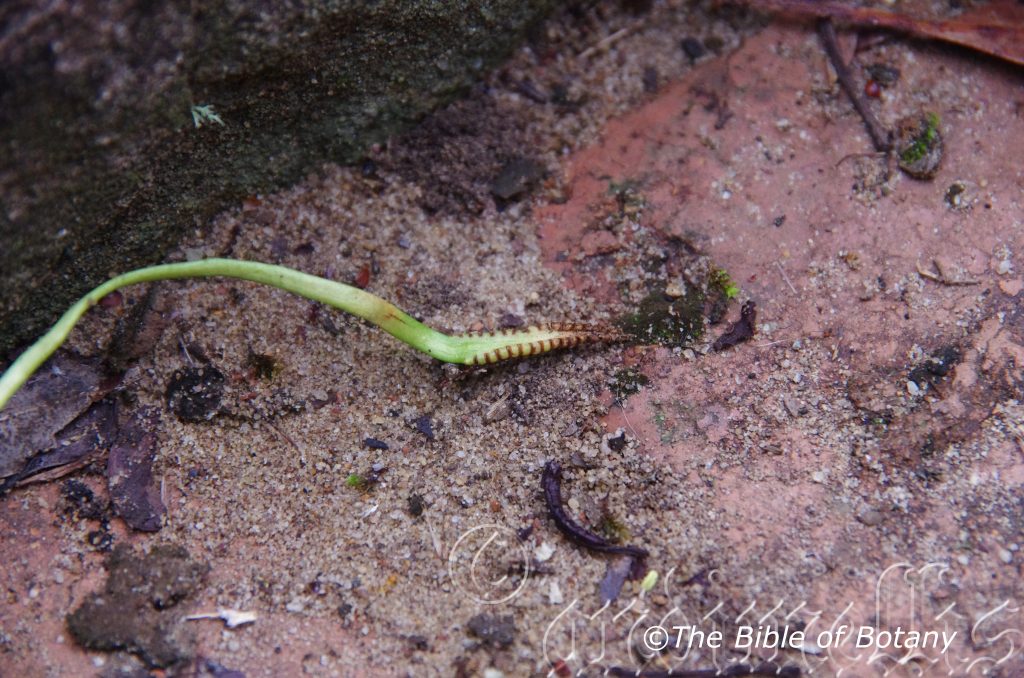
Author’s Garden The PInnacles NSW
xxxxxxxxxxxxxxxxxxxxxxxxxxxxxxxxxxxxOphioglossum lusitanicum
Classification:
Division: Pteridophyta
Class: Psilotopsida
Order: Ophioglossalis
Family: Ophioglossaceae
Genus: From Ophī́s/Ophī́tēs, which is Ancient Greek for a snake and Glossum, which is Ancient Greek for a tongue. It refers to a long thin tongue like appendage on the apexes of the fertile fronds which bear the sporangia.
Specie: From Lusitania, which is Latinized for the Lusitania province in Ancient Rome. It refers to the fern, which was probably first described the Lusitania province.
Common Name: Dwarf Ribbon Fern or Least Adder’s Tongue.
Distribution:
Ophioglossum lusitanicum is found in the southern two thirds of Australia and in the east from Cape York Peninsula to Tasmania.
It is also found in the British Isles across the Mediterranean countries, Africa, Asia, South American countries and is very common in New Zealand.
https://avh.ala.org.au/occurrences/search?taxa=Ophioglossum+lusitanicum#tab_mapView
Habitat Aspect Climate:
Ophioglossum lusitanicum prefers medium shade to dense shade. It usually grows in warm subtropical rainforest, cool tropical rainforests close to the coast or coastal ranges. The altitude ranges from 8 meters ASL to 750 meters ASL.
The temperatures range from 1 degree in August to 35 degrees in January.
The rainfalls range from lows of 1100mm to an average of 3200mm annually.
Soil Requirements:
Ophioglossum lusitanicum usually grows as an epiphyte on trees, from the nests of Asplenium australis, Asplenium nidus, and Platycerium species or at times as a lithophyte on rocks. The leaf litters pH. ranges from 6.5pH to 6.8pH. It does not tolerate waterlogged soils. Only non-saline soils are tolerated.
Height & Spread:
Wild Plants: 30mm to 150mm by 30mm to 50mm.
Characteristics:
Ophioglossum lusitanicum’s roots form a compact rhizome when mature maybe 50mm to 150mm in diameter. It is spongy from the amount of decomposing leaf litter collected by the nest fronds and leached down to the feeder and aerial roots below. It is a pendent epiphyte with a short creeping 10mm to 30mm long rhizomes.
Ophioglossum lusitanicum has beautiful, long, linear, simple fronds. The 2 to 6 sterile fronds measure 1.5 meters to 2 meters in length by 10mm to 25mm in width. The common rachis measures 70mm to 150mm in length. The bases taper to the single rhizome while the apexes are obtuse, narrowing-obtuse, and acute or forked with the forks apexes being acute or narrowing-obtuse. The thin coriaceous concolourous laminas are bright, green, semi glossy and glabrous.
The fertile frond is a spike which arises from the mid vein near the base of the sterile lamina. The fertile fronds measure 50mm to 300mm in length. The petiole measures 10mm to 50mm in length. The sporangia are aligned along the margins. The fertile frond turns chocolate brown when the spore is ripe. The sporangia dehisce from the apex to release the relatively large ochre-brown spore.
Wildlife:
Ophioglossum lusitanicum’s borers can attack the plant and kangaroos and possums will eat the new fronds if food is scarce.
Cultivation:
Ophioglossum lusitanicum is a beautiful small fern associated with moist locations Australia. Growing it is easy and a small plant will reach its full potential in the first year from spore. Ophioglossum pendulum is cold tolerant to temperatures to minus 3 degrees.
Many authorities state that it requires a shady position, however I have it growing here between the paving bricks in my driveway where it is in full sun for well over half the day. A warm humid microclimate seems to be a more reliable statement. Feeding the plants with diluted seaweed extract, diluted fish emulsion or diluted organic chicken pellets soaked in water and sprayed onto the leaves every few months will see Ophioglossum lusitanicum thrive. The additional use of cold tea leaves and a hand full of course bush litter from time to time will do the plants no harm.
It can be used with great affect in the bush house when mass planted in saucer type pots. It may be small but it is huge in beauty.
It would make an excellent terrarium plant by itself or better still mixed with many of the smaller sundews like drosera burmannii, Drosera spathulata or Drosera pygmaea.
Propagation:
Spores: All ferns that are declared rare, vulnerable or endangered are protected by Federal and State Laws and must not be removed from the wild unless you are a land developer, mining company or main Roads department etc. This includes bulbs, roots, leaves and flowers. No part of any plant can be removed from Federal, State or Local Government land without the prior permission of the authority and this includes the spore.
Most people are put off at the thought of growing ferns from spore. Like all plants that produce their offspring from seed or spore the methods are basically the same. Remember nature has been doing this for millions of years and has been very successful. I have had excellent results growing over 200 different species of Australian ferns so don’t be afraid. Give it a go.
Step 1. Select spore from the fern fronds. Wait until the fern is just starting to release its spore. Rinse the fronds under clean running water and dry. This is to wash off any other spores from rogue ferns that may have settled onto the fronds. (There is nothing worse than having common brake or common soft bracken contaminating a prized tree fern or epiphyte.)
Step 2. Place the dry fronds in a clean brown paper bag and keep them in a cool dark place like the linen closet for about a week to ten days before you are ready to sow the spore. The exception to this rule applies to ferns, which produce green spores. These must be sown immediately that they are released. Todea Barbara is a good example of a fern, which produces green spore.
Step 3. Take a large ice cream container, a small ice cream container and a clean clear plastic bag large enough to seal the large ice cream container and three or four milk bottle tops.
Step 4. Punch or drill 6 to 10 5mm holes in the bottom of the small ice cream container.
Step 5. Wash both containers, tops and plastic bag so that they are very clean and sterile.
Step 6. Use a clean fine seed raising mi. We used 30mm fine sand, 30mm peat and 30mm perlite and 10mm vermiculite. We used crushed basalt, crusher dust and peat in a 50:50 ratio for epiphytes. Moisten the mix enough that water does not run out when the mix is squeezed between the fingers.
Step 7. Place the moisten mix (Enough to half fill the small ice cream container) in the microwave oven with a large glass of water for 7 or 8 minutes, until the water is boiling. Allow them to cool in the oven. You will need the water later so do not tip it out.
Step 8. Take the brown paper bag out of the linen closet. Shake the bag and remove the fronds. You should have a yellow, brown, black or rarely greenish brown or ochre powder or very fine, small round pin head size spore depending on the specie involved.
Step 9. Remove the mixture from the oven once it has cooled and place it in the small ice cream container and level.
Step 10. Sprinkle the spore sparsely over the mixture in the small ice cream container.
Step 11. Place the milk bottle tops in the large ice cream container with the flat surface facing down. Place the small ice cream container in the large ice cream container so that it is sitting on the milk bottle tops.
Step 12. Remove the water from the microwave and pour it into the larger ice cream container so there is 25mm to 30mm of water in the bottom.
Step 13. Place the ice cream containers in the plastic bag and seal. Step 14. Place the contents and bag in a warm shady place preferably 50mm to 70mm shade depending on the specie. Shade houses and some window sills are ideal.
Step 15. The surface should turn green within a week to two weeks. The prothallus will then develop. From the prthalus the first true fronds will appear. Wait until the ferns are 20mm to 35mm in height before you attempt to transplant them. Once they are ready open the bag up slightly and allow the air to flow around the little ferns. Every 3 to 5 days open the bag a little further so the ferns get use to their new environment. Allow them a week to two weeks to harden off before you transplant them following the removal of the plastic bag. Carefully prick them out into 50mm standard squat tubes as you would any seedling.
Do not try to transplant them as single plants as they are still a little delicate still.
Once the smaller ones again reach 50mm to 70mm you may wish to divide the stronger and hardier individual plants into smaller clumps in 100mm squat pots.
Step 16. We fertilized with seaweed, fish emulsion or organic chicken pellets soaked in water on an alternate basis until established. Fertilize every two months for one year even when in the ground.
Fertilize using seaweed, fish emulsion or organic chicken pellets soaked in water on an alternate basis. Fertilize every two months once planted out until the plants are established then annually in early September to October to maintain health, vitality and better flowering.
Further Comments from Readers:
Hi reader, it seems you use The Bible of Botany a lot. That’s great as we have great pleasure in bringing it to you! It’s a little awkward for us to ask, but our first aim is to purchase land approximately 1,600 hectares to link several parcels of N.P. into one at The Pinnacles NSW Australia, but we need your help. We’re not salespeople. We’re amateur botanists who have dedicated over 30 years to saving the environment in a practical way. We depend on donations to reach our goal. If you donate just $5, the price of your coffee this Sunday, We can help to keep the planet alive in a real way and continue to bring you regular updates and features on Australian plants all in one Botanical Bible. Any support is greatly appreciated. Thank you.
In the spirit of reconciliation we acknowledge the Bundjalung, Gumbaynggirr and Yaegl and all aboriginal nations throughout Australia and their connections to land, sea and community. We pay our respect to their Elders past, present and future for the pleasures we have gained.
Ophioglossum pendulum
Classification:
Division: Pteridophyta
Class: Psilotopsida
Order: Ophioglossales
Family: Ophioglossaceae
Genus: From Ophī́s/Ophī́tēs, which is Ancient Greek for a snake and Glossum, which is Ancient Greek for a tongue. It refers to long thin tongue like appendage on the apexes of the fertile fronds which bear the sporangia.
Species: From Pendens/Pendere, which is Latin for to hang down. It refers to branches, stems or fronds, which droop, hang down or weep.
Common Name: Ribbon Fern.
Distribution:
Ophioglossum pendulum is found south from the tip of Cape York Peninsula in far north eastern Queensland to an old record found on Ash Island near Port Stevens in coastal New South Wales. It usually grows on and east of the Great Dividing Range with the exception of plants found further west in the Carnarvon Gorge national Park.
https://avh.ala.org.au/occurrences/search?taxa=Ophioglossum+pendulum#tab_mapView
Habitat Aspect Climate:
Ophioglossum pendulum prefers medium shade to dense shade. It usually grows in warm subtropical rainforest, cool tropical rainforests close to the coast or coastal ranges. The altitude ranges from 8 meters ASL to 750 meters ASL.
The temperatures range from 1 degree in August to 35 degrees in January.
The rainfalls range from lows of 1100mm to an average of 3200mm annually.
Soil Requirements:
Ophioglossum pendulum usually grows as an epiphyte on trees, from the nests of Asplenium australis, Asplenium nidus, and Platycerium species or at times as a lithophyte on rocks. The leaf litters pH. ranges from 6.5pH to 6.8pH. It does not tolerate waterlogged soils. Only non-saline soils are tolerated.
Height & Spread:
Wild Plants: 0.2meters to 0.3meters by 0.3 meters to 0.5meters.
Characteristics:
Ophioglossum pendulum’s roots form a compact rhizome when mature maybe 50mm to 150mm in diameter. It is spongy from the amount of decomposing leaf litter collected by the nest fronds and leached down to the feeder and aerial roots below. It is a pendent epiphyte with a short creeping 10mm to 30mm long rhizomes.
Ophioglossum pendulum has beautiful, long, linear, simple fronds. The 2 to 6 sterile fronds measure 1.5 meters to 2 meters in length by 10mm to 25mm in width. The common rachis measures 70mm to 150mm in length. The bases taper to the single rhizome while the apexes are obtuse, narrowing-obtuse, and acute or forked with the forks apexes being acute or narrowing-obtuse. The thin coriaceous concolourous laminas are bright, green, semi glossy and glabrous.
The fertile frond is a spike which arises from the mid vein near the base of the sterile lamina. The fertile fronds measure 50mm to 300mm in length. The petiole measures 10mm to 50mm in length. The sporangia are aligned along the margins. The fertile frond turns chocolate brown when the spore is ripe. The sporangia dehisce from the apex to release the relatively large ochre-brown spore.
Wildlife:
Ophioglossum pendulum’s wildlife is unknown to the author.
Cultivation:
Ophioglossum pendulum is a beautiful small fern from the dry rainforests of Australia. Growing it is easy and small plants will reach their full potential in around one year. It is cold tolerant of temperatures down to 2 or 3 degrees.
Its only requirement is shade with dappled sunlight and a warm humid microclimate. Feeding the plants with dilute seaweed extract, diluted fish emulsion or diluted organic chicken pellets soaked in water and sprayed onto the leaves every few months will see Ophioglossum pendulum thrive.
It would make an excellent terrarium plant by itself or better still mixed with many of the smaller sundews like Drosera burmannii, Drosera spathulata or Drosera pygmaea.
Mixed with stags Platycerium superbum or especially Platycerium bifurcatum along the branches and trunks of trees gives the appropriate trees a very natural look.
Propagation:
Spores: Most people are put off at the thought of growing ferns from spore. Like all plants that produce their offspring from seed or spore the methods are basically the same. Remember nature has been doing this for millions of years and has been very successful. I have had excellent results growing over 200 different species of Australian ferns so don’t be afraid. Give it a go.
Step 1. Select spore from the fern fronds. Wait until the fern is just starting to release its spore. Rinse the fronds under clean running water and dry. This is to wash off any other spores from rogue ferns that may have settled onto the fronds. (There is nothing worse than having common brake or common soft bracken contaminating a prized tree fern or epiphyte.)
Step 2. Place the dry fronds in a clean brown paper bag and keep them in a cool dark place like the linen closet for about a week to ten days before you are ready to sow the spore. The exception to this rule applies to ferns, which produce green spores. These must be sown immediately that they are released. Todea Barbara is a good example of a fern, which produces green spore.
Step 3. Take a large ice cream container, a small ice cream container and a clean clear plastic bag large enough to seal the large ice cream container and three or four milk bottle tops.
Step 4. Punch or drill 6 to 10 5mm holes in the bottom of the small ice cream container.
Step 5. Wash both containers, tops and plastic bag so that they are very clean and sterile.
Step 6. Use a clean fine seed raising mi. We used 30mm fine sand, 30mm peat and 30mm perlite and 10mm vermiculite. We used crushed basalt, crusher dust and peat in a 50:50 ratio for epiphytes. Moisten the mix enough that water does not run out when the mix is squeezed between the fingers.
Step 7. Place the moisten mix (Enough to half fill the small ice cream container) in the microwave oven with a large glass of water for 7 or 8 minutes, until the water is boiling. Allow them to cool in the oven. You will need the water later so do not tip it out.
Step 8. Take the brown paper bag out of the linen closet. Shake the bag and remove the fronds. You should have a yellow, brown, black or rarely greenish brown or ochre powder or very fine, small round pin head size spore depending on the specie involved.
Step 9. Remove the mixture from the oven once it has cooled and place it in the small ice cream container and level.
Step 10. Sprinkle the spore sparsely over the mixture in the small ice cream container.
Step 11. Place the milk bottle tops in the large ice cream container with the flat surface facing down. Place the small ice cream container in the large ice cream container so that it is sitting on the milk bottle tops.
Step 12. Remove the water from the microwave and pour it into the larger ice cream container so there is 25mm to 30mm of water in the bottom.
Step 13. Place the ice cream containers in the plastic bag and seal. Step 14. Place the contents and bag in a warm shady place preferably 50mm to 70mm shade depending on the specie. Shade houses and some window sills are ideal.
Step 15. The surface should turn green within a week to two weeks. The prothallus will then develop. From the prthalus the first true fronds will appear. Wait until the ferns are 20mm to 35mm in height before you attempt to transplant them. Once they are ready open the bag up slightly and allow the air to flow around the little ferns. Every 3 to 5 days open the bag a little further so the ferns get use to their new environment. Allow them a week to two weeks to harden off before you transplant them following the removal of the plastic bag. Carefully prick them out into 50mm standard squat tubes as you would any seedling.
Do not try to transplant them as single plants as they are still a little delicate still.
Once the smaller ones again reach 50mm to 70mm you may wish to divide the stronger and hardier individual plants into smaller clumps in 100mm squat pots.
Step 16. We fertilized with seaweed, fish emulsion or organic chicken pellets soaked in water on an alternate basis until established. Fertilize every two months for one year even when in the ground.
Fertilize using seaweed, fish emulsion or organic chicken pellets soaked in water on an alternate basis. Fertilize every two months once planted out until the plants are established then annually in early September to October to maintain health, vitality and better flowering.
Further Comments from Readers:
Hi reader, it seems you use The Bible of Botany a lot. That’s great as we have great pleasure in bringing it to you! It’s a little awkward for us to ask, but our first aim is to purchase land approximately 1,600 hectares to link several parcels of N.P. into one at The Pinnacles NSW Australia, but we need your help. We’re not salespeople. We’re amateur botanists who have dedicated over 30 years to saving the environment in a practical way. We depend on donations to reach our goal. If you donate just $5, the price of your coffee this Sunday, We can help to keep the planet alive in a real way and continue to bring you regular updates and features on Australian plants all in one Botanical Bible. Any support is greatly appreciated. Thank you.
In the spirit of reconciliation we acknowledge the Bundjalung, Gumbaynggirr and Yaegl and all aboriginal nations throughout Australia and their connections to land, sea and community. We pay our respect to their Elders past, present and future for the pleasures we have gained.
Ophioglossum reticulatum
Classification:
Division: Pteridophyta
Class: Psilotopsida
Order: Ophioglossalis
Family: Ophioglossaceae
Genus: From Ophī́s/Ophī́tēs, which is Ancient Greek for a snake and Glossum, which is Ancient Greek for a tongue. It refers to long thin tongue like appendage on the apexes of the fertile fronds which bear the sporangia.
Species: From Rēticulātum, which is Latin for a network. It refers to veins or nerves, which form a threadlike network between the main vein and lateral veins.
Common Name: Adder’s Tongue
Distribution:
Ophioglossum reticulatum is basically found north of a line in the north west of Western Australia from near the coast of the Mitchel River south to Millie Windie Valley and north east to Katherine Gorge and south east to near the junction of the McArthur River and the Glyde River in the Northern Territory.
In the east it is found south from the tip of Cape York Peninsula to the Byfield National Park east of the Great Dividing Range. It is then bounded by the Grey Range to the west, near Quilpie in Queensland then south-south easterly direction to Ballina in far north eastern New South Wales.
It is also found further south at Frogalla Wetlands in central coastal New South Wales and in Victoria between Shelly, Mansfield, the Mitchell River, Boggy Creek Buchan and Wulgulmerang.
https://avh.ala.org.au/occurrences/search?taxa=Ophioglossum+reticulatum#tab_mapView
Habitat Aspect Climate:
Ophioglossum reticulatum prefers full shade to even dappled light. It usually grows in tropical rainforests, warm sub-tropical rainforest, cool tropical rainforests, and warm temperate rainforests in gorges and adjacent to protective cliffs close to the coast or coastal ranges in riparian zones. The altitude ranges from 10 meter ASL to 900 meters ASL.
The temperatures range from 10 degrees in the cooler months to 37 degrees in the monsoonal and cyclone seasons.
The rainfalls range from lows of 1250mm to an average of 4200mm annually.
Soil Requirements:
Ophioglossum reticulatum grows as an epiphyte on trees, from the nests of Asplenium australis, Asplenium nidus, and Platycerium species or at times as a lithophyte on rocks. The leaf litters pH. ranges from 5pH to 6pH. It does not tolerate waterlogged soils. Non saline soils to slightly be tolerated.
Height & Spread:
Wild Plants: 0.3meter to 0.35 meters by 0.1 meters.
Characteristics:
Ophioglossum reticulatum’s roots form a compact rhizome when mature. The stipe bases are not persistent while the rhizomes are cylindrical to sub globose and usually bear several fronds.
Ophioglossum reticulatum has a single simple ovate to lanceolate frond. The sterile frond measures 10mm to 80mm in length by 5mm to 60mm in width. The common rachis measures 70mm to 150mm in length. The bases truncate to rounded while the apexes are obtuse to narrowing obtuse. The thin coriaceous concolourous laminas are bright, green, semi glossy and glabrous.
The fertile frond is on a spike which arises from the mid vein near the base of the sterile lamina. The fertile fronds measure 10mm to 80mm in length. The petiole measures 10mm to 20mm in length. The sporangia are aligned along the margins. The fertile frond turns deep brown when the spore is ripe. The sporangia dehisce from the apex to release the relatively large ochre-brown spore.
It would make an excellent terrarium plant in a larger terrarium or confined in a bottle, by itself or better still mixed with any of the smaller sundews like drosera burmannii, Drosera spathulata or Drosera pygmaea.
Wildlife:
Ophioglossum reticulatum borers can attack the plant and kangaroos and possums will eat the new fronds if food is scarce.
Cultivation:
Ophioglossum reticulatum is an unusual fern from the rainforests of Australia. Growing it is not easy and if you are lucky enough to have it growing on your property it is worthwhile persevering to save it.
Its only requirement is shade and a warm humid microclimate. Feeding the plants with dilute seaweed extract, diluted fish emulsion or diluted organic chicken pellets soaked in water and sprayed onto the leaves will see Ophioglossum reticulatum thrive. The additional use of cold tea leaves and a hand full of course bush litter from time to time will do the plants no harm.
Propagation:
Spores: The ferns are rare so fern spore will be difficult to collect and propagate from.
Most people are put off at the thought of growing ferns from spore. Like all plants that produce their offspring from seed or spore the methods are basically the same. Remember nature has been doing this for millions of years and has been very successful. I have had excellent results growing over 200 different species of Australian ferns so don’t be afraid. Give it a go.
Step 1. Select spore from the fern fronds. Wait until the fern is just starting to release its spore. Rinse the fronds under clean running water and dry. This is to wash off any other spores from rogue ferns that may have settled onto the fronds. (There is nothing worse than having common brake or common soft bracken contaminating a prized tree fern or epiphyte.)
Step 2. Place the dry fronds in a clean brown paper bag and keep them in a cool dark place like the linen closet for about a week to ten days before you are ready to sow the spore. The exception to this rule applies to ferns, which produce green spores. These must be sown immediately that they are released. Todea Barbara is a good example of a fern, which produces green spore.
Step 3. Take a large ice cream container, a small ice cream container and a clean clear plastic bag large enough to seal the large ice cream container and three or four milk bottle tops.
Step 4. Punch or drill 6 to 10 5mm holes in the bottom of the small ice cream container.
Step 5. Wash both containers, tops and plastic bag so that they are very clean and sterile.
Step 6. Use a clean fine seed raising mi. We used 30mm fine sand, 30mm peat and 30mm perlite and 10mm vermiculite. We used crushed basalt, crusher dust and peat in a 50:50 ratio for epiphytes. Moisten the mix enough that water does not run out when the mix is squeezed between the fingers.
Step 7. Place the moisten mix (Enough to half fill the small ice cream container) in the microwave oven with a large glass of water for 7 or 8 minutes, until the water is boiling. Allow them to cool in the oven. You will need the water later so do not tip it out.
Step 8. Take the brown paper bag out of the linen closet. Shake the bag and remove the fronds. You should have a yellow, brown, black or rarely greenish brown or ochre powder or very fine, small round pin head size spore depending on the specie involved.
Step 9. Remove the mixture from the oven once it has cooled and place it in the small ice cream container and level.
Step 10. Sprinkle the spore sparsely over the mixture in the small ice cream container.
Step 11. Place the milk bottle tops in the large ice cream container with the flat surface facing down. Place the small ice cream container in the large ice cream container so that it is sitting on the milk bottle tops.
Step 12. Remove the water from the microwave and pour it into the larger ice cream container so there is 25mm to 30mm of water in the bottom.
Step 13. Place the ice cream containers in the plastic bag and seal. Step 14. Place the contents and bag in a warm shady place preferably 50mm to 70mm shade depending on the specie. Shade houses and some window sills are ideal.
Step 15. The surface should turn green within a week to two weeks. The prothallus will then develop. From the prthalus the first true fronds will appear. Wait until the ferns are 20mm to 35mm in height before you attempt to transplant them. Once they are ready open the bag up slightly and allow the air to flow around the little ferns. Every 3 to 5 days open the bag a little further so the ferns get use to their new environment. Allow them a week to two weeks to harden off before you transplant them following the removal of the plastic bag. Carefully prick them out into 50mm standard squat tubes as you would any seedling.
Do not try to transplant them as single plants as they are still a little delicate still.
Once the smaller ones again reach 50mm to 70mm you may wish to divide the stronger and hardier individual plants into smaller clumps in 100mm squat pots.
Step 16. We fertilized with seaweed, fish emulsion or organic chicken pellets soaked in water on an alternate basis until established. Fertilize every two months for one year even when in the ground.
Fertilize using seaweed, fish emulsion or organic chicken pellets soaked in water on an alternate basis. Fertilize every two months once planted out until the plants are established then annually in early September to October to maintain health, vitality and better flowering.
Further Comments from Readers:
Hi reader, it seems you use The Bible of Botany a lot. That’s great as we have great pleasure in bringing it to you! It’s a little awkward for us to ask, but our first aim is to purchase land approximately 1,600 hectares to link several parcels of N.P. into one at The Pinnacles NSW Australia, but we need your help. We’re not salespeople. We’re amateur botanists who have dedicated over 30 years to saving the environment in a practical way. We depend on donations to reach our goal. If you donate just $5, the price of your coffee this Sunday, We can help to keep the planet alive in a real way and continue to bring you regular updates and features on Australian plants all in one Botanical Bible. Any support is greatly appreciated. Thank you.
In the spirit of reconciliation we acknowledge the Bundjalung, Gumbaynggirr and Yaegl and all aboriginal nations throughout Australia and their connections to land, sea and community. We pay our respect to their Elders past, present and future for the pleasures we have gained.
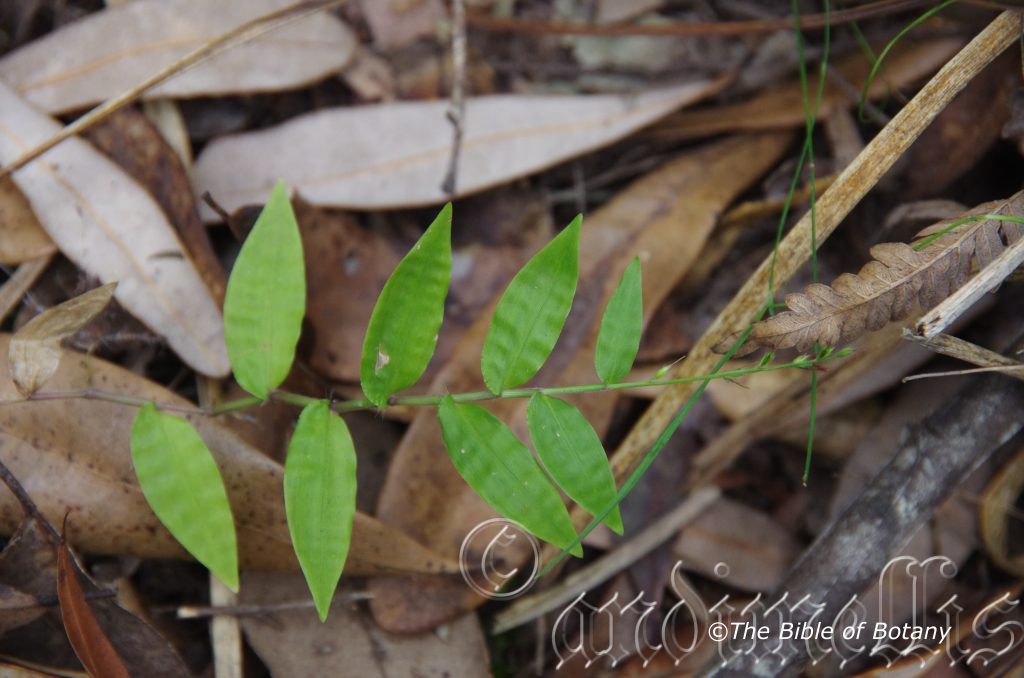
Pillar Valley NSW

Pillar Valley NSW
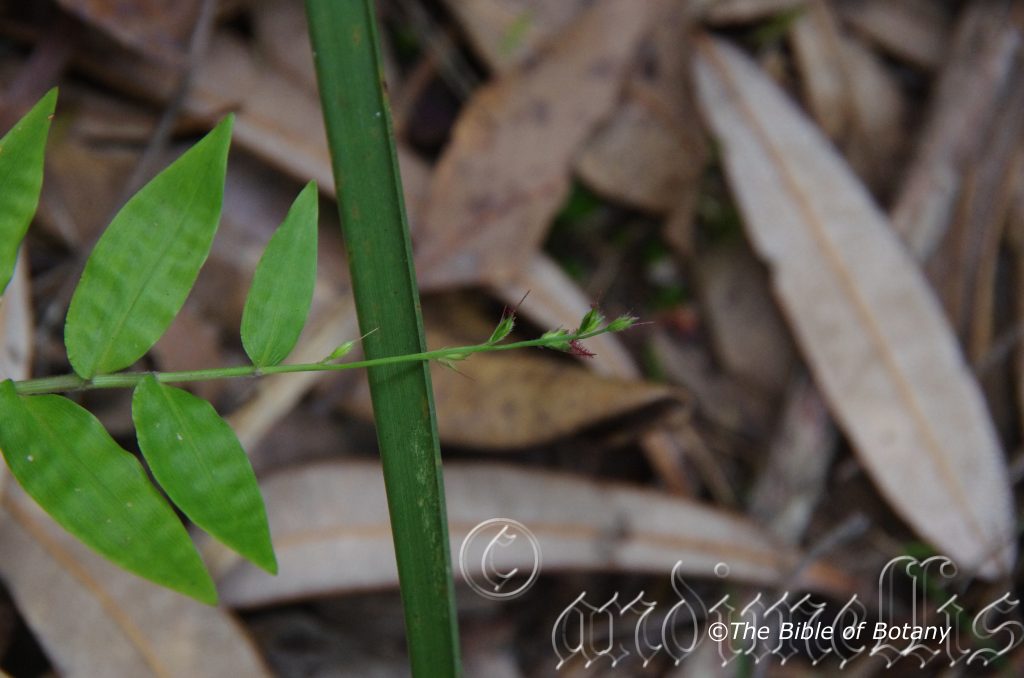
Pillar Valley NSW
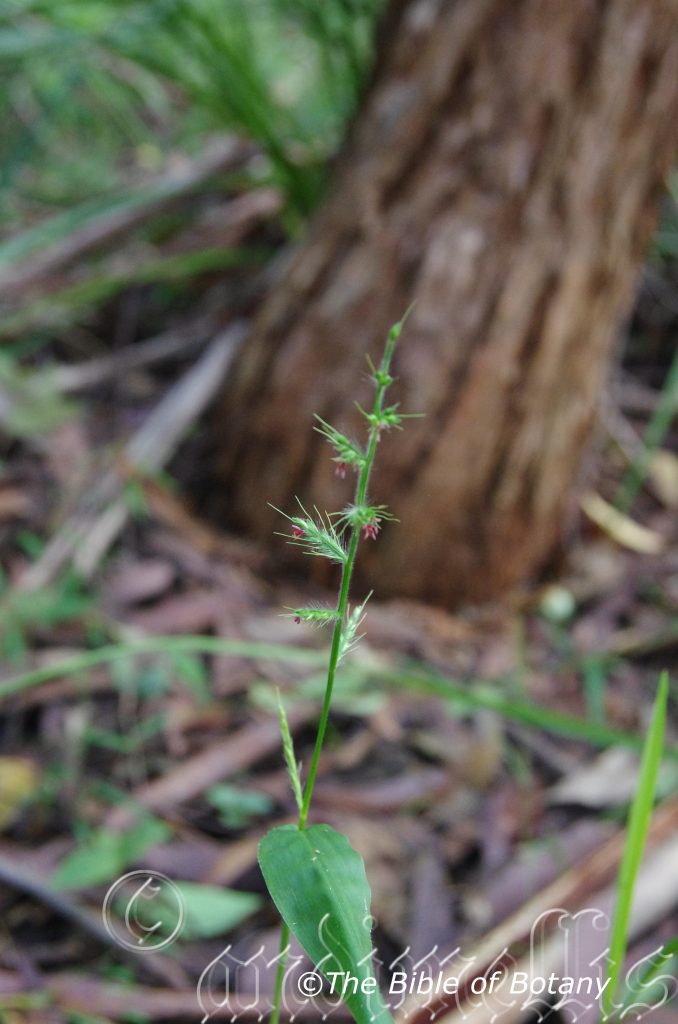
Pillar Valley NSW
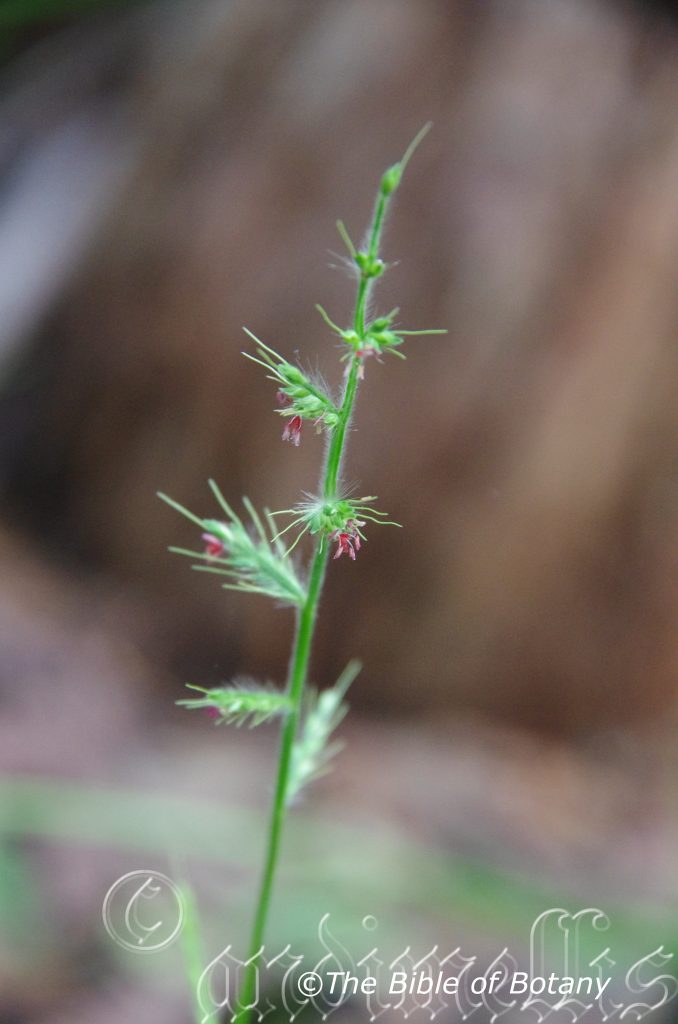
Pillar Valley NSW
Classification:
Unranked: Monocots
Unranked: Commelinds
Order: Poales
Family: Poaceae
Genus: From Hoplismosm, which is Ancient Greek for a weapon. It refers to spiked awns, which just look rather menacing.
Species: From Aemulus, which is Latin for emulative or to compete with. It refers to the plants appearance, which is similar to another species or genus.
Subspecies: Oplismenus aemulus subspecies aemulus. From Aemulus, which is Latin for emulative or to compete with. It refers to the plants appearance being similar to another species or genus.
Variety: Oplismenus aemulus var. flaccidus. From Pilōsus, which is Latin for soft, wavy hairs. It refers to structures or organs, which are covered in soft wavy hairs.
Variety: Oplismenus aemulus var. lasiorhachis. From Pilōsus, which is Latin for soft, wavy hairs. It refers to structures or organs, which are covered in soft wavy hairs.
Variety: Oplismenus aemulus var. pilosus. From Pilōsus, which is Latin for soft, wavy hairs. It refers to structures or organs, which are covered in soft wavy hairs.
Common Name: Basket Grass or Wavy Bearded Grass.
Distribution:
Oplismenus aemulus var. aemulus is restricted to a small area west of Armidale.
Oplismenus aemulus var. flaccidus, Oplismenus aemulus var. lasiorhachisand Oplismenus aemulus var. pilosus are all found south from the Torres Strait Islands in far north Queensland to Glena Dale in eastern Victoria. It is mainly found on and east of the Great Dividing Range to the coast.
https://avh.ala.org.au/occurrences/search?taxa=Oplismenus+aemulus#tab_mapView
Habitat Aspect Climate:
Oplismenus aemulus prefers full sun to dappled shade to full sun. It grows in or adjacent to riverine forests, dry rainforests or dry littoral rainforests. The altitude ranges from 5 meter ASL to 1100 meters ASL.
The temperatures range from minus 6 degrees in August to 34 degrees in February.
The rainfalls range from lows of 850mm to an average 3000mm annually.
Soil Requirements:
Oplismenus aemulus prefers to grow on better quality sandy loams to medium clays or fine to medium silts. The soils are usually derived from decomposed brown basalts, black basalts, shales, fatty sandstones or metamorphic rocks often being laid down as alluvial silts. The soils pH. ranges from 5pH to 6.5pH. It does not tolerate waterlogged soils. Non saline soils to moderately saline soils are tolerated.
Height & Spread:
Wild Plants: 0.2m to 0.3m by 0.6m to 1m.
Characteristics:
Oplismenus aemulus grows as a small tussock grass with blue green glabrous culms. The green sheaths are covered in white hirsute hairs.
Oplismenus aemulus’s alternate simple leaves are narrow lanceolate and measure 10mm to 30mm in length by 6mm to 10mm in width. The concolourous laminas are pale blue green and sparsely covered in white hirsute hairs. The discolourous laminas are pale greenish-blue and very sparsely covered in long white hirsute hairs on the upper laminas while the lowers are paler. The mid vein is slightly prominent and covered in white hirsute hairs on the lower lamina and is not visible on the upper lamina. There are 10 to 15 very fine longitudinal veins either side of the mid vein. The margins are entire, flat or slightly undulating. The base is broadly cuneate and clasping while the apex is tapering to the tip.
The inflorescences of Oplismenus aemulus are short panicle with 6 to 10 secunds, born from the terminals. The panicles measure 120mm to 150mm in length while the secunds measure 30mm to 50mm in length. The 2.5mm to 3.5mm blue green spikelets are closely packed along the lower side of the secunds. The single burgundy awn measures 6mm to 7.5mm in length. The burgundy flowers measure 1.2mm in length. The flowers appear throughout the year.
Oplismenus aemulus’s fruit is an oblong caryopsis. (Grain) The 3.5mm to 4mm long grain is surround by the persistent basal bracts. The caryopsis has an acute apex and is glabrous and glossy.
Confusing Species:
Both Oplismenus imbecillis and Oplismenus aemulus are now being considered, to be one species of Oplismenus hirtellus by the national herbarium and internationally so maybe changed in the near future or seen as sub specie following DNA testing of the genus.
Oplismenus aemulus’s leaves are generally wider at 6mm to 10mm in width. The lower glumes awn measures 0.2mm to 1.2mm in length.
Oplismenus imbecillis’s leaves are generally narrower at 3mm to 7mm in width. The lower glumes awn measures 2mm to 2.5mm in length.
Oplismenus undulatifolius’s leaves are generally larger and measure 35mm to 60mm in length by 4mm to 18mm in width. The lower spikelet’s awns are divaricate and are 4 times longer than the spikelets.
Arthroxon hispidus’s laminas and sheaths are covered in white hispid ciliate hairs on the margins and white hispid hairs on the sheaths. The bases are strongly clasping and cordate. The laminas are undulating not pleated.

Wildlife:
Oplismenus aemulus’s is the host plant for the Wonder Brown butterfly (Heteronympha mirifica), Brown Ringlet Moth Hypocysta metirius and Orange Ringlet Hypocysta adiante.
Cultivation:
Oplismenus aemulus is a beautiful soft foliaged mat forming grass for forested areas in the garden. It would look rather weedy in small gardens. It can be mown and will recover very quickly but is not dense enough or hard wearing to be considered a good lawn grass.
It is suitable for semi shaded areas near the entrance to rainforests and do exceptionally well on riparian flats and beneath forest canopies.
Propagation:
Seeds: Oplismenus aemulus’s seeds directly into a seed raising mix. Cover them with 2mm of fine sand and keep moist not wet. Place the tray in a warm sunny position. When the seedlings are 25mm to 50mm tall, prick them out in small groups and plant them into 150mm squat pots using a good organic mix.
Once the seedlings reach 150mm to 200mm in diameter, nip the tips out before planting them out into their permanent position and water thoroughly with our recommended fertilizer.
Cuttings: Mow the section where the tuffs will be removed. Use 200mm square tuffs from the garden with some root the following day for best results. Replace the divots with sand. Place the tuffs in there new position and water in thoroughly with our recommended fertilizer. Keep moist until the new shoots appear.
Fertilize using seaweed, fish emulsion or organic chicken pellets soaked in water on an alternate basis. Fertilize every two months once planted out until the plants are established then annually in early September to October to maintain health, vitality and better flowering.
Further Comments from Readers:
Hi reader, it seems you use The Bible of Botany a lot. That’s great as we have great pleasure in bringing it to you! It’s a little awkward for us to ask, but our first aim is to purchase land approximately 1,600 hectares to link several parcels of N.P. into one at The Pinnacles NSW Australia, but we need your help. We’re not salespeople. We’re amateur botanists who have dedicated over 30 years to saving the environment in a practical way. We depend on donations to reach our goal. If you donate just $5, the price of your coffee this Sunday, We can help to keep the planet alive in a real way and continue to bring you regular updates and features on Australian plants all in one Botanical Bible. Any support is greatly appreciated. Thank you.
In the spirit of reconciliation we acknowledge the Bundjalung, Gumbaynggirr and Yaegl and all aboriginal nations throughout Australia and their connections to land, sea and community. We pay our respect to their Elders past, present and future for the pleasures we have gained.

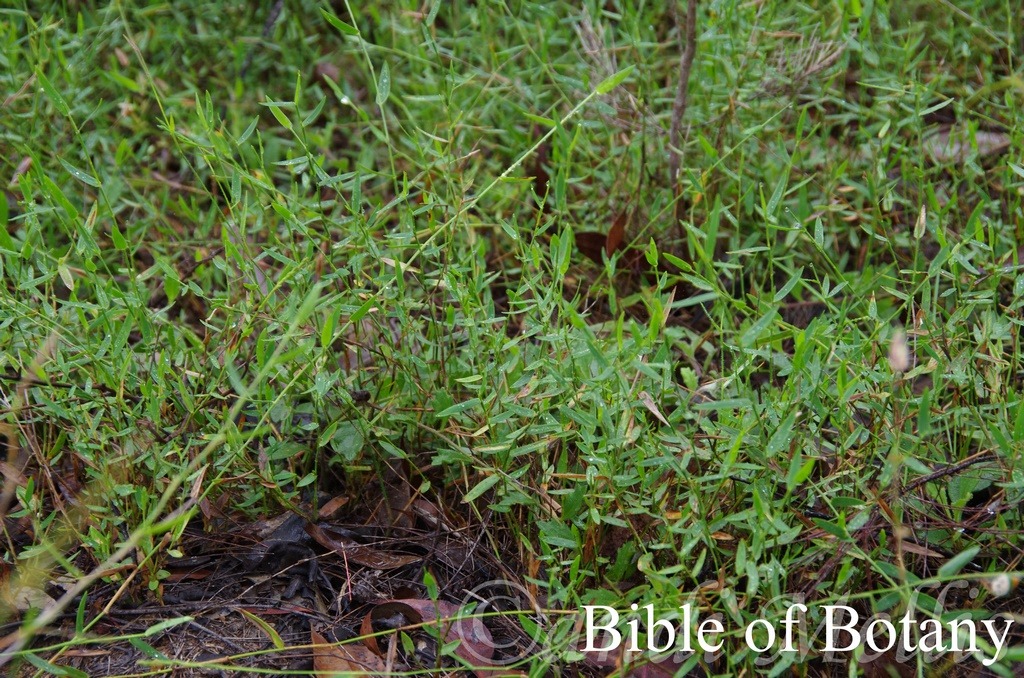
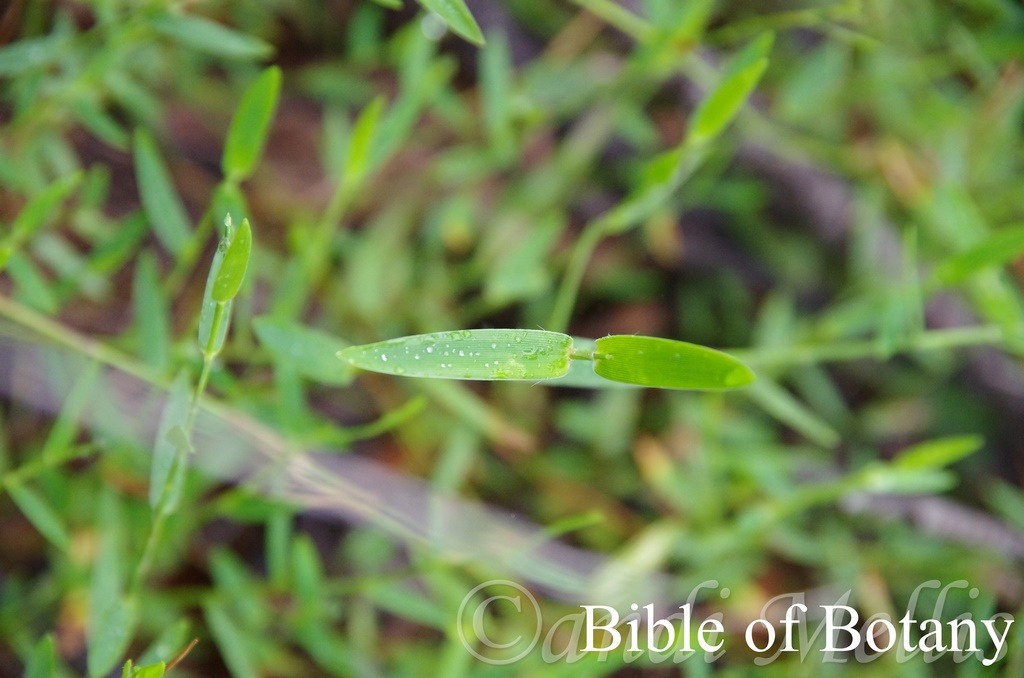
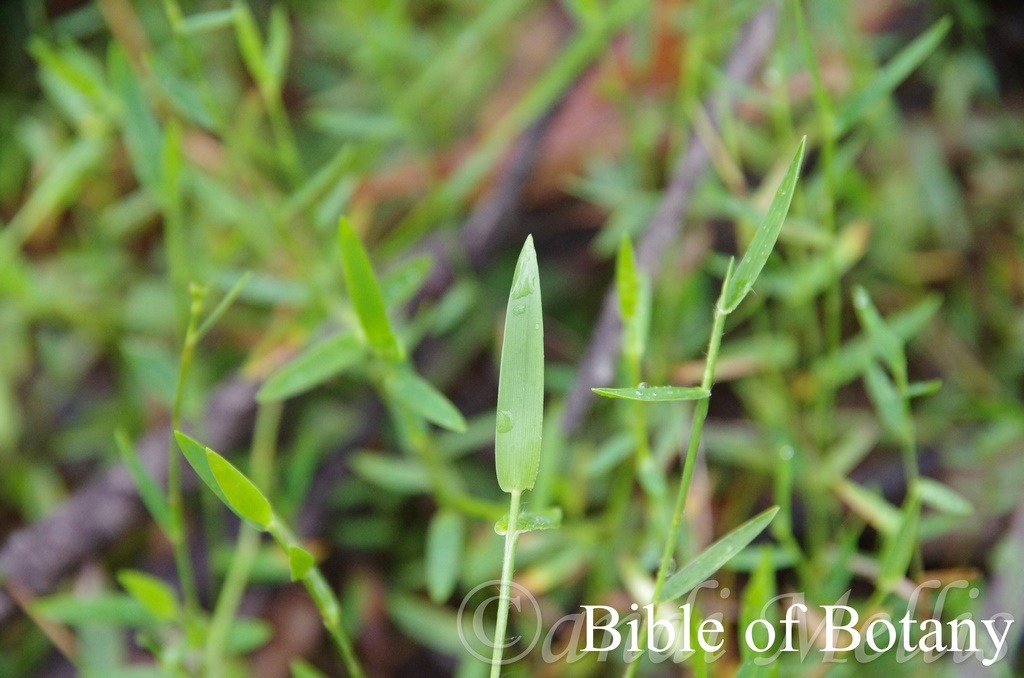
Classification:
Unranked: Monocots
Unranked: Commelinds
Order: Poales
Family: Poaceae
Genus: From Hoplismosm, which is Ancient Greek for a weapon. It refers to spiked awns, which just look rather menacing.
Species: From Imbecillus, which is Latin for weak. It refers to the overall habit of the plants, which appear to be feeble or weak especially when comparing the growth habit or flower heads to other species in the genus. It is still widely known as Oplismenus hirtellus var. imbecillis.
Common Name: Creeping Bearded Grass.
Distribution:
Oplismenus imbecillis is found along the east coast east of the Great Dividing Range of Australia south from the Claudia River in far north eastern Queensland to Melbourne in southern Victoria.
https://avh.ala.org.au/occurrences/search?taxa=Oplismenus+imbicillis#tab_mapView
Habitat Aspect Climate:
Oplismenus imbecillis prefers full sun to dappled shade to full sun. It often forms extensive mats on the forest floor. It grows in or adjacent to riverine forests, dry rainforests, moist sclerophyll forests or dry littoral rainforests. The altitude ranges from 5 meters ASL to 1250 meters ASL.
The temperatures range from minus 6 degrees in August to 34 degrees in February.
The rainfalls range from lows of 850mm to an average 3000mm annually.
Soil Requirements:
Oplismenus imbecillis prefers better quality sandy loams to medium clays or fine to medium silts. The soils are usually derived from decomposed brown basalts, black basalts, shales, fatty sandstones, granites, metamorphic rocks, podzolic soils or alluvial deposits. The soils pH. ranges from 4.2pH to 7pH. It tolerates waterlogged soils but is more often found associated with seasonal flooded plains and riparian zones. Non saline soils to moderately saline soils are tolerated.
Height & Spread:
Wild Plants: 0.2m to 0.3m by 0.6m to 2m.
Characteristics:
Oplismenus imbecillis grows as a weak trailing perennial with blue-green main culms that are glabrous between the nodes. The grass-green to purplish leaf sheaths are clasping and measure 10mm to 38mm in length. The sheath is covered in white hirsute hairs. The plants readily root from the nodes where they touch the ground or in prolonged wet weather.
Oplismenus imbecillis’s alternate simple leaves are narrow elliptical to broad elliptical and measure 15mm to 36mm in length by 3mm to 7mm in width. The ligule measures 3mm to 4mm in length and is membranous at the base and dividing into long white ciliate hairs at the apexes. The bases are often rounded to broad cuneate while the apexes are narrow acute and semi cupular often on one side. The discolourous laminas are pale blue-green and very sparsely covered in long, fine, white often glistening hirsute hairs on the upper laminas while the lower laminas are paler greenish-white, purple or burgundy and covered in long, soft, white hirsute hairs. The laminas are flat while the margins are entire. The mid vein is prominent on the lower lamina while there are 10 to 15 very fine longitudinal veins either side of the mid vein.
The inflorescences of Oplismenus imbecillis are short panicles with 9 to 13 racemes born from the terminals. The panicles measure 60mm to 100mm in length while the racemes measure 3mm to 15mm in length.
The peduncle and rachises are usually glabrous except at the nodes which are covered in long white hirsute hairs. The raceme’s rachis are covered in fine, long white hairs.
The spikelets measure 2mm to 3mm in length.
The glumes are similar. The lower glumes are shorter than the spikelets are keeless with 3 nerves which terminate in a long, slender awn up to 2.5 times as long as the spikelet. The upper glumes are keeless with 5 to 7 nerves and are obtuse.
The lower lemmas are equal in the length to the spikelets, are keeless with 7 nerves. They embrace the fertile floret. The palea are shorter than the lemma, reduced or absent. The upper lanceolate lemmas measure 2mm to 2.5mm in length. The flowers appear throughout the year.
Oplismenus imbecillis’s fruits are oblong caryopsis. (Grain) The grains measure 2mm to 3mm in length. The caryopsis has an acute apex and is glabrous and glossy.

Wildlife:
Oplismenus imbecillis’s is the host plant for the Wonder Brown butterfly Heteronympha mirifica, Brown Ringlet Moth Hypocysta metirius, and Orange Ringlet Hypocysta adiante.
Cultivation:
Oplismenus imbecillis is a beautiful soft foliaged mat forming grass for forested areas in the garden. It would look rather weedy in small gardens. It can be mown and will recover very quickly but is not dense enough or hard wearing to be considered a good lawn grass.
It is suitable for semi shaded areas near the entrance to rainforests and do exceptionally well on riparian flats and beneath forest canopies.
Propagation:
Seeds: Oplismenus imbecillis’s seeds directly into a seed raising mix. Cover them with 2mm of fine sand and keep moist not wet. Place the tray in a warm sunny position. When the seedlings are 25mm to 50mm tall, prick them out in small groups and plant them into 150mm squat pots using a good organic mix.
Once the seedlings reach 150mm to 200mm in diameter, nip the tips out before planting them out into their permanent position and water thoroughly with our recommended fertilizer.
Cuttings: Mow the section where the tuffs will be removed. Use 100mm by 100mm to 200mm to 200mm square tuffs from the garden with some root one or two days later for best results. Replace the divots with sand. Place the tuffs in there new position and water in thoroughly with our recommended fertilizer. Keep moist until the new shoots appear.
Fertilize using seaweed, fish emulsion or organic chicken pellets soaked in water on an alternate basis. Fertilize every two months once planted out until the plants are established then annually in early September to October to maintain health, vitality and better flowering.
Further Comments from Readers:
Hi reader, it seems you use The Bible of Botany a lot. That’s great as we have great pleasure in bringing it to you! It’s a little awkward for us to ask, but our first aim is to purchase land approximately 1,600 hectares to link several parcels of N.P. into one at The Pinnacles NSW Australia, but we need your help. We’re not salespeople. We’re amateur botanists who have dedicated over 30 years to saving the environment in a practical way. We depend on donations to reach our goal. If you donate just $5, the price of your coffee this Sunday, We can help to keep the planet alive in a real way and continue to bring you regular updates and features on Australian plants all in one Botanical Bible. Any support is greatly appreciated. Thank you.
In the spirit of reconciliation we acknowledge the Bundjalung, Gumbaynggirr and Yaegl and all aboriginal nations throughout Australia and their connections to land, sea and community. We pay our respect to their Elders past, present and future for the pleasures we have gained.
Classification:
Unranked: Monocots
Unranked: Commelinds
Order: Poales
Family: Poaceae
Genus: From Hoplismosm, which is Ancient Greek for a weapon. It refers to spiked awns, which just look rather menacing.
Species: From Undulātum, which is Latin for wavy and Folium, which is Latin for foliage. It refers to leaves, which have margins or surfaces which are wave like or undulating.
Common Name:
Distribution:
Oplismenus undulatifolius is found in 2 distinct disjunct populations on and east of the Great Dividing Range. The northern population is found south from the Iron Range National Park on Cape York Peninsula to Clarke Range near Mackay in far north Queensland while the southern population is found south from Moreton Bay in south eastern Queensland to Vaucluse in central coastal New South Wales.
https://avh.ala.org.au/occurrences/search?taxa=Oplismenus+undulatifolius#tab_mapView
Habitat Aspect Climate:
Oplismenus undulatifolius prefers full sun to dappled shade to full sun. It can form large mats beneath trees in or adjacent to riverine forests, well developed rainforests, moist littoral rainforests vine forests and swampy Melaleuca forests. The altitude ranges from 5 meter ASL to 730 meters ASL.
The temperatures range from minus 6 degrees in August to 34 degrees in February.
The rainfalls range from lows of 850mm to an average 3000mm annually.
Soil Requirements:
Oplismenus undulatifolius prefers better quality sandy loams to medium clays or fine to medium silts. The soils are usually derived from decomposed brown basalts, black basalts, shales, fatty sandstones or metamorphic rocks often being laid down as alluvial deposits. The soils pH. ranges from 5pH to 6.5pH. It does not tolerate waterlogged soils. Non saline soils to moderately saline soils are tolerated.
Height & Spread:
Wild Plants: 0.2m to 0.3m by 0.6m to 1m.
Characteristics:
Oplismenus undulatifolius’s is a weak trailing perennial with blue-green stems that are glabrous between the nodes. The grass-green to purplish leaf sheaths are clasping and measure 10mm to 38mm in length. The sheath is covered in white hirsute hairs. The plants readily root from the nodes where they touch the ground or in prolonged wet weather.
Oplismenus undulatifolius has alternate simple leaves are narrow elliptical to broad elliptical and measure 35mm to 60mm in length by 5mm to 18mm in width. The ligule measures 3mm to 4mm in length and is membranous at the base and dividing into long white ciliate hairs at the apexes. The membranous bases are often rounded or tapering while the apexes are narrow acute. The discolourous laminas are soft grass-green and moderately covered in fine white pulverulent hairs on the upper laminas while the lower laminas are paler and densely covered in soft, white pulverulent hairs. The laminas are strongly undulating while the margins are entire. The mid vein is prominent on the lower lamina while there are 10 to 15 very fine longitudinal veins either side of the mid vein.
The inflorescences of Oplismenus undulatifolius are racemes or 4 to 7 small clusters on a spike born from the terminals. The racemes or spikes measure 60mm to 100mm in length while the racemes measure 10mm to 15mm in length.
The peduncle and rachises are usually glabrous except at the nodes which are covered in long white hirsute hairs. The raceme’s rachis are covered in fine, long white hairs.
The lanceolate spikelets and their awns are divergently spreading and measure 3mm to 4mm in length.
The glumes are similar. The lower glumes are shorter than the spikelets, are keeless with 5 to 7 nerves which terminate in a long, slender awn up to 4 times as long as the spikelet. The upper glumes are keeless and without nerves. It terminates in an awn that is as long as the glume.
The lower lemmas are equal in the length to the spikelets, are keeless with 9 nerves and a short 1mm awn. They embrace the fertile floret. The palea is shorter than the lemma, reduced or absent. The upper lanceolate lemmas measure 3mm to 3.5mm in length. The flowers appear throughout the year.
Oplismenus undulatifolius’s fruits are oblong caryopsis. The grains measure 2mm to 3mm in length. The caryopsis has an acute apex and is glabrous and glossy.
Confusing Specie:
Both Oplismenus imbecillis and Oplismenus aemulus are now being considered as one species of Oplismenus hirtellus by the national herbarium and internationally so maybe changed in the near future or seen as sub specie following DNA testing of the genus.
Oplismenus aemulus’s leaves are generally wider at 6mm to 10mm in width. The lower glumes awn measures 0.2mm to 1.2mm in length.
Oplismenus imbecillis’s leaves are generally narrower at 3mm to 7mm in width. The lower glumes awn measures 2mm to 2.5mm in length.
Oplismenus undulatifolius’s leaves are generally larger and measure 35mm to 60mm in length by 4mm to 18mm in width. The lower spikelet’s awns are divaricate and are 4 times longer than the spikelets.
Arthraxonj hispidus’s laminas and sheaths are covered in white hispid ciliate hairs on the margins and white hispid hairs on the sheaths. The bases are strongly clasping and cordate. The laminas are undulating not pleated.
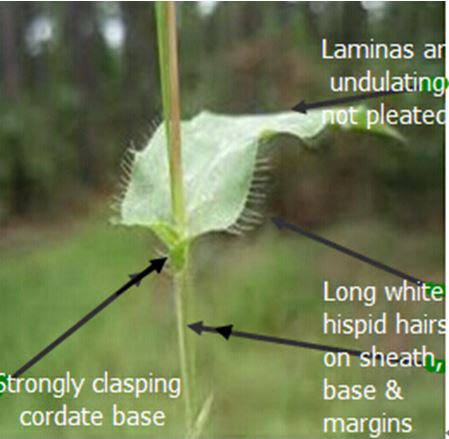
Wildlife:
Oplismenus undulatifolius is the host plant for the Wonder Brown butterfly Heteronympha mirifica, Brown Ringlet Moth Hypocysta metirius and Orange Ringlet Hypocysta adiante.
Cultivation:
Oplismenus undulatifolius is a beautiful soft foliaged mat forming grass for forested areas in the garden. It would look rather weedy in small gardens. It can be mown and will recover very quickly but is not dense enough or hard wearing to be considered a good lawn grass.
It is suitable for semi shaded areas near the entrance to rainforests and do exceptionally well on riparian flats and beneath forest canopies.
Propagation:
Seeds: Oplismenus undulatifolius’s seeds directly into a seed raising mix. Cover them with 2mm of fine sand and keep moist not wet. Place the tray in a warm sunny position. When the seedlings are 25mm to 50mm tall, prick them out in small groups and plant them into 150mm squat pots using a good organic mix.
Once the seedlings reach 150mm to 200mm in diameter, nip the tips out before planting them out into their permanent position and water thoroughly with our recommended fertilizer.
Cuttings: Mow the section where the tuffs will be removed. Use 200mm square tuffs from the garden with some root the following day for best results. Replace the divots with sand. Place the tuffs in there new position and water in thoroughly with our recommended fertilizer. Keep moist until the new shoots appear.
Fertilize using seaweed, fish emulsion or organic chicken pellets soaked in water on an alternate basis. Fertilize every two months once planted out until the plants are established then annually in early September to October to maintain health, vitality and better flowering.
Further Comments from Readers:
Hi reader, it seems you use The Bible of Botany a lot. That’s great as we have great pleasure in bringing it to you! It’s a little awkward for us to ask, but our first aim is to purchase land approximately 1,600 hectares to link several parcels of N.P. into one at The Pinnacles NSW Australia, but we need your help. We’re not salespeople. We’re amateur botanists who have dedicated over 30 years to saving the environment in a practical way. We depend on donations to reach our goal. If you donate just $5, the price of your coffee this Sunday, We can help to keep the planet alive in a real way and continue to bring you regular updates and features on Australian plants all in one Botanical Bible. Any support is greatly appreciated. Thank you.
In the spirit of reconciliation we acknowledge the Bundjalung, Gumbaynggirr and Yaegl and all aboriginal nations throughout Australia and their connections to land, sea and community. We pay our respect to their Elders past, present and future for the pleasures we have gained.
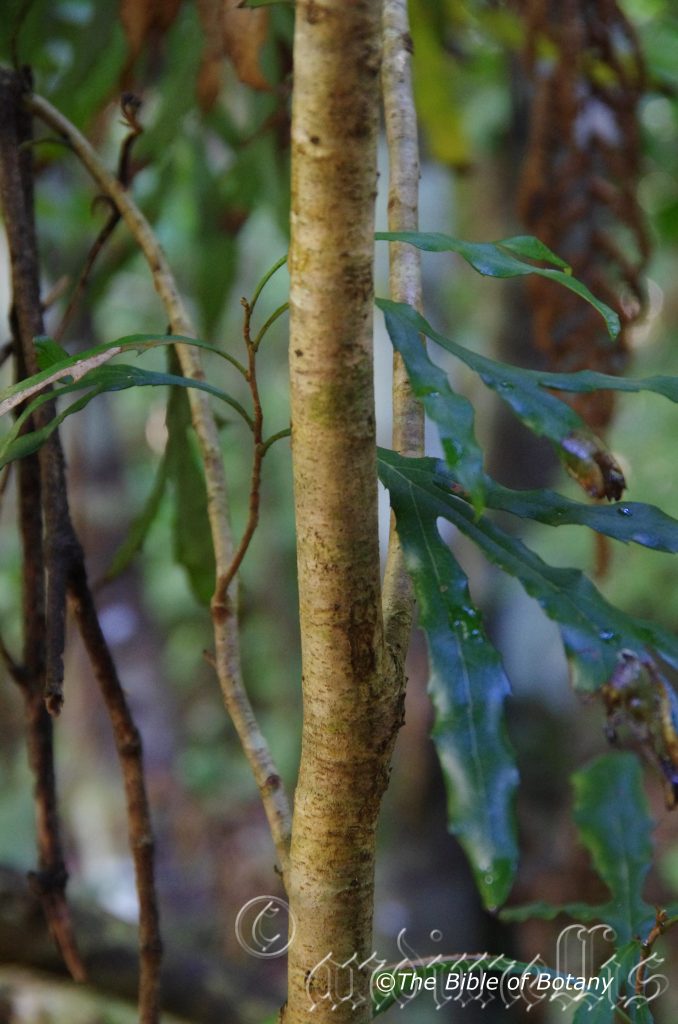
Washpool National Park NSW
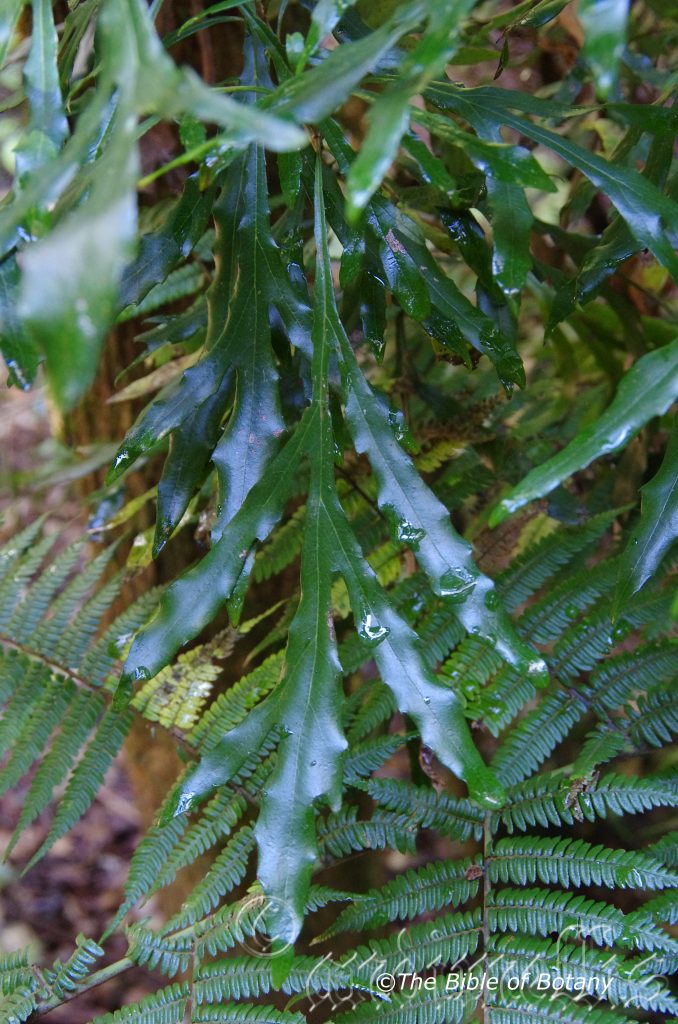
Washpool National Park NSW
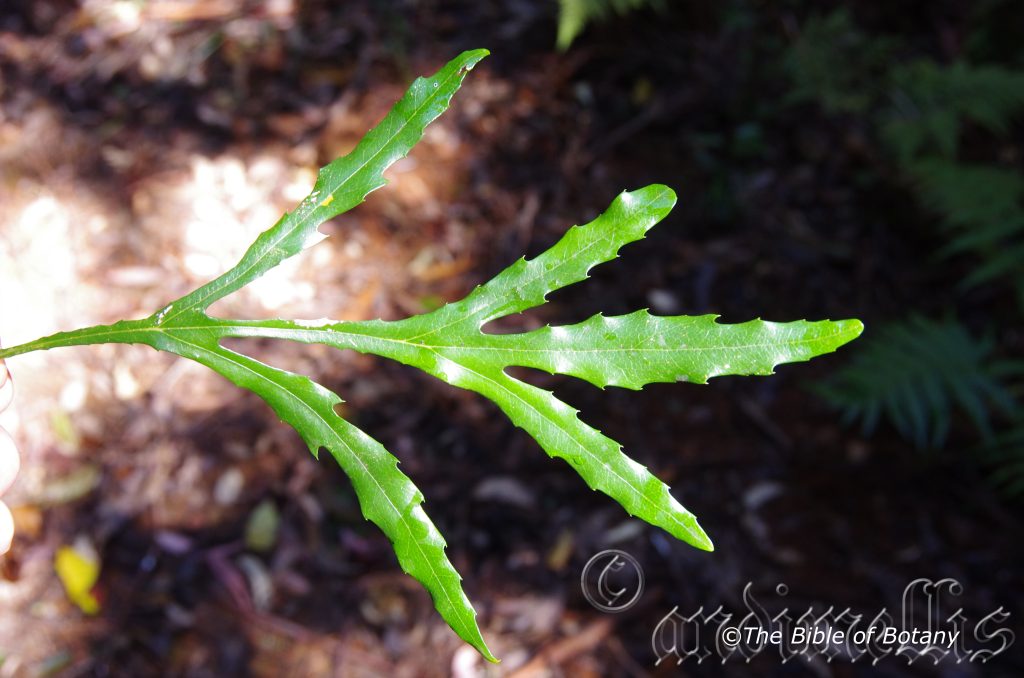
Washpool National Park NSW
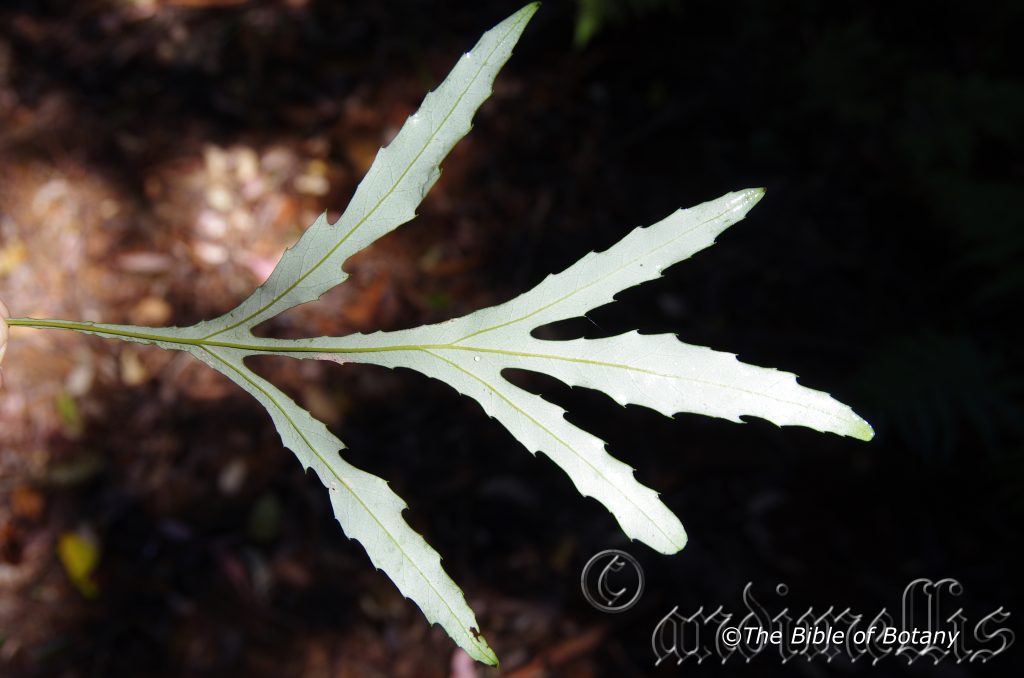
Washpool National Park NSW
Orites excelsus
Classification:
Unranked: Eudicots
Order: Proteales
Family: Proteaceae
Genus: From Orios, which is Ancient Greek for of the mountains and for Native which is Ancient Greek for a resident of. It refers to plants, which prefer to grow on mountains or at higher altitudes.
Species: From Ex which is Latin for out of the ordinary, outside or external and Celsus which is Latin for high. It refers to trees, which are much taller than other species in the genus.
Common Name: Southern Silky Oak.
Distribution:
Orites excelsus is found east of the Great Dividing Range south from the Brisbane Valley in southern Queensland to Newcastle in central coastal New South Wales.
There are 2 disjunct populations in north Queensland north and south of Cairns.
https://avh.ala.org.au/occurrences/search?taxa=Orites+excelsus#tab_mapView
Habitat Aspect Climate:
Orites excelsus prefers full sun to dappled shade. It grows in or adjacent to cool subtropical rainforests, riparian rainforests and cool well developed temperate rainforests at higher altitudes. The altitude ranges from 100 meters ASL to 750 meters ASL in New South Wales and from 1000 meters ASL to 1500 meters ASL in northern Queensland.
The temperatures range from minus 3 degrees in August to 35degrees in February.
The rainfalls range from lows of 750mm to an average 3000mm annually.
Soil Requirements:
Orites excelsus prefers better quality sandy loams to medium clays or fine to medium silts. The soils are usually derived from decomposed brown basalts, black basalts, shales, fatty sandstones or alluvial deposits. The soils pH. ranges from 5pH to 6.5pH. It does not tolerate waterlogged soil. Non saline soils to moderately saline soils are tolerated.
Height & Spread:
Wild Plants: 10m to 30m by 5m to 10m.
Characteristics:
Orites excelsus’s main trunk is deep grey to deep grey-brown, slightly rough and scaly. The boles measure up to 900mm in diameter. Young branchlets are grey-brown turning pale olive green as they approach the leaves. The branchlets are covered in rusty brown hirsute hairs.
Orites excelsus has alternate simple leaves are oblanceolate to oblong and measure 100mm to 150mm in length by 12mm to 30mm in width. The juvenile leaves are 3 to 5 lobed and measure 150mm to 200mm in length by 60mm to 90mm in width. The juvenile leaves are bright lime green.
The petioles measure 5mm to 20mm in length. The bases are broadly cuneate and slightly oblique while the apexes are obtuse with a mucronate tip. The mature discolourous laminas are lime green to deep sea-green and glabrous on the upper lamina while the lower lamina is white to pale grey. The mid vein is strongly prominent on the lower lamina and is barely visible on the upper lamina. The margins are regularly toothed and undulating.
The conflorescences of Orites excelsus are short raceme born in the leaf axils. The erect racemes measure 50mm to 100mm in length. The perianths and styles are the most prominent parts of the flower. The flowers are paired along the white rachis. The individual perianths are white from the base through to the lobes which are very irregular. The perianth is glabrous externally and internally. The perianth and lobes measure 6mm to 8mm in length. The lobes are strongly recurved and free.
The style and stigma are white. The lateral pollen presenter is white. The lateral style and ovary measure 6mm to 8mm in length. The ovary is densely covered in rusty-red hirsute hairs. The flowers appear from July to September.
Orites excelsus’s fruit is a flat ellipsoidal follicle. The glabrous follicles turn deep red-brown as they ripen. The follicles measure 20mm to 30mm in length by 8mm to 10mm in width. The flat grey oval seeds measure 5mm to 9mm in length by 4mm to 5mm in width. There is a 2.5mm by 0.6mm pale grey papery wing surrounding the seed.
Wildlife:
The flowers are a great attraction for small and medium size nectar eating birds, butterflies and native flies.
Cultivation:
Orites excelsus is a beautiful dense foliage upright shaped tree for medium to large gardens. It is suitable in warm temperate to cool tropical areas in the mountains. It is a very reliable and blooms over a long period. As a garden subject it will grow from 12 meter to 15 meters in height by 9 meter to 13 meters in diameter when cultivated in the open. It is fast growing, drought and cold tolerant down to at least minus 4 degrees.
In Native gardens it can be used for attracting smaller birds like silver eyes or butterflies, native bees, native flies or native beetles.
It is a very compact dense foliage plant for starting a rainforest setting and will stand out because of its colour and beautiful shaped leaves on juvenile trees when planted amongst other plants. To highlight the colour, select smaller leaf plants with deep green leaves. It can be used in more formal or English style gardens because it has a naturally neat rounded appearance that needs very little attention.
Propagation:
Seeds: Orites excelsus’s seeds directly into a seed raising mix. Cover them with 5mm of fine sand and keep moist not wet. Place the tray in a warm semi shaded position. When the seedlings are 25 to 50 mm tall, prick them out and plant them into 50mm native tubes using a good organic mix.
Once the seedlings reach 150 to 200mm in height, nip the tips out before planting them out into their permanent position.
Fertilize using seaweed, fish emulsion or organic chicken pellets soaked in water on an alternate basis. Fertilize every two months once planted out until the plants are established then annually in early September to October to maintain health, vitality and better flowering.
Further Comments from Readers:
Hi reader, it seems you use The Bible of Botany a lot. That’s great as we have great pleasure in bringing it to you! It’s a little awkward for us to ask, but our first aim is to purchase land approximately 1,600 hectares to link several parcels of N.P. into one at The Pinnacles NSW Australia, but we need your help. We’re not salespeople. We’re amateur botanists who have dedicated over 30 years to saving the environment in a practical way. We depend on donations to reach our goal. If you donate just $5, the price of your coffee this Sunday, We can help to keep the planet alive in a real way and continue to bring you regular updates and features on Australian plants all in one Botanical Bible. Any support is greatly appreciated. Thank you.
In the spirit of reconciliation we acknowledge the Bundjalung, Gumbaynggirr and Yaegl and all aboriginal nations throughout Australia and their connections to land, sea and community. We pay our respect to their Elders past, present and future for the pleasures we have gained.
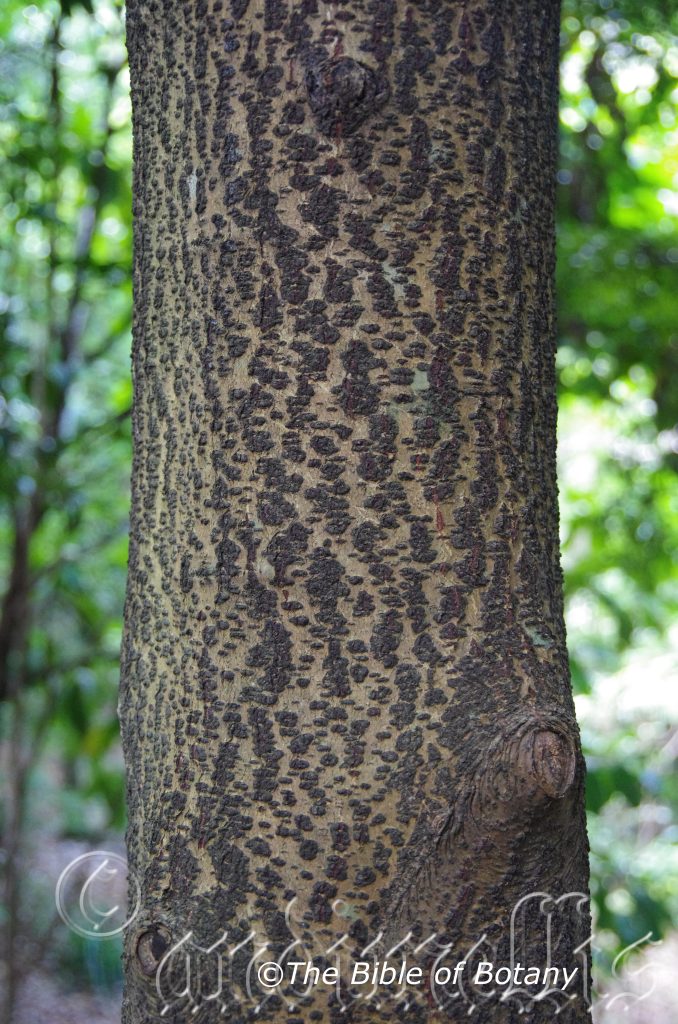
Mount Cootha Botanic Gardens Qld.
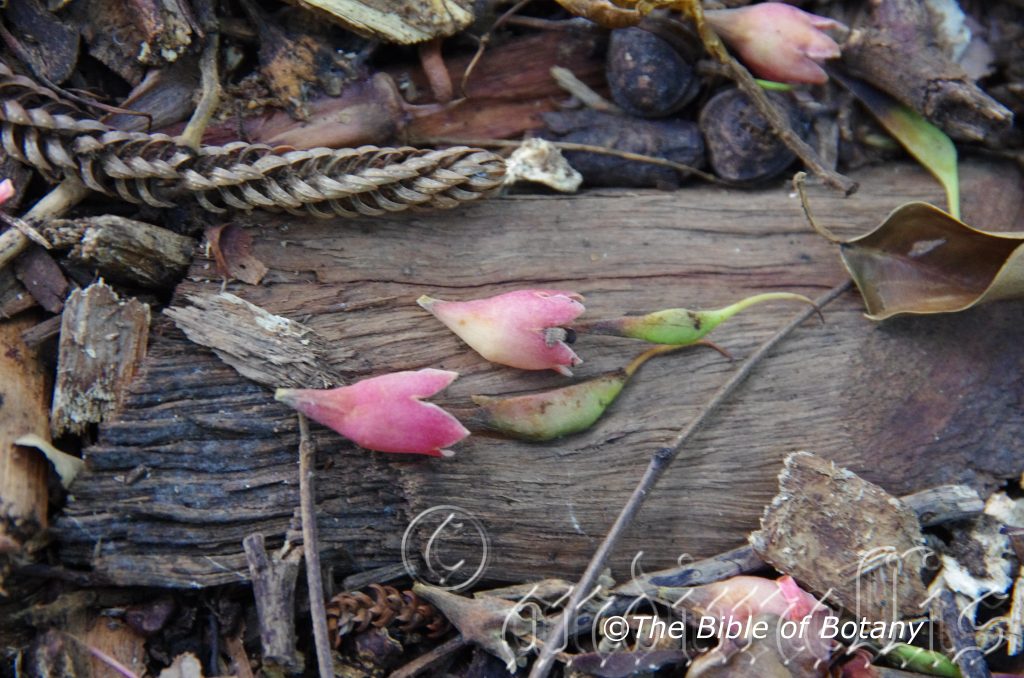
Mount Cootha Botanic Gardens Qld.
Ormosia ormondii
Classification:
Unranked: Eudicots
Class: Rosids
Order: Fabales
Family: Fabaceae
Subfamily: Faboideae
Tribe: Sophoreae
Genus: From Ormos, which is Ancient Greek for a cord or chain. It refers to fruiting pods, which hang down on long thick pedicel cord like ropes.
Species: Is named in honour of Mr. Ormond.
Common Name: Red Bean or Yellow Bean. (Yellow Bean is a miss name as the closely related species from Africa has yellow seeds not the red seeds like the Australian species.)
Distribution:
Ormosia ormondii is found east of the Great Dividing Range south from Starck National Park to Babinda with an outlying population further north between Yaraden National Park and Lochart River National Park.
https://avh.ala.org.au/occurrences/search?taxa=Ormosia+ormundii#tab_mapView
Habitat Aspect Climate:
Ormosia ormondii prefers full sun to dappled shade. It grows in or adjacent to well-developed rainforests riverine or riparian rainforests close to the coast. The altitude ranges from 5 meter ASL to 400 meters ASL.
The temperatures range from 8 degrees in August to 36 degrees in February.
The rainfalls range from lows of 1650mm to an average 3200mm annually.
Soil Requirements:
Ormosia ormondii prefers course sand, sandy loams to medium clays. The soils are usually derived from decomposed brown basalts, black basalts, heavier sandstones or granites. The soils pH. ranges from 5pH to 6.5pH. It does not tolerate waterlogged soils. Non saline soils to moderately saline soils are tolerated.
Height & Spread:
Wild Plants: 10m to 25m by 5m to 10m.
Characteristics:
Ormosia ormondii grows as an erect medium tree with a deep grey to deep grey-brown, rough, scabrous trunk. The trunk measures up to 800mm in diameter. Young branchlets are khaki to grey-brown turning pale olive green as they approach the leaves. The branchlets are glabrous.
Ormosia ormondii’s compound leaves are whorled in clusters along the branchlets. The narrow elliptical to oblong-elliptical leaflets measure 70mm to 210mm in length by 35mm to 80mm in width. The slightly asymmetrical discolourous laminas are deep sea-green and glabrous on the upper lamina while the lower lamina is paler. The mid vein is slightly prominent on the lower lamina and is distinctly visible on the upper lamina being much paler. The margins are entire, flat or curve slightly upwards from the mid vein. The oblique base is cuneate while the apex is acute with a blunt obtuse tip. The petioles have e groove on the upper surface and are wrinkled. They measure 8mm to 12mm in length.
The inflorescences of Ormosia ormondii are panicles born in the leaf axils. The pendulant panicles are much branched. The calyx tubes measure 6mm to 7mm in length while the 5 lobes measure 4.5mm to 5.5mm in length. The lobes apexes are obtuse and covered in white puberulent hairs externally. The individual corollas are variable, deep pink to carmine pink from the base through to the lobes which are very regular. The corolla is glabrous externally and internally. The corolla and lobes measure 20mm to 26mm in length by 9mm to 11mm in width. The lobes are weakly recurved. The side lobes have an acute apex while the top and bottom lobes have an obtuse apex.
The style and ovary are variable, pale pink at the base turning a deeper pink as it approaches the stigma. The stigma is deep green. The style and ovary measure 26mm to 32mm in length. The 10 stamens are white to very pale pink and measure 26mm to 30mm in length.
Ormosia ormondii’s fruit is a flat pod. The pods measure 50mm to 90mm in length by 20mm to 25mm in diameter. The pods are constricted between the seeds. The calyx is persistent at the base of the pods. The pale green pods turn deep brown-black externally and fawn to pale khaki internally as they ripen.
The glossy, red, flattened oval seeds measure 10mm to 12mm in diameter by 7mm to 9mm thick. The seeds are poisonous.
Wildlife:
The flowers are a great attraction for all nectar eating birds.
Cultivation:
Ormosia ormondii’s is a beautiful dense foliage dome shaped small shrub with magnificent pink flowers that have been largely ignored by home gardeners in small, medium and large gardens. It would suit most gardens in most areas from the tropical monsoons to warm frost free temperate areas. As a garden subject it will grow from 8 meter to 15 meters in height by 8 meter to 12 meters in diameter when cultivated in the open.
It is fast growing though it has not been tried in the south, where it should do well.
It is a very compact dense foliage plant for a bush setting and will stand out because of its flower colour when planted amongst other plants. To highlight the colour, select smaller leaf plants with pale green leaves.
Being a legume it will help add nitrogen to the soil. It is great plant for the establishment of small orchids and epiphytic ferns on while the bark will be covered in lichens and mosses in the long term.
Propagation:
Seeds: Ormosia ormondii seeds directly into a seed raising mix. Cover them with 5mm of fine sand and keep moist not wet. Place the tray in a warm sunny position. When the seedlings are 25mm to 50mm tall, prick them out and plant them into 50mm native tubes using a good organic mix.
Once the seedlings reach 150mm to 200mm in height, nip the tips out before planting them out into their permanent position.
Fertilize using seaweed, fish emulsion or organic chicken pellets soaked in water on an alternate basis. Fertilize every two months once planted out until the plants are established then annually in early September to October to maintain health, vitality and better flowering.
Further Comments from Readers:
Hi reader, it seems you use The Bible of Botany a lot. That’s great as we have great pleasure in bringing it to you! It’s a little awkward for us to ask, but our first aim is to purchase land approximately 1,600 hectares to link several parcels of N.P. into one at The Pinnacles NSW Australia, but we need your help. We’re not salespeople. We’re amateur botanists who have dedicated over 30 years to saving the environment in a practical way. We depend on donations to reach our goal. If you donate just $5, the price of your coffee this Sunday, We can help to keep the planet alive in a real way and continue to bring you regular updates and features on Australian plants all in one Botanical Bible. Any support is greatly appreciated. Thank you.
In the spirit of reconciliation we acknowledge the Bundjalung, Gumbaynggirr and Yaegl and all aboriginal nations throughout Australia and their connections to land, sea and community. We pay our respect to their Elders past, present and future for the pleasures we have gained.
Orthoceras strictum
Classification:
Unranked: Monocots
Order: Asparagales
Family: Orcidaceae
Subfamily: Malaxideae
Genus: From Orth’s, which is a Greek prefix for upright, straight, right or correct and Keros which is Ancient Greek for a horn. It refers to the two upper petals on orchids, which appear like erect horns.
Species: From Stricta, which is Latin for to draw tight. It refers to organs, which are stiff and rigid.
Common Name: Bird’s Mouth Orchid.
Distribution:
Orthoceras strictum is found in an isolated population near Dalrymple in northern Queensland then south from Maryborough in central coastal Queensland to the Grampians and the Narracoorte Plains in southern western Victoria and south eastern South Australia. It is found on and east of the Great Dividing Range to the coast.
It is also found in an area bounded by Willow Creek in the Flinders ranges south to Mount Wedge on Eyre Peninsula and Kangaroo Island but is absent from York Peninsula.
In Tasmania it is found on the main Bass Strait Islands of King Island and Flinders Island group and down the west coast to Strahan and Roseberry and on the east coast it is found south to Mount Brown with a single population inland at Schoutan Island.
https://avh.ala.org.au/occurrences/search?taxa=Orthoceras+strictum#tab_mapView
Habitat Aspect Climate:
Orthoceras strictum prefers medium shade to dappled shade. It grows in moist to wet sites in open grassy habitats in open woodlands or open forests. Its altitude ranges from 25 meters ASL to 920 meters ASL.
The temperatures range from 1 degree in August to 36 degrees in January.
The rainfall ranges from lows of 300mm to 3200mm average per annum.
Soil Requirements:
Orthoceras strictum grows as an epiphyte on trees that prefer better quality peaty sands, sandy loams to medium clays, podzolic soils or light silts to heavy silts. The soils pH ranges from 4pH to 7.6pH are preferred. The host trees tolerances to waterlogged soils varies greatly. Non saline soils to moderately saline soils are tolerated.
Height & Spread:
Wild Plants: 0.2m to 0.6m by 0.1m to 0.2m when in flower.
Characteristics:
Orthoceras strictum grows as a slender terrestrial orchid.
Orthoceras strictum has 2 to 5, erect linear to filiform leaves. The leaves measures 100mm to 300mm in length by 1mm to 3mm in width. The bases are sheathing while the apexes are acute. The concolourous, coriaceous leaves are grass-green and glabrous. The laminas are channelled while the margins are entire.
The inflorescences of Orthoceras strictum are long stiff, erect spikes. The spikes usually have 2 to 9 individual flowers that measure 10mm in width. The spikes measure 300mm to 600mm in length. The ovary which appears to be part of the pedicel is slightly swollen at the base. The large floral bract is clasping at the base and extends up the rear of the flower has an acute apex and is yellowish-green, reddish-green deep burgundy-brown or blackish. The bract measures 15mm to 30mm in length by 4.5mm to 12mm in width. The rigid spike is yellowish-green, reddish-green, deep burgundy-brown or blackish. The pedicels measure 0.5mm to 1mm in length.
The glabrous dorsal sepal is broad ovate and is yellowish-green, reddish-green, deep burgundy-brown or blackish. The strongly cupuliform dorsal sepal measures 10mm to 12mm in length by 8mm to 10mm in width.
The yellowish-green, reddish-green, deep burgundy-brown or blackish lateral sepals are glabrous. The linear lateral sepals margins are entire while the apexes are usually tapering or at times clavate. The sepals measure 20mm to 40mm in length by 0.8mm to 1mm in width.
The lateral petals are reddish-maroon to deep burgundy almost black, glabrous and glossy with broadly blunt acute to obtuse or at times notched apexes. The lateral petals measure 6mm to 8mm in length by 3mm to 4mm in width.
The cordate labellum gently decurve and is trilobed and measures 9mm to 12mm in length by 3.5mm to 5mm in width. The reddish-maroon to deep burgundy almost black, glabrous and glossy labellum has a yellowish-green central patch. The mid lobe decurve downwards on the apical half while the margins recurve upwards. The elliptic to ovate labellum has a large callus at the base. The lateral lobes measure 4mm to 5mm in length. The callus has 2 basal swellings and another pale yellow one at the base of the mid lobe. The flowers appear from November to January.
Orthoceras strictum’s capsules are unknown to the author.
Wildlife:
Orthoceras strictum’s fertilization is carried out by at least 4 specie of ants. Jones in Orchids of Australia and New Zealand 1975.
The orchids are also visited by native bees and several species of hover flies and pollen wasps. The exotic honey bee odour marks its flowers which prevents native bees from visiting the flowers like a first in best dress scenario.
Cultivation:
Orthoceras strictum is an unusual terrestrial orchid to grow in the garden. If you are lucky enough to have it growing It is worthwhile preserving with in situation. The best method to establish a colony is to mark the area with stakes where the plants are known to occur. Use local mulch to lightly top dress the area on an annual basis.
Orchid enthusiasts have found this orchid to be less temperamental than most ground orchids to keep in the bush house. Orthoceras strictum can be grown in pots in a freely draining, sandy mix with organic matter incorporated. It requires good air circulation in a protected position beneath 30mm to 50mm shade cloth during the growing period from mid-winter to late summer. During the growing period the plants must be kept moist not wet at all times. After the leaves have died back to the tuber, the pots should be allowed to dry out completely and not watered until the following July.
Propagation:
Seeds: All orchids and ferns that are declared rare, vulnerable or endangered are protected by Federal and State Laws and must not be removed from the wild unless you are a land developer, mining company or main Roads department etc. This includes bulbs, roots, leaves and flowers. No part of any plant can be removed from Federal, State or Local Government land without the prior permission of the authority and this includes the spore.
1. Obtain relevant materials
The first step in growing orchid from seed will be sourcing and having at the ready all materials that will be required in the propagation process.
This includes all of the following:
Unripe orchid seed capsule. If there are 2 capsules secure the second capsule immediately after the first capsule splits or if only one capsule as soon as it changes colour.
Orchid gelling medium with agar which can be purchased from an orchid society or a specialist nursery.
Distilled water
Cooking pot
Spoon
Oven-safe glass or polypropylene containers with lids
Sealable bags
Clean, sterilized cutting board
Rubber gloves
Paper towels
Tweezers or forceps
70 percent ethanol
Bleach
Scalpel or sharp knife
Planting pot
Orchid compost
Length of wire metal
Plastic spray bottle.
deep petri dishes or sterile jars.
2. Prepare agar medium. The agar medium is a special orchid gelling mixture that distilled water will be added to distilled water.
To prepare the medium, mix equal parts of orchid gelling medium with distilled water in a cooking pot.
Place the pot on a stove and bring the mixture to boil for while stirring continuously for two minutes.
Pour the mixture into the petri dishes glass or propylene containers while ensuring not to fill the containers above 20 percent of their volume.
Loosely replace the lids to the containers. Sterilize the containers by heating them up in a microwave oven for between 2 to 3 minutes.
Spray 70 percent ethanol into a sealable bag to create a sterile environment. Transfer the heated containers into the sealable bag.
Allow the containers to cool a bit before tightening their lids and then sealing the bag. Leave the containers to stand for a few days until the mixture solidifies.
3. Prepare seed capsule and work surface
Place an open pot of water on a stove and bring to boil. Place the cutting board in the oven and sterilize.
Put on rubber gloves and sterilize the forceps, and scalpel with 70 percent ethanol.
Insert the seed capsule into a bowel filled with bleach for about fifteen minutes.
Sterilize seed capsule again with 70 percent ethanol and place on grill.
Using the sterilized scalpel, cut open the seed capsule to reveal the seeds. Using a scalpel or sharp knife, scrape out the seeds from the capsule unto an ethanol soaked paper towel.
4. Flasking of the seed
Take out the petri dishes or glass jars containers holding the agar medium. Over the steam, open up the containers and transfer seeds from the ethanol soaked paper towel into the individual containers using the sterilized forceps.
The amount of seeds will determine the number of containers required. Replace the lid of the containers and place them on a window sill that receives indirect sunlight.
5. Wait and exercise patience
All that can be done at this point is to wait until the seeds germinate. The amount of time that this might take varies and is dependent on the particular species.
Generally, the time can range from a few months to a few years. During this period of waiting, ensure the containers are free from contamination to ensure that germination is not disrupted.
6. Emergence of protocorms
Protocorms are tuber-shaped bodies with rhizoids that are produced by the young seedlings of various orchids. Protocorms represent the embryonic form of the orchid plant.
Their emergence after the period of waiting at an affirmation that everything in the propagation process is on track.
7. Transflask orchid seedlings is done after they have developed roots
Upon the emergence of the protocorms, consistently observe the growth of the seedlings. At the point when the seedlings appear to overcrowd the flask, transflasking should be carried out, typically within 30 and 60 days.
* This is done by removing individual seedlings using sterilized tweezers from the original containers and placing them in new containers also filled, in a proportion similar to the original, with agar medium. 6 to 8 in a standard petri dish or 1or 2 to a test tube
8. Transplant seedlings into planting pots
On the presumption that there are no disruptions to the plant growth, the seedlings will eventually outgrow the containers.
At this point, they are to be transplanted into planting pots. A good rule of thumb to determine when they are ready to be transplanted is when the seedlings have developed roots that have grown up to the length of one-quarter of an inch.
To transplant, prepare a planting pot or other container for receiving the seedling by majorly filling it up with coarse fir bark and possibly some slightly moist orchid compost mixture containing perlite, fine charcoal, redwood bark shavings, etc.
To extract the seedlings, submerge the containers in warm water to help loosen the agar gel.
Once the agar medium is softened, twist a piece of metal to form a loop and in turn, use it to carefully pull out the seedlings from the container. It is best done if the agar and seedling can be removed together.
The seedlings can be further rinsed in lukewarm water to remove any excess agar mixture still stuck to them.
Following this, the seedlings can now be planted into the prepared pot with at least 50mm of space between each individual seedling.
9. Positioning the orchid
The seedling once fully transplanted should be placed in a location that is warm with good indirect sun light.
Slowly position the pots into an area that closely assimilates the conditions it will be growing under.
The choice as to whether the plant should be exposed to full sun or in direct sunlight will be dependent on the particular orchid specie.
10. Subsequent care of the plant
After the first week, the seedling can be misted several times a day and watered just once a week.
A guide in watering the plant will be using the dryness of the fir back that is, water the plant until the fir back is completely moistened and wait till it has completely dried out before watering again.
Do not fertilize until the seedlings until they have fully established themselves.
Fertilize using seaweed, fish emulsion or organic chicken pellets soaked in water on an alternate basis. Fertilize every two months until it is established then annually in early September to October to maintain health, vitality and better flowering.
Further Comments from Readers:
Hi reader, it seems you use The Bible of Botany a lot. That’s great as we have great pleasure in bringing it to you! It’s a little awkward for us to ask, but our first aim is to purchase land approximately 1,600 hectares to link several parcels of N.P. into one at The Pinnacles NSW Australia, but we need your help. We’re not salespeople. We’re amateur botanists who have dedicated over 30 years to saving the environment in a practical way. We depend on donations to reach our goal. If you donate just $5, the price of your coffee this Sunday, We can help to keep the planet alive in a real way and continue to bring you regular updates and features on Australian plants all in one Botanical Bible. Any support is greatly appreciated. Thank you.
In the spirit of reconciliation we acknowledge the Bundjalung, Gumbaynggirr and Yaegl and all aboriginal nations throughout Australia and their connections to land, sea and community. We pay our respect to their Elders past, present and future for the pleasures we have gained.
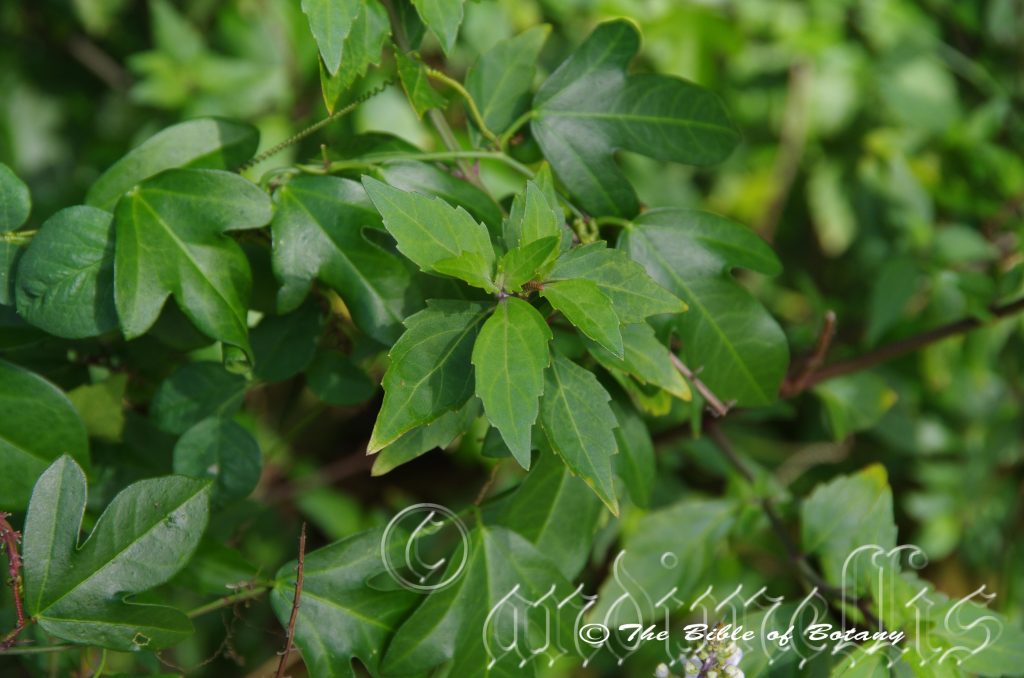
Gleeson Gardens Townsville Qld.
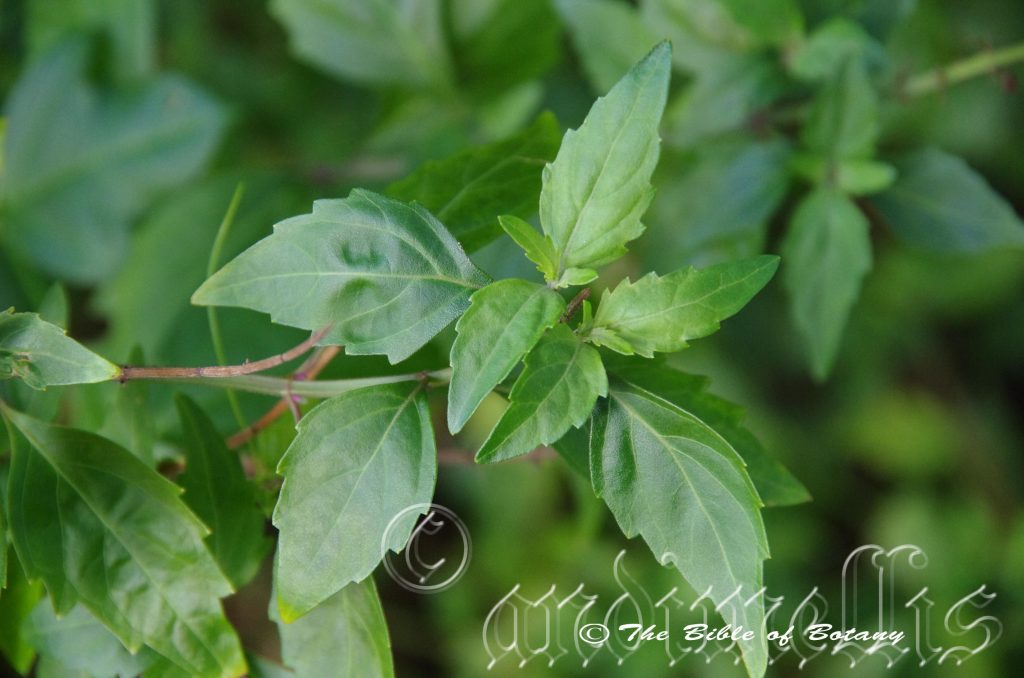
Gleeson Gardens Townsville Qld.
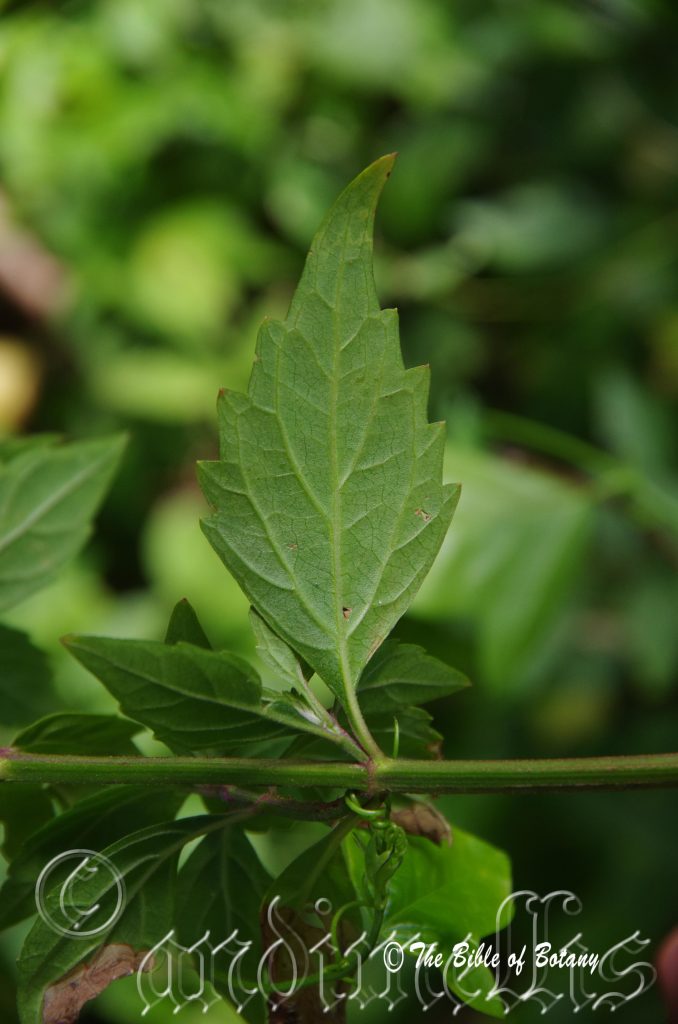
Gleeson Gardens Townsville Qld.
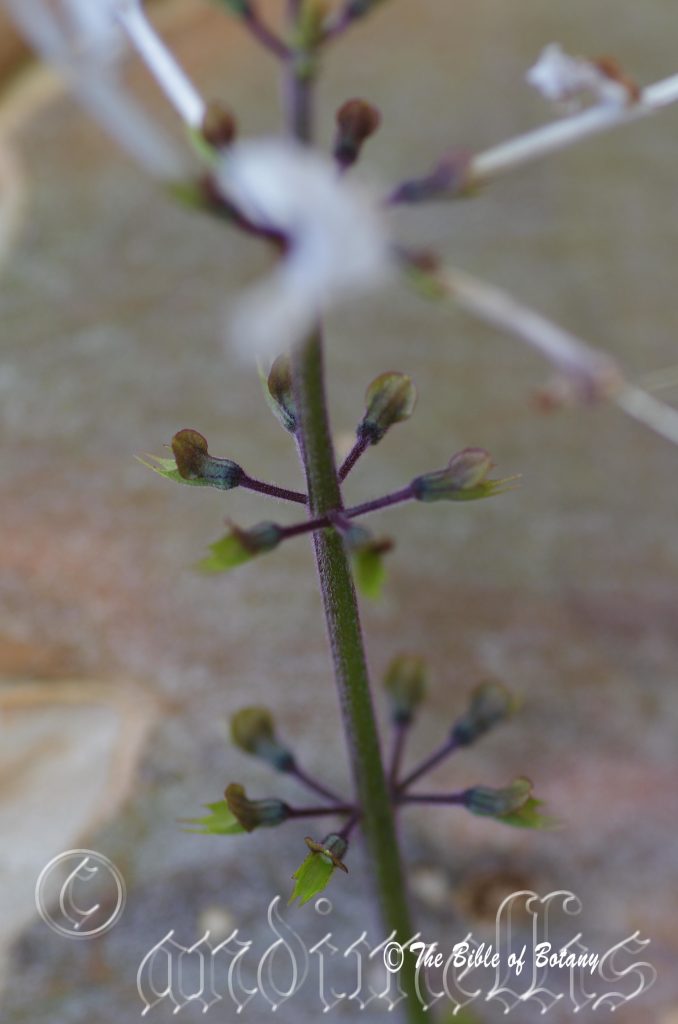
Gleeson Gardens Townsville Qld.
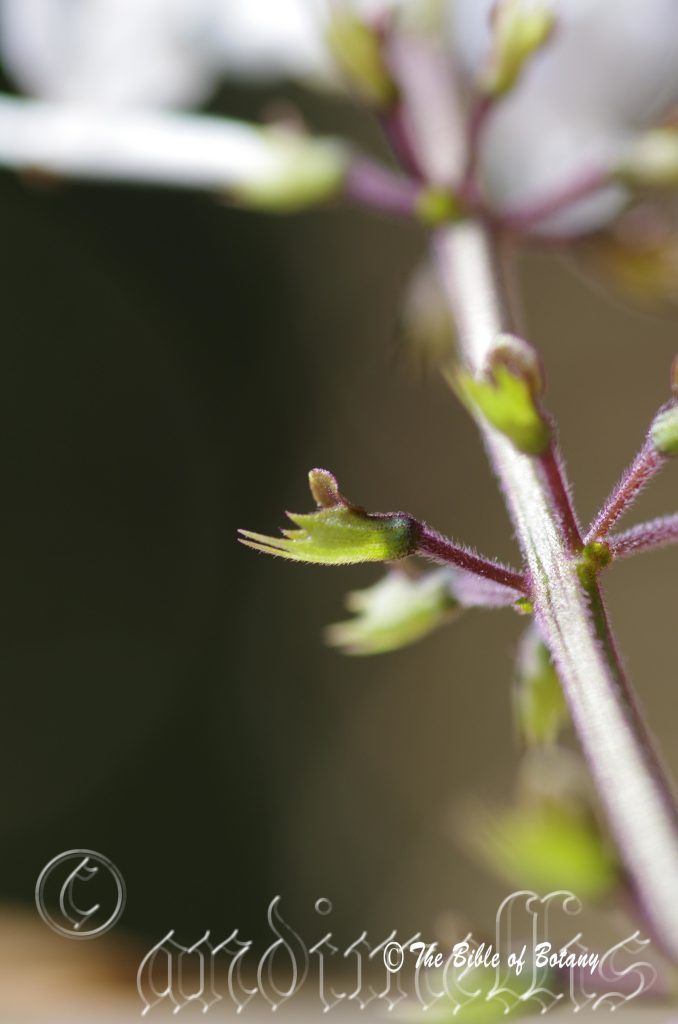
Gleeson Gardens Townsville Qld.
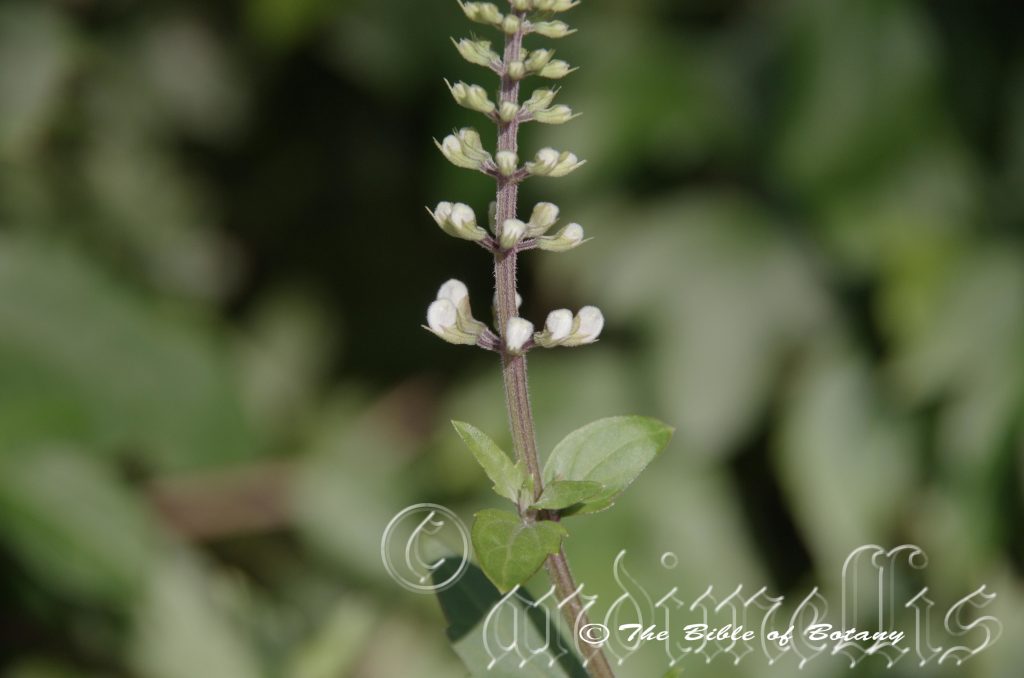
NCBG Coffs Harbour NSW
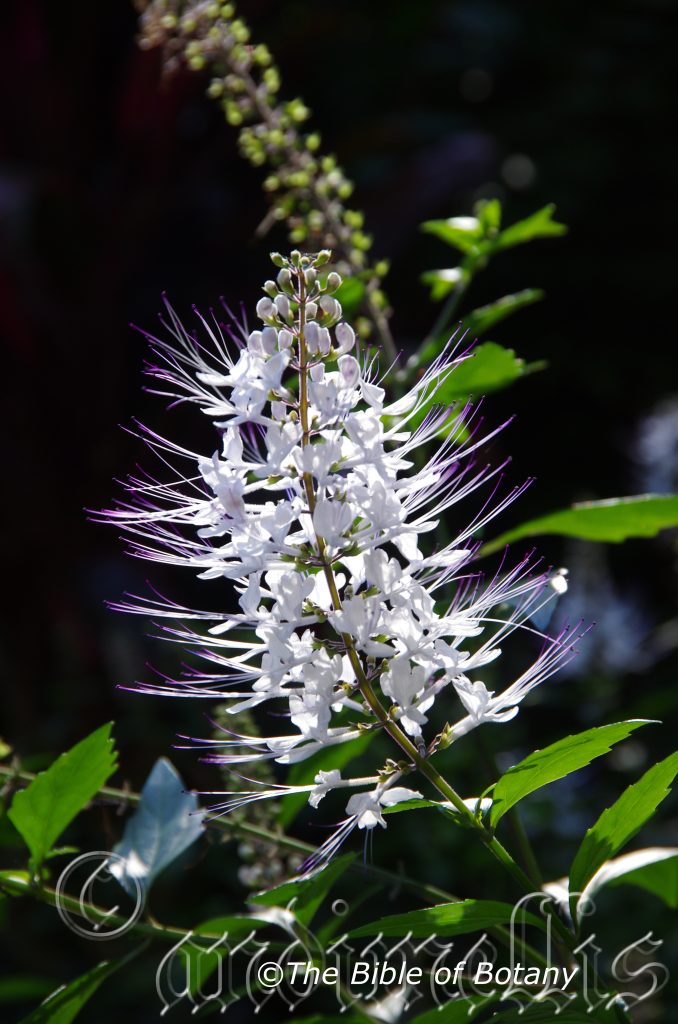
NCBG Coffs Harbour NSW
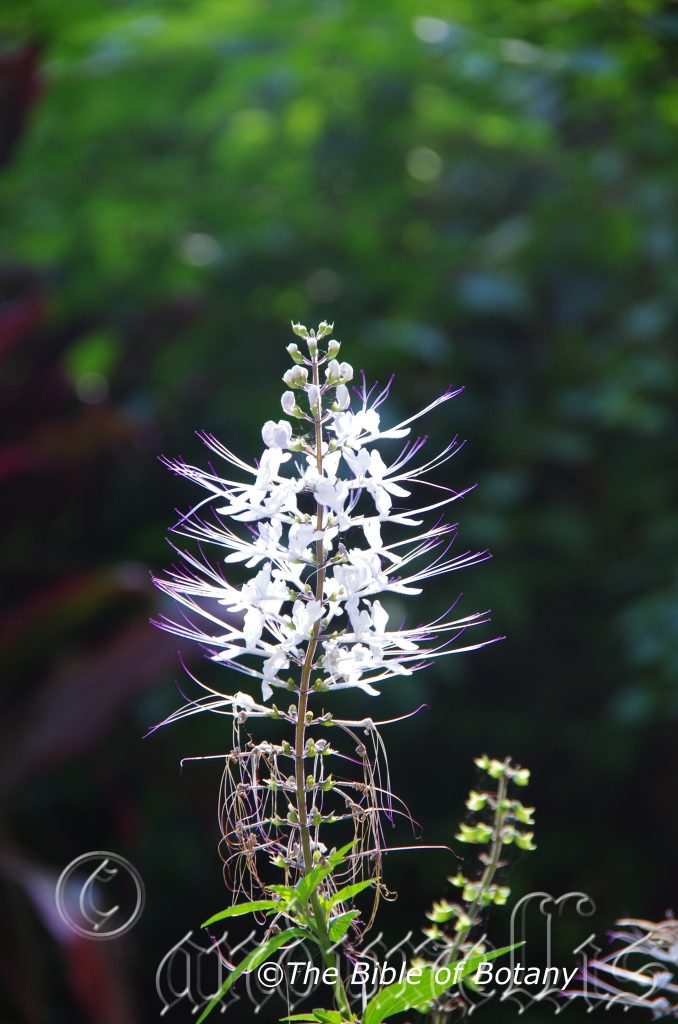
NCBG Coffs Harbour NSW
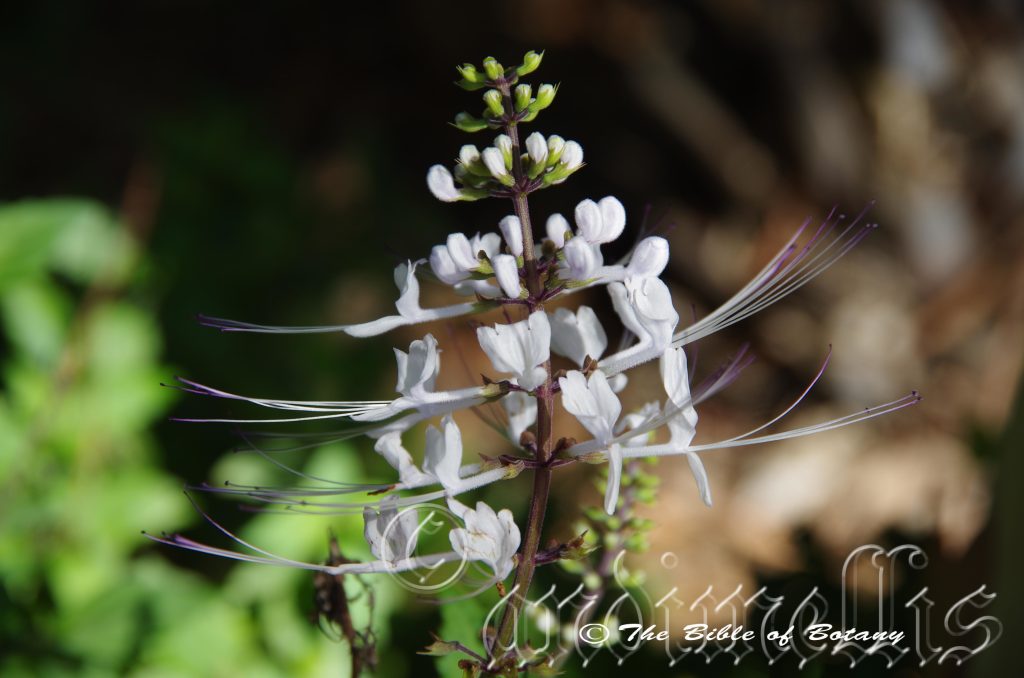
Gleeson Gardens Townsville Qld.

NCBG Coffs Harbour NSW
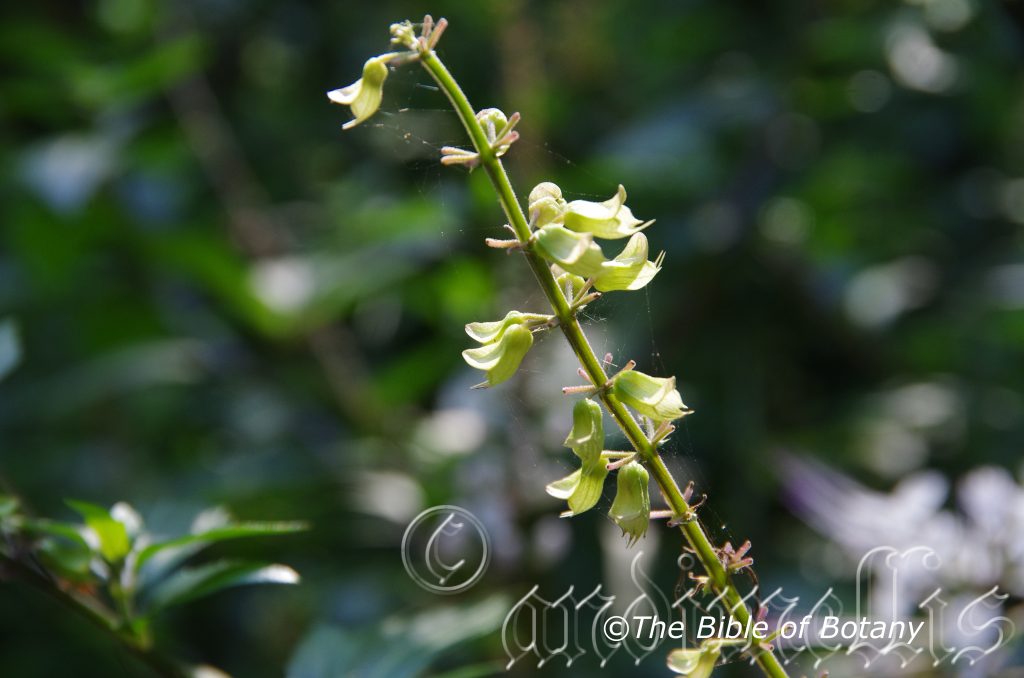
NCBG Coffs Harbour NSW
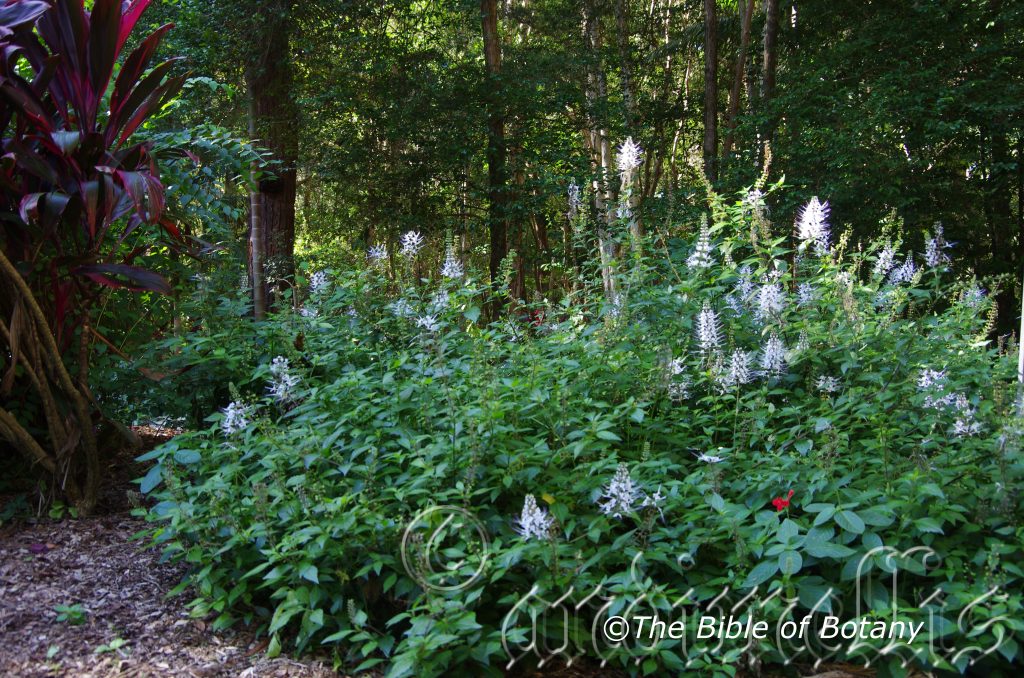
NCBG Coffs Harbour NSW
xxxxxxxxxxxxxxxxxxxxxxxxxxxxxxxxxxxxxxxxxxxxOrthosiphon aristatus
Classification:
Unranked: Eudicots
Class: Asterids
Order: Lamiales
Family: Lamiaceae
Genus: From Orthós, which is Ancient Greek for straight, upright, proper or decent and Síphōn, which is Ancient Greek for a tube. It refers to an organ or structure, which has a distinct straight corolla.
Species: From Aristatus, which is Latin for a long appendage. It refers to organs, which have a long appendage at the apex.
Common Name: Cats Whiskers.
Distribution:
Orthosiphon aristatus is found south from Cohen on Cape York Peninsula to Newcastle in central coastal New South Wales. It is found on and east of the Great Dividing Range to the coast.
https://avh.ala.org.au/occurrences/search?taxa=Orthosiphon+aristatus#tab_mapView
Habitat Aspect Climate:
Orthosiphon aristatus prefers full sun to dappled shade. It grows where gaps appear in riverine forests, mountain rainforests, dry rainforests and well developed littoral rainforests. The altitude ranges from 5 meter ASL to 350 meters ASL.
The temperatures range from minus 3 degrees in August to 34 degrees in February.
The rainfalls range from lows of 850mm to an average 3000mm annually.
Soil Requirements:
Orthosiphon aristatus prefers course sand, sandy loams to medium clays. The soils are usually derived from decomposed brown basalts, black basalts, granites or sandstones. The soils pH. ranges from 5pH to 6.5pH. It does not tolerate waterlogged soils. Non saline soils to moderately saline soils are tolerated.
Height & Spread:
Wild Plants: 0.2m to 0.6m by 0.5m to 0.6m.
Characteristics:
Orthosiphon aristatus grows as a perennial herb with deep grey to deep grey-brown stems. Young branchlets are grey-brown turning deep grey-green as they approach the leaves. The branchlets are sparsely covered in grey hirtellous hairs.
Orthosiphon aristatus’s opposite simple leaves are narrow ovate to ovate or rhomboid and measure 35mm to 160mm in length by 20mm to 45mm in width. The petiole measures 10mm to 60mm in length. The bases are broadly cuneate and slightly oblique while the apexes are obtuse with a mucronate tip. The concolourous laminas are deep sea-green, glabrous and covered in grey hirtellous hairs and sessile glandular hairs. The mid vein and main lateral veins are prominent on the lower lamina and are distinctly visible on the upper lamina. The margins are coarsely toothed, revolute with a decurve apex.
The inflorescences of Orthosiphon aristatus are racemes born from the terminals. The erect racemes are measure 60mm to 120mm in length by 45mm to 55mm in width. The campanulate calyxes are green and measure 2.5mm to 4.5mm in length while the calyx lobes measure 1.5mm to 2mm in length. The corollas, stamens and styles are the most prominent parts of the flower. The individual perianths are variable, white, pale blue, lilac or pale purple from the base through to the lobes which are very irregular. The corolla is glabrous externally and internally. The corolla and lobes measure 10mm to 16mm in length. The upper lobe is weakly recurved and further divides into 4 smaller lobes. The lower lobe is slightly decurve and canoe shaped.
The white, pale blue, lilac or pale purple style is pale pink at the base white at the stigma. The clavate stigma is white. The lateral style and ovary measure 50mm to 60mm in length. The style, ovary and stamens are glabrous. The stamens measure 50mm to 55mm in length and are equal or slightly shorter than the style. The flowers appear from April to October.
Orthosiphon aristatus’s fruit is a flat ellipsoidal capsule. The calyx is persistent on the capsules growing to 6.5mm to 12mm in length. The capsules turn deep brown as they ripen.
Wildlife:
The flowers are a great attraction for small and medium size nectar eating birds, butterflies and native flies.
Cultivation:
Orthosiphon aristatus is a beautiful dense foliaged dome shaped small shrub with very beautiful flowers for small to large gardens. It would suit most small gardens in cool semi subtropical to warm temperate zones. It is a very reliable and blooms over a long period. As a garden subject it will grow from 0.8 meter to 1.2 meters in height by 1 meter to 1.5 meters in diameter when cultivated in the open.
It is fast growing and cold tolerant down to at least minus 4 degrees. It can be pruned heavily to increase bushiness and flowering for the following season. This should be done immediately following the last blooms. Give it a deep watering with our recommended fertilizers over the remainder of the summer months.
There are some varieties around now with deep purple flowers and these contrast well with the pure white forms when mass planted in the garden either in the open or on the edge of a rainforest. It is also quite suitable for moderately shady positions however some flowering will be sacrificed.
It is most suitable for use around swimming pools, sunny courtyards, besides pathways, rockeries, along sandy banks and along drive ways, screens, wind breaks or shelter belts for small native animals in cool arid, sub-tropical and temperate zones.
In Native gardens It can be used for attracting smaller birds like silver eyes or butterflies, native bees, native flies or native beetles.
It is a very compact dense foliaged plant for a moist bush setting and will stand out because of its colour and unusual flowers when planted amongst other plants. To high light the colour, select larger leaf plants with pale green leaves.
It can be used in more formal or English style gardens because it has a naturally neat rounded appearance that needs very little attention. If used in rockeries which have been planted out to highlight other features like rocks, stumps or fish ponds. It should be planted to the rear so as to balance the look because of its size. It can be tip pruned to keep them shorter. It is non-obtrusive easy to maintain yet highly visible when in flower or out of flower.
Propagation:
Seeds: Orthosiphon aristatus’s seeds directly into a seed raising mix. Cover them with 5mm of fine sand and keep moist not wet. Place the tray in a warm sunny position.
When the seedlings are 25mm to 50mm tall, prick them out and plant them into 50mm native tubes using a good organic mix.
Once the seedlings reach 150 to 200mm in height, nip the tips out before planting them out into their permanent position.
Cuttings: Fortunately Orthosiphon aristatus cuttings strike easy and must be used if a particular flower colour is required. Use 100mm to 150mm long semi hardwood cuttings from the present season’s growth. Take them in warmer months of the year. Remove half the leaves from the bottom section being careful not to tear the bark.
1 Prepare the cutting mix by adding two thirds sharp clean river sand, one third peat or one third perlite. These ingredients must be sterilized,
2 Select good material from non diseased plants,
3 Select semi green stems for cuttings. Look for a stem with two or three nodes,
4 Place the cutting on a flat, hard surface, and make a clean cut down one side of the cutting at the base for 10mm with a sharp sterile knife or razor blade. – This scarification of the node will increase the chances of roots emerging from this spot. Now remove all but one or two the leaves, leaving the apex leaves in tact. If the leaves are very large in proportion to the stem, cut off the apical halves.
5 Fill a saucer with water, and place a little medium strength rooting hormone into another container like a milk bottle top. Dip the node end of the cutting into the water and then into the rooting hormone. Tap off any excess hormone,
6 Use a small dipple stick or old pencil to poke a hole into the soilless potting mix. Ensure the hole is slightly larger than the stem diameter and be careful not to wipe the rooting hormone off the cuttings base. Place 2 to 4 cuttings in each of the 50mm native tubes,
7 I like to place the tubes in bucket with holes drilled in the bottom to allow excess water to drain out. A plastic bag that fits over the bucket is ideal to help maintain temperature and moisture. Place in a semi shaded, warm position like under 50mm shade cloth.
8 When the cuttings have struck, open the bag to allow air circulation for a few days to a week,
9 Once hardened off remove the cuttings from the bag and allow to further hardening for a few more days to a week,
10 Transplant into a good potting mix to grow on.
Fertilize using seaweed, fish emulsion or organic chicken pellets soaked in water on an alternate basis. Fertilize every two months until it is established then annually in early September to October to maintain health, vitality and better flowering.
Further Comments from Readers:
Hi reader, it seems you use The Bible of Botany a lot. That’s great as we have great pleasure in bringing it to you! It’s a little awkward for us to ask, but our first aim is to purchase land approximately 1,600 hectares to link several parcels of N.P. into one at The Pinnacles NSW Australia, but we need your help. We’re not salespeople. We’re amateur botanists who have dedicated over 30 years to saving the environment in a practical way. We depend on donations to reach our goal. If you donate just $5, the price of your coffee this Sunday, We can help to keep the planet alive in a real way and continue to bring you regular updates and features on Australian plants all in one Botanical Bible. Any support is greatly appreciated. Thank you.
In the spirit of reconciliation we acknowledge the Bundjalung, Gumbaynggirr and Yaegl and all aboriginal nations throughout Australia and their connections to land, sea and community. We pay our respect to their Elders past, present and future for the pleasures we have gained.
Osbeckia australiana
Classification:
Unranked: Eudicots
Unranked: Rosids
Order: Myrtales
Family: Melastomataceae
Genus: Is named in honour of Pehr Osbeck; 1723-1805, who was a Swedish naturalist and explorer where he collected over 600 specimens from south east China for Linnaeus.
Species: From Terra Australis, which is Latin for land of the south. It refers to plants, which were first discovered from the land down under.
Common Name: Native Lasiandra or Fine Leaf Lasiandra.
Distribution:
Osbeckia australiana is mainly found north of the Halls Creek in Western Australia and the Keep River National Park on the western half of the Northern Territory.
https://avh.ala.org.au/occurrences/search?taxa=Osbeckia+australiana#tab_mapView
Habitat Aspect Climate:
Osbeckia australiana prefers full sun to light dappled shade. It grows in or adjacent swamp forests close to rivers, billabongs or permanent soaks. The altitude ranges from 5 meters ASL to 360 meters ASL.
The temperatures range from minus 6 degrees in August to 34 degrees in February.
The rainfalls range from lows of 850mm to an average 3000mm annually.
Soil Requirements:
Osbeckia australiana prefers course sand, sandy loams to light gritty clays or fine to medium silts. The soils are usually derived from decomposed sandstones and granites. The soils pH. ranges from 5pH to 6pH. It does not tolerate waterlogged soils. Non saline soils to moderately saline soils are tolerated.
Height & Spread:
Wild Plants: 1m to 2m by 1m to 2m.
Characteristics:
Osbeckia australiana grows as a medium open or dense foliaged shrub with deep grey to deep grey-green, scabrous stems. Young branchlets are green and are covered in small to large brown blotches. The stems are glabrous to covered in pale grey to white tomentose hairs.
Osbeckia australiana’s opposite, simple leaves are narrow oblong to linear and measure 20mm to 60mm in length by 3mm to 13mm in width. The petiole is sessile to 0.5mm in length. The bases are tapering while the apexes are tapering to acute. The discolourous laminas are deep sea-green and moderately covered in pale grey to fawn hirtellous hairs on the upper laminas while the lower laminas are slightly paler. The margins are entire and curve slightly upwards from the mid-vein. The mid vein with 1 longitudinal vein each side of the main vein is slightly prominent on the lower lamina and is not visible on the upper lamina.
The inflorescences of Osbeckia australiana are born singularly from the leaf axils. The flowers measure 40mm to 45mm in diameter. The hypanthium is densely covered in clumps of long white hirsute hairs. The petals are broadly spathulate to ovoid and glabrous. The 5 petals measure 18mm to 22mm in length by 13mm to 18mm in width. The lobes apexes are obtuse and undulating.
The 10 stamens are born 5 on one side, 4 on the other side and 1 below the style. The filaments measure 7mm to 10mm in length while the elongated anthers measure 6.5mm to 8mm in length. The filaments are deep pink to red-purple and have bright yellow anthers. There is a large gland at the base of the anthers while there is a pore at the apex.
The style is pale pink to red with a pale green stigma. The lateral or curved styles measure 15mm to 20mm in length. The flowers appear from February to September.
Osbeckia australiana’s fruit is a dry globose capsule with a sunken flat disc. The capsules are densely covered in long; white clumps of hirsute. The capsules measure 5.5mm to 7.5mm in length by 6mm to 8mm in diameter. The deep brown seeds are cochleate and measure 0.3mm to 0.5mm in diameter.
Wildlife:
The flowers are a great attraction for butterflies, native flies and native nectar eating flies.
Cultivation:
Osbeckia australiana is a beautiful open foliaged small shrub with lovely pink to purple flowers that is worthwhile growing for its beauty in small tropical and monsoonal gardens. It is a very reliable and blooms over a long period. As a garden subject it will grow from 0.8 meter to 1.2 meters in height by 0.8 meter to 1.2 meters in diameter when cultivated in the open. It is fast growing, drought cold tolerant down to at least minus 4 degrees.
It is most suitable for use around swimming pools, sunny courtyards, besides pathways, rockeries, along wet banks and along drive ways.
Osbeckia australiana would make an outstanding contribution to a moist heath garden. Here It can be used as for its flowers scattered throughout the heath scene. When you design a flat heath garden which this shrub is well suited don’t use contours to display the plants as heath lands are almost always flat or have a slight rise. Plants must be planted close together and be short to 1 meter so you can see over the tallest ones with the exception of one or two plants at the most. These will be feature plants. The idea is to achieve a feeling of expansive flatness and texture. This can be achieved with using the Osbeckia australiana’s flowers and fine foliage and having them contrasting with finer pale green or soft grey to glaucous coloured foliage. Use a lot of procumbent plants like Carpobrotus edulis or any of the Hibbertia species. Mix it with other smaller shrubs so none of them dominate the scene but blend in to give a mosaic of foliage colours that you oversee. Here I immediately think of Actinotis helianthi or Grevillea miniata planted at the edges out of the water for two great contrasting foliages.
Propagation:
Seeds: Osbeckia australiana’s seeds directly into a seed raising mix. Cover them with 5mm of fine sand and keep moist not wet. Place the tray in a warm sunny position. When the seedlings are 25 to 50 mm tall, prick them out and plant them into 50mm native tubes using a good organic mix.
Once the seedlings reach 150 to 200mm in height, nip the tips out before planting them out into their permanent position.
Cuttings: Fortunately Osbeckia australiana cuttings strike easy. Use 100mm to 150mm long tip cuttings or lateral shoots from the present season’s growth. Take them in warmer months of the year. Remove half the leaves from the bottom section being careful not to tear the bark.
1 Prepare the cutting mix by adding two thirds sharp clean river sand, one third peat or one third perlite. These ingredients must be sterilized,
2 Select good material from non diseased plants,
3 Select semi green stems for cuttings. Look for a stem with two or three nodes,
4 Place the cutting on a flat, hard surface, and make a clean cut down one side of the cutting at the base for 10mm with a sharp sterile knife or razor blade. – This scarification of the node will increase the chances of roots emerging from this spot. Now remove all but one or two the leaves, leaving the apex leaves in tact. If the leaves are very large in proportion to the stem, cut off the apical halves.
5 Fill a saucer with water, and place a little medium strength rooting hormone into another container like a milk bottle top. Dip the node end of the cutting into the water and then into the rooting hormone. Tap off any excess hormone,
6 Use a small dipple stick or old pencil to poke a hole into the soilless potting mix. Ensure the hole is slightly larger than the stem diameter and be careful not to wipe the rooting hormone off the cuttings base. Place 2 to 4 cuttings in each of the 50mm native tubes,
7 I like to place the tubes in bucket with holes drilled in the bottom to allow excess water to drain out. A plastic bag that fits over the bucket is ideal to help maintain temperature and moisture. Place in a semi shaded, warm position like under 50mm shade cloth.
8 When the cuttings have struck, open the bag to allow air circulation for a few days to a week,
9 Once hardened off remove the cuttings from the bag and allow to further hardening for a few more days to a week,
10 Transplant into a good potting mix to grow on.
Fertilize using seaweed, fish emulsion or organic chicken pellets soaked in water on an alternate basis. Fertilize every two months until it is established then annually in early September to October to maintain health, vitality and better flowering.
Further Comments from Readers:
Hi reader, it seems you use The Bible of Botany a lot. That’s great as we have great pleasure in bringing it to you! It’s a little awkward for us to ask, but our first aim is to purchase land approximately 1,600 hectares to link several parcels of N.P. into one at The Pinnacles NSW Australia, but we need your help. We’re not salespeople. We’re amateur botanists who have dedicated over 30 years to saving the environment in a practical way. We depend on donations to reach our goal. If you donate just $5, the price of your coffee this Sunday, We can help to keep the planet alive in a real way and continue to bring you regular updates and features on Australian plants all in one Botanical Bible. Any support is greatly appreciated. Thank you.
In the spirit of reconciliation we acknowledge the Bundjalung, Gumbaynggirr and Yaegl and all aboriginal nations throughout Australia and their connections to land, sea and community. We pay our respect to their Elders past, present and future for the pleasures we have gained.
Ottelia ovalifolia
Classification:
Unranked: Monocots
Order: Alismatales
Family: Hydrocharitaceae
Genus: From Ottel-ambel, which is Latinized from the vernacular name of the plant in Malabar.
Species: From Ovalis, which is Latin for an egg shape and Folium, which is Latin for foliage. It refers to leaves, which has the outline of an egg in shape.
Subspecies: Ottelia ovalifolia subsp. chrysobasis. From Básis, which is Ancient Greek or Basis which is Latin for a foundation, base or platform. It refers to the base of the stems, which are a golden-yellow in colour.
Subspecies: Ottelia ovalifolia subsp. ovalifolia. From Ovalis, which is Latin for an egg shape and Folium, which is Latin for foliage. It refers to leaves, which has the outline of an egg in shape.
Common Name: Swamp Lily.
Distribution:
Ottelia ovalifolia subsp. chrysobasis is found in 4 widely isolated populations from the Gibb River, the Lennard River and Perth (this may not have been a naturally occurring plant) in Western Australia and Forked Lagoon near Wernadinga in far north Queensland Gulf country.
Ottelia ovalifolia subsp. ovalifolia is found on the eastern third of mainland of Australia and the lower south eastern corner of Western Australia.
https://avh.ala.org.au/occurrences/search?taxa=Ottelia+ovalifolia#tab_mapView
Habitat Aspect Climate:
Ottelia ovalifolia prefers full sun to very light dappled shade. It grows in nutrient rich stationary to slow flowing water up to 1 meter in depth.
Ottelia ovalifolia subsp. chrysobasis’s altitude ranges from 5 meters ASL to 360 meters ASL.
Ottelia ovalifolia subsp. ovalifolia’s altitude ranges from 15 meters ASL to 1000 meters ASL.
The water temperatures range from 15 degrees in August to 26 degrees in February.
The rainfalls range from lows of 850mm to an average 3000mm annually.
Soil Requirements:
Ottelia ovalifolia prefers coarse sand, sandy loams to light gritty clays or fine to heavy sludges. The nutrient rich soils with high organic matter are usually derived from decomposed sandstones, granites, brown basalts, black basalts, metamorphic rocks or shales. The soils pH. ranges from 5.5pH to 7.5pH. It tolerates waterlogged soils and prefers to grow in freshwater. Non saline soils to moderately saline soils are tolerated.
Height & Spread:
Wild Plants: 0.3m to 1.5m by 0.6m to 2m.
Characteristics:
Ottelia ovalifolia grows as a tufted aquatic perennial or annual that grows in warm, shallow waters.
Ottelia ovalifolia has both submerged and floating leaves. The long, linear submerged leaves are deep grass-green and glossy. The simple floating leaves are elliptical and measure 60mm to 160mm in length by 30mm to 60mm in width. The petiole measures to 100mm to 1000mm in length. The bases are slightly cordate while the apexes are obtuse to bluntly acuminate. The discolourous laminas are deep grass-green to sea-green and glabrous on the upper laminas while the lower laminas are reddish-green maroon, burgundy to deep burgundy-red. The laminas are flat while the margins are entire. The mid vein with 2 longitudinal veins are distinctly visible on the lower lamina and are faintly visible on the upper lamina.
The inflorescences are bisexual and both chasmogamous and cleistogamous born from the base of the tuft leaves.
The cleistogamous flowers are submerged with reduced perianth segments.
The chasmogamous flowers are emergent and measure 50mm to 60mm in diameter. The 2 lobed spathe is thick, tuberculate and ridged. The spathes measure 30mm to 60mm in length. The green outer perianth segments measure 15mm to 23mm in length. The white inner segment is maroon at the base, ovate to orbicular and measures 4omm to 50mm in length.
The yellow stamens are born in 3 groups of 3 to 5.The 6 to 9 bifid styles are linear and yellow. The flowers appear during the warmer months especially in the south and can extend for most of the year in the north.
Ottelia ovalifolia’s developing fruits are capsules are withdrawn below the water surface as they mature. The seeds are finely hairy and measure 2mm to 3mm in length.
Confusing Subspecies Varieties:
Ottelia ovalifolia subsp. chrysobasis’s leaves are slightly more cordate. The white inner segment is yellow at the base.
Ottelia ovalifolia subsp. ovalifolia’s leaves are slightly less cordate. The white inner segment is maroon at the base.
Wildlife:
The flowers are a great attraction for butterflies, native flies and native bees.
Cultivation:
Ottelia ovalifolia makes an excellent water feature plant for smaller fish and frog ponds and dams in sunny situations. Because It can grow in very shallow depressions this makes them ideal for the home garden ponds. It is generally self-seeding, however seed collection is easy from the pond. The seeds germinate very quickly.
When planting it into containers a rich humus mix is required with some dry chicken manure pellets being added to the mix. Cover the container with pebbles to prevent the mix floating into the water and clouding it.
Propagation:
Seeds: The seeds can be sown directly into a seed raising mix. Cover the seeds with 1mm of fine weed free mulch and keep moist by placing the trays in a saucer of water. Place the tray in a warm sunny position. When the seedlings are 30mm to 50mm tall, prick them out and plant them into 125mm squat pots using a good organic mix. Place the trays in water so that the tops of the tubes are covered with at least 100mm of water.
Once the seedlings reach 100mm to 150mm in height It can be transplanted into their permanent position. Alternatively the squat pots can be placed directly into the pond. I like to use a layer of stones over the top of the pots to help prevent the organic matter floating off and clouding the water or worse still nitrifying the water where it continually turns green.
Fertilize using seaweed, fish emulsion or organic chicken pellets soaked in water on an alternate basis. Fertilize every two months until it is established then annually in early September to October to maintain health, vitality and better flowering.
Further Comments from Readers:
Hi reader, it seems you use The Bible of Botany a lot. That’s great as we have great pleasure in bringing it to you! It’s a little awkward for us to ask, but our first aim is to purchase land approximately 1,600 hectares to link several parcels of N.P. into one at The Pinnacles NSW Australia, but we need your help. We’re not salespeople. We’re amateur botanists who have dedicated over 30 years to saving the environment in a practical way. We depend on donations to reach our goal. If you donate just $5, the price of your coffee this Sunday, We can help to keep the planet alive in a real way and continue to bring you regular updates and features on Australian plants all in one Botanical Bible. Any support is greatly appreciated. Thank you.
In the spirit of reconciliation we acknowledge the Bundjalung, Gumbaynggirr and Yaegl and all aboriginal nations throughout Australia and their connections to land, sea and community. We pay our respect to their Elders past, present and future for the pleasures we have gained.
Capalaba Qld.
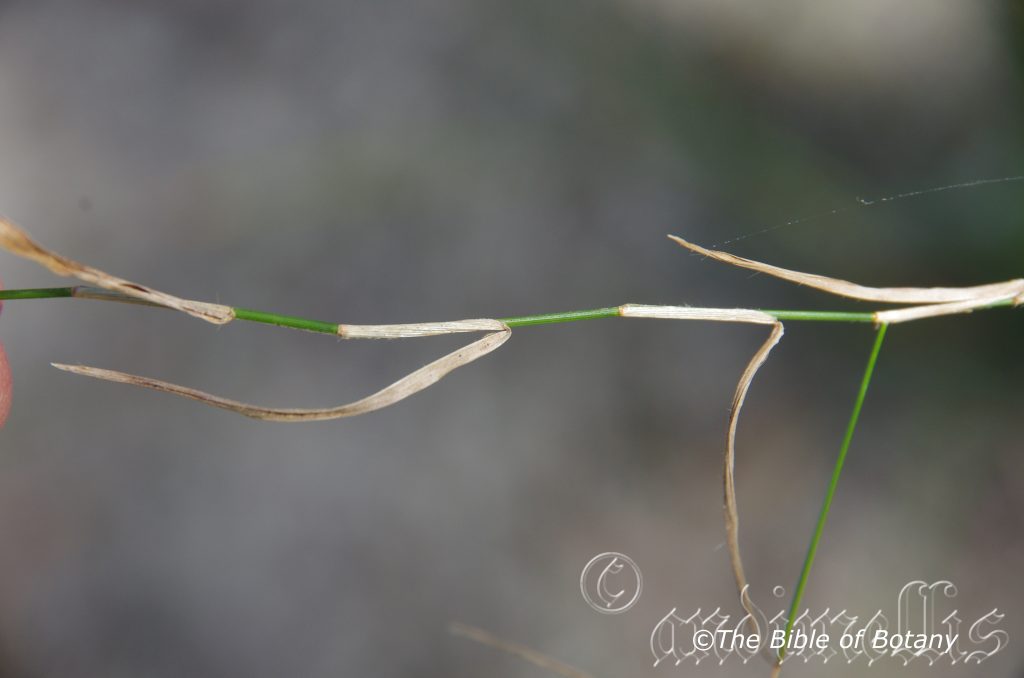
Capalaba Qld.
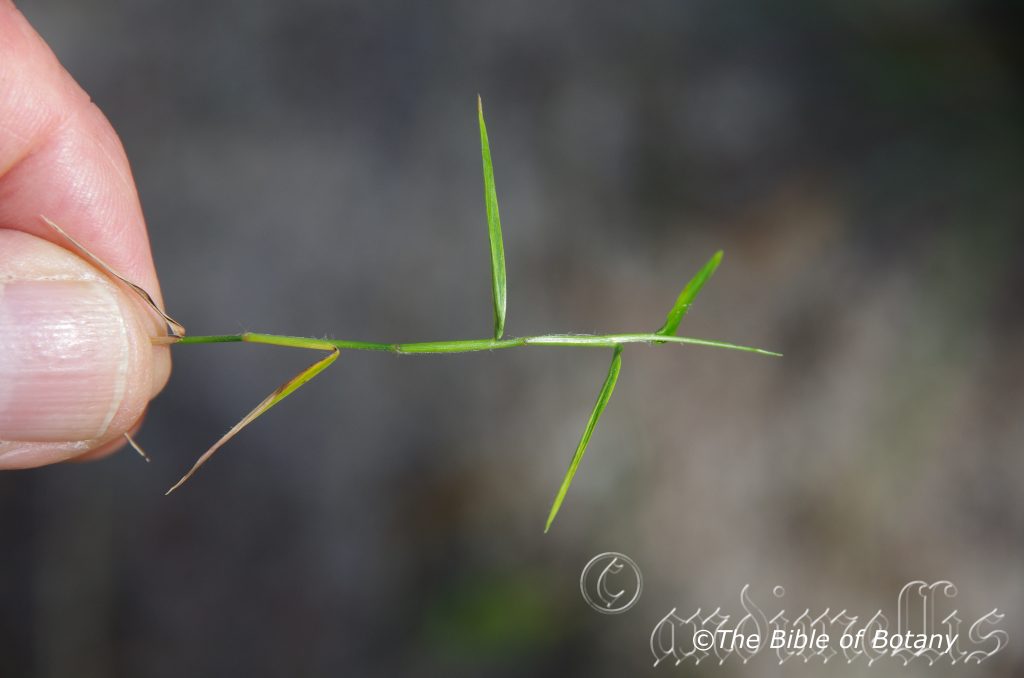
Capalaba Qld.
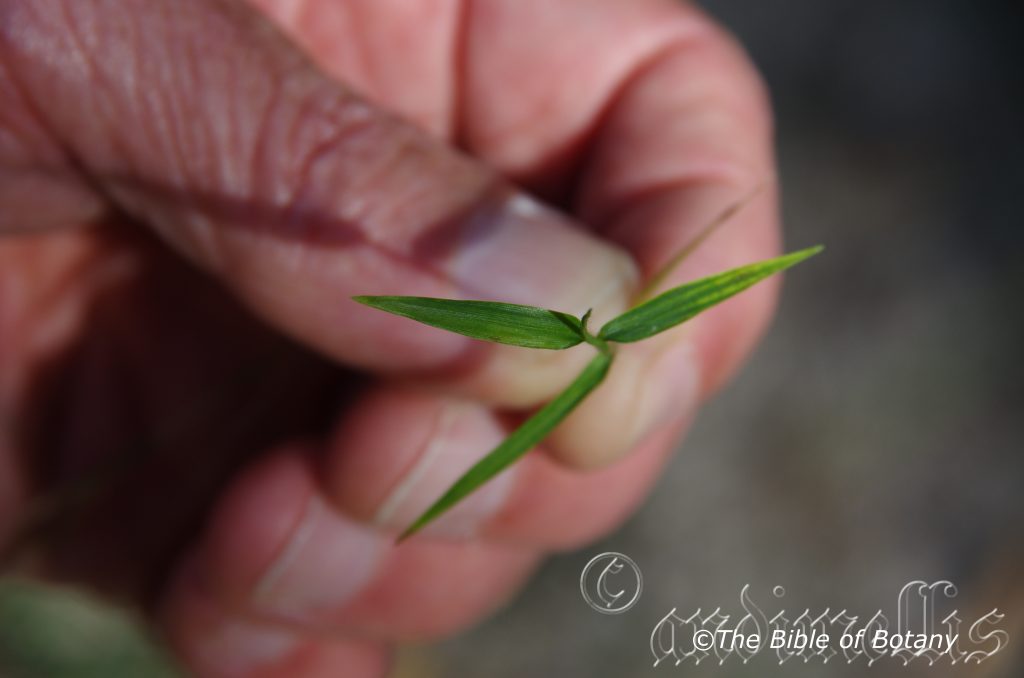
Capalaba Qld.
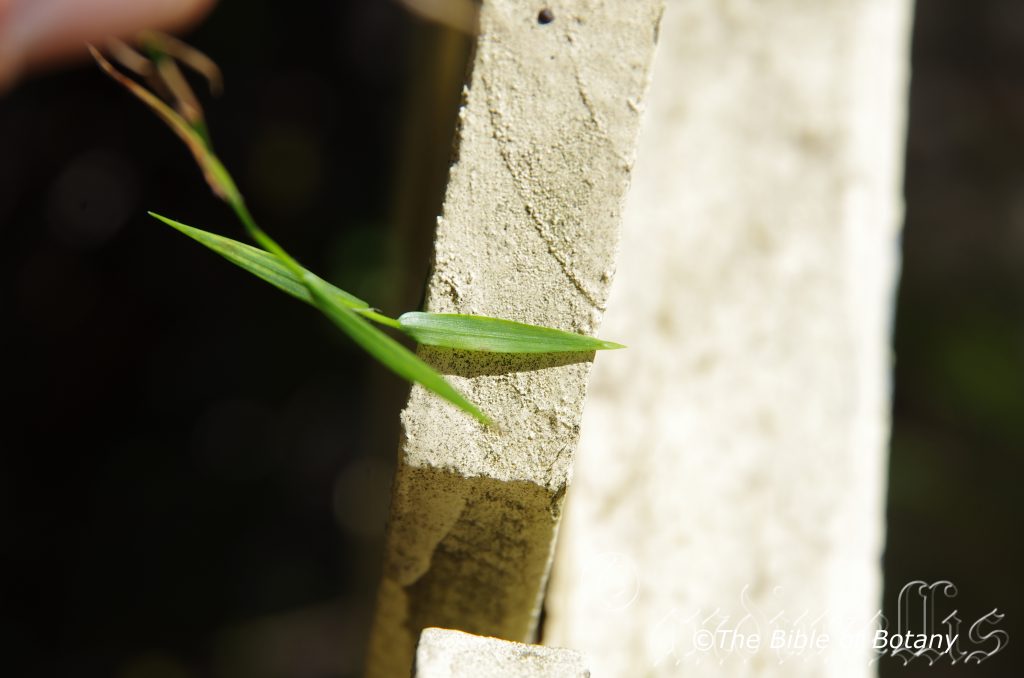
Capalaba Qld.
Ottochloa gracillima
Classification:
Unranked: Monocots
Unranked: Commelinds
Order: Poales
Family: Poaceae
Genus: Is probably named in honour of Otto Staff; 1857–1933 who was an Austrian botanist and taxonomist and Khloa, which is Ancient Greek for a grass.
Species: From Gracilis, which is Latin for slender and graceful. It refers to plants especially the stems, which are more slender and graceful than other species in the genus.
Common Name: Graceful Grass.
Distribution:
Ottochloa gracillima is found south from Adeline Creek in the Daintree National Park on Cape York Peninsula in far north Queensland to Christmas Creek near Kempsey in central coastal New South Wales with a population further south at Wyong.
https://avh.ala.org.au/occurrences/search?taxa=Ottochloa+gracillima#tab_mapView
Habitat Aspect Climate:
Ottochloa gracillima prefers dappled shade to full sun. It grows in or adjacent to riverine forests, dry rainforests or dry littoral rainforests. The altitude ranges from 5 meter ASL to 1250 meters ASL.
The temperatures range from minus 6 degrees in August to 34 degrees in February.
The rainfalls range from lows of 850mm to an average 3000mm annually.
Soil Requirements:
Ottochloa gracillima prefers better quality sandy loams to medium clays or fine silts to medium silts. The soils are usually derived from decomposed brown basalts, black basalts, shales, fatty sandstones or metamorphic rocks often being laid down as alluvial silts. The soils pH. ranges from 5pH to 6.5pH. It does not tolerate waterlogged soils. Non saline soils to moderately saline soils are tolerated.
Height & Spread:
Wild Plants: 0.2m to 0.3m by 0.6m to 2m.
Characteristics:
Ottochloa gracillima is a slender spreading perennial grass that often forms large mats on the forest floor. The mid culm’s internodes are glabrous or with a longitudinal row of hispid hairs. The leaf sheaths are glabrous or covered in short, white hispid hairs while the margins are covered in white ciliate hairs. The ligules are eciliate membranes and measure, 0.1mm to 0.3mm in length. The nodes root readily when they make contact with the ground or during prolonged wet weather.
The alternate simple leaves are linear or lanceolate and measure 15mm to 100mm in length by 1.5mm to 7mm in width. The bases are often rounded to truncate while the apexes are acute. The concolourous laminas are grass-green and sparsely covered in fine white hirsute hairs. The laminas are flat to semi cupuliform near the apex and decurve downwards on the apical half or from the base while the margins are entire. The mid vein is prominent on the lower lamina while there are 8 to 11 fine longitudinal veins either side of the mid vein which extend down onto the sheaths.
The inflorescences are short panicles with 3 to 6 racemes born from the terminals. The panicles measure 30mm to 130mm in length while the racemes measure 5mm to 50mm in length. The racemes often divide further and bear 2 to 4 spikelets.
The peduncle and rachises are usually glabrous except at the nodes which are covered in long white hirsute hairs. The raceme’s rachis are covered in fine, long white hairs.
The fertile spikelets consist of 2 individual flowers. The lower floret is barren or rarely a male while the upper fertile floret comprises 1 basal sterile floret and 1 fertile floret without a rachilla extension. The oblong, dorsally compressed florets measure 1.7mm to 2.3mm in length.
The glumes are similar. The lower glumes are shorter than the spikelets are keeless with 3 nerves which terminate in a long, slender awn up to 2.5 times as long as the spikelet. The upper glumes are keeless with 5 to 7 nerves and are obtuse.
The similar glumes are thinner than fertile lemmas. The ovate lower glume is membranous and keeless with 7 nerves. The elliptic or ovate upper glume is membranous and keeless with 3 to 5 nerves. The glumes are glabrous or with a few short tubercle based hirsute hairs between the nerves or towards the margins. The glumes measure 1mm to 1.2mm in length.
The lower lemmas are equal in the length to the spikelets. The palea are absent. The upper lanceolate lemmas are apiculate, minutely wrinkled and bisexual. The lemmas measure 2mm to 2.5mm in length. The flowers appear throughout the year.
Ottochloa gracillima’s fruits are oblong caryopsis.
Wildlife:
Ottochloa gracillima’s hosts the Brown Ringlet moth larvae (Hypocysta metirius) and the Orange Ringlet (Hypocysta adiante).
Cultivation:
Ottochloa gracillima is a beautiful soft foliaged mat forming grass for forested areas in the garden. It would look rather weedy in small gardens. It can be mown and will recover very quickly but is not dense enough or hard wearing to be considered a good lawn grass.
It is suitable for semi shaded areas near the entrance to rainforests and do exceptionally well on riparian flats and beneath forest canopies.
Propagation:
Seeds: Ottochloa gracillima’s seeds directly into a seed raising mix. Cover them with 2mm of fine sand and keep moist not wet. Place the tray in a warm sunny position. When the seedlings are 25mm to 50mm tall, prick them out in small groups and plant them into 150mm squat pots using a good organic mix.
Once the seedlings reach 150mm to 200mm in diameter, nip the tips out before planting them out into their permanent position and water thoroughly with our recommended fertilizer.
Cuttings: Use 100mm by 100mm to 200mm by 200mm square tuffs from the garden with some root the following day for best results. Replace the divots with sand. Place the tuffs in there new position and water in thoroughly with our recommended fertilizer. Keep moist until the new shoots appear.
Fertilize using seaweed, fish emulsion or organic chicken pellets soaked in water on an alternate basis. Fertilize every two months until it is established then annually in early September to October to maintain health, vitality and better flowering.
Further Comments from Readers:
Hi reader, it seems you use The Bible of Botany a lot. That’s great as we have great pleasure in bringing it to you! It’s a little awkward for us to ask, but our first aim is to purchase land approximately 1,600 hectares to link several parcels of N.P. into one at The Pinnacles NSW Australia, but we need your help. We’re not salespeople. We’re amateur botanists who have dedicated over 30 years to saving the environment in a practical way. We depend on donations to reach our goal. If you donate just $5, the price of your coffee this Sunday, We can help to keep the planet alive in a real way and continue to bring you regular updates and features on Australian plants all in one Botanical Bible. Any support is greatly appreciated. Thank you.
In the spirit of reconciliation we acknowledge the Bundjalung, Gumbaynggirr and Yaegl and all aboriginal nations throughout Australia and their connections to land, sea and community. We pay our respect to their Elders past, present and future for the pleasures we have gained.
Owenia cepiodora
Classification:
Unranked: Eudicots
Unranked: Rosids
Order: Sapindales
Family: Melaiaceae
Genus: Is named in honour of Sir Richard Owen; 1804–1892, was a British born palaeontologist who studied bones from caves in Wellington New South Wales and was an anti-Darwinist.
Species: From Cepa, which is Latin for an onion and Odora, which is Latin for an odour. It refers to the odour of the freshly cut bark when crushed smelling of onions.
Common Name: Bog Onion or Onion Cedar.
Distribution:
Owenia cepiodora is restricted to a small area between Canungra, in far south eastern Queensland, Kyogle, the Richmond River and Tintenbar in far north eastern New South Wales.
https://avh.ala.org.au/occurrences/search?taxa=Owenia+cepiodora#tab_mapView
Habitat Aspect Climate:
Owenia cepiodora prefers full sun to light dappled shade. It grows in dry sub-tropical rainforests and dry tropical rainforests. The altitude ranges from 43 meters ASL to 360 meters ASL.
The temperatures range from minus 2 degrees in August to 36 degrees in February.
The rainfalls range from lows of 1000mm to an average 2000mm annually.
Soil Requirements:
Owenia cepiodora prefers better quality sandy loams to medium clays. The soils are usually derived from decomposed black basalts. The soils ph ranges from 5pH to 6pH. It does not tolerate waterlogged soils however it prefers seasonally wet sites. Non saline soils to moderately saline soils are tolerated.
Height & Spread:
Wild Plants: 25m to 30m by 8m to 12m.
Characteristics:
Owenia cepiodora’s grows as an erect medium tree with pale grey, finely fissured longitudinal bark. The bark is often covered in lichens and mosses. The branches are brownish and smooth. The juvenile and young branchlets are grass-green and glabrous. The buds are resinous and glabrous. The freshly cut or injured bark exudes a clear, red sap which has a strong onion odour.
cepiodora’s imparipinnate leaves are clustered at end of the branches. The leaves measure 300mm to 600mm in length by 150mm to 320mm in width. There are 15 to 25 alternate to sub opposite leaflets on a leaf. The narrow elliptic to narrow ovate leaflets measure 70mm to 150mm in length by 15mm to 35mm in width. The petioles, rachis and petiolules are grass-green and glabrous. The petiole measures 50mm to 100mm in length while the rachis measures 230mm to 480mm in length and the petiolules measure 3mm to 10mm in length. The bases are cuneate, rounded-cuneate or rounded while the apexes are acuminate. The concolourous laminas are mid grass-green to deep grass-green, glossy and glabrous on the upper laminas while the lower laminas are dull to semi glossy. The undulating laminas recurve slightly upwards from the mid-vein to the margins and decurve downwards near the apex. The margins are entire. The mid vein is prominent while the lateral veins are slightly prominent on the lower lamina and only the mid-vein is visible on the upper lamina.
The inflorescences are born on panicles from the terminals. The panicles measure 100mm to 200mm in diameter. The 5 white petals measure 3mm to 4.5mm in length.
The 5 stamens in the staminal tube measures 2mm to 3mm in length. The flowers appear from November to December.
Owenia cepiodora’s fruits are globose drupes. The green drupes are glabrous and turn dull, reddish-brown when ripe. The drupes measure 13mm to 17mm in length by 15mm to 20mm in diameter.
The drupes have 2 to 4 compartments and each compartment usually has two seeds. Fruits mature from January to March.
Wildlife:
Owenia cepiodora’s flowers are a great attraction for native pollen flies and native bees.
Cultivation:
Owenia cepiodora is a beautiful fast growing open foliaged tree with lovely pink to purple flowers that is worthwhile growing for its beauty in medium to large dry sub-tropical and dry tropical gardens. As a garden subject it will grow from 18 meter to 22 meters in height by 8 meter to 12 meters in diameter when cultivated in an open sunny position. It is fast growing, drought tolerant and cold tolerant down to at least minus 4 degrees once established but will need protection until it is well established from frosts.
It should not be fertilized with synthetic fertilizers especially if it is planted in open situations subject to strong winds and on heavier soils as the branches are subject to breaking.
Propagation:
Seeds: Owenia cepiodora’s seeds directly into a seed raising mix in 70mm native tubes. Cover them with 5mm to 10mm of fine sand and keep moist not wet. Place the tubes in a warm sunny position. When the seedlings are 150mm to 200mm tall, prick them out and plant them into 250mm pots using a good organic mix or planting them out into their permanent position.
Fertilize using seaweed, fish emulsion or organic chicken pellets soaked in water on an alternate basis. Fertilize every two months until it is established then annually in early September to October to maintain health, vitality and better flowering.
Further Comments from Readers:
Hi reader, it seems you use The Bible of Botany a lot. That’s great as we have great pleasure in bringing it to you! It’s a little awkward for us to ask, but our first aim is to purchase land approximately 1,600 hectares to link several parcels of N.P. into one at The Pinnacles NSW Australia, but we need your help. We’re not salespeople. We’re amateur botanists who have dedicated over 30 years to saving the environment in a practical way. We depend on donations to reach our goal. If you donate just $5, the price of your coffee this Sunday, We can help to keep the planet alive in a real way and continue to bring you regular updates and features on Australian plants all in one Botanical Bible. Any support is greatly appreciated. Thank you.
In the spirit of reconciliation we acknowledge the Bundjalung, Gumbaynggirr and Yaegl and all aboriginal nations throughout Australia and their connections to land, sea and community. We pay our respect to their Elders past, present and future for the pleasures we have gained.
NCBG Coffs Harbour NSW
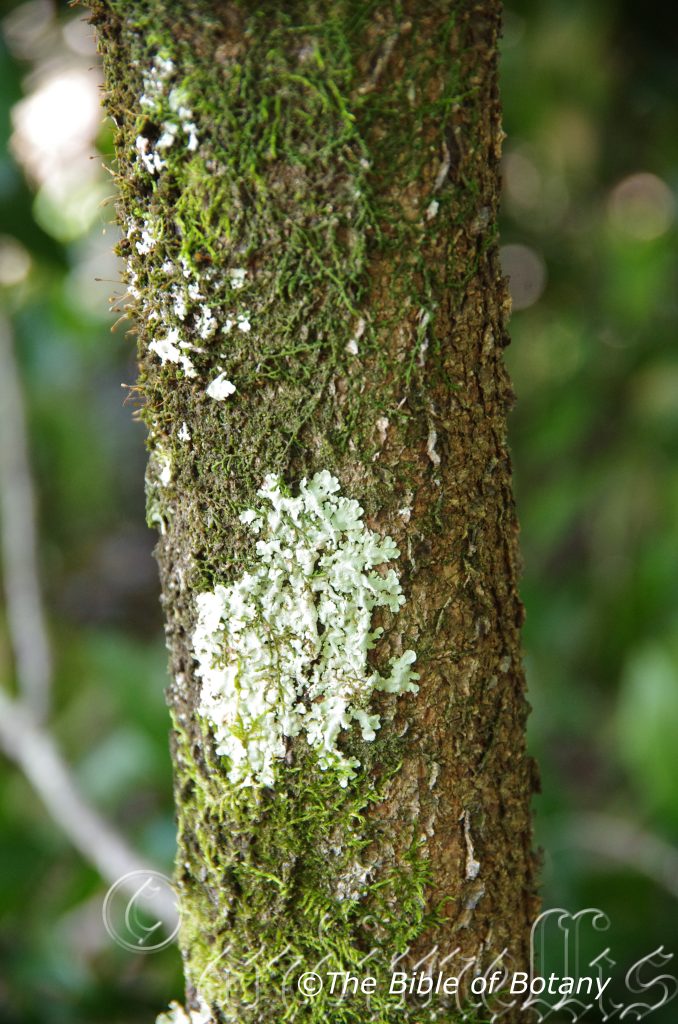
NCBG Coffs Harbour NSW
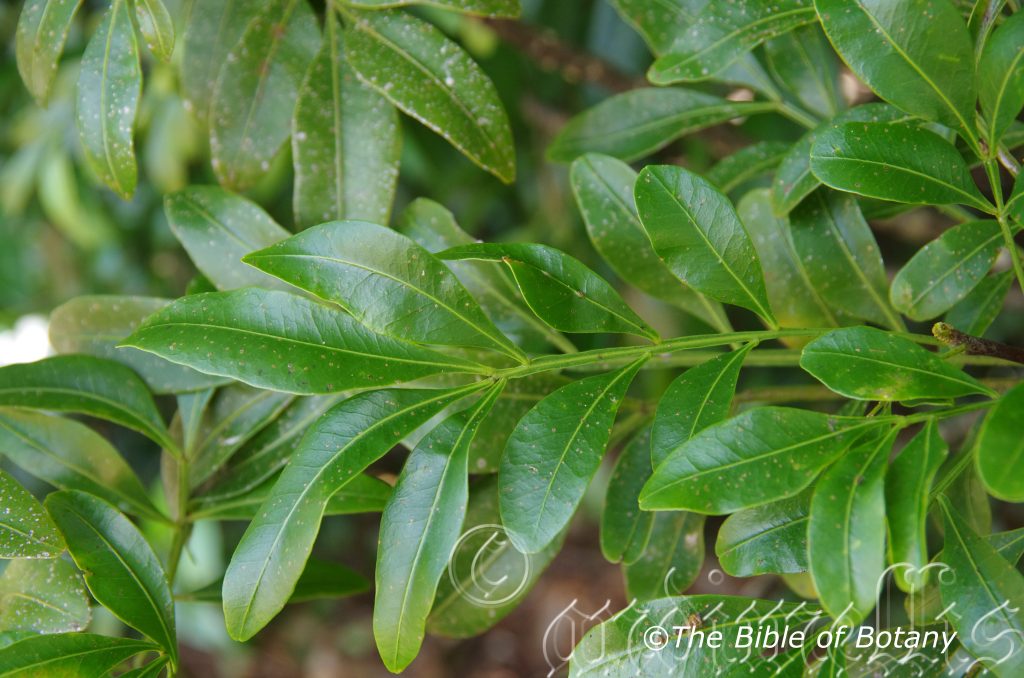
NCBG Coffs Harbour NSW

NCBG Coffs Harbour NSW
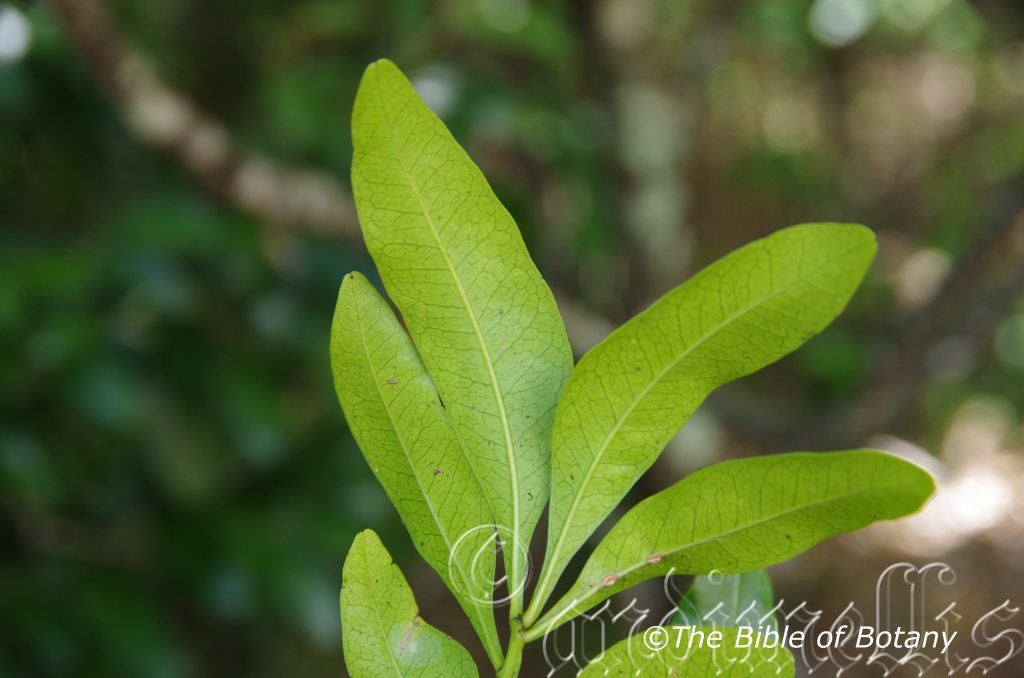
NCBG Coffs Harbour NSW
Owenia venosa
Classification:
Unranked: Eudicots
Unranked: Rosids
Order: Sapindales
Family: Melaiaceae
Genus: Is named in honour of Sir Richard Owen; 1804–1892, was a British born palaeontologist who studied bones from caves in Wellington New South Wales and was an anti-Darwinist.
Species: From Venosa, which is Latin for a blood vessel or vein. It refers to plants, whose leaves or flowers have prominent veins.
Common Name: Veiny Cedar, Crow’s apple, Rose almond, Sour plum, or Rose apple.
Distribution:
Owenia venosa is found south from the Herbert River to the Border Ranges National Park in south eastern Queensland. It is found on and east of the Great Dividing Range.
https://avh.ala.org.au/occurrences/search?taxa=Owenia+venosa#tab_mapView
Habitat Aspect Climate:
Owenia venosa prefers full sun to light dappled shade. It grows in dry sub-tropical rainforests and dry tropical rainforests. The altitude ranges from 5 meters ASL to 800 meters ASL.
The temperatures range from minus 2 degrees in August to 36 degrees in February.
The rainfalls range from lows of 700mm to an average 1800mm annually.
Soil Requirements:
Owenia venosa prefers better quality medium clays. The red soils are usually derived from decomposed black basalts. The soils ph ranges from 5pH to 6pH. It does not tolerate waterlogged soils however it prefers seasonally moist sites. Non saline soils to moderately saline soils are tolerated.
Height & Spread:
Wild Plants: 5m to 20m by 3m to 6m.
Characteristics:
Owenia venosa’s grows as an erect medium tree with grey-brown, finely scaly bark. The bark is often covered in lichens and mosses. The branches are brownish and smooth. The juvenile and young branchlets are grass-green and glabrous. The buds are resinous and glabrous. The freshly cut or injured bark exudes a clear, red sap which has a strong onion odour.
Owenia venosa’s imparipinnate alternate leaves are clustered at end of the branches and have 6 to 14 opposite to sub opposite leaflets. The rachis and petiole are slightly to prominently winged and measure 30 to 80mm in length, while the petiolules measure 0mm to 2mm in length. The leaflets measure 150mm to 280mm in length. The oblong-elliptic to oblong-ovate leaflets measure 25mm to 100mm in length by 13mm to 40mm in width.
The bases taper to the petiolule, while the apexes are obtuse often with a retuse notch. The discolourous laminas are mid to deep green, semi glossy and glabrous on the upper laminas, while the lower laminas are much paler. The somewhat undulating laminas decurve downwards near the apex. The margins are entire. The mid vein is prominent on both laminas while the 10 to 15 lateral veins are slightly prominent on the upper lamina.
The inflorescences of Owenia venosa are usually born as unisexual or at times bisexual axillary panicles. The pedicels measure 1mm to 1.5mm in length. The actinomorphic, 5 merous. The orbicular, green sepals have sparsely ciliate margins and measure 2mm in length. The oblong to lanceolate, white to pale green, glabrous petals are free and measure 4mm to 5.5mm in length.
The male flowers have 10 anthers attached to the upper margins of the lobed staminal tubes.
The 2 to 4 locular ovary female flowers have 10 staminodes. The ovary is surrounded by a yellow to yellowish-green disc. The sessile or subsessile stigma is conical. The flowers appear from November to December.
Owenia venosa’s fruits are globose drupes. The green drupes are glabrous and turn dull, pink or reddish-brown when ripe. The drupes measure 13mm to 18mm in length by 15mm to 20mm in diameter.
The drupes have 2 to 4 compartments and each compartment usually has a single seed. Fruits mature from January to March.
Wildlife:
Owenia venosa’s flowers are a great attraction for native pollen flies and native bees.
Cultivation:
Owenia is a beautiful fast growing densely foliaged tree that is worthwhile growing for its beauty in medium to large dry sub-tropical and dry tropical gardens. As a garden subject it will grow from 12 meter to 15 meters in height by 8 meter to 12 meters in diameter when cultivated in an open sunny position. It is fast growing, somewhat drought tolerant and cold tolerant down to cope with light frosts once established but will need protection until it is well established from frosts.
It should not be fertilized with synthetic fertilizers especially if it is planted in open situations subject to strong winds and on heavier soils as the branches maybe subject to breaking.
Propagation:
Seeds: Owenia venosa’s seeds directly into a seed raising mix in 70mm native tubes. Cover them with 5mm to 10mm of fine sand and keep moist not wet. Place the tubes in a warm sunny position. When the seedlings are 150mm to 200mm tall, prick them out and plant them into 250mm pots using a good organic mix or planting them out into their permanent position.
Fertilize using seaweed, fish emulsion or organic chicken pellets soaked in water on an alternate basis. Fertilize every two months until it is established then annually in early September to October to maintain health, vitality and better flowering.
Further Comments from Readers:
Hi reader, it seems you use The Bible of Botany a lot. That’s great as we have great pleasure in bringing it to you! It’s a little awkward for us to ask, but our first aim is to purchase land approximately 1,600 hectares to link several parcels of N.P. into one at The Pinnacles NSW Australia, but we need your help. We’re not salespeople. We’re amateur botanists who have dedicated over 30 years to saving the environment in a practical way. We depend on donations to reach our goal. If you donate just $5, the price of your coffee this Sunday, We can help to keep the planet alive in a real way and continue to bring you regular updates and features on Australian plants all in one Botanical Bible. Any support is greatly appreciated. Thank you.
In the spirit of reconciliation we acknowledge the Bundjalung, Gumbaynggirr and Yaegl and all aboriginal nations throughout Australia and their connections to land, sea and community. We pay our respect to their Elders past, present and future for the pleasures we have gained.
The Pinnacles NSW
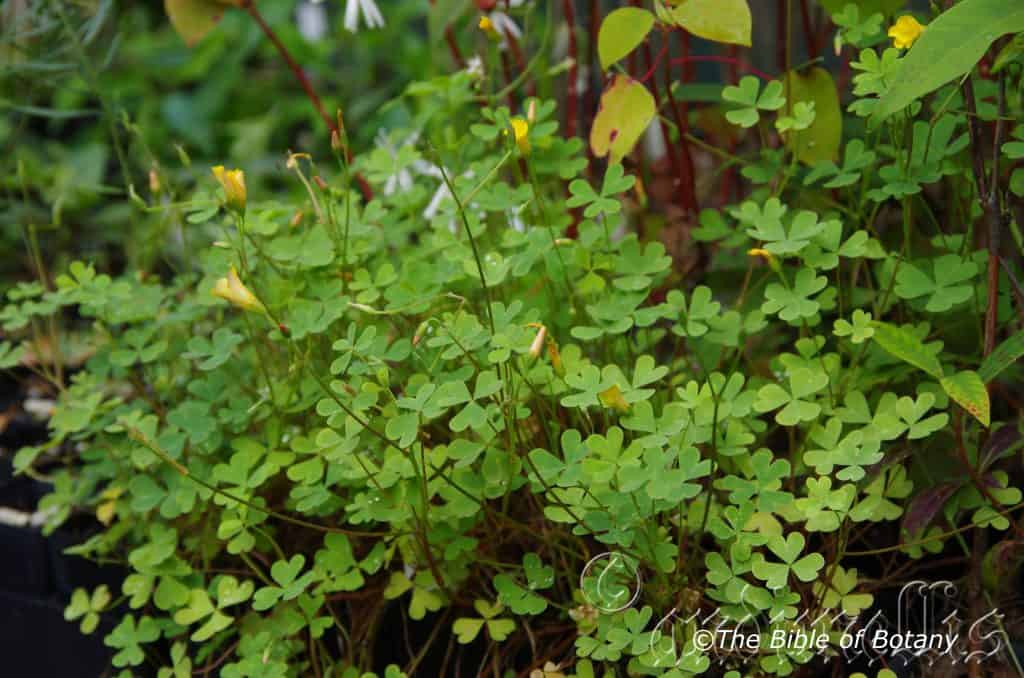
Capalaba Qld.
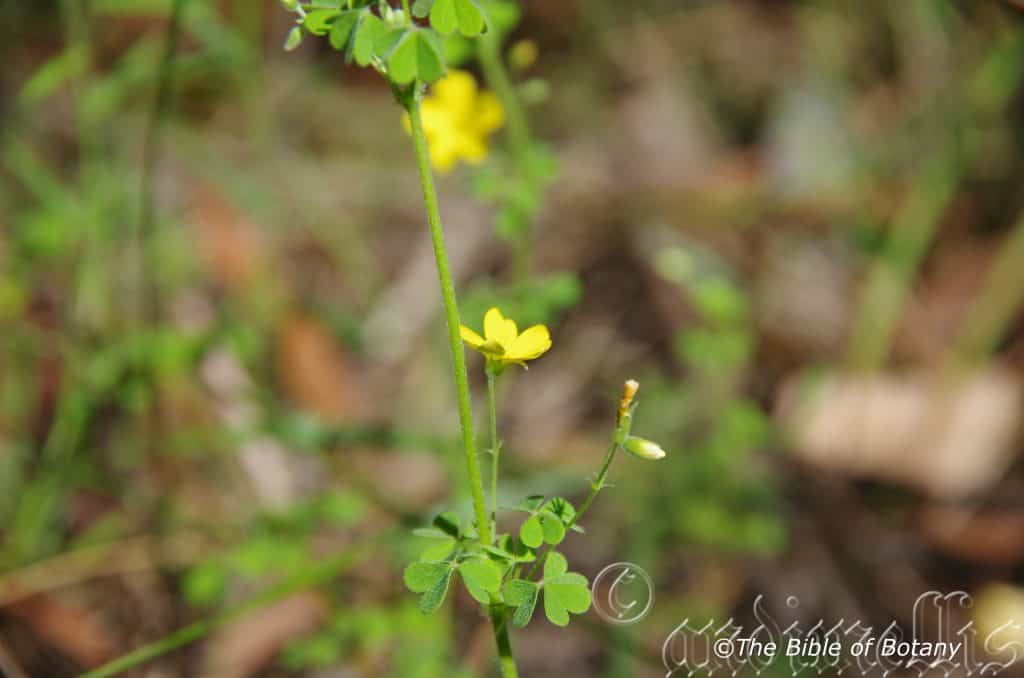
The Pinnacles NSW
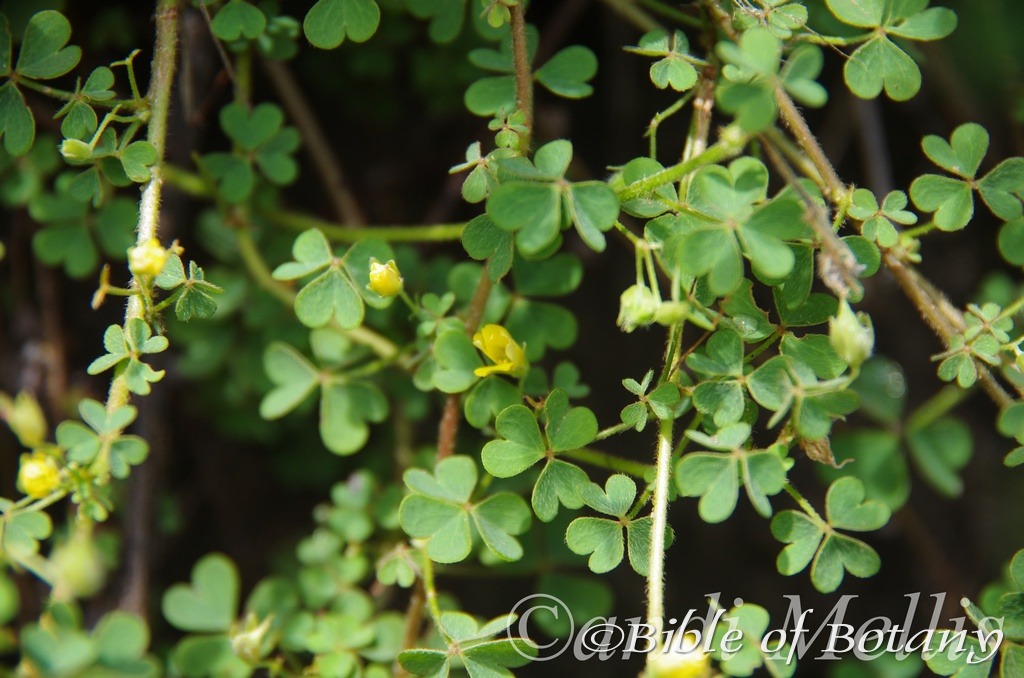
Banyabba National Park NSW
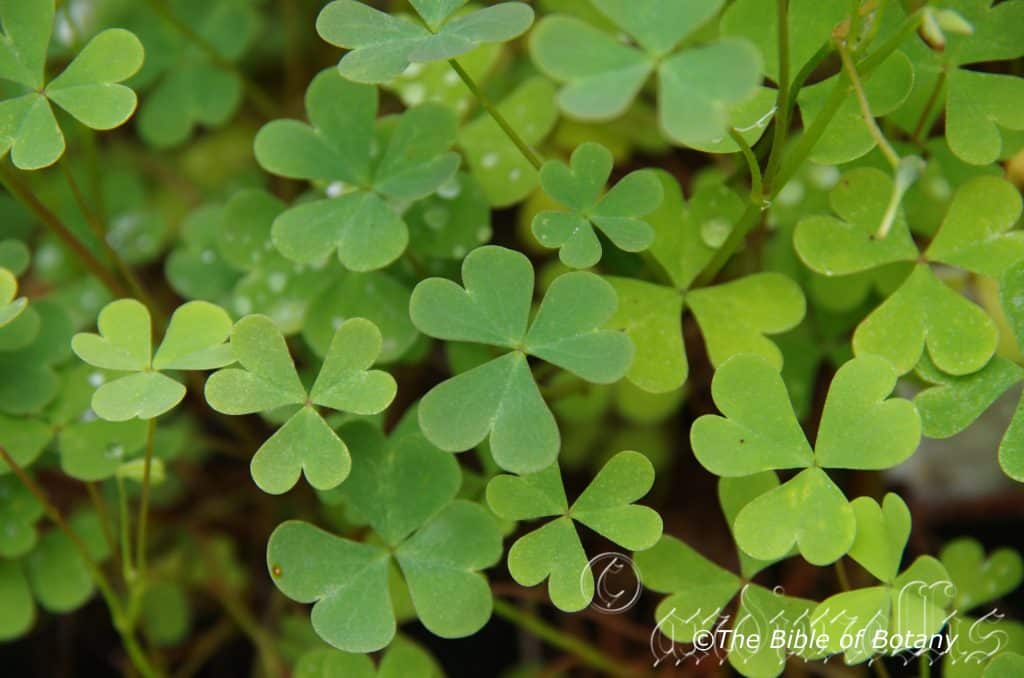
Capalaba Qld.
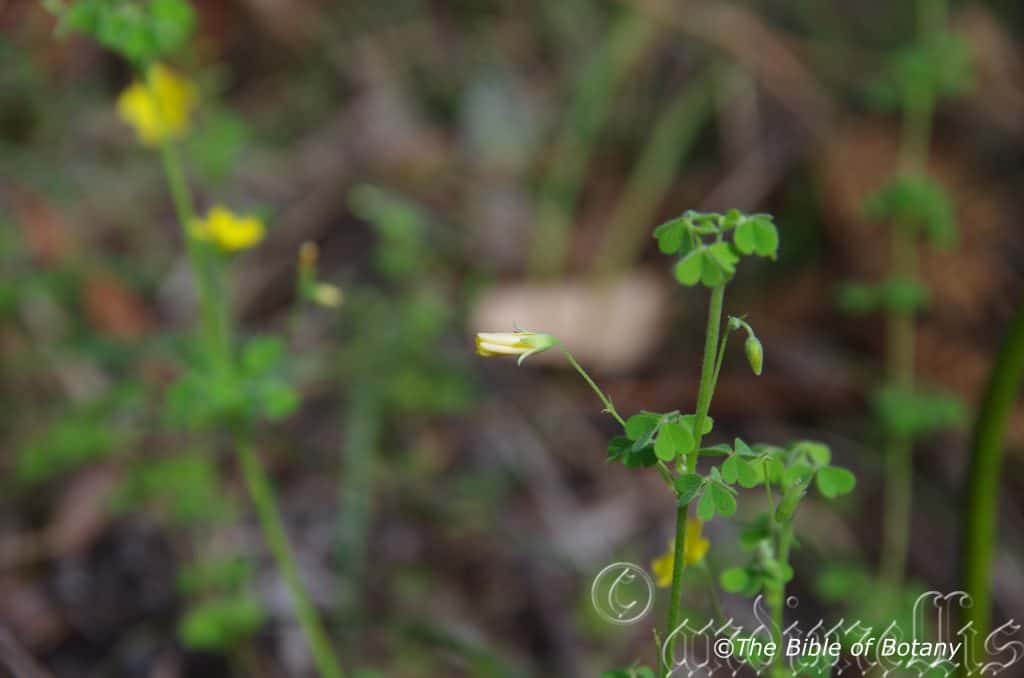
The Pinnacles NSW
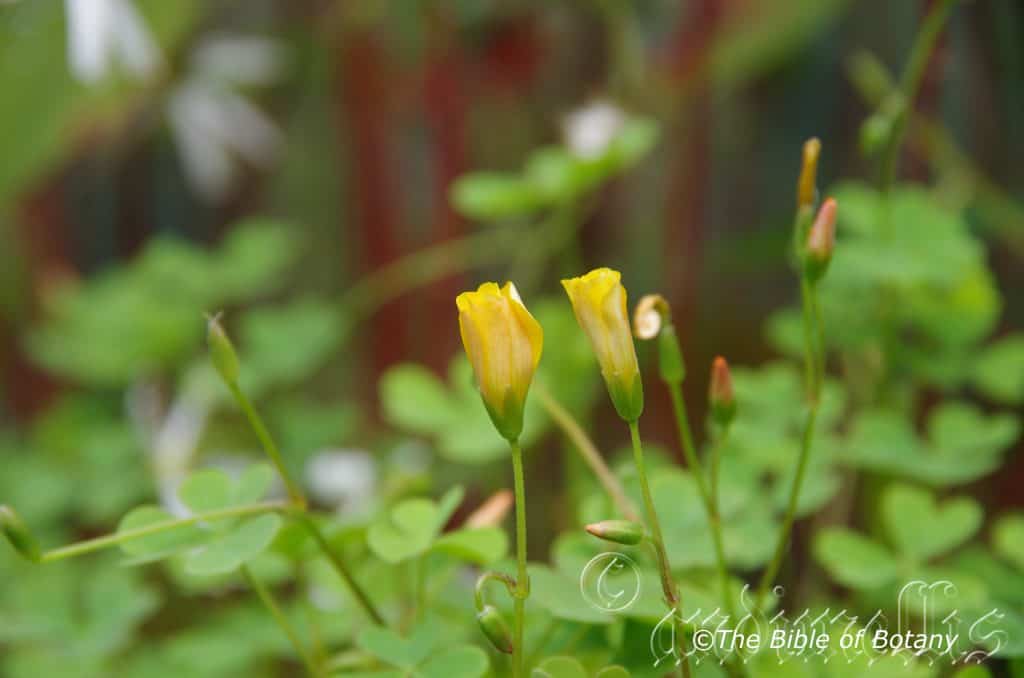
Capalaba Qld.
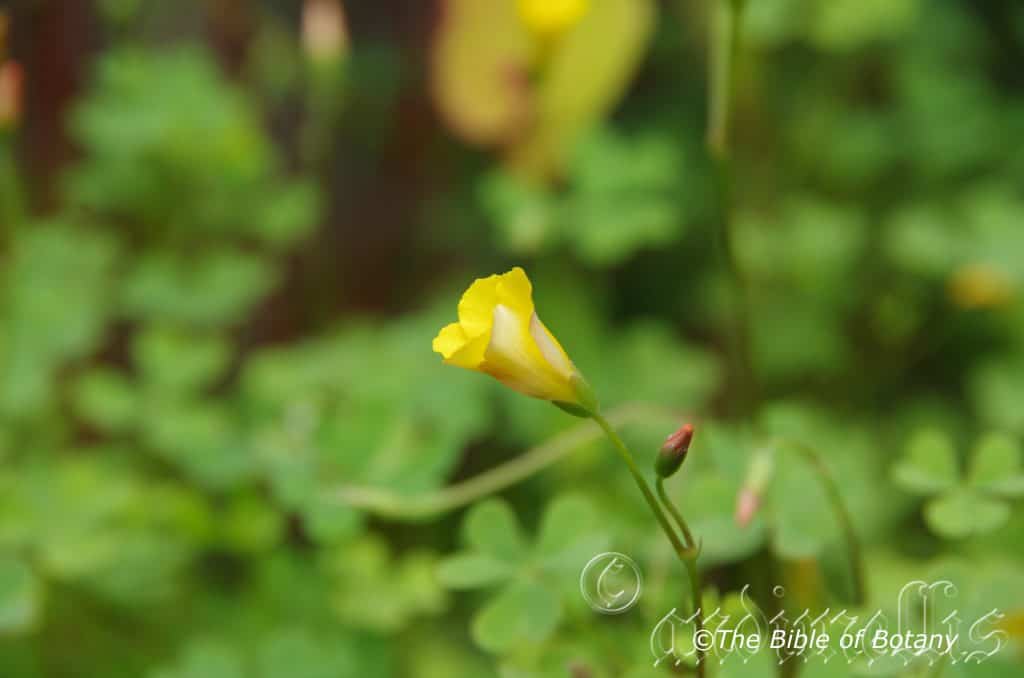
Capalaba Qld.
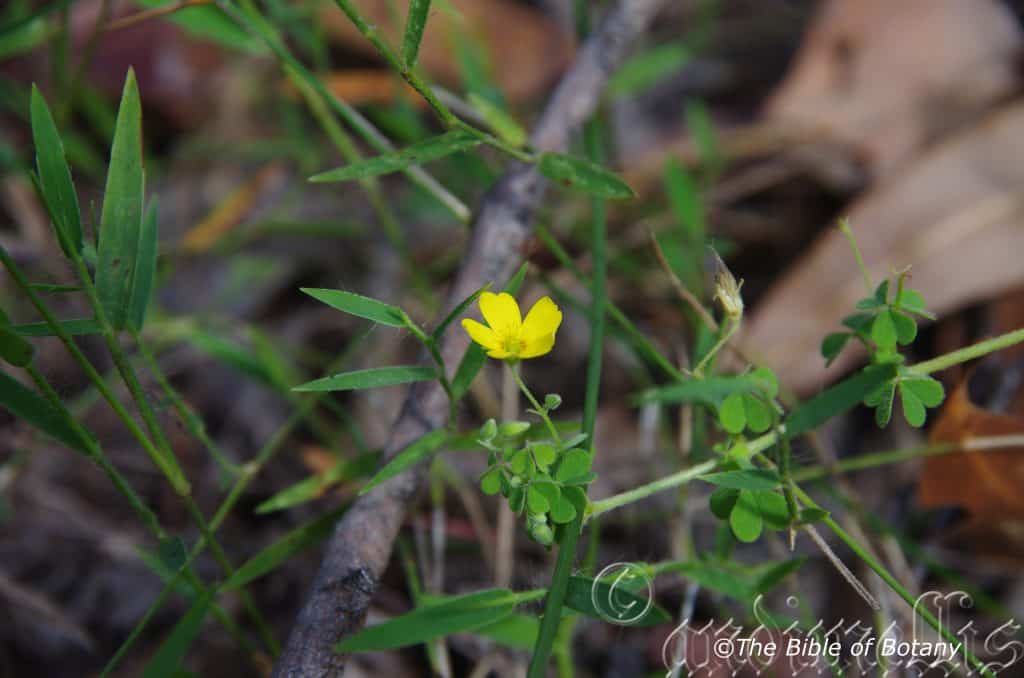
The Pinnacles NSW
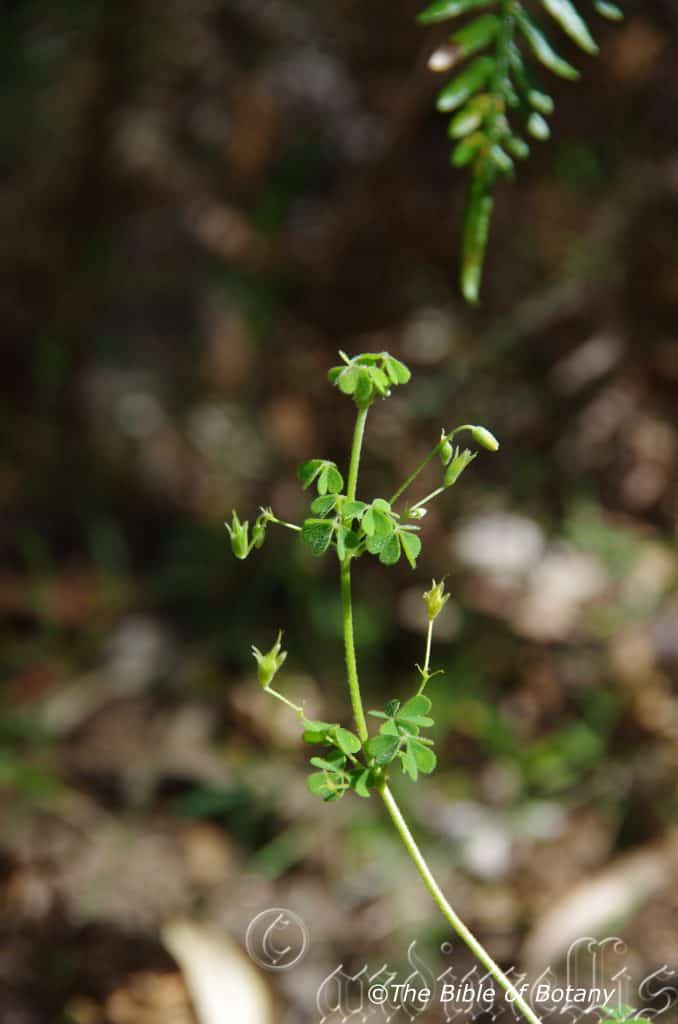
The Pinnacles NSW

The Pinnacles NSW
Oxalis chnoodes
Classification:
Class: Equisetopsida
Subclass: Magnoliidae
Superorder: Rosanae
Order: Oxalidales
Family: Oxalidaceae
Genus: From Oxalis, which is Ancient Greek for an acid salt. It refers to the taste being similar to Sorrel which is high in oxalic acid.
Species: From Chnoodes, may be a miss spelling of Chloodes, which is Latin for grass green. It refers to the colour of the leaves and stems which are grass green.
Common Name:
Distribution:
Oxalis chnoodes is found south from the Endeavour River in far north Queensland to Baw Baw in north eastern Victoria. It is mainly found on and east of the Great Dividing Range to the coast though it is found further west in Queensland around the Alice River near Barcaldine, Hell Hole Gorge National Park, Quilpie, Wyandra and Currawinya indicating it may be more widespread than the map indicates.
In the Northern Territory it is found south west of Alice Springs on Carmichaels Crag and the George Gill Range.
https://avh.ala.org.au/occurrences/search?taxa=Oxalis+chnoodes#tab_mapView
Habitat Aspect Climate:
Oxalis chnoodes prefers full sun to light dappled shade. It grows in or adjacent to swamps, forests close to rivers, billabongs or soaks. The altitude ranges from 50 meters ASL to 1040 meters ASL.
The temperatures range from minus 6 degrees in August to 34 degrees in February.
The rainfalls range from lows of 850mm to an average 3000mm annually.
Soil Requirements:
Oxalis chnoodes prefers course sand, fine sands, sandy loams to light gritty clays or fine silts to medium silts. The soils are usually derived from decomposed shale, sandstones or granites. The soils ph ranges from 5pH to 6pH. It does not tolerate waterlogged soils. Non saline soils to moderately saline soils are tolerated.
Height & Spread:
Wild Plants: 0.1m to 0.2m by 0.2m to 0.6m.
Characteristics:
Oxalis chnoodes is a small perennial herb with decumbent stems or at times creeping stems that may root at the nodes under favourable conditions. The stems are grass-green, emerald-green or olive-green and glabrous to densely covered in white, spreading or antrorse hirsute hairs. The roots are fibrous and without bulbils.
Oxalis chnoodes’s alternate, trifoliate leaves are cauline and fasciculate. The leaflets are broad obovate, bilobed with a sinus from an eighth to a fifth of the length of the leaflet. The oblong to obovate lobes measure 7mm to 14mm in length by 2mm to 5mm in width.
The stipules are usually conspicuous, truncate to abruptly tapering to the petiole and are glabrous to sparsely covered in long, white, antrorse hirsute on the upper laminas, while the lower laminas are sparsely to densely covered in long, white antrorse hairs The margins are entire. The grass–green to emerald-green petioles and petiolules are sparsely to densely covered in white to cream, spreading and or retrorse hirsute hairs. The petioles measure 8mm to 30mm in length while the petiolules measure 0.6mm to 1.3mm in length.
The bases taper to the petiolule while the apexes are obtuse. The discolourous laminas are grass-green to emerald-green and covered in white to cream, spreading and or retrorse hirsute hairs on the upper laminas while the lower laminas are paler. The laminas are flat while the margins are entire. The mid vein and lateral veins are obscure to slightly prominent on the lower lamina and are not visible on the upper laminas. The leaves are Nyctinastically controlled meaning they fold up at night or under darker conditions and open outwards in full sun.
The inflorescences of Oxalis chnoodes are umbels born from the leaf axils. The 2 to 4 flowers measure 10mm to 15mm in diameter. The 5 lobed calyx is grass-green to emerald-green. The calyx measures 2.5mm to 5mm in length including the five 1.2mm to 1.5mm long triangular lobes. The 5 yellow, obovate to spathulate petals are free and form a tubular like corolla on the basal half inside the calyx tube and are divaricate on the apical half where It is exserted. The petals measure 6mm to 12mm in length.
The 10 connate stamens consist of 5 short outer stamens opposite the petals and 5 longer inner ones opposite the sepals. The yellow-green exserted filaments measure 3mm to 9mm in length while the oblong-spherical anthers are white. The pistil is heterostylous. The flowers appear from May to December.
]Oxalis chnoodes’s fruits are an erect sub globose to ellipsoidal capsules that are usually held above the leaves. The capsules are moderately to densely covered in long; white retrorse hirsute hairs. The calyx is persistent at the base of the capsule and turns grey when ripe. The capsules measure 5mm to 9mm in length by 1.5mm to 2.5mm in diameter. The deep brown seeds are longitudinally ribbed.
Confusing Specie:
Oxalis chnoodes has a tap woody tap root. The stems, petioles and petiolules are densely covered in white tomentose hairs. Leaves covered in white ciliate hairs.
Oxalis corniculata has a fleshy tap root when present. The stems, petioles and petiolules are glabrous to sparsely covered in white tomentose hairs while the leaf margins are glabrous.
Wildlife:
Oxalis chnoodes’s flowers attract many small butterflies including the Common Grass Blue Butterfly (Zizina labradus).
Cultivation:
Oxalis chnoodes is a beautiful foliaged small herb with lovely yellow flowers that is worthwhile growing for its beauty in small temperate to monsoonal gardens. It must be planted in full sun.
It is a very reliable and blooms over a long period. As a garden subject it will grow from 0.15 meter to 0.2 meters in height by 0.5 meter to 0.6 meters in diameter when cultivated in the open. It is fast growing, drought tolerant and cold tolerant down to at least minus 4 degrees.
It is most suitable for use around sunny swimming pools, sunny courtyards, besides pathways, between driveways rockeries, along wet banks and for border arrangements.
Oxalis chnoodes would make an outstanding contribution to moist desert scenes or amongst medium to large boulders. When you design a miniature desert garden; which Oxalis chnoodes is suitable to use in contours to display the plant to its best. The use of one, two or even smaller or larger rushes like Fimbristylis ferruginea will give a stronger more vertical break to the sides which will help frame the center or placed in the center make the sides look wider. Using the second scenario taller shrubs will be required near the edges near the rear so that the eyes remain focused on the bed and not run off the bed losing interest. Use small Oxalis, like Oxalis exilis or Oxalis chnoodes or use red or blue flowering annuals to help contrast the yellow of Oxalis chnoodes.
Place it near old stumps and roots to make the stumps or roots look larger. Select an area of ground and let your hair down and be imaginative and this is the plant that may just change your life. Remember to plant sparingly leaving larger gaps between the plants to allow the mulch to be seen.
Propagation:
Seeds: Oxalis chnoodes’s seeds directly into a seed raising mix. Cover them with 5mm of fine sand and keep moist not wet. Place the tray in a warm sunny position. When the seedlings are 25mm to 50mm tall, prick them out and plant them into 50mm native tubes using a good organic mix.
Once the seedlings reach 150mm to 200mm in height, nip the tips out before planting them out into their permanent position.
Fertilize using seaweed, fish emulsion or organic chicken pellets soaked in water on an alternate basis. Fertilize every two months until it is established then annually in early September to October to maintain health, vitality and better flowering.
Further Comments from Readers:
Hi reader, it seems you use The Bible of Botany a lot. That’s great as we have great pleasure in bringing it to you! It’s a little awkward for us to ask, but our first aim is to purchase land approximately 1,600 hectares to link several parcels of N.P. into one at The Pinnacles NSW Australia, but we need your help. We’re not salespeople. We’re amateur botanists who have dedicated over 30 years to saving the environment in a practical way. We depend on donations to reach our goal. If you donate just $5, the price of your coffee this Sunday, We can help to keep the planet alive in a real way and continue to bring you regular updates and features on Australian plants all in one Botanical Bible. Any support is greatly appreciated. Thank you.
In the spirit of reconciliation we acknowledge the Bundjalung, Gumbaynggirr and Yaegl and all aboriginal nations throughout Australia and their connections to land, sea and community. We pay our respect to their Elders past, present and future for the pleasures we have gained.
Oxalis exilis
Classification:
Class: Equisetopsida
Subclass: Magnoliidae
Superorder: Rosanae
Order: Oxalidales
Family: Oxalidaceae
Genus: From Oxalis, which is Ancient Greek for an acid salt. It refers to the taste being similar to Sorrel which is high in oxalic acid.
Species: From Exilis, which is Latin for slender and feeble. It refers to the tepals, which are slimmer than those of the other species in the genus.
Common Name:
Distribution:
Oxalis exilis is found south and west from Shark Bay to Yalgoo, Ravensthorpe and Forrest in Western Australia.
In the east it is found south and east of a line from Condamine in southern Queensland to Mount Scott Conservation Park in south east South Australia.
It is also found further north and west near Trinity Bay, Boulia, Albinia National Park, Saint Bees Island and Fairfax Island in Queensland. Which indicates it may be more widespread in Queensland and north western New South Wales than previously recorded.
It is also found on King Island and Flinders Island group in Bass Strait and most of mainland Tasmania except for the highland areas in the south west and north east.
https://avh.ala.org.au/occurrences/search?taxa=Oxalis+exilis#tab_mapView
Habitat Aspect Climate:
Oxalis exilis prefers full sun to light dappled shade. It grows on coastal peaty sands, humus rich creek meander flats, billabongs or drainage lines that are humus rich. The altitude ranges from 5 meters ASL to 1333 meters ASL.
The temperatures range from minus 5 degrees in August to 34 degrees in February.
The rainfalls range from lows of 400mm to an average 3200mm annually. Rainfall is not as important as the location of ground moisture and humus or peat in the soil.
Soil Requirements:
Oxalis exilis prefers course sand, fine sand, sandy loams to medium gritty clays or fine to heavy silts. The soils are usually derived from decomposed sandstones, granites metamorphic rocks, brown basalts, black basalts, shales, accumulated peaty beach sands or alluvial deposits. The soils ph ranges from 5pH to 6pH. It does not tolerate waterlogged soils. Non saline soils to moderately saline soils are tolerated.
Height & Spread:
Wild Plants: 0.1m to 0.3m by 0.4m to 0.7m.
Characteristics:
Oxalis exilis’s grows as a small perennial herb with procumbent branches or at times creeping stems that may root at the nodes under favourable conditions. The stems are grass-green, olive-green or reddish and sparsely covered in white to cream, spreading and or antrorse hirsute hairs. The roots are fibrous and without bulbils.
It is a small tuft herbaceous sorrel. The cauline leaves are trifoliate. The leaflets are broad obovate, bilobed with a sinus to an sixth to a third of the length of the leaflet. The obovate-triangular lobes measure 2.5mm to 4mm in length by 1.5mm to 3mm in width.
The stipules taper to the petiole while the apexes are truncate or shallowly lobed. The maroon–green to reddish-green petioles and petiolules are sparsely covered in long, white to cream, spreading and or antrorse hirsute hairs. The petioles measure 15mm to 90mm in length while the petiolules measure 0mm to 0.3mm in length.
The bases taper to the petiole while the apexes are broad obtuse. The discolourous laminas are grass-green to blue-green and covered in white to cream, spreading and or antrorse hirsute hairs on the upper laminas while the lower laminas are paler. The laminas are flat while the margins are entire. The mid vein and lateral veins are slightly prominent on the lower lamina and are obscurely visible on the upper laminas. The leaves are Nyctinastically controlled meaning they fold up at night or under darker conditions and open outwards in full sun.
The inflorescences are born singularly or in pairs from the leaf axils. The flowers measure 10mm to 15mm in diameter. The 5 lobed calyx is grass-green tinged reddish near the lobes. The calyx measures 2.5mm to 5mm in length including the five 1.5mm to 3mm long triangular lobes. The 5 yellow, obovate petals are often tinged reddish near the throat or inside the calyx. It is free and form a tubular like corolla on the basal half; inside the calyx tube, are divaricate on the apical portion where It is exserted. The petals measure 4.5mm to 9mm in length.
The 10 connate stamens consist of 5 short outer stamens opposite the petals and 5 longer inner ones opposite the sepals. The yellow-green exserted filaments measure 3mm to 9mm in length while the oblong-spherical anthers are white. The pistil is heterostylous. The flowers appear from February to September.
Oxalis exilis’s fruits are erect or reflexed, short, conical to cylindrical Capsules. It is usually held above the leaves. The green capsules first turn reddish then dry to grey-brown and are sparsely covered in long white retrorse hirsute hairs. The calyx is persistent at the base of the capsules and turns grey when ripe. The capsules are faintly longitudinally ribbed and dehisc along the longitudinal sutures. They measure 5mm to 6.5mm in length by 2mm to 2.5mm in diameter. The deep brown seeds are transversely ribbed.
Wildlife:
Oxalis exilis’s flowers are a great attraction for butterflies, native flies and native nectar eating flies.
Cultivation:
Oxalis exilis is a beautiful foliaged small herb with lovely yellow flowers that is worthwhile growing for its beauty in small temperate to monsoonal gardens. It must be planted in full sun.
It is a very reliable and blooms over a long period. As a garden subject it will grow from 0.15 meter to 0.2 meters in height by 0.5 meter to 0.6 meters in diameter when cultivated in the open. It is fast growing, drought tolerant and cold tolerant down to at least minus 4 degrees.
It is most suitable for use around swimming pools, sunny courtyards, besides pathways, between driveways rockeries, along wet banks and for border arrangements.
Place it near old stumps and roots to make the stumps or roots look larger. Select an area of ground and let your hair down and be imaginative and this is the plant that may just change your life. Remember to plant sparingly leaving large gaps between the plants to allow the mulch to be seen. Mulches should consist of fine pebbles to give a more expansive barren look.
Propagation:
Seeds: Sow seeds directly into a seed raising mix. Cover them with 5mm of fine sand and keep moist not wet. Place the tray in a warm sunny position. When the seedlings are 25mm to 50mm tall, prick them out and plant them into 50mm native tubes using a good organic mix.
Once the seedlings reach 150mm to 200mm in height, nip the tips out before planting them out into their permanent position.
Fertilize using seaweed, fish emulsion or organic chicken pellets soaked in water on an alternate basis. Fertilize every two months until it is established then annually in early September to October to maintain health, vitality and better flowering.
Further Comments from Readers:
Hi reader, it seems you use The Bible of Botany a lot. That’s great as we have great pleasure in bringing it to you! It’s a little awkward for us to ask, but our first aim is to purchase land approximately 1,600 hectares to link several parcels of N.P. into one at The Pinnacles NSW Australia, but we need your help. We’re not salespeople. We’re amateur botanists who have dedicated over 30 years to saving the environment in a practical way. We depend on donations to reach our goal. If you donate just $5, the price of your coffee this Sunday, We can help to keep the planet alive in a real way and continue to bring you regular updates and features on Australian plants all in one Botanical Bible. Any support is greatly appreciated. Thank you.
In the spirit of reconciliation we acknowledge the Bundjalung, Gumbaynggirr and Yaegl and all aboriginal nations throughout Australia and their connections to land, sea and community. We pay our respect to their Elders past, present and future for the pleasures we have gained.
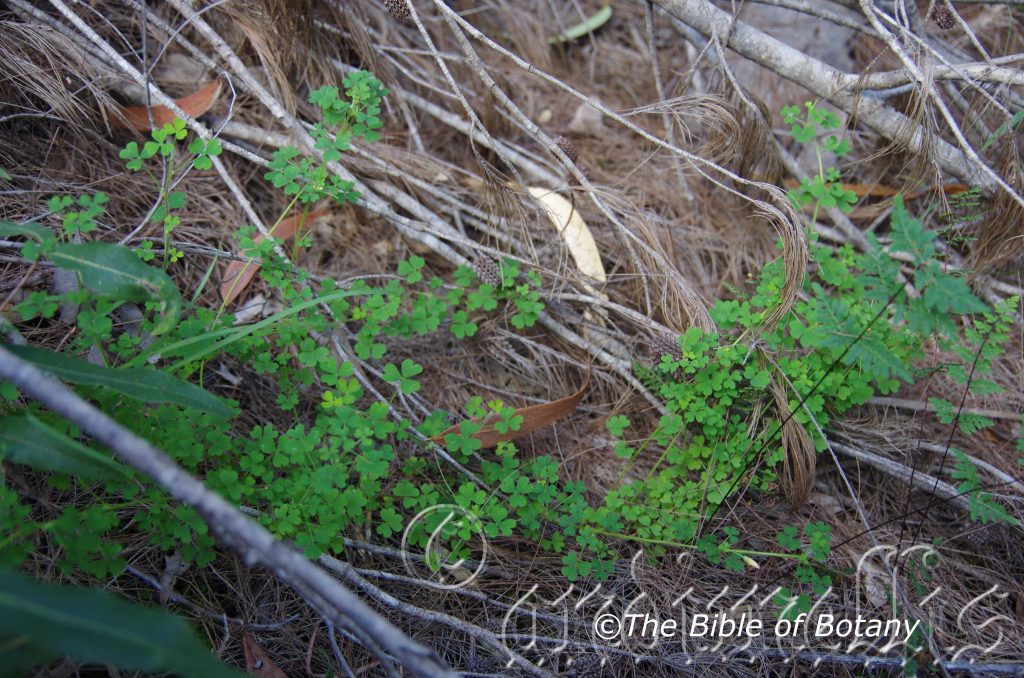
The Pinnacles NSW
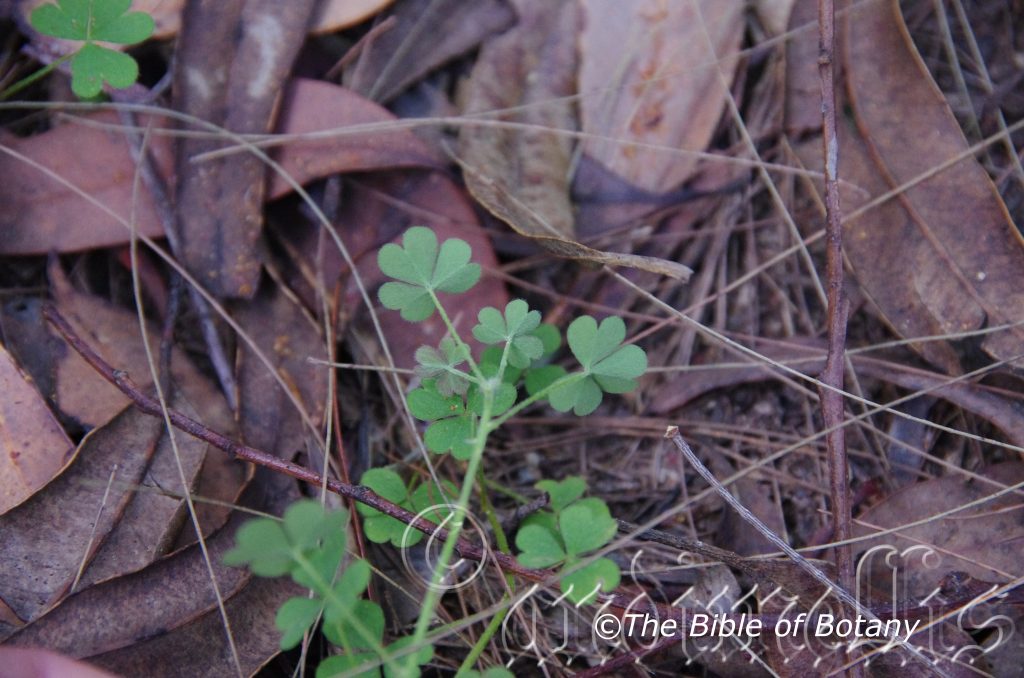
The Pinnacles NSW
Oxalis perennans
Classification:
Class: Equisetopsida
Subclass: Magnoliidae
Superorder: Rosanae
Order: Oxalidales
Family: Oxalidaceae
Genus: From Oxalis, which is Ancient Greek for an acid salt. It refers to the taste being similar to Sorrel which is high in oxalic acid.
Species: From Per/Peri, which is Latin for around, through, beyond, extra or at times very and Annan which is Latin for a year. It refers to plants, which have two or more flowering cycles before they die.
Common Name:
Distribution:
Oxalis perennans is found in the southern half of Australia except the true deserts. It is found a line south from Bernier Island in Shark Bay in Western Australia to Trinity Bay in Queensland.
It is also found on the eastern Islands of Deal Island, Flinders Island, Preservation Island and Waterhouse Island in Bass Strait and on the eastern side of Tasmania from Swansea to Blackmans Bay.
https://avh.ala.org.au/occurrences/search?taxa=Oxalis+perennans#tab_mapView
Habitat Aspect Climate:
Oxalis perennans prefers full sun to light dappled shade. It grows in riparian zones along creeks, streams, rivers especially seasonal waterways in central Australia, billabongs, drainage lines, soaks or river or creek meander flats. The altitude ranges from 10 meters ASL to 1360 meters ASL.
The temperatures range from minus 6 degrees in August to 40 degrees in February.
The rainfalls range from lows of 200mm to an average 3200mm annually.
Soil Requirements:
Oxalis perennans prefers sandy loams to heavy clays, podzolics or fine silts to heavy silts. The soils are usually alluviums derived from decomposed fatty sandstones, mudstones, conglomerates, granites, shales, metamorphic rocks, brown basalts or black basalts. The soils ph ranges from 4.5pH to 6.5pH. It tolerates waterlogged soils and is often associated with soils that experience seasonal floods. Non saline soils to moderately saline soils are tolerated.
Height & Spread:
Wild Plants: 0.1m to 0.25m by 0.2m to 0.4m.
Characteristics:
Oxalis perennans’s is a small perennial herb with ascending stems or at times creeping stems. The stems are grass-green, emerald-green or bluish-green and are sparsely covered in short, white to cream, spreading and or antrorse hirsute hairs. The thick taproots are without bulbils.
Oxalis perennans’s is a small tuft herbaceous sorrel. The cauline leaves are trifoliolate. The leaflets are broad obovate, bilobed with a sinus to a three-fifths to a third of the length of the leaflet. The obovate-triangular lobes usually measure 4mm to 6mm in length but have been recorded to 10mm in length by 2mm to 6mm in width.
The stipules taper to the petiole while the apexes are truncate or shallowly lobed. The maroon–green to reddish-green petioles and petiolules are sparsely covered in short, white to cream, spreading and or antrorse hirsute hairs. The petioles measure 10mm to 40mm in length while the petiolules measure 1mm to 0.3mm in length.
The bases taper to the petiole while the apexes are broad obtuse. The discolourous laminas are grass-green to blue-green and glabrous on the upper laminas while the lower laminas are paler. The laminas are flat while the margins are entire and sparsely covered in white antrorse hirsute hairs. The mid vein and lateral veins are slightly prominent on the lower lamina and are obscurely visible on the upper laminas. The leaves are Nyctinastically controlled meaning they fold up at night or under darker conditions and open outwards in full sun.
The inflorescences are born in small clusters of 1 to 6 individual flowers from the leaf axils. The flowers measure 10mm to 15mm in diameter. The 5 lobed calyxes is grass-green tinged reddish near the lobes. The calyx measures 1.5mm to 3mm in length including the five 1mm to 2.5mm long oblong lobes. The 5 yellow, oblong petals are free and form a tubular like corolla on the basal half; inside the calyx tube, are divaricate on the apical portion where It is exserted. The petals measure 6mm to 12mm in length.
The 10 connate stamens consist of 5 short outer stamens opposite the petals and 5 longer inner ones opposite the sepals. The yellow-green exserted filaments measure 3mm to 9mm in length while the oblong-spherical anthers are white. The pistil is heterostylous. The flowers appear from May to December.
The fruits are long, dry, cylindrical capsules. The capsules are held above the leaves and are densely covered in long white retrorse and or hirsute hairs. The calyxes are persistent at the base of the capsules and turn grey when ripe. The ripe capsules dehisc along the longitudinal sutures and measure 8mm to 30mm in length by 2mm to 3mm in diameter. The deep brown ellipsoidal seeds are longitudinally ribbed.
Wildlife:
Oxalis perennans’s flowers are a great attraction for butterflies, native flies and native nectar eating flies.
Cultivation:
Oxalis perennans is a beautiful foliaged small herb with lovely yellow flowers that is worthwhile growing for its beauty in small temperate to monsoonal gardens. It must be planted in full sun.
It is a very reliable and blooms over a long period. As a garden subject it will grow from 0.15 meter to 0.2 meters in height by 0.5 meter to 0.6 meters in diameter when cultivated in the open. It is fast growing, drought tolerant and cold tolerant down to at least minus 4 degrees.
It is most suitable for use around swimming pools, sunny courtyards, besides pathways, between driveways rockeries, along wet banks and for border arrangements.
Place it near old stumps and roots to make the stumps or roots look larger. Select an area of ground and let your hair down and be imaginative and this is the plant that may just change your life. Remember to plant sparingly leaving large gaps between the plants to allow the mulch to be seen. Mulches should consist of fine pebbles to give a more expansive barren look.
Propagation:
Seeds: Oxalis perennans’s seeds directly into a seed raising mix. Cover them with 5mm of fine sand and keep moist not wet. Place the tray in a warm sunny position. When the seedlings are 25mm to 50mm tall, prick them out and plant them into 50mm native tubes using a good organic mix.
Once the seedlings reach 150mm to 200mm in height, nip the tips out before planting them out into their permanent position.
Fertilize using seaweed, fish emulsion or organic chicken pellets soaked in water on an alternate basis. Fertilize every two months until it is established then annually in early September to October to maintain health, vitality and better flowering.
Further Comments from Readers:
Hi reader, it seems you use The Bible of Botany a lot. That’s great as we have great pleasure in bringing it to you! It’s a little awkward for us to ask, but our first aim is to purchase land approximately 1,600 hectares to link several parcels of N.P. into one at The Pinnacles NSW Australia, but we need your help. We’re not salespeople. We’re amateur botanists who have dedicated over 30 years to saving the environment in a practical way. We depend on donations to reach our goal. If you donate just $5, the price of your coffee this Sunday, We can help to keep the planet alive in a real way and continue to bring you regular updates and features on Australian plants all in one Botanical Bible. Any support is greatly appreciated. Thank you.
In the spirit of reconciliation we acknowledge the Bundjalung, Gumbaynggirr and Yaegl and all aboriginal nations throughout Australia and their connections to land, sea and community. We pay our respect to their Elders past, present and future for the pleasures we have gained.
Oxalis radicosa
Classification:
Class: Equisetopsida
Subclass: Magnoliidae
Superorder: Rosanae
Order: Oxalidales
Family: Oxalidaceae
Genus: From Oxalis, which is Ancient Greek for an acid salt. It refers to the taste being similar to Sorrel which is high in oxalic acid.
Species: From Radicosus, which is Latin for a plant that grows crowns freely from the root nodes. It refers to prostrate plants, which spread freely from the roots.
Common Name:
Distribution:
Oxalis radicosa is found at Watheroo in Western Australia and between Huckita Station north east of Alice Springs in the Northern Territory, the Docker River in Western Australia and Watarunya Rockhole and Boorndoolyanna Homeland in South Australia.
In the east it is found south from the MacIlwraith Range in far north eastern Queensland in the north to the Grampians and Mornington Peninsula in southern Victoria.
In South Australia it is found between Mount Finke, Rockleigh on the lower Murray River, Sandergrove on Lake Alexandrina and Polda.
It is found on the Bass Strait Islands of Flinders Island to Lower Snug in the eastern third of Tasmania and off shore islands along the east coast.
It is also found on Lord Howe Island and Norfolk Island.
https://avh.ala.org.au/occurrences/search?taxa=Oxalis+radicosa#tab_mapView
Habitat Aspect Climate:
Oxalis radicosa prefers full sun to light dappled shade. It grows amongst rocks in open woodlands, open forests, along rivers, seasonal creeks, streams or in gorges. The altitude ranges from 10 meters ASL to 860 meters ASL.
The temperatures range from minus 4 degrees in August to 40 degrees in February.
The rainfalls range from lows of 200mm to an average 3200mm annually.
Soil Requirements:
Oxalis radicosa prefers skeletal to shallow course sand, fine sands, sandy loams to light gritty clays or fine silts. The soils are usually derived from decomposed sandstones, granites, accumulated peaty beach sands, accumulated coral sands or at times fissures in granite, basalt boulders or on ledges. The soils ph ranges from 5pH to 6pH. It does not tolerate waterlogged soils though seasonal floods are tolerated. Non saline soils to very saline soils are tolerated.
Height & Spread:
Wild Plants: 0.1m to 0.3m by 0.3m to 0.5m.
Characteristics:
Oxalis radicosa grows as a small perennial herb with ascending stems or at times creeping stems. The stems are grass-green, reddish-green or bluish-green and are moderately to densely covered in long, white to cream, spreading and or retrorse hirsute hairs. The thick woody taproots are without bulbils.
It is a small tuft herbaceous sorrel. The cauline leaves are trifoliolate. The leaflets are broad obovate, bilobed with a sinus to a third to half of the length of the leaflet. The obovate lobes usually measure 2mm to 6mm in length by 2mm to 4mm in width.
The minute stipules bases are cuneate while the apexes are obtuse. The bluish–green to grass-green petioles and petiolules often have a purplish tinge and are sparsely to moderately covered in long, white to cream, spreading and or antrorse hirsute hairs. The petioles measure 30mm to 70mm in length while the petiolules measure 0mm to 0.3mm in length. The bases taper to the petiole while the apexes are typical obtuse. The discolourous laminas are bluish–green to grass-green and moderately covered in short, white to cream, spreading and or antrorse hirsute hairs on the upper laminas while the lower laminas are paler and moderately to densely covered in long, white to cream, spreading and or antrorse hirsute hairs. The laminas are flat while the margins are entire and are densely covered in white antrorse ciliate hairs. The mid vein and lateral veins are slightly prominent on the lower lamina and are obscurely visible on the upper laminas. The leaves are nyctinastically controlled meaning they fold up at night or under darker conditions and open outwards in full sun.
The inflorescences are born in small clusters of 2 to 4 individual flowers from the leaf axils. The flowers measure 10mm to 15mm in diameter. The 5 lobed calyxes is grass-green tinged reddish near the lobes. The calyx measures 1.5mm to 3mm in length including the five 1mm to 2.5mm long oblong lobes. The 5 yellow, oblong petals are free but form a tubular like corolla on the basal half; inside the calyx tube, are divaricate on the apical portion where It is exserted. The petals measure 6mm to 12mm in length.
The 10 connate stamens consist of 5 short outer stamens opposite the petals and 5 longer inner ones opposite the sepals. The 5 longer yellow filaments are exserted and measure 3mm to 7mm in length while the oblong-spherical anthers are deep yellow. The pistil is heterostylous. The flowers appear from September to April but may have the odd flower appearing at other times throughout the year.
Oxalis radicosa erect or at times deflexed pedicelled fruits are long, dry, 5 suture, furrowed, cylindrical capsules. The capsules are held below the leaves and are densely covered in long white retrorse, hirsute hairs. The calyxes are persistent at the base of the ripe capsules and turn grey when ripe. The ripe capsules dehisce along the longitudinal sutures and measure 7mm to 20mm in length by 2mm to 3mm in diameter. The deep brown ellipsoidal seeds are longitudinally ribbed.
The 5 to 14 brown to brownish-red, glossy, seeds per locule are ovoidal-oblong. The seeds measure 1mm to 1.5mm in length by 0.8mm to 1mm in diameter. It is prominently transversely ridged and tuberculate.
Confusing Species:
The two following specie are very confusing and the variability within Oxalis corniculata adds to any real clarity between the 2 specie. These are my personal observational differences and it would not surprise me if the 2 species are in fact the same specie with Oxalis radicosa being an Australian continental variation or sub specie of Oxalis corniculata.
Oxalis corniculata has 1 to 7 individual flowers in a cluster. Anthers usually white. The inner stamens are loosely grouped together to form a column. The capsules measure 8mm to 24mm in length by 2mm to 3mm in diameter. The seeds are similar.
Oxalis radicosa has 2 to 4 individual flowers in a cluster. Anthers yellow. The inner stamens are more adhering to form a slightly tighter column. The capsules measure 7mm to 20mm in length by 2mm to 3mm in diameter. The seeds are similar.
Wildlife:
Oxalis radicosa’s flowers are a great attraction for butterflies, native flies and native nectar eating flies.
Cultivation:
Oxalis radicosa is a beautiful foliaged small herb with lovely yellow flowers that is worthwhile growing for its beauty in small temperate to monsoonal gardens. It must be planted in full sun.
It is a very reliable and blooms over a long period. As a garden subject it will grow from 0.15 meter to 0.2 meters in height by 0.5 meter to 0.6 meters in diameter when cultivated in the open. It is fast growing, drought tolerant and cold tolerant down to at least minus 4 degrees.
It is most suitable for use around swimming pools, sunny courtyards, besides pathways, between driveways rockeries, along wet banks and for border arrangements.
Place it near old stumps and roots to make the stumps or roots look larger. Select an area of ground and let your hair down and be imaginative and this is the plant that may just change your life. Remember to plant sparingly leaving large gaps between the plants to allow the mulch to be seen. Mulches should consist of fine pebbles to give a more expansive barren look.
Propagation:
Seeds: Sow the seeds directly into a seed raising mix. Cover them with 5mm of fine sand and keep moist not wet. Place the tray in a warm sunny position. When the seedlings are 25mm to 50mm tall, prick them out and plant them into 50mm native tubes using a good organic mix.
Once the seedlings reach 150mm to 200mm in height, nip the tips out before planting them out into their permanent position.
Fertilize using seaweed, fish emulsion or organic chicken pellets soaked in water on an alternate basis. Fertilize every two months until it is established then annually in early September to October to maintain health, vitality and better flowering.
Further Comments from Readers:
Hi reader, it seems you use The Bible of Botany a lot. That’s great as we have great pleasure in bringing it to you! It’s a little awkward for us to ask, but our first aim is to purchase land approximately 1,600 hectares to link several parcels of N.P. into one at The Pinnacles NSW Australia, but we need your help. We’re not salespeople. We’re amateur botanists who have dedicated over 30 years to saving the environment in a practical way. We depend on donations to reach our goal. If you donate just $5, the price of your coffee this Sunday, We can help to keep the planet alive in a real way and continue to bring you regular updates and features on Australian plants all in one Botanical Bible. Any support is greatly appreciated. Thank you.
In the spirit of reconciliation we acknowledge the Bundjalung, Gumbaynggirr and Yaegl and all aboriginal nations throughout Australia and their connections to land, sea and community. We pay our respect to their Elders past, present and future for the pleasures we have gained.
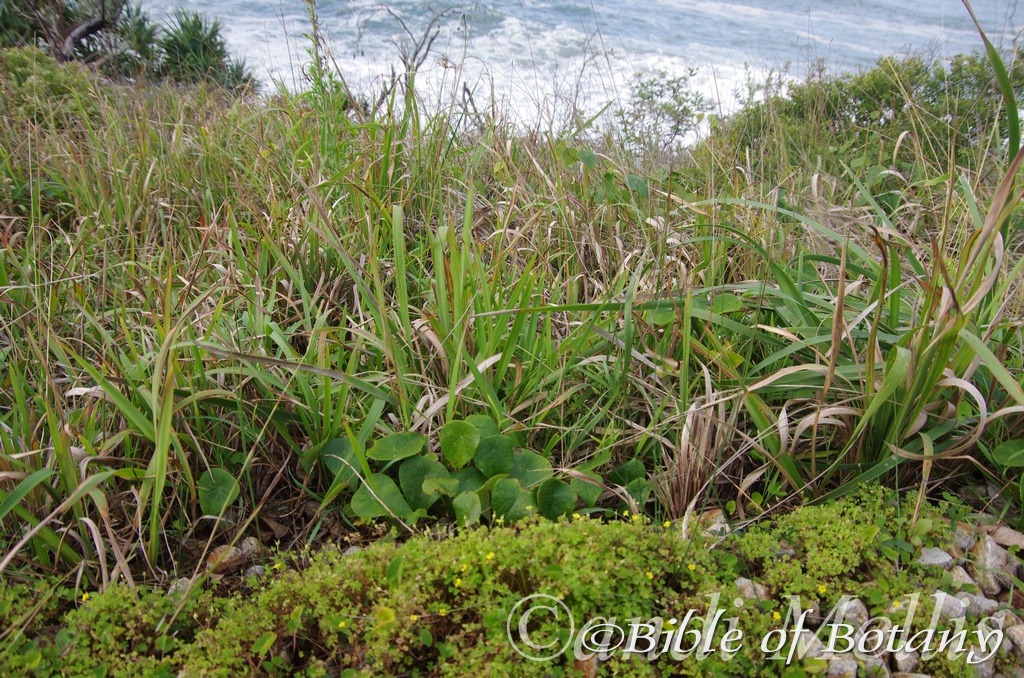
North Yuraygir National Park NSW
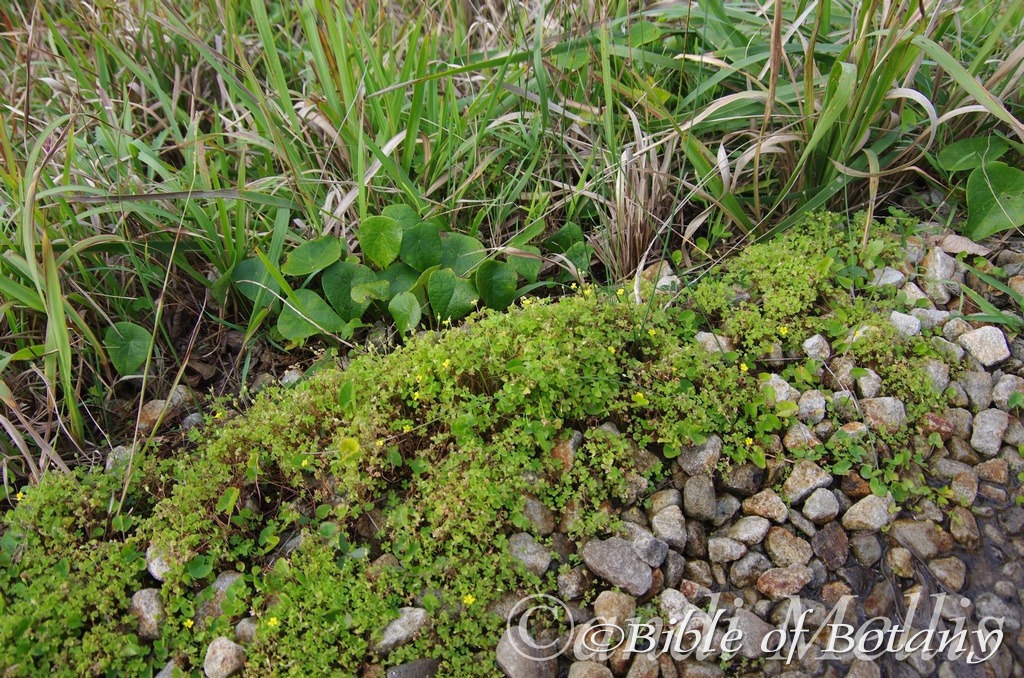
North Yuraygir National Park NSW

North Yuraygir National Park NSW
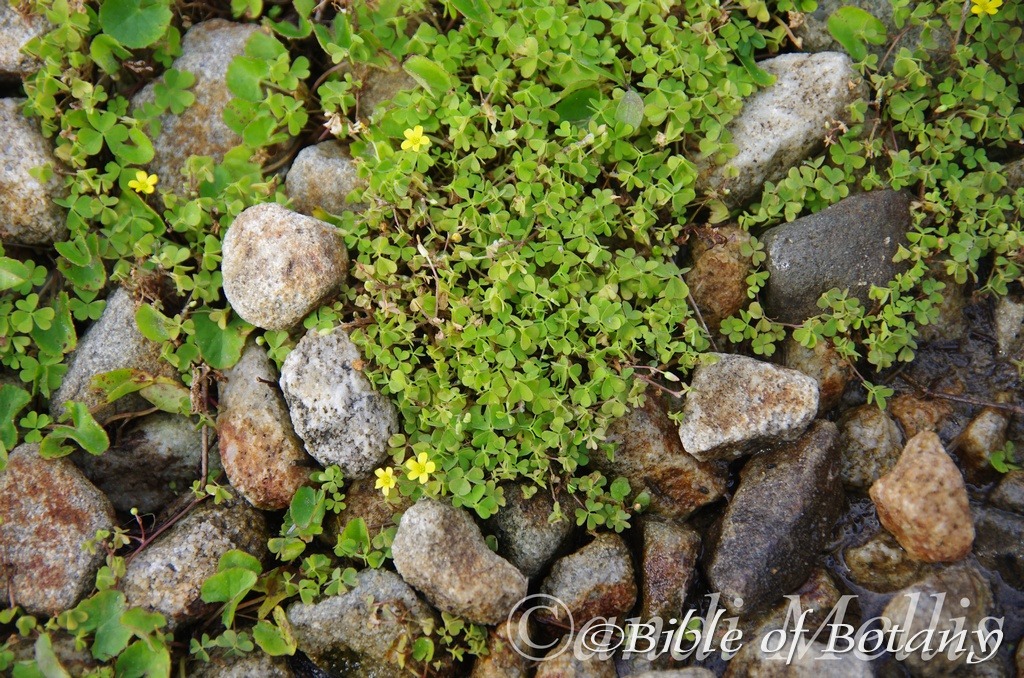
North Yuraygir National Park NSW
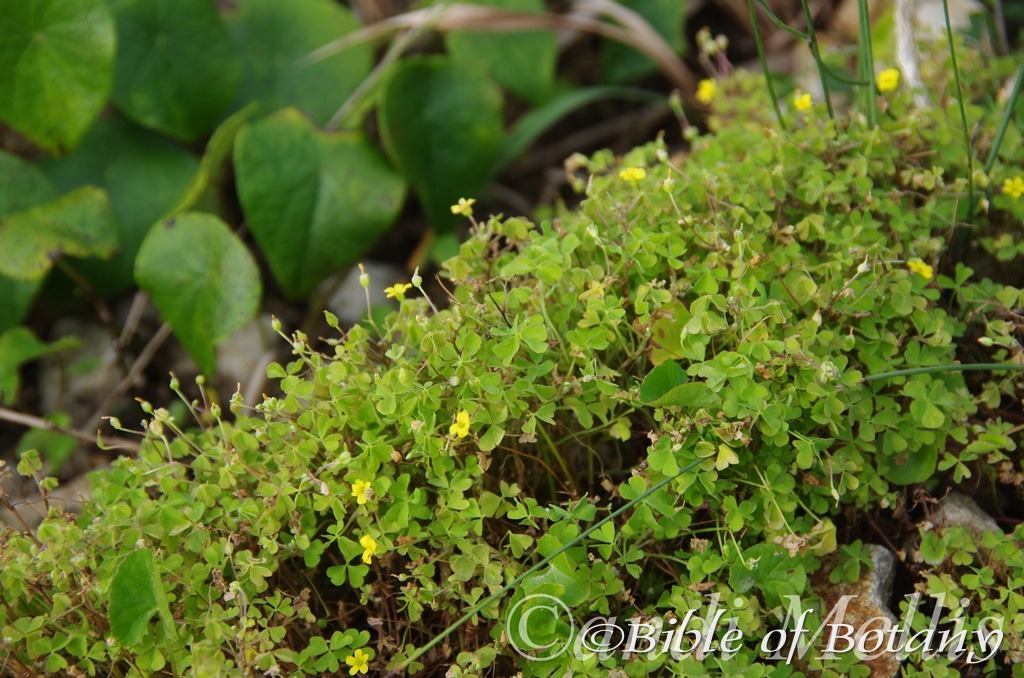
North Yuraygir National Park NSW
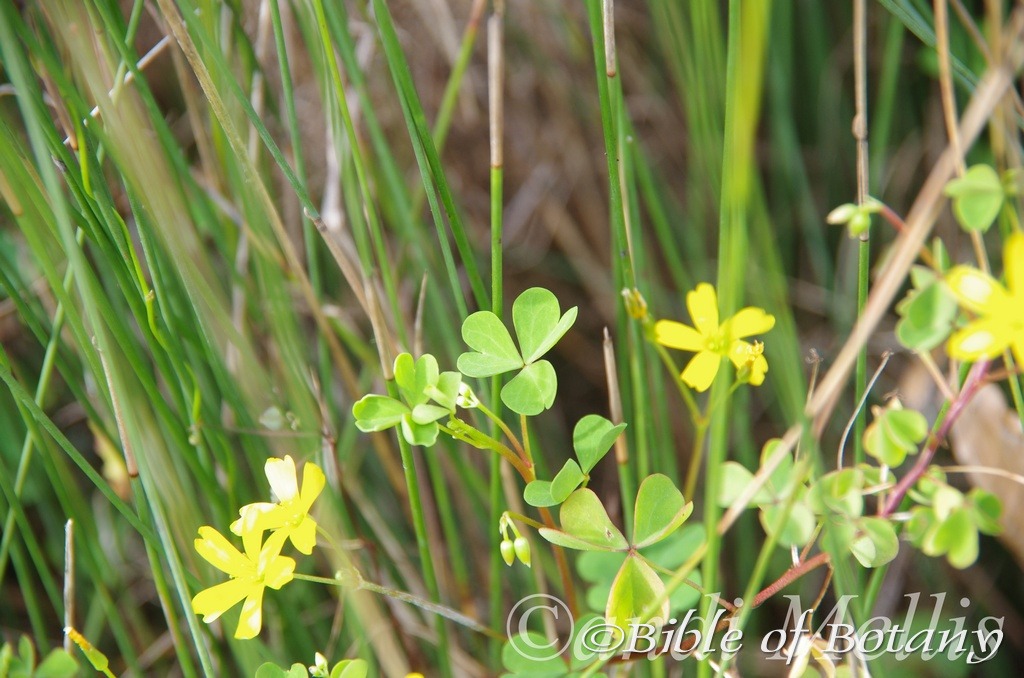
North Yuraygir National Park NSW

North Yuraygir National Park NSW
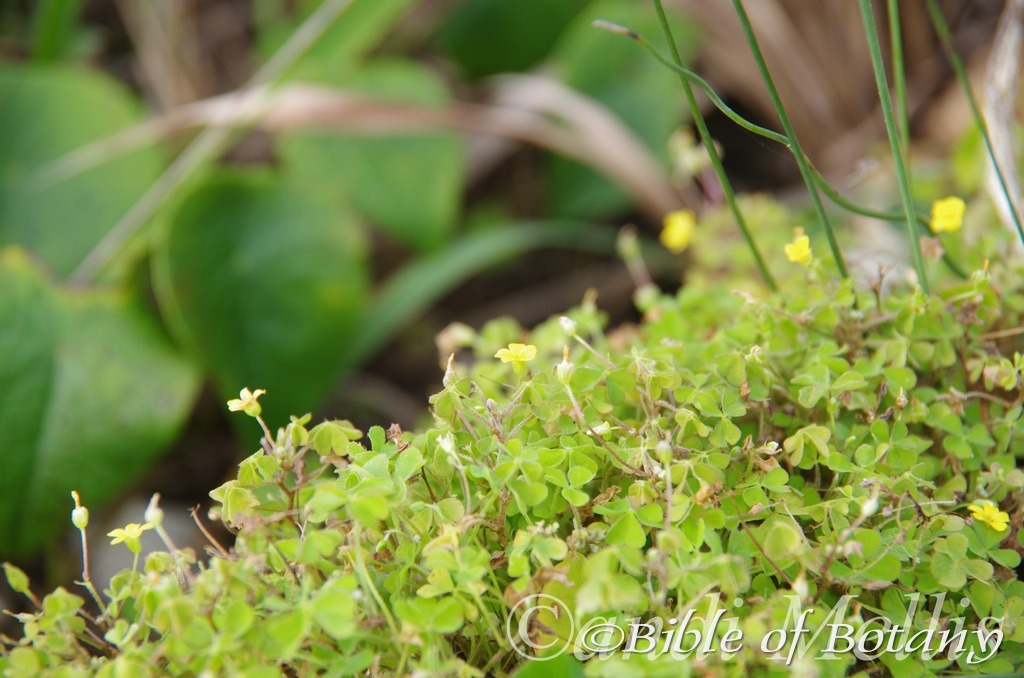
North Yuraygir National Park NSW
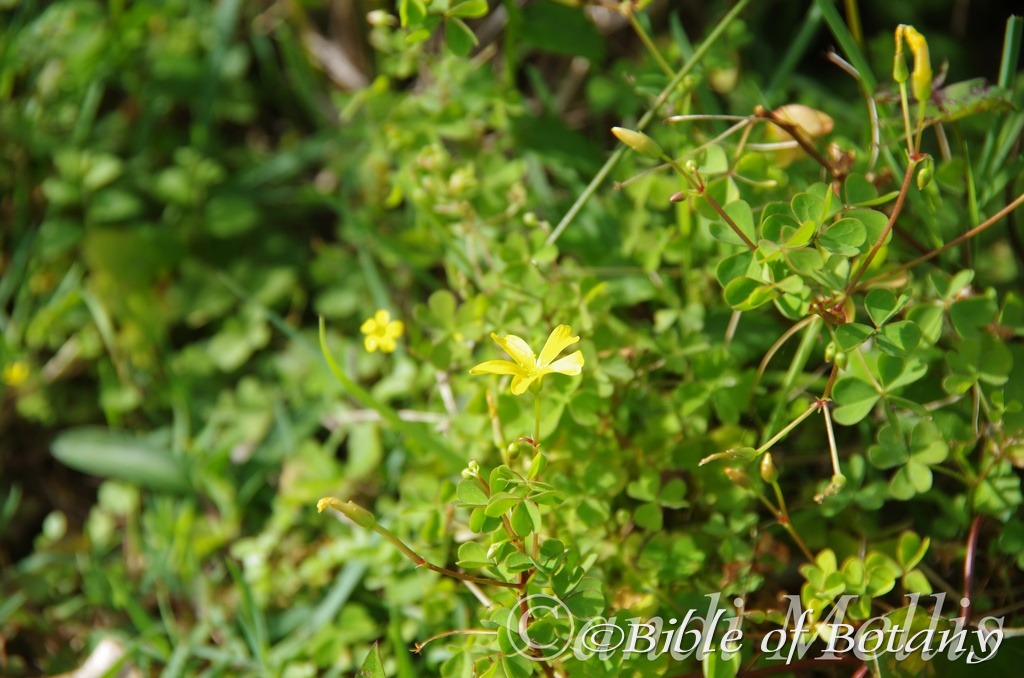
North Yuraygir National Park NSW
Oxalis rubens
Classification:
Class: Equisetopsida
Subclass: Magnoliidae
Superorder: Rosanae
Order: Oxalidales
Family: Oxalidaceae
Genus: From Oxalis, which is Ancient Greek for an acid salt. It refers to the taste being similar to Sorrel which is high in oxalic acid.
Species: From Rubēns, which is Latin for reddish. It refers to organs, which are reddish in colour.
Common Name:
Distribution:
Oxalis rubens is found south from Shoal Point north of Mackay in central coastal Queensland to Melbourne in Victoria and further south on King Island, Flinders Island and in Tasmania from Hobart to Simmonds Bay, on North Brunie Island and Port Davey.
In South Australia it has been collected from Koonalda to Streaky Bay along the south coast and Kangaroo Island.
https://avh.ala.org.au/occurrences/search?taxa=Oxalis+rubens#tab_mapView
Habitat Aspect Climate:
Oxalis rubens prefers full sun to light dappled shade. It grows on grows on the off shore islands along the east coast, sandy beaches sandy heaths or coastal sand dunes. Particularly healthy specimens have been noted growing where seaweed flotsam gathers along the foreshore or estuaries after tidal surges. The altitude ranges from 2 meters ASL to 68 meters ASL.
The temperatures range from 1 degree in August to 40 degrees in February.
The rainfalls range from lows of 250mm to an average 2000mm annually.
Soil Requirements:
Oxalis rubens prefers course sand to fine peaty sands. The soils are usually derived from accumulated beach sands, accumulated coral sands or at times decomposed sandstones. The soils ph ranges from 5pH to 8pH. It does not tolerate waterlogged soils. Non saline soils to extremely saline soils are tolerated as are salt laden winds.
Height & Spread:
Wild Plants: 0.2m to 0.35m by 0.5m to 0.6m.
Characteristics:
It is a small perennial herb with ascending stems or at times creeping stems. The fleshy stems are reddish-green, greenish-brown or reddish-brown and are usually glabrous or sparsely covered in long, white to cream, antrorse hirsute hairs. The fibrous roots are branched and without bulbils.
It is a small tuft herbaceous sorrel. The cauline sub opposite or fasciculate leaves are trifoliolate and obcordate. The leaflets are broad obovate, bilobed with a sinus to a third to half of the length of the leaflet. The oblong to obovate lobes have with one straight side and usually measure 2.5mm to 6mm in length by 2mm to 5mm in width.
The minute stipules bases are cuneate while the apexes are obtuse. The bluish–green to grass-green petioles often have a purplish tinge and are sparsely to moderately covered in long, white to cream, spreading and or antrorse hirsute hairs. The petioles measure 70mm to 300mm in length but usually much shorter. The bases taper to the petiole while the apexes are obtuse to truncate. The discolourous laminas are bluish–green to grass-green often tinged purple and glabrous on the upper laminas while the lower laminas are paler to sub glaucous. The laminas are flat while the margins are entire. The mid vein and lateral veins are slightly prominent on the lower lamina and are obscurely visible on the upper laminas. The leaves are nyctinastically controlled meaning they fold up at night or under darker conditions and open outwards in full sun.
The inflorescences are born in small clusters of 1 to 2 individual flowers from the leaf axils. The flowers measure 7mm to 10mm in diameter. The 5 lobed calyxes or 5 sepals are grass-green tinged purplish with obtuse to obtuse-acute apexes. The calyxes measure 1.8mm to 2mm in length including the five 1.6mm to 2mm long, oblong lobes. The 5 oblong petals are free but form a tubular like corolla on the basal half; inside the calyx tube, are divaricate on the apical portion where It is exserted. The petals are pale yellow externally and yellow internally and measure 7mm to 8mm in length.
The 10 yellow-green connate stamens consist of 5 short, slightly inserted outer stamens opposite the petals and 5 slightly exserted longer inner stamens opposite the sepals. The 5 longer filaments measure 2.2mm to 3mm in length while the oblong-spherical anthers are deep yellow. The pistil is heterostylous. The flowers appear from February to September
Oxalis rubens’s fruits are long, erect, cylindrical capsules. The capsules are held above the leaves and are densely covered in long white retrorse and or hirsute hairs. The calyxes are persistent at the base of the capsules and turn grey when ripe. The ripe capsules dehisc along the longitudinal sutures and measure 15mm to 18mm in length by 3mm to 4mm in diameter. The deep brown ellipsoidal seeds are ribbed.
Wildlife:
Oxalis rubens’s flowers are a great attraction for butterflies, native flies and native nectar eating flies.
Cultivation:
Oxalis rubens is a beautiful foliaged small herb with lovely yellow flowers that is worthwhile growing for its beauty in small temperate to monsoonal seaside gardens or gardens close to the coast. It must be planted in full sun.
It is a very reliable and blooms over a long period. As a garden subject it will grow from 0.15 meter to 0.2 meters in height by 0.5 meter to 0.6 meters in diameter when cultivated in the open. It is fast growing, drought tolerant and cold tolerant down to at least minus 4 degrees.
It is most suitable for use around swimming pools, sunny courtyards, besides pathways, between driveways, rockeries, along wet banks and for border arrangements.
Place it near old stumps and roots to make the stumps or roots look larger. Select an area of ground and let your hair down and be imaginative and this is the plant that may just change your life. Remember to plant sparingly leaving large gaps between the plants to allow the mulch to be seen. Mulches should consist of fine pebbles to give a more expansive barren look.
Propagation:
Seeds: Oxalis rubens’s seeds directly into a seed raising mix. Cover them with 5mm of fine sand and keep moist not wet. Place the tray in a warm sunny position. When the seedlings are 25mm to 50mm tall, prick them out and plant them into 50mm native tubes using a good organic mix.
Once the seedlings reach 150mm to 200mm in height, nip the tips out before planting them out into their permanent position.
Fertilize using seaweed, fish emulsion or organic chicken pellets soaked in water on an alternate basis. Fertilize every two months until it is established then annually in early September to October to maintain health, vitality and better flowering.
Further Comments from Readers:
Hi reader, it seems you use The Bible of Botany a lot. That’s great as we have great pleasure in bringing it to you! It’s a little awkward for us to ask, but our first aim is to purchase land approximately 1,600 hectares to link several parcels of N.P. into one at The Pinnacles NSW Australia, but we need your help. We’re not salespeople. We’re amateur botanists who have dedicated over 30 years to saving the environment in a practical way. We depend on donations to reach our goal. If you donate just $5, the price of your coffee this Sunday, We can help to keep the planet alive in a real way and continue to bring you regular updates and features on Australian plants all in one Botanical Bible. Any support is greatly appreciated. Thank you.
In the spirit of reconciliation we acknowledge the Bundjalung, Gumbaynggirr and Yaegl and all aboriginal nations throughout Australia and their connections to land, sea and community. We pay our respect to their Elders past, present and future for the pleasures we have gained.
Innes Lake National Park NSW
Innes Lake National Park NSW
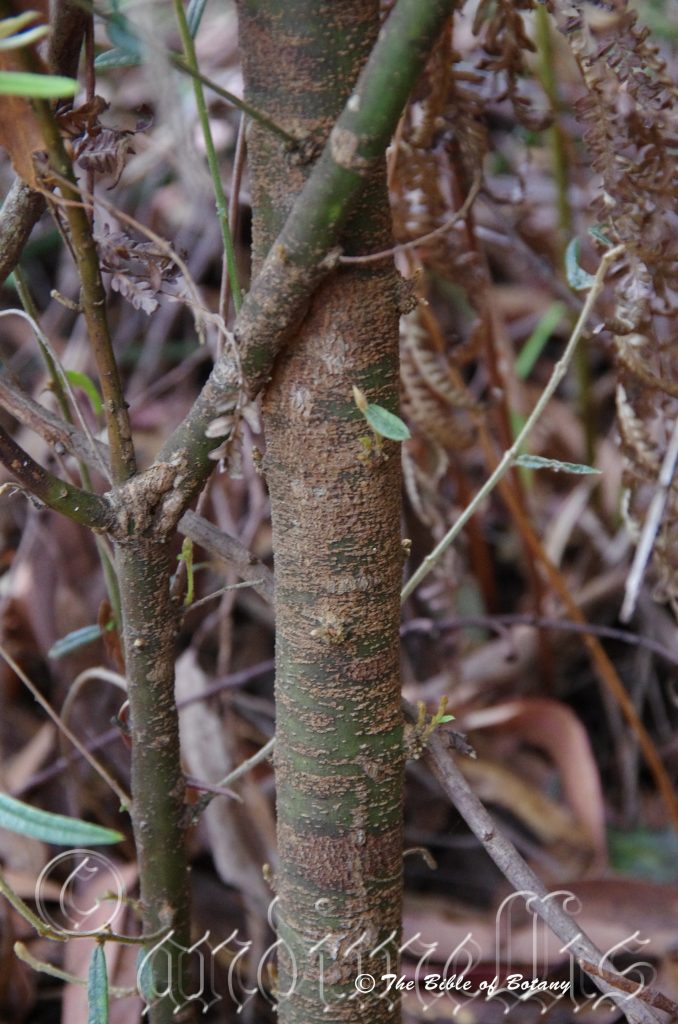
Innes Lake National Park NSW
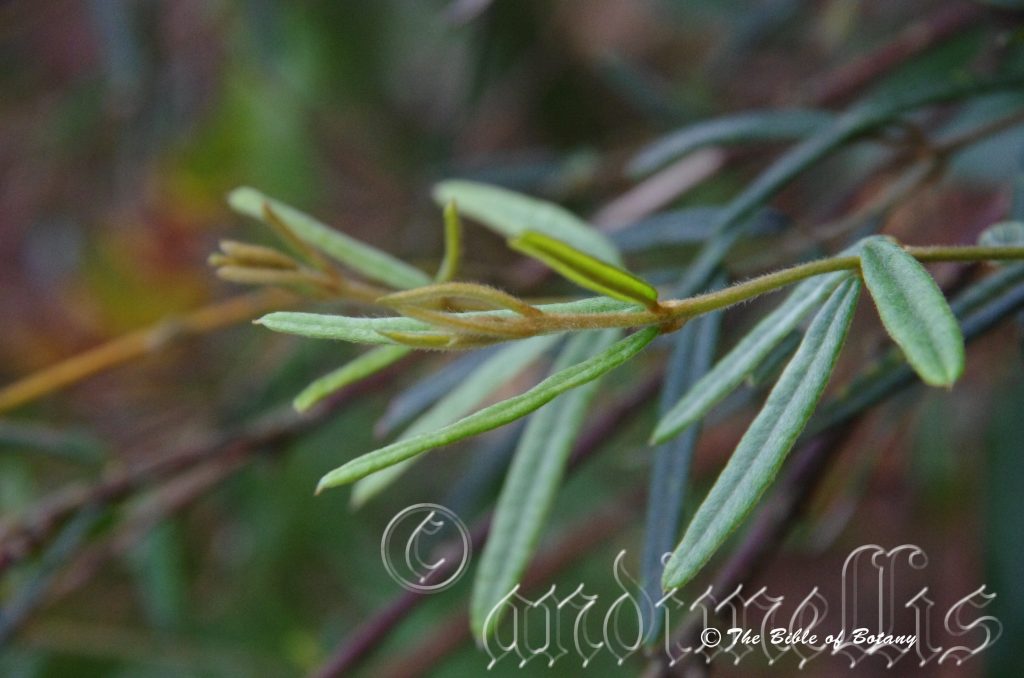
Innes Lake National Park NSW
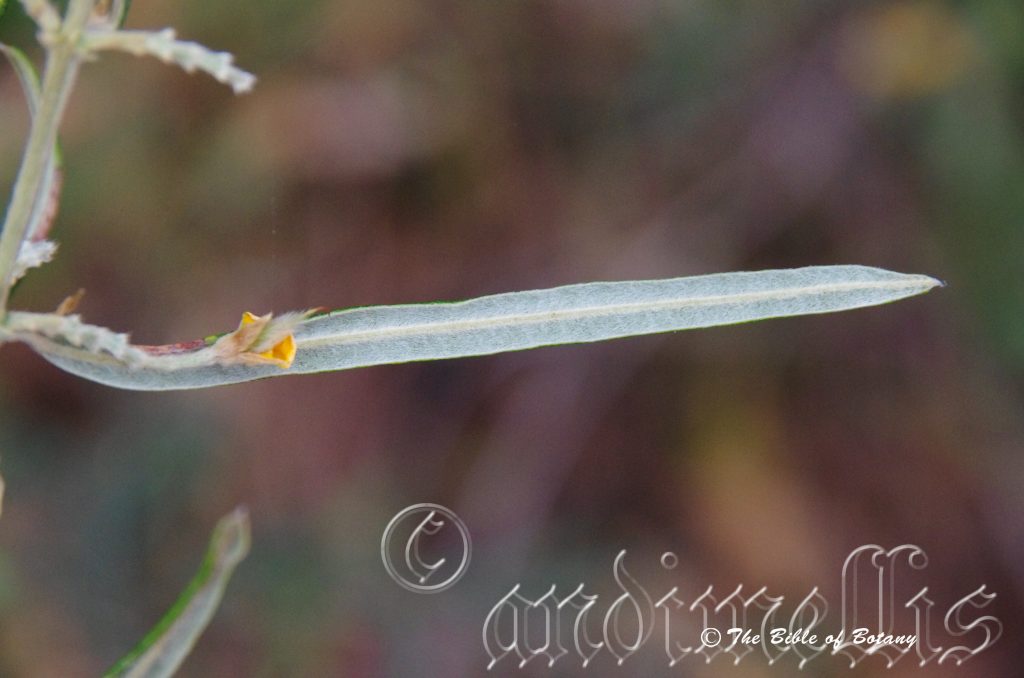
Innes Lake National Park NSW
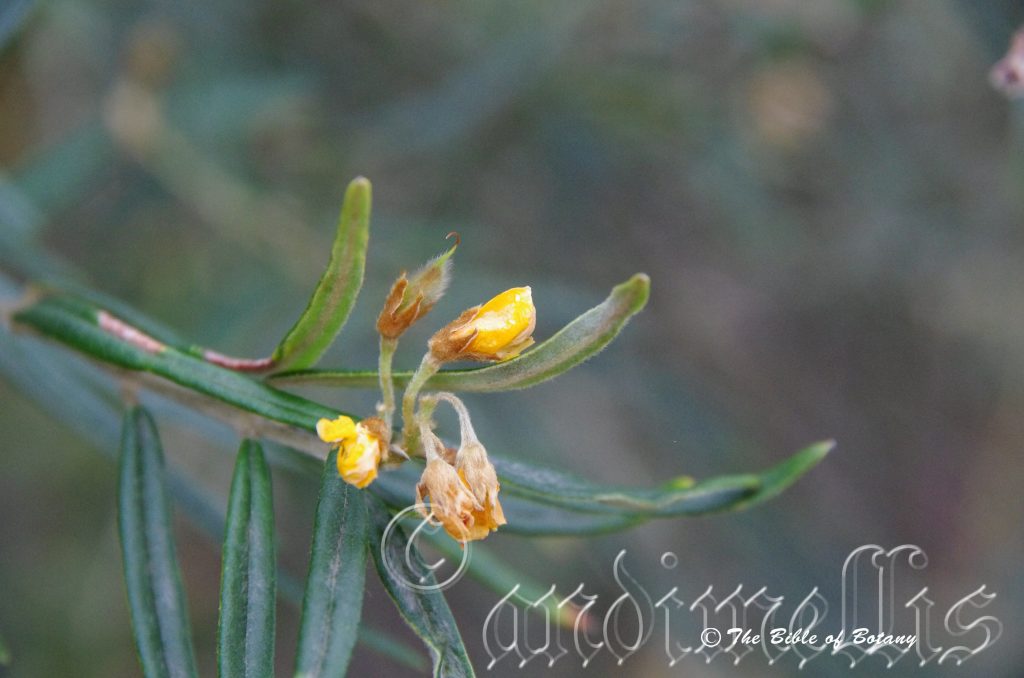
Innes Lake National Park NSW
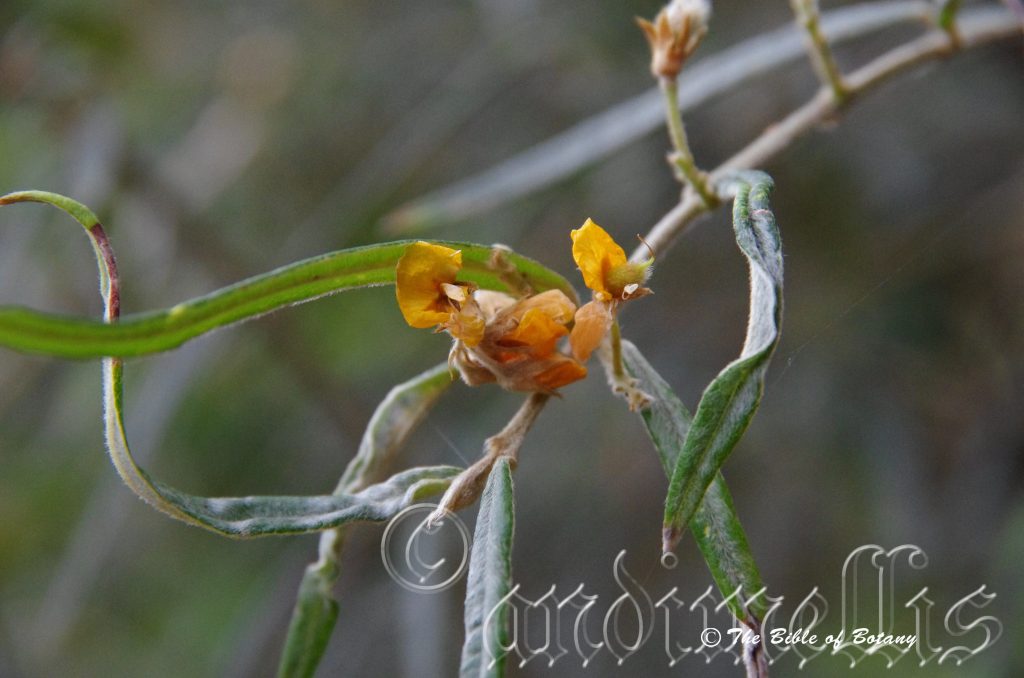
Innes Lake National Park NSW
Oxylobium arborescens
Classification:
Unranked: Eudicots
Unranked: Rosids
Order: Fabales
Family: Fabaceae
Subfamily: Fabopideae
Tribe: Mirabelieae
Genus: From Oxalis/Oxus/Oxys, which are Greek for sharp and Lobos/Lobī, which is Ancient Greek or Lobus which is Latin for a lobe. It refers to the lobes on the pods, which are rather sharp on some species.
Species: From Arborescent, which is Latin for a tree. It refers to plants, which are more tree like than other species in the genus.
Common Name: Golden Shaggy Pea.
Distribution:
Oxylobium arborescens is found south from the Kroombit Tops in central coastal Queensland to Wallace Creek Tonimbuk east of Melbourne in Victoria.
In Tasmania it is found north and west of a line from Retreat in the central north to Landing Creek on the south west coast and on the east bank of Lake Gordon, Mount Wellington and the Ida Bay State Reserve.
https://avh.ala.org.au/occurrences/search?taxa=Oxylobium+arborescens#tab_mapView
Habitat Aspect Climate:
Oxylobium arborescens prefers full sun to light dappled shade. It grows in open dry sclerophyll forests moist sclerophyll forests, beach woodlands or on the coastal ranges. The altitude ranges from 5 meters ASL to 1260 meters ASL.
The temperatures range from minus 5 degrees in August to 39 degrees in February.
The rainfalls range from lows of 600mm to an average 2000mm annually.
Soil Requirements:
Oxylobium arborescens prefers fine sand, sandy loams, light gritty clays to medium clays. The soils are usually derived from decomposed brown basalts, black basalts, shales, metamorphic rocks, sandstones or granites. The soils ph ranges from 5pH to 6pH. It does not tolerate waterlogged soils. Non saline soils to moderately saline soils are tolerated.
Height & Spread:
Wild Plants: 1m to 5m by 1m to 2m.
Characteristics:
Oxylobium arborescens grows as a small shrub to small tree with deep grey stems. The stems are moderately covered in white or pale grey pulverulent hairs. The new growth and young stems are sea-green and are densely covered in white or pale grey pulverulent hairs.
The disjunct, opposite, sub opposite, irregularly opposite or irregularly in whirls of 3.The simple leaves are narrow oblong to linear or narrow elliptical and usually measure 30mm to 50mm in length but can be up to 70mm in length by 5mm to 8mm in width. The stipules are absent on this species. The petiole measures 2.6mm to 4mm in length. The bases taper to the petiole while the apexes are strongly mucronate. The discolourous laminas are deep sea-green and are covered in small tuberculate lumps and glabrous on the upper laminas while the lower laminas are densely covered in fawnish, silky sericeous hairs. The upper laminas are convex from the mid-vein to the margins, and are straight and recurve upwards or decurve downwards gently right at the apex while the margins are entire and recurved. The mid vein is prominent on the lower lamina and is clearly visible on the upper lamina while the lateral and secondary reticulate veins are depressed and clearly visible on the upper lamina.
The inflorescences are born short, axillary or terminal racemes. The pedicels are densely covered in fawnish sericeous hairs with the occasional appressed pilose hair and measure 1.5mm to 2.5mm in length. The lanceolate bracts and linear bracteoles have acuminate apexes and are densely covered in fawnish sericeous hairs with the occasional appressed pilose hair. They measure 3mm to 4.5mm in length. The greenish-ochre calyxes are densely covered in fawnish sericeous hairs. The calyxes measure 5mm to 9mm in length including the 5 lobes which measure 2.2mm to 4mm in length.
The standard is yellow with or without red splash at the base internally and measures 8mm to 10mm in length by 17mm to 22mm in width. The yellow obovate wings have obtuse or mucronate apexes and measure 7mm to 9mm in length by 3.5mm to 5mm in width. The obovate keel petals have an obtuse apex and are slightly shorter or slightly longer than the wing petals.
The ovary is sessile with 6 to 9 ovules. The 5 yellow stamens are inserted in the keel. The flowers appear from late October to December
Oxylobium arborescens’s fruits are short, ovoidal pods with an abruptly acuminate apex. The bluish-green pods are densely covered in fawnish sericeous hairs and turn deep grey when ripe. The pods are often slightly laterally compressed and measure 6mm to 10mm in length by 4.5mm to 8mm in width and 4mm to 7mm in height. The seeds are deep brown.
Wildlife:
Oxylobium arborescens’s flowers attract small butterflies, native flies and native nectar eating flies.
Cultivation:
Oxylobium arborescens is a small open tree that should be more widely grown in temperate to subtropical gardens. It is ideal at the edge of a dry forest or as a small pioneer tree before establishing a garden proper. It also makes a great backdrop to a rockery display in hot open spaces. In cultivation it will grow from 3 meters to 5 meters in height by 2 meters to 4 meters in diameter when grown in the open.
It grows exceptionally well on light clays to medium clay soils. It can cope with temperatures as low as minus 5 degrees and up to 40 degrees once established. It is also drought resistant once established and in fact detest wet feet.
Add to the above, if It is given a little extra moisture and native fertilizer on being planted out as a seedling will respond with good flowering and good fruit set in the following season.
Oxylobium arborescens would make a good contribution to a dry or moist heath garden if planted in the back ground. It can be used as the taller feature plant in a small garden. When you design a flat heath garden which it is well suited the Plants must be planted close together and be short so you can see over the tallest ones with the exception of one or two plants at the most. The idea is to achieve a feeling of expansive flatness. This can be achieved with using the deep green leaves contrasting with finer or larger pale green or soft grey to glaucous coloured foliage. Use a lot of procumbent plants like Carpobrotus edulis or any of the Hibbertia species. Mix them with other smaller shrubs so none of them dominate the scene but blend in to give a mosaic of foliage colours that you oversee. Actinotis helianthi or Grevillea thelemanniana for two great contrasting foliages.
Propagation:
Seeds: Sow the seeds directly into a seed raising mix. Cover them with 5mm of fine sand and keep moist not wet. Place the tray in a warm sunny position. When the seedlings are 25mm to 50mm tall, prick them out and plant them into 50mm native tubes using a good organic mix.
Once the seedlings reach 150mm to 200mm in height, nip the tips out before planting them out into their permanent position.
Cuttings: Propagation is usually done by seed as they are easy to obtain and grow in large numbers.
Fortunately Oxylobium arborescens cuttings strike easy. Use 100mm to 200mm long tip cuttings or lateral shoots from the present season’s growth. Take them in warmer months of the year. Remove half the leaves from the bottom section being careful not to tear the bark.
1 Prepare the cutting mix by adding two thirds sharp clean river sand, one third peat or one third perlite. These ingredients must be sterilized,
2 Select good material from non diseased plants,
3 Select semi green stems for cuttings. Look for a stem with two or three nodes,
4 Place the cutting on a flat, hard surface, and make a clean cut down one side of the cutting at the base for 10mm with a sharp sterile knife or razor blade. – This scarification of the node will increase the chances of roots emerging from this spot. Now remove all but one or two the leaves, leaving the apex leaves in tact. If the leaves are very large in proportion to the stem, cut off the apical halves.
5 Fill a saucer with water, and place a little medium strength rooting hormone into another container like a milk bottle top. Dip the node end of the cutting into the water and then into the rooting hormone. Tap off any excess hormone,
6 Use a small dipple stick or old pencil to poke a hole into the soilless potting mix. Ensure the hole is slightly larger than the stem diameter and be careful not to wipe the rooting hormone off the cuttings base. Place 2 to 4 cuttings in each of the 50mm native tubes,
7 I like to place the tubes in bucket with holes drilled in the bottom to allow excess water to drain out. A plastic bag that fits over the bucket is ideal to help maintain temperature and moisture. Place in a semi shaded, warm position like under 50mm shade cloth.
8 When the cuttings have struck, open the bag to allow air circulation for a few days to a week,
9 Once hardened off remove the cuttings from the bag and allow to further hardening for a few more days to a week,
10 Transplant into a good potting mix to grow on.
Fertilize using seaweed, fish emulsion or organic chicken pellets soaked in water on an alternate basis. Fertilize every two months until it is established then annually in early September to October to maintain health, vitality and better flowering.
Further Comments from Readers:
Hi reader, it seems you use The Bible of Botany a lot. That’s great as we have great pleasure in bringing it to you! It’s a little awkward for us to ask, but our first aim is to purchase land approximately 1,600 hectares to link several parcels of N.P. into one at The Pinnacles NSW Australia, but we need your help. We’re not salespeople. We’re amateur botanists who have dedicated over 30 years to saving the environment in a practical way. We depend on donations to reach our goal. If you donate just $5, the price of your coffee this Sunday, We can help to keep the planet alive in a real way and continue to bring you regular updates and features on Australian plants all in one Botanical Bible. Any support is greatly appreciated. Thank you.
In the spirit of reconciliation we acknowledge the Bundjalung, Gumbaynggirr and Yaegl and all aboriginal nations throughout Australia and their connections to land, sea and community. We pay our respect to their Elders past, present and future for the pleasures we have gained.
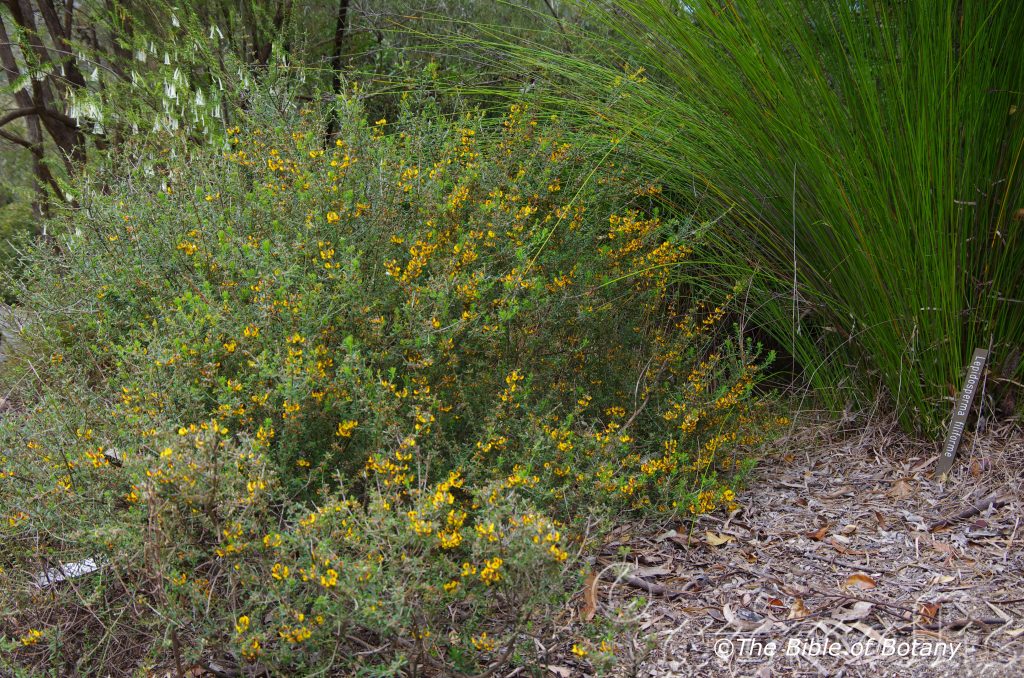
National Botanic Gardens ACT

National Botanic Gardens ACT
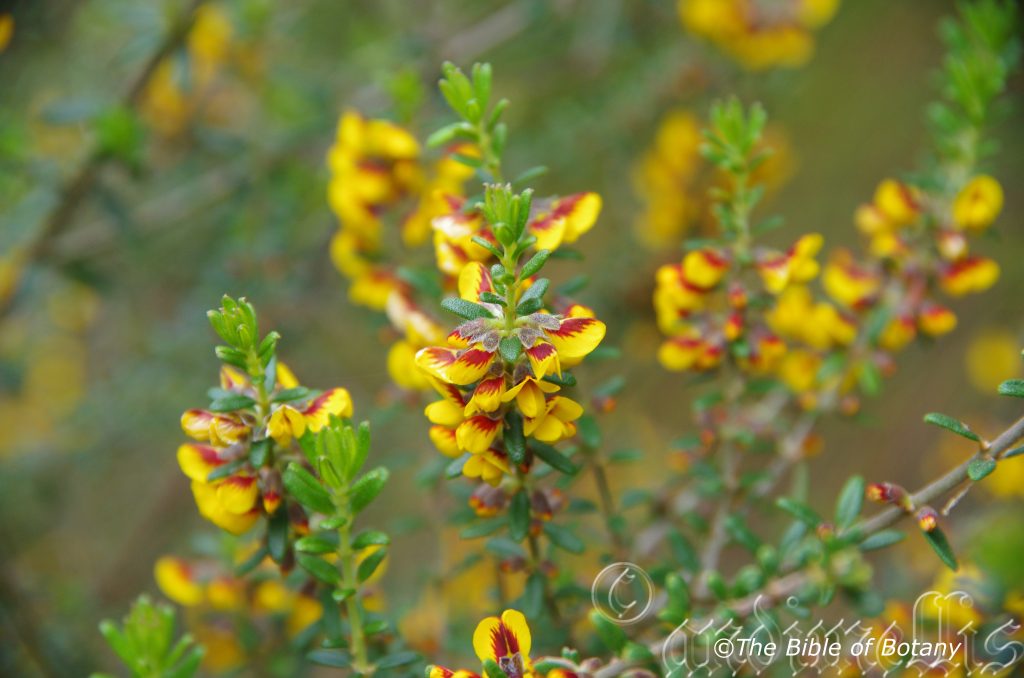
National Botanic Gardens ACT
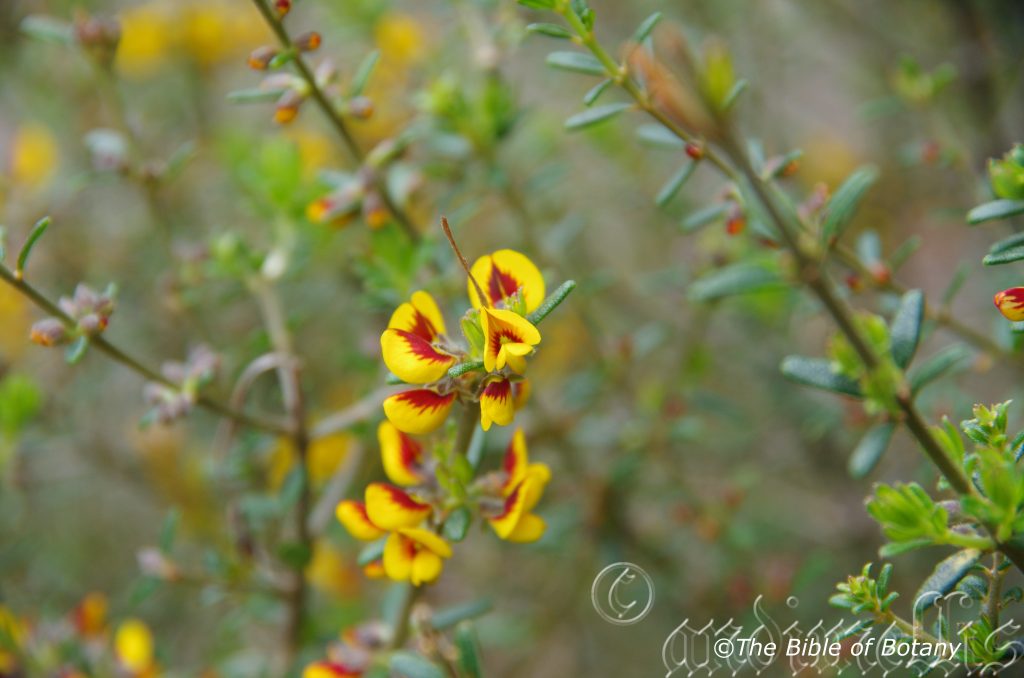
National Botanic Gardens ACT
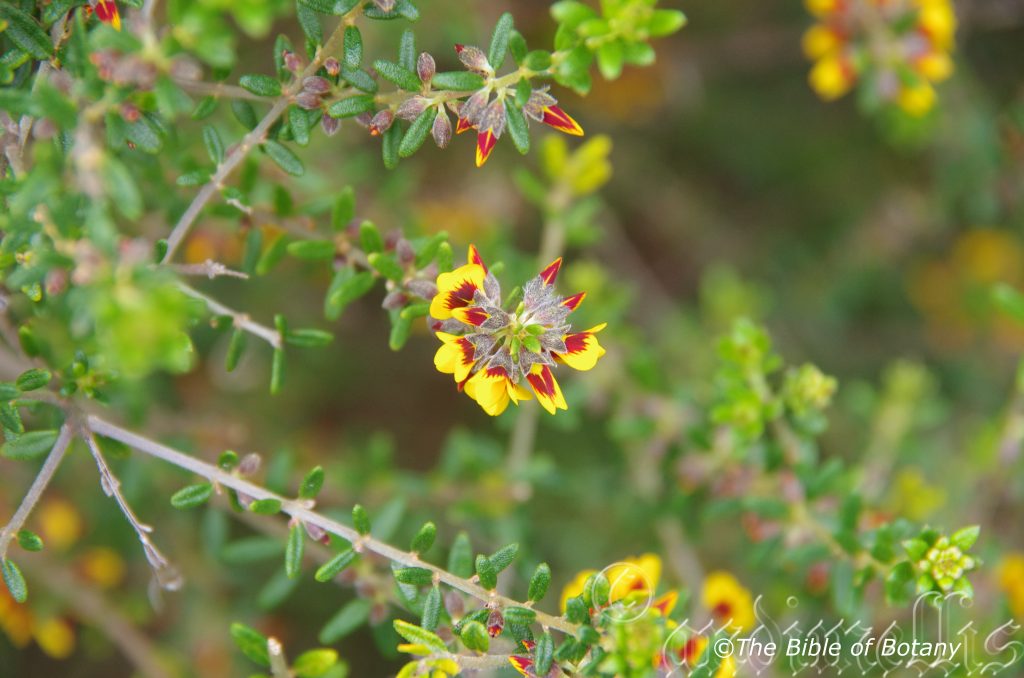
National Botanic Gardens ACT
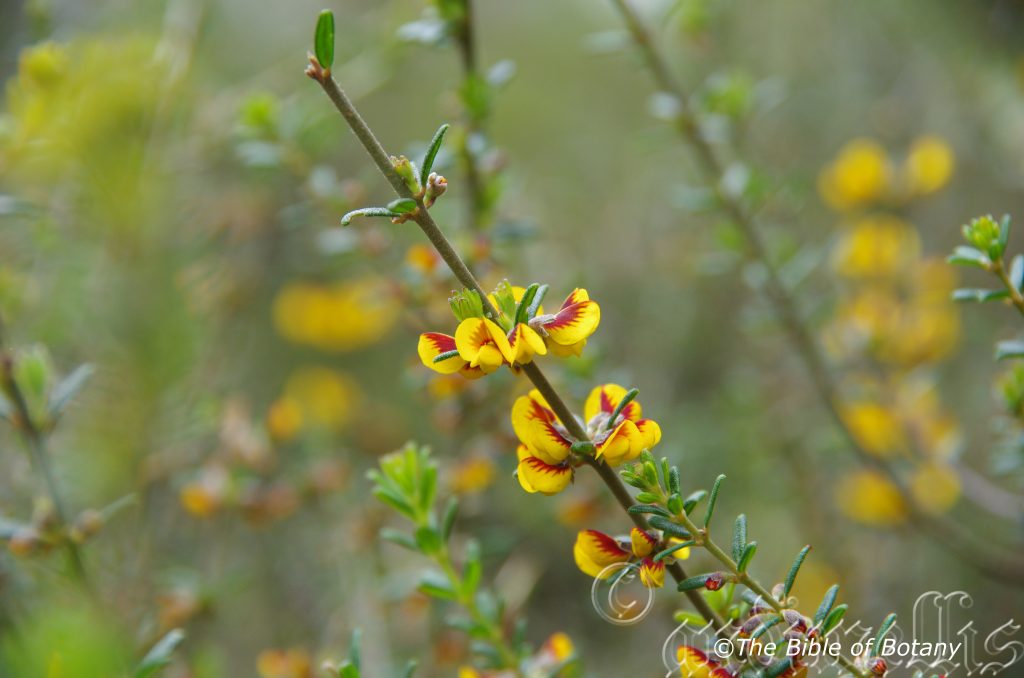
National Botanic Gardens ACT
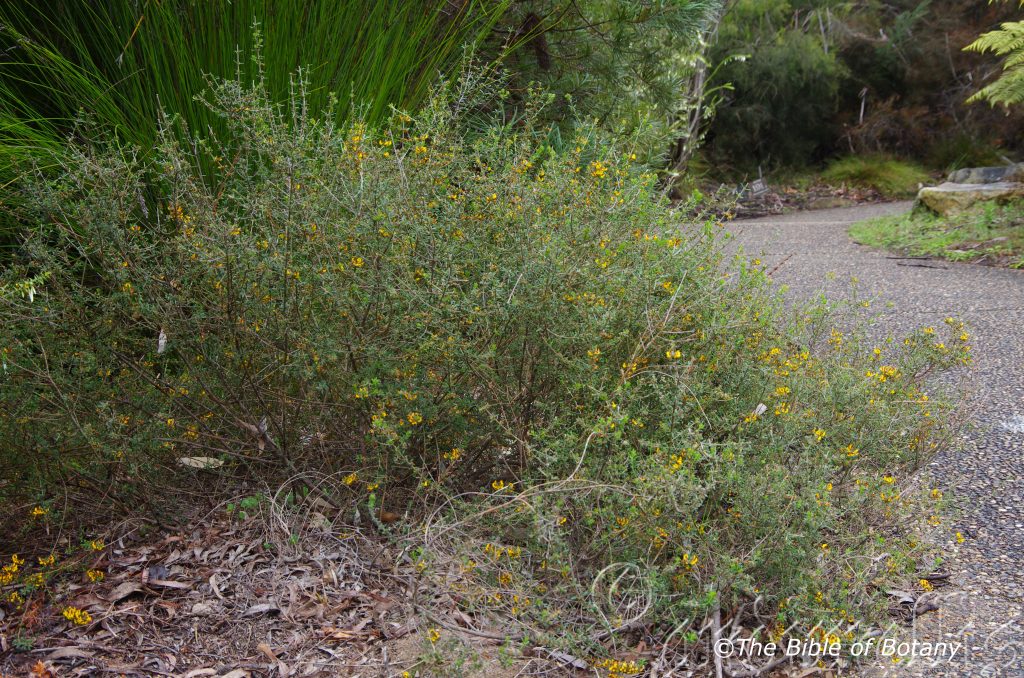
National Botanic Gardens ACT
Oxylobium ellipticum
Classification:
Unranked: Eudicots
Unranked: Rosids
Order: Fabales
Family: Fabaceae
Subfamily: Fabopideae
Tribe: Mirabelieae
Genus: From Oxalis/Oxus/Oxys, which are Greek for sharp and Lobos/Lobī, which is Ancient Greek or Lobus which is Latin for a lobe. It refers to the lobes on the pods, which are rather sharp on some species.
Species: From Elleiptikós, which is Ancient Greek for to have an ellipsoidal shape or form. It refers to organs or structures usually the leaves that have an elliptical shape.
Common Name: Common shaggy-pea or Golden shaggy-pea.
Distribution:
Oxylobium ellipticum is found south from the Boyde River catchment in central eastern New South Wales to Mount Baw Baw in south eastern Victoria.
It is also found throughout mainland Tasmania.
https://avh.ala.org.au/occurrences/search?taxa=Oxylobium+ellipticum#tab_mapView
Habitat Aspect Climate:
Oxylobium ellipticum prefers full sun to light dappled shade. It grows in montane environments, on the ranges in open forest and woodlands. The altitude ranges from 50 meters ASL to 1900 meters ASL.
The temperatures range from minus 5 degrees in August to 38 degrees in February.
The rainfalls range from lows of 500mm to an average 2800mm annually.
Soil Requirements:
Oxylobium ellipticum prefers skeletal course sands, sandy loams to light gritty clays. The soils are derived from decomposed or partially decomposed sandstone. The soils ph ranges from 5pH to 6pH. It does not tolerate waterlogged soils. Non saline soils to moderately saline soils are tolerated.
Height & Spread:
Wild Plants: 1m to 2m by 1m to 2.5m.
Characteristics:
Oxylobium ellipticum’s main stems are grey-brown and are somewhat smooth and glabrous. The stems are yellow-green turning green and are moderately covered in white pubescent hairs.
Oxylobium ellipticum’s leaves occur in irregular whorls of 3 or 4. The elliptical or rarely ovate to lanceolate leaves measure 5mm to 30mm in length by 3mm to 10mm in width. The stipules are absent or present on this species. The thick, terete yellow petioles measure 3mm to 6mm in length. The bases taper to the petiole, while the apexes are obtuse with a pungent tip. The discolourous laminas are deep green and are covered in fine tuberculate lumps on the upper laminas while the lower laminas are paler with a sparse covering of white, appressed, pubescent hairs. The upper laminas are flat and strongly recurved at the margins. The margins are entire. The mid vein is strongly prominent on the lower lamina and is not visible from the upper lamina.
The inflorescences of Oxylobium ellipticum are born on dense, short, axillary or terminal or axillary racemes. The thick yellow terete pedicels are moderately covered in white pubescent hairs and measure 3mm to 3.5mm in length. The cupular calyx has 5 broad acute lobes that are moderately to densely covered in appressed pubescent hairs. The calyxes measure 2.5mm to 3.5mm in length including the 5 lobes which measure 2.5mm to 3.5mm in length.
The bright yellow corolla measures 8mm to 10mm in length. The bright yellow standard is with or without red splash at the base internally and larger splashed externally and measures 8mm to 10mm in length by 9mm to 12mm in width. The bright yellow, obovate wings have obtuse apexes and measure 7mm to 9mm in length by 5mm to 6mm in width. The obovate keel petals have an obtuse apex and are inserted between the wing petals. The keel is usually red or at times bright yellow.
The sessile ovary has 8 to 10 ovules. The 5 yellow stamens are inserted in the keel. The flowers appear from September to early December.
Oxylobium ellipticum’s fruits are short, ovoid pods with an acuminate apex. The bluish-green pods turn pale grey-brown when ripe and measure 7mm to 9mm in length. The seeds are deep brown.
Wildlife:
Oxylobium ellipticum’s flowers are a great attraction for butterflies, native bees like Tetragonula carbonaria and the Blue banded bee Amegilla cingulata.
Cultivation:
Oxylobium ellipticum is a dense bushy shrub that should be more widely grown in temperate to subtropical gardens. It is ideal at the edge of a dry forest or as a small pioneer shrub before establishing a garden proper. It also makes a great backdrop to a sloping rockery display in cold open spaces. In cultivation it will grow from 2 meters to 2.5 meters in height by 1.5 meters to 3 meters in diameter when grown in the open.
It grows well on light fatty clays to sandy loams. It can cope with temperatures as low as minus 8 degrees and up to 40 degrees once established. It is also drought resistant once established.
Add to the above, if it is given a little extra moisture in dry periods or drier climates and native fertilizer on being planted out as a seedling will respond with good flowering and good fruit set in the following season.
Oxylobium ellipticum’s deep green leaves contrasting with finer or larger pale green or soft grey to glaucous coloured foliage. Use a lot of procumbent plants like Carpobrotus edulis or small prostrate Greville species. Mix them with other smaller shrubs so none of them dominate the scene but blend in to give a mosaic of foliage colours that you oversee. Here I immediately think of Actinotis helianthi or Grevillea thelemanniana for two great contrasting foliages.
Propagation:
Seeds: Oxylobium ellipticum seeds should be placed in a dry cloth bag and then placed in the fridge or freezer for a few weeks before sowing. Dow the treated seeds directly into a seed raising mix. Cover them with 5mm of fine sand and keep moist not wet. Place the tray in a warm sunny position.
When the seedlings are 25mm to 50mm tall, prick them out and plant them into 50mm native tubes using a good organic mix.
Once the seedlings reach 150mm to 200mm in height, nip the tips out before planting them out into their permanent position.
Cuttings: Fortunately Oxylobium ellipticum cuttings strike easy. Use 100mm to 200mm long tip cuttings or lateral shoots from the present season’s growth. Take them in warmer months of the year. Remove half the leaves from the bottom section being careful not to tear the bark.
1 Prepare the cutting mix by adding two thirds sharp clean river sand, one third peat or one third perlite. These ingredients must be sterilized,
2 Select good material from non diseased plants,
3 Select semi green stems for cuttings. Look for a stem with two or three nodes,
4 Place the cutting on a flat, hard surface, and make a clean cut down one side of the cutting at the base for 10mm with a sharp sterile knife or razor blade. – This scarification of the node will increase the chances of roots emerging from this spot. Now remove all but one or two the leaves, leaving the apex leaves in tact. If the leaves are very large in proportion to the stem, cut off the apical halves.
5 Fill a saucer with water, and place a little medium strength rooting hormone into another container like a milk bottle top. Dip the node end of the cutting into the water and then into the rooting hormone. Tap off any excess hormone,
6 Use a small dipple stick or old pencil to poke a hole into the soilless potting mix. Ensure the hole is slightly larger than the stem diameter and be careful not to wipe the rooting hormone off the cuttings base. Place 2 to 4 cuttings in each of the 50mm native tubes,
7 I like to place the tubes in bucket with holes drilled in the bottom to allow excess water to drain out. A plastic bag that fits over the bucket is ideal to help maintain temperature and moisture. Place in a semi shaded, warm position like under 50mm shade cloth.
8 When the cuttings have struck, open the bag to allow air circulation for a few days to a week,
9 Once hardened off remove the cuttings from the bag and allow to further hardening for a few more days to a week,
10 Transplant into a good potting mix to grow on.
Fertilize using seaweed, fish emulsion or organic chicken pellets soaked in water on an alternate basis. Fertilize every two months once planted out until the plants are established then annually in early September to October to maintain health, vitality and better flowering.
Further Comments from Readers:
Hi reader, it seems you use The Bible of Botany a lot. That’s great as we have great pleasure in bringing it to you! It’s a little awkward for us to ask, but our first aim is to purchase land approximately 1,600 hectares to link several parcels of N.P. into one at The Pinnacles NSW Australia, but we need your help. We’re not salespeople. We’re amateur botanists who have dedicated over 30 years to saving the environment in a practical way. We depend on donations to reach our goal. If you donate just $5, the price of your coffee this Sunday, We can help to keep the planet alive in a real way and continue to bring you regular updates and features on Australian plants all in one Botanical Bible. Any support is greatly appreciated. Thank you.
In the spirit of reconciliation we acknowledge the Bundjalung, Gumbaynggirr and Yaegl and all aboriginal nations throughout Australia and their connections to land, sea and community. We pay our respect to their Elders past, present and future for the pleasures we have gained.
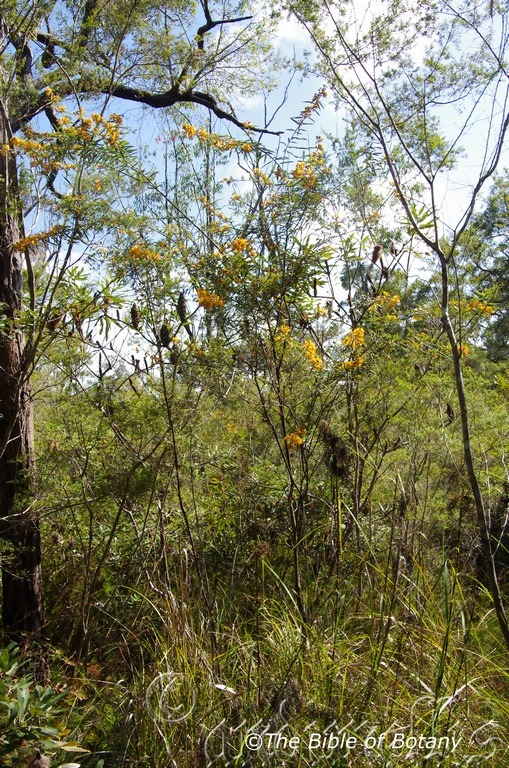
The Pinnacles NSW
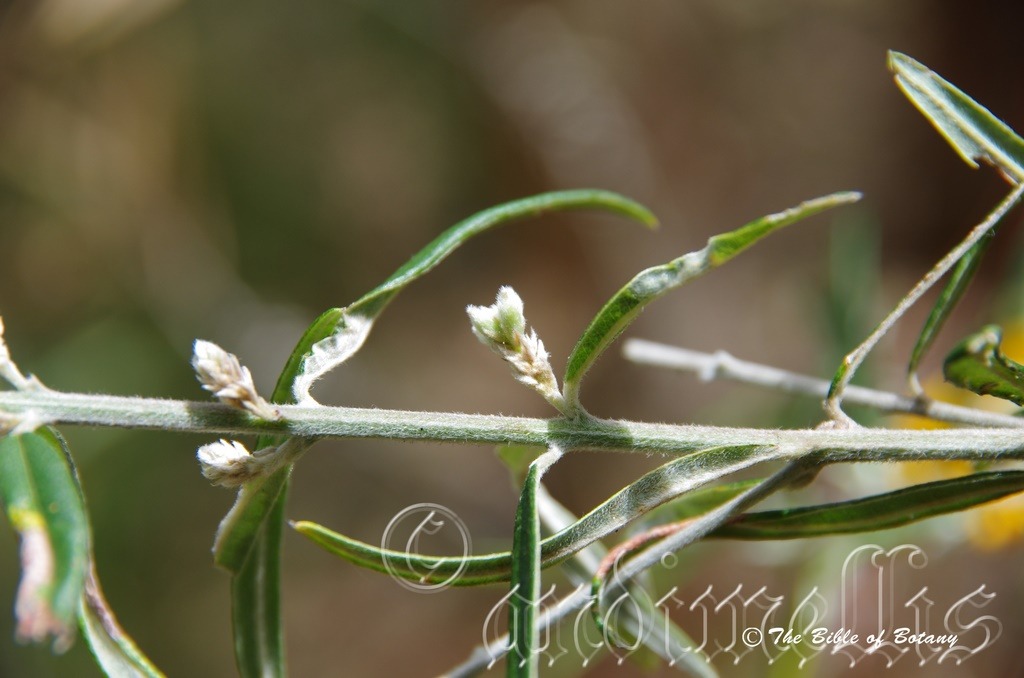
Innes Lake National Park NSW
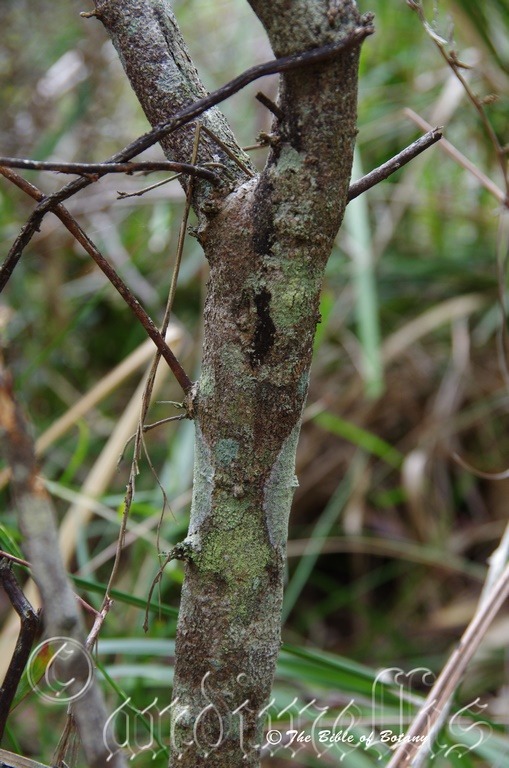
Innes Lake National Park NSW
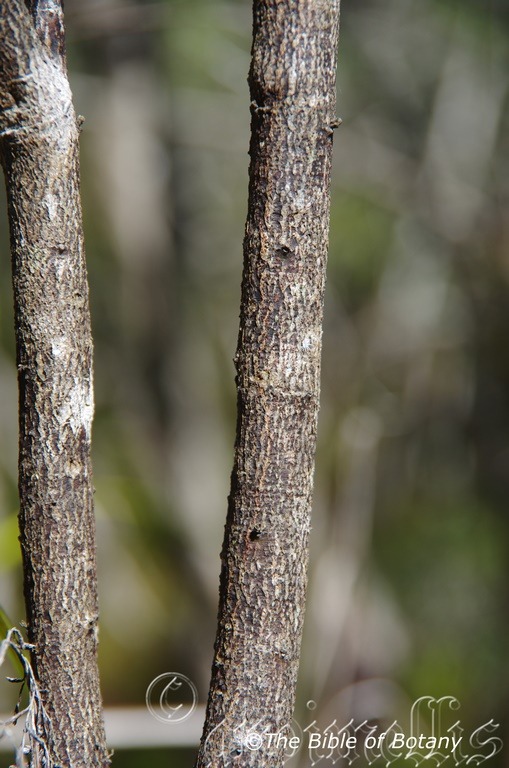
The Pinnacles NSW
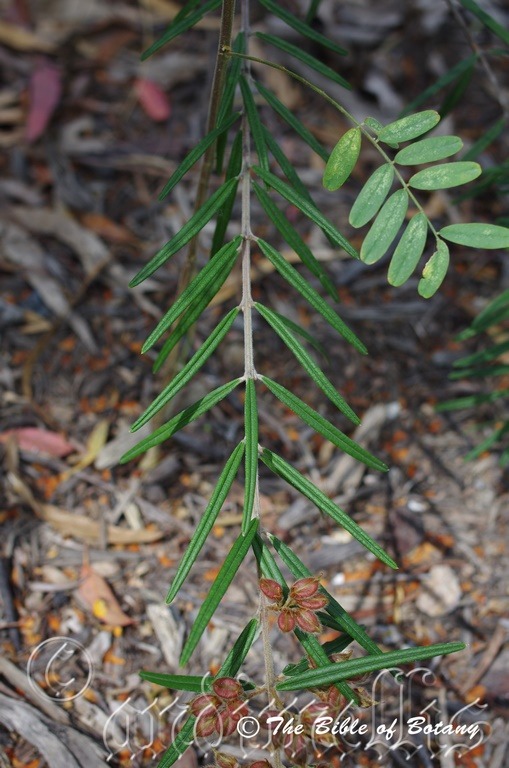
Mount Cootha Botanical Gardens Qld.
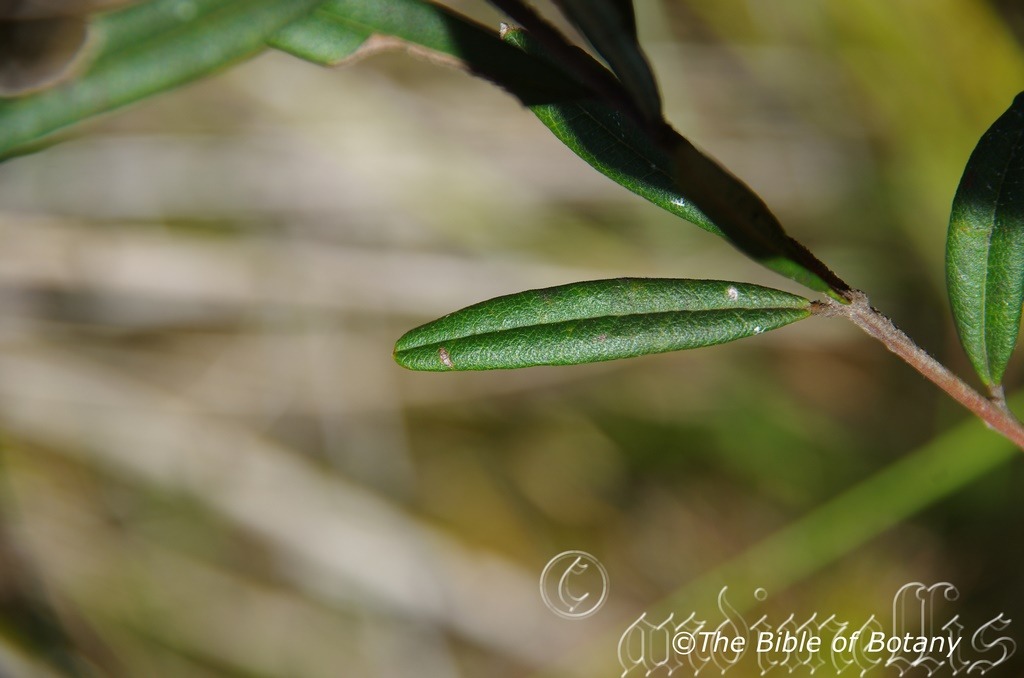
The Pinnacles NSW
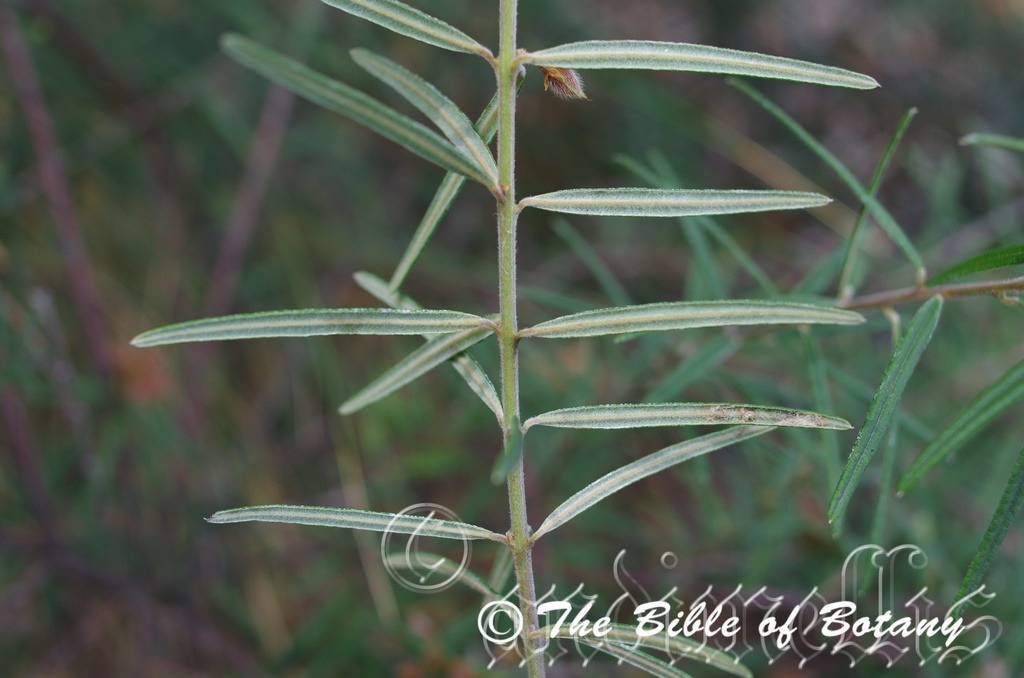
Mount Cootha Botanical Gardens Qld.
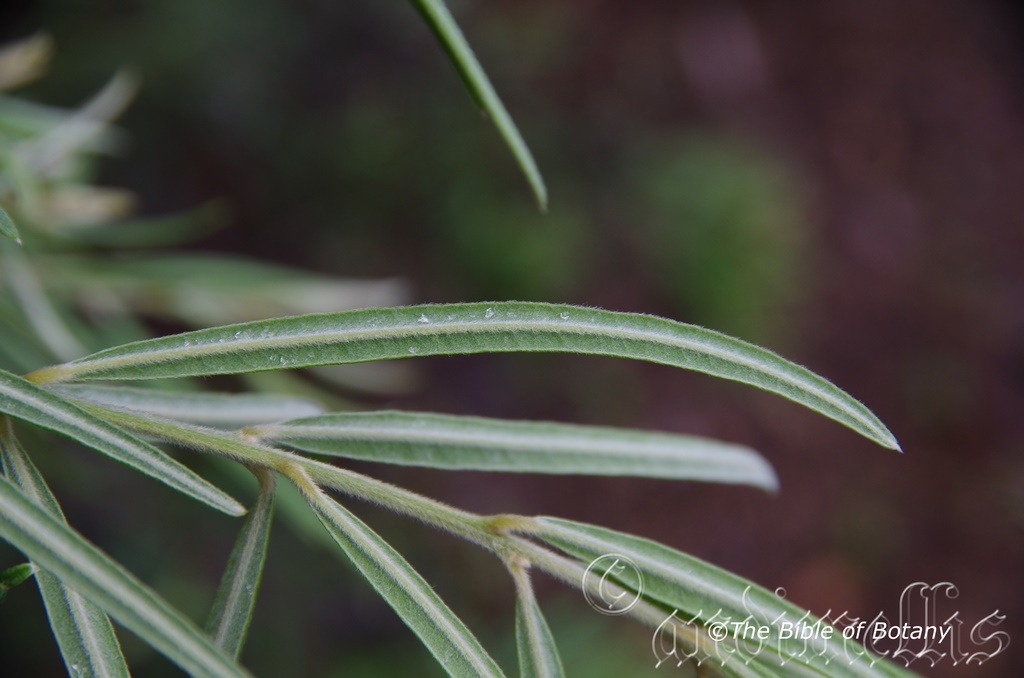
NCBG Coffs Harbour NSW
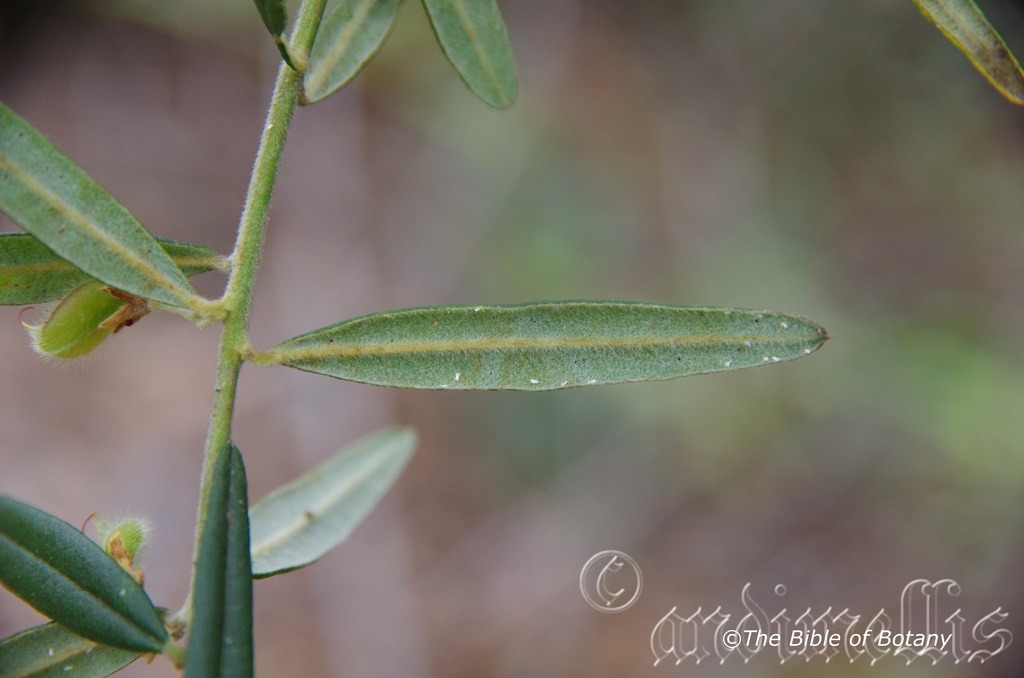
The Pinnacles NSW
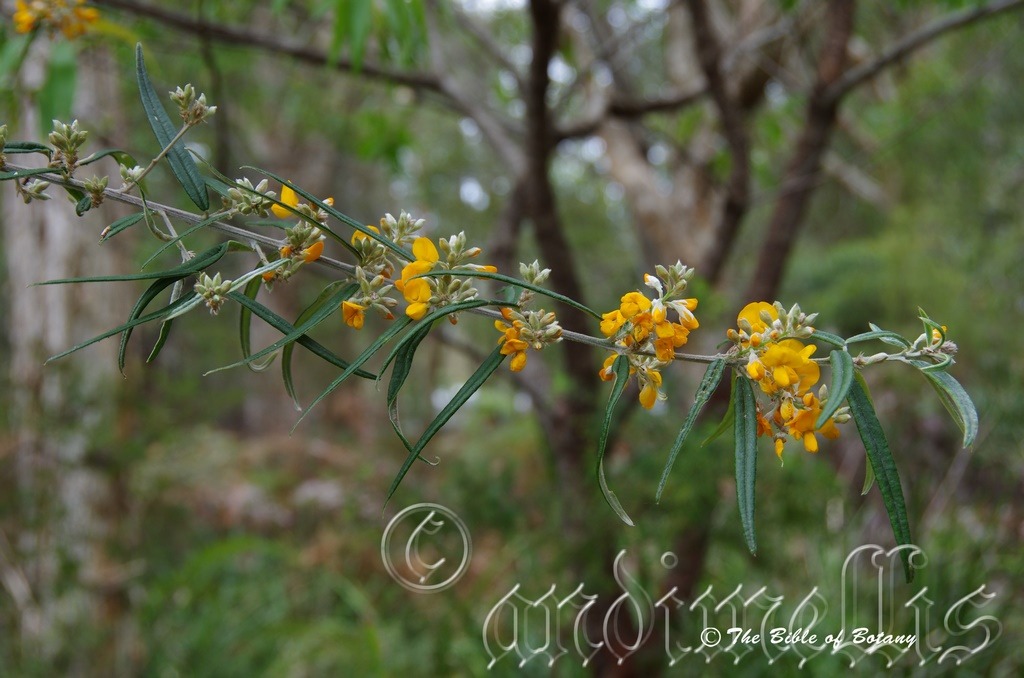
Innes Lake National Park NSW
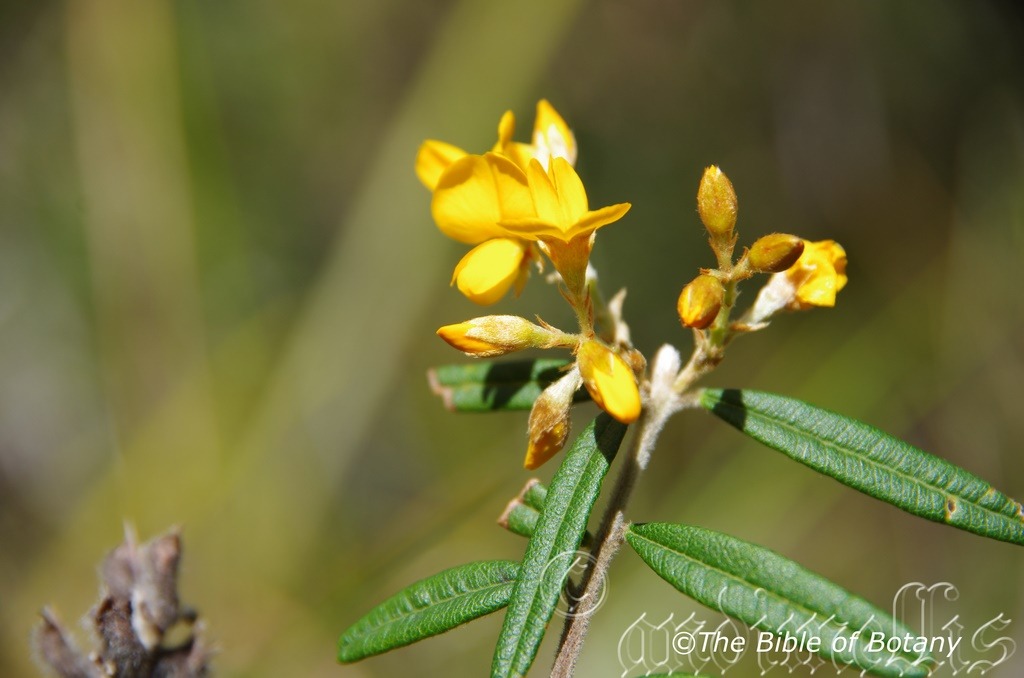
The Pinnacles NSW
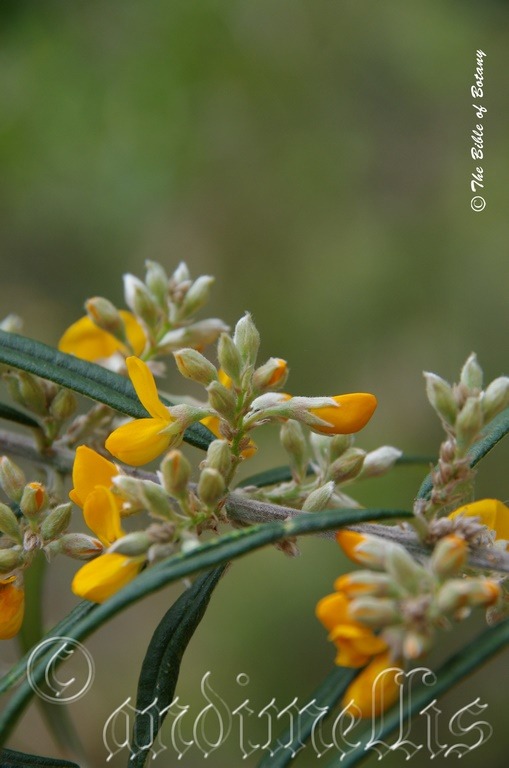
Innes Lake National Park NSW
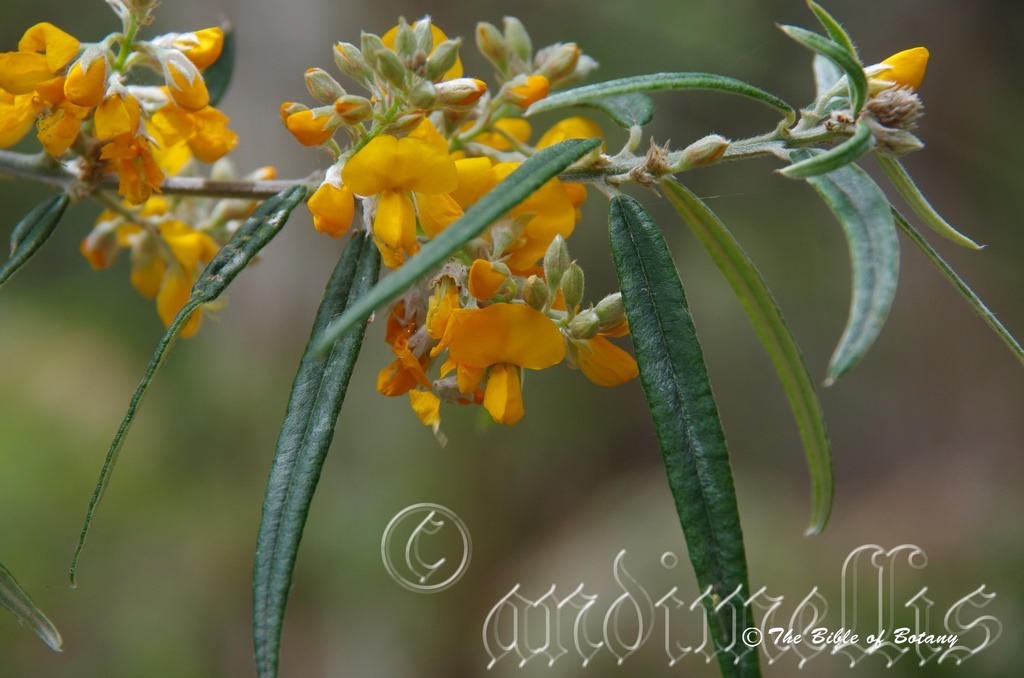
Innes Lake National Park NSW
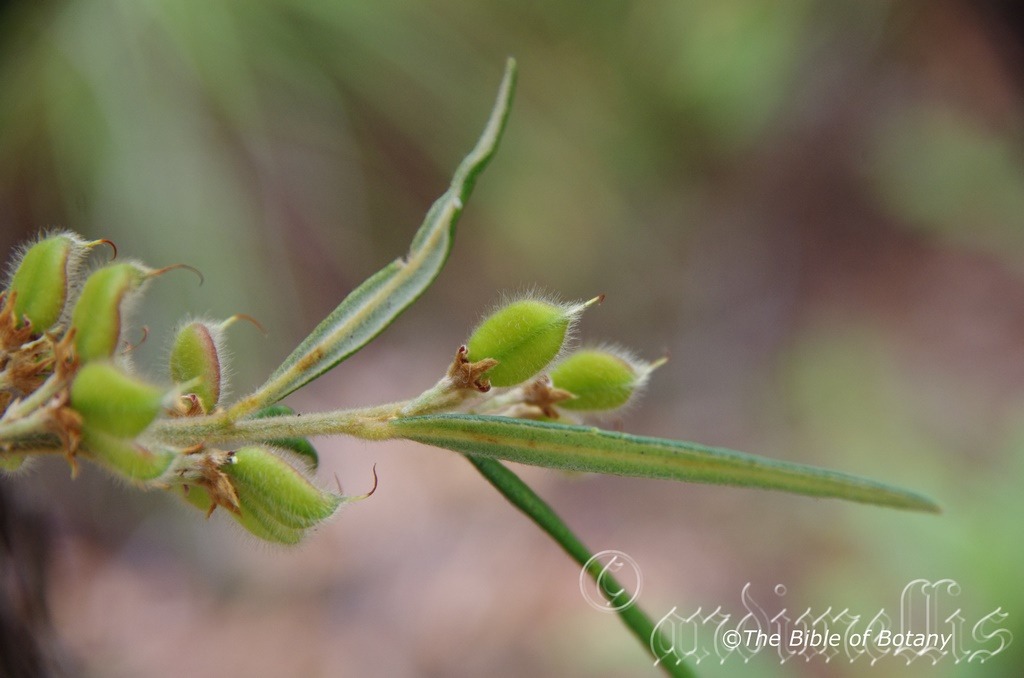
The Pinnacles NSW
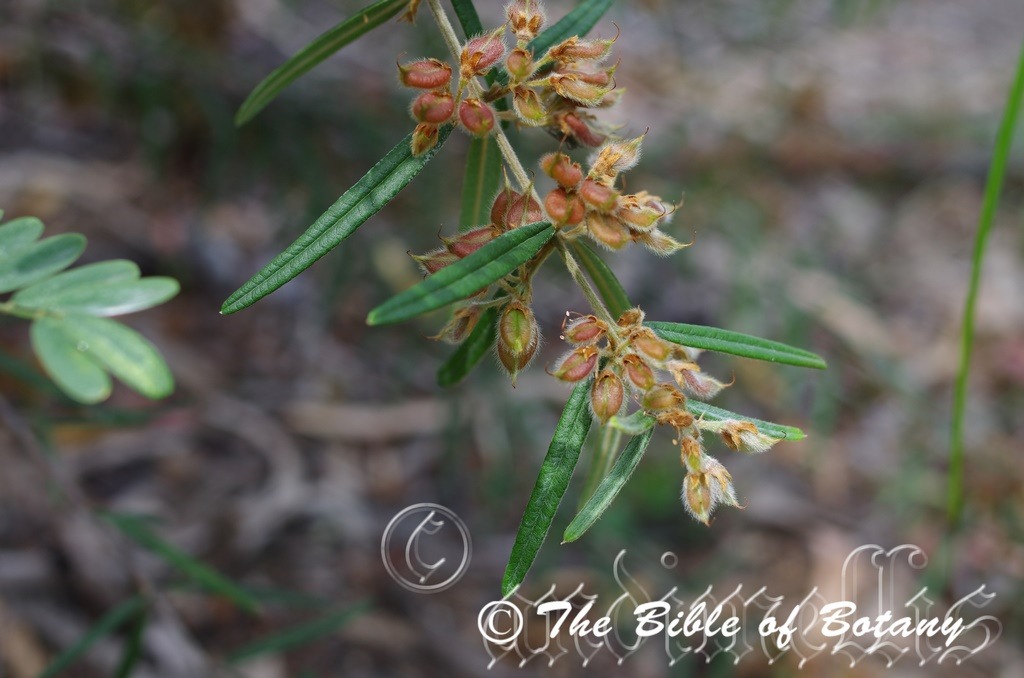
Mount Cootha Botanical Gardens Qld.
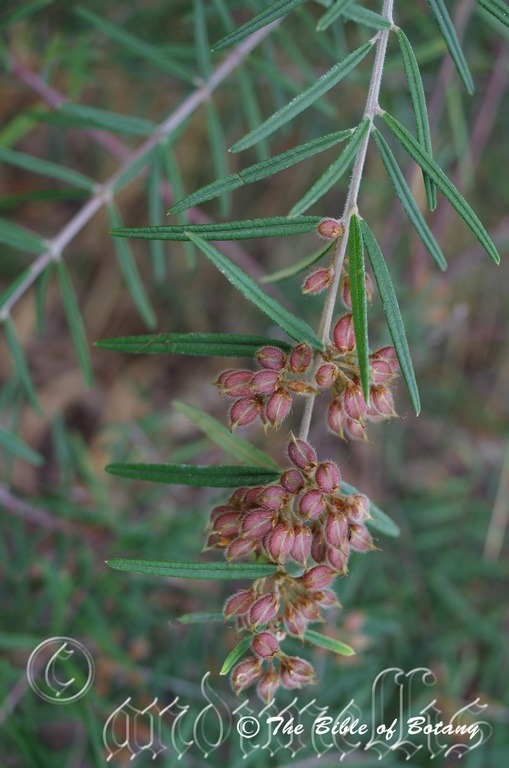
Mount Cootha Botanical Gardens Qld.
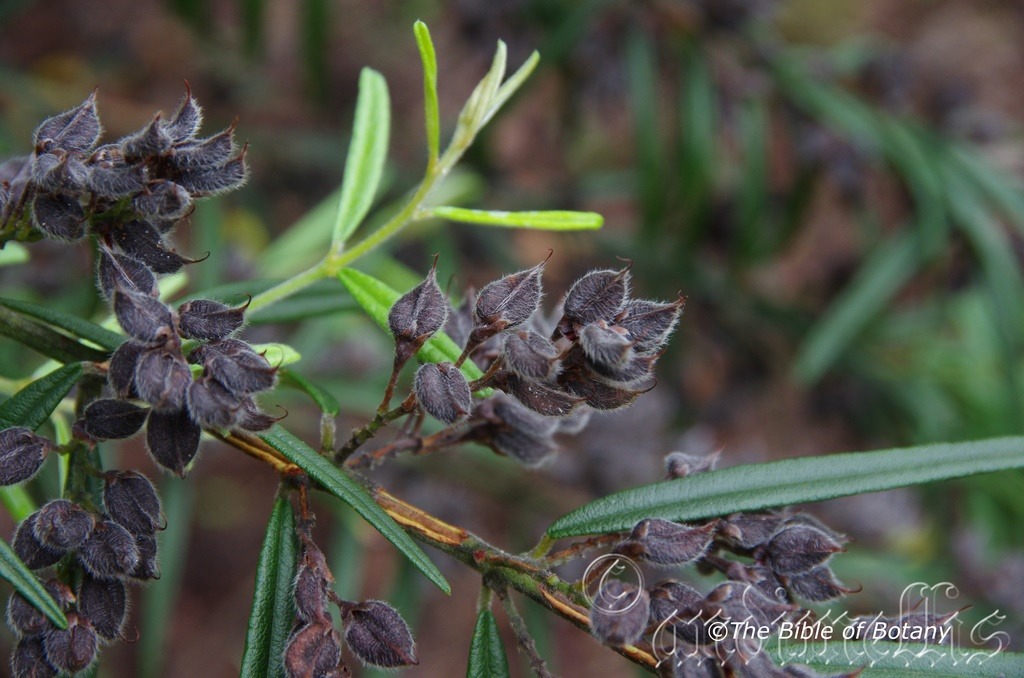
NCBG Coffs Harbour NSW
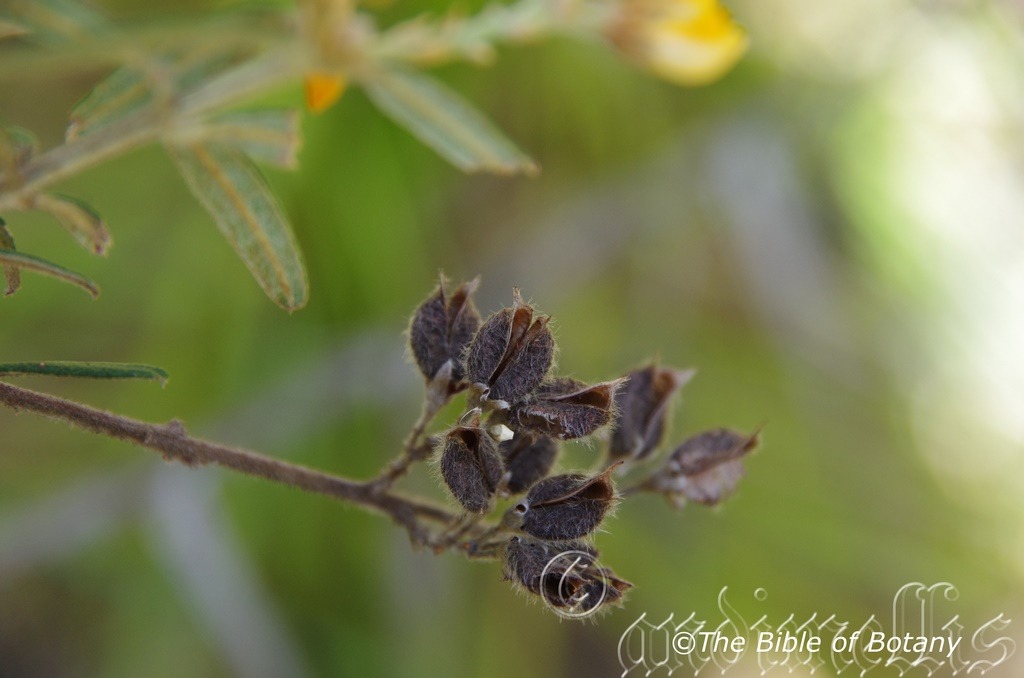
The Pinnacles NSW
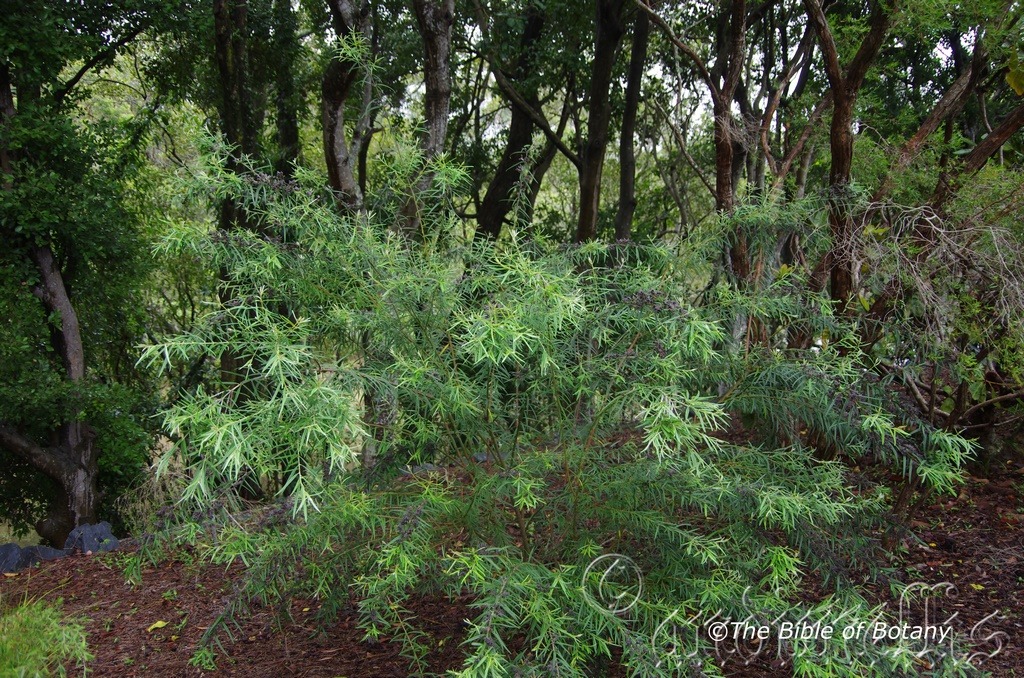
NCBG Coffs Harbour NSW
Oxylobium robustum
Classification:
Unranked: Eudicots
Unranked: Rosids
Order: Fabales
Family: Fabaceae
Subfamily: Fabopideae
Tribe: Mirabelieae
Genus: From Oxalis/Oxus/Oxys, which are Greek for sharp and Lobos/Lobī, which is Ancient Greek or Lobus which is Latin for a lobe. It refers to the lobes on the pods, which are rather sharp on some species.
Species: From Rōbustum, which is Latin for strong and hard as in Oak. It refers to timbers, trunks, branches or stems which are hard and strong.
Common Name: Tall Shaggy Pea.
Distribution:
Oxylobium robustum is found south from Bundaberg in central coastal Queensland to the Tamago Sandbeds near Newcastle in central coastal New South Wales with an isolated population on Wallis Island in the Torres Strait.
https://avh.ala.org.au/occurrences/search?taxa=Oxylobium+robustum#tab_mapView
Habitat Aspect Climate:
Oxylobium robustum prefers full sun to light dappled shade. It grows in open sclerophyll forests open woodlands coastal or mountain heaths. The altitude ranges from 5 meters ASL to 360 meters ASL.
The temperatures range from minus 3 degrees in August to 39 degrees in February.
The rainfalls range from lows of 900mm to an average 2000mm annually however the population found on Wallis Island is subject to 3200mm average rainfalls.
Soil Requirements:
Oxylobium robustum prefers course sand, sandy loams to light gritty clays. The soils are usually derived from decomposed granites, accumulated beach sands or at times decomposed sandstone. The soils ph ranges from 5pH to 7pH. It does not tolerate waterlogged soils. Non saline soils to moderately saline soils are tolerated.
Height & Spread:
Wild Plants: 2m to 3m by 1m to 2m.
Characteristics:
The main stems are deep grey and moderately to densely covered in white or yellow tomentose hairs. The new growth and young stems are grey-green and are densely covered in white or yellow tomentose hairs.
The disjunct, leaves are in irregularly in whorls of 3 or at times 4.The simple, narrow lanceolate to linear leaves measure 30mm to 80mm in length by 3mm to 10mm in width. The stipules are absent on this species. The petiole measures 3mm to 6mm in length. The bases taper to the petiole or are cuneate while the apexes are narrow acute with a pungent tip. The discolourous laminas are sea-green and are covered in fine tuberculate lumps on the upper laminas while the lower laminas are densely covered in white tomentose hairs. The upper laminas are flat to slightly convex from the mid-vein to the margins, and straight and recurve upwards or decurve downwards right at the apex while the margins are entire and recurved. The mid vein is strongly prominent on the lower lamina and is clearly visible on the upper lamina while the lateral and secondary reticulate veins are depressed and clearly visible on the upper lamina.
The inflorescences of Oxylobium robustum are born short, axillary or terminal racemes. The pedicels are densely covered in white or yellow tomentose hairs and measure 1mm to 2mm in length. The lanceolate bracts and linear-lanceolate bracteoles are short and very variable in length and are densely covered in white or yellow tomentose hairs. The reddish-brown calyxes are densely covered in white or yellowish pulverulent hairs. The calyxes measure 5mm to 8mm in length including the 5 lobes which measure 1.5mm to 3.5mm in length.
The standard is yellow with or without red splash at the base internally and measures 8mm to 12mm in length by 14mm to 20mm in width. The deep yellow-orange, obovate wings have obtuse apexes. The wings measure 7mm to 11mm in length by 5mm to 7mm in width. The obovate keel petals have an obtuse apex and are and are straight on the upper edge and deeply ovate on the lower edge. It is slightly shorter or slightly longer than the wing petals.
The sessile ovary has 8 to 12 ovules. The 5 yellow stamens are inserted in the keel. The flowers appear from September to early October.
Oxylobium robustum’s fruits are short, obloidal pods with an oblique rostrate apex. The bluish-green pods are moderately covered in white sericeous hairs and turn deep grey when ripe. The pods are often slightly laterally compressed and measure 7mm to 12mm in length by 6mm to 9mm in width and 3mm to 4mm in height. The seeds are deep brown.
Wildlife:
Oxylobium robustum’s flowers are a great attraction for butterflies, native bees like Tetragonula carbonaria and the Blue banded bee Amegilla cingulate.
Cultivation:
Oxylobium robustum is a dense bushy shrub that should be more widely grown in temperate to subtropical gardens. It is ideal at the edge of a dry forest or as a small pioneer shrub before establishing a garden proper. It also makes a great backdrop to a rockery display in hot open spaces. In cultivation it will grow from 2.5 meters to 3 meters in height by 2 meters to 3 meters in diameter when grown in the open.
It grows well on light fatty clays to sandy loams. It can cope with temperatures as low as minus 3 degrees and up to 40 degrees once established. It is also drought resistant once established.
Add to the above, if It is given a little extra moisture in dry periods or drier climates and native fertilizer on being planted out as a seedling will respond with good flowering and good fruit set in the following season.
It would make a good contribution to a dry or moist frost garden or tall heath garden if planted in the background. It can be used as the taller feature plant in a small garden. When you design a flat heath garden which this it is well suited. Plants must be planted close together and be short so you can see over the tallest ones with the exception of one or two plants at the most. The idea is to achieve a feeling of expansive flatness. This can be achieved with using the Oxylobium robustum’s deep green leaves contrasting with finer or larger pale green or soft grey to glaucous coloured foliage. Use a lot of procumbent plants like Carpobrotus edulis or small prostrate Grevillea species. Mix them with other smaller shrubs so none of them dominate the scene but blend in to give a mosaic of foliage colours that you oversee. Actinotis helianthi or Grevillea thelemanniana for two great contrasting foliages.
Propagation:
Seeds: Oxylobium robustum seeds directly into a seed raising mix. Cover them with 5mm of fine sand and keep moist not wet. Place the tray in a warm sunny position. When the seedlings are 25mm to 50mm tall, prick them out and plant them into 50mm native tubes using a good organic mix.
Once the seedlings reach 150mm to 200mm in height, nip the tips out before planting them out into their permanent position.
Cuttings: Propagation is usually done by seed as It is easy to obtain and grow in large numbers. Use 100mm long half ripened material when growing from cuttings from the present season’s growth. Take them in mid autumn or early spring. Remove half the leaves from the bottom section being careful not to tear the bark. Remove any flowers and buds. Take a 10mm slice off the bark from the bottom of the cutting on one side. Using an appropriate rooting hormone, dip the cutting in and place it in a moist sterile seed raising mix.
Place the trays under 30mm shade and keep the trays warm. Bottom heat is beneficial when striking the cuttings. Ideally temperatures should be maintained at between 22 to 24 degrees.
When the cuttings have obviously struck and have developed good roots treat them as for seedlings.
Fertilize using seaweed, fish emulsion or organic chicken pellets soaked in water on an alternate basis. Fertilize every two months once planted out until the plants are established then annually in early September to October to maintain health, vitality and better flowering.
Further Comments from Readers:
Hi reader, it seems you use The Bible of Botany a lot. That’s great as we have great pleasure in bringing it to you! It’s a little awkward for us to ask, but our first aim is to purchase land approximately 1,600 hectares to link several parcels of N.P. into one at The Pinnacles NSW Australia, but we need your help. We’re not salespeople. We’re amateur botanists who have dedicated over 30 years to saving the environment in a practical way. We depend on donations to reach our goal. If you donate just $5, the price of your coffee this Sunday, We can help to keep the planet alive in a real way and continue to bring you regular updates and features on Australian plants all in one Botanical Bible. Any support is greatly appreciated. Thank you.
In the spirit of reconciliation we acknowledge the Bundjalung, Gumbaynggirr and Yaegl and all aboriginal nations throughout Australia and their connections to land, sea and community. We pay our respect to their Elders past, present and future for the pleasures we have gained.
Oxytes brachypoda
Classification
Unranked: Eudicots
Unranked: Rosids
Order: Fabales
Family: Fabaceae
Subfamily: Faboideae
Tribe: Desmodieae
Genus: From Oxýtēs, which is Ancient Greek for sharpness or acuteness. It refers to organs, which have a strongly acute appendage/s. Here it refers to the appendage on the apex of the fruits.
Species: From Brachy, which is Ancient Greek for short and Pous which is Ancient Greek or Pedi, which is Latin for a foot or feet. It refers to leaves which have short petioles.
Common Name: Three Leaf Derris.
Distribution:
Oxytes brachypoda is widespread species from near Cooktown in far north east Queensland south to Bulumwaal in north eastern Victoria.
It is also found from the Kakadu National Park, the Victoria River, Elsey and the Carpentaria Gulf Rivers districts in the Northern Territory.
It is found from the coast to semi-arid areas well inland like the Idalia National Park and the Blackbraes Resource Reserve which indicates it may be far more widespread than the map indicates.
https://avh.ala.org.au/occurrences/search?taxa=Desmodium+brachypodium#tab_mapView
Habitat Aspect Climate:
Oxytes brachypoda prefers full sun to dappled shade. It grows in dry open Eucalyptus forests, open woodlands and grasslands. The altitude ranges from 10 meters ASL to 1400 meters ASL.
The temperatures range from minus 2 degrees in August to 36 degrees in January.
The rainfall ranges from lows of 1250mm to 3200mm average per annum.
Soil Requirements:
Oxytes brachypoda prefers sandy loams to medium clays. The soils are derived from decomposed brown basalt, black basalt, metamorphic rocks, granite, sandstone and laterites. The soils pH ranges from 5pH to 5.5pH. It does not tolerate waterlogged soils. Non saline soils to moderately saline soils are tolerated.
Height & Spread:
Wild Plants: 0.3m to 0.6m by 0.2m to 0.4m
Characteristics:
Oxytes brachypoda is a fast growing small vine or sub shrub. The stems and branchlets are covered in short white uncinate hairs.
The alternate leaves of Oxytes brachypoda are trifoliate. The ovate to elliptical leaflets measure 15mm to 70mm in length by 7mm to 40mm in width. The terminal leaflets are the longest and widest. The bases are rounded while the apexes are obtuse, obtuse with a fine apiculate tip, broad emarginate or broad acute. The discolourous laminas are grass-green to deep grey-green, glabrous and dull on the upper laminas while the lower laminas are paler and sparsely covered in short and white, uncinated hairs. The laminas margins are entire or very finely crenate. The midvein is prominent on the lower lamina and is visible from the upper lamina. The petioles and petiolules are glabrous to sparsely covered in white uncinated hairs. The stipules measure 4mm to 8mm in length. The petioles measure 20mm to 55mm in length while the lateral petiolules measure 1mm to 2mm in length and the terminal petiolules measure 8mm to 10mm in length.
The inflorescences of Oxytes brachypoda are born on long narrow terminal racemes with 8 to 60 individual flowers. The rachises measure 150mm to 400mm in length while the pedicels measure 1mm to 2mm in length.
The individual flowers are typical legume and measure 8mm to 10mm in length. The deep green tinged maroon to reddish-maroon calyxes measure 3.5mm to 4mm in length including the 5 broad acute lobes which measure 1.7mm to 2mm in length.
The united, round triangular standard petals are pendulant and semi covers the wings. The standards are mauve, pale purple, pink or red measure 7.5mm to 10mm in length by 5mm to 6mm in height. The pinkish-purple, pink or red, oblong to oblong-elliptical wing petals run parallel to the keel but do not cover them. The wing petals measure 8mm to 9mm in length by 4mm to 4.5mm in height. The pinkish-purple, pink or red, keel petals measure 7.5mm to 8.5mm in length by 3.5mm to 4mm in height.
9 of the 10 white, dimorphic; alternately 1 long and 1 shorter, filaments are united to form a staminal tube which is open on one side. The filaments are united for 4mm to 5mm of their length and are free for 4mm to 5mm in length. The upper free stamen measures 8mm to 9mm in length. The oblong, cream to pale yellow anthers measure 0.5mm in length.
The white pistil measures 7mm to 8mm in length. The flowers appear from February to April.
Oxytes brachypoda fruits are long pods. The pods contain 3 to 8 seeds usually 4 or 5. The pods are strongly constricted between the seeds and measure 20mm to 40mm in length by 3mm to 4mm in diameter. The green pods turn black when ripe and are covered in short white uncinated hairs. The reniform seeds are cream, creamy pastel orange. The seeds measure 2.4mm in length by 1.6 mm in diameter.
Wildlife:
Oxytes brachypoda flowers are visited by almost every small butterfly in the district. The seeds are often eaten by an unknown weevil as the fruits ripen gaining access when the fruits are at the immature stage.
The fruit segments are easily broken and are dispersed by adhesion to animals and humans by the short uncinated hairs. The seeds are not released spontaneously from fruit with both methods ensuring wide distribution of the seeds.
Cultivation:
Oxytes brachypoda is a beautiful sub shrub that deserves a place in most small garden where it can be poked into bare patches away from paths as the fruits are rather annoying when collected in large numbers.
It has a tendency to look unkempt and in need of a good pruning especially from a distance if planted in loose widespread clumps. Its appeal comes when it can be incorporated into the garden as isolated plants filling a small niche or mass planted in close associating as to forms dense clumps of 3 or 5 plants. It will need pruning to ensure a bushier plant with many terminal shoots. Its upside is the foliage lying rather prostrate while the long racemes make the flowers look more prevalent and larger than they really are by standing well above the ground. This means it is best planted just beyond the shorter border plants or between small shrubs with different foliage. Use plants with deep red or orange flowers to the rear and in the foreground. This will ensure that the whole plant blends into the midground when not in flower and contrasts nicely when in flower. Mass plantings are best achieved by planting them at 200mm to 300mm centers. Light tip pruning may also be advantageous.
Once established it is drought tolerant and will tolerate light frosts. It will die back to an underground tuber under severe drought conditions and is best pruned heavily every 2 or 3 years to maintain good vigour and health.
Propagation:
Seeds: Oxytes brachypoda‘s seeds require scarification prior to sowing. The abrasion method has proven very successful for us. This involves rubbing the seeds gently between two sheets of very fine sandpaper to reduce the thickness of the seed coat. What we did if there are large numbers of seeds to do is a glue sheet of medium corundum to the inside surfaces of a small disposable plastic container. Place the seeds into the container and shake the container vigorously for several minutes. Check to see if the coating has been partially removed.
Alternatively the seeds can be placed in a cup of hot water and let stand for 4 or 5 hours.
Sow freshly treated seeds directly into a seed raising mix and cover with 5mm of the mix. When the seedlings are 25mm to 50mm tall, prick them out and plant them into 50mm native tubes using a seed raising mix. Alternately place one or two seeds directly into the 50mm tubes
Once the seedlings reach 150mm to 200mm in height plant them out into their permanent position. If the plants are to be used for ground covers nip the tips out prior to sowing.
Plants can be grown by digging up patches and just cutting into 4 sections. Replant into a shallow saucer made in the ground, cover with 5mm to 10mm of sand and water every second day until the new shoots appear.
Fertilize using seaweed, fish emulsion or organic chicken pellets soaked in water on an alternate basis. Fertilize every two months until the plants are established then annually in early September to October to maintain health, vitality and better flowering.
Further Comments from Readers:
Hi reader, it seems you use The Bible of Botany a lot. That’s great as we have great pleasure in bringing it to you! It’s a little awkward for us to ask, but our first aim is to purchase land approximately 1,600 hectares to link several parcels of N.P. into one at The Pinnacles NSW Australia, but we need your help. We’re not salespeople. We’re amateur botanists who have dedicated over 30 years to saving the environment in a practical way. We depend on donations to reach our goal. If you donate just $5, the price of your coffee this Sunday, We can help to keep the planet alive in a real way and continue to bring you regular updates and features on Australian plants all in one Botanical Bible. Any support is greatly appreciated. Thank you.
In the spirit of reconciliation we acknowledge the Bundjalung, Gumbaynggirr and Yaegl and all aboriginal nations throughout Australia and their connections to land, sea and community. We pay our respect to their Elders past, present and future for the pleasures we have gained.
Ozothamnus bidwillii
Classification:
Unranked: Eudicots
Class: Asterids
Order: Asterales
Family: Asteracea
Tribe: Gnaphalieae
Genus: From Ozein, which is Ancient Greek for to have a smell and Thamnos, which is Ancient Greek for a shrub. It refers to shrubs, which emit a strong pleasant or unpleasant smell.
Species: Is named in honour of John Carne Bidwill, 1815-1853, who was a British born New Zealander who took a strong interest in New Zealand alpine plants.
Common Name:
Distribution:
Ozothamnus bidwillii is found south from Gallangowan in south eastern Queensland to Scone in central eastern New South Wales.
https://avh.ala.org.au/occurrences/search?taxa=Ozothamnus+bidwillii#tab_mapView
Habitat Aspect Climate:
Ozothamnus bidwillii prefers dappled shade to full sun. It grows in or adjacent to warm well developed rainforests, dry rainforests or moist sclerophyll forests. The altitude ranges from 5 meters ASL to 1300 meters ASL.
The temperatures range from minus 2 degrees in August to 34 degrees in February.
The rainfalls range from lows of 850mm to an average 3000mm annually.
Soil Requirements:
Ozothamnus bidwillii prefers better quality sandy loams to medium clays. The soils are usually derived from decomposed black basalts or brown shales. The soils ph ranges from 5pH to 6.5pH. It does not tolerate waterlogged soils. Non saline soils to moderately saline soils are tolerated.
Height & Spread:
Wild Plants: 1m to 1.5m by 1m to 1.5m.
Characteristics:
Ozothamnus bidwillii grows as a straggly semi prostrate shrub with glabrous, grey stems. The juvenile stems and new growth are pale grey-green and are obscurely striated. It is densely covered in white glandular hairs and loose floccose hairs.
Ozothamnus bidwillii’s alternate, simple, and ovate to elliptic leaves measure 10mm to 40mm in length by 3mm to 16mm in width. The petioles are covered in white glandular hairs and loose floccose hairs measure 0.5mm to 4mm in length. The bases taper to the petioles while the apexes are obtuse, acute, and acuminate or broad acuminate.
The discolourous laminas are sea-green and glabrous to sparsely covered in white glandular and loose floccose hairs on the upper lamina while the lower laminas arte paler, white glaucous and sparsely to moderately covered in white glandular and loose floccose hairs. The laminas are flat, recurve slightly to strongly upwards from the mid vein to the margins while the margins are entire. The mid vein is prominent on the lower lamina and is not visible on the upper lamina while the lateral veins are obscure on both laminas.
The inflorescences of Ozothamnus bidwillii are short dense corymbs born from the terminals. The erect corymbs measure 25mm to 35mm in length by 30mm to 55mm in diameter. The individual heads measure 3mm to 4mm in length by 2.5mm to 5mm in diameter. The involucral bracts are pale golden and loosely appressed. It is covered in long, fine, white, tangled threads at the base on lower external surface while the inner surface is scarcely defined and translucent spreading tip. There are 22 to 23 florets in a head with the outer 8 to12 florets being female. The individual flowers are white and measure 2mm to 3mm in length by 2mm to 3mm in width. The flowers appear from mid-August to late November.
Ozothamnus bidwillii’s fruits are linear achenes. The achene’s pappi are short bristles.
Wildlife:
Ozothamnus bidwillii’s flowers are a great attraction for small butterflies, small beetles and native pollen flies.
Cultivation:
Ozothamnus bidwillii is suitable for growing in warm temperate, sub-tropical to cool tropical areas and cool semi-arid zones. As a garden subject it will grow from 0.5 meters to 1.2 meters in height by 1 meter to 1.6 meters in diameter when cultivated in the open. It is fast growing, drought and cold tolerant down to at least minus 4 degrees and can stand quite heavy frosts.
It is an open foliage plant best suited to a bush garden setting and will stand out because of its proliferation of white flowers when planted amongst other plants. It is best planted amongst leaf plants with pale green leaves.
Ozothamnus bidwillii would make a contribution to a moist heath garden. Here it can be used as the taller growing plant scattered throughout the heath scene. When you design a flat heath garden which Ozothamnus bidwillii is well suited don’t use contours to display the plants as heath lands are almost always flat or have a slight rise. Plants must be planted close together and be short so you can see over the tallest ones with the exception of one or two plants at the most. These will be feature plants. The idea is to achieve a feeling of expansive flatness. Use a lot of procumbent plants like Carpobrotus edulis or Hibbertia specie. Mix them with other smaller shrubs so none of them dominate the scene but blend in to give a mosaic of foliage colours that you oversee. Actinotis helianthi or Grevillea thelemanniana or Grevillea masonii for three great contrasting foliages.
The flowers are ideal fresh cut flowers in the home and last for weeks after picking. It is also ideal for dry flower arrangements and can be dyed if different colours are desired in the home.
Ozothamnus are best treated as a perennial with new seedlings planted below the parent plants every 3 years.
Propagation:
Seeds: Ozothamnus bidwillii seeds directly into a seed raising mix. Cover them with 5mm of fine sand and keep moist not wet. Place the tray in a warm sunny position. When the seedlings are 25mm to 50mm tall, prick them out and plant them into 50mm native tubes using a good organic mix.
Once the seedlings reach 150mm to 200mm in height, nip the tips out before planting them out into their permanent position.
Cuttings: Fortunately Ozothamnus bidwillii cuttings strike relatively easy. Use 100mm to 200mm long tip cuttings or lateral shoots from the present season’s growth. Take them in warmer months of the year. Remove half the leaves from the bottom section being careful not to tear the bark.
1 Prepare the cutting mix by adding two thirds sharp clean river sand, one third peat or one third perlite. These ingredients must be sterilized,
2 Select good material from non diseased plants,
3 Select semi green stems for cuttings. Look for a stem with two or three nodes,
4 Place the cutting on a flat, hard surface, and make a clean cut down one side of the cutting at the base for 10mm with a sharp sterile knife or razor blade. – This scarification of the node will increase the chances of roots emerging from this spot. Now remove all but one or two the leaves, leaving the apex leaves in tact. If the leaves are very large in proportion to the stem, cut off the apical halves.
5 Fill a saucer with water, and place a little medium strength rooting hormone into another container like a milk bottle top. Dip the node end of the cutting into the water and then into the rooting hormone. Tap off any excess hormone,
6 Use a small dipple stick or old pencil to poke a hole into the soilless potting mix. Ensure the hole is slightly larger than the stem diameter and be careful not to wipe the rooting hormone off the cuttings base. Place 2 to 4 cuttings in each of the 50mm native tubes,
7 I like to place the tubes in bucket with holes drilled in the bottom to allow excess water to drain out. A plastic bag that fits over the bucket is ideal to help maintain temperature and moisture. Place in a semi shaded, warm position like under 50mm shade cloth.
8 When the cuttings have struck, open the bag to allow air circulation for a few days to a week,
9 Once hardened off remove the cuttings from the bag and allow to further hardening for a few more days to a week,
10 Transplant into a good potting mix to grow on.
Fertilize using seaweed, fish emulsion or organic chicken pellets soaked in water on an alternate basis. Fertilize every two months once planted out until the plants are established then annually in early September to October to maintain health, vitality and better flowering.
Further Comments from Readers:
Hi reader, it seems you use The Bible of Botany a lot. That’s great as we have great pleasure in bringing it to you! It’s a little awkward for us to ask, but our first aim is to purchase land approximately 1,600 hectares to link several parcels of N.P. into one at The Pinnacles NSW Australia, but we need your help. We’re not salespeople. We’re amateur botanists who have dedicated over 30 years to saving the environment in a practical way. We depend on donations to reach our goal. If you donate just $5, the price of your coffee this Sunday, We can help to keep the planet alive in a real way and continue to bring you regular updates and features on Australian plants all in one Botanical Bible. Any support is greatly appreciated. Thank you.
In the spirit of reconciliation we acknowledge the Bundjalung, Gumbaynggirr and Yaegl and all aboriginal nations throughout Australia and their connections to land, sea and community. We pay our respect to their Elders past, present and future for the pleasures we have gained.
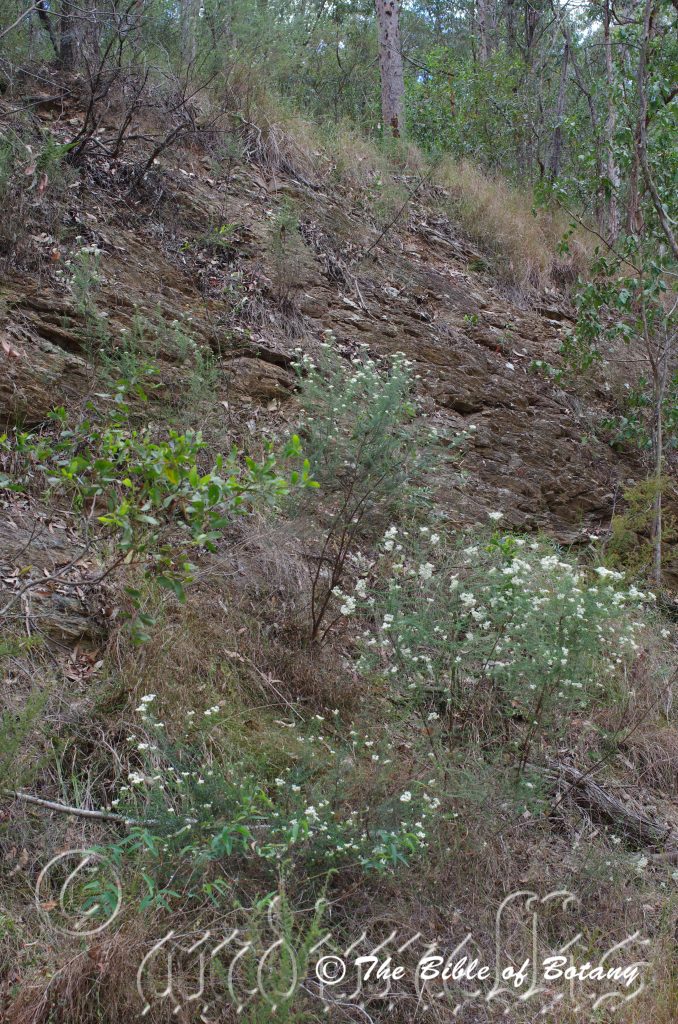
Toohey Forest Qld.
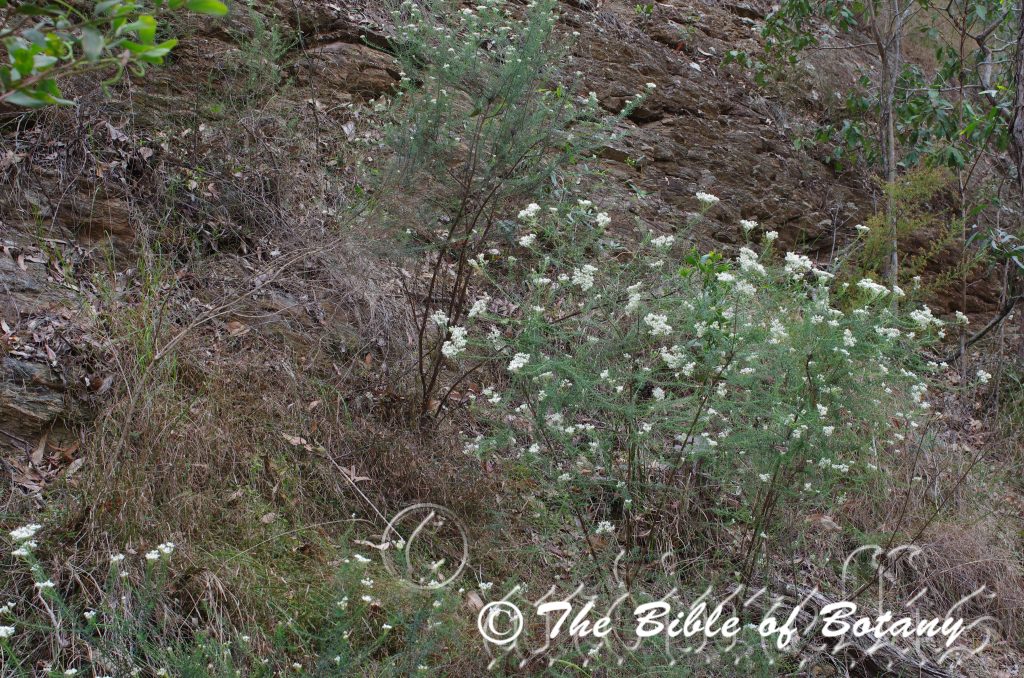
Toohey Forest Qld.
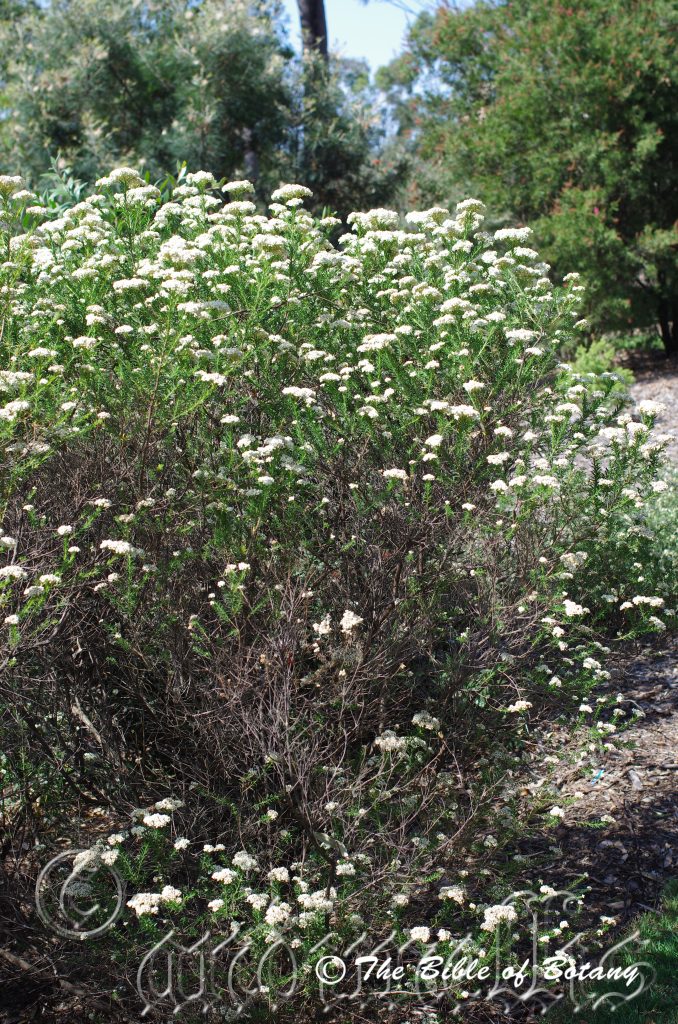
Mount Cootha Botanic Gardens Qld.
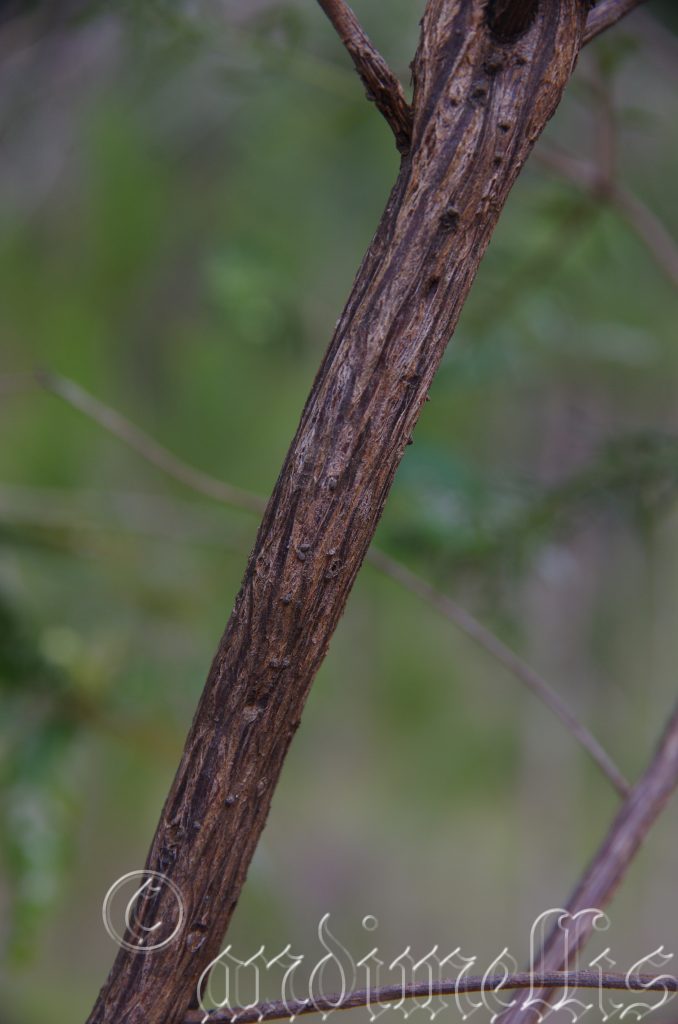
The Pinnacles NSW
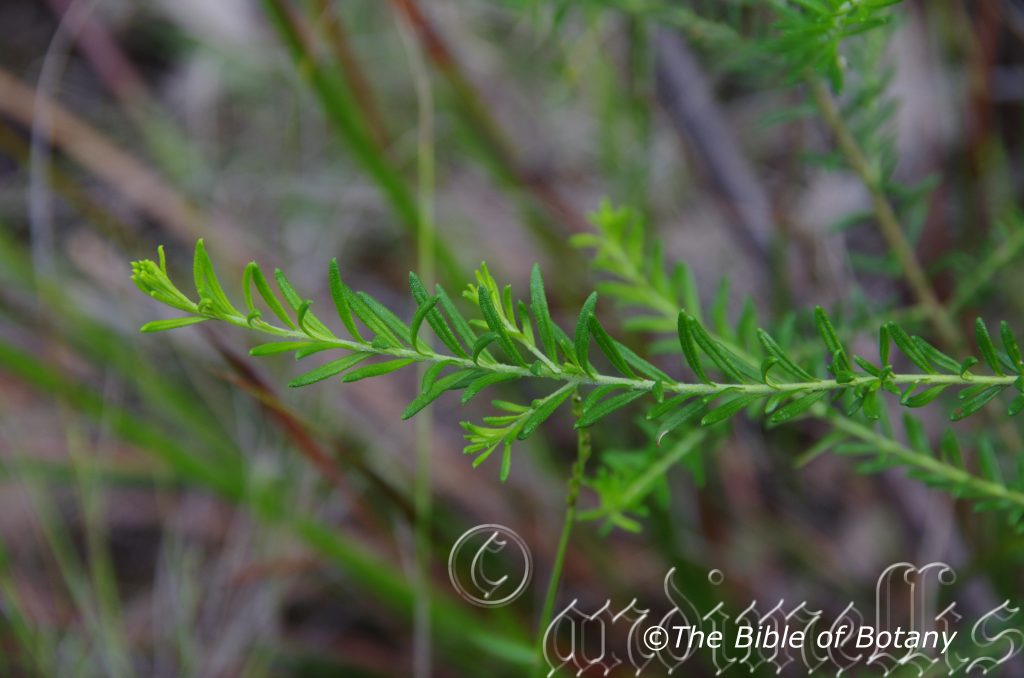
The Pinnacles NSW
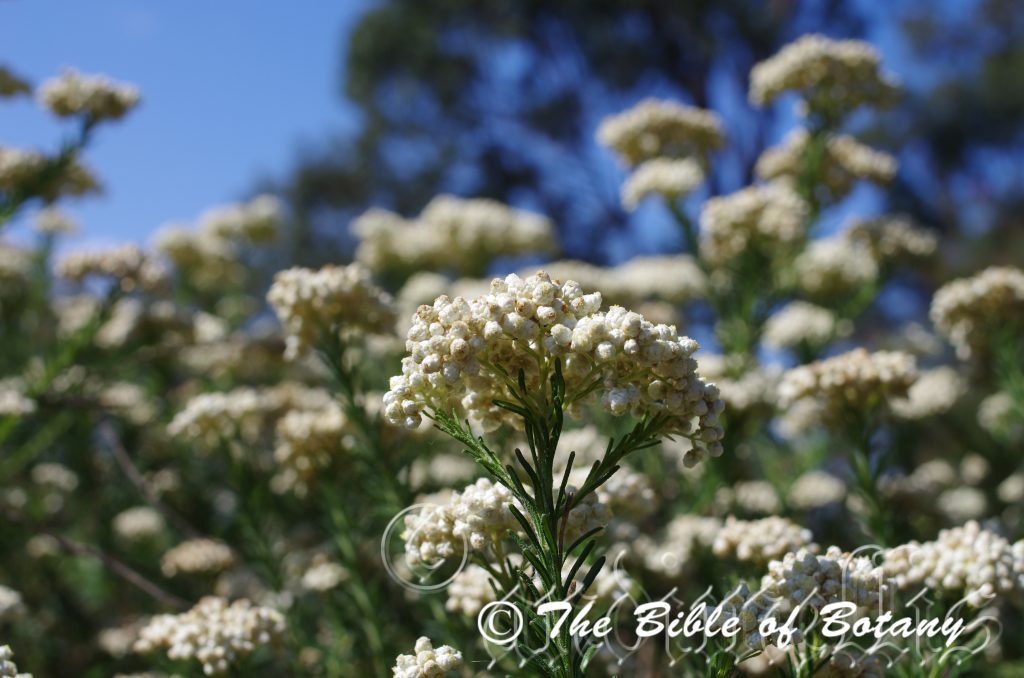
Mount Cootha Botanic Gardens Qld.
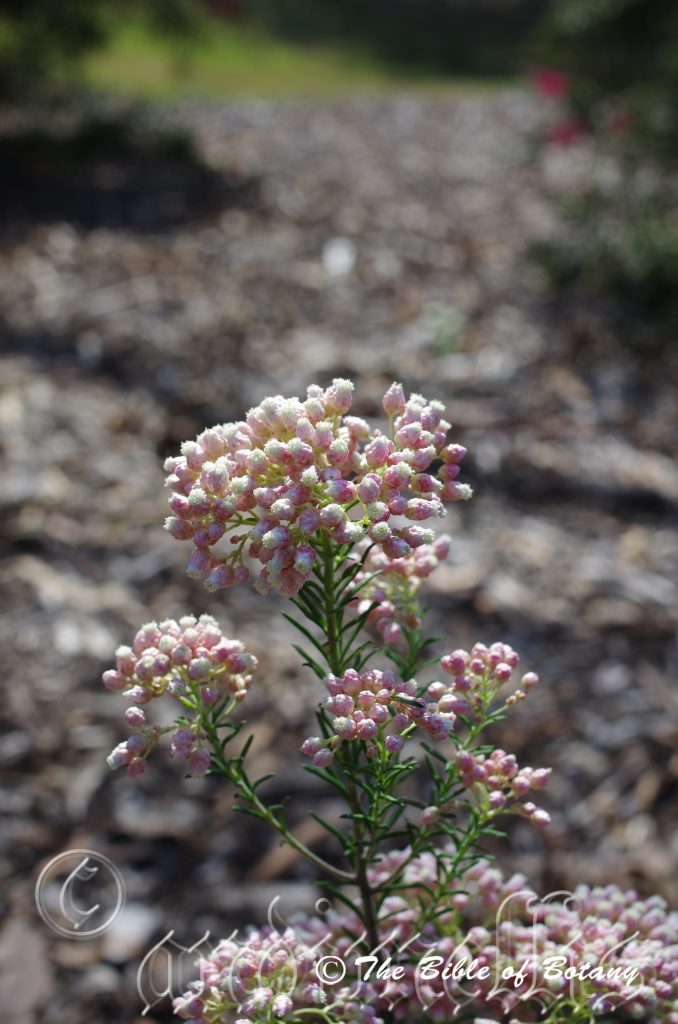
Mount Cootha Botanic Gardens Qld.
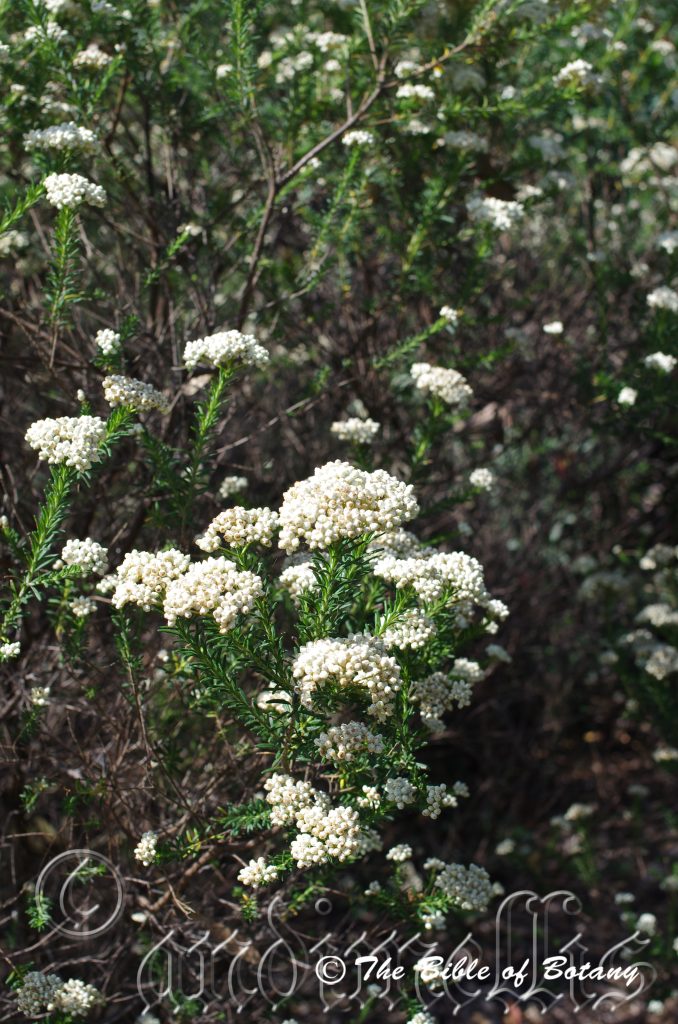
Mount Cootha Botanic Gardens Qld.
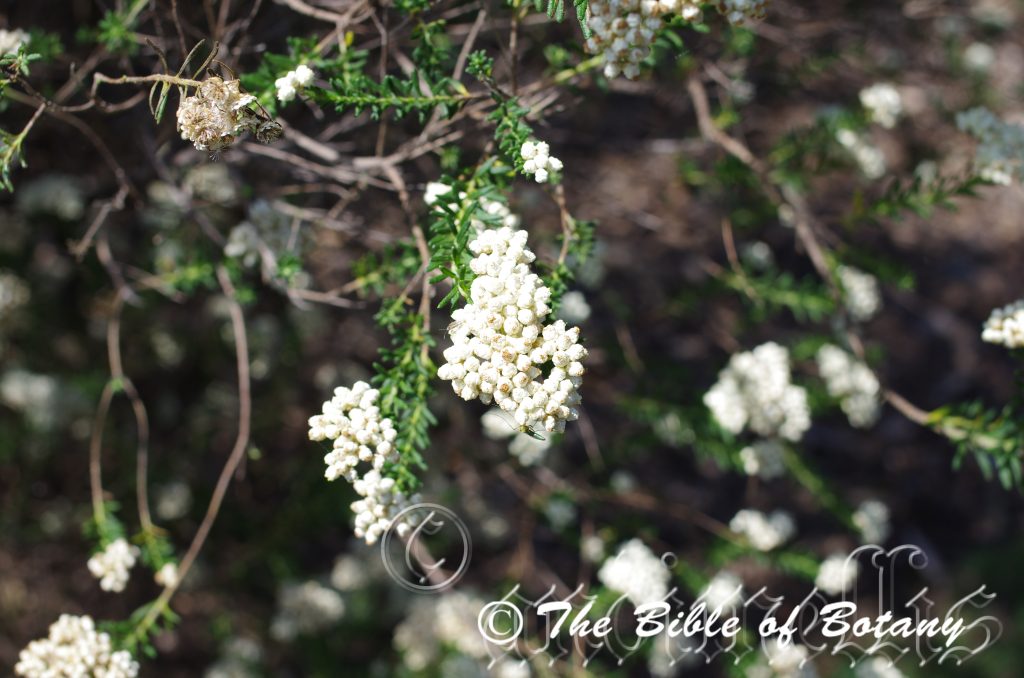
Mount Cootha Botanic Gardens Qld.
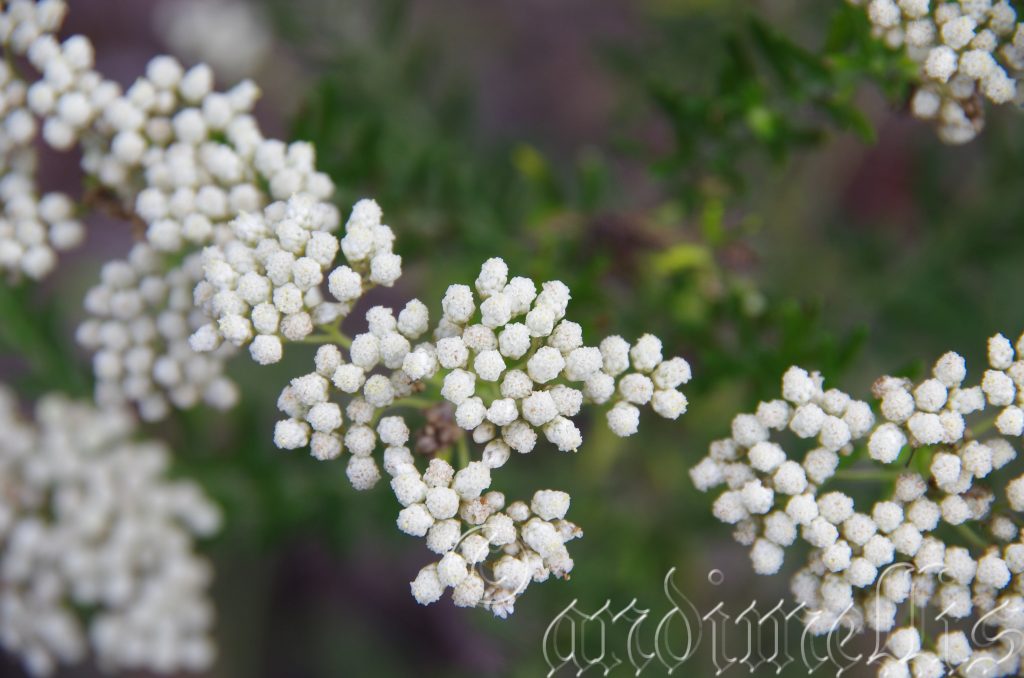
The Pinnacles NSW
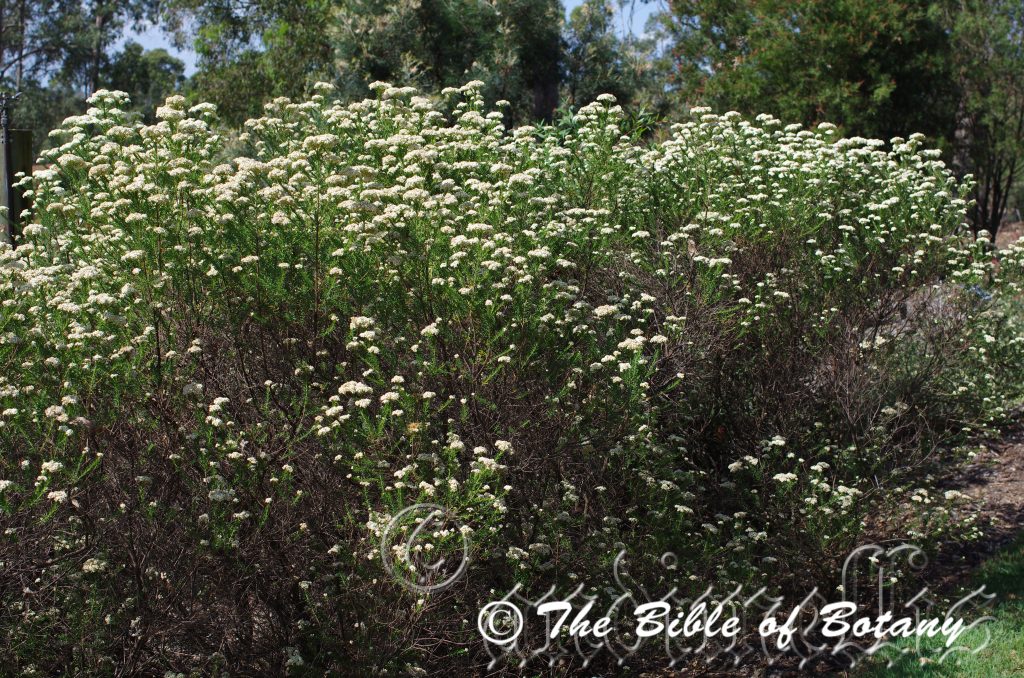
Mount Cootha Botanic Gardens Qld.
Ozothamnus diosmifolius
Classification:
Unranked: Eudicots
Class: Asterids
Order: Asterales
Family: Asteracea
Tribe: Gnaphalieae
Genus: From Ozein, which is Ancient Greek for to have a smell and Thamnos, which is Ancient Greek for a shrub. It refers to shrubs, which emit a strong pleasant or unpleasant smell.
Species: From Dîos, which is Ancient Greek for divine and Folium, which is Latin for a leaf. It refers to leaves, which have a divine fragrance similar to the European Diosma genus.
Common Name: Rice Flower or Sago Bush.
Distribution:
Ozothamnus diosmifolius is found south from Biloela and west to Blackall to Batehaven and west to Nyngan. It is found on the Western Plains, Western Slopes, on and east of the Great Dividing Range to the coast.
https://avh.ala.org.au/occurrences/search?taxa=Ozothamnus+diosmifolius#tab_mapView
Habitat Aspect Climate:
Ozothamnus diosmifolius prefers full sun to dappled shade. It grows in or adjacent to riverine forests, dry rainforests and dry littoral rainforests. The altitude ranges from 5 meters ASL to 1360 meters ASL.
The temperatures range from minus 6 degrees in August to 34 degrees in February.
The rainfalls range from lows of 850mm to an average 3000mm annually.
Soil Requirements:
Ozothamnus diosmifolius prefers coarse sand, sandy loams to medium clays or light slits to medium silts. The soils are usually derived from decomposed brown basalts, black basalts, shales, granite, sandstone, metamorphic rocks, alluvial silts or accumulated beach sands. The soils ph ranges from 5pH to 6.5pH. It does not tolerate waterlogged soils. Non saline soils to moderately saline soils are tolerated.
Height & Spread:
Wild Plants: 1m to 3m by m to 2m.
Characteristics:
Ozothamnus diosmifolius grows as a dense shrub with deep grey, rough, scabrous and slightly furrowed trunk and main branches on older plants. Young branchlets are grey turning mid green to sea-green as they approach the leaves. The new growth is covered in white tomentum scaly hairs.
Ozothamnus diosmifolius’s alternate simple leaves are loosely whirled along the branches. It is linear and measure 10mm to 17mm in length by 1mm to 2.2mm in width. The bases are sessile while the apexes are mucronate to apiculate. The discolourous laminas are deep sea-green and scabrous on the upper lamina while the lower lamina densely covered in white pannate to villous hairs. The mid vein is slightly prominent on the lower lamina and is not visible on the upper lamina. The margins are tightly revolute. The base is tapering while the apex is obtuse and reflexed.
The inflorescences of Ozothamnus diosmifolius are short dense corymbs born from the terminals. The erect corymbs measure 30mm to 42mm in diameter. The individual flowers vary from white, very pale pinks to rose pinks and measure 2mm to 3mm in length by 2mm to 3mm in width. The 4 to 8 involucral bracts are broad with an obtuse apex. There are 20 to 22 disc florets. The flowers appear from mid-August to late November.
Ozothamnus diosmifolius’s fruit is a flat, linear glabrous achene. The achene’s pappus has short clavate bristles.
Wildlife:
The flowers are a great attraction for small and medium, butterflies, beetles and native flies.
Cultivation:
Ozothamnus diosmifolius is a beautiful dense foliaged dome shaped small shrub with lovely pink and cream flowers that is worthwhile growing for its beauty in small to large gardens. It is suitable for growing in warm temperate, sub-tropical to cool tropical areas and cool semi-arid zones. As a garden subject it will grow from 1.5 meters to 2.5 meters in height by 1.5 meter to 2 meters in diameter when cultivated in the open. It is fast growing, drought and cold tolerant down to at least minus 4 degrees and can stand quite severe frosts
It is open foliaged plants best suited to a bush garden setting and will stand out because of its proliferation of white or pink flowers when planted amongst other plants. To highlight the colour, select larger leaf plants with pale green leaves. It can be used in more formal or English style gardens because they have a naturally neat rounded appearance that needs very little attention. If used in rockeries which have been planted out to highlight other features like rocks, stumps or fish ponds they should be planted to the rear so as to balance the look because of their size. It can be tip pruned to keep them shorter. It is non-obtrusive easy to maintain yet highly visible when in flower or out of flower.
Ozothamnus diosmifolius would make outstanding contribution to a moist heath garden. It can be used as the taller growing plant scattered throughout the heath scene. When you design a flat heath garden which Ozothamnus diosmifolius is well suited don’t use contours to display the plants as heath lands are almost always flat or have a slight rise. Plants must be planted close together and be short so you can see over the tallest ones with the exception of one or two plants at the most. These will be feature plants. The idea is to achieve a feeling of expansive flatness. This can be achieved with using the Ozothamnus diosmifolius’s green linear leaves and having them contrasting with finer pale green or soft grey to glaucous coloured foliage. Use a lot of procumbent plants like Carpobrotus edulis or any of the Hibbertia species. Mix them with other smaller shrubs so none of them dominate the scene but blend in to give a mosaic of foliage colours that you oversee. Actinotis helianthi Grevillea thelemanniana or Grevillea masonii for three great contrasting foliages.
The flowers are ideal fresh cut flowers in the home and last for weeks after picking. It is also ideal for dry flower arrangements and can be dyed if different colours are desired in the home.
Ozothamnus diosmifolius are best treated as a perennial with new seedlings planted below the parent plants every 3 years.
Propagation:
Seeds: Ozothamnus diosmifolius seeds directly into a seed raising mix. Cover them with 5mm of fine sand and keep moist not wet. Place the tray in a warm sunny position. When the seedlings are 25 to 50 mm tall, prick them out and plant them into 50mm native tubes using a good organic mix.
Once the seedlings reach 150 to 200mm in height, nip the tips out before planting them out into their permanent position.
Cuttings: Use 100mm long half ripened material when growing from cuttings from the present season’s growth. Take them in mid-autumn or early spring. Remove half the leaves from the bottom section being careful not to tear the bark. Remove any flowers and buds. Take a 10mm slice off the bark from the bottom of the cutting on one side. Use a medium rooting hormone, dip the cutting in and place it in a moist sterile seed raising mix.
Place the trays under 30mm shade and keep the trays warm. Bottom heat is beneficial when striking the cuttings. Ideally temperatures should be maintained at between 22 to 24 degrees.
When the cuttings have obviously struck and have developed good roots treat them as for seedlings.
Fertilize using seaweed, fish emulsion or organic chicken pellets soaked in water on an alternate basis. Fertilize every two months once planted out until the plants are established then annually in early September to October to maintain health, vitality and better flowering.
Further Comments from Readers:
Hi reader, it seems you use The Bible of Botany a lot. That’s great as we have great pleasure in bringing it to you! It’s a little awkward for us to ask, but our first aim is to purchase land approximately 1,600 hectares to link several parcels of N.P. into one at The Pinnacles NSW Australia, but we need your help. We’re not salespeople. We’re amateur botanists who have dedicated over 30 years to saving the environment in a practical way. We depend on donations to reach our goal. If you donate just $5, the price of your coffee this Sunday, We can help to keep the planet alive in a real way and continue to bring you regular updates and features on Australian plants all in one Botanical Bible. Any support is greatly appreciated. Thank you.
In the spirit of reconciliation we acknowledge the Bundjalung, Gumbaynggirr and Yaegl and all aboriginal nations throughout Australia and their connections to land, sea and community. We pay our respect to their Elders past, present and future for the pleasures we have gained.
Ozothamnus obcordatus
Classification:
Unranked: Eudicots
Class: Asterids
Order: Asterales
Family: Asteracea
Tribe: Gnaphalieae
Genus: From Ozein, which is Ancient Greek for to have a smell and Thamnos, which is Ancient Greek for a shrub. It refers to shrubs, which emit a strong pleasant or unpleasant smell.
Species: From Ob, which is Latin for orbit and Cordātum which is Latin for heart shape. It refers to petals or leaves, which are heart.
Subspecies: Ozothamnus obcordatus subspecies major. From Majus, which is Latin for the major one. It refers to plants or sub species which has the larger populations or distributions.
Subspecies: Ozothamnus obcordatus subspecies obcordatus. From Ob, which is Latin for orbit and Cordātum which is Latin for heart shape. It refers to petals or leaves, which are heart.
Common Name: Grey Everlasting Daisy or Rice Flower or Sago Bush.
Distribution:
Ozothamnus obcordatus subsp. major is found south from Carneys Creek in southern Queensland in several large disjunct populations to southern Tasmania and west to the Grampians in Victoria.
Ozothamnus obcordatus subsp. obcordatus is found in an area bounded by Yalgogrin, Weddin Range and Temor in central southern New South Wales.
https://avh.ala.org.au/occurrences/search?taxa=Ozothamnus+obcordatus#tab_mapView
Habitat Aspect Climate:
Ozothamnus obcordatus prefers full sun to dappled shade. It grows in schlerophyll forests, open Eucalyptus forests, dry in heaths, on ridges or depressions in lower rainfall areas. The altitude ranges from 5 meters ASL to 900 meters ASL.
The temperatures range from minus 6 degrees in August to 34 degrees in February.
The rainfalls range from lows of 450mm to an average 1600mm annually.
Soil Requirements:
Ozothamnus obcordatus prefers course sand, sandy loams to light fatty clays. The soils are usually derived from partially decomposed granites, decomposed granites or accumulated beach sands. The soils ph ranges from 5pH to 6.5pH. It does not tolerate waterlogged soils. Non saline soils to moderately saline soils are tolerated.
Height & Spread:
Wild Plants: 1m to 1.6m by 1m to 1.2m.
Characteristics:
Ozothamnus obcordatus grows as a small to medium shrub with pale grey, glabrous or slightly furrowed on older plants near the base. The new growth is very pale grey to almost white. The stems are densely covered in white tomentose hairs.
Ozothamnus obcordatus’s alternate simple leaves are arranged close together near the apexes of the branchlets.
It is broad elliptical to obovate in Ozothamnus obcordatus subsp. major. The leaves measure 5mm to 10mm in length by 4mm to 7mm in width.
The leaves are cordate to orbicular in Ozothamnus obcordatus subsp. obcordatus. The leaves measure 3mm to 5mm in length by 3mm to 4mm in width.
The discolourous laminas are grass-green to deep grass-green and glabrous on the upper lamina while the lower lamina densely covered in pale grey tomentose hairs. The mid vein is slightly prominent on the lower lamina and is not visible on the upper lamina. The margins are entire and tightly revolute. The base is rounded while the apex is broadly acute to obtuse and reflexed. The petiole is sessile to 1mm in length and is decurrent.
The inflorescences of Ozothamnus obcordatus are short dense corymbs born from the terminals. The erect corymbs measure 30mm to 45mm in diameter. The individual flowers are cylindrical, vary from very pale yellow to deep yellow and measure 3mm to 4mm in length by 1.5mm to 2mm in diameter. The 4 to 8 involucral bracts are pale creamy yellow, broad with an obtuse apex. There are 10 to 12 disc florets. The disc florets are dissimilar with 8 or 9 bisexual flowers and 2 or 3 female flowers which lack a pappus. The flowers appear from mid-September to early December.
Ozothamnus obcordatus’s fruit is a flat, linear glabrous achene. The achene’s pappus is sparsely covered in hirtellous hairs.
Wildlife:
The flowers are a great attraction for small and medium, butterflies, beetles and native flies.
Cultivation:
Ozothamnus obcordatus is a beautiful dense foliaged dome shaped small shrub with strong contrasting stems foliage and flowers. It is suitable for growing in cool temperate, cool sub-tropical and cool semi-arid areas. As a garden subject it will grow from 1.5 meters to 1.8 meters in height by 1.2 meter to 1.5 meters in diameter when cultivated in the open. It is fast growing, drought and cold tolerant down to at least minus 6 degrees and can stand quite severe frosts.
It is open foliaged plants best suited to a bush garden setting and will stand out because of its proliferation of white or pink flowers when planted amongst other plants. To high light the colour, select larger leaf plants with pale green leaves. It can be used in more formal or English style gardens because they have a naturally neat rounded appearance that needs very little attention. If used in rockeries which have been planted out to highlight other features like rocks, stumps or fish ponds it should be planted to the rear so as to balance the look because of its size. It can be tip pruned to keep them shorter. It is non-obtrusive easy to maintain yet highly visible when in flower or out of flower.
Ozothamnus obcordatus would make outstanding contribution to a heath garden. It can be used as the taller growing plant scattered throughout the heath scene. When you design a flat heath garden which Ozothamnus obcordatus is well suited don’t use contours to display the plants as heath lands are almost always flat or have a slight rise. Plants must be planted close together and be short so you can see over the tallest ones with the exception of one or two plants at the most. These will be feature plants. The idea is to achieve a feeling of expansive flatness. This can be achieved with using the Ozothamnus obcordatus’s green linear leaves and having them contrasting with finer pale green or soft grey to glaucous coloured foliage. Use a lot of procumbent plants like Carpobrotus edulis, Dampier purpurea or Hibbertia scandens. Mix them with other smaller shrubs so none of them dominate the scene but blend in to give a mosaic of foliage colours that you oversee. Actinotis helianthi, Grevillea thelemanniana or Grevillea masonii for three great contrasting foliages.
The flowers are ideal fresh cut flowers in the home and last for weeks after picking. It is also ideal for dry flower arrangements and can be dyed if different colours are desired in the home.
Ozothamnus obcordatus is best treated as a perennial and replace the old plants by planting new seedlings under the parent plants every 3 years to maintain vigour and good flowering.
Propagation:
Seeds: Ozothamnus obcordatus seeds directly into a seed raising mix. Cover them with 5mm of fine sand and keep moist not wet. Place the tray in a warm sunny position. When the seedlings are 25 to 50 mm tall, prick them out and plant them into 50mm native tubes using a good organic mix.
Once the seedlings reach 150 to 200mm in height, nip the tips out before planting them out into their permanent position.
Cuttings: Fortunately Ozothamnus obcordatus cuttings are relatively easy to strike from cuttings. Cuttings must be used if both subspecies are found growing near each other or a particular flower form or colour is required. Use 100mm to 150mm long tip cuttings or lateral shoots from the present season’s growth. Take them in warmer months of the year. Remove half the leaves from the bottom section being careful not to tear the bark.
1 Prepare the cutting mix by adding two thirds sharp clean river sand, one third peat or one third perlite. These ingredients must be sterilized,
2 Select good material from non diseased plants,
3 Select semi green stems for cuttings. Look for a stem with two or three nodes,
4 Place the cutting on a flat, hard surface, and make a clean cut down one side of the cutting at the base for 10mm with a sharp sterile knife or razor blade. – This scarification of the node will increase the chances of roots emerging from this spot. Now remove all but one or two the leaves, leaving the apex leaves in tact. If the leaves are very large in proportion to the stem, cut off the apical halves.
5 Fill a saucer with water, and place a little medium strength rooting hormone into another container like a milk bottle top. Dip the node end of the cutting into the water and then into the rooting hormone. Tap off any excess hormone,
6 Use a small dipple stick or old pencil to poke a hole into the soilless potting mix. Ensure the hole is slightly larger than the stem diameter and be careful not to wipe the rooting hormone off the cuttings base. Place 2 to 4 cuttings in each of the 50mm native tubes,
7 I like to place the tubes in bucket with holes drilled in the bottom to allow excess water to drain out. A plastic bag that fits over the bucket is ideal to help maintain temperature and moisture. Place in a semi shaded, warm position like under 50mm shade cloth.
8 When the cuttings have struck, open the bag to allow air circulation for a few days to a week,
9 Once hardened off remove the cuttings from the bag and allow to further hardening for a few more days to a week,
10 Transplant into a good potting mix to grow on.
Fertilize using seaweed, fish emulsion or organic chicken pellets soaked in water on an alternate basis. Fertilize every two months until the plants are established then twice annually in early September or March to maintain health, vitality and better flowering.
Further Comments from Readers:
Hi reader, it seems you use The Bible of Botany a lot. That’s great as we have great pleasure in bringing it to you! It’s a little awkward for us to ask, but our first aim is to purchase land approximately 1,600 hectares to link several parcels of N.P. into one at The Pinnacles NSW Australia, but we need your help. We’re not salespeople. We’re amateur botanists who have dedicated over 30 years to saving the environment in a practical way. We depend on donations to reach our goal. If you donate just $5, the price of your coffee this Sunday, We can help to keep the planet alive in a real way and continue to bring you regular updates and features on Australian plants all in one Botanical Bible. Any support is greatly appreciated. Thank you.
In the spirit of reconciliation we acknowledge the Bundjalung, Gumbaynggirr and Yaegl and all aboriginal nations throughout Australia and their connections to land, sea and community. We pay our respect to their Elders past, present and future for the pleasures we have gained.
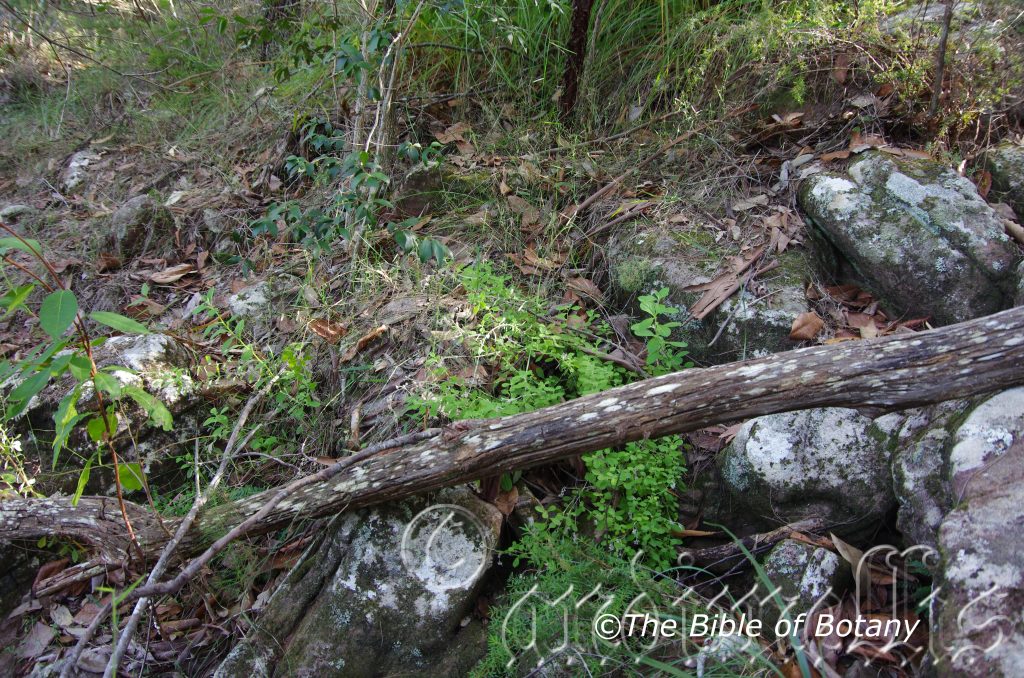
The Pinnacles NSW
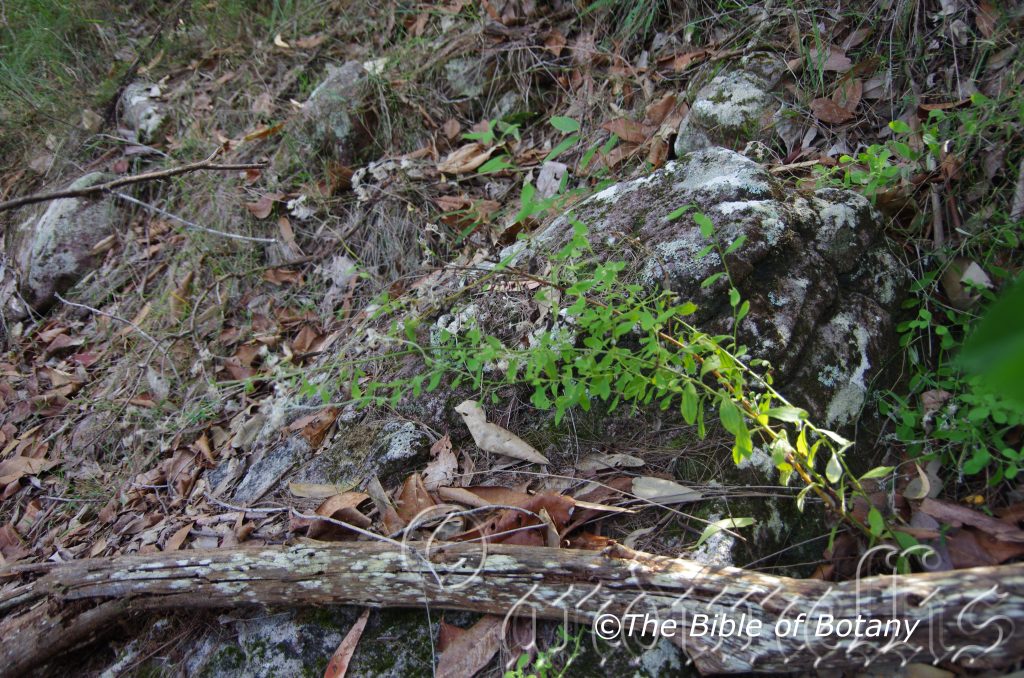
The Pinnacles NSW
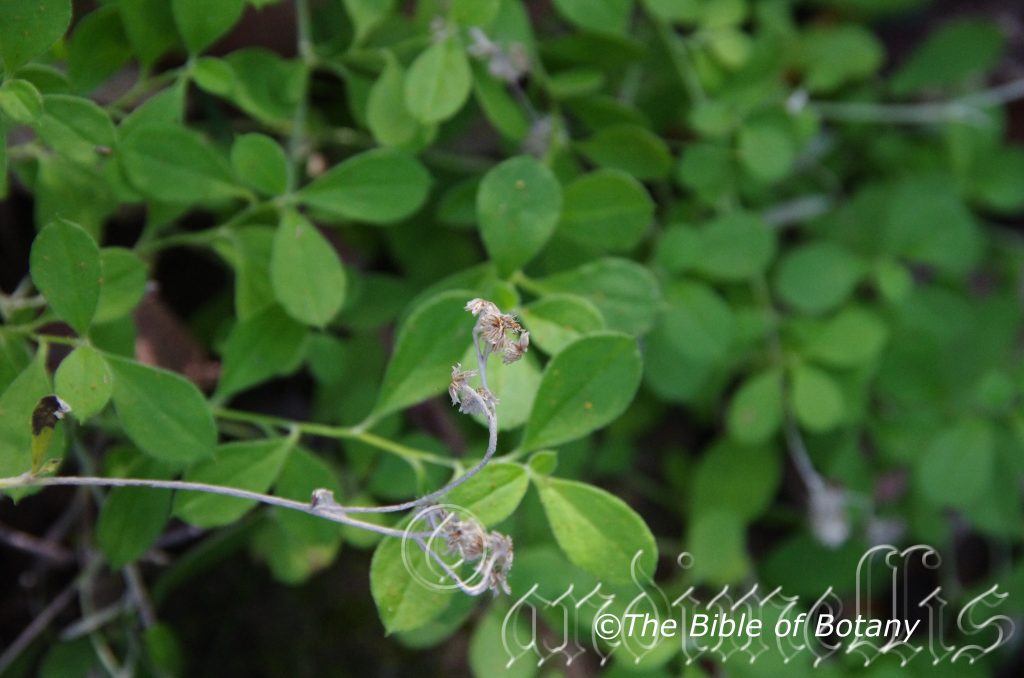
The Pinnacles NSW
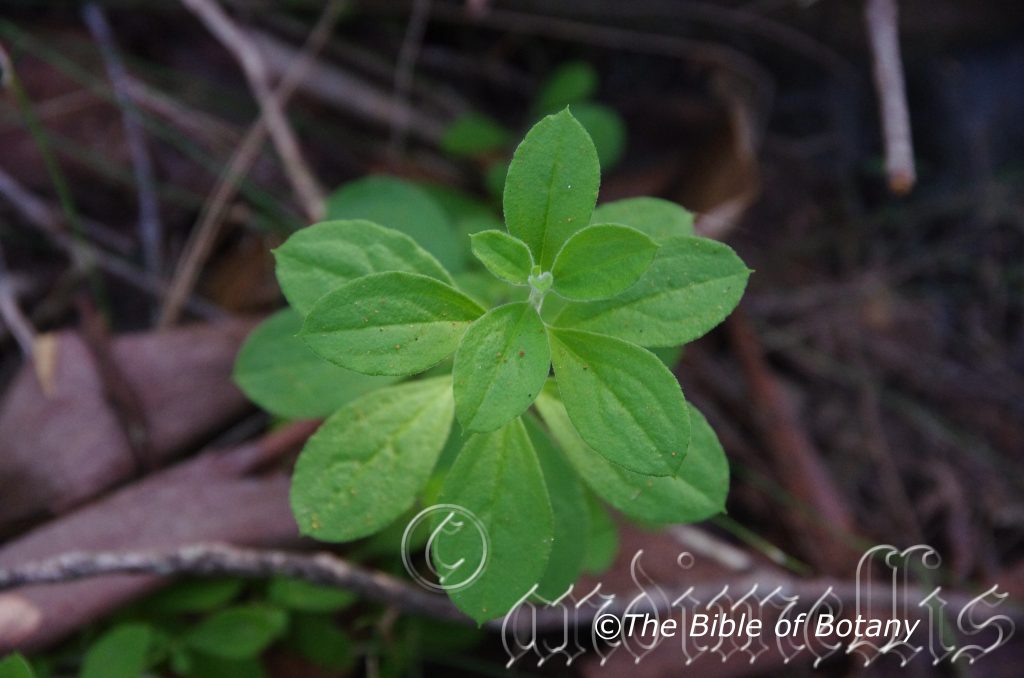
The Pinnacles NSW
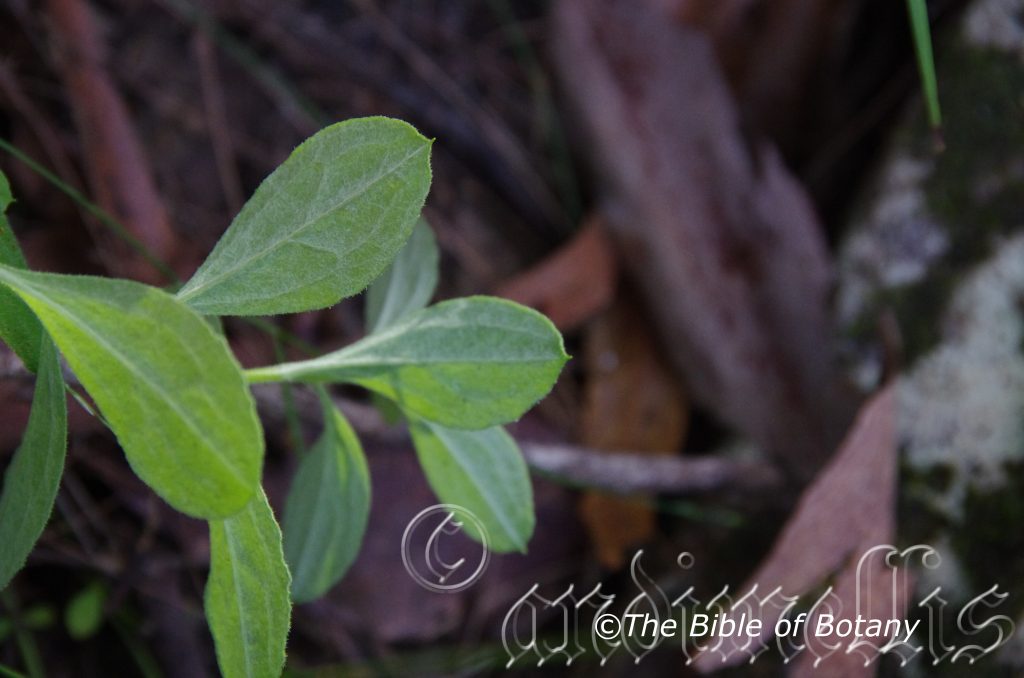
The Pinnacles NSW
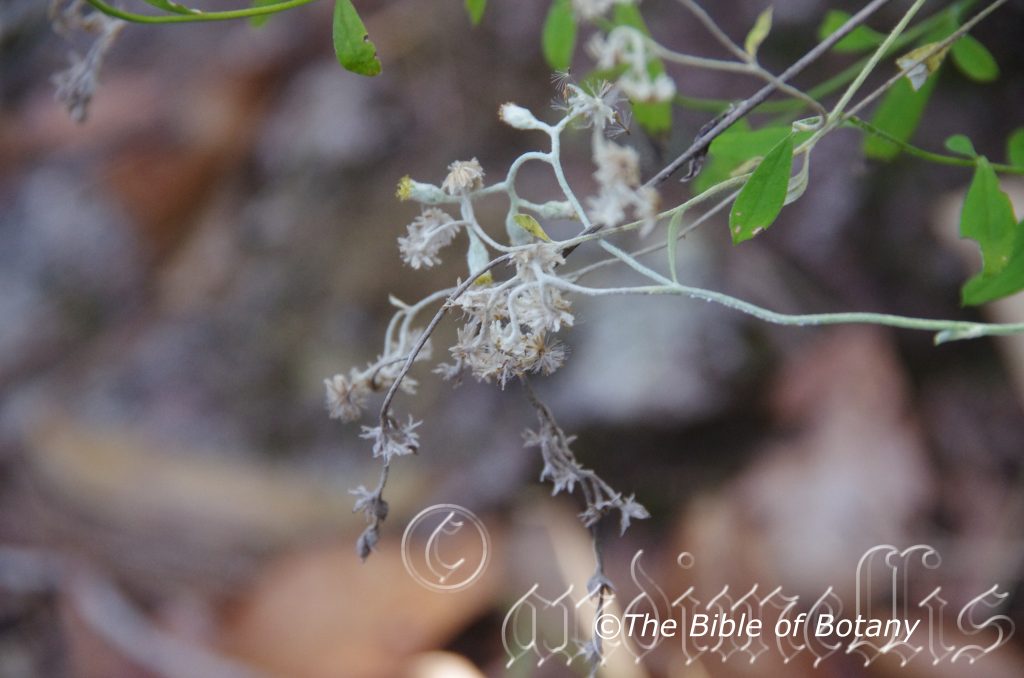
The Pinnacles NSW
Ozothamnus obovatus
Classification
Unranked: Eudicots
Class: Asterids
Order: Asterales
Family: Asteracea
Tribe: Gnaphalieae
Genus: From Ozein, which is Ancient Greek for to have a smell and Thamnos, which is Ancient Greek for a shrub. It refers to shrubs, which emit a strong pleasant or unpleasant smell.
Species: From Ob, which is Latin for orbital and Ovatus which is Latin for an egg shape. It refers to leaves, which are somewhat variable but usually obovate.
Sub Species:
Common Name:
Distribution:
Ozothamnus obovatus is restricted to an area bounded by Drake on the New England Tablelands south to Ellenborough Falls near Wingham, Middle Brother Mountain, Port Macquarie and old Timber Top near Glenreagh.
https://avh.ala.org.au/occurrences/search?taxa=Ozothamnus+obovatus#tab_mapView
Habitat Aspect Climate:
Ozothamnus obovatus prefers full sun to dappled shade. It grows in or adjacent to well-developed moist rainforests, dry rainforests and moist sclerophyll forests. The altitude ranges from 80 meters ASL to 1360 meters ASL.
The temperatures range from minus 2 degrees in August to 36degrees in February.
The rainfalls range from lows of 820mm to an average 2000mm annually. All these locations derive additional moisture from orographic precipitation.
Soil Requirements:
Ozothamnus obovatus prefers better quality course sand, sandy loams to medium gritty clays. The soils are usually derived from partially decomposed granites. The soils ph ranges from 5pH to 6.5pH. It does not tolerate waterlogged soils. Non saline soils to moderately saline soils are tolerated.
Height & Spread:
Wild Plants: 1m to 1.5m by 1m to 1.2m.
Characteristics:
Ozothamnus obovatus grows as a stout, woody, erect shrub with glabrous, grey stems which branch from near the base. The juvenile stems and new growth are pale grey-green and are obscurely striated. It is densely covered in white, loose, caduceous, floccose hairs and minute glandular hairs.
Ozothamnus obovatus’s alternate, simple, and obovate to broad lanceolate leaves measure 20mm to 40mm in length by 7mm to 12mm in width. The petioles are covered in white glandular hairs and measure 1mm to 5mm in length. The bases are attenuate or taper to the petioles while the apexes are acute. The discolourous laminas are grass-green, blue-green to deep green, dull, rough and sparsely covered in white glandular hairs on the upper lamina while the lower laminas are white and covered in white floccose hairs or pale green and glabrous or covered in white glandular hairs. The laminas recurve upwards from the mid-vein to the margins and decurve downwards on the apical half while the margins are finely crenate or finely toothed or are finely fringed with minute tubercular lumps on the apical half. The mid vein is strongly prominent on the lower lamina and is visible on the upper lamina while the lateral veins are obscure on both laminas.
The inflorescences of Ozothamnus obovatus are loose panicles of corymbs born from the terminals. The erect corymbs measure 50mm to 95mm in length by 30mm to 75mm in diameter. The individual heads measure 4mm to 5mm in length by 5mm to 6.5mm in diameter. The 6 to 9 involucral lanceolate bracts are pale grey and loosely appressed. It is covered in long, fine, white, threads with a glandular midrib and narrow hyaline margin. There are 24 to 26 bisexual florets in a head. The individual florets are yellow and measure 2mm to 3mm in length by 2mm to 3mm in width. The flowers appear from mid-August to late February.
Ozothamnus obovatus’s fruits are linear achenes. The achene’s pappi are short bristles.
Wildlife:
Ozothamnus obovatus’s flowers are a great attraction for small butterflies, small beetles and native bees like Tetragonula carbonaria and the Blue banded bee Amegilla cingulate.
Cultivation:
Ozothamnus obovatus is suitable for growing in warm temperate, sub-tropical to cool tropical areas and cool semi-arid zones. As a garden subject it will grow from 0.5 meters to 1.2 meters in height by 1 meter to 1.6 meters in diameter when cultivated in the open. It is fast growing, drought and cold tolerant down to at least minus 4 degrees and can stand quite heavy frosts.
It is an open foliage plant best suited to a bush garden setting and will stand out because of its proliferation of white flowers when planted amongst other plants. It is best planted amongst leaf plants with pale green leaves.
Ozothamnus obovatus would make a contribution to a moist heath garden. Here it can be used as the taller growing plant scattered throughout the heath scene. When you design a flat heath garden which Ozothamnus obovatus is well suited don’t use contours to display the plants as heath lands are almost always flat or have a slight rise. Plants must be planted close together and be short so you can see over the tallest ones with the exception of one or two plants at the most. These will be feature plants. The idea is to achieve a feeling of expansive flatness. Use a lot of procumbent plants like Carpobrotus edulis or Hibbertia scandens. Mix it with other smaller shrubs so none of them dominate the scene but blend in to give a mosaic of foliage colours that you oversee. Actinotis helianthi, Grevillea thelemanniana or Grevillea masonii for three great contrasting foliages.
The flowers are ideal fresh cut flowers in the home and last for weeks after picking. It is also ideal for dry flower arrangements and can be dyed if different colours are desired in the home.
Ozothamnus obovatus are best treated as a perennial with new seedlings planted below the parent plants every 3 years.
Propagation:
Seeds: Ozothamnus obovatus seeds directly into a seed raising mix. Cover them with 5mm of fine sand and keep moist not wet. Place the tray in a warm sunny position. When the seedlings are 25mm to 50mm tall, prick them out and plant them into 50mm native tubes using a good organic mix.
Once the seedlings reach 150mm to 200mm in height, nip the tips out before planting them out into their permanent position.
Cuttings: Fortunately Ozothamnus obovatus cuttings strike easy. Use 100mm to 200mm long tip cuttings or lateral shoots from the present season’s growth. Take them in warmer months of the year. Remove half the leaves from the bottom section being careful not to tear the bark.
1 Prepare the cutting mix by adding two thirds sharp clean river sand, one third peat or one third perlite. These ingredients must be sterilized,
2 Select good material from non diseased plants,
3 Select semi green stems for cuttings. Look for a stem with two or three nodes,
4 Place the cutting on a flat, hard surface, and make a clean cut down one side of the cutting at the base for 10mm with a sharp sterile knife or razor blade. – This scarification of the node will increase the chances of roots emerging from this spot. Now remove all but one or two the leaves, leaving the apex leaves in tact. If the leaves are very large in proportion to the stem, cut off the apical halves.
5 Fill a saucer with water, and place a little medium strength rooting hormone into another container like a milk bottle top. Dip the node end of the cutting into the water and then into the rooting hormone. Tap off any excess hormone,
6 Use a small dipple stick or old pencil to poke a hole into the soilless potting mix. Ensure the hole is slightly larger than the stem diameter and be careful not to wipe the rooting hormone off the cuttings base. Place 2 to 4 cuttings in each of the 50mm native tubes,
7 I like to place the tubes in bucket with holes drilled in the bottom to allow excess water to drain out. A plastic bag that fits over the bucket is ideal to help maintain temperature and moisture. Place in a semi shaded, warm position like under 50mm shade cloth.
8 When the cuttings have struck, open the bag to allow air circulation for a few days to a week,
9 Once hardened off remove the cuttings from the bag and allow to further hardening for a few more days to a week,
10 Transplant into a good potting mix to grow on.
Fertilize using seaweed, fish emulsion or organic chicken pellets soaked in water on an alternate basis. Fertilize every two months until the plants are established then twice annually in early September or March to maintain health, vitality and better flowering.
Further Comments from Readers:
Hi reader, it seems you use The Bible of Botany a lot. That’s great as we have great pleasure in bringing it to you! It’s a little awkward for us to ask, but our first aim is to purchase land approximately 1,600 hectares to link several parcels of N.P. into one at The Pinnacles NSW Australia, but we need your help. We’re not salespeople. We’re amateur botanists who have dedicated over 30 years to saving the environment in a practical way. We depend on donations to reach our goal. If you donate just $5, the price of your coffee this Sunday, We can help to keep the planet alive in a real way and continue to bring you regular updates and features on Australian plants all in one Botanical Bible. Any support is greatly appreciated. Thank you.
In the spirit of reconciliation we acknowledge the Bundjalung, Gumbaynggirr and Yaegl and all aboriginal nations throughout Australia and their connections to land, sea and community. We pay our respect to their Elders past, present and future for the pleasures we have gained.
Ozothamnus rufescens
Classification
Unranked: Eudicots
Class: Asterids
Order: Asterales
Family: Asteracea
Tribe: Gnaphalieae
Genus: From Ozein, which is Ancient Greek for to have a smell and Thamnos, which is Ancient Greek for a shrub. It refers to shrubs, which emit a strong pleasant or unpleasant smell.
Species: From Rufescere, which is Latin for deep rusty-red to tawny-red. It refers to the colour of the leaves and/or stems which are a deep rusty-red colour.
Common Name: Brown Dogwood.
Distribution:
Ozothamnus rufescens is found south from Mount Huntley near Warwick and Springbrook in the Macpherson Ranges in southern Queensland to Lithgow and Menangle in central coastal New South Wales.
There is an isolated population further west at Upper Albyn on the Cobar Peneplain and one further north on the Kroombit Tops near Bundaberg.
https://avh.ala.org.au/occurrences/search?taxa=Ozothamnus+rufescens#tab_mapView
Habitat Aspect Climate:
Ozothamnus rufescens prefers full sun to dappled shade. It grows in or on the margins of cool moist sub-tropical rainforests and is particularly common in rainforest regrowth areas. The altitude ranges from 5 meters ASL to 1360 meters ASL.
The temperatures range from minus 6 degrees in August to 34 degrees in February.
The rainfalls range from lows of 850mm to an average 3000mm annually.
Soil Requirements:
Ozothamnus rufescens prefers better quality loams to medium clays. The soils are usually derived from decomposed brown basalts, black basalts, shales or granites. The soils ph ranges from 5pH to 6pH. It does not tolerate waterlogged soils. Non saline soils to moderately saline soils are tolerated.
Height & Spread:
Wild Plants: 2.5m to 4m by 2m to 3m.
Characteristics:
Ozothamnus rufescens grows as an erect shrub with numerous lateral branches and stems. The branches and stems are mid brown to pale grey-brown and glabrous. The juvenile stems and new growth are pale grey-green and densely covered in white tomentose hairs.
Ozothamnus rufescens‘s alternate, almost divaricate or reflexed, oblong to ovate leaves measure 4mm to 18mm in length by 1.5mm to 3mm in width or rarely to 5mm in width. The petioles are densely covered in white tomentose hairs and measure 0.1mm to 0.5mm in length. The bases are rounded or minutely cordate while the apexes are broad acuminate. The discolourous laminas are mid blue-green, deep blue-green to deep green, dull and glabrous to sparsely covered in soft, white puberulent hairs along the mid-vein on the upper lamina while the lower laminas are is slightly paler and densely covered in short, white tomentose hairs. The laminas are flat or recurve slightly upwards from the mid-vein to the margins and are usually straight or at times decurve downwards near the apex half while the margins are entire. The mid vein is prominent on the lower lamina and is visible on the upper lamina while the lateral veins are obscure on both laminas.
The inflorescences of Ozothamnus obovatus are dense corymbs born from the terminals. The erect corymbs measure 20mm to 70mm in length by 30mm to 100mm in diameter. The individual campanulate heads measure 4mm to 6mm in length by 3mm to 5mm in diameter. The 20 to 24 involucral ovate bracts have acuminate apexes, are pastel yellow to cream. The tightly appressed bracts are scarious. There are 27 bisexual florets in a head. The individual florets are yellow and measure 3mm to 4mm in length by 2mm to 3mm in width. The flowers appear from mid-September to late November.
Ozothamnus obovatus’s fruits are linear achenes. The achene’s pappi are short, clavate bristles.
Wildlife:
Ozothamnus rufescens’s flowers are a great attraction for small and medium, butterflies, beetles and native flies.
Cultivation:
Ozothamnus rufescens is a beautiful, dense, foliaged, dome shaped, small shrub with lovely pink and cream flowers that is worthwhile growing for its beauty in small to large gardens. It is suitable for growing in warm temperate, sub-tropical to cool tropical areas and cool semi-arid zones. As a garden subject it will grow from 3 meters to 4 meters in height by 2 meter to 3 meters in diameter when cultivated in the open. It is fast growing, drought and cold tolerant down to at least minus 4 degrees and can stand quite severe frosts.
It is open foliaged plants best suited to a bush garden setting and will stand out because of its proliferation of pastel yellow flowers when planted amongst other plants. To high light the colour, select larger leaf plants with pale green leaves with pink flowers. It can be used in more formal or English style gardens because it has a naturally neat rounded appearance that needs very little attention. If used in rockeries which have been planted out to highlight other features like rocks, stumps or fish ponds they should be planted to the rear so as to balance the look because of their size. It can be tip pruned to keep them shorter. It is non-obtrusive easy to maintain yet highly visible when in flower or out of flower.
Ozothamnus rufescens would make outstanding contribution to a moist heath garden. It can be used as the taller growing plant scattered throughout the heath scene. When you design a flat heath garden which, it is well suited don’t use contours to display the plants as heath lands are almost always flat or have a slight rise. Plants must be planted close together and be short so you can see over the tallest ones with the exception of one or two plants at the most. These will be feature plants. The idea is to achieve a feeling of expansive flatness. This can be achieved with using the Ozothamnus rufescens’s green linear leaves and having them contrasting with finer pale green or soft grey to glaucous coloured foliage. Use a lot of procumbent plants like Carpobrotus edulis or Hibbertia diffusa. Mix them with other smaller shrubs so none of them dominate the scene but blend in to give a mosaic of foliage colours that you oversee. Actinotis helianthi, Grevillea thelemanniana or Grevillea masonii for three great contrasting foliages.
The flowers are ideal fresh cut flowers in the home and last for weeks after picking. It is also ideal for dry flower arrangements and can be dyed if different colours are desired in the home.
Ozothamnus rufescens are best treated as a perennial with new seedlings planted below the parent plants every 5 or 6 years.
Propagation:
Seeds: Ozothamnus rufescens seeds directly into a seed raising mix. Cover them with 5mm of fine sand and keep moist not wet. Place the tray in a warm sunny position. When the seedlings are 25mm to 50mm tall, prick them out and plant them into 50mm native tubes using a good organic mix.
Once the seedlings reach 150mm to 200mm in height, nip the tips out before planting them out into their permanent position.
Cuttings: Fortunately Ozothamnus rufescens cuttings strike easy. Use 100mm to 200mm long tip cuttings or lateral shoots from the present season’s growth. Take them in warmer months of the year. Remove half the leaves from the bottom section being careful not to tear the bark.
1 Prepare the cutting mix by adding two thirds sharp clean river sand, one third peat or one third perlite. These ingredients must be sterilized,
2 Select good material from non diseased plants,
3 Select semi green stems for cuttings. Look for a stem with two or three nodes,
4 Place the cutting on a flat, hard surface, and make a clean cut down one side of the cutting at the base for 10mm with a sharp sterile knife or razor blade. – This scarification of the node will increase the chances of roots emerging from this spot. Now remove all but one or two the leaves, leaving the apex leaves in tact. If the leaves are very large in proportion to the stem, cut off the apical halves.
5 Fill a saucer with water, and place a little medium strength rooting hormone into another container like a milk bottle top. Dip the node end of the cutting into the water and then into the rooting hormone. Tap off any excess hormone,
6 Use a small dipple stick or old pencil to poke a hole into the soilless potting mix. Ensure the hole is slightly larger than the stem diameter and be careful not to wipe the rooting hormone off the cuttings base. Place 2 to 4 cuttings in each of the 50mm native tubes,
7 I like to place the tubes in bucket with holes drilled in the bottom to allow excess water to drain out. A plastic bag that fits over the bucket is ideal to help maintain temperature and moisture. Place in a semi shaded, warm position like under 50mm shade cloth.
8 When the cuttings have struck, open the bag to allow air circulation for a few days to a week,
9 Once hardened off remove the cuttings from the bag and allow to further hardening for a few more days to a week,
10 Transplant into a good potting mix to grow on.
Fertilize using seaweed, fish emulsion or organic chicken pellets soaked in water on an alternate basis. Fertilize every two months until the plants are established then twice annually in early September or March to maintain health, vitality and better flowering.
Further Comments from Readers:
Hi reader, it seems you use The Bible of Botany a lot. That’s great as we have great pleasure in bringing it to you! It’s a little awkward for us to ask, but our first aim is to purchase land approximately 1,600 hectares to link several parcels of N.P. into one at The Pinnacles NSW Australia, but we need your help. We’re not salespeople. We’re amateur botanists who have dedicated over 30 years to saving the environment in a practical way. We depend on donations to reach our goal. If you donate just $5, the price of your coffee this Sunday, We can help to keep the planet alive in a real way and continue to bring you regular updates and features on Australian plants all in one Botanical Bible. Any support is greatly appreciated. Thank you.
In the spirit of reconciliation we acknowledge the Bundjalung, Gumbaynggirr and Yaegl and all aboriginal nations throughout Australia and their connections to land, sea and community. We pay our respect to their Elders past, present and future for the pleasures we have gained.
Ozothamnus thyrsoideus
Classification
Unranked: Eudicots
Class: Asterids
Order: Asterales
Family: Asteracea
Tribe: Gnaphalieae
Genus: From Ozein, which is Ancient Greek for to have a smell and Thamnos, which is Ancient Greek for a shrub. It refers to shrubs, which emit a strong pleasant or unpleasant smell.
Species: From Thyrsus, which is Latin for a compact pyramidal cyme and Eîdos/Oides, which is Ancient Greek for alike or similar to. It refers to plants which have flower spikes that resemble a typical thyrse.
Common Name: Brown Dogwood.
Distribution:
Ozothamnus thyrsoideus is found from the Brindabella Range north of the ACT to east Gippsland and west to the western suburbs of Melbourne.
It covers most of the island of Tasmania except for the north-west and south-west portions of the state.
https://avh.ala.org.au/occurrences/search?taxa=Ozothamnus+thyrsoideus#tab_mapView
Habitat Aspect Climate:
Ozothamnus thyrsoideus prefers full sun to dappled shade. It grows in schlerophyll forests or better quality sub alpine forests. The altitude ranges from 41 meters ASL to 1500 meters ASL.
The temperatures range from minus 6 degrees in August to 30 degrees in February.
The rainfalls range from lows of 800mm to an average 3000mm annually.
Soil Requirements:
Ozothamnus thyrsoideus prefers course sands, sandy loams to light fatty clays. The soils are usually derived from partially decomposed granites or decomposed granites. The soils ph ranges from 5pH to 6.5pH. It does not tolerate waterlogged soils. Non saline soils to moderately saline soils are tolerated.
Height & Spread:
Wild Plants: 1m to 3m by 1m to 2m.
Characteristics:
Ozothamnus thyrsoideus grows as an open to dense medium shrub with is grey-green to olive green, glabrous and slightly furrowed on older plants. Young branchlets are olive green and densely covered in white to grey glandular hairs and tomentum scales and hairs.
Ozothamnus thyrsoideus’s alternate simple leaves are linear to narrow oblong and measure 15mm to 30mm in length by 1.5mm to 2.2mm in width or rarely to 45mm in length by 4mm in width. The base is sessile while the apex is acute. The discolourous laminas are deep sea-green and viscid on the upper lamina while the lower lamina pale lemon green and densely covered in yellow tomentum scales and hairs. The mid vein is slightly prominent on the lower lamina and is not visible on the upper lamina. The margins are recurved.
The inflorescences of Ozothamnus thyrsoideus are short dense corymbs born from the terminals or special side shoots. It is mainly born on the upper side of lateral stems. The erect corymbs measure 25mm to 35mm in diameter. The individual white flowers measure 4mm to 5mm in length by 5mm to 6.5mm in diameter. The 4 to 8 involucral scarious bracts are broad with an obtuse apex. It is glossy and golden brown or tinged pale pink. There are 15 to 18 disc florets. The flowers appear from mid-November to late early March.
Ozothamnus thyrsoideus’s fruits are flat, linear glabrous achene. The achene’s pappus has short clavate bristles.
Wildlife:
The flowers are a great attraction for small and medium, butterflies, beetles and native flies.
Cultivation:
Ozothamnus thyrsoideus is a beautiful dense foliaged dome shaped small shrub with lovely white flowers and red to pink bracteoles for small to large gardens. It is suitable for growing in cold sub alpine to cool temperate areas. As agarden subject it will grow from 1.5 meters to 2.5 meters in height by 1.5 meter to 2 meters in diameter when cultivated in the open. It is fast growing, drought and cold tolerant down to at least minus 10 degrees and can stand very severe frosts.
It is open foliaged plants best suited for a bush garden setting and will stand out because of its proliferation of white or pink flowers when planted amongst other plants. To highlight the colour, select larger leaf plants with pale green leaves. It can be used in more formal or English style gardens because it has a naturally neat rounded appearance that needs very little attention. If used in rockeries which have been planted out to highlight other features like rocks, stumps or fish ponds they should be planted to the rear so as to balance the look because of their size. It can be tip pruned to keep them shorter. It is non-obtrusive easy to maintain yet highly visible when in flower or out of flower.
Ozothamnus thyrsoideus would make outstanding contribution to a moist heath garden. Here It can be used as the taller growing plant scattered throughout the heath scene. When you design a flat heath garden which Ozothamnus thyrsoideus is well suited don’t use contours to display the plants as heath lands are almost always flat or have a slight rise. It should be planted close together and be short so you can see over the tallest ones with the exception of one or two plants at the most. These will be feature plants. The idea is to achieve a feeling of expansive flatness. This can be achieved with using the Ozothamnus thyrsoideus’s green linear leaves and having them contrasting with finer pale green or soft grey to glaucous coloured foliage. Use a lot of procumbent plants like Carpobrotus edulis or Dampiera purpurea Mix it with other smaller shrubs so none of them dominate the scene but blend in to give a mosaic of foliage colours that you oversee. Actinotis helianthi, Grevillea nana, Grevillea thelemanniana or Grevillea masonii for three great contrasting foliages.
The flowers are ideal fresh cut flowers in the home where a horizontal display is required. They will last for weeks after picking. It is also ideal for dry flower arrangements and can be dyed if different colours are desired in the home.
Ozothamnus thyrsoideus is best treated as a perennial and replace the old plants by planting new seedlings under the parent plants every 3 years to maintain vigour and good flowering.
Propagation:
Seeds: Ozothamnus thyrsoideus seeds directly into a seed raising mix. Cover them with 5mm of fine sand and keep moist not wet. Place the tray in a warm sunny position. When the seedlings are 25 to 50 mm tall, prick them out and plant them into 50mm native tubes using a good organic mix.
Once the seedlings reach 150 to 200mm in height, nip the tips out before planting them out into their permanent position.
Cuttings: Fortunately Ozothamnus thyroideus cuttings strike easy. Use 100mm to 200mm long tip cuttings or lateral shoots from the present season’s growth. Take them in warmer months of the year. Remove half the leaves from the bottom section being careful not to tear the bark.
1 Prepare the cutting mix by adding two thirds sharp clean river sand, one third peat or one third perlite. These ingredients must be sterilized,
2 Select good material from non diseased plants,
3 Select semi green stems for cuttings. Look for a stem with two or three nodes,
4 Place the cutting on a flat, hard surface, and make a clean cut down one side of the cutting at the base for 10mm with a sharp sterile knife or razor blade. – This scarification of the node will increase the chances of roots emerging from this spot. Now remove all but one or two the leaves, leaving the apex leaves in tact. If the leaves are very large in proportion to the stem, cut off the apical halves.
5 Fill a saucer with water, and place a little medium strength rooting hormone into another container like a milk bottle top. Dip the node end of the cutting into the water and then into the rooting hormone. Tap off any excess hormone,
6 Use a small dipple stick or old pencil to poke a hole into the soilless potting mix. Ensure the hole is slightly larger than the stem diameter and be careful not to wipe the rooting hormone off the cuttings base. Place 2 to 4 cuttings in each of the 50mm native tubes,
7 I like to place the tubes in bucket with holes drilled in the bottom to allow excess water to drain out. A plastic bag that fits over the bucket is ideal to help maintain temperature and moisture. Place in a semi shaded, warm position like under 50mm shade cloth.
8 When the cuttings have struck, open the bag to allow air circulation for a few days to a week,
9 Once hardened off remove the cuttings from the bag and allow to further hardening for a few more days to a week,
10 Transplant into a good potting mix to grow on.
Fertilize using seaweed, fish emulsion or organic chicken pellets soaked in water on an alternate basis. Fertilize every two months until the plants are established then twice annually in early September or March to maintain health, vitality and better flowering.
Further Comments from Readers:
Hi reader, it seems you use The Bible of Botany a lot. That’s great as we have great pleasure in bringing it to you! It’s a little awkward for us to ask, but our first aim is to purchase land approximately 1,600 hectares to link several parcels of N.P. into one at The Pinnacles NSW Australia, but we need your help. We’re not salespeople. We’re amateur botanists who have dedicated over 30 years to saving the environment in a practical way. We depend on donations to reach our goal. If you donate just $5, the price of your coffee this Sunday, We can help to keep the planet alive in a real way and continue to bring you regular updates and features on Australian plants all in one Botanical Bible. Any support is greatly appreciated. Thank you.
In the spirit of reconciliation we acknowledge the Bundjalung, Gumbaynggirr and Yaegl and all aboriginal nations throughout Australia and their connections to land, sea and community. We pay our respect to their Elders past, present and future for the pleasures we have gained.
Ozothamnus whitei
Classification
Unranked: Eudicots
Class: Asterids
Order: Asterales
Family: Asteracea
Tribe: Gnaphalieae
Genus: From Ozein, which is Ancient Greek for to have a smell and Thamnos, which is Ancient Greek for a shrub. It refers to shrubs, which emit a strong pleasant or unpleasant smell.
Species: Is probably named in honour of Cyril Tennison White; 1890-1950, who was a Queensland botanist for 35 years.
Common Name: Brown Dogwood.
Distribution:
Ozothamnus whitei is found south from Binna Burra Lodge in south eastern Queensland to Nulla Range Road on the New England National Park to Port Macquarie with a small population further south at Black Swamp on the Barrington Tops.
https://avh.ala.org.au/occurrences/search?taxa=Ozothamnus+whitei#tab_mapView
Habitat Aspect Climate:
Ozothamnus whitei prefers full sun to dappled shade. It grows in sclerophyll forests and better quality sub alpine Eucalyptus woodlands on the New England. The altitude ranges from 350 meters ASL to 1511 meters ASL except for the record at Port Macquarie which was collected at 7 meters ASL
The temperatures range from minus 2 degrees in August to 36 degrees in February.
The rainfalls range from lows of 100mm to an average 2000mm annually with good orographic precipitation.
Soil Requirements:
Ozothamnus whitei prefers better quality loams to medium clays. The soils are usually derived from partially decomposed or decomposed black basalts or at times granites. The soils ph ranges from 5pH to 6pH. It does not tolerate waterlogged soils. Non saline soils to moderately saline soils are tolerated.
Height & Spread:
Wild Plants: 0.6m to 1m by 0.8m to 1.2m.
Characteristics:
Ozothamnus whitei grows as a small open to densely straggly shrub with numerous lateral branches and stems crossing over each other. The branches and stems are pastel greenish-grey to off white and densely covered in white matted tomentose hairs. The juvenile stems and new growth are similar to the branches and stems.
Ozothamnus whitei’s alternate, disjunct lanceolate leaves measure 30mm to 90mm in length by 5mm to 15mm in width. The petioles are pastel greenish-grey to off white and densely covered in white matted tomentose hairs and measure 4mm to 15mm in length. The bases are cuneate while the apexes are acute. The discolourous laminas are deep green, glabrous or viscid with glandular dots on the upper laminas while the lower laminas are densely covered in white matted tomentose hairs. The laminas are flat or recurve slightly upwards from the mid-vein to the margins and are usually straight or at times decurve downwards near the apex half while the margins are entire. The mid vein and 3 longitudinal veins are prominent on both laminas.
The inflorescences of Ozothamnus whitei are loose panicles of corymbs born from the terminals. The erect corymbs measure 30mm to 70mm in length by 40mm to 80mm in diameter. The individual campanulate heads measure 3mm to 4mm in length by 4mm to 5mm in diameter. The 10 to 12 involucral narrow triangular bracts have acute apexes and are densely covered in white matted tomentose hairs. The bracts are tightly appressed. There are 20 to 24 bisexual florets in a head. The individual florets are yellow and measure 3mm to 4mm in length by 2mm to 3mm in width. The flowers appear from mid-October to April or at times into May.
Ozothamnus whitei’s fruits are fusiform to linear achenes. The reddish-brown to brown achene’s white pappi are long, clavate and filiform at the apex of the achenes.
Wildlife:
Ozothamnus whitei’s flowers are a great attraction for small and medium, butterflies, beetles and native flies.
Cultivation:
Ozothamnus whitei is a beautiful dense foliaged dome shaped small shrub with lovely white flowers and red to pink bracteoles for small to large gardens. It is suitable for growing in cold sub alpine to cool temperate areas. As a garden subject it grows from 0.8 meters to 1 meter in height by 1 meter to 1.5 meters in diameter when cultivated in an open sunny position. It is fast growing, drought and cold tolerant down to at least minus 5 degrees and can stand quite severe frosts once established.
It is open foliaged plants best suited for a bush garden setting and will stand out because of the colour of its very unusual stems, proliferation of white and yellow flowers when planted amongst other plants. To highlight the colour, select large or small leaf plants with pale green to deep green leaves. It can be used in formal alpine scenarios to great effect because it has a naturally dense scrambled look that needs very little attention. If it is used in rockeries which have been planted out to highlight other features like rocks, boulders, stumps or fish ponds it should be planted sparingly so that a balanced look is achieved. It can be tip pruned to keep them shorter. It is non-obtrusive easy to maintain yet still highly visible.
Ozothamnus whitei would make outstanding contribution to a moist alpine heath garden. It can be used as the taller growing plant scattered throughout the heath scene or in a taller heath as that beautiful textured plant against smooth features. When you design a flat heath garden which Ozothamnus whitei is well suited don’t use contours to display the plants as heath lands are almost always flat or have a slight rise. Plants must be planted close together and be short so you can see over the tallest ones with the exception of one or two plants at the most. These will be feature plants. The idea is to achieve a feeling of expansive flatness. This can be achieved with using the Ozothamnus whitei’s white stems and having them contrasting with finer pale green or soft grey to glaucous coloured foliage. Use a lot of procumbent plants like Hibbertia specie, Leucopogon specie, Juncea specie, Goodenia rotundifolia or Pelargonium australe. Mix it with other smaller shrubs so none of them dominate the scene but blend in to give a mosaic of foliage colours that you oversee. Grevillea masonii or Grevillea thelemanniana are two great contrasting foliages.
The flowers are ideal fresh cut flowers in the home where a horizontal display is required. Cut flowers will last for weeks indoors. It is also ideal for dry flower arrangements and can be dyed if different colours are desired in the home.
Ozothamnus thyrsoideus is best treated as a perennial and replace the old plants by planting new seedlings under the parent plants every 3 years to maintain vigour and good flowering.
Propagation:
Seeds: Ozothamnus whitei seeds directly into a seed raising mix. Cover them with 5mm of fine sand and keep moist not wet. Place the tray in a warm sunny position. When the seedlings are 25mm to 50mm tall, prick them out and plant them into 50mm native tubes using a good organic mix.
Once the seedlings reach 150mm to 200mm in height, nip the tips out before planting them out into their permanent position.
Cuttings: Use 50mm to 80mm long half ripened material when growing from cuttings from the present season’s growth. Take them in mid-autumn or early spring. Remove half the leaves from the bottom section being careful not to tear the bark. Remove any flowers and buds. Take a 10mm slice off the bark from the bottom of the cutting on one side. Using an appropriate rooting hormone, dip the cutting in and place it in a moist sterile seed raising mix.
Place the trays under 30mm shade and keep the trays warm. Bottom heat is beneficial when striking the cuttings. Ideally temperatures should be maintained at between 22 to 24 degrees.
When the cuttings have obviously struck and have developed good roots treat them as for seedlings.
Fertilize using seaweed, fish emulsion or organic chicken pellets soaked in water on an alternate basis. Fertilize every two months until the plants are established then twice annually in early September or March to maintain better health, vitality and flowering.
Further Comments from Readers:
Hi reader, it seems you use The Bible of Botany a lot. That’s great as we have great pleasure in bringing it to you! It’s a little awkward for us to ask, but our first aim is to purchase land approximately 1,600 hectares to link several parcels of N.P. into one at The Pinnacles NSW Australia, but we need your help. We’re not salespeople. We’re amateur botanists who have dedicated over 30 years to saving the environment in a practical way. We depend on donations to reach our goal. If you donate just $5, the price of your coffee this Sunday, We can help to keep the planet alive in a real way and continue to bring you regular updates and features on Australian plants all in one Botanical Bible. Any support is greatly appreciated. Thank you.
In the spirit of reconciliation we acknowledge the Bundjalung, Gumbaynggirr and Yaegl and all aboriginal nations throughout Australia and their connections to land, sea and community. We pay our respect to their Elders past, present and future for the pleasures we have gained.
All information is included in good faith and has been thoroughly researched prior to printing. The website or the author does not warrant or guarantee the accuracy of any information on these pages, nor does the website or the author accept any responsibility for any loss arising from the use of the information found within. The views and opinions are strictly those of the author or those members who chose to actively participate in the contents herein.