Polyosma cunninghamii
Polyscias elegans
Polyscias murrayi
Polyscias sambucifolia
Polystichum australiensis
Polystichum fallax
Polystichum formosum
Polystichum proliferum
Pomaderris argyrophylla
Pomaderris aurea
Pomaderris brunnea
Pomaderris eriocephala
Pomaderris ferruginea
Pomaderris intermedia
Pomaderris lanigera
Pomaderris ligustrina
Pomaderris nitidula
Pomaderris phylicifolia
Pomaderris queenslandica
Pomaderris subcapitata
Pomax umbellata
Poranthera corymbosa
Poranthera ericifolia
Poranthera microphylla
Poranthera obovata
Portulaca oleracea
Potamogeton crispus
Potamogeton octandrus
Potamophila parviflora
Pomatogeton perfoliatus
Potamophila parviflora
Pothos longipes
Prasophyllum australe
Prasophyllum brevilabre
Prasophyllum elatum
Prasophyllum flavum
Prasophyllum patens
Premna lignum-vitae
Proiphys amboinensis
Proiphys cunninghamii
Prostanthera caerulea
Prostanthera incisa
Prostanthera lanceolata
Prostanthera lasianthos
Prostanthera nivea
Prostanthera ovalifolia
Prostanthera palustris
Prostanthera prunelloides
Prostanthera rhombea
Prostanthera rugosa
Prostanthera rotundifolia
Prostanthera scutellarioides
Prostanthera sejuncta
Prumnopitys ladei
Polyosma cunninghamii
Classification:
Class: Equisetopsida
Subclass: Magnoliidae
Superorder: Asteranae
Order: Escalloniales
Family: Escalloniaceae
Genus: From Polús, which is Ancient Greek for many and Osme, which is Ancient Greek for beautiful scent. It refers to flowers, which emit distinctly different beautiful scents.
Species: Is named in honour of Allan Cunningham; 1791-1839, who was an Australian explorer, botanist and collector of plants.
Common Name: Featherwood
Distribution:
Polyosma cunninghamii is found south from Kilkivin in south eastern Queensland to Musgrave Creek south of Ulladulla in south eastern New South Wales. It is mainly found on and east of the Great Dividing Range to the coast.
https://avh.ala.org.au/occurrences/search?taxa=Polyosma+cunninghamii#tab_mapView
Habitat Aspect Climate:
Polyosma cunninghamii prefers light dappled shade to full shade. It grows in and adjacent to cool subtropical rainforests, warm temperate rainforests or closed moist Eucalyptus forests. The altitude ranges from 30 meters to 1150 meters ASL.
The temperatures range from minus 2 degrees in August to 38 degrees in January.
The rainfalls range from lows of 800mm to an average of 2000mm.
Soil Requirements:
Polyosma cunninghamii prefers to grow on better quality light stony clays to medium clays often with copious quantities of leaf litter. The soils are usually derived from decomposed brown basalts, black basalts, metamorphic rocks or heavier fine sandstones. The soils pH ranges from 5pH to 6.5pH. It does not tolerate waterlogged soils. Non saline soils to moderately saline soils are tolerated.
Height & Spread:
Wild Plants: 10m to 16m by 7m to 4m.
Characteristics:
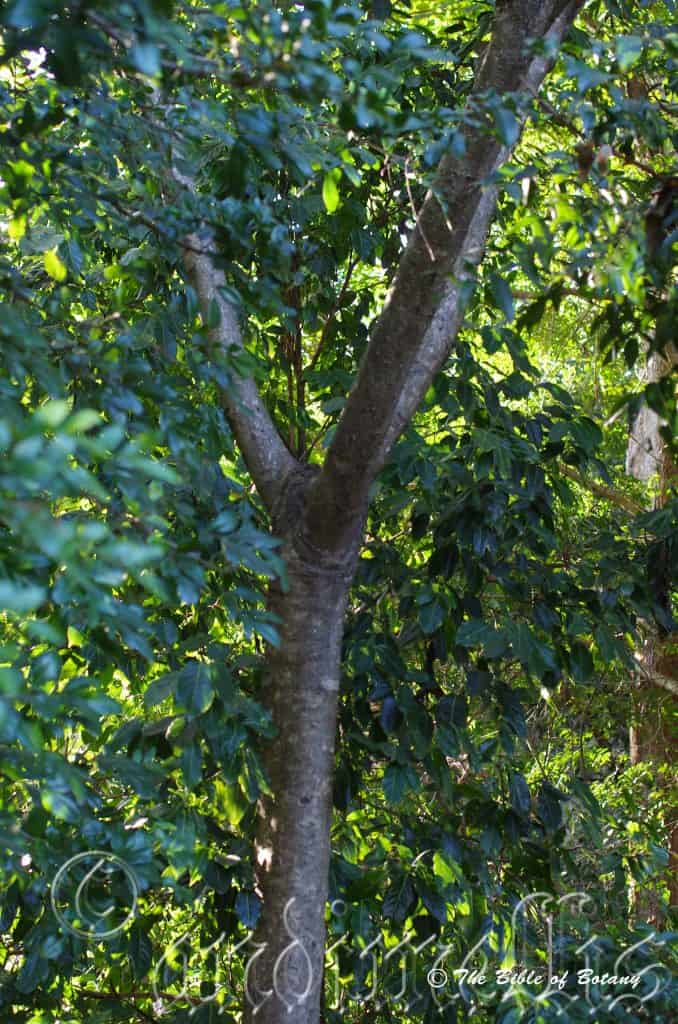
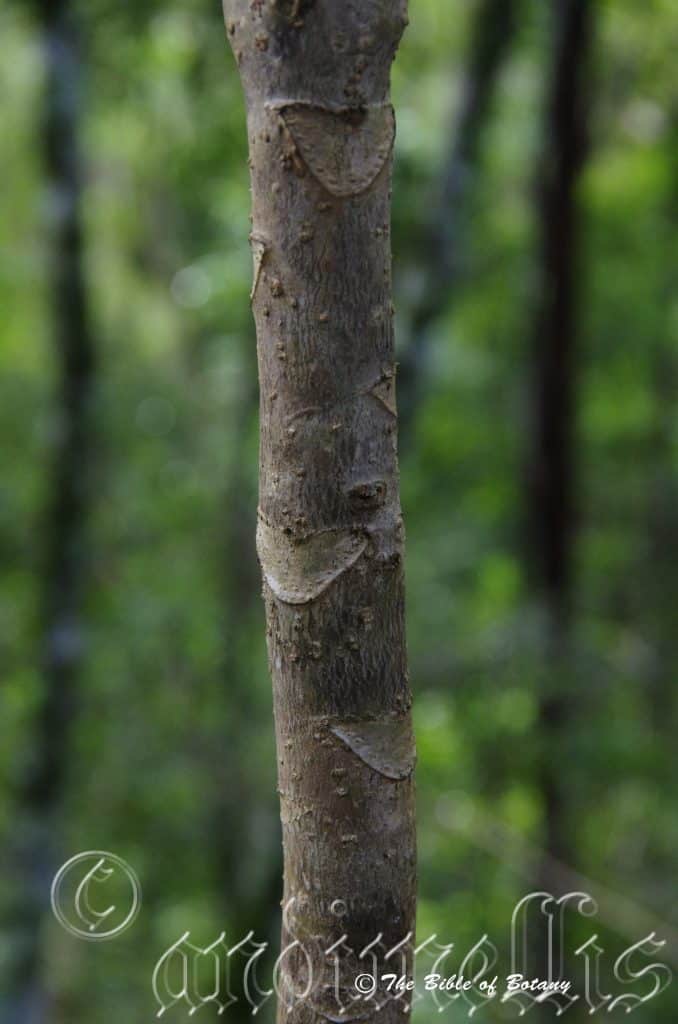
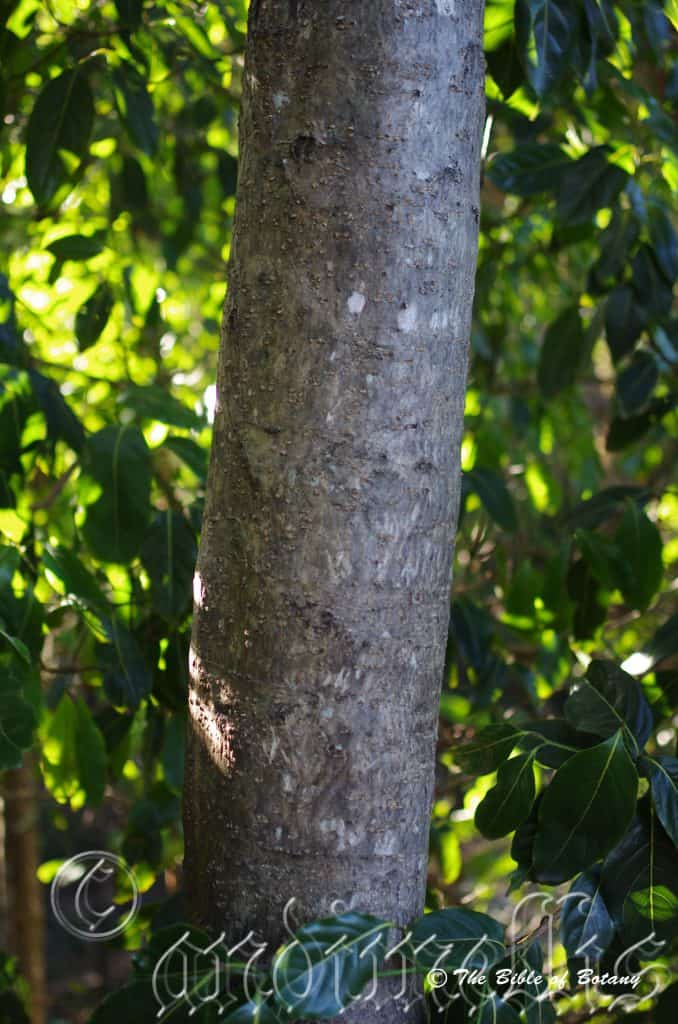
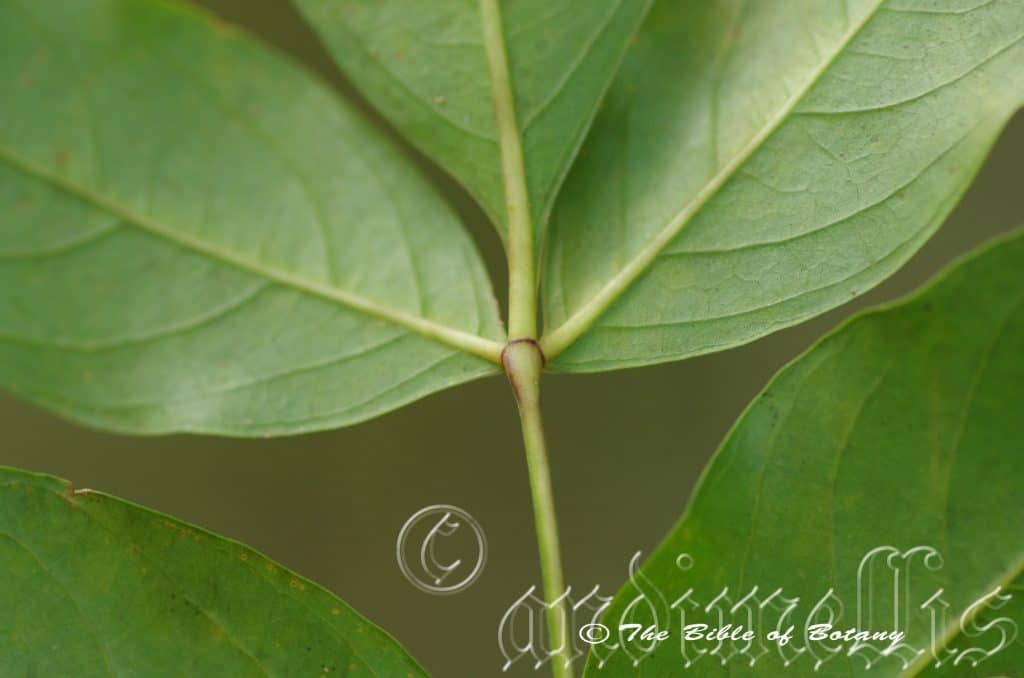
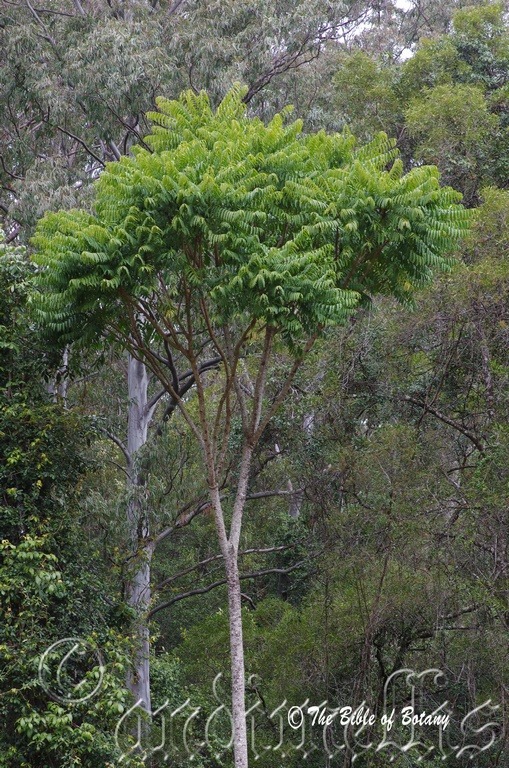
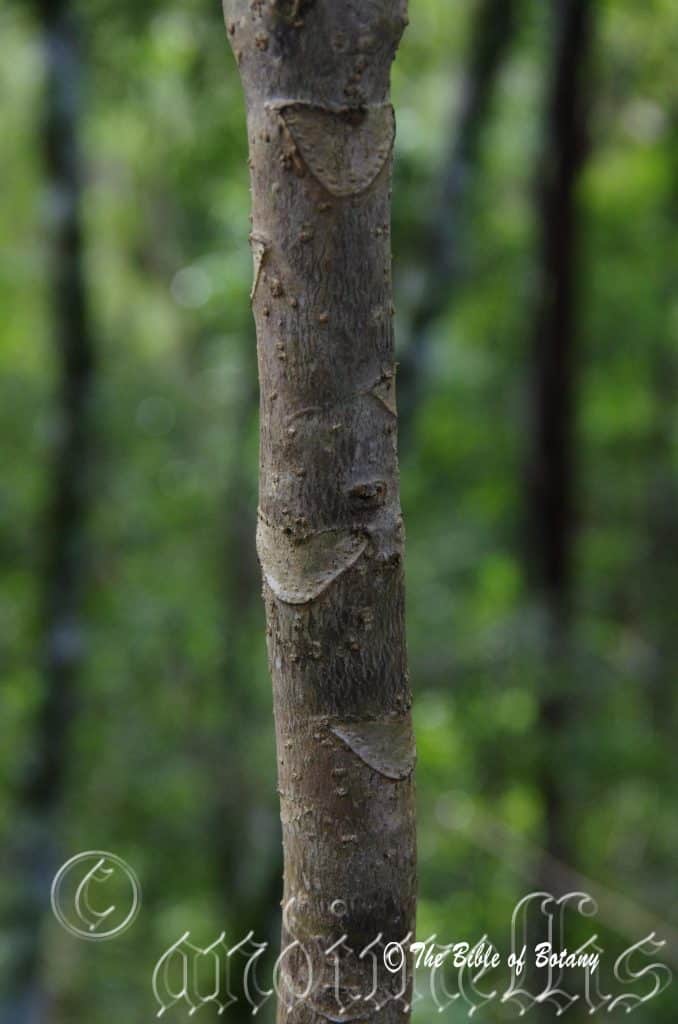
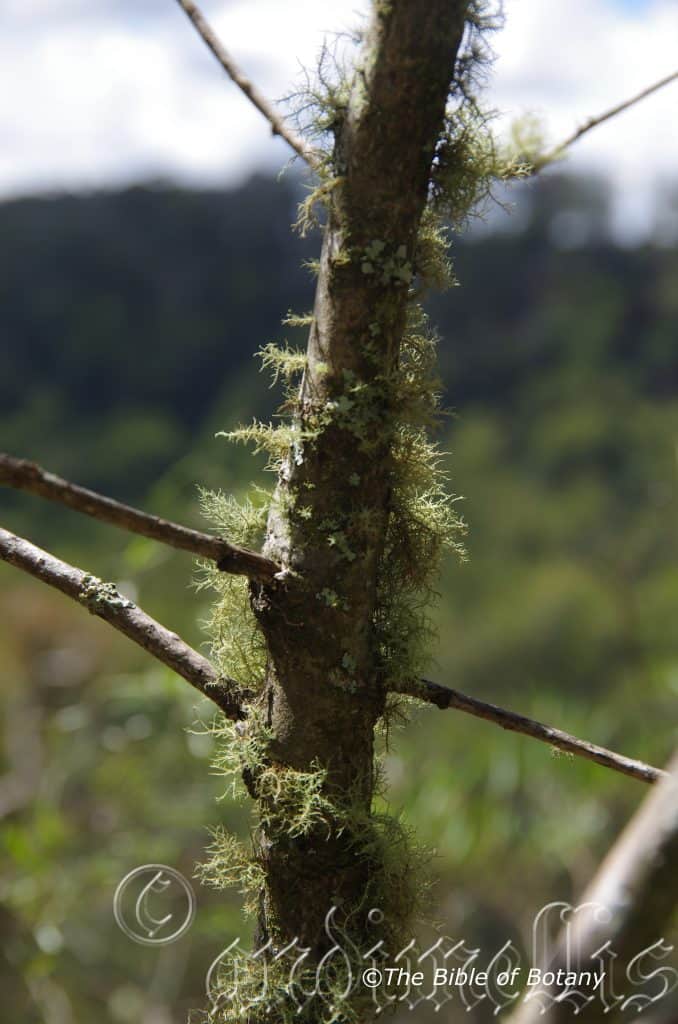
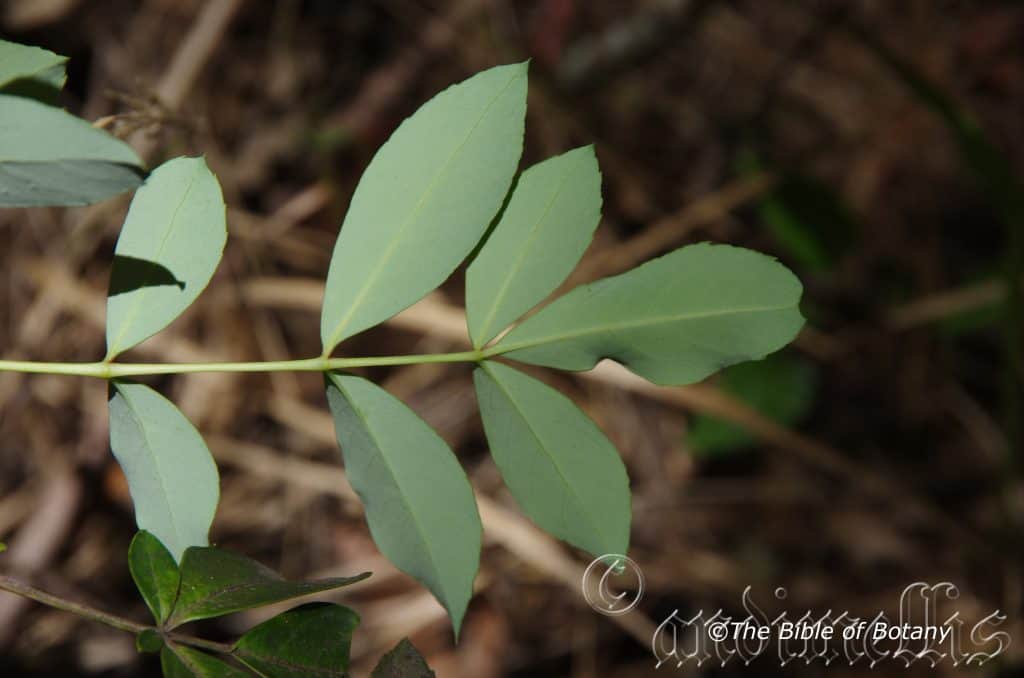
Polyosma cunninghamii grows as a large, bushy shrub or small tree. The trunk and larger branches are pale brown to mid brown, wrinkled with small vertical ridges. The younger stems are grass-green and are sparsely to densely covered in white, appressed, hirsute or sericeous hairs.
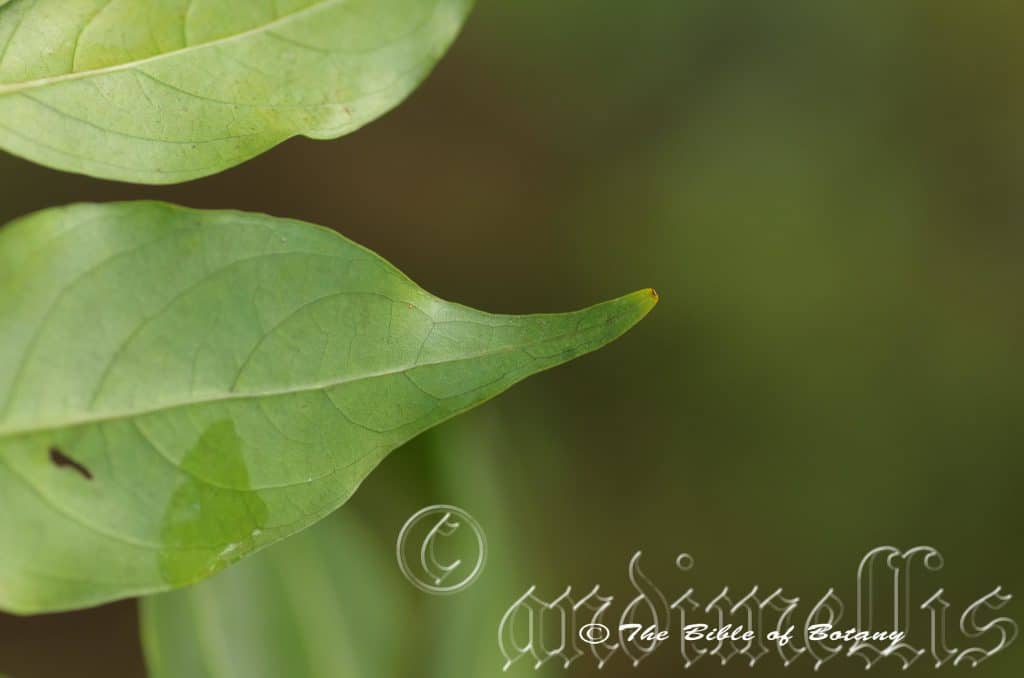
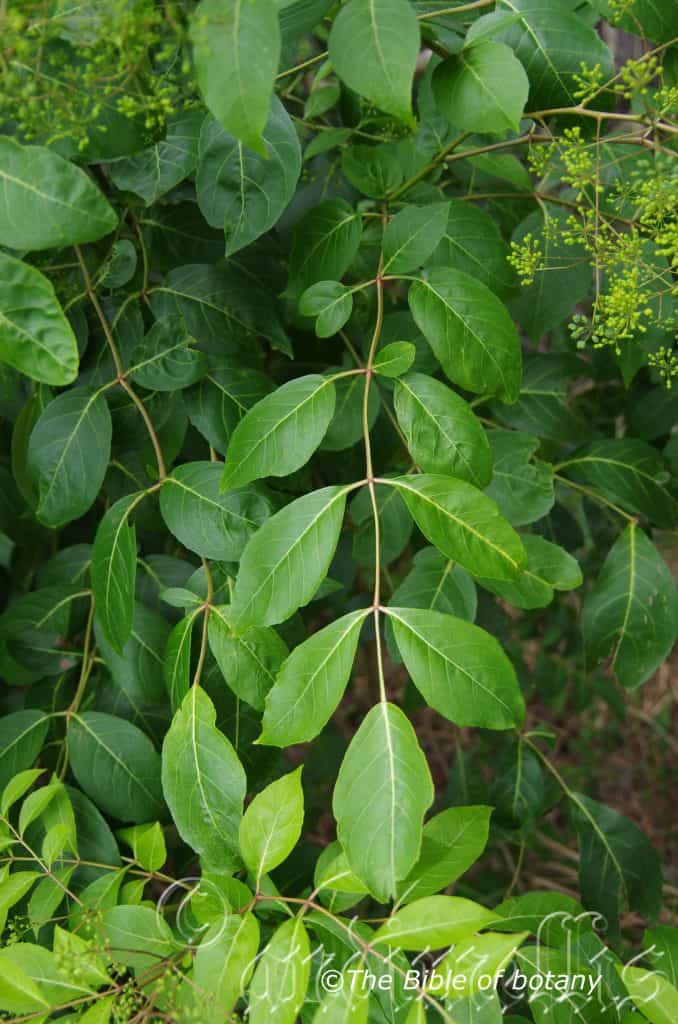
Polyosma cunninghamii’s opposite, oblanceolate to elliptic, leaves measure 30mm to 90mm in length by 10mm to 30mm in width. The petioles measure 6mm to 20mm in length. The bases are cuneate while the apexes are acuminate to acute. The discolourous laminas are pale grass-green to mid grass-green glabrous and glossy on the upper laminas while the lower laminas are paler and dull. The laminas are soft, chartaceous flat or recurve upwards from the mid vein to the margins and decurve downwards on the apical third. The margins are irregularly toothed with teeth ending in a callus point and undulate between the teeth. The mid vein and lateral veins are prominent on the lower lamina and are visible on the upper lamina. The reticulated venation is more distinct on lower surface but not necessarily prominent.
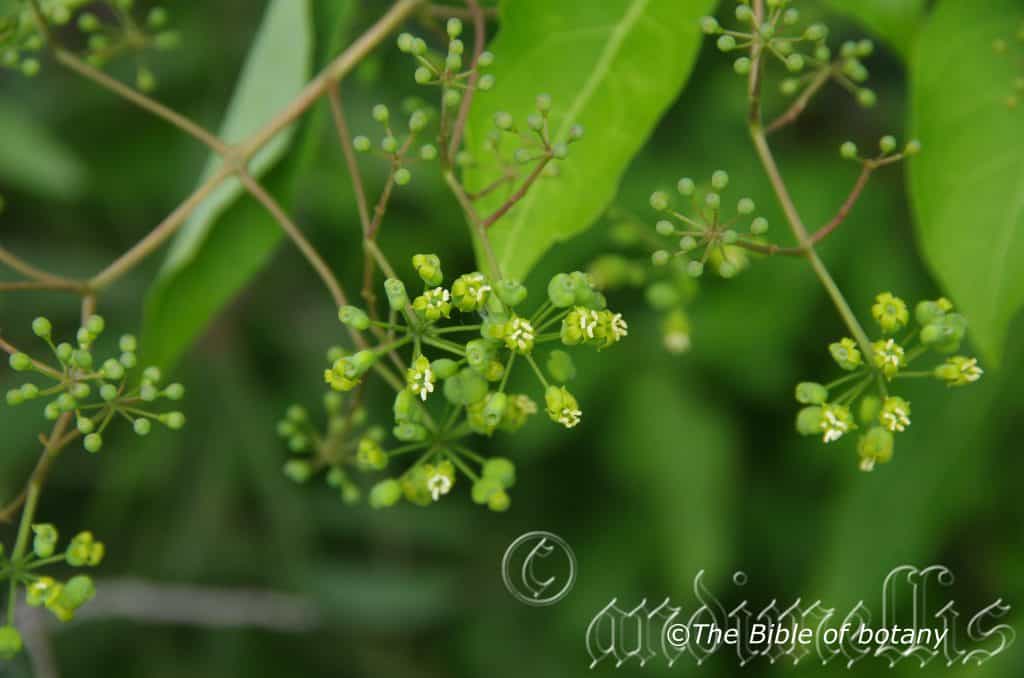
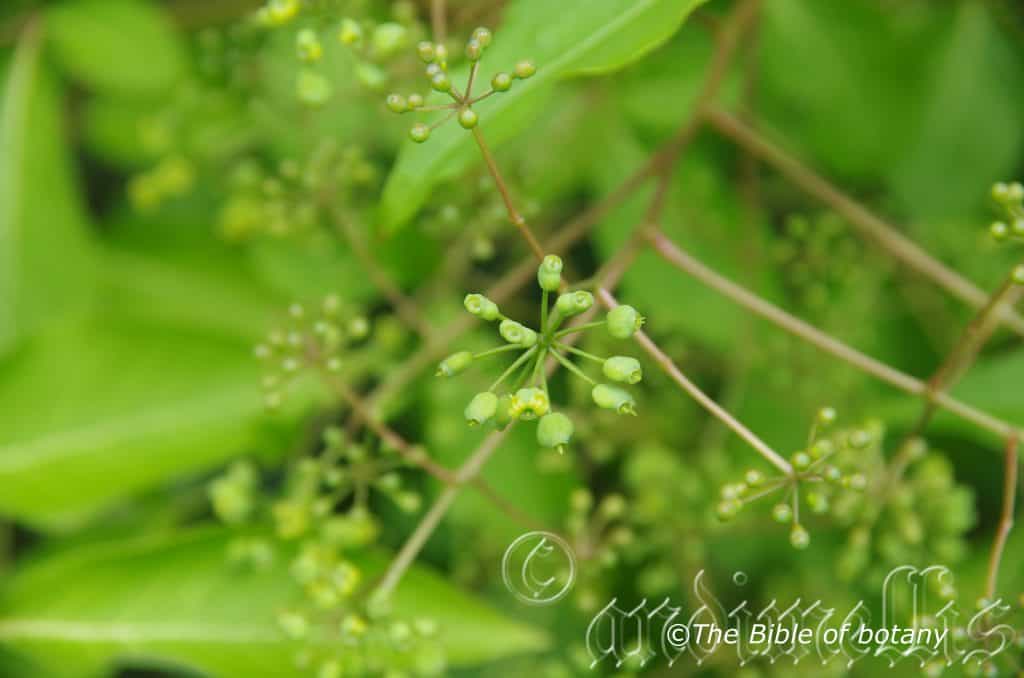
The inflorescences are racemes born from the leaf axils. The racemes measure 20mm to 70mm in length. The pedicels are glabrous to sparsely covered in white sericeous hairs and measure 5mm to 6mm in length. There are 2 small bracteoles below each flower. The calyxes are grass-green and measure 1mm to 2mm in length including the minute lobes. The greenish, greenish-yellow or at times white tubular corollas measure 8mm to 10mm in length by 2mm to 2.5mm in diameter. The 4 oblong lobes have acute apexes and are reflexed at the time of anthesis. The lobes measure 2mm to 2.5mm in length.
The stamens are inserted. The pale yellow exserted style measures 9mm to 12mm in length. The sweetly scented flowers appear from March to November.
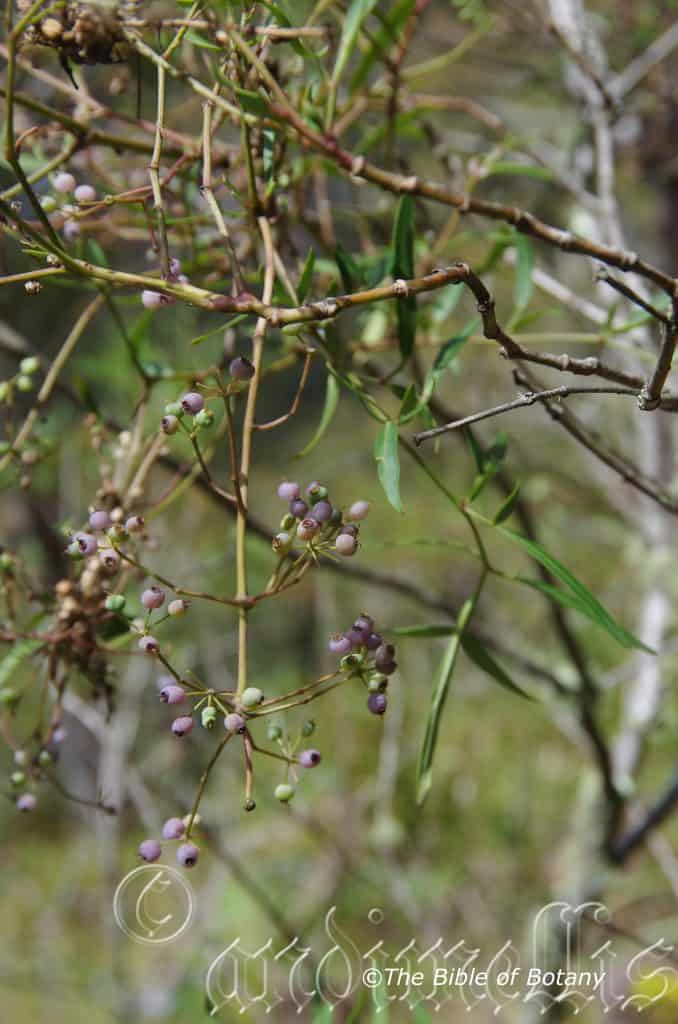
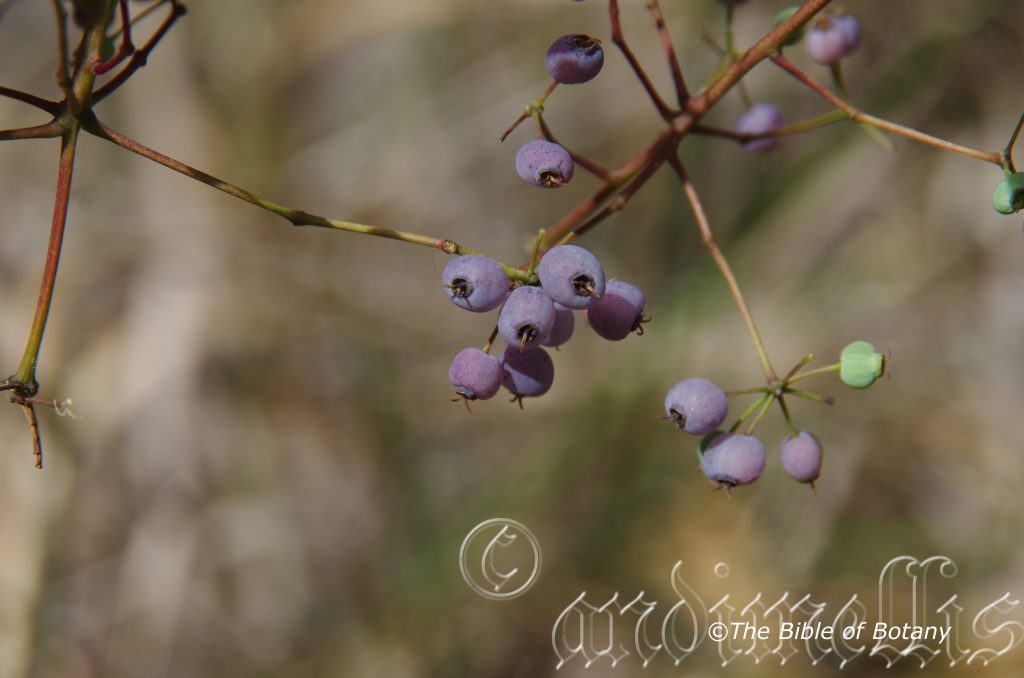
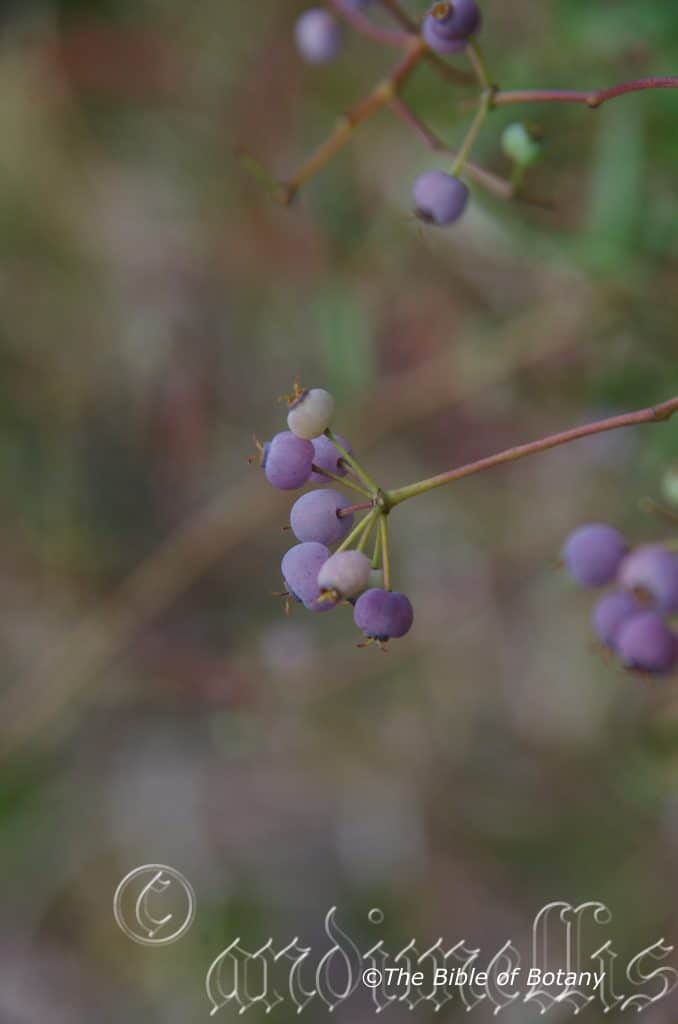
The fruits are ovoidal berries. The berries measure 12mm to 20mm in length by 7mm to 10mm in diameter. The faintly ribbed grass-green berries turn deep purple-black when ripe.
The fruits mature from March to August however some fruit may be found on the trees at most times of the year.
Wildlife:
Polyosma cunninghamii’s fruits eaten by various birds including the Green catbird, Ailuroedus crassirostris and the Rose Crown Fruit Dove, Ptilinopus regina.
Cultivation:
Polyosma cunninghamii is a beautiful specimen tree for small areas or for the suburban rainforest garden. It always looks fresh because of its bright green glossy foliage. It does best where a little water is added during the dry season or ground moisture is retained at an even content throughout the year. It is most suitable for small, medium and large gardens in the mountainous locations in warm frost free temperate or subtropical gardens. The perfume from the flowers lingers and is similar to the exotic Chinese Ozomanthus.
It is ideal in small open areas when used as an accent tree. Here it can be planted in small groups of 2 or 3 or as a standalone tree.
The tree would make an excellent accent tree in front of low set homes, commercial buildings, industrial sheds or school classrooms where it will break up hard rigid architectural lines and give warmth and breadth to a building. Its only drawback is that it is moderately slow in growth.
The tree is useful for the attachment of epiphytic orchids and ferns. It can be used as a patio tree in large urns or indoors in well-lit areas of the home away from central heating.
Propagation:
Seeds:
Polyosma cunninghamii seeds can be sown directly into a deep seed raising mix. Place seeds onto the mix and press into the surface. Place the trays beneath 20mm shade cloth and keep moist not wet. When the seedlings are 20mm to 25mm tall, prick them out and plant them into 50mm native tubes using a good organic mix.
As the seedlings roots reach the bottom of the tubes nip the tips out and plant them out into their permanent position. Keep seedlings moist and allow them to dry out between watering until established.
Fertilize using Seaweed, fish emulsion or organic chicken pellets soaked in water and apply the liquid on an alternate basis. Fertilize every 2 months until the plants commence flowering to maintain health, vigour and better flowering.
Fertilize using seaweed, fish emulsion or organic chicken pellets soaked in water on an alternate basis. Fertilize every two months until the plants are established then annually in early September to October to maintain better colour, health, vitality and flowering
Further Comments from Readers:
“Hi reader, it seems you use The Bible of Botany a lot. That’s great as we have great pleasure in bringing it to you! It’s a little awkward for us to ask, but our first aim is to purchase land approximately 1,600 hectares to link several parcels of N.P. into one at The Pinnacles NSW Australia, but we need your help. We’re not salespeople. We’re amateur botanists who have dedicated over 30 years to saving the environment in a practical way. We depend on donations to reach our goal. If you donate just $5, the price of your coffee this Sunday, We can help to keep the planet alive in a real way and continue to bring you regular updates and features on Australian plants all in one Botanical Bible. Any support is greatly appreciated. Thank you.”
In the spirit of reconciliation we acknowledge the Bundjalung, Gumbaynggirr and Yaegl and all aboriginal nations throughout Australia and their connections to land, sea and community. We pay our respect to their Elders past, present and future for the pleasures we have gained.
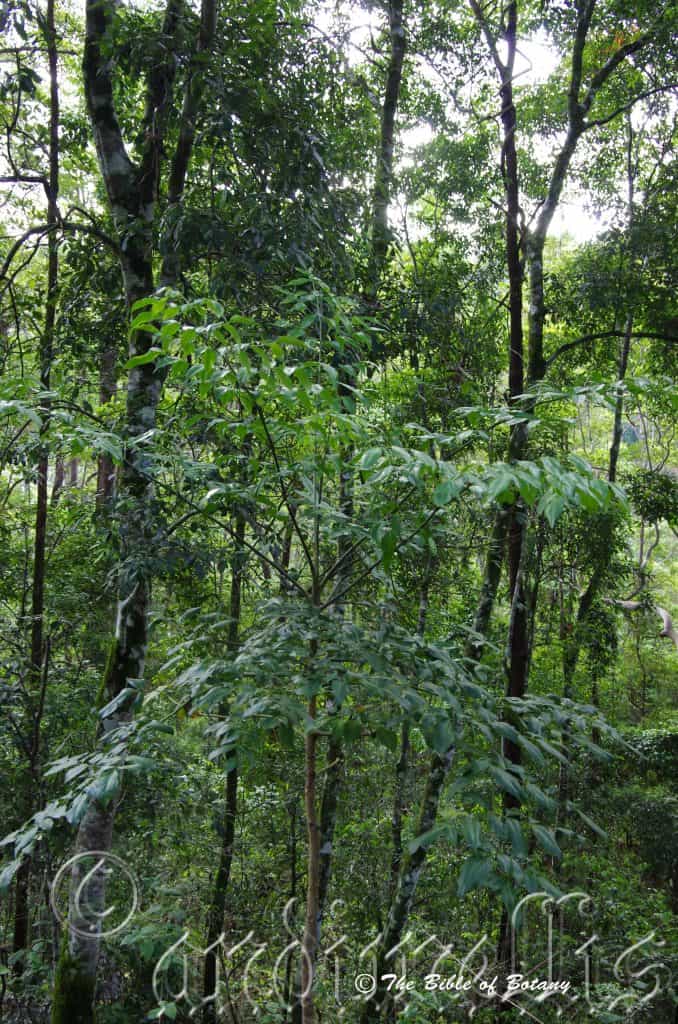
Border Ranges National Park NSW
Mount Cootha Botanical Gardens Qld.
Mount Cootha Botanical Gardens Qld.
Border Ranges National Park NSW
Mount Cootha Botanical Gardens Qld.
Washpool National Park NSW
Border Ranges National Park NSW
Washpool National Park NSW
Border Ranges National Park NSW
Border Ranges National Park NSW
Polyscias elegans
Classification:
Unranked: Eudicots
Unranked: Asterids
Order: Apiales
Family: Araliaceae
Genus: From Polús, which is Ancient Greek for many and Scias, which is Ancient Greek for shade or an umbrella. It refers to the flowers, which form in many umbels.
Species: From ēlegāns, which is Latin for fine, elegant, handsome and tasteful. It refers to the overall appearance of plants, which are neat and good looking.
Common Name: Celerywood or Silver Basswood or Black Pencil Cedar.
Distribution:
Polyscias elegans is found south from Cape York Peninsular in far North Queensland to Morton National Park in southern coastal New South Wales It is found on the Western Slopes on and east of the Great Dividing Range.
https://avh.ala.org.au/occurrences/search?taxa=Polyscias+elegans#tab_mapView
Habitat Aspect Climate:
Polyscias elegans prefers dappled shade to full sun. It grows in openings and adjacent to warm well developed dry rainforests, littoral rainforests, drier gallery forests and sheltered seasonal monsoonal forests. The altitude ranges from 50 meters ASL to 1000 meters ASL.
The temperatures range from minus 2 degrees in July to 36 degrees in January.
The rainfall ranges from lows of 600mm to 3200mm average per annum.
Soil Requirements:
Polyscias elegans prefers better quality light fatty clays to medium clays with a high proportion of gravel and forest litter. The soils are derived from decomposed black basalts, brown basalts, metamorphic rocks or at times granites or accumulated peaty beach sands. The soils pH ranges from 5pH to 6.5pH. It does not tolerate waterlogged soils. Non saline soils to moderately saline soils are tolerated.
Height & Spread:
Wild Plants: 20m to 30m by 10m to 18m
Characteristics:
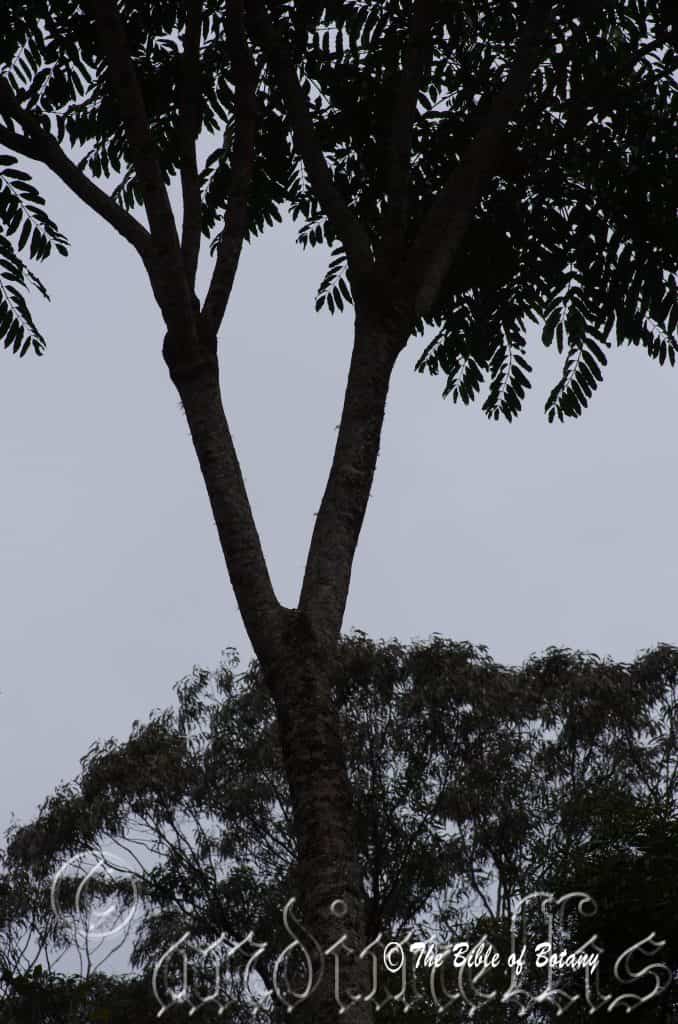
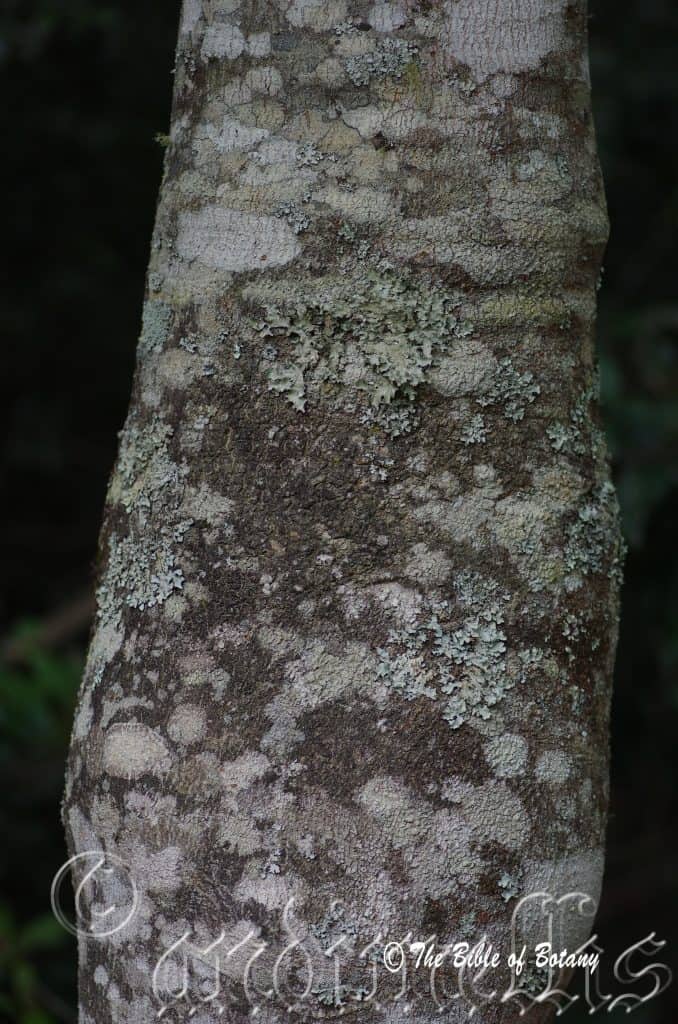
The trunk is tall, straight, pale grey, scabrous and usually covered in blue-green lichens and especially mosses in cooler moist terrains. The stems are thin pale grey becoming pale green-brown to pale grey-green only near the apex with newer leaf growth. The branchlets are covered in rhomboidal scars of discarded leaves.
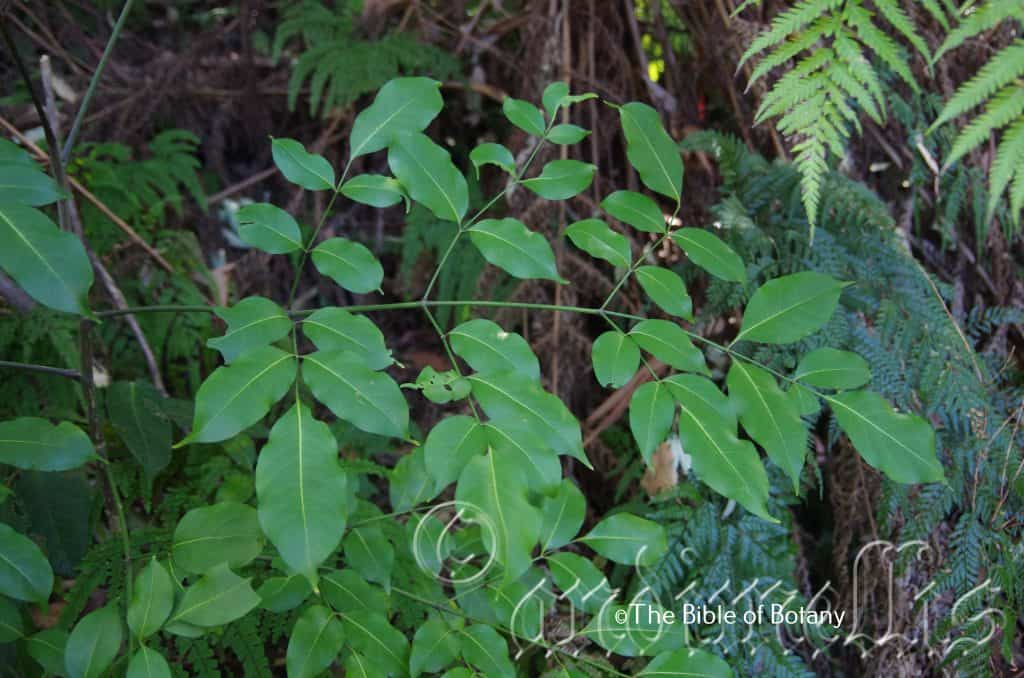
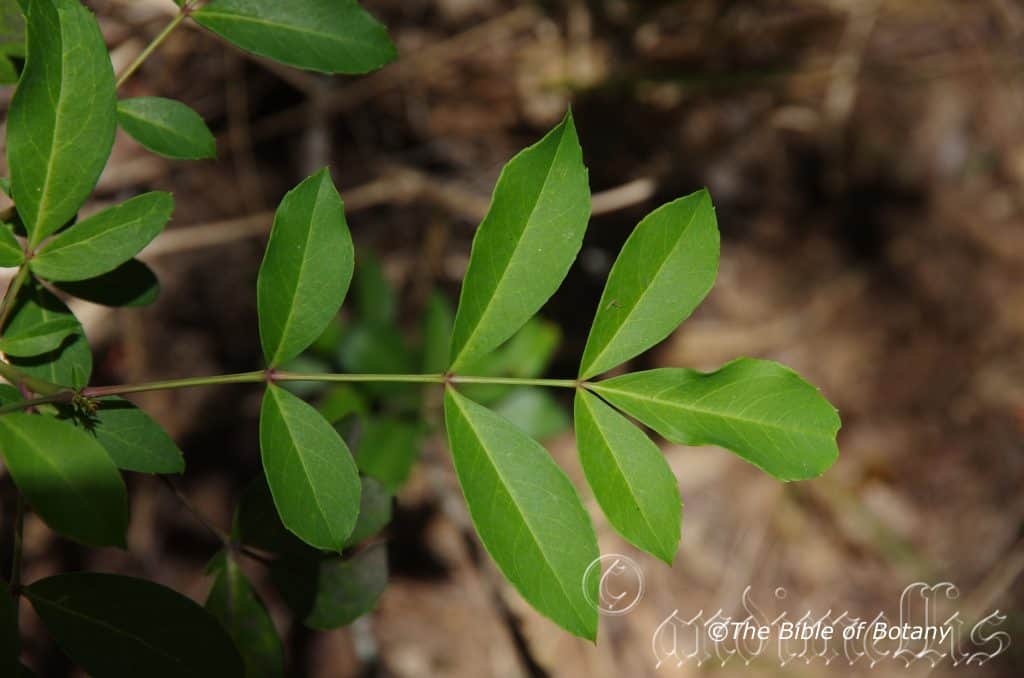
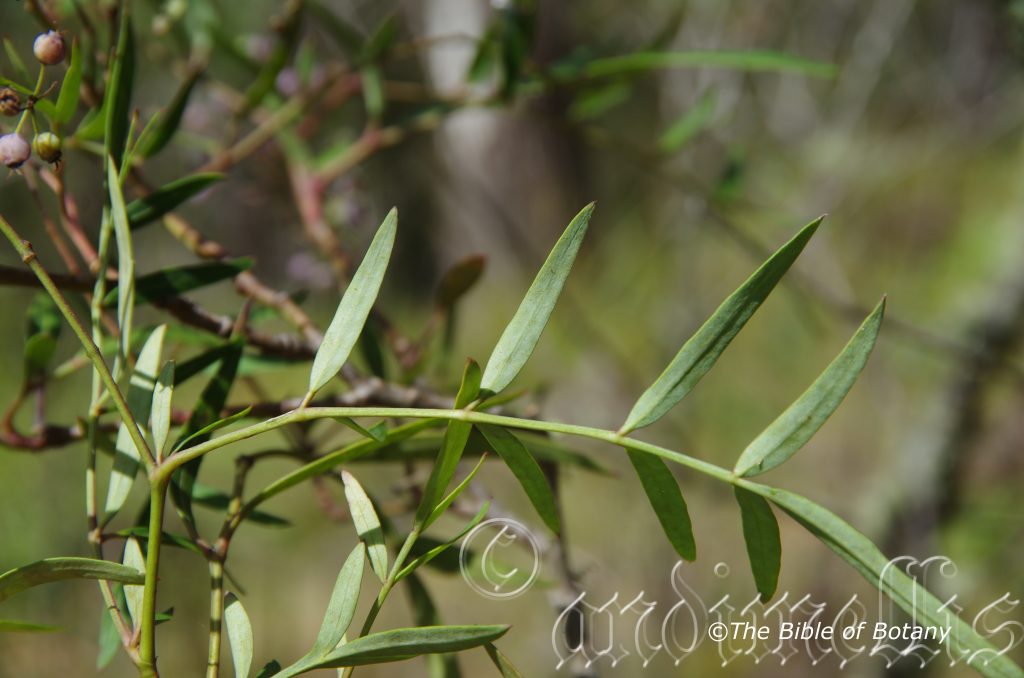
The clustered leaves of Polyscias elegans are bipinnate. The rachis, petiolules and petiole are all circular in cross section with the rachis being somewhat rhomboidal and spreading widely where it attaches to the branchlets. The rachis measures 800mm to 1000mm in length while the 5 to 7 pairs of opposite petiolules measure 75mm to 130mm in length. The odd pinnate leaflets are opposite on petiolules which measure 3mm to 5mm in length while the terminal petiolule measures 5mm to 12mm in length.
The 3 to 11 ovate to elliptical leaflets measure 60mm to 120mm in length by 30mm to 65mm in width. The bases are very broadly cuneate to rounded while the apexes are acuminate. The concolourous laminas are grass-green, semi glossy on the upper lamina while the lower lamina is dull. The new shoots are sparsely covered in pale brown to white branched hirsute hairs. The leaf margins are entire, flat and curve slightly upwards from the mid vein to the margins and downwards near the apex. The mid vein is prominent on the upper lamina. The leaves have a mild yet distinct celery odour when crushed.
Leaves on the flowering rachis are smaller with only 1 pinnate.
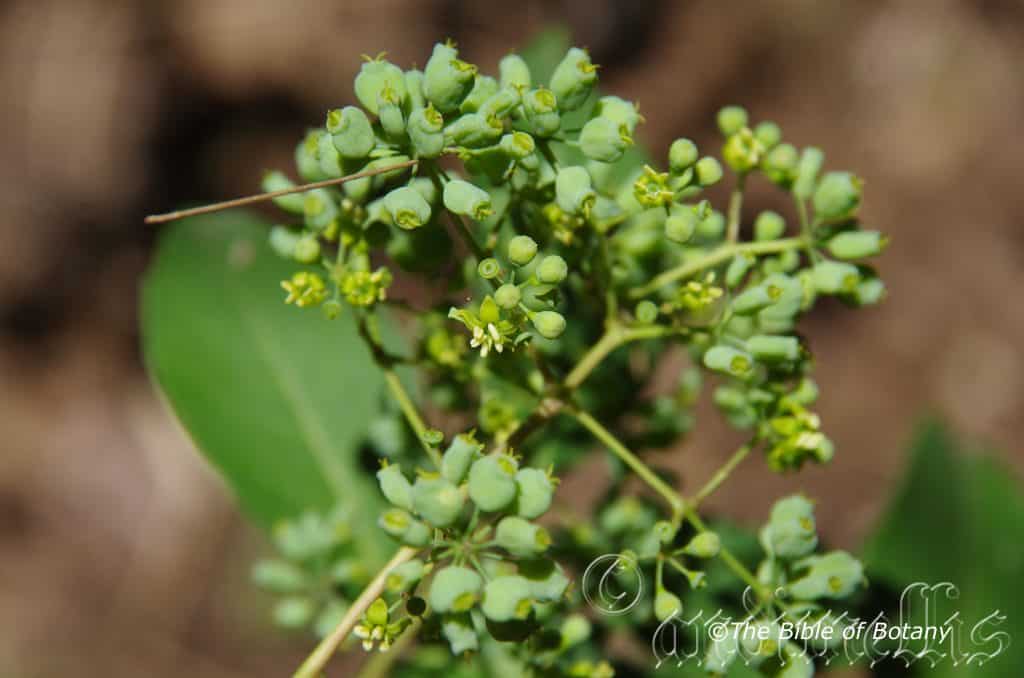
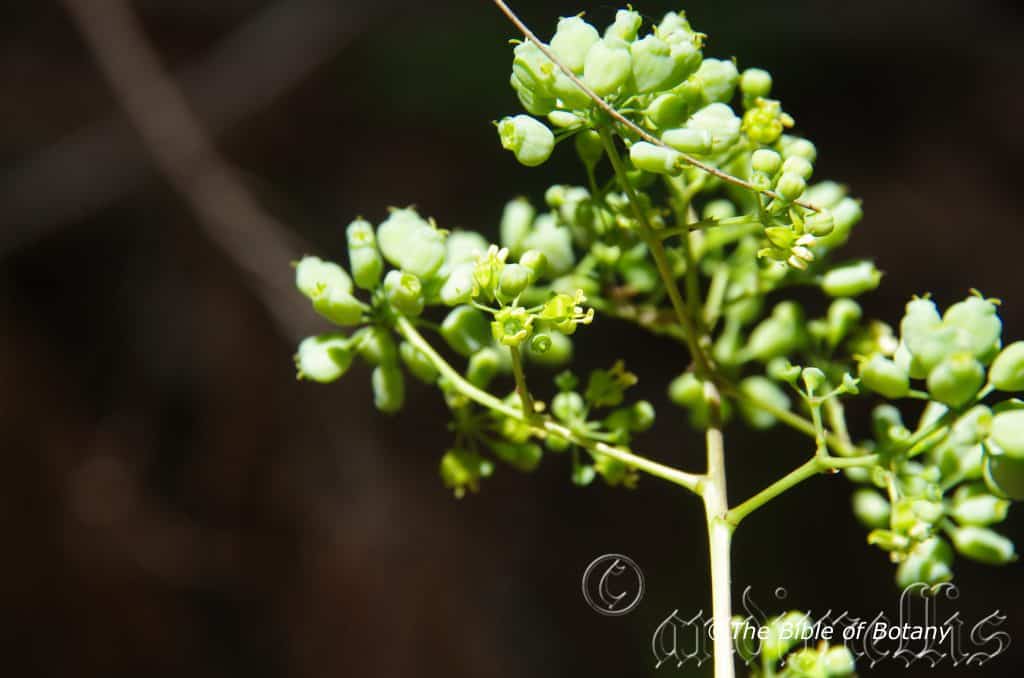
Inflorescences of Polyscias elegans are born in large, loose terminal panicle which branch 1 to 3 times. The solitary flowers are arranged race Mosely on the peduncules. The pedicels measure 1.5mm to 2.5mm and are densely covered in white scales. The urceolate calyx is deep purple- burgundy and covered in white scales. The calyxes have 5 to 7 faint longitudinal ribs. The 5 deep elliptical, deep purple-burgundy lobes measure 3mm to 3.5mm in length. The acute apexes of the lobes recurve like the bow of a boat.
The 5 exserted greenish burgundy thick filaments measure 2mm to 2.2mm in length while the pale green anthers measure 2mm to 2.2mm in length. The pollen is creamy yellow.
The deep purple-burgundy styles are glabrous and measure 0.4mm to 0.6mm in length while the stigma is free and diverge following anthesis. The ovaries are 2 locular. Polyscias elegans’s honey scented flowers appear from April to August.
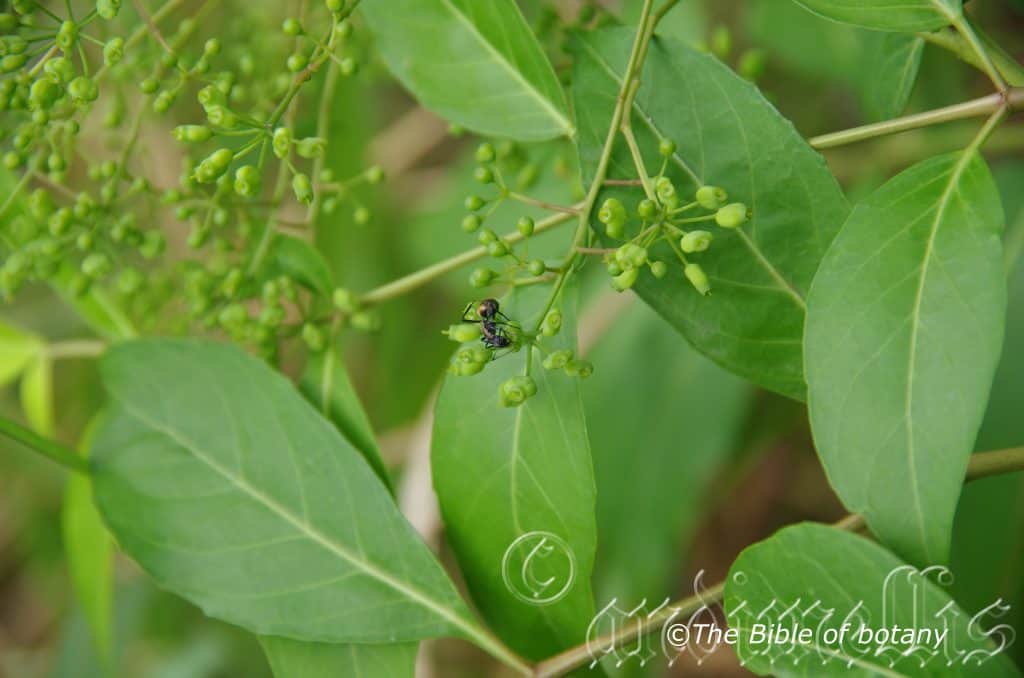
Polyscias elegans’s fruits are laterally compressed, globose berries while the rim of the calyxes remains circular. The berries are glabrous and covered in white scales. They measure 5mm to 6mm in length by 5mm to 6mm in width and 3mm to 3.5mm in thickness. The deep purple-burgundy berries turn deep purple-black and soften when ripe. The styles are persistent on the berries. The 2 laterally compressed, ellipsoidal seeds are glossy brown and woody. The seeds measure 1.4mm to 1.6mm in length by 1.4mm to 1.6mm in depth and 0.4mm to 0.6mm in thickness.
Wildlife:
Polyscias elegans does not appear to have any predators though the berries are often eaten by flying foxes, native rats and mice and most fruitigrove birds including the Satin Bower bird and regent bowerbird, Lewin’s, honeyeater, the yellow faced honeyeater and silver eyes throughout its range.
The fruits have a very strong, somewhat pungent taste reminiscent of nothing I have tasted before. The texture is that of a ripe plum.
Cultivation:
Polyscias elegans is a magnificent tall tree that should be more widely grown in tropical, subtropical and monsoonal gardens. Polyscias elegans grows as a spreading densely foliaged large tree. It is ideal at the edge of a rainforest or as the pioneer trees for a rainforest garden. It also makes a great park tree offering quick growth, and good shade. In cultivation it will grow from 15 meters to 18 meters in height by 8 meters to 10 meters in diameter when grown in the open or taller and narrower if grown closer together as a rainforest tree.
It grows well on lighter soils where deep leaf litter keeps the soil cool and moisture at an even level. If these requirements are met it can cope with temperatures as low as minus 3 degrees and up to 42 degrees once established. It is moderately drought resistant.
Add to the above, if It is given a little native fertilizer on a regular basis the plants will respond with good flowering and possibly good fruit set over a long period.
It often reaches its full potential in just 12 to 15 years and flower from the fourth or fifth year from seed.
Propagation:
Seeds: The seeds of Polyscias elegans can be removed easily from the fruits that have fallen to the ground. Polyscias elegans produce a large number of infertile seeds or seeds that germinate over a variable time. Sow large number of seeds and expect only a few to germinate.
Sow the fresh seeds directly into a seed raising mix, keeping them moist not wet. When the seedlings are 20mm to 25mm tall, prick them out and plant them into 50mm native tubes using a good organic mix.
As the seedlings roots reach the bottom of the tubes plant them out into their permanent position. Do not delay as Polyscias have a tendency to set back if root bound.
Fertilize using seaweed, fish emulsion or organic chicken pellets soaked in water on an alternate basis. Fertilize every two months until the plants are established then annually in early September to October to maintain better colour, health, vitality and flowering
Further Comments from Readers:
“Hi reader, it seems you use The Bible of Botany a lot. That’s great as we have great pleasure in bringing it to you! It’s a little awkward for us to ask, but our first aim is to purchase land approximately 1,600 hectares to link several parcels of N.P. into one at The Pinnacles NSW Australia, but we need your help. We’re not salespeople. We’re amateur botanists who have dedicated over 30 years to saving the environment in a practical way. We depend on donations to reach our goal. If you donate just $5, the price of your coffee this Sunday, We can help to keep the planet alive in a real way and continue to bring you regular updates and features on Australian plants all in one Botanical Bible. Any support is greatly appreciated. Thank you.”
In the spirit of reconciliation we acknowledge the Bundjalung, Gumbaynggirr and Yaegl and all aboriginal nations throughout Australia and their connections to land, sea and community. We pay our respect to their Elders past, present and future for the pleasures we have gained.
Nana Glen-Ulong Road NSW
Nana Glen-Ulong Road NSW
Nana Glen-Ulong Road NSW
Nana Glen-Ulong Road NSW
Polyscias murrayi
Classification:
Unranked: Eudicots
Unranked: Asterids
Order: Apiales
Family: Araliaceae
Genus: From Polús, which is Ancient Greek for many and Scias, which is Ancient Greek for shade or an umbrella. It refers to the flowers, which form in many umbels.
Species: Is named in honour of Murray but which Murray cannot be substantiated.
Common Name: Pencil Cedar or White Basswood or Umbrella Tree.
Distribution:
Polyscias murray iis found in several disjunct populations south from Ingham and Mareeba in far north east Queensland to the Eungella National Park and south from the Macpherson Ranges in south eastern Queensland to Malacoota in north eastern Victoria.
https://avh.ala.org.au/occurrences/search?taxa=Polyscias+murrayi#tab_mapView
Habitat Aspect Climate:
Polyscias murrayi prefers dappled shade to full sun. It grows in openings on steeper slopes in well-developed dry rainforests and moist Eucalyptus forests on drier slopes. The altitude ranges from 20 meters ASL to 1150 meters ASL.
The temperatures range from minus 3 degrees in July to 36 degrees in January.
The rainfall ranges from lows of 600mm to 3200mm average per annum.
Soil Requirements:
Polyscias murrayi prefers better quality, well drained sandy loams to medium clays with a high proportion of gravel and copious quantities of forest litter. The soils are derived from decomposed black basalts, brown basalts and metamorphic rocks. The soils pH ranges from 5pH to 7pH. It does not tolerate waterlogged soils. Non saline soils to moderately saline soils are tolerated.
Height & Spread:
Wild Plants: 18m to 24m by 8m to 12m.
Characteristics:
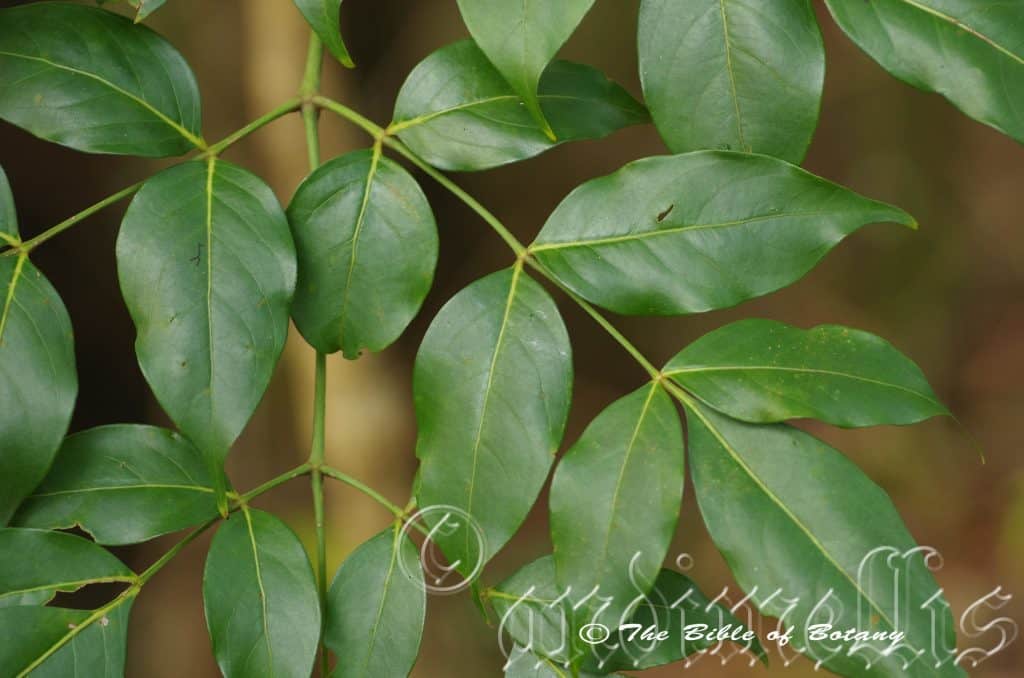
Polyscias murrayi grows as a tall, straight tree with pale grey, scabrous bark that is usually covered in blue-green lichens and mosses in cooler moist terrains. The stems are thin pale grey becoming pale green-brown to pale grey-green only near the apex with newer leaf growth. The branchlets are covered in rhomboidal scars of discarded leaves.
The clustered leaves of Polyscias murrayi are odd pinnate. The rachises are u shaped in cross section and tapers towards the apex. The base is swollen where it attaches to the branches. There are two small triangular stipules on the upper edge at the base of the rachis. The rachis measures 1000mm to 1300mm in length while the 11 to 17 pairs of opposite petioles measure 10mm to 18mm in length. The terminal petiole is longer than the lateral petioles.
The narrow ovate to elliptical leaflets measure 60mm to 160mm in length by 30mm to 60mm in width. The bases are oblique being rounded on one side and cuneate on the other while the apexes are acute to acuminate. The concolourous laminas are glabrous, grass-green, semi glossy on the upper lamina while the lower lamina is dull. The leaf margins are covered in fine teeth. It is flat and curve slightly upwards from the mid vein. The mid vein is prominent on the lower lamina and is distinctly visible from the lower lamina. The leaves are scentless when crushed.
Inflorescences of Polyscias murrayi are born in large, compound terminal panicles which branch 1 to 3 times. The solitary flowers are arranged racemose on the rachis. The rachis and pedicels are glabrous to sparsely covered in fawn hirtellous hairs. The pedicels measure 1.5mm to 2.5mm. The narrow, urceolate calyx is creamy yellow to pale yellow. The calyxes have 5 triangular lobes. The calyx tubes measure 1mm to 1.2mm in length while the lobes measure 0.2mm to 0.3mm in length. The 5 oblong, straight or twisted petals are white and have acute apexes. They measure 2mm to 2.2mm in length.
The 5 exserted creamy white filaments taper strongly from the base to the anthers and measure 1.4mm to 1.6mm in length while the pale green anthers measure 0.2mm to 0.3mm in length.
The creamy yellow styles are glabrous and measure 0.4mm to 0.6mm in length while the stigma is free and diverge following anthesis. The ovaries have 2 or 3 locules. Polyscias murrayi’s honey scented flowers appear from March to April.
Polyscias murrayi’s fruits are laterally compressed, globose berries while the rim of the calyxes remains circular. The berries are glabrous and turn pale lilac-blue when ripe. They measure 4mm to 5.5mm in length by 5.5mm to 6mm in width and 3.6mm to 4mm in thickness. The style’s bifid stigmas are persistent on the apex of the berries. The 2 laterally compressed, ellipsoidal seeds are fawnish and woody. The seeds are very small.
Wildlife:
Polyscias murrayi does not appear to have any predators though the berries flying foxes, native rats and mice and most fruitigrove birds including the Satin Bower and regent Birds, Lewin’s, and Yellow faced honeyeaters and silver eyes throughout their range.
The fruits have a very strong pungent taste reminiscent of nothing I have tasted before. The texture is that of a plum.
Cultivation:
Polyscias murrayi is a magnificent tall tree that could be more widely grown in tropical, subtropical and monsoonal gardens. Polyscias murrayi grows as a spreading densely foliaged large tree. It is ideal at the edge of a rainforest or as the pioneer trees for a rainforest garden. It also makes a great park tree offering quick growth, and good shade. In cultivation it grows from 15 meters to 18 meters in height by 8 meters to 10 meters in diameter when grown in the open or taller and narrower if grown closer together as a rainforest tree.
It grows well on lighter soils where deep leaf litter keeps the soil cool and moisture at an even level. If these requirements are met it can cope with temperatures as low as minus 4 degrees and up to 42 degrees once established. It is moderately drought resistant.
Add to the above, if it is given a little native fertilizer on a regular basis the plants will respond with good flowering and possibly good fruit set over a long period.
It often reaches its full potential in just 12 to 15 years and flower from the fourth or fifth year from seed.
Propagation:
Seeds: The seeds of Polyscias murrayi can be removed easily from the fruits that have fallen to the ground. Polyscias murrayi produce a large number of infertile seeds or seeds that germinate over a variable time. Sow large number of seeds and expect only a few to germinate. Germination is rather quick with
Sow the fresh seeds directly into a seed raising mix, keeping them moist not wet. When the seedlings are 20mm to 25mm tall, prick them out and plant them into 50mm native tubes using a good organic mix.
As the seedlings roots reach the bottom of the tubes plant them out into their permanent position. Do not delay.
Fertilize using seaweed, fish emulsion or organic chicken pellets soaked in water on an alternate basis. Fertilize every two months until the plants are established then annually in early September to October to maintain better colour, health, vitality and flowering
Further Comments from Readers:
“Hi reader, it seems you use The Bible of Botany a lot. That’s great as we have great pleasure in bringing it to you! It’s a little awkward for us to ask, but our first aim is to purchase land approximately 1,600 hectares to link several parcels of N.P. into one at The Pinnacles NSW Australia, but we need your help. We’re not salespeople. We’re amateur botanists who have dedicated over 30 years to saving the environment in a practical way. We depend on donations to reach our goal. If you donate just $5, the price of your coffee this Sunday, We can help to keep the planet alive in a real way and continue to bring you regular updates and features on Australian plants all in one Botanical Bible. Any support is greatly appreciated. Thank you.”
In the spirit of reconciliation we acknowledge the Bundjalung, Gumbaynggirr and Yaegl and all aboriginal nations throughout Australia and their connections to land, sea and community. We pay our respect to their Elders past, present and future for the pleasures we have gained.
Ebor near Point Lookout NSW
Coffs Harbour NSW
Ebor near Point Lookout NSW
Woodenbong NSW
NCBG Coffs Harbour NSW
Ebor near Point Lookout NSW
Woodenbong NSW
Ebor near Point Lookout NSW
Woodenbong NSW
Woodenbong NSW
NCBG Coffs Harbour NSW
NCBG Coffs Harbour NSW
Ebor near Point Lookout NSW
Ebor near Point Lookout NSW
Ebor near Point Lookout NSW
NCBG Coffs Harbour NSW
Polyscias sambucifolia
Classification:
Unranked: Eudicots
Unranked: Asterids
Order: Apiales
Family: Araliaceae
Genus: From Polús, which is Ancient Greek for many and Scias, which is Ancient Greek for shade or an umbrella. It refers to the flowers, which form in many umbels.
Species: From Sambyke, which is Ancient Greek or Sambuca, which is Latin for elderberry and Folium, which is Latin for foliage. It refers to leaves, which resemble the European elderberry, Sambucus nigra.
Subspecies: Polyscias sambucifolia subsp. decomposita. From De, which is Latin for down and (com which is Latin for to come together) composita, which is Latin for to divide more than once. It refers to structures or organs which divide from a common point.
Subspecies: Polyscias sambucifolia subsp. leptophylla. From Gýmnos, which is Ancient Greek for naked or bare and Gramma which is Ancient Greek for a written line. It refers to organs, which have longitudinal lines or faint ribs.
Subspecies: Polyscias sambucifolia subsp. sambucifolia. From Sambyke, which is Ancient Greek or Sambuca, which is Latin for elderberry and Folium, which is Latin for foliage. It refers to leaves, which resemble the European elderberry, Sambucus nigra.
Common Name: Native Elderberry, Elderberry, Elderberry Ash, Ferny Panax or Ornamental Ash.
This species is to undergo further investigation with the possibility of as many as 9 new sub specie or even new species evolving.
Distribution:
Polyscias sambucifolia is found south from Mount Mee in far southern Queensland to the Mount Cole Forest in central western Victoria.
It is also found scattered throughout mainland Tasmania.
https://avh.ala.org.au/occurrences/search?taxa=Polyscias+sambucifolia#tab_mapView
Habitat Aspect Climate:
Polyscias sambucifolia prefers dappled shade to full shade. It grows in openings adjacent to warm temperate rainforests forests, cool well developed sub-tropical rainforests, littoral rainforests and moist gallery forests. The altitude ranges from 50 meters ASL to 500 meters ASL.
The temperatures range from minus 3 degrees in July to 36 degrees in January.
The rainfall ranges from lows of 450mm to 1800mm average per annum.
Soil Requirements:
Polyscias sambucifolia prefers sandy loams to medium clays with a high proportion of leaf litter. The soils are derived from decomposed black basalts, brown basalts, granites, sandstones, metamorphic rocks and accumulated sands. The soils pH ranges from 4.5pH to 7pH. It does not tolerate waterlogged soils. Non saline soils to moderately saline soils are tolerated.
Height & Spread:
Wild Plants:
Polyscias sambucifolia subsp. decomposita 1m to 2m by 2m to 4m.
Polyscias sambucifolia subsp. leptophylla 1m to 1.8m by 2m to 3m.
Polyscias sambucifolia subsp. sambucifolia 3m to 5m by 3m to 4m.
Characteristics:
Polyscias sambucifolia’s stems are straight, pale grey, scabrous and usually covered in blue-green lichens and mosses in cooler moist terrains close to rivers and creeks. The stems are thin pale grey becoming pale green-brown to pale grey-green only near the apex with newer leaf growth. The branchlets are covered in rhomboidal scars of discarded leaves. Plants often sucker from the roots when damaged.
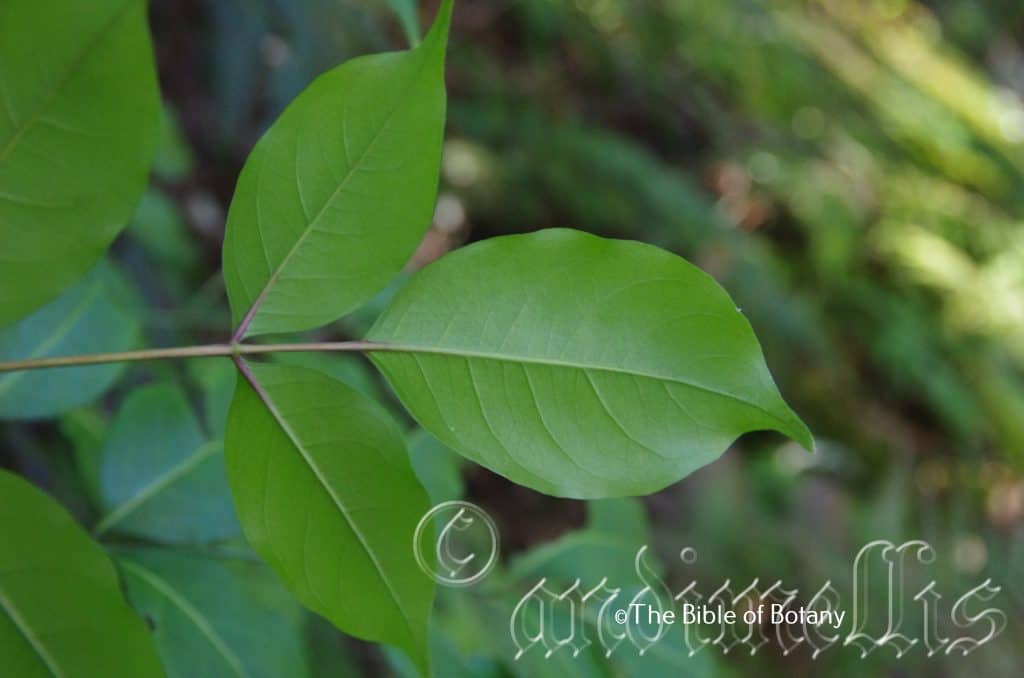
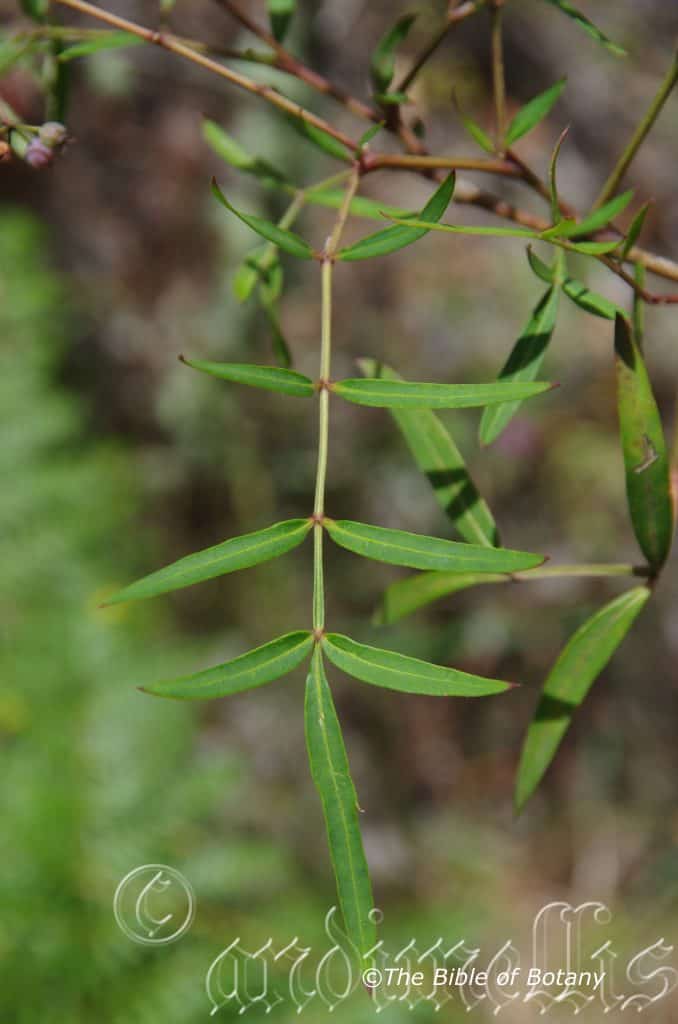
The ovate to elliptical or broad elliptical leaflets measure 50mm to 200mm in length by 30mm to 65mm in width. The base is very broadly cuneate while the apex is narrowly acute to narrowly acuminate. The concolourous laminas are blue-green, glabrous and dull. The leaf margins are finely toothed, flat and curve upwards from the mid vein to the margins and downwards near the apex. The mid vein is prominent on the lower lamina. The leaves are scentless when crushed.
The clustered leaves of Polyscias sambucifolia subsp. decomposita are bipinnate or rarely tripinnate. The rachis and petioles are circular in cross section with the rachis being somewhat rhomboidal and spreading widely where it attaches to the stems. The rachis and petiolules are often winged for part or the whole of the length. The rachis measures 100mm to 300mm in length while the petiolules measure 150mm to 200mm in length. The petioles are sessile to petiolules.
The linear or elliptical or rarely falcate leaflets usually measure 15mm to 30mm in length by 5mm to 15mm in width but can measure up to 70mm in length by 25mm in width. The base is broadly cuneate while the apex is narrowly acute to narrowly acuminate. The concolourous laminas are blue-green, glabrous and dull. The leaf margins are entire to deeply pinnatifid. The mid vein is prominent on the lower lamina. The leaves are scentless when crushed.
The clustered leaves of Polyscias sambucifolia subsp. leptophylla are pinnate or rarely tripinnate. The rachis and petioles are circular in cross section with the rachis being somewhat rhomboidal and spreading widely where it attaches to the stems. The rachis and petiolules are often winged for part or the whole of the length. The rachis measures 60mm to 300mm in length. The petioles are sessile to petiolules.
The 13 oblong-linear or rarely slightly falcate leaflets usually measure 50mm to 70mm in length by 15mm to 22mm in width. The base is broadly cuneate while the apex is narrowly acute to narrowly acuminate. The concolourous laminas are blue-green, glabrous and dull. The leaf margins are entire or rarely lobed. The mid vein is prominent on the lower lamina. The leaves are scentless when crushed.
The clustered leaves of Polyscias sambucifolia subsp. sambucifolia are pinnate. The rachis and petioles are circular in cross section with the rachis being somewhat rhomboidal and spreading widely where it attaches to the stems. The rachis measures 90mm to 300mm in length while the 11 leaflets are in 5 opposite pairs. The petioles are sessile to petiolules.
Inflorescences of Polyscias sambucifolia bisexual or male and are born in large, compound terminal panicle which branch 1 to 3 times. Umbels terminate all the apexes on the panicle. The peduncules measure 7mm to 9mm in length while the pedicels measure 2mm to 3mm and are glabrous. The cylindrical or urceolate calyxes are blue-green and glabrous. The 5 elliptical, creamy green lobes measure 3mm to 4mm in length. The cuspidate apexes of the lobes are strongly decurved.
The 5 exserted creamy green thin filaments measure 0.8mm to 1mm in length while the creamy green anthers measure 0.8mm to 1mm in length. The pollen is white.
The creamy green styles are glabrous and measure 0.4mm to 0.6mm in length while the stigma is free and divergent following anthesis. The ovaries have 2 or 3 locules.
Polyscias sambucifolia subsp. decomposita’s flowers appear from November to January and are usually branched 3 times.
Polyscias sambucifolia subsp. leptophylla’s flowers appear from January to February and are single or rarely branched twice.
Polyscias sambucifolia subsp. sambucifolia’s flowers appear from November to February and are usually branched 3 times.
Polyscias sambucifolia’s fruits are slightly laterally compressed, globose berries with a circular rim. The berries are glabrous. They measure 4mm to 4.5mm in length by 4mm to 4.5mm in width and 3mm to 3.5mm in thickness. The pale blue-green berries turn lilac-blue and white and soften when ripe. The styles are persistent on the berries. The 2 laterally compressed, ellipsoidal seeds are glossy brown and woody.
Wildlife:
Polyscias sambucifolia does not appear to have any predators though the berries flying foxes, native rats and mice and most fruitigrove birds including the Satin Bower and regent Birds, Lewin’s, and the yellow faced honeyeaters and silver eyes throughout their range.
The fruits have a very strong pungent taste reminiscent of nothing I have ever tasted before. The texture is that of a plum.
Cultivation:
Polyscias sambucifolia is a small spreading shrub that should be more widely grown in tropical, subtropical and monsoonal gardens as a rainforest understory plant or mixed in with other shrubs of a similar size. Polyscias sambucifolia grows as an open spreading, medium shrub. It is ideal at the edge or within a small rain forest garden or as pioneer shrubs for a rainforest garden. In cultivation it grows from 1 meter to 4 meters in height by 2 meters to 4 meters in diameter when grown in the open.
It can be planted close together and pruned hard once established to help to increase bushiness.
It grows exceptionally well on lighter soils where deep leaf litter keeps the soil cool and moisture at an even level. If these requirements are met they can cope with temperatures as low as minus 4 degrees and up to 42 degrees once established. It is moderately drought resistant.
Add to the above, if It is given an adequate supply of ground moisture and a little native fertilizer on a regular basis the plants will respond with good flowering and better fruit set over a long period. This was particularly noticeable with plants around our citrus orchard with the fruit always being large, prolific and attractive to many species of birds.
It often reaches its full potential in just 4 to 5 years and flower from the third or fourth year from seed.
Propagation:
Seeds: The seeds of Polyscias sambucifolia can be removed easily from the fruits that have fallen to the ground. Polyscias elegans produce a large number of infertile seeds or seeds that germinate over a variable time. Sow large number of seeds and expect only a few to germinate.
Sow the fresh seeds directly into a seed raising mix, keeping them moist not wet. When the seedlings are 20mm to 25mm tall, prick them out and plant them into 50mm native tubes using a good organic mix.
As the seedlings roots reach the bottom of the tubes plant them out into their permanent position. Do not delay.
Fertilize using seaweed, fish emulsion or organic chicken pellets soaked in water on an alternate basis. Fertilize every two months until the plants are established then annually in early September to October to maintain better colour, health, vitality and flowering
Further Comments from Readers:
“Hi reader, it seems you use The Bible of Botany a lot. That’s great as we have great pleasure in bringing it to you! It’s a little awkward for us to ask, but our first aim is to purchase land approximately 1,600 hectares to link several parcels of N.P. into one at The Pinnacles NSW Australia, but we need your help. We’re not salespeople. We’re amateur botanists who have dedicated over 30 years to saving the environment in a practical way. We depend on donations to reach our goal. If you donate just $5, the price of your coffee this Sunday, We can help to keep the planet alive in a real way and continue to bring you regular updates and features on Australian plants all in one Botanical Bible. Any support is greatly appreciated. Thank you.”
In the spirit of reconciliation we acknowledge the Bundjalung, Gumbaynggirr and Yaegl and all aboriginal nations throughout Australia and their connections to land, sea and community. We pay our respect to their Elders past, present and future for the pleasures we have gained.
Point Lookout National Park Ebor NSW
Point Lookout National Park Ebor NSW
Point Lookout National Park Ebor NSW
Point Lookout National Park Ebor NSW
Polystichum australiense
Classification:
Unranked: Tracheophytes
Unranked: Polypodiophyta
Class: Polypodiopsida
Order: Polypodiales
Family: Thelypteridaceae
Family: Araliaceae
Genus: From Polús, which is Ancient Greek for many and Stíkhos, which is Ancient Greek for a row or file of soldiers. It usually refers to sporangia which are in two distinct rows along the pinnae/pinnules.
Species: From Terra Australis, which is Latin for land of the south and Anum/Ensis, which is Latin for to originate from. It refers to plants, which were first discovered from the land down under.
Common Name: Broad Shield Fern
Distribution:
Polystitchum australiense is found in several disjunct populations on and east of the Great Dividing Range south from the Tweed Valley in far north eastern New South Wales to Clyde Mountain in central coastal New South Wales. There are 2 disjunct populations further south Eden on the coast and the Yarra Ranges in south eastern Victoria. It may be more common in more isolated spots with in this range than the maps indicate.
https://avh.ala.org.au/occurrences/search?taxa=Polystichum+australiensis#tab_mapView
Habitat Aspect Climate:
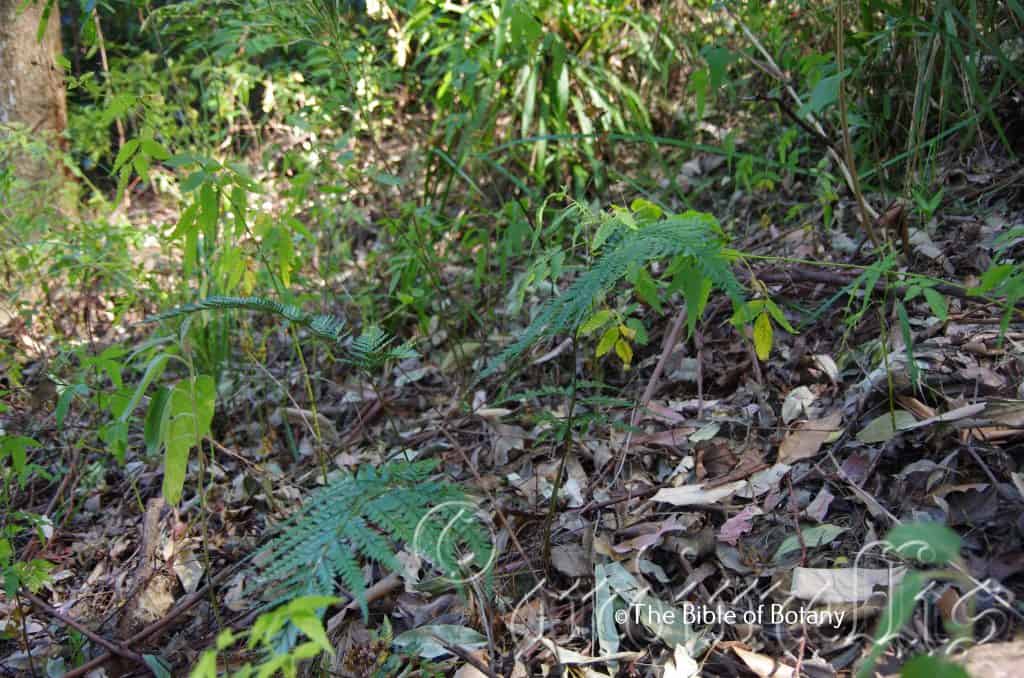
Polystitchum australiense prefers light dappled shade to dense shade. It grows along creeks and streams especially near seepages in cool, humid, well developed temperate and cool humid well-developed subtropical rainforests. The altitude are usually at the middle and higher elevations but ranges from 10 meters ASL to 1400 meters ASL.
The temperatures range from minus 4 degrees in August to 36 degrees in January.
The rainfall ranges from lows of 800mm to an average of 1650mm. Orographic precipitation is common at the higher altitudes and may account for as much as 50mm more moisture than what is recorded in rain gauges.
Soil Requirements:
Polystitchum australiense prefers to grow on better quality loamy soils to medium clays with a high proportion of forest litter close to the parent rocks. The soils are usually derived from decomposed brown basalts or black basalts or at times heavier fatty grained sandstones and granites. The soils pH ranges from 5pH to 7pH. It does not tolerate of waterlogged soils but demands even soil moisture throughout the year. Non saline soils to moderately saline soils are tolerated.
Height & Spread:
Wild Plants: 0.3m to 0.9m by 0.5m to 1m.
Characteristics:
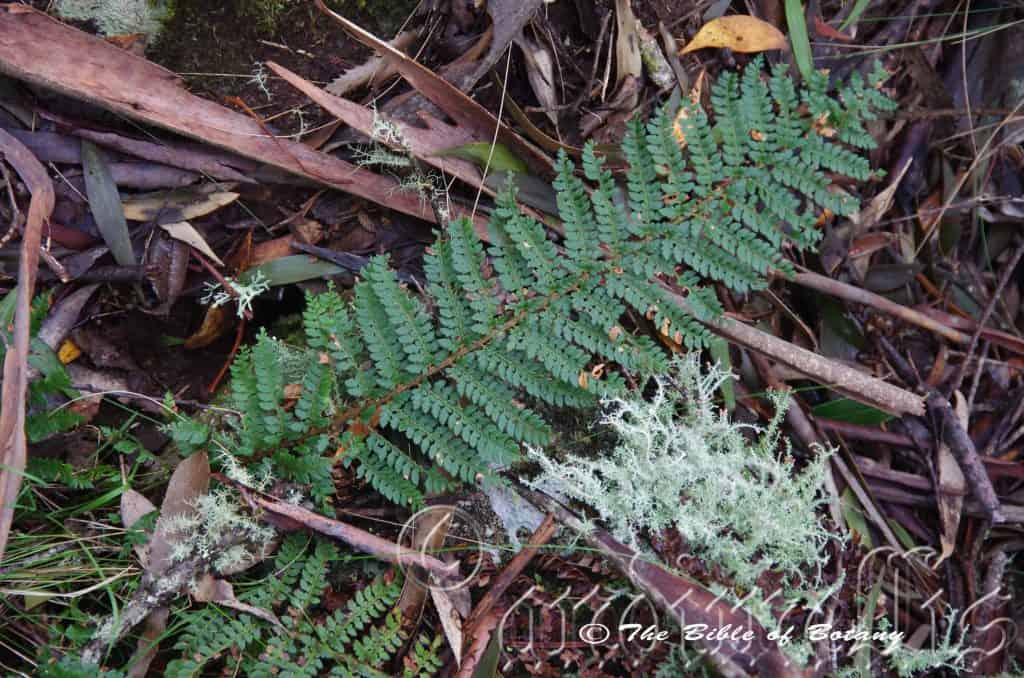
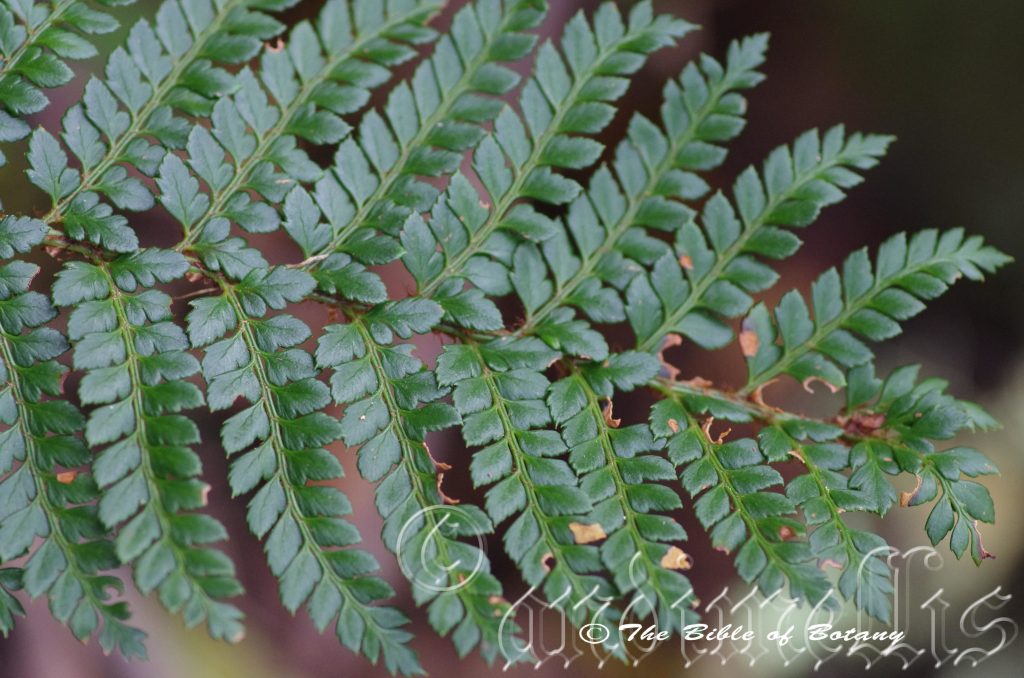
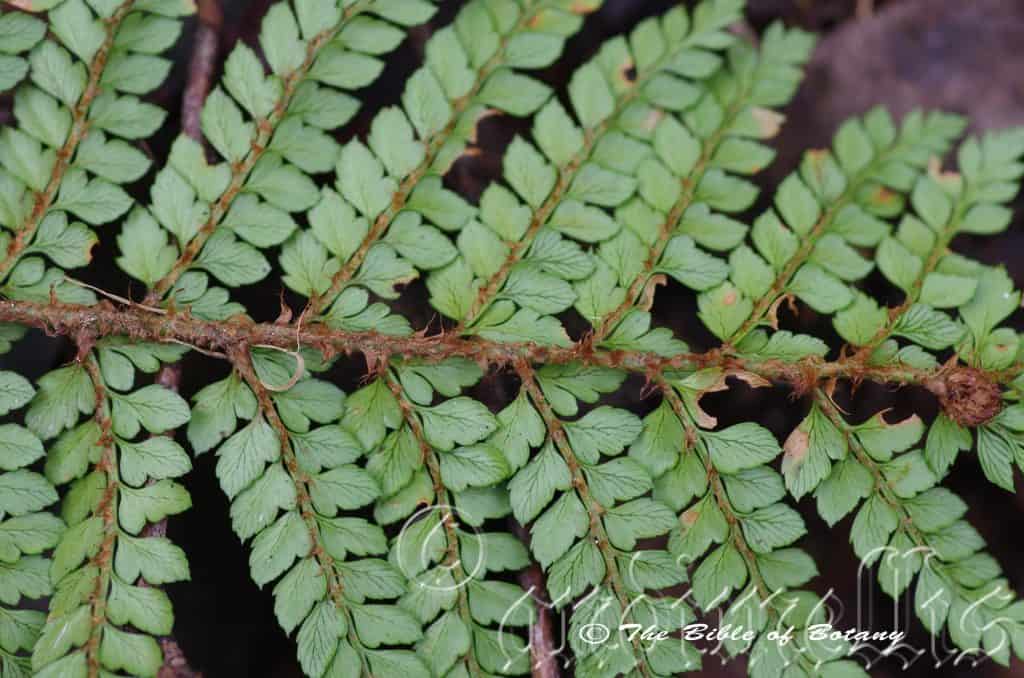
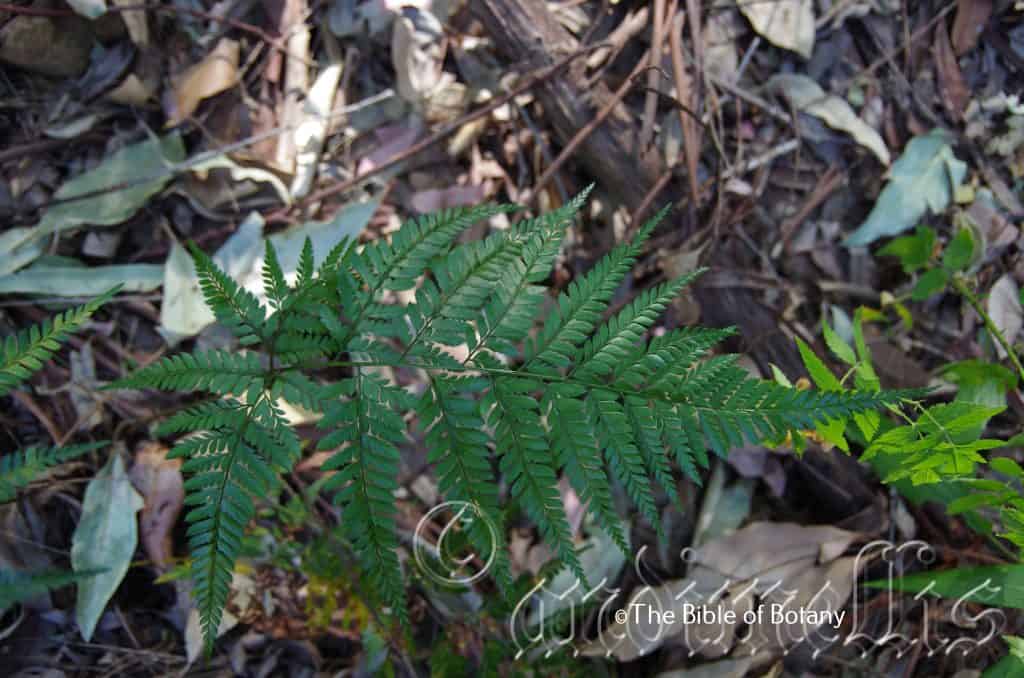
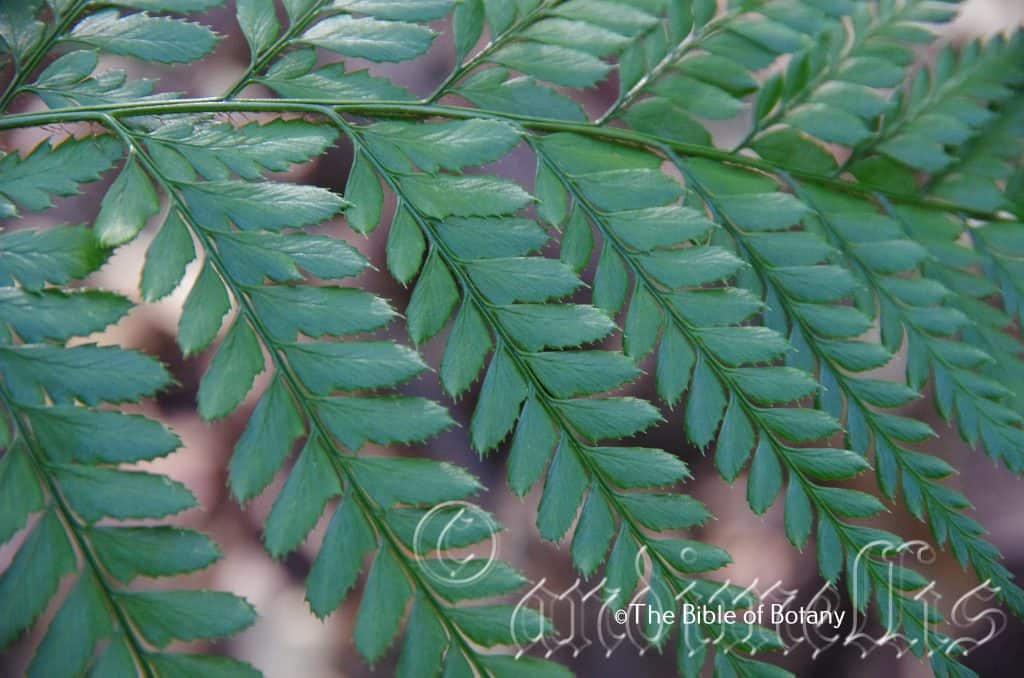
Polystitchum australiense grows as a fern with the lower parts of the rhizome’s stipes covered with fine soft reddish-brown ovate to lanceolate scales.
The fronds are 2 to 3 pinnate. The fronds measure 380mm to 900mm in overall length. The slender 200mm to 600mm stipes are brown and are densely covered in long narrow reddish-brown scales becoming less dense as they approach the apex. The rachises are moderately covered in elliptical, brownish scales with acute, flagella like apex. The rachis is often sparsely covered in scaly proliferous buds which may develop into new plants under favourable conditions. The discolourous laminas are sea-green, coriaceous and glossy on the upper laminas while the lower laminas are paler and dull. The laminas are flat while the ultimate segments have aristate margins and decurve downwards towards the apexes. The teeth are acute to aristate with the apical spine usually equalling the marginal teeth.
The fertile fronds are identical to the sterile fronds. The sori are in irregular rows near the margin of the pinnae. The circular sori’s caduceus indusium is mid brown with a deeper coloured centre.
Wildlife:
Polystitchum australiense’s wildlife is unknown.
Cultivation:
Polystitchum australiense makes an excellent fern where there is deep shade to filtered light in a protected position. It always look green and fresh provided adequate ground moisture is retained in the soil at all times. It is very suitable on medium clays to heavy clay soils and is most suitable for small medium and large gardens close to the coast in warm temperate, warm subtropical or cool tropical gardens. It is cold tolerant to temperatures as low as minus 1 degree once established provided frosts are light. Good specimens will grow from 0.6 meters to 0.8 meters in height by 1 meter to 1.3 meters in diameter.
It is most suitable for use deep in the center of a rainforest mixed with other understory plants or in gullies where it will colonize banks. It likes plenty of leaf litter to help increase soil fertility, maintain soil moisture and to maintain a cool root zone. The glossy fronds contrast coloured foliage plants beautifully. Scenes with Cordyline petiolaris and Cordyline terminalis with Polystitchum australiense planted out below and mixed with Adiantum aethiopicum always look particularly attractive.
Large frog or fish ponds are made the more attractive when surrounded by this fern which can spread over large areas if given the opportunity without becoming problem some. Their size makes for a balanced setting.
The fronds can be used in flower arrangements and last particularly well indoors.
Propagation:
Fern Spores: All ferns that are declared rare, vulnerable or endangered are protected by Federal and State Laws and must not be removed from the wild unless you are a land developer, mining company or main Roads department etc. This includes bulbs, roots, leaves and flowers. No part of any plant can be removed from Federal, State or Local Government land without the prior permission of the authority and this includes the spore.
Most people are put off at the thought of growing ferns from spore. Like all plants that produce their offspring from seed or spore the methods are basically the same. Remember nature has been doing this for millions of years and has been very successful. I have had excellent results growing over 200 different species of Australian ferns so don’t be afraid. Give it a go.
Step 1. Select spore from the fern fronds. Wait until the fern is just starting to release its spore. Rinse the fronds under clean running water and dry. This is to wash off any other spores from rogue ferns that may have settled onto the fronds. (There is nothing worse than having common brake or common soft bracken contaminating a prized tree fern or epiphyte.)
Step 2. Place the dry fronds in a clean brown paper bag and keep them in a cool dark place like the linen closet for about a week to ten days before you are ready to sow the spore. The exception to this rule applies to ferns, which produce green spores. These must be sown immediately that they are released. Todea Barbara is a good example of a fern, which produces green spore.
Step 3. Take a large ice cream container, a small ice cream container and a clean clear plastic bag large enough to seal the large ice cream container and three or four milk bottle tops.
Step 4. Punch or drill 6 to 10 5mm holes in the bottom of the small ice cream container.
Step 5. Wash both containers, tops and plastic bag so that they are very clean and sterile.
Step 6. Use a clean fine seed raising mi. We used 30mm fine sand, 30mm peat and 30mm perlite and 10mm vermiculite. We used crushed basalt, crusher dust and peat in a 50:50 ratio for epiphytes. Moisten the mix enough that water does not run out when the mix is squeezed between the fingers.
Step 7. Place the moisten mix (Enough to half fill the small ice cream container) in the microwave oven with a large glass of water for 7 or 8 minutes, until the water is boiling. Allow them to cool in the oven. You will need the water later so do not tip it out.
Step 8. Take the brown paper bag out of the linen closet. Shake the bag and remove the fronds. You should have a yellow, brown, black or rarely greenish brown or ochre powder or very fine, small round pin head size spore depending on the specie involved.
Step 9. Remove the mixture from the oven once it has cooled and place it in the small ice cream container and level.
Step 10. Sprinkle the spore sparsely over the mixture in the small ice cream container.
Step 11. Place the milk bottle tops in the large ice cream container with the flat surface facing down. Place the small ice cream container in the large ice cream container so that it is sitting on the milk bottle tops.
Step 12. Remove the water from the microwave and pour it into the larger ice cream container so there is 25mm to 30mm of water in the bottom.
Step 13. Place the ice cream containers in the plastic bag and seal. Step 14. Place the contents and bag in a warm shady place preferably 50mm to 70mm shade depending on the specie. Shade houses and some window sills are ideal.
Step 15. The surface should turn green within a week to two weeks. The prothallus will then develop. From the prothallus the first true fronds will appear. Wait until the ferns are 20mm to 35mm in height before you attempt to transplant them. Once they are ready open the bag up slightly and allow the air to flow around the little ferns. Every 3 to 5 days open the bag a little further so the ferns get use to their new environment. Allow them a week to two weeks to harden off before you transplant them following the removal of the plastic bag. Carefully prick them out into 50mm standard squat tubes as you would any seedling.
Do not try to transplant them as single plants as they are still a little delicate still.
Once the smaller ones again reach 50mm to 70mm you may wish to divide the stronger and hardier individual plants into smaller clumps in 100mm squat pots.
This ferns can also be grown from the removal of the proliferous buds along the rachis for small numbers. This is best achieved by leering the frond on the ground or over seed trays where soil moisture is consistent.
Nick the underside of the rachis on the basal side of the proliferous bud and peg it to the ground securely so it does not move. Repeat the process at each bud. Once the buds have taken root gently sever the rachis where the nicks were and treat as young ferns.
Fertilize using seaweed, fish emulsion or organic chicken pellets soaked in water on an alternate basis. Fertilize every two months until the plants are established then annually in early September to October to maintain better colour, health, vitality and flowering
Further Comments from Readers:
“Hi reader, it seems you use The Bible of Botany a lot. That’s great as we have great pleasure in bringing it to you! It’s a little awkward for us to ask, but our first aim is to purchase land approximately 1,600 hectares to link several parcels of N.P. into one at The Pinnacles NSW Australia, but we need your help. We’re not salespeople. We’re amateur botanists who have dedicated over 30 years to saving the environment in a practical way. We depend on donations to reach our goal. If you donate just $5, the price of your coffee this Sunday, We can help to keep the planet alive in a real way and continue to bring you regular updates and features on Australian plants all in one Botanical Bible. Any support is greatly appreciated. Thank you.”
In the spirit of reconciliation we acknowledge the Bundjalung, Gumbaynggirr and Yaegl and all aboriginal nations throughout Australia and their connections to land, sea and community. We pay our respect to their Elders past, present and future for the pleasures we have gained.
Washpool National Park NSW
Washpool National Park NSW
Washpool National Park NSW
Washpool National Park NSW
Polystichum fallax
Classification:
Unranked: Tracheophytes
Unranked: Polypodiophyta
Class: Polypodiopsida
Order: Polypodiales
Family: Thelypteridaceae
Family: Araliaceae
Genus: From Polús, which is Ancient Greek for many and Stíkhos, which is Ancient Greek for a row or file of soldiers. It usually refers to sporangia which are in two rows along the pinnae/pinnules.
Species: From Fallax, which is Latin for beautiful or vivacious. It refers to the species being the most beautiful in the genus.
Common Name: Broad Shield Fern
Distribution:
Polystitchum fallax is found in several scattered populations mainly on the Great Dividing Range south from the Brisbane in south eastern Queensland to the Liverpool Range in northern New South Wales.
https://avh.ala.org.au/occurrences/search?taxa=Polystichum+fallax#tab_mapView
Habitat Aspect Climate:
Polystitchum fallax prefers light dappled shade to dense shade. It grows along creeks and streams especially near water falls in warm, humid, well developed temperate and cool humid well-developed subtropical rainforests. The altitude are usually at the middle and higher elevations but ranges from 40 meters ASL to 950 meters ASL.
The temperatures range from minus 4 degrees in August to 36 degrees in January.
The rainfall ranges from lows of 800mm to an average of 2000mm.
Soil Requirements:
Polystitchum fallax prefers to grow on better quality loamy soils to medium clays with a high proportion of forest litter. The soils are usually derived from decomposed brown basalts or black basalts or at times heavier fatty grained sandstones close to the parent rock. The soils pH ranges from 5pH to 6.5pH. It does not tolerate of waterlogged soils but demands even soil moisture throughout the year. Non saline soils to moderately saline soils are tolerated.
Height & Spread:
Wild Plants: 0.3m to 0.7m by 0.5m to 1m.
Characteristics:
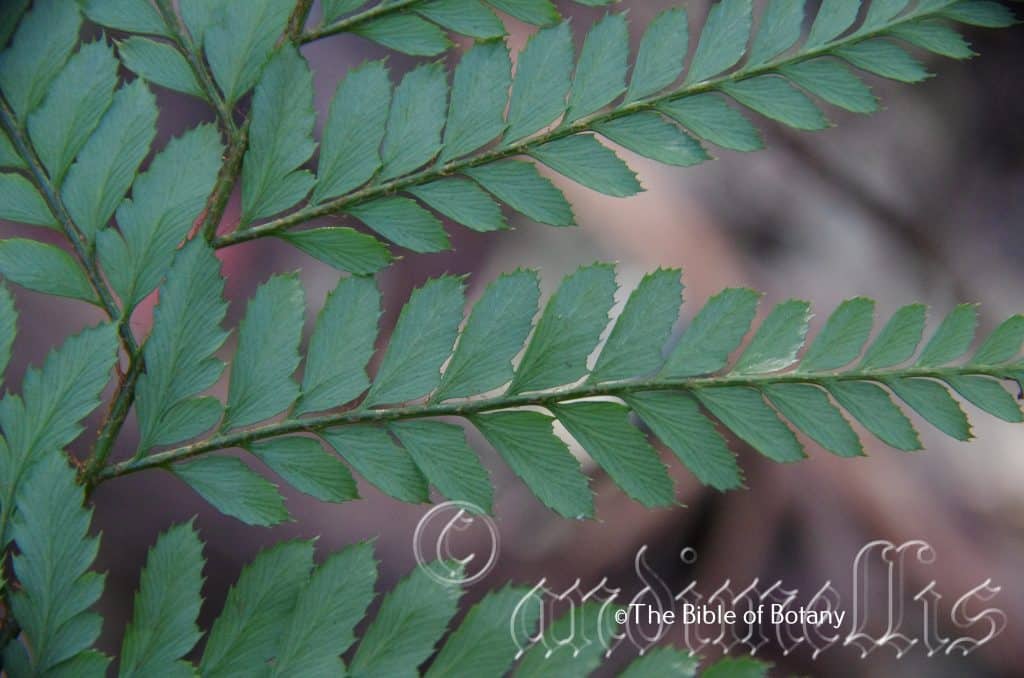
Polystitchum fallax grows as a fern with the lower parts of the rhizome and lower parts of stipes covered with fine, reddish-brown scales at the base d and broader, and often deeper coloured scales higher up.
Polystitchum fallax’s fronds are 2 to 3 pinnate. The fronds measure 400mm to 750mm in overall length. The slender rachises is sparsely covered in reddish-brown scales on mature fronds and measures 200mm to 300mm.
The stipes are brown and are densely covered in long narrow reddish-brown scales becoming less dense as they approach the apex. The rachises are sparsely covered in brownish scales on the mature fronds. The discolourous laminas are deep green, leathery and glossy on the upper laminas while the lower laminas are slightly paler and dull. The ultimate segments with acute or aristate teeth, the apical spine is longer than the marginal lateral teeth.
The fertile fronds are identical to the sterile fronds. The proliferous buds are not present on this species. The obtuse sori are in irregular rows near the margin of the pinnae. The sori’s caduceus indusium is reddish-brown with a deeper coloured centre.
Wildlife:
Polystitchum fallax’s wildlife is unknown.
Cultivation:
Polystitchum fallax makes an excellent addition where there is deep shade to filtered light in a protected position. It always look green and fresh provided adequate ground moisture is retained in the soil at all times. It is very suitable on medium clays to heavy clay soils and is most suitable for small medium and large gardens close to the coast in warm temperate, warm subtropical or cool tropical gardens. It is cold tolerant to temperatures as low as minus 1 degree once established provided frosts are light. Good specimens will grow from 0.6 meters to 0.8 meters in height by 1 meter to 1.3 meters in diameter.
It is most suitable for use deep in the center of a rainforest mixed with other understory plants or in gullies where it will colonize banks. It likes plenty of leaf litter to help increase soil fertility, maintain soil moisture and to maintain a cool root zone. The glossy fronds contrast coloured foliage plants beautifully. Scenes with Cordyline petiolaris and Cordyline terminalis with Polystitchum fallax planted out below and mixed with Adiantum aethiopicum would always look particularly attractive.
Large frog or fish ponds are made the more attractive when surrounded by this fern which can spread over large areas if given the opportunity without becoming problem some. Their size makes for a balanced setting.
The fronds can be used in flower arrangements and last particularly well indoors.
Propagation:
Fern Spores: All ferns that are declared rare, vulnerable or endangered are protected by Federal and State Laws and must not be removed from the wild unless you are a land developer, mining company or main Roads department etc. This includes bulbs, roots, leaves and flowers. No part of any plant can be removed from Federal, State or Local Government land without the prior permission of the authority and this includes the spore.
Most people are put off at the thought of growing ferns from spore. Like all plants that produce their offspring from seed or spore the methods are basically the same. Remember nature has been doing this for millions of years and has been very successful. I have had excellent results growing over 200 different species of Australian ferns so don’t be afraid. Give it a go.
Step 1. Select spore from the fern fronds. Wait until the fern is just starting to release its spore. Rinse the fronds under clean running water and dry. This is to wash off any other spores from rogue ferns that may have settled onto the fronds. (There is nothing worse than having common brake or common soft bracken contaminating a prized tree fern or epiphyte.)
Step 2. Place the dry fronds in a clean brown paper bag and keep them in a cool dark place like the linen closet for about a week to ten days before you are ready to sow the spore. The exception to this rule applies to ferns, which produce green spores. These must be sown immediately that they are released. Todea Barbara is a good example of a fern, which produces green spore.
Step 3. Take a large ice cream container, a small ice cream container and a clean clear plastic bag large enough to seal the large ice cream container and three or four milk bottle tops.
Step 4. Punch or drill 6 to 10 5mm holes in the bottom of the small ice cream container.
Step 5. Wash both containers, tops and plastic bag so that they are very clean and sterile.
Step 6. Use a clean fine seed raising mi. We used 30mm fine sand, 30mm peat and 30mm perlite and 10mm vermiculite. We used crushed basalt, crusher dust and peat in a 50:50 ratio for epiphytes. Moisten the mix enough that water does not run out when the mix is squeezed between the fingers.
Step 7. Place the moisten mix (Enough to half fill the small ice cream container) in the microwave oven with a large glass of water for 7 or 8 minutes, until the water is boiling. Allow them to cool in the oven. You will need the water later so do not tip it out.
Step 8. Take the brown paper bag out of the linen closet. Shake the bag and remove the fronds. You should have a yellow, brown, black or rarely greenish brown or ochre powder or very fine, small round pin head size spore depending on the specie involved.
Step 9. Remove the mixture from the oven once it has cooled and place it in the small ice cream container and level.
Step 10. Sprinkle the spore sparsely over the mixture in the small ice cream container.
Step 11. Place the milk bottle tops in the large ice cream container with the flat surface facing down. Place the small ice cream container in the large ice cream container so that it is sitting on the milk bottle tops.
Step 12. Remove the water from the microwave and pour it into the larger ice cream container so there is 25mm to 30mm of water in the bottom.
Step 13. Place the ice cream containers in the plastic bag and seal. Step 14. Place the contents and bag in a warm shady place preferably 50mm to 70mm shade depending on the specie. Shade houses and some window sills are ideal.
Step 15. The surface should turn green within a week to two weeks. The prothallus will then develop. From the prothallus the first true fronds will appear. Wait until the ferns are 20mm to 35mm in height before you attempt to transplant them. Once they are ready open the bag up slightly and allow the air to flow around the little ferns. Every 3 to 5 days open the bag a little further so the ferns get use to their new environment. Allow them a week to two weeks to harden off before you transplant them following the removal of the plastic bag. Carefully prick them out into 50mm standard squat tubes as you would any seedling.
Do not try to transplant them as single plants as they are still a little delicate still.
Once the smaller ones again reach 50mm to 70mm you may wish to divide the stronger and hardier individual plants into smaller clumps in 100mm squat pots.
Fertilize using seaweed, fish emulsion or organic chicken pellets soaked in water on an alternate basis. Fertilize every two months until the plants are established then annually in early September to October to maintain better colour, health, vitality and flowering
Further Comments from Readers:
“Hi reader, it seems you use The Bible of Botany a lot. That’s great as we have great pleasure in bringing it to you! It’s a little awkward for us to ask, but our first aim is to purchase land approximately 1,600 hectares to link several parcels of N.P. into one at The Pinnacles NSW Australia, but we need your help. We’re not salespeople. We’re amateur botanists who have dedicated over 30 years to saving the environment in a practical way. We depend on donations to reach our goal. If you donate just $5, the price of your coffee this Sunday, We can help to keep the planet alive in a real way and continue to bring you regular updates and features on Australian plants all in one Botanical Bible. Any support is greatly appreciated. Thank you.”
In the spirit of reconciliation we acknowledge the Bundjalung, Gumbaynggirr and Yaegl and all aboriginal nations throughout Australia and their connections to land, sea and community. We pay our respect to their Elders past, present and future for the pleasures we have gained.
Polystichum formosum
Classification:
Unranked: Tracheophytes
Unranked: Polypodiophyta
Class: Polypodiopsida
Order: Polypodiales
Family: Thelypteridaceae
Family: Araliaceae
Genus: From Polús, which is Ancient Greek for many and Stíkhos, which is Ancient Greek for a row or file of soldiers. It usually refers to sporangia which are in two rows along the pinnae/pinnules.
Species: From Formosum, which is Latin for beautiful or vivacious. It refers to the species being the most beautiful in the genus.
Common Name: Broad Shield Fern
Distribution:
Polystitchum formosum is found in several disjunct populations on and east of the Great Dividing Range south from the Blackall Range in southern Queensland to Heidelberg in southern Victoria.
https://avh.ala.org.au/occurrences/search?taxa=Polystichum+formosum#tab_mapView
Habitat Aspect Climate:
Polystitchum formosum prefers light dappled shade to dense shade. It grows along creeks and streams especially near water falls in warm, humid, well developed temperate and cool humid well-developed subtropical rainforests. The altitude are usually at the middle and higher elevations but ranges from 40 meters ASL to 950 meters ASL.
The temperatures range from minus 4 degrees in August to 36 degrees in January.
The rainfall ranges from lows of 800mm to an average of 2000mm.
Soil Requirements:
Polystitchum formosum prefers to grow on better quality loamy soils to medium clays with a high proportion of forest litter. The soils are usually derived from decomposed brown basalts or black basalts or at times heavier fatty grained sandstones close to the parent rock. The soils pH ranges from 5pH to 6.5pH. It does not tolerate of waterlogged soils but demands even soil moisture throughout the year. Non saline soils to moderately saline soils are tolerated.
Height & Spread:
Wild Plants: 0.3m to 0.7m by 0.5m to 1m.
Characteristics:
Polystitchum formosum grows as a fern with the lower parts of the rhizome’s stipes covered with fine soft reddish-brown ovate to lanceolate scales.
Polystitchum formosum’s fronds are 2 to 3 pinnate. The fronds measure 350mm to 700mm in overall length. The slender 200mm to 300mm stipes are brown and are densely covered in long narrow reddish-brown scales becoming less dense as they approach the apex. The rachises are sparsely covered in brownish scales on the mature fronds. The concolourous laminas are deep green, leathery and glossy on the upper laminas while the lower laminas are dull. The laminas are flat while the ultimate segments have deeply toothed margins. The teeth are acute to aristate with the apical spine usually is equal to the marginal teeth.
Polystitchum formosum’s fertile fronds are identical to the sterile fronds. The proliferous buds are never present on main rachis. The sori are in irregular rows near the margin of the pinnae. The circular sori’s caduceus indusium is usually pale brown with a deeper coloured centre.
Wildlife:
Polystitchum formosum’s wildlife is unknown.
Cultivation:
Polystitchum formosum makes an excellent fern where there is deep shade to filtered light in a protected position. It always look green and fresh provided adequate ground moisture is retained in the soil at all times. It is very suitable on medium clays to heavy clay soils and is most suitable for small medium and large gardens close to the coast in warm temperate, warm subtropical or cool tropical gardens. It is cold tolerant to temperatures as low as minus 1 degree once established provided frosts are light. Good specimens will grow from 0.6 meters to 0.8 meters in height by 1 meter to 1.3 meters in diameter.
It is most suitable for use deep in the center of a rainforest mixed with other ferns or in gullies where it will colonize banks. It likes plenty of leaf litter to help increase soil fertility, maintain soil moisture and to maintain a cool root zone. The glossy fronds contrast coloured foliage plants beautifully. Scenes with Cordyline petiolaris and Cordyline terminalis with Polystitchum formosum planted out below and mixed with Adiantum aethiopicum or Pteris pacifica always look particularly attractive.
Large frog or fish ponds are made the more attractive when surrounded by this fern which can spread over large areas if given the opportunity without becoming problem some. Their size makes for a balanced setting.
The leaves can be used in flower arrangements and last particularly well indoors.
Propagation:
Fern Spores: All ferns that are declared rare, vulnerable or endangered are protected by Federal and State Laws and must not be removed from the wild unless you are a land developer, mining company or main Roads department etc. This includes bulbs, roots, leaves and flowers. No part of any plant can be removed from Federal, State or Local Government land without the prior permission of the authority and this includes the spore.
Most people are put off at the thought of growing ferns from spore. Like all plants that produce their offspring from seed or spore the methods are basically the same. Remember nature has been doing this for millions of years and has been very successful. I have had excellent results growing over 200 different species of Australian ferns so don’t be afraid. Give it a go.
Step 1. Select spore from the fern fronds. Wait until the fern is just starting to release its spore. Rinse the fronds under clean running water and dry. This is to wash off any other spores from rogue ferns that may have settled onto the fronds. (There is nothing worse than having common brake or common soft bracken contaminating a prized tree fern or epiphyte.)
Step 2. Place the dry fronds in a clean brown paper bag and keep them in a cool dark place like the linen closet for about a week to ten days before you are ready to sow the spore. The exception to this rule applies to ferns, which produce green spores. These must be sown immediately that they are released. Todea Barbara is a good example of a fern, which produces green spore.
Step 3. Take a large ice cream container, a small ice cream container and a clean clear plastic bag large enough to seal the large ice cream container and three or four milk bottle tops.
Step 4. Punch or drill 6 to 10 5mm holes in the bottom of the small ice cream container.
Step 5. Wash both containers, tops and plastic bag so that they are very clean and sterile.
Step 6. Use a clean fine seed raising mi. We used 30mm fine sand, 30mm peat and 30mm perlite and 10mm vermiculite. We used crushed basalt, crusher dust and peat in a 50:50 ratio for epiphytes. Moisten the mix enough that water does not run out when the mix is squeezed between the fingers.
Step 7. Place the moisten mix (Enough to half fill the small ice cream container) in the microwave oven with a large glass of water for 7 or 8 minutes, until the water is boiling. Allow them to cool in the oven. You will need the water later so do not tip it out.
Step 8. Take the brown paper bag out of the linen closet. Shake the bag and remove the fronds. You should have a yellow, brown, black or rarely greenish brown or ochre powder or very fine, small round pin head size spore depending on the specie involved.
Step 9. Remove the mixture from the oven once it has cooled and place it in the small ice cream container and level.
Step 10. Sprinkle the spore sparsely over the mixture in the small ice cream container.
Step 11. Place the milk bottle tops in the large ice cream container with the flat surface facing down. Place the small ice cream container in the large ice cream container so that it is sitting on the milk bottle tops.
Step 12. Remove the water from the microwave and pour it into the larger ice cream container so there is 25mm to 30mm of water in the bottom.
Step 13. Place the ice cream containers in the plastic bag and seal. Step 14. Place the contents and bag in a warm shady place preferably 50mm to 70mm shade depending on the specie. Shade houses and some window sills are ideal.
Step 15. The surface should turn green within a week to two weeks. The prothallus will then develop. From the prothallus the first true fronds will appear. Wait until the ferns are 20mm to 35mm in height before you attempt to transplant them. Once they are ready open the bag up slightly and allow the air to flow around the little ferns. Every 3 to 5 days open the bag a little further so the ferns get use to their new environment. Allow them a week to two weeks to harden off before you transplant them following the removal of the plastic bag. Carefully prick them out into 50mm standard squat tubes as you would any seedling.
Do not try to transplant them as single plants as they are still a little delicate still.
Once the smaller ones again reach 50mm to 70mm you may wish to divide the stronger and hardier individual plants into smaller clumps in 100mm squat pots.
Fertilize using seaweed, fish emulsion or organic chicken pellets soaked in water on an alternate basis. Fertilize every two months until the plants are established then annually in early September to October to maintain better colour, health, vitality and flowering
Further Comments from Readers:
“Hi reader, it seems you use The Bible of Botany a lot. That’s great as we have great pleasure in bringing it to you! It’s a little awkward for us to ask, but our first aim is to purchase land approximately 1,600 hectares to link several parcels of N.P. into one at The Pinnacles NSW Australia, but we need your help. We’re not salespeople. We’re amateur botanists who have dedicated over 30 years to saving the environment in a practical way. We depend on donations to reach our goal. If you donate just $5, the price of your coffee this Sunday, We can help to keep the planet alive in a real way and continue to bring you regular updates and features on Australian plants all in one Botanical Bible. Any support is greatly appreciated. Thank you.”
In the spirit of reconciliation we acknowledge the Bundjalung, Gumbaynggirr and Yaegl and all aboriginal nations throughout Australia and their connections to land, sea and community. We pay our respect to their Elders past, present and future for the pleasures we have gained.
Polystichum proliferum
Classification:
Unranked: Tracheophytes
Unranked: Polypodiophyta
Class: Polypodiopsida
Order: Polypodiales
Family: Thelypteridaceae
Family: Araliaceae
Genus: From Polús, which is Ancient Greek for many and Stíkhos, which is Ancient Greek for a row or file of soldiers. It usually refers to sporangia which are in two rows along the pinnae/pinnules.
Species: From Proles, which is Latin for offspring and Ferae/Ferārum, which is Latin for to bear or bearing. It refers to the production of new daughter plants from offshoots close to the ground on seed heads, leaves or fronds.
Common Name:
Distribution:
Polystitchum proliferum is found south from Mount Superbus in far south east Queensland to the tributaries of the Glenelg River and the Glenelg National Park in far south western Victoria. It mainly grows on the Great Dividing Range at higher elevations in the north compared to the southern populations.
It is found on the larger Bass Strait Islands and throughout mainland Tasmania.
https://avh.ala.org.au/occurrences/search?taxa=Polystichum+proliferum#tab_mapView
Habitat Aspect Climate:
Polystitchum proliferum prefers light dappled shade to dense shade. It grows along creeks and streams and sheltered gullies in warm, humid, well developed temperate rainforests, cool humid well-developed subtropical rainforests or warm moist Eucalyptus forests. The altitude are usually at the middle and higher elevations but ranges from 40 meters ASL to 1325 meters ASL.
The temperatures range from minus 4 degrees in August to 36 degrees in January.
The rainfall ranges from lows of 800mm to an average of 2000mm.
Soil Requirements:
Polystichum proliferum prefers light dappled shade to dense shade. It grows along creeks and streams and sheltered gullies in warm, humid, well developed temperate rainforests, cool humid well-developed subtropical rainforests or warm moist Eucalyptus forests. The altitude are usually at the middle and higher elevations but ranges from 40 meters ASL to 1325 meters ASL.
The temperatures range from minus 4 degrees in August to 36 degrees in January.
The rainfall ranges from lows of 800mm to an average of 2000mm.
Height & Spread:
Wild Plants: 1m to 1.5m by 1.5m to 2.5m.
Characteristics:
Polystitchum proliferum grows as fern with the rhizomes and base of the stipes densely covered with glossy, deep red-brown scales that have pale margins and extensions. The lanceolate scales are often twisted. The rhizomes are short and often erect with the fronds forming a short weak trunk.
Polystitchum proliferum’s fronds are 2 to 3 pinnate. The fronds usually measure 500mm to 800mm in length but have been known to exceed 1400mm in overall length. The slender 200mm to 300mm stipes are brown and covered and covering in narrow pale scales becoming less dense as they approach the apex. The main rachis is densely scaly; often giving rise to scaly proliferous buds. The lower surface is glabrous. The concolourous laminas are deep glossy green on the upper laminas while the lower laminas are dull. The ultimate segments margins are toothed the teeth never having aristate apexes.
The fertile fronds are identical to the sterile fronds. The proliferous buds are usually present on main rachis. The sori are in irregular rows near the margin of the pinnae. The circular sori’s indusium are usually mid brown with a black centre.
The fronds can be used in flower arrangements and last particularly well indoors.
Wildlife:
Polystitchum proliferum’s wildlife is unknown.
Cultivation:
Polystitchum proliferum makes an excellent fern where there is deep shade to filtered light in a protected position. It always look green and fresh provided adequate ground moisture is retained in the soil at all times. It is very suitable on medium clays to heavy clay soils are most suitable for small medium and large gardens close to the coast in warm temperate, warm subtropical or cool tropical gardens. It is cold tolerant to temperatures as low as minus 1 degree once established provided frosts are light. Good specimens will grow from 0.6 meters to 0.8 meters in height by 1 meter to 1.3 meters in diameter.
It is most suitable for use deep in the center of a rainforest mixed with other understory plants or in gullies where it will colonize banks. It likes plenty of leaf litter to help increase soil fertility, maintain soil moisture and to maintain a cool root zone. The glossy fronds contrast coloured foliage plants beautifully. Scenes with Cordyline petiolaris and Cordyline terminalis with Polystitchum formosum planted out below and mixed with Adiantum aethiopicum or Pteris pacifica always look particularly attractive with the contrasting fronds colours and shapes.
Large frog or fish ponds are made the more attractive when surrounded by this fern which can spread over large areas if given the opportunity without becoming problem some. Their size makes for a balanced setting.
Propagation:
Fern Spores: All ferns that are declared rare, vulnerable or endangered are protected by Federal and State Laws and must not be removed from the wild unless you are a land developer, mining company or main Roads department etc. This includes bulbs, roots, leaves and flowers. No part of any plant can be removed from Federal, State or Local Government land without the prior permission of the authority and this includes the spore.
Most people are put off at the thought of growing ferns from spore. Like all plants that produce their offspring from seed or spore the methods are basically the same. Remember nature has been doing this for millions of years and has been very successful. I have had excellent results growing over 200 different species of Australian ferns so don’t be afraid. Give it a go.
Step 1. Select spore from the fern fronds. Wait until the fern is just starting to release its spore. Rinse the fronds under clean running water and dry. This is to wash off any other spores from rogue ferns that may have settled onto the fronds. (There is nothing worse than having common brake or common soft bracken contaminating a prized tree fern or epiphyte.)
Step 2. Place the dry fronds in a clean brown paper bag and keep them in a cool dark place like the linen closet for about a week to ten days before you are ready to sow the spore. The exception to this rule applies to ferns, which produce green spores. These must be sown immediately that they are released. Todea Barbara is a good example of a fern, which produces green spore.
Step 3. Take a large ice cream container, a small ice cream container and a clean clear plastic bag large enough to seal the large ice cream container and three or four milk bottle tops.
Step 4. Punch or drill 6 to 10 5mm holes in the bottom of the small ice cream container.
Step 5. Wash both containers, tops and plastic bag so that they are very clean and sterile.
Step 6. Use a clean fine seed raising mi. We used 30mm fine sand, 30mm peat and 30mm perlite and 10mm vermiculite. We used crushed basalt, crusher dust and peat in a 50:50 ratio for epiphytes. Moisten the mix enough that water does not run out when the mix is squeezed between the fingers.
Step 7. Place the moisten mix (Enough to half fill the small ice cream container) in the microwave oven with a large glass of water for 7 or 8 minutes, until the water is boiling. Allow them to cool in the oven. You will need the water later so do not tip it out.
Step 8. Take the brown paper bag out of the linen closet. Shake the bag and remove the fronds. You should have a yellow, brown, black or rarely greenish brown or ochre powder or very fine, small round pin head size spore depending on the specie involved.
Step 9. Remove the mixture from the oven once it has cooled and place it in the small ice cream container and level.
Step 10. Sprinkle the spore sparsely over the mixture in the small ice cream container.
Step 11. Place the milk bottle tops in the large ice cream container with the flat surface facing down. Place the small ice cream container in the large ice cream container so that it is sitting on the milk bottle tops.
Step 12. Remove the water from the microwave and pour it into the larger ice cream container so there is 25mm to 30mm of water in the bottom.
Step 13. Place the ice cream containers in the plastic bag and seal. Step 14. Place the contents and bag in a warm shady place preferably 50mm to 70mm shade depending on the specie. Shade houses and some window sills are ideal.
Step 15. The surface should turn green within a week to two weeks. The prothallus will then develop. From the prothallus the first true fronds will appear. Wait until the ferns are 20mm to 35mm in height before you attempt to transplant them. Once they are ready open the bag up slightly and allow the air to flow around the little ferns. Every 3 to 5 days open the bag a little further so the ferns get use to their new environment. Allow them a week to two weeks to harden off before you transplant them following the removal of the plastic bag. Carefully prick them out into 50mm standard squat tubes as you would any seedling.
Do not try to transplant them as single plants as they are still a little delicate still.
Once the smaller ones again reach 50mm to 70mm you may wish to divide the stronger and hardier individual plants into smaller clumps in 100mm squat pots.
Fertilize using Seaweed, fish emulsion or organic chicken pellets soaked in water and apply the liquid on an alternate basis. Fertilize every 2 months until the plants are established then once a year there after in spring or autumn to maintain better colour, health and vigour.
Cuttings:
This fern can also be grown from the removal of the proliferous buds along the rachis for small numbers. This is best achieved by layering the frond on the ground or over seed trays where soil moisture is consistent.
Nick the underside of the rachis on the basal side of the proliferous bud and peg it to the ground or mix in a tray or tube securely so it does not move. Repeat the process at each bud. Once the buds have taken root gently sever the rachis where the nicks were and treat as young ferns.
Fertilize using Seaweed, fish emulsion or organic chicken pellets soaked in water and apply the liquid on an alternate basis. Fertilize every 2 months until the plants are established then once a year there after in spring or autumn to maintain better colour, health and vigour.
Fertilize using seaweed, fish emulsion or organic chicken pellets soaked in water on an alternate basis. Fertilize every two months until the plants are established then annually in early September to October to maintain better colour, health, vitality and flowering
Further Comments from Readers:
“Hi reader, it seems you use The Bible of Botany a lot. That’s great as we have great pleasure in bringing it to you! It’s a little awkward for us to ask, but our first aim is to purchase land approximately 1,600 hectares to link several parcels of N.P. into one at The Pinnacles NSW Australia, but we need your help. We’re not salespeople. We’re amateur botanists who have dedicated over 30 years to saving the environment in a practical way. We depend on donations to reach our goal. If you donate just $5, the price of your coffee this Sunday, We can help to keep the planet alive in a real way and continue to bring you regular updates and features on Australian plants all in one Botanical Bible. Any support is greatly appreciated. Thank you.”
In the spirit of reconciliation we acknowledge the Bundjalung, Gumbaynggirr and Yaegl and all aboriginal nations throughout Australia and their connections to land, sea and community. We pay our respect to their Elders past, present and future for the pleasures we have gained.
Pomaderris argyrophylla
Classification:
Division: Eudicots
Superclass: Rosids
Order: Rosales
Family: Rhamnaceae
Genus: From Poma, which is Ancient Greek for a lid and Derris, which is Ancient Greek for a fur or at times skin. It refers to a membrane covering the fruits, which are covered in short hairs.
Species: From Aárgillos, which is Greek and later Latin for bright and silvery or white and Phullon/Phýllon, which is Ancient Greek for a leaf. It refers to lower laminas on leaves, which are silvery-white.
Common Name: Silver Pomaderris.
Distribution:
Pomaderris argyrophylla is found in 2 distinct disjunct populations mainly on and east of the Great Dividing Range. The northern population is bounded by the Windsor Tableland, on the Torrens Creek headwaters and Mount Abbott near Bowen in far north eastern Queensland.
The southern populations are bounded by Yandina, Mapleton and Proston in south eastern Queensland south to the Goonoowigall Nature Reserve, Mistake Ridge and the Nightcap range in north eastern New South Wales with an outlying population west of the Range in the Warrumbungles.
https://avh.ala.org.au/occurrences/search?taxa=Pomaderris+argyrophylla#tab_mapView
Habitat Aspect Climate:
Pomaderris argyrophylla prefers light dappled shade to full sun. It grows along creeks, road side culverts where there is a break in the forest canopy. The altitude usually grows from the mid-levels to the higher elevations but ranges from 71 meters ASL to 1310 meters ASL.
The temperatures range from minus 4 degree in August to 35 degrees in January.
The rainfalls range from lows of 500mm to an average of 2400mm.
Soil Requirements:
Pomaderris argyrophylla prefers better quality light sandy loams to medium clays often with copious quantities of leaf litter. The soils are usually derived from decomposed black basalts, brown basalts, granites, sandstones or metamorphic rocks. The soils pH ranges from 4.5pH to 6pH. It does not tolerate waterlogged soils. Non saline soils to moderately saline soils are tolerated.
Height & Spread:
Wild Plants: 1m to 6m by 2m to 4m.
Characteristics:
Pomaderris argyrophylla grows as a small tree or more often as a large bushy shrub with a straight, mid grey trunk and larger branches which are covered in fine longitudinal ridges, lichens and mosses otherwise it is relatively smooth. The stems are grass-green and are densely covered in rusty-fawn to rusty-brown pubescent hairs and longer hirsute hairs. The new growth is rusty brown to fawn.
Pomaderris argyrophylla’s alternate, lanceolate to elliptic leaves measure 50mm to 120mm in length by 15mm to 30mm in width. The petioles are grooved on the upper surface, are densely covered in white pubescent hairs and measure 6mm to 13mm in length. The bases are broadly cuneate to cuneate while the apexes are tapering to acute to acuminate. The discolourous laminas are deep sea-green, dull and glabrous on the upper laminas while the lower laminas are silvery and densely covered in white pubescent hairs. The laminas are flat and slightly undulating while the margins are entire. The mid vein is strongly prominent on the lower laminas while the 20 to 25 pinnate lateral veins are regularly arranged and loop inside the margins and are covered in longer hirsute hairs. The reticulated veins are usually not apparent.
The inflorescence of Pomaderris argyrophylla are born in sparse panicles that measure 50mm to 100mm in diameter. The white to silvery peduncles and pedicels are moderately covered in white pubescent hairs. The rachis and peduncles measure 20mm to 60mm in length while the pedicels measure 2mm to 4mm in length. The 5 caduceus, white, cream or pale yellow sepals are reflexed at anthesis and measure 1.3mm to 2mm in length by 0.8mm to 1mm in width. The petals are usually absent but when present the caduceus, single white, cream or pale yellow is auriculate.
The staminal filaments measure 1.4mm to 1.6mm in length and are inflexed before anthesis. The anthers measure 0.3mm to 0.4mm in length. The ovary is densely covered in white pulverulent hairs.
Pomaderris argyrophylla’s fruits are capsules. The green capsules and hypanthium turn silvery-grey when ripe and are sparsely covered in long white hirsute hairs. The seeds are hard, deep brown to black and are oval to ovate.
Wildlife:
Pomaderris argyrophylla’s leaves are the host plant for the beautiful little Yellow Jewel Butterfly Hypochyrsops hecalius. The flowers are attractive to myriads of pollen flies and other insects.
It is particularly attractive to insectivorous birds which are attracted to the trees when in flower.
Cultivation:
Pomaderris argyrophylla makes a beautiful large shrub or small tree for the garden. It always looks green and fresh especially where adequate ground moisture is retained and some shade is provided. In cultivation it will grow 3 meters to 4 meters in height by 2 meter to 4 meters in diameter when grown in the open as a shrub or 5 meters to 6 meters in height by 2 meters to 3 meters in diameter as a small rainforest tree when grown in an enclosed position in a suburban rainforest tree.
2 to 5 plants planted close together at random spacing or in curved lines look particularly good when mixed with plants which are of a similar size and have bright pale green foliages and various coloured trunks. It can also be used to great effect where mixed coloured annuals are planted below or with prostrate Grevillea for a bush garden adding height and width to the garden.
It is most suitable where shade is a problem on moist soils. Use them adjacent to pathways, rockeries, along sandy clay banks or along driveways or adjacent to natural bushy gardens. Mass plantings of 5 or more plants in a row can make a beautiful formal backdrop or make a garden very private. The flowers are a real bonus.
It makes good dense hedges and safe wildlife corridors for birds to travel along.
Propagation:
Seeds: Seeds of Pomaderris argyrophylla can be removed easily from the capsules as they ripen but are difficult to collect. The best method of collection is to place brown paper bags over the spent flower heads and wait and observe. Freshly collected seed must be treated first.
First scarify the seeds by lightly rubbing them over very fine emery paper. Do not break the testa.
Secondly place the seeds in a container of water that has just come off the boil and allow them to soak for 4 to 5 hours.
Sow the freshly treated seeds directly into a seed raising mix, keeping them moist not wet. When the seedlings are 20mm to 25mm tall, prick them out and plant them into 50mm native tubes using a good organic mix.
As the seedlings roots reach the bottom of the tubes plant them out into their permanent position. Do not delay.
Cuttings: Fortunately Pomaderris argyrophylla cuttings strike easy. Use 100mm to 200mm long tip cuttings or lateral shoots from the present season’s growth. Take them in warmer months of the year. Remove half the leaves from the bottom section being careful not to tear the bark.
1 Prepare the cutting mix by adding two thirds sharp clean river sand, one third peat or one third perlite. These ingredients must be sterilized,
2 Select good material from non diseased plants,
3 Select semi green stems for cuttings. Look for a stem with two or three nodes,
4 Place the cutting on a flat, hard surface, and make a clean cut down one side of the cutting at the base for 10mm with a sharp sterile knife or razor blade. – This scarification of the node will increase the chances of roots emerging from this spot. Now remove all but one or two the leaves, leaving the apex leaves in tact. If the leaves are very large in proportion to the stem, cut off the apical halves.
5 No rooting hormone is required,
6 Use a small dipple stick or old pencil to poke a hole into the soilless potting mix. Ensure the hole is slightly larger than the stem diameter and be careful not to wipe the rooting hormone off the cuttings base. Place 2 to 4 cuttings in each of the 50mm native tubes,
7 I like to place the tubes in bucket with holes drilled in the bottom to allow excess water to drain out. A plastic bag that fits over the bucket is ideal to help maintain temperature and moisture. Place in a semi shaded, warm position like under 50mm shade cloth.
8 When the cuttings have struck, open the bag to allow air circulation for a few days to a week,
9 Once hardened off remove the cuttings from the bag and allow to further hardening for a few more days to a week,
10 Transplant into a good potting mix to grow on.
Fertilize using seaweed, fish emulsion or organic chicken pellets soaked in water on an alternate basis. Fertilize every two months until the plants are established then annually in early September to October to maintain better colour, health, vitality and flowering
Further Comments from Readers:
“Hi reader, it seems you use The Bible of Botany a lot. That’s great as we have great pleasure in bringing it to you! It’s a little awkward for us to ask, but our first aim is to purchase land approximately 1,600 hectares to link several parcels of N.P. into one at The Pinnacles NSW Australia, but we need your help. We’re not salespeople. We’re amateur botanists who have dedicated over 30 years to saving the environment in a practical way. We depend on donations to reach our goal. If you donate just $5, the price of your coffee this Sunday, We can help to keep the planet alive in a real way and continue to bring you regular updates and features on Australian plants all in one Botanical Bible. Any support is greatly appreciated. Thank you.”
In the spirit of reconciliation we acknowledge the Bundjalung, Gumbaynggirr and Yaegl and all aboriginal nations throughout Australia and their connections to land, sea and community. We pay our respect to their Elders past, present and future for the pleasures we have gained.
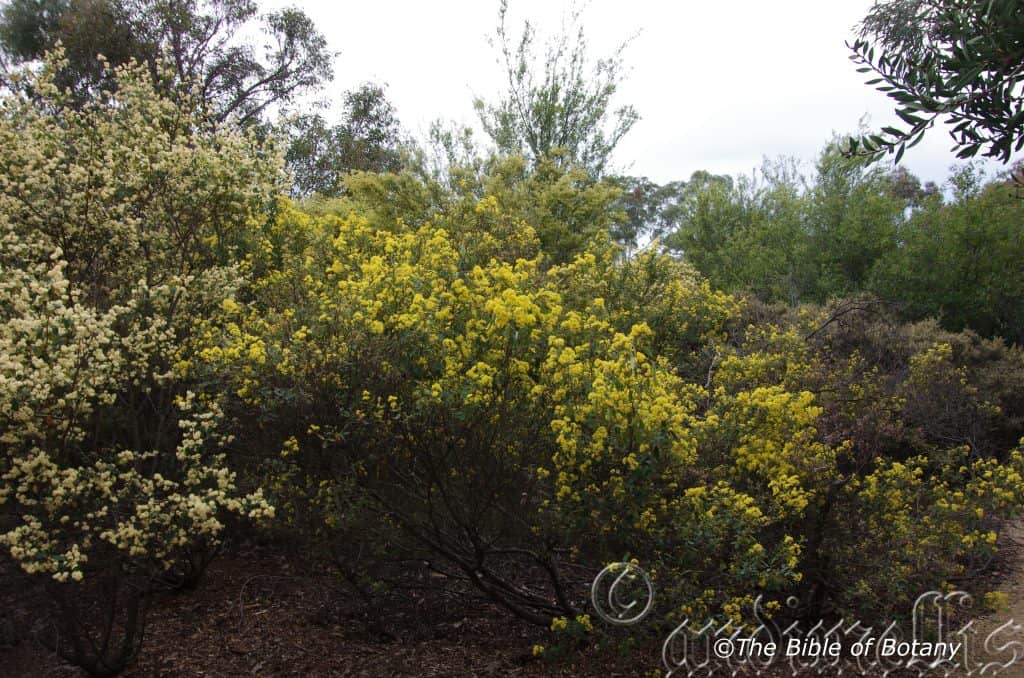
National Botanic Gardens ACT
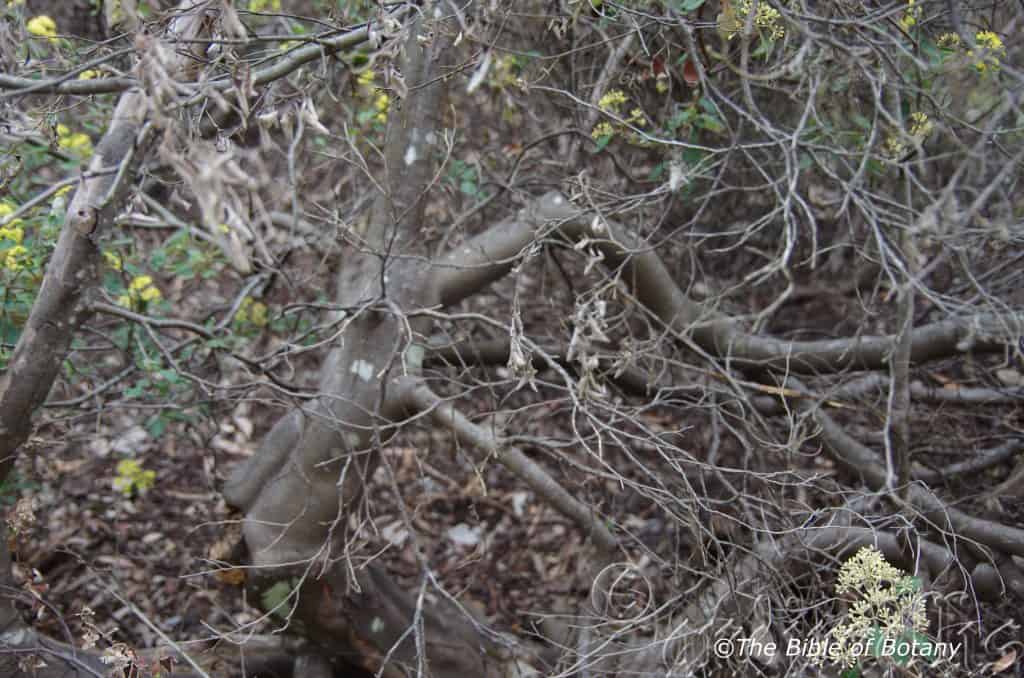
National Botanic Gardens ACT
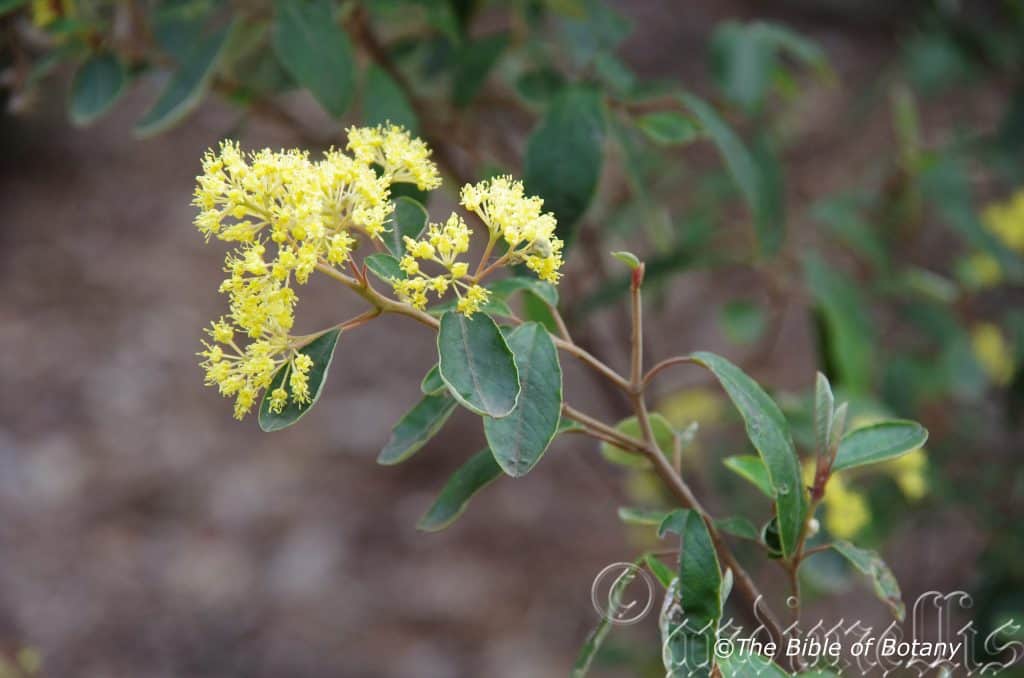
National Botanic Gardens ACT
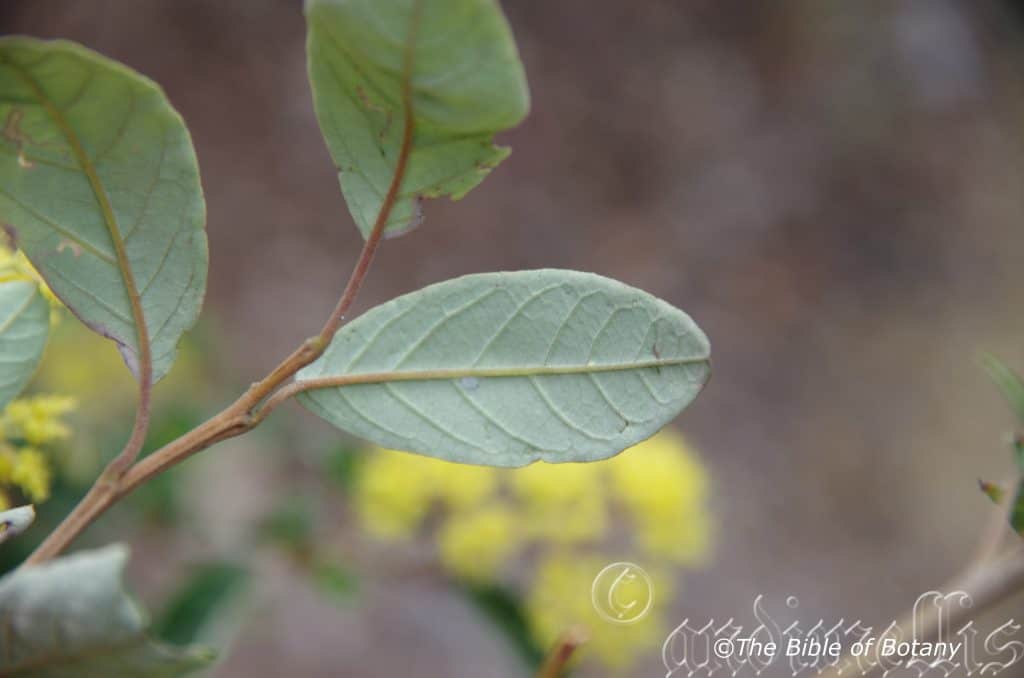
National Botanic Gardens ACT
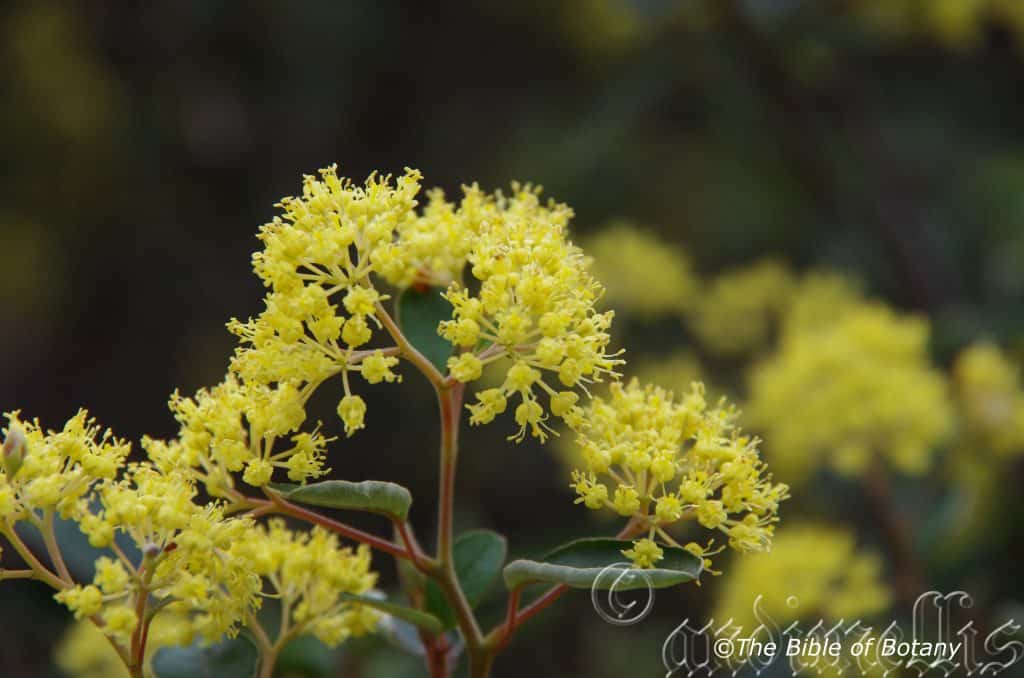
National Botanic Gardens ACT
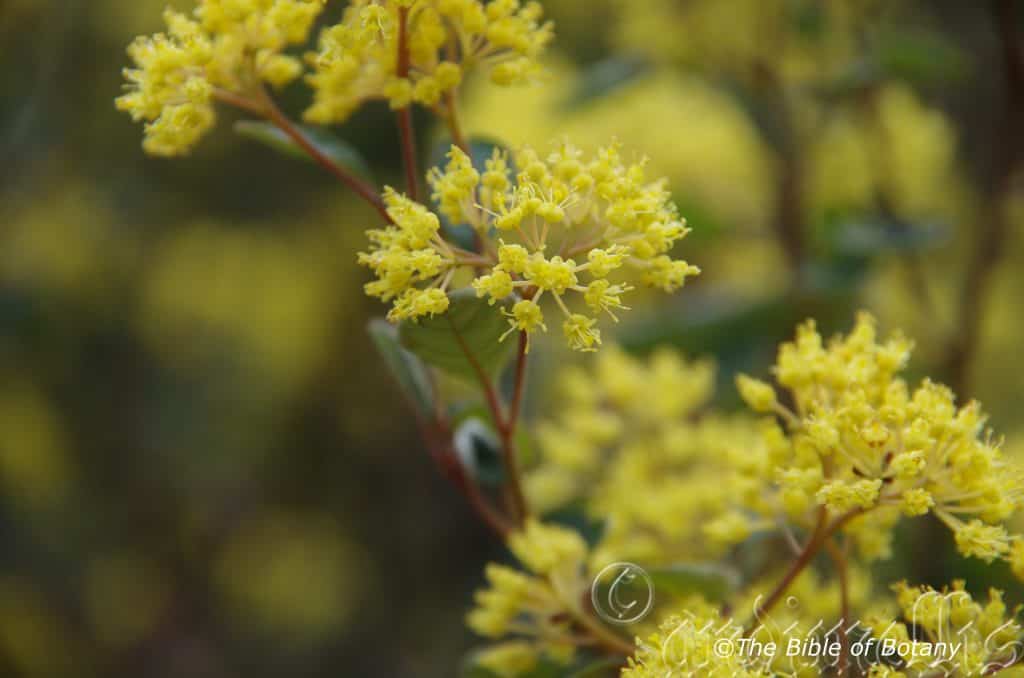
National Botanic Gardens ACT
Pomaderris aurea
Classification:
Division: Eudicots
Order: Core Eudicots
Superclass: Rosids
Class: Eurosids
Order: Rosales
Family: Rhamnaceae
Genus: From Poma, which is Ancient Greek for a lid and Derris, which is Ancient Greek for a fur or at times skin. It refers to membrane covering the fruits, which are covered in short hairs, resembling an animals pelt.
Species: From Khthṓn which is Ancient Greek for the soils or earth and later Humus which is Latin for the earth. It refers to plants, which stay close to the earth.
Common Name:
Distribution:
Pomaderris aurea is found in scattered populations south from the Upper reaches of the Hume River to near Tarralgon in the easthern third of Victoria.
https://avh.ala.org.au/occurrences/search?taxa=Pomaderris+aurea#tab_mapView
Habitat Aspect Climate:
Pomaderris aurea prefers light dappled shade to full sun. It usually grows in dry or moist Eucalyptus forests, open woodlands and adjacent to montane heath lands. The altitude ranges from 100 meters ASL to 1250 meters ASL.
The temperatures range from minus 4 degree in August to 37degrees in January.
The rainfalls range from lows of 700mm to an average of 2200mm annually.
Soil Requirements:
Pomaderris aurea prefers better quality light fatty clays to medium clays often with copious quantities of forest litter. The soils are usually derived from decomposed granites. The soils pH ranges from 4.5pH to 6pH. It does not tolerate waterlogged soils. Non saline soils to moderately saline soils are tolerated.
Height & Spread:
Wild Plants: 0.5m to 2m by 2m to 3m.
Characteristics:
Pomaderris aurea is a multi stemmed shrub with smooth, deep grey-brown stems. The young stems are maroon or pale green and moderately to densely covered in long simple rusty villous hairs.
The alternate, elliptic to ovate leaves measure 15mm to 50mm in length by 8mm to 20mm in width. The petioles are sparsely covered in long simple or clustered hirsute hairs over a short whitish stellate tomentose hairs and measure 8m to 22mm in length. The bases are rounded while the apexes are obtuse to acute. The discolourous laminas are deep sea-green, dull and sparsely to moderately covered hirsute hairs, while the lower is paler, sparsely covered in rusty, sub appressed hirsute hairs overlying dense greyish stellate hairs. The laminas decurve slightly downwards from the mid vein to the margins or can recurve strongly near the margins and gently decurve on the apical third. The margins are entire and slightly undulate. The mid vein and 7 to 11 lateral veins are strongly prominent and are densely covered in rusty, sub appressed hirsute hairs overlying dense greyish stellate hairs and are visible on the upper lamina. The lateral veins form a loop well inside the margins.
The caduceus stipules are sparsely to moderately covered in rusty, sub appressed hirsute hairs overlying dense greyish stellate hairs and measure 4mm to 9mm in length.
The inflorescence are a rounded or pyramidal panicle, which measure 30mm to 50mm in diameter. The caduceus bracts or weakly persistent. The golden yellow flowers are moderately covered in greyish stellate hairs externally. The pedicels measure 2mm to 3mm in length. The yellow hypanthium measures 1.4 to 1.8mm in length. The 5 caduceus sepals measure 2mm to 2.5mm length. The 5 narrow to broad spathulate or elliptical petals measure 1.5mm to 22mm in length by 2mm in width. The ovary is virtually inferior. The style is branched on the apical third to half. The flowers appear from September to October.
The erect filaments measure 2.5mm to 3mm in length. The deep yellow, oblong, dorsifixed anthers measure 0.7mm to 0.9mm in length, dehisce longitudinally. The ovary is densely covered in cream pulverulent hairs. The flowers appear from September to October.
The fruits are small ellipsoidal capsule. The pale green capsules turn brown when ripe. The hypanthia and capsules are covered in rusty stellate and tomentose hairs with longer hirsute hairs. The seeds are hard, deep brown to black and are oval to ovate.
Wildlife:
Pomaderris aurea is particularly attractive to insectivorous birds which are attracted to the trees when in flower.
Cultivation:
Pomaderris aurea makes a beautiful large shrub or small tree for the garden. It always looks green and fresh especially where adequate ground moisture is retained and some shade is provided. In cultivation it will grow 2.5 meters to 3 meters in height by 2.5 meters to 3 meters in diameter when grown in the open as a shrub or 5 meters to 6 meters in height by 2 meters to 3 meters in diameter when trained as a small tree when grown in the open or in a semi shaded position.
2 to 5 plants planted close together with random spacing or in curved lines look particularly good when mixed with plants which are of a similar size and have bright pale green foliages and various coloured trunks. It can also be used to great effect where mixed coloured annuals are planted below or with prostrate Grevillea for a bush garden adding height and width to the garden.
It is most suitable where shade is a problem on moist soils. Use it adjacent to pathways, rockeries, along sandy clay banks or along driveways or adjacent to natural bush gardens. Mass plantings of 5 or more plants in a row can make a beautiful formal backdrop or make a garden very private. The flowers are a real bonus.
It makes good dense hedges and safe wildlife corridors for birds to travel along.
Propagation:
Seeds: The seeds of Pomaderris aurea can be removed easily from the capsules as they ripen but are difficult to collect. The best method of collection is to place brown paper bags over the spent flower heads and wait and observe. Freshly collected seed must be treated first.
First scarify the seeds by lightly rubbing them lightly over very fine emery paper. Do not break the testa.
Secondly place the seeds in a container of water that has just come off the boil and allow them to soak for 4 to 5 hours.
Sow the freshly treated seeds directly into a seed raising mix, keeping them moist not wet. When the seedlings are 20mm to 25mm tall, prick them out and plant them into 50mm native tubes using a good organic mix.
As the seedlings roots reach the bottom of the tubes plant them out into their permanent position. Do not delay.
Cuttings: Pomaderris aurea cuttings may prove difficult in the nursery. Use 100mm to 200mm long tip cuttings or lateral shoots from the present season’s growth. Take them in warmer months of the year.
1 Prepare the cutting mix which is made from 30mm coconut fibre, 30mm course washed sand, 30mm perlite and 10mm peat,
2 Select good material from non diseased plants,
3 Select semi green stems for cuttings. Look for a stem with two or three nodes,
4 Place the cutting on a flat, hard surface, and make a clean cut down one side of the cutting at the base for 10mm with a sharp sterile knife or razor blade. – This scarification of the node will increase the chances of roots emerging from this spot. Now remove all but one or two the leaves, leaving the apex leaves in tact. If the leaves are very large in proportion to the stem, cut off the apical halves.
5 Use a medium rooting hormone. Place water in a saucer and a little hormone in a milk bottle top or similar top. Place the base of the cutting in the water and dip into the rooting hormone tapping off the excess. With a dipple stick make a hole slightly larger than the cutting and place the cuttiing into it, being careful not to damage or lose the hormone,
6 Use a small dipple stick or old pencil to poke a hole into the soilless potting mix. Ensure the hole is slightly larger than the stem diameter and be careful not to wipe the rooting hormone off the cuttings base. Place 2 to 4 cuttings in each of the 50mm native tubes,
7 I like to place the tubes in bucket with holes drilled in the bottom to allow excess water to drain out. A plastic bag that fits over the bucket is ideal to help maintain temperature and moisture. Place in a semi shaded, warm position like under 50mm shade cloth.
8 When the cuttings have struck, open the bag to allow air circulation for a few days to a week,
9 Once hardened off remove the cuttings from the bag and allow to further hardening for a few more days to a week,
10 Transplant into a good potting mix to grow on.
Fertilize using seaweed, fish emulsion or organic chicken pellets soaked in water on an alternate basis. Fertilize every two months until the plants are established then annually in early September to October to maintain better colour, health, vitality and flowering
Further Comments from Readers:
“Hi reader, it seems you use The Bible of Botany a lot. That’s great as we have great pleasure in bringing it to you! It’s a little awkward for us to ask, but our first aim is to purchase land approximately 1,600 hectares to link several parcels of N.P. into one at The Pinnacles NSW Australia, but we need your help. We’re not salespeople. We’re amateur botanists who have dedicated over 30 years to saving the environment in a practical way. We depend on donations to reach our goal. If you donate just $5, the price of your coffee this Sunday, We can help to keep the planet alive in a real way and continue to bring you regular updates and features on Australian plants all in one Botanical Bible. Any support is greatly appreciated. Thank you.”
In the spirit of reconciliation we acknowledge the Bundjalung, Gumbaynggirr and Yaegl and all aboriginal nations throughout Australia and their connections to land, sea and community. We pay our respect to their Elders past, present and future for the pleasures we have gained.
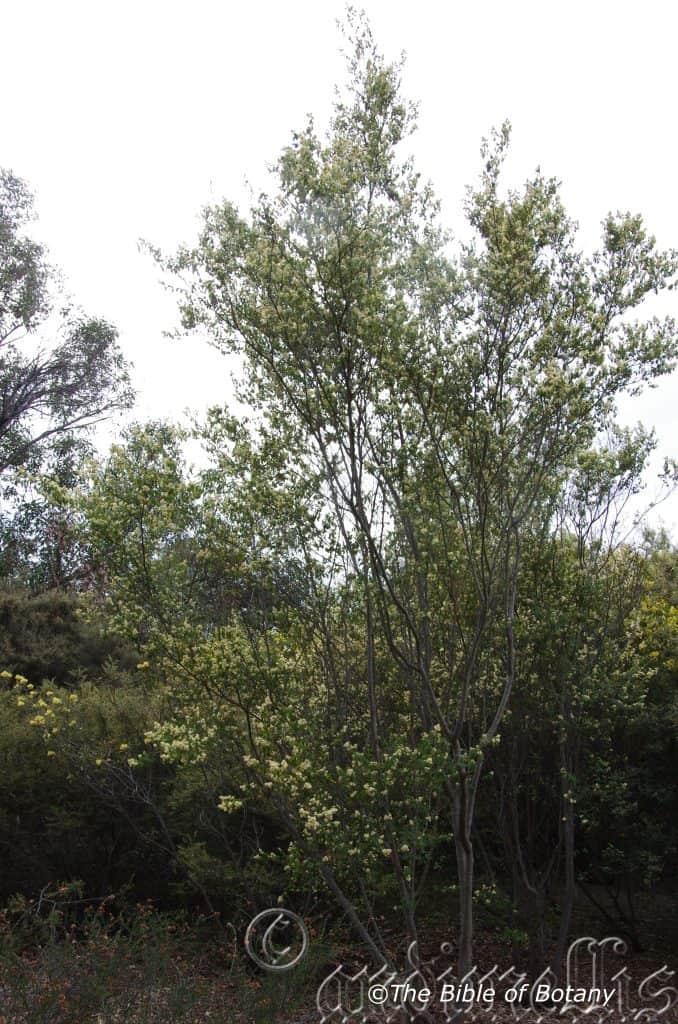
National Botanic Gardens ACT
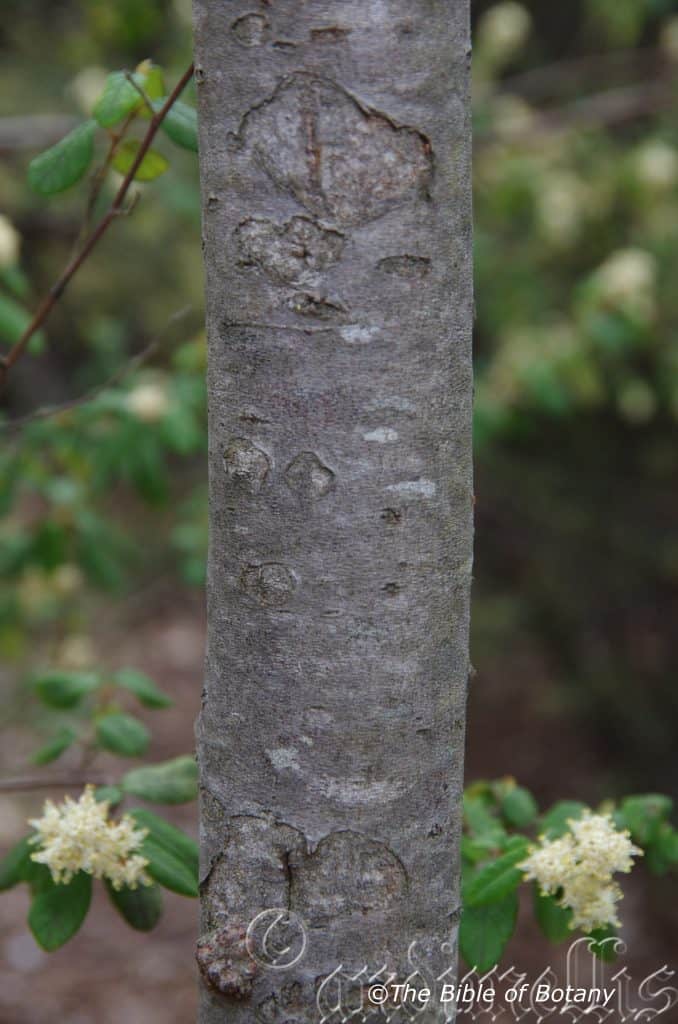
National Botanic Gardens ACT
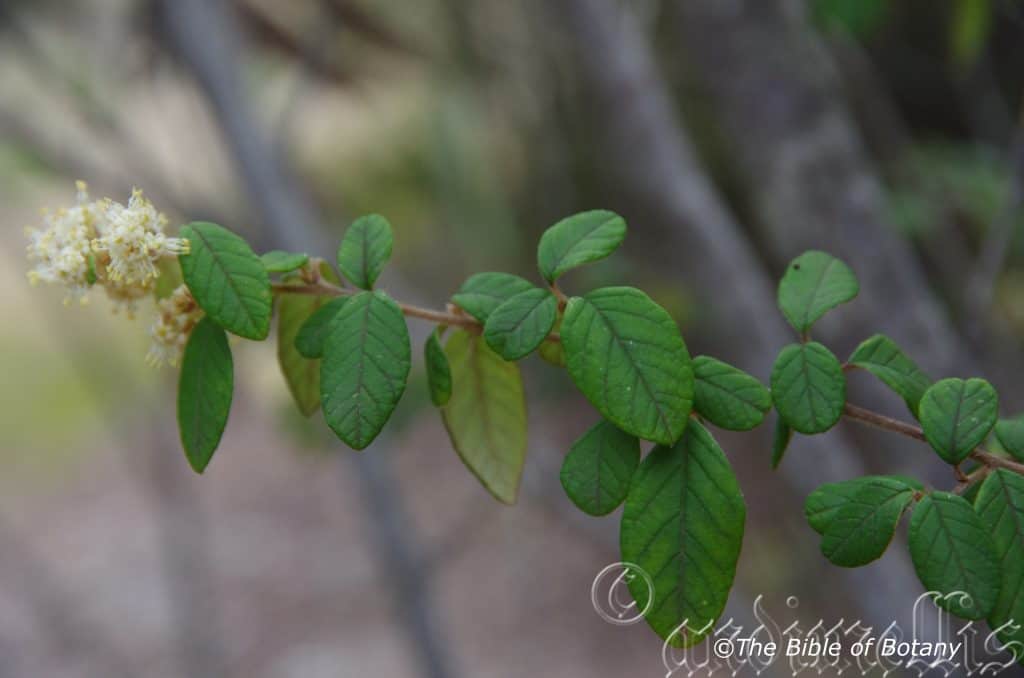
National Botanic Gardens ACT
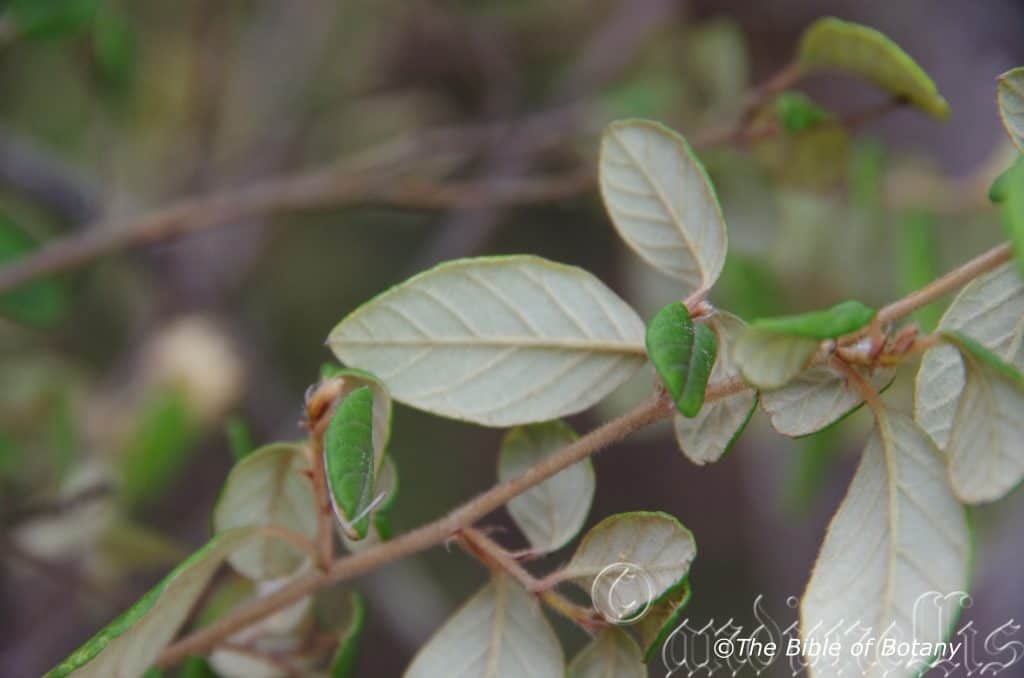
National Botanic Gardens ACT
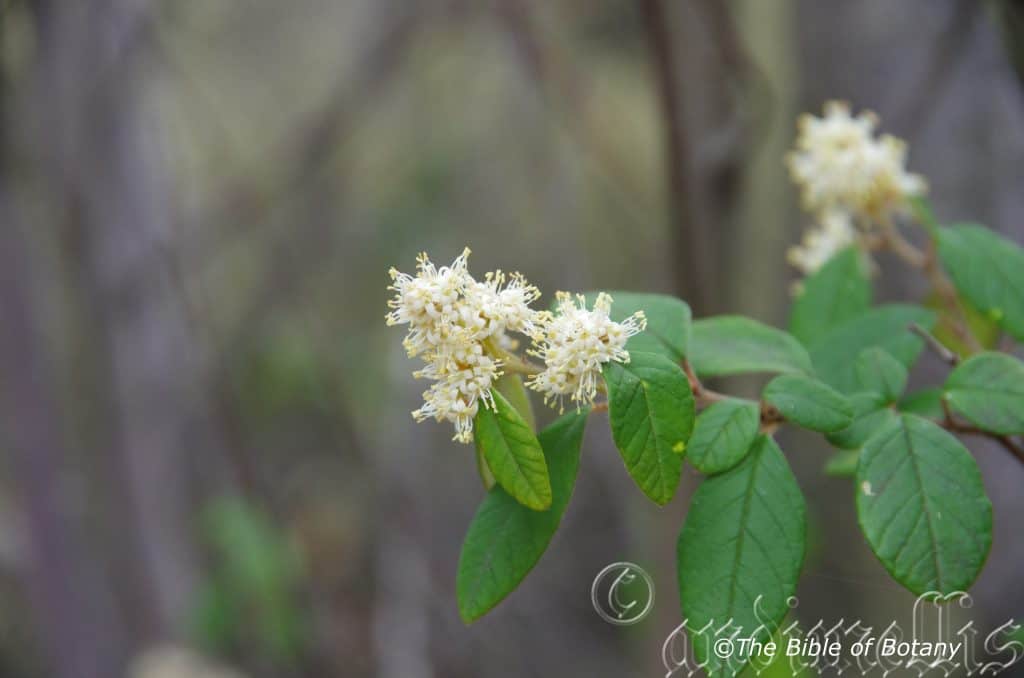
National Botanic Gardens ACT
Pomaderris brunnea
Classification:
Division: Eudicots
Superclass: Rosids
Order: Rosales
Family: Rhamnaceae
Genus: From Poma, which is Ancient Greek for a lid and Derris, which is Ancient Greek for a fur or at times skin. It refers to membrane covering the fruits, which are covered in short hairs.
Species: From Brunnea, which is late Latin for brown. It refers to the fruits being covered in deep rusty-brown hairs.
Common Name: Silver Pomaderris.
Distribution:
Pomaderris brunnea is found in 2 distinct disjunct populations mainly on and east of the Great Dividing Range. The northern population is bounded by the Windsor Tableland, on the Torrens Creek headwaters and Mount Abbott near Bowen in far north eastern Queensland.
The southern populations are bounded by Yandina, Mapleton and Proston in south eastern Queensland south to the Goonoowigall Nature Reserve, Mistake Ridge and the Nightcap range in north eastern New South Wales with an outlying population west of the Range in the Warrumbungles.
Habitat Aspect Climate:
Pomaderris brunnea prefers light dappled shade to full sun. It grows along creeks, road side culverts where there is a break in the forest canopy. The altitude usually grows from the mid-levels to the higher elevations but ranges from 71 meters ASL to 1310 meters ASL.
The temperatures range from minus 4 degree in August to 35 degrees in January.
The rainfalls range from lows of 500mm to an average of 2400mm.
Soil Requirements:
Pomaderris brunnea prefers better quality light sandy loams to medium clays often with copious quantities of leaf litter. The soils are usually derived from decomposed black basalts, brown basalts, granites, sandstones or metamorphic rocks. The soils pH ranges from 4.5pH to 6pH. It does not tolerate waterlogged soils. Non saline soils to moderately saline soils are tolerated.
Height & Spread:
Wild Plants: 1m to 6m by 2m to 4m.
Characteristics:
Pomaderris brunnea grows as a small tree or more often as a large bushy shrub with a straight, mid grey trunk and larger branches which are covered in fine longitudinal ridges, lichens and mosses otherwise it is relatively smooth. The stems are grass-green and are densely covered in rusty-fawn to rusty-brown pubescent hairs and longer hirsute hairs. The new growth is rusty brown to fawn.
Pomaderris brunnea’s alternate, lanceolate to elliptic leaves measure 50mm to 120mm in length by 15mm to 30mm in width. The petioles are grooved on the upper surface, are densely covered in white pubescent hairs and measure 6mm to 13mm in length. The bases are broadly cuneate to cuneate while the apexes are tapering to acute to acuminate. The discolourous laminas are deep sea-green, dull and glabrous on the upper laminas while the lower laminas are silvery and densely covered in white pubescent hairs. The laminas are flat and slightly undulating while the margins are entire. The mid vein is strongly prominent on the lower laminas while the 20 to 25 pinnate lateral veins are regularly arranged and loop inside the margins and are covered in longer hirsute hairs. The reticulated veins are usually not apparent.
The inflorescence of Pomaderris brunnea are born in sparse panicles that measure 50mm to 100mm in diameter. The white to silvery peduncles and pedicels are moderately covered in white pubescent hairs. The rachis and peduncles measure 20mm to 60mm in length while the pedicels measure 2mm to 4mm in length. The 5 caduceus, white, cream or pale yellow sepals are reflexed at anthesis and measure 1.3mm to 2mm in length by 0.8mm to 1mm in width. The petals are usually absent but when present the caduceus, single white, cream or pale yellow is auriculate.
The staminal filaments measure 1.4mm to 1.6mm in length and are inflexed before anthesis. The anthers measure 0.3mm to 0.4mm in length. The ovary is densely covered in white pulverulent hairs.
Pomaderris brunne’s fruits are capsules. The green capsules and hypanthium turn brown when ripe and are moderately covered in long rusty-brown hirsute hairs. The seeds are hard, deep brown to black and are oval to ovate.
Wildlife:
Pomaderris brunnea leaves are the host plant for the beautiful little Yellow Jewel Butterfly Hypochyrsops hecalius. The flowers are attractive to myriads of pollen flies and other insects.
It is particularly attractive to insectivorous birds which are attracted to the trees when in flower.
Cultivation:
Pomaderris brunnea makes a beautiful large shrub or small tree for the garden. It always looks green and fresh especially where adequate ground moisture is retained and some shade is provided. In cultivation it will grow 3 meters to 4 meters in height by 2 meter to 4 meters in diameter when grown in the open as a shrub or 5 meters to 6 meters in height by 2 meters to 3 meters in diameter as a small rainforest tree when grown in an enclosed position in a suburban rainforest tree.
2 to 5 plants planted close together at random spacing or in curved lines look particularly good when mixed with plants which are of a similar size and have bright pale green foliages and various coloured trunks. It can also be used to great effect where mixed coloured annuals are planted below or with prostrate Grevillea for a bush garden adding height and width to the garden.
It is most suitable where shade is a problem on moist soils. Use it adjacent to pathways, rockeries, along sandy clay banks or along drive ways or adjacent to natural bush gardens. Mass plantings of 5 or more plants in a row can make a beautiful formal back drop or make a garden very private. The flowers are a real bonus.
It makes a good dense hedge row and safe wildlife corridors for birds to travel along.
Propagation:
Seeds: Seeds of Pomaderris brunnea can be removed easily from the capsules as they ripen but are difficult to collect. The best method of collection is to place brown paper bags over the spent flower heads and wait and observe. Freshly collected seed must be treated first.
First scarify the seeds by lightly rubbing them over very fine emery paper. Do not break the testa.
Secondly place the seeds in a container of water that has just come off the boil and allow them to soak for 4 to 5 hours.
Sow the freshly treated seeds directly into a seed raising mix, keeping them moist not wet. When the seedlings are 20mm to 25mm tall, prick them out and plant them into 50mm native tubes using a good organic mix.
As the seedlings roots reach the bottom of the tubes plant them out into their permanent position.
Cuttings: Fortunately Pomaderris brunnea cuttings strike easy. Use 100mm to 200mm long tip cuttings or lateral shoots from the present season’s growth. Take them in warmer months of the year. Remove half the leaves from the bottom section being careful not to tear the bark.
1 Prepare the cutting mix by adding two thirds sharp clean river sand, one third peat or one third perlite. These ingredients must be sterilized,
2 Select good material from non diseased plants,
3 Select semi green stems for cuttings. Look for a stem with two or three nodes,
4 Place the cutting on a flat, hard surface, and make a clean cut down one side of the cutting at the base for 10mm with a sharp sterile knife or razor blade. – This scarification of the node will increase the chances of roots emerging from this spot. Now remove all but one or two the leaves, leaving the apex leaves in tact. If the leaves are very large in proportion to the stem, cut off the apical halves.
5 No rooting hormone is required,
6 Use a small dipple stick or old pencil to poke a hole into the soilless potting mix. Ensure the hole is slightly larger than the stem diameter and be careful not to wipe the rooting hormone off the cuttings base. Place 2 to 4 cuttings in each of the 50mm native tubes,
7 I like to place the tubes in bucket with holes drilled in the bottom to allow excess water to drain out. A plastic bag that fits over the bucket is ideal to help maintain temperature and moisture. Place in a semi shaded, warm position like under 50mm shade cloth.
8 When the cuttings have struck, open the bag to allow air circulation for a few days to a week,
9 Once hardened off remove the cuttings from the bag and allow to further hardening for a few more days to a week,
10 Transplant into a good potting mix to grow on.
Fertilize using seaweed, fish emulsion or organic chicken pellets soaked in water on an alternate basis. Fertilize every two months until the plants are established then annually in early September to October to maintain better colour, health, vitality and flowering
Further Comments from Readers:
“Hi reader, it seems you use The Bible of Botany a lot. That’s great as we have great pleasure in bringing it to you! It’s a little awkward for us to ask, but our first aim is to purchase land approximately 1,600 hectares to link several parcels of N.P. into one at The Pinnacles NSW Australia, but we need your help. We’re not salespeople. We’re amateur botanists who have dedicated over 30 years to saving the environment in a practical way. We depend on donations to reach our goal. If you donate just $5, the price of your coffee this Sunday, We can help to keep the planet alive in a real way and continue to bring you regular updates and features on Australian plants all in one Botanical Bible. Any support is greatly appreciated. Thank you.”
In the spirit of reconciliation we acknowledge the Bundjalung, Gumbaynggirr and Yaegl and all aboriginal nations throughout Australia and their connections to land, sea and community. We pay our respect to their Elders past, present and future for the pleasures we have gained.
Pomaderris eriocephala
Classification:
Division: Eudicots
Order: Core Eudicots
Superclass: Rosids
Class: Eurosids
Order: Rosales
Family: Rhamnaceae
Genus: From Poma, which is Ancient Greek for a lid and Derris, which is Ancient Greek for a fur or at times skin. It refers to membrane covering the fruits, which are covered in short hairs.
Species: From Erios, which is Ancient Greek for woolly and Képhalos, which is Ancient Greek for a head. It refers to peduncles, pedicels, calyxes and sepals, which are covered in long, soft, silky, floccose hairs.
Common Name:
Distribution:
Pomaderris eriocephala is found south from Torrington near Tenterfield in north eastern New South Wales to the Strzelecki Ranges in south eastern Victoria. It is mainly found on the Western Slopes and on the Great Dividing Range in the north and east of the range in the southern parts of its range.
https://avh.ala.org.au/occurrences/search?taxa=Pomaderris+eriocephala#tab_mapView
Habitat Aspect Climate:
Pomaderris eriocephala prefers light dappled shade to full sun. It grows in open Eucalyptus forests. The altitude ranges from 50 meters ASL to 1380 meters ASL.
The temperatures range from minus 2 degree in August to 34 degrees in January.
The rainfalls range from lows of 550mm to an average of 2000mm.
Soil Requirements:
Pomaderris eriocephala prefers better quality light fatty clays to medium clays often with copious quantities of forest litter. The soils are usually derived from decomposed granites. The soils pH ranges from 4.5pH to 6pH. It does not tolerate waterlogged soils. Non saline soils to moderately saline soils are tolerated.
Height & Spread:
Wild Plants: 1m to 3m by 1.5m to 4m.
Characteristics:
Pomaderris eriocephala usually grows as a multi stemmed shrub with smooth, deep grey to pinkish-grey stems. The new growth and stems are pale green and densely covered in white or rusty-fawn to rusty golden-brown hirsute and tomentose hairs.
Pomaderris eriocephala’s alternate, ovate to orbicular leaves measure 10mm to30mm in length by 8mm to 20mm in width. The petioles are densely covered in white or rusty-fawn to rusty golden-brown hirsute and tomentose hairs and measure 5mm to 10mm in length. The bases are rounded while the apexes are obtuse. The discolourous laminas are deep sea-green, dull or semi glossy and sparsely to densely covered in rusty hirsute hairs while the lower laminas are densely covered in white tomentose hairs and rusty sparsely to moderately covered in rusty long rusty hirsute hairs. The laminas are rarely flat but are usually gently convex on the upper surface from the mid vein to the margins and gently decurve near the apexes. The lamina is also convex between the mid vein and lateral veins. The margins are irregularly, finely and bluntly toothed. The mid vein and 11 to 15 lateral veins are strongly prominent on the lower lamina and are visible on the upper lamina. The lateral veins forma loop well inside the margins.
The inflorescences of Pomaderris eriocephala are corymbs born from the upper leaf axils and terminals. They measure 50mm to 100mm in diameter. The peduncle, rachis and pedicels are densely covered in white or rusty-fawn to rusty golden-brown hirsute and tomentose hairs. The peduncles measure 10mm to 12mm in length while the pedicels measure 2mm to 4mm in length. The narrow triangular, contorted stipules sheath the terminal bud in the leaf axils and measure 4.5mm to 5.5mm in length by 1mm to 2mm in width. The white to pastel cream calyx’s tube (hypanthium) is densely covered in white sericeous hairs externally and is glabrous internally. The 5 white to pastel cream sepals 2mm to 2.2mm in length by 1mm to 1.1mm in width. The petals are usually absent or at times a single, white to pastel cream, caduceus petal is present.
The staminal filaments measure 1.5mm to 1.7mm in length and are inflexed before anthesis. The pastel yellow anthers measure 0.3mm to 0.4mm in length. The ovary is densely covered in cream pulverulent hairs. The flowers appear from late August to late April with some flowers appearing throughout the year.
Pomaderris eriocephala’s fruits are small ellipsoidal capsule. The capsules measure 3mm to 3.5mm in length by 2mm to 2.5mm in diameter. The pale green capsules turn grey on ripening before drying. The hypanthium and capsule are covered in white tomentose hairs. The seeds are hard, deep brown to black and are oval to ovate.
Wildlife:
Pomaderris eriocephala’s leaves are the host plant for the beautiful little Yellow Jewel Butterfly Hypochyrsops hecalius. The flowers are attractive to myriads of pollen flies and other insects.
It is particularly attractive to insectivorous birds which are attracted to the trees when in flower.
Cultivation:
Pomaderris eriocephala makes a beautiful large shrub or small tree for the garden. It always looks green and fresh especially where adequate ground moisture is retained and some shade is provided. In cultivation it will grow 2.5 meters to 3 meters in height by 2.5 meters to 3 meters in diameter when grown in the open as a shrub or 3 meters to 4.5 meters in height by 2 meters to 3 meters in diameter when trained as a small tree when grown in the open or in a semi shaded position.
2 to 5 plants planted close together with random spacing or in curved lines look particularly good when mixed with plants which are of a similar size and have bright pale green foliages and various coloured trunks. It can also be used to great effect where mixed coloured annuals are planted below or with prostrate Grevillea for a bush garden adding height and width to the garden.
It is most suitable where shade is a problem on moist soils. Use them adjacent to pathways, rockeries, along sandy clay banks or along drive ways or adjacent to natural bush gardens. Mass plantings of 5 or more plants in a row can make a beautiful formal back drop or make a garden very private. The flowers are a real bonus.
It makes a good dense hedge and safe wildlife corridor for birds to travel along.
Propagation:
Seeds: Seeds of Pomaderris eriocephala can be removed easily from the capsules as they ripen but are difficult to collect. The best method of collection is to place brown paper bags over the spent flower heads and wait and observe. Freshly collected seed must be treated first.
First scarify the seeds by lightly rubbing them over very fine emery paper. Do not break the testa.
Secondly place the seeds in a container of water that has just come off the boil and allow them to soak for 4 to 5 hours.
Sow the freshly treated seeds directly into a seed raising mix, keeping them moist not wet. When the seedlings are 20mm to 25mm tall, prick them out and plant them into 50mm native tubes using a good organic mix.
As the seedlings roots reach the bottom of the tubes plant them out into their permanent position. Do not delay.
Cuttings: Pomaderris eriocephala cuttings may prove difficult in the nursery.
1 Prepare the cutting mix which is made from 30mm coconut fibre, 30mm course washed sand, 30mm perlite and 10mm peat,
2 Select good material from non diseased plants,
3 Select semi green stems for cuttings. Look for a stem with two or three nodes,
4 The best success was had with new season wood that had just hardened off. Take a 10mm slice off the bark from the bottom of the cutting on one side. – This scarification of the node will increase the chances of roots emerging from this spot. Now remove all but one or two the leaves, leaving the apex leaves in tact. If the leaves are very large in proportion to the stem, cut off the apical halves.
5 Use a medium rooting hormone. Place water in a saucer and a little hormone in a milk bottle top or similar top. Place the base of the cutting in the water and dip into the rooting hormone tapping off the excess. With a dipple stick make a hole slightly larger than the cutting and place the cutting into it, being careful not to damage or lose the hormone,
6 Use a small dipple stick or old pencil to poke a hole into the soilless potting mix. Ensure the hole is slightly larger than the stem diameter and be careful not to wipe the rooting hormone off the cuttings base. Place 2 to 4 cuttings in each of the 50mm native tubes,
7 I like to place the tubes in bucket with holes drilled in the bottom to allow excess water to drain out. A plastic bag that fits over the bucket is ideal to help maintain temperature and moisture. Place in a semi shaded, warm position like under 50mm shade cloth.
8 When the cuttings have struck, open the bag to allow air circulation for a few days to a week,
9 Once hardened off remove the cuttings from the bag and allow to further hardening for a few more days to a week,
10 Transplant into a good potting mix to grow on.
Fertilize using seaweed, fish emulsion or organic chicken pellets soaked in water on an alternate basis. Fertilize every two months until the plants are established then twice annually in early September or March to maintain health, vitality and better flowering.
Fertilize using seaweed, fish emulsion or organic chicken pellets soaked in water on an alternate basis. Fertilize every two months until the plants are established then annually in early September to October to maintain better colour, health, vitality and flowering
Further Comments from Readers:
“Hi reader, it seems you use The Bible of Botany a lot. That’s great as we have great pleasure in bringing it to you! It’s a little awkward for us to ask, but our first aim is to purchase land approximately 1,600 hectares to link several parcels of N.P. into one at The Pinnacles NSW Australia, but we need your help. We’re not salespeople. We’re amateur botanists who have dedicated over 30 years to saving the environment in a practical way. We depend on donations to reach our goal. If you donate just $5, the price of your coffee this Sunday, We can help to keep the planet alive in a real way and continue to bring you regular updates and features on Australian plants all in one Botanical Bible. Any support is greatly appreciated. Thank you.”
In the spirit of reconciliation we acknowledge the Bundjalung, Gumbaynggirr and Yaegl and all aboriginal nations throughout Australia and their connections to land, sea and community. We pay our respect to their Elders past, present and future for the pleasures we have gained.
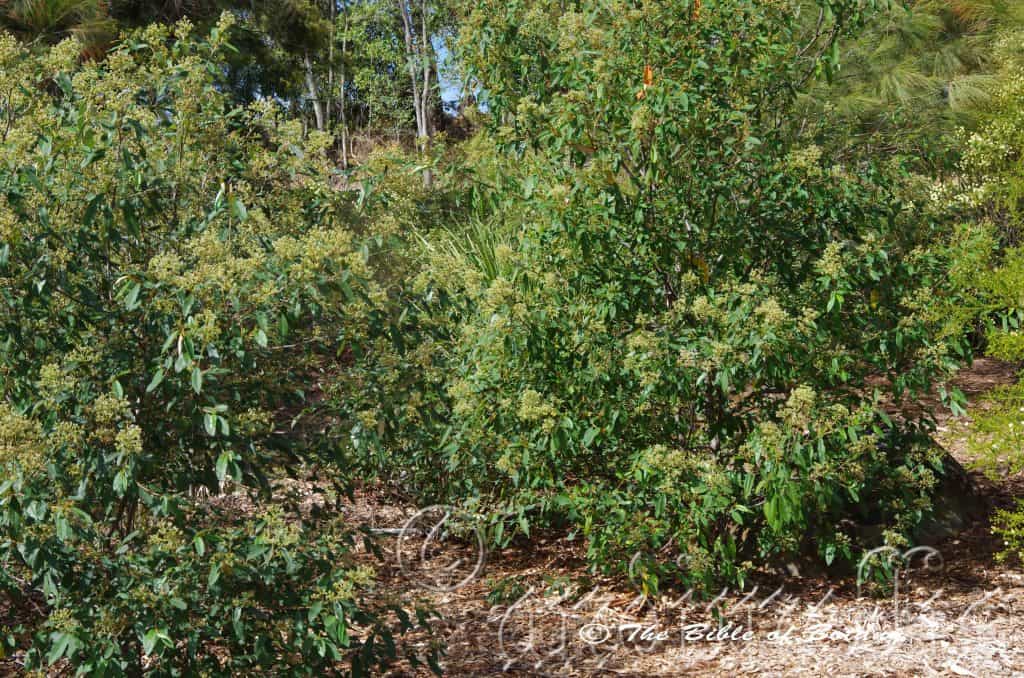
Rosser Gardens Benowa Qld.
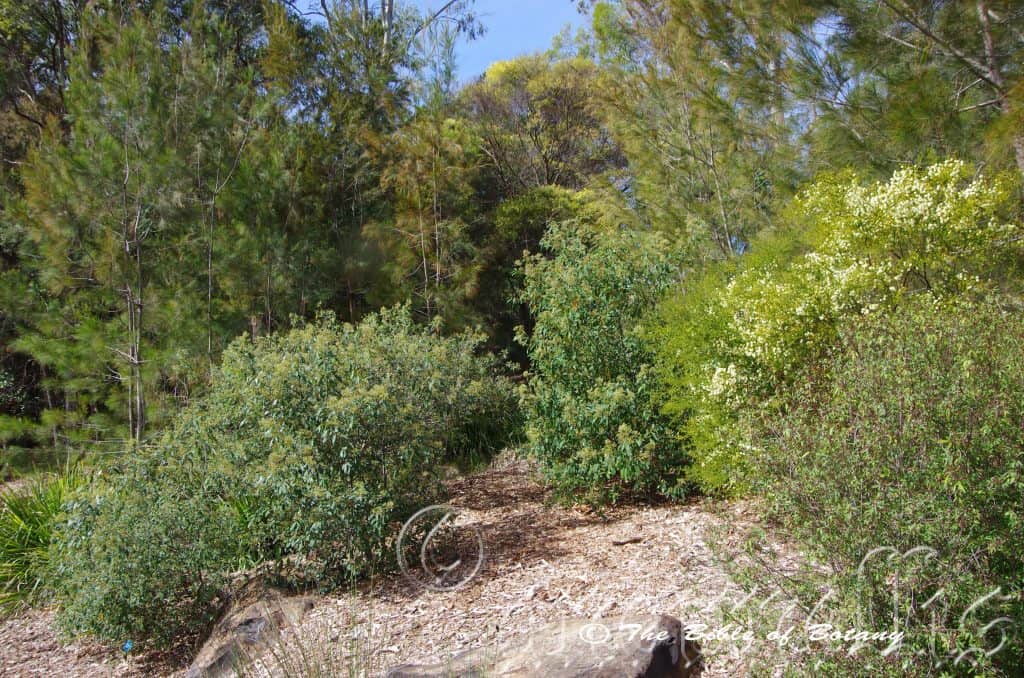
Rosser Gardens Benowa Qld.
Pomaderris ferruginea
Classification:
Division: Eudicots
Order: Core Eudicots
Superclass: Rosids
Class: Eurosids
Order: Rosales
Family: Rhamnaceae
Genus: From Poma, which is Ancient Greek for a lid and Derris, which is Ancient Greek for a fur or at times skin. It refers to membrane covering the fruits, which are covered in short hairs.
Species: From Ferrugineus, which is Latin for rusty iron coloured. It refers to the colour of the leaves, hairs or other physical properties of a plant, which have a rusty iron colour.
Common Name: Rusty Pomaderris.
Distribution:
Pomaderris ferruginea is found in several disjunct populations south from Eungella National Park west of Mackay in central eastern Queensland to Cape Otway south east of Melbourne and north to near Maldon in southern Victoria. It is mainly found on the Western Slopes, on and east of the Great Dividing Range.
https://avh.ala.org.au/occurrences/search?taxa=Pomaderris+ferruginea#tab_mapView
Habitat Aspect Climate:
Pomaderris ferruginea prefers light dappled shade to full sun. It grows along creeks, road side culverts, in open Eucalyptus forests or open sclerophyll forests. The altitude ranges from 20 meters ASL to 700 meters ASL.
The temperatures range from minus 2 degree in August to 34 degrees in January.
The rainfalls range from lows of 550mm to an average of 2000mm.
Soil Requirements:
Pomaderris ferruginea prefers better quality light fatty clays to medium clays often with copious quantities of leaf litter and pebbles. The soils are deep or on rare occasions on shallow soils close to the parent bedrock. The soils are derived from decomposed black basalts, brown basalts, granites, sandstones, metamorphic rocks or at times accumulated sands. The soils pH ranges from 4.5pH to 7pH. It does not tolerate waterlogged soils. Non saline soils to moderately saline soils are tolerated.
Height & Spread:
Wild Plants: 1m to 4m by 1m to 3m.
Characteristics:
Pomaderris ferruginea’s stems are deep grey. The stems are rusty brown to fawn and are moderately densely covered in rusty-fawn to rusty-brown pubescent hairs and hirsute hairs.
Pomaderris ferruginea’s alternate to almost opposite, elliptical to lanceolate leaves measure 30mm to 100mm in length by 10mm to 35mm in width. The caduceus stipules are ovate to lanceolate and measure 6mm to 9mm in length. The petiole is moderately to densely covered in rusty-fawn to rusty-brown hirsute spreading hairs. The bases are broadly cuneate while the apexes are acute to obtuse. The discolourous laminas are deep sea-green, dull and sparsely covered in rusty hirsute hairs on the upper laminas while the lower lamina is silvery and densely covered in white and rusty tomentose hairs. The laminas recurve slightly upwards from the mid vein the margins and decurve downwards on the apical third to quarter. The margins are entire and flat. The mid vein and 15 to 19 lateral veins are strongly prominent on the lower lamina and are visible on the upper lamina. The lateral veins forma loop well inside the margins.
The inflorescence of Pomaderris ferruginea are born in terminal panicles and measure 50mm to 100mm in diameter. The white to pale pink peduncles and pedicels are covered in white tomentose hairs. The peduncles measure 10mm to 12mm in length while the pedicels measure 4mm to 5mm in length. The cream to pale yellow calyx tubes measure lobes measure 2mm to 2.5mm in length. The 5 sepals are reflexed at anthesis and measure 1.5mm to 2.5mm in length.
The staminal filaments measure 1.4mm to 1.8mm in length and are inflexed before anthesis. The pastel yellow anthers measure 0.3mm to 0.4mm in length.
The ovary is densely covered in rusty pulverulent hairs. The flowers appear from late August to late October.
Pomaderris ferruginea’s fruit is a small ellipsoidal capsule. The capsules measure 3mm to 3.5mm in length by 2mm to 2.5mm in diameter. The pale green capsules turn grey on ripening before drying. The hypanthium and capsule are covered in white tomentose hairs. The seeds are hard, deep brown to black and are oval to ovate.
Wildlife:
Pomaderris ferruginea’s wildlife is unknown to the author.
Cultivation:
Pomaderris ferruginea is an excellent small shrub. It always looks green and fresh especially where adequate ground moisture is retained and some shade is provided. In cultivation it will grow 2 meters to 4 meters in height by 2 meter to 4 meters in diameter when grown in the open.
Three to five plants planted close together at random spacing on raised garden beds make great features especially when mixed with plants with different coloured flowers. It looks particularly good when mixed with plants which are of a similar size and have bright pale green foliages. It can also be used to great effect when mixed coloured annuals are planted below or with prostrate Grevillea for a bush garden adding height and width to the garden.
It is most suitable where shade is a problem on moist soils. Use them adjacent to pathways, rockeries, along sandy clay banks or along driveways or adjacent to natural bush gardens. Mass plantings of 5 or more plants in a row can make a beautiful formal backdrop or makes a garden very private in semi shaded areas. The flowers are a real bonus on this plant and can be used indoors as a cut flower though they only last for a few days
It makes good dense hedges and safe wildlife corridors for birds to travel along.
Propagation:
Seeds: Seeds of Pomaderris ferruginea can be removed easily from the capsules as they ripen but are difficult to collect. The best method of collection is to place brown paper bags over the spent flower heads and wait and observe. Freshly collected seed must be treated first.
First scarify the seeds by lightly rubbing them over very fine emery paper. Do not break the testa.
Secondly place the seeds in a container of water that has just come off the boil and allow them to soak for 4 to 5 hours.
Sow the freshly treated seeds directly into a seed raising mix, keeping them moist not wet. When the seedlings are 20mm to 25mm tall, prick them out and plant them into 50mm native tubes using a good organic mix.
As the seedlings roots reach the bottom of the tubes plant them out into their permanent position. Do not delay.
Cuttings: Pomaderris ferruginea cuttings may prove difficult in the nursery. The best success would probably be obtained by using new season wood that had just hardened off. Use 100mm long hardened material from the present season’s growth. Take them in mid-autumn or early spring. Remove 50mm to 60mm of the leaves from the bottom section being careful not to tear the bark. Take a 10mm slice off the bark from the bottom of the cutting on one side. Using a medium strength rooting hormone, dip the cutting in and place them in a moist sterile seed raising mix which is made from 30mm coconut fibre, 30mm course washed sand, 30mm perlite and 10mm peat. When the cuttings have obviously struck and have developed good roots treat them as for seedlings. Expect around a 30mm to 50mm strike rate.
Fertilize using seaweed, fish emulsion or organic chicken pellets soaked in water on an alternate basis. Fertilize every two months until the plants are established then annually in early September to October to maintain better colour, health, vitality and flowering
Further Comments from Readers:
“Hi reader, it seems you use The Bible of Botany a lot. That’s great as we have great pleasure in bringing it to you! It’s a little awkward for us to ask, but our first aim is to purchase land approximately 1,600 hectares to link several parcels of N.P. into one at The Pinnacles NSW Australia, but we need your help. We’re not salespeople. We’re amateur botanists who have dedicated over 30 years to saving the environment in a practical way. We depend on donations to reach our goal. If you donate just $5, the price of your coffee this Sunday, We can help to keep the planet alive in a real way and continue to bring you regular updates and features on Australian plants all in one Botanical Bible. Any support is greatly appreciated. Thank you.”
In the spirit of reconciliation we acknowledge the Bundjalung, Gumbaynggirr and Yaegl and all aboriginal nations throughout Australia and their connections to land, sea and community. We pay our respect to their Elders past, present and future for the pleasures we have gained.
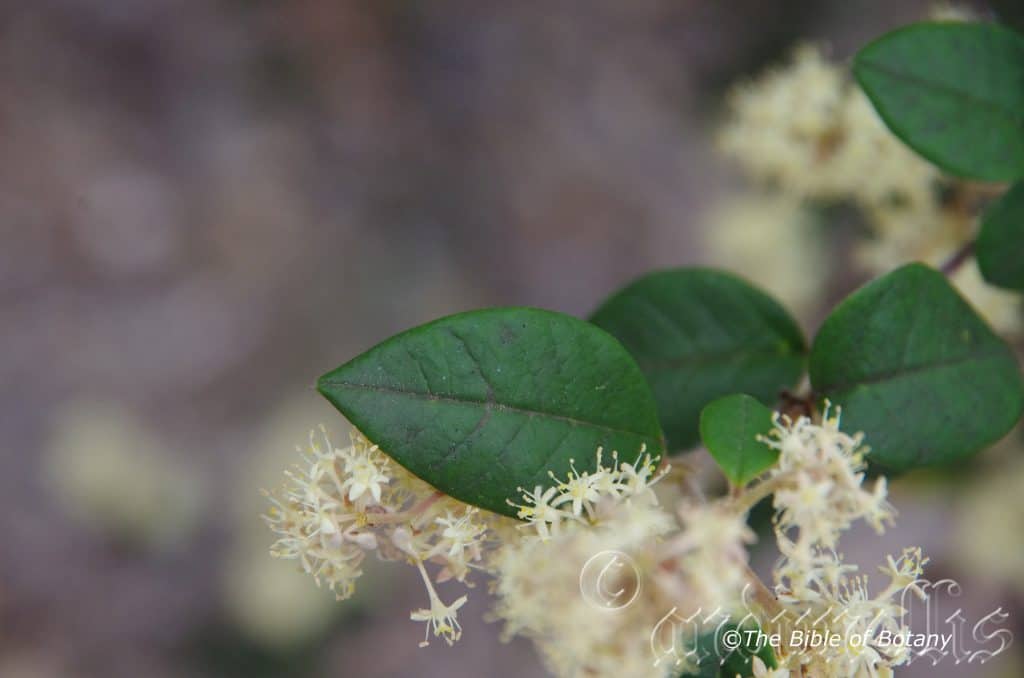
Canberra ACT
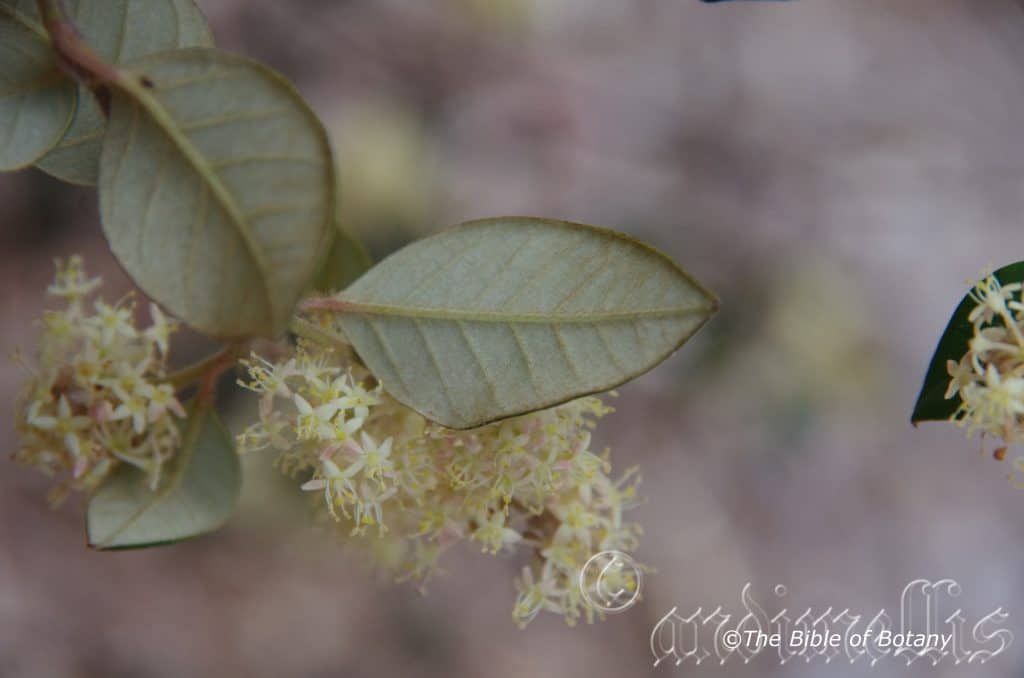
Canberra ACT
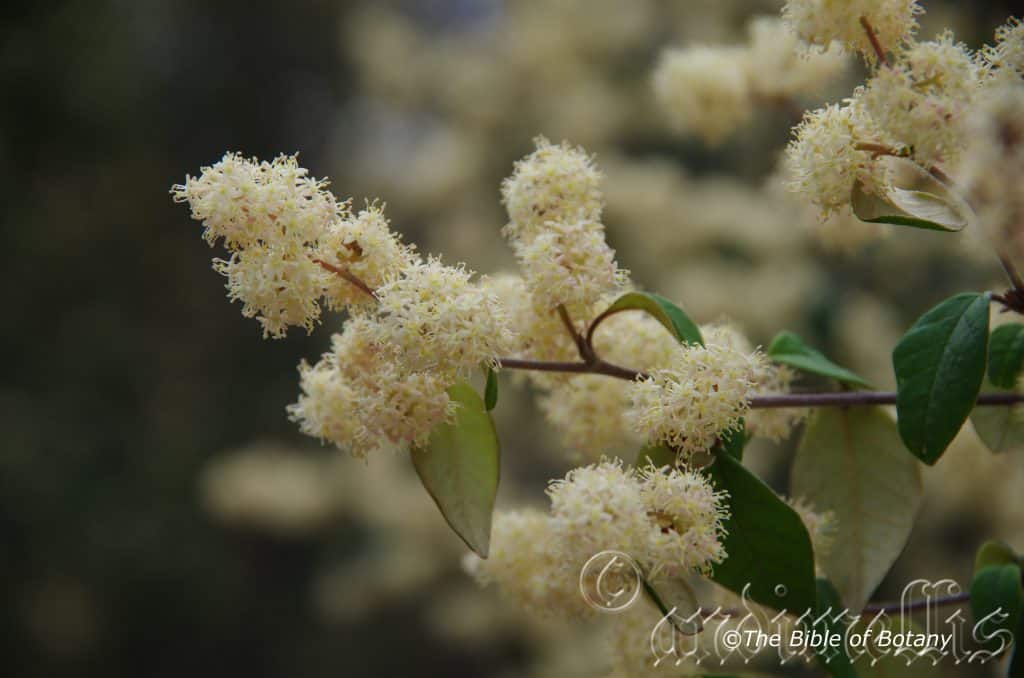
Canberra ACT
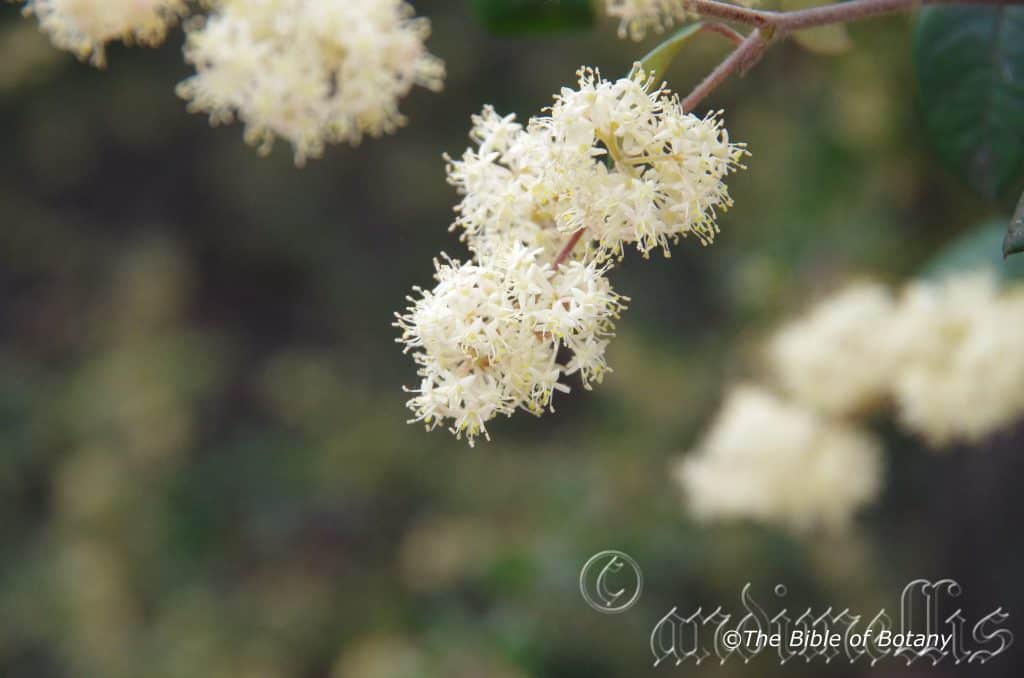
Canberra ACT
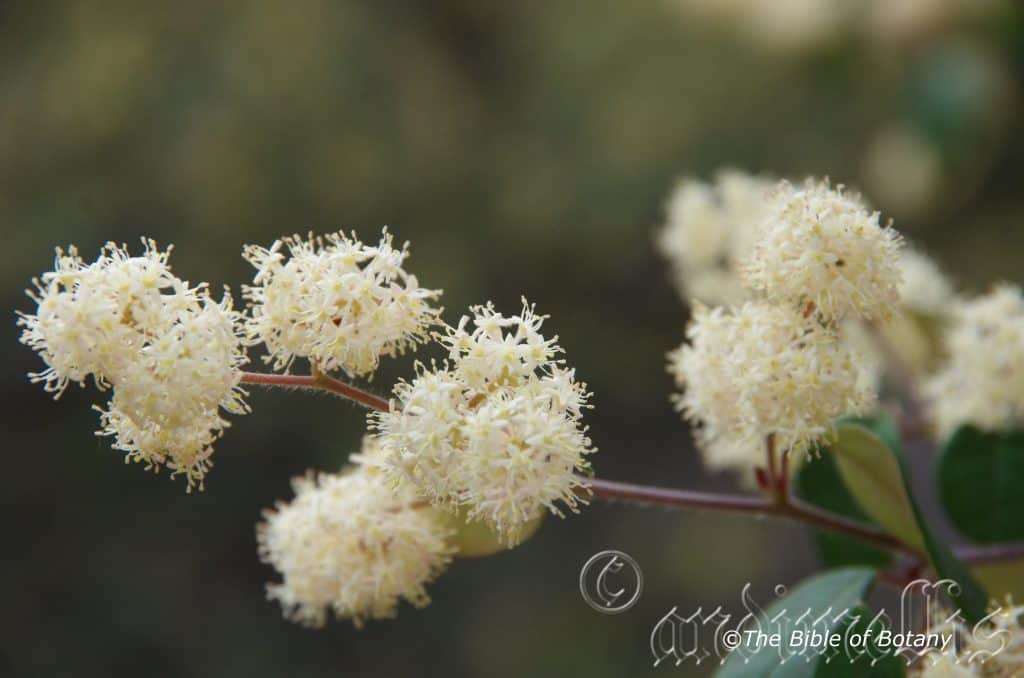
Canberra ACT
Pomaderris intermedia
Classification:
Division: Eudicots
Division: Rosids
Class: Eurosids
Order: Rosales
Family: Rhamnaceae
Genus: From Poma, which is Ancient Greek for a lid and Derris, which is Ancient Greek for a fur or at times skin. It refers to membrane covering the fruits, which are covered in short hairs.
Species: From Inter/Intra, which is Latin for between or among and Mésos, which is Ancient Greek or Medium, which is Latin for half way or in a middle position. It refers to a characteristic which has a position somewhere in the middle.
Common Name:
Distribution:
Pomaderris intermedia is mainly found south from the Gibraltar Range west of Grafton in north eastern New South Wales to south eastern coastal Tasmania on the eastern half of the Island including the Flinders Island group of islands. The noticeable exceptions are in populations on the Darling River near Bourke and Grant Creek near Herberton in far north Queensland. It is usually found on and east of the Great Dividing Range to the coast.
https://avh.ala.org.au/occurrences/search?taxa=Pomaderris+intermedia#tab_mapView
Habitat Aspect Climate:
Pomaderris intermedia prefers light dappled shade to full sun. It usually grows in dry rainforests, moist Eucalyptus forests, open woodlands and adjacent to montane heath lands or venturing to coastal transitional zones adjacent to littoral rainforests. The altitude ranges from 20 meters ASL to 1250 meters ASL.
The temperatures range from minus 4 degree in August to 37degrees in January.
The rainfalls range from lows of 700mm to an average of 1700mm annually, except for the population on the Darling River where the rainfall can be as low as 300mm per year.
Soil Requirements:
Pomaderris intermedia prefers better quality light fatty clays to medium clays often with copious quantities of forest litter. The soils are usually derived from decomposed granites or sandstones. The soils pH ranges from 4.5pH to 6pH. It does not tolerate waterlogged soils. Non saline soils to moderately saline soils are tolerated.
Height & Spread:
Wild Plants: 2m to 8m by 2m to 4m.
Characteristics:
Pomaderris intermedia are usually a multi stemmed shrub with smooth, deep grey-brown stems. The new growth and stems are pale green and sparsely covered in long simple or clustered hirsute hairs over short whitish stellate tomentose hairs.
Pomaderris intermedia’s alternate, elliptic to ovate leaves measure 40mm to 120mm in length by 15mm to 45mm in width. The petioles are sparsely covered in long simple or clustered hirsute hairs over a short whitish stellate tomentose hairs and measure 8m to 22mm in length. The bases are broad cuneate to cuneate while the apexes are acute. The discolourous laminas are deep sea-green, dull and sparsely covered in rusty hirsute hairs on the upper laminas while the lower laminas are silvery-white and densely covered in white tomentose hairs and white hirsute hairs. The laminas are flat or recurve slightly from the mid vein to the margins or decurve slightly from the mid vein to the margins on the upper surface from the mid vein to the margins and gently decurve on the apical. The laminas may also be slightly convex between the mid vein and lateral veins. The margins are entire and flat or slightly undulate. The mid vein and 15 to 19 lateral veins are strongly prominent and are densely covered in white tomentose hairs and white hirsute hairs on the lower lamina and are visible on the upper lamina. The lateral veins form a loop well inside the margins.
The inflorescences of Pomaderris intermedia are corymbose panicles born from the upper leaf axils and terminals. They measure 50mm to 100mm in diameter. The peduncle, rachis and pedicels are densely covered in white or rusty-fawn to rusty golden-brown hirsute and tomentose hairs. The peduncles measure 10mm to 12mm in length while the pedicels measure 2mm to 4mm in length. The narrow triangular, contorted stipules sheath the terminal bud in the leaf axils and measure 5mm to 6mm in length by 1mm to 2mm in width. The pale yellow to deep yellow calyx tubes measure 2mm to 3mm in length. The 5 pale yellow to deep yellow sepals are reflexed at anthesis and measure 1.5mm to 2.5mm in length. The pale yellow to deep yellow caduceus petals are auriculate.
The staminal filaments measure 1.5mm to 1.7mm in length and are inflexed before anthesis. The pastel yellow anthers measure 0.3mm to 0.4mm in length. The ovary is densely covered in cream pulverulent hairs. The flowers appear from September to October.
Pomaderris intermedia’s fruits are small ellipsoidal capsule. The pale green capsules turn brown when ripe. The hypanthia and capsules are covered in white stellate and tomentose hairs with longer hirsute hairs. The seeds are hard, deep brown to black and are oval to ovate.
Wildlife:
Pomaderris intermedia are particularly attractive to insectivorous birds which are attracted to the trees when in flower.
Cultivation:
Pomaderris intermedia makes a beautiful large shrub or small tree for the garden. It always looks green and fresh especially where adequate ground moisture is retained and some shade is provided. In cultivation it will grow 2.5 meters to 3 meters in height by 2.5 meters to 3 meters in diameter when grown in the open as a shrub or 5 meters to 6 meters in height by 2 meters to 3 meters in diameter when trained as a small tree when grown in the open or in a semi shaded position.
2 to 5 plants planted close together with random spacing or in curved lines look particularly good when mixed with plants which are of a similar size and have bright pale green foliages and various coloured trunks. It can also be used to great effect where mixed coloured annuals are planted below or with prostrate Grevillea species like Grevillea lanigera or Grevillea nana for a bush garden adding height and width to the garden.
It is most suitable where shade is a problem on moist soils. Use them adjacent to pathways, rockeries, along sandy clay banks or along drive ways or adjacent to natural bush gardens. Mass plantings of 5 or more plants in a row can make a beautiful formal back drop or make a garden very private. The flowers are a real bonus.
It makes a good dense hedge row and safe wildlife corridors for birds to travel along.
Propagation:
Seeds: The seeds of Pomaderris intermedia can be removed easily from the capsules as they ripen but are difficult to collect. The best method of collection is to place brown paper bags over the spent flower heads and wait and observe. Freshly collected seed must be treated first.
First scarify the seeds by lightly rubbing them over very fine emery paper. Do not break the testa or,
Secondly place the seeds in a container of water that has just come off the boil and allow them to soak for 4 to 5 hours.
Sow the freshly treated seeds directly into a seed raising mix, keeping them moist not wet. When the seedlings are 20mm to 25mm tall, prick them out and plant them into 50mm native tubes using a good organic mix.
As the seedlings roots reach the bottom of the tubes plant them out into their permanent position. Do not delay.
Cuttings: Pomaderris intermedia cuttings may prove difficult in the nursery.
Use 150mm to 200mm long tip cuttings or lateral shoots from the present season’s growth. Take them in warmer months of the year. Remove half the leaves from the bottom section being careful not to tear the bark.
1 Prepare the cutting mix which is made from 30mm coconut fibre, 30mm course washed sand, 30mm perlite and 10mm peat,
2 Select good material from non diseased plants,
3 Select semi green stems for cuttings. Look for a stem with two or three nodes,
4 Place the cutting on a flat, hard surface, and make a clean cut down one side of the cutting at the base for 10mm with a sharp sterile knife or razor blade. – This scarification of the node will increase the chances of roots emerging from this spot. Now remove all but one or two the leaves, leaving the apex leaves in tact. If the leaves are very large in proportion to the stem, cut off the apical halves.
5 Use a medium rooting hormone. Place water in a saucer and a little hormone in a milk bottle top or similar top. Place the base of the cutting in the water and dip into the rooting hhormone tapping off the excess. With a dipple stick make a hole slightly larger than the cutting and place the cutiing into it, being careful not to damage or lose the hormone,
6 Use a small dipple stick or old pencil to poke a hole into the soilless potting mix. Ensure the hole is slightly larger than the stem diameter and be careful not to wipe the rooting hormone off the cuttings base. Place 2 to 4 cuttings in each of the 50mm native tubes,
7 I like to place the tubes in bucket with holes drilled in the bottom to allow excess water to drain out. A plastic bag that fits over the bucket is ideal to help maintain temperature and moisture. Place in a semi shaded, warm position like under 50mm shade cloth.
8 When the cuttings have struck, open the bag to allow air circulation for a few days to a week,
9 Once hardened off remove the cuttings from the bag and allow to further hardening for a few more days to a week,
10 Transplant into a good potting mix to grow on.
Fertilize using seaweed, fish emulsion or organic chicken pellets soaked in water on an alternate basis. Fertilize every two months until the plants are established then twice annually in early September or March to maintain health, vitality and better flowering.
Fertilize using seaweed, fish emulsion or organic chicken pellets soaked in water on an alternate basis. Fertilize every two months until the plants are established then annually in early September to October to maintain better colour, health, vitality and flowering
Further Comments from Readers:
“Hi reader, it seems you use The Bible of Botany a lot. That’s great as we have great pleasure in bringing it to you! It’s a little awkward for us to ask, but our first aim is to purchase land approximately 1,600 hectares to link several parcels of N.P. into one at The Pinnacles NSW Australia, but we need your help. We’re not salespeople. We’re amateur botanists who have dedicated over 30 years to saving the environment in a practical way. We depend on donations to reach our goal. If you donate just $5, the price of your coffee this Sunday, We can help to keep the planet alive in a real way and continue to bring you regular updates and features on Australian plants all in one Botanical Bible. Any support is greatly appreciated. Thank you.”
In the spirit of reconciliation we acknowledge the Bundjalung, Gumbaynggirr and Yaegl and all aboriginal nations throughout Australia and their connections to land, sea and community. We pay our respect to their Elders past, present and future for the pleasures we have gained.
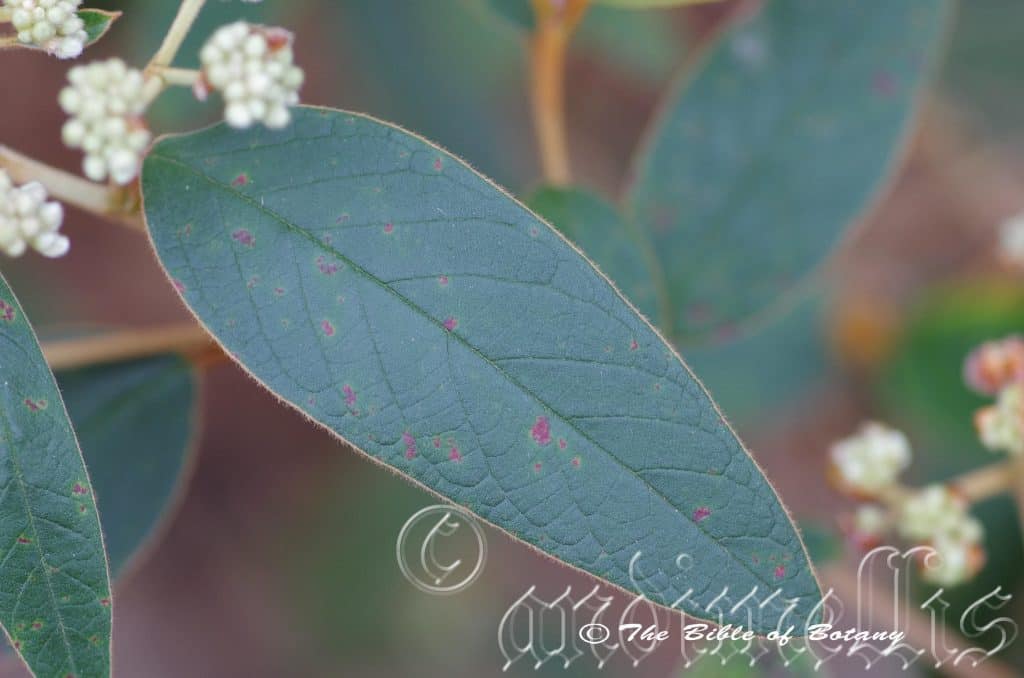
Nana Glen-Lowana Road Nana Glen NSW
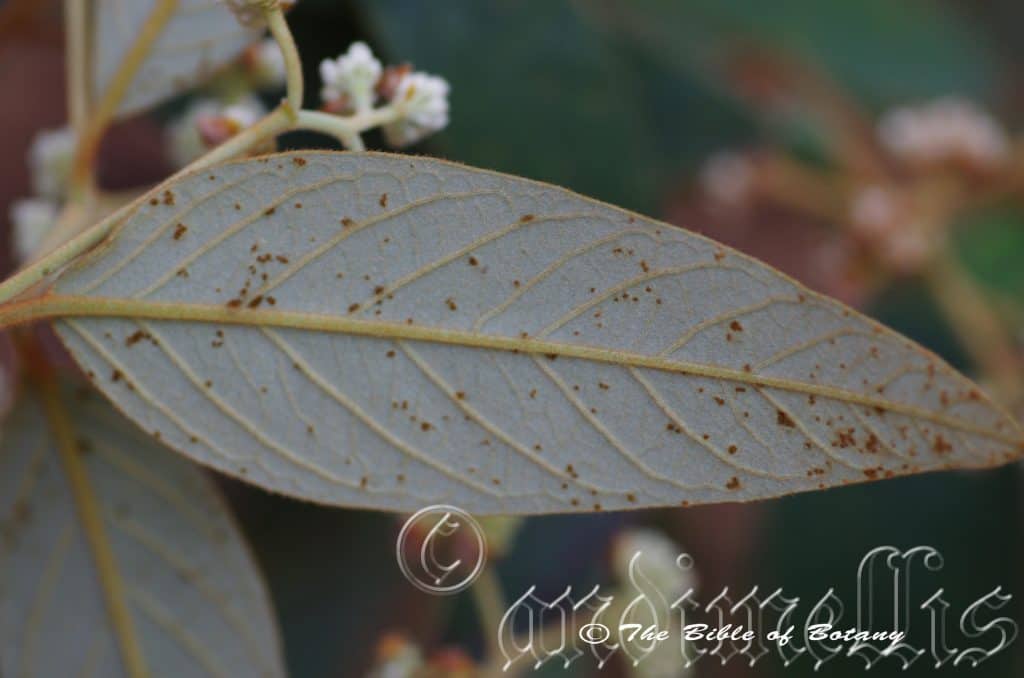
Nana Glen-Lowana Road Nana Glen NSW
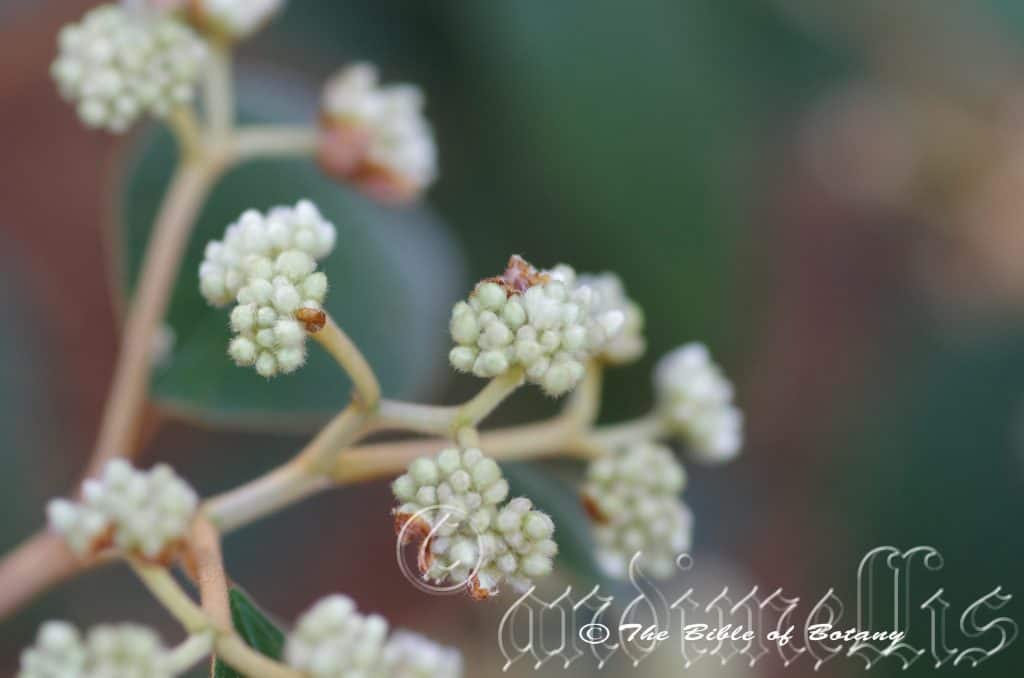
Nana Glen-Lowana Road Nana Glen NSW
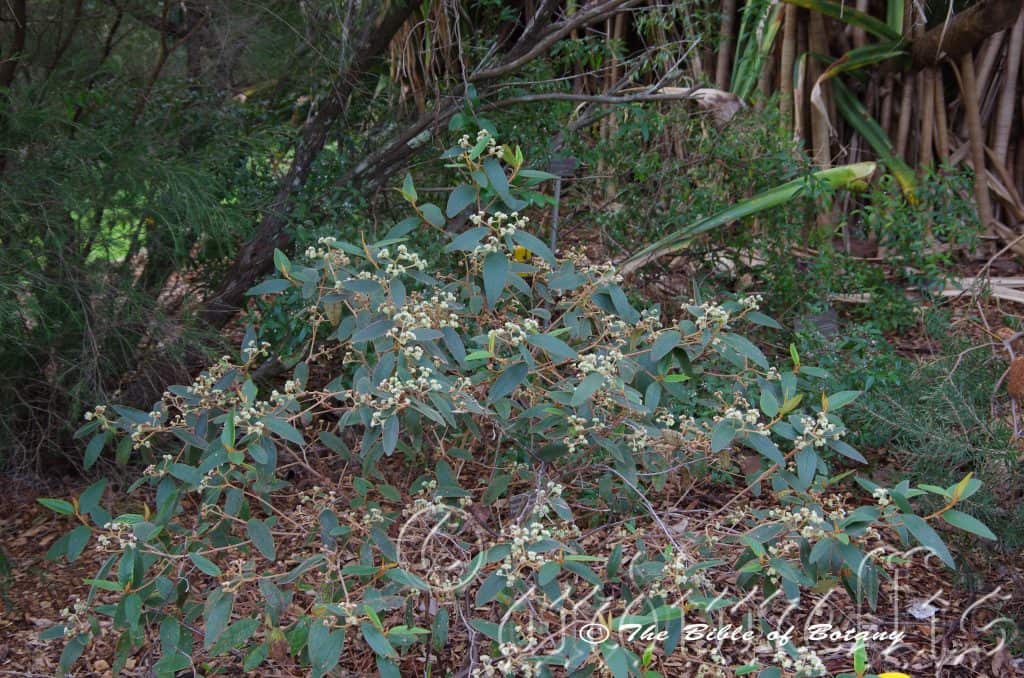
Nana Glen-Lowana Road Nana Glen NSW
Pomaderris lanigera
Classification:
Division: Eudicots
Order: Core Eudicots
Superclass: Rosids
Class: Eurosids
Order: Rosales
Family: Rhamnaceae
Genus: From Poma, which is Ancient Greek for a lid and Derris, which is Ancient Greek for a fur or at times skin. It refers to membrane covering the fruits, which are covered in short hairs.
Species: From Lanos, which is Latin for woolly and Ferra, which is Latin for to bear. It refers to the organs, which are sparsely to densely covered in long woolly type hairs.
Common Name: Woolly Pomaderris.
Distribution:
Pomaderris lanigera found south from Mimosa Creek on the Blackdown Tableland and as far west as Carnarvon Gorge National Park in central eastern Queensland to French Island and Wilson’s Promontory in southern Victoria.It is mainly found on the western slopes on and east of the Great Dividing Range to the coast.
https://avh.ala.org.au/occurrences/search?taxa=Pomaderris+lanigera#tab_mapView
Habitat Aspect Climate:
Pomaderris lanigera prefers light dappled shade to full sun. It grows in open woodlands and open sclerophyll forests. The altitude ranges from 5 meters ASL to 1100 meters ASL.
The temperatures range from minus 3 degree in August to 36 degrees in January.
The rainfalls range from lows of 550mm to an average of 2000mm.
Soil Requirements:
Pomaderris lanigera prefers a better quality light fatty clays to medium clays often with copious quantities of leaf litter. The soils are usually derived from decomposed sandstones, granites, black basalts, brown basalts, metamorphic rocks or brown shale. The soils pH ranges from 4.5pH to 6pH. It does not tolerate waterlogged soils. Non saline soils to moderately saline soils are tolerated.
Height & Spread:
Wild Plants: 1m to 5m by 1.5m to 3m.
Characteristics:
Pomaderris lanigera’s is usually a multi stemmed shrub with smooth, deep grey-brown stems. The new growth and stems are pale green to pinkish or orange-pink and are sparsely to densely covered in rusty to white pilose hairs.
Pomaderris lanigera’s alternate leaves are usually lanceolate to ovate or at times elliptic and measure 25mm to 100mm in length by 5mm to 30mm in width but are usually 5mm to 10mm in width. The petioles are sparsely to densely covered in rusty to white tomentose hairs and measure 8m to 22mm in length. The bases are rounded while the apexes are apiculate. The discolourous laminas are sea-green, dull and sparsely covered in rusty to white hirsute hairs on the upper laminas while the lower laminas are silvery-white and sparsely to densely covered in rusty to white tomentose hairs. The laminas are flat or recurve upwards slightly from the mid vein to the margins. The margins are entire and flat or at times slightly undulate. The mid vein and 25 to 27 lateral veins are strongly prominent and are densely covered in golden-rusty tomentose hairs on the lower lamina and are visible on the upper lamina. The lateral veins form a loop close to the margins.
The inflorescences of Pomaderris lanigera are corymbs born from the upper leaf axils and terminals. They measure 50mm to 100mm in diameter. The peduncle, rachis and pedicels are densely covered in white to rusty-fawn to rusty golden-brown hirsute and tomentose hairs. The peduncles measure 10mm to 12mm in length while the pedicels measure 2mm to 4mm in length. The narrow triangular, contorted stipules sheath the terminal bud in the leaf axils and measure 5mm to 6mm in length by 1mm to 2mm in width. The pale yellow to deep lemon-yellow calyx tubes measure 2mm to 3mm in length. The 5 pale yellow to deep lemon-yellow sepals are reflexed at anthesis and measure 3mm to 5mm in length. The pale yellow to deep lemon-yellow caduceus petals are auriculate.
The staminal filaments measure 1.5mm to 1.7mm in length and are inflexed before anthesis. The pastel yellow anthers measure 0.3mm to 0.4mm in length. The ovary is densely covered in cream pulverulent hairs. The flowers appear from August to October.
Pomaderris lanigera’s fruits are small ellipsoidal capsules. The pale green capsules turn brown when ripe. The hypanthia and capsules are covered in short, greyish stellate-tomentose hairs with longer hirsute hairs. The seeds are hard, deep brown to black and are oval to ovate.
Wildlife:
Pomaderris lanigera is particularly attractive to insectivorous birds which are attracted to the trees when in flower.
Cultivation:
Pomaderris lanigera makes a beautiful large shrub or small tree for the garden. It always looks green and fresh especially where adequate ground moisture is retained and some shade is provided. In cultivation it will grow 2.5 meters to 3 meters in height by 2.5 meters to 3 meters in diameter when grown in the open as a shrub or 4 meters to 5 meters in height by 2 meters to 3 meters in diameter when trained as a small tree when grown in the open or in a semi shaded position.
2 to 5 plants planted close together with random spacing or in curved lines look particularly good when mixed with plants, which are of a similar size and have bright pale green foliage and various coloured trunks. It can also be used to great effect where mixed coloured annuals are planted below or with prostrate Grevillea for a bush garden adding height and width to the garden.
It is most suitable where shade is a problem on moist soils. Use them adjacent to pathways, rockeries, along sandy clay banks or along drive ways or adjacent to natural bush gardens. Mass plantings of 5 or more plants in a row can make a beautiful formal back drop or make a garden very private. The flowers are a real bonus.
It makes a good dense hedge row and safe wildlife corridors for birds to travel along.
Propagation:
Seeds: Seeds of Pomaderris lanigera can be removed easily from the capsules as they ripen but are difficult to collect. The best method of collection is to place brown paper bags over the spent flower heads and wait and observe. Freshly collected seed must be treated first.
First scarify the seeds by lightly rubbing them over very fine emery paper. Do not break the testa.
Secondly place the seeds in a container of water that has just come off the boil and allow them to soak for 4 to 5 hours.
Sow the freshly treated seeds directly into a seed raising mix, keeping them moist not wet. When the seedlings are 20mm to 25mm tall, prick them out and plant them into 50mm native tubes using a good organic mix.
As the seedlings roots reach the bottom of the tubes plant them out into their permanent position.
Cuttings: Pomaderris lanigera cuttings may prove difficult in the nursery.
Use 150mm to 200mm long tip cuttings or lateral shoots from the present season’s growth. Take them in warmer months of the year. Remove half the leaves from the bottom section being careful not to tear the bark.
1 Prepare the cutting mix which is made from 30mm coconut fibre, 30mm course washed sand, 30mm perlite and 10mm peat,
2 Select good material from non diseased plants,
3 Select semi green stems for cuttings. Look for a stem with two or three nodes,
4 Place the cutting on a flat, hard surface, and make a clean cut down one side of the cutting at the base for 10mm with a sharp sterile knife or razor blade. – This scarification of the node will increase the chances of roots emerging from this spot. Now remove all but one or two the leaves, leaving the apex leaves in tact. If the leaves are very large in proportion to the stem, cut off the apical halves.
5 Use a medium rooting hormone. Place water in a saucer and a little hormone in a milk bottle top or similar top. Place the base of the cutting in the water and dip into the rooting hormone tapping off the excess. With a dipple stick make a hole slightly larger than the cutting and place the cutting into it, being careful not to damage or lose the hormone,
6 Use a small dipple stick or old pencil to poke a hole into the soilless potting mix. Ensure the hole is slightly larger than the stem diameter and be careful not to wipe the rooting hormone off the cuttings base. Place 2 to 4 cuttings in each of the 50mm native tubes,
7 I like to place the tubes in bucket with holes drilled in the bottom to allow excess water to drain out. A plastic bag that fits over the bucket is ideal to help maintain temperature and moisture. Place in a semi shaded, warm position like under 50mm shade cloth.
8 When the cuttings have struck, open the bag to allow air circulation for a few days to a week,
9 Once hardened off remove the cuttings from the bag and allow to further hardening for a few more days to a week,
10 Transplant into a good potting mix to grow on.
Fertilize using seaweed, fish emulsion or organic chicken pellets soaked in water on an alternate basis. Fertilize every two months until the plants are established then annually in early September to October to maintain better colour, health, vitality and flowering
Further Comments from Readers:
“Hi reader, it seems you use The Bible of Botany a lot. That’s great as we have great pleasure in bringing it to you! It’s a little awkward for us to ask, but our first aim is to purchase land approximately 1,600 hectares to link several parcels of N.P. into one at The Pinnacles NSW Australia, but we need your help. We’re not salespeople. We’re amateur botanists who have dedicated over 30 years to saving the environment in a practical way. We depend on donations to reach our goal. If you donate just $5, the price of your coffee this Sunday, We can help to keep the planet alive in a real way and continue to bring you regular updates and features on Australian plants all in one Botanical Bible. Any support is greatly appreciated. Thank you.”
In the spirit of reconciliation we acknowledge the Bundjalung, Gumbaynggirr and Yaegl and all aboriginal nations throughout Australia and their connections to land, sea and community. We pay our respect to their Elders past, present and future for the pleasures we have gained.
Pomaderris ligustrina
Classification:
Division: Eudicots
Order: Core Eudicots
Superclass: Rosids
Class: Eurosids
Order: Rosales
Family: Rhamnaceae
Genus: From Poma, which is Ancient Greek for a lid and Derris, which is Ancient Greek for a fur or at times skin. It refers to membrane covering the fruits, which are covered in short hairs.
Species: From Ligustrum, which is the old Latin name for Privet. It refers to leaves, which resemble the Chinese Privet Ligustrum sinense.
Subspecies: Pomaderris ligustrina subsp. latifolia. From Latus, which is Latin for broad and Folium, which is Latin for foliage. It refers to leaves, which are very broad or very broad when compared to other species in the genus. It refers to the leaves being very broad.
Subspecies: Pomaderris ligustrum subsp. ligustrina. From Ligustrum, which is the old Latin name for Privet. It refers to leaves, which resemble the Chinese Privet Ligustrum sinense.
Common Name: Privet Pomaderris.
Distribution:
Pomaderris ligustrina subsp. latifolia is found south from Ballandean National Park in far south eastern Queensland and Mount Warning National Park in far north eastern New South Wales to Guyra in central eastern New South Wales. It grows on the western slopes of the Great Dividing Range and on the Range.
Pomaderris ligustrina subsp. ligustrina is found south from Wright Lookout near Kempsey in New South Wales to Seaton in south eastern Victoria. It grows on and east of the Great Dividing Range.
https://avh.ala.org.au/occurrences/search?taxa=Pomaderris+ligustrina#tab_mapView
Habitat Aspect Climate:
Pomaderris ligustrina prefers light dappled shade to full sun. It grows along escarpments on the ranges. The altitude ranges from 160 meters ASL to 1050 meters ASL.
The temperatures range from minus 4 degree in August to 36 degrees in January.
The rainfalls range from lows of 800mm to an average of 2000mm.
Soil Requirements:
Pomaderris ligustrina prefers better quality light sandy clays to medium clays often on shallow soils close to the parent bedrock. The soils are usually derived from decomposed black basalts, brown basalts, granites or sandstones. The soils pH ranges from 4.5pH to 6pH. It does not tolerate waterlogged soils. Non saline soils to moderately saline soils are tolerated.
Height & Spread:
Wild Plants: 1m to 2m by 1m to 2.5m.
Characteristics:
Pomaderris ligustrina usually grows as a multi stemmed shrub with smooth, deep grey to reddish-brown stems. The new growth and stems are pale pinkish-green to pinkish or pale green and are densely covered in short, white hirsute and stellate tomentose hairs.
Pomaderris ligustrina’s alternate, lanceolate to narrow elliptic, rarely ovate to orbicular leaves measure 20mm to 80mm in length by 10mm to 20mm in width. The caduceus stipules are lanceolate and measure 5mm to 7mm in length. The petioles and stipules are densely covered in short, white hirsute and stellate-tomentose hairs and measure 8m to 10mm in length. The bases are tapering to cuneate while the apexes are acute with a small apiculate tip. The discolourous laminas are deep green to sea-green, dull and glabrous on the upper laminas while the lower laminas are silvery-white and moderately covered in pale rusty hirsute hairs which usually obscure the pannate lateral veins and the reticulate veins. The laminas are erect divaricate or nodding and are flat and straight. The margins are entire and slightly thickened. The mid vein is strongly prominent on the lower lamina and is impressed on the upper lamina. The 13 to 15 lateral veins usually not apparent or very faintly visible on the lower lamina.
The inflorescence of Pomaderris ligustrina are loose panicles born from the upper leaf axils and terminals. They measure 15mm to 60mm in diameter. The peduncle, rachis and pedicels are moderately covered in long, white hirsute hairs. The peduncles measure 10mm to 25mm in length while the pedicels measure 2mm to 4mm in length. The mid white calyx tubes measure 2mm to 3mm in length. The 5 pale white, elliptical sepals are divaricate or decurve slightly backwards at anthesis and measure 4mm to 6mm in length by 2mm to 2.5mm in width. The petals are absent on this species. The hypanthium is covered in long white hairs.
The white filiform filaments measure 4mm to 5mm in length and are inflexed before anthesis. The oblong lemon-yellow anthers are dorsifixed and dehisce longitudinally. They measure 2mm to 3mm in length. The pastel lemon-yellow style measure 5mm to 6mm in length. The ovary is densely covered in cream pulverulent hairs. The flowers appear from August to October.
Pomaderris ligustrina’s fruit is a small ellipsoidal capsule. The capsules measure 3mm to 3.5mm in length by 2mm to 2.5mm in diameter. The pale green capsules turn grey on ripening before drying. The hypanthium and capsule are covered in silvery hirsute hairs. The seeds are hard, deep brown to black and are oval to ovate.
Confusing Subspecie:
Pomaderris ligustrina subsp. ligustrina’s lanceolate to narrow elliptic leaves measure 20mm to 80mm in length. It is more than twice as long as broad. The margins are usually distinctly recurved. The sepals measure 0.8mm to 1.4mm in length.
Pomaderris ligustrina subsp. latifolia’s broad ovate to orbicular leaves measure 15mm to 30mm in length. It is less than twice as long as broad. The margins are flat to weakly recurve. The sepals measure 1.5mm to 2mm in length.
Wildlife:
Pomaderris ligustrina is particularly attractive to insectivorous birds which are attracted to the trees when in flower.
Cultivation:
When mixed with plants with different coloured flowers. It looks particularly good when mixed with plants which are of a similar size and have bright pale green foliages. It can also be used to great effect with mixed coloured annuals below or with prostrate Grevillea species for a bush garden adding height and width to the garden.
It is most suitable where shade is a problem on moist soils. Use them adjacent to pathways, rockeries, along sandy clay banks or along driveways or adjacent to natural bushy gardens. Mass plantings of 5 or more plants in a row can make a beautiful formal back drop or make a garden very private in semi shaded areas. The flowers are a real bonus on this plant and can be used indoors as a cut flower though they only last for a few days
It makes a good dense hedge and safe wildlife corridors for birds to travel along.
Propagation:
Seeds: The seeds of Pomaderris ligustrina can be removed easily from the capsules as they ripen but are difficult to collect. The best method of collection is to place brown paper bags over the spent flower heads and wait and observe. Freshly collected seed must be treated first.
First scarify the seeds by lightly rubbing them over very fine emery paper. Do not break the testa.
Secondly place the seeds in a container of water that has just come off the boil and allow them to soak for 4 to 5 hours.
Sow the freshly treated seeds directly into a seed raising mix, keeping them moist not wet. When the seedlings are 20mm to 25mm tall, prick them out and plant them into 50mm native tubes using a good organic mix.
As the seedlings roots reach the bottom of the tubes plant them out into their permanent position. Do not delay.
Cuttings: Pomaderris ligustrina cuttings prove difficult in the nursery above at home.
Use 150mm to 200mm long tip cuttings or lateral shoots from the present season’s growth. Take them in warmer months of the year. Remove half the leaves from the bottom section being careful not to tear the bark.
1 Prepare the cutting mix which is made from 30mm coconut fibre, 30mm course washed sand, 30mm perlite and 10mm peat,
2 Select good material from non diseased plants,
3 Select semi green stems for cuttings. Look for a stem with two or three nodes,
4 Place the cutting on a flat, hard surface, and make a clean cut down one side of the cutting at the base for 10mm with a sharp sterile knife or razor blade. – This scarification of the node will increase the chances of roots emerging from this spot. Now remove all but one or two the leaves, leaving the apex leaves in tact. If the leaves are very large in proportion to the stem, cut off the apical halves.
5 Use a medium rooting hormone. Place water in a saucer and a little hormone in a milk bottle top or similar top. Place the base of the cutting in the water and dip into the rooting hormone tapping off the excess. With a dipple stick make a hole slightly larger than the cutting and place the cutting into it, being careful not to damage or lose the hormone,
6 Use a small dipple stick or old pencil to poke a hole into the soilless potting mix. Ensure the hole is slightly larger than the stem diameter and be careful not to wipe the rooting hormone off the cuttings base. Place 2 to 4 cuttings in each of the 50mm native tubes,
7 I like to place the tubes in bucket with holes drilled in the bottom to allow excess water to drain out. A plastic bag that fits over the bucket is ideal to help maintain temperature and moisture. Place in a semi shaded, warm position like under 50mm shade cloth.
8 When the cuttings have struck, open the bag to allow air circulation for a few days to a week,
9 Once hardened off remove the cuttings from the bag and allow to further hardening for a few more days to a week,
10 Transplant into a good potting mix to grow on.
Fertilize using seaweed, fish emulsion or organic chicken pellets soaked in water on an alternate basis. Fertilize every two months until the plants are established then annually in early September to October to maintain better colour, health, vitality and flowering
Further Comments from Readers:
“Hi reader, it seems you use The Bible of Botany a lot. That’s great as we have great pleasure in bringing it to you! It’s a little awkward for us to ask, but our first aim is to purchase land approximately 1,600 hectares to link several parcels of N.P. into one at The Pinnacles NSW Australia, but we need your help. We’re not salespeople. We’re amateur botanists who have dedicated over 30 years to saving the environment in a practical way. We depend on donations to reach our goal. If you donate just $5, the price of your coffee this Sunday, We can help to keep the planet alive in a real way and continue to bring you regular updates and features on Australian plants all in one Botanical Bible. Any support is greatly appreciated. Thank you.”
In the spirit of reconciliation we acknowledge the Bundjalung, Gumbaynggirr and Yaegl and all aboriginal nations throughout Australia and their connections to land, sea and community. We pay our respect to their Elders past, present and future for the pleasures we have gained.
Pomaderris nitidula
Classification:
Division: Eudicots
Order: Core Eudicots
Superclass: Rosids
Class: Eurosids
Order: Rosales
Family: Rhamnaceae
Genus: From Poma, which is Ancient Greek for a lid and Derris, which is Ancient Greek for a fur or at times skin. It refers to membrane covering the fruits, which are covered in short hairs.
Species: From Nitere/Nitidus, which is Latin for to shine or to be polished. It refers to leaves and stems which are shinny.
Common Name: Shining Pomaderris.
Distribution:
Pomaderris nitidula is restricted to a small area between the pinnacles at Tweed heads and the Boonoo Boonoo Falls near Tenterfield to Gloucester Tops at Falls Lookout in north eastern New South Wales. It grows on the Great Dividing Range.
https://avh.ala.org.au/occurrences/search?taxa=Pomaderris+nitidula#tab_mapView
Habitat Aspect Climate:
Pomaderris nitidula prefers light dappled shade to full sun. It grows in open forests, open sclerophyll forests, open woodlands and scrubby country adjacent to heaths mostly at higher altitude. The altitude ranges from 260 meters ASL to 1315 meters ASL.
The temperatures range from minus 4 degree in August to 36 degrees in January.
The rainfalls range from lows of 900mm to an average of 2000mm.
Soil Requirements:
Pomaderris nitidula prefers better quality light sandy loams, light fatty clays to medium clays often amongst rocks and boulders. The soils can be deep or more often are shallow rocky soils close to the parent bedrock. The soils are usually derived from decomposed granites or at times black basalts, brown basalts. The soils pH ranges from 4.5pH to 7pH. It does not tolerate waterlogged soils. Non saline soils to moderately saline soils are tolerated.
Height & Spread:
Wild Plants: 0.6m to 1.5m by 1m to 1.5m.
Characteristics:
Pomaderris nitidula is usually a multi stemmed shrub with smooth, deep grey to reddish-brown stems. The new growth and stems are copper-pink to pinkish-green and are densely covered in short, soft, white pubescent hairs.
Pomaderris nitidula’s alternate, narrow elliptic to elliptic leaves measure 30mm to 70mm in length by 10mm to 25mm in width. The petioles are densely covered in short, soft, white pubescent hairs and measure 1m to 3mm in length. The bases are tapering to cuneate while the apexes are usually acute or obtuse or at times emarginate. The discolourous laminas are deep green to sea-green, glossy and glabrous on the upper laminas while the lower laminas are silvery-white and moderately covered in silky, antrorse, sericeous hairs. The laminas recurve upwards from the mid vein to the margins while the margins are entire. The mid vein is strongly prominent on the lower lamina while the 17 to 21 pannate, lateral veins are faintly prominent and the reticulated veins are not apparent beneath the sericeous hairs.
The inflorescences of Pomaderris nitidula are loose panicles born from the upper leaf axils and terminals. They measure 50mm to 90mm in diameter. The peduncles and pedicels are covered in white tomentose hairs. The peduncles measure 10mm to 20mm in length while the pedicels measure 3mm to 5mm in length. The cream to white calyx tubes measure lobes measure 2mm to 2.5mm in length. The 5 cream to white sepals are divaricate and measure 1.5mm to 2.5mm in length. The cream petals are auriculate.
The white filiform filaments measure 3mm to 5mm in length and are inflexed before anthesis. The oblong lemon-yellow anthers are dorsifixed and dehisce longitudinally. They measure 2mm to 3mm in length. The pastel lemon-yellow style measure 4mm to 6mm in length. The ovary is densely covered in cream pulverulent hairs. The flowers appear from late August to October.
Pomaderris nitidula’s fruit is a small ellipsoidal capsule. The capsules measure 3mm to 3.5mm in length by 2mm to 2.5mm in diameter. The pale green capsules turn grey on ripening before drying. The hypanthium and capsule are covered in long, off white, hirsute hairs. The seeds are hard, deep brown to black and are oval to ovate.
Wildlife:
Pomaderris nitidula is particularly attractive to insectivorous birds which are attracted to the trees when in flower.
Cultivation:
Pomaderris nitidula is an excellent small shrub for small to medium size gardens. It always looks green and fresh especially where adequate ground moisture is retained and some shade is provided. In cultivation it will grow 1.5 meters to 2 meters in height by 1.5 meter to 2 meters in diameter when grown in the open.
3 to 5 plants planted close together at random spacing on raised garden beds make great features especially when mixed with plants with red or deep orange coloured flowers. It looks particularly good when mixed with plants which are of a similar size and have bright pale green foliages. It can also be used to great effect with mixed coloured annuals below or with prostrate Grevillea species like Grevillea nana or Grevillea lanigera for a bush garden adding height and width to the garden.
It is most suitable where shade is a problem on moist soils. Use it adjacent to pathways, rockeries, along sandy clay banks or along driveways or adjacent to natural bush gardens. Mass plantings of 5 or more plants in a row can make a beautiful formal backdrop or can make a garden very private. The flowers are a real bonus on this plant and can be used indoors as a cut flower though they only last for a few days
It makes a good dense hedge and safe wildlife corridors for birds to travel along. When planted as a hedge plant it at 1 meter to 1.5 meter centers while mass plantings elsewhere are best at 2.5 meter to 3 meter centers.
Propagation:
Seeds: The seeds of Pomaderris nitidula can be removed easily from the capsules as they ripen but are difficult to collect. The best method of collection is to place brown paper bags over the spent flower heads and wait and observe. Freshly collected seed must be treated first.
First scarify the seeds by lightly rubbing them over very fine emery paper. Do not break the testa.
Secondly place the seeds in a container of water that has just come off the boil and allow them to soak for 4 to 5 hours.
Sow the freshly treated seeds directly into a seed raising mix, keeping them moist not wet. When the seedlings are 20mm to 25mm tall, prick them out and plant them into 50mm native tubes using a good organic mix.
Cuttings: Pomaderris nitidula cuttings prove difficult in the nursery so be patient.
Use 150mm to 200mm long tip cuttings or lateral shoots from the present season’s growth. Take them in warmer months of the year. Remove half the leaves from the bottom section being careful not to tear the bark.
1 Prepare the cutting mix which is made from 30mm coconut fibre, 30mm course washed sand, 30mm perlite and 10mm peat,
2 Select good material from non diseased plants,
3 Select semi green stems for cuttings. Look for a stem with two or three nodes,
4 Place the cutting on a flat, hard surface, and make a clean cut down one side of the cutting at the base for 10mm with a sharp sterile knife or razor blade. – This scarification of the node will increase the chances of roots emerging from this spot. Now remove all but one or two the leaves, leaving the apex leaves in tact. If the leaves are very large in proportion to the stem, cut off the apical halves.
5 Use a medium rooting hormone. Place water in a saucer and a little hormone in a milk bottle top or similar top. Place the base of the cutting in the water and dip into the rooting hormone tapping off the excess. With a dipple stick make a hole slightly larger than the cutting and place the cutting into it, being careful not to damage or lose the hormone,
6 Use a small dipple stick or old pencil to poke a hole into the soilless potting mix. Ensure the hole is slightly larger than the stem diameter and be careful not to wipe the rooting hormone off the cuttings base. Place 2 to 4 cuttings in each of the 50mm native tubes,
7 I like to place the tubes in bucket with holes drilled in the bottom to allow excess water to drain out. A plastic bag that fits over the bucket is ideal to help maintain temperature and moisture. Place in a semi shaded, warm position like under 50mm shade cloth.
8 When the cuttings have struck, open the bag to allow air circulation for a few days to a week,
9 Once hardened off remove the cuttings from the bag and allow to further hardening for a few more days to a week,
10 Transplant into a good potting mix to grow on.
Fertilize using seaweed, fish emulsion or organic chicken pellets soaked in water on an alternate basis. Fertilize every two months until the plants are established then annually in early September to October to maintain better colour, health, vitality and flowering
Further Comments from Readers:
“Hi reader, it seems you use The Bible of Botany a lot. That’s great as we have great pleasure in bringing it to you! It’s a little awkward for us to ask, but our first aim is to purchase land approximately 1,600 hectares to link several parcels of N.P. into one at The Pinnacles NSW Australia, but we need your help. We’re not salespeople. We’re amateur botanists who have dedicated over 30 years to saving the environment in a practical way. We depend on donations to reach our goal. If you donate just $5, the price of your coffee this Sunday, We can help to keep the planet alive in a real way and continue to bring you regular updates and features on Australian plants all in one Botanical Bible. Any support is greatly appreciated. Thank you.”
In the spirit of reconciliation we acknowledge the Bundjalung, Gumbaynggirr and Yaegl and all aboriginal nations throughout Australia and their connections to land, sea and community. We pay our respect to their Elders past, present and future for the pleasures we have gained.
Pomaderris phylicifolia
Classification:
Division: Eudicots
Order: Core Eudicots
Superclass: Rosids
Class: Eurosids
Order: Rosales
Family: Rhamnaceae
Genus: From Poma, which is Ancient Greek for a lid and Derris, which is Ancient Greek for a fur or at times skin. It refers to membrane covering the fruits, which are covered in short hairs.
Species: From Phŷllikos, which is Ancient Greek for an abundance or plenty and Folium, which is Latin for foliage. It refers to plants which have much denser foliage than other species in the genus.
Subspecies: Pomaderris phylicifolia subsp. ericoides. From Erica, which is Latin for heath and Eîdos/Oides, which is Ancient Greek for alike or similar to. It refers to plants, which have foliage similar to the exotic Erica genus.
Subspecies: Pomaderris phylicifolia subsp. phylicifolia. From Phŷllikos, which is Ancient Greek for an abundance or plenty and Folium, which is Latin for foliage. It refers to plants which have very dense foliage.
Variety: Pomaderris phylicifolia var. ericifolia. From Erica, which is Latin for heath and Folia, which is Latin for foliage. It refers to plants, which have foliage similar to the exotic Erica genus.
Variety: Pomaderris phylicifolia var. latifolia. From Latus, which is Latin for broad and Folium, which is Latin for foliage. It refers to leaves, which are very broad or very broad when compared to other species in the genus. It refers to the leaves being very broad.
Variety: Pomaderris phylicifolia var. polyfolia. From Polús, which is Ancient Greek for many or much and Folium, which is Latin for foliage. It refers to plants, which have many leaves or have a denser foliage than other species or sub species in the genus.
Common Name: Dense Foliage Pomaderris.
Distribution:
Pomaderris phylicifolia subsp. ericoides is found south of Mount Irvine in central eastern New South Wales to The Sentinels in central Victoria.
It is also found scattered on the eastern half of Tasmania excluding the Bass Strait Islands.
Pomaderris phylicifolia subsp. phylicifolia is found south from the Blue Mountains to Exeter in central, eastern New South Wales.
Pomaderris phylicifolia var. ericifolia is found south from Ebor mainly on and eastern half of Tasmania.
Pomaderris phylicifolia var. latifolia is found south from Tenterfield in far north eastern New South Wales to the Avon Wilderness area in Central Victoria on and east of the Great Dividing Range.
Pomaderris phylicifolia var. polyfolia is found south from Ebor mainly on and eastern half of Tasmania.
https://avh.ala.org.au/occurrences/search?taxa=Pomaderris+phylicifolia#tab_mapView
Habitat Aspect Climate:
Pomaderris phylicifolia prefers light dappled shade to full sun. It grows in open dry Eucalyptus forests, dry sclerophyll forests on slopes and ridges. The altitude ranges from 100 meters ASL to 1800 meters ASL.
The temperatures range from minus 5 degree in August to 36 degrees in January.
The annual rainfall ranges from lows of 1000mm to an average of 1650mm.
Soil Requirements:
Pomaderris phylicifolia prefers deep, coarse sandy loams to light clays often with copious quantities of forest litter and pebbles. The soils are usually derived from decomposed granites, sandstones or shales. The soils pH ranges from 4.5pH to 6pH. It does not tolerate waterlogged soils. Non saline soils to moderately saline soils are tolerated.
Height & Spread:
Wild Plants: 1.2m to 2.2m by 1.5m to 2.5m.
Characteristics:
Pomaderris phylicifolia usually grows as a dense multi stemmed, rounded shrub with smooth, pale grey to mid-grey bark. The new growth and stems are pale green to mid-green and are moderately to densely covered in short branched hirsute hairs and much longer spreading to appressed hairs.
Pomaderris phylicifolia‘s alternate, narrow oblong to linear or oblanceolate leaves measure 5mm to 20mm in length by 1mm to 3mm in width. The petioles are moderately to densely covered in short branched hirsute hairs and much longer spreading to appressed hairs and measure 1.5m to 3mm in length. The bases are tapered to cuneate while the apexes are obtuse. The discolourous laminas are deep green, semi glossy and sparsely to moderately covered in white pubescent hairs on the upper laminas while the lower laminas are paler and moderately to densely covered in white lower surface tomentose with stellate hairs. The laminas are flat to strongly revolute. The mid vein is prominent on the lower lamina while the lateral veins are not visible to faintly visible on the lower lamina only. The mid vein is moderately covered in long, white hirsute hairs.
The inflorescences of Pomaderris phylicifolia are short, auxiliary, spherical cymes that taper to form narrow terminal panicles. It is subtended by ovate bracts which drop shortly after anthesis. The hypanthium and sepals are sparsely to moderately covered in white pubescent hairs. The petals are absent on this species. The flowers appear from August to October.
Pomaderris phylicifolia’s fruits are small ellipsoidal capsules immersed for about a third of its length in the hypanthium. The capsules measure 2mm to 3mm in length by 2mm to 2.5mm in width. The pale green capsules turn grey when ripe. The hypanthium and capsule are moderately to very densely covered in white tomentose hairs.
Confusing Subspecies Varieties:
Pomaderris ericoides leaves are narrower than 1.5mm, somewhat terete with revolute margins. The lower lamina is scarcely visible and the lateral veins are usually not visible without a hand lens.
Pomaderris phylicifolia leaves are wider than 1.5mm, flat with recurved margins. The lower lamina is visible while the lateral veins are usually faintly visible.
Wildlife:
Pomaderris phylicifolia is particularly attractive to insectivorous birds which are attracted to the trees when in flower.
Cultivation:
Pomaderris phylicifolia is an excellent small shrub for small to medium size gardens. It always looks green and fresh especially where adequate ground moisture is retained even in the middle of winter where temperatures may drop to minus 7 degrees for extended periods. In cultivation it grows 1.5 meters to 2.2 meters in height by 1.5 meter to 2.5 meters in diameter when grown in the open.
Three to five plants planted close together at random spacing on raised garden beds make great features especially when mixed with plants with red or deep orange coloured flowers. It looks particularly good when mixed with plants which are of a similar size or slightly smaller and have bright pale green foliage. It can also be used to great effect with mixed coloured annuals below or with small and prostrate Grevillea species like Grevillea rosmarinifolia or Grevillea sericea for a bush garden adding height and width to the garden.
Use it adjacent to pathways, rockeries, along sandy clay banks or along drive ways or adjacent to natural bush gardens. Mass plantings of 5 or more plants in a row can make an open formal back drop or break up hard straight lines giving a criss-cross pattern against the hard structure. This can be greatly emphasized when planted in front of a northern or western wall where the sun highlights the patterns. The flowers are a bonus on this plant and can be used indoors as a cut flower though they only last for a few days to a week.
It makes an excellent hedge making a safe wildlife corridor for birds to travel along and nesting.
Propagation:
Seeds: The seeds of Pomaderris phylicifolia can be removed easily from the capsules as they ripen but are difficult to collect. The best method of collection is to place brown paper bags over the spent flower heads and wait and observe. Freshly collected seed must be treated first.
First scarify the seeds by lightly rubbing them over very fine emery paper. Do not break the testa.
Secondly place the seeds in a container of water that has just come off the boil and allow them to soak for 4 to 5 hours.
Sow the freshly treated seeds directly into a seed raising mix, keeping them moist not wet. When the seedlings are 20mm to 25mm tall, prick them out and plant them into 50mm native tubes using a good organic mix.
As the seedlings roots reach the bottom of the tubes plant them out into their permanent position. Do not delay.
Cuttings: Pomaderris phylicifolia cuttings may prove difficult in the nursery.
Use 150mm to 200mm long tip cuttings or lateral shoots from the present season’s growth. Take them in warmer months of the year. Remove half the leaves from the bottom section being careful not to tear the bark.
1 Prepare the cutting mix which is made from 30mm coconut fibre, 30mm course washed sand, 30mm perlite and 10mm peat,
2 Select good material from non diseased plants,
3 Select semi green stems for cuttings. Look for a stem with two or three nodes,
4 Place the cutting on a flat, hard surface, and make a clean cut down one side of the cutting at the base for 10mm with a sharp sterile knife or razor blade. – This scarification of the node will increase the chances of roots emerging from this spot. Now remove all but one or two the leaves, leaving the apex leaves in tact. If the leaves are very large in proportion to the stem, cut off the apical halves.
5 Use a medium rooting hormone. Place water in a saucer and a little hormone in a milk bottle top or similar top. Place the base of the cutting in the water and dip into the rooting hormone tapping off the excess. With a dipple stick make a hole slightly larger than the cutting and place the cutting into it, being careful not to damage or lose the hormone,
6 Use a small dipple stick or old pencil to poke a hole into the soilless potting mix. Ensure the hole is slightly larger than the stem diameter and be careful not to wipe the rooting hormone off the cuttings base. Place 2 to 4 cuttings in each of the 50mm native tubes,
7 I like to place the tubes in bucket with holes drilled in the bottom to allow excess water to drain out. A plastic bag that fits over the bucket is ideal to help maintain temperature and moisture. Place in a semi shaded, warm position like under 50mm shade cloth.
8 When the cuttings have struck, open the bag to allow air circulation for a few days to a week,
9 Once hardened off remove the cuttings from the bag and allow to further hardening for a few more days to a week,
10 Transplant into a good potting mix to grow on.
Fertilize using seaweed, fish emulsion or organic chicken pellets soaked in water on an alternate basis. Fertilize every two months until the plants are established then annually in early September to October to maintain better colour, health, vitality and flowering
Further Comments from Readers:
“Hi reader, it seems you use The Bible of Botany a lot. That’s great as we have great pleasure in bringing it to you! It’s a little awkward for us to ask, but our first aim is to purchase land approximately 1,600 hectares to link several parcels of N.P. into one at The Pinnacles NSW Australia, but we need your help. We’re not salespeople. We’re amateur botanists who have dedicated over 30 years to saving the environment in a practical way. We depend on donations to reach our goal. If you donate just $5, the price of your coffee this Sunday, We can help to keep the planet alive in a real way and continue to bring you regular updates and features on Australian plants all in one Botanical Bible. Any support is greatly appreciated. Thank you.”
In the spirit of reconciliation we acknowledge the Bundjalung, Gumbaynggirr and Yaegl and all aboriginal nations throughout Australia and their connections to land, sea and community. We pay our respect to their Elders past, present and future for the pleasures we have gained.
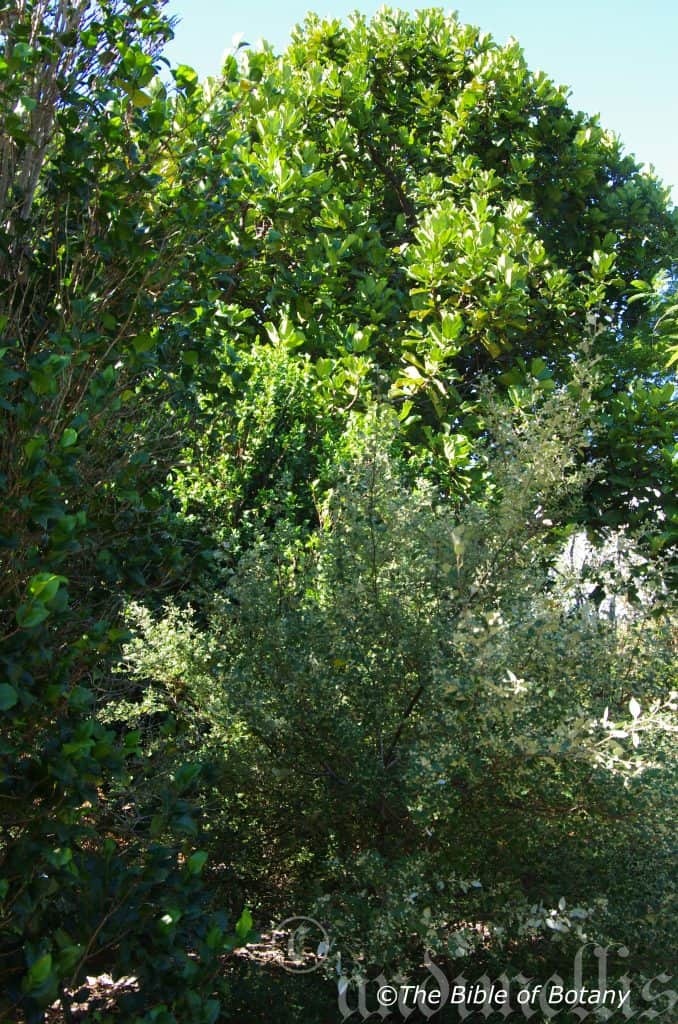
NCBG Coffs Harbour NSW
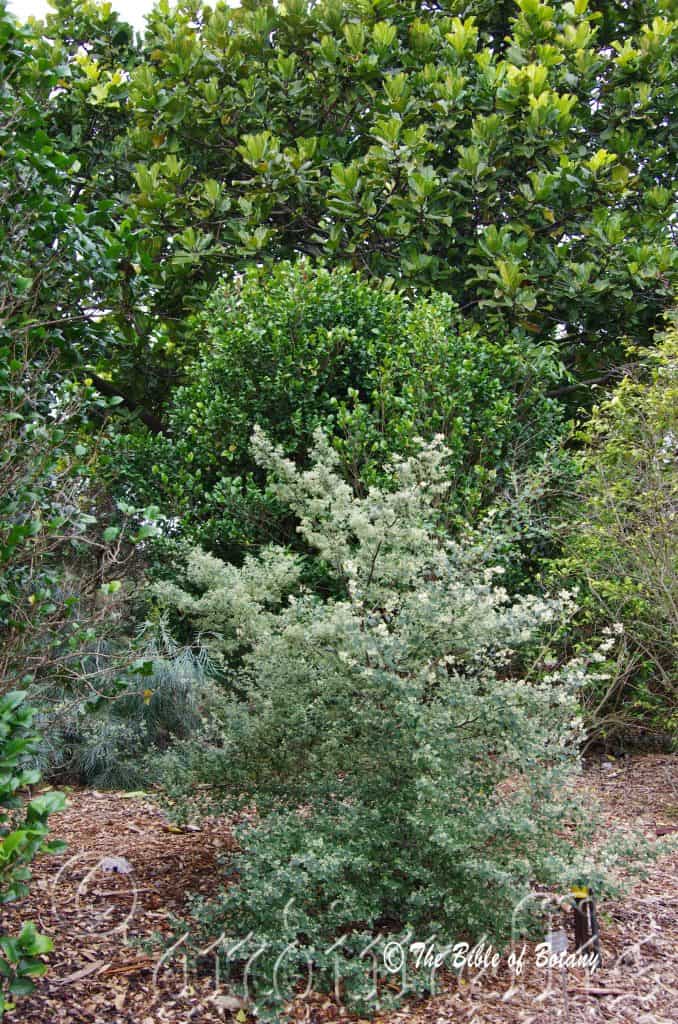
NCBG Coffs Harbour NSW
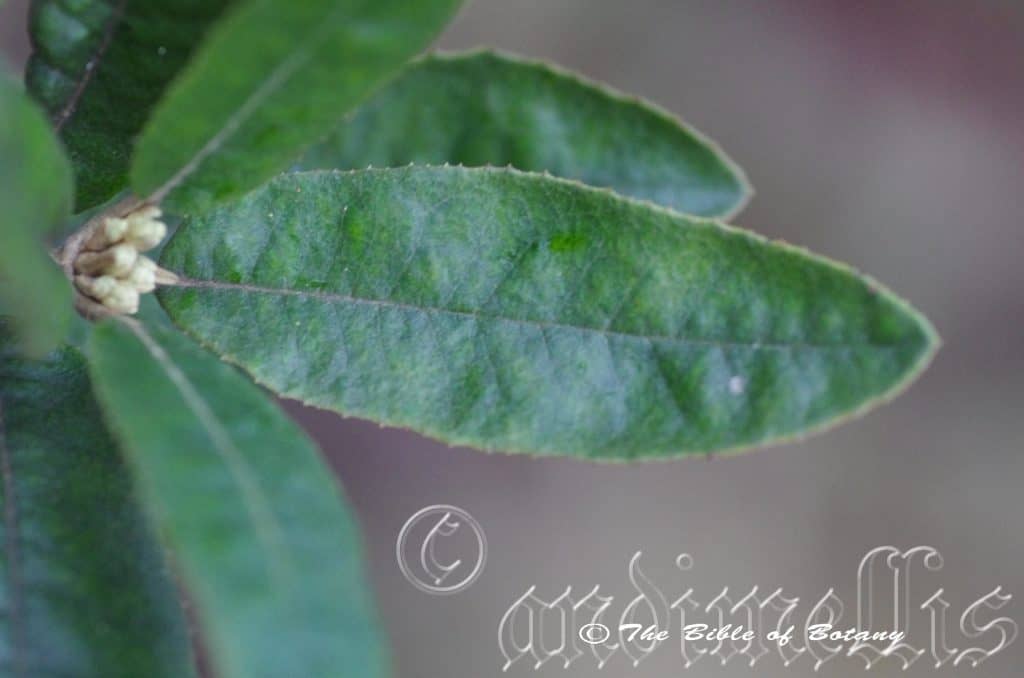
NCBG Coffs Harbour NSW
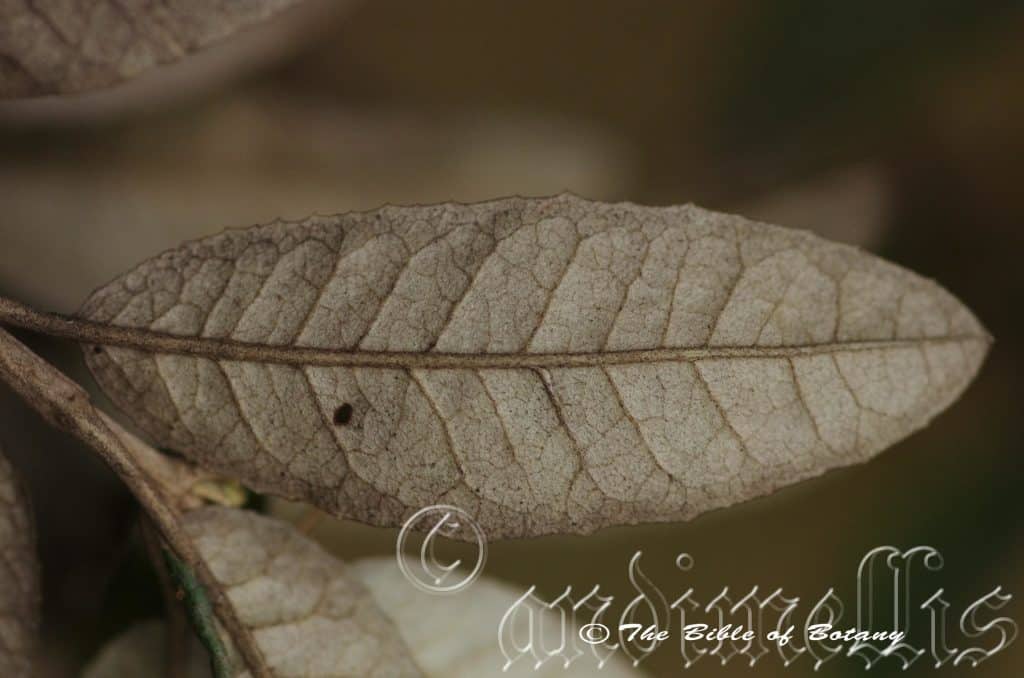
NCBG Coffs Harbour NSW
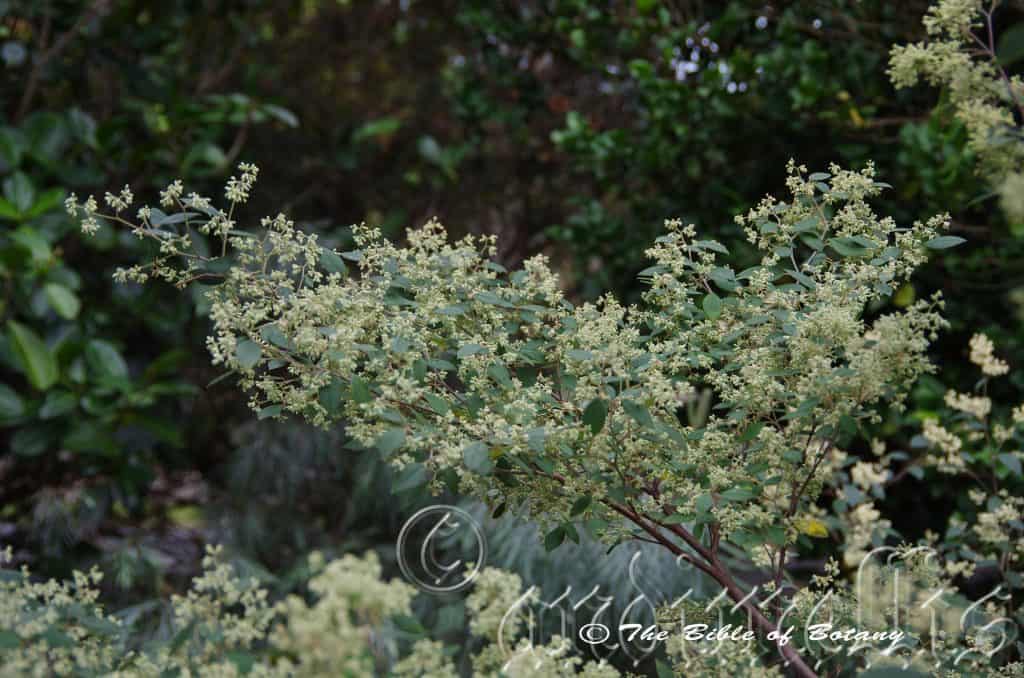
NCBG Coffs Harbour NSW
Pomaderris queenslandica
Classification:
Division: Eudicots
Order: Core Eudicots
Superclass: Rosids
Class: Eurosids
Order: Rosales
Family: Rhamnaceae
Genus: From Poma, which is Ancient Greek for a lid and Derris, which is Ancient Greek for a fur or at times skin. It refers to membrane covering the fruits, which are covered in short hairs.
Species: From Queensland, which is Latinized for the state of Queensland. It refers to species which were first discovered in Queensland or are restricted to Queensland.
Common Name: Scant Pomaderris.
Distribution:
Pomaderris queenslandica is found south from Bundoora State Forest in central eastern Queensland to Cabonne district in New South Wales. There is an isolated population from Mount Spec in far north eastern Queensland. It is mainly found on the Western Slopes, on the Great Dividing Range and eastern slopes of the coastal ranges.
https://avh.ala.org.au/occurrences/search?taxa=Pomaderris+queenslandica#tab_mapView
Habitat Aspect Climate:
Pomaderris queenslandica prefers light dappled shade to full sun. It grows in open dry Eucalyptus forests, dry sclerophyll forests on slopes and ridges. The altitude ranges from 60 meters ASL to 1000 meters ASL.
The temperatures range from minus 3 degree in August to 40 degrees in January.
The rainfall ranges from lows of 60mm to an average of 1200mm.
Soil Requirements:
Pomaderris queenslandica prefers deep, coarse sandy loams to light clays often with copious quantities of forest litter and pebbles. The soils are usually derived from decomposed granites, sandstones or shales. The soils pH ranges from 4.5pH to 6pH. It does not tolerate waterlogged soils. Non saline soils to moderately saline soils are tolerated.
Height & Spread:
Wild Plants: 2m to 3m by 2m to 3m.
Characteristics:
Pomaderris queenslandica usually grows as a multi stemmed, open, rounded shrub with smooth, white to pale grey bark. The new growth and stems are pale green to mid-green and are densely covered in short, off white to brownish stellate and longer hirsute hairs.
Pomaderris queenslandica s alternate, narrow elliptic to ovate leaves measure 25mm to 70mm in length by 10mm to 25mm in width. The caduceus stipules measure 8mm to 10mm in length. The petioles are densely covered in short, off white to brownish stellate and longer hirsute hairs and measure 8m to 12mm in length. The at times slightly oblique bases are sub rounded while the apexes are obtuse to broad acute. The discolourous laminas are deep green to deep olive-green, dull and glabrous on the upper laminas while the lower laminas are densely covered in off white to brownish scruffy pilose hairs and longer tomentose hairs. The laminas are flat, slightly raised between the lateral veins and recurve slightly to moderately upwards from the mid vein to the margins. The margins have 30 to 40 irregularly spaced shallow lobes which have a short fine tooth. The mid vein is strongly prominent on the lower lamina while the 20 to 30 lateral veins are variably prominent on the lower lamina. The lateral veins loop well onside the margins.
The inflorescences of Pomaderris queenslandica are dense spherical panicles born from the terminals. It is subtended by ovate bracts which persist until anthesis. They measure 5mm to 6mm in length. The bracts and peduncles are densely covered in in short, soft, pale brownish pubescent hairs. The hypanthium and sepals are densely covered in short, soft brownish pubescent hairs and a few longer, soft whitish hairs. The petals are usually absent on this species. The flowers appear from August to October.
Pomaderris queenslandica’s fruits are small ellipsoidal capsules. The capsules measure 2mm to 3mm in length by 2mm to 2.5mm in width. The pale green capsules turn grey when ripe. The hypanthium and capsule are densely covered in short pale brownish pubescent hairs with a few longer whitish tomentose hairs.
Wildlife:
Pomaderris queenslandica is particularly attractive to insectivorous birds which are attracted to the trees when in flower.
Cultivation:
Pomaderris queenslandica is an excellent small shrub for small to medium size gardens. It always looks green and fresh especially where adequate ground moisture is retained even in the middle of winter where temperatures may drop to minus 7 degrees for extended periods. In cultivation it grows 1.5 meters to 2.2 meters in height by 1.5 meter to 2.2 meters in diameter when grown in the open.
Three to five plants planted close together at random spacing on raised garden beds make great features especially when mixed with plants with red or deep orange coloured flowers. It looks particularly good when mixed with plants which are of a similar size and have bright pale green foliage. It can also be used to great effect with mixed coloured annuals below or with small and prostrate Grevillea specie for a bush garden adding height and width to the garden.
Use it adjacent to pathways, rockeries, along sandy clay banks or along driveways or adjacent to natural bush gardens. Mass plantings of 5 or more plants in a row can make an open formal back drop or break up hard straight lines giving a criss-cross pattern against the hard structure. This can be greatly emphasized when planted in front of a northern or western wall where the sun highlights the patterns. The flowers are a bonus on this plant and can be used indoors as a cut flower though they only last for a few days
It makes reasonable open hedge which is a good safe wildlife corridors for birds to travel along.
Propagation:
Seeds: The seeds of Pomaderris queenslandica can be removed easily from the capsules as they ripen but are difficult to collect. The best method of collection is to place brown paper bags over the spent flower heads and wait and observe. Freshly collected seed must be treated first.
First scarify the seeds by lightly rubbing them over very fine emery paper. Do not break the testa.
Secondly place the seeds in a container of water that has just come off the boil and allow them to soak for 4 to 5 hours.
Sow the freshly treated seeds directly into a seed raising mix, keeping them moist not wet. When the seedlings are 20mm to 25mm tall, prick them out and plant them into 50mm native tubes using a good organic mix.
As the seedlings roots reach the bottom of the tubes plant them out into their permanent position. Do not delay.
Cuttings: Pomaderris queenslandica cuttings may prove difficult in the nursery. The best success would probably be obtained by using new season wood that had just hardened off. Use 100mm long hardened material from the present season’s growth. Take them in mid-autumn or early spring. Remove 50mm to 60mm of the leaves from the bottom section being careful not to tear the bark. Take a 10mm slice off the bark from the bottom of the cutting on one side. Using a medium strength rooting hormone, dip the cutting in and place them in a moist sterile seed raising mix which is made from 30mm coconut fibre, 30mm course washed sand, 30mm perlite and 10mm peat. When the cuttings have obviously struck and have developed good roots treat them as for seedlings. Expect around a 30mm to 50mm strike rate.
Fertilize using seaweed, fish emulsion or organic chicken pellets soaked in water on an alternate basis. Fertilize every two months until the plants are established then annually in early September to October to maintain better colour, health, vitality and flowering
Further Comments from Readers:
“Hi reader, it seems you use The Bible of Botany a lot. That’s great as we have great pleasure in bringing it to you! It’s a little awkward for us to ask, but our first aim is to purchase land approximately 1,600 hectares to link several parcels of N.P. into one at The Pinnacles NSW Australia, but we need your help. We’re not salespeople. We’re amateur botanists who have dedicated over 30 years to saving the environment in a practical way. We depend on donations to reach our goal. If you donate just $5, the price of your coffee this Sunday, We can help to keep the planet alive in a real way and continue to bring you regular updates and features on Australian plants all in one Botanical Bible. Any support is greatly appreciated. Thank you.”
In the spirit of reconciliation we acknowledge the Bundjalung, Gumbaynggirr and Yaegl and all aboriginal nations throughout Australia and their connections to land, sea and community. We pay our respect to their Elders past, present and future for the pleasures we have gained.
Pomaderris subcapitata
Classification:
Division: Eudicots
Order: Core Eudicots
Superclass: Rosids
Class: Eurosids
Order: Rosales
Family: Rhamnaceae
Genus: From Poma, which is Ancient Greek for a lid and Derris, which is Ancient Greek for a fur or at times skin. It refers to membrane covering the fruits, which are covered in short hairs.
Species: From Sub, which is Ancient Greek/Latin for below or lower and Capitata, which is Latin for a head. It refers to flowers, which form very loose heads.
Common Name:
Distribution:
Pomaderris subcapitata is found south from Liston near Tenterfield in north eastern New South Wales to the Alpine National Park and the Timbarra River near Tambo in central eastern Victoria. It mainly grows on the Great Dividing Range south of Canberra with only isolated disjunct populations further north.
https://avh.ala.org.au/occurrences/search?taxa=Pomaderris+subcapitata#tab_mapView
Habitat Aspect Climate:
Pomaderris subcapitata prefers light dappled shade to full sun. It grows in open moist Eucalyptus forests, dry sclerophyll forests on slopes and ridges. The altitude ranges from 260 meters ASL to 800 meters ASL.
The temperatures range from minus 5 degree in August to 34 degrees in January.
The rainfalls range from lows of 600mm to an average of 1600mm.
Soil Requirements:
Pomaderris subcapitata prefers coarse sandy loams to light fatty clays often with copious quantities of forest litter and pebbles. The soils are deep or on rare occasions on shallow soils close to the parent bedrock. The soils are usually derived from decomposed granites, sandstones or shales. The soils pH ranges from 5pH to 6pH. It does not tolerate waterlogged soils. Non saline soils to moderately saline soils are tolerated.
Height & Spread:
Wild Plants: 1m to 2m by 1m to 2m.
Characteristics:
Pomaderris subcapitata usually grows as a multi stemmed, open, rounded shrub with smooth, grey bark at the base and coppery-brown to pinkish-brown on the larger stems. The new growth and stems are pale green to mid green and are covered in short, off white tomentose hairs with longer spreading rusty hirsute hairs.
Pomaderris subcapitata’s alternate, elliptic to obovate leaves measure 7mm to 17mm in length by 5mm to 10mm in width. The caduceus stipules measure 8mm to 10mm in length. The petioles are densely covered in short, soft, golden-rusty hirsute hairs and measure 2m to 5mm in length. The bases are rounded while the apexes are obtuse. The discolourous laminas are deep green to deep olive-green, glossy and densely covered in rusty pubescent to canescent hairs on the upper laminas while the lower laminas are short, off white tomentose hairs with longer spreading rusty hirsute hairs. The laminas are straight and recurve upwards from the mid vein to the margins and are convex on the upper surface between the main vein and the lateral veins. The margins are regularly crenate. The mid vein and 11 to 13 pannate, lateral veins are strongly prominent on the lower lamina while the reticulated veins are not apparent beneath the hairs. The lateral veins extend to the margins.
The inflorescences are dense spherical panicles born from the upper leaf axils and terminals. They measure 10mm to 20mm in diameter. The bracts are densely covered in rusty tomentose with fringed margins. The peduncles are densely covered in short, soft, golden-rusty tomentose hairs. The peduncles and rachises measure 10mm to 25mm in length while the individual flowers are sessile. The creamy-yellow calyx tubes measure lobes measure 2mm to 2.5mm in length. The hypanthium and sepals are covered in long, off white hirsute hairs. The 5 creamy-yellow sepals are strongly retrorse at anthesis and measure 2mm to 2.5mm in length. The 5 creamy-yellow petals are present.
The white filiform filaments measure 2mm to 2.5mm in length and are inflexed before anthesis. The oblong lemon-yellow anthers are dorsifixed and dehisce longitudinally on the abaxial side. They measure 0.5mm to 0.6mm in length. The 3 pastel lemon-yellow stigmas measure 1mm to 1.5mm in length. The ovary is densely covered in short, soft, rusty hirsute hairs. The flowers appear from August to October.
Pomaderris subcapitata’s fruits are small ellipsoidal capsules. The capsules measure 2mm to 3mm in length by 2mm to 2.5mm in width. The pale green capsules turn grey when ripe. The hypanthium and capsule are covered in long, off white, hirsute hairs. The sepals are not persistent on the ripe fruit. The seeds are hard, deep brown to black and are oval to ovate.
Wildlife:
Pomaderris subcapitata is particularly attractive to insectivorous birds which are attracted to the trees when in flower.
Cultivation:
Pomaderris subcapitata is an excellent small shrub for small to medium size gardens. It always looks green and fresh especially where adequate ground moisture is retained even in the middle of winter where temperatures may drop to minus 7 degrees for extended periods. In cultivation it will grow 2 meters to 2.5 meters in height by 1.5 meter to 2 meters in diameter when grown in the open.
3 to 5 plants planted close together or at random spacing on raised garden beds make great features especially when mixed with plants with red or deep orange coloured flowers. It looks particularly good when mixed with plants which are of a similar size and have bright pale green foliages. It can also be used to great effect with mixed coloured annuals below or with small and prostrate Grevillea species like Grevillea nana or try Pterocaulon redolens for a bush garden adding height and width to the garden.
Use it adjacent to pathways, rockeries, along sandy clay banks or along driveways or adjacent to natural bushy gardens. Mass plantings of 5 or more plants in a row can make an open formal back drop or break up hard straight lines giving a criss-cross pattern against the hard structure. This can be greatly emphasized when planted in front of a northern or western wall where the sun highlights the patterns. The flowers are a bonus on this plant and can be used indoors as a cut flower though they only last for a few days
Propagation:
Seeds: The seeds of Pomaderris subcapitata can be removed easily from the capsules as they ripen but are difficult to collect. The best method of collection is to place brown paper bags over the spent flower heads and wait and observe. Freshly collected seed must be treated first.
First scarify the seeds by lightly rubbing them over very fine emery paper. Do not break the testa.
Secondly place the seeds in a container of water that has just come off the boil and allow them to soak for 4 to 5 hours.
Sow the freshly treated seeds directly into a seed raising mix, keeping them moist not wet. When the seedlings are 20mm to 25mm tall, prick them out and plant them into 50mm native tubes using a good organic mix.
As the seedlings roots reach the bottom of the tubes plant them out into their permanent position. Do not delay.
Cuttings: Pomaderris subcapitata cuttings may prove difficult in the nursery.
Use 150mm to 200mm long tip cuttings or lateral shoots from the present season’s growth. Take them in warmer months of the year. Remove half the leaves from the bottom section being careful not to tear the bark.
1 Prepare the cutting mix which is made from 30mm coconut fibre, 30mm course washed sand, 30mm perlite and 10mm peat,
2 Select good material from non diseased plants,
3 Select semi green stems for cuttings. Look for a stem with two or three nodes,
4 Place the cutting on a flat, hard surface, and make a clean cut down one side of the cutting at the base for 10mm with a sharp sterile knife or razor blade. – This scarification of the node will increase the chances of roots emerging from this spot. Now remove all but one or two the leaves, leaving the apex leaves in tact. If the leaves are very large in proportion to the stem, cut off the apical halves.
5 Use a medium rooting hormone. Place water in a saucer and a little hormone in a milk bottle top or similar top. Place the base of the cutting in the water and dip into the rooting hormone tapping off the excess. With a dipple stick make a hole slightly larger than the cutting and place the cutting into it, being careful not to damage or lose the hormone,
6 Use a small dipple stick or old pencil to poke a hole into the soilless potting mix. Ensure the hole is slightly larger than the stem diameter and be careful not to wipe the rooting hormone off the cuttings base. Place 2 to 4 cuttings in each of the 50mm native tubes,
7 I like to place the tubes in bucket with holes drilled in the bottom to allow excess water to drain out. A plastic bag that fits over the bucket is ideal to help maintain temperature and moisture. Place in a semi shaded, warm position like under 50mm shade cloth.
8 When the cuttings have struck, open the bag to allow air circulation for a few days to a week,
9 Once hardened off remove the cuttings from the bag and allow to further hardening for a few more days to a week,
10 Transplant into a good potting mix to grow on.
Fertilize using seaweed, fish emulsion or organic chicken pellets soaked in water on an alternate basis. Fertilize every two months until the plants are established then annually in early September to October to maintain better colour, health, vitality and flowering
Further Comments from Readers:
“Hi reader, it seems you use The Bible of Botany a lot. That’s great as we have great pleasure in bringing it to you! It’s a little awkward for us to ask, but our first aim is to purchase land approximately 1,600 hectares to link several parcels of N.P. into one at The Pinnacles NSW Australia, but we need your help. We’re not salespeople. We’re amateur botanists who have dedicated over 30 years to saving the environment in a practical way. We depend on donations to reach our goal. If you donate just $5, the price of your coffee this Sunday, We can help to keep the planet alive in a real way and continue to bring you regular updates and features on Australian plants all in one Botanical Bible. Any support is greatly appreciated. Thank you.”
In the spirit of reconciliation we acknowledge the Bundjalung, Gumbaynggirr and Yaegl and all aboriginal nations throughout Australia and their connections to land, sea and community. We pay our respect to their Elders past, present and future for the pleasures we have gained.
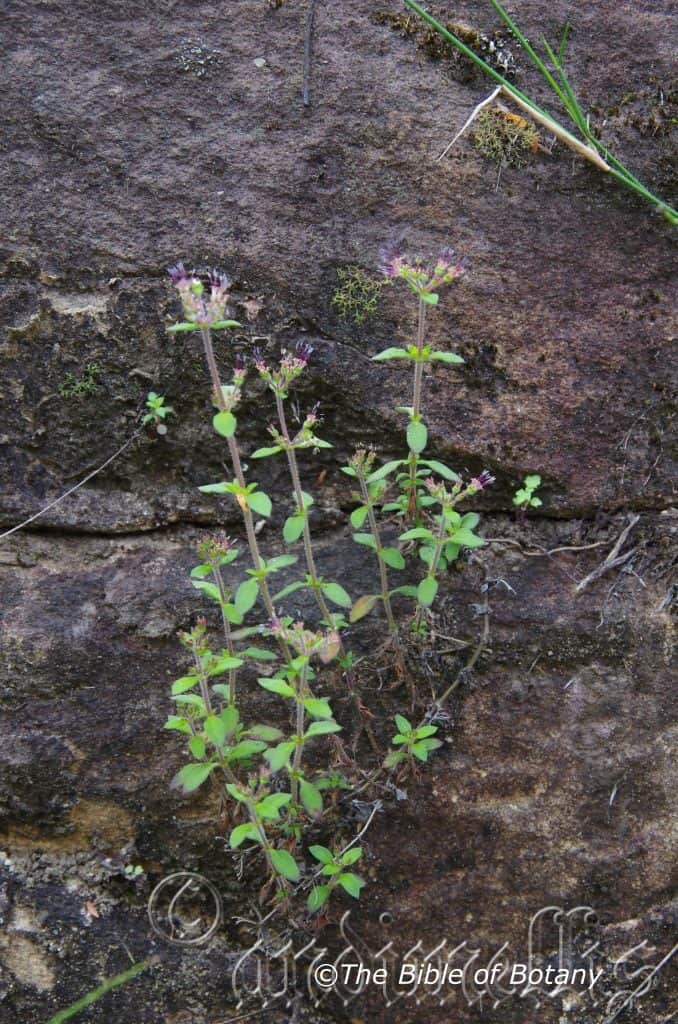
The Pinnacles NSW
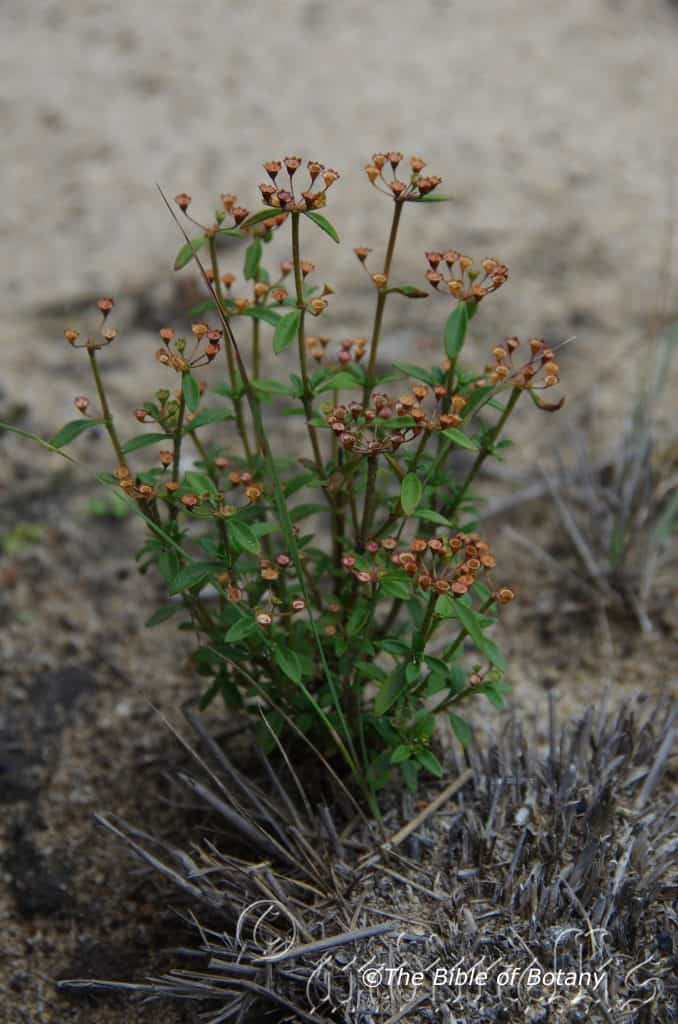
Author’s Garden The Pinnacles NSW
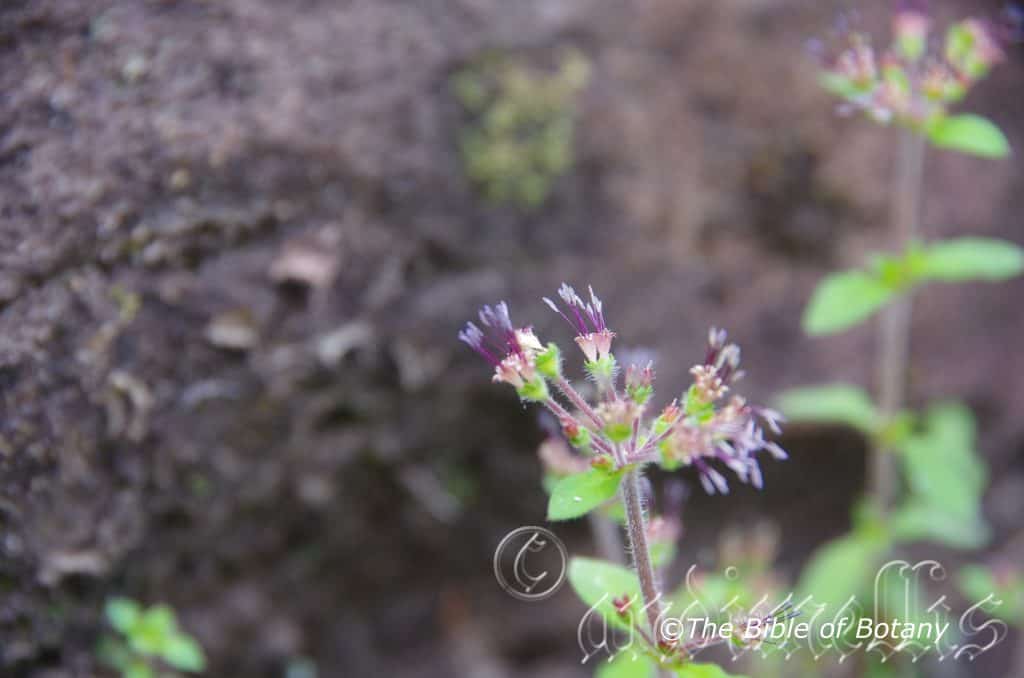
The Pinnacles NSW
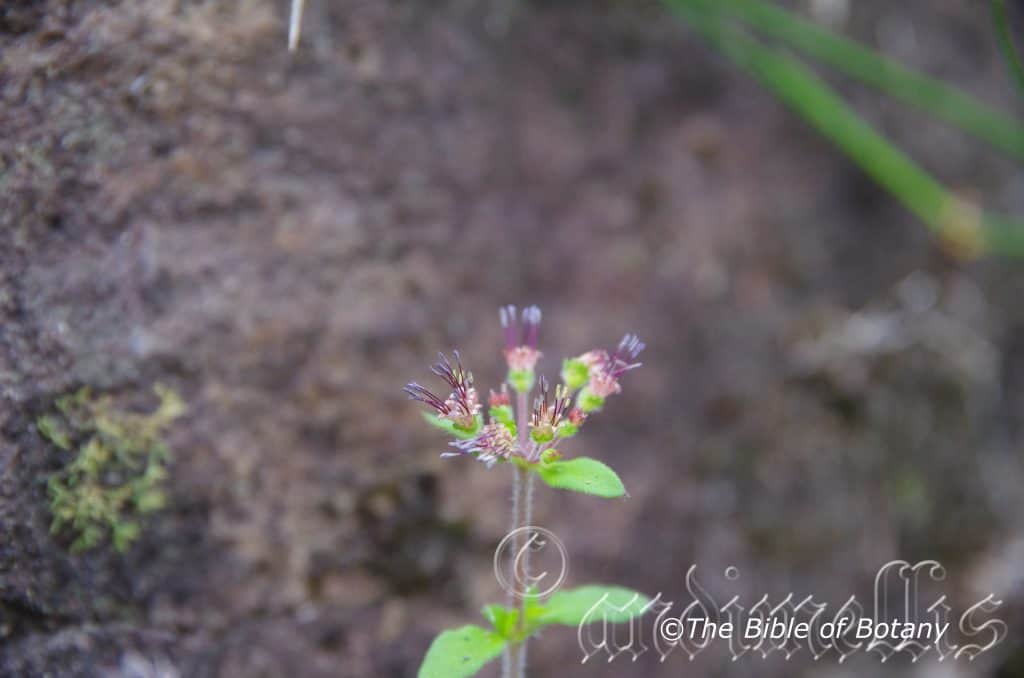
The Pinnacles NSW
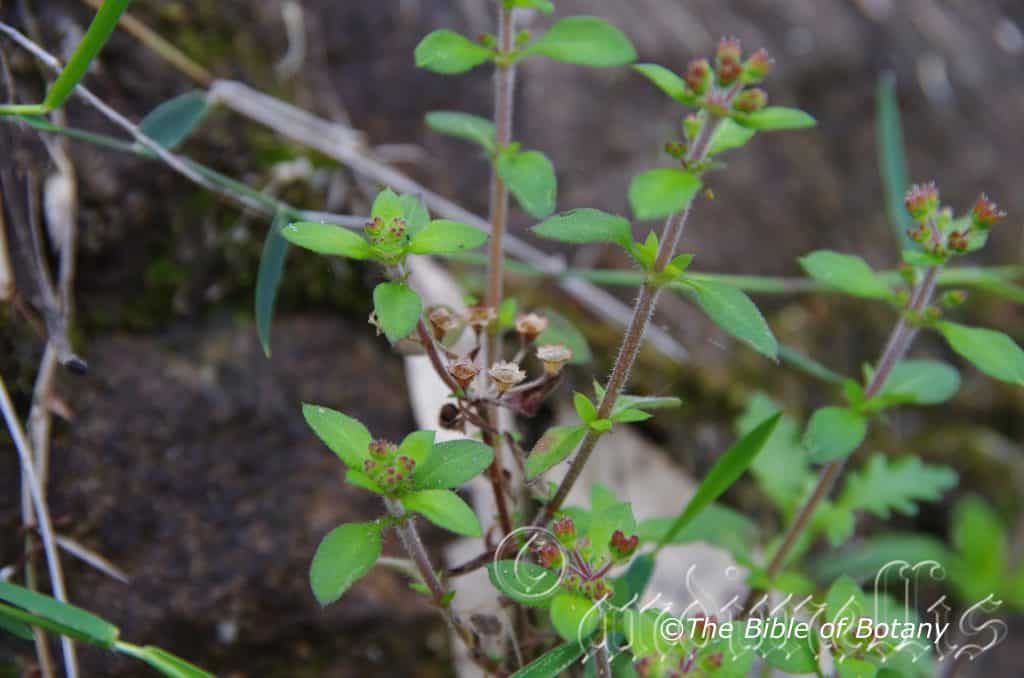
The Pinnacles NSW
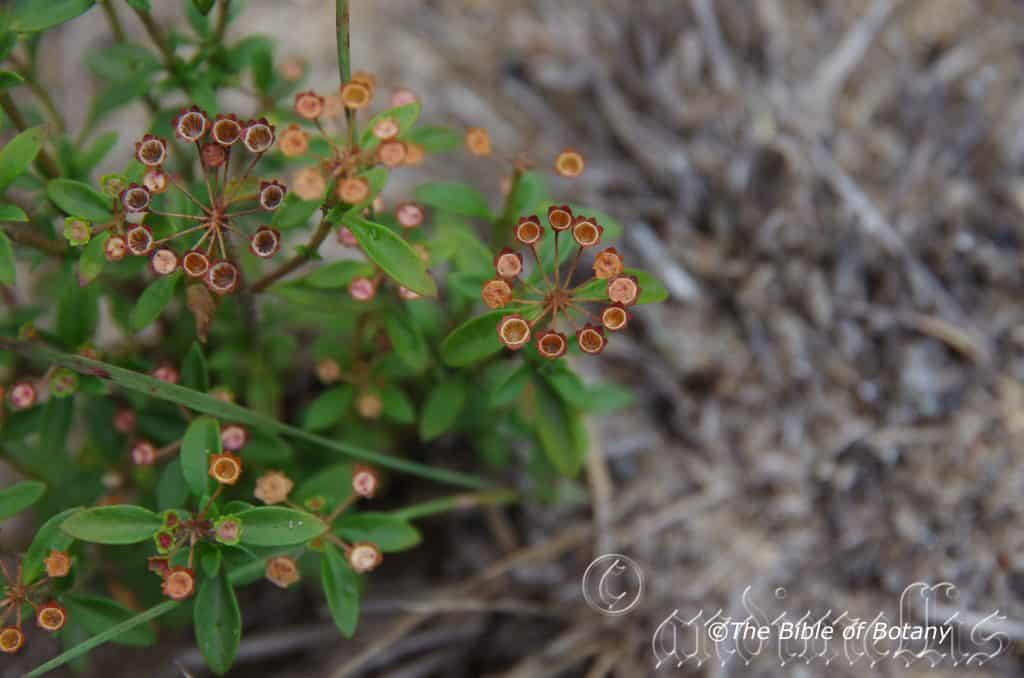
Author’s Gaarden The Pinnacles NSW
Pomax umbellata
Classification:
Class: Equisetopsida
Subclass: Magnoliidae
Superorder: Asteranae
Order: Gentales
Family: Rubiaceae
Subfamily: Rubioideae
Tribe: Anthospermeae
Genus: From Poma, which is Ancient Greek for a lid and Axon, which is Ancient Greek for an axis. It refers to lids, which helps the plant dehisce in the releasing of its seed.
Species: From Umbella/Umbra, which is Latin for a parasol or umbrella. It refers to floral clusters of flowers, in which all the petioles branch from the same level on the stalk axis and terminate at the same level in loose umbels.
Common Name:
Distribution:
Pomax umbellata is restricted to a few populations around Queen Victoria Spring, Laverton, Earaheedy Homestead and Cassidy Hill in central southern Western Australia.
In Central Australia it is bounded by Middleback Range west to Serpentine Lakes then north to Dean Range to Mount Ultim in the Northern Territory through the south western corner of Queensland to Innamincka in north eastern South Australia then west to Mount Watson then south to Vokes Hill and then south of a line to Devils Peak on the Flinders Rangers where it is found north to Terrapinna Springs and south to Crystal Brook. It is then found east to Wilcannia and the Cobar Peneplains
In the east it is found south from Kuranda and Mareeba in far north Queensland to Castlemaine and Beremboke in the Brisbane Ranges in southern Victoria. It grows on the Western Plains, on and east of the Great Dividing Range including some of the off shore Islands.
https://avh.ala.org.au/occurrences/search?taxa=Pomax+umbellata#tab_mapView
Habitat Aspect Climate:
Pomax umbellata prefers light shade to full sun. It grows in open Eucalyptus, open Eucalyptus woodlands, savannah woodlands, coastal heaths, or coastal woodland heaths. The altitude ranges from 2 meters ASL to 1300 meters ASL.
The temperatures range from minus 3 degree in August to 40 degrees in January.
The rainfalls range from lows of 100mm to an average of 3000mm.
Soil Requirements:
Pomax umbellata prefers most deep to shallow sands, sandy loams, light fatty clays to heavy clays or light silts to heavy silts. The soils are derived from decomposed black basalts, brown basalts, granites, sandstones, metamorphic rocks, limestones, shales, alluvial deposits, accumulated beach sands or accumulated coral sands. The soils pH ranges from 4.5pH to 8pH. It tolerates waterlogged soils but resents being submerged for extended periods. Non saline soils to moderately saline soils are tolerated as are salt laden winds.
Height & Spread:
Wild Plants: 0.1m to 0.4m by 0.1m to 0.4m.
Characteristics:
Pomax umbellata grows as an erect to spreading sub shrub with pale green to grass-green stems that are moderately covered in off pulverulent hairs.
The alternate ovate to lanceolate leaves measure 4mm to 30mm in length by 2mm to 13mm in width. The petioles are pale green and glabrous to moderately covered in off white pubescent and or hirsute hairs and measure 1mm to 9mm in length. The attenuate bases are broad cuneate to rounded while the apexes are acute. The concolourous laminas are mid bluish-green, dull and glabrous to moderately covered in off white pubescent and or hirsute hairs. The laminas are flat and decurve slightly close to the apexes while the margins are entire and glabrous to moderately covered in off white ciliate hairs. The mid vein and main lateral veins are slightly prominent on the lower lamina and are visible on the upper lamina.
The inflorescence are compound umbels born from the terminals. There are usually 8 or 9 heads in each umbel with 2 to 4 individual flowers to a head. The peduncles measure 5mm to 12mm in length. The cupuliform calyxes measure 2.2mm to 2.8mm in length including the 5 lobes which measure 0.6mm to 0.8mm in length. The reddish corolla measures 2.5mm to 3.2mm in length and are glabrous to moderately covered in off white pubescent and or hirsute hairs externally.
The anthers are exserted and measure 2mm to 2.5mm in length. The flowers appear from late August to September.
The fruits are small turbinate capsules. The calyxes enlarge on the ripe capsules and measure 3.5mm to 4mm in length. The calyxes turn rusty-red and persist on plant for some time after the seeds have been discarded. The capsules measure 3mm to 3.5mm in length by 4mm to 4.5mm in diameter. The pale green capsules turn reddish when ripe. The hypanthia and capsules are sparsely to moderately covered in white pubescent and or hirsute hairs. The seeds are hard, deep grey-brown to black and measure 2mm to 3mm in length.
Wildlife:
Pomax umbellata’s wildlife is unknown to the author.
Cultivation:
Pomax umbellata is an excellent small herb, which is suitable for small garden beds. It always looks green and fresh especially where adequate ground moisture is retained throughout the year. In cultivation it will grow 0.35 meters to 0.4 meters in height by 0.35 meter to 0.4 meters in diameter when grown in an open moist position.
Six or more plants planted close together at random spacing in raised garden beds make great features especially when mixed with plants with different coloured flowers. It looks particularly good when mixed with plants which are of a similar size or slightly larger. Its domed, compact shape features strongly when in flower. It can be used to great effect when mixed with coloured annuals in a formal or informal garden bed. It does not steal the attention but assists in highlighting the other more colourful plants in the bed that surround it.
Unfortunately it is often overlooked and many gardeners disregard its main attribute of highlighting other features like garden sculptures, ornaments bird baths or small fish ponds and small frog ponds. It needs to be mass planted for best results.
Use it adjacent to pathways, along sandy or clay banks or along driveways or adjacent to natural bush gardens. Mass plantings of 10 or more plants in a row can make a beautiful formal border plant.
Mass plantings are best achieved by planting it at 250mm centres for borders or up to 600mm centres for random plantings, where plants like Lechenausltia biloba (blue) or Leschenaultia formosa (red) or even the dwarf forms of Xerochrysum viscosum mixed colours or some of the small Hibbertia species like Hibbertia pedunculata or Hibbertia vestita. All these plants are annuals so will need replacing every 12 months to maintain optimum health in the garden. What ever you decide have fun.
Propagation:
Seeds: The seeds of Pomax umbellata can be removed easily from the fruits as they ripen, however you must be alert and quick once the capsules begin to dehisce or collection will be lost. The best method of collection is to place brown paper bags over the spent flower heads, wait and observe.
Freshly collected seeds can be directly into a seed raising mix. Place the trays beneath 20mm to 30mm shade cloth and keep them moist at all times. When the seedlings are 20mm to 25mm tall, prick them out and plant them into 50mm squat tubes using a good organic mix.
As the seedlings roots reach the bottom of the tubes plant them out into their permanent position. Do not delay.
Fertilize using seaweed, fish emulsion or organic chicken pellets soaked in water on an alternate basis. Fertilize every two months until the plants are established then annually in early September to October to maintain better colour, health, vitality and flowering
Further Comments from Readers:
“Hi reader, it seems you use The Bible of Botany a lot. That’s great as we have great pleasure in bringing it to you! It’s a little awkward for us to ask, but our first aim is to purchase land approximately 1,600 hectares to link several parcels of N.P. into one at The Pinnacles NSW Australia, but we need your help. We’re not salespeople. We’re amateur botanists who have dedicated over 30 years to saving the environment in a practical way. We depend on donations to reach our goal. If you donate just $5, the price of your coffee this Sunday, We can help to keep the planet alive in a real way and continue to bring you regular updates and features on Australian plants all in one Botanical Bible. Any support is greatly appreciated. Thank you.”
In the spirit of reconciliation we acknowledge the Bundjalung, Gumbaynggirr and Yaegl and all aboriginal nations throughout Australia and their connections to land, sea and community. We pay our respect to their Elders past, present and future for the pleasures we have gained.
Poranthera corymbosa
Classification:
Division: Eudicots
Class: Rosids
Order: Malpighiales
Family: Phyllanthaceae
Tribe: Poranthereae
Genus: From Poros, which is Ancient Greek or Porus, which is Latin for a small aperture and ántha/ánthos, which are Ancient Greek for the male reproductive organ of a flower or the flower. It refers to anthers, which have smaller pores and pollen for dehiscing pollen than other species in the genus.
Species: From Korymbōs, which is Ancient Greek or Corymbōsa, which is Latin for a cluster of flowers. It refers to flowers, where the stems branch from different levels on the stalk’s axis but ultimately terminate at the same level.
Common Name:
Distribution:
Poranthera corymbosa is found south from Mount Ernest in the Macpherson Ranges on the border of Queensland and New South Wales to the Wingen River near Orbost in north eastern Victoria. It mainly grows on the Great Dividing Range in the north and on and east of the range in the southern part of its distribution. It has 3 disjunct populations further west on the Grampians and the Brisbane ranges west of Melbourne and between the Warrumbungle Ranges and Coonabarabran in central eastern New South Wales.
https://avh.ala.org.au/occurrences/search?taxa=Poranthera+corymbosa#tab_mapView
Habitat Aspect Climate:
Poranthera corymbosa prefers light dappled shade to full sun. It grows in open Eucalyptus forests, open Eucalyptus woodlands, grasslands or coastal heaths. The altitude ranges from 260 meters ASL to 800 meters ASL.
The temperatures range from minus 5 degree in August to 40 degrees in January.
The rainfalls range from lows of 500mm to an average of 1600mm.
Soil Requirements:
Poranthera corymbosa prefers poorer quality sands, light sandy clays or light fatty clays often with copious quantities pebbles and stones. The soils are derived from decomposed black basalts, brown basalts, granites or sandstones. The soils pH ranges from 4.5pH to 7pH. It does not tolerate waterlogged soils. Non saline soils to moderately saline soils are tolerated.
Height & Spread:
Wild Plants: 0.3m to 0.8m by 0.3m to 0.6m.
Characteristics:
Poranthera corymbosa is an erect perennial shrub with deep reddish-brown stems near the base while the apical half is bright lime green and glabrous.The few branches on the apical half each terminate in an inflorescence.
The leaves are crowded on the basal section and are more disjunct on the apical section. The linear to narrow ovate sessile leaves usually measure 30mm to 50mm but have been recorded to 90mm in length by 1mm to 6mm in width. The minute elliptical stipules margins are entire. The bases taper to the stem while the apexes are acute. The concolourous laminas are lime-green, semi glossy and glabrous. The laminas decurve downwards near the apexes while the margins are entire and revolute. The mid vein is slightly prominent on the lower lamina and is not visible on the upper lamina.
The inflorescences are compound corymbs born from the upper leaf axils and terminals. They measure 80mm to 150mm in diameter. The lime green peduncles and pastel green to white pedicels are glabrous. The peduncles measure 70mm to 100mm in length while the pedicels measure 1mm to 2.5mm in length. The white corolla tubes measure 2.5mm to 3mm in length by 2mm to 3mm in diameter. The 4 oblong lobes have obtuse apexes and are divaricate at anthesis. The white lobes measure 1.5mm to 2mm in length.
The 5 filiform, white, filaments are exserted at anthesis and measure 2.5mm to 3mm in length. The anthers are pale yellow. The ovary is glabrous. The style and 6 filiform stigmas are reddish. The flowers appear from late September to November.
Poranthera corymbosa’s fruits are small 6 chambered ovoidal capsules. The capsules measure 3mm to 3.5mm in length by 5mm to 7mm in diameter. The pale green capsules turn grey when ripe.
Wildlife:
Poranthera corymbosa’s wildlife is unknown to the author.
Cultivation:
Poranthera corymbosa is a small sub shrub perennial for mass planting in dry open rockeries. It always looks green and fresh even when growing on ridges and cliff shelves. In cultivation it will grow 0.7 meters to 1 meter in height by 0.3 meter to 0.5 meters in diameter when grown in an open dry situation.
7 to 11 plants planted close together at random spacing on raised garden beds in the mid ground or background make great features especially when mixed with smaller plants with different deep coloured flowers. It looks particularly good when mixed with plants which are more prostrate and have broad foliages.
Use it close to pathways and rockeries behind border plants, along the tops of clay banks or along driveways and adjacent to natural bushy gardens. Poranthera corymbosa is well suited to mass planting in the garden even amongst larger shrubs where there is a gap or opening and beneath Eucalyptus trees where the soils tend to be drier.
Seek companion plants with deep strong coloured flowers like Hibbertia obtusifolia, Leschenaultia formosa, Leschenaultia biloba, Goodenia ovate, Indigofera australis, Dampiera specie, Xerochrysum bracteatum, Xerochrysum bracteatum or any of the Plectranthus specie for strong foliage contrasts.
Propagation:
Seeds: The seeds of Poranthera corymbosa can be removed easily from the fruits as they ripen but are difficult to collect. The best method of collection is to place brown paper bags over the spent flower heads and wait and observe.
Freshly collected seeds can be sown directly into a seed raising mix, keeping them moist not wet. When the seedlings are 20mm to 25mm tall, prick them out and plant them into 50mm native tubes using a good organic mix.
As the seedlings roots reach the bottom of the tubes plant them out into their permanent position. Do not delay as some set back will occur especially on heavy clay soils.
Cuttings: Fortunately Poranthera corymbosa cuttings strike easy. Use 100mm to 200mm long tip cuttings or lateral shoots from the present season’s growth. Take them in warmer months of the year. Remove half the leaves from the bottom section being careful not to tear the bark.
1 Prepare the cutting mix by adding two thirds sharp clean river sand, one third peat or one third perlite. These ingredients must be sterilized,
2 Select good material from non diseased plants,
3 Select semi green stems for cuttings. Look for a stem with two or three nodes,
4 Place the cutting on a flat, hard surface, and make a clean cut down one side of the cutting at the base for 10mm with a sharp sterile knife or razor blade. – This scarification of the node will increase the chances of roots emerging from this spot. Now remove all but one or two the leaves, leaving the apex leaves in tact. If the leaves are very large in proportion to the stem, cut off the apical halves.
5 Fill a saucer with water, and place a little medium strength rooting hormone into another container like a milk bottle top. Dip the node end of the cutting into the water and then into the rooting hormone. Tap off any excess hormone,
6 Use a small dipple stick or old pencil to poke a hole into the soilless potting mix. Ensure the hole is slightly larger than the stem diameter and be careful not to wipe the rooting hormone off the cuttings base. Place 2 to 4 cuttings in each of the 50mm native tubes,
7 I like to place the tubes in bucket with holes drilled in the bottom to allow excess water to drain out. A plastic bag that fits over the bucket is ideal to help maintain temperature and moisture. Place in a semi shaded, warm position like under 50mm shade cloth.
8 When the cuttings have struck, open the bag to allow air circulation for a few days to a week,
9 Once hardened off remove the cuttings from the bag and allow to further hardening for a few more days to a week,
10 Transplant into a good potting mix to grow on.
Fertilize using seaweed, fish emulsion or organic chicken pellets soaked in water on an alternate basis. Fertilize every two months until the plants are established then annually in early September to October to maintain better colour, health, vitality and flowering
Further Comments from Readers:
“Hi reader, it seems you use The Bible of Botany a lot. That’s great as we have great pleasure in bringing it to you! It’s a little awkward for us to ask, but our first aim is to purchase land approximately 1,600 hectares to link several parcels of N.P. into one at The Pinnacles NSW Australia, but we need your help. We’re not salespeople. We’re amateur botanists who have dedicated over 30 years to saving the environment in a practical way. We depend on donations to reach our goal. If you donate just $5, the price of your coffee this Sunday, We can help to keep the planet alive in a real way and continue to bring you regular updates and features on Australian plants all in one Botanical Bible. Any support is greatly appreciated. Thank you.”
In the spirit of reconciliation we acknowledge the Bundjalung, Gumbaynggirr and Yaegl and all aboriginal nations throughout Australia and their connections to land, sea and community. We pay our respect to their Elders past, present and future for the pleasures we have gained.
Poranthera ericifolia
Classification:
Division: Eudicots
Class: Rosids
Order: Malpighiales
Family: Phyllanthaceae
Tribe: Poranthereae
Genus: From Poros, which is Ancient Greek or Porus, which is Latin for a small aperture and ántha/ánthos, which are Ancient Greek for the male reproductive organ of a flower or the flower. It refers to anthers, which have smaller pores and pollen for dehiscing pollen than other species in the genus.
Species: From Erica, which is Latin for heath and Folia, which is Latin for foliage. It refers to plants, which have foliage similar to the exotic Erica genus.
Common Name:
Distribution:
Poranthera ericifolia is found south from Bylong to Moruya eastern New South Wale. There are 3 disjunct populations further north at Kremnos Creek Glenreagh in northern New South Wales and on Stradbroke Island and Mount Perry in southern coastal Queensland. It mainly grows on and east of the Great Dividing.
https://avh.ala.org.au/occurrences/search?taxa=Poranthera+ericifolia#tab_mapView
Habitat Aspect Climate:
Poranthera ericifolia prefers light dappled shade to full sun. It grows in dry sclerophyll forests and open Eucalyptus type woodlands. The altitude ranges from 5 meters ASL to 762 meters ASL.
The temperatures range from minus 3 degree in August to 34 degrees in January.
The rainfalls range from lows of 800mm to an average of 2100mm.
Soil Requirements:
Poranthera ericifolia prefers various types of sands to light fatty clays. The soils are usually derived from decomposed sandstones or at times accumulated peaty beach sands. The soils pH ranges from 4.5pH to 6pH. It does not tolerate waterlogged soils. Non saline soils to moderately saline soils are tolerated as are salt laden winds.
Height & Spread:
Wild Plants: 0.1m to 0.3m by 0.15m to 0.5m.
Characteristics:
Poranthera ericifolia grows as an erect perennial sub shrub with deep reddish-brown stems near the base while the apical half It is bright lime green and scabrous or sparsely covered in off white puberulent hairs.The few branches on the apical half each terminate in an inflorescence.
The leaves are crowded along the stems. The linear to narrow ovate sessile leaves measure 8mm to 12mm in length by 1mm to 2.5mm in width. The minute elliptical stipules margins are lobed or lacerated. The bases taper to the stem while the apexes are acute. The concolourous laminas are lime-green to grass-green, semi glossy and glabrous. The laminas decurve downwards near the apexes while the margins are entire and revolute. The mid vein is slightly prominent on the lower lamina and is not visible on the upper lamina.
The inflorescence are dense compound corymbs born from the upper leaf axils and terminals. They measure 30mm to 80mm in diameter. The grass-green peduncles and pastel green to white pedicels are glabrous to slightly scabrous. The peduncles measure 30mm to 45mm in length while the pedicels measure 1mm to 2.5mm in length. The white corolla tubes measure 2.5mm to 3mm in length by 2mm to 3mm in diameter. The oblong lobes have obtuse apexes and are divaricate at anthesis. The white lobes measure 1.5mm to 2mm in length.
The 5 filiform, white, filaments are exserted at anthesis and measure 2.5mm to 3mm in length. The anthers are pale yellow. The style and 6 filiform stigmas are reddish. The ovary is glabrous. The flowers appear from late September to late February.
Poranthera ericifolia’s fruits are small 6 chambered ovoidal capsules. The capsules measure 3.5mm to 4mm in length by 5mm to 7.5mm in diameter. The pale green capsules turn grey when ripe.
Wildlife:
Poranthera ericifolia’s wildlife is unknown to the author.
Cultivation:
Poranthera ericifolia is a small herb suitable for mass planting in dry open rockeries. It always looks green and fresh even when growing on ridges and cliff shelves. In cultivation it will grow 0.3 meters to 0.4 meters in height by 0.2 meter to 0.3 meters in diameter when grown in an open dry situation.
7 to 11 or more plants planted close together at random spacing on raised garden beds in the mid ground or background make great features especially when mixed with smaller plants with different deep coloured flowers. It looks particularly good when mixed with plants which are more prostrate and have broad foliage.
Use it back from pathways and rockeries behind border plants, along the tops of clay banks or along drive ways and adjacent to natural bush gardens. Poranthera ericifolia is well suited to mass planting in the garden even amongst larger shrubs where there is a gap or opening and beneath Eucalyptus trees where the soils tend to be drier.
Seek companion plants with deep strong coloured flowers like Hibbertia obtusifolia, Lecshenaltia formosa, Lecshenaltia biloba, Goodenia ovate, Indigofera australis, Dampiera specie, Xerochrysum bracteatum, Xerochrysum bracteatum or any of the Plectranthus specie for strong foliage contrasts.
Propagation:
Seeds: Seeds of Poranthera ericifolia can be removed easily from the fruits as they ripen but are difficult to collect. The best method of collection is to place a small paper bag over the spent flower heads and wait and observe.
It is a good starter plant for beginners to try. Freshly collected seeds can be sown directly into a seed raising mix, keeping them moist not wet. When the seedlings are 20mm to 25mm tall, prick them out and plant them into 50mm native tubes using a good organic mix.
As the seedlings roots reach the bottom of the tubes plant them out into their permanent position. Do not delay as some set back will occur especially in heavy clay soils.
Fertilize using seaweed, fish emulsion or organic chicken pellets soaked in water on an alternate basis. Fertilize every two months until the plants are established then annually in early September to October to maintain better colour, health, vitality and flowering
Further Comments from Readers:
“Hi reader, it seems you use The Bible of Botany a lot. That’s great as we have great pleasure in bringing it to you! It’s a little awkward for us to ask, but our first aim is to purchase land approximately 1,600 hectares to link several parcels of N.P. into one at The Pinnacles NSW Australia, but we need your help. We’re not salespeople. We’re amateur botanists who have dedicated over 30 years to saving the environment in a practical way. We depend on donations to reach our goal. If you donate just $5, the price of your coffee this Sunday, We can help to keep the planet alive in a real way and continue to bring you regular updates and features on Australian plants all in one Botanical Bible. Any support is greatly appreciated. Thank you.”
In the spirit of reconciliation we acknowledge the Bundjalung, Gumbaynggirr and Yaegl and all aboriginal nations throughout Australia and their connections to land, sea and community. We pay our respect to their Elders past, present and future for the pleasures we have gained.

Banyabba National Park NSW
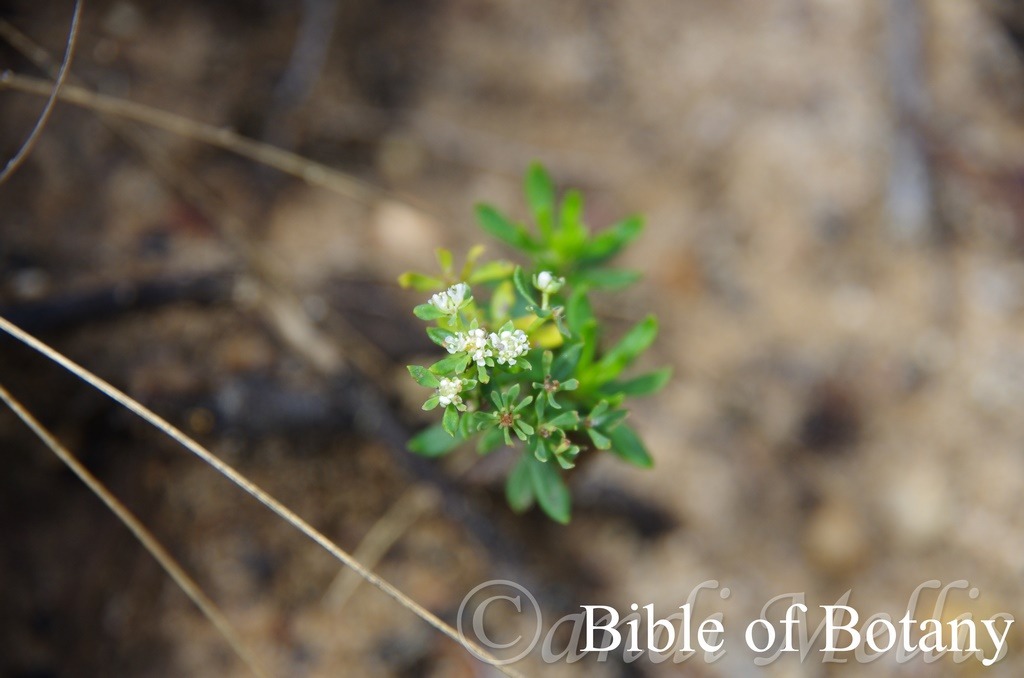
Banyabba National Park NSW
Poranthera microphylla
Classification:
Division: Eudicots
Class: Rosids
Order: Malpighiales
Family: Phyllanthaceae
Tribe: Poranthereae
Genus: From Poros, which is Ancient Greek or Porus, which is Latin for a small aperture and ántha/ánthos, which are Ancient Greek for the male reproductive organ of a flower or the flower. It refers to anthers, which have smaller pores and pollen for dehiscing pollen than other species in the genus.
Species: From Mikrós, which is Ancient Greek for small or very small and Phullon/Phýllon, which is Ancient Greek for a leaf. It refers to leaves, phyllodes or fronds, which are notably smaller or finer than other species in the genus.
Common Name:
Distribution:
Poranthera microphylla is found throughout Australia especially within 300 kilometres of the coast in the southern half of Western Australia, the south coast and east coast. It is not found in the true deserts, in the alpine regions or the north west of Western Australia.
In Tasmania it is found in the eastern two thirds of the state and the Bass Strait Islands.
https://avh.ala.org.au/occurrences/search?taxa=Poranthera+microphylla#tab_mapView
Habitat Aspect Climate:
Poranthera microphylla prefers light dappled shade to full sun. It grows in open sclerophyll forests, open Eucalyptus woodlands or open coastal heaths. The altitude ranges from 2 meters ASL to 1300 meters ASL.
The temperatures range from minus 4 degree in August to 40 degrees in January.
The rainfalls range from lows of 150mm to an average of 3200mm.
Soil Requirements:
Poranthera microphylla prefers various types of sands to light fatty clays. The soils are usually derived from decomposed sandstones, granites sands or at times accumulated peaty beach sands. The soils pH ranges from 4.5pH to 6pH. It does not tolerate waterlogged soils. Non saline soils to moderately saline soils are tolerated as are salt laden winds.
Height & Spread:
Wild Plants: 0.03m to 0.15m by 0.15m to 0.25m.
Characteristics:
Poranthera microphylla grows as a small prostrate ground cover or small upright annual herb with deep bluish-green glabrous stems.
The alternate to sub opposite, spathulate to obovate leaves measure 4mm to 15mm in length by 1.5mm to 4mm in width. The elliptical stipules are membranous while the margins are entire. The petioles measure 2mm to 5mm in length. The bases are tapering, attenuate while the apexes are mucronate to acuminate or truncate. The concolourous laminas are bluish-green, dull and glabrous. The laminas are usually flat and straight while the margins are entire. The mid vein and main lateral veins are faintly prominent on the lower lamina and are not visible on the upper lamina. The reticulated venation is faintly visible on the upper laminas.
The inflorescence are corymbs born from the terminals. They measure 5mm to 10mm in diameter. The green peduncles and pastel green pedicels are glabrous. The peduncles measure 8mm to 15mm in length while the pedicels measure 1mm to 1.5mm in length. The white corolla tubes measure 2mm to 2.5mm in length. The 5 corolla lobes are semi erect and measure 1.5mm to 2mm in length.
The 5 filiform, white, filaments are level with the mouth of the tube or slightly exserted at anthesis and measure 2mm to 2.5mm in length. The dorsifixed anthers are pale yellow. The style and 6 filiform stigmas are white. The ovary is glabrous. The flowers appear throughout the warmer months of the year.
The fruits are small 6 chamber, ovoidal capsules. The capsules measure 1.5mm to 2mm in length by 1.5mm to 2mm in diameter. The pale green capsules turn grey on ripening before drying. The hypanthium and capsule are covered in white tomentose hairs. The seeds are hard, deep brown to black and are oval to ovate.
Wildlife:
Poranthera microphylla’s wildlife is unknown to the author.
Cultivation:
Poranthera microphylla is a small sub shrub for mass planting in dry open rockeries. It always looks green and fresh even when growing on ridges and cliff shelves. In cultivation it will grow 0.03 meters to 0.1 meters in height by 0.2 meter to 0.4 meters in diameter when grown in an open dry, sunny position.
7 or more plants planted close together at random spacing on raised garden beds in the mid ground or background make great features especially when mixed with smaller plants with different deep coloured flowers. It looks particularly good when mixed with plants which are domed shape and have broad foliages.
Use it adjacent to pathways and rockeries as border plants, along the tops of clay banks or along dry drive ways and adjacent to natural bush gardens. Poranthera ericifolia is well suited to mass planting in the garden even amongst larger shrubs where there is a gap or opening and beneath Eucalyptus trees where the soils tend to be drier.
Seek companion plants with deep strong coloured flowers like Hibbertia obtusifolia, Leschenaultia formosa, Leschenaultia biloba, Goodenia ovate, Indigofera australis, Dampiera specie, Xerochrysum bracteatum, Xerochrysum bracteatum or any of the Plectranthus specie for strong foliage contrasts.
Propagation:
Seeds: Seeds of Poranthera microphylla can be removed easily from the fruits as they ripen but are difficult to collect. The best method of collection is to place brown paper bags over the spent flower heads, wait and observe.
This is another plant for beginners to try out. Freshly collected seeds can be sown directly into a seed raising mix, keeping them moist not wet. When the seedlings are 20mm to 25mm tall, prick them out and plant them into 50mm native tubes using a good organic mix.
As the seedlings roots reach the bottom of the tubes plant them out into their permanent position. Do not delay as some set back will occur especially in heavy clay soils.
Fertilize using seaweed, fish emulsion or organic chicken pellets soaked in water on an alternate basis. Fertilize every two months until the plants are established then annually in early September to October to maintain better colour, health, vitality and flowering
Further Comments from Readers:
“Hi reader, it seems you use The Bible of Botany a lot. That’s great as we have great pleasure in bringing it to you! It’s a little awkward for us to ask, but our first aim is to purchase land approximately 1,600 hectares to link several parcels of N.P. into one at The Pinnacles NSW Australia, but we need your help. We’re not salespeople. We’re amateur botanists who have dedicated over 30 years to saving the environment in a practical way. We depend on donations to reach our goal. If you donate just $5, the price of your coffee this Sunday, We can help to keep the planet alive in a real way and continue to bring you regular updates and features on Australian plants all in one Botanical Bible. Any support is greatly appreciated. Thank you.”
In the spirit of reconciliation we acknowledge the Bundjalung, Gumbaynggirr and Yaegl and all aboriginal nations throughout Australia and their connections to land, sea and community. We pay our respect to their Elders past, present and future for the pleasures we have gained.
Poranthera obovata
Classification:
Division: Eudicots
Class: Rosids
Order: Malpighiales
Family: Phyllanthaceae
Tribe: Poranthereae
Genus: From Poros, which is Ancient Greek or Porus, which is Latin for a small aperture and ántha/ánthos, which are Ancient Greek for the male reproductive organ of a flower or the flower. It refers to anthers, which have smaller pores and pollen for dehiscing pollen than other species in the genus.
Species: From Ob, which is Latin for orbital and Ovatus which is Latin for an egg shape. It refers to organs, which are somewhat variable but usually takes the shape or form of an egg.
Common Name:
Distribution:
Poranthera obovata is found in several disjunct populations including the Blackdown Tablelands, Kroombit Tops and then south from the Blackall Ranges in southern Queensland to Middle Creek in Sherwood Nature Reserve in north eastern New South Wales.
https://avh.ala.org.au/occurrences/search?taxa=Poranthera+obovata#tab_mapView
Habitat Aspect Climate:
Poranthera obovata prefers light dappled shade to full sun. It grows along creeks, road side culverts in open Eucalyptus forests or open Eucalyptus woodlands. The altitude ranges from 38 meters ASL to 814 meters ASL.
The temperatures range from minus 3 degrees in August to 37 degrees in January.
The rainfalls range from lows of 850mm to an average of 2000mm.
Soil Requirements:
Poranthera obovata prefers various types of fine sands, coarse sands or light fatty clays. The soils are usually derived from decomposed sandstones sands or granites. The soils pH ranges from 4.5pH to 7pH. It does not tolerate waterlogged soils. Non saline soils to moderately saline soils are tolerated as are salt laden winds.
Height & Spread:
Wild Plants: 0.8m to 1.2m by 0.3m to 0.5m.
Characteristics:
Poranthera obovata grows as an erect perennial shrub with deep reddish-brown stems near the base while the apical half is bright lime green and glabrous.The few branches on the apical half each terminate in an inflorescence.
The leaves are crowded on the basal section and are more disjunct on the apical section. The obovate sessile leaves usually measure 10mm to 20mm but have been recorded to 90mm in length by 1mm to 6mm in width. The minute elliptical stipules margins are entire. The bases taper to the stem while the apexes are acute. The concolourous laminas are lime-green, semi glossy and glabrous. The laminas decurve downwards near the apexes while the margins are entire and revolute. The mid vein is slightly prominent on the lower lamina and is not visible on the upper lamina.
The inflorescences are compound corymbs born from the upper leaf axils and terminals. They measure 100mm to 130mm in length 100mm to 120mm in diameter. The lime green peduncles and pastel green to white pedicels are glabrous. The peduncles measure 80mm to 90mm in length while the pedicels measure 1mm to 2.5mm in length. The white corolla tubes measure 2.5mm to 3mm in length by 2mm to 3mm in diameter. The 4 oblong lobes have obtuse apexes and are strongly divaricate to slightly reflex at anthesis. The white lobes measure 1.5mm to 2mm in length.
The 5 filiform, white, filaments are exserted at anthesis and measure 2.5mm to 3mm in length. The anthers are pale yellow. The ovary is glabrous. The style and 6 filiform stigmas are reddish. The flowers appear from late September to November.
The fruits are small 6 chambered ovoidal capsules. The capsules measure 3mm to 3.5mm in length by 5mm to 6mm in diameter. The pale green capsules turn grey when ripe.
Wildlife:
Poranthera obovata’s wildlife is unknown to the author.
Cultivation:
Poranthera obovata is a small sub shrub for mass planting in dry open rockeries. It always looks green and fresh even when growing on ridges and cliff shelves. In cultivation it will grow 0.7 meters to 0.8 meters in height by 0.3 meter to 0.5 meters in diameter when grown in an open dry situation.
4 or 5 plants planted close together or at random spacing on raised garden beds in the mid ground or background make great features especially when mixed with smaller plants with different deep coloured flowers. It looks particularly good when mixed with plants which are more prostrate and have broad foliages.
Use it back from pathways and rockeries behind border plants, along the tops of clay banks or along drive ways and adjacent to natural bush gardens. Poranthera obovata is well suited to mass planting in the garden even amongst larger shrubs where there is a gap or opening and beneath Eucalyptus trees where the soils tend to be drier.
Seek companion plants with deep strong coloured flowers like Hibbertia obtusifolia yellow, Leschenaultia formosa red, Leschenaultia biloba blue, Goodenia ovate yellow, Indigofera australis purple, Dampiera purpurea deep purple-blue, Xerochrysum bracteatum variable, Xerochrysum viscosum variable or any of the Plectranthus specie for strong foliage contrasts.
Propagation:
Seeds: The seeds can be removed easily from the fruits as they ripen but are difficult to collect. The best method of collection is to place brown paper bags over the spent flower heads and wait and observe.
Freshly collected seeds can be sown directly into a seed raising mix, keeping them moist not wet. When the seedlings are 20mm to 25mm tall, prick them out and plant them into 50mm native tubes using a good organic mix.
As the seedlings roots reach the bottom of the tubes plant them out into their permanent position. Do not delay as some set back will occur especially in heavy clay soils.
Cuttings: Fortunately Poranthera obovata cuttings strike easy. Use 80mm to 100mm long tip cuttings or lateral shoots from the present season’s growth. Take them in warmer months of the year. Remove half the leaves from the bottom section being careful not to tear the bark.
1 Prepare the cutting mix by adding two thirds sharp clean river sand, one third peat or one third perlite. These ingredients must be sterilized,
2 Select good material from non diseased plants,
3 Select semi green stems for cuttings. Look for a stem with two or three nodes,
4 Place the cutting on a flat, hard surface, and make a clean cut down one side of the cutting at the base for 10mm with a sharp sterile knife or razor blade. – This scarification of the node will increase the chances of roots emerging from this spot. Now remove all but one or two the leaves, leaving the apex leaves in tact. If the leaves are very large in proportion to the stem, cut off the apical halves.
5 Fill a saucer with water, and place a little medium strength rooting hormone into another container like a milk bottle top. Dip the node end of the cutting into the water and then into the rooting hormone. Tap off any excess hormone,
6 Use a small dipple stick or old pencil to poke a hole into the soilless potting mix. Ensure the hole is slightly larger than the stem diameter and be careful not to wipe the rooting hormone off the cuttings base. Place 2 to 4 cuttings in each of the 50mm native tubes,
7 I like to place the tubes in bucket with holes drilled in the bottom to allow excess water to drain out. A plastic bag that fits over the bucket is ideal to help maintain temperature and moisture. Place in a semi shaded, warm position like under 50mm shade cloth.
8 When the cuttings have struck, open the bag to allow air circulation for a few days to a week,
9 Once hardened off remove the cuttings from the bag and allow to further hardening for a few more days to a week,
10 Transplant into a good potting mix to grow on.
Fertilize using seaweed, fish emulsion or organic chicken pellets soaked in water on an alternate basis. Fertilize every two months until the plants are established then annually in early September to October to maintain better colour, health, vitality and flowering
Further Comments from Readers:
“Hi reader, it seems you use The Bible of Botany a lot. That’s great as we have great pleasure in bringing it to you! It’s a little awkward for us to ask, but our first aim is to purchase land approximately 1,600 hectares to link several parcels of N.P. into one at The Pinnacles NSW Australia, but we need your help. We’re not salespeople. We’re amateur botanists who have dedicated over 30 years to saving the environment in a practical way. We depend on donations to reach our goal. If you donate just $5, the price of your coffee this Sunday, We can help to keep the planet alive in a real way and continue to bring you regular updates and features on Australian plants all in one Botanical Bible. Any support is greatly appreciated. Thank you.”
In the spirit of reconciliation we acknowledge the Bundjalung, Gumbaynggirr and Yaegl and all aboriginal nations throughout Australia and their connections to land, sea and community. We pay our respect to their Elders past, present and future for the pleasures we have gained.
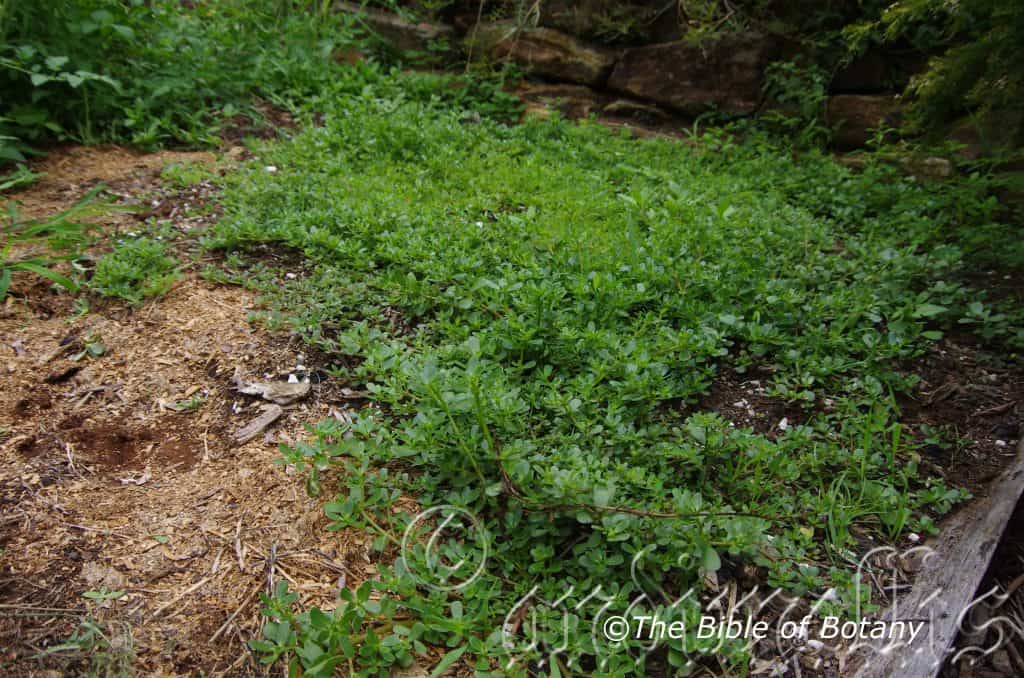
Author’s Garden The Pinnacles NSW
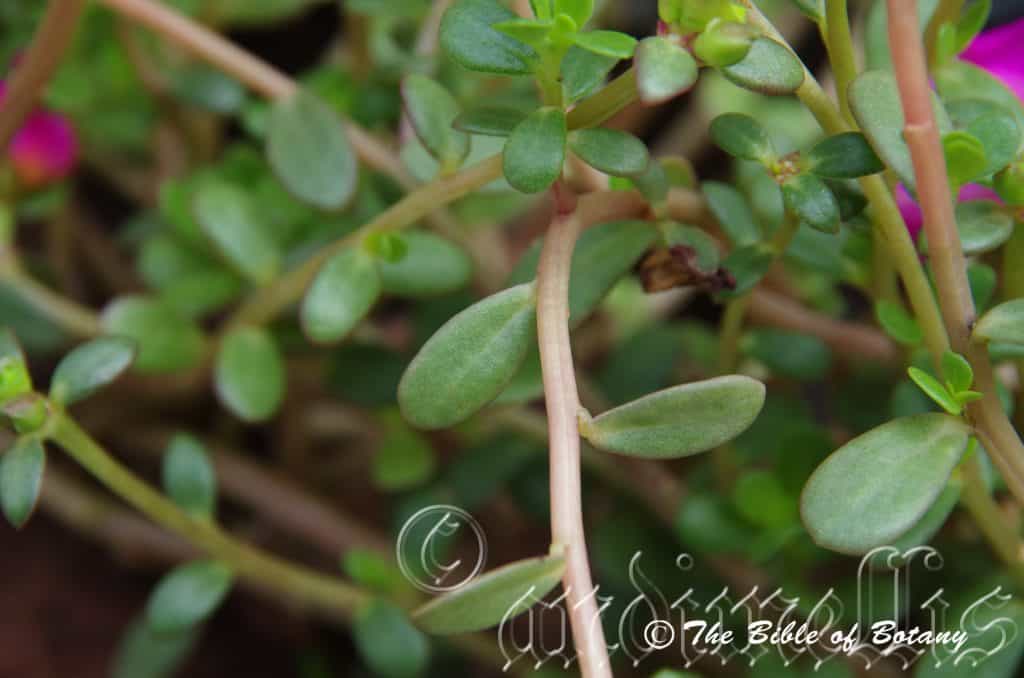
Chong Qing China
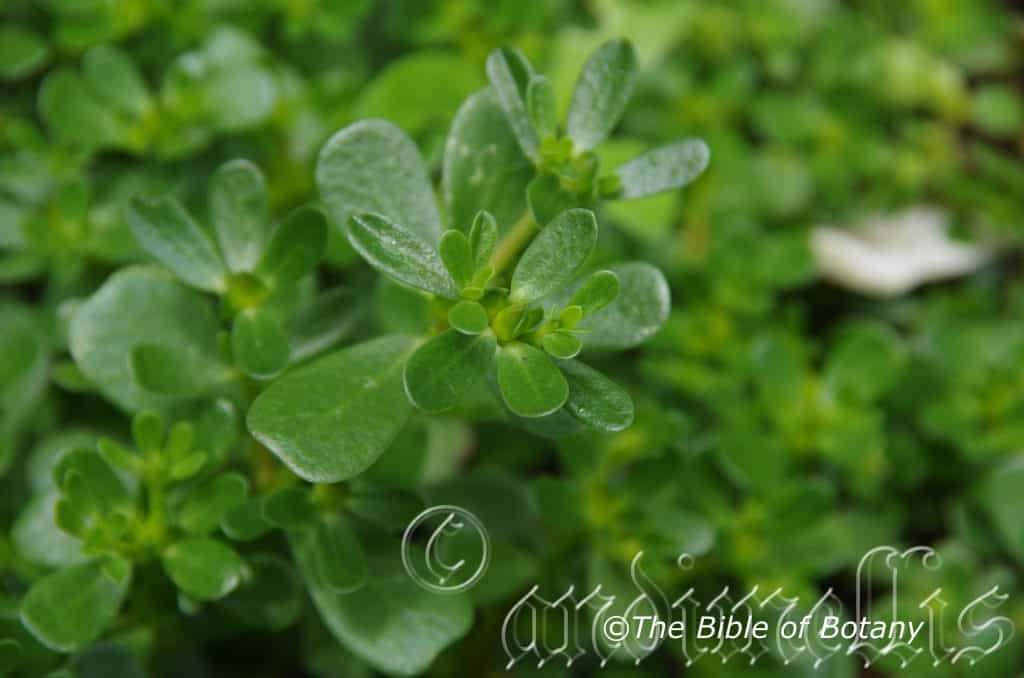
Author’s Garden The Pinnacles NSW
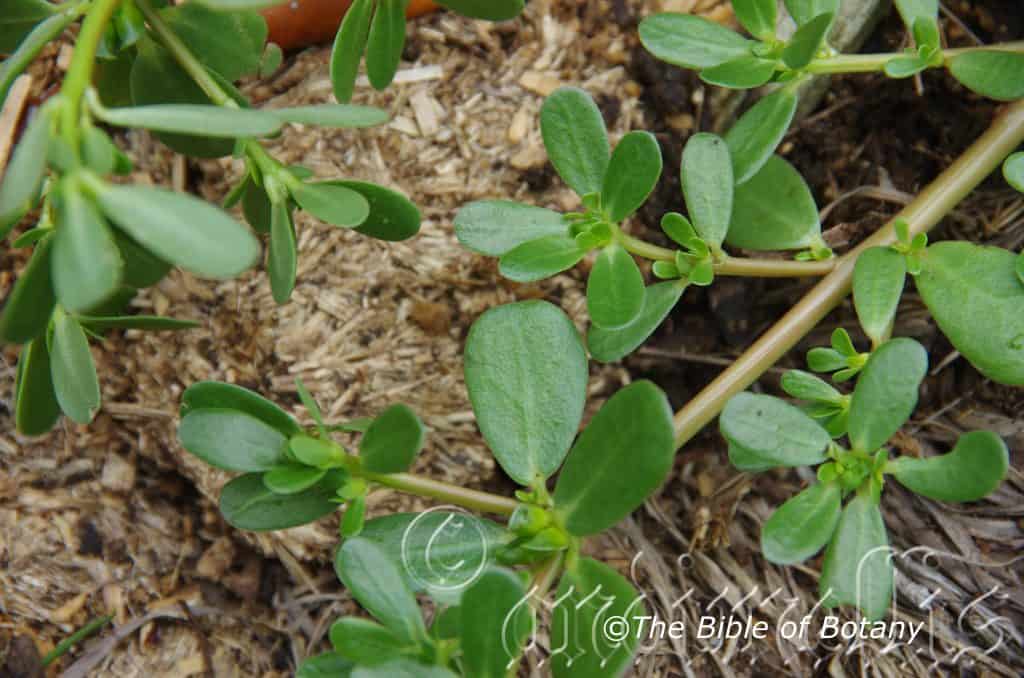
Author’s Garden The Pinnacles NSW
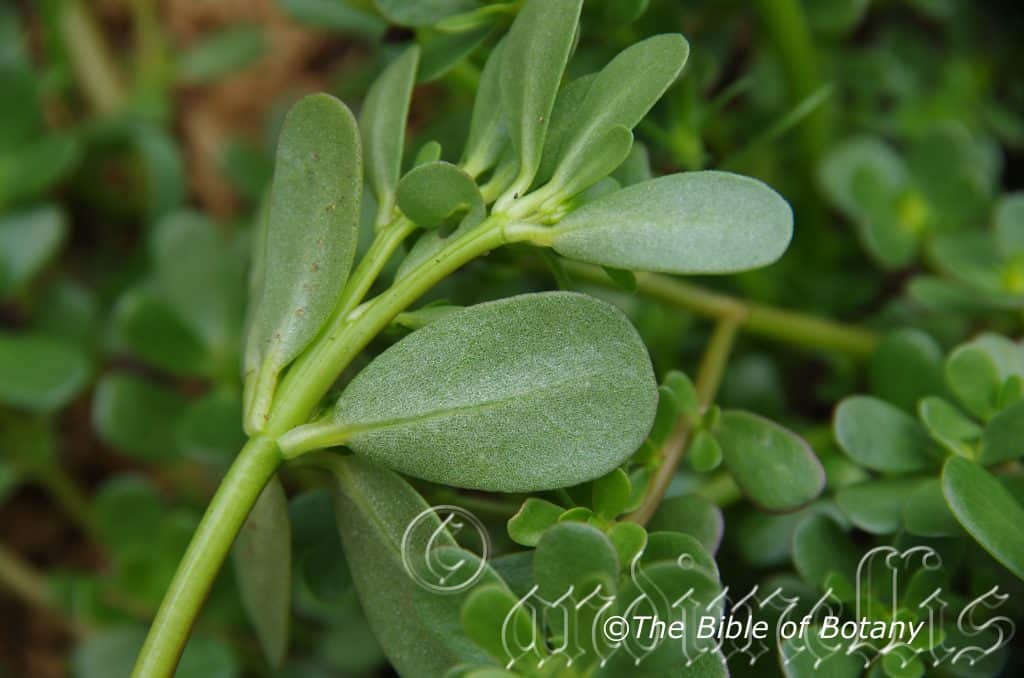
Author’s Garden The Pinnacles NSW
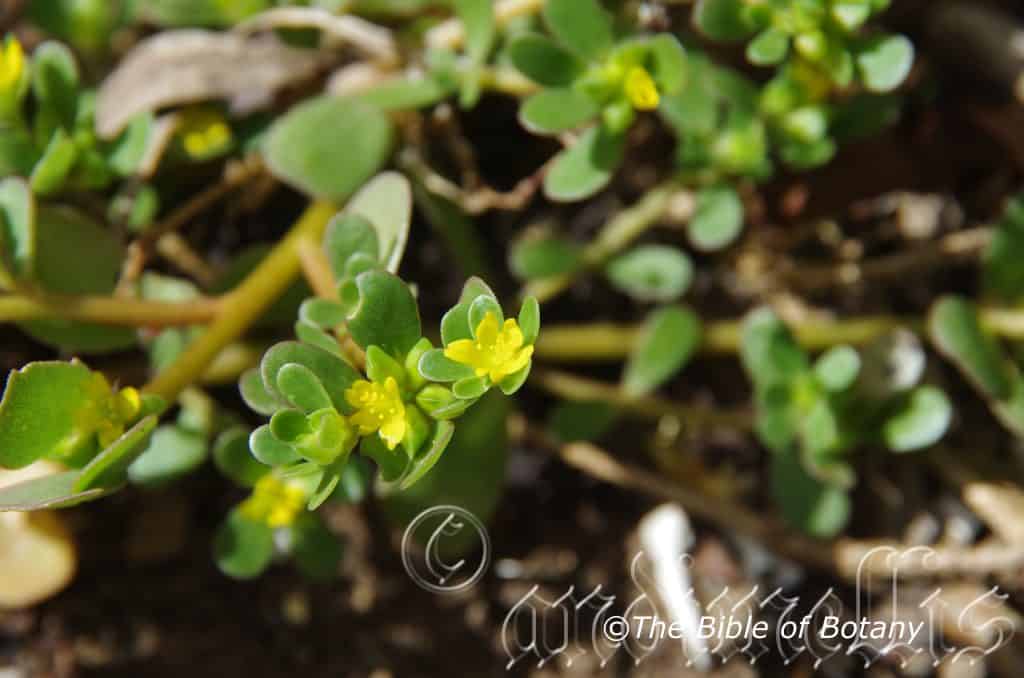
Author’s Garden The Pinnacles NSW

Author’s Garden The Pinnacles NSW
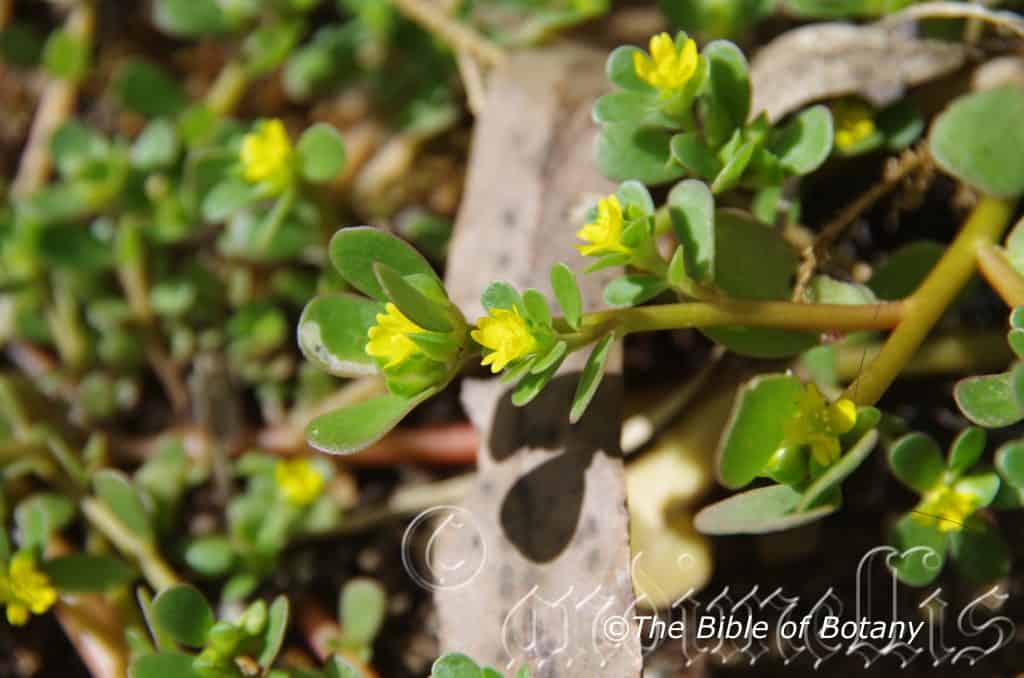
Author’s Garden The Pinnacles NSW

Cultivated form from Chinese Native Plants Chong Qing China

Cultivated form from Chinese Native Plants Chong Qing China
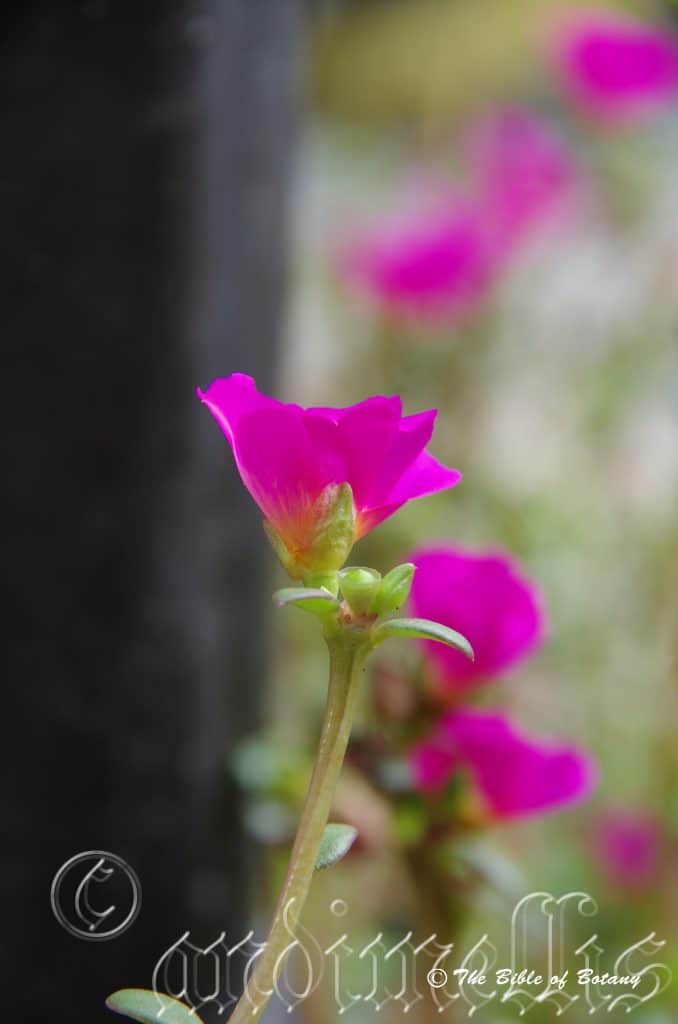
Cultivated form from Chinese Native Plants Chong Qing China

Portulaca oleracea
Classification:
Class: Magnoliopsida
Subclass: Magnoliidae
Superorder: Caryophyllanae
Order: Caryophyllales
Family: Portulacaceae
Genus: From Portare, which is Latin for to carry and lac, milk, referring to the milky sap of some species.
Species: From Olerācea, which is Latin for edible or from the kitchen garden. It refers to plants which were extensively used as the main vegetable in many parts of the world.
Common Name: Pig Weed, Purslane, Ma chi xian (马齿苋 Horse eat amaranth/weed). There is undoubtedly many more localised names for the plant but this was the first I was introduced to as a vegetable in China, where it is regarded in the early days as a weed only suitable for livestock and peasants.
In the Aboriginal language it is known as Muyaroo, Dhamu, Munyaru are three of the aboriginal names that I am aware of.
Distribution:
Portulaca oleracea is found throughout Australia except for the southern third of south western South Australia, the adjoining south eastern half of Western Australia and Tasmania and the Bass Strait Islands. Plants recorded in Tasmanian are garden escapees.
The exact countries in which Portulaca oleracea is native to is unclear because of its widespread use over the millenniums but is thought to be native to: Afghanistan, Albania, Aldabra, Algeria, Angola, Ascension, Benin, Bougainville, Burkina, Burundi, Cameroon, Canary Islands, Central African Repu, Chad, Chagos Archipelago, China, Congo, Egypt, Eritrea, Ethiopia, Fiji, Gabon, Gambia, Greece, Guinea, Guinea-Bissau, Gulf of Guinea Islands, Gulf States, India, Indonesia, Iran, Iraq, Italy, Ivory Coast, Japan, Kenya, Kriti,Laos, Lebanon-Syria, Liberia, Madeira, Malaya, Mali, Mauritania, Morocco, Myanmar, New Guinee, Niger, Nigeria, North Caucasus, Oman, Pakistan, Palestine, Papua, Philippines, Saudi Arabia, Senegal, Seychelles, Shri Lanka, Sicilia, Sierra Leone, Sinai, Socotra, Solomon Islands, Somalia, St.Helena, Sudan, Taiwan, Thailand, Timor, Transcaucasus, Tunisia, Turkey, Turkey-in-Europe, Yemen, Yugoslavia, Vietnam and Zaïre.
https://avh.ala.org.au/occurrences/search?taxa=Portulaca+oleracea#tab_mapView
Habitat Aspect Climate:
Portulaca oleracea prefer light dappled shade to full sun. It grows along creeks, road side culverts where there is a break in the forest or woodland canopy and is especially common on disturbed land. The altitude ranges from 1 meters ASL to 2600 meters ASL.
The temperatures range from minus 5 degree in August to 34 degrees in January.
The rainfalls range from lows of 600mm to an average of 1600mm.
Soil Requirements:
Portulaca oleracea prefer better quality light sandy clays to medium clays often with copious quantities of leaf litter and pebbles. The soils are deep or on rare occasions on shallow soils close to the parent bedrock. The soils are derived from decomposed black basalts, brown basalts, granites, sandstones, metamorphic rocks, shales, limestones or accumulated sands. The soils pH ranges from 4.5pH to 7pH. It does not tolerate waterlogged soils. Non saline soils to very saline soils are tolerated as are salt laden winds.
Height & Spread:
Wild Plants: 0.03m to 0.06m by 0.1m to 0.45m.
Characteristics:
Portulaca oleracea usually grows as a prostrate to decumbent annual or at times a perennial with reddish, olive-green, or olive, glabrous fleshy stems.
The opposite, obovate to oblanceolate leaves measure 10mm to 25mm in length by 8mm to 20mm in width. The axillary hairs are inconspicuous and measure 0.3mm to 1mm in length. The bases are cuneate while the apexes are obtuse. The discolourous fleshy laminas are olive-green to deep green often tinged reddish, dull to semi glossy and glabrous. The laminas are flat while the margins are entire. The mid vein is obscurely prominent on the lower lamina and is not visible on the upper lamina.
The inflorescences are born singularly or in pairs from the leaf axis. There are 3 to 30 individual flowers born in a cluster with 1 flower opening at a time. The reddish, olive-green, or olive fleshy pedicels are glabrous. The pedicels measure 0mm to 1mm in length. The lime-green to olive-green cupular hypanthium measures 1.3mm to 2.3mm in length. There is a single hyaline ring around the rim of the hypanthium. The elliptical sepals are reddish, olive-green, or olive fleshy and have a hyaline wing down each side. The sepals measure 3.5mm to 6mm in length. The bright yellow petals measure 4mm to 7.5mmin length.
The 15 to 20 bright yellow stamens measure 3mm to 4mm in length. The anthers are bright yellow. The style is usually 5 fid or rarely 4 fid and measures 4mm to 5mm in length while the style’s stigmas measure 2.5mm to 3mm in length. The flowers appear from August to March.
The fruits are small cupuliform capsules. The capsules measure 3mm to 6mm in length by 3mm to 5mm in diameter. The pale green capsules turn reddish then brown when dry. The black seeds testa cells are stellate at base and tuberculate near the apex. The tubercles are usually rounded or at times pointed.
Wildlife:
Australian Aborigines collected the seeds and ate them baked as a bread or raw.
The Greeks had Purslane well established as a culinary item at least three thousand years ago and Theophrastus named purslane, Andrákhne (ἀνδράχνη) in Greek.
The Chinese know it is machixian (马齿苋 Horse eat weed) and it was a basic food for peasants in past eras.
Here is a bush tucker plant that everyone can grow and eat as a cooked vegetable or salad. Stems, leaves and flowers are edible which makes preparation easy – Rinse and serve.
Portulaca oleracea tiny black seeds were one of the most important bush foods of the inland Australian Aborigines. The seeds contain 16mm to 20mm protein and 16mm fat in the form of Omega 3. Joseph Maiden (1889) reported that the Aborigines pulled up the plants up tap root and all then threw them in heaps onto bark. After a few days they returned shook the plants and had an abundant supply of seeds which had fallen out onto the bark where it was collected. The seed was then processed by grinding it on a flat rock with a hand-held stone. The resulting flour was made into damper. Low – in 1989, commented that the oil from the seeds stains the grinding stones.
The leaves and stems are also edible. They can be pounded into a mash and eaten raw, cooked as a vegetable or added to salads. In China it is still used in stir fries where I consider it a great addition with good flavour enhancing qualities. I grow the native form as a staple vegetable in our garden as it is easy to grow, harvest and prepare for the table. It is ideal in stir fries or steamed. All forms are very high in minerals and vitamins.
Cultivation:
Portulaca oleracea is an extraordinarily beautiful annual that is considered an enemy and not a friend of the gardener but let’s make one thing certain, one thing very clear it is Native well the small yellow flowering forms are definitely from native stock. It always looks green and fresh especially where adequate ground moisture is retained and some shade is provided. In cultivation it grows 0.05 meters to 0.1 meter in height by 0.3 meter to 0.4 meters in diameter when grown in the open.
5 to 7 plants planted close together at random spacing on raised garden beds make great features especially when mixed with plants with different coloured flowers. It looks particularly good when mixed with plants which are of a similar size and have bright pale green foliages. It can also be used to great effect with mixed coloured annuals below or with prostrate Grevillea for a bush garden adding height and width to the garden.
It is most suitable where shade is a problem on moist soils. Use it adjacent to pathways, rockeries, along sandy clay banks or along driveways or adjacent to natural bush gardens. Mass plantings of 10 or more plants in a row can make a beautiful formal border or fill in plants.
Seek companion plants with deep strong coloured flowers; preferably those that do not have yellow flowers like Lecshenaltia formosa, Lecshenaltia biloba, Indigofera australis, Dampiera specie, Xerochrysum bracteatum, Xerochrysum bracteatum, small Hovea specie or any of the Plectranthus specie for strong foliage contrasts. The latter can be planted as backdrops to Portulaca oleracea.
Most the variation in colours are hybrids from plants originating from Africa.
Propagation:
Seeds: Seeds of Portulaca oleracea can be removed easily from the fruits as they ripen. The best method of collection is to place brown paper bags over the spent flower heads and wait and observe.
Sow the fresh seeds directly into a seed raising mix, keeping them moist not wet. When the seedlings are 20mm to 25mm tall, prick them out and plant them into 50mm native tubes using a good organic mix.
As the seedlings roots reach the bottom of the tubes plant them out into their permanent position.
Alternatively seeds can be broadcast over an area of land that has been prepared with mulch and a little pure blood and bone or dynamic lifter. Fresh seeds generally germinate in 5 to 10 days with a high percentage strike rate.
Cuttings: This is the best method if a particular flower colour is required. (Native plants only have small single yellow flowers.) Use 100mm long hardened material from the present season’s growth. Take them in mid-autumn or early spring. Remove half the leaves from the bottom section being careful not to tear the bark. Take a 10mm slice off the bark from the bottom of the cutting on one side. Using a medium strength rooting hormone, dip the cutting in and place it in a moist sterile seed raising mix. When the cuttings have obviously struck and have developed good roots treat them as for seedlings. Expect around a 50mm strike rate.
Fertilize using seaweed, fish emulsion or organic chicken pellets soaked in water on an alternate basis. Fertilize every two months until the plants are established then annually in early September to October to maintain better colour, health, vitality and flowering
Further Comments from Readers:
“Hi reader, it seems you use The Bible of Botany a lot. That’s great as we have great pleasure in bringing it to you! It’s a little awkward for us to ask, but our first aim is to purchase land approximately 1,600 hectares to link several parcels of N.P. into one at The Pinnacles NSW Australia, but we need your help. We’re not salespeople. We’re amateur botanists who have dedicated over 30 years to saving the environment in a practical way. We depend on donations to reach our goal. If you donate just $5, the price of your coffee this Sunday, We can help to keep the planet alive in a real way and continue to bring you regular updates and features on Australian plants all in one Botanical Bible. Any support is greatly appreciated. Thank you.”
In the spirit of reconciliation we acknowledge the Bundjalung, Gumbaynggirr and Yaegl and all aboriginal nations throughout Australia and their connections to land, sea and community. We pay our respect to their Elders past, present and future for the pleasures we have gained.
Potamogeton crispus
Classification:
Division: Magnoliophyta
Class: Equisetopsida
Order: Alismatales
Family: Potamogetaceae
Genus: From Potam/Potamós, which is Ancient Greek for a river and Geton, which is Ancient Greek for a neighbour. It refers to the habitats, which are in rivers but usually close to the banks.
Species From Crispus, which is Latin for a curl, curly or wavy. It refers to an organ, which have curly, wavy or ruffled surface or margin.
Common Name: Curly Pondweed.
Distribution:
Potamogeton crispus is found from the Fitzroy Trough to Halls Creek in Western Australia.
In the Northern territory it is found from Baggot Creek in the George Gill Range to Tarlton Downs Station Bore and further north at the Frew River waterhole.
In Queensland, New South Wales and Victoria it is found throughout the states except for the true deserts.
In South Australia it is found along the Murray River Basin across to Adelaide and around Lake Alexandrina and further north at Baroota Creek between Port Augusta and Port Pirie.
In Tasmania it is found around Longford in the Northern Midlands and an area bounded by New Norfolk, Lewisham and Margate near Hobart.
It is also widely distributed throughout New Zealand.
https://avh.ala.org.au/occurrences/search?taxa=Potamogeton+crispus#tab_mapView
Habitat Aspect Climate:
Potamogeton crispus prefers light dappled shade to full sun. It grows in slow flowing fresh water and table drains, discharge outlets close to the coast. The altitude ranges from 5 meters ASL to 650 meters ASL.
The temperatures range from minus 4 degree in August to 40 degrees centigrade in January.
The rainfalls range from lows of 200mm to an average of 2400mm.
Soil Requirements:
Potamogeton crispus prefers better quality gravelly loams and light muddy silts to heavy muddy silts. The soils are deep and close to permanent water. The soils are usually derived from alluvial deposits or at times wet podzolic depressions. The soils pH ranges from 4.5pH to 6pH. It tolerates waterlogged soils. Non saline soils to very saline soils are tolerated.
Height & Spread:
Wild Plants: 1m to 4m by several meters.
Characteristics:
Potamogeton crispus grows as a submerged rhizomatous aquatic perennial with long branched, trailing, flattened stems. The stems measure 200mm to 3 meters in length. The stems are grass-green, olive green or reddish-green and glabrous. The turions; when present usually as a result of drought are formed terminally on the rhizomes. The turions have the appearance of a cluster of flattened, ovate to semi ovate coriaceous leaves. The olive green or reddish-green turions are glabrous while the upper margins are covered in coarse, triangular, regular teeth.
The alternate, linear to oblong leaves measure 50mm to 100mm in length by 5mm to 15mm in width. The leaves are or opposite when subtending an inflorescence. The sessile translucent leaves are free from the stipula sheath. The translucent stipula sheathes or ligules measure 3mm to 5mm in length and surrounds the stem above the node and splits longitudinally on the opposite side to the leaf. The bases are rounded while the apexes are acute to obtuse. The concolourous laminas are grass-green, olive green to deep olive-green often tinged reddish and glabrous. The laminas are strongly undulating while the margins are minutely toothed. The mid vein and is faintly prominent on the lower lamina and are visible on the upper lamina.
The inflorescences are emergent spikes born from the leaf axils or terminals. The spikes have 4 to 10 individual female flowers or 12 to 24 individual male flowers in clusters of 3 surrounding the spike. The spikes measure 10mm to 20mm in length when in fruit while the peduncle measures 30mm to 80mm in length.
The male cupular receptacle is attended by a pair of fleshy, elliptical bracts. The receptacles measure 1.6mm to 2mm in height by 3mm to 4mm in diameter. The bracts measure 3mm to 4mm in length by 1.2mm to 1.6mm in width. The 4 deep reddish to crimson-red anthers are feathery and measure 2.5mm to 3mm in length by 1.4mm to 1.8mm in diameter.
The female cupular receptacle is attended by a pair of translucent, elliptical bracts. The receptacles measure 1.6mm to 2mm in height by 3mm to 3.5mm in diameter. The bracts measure 3mm to 3.5mm in length by 1mm to 1.3mm in width. The deep reddish to crimson-red style is feathery and measure 2.5mm to 3mm in length. The ovary has 2 to 5 ovules. The flowers appear September in the north and late October in the south to April.
Potamogeton crispus’s fruits are narrow conical nutlets. The conical nutlets have a rostrate apex and are glabrous to tuberculate. The nutlets measure 5mm to 7.5mm in length by 2.5mm to 4mm in diameter at the base. The pale green capsules turn reddish-green when ripe.
Wildlife:
Potamogeton crispus’s rhizomes form dense mats which play an important role in erosion control of streams and rivers. It is also a safe refuge for small and medium fish species and provides safe corridors for travelling along. It is the food source for several water born snails.
This is an essential water plant for the conservation of our native fish.
Of the 300 species of native freshwater fish known in Australia over 40 are now considered threatened, rare or vulnerable due to the introduction of exotic fish and habitat destruction.
Cultivation:
Potamogeton crispus is an excellent medium to large water born plant for slow moving water or larger dams at the entry point. In cultivation it will grow from 1 meter to 3 meters in length by several meters in diameter when grown in the open.
Propagation:
Seeds: The seeds or turions of Potamogeton crispus can be removed easily from the spikes as they ripen.
Sow the freshly collected seeds directly into a seed raising mix, keeping them wet. Place the trays into a larger container and fill the outer container with water. Place the tray beneath 20mm to 30mm shade. When the seedlings are 20mm to 25mm tall, prick them out and plant them into 50mm native tubes using a good organic mix. Return them to the container and ensure the plants are fully submerged.
As the seedlings roots reach the bottom of the tubes plant them out into their permanent position. Do not delay as the rhizomes do better when it is not twisted.
Division: This is the best method of reproduction and is easy and quick for securing large plants for large areas. Sever the rhizomes into pads of around 200mm square or pull the plants form loose gravel beds ensuring a good bunch has rhizomes attached. Keep them moist and replant in the new location with 1 bunch for every square meter of ground. Be aware that as you remove plants this affects the habitat and environment for local fish and aquatic wildlife. If you remove a plant think responsibly by replacing it 2 fold as your plants become larger.
Further Comments from Readers:
“Hi reader, it seems you use The Bible of Botany a lot. That’s great as we have great pleasure in bringing it to you! It’s a little awkward for us to ask, but our first aim is to purchase land approximately 1,600 hectares to link several parcels of N.P. into one at The Pinnacles NSW Australia, but we need your help. We’re not salespeople. We’re amateur botanists who have dedicated over 30 years to saving the environment in a practical way. We depend on donations to reach our goal. If you donate just $5, the price of your coffee this Sunday, We can help to keep the planet alive in a real way and continue to bring you regular updates and features on Australian plants all in one Botanical Bible. Any support is greatly appreciated. Thank you.”
In the spirit of reconciliation we acknowledge the Bundjalung, Gumbaynggirr and Yaegl and all aboriginal nations throughout Australia and their connections to land, sea and community. We pay our respect to their Elders past, present and future for the pleasures we have gained.
Potamogeton octandrus
Classification:
Division: Monocots
Class: Equisetopsida
Order: Alismatales
Family: Potamogetaceae
Genus: From Potam/Potamós, which is Ancient Greek for a river and Geton, which is Ancient Greek for a neighbour. It refers to the habitats, which are in rivers but usually close to the banks.
Species: From Oktṓ, which is Ancient Greek or later Octō, which is Latin for eight and Andros, which is Ancient Greek for the male. It refers to flowers, which have eight stamens.
Common Name: Pondweed.
Distribution:
Potamogeton octandrus is found in an area bounded by the East Alligator River in the Northern Territory to the Central Kimberley and the Northern Kimberley in Western Australia.
The east coast populations are found in 3 disjunct populations south from the McIvor Range to Charters Tower on the Burdekin River, the Bowen River to Lake Callemondah west of Gladstone and from Gympie to Wallacia near Penrith. It is mainly found on and east of the Great Dividing Range except for the following populations on the Mitchell River, Georgetown, the Norman River on Croydon Road Croydon and Griffith.
It is also found in Indonesia and New Guinee.
https://avh.ala.org.au/occurrences/search?taxa=Potamogeton+octandrus#tab_mapView
Habitat Aspect Climate:
Potamogeton octandrus prefers light dappled shade to full sun. It grows in slow flowing fresh water, in billabongs or backwaters. The altitude ranges from 5 meters ASL to 600 meters ASL.
The temperatures range from minus 5 degree in August to 34 degrees in January.
The rainfalls range from lows of 400mm to an average of 3000mm.
Soil Requirements:
Potamogeton octandrus prefers better quality gravelly loams and light silts to heavy silts. The soils are deep and enclose in permanent water. The soils are derived from alluvial deposits or at times wet podzolic depressions. The soils pH ranges from 4.5pH to 6pH. It tolerates waterlogged soils. Non saline soils to moderately saline soils are tolerated.
Height & Spread:
Wild Plants: 1m to 2m by several meters.
Characteristics:
Potamogeton octandrus grows as a submerged perennial with dimorphic habits of growth. The rhizomatous submerged stems are turf forming, grass-green to lime-green and glabrous. It has numerous submerged leaves while the floating leaves are few. The turions are absent in this species.
The leaves are strongly dimorphic. The alternate submerged linear to acicular leaves are sessile. The bases are tapering to the stems while the apexes are aciculate. The leaves measure 50mm to 100mm in length by 2mm to 3mm in diameter. The concolourous leaves are lime-green to grass-green and glabrous. The laminas are flat while the margins are entire.
The floating leaves are narrow elliptic and measure 20mm to 40mm in length by 6mm to 10mm in width. The pale reddish-green to mid reddish-green or maroon-green petioles measure 0mm to 230mm in length. The discolourous leaves are lime-green, grass-green to mid-green with reddish to purplish tinge and glabrous on the upper laminas while the lower laminas are mid reddish-green or maroon-green. The laminas are flat while the margins are entire. The mid vein is strongly prominent while the 4 to 6 parallel lateral veins are slightly prominent on the lower laminas. The mid vein is clearly visible from the upper lamina.
The inflorescence are emergent spikes born from the leaf axils or terminals. The spikes have 4 to 10 individual female flowers or 12 to 24 individual male flowers in clusters of 3 surrounding the spike. The spikes measure 15mm to 20mm in length when in fruit while the peduncle measures 10mm to 30mm in length.
The male cupular receptacle is attended by 4 cupuliform sepals. The receptacles measure 1.6mm to 2mm in height by 3mm to 4mm in diameter. The 4 sepals measure 3mm to 4mm in length by 1.2mm to 1.6mm in width. The mid rib is strongly prominent internally on the sepals. The 8 deep reddish to crimson-red anthers are feathery and measure 2.5mm to 3mm in length by 1.4mm to 1.8mm in diameter.
The female cupular receptacle is attended by 4 cupuliform sepals. The receptacles measure 1.6mm to 2mm in height by 3mm to 3.5mm in diameter. The orbicular sepals measure 3mm to 4mm in length by 3mm to 4mm in width. The mid rib is strongly prominent internally on the sepals. The deep reddish translucent style is 4 fid and measure 2.5mm to 3mm in length. The glabrous ovary has 8 ovules and is white. The flowers appear throughout the warmer months.
The fruits are narrow conical nutlets. The conical nutlets have a rostrate apex and are glabrous and keeled. The nutlets measure 2mm to 2.5mm in length by 2mm to 2.5mm in diameter at the base. The pale green capsules turn reddish-green when ripe.
Wildlife:
Potamogeton octandrus rhizomes form dense mats which play an important role in erosion control of streams and rivers. It also forms a rather long dense turf like layer over the stream bed. It is a safe refuge for small and medium fish species and provides safe corridors for travelling along. It is the food source for several water born snails.
This is an essential water plant for the conservation of our native fish.
Of the 300 species of native freshwater fish known in Australia over 40mm are now considered threatened, rare or vulnerable due to the introduction of exotic fish and habitat destruction.
Cultivation:
Potamogeton octandrus is an excellent medium to large waterborn plant for slow moving water or larger dams at the entry point. In cultivation it will grow from 0.5 meter to 2 meters in length by several meters in diameter when grown in the open.
Potamogeton octandrus is suitable for aquariums provided good light is available.
Propagation:
Seeds: The seeds of Potamogeton octandrus can be removed easily from the spikes as they ripen.
Sow the freshly collected seeds directly into a seed raising mix, keeping them wet. Place the trays into a larger container and fill the outer container with water. Place the tray beneath 20mm to 30mm shade. When the seedlings are 20mm to 25mm tall, prick them out and plant them into 50mm native tubes using a good organic mix. Return them to the container and ensure the plants are fully submerged.
As the seedlings roots reach the bottom of the tubes plant them out into their permanent position. Do not delay as the rhizomes do better when it is not twisted.
Cuttings/Division: This is the best method of reproduction and is easy and quick for securing large plants for large areas. Sever the rhizomes into pads of around 200mm square or pull the plants form loose gravel beds ensuring a good bunch has rhizomes attached. Keep them moist and replant in the new location with 1 bunch for every square meter of ground. Be aware that as you remove plants this affects the habitat and environment for local fish and aquatic wildlife. If you remove a plant think responsibly by replacing it 2 fold as your plants become larger.
Further Comments from Readers:
“Hi reader, it seems you use The Bible of Botany a lot. That’s great as we have great pleasure in bringing it to you! It’s a little awkward for us to ask, but our first aim is to purchase land approximately 1,600 hectares to link several parcels of N.P. into one at The Pinnacles NSW Australia, but we need your help. We’re not salespeople. We’re amateur botanists who have dedicated over 30 years to saving the environment in a practical way. We depend on donations to reach our goal. If you donate just $5, the price of your coffee this Sunday, We can help to keep the planet alive in a real way and continue to bring you regular updates and features on Australian plants all in one Botanical Bible. Any support is greatly appreciated. Thank you.”
In the spirit of reconciliation we acknowledge the Bundjalung, Gumbaynggirr and Yaegl and all aboriginal nations throughout Australia and their connections to land, sea and community. We pay our respect to their Elders past, present and future for the pleasures we have gained.
Pomatogeton perfoliatus
Classification:
Division: Monocots
Order: Alismatales
Family: Potamogetaceae
Genus: From Potam/Potamós, which is Ancient Greek for a river and Geton, which is Ancient Greek for a neighbour. It refers to the habitats, which are in rivers but usually close to the banks.
Species: From Per/Peri, which is Latin for around, through, beyond, extra or at times very and Folium, which is Latin for a leaf or foliage. It refers to bases of the leaves, which surround the stem as though the stem or stalk appears to pass through the leaf.
Common Name: Clasped Pondweed.
Distribution:
Pomatogeton perfoliatus is found south and east of a line from Woongarra Channel near Bundaberg in central coastal Queensland to Tailem Bend on the Murray River in South Australia.
It is also found on the eastern half of Tasmania.
https://avh.ala.org.au/occurrences/search?taxa=Potamogeton+perfoliatus#tab_mapView
Habitat Aspect Climate:
Pomatogeton perfoliatus prefers light dappled shade to full sun. It grows along creeks, road side culverts where there is a break in the forest canopy. The altitude ranges from 5 meters ASL to 1100 meters ASL.
The temperatures range from minus 3 degree in August to 36 degrees in January.
The rainfalls range from lows of 200mm to an average of 1600mm however the ground water found in streams and rivers is more important than actual rainfall.
Soil Requirements:
Pomatogeton perfoliatus prefers better quality gravelly loams and light silts to heavy silts. The soils are deep and close to permanent water. The soils are derived from alluvial deposits or at times wet podzolic depressions. The soils pH ranges from 4.5pH to 6pH. It tolerates waterlogged soils. Non saline soils to moderately saline soils are tolerated.
Height & Spread:
Wild Plants: 1m to 3.2m by several meters.
Characteristics:
Pomatogeton perfoliatus grows as a semi submerged to submerged perennial with dimorphic habits of growth. The stems are terete, olive-green, glabrous and measure 200mm to 3 meters in length. The turions; when present usually as a result of drought are formed terminally on the rhizomes. The turions have the appearance of a cluster of flattened, ovate to semi ovate coriaceous leaves. The olive green or reddish-green turions are glabrous while the upper margins are covered in coarse, triangular, regular teeth.
The alternate leaves are ovate to oblong-ovate. The submerged translucent leaves are sessile. The leaves are free from the stipula sheath or ligule. The caduceus sheath is membranous and partially surrounds the stem above the node. It measures 4mm to 11mm in length. The bases are stem clasping, truncate to rounded-truncate while the apexes are obtuse to very broad acute. The leaves measure 20mm to 60mm in length by 20mm to 40mm in diameter. The concolourous leaves are grass-green to mid-green and are often tinged reddish-brown or reddish-olive and glabrous. The laminas are undulating while the margins are entire.
The inflorescence are emergent spikes born from the leaf axils or terminals. The spikes have 4 to 10 individual female flowers or 12 to 24 individual male flowers in clusters of 3 surrounding the spike. The spikes measure 15mm to 20mm in length when in fruit while the stout peduncle measures 20mm to 30mm in length.
The male cupular receptacle is attended by 4 cupuliform sepals. The receptacles measure 1.6mm to 2mm in height by 3mm to 4mm in diameter. The 4 sepals measure 3mm to 4mm in length by 1.2mm to 1.6mm in width. The mid rib is strongly prominent internally on the sepals. The 4 deep reddish to crimson-red anthers are feathery and measure 2.5mm to 3mm in length by 1.4mm to 1.8mm in diameter.
The female cupular receptacle is attended by 4 cupuliform sepals. The receptacles measure 1.6mm to 2mm in height by 3mm to 3.5mm in diameter. The semi ovate sepals are translucent and measure 3mm to 4mm in length by 3mm to 4mm in width. The mid rib is strongly prominent on the lower surface of the sepals. The deep reddish translucent style is 4 fid and measure 2mm to 3mm in length. The glabrous ovary has 8 ovules and is white. The flowers appear throughout the warmer months.
Pomatogeton perfoliatus’s fruits are squat conical nutlets that are convex on ventral side, semi-circular on the dorsal side and laterally compressed. The glabrous conical nutlets have a short rostrate apex. The nutlets measure 2mm to 3mm in length by 2mm to 3mm in diameter at the base. The pale green capsules turn reddish-green when ripe.
Wildlife:
Pomatogeton perfoliatus rhizomes form dense mats which play an important role in erosion control of streams and rivers. It is also a safe refuge for small and medium fish species and provides safe corridors for travelling along. It is the food source for several water born snails.
This is an essential water plant for the conservation of our native fish.
Of the 300 species of native freshwater fish known in Australia over 40mm are now considered threatened, rare or vulnerable due to the introduction of exotic fish and habitat destruction.
Cultivation:
Pomatogeton perfoliatus is an excellent medium to large water born plant for slow moving water or larger dams at the entry point. In cultivation it will grow from 0.5 meter to 3 meters in length by several meters in diameter when grown in the open.
Propagation:
Seeds: The seeds or turions of Pomatogeton perfoliatus can be removed easily from the spikes as they ripen.
Sow the freshly collected seeds directly into a seed raising mix, keeping them wet. Place the trays into a larger container and fill the outer container with water. Place the tray beneath 20mm to 30mm shade. When the seedlings are 20mm to 25mm tall, prick them out and plant them into 50mm native tubes using a good organic mix. Return them to the container and ensure the plants are fully submerged.
As the seedlings roots reach the bottom of the tubes plant them out into their permanent position. Do not delay as the rhizomes do better when it is not twisted.
Cuttings/Division: This is the best method of reproduction and is easy and quick for securing large plants for large areas. Sever the rhizomes into pads of around 200mm square or pull the plants form loose gravel beds ensuring a good bunch has rhizomes attached. Keep them moist and replant in the new location with 1 bunch for every square meter of ground. Be aware that as you remove plants this affects the habitat and environment for local fish and aquatic wildlife. If you remove a plant think responsibly by replacing it 2 fold as your plants become larger.
Further Comments from Readers:
“Hi reader, it seems you use The Bible of Botany a lot. That’s great as we have great pleasure in bringing it to you! It’s a little awkward for us to ask, but our first aim is to purchase land approximately 1,600 hectares to link several parcels of N.P. into one at The Pinnacles NSW Australia, but we need your help. We’re not salespeople. We’re amateur botanists who have dedicated over 30 years to saving the environment in a practical way. We depend on donations to reach our goal. If you donate just $5, the price of your coffee this Sunday, We can help to keep the planet alive in a real way and continue to bring you regular updates and features on Australian plants all in one Botanical Bible. Any support is greatly appreciated. Thank you.”
In the spirit of reconciliation we acknowledge the Bundjalung, Gumbaynggirr and Yaegl and all aboriginal nations throughout Australia and their connections to land, sea and community. We pay our respect to their Elders past, present and future for the pleasures we have gained.
Potamophila parviflora
Classification:
Class: Equisetopsida
Subclass: Magnoliidea
Superorder: Lilianae
Order: Poales
Family: Poaceae
Genus: From Potam/Potamós, which is Ancient Greek for a river and Phila, which is Ancient Greek for to love. It refers to plants, which prefer habitats, which are adjacent to rivers or streams along the banks, on flood plains or wet alluvial flats.
Species: From Paûros, which is Ancient Greek or Parvum which is Latin for small and Flōris which is Latin for a flower or Flōs from the Roman goddess of spring and flowers. It refers to flowers, which are smaller than other species in the genus.
Common Name: Wild Rice.
Distribution:
Potamophila parviflora is restricted to a small area south from the headwaters of Eden Creek near Kyogle to Newcastle in eastern New South Wales. It is mainly found on and east of the Great Dividing Range.
https://avh.ala.org.au/occurrences/search?taxa=Potamophila+parviflora#tab_mapView
Habitat Aspect Climate:
Potamophila parviflora prefers light dappled shade to full sun. It grows along creeks beds, streams, river flats, backwaters or permanently watered filled depressions. The altitude ranges from 10 meters ASL to 350 meters ASL.
The temperatures range from minus 2 degree in August to 36 degrees in January.
The rainfalls range from lows of 1000mm to an average of 1600mm.
Soil Requirements:
Potamophila parviflora prefers better quality gravelly loams or light muddy silts to heavy muddy silts. The soils are deep and are enclosed in permanent water. The soils are derived from alluvial deposits or at times wet podzolic depressions. The soils pH ranges from 4.5pH to 6pH. It tolerates waterlogged soils. Non saline soils to moderately saline soils are tolerated.
Height & Spread:
Wild Plants: 1m to 2m by 1m to 2m.
Characteristics:
Potamophila parviflora grows as a tall, tufted, semi aquatic or fully emergent perennial grass or reed like plant. The rhizomes are elongated while the culms are erect and measure 300mm to 1500mm in length by 3mm to 7mm in diameter. The ligule is an ciliate, acute, lacerated membrane and measures 4mm to 15mm in length.
The alternate, erect, linear leaves measure 200mm to 500mm in length by 4mm to 6mm in width. The lamina is rolled at the bud stage. The bases taper to the sheath while the apex is acute. The concolourous laminas are grass-green to deep grass-green, dull and scabrous on the upper Laminas and smooth on the lower laminas. The laminas are flat or involute while the margins are entire. The mid vein and parallel lateral veins are prominent on the lower lamina and are visible on the upper lamina.
The inflorescence are lanceolate, panicles born from the terminals of a culm. The panicles measure 150mm to 450mm in length by 10mm to 20mm in diameter. The main axis is angular and covered in white floccose hairs at the nodes.
The spikelets are pedicelled. The fertile spikelets have a single individual floret comprising 2 basal sterile florets and a single fertile floret without a rachilla extension. The lanceolate to oblong, laterally compressed spikelets measure 3mmto 5.5mm in length. The slender pedicels are glabrous and disarticulating above the glumes.
The glumes are similar. The persistent glumes are reduced to minute, membranous cupular sheath that measures 0.1mm in length.
The 2 sterile basal florets are barren without a significant palea. The lemma of lower sterile floret is membranous, are without keels and have 5 prominent nerves. The fertile florets are usually bisexual or at times unisexual and measure 3mm to 5.5mm in length. The palea without keels and have 3 nerves.
The 6 stamens measure 1.4mm to 2mm in length. The flowers appear from late November to early March.
Potamophila parviflora’s fruits are oblong to lanceolate grains. The grains measure 5mm to 7.5mm in length by 1.5mm to 3mm in diameter. The pale green grains turn rusty browns and glossy when ripe.
Wildlife:
Potamophila parviflora is the host plant for the Little Native Mouse, Pseudomys delicatulus and probably most other native mice and rats. It is also probably a staple food source for many small parrots, Rosellas and finches however; as yet, I have not witnessed these on the plants.
Cultivation:
Potamophila parviflora is a large tuft grass for large gardens, for around dams, along water courses or for seed cultivation. It can be slashed and will recover very quickly but is not suitable for long term heavy grazing.
It is ideally suitable for full sun areas in low depressions where water lies for extended periods in ephemeral pools or the ground remains wet throughout the year.
It is a preferred food source of grazing stock and native mammals throughout the year.
Propagation:
Seeds: Potamophila parviflora’s seeds directly into a seed raising mix. Cover them with 2mm of fine sand and keep moist not wet. Place the tray in a warm sunny position. When the seedlings are 25mm to 50mm tall, prick them out in small groups and plant them into 20mm tubes using a good organic mix.
Once the seedlings reach 75mm to 80mm in height, plant them out into their permanent position and water thoroughly with our recommended fertilizer. Plant them at 500mm centers.
Alternatively the seed can be broadcast out in small areas or used in a seeder on broad acreage.
Fertilize using seaweed, fish emulsion or organic chicken pellets soaked in water on an alternate basis. Fertilize every two months until the plants are established then annually in early September to October to maintain better colour, health, vitality and flowering
Further Comments from Readers:
“Hi reader, it seems you use The Bible of Botany a lot. That’s great as we have great pleasure in bringing it to you! It’s a little awkward for us to ask, but our first aim is to purchase land approximately 1,600 hectares to link several parcels of N.P. into one at The Pinnacles NSW Australia, but we need your help. We’re not salespeople. We’re amateur botanists who have dedicated over 30 years to saving the environment in a practical way. We depend on donations to reach our goal. If you donate just $5, the price of your coffee this Sunday, We can help to keep the planet alive in a real way and continue to bring you regular updates and features on Australian plants all in one Botanical Bible. Any support is greatly appreciated. Thank you.”
In the spirit of reconciliation we acknowledge the Bundjalung, Gumbaynggirr and Yaegl and all aboriginal nations throughout Australia and their connections to land, sea and community. We pay our respect to their Elders past, present and future for the pleasures we have gained.
Pothos longipes
Classification:
Order: Alismatales
Family: Araceae
Subfamily: Pothoideae
Tribe: Pothaea
Genus: From Potam/Potamós, which is Ancient Greek for a river and Geton, which is Ancient Greek for a neighbour. It refers to the habitats, which are in rivers but usually close to the banks.
Species: From Longitia/Longus, which is Latin for long in length and Pous, which is Ancient Greek or Pedi which is Latin for a foot or feet. It refers to plants, which have pedicels, petioles or stalks which are rather long compared to other species in the genus.
Common Name: Slender Pothos or Guyu.
Distribution:
Pothos longipes is found in three widely disjunct populations. The most northern, smallest population is found north and east of Coen on Cape York Peninsula.
The central population is found south from Lakefield National Park to Townsville north.
The southern population occurs south from Maryborough in south eastern Queensland to Newcastle in central New South Wales.
https://avh.ala.org.au/occurrences/search?taxa=Pothos+longipes#tab_mapView
Habitat Aspect Climate:
Pothos longipes prefers light dappled shade to full shade. It grows on the trunks of most Rainforest trees and on suitable rocks within the rainforest. The altitude ranges from 50 meters ASL to 1150 meters ASL.
The temperatures range from minus 2 degree in August to 36 degrees in January.
The rainfalls range from lows of 850mm to an average of 3200mm.
Soil Requirements:
Pothos longipes prefers growing as an epiphyte or lithophyte. When growing on rocks the rocks are usually of basalt origin and have a 4.5pH through to 6pH. It does not tolerate waterlogged soils. Only non-saline soils are tolerated.
Height & Spread:
Wild Plants: 1m to 5mm by 0.75m to 2m.
Characteristics:
Pothos longipes grows as a climbing epiphytic plant with deep green to sea-green, slender, glossy, glabrous stems. The plants adhere to the trunks of trees and at times rocks with a fine network of adventitious roots. The plants are easily distinguished by their climbing habit hugging the trees and their long flat petioles.
Pothos longipes’s alternate, ovate to lanceolate leaves measure 15mm to 50mm in length by 6mm to 15mm in width. The laminas bases are broadly rounded to almost truncate while the apex is long broadly acuminate. The oblong-oblanceolate to oblanceolate petioles are usually longer than the lamina, are flattened and appear leaf like. The petioles vary greatly in length and measure 3mm to 120mm in length by 5mm to 12mm in width. The petioles bases are rounded and clasping while the apexes are obtuse-truncate to truncate. The concolourous laminas are deep sea-green, semi glossy and glabrous. The margins are entire and flat. The mid vein is slightly prominent on the lower lamina and the petiole and is visible on the upper lamina.
The inflorescence of Pothos longipes are born on a spike from the leaf axils. The spikes peduncles measure 25mm to 55mm in length. The dull green lanceolate spathe recurves before anthesis and turns black after anthesis. They measures 25mm to 60mm in length by 10mm to 15mm in width. The spathes apex is apiculate. The spikes measure 20mm to 60mm in length by 5mm to 9mm in diameter.
The individual white flowers measure 1.3mm in length by 1mm in width. The staminal filaments are flattened and widest near the base. They measure 1mm in length by 1.3mm to 1.5mm in width. The pollen is white.
The single locular ovules are surrounded by a clear mucous. The flowers appear from September to late December.
Pothos longipes’s fruit is a small ovoid drupe. The drupes measure 8mm to 13mm in length by 5mm to 8mm in diameter. The pale green capsules turn bright scarlet red on ripening. There are usually 3 to 7 fruits per spike.
The seeds are hard, deep brown to deep grey-brown and are semi oval to semi ovate. They measure 2mm to 2.5mm in length by 1.5mm to 2mm in width and 1mm to 1.2mm in depth. The drupes fall to rot on the rainforest floor or at times adhere to the spike and decompose.
Wildlife:
Pothos longipes appears not to have any predators on a regular basis. The fruits are eaten by most rainforest birds including Bell Miners, Cat Birds and both the Satin and Regent Bowerbirds.
The fruits are edible having a rather bland to slightly acrid taste.
Cultivation:
Pothos longipes is a good ground cover for covering rocks in dense shade or for climbing on the trunks of rainforest trees. It always looks green and fresh especially where adequate ground moisture or high humilities are retained. It is most suitable for small, medium and large gardens close to the coast or high in the mountains in warm temperate, subtropical or tropical gardens.
Indoors Potted On:
It makes a very interesting specimen for shaded courtyards or placed on totem poles inside the home. Pothos longipes resent artificial heat and extremely dry humilities. A weekly or daily spray will help keep it happy.
Sawdust or sand mixes are too well draining unless the sawdust has completely composted down where it exhibits a texture like plasticine to the touch. Moisture can be squeezed out between the fingers yet it remains moist. I find this a great basis to start with.
Mix equal parts of the well decomposed saw dust with the above feel with perlite and vermiculite. To this add two part sharp clean sand, one part compost and one part good crusher dust from a basalt rock quarries. Preferably black basalt but both are good. Make sure the sand comes from a source that does not have salt.
The decomposed Sawdust in this condition creates the moisture retention and holds nutrient in. The perlite and vermiculite make the mix neutral and both have great water holing capacity without shrinkage with age. The sand creates good drainage and is good for good healthy root development. The crusher dust adds vital minerals which the plants need.
Indoor plants need good light and ventilation without drying breezes or wind.
The ingredients:
Sand opens the mix up and allows for good aeration.
Decomposed sawdust retains moisture, is full of life like microbes and beneficial fungi and bacteria. Decomposed sawdust adds that symbiotic relationship that is often missing in lifeless mixes based on just sawdust and sand.
Compost is the life blood of the mix and introduces new and varied microbes. Use table scraps, leaf litter animal droppings though beware of droppings from ruminant animals as these will add weed seeds.
Vermiculite is water retentive mineral made from mica. It is high in minerals particularly phosphorous and magnesium.
Perlite is another water retentive mineral that helps to lighten the mix.
Crusher dust is heavy but contains some of the best quantities of minerals particularly those needed in small quantities. It is vital for balance in the mix.
Aged sawdust has not fully decomposed but it has the benefits of being cheap readily available and easy to age quickly. Hardwood is better than pine because it does not break down as quickly nor does it have the same shrinkage in the pots. To age 1 cubic meter of fresh hardwood sawdust add 5 kilograms of urea, 10 kilograms of pure blood and bone. Hoods Blood and bone is one of the best available as it is reliable uses more blood, is 100mm pure and certified organic. Water the urea in and then sprinkle the blood and bone over sawdust. Mix it in and turn the mix over every week. The sawdust will be ready to use in three to four weeks.
Propagation:
Seeds: Seeds of Pothos longipes can be removed easily from the fruits as they ripen though large quantities are difficult to collect.
Sow the fresh seeds directly into a seed raising mix, keeping them moist not wet. When the seedlings are 20 to 25 mm tall, prick them out and plant them into 50mm native tubes using a good organic mix. Be very careful as the plants are quite fragile still and losses will occur even at this age.
Fertilize as a foliar spray using seaweed, fish emulsion or organic chicken pellets soaked in water on an alternate basis. Fertilize every two months until the plants are established then twice annually in early September and March to maintain better colour, health and vitality.
Cuttings:
Fortunately Pothos longipes cuttings strike very easy. Use 100mm to 200mm long tip cuttings or lateral shoots from the present season’s growth. Take them in warmer months of the year. Remove half the leaves from the bottom section being careful not to tear the bark.
1 Prepare the cutting mix by adding two thirds sharp clean river sand, one third peat or one third perlite. These ingredients must be sterilized,
2 Select good material from non diseased plants,
3 Select semi green stems for cuttings. Look for a stem with two or three nodes,
4 Place the cutting on a flat, hard surface, and make a clean cut down one side of the cutting at the base for 10mm with a sharp sterile knife or razor blade. – This scarification of the node will increase the chances of roots emerging from this spot. Now remove all but one or two the leaves, leaving the apex leaves in tact. If the leaves are very large in proportion to the stem, cut off the apical halves.
5 Hormones are not required,
6 Use a small dipple stick or old pencil to poke a hole into the soilless potting mix. Ensure the hole is slightly larger than the stem diameter and be careful not to tear or damage the cuttings base. Place 2 or 3 cuttings in each of the 50mm native tube,
7 I like to place the tubes in bucket with holes drilled in the bottom to allow excess water to drain out. A plastic bag that fits over the bucket is ideal to help maintain temperature and moisture. Place in a semi shaded, warm position like under 50mm shade cloth.
8 When the cuttings have struck, open the bag to allow air circulation for a few days to a week,
9 Once hardened off remove the cuttings from the bag and allow to further hardening for a few more days to a week,
10 Transplant into a good potting mix to grow on.
Fertilize using seaweed, fish emulsion or organic chicken pellets soaked in water on an alternate basis. Fertilize every two months until the plants are established then annually in early September to October to maintain better colour, health, vitality and flowering
Further Comments from Readers:
“Hi reader, it seems you use The Bible of Botany a lot. That’s great as we have great pleasure in bringing it to you! It’s a little awkward for us to ask, but our first aim is to purchase land approximately 1,600 hectares to link several parcels of N.P. into one at The Pinnacles NSW Australia, but we need your help. We’re not salespeople. We’re amateur botanists who have dedicated over 30 years to saving the environment in a practical way. We depend on donations to reach our goal. If you donate just $5, the price of your coffee this Sunday, We can help to keep the planet alive in a real way and continue to bring you regular updates and features on Australian plants all in one Botanical Bible. Any support is greatly appreciated. Thank you.”
In the spirit of reconciliation we acknowledge the Bundjalung, Gumbaynggirr and Yaegl and all aboriginal nations throughout Australia and their connections to land, sea and community. We pay our respect to their Elders past, present and future for the pleasures we have gained.
Prasophyllum australe
Classification::
Unranked: Monocots
Order: Asparagales
Family: Orcidaceae
Subfamily: Orchidoideae
Tribe: Diurideae
Subtribe: Prasophylliinae
Genus: From Prason, which is Ancient Greek for a leek and Phullon/Phýllon, which is Ancient Greek for a leaf. It refers to leaves, which are deep green and resemble the leaves of the culinary leek, Allium ursinum.
Species: From Terra Australis, which is Latin for land of the south. It refers to plants, which were first discovered from the land down under.
Common Name: Southern Leek orchid.
Distribution:
Prasophyllum australe is found south from Hervey Bay in central coastal Queensland to Mount MacIntyre lower swamps in south eastern South Australia. It is mainly found on the Great Dividing Range to the coast with the only exceptions being populations at Millmerran, Scotsdale and the Grampians.
In South Australia it is also found south from the Adelaide Hills to Lake Alexandria and on the eastern half of Kangaroo Island.
In Tasmania it is found circumnavigating the main Island and inland as far as Epping in the northern Midlands and all the Bass Strait Islands.
https://avh.ala.org.au/occurrences/search?taxa=Prasophyllum+australe#tab_mapView
Habitat Aspect Climate:
Prasophyllum australe prefers medium shade to dappled shade. It usually grows in small colonies in swamps, peaty bogs or heath in open forests, open coastal woodlands or shallow depressions near ephemeral pools. Its altitude ranges from 5 meters ASL to 603 meters ASL.
The temperatures range from minus 5 degrees in August to 38 degrees in January.
The rainfall ranges from lows of 500mm to 2000mm average per annum. The plants are more reliant on capillary action from nearby permanent water sources to keep the soils permanently moist.
Soil Requirements:
Prasophyllum australe grows as a terrestrial orchid on coarse sands, fine sands and sandy loams to light gritty fatty clays. The soils are derived from decomposed granites, sandstones and accumulated peaty beach sands. The soils pH ranges from 4.5pH to 6pH. It does not tolerate waterlogged soils however soil moisture is essential for survival throughout the year. Non saline soils to slightly saline soils are tolerated.
Height & Spread:
Wild Plants: 0.6m to 0.9m by 0.1m to 0.3m.
Characteristics:
Prasophyllum australe grows as a slender erect terrestrial orchid with fleshy tubers. The new season’s tubers are produced at a distance from the present season’s tuber.
The single linear leaf measures 200mm to 350mm in length by 1.5mm to 3.5mm in width. The bases are clasping but not sheathing while the apexes are tapering acute. The concolourous, coriaceous leaves are grass-green to deep green often with a reddish tinge near the base. The laminas are roundish to ovate in cross section.
The inflorescences of are dense, long, slender, mid green, glabrous scapes that measure 700mm to 900mm in length including the spike. The spikes have 10 to 60 individual flowers and measure 60mm to 200mm in length. The sheathing bract is green with a purplish, acute apex and partially surrounds the base of the tapering ovary.
The glabrous oblong to ovate, pendulant dorsal sepal has an acute apex. The margins are entire and slightly recurve forwards near the edges. The dorsal sepal is olive-green tinged purple with 3 purplish longitudinal stripes and measures 7mm to 8mm in length by 4mm to 5mm in width.
The glabrous oblong to ovate, erect lateral sepals are usually united for their whole length or are seldom free or united to only part of their length. The apexes are broad acute while the margins are entire and curve backwards near the edges. The lateral sepal is are olive-green tinged purple with 3 purplish longitudinal stripes and measures 7mm to 8mm in length by 4mm to 5mm in width.
The glabrous lanceolate divaricate lateral petal has an acute apex. The petals are deep purple while the margins are entire, undulating and lime-green to grass-green. The lateral petals measure 6mm to 8mm in length by 1.5mm to 2mm in width.
The labellum is lanceolate when flattened but in living flowers the upper portion strongly recurves until the tip touches the gibbous base. The pastel pink to pale pink labellum has translucent margins that are crisped and often undulating. The labellum measures 7.5mm to 9mm in length by 2.5mm to 3mm in width. The callus plate extends to 50mm of the length of the lamina and ends with 2, compressed or many ridges. The column wings are short and are often triangular or at times obtuse. The rostellum is longer than wings. The sweetly scented flowers appear more profusely after fire and flower from September to January.
Prasophyllum australe’s fruits are obloidal capsules. The green capsules turn deep grey-brown when ripe.
Wildlife:
Prasophyllum australe’s wildlife is unknown to the author.
Cultivation:
Prasophyllum australe is a beautiful terrestrial orchid to grow in the garden but it needs a cool, moist, light shady position to survive and thrive. The best place is in a greenhouse or bush house where the environment can be controlled better.
In a littoral rainforest or rainforest setting free of frost or sub zero temperatures and a humid microclimate will see the plants thrive.
For cultivation notes see article on Terrestrial Orchid Cultivation for Acianthus, Caladenia, Caleana, Diuris, Pterostylis and Thelymitra specie. These orchids may prove more difficult than the above mentioned plants but the methods are probably similar.
The removal of orchids from their natural environment is illegal. If you are fortunate enough to have a colony growing wild on your block peg the area out so you know where it is. Cover the area in fine loose mulch on an annual basis when the plants are dormant. Water well as the first leaves appear with our recommended fertilizing program at a full strength.
Propagation:
Seeds:
Prasophyllum australe’s seeds are very difficult to acquire and the seed requires treatment before sowing. Really Orchid seeds are meant for professionals with time, equipment and space. However if you wish to persevere then here are the basics and you are learning from an amateur. Once the orchids are large enough to handle treat them similarly to other ground orchids.
All orchids that are declared rare, vulnerable or endangered are protected by Federal and State Laws and must not be removed from the wild unless you are a land developer, mining company or main Roads department etc. This includes bulbs, roots, leaves and flowers. No part of any plant can be removed from Federal, State or Local Government land without the prior permission of the authority and this includes the spore.
1. Obtain relevant materials
The first step in growing orchid from seed will be sourcing and having at the ready all materials that will be required in the propagation process.
This includes all of the following:
Unripe orchid seed capsule. If there are 2 capsules secure the second capsule immediately after the first capsule splits or if only one capsule as soon as it changes colour.
Orchid gelling medium with agar which can be purchased from an orchid society or a specialist nursery.
Distilled water
Cooking pot
Spoon
Oven-safe glass or polypropylene containers with lids
Sealable bags
Clean, sterilized cutting board
Rubber gloves
Paper towels
Tweezers or forceps
70 percent ethanol
Bleach
Scalpel or sharp knife
Planting pot
Orchid compost
Length of wire metal
Plastic spray bottle.
deep petri dishes or sterile jars.
2. Prepare agar medium
The agar medium is a special orchid gelling mixture that distilled water will be added to distilled water.
To prepare the medium, mix equal parts of orchid gelling medium with distilled water in a cooking pot.
Place the pot on a stove and bring the mixture to boil for while stirring continuously for two minutes.
Pour the mixture into the petri dishes glass or propylene containers while ensuring not to fill the containers above 20 percent of their volume.
Loosely replace the lids to the containers. Sterilize the containers by heating them up in a microwave oven for between 2 to 3 minutes.
Spray 70 percent ethanol into a sealable bag to create a sterile environment. Transfer the heated containers into the sealable bag.
Allow the containers to cool a bit before tightening their lids and then sealing the bag. Leave the containers to stand for a few days until the mixture solidifies.
3. Prepare seed capsule and work surface
Place an open pot of water on a stove and bring to boil. Place the cutting board in the oven and sterilize.
Put on rubber gloves and sterilize the forceps, and scalpel with 70 percent ethanol.
Insert the seed capsule into a bowel filled with bleach for about fifteen minutes.
Sterilize seed capsule again with 70 percent ethanol and place on grill.
Using the sterilized scalpel, cut open the seed capsule to reveal the seeds. Using a scalpel or sharp knife, scrape out the seeds from the capsule unto an ethanol soaked paper towel.
4. Flasking of the seed
Take out the petri dishes or glass jars containers holding the agar medium. Over the steam, open up the containers and transfer seeds from the ethanol soaked paper towel into the individual containers using the sterilized forceps.
The amount of seeds will determine the number of containers required. Replace the lid of the containers and place them on a window sill that receives indirect sunlight.
5. Wait and exercise patience
All that can be done at this point is to wait until the seeds germinate. The amount of time that this might take varies and is dependent on the particular species.
Generally, the time can range from a few months to a few years. During this period of waiting, ensure the containers are free from contamination to ensure that germination is not disrupted.
6. Emergence of protocorms
Protocorms are tuber-shaped bodies with rhizoids that are produced by the young seedlings of various orchids. Protocorms represent the embryonic form of the orchid plant.
Their emergence after the period of waiting at an affirmation that everything in the propagation process is on track.
7. Transflask orchid seedlings is done after they have developed roots
Upon the emergence of the protocorms, consistently observe the growth of the seedlings. At the point when the seedlings appear to overcrowd the flask, transflasking should be carried out, typically within 30 and 60 days.
* This is done by removing individual seedlings using sterilized tweezers from the original containers and placing them in new containers also filled, in a proportion similar to the original, with agar medium. 6 to 8 in a standard petri dish or 1or 2 to a test tube
8. Transplant seedlings into planting pots
On the presumption that there are no disruptions to the plant growth, the seedlings will eventually outgrow the containers.
At this point, it is to be transplanted into planting pots. A good rule of thumb to determine when it is ready to be transplanted is when the seedlings have developed roots that have grown up to the length of one-quarter of an inch.
To transplant, prepare a planting pot or other container for receiving the seedling by majorly filling it up with coarse fir bark and possibly some slightly moist orchid compost mixture containing perlite, fine charcoal, redwood bark shavings, etc.
To extract the seedlings, submerge the containers in warm water to help loosen the agar gel.
Once the agar medium is softened, twist a piece of metal to form a loop and in turn, use it to carefully pull out the seedlings from the container. It is best done if the agar and seedling can be removed together.
The seedlings can be further rinsed in lukewarm water to remove any excess agar mixture still stuck to them.
Following this, the seedlings can now be planted into the prepared pot with at least 50mm of space between each individual seedling.
9. Positioning the orchid
The seedling once fully transplanted should be placed in a location that is warm with good indirect sun light.
Slowly position the pots into an area that closely assimilates the conditions it will be growing under.
The choice as to whether the plant should be exposed to full sun or in direct sunlight will be dependent on the particular orchid specie.
10. Subsequent care of the plant
After the first week, the seedling can be misted several times a day and watered just once a week.
A guide in watering the plant will be using the dryness of the fir back that is, water the plant until the fir back is completely moistened and wait till it has completely dried out before watering again.
Fertilize using seaweed, fish emulsion or organic chicken pellets soaked in water on an alternate basis. Only fertilize once the plants have established themselves then annually in early September to October to maintain better colour, health, vitality and flowering
Further Comments from Readers:
“Hi reader, it seems you use The Bible of Botany a lot. That’s great as we have great pleasure in bringing it to you! It’s a little awkward for us to ask, but our first aim is to purchase land approximately 1,600 hectares to link several parcels of N.P. into one at The Pinnacles NSW Australia, but we need your help. We’re not salespeople. We’re amateur botanists who have dedicated over 30 years to saving the environment in a practical way. We depend on donations to reach our goal. If you donate just $5, the price of your coffee this Sunday, We can help to keep the planet alive in a real way and continue to bring you regular updates and features on Australian plants all in one Botanical Bible. Any support is greatly appreciated. Thank you.”
In the spirit of reconciliation we acknowledge the Bundjalung, Gumbaynggirr and Yaegl and all aboriginal nations throughout Australia and their connections to land, sea and community. We pay our respect to their Elders past, present and future for the pleasures we have gained.
Prasophyllum brevilabre
Classification::
Unranked: Monocots
Order: Asparagales
Family: Orchidaceae
Subfamily: Orchidoideae
Tribe: Diurideae
Subtribe: Prasophylliinae
Genus: From Prason, which is Ancient Greek for a leek and Phullon/Phýllon, which is Ancient Greek for a leaf. It refers to leaves, which are deep green and resemble the leaves of the culinary leek, Allium ursinum.
Species: From Brevis, which is Latin for short and Labrus, which is Latin for a lip. It refers to the lip on the lower tepal, which is very short even compared to other species within the genus.
Common Name: Short Lipped Leek orchid.
Distribution:
Prasophyllum brevilabre is found south from Hervey Bay and Fraser Island in southern coastal Queensland to the Lower Glenegle National Park on the Narracoorte Plains in south western Victoria. It is mainly found on and east of the Great Dividing Range to the coast except for an isolated population at Bauhinia.
In Tasmania it is found from Circular Head in the north west corner along the north and east coasts to Ida Bay in the south east corner and Flinders Island. It may be more widespread as it is also found in an isolated population in the south west corner in the Giblin River Basin in the South West National Park.
https://avh.ala.org.au/occurrences/search?taxa=Prasophyllum+brevilabre#tab_mapView
Habitat Aspect Climate:
Prasophyllum brevilabre prefers medium shade to dappled shade. It usually grows in small colonies in swamps, peaty bogs or heath in open forests, open coastal woodlands and shallow depressions near ephemeral pools or sub alpine heaths. Its altitude ranges from 5 meters ASL to 1050 meters ASL.
The temperatures range from minus 5 degrees in August to 38 degrees in January.
The rainfall ranges from lows of 500mm to 2000mm average per annum. The plants are more reliant on capillary action from nearby permanent water sources to keep the soils permanently moist.
Soil Requirements:
Prasophyllum brevilabre grows as a terrestrial orchid on coarse sands, fine sands and sandy loams to light gritty fatty clays. The soils are derived from decomposed granites, sandstones or accumulated peaty beach sands. The soils pH ranges from 4.5pH to 6pH. It does not tolerate waterlogged soils however soil moisture is essential for survival throughout the year. Non saline soils to slightly saline soils are tolerated.
Height & Spread:
Wild Plants: 0.2m to 0.5m by 0.1m to 0.2m.
Characteristics:
Prasophyllum brevilabre grows as a slender erect terrestrial orchid with fleshy tubers. The new season’s tubers are produced at a moderate distance from the present season’s tuber.
The single linear leaf measures 200mm to 350mm in length by 1.5mm to 3.5mm in width. The bases are clasping but not sheathing while the apexes are tapering acute. The concolourous, coriaceous leaf is grass-green to deep green often with a reddish tinge near the base. The laminas are roundish to ovate in cross section.
The inflorescences are long, slender, mid green, scabrous scapes that measure 700mm to 900mm in length including the spike. The spikes have 10 to 35 disjunct individual flowers and measure 40mm to 120mm in length. The sheathing bract is grass-green with a purplish acute apex and does not surround the angulated ovary.
The glabrous, ovate to broad lanceolate, pendulant dorsal sepal has an acute apex. The margins are entire and slightly recurve forwards near the edges. The dorsal sepal is olive-green tinged purple with 3 purplish longitudinal stripes and purplish margins. It measures 7mm to 8mm in length by 4mm to 5mm in width.
The glabrous oblong to ovate, erect lateral sepals are usually united for their whole length or are seldom free or united to only part of their length. The apexes are broad acute while the margins are entire and curve backwards near the edges. The lateral sepal is are olive-green tinged purple with 3 purplish longitudinal stripes and measures 8.5mm to 10mm in length by 5.5mm to 7mm in width.
The glabrous divaricate lateral petals are usually linear to lanceolate or at times sickle shape has an acute apex. The petals are deep olive-green with 3 broad deep purple stripes while the margins are entire with a whitish apex that recurves forward. The lateral petals measure 6mm to 8mm in length by 1mm to 1.2mm in width.
The labellum is broad spathulate and strongly recurves upwards until the tip touches the erect lateral sepals. The white or pastel pink labellum has translucent margins that are crisped and often undulating. The labellum measures 7.5mm to 9mm in length by 2.5mm to 3mm in width. The callus plate extends to 30mm to 35mm of the length of the lamina and has a deep but narrow central channel which does not extending much further than the bend in the lamina. The lanceolate column wings are pastel purple. The rostellum is almost as high as wings. The faintly scented flowers appear from July to January especially after fire.
Prasophyllum brevilabre’s fruits are obloidal capsules. The green capsules turn deep grey-brown when ripe.
Wildlife:
Prasophyllum brevilabre’s wildlife is unknown to the author.
Cultivation:
Prasophyllum brevilabre is a beautiful terrestrial orchid to grow in the garden but it needs a cool, moist, light shady position to survive and thrive. The best place is in a greenhouse or bush house where the environment can be controlled better.
In a littoral rainforest or rainforest setting free of frost or sub zero temperatures and a humid microclimate will see the plants thrive.
For cultivation notes see article on Terrestrial Orchid Cultivation for Acianthus, Caladenia, Caleana, Diuris, Pterostylis and Thelymitra specie. These orchids may prove more difficult than the above mentioned plants but the methods are similar.
The removal of orchids from their natural environment is illegal. If you are fortunate enough to have a colony growing wild on your block peg the area out so you know where it is. Cover the area in fine loose mulch on an annual basis when the plants are dormant. Water well as the first leaves appear with our recommended fertilizing program at a full strength.
Propagation:
Seeds: Prasophyllum brevilabre’s seeds are very difficult to acquire and the seed requires treatment before sowing. Really Orchid seeds are meant for professionals with time, equipment and space. However if you wish to persevere then here are the basics and you are learning from an amateur. Once the orchids are large enough to handle treat them similarly to other ground orchids.
All orchids that are declared rare, vulnerable or endangered are protected by Federal and State Laws and must not be removed from the wild unless you are a land developer, mining company or main Roads department etc. This includes bulbs, roots, leaves and flowers. No part of any plant can be removed from Federal, State or Local Government land without the prior permission of the authority and this includes the spore.
1. Obtain relevant materials
The first step in growing orchid from seed will be sourcing and having at the ready all materials that will be required in the propagation process.
This includes all of the following:
Unripe orchid seed capsule. If there are 2 capsules secure the second capsule immediately after the first capsule splits or if only one capsule as soon as it changes colour.
Orchid gelling medium with agar which can be purchased from an orchid society or a specialist nursery.
Distilled water
Cooking pot
Spoon
Oven-safe glass or polypropylene containers with lids
Sealable bags
Clean, sterilized cutting board
Rubber gloves
Paper towels
Tweezers or forceps
70 percent ethanol
Bleach
Scalpel or sharp knife
Planting pot
Orchid compost
Length of wire metal
Plastic spray bottle.
deep petri dishes or sterile jars.
2. Prepare agar medium
The agar medium is a special orchid gelling mixture that distilled water will be added to distilled water.
To prepare the medium, mix equal parts of orchid gelling medium with distilled water in a cooking pot.
Place the pot on a stove and bring the mixture to boil for while stirring continuously for two minutes.
Pour the mixture into the petri dishes glass or propylene containers while ensuring not to fill the containers above 20 percent of their volume.
Loosely replace the lids to the containers. Sterilize the containers by heating them up in a microwave oven for between 2 to 3 minutes.
Spray 70 percent ethanol into a sealable bag to create a sterile environment. Transfer the heated containers into the sealable bag.
Allow the containers to cool a bit before tightening their lids and then sealing the bag. Leave the containers to stand for a few days until the mixture solidifies.
3. Prepare seed capsule and work surface
Place an open pot of water on a stove and bring to boil. Place the cutting board in the oven and sterilize.
Put on rubber gloves and sterilize the forceps, and scalpel with 70 percent ethanol.
Insert the seed capsule into a bowel filled with bleach for about fifteen minutes.
Sterilize seed capsule again with 70 percent ethanol and place on grill.
Using the sterilized scalpel, cut open the seed capsule to reveal the seeds. Using a scalpel or sharp knife, scrape out the seeds from the capsule unto an ethanol soaked paper towel.
4. Flasking of the seed
Take out the petri dishes or glass jars containers holding the agar medium. Over the steam, open up the containers and transfer seeds from the ethanol soaked paper towel into the individual containers using the sterilized forceps.
The amount of seeds will determine the number of containers required. Replace the lid of the containers and place them on a window sill that receives indirect sunlight.
5. Wait and exercise patience
All that can be done at this point is to wait until the seeds germinate. The amount of time that this might take varies and is dependent on the particular species.
Generally, the time can range from a few months to a few years. During this period of waiting, ensure the containers are free from contamination to ensure that germination is not disrupted.
6. Emergence of protocorms
Protocorms are tuber-shaped bodies with rhizoids that are produced by the young seedlings of various orchids. Protocorms represent the embryonic form of the orchid plant.
Their emergence after the period of waiting at an affirmation that everything in the propagation process is on track.
7. Transflask orchid seedlings is done after they have developed roots
Upon the emergence of the protocorms, consistently observe the growth of the seedlings. At the point when the seedlings appear to overcrowd the flask, transflasking should be carried out, typically within 30 and 60 days.
* This is done by removing individual seedlings using sterilized tweezers from the original containers and placing them in new containers also filled, in a proportion similar to the original, with agar medium. 6 to 8 in a standard petri dish or 1or 2 to a test tube
8. Transplant seedlings into planting pots
On the presumption that there are no disruptions to the plant growth, the seedlings will eventually outgrow the containers.
At this point, it is to be transplanted into planting pots. A good rule of thumb to determine when it is ready to be transplanted is when the seedlings have developed roots that have grown up to the length of one-quarter of an inch.
To transplant, prepare a planting pot or other container for receiving the seedling by majorly filling it up with coarse fir bark and possibly some slightly moist orchid compost mixture containing perlite, fine charcoal, redwood bark shavings, etc.
To extract the seedlings, submerge the containers in warm water to help loosen the agar gel.
Once the agar medium is softened, twist a piece of metal to form a loop and in turn, use it to carefully pull out the seedlings from the container. It is best done if the agar and seedling can be removed together.
The seedlings can be further rinsed in lukewarm water to remove any excess agar mixture still stuck to them.
Following this, the seedlings can now be planted into the prepared pot with at least 50mm of space between each individual seedling.
9. Positioning the orchid
The seedling once fully transplanted should be placed in a location that is warm with good indirect sun light.
Slowly position the pots into an area that closely assimilates the conditions it will be growing under.
The choice as to whether the plant should be exposed to full sun or in direct sunlight will be dependent on the particular orchid specie.
10. Subsequent care of the plant
After the first week, the seedling can be misted several times a day and watered just once a week.
A guide in watering the plant will be using the dryness of the fir back that is, water the plant until the fir back is completely moistened and wait till it has completely dried out before watering again.
Fertilize using seaweed, fish emulsion or organic chicken pellets soaked in water on an alternate basis. Only fertilize once the plants have established themselves then annually in early September to October to maintain better colour, health, vitality and flowering
Further Comments from Readers:
“Hi reader, it seems you use The Bible of Botany a lot. That’s great as we have great pleasure in bringing it to you! It’s a little awkward for us to ask, but our first aim is to purchase land approximately 1,600 hectares to link several parcels of N.P. into one at The Pinnacles NSW Australia, but we need your help. We’re not salespeople. We’re amateur botanists who have dedicated over 30 years to saving the environment in a practical way. We depend on donations to reach our goal. If you donate just $5, the price of your coffee this Sunday, We can help to keep the planet alive in a real way and continue to bring you regular updates and features on Australian plants all in one Botanical Bible. Any support is greatly appreciated. Thank you.”
In the spirit of reconciliation we acknowledge the Bundjalung, Gumbaynggirr and Yaegl and all aboriginal nations throughout Australia and their connections to land, sea and community. We pay our respect to their Elders past, present and future for the pleasures we have gained.
Prasophyllum elatum
Classification::
Unranked: Monocots
Order: Asparagales
Family: Orcidaceae
Subfamily: Orcidoideae
Tribe: Diurideae
Subtribe: Prasophylliinae
Genus: From Prason, which is Ancient Greek for a leek and Phullon/Phýllon, which is Ancient Greek for a leaf. It refers to leaves, which are deep green and resemble the leaves of the culinary leek, Allium ursinum.
Species: From Elatus, which is Latin for tall. It refers to the plants, which are upright and much taller than other species in the genus.
Common Name: Tall Leek Orchid or Piano Leek Orchid.
Distribution:
Prasophyllum elatum is found south and west of a line from Port Gregory on the central west coast to Cape Arid National Park on the south west coast of Western Australia.
In the east it is found south from Hervey Bay in central coastal Queensland to Port August with a disjunct population further north at Wilpina Pound and down the eastern side of Eyre Peninsula to Venus Bay in south eastern South Australia. It is mainly found on the Great Dividing Range to the coast with the only exceptions being populations at Millmeran, Scotsdale and the Grampians.
In South Australia it is found south from the Adelaide Hills to Lake Alexandria and on the eastern half of Kangaroo Island.
In Tasmania it is found circumnavigating most of the main Island north from the Nelson River on the west coast across the north then across the north coast down the east coast and back along the south coast to in the south west to Bathurst Harbour. It is also found on the Bass Strait on Flinders Island.
https://avh.ala.org.au/occurrences/search?taxa=Prasophyllum+elatum#tab_mapView
Habitat Aspect Climate:
Prasophyllum elatum prefers medium shade to dappled shade. It usually grows in small colonies in swamps, peaty bogs or heath in open forests, open coastal woodlands or shallow depressions near ephemeral pools and sub alpine heaths. Its altitude ranges from 5 meters ASL to 1050 meters ASL.
The temperatures range from minus 5 degrees in August to 38 degrees in January.
The rainfall ranges from lows of 500mm to 2000mm average per annum. The plants are more reliant on capillary action from nearby permanent water sources to keep the soils permanently moist.
Soil Requirements:
Prasophyllum elatum grows as a terrestrial orchid on coarse sands, fine sands and sandy loams to light gritty fatty clays. The soils are derived from decomposed granites, sandstones or accumulated peaty beach sands. The soils pH ranges from 4.5pH to 6pH. It does not tolerate waterlogged soils however soil moisture is essential for survival throughout the year. Non saline soils to slightly saline soils are tolerated.
Height & Spread:
Wild Plants: 0.1m to 1.5m by 0.1m to 0.3m.
Characteristics:
Prasophyllum elatum grows as a slender erect terrestrial orchid with fleshy tubers. The new season’s tubers are produced at a moderate distance from the present season’s tuber.
The single linear leaf measures 80mm to 120mm in length by 1mm to 2mm in width. The bases are clasping but not sheathing while the apexes are tapering acute. The concolourous, coriaceous leaf is deep green often with a purplish tinge. The laminas are roundish to ovate in cross section.
The inflorescences are dense, long, slender scapes are mid green, deep green or deep purplish-maroon and scabrous. They measure 1000mm to 1500mm in length including the spike. The spikes have 50 to 80 individual flowers and measure 330mm to 550mm in length. The sheathing bract is grass-green, deep green or deep purplish-maroon acute apex and partially surrounds the angulated ovary at the base.
The glabrous, ovate to lanceolate dorsal sepal curves gently forward from the base and has an acute apex. The margins are entire and slightly recurve forwards near the edges. The dorsal sepal is usually greenish-maroon externally and paler internally with 3 purplish longitudinal stripes and 2 paler longitudinally purplish stripes or lime-green to yellowish-green with 3 deeper green longitudinal stripes and 2 paler longitudinally green stripes. It measures 9mm to 11mm in length by 4mm to 5.5mm in width.
The glabrous oblong to ovate, erect to slightly forward leaning lateral sepals are usually united for their whole length. The apexes are broad acute while the margins are entire. The margins are entire and slightly recurve forwards near the edges. The lateral sepal is usually greenish-maroon externally and paler internally with 3 purplish longitudinal stripes and 2 paler longitudinally purplish stripes or lime-green to yellowish-green with 3 deeper green longitudinal stripes and 2 paler longitudinally green stripes. They measures 9mm to 11mm in length by 6mm to 7mm in width.
The glabrous lateral petals are usually lanceolate to ovate or slightly sickle shape and have an acute apex. The petals are deep maroon with a lime-green or yellowish-green broad, marginal stripe or are lime-green with a yellowish-green, broad, marginal stripe. The margins are entire. The lateral petals measure 9mm to 10mm in length by 3.5mm to 5mm in width.
The labellum is broad ovate when flattened and on live plants it strongly recurves upwards until the tip touches the erect to slightly forward leaning lateral sepals. The white, lilac or pastel pink labellum margins are strongly crisped to pleated. The labellum measures 9mm to 10mm in length by 9mm to 10mm in width. The callus plate is lime-green and extends at least three quarters the length of the lamina tip. It is broad and widely channelled so that the margins form 2 raised continuous, undulating winged ridges which join at the apex. The column wings are long, narrow and sickle shaped. The rostellum is shorter than wings.
The fruits are obloidal capsules. The green capsules turn deep grey-brown when ripe.
Wildlife:
Prasophyllum elatum’s wildlife is unknown to the author.
Cultivation:
Prasophyllum elatum is a large beautiful terrestrial orchid to grow in the garden but it needs a cool, moist, light shady position to survive and thrive. The best place is in a greenhouse or bush house where the environment can be controlled better.
In a littoral rainforest or rainforest setting free of frost or sub zero temperatures and a humid microclimate will see the plants thrive.
The removal of orchids from their natural environment is illegal. If you are fortunate enough to have a colony growing wild on your block peg the area out so you know where it is. Cover the area in fine loose mulch on an annual basis when the plants are dormant. Water well as the first leaves appear with our recommended fertilizing program at a full strength.
For cultivation notes see article on Terrestrial Orchid Cultivation for Acianthus, Caladenia, Caleana, Diuris, Pterostylis and Thelymitra. These orchids may prove more difficult than the above mentioned plants but the methods are similar.
Propagation:
Seeds: Prasophyllum elatum’s seeds are very difficult to acquire and the seed requires treatment before sowing. Really Orchid seeds are meant for professionals with time, equipment and space. However if you wish to persevere then here are the basics and you are learning from an amateur. Once the orchids are large enough to handle treat them similarly to other ground orchids.
All orchids that are declared rare, vulnerable or endangered are protected by Federal and State Laws and must not be removed from the wild unless you are a land developer, mining company or main Roads department etc. This includes bulbs, roots, leaves and flowers. No part of any plant can be removed from Federal, State or Local Government land without the prior permission of the authority and this includes the spore.
1. Obtain relevant materials
The first step in growing orchid from seed will be sourcing and having at the ready all materials that will be required in the propagation process.
This includes all of the following:
Unripe orchid seed capsule. If there are 2 capsules secure the second capsule immediately after the first capsule splits or if only one capsule as soon as it changes colour.
Orchid gelling medium with agar which can be purchased from an orchid society or a specialist nursery.
Distilled water
Cooking pot
Spoon
Oven-safe glass or polypropylene containers with lids
Sealable bags
Clean, sterilized cutting board
Rubber gloves
Paper towels
Tweezers or forceps
70 percent ethanol
Bleach
Scalpel or sharp knife
Planting pot
Orchid compost
Length of wire metal
Plastic spray bottle.
deep petri dishes or sterile jars.
2. Prepare agar medium
The agar medium is a special orchid gelling mixture that distilled water will be added to distilled water.
To prepare the medium, mix equal parts of orchid gelling medium with distilled water in a cooking pot.
Place the pot on a stove and bring the mixture to boil for while stirring continuously for two minutes.
Pour the mixture into the petri dishes glass or propylene containers while ensuring not to fill the containers above 20 percent of their volume.
Loosely replace the lids to the containers. Sterilize the containers by heating them up in a microwave oven for between 2 to 3 minutes.
Spray 70 percent ethanol into a sealable bag to create a sterile environment. Transfer the heated containers into the sealable bag.
Allow the containers to cool a bit before tightening their lids and then sealing the bag. Leave the containers to stand for a few days until the mixture solidifies.
3. Prepare seed capsule and work surface
Place an open pot of water on a stove and bring to boil. Place the cutting board in the oven and sterilize.
Put on rubber gloves and sterilize the forceps, and scalpel with 70 percent ethanol.
Insert the seed capsule into a bowel filled with bleach for about fifteen minutes.
Sterilize seed capsule again with 70 percent ethanol and place on grill.
Using the sterilized scalpel, cut open the seed capsule to reveal the seeds. Using a scalpel or sharp knife, scrape out the seeds from the capsule unto an ethanol soaked paper towel.
4. Flasking of the seed
Take out the petri dishes or glass jars containers holding the agar medium. Over the steam, open up the containers and transfer seeds from the ethanol soaked paper towel into the individual containers using the sterilized forceps.
The amount of seeds will determine the number of containers required. Replace the lid of the containers and place them on a window sill that receives indirect sunlight.
5. Wait and exercise patience
All that can be done at this point is to wait until the seeds germinate. The amount of time that this might take varies and is dependent on the particular species.
Generally, the time can range from a few months to a few years. During this period of waiting, ensure the containers are free from contamination to ensure that germination is not disrupted.
6. Emergence of protocorms
Protocorms are tuber-shaped bodies with rhizoids that are produced by the young seedlings of various orchids. Protocorms represent the embryonic form of the orchid plant.
Their emergence after the period of waiting at an affirmation that everything in the propagation process is on track.
7. Transflask orchid seedlings is done after they have developed roots
Upon the emergence of the protocorms, consistently observe the growth of the seedlings. At the point when the seedlings appear to overcrowd the flask, transflasking should be carried out, typically within 30 and 60 days.
* This is done by removing individual seedlings using sterilized tweezers from the original containers and placing them in new containers also filled, in a proportion similar to the original, with agar medium. 6 to 8 in a standard petri dish or 1or 2 to a test tube
8. Transplant seedlings into planting pots
On the presumption that there are no disruptions to the plant growth, the seedlings will eventually outgrow the containers.
At this point, it is to be transplanted into planting pots. A good rule of thumb to determine when it is ready to be transplanted is when the seedlings have developed roots that have grown up to the length of one-quarter of an inch.
To transplant, prepare a planting pot or other container for receiving the seedling by majorly filling it up with coarse fir bark and possibly some slightly moist orchid compost mixture containing perlite, fine charcoal, redwood bark shavings, etc.
To extract the seedlings, submerge the containers in warm water to help loosen the agar gel.
Once the agar medium is softened, twist a piece of metal to form a loop and in turn, use it to carefully pull out the seedlings from the container. It is best done if the agar and seedling can be removed together.
The seedlings can be further rinsed in lukewarm water to remove any excess agar mixture still stuck to them.
Following this, the seedlings can now be planted into the prepared pot with at least 50mm of space between each individual seedling.
9. Positioning the orchid
The seedling once fully transplanted should be placed in a location that is warm with good indirect sun light.
Slowly position the pots into an area that closely assimilates the conditions it will be growing under.
The choice as to whether the plant should be exposed to full sun or in direct sunlight will be dependent on the particular orchid specie.
10. Subsequent care of the plant
After the first week, the seedling can be misted several times a day and watered just once a week.
A guide in watering the plant will be using the dryness of the fir back that is, water the plant until the fir back is completely moistened and wait till it has completely dried out before watering again.
Fertilize using seaweed, fish emulsion or organic chicken pellets soaked in water on an alternate basis. Only fertilize once the plants have established themselves then as the first leaves appear to maintain better colour, health, vitality and flowering
Further Comments from Readers:
“Hi reader, it seems you use The Bible of Botany a lot. That’s great as we have great pleasure in bringing it to you! It’s a little awkward for us to ask, but our first aim is to purchase land approximately 1,600 hectares to link several parcels of N.P. into one at The Pinnacles NSW Australia, but we need your help. We’re not salespeople. We’re amateur botanists who have dedicated over 30 years to saving the environment in a practical way. We depend on donations to reach our goal. If you donate just $5, the price of your coffee this Sunday, We can help to keep the planet alive in a real way and continue to bring you regular updates and features on Australian plants all in one Botanical Bible. Any support is greatly appreciated. Thank you.”
In the spirit of reconciliation we acknowledge the Bundjalung, Gumbaynggirr and Yaegl and all aboriginal nations throughout Australia and their connections to land, sea and community. We pay our respect to their Elders past, present and future for the pleasures we have gained.
Prasophyllum flavum
Classification::
Unranked: Monocots
Order: Asparagales
Family: Orcidaceae
Subfamily: Orcidoideae
Tribe: Diurideae
Subtribe: Prasophylliinae
Genus: From Prason, which is Ancient Greek for a leek and Phullon/Phýllon, which is Ancient Greek for a leaf. It refers to leaves, which are deep green and resemble the leaves of the culinary leek, Allium ursinum.
Species: From Flavum, which is Latin for yellow. It refers to flowers, which turn from white to creamy yellow or yellow on ageing.
Common Name:
Distribution:
Prasophyllum flavum is found south from Stanthorpe in far south east Queensland to near Portland in south western Victoria. It is found on and east of the Great Dividing Range to the coast including the Grampians with a disjunct population on Mount Wilson on the Cobar Peneplains.
It is also found on the southern section of Flinders Island and the eastern half of Tasmania.
https://avh.ala.org.au/occurrences/search?taxa=Prasophyllum+flavum#tab_mapView
Habitat Aspect Climate:
Prasophyllum flavum prefers medium shade to dappled shade. It usually grows on fertile well-drained soils in dry sclerophyll forest or wet sclerophyll forests. Its altitude ranges from 5 meters ASL to 1000 meters ASL.
The temperatures range from minus 4 degrees in August to 40 degrees in January.
The rainfall ranges from lows of 500mm to 2000mm average per annum. The lower rainfall areas are associated with orographic precipitation.
Soil Requirements:
Prasophyllum flavum is a terrestrial orchid on coarse sands, fine sands and sandy loams to light gritty fatty clays. The soils are usually derived from fertile decomposed granites or seldom on fertile sandstones. The soils pH ranges from 5.5pH to 6.5pH. It does not tolerate waterlogged soils however soil moisture is essential for survival throughout the year. Non saline soils to slightly saline soils are tolerated.
Height & Spread:
Wild Plants: 0.5m to 0.6m by 0.1m to 0.2m.
Characteristics:
Prasophyllum flavum grows as a slender erect terrestrial orchid with fleshy tubers. The new season’s tubers are produced close to the present season’s tuber.
The single linear leaf measures 350mm to 600mm in length by 1.5mm to 3.5mm in width. The bases are clasping but not sheathing while the apexes are tapering acute. The concolourous, coriaceous leaf is yellowish-green to purplish-green.
The inflorescences are long, slender, mid green, scabrous scapes that measure 400mm to 600mm in length including the spike. The spikes have 20 to 50 moderately crowded individual flowers and measure 100mm to 250mm in length. The bract is clasping at the base and measures 15mm to 20mm in length. It is yellowish-green or yellowish-green with a purplish tinge while the apex is tapering acute. It does not surround the roundish to angulated ovary.
The glabrous, ovate to lanceolate, pendulant dorsal sepal has an acute apex and 3 longitudinal ridges with the center ridge being obtuse-acute and the most prominent. The margins are entire and recurve upwards near the edges to form a strong broad upper concave surface and longitudinally form a continuous crescent. It is rostrate to almost cupuliform at the apex. The dorsal sepal is yellowish-green to lime-green at times tinged purple with 3 faint purplish, complete or incomplete longitudinal stripes. It measures 9mm to 11mm in length by 5mm to 6mm in width.
The glabrous, ovate to lanceolate, pendulant lateral sepals have has an acute apex and 3 longitudinal ridges with the center ridge being double keeled with a flat furrow and is the most prominent. The margins are entire and recurve upwards near the edges to form a strong broad concave lower surface and longitudinally form a continuous crescent. It is rostrate to almost cupuliform at the apex. The lateral sepals are united for most their length often splitting near the apexes and are yellowish-green to lime-green at times tinged purple with no stripes or 3 faint purplish, complete or incomplete longitudinal stripes. It measures 8mm to 10mm in length by 5mm to 6mm in width.
The glabrous lateral petal are usually broad linear, lanceolate to narrow ovate and has an acute apex. The petals are yellowish-green to lime-green at times tinged purple with a single broad maroon, complete or incomplete longitudinal stripe. The lateral petals moderately form a longitudinally and continuous crescent and are thicker than the sepals. They measure 6mm to 8mm in length by 1.5mm to 3mm in width.
The labellum is broad ovate to broad lanceolate when flattened and recurves upwards on the apical half. The yellowish-green to lime-green labellum has white margins that are crisped and often undulating pleated or wrinkled. The labellum measures 7mm to 8mm in length by 3mm to 3.5mm in width. The callus is broadly triangular, greenish-yellow with a deep obtuse longitudinal furrow with irregular margins. It extends from 70mm to 75mm of the length of the lamina. The column wings are lanceolate to obtuse with a large, irregular lobe and or irregular basal teeth. The rostellum is longer than the wings. The moderately to strongly scented flowers appear from October to January.
The fruits are obloidal capsules. The yellowish-green capsules turn deep grey-brown when ripe.
Wildlife:
Prasophyllum flavum’s wildlife is unknown to the author.
Cultivation:
Prasophyllum flavum is a beautiful terrestrial orchid to grow in the garden but it needs a cool, moist, light shady position to survive and thrive. The best place is in a green house or bush house where the environment can be controlled better.
In a littoral rainforest or rainforest setting free of frost or sub zero temperatures and a humid microclimate will see the plants thrive.
For cultivation notes see article on Terrestrial Orchid Cultivation for Acianthus specie, Caladenia specie, Caleanaspecie, Diuris, Pterostylis specie and Thelymitra specie. These orchids may prove more difficult than the above mentioned plants but the methods applied should be similar.
The removal of orchids from their natural environment is illegal. If you are fortunate enough to have a colony growing wild on your block peg the area out so you know where it is. Cover the area in fine loose mulch on an annual basis when the plants are dormant. Water well as the first leaves appear with our recommended fertilizing program at a full strength.
Propagation:
Seeds: Prasophyllum flavum’s seeds are very difficult to acquire and the seed requires treatment before sowing. Really Orchid seeds are meant for professionals with time, equipment and space. However if you wish to persevere then here are the basics and you are learning from an amateur. Once the orchids are large enough to handle treat them similarly to other ground orchids.
All orchids that are declared rare, vulnerable or endangered are protected by Federal and State Laws and must not be removed from the wild unless you are a land developer, mining company or main Roads department etc. This includes bulbs, roots, leaves and flowers. No part of any plant can be removed from Federal, State or Local Government land without the prior permission of the authority and this includes the spore.
1. Obtain relevant materials
The first step in growing orchid from seed will be sourcing and having at the ready all materials that will be required in the propagation process.
This includes all of the following:
Unripe orchid seed capsule. If there are 2 capsules secure the second capsule immediately after the first capsule splits or if only one capsule as soon as it changes colour.
Orchid gelling medium with agar which can be purchased from an orchid society or a specialist nursery.
Distilled water
Cooking pot
Spoon
Oven-safe glass or polypropylene containers with lids
Sealable bags
Clean, sterilized cutting board
Rubber gloves
Paper towels
Tweezers or forceps
70 percent ethanol
Bleach
Scalpel or sharp knife
Planting pot
Orchid compost
Length of wire metal
Plastic spray bottle.
deep petri dishes or sterile jars.
2. Prepare agar medium
The agar medium is a special orchid gelling mixture that distilled water will be added to distilled water.
To prepare the medium, mix equal parts of orchid gelling medium with distilled water in a cooking pot.
Place the pot on a stove and bring the mixture to boil for while stirring continuously for two minutes.
Pour the mixture into the petri dishes glass or propylene containers while ensuring not to fill the containers above 20 percent of their volume.
Loosely replace the lids to the containers. Sterilize the containers by heating them up in a microwave oven for between 2 to 3 minutes.
Spray 70 percent ethanol into a sealable bag to create a sterile environment. Transfer the heated containers into the sealable bag.
Allow the containers to cool a bit before tightening their lids and then sealing the bag. Leave the containers to stand for a few days until the mixture solidifies.
3. Prepare seed capsule and work surface
Place an open pot of water on a stove and bring to boil. Place the cutting board in the oven and sterilize.
Put on rubber gloves and sterilize the forceps, and scalpel with 70 percent ethanol.
Insert the seed capsule into a bowel filled with bleach for about fifteen minutes.
Sterilize seed capsule again with 70 percent ethanol and place on grill.
Using the sterilized scalpel, cut open the seed capsule to reveal the seeds. Using a scalpel or sharp knife, scrape out the seeds from the capsule unto an ethanol soaked paper towel.
4. Flasking of the seed
Take out the petri dishes or glass jars containers holding the agar medium. Over the steam, open up the containers and transfer seeds from the ethanol soaked paper towel into the individual containers using the sterilized forceps.
The amount of seeds will determine the number of containers required. Replace the lid of the containers and place them on a window sill that receives indirect sunlight.
5. Wait and exercise patience
All that can be done at this point is to wait until the seeds germinate. The amount of time that this might take varies and is dependent on the particular species.
Generally, the time can range from a few months to a few years. During this period of waiting, ensure the containers are free from contamination to ensure that germination is not disrupted.
6. Emergence of protocorms
Protocorms are tuber-shaped bodies with rhizoids that are produced by the young seedlings of various orchids. Protocorms represent the embryonic form of the orchid plant.
Their emergence after the period of waiting at an affirmation that everything in the propagation process is on track.
7. Trans flask the orchid seedlings is done after they have developed roots
Upon the emergence of the protocorms, consistently observe the growth of the seedlings. At the point when the seedlings appear to overcrowd the flask, transflasking should be carried out, typically within 30 and 60 days.
* This is done by removing individual seedlings using sterilized tweezers from the original containers and placing them in new containers also filled, in a proportion similar to the original, with agar medium. 6 to 8 in a standard petri dish or 1or 2 to a test tube
8. Transplant seedlings into planting pots
On the presumption that there are no disruptions to the plant growth, the seedlings will eventually outgrow the containers.
At this point, it is to be transplanted into planting pots. A good rule of thumb to determine when it is ready to be transplanted is when the seedlings have developed roots that have grown up to the length of one-quarter of an inch.
To transplant, prepare a planting pot or other container for receiving the seedling by majorly filling it up with coarse fir bark and possibly some slightly moist orchid compost mixture containing perlite, fine charcoal, redwood bark shavings, etc.
To extract the seedlings, submerge the containers in warm water to help loosen the agar gel.
Once the agar medium is softened, twist a piece of metal to form a loop and in turn, use it to carefully pull out the seedlings from the container. It is best done if the agar and seedling can be removed together.
The seedlings can be further rinsed in lukewarm water to remove any excess agar mixture still stuck to them.
Following this, the seedlings can now be planted into the prepared pot with at least 50mm of space between each individual seedling.
9. Positioning the orchid
The seedling once fully transplanted should be placed in a location that is warm with good indirect sun light.
Slowly position the pots into an area that closely assimilates the conditions it will be growing under.
The choice as to whether the plant should be exposed to full sun or in direct sunlight will be dependent on the particular orchid specie.
10. Subsequent care of the plant
After the first week, the seedling can be misted several times a day and watered just once a week.
A guide in watering the plant will be using the dryness of the fir back that is, water the plant until the fir back is completely moistened and wait till it has completely dried out before watering again.
Fertilize using seaweed, fish emulsion or organic chicken pellets soaked in water on an alternate basis. Only fertilize once the plants have established themselves then annually in early September to October to maintain better colour, health, vitality and flowering
Further Comments from Readers:
“Hi reader, it seems you use The Bible of Botany a lot. That’s great as we have great pleasure in bringing it to you! It’s a little awkward for us to ask, but our first aim is to purchase land approximately 1,600 hectares to link several parcels of N.P. into one at The Pinnacles NSW Australia, but we need your help. We’re not salespeople. We’re amateur botanists who have dedicated over 30 years to saving the environment in a practical way. We depend on donations to reach our goal. If you donate just $5, the price of your coffee this Sunday, We can help to keep the planet alive in a real way and continue to bring you regular updates and features on Australian plants all in one Botanical Bible. Any support is greatly appreciated. Thank you.”
In the spirit of reconciliation we acknowledge the Bundjalung, Gumbaynggirr and Yaegl and all aboriginal nations throughout Australia and their connections to land, sea and community. We pay our respect to their Elders past, present and future for the pleasures we have gained.
Prasophyllum patens
Classification:
Unranked: Monocots
Order: Asparagales
Family: Orcidaceae
Subfamily: Orcidoideae
Tribe: Diurideae
Subtribe: Prasophylliinae
Genus: From Prason, which is Ancient Greek for a leek and Phullon/Phýllon, which is Ancient Greek for a leaf. It refers to leaves, which are deep green and resemble the leaves of the culinary leek, Allium ursinum.
Species: From Patina, which is Latin for something which is wide open. It refers to structures or organs, which resemble a patina pan (Pizza pan).
Common Name: Broad lipped Leek orchid.
Distribution:
Prasophyllum patens is found south and east of a line from Durundur in southern Queensland to Fryers Ridge Floral Reserve in central Victoria where it moves north west to Wyperfeld National Park, Bordertown then west to Mount Boothby and east again to the Glenelge River. It is found on and east of the Great Dividing Range to the coast. In South Australia it is also found in the Adelaide Hills, Port Augusta, Marion Bay and Streaky Bay.
In the Apple isle it is found on Flinders Island and east of a line from Rocky Cape in the north west corner to Rechercher in the south east corner.
https://avh.ala.org.au/occurrences/search?taxa=Prasophyllum+patens#tab_mapView
Habitat Aspect Climate:
Prasophyllum patens prefers medium shade to dappled shade. It usually grows in open forests and open woodlands or heaths. Its altitude ranges from 15 meters ASL to 900 meters ASL.
The temperatures range from minus 4 degrees in August to 40 degrees in January.
The rainfall ranges from lows of 400mm to 2000mm average per annum. The lower rainfall areas are usually associated with orographic precipitation.
Soil Requirements:
Prasophyllum patens is a terrestrial orchid on coarse sands, fine sands and sandy loams to light gritty fatty clays. The soils are usually derived from fertile decomposed granites or seldom on fertile sandstones. The soils pH ranges from 5pH to 6.5pH. It does not tolerate waterlogged soils however soil moisture is essential for survival throughout the year. Non saline soils to slightly saline soils are tolerated.
Height & Spread:
Wild Plants: 0.1m to 0.3m by 0.1m to 0.3m.
Characteristics:
Prasophyllum patens grows as a slender erect terrestrial orchid with fleshy tubers. The new seasons tubers are produced at a rather close to the present season’s tuber.
The single linear leaf measures 150mm to 300mm in length by 1mm to 2mm in width. The bases are clasping but not sheathing while the apexes are tapering acute. The concolourous, coriaceous leaf is deep green often with a purplish tinge. The laminas are roundish to ovate in cross section.
The inflorescences are disjunct, long, slender scapes that are yellowish–green to grass-green and glabrous. They measure 100mm to 300mm in length including the spike. The spikes have 15 to 50 individual flowers and measure 50mm to 120mm in length. The sheathing bract is yellowish–green to grass-green with an acute apex and partially surrounds the angulated ovary at the base. It measures 2mm to 3mm in length.
The glabrous, ovate to lanceolate dorsal sepal curves gently forward from the base and has an acute apex. The margins are entire and strongly recurve upwards near the edges. The dorsal sepal is usually maroon-green externally and paler internally with 3 purplish longitudinal stripes. It measures 5mm to 7mm in length by 4mm to 5.5mm in width.
The glabrous oblong to ovate, erect to slightly forward leaning lateral sepals are slightly divergent to widely divergent. The apexes are broad acute while the margins are entire, strongly recurved and slightly undulating. The margins are entire and slightly recurve forwards near the edges. The lateral sepals are usually maroon-green externally and paler internally. They measures 5mm to 7mm in length by 4mm to 5mm in width.
The glabrous lateral petal is linear to broad linear with an acute apex. The petals are olive-green with 3 narrow maroon stripes, white margins and white apexes. The margins are entire and slightly undulating. The lateral petals measure 6.5mm to 8mm in length by 1mm to 1.5mm in width.
The labellum is broad ovate when flattened and on live plants it strongly recurves upwards and backwards until the tip reaches the lateral sepals but usually does not protrude further than the lateral sepals. The pale olive-green to yellowish labellum has broad white, crisped to pleated margins. The labellum measures 7mm to 8mm in length by 3mm to 4mm in width. The callus plate is greenish, with a broad, shallow central channel. It extends slightly past the bend in the lamina. The column with column wings is lanceolate to slightly sickle shaped. The rostellum is almost as high as column wings. The lemon scented flowers appear from October to December and are more prolific following fires.
The fruits are obloidal capsules. The green capsules turn deep grey-brown when ripe.
Wildlife:
Prasophyllum patens’s wildlife is unknown to the author.
Cultivation:
Prasophyllum patens is a beautiful terrestrial orchid to grow in the garden but it needs a cool, moist, light shady position to survive and thrive. The best place is in a greenhouse or bush house where the environment can be controlled better.
In a littoral rainforest or rainforest setting free of frost or sub zero temperatures and a humid microclimate will see the plants thrive.
For cultivation notes see article on Terrestrial Orchid Cultivation for Acianthus, Caladenia, Caleana, Diuris, Pterostylis and Thelymitra specie. These orchids may prove more difficult than the above mentioned plants but the methods are similar.
The removal of orchids from their natural environment is illegal. If you are fortunate enough to have a colony growing wild on your block peg the area out so you know where it is. Cover the area in fine loose mulch on an annual basis when the plants are dormant. Water well as the first leaves appear with our recommended fertilizing program at a full strength.
Propagation:
Seeds:
Prasophyllum patens’s seeds are very difficult to acquire and the seed requires treatment before sowing. Really Orchid seeds are meant for professionals with time, equipment and space. However if you wish to persevere then here are the basics and you are learning from an amateur. Once the orchids are large enough to handle treat them similarly to other ground orchids.
All orchids that are declared rare, vulnerable or endangered are protected by Federal and State Laws and must not be removed from the wild unless you are a land developer, mining company or main Roads department etc. This includes bulbs, roots, leaves and flowers. No part of any plant can be removed from Federal, State or Local Government land without the prior permission of the authority and this includes the spore.
1. Obtain relevant materials
The first step in growing orchid from seed will be sourcing and having at the ready all materials that will be required in the propagation process.
This includes all of the following:
Unripe orchid seed capsule. If there are 2 capsules secure the second capsule immediately after the first capsule splits or if only one capsule as soon as it changes colour.
Orchid gelling medium with agar which can be purchased from an orchid society or a specialist nursery.
Distilled water
Cooking pot
Spoon
Oven-safe glass or polypropylene containers with lids
Sealable bags
Clean, sterilized cutting board
Rubber gloves
Paper towels
Tweezers or forceps
70 percent ethanol
Bleach
Scalpel or sharp knife
Planting pot
Orchid compost
Length of wire metal
Plastic spray bottle.
deep petri dishes or sterile jars.
2. Prepare agar medium
The agar medium is a special orchid gelling mixture that distilled water will be added to distilled water.
To prepare the medium, mix equal parts of orchid gelling medium with distilled water in a cooking pot.
Place the pot on a stove and bring the mixture to boil for while stirring continuously for two minutes.
Pour the mixture into the petri dishes glass or propylene containers while ensuring not to fill the containers above 20 percent of their volume.
Loosely replace the lids to the containers. Sterilize the containers by heating them up in a microwave oven for between 2 to 3 minutes.
Spray 70 percent ethanol into a sealable bag to create a sterile environment. Transfer the heated containers into the sealable bag.
Allow the containers to cool a bit before tightening their lids and then sealing the bag. Leave the containers to stand for a few days until the mixture solidifies.
3. Prepare seed capsule and work surface
Place an open pot of water on a stove and bring to boil. Place the cutting board in the oven and sterilize.
Put on rubber gloves and sterilize the forceps, and scalpel with 70 percent ethanol.
Insert the seed capsule into a bowel filled with bleach for about fifteen minutes.
Sterilize seed capsule again with 70 percent ethanol and place on grill.
Using the sterilized scalpel, cut open the seed capsule to reveal the seeds. Using a scalpel or sharp knife, scrape out the seeds from the capsule unto an ethanol soaked paper towel.
4. Flasking of the seed
Take out the petri dishes or glass jars containers holding the agar medium. Over the steam, open up the containers and transfer seeds from the ethanol soaked paper towel into the individual containers using the sterilized forceps.
The amount of seeds will determine the number of containers required. Replace the lid of the containers and place them on a window sill that receives indirect sunlight.
5. Wait and exercise patience
All that can be done at this point is to wait until the seeds germinate. The amount of time that this might take varies and is dependent on the particular species.
Generally, the time can range from a few months to a few years. During this period of waiting, ensure the containers are free from contamination to ensure that germination is not disrupted.
6. Emergence of protocorms
Protocorms are tuber-shaped bodies with rhizoids that are produced by the young seedlings of various orchids. Protocorms represent the embryonic form of the orchid plant.
Their emergence after the period of waiting at an affirmation that everything in the propagation process is on track.
7. Transflask orchid seedlings is done after they have developed roots
Upon the emergence of the protocorms, consistently observe the growth of the seedlings. At the point when the seedlings appear to overcrowd the flask, transflasking should be carried out, typically within 30 and 60 days.
* This is done by removing individual seedlings using sterilized tweezers from the original containers and placing them in new containers also filled, in a proportion similar to the original, with agar medium. 6 to 8 in a standard petri dish or 1or 2 to a test tube
8. Transplant seedlings into planting pots
On the presumption that there are no disruptions to the plant growth, the seedlings will eventually outgrow the containers.
At this point, it is to be transplanted into planting pots. A good rule of thumb to determine when it is ready to be transplanted is when the seedlings have developed roots that have grown up to the length of one-quarter of an inch.
To transplant, prepare a planting pot or other container for receiving the seedling by majorly filling it up with coarse fir bark and possibly some slightly moist orchid compost mixture containing perlite, fine charcoal, redwood bark shavings, etc.
To extract the seedlings, submerge the containers in warm water to help loosen the agar gel.
Once the agar medium is softened, twist a piece of metal to form a loop and in turn, use it to carefully pull out the seedlings from the container. It is best done if the agar and seedling can be removed together.
The seedlings can be further rinsed in lukewarm water to remove any excess agar mixture still stuck to them.
Following this, the seedlings can now be planted into the prepared pot with at least 50mm of space between each individual seedling.
9. Positioning the orchid
The seedling once fully transplanted should be placed in a location that is warm with good indirect sun light.
Slowly position the pots into an area that closely assimilates the conditions it will be growing under.
The choice as to whether the plant should be exposed to full sun or in direct sunlight will be dependent on the particular orchid specie.
10. Subsequent care of the plant
After the first week, the seedling can be misted several times a day and watered just once a week.
A guide in watering the plant will be using the dryness of the fir back that is, water the plant until the fir back is completely moistened and wait till it has completely dried out before watering again.
Fertilize using seaweed, fish emulsion or organic chicken pellets soaked in water on an alternate basis. Only fertilize once the plants have established themselves then as the first leaves appear each year to maintain better colour, health, vitality and flowering
Further Comments from Readers:
“Hi reader, it seems you use The Bible of Botany a lot. That’s great as we have great pleasure in bringing it to you! It’s a little awkward for us to ask, but our first aim is to purchase land approximately 1,600 hectares to link several parcels of N.P. into one at The Pinnacles NSW Australia, but we need your help. We’re not salespeople. We’re amateur botanists who have dedicated over 30 years to saving the environment in a practical way. We depend on donations to reach our goal. If you donate just $5, the price of your coffee this Sunday, We can help to keep the planet alive in a real way and continue to bring you regular updates and features on Australian plants all in one Botanical Bible. Any support is greatly appreciated. Thank you.”
In the spirit of reconciliation we acknowledge the Bundjalung, Gumbaynggirr and Yaegl and all aboriginal nations throughout Australia and their connections to land, sea and community. We pay our respect to their Elders past, present and future for the pleasures we have gained.
Premna lignum-vitae
Classification:
Unranked: Eudicots
Unranked: Asterids
Order: Lamiales
Family: Lamiaceae
Genus: From Premna, which is Latin for a bole, trunk or stump of a tree. It refers to the short stumpy bole of one species.
Species: From Ligneus, which is Latin for wood and Vitae, which is Latin for life. It refers to plants, which a very hard timber.
Common Name: Satinwood or Yellow Hollywood.
Distribution:
Premna lignum-vitae is found in 4 small disjunct populations east of the Great Dividing Range south from the Daintree River National Park to Mossman in far north Queensland and south from the Calliope River in south east Queensland to the Richmond River in far northern coastal New South Wales.
https://avh.ala.org.au/occurrences/search?taxa=Premna+lignum-vitae#tab_mapView
Habitat Aspect Climate:
Premna lignum-vitae prefers dappled shade to full shade. It grows in the mountains in warm well developed rainforests or moist Eucalyptus forests. The altitude ranges from 100 meters ASL to 950 meters ASL.
The temperatures range from 3 degrees in July to 36 degrees in January.
The rainfall ranges from lows of 1000mm to 3000mm average per annum.
Soil Requirements:
Premna lignum-vitae prefers to grow on light sandy clays to medium clays often with copious quantities of leaf litter. The soils are usually derived from decomposed brown basalt, black basalts, sandstones, shale or metamorphic rocks. The soils pH ranges from 5.5pH to 7pH. It does not tolerate waterlogged soils. Non saline soils to moderately saline soils are tolerated.
Height & Spread:
Wild Plants: 12m to 30m by 8m to 12m.
Characteristics:
Premna lignum-vitae grows as a wide spreading densely foliaged small tree. The trunk is tall, straight, with variable patchy pale fawn-brown to brown, scabrous. The stems are thin deep brown and becoming green-brown only near the apex with newer leaf growth. These stems are covered in lighter coloured lenticels. The new growth is deep sea-green and sparsely covered in pale rusty brown sericeous hairs.
The opposite leaves of Premna lignum-vitae are clustered near the ends of the branchlets and are oblong, obovate or elliptical. They measure 50mm to 100mm in length by 20mm to 45mm in width. The petioles have an articulate swelling at both the base and apex and measures 5mm to 20mm in length. The bases are cuneate while the apexes are acuminate. The discolourous laminas are green, semi glossy and glabrous on the upper lamina while the lower lamina is paler, glabrous with pale yellow surface glands and domatia which are covered in white hirsute hairs. The leaves turn black on drying and before being discarded. The leaf margins are entire, flat and curve slightly downwards from the mid vein. Leaves on suckers and are more often weakly lobed along the margins. The mid vein is prominent on the lower lamina while the main lateral veins are slightly prominent on the lower lamina.
Inflorescences of Premna lignum-vitae are born in small cymes from the leaf axils. The rachis measures 5mm to 15mm in length while the pedicels measure 3mm to 10mm in length. The 4 pale olive-green calyxes lobes are densely covered rusty pulverulent hairs externally. The calyxes measure 3mm to 4mm in length by 6.5mm to 10mm in diameter. The corollas are deep pink and covered in yellowish glands externally and are white to pale pink internally. They measure 9mm to 15mm in length. The 4 variable lobes measure 3.5mm to 4.5mm in length by 3.5mm to 4.5mm in width. The divaricate lobes apexes are obtuse to acute.
The 3 exserted white stamens are free for their entire length. It is covered in white villose hairs near the base. The filaments measure 7mm to 11mm in length while the anthers measure 0.3mm in diameter.
The white style is glabrous and measures 9mm to 15mm in length while the bi-stigma measures 0.4mm to 0.6mm in diameter. The glabrous ovaries measure 1mm to 2mm in diameter. Premna lignum-vitae’s flowers appear from late March to early May.
The fruits of Premna lignum-vitae are globose to ovoidal berries. The glabrous berries measure 5mm to 18mm in length by 5mm to 20mm in diameter. The green capsules turn deep red to carmine while the flesh turns pale red to deep red-burgundy when ripe.
Wildlife:
Premna lignum-vitae’s fruits are eaten by the Green catbird Ailuroedus crassirostris, Emerald dove Chalcophaps indica, and Rose Crown Dove Ptilinopus regina. It is probably eaten by other medium size fruit eating birds as well.
Cultivation:
Premna lignum-vitae is a magnificent medium tree that could be more widely grown in tropical, subtropical and monsoonal gardens. It is ideal at the edge of a rainforest or as the pioneer trees for a rainforest garden. It also makes a great park tree offering quick growth, and good shade. In cultivation it will grow from 12 meters to 18 meters in height by 8 meters to 12 meters in diameter when grown in the open.
It grows exceptionally well on lighter soils where deep leaf litter keeps the soil cool and moisture at an even level. If these requirements are met it can cope with temperatures as low as minus 4 degrees and up to 42 degrees. It is moderately drought resistant.
Add to the above, if it is given an adequate supply of water and a little native fertilizer on a regular basis the plants will respond with good flowering and possibly better fruit set over a long period.
It often reaches its full potential in just 12 to 15 years and flower from the eighth to tenth year from seed.
Premna lignum-vitae can be used in bonsai work where it is very responsive.
Propagation:
Seeds: Seeds of Premna lignum-vitae can be removed easily from the fruits that have fallen to the ground. Finding viable seed may be a problem.
Sow fresh seeds directly into a seed raising mix, keeping them moist not wet. When the seedlings are 20mm to 25 mm tall, prick them out and plant them into 50mm native tubes using a good organic mix.
As the seedlings roots reach the bottom of the tubes plant them out into their permanent position. Do not delay.
Fertilize using seaweed, fish emulsion or organic chicken pellets soaked in water on an alternate basis. Only fertilize once the plants have established themselves then annually in early September to October to maintain better colour, health, vitality and flowering
Further Comments from Readers:
“Hi reader, it seems you use The Bible of Botany a lot. That’s great as we have great pleasure in bringing it to you! It’s a little awkward for us to ask, but our first aim is to purchase land approximately 1,600 hectares to link several parcels of N.P. into one at The Pinnacles NSW Australia, but we need your help. We’re not salespeople. We’re amateur botanists who have dedicated over 30 years to saving the environment in a practical way. We depend on donations to reach our goal. If you donate just $5, the price of your coffee this Sunday, We can help to keep the planet alive in a real way and continue to bring you regular updates and features on Australian plants all in one Botanical Bible. Any support is greatly appreciated. Thank you.”
In the spirit of reconciliation we acknowledge the Bundjalung, Gumbaynggirr and Yaegl and all aboriginal nations throughout Australia and their connections to land, sea and community. We pay our respect to their Elders past, present and future for the pleasures we have gained.
Proiphys amboinensis
Classification:
Unranked: Monocots
Order: Asparagales
Family: Amaryllidaceae
Subfamily: Amaryllidoideae
Genus: From Proi, which is Latin for early and Phyo, which is Latin for to bring forth. It refers to the premature germination of the seeds.
Species: From Ambon which is Latinized for an Island in Indonesia and Anum/Ensis, which is Latin for to originate from or to come from. It refers to where the original plants were first discovered from Ambon Island.
Common Name:
Distribution:
Proiphys amboinensis is found south from the Torres Strait Islands to tip of Cape York Peninsular and through to New Guinea.
In the south it is found south from Cooktown to MacKay in central coastal Queensland.
It is also found in Thailand, the Indonesia islands of Maluku, Sulawesi, Bali and Lombok, the Philippines, the Bismark Archipelago, Timor, Vanuatu, New Guinea and Papua.
https://avh.ala.org.au/occurrences/search?taxa=Proiphys+amboinensis#tab_mapView
Habitat Aspect Climate:
Proiphys amboinensis prefers dappled light to full shade. It grows in openings, adjacent to warm well developed rainforests, littoral rainforests, moist gallery forests, monsoonal forests or moist areas within dry rainforests. The altitude ranges from 10 meters ASL to 950 meters ASL.
The temperatures range from 6 degrees in July to 36 degrees in January.
The rainfall ranges from lows of 800mm to 3000mm average per annum.
Soil Requirements:
Proiphys amboinensis prefers to grow on light sandy clays to medium clays often with copious quantities of leaf litter. The soils are usually derived from decomposed brown basalt, black basalts, sandstones, shale, granites or metamorphic rocks. The soils pH ranges from 5.5pH to 7pH. It does not tolerate waterlogged soils however plants in riparian zones are often inundated for short periods. Non saline soils to moderately saline soils are tolerated.
Height & Spread:
Wild Plants: 0.5m to 0.7m by 0.5m to 1m including the flower spike.
Characteristics:
Proiphys amboinensis grows as an annual herb with an 80mm diameter bulb. All parts of the plant rise from the subterranean bulb.
The 2 to 4 leaves of Proiphys amboinensis are orbicular to ovate or ovate-reniform and are produced after the flowering has commenced. They measure 200mm to 300mm in length by 150mm to 350mm in width. The petioles have a groove along one side and measure 150mm to 600mm in length. The bases are rounded cordate while the apexes are broadly obtuse with a small mucronate tip. The concolourous laminas are deep sea-green, glabrous and semi-glossy. The leaf margins are entire and are slightly to strongly undulating and curve strongly from the middle almost forming a funnel near the base. The main reticulated veins are prominent on the lower lamina distinctly visible on the upper lamina.
Inflorescences of Proiphys amboinensis are born on a single scape from the center of the bulb. The peduncles measure 60mm to 100mm in length while the pedicels measure 27mm to 33mm in length and have 4 longitudinal furrows. There are 5 to 25 individual flowers on an umbel. The 2 or 3 oblong involucral green bracts measure 40mm to 60mm in length by 10mm to 20mm in width near the base. The bases are clasping while the apexes are tapering obtuse to acute. The bracts wither before the flowers fully develop.
The glossy green calyxes measure 4mm to 5mm in length while the 6 lobes are minute. The perianths are pale green near the base, turning pale yellow to creamy yellow and finally pristine white as they approach the lobes. The perianths measure 30mm to 35mm in length by 4.5mm to 5.5mm in diameter. The lobes measure 33mm to 38mm in length by 12mm to 15mm in width. The elliptical lobes are not divaricate, are flat and are slightly recurved or decurve near the apex.
The 6 exserted white stamen’s filaments and the inserted staminodes filaments are united at the base and form a staminal tube within the perianth. The tube measures 28mm to 33mm in length while the free section measures 28mm to 31mm in length. The oblong, yellow anthers measure 6mm to 7mm in length by 1.8 to 2.2mm in width.
The white style is glabrous and measures 55mm to 65mm in length. Proiphys amboinensis’s flowers usually appear from early October through to early November when they flower.
The fruits are globose to ovoidal capsule. The capsules are glabrous and vary in diameter and length even on the same plant. They vary from 15mm to 30mm in length by 15mm to 30mm in diameter. The green capsules turn yellow-green when ripe. The seeds are onion like leaf layers or premature bulbils.
Wildlife:
Proiphys amboinensis’s do not appear to have any predators.
Cultivation:
Proiphys amboinensis is a magnificent small herb that should be more widely grown in tropical and monsoonal gardens. It would be worth while trying in sub-tropical areas close to the coast where humid air currents are common and frosts do not exist. It is ideal at the edge of a rainforest or set in a rainforests or shaded areas around a swimming pool. It would also make a great bush house plant in medium size pots. In cultivation it will grow from 0.6meters to 0.8 meters in height by 0.5 meters to 0.8 meters in diameter while the flowers will reach as high as 1.2 meters under favourable conditions.
It grows exceptionally well on medium clays with a gritty texture where deep leaf litter keeps the soil cool and moisture at an even level. If these requirements are met they can cope with temperatures as low as 2 degrees and up to 38 degrees. It is moderately drought resistant.
Add to the above, if it is given an adequate supply of water and a little native fertilizer on a regular basis the plants may respond with good flowering and possibly good fruit set. The plant is very erratic in flowering and must be grown for the leaves. Any flowering is a sheer bonus but when it flowers it is magnificent whether in the garden or bush house.
Proiphys amboinensis would make outstanding contribution to a moist heath gardens especially where it is mass planted. Here it can be used adjacent to the smaller growing plants scattered throughout the heath scene in small groups. When you design a flat heath garden which this Proiphys amboinensis is well suited don’t use contours to display the plants as heath lands are almost always flat or have a slight rise. Plants must be planted close together and be short so you can see over the tallest ones with the exception of one or two plants at the most. These will be feature plants. The idea is to achieve a feeling of expansive flatness. This can be achieved with using the Proiphys amboinensis’s large ovate deep green leaves and having them contrasting with finer pale green or soft grey to glaucous coloured foliage. Make sure it is kept in small areas devoid of plants that will over grow it and that they will have plenty of shade. Use a lot of procumbent plants like Hibbertia linearis or Hibbertia obtusifolia which would look stunning in flower together. Mix it with ferns like Maidenhair ferns of Adiantum aethiopicum, Adiantum hispidulum, pteris ferns like Pteris pacifica, Pteris Pteris ensiformis, Pteris tremula or Pteris umbrosa or for something a little larger Adiantum formosum or Calochlaena dubia.
It is ideal in settings near ponds in courtyards or the rockery. It needs light shade to heavy shade to grow at their best. Place it near old stumps and roots or medium size rocks to make the stumps, rocks or roots look larger and more gnarled. The deep greys and blacks against the large ovate leaves and stems will contrast both the finesse of the plants and the coarseness of the stumps, rocks or roots. Select an area of ground and let your hair down and be imaginative. Sparingly use other plants when planting and remember that this plants foliage and form is the center of attraction. Planted in mass using a gentle slope or a basin with a medium to large pool at the bottom would also give a strong contrast for most of the year. A billabong affect is the go, not a waterfall or cascades. When using this plant as a feature only grow small plants that do not reach more than 300mm in height and have a compact habit with either blue or grey leaves, but be careful that these plants do not steal the stage. Annuals and perennials would really compliment the scene especially during the winter when the leaves are not present.
Propagation:
Seeds: Seeds of Proiphys amboinensis can be removed easily from the fruits that have fallen to the ground.
Sow freshly treated seeds directly into a seed raising mix, keeping them moist not wet. When the seedlings are 20mm to 25mm tall, prick them out and plant them into 50mm native tubes using a good organic mix.
As the seedlings roots reach the bottom of the tubes plant them out into their permanent position. Do not delay.
It can also be grown from bulb division at the start of the dry season.
Fertilize using seaweed, fish emulsion or organic chicken pellets soaked in water on an alternate basis. Fertilize bi monthly until the plants have established themselves then annually in early September to October to maintain better colour, health, vitality and flowering
Further Comments from Readers:
“Hi reader, it seems you use The Bible of Botany a lot. That’s great as we have great pleasure in bringing it to you! It’s a little awkward for us to ask, but our first aim is to purchase land approximately 1,600 hectares to link several parcels of N.P. into one at The Pinnacles NSW Australia, but we need your help. We’re not salespeople. We’re amateur botanists who have dedicated over 30 years to saving the environment in a practical way. We depend on donations to reach our goal. If you donate just $5, the price of your coffee this Sunday, We can help to keep the planet alive in a real way and continue to bring you regular updates and features on Australian plants all in one Botanical Bible. Any support is greatly appreciated. Thank you.”
In the spirit of reconciliation we acknowledge the Bundjalung, Gumbaynggirr and Yaegl and all aboriginal nations throughout Australia and their connections to land, sea and community. We pay our respect to their Elders past, present and future for the pleasures we have gained.
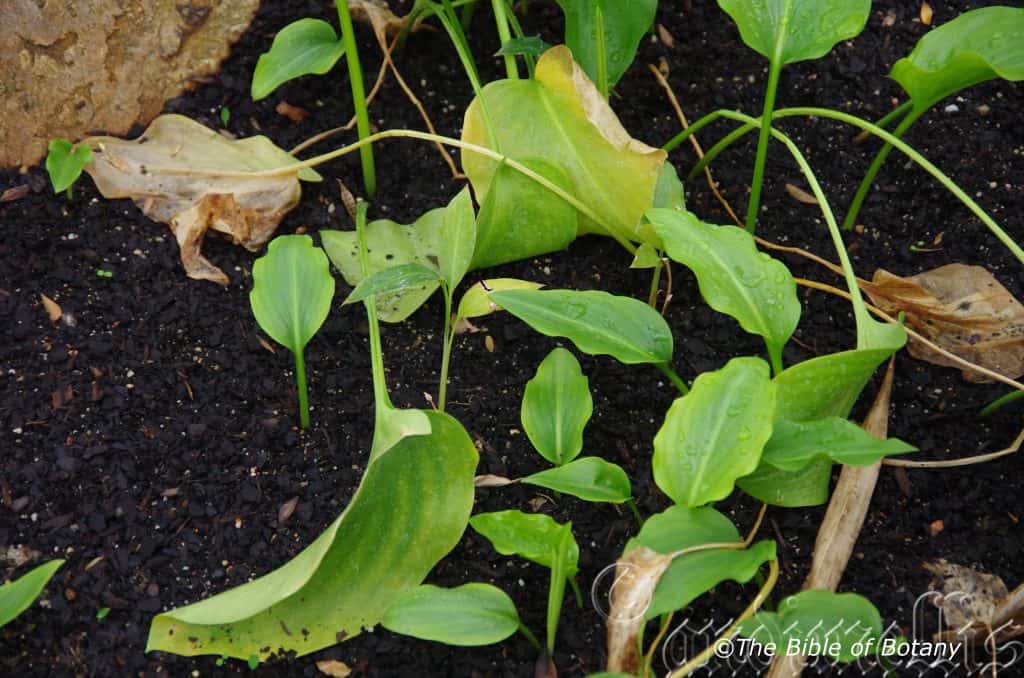
National Botanic Gardens ACT
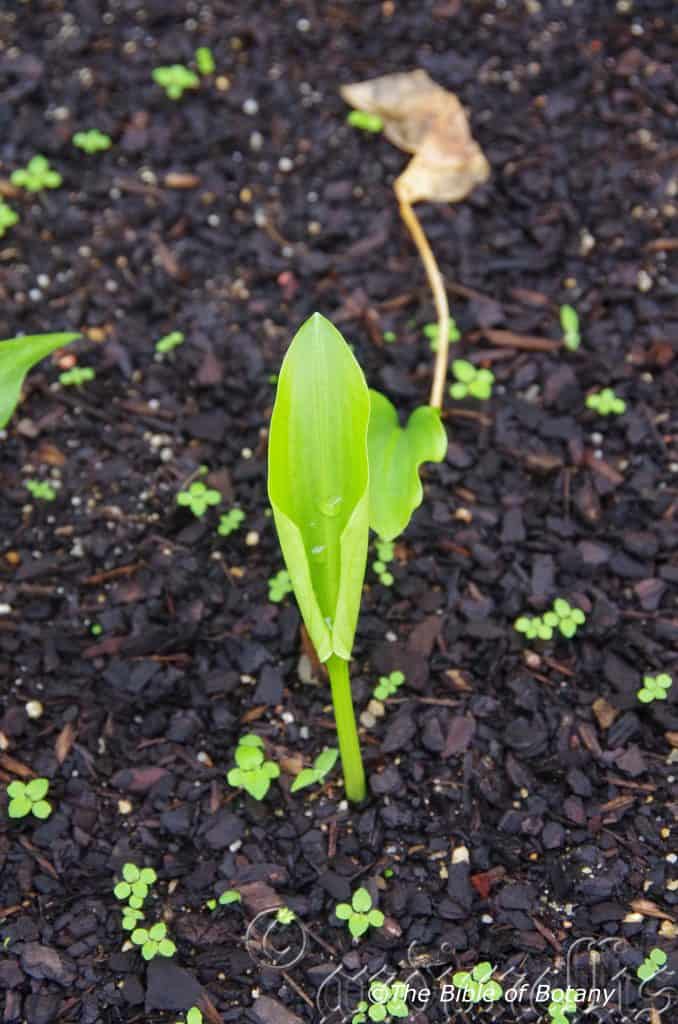
National Botanic Gardens ACT
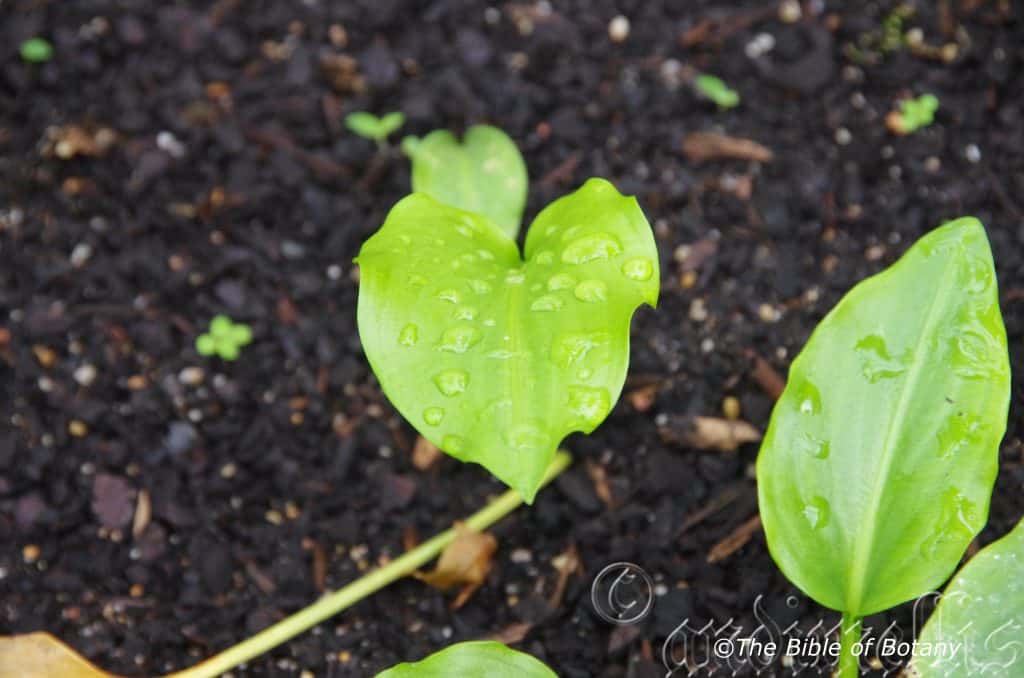
National Botanic Gardens ACT
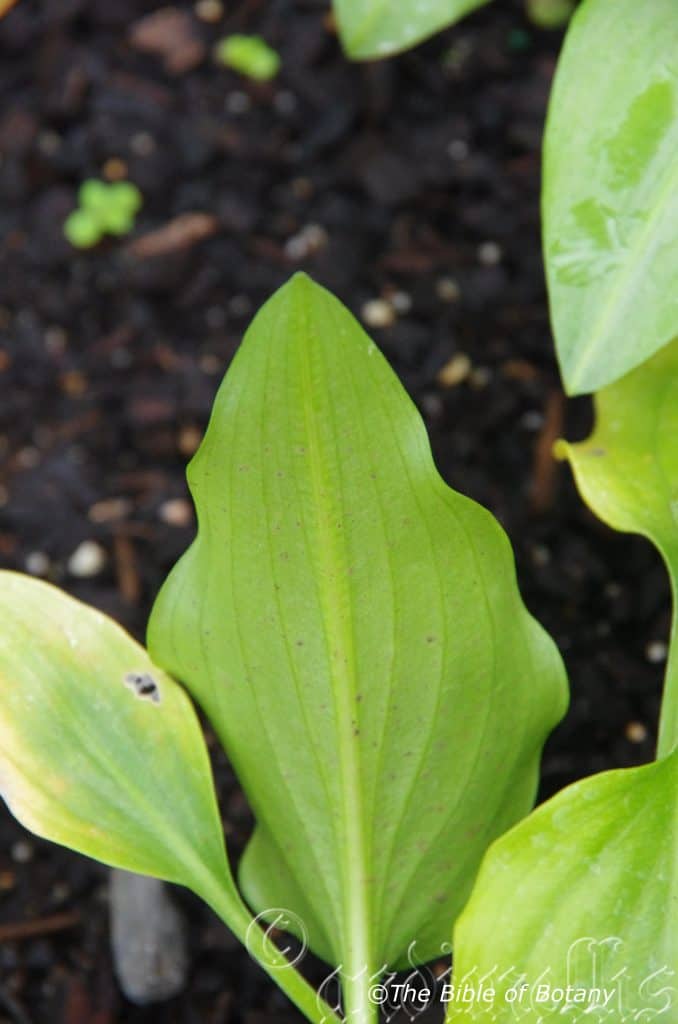
National Botanic Gardens ACT
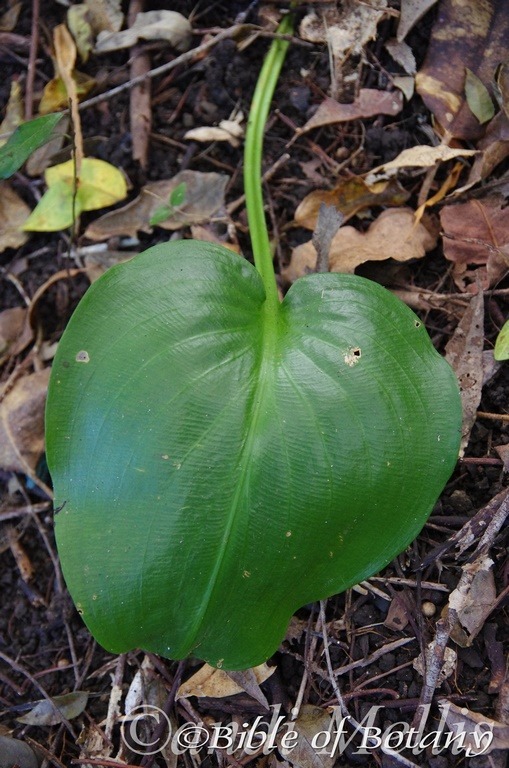
Lismore NSW
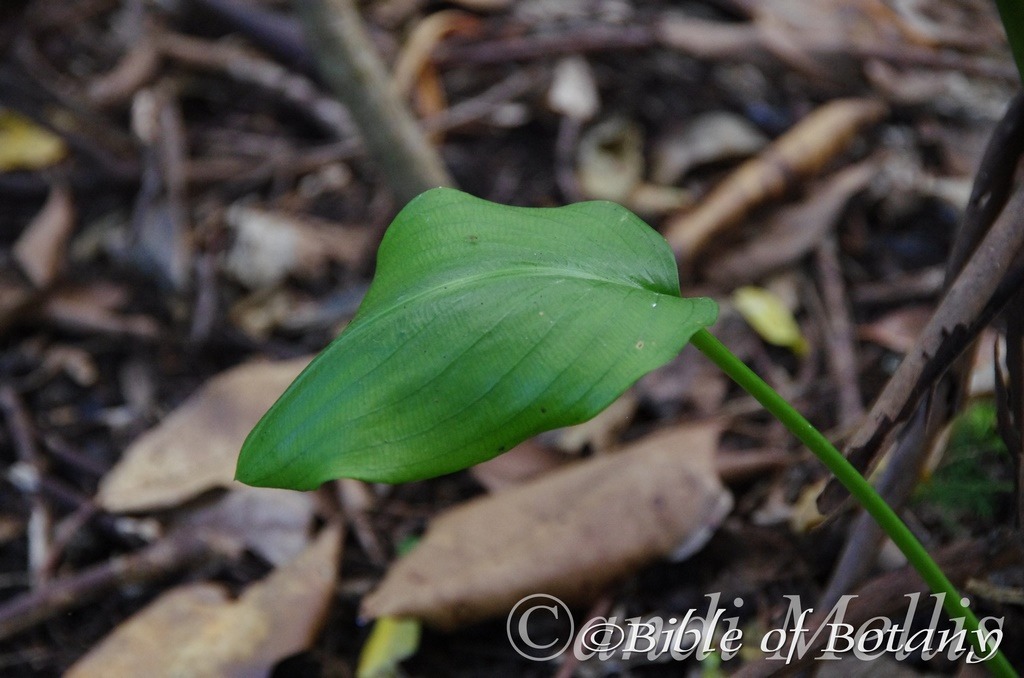
Lismore NSW
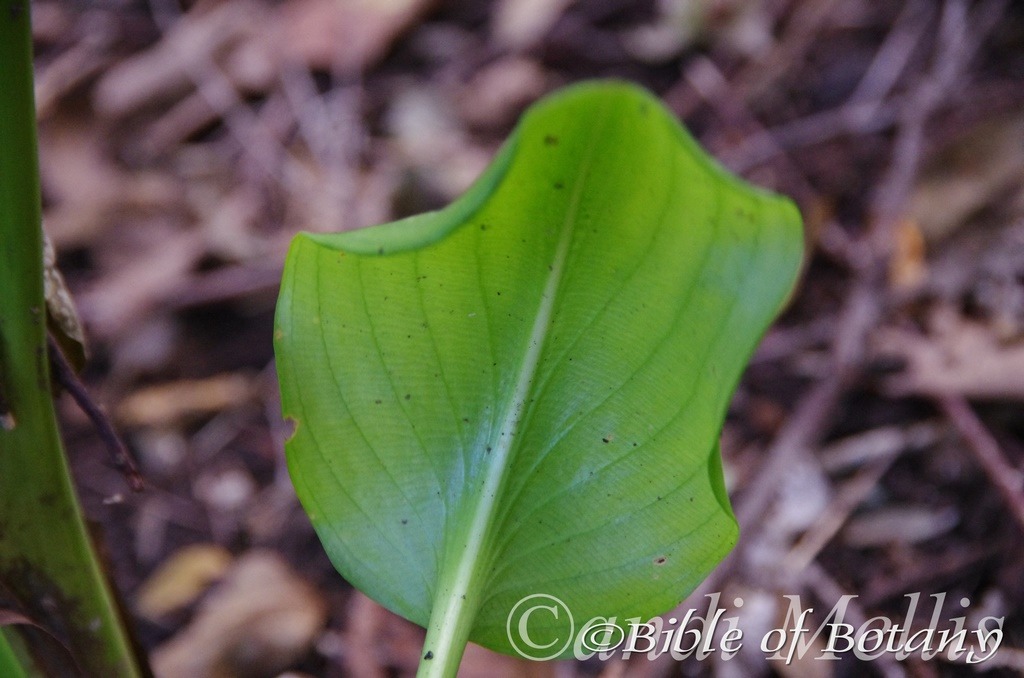
Lismore NSW
Proiphys cunninghamii
Classification:
Unranked: Eudicots
Order: Asparagales
Family: Amaryllidaceae
Subfamily: Amaryllidoideae
Genus: From Proi, which is Latin for early and Phyo, which is Latin for to bring forth. It refers to the premature germination of the seeds.
Species: Is named in honour of Allan Cunningham; 1791-1839, who was an Australian explorer, botanist and collector of plants.
Common Name:
Distribution:
Proiphys cunninghamii is found south from Homevale National Park north of Rockhampton in central coastal Queensland in several disjunct populations to Glenuige Peak near Grafton in northern New South Wales north to near.
https://avh.ala.org.au/occurrences/search?taxa=Proiphys+cunninghamii#tab_mapView
Habitat Aspect Climate:
Proiphys cunninghamii prefers full sun to dappled shade. It grows in openings, adjacent to warm well developed rainforests, littoral rainforests or moist gallery forests. The altitude ranges from 20 meters ASL to 950 meters ASL.
The temperatures range from minus 1 degree in July to 36 degrees in January.
The rainfall ranges from lows of 450mm to 1800mm average per annum.
Soil Requirements:
Proiphys cunninghamii prefers to grow on light sandy clays to medium clays often with copious quantities of leaf litter. The soils are usually derived from decomposed brown basalt, black basalts, sandstones, shale or metamorphic rocks. The soils pH ranges from 5pH to 6pH. It does not tolerate waterlogged soils. Non saline soils to moderately saline soils are tolerated.
Height & Spread:
Wild Plants: 0.3m to 0.5m by 0.5m to 0.7m
Characteristics:
Proiphys cunninghamii grows as an annual herb with a 50mm diameter bulb.
The 2 to 6 leaves of Proiphys cunninghamii are ovate and measure 100mm to 250mm in length by 65mm to 150mm in width. The petiole measures 8mm to 25mm in length. The bases are rounded, truncate or shallowly cordate while the apexes are broadly acute to broadly acuminate. The concolourous laminas are deep sea-green, glabrous and glossy. The leaf margins are entire and slightly to strongly undulating and curve downwards from the middle. The veins are prominent on the lower lamina distinctly visible on the upper lamina.
Inflorescences of Proiphys cunninghamii are born on a single scape from near the base of the leaves. The scape measures 25mm to 80mm in length. There are 5 to 12 individual flowers on an umbel. The 2 or 3 oblong involucral green bracts measure 20mm to 50mm in length by 7mm to 16mm in width near the base. The bases are clasping while the apexes are tapering obtuse to acute.
The glossy green calyxes measure 5mm to 8mm in length while the 6 lobes are minute. The perianths are pale yellow to creamy yellow near the base and turn pristine white as they approach the lobes. The perianths measure 7mm to 16mm in length while the lobes measure 10mm to 20mm in length. The ovate lobes recurve towards the apex and margins. The margins are covered in short whit ciliate hairs.
The 6 exserted white to pale yellow stamen’s and 12 staminodes filaments are united at the base and form a staminal tube. The tube measures 12mm to 16mm in length while the free section measures 3mm to 4.5mm in length. The oblong, yellow anthers measure 2.2mm to 2.6mm in length by 1.2 to 1.4mm in width. The staminodes measure 2.2mm to 2.6mm in length and are recurved to decurve and taper to an acute apex.
The white style is glabrous and measures 2.6 mm to 2.8mm in length. Proiphys cunninghamii’s flowers usually appear from early December through to late January however it is very irregular in flowering often not flowering at all.
Proiphys cunninghamii’s fruits are globose to ovoidal capsule. The capsules are glabrous and vary in diameter and length even on the same plant. They vary from 10mm to 20mm in length by 11mm to 20mm in diameter. The green capsules turn orange-green when ripe. The seeds are onion like leaf layers or premature bulbils.
Wildlife:
Proiphys cunninghamii’s do not appear to have any predators.
Cultivation:
Proiphys cunninghamii is a magnificent small herb that should be more widely grown in tropical and monsoonal gardens. It would be worthwhile trying in sub-tropical areas close to the coast where humid air currents are common and frosts do not exist. It is ideal at the edge of a rainforest or set in a rainforests, shaded areas around a swimming pool or courtyards. It would also make great bush house plant in medium size pots. In cultivation it will grow from 0.6meters to 0.8 meters in height by 0.5 meters to 0.8 meters in diameter while the flowers will reach as high as 1.2 meters under favourable conditions.
It grows well on medium clays with a gritty texture where deep leaf litter keeps the soil cool and moisture at an even level. If these requirements are met they can cope with temperatures as low as 2 degrees and up to 38 degrees. It is moderately drought resistant.
Add to the above, if it is given an adequate supply of water and a little native fertilizer on a regular basis the plants may respond with good flowering and possibly good fruit set. It is very erratic in flowering and must be grown for the leaves. Any flowering is a sheer bonus but when they flower it is magnificent whether in the garden or bush house.
Proiphys cunninghamii would make an outstanding contribution to a moist heath gardens especially where it is mass planted. It can be used adjacent to the smaller growing plants scattered throughout the heath scene in small groups. When you design a flat heath garden which this Proiphys cunninghamii is well suited don’t use contours to display the plants as heath lands are almost always flat or have a slight rise. Plants must be planted close together and be short so you can see over the tallest ones with the exception of one or two plants at the most. These will be feature plants. The idea is to achieve a feeling of expansive flatness. This can be achieved with using the Proiphys amboinensis’s large ovate deep green leaves in a mass display of 9 or more in a specific area and having them contrasting with finer pale green or soft grey to glaucous coloured foliage. Make sure it is kept in small areas devoid of plants that will over grow it and that it will have plenty of shade. Use a lot of procumbent plants like Hibbertia linearis or Hibbertia obtusifolia which would look stunning in flower together. Mix it with other smaller shrubs or herbs like beautiful Remusatia vivipara, Dianella caerulea, Alpinia acerulea Viola betonicifolia or Viola hederacea for a ground cover so none of them dominate the scene but blend in to give a mosaic of foliage colours that you oversee.
It is ideal in settings near ponds in court yards or the rockery. It needs light shade to heavy shade to grow at their best. Place it near old stumps and roots or medium size rocks to make the stumps, rocks or roots look larger and more gnarled. The deep greys and blacks against the large ovate leaves and stems will contrast both the finesse of the plants and the coarseness of the stumps, rocks or roots. Select an area of ground and let your hair down and be imaginative. Sparingly use other plants when planting and remember that this plants foliage and form is the center of attraction. Planted in mass using a gentle slope or a basin with a medium to large pool at the bottom would also give a strong contrast for most of the year. A billabong affect is the go, not a waterfall or cascades. When using this plant as a feature only grow small plants that do not reach more than 300mm in height and have a compact habit with either blue or grey leaves, but be careful that these plants do not steal the stage. Annuals and perennials would really compliment the scene especially during the winter when the leaves are not present.
Propagation:
Seeds: Seeds of Proiphys cunninghamii can be removed easily from the fruits that have fallen to the ground.
Sow freshly treated seeds directly into a seed raising mix, keeping them moist not wet. When the seedlings are 20m to 25 mm tall, prick them out and plant them into 50mm native tubes using a good organic mix.
As the seedlings roots reach the bottom of the tubes plant them out into their permanent position. Do not delay.
It can also be grown from bulb division at the start of the dry season by removing the bulbils and placing in a warm moist position beneath 50mm shade.
Fertilize using seaweed, fish emulsion or organic chicken pellets soaked in water on an alternate basis. Fertilize bi monthly until the plants have established themselves then annually in early September to October to maintain better colour, health, vitality and flowering
Further Comments from Readers:
“Hi reader, it seems you use The Bible of Botany a lot. That’s great as we have great pleasure in bringing it to you! It’s a little awkward for us to ask, but our first aim is to purchase land approximately 1,600 hectares to link several parcels of N.P. into one at The Pinnacles NSW Australia, but we need your help. We’re not salespeople. We’re amateur botanists who have dedicated over 30 years to saving the environment in a practical way. We depend on donations to reach our goal. If you donate just $5, the price of your coffee this Sunday, We can help to keep the planet alive in a real way and continue to bring you regular updates and features on Australian plants all in one Botanical Bible. Any support is greatly appreciated. Thank you.”
In the spirit of reconciliation we acknowledge the Bundjalung, Gumbaynggirr and Yaegl and all aboriginal nations throughout Australia and their connections to land, sea and community. We pay our respect to their Elders past, present and future for the pleasures we have gained.
Prostanthera caerulea
Classification:
Class: Equisetopsida
Subclass: Magnoliidae
Superorder: Asteranae
Order: Lamiales
Family: Lamiaceae
Genus: From Prostheke, which is Greek, for an appendage and ántha/ánthos, which are Ancient Greek for the male reproductive organ of a flower or the flower. It refers to anthers or stamens which have an additional appendage attached.
Species: From Caerulus, which is Latin for deep blue. It refers to a structure or organ, which is deep blue in colour.
Common Name: Lilac Mint Bush.
Distribution:
Prostanthera caerulea is found south from the Macpherson range on the Queensland, New South Wales border to Wollongong in central coastal New South Wales.
https://avh.ala.org.au/occurrences/search?taxa=Prostanthera+caerulea#tab_mapView
Habitat Aspect Climate:
Prostanthera caerulea prefers full sun to dappled shade. It grows in moist heaths or open wet sclerophyll forest, mainly in rocky gullies at higher altitudes. The altitude ranges from 15 meters ASL to 1250 meters ASL.
The temperatures range from minus 1 degree in July to 36 degrees in January.
The rainfall ranges from lows of 450mm to 1800mm average per annum.
Soil Requirements:
Prostanthera caerulea prefers to grow on sandy soil, and rocky areas often with copious quantities of leaf litter. The soils are usually derived from decomposed granites or at times black basalts or reddish sandstones. The soils pH ranges from 5pH to 6pH. It does not tolerate waterlogged soils however prefers the soils to be moist for most of the year. Non saline soils to moderately saline soils are tolerated.
Height & Spread:
Wild Plants:0.5m to 3m by 0.5m to 2.5m
Characteristics:
Prostanthera caerulea grows as an erect shrub with slightly aromatic stems and leaves. The 4 angled stems are densely covered in sessile glands and are sparsely covered in short, white pilose hairs along the ridges.
The opposite leaves are usually narrow ovate, or occasionally ovate and measure 18mm to 65mm in length by 6mm to 22mm in width. The petiole measures 2mm to 12mm in length. The bases are cuneate to narrow obtuse while the apexes are obtuse to sub-acute. The concolourous laminas are mid green to deep sea-green, glabrous and dull. The laminas recurve upwards from the mid vein to the margins and decurve downwards on the apical half while the margins are slightly to strongly tooth. The mid vein is prominent on the lower lamina and distinctly visible on the upper lamina.
Inflorescences are born in botryoidal racemes from the terminals. The caducous bracteoles measure 2.5mm to 3mm in length. The calyxes measure 4mm to 7mm in length while the calyx tube measures 2mm to 4mm in length and the upper lobes measure 2mm to 3mm in length. The white, deep purple-pink to bluish-mauve corolla tube measures 3.5mm to 4mm in length. The oblong lobes have obtuse apexes. The lower lobe measures 6mm to 7mm in length while the 2 lateral lobes measure 4mm to 4.5mm in length and the 2 united upper lobes measure 3mm to 3.5mm in length.
The anthers have a 0.5mm to 0.6mm long appendage. The flowers appear from September to November.
The fruits are flattened, ovoidal capsules. The capsules are glabrous and vary in diameter and length even on the same plant. The calyxes are persistent on the ripe fruits.
Wildlife:
Prostanthera caerulea’s wildlife is unknown to the author.
Cultivation:
Prostanthera caerulea is a magnificent small shrub that should be more widely grown in cool subtropical and temperate gardens. It is ideal at the edge of a rainforest garden around swimming pools or courtyards and in heath gardens. In cultivation it will grow from 2 meters to 3 meters in height by 2 meters to 2.5 meters in diameter.
It can be pruned to maintain a smaller shrub or hedge rows.
It grows exceptionally well on lighter friable soils where deep leaf litter keeps the soil cool and moisture at an even level throughout the year. If these requirements are met it can cope with temperatures as low as minus 4 degrees and up to 37 degrees.
Add to the above, if it is given an adequate supply of water and a little native fertilizer on a regular basis the plants will respond with exceptionally good flowering year after year.
Prostanthera caerulea would make outstanding contribution to a moist heath gardens especially where it is mass planted. Here it can be used adjacent to the smaller growing plants scattered throughout the heath scene in small groups. When you design a flat heath garden which this it is well suited don’t use contours to display the plants as heath lands are almost always flat or have a slight rise. Plants must be planted close together and be short so you can see over the tallest ones with the exception of one or two plants at the most. These will be feature plants. The idea is to achieve a feeling of expansive flatness. This can be achieved with using the Prostanthera caerulea deep green leaves and brilliant flowering displays to contrast finer pale green or soft grey to glaucous coloured foliage. Make sure you give it the room to grow to its full potential. Use a lot of procumbent plants like Hibbertia linearis, Hibbertia obtusifolia or Hibbertia scandens as a ground cover which would look stunning in flower together. Mix them with other smaller shrubs so none of them dominate the scene but blend in to give a mosaic of foliage colours that you oversee. Here I immediately think of Actinotis helianthi or Grevillea thelemanniana for two great contrasting foliages.
It is ideal in settings near large ponds in large courtyards or the larger rockery. It needs light shade to grow at its best. Place them near old stumps and roots or medium size rocks to make the stumps, rocks or roots look larger and more gnarled. The deep greys and blacks against the ovate leaves and stems will contrast both the finesse of the plants and the coarseness of the stumps, rocks or roots. Select an area of ground and let your hair down and be imaginative. Sparingly use other plants when planting and remember that this plants foliage and form is the center of attraction. Planted in mass using a gentle slope or a basin with a medium pool at the bottom would also give a strong contrast for most of the year. A billabong effect would give a quiet tranquil affect,l where as a waterfall or cascade would give more stimulation and energy to the scene. When using this plant as a feature only grow small plants that do not reach more than 250mm in height and have a compact habit with either blue or grey leaves, but be careful that these plants do not steal the stage. Taller plants can be grown in the background for balance. Annuals and perennials would really compliment the scene especially during the spring when the flowers are present.
Propagation:
Seeds: The seeds of Prostanthera caerulea are small and not the easiest to collect from the fruiting heads. You could try snipping ripe heads off and store them for a couple of days in a brown paper bag.
Sow the freshly picked seeds directly into a seed raising mix, keeping them moist not wet. When the seedlings are 20mm to 25mm tall, prick them out and plant them into 50mm native tubes using a good organic mix. Store the excess seeds in the vegetable crisper of the fridge.
As the seedlings roots reach the bottom of the tubes plant them out into their permanent position. Do not delay as some set back will occur before the new roots emerge.
Cuttings: Fortunately cuttings strike relatively easy. Use 80mm to 100mm long tip cuttings or lateral shoots from the present season’s growth. Take them in warmer months of the year. Remove half the leaves from the bottom section being careful not to tear the bark.
1 Prepare the cutting mix by adding two thirds sharp clean river sand, one third peat or one third perlite. These ingredients must be sterilized,
2 Select good material from non diseased plants,
3 Select semi green stems for cuttings. Look for a stem with two or three nodes,
4 Place the cutting on a flat, hard surface, and make a clean cut down one side of the cutting at the base for 10mm with a sharp sterile knife or razor blade. – This scarification of the node will increase the chances of roots emerging from this spot. Now remove all but one or two the leaves, leaving the apex leaves in tact. If the leaves are very large in proportion to the stem, cut off the apical halves.
5 Fill a saucer with water, and place a little mild strength rooting hormone into another container like a milk bottle top. Dip the node end of the cutting into the water and then into the rooting hormone. Tap off any excess hormone,
6 Use a small dipple stick or old pencil to poke a hole into the soilless potting mix. Ensure the hole is slightly larger than the stem diameter and be careful not to wipe the rooting hormone off the cuttings base. Place 2 to 4 cuttings in each of the 50mm native tubes,
7 I like to place the tubes in bucket with holes drilled in the bottom to allow excess water to drain out. A plastic bag that fits over the bucket is ideal to help maintain temperature and moisture. Place in a semi shaded, warm position like under 50mm shade cloth.
8 When the cuttings have struck, open the bag to allow air circulation for a few days to a week,
9 Once hardened off remove the cuttings from the bag and allow to further hardening for a few more days to a week,
10 Transplant into a good potting mix to grow on.
Fertilize using seaweed, fish emulsion or organic chicken pellets soaked in water on an alternate basis. Fertilize bi monthly until the plants have established themselves then annually in early September to October to maintain better colour, health, vitality and flowering
Further Comments from Readers:
“Hi reader, it seems you use The Bible of Botany a lot. That’s great as we have great pleasure in bringing it to you! It’s a little awkward for us to ask, but our first aim is to purchase land approximately 1,600 hectares to link several parcels of N.P. into one at The Pinnacles NSW Australia, but we need your help. We’re not salespeople. We’re amateur botanists who have dedicated over 30 years to saving the environment in a practical way. We depend on donations to reach our goal. If you donate just $5, the price of your coffee this Sunday, We can help to keep the planet alive in a real way and continue to bring you regular updates and features on Australian plants all in one Botanical Bible. Any support is greatly appreciated. Thank you.”
In the spirit of reconciliation we acknowledge the Bundjalung, Gumbaynggirr and Yaegl and all aboriginal nations throughout Australia and their connections to land, sea and community. We pay our respect to their Elders past, present and future for the pleasures we have gained.
Prostanthera incisa
Classification:
Class: Equisetopsida
Subclass: Magnoliidae
Superorder: Asteranae
Order: Lamiales
Family: Lamiaceae
Genus: From Prostheke, which is Greek, for an appendage and ántha/ánthos, which are Ancient Greek for the male reproductive organ of a flower or the flower. It refers to anthers or stamens which have an appendage attached.
Species: From Incisus, which is Latin for to be deeply cut. It refers to leaf margins, which are deeply cut or torn in appearance.
Common Name: Cut Leaf Mint Bush.
Distribution:
Prostanthera incisa is found south from the Lamington Plateau on the Queensland New South Wales border to the Howe Range in Croajingalong National Park in far north eastern Victoria. There are 2 isolated populations further south in the Otway Ranges near Geelong.
There is a small population in south eastern Tasmania in the Hatz Mountain National Park.
https://avh.ala.org.au/occurrences/search?taxa=Prostanthera+incisa#tab_mapView
Habitat Aspect Climate:
Prostanthera incisa prefers dappled sunlight to light shade. It grows in openings, in wet sclerophyll forests, adjacent to cool well developed rainforests or cool moist gallery forests. The altitude ranges from 20 meters ASL to 1150 meters ASL.
The temperatures range from minus 1 degree in July to 36 degrees in January.
The rainfall ranges from lows of 450mm to 1800mm average per annum.
Soil Requirements:
Prostanthera incisa prefers to grow on light sandy clays to medium clays often with copious quantities of leaf litter. The soils are usually derived from decomposed brown basalt, black basalts, sandstones, shale or metamorphic rocks. The soils pH ranges from 5pH to 6pH. It does not tolerate waterlogged soils. Non saline soils to moderately saline soils are tolerated.
Height & Spread:
Wild Plants: 0.5m to 3m by 2m to 3m
Characteristics:
Prostanthera incisa is an erect open shrub with strongly aromatic stems and leaves. The 4 angled stems are laterally ridged and moderately to densely covered in short, pilose hairs and are densely covered with sessile glands.
The opposite leaves are ovate, narrow-ovate to oblong and measure 8mm to 30mm in length by 4mm to 12mm in width. The petioles are moderately covered in short, white pilose hairs and measure 1mm to 10mm in length. The bases are decurrent and attenuate while the apexes are obtuse. The discolourous laminas are mid green to deep green, glabrous and dull on the upper laminas while the lower laminas are paler and sparsely covered in short, white pilose hairs and densely covered in sessile glands. The laminas recurve very slightly upwards from the mid vein to the margins while the margins are coarsely toothed with teeth directed forward to laterally. The mid vein is prominent on the lower lamina and distinctly visible on the upper lamina. The petiole measures 2mm to 12mm in length.
The inflorescences are born in leafy botryoidal racemes from the terminals. The caducous bracteoles measure 0.5mm to 1mm in length. The calyxes measure 3mm to 4.5mm in length while the calyx tube measures 1.5mm to 2.5mm in length and the upper lobes measure 1.5mm to 2.5mm in length. The pale mauve to mauve corolla tube measures 4mm to 5mm in length. The oblong lobes have obtuse apexes. The lower lobe measures 4.5mm to 5.5mm in length while the 2 lateral lobes measure 4mm to 4.5mm in length and the 2 partially united upper lobes measure 3.5mm to 4mm in length.
The appendage on the anthers is absent in this species. The flowers appear from September to November.
The fruits are flattened ovoidal capsule. The capsules are glabrous and vary in diameter and length even on the same plant. The green capsules turn pale grey-brown when ripe. The calyxes are persistent and lengthen on the ripe fruits. The minute seeds are black.
Wildlife:
Prostanthera incisa’s wildlife is unknown to the author.
Cultivation:
Prostanthera incisa is a magnificent small shrub that should be more widely grown in cool subtropical and temperate gardens. It is ideal at the edge of a rainforest garden around swimming pools or courtyards and in heath gardens. In cultivation it will grow from 0.7 meters to 3 meters in height by 2.5 meters to 3.2 meters in diameter.
It can be pruned to maintain a smaller shrub or hedge rows.
It grows exceptionally well on lighter friable soils where deep leaf litter keeps the soil cool and moisture at an even level throughout the year. If these requirements are met it can cope with temperatures as low as minus 4 degrees and up to 37 degrees.
Add to the above, if it is given an adequate supply of water and a little native fertilizer on a regular basis the plants will respond with exceptionally good flowering year after year.
Prostanthera incisa would make outstanding contribution to a moist heath gardens especially where it is mass planted. Here it can be used adjacent to the smaller growing plants scattered throughout the heath scene in small groups. When you design a flat heath garden which this it is well suited don’t use contours to display the plants as heath lands are almost always flat or have a slight rise. Plants must be planted close together and be short so you can see over the tallest ones with the exception of one or two plants at the most. These will be feature plants. The idea is to achieve a feeling of expansive flatness. This can be achieved with using the Prostanthera incisa deep green leaves and brilliant flowering displays to contrast finer pale green or soft grey to glaucous coloured foliage. Make sure you give it the room to grow to its full potential. Use a lot of procumbent plants like Hibbertia linearis, Hibbertia obtusifolia or Hibbertia scandens as a ground cover which would look stunning in flower together. Mix it with other smaller shrubs so none of them dominate the scene but blend in to give a mosaic of foliage colours that you oversee. Here I immediately think of Actinotis helianthi for a sunnier position or Remusatia vivipara where the shade is more prevalent as they both have great contrasting foliages.
It is ideal in settings near large ponds in large court yards or the larger rockery. It needs light shade to grow at its best. Place them near old stumps and roots or medium size rocks to make the stumps, rocks or roots look larger and more gnarled. The deep greys and blacks against the ovate leaves and stems will contrast both the finesse of the plants and the coarseness of the stumps, rocks or roots. Select an area of ground and let your hair down and be imaginative. Sparingly use other plants when planting and remember that this plants foliage and form is the center of attraction. Planted in mass using a gentle slope or a basin with a medium pool at the bottom would also give a strong contrast for most of the year. A billabong affect would give a quite tranquil affect where as a waterfall or cascade would give more stimulation and energy to the scene.
When using this plant as a feature only grow small plants that do not reach more than 250mm in height and have a compact habit with either blue or grey leaves, but be careful that these plants do not steal the stage. Taller plants can be grown in the background for balance. Annuals and perennials would really compliment the scene especially during the spring when the flowers are present.
Propagation:
Seeds: The seeds can be removed easily from the fruits as they start to open by snipping the heads off and placing in a brown paper bag for a couple of days.
Sow the freshly picked seeds directly into a seed raising mix, keeping them moist not wet. When the seedlings are 20mm to 25mm tall, prick them out and plant them into 50mm native tubes using a good organic mix. Store the excess seeds in the vegetable crisper of the fridge.
As the seedlings roots reach the bottom of the tubes plant them out into their permanent position. Do not delay.
Cuttings: Fortunately Prostanthera incisa cuttings strike relatively easy. Use 60mm to 120mm long semi hardwood cuttings prepared from partially mature wood of the current season’s growth
1 Prepare the cutting mix by adding two thirds sharp clean river sand, one third peat or one third perlite. These ingredients must be sterilized,
2 Select good material from non diseased plants,
3 Select semi green stems for cuttings. Look for a stem with two or three nodes,
4 Place the cutting on a flat, hard surface, and make a clean cut down one side of the cutting at the base for 10mm with a sharp sterile knife or razor blade. – This scarification of the node will increase the chances of roots emerging from this spot. Now remove all but one or two the leaves, leaving the apex leaves in tact. If the leaves are very large in proportion to the stem, cut off the apical halves.
5 Fill a saucer with water, and place a little mild strength rooting hormone into another container like a milk bottle top. Dip the node end of the cutting into the water and then into the rooting hormone. Tap off any excess hormone,
6 Use a small dipple stick or old pencil to poke a hole into the soilless potting mix. Ensure the hole is slightly larger than the stem diameter and be careful not to wipe the rooting hormone off the cuttings base. Place 2 to 4 cuttings in each of the 50mm native tubes,
7 I like to place the tubes in bucket with holes drilled in the bottom to allow excess water to drain out. A plastic bag that fits over the bucket is ideal to help maintain temperature and moisture. Place in a semi shaded, warm position like under 50mm shade cloth.
8 When the cuttings have struck, open the bag to allow air circulation for a few days to a week,
9 Once hardened off remove the cuttings from the bag and allow to further hardening for a few more days to a week,
10 Transplant into a good potting mix to grow on.
Fertilize using seaweed, fish emulsion or organic chicken pellets soaked in water on an alternate basis. Fertilize bi monthly until the plants have established themselves then annually in early September to October to maintain better colour, health, vitality and flowering
Further Comments from Readers:
“Hi reader, it seems you use The Bible of Botany a lot. That’s great as we have great pleasure in bringing it to you! It’s a little awkward for us to ask, but our first aim is to purchase land approximately 1,600 hectares to link several parcels of N.P. into one at The Pinnacles NSW Australia, but we need your help. We’re not salespeople. We’re amateur botanists who have dedicated over 30 years to saving the environment in a practical way. We depend on donations to reach our goal. If you donate just $5, the price of your coffee this Sunday, We can help to keep the planet alive in a real way and continue to bring you regular updates and features on Australian plants all in one Botanical Bible. Any support is greatly appreciated. Thank you.”
In the spirit of reconciliation we acknowledge the Bundjalung, Gumbaynggirr and Yaegl and all aboriginal nations throughout Australia and their connections to land, sea and community. We pay our respect to their Elders past, present and future for the pleasures we have gained.
Prostanthera lanceolata
Classification:
Class: Equisetopsida
Subclass: Magnoliidae
Superorder: Asteranae
Order: Lamiales
Family: Lamiaceae
Genus: From Prostheke, which is Greek, for an appendage and ántha/ánthos, which are Ancient Greek for the male reproductive organ of a flower or the flower. It refers to anthers or stamens which have an appendage attached.
Species: From Lancea, which is Latin for a small lance. It usually refers to leaves, which are several times longer than it is wide with one side broader than the other and tapering after the broadest point in the middle.
Common Name:
Distribution:
Prostanthera lanceolata is not well documented because of its rarity and isolation. It is found in just 7 disjunct populations south from Lismore and the Boonoo Boonoo Falls in northern New South Wales to the far north east highlands of Victoria in the Kosciusko National Park.
https://avh.ala.org.au/occurrences/search?taxa=Prostanthera+lanceolata#tab_mapView
Habitat Aspect Climate:
Prostanthera lanceolata prefers full sun to dappled shade. It grows in openings, adjacent to warm well developed rainforests and moist sclerophyll forests. The altitude ranges from 260 meters ASL to 1700 meters ASL.
The temperatures range from minus 5 degree in July to 32 degrees in January.
The rainfall ranges from lows of 800mm to 1600mm average per annum.
Soil Requirements:
Prostanthera lanceolata prefers to grow on light sandy clays to medium clays often with copious quantities of leaf litter. The soils are usually derived from decomposed granite or at times black basalts. The soils pH ranges from 5pH to 6pH. It does not tolerate waterlogged soils. Non saline soils to moderately saline soils are tolerated.
Height & Spread:
Wild Plants: 3m to 4m by 2m to 3m
Characteristics:
Prostanthera lanceolata grows as an erect shrub with deep grey stems while the smaller 4 angulated stems are deep blue-green. The smaller stems are moderately covered with sessile glands and moderately to densely covered with short, pilose hairs, at least on the ridges.
The opposite leaves are narrow-ovate to ovate and measure 15mm to 25mm in length by 9mm to 12mm in width. The petioles are moderately to densely covered with short, pilose hairs and measure 2mm to 5mm in length. The bases are decurrent and attenuate while the apexes are obtuse. The discolourous laminas are mid green to deep green, glabrous and dull on the upper laminas while the lower laminas are paler and densely covered in sessile glands. The laminas recurve strongly upwards from the mid vein to the margins and decurve downwards strongly near the apexes while the margins are entire or with a few irregular minute teeth. The mid vein is prominent on the lower lamina and is sparsely covered in short, white pilose hairs. It is faintly visible on the upper lamina.
The inflorescences are born in leafy botryoidal racemes from the terminals. The caducous bracteoles measure 1mm to 1.2mm in length. The calyxes measure 3.5mm to 4mm in length while the calyx tube measures 1.5mm to 2mm in length and the upper lobes measure 1.5mm to 2mm in length. The mauve or deep blue-purple corolla tube measures 4mm to 5mm in length. The upper lobe is spathulate and measures 6mm to 7.5mm in length. The 2 lateral narrow oblong to lanceolate lobes have obtuse to truncate apexes and measure 6mm to 7mm in length while the 2 lower lobes are partially united, ovate and measure 5mm to 5.5mm in length.
The appendage on the anthers is absent in this species or measure 0.3mm to 0.4mm in length when present. The flowers appear from September to November.
Prostanthera lanceolata’s The fruits are flattened ovoidal capsule. The capsules are glabrous and vary in diameter and length even on the same plant. The green capsules turn pale grey-brown when ripe. The calyxes are persistent on the ripe fruits. The minute seeds are black.
Confusing Species:
Prostanthera lanceolata discolourous leaves measure 12mm to 50mm in length by 9mm to 12mm in width. The leaves are toothed and sparsely to moderately covered in soft white hirsute hairs. Leaves are strongly aromatic.
Prostanthera lanceolata leaves measure 12mm to 25mm in length by 4mm to 12mm in width. The leaves are entire and sparsely covered in white pilose hairs. Leaves are faintly to moderately aromatic. Prostanthera discolourous leaves measure 5mm to 40mm in length by 3mm to 10mm in width. The leaves are entire and sparsely covered in soft white hirsute hairs. Leaves are faintly to moderately aromatic.
Wildlife:
Prostanthera lanceolata’s wildlife is unknown to the author.
Cultivation:
Prostanthera lanceolata is a magnificent small shrub that should be more widely grown in cool temperate gardens. It is ideal at the edge of a cool rainforest garden around swimming pools or courtyards and in heath gardens. In cultivation it will grow from 3 meters to 4 meters in height by 3 meters to 3.5 meters in diameter.
It can be pruned to maintain a smaller shrub or hedge rows.
It grows exceptionally well on lighter more friable soils where deep leaf litter keeps the soil cool and moisture at an even level throughout the year. If these requirements are met it can cope with temperatures as low as minus 4 degrees and up to 37 degrees.
Add to the above, if it is given an adequate supply of water and a little native fertilizer on a regular basis the plants will respond with exceptionally good flowering year after year.
It would make outstanding contribution to a moist heath gardens especially where it is mass planted. Here it can be used adjacent to the smaller growing plants scattered throughout the heath scene in small groups. When you design a flat heath garden which this Prostanthera lanceolata is well suited don’t use contours to display the plants as heath lands are almost always flat or have a slight rise. Plants must be planted close together and be short so you can see over the tallest ones with the exception of one or two plants at the most. These will be feature plants. The idea is to achieve a feeling of expansive flatness. This can be achieved with using the Prostanthera lanceolata has deep green leaves and brilliant flowering displays to contrast finer pale green or soft grey to glaucous coloured foliage. Make sure you give it the room to grow to its full potential. Mix it with other smaller shrubs so none of them dominate the scene but blend in to give a mosaic of foliage colours that you oversee. Actinotis helianthi, Eriostemon australiensis, Philotheca myoporoides or larger ferns like Adiantum formosum, Pteris umbrosa or Calochlaena dubia.
It is ideal in settings near large ponds in large court yards or the larger rockery. It needs light shade to grow at its best. Place them near old stumps and roots or medium size rocks to make the stumps, rocks or roots look larger and more gnarled. The deep greys and blacks against the ovate leaves and stems will contrast both the finesse of the plants and the coarseness of the stumps, rocks or roots. Select an area of ground and let your hair down and be imaginative. Sparingly use other plants when planting and remember that this plants foliage and form is the center of attraction. Planted in mass using a gentle slope or a basin with a medium pool at the bottom would also give a strong contrast for most of the year. A billabong affect would give a quite tranquil affect where as a waterfall or cascade would give more stimulation and energy to the scene. When using this plant as a feature only grow small plants that do not reach more than 250mm in height and have a compact habit with either blue or grey leaves, but be careful that these plants do not steal the stage. Taller plants can be grown in the background for balance. Annuals and perennials would really compliment the scene especially during the spring when the flowers are present.
Propagation:
Seeds: The seeds of Prostanthera lanceolata can be removed easily from the fruits as they start to open. Prune the flower heads off and store them for a couple of days in a brown paper bag. Store seeds over winter in the vegetable crisper of the fridge.
Sow the freshly picked seeds or those removed from the vegetable crisper directly into a seed raising mix, keeping them moist not wet. When the seedlings are 20mm to 25mm tall, prick them out and plant them into 50mm native tubes using a good organic mix. Store the excess seeds in the vegetable crisper of the fridge.
As the seedlings roots reach the bottom of the tubes plant them out into their permanent position. Do not delay.
Cuttings: Fortunately Prostanthera lanceolata cuttings strike relatively easy. Use 60mm to 120mm long semi hardwood cuttings prepared from partially mature wood of the current season’s growth
1 Prepare the cutting mix by adding two thirds sharp clean river sand, one third peat or one third perlite. These ingredients must be sterilized,
2 Select good material from non diseased plants,
3 Select semi green stems for cuttings. Look for a stem with two or three nodes,
4 Place the cutting on a flat, hard surface, and make a clean cut down one side of the cutting at the base for 10mm with a sharp sterile knife or razor blade. – This scarification of the node will increase the chances of roots emerging from this spot. Now remove all but one or two the leaves, leaving the apex leaves in tact. If the leaves are very large in proportion to the stem, cut off the apical halves.
5 Fill a saucer with water, and place a little mild strength rooting hormone into another container like a milk bottle top. Dip the node end of the cutting into the water and then into the rooting hormone. Tap off any excess hormone,
6 Use a small dipple stick or old pencil to poke a hole into the soilless potting mix. Ensure the hole is slightly larger than the stem diameter and be careful not to wipe the rooting hormone off the cuttings base. Place 2 to 4 cuttings in each of the 50mm native tubes,
7 I like to place the tubes in bucket with holes drilled in the bottom to allow excess water to drain out. A plastic bag that fits over the bucket is ideal to help maintain temperature and moisture. Place in a semi shaded, warm position like under 50mm shade cloth.
8 When the cuttings have struck, open the bag to allow air circulation for a few days to a week,
9 Once hardened off remove the cuttings from the bag and allow to further hardening for a few more days to a week,
10 Transplant into a good potting mix to grow on.
Fertilize using seaweed, fish emulsion or organic chicken pellets soaked in water on an alternate basis. Fertilize bi monthly until the plants have established themselves then annually in early September to October to maintain better colour, health, vitality and flowering
Further Comments from Readers:
“Hi reader, it seems you use The Bible of Botany a lot. That’s great as we have great pleasure in bringing it to you! It’s a little awkward for us to ask, but our first aim is to purchase land approximately 1,600 hectares to link several parcels of N.P. into one at The Pinnacles NSW Australia, but we need your help. We’re not salespeople. We’re amateur botanists who have dedicated over 30 years to saving the environment in a practical way. We depend on donations to reach our goal. If you donate just $5, the price of your coffee this Sunday, We can help to keep the planet alive in a real way and continue to bring you regular updates and features on Australian plants all in one Botanical Bible. Any support is greatly appreciated. Thank you.”
In the spirit of reconciliation we acknowledge the Bundjalung, Gumbaynggirr and Yaegl and all aboriginal nations throughout Australia and their connections to land, sea and community. We pay our respect to their Elders past, present and future for the pleasures we have gained.
Prostanthera lasianthos
Classification:
Class: Equisetopsida
Subclass: Magnoliidae
Superorder: Asteranae
Order: Lamiales
Family: Lamiaceae
Genus: From Prostheke, which is Greek, for an appendage and ántha/ánthos, which are Ancient Greek for the male reproductive organ of a flower or the flower. It refers to anthers or stamens which have an appendage attached.
Species: From Lasios, which is Ancient Greek for soft and woolly and ántha/ánthos, which are Ancient Greek for the male reproductive organ of a flower or the flower. It refers to anthers or flowers, which are covered in short, soft, woolly hairs.
Common Name: Victorian Christmas Bush.
Distribution:
Prostanthera lasianthos is found in 2 disjunct populations on and east of the Great Dividing Range from Dick’s Ridge to Eungella in central eastern Queensland and south from Mount Esk in south eastern Queensland to Coboboonee Forest Reserve in south western Victoria.
It is also found over most of Tasmania except the far south west corner.
https://avh.ala.org.au/occurrences/search?taxa=Prostanthera+lasianthos#tab_mapView
Habitat Aspect Climate:
Prostanthera lasianthos prefers full sun to dappled shade. It grows in openings, adjacent to warm well developed rainforests, littoral rainforests or moist gallery forests. The altitude ranges from 20 meters ASL to 1450 meters ASL.
The temperatures range from minus 5 degree in July to 36 degrees in January.
The rainfall ranges from lows of 500mm to 2400mm average per annum.
Soil Requirements:
Prostanthera lasianthos prefers to grow on light sandy clays to light fatty clays often with copious quantities of leaf litter. The soils are usually derived from decomposed granites or at times sandstone, shale or black basalt. The soils pH ranges from 5pH to 6pH. It does not tolerate waterlogged soils. Non saline soils to moderately saline soils are tolerated.
Height & Spread:
Wild Plants: 1m to 6m by 1m to 3m
Characteristics:
Prostanthera lasianthos grows as an erect shrub with deep grey stems while the smaller 4 angulated stems are deep blue-green. The smaller stems are aromatic. The stems are glabrous to sparsely covered in soft, short, white pilose hairs and sessile to shortly hirsute glands.
The opposite leaves are usually ovate or rarely narrow ovate and measure 40mm to 125mm in length by 10mm to 32mm in width. The petioles are sparsely covered in soft, short, white pilose hairs and measure 6mm to 10mm in length. The slightly oblique bases are cuneate to shortly attenuate while the apexes are acute to acuminate. The discolourous laminas are mid green to deep green, glabrous and dull on the upper laminas while the lower laminas are paler. The laminas are flat and raised between the mid vein and lateral veins on the upper surface while the margins usually irregularly toothed or on occasions are entire. The mid vein and lateral veins are prominent on the lower lamina and clearly visible on the upper lamina.
The inflorescences are born in branched botryoidal racemes from the terminals. The caducous bracteoles measure 2mm to 4mm in length. The calyxes measure 4mm to 5mm in length while the calyx tube measures 2mm to 3mm in length and the upper lobes measure 1.5mm to 3mm in length. The corolla is white to pale mauve externally and is white to mauve internally and spotted purple. The corollas are glabrous to moderately covered in long, silky, white, pilose hairs. The corolla tube measures 4mm to 6.5mm in length. The upper lobe is ovate and measures 6mm to 7mm in length by 6mm to 7mm in width. The 2 triangular lateral lobes have acute apexes and measure 6mm to 7mm in length while the 2 lower lobes are united, spathulate and measure 8mm to 9mm in length.
The appendage on the anthers is present in this species and measure 1.4mm to 1.7mm in length. The flowers appear from November to March.
Prostanthera lasianthos’s fruits are flattened ovoidal capsule. The capsules are glabrous and vary in diameter and length even on the same plant. The green capsules turn pale grey-brown when ripe. The calyxes are persistent and lengthen on the ripe fruits. The minute seeds are black.
Wildlife:
Prostanthera lasianthos’s wildlife is unknown to the author.
Cultivation:
Prostanthera lasianthos is a magnificent small shrub that should be more widely grown in cool sub-tropical and temperate gardens. It is ideal at the edge of a rain forest garden around swimming pools or courtyards and in heath gardens. In cultivation it will grow from 5 meters to 6 meters in height by 3 meters to 4 meters in diameter.
It can be pruned to maintain a smaller bushier shrub or hedge rows.
It grows exceptionally well on lighter friable soils where deep leaf litter keeps the soil cool and moisture at an even level throughout the year. If these requirements are met it can cope with temperatures as low as minus 5 degrees and up to 35 degrees.
Add to the above, if it is given an adequate supply of water and a little native fertilizer on a regular basis the plants will respond with exceptionally good flowering year after year.
Prostanthera lasianthos would make outstanding contribution to a moist bush garden especially where it is mass planted. Here it can be used adjacent to the smaller growing plants scattered throughout the heath scene in small groups. When you design a flat heath garden which it is well suited don’t use contours to display the plants as heath lands are almost always flat or have a slight rise. Plants must be planted close together and be short so you can see over the tallest ones with the exception of one or two plants at the most. These will be feature plants.
This can be achieved with using the Prostanthera lasianthos deep green leaves and brilliant flowering displays to contrast finer pale green or soft grey to glaucous coloured foliage. Make sure you give it the room to grow to its full potential. Use a lot of procumbent plants like or larger ferns like Adiantum formosum, Pteris umbrosa or Calochlaena dubia. Mix it with other smaller shrubs so none of them dominate the scene but blend in to give a mosaic of foliage colours that you oversee. Actinotis helianthi, Eriostemon australiensis, Philotheca myoporoides or Viola hederacea and Viola betonicifolia would all have great contrasting foliages.
Alternatively it can be planted singularly with sparse covering of ground covers and dome herbs or grasses to achieve a totally different scene.
Propagation:
Seeds: The seeds can be removed easily from the fruits as they start to open. Prune the flower heads off and store them for a couple of days in a brown paper bag.
Sow the freshly picked seeds directly into a seed raising mix, keeping them moist not wet.
When the seedlings are 20mm to 25mm tall, prick them out and plant them into 50mm native tubes using a good organic mix. Store the excess seeds in the vegetable crisper of the fridge.
As the seedlings roots reach the bottom of the tubes plant them out into their permanent position. Do not delay as the seedlings will suffer some set back until the new leaves emerge.
Cuttings: Fortunately Prostanthera lasianthos cuttings strike relatively easy. Use 60mm to 120mm long semi hardwood cuttings prepared from partially mature wood of the current season’s growth
1 Prepare the cutting mix by adding two thirds sharp clean river sand, one third peat or one third perlite. These ingredients must be sterilized,
2 Select good material from non diseased plants,
3 Select semi green stems for cuttings. Look for a stem with two or three nodes,
4 Place the cutting on a flat, hard surface, and make a clean cut down one side of the cutting at the base for 10mm with a sharp sterile knife or razor blade. – This scarification of the node will increase the chances of roots emerging from this spot. Now remove all but one or two the leaves, leaving the apex leaves in tact. If the leaves are very large in proportion to the stem, cut off the apical halves.
5 Fill a saucer with water, and place a little mild strength rooting hormone into another container like a milk bottle top. Dip the node end of the cutting into the water and then into the rooting hormone. Tap off any excess hormone,
6 Use a small dipple stick or old pencil to poke a hole into the soilless potting mix. Ensure the hole is slightly larger than the stem diameter and be careful not to wipe the rooting hormone off the cuttings base. Place 2 to 4 cuttings in each of the 50mm native tubes,
7 I like to place the tubes in bucket with holes drilled in the bottom to allow excess water to drain out. A plastic bag that fits over the bucket is ideal to help maintain temperature and moisture. Place in a semi shaded, warm position like under 50mm shade cloth.
8 When the cuttings have struck, open the bag to allow air circulation for a few days to a week,
9 Once hardened off remove the cuttings from the bag and allow to further hardening for a few more days to a week,
10 Transplant into a good potting mix to grow on.
Fertilize using seaweed, fish emulsion or organic chicken pellets soaked in water on an alternate basis. Fertilize bi monthly until the plants have established themselves then annually in early September to October to maintain better colour, health, vitality and flowering
Further Comments from Readers:
“Hi reader, it seems you use The Bible of Botany a lot. That’s great as we have great pleasure in bringing it to you! It’s a little awkward for us to ask, but our first aim is to purchase land approximately 1,600 hectares to link several parcels of N.P. into one at The Pinnacles NSW Australia, but we need your help. We’re not salespeople. We’re amateur botanists who have dedicated over 30 years to saving the environment in a practical way. We depend on donations to reach our goal. If you donate just $5, the price of your coffee this Sunday, We can help to keep the planet alive in a real way and continue to bring you regular updates and features on Australian plants all in one Botanical Bible. Any support is greatly appreciated. Thank you.”
In the spirit of reconciliation we acknowledge the Bundjalung, Gumbaynggirr and Yaegl and all aboriginal nations throughout Australia and their connections to land, sea and community. We pay our respect to their Elders past, present and future for the pleasures we have gained.
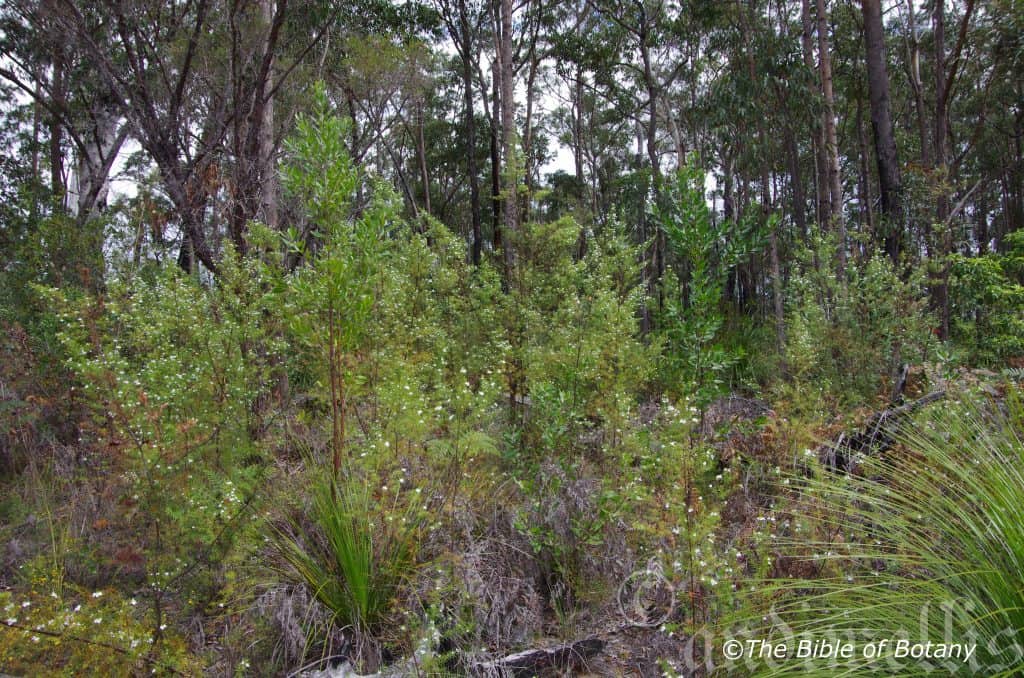
The Pinnacles NSW

The Pinnacles NSW

The Pinnacles NSW
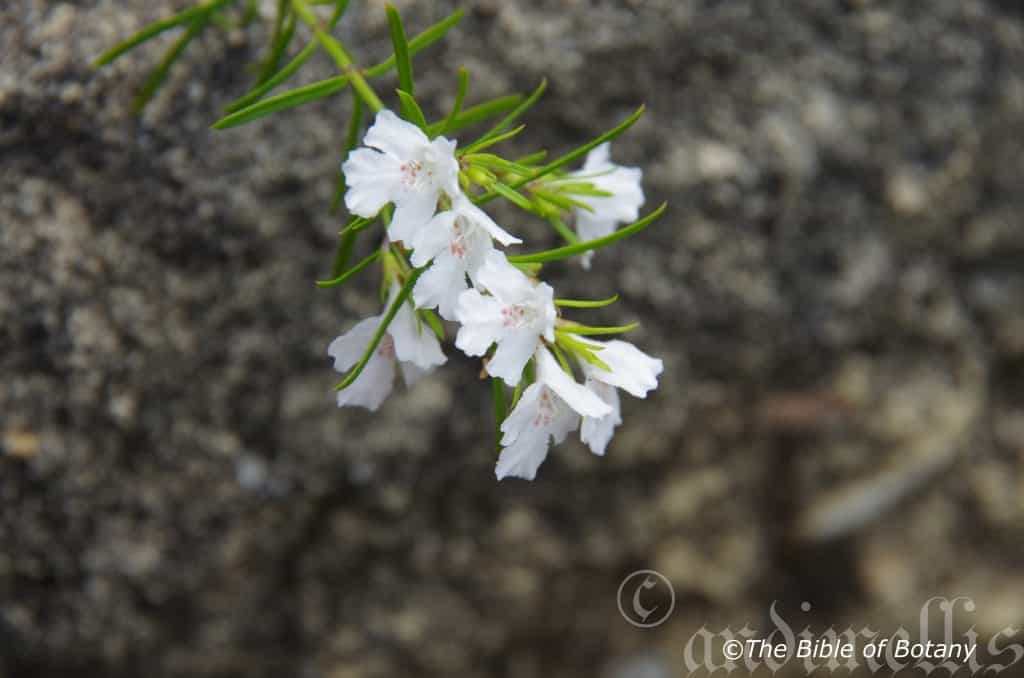
The Pinnacles NSW
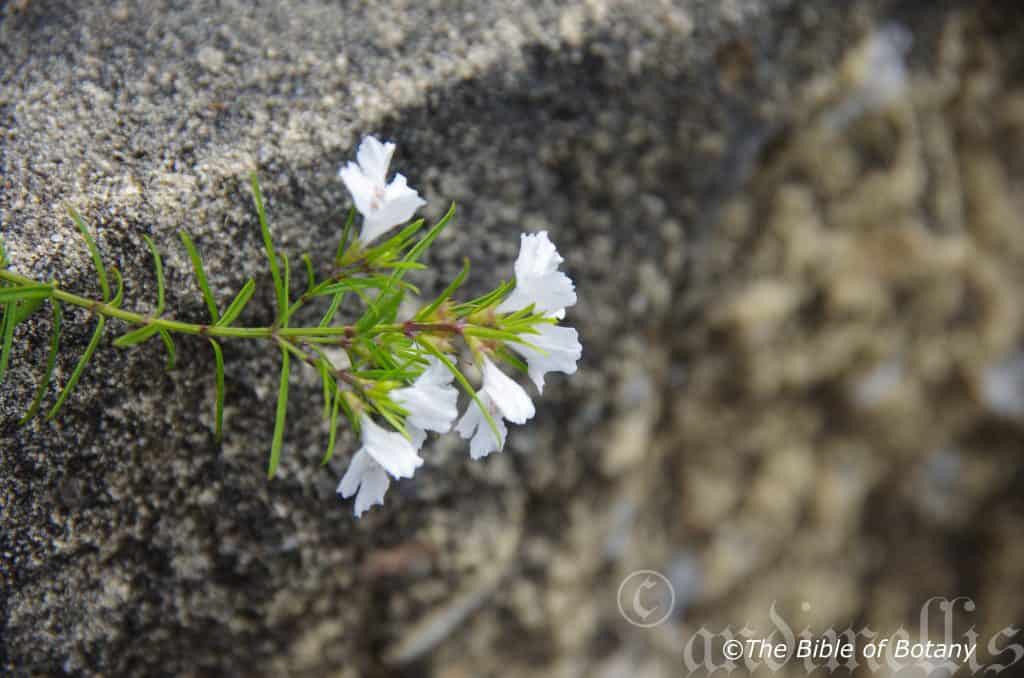
The Pinnacles NSW
Prostanthera nivea
Classification:
Class: Equisetopsida
Subclass: Magnoliidae
Superorder: Asteranae
Order: Lamiales
Family: Lamiaceae
Genus: From Prostheke, which is Greek, for an appendage and ántha/ánthos, which are Ancient Greek for the male reproductive organ of a flower or the flower. It refers to anthers or stamens which have an appendage attached.
Species: From Nípha, which is Ancient Greek or Nix/Nivēs, which is Latin for snowy or snow white. It refers to flowers, which are snowy white or the foliage being pale smoky grey.
Subspecies: Prostanthera nivea subsp. induta. From Induere, which is Latin to put on, or to clad oneself. It usually refers to glumes or at times other organs, which are rather large compared to the actual seed thus covering them completely.
Subspecies: Prostanthera nivea subsp. nívea. From Nípha, which is Ancient Greek or Nix/Nivēs, which is Latin for snowy or snow white. It refers to flowers, which are snowy white or the foliage being pale smoky grey.
Common Name: Snowy Mint Bush.
Distribution:
Prostanthera nivea subsp. induta is found south from Inverell to Warrumbungle National Park in northern New South Wales It is mainly found on and west of the Great Dividing Range on the western Plains.
Prostanthera nivea subsp. nívea is found south from Conondale Range in central Queensland to Steiglitz and the Brisbane Ranges in southern Victoria. There is a disjunct population further north near Biloela in southern Queensland. It is mainly found on and west of the Great Dividing Range on the western Plains.
https://avh.ala.org.au/occurrences/search?taxa=Prostanthera+nivea#tab_mapView
Habitat Aspect Climate:
Prostanthera nivea prefers full sun to dappled shade. It grows in open dry sclerophyll forest or open woodlands heaths. The altitude ranges from 300 meters ASL to 1050 meters ASL in the northern part of its range and from 30 meters ASL to 550 meters ASL in the southern part of its range.
The temperatures range from minus 4 degree in July to 36 degrees in January.
The rainfall ranges from lows of 300mm to 2000mm average per annum.
Soil Requirements:
Prostanthera nivea prefers to grow on light sandy clays to medium clays often with copious quantities of leaf litter. The soils are usually derived from decomposed brown basalt, black basalts, shale, metamorphic rocks or at times sandstone. The soils pH ranges from 5pH to 6pH. It does not tolerate waterlogged soils. Non saline soils to moderately saline soils are tolerated.
Height & Spread:
Wild Plants: 0.3m to 0.5m by 0.5m to 0.7m
Characteristics:
Prostanthera nivea grows as an erect to spreading shrub with none aromatic stems and leaves. The stems are angulated and glabrous to densely covered in off white appressed hairs while the glands are inconspicuous.
The opposite leaves are linear to almost terete and measure 10mm to 50mm in length by 0.5mm to 2mm in width. The petioles measure 0mm to 0.2mm in length. The bases are decurrent, narrow cuneate to shortly attenuate while the apexes are obtuse to acute. The concolourous laminas are grass-green to mid green, dull and glabrous to densely covered in soft, pale grey to pale bluish-grey sericeous hairs. The laminas are erect and bend sharply near the base and are flat. The margins are entire and flat or involute. The mid vein is prominent on the lower lamina and clearly visible on the upper lamina.
The inflorescences are born in clusters of 2 to 4 individual flowers from the leaf axils or crowded towards the terminals in leafy botryoidal racemes. The persistent bracteoles are minute and measure 0.4mm to 0.6mm in length or are leafy and lanceolate and measure 2.5mm to 4mm in length. The calyxes measure 6mm to 8mm in length while the calyx tube measures 3mm to 4mm in length and the upper lobes measure 3mm to 4mm in length. The corolla is white to mauve externally and is white to mauve internally and blotched yellow to pink. The corolla tube measures 6mm to 7mm in length. The lobes margins are crisped. The upper lobe is ovate and measures 4mm to 5mm in length by 4mm to 5mm in width. The 2 oblong lateral lobes have obtuse to truncate apexes and measure 7.5mm to 9.2mm in length while the 2 lower lobes are partially united, spathulate and measure 9mm to 11mm in length.
The appendage on the anthers is present in this species and measure 1.5mm to 1.7mm in length. The flowers appear from September to November.
The fruits are flattened ovoidal capsule. The capsules are glabrous and vary in diameter and length even on the same plant. The green capsules turn pale grey-brown when ripe. The calyxes are persistent and lengthen on the ripe fruits. The minute seeds are black.
Confusing Subspecies:
Prostanthera nivea subsp. nivea is an erect densely foliaged shrub which grows 1 meter to 4 meters in height. The pale green smaller stems are glabrous to sparsely covered in white appressed sericeous hairs. The pale grey-green leaves are sparsely to densely covered in bluish grey to pale grey hirsute hairs and are covered in white appressed sericeous hairs. The leaves measure 10mm to 50mm in length by 0.5mm to 1mm in width. The inconspicuous bracteoles measure 0.5mm to 0.8mm in length. The glabrous calyxes are glabrous on the margins or covered in white ciliate hairs while the corolla is pastel mauve with yellow spots.
Prostanthera nivea subsp. induta is an erect densely foliaged shrub which grows 1 meter to 2 meters in height. The grey-green smaller stems are covered in bluish grey to pale grey hirsute hairs and are densely covered in white appressed sericeous hairs. The pale grey-green leaves are sparsely to densely covered in bluish grey to pale grey hirsute hairs and are covered in white appressed sericeous hairs. The leaves measure 10mm to 50mm in length by 1mm to 2mm in width. The lanceolate leafy bracteoles measure 2mm to 4 mm in length by 0.3mm to 0.5mm in width. The calyxes are moderately to densely hoary while the corolla is pastel mauve to deep mauve.
Wildlife:
Prostanthera nivea’s wildlife is unknown to the author.
Cultivation:
Prostanthera nivea is a magnificent small shrub that should be more widely grown in cool subtropical and temperate gardens. It is ideal at the edge of a rainforest garden around swimming pools or courtyards and in heath gardens. In cultivation it will grow from 0.5 meters to 0.8 meters in height by 0.6 meters to 1 meter in diameter.
It can be pruned to maintain a smaller shrub if required.
It grows exceptionally well on lighter friable soils where deep leaf litter keeps the soil cool and moisture at an even level throughout the year. If these requirements are met it can cope with temperatures as low as minus 4 degrees and up to 37 degrees.
Add to the above, if it is given an adequate supply of water and a little native fertilizer on a regular basis the plants will respond with exceptionally good flowering year after year.
Prostanthera nivea would make outstanding contribution to a moist heath garden especially where it is mass planted. Here it can be used adjacent to the smaller growing plants scattered throughout the heath scene in small groups.
Make sure you give it the room to grow to its full potential. Use a lot of procumbent plants like or larger ferns like Adiantum formosum, Pteris umbrosa or Calochlaena dubia or large leaf fern like Microsorum sparsisora. Remusatia viviparia, Alocasia macrorrhiza or Coleus argentea would make good foliage contrasts. Mix it with other smaller shrubs so none of them dominate the scene but blend in to give a mosaic of foliage colours that you oversee. Actinotis helianthi, Eriostemon australiensis, Philotheca myoporoides or small red flowering Grevillea specie would all have great contrasting foliages. Something different would be the use of Cyathea cooperi, Cyathea australis, Asplenium australisica or Asplenium nidus.
It is ideal in settings near large ponds in larger sunny court yards or the larger rockeries. It needs light shade to grow at its best. Place it near old stumps and roots or medium size rocks to make the stumps, rocks or roots look larger and more gnarled. The deep greys and blacks against the ovate leaves and stems will contrast both the finesse of the plants and the coarseness of the stumps, rocks or roots.
Sparingly use other plants when planting and remember that this plants foliage and form is the center of attraction. Planted in small clusters using a gentle slope or a basin with a medium pool at the bottom would also give a strong contrast for most of the year. A billabong effect would give a quiet tranquil affect, whereas a waterfall or cascade would give more stimulation and energy to the scene. When using this plant as a feature only grow small plants that do not reach more than 250mm in height and have a compact habit with either blue or grey leaves, but be careful that these plants do not steal the stage. Taller plants can be grown in the background for balance. Annuals and perennials would really compliment the scene especially during the spring when the flowers are present.
Propagation:
Seeds: The seeds can be removed easily from the fruits as they start to open. Prune the flower heads off and store them for a couple of days in a brown paper bag.
Sow the freshly picked seeds directly into a seed raising mix, keeping them moist not wet. When the seedlings are 20mm to 25mm tall, prick them out and plant them into 50mm native tubes using a good organic mix. Store the excess seeds in the vegetable crisper of the fridge.
As the seedlings roots reach the bottom of the tubes plant them out into their permanent position. Do not delay as some set back will result.
Cuttings: Fortunately Prostanthera nivea cuttings strike relatively easy. Use 60mm to 120mm long semi hardwood cuttings prepared from partially mature wood of the current season’s growth
1 Prepare the cutting mix by adding two thirds sharp clean river sand, one third peat or one third perlite. These ingredients must be sterilized,
2 Select good material from non diseased plants,
3 Select semi green stems for cuttings. Look for a stem with two or three nodes,
4 Place the cutting on a flat, hard surface, and make a clean cut down one side of the cutting at the base for 10mm with a sharp sterile knife or razor blade. – This scarification of the node will increase the chances of roots emerging from this spot. Now remove all but one or two the leaves, leaving the apex leaves in tact. If the leaves are very large in proportion to the stem, cut off the apical halves.
5 Fill a saucer with water, and place a little mild strength rooting hormone into another container like a milk bottle top. Dip the node end of the cutting into the water and then into the rooting hormone. Tap off any excess hormone,
6 Use a small dipple stick or old pencil to poke a hole into the soilless potting mix. Ensure the hole is slightly larger than the stem diameter and be careful not to wipe the rooting hormone off the cuttings base. Place 2 to 4 cuttings in each of the 50mm native tubes,
7 I like to place the tubes in bucket with holes drilled in the bottom to allow excess water to drain out. A plastic bag that fits over the bucket is ideal to help maintain temperature and moisture. Place in a semi shaded, warm position like under 50mm shade cloth.
8 When the cuttings have struck, open the bag to allow air circulation for a few days to a week,
9 Once hardened off remove the cuttings from the bag and allow to further hardening for a few more days to a week,
10 Transplant into a good potting mix to grow on.
Fertilize using seaweed, fish emulsion or organic chicken pellets soaked in water on an alternate basis. Fertilize bi monthly until the plants have established themselves then annually in early September to October to maintain better colour, health, vitality and flowering
Further Comments from Readers:
“Hi reader, it seems you use The Bible of Botany a lot. That’s great as we have great pleasure in bringing it to you! It’s a little awkward for us to ask, but our first aim is to purchase land approximately 1,600 hectares to link several parcels of N.P. into one at The Pinnacles NSW Australia, but we need your help. We’re not salespeople. We’re amateur botanists who have dedicated over 30 years to saving the environment in a practical way. We depend on donations to reach our goal. If you donate just $5, the price of your coffee this Sunday, We can help to keep the planet alive in a real way and continue to bring you regular updates and features on Australian plants all in one Botanical Bible. Any support is greatly appreciated. Thank you.”
In the spirit of reconciliation we acknowledge the Bundjalung, Gumbaynggirr and Yaegl and all aboriginal nations throughout Australia and their connections to land, sea and community. We pay our respect to their Elders past, present and future for the pleasures we have gained.
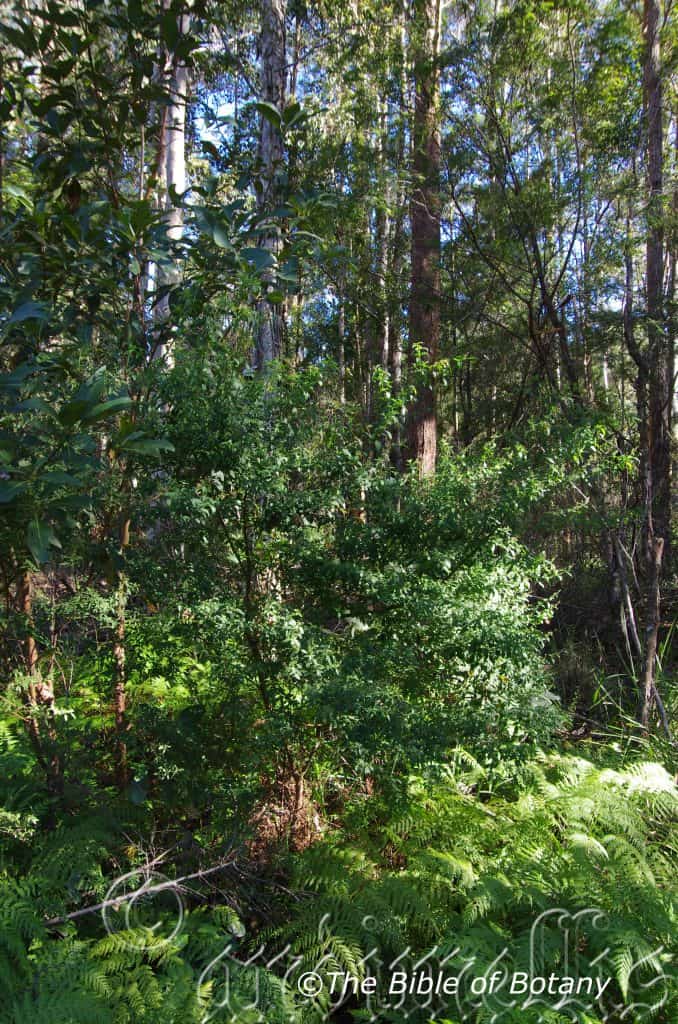
Yuraygir National Park NSW
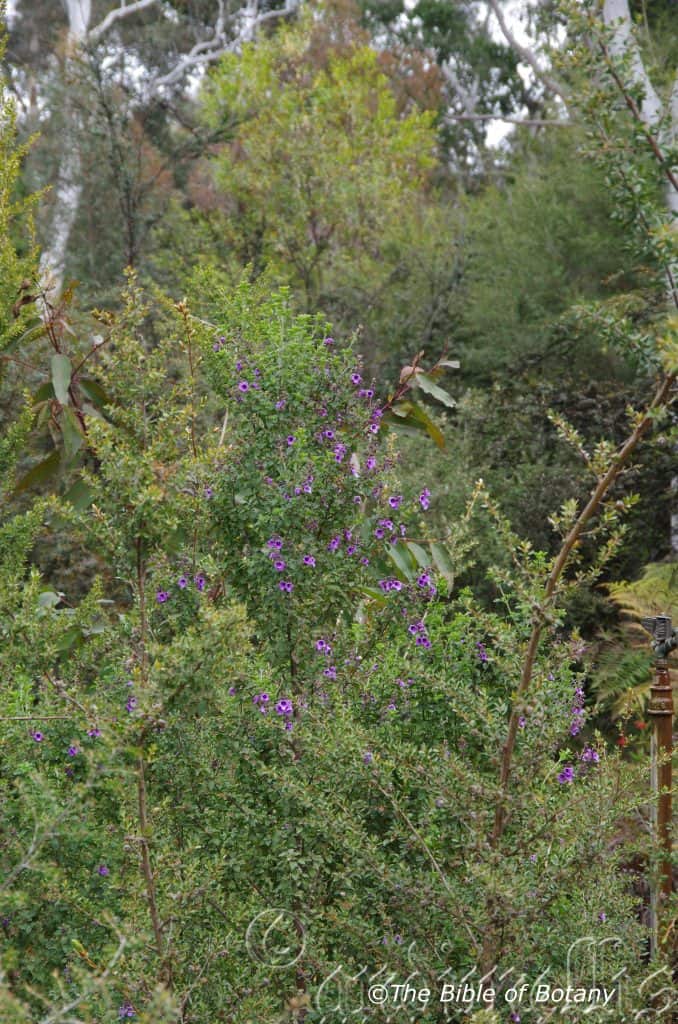
Canberra ACT
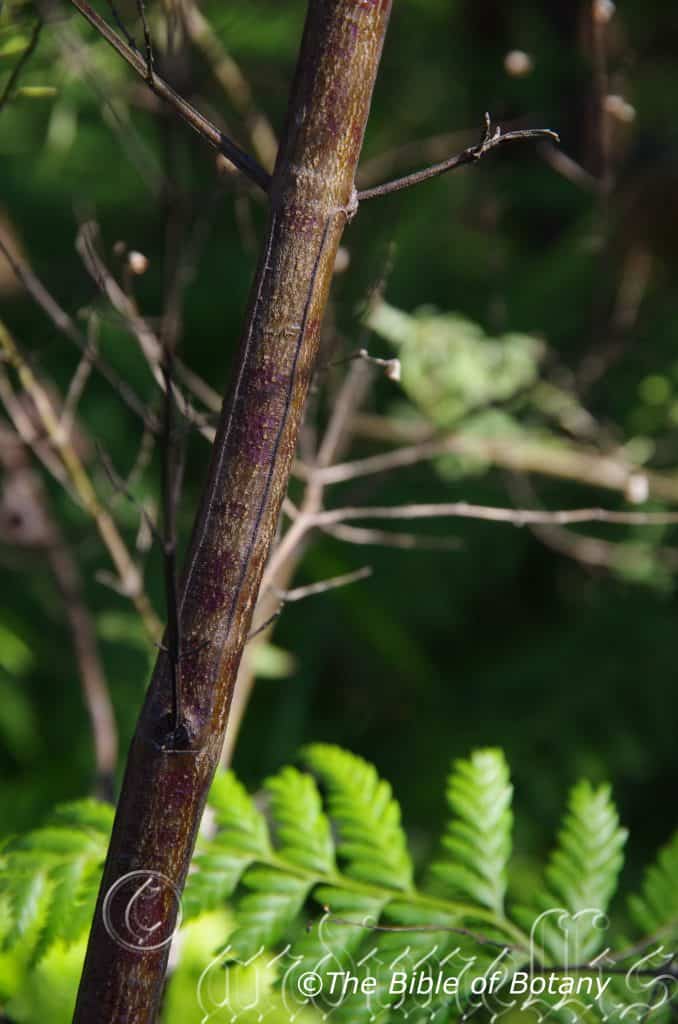
Yuraygir National Park NSW
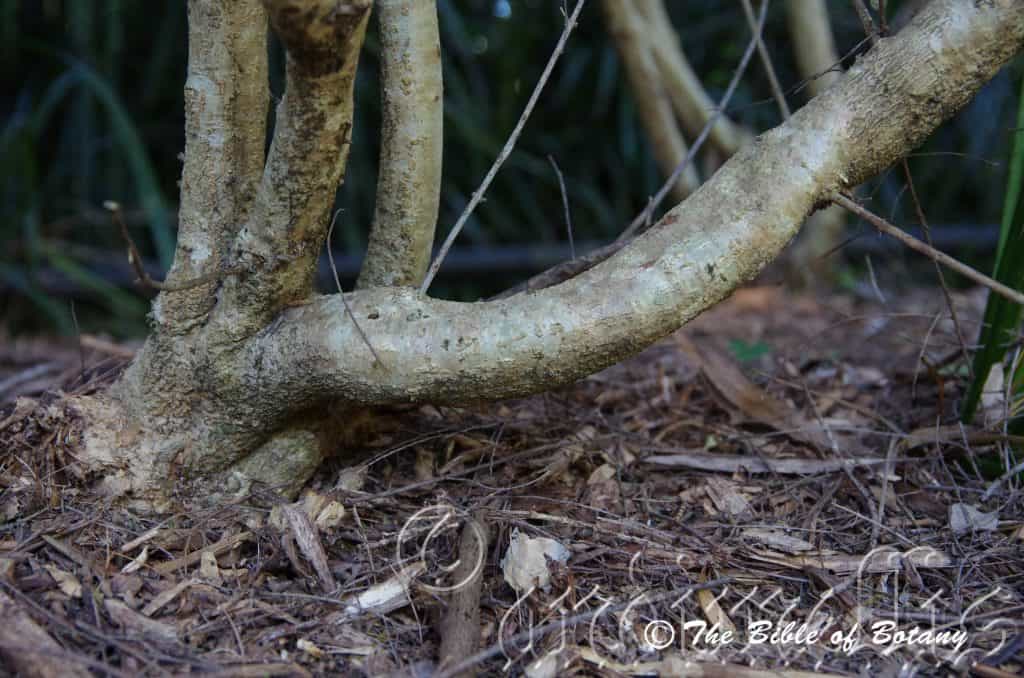
Indigiscapes Capalaba Qld.
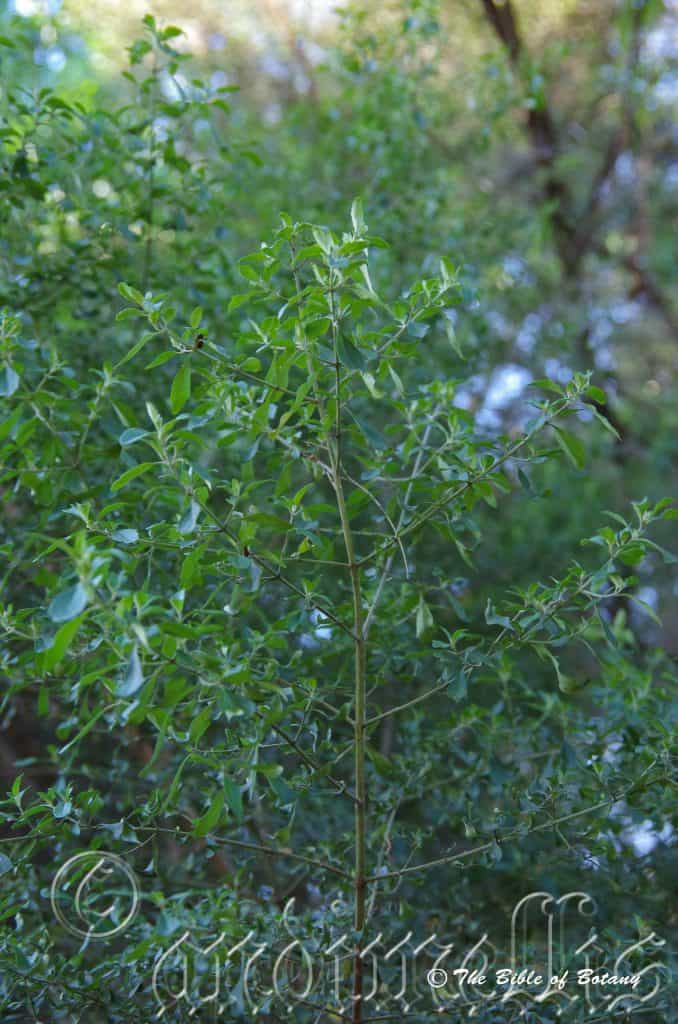
Indigiscapes Capalaba Qld.

Indigiscapes Capalaba Qld.
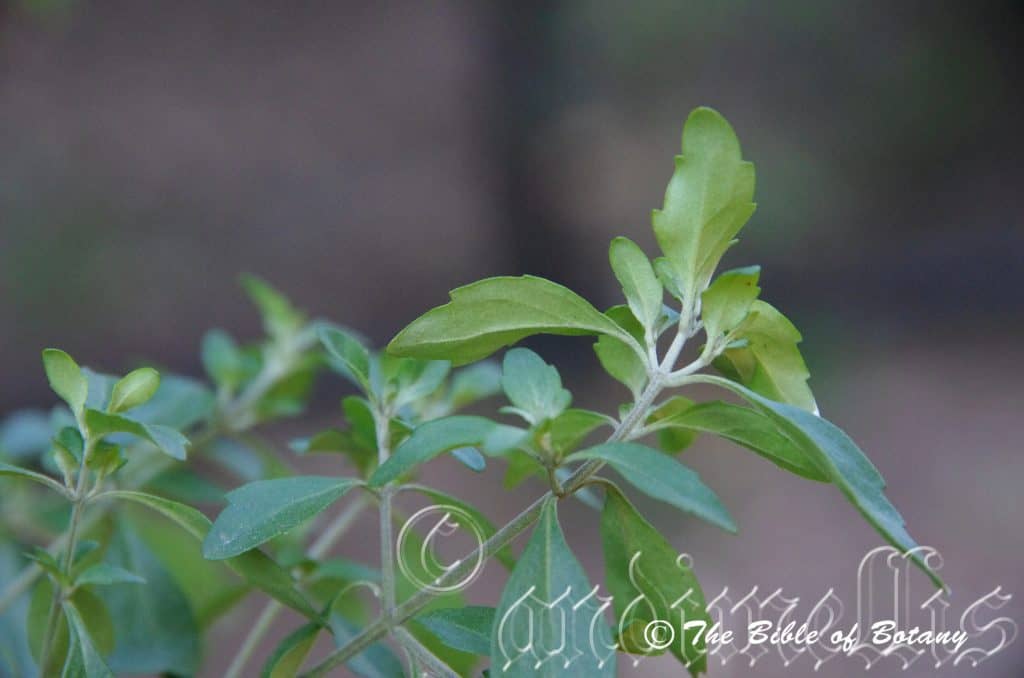
Indigiscapes Capalaba Qld.
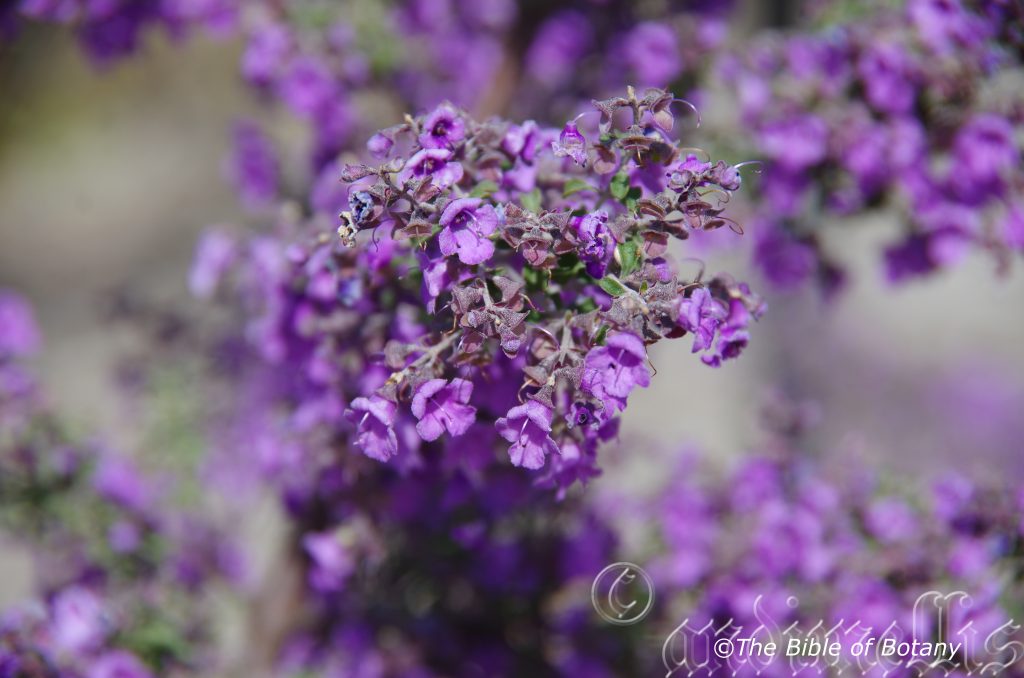
Canberra ACT
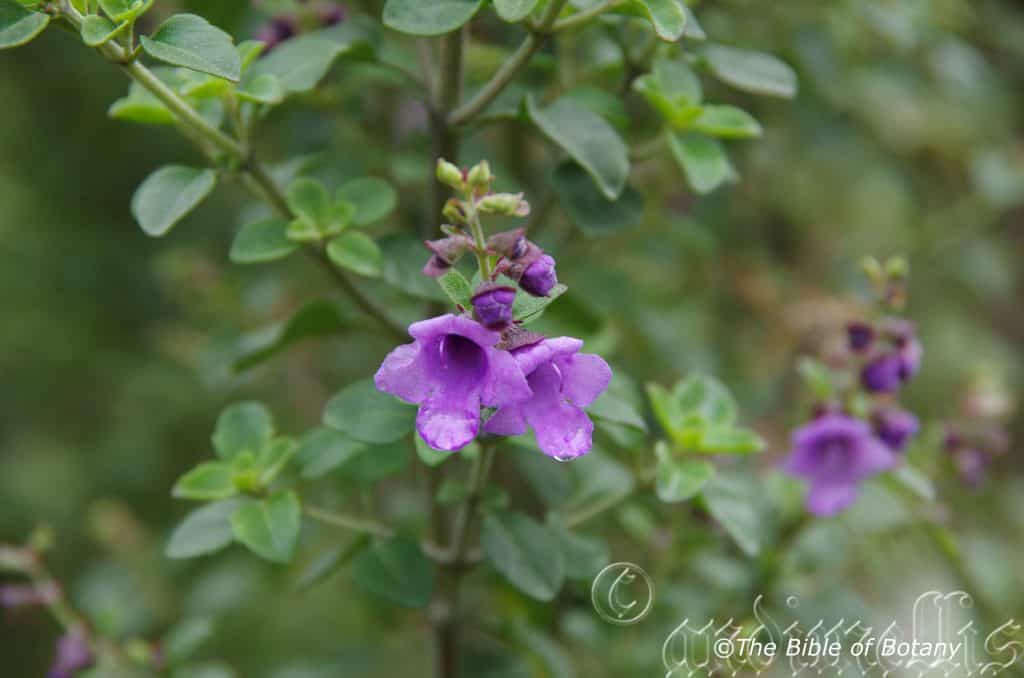
Canberra ACT
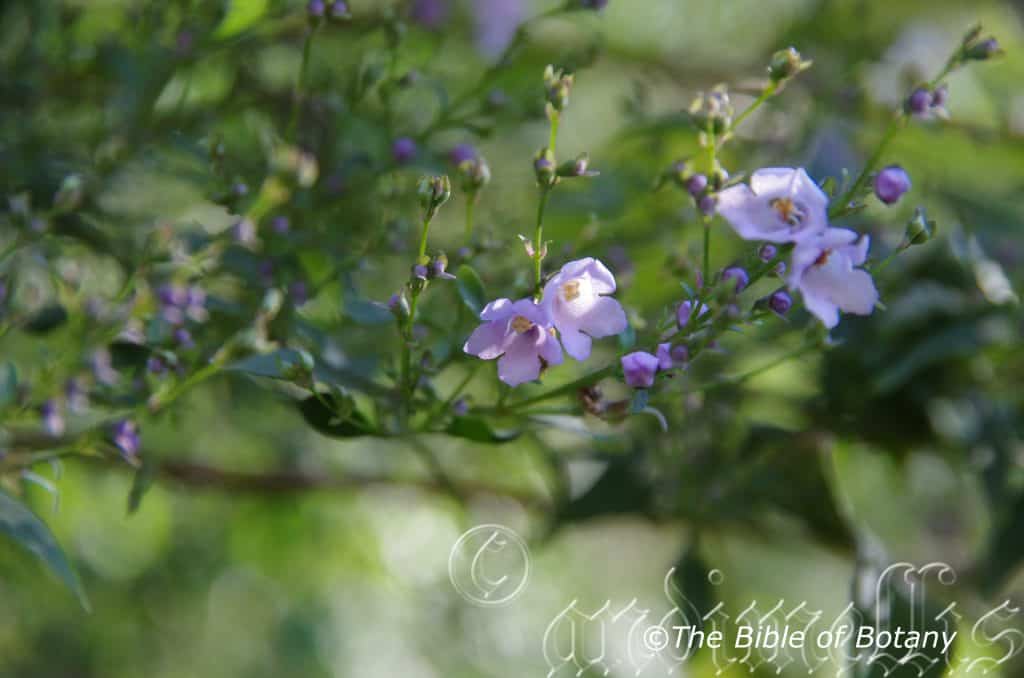
Yuraygir National Park NSW
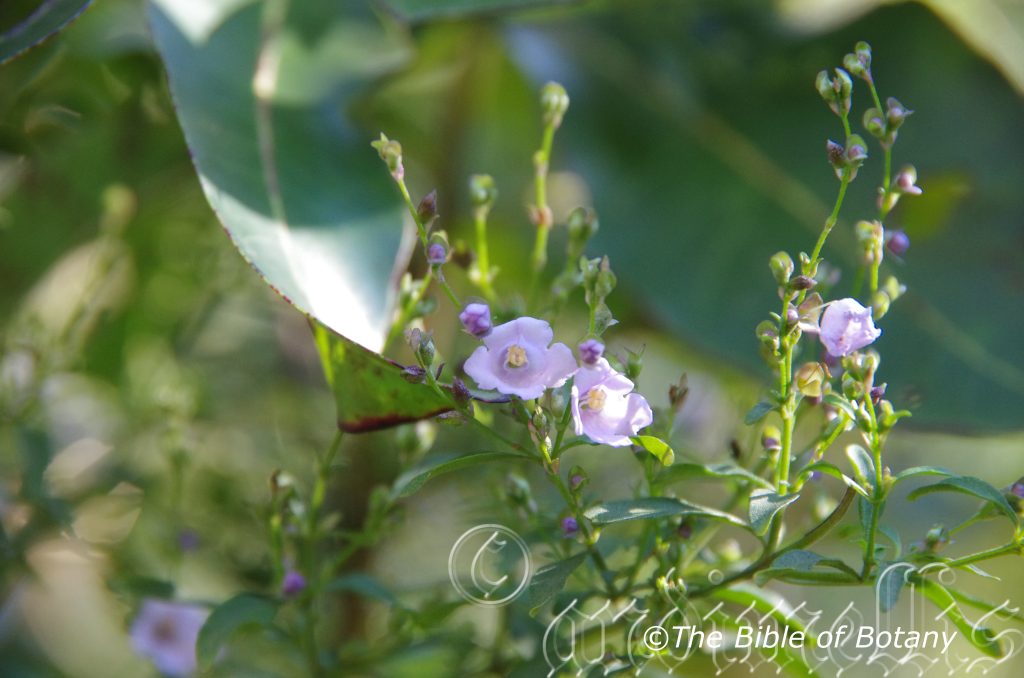
Yuraygir National Park NSW

Canberra ACT
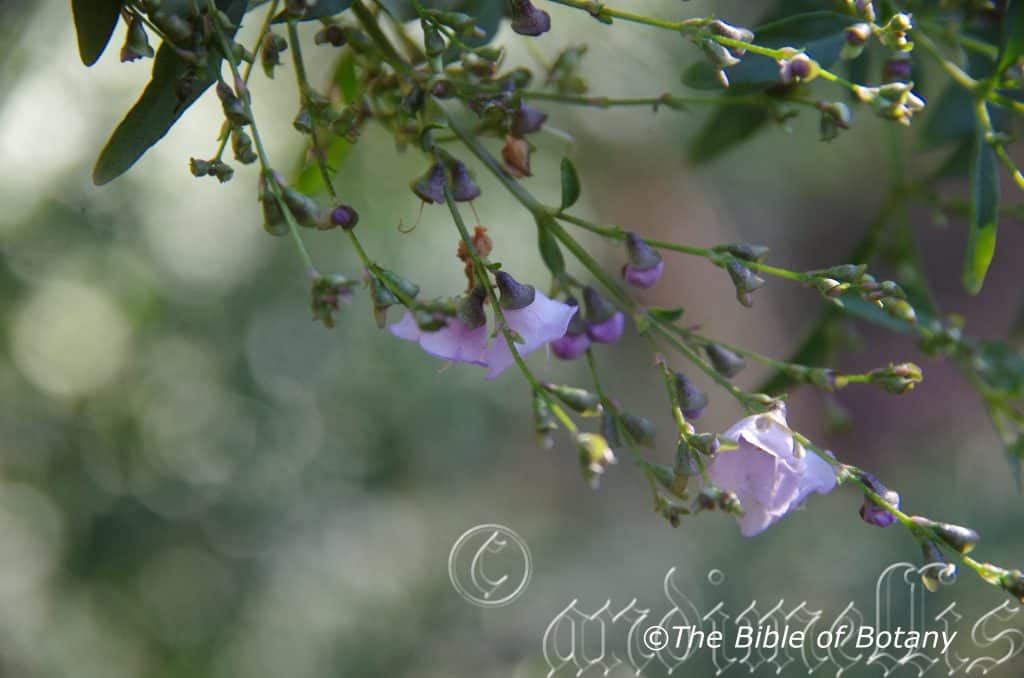
Yuraygir National Park NSW
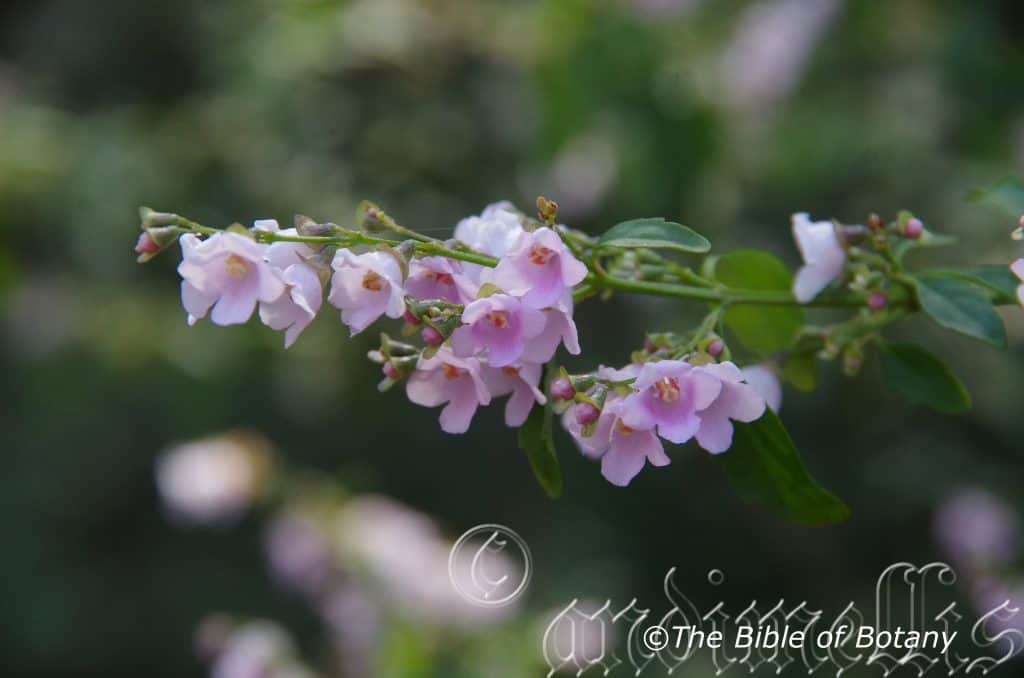
Yuraygir National Park NSW
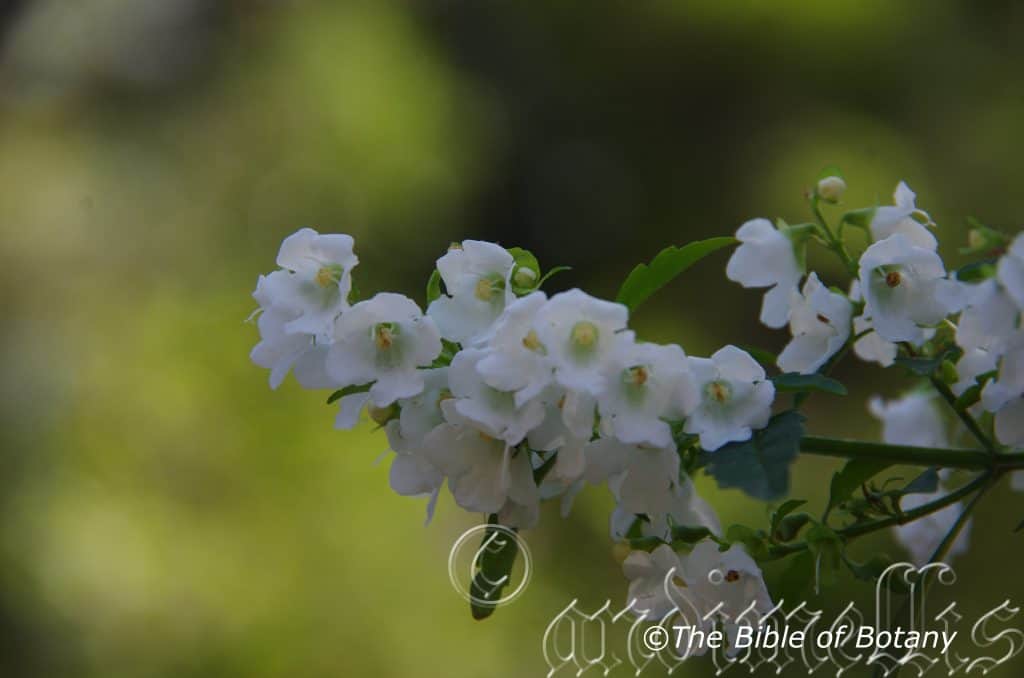
Yuraygir National Park NSW

Yuraygir National Park NSW
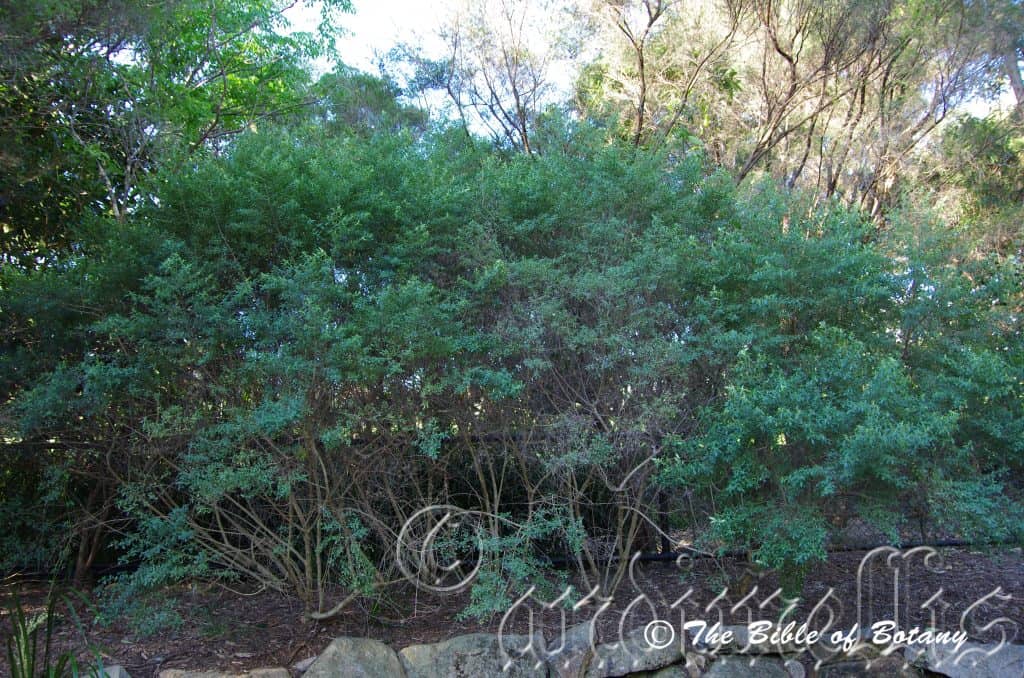
Indigiscapes Capalaba Qld.
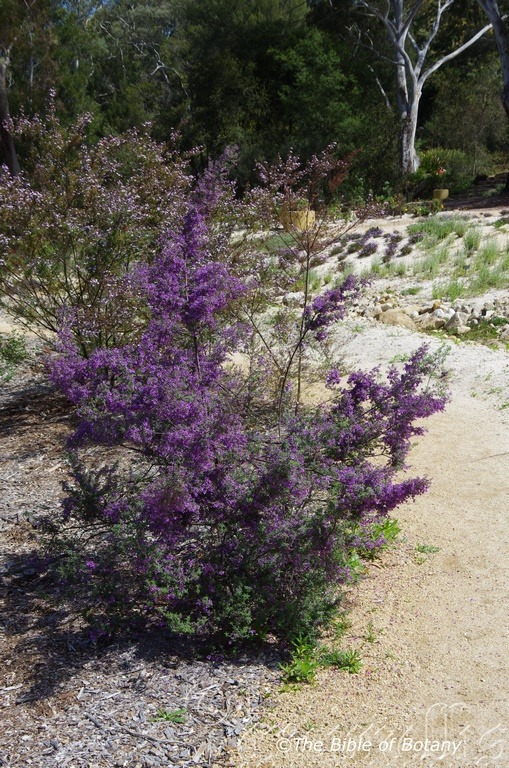
National Botanic Gardens ACT
Prostanthera ovalifolia
Classification:
Class: Equisetopsida
Subclass: Magnoliidae
Superorder: Asteranae
Order: Lamiales
Family: Lamiaceae
Genus: From Prostheke, which is Greek, for an appendage and ántha/ánthos, which are Ancient Greek for the male reproductive organ of a flower or the flower. It refers to anthers or stamens which have an appendage attached.
Species: From Ovalis, which is Latin for an egg shape and Folium, which is Latin for foliage. It refers to leaves, which has the outline of an egg in shape.
Common Name: Oval Leaf Mint Bush or Purple Mint Bush.
Distribution:
Prostanthera ovalifolia is found south from Shoalwater Bay north of Rockhampton in central coastal Queensland to the Tambo River in south eastern Gippsland with 2 isolated populations further to the west at Anglesea in Victoria and the Basket Range, Mitcham and Ferries McDonald Range in South Australia. It is found and as far west as Griffith on the Western Plains on the western side of Great Dividing on the range and east to the coast.
https://avh.ala.org.au/occurrences/search?taxa=Prostanthera+ovalifolia#tab_mapView
Habitat Aspect Climate:
Prostanthera ovalifolia prefers full sun to dappled shade. It usually grows in gullies and on slopes in moist sclerophyll forest to dry sclerophyll forest or openings adjacent to Rainforests. The altitude ranges from 10 meters ASL to 850 meters ASL.
The temperatures range from minus 3 degree in July to 36 degrees in January.
The rainfall ranges from lows of 300mm to 2100mm average per annum.
Soil Requirements:
Prostanthera ovalifolia prefers to grow on light sandy clays to medium clays often with copious quantities of leaf litter. The soils are usually derived from decomposed brown basalt, black basalts, sandstones, shale, granites or metamorphic rocks. The soils pH ranges from 5pH to 6pH. It does not tolerate waterlogged soils. Non saline soils to moderately saline soils are tolerated.
Height & Spread:
Wild Plants: 1m to 4m by 1m to 3m.
Characteristics:
Prostanthera ovalifolia grows as an erect, dense, spreading shrub with none aromatic to only slightly aromatic stems and leaves. The stems are angulated and sparsely covered moderately covered with short, soft, pilose hairs and sessile glands at least on the ridges.
The juvenile leaves are broad ovate, lobed and measure 7mm to 40mm in length by 3mm to 12mm in width.
The opposite narrow ovate to ovate leaves measure 5mm to 40mm in length by 3mm to 10mm in width. The petiole measures 1mm to 6mm in length. The bases are decurrent and attenuate while the apexes are obtuse to sub-acute. The discolourous laminas are deep sea-green, glabrous and dull on the upper laminas while the lower laminas are paler and densely covered in sessile glands. The laminas are flat or recurve upwards from the mid vein to the margins and decurve gently on the apical third. The margins are entire to slightly and irregularly sinuate. The midvein vein is prominent on the lower lamina is faintly visible on the upper lamina. The mid vein is sparsely covered in white hirsute hairs on the lower lamina.
Inflorescences are born in botryoidal racemes from the terminals. The caducous bracteoles measure 1mm to 2mm in length or are leafy and lanceolate and measure 2.5mm to 4mm in length. The calyxes measure 2mm to 3mm in length while the calyx tube measures 0.5mm to 1.5mm in length and the upper lobes measure 0.5mm to 1.5mm in length. The corolla is mauve to deep blue-purple or rarely white. The corolla tube measures 6mm to 10mm in length. The lobes margins are entire and slightly undulating. The upper lobe is ovate and measures 4mm to 5mm in length by 4mm to 5mm in width. The 2 oblong lateral lobes have obtuse to truncate apexes and measure 7.5mm to 9.2mm in length while the 2 lower lobes are partially united, spathulate and measure 9mm to 11mm in length.
The appendage on the anthers is usually absent in this species or when present measure 0.5mm to 0.6mm in length. The mauve to deep blue-purple or rarely white pistil measures 5mm to 8mm in length. The flowers appear from August to November.
The fruits are flattened ovoidal capsule. The capsules are glabrous and vary in diameter and length even on the same plant. The green capsules turn pale grey-brown when ripe. The calyxes are persistent and lengthen on the ripe fruits. The minute seeds are black.
Confusing Species:
Prostanthera cineolifera’s concolourous leaves measure 12mm to 25mm in length by 4mm to 12mm in width. The leaves are entire and sparsely covered in white pilose hairs. Leaves are faintly to moderately aromatic.
Prostanthera lanceolata’s discolourous leaves measure 12mm to 50mm in length by 9mm to 12mm in width. The leaves are toothed and sparsely to moderately covered in soft white hirsute hairs. Leaves are strongly aromatic.
Prostanthera ovalifolia’s discolourous leaves measure 5mm to 40mm in length by 3mm to 10mm in width. The leaves are entire and sparsely covered in soft white hirsute hairs. Leaves are faintly to moderately aromatic.
Wildlife:
Prostanthera ovalifolia’s wildlife is unknown to the author.
Cultivation:
Prostanthera ovalifolia is one of the best small shrubs for cool sub-tropical and temperate gardens. It is ideal at the edge of a rain forest garden around swimming pools or courtyards and in heath gardens. In cultivation it will grow from 1.5 meters to 4 meters in height by 2 meters to 3 meters in diameter.
It can be pruned to maintain a smaller shrub or hedge rows.
It grows exceptionally well on lighter friable soils where deep leaf litter keeps the soil cool and moisture at an even level throughout the year. If these requirements are met it can cope with temperatures as low as minus 4 degrees and up to 37 degrees.
Add to the above, if it is given an adequate supply of water and a little native fertilizer on a regular basis the plants will respond with exceptionally good flowering year after year.
Prostanthera ovalifolia would make outstanding contribution to a moist heath gardens especially where it is mass planted. Here it can be used adjacent to the smaller growing plants scattered throughout the heath scene in small groups. When you design a flat heath garden which it is well suited don’t use contours to display the plants as heath lands are almost always flat or have a slight rise. Plants must be planted close together and be short so you can see over the tallest ones with the exception of one or two plants at the most. These will be feature plants. The idea is to achieve a feeling of expansive flatness. This can be achieved with using the Prostanthera ovalifolia deep green leaves and brilliant flowering displays to contrast finer pale green or soft grey to glaucous coloured foliages. Make sure you give it the room to grow to its full potential. Use a lot of procumbent plants like or larger ferns like Adiantum formosum, Pteris umbrosa or Calochlaena dubia or large leaf plants like Microsorum sparsisora, Remusatia viviparia, Alocasia macrorrhiza or Coleus argentea. Mix it with other smaller shrubs so none of them dominate the scene but blend in to give a mosaic of foliage colours that you oversee. Actinotis helianthi, Eriostemon australiensis, Philotheca myoporoides or small red flowering Grevillea specie would all have great contrasting foliages. Something different would be the use of Cyathea cooperi, Cyathea australis, Asplenium australisica or Asplenium nidus.
It is ideal in settings near large ponds in large courtyards or the larger rockery. It needs light shade or dappled sunlight to grow at its best. Place it near old stumps and roots or medium size rocks to make the stumps, rocks or roots look larger and more gnarled. The deep greys and blacks against the ovate leaves and stems will contrast both the finesse of the plants and the coarseness of the stumps, rocks or roots. Sparingly use other plants when planting and remember that this plants foliage and form is the center of attraction. Planted in mass using a gentle slope or a basin with a medium pool at the bottom would also give a strong contrast for most of the year. A billabong effect would give a quite tranquil affect, whereas a waterfall or cascade would give more stimulation and energy to the scene. When using this plant as a feature only grow small plants that do not reach more than 250mm in height and have a compact habit with either blue or grey leaves, but be careful that these plants do not steal the stage. Taller plants can be grown in the background for balance. Annuals and perennials would really compliment the scene especially during the spring when the flowers are present.
Propagation:
Seeds: The seeds can be removed easily from the fruits as they start to open. Prune the flower heads off and store them for a couple of days in a brown paper bag.
Sow the freshly picked seeds directly into a seed raising mix, keeping them moist not wet. When the seedlings are 20mm to 25mm tall, prick them out and plant them into 50mm native tubes using a good organic mix. Store the excess seeds in the vegetable crisper of the fridge.
As the seedlings roots reach the bottom of the tubes plant them out into their permanent position. Do not delay.
Cuttings: Fortunately Prostanthera ovalifolia cuttings strike relatively easy. Use 60mm to 120mm long semi hardwood cuttings prepared from partially mature wood of the current season’s growth
1 Prepare the cutting mix by adding two thirds sharp clean river sand, one third peat or one third perlite. These ingredients must be sterilized,
2 Select good material from non diseased plants,
3 Select semi green stems for cuttings. Look for a stem with two or three nodes,
4 Place the cutting on a flat, hard surface, and make a clean cut down one side of the cutting at the base for 10mm with a sharp sterile knife or razor blade. – This scarification of the node will increase the chances of roots emerging from this spot. Now remove all but one or two the leaves, leaving the apex leaves in tact. If the leaves are very large in proportion to the stem, cut off the apical halves.
5 Fill a saucer with water, and place a little mild strength rooting hormone into another container like a milk bottle top. Dip the node end of the cutting into the water and then into the rooting hormone. Tap off any excess hormone,
6 Use a small dipple stick or old pencil to poke a hole into the soilless potting mix. Ensure the hole is slightly larger than the stem diameter and be careful not to wipe the rooting hormone off the cuttings base. Place 2 to 4 cuttings in each of the 50mm native tubes,
7 I like to place the tubes in bucket with holes drilled in the bottom to allow excess water to drain out. A plastic bag that fits over the bucket is ideal to help maintain temperature and moisture. Place in a semi shaded, warm position like under 50mm shade cloth.
8 When the cuttings have struck, open the bag to allow air circulation for a few days to a week,
9 Once hardened off remove the cuttings from the bag and allow to further hardening for a few more days to a week,
10 Transplant into a good potting mix to grow on.
Fertilize using seaweed, fish emulsion or organic chicken pellets soaked in water on an alternate basis. Fertilize bi monthly until the plants have established themselves then annually in early September to October to maintain better colour, health, vitality and flowering
Further Comments from Readers:
“Hi reader, it seems you use The Bible of Botany a lot. That’s great as we have great pleasure in bringing it to you! It’s a little awkward for us to ask, but our first aim is to purchase land approximately 1,600 hectares to link several parcels of N.P. into one at The Pinnacles NSW Australia, but we need your help. We’re not salespeople. We’re amateur botanists who have dedicated over 30 years to saving the environment in a practical way. We depend on donations to reach our goal. If you donate just $5, the price of your coffee this Sunday, We can help to keep the planet alive in a real way and continue to bring you regular updates and features on Australian plants all in one Botanical Bible. Any support is greatly appreciated. Thank you.”
In the spirit of reconciliation we acknowledge the Bundjalung, Gumbaynggirr and Yaegl and all aboriginal nations throughout Australia and their connections to land, sea and community. We pay our respect to their Elders past, present and future for the pleasures we have gained.
Prostanthera palustris
Classification:
Class: Equisetopsida
Subclass: Magnoliidae
Superorder: Asteranae
Order: Lamiales
Family: Lamiaceae
Genus: From Prostheke, which is Greek, for an appendage and ántha/ánthos, which are Ancient Greek for the male reproductive organ of a flower or the flower. It refers to anthers or stamens which have an appendage attached.
Species: From Paludosa which is Greek or Palūs/ Palūdōsum, which is Latin for wallums, swamps or marshes. It refers to plants, which love of wet places like wallums, marshes and swamps.
Common Name:
Distribution:
Prostanthera palustris is found in 3 disjunct populations south from Mount Tinbeerwah on the south eastern coastal of Queensland to Upper Mongogarie Creek and Bundjarlung National Park north of Yamba in north eastern New South Wales.
https://avh.ala.org.au/occurrences/search?taxa=Prostanthera+palustris#tab_mapView
Habitat Aspect Climate:
Prostanthera palustris prefers full sun to dappled shade. It usually grows in wet to swampy shallow depressions in open woodlands and adjacent to littoral rainforests in moist to wet heaths. The altitude ranges from 10 meters ASL to 80 meters ASL.
The temperatures range from 1 degree in July to 38 degrees in January.
The rainfall ranges from lows of 1050mm to 1900mm average per annum.
Soil Requirements:
Prostanthera palustris prefers to grow on light sandy clays to medium clays often with copious quantities of leaf litter. The soils are usually derived from decomposed brown basalt, black basalts, sandstones, shale, granites or metamorphic rocks. The soils pH ranges from 5pH to 6pH. It does not tolerate waterlogged soils. Non saline soils to moderately saline soils are tolerated.
Height & Spread:
Wild Plants: 0.2m to 0.3m by 0.3m to 0.5m
Characteristics:
Prostanthera palustris grows as a low spreading, weak sub shrub with none aromatic to only slightly aromatic stems and leaves. The stems are covered in soft, off white hirsute hairs, restricted to the area between the ridges. The antrorse to semi appressed sericeous hairs measure 0.4mm to 0.7mm in length.
The opposite, spathulate leaves measure 3mm to 8mm in length by 2.5mm to 5mm in width. The petiole measures 1mm to 2mm in length. The bases are attenuate while the apexes are obtuse to obtuse-acute. The discolourous laminas are grass-green to deep green, glabrous and dull on the upper laminas while the lower laminas are paler and sparsely covered white, puberulent hairs. The laminas are flat while the margins are entire to slightly and irregularly sinuate. The midvein vein is moderately covered in white pulverulent hairs and is prominent on the lower lamina is faintly visible on the upper lamina.
The inflorescences are monadic, frondose racemes born from the terminals. The racemes have 4 to 10 individual flowers. The caducous bracteoles measure 1.2mm to 1.5mm in length. The calyxes measure 4mm to 6mm in length while the calyx tube measures 2.5mm to 3mm in length and the lobes measure 1.5mm to 3mm in length. The corolla is pale mauve to white with deep yellow dots in throat and inner adaxial-median surface of tube. The corolla tube measures 8mm to 10mm in length. The lobes margins are entire and slightly undulating. The upper lobe is ovate and measures 4mm to 5mm in length by 4mm to 5mm in width. The 2 oblong lateral lobes have obtuse to truncate apexes and measure 7.5mm to 9.2mm in length while the 2 lower lobes are partially united, spathulate and measure 9mm to 11mm in length.
The anthers have a short basal appendage terminating in 4 to 6 narrowly triangular trichomes. The mauve to white pistil measures 5mm to 6mm in length. The flowers appear from September to November.
The fruits are flattened ovoidal capsule. The capsules are glabrous and vary in diameter and length even on the same plant. The green capsules turn pale grey-brown when ripe. The calyxes are persistent and lengthen on the ripe fruits. The minute seeds are black.
Wildlife:
Prostanthera palustris’s wildlife is unknown to the author.
Cultivation:
There is very little known about this little Prostanthera. Prostanthera palustris is a small open shrub that should be more widely grown in cool subtropical and temperate gardens. It would be ideal in a heath, garden around swimming pools or courtyards. In cultivation it will probably grow from 0.3 meters to 0.5 meters in height by 0.5 meters to 0.8 meters in diameter.
It would probably grow exceptionally well on lighter friable soils where deep leaf litter keeps the soil cool and moisture at an even level throughout the year. If these requirements are met it probably cope with temperatures as low as minus 2 degrees and up to 39 degrees.
Add to the above, if it is given an adequate supply of water and a little native fertilizer on a regular basis the plants will respond with exceptionally good flowering year after year.
Prostanthera palustris would make a good contribution to a moist heath garden especially where it is mass planted due to its sparseness of stems. Here it can be used adjacent to the smaller growing plants scattered throughout the heath scene in small groups. When you design a flat heath garden which it is well suited don’t use contours to display the plants as heath lands are almost always flat or have a slight rise. Plants must be planted close together and be short so you can see over the tallest ones with the exception of one or two plants at the most. These will be feature plants. The idea is to achieve a feeling of expansive flatness. This can be achieved with using the Prostanthera palustris deep green leaves and brilliant flowering displays to contrast finer pale green or soft grey to glaucous coloured foliages. Make sure you give it the room to grow to its full potential. Use a lot of procumbent plants like or larger ferns like Adiantum formosum, Pteris umbrosa or Calochlaena dubia or large leaf plants like Microsorum sparsisora. Remusatia viviparia, Alocasia macrorrhiza or Coleus argentea are great plants to add foliage variation and colour. Mix it with other smaller shrubs so none of them dominate the scene but blend in to give a mosaic of foliage colours that you oversee. Actinotis helianthi, Eriostemon australiensis, Philotheca myoporoides or small red flowering Grevillea species would all have great contrasting foliages. Something different would be the use of Cyathea cooperi, Cyathea australis, Asplenium australisica or Asplenium nidus.
Propagation:
Seeds: The seeds of Prostanthera palustris can probably be removed easily from the fruits as they start to open. Prune the flower heads off and store them for a couple of days in a brown paper bag.
Sow the freshly picked seeds directly into a seed raising mix, keeping them moist not wet.
When the seedlings are 20mm to 25mm tall, prick them out and plant them into 50mm native tubes using a good organic mix. Store the excess seeds in the vegetable crisper of the fridge.
As the seedlings roots reach the bottom of the tubes plant them out into their permanent position.
Cuttings: Fortunately the cuttings like all Prostanthera probably strike relatively easy. Use 60mm to 120mm long semi hardwood cuttings prepared from partially mature wood of the current season’s growth
1 Prepare the cutting mix by adding two thirds sharp clean river sand, one third peat or one third perlite. These ingredients must be sterilized,
2 Select good material from non diseased plants,
3 Select semi green stems for cuttings. Look for a stem with two or three nodes,
4 Place the cutting on a flat, hard surface, and make a clean cut down one side of the cutting at the base for 10mm with a sharp sterile knife or razor blade. – This scarification of the node will increase the chances of roots emerging from this spot. Now remove all but one or two the leaves, leaving the apex leaves in tact. If the leaves are very large in proportion to the stem, cut off the apical halves.
5 Fill a saucer with water, and place a little mild strength rooting hormone into another container like a milk bottle top. Dip the node end of the cutting into the water and then into the rooting hormone. Tap off any excess hormone,
6 Use a small dipple stick or old pencil to poke a hole into the soilless potting mix. Ensure the hole is slightly larger than the stem diameter and be careful not to wipe the rooting hormone off the cuttings base. Place 2 to 4 cuttings in each of the 50mm native tubes,
7 I like to place the tubes in bucket with holes drilled in the bottom to allow excess water to drain out. A plastic bag that fits over the bucket is ideal to help maintain temperature and moisture. Place in a semi shaded, warm position like under 50mm shade cloth.
8 When the cuttings have struck, open the bag to allow air circulation for a few days to a week,
9 Once hardened off remove the cuttings from the bag and allow to further hardening for a few more days to a week,
10 Transplant into a good potting mix to grow on.
Fertilize using seaweed, fish emulsion or organic chicken pellets soaked in water on an alternate basis. Fertilize bi monthly until the plants have established themselves then annually in early September to October to maintain better colour, health, vitality and flowering
Further Comments from Readers:
“Hi reader, it seems you use The Bible of Botany a lot. That’s great as we have great pleasure in bringing it to you! It’s a little awkward for us to ask, but our first aim is to purchase land approximately 1,600 hectares to link several parcels of N.P. into one at The Pinnacles NSW Australia, but we need your help. We’re not salespeople. We’re amateur botanists who have dedicated over 30 years to saving the environment in a practical way. We depend on donations to reach our goal. If you donate just $5, the price of your coffee this Sunday, We can help to keep the planet alive in a real way and continue to bring you regular updates and features on Australian plants all in one Botanical Bible. Any support is greatly appreciated. Thank you.”
In the spirit of reconciliation we acknowledge the Bundjalung, Gumbaynggirr and Yaegl and all aboriginal nations throughout Australia and their connections to land, sea and community. We pay our respect to their Elders past, present and future for the pleasures we have gained.
Prostanthera prunelloides
Classification:
Class: Equisetopsida
Subclass: Magnoliidae
Superorder: Asteranae
Order: Lamiales
Family: Lamiaceae
Genus: From Prostheke, which is Greek, for an appendage and ántha/ánthos, which are Ancient Greek for the male reproductive organ of a flower or the flower. It refers to anthers or stamens which have an appendage attached.
Species: From Brunella, which is Latin for a smooth twill made from composite materials and wool and Eîdos/Oides, which is Ancient Greek for alike or similar to. It refers to leaves, which resemble those of the Prunella genus.
Common Name:
Distribution:
Prostanthera prunelloides is found in 4 disjunct populations on and east of the Great Dividing Range including Poverty Point in southern coastal Queensland, Murwillumbah, then south from Murrumbo to the Nepean River and south from Bundawang Range to the upper Clyde River in eastern New South Wales.
https://avh.ala.org.au/occurrences/search?taxa=Prostanthera+prunelloides#tab_mapView
Habitat Aspect Climate:
Prostanthera prunelloides prefers full sun to dappled shade. It grows in dry sclerophyll forest, open eucalyptus woodlands, often along creeks and rills. The altitude ranges from 20 meters ASL to 650 meters ASL.
The temperatures range from minus 2 degree in July to 38 degrees in January.
The rainfall ranges from lows of 850mm to 2000mm average per annum.
Soil Requirements:
Prostanthera prunelloides prefers to grow on light sandy loams to light fatty clays often with copious quantities of forest litter. The soils are usually derived from decomposed brown or reddish sandstones or at times shale and conglomerate rocks. The soils pH ranges from 5pH to 6pH. It does not tolerate waterlogged soils. Non saline soils to moderately saline soils are tolerated.
Height & Spread:
Wild Plants: 1m to 2m by 1m to 2.2m.
Characteristics:
Prostanthera prunelloides grows as an erect to spreading shrub with slightly aromatic stems and leaves. The 4 angulated stems are usually tuberculate and moderately covered in sessile glands and are also moderately covered in short, white pilose hairs between ridges.
The opposite, ovate to orbicular leaves measure 16mm to 65mm in length by 9mm to 40mm in width. The petiole is moderately covered in short, white pilose and measures 3mm to 14mm in length. The bases are broad-cuneate to rounded while the apexes are obtuse. The concolourous laminas are grass-green to mid green, glabrous and dull on the upper laminas while the lower laminas are glabrous and densely covered with sessile or shortly stemmed glands. The laminas are flat or recurve slightly from the mid vein to the margins while the margins are entire to finely tooth. The midvein vein and lateral veins are sparsely covered in white puberulent hairs and are prominent on the lower lamina is faintly visible on the upper lamina.
The inflorescences are botryoidal racemes born from the terminals. The caducous bracteoles measure 2.2mm to 3mm in length. The calyxes measure 5mm to 6.5mm in length while the calyx tube measures 3mm to 3.5mm in length and the lobes measure 2mm to 3mm in length. The corolla is white, pale mauve or rarely with a pink tinge with white externally and is white to mauve or white tinged mauve at the base internally. The corolla tube measures 12mm to 15mm in length. The lobes margins are entire and slightly undulating. The upper lobe is ovate and measures 5mm to 6mm in length by 5mm to 6mm in width. The 2 oblong lateral lobes have obtuse to truncate apexes and measure 6mm to 7.5mm in length while the 2 lower lobes are partially united, spathulate and measure 7.5mm to 10mm in length.
The anther’s appendages measure 1mm to 1.3mm in length. The white with faint mauve pistil measures 8mm to 10mm in length. The flowers appear from September to November.
The fruits are flattened ovoidal capsule. The capsules are glabrous and vary in diameter and length even on the same plant. The green capsules turn pale grey-brown when ripe. The calyxes are persistent and lengthen slightly on the ripe fruits. The minute seeds are black.
Wildlife:
Prostanthera prunelloides’s wildlife is unknown to the author.
Cultivation:
Prostanthera prunelloides is a magnificent small shrub that should be more widely grown in cool sub-tropical and temperate gardens. It is ideal at the edge of a rainforest garden around swimming pools or courtyards and in heath gardens. In cultivation it will grow from 1.5 meters to 2.2 meters in height by 2 meters to 2.5 meters in diameter.
It can be pruned to maintain a smaller shrub or hedge rows.
It grows exceptionally well on lighter friable soils where deep leaf litter keeps the soil cool and moisture at an even level throughout the year. If these requirements are met it can cope with temperatures as low as minus 3 degrees and up to 37 degrees.
Prostanthera prunelloides would make outstanding contribution to a tall moist heath garden especially where it is planted in small clusters. Here it can be used adjacent to the smaller growing plants scattered throughout the heath scene in small groups. When you design a flat heath garden which it is well suited don’t use contours to display the plants as heath lands are almost always flat or have a slight rise. Plants should be planted close together and be short so you can see over the tallest ones with the exception of one or two plants at the most. These will be feature plants. The idea is to achieve a feeling of expansive flatness. This can be achieved with using the Prostanthera prunelloides deep green leaves and brilliant flowering displays to contrast finer pale green or soft grey to glaucous coloured foliages. Make sure you give it the room to grow to its full potential. Use a lot of procumbent plants like Hibbertia linearis, Hibbertia obtusifolia or Hibbertia scandens as a ground cover which would look stunning in flower together. Mix it with other smaller shrubs so none of them dominate the scene but blend in to give a mosaic of foliage colours that you oversee. Actinotis helianthi, Myoporum parvifolia, Xerochrysum bracteatum or Grevillea thelemanniana will all add colour and texture to create great contrasting foliages.
It is ideal in settings near large ponds in large court yards or the larger rockery. It needs light shade to grow at its best. Place them near old stumps and roots or medium size rocks to make the stumps, rocks or roots look larger and more gnarled. The deep greys and blacks against the ovate leaves and stems will contrast both the finesse of the plants and the coarseness of the stumps, rocks or roots.
Sparingly use other plants when planting and remember that this plants foliage and form is the center of attraction. Planted in mass using a gentle slope or a basin with a medium pool at the bottom would also give a strong contrast for most of the year. A billabong affect would give a quite tranquil affect where as a waterfall or cascade would give more stimulation and energy to the scene. When using this plant as a feature only grow small plants that do not reach more than 250mm in height and have a compact habit with either blue or grey leaves, but be careful that these plants do not steal the stage. Taller plants can be grown in the background for balance. Annuals and perennials would really compliment the scene especially during the spring when the flowers are present.
Propagation:
Seeds: The seeds can be removed easily from the fruits as they start to open. Prune the flower heads off and store them for a couple of days in a brown paper bag.
Sow the freshly picked seeds directly into a seed raising mix, keeping them moist not wet. When the seedlings are 20mm to 25mm tall, prick them out and plant them into 50mm native tubes using a good organic mix. Store the excess seeds in the vegetable crisper of the fridge.
As the seedlings roots reach the bottom of the tubes plant them out into their permanent position. Do not delay.
Cuttings: Fortunately Prostanthera prunelloides cuttings strike relatively easy. Use 60mm to 120mm long semi hardwood cuttings prepared from partially mature wood of the current season’s growth
1 Prepare the cutting mix by adding two thirds sharp clean river sand, one third peat or one third perlite. These ingredients must be sterilized,
2 Select good material from non diseased plants,
3 Select semi green stems for cuttings. Look for a stem with two or three nodes,
4 Place the cutting on a flat, hard surface, and make a clean cut down one side of the cutting at the base for 10mm with a sharp sterile knife or razor blade. – This scarification of the node will increase the chances of roots emerging from this spot. Now remove all but one or two the leaves, leaving the apex leaves in tact. If the leaves are very large in proportion to the stem, cut off the apical halves.
5 Fill a saucer with water, and place a little mild strength rooting hormone into another container like a milk bottle top. Dip the node end of the cutting into the water and then into the rooting hormone. Tap off any excess hormone,
6 Use a small dipple stick or old pencil to poke a hole into the soilless potting mix. Ensure the hole is slightly larger than the stem diameter and be careful not to wipe the rooting hormone off the cuttings base. Place 2 to 4 cuttings in each of the 50mm native tubes,
7 I like to place the tubes in bucket with holes drilled in the bottom to allow excess water to drain out. A plastic bag that fits over the bucket is ideal to help maintain temperature and moisture. Place in a semi shaded, warm position like under 50mm shade cloth.
8 When the cuttings have struck, open the bag to allow air circulation for a few days to a week,
9 Once hardened off remove the cuttings from the bag and allow to further hardening for a few more days to a week,
10 Transplant into a good potting mix to grow on.
Fertilize using seaweed, fish emulsion or organic chicken pellets soaked in water on an alternate basis. Fertilize bi monthly until the plants have established themselves then annually in early September to October to maintain better colour, health, vitality and flowering
Further Comments from Readers:
“Hi reader, it seems you use The Bible of Botany a lot. That’s great as we have great pleasure in bringing it to you! It’s a little awkward for us to ask, but our first aim is to purchase land approximately 1,600 hectares to link several parcels of N.P. into one at The Pinnacles NSW Australia, but we need your help. We’re not salespeople. We’re amateur botanists who have dedicated over 30 years to saving the environment in a practical way. We depend on donations to reach our goal. If you donate just $5, the price of your coffee this Sunday, We can help to keep the planet alive in a real way and continue to bring you regular updates and features on Australian plants all in one Botanical Bible. Any support is greatly appreciated. Thank you.”
In the spirit of reconciliation we acknowledge the Bundjalung, Gumbaynggirr and Yaegl and all aboriginal nations throughout Australia and their connections to land, sea and community. We pay our respect to their Elders past, present and future for the pleasures we have gained.
Prostanthera rhombea
Classification:
Class: Equisetopsida
Subclass: Magnoliidae
Superorder: Asteranae
Order: Lamiales
Family: Lamiaceae
Genus: From Prostheke, which is Greek, for an appendage and ántha/ánthos, which are Ancient Greek for the male reproductive organ of a flower or the flower. It refers to anthers or stamens which have an appendage attached.
Species: From Rhómbos, which is Ancient Greek for to spin around or diamond shape. It refers to leaves or phyllodes, which have a diamond shape.
Common Name: Sparkling Mint Bush.
Distribution:
Prostanthera rhombea is found in several disjunct populations south from Mount Merino, McPherson Range in northern New South Wales to Licola in central Victoria. It is mainly found on and east of the Great Dividing Range except for a single population near Narrabri.
https://avh.ala.org.au/occurrences/search?taxa=Prostanthera+rhombea#tab_mapView
Habitat Aspect Climate:
Prostanthera rhombea prefers full sun to dappled shade. It grows adjacent in dry rainforest, moist sclerophyll forest, often in riparian habitats or gallery forests. The altitude ranges from 12 meters ASL to 1110 meters ASL.
The temperatures range from minus 4 degree in July to 36 degrees in January.
The rainfall ranges from lows of 850mm to 2000mm average per annum.
Soil Requirements:
Prostanthera rhombea prefers skeletal to deep, coarse sands, fine sands, sandy loams to light fatty clays often with or without copious quantities of leaf litter. The soils are usually derived from decomposed brown, orange or reddish sandstones. The soils pH ranges from 5pH to 6pH. It does not tolerate waterlogged soils but prefers reasonable moisture retention throughout the year. Non saline soils to moderately saline soils are tolerated.
Height & Spread:
Wild Plants: 0.5m to 2m by 1m to 2.5m.
Characteristics:
Prostanthera rhombea grows as an open divaricate shrub with strongly aromatic stems and leaves. The stems are moderately to densely covered in stiff divaricate to spreading hirsute hairs and glandular hirtellous hairs.
The opposite, ovate to orbicular leaves measure 2mm to 6mm in length by 2mm to 6mm in width. The petioles are moderately covered in white to pale brown hirsute and hirtellous hairs and measure 1mm to 3mm in length. The bases are broad-cuneate to rounded while the apexes are obtuse. The concolourous laminas are grass-green to mid green, dull and sparsely to moderately covered in white hirtellous hairs or hispid hairs and shortly stemmed glandular hairs on the upper laminas while the lower laminas are moderately to densely covered in pale brown hirsute hairs and sessile glands. The laminas are convexed from the mid vein to the margins and the base to the apex on the upper surface while the margins are entire and are irregularly recurved to not quite revolute. The midvein vein is prominent on the lower lamina is faintly visible on the upper lamina.
The inflorescences are born singularly from the leaf axils. The persistent bracteoles measure 1.5mm to 2mm in length. The calyxes measure 4mm to 5mm in length while the calyx tube measures 1.5mm to 2mm in length and the upper lobes measure 2mm to 3mm in length. The corolla is mauve or pastel bluish-pink often with a white apex. The corolla tube measures 3mm to 4mm in length. The oblong lobes margins are entire and slightly undulating. The upper lobe measures 3mm to 3.5mm in length. The 2 oblong lateral lobes have obtuse to truncate apexes and measure 3mm to 4mm in length while the 2 lower lobes are partially united, oblong and measure 4mm to 5mm in length.
The anther’s appendage are absent in this species. The white with faint mauve pistil measures 8mm to 10mm in length. The flowers appear from September to November.
The fruits are flattened ovoidal capsules. The capsules are glabrous and vary in diameter and length even on the same plant. The green capsules turn pale grey-brown when ripe. The calyxes are persistent and lengthen slightly on the ripe fruits. The minute seeds are black.
Wildlife:
Prostanthera rhombea’s wildlife is unknown to the author.
Cultivation:
Prostanthera rhombea is a magnificent small shrub that should be more widely grown in cool sub-tropical and temperate gardens. It is ideal at the edge of a rainforest garden around swimming pools or courtyards and in heath gardens. In cultivation it will grow from 0.6 meters to 1.8 meters in height by 1.5 meters to 2.5 meters in diameter.
It can be pruned to maintain a smaller shrub or low hedge.
It grows exceptionally well on lighter friable soils where deep leaf litter keeps the soil cool and moisture at an even level throughout the year. If these requirements are met it can cope with temperatures as low as minus 4 degrees and up to 37 degrees.
Add to the above, if it is given an adequate supply of water and a little native fertilizer on a regular basis the plants will respond with exceptionally good flowering year after year.
Prostanthera rhombea would make outstanding contribution to a moist heath gardens especially where it is mass planted. Here it can be used adjacent to the smaller growing plants scattered throughout the heath scene in small groups. When you design a flat heath garden which it is well suited don’t use contours to display the plants as heath lands are almost always flat or have a slight rise. Plants must be planted close together and be short so you can see over the tallest ones with the exception of one or two plants at the most. These will be feature plants. The idea is to achieve a feeling of expansive flatness. This can be achieved with using the Prostanthera rhombea deep green leaves and brilliant flowering displays to contrast finer pale green or soft grey to glaucous coloured foliages. Make sure you give it the room to grow to its full potential. Use a lot of procumbent plants like Hibbertia linearis, Hibbertia obtusifolia or Hibbertia scandens as a ground cover which would look stunning in flower together. Mix it with other smaller shrubs so none of them dominate the scene but blend in to give a mosaic of foliage colours and textures like Actinotis helianthi, Xerochrysum bracteatum, Dampiera specie, Pattersonia specie or small red flowering Grevillea specie will that little bit for great contrasting foliages.
It is ideal in settings near large ponds in large court yards or the larger rockery. It needs light shade to grow at its best. Place them near old stumps and roots or medium size rocks to make the stumps, rocks or roots look larger and more gnarled. The deep greys and blacks against the ovate leaves and stems will contrast both the finesse of the plants and the coarseness of the stumps, rocks or roots. Select an area of ground and let your hair down and be imaginative. Sparingly use other plants when planting and remember that this plants foliage and form is the center of attraction. Planted in mass using a gentle slope or a basin with a medium pool at the bottom would also give a strong contrast for most of the year. A billabong affect would give a quite tranquil affect where as a waterfall or cascade would give more stimulation and energy to the scene. When using this plant as a feature only grow small plants that do not reach more than 250mm in height and have a compact habit with either blue or grey leaves, but be careful that these plants do not steal the stage. Taller plants can be grown in the background for balance. Annuals and perennials would really compliment the scene especially during the spring when the flowers are present.
Propagation:
Seeds: The seeds can be removed easily from the fruits as they start to open. Prune the flower heads off and store them for a couple of days in a brown paper bag.
Sow the freshly picked seeds directly into a seed raising mix, keeping them moist not wet. When the seedlings are 20mm to 25mm tall, prick them out and plant them into 50mm native tubes using a good organic mix. Store the excess seeds in the vegetable crisper of the fridge.
As the seedlings roots reach the bottom of the tubes plant them out into their permanent position. Do not delay.
Cuttings: Fortunately Prostanthera rhombea cuttings strike relatively easy. Use 60mm to 120mm long semi hardwood cuttings prepared from partially mature wood of the current season’s growth
1 Prepare the cutting mix by adding two thirds sharp clean river sand, one third peat or one third perlite. These ingredients must be sterilized,
2 Select good material from non diseased plants,
3 Select semi green stems for cuttings. Look for a stem with two or three nodes,
4 Place the cutting on a flat, hard surface, and make a clean cut down one side of the cutting at the base for 10mm with a sharp sterile knife or razor blade. – This scarification of the node will increase the chances of roots emerging from this spot. Now remove all but one or two the leaves, leaving the apex leaves in tact. If the leaves are very large in proportion to the stem, cut off the apical halves.
5 Fill a saucer with water, and place a little mild strength rooting hormone into another container like a milk bottle top. Dip the node end of the cutting into the water and then into the rooting hormone. Tap off any excess hormone,
6 Use a small dipple stick or old pencil to poke a hole into the soilless potting mix. Ensure the hole is slightly larger than the stem diameter and be careful not to wipe the rooting hormone off the cuttings base. Place 2 to 4 cuttings in each of the 50mm native tubes,
7 I like to place the tubes in bucket with holes drilled in the bottom to allow excess water to drain out. A plastic bag that fits over the bucket is ideal to help maintain temperature and moisture. Place in a semi shaded, warm position like under 50mm shade cloth.
8 When the cuttings have struck, open the bag to allow air circulation for a few days to a week,
9 Once hardened off remove the cuttings from the bag and allow to further hardening for a few more days to a week,
10 Transplant into a good potting mix to grow on.
Fertilize using seaweed, fish emulsion or organic chicken pellets soaked in water on an alternate basis. Fertilize bi monthly until the plants have established themselves then annually in early September to October to maintain better colour, health, vitality and flowering
Further Comments from Readers:
“Hi reader, it seems you use The Bible of Botany a lot. That’s great as we have great pleasure in bringing it to you! It’s a little awkward for us to ask, but our first aim is to purchase land approximately 1,600 hectares to link several parcels of N.P. into one at The Pinnacles NSW Australia, but we need your help. We’re not salespeople. We’re amateur botanists who have dedicated over 30 years to saving the environment in a practical way. We depend on donations to reach our goal. If you donate just $5, the price of your coffee this Sunday, We can help to keep the planet alive in a real way and continue to bring you regular updates and features on Australian plants all in one Botanical Bible. Any support is greatly appreciated. Thank you.”
In the spirit of reconciliation we acknowledge the Bundjalung, Gumbaynggirr and Yaegl and all aboriginal nations throughout Australia and their connections to land, sea and community. We pay our respect to their Elders past, present and future for the pleasures we have gained.
Prostanthera rotundifolia
Classification:
Class: Equisetopsida
Subclass: Magnoliidae
Superorder: Asteranae
Order: Lamiales
Family: Lamiaceae
Genus: From Prostheke, which is Greek, for an appendage and ántha/ánthos, which are Ancient Greek for the male reproductive organ of a flower or the flower. It refers to anthers or stamens which have an appendage attached.
Species: From Rotundātus, which is Latin for round and Folium, which is Latin for foliage. It refers to leaves, which are round or much rounder than other species in the genus.
Common Name: Round Leaf Mint.
Distribution:
Prostanthera rotundifolia is found south from Barren Mountain in northern New South Wales to the Grampians in south western Victoria. It is found on the Western Plains, on and east of the Great Dividing Range to the coast.
In Tasmania it is found in several disjunct populations including Brady’s Lookout to Corra Linn around Launceston and from Scamander to Avenue River on the east coast.
https://avh.ala.org.au/occurrences/search?taxa=Prostanthera+rotundifolia#tab_mapView
Habitat Aspect Climate:
Prostanthera rotundifolia prefers full sun to dappled shade. It grows in sheltered sites in sclerophyll forest, adjacent to well-developed cool sub-tropical rainforest, temperate rainforests, woodland, often in areas associated with large boulders. The altitude ranges from 2 meters ASL to 1550 meters ASL.
The temperatures range from minus 4 degree in July to 36 degrees in January.
The rainfall ranges from lows of 300mm to 2000mm average per annum.
Soil Requirements:
Prostanthera rotundifolia prefers to grow on light sandy clays to medium clays often with copious quantities of leaf litter. The soils are usually derived from decomposed brown basalt, black basalts, sandstones, shales granites or metamorphic rocks. The soils pH ranges from 5pH to 6pH. It does not tolerate waterlogged soils. Non saline soils to moderately saline soils are tolerated.
Height & Spread:
Wild Plants: 0.5m to 3m by 1.5m to 2.5m.
Characteristics:
Prostanthera rotundifolia grows as a compact, erect to spreading shrub with aromatic stems. The stems are moderately to densely covered in short, soft hirtellous hairs and shorter hirtellous glandular hairs and sessile glands.
The opposite, broad ovate to obovate or orbicular leaves measure 3mm to 20mm in length by 3mm to 15mm in width. The petioles are moderately to densely covered in white hirtellous hairs and measures 2mm to 8mm in length. The bases are decurrent, broad cuneate to attenuate while the apexes are broadly obtuse. The coriaceous, concolourous laminas are deep green to deep blue-green, dull, glabrous and covered in white glands. The laminas are straight and recurve from the mid vein to the margins while the margins are entire or irregularly lobed or crenate. The mid vein is sparsely to moderately covered in white hirtellous hairs, is moderately to densely covered in white glandular hairs on the lower surface and is prominent on the lower lamina and distinctly visible on the upper lamina.
The are born singularly from the leaf axils. The caducous bracteoles measure 1mm to 2mm in length. The calyxes measure 4mm to 5mm in length while the calyx tube measures 2mm to 3.5mm in length and the upper lobe measures 1mm to 2mm in length. The corolla is purple-mauve to purple, sometimes pinkish. The corolla tube measures 4mm to 7mm in length. The lobes margins are entire and slightly undulating. The 2 upper lobes are reflexed and measures 3mm to 4.5mm in length. The 2 obovate lateral lobes have obtuse apexes and measure 5mm to 7mm in length while the lower lobe is spathulate and measures 6mm to 8mm in length.
The anther’s appendage are absent in this species. The anthers are set at the base of each lobe and are surrounded by a tuft of basal hairs. The purple-mauve to purple, sometimes pinkish pistil measures 8mm to 11mm in length. The flowers appear from September to November.
The fruits are flattened ovoidal capsules. The capsules are glabrous and vary in diameter and length even on the same plant. The green capsules turn pale grey-brown when ripe. The calyxes are persistent and lengthen slightly on the ripe fruits. The minute seeds are black.
Wildlife:
Prostanthera rotundifolia’s wildlife is unknown to the author.
Cultivation:
Prostanthera rotundifolia is a magnificent small shrub that should be more widely grown in cool sub-tropical and temperate gardens. It is ideal at the edge of a rainforest garden around swimming pools or courtyards and in heath gardens. In cultivation it will grow from 1 meter to 3 meters in height by 2 meters to 2.5 meters in diameter.
It can be pruned to maintain a smaller shrub or hedge rows.
It grows well on lighter friable soils where deep leaf litter keeps the soil cool and moisture at an even level throughout the year. If these requirements are met it can cope with temperatures as low as minus 4 degrees and up to 38 degrees.
Prostanthera rotundifolia would make outstanding contribution to a moist heath gardens especially where it is mass planted. Here it can be used adjacent to the smaller growing plants scattered throughout the heath scene in small groups. When you design a flat heath garden which it is well suited don’t use contours to display the plants as heath lands are almost always flat or have a slight rise. Plants must be planted close together and be short so you can see over the tallest ones with the exception of one or two plants at the most. These will be feature plants. The idea is to achieve a feeling of expansive flatness. This can be achieved with using the Prostanthera rotundifolia deep green leaves and brilliant flowering displays to contrast finer pale green or soft grey to glaucous coloured foliages. Make sure you give it the room to grow to its full potential. Use a lot of procumbent plants like Hibbertia linearis, Hibbertia obtusifolia or Hibbertia scandens as a ground cover which would look stunning in flower together. Mix it with other smaller shrubs so none of them dominate the scene but blend in to give a mosaic of foliage colours that you oversee. Actinotis helianthi, small red flowering Grevillea species, Philotheca difformis, Anigozanthus flavida Dampier purpurea or even Pattersonia sericea will all achieve a contrasts in foliages.
Sparingly use other plants when planting and remember that this plants foliage and form is the center of attraction. Planted in mass using a gentle slope or a basin with a medium pool at the bottom would also give a strong contrast for most of the year. A billabong effect would give a quiet tranquil affect, whereas a waterfall or cascade would give more stimulation and energy to the scene. When using this plant as a feature only grow small plants that do not reach more than 250mm in height and have a compact habit with either blue or grey leaves, but be careful that these plants do not steal the stage. Taller plants can be grown in the background for balance. Annuals and perennials would really compliment the scene especially during the spring when the flowers are present.
Propagation:
Seeds: The seeds can be removed easily from the fruits as they start to open. Prune the flower heads off and store them for a couple of days in a brown paper bag.
Sow the freshly picked seeds directly into a seed raising mix, keeping them moist not wet. When the seedlings are 20mm to 25mm tall, prick them out and plant them into 50mm native tubes using a good organic mix. Store the excess seeds in the vegetable crisper of the fridge.
As the seedlings roots reach the bottom of the tubes plant them out into their permanent position. Do not delay.
Cuttings: Fortunately Prostanthera rotundifolia cuttings strike relatively easy. Use 60mm to 120mm long semi hardwood cuttings prepared from partially mature wood of the current season’s growth
1 Prepare the cutting mix by adding two thirds sharp clean river sand, one third peat or one third perlite. These ingredients must be sterilized,
2 Select good material from non diseased plants,
3 Select semi green stems for cuttings. Look for a stem with two or three nodes,
4 Place the cutting on a flat, hard surface, and make a clean cut down one side of the cutting at the base for 10mm with a sharp sterile knife or razor blade. – This scarification of the node will increase the chances of roots emerging from this spot. Now remove all but one or two the leaves, leaving the apex leaves in tact. If the leaves are very large in proportion to the stem, cut off the apical halves.
5 Fill a saucer with water, and place a little mild strength rooting hormone into another container like a milk bottle top. Dip the node end of the cutting into the water and then into the rooting hormone. Tap off any excess hormone,
6 Use a small dipple stick or old pencil to poke a hole into the soilless potting mix. Ensure the hole is slightly larger than the stem diameter and be careful not to wipe the rooting hormone off the cuttings base. Place 2 to 4 cuttings in each of the 50mm native tubes,
7 I like to place the tubes in bucket with holes drilled in the bottom to allow excess water to drain out. A plastic bag that fits over the bucket is ideal to help maintain temperature and moisture. Place in a semi shaded, warm position like under 50mm shade cloth.
8 When the cuttings have struck, open the bag to allow air circulation for a few days to a week,
9 Once hardened off remove the cuttings from the bag and allow to further hardening for a few more days to a week,
10 Transplant into a good potting mix to grow on.
Fertilize using seaweed, fish emulsion or organic chicken pellets soaked in water on an alternate basis. Fertilize bi monthly until the plants have established themselves then annually in early September to October to maintain better colour, health, vitality and flowering
Further Comments from Readers:
“Hi reader, it seems you use The Bible of Botany a lot. That’s great as we have great pleasure in bringing it to you! It’s a little awkward for us to ask, but our first aim is to purchase land approximately 1,600 hectares to link several parcels of N.P. into one at The Pinnacles NSW Australia, but we need your help. We’re not salespeople. We’re amateur botanists who have dedicated over 30 years to saving the environment in a practical way. We depend on donations to reach our goal. If you donate just $5, the price of your coffee this Sunday, We can help to keep the planet alive in a real way and continue to bring you regular updates and features on Australian plants all in one Botanical Bible. Any support is greatly appreciated. Thank you.”
In the spirit of reconciliation we acknowledge the Bundjalung, Gumbaynggirr and Yaegl and all aboriginal nations throughout Australia and their connections to land, sea and community. We pay our respect to their Elders past, present and future for the pleasures we have gained.
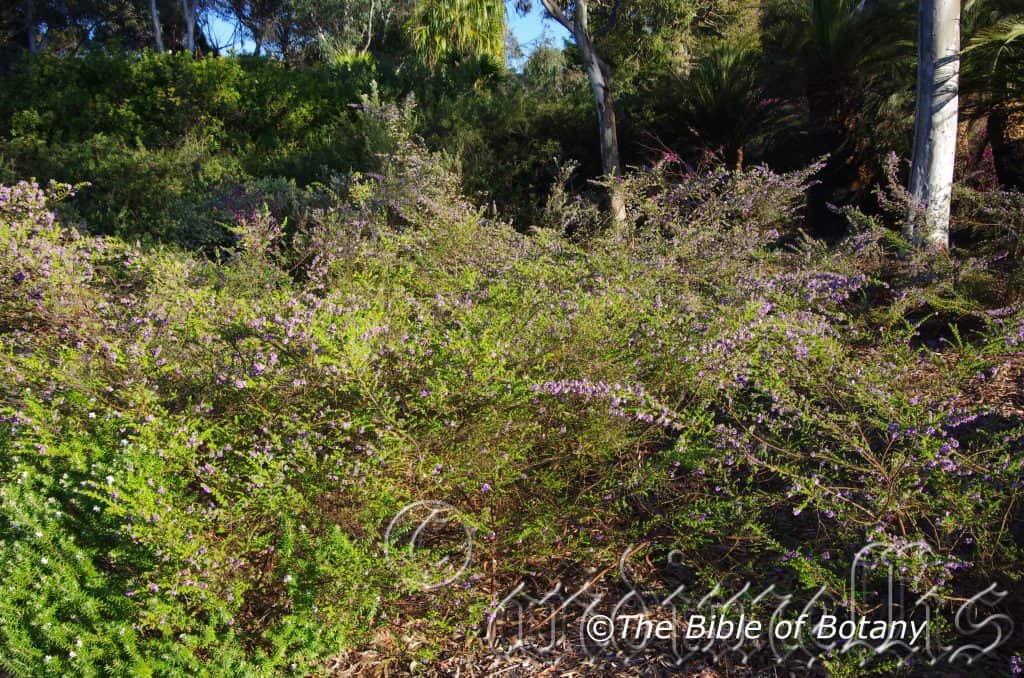
National Botanic Gardens ACT
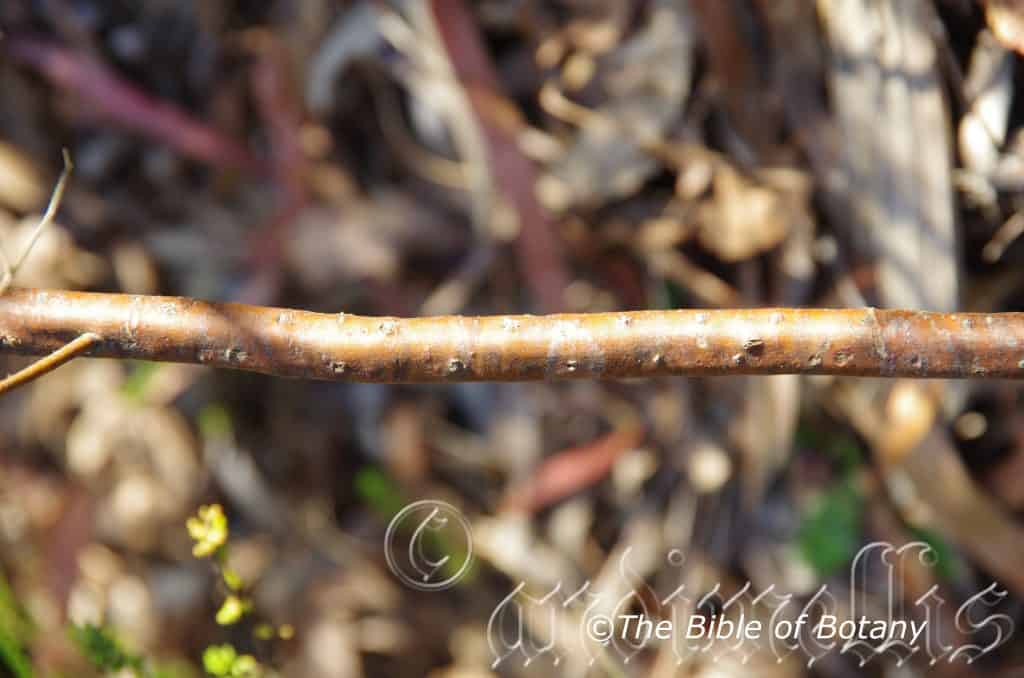
National Botanic Gardens ACT
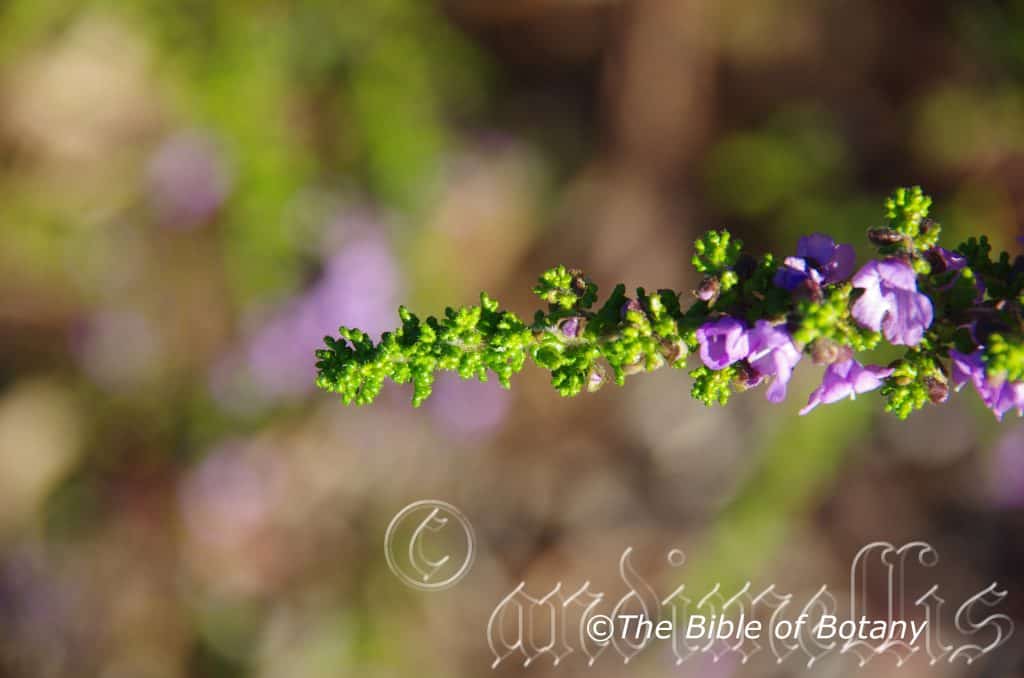
National Botanic Gardens ACT
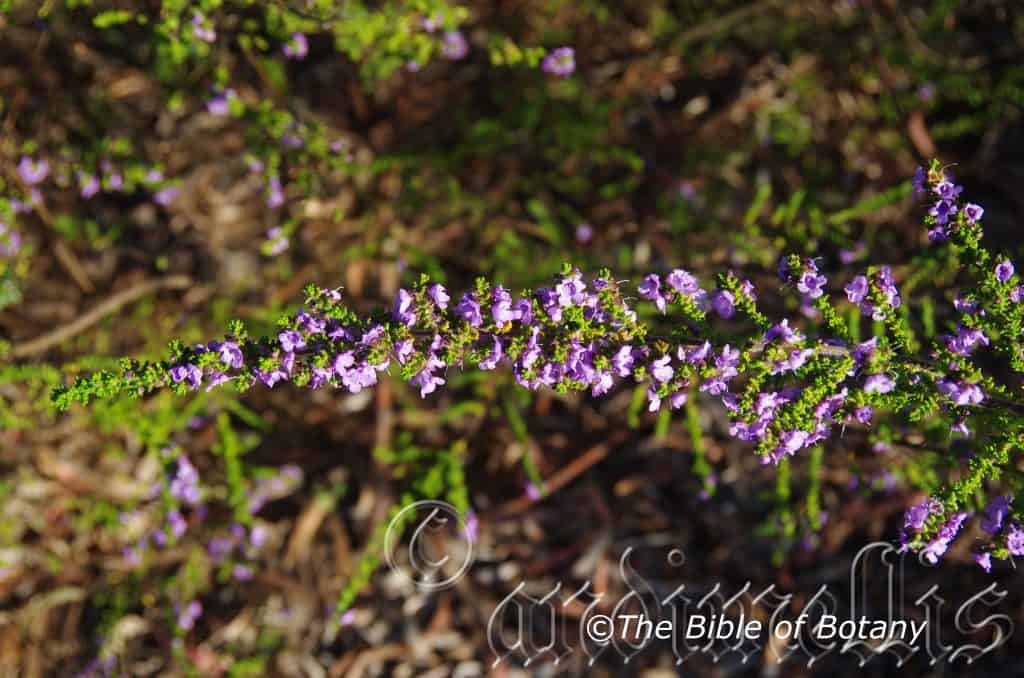
National Botanic Gardens ACT
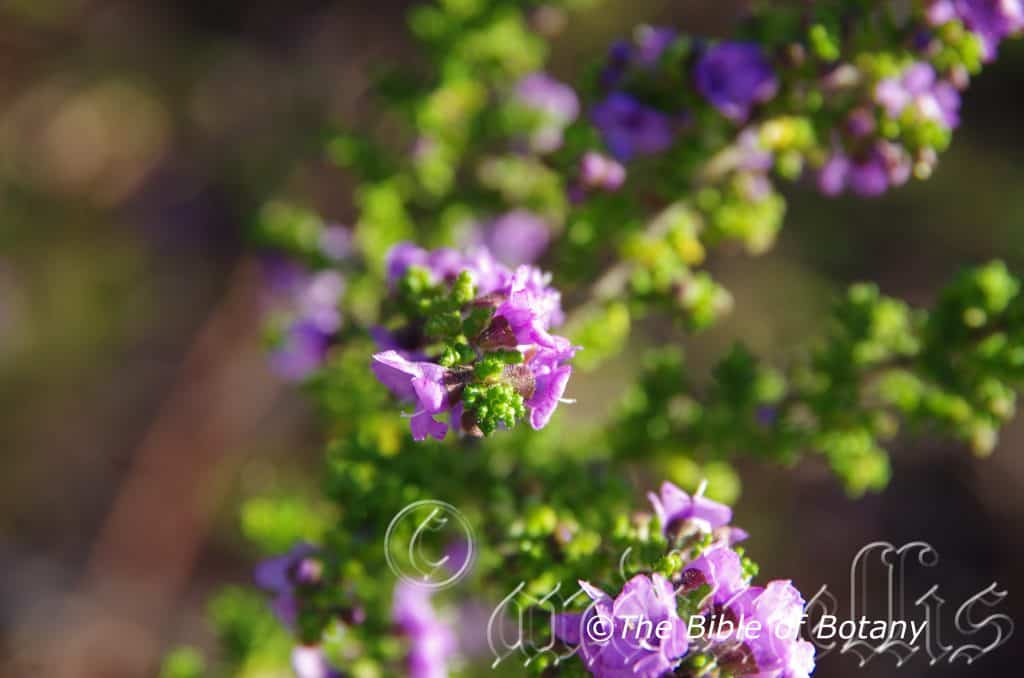
National Botanic Gardens ACT
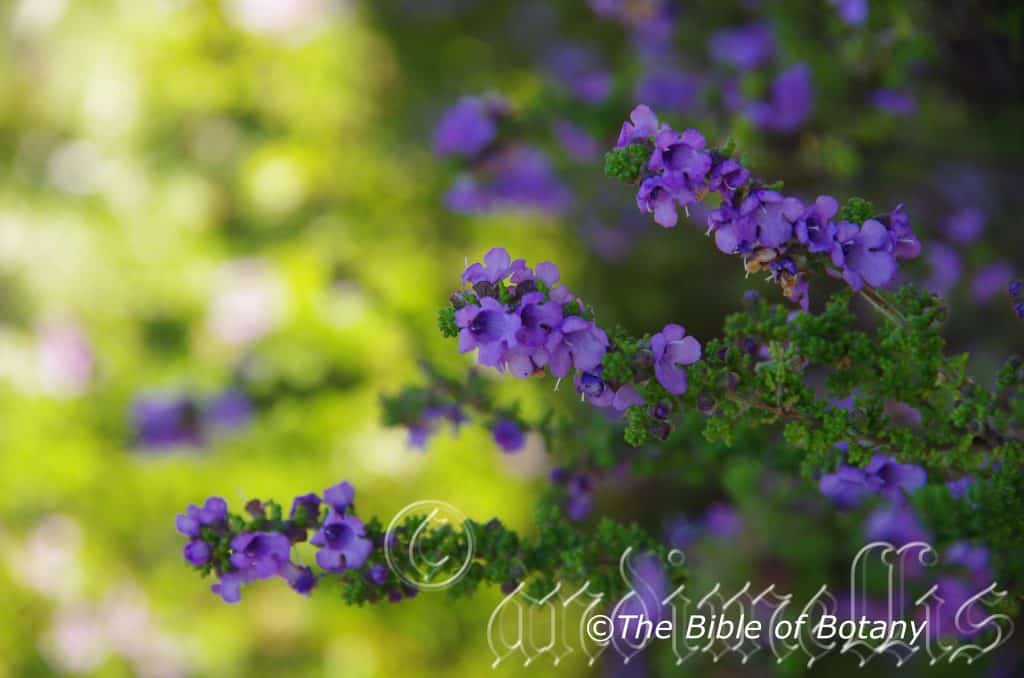
National Botanic Gardens ACT
Prostanthera rugosa
Classification:
Class: Equisetopsida
Subclass: Magnoliidae
Superorder: Asteranae
Order: Lamiales
Family: Lamiaceae
Genus: From Prostheke, which is Greek, for an appendage and ántha/ánthos, which are Ancient Greek for the male reproductive organ of a flower or the flower. It refers to anthers or stamens which have an appendage attached.
Species: From Rūgōsa, which is Latin for wrinkled or shrivelled. It refers to organs or structures, which are obviously wrinkled or look as though it is in a state of shrivelling up. Here it refers to the leaves.
Common Name:
Distribution:
Prostanthera rugosa is found in 3 small disjunct populations south from Bulladelah, west of Newcastle and north west to south west of Woolongong in eastern New South Wales. It is found on and east of the Great Dividing Range.
https://avh.ala.org.au/occurrences/search?taxa=Prostanthera+rugosa#tab_mapView
Habitat Aspect Climate:
Prostanthera rugosa prefers full sun to dappled shade. It grows in dry sclerophyll forests, Eucalyptus woodlands on gentle slopes and escarpments. The altitude ranges from 70 meters ASL to 1500 meters ASL.
The temperatures range from minus 4 degree in July to 36 degrees in January.
The rainfall ranges from lows of 500mm to 2000mm average per annum.
Soil Requirements:
Prostanthera rugosa prefers to grow on fine sands to skeletal sands over sandstone with various quantities of forest litter. The soils are usually derived from sandstones or at time. The soils pH ranges from 4.5pH to 5.5pH. It does not tolerate waterlogged soils. Non saline soils to moderately saline soils are tolerated.
Height & Spread:
Wild Plants:1m to 1.5m by 1m to 1.5m.
Characteristics:
Prostanthera rugosa grows as a divaricate open shrub with aromatic stems and leaves. The terete branchlets and stems are densely covered with long spreading hairs and somewhat sessile glands.
The crowded, thick, narrow ovate to ovate, fleshy leaves measure 3mm to 9mm in length by 2mm to 5.5mm in width. The terete petioles are densely covered with short, somewhat spreading hairs. The bases are broad cuneate to rounded, while the apexes are obtuse. The margins have 2 or 3 pairs of shallow, obtuse, recurved lobes. The upper laminas are sparsely to moderately covered with short, erect and spreading hairs, while the lower laminas are glabrous to moderately covered with long spreading hairs and densely covered in short or sessile glandular hairs. The mid vein is moderately to densely covered in long erect and spreading hairs. The mid vein and lateral veins are prominent on the lower lamina and distinctly visible on the upper lamina.
The inflorescences are born singularly from the leaf axils. The persistent bracteoles measure 0.4mm to 0.6mm in length. The cupular calyx measures 4mm to 5mm in length. The tube measure 2mm to 3mm, while the upper lobe is longer at 2mm to 3mm enlarging further in fruit. The mauve with a white tinge corolla measures 10mm to 13mm in length. The anthers have a 0.5mm to 0.8mm long appendage. The flowers appear from September to October.
The fruits are flattened ovoidal capsules. The capsules are moderately to densely covered in long erect and spreading hairs and vary in diameter and length even on the same plant. The green capsules turn pale grey-brown when ripe. The minute glossy seeds are black.
Wildlife:
Prostanthera rugosa’s wildlife is unknown to the author.
Cultivation:
Prostanthera rugosa is a beautiful small shrub that could be more widely grown in cool subtropical and temperate gardens. It is ideal at the edge of a temperate rainforest garden around swimming pools or courtyards and in heath gardens. In cultivation it will grow from 0.5 meters to 2.5 meters in height by 2 meters to 2.5 meters in diameter.
It can be pruned to maintain a smaller shrub or hedge rows on the upright forms.
It grows exceptionally well on lighter friable soils where deep leaf litter keeps the soil cool and moisture at an even level throughout the year. If these requirements are met it can cope with temperatures as low as minus 4 degrees and up to 37 degrees.
Add to the above, if it is given an adequate supply of water and a little native fertilizer on a regular basis the plants will respond with exceptionally good flowering year after year.
Prostanthera rugosa would make outstanding contribution to a moist heath gardens especially where it is mass planted. Here it can be used adjacent to the smaller growing plants scattered throughout the heath scene in small groups. When you design a flat heath garden which it is well suited don’t use contours to display the plants as heath lands are almost always flat or have a slight rise. Plants must be planted close together and be short so you can see over the tallest ones with the exception of one or two plants at the most. These will be feature plants. The idea is to achieve a feeling of expansive flatness. This can be achieved with using the Prostanthera rugosa deep green leaves and brilliant flowering displays to contrast finer pale green or soft grey to glaucous coloured foliages. Make sure you give it the room to grow to its full potential. Use a lot of procumbent plants like Hibbertia linearis, Hibbertia obtusifolia or Hibbertia scandens as a ground cover which would look stunning in flower together. Mix it with other smaller shrubs so none of them dominate the scene but blend in to give a mosaic of foliage colours that you oversee.
Propagation:
Seeds: The seeds of Prostanthera rugosa can be removed easily from the fruits as they start to open. Prune the flower heads off and store them for a couple of days in a brown paper bag.
Sow the freshly picked seeds directly into a seed raising mix, keeping them moist not wet. When the seedlings are 20mm to 25mm tall, prick them out and plant them into 50mm native tubes using a good organic mix. Store the excess seeds in the vegetable crisper of the fridge.
As the seedlings roots reach the bottom of the tubes plant them out into their permanent position. Do not delay.
Cuttings: Fortunately Prostanthera rugosa cuttings strike relatively easy. Use 60mm to 90mm long semi hardwood cuttings prepared from partially mature wood of the current season’s growth
1 Prepare the cutting mix by adding two thirds sharp clean river sand, one third peat or one third perlite. These ingredients must be sterilized,
2 Select good material from non diseased plants,
3 Select semi green stems for cuttings. Look for a stem with two or three nodes,
4 Place the cutting on a flat, hard surface, and make a clean cut down one side of the cutting at the base for 10mm with a sharp sterile knife or razor blade. – This scarification of the node will increase the chances of roots emerging from this spot. Now remove all but one or two the leaves, leaving the apex leaves in tact. If the leaves are very large in proportion to the stem, cut off the apical halves.
5 Fill a saucer with water, and place a little mild strength rooting hormone into another container like a milk bottle top. Dip the node end of the cutting into the water and then into the rooting hormone. Tap off any excess hormone,
6 Use a small dipple stick or old pencil to poke a hole into the soilless potting mix. Ensure the hole is slightly larger than the stem diameter and be careful not to wipe the rooting hormone off the cuttings base. Place 2 to 4 cuttings in each of the 50mm native tubes,
7 I like to place the tubes in bucket with holes drilled in the bottom to allow excess water to drain out. A plastic bag that fits over the bucket is ideal to help maintain temperature and moisture. Place in a semi shaded, warm position like under 50mm shade cloth.
8 When the cuttings have struck, open the bag to allow air circulation for a few days to a week,
9 Once hardened off remove the cuttings from the bag and allow to further hardening for a few more days to a week,
10 Transplant into a good potting mix to grow on.
Fertilize using seaweed, fish emulsion or organic chicken pellets soaked in water on an alternate basis. Fertilize bi monthly until the plants have established themselves then annually in early September to October to maintain better colour, health, vitality and flowering
Further Comments from Readers:
“Hi reader, it seems you use The Bible of Botany a lot. That’s great as we have great pleasure in bringing it to you! It’s a little awkward for us to ask, but our first aim is to purchase land approximately 1,600 hectares to link several parcels of N.P. into one at The Pinnacles NSW Australia, but we need your help. We’re not salespeople. We’re amateur botanists who have dedicated over 30 years to saving the environment in a practical way. We depend on donations to reach our goal. If you donate just $5, the price of your coffee this Sunday, We can help to keep the planet alive in a real way and continue to bring you regular updates and features on Australian plants all in one Botanical Bible. Any support is greatly appreciated. Thank you.”
In the spirit of reconciliation we acknowledge the Bundjalung, Gumbaynggirr and Yaegl and all aboriginal nations throughout Australia and their connections to land, sea and community. We pay our respect to their Elders past, present and future for the pleasures we have gained.
Prostanthera scutellarioides
Classification:
Class: Equisetopsida
Subclass: Magnoliidae
Superorder: Asteranae
Order: Lamiales
Family: Lamiaceae
Genus: From Prostheke, which is Greek, for an appendage and ántha/ánthos, which are Ancient Greek for the male reproductive organ of a flower or the flower. It refers to anthers or stamens which have an appendage attached.
Species: From Scutellaria, which is Latin for a dish or saucer shaped and Eîdos/Oides, which is Ancient Greek for alike or similar to. It refers to plants, which have saucer shape leaves similar to the Scutellaria genus.
Common Name:
Distribution:
Prostanthera scutellarioides is found south from Turtle Rock, Numinbah Valley south eastern Queensland to the Shoalhaven river in south eastern New South Wales with a population further south at Kydra Reefs. It is found on the Western Plains, on and east of the Great Dividing Range.
https://avh.ala.org.au/occurrences/search?taxa=Prostanthera+scutellarioides#tab_mapView
Habitat Aspect Climate:
Prostanthera scutellarioides prefers full sun to dappled shade. It grows in dry sclerophyll forests, Eucalyptus woodlands, creek meanders or gentle slopes. The altitude ranges from 70 meters ASL to 1500 meters ASL.
The temperatures range from minus 4 degree in July to 36 degrees in January.
The rainfall ranges from lows of 500mm to 2000mm average per annum.
Soil Requirements:
Prostanthera scutellarioides prefers to grow on fine sands to heavy clays and medium silts to heavy silts often with copious quantities of forest litter. The soils are usually derived from decomposed brown basalt, black basalts, sandstones, granites, shale, metamorphic rocks alluvial deposits or podzolic soils. The soils pH ranges from 4.5pH to 5.5pH. It does not tolerate waterlogged soils. Non saline soils to moderately saline soils are tolerated.
Height & Spread:
Wild Plants: 0.3m to 2.5m by 0.5m to 2m.
Characteristics:
Prostanthera scutellarioides grows as an erect or decumbent shrub with faintly aromatic stems and leaves. The stems are laterally ridged and moderately covered with short antrorse, sericeous hairs at least on/or between the ridges and are moderately to sparsely covered in white sessile glands.
The opposite, linear leaves measure 7mm to 25mm in length by 0.5mm to 2mm in width. The petioles are moderately covered with short antrorse, sericeous hairs and measures 0mm to 1mm in length. The bases are attenuate while the apexes are obtuse or apiculate. The discolourous laminas are pale green to grass-green, dull, glabrous on the upper laminas while the lower laminas are sparsely covered in white puberulent hairs. The laminas are flat and straight or decurve gently downwards from the base to the apex while the margins are entire and decurve downwards at the margins. The mid vein is sparsely to moderately covered in white pulverulent hairs, is prominent on the lower lamina and distinctly visible on the upper lamina.
The inflorescences are born singularly from the leaf axils. The persistent bracteoles measure 2.2mm to 2.6mm in length. The calyxes measure 3mm to 4.5mm in length while the calyx tube measures 1.7mm to 2.5mm in length and the upper lobe measures 1.5mm to 2.5mm in length. The corolla is pale to deep mauve, often with a purple or bluish tinge. The corolla tube measures 3mm to 4mm in length. The lobes margins are entire and slightly crisped. The 2 upper lobes are united for about 60mm of their length and measures 2.5mm to 4mm in length. The 2 oblong lateral lobes have obtuse-truncate apexes and measure 5mm to 7mm in length while the lower lobe is oblong, broader on the apical half and measures 5mm to 6mm in length.
The anther’s appendage are absent in this species. The pale to deep mauve, often with a purple or bluish tinge pistil measures 8mm to 11mm in length. The flowers appear from September to November.
The fruits are flattened ovoidal capsules. The capsules are glabrous and vary in diameter and length even on the same plant. The green capsules turn pale grey-brown when ripe. The calyxes are persistent and lengthen slightly on the ripe fruits. The minute seeds are black.
Wildlife:
Prostanthera scutellarioides’s wildlife is unknown to the author.
Cultivation:
Prostanthera scutellarioides is a small shrub that could be more widely grown in cool subtropical and temperate gardens. It is ideal at the edge of a rainforest garden around swimming pools or courtyards and in heath gardens. In cultivation it will grow from 0.5 meters to 2.5 meters in height by 2 meters to 2.5 meters in diameter.
It can be pruned to maintain a smaller shrub or hedge rows on the upright forms.
It grows exceptionally well on lighter friable soils where deep leaf litter keeps the soil cool and moisture at an even level throughout the year. If these requirements are met it can cope with temperatures as low as minus 4 degrees and up to 37 degrees.
Add to the above, if it is given an adequate supply of water and a little native fertilizer on a regular basis the plants will respond with exceptionally good flowering year after year.
It would make a good contribution to a moist heath garden especially where it is mass planted. Here it can be used adjacent to the smaller growing plants scattered throughout the heath scene in small groups. When you design a flat heath garden which it is well suited don’t use contours to display the plants as heath lands are almost always flat or have a slight rise. Plants must be planted close together and be short so you can see over the tallest ones with the exception of one or two plants at the most. These will be feature plants. The idea is to achieve a feeling of expansive flatness. This can be achieved with using the Prostanthera scutellarioides deep green leaves and brilliant flowering displays to contrast finer pale green or soft grey to glaucous coloured foliages. Make sure you give it the room to grow to its full potential. Use a lot of procumbent plants like Hibbertia linearis, Hibbertia obtusifolia or Hibbertia scandens as a ground cover which would look stunning in flower together. Mix it with other smaller shrubs so none of them dominate the scene but blend in to give a mosaic of foliage colours that you oversee.
Propagation:
Seeds: The seeds can be removed easily from the fruits as they start to open. Prune the flower heads off and store them for a couple of days in a brown paper bag.
Sow the freshly picked seeds directly into a seed raising mix, keeping them moist not wet. When the seedlings are 20mm to 25mm tall, prick them out and plant them into 50mm native tubes using a good organic mix. Store the excess seeds in the vegetable crisper of the fridge.
As the seedlings roots reach the bottom of the tubes plant them out into their permanent position. Do not delay.
Cuttings: Fortunately Prostanthera scutellarioides cuttings strike relatively easy. Use 60mm to 120mm long semi hardwood cuttings prepared from partially mature wood of the current season’s growth
1 Prepare the cutting mix by adding two thirds sharp clean river sand, one third peat or one third perlite. These ingredients must be sterilized,
2 Select good material from non diseased plants,
3 Select semi green stems for cuttings. Look for a stem with two or three nodes,
4 Place the cutting on a flat, hard surface, and make a clean cut down one side of the cutting at the base for 10mm with a sharp sterile knife or razor blade. – This scarification of the node will increase the chances of roots emerging from this spot. Now remove all but one or two the leaves, leaving the apex leaves in tact. If the leaves are very large in proportion to the stem, cut off the apical halves.
5 Fill a saucer with water, and place a little mild strength rooting hormone into another container like a milk bottle top. Dip the node end of the cutting into the water and then into the rooting hormone. Tap off any excess hormone,
6 Use a small dipple stick or old pencil to poke a hole into the soilless potting mix. Ensure the hole is slightly larger than the stem diameter and be careful not to wipe the rooting hormone off the cuttings base. Place 2 to 4 cuttings in each of the 50mm native tubes,
7 I like to place the tubes in bucket with holes drilled in the bottom to allow excess water to drain out. A plastic bag that fits over the bucket is ideal to help maintain temperature and moisture. Place in a semi shaded, warm position like under 50mm shade cloth.
8 When the cuttings have struck, open the bag to allow air circulation for a few days to a week,
9 Once hardened off remove the cuttings from the bag and allow to further hardening for a few more days to a week,
10 Transplant into a good potting mix to grow on.
Fertilize using seaweed, fish emulsion or organic chicken pellets soaked in water on an alternate basis. Fertilize bi monthly until the plants have established themselves then annually in early September to October to maintain better colour, health, vitality and flowering
Further Comments from Readers:
“Hi reader, it seems you use The Bible of Botany a lot. That’s great as we have great pleasure in bringing it to you! It’s a little awkward for us to ask, but our first aim is to purchase land approximately 1,600 hectares to link several parcels of N.P. into one at The Pinnacles NSW Australia, but we need your help. We’re not salespeople. We’re amateur botanists who have dedicated over 30 years to saving the environment in a practical way. We depend on donations to reach our goal. If you donate just $5, the price of your coffee this Sunday, We can help to keep the planet alive in a real way and continue to bring you regular updates and features on Australian plants all in one Botanical Bible. Any support is greatly appreciated. Thank you.”
In the spirit of reconciliation we acknowledge the Bundjalung, Gumbaynggirr and Yaegl and all aboriginal nations throughout Australia and their connections to land, sea and community. We pay our respect to their Elders past, present and future for the pleasures we have gained.
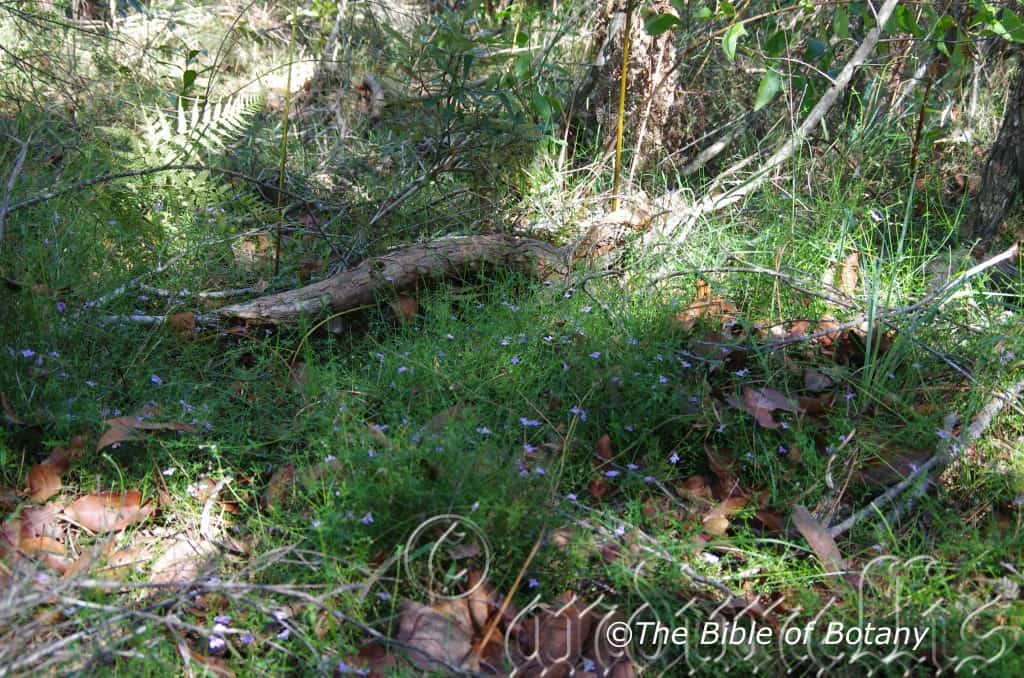
Fortis Creek National Park NSW
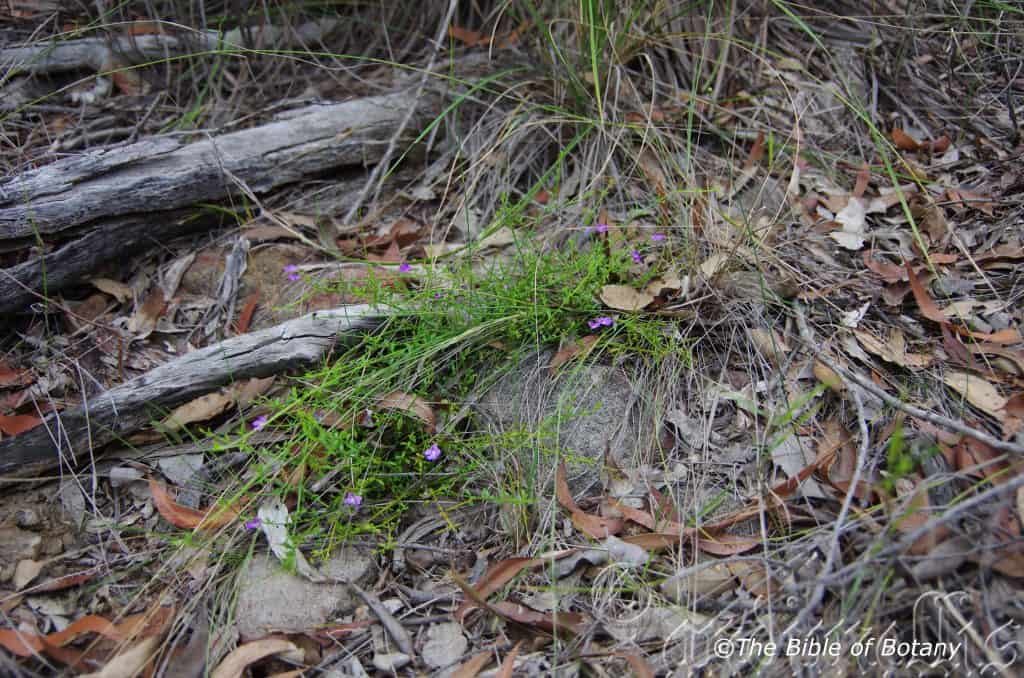
The Pinnacles NSW
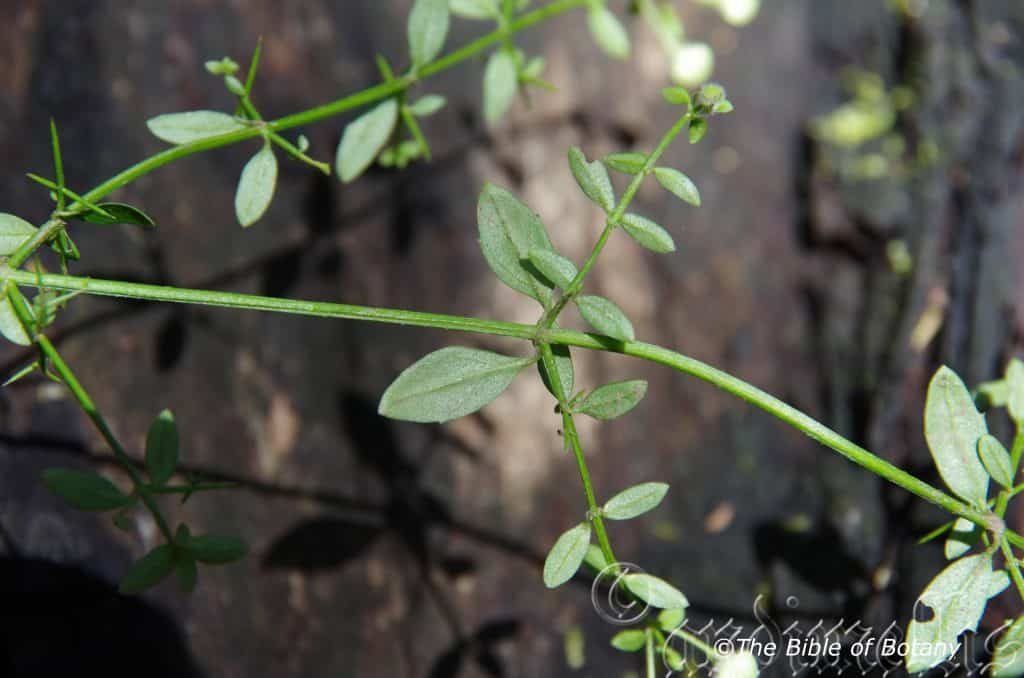
Fortis Creek National Park NSW
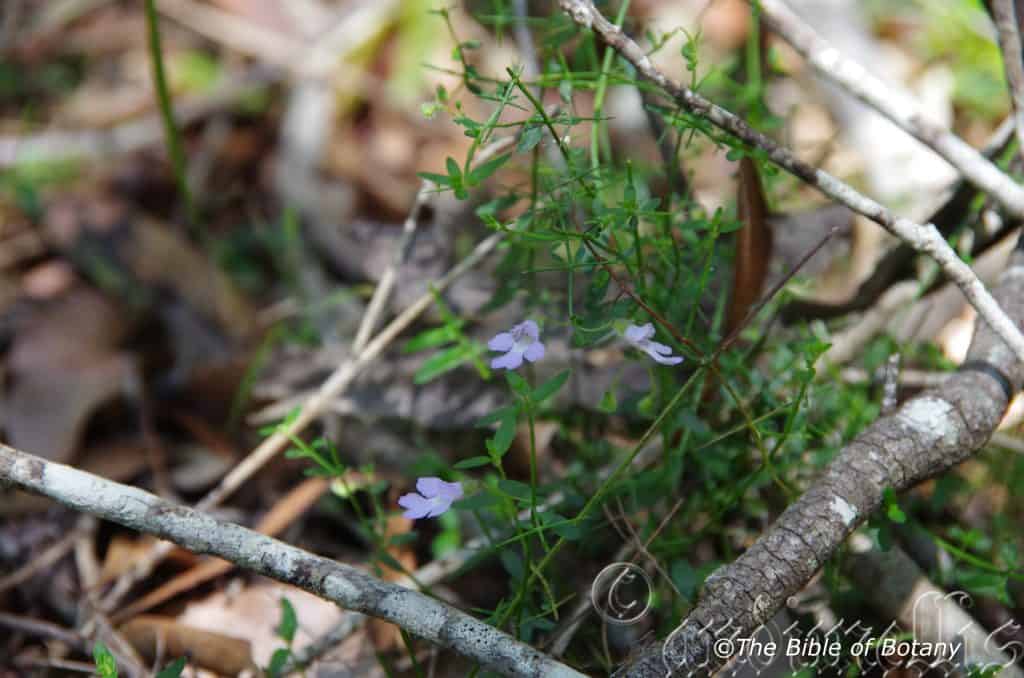
Fortis Creek National Park NSW
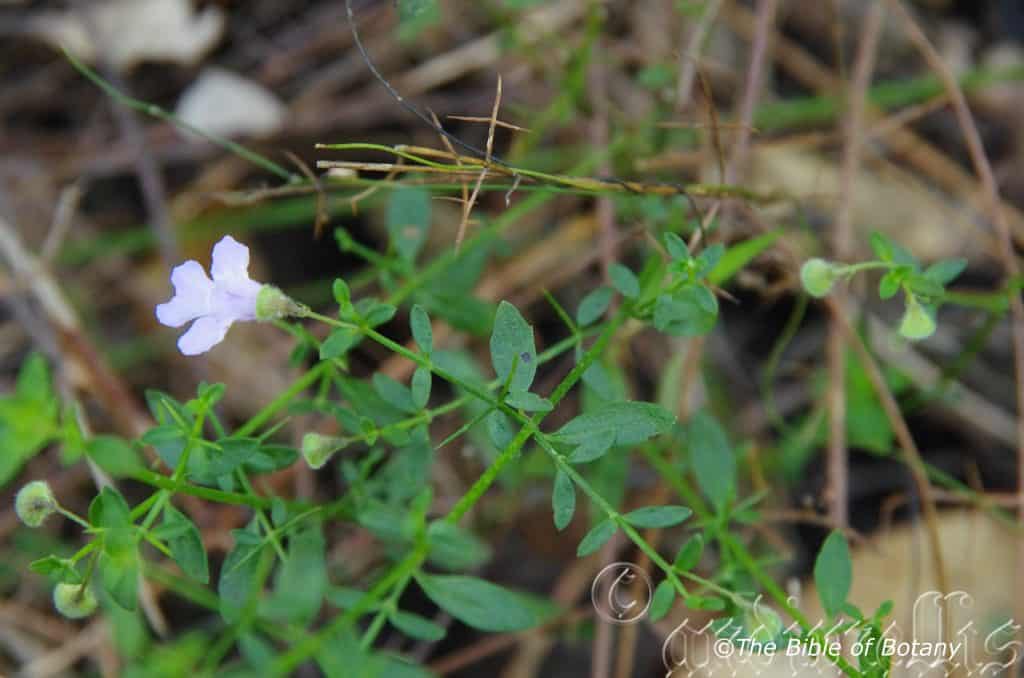
Fortis Creek National Park NSW
Fortis Creek National Park NSW
Fortis Creek National Park NSW
Fortis Creek National Park NSW
Fortis Creek National Park NSW
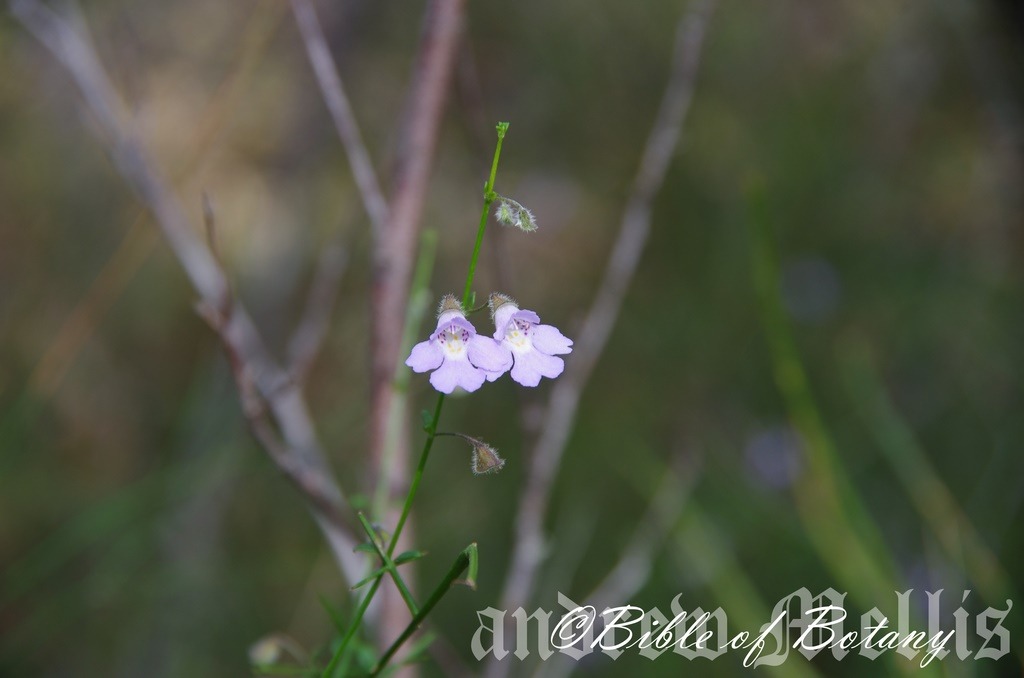
Rocky Creek NSW
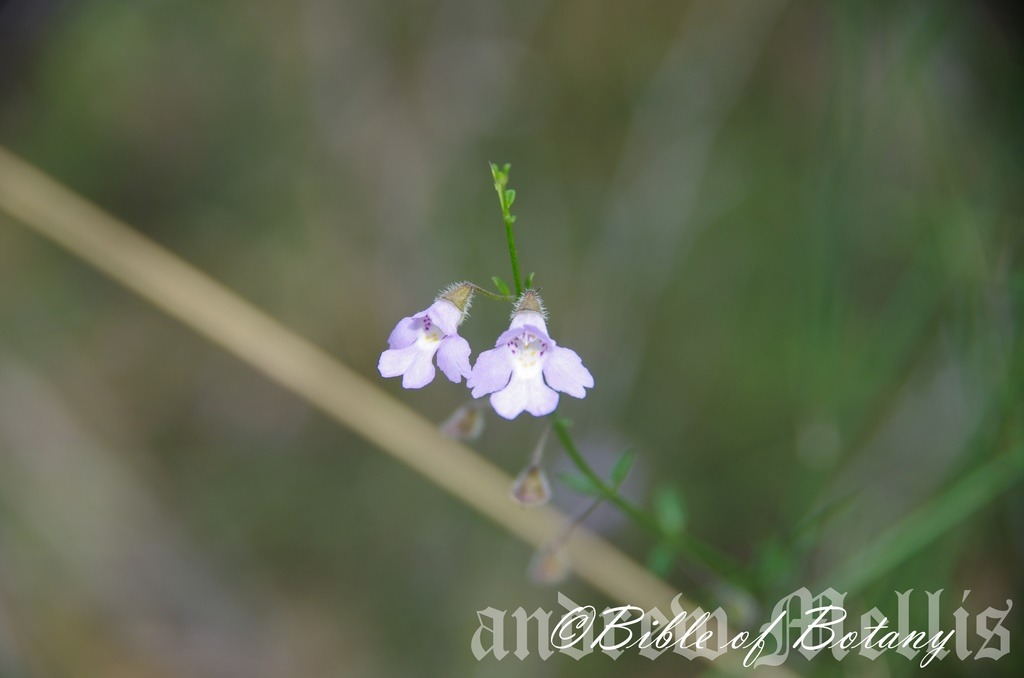
Rocky Creek NSW

The Pinnacles NSW
Prostanthera sejuncta
Classification:
Class: Equisetopsida
Subclass: Magnoliidae
Superorder: Asteranae
Order: Lamiales
Family: Lamiaceae
Genus: From Prostheke, which is Greek, for an appendage and ántha/ánthos, which are Ancient Greek for the male reproductive organ of a flower or the flower. It refers to anthers or stamens which have an appendage attached.
Species: From Sējunctum which is Latin for to exclude. It refers to plants, which have very fine features and often are overlooked or are excluded over other species in the genus.
Common Name:
Distribution:
Prostanthera sejuncta is restricted to a small area in Fortis Creek National Park and the headwaters of Sportsman Creek north east of Grafton in northern New South Wales.
https://avh.ala.org.au/occurrences/search?taxa=Prostanthera+sejuncta#tab_mapView
Habitat Aspect Climate:
Prostanthera sejuncta prefer full sun to dappled shade. It grows in moist areas of open sclerophyll forests or moist open scrubby woodlands. The altitude ranges from 45 meters ASL to 190 meters ASL.
The temperatures range from minus 1 degree in July to 36 degrees in January.
The rainfall ranges from lows of 940mm to 1420mm average per annum.
Soil Requirements:
Prostanthera sejuncta prefers reddish to white, skeletal to deep coarse sands to fine skeletal sands often with copious quantities of forest litter or with rocks or boulders. The soils are derived from decomposed sandstones. The soils pH ranges from 5pH to 6pH. It does not tolerate waterlogged soils. Non saline soils to moderately saline soils are tolerated.
Height & Spread:
Wild Plants: 0.3m to 0.5m by 0.5m to 0.7m.
Characteristics:
Prostanthera sejuncta grows as a scrambling to prostrate shrub with aromatic stems. The stems are glabrous or sparsely to moderately covered in off white hirsute hairs at least at the nodes and are sparsely covered in white sessile glands. The decussate spines measure 10mm to 16mm in length.
The opposite, narrow ovate leaves measure 2mm to 6mm in length by 1mm to 4mm in width. The petioles are glabrous to sparsely covered in off white hirsute hairs and measures 0.5mm to 1mm in length. The bases are cuneate to rounded while the apexes are obtuse. The discolourous laminas are pale green to deep green, dull, glabrous on the upper laminas while the lower laminas are paler and sparsely covered in coarse, white sericeous hairs and moderately covered in white sessile glands. The laminas are flat and straight while the margins are entire and slightly recurved. The mid vein is sparsely to moderately covered in white sericeous hairs, is prominent on the lower lamina and distinctly visible on the upper lamina.
The inflorescences of Prostanthera are born singularly from the leaf axils. The persistent bracteoles measure 0.9mm to 2.5mm in length. The brownish calyxes measure 3.5mm to 6.5mm in length while the calyx tube measures 2mm to 2.5mm in length and the upper lobe measures 1.5mm to 3mm in length. The corolla is pale mauve, very pale lilac to almost white externally while internally there are a few isolated ochre blotches. The corolla tube measures 4mm to 6mm in length. The lobes margins are entire and undulating to slightly crisped. The 2 upper lobes are united for their entire length and measure 2.5mm to 4mm in length. The 2 oblong lateral lobes have obtuse-truncate apexes and measure 5mm to 8mm in length while the lower lobe is oblong, spreads on the apical half and measures 5mm to 6mm in length.
The anther’s appendage measures 0.7mm to 2.1mm in length. The pale to deep mauve, often with a purple or bluish tinge pistil measures 8mm to 11mm in length. The flowers appear from September to early December and often has the odd flower through to late Autumn.
The fruits are flattened ovoidal capsules. The capsules are glabrous and vary in diameter and length even on the same plant. The green capsules turn pale grey-brown when ripe. The calyxes are persistent on the ripe fruits. The minute seeds are black.
Wildlife:
Prostanthera sejuncta’s wildlife is unknown to the author.
Cultivation:
Prostanthera sejuncta is a beautiful low growing shrub with unusual delicate foliage that could be more widely grown in cool subtropical and temperate gardens. It is ideal at the edge of a moist dwarf Eucalyptus garden around swimming pools or courtyards and in heath gardens where it receives shade for part of the day or dappled sunlight. In cultivation it will grow from 0.25 meters to 0.5 meters in height by 1 meter to 1.2 meters in diameter.
It grows exceptionally well on lighter friable soils where deep leaf litter keeps the soil cool and moisture at an even level throughout the year. If these requirements are met it can cope with temperatures as low as minus 4 degrees and up to 39 degrees.
Prostanthera sejuncta would make outstanding contribution to a moist heath garden especially where it is mass planted. Mass planting benefits the plants delicate foliage. Here it can be used adjacent to the larger growing plants scattered throughout the heath scene in small groups. When you design a flat heath garden which this Prostanthera sejuncta is well suited don’t use contours to display the plants as heath lands are almost always flat or have a slight rise. Plants must be planted close together and be short so you can see over the tallest ones with the exception of one or two plants at the most. These will be feature plants. The idea is to achieve a feeling of expansive flatness. This can be achieved with using the Prostanthera sejuncta’s pale green leaves and brilliant flowering displays to contrast soft grey to glaucous coloured foliages. Make sure you give it the room to grow to its full potential. Use a lot of procumbent plants like Hibbertia linearis, Hibbertia obtusifolia or Dampier species as a ground cover which would look stunning in flower together as would Xerochrysum bracteatum or Xerochrysum viscosum. Mix it with other smaller shrubs so none of them dominate the scene but blend in to give a mosaic of foliage colours that you oversee.
It is ideal in settings near large ponds in large court yards or the larger rockery. It needs light shade to grow at its best. Place them near old stumps and roots or medium size rocks to make the stumps, rocks or roots look larger and more gnarled. The deep greys and blacks against the ovate leaves and stems will contrast both the finesse of the plants and the coarseness of the stumps, rocks or roots. Select an area of ground and let your hair down and be imaginative. Sparingly use other plants when planting and remember that this plants foliage and form is the center of attraction. Planted in mass using a gentle slope or a basin with a medium pool at the bottom would also give a strong contrast for most of the year. A billabong affect would give a quite tranquil affect where as a waterfall or cascade would give more stimulation and energy to the scene. When using this plant as a feature only grow small plants that do not reach more than 250mm in height and have a compact habit with either blue or grey leaves, but be careful that these plants do not steal the stage. Taller plants can be grown in the background for balance. Annuals and perennials would really compliment the scene especially during the spring when the flowers are present.
Propagation:
Seeds: The seeds can be removed easily from the fruits as they start to open, however seed is often difficult to come by.
Sow freshly picked seeds directly into a seed raising mix, keeping them moist not wet. When the seedlings are 20mm to 25mm tall, prick them out and plant them into 50mm native tubes using a good organic mix. Store the excess seeds in the vegetable crisper of the fridge.
As the seedlings roots reach the bottom of the tubes plant them out into their permanent position. Do not delay.
Cuttings: Fortunately Prostanthera sejuncta cuttings strike relatively easy. Use 60mm to 120mm long semi hardwood cuttings prepared from partially mature wood of the current season’s growth
1 Prepare the cutting mix by adding two thirds sharp clean river sand, one third peat or one third perlite. These ingredients must be sterilized,
2 Select good material from non diseased plants,
3 Select semi green stems for cuttings. Look for a stem with two or three nodes,
4 Place the cutting on a flat, hard surface, and make a clean cut down one side of the cutting at the base for 10mm with a sharp sterile knife or razor blade. – This scarification of the node will increase the chances of roots emerging from this spot. Now remove all but one or two the leaves, leaving the apex leaves in tact. If the leaves are very large in proportion to the stem, cut off the apical halves.
5 Fill a saucer with water, and place a little mild strength rooting hormone into another container like a milk bottle top. Dip the node end of the cutting into the water and then into the rooting hormone. Tap off any excess hormone,
6 Use a small dipple stick or old pencil to poke a hole into the soilless potting mix. Ensure the hole is slightly larger than the stem diameter and be careful not to wipe the rooting hormone off the cuttings base. Place 2 to 4 cuttings in each of the 50mm native tubes,
7 I like to place the tubes in bucket with holes drilled in the bottom to allow excess water to drain out. A plastic bag that fits over the bucket is ideal to help maintain temperature and moisture. Place in a semi shaded, warm position like under 50mm shade cloth.
8 When the cuttings have struck, open the bag to allow air circulation for a few days to a week,
9 Once hardened off remove the cuttings from the bag and allow to further hardening for a few more days to a week,
10 Transplant into a good potting mix to grow on.
Fertilize using seaweed, fish emulsion or organic chicken pellets soaked in water on an alternate basis. Fertilize bi monthly until the plants have established themselves then annually in early September to October to maintain better colour, health, vitality and flowering
Further Comments from Readers:
“Hi reader, it seems you use The Bible of Botany a lot. That’s great as we have great pleasure in bringing it to you! It’s a little awkward for us to ask, but our first aim is to purchase land approximately 1,600 hectares to link several parcels of N.P. into one at The Pinnacles NSW Australia, but we need your help. We’re not salespeople. We’re amateur botanists who have dedicated over 30 years to saving the environment in a practical way. We depend on donations to reach our goal. If you donate just $5, the price of your coffee this Sunday, We can help to keep the planet alive in a real way and continue to bring you regular updates and features on Australian plants all in one Botanical Bible. Any support is greatly appreciated. Thank you.”
In the spirit of reconciliation we acknowledge the Bundjalung, Gumbaynggirr and Yaegl and all aboriginal nations throughout Australia and their connections to land, sea and community. We pay our respect to their Elders past, present and future for the pleasures we have gained.
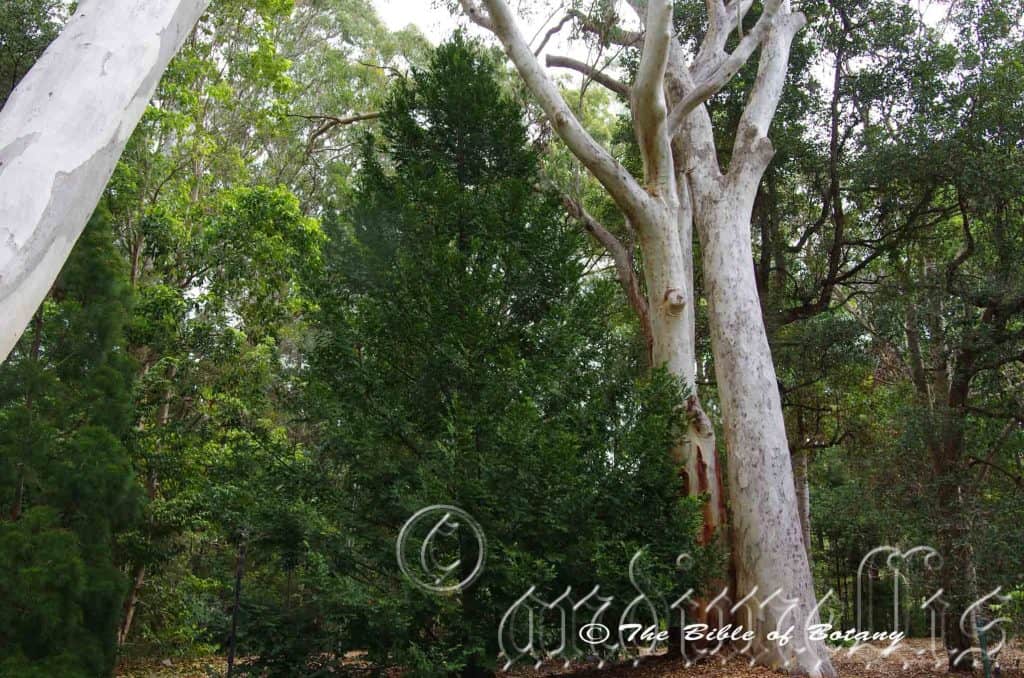
NCBG Coffs harbour NSW
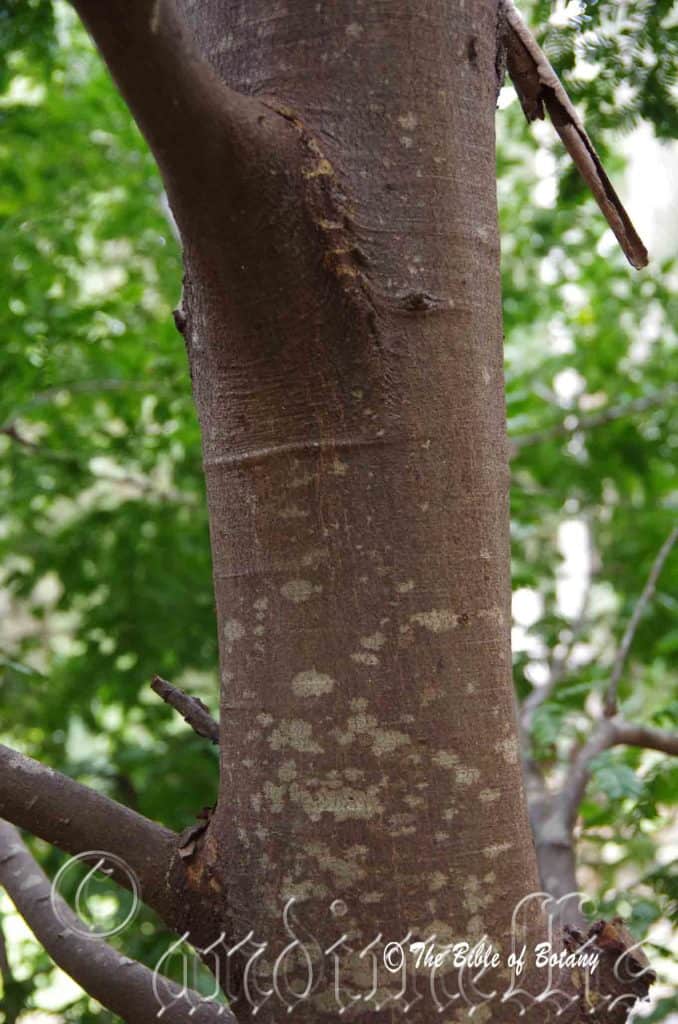
NCBG Coffs harbour NSW
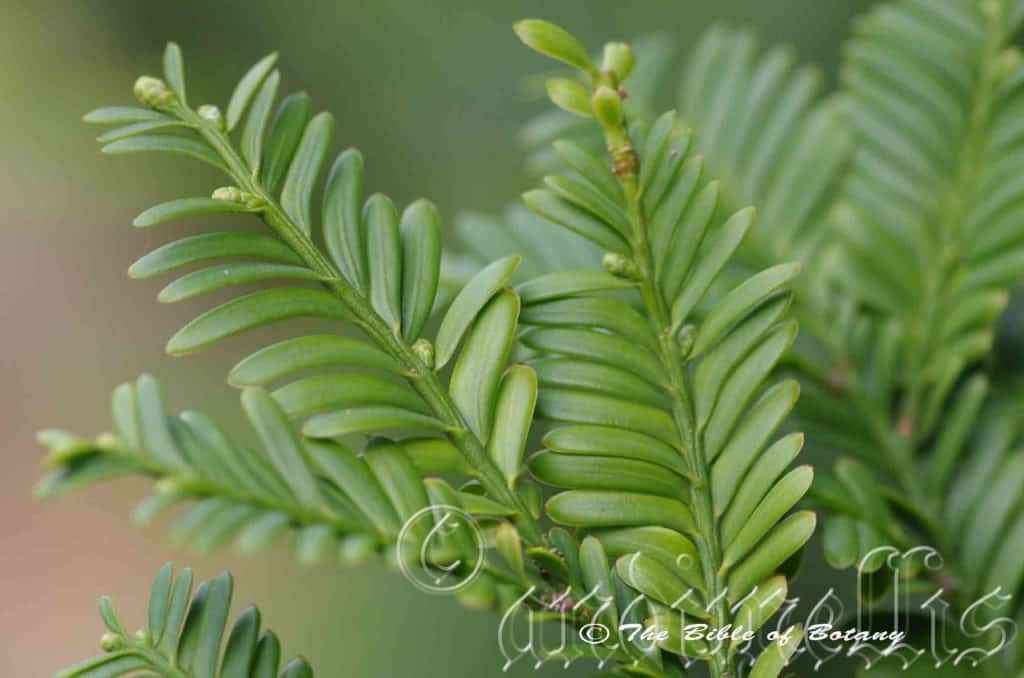
NCBG Coffs harbour NSW
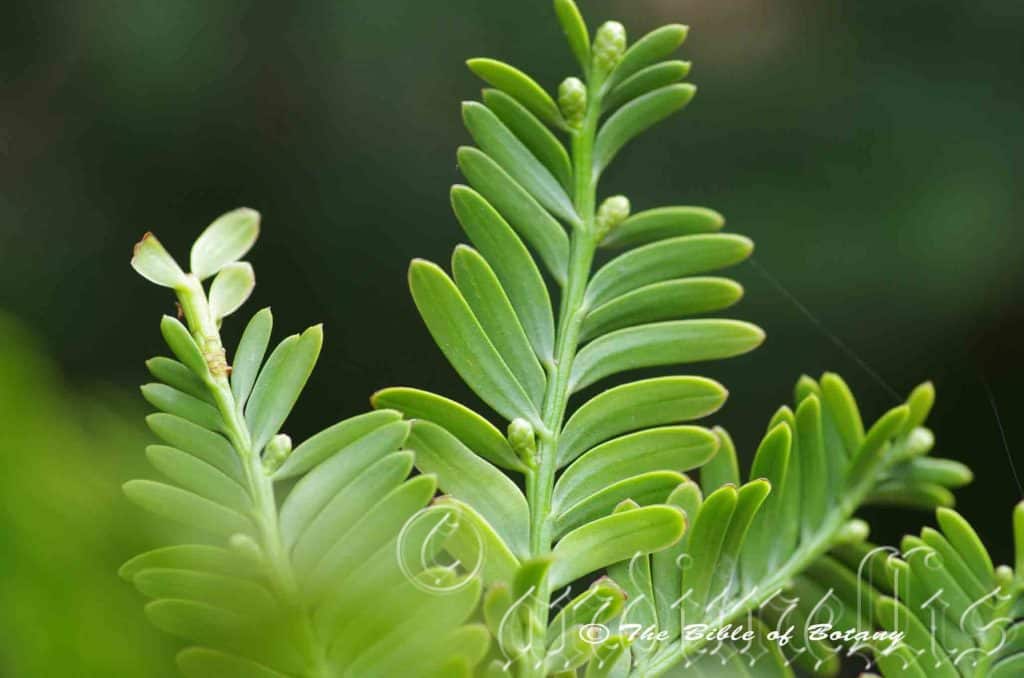
NCBG Coffs harbour NSW
Prumnopitys ladei
Classification:
Division: Pinophyta
Class: Pinopsida
Order: Pinales
Family: Podocarpaceae
Genus: From Prymnos, which is Ancient Greek for to the stern or behind and Pytis, which is a Greek for a pine tree. It refers to the location of the resin ducts on conifers.
Species: From Ladanum, which is Ancient Greek for a resin. It refers to plants which produce a similar type of resin that is extracted from the Myrrh plant of Asia Minor.
Common Name:
Distribution:
Prumnopitys ladei is restricted to Mount Spurgeon to Mount Lewis in far north eastern Queensland.
https://avh.ala.org.au/occurrences/search?taxa=Prumnopitys+ladei#tab_mapView
Habitat Aspect Climate:
Prumnopitys ladei prefers full sun to dappled shade. It grows on slopes in well-developed rainforests. The altitude ranges from 850 meters ASL to 1300 meters ASL.
The temperatures range from 4 degree in July to 32 degrees in January.
The rainfall ranges from lows of 1650mm to 3200mm average per annum.
Soil Requirements:
Prumnopitys ladei prefers to grow on better quality fine sandy loams to medium clays with copious quantities of forest litter. The soils are derived from decomposed intrusive rocks such as granite. The soils pH ranges from 6pH to 7pH. It does not tolerate waterlogged soils. Non saline soils to moderately saline soils are tolerated as are salt laden winds.
Height & Spread:
Wild Plants: 25m to 40m by 8m to 16m
Characteristics:
Prumnopitys ladei grows as a tall rigid tree with decumbent angular stems. The trunk and older stems are mid brown to greyish-brown with large chartacea like flakes decorticating on larger trees. The blaze odour is very similar to that of Pinus radiata. It exudes a slow thick, clear sap that is mostly clear and inconspicuous. The compressed branchlets are lime green to mid yellowish-green semi glossy and g sparsely or moderately covered in pale brown to fawn ovate scales eventually becoming glabrous.
The alternate leaves of Prumnopitys ladei are flat and crowded along a single plane. The oblong-linear to oblong leaves measure 15mm to 26mm in length by 2mm to 3.5mm in width. There is a faint but distinct on the upper surface of the petiole and extends along the stem. The petioles measure 0mm to 1.5mm in length. The slightly oblique to normal bases are rounded while the apexes are obtuse to broad acute. The concolourous or slightly discolourous laminas are deep lime-green to deep grass-green, glabrous and semi glossy on the upper laminas while the lower laminas are slightly paler. The laminas are flat to slightly convex on the upper surface. The mid vein is faintly prominent on the upper lamina.
The male cones on Prumnopitys ladei are sessile or borne on very short pedicels that measure up to 1mm in length. The cones measure 7mm to 9 mm in length by 2mm to 3mm in diameter.
The female cones are small receptacles. The flowers appear from January early April.
The fruits of Prumnopitys ladei are globose cones. The green, glossy cones are glabrous and measure 25mm to 30mm in length by 20mm to 25mm in diameter. The green capsules turn deep purple with a glaucous coat when ripe and contain a single seed when ripe. The hard woody seed measures 18mm to 21mm in length by 12mm to 15mm in diameter. The testa is reasonably thick and measures 3mm to 6mm in thickness.
Wildlife:
Prumnopitys ladei’s are eaten by many fruit eating pigeons.
The fruits are edible but have a strong resinous taste which is difficult to swallow.
Cultivation:
Prumnopitys ladei is an interesting tall tree that should be more widely grown in subtropical to cool temperate gardens. It is ideal when used as a park tree or adjacent to a new rainforest garden. In cultivation it probably grows from 15 meters to 25 meters in height by 8 meters to 15 meters in diameter.
It grows well on lighter soils where deep leaf litter keeps the soil cool and moisture at an even level. If these requirements are met it can cope with temperatures as low as minus 4 degrees and up to 42 degrees as it has done at Nana Glen west of Coffs Harbour. It is moderately drought tolerant in most districts that receive over 1200mm of rainfall a year.
Prumnopitys ladei is best used adjacent to small areas of bush close to paths or the house so their unique form and colour can be fully appreciated and utilized into the landscape. It is great placed along long narrow driveways. Here they can be planted very formally in straight rows. In small groups of 2 or 3 or as a standalone plant it can create a beautiful park like scene for medium areas or fill a small backyard. If it is surrounded by shorter plants with fine foliages and red flowers it will dominate at the center giving height and strength to the garden especially when the surrounding flowers are in bloom. Remember that the trunk is a beautiful feature of this tree so it must remain exposed so it can be appreciated.
As it develops a crown it is particularly good for growing epiphytic orchids and ferns particularly stags and elk horns.
Propagation:
Seeds: The seeds of Prumnopitys ladei can be removed easily from the fruits that have fallen to the ground.
Sow freshly treated seeds directly into a seed raising mix, keeping them moist not wet. When the seedlings are 20mm to 25mm tall, prick them out and plant them into 50mm native tubes using a good organic mix.
As the seedlings roots reach the bottom of the tubes plant them out into their permanent position.
Fertilize using seaweed, fish emulsion or organic chicken pellets soaked in water on an alternate basis. Fertilize bi monthly until the plants have established themselves then annually in early September to October to maintain better colour, health, vitality and flowering
Further Comments from Readers:
“Hi reader, it seems you use The Bible of Botany a lot. That’s great as we have great pleasure in bringing it to you! It’s a little awkward for us to ask, but our first aim is to purchase land approximately 1,600 hectares to link several parcels of N.P. into one at The Pinnacles NSW Australia, but we need your help. We’re not salespeople. We’re amateur botanists who have dedicated over 30 years to saving the environment in a practical way. We depend on donations to reach our goal. If you donate just $5, the price of your coffee this Sunday, We can help to keep the planet alive in a real way and continue to bring you regular updates and features on Australian plants all in one Botanical Bible. Any support is greatly appreciated. Thank you.”
In the spirit of reconciliation we acknowledge the Bundjalung, Gumbaynggirr and Yaegl and all aboriginal nations throughout Australia and their connections to land, sea and community. We pay our respect to their Elders past, present and future for the pleasures we have gained.
All information is included in good faith and has been thoroughly researched prior to printing. The website or the author does not warrant or guarantee the accuracy of any information on these pages, nor does the website or the author accept any responsibility for any loss arising from the use of the information found within. The views and opinions are strictly those of the author or those members who chose to actively participate in the contents herein.