Arytera distylis
Arytera divaricata
Asparagus racemosus
Asplenium attenuatum
Asplenium australasicum
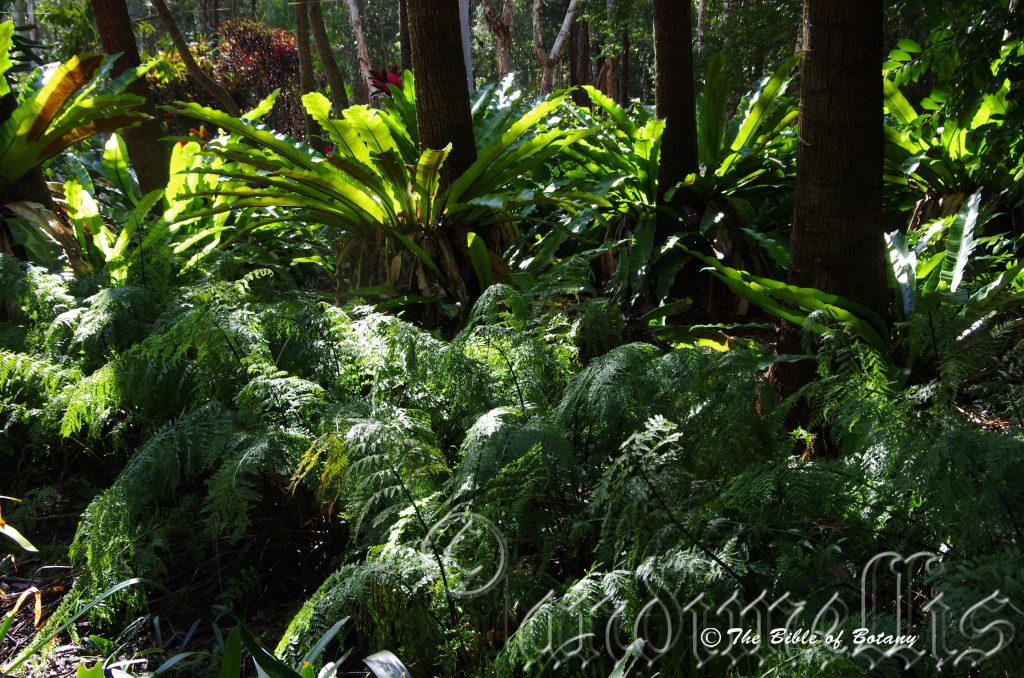
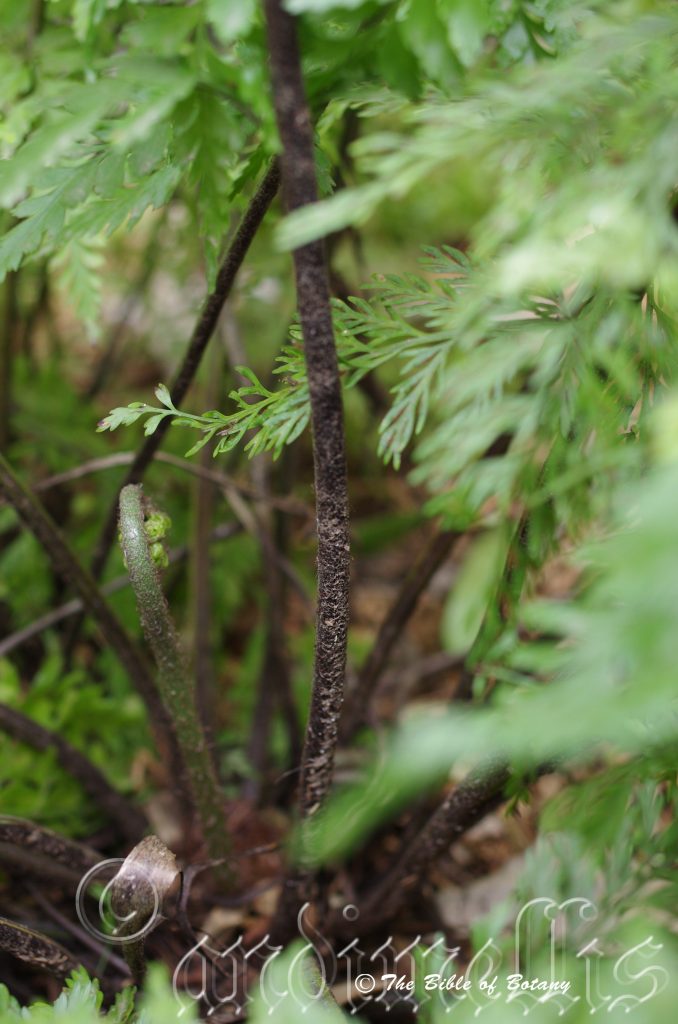
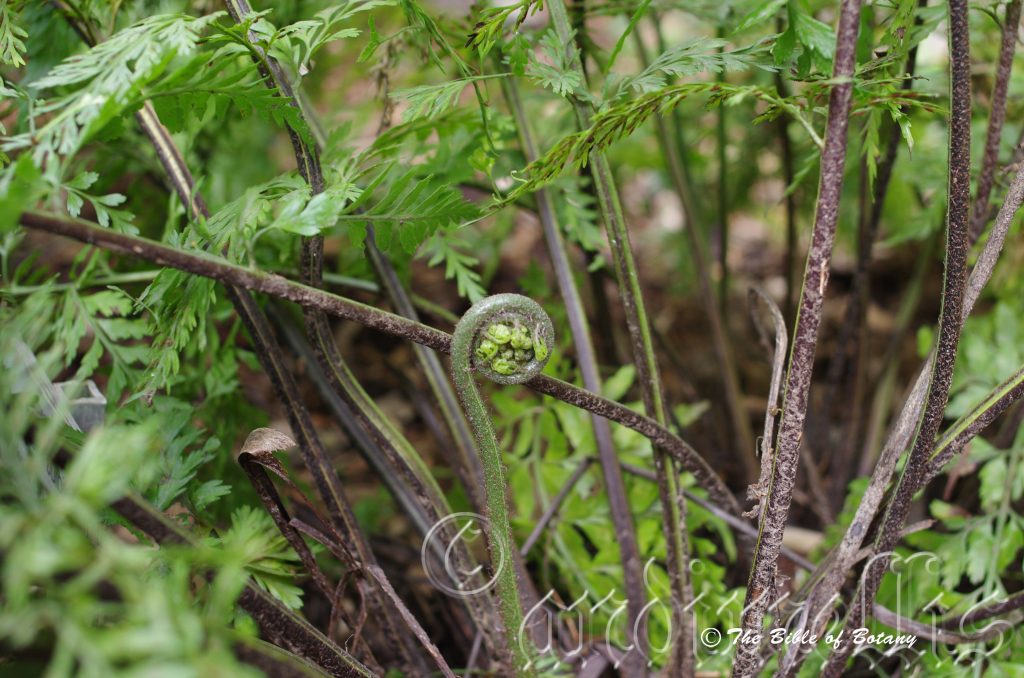
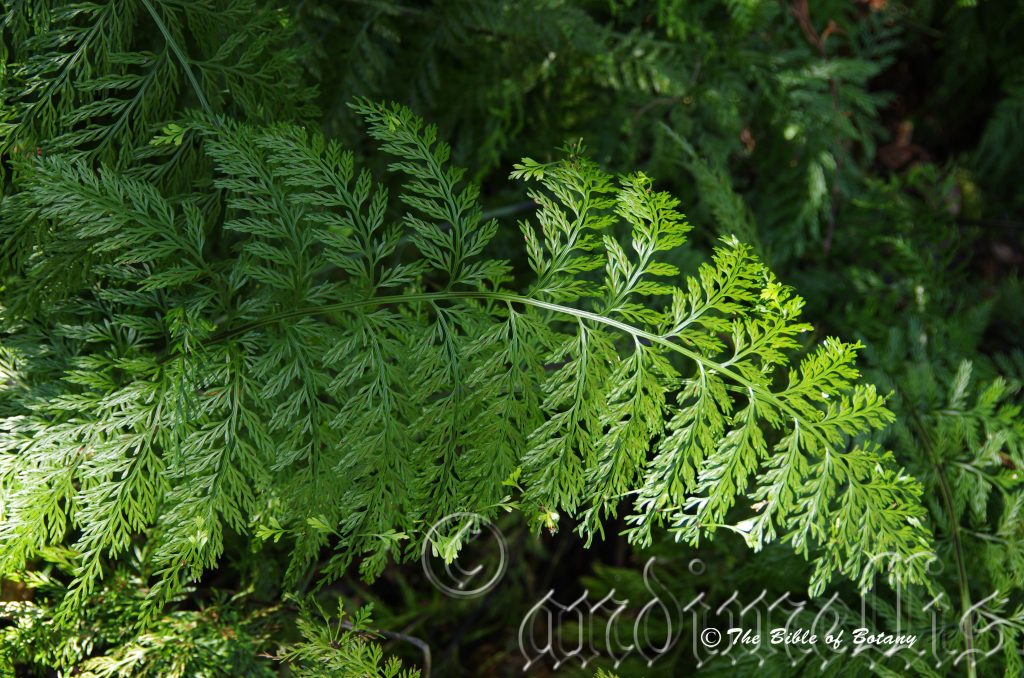
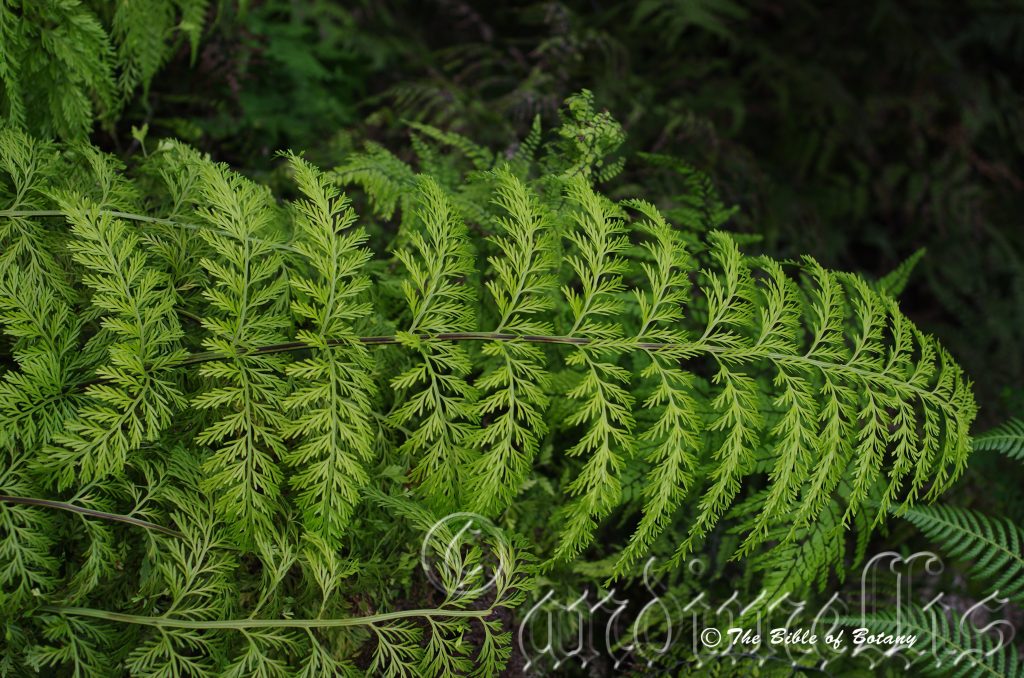
Asplenium bulbiferum
Asplenium difforme
Asplenium flabellifolium
Asplenium flaccidum subsp. flaccidum
Asplenium nidus
Asplenium polyodon
Asplenium simplicifrons
Asterolasia correifolia
Asteromyrtus brassii
Astroloma pinifolium
Astrotricha cordata
Astrotricha latifolia
Astrotricha longifolia
Atalaya salicifolia
Atractocarpus benthamianus subsp. benthamianus
Atractocarpus benthamianus subsp. glaber
Atractocarpus fitzalanii
Atractocarpus sessilis
Atriplex nummularia
Atriplex semibaccata
Auranticarpa rhombifolia
Australina pusilla
Austrobuxus swainii
Austrocynoglossum latifolium
Austromuellera trinervia
Austromyrtus dulcis
Austromyrtus tenuifolia
Austrosteenisia blackii subsp. blackii
Austrosteenisia glabristyla
Austrostipa pubescens
Austrostipa ramosissima
Austrostipa rudis subsp. nervosa
Austrostipa scabra subsp. falcata
Austrostipa scabra subsp. scabra
Avicennia marina subsp. australisica
Azolla filiculoides
Azolla pinnata
Lismore Botanic Gardens Lismore NSW
Lismore Botanic Gardens Lismore NSW

Lismore Botanic Gardens Lismore NSW
Lismore Botanic Gardens Lismore NSW
Lismore Botanic Gardens Lismore NSW
Lismore Botanic Gardens Lismore NSW
Arytera distylis
Classification:
Unranked: Eudicots
Unranked: Rosid
Order: Sapindales
Family: Sapindaceae
Genus: From Arytaenus, which is Latin for a cup or ladle. It refers to fruits, which have a shape that resembles a cup or ladle.
Species: May be from Di/Dis, which is Latin for two or twice and Stylos, which is Ancient Greek for a pillar or a column. It refers to flowers which have two styles.
Common Name: Coogera or Rose Tamarind.
Distribution:
Arytera distylis is found south from the Fraser Coast in southern coastal Queensland to Ballina in far north eastern coastal central New South Wales. There is a disjunct population further north at Port Dennison and further south at Bellingen. It is found on and east of the Great Dividing Range to the coast.
https://avh.ala.org.au/occurrences/search?taxa=Arytera+distylis#tab_mapView
Habitat Aspect Climate:
Arytera distylis prefer full sun to dappled shade. It grows in low land rainforests and in subtropical dry rainforest. The altitude ranges from 5 meters ASL to 600 meters ASL.
The temperatures range from 2 degrees in August to 38 degrees in January.
The rainfalls range from lows of 900mm to an average of 1600mm annually.
Soil Requirements:
Arytera distylis prefer better quality sandy loams to medium clays. The soils are derived from decomposed black basalts, brown basalts, shale and metamorphic rocks. Soils pH ranges from 5pH t to 7pH are preferred where the water can drain freely. It does not tolerate waterlogged soils. Non saline soils to very saline soils are tolerated.
Height & Spread:
Wild Plants: 15m to 20m by 10m to 12m.
Characteristics:
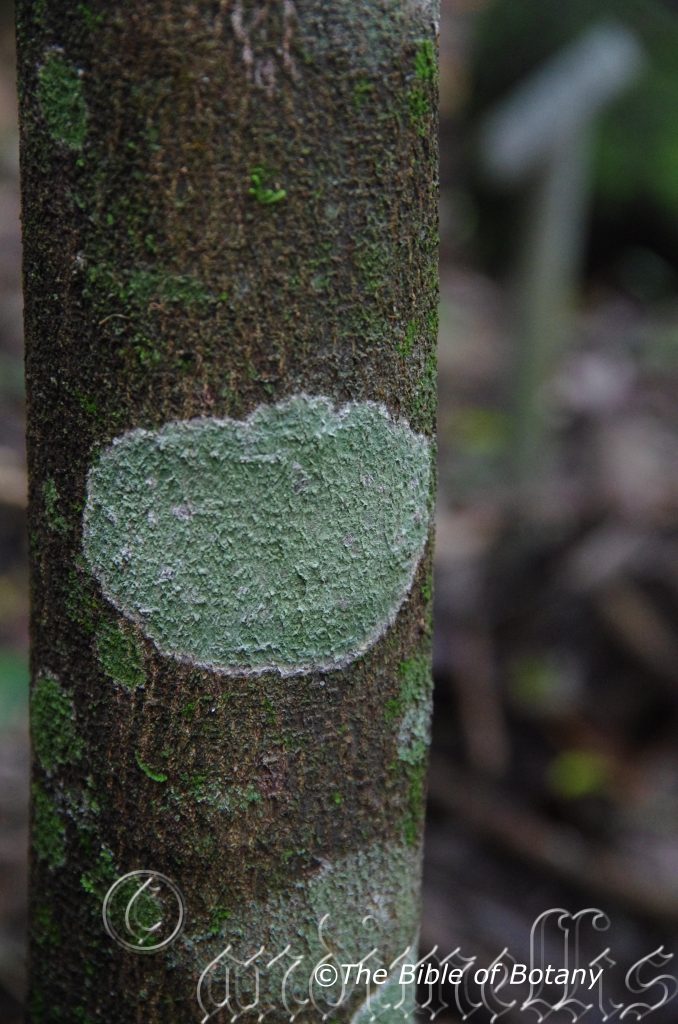
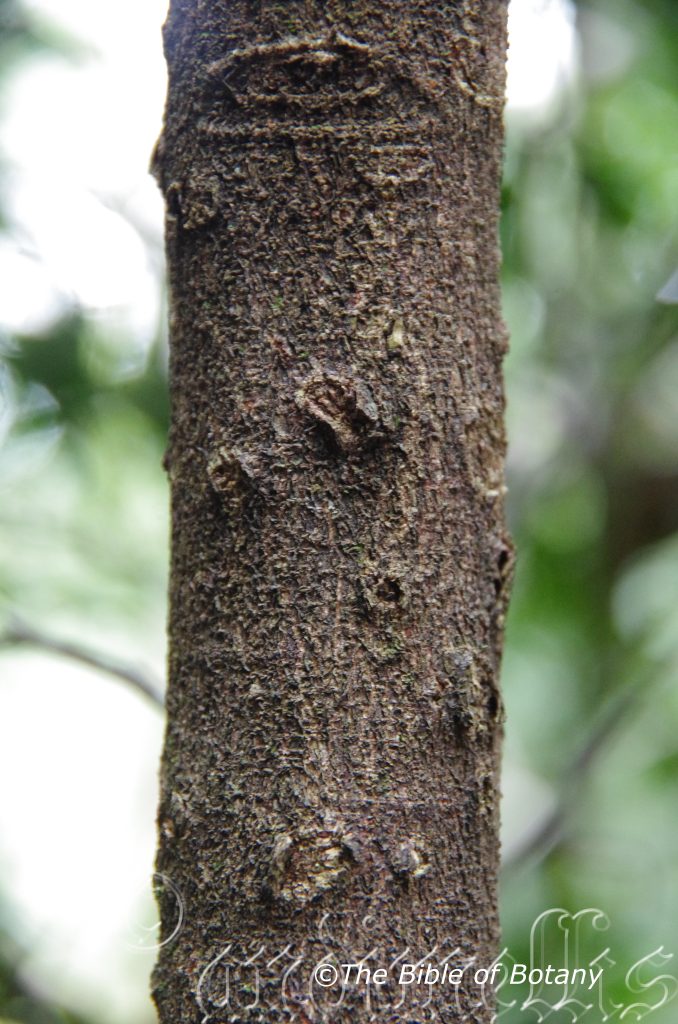
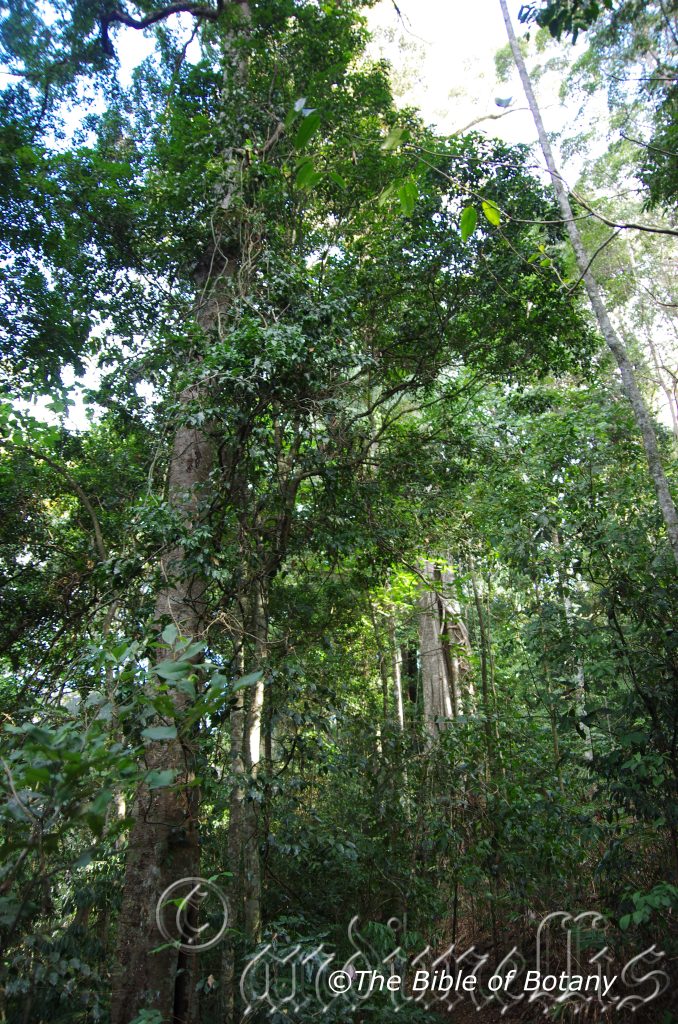
Arytera distylis has a rough hard mid brown bark. Large trees are fluted close to the ground. Branches are paler brown while the branchlets are reddish brown. The stems are densely covered in short, pale pubescent hairs.
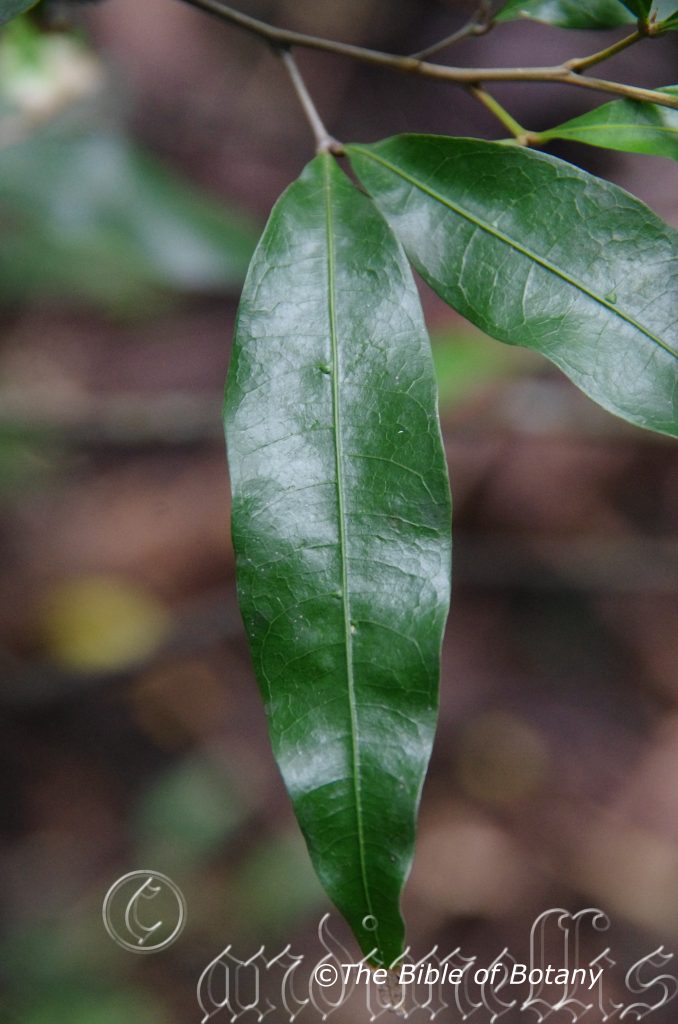
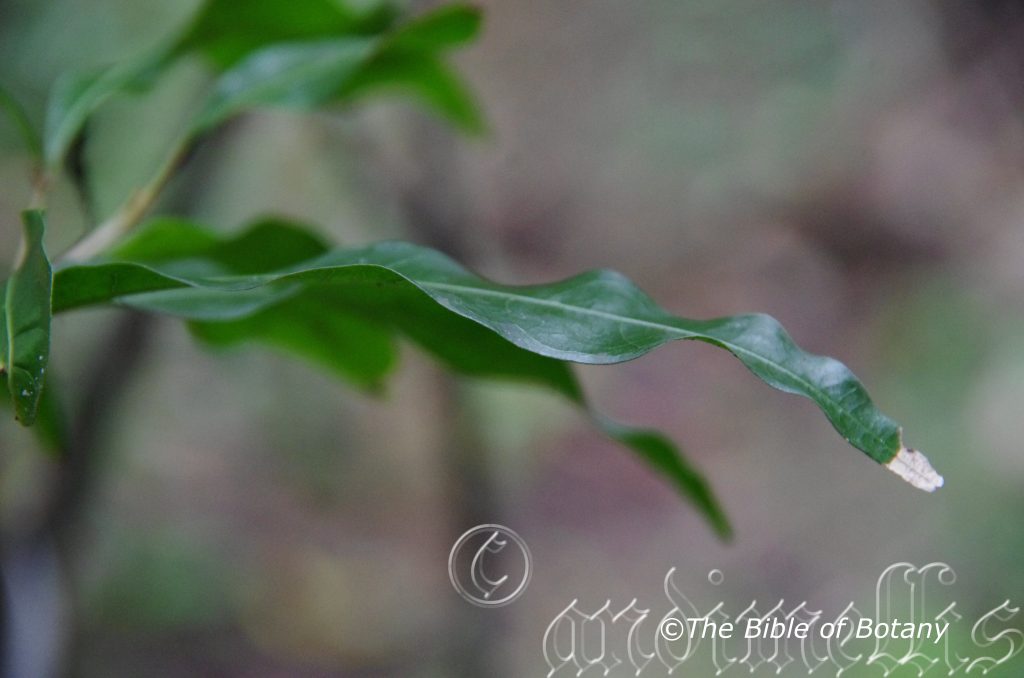
The juvenile leaves and new growth is vivid deep pink to pinkish-red. Arytera distylis alternate leaves measure 50mm to 130mm in length. There are usually 1 rarely 2 pairs of opposite leaflets which are elliptic to lanceolate and measure 40mm to 80mm in length by 15mm to 35mm in width. The terete, glabrous petiole measures 5mm to 15mm in length, while the petiolules measure 2mm to 4mm in length. The bases are broadly cuneate to round while the apexes are short acuminate often with a retuse tip. The discolourous leaves are deep sea-green, glabrous and glossy on the upper laminas while the lower laminas are paler and glabrous or at times very sparsely covered covered in short, pale pubescent hairs. The laminas are undulating, while the margins are entire. The main vein is prominent on the both laminas, while the lateral veins are prominent, set at 70 to 80 degrees and form loops inside the margin. There are several visible, glabrous domatia present adjacent to the mid vein.
The inflorescence of Arytera distylis is a terminal raceme and measure 20mm to 80mm in length. The rachises is glabrous or sparsely covered in pale pubescent hairs.
The 5 acute calyxes are creamy-yellow and measure 1mm to 2.5mm in length. The dull yellowish obtuse petals measure 2mm to 3mm in length and are longer than the calyx lobes. The disc is pale yellow while the cream anthers are covered in cream pulverulent hairs. Flowers appear from November to early April.
Arytera distylis fruits are 1 or 2-lobed, ellipsoidal to ovoidal capsules that measure 10mm to 15mm in length by 5mm to 10mm in diameter. The calyxes are not persistent on the capsules. The green capsules turn yellow to orange when ripe. They are glabrous, split longitudinally to reveal the scarlet-red aril that almost completely surrounds the black glossy seed.
Wildlife:
Arytera distylis flowers are attractive to native bees like Tetragonula carbonaria, while the seeds green figbird, Sphecotheres vieilloti and the regent bower bird, Sericulus chrysocephalus are both known to eat the seeds.
Cultivation:
It would make an good fire retardant small to medium tree.
* Fire retardant plants act as radiant heat screens and absorb more heat from an approaching fire without burning.
* Fire retardant trees are able reduce wind speed near a house or out buildings.
* Fire retardant also trap embers and sparks carried by the wind.
* Fire retardant ground covers are able to catch burning embers without catching fire themselves, and also slow the travel of a fire through debris and litter on the ground.
Arytera distylis is an interesting subject for medium to larger gardens in tropical and subtropical areas. It forms very compact dense small spreading trees and is an excellent shade tree for small to medium gardens. The new growth is outstandingly beautiful as it turns from pale pink to deep ping and pinkish-red on its way to green. It is slow growing even when given moisture and organic fertilizers on a regular basis. As garden subjects they will grow 8 meters to 10 meters tall by 8 meters to 10 meters in diameter when grown in the open.
Arytera distylis is best grown in the tropics and subtropics where it responds to the heat and reliable rainfalls. It is cold tolerant to temperatures as low as 2 provided there is adequate moisture in the ground and it is not subjected to severe frosts.
It would make a very good accent trees in front of low set commercial, industrial sheds or low set classrooms where it will break up hard rigid architectural lines and give warmth and breadth to a building. It is also ideal for planting on nature strips as the trees have a small root system and dropping very few leaves and twigs.
It should be planted away from buildings, because of their spread and where it can be viewed as a complete tree. It is best used adjacent to small areas of bush so its umbrella shape can be contrasted against those trees in the background. Close to paths or the house will lose this affect however you want it where it can be viewed regularly especially when it is in flower or in a flush of growth. It is great in medium rockeries or where vehicles turn around as the main feature plant. Here it can be planted as a standalone specimen to create a harsh barren look or a strong welcoming attraction if planted beneath with luxurious arrays of colour. In large gardens small clusters will give an expansive park scenario especially when planted with pyramidal or columnar trees.
Surrounding it with shorter shrubss with fine foliages and multicolour flowers it will dominate at the center giving an expansive look to the bed especially when it is in flower. This is one plant that benefits from high exposure. Its smaller size and wide spread enables this to be achieved to great effect.
It can be used in raised garden beds surrounded by annuals with fine pale green leaves which flower in October to the end of summer, the rose pink flowers would give a double layer of colour.
Propagation:
Seeds: Sow fresh Arytera distylis’s seeds directly into the seed raising mix. Cover the seeds with 5mm to 10mm of the mix and place the trays in a warm well-lit area with no more than 50mm shade where there is good ventilation. Allow the mix to become semi dry between each watering. Germination is rapid with fresh seed and completed within a month or 6 weeks at the most. Seed deteriorates very quickly so seeds should not be stored for long periods.
Once the seedlings reach 150mm to 200mm in height plant them out into their permanent position. For mass plantings plant them at 8m to 9m centers for a rainforest of bank establishment projects or 15 meters to 20 meters apart for park land situations.
Fertilize using seaweed, fish emulsion or organic chicken pellets soaked in water on an alternate basis. Fertilize every two months until the plants are established then annually in early September to October to maintain health, vitality and better flowering.
Further comments from readers:
Hi reader, it seems you use The Bible of Botany a lot. That’s great as we have great pleasure in bringing it to you! It’s a little awkward for us to ask, but our first aim is to purchase land approximately 1,600 hectares to link several parcels of N.P. into one at The Pinnacles NSW Australia, but we need your help. We’re not salespeople. We’re amateur botanists who have dedicated over 30 years to saving the environment in a practical way. We depend on donations to reach our goal. If you donate just $5, the price of your coffee this Sunday, We can help to keep the planet alive in a real way and continue to bring you regular updates and features on Australian plants all in one Botanical Bible. Any support is greatly appreciated. Thank you.
In the spirit of reconciliation we acknowledge the Bundjalung, Gumbaynggirr and Yaegl and all aboriginal nations throughout Australia and their connections to land, sea and community. We pay our respect to their Elders past, present and future for the pleasures we have gained.
Border Ranges National Park NSW

Border Ranges National Park NSW

Border Ranges National Park NSW
Border Ranges National Park NSW

Border Ranges National Park NSW
Border Ranges National Park NSW
Arytera divaricata
Classification:
Unranked: Eudicots
Unranked: Rosid
Order: Sapindales
Family: Sapindaceae
Genus: From Arytaenus, which is Latin for a cup or ladle. It refers to fruits, which have a shape that resembles a cup or ladle.
Species: From divaricare, which is Ancient Greek for to stand astride or spreading out. It refers to spikelets on the panicles, which are widely spaced.
Common Name: Coogera or Rose Tamarind.
Distribution:
Arytera divaricata is found south from the tip of Cape York Peninsula in northern Queensland to Port Stevens in coastal central New South Wales. It is found on and east of the Great Dividing Range.
https://avh.ala.org.au/occurrences/search?taxa=Arytera+divaricata#tab_mapView
Habitat Aspect Climate:
Arytera divaricata prefers full sun to dappled shade. It grows in low land rainforests and warm riverine sub-tropical, tropical rainforests and littoral rainforests. The altitude ranges from 5 meters ASL to 900 meters ASL.
The temperatures range from 2 degrees in August to 38 degrees in January.
The rainfalls range from lows of 900mm to an average of 3200mm annually.
Soil Requirements:
Arytera divaricata prefers better quality sandy loams to medium clays. The soils are derived from decomposed black basalts, brown basalts, shale, metamorphic rocks, alluvial flats and accumulated peaty beach sands. Soils pH ranges from 5pH t to 7pH are preferred where the water can drain freely. It does not tolerate waterlogged soils. Non saline soils to very saline soils are tolerated.
Height & Spread:
Wild Plants: 8m to 30m by 6m to 20m.
Characteristics:
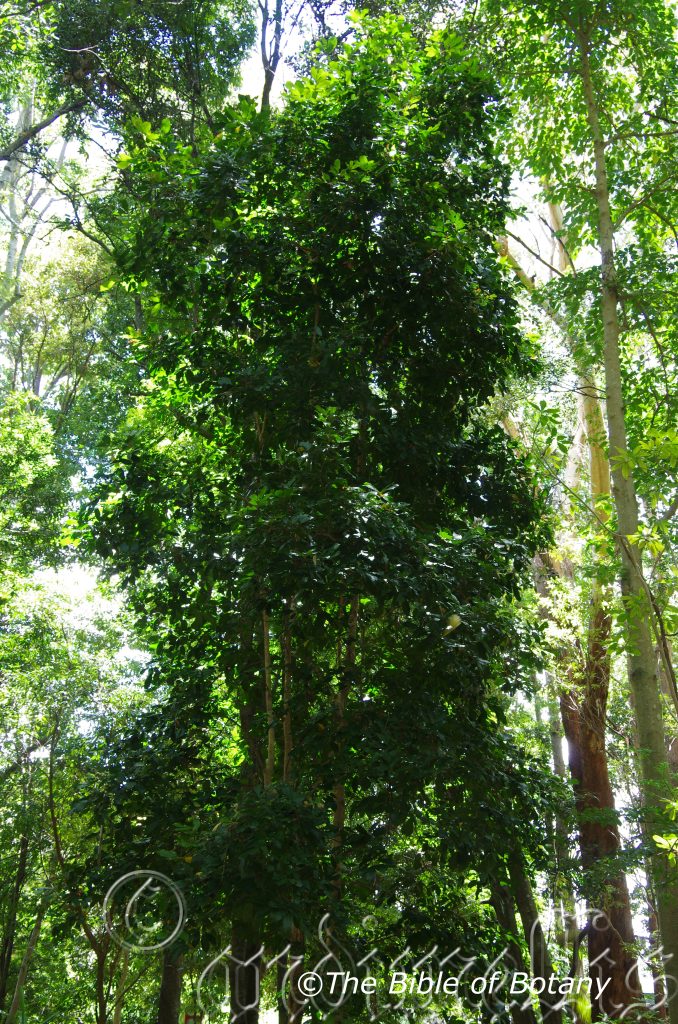
Arytera divaricata’s pale grey to mid grey bark is hard and glabrous. Large trees are fluted close to the ground. Branches are pale grey while the branchlets are reddish brown. The branchlets are densely covered in rusty-brown pulverulent hairs.
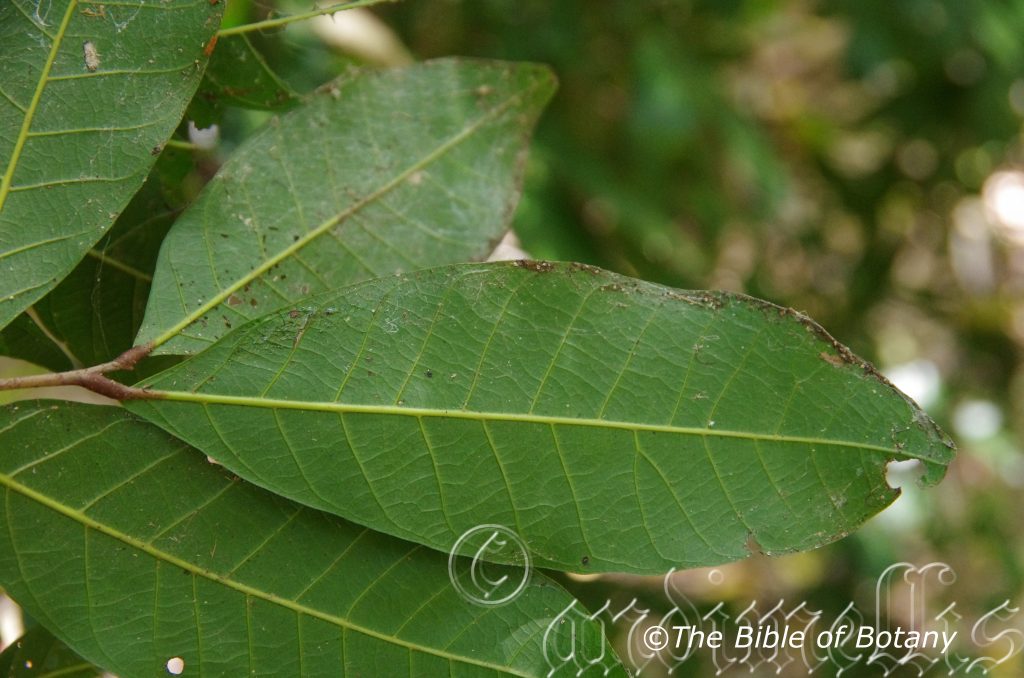
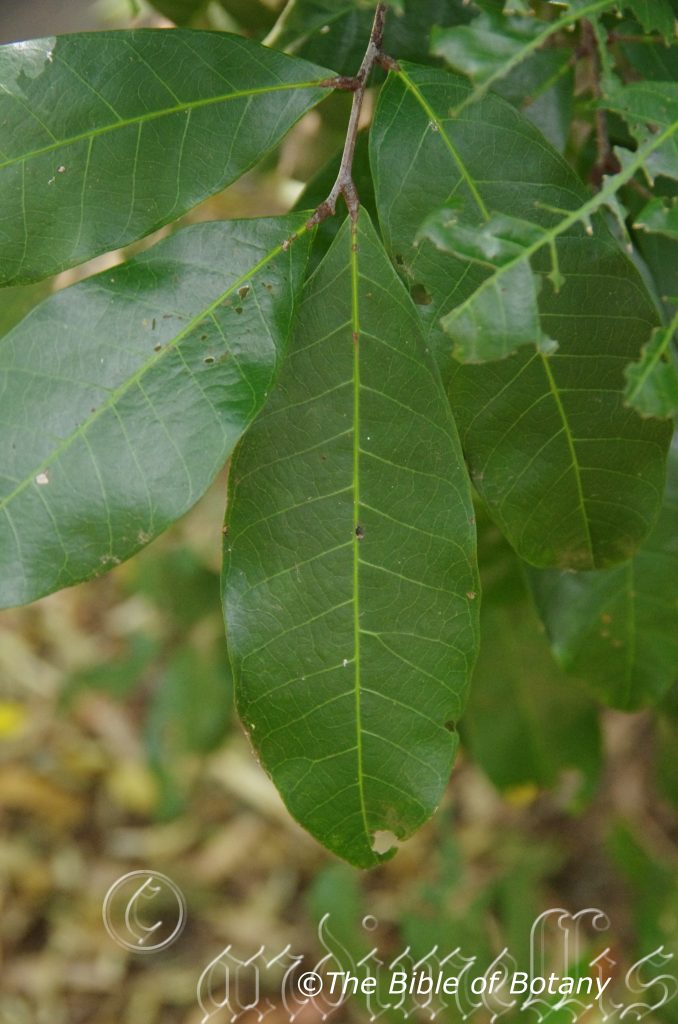
Arytera divaricata’s alternate leaves measure 70mm to 200mm in length by 110mm to 220mm in width. There are 4 to 8 pairs of leaflets which are obovate, ovate-elliptical or broadly elliptical. The alternate leaflets measure 50mm to 100mm in length by 15mm to 60mm in width. The petiole, rachises and petiolules are fawn and densely covered in fawn pubescent hairs. The petioles measure 20mm to 50mm in length while the rachises measure 40mm to 100mm in length and the petiolules measure 3mm to 10mm in length. The bases are broadly cuneate to round while the apexes are acuminate to obtuse. The pendent, concolourous leaves are sea-green and semi glossy on the upper laminas while the lower laminas are glabrous or sparsely covered in fine white puberulent hairs and minute oil dots. The laminas are flat or slightly undulating and are convex between the lateral veins and the main vein. The juvenile leaves and new growth are vivid deep pinks and pinkish-red. The margins are entire. The main vein is prominent on the lower lamina is distinctly visible from above. The lateral veins are very uniformly alternate, prominent on the lower lamina and clearly visible from the upper lamina.
The inflorescence of Arytera divaricata are panicles born terminally and measure 55mm to 150mm in length by 60mm to 140mm in diameter. The panicle branches are divaricate. The rachises, peduncles and pedicels are covered in pale creamy fawn pulverulent hairs. The rachises measure 55mm to 150mm in length while the peduncles measure 30mm to 90mm in length and the pedicels measure 3mm to 5mm in length.
The 5 cupular calyxes are covered in cream to creamy-fawn pulverulent hairs and measure 2mm to 2.2mm in length. The pale cream petals are elliptical to sub rhomboidal and measure 1.5mm to 2.5mm in length by 1.4mm to 2.4mm in width. The disc is pale yellow while the cream anthers are covered in cream pulverulent hairs. Flowers appear from November to early April.
Arytera divaricata’s fruits are globose or ovoid capsules. The capsules measure 10mm to 15mm in length by 6mm to 12mm in diameter. The calyxes are not persistent on the capsules. The green capsules turn pale yellow then to deep yellow or reddish-brown when ripe. It is glabrous or finely pitted externally while internally there is a dense layer of long, pale fawn to golden yellow velutinous hairs surrounding the single seed. The capsules split longitudinally to reveal the scarlet-red aril that almost completely surrounds the black glossy seed.
Wildlife:
Arytera divaricata flowers are attractive to native bees, many hoverflies while the fruits are consumed by medium to large fruit eating birds.
Cultivation:
It would make an good fire retardant small to medium tree.
* Fire retardant plants act as radiant heat screens and absorb more heat from an approaching fire without burning.
* Fire retardant trees are able reduce wind speed near a house or out buildings.
* Fire retardant also trap embers and sparks carried by the wind.
* Fire retardant ground covers are able to catch burning embers without catching fire themselves, and also slow the travel of a fire through debris and litter on the ground.
Arytera divaricata is an interesting subject for medium to larger gardens in tropical and subtropical areas. It forms very compact dense small spreading trees. It is excellent shade trees for medium gardens. It is slow growing even when given moisture and organic fertilizers on a regular basis. As garden subjects it will grow 8 meters to 14 meters tall by 5 meters to 9 meters in diameter when grown in the open.
Arytera divaricata is best grown in the tropics and subtropics where they respond to the heat and reliable rainfalls. It is cold tolerant to temperatures as low as minus 2 provided there is adequate moisture in the ground and it is not subjected to severe frosts.
The tree would make a very good accent tree in front of low set homes, commercial, industrial sheds or low set classrooms where they will break up hard rigid architectural lines and give warmth and breadth to a building. It is also ideal for planting on nature strips as the trees have a small root system and dropping very few leaves and twigs.
It should be planted away from buildings, because of their spread and where it can be viewed as a complete tree. It is best used adjacent to small areas of bush so its upright form can be contrasted against those trees in the background. Close to paths or the house will lose this affect, however you want it where it can be viewed regularly especially when it is in flower or in a flush of growth. It is great in medium rockeries or where vehicles turn around as the main feature plant. Here it can be planted as a standalone specimen to create a harsh barren look or a strong welcoming attraction if planted beneath with luxurious arrays of colour. In large gardens small groups will give an expansive park scenario especially when planted with pyramidal or columnar trees.
If it is surrounded by shorter shrubs with fine foliage and multicolour flowers it will dominate at the center giving an expansive look to the bed especially when it is in flower. This is one tree that benefits from high exposure. Its smaller size and narrow upright form enables this to be achieved to great effect.
It can be used in raised garden beds surrounded by small shrubs with fine pale green leaves which flower at a different times of the year as the rose pink flowers would be lost amongst strong reds and purples while lilacs, pinks and whites would blend leaving a feeling that something is missing.
Propagation:
Seeds: Sow fresh Arytera divaricata seeds directly into the seed raising mix. Cover the seeds with 5mm to 10mm of the mix and place the trays in a warm well-lit area with no more than 50mm shade where there is good ventilation. Allow the mix to become semi dry between each watering. Germination is rapid with fresh seed and completed within a month or 6 weeks at the most. Seed deteriorates very quickly so seeds should not be stored for long periods.
Once the seedlings reach 150mm to 200mm in height plant them out into their permanent position. For mass plantings plant them at 8m to 9m centers for a rainforest of bank establishment projects or 15 meters to 20 meters apart for park land situations.
Fertilize using seaweed, fish emulsion or organic chicken pellets soaked in water on an alternate basis. Fertilize every two months until the plants are established then annually in early September to October to maintain health, vitality and better flowering.
Further comments from readers:
Hi reader, it seems you use The Bible of Botany a lot. That’s great as we have great pleasure in bringing it to you! It’s a little awkward for us to ask, but our first aim is to purchase land approximately 1,600 hectares to link several parcels of N.P. into one at The Pinnacles NSW Australia, but we need your help. We’re not salespeople. We’re amateur botanists who have dedicated over 30 years to saving the environment in a practical way. We depend on donations to reach our goal. If you donate just $5, the price of your coffee this Sunday, We can help to keep the planet alive in a real way and continue to bring you regular updates and features on Australian plants all in one Botanical Bible. Any support is greatly appreciated. Thank you.
In the spirit of reconciliation we acknowledge the Bundjalung, Gumbaynggirr and Yaegl and all aboriginal nations throughout Australia and their connections to land, sea and community. We pay our respect to their Elders past, present and future for the pleasures we have gained.
Asparagus racemosus
Classification:
Order: Asparagales
Family: Asparagaceae
Subfamily: Asparagoideae
Genus: From Asparagos, which is Ancient Greek or Asparagus, which is Latin for the Asparagus genus. It refers to plants, which are related to the original name given to the genus by the Greek botanist Theophrastus. The etymology of the word is unknown.
Species: From Racamosum, which is Latin for a cluster. It refers to flowers, which are born on densely packed racemes.
Common Name: Asparagus Fern.
Distribution:
Asparagus racemosus is found east of the Great Dividing Range from Cape York Peninsula to Brisbane. It is also found on the larger islands of the Torres Strait Islands and the Islands of the Great Barrier Reef.
It is also found in disjunct populations from Broome in north western, Western Australia across Arnhem Land in the Northern Territory to Groote Eylandt.
https://avh.ala.org.au/occurrences/search?taxa=Asparagus+racemosus#tab_mapView
Habitat Aspect Climate:
Asparagus racemosus prefers semi shade to full sun. It usually grows in monsoonal rain forests or littoral rainforests or at times it is found in mangrove forests. The altitude ranges from 2 meters to 300 meters ASL.
The temperatures range from 4 degrees in August to 42 degrees in January.
The rainfalls range from lows of 600mm to an average of 3200mm annually.
Soil Requirements:
Asparagus racemosus prefers deep, sandy loams, light fatty clays, medium clays or light silts to heavy silts. The soils are derived from decomposed sandstones granites, brown basalts, black basalts, shales, metamorphic rocks, alluvial deposits or accumulated peaty beach sands. The soil’s pH ranges from 4.5pH to 6.5pH. It does not tolerate waterlogged soils. None saline soils to moderately saline soils are tolerated. Non saline soils to very saline soils are tolerated.
Height & Spread:
Wild Plants: 1 meter to 6 meters by 2 meters to 3 meters.
Characteristics:
The thick fibrous roots of Asparagus racemosus are long thin tubers that measure 100mm to 160mm in length but have been recorded to reach 1 meter in length by 6mm to 15mm in diameter. It is a twining climber with long thin pale grass green stems with soft, long, thin recurved spines to 15mm in length. The stems may reach 6 meters in length by 2mm to 20mm in diameter near the base. The stems have an almost artificial plastic appearance to them. The final branchlets and cladodes are flattened.
Asparagus racemosus’s leaves are reduced to minute scales and are replaced by 4 to 10 cladodes in each leaf axis or small branchlets. The terete, triangular or narrow linear falcate cladodes are glabrous and measure 15mm to 20mm in length by 0.2 to 0.5mm in width. They have a longitudinal groove while the mid vein is not distinct on either lamina. The margins are entire while the base is sessile. The cladodes and final branchlets are pale grass green, glabrous and very glossy appearing more plastic like than real.
Asparagus racemosus’s inflorescence is a raceme born from the old leaf axis for the complete length of the stem. The 6 linear to long spathulate tepals are recurved and measure 4mm to 4.5mm in length by 1.5mm in width. The tepals are white with a distinct pale green longitudinal stripe down the center.
The 6 free stamens are white and measure 3mm to 5 mm in length. The pale pink, red, purple or burgundy anthers measure 0.5 to 0.6mm in diameter.
The 3 lobed stigma sits directly on the pale green ovary. The lobes measure 0.5mm in length while the ovate ovary measures 2.5mm to 3mm in length by 2mm to 2.5mm in diameter. The flowers have a faint sweet scent. Flowers appear from October to February depending on local conditions.
The fruits of Asparagus racemosus are small globose berries. The berries are pale green with the thin papery testa turning crimson red on ripening. The berries measure 5mm to 6mm in diameter.
The globose seeds measure 4mm to 4.5mm in diameter.
Wildlife:
Small nectar eating native flies, wasps and butterflies are attracted to the flowers.
Raw, roasted, boiled, steam, stir fried or candied they have a pleasant, sweet taste.
Cultivation:
Asparagus racemosus is a beautiful plant from the rainforests of Australia. Growing it is easy and a small plant will reach its full potential in around 2 to 3 years. It is ideal for basket cultivation or growing around swimming pools, courtyards or other confined spaces where it can climb or hang down. Plants are best trimmed regularly to ensure bushiness and a habit where cascade into permanent view. When Asparagus racemosus is in flower especially if the backdrop are deep reds or purples it is a sight to behold. Neighbouring plants should have finer leaves but not feathery like Asparagus racemosus and be deep green in colour to help contrast the elegance it will display.
Basket plants must be divided every 2 or 3 years to ensure vigour good stem growth and an abundance of flowering. It could be tried as far south as Melbourne.
Propagation:
Seeds: Asparagus racemosus seeds require special handling when collecting seeds and during sowing. The fruits contain Calcium Oxalate crystals which will cause pain and discomfort if it comes in contact with the skin. Wear protective clothing and thick leather gloves when handling.
Sow fresh seeds into a seed raising mix and cover with 20mm of the seed raising mix. When the seedlings are 25mm to 50mm tall, prick them out and plant them into 50mm native tubes using a seed raising mix. Germination is erratic and will commence in six months but may last a further 18 months.
Once the seedlings reach 150mm to 200mm in height plant them out into their permanent position. Mass plantings can be achieved with planting them at 3 meter to 4 meter centers.
INDOORS OR POTTED ON:
Sawdust or sand mixes are too well draining unless the sawdust has completely composted down where it exhibits a texture like plasticize to the touch. Moisture can be squeezed out between the fingers yet it remains moist. I find this a great basis to start with.
Mix equal parts of the well decomposed saw dust with the above feel with perlite and vermiculite. To this add two part sharp clean sand and one part compost. Make sure the sand comes from a source that does not have salt.
The Saw dust in this condition creates the moisture retention and holds nutrient in. The perlite and vermiculite make the mix neutral and both have great water holding capacity without shrinkage with age. The sand creates good drainage and is good for good healthy root development.
Indoor plants need good light and ventilation without drying breezes or wind. Again fertilize the plants on a monthly basis with the above formula on a rotation basis.
Indoor plants need good light and ventilation without drying breezes or wind. Again fertilize the plants on a monthly basis with the above formula on a rotation basis.
Fertilize using seaweed, fish emulsion or organic chicken pellets soaked in water on an alternate basis. Fertilize every two months until the plants are established then annually in early September to October to maintain health, vitality and better flowering.
Further comments from readers:
Hi reader, it seems you use The Bible of Botany a lot. That’s great as we have great pleasure in bringing it to you! It’s a little awkward for us to ask, but our first aim is to purchase land approximately 1,600 hectares to link several parcels of N.P. into one at The Pinnacles NSW Australia, but we need your help. We’re not salespeople. We’re amateur botanists who have dedicated over 30 years to saving the environment in a practical way. We depend on donations to reach our goal. If you donate just $5, the price of your coffee this Sunday, We can help to keep the planet alive in a real way and continue to bring you regular updates and features on Australian plants all in one Botanical Bible. Any support is greatly appreciated. Thank you.
In the spirit of reconciliation we acknowledge the Bundjalung, Gumbaynggirr and Yaegl and all aboriginal nations throughout Australia and their connections to land, sea and community. We pay our respect to their Elders past, present and future for the pleasures we have gained.
Ramourni National Park NSW
Ramourni National Park NSW
Ramourni National Park NSW
Ramourni National Park NSW
Asplenium attenuatum
Classification:
Class: Polypodiopsida
Order: Polypodialis
Family: Aspleniaceae
Genus: From A, which is Greek/Latin for without or not having and Splenon, which is Ancient Greek or Splenum, which is Latin for the spleen. It refers to ancient beliefs that the plants supplied a medicine to benefit the spleen.
Species: From Attenuatus, which is Latin for thin, slender or weak. It refers to structures or organs, which are thin, slender and weak looking.
Subspecies: Asplenium attenuatum subsp. attenuatum. From Attenuatus, which is Latin for thin, slender or weak. It refers to structures or organs, which are thin, slender and weak looking.
Subspecies: Asplenium attenuatum subsp. indivisum. From Indivisum, which is Latin for entire or undivided. It refers to an organ’s margin, which is undivided.
Common Name: Simple Spleenwort.
Distribution:
Asplenium attenuatum subspecies attenuatum is found south from Mackay in central coastal Queensland to the Blue Mountains in central Coastal New South Wales.
Asplenium attenuatum subspecies indivisum is found in two disjunct populations in Queensland, one at Mount Dryander and the other south from the Fraser Coast to the Macpherson Ranges National Park in far south eastern Queensland.
https://avh.ala.org.au/occurrences/search?taxa=Asplenium+attenuatum#tab_mapView
Habitat Aspect Climate:
Asplenium attenuatum prefer full shade to lightly filtered sunlight or even dappled light are the favourite haunts.
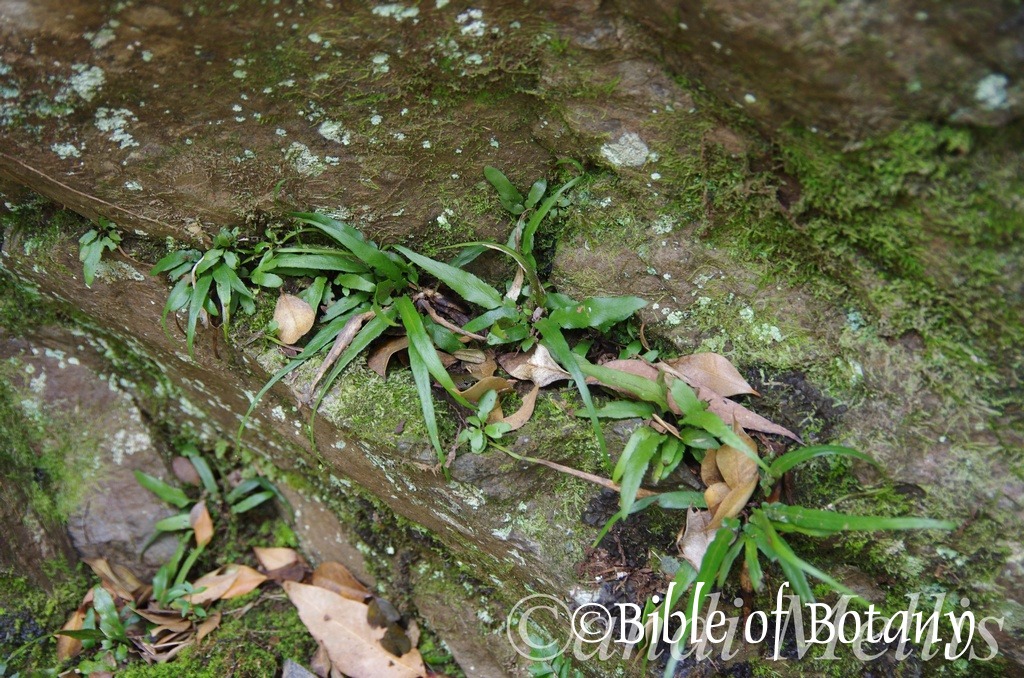
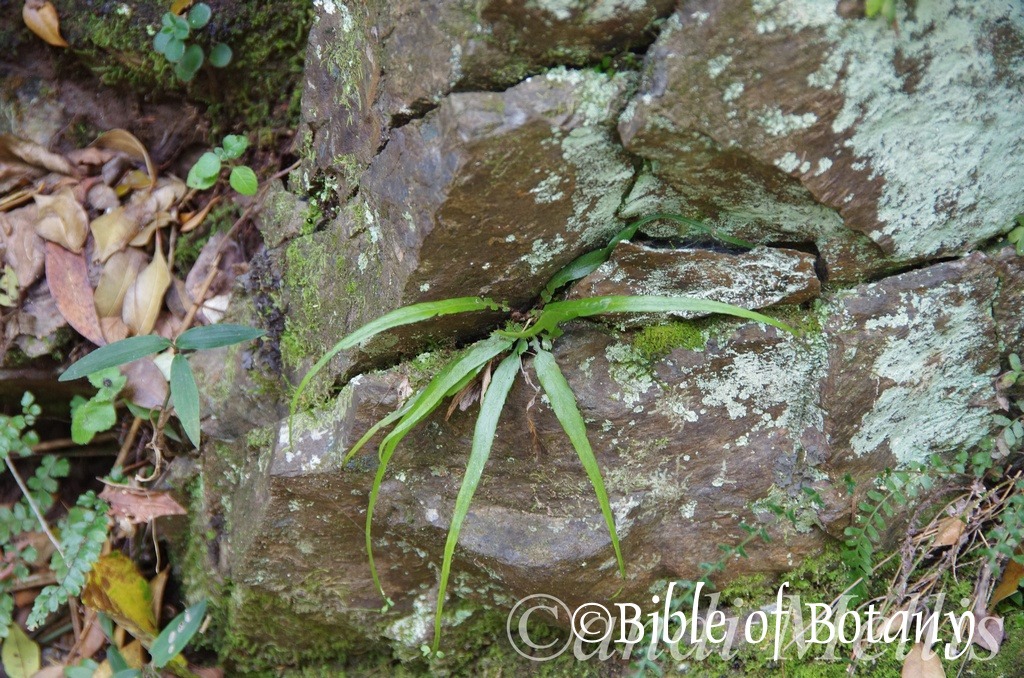
Asplenium attenuatum subsp. attenuatum is usually found growing on rocks in shady places or gullies as a lithophyte or rarely as an epiphytic on trees. The altitude ranges from 5 meters ASL to 900 meters ASL.
Asplenium attenuatum subsp. indivisum is usually found in rain forests both mountain and coastal where it will be seen growing high on the trunks or branches of suitable trees as an epiphyte or on boulders as a lithophyte. It occasionally is seen growing on the ground. The altitudes range from 100 meters ASL to 1200 meters ASL
The temperatures range from 4 degrees in August to 32 degrees in January.
The rainfalls range from lows of 950mm to an average of 3000mm annually.
Soil Requirements:
Asplenium attenuatum frefers soils with a pH ranging from 6pH to 6.5pH. It is not tolerant of waterlogged soils. Only non saline soils are tolerated.
Height & Spread:
Wild Plants: 1meter to 1.5 meters by 3 meters to 4 meters.
Characteristics:
The roots of Asplenium attenuatum form a compact, erect, toughed rhizome when mature. They measure 35mm to 45mm in length by 2mm to 5mm in width. The rhizomes are covered in deep brown finely toothed scales. The aerial roots are deep brown to black and filiform.
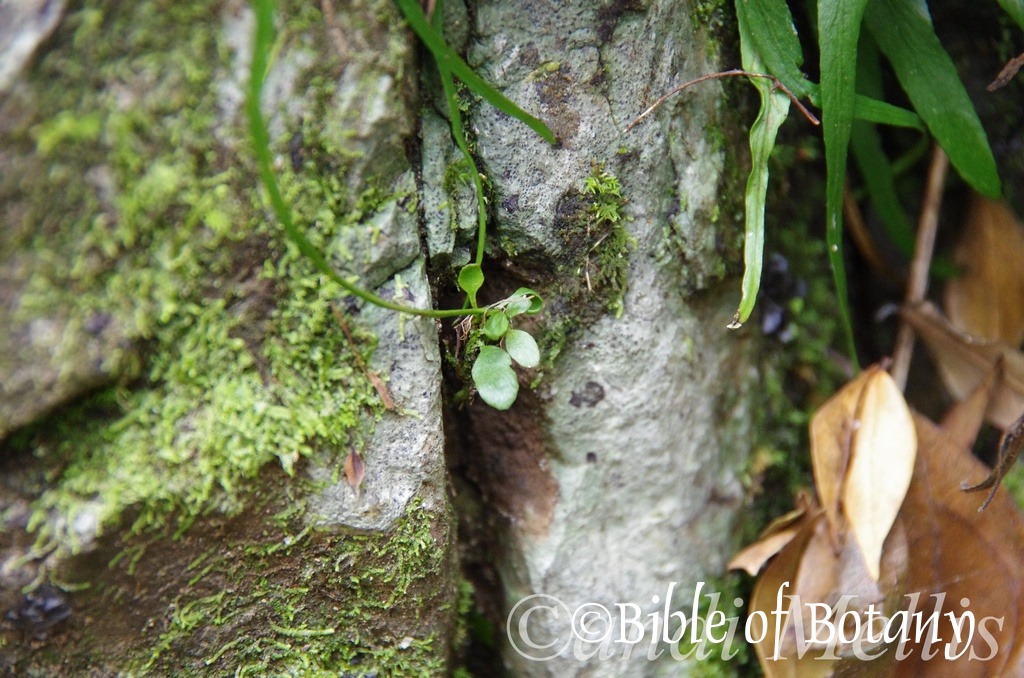
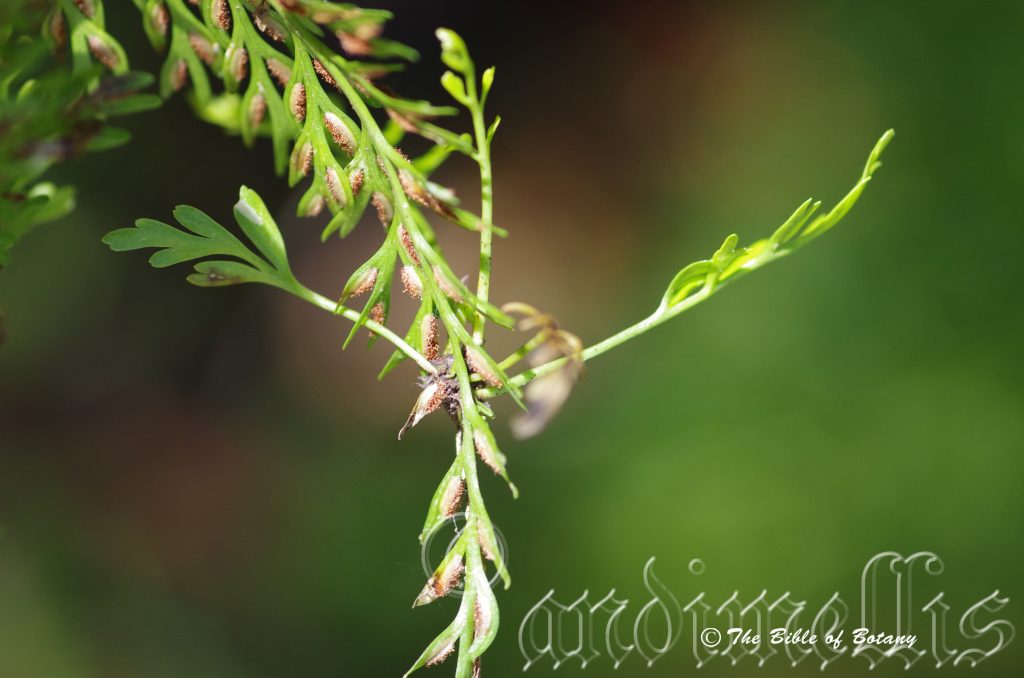
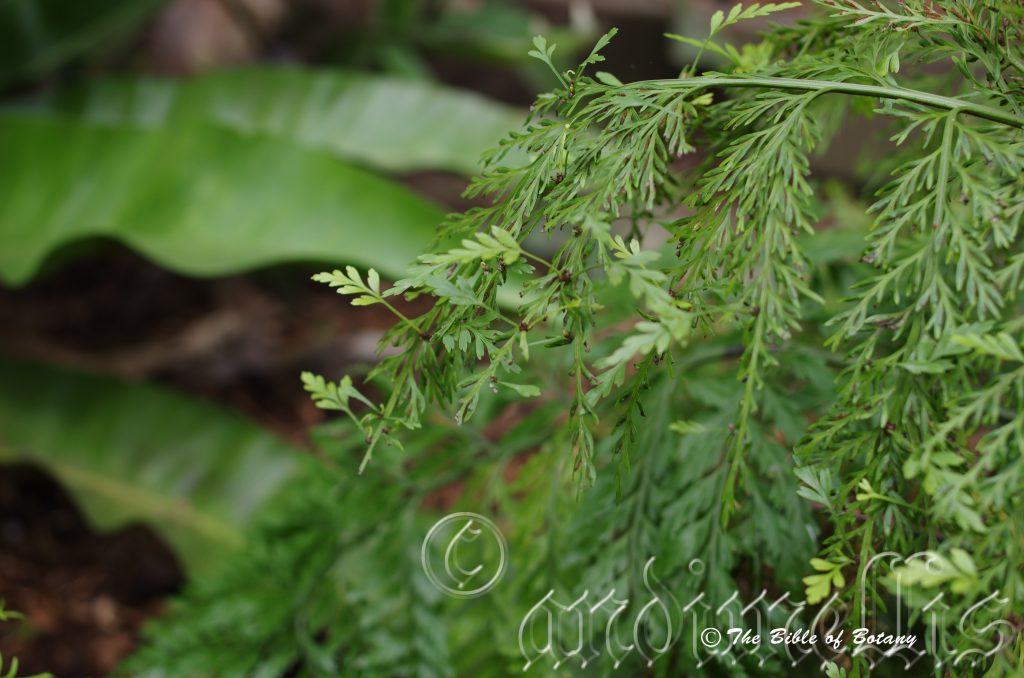
Asplenium attenuatum fronds are deep green-brown, glabrous and measure 40mm to 60mm in length. The laminas are simple or sparsely and irregularly lobed near the base and usually measure 100mm to 350mm in length by 10 to 50mm in width. The bases are narrow cuneate to attenuate while the apexes are long tapering often having a proliferous bud. The concolourous laminas are deep green. The midvein is prominent and rounded on the lower lamina and usually is sparsely covered in fine silvery scales. The main vein is distinctly visible from the upper lamina. The lateral veins are free from the mid vein. There are several flushes a year.
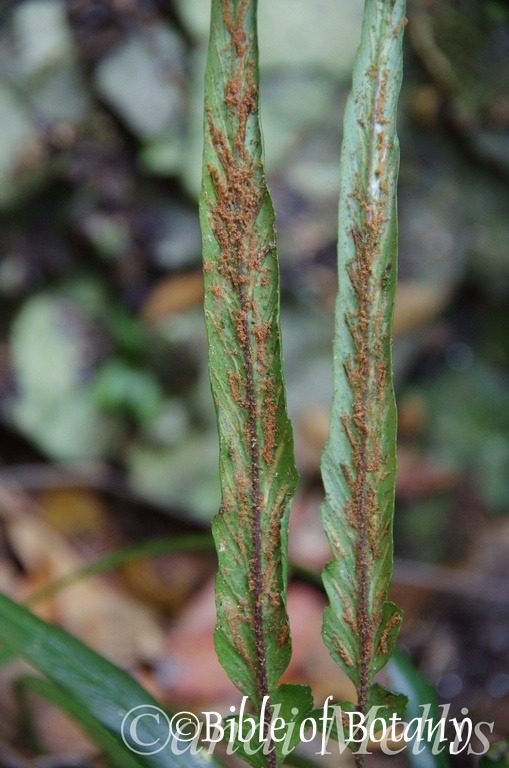
The sori are in parallel lines on the lower surface of the frond and are at around 60 degrees. The sori measure 10mm to 15mm in length and are approximately 4mm or further apart. The sterile and fertile fronds are very similar.
Sub Specie Differences:
Asplenium attenuatum subsp. attenuatum;s sori are irregularly spaced along the lower lamina from near the base of the frond.
Asplenium attenuatum subsp. indivisum sori are more regularly spaced along the lower lamina on the apex two thirds of the frond.
Wildlife:
Asplenium attenuatum wildlife is unknown to the author.
Cultivation:
Asplenium attenuatum is a beautiful fern from the rainforests of Australia. Growing it is easy and small plants will reach their full potential in around 6 to 10 years.
Its only requirement is shade and a humid microclimate. Feeding the plants with dilute seaweed extract, diluted fish emulsion or diluted organic chicken pellets soaked in water and sprayed onto the leaves alternatively will see Asplenium australasicum thrive. The additional use of cold tea leaves from time to time will do the plants no harm.
It can be used with great affect around shaded swimming pools, in court yards, poked into small corners or rain forest settings.
It is best used adjacent to small areas of bush close to paths or the house there long strap like leaves can be viewed regularly. It is great in medium shaded rockeries as a fill in plant. Here it can be planted in small groups of 2 or 3 to create a lush tropical look with other fine leaf ferns and orchids. If it is surrounded by taller narrow growing plants a 3 dimensional scene is quickly visualized. Try using scatter plantings of Cordyline stricta, Cordyline petiolaris or Cordyline terminalis for a great affect against the coloured foliage. This is one plant that benefits highly from being scatter planted so use it at different levels. Some on the ground on large boulders as lithophytes, some attached to trees.
Mixed with stags Platycerium superbum or Platycerium bifurcatum along the branches and trunks of trees gives the appropriate trees a very natural look. There is nothing worse than a single tree in a yard with Platycerium species and Asplenium species covering the branches and trunk. This scene conjures up the destruction of its natural environment and it is left there alone the last survivor in what will soon determine its fate.
Propagation:
Spores:
Step 1. Select spore from the fern fronds. Wait until the fern is just starting to release its spore. Rinse the fronds under clean running water and dry. This is to wash off any other spores from rogue ferns that may have settled onto the fronds. (There is nothing worse than having common brake or common soft bracken contaminating a prized tree fern or epiphyte.)
Step 2. Place the dry fronds in a clean brown paper bag and keep them in a cool dark place like the linen closet for about a week to ten days before you are ready to sow the spore. The exception to this rule applies to ferns, which produce green spores. These must be sown immediately that they are released. Todea Barbara is a good example of a fern, which produces green spore.
Step 3. Take a large ice cream container, a small ice cream container and a clean clear plastic bag large enough to seal the large ice cream container and three or four milk bottle tops.
Step 4. Punch or drill 6 to 10 5mm holes in the bottom of the small ice cream container.
Step 5. Wash both containers, tops and plastic bag so that they are very clean and sterile.
Step 6. Use a clean fine seed raising mi. We used 30mm fine sand, 30mm peat and 30mm perlite and 10mm vermiculite. We used crushed basalt, crusher dust and peat in a 50:50 ratio for epiphytes. Moisten the mix enough that water does not run out when the mix is squeezed between the fingers.
Step 7. Place the moisten mix (Enough to half fill the small ice cream container) in the microwave oven with a large glass of water for 7 or 8 minutes, until the water is boiling. Allow them to cool in the oven. You will need the water later so do not tip it out.
Step 8. Take the brown paper bag out of the linen closet. Shake the bag and remove the fronds. You should have a yellow, brown, black or rarely greenish brown or ochre powder or very fine, small round pin head size spore depending on the specie involved.
Step 9. Remove the mixture from the oven once it has cooled and place it in the small ice cream container and level.
Step 10. Sprinkle the spore sparsely over the mixture in the small ice cream container.
Step 11. Place the milk bottle tops in the large ice cream container with the flat surface facing down. Place the small ice cream container in the large ice cream container so that it is sitting on the milk bottle tops.
Step 12. Remove the water from the microwave and pour it into the larger ice cream container so there is 25mm to 30mm of water in the bottom.
Step 13. Place the ice cream containers in the plastic bag and seal. Step 14. Place the contents and bag in a warm shady place preferably 50mm to 70mm shade depending on the specie. Shade houses and some window sills are ideal.
Step 14. The surface should turn green within a week to two weeks. The prothallus will then develop. From the prtohalus the first true fronds will appear. Wait until the ferns are 20mm to 35mm in height before you attempt to transplant them. Once they are ready open the bag up slightly and allow the air to flow around the little ferns. Every 3 to 5 days open the bag a little further so the ferns get use to their new environment. Allow them a week to two weeks to harden off before you transplant them following the removal of the plastic bag. Carefully prick them out into 50mm standard squat tubes as you would any seedling.
Do not try to transplant them as single plants as they are still a little delicate.
Once the smaller ones again reach 50mm to 70mm you may wish to divide the stronger and hardier individual plants into smaller clumps in 100mm squat pots.
Do not try to transplant them as single plants as they are a little delicate still.
Once they reach 60mm to 70mm start separating the strongest ones and again do not move them far from their original position. After a few weeks the ferns will power away without any setbacks.
When they have reached 150mm to 180mm they will be safe to plant out in the garden. Make sure the light densities are similar or burning and set back will occur.
When attaching them to a tree Use an old sock or stocking and partly fill it with some peat. Tie them firmly in position so that they do not move. Water and keep moist until they have shown signs that it is well established.
Where mass plantings of Asplenium attenuatum are required, as a feature; on the ground plant them at greater than 4 meter centers. The plants look better if they have empty space around them rather than being crowded. If it is being used as epiphyte leave plenty of space on the trunks and branches so they can reach their full potential.
Fertilize using Seaweed, fish emulsion or organic chicken pellets soaked in water on an alternate basis. Fertilize every two months until the plants are established then annually in early September or March to maintain health and vitality.
Indoors or Potted On:
Sawdust or sand mixes are too well draining unless the sawdust has completely composted down where it exhibits a texture like plastacine to the touch. Moisture can be squeezed out between the fingers yet it remains moist. I find this a great basis to start with.
Mix equal parts of the well decomposed saw dust with the above feel with perlite and vermiculite. To this add two part sharp clean sand and one part compost. Make sure the sand comes from a source that does not have salt.
The Saw dust in this condition creates the moisture retention and holds nutrient in. The perlite and vermiculite make the mix neutral and both have great water holding capacity without shrinkage with age. The sand creates good drainage and is good for good healthy root development.
Indoor plants need good light and ventilation without drying breezes or wind. Again fertilize the plants on a monthly basis with the above formula on a rotation basis.
Indoor plants need good light and ventilation without drying breezes or wind. Again fertilize the plants on a monthly basis with the above formula on a rotation basis.
Fertilize using seaweed, fish emulsion or organic chicken pellets soaked in water on an alternate basis. Fertilize every two months until the plants are established then annually in early September to October to maintain health, vitality and better flowering.
Further comments from readers:
Hi reader, it seems you use The Bible of Botany a lot. That’s great as we have great pleasure in bringing it to you! It’s a little awkward for us to ask, but our first aim is to purchase land approximately 1,600 hectares to link several parcels of N.P. into one at The Pinnacles NSW Australia, but we need your help. We’re not salespeople. We’re amateur botanists who have dedicated over 30 years to saving the environment in a practical way. We depend on donations to reach our goal. If you donate just $5, the price of your coffee this Sunday, We can help to keep the planet alive in a real way and continue to bring you regular updates and features on Australian plants all in one Botanical Bible. Any support is greatly appreciated. Thank you.
In the spirit of reconciliation we acknowledge the Bundjalung, Gumbaynggirr and Yaegl and all aboriginal nations throughout Australia and their connections to land, sea and community. We pay our respect to their Elders past, present and future for the pleasures we have gained.
Author’s Garden The Pinnacles NSW
Author’s Garden The Pinnacles NSW
Author’s Garden The Pinnacles NSW
Author’s Garden The Pinnacles NSW
Author’s Garden The Pinnacles NSW
Author’s Garden The Pinnacles NSW
Author’s Garden The Pinnacles NSW
Author’s Garden The Pinnacles NSW
Asplenium australasicum
Classification:
Class: Polypodiopsida
Order: Polypodialis
Family: Aspleniaceae
Genus: From A, which is Greek/Latin for without or not having and Splenon, which is Ancient Greek or Splenum, which is Latin for the spleen. It refers to ancient beliefs that the plants supplied a medicine to benefit the spleen.
Species: From Terra Australis, which is Latin for land of the south. It refers to plants, which were first discovered from the land down under – Australia.
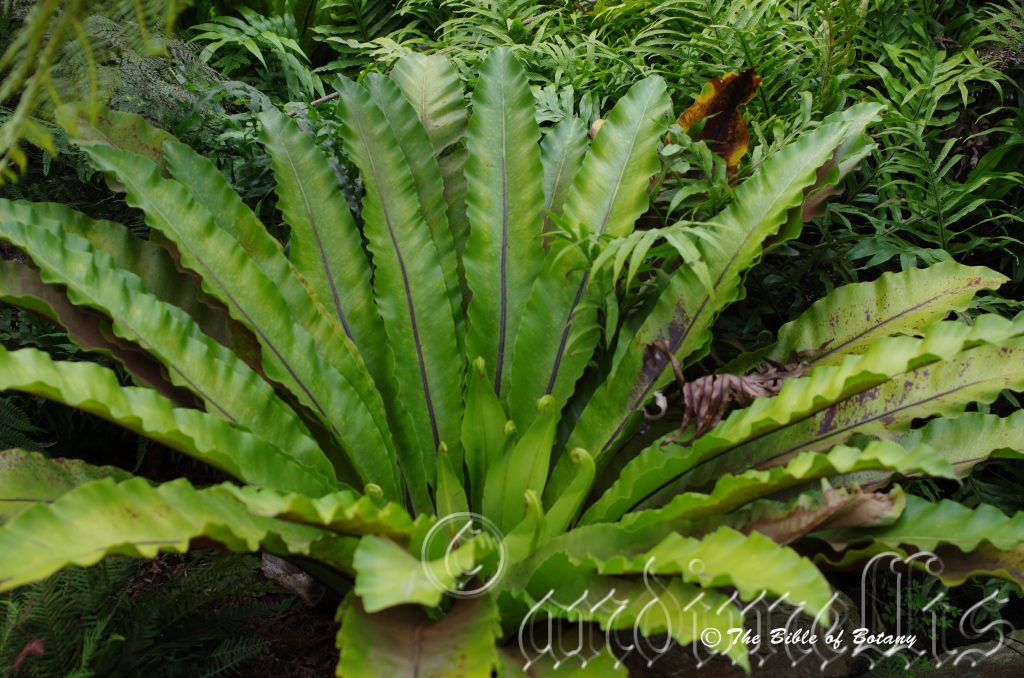
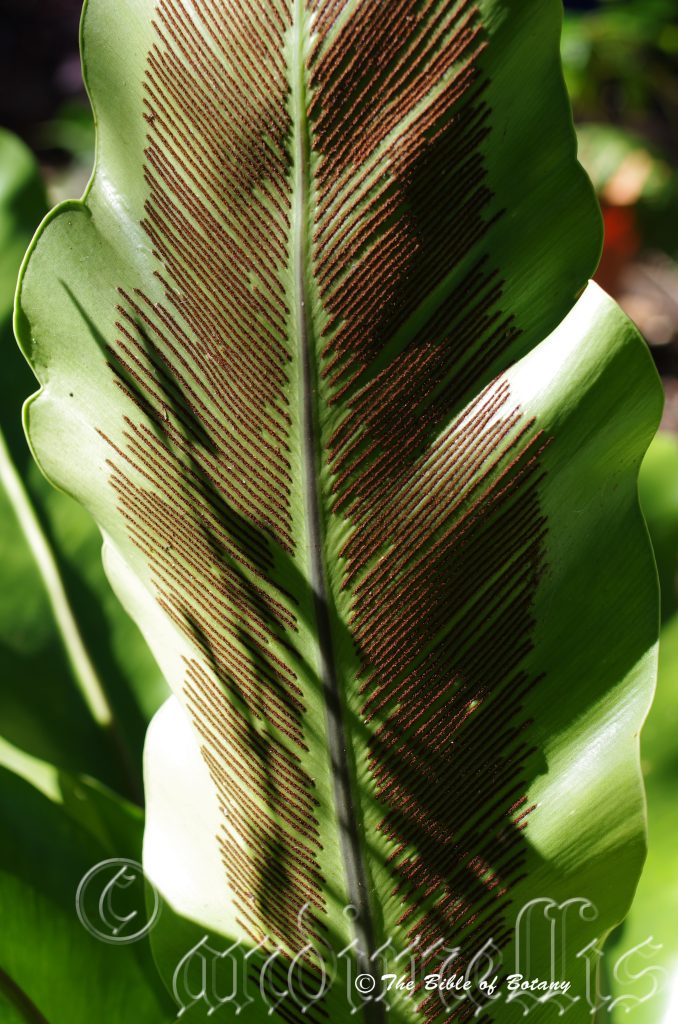
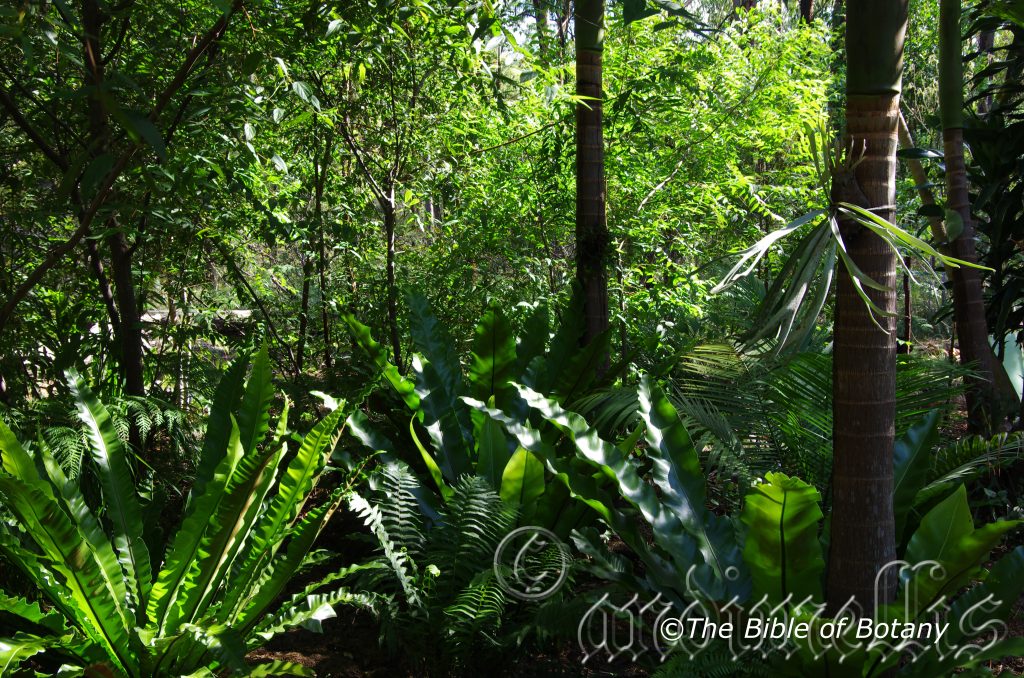
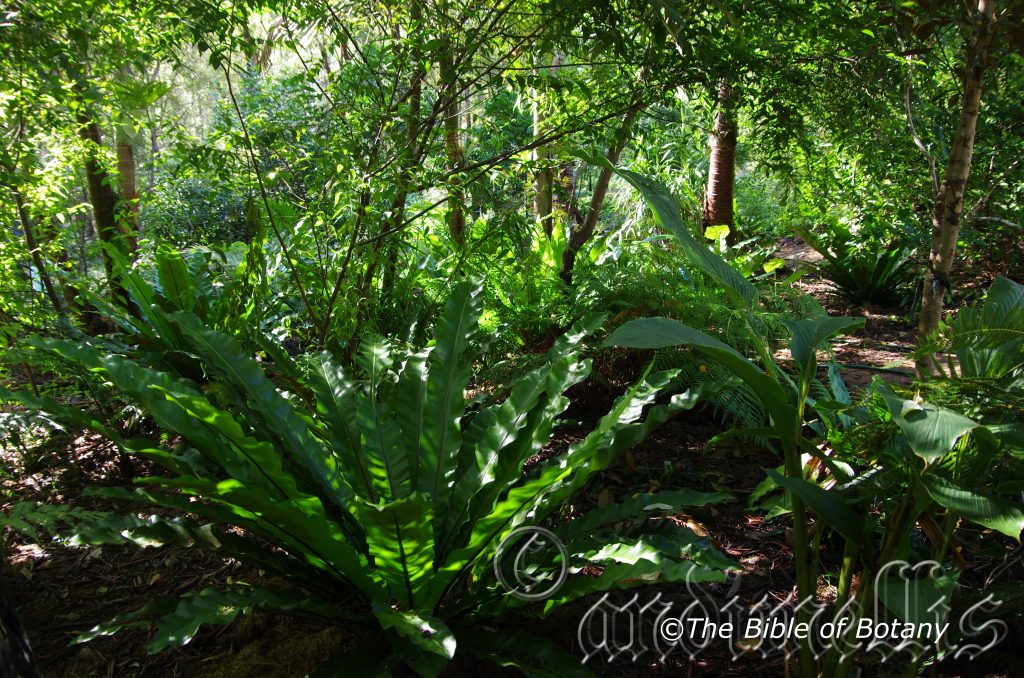
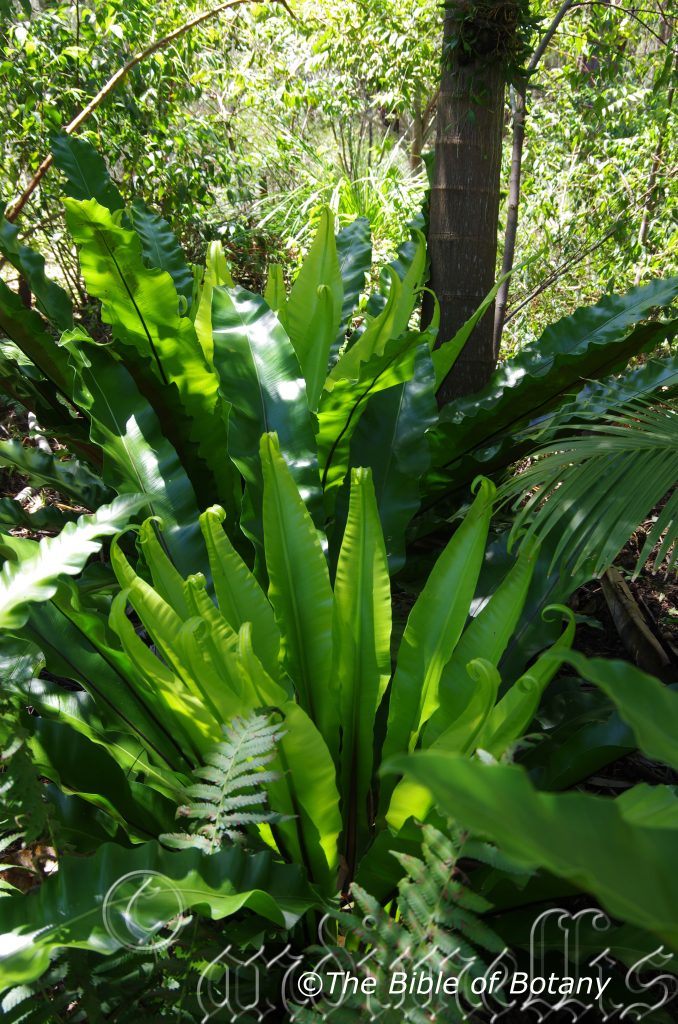
Common Name: Birds Nest Fern.
Distribution:
Asplenium australasicum is found south from Cape York Peninsula in far north eastern Queensland to the Bega Valley in southern New South Wales. It is found on and east of the Great Dividing Range.to the coast.
https://avh.ala.org.au/occurrences/search?taxa=Asplenium+australasicum#tab_mapView
Habitat Aspect Climate:
Asplenium australasicum prefers dense shade to lightly filtered sunlight. It grows in well-developed rainforests, littoral rainforests, wet Eucalyptus forests or gallery forests on trees as an epiphyte or on boulders as a lithophyte. It occasionally is seen growing in the soil.
The ferns prefer cool temperate positions and excel where orographic precipitation occurs frequently. The temperatures range from 2 degrees in August to 32 degrees in January are the optimum for this species.
The rainfalls range from lows of 900mm to an average of 4000mm annually.
Soil Requirements:
Asplenium australasicum grows as an epiphyte on trees or a lithophyte on rocks. Occasionally it can be seen growing on the forest floor amongst leaf litter.
Height & Spread:
Wild Plants: 1m to 1.5m by 3m to 4m.
Characteristics:
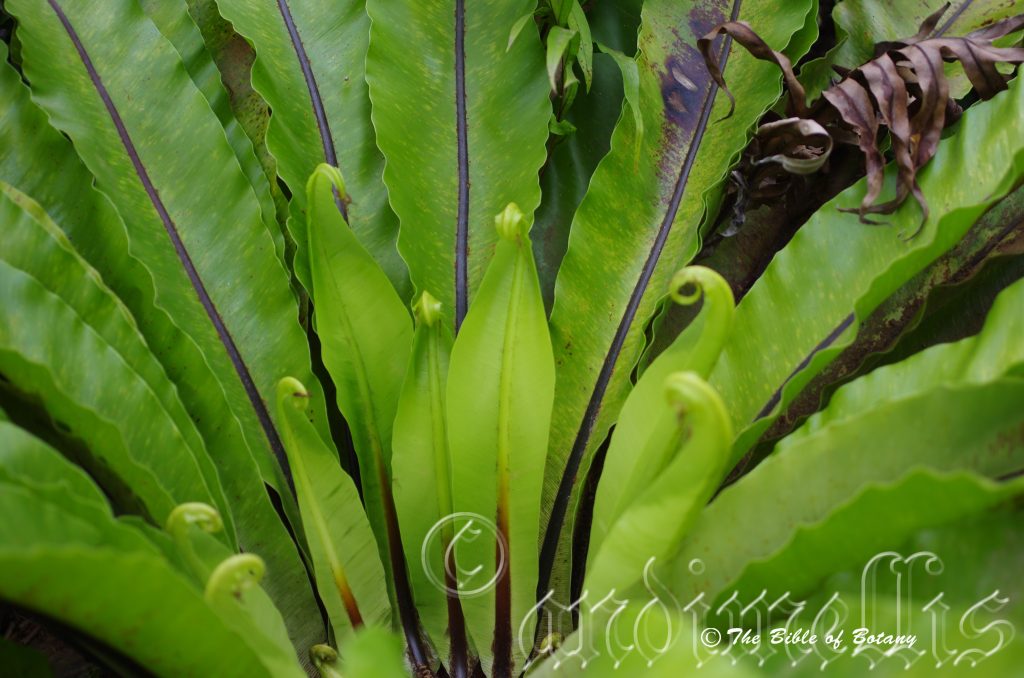
The roots of Asplenium australasicum form a compact rhizome when mature. It is spongy from the amount of decomposing leaf litter collected by the nest fronds. The aerial roots are rusty-brown and velvety to touch in well grown plants. There are several flushes a year. The simple fronds grow 600mm to 900mm in length by 120mm to 210mm in width.
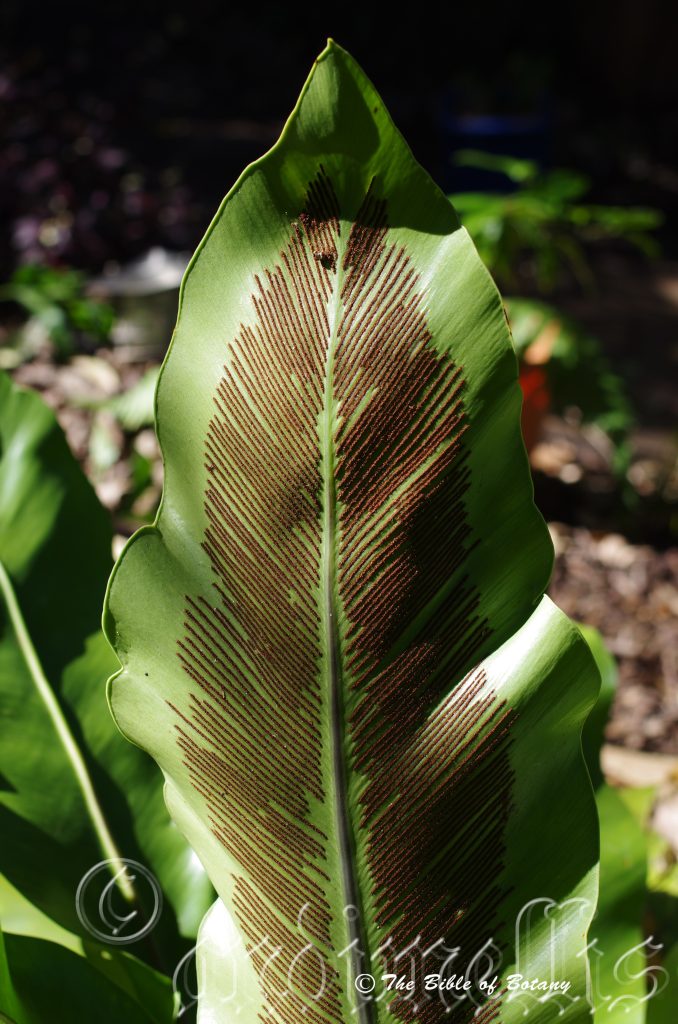
The spore is in parallel rows on the lower surface of the frond from near the mid vein to the margins. Sterile and fertile fronds are similar.
Confusing Specie:
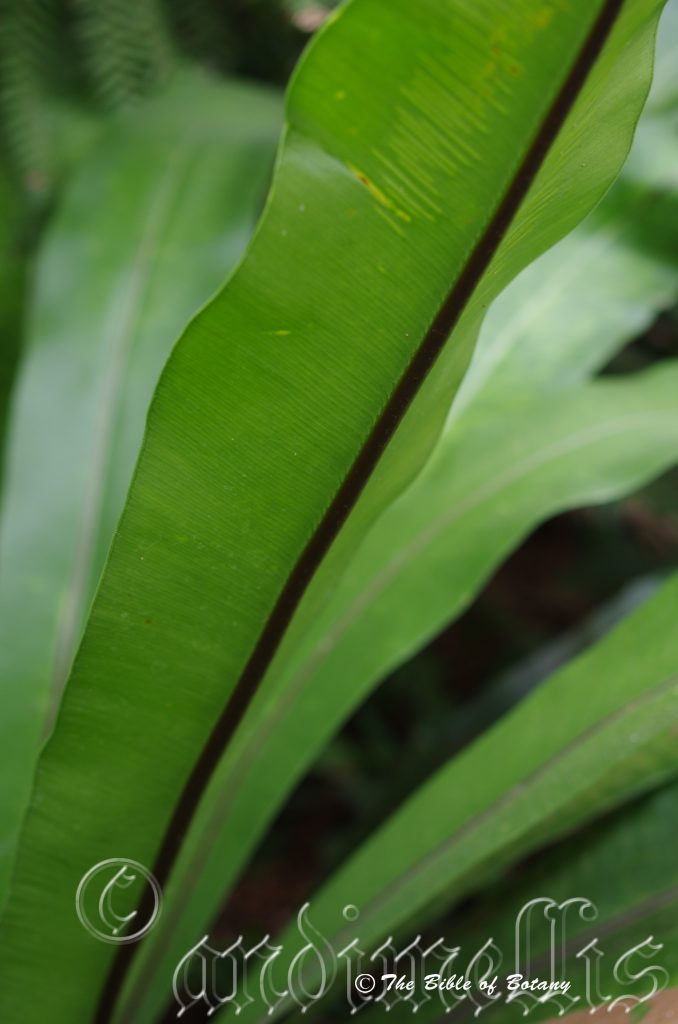
Asplenium australasicum’s mid vein is triangular in shape on the lower lamina. It occurs in cooler temperate type rainforests in the north.
Asplenium nidus mid vein is rounded in shape on the lower lamina. It occurs in warmer humid tropical rainforests in the southern limits of its distribution.
Wildlife:
Borers can attack the plant during drought and kangaroos and possums will eat the new fronds if food is scarce and where plants have fallen to the ground.
Cultivation:
It would make an good fire retardant large ground cover fern for shady areas.
* Fire retardant plants act as radiant heat screens and absorb more heat from an approaching fire without burning.
* Fire retardant trees are able reduce wind speed near a house or out buildings.
* Fire retardant also trap embers and sparks carried by the wind.
* Fire retardant ground covers are able to catch burning embers without catching fire themselves, and also slow the travel of a fire through debris and litter on the ground.
Asplenium australasicum is a magnificent fern from the rainforests of Australia for that understory rainforest look. Growing it is easy and small plants will reach their full potential in around 3 to 4 years. Asplenium Nidus is difficult to maintain in cool subtropical zones south of Brisbane where as Asplenium australisicum thrives, so it is a far better choice in cooler areas and leave Asplenium nidus for the tropics.
Its only requirement is shade and a humid microclimate. Feeding the plants with dilute seaweed extract, diluted fish emulsion or diluted organic chicken pellets soaked in water and sprayed onto the leaves will see Asplenium australasicum thrive. The additional use of cold tea leaves and a hand full of course bush litter from time to time will do the plants no harm.
It can be used with great affect around shady swimming pools, in court yards, poked into small corners or rain forest understory settings.
It is best used within small areas of bush close to paths or the house, where its long strap like leaves can be viewed regularly. It is great in medium shaded rockeries as a fill in plant. Here it can be planted in small groups of 2 or more to create a lush tropical look with other fine leaf ferns and orchids. If it is surrounded by taller narrow growing plants a 3 dimensional scene is quickly visualized. Try using scatter plantings of Cordyline stricta, Cordyline petiolaris or Cordyline terminalis for a great affect. The latter with its deep red leaves makes a strong contrast. This is one plant that benefits highly from being mass planted so use it at different levels. Some on the ground some attached to trees or if there are no trees around, large boulders or logs.
Mixed with stags Platycerium superbum or Platycerium bifurcatum along the branches and trunks of trees gives the appropriate trees a very natural look. There is nothing worse than a single tree in a yard with Platycerium specie and Asplenium specie covering the branches and trunk. This scene conjures up the destruction of their natural environment and it is left there alone the last survivors in what will soon be their fate.
Propagation:
Spores: Most people are put off at the thought of growing ferns from spore. Like all plants that produce their offspring from seed or spore the methods are basically the same. Remember nature has been doing this for millions of years and has been very successful. I have had excellent results growing over 200 different species of Australian ferns so don’t be afraid. Give it a go.
Step 1. Select spore from the fern fronds. Wait until the fern is just starting to release its spore. Rinse the fronds under clean running water and dry. This is to wash off any other spores from rogue ferns that may have settled onto the fronds. (There is nothing worse than having common brake or common soft bracken contaminating a prized tree fern or epiphyte.)
Step 2. Place the dry fronds in a clean brown paper bag and keep them in a cool dark place like the linen closet for about a week before you are ready to sow the spore. The exception to this rule applies to ferns, which produce green spores. These must be sown immediately that it is released. Todea Barbara is a good example of a fern, which produces green spore.
Step 3. Take a large ice cream container, a small ice cream container and a clean clear plastic bag large enough to seal the large ice cream container and three or four milk bottle tops.
Step 4. Punch or drill some small holes in the bottom of the small ice cream container.
Step 5. Wash both containers, tops and plastic bag so that it is very clean and sterile.
Step 6. Use a clean fine seed raising mix that has had some clay or fine crusher dust added to it. About 10mm is great. We used crushed basalt, crusher dust and peat in a ratio of 80:20 to 50:50 depending on the type of ferns being sown. Ferns, which grow in very wet habitats had their spore placed on the 50:50 mix while those that were epiphytic or desert species we used the 80:20 mix. Then moisten the mix.
Step 7. Place the moisten mix (Enough to half fill the small ice cream container) in the microwave oven with a large glass of water for 7 or 8 minutes, until the water is boiling. Allow them to cool in the oven. You will need the water later so do not tip it out.
Step 8. Take the brown paper bag out of the linen closet. Shake the bag and remove the fronds. You should have a yellow, brown, black or rarely greenish brown or ochre powder or very fine, small round pin head size spore depending on the specie involved.
Step 9. Remove the mixture from the oven once it has cooled and place it in the small ice cream container and level.
Step 10. Sprinkle the spore sparsely over the mixture in the small ice cream container.
Step 11. Place the milk bottle tops in the large ice cream container with the flat surface facing down. Place the small ice cream container in the large ice cream container so that it is sitting on the milk bottle tops.
Step 12. Remove the water from the microwave and pour it into the larger ice cream container so there is 25mm to 30mm of water in the bottom.
Step 13. Place the ice cream containers in the plastic bag and seal.
Step 14. Place the contents and bag in a warm shady place preferably 50mm to 70mm shade depending on the specie. Shade houses and some window sills are ideal.
Step 15. The surface should turn green within a week to two weeks. Wait until the ferns are 15mm to 25mm in height before you attempt to transplant them. Once it is ready open the bag up slightly and allow the air to flow around the little ferns. Every 3 to 5 days open the bag a little further so the ferns get use to their new environment. Allow them a week to two weeks to harden off before you transplant them following the removal of the plastic bag. Carefully prick them out into 50mm standard squat tubes as you would any seedling.
Do not try to transplant them as single plants as it is still a little delicate still.
Platycerium and Asplenium will have to be divided into single plants. This can be done later once the first divisions have hardened off and the plants reach 25mm to 50mm in height. Be careful, as it is still fragile at this stage. Replace them close to their original position and water. After a few weeks, the ferns will power away without any setbacks. Here they can be further divided where necessary removing the smaller ferns leaving the largest one in place.
Once they reach 40mm to 50mm you may wish to divide the stronger and hardier individual plants into smaller clumps in 100mm squat pots.
Do not try to transplant them as single plants as it is a little delicate still.
Once they reach 60mm to 70mm start separating the strongest ones and again do not move them far from their original position. After a few weeks the ferns will power away without any setbacks.
When they have reached 150mm to 180mm they will be safe to plant out in the garden. Make sure the light densities are similar or burning and set back will occur.
When attaching them to a tree Use an old sock or stocking and partly fill it with some peat. Tie them firmly in position so that they do not move. Water and keep moist until they have shown signs that it is well established.
Where mass plantings of Asplenium australasicum are required, as a feature; on the ground plant them at greater than 4 meter centers. The plants look better if they have empty space around them rather than being crowded. If it is being used as epiphyte leave spacings on trunks and branches of 3 meters.
Fertilize using Seaweed, fish emulsion or organic chicken pellets soaked in water on an alternate basis. Fertilize every two months until the plants are established then annually in early September or March to maintain health and vitality.
Indoor or Potted On:
Sawdust or sand mixes are too well draining unless the sawdust has completely composted down where it exhibits a texture like plastacine to the touch. Moisture can be squeezed out between the fingers yet it remains moist. I find this a great basis to start with.
Mix equal parts of the well decomposed saw dust with the above feel with perlite and vermiculite. To this add two part sharp clean sand and one part compost. Make sure the sand comes from a source that does not have salt. Crusher dust from black basalt gives good mineral content to the mix and can be substituted for the perlite or vermiculite.
The Saw dust in this condition creates the moisture retention and holds nutrient in. The perlite and vermiculite make the mix neutral and both have great water holding capacity without shrinkage with age. The sand creates good drainage and is good for good healthy root development.
Indoor plants need good light and ventilation without drying breezes or wind. Again fertilize the plants on a monthly basis with the above formula on a rotation basis.
Indoor plants need good light and ventilation without drying breezes or wind. Again fertilize the plants on a monthly basis with the above formula on a rotation basis.
Fertilize using seaweed, fish emulsion or organic chicken pellets soaked in water on an alternate basis. Fertilize every two months until the plants are established then annually in early September to October to maintain health, vitality and better flowering.
Further comments from readers:
Hi reader, it seems you use The Bible of Botany a lot. That’s great as we have great pleasure in bringing it to you! It’s a little awkward for us to ask, but our first aim is to purchase land approximately 1,600 hectares to link several parcels of N.P. into one at The Pinnacles NSW Australia, but we need your help. We’re not salespeople. We’re amateur botanists who have dedicated over 30 years to saving the environment in a practical way. We depend on donations to reach our goal. If you donate just $5, the price of your coffee this Sunday, We can help to keep the planet alive in a real way and continue to bring you regular updates and features on Australian plants all in one Botanical Bible. Any support is greatly appreciated. Thank you.
In the spirit of reconciliation we acknowledge the Bundjalung, Gumbaynggirr and Yaegl and all aboriginal nations throughout Australia and their connections to land, sea and community. We pay our respect to their Elders past, present and future for the pleasures we have gained.
NCBG Coffs Harbour NSW

NCBG Coffs Harbour NSW
NCBG Coffs Harbour NSW
NCBG Coffs Harbour NSW
NCBG Coffs Harbour NSW
NCBG Coffs Harbour NSW
NCBG Coffs Harbour NSW
NCBG Coffs Harbour NSW
NCBG Coffs Harbour NSW
NCBG Coffs Harbour NSW
NCBG Coffs Harbour NSW
Asplenium bulbiferum
Classification:
Class: Polypodiopsida
Order: Polypodialis
Family: Aspleniaceae
Genus: From A, which is Greek/Latin for without or not having and Splenon, which is Ancient Greek or Splenum, which is Latin for the spleen. It refers to ancient beliefs that the plants supplied a medicine to benefit the spleen.
Species: From Bulbos, which is Ancient Greek or Bulbus, which is Latin for a subterranean, globular bud having fleshy leaves which emerge from the top with a reduced flat disk for a stem and rooting from the base and Ferae/Ferum, which are Latin for to bear or bearing. It refers to fronds or leaves, which often develop miniature clones of the mother plant near the apexes of the veins.
Common Name: Hen and Chicken Fern or Mother Spleen Fern.
Distribution:
Asplenium bulbiferum is found along the East coast of Australia. It is found on and east of the Great Dividing Range from The Border Ranges National Park in the north, south to Wilsons promontory and west to the Myora Forest Reserve in South Australia.
In Tasmania it is found in most areas except the very high country and exposed coastal districts.
https://avh.ala.org.au/occurrences/search?taxa=Asplenium+bulbiferum#tab_mapView
Habitat Aspect Climate:
Asplenium bulbiferum prefers full shade to lightly filtered sunlight or even dappled light. It is found in and adjacent to cool montane rainforests, wet eucalyptus gallery forests and moist scrubby riverine gullies. It occasionally is seen growing on the ground. The altitude ranges from 50 meters ASL to 900 meters ASL.
Temperatures of minus 5 degrees in August to 30 degrees in January are the optimum temperatures for this species.
Rainfalls range from lows of 600mm to an average of 3200mm annually however where lower rainfall patterns occur it is found in forests where Orographic precipitation is very high.
Soil Requirements:
Asplenium bulbiferum grows as an epiphyte on trees or a lithophyte on rocks. Occasionally it can be seen growing on the forest floor amongst leaf litter but this is rare.
Height & Spread:
Wild Plants: 1meter to 1.8 meters by 0.6 meters to 1.2 meters.
Characteristics:
The rhizomes of Asplenium bulbiferum are compact tufted and densely covered in dull brown and glossy brown scales. Aerial roots may form in areas of very high orographic precipitation and are rusty-brown and velvety to touch in well grown plants.
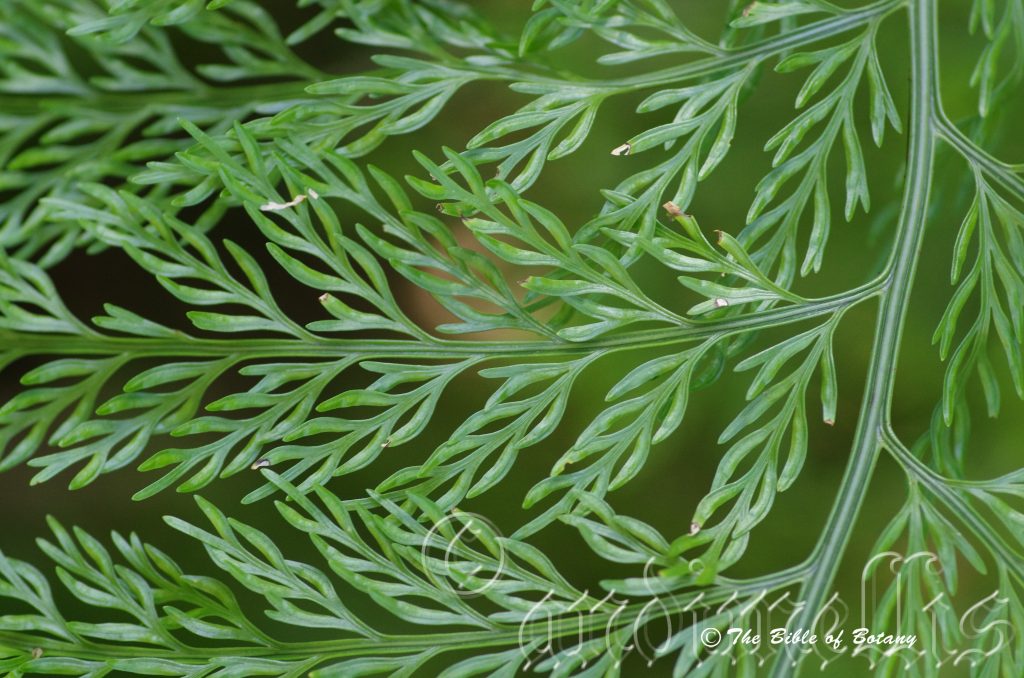
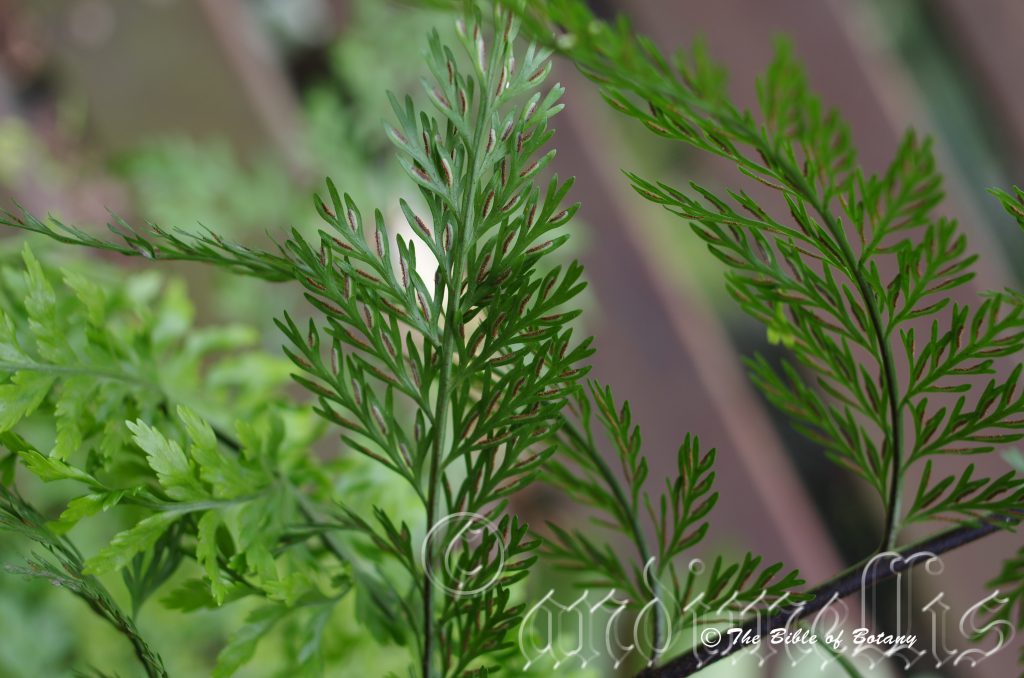
Asplenium bulbiferum have beautiful large erect fronds which eventually become pendent with time. The stipes are black and glabrous while the rachises are black on the lower surface and tending bright glossy green as they approach the ultimate segments and on the upper surfaces. The fronds measure 600mm to 1200mm in length by 100mm to 200mm in width. The concolourous 2 pinnate laminas are bright, glossy grass-green and glabrous on the upper lamina and dull on the lower lamina. The ultimate pinnae are linear, narrow lanceolate to very narrow elliptical and measure 6mm to 10mm in length by 2mm to 3.3mm in width. The margins are entire, have 1 or 2 lobes or are crenate. The main vein is prominent on both laminas. The ultimate pinnae occasionally produce proliferous buds.
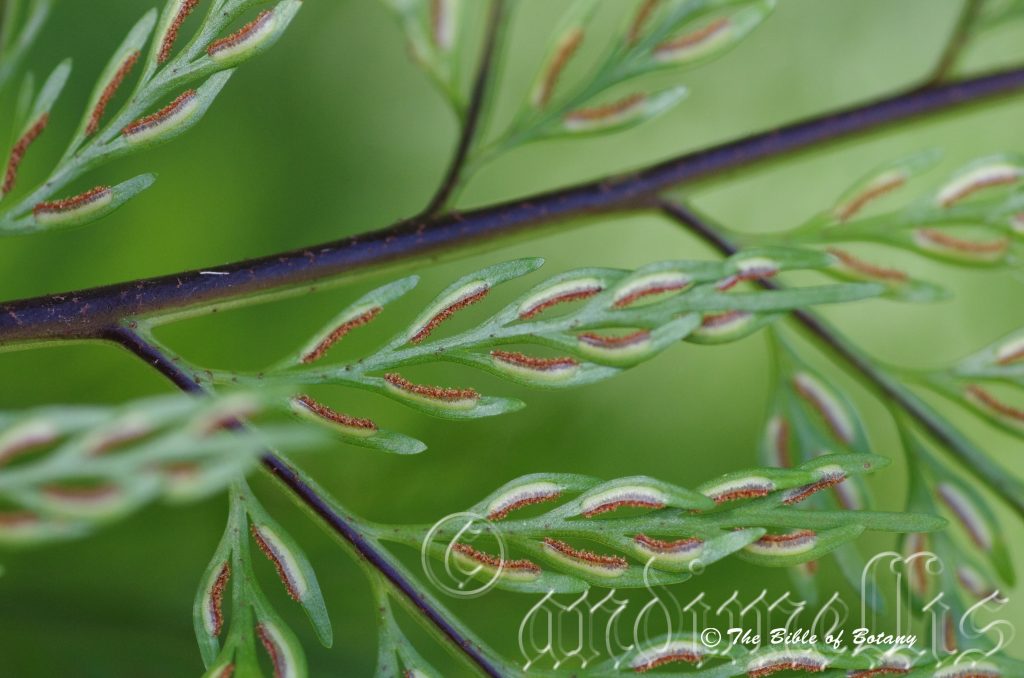
The 2 to 6 oblong sori are marginal on the lower surface of the frond. The sori measure 2mm to 4mm in length by 1mm to 1.5mm in width. The indusium are white. Sterile and fertile fronds are very similar.
Wildlife:
Asplenium bulbiferum wildlife is unknown to the author.
Cultivation:
It would make an good fire retardant small to medium ground cover fern for shady areas.
* Fire retardant plants act as radiant heat screens and absorb more heat from an approaching fire without burning.
* Fire retardant trees are able reduce wind speed near a house or out buildings.
* Fire retardant also trap embers and sparks carried by the wind.
* Fire retardant ground covers are able to catch burning embers without catching fire themselves, and also slow the travel of a fire through debris and litter on the ground.
Asplenium bulbiferum is a beautiful fern from the cool temperate rain forests of Australia and as such dislike hot dry conditions. Growing it is easy and small plants will reach their full potential in around 3 to 4 years.
There only requirement is shade and a cool humid microclimate. Feeding the plants with dilute seaweed extract, diluted fish emulsion or diluted organic chicken pellets soaked in water and sprayed onto the leaves will see Asplenium bulbiferum thrive. The additional use of cold tea sprayed leaves from time to time will do the plants no harm.
It can be used with great affect around shaded swimming pools, in court yards, poked into small corners or rain forest settings.
It is best used adjacent to small areas of rainforest close to paths or the house there long strap like leaves can be viewed regularly. It is great in medium rockeries as a fill in plant. Here it can be planted in small groups of 2 or 3 to create a lush tropical look with other fine leaf ferns and orchids. If it is surrounded by taller narrow growing plants a 3 dimensional scene is quickly visualized. Try using scatter plantings of Cordyline stricta, Cordyline petiolaris or Cordyline terminalis for a great affect. This is one plant that benefits highly from being scatter planted so use them at different levels. Some on the ground some attached to trees or if there are no trees and large boulders on top of the boulders.
It makes an excellent basket plants in the bush house or shade house where its fronds add a different dimension cascading down especially when it is covered in bulbils.
Another area the plants excel is being planted into an old or dead elkhorn peat. This should only be done where the correct microclimate already exists.
Propagation:
Seeds:
Step 1. Select spore from the fern fronds. Wait until the fern is just starting to release its spore. Rinse the fronds under clean running water and dry. This is to wash off any other spores from rogue ferns that may have settled onto the fronds. (There is nothing worse than having common brake or common soft bracken contaminating a prized tree fern or epiphyte.)
Step 2. Place the dry fronds in a clean brown paper bag and keep them in a cool dark place like the linen closet for about a week to ten days before you are ready to sow the spore. The exception to this rule applies to ferns, which produce green spores. These must be sown immediately that they are released. Todea Barbara is a good example of a fern, which produces green spore.
Step 3. Take a large ice cream container, a small ice cream container and a clean clear plastic bag large enough to seal the large ice cream container and three or four milk bottle tops.
Step 4. Punch or drill 6 to 10mm holes in the bottom of the small ice cream container.
Step 5. Wash both containers, tops and plastic bag so that they are very clean and sterile.
Step 6. Use a clean fine seed raising mi. We used 30mm fine sand, 30mm peat and 30mm perlite and 10mm vermiculite. We used crushed basalt, crusher dust and peat in a 50:50 ratio for epiphytes. Moisten the mix enough that water does not run out when the mix is squeezed between the fingers.
Step 7. Place the moisten mix (Enough to half fill the small ice cream container) in the microwave oven with a large glass of water for 7 or 8 minutes, until the water is boiling. Allow them to cool in the oven. You will need the water later so do not tip it out.
Step 8. Take the brown paper bag out of the linen closet. Shake the bag and remove the fronds. You should have a yellow, brown, black or rarely greenish brown or ochre powder or very fine, small round pin head size spore depending on the specie involved.
Step 9. Remove the mixture from the oven once it has cooled and place it in the small ice cream container and level.
Step 10. Sprinkle the spore sparsely over the mixture in the small ice cream container.
Step 11. Place the milk bottle tops in the large ice cream container with the flat surface facing down. Place the small ice cream container in the large ice cream container so that it is sitting on the milk bottle tops.
Step 12. Remove the water from the microwave and pour it into the larger ice cream container so there is 25mm to 30mm of water in the bottom.
Step 13. Place the ice cream containers in the plastic bag and seal. Step 14. Place the contents and bag in a warm shady place preferably 50mm to 70mm shade depending on the specie. Shade houses and some window sills are ideal.
Step 14. The surface should turn green within a week to two weeks. The prothallus will then develop. From the prothallus the first true fronds will appear. Wait until the ferns are 20mm to 35mm in height before you attempt to transplant them. Once they are ready open the bag up slightly and allow the air to flow around the little ferns. Every 3 to 5 days open the bag a little further so the ferns get use to their new environment. Allow them a week to two weeks to harden off before you transplant them following the removal of the plastic bag. Carefully prick them out into 50mm standard squat tubes as you would any seedling.
Do not try to transplant them as single plants as they are still a little delicate.
Once the smaller ones again reach 50mm to 70mm you may wish to divide the stronger and hardier individual plants into smaller clumps in 100mm squat pots.
Do not try to transplant them as single plants as it is a little delicate still.
Once they reach 60mm to 70mm start separating the strongest ones and again do not move them far from their original position. After a few weeks the ferns will power away without any setbacks.
When they have reached 150mm to 180mm they will be safe to plant out in the garden. Make sure the light densities are similar or burning and set back will occur.
When attaching them to a tree Use an old sock or stocking and partly fill it with some peat. Tie them firmly in position so that they do not move. Water and keep moist until they have shown signs that it is well established.
Where mass plantings of Asplenium bulbiferum are required, as a feature; on the ground plant them at greater than 4 meter centers. The plants look better if they have empty space around them rather than being crowded. If it is being used as an epiphyte it is best placed in the forks of trees where leaf litter can accumulate.
Bulbils: Alternatively the frond with the bulbils can be removed from the parent plant and laid onto a propagating tray and covered in 1mm to 2mm of fine shredded peat of coconut fibre mix. Misted and kept moist many of the bulbils will develop roots of their own. Once the bulbils have developed good roots the parent frond; if it hasn’t already decomposed, can be severed and the new plants potted up separately.
Fertilize using Seaweed, fish emulsion or organic chicken pellets soaked in water on an alternate basis. Fertilize every two months until the plants are established then annually in early September or March to maintain health and vitality.
Indoor or Potted On:
Sawdust or sand mixes are too well draining unless the sawdust has completely composted down where it exhibits a texture like plastacine to the touch. Moisture can be squeezed out between the fingers yet it remains moist. I find this a great basis to start with.
Mix equal parts of the well decomposed saw dust with the above feel with perlite and vermiculite. To this add two part sharp clean sand and one part compost. Make sure the sand comes from a source that does not have salt.
The Saw dust in this condition creates the moisture retention and holds nutrient in. The perlite and vermiculite make the mix neutral and both have great water holding capacity without shrinkage with age. The sand creates good drainage and is good for good healthy root development.
Indoor plants need good light and ventilation without drying breezes or wind. Again fertilize the plants on a monthly basis with the above formula on a rotation basis.
Indoor plants need good light and ventilation without drying breezes or wind. Again fertilize the plants on a monthly basis with the above formula on a rotation basis.
Fertilize using seaweed, fish emulsion or organic chicken pellets soaked in water on an alternate basis. Fertilize every two months until the plants are established then annually in early September to October to maintain health, vitality and better flowering.
Further comments from readers:
Hi reader, it seems you use The Bible of Botany a lot. That’s great as we have great pleasure in bringing it to you! It’s a little awkward for us to ask, but our first aim is to purchase land approximately 1,600 hectares to link several parcels of N.P. into one at The Pinnacles NSW Australia, but we need your help. We’re not salespeople. We’re amateur botanists who have dedicated over 30 years to saving the environment in a practical way. We depend on donations to reach our goal. If you donate just $5, the price of your coffee this Sunday, We can help to keep the planet alive in a real way and continue to bring you regular updates and features on Australian plants all in one Botanical Bible. Any support is greatly appreciated. Thank you.
In the spirit of reconciliation we acknowledge the Bundjalung, Gumbaynggirr and Yaegl and all aboriginal nations throughout Australia and their connections to land, sea and community. We pay our respect to their Elders past, present and future for the pleasures we have gained.
Asplenium difforme
Classification:
Class: Polypodiopsida
Order: Polypodialis
Family: Aspleniaceae
Genus: From A, which is Greek/Latin for without or not having and Splenon, which is Ancient Greek or Splenum, which is Latin for the spleen. It refers to ancient beliefs that the plants supplied a medicine to benefit the spleen.
Species: From Di/Dis, which are Ancient Greek for two and Forme, which is Latin for to take the shape or form of. It refers to plants, which have two distinctly different forms.
Common Name:
Distribution:
Asplenium difforme is found south along the coastal strip from Noosa Heads in south eastern Queensland to Kiama in central coastal New South Wales and in the La Perouse district in the south and on Norfolk Island.
https://avh.ala.org.au/occurrences/search?taxa=Asplenium+difforme#tab_mapView
Habitat Aspect Climate:
Asplenium difforme prefers full shade to heavy shade, filtered sunlight or even dappled sunlight. It grows in sheltered positions on rocky headlands in crevices nooks and crannies. The altitude ranges from 50 meters ASL to 650 meters ASL.
The temperatures of 2 degrees in August to 34 degrees in January are the optimum temperatures for this species.
The rainfalls range from lows of 1100mm to an average of 2200mm annually.
Soil Requirements:
Asplenium difforme grows as a lithophytic fern. It usually prefers igneous based basalt rocks. The soils pH varies from 5.5pH to 6pH. It does not tolerate waterlogged soils.
Height & Spread:
Wild Plants: 0.2 meter to 0.4 meters by 0.3 meters to 0.8 meters.
Characteristics:
The rhizomes of Asplenium difforme are short and stout. It is compact tufted and densely covered in dull rusty-brown to deep chocolate brown scales. The linear scales measure 10mm to 15mm in length. The deep chocolate brown to black aerial roots may completely cover the rhizomes especially in areas of high rainfall.
Asplenium difforme almost erect fronds are coriaceous and usually bipinnate or at times single pinnate without a distinct terminal pinna. The stipes and rachises are pale green to mid green, thick and are very sparsely covered in dull rusty-brown to deep chocolate brown linear scales. The fronds measure 150mm to 450mm in length by 60mm to 280mm in width. The concolourous laminas are dull pale green to dull mid green and glabrous. The ultimate pinnae are oblong and measure 15mm to 80mm in length by 8mm to 33mm in width. The margins are sinuate to shallowly lobed. The main vein is prominent on the upper laminas and form channels on the lower laminas. The lateral veins are free. The ultimate pinnae never produce proliferous buds. The petioles are glabrous and are very sparsely covered in rusty-brown linear scales and measure 1mm to 3mm in length.
The single oblong sori are sub marginal on the apexial side of the midvein dehiscing along the marginal side. The sori measure 2mm to 8mm in length by 1.5mm to 2.2mm in width. The coriaceous indusium is pale silvery-grey. Sterile and fertile fronds are very similar.
Wildlife:
Asplenium difforme wildlife is unknown to the author.
Cultivation:
Asplenium difforme is a beautiful small fern from the warm subtropical regions of Australia and as such dislike hot dry conditions. Growing it is easy and small plants will reach their full potential in around 3 to 4 years.
Its only requirement is partial shade and a warm humid microclimate. Feeding the plants with dilute seaweed extract, diluted fish emulsion or diluted organic chicken pellets soaked in water and sprayed onto the leaves will see Asplenium difforme thrive. The additional use of cold tea sprayed leaves from time to time will do the plants no harm.
It can be used with great affect around semi shaded swimming pools, in court yards, poked into small corners or in rocky rock gardens and boulder settings.
It is best used where it can be planted in small groups of 2 or 3 to create a lush look with other fine leaf ferns and orchids in exposed nooks and crannies. If it is surrounded by taller narrow growing plants a 3 dimensional scene is quickly visualized. Try using scatter plantings of dwarf forms of Cordyline stricta, Cordyline petiolaris or Cordyline terminalis for a great affect. This is one plant that benefits highly from being scatter planted so use them at different levels. Plant some on the ground while others are attached to the base of large boulders.
It makes excellent basket plants in the bush house or shade house especially where it is planted throughout the basket including the bottom where their semi erect fronds add a different dimension hugging the basket liner.
Propagation:
Spores: Step 1. Select spore from the fern fronds. Wait until the fern is just starting to release its spore. Rinse the fronds under clean running water and dry. This is to wash off any other spores from rogue ferns that may have settled onto the fronds. (There is nothing worse than having common brake or common soft bracken contaminating a prized tree fern or epiphyte.)
Step 2. Place the dry fronds in a clean brown paper bag and keep them in a cool dark place like the linen closet for about a week to ten days before you are ready to sow the spore. The exception to this rule applies to ferns, which produce green spores. These must be sown immediately that they are released. Todea Barbara is a good example of a fern, which produces green spore.
Step 3. Take a large ice cream container, a small ice cream container and a clean clear plastic bag large enough to seal the large ice cream container and three or four milk bottle tops.
Step 4. Punch or drill 6 to 10 5mm holes in the bottom of the small ice cream container.
Step 5. Wash both containers, tops and plastic bag so that they are very clean and sterile.
Step 6. Use a clean fine seed raising mi. We used 30mm fine sand, 30mm peat and 30mm perlite and 10mm vermiculite. We used crushed basalt, crusher dust and peat in a 50:50 ratio for epiphytes. Moisten the mix enough that water does not run out when the mix is squeezed between the fingers.
Step 7. Place the moisten mix (Enough to half fill the small ice cream container) in the microwave oven with a large glass of water for 7 or 8 minutes, until the water is boiling. Allow them to cool in the oven. You will need the water later so do not tip it out.
Step 8. Take the brown paper bag out of the linen closet. Shake the bag and remove the fronds. You should have a yellow, brown, black or rarely greenish brown or ochre powder or very fine, small round pin head size spore depending on the specie involved.
Step 9. Remove the mixture from the oven once it has cooled and place it in the small ice cream container and level.
Step 10. Sprinkle the spore sparsely over the mixture in the small ice cream container.
Step 11. Place the milk bottle tops in the large ice cream container with the flat surface facing down. Place the small ice cream container in the large ice cream container so that it is sitting on the milk bottle tops.
Step 12. Remove the water from the microwave and pour it into the larger ice cream container so there is 25mm to 30mm of water in the bottom.
Step 13. Place the ice cream containers in the plastic bag and seal. Step 14. Place the contents and bag in a warm shady place preferably 50mm to 70mm shade depending on the specie. Shade houses and some window sills are ideal.
Step 14. The surface should turn green within a week to two weeks. The prothallus will then develop. From the prtohalus the first true fronds will appear. Wait until the ferns are 20mm to 35mm in height before you attempt to transplant them. Once they are ready open the bag up slightly and allow the air to flow around the little ferns. Every 3 to 5 days open the bag a little further so the ferns get use to their new environment. Allow them a week to two weeks to harden off before you transplant them following the removal of the plastic bag. Carefully prick them out into 50mm standard squat tubes as you would any seedling.
Do not try to transplant them as single plants as they are still a little delicate.
Once the smaller ones again reach 50mm to 70mm you may wish to divide the stronger and hardier individual plants into smaller clumps in 100mm squat pots.
Do not try to transplant them as single plants as it is a little delicate still.
Once they reach 60mm to 70mm start separating the strongest ones and again do not move them far from their original position. After a few weeks the ferns will power away without any setbacks.
When they have reached 150mm to 180mm they will be safe to plant out in the garden. Make sure the light densities are similar or burning and set back will occur.
When attaching them to a tree Use an old sock or stocking and partly fill it with some peat. Tie them firmly in position so that they do not move. Water and keep moist until they have shown signs that it is well established.
Where mass plantings of Asplenium difforme are required, as a feature; on the ground plant them at greater than 4 meter centers. The plants look better if they have empty space around them rather than being crowded. If it is being used as an epiphyte it is best placed in the forks of trees where leaf litter can accumulate.
Fertilize using Seaweed, fish emulsion or organic chicken pellets soaked in water on an alternate basis. Fertilize every two months until the plants are established then annually in early September or March to maintain health and vitality.
Indoor or Potted On:
Sawdust or sand mixes are too well draining unless the sawdust has completely composted down where it exhibits a texture like plastacine to the touch. Moisture can be squeezed out between the fingers yet it remains moist. I find this a great basis to start with.
Mix equal parts of the well decomposed saw dust with the above feel with perlite and vermiculite. To this add two part sharp clean sand and one part compost. Make sure the sand comes from a source that does not have salt.
The Saw dust in this condition creates the moisture retention and holds nutrient in. The perlite and vermiculite make the mix neutral and both have great water holding capacity without shrinkage with age. The sand creates good drainage and is good for good healthy root development.
Indoor plants need good light and ventilation without drying breezes or wind. Again fertilize the plants on a monthly basis with the above formula on a rotation basis.
Indoor plants need good light and ventilation without drying breezes or wind. Again fertilize the plants on a monthly basis with the above formula on a rotation basis.
Fertilize using seaweed, fish emulsion or organic chicken pellets soaked in water on an alternate basis. Fertilize every two months until the plants are established then annually in early September to October to maintain health, vitality and better flowering.
Further comments from readers:
Hi reader, it seems you use The Bible of Botany a lot. That’s great as we have great pleasure in bringing it to you! It’s a little awkward for us to ask, but our first aim is to purchase land approximately 1,600 hectares to link several parcels of N.P. into one at The Pinnacles NSW Australia, but we need your help. We’re not salespeople. We’re amateur botanists who have dedicated over 30 years to saving the environment in a practical way. We depend on donations to reach our goal. If you donate just $5, the price of your coffee this Sunday, We can help to keep the planet alive in a real way and continue to bring you regular updates and features on Australian plants all in one Botanical Bible. Any support is greatly appreciated. Thank you.
In the spirit of reconciliation we acknowledge the Bundjalung, Gumbaynggirr and Yaegl and all aboriginal nations throughout Australia and their connections to land, sea and community. We pay our respect to their Elders past, present and future for the pleasures we have gained.
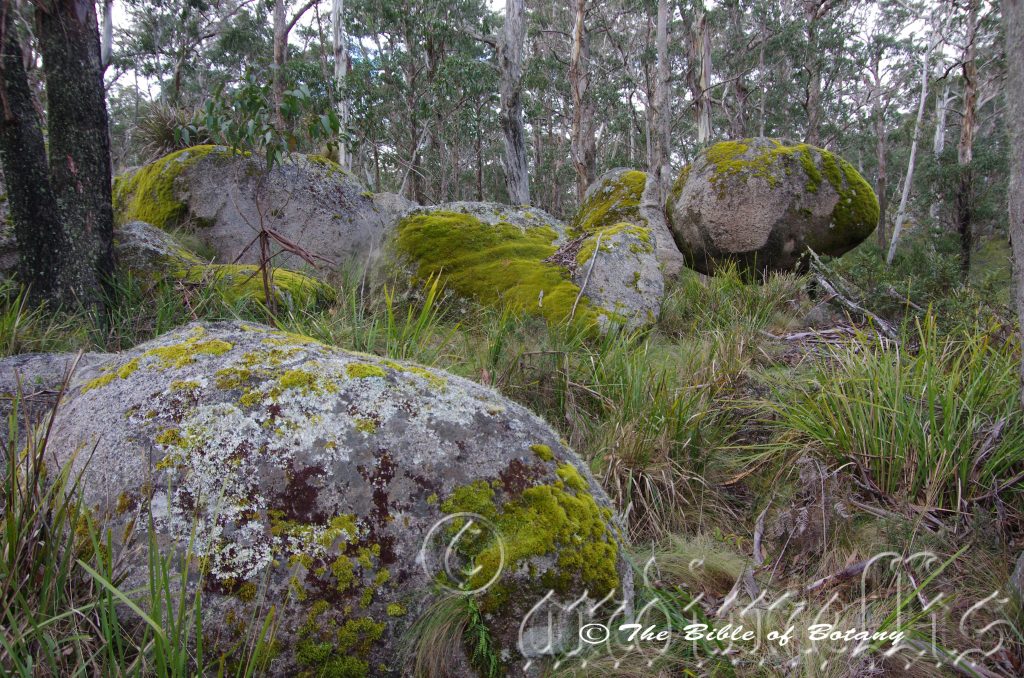
Cathedral Rocks National Park Ebor NSW
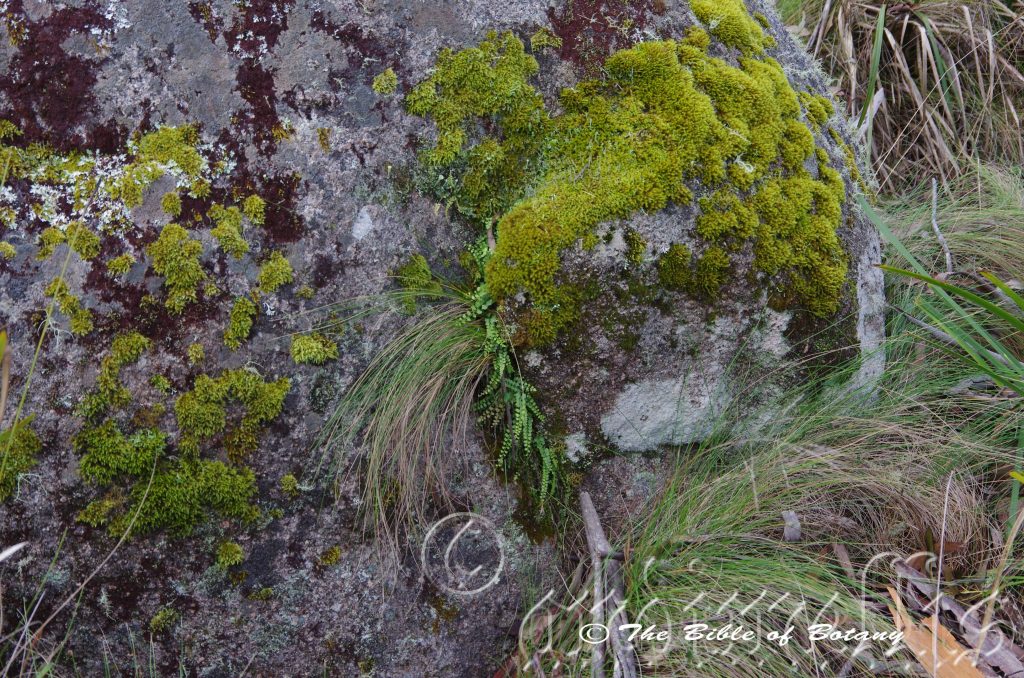
Cathedral Rocks National Park Ebor NSW
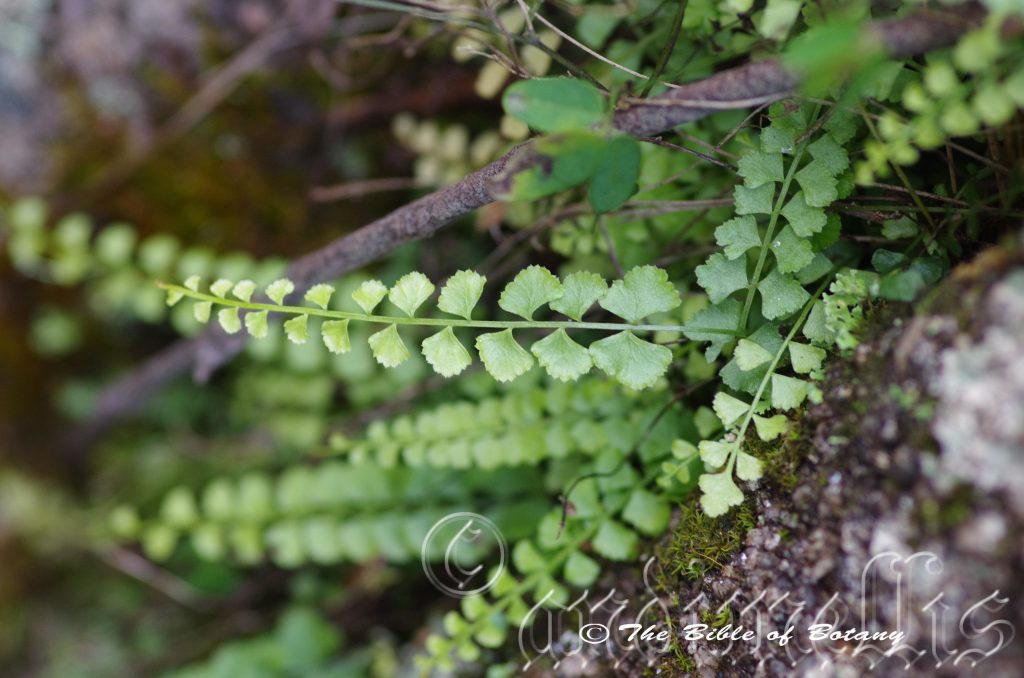
Point Lookout National Park Ebor NSW

Point Lookout National Park Ebor NSW
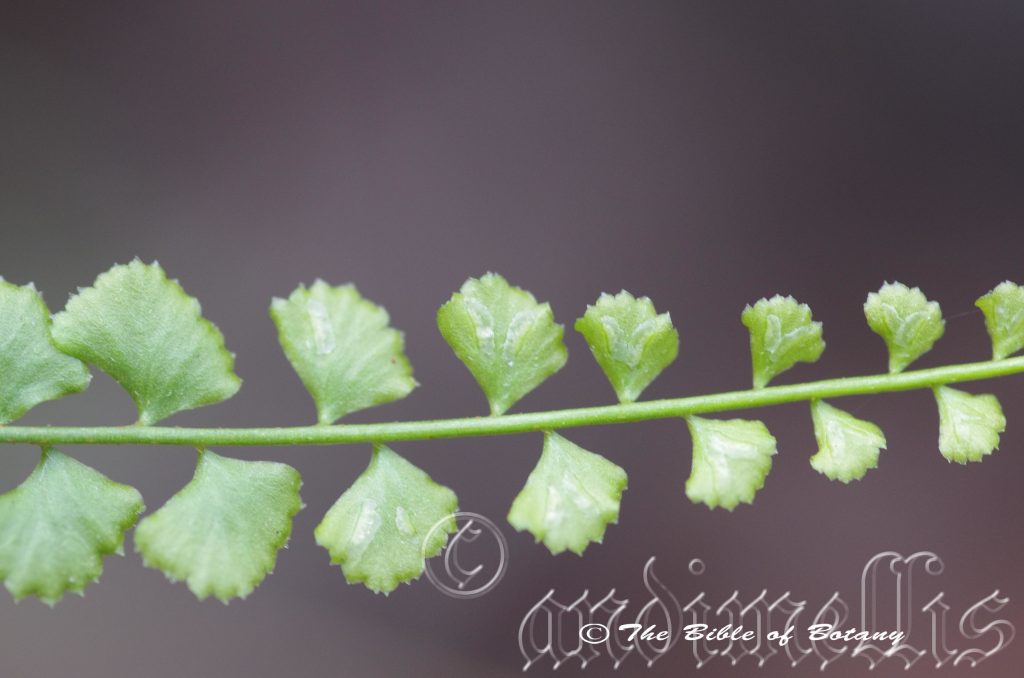
Point Lookout National Park Ebor NSW
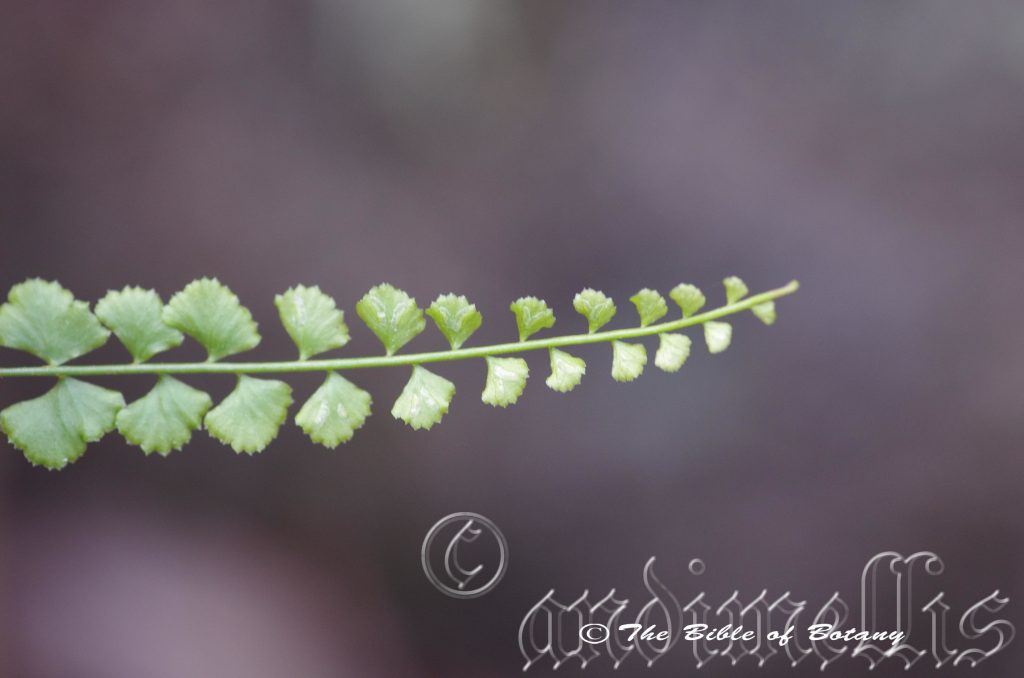
Point Lookout National Park Ebor NSW
Asplenium flabellifolium
Classification:
Class: Polypodiopsida
Order: Polypodialis
Family: Aspleniaceae
Genus: From A, which is Greek/Latin for without or not having and Splenon, which is Ancient Greek or Splenum, which is Latin for the spleen. It refers to ancient beliefs that the plants supplied a medicine to benefit the spleen.
Species: From Flabellum, which is Latin for a fan shape and Folium, which is Latin for foliage. It refers to leaves, phyllodes or fronds which have a fan shape.
Common Name: Necklace Fern.
Distribution:
Asplenium flabellifolium is found south from Koombrit Tops National Park on both sides of the Great Dividing Range to Mount Gambia in South Australia. In South Australia it is found on Mount Hope on lower Ayre Peninsula and from near Port Augusta south and east to the Gyp Rocks near the Victorian border. The altitude ranges from 50 meters ASL to 650 meters ASL.
It is found within 50 kilometres of the coast east of and south of Harvey to eastern edge of Cape Arid in Western Australia.
It is also found on all the Bass Strait Island and most of Tasmania.
https://avh.ala.org.au/occurrences/search?taxa=Asplenium+flabellifolium#tab_mapView
Habitat Aspect Climate:
Asplenium flabellifolium prefers full shade to lightly filtered sunlight or even dappled light. It is found in and adjacent to cool montane rainforests, wet eucalyptus gallery forests and moist scrubby riverine gullies in open situations especially near waterfalls, streams, creeks and rivers where water spray is frequently seen. It is a trailing terrestrial Asplenium which prefers to grow in nooks and crevices amongst rocks and occasionally is seen growing as an epiphyte on rainforest trees especially where orographic precipitation occurs.
Temperatures of minus 5 degrees in August to 30 degrees in January are the optimum temperatures for this species.
Rainfalls range from lows of 850mm to an average of 3200mm annually however where lower rainfall patterns occur it is found in forests where Orographic precipitation is very high.
Soil Requirements:
Asplenium flabellifolium grows as a lithophytic fern. It usually prefers igneous based basalt and Granitic rocks but has been found on metamorphic rocks. The soils pH varies from 5.5pH to 6pH. It is not tolerant of waterlogged soils.
Height & Spread:
Wild Plants: 0.1meter to 0.2 meters by 0.2 meters to 0.4 meters.
Characteristics:
The rhizomes of Asplenium flabellifolium are short tufted and densely covered in glossy deep brown lanceolate scales. The chocolate brown to black aerial roots may form growing over the rocks in areas of very high orographic precipitation or spray from falling water occurs.
Asplenium flabellifolium have procumbent single pinnate fronds. The glossy, glabrous stipes are pale rusty-brown except near the base where it is chocolate-brown. The rachises often extend beyond the final pair of pinnae. The fronds measure 100mm to 200mm in length by 10mm to 40mm in width. The 10 to 40 alternate pinnae are usually deltoid but can be lanceolate, ovate or orbicular. The concolourous laminas are bright, glossy grass-green and glabrous on the upper lamina and dull on the lower lamina. The ultimate pinnae measure 10mm to 20mm in length by 10mm to 26mm in width. The margins are entire or sinuate. The main vein is faintly prominent on the upper lamina and is not visible from the lower lamina. The lateral veins are free. The ultimate pinnae occasionally produce proliferous buds.
The 2 to 7 oblong sori are on the lower surface of the frond adjacent to the lateral veins. The sori measure 2mm to 5mm in length by 1mm to 1.5mm in width. The indusium are membranous and dehisce away from the veins. Sterile and fertile fronds are very similar.
Wildlife:
Asplenium flabellifolium wildlife is unknown to the author.
Cultivation:
Asplenium flabellifolium is a beautiful fern from the cool temperate rainforests of Australia and as such dislike hot dry conditions. Growing it is easy and small plants will reach their full potential in around 3 to 4 years.
Its only requirement is shade and a cool humid microclimate. Feeding the plants with dilute seaweed extract, diluted fish emulsion or diluted organic chicken pellets soaked in water and sprayed onto the leaves will see Asplenium bulbiferum thrive. The additional use of cold tea sprayed leaves from time to time will do the plants no harm.
It can be used with great affect around shaded swimming pools, in court yards, poked into small corners or rain forest settings.
It is best used adjacent to small areas of rainforest close to paths or the house there long strap like leaves can be viewed regularly. It is great in medium rockeries as a fill in plant. It can be planted in small groups of 2 or 3 to create a lush tropical look with other fine leaf ferns and orchids. If it is surrounded by taller narrow growing plants a 3 dimensional scene is quickly visualized. Try using scatter plantings of Duboisia myoporoides or Syzygium luehmannii for a great affect. This is one plant that benefits highly from being scatter planted so use them at different levels. Some on the ground some attached to trees or if there are no trees and large boulders on top of the boulders.
It makes an excellent basket plants in the bush house or shade house where its fronds add a different dimension cascading down especially when they have a bulbil at the end of each frond.
Another area the plants excel is being planted into an old or dead elkhorn peat. This should only be done where the correct microclimate already exists.
Propagation:
Spores: Step 1. Select spore from the fern fronds. Wait until the fern is just starting to release its spore. Rinse the fronds under clean running water and dry. This is to wash off any other spores from rogue ferns that may have settled onto the fronds. (There is nothing worse than having common brake or common soft bracken contaminating a prized tree fern or epiphyte.)
Step 2. Place the dry fronds in a clean brown paper bag and keep them in a cool dark place like the linen closet for about a week to ten days before you are ready to sow the spore. The exception to this rule applies to ferns, which produce green spores. These must be sown immediately that they are released. Todea Barbara is a good example of a fern, which produces green spore.
Step 3. Take a large ice cream container, a small ice cream container and a clean clear plastic bag large enough to seal the large ice cream container and three or four milk bottle tops.
Step 4. Punch or drill 6 to 10 5mm holes in the bottom of the small ice cream container.
Step 5. Wash both containers, tops and plastic bag so that they are very clean and sterile.
Step 6. Use a clean fine seed raising mi. We used 30mm fine sand, 30mm peat and 30mm perlite and 10mm vermiculite. We used crushed basalt, crusher dust and peat in a 50:50 ratio for epiphytes. Moisten the mix enough that water does not run out when the mix is squeezed between the fingers.
Step 7. Place the moisten mix (Enough to half fill the small ice cream container) in the microwave oven with a large glass of water for 7 or 8 minutes, until the water is boiling. Allow them to cool in the oven. You will need the water later so do not tip it out.
Step 8. Take the brown paper bag out of the linen closet. Shake the bag and remove the fronds. You should have a yellow, brown, black or rarely greenish brown or ochre powder or very fine, small round pin head size spore depending on the specie involved.
Step 9. Remove the mixture from the oven once it has cooled and place it in the small ice cream container and level.
Step 10. Sprinkle the spore sparsely over the mixture in the small ice cream container.
Step 11. Place the milk bottle tops in the large ice cream container with the flat surface facing down. Place the small ice cream container in the large ice cream container so that it is sitting on the milk bottle tops.
Step 12. Remove the water from the microwave and pour it into the larger ice cream container so there is 25mm to 30mm of water in the bottom.
Step 13. Place the ice cream containers in the plastic bag and seal. Step 14. Place the contents and bag in a warm shady place preferably 50mm to 70mm shade depending on the specie. Shade houses and some window sills are ideal.
Step 14. The surface should turn green within a week to two weeks. The prothallus will then develop. From the prtohalus the first true fronds will appear. Wait until the ferns are 20mm to 35mm in height before you attempt to transplant them. Once they are ready open the bag up slightly and allow the air to flow around the little ferns. Every 3 to 5 days open the bag a little further so the ferns get use to their new environment. Allow them a week to two weeks to harden off before you transplant them following the removal of the plastic bag. Carefully prick them out into 50mm standard squat tubes as you would any seedling.
Do not try to transplant them as single plants as they are still a little delicate.
Once the smaller ones again reach 50mm to 70mm you may wish to divide the stronger and hardier individual plants into smaller clumps in 100mm squat pots.
Do not try to transplant them as single plants as it is a little delicate still.
Once they reach 60mm to 70mm start separating the strongest ones and again do not move them far from their original position. After a few weeks the ferns will power away without any setbacks.
When they have reached 150mm to 180mm they will be safe to plant out in the garden. Make sure the light densities are similar or burning and set back will occur.
When attaching them to a tree Use an old sock or stocking and partly fill it with some peat. Tie them firmly in position so that they do not move. Water and keep moist until they have shown signs that it is well established.
Where mass plantings of Asplenium flabellifolium are required, as a feature; on the ground plant them at greater than 4 meter centers. The plants look better if they have empty space around them rather than being crowded. If it is being used as an epiphyte it is best placed in the forks of trees where leaf litter can accumulate.
Bulbils: Alternatively the apex of each frond can be pinned down to finely shredded peat of coconut fibre mix. Misted and kept a new fern will develop from the apex. Once the bulbil has developed good roots the rachises can be severed; if it hasn’t already decomposed, and the new plants potted up separately.
Fertilize using Seaweed, fish emulsion or organic chicken pellets soaked in water on an alternate basis. Fertilize every two months until the plants are established then annually in early September or March to maintain health and vitality.
Indoor or Potted On:
Sawdust or sand mixes are too well draining unless the sawdust has completely composted down where it exhibits a texture like plastacine to the touch. Moisture can be squeezed out between the fingers yet it remains moist. I find this a great basis to start with.
Mix equal parts of the well decomposed saw dust with the above feel with perlite and vermiculite. To this add two part sharp clean sand and one part compost. Make sure the sand comes from a source that does not have salt.
The Saw dust in this condition creates the moisture retention and holds nutrient in. The perlite and vermiculite make the mix neutral and both have great water holding capacity without shrinkage with age. The sand creates good drainage and is good for good healthy root development.
Indoor plants need good light and ventilation without drying breezes or wind. Again fertilize the plants on a monthly basis with the above formula on a rotation basis.
Indoor plants need good light and ventilation without drying breezes or wind. Again fertilize the plants on a monthly basis with the above formula on a rotation basis.
Fertilize using seaweed, fish emulsion or organic chicken pellets soaked in water on an alternate basis. Fertilize every two months until the plants are established then annually in early September to October to maintain health, vitality and better flowering.
Further comments from readers:
Hi reader, it seems you use The Bible of Botany a lot. That’s great as we have great pleasure in bringing it to you! It’s a little awkward for us to ask, but our first aim is to purchase land approximately 1,600 hectares to link several parcels of N.P. into one at The Pinnacles NSW Australia, but we need your help. We’re not salespeople. We’re amateur botanists who have dedicated over 30 years to saving the environment in a practical way. We depend on donations to reach our goal. If you donate just $5, the price of your coffee this Sunday, We can help to keep the planet alive in a real way and continue to bring you regular updates and features on Australian plants all in one Botanical Bible. Any support is greatly appreciated. Thank you.
In the spirit of reconciliation we acknowledge the Bundjalung, Gumbaynggirr and Yaegl and all aboriginal nations throughout Australia and their connections to land, sea and community. We pay our respect to their Elders past, present and future for the pleasures we have gained.
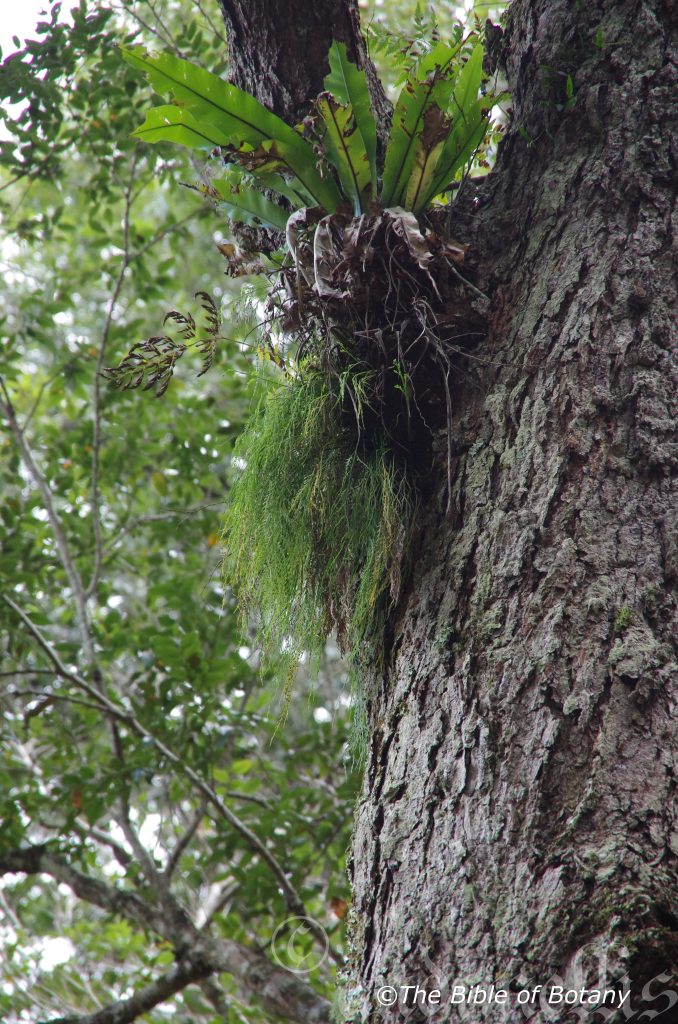
Growing out below Asplenium australisica Dorrigo National Park NSW
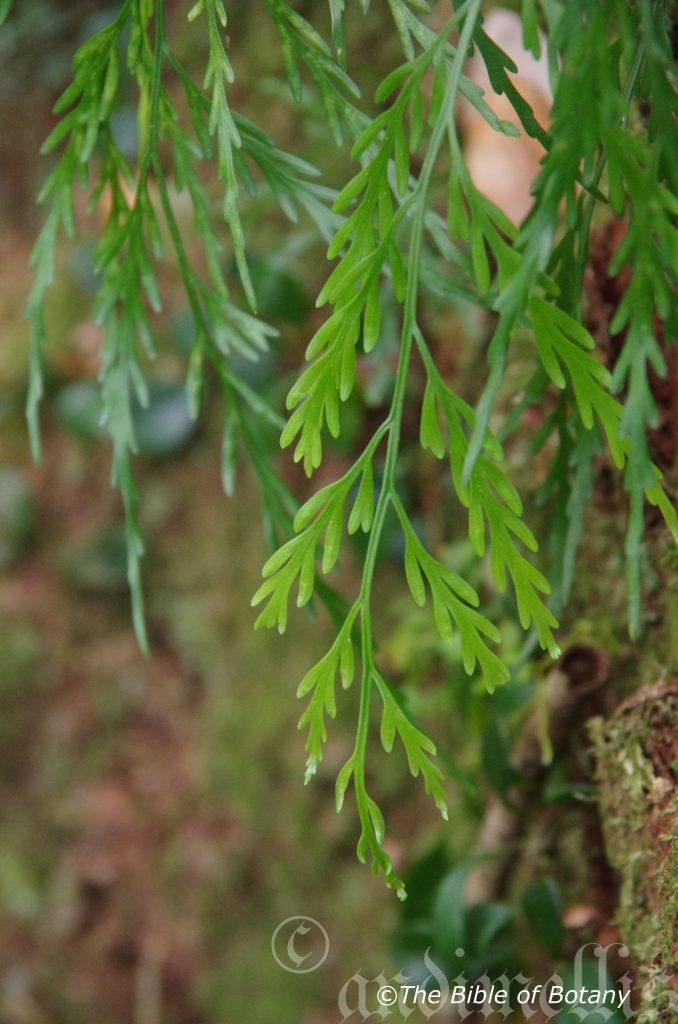
Dorrigo National Park NSW
Asplenium flaccidum
Classification:
Class: Polypodiopsida
Order: Polypodialis
Family: Aspleniaceae
Genus: From A, which is Greek/Latin for without or not having and Splenon, which is Ancient Greek or Splenum, which is Latin for the spleen. It refers to ancient beliefs that the plants supplied a medicine to benefit the spleen.
Species: From flaccidum, which is Latin for Flaccid, flabby, pendulous. It refers to leaves, which are pendulous and look rather fragile.
Subspecies: Asplenium flaccidum subsp. flaccidum is the only subspecies found in Australia.
Common Name: Weeping Spleenwort.
Distribution:
Asplenium flaccidum subsp. flaccidum is found south from near Tenterfield in northern New South Wales to the Colac ottway Ranges in southern Victoria. It occurs along the Great Dividing Range to the coast.
In Tasmania it is mainly found on the west coast and Flinders Island.
https://avh.ala.org.au/occurrences/search?taxa=Asplenium+flaccidum #tab_mapView
Habitat Aspect Climate:
Asplenium flaccidum prefer full shade to lightly filtered sunlight or even dappled light. It is found in and adjacent to cool montane, moist, rainforests, where it grows as an epiphyte or lithophyte. It forms large pendulous clumps often being the major fern in the clump. The altitude ranges from 5 meters ASL to 760 meters ASL.
Temperatures of minus 5 degrees in August to 28 degrees in January are the optimum temperatures for this species.
Rainfalls range from lows of 700mm to an average of 3200mm annually however where lower rainfall patterns occur it is found in rainforests where Orographic precipitation is very high.
Soil Requirements:
Asplenium flaccidum grows as an epiphyte on trees or a lithophyte on rocks. Occasionally it can be seen growing on the forest floor amongst leaf litter but this is rare.
Height & Spread:
Wild Plants: 0.4 meters to 0.7 meters by 1 meter to 1.8 meters.
Characteristics:
The rhizomes of Asplenium flaccidum are short, creeping and densely covered in deep chocolate-brown to black dull brown and semi glossy brown scales. Aerial roots may form especially in areas of very high orographic precipitation and are rusty-brown and velvety to touch in well grown plants.
Asplenium flaccidum have beautiful large erect fronds which eventually become pendent with time. The stipes are chocolate-brown to black, glabrous dull to semi glossy to glossy becoming green well prior to the first pinna while the rachises are glossy grass-green as they approach the first pinnae and remain so to the ultimate segments. The rachises have 2 distinct longitudinal furrows on the upper surface. The fronds measure 600mm to 900mm in length by 120mm to 170mm in width. The pinnae are deeply pinnasect to bipinnasect. The thick, coriaceous laminas are concolourous, bright, glossy grass-green and glabrous on the upper lamina and dull on the lower lamina. The ultimate pinnae are usually linear to narrow lanceolate and measure 6mm to 12mm in length by 2mm to 4mm in width. The margins are entire. The veins are absent from both laminas. The ultimate pinnae never produce proliferous buds.
The single linear sori are adaxial and are marginal on the lower surface of the frond. The sori measure 2mm to 7mm in length by 1mm to 1.3mm in width. The indusium is hyaline to translucent and dehisces from the abaxial side. The spore is rusty-brown to reddish-brown. Sterile and fertile fronds are very similar.
Wildlife:
Asplenium flaccidum wildlife is unknown to the author.
Cultivation:
Asplenium flaccidum is a beautiful fern from the cool temperate in forests of Australia and as such dislike hot dry conditions. Growing it is easy and small plants will reach their full potential in around 4 to 5 years.
Its only requirement is semi-shade and a cool humid microclimate. The additional use of cold tea sprayed on leaves from time to time will do the plants no harm.
It can be used with great affect in large hanging baskets around shaded swimming pools, in court yards, poked into small corners or hanging from selected rainforest trees.
It is best used adjacent to small areas of rainforest close to paths or the house where there long strap like leaves can be viewed regularly. It is great in large rockeries as a fill in plants on large semi porous boulders. It can be planted in small groups of 2 or 3 to create a lush tropical look with other fine leaf and broad leaf ferns and orchids. If it is surrounded by taller narrow growing plants a 3 dimensional scene is quickly visualized. Try using scatter plantings of Cordyline stricta, Cordyline petiolaris or Cordyline terminalis for a great affect. This is one plant that benefits highly from being scatter planted so use them at different levels either on the trunks of trees or along steep banks.
It makes an excellent basket plants in the bush house or shade house where its fronds add a different dimension cascading down.
Another area the plants excel in, is being planted into an old or dead elkhorn or tree fern peat. This should only be done where the correct microclimate already exists.
Propagation:
Spore: Step 1. Select spore from the fern fronds. Wait until the fern is just starting to release its spore. Rinse the fronds under clean running water and dry. This is to wash off any other spores from rogue ferns that may have settled onto the fronds. (There is nothing worse than having common brake or common soft bracken contaminating a prized tree fern or epiphyte.)
Step 2. Place the dry fronds in a clean brown paper bag and keep them in a cool dark place like the linen closet for about a week to ten days before you are ready to sow the spore. The exception to this rule applies to ferns, which produce green spores, must be sown immediately that they are released. Todea barbara is a good example of a fern, which produces green spore.
Step 3. Take a large ice cream container, a small ice cream container and a clean clear plastic bag large enough to seal the large ice cream container and three or four milk bottle tops.
Step 4. Punch or drill 6 to 10 5mm holes in the bottom of the small ice cream container.
Step 5. Wash both containers, tops and plastic bag so that they are very clean and sterile.
Step 6. Use a clean fine seed raising mi. We used 30mm fine sand, 30mm peat and 30mm perlite and 10mm vermiculite. We used crushed basalt, crusher dust and peat in a 50:50 ratio for epiphytes. Moisten the mix enough that water does not run out when the mix is squeezed between the fingers.
Step 7. Place the moisten mix (Enough to half fill the small ice cream container) in the microwave oven with a large glass of water for 7 or 8 minutes, until the water is boiling. Allow them to cool in the oven. You will need the water later so do not tip it out.
Step 8. Take the brown paper bag out of the linen closet. Shake the bag and remove the fronds. You should have a yellow, brown, black or rarely greenish brown or ochre powder or very fine, small round pin head size spore depending on the specie involved.
Step 9. Remove the mixture from the oven once it has cooled and place it in the small ice cream container and level.
Step 10. Sprinkle the spore sparsely over the mixture in the small ice cream container.
Step 11. Place the milk bottle tops in the large ice cream container with the flat surface facing down. Place the small ice cream container in the large ice cream container so that it is sitting on the milk bottle tops.
Step 12. Remove the water from the microwave and pour it into the larger ice cream container so there is 25mm to 30mm of water in the bottom.
Step 13. Place the ice cream containers in the plastic bag and seal. Step 14. Place the contents and bag in a warm shady place preferably 50mm to 70mm shade depending on the specie. Shade houses and some window sills are ideal.
Step 14. The surface should turn green within a week to two weeks. The prothallus will then develop. From the prtohalus the first true fronds will appear. Wait until the ferns are 20mm to 35mm in height before you attempt to transplant them. Once they are ready open the bag up slightly and allow the air to flow around the little ferns. Every 3 to 5 days open the bag a little further so the ferns get use to their new environment. Allow them a week to two weeks to harden off before you transplant them following the removal of the plastic bag. Carefully prick them out into 50mm standard squat tubes as you would any seedling.
Do not try to transplant them as single plants as they are still a little delicate.
Once the smaller ones again reach 50mm to 70mm you may wish to divide the stronger and hardier individual plants into smaller clumps in 100mm squat pots.
Do not try to transplant them as single plants as it is a little delicate still.
Once they reach 60mm to 70mm start separating the strongest ones and again do not move them far from their original position. After a few weeks the ferns will power away without any setbacks.
When they have reached 150mm to 180mm they will be safe to plant out in the garden. Make sure the light densities are similar or burning and set back will occur.
When attaching them to a tree Use an old sock or stocking and partly fill it with some peat. Tie them firmly in position so that they do not move. Water and keep moist until they have shown signs that it is well established.
Where mass plantings of Asplenium flaccidum are required, as a feature; on the ground plant them at greater than 4 meter centers. The plants look better if they have empty space around them rather than being crowded. If it is being used as an epiphyte it is best placed in the forks of trees where leaf litter can accumulate.
Fertilize using Seaweed, fish emulsion or organic chicken pellets soaked in water on an alternate basis. Fertilize every two months until the plants are established then annually in early September or March to maintain health and vitality.
INDOORS OR POTTED ON:
Sawdust or sand mixes are too well draining unless the sawdust has completely composted down where it exhibits a texture like plastacine to the touch. Moisture can be squeezed out between the fingers yet it remains moist. I find this a great basis to start with.
Mix equal parts of the well decomposed saw dust with the above feel with perlite and vermiculite. To this add two part sharp clean sand and one part compost. Make sure the sand comes from a source that does not have salt.
The Saw dust in this condition creates the moisture retention and holds nutrient in. The perlite and vermiculite make the mix neutral and both have great water holding capacity without shrinkage with age. The sand creates good drainage and is good for good healthy root development.
Indoor plants need good light and ventilation without drying breezes or wind. Again fertilize the plants on a monthly basis with the above formula on a rotation basis.
Indoor plants need good light and ventilation without drying breezes or wind. Again fertilize the plants on a monthly basis with the above formula on a rotation basis.
Fertilize using seaweed, fish emulsion or organic chicken pellets soaked in water on an alternate basis. Fertilize every two months until the plants are established then annually in early September to October to maintain health, vitality and better flowering.
Further comments from readers:
Hi reader, it seems you use The Bible of Botany a lot. That’s great as we have great pleasure in bringing it to you! It’s a little awkward for us to ask, but our first aim is to purchase land approximately 1,600 hectares to link several parcels of N.P. into one at The Pinnacles NSW Australia, but we need your help. We’re not salespeople. We’re amateur botanists who have dedicated over 30 years to saving the environment in a practical way. We depend on donations to reach our goal. If you donate just $5, the price of your coffee this Sunday, We can help to keep the planet alive in a real way and continue to bring you regular updates and features on Australian plants all in one Botanical Bible. Any support is greatly appreciated. Thank you.
In the spirit of reconciliation we acknowledge the Bundjalung, Gumbaynggirr and Yaegl and all aboriginal nations throughout Australia and their connections to land, sea and community. We pay our respect to their Elders past, present and future for the pleasures we have gained.
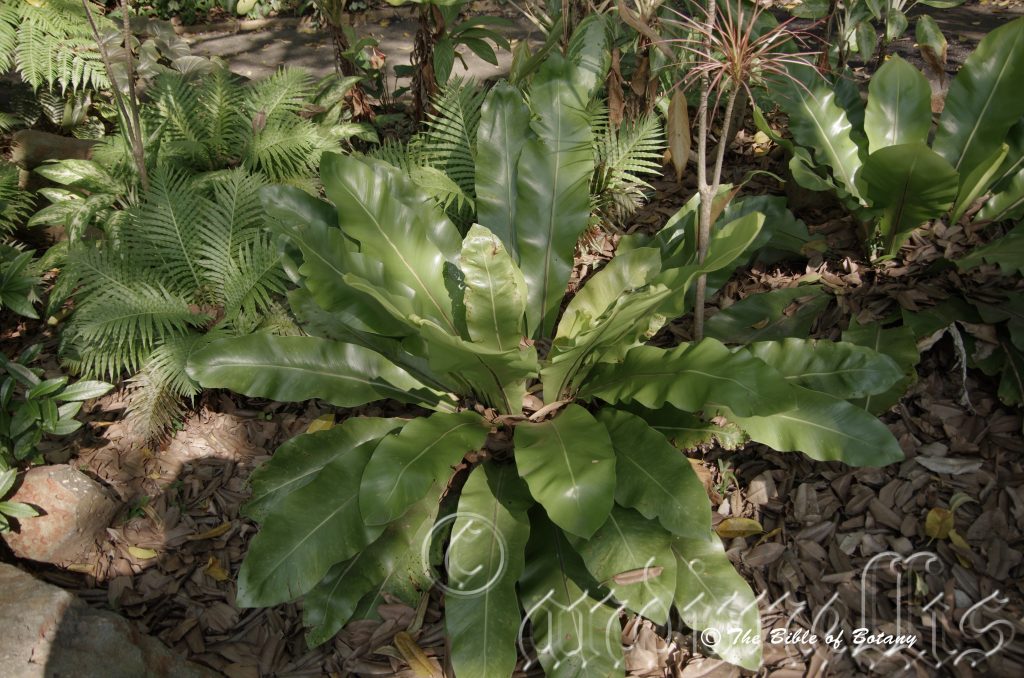
Townsville Botanic Garden Qld.
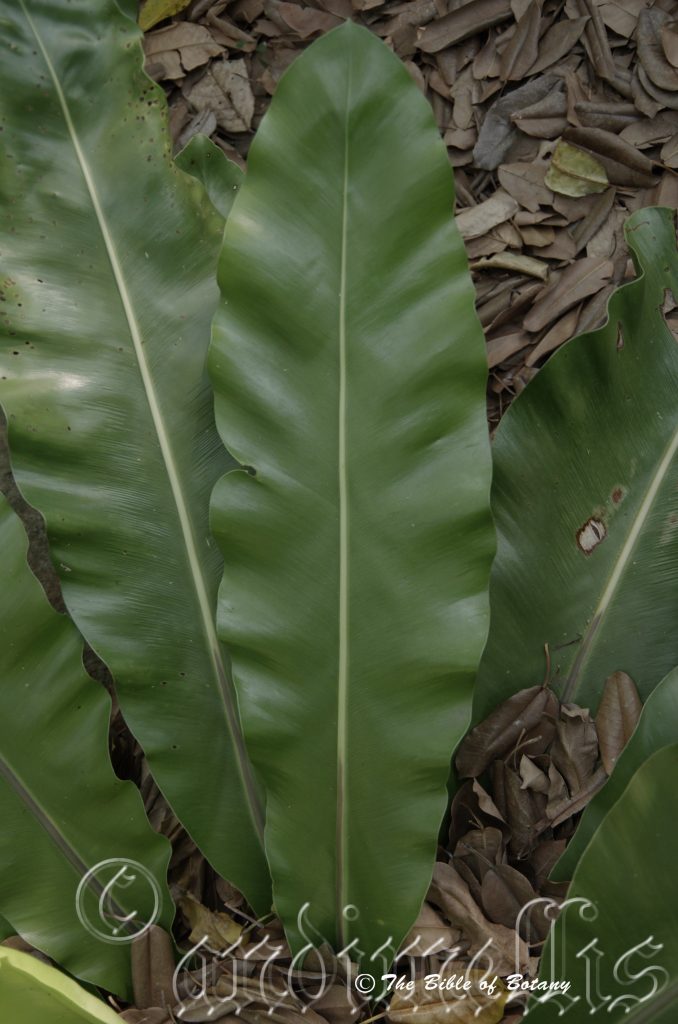
Townsville Botanic Garden Qld.
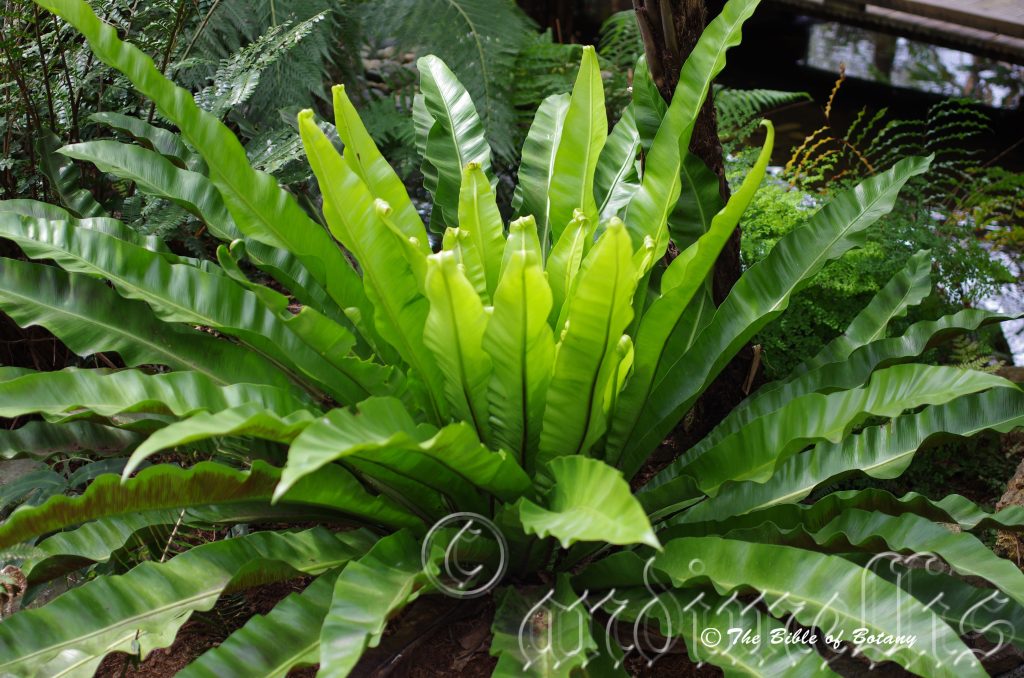
Mount Cootha Botanic Garden Qld.
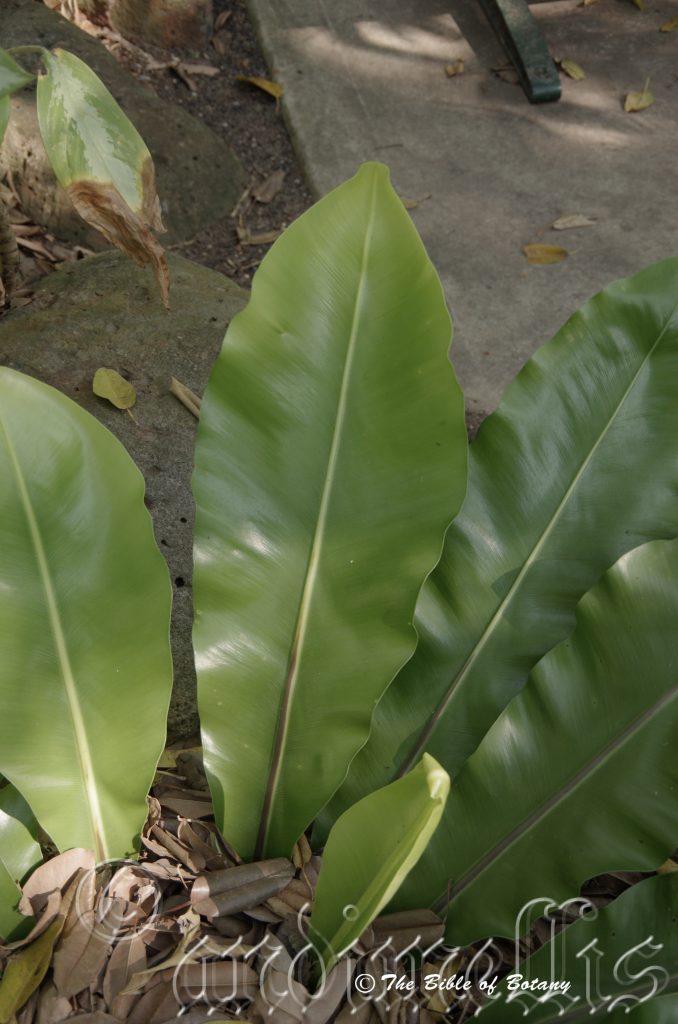
Townsville Botanic Garden Qld.
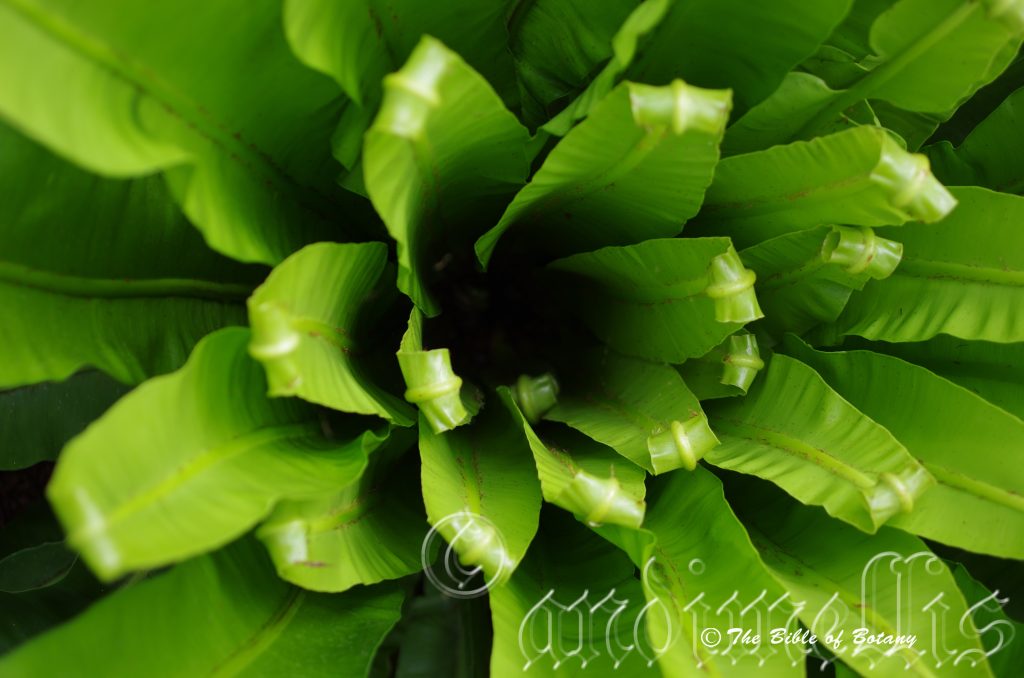
Mount Cootha Botanic Garden Qld.
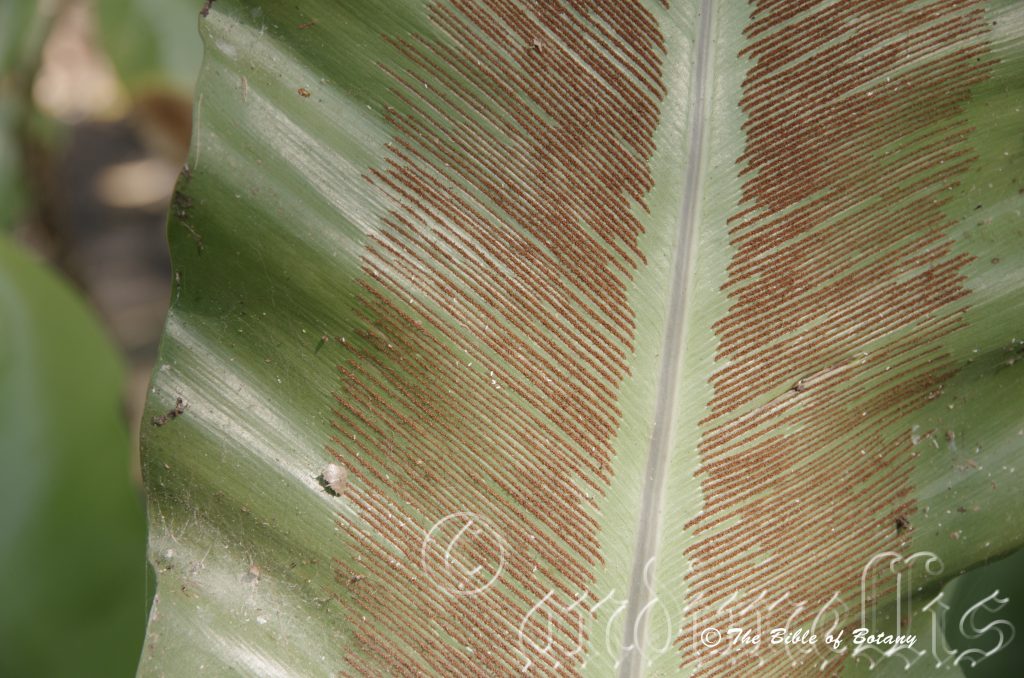
Townsville Botanic Garden Qld.
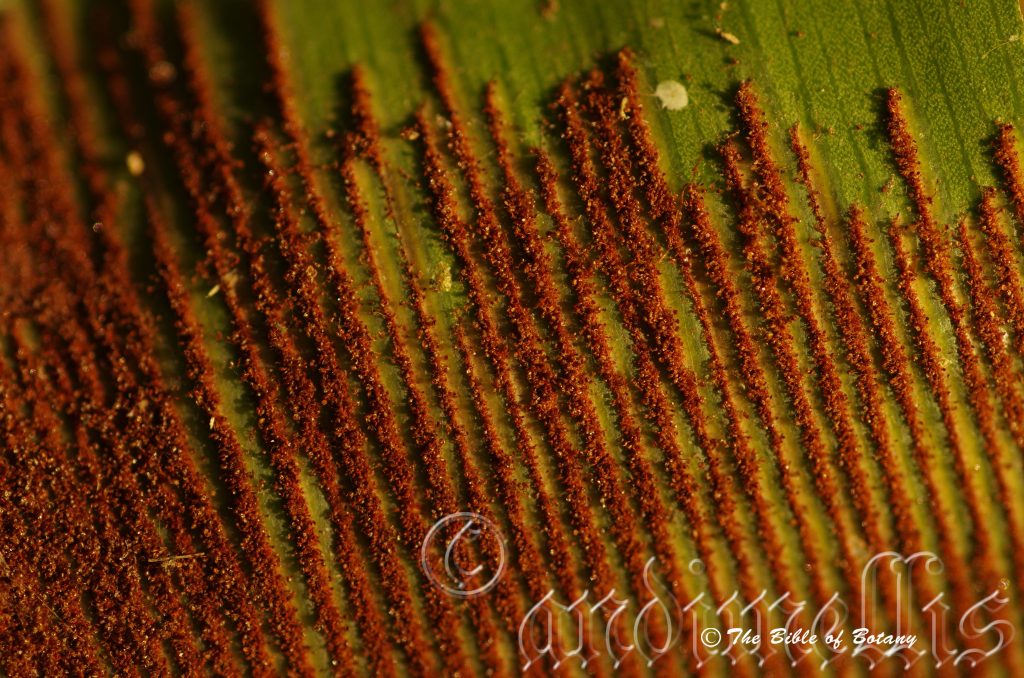
Townsville Botanic Garden Qld.
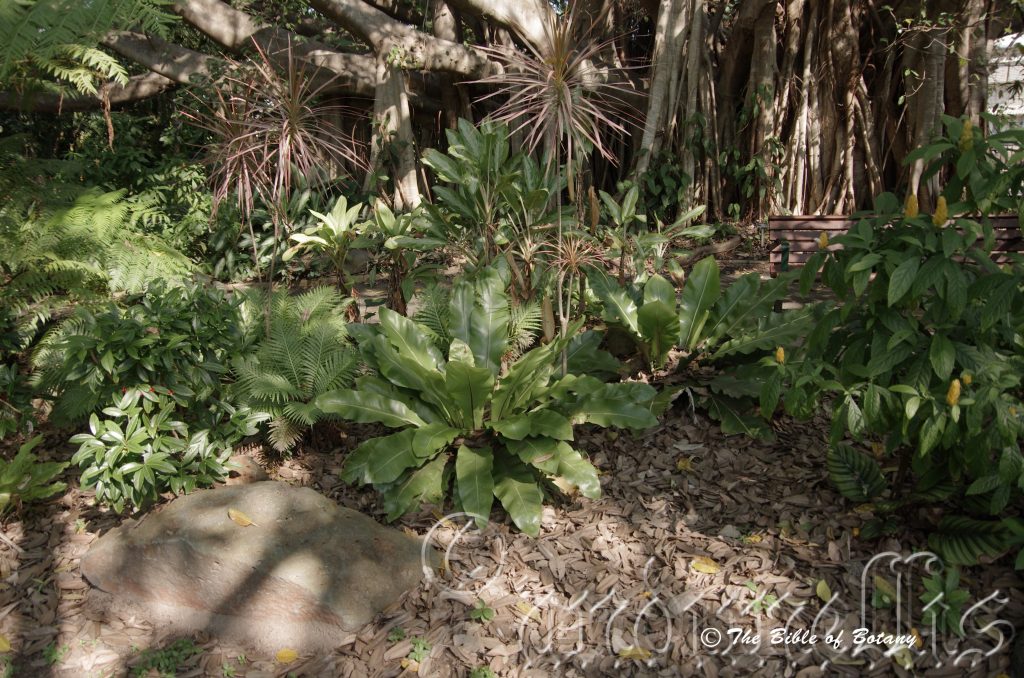
Townsville Botanic Garden Qld.
Asplenium nidus
Classification:
Class: Polypodiopsida
Order: Polypodialis
Family: Aspleniaceae
Genus: From A, which is Greek/Latin for without or not having and Splenon, which is Ancient Greek or Splenum, which is Latin for the spleen. It refers to ancient beliefs that the plants supplied a medicine to benefit the spleen.
Species: From Nidus, which is Latin for a nest. It refers to structures or organs, which resemble a bird’s nest.
Common Name: Bird’s Nest or Bird’s Nest Fern
Distribution:
Asplenium nidus is found along the lowland rainforests of Northern Queensland and the Northern Territory. It is found south from the Torres Strait Islands to near Townsville in far north eastern Queensland. Asplenium nidus is also found naturally in Hawaii, India, Indonesia, Northern Africa, South East Asia and Taiwan. It is only found in the warmer rainforests in Australia.
https://avh.ala.org.au/occurrences/search?taxa=Asplenium+nidus#tab_mapView
Habitat Aspect Climate:
Asplenium nidus prefers full shade to even dappled light. It grows in warm tropical rainforests where it grows as an epiphyte fern or on boulders as a lithophyte. It occasionally is seen growing on the ground. The altitude ranges from 5 meters ASL to 800 meters ASL.
The temperatures range from 8 degrees in August to 39degrees in January.
The rainfalls range from lows of 1250mm to an average of 4200mm annually.
Soil Requirements:
Asplenium nidus grows as an epiphyte on trees or a lithophyte on rocks. Occasionally it can be seen growing on the forest floor amongst leaf litter.
Height & Spread:
Wild Plants: 1meter to 1.5 meters by 3 meters to 4 meters.
Characteristics:
The roots of Asplenium nidus form a compact rhizome when mature. The simple fronds grow 600mm to 1200mm in length by 160mm to 360mm in width. It is spongy from the amount of decomposing leaf litter collected by the nest fronds. The aerial roots are rusty-brown and velvety to touch in well grown plants. The plant grows in flushes with all the new fronds appearing at the same time. There are several flushes a year.
Spore is in parallel lines on the lower surface of the frond from near the mid vein to the margins. Sterile and fertile fronds are very similar.
Confusing Specie:
Asplenium nidus‘s mid vein is round in shape on the lower lamina.
Asplenium australasicum’s mid vein is triangular in shape on the lower lamina.
Wildlife:
Borers can attack the plant and kangaroos and possums will eat the new fronds if food is scarce.
Cultivation:
It would make an good fire retardant large ground cover fern for shady areas.
* Fire retardant plants act as radiant heat screens and absorb more heat from an approaching fire without burning.
* Fire retardant trees are able reduce wind speed near a house or out buildings.
* Fire retardant also trap embers and sparks carried by the wind.
* Fire retardant ground covers are able to catch burning embers without catching fire themselves, and also slow the travel of a fire through debris and litter on the ground.
Asplenium nidus is a beautiful fern from the rainforests of Australia. It is easy to grow and small plants will reach their full potential in around 4 to 6 years. Asplenium Nidus is difficult to maintain in cool subtropical zones south of Brisbane where Asplenium australisicum is a far better choice.
There only requirement is shade and a humid microclimate. The additional use of cold tea leaves and a hand full of course bush litter from time to time will do the plants no harm.
It can be used with great affect around shady swimming pools, in shady courtyards, poked into small corners of a rainforest setting.
It is best used adjacent to small areas of bush close to paths or the house its long strap like leaves can be viewed regularly. It is great in medium rockeries as a fill in plant. It can be planted in small groups of 2 or 3 to create a lush tropical look with other fine leaf ferns and orchids. If it is surrounded by taller narrow growing plants a 3 dimensional scene is quickly visualized. Try using scatter plantings of Cordyline stricta, Cordyline petiolaris or Cordyline terminalis for a great affect. This is one plant that benefits highly from being scatter planted so use them at different levels. Some on the ground some attached to trees or if there are no trees and large boulders on top of the boulders.
Mixed with stags Platycerium superbum or Platycerium bifurcatum along the branches and trunks of suitable trees gives the appropriate trees a very natural look. There is nothing worse than a single tree in a yard with Platycerium specie and Asplenium specie covering the branches and trunk. This scene conjures up the destruction of their natural environment and it is left there alone the last survivors in what will soon be their fate.
Propagation from Spore:
Step 1. Select spore from the fern fronds. Wait until the fern is just starting to release its spore. Rinse the fronds under clean running water and dry. This is to wash off any other spores from rogue ferns that may have settled onto the fronds. (There is nothing worse than having common brake or common soft bracken contaminating a prized tree fern or epiphyte.)
Step 2. Place the dry fronds in a clean brown paper bag and keep them in a cool dark place like the linen closet for about a week to ten days before you are ready to sow the spore. The exception to this rule applies to ferns, which produce green spores. These must be sown immediately that they are released. Todea Barbara is a good example of a fern, which produces green spore.
Step 3. Take a large ice cream container, a small ice cream container and a clean clear plastic bag large enough to seal the large ice cream container and three or four milk bottle tops.
Step 4. Punch or drill 6 to 10 5mm holes in the bottom of the small ice cream container.
Step 5. Wash both containers, tops and plastic bag so that they are very clean and sterile.
Step 6. Use a clean fine seed raising mi. We used 30mm fine sand, 30mm peat and 30mm perlite and 10mm vermiculite. We used crushed basalt, crusher dust and peat in a 50:50 ratio for epiphytes. Moisten the mix enough that water does not run out when the mix is squeezed between the fingers.
Step 7. Place the moisten mix (Enough to half fill the small ice cream container) in the microwave oven with a large glass of water for 7 or 8 minutes, until the water is boiling. Allow them to cool in the oven. You will need the water later so do not tip it out.
Step 8. Take the brown paper bag out of the linen closet. Shake the bag and remove the fronds. You should have a yellow, brown, black or rarely greenish brown or ochre powder or very fine, small round pin head size spore depending on the specie involved.
Step 9. Remove the mixture from the oven once it has cooled and place it in the small ice cream container and level.
Step 10. Sprinkle the spore sparsely over the mixture in the small ice cream container.
Step 11. Place the milk bottle tops in the large ice cream container with the flat surface facing down. Place the small ice cream container in the large ice cream container so that it is sitting on the milk bottle tops.
Step 12. Remove the water from the microwave and pour it into the larger ice cream container so there is 25mm to 30mm of water in the bottom.
Step 13. Place the ice cream containers in the plastic bag and seal. Step 14. Place the contents and bag in a warm shady place preferably 50mm to 70mm shade depending on the specie. Shade houses and some window sills are ideal.
Step 14. The surface should turn green within a week to two weeks. The prothallus will then develop. From the prtohalus the first true fronds will appear. Wait until the ferns are 20mm to 35mm in height before you attempt to transplant them. Once they are ready open the bag up slightly and allow the air to flow around the little ferns. Every 3 to 5 days open the bag a little further so the ferns get use to their new environment. Allow them a week to two weeks to harden off before you transplant them following the removal of the plastic bag. Carefully prick them out into 50mm standard squat tubes as you would any seedling.
Do not try to transplant them as single plants as they are still a little delicate.
Once the smaller ones again reach 50mm to 70mm you may wish to divide the stronger and hardier individual plants into smaller clumps in 100mm squat pots.
Step 16. We fertilized with seaweed, fish emulsion or organic chicken pellets soaked in water on an alternate basis until established. Fertilize every two months for one year even when in the ground.
Do not try to transplant them as single plants as it is a little delicate still.
Once they reach 60mm to 70mm start separating the strongest ones and again do not move them far from their original position. After a few weeks the ferns will power away without any setbacks.
When they have reached 150mm to 180mm they will be safe to plant out in the garden. Make sure the light densities are similar or burning and set back will occur.
When attaching them to a tree Use an old sock or stocking and partly fill it with some peat. Tie them firmly in position so that they do not move. Water and keep moist until they have shown signs that it is well established.
Where mass plantings of Asplenium nidus are required, as a feature; on the ground plant them at greater than 4 meter centers. The plants look better if they have empty space around them rather than being crowded. If it is being used as epiphyte leave spacings on trunks and branches of 3 meters.
Fertilize using Seaweed, fish emulsion or organic chicken pellets soaked in water on an alternate basis. Fertilize every two months until the plants are established then annually in early September or March to maintain health and vitality.
INDOORS OR POTTED ON:
Sawdust or sand mixes are too well draining unless the sawdust has completely composted down where it exhibits a texture like plastacine to the touch. Moisture can be squeezed out between the fingers yet it remains moist. I find this a great basis to start with.
Mix equal parts of the well decomposed saw dust with the above feel with perlite and vermiculite. To this add two part sharp clean sand and one part compost. Make sure the sand comes from a source that does not have salt.
The Saw dust in this condition creates the moisture retention and holds nutrient in. The perlite and vermiculite make the mix neutral and both have great water holding capacity without shrinkage with age. The sand creates good drainage and is good for good healthy root development.
Indoor plants need good light and ventilation without drying breezes or wind. Again fertilize the plants on a monthly basis with the above formula on a rotation basis.
Indoor plants need good light and ventilation without drying breezes or wind. Again fertilize the plants on a monthly basis with the above formula on a rotation basis.
Fertilize using seaweed, fish emulsion or organic chicken pellets soaked in water on an alternate basis. Fertilize every two months until the plants are established then annually in early September to October to maintain health, vitality and better flowering.
Further comments from readers:
Hi reader, it seems you use The Bible of Botany a lot. That’s great as we have great pleasure in bringing it to you! It’s a little awkward for us to ask, but our first aim is to purchase land approximately 1,600 hectares to link several parcels of N.P. into one at The Pinnacles NSW Australia, but we need your help. We’re not salespeople. We’re amateur botanists who have dedicated over 30 years to saving the environment in a practical way. We depend on donations to reach our goal. If you donate just $5, the price of your coffee this Sunday, We can help to keep the planet alive in a real way and continue to bring you regular updates and features on Australian plants all in one Botanical Bible. Any support is greatly appreciated. Thank you.
In the spirit of reconciliation we acknowledge the Bundjalung, Gumbaynggirr and Yaegl and all aboriginal nations throughout Australia and their connections to land, sea and community. We pay our respect to their Elders past, present and future for the pleasures we have gained.
Asplenium polyodon
Classification:
Class: Polypodiopsida
Order: Polypodialis
Family: Aspleniaceae
Genus: From A, which is Greek/Latin for without or not having and Splenon, which is Ancient Greek or Splenum, which is Latin for the spleen. It refers to ancient beliefs that the plants supplied a medicine to benefit the spleen.
Species: From Polys, which is Ancient Greek for many and Odon/tes, which is Ancient Greek for a tooth or teeth. It refers to fronds or leaves which have many teeth on each lobe.
Common Name: Sickle Spleenwort or Mare’s Tail.
Distribution:
Asplenium polyodon is found along the East coast of Australia. It is found south from the Big Tableland National Park near Cooktown in far north Queensland to Mount Dromedary in the southern New South Wales. It is found on and east of the Great Dividing Range. There is a disjunct population near Orbost in far north eastern Victoria with 2 isolated populations, one near Daylesford in southern Victoria and the other near Litchfield, Wangi Falls in the Northern Territory. It is also widespread outside Australia’s mainland being found on both Lord Howe Island and Norfolk Island and further afield in New Guinea and south East Asia.
https://avh.ala.org.au/occurrences/search?taxa=Asplenium+polyodon#tab_mapView
Habitat Aspect Climate:
Asplenium polyodon prefers full shade to lightly filtered sunlight or even dappled light. It is found in and adjacent to cool montane rainforests, wet eucalyptus gallery forests and cool highland tropical rainforests. It occasionally is seen growing on the ground. The altitude ranges from 15 meters ASL to 1200 meters ASL.
Temperatures of minus 5 degrees in August to 30 degrees in January are the optimum temperatures for this species.
Rainfalls range from lows of 600mm to an average of 3200mm annually however where lower rainfall patterns occur it is found in forests where Orographic precipitation is very high.
Soil Requirements:
Asplenium polyodon grows as an epiphyte on trees or a lithophyte on rocks. Occasionally it can be seen growing on the forest floor amongst leaf litter but this is rare.
Height & Spread:
Wild Plants: 0.3 meter to 0.8 meters by 0.5 meters to 1.6 meters.
Characteristics:
The rhizomes of Asplenium polyodon are compact medium creeping and are densely covered in dull brown to chocolate-brown semi-glossy scales. Aerial roots may form in areas of very high orographic precipitation and are rusty-brown and velvety to touch in well grown plants.
Asplenium polyodon have beautiful large semi-erect fronds eventually become pendent with time. The stipes are deep brown to chocolate-brown glabrous dull to semi glossy becoming green about midway along the rachises while the apex half of the rachises are glossy olive green on the upper surface and grass-green to deep green on the lower surface to the ultimate segments. The fronds measure 600mm to 1000mm in length by 120mm to 200mm in width.
The pinnae are deeply pinnasect to bipinnasect. The thin, coriaceous laminas are broad lanceolate to broad elliptic or deltoid in juvenile fronds. The concolourous laminas are bright, glossy grass-green to deep green, semi glossy to glossy and glabrous on the upper laminas and dull to semi glossy on the lower laminas. The ultimate pinnae very variable and measure 30mm to 50mm on smaller fronds to 150mm in larger fronds in length by 2mm to 28mm in width. The deltoid juvenile fronds and base pinnae measure 25mm by 25 mm. The margins are shallowly lobed often finely toothed at the apexes. The veins are free from the mid vein. The ultimate pinnae never produce proliferous buds.
The 5 to 22 linear sori are marginal on the lower surface of the frond near the veins. The sori measure 4mm to 12mm in length by 1mm to 1.5mm in width. The pale green, membranous indusium open adaxially to the veins. The sterile and fertile fronds are very similar.
Wildlife:
Asplenium polyodon wildlife is unknown to the author.
Cultivation:
Asplenium polyodon is a beautiful fern from the cool temperate rainforests and cool high land rainforests of the tropics of Australia and as such dislike hot dry conditions. Growing it is easy and small plants will reach their full potential in around 3 to 5 years.
Its only requirement is shade and a cool humid microclimate. Feeding the plants with dilute seaweed extract, diluted fish emulsion or diluted organic chicken pellets soaked in water and sprayed onto the leaves will see Asplenium polyodon thrive. The additional use of cold tea sprayed leaves from time to time will do the plants no harm.
They can be used with great affect around shaded swimming pools, in court yards, poked into small corners or rain forest settings.
It is best used adjacent to small areas of rainforest close to paths or the house there long strap like leaves can be viewed regularly. It is great in medium rockeries as a fill in plant. It can be planted in small groups of 2 or 3 to create a lush tropical look with other fine leaf ferns and orchids. If it is surrounded by taller narrow growing plants a 3 dimensional scene is quickly visualized. Try using scatter plantings of Duboisia myoporoides with Cordyline stricta, Cordyline petiolaris or Cordyline terminalis for a great affect. This is one plant that benefits highly from being scatter planted so use them at different levels. Some on the ground some attached to trees or if there are no trees and large boulders on top of the boulders.
They make excellent basket plants in the bush house or shade house where its fronds add a different dimension cascading down especially when it is covered in bulbils.
Another area the plants excel is being planted into an old or dead elkhorn peat or tree fern stumps. This should only be done where the correct microclimate already exists.
Propagation:
Spore: Step 1. Select spore from the fern fronds. Wait until the fern is just starting to release its spore. Rinse the fronds under clean running water and dry. This is to wash off any other spores from rogue ferns that may have settled onto the fronds. (There is nothing worse than having common brake or common soft bracken contaminating a prized tree fern or epiphyte.)
Step 2. Place the dry fronds in a clean brown paper bag and keep them in a cool dark place like the linen closet for about a week to ten days before you are ready to sow the spore. The exception to this rule applies to ferns, which produce green spores. These must be sown immediately that they are released. Todea Barbara is a good example of a fern, which produces green spore.
Step 3. Take a large ice cream container, a small ice cream container and a clean clear plastic bag large enough to seal the large ice cream container and three or four milk bottle tops.
Step 4. Punch or drill 6 to 10 5mm holes in the bottom of the small ice cream container.
Step 5. Wash both containers, tops and plastic bag so that they are very clean and sterile.
Step 6. Use a clean fine seed raising mi. We used 30mm fine sand, 30mm peat and 30mm perlite and 10mm vermiculite. We used crushed basalt, crusher dust and peat in a 50:50 ratio for epiphytes. Moisten the mix enough that water does not run out when the mix is squeezed between the fingers.
Step 7. Place the moisten mix (Enough to half fill the small ice cream container) in the microwave oven with a large glass of water for 7 or 8 minutes, until the water is boiling. Allow them to cool in the oven. You will need the water later so do not tip it out.
Step 8. Take the brown paper bag out of the linen closet. Shake the bag and remove the fronds. You should have a yellow, brown, black or rarely greenish brown or ochre powder or very fine, small round pin head size spore depending on the specie involved.
Step 9. Remove the mixture from the oven once it has cooled and place it in the small ice cream container and level.
Step 10. Sprinkle the spore sparsely over the mixture in the small ice cream container.
Step 11. Place the milk bottle tops in the large ice cream container with the flat surface facing down. Place the small ice cream container in the large ice cream container so that it is sitting on the milk bottle tops.
Step 12. Remove the water from the microwave and pour it into the larger ice cream container so there is 25mm to 30mm of water in the bottom.
Step 13. Place the ice cream containers in the plastic bag and seal. Step 14. Place the contents and bag in a warm shady place preferably 50mm to 70mm shade depending on the specie. Shade houses and some window sills are ideal.
Step 14. The surface should turn green within a week to two weeks. The prothallus will then develop. From the prtohalus the first true fronds will appear. Wait until the ferns are 20mm to 35mm in height before you attempt to transplant them.
Once they are ready open the bag up slightly and allow the air to flow around the little ferns. Every 3 to 5 days open the bag a little further so the ferns get use to their new environment. Allow them a week to two weeks to harden off before you transplant them following the removal of the plastic bag. Carefully prick them out into 50mm standard squat tubes as you would any seedling.
Do not try to transplant them as single plants as they are still a little delicate.
Once the smaller ones again reach 50mm to 70mm you may wish to divide the stronger and hardier individual plants into smaller clumps in 100mm squat pots.
Step 16. We fertilized with seaweed, fish emulsion or organic chicken pellets soaked in water on an alternate basis until established. Fertilize every two months for one year even when in the ground.
Do not try to transplant them as single plants as it is a little delicate still.
Once they reach 60mm to 70mm start separating the strongest ones and again do not move them far from their original position. After a few weeks the ferns will power away without any setbacks.
When they have reached 150mm to 180mm they will be safe to plant out in the garden. Make sure the light densities are similar or burning and set back will occur.
When attaching them to a tree Use an old sock or stocking and partly fill it with some peat. Tie them firmly in position so that they do not move. Water and keep moist until they have shown signs that it is well established.
Where mass plantings of Asplenium polyodon are required, as a feature; on the ground plant them at greater than 4 meter centers. The plants look better if they have empty space around them rather than being crowded. If it is being used as an epiphyte it is best placed in the forks of trees where leaf litter can accumulate.
INDOORS OR POTTED ON:
Sawdust or sand mixes are too well draining unless the sawdust has completely composted down where it exhibits a texture like plastacine to the touch. Moisture can be squeezed out between the fingers yet it remains moist. I find this a great basis to start with.
Mix equal parts of the well decomposed saw dust with the above feel with perlite and vermiculite. To this add two part sharp clean sand and one part compost. Make sure the sand comes from a source that does not have salt.
The Saw dust in this condition creates the moisture retention and holds nutrient in. The perlite and vermiculite make the mix neutral and both have great water holding capacity without shrinkage with age. The sand creates good drainage and is good for good healthy root development.
Fertilize using seaweed, fish emulsion or organic chicken pellets soaked in water on an alternate basis. Fertilize every two months until the plants are established then annually in early September to October to maintain health, vitality and better flowering.
Further comments from readers:
Hi reader, it seems you use The Bible of Botany a lot. That’s great as we have great pleasure in bringing it to you! It’s a little awkward for us to ask, but our first aim is to purchase land approximately 1,600 hectares to link several parcels of N.P. into one at The Pinnacles NSW Australia, but we need your help. We’re not salespeople. We’re amateur botanists who have dedicated over 30 years to saving the environment in a practical way. We depend on donations to reach our goal. If you donate just $5, the price of your coffee this Sunday, We can help to keep the planet alive in a real way and continue to bring you regular updates and features on Australian plants all in one Botanical Bible. Any support is greatly appreciated. Thank you.
In the spirit of reconciliation we acknowledge the Bundjalung, Gumbaynggirr and Yaegl and all aboriginal nations throughout Australia and their connections to land, sea and community. We pay our respect to their Elders past, present and future for the pleasures we have gained.
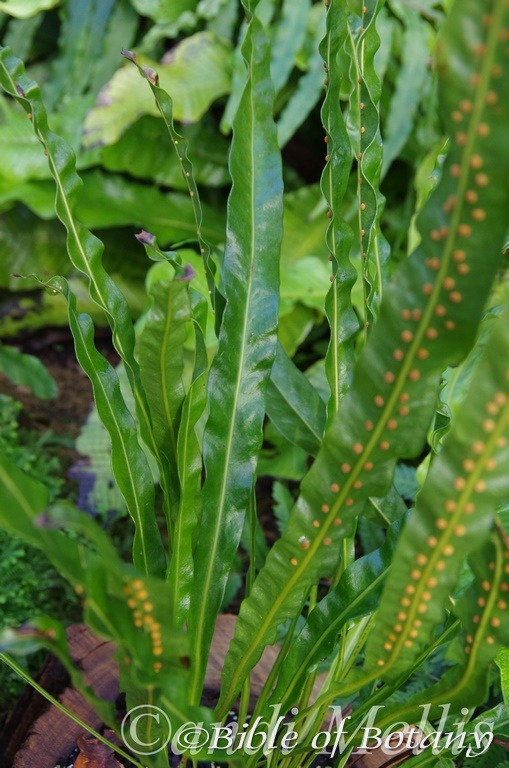
MCBG Brisbane Qld.
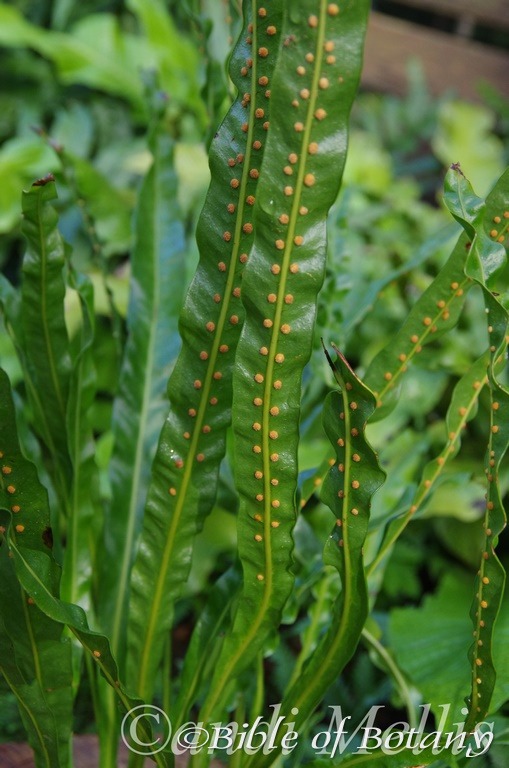
MCBG Brisbane Qld.
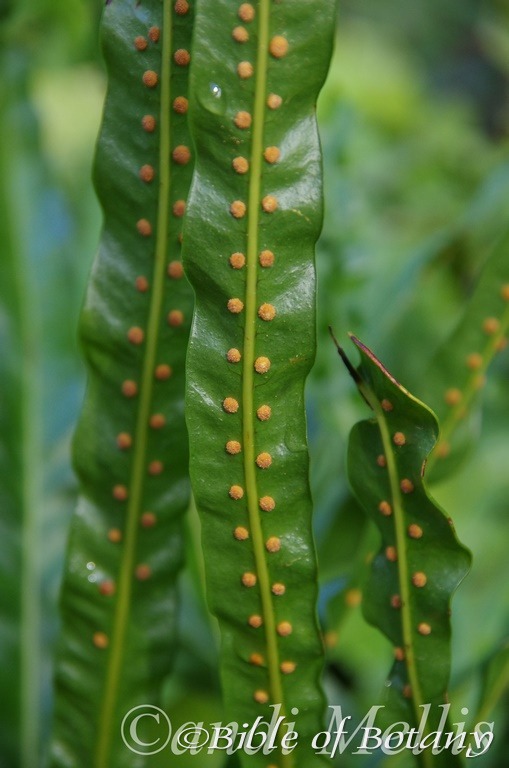
MCBG Brisbane Qld.
Asplenium simplicifrons
Classification:
Class: Polypodiopsida
Order: Polypodialis
Family: Aspleniaceae
Genus: From A, which is Greek/Latin for without or not having and Splenon, which is Ancient Greek or Splenum, which is Latin for the spleen. It refers to ancient beliefs that the plants supplied a medicine to benefit the spleen.
Species: From Simplus, which is Latin for not complex and Frons, which is Ancient Greek and later Latin for a frond. It refers to fronds of ferns, which have unpretentious or undivided fronds.
Common Name:
Distribution:
Asplenium simplicifrons is found south from Mount Finnegan to Mount Spec in far north eastern Queensland There is an isolated population in Jardine River National Park on Cape York peninsula and several to the south Eungella National Park. It is found on and east of the Great Dividing Range.
https://avh.ala.org.au/occurrences/search?taxa=Asplenium+simplicifrons#tab_mapView
Habitat Aspect Climate: NOT WRITTEN UP BELOW HERE
Asplenium simplicifrons prefers full shade to lightly filtered sunlight or even dappled light. It is found in and adjacent to cool montane rainforests, wet eucalyptus gallery forests and cool highland tropical rainforests. It occasionally is seen growing on the ground. The altitude ranges from 15 meters ASL to 1200 meters ASL.
Temperatures of minus 5 degrees in August to 30 degrees in January are the optimum temperatures for this species.
Rainfalls range from lows of 600mm to an average of 3200mm annually however where lower rainfall patterns occur it is found in forests where Orographic precipitation is very high.
Soil Requirements:
Asplenium simplicifrons grows as an epiphyte on trees or a lithophyte on rocks. Occasionally it can be seen growing on the forest floor amongst leaf litter but this is rare.
Height & Spread:
Wild Plants: 0.3 meter to 0.8 meters by 0.5 meters to 1.6 meters.
Characteristics:
The rhizomes of Asplenium simplicifrons are compact medium creeping and are densely covered in dull brown to chocolate-brown semi-glossy scales. Aerial roots may form in areas of very high orographic precipitation and are rusty-brown and velvety to touch in well grown plants.
Asplenium simplicifrons has beautiful large semi-erect fronds eventually become pendent with time. The stipes are deep brown to chocolate-brown glabrous dull to semi glossy becoming green about midway along the rachises while the apex half of the rachises are glossy olive green on the upper surface and grass-green to deep green on the lower surface to the ultimate segments. The fronds measure 600mm to 1000mm in length by 120mm to 200mm in width.
The pinnae are deeply pinnasect to bipinnasect. The thin, coriaceous laminas are broad lanceolate to broad elliptic or deltoid in juvenile fronds. The concolourous laminas are bright, glossy grass-green to deep green, semi glossy to glossy and glabrous on the upper laminas and dull to semi glossy on the lower laminas. The ultimate pinnae very variable and measure 30mm to 50mm on smaller fronds to 150mm in larger fronds in length by 2mm to 28mm in width. The deltoid juvenile fronds and base pinnae measure 25mm by 25 mm. The margins are shallowly lobed often finely toothed at the apexes. The veins are free from the mid vein. The ultimate pinnae never produce proliferous buds.
The 5 to 22 linear sori are marginal on the lower surface of the frond near the veins. The sori measure 4mm to 12mm in length by 1mm to 1.5mm in width. The pale green, membranous indusium open adaxially to the veins. The sterile and fertile fronds are very similar.
Wildlife:
Asplenium simplicifrons wildlife is unknown to the author.
Cultivation:
Asplenium simplicifrons is a beautiful fern from the cool temperate rainforests and cool high land rainforests of the tropics of Australia and as such dislike hot dry conditions. Growing it is easy and small plants will reach their full potential in around 3 to 4 years.
There only requirement is shade and a cool humid microclimate. Feeding the plants with dilute seaweed extract, diluted fish emulsion or diluted organic chicken pellets soaked in water and sprayed onto the leaves will see Asplenium simplicifrons thrive. The additional use of cold tea sprayed leaves from time to time will do the plants no harm.
They can be used with great affect around shaded swimming pools, in court yards, poked into small corners or rain forest settings.
It is best used adjacent to small areas of rainforest close to paths or the house where the long strap like leaves can be viewed regularly. It is great in medium rockeries as a fill in plant. Here they can be planted in small groups of 2 or 3 to create a lush tropical look with other fine leaf ferns and orchids. If it is surrounded by taller narrow growing plants a 3 dimensional scene is quickly visualized. Try using scatter plantings of Duboisia myoporoides with Cordyline stricta, Cordyline petiolaris or Cordyline terminalis for a great affect. This is one plant that benefits highly from being scatter planted so use them at different levels. Some on the ground some attached to trees or if there are no trees and large boulders on top of the boulders.
It makes an excellent basket plants in the bush house or shade house where its fronds add a different dimension cascading down especially when it is covered in bulbils.
Another area the plants excel is being planted into an old or dead elkhorn peat or tree fern stumps. This should only be done where the correct microclimate already exists.
Propagation:
Spores: Step 1. Select spore from the fern fronds. Wait until the fern is just starting to release its spore. Rinse the fronds under clean running water and dry. This is to wash off any other spores from rogue ferns that may have settled onto the fronds. (There is nothing worse than having common brake or common soft bracken contaminating a prized tree fern or epiphyte.)
Step 2. Place the dry fronds in a clean brown paper bag and keep them in a cool dark place like the linen closet for about a week to ten days before you are ready to sow the spore. The exception to this rule applies to ferns, which produce green spores. These must be sown immediately that they are released. Todea Barbara is a good example of a fern, which produces green spore.
Step 3. Take a large ice cream container, a small ice cream container and a clean clear plastic bag large enough to seal the large ice cream container and three or four milk bottle tops.
Step 4. Punch or drill 6 to 10 5mm holes in the bottom of the small ice cream container.
Step 5. Wash both containers, tops and plastic bag so that they are very clean and sterile.
Step 6. Use a clean fine seed raising mi. We used 30mm fine sand, 30mm peat and 30mm perlite and 10mm vermiculite. We used crushed basalt, crusher dust and peat in a 50:50 ratio for epiphytes. Moisten the mix enough that water does not run out when the mix is squeezed between the fingers.
Step 7. Place the moisten mix (Enough to half fill the small ice cream container) in the microwave oven with a large glass of water for 7 or 8 minutes, until the water is boiling. Allow them to cool in the oven. You will need the water later so do not tip it out.
Step 8. Take the brown paper bag out of the linen closet. Shake the bag and remove the fronds. You should have a yellow, brown, black or rarely greenish brown or ochre powder or very fine, small round pin head size spore depending on the specie involved.
Step 9. Remove the mixture from the oven once it has cooled and place it in the small ice cream container and level.
Step 10. Sprinkle the spore sparsely over the mixture in the small ice cream container.
Step 11. Place the milk bottle tops in the large ice cream container with the flat surface facing down. Place the small ice cream container in the large ice cream container so that it is sitting on the milk bottle tops.
Step 12. Remove the water from the microwave and pour it into the larger ice cream container so there is 25mm to 30mm of water in the bottom.
Step 13. Place the ice cream containers in the plastic bag and seal. Step 14. Place the contents and bag in a warm shady place preferably 50mm to 70mm shade depending on the specie. Shade houses and some window sills are ideal.
Step 14. The surface should turn green within a week to two weeks. The prothallus will then develop. From the prtohalus the first true fronds will appear. Wait until the ferns are 20mm to 35mm in height before you attempt to transplant them. Do not try to transplant them as single plants as it is a little delicate still.
Once they reach 60mm to 70mm start separating the strongest ones and again do not move them far from their original position. After a few weeks the ferns will power away without any setbacks.
When they have reached 150mm to 180mm they will be safe to plant out in the garden. Make sure the light densities are similar or burning and set back will occur.
When attaching them to a tree Use an old sock or stocking and partly fill it with some peat. Tie them firmly in position so that they do not move. Water and keep moist until they have shown signs that it is well established.
Where mass plantings of Asplenium simplicifrons is required, as a feature; on the ground plant them at greater than 4 meter centres. The plants look better if they have empty space around them rather than being crowded. If it is being used as an epiphyte it is best placed in the forks of trees where leaf litter can accumulate.
INDOORS OR POTTED ON:
Sawdust or sand mixes are too well draining unless the sawdust has completely composted down where it exhibits a texture like plastacine to the touch. Moisture can be squeezed out between the fingers yet it remains moist. I find this a great basis to start with.
Mix equal parts of the well decomposed saw dust with the above feel with perlite and vermiculite. To this add two part sharp clean sand and one part compost. Make sure the sand comes from a source that does not have salt.
The Saw dust in this condition creates the moisture retention and holds nutrient in. The perlite and vermiculite make the mix neutral and both have great water holding capacity without shrinkage with age. The sand creates good drainage and is good for good healthy root development.
Indoor plants need good light and ventilation without drying breezes or wind. Again fertilize the plants on a monthly basis with the above formula on a rotation basis.
Indoor plants need good light and ventilation without drying breezes or wind. Again fertilize the plants on a monthly basis with the above formula on a rotation basis.
Fertilize using seaweed, fish emulsion or organic chicken pellets soaked in water on an alternate basis. Fertilize every two months until the plants are established then annually in early September to October to maintain health, vitality and better flowering.
Further comments from readers:
Hi reader, it seems you use The Bible of Botany a lot. That’s great as we have great pleasure in bringing it to you! It’s a little awkward for us to ask, but our first aim is to purchase land approximately 1,600 hectares to link several parcels of N.P. into one at The Pinnacles NSW Australia, but we need your help. We’re not salespeople. We’re amateur botanists who have dedicated over 30 years to saving the environment in a practical way. We depend on donations to reach our goal. If you donate just $5, the price of your coffee this Sunday, We can help to keep the planet alive in a real way and continue to bring you regular updates and features on Australian plants all in one Botanical Bible. Any support is greatly appreciated. Thank you.
In the spirit of reconciliation we acknowledge the Bundjalung, Gumbaynggirr and Yaegl and all aboriginal nations throughout Australia and their connections to land, sea and community. We pay our respect to their Elders past, present and future for the pleasures we have gained.
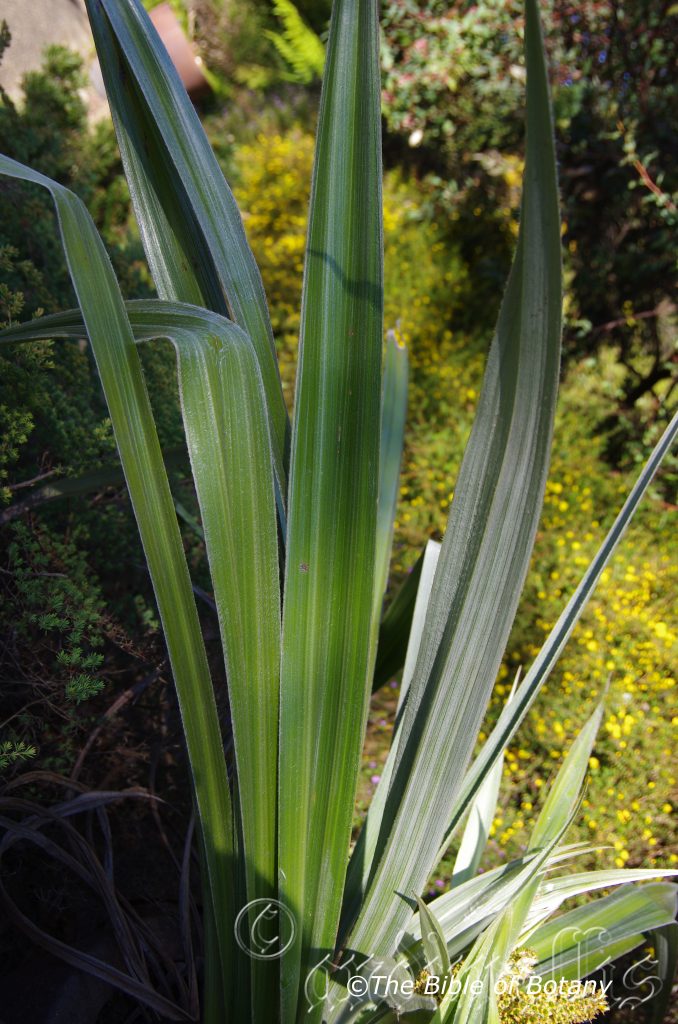
National Botanic Gardens Canberra ACT
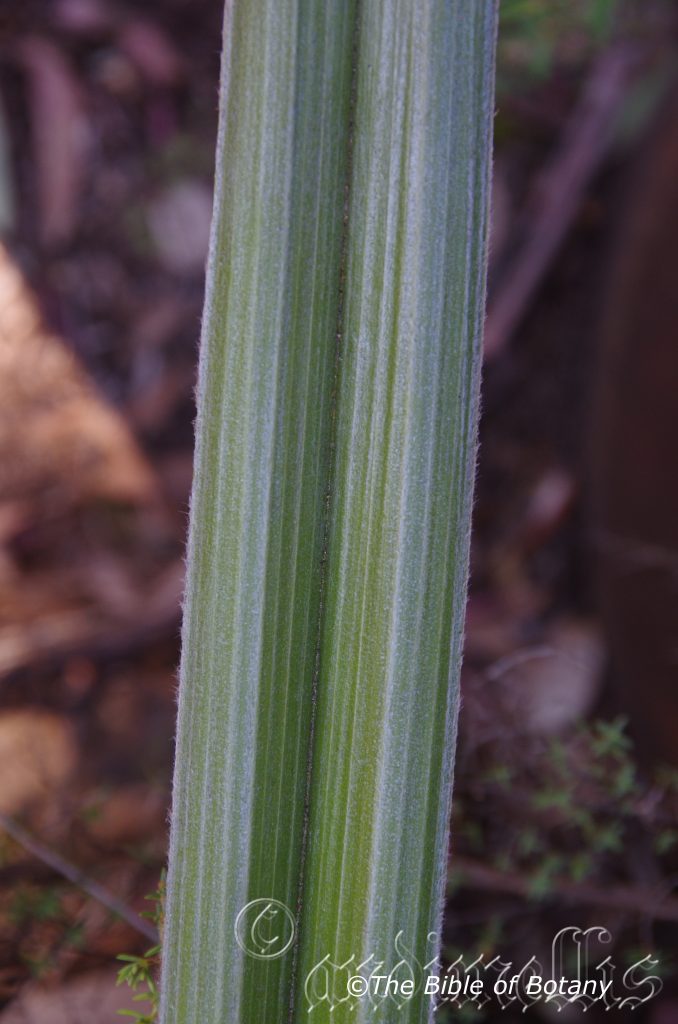
National Botanic Gardens Canberra ACT
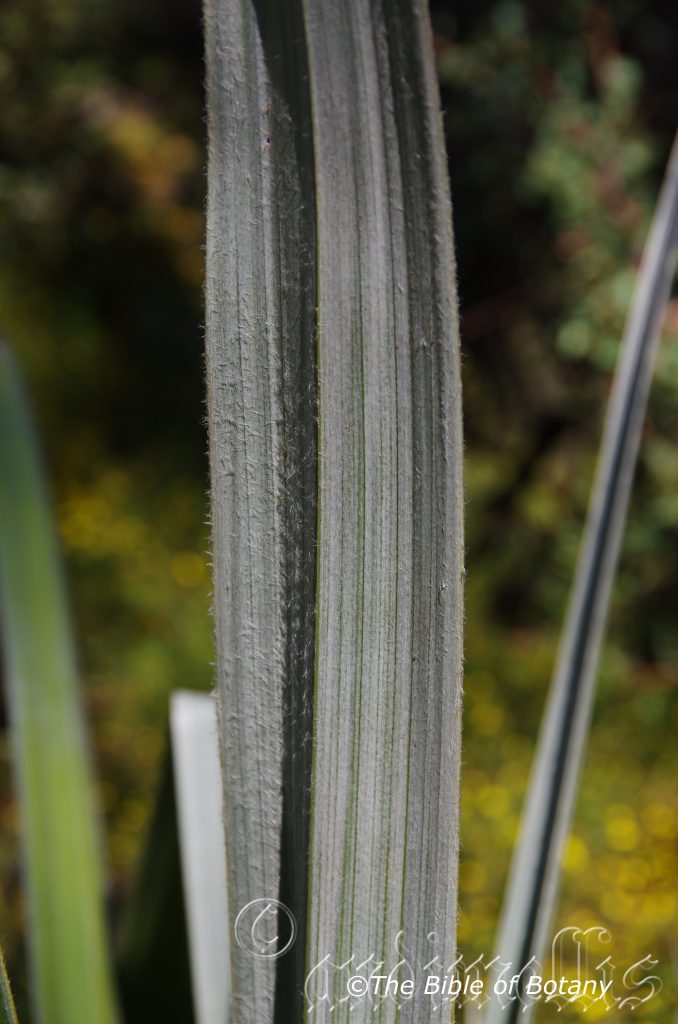
National Botanic Gardens Canberra ACT
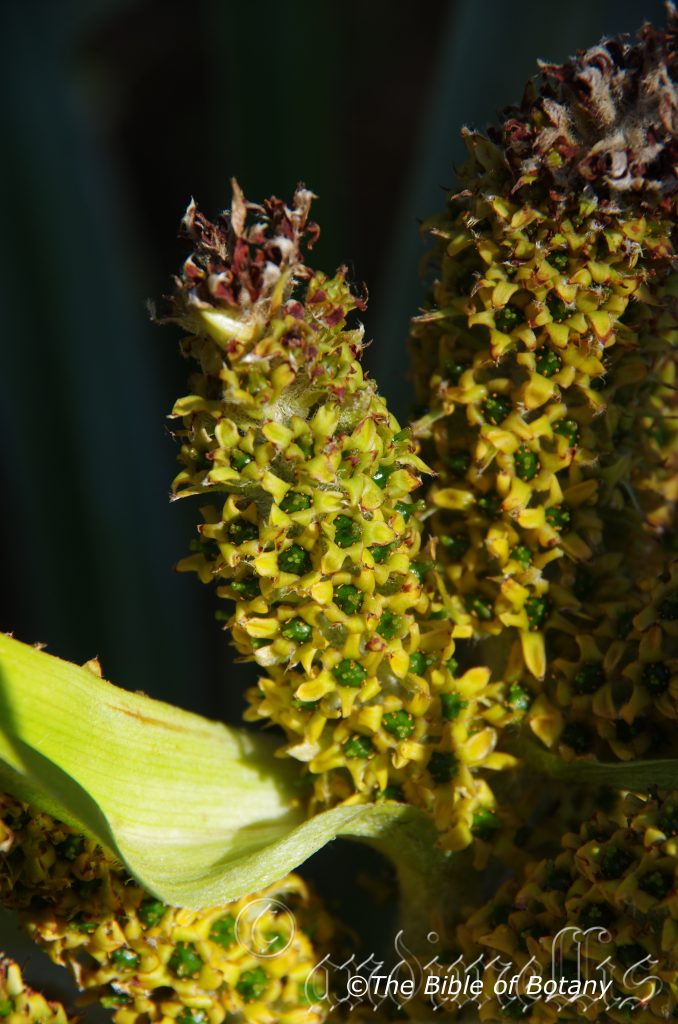
National Botanic Gardens Canberra ACT
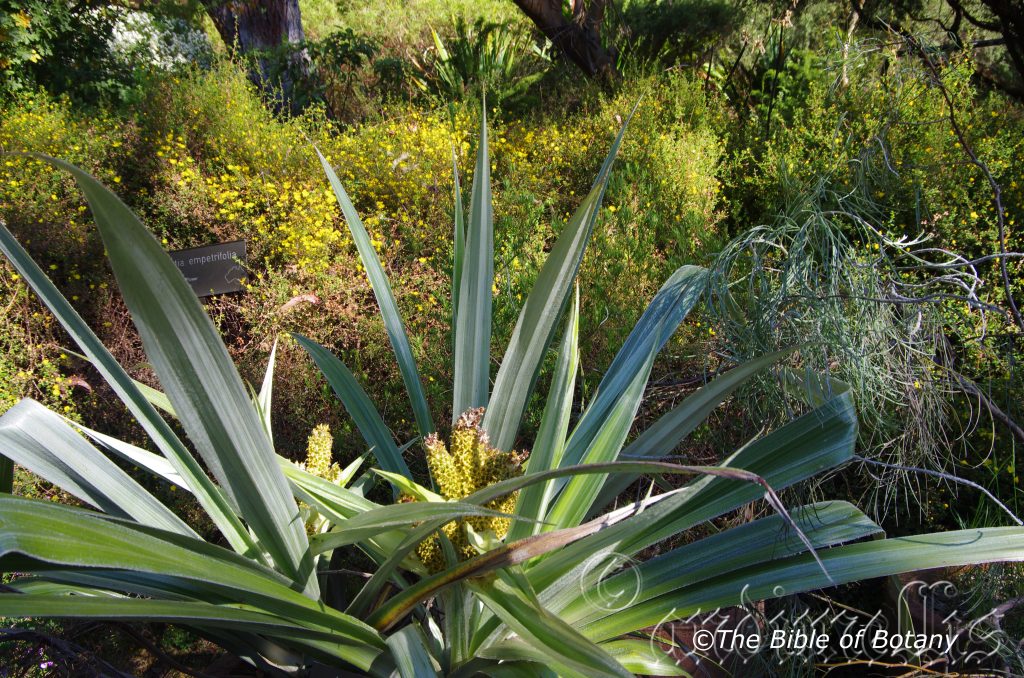
National Botanic Gardens Canberra ACT
Astelia australiana
Classification:
Unranked: Monocots
Unranked: Asparigales
Order: Liliales
Family: Liliaceae
Genus: From A, which is Greek/Latin for without or not having and Stele, which is Ancient Greek for a pillar or trunk. It refers to plants, which do not have stems, trunks or more usually do not have styles.
Species: From Terra Australis, which is Latin for land of the south and Anum/Ensis, which is Latin for to originate from. It refers to plants, which were first discovered from the land down under.
Common Name:
Distribution:
Astelia australiana is a rare lily which is endemic to Victoria and is found in the Powell town to Beenak district including the upper Latrobe and Bunyip River catchments and Tomahawk Creek, and near Lavers Hill in the Otway Ranges.
https://avh.ala.org.au/occurrences/search?taxa=Astelia+australiana#tab_mapView
Habitat Aspect Climate:
Astelia australiana prefer full shade to dappled sunlight. It grows in wet schlerophyll forest in moist riparian zones and moist gallery forests associated with Eucalyptus regnans and Nothofagus spp. which are often waterlogged for long periods during and following the wet season. The altitude ranges from 70 meters ASL to 300 meters ASL.
The temperatures range from minus 2 degrees in August to 36 degrees in January.
The rainfalls range from lows of 1000mm to 1600mm average per annum.
Soil Requirements:
Astelia australiana prefer good quality loams to gritty medium clays with plenty of humus. The soils are derived from decomposed brown basalts and black basalts. The soils range from a 5pH to 6pH. It tolerates waterlogged soils. Non saline soils to slightly saline soils are tolerated.
Height & Spread:
Wild Plants: 1m to 2m by 1.5m to 2m.
Characteristics:
Astelia australiana grows as a robust, dense tufted plant. It has long stout branching rhizomes just beneath the soil surface.
Astelia australiana‘s large linear leaves measure 600mm to 2.3 meters in length by 50mm to 100mm in width. The bases are clasping while the apexes are acute to tapering. The discolourous leaves are grey-green to deep green and glabrous on the upper laminas while the lower laminas are silvery to silvery-blue and moderately to densely covered in white pubescent hairs. The laminas recurve slightly upwards from the mid vein to the margins. The leaf margins are entire.
The Inflorescence of Astelia australiana are born on a many flowered stout racemose panicle which measures 1 meter to 1.2 meters high. Each of the 5 to 10 racemes measure 100mm to 200mm in length. The individual racemes are each subtended by a leaf like bract. The greenish to greenish maroon inflorescences measure 12mm to 18mm in diameter. The individual segments are fused basally while the apexes are reflexed.
The male flowers or bisexual flowers stamens are shorter than the perianth. The 6 greenish to greenish maroon filaments measure 10mm to 14mm in length while the paler greenish to greenish maroon dorsifixed anthers measure 1.5mm to 2mm in length by 0.8mm in width. The male inflorescences have a mild to strong foetid odour.
The female flowers have rudimentary stamens and can at times produce viable fruit without fertilization. The perianth tube is fleshy while the ovary 3 locular measures 4mm to 6mm in length. The flowers appear from November to February however I have seen plants flowering as early as early October as garden specimens.
Astelia australiana‘s fruits are globular berries. The mid green berries are ovoid to globular and turn bright orange when ripe and measure 6mm to 10mm in length. The 4 to 12 seeds measure 2.5mm to 3.5mm in length.
Wildlife:
Astelia australiana wildlife is unknown to the author however it appears that the seeds maybe eaten by an unknown parrot/s rosella/s.
Cultivation:
Astelia australiana is a beautiful medium to large lily that looks great in the garden as a feature plant or in the center of a small open bush garden as an understory plant.
This lily is naturally robust so not much encouragement is required other than plenty of water. One of the best large colourful flowering natives on the market but give it the room to reach its full potential. In cultivation, it will grow 2 meters to 2.5 meters in height by 1.5 meters to 2 meters in diameter with flowering often occurring earlier or later in the season. The photographed plants were photographed in late September.
It should grow very well as far south as Melbourne and Adelaide and north to Brisbane along the Great Dividing Range where temperatures and ground moisture are assured. Astelia australiana is frost hardy to temperatures as low as minus 5 where it has some tree cover and the soil remains wet. It should be more widely grown with in temperate areas of Australia that are subjected to flooding. If organic fertilizers are used fast growth and copious quantities of flowers will be guaranteed.
It looks great either from a raised garden bed or set below a path so that you are looking down on the plants. So low or raised garden beds are one way of bring them to the attention of the viewer. Planted on banks that are above your normal eye height is good but you need to place smaller plants between it and the bottom of the bank. Annuals with white flowers or other semi prostrate plants like Hibbertia salicifolia or Hibbertia vestita will suffice beautifully and will not be overpowering for the Astelia australiana. Plant smaller fine leaf plants in the mid and foreground and inter plant with annuals that do not have purple or maroon foliage make for strong contrasts.
Plant it at 1 meter to 4 meter centers so that the plants can spread out to their full potential or closer where a wild look is required.
Propagation:
Seeds: Astelia australiana‘s seeds can be sown directly into a seed raising mix. They need to be covered to a depth of 10mm and watered thoroughly keeping moist to promote rapid germination and to avoid killing the new seedlings. It is best to place the seed trays in another tray of water to ensure moisture is retained.
When the seedlings are 30mm to 50mm tall, prick them out and plant them into 50mm native tubes using a seed raising mix and place the tubes in a shallow tray of water.
Once the seedlings reach 100mm to 200mm in height plant them out into their permanent position. When planting along creek banks or bog gardens plant them at 1 meter to 4 meter centers.
Fertilize using seaweed, fish emulsion or organic chicken pellets soaked in water on an alternate basis. Fertilize every two months until the plants are established then annually in early September to October to maintain health, vitality and better flowering.
Further comments from readers:
Hi reader, it seems you use The Bible of Botany a lot. That’s great as we have great pleasure in bringing it to you! It’s a little awkward for us to ask, but our first aim is to purchase land approximately 1,600 hectares to link several parcels of N.P. into one at The Pinnacles NSW Australia, but we need your help. We’re not salespeople. We’re amateur botanists who have dedicated over 30 years to saving the environment in a practical way. We depend on donations to reach our goal. If you donate just $5, the price of your coffee this Sunday, We can help to keep the planet alive in a real way and continue to bring you regular updates and features on Australian plants all in one Botanical Bible. Any support is greatly appreciated. Thank you.
In the spirit of reconciliation we acknowledge the Bundjalung, Gumbaynggirr and Yaegl and all aboriginal nations throughout Australia and their connections to land, sea and community. We pay our respect to their Elders past, present and future for the pleasures we have gained.
Asterolasia correifolia
Classification:
Unranked: Eudicots
Unranked: Rosids
Order: Sapindales
Family: Rutaceae
Genus: From Aster, which is Ancient Greek for a star and Lasios which is Ancient Greek for hairy. It refers to a leaves, which have stellate hairs.
Species: From CorrÄ«vÄlum which is Latin for a competitor and Folium, which is Latin for foliage. It refers to the beauty of the leaves which rival any plant in the garden or bush.
Common Name: Lemon Starbush.
Distribution:
Asterolasia correifolia is found south from Murwillumbah to the Hornsby Plateau in eastern New South Wales. There is an outlying population in the Carnarvon Gorge in central Queensland. It is found on and east of the Great Dividing Range except for the population found in the northern Carnarvon.
https://avh.ala.org.au/occurrences/search?taxa=Asterolasia+correifolia#tab_mapView
Habitat Aspect Climate:
Asterolasia correifolia prefers full shade to dappled shade. It grows in moist sclerophyll forest in moist riparian zones and moist gallery forests. The altitude ranges from 15 meters ASL to 800 meters ASL.
The temperatures range from minus 3 degrees in August to 38 degrees in January.
The rainfalls range from lows of 500mm to 2000mm average per annum.
Soil Requirements:
Asterolasia correifolia prefers good quality sandy loams to medium clays. The soils are derived from decomposed sandstone, shale, brown and black basalts and finer granites. The soils range from a 5pH to 7pH. It does not tolerate waterlogged soils. Non saline soils to moderately saline soils are tolerated.
Height & Spread:
Wild Plants: 1m to 2m by 1.5m to 2.5m.
Characteristics:
Asterolasia correifolia grows as a dense multi stemmed shrub. The larger stems are fawn to pale olive-brown while the newer growth is olive-green to brownish-green and densely covered in white or pale brown stellate and tomentose hairs.
Asterolasia correifolia’s leaves are elliptical to lanceolate and measure 30mm to 90mm long by 8mm to 30mm wide. The mid veins are prominent on the lower laminas and are visible from the upper laminas. The bases are cuneate while the apexes are acute to obtuse. The discolourous leaves are grey-green to deep green and glabrous on the upper laminas while the lower laminas are paler and covered in white to brown stellate and tomentose hairs. The laminas are flat to slightly undulating. The leaf margins are entire, curve slightly upwards from the midvein and are covered in white or brown stellate and tomentose hairs. The petioles are densely covered in white or brown stellate and tomentose hairs. The petioles measure 5mm to 15mm in length.
The Inflorescence of Asterolasia correifolia are born singularly or several on a simple umbel or sessile from the leaf axils and terminally. The inflorescences are white to pale cream and measure 8mm to 10mm in diameter. The peduncles and pedicels are covered in white or brown stellate and tomentose hairs. The peduncles measure 0mm to 18mm in length while the pedicel measures 3mm to 15mm in length.
The 5 linear petals are winged and densely covered in white to brown stellate and tomentose hairs externally and are glabrous internally. They measure 5mm to 6mm in length by 2.5mm to 3.2mm in width including the wings.
The 10 white filiform filaments measure 3mm to 3.5mm in length while the deep yellow to yellow-orange anthers 1.5mm in length by 1mm in width.
The stout, pastel green style is glabrous and measures 3mm to 3.5mm in length. The stigma is pale green. The ovaries are densely covered in long white tomentose hairs. The flowers appear from September to November.
Asterolasia correifolia’s fruits are globular pent angular globose cocci. The cocci measure 2.5mm to 3.2mm in length by 2.5mm to 3.2mm in diameter. The grass-green fruits ripen turn brown when ripe and are covered in white and brown stellate and tomentose hairs.
Wildlife:
Asterolasia correifolia wildlife is unknown to the author.
Cultivation:
Asterolasia correifolia is a beautiful medium to large shrub that looks great in the garden as a feature plant or in the center of a small bush garden as an understory plant.
The shrubs are naturally bushy so not much encouragement is required. One of the best white flowering natives on the market but allow it the room to reach its full potential. In cultivation, plants will grow 1.5 meters to 2.5 meters in height by 2 meters to 3 meters in diameter.
It should grow very well as far south as Melbourne and Adelaide. Asterolasia correifolia is frost hardy to temperatures as low as minus 5. It should be more widely grown in temperate areas of Australia that are subjected to to light frosts. It can be lightly tipped pruned annually to increase bushiness immediately following the flowering. If organic fertilizers are used fast growth and copious quantities of flowers will be guaranteed.
It looks great either from a raised garden bed or set below a path so that you are looking down on the plants. So low or raised garden beds are one way of bring them to the attention of the viewer. Planted on banks that are above the viewer’s normal eye height is great but you need to place smaller plants between them and the bottom of the bank. Annuals with red flowers or other semi prostrate plants like Hibbertia will suffice beautifully and will not be overpowering for the Asterolasia correifolia. Plant smaller fine leaf plants in the mid and foreground and inter plant with annuals that do not have blue foliage make for strong contrasts.
Plant it at 3 meter to 4 meter centers so that the plants can spread out to their full potential or closer where a soft hedge is required.
Propagation:
Seeds: Asterolasia correifolia‘s seeds can be sown directly into a seed raising mix. They need to be covered to a depth of 10mm and watered thoroughly keeping moist to promote rapid germination and to avoid killing the new seedlings.
When the seedlings are 30mm to 50mm tall, prick them out and plant them into 50mm native tubes using a seed raising mix.
Once the seedlings reach 150mm to 200mm in height plant them out into their permanent position. When planting along creek banks or being used as a screen plant them at 1 meter to 1.5 meter centers.
Cuttings: Use 50mm to 60mm long half ripened to fully ripened material when growing from cuttings from the present season’s growth. Take them in early May or early October. Remove half the leaves from the bottom section being careful not to tear the bark. Take a 10mm slice off the bark from the bottom of the cutting on one side just below the node. Using a medium rooting hormone, dip the cutting in and place it in a moist sterile seed raising mix. When the cuttings have obviously struck and have developed good roots treat them as for seedlings.
Fertilize using seaweed, fish emulsion or organic chicken pellets soaked in water on an alternate basis. Fertilize every two months until the plants are established then annually in early September to October to maintain health, vitality and better flowering.
Further comments from readers:
Hi reader, it seems you use The Bible of Botany a lot. That’s great as we have great pleasure in bringing it to you! It’s a little awkward for us to ask, but our first aim is to purchase land approximately 1,600 hectares to link several parcels of N.P. into one at The Pinnacles NSW Australia, but we need your help. We’re not salespeople. We’re amateur botanists who have dedicated over 30 years to saving the environment in a practical way. We depend on donations to reach our goal. If you donate just $5, the price of your coffee this Sunday, We can help to keep the planet alive in a real way and continue to bring you regular updates and features on Australian plants all in one Botanical Bible. Any support is greatly appreciated. Thank you.
In the spirit of reconciliation we acknowledge the Bundjalung, Gumbaynggirr and Yaegl and all aboriginal nations throughout Australia and their connections to land, sea and community. We pay our respect to their Elders past, present and future for the pleasures we have gained.
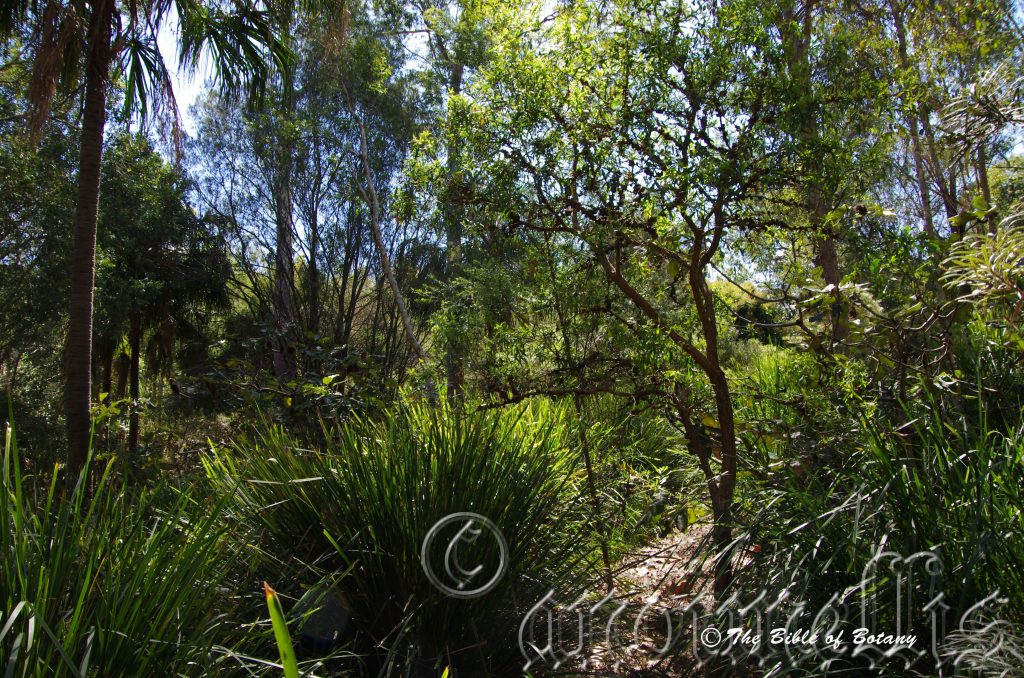
MCBG Brisbane Qld.
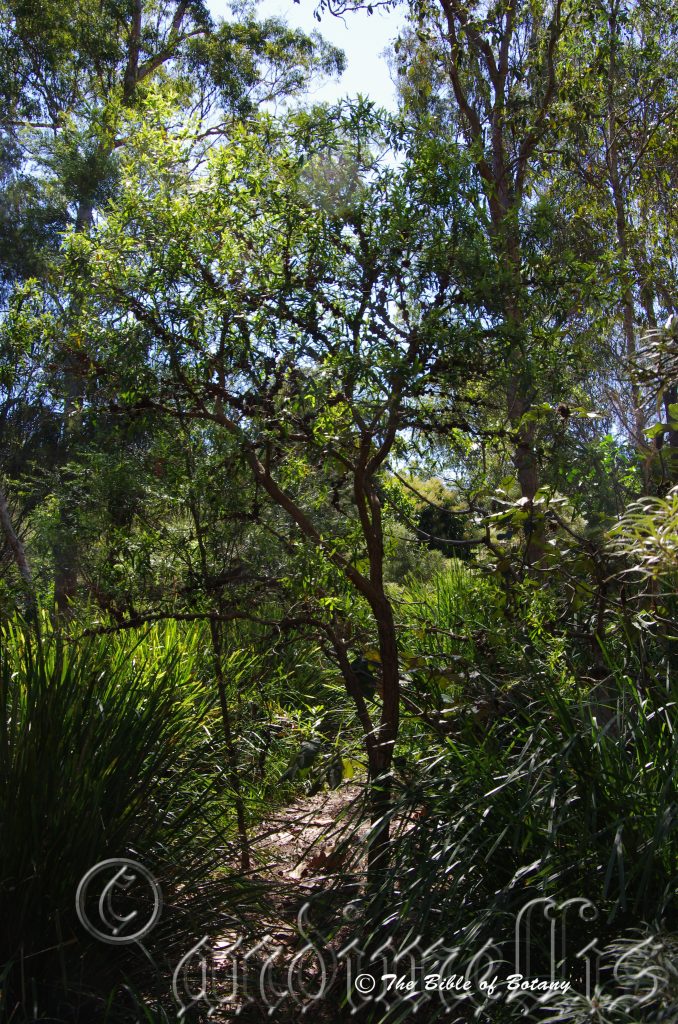
MCBG Brisbane Qld.
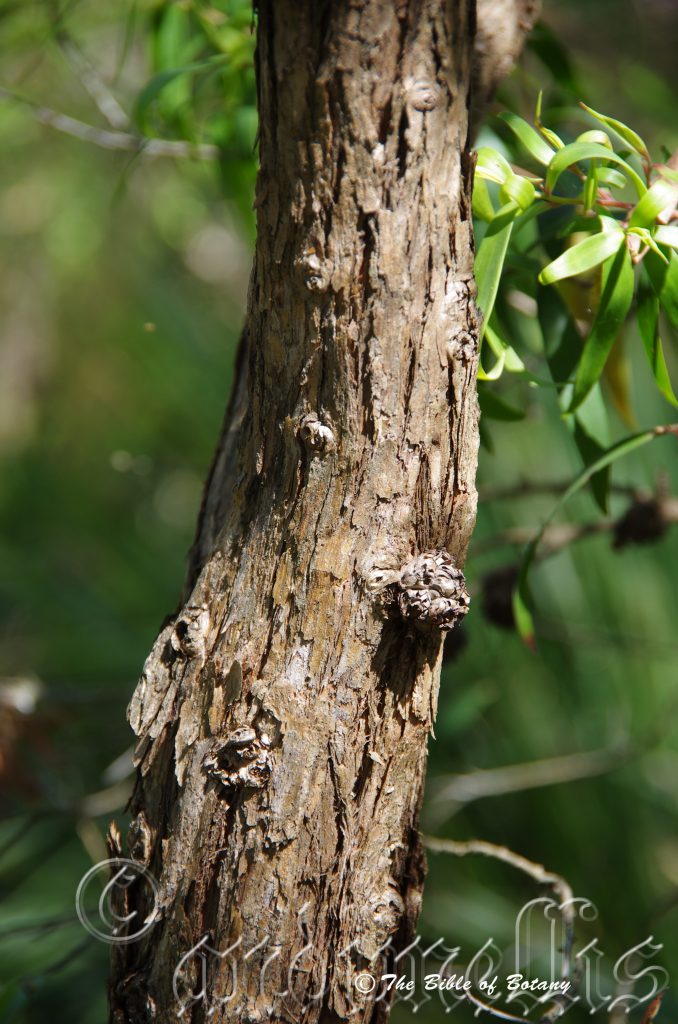
MCBG Brisbane Qld.
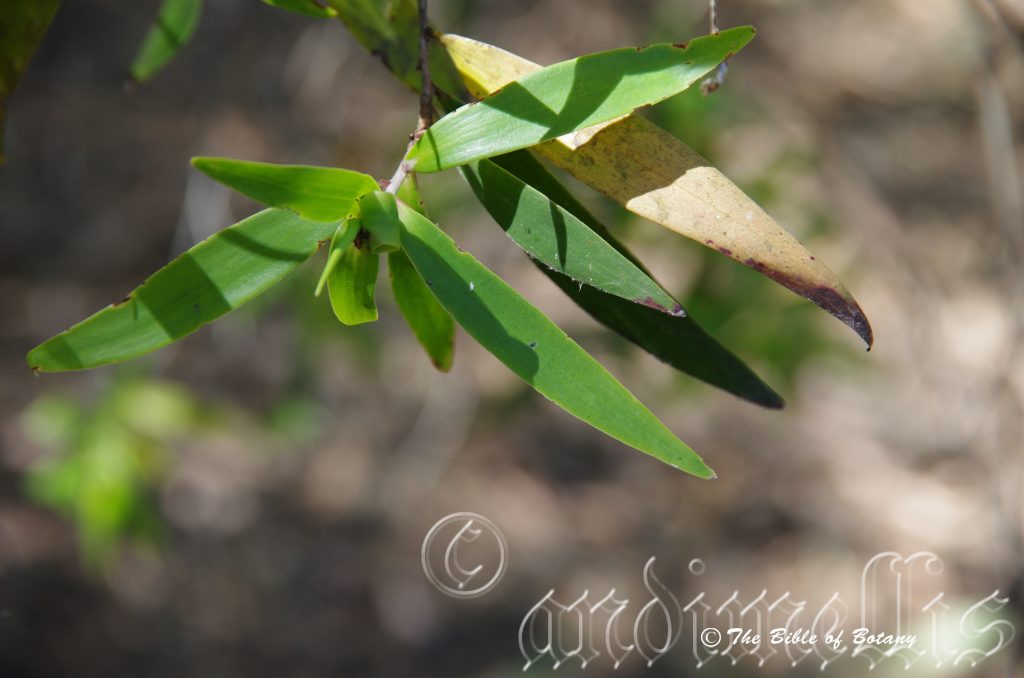
MCBG Brisbane Qld.
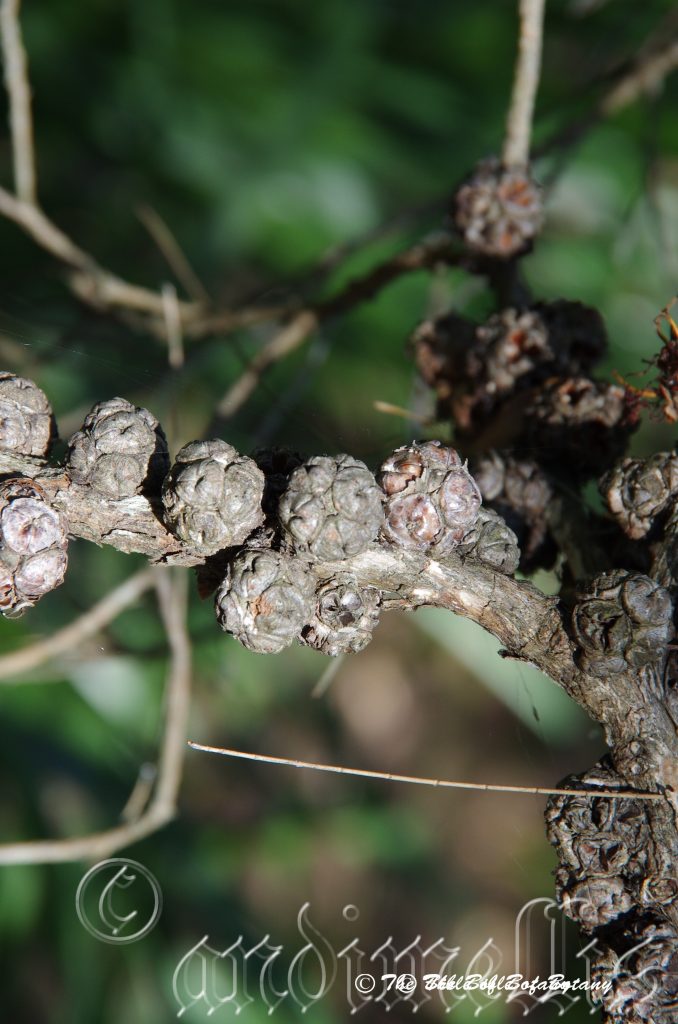
MCBG Brisbane Qld.
Asteromyrtus brassii
Classification:
Unranked: Eudicots
Unranked: Rosids
Order: Myrtales
Family: Myrtaceae
Genus: From Strum, which is Latin for a star/s and Myrtus, which is Ancient Greek for the European Myrtle. It refers to plants, which have flowers that resemble those of the exotic Asters genus and leaves which resemble the European Myrtle genus.
Species: Is named in honour of Leonard J Brass; 1900-1971, who was an Australian botanical collector from New Guinee and northern Australian.
Common Name: Cape York Tea Tree.
Distribution:
Asteromyrtus brassii is found south from Cape Melville to Bowen in north east Queensland.
https://avh.ala.org.au/occurrences/search?taxa=Asteromyrtus+brassii#tab_mapView
Habitat Aspect Climate:
Asteromyrtus brassii prefers full sun to dappled shade. It grows in heaths, woodlands, open forests or occasionally found adjacent to rain forest on a variety of sites.
The temperatures range from 8 degrees in August to 38 degrees in January.
The rainfalls range from lows of 1050mm to 3000mm average per annum.
Soil Requirements:
Asteromyrtus brassii prefers sandy loams to light clays. Many of the soils are old by geological standards and are derived from decomposed lateritic sandstones, accumulated sands and some granitic gritty clay. The soils range from a 4.5pH to 7pH. It does tolerate waterlogged soils. Non saline soils to very saline soils are not tolerated.
Height & Spread:
Wild Plants: 3m to 6m by 3m to 6m.
Characteristics:
Asteromyrtus brassii grows as a single or multi trunked small tree or large shrub. The bark is a bright mid red-brown to deep brown, flaky and layered. Young branchlets first emerge green and are sparsely covered in white puberulent hairs before turning a light flaky grey-brown.
Asteromyrtus brassii’s narrow elliptical leaves are glabrous and amazingly uniform measure 50mm to 60mm in length by 9mm to 11mm in width. The petioles measure 2mm to 4mm in length. The bases are cuneate while the apexes are broad acute to acute-obtuse. The concolourous laminas are deep olive-green, dull and glabrous. The laminas are flat. The leaf margins are entire. The mid vein and 5 or 6 parallel veins are slightly prominent on the lower lamina and are faintly visible from the upper lamina. The newly emerged leaves are sparsely covered in white puberulent hairs. Young leaves are a bright glossy lime green.
The Inflorescences of Asteromyrtus brassii are born cauliflorous along the upper trunk and older branches. The hypanthia are hemi orbicular and are sparsely covered in white puberulent hairs externally and glabrous internally. They measure 8mm to 9mm in length by 4.5mm to 5mm in diameter. The 5 hypanthia lobes are pale green and measure 4mm to 4.5mm in length. The 5 scarlet red petals measure 4.5mm to 5mm in length by 3mm in width. The pedicels are non-existent with the flowers being sessile.
The scarlet red stamens, filaments are united in five bundles with each bundle consisting of 30-35 stamens. The united section of the filaments measure 7.5mm to 8.5mm in length while the free sections of the filaments measure 4mm to 4.5mm in length. The pale yellow globose anthers measure less than 0.5mm in diameter.
The scarlet red pistils measure 9mm to 10mm in length. The stigma is conical. The flowers appear from late August to early October.
Asteromyrtus brassii’s fruits are globular masses of globose, woody capsules. They measure 18mm to 20mm in length by 18mm to 20mm in diameter. There are 5 to 8 individual capsules in a mass with each individual capsule measuring 10,5mm to 11mm in diameter. The grass-green capsules turn grey-brown when ripe. The calyx or styles are not persistent on the capsules.
The ovoid, flattened seeds measure 4mm in length by 1mm width including the wing which is on the apex and each side. The embryo measures 3mm in length.
Wildlife:
Asteromyrtus brassii is the host to numerous butterflies and small honeyeaters when in flower. Native bees also visit the trees during flowering.
Cultivation:
Asteromyrtus brassii is a beautiful small tree or large shrub that looks great in the garden as a feature plant or in the center of a small forest garden. The beautiful red-brown layered bark deep green leave and scarlet red flowers are all attractive parts of the plants which are worthwhile exhibiting to the best advantage.
They can be tipped pruned to encourage a shrub like growth or even a twisted gnarled looking specimen. The trees or shrubs are naturally bushy so not much encouragement is required. It grows very well as far south as Coffs Harbour and would be worthwhile trying as far south as Melbourne and Adelaide in frost free areas. In cultivation it will grow 3 meters to 3.5 meters in height by 2 meters to 3 meters when grown in the open. As a small tree they will grow 4.5 meters to 6 meters in height by 2 meters to 3 meters in diameter with the foliage concentrated in the upper third of the plant.
Asteromyrtus brassii can be regularly tipped pruned to form wind swept shapes or a smaller denser foliaged shrub. In formal or Japanese Gardens It can be used as the main plant beside the water feature. Imagine a small pond with fish swimming. Beside it is one or two Asteromyrtus brassii, and below them is water cascading down over small rocks. This is very powerful yet formal and relaxing. They can partially surround such a scene and still look effective. Use it with larger rocks or in front of a large log. The large log gives a strong horizontal affect with depth if placed on an angle. Right along the front plant the Hybanthus specie. The vertical twisted trunk though fairly thin will catch your attention. The scene doesn’t need anything more to be relaxing and thought provoking.
Mass planted at 3 meter to 4 meter centres with twisted trunks and gnarled branches in the corner of a small garden will make the area look larger and very surreal.
This is a plant that is begging to be the centre of attraction so it would be ideally located in sunny courtyards, foyers or even as large container and bonsai pots. So go ahead and make its day!
Propagation:
Seeds: Asteromyrtus brassii‘s seeds can be sown directly into a seed raising mix. They need to be covered to a depth of 1mm and watered thoroughly keeping moist to promote rapid germination and to avoid killing the new seedlings.
When the seedlings are 30mm to 5 mm tall, prick them out and plant them into 50mm native tubes using a seed raising mix.
Once the seedlings reach 150mm to 200mm in height plant them out into their permanent position. When planting along creek banks or being used as a screen plant them at 7 meter to 9 meter centers.
Fertilize using seaweed, fish emulsion or organic chicken pellets soaked in water on an alternate basis. Fertilize every two months until the plants are established then annually in early September to October to maintain health, vitality and better flowering.
Further comments from readers:
Hi reader, it seems you use The Bible of Botany a lot. That’s great as we have great pleasure in bringing it to you! It’s a little awkward for us to ask, but our first aim is to purchase land approximately 1,600 hectares to link several parcels of N.P. into one at The Pinnacles NSW Australia, but we need your help. We’re not salespeople. We’re amateur botanists who have dedicated over 30 years to saving the environment in a practical way. We depend on donations to reach our goal. If you donate just $5, the price of your coffee this Sunday, We can help to keep the planet alive in a real way and continue to bring you regular updates and features on Australian plants all in one Botanical Bible. Any support is greatly appreciated. Thank you.
In the spirit of reconciliation we acknowledge the Bundjalung, Gumbaynggirr and Yaegl and all aboriginal nations throughout Australia and their connections to land, sea and community. We pay our respect to their Elders past, present and future for the pleasures we have gained.
Astroloma pinifolium
Classification:
Unranked: Eudicots
Unranked: Asterids
Order: Ericales
Family: Ericaceae
Genus: From Aster, which is Ancient Greek for a star and Loma, which is Ancient Greek for a fringe. It refers to floral tubes which have a ring of stellate hairs inside.
Species: From Pinus, which is Latin for a pine tree and Folium, which is Latin for foliage. It refers to leaves, which resemble those of a typical pine tree.
Common Name: Pine Heath.
Distribution:
Astroloma pinifolium is found south from Evens Head to Ulladulla in coast New South Wales. Further south it is found in several disjunct populations to Lake Entrance and west to the Grampians in Victoria.
It is also found in Tasmania’s east coast and slopes, in the north west from Smithton to Robins Island and near Straham.
https://avh.ala.org.au/occurrences/search?taxa=Astroloma+pinifolium#tab_mapView
Habitat Aspect Climate:
Astroloma pinifolium prefers full sun to dappled shade. It is found growing in dry heath or schlerophyll forest on ridges and slopes. The altitude ranges from 5 meters ASL to 860 meters ASL.
The temperatures range from minus 4 degrees in July to 34 degrees in January.
The rainfalls range from lows of 450mm to 2000mm average per annum.
Soil Requirements:
Astroloma pinifolium prefers sandy loams derived from decomposed sandstone over sandstone, granites or accumulated peaty sands. The soils range from a 5pH to 7pH. It is not tolerant of waterlogged soils. Non saline soils to moderately saline soils are tolerated.
Height & Spread:
Wild Plants: 0.5m to 1m by 0.4m to 0.8m
Characteristics:
Astroloma pinifolium grows as a multi stemmed erect or spreading small shrub. The stems are a dull pale grey to deep reddish-brown. Young branchlets first emerge blue-green before turning a pale grey to pale brown. It is covered in white puberulent hairs.
Astroloma pinifolium’s crowded, linear leaves measure 10mm to 25mm in length by 0.4mm to 1mm in width. The bases are flattened where it connects to the stems while the apexes are straight with a 0.5mm to 0.9mm tapering thorn. The concolourous laminas are blue-green and rigid. The leaf margins are entire. Young leaves are a bright semi glossy lime-green to blue-green. The mid vein is prominent on the lower lamina and is not visible from the upper lamina.
The Inflorescences of Astroloma pinifolium are erect, solitary from the leaf axils near the base of the branchlets. The inflorescences are red at the base and yellow-green on the upper section. The greenish-yellow bracteoles are moderately covered in short white pubescent hairs and measure 7mm to 8mm in length. The greenish-yellow sepals measure 10mm to 12mm in length. The red to deep pink corolla tubes are sparsely covered in white hirsute hairs internally and glabrous externally. The lobes have a tuft of erect white hairs near the midpoint internally and are glabrous externally. The 4 lobes measure 11mm to 20mm in length while the yellow-green to green lobes measure 4.5mm to 6.2mm in length. The flowers are sessile.
The white, inserted filaments measure 1.5mm to 2.6mm in length while the yellow anthers measure 1.1mm to 1.3mm in length.
The inserted style and stigma measure 1.6mm to 2.8mm in length. The flowers appear from March to October.
Astroloma pinifolium’s fruits are ovoidal to globose drupes. The drupes measure 10mm to 15mm in length by 8mm to 11mm in width. The grass green fruits turn translucent yellow when ripe. The bracteoles, calyx and style become papery and are persistent at the apex of the drupes.
The seeds are small, ovoid and deep brown.
Wildlife:
Astroloma pinifolium is the host to numerous butterflies and small honeyeaters when in flower. Honeyeaters are also attracted to the fruits when it is ripe.
The fresh fruits are succulent and honey sweet.
Cultivation:
Astroloma pinifolium is a beautiful small heath like shrub that looks great in the garden as a feature plant or in the center of a small bush rockery or as an understory plant to small trees with gnarled trunks where there is plenty of light penetrating the spaces between the foliage.
The shrubs are naturally bushy so not much encouragement is required to keep them at their best. Astroloma pinifolium is one of the best heath plants to grow with distinct blue-green foliage. In cultivation it will grow 0.5 meters to 1 meter in height by 0.5 meters to 0.8 meters in diameter.
It is frost hardy to temperatures as low as minus 6 so this would make them ideal for southern or alpine heath gardens. It could be more widely grown within temperate areas of Australia that are subjected to severe frosts. It can be lightly tipped pruned regularly to increase bushiness immediately following the flowering.
It looks great either when planted in beds which are lower than the path. Garden beds set below a path allow the viewer to look down on the plants taking in the mosaic effect created more readily than when viewed from a level platform. Low garden beds are one way to bring them to the attention of the viewer.
Astroloma pinifolium would make outstanding contribution to a moist heath garden. Here they can be used as the taller growing plant scattered throughout the heath scene. When you design a flat heath garden which Astroloma pinifolium is well suited. Plants should be planted close together and be short so you can see over the tallest ones with the exception of one or two plants at the most. These will be feature plants. The idea is to achieve a feeling of expansive flatness. This can be achieved with using Astroloma pinifolium‘s blue-green linear leaves and having them contrasting with finer pale green or soft green foliage. Use a lot of procumbent plants like Carpobrotus edulis or Hibbertia vestita. Mix it with other smaller shrubs so none of them dominate the scene but blend in to give a mosaic of foliage colours that you oversee. Actinotis helianthi or Grevillea thelemanniana are two more good contrasting foliage plants.
Propagation:
Seeds: Astroloma pinifolium‘s seeds can be sown directly into a seed raising mix. They need to be covered to a depth of 1mm and watered thoroughly keeping moist to promote rapid germination and to avoid killing the new seedlings until they have developed good roots. Germination is erratic and unreliable.
When the seedlings are 30mm to 50 mm tall, prick them out and plant them into 50mm native tubes using a seed raising mix.
Once the seedlings reach 150mm to 200mm in height plant them out into their permanent position. When planting along creek banks or being used as a screen plant them at 0.6 meter to 1 meter centers.
Cuttings: Propagation is usually done by cuttings of firm current season’s growth. Use 50mm to 60mm long medium wood. Take them in early May or early October. Remove half the leaves from the bottom section being careful not to tear the bark. Take a 10mm slice off the bark from the bottom of the cutting on one side just below the node. Dip the base of the cutting into a saucer of water. Using a medium rooting hormone, dip the cutting in and place it in a moist sterile seed raising mix using a dipple stick.. When the cuttings have obviously struck and have developed good roots treat them as for seedlings.
Fertilize using seaweed, fish emulsion or organic chicken pellets soaked in water on an alternate basis. Fertilize every two months until the plants are established then annually in early September to October to maintain health, vitality and better flowering.
Further comments from readers:
Hi reader, it seems you use The Bible of Botany a lot. That’s great as we have great pleasure in bringing it to you! It’s a little awkward for us to ask, but our first aim is to purchase land approximately 1,600 hectares to link several parcels of N.P. into one at The Pinnacles NSW Australia, but we need your help. We’re not salespeople. We’re amateur botanists who have dedicated over 30 years to saving the environment in a practical way. We depend on donations to reach our goal. If you donate just $5, the price of your coffee this Sunday, We can help to keep the planet alive in a real way and continue to bring you regular updates and features on Australian plants all in one Botanical Bible. Any support is greatly appreciated. Thank you.
In the spirit of reconciliation we acknowledge the Bundjalung, Gumbaynggirr and Yaegl and all aboriginal nations throughout Australia and their connections to land, sea and community. We pay our respect to their Elders past, present and future for the pleasures we have gained.
Astrotricha cordata
Classification:
Unranked: Eudicots
Unranked: Asterids
Order: Apiales
Family: Araliaceae
Subfamily: Aralioideae
Genus: From Aster, which is Ancient Greek for a star and Thrix/Trikos which is Ancient Greek for a stiff hair. It refers to a vestiture of short, stiff stellate hairs.
Species: From Kordatum, which is Ancient Greek or Cordatum, which is Latin for heart shape. It usually refers to leaves, which are heart shaped.
Common Name:
Distribution:
Astrotricha cordata is found from the Burnett River in central coastal Queensland to the Diamantina River in central west. There is also an outlying population in the Mt Neville area between Casino and Grafton.
https://avh.ala.org.au/occurrences/search?taxa=Astrotricha+cordata#tab_mapView
Habitat Aspect Climate:
Astrotricha pinifolium prefers full sun to dappled shade. It grows in dry schlerophyll communities on exposed rocky summits, cliff edges, and rocky slopes to flats and natural levee banks in the north west of its distribution. The altitude ranges from 50 meters ASL to 550 meters ASL.
The temperatures range from 2 degrees in July to 42 degrees in January.
The rainfalls range from lows of 200mm to 1200mm average per annum.
Soil Requirements:
Astrotricha cordata prefers red or yellow sandy loams derived from decomposed sandstone and lateritic sandstone. The soils pH ranges from 5pH to 7pH. It does not tolerate waterlogged soils. Non saline soils to moderately saline soils are not tolerated.
Height & Spread:
Wild Plants: 2m to 3m by 1.5m to 2m.
Characteristics:
Astrotricha cordata grows as a multi stemmed erect shrub. The stems are few and strongly ascending and are densely covered in white floccose wool.
Astrotricha cordata’s large, cordate to ovate, sometimes peltate leaves measure 120mm to 300mm long by 70mm to 200mm wide. The mid vein and main veins are prominent on the lower lamina and are distinctly visible from the upper lamina. The bases are cordate to peltate while the apex is acuminate to acute or rarely obtuse. The discolourous laminas are deep green and glabrous while the lower laminas are paler and densely covered in white floccose wool. The leaf margins are entire and curve slightly upwards from the midvein. Young leaves are a bright glossy lime green. The petioles measure 7mm to 23mm in length.
The Inflorescence of Astrotricha cordata are loose panicles with lateral umbels. The inflorescences are purple with the umbels measuring 20mm to 30mm in diameter. The calyx lobes are hemi orbicular and inconspicuous to less than 1mm in length. The rachis, peduncles and pedicels are purple-green, purple to glaucescent and glabrous or nearly so. The rachises measure 400mm to 1200mm in length while the peduncles measure 10mm to 75mm in length and the pedicles measure 2mm to 14mm in length.
The purple, elliptical sepals measure 1.5mm to 2.5mm in length while the purple elliptical strongly reflexed petals measure 1mm to 1.5mm in length.
The 5 anthers and single style measure 1mm in length. The flowers appear from September to November.
Astrotriche cordata‘s fruits are a 3 winged capsule. The plants become deciduous when it is in fruit. The capsules turn lemon or lime green then to a pale fawn on ripening and may hang on the plant for extended periods up to 4 months.
Wildlife:
The wildlife attracted to Astrotriche cordata is unknown to the author.
Cultivation:
Astrotricha cordata is an interesting shrub with unusual flowers and structure for the bush garden on sandstone. It looks great in the garden as a feature plant or in the center of a small forest garden. The shrubs are not naturally bushy but this lends them perfectly to being displayed against walls where character and form is more important than a dense cover up. This can also be highlighted further if a mixture of erect and spreading stemmed plants is planted.
Another interesting feature is it is without leaves when the fruit is ripening meaning that the fruits can be displayed to its best during mid-summer. Astrotriche cordata is one of the best medium shrubs for this. In cultivation plants will grow 2 meters to 2.8 meters in height by 1.5 meters to 2 meters in diameter for the upright form or 1.8 meters to 2.2 meters in height by 1.8 meters to 2.2 for the spreading form when grown in the open.
It is frost hardy to temperatures as low as minus 1 so this would make them ideal for southern gardens that suffer from mild frosts. It should be more widely grown with in temperate areas of Australia. It can be lightly tipped pruned regularly to increase bushiness immediately following the flowering.
Organic fertilizers may assist in the plants bushiness to some degree but working with its natural form is probably a better way to harness the plants natural beauty.
Astrotricha cordata would make a good contribution to a sandy or rocky terrain rock garden. Here it can be used as the main display, scattered throughout the boulders. When you use it in an area that is strewn with large boulders do not over crowd the scene as the boulders are a formidable part of the scene. Astrotricha cordata is well suited to such conditions so use contours to display the plants boulder country are almost always rising and falling in contour and have sharp rises. Plants must be planted sparingly with short annuals between or beneath to give vibrant colour. Make the scene so you can see over the tallest ones with the exception of one or two plants at the most. The idea is to achieve a feeling of expansive harshness. This can be achieved with using Astrotricha cordata‘s cordate leaves and open habit contrasting with finer pale green, soft grey or glaucous coloured foliage or stand alone to emphasize the boulders. If large deep green leafy plants are wanted try using them as prostrate plants. Use a lot of procumbent plants with vibrant coloured flowers like Hibbertia pedunculata or Hibbertia riparia to make the rocks look larger and the spaces between the plants bigger.
Propagation:
Seeds: Not much is known of the seed viability or ease of propagation of Astrotricha cordata. I would treat them similar to Astritricha latifolia. The seeds need to be scarified lightly between fine sand-paper or placed in a dry calico bag and placed in the vegetable crisper of the fridge for several weeks before sowing.
The seeds can be sown directly into a seed raising mix. They need to be covered to a depth of 2mm to 3mm and watered thoroughly keeping moist to promote rapid germination and to avoid killing the new seedlings.
When the seedlings are 30mm to 50mm tall, prick them out and plant them into 50mm native tubes using a seed raising mix.
Once the seedlings reach 150mm to 200mm in height plant them out into their permanent position.
Fertilize using seaweed, fish emulsion or organic chicken pellets soaked in water on an alternate basis. Fertilize every two months until the plants are established then annually in early September to October to maintain health, vitality and better flowering.
Further comments from readers:
Hi reader, it seems you use The Bible of Botany a lot. That’s great as we have great pleasure in bringing it to you! It’s a little awkward for us to ask, but our first aim is to purchase land approximately 1,600 hectares to link several parcels of N.P. into one at The Pinnacles NSW Australia, but we need your help. We’re not salespeople. We’re amateur botanists who have dedicated over 30 years to saving the environment in a practical way. We depend on donations to reach our goal. If you donate just $5, the price of your coffee this Sunday, We can help to keep the planet alive in a real way and continue to bring you regular updates and features on Australian plants all in one Botanical Bible. Any support is greatly appreciated. Thank you.
In the spirit of reconciliation we acknowledge the Bundjalung, Gumbaynggirr and Yaegl and all aboriginal nations throughout Australia and their connections to land, sea and community. We pay our respect to their Elders past, present and future for the pleasures we have gained.
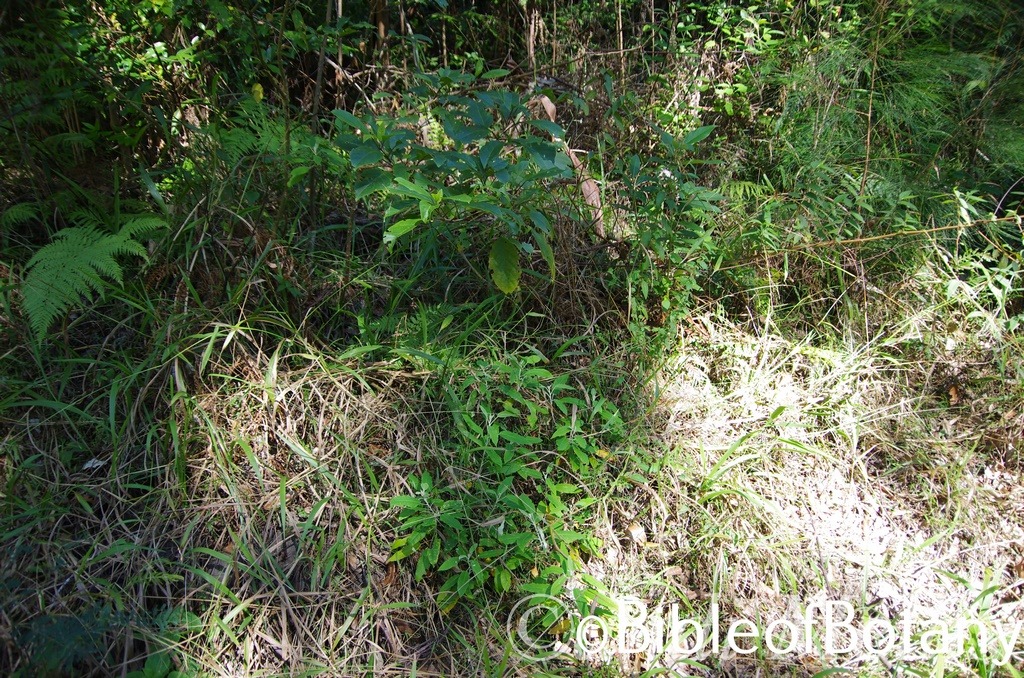
Yuryaigir National Park NSW

Yuryaigir National Park NSW
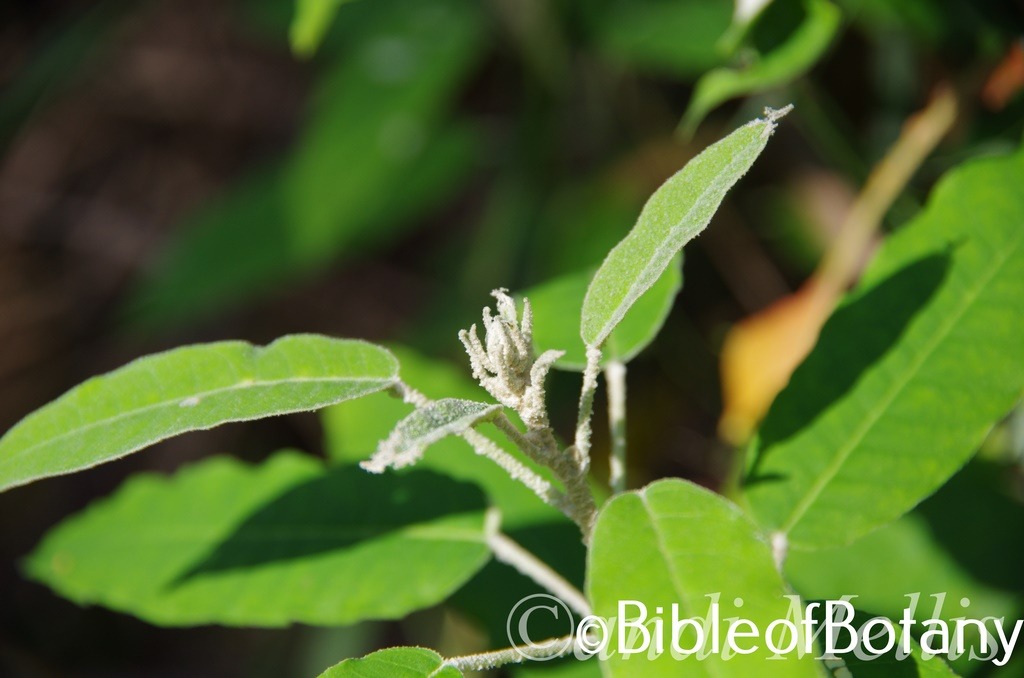
Yuryaigir National Park NSW
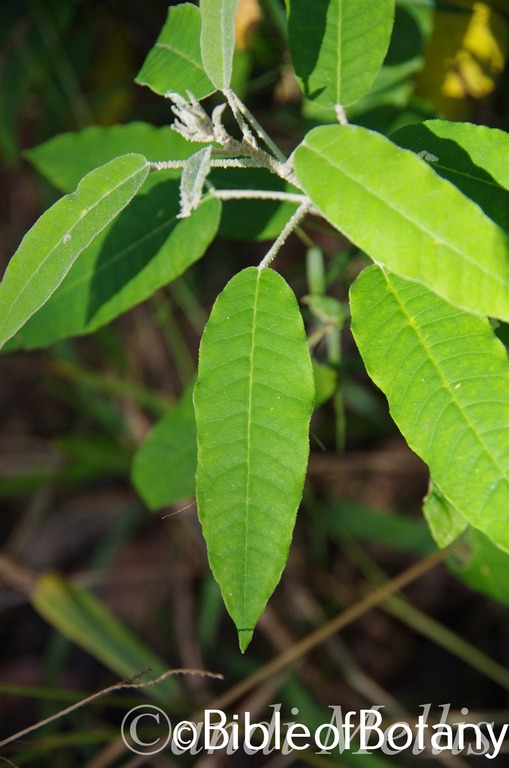
Yuryaigir National Park NSW
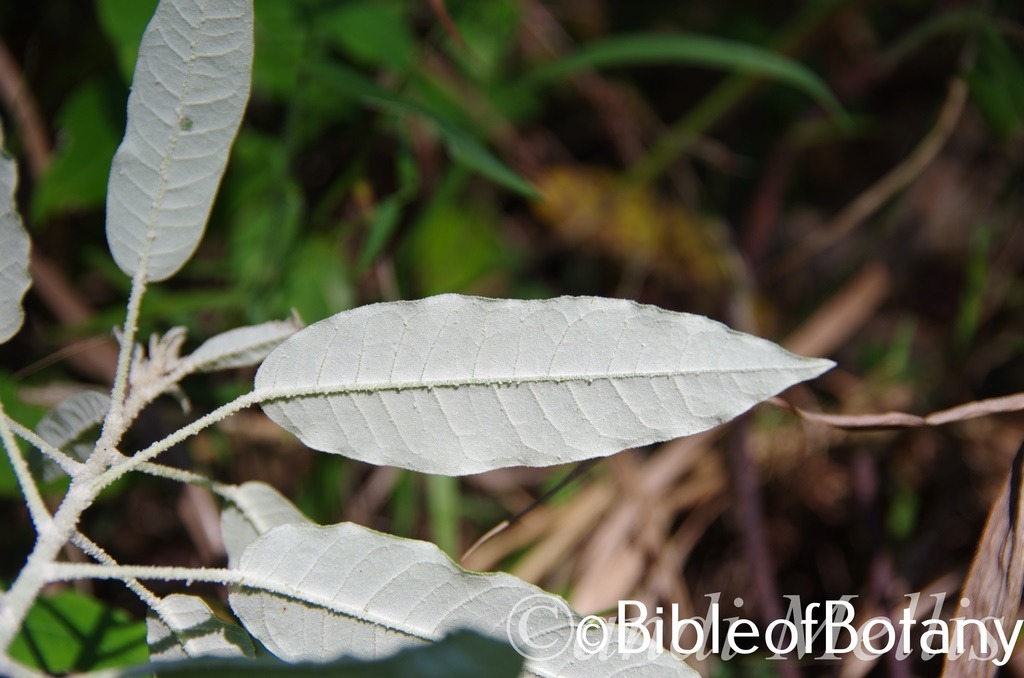
Yuryaigir National Park NSW
Astrotricha latifolia
Classification:
Unranked: Eudicots
Unranked: Asterids
Order: Apiales
Family: Araliaceae
Subfamily: Aralioideae
Genus: From Aster, which is Ancient Greek for a star and Thrix/Trikos which are Ancient Greek for a stiff hair/s. It refers to a vestiture of short, stiff stellate hairs.
Species: From Latus, which is Latin for broad and Folium, which is Latin for foliage. It refers to leaves, which are very broad or very broad when compared to other species in the genus. It refers to the leaves being very broad.
Common Name: Broad Leaf Star Hair Bush.
Distribution:
Astrotricha latifolia is found south from the Burnett River in southern coastal Queensland to Narooma in central eastern New South Wales. It is found on and east of the Great Dividing Range.
https://avh.ala.org.au/occurrences/search?taxa=Astrotricha+latifolia#tab_mapView
Habitat Aspect Climate:
Astrotricha latifolia prefers full shade to dappled shade. It grows in wet sclerophyll forest, gallery forests and rainforest margins. It is found on and east of the Great Dividing Range. The altitude range from 5 meters ASL to 1500 meters above sea level
The temperatures range from minus 3 degrees in August to 38 degrees in January.
The rainfalls range from lows of 700mm to 2000mm average per annum.
Soil Requirements:
Astrotricha latifolia prefers deeper, sandy loams, light fatty clays to medium clays. The soils are usually derived from decomposed sandstones, granites, brown basalts, black basalts or quartzite. The soil’s pH ranges from 4.5pH to 6.5pH. It does not tolerate waterlogged soils. None saline soils to moderately saline soils are tolerated.
None saline soils to moderately saline soils are tolerated.
Height & Spread:
Wild Plants: 2m to 4m by 2m to 4m but has been recorded at 9 meters in height by 4 meters in diameter.
Characteristics:
Astrotricha latifolia grows as a large multi stemmed shrub with many ascending branches. The bark on the older main stems is red-brown to brown and glabrous. When the young branchlets first emerge it is pale green and densely covered in thick white floccose indumentums which may still be seen on older branches in well protected areas.
Astrotricha latifolia’s large oblong-ovate to oblong-elliptical leaves measure 80mm to 220mm in length by 20mm to 80mm in width. The base is rounded while the apex acute to mucronate. The discolourous laminas are mid green and semi glossy while the lower laminas are densely covered in white floccose wool. The laminas of young leaves recurve upwards from the mid vein to the margins and become flat then decurve downwards near the margins as the leaves mature. The leaf margins are entire or crisped. The mid vein and lateral veins are prominent on the lower lamina and are distinctly visible from the upper lamina being paler and recessed below the lamina. The lateral veins form a loop well inside from the margin. The petioles are densely covered in thick white floccose wool measure 25mm to 80mm in length.
The Inflorescence of Astrotricha latifolia are loose panicles with lateral umbels. The inflorescences are pale green with the umbels measuring 20mm to 30mm in diameter. The calyx lobes are hemi orbicular and inconspicuous to less than 1mm in length. The rachis, peduncles and pedicels are pale green and densely covered in white floccose wool. The rachises measure 100mm to 300mm in length while the peduncles measure 10mm to 75mm in length and the pedicles measure 2mm to 15mm in length.
The green, elliptical sepals measure 1.5mm to 2.5mm in length while the pale green elliptical, strongly reflexed petals measure 1.5mm to 2mm in length.
The 5 white anthers on the male flowers measure 1.5mm to 2mm in length.
The female flower’s two styles are pastel green and arise from a pale green disc. The flowers appear from November to January.
Astrotricha latifolia‘s fruits are a small wingless capsule. The capsules measure 2mm to 2.5mm in length by 2.5mm to 3mm in diameter. The capsules turn lemon or lime green then to a pale fawn on ripening and may hang on the plant for extended periods up to 6 weeks.
Wildlife:
Astrotricha latifolia is one of the best native shrubs around for attracting many different varieties of beetles, pollen flies, butterflies native bees which in return feed insectivorous birds as well as attracting spiders, parasitic wasps and robber flies lurking for the kill.
Cultivation:
Astrotricha latifolia is an interesting shrub with unusual flowers and structure for the bush garden on sandstone. It looks great in the garden as a feature plant or tucked away in a corner of a small forest garden. The shrub varies considerably in height and diameter but in the open usually becomes denser.
In cultivation it will usually grow 2 meters to 3 meters in height by 2.5 meters to 3.5 meters in diameter when grown in the open.
It is frost hardy to temperatures as low as minus 3 but colder temperatures can be endured if protected from severe frosts so this would make them ideal for southern gardens that suffer only from mild frosts. It should be more widely grown with in temperate areas of Australia.
It can be lightly tipped pruned regularly to increase bushiness immediately following the flowering. The plants will accept hard pruning once established.
Organic fertilizers will assist in the plants bushiness and flowering in the following spring and should be applied immediately after any pruning is carried out.
Astrotricha latifolia would make a good contribution to a sandy to medium clay or rocky terrain rock garden where a small rainforest understory shrub is required. Here it can be used as the main display planted in mass or scattered throughout the forest. When you use it in a rainforest scene it will grow lankier and grow upward towards the light gaining height and ceding width. Astrotriche latifolia is well suited to such conditions and can become weedy if over used. The idea is to achieve a feeling of being enclosed which rainforests are renowned for. This can be achieved with using its large pale green leaves with the white reverse and compact habit contrasting with broader deep green glossy and coloured foliage or stand alone to emphasize darkness of its surroundings.
A draw back or attraction of using Astrotricha latifolia in the garden is the number of insects and birds that it will attract even within the small microclimate of a rainforest. This hustle and bustle of insect life doesn’t stop with the flowers but also includes the leaves and new shoots that are frequently holed or devoured.
Propagation:
Seeds: The seeds of Astrotricha latifolia can be sown directly into a seed raising mix. They need to be covered to a depth of 10mm and watered thoroughly keeping moist to promote rapid germination and to avoid killing the new seedlings.
When the seedlings are 30mm to 50 mm tall, prick them out and plant them into 50mm native tubes using a seed raising mix.
Once the seedlings reach 150mm to 200mm in height plant them out into their permanent position.
Fertilize using seaweed, fish emulsion or organic chicken pellets soaked in water on an alternate basis. Fertilize every two months until the plants are established then annually in early September to October to maintain health, vitality and better flowering.
Further comments from readers:
Hi reader, it seems you use The Bible of Botany a lot. That’s great as we have great pleasure in bringing it to you! It’s a little awkward for us to ask, but our first aim is to purchase land approximately 1,600 hectares to link several parcels of N.P. into one at The Pinnacles NSW Australia, but we need your help. We’re not salespeople. We’re amateur botanists who have dedicated over 30 years to saving the environment in a practical way. We depend on donations to reach our goal. If you donate just $5, the price of your coffee this Sunday, We can help to keep the planet alive in a real way and continue to bring you regular updates and features on Australian plants all in one Botanical Bible. Any support is greatly appreciated. Thank you.
In the spirit of reconciliation we acknowledge the Bundjalung, Gumbaynggirr and Yaegl and all aboriginal nations throughout Australia and their connections to land, sea and community. We pay our respect to their Elders past, present and future for the pleasures we have gained.
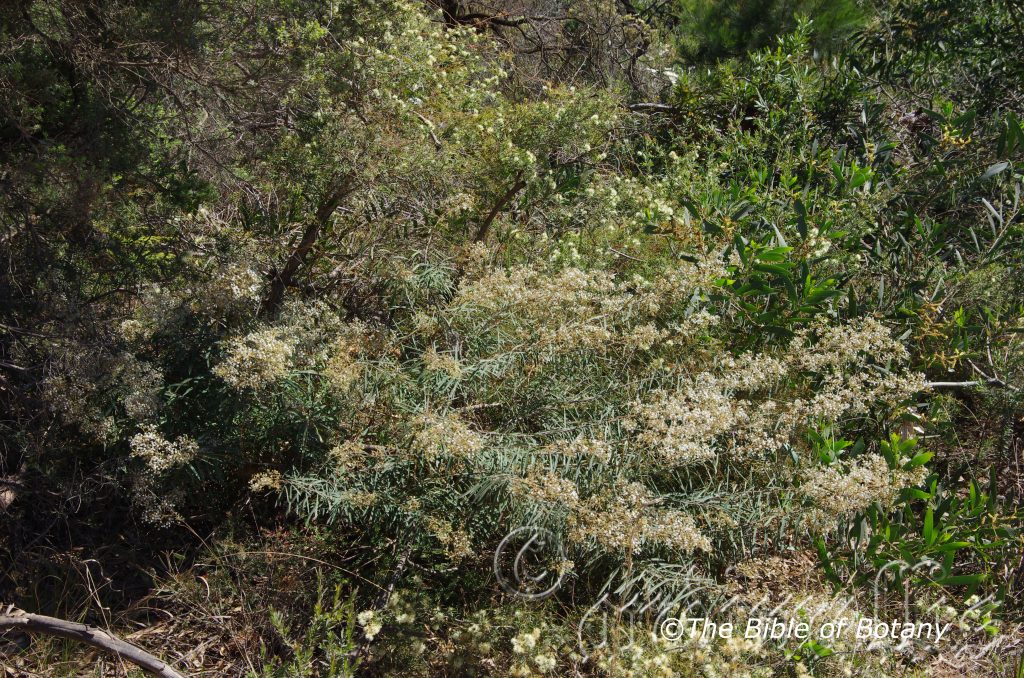
Yuraygir National Park NSW
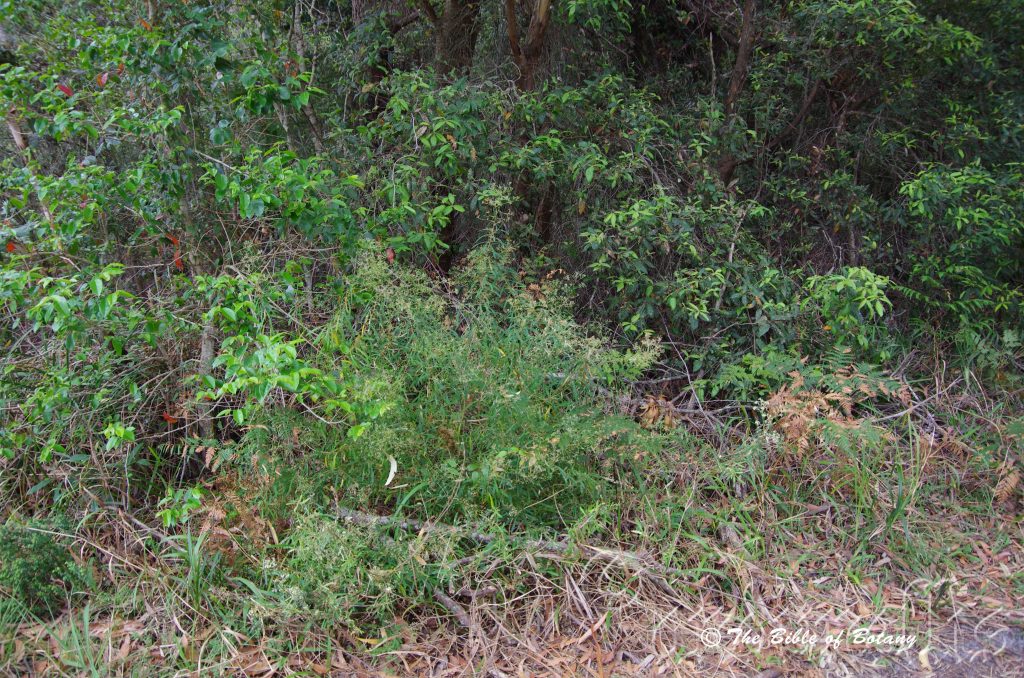
Ebor NSW
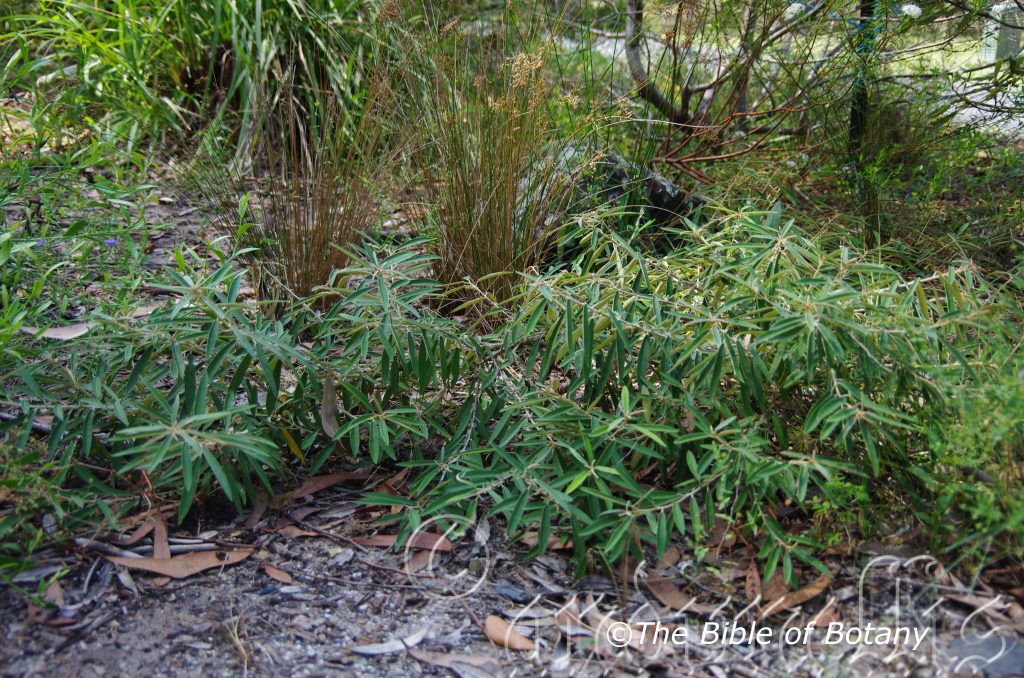
Coffs Harbour Botanic Gardens NSW
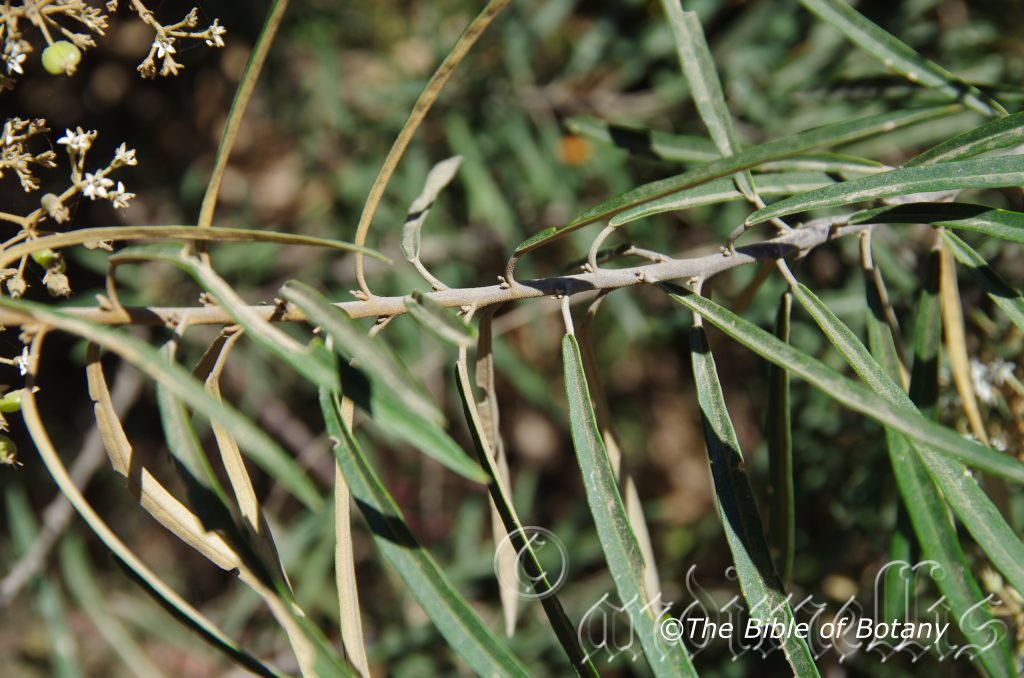
Yuraygir National Park NSW
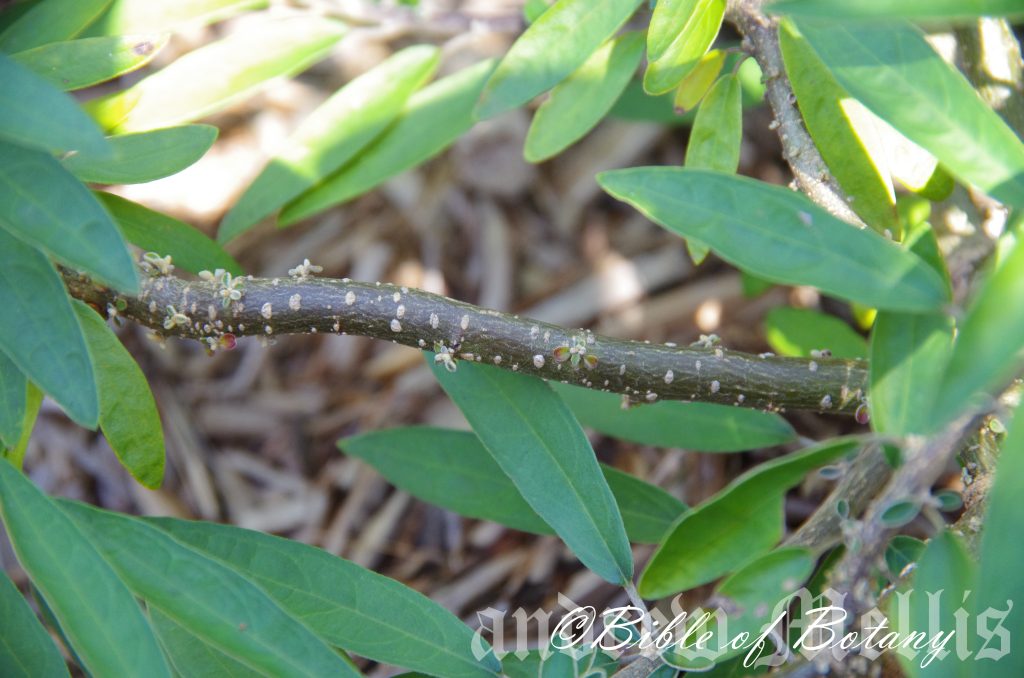
Coffs Harbour Botanic Gardens NSW
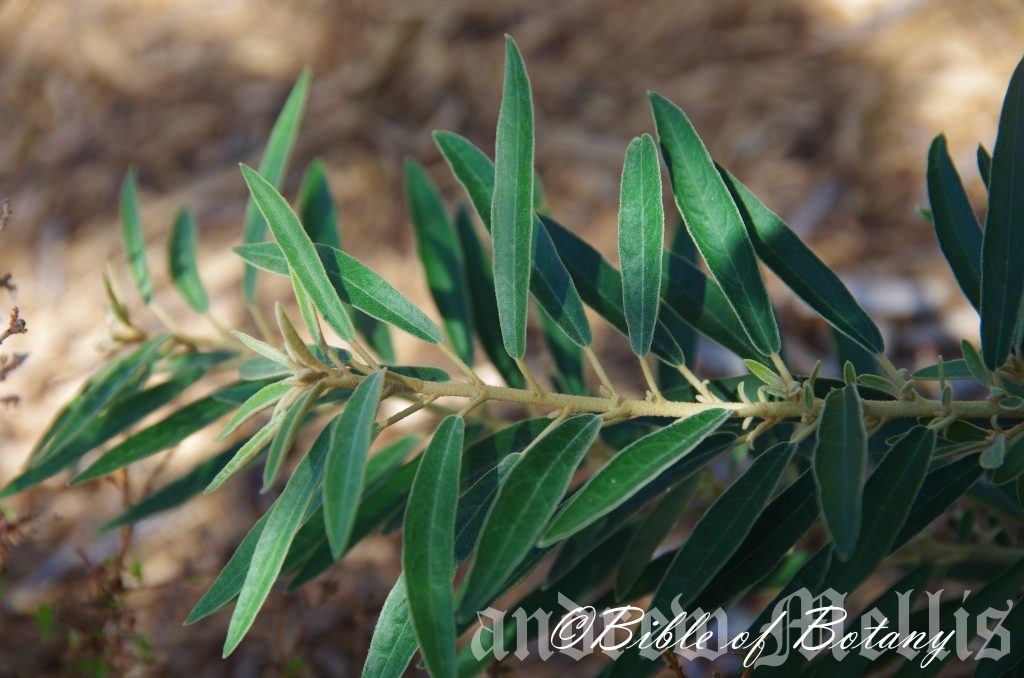
Coffs Harbour Botanic Gardens NSW
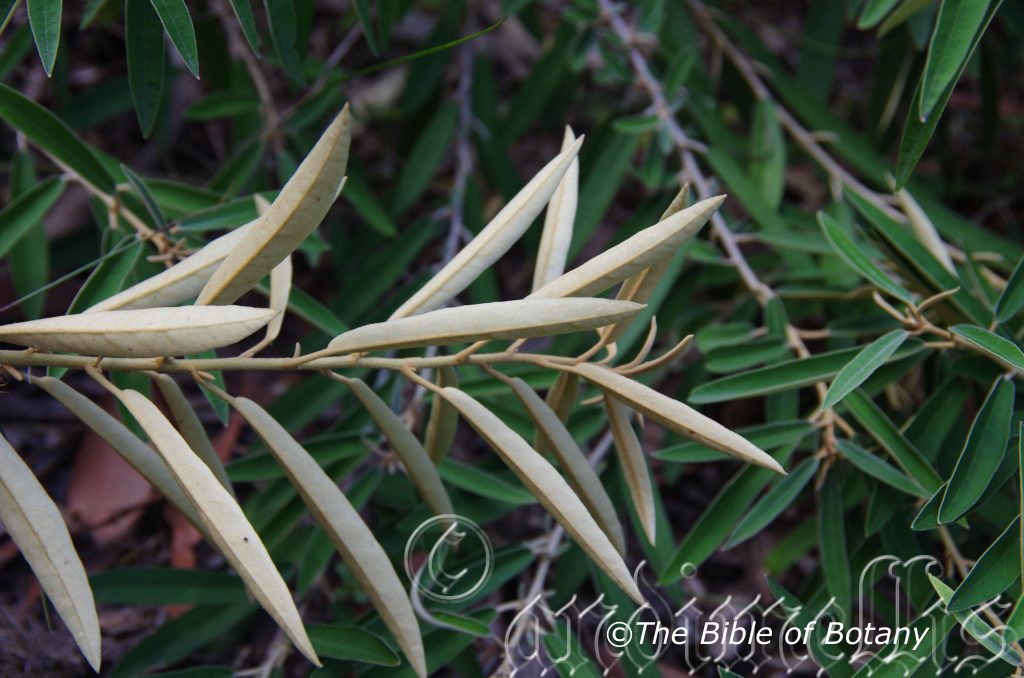
Coffs Harbour Botanic Gardens NSW
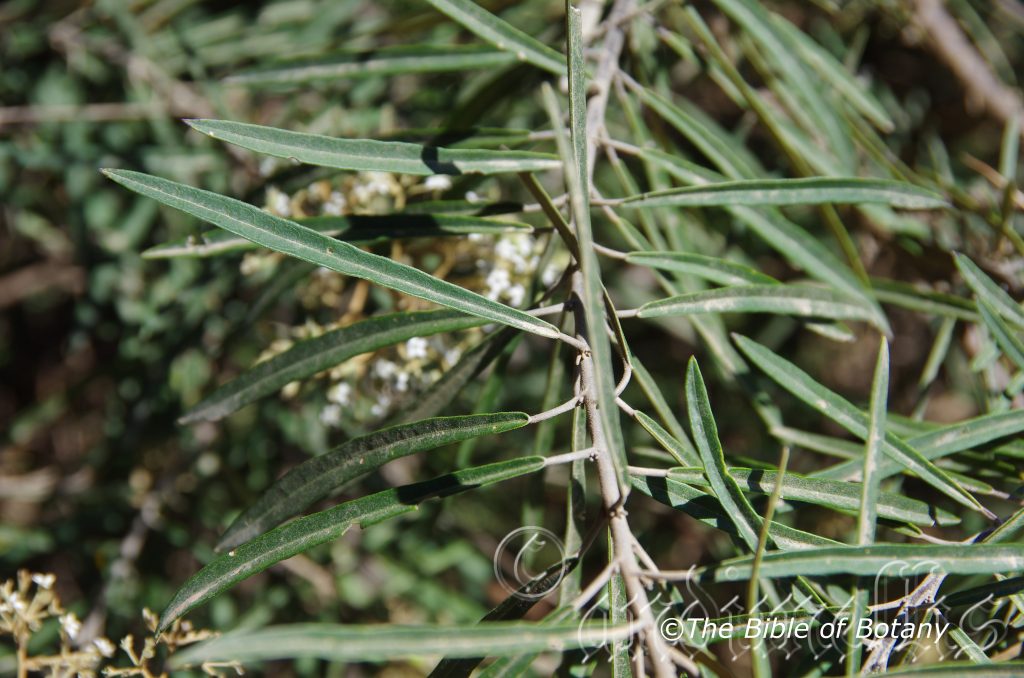
Yuraygir National Park NSW
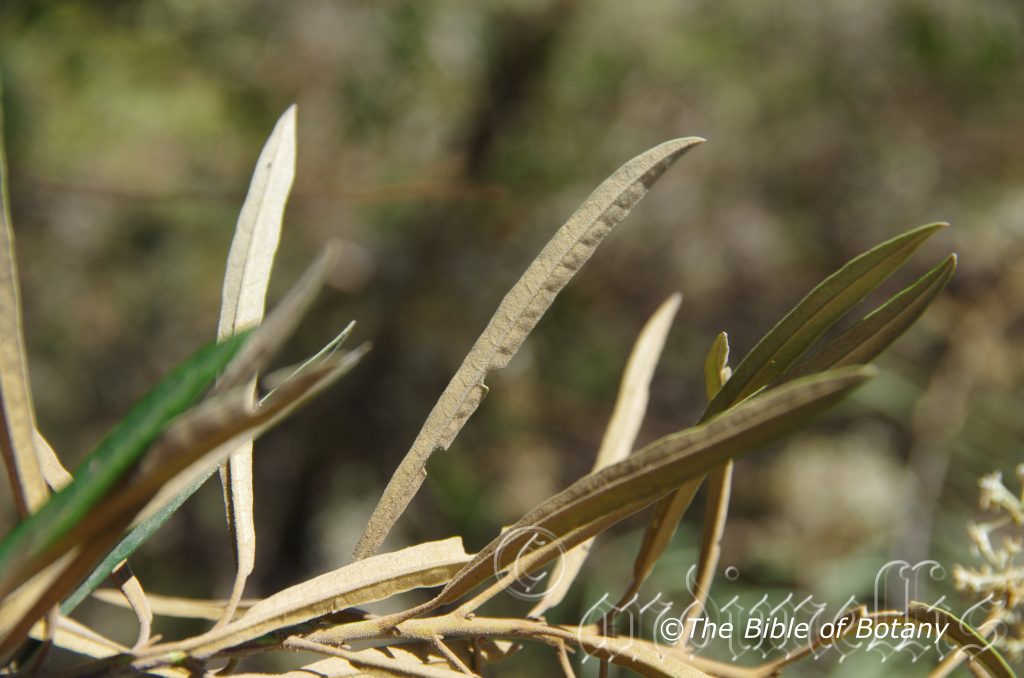
Yuraygir National Park NSW
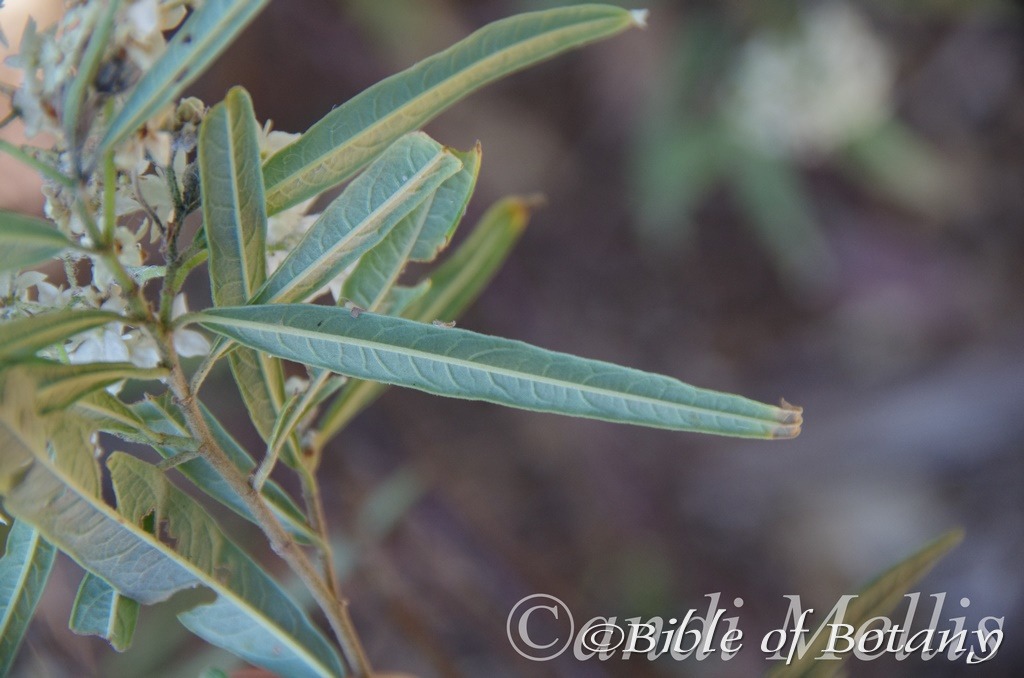
Coffs Harbour NSW

Yuraygir National Park NSW
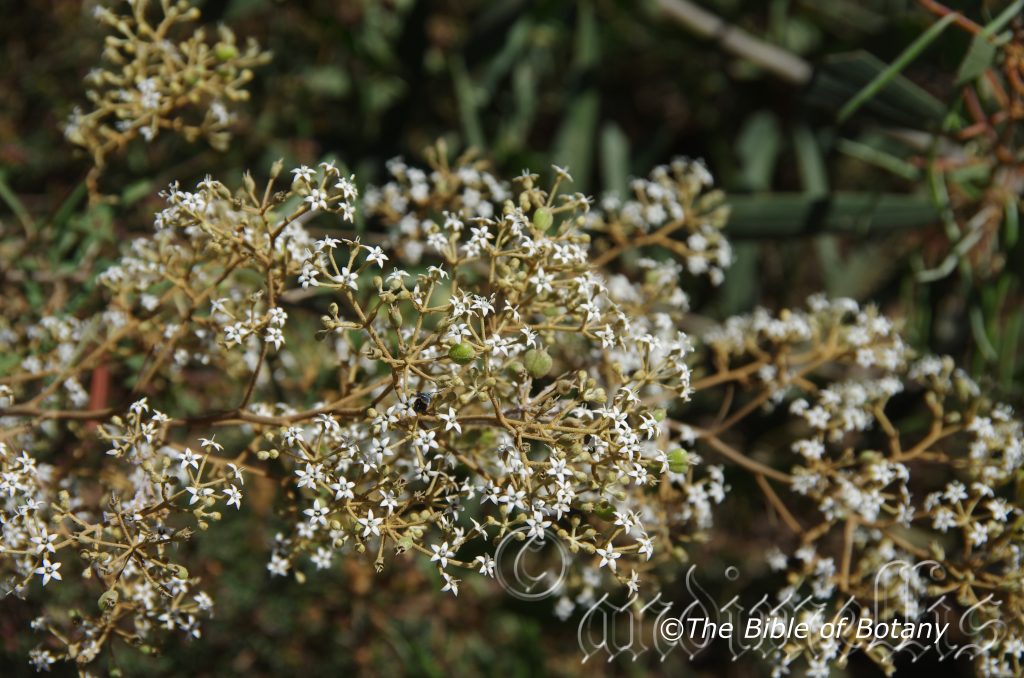
Yuraygir National Park NSW
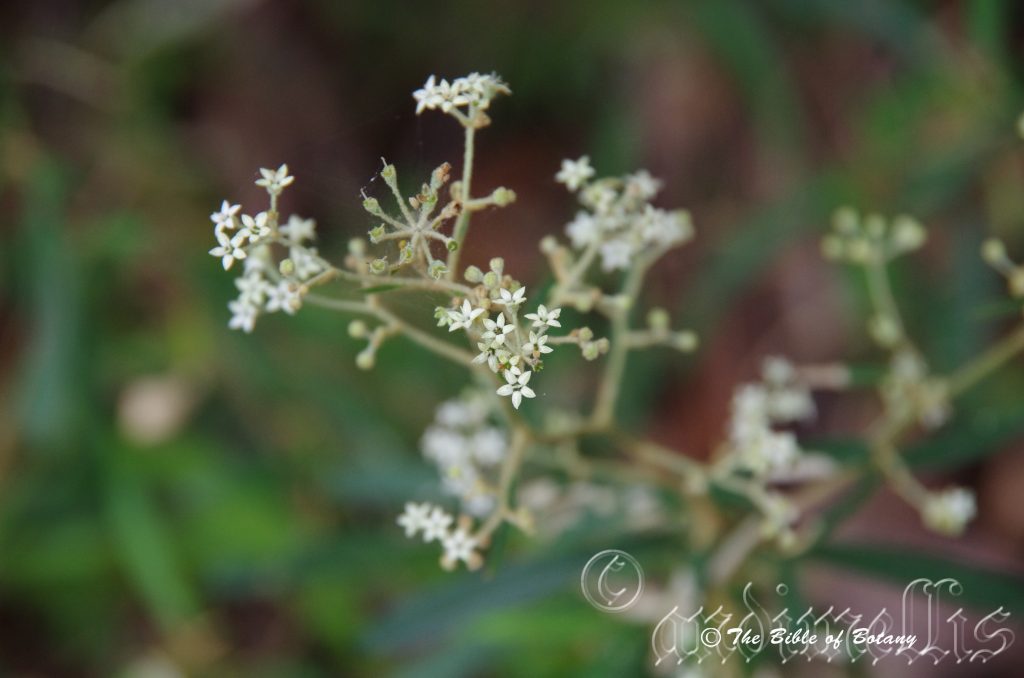
Yuraygir National Park NSW
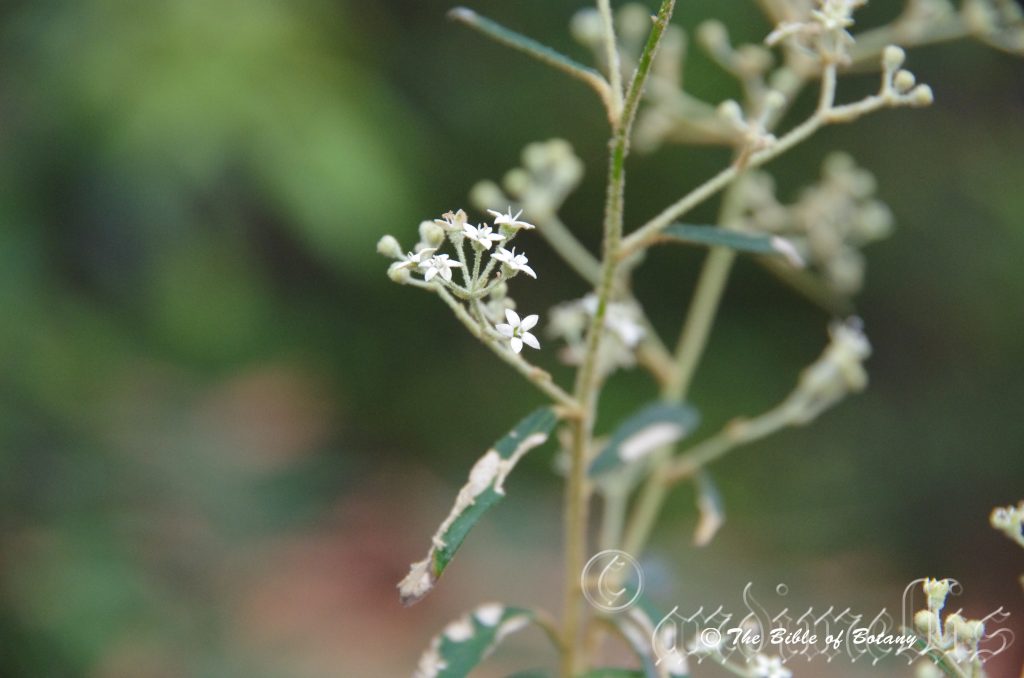
Ebor NSW
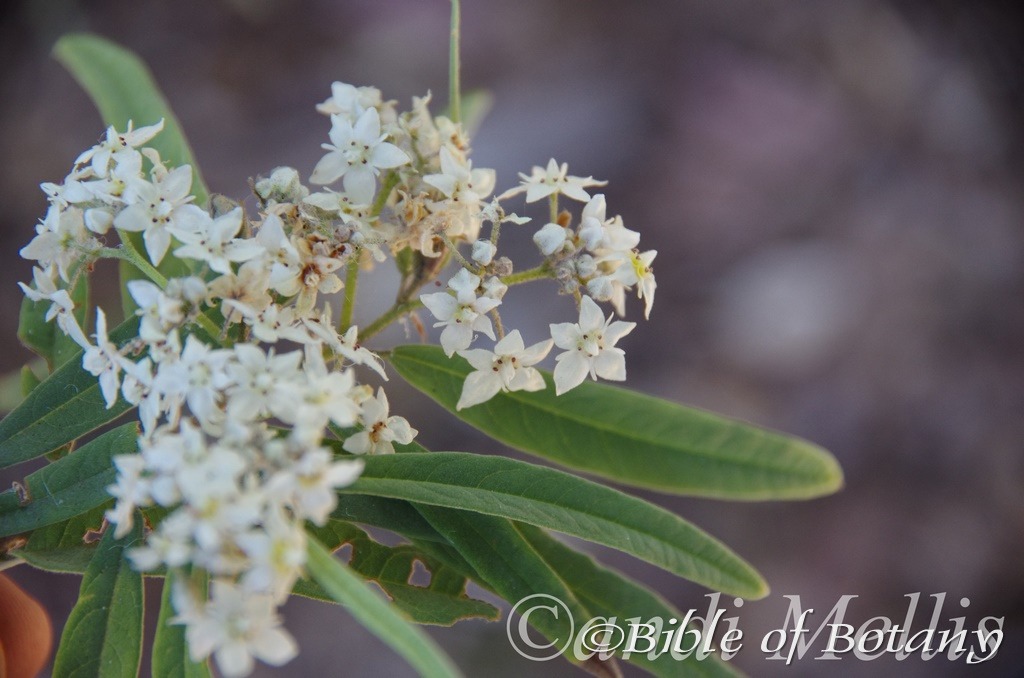
Coffs Harbour NSW
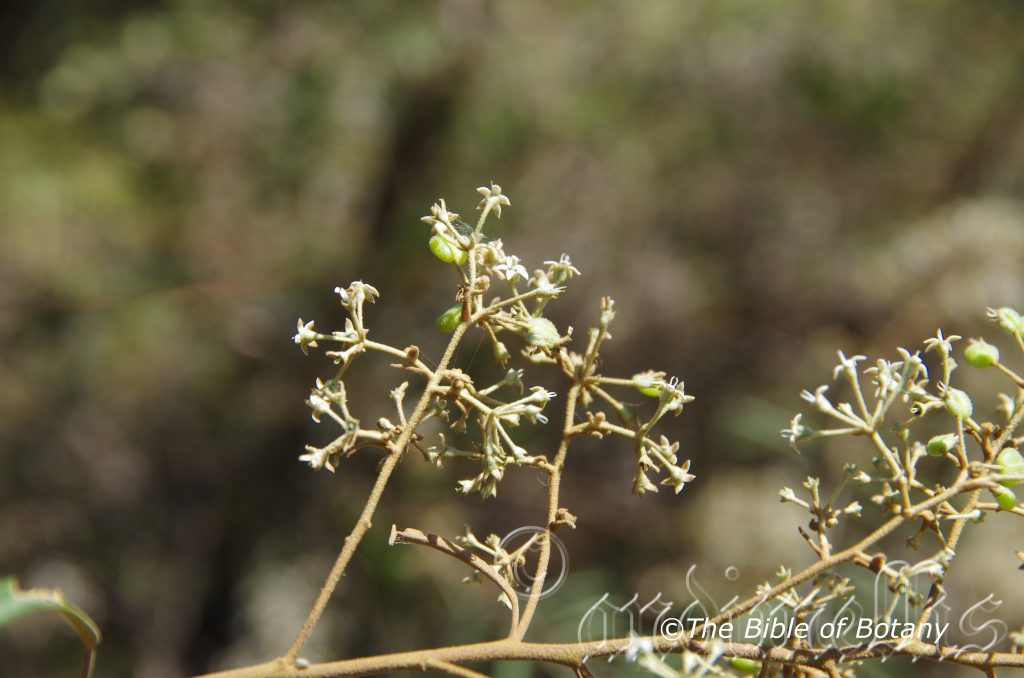
Yuraygir National Park NSW
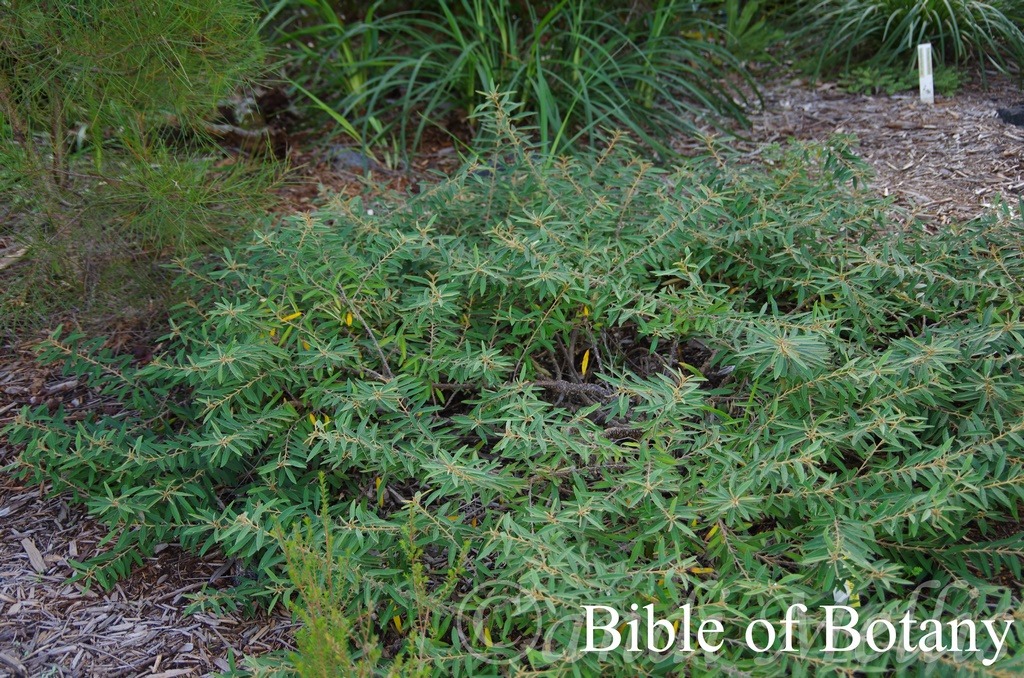
Coffs Harbour Botanic Gardens NSW
Astrotricha longifolia
Classification:
Unranked: Eudicots
Unranked: Asterids
Order: Apiales
Family: Araliaceae
Subfamily: Aralioideae
Genus: From Aster, which is Ancient Greek for a star and Thrix/Trikos which are Ancient Greek for a stiff hair. It refers to a vestiture of short, stiff stellate hairs.
Species: From Longitia/Longus, which is Latin for long in length and Folium, which is Latin for foliage. It refers to leaves, which are long and strap like.
Common Name: Long Leaf Astrotricha.
Distribution:
Astrotricha longifolia is found in several disjunct populations from Bowen in the north in Northern Queensland south to the Nadgee Nature Reserve in far southern New South Wales. It is found on the Great Dividing Range as well as on the western slopes in New South Wales and on the eastern side throughout its range. There is also an outlying population south and east of Emerald in Queensland.
There appears to be two distinct forms; one is found on and east of the Great Dividing Range while the second is found on the western slopes. These may be divided into two or more sub specie or even separate species when further research is carried out on the plants nomenclature.
https://avh.ala.org.au/occurrences/search?taxa=Astrotricha+longifolia#tab_mapView
Habitat Aspect Climate:
Astrotricha longifolia prefers full sun to dappled shade. It grows in dry sclerophyll woodlands, with shrubby under stories and along heath and woodland boundaries. The altitude ranges from 5 meters ASL to 800 meters ASL.
The temperatures range from minus 3 degrees in July to 40 degrees in January.
The rainfalls range from lows of 350mm to 2000mm average per annum.
Soil Requirements:
Astrotricha longifolia prefers deep, sandy loams, light fatty clays, medium clays or light silts to heavy silts. The soils are derived from decomposed sandstones granites, brown basalts, black basalts, shales, metamorphic rocks, alluvial deposits or accumulated peaty beach sands. The soil’s pH ranges from 4.5pH to 6.5pH. It does not tolerate waterlogged soils. None saline soils to moderately saline soils are tolerated.
Height & Spread:
Wild Plants: 1.2m to 3m by 1.5m to 3m.
Characteristics:
Astrotricha longifolia grows as a multi stemmed small shrub. The bark is a dull pale purple-grey and densely covered in patchy white and fawn thick pulverulent hairs or rarely glabrescent in the inland form while the coastal form is usually glabrescent. Young branchlets when they first emerge are pale olive-green and densely covered white and fawn thick pubescent hairs.
The inland form is erect with few stems and branches while the coastal form is spreading with many stems and branches.
Astrotricha longifolia narrow elliptical to oblong-elliptical leaves measure 40mm to 150mm long by 8mm to 25mm wide. The petioles are densely covered white and fawn thick pubescent hairs and measure 4mm to 14mm in length. The bases are rounded while the apexes are acute to narrowly obtuse. The discolourous laminas are deep green and glabrous while the lower laminas are densely covered in fawn pubescent hairs. The leaf margins are entire and recurve upwards from the midvein. The mid vein is prominent on the lower lamina and is distinctly visible from the upper lamina while the lateral veins are faintly prominent on the lower lamina and faintly visible on the upper lamina.
The coastal Form of Astrotricha longifolia narrow elliptical to oblong-elliptical leaves measure 40mm to 150mm long by 3mm to 12mm wide. The mid vein is prominent on the lower lamina and is distinctly visible from the upper lamina while the lateral veins are obscure on the lower lamina and not visible on the upper lamina. The base is rounded while the apex is acute to narrowly obtuse. The discolourous laminas are deep green and glabrous while the lower laminas are densely covered in fawn pulverulent to indumentum hairs. The leaf margins are entire and flat or rarely recurve slightly upwards from the midvein. The petioles are densely covered white and fawn thick pulverulent hairs and measure 4mm to 14mm in length.
The Inflorescence of Astrotricha longifolia is a loose panicle born from the terminals.
The inland form inflorescences are white and measuring 150mm to 250mm in length. The rachis, peduncles and pedicels are pale green and densely covered in white floccose wool hairs. The rachises measure 150mm to 250mm in length while the peduncles measure 30mm to 90mm in length and the pedicles measure 4mm to 12mm in length.
The coastal form inflorescences are white to creamy-white and measure 500mm to 600mm in length. The rachis, peduncles and pedicels are pale purple-green and glabrescent to densely covered in fawn to rusty pulverulent hairs. The rachises measure 300mm to 600mm in length while the peduncles measure 50mm to 180mm in length and the pedicles measure 6mm to 20mm in length.
The calyx lobes are hemi orbicular and inconspicuous to less than 1mm in length. The pale olive-green, elliptical sepals measure 1.5mm to 2mm in length while the white to pale cream elliptical, divaricated petals measure 2mm to 25mm in length.
The 5 white anthers on the male flowers measure 1.2mm to 1.5mm in length.
The female flower’s style is white and arises from a pale green disc. The flowers appear from October to January.
Astrotricha longifolia’s fruits are a small flattened globose capsule. The capsules measure 7mm to 8mm in length by 5mm to 6mm in width by 3mm to 3.5m to 4mm in depth. It is covered in white puberulent hairs. The sepals and style are persistent at the apex of the capsules. The capsules turn lemon or lime green then to a grey-fawn on ripening.
Wildlife:
Astrotricha longifolia is another great native shrub for attracting many different varieties of beetles, pollen flies butterflies native bees which in return feed insectivorous birds as well as attracting spiders, parasitic wasps and robber flies lurking for the visitors to fly in.
Cultivation:
Astrotricha longifolia is an interesting shrub with unusual flowers and structure for the bush garden on sandstone. It looks great in the garden as a feature plant or in the center of a small forest garden. The shrubs are not naturally bushy but this lends them perfectly to being displayed against walls where character and form is more important than a dense cover up. This can also be highlighted further if a mixture of erect inland form and spreading coastal form stemmed plants is planted.
In cultivation it will grow 2 meters to 3 meters in height by 1.5 meters to 2 meters in diameter for the upright form or 2.2 meters to 2.8 meters in height by 1.8 meters to 2.5 for the spreading form when grown in the open.
It is frost hardy to temperatures as low as minus 1 so this would make them ideal for southern gardens that suffer from mild frosts. They should be more widely grown with in temperate areas of Australia. It can be lightly tipped pruned regularly to increase bushiness immediately following the flowering.
Organic fertilizers may assist in the plants bushiness to some degree but deep layer of organic mulch is a natural method to harness the its natural beauty.
Astrotricha longifolia would make a good contribution to a sandy or rocky terrain rock garden. It can be used as the main display, scattered throughout the boulders. When you use it in an area that is strewn with large boulders do not over crowd the scene as the boulders are a formidable part of the scene. Astrotricha longifolia is well suited to such conditions so use contours to display the plants boulder country are almost always rising and falling in contour and have sharp rises. Plants should be planted sparingly with short annuals between or beneath to give vibrant colour. Make the scene so you can see over the tallest ones with the exception of one or two plants at the most. The idea is to achieve a feeling of expansive harshness. This can be achieved with using its long narrow leaves and open habit contrasting with finer pale green, soft grey or glaucous coloured foliage or stand alone to emphasize the boulders. If large deep green leafy plants are wanted try using them as prostrate plants. Use a lot of procumbent plants with vibrant coloured flowers like the various species of Hibbertia to make the rocks look larger and the spaces between the plants bigger.
Propagation:
Seeds: Astrotricha longifolia‘s seeds can be sown directly into a seed raising mix. They need to be covered to a depth of 10mm and watered thoroughly keeping moist to promote rapid germination and to avoid killing the new seedlings.
When the seedlings are 30mm to 50mm tall, prick them out and plant them into 50mm native tubes using a seed raising mix.
Once the seedlings reach 150mm to 200mm in height plant them out into their permanent position.
Fertilize using seaweed, fish emulsion or organic chicken pellets soaked in water on an alternate basis. Fertilize every two months until the plants are established then annually in early September to October to maintain health, vitality and better flowering.
Further comments from readers:
Hi reader, it seems you use The Bible of Botany a lot. That’s great as we have great pleasure in bringing it to you! It’s a little awkward for us to ask, but our first aim is to purchase land approximately 1,600 hectares to link several parcels of N.P. into one at The Pinnacles NSW Australia, but we need your help. We’re not salespeople. We’re amateur botanists who have dedicated over 30 years to saving the environment in a practical way. We depend on donations to reach our goal. If you donate just $5, the price of your coffee this Sunday, We can help to keep the planet alive in a real way and continue to bring you regular updates and features on Australian plants all in one Botanical Bible. Any support is greatly appreciated. Thank you.
In the spirit of reconciliation we acknowledge the Bundjalung, Gumbaynggirr and Yaegl and all aboriginal nations throughout Australia and their connections to land, sea and community. We pay our respect to their Elders past, present and future for the pleasures we have gained.
Atalaya salicifolia
Classification:
Unranked: Eudicots
Unranked: Rosids
Order: Sapindales
Family: Sapindaceae
Genus: From Atalaya, which is the Latinized form of the Indian word for a local tree. It refers to plants with similar winged seeds.
Species: From Salix, which is Latin for the weeping willow and Folium, which is Latin for foliage. It refers to the foliage being similar to that of the weeping willow in the Salix genus.
Common Name: Brush Whitewood or Whitewood.
Distribution:
Atalaya salicifolia is found along the Kimberley Coast, the Drysdale River National Park and the Prince Regent National Park in Western Australia.
In the Northern Territory it is found in the north western section of Kakadu National Park.
In the east it is found in several disjunct populations south from Cape York Peninsula in the north of far north Queensland to the Clarence River west of Grafton in northern New South Wales. It is mainly found on and east of the Great Dividing Range.
https://avh.ala.org.au/occurrences/search?taxa=Atalaya+salicifolia#tab_mapView
Habitat Aspect Climate:
Atalaya salicifolia prefer full shade to dappled shade. It grows in well-developed dry rainforests or monsoonal rainforests. The tree is not common and is never the dominate specie in its habitat. The altitude ranges from 5 meters ASL to 900 meters ASL.
The temperatures range from minus 2 degrees in July to 42 degrees in January.
The rainfalls range from lows of 500mm to 2400mm average per annum.
Soil Requirements:
Atalaya salicifolia prefer deep, heavy loams heavy clays. The soils are derived from decomposed brown basalts, black basalts, mudstone, shales, metamorphic rocks or alluvial deposits. The soil’s pH ranges from 4pH to 7pH. It tolerates seasonal waterlogged soils for short periods. None saline soils to moderately saline soils are tolerated. Non saline soils to very saline soils are tolerated.
Height & Spread:
Wild Plants: 8m to 10m by 5m to 6m.
Characteristics:
Atalaya salicifolia grows as a single trunked small tree. The bark is a dull pale grey and covered in large lenticels and tuberculate lumps. The branches are deep brown and covered in lenticel lumps. The young branchlets are semi glossy, pale green and covered in white puberulent hairs.
Atalaya salicifolia’s usually paripinnate opposite leaves measure 80mm to 200mm in length by 85mm to 220mm in width. The 1 to 4 pairs of opposite leaflets on mature trees are narrow oblong. The leaflets measure 40mm to120mm in length by 5mm to 30mm in width. The terminal pair of leaflets is longer with the base pair being the shortest. The petioles, rachises and petiolules are dull and glabrous. The bases are cuneate while the apexes are obtuse to acute. The concolourous laminas are dull deep green to grey-green. The leaf margins are entire and curve slightly upwards from the midvein. Young leaves are a bright glossy lime-green and covered in white caduceus pubescent hairs. The mid vein is prominent, paler or even yellowish on the upper lamina and is distinctly visible from the lower lamina. The petioles measure 15mm to 45mm in length while the rachises measure 30mm to 90mm in length and the petiolules measure 1mm to 5mm in length.
The petioles and rachises on juvenile trees and coppice growth are winged, larger and have 1 to 9 pairs of leaflets.
The Inflorescences of Atalaya salicifolia are panicles born from the terminals. The inflorescences are white and measure 50mm to 250mm in length. The 5 white sepals are hemi orbicular and measure 2mm to 3mm in length. The 5 white oblong petals measure 5mm to 7mm in length by 3mm to 4mm in width. The pedicels measure 5mm to 7mm in length.
The 8 white filaments are sparsely covered in white pubescent hairs and measure 2mm to 3mm in length while the white anthers measure 1.5mm in length by 0.5mm in width.
The conical style is short and green or the stigma is sessile. The disc is densely covered in short white pulverulent hairs.
The flowers appear from August to September.
Atalaya salicifolia’s fruits are flattened samaras. The green, glabrous samaras turn brown and measure 25mm to 35mm in length by 10mm to 15mm in width. The wings are falcate. The ovoid, flattened seeds measure 5.5mm to mm in length by 4mm to 5.5mm in width and 3.5mm to 4mm in depth.
Wildlife:
Atalaya salicifolia is the host to some of our unusual slender stink bugs like Leptocoris mitellatus, and Leptocoris tagalicus. (http://soapberrybug. org)
Cultivation:
Atalaya salicifolia is an interesting subject for small to larger gardens in tropical and subtropical areas. It is a compact dense small spreading trees. It is excellent shade trees for medium gardens. It is relatively slow to mature but relatively fast in the initial stages even when given moisture and organic fertilizers on a regular basis. As a garden subject it will grow 7 meters to 9 meters tall by 6 meters to 8 meters in diameter when grown in the open forming a very dense crown.
Atalaya salicifolia are best grown in the tropics and subtropics where they respond better to the heat and reliable rainfalls. It is cold tolerant to temperatures as low as minus 2 provided there is adequate moisture in the ground and it is not subjected to severe frosts.
The tree would make a good accent tree in front of low set homes, commercial, industrial sheds or low set classrooms where they will break up hard rigid architectural lines and give warmth and breadth to a building. It is also ideal for planting on nature strips as the trees have a small root system and dropping very few leaves and twigs.
It should be planted away from buildings, because of its spread and where it can be viewed as a complete tree. It is best used adjacent to small areas of bush so its umbrella shape can be contrasted against those trees in the background. Close to paths or the house will lose this affect however you want it where it can be viewed regularly especially when it is in flower or in a flush of growth. It is good in medium rockeries or where vehicles turn around as the main feature plant. Here it can be planted as a standalone specimen to create a harsh barren look or a strong welcoming attraction if planted beneath with luxurious arrays of colour. In large gardens small groups will give an expansive park scenario especially when planted with pyramidal or columnar trees.
If it is surrounded by shorter plants with fine foliage and multi-coloured flowers it will dominate at the center giving an expansive look to the bed especially when it is in flower. This is one plant that benefits from high exposure. Its smaller size and wide spread enables this to be achieved to great effect.
It can be used in raised garden beds surrounded by small shrubs with fine pale green leaves which flower at a different times of the year as the rose pink flowers would be lost amongst strong reds and purples while lilacs, pinks and whites would blend leaving a feeling that something is missing.
Propagation:
Seeds: Atalaya salicifolia‘s seeds can be sown directly into a seed raising mix. They need to be covered to a depth of 10mm and watered thoroughly keeping moist to promote rapid germination and to avoid killing the new seedlings.
When the seedlings are 30mm to 50mm tall, prick them out and plant them into 50mm native tubes using a seed raising mix.
Once the seedlings reach 150mm to 200mm in height plant them out into their permanent position. When planting along creek banks or being used as a screen plant them at 3 meter to 5 meter centers.
Fertilize using seaweed, fish emulsion or organic chicken pellets soaked in water on an alternate basis. Fertilize every two months until the plants are established then annually in early September to October to maintain health, vitality and better flowering.
Further comments from readers:
Hi reader, it seems you use The Bible of Botany a lot. That’s great as we have great pleasure in bringing it to you! It’s a little awkward for us to ask, but our first aim is to purchase land approximately 1,600 hectares to link several parcels of N.P. into one at The Pinnacles NSW Australia, but we need your help. We’re not salespeople. We’re amateur botanists who have dedicated over 30 years to saving the environment in a practical way. We depend on donations to reach our goal. If you donate just $5, the price of your coffee this Sunday, We can help to keep the planet alive in a real way and continue to bring you regular updates and features on Australian plants all in one Botanical Bible. Any support is greatly appreciated. Thank you.
In the spirit of reconciliation we acknowledge the Bundjalung, Gumbaynggirr and Yaegl and all aboriginal nations throughout Australia and their connections to land, sea and community. We pay our respect to their Elders past, present and future for the pleasures we have gained.
Atractocarpus benthamianus
Classification:
Class: Eudicots
Class: Asterids
Order: Gentianales
Family: Rubiaceae
Subfamily: Ixoroideae
Tribe: Gardenieae
Genus: From Actractivum which is Latin for attractive and Karp’s, which is Ancient Greek for a fruit. It refers to fruits, which have a lovely appearance.
Species: Is named in honour of George Bentham; 1800-1884, who was an English botanist who undertook the reclassification: of seed plants into families.
Subspecies: Atractocarpus benthamianus subspecies benthamianus. Is named in honour of George Bentham; 1800-1884, who was an English botanist who undertook the reclassification: of seed plants into families.
Subspecies: Atractocarpus benthamianus subspecies glabe. From Glabrum, which is Latin for glabrous or smooth. It refers to a structure or organ, which has no hairs or scales.
Common Name: Native Gardenia or Narrow leaf Gardenia.
Distribution:
Atractocarpus benthamianus subsp. benthamianus is found south from the Gold Coast Hinterland in southern coastal Queensland to the Nambucca River in northern New South Wales. There is an isolated population near Armidale in New South Wales.
Atractocarpus benthamianus subsp. glaber is found in several disjunct populations south from the North Coast Hinterland in southern coastal Queensland, around the Gold Coast to Lismore around Coffs Harbour in northern New South Wales. There is also an isolated population on the upper Clarence River in New South Wales.
https://avh.ala.org.au/occurrences/search?taxa=Atractocarpus+benthamianus#tab_mapView
Habitat Aspect Climate:
Aspect / Climate:
Atractocarpus benthamianus prefers full shade to dappled shade. It grows in well-developed rainforests, gallery forests moist areas within dry rainforests. The altitude ranges from 20 meters ASL to 1100 meters ASL.
The temperatures range from minus 2 degrees in July to 36 degrees in January.
The rainfalls range from lows of 650mm to 2000mm average per annum. The isolated populations north of Tamworth are located where orographic precipitation occurs.
Soil Requirements:
Atractocarpus benthamianus prefers good quality loams. The soils range from 6pH to 7pH. It is not tolerant of waterlogged soils. None saline soils to slightly saline soils are tolerated.
Height & Spread:
Wild Plants: 6m to 8m by 5m to 8m.
Characteristics:
Atractocarpus benthamianus grows as a multi trunked small tree or very large shrub. The bark is a dull pale grey and sparsely covered shallow longitudinal lenticels. The branches are pale grey to pale grey-green and sparsely covered in resinous markings. The young branchlets are flattened or square in cross section glabrous or sparsely covered in white puberulent hairs and bright mid green.
Atractocarpus benthamianus opposite or in whorls of 3 or 4 are large oblong-obovate and measure 55mm to 200mm in length by 20mm to 60mm in width. The petioles measure 5mm to 10mm in length. The young leaves are a bright glossy lime green. The bases are cuneate to attenuate for half the length of the petiole while the apexes are broad acuminate. The upper laminas are slightly aureate between the lateral veins. The leaf margins are entire and curve slightly upwards from the midvein. The mid vein is prominent on the lower lamina and is distinctly visible from the upper lamina being yellow-green while the lateral veins form distinct loops inside the margins. Small domatium are present in the axils of the veins.
The concolourous laminas of Atractocarpus benthamianus subspecies benthamianus‘s are deep glossy grass-green on the upper laminas while the lower laminas are sparsely covered in white puberulent hairs.
The concolourous laminas of Atractocarpus benthamianus subsp. glaber’s are deep glossy grass-green on the upper laminas while the lower laminas are glabrous.
The Inflorescence of Atractocarpus benthamianus subspecies benthamianus’s are clusters born from the terminals or auxiliary. There are 3 to 9 individual flowers in a cluster. The lemon-yellow to pale yellow calyxes are cupular and sparsely covered in white puberulent hairs. They measure 5mm to 8mm in length and are finely toothed. The white corolla tube measures 6mm to 8mm in length while the 5 white contorted lobes are oblong with acute apexes. They measure 8mm to 15mm in length. The pedicel measures 6mm to 18mm in length.
The inserted stamens are white.
The inserted style is creamy yellow, is covered in white puberulent hairs and measure 6mm to 8mm in length while the exserted conical stigma measures 5mm to 7mm in length.
The Inflorescence of Atractocarpus benthamianus subspecies glaber‘s are clusters born from the terminals or auxiliary. There are 7 to 15 individual flowers in a cluster. The lemon-yellow to pale yellow calyxes are cupular and glabrous. They measure 5mm to 8mm in length and are finely toothed. The white corolla tube measures 6mm to 8mm in length while the 5 white contorted lobes are oblong with acute apexes. They measure 8mm to 15mm in length. The pedicel measures 6mm to 18mm in length.
The inserted stamens are white.
The inserted style is creamy yellow, glabrous and measure 6mm to 8mm in length while the exserted conical stigma measures 5mm to 7mm in length.
Both the male and female flowers are highly scented and appear from July to late October.
Atractocarpus benthamianus’s fruits are ovoidal to globose drupes. The grass-green fruits turn creamy yellow to orange-yellow. The calyx is persistent as a scar on the apex. The numerous ovoid, flattened creamy seeds measure 3.5mm to 4mm length by 3mm to 3.5mm in diameter.
The drupes of Atractocarpus benthamianus subspecies benthamianus’s measure 20mm to 30mm in length by 20mm to 25mm in width.
The drupes of Atractocarpus benthamianus subspecies glaber’s measure 15mm to 20mm in length by 12mm to 15mm in width.
Wildlife:
It is the host to numerous butterflies when in flower. Native bees also visit the trees during flowering. Catbirds Ailuroedus crassirostris, the Regent Bowerbird Sericulus chrysocephalus, Satin Bowerbirds Ptilonorhynchus violaceus, are some of the birds which eat the fruits. The fruits are also probably eaten by the red headed and Grey Headed flying foxes Pteropus poliocephalus.
The fruits are edible
Cultivation:
This is a beautiful small tree or large shrub that looks great in the garden as a feature plant or in the center of a small rainforest garden. The large glossy leaves are a welcome change from dark greens as is the Gardenia scent which carries afar when the trees are in flower. It makes an excellent large container plant for many years or look really great in very large courtyards where the foliage is relaxing and cooling. Atractocarpus benthamianus looks good along small creek banks or artificial creeks.
It grows very well as far south as Melbourne where it can be protected from frosts when young. Atractocarpus benthamianus is very frost sensitive so if frosts are encountered select another tree for the site. It should be more widely grown with in temperate areas of Australia that are frost free. It can be lightly tipped pruned annually to increase bushiness and flowering after fruit has been harvested. If mild native fertilizers are used it will develop deep sea green leaves and the likelihood of better quality and greater fruit set could be achieved.
The tree or shrub is naturally bushy so not much maintenance is required unless a small tree is wanted where it will be necessary to prune the lower branches and nip the leading shoots. One of the best scented flowering natives on the market but give it the room to reach its full potential. Trimmed plants for trees will grow from 8 meters to 10 meters tall by 4 meters to 5 meters in diameter while shrubs grown as a rainforest will attain 4 meters to 5 meters in height by 4 to 5 meters in diameter. The tree’s trunks would be suitable for growing epiphytic ferns and orchids.
Propagation:
Seeds: Atractocarpus benthamianus’s seeds can be sown directly into a seed raising mix. They need to be covered to a depth of 10mm and watered thoroughly keeping moist to promote rapid germination and to avoid killing the new seedlings.
When the seedlings are 30mm to 50mm tall, prick them out and plant them into 50mm native tubes using a seed raising mix.
Once the seedlings reach 150m to 200mm in height plant them out into their permanent position. When planting along creek banks or as screens or as a rainforest tree plant them at 4 meter to 5 meter centers. Plant them much wider when a specimen tree is required or where the scented flowers is the main focus.
Fertilize using seaweed, fish emulsion or organic chicken pellets soaked in water on an alternate basis. Fertilize every two months until the plants are established then annually in early September to October to maintain health, vitality and better flowering.
Further comments from readers:
Hi reader, it seems you use The Bible of Botany a lot. That’s great as we have great pleasure in bringing it to you! It’s a little awkward for us to ask, but our first aim is to purchase land approximately 1,600 hectares to link several parcels of N.P. into one at The Pinnacles NSW Australia, but we need your help. We’re not salespeople. We’re amateur botanists who have dedicated over 30 years to saving the environment in a practical way. We depend on donations to reach our goal. If you donate just $5, the price of your coffee this Sunday, We can help to keep the planet alive in a real way and continue to bring you regular updates and features on Australian plants all in one Botanical Bible. Any support is greatly appreciated. Thank you.
In the spirit of reconciliation we acknowledge the Bundjalung, Gumbaynggirr and Yaegl and all aboriginal nations throughout Australia and their connections to land, sea and community. We pay our respect to their Elders past, present and future for the pleasures we have gained.
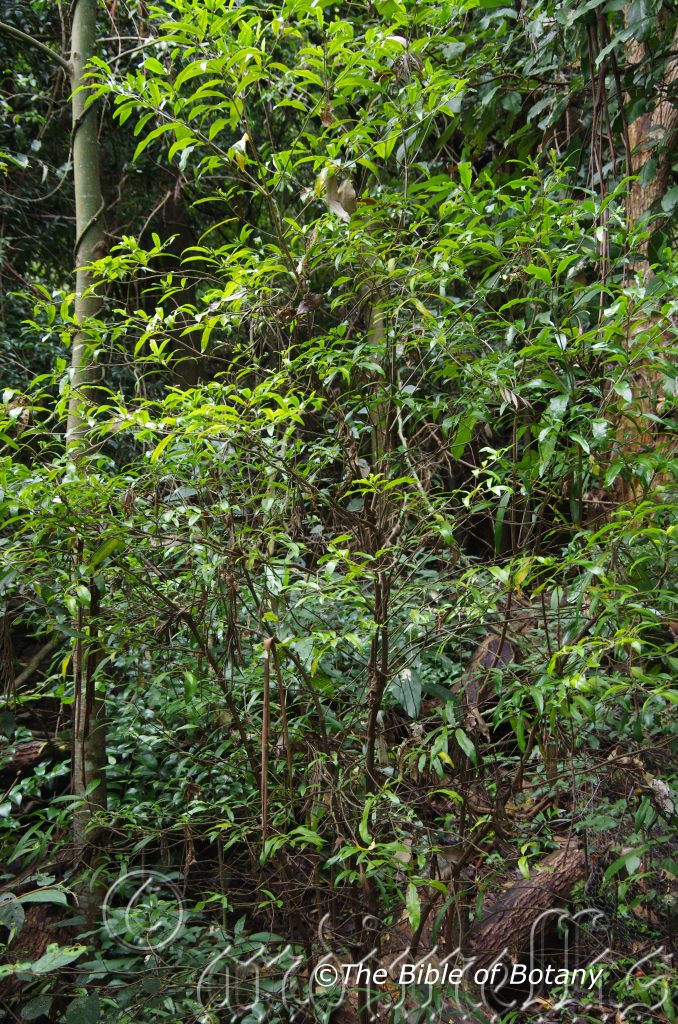
LBG Lismore NSW
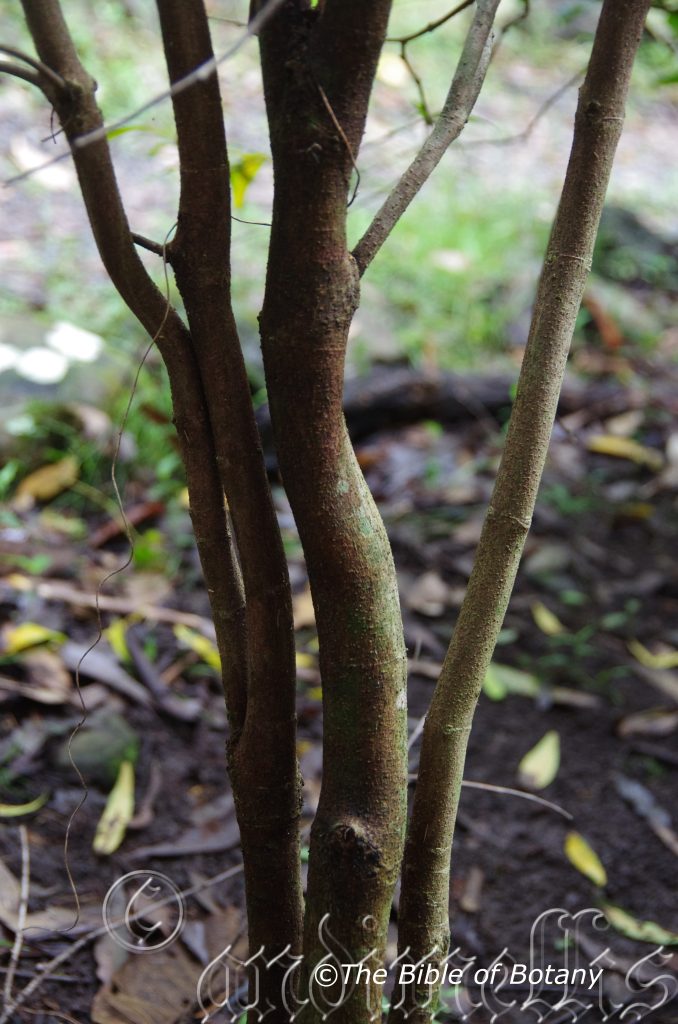
LBG Lismore NSW
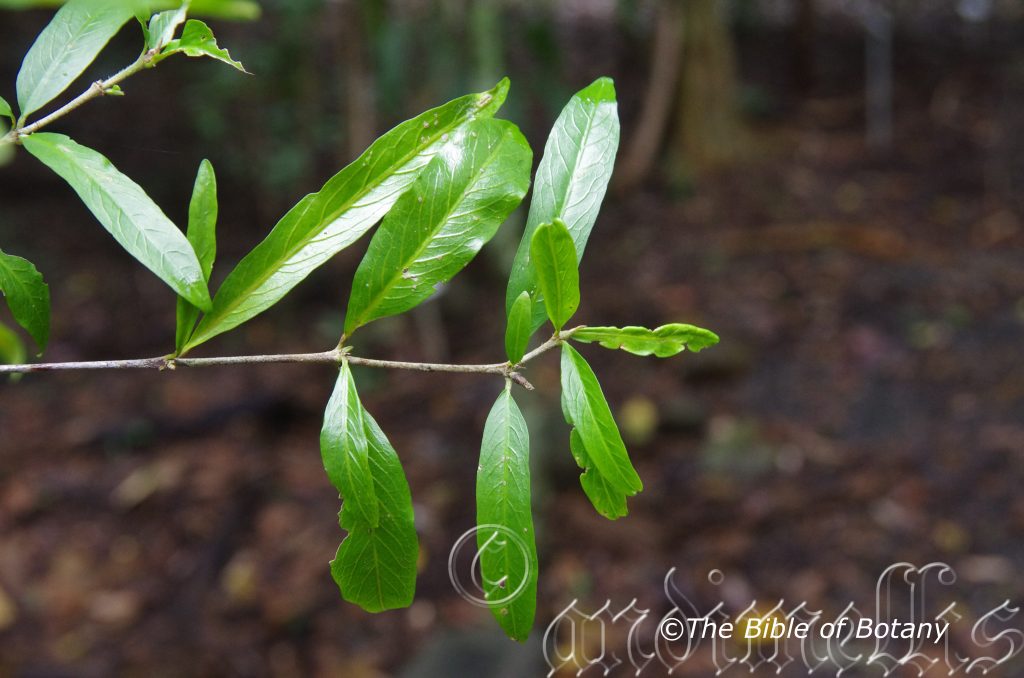
LBG Lismore NSW
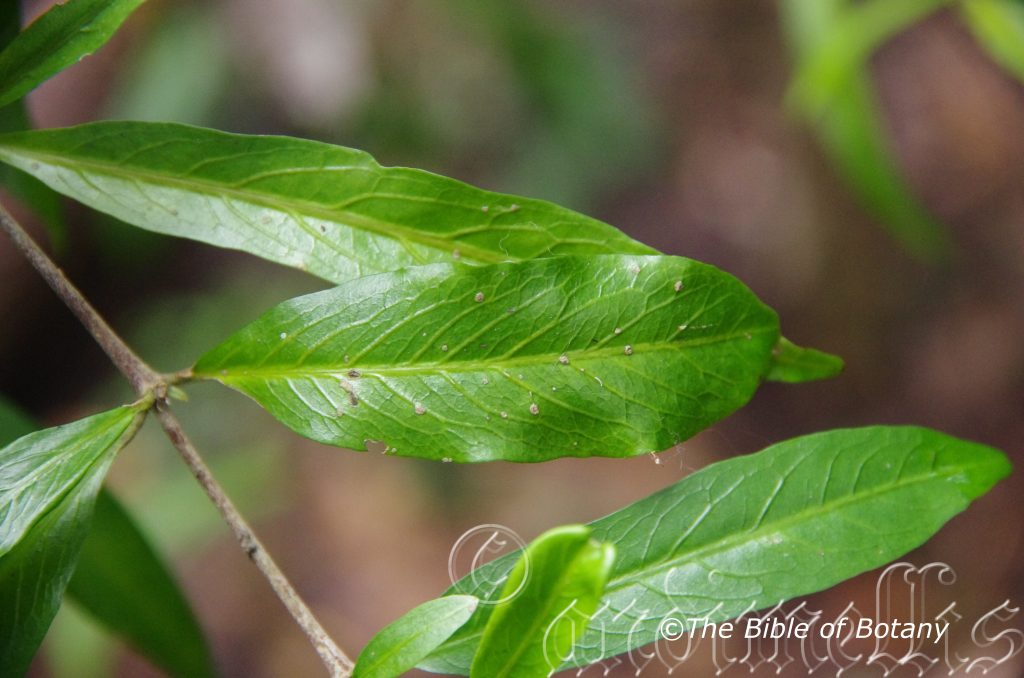
LBG Lismore NSW
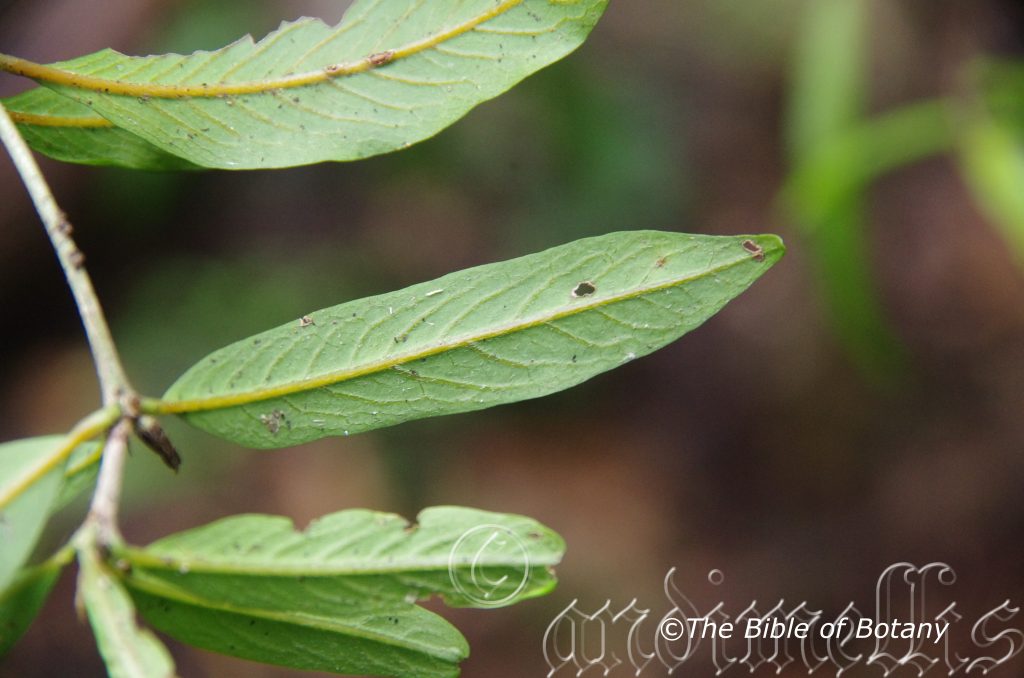
LBG Lismore NSW
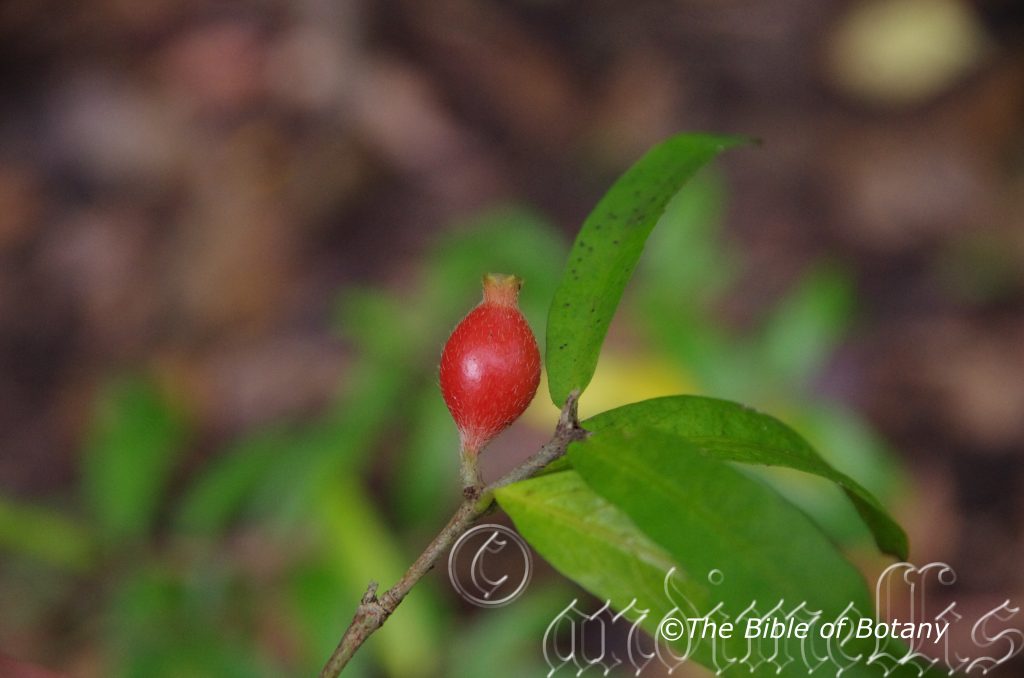
LBG Lismore NSW
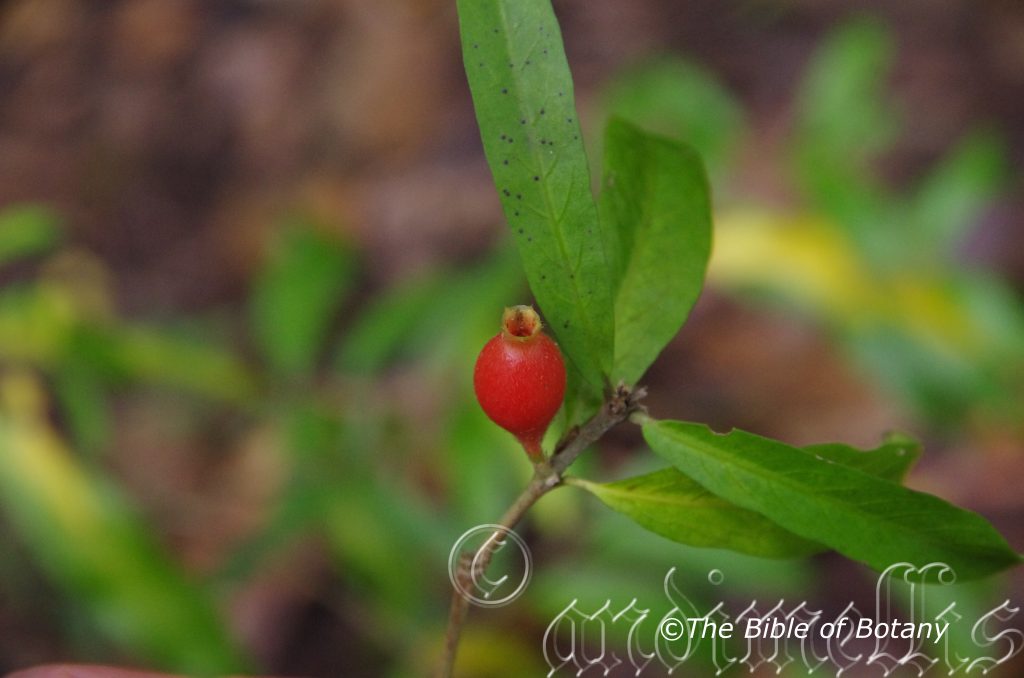
LBG Lismore NSW
Atractocarpus chartaceus
Classification:
Unranked: Magnoliophyta
Class: Magnoliopsida
Order: Fabales
Family: Fabaceae
Genus: From Actractivum which is Latin for attractive and Karpos, which is Ancient Greek for a fruit. It refers to fruits, which have a lovely appearance.
Species: May be from chartacea, which is Latin for to be made of paper. It refers to organs or structures, which have a papery texture or are paper thin. Here it refers to the very thin leaves, which are more paper like than other species in the genus.
Common Name: Native Gardenia.
Distribution:
Atractocarpus chartaceus is found south from Gladstone in central coastal Queensland to the Clarence River near Coaldale. It is found on and east of the Great Dividing Range to the coast.
https://avh.ala.org.au/occurrences/search?taxa=Atractocarpus+chartaceus#tab_mapView
Habitat Aspect Climate:
Atractocarpus chartaceus prefers full sun to dappled shade. It grows in low land rainforests, riverine moist Eucalyptus forests, adjacent to sub-tropical rainforests or monsoonal forests. The altitude ranges from 5 meters ASL to 550 meters ASL.
The temperatures range from minus 2 degrees in July to 40 degrees in January.
The rainfalls range from lows of 800mm to an average of 1200mm annually.
Soil Requirements:
Atractocarpus chartaceus prefers better quality, deep, sandy loams, light fatty clays to medium clays. The soils are usually derived from decomposed black basalts or alluvial deposits. The soil’s pH ranges from 5pH to 6.5pH. It does not tolerate waterlogged soils. None saline soils to moderately saline soils are tolerated. None saline soils to moderately saline soils are tolerated.
Height & Spread:
Wild Plants: 2m to 3m by 2m to 3m.
Characteristics:
Atractocarpus chartaceus has a fawn to grey-brown, rough bark that is somewhat scabrous and covered in lenticels. It is often covered in often covered in lichens and mosses. Juvenile branchlets and stems are mid greenish-brown and sparsely to moderately covered in long, white pubescent, antrorse hairs.
Atractocarpus chartaceus has opposite leaves or are produced in whorls of 3 where the third leaf is often much smaller than the other two. The leaves are narrow elliptic to oblong-ovate or linear. The mature leaves are elliptic to oblong-ovate and measure 50mm to 150mm in length by 5mm to 30mm in width. The terete petioles measure 2mm to 5mm in length. The concolourous leaves are pale green to deep glossy green and glabrous on the upper lamina, while the lower lamina is glabrous or sparsely covered in white pubescent hairs especially on the new growth. The laminas are undulating. The bases are cuneate, while the apexes are broad acute to obtuse. The yellowish mid vein is strongly prominent on the lower lamina, while the yellowish lateral veins are parallel and also prominent on the lower lamina and curve at around 35 degrees. They are form a loop well inside the entire margin.
The inflorescence of Atractocarpus chartaceus are born singularly or in pairs in the leaf axils. The pedicels are sparsely to moderately covered in long, white antrorse hairs and measure 8mm to 10mm in length. The cupular calyxes have linear lobes and sparsely to moderately covered in long, white antrorse hairs. The calyx measures 6mm to 8mm in length. The glabrous white corolla tube measures 8mm to 9mm in length, while the 5 lanceolate lobes measure 10mm to 12mm in length.
Atractocarpus chartaceus fruits are cylindrical, fleshy berries and measure 28mm to 35mm in length by 15mm to 20mm in diameter. The berries ripen to a bright red from early to late autumn. The calyx swells and is persistent on the ripe fruits. The inner flesh is a creamy white and edible.
The turgid, reniform seeds measure 5mm to 6mm in length by 5.5mm to 7mm in width. The seeds are creamy fawn in colour.
Wildlife:
The only reports I have besides the fruits being eaten raw by aborigines. (Cribb & Cribb wild food of Australia) is the Satin Bower Bird, Ptilonorhynchus violaceus.
The taste is similar to a guava crossed with Monstera deliciosa and has a similar irritation to that of Monstera deliciosus for a short period.
Cultivation:
Atractocarpus chartaceus is an interesting subject for small to large gardens in tropical and subtropical areas. It is a beautiful small tree or large shrub that looks great in the garden as a feature plant or as an understory shrub in a rainforest garden. The pale grass green leaves are a welcome change from dark greens as is the Gardenia scented flowers which fills the air when the trees are in flower. It makes an excellent large container plant for many years or look really great in very large courtyards where the foliage is relaxing and cooling.
It is best grown in the tropics and subtropics where it respond to the heat and reliable rainfalls. It is a cold sensitive plants and need protecting from all frosts. It can be induced to grow as a large shrub with regular pruning. In cultivation it will attain a height of around 2 meters to 3 meters by 1 meters to 2.5 meters wide when grow as a multi trunk large shrub.
Propagation:
Seeds: Atractocarpus chartaceus‘s seeds can be sown directly into the seed raising mix. Place the seed trays in a warm semi shaded place. When the seedlings are 40mm to 70mm tall, prick them out and plant them into 50mm native tubes using a seed raising mix.
Once the seedlings reach 200mm to 250mm in height plant them out into their permanent position. For mass plantings plant them at 8m to 10m centers for a rainforest of bank establishment projects or 8 meters apart for park land situations.
Fertilize using seaweed, fish emulsion or organic chicken pellets soaked in water on an alternate basis. Fertilize every two months until the plants are established then annually in early September to October to maintain health, vitality and better flowering.
Further comments from readers:
Hi reader, it seems you use The Bible of Botany a lot. That’s great as we have great pleasure in bringing it to you! It’s a little awkward for us to ask, but our first aim is to purchase land approximately 1,600 hectares to link several parcels of N.P. into one at The Pinnacles NSW Australia, but we need your help. We’re not salespeople. We’re amateur botanists who have dedicated over 30 years to saving the environment in a practical way. We depend on donations to reach our goal. If you donate just $5, the price of your coffee this Sunday, We can help to keep the planet alive in a real way and continue to bring you regular updates and features on Australian plants all in one Botanical Bible. Any support is greatly appreciated. Thank you.
In the spirit of reconciliation we acknowledge the Bundjalung, Gumbaynggirr and Yaegl and all aboriginal nations throughout Australia and their connections to land, sea and community. We pay our respect to their Elders past, present and future for the pleasures we have gained.
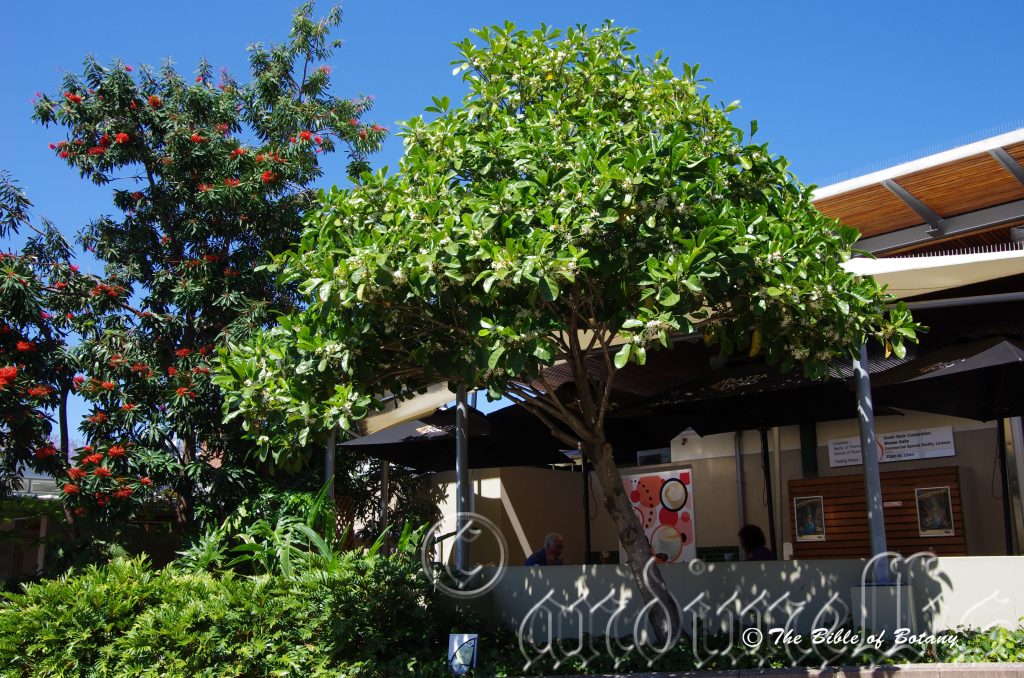
South Bank Brisbane Qld.
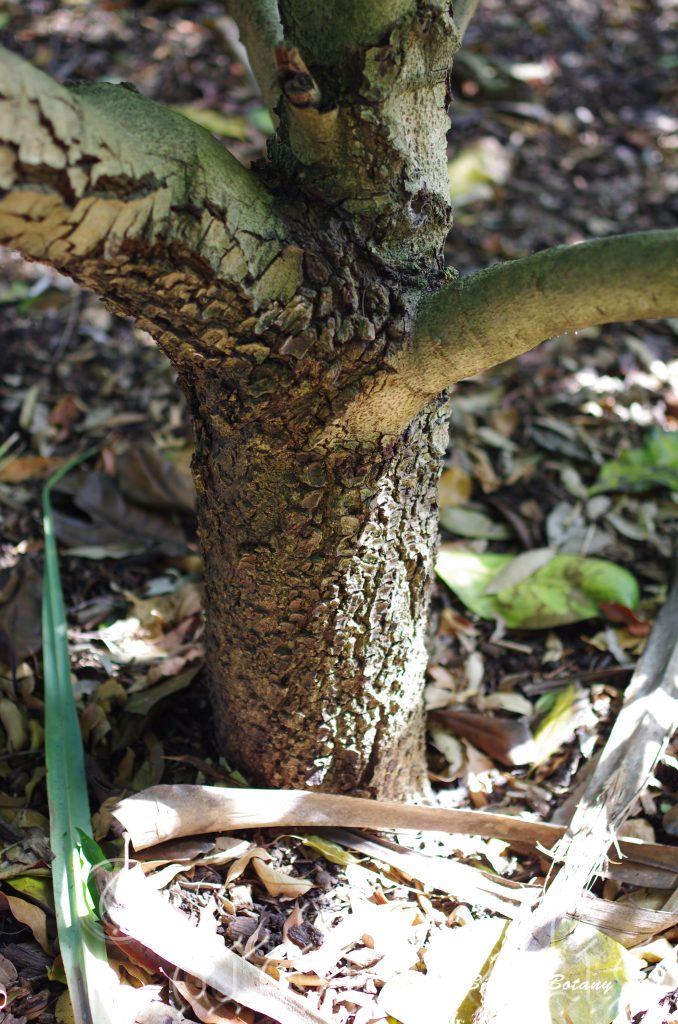
Mount Cootha Botanic Gardens Qld.
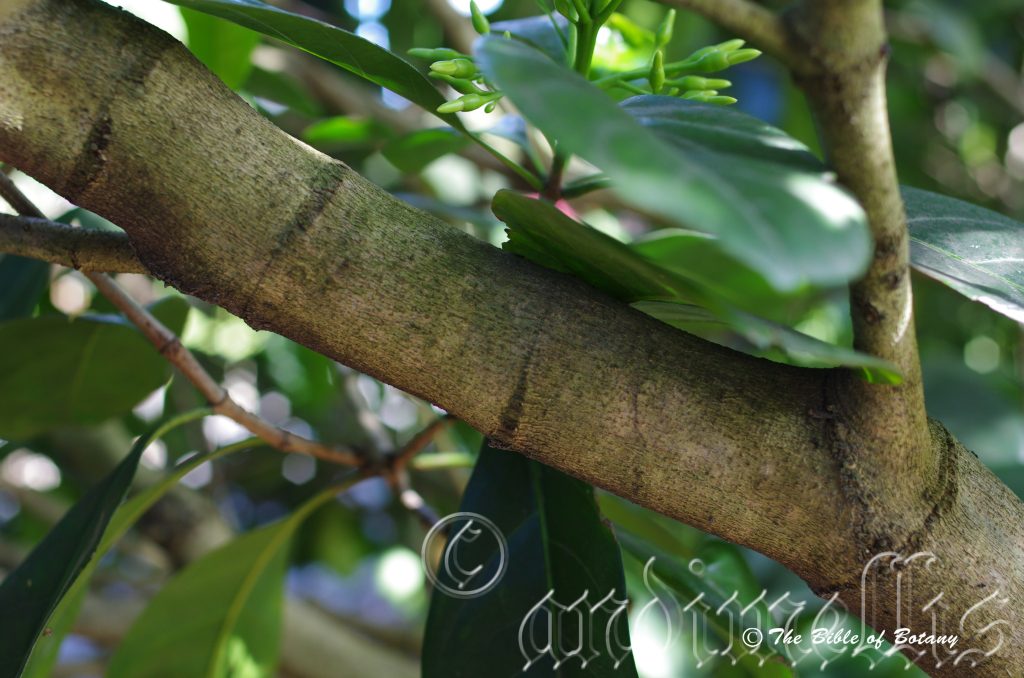
Mount Cootha Botanic Gardens Qld.
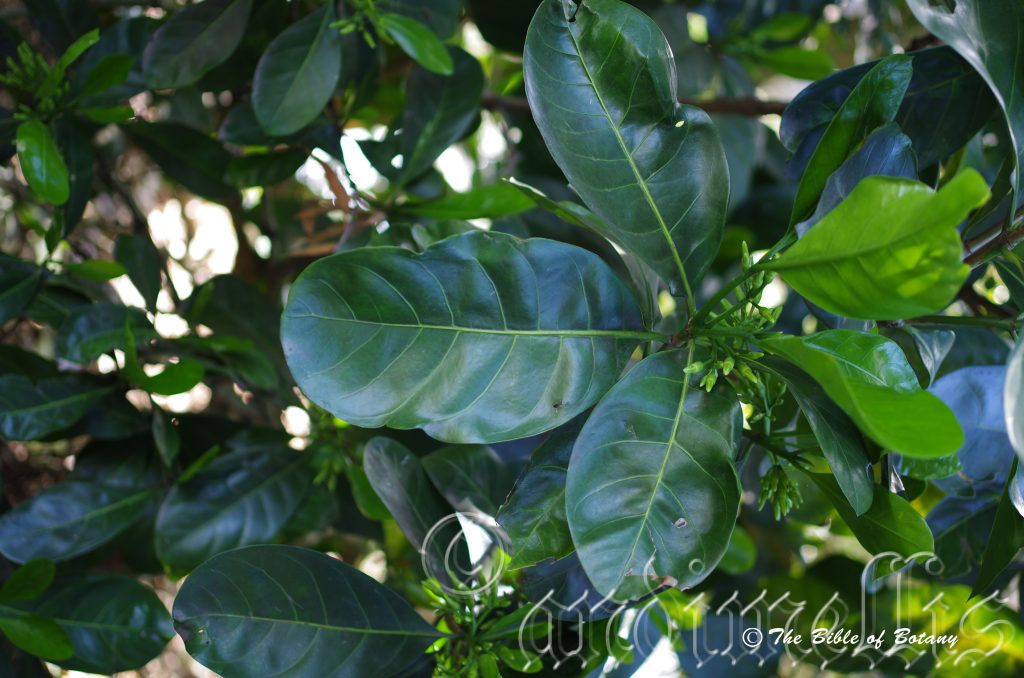
Mount Cootha Botanic Gardens Qld.
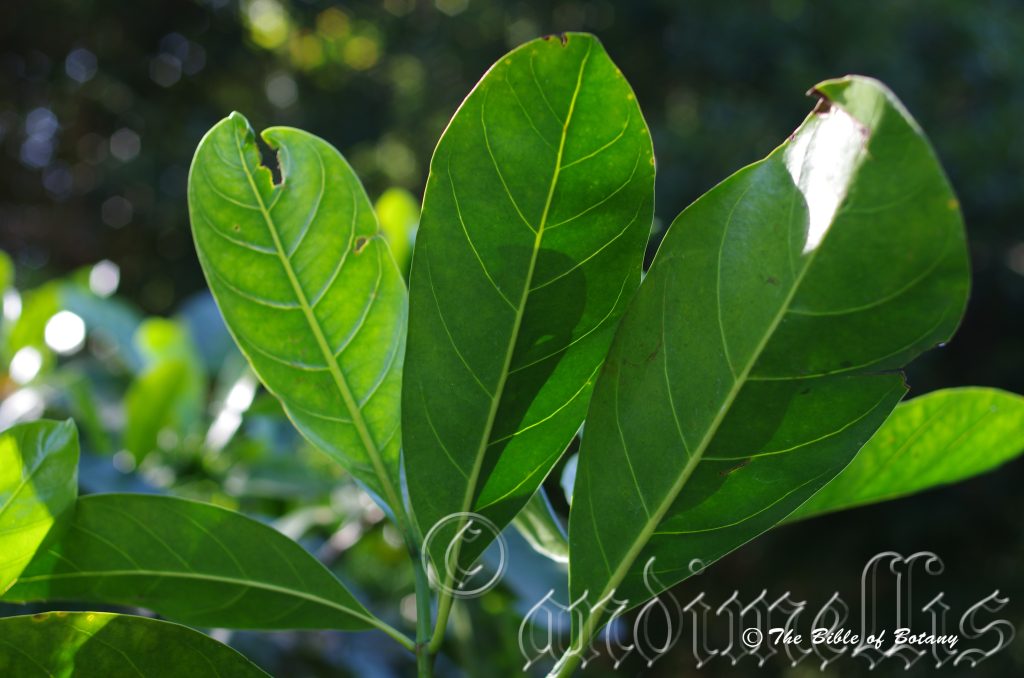
Mount Cootha Botanic Gardens Qld.
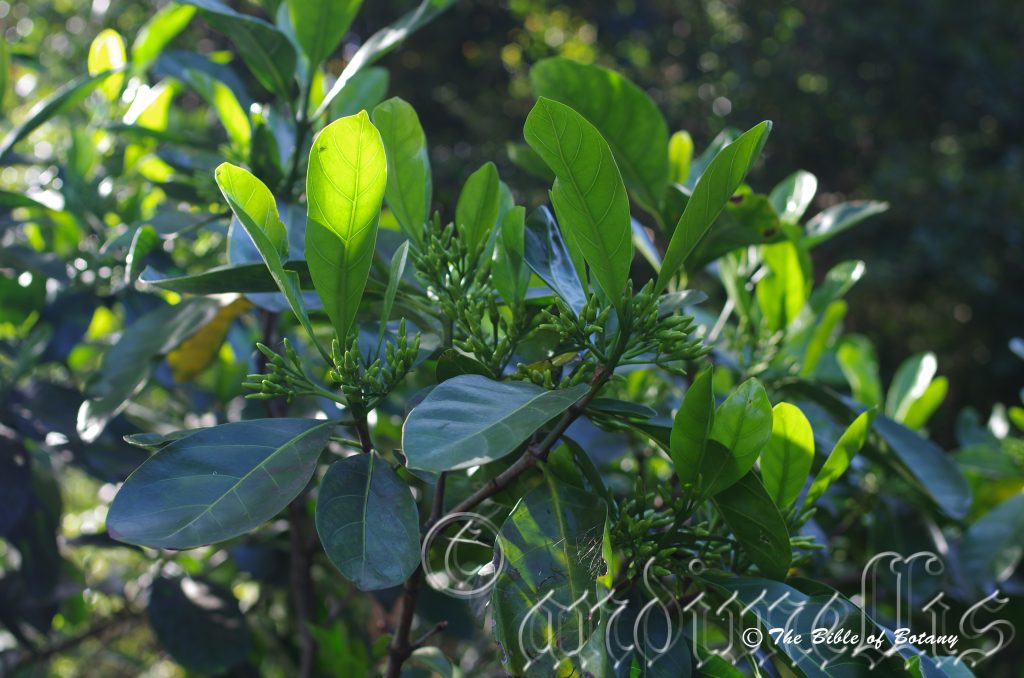
Mount Cootha Botanic Gardens Qld.
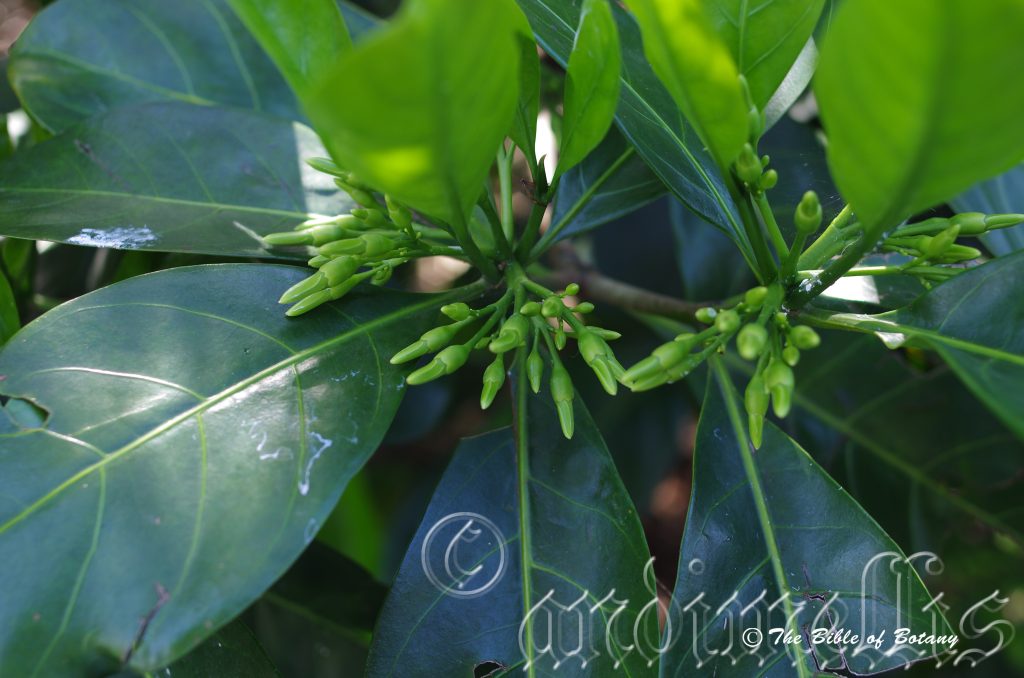
Mount Cootha Botanic Gardens Qld.
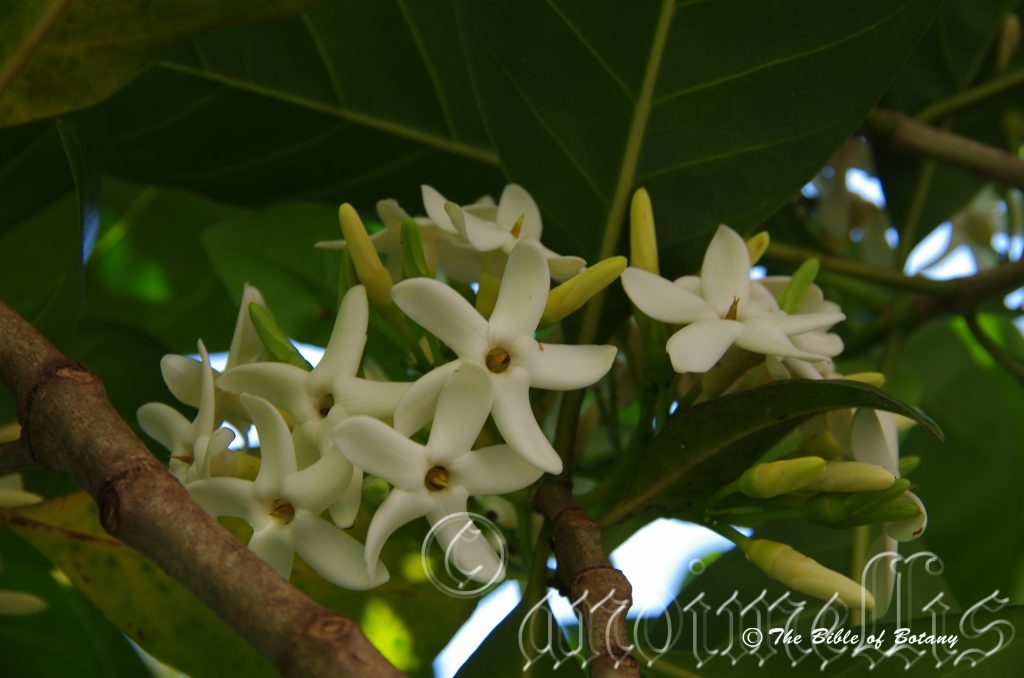
Mount Cootha Botanic Gardens Qld.
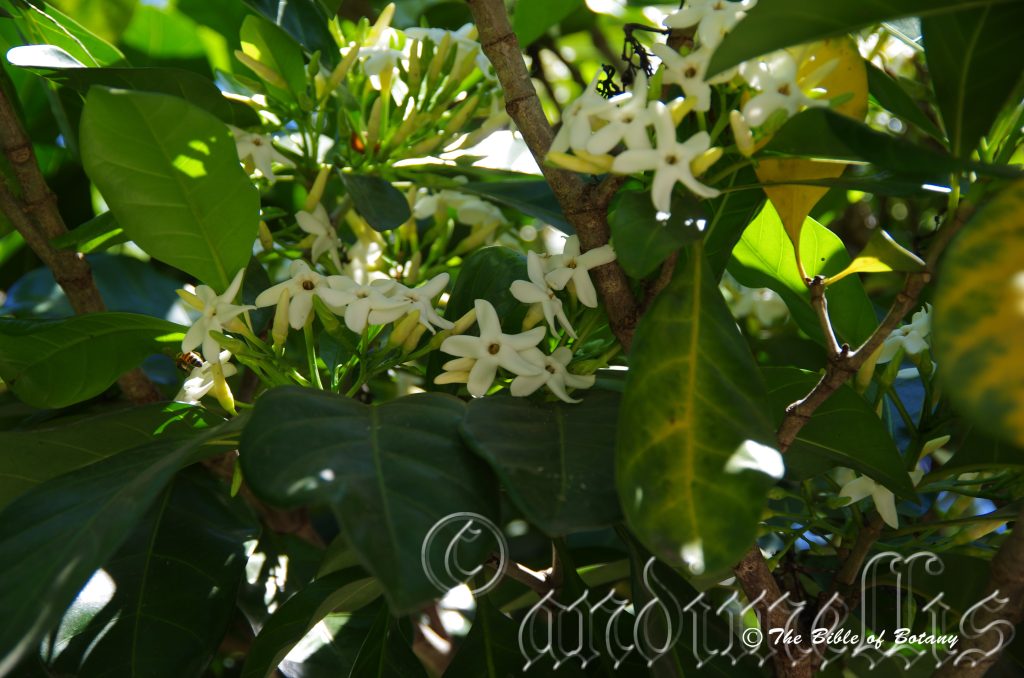
Mount Cootha Botanic Gardens Qld.
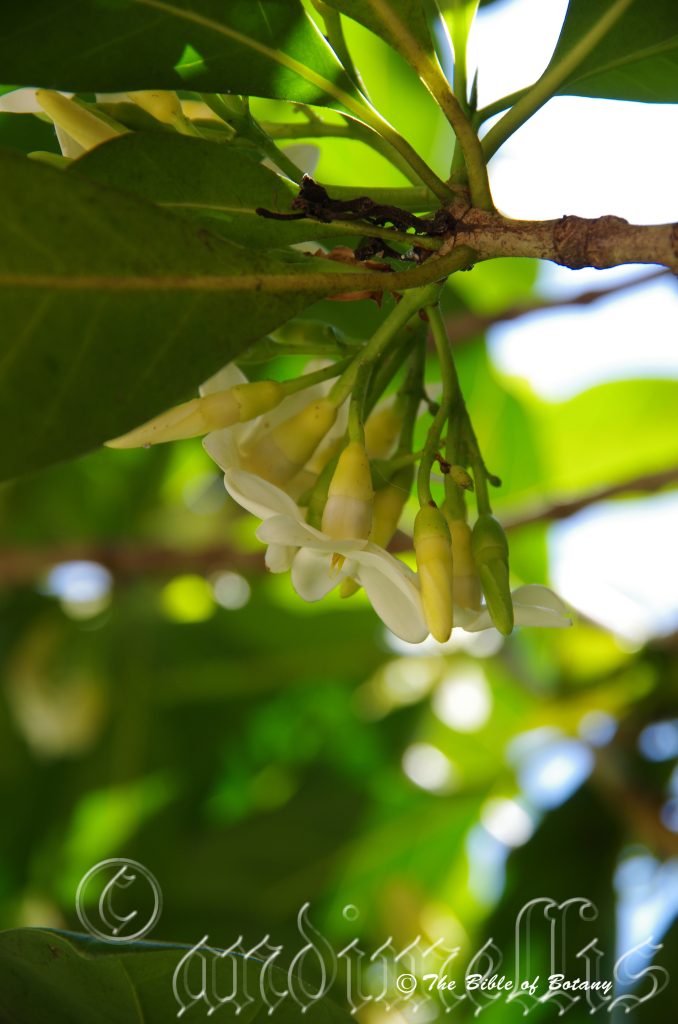
Mount Cootha Botanic Gardens Qld.
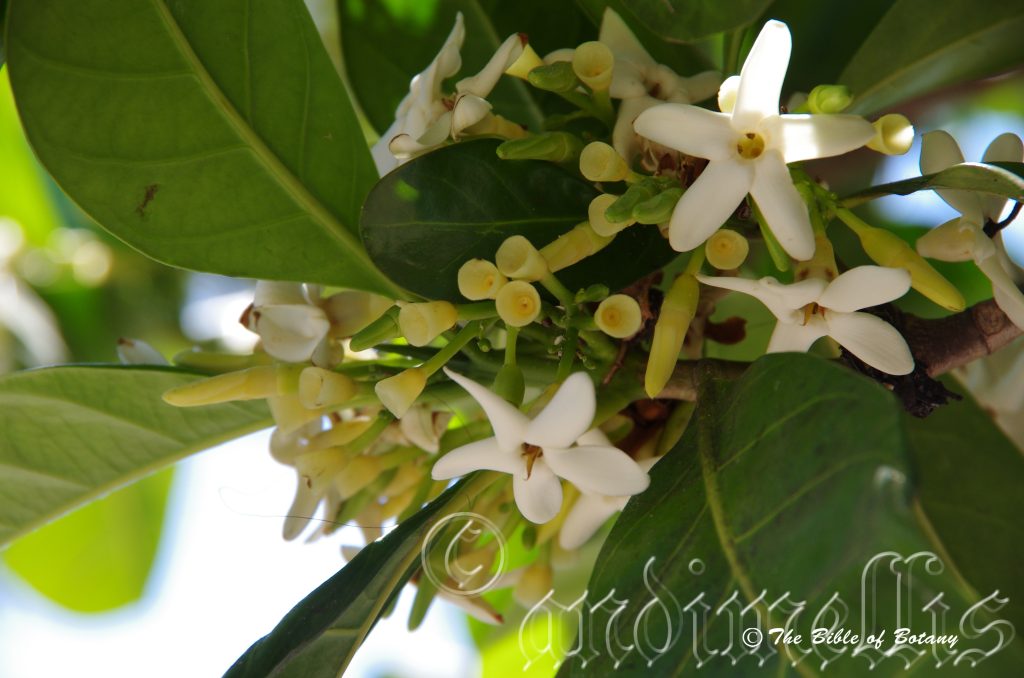
Mount Cootha Botanic Gardens Qld.
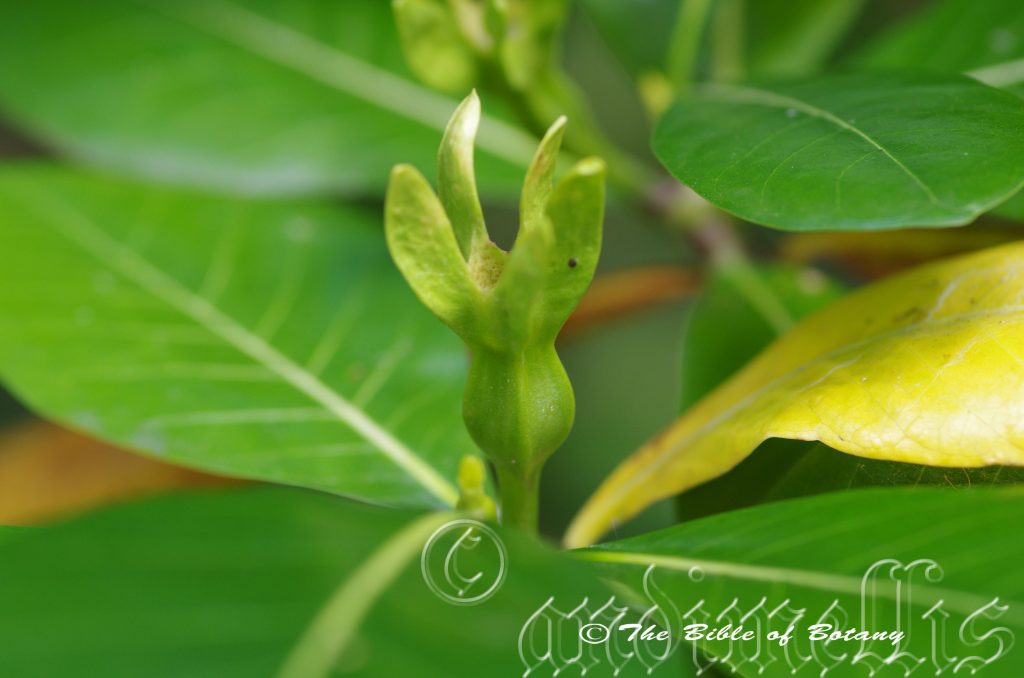
Mount Cootha Botanic Gardens Qld.
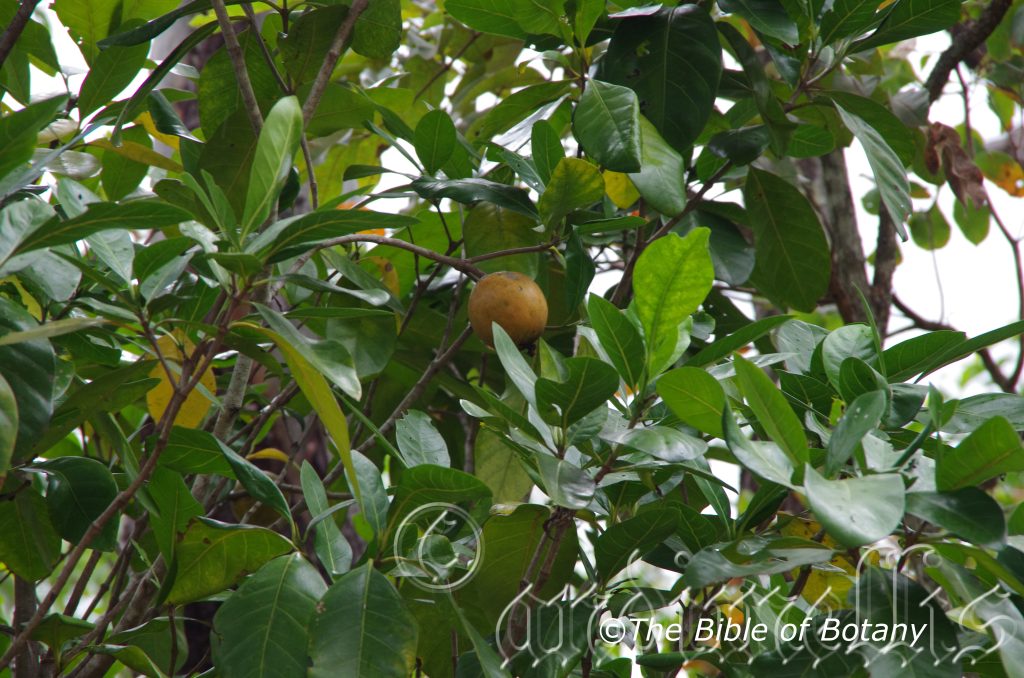
Paluma Range National Park Qld.
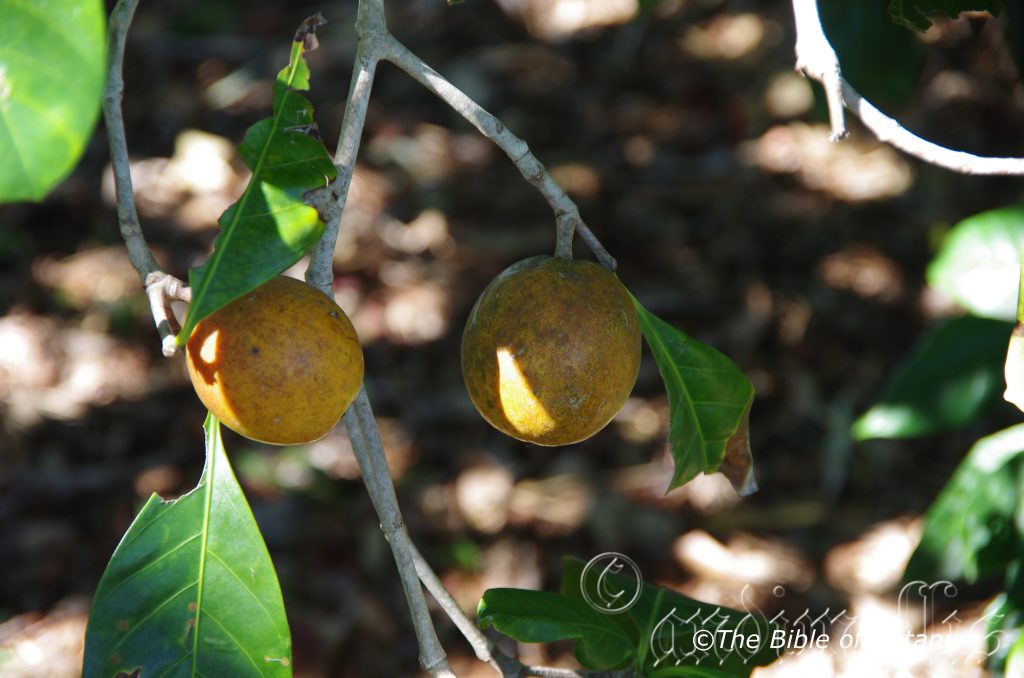
Paluma Range National Park Qld.
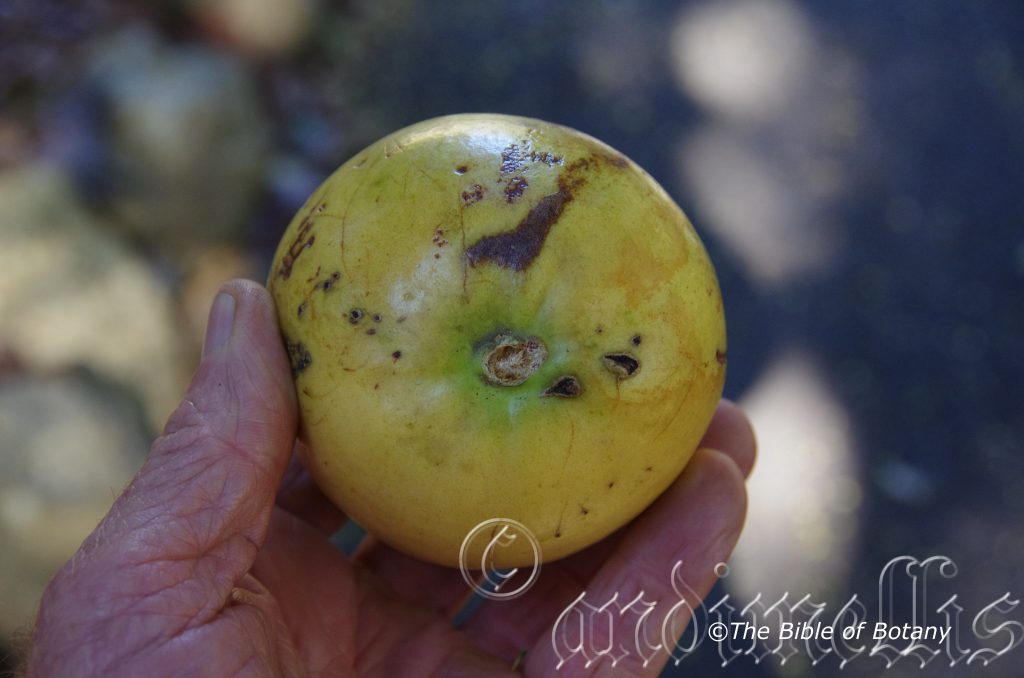
Mount Cootha Botanic Gardens Qld.
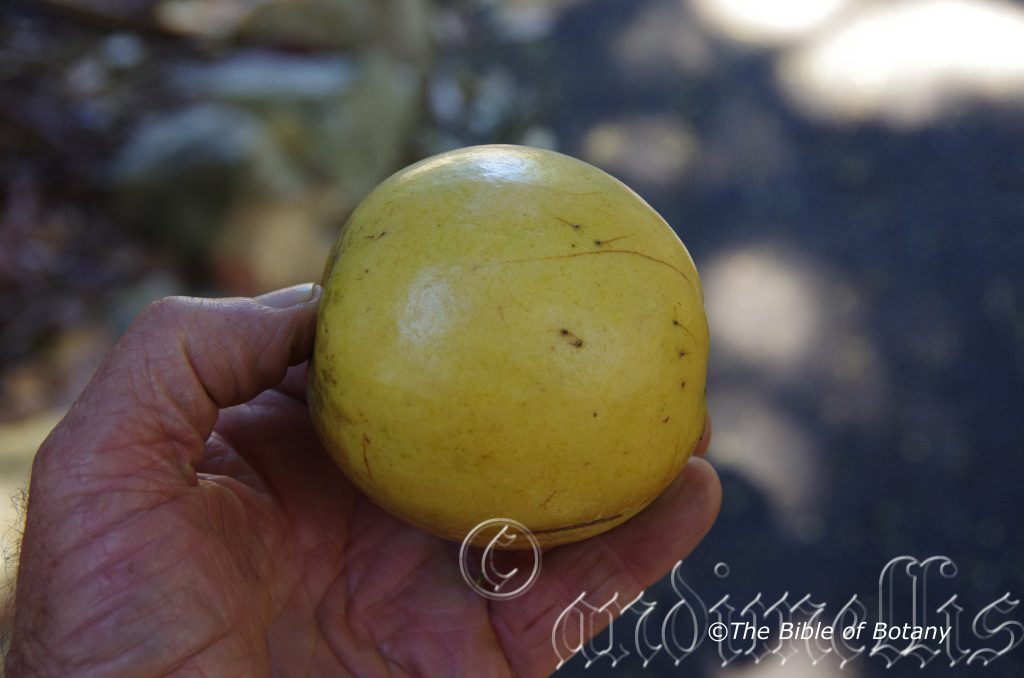
Mount Cootha Botanic Gardens Qld.
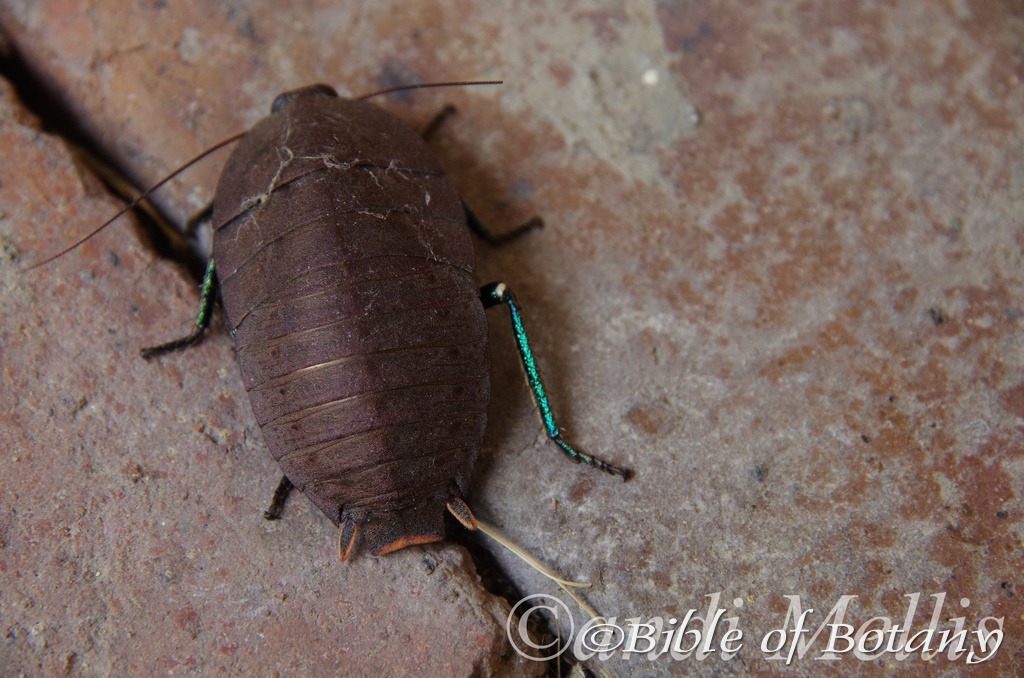
New species of Polyzosteria, Wood Roach discovered in Author’s Garden The Pinnacles NSW
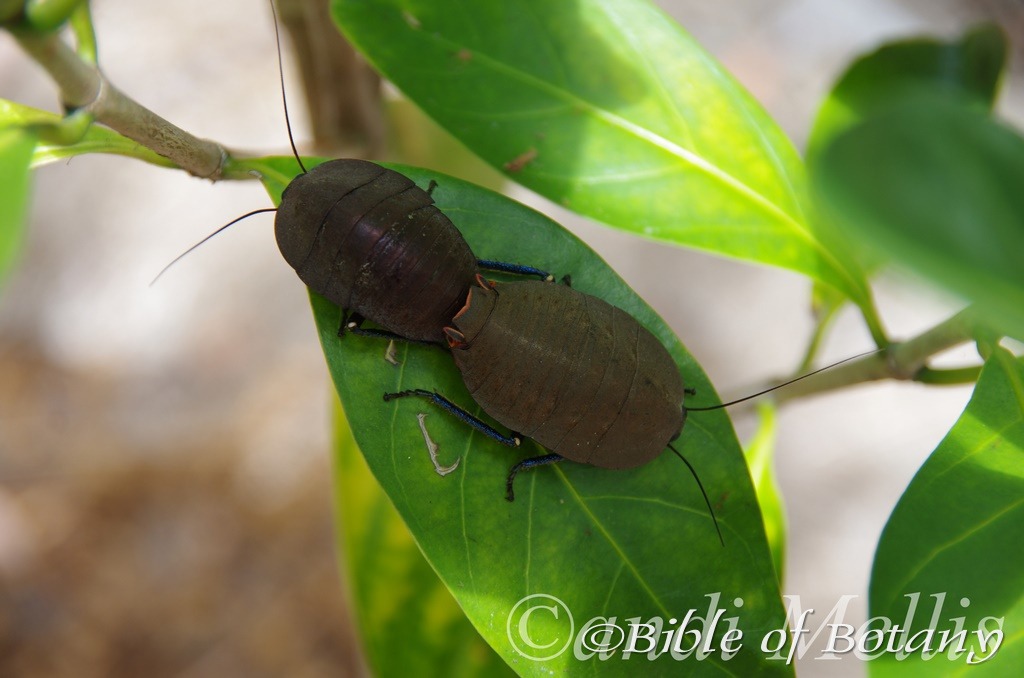
New species of Polyzosteria, Wood Roach discovered in Author’s Garden The Pinnacles NSW
Atractocarpus fitzalanii
Classification:
Class: Eudicots
Subclass: Asterids
Order: Gentianales
Family: Rubiaceae
Subfamily: Ixoroideae
Tribe: Gardenieae
Genus: From Actractivum which is Latin for attractive and Karpos, which is Ancient Greek for a fruit. It refers to fruits, which have a lovely appearance.
Species: Is named in honour of Eugene Fitzalan; 1830-1911, who was an Irish born Australian who collected many new specimens from Brisbane, north especially around the Burdekin District in Queensland.
Subspecies: Atractocarpus fitzalanii subspecies fitzalanii. Is named in honour of Eugene Fitzalan; 1830-1911, who was an Irish born Australian who collected many new specimens from Brisbane, north especially around the Burdekin District in Queensland.
Subspecies: Atractocarpus fitzalanii subspecies tenuipes. From Tanu, which is Ancient Greek or later Tenue, which is Latin for slender and fine and Pous, which is Ancient Greek or Pedi, which is Latin for a foot or feet. It refers to pedicels or petioles, which are rather slender.
Common Name: Native Gardenia or Brown Mangostene or Yellow Mangostene.
Distribution:
Atractocarpus fitzalanii subspecies fitzalanii is found south from the Monkhorse Timber Reserve to St Lawrence in coastal Queensland.
Atractocarpus fitzalanii subspecies tenuipes is found south from Port Douglas to Tulley in far North Queensland.
https://avh.ala.org.au/occurrences/search?taxa=Atractocarpus+fitzalanii#tab_mapView
Habitat Aspect Climate:
Atractocarpus fitzalanii prefers full shade to dappled shade. It grows in well-developed littoral rainforests, estuarine littoral rainforests, riverine rainforests, and monsoonal rainforests. Despite its varied habitats the tree is listed as vulnerable. The altitude ranges from 3 meters ASL to 800 meters ASL for Atractocarpus fitzalanii subspecies fitzalanii and 500 meters ASL to 1200 meters ASL for Atractocarpus fitzalanii subspecies tenuipes.
The temperatures range from 8 degrees in July to 36 degrees in January.
The rainfalls range from lows of 1750mm to 3200mm average per annum.
Soil Requirements:
Atractocarpus fitzalanii prefer deep, better quality loams, light fatty clays to medium clays. The soils are usually derived from decomposed granites. The soil’s pH ranges from 5pH to 6pH. It does not tolerate waterlogged soils. None saline soils to moderately saline soils are tolerated. None saline soils to medium saline soils are tolerated.
Height & Spread:
Wild Plants: 8m to 15m by 5m to 6m.
Characteristics:
Atractocarpus fitzalanii grows as a multi trunked small tree to 5 meters or as a single trunked tree to 12 meters. The bark is a dull light grey with darker farinaceous spots. Young branchlets first emerge green before turning a light glabrous brown.
Atractocarpus fitzalanii’s large obovate to broad lanceolate leaves are glabrous and measure 100mm to 200mm long by 50mm to 105mm wide. The petioles are glabrous, glossy and lack the scurfy scales of other members of the genus. The stipules do not leave a scar once discarded. The petioles measure 10mm to 20mm in length. The bases are rounded to cuneate while the apexes are broad acuminata to obtuse. The concolourous laminas are deep sea green, glabrous and semi glossy. The leaf margins are entire and curve slightly upwards from the midvein. Young leaves are a bright glossy lime green. The stipules are large oblong to lanceolate and measure 20mm to 30mm in length by 5mm to 9mm in width. The mid vein and main veins are prominent on the lower lamina and are distinctly visible from the upper lamina being paler or even yellow.
The Inflorescence Atractocarpus fitzalanii occur on separate trees being dioecious. The inflorescences are white and measure 25mm to 30mm in diameter. The calyx lobes are hemi orbicular and inconspicuous to less than 1mm in length. The pedicel measures 2mm to 15mm in length.
The calyx on the male flowers measures 2 to 15mm in length. The corolla tube of the male flowers measure 8mm to 10mm in length. The 5 lobe bases are contorted while the apex is acute. The lanceolate to elliptical lobes measure 13mm to 15mm in length by 6mm to 8mm in width at the widest point. The inserted anthers are white, sessile and measure 6mm to 7mm in length.
The calyx on the female flowers measures 5 to 6mm in length. The hypanthium measures 6mm to 7mm in length. The corolla tube of the female flowers measure 13mm to 15mm in length. The 5 lobe bases are contorted while the apex is obtuse. The lanceolate to elliptical lobes measure 18mm to 20mm in length by 9mm to 11mm in width at the widest point. The exserted pistil is white and measure 14mm to 18mm in length. The stigma measures 6mm to 9mm while the style measures 9mm to 12mm in length.
Both the male and female flowers are highly scented and appear from September to November.
Atractocarpus fitzalanii’s fruits are globular to ellipsoidal drupes. The drupes measure 60mm to 70mm in length by 35mm to 95mm in width. The grass green fruits ripen from April to May and turn to a creamy yellow green to yellow. The calyx is persistent on the apex. The pedicel measures 10mm to 15 mm. The ovoid, flattened seeds measure 8mm in length by 6.5mm to 7mm in diameter and 5mm in depth.
Wildlife:
Atractocarpus fitzalanii is the host to numerous butterflies when in flower. Native bees also visit the trees during flowering. Cat birds, the Regent Bower Bird, Cassowary are some of the birds which are attracted to the ripe fruits.
The flowers and fruits are edible.
Back in October 2017 I discovered a new species of wood roach on the block second last photo. I have only seen it on two more occasions until this morning. Grabbed the camera as I new they weren’t going anywhere; in a hurry, this time and settled in for a little pornographic photography of the pair. Totally oblivious to me, the Polyzosteria sp. were on the leaf of Atractocarpus fitzalanii. It made me feel good as I knew the garden had not interfered with its life cycle. Hopefully their numbers will increase to a sustainable level. Note the bright iridescent blue-green legs. A great start to my new Year.
Unfortunately the introduced house cockroach has given the local garden species a bad name. Our native species are not vectors of any disease, or haunt garbage for food’ which can affects humans. They can be found in virtually all terrestrial habitats in Australia. Native cockroaches are present, tropical rain forests, woodlands arid mallees and temperate forests. Even some caves are host to a specialised pale blind and wingless species of cockroaches. There are no aquatic species known.
Most native species are nocturnal, while some are diurnal feeding amongst the foliage of native trees. Native cockroaches are an important part of the food web in many natural habitats, being eaten by invertebrates as well as mammals, frogs and reptiles. To repel predators, some species produce a pungent smell. Some of the wood eating cockroaches also play an important role as decomposers.
Cultivation:
It would make an good fire retardant large shrub or small to medium tree.
* Fire retardant plants act as radiant heat screens and absorb more heat from an approaching fire without burning.
* Fire retardant trees are able reduce wind speed near a house or out buildings.
* Fire retardant also trap embers and sparks carried by the wind.
* Fire retardant ground covers are able to catch burning embers without catching fire themselves, and also slow the travel of a fire through debris and litter on the ground.
Atractocarpus fitzalanii is a beautiful small tree or large shrub that looks great in the garden as a feature plant or in the center of a small rainforest garden. The large glossy leaves are a welcome change from dark greens as is the Gardenia scent which carries afar when the trees are in flower. They make an excellent large container plant for many years or look really great in very large courtyards where the foliage is relaxing and cooling. Atractocarpus fitzlanii look good along small creek banks or artificial creeks.
It grows very well as far south as Coffs Harbour. Atractocarpus fitzalanii is very frost sensitive so if frosts are encountered select another tree for the site. It should be more widely grown with in temperate areas of Australia that are frost free. It be slightly tipped pruned annually to increase bushiness and flowering after fruit has been harvested. If mild native fertilizers are used it will develop rather glossy grass-green leaves and the likelihood of better quality and greater fruit set could be achieved in the following season.
It is one of the best scented flowering natives on the market but give it the room to reach its full potential. Trimmed plants for trees will grow from 12 meters to 16 meters tall by 4 meters to 6 meters in diameter while shrubs grown as a rainforest specimen will attain 4 meters to 6 meters in height by 4 meters to 6 meters in diameter. The tree’s trunks would be suitable for growing epiphytic ferns and orchids.
Propagation:
Seeds: Atractocarpus fitzalanii‘s seeds can be sown directly into a seed raising mix. They need to be covered to a depth of 10mm and watered thoroughly keeping moist to promote rapid germination and to avoid killing the new seedlings.
When the seedlings are 30mm to 50mm tall, prick them out and plant them into 50mm native tubes using a seed raising mix.
Once the seedlings reach 150m to 200mm in height plant them out into their permanent position. When planting along creek banks or as screens or as a rainforest tree plant them at 7 meter to 9 meter centers. Plant them much wider when a specimen tree is required or where the scented flowers is the main focus.
Fertilize using seaweed, fish emulsion or organic chicken pellets soaked in water on an alternate basis. Fertilize every two months until the plants are established then annually in early September to October to maintain health, vitality and better flowering.
Further comments from readers:
Hi reader, it seems you use The Bible of Botany a lot. That’s great as we have great pleasure in bringing it to you! It’s a little awkward for us to ask, but our first aim is to purchase land approximately 1,600 hectares to link several parcels of N.P. into one at The Pinnacles NSW Australia, but we need your help. We’re not salespeople. We’re amateur botanists who have dedicated over 30 years to saving the environment in a practical way. We depend on donations to reach our goal. If you donate just $5, the price of your coffee this Sunday, We can help to keep the planet alive in a real way and continue to bring you regular updates and features on Australian plants all in one Botanical Bible. Any support is greatly appreciated. Thank you.
In the spirit of reconciliation we acknowledge the Bundjalung, Gumbaynggirr and Yaegl and all aboriginal nations throughout Australia and their connections to land, sea and community. We pay our respect to their Elders past, present and future for the pleasures we have gained.
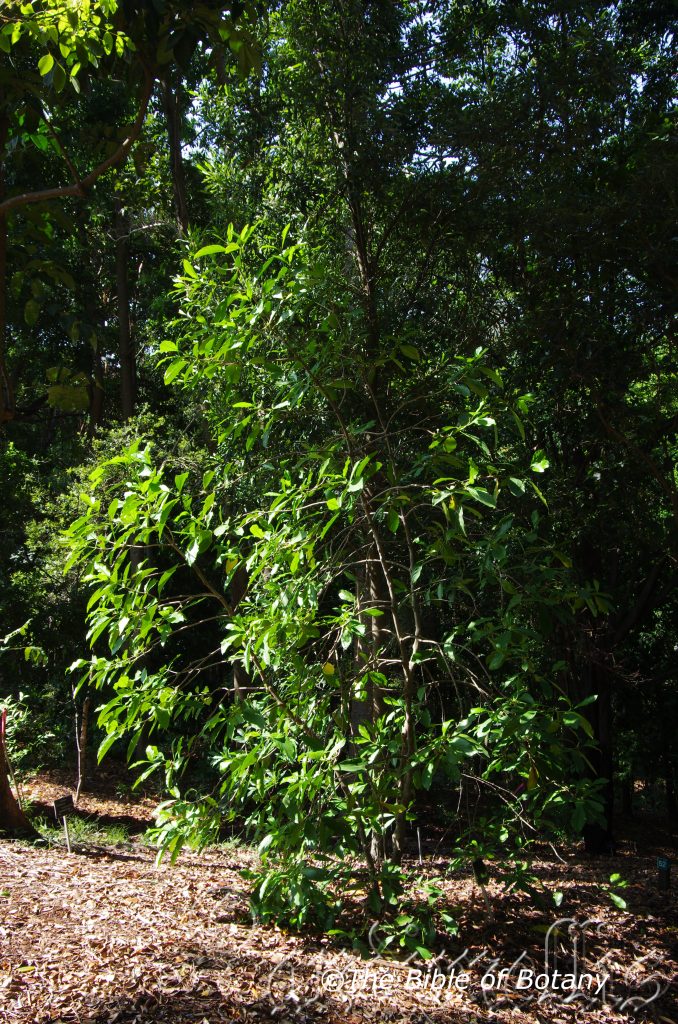
Mount Cootha Botanic Gardens Qld.
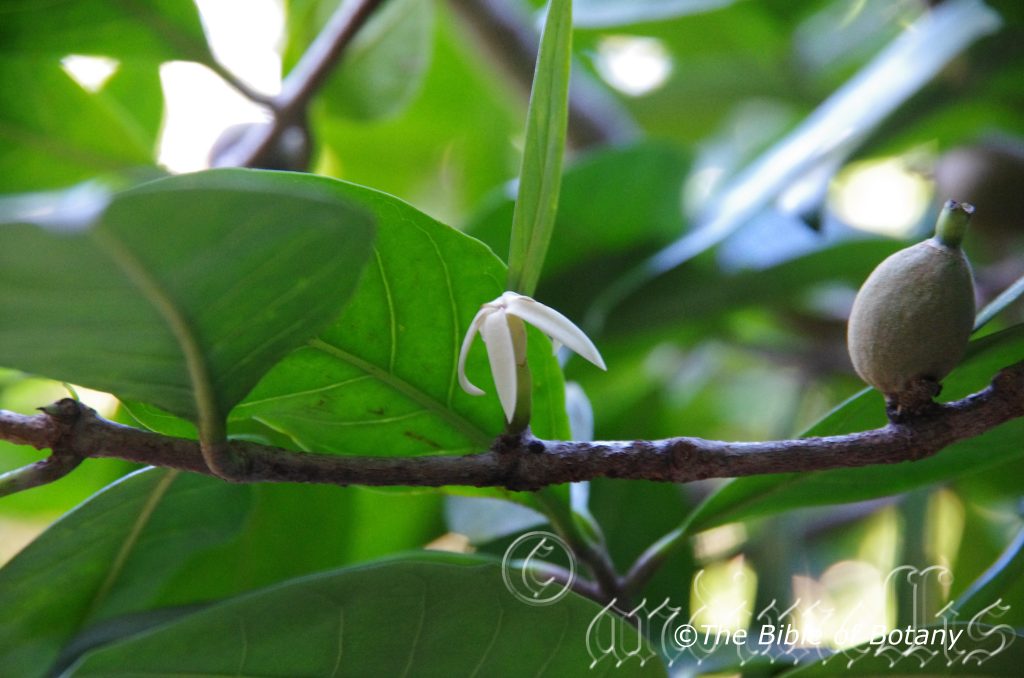
Mount Cootha Botanic Gardens Qld.
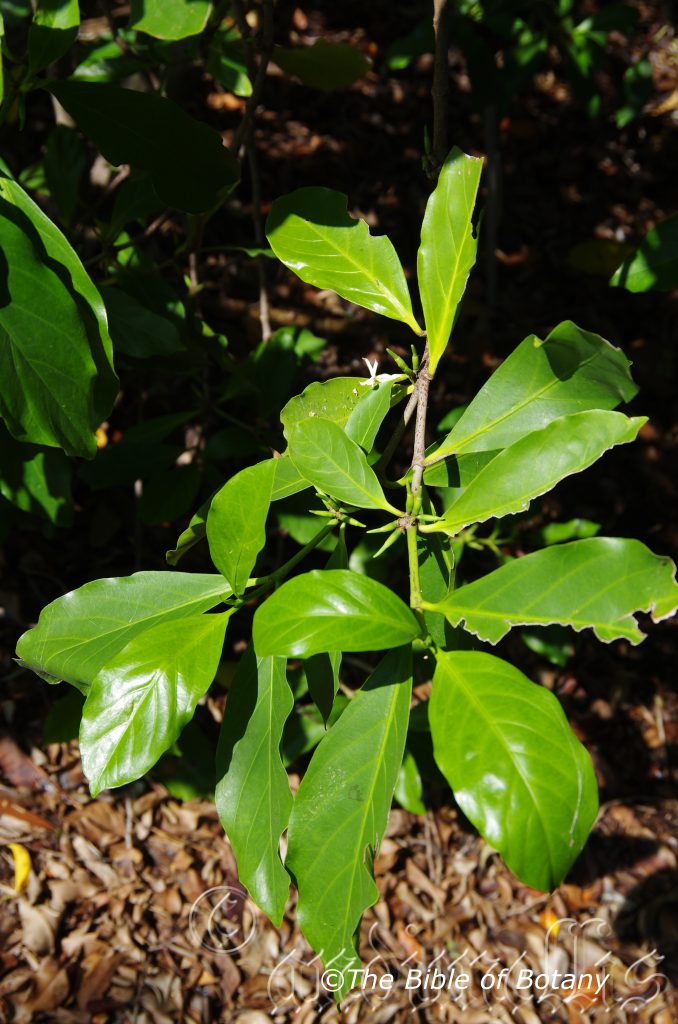
Mount Cootha Botanic Gardens Qld.
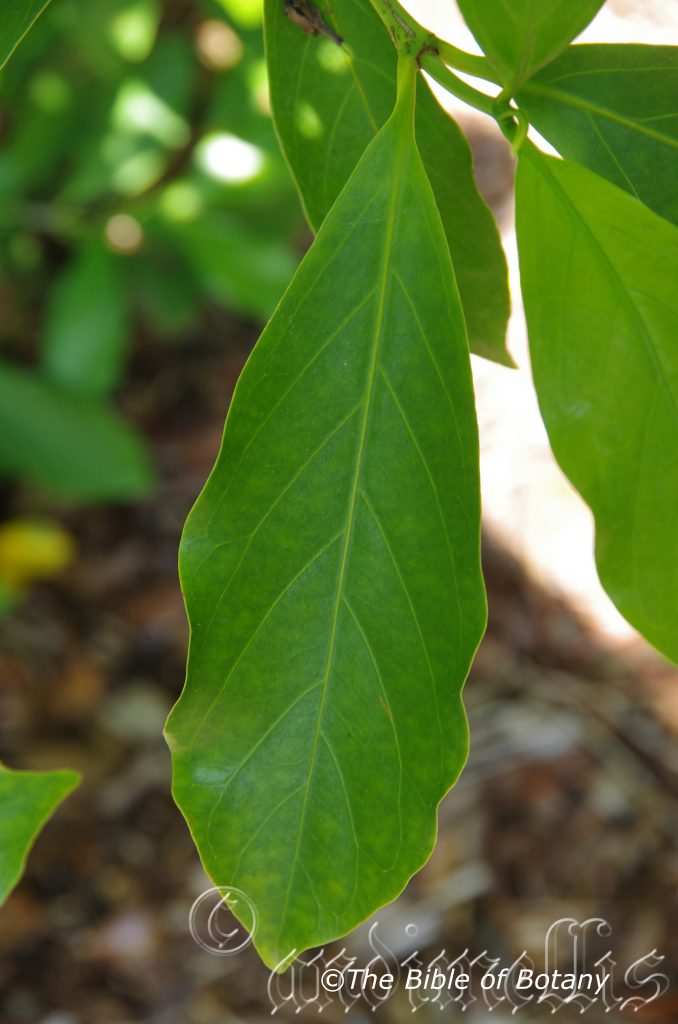
Mount Cootha Botanic Gardens Qld.
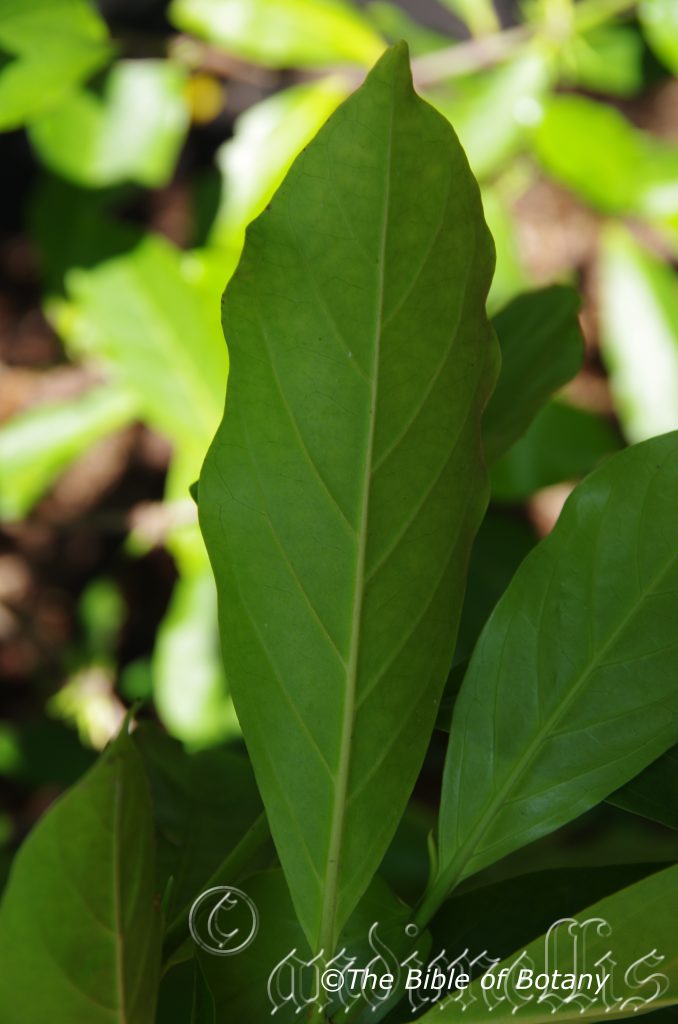
Mount Cootha Botanic Gardens Qld.
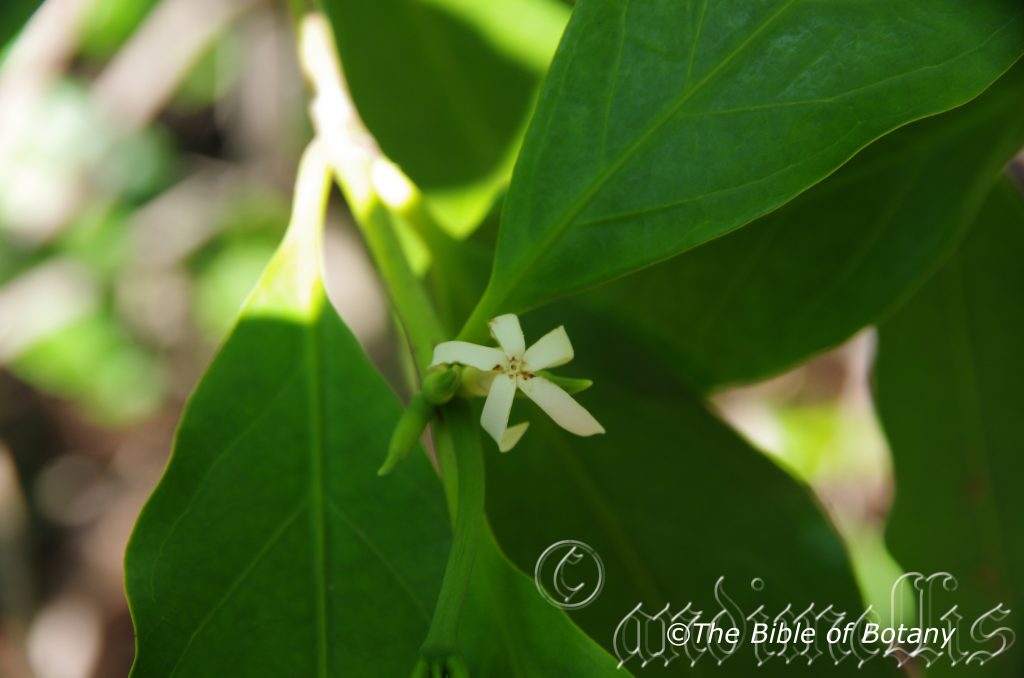
Mount Cootha Botanic Gardens Qld.
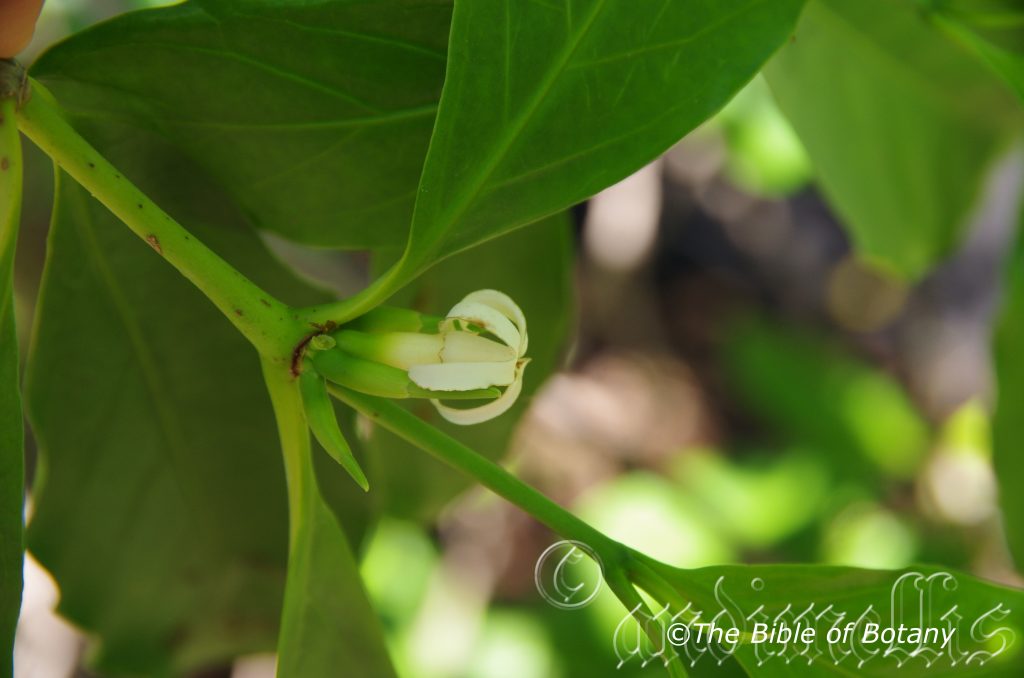
Mount Cootha Botanic Gardens Qld.
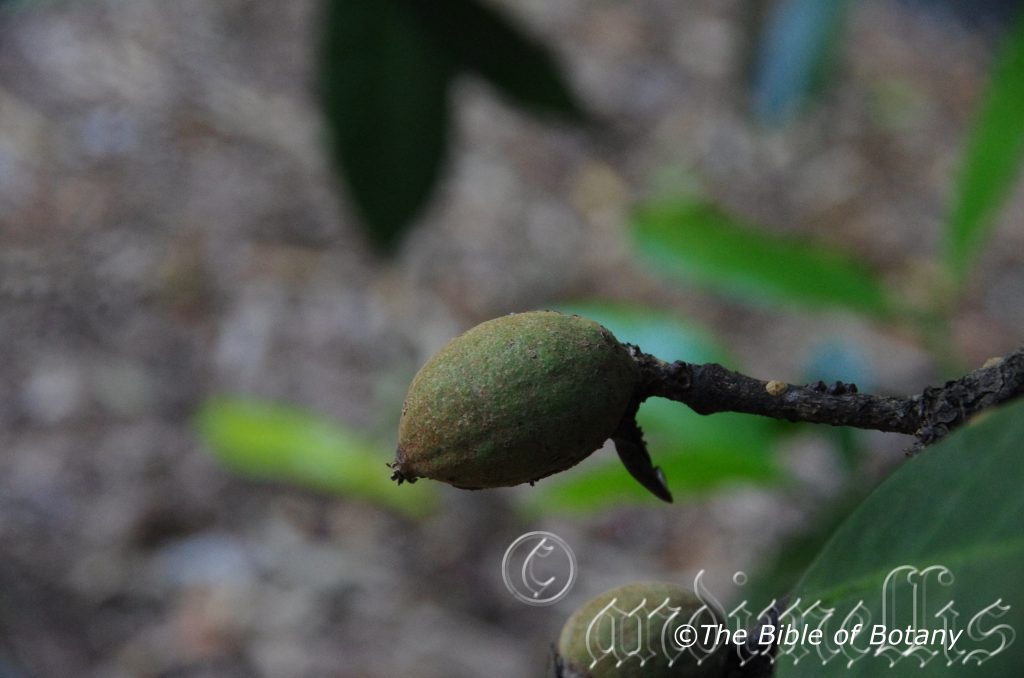
Mount Cootha Botanic Gardens Qld.
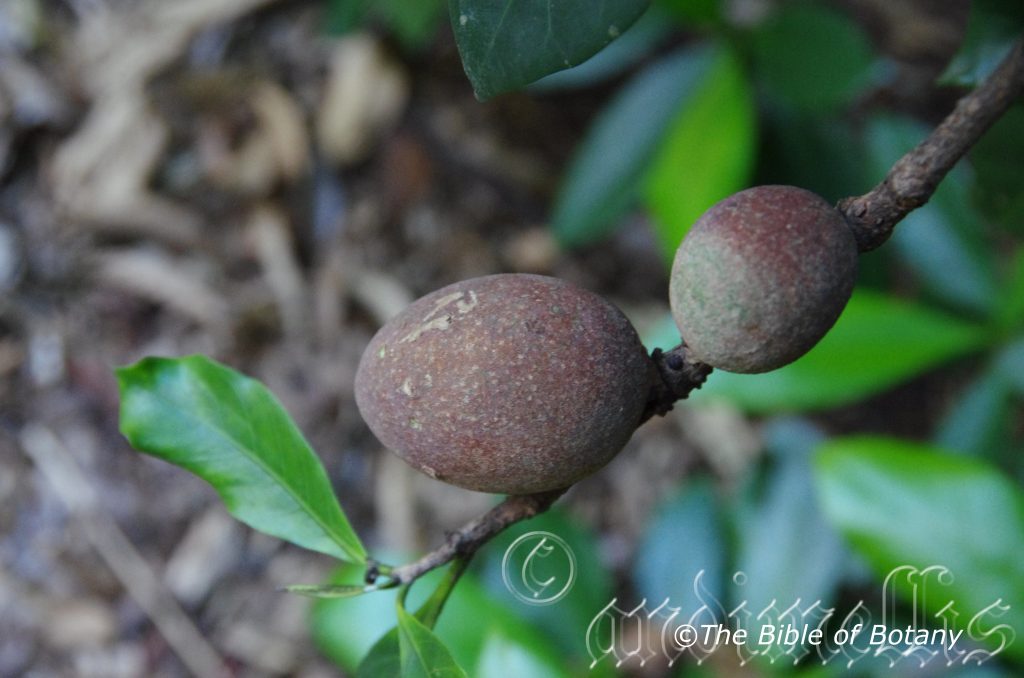
Mount Cootha Botanic Gardens Qld.
Atractocarpus sessilis
Classification:
Unranked: Magnoliophyta
Class: Magnoliopsida
Order: Fabales
Family: Fabaceae
Genus: From Actractivum which is Latin for attractive and Karpos, which is Ancient Greek for a fruit. It refers to fruits, which have a lovely appearance.
Species: From Sessilis, which is Latin for to sit on. It refers to an organ usually the leaves or flowers, which do not have a stalk.
Common Name: Native Gardenia.
Distribution:
Atractocarpus sessilis is found south from the tip of Cape York Peninsula to Townsville in far north Queensland. It is found on the east side of the Great Dividing Range.
https://avh.ala.org.au/occurrences/search?taxa=Atractocarpus+sessilis#tab_mapView
Habitat Aspect Climate:
Atractocarpus sessilis prefers full sun to dappled shade. It grows in low land rainforests, riverine wet Eucalyptus forests, sub-tropical rainforests or monsoonal forests. The altitude ranges from 5 meters ASL to 550 meters ASL.
The temperatures range from 10 degrees in July to 38 degrees in January.
The rainfalls range from lows of 1500mm to an average of 3200mm annually.
Soil Requirements:
Atractocarpus sessilis prefers better quality, deep, sandy loams, light fatty clays to medium clays. The soils are usually derived from decomposed black basalts. The soil’s pH ranges from 5pH to 6.5pH. It does not tolerate waterlogged soils. None saline soils to moderately saline soils are tolerated. None saline soils to moderately saline soils are tolerated.
Height & Spread:
Wild Plants: 8m to 25m by 5m to 12m.
Characteristics:
Atractocarpus sessilis’s deep grey to black bark is glabrous to scabrous and often covered in lichens and mosses. Large trees have a small buttress and a trunk diameter up to 300mm in diameter. Branches are glabrous, pale grey to deep grey and black. Juvenile branchlets are mid green glabrous and sparsely covered in short white pubescent hairs. The juvenile branchlets end with a pair of oblong stipules which measure 15mm to 20mm in length by 3.5mm to 4.5mm wide. The stipules spirally twist while the apex is narrow acute. The stipules are sparsely covered in short pubescent hairs externally. The discarded stipules leave a raised scar.
Atractocarpus sessilis’s ovate to broad elliptical leaves measure 100mm to 225mm in length by 30mm to 120mm in width. The petioles measure 3mm to 5mm in length. The scurfy petioles measure 5mm to 17mm in length. The concolourous leaves are mid green to deep glossy green. The leaf margins are entire. The base is cuneate to cuneate-round, symmetrical or slightly oblique while the apex is broadly acuminate. The main vein is prominent on both laminas.
The sessilis inflorescence of Atractocarpus sessilis are born singularly to 6 in the leaf axils. They occur on separate trees being dioecious. The inflorescences are white and measure 25mm to 30mm in diameter. The calyx lobes are inconspicuous. The deep green calyx turns to pale green and eventually white as it approaches the apex and measures 9mm to 10mm long. The corolla tubes measure 9mm to 12mm in length. The 5 lobe bases are contorted while the apex is narrow acute. The lanceolate lobes measure 14mm to 16mm in length by 4.5mm to 6.5mm in width at the widest point. The lobes are strongly recurved back onto the corolla tube.
The inserted stamens are white.
The exserted pistil is white and measure 10mm to 111mm in length. The stigma measures 1mm in length. The flowers are highly scented and appear from September to November.
Atractocarpus sessilis‘s scurfy fruits are ellipsoidal to ovoid fleshy berries. It is ellipsoidal to ovoid, scurfy and measure 45mm to 60mm long by 40mm to 50mm wide. The berries ripen to a dull purple-brown from mid-summer to autumn. The calyx swells and is persistent on the ripe fruits. The inner flesh is a creamy white and edible.
The turgid, reniform seeds measure 5mm to 6mm in length by 5.5mm to 7mm in width. The seeds are creamy fawn in colour.
Wildlife:
The only reports I have besides the fruits being eaten raw by aborigines. Cribb & Cribb wild food of Australia is that of the Cassowary Casuarius casuarius. I would however think that the fruits would be attractive to tree kangaroos, possums and other large fruit eating birds.
The taste is similar to a guava crossed with Monstera deliciosus and has a similar irritation to that of Monstera deliciosus for a short period.
Cultivation:
It would make an good fire retardant large shrub or small to medium tree.
* Fire retardant plants act as radiant heat screens and absorb more heat from an approaching fire without burning.
* Fire retardant trees are able reduce wind speed near a house or out buildings.
* Fire retardant also trap embers and sparks carried by the wind.
* Fire retardant ground covers are able to catch burning embers without catching fire themselves, and also slow the travel of a fire through debris and litter on the ground.
Atractocarpus sessilis is an interesting subject for small to large gardens in tropical and subtropical areas. It is a beautiful small tree or large shrub that looks great in the garden as a feature plant or in the center of a small rainforest garden. The large glossy leaves are a welcome change from dark greens as is the Gardenia scented flowers which fills the air when the trees are in flower. It makes an excellent large container plant for many years.
The tree is a good host for small and large epiphytic plants. Trees in their native habitats are ideal for all small and large epiphytic plants.
It is best grown in the tropics and subtropics where it responds to the heat and reliable rainfalls. It is cold sensitive plants and need protecting from all frosts. It can be induced to grow as a large shrub with regular pruning. In cultivation it will attain a height of around 12 meters to 15 meters by 6 meters to 8 meters wide when grow as a multi trunk large shrub. If it is pruned as a shrub growing in the open it may grow to 6 meters to 8 meters and spread up to 6 meters to 7 meters in diameter. This tree makes an excellent park tree with its large glossy green leaves and looks good at the edge of a rainforest garden setting. It can also be used effectively in small yards to create a small micro climate for understory rainforest plants.
Propagation:
Seeds: Atractocarpus sessilis‘s seeds can be sown directly into the seed raising mix. Place the seed trays in a warm semi shaded place. When the seedlings are 40mm to 70mm tall, prick them out and plant them into 50mm native tubes using a seed raising mix.
Once the seedlings reach 200mm to 250mm in height plant them out into their permanent position. For mass plantings plant them at 8m to 10m centers for a rainforest of bank establishment projects or 8 meters apart for park land situations.
Fertilize using seaweed, fish emulsion or organic chicken pellets soaked in water on an alternate basis. Fertilize every two months until the plants are established then annually in early September to October to maintain health, vitality and better flowering.
Further comments from readers:
Hi reader, it seems you use The Bible of Botany a lot. That’s great as we have great pleasure in bringing it to you! It’s a little awkward for us to ask, but our first aim is to purchase land approximately 1,600 hectares to link several parcels of N.P. into one at The Pinnacles NSW Australia, but we need your help. We’re not salespeople. We’re amateur botanists who have dedicated over 30 years to saving the environment in a practical way. We depend on donations to reach our goal. If you donate just $5, the price of your coffee this Sunday, We can help to keep the planet alive in a real way and continue to bring you regular updates and features on Australian plants all in one Botanical Bible. Any support is greatly appreciated. Thank you.
In the spirit of reconciliation we acknowledge the Bundjalung, Gumbaynggirr and Yaegl and all aboriginal nations throughout Australia and their connections to land, sea and community. We pay our respect to their Elders past, present and future for the pleasures we have gained.
Atriplex nummularia
Classification:
Class: Magnoliophyta
Order: Caryophyllales
Family: Amaranthaceae
Subfamily: Chenopodioideae
Genus: From Atriplexum, which is Ancient Greek for a saltbush. It refers to plants, which have rather saline environments around salt lakes, estuaries and coastlines.
Species: From Nummuli, which is Latin for peticash or a coin. It refers to leaves, which resemble silver coins in shape and colour.
Common Name: Old Man Saltbush.
Distribution
Atriplex nummularia is found in all states except Tasmania. Its distribution in Victoria is along the Murray River. It thrives in arid and semi-arid areas of inland Australia. It is possible that Atriplex nummularia is found continuously throughout the inland areas of Australia.
https://avh.ala.org.au/occurrences/search?taxa=Atriplex+nummularia #tab_mapView
Habitat Aspect Climate:
Atriplex nummularia prefers full sun in drier habitats. It grows in the open woodlands and savannah grasslands in semi-arid regions to deserts. It forms large colonies around saline clay pans. The altitude ranges from 50 meters ASL to 450 meters ASL.
The temperatures range from minus 5 degrees in July to 44 degrees in January.
The rainfalls range from lows of 120mm to an average of 600mm annually.
Soil Requirements:
Atriplex nummularia prefers medium to heavy clays including limestones and saline clay pans. Occasionally found on sand where rainfall is greater than 400mm. The soils are derived from decomposed sandstone or granites or at times accumulated dune sands. The soils pH ranges from 6pH to 8pH. It does not intolerant waterlogged soils. None saline soils to the high end of very saline soils are tolerated.
Height & Spread:
Wild Plants: 1m to 3m by 1m to 4m.
Characteristics:
Atriplex nummularia is a very variable species with the main stems being rusty brown furrowed or vertically flaky. The smaller stems and juvenile branchlets are smoky grey or pinkish-grey to pink, glaucous, glabrous and covered in a blue grey waxy coating. It is held erect.
The leaves are obovate, broad ovate to circular, almost hastate, or at times almost oblong. The leaves measure 15mm to 30mm in length by 15mm to 28mm in width. The petiole measures 3mm to 8mm in length. It is thick leathery glabrous or sparsely to densely covered in resinous or farinaceous lumps. The concolourous leaves are blue grey or pale green-blue and covered in a waxy coating on juvenile leaves. The bases are slightly hastate to round to cuneate while the apexes are mucronate, obtuse, broad acute to broadly acuminate. The margins vary from entire to sinuate or at times serrate.
Atriplex nummularia are monoecious or dioecious having separate male and female flowers on the same bush or on separate bushes. The inflorescences of Atriplex nummularia are born in panicles from the apexes or at times from the upper leaf axis.
The male flowers are in dense globular heads and measure 15mm to 20mm in length by 15mm to 20mm in diameter. Flowering occurs during June, July and August however flowering can occur at any times when conditions dictate the seasons.
Seeds are triangular shaped samaras. The flower bracts cover the seed to eventually form the samara. The hand held fan shaped samaras measure 7mm to 9mm in length by 8.5mm to 10.5mm in width across the widest part while the seeds. The seeds measure 4.5mm to 5.5mm in diameter. Under favourable conditions Atriplex nummularia is a prolific seed bearer.
Wildlife:
Budgerigahs have been seen foraging seed beneath the shrubs so it is feasible to suggest other small parrots and finches may also eat the seeds of Atriplex nummularia. It also attracts the saltbush blue butterfly Theclinesthyses serpentata var. serpentata, Victorian Museum butterfly collection
Though the leaves can be eaten similarly to silver beet they have a strong taste of salt even when grown in areas where saline soils do not exist.
The seeds can be removed from the samaras and ground into high protein flour. Good high producing plants with larger seeds should be considered in breeding programs for the seeds as a high protein alternative crop for semi-arid and arid areas of Australia where cultivated plants could yield better profits than traditional crops and cattle. They could also be utilized in mixed farming projects to return higher profits. Various exotic Amaranthus are being exploited in China for the edible leaves and shoots. Again plants with leaves, lower in sodium could be bred as an alternative vegetable or addition to salads. Either way I consider this plant to be the most obvious choice that is continually being overlooked by scientists and the agricultural industry as a whole.
The plant is susceptible to the red legged desert mite in seasons of higher rainfall where prolonged humidity is experienced. This could be a real problem if the plant were to be grown as a monoculture or in the one area year after year. Grazing in alternative years or using an onion or member of the Compositae family that the mite is not resistant to is another alternative that would need to be investigated.
Cultivation:
It would make an good fire retardant medium shrub.
* Fire retardant plants act as radiant heat screens and absorb more heat from an approaching fire without burning.
* Fire retardant trees are able reduce wind speed near a house or out buildings.
* Fire retardant also trap embers and sparks carried by the wind.
* Fire retardant ground covers are able to catch burning embers without catching fire themselves, and also slow the travel of a fire through debris and litter on the ground.
Atriplex nummularia is a good addition to suburban gardens where a 2 meter to 3 meter dense shrub is required in semiarid and arid areas of Australia. Atriplex nummularia has been used to great effect on the northern and western walls of colourbond walled sheds near Grafton where it reflects and absorbs heat off the walls. It grows well along the coast on pure sand south of where it naturally occurs.
Atriplex nummularia is very fast growing reaching maturity within 3 years. Life expectancy is 12 to 15 years, less on the coast and where good favourable conditions occur. Plants should be culled at around 10 years of age to maintain vigour and bushiness.
It would make a valuable addition around salt pools because of its ability to accept salt spray, and to soften the glare around a pool. Its leaves are heavy and leathery meaning when they fall they will not blow around or into the pool.
It is best used adjacent to small areas of bush close to paths or the house so their blue grey leaves can be viewed regularly. It is great in medium to large rockeries as a fill in plant. Here it can be planted in small groups of 2 or 3 or as a standalone plant to create a harsh barren look with other arid plants. If it is surrounded by shorter plants with fine or large foliage plants with pale green or deep green leaves and red flowers they will dominate at the center giving an expansive look to the bed. For a softer look use plants with finer pale green leaves and yellow flowers but avoid cream or white flowers as these will blend together and destroy any contrast. The ornamental foliage provides an attractive silvery contrast against darker plants in the garden. This is one plant that benefits highly from being mass planted or planted in scattered clumps in larger gardens.
Six or more planted back from a bend will become a very strong focal point because of the fresh clean look of the foliage even in the driest of times. It can be regularly tip pruned if a smaller shrub is required.
It responds well to either tip pruning or hard pruning recovering quickly and often increasing the number of flowers in the following season. Place it in the mid ground, to the rear, use large lime green leaf taller plants to the rea or sides.
Propagation:
Seeds: Atriplex nummularia‘s seeds require treatment before sowing. Pre-treat the seeds by gently washing the seeds by hand in water which has had some sand added to it for 1 or 2 minutes.
Sow the washed seeds into a seed raising mix. Place the mixture in a warm well ventilated space.
When the seedlings are 25mm to 50mm tall, prick them out and plant them into 50mm native tubes using a seed raising mix.
Once the seedlings reach 200mm to 250mm in height plant them out into their permanent position.
Fertilize using seaweed, fish emulsion or organic chicken pellets soaked in water on an alternate basis. Fertilize every two months until the plants are established then annually in early September to October to maintain health, vitality and better flowering.
Further comments from readers:
Hi reader, it seems you use The Bible of Botany a lot. That’s great as we have great pleasure in bringing it to you! It’s a little awkward for us to ask, but our first aim is to purchase land approximately 1,600 hectares to link several parcels of N.P. into one at The Pinnacles NSW Australia, but we need your help. We’re not salespeople. We’re amateur botanists who have dedicated over 30 years to saving the environment in a practical way. We depend on donations to reach our goal. If you donate just $5, the price of your coffee this Sunday, We can help to keep the planet alive in a real way and continue to bring you regular updates and features on Australian plants all in one Botanical Bible. Any support is greatly appreciated. Thank you.
In the spirit of reconciliation we acknowledge the Bundjalung, Gumbaynggirr and Yaegl and all aboriginal nations throughout Australia and their connections to land, sea and community. We pay our respect to their Elders past, present and future for the pleasures we have gained.
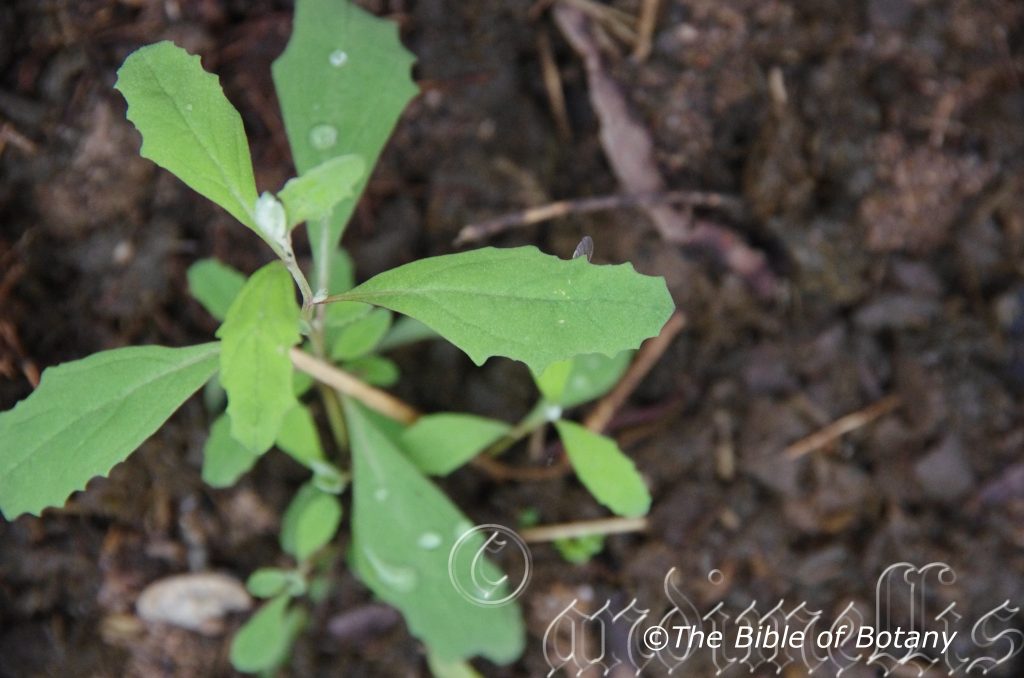
Author’s Garden The Pinnacles NSW
Atriplex semibaccata
Classification:
Class: Magnoliophyta
Order: Caryophyllales
Family: Amaranthaceae
Subfamily: Chenopodioideae
Genus: From Atriplexum, which is Ancient Greek for a saltbush. It refers to plants, which have rather saline environments around salt lakes, estuaries and coastlines.
Species: From Semi, which is Latin for a half and Baccata, which is Latin for a berry. It refers to fruits, which are somewhat berry like.
Common Name: Salt Bush.
Distribution:
Atriplex semibaccata is widespread in New South Wales. It is also found in South Australia, Queensland and Victoria mainly on the western side of the Great Dividing Range. It is also found on Flinders Island and some of the larger Islands of Bass Strait.
https://avh.ala.org.au/occurrences/search?taxa=Atriplex+semibaccata #tab_mapView
Habitat Aspect Climate:
Atriplex semibaccata prefers to grow in the open in full sun or below a very light tree canopy in semi-arid regions to deserts away from rivers and permanent water however it also grows as a scrambling shrub on heavy soils adjacent to mangroves around Moreton Bay in southern Queensland. The altitude ranges from 1 meters ASL to 60 meters ASL.
The temperatures range from minus 3 degrees in July to 40 degrees in January.
The rainfalls range from lows of 150mm to an average of 1250mm annually.
Soil Requirements:
Atriplex semibaccata prefers coarse sands to heavier clays and is common on saline clay pans and saline alluvial flats. The soils are usually derived from decomposed sandstones, granites, laterites, alluvial deposits or accumulated beach sands. The soil’s pH ranges from 4.5pH to 7.5pH. It does not tolerate waterlogged soils. None saline soils to moderately saline soils are tolerated. None saline soils to extremely saline soils are tolerated as are salt laden winds.
Height & Spread:
Wild Plants: 0.5m to 1m by 1m to 3m.
Characteristics:
It would make an good fire retardant small shrub.
* Fire retardant plants act as radiant heat screens and absorb more heat from an approaching fire without burning.
* Fire retardant trees are able reduce wind speed near a house or out buildings.
* Fire retardant also trap embers and sparks carried by the wind.
* Fire retardant ground covers are able to catch burning embers without catching fire themselves, and also slow the travel of a fire through debris and litter on the ground.
Atriplex semibaccata stems are white, cream or pale fawn and scaly tending to become glabrous with age. Branchlets are white, cream or pale pink and densely covered in white scales.
The narrow elliptical to elliptical leaves, measure 20mm to 30mm long by 8mm to 12mm wide. The concolourous leaves are blue grey to grey-green. The laminas are covered in short white vesicular hirtellous hairs. This is more pronounced on the lower lamina. The leaf margins are entire or sinuate and are tinged pink or purple-pink. The base is cuneate to round cuneate while the apex is broadly acute to broadly acuminate. The petioles are 1mm to 4mm in length.
Atriplex semibaccata are born terminally or auxiliary in small clusters.
Flowering occurs mainly from April to December however flowering can occur at any times when seasonal conditions are favourable.
The small succulent 3 lobed fruits are berries or dry rhomboidal samaras. The seeds are 4mm to 6mm in diameter. New South Wales fruits are generally dry while those in other areas are succulent.
Wildlife:
Atriplex semibaccata is a perennial bushy prostrate plant which is good for regeneration projects on clay pans, mud flats or where salt tolerant plants are required.
Atriplex semibaccata is an ideal plant for the control of soil erosion in arid areas and to assist in salt depredated landscapes. Wildlife which are dependent on this Atriplex is unknown to the author, however it is believed that various native mice may collect the fruits and spread the seeds as many seeds are to be found in caches close to parent bushes. Some birds like budgerigars, small parrots and finches eat the seeds of Atriplex nummularia may also eat the seeds and or the fruits here as well.
Though the leaves can be eaten similarly to silver beet they have an overwhelming taste of salt even when grown in areas where saline soils do not exist. The fruits are edible and have a salty cherry taste.
Cultivation:
Atriplex semibaccata is a good addition to suburban gardens where a dense prostrate ground cover is required. The blue grey foliage is attractive and glistens in the sun. Good for cascading over rockeries near the coast. It can tolerate the harshness of conditions in the garden and do well on sand to heavy clays as long as it is very well drained.
It is very fast growing reaching maturity within the first year. Life expectancy is 2 to 4 years. Atriplex semibaccata responds very well to both tip pruning and hard pruning. Plants should be culled at around 2 years of age to maintain vigour and bushiness. The plants root at the nodes so this can be a good method of propagating on site. Heavy pruning of old growth leaving rooted branchlets to be fostered into new plants is quick and easy. It will grow 0.3 meters to 0.5 meters tall by 1.5 meter to 2 meters under cultivation.
It would make a valuable addition around salt pools because of its ability to accept salt spray, and to soften the glare around a pool. Its leaves are heavy and leathery meaning when they fall directly onto the ground and will not blow around or into the pool.
It is best used adjacent to small areas of bush close to paths or the house so its blue grey leaves can be viewed regularly. It is great in medium to large rockeries as a fill in plant or for stabilizing hot dry banks. Here it can be planted in small groups of 2 or 3 or more to create a harsh barren look with other arid plants or a display to help accentuate taller plants with broad deep green leaves or fine pale green foliage. Use plants with strong red or deep purple flowers in this way it will give an expansive look to the bed with greater depth. This will be more evident if narrow or columnar shapes are utilized. For a softer more gentle look use plants with finer pale green leaves and yellow or deep cream flowers but avoid white or pastel coloured flowers as these will blend together, destroying any contrast and will look boring when in flower. The exception to this would be Auranticarpa rhombifolium with its strong brilliant orange fruits. The narrow upright growth coupled with mid to deep green glossy leaves is the perfect contrast. Both plants can be easily grown on heavy soils and their moisture requirements can overlap without stress to either plant. The ornamental foliage provides an attractive silvery contrast against darker plants in the garden. This is one plant that benefits highly from being mass planted or planted in scattered clumps in larger gardens in full sun.
Six or more planted back from a sunny bend will become a very strong focal point because of the fresh clean look of the foliage even in the driest of times.
It responds well to either tip pruning or hard pruning recovering quickly and often increasing the number of flowers and fruit in the following season.
Propagation:
Seeds: Atriplex semibaccata‘s seeds can be sown directly into a seed raising mix covering them to a depth of 5mm with the mix. Place the mixture in a warm sunny well ventilated space to avoid damping off.
When the seedlings are 25mm to 50 mm tall, prick them out and plant them into 50mm native tubes using a seed raising mix. Tip prune the juvenile plants prior to planting them in full sun.
Once the seedlings reach 100mm to 150mm across plant them out into their permanent position tip pruning them as it is planted out.
Fertilize using seaweed, fish emulsion or organic chicken pellets soaked in water on an alternate basis. Fertilize every two months until the plants are established then annually in early September to October to maintain health, vitality and better flowering.
Further comments from readers:
Hi reader, it seems you use The Bible of Botany a lot. That’s great as we have great pleasure in bringing it to you! It’s a little awkward for us to ask, but our first aim is to purchase land approximately 1,600 hectares to link several parcels of N.P. into one at The Pinnacles NSW Australia, but we need your help. We’re not salespeople. We’re amateur botanists who have dedicated over 30 years to saving the environment in a practical way. We depend on donations to reach our goal. If you donate just $5, the price of your coffee this Sunday, We can help to keep the planet alive in a real way and continue to bring you regular updates and features on Australian plants all in one Botanical Bible. Any support is greatly appreciated. Thank you.
In the spirit of reconciliation we acknowledge the Bundjalung, Gumbaynggirr and Yaegl and all aboriginal nations throughout Australia and their connections to land, sea and community. We pay our respect to their Elders past, present and future for the pleasures we have gained.

Grafton NSW
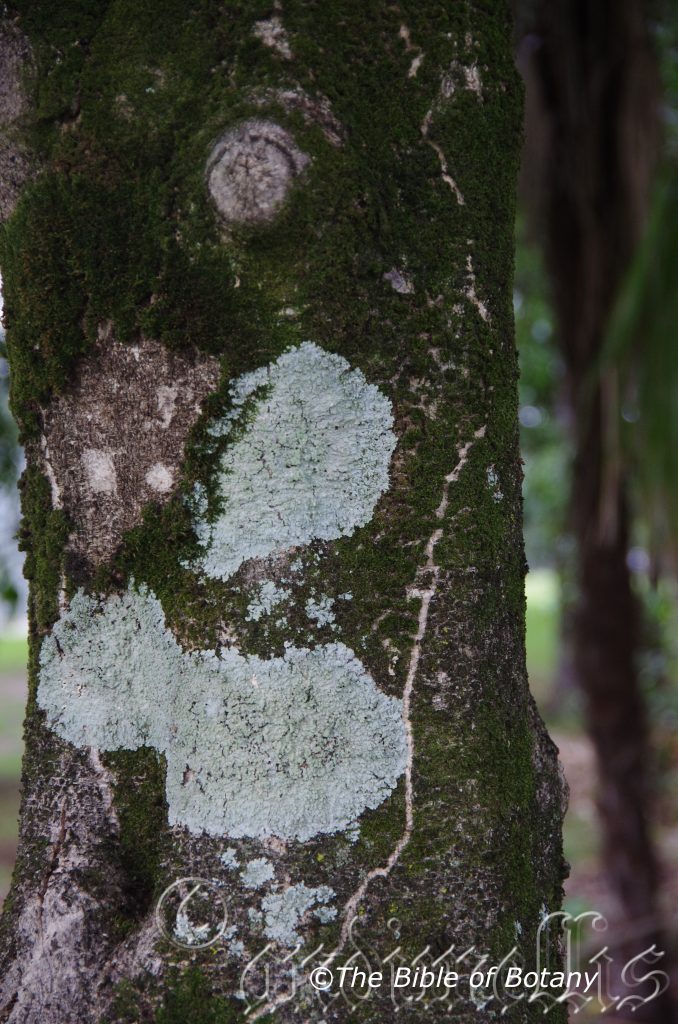
Grafton NSW
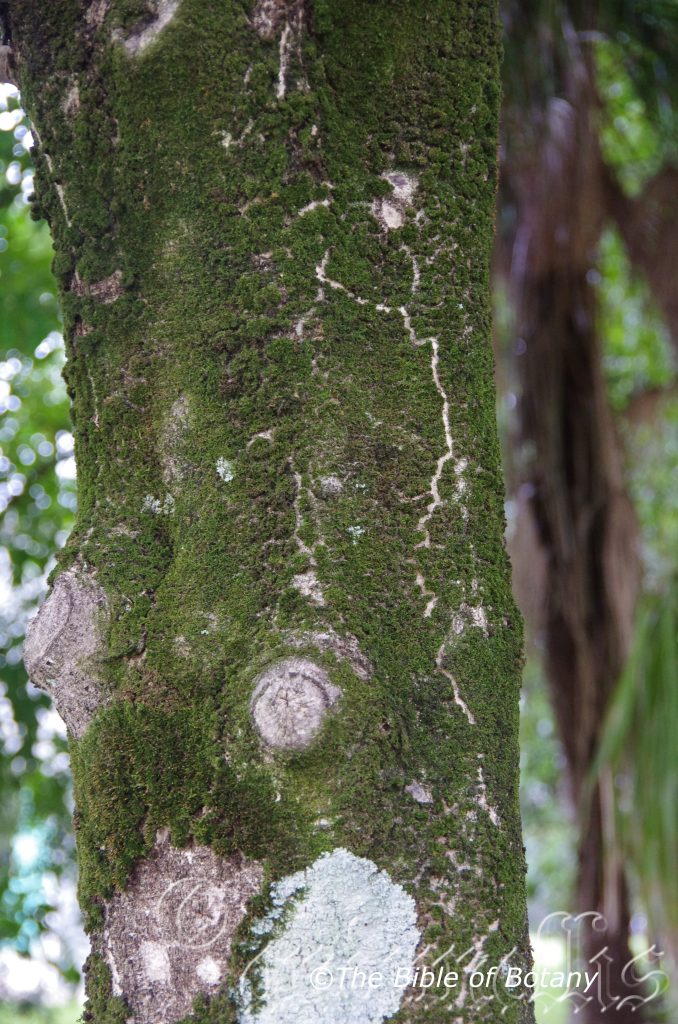
Grafton NSW
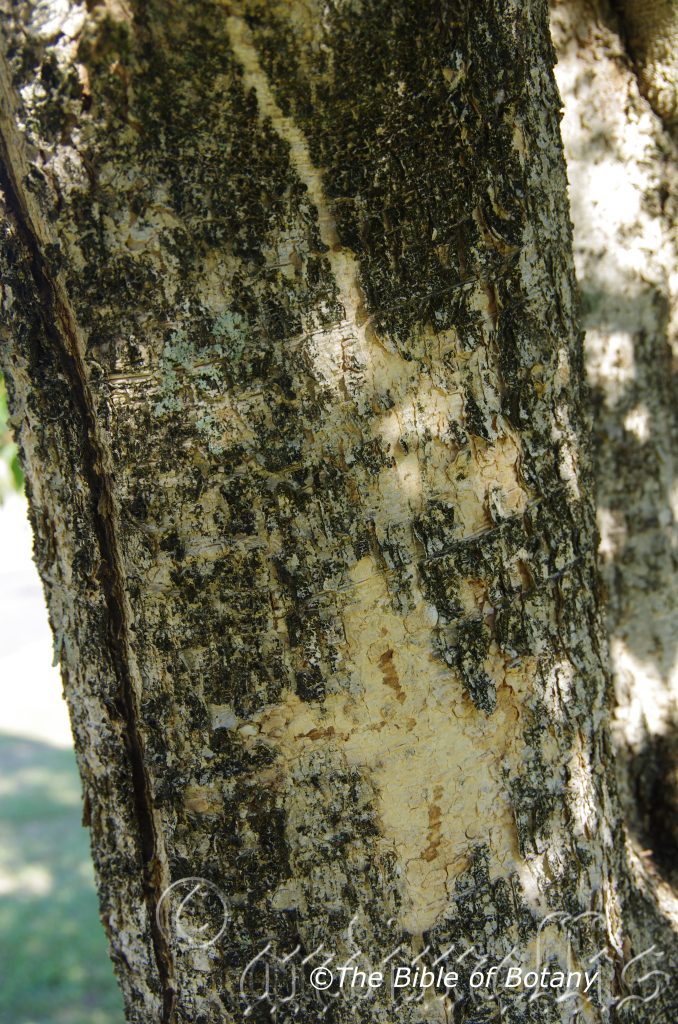
Grafton NSW
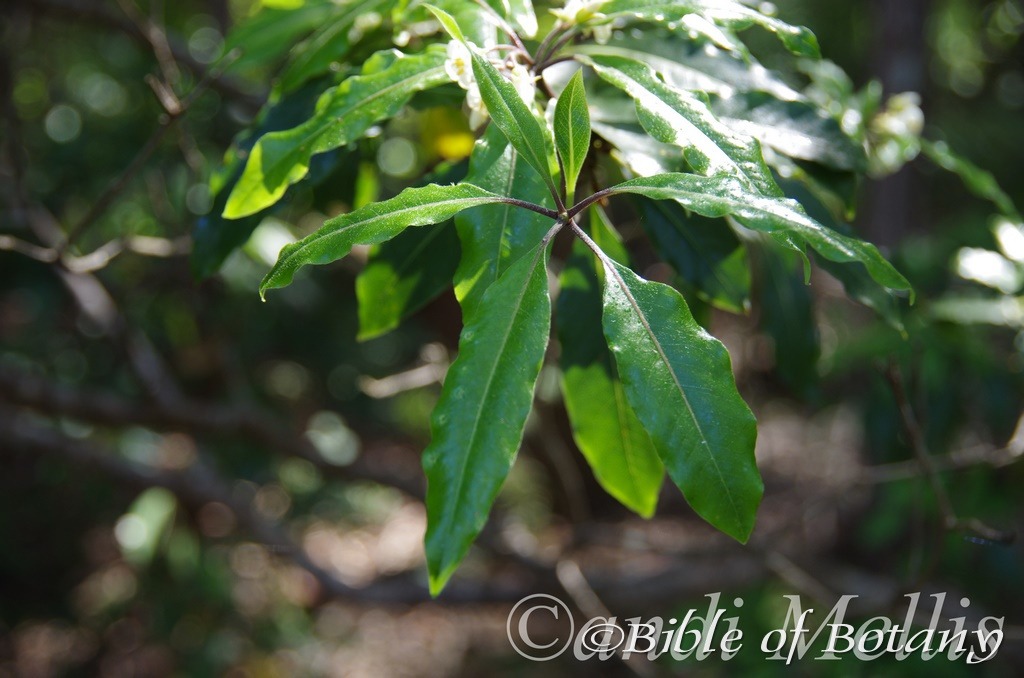
Clarence River NSW
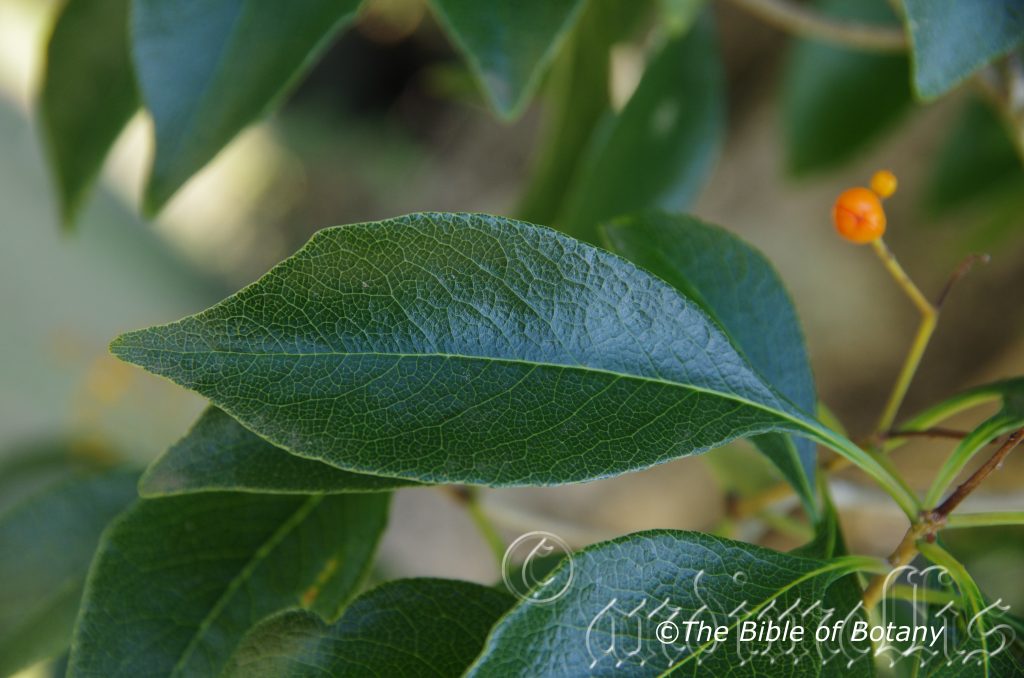
Grafton NSW
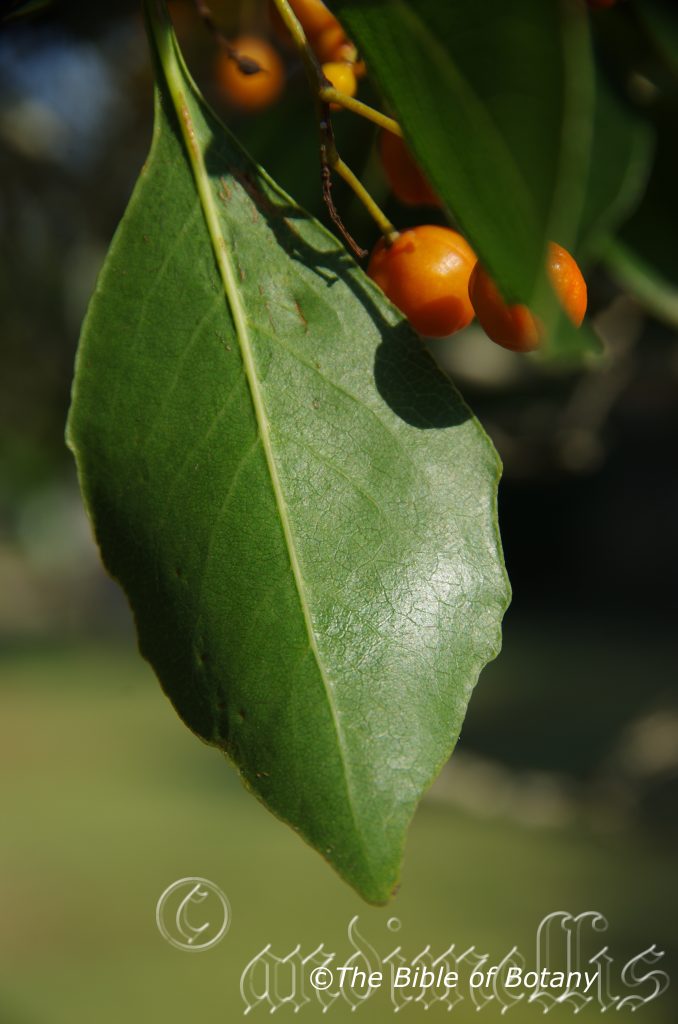
Grafton NSW
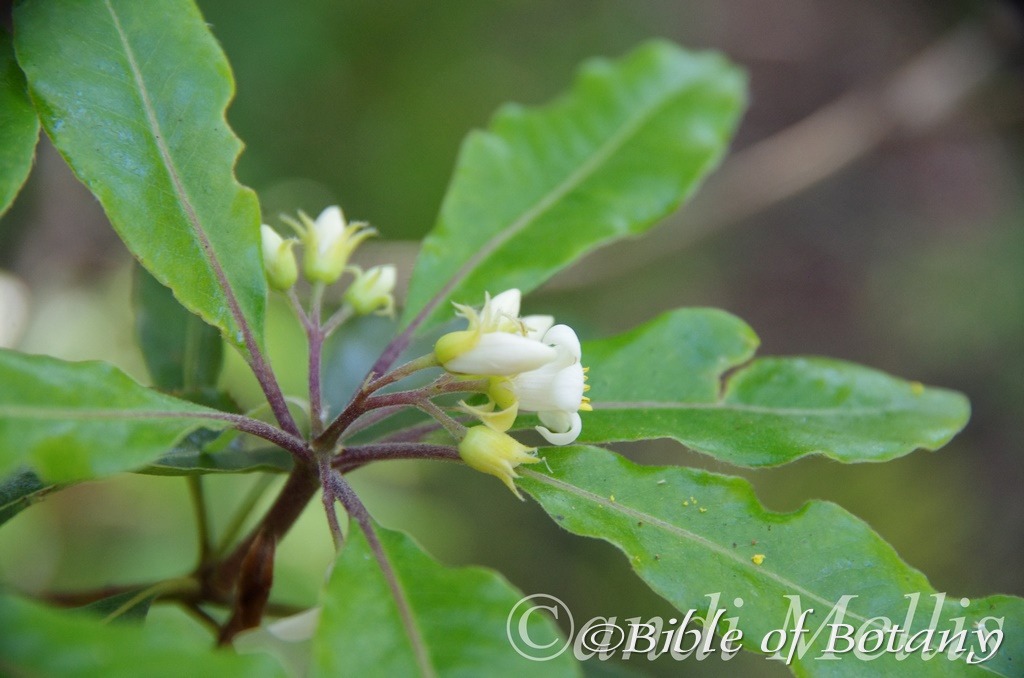
Clarence River NSW
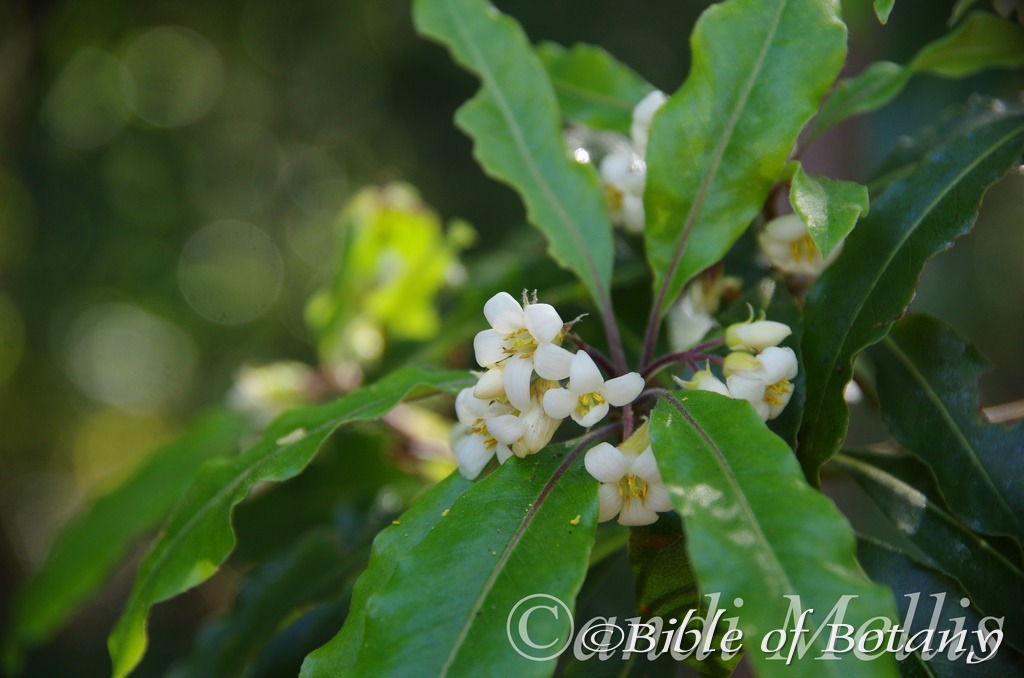
Clarence River NSW
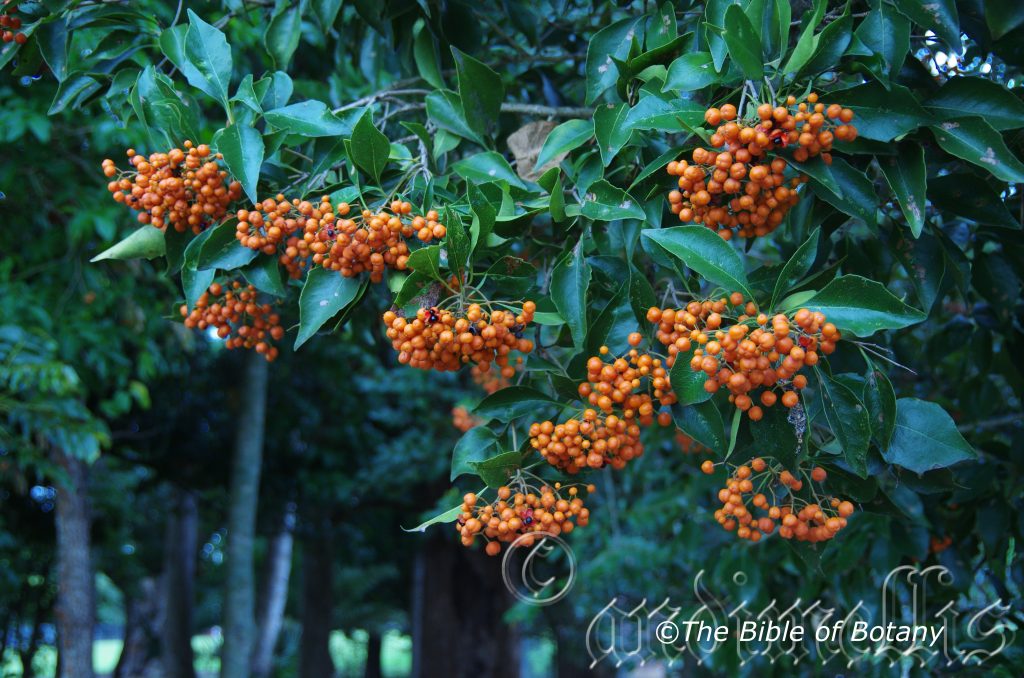
Grafton NSW
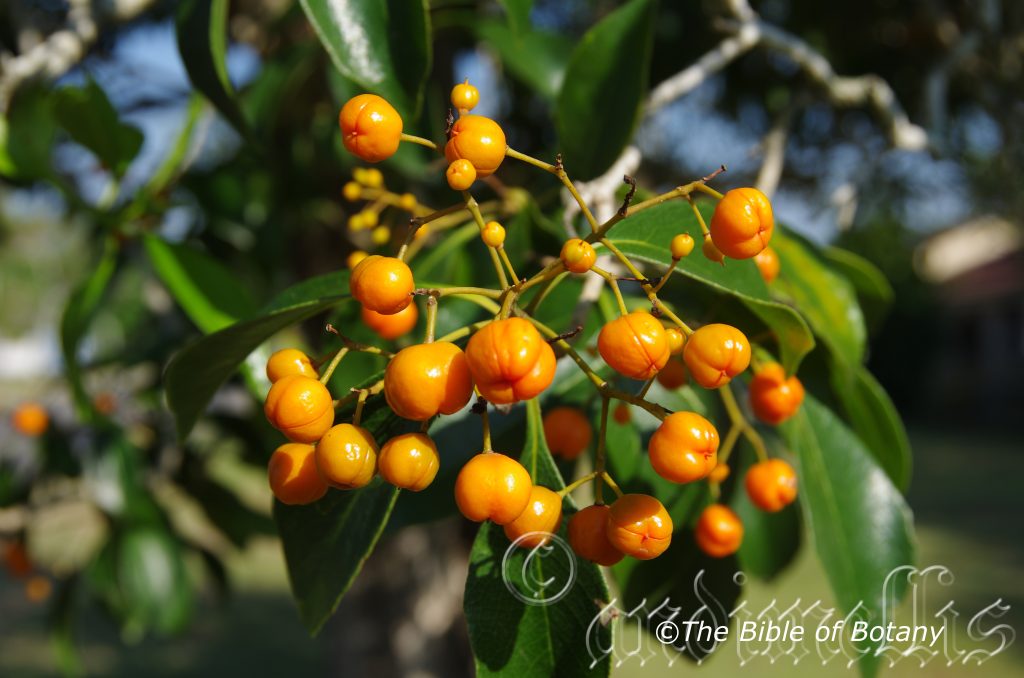
Grafton NSW
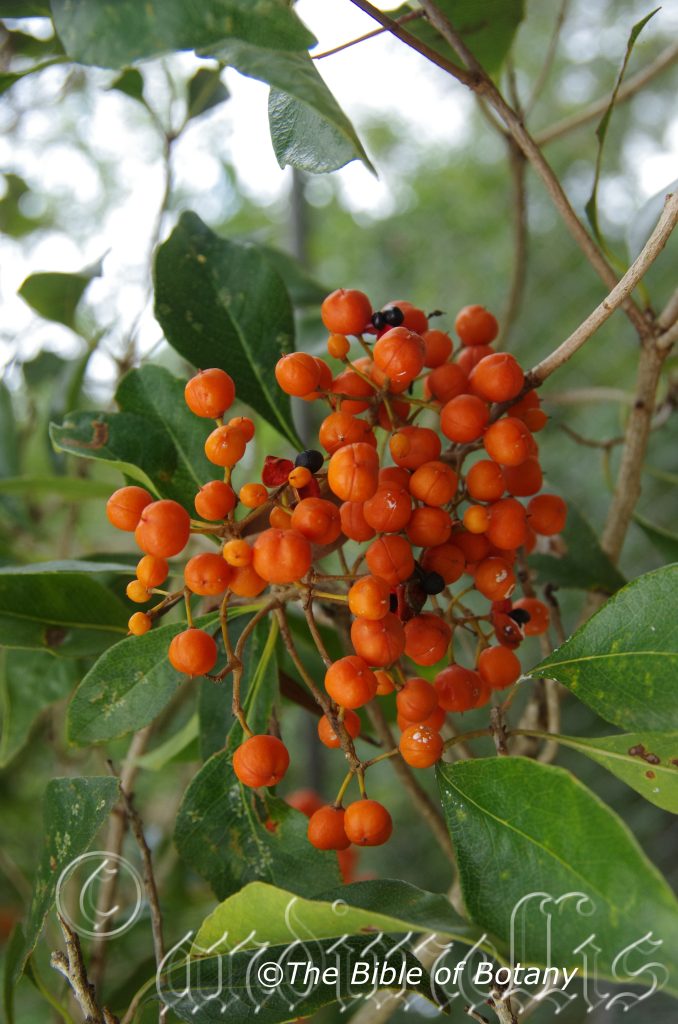
Grafton NSW
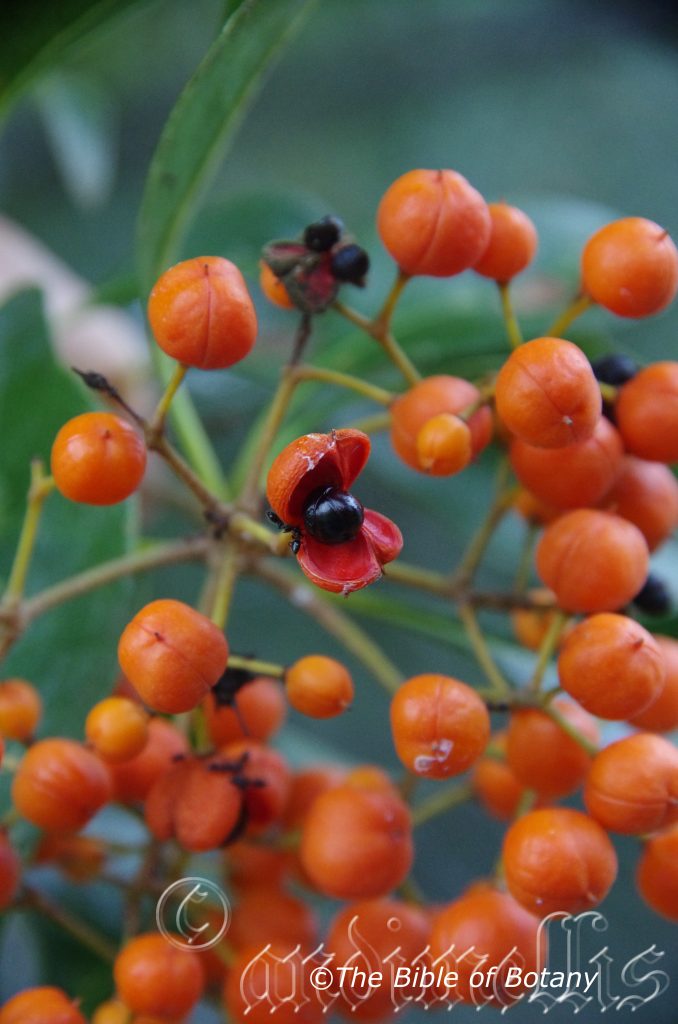
Grafton NSW
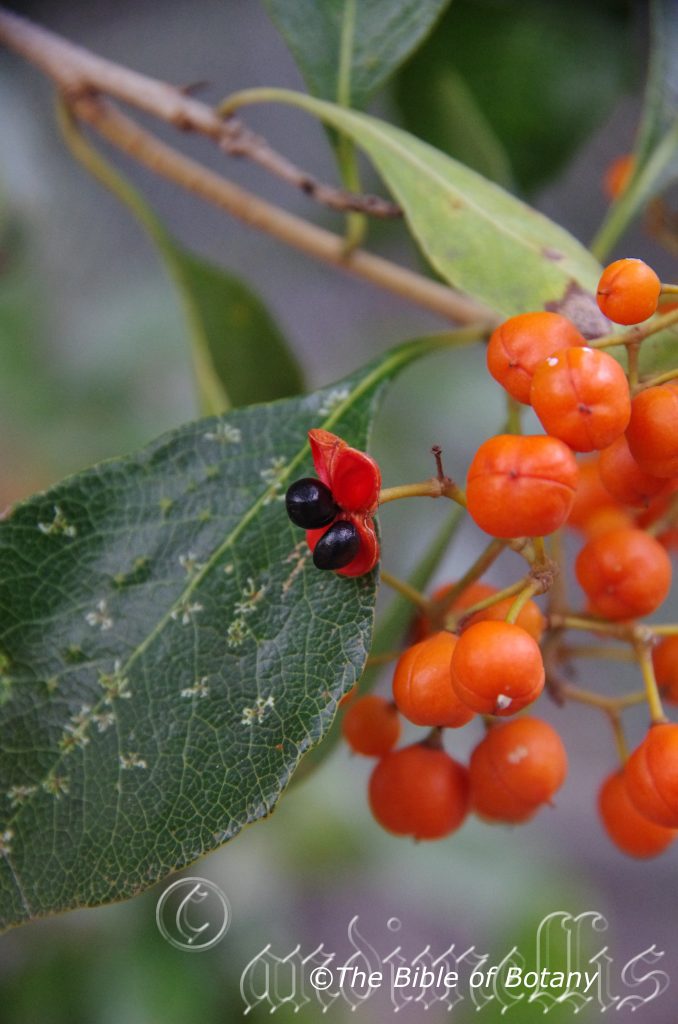
Grafton NSW
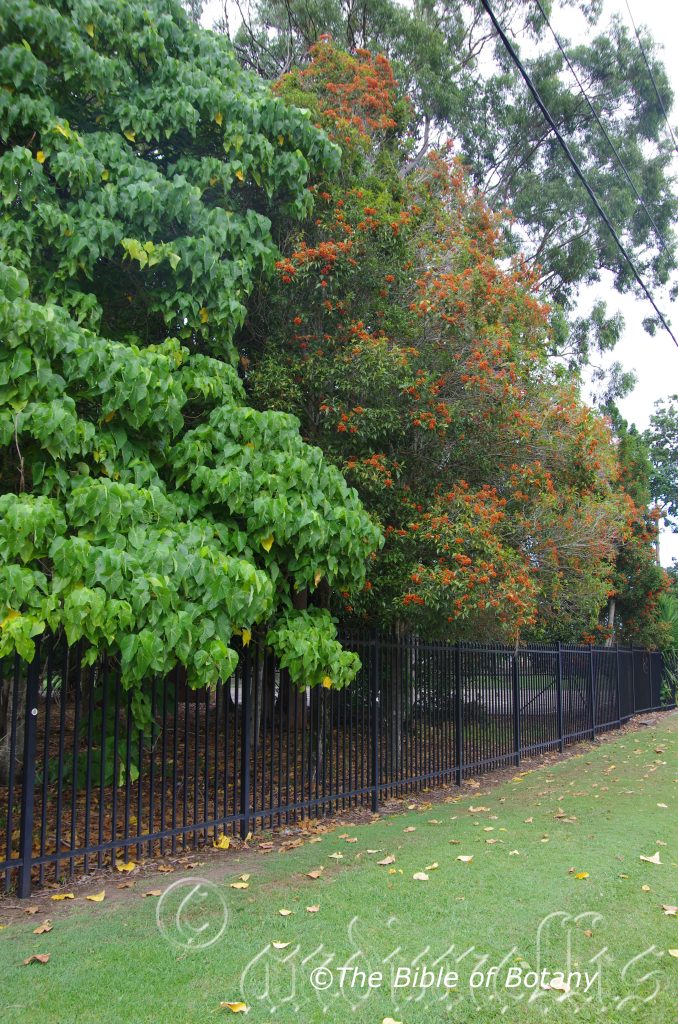
Grafton NSW
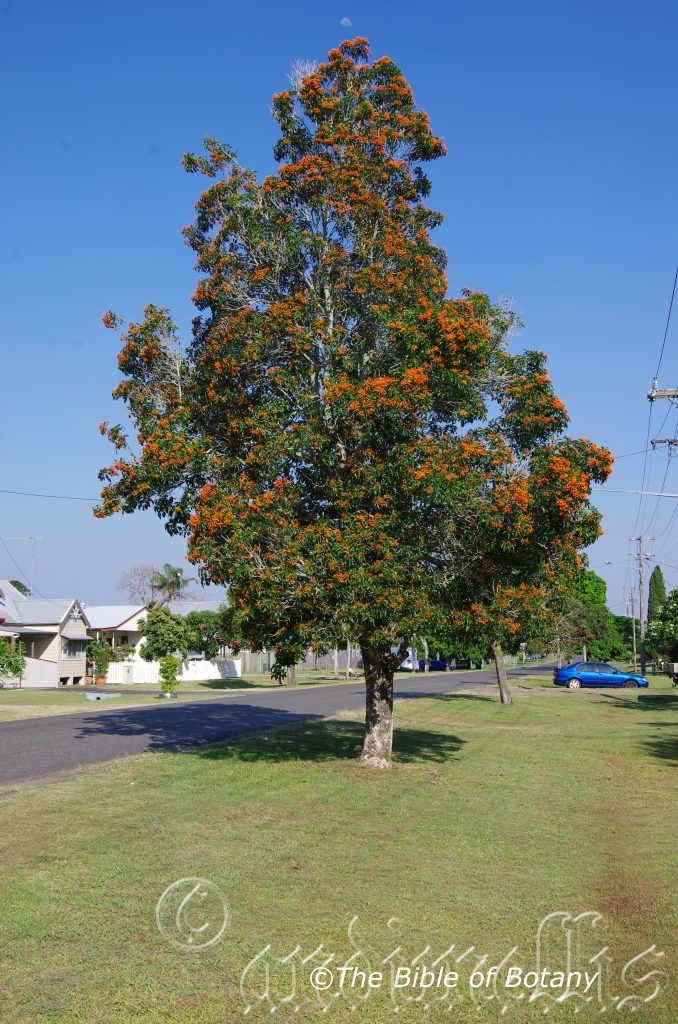
Grafton NSW
Auranticarpa rhombifolia
Classification:
Class: Eudicots
Order: Asterids
Family: Pittosporacaea
Genus: From Aurantius/Aurantiacum, which is Latin for orange colour or gold(en) and Karpos, which is Ancient Greek for a fruit. It refers to fruits, which are brightly orange in colour.
Species: From Rhombos, which is Ancient Greek for to spin around or diamond shape and Folium which is Latin for foliage. It refers to leaves or phyllodes, which have a diamond shape. Previously known as Pittosporum rhombifolia.
Common Name: Diamond Leaf Pittosporum or Native Mock Orange.
Distribution:
Auranticarpa rhombifolia is found south from Cooktown in north eastern Queensland to Coffs Harbour in north eastern coastal New South Wales.
https://avh.ala.org.au/occurrences/search?taxa=Auranticarpa+rhombifolia#tab_mapView
Habitat Aspect Climate:
Auranticarpa rhombifolia prefers partial shade to full sun. It grows in littoral and riverine rainforests or dry rainforests. The altitude ranges from 5 meters ASL to 760 meters ASL.
The temperatures range from 2 degrees in July to 36 degrees in January.
The rainfalls range from lows of 550mm to 2600mm average per annum.
Soil Requirements:
Auranticarpa rhombifolia prefers deep, sandy loams, light fatty clays, medium clays or light silts to heavy silts. The soils are usually derived from decomposed sandstones granites, brown basalts, black basalts, shales, metamorphic rocks, alluvial deposits or accumulated peaty beach sands. The best trees grow on better quality medium silts. The soil’s pH ranges from 4.5pH to 6.5pH. It does not tolerate waterlogged soils. None saline soils to moderately saline soils are tolerated.
Height & Spread:
Wild Plants: 15m to 30m by 6m to 8m.
Characteristics:
Auranticarpa rhombifolia is a narrow pyramidal shaped tree with a grey farinaceous almost corky appearance bark on the trunk and larger branches. Branchlets are pale creamy kaki and glabrous. Branches rise at less than 40 degrees from the trunk.
The angular to obovate to rhomboidal leaves are initially clustered at the ends of the branches before growing out to be opposite on the branchlets. The lamina measures 86mm to 120mm in length by 35mm to 70mm in width at the widest two points. The discolourous laminas are bright pale green to mid green in colour on the upper lamina and paler on the lower lamina. It is glabrous and semi glossy to glossy. The margin is sinuate or with blunt teeth and slightly involute. The base is cuneate to attenuate while the apex is broadly acuminate to narrow acuminate. The petiole on Auranticarpa rhombifolia is 15mm to 25mm long.
The inflorescence of Auranticarpa rhombifolia is a dense terminal compound corymb. Individual flowers have 5 linear pale creamy green sepals which measure 1mm to 2mm in length and 0.3mm to 0.6mm in width. The 5 oblong, recurved petals are cream to silky white and measure 5mm to 6mm in length by 2.5mm to 3.2mm wide. The 6mm style tapers from a cream, longitudinally ridged hirsute ovary. The ovary is covered in short white hirtellus hairs. The stamens measure 4.5mm to 5mm in length while the anthers measure 1.5mm to 2mm in length. The perfumed flowers appear in summer but flowering is often erratic being from October through to March.
The fruits of Auranticarpa rhombifolia are pear to globose shaped capsules, which can hang on the trees for several months. The capsules appear to have 4 compartments though there are usually only two rarely three locules. The capsules measure 6mm to 10mm in length by 6mm to 8mm in width. There is a distinct groove running lengthways around the fruit from the 2mm long stipe which splits to reveal the two or rarely three seeds. There is a fainter groove between the main grooves. The green fruits turn bright orange when ripe. The style is persistent on the apex of the capsules. The outer surface of the capsules is smooth and glabrous with a waxy feel to the touch.
The inside of the capsules are brilliant scarlet red while the black seeds are covered in a thick viscous like liquid. The flattened round seeds measure 5mm to 6mm in diameter by 2.5mm to 3mm thick. The capsules ripen in late February to early May.
Wildlife:
For a tree that produces a myriad of beautifully coloured fruits I have only ever witnessed the Green Cat Bird, Ailuroedus crassirostris visiting the trees to feed on the fruit or seeds. The way the fruits split and hold the seeds on display in a glutinous substance certainly appears that it is dependent on animals or birds for seed dispersal.
In contrast I have seen a number of native flies, butterflies, weevils and beetles on the flowers.
The seeds of Auranticarpa rhombifolia have a slight nutty flavour but this is hard to detect through the insipid glutinous surrounding. The fruits have a strong unpleasant taste similar to sweetened gum leaves. A last resort bush food. They are not considered edible for human consumption and can cause irritation and vomiting.
Cultivation:
It would make an good fire retardant small tree.
* Fire retardant plants act as radiant heat screens and absorb more heat from an approaching fire without burning.
* Fire retardant trees are able reduce wind speed near a house or out buildings.
* Fire retardant also trap embers and sparks carried by the wind.
* Fire retardant ground covers are able to catch burning embers without catching fire themselves, and also slow the travel of a fire through debris and litter on the ground.
Auranticarpa rhombifolia is a beautiful bushy small tree that grows 8 meters to 12 meters by 4 meters to 5 meters in the garden. The roots are not a problem so it can be planted close to buildings, foundations and underground services. As it is hardy on all soil types it is easy to grow giving a wonderful display in just 5 to 6 years from seed. It can be grown in tropical, subtropical, temperate gardens and I would be very tempted to try it in semi-arid areas where it can be regularly watered.
Auranticarpa rhombifolia is best planted as a small specimen tree where its bright orange fruits give a strong feature in autumn when there is not a lot of colour around. It should be planted adjacent to small areas of bush close to paths or the house so its abundance of mildly perfumed cream flowers can be viewed regularly. Here it can be planted in small groups of 2 or 3 or as a standalone plant to create strong contrast in autumn colour. If it is surrounded by shorter plants with fine pale green foliage and red flowers it will not form a distraction at the center giving height and strength to the bed especially when it is in flower. Remember full sun and good viewing aspects are essential so do not overcrowd the bed. Do not use plants with large leaves as these will be too overpowering and they will blend into each other. Planted with a mass of smaller plants and groundcovers with mixed coloured flowers and foliage will ensure a great display during the winter and spring months and for the rest of the year. This would be particularly strong, if a mixture of different finer foliage of different colours and textures are incorporated together. This will give a strong uplifting of central height. Be sure to plant any plant exactly in the center for a formal look or well off to one side for an informal look. 2 or 3 shrubs close together on one side looks even more spectacular when just a single plant is placed on the other side to give balance to the picture. The area below Auranticarpa rhombifolia can be mass planted with Atriplex semibaccata and other small perennials like Xerochrysum bracteatum or Hibbertia diffusa. The whole bed can be covered, to create a woodland scene, or sparsely planted for an arid scene.
Two plants can achieve the same scenario if planted in close proximity and still achieve the sparseness and harshness of the desert picture. Here a few annuals strategically scattered around would complete the picture. The plants planted out below should have a mixture of bold colours radiating out from the base of the trees so use pinks and mauves directly below unless they flower at the same period as Auranticarpa rhombifolia is in fruit.
Auranticarpa rhombifolia is suitable for hosting small epiphytic plants like Dendrobium gracicaulie or ferns like Pyrrosia rupestre. Lichens and mosses will eventually start growing on the trunk and branches when it is ten years old or older giving the effect that a rainforest is close at hand.
Trees planted in a row either side of a driveway or on the street, give brilliant displays in autumn. Many streets in Coffs Harbour’s older suburbs are lined with Auranticarpa rhombifolia to great effect despite never getting any attention.
Propagation:
Seeds: Collect the fruits of Auranticarpa rhombifolia from around trees where fruits have started to split. Lay the fruits out to dry and collect the seeds. The fresh seeds of Auranticarpa rhombifolia need to be washed before they can be sown. Sow the washed seeds directly into a seed raising mix. When the seedlings are 25mm to 40mm tall, prick them out and plant them into 50mm native tubes using a seed raising mix.
Once the seedlings reach 150mm to 175mm in height plant them out into their permanent position.
When planting in small groups for a feature use 4 meter to 6 meter centers for hedge rows and up to 12 meters for specimen trees.
Fertilize using seaweed, fish emulsion or organic chicken pellets soaked in water on an alternate basis. Fertilize every two months until the plants are established then annually in early September to October to maintain health, vitality and better flowering.
Further comments from readers:
Hi reader, it seems you use The Bible of Botany a lot. That’s great as we have great pleasure in bringing it to you! It’s a little awkward for us to ask, but our first aim is to purchase land approximately 1,600 hectares to link several parcels of N.P. into one at The Pinnacles NSW Australia, but we need your help. We’re not salespeople. We’re amateur botanists who have dedicated over 30 years to saving the environment in a practical way. We depend on donations to reach our goal. If you donate just $5, the price of your coffee this Sunday, We can help to keep the planet alive in a real way and continue to bring you regular updates and features on Australian plants all in one Botanical Bible. Any support is greatly appreciated. Thank you.
In the spirit of reconciliation we acknowledge the Bundjalung, Gumbaynggirr and Yaegl and all aboriginal nations throughout Australia and their connections to land, sea and community. We pay our respect to their Elders past, present and future for the pleasures we have gained.
Australina pusilla
Classification:
Unranked: Magnoliophtya
Class: Magnoliopsida
Order: Rosales
Family: Urticaceae
Genus: From Terra Australis, which is Latin for land of the south. It refers to plants, which were first discovered from the land down under.
Species: From Pusilla, which is Latin for insignificant or weak. It refers to this species, which are insignificant compared to other species in the genus.
Common Name: Small Shade Nettle.
Distribution:
Australina pusilla is found south from Mt Cordeaux on the Main Range National Park in south eastern Queensland to Cape Otway National Park and Wilsons Promontory in southern Victoria. It is also found on King Island and most of mainland Tasmania. It is found on and east of the Great Dividing Range.
https://avh.ala.org.au/occurrences/search?taxa=Australina+pusilla #tab_mapView
Habitat Aspect Climate:
Australina pusilla prefers partial shade to dappled sun light. It is found in cool well developed sub-tropical rainforests and cool temperate rainforests and wet Eucalyptus forests amongst tall trees, medium trees, scrubs. The altitude ranges from 5 meters ASL to 950 meters ASL.
The temperatures range from minus 3 degrees in August to 36 degrees in January.
The rainfalls range from lows of 900mm to 3000mm average per annum.
Soil Requirements:
Australina pusilla prefers better quality loams to medium clays. The soils are usually derived from decomposed brown basalt, black basalt, shale and metamorphic rocks. It has also been seen growing on alkaline soils with a pH from 5.5 to 7.5.It is intolerant of waterlogged soils however annual inundations are acceptable for short periods. Non saline soils to moderately saline soils are tolerated.
Height & Spread:
Wild Plants: 25m to 40m by 12m to 15m.
Characteristics:
Australina pusilla is a perennial herb. The prostrate stems are pale grass green, pale purple-grey to translucent pink and very sparsely to densely covered in fine white puberulent hairs.
The alternate to sub opposite ovate to broad ovate leaves of Australina pusilla measure 12mm to 40mm in length by 10mm to 26mm in width. The bases are broad cuneate to rounded or truncate while the apexes are acute to obtuse. The discolourous laminas are bright deep grass-green to sea-green, glabrous and glossy on the upper laminas and paler below. The margins are toothed to crenate. The laminas are convex on the upper laminas between the main vein and lateral veins. The mid vein and lateral veins are strongly prominent on the lower laminas and distinctly visible from the upper laminas. The caduceus, linear stipules are minute. The petioles are very sparsely to densely covered in short, fine, white puberulent hairs and measure 5mm to 50mm in length.
The inflorescences of Australina pusilla are born in insignificant clusters from the leaf axils. There are 2 to 5 individual flowers in a cluster.
The ovary is glabrous. The flowers appear from November to February.
The fruits of Australina pusilla are ovoidal achenes. The green achenes turn brown when ripe. The achenes measure 1.2mm to 2.5mm in length by 1.2mm to 2.5mm in width.
Wildlife:
Australina pusilla wildlife is unknown to the author.
Cultivation:
Australina pusilla is a beautiful foliage plant when grown in a secluded shaded position near paths, baskets or the bush house. In moist gullies it can form a major component of banks and niches which makes it valuable for erosion control yet it is easy to control and rarely become weedy.
Australina pusilla is suitable for mixing with small ferns with different foliage.
Propagation:
Cuttings: Use 50mm to 70mm long herbaceous cuttings taken throughout the year in a frost free areas. Vigorously growing plants of the form you desire should be used when growing from cuttings. Remove the leaves from the lower one-third to one-half of the stem being careful not to tear the stem. A rooting hormone is not required as the cuttings strike easily and within a couple of weeks. Place the cuttings in a cool semi shaded position preferably under 50mm shade cloth.
Once the seedlings reach 150mm to 175mm in height plant them out into their permanent position and water thoroughly.
When planting banks and gullies they can be mass planted at 500mm centers.
Fertilize using seaweed, fish emulsion or organic chicken pellets soaked in water on an alternate basis. Fertilize every two months until the plants are established then annually in early September to October to maintain health, vitality and better flowering.
Further comments from readers:
Hi reader, it seems you use The Bible of Botany a lot. That’s great as we have great pleasure in bringing it to you! It’s a little awkward for us to ask, but our first aim is to purchase land approximately 1,600 hectares to link several parcels of N.P. into one at The Pinnacles NSW Australia, but we need your help. We’re not salespeople. We’re amateur botanists who have dedicated over 30 years to saving the environment in a practical way. We depend on donations to reach our goal. If you donate just $5, the price of your coffee this Sunday, We can help to keep the planet alive in a real way and continue to bring you regular updates and features on Australian plants all in one Botanical Bible. Any support is greatly appreciated. Thank you.
In the spirit of reconciliation we acknowledge the Bundjalung, Gumbaynggirr and Yaegl and all aboriginal nations throughout Australia and their connections to land, sea and community. We pay our respect to their Elders past, present and future for the pleasures we have gained.

Nana Glen NSW
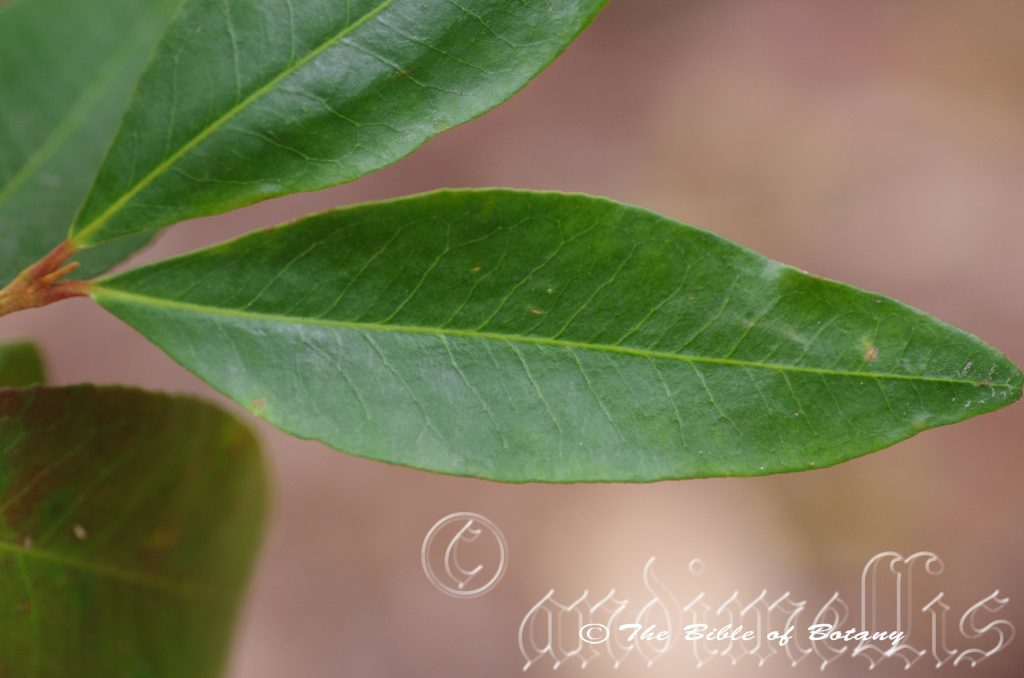
Nana Glen NSW
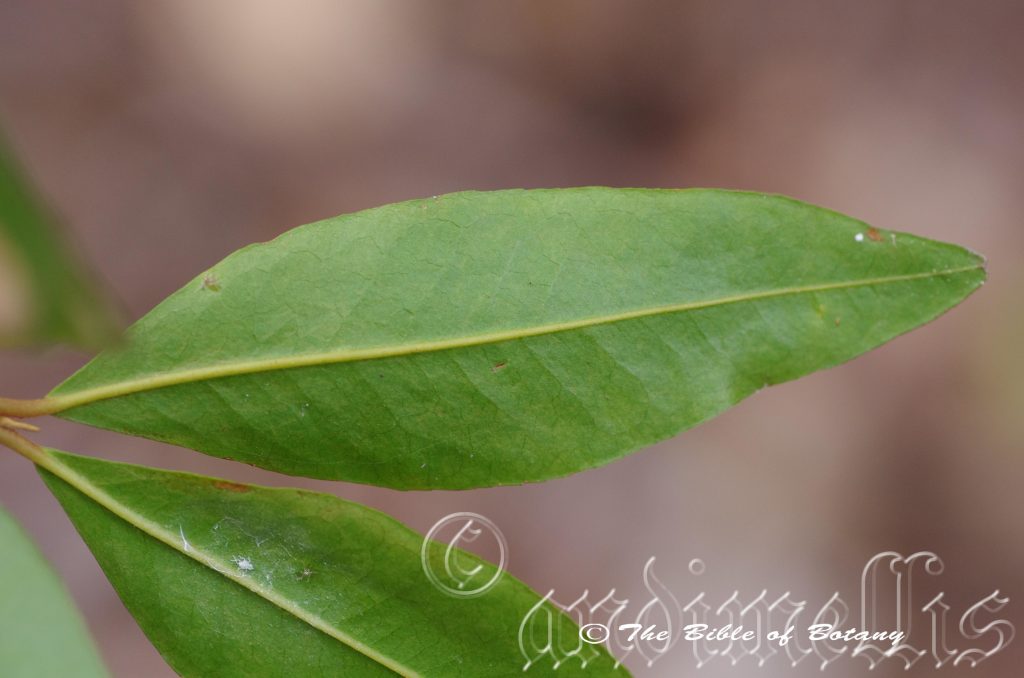
Nana Glen NSW
Austrobuxus swainii
Classification:
Unranked: Magnoliophtya
Class: Magnoliopsida
Order: Malpighiales
Family: Picrodendraceae
Genus: From Terra Australis, which is Latin for land of the south and Buxus, which is Latin for boxwood. It refers to species, which resemble the northern hemispheres Buxus genus but which were first discovered from the land down under.
Species: Is probably named after John Swain an early 20th century Australian Botanist.
Common Name: Pink Cherry or Hairy Bark.
Distribution:
Austrbuxus swainii is restricted to a small area in southern Queensland and northern New South Wales. It is found south from Springbrook in the Macpherson Ranges to the Bellinger River.
https://avh.ala.org.au/occurrences/search?taxa=Austrobuxus+swainii#tab_mapView
Habitat Aspect Climate:
Austrbuxus swainii prefers partial shade to dappled sunlight. It grows below medium trees, or low trees, in dry vine scrubs or adjacent to rainforests. The altitude ranges from 250 meters ASL to 850 meters ASL.
The temperatures range from 3 degrees in August to 36 degrees in January.
The rainfalls range from lows of 1300mm to 2000mm average per annum.
Soil Requirements:
Austrbuxus swainii prefers better quality, deep, loams, light fatty clays to medium clays. The soils are usually derived from decomposed black basalts. The soil’s pH ranges from 6pH to 7.5pH. It does not tolerate waterlogged soils. None saline soils to moderately saline soils are tolerated.
Height & Spread:
Wild Plants: 25m to 40m by 12m to 15m.
Characteristics:
Austrbuxus swainii is a narrow pyramidal shaped tree with pale grey to pale brown scaly to scurfy bark. The branches are pale grey to rusty-brown and covered in lenticels. The trunk and branches are covered in lichens and at times mosses. The branches pale olive green to mid olive green and covered in fawn to rusty-brown puberulent hairs.
The opposite lanceolate to narrow elliptical leaves measures 70mm to 140mm in length by 20mm to 40mm in width. The petioles are covered in fawn to pale rusty-brown puberulent hairs and measure 7mm to 11mm in length. The concolourous laminas are bright deep green to sea-green and glabrous. The margins are finely toothed to crenate. The bases are cuneate while the apexes are acute to acute-obtuse. The young leaves are bright glossy lime green while the old leaves turn scarlet red before falling.
The inflorescences of Austrbuxus swainii are short panicles born from the leaf axils. The rachises, peduncles and pedicels are covered in fawn to pale rusty-brown puberulent hairs. The rachises measure 20mm to 33mm in length while the peduncules measure 8mm to 18mm in length and the pedicels measure 2mm to 3.5mm in length. The calyxes and lobes are minute. The individual flowers have 4 orbicular, pale creamy green sepals which measure 0.6mm to 0.8mm in length and 0.6mm to 0.8mm in width. The 4 orbicular, pale creamy green petals which measure 0.8mm to 1mm in length and 0.8mm to 1mm in width. The petals are strongly convex.
The 8 to 10 pastel yellow-green filaments measure 1mm to 1.1mm in length while the anthers are pale yellow and vary in size.
The 1mm to 1.2mm style is yellow-green and rises from the yellow convex ovary. The ovary is glabrous. The flowers appear from February through to March.
The fruits of Austrbuxus swainii are ovoidal capsules. The green capsules turn deep brown when ripe. The capsules measure 11mm to 14mm in length by 9mm to 11mm in width. There is a distinct longitudinal groove which split and drops off to reveal the two deep seeds. The calyxes are persistent on the basses while the styles are persistent on the apexes of the capsules.
The flattened, elongated ellipsoidal, deep brown seeds are partially surrounded by a yellow, fibrous aril. The seeds measure 8mm to 10mm in length by 6mm to 8mm thick.
Wildlife:
Austrbuxus swainii is a tree that produces very colourful seeds yet I have not witnessed any birds or animals eating the fruits. In contrast I have seen a number of native flies, bees, weevils and beetles on the flowers.
Cultivation:
Austrobuxus swainii is a beautiful foliage plant when growing in the open. I have yet to see the tree in cultivation so am unable to comment at this stage on how it will grow. I suspect it will grow from 18 meters to 28 meters in height by 12 meters to 20 meters in diameter in cultivation when grown in an open situation. The roots are not a problem so it can be planted close to buildings, foundations and underground services.
Austrobuxus swainii would be best planted in a garden where a medium to large rainforest affect is required.
Austrbuxus swainii is suitable for hosting small and large epiphytic plants like Dendrobium gracicaule or ferns like Pyrrosia rupestris through to Platycerium superbum or Thelychiton speciosum. Lichens and mosses will eventually start growing on the trunk and branches when it is ten years old or older giving the effect that a rain forest is close at hand.
Propagation:
Seeds: Collect fruits of Austrobuxus swainii from around trees where fruits have started to split and drop to the ground.
Sow them directly into a seed raising mix. When the seedlings are 25mm to 40mm tall, prick them out and plant them into 50mm native tubes using a seed raising mix.
Once the seedlings reach 150mm to 175mm in height plant them out into their permanent position. When planting in small groups for a feature in parks use 15 meter to 20 meter centers.
Fertilize using seaweed, fish emulsion or organic chicken pellets soaked in water on an alternate basis. Fertilize every two months until the plants are established then annually in early September to October to maintain health, vitality and better flowering.
Further comments from readers:
Hi reader, it seems you use The Bible of Botany a lot. That’s great as we have great pleasure in bringing it to you! It’s a little awkward for us to ask, but our first aim is to purchase land approximately 1,600 hectares to link several parcels of N.P. into one at The Pinnacles NSW Australia, but we need your help. We’re not salespeople. We’re amateur botanists who have dedicated over 30 years to saving the environment in a practical way. We depend on donations to reach our goal. If you donate just $5, the price of your coffee this Sunday, We can help to keep the planet alive in a real way and continue to bring you regular updates and features on Australian plants all in one Botanical Bible. Any support is greatly appreciated. Thank you.
In the spirit of reconciliation we acknowledge the Bundjalung, Gumbaynggirr and Yaegl and all aboriginal nations throughout Australia and their connections to land, sea and community. We pay our respect to their Elders past, present and future for the pleasures we have gained.
Austrocallerya australis
Classification
Class: Rosids
Order: Fabales
Family: Fabaceae
Subfamily: Faboideae
Tribe: Millettieae
Genus: From Terra Australis, which is Latin for land of the south and is named in honour of Joseph-Marie Callery; 1810-1862, who was a French missionary and plant collector in China.
Species: From Terra Australis, which is Latin for land of the south. It refers to plants, which were first discovered from the land down under.
Common Name: Native Wisteria.
Distribution:
Austrocallerya australis is found south from the MacPherson Ranges in southern Queensland to Port Macquarrie in New South Wales. It is found on and east of the Great Dividing Range.
https://avh.ala.org.au/occurrences/search?taxa=Austrocallerya+australis#tab_mapView
Habitat Aspect Climate:
These vines prefers part shade to dappled shade. It grows in warm rainforests along rivers streams and creeks. The forest floor always has a deep layer of mulch. The altitude ranges from 50 meters ASL to 900 meters ASL.
The temperatures range from 4 degrees in July to 39 degrees in January.
The rainfall ranges from lows of 750mm to 1800mm average per annum but is not important due to the close association with permanent flowering water. The capillary action of the soils ensures constant moisture and a cool root zone.
Soil Requirements:
Austrocallerya australis prefers sandy loams to medium clays. The soils are derived from decomposed basalts to light gravelly clays or even rocky clays associated with river stones. The soils pH ranges from 6pH to 6.5pH. It does not tolerate water logging however annual inundation of its terrain is common where it is found along riparian zones. Non saline soils to moderately saline soils are tolerated.
Height & Spread:
Wild Plants: 10m to 35m by 5m to 6m
Characteristics:
Austrocallerya australis is a fast growing woody climber which relies on its leading shoots to twist around anything it comes in contact with. The bark is rough, flaky and dull grey on older stems. Young shoots are deep green and covered in white sericeous hairs.
The odd pinnate glossy dark green leaves of Callerya australis number 7 to 19. They measure 150mm to 300mm in length by 80mm to 200mm in width. The elliptical to obovate leaflets measure 40mm to 100mm in length by 20mm to 35mm in width. The petiole measures 30mm to 50mm in length while the petiolules measure 2mm to 3mm in length. The bases are rounded while the apexes are blunt or retuse. The concolourous laminas are mid green to deep green. The leaf margins are entire with some undulation. The mid vein is distinctly lighter in colour. Young leaves are a glossy green in colour similar to the adult leaves.
The inflorescences of Austrocallerya australis is a dense raceme, measuring 100mm to 150mm long supporting 5 to 25 flowers. Individual pedicels are 10mm to 20mm in length. The pea flowers have lavender to lilac standard with a yellow center. The reverse side of the standard is lilac. The keel is a deep purple. The calyx is 5mm to 6mm in length while the standard is 10mm to 12mm across and 8mm to 10mm high. The keel measures 8mm to 12mm in length with the white stamens protruding from the base of the keel and curve upwards measure 10mm to 12mm in length. Callerya megasperma flowers from early August through to late October.
Austrocallerya australis has fruits that are woody pods or legumes measure 80mm to 150mm in length by 20mm to 35mm in width dry to a dark brown or black colour. They are woody and glabrous with slight horizontally ribbed when ripe. The curved legumes are pointed at both ends and are slightly constricted between the 3 to 8 seeds. The globose bright orange seeds measure 14mm to 15mm in length by 12mm to 13mm in width and ripen in January to February.
Wildlife:
Austrocallerya australis is a necessary plant in the support of the Richmond River butterfly Ornithoptera richmondia, as are Flagellaria indica and Pandorea jasminoides. The bird wing butterfly larvae are cannibalistic so to prevent being eaten as they pupate they seek refuge by leaving the host vine to pupate on non-edible vine species nearby.
Cultivation:
This is a lovely large woody vine for warmer sub-tropical areas that looks great in the garden on a feature wall or covering a pergola. The spring flowering will rival the Chinese wisteria. It is quick growing when grown in a friable loam or light clays with copious amounts of leaf litter and even moisture content is maintained in the soil. Mulching is necessary to maintain a cool root zone and fertilizing on a regular basis with one of our recommended fertilizing regimes will ensure great flowering displays.
Austrocallerya australis is long lived and will develop a strong robust trunk so ensure any structure it is planted on can take the weight of a fully developed liana. If it is to be grown on a pergola plant one on each corner. This vine will overpower most other vines as it is very robust once established. Planting other vines like Flagellaria indica and Pandorea jasminoides will complement and extend the flowering season on the structure.
Propagation:
Seeds: Austrocallerya australis’s seeds require treatment before sowing. Pre-treat by washing the seeds by placing in a calico bag with clean sand and washing for 15 to 20 minutes. I like to place the bag in with the weekly washing and let the machine do the work. Another method is to rub the seeds gently on fine sandpaper until the outer testa is just removed in one spot.
Sow the treated seeds directly into 50mm native tubes and cover with 10mm of the mix. Keep them moist not wet
Cuttings:
Though I have not grown this plant from cutting or seed I would treat it the same as Austrocallerya megasperma it should be an easy exercise. Take 100mm to 200mm long cutting material in early spring, from the previous season’s growth.
1 Prepare the cutting mix by adding one third sharp clean river sand, one third peat and one third perlite. These ingredients are sterile,
2 Select good material from non diseased plants,
3 Select semi green stems for cuttings. Look for a stem with two or three nodes,
4 Place the cutting on a flat, hard surface, and make a clean slice through the middle of the lower node on an angle towards the base, with a sterilized sharp knife or razor blade. – This scarification of the node will increase the chances of roots emerging from this spot. Now remove all but one or two the leaves, leaving the apex leaves in tact. If the leaves are very large in proportion to the stem, cut off the apical halves.
5 Some plants root easily, but a rooting hormone can help others by stimulating the cutting into sending out new roots. Fill a saucer with water, and place some rooting hormone into another container like a bottle top. Dip the node end of the cutting into the water and then into the rooting hormone. Tap off any excess hormone,
6 Use a small dipple stick or old pencil to poke a hole into the soilless potting mix. Ensure the hole is slightly larger than the stem diameter and be careful not to wipe the rooting hormone off the cuttings base, place the cuttings in a pattern ensuring the cuttings are not touching each other,
7 I like to place the pots in Plastic bags to help maintain temperature and moisture. Place in a semi shaded place like under 50mm shade cloth.
8 When the cuttings have struck, open the bag to allow air circulation for a few days to a week,
9 Once hardened off remove the cuttings from the bag and allow to further hardening for a few more days,
10 Transplant into a good potting mix to grow on.
Fertilize using seaweed, fish emulsion or organic chicken pellets soaked in water on an alternate basis. Fertilize every two months until the plants are established then annually in early September to October to maintain health, vitality and better flowering.
Further comments from readers:
Hi reader, it seems you use The Bible of Botany a lot. That’s great as we have great pleasure in bringing it to you! It’s a little awkward for us to ask, but our first aim is to purchase land approximately 1,600 hectares to link several parcels of N.P. into one at The Pinnacles NSW Australia, but we need your help. We’re not salespeople. We’re amateur botanists who have dedicated over 30 years to saving the environment in a practical way. We depend on donations to reach our goal. If you donate just $5, the price of your coffee this Sunday, We can help to keep the planet alive in a real way and continue to bring you regular updates and features on Australian plants all in one Botanical Bible. Any support is greatly appreciated. Thank you.
In the spirit of reconciliation we acknowledge the Bundjalung, Gumbaynggirr and Yaegl and all aboriginal nations throughout Australia and their connections to land, sea and community. We pay our respect to their Elders past, present and future for the pleasures we have gained.
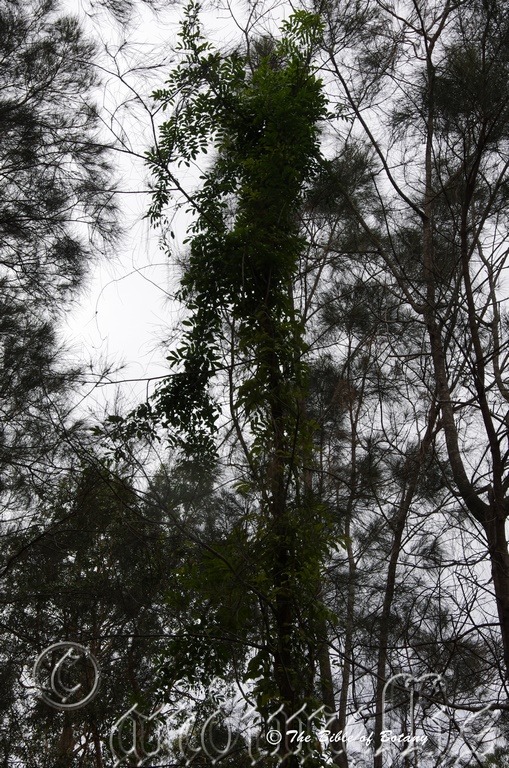
Benowa Botanical Gardens Gold Coast Qld.

Author’s Garden The Pinnacles NSW
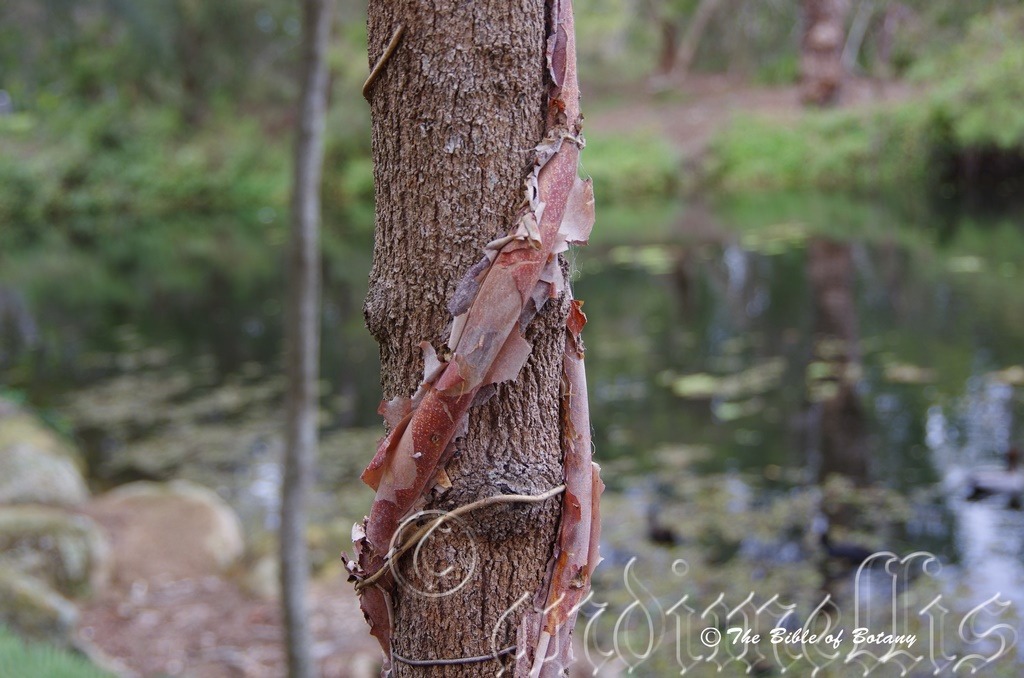
Benowa Botanical Gardens Gold Coast Qld.
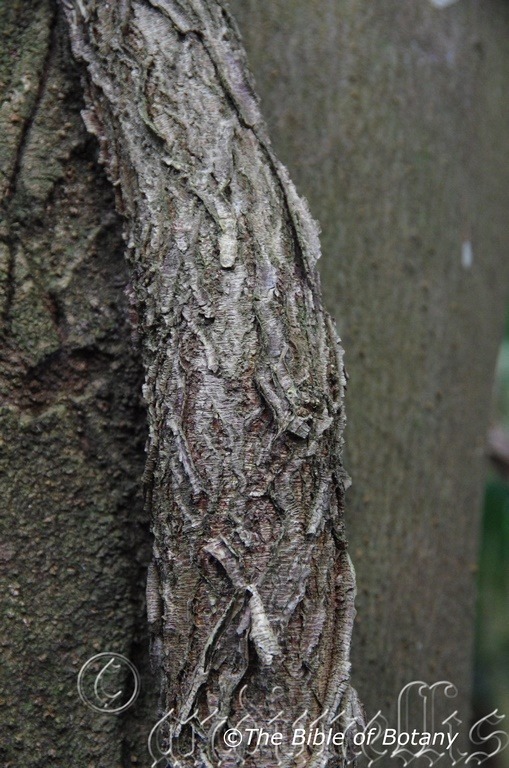
Benowa Botanical Gardens Gold Coast Qld.
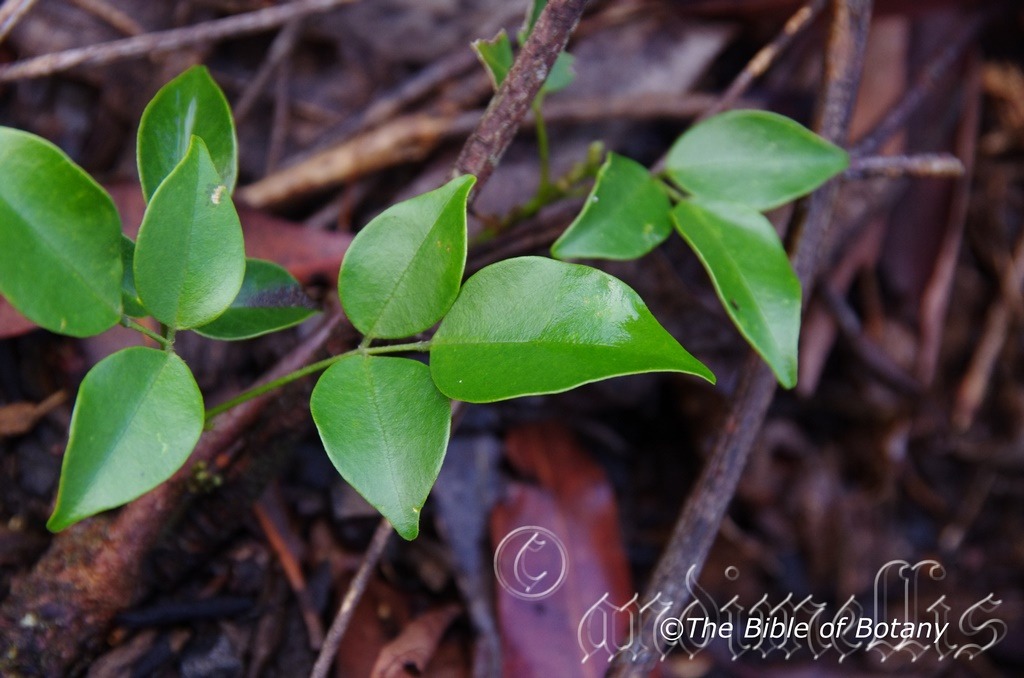
Benowa Botanical Gardens Gold Coast Qld.
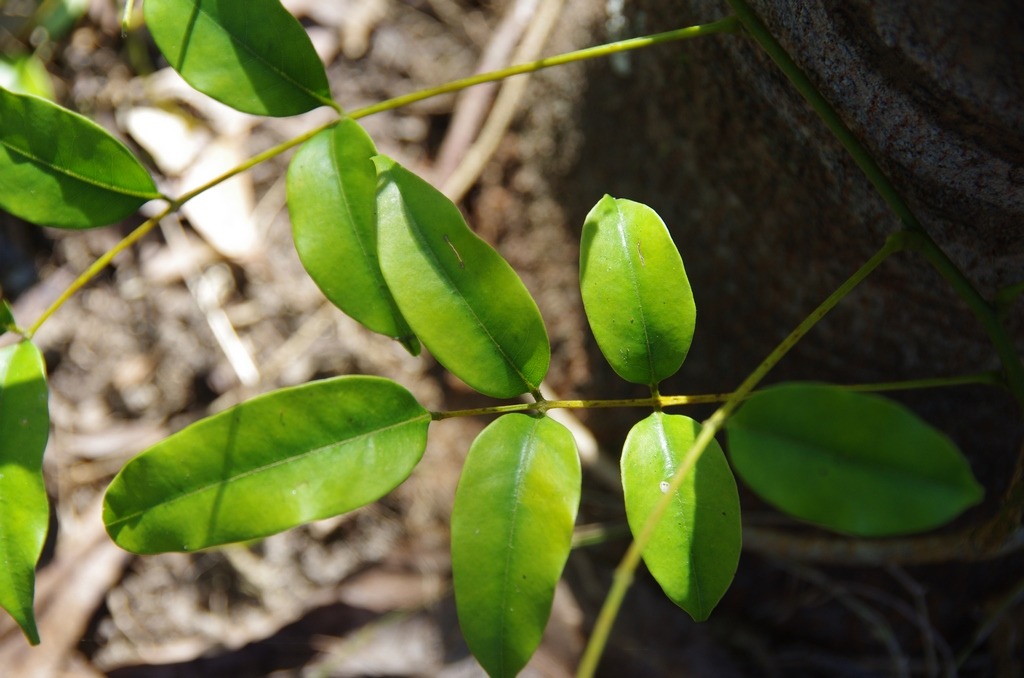
Author’s Garden The Pinnacles NSW

Benowa Botanical Gardens Gold Coast Qld.
Austrocallerya megasperma
Classification
Class: Rosids
Order: Fabales
Family: Fabaceae
Subfamily: Faboideae
Tribe: Millettieae
Genus: From Terra Australis, which is Latin for land of the south and is named in honour of Joseph-Marie Callery; 1810-1862, who was a French missionary and plant collector in China.
Species: From Megas, which is Ancient Greek for very large and Sperma, which is Ancient Greek for a seed. It refers to plants, which have very large seeds.
Common Name: Native Wisteria.
Distribution:
Austrocallerya megasperma is found south from Marybough and Fraser Island in Queensland to Wardell in New South Wales. It is found in warmer tropical rainforests on and east of the Great Dividing Range.
https://avh.ala.org.au/occurrences/search?taxa=Austrocallerya+megasperma#tab_mapView
Habitat Aspect Climate:
Austrocallerya megasperma prefers part shade to dappled shade. It grows in warm subtropical rainforests along rivers streams and creeks. The forest floors always have deep layers of mulch. The altitude ranges from 50 meters ASL to 500 meters ASL.
The temperatures range from 4 degrees in July to 39 degrees in January.
The rainfall ranges from lows of 800mm to 2000mm average per annum. Moist soils are important and they have a close association with permanent flowering water. The capillary action of the soils ensures constant moisture and a cool root zone.
Soil Requirements:
Austrocallerya megasperma prefers sandy soils through to medium clays derived from decomposed basalts to light gravelly clays or even rocky clays associated with river stones. The soils are mainly derived from decomposed basalts. The soils pH ranges from a 5.5pH to 6.5pH. It is not tolerant of waterlogged soils. Non saline soils to moderately saline soils are not tolerated at all.
Height & Spread:
Wild Plants: 10m to 35m to 4m to 6m.
Characteristics:
Austrocallerya megasperma is a fast growing woody climber which relies on its leading shoots to twist around anything it comes in contact with. The bark is rough and flaky and dull grey on older stems. Juvenile shoots are deep sea green and densely covered in white sericeous hairs.
The odd pinnate leaflets of Austrocallerya megasperma number 7 to 19. They measure 150mm to 300mm in length by 80mm to 200mm width. The leaflets are elliptical to obovate and measure 40mm to 100mm in length by 20mm to 35mm in width. The petiole is 40mm to 60mm long while the petiolules measure 2mm to 5mm. The bases are rounded while the apexes are acuminate. The concolourous laminas are deep glossy, sea-green and glabrous. The leaf margins are entire with some undulation and curve slightly upwards from the mid vein. The mid vein is prominent on the lower lamina and is distinctly lighter in colour on the upper lamina. Young leaves are a glossy green in colour similar to the adult leaves.
The inflorescences of Austrocallerya megasperma are dense racemes measuring 100mm to 150mm in length. There are 50 to 125 individual flowers on a raceme. Individual pedicels are 10mm to 20mm long. The pea flowers have a rich rose pink or lilac standard with a yellow center. The reverse side of the standard is pale white. The keel is a bright rich maroon. The calyx is 5mm to 7mm in length while the standard is 15mm to 20mm across and 12mm to 16mm high. The keel measures 12mm to 15mm in length with the white stamens protruding from the base of the keel and curve upwards measure 10mm to 12mm long. Callerya megasperma flowers from late September through to early November.
Austrocallerya megasperma’s woody pods or legumes are 100mm to 180mm in length by 30mm to 50mm in width. The green pods are densely covered in white sericeous hairs. They are woody and glabrous with fine longitudinal ribs when ripe. The curved legumes are pointed at both ends and are constricted between the 2 to 4 seeds. The ovoid velvety seeds are surrounded by a papery brown testa and measure 30mm to 40mm in length by 20mm to 30mm in diameter when they ripen in January to February.
Wildlife:
Austrocallerya megasperma is a necessary plant in the support of the Richmond River butterfly (Ornithoptera richmondia) as are Flagellaria indica and Pandorea jasminoides. The bird wing butterfly larvae are cannibalistic so to prevent being eaten as they pupate they seek refuge by leaving the host vine to pupate on non-edible vine species nearby.
Cultivation:
This is a beautiful large woody vine for warmer subtropical areas that looks great in the garden on a feature wall or covering a pergola. The spring flowering will rival the Chinese wisteria. It is quick growing when grown in a friable loam or light clays and provided even moisture content is maintained in the soil. Mulching is necessary to maintain a cool root zone and fertilizing on a regular basis with one of our recommended fertilizing regimes will ensure great flowering displays.
Austrocallerya megasperma is long lived and will develop a strong robust trunk so ensure any structure it is planted on can take the weight of a fully developed liana. If it is to be grown on a pergola plant one on each corner. This vine will overpower most other vines as it is very robust once established. Planting other vines like Flagellaria indica and Pandorea jasminoides will complement and extend the flowering season on the structure. My plants here were grown from seed, have really struggled at the base of Flindersia species. Envious of the photos on the web under images.
Propagation:
Seeds: Austrocallerya megasperma‘s seeds require treatment before sowing. Pre-treat by washing the seeds with sand for 5 to 10 minutes. Another method is to rub the seeds gently on fine sand paper until the outer testa is just removed in one spot.
Sow the treated seeds directly into 50mm native tubes and cover with 10mm of the mix.
Once the seedlings have sprouted fertilize using Seaweed, fish emulsion or organic chicken pellets soaked in water.
Cuttings:
1 Prepare the cutting mix by adding one third sharp clean river sand, one third peat and one third perlite. These ingredients are sterile,
2 Select good material from non diseased plants,
3 Select semi green stems for cuttings. Look for a stem with two or three nodes,
4 Place the cutting on a flat, hard surface, and make a clean slice through the middle of the lower node on an angle towards the base, with a sterilized sharp knife or razor blade. – This scarification of the node will increase the chances of roots emerging from this spot. Now remove all but one or two the leaves, leaving the apex leaves in tact. If the leaves are very large in proportion to the stem, cut off the apical halves.
5 Some plants root easily, but a rooting hormone can help others by stimulating the cutting into sending out new roots. Fill a saucer with water, and place some rooting hormone into another container like a bottle top. Dip the node end of the cutting into the water and then into the rooting hormone. Tap off any excess hormone,
6 Use a small dipple stick or old pencil to poke a hole into the soilless potting mix. Ensure the hole is slightly larger than the stem diameter and be careful not to wipe the rooting hormone off the cuttings base, place the cuttings in a pattern ensuring the cuttings are not touching each other,
7 I like to place the pots in Plastic bags to help maintain temperature and moisture. Place in a semi shaded place like under 50mm shade cloth.
8 When the cuttings have struck, open the bag to allow air circulation for a few days to a week,
9 Once hardened off remove the cuttings from the bag and allow to further hardening for a few more days,
10 Transplant into a good potting mix to grow on.
Fertilize using seaweed, fish emulsion or organic chicken pellets soaked in water on an alternate basis. Fertilize every two months until the plants are established then annually in early September to October to maintain health, vitality and better flowering.
Further comments from readers:
Hi reader, it seems you use The Bible of Botany a lot. That’s great as we have great pleasure in bringing it to you! It’s a little awkward for us to ask, but our first aim is to purchase land approximately 1,600 hectares to link several parcels of N.P. into one at The Pinnacles NSW Australia, but we need your help. We’re not salespeople. We’re amateur botanists who have dedicated over 30 years to saving the environment in a practical way. We depend on donations to reach our goal. If you donate just $5, the price of your coffee this Sunday, We can help to keep the planet alive in a real way and continue to bring you regular updates and features on Australian plants all in one Botanical Bible. Any support is greatly appreciated. Thank you.
In the spirit of reconciliation we acknowledge the Bundjalung, Gumbaynggirr and Yaegl and all aboriginal nations throughout Australia and their connections to land, sea and community. We pay our respect to their Elders past, present and future for the pleasures we have gained.
Austrocynoglossum latifolium
Classification:
Class: Equisetopsida
Subclass: Magnoliadae
Order: Boraginal
Family: Boraginaceae
Genus: From Terra Australis, which is Latin for land of the south, Kyno, which is Ancient Greek for a dog and Glossum which is Ancient Greek for a tongue. It refers to a genus of Australian plants, which have structures or organs, which resemble a dog’s tongue. Here it is the fruits which look like a dog’s tongue.
Species: From Latus, which is Latin for broad and Folium, which is Latin for foliage. It refers to leaves which are much broader than other species in the genus.
Common Name:.
Distribution:
Austrocynglossum latifolium is found south from Mount Wooroolin, near Kingaroy in southern Queensland to the Great Otway National Park and Wilsons Promontory in southern Victoria. There is a disjunct population in western Victoria around the Grampians. It is also found on King Island and near Circular Head, The Parramatta River and Mole Creek in north eastern Tasmania. It is mainly found on and east of the Great Dividing Range.
https://avh.ala.org.au/occurrences/search?taxa=Austrocynoglossum+latifolium#tab_mapView
Habitat Aspect Climate:
Austrocynglossum atifolium prefer partial shade to dappled sun light. It is found in wet Eucalyptus forests, and adjacent to moist subtropical rainforests to cool moist temperate rainforests amongst tall trees, medium trees, or low trees. It is found from 5 meters ASL to 1500 meters ASL.
The temperatures range from minus 4 degrees in August to 36 degrees in January.
The rainfalls range from lows of 550mm to 3000mm average per annum. It relies on orographic precipitation in the lower rainfall areas.
Soil Requirements:
Austrocynglossum latifolium prefers better quality light clays to medium clays. The soils are usually derived from decomposed brown basalt or black basalt, metamorphic rocks, granites and metashales. The soils pH ranges from 5pH to 6.5pH. It is not tolerant of waterlogged soils however annual inundations are acceptable for short periods. Non saline soils to moderately saline soils are tolerated.
Height & Spread:
Wild Plants: 1m to 2m by 1m to 2m.
Characteristics:
Austrocynglossum latifolium is a small decumbent perennial herb. The slender, trailing stems are pale green to grass-green and covered in short, erect hispid hairs.
The alternate ovate to broad ovate leaves of Austrocynglossum latifolium measures 20mm to 60mm in length by 15mm to 60mm in width. The petioles are covered in short, white hispid hairs and measure 5mm to 11mm in length. The young leaves are bright glossy lime green. The bases are cordate while the apexes are apiculate. The concolourous laminas are bright grass-green to sea-green and moderately to densely cover in short pubescent hairs on the upper lamina while the lower lamina is covered in short, white hispid hairs which are restricted to the main vein and lateral veins. The margins are entire and sparsely covered in white ciliate hairs.
The inflorescences of Austrocynglossum latifolium are born singularly from the leaf axils. The grass-green filiform pedicels are sparsely covered in short white pubescent hairs. The pedicels measure 10mm to 18mm in length. The 5 elliptical sepals measure 2mm to 2.5mm in length and 1.8mm to 2.2mm in width near the base. The white to mid blue, usually lilac to pale blue corollas measure 4mm to 5mm in length while the divaricate lobes measure 4.5mm to 6mm in length and width.
The yellow to yellow-green filaments are inserted.
The inserted style is yellow to yellow-green and rises from the yellow convex ovary. The ovary is glabrous. The flowers appear from October to May.
The fruits of Austrocynglossum latifolium are ovoidal mericarps which are densely covered in long hispid hairs. The pale yellow-green mericarps turn pale brown when ripe. The mericarps measure 2.5mm to 4mm in length by 1.5mm to 3mm in width and 1.2mm to 2mm in depth. The calyxes are persistent at the bases of the mericarps.
Wildlife:
Austrocynglossum latifolium wildlife is unknown to the author.
Cultivation:
Austrocynglossum latifolium is not an over attractive plant in competition but still warrants a position in the rainforest garden as a ground cover. It would look good and does well in the wild amongst Cordyline stricta. Wild plants grow 0.3 meters to 0.5 meters in height by 1.5 meters to 2 meters in diameter when grown in an open shady situation with some direct sunlight.
Austrocynglossum latifolium would be best planted in a garden along riparian zones where a small to medium rainforest affect is required.
Propagation:
Seeds: Collect the mericarps of Austrocynglossum latifolium as they begin to ripen and dehisce from the plants before they drop to the ground. I have never collected the seeds despite being around plants that are shedding their seeds.
Sow the seeds directly into a seed raising mix and cover with 1mm to 2mm of fine sand. When the seedlings are 25mm to 40mm tall, prick them out and plant them into 50mm native tubes using a seed raising mix.
Fertilize using Seaweed, fish emulsion or organic chicken pellets soaked in water and apply the liquid on an alternate basis. Fertilize every two months.
Once the seedlings reach 150mm to 175mm in height, nip the tips out and plant them out into their permanent position.
When planting in small groups below rain forest trees plant them at 1.5 meter to 2 meter centers for a complete covering of the ground.
Fertilize using seaweed, fish emulsion or organic chicken pellets soaked in water on an alternate basis. Fertilize every two months until the plants are established then annually in early September to October to maintain health, vitality and better flowering.
Further comments from readers:
Hi reader, it seems you use The Bible of Botany a lot. That’s great as we have great pleasure in bringing it to you! It’s a little awkward for us to ask, but our first aim is to purchase land approximately 1,600 hectares to link several parcels of N.P. into one at The Pinnacles NSW Australia, but we need your help. We’re not salespeople. We’re amateur botanists who have dedicated over 30 years to saving the environment in a practical way. We depend on donations to reach our goal. If you donate just $5, the price of your coffee this Sunday, We can help to keep the planet alive in a real way and continue to bring you regular updates and features on Australian plants all in one Botanical Bible. Any support is greatly appreciated. Thank you.
In the spirit of reconciliation we acknowledge the Bundjalung, Gumbaynggirr and Yaegl and all aboriginal nations throughout Australia and their connections to land, sea and community. We pay our respect to their Elders past, present and future for the pleasures we have gained.
Austromuellera trinervia
Classification:
Class: Equisetopsida
Subclass: Magnoliidae
Order: Proteales
Family: Proteacaea
Genus: From Terra Australis, which is Latin for land of the south and named in honour of Ferdinand Von Mueller 1825-1896 who was a German born Australian noted botanist and taxonomist. It refers to plants, which were first discovered in the land down under and still pays tribute to Ferdinand von Mueller.
Species: From Treis/Tria, which are Ancient Greek or Tri, which is Latin for three and Neuron, which is Ancient Greek for a nerve. It refers to leaves or phyllodes, which have three, prominent, usually parallel veins.
Common Name: Mueller’s Silky Oak.
Distribution:
Austromuellera trinervia can be found growing in 2 restricted areas between the Big Tableland on the Daintree River and Butchers Creek-Boonjee area on the western side of Mt Bartle Frere in far north Queensland.
https://avh.ala.org.au/occurrences/search?taxa=Austromuellera+trinervia#tab_mapView
Habitat Aspect Climate:
Austromuellera trinervia prefers partial shade to dappled sunlight. It grows in well-developed lowland to upland rainforest close to the coast. The altitude ranges from 10 meters ASL to 800 meters ASL.
The temperatures range from 12 degrees in August to 36 degrees in January.
The rainfalls range from lows of 1550mm to 3200mm average per annum.
Soil Requirements:
Austromuellera trinervia prefers rich red loams to medium clays. The soils are derived from decomposed black basalts. The soils pH ranges from 5.5pH to 6.5pH. It does not tolerate waterlogged soils however annual inundations are acceptable for short periods. Non saline soils to slightly saline soils are not tolerated.
Height & Spread:
Wild Plants: 15m to 35m by 6m to 10m.
Characteristics:
Austromuellera trinervia is a tall narrow pyramidal shaped tree with a pale grey scurfy bark on the trunk and larger branches. Branchlets are pale grey and covered in the scars of fallen leaves. Terminal buds and growing shoots are purple-glaucescent and densely covered in rusty-brown or orange-brown hirsute hairs.
The oblong leaves are clustered at the ends of the branches. The leaves odd pinnate leaves have 19 to 45 leaflets. The strongly asymmetrical leaflets measures 75mm to 150mm in length by 30mm to 50mm in width at the widest point. The discolourous laminas are mid green to deep green, semi glossy and glabrous on the upper laminas while the lower laminas are much paler to almost glaucescent and dull. The margins are entire and crisped. The base is strongly oblique being rounded on one side and straight on the other while the apexes are narrow acuminate.
The vein structure is a significant method in identifying wild plants in the bush along with them being oblique, asymmetrical and odd pinnate. There are 3 prominent longitudinal veins often there is a fourth which is prominent for half the lamina’s length. The first vein is straight while the other 2 or 3 three are curved. Three of the longitudinal veins are visible from the upper laminas.
The terminal leaflet’s mid vein and lateral veins are prominent on the lower lamina and are visible from the upper lamina.
The petioles measure 6mm to 10mm in length.
The inflorescences of Austromuellera trinervia are dense racemes born from the lower leaf axils or the axils of the upper leaf scars. The racemes measure 30mm to 70mm in length. There are 460 to 900 individual flowers to a raceme. The tepals measure 17mm to 25mm in length. The 3 hypogenous glands are red and turgid. Ovules number 1 or 2.The flowers appear from October through to March.
The fruits of Austromuellera trinervia are ovoidal capsules. The capsules have a single compartment though there is often one seed 2 is not rare. The capsules measure 14mm to 21mm in length by 5.5mm to 8mm in width. There are 2 distinct longitudinal ridges in which one splits and recurves 90 degrees to reveal the seeds. The green fruits turn pinkish-brown to deep mushroom externally and creamy yellow when ripe. The style is not persistent on the ripe capsules.
The flattened, reniform seeds are pink-brown and measure 14mm to 21mm in length by 5.5mm to 8mm in width including the papery wing which completely surrounds the seed.
Wildlife:
Austromuellera trinervia’s wildlife is unknown to the author.
Cultivation:
Austromuellera trinervia is a beautiful bushy small tree that deserves to be more popular than it is at the moment. In cultivation they will grow 12 meters to 16 meters by 7 meters to 9 meters in the garden when grown in the open. The roots are not a problem so it can be planted close to buildings, foundations and underground services. As it is hardy on most soil types it is easy to grow giving a wonderful display in just 6 to 8 years from seed. It can be grown in tropical, subtropical, warm frost free temperate gardens. It would be very tempted to try it in semiarid areas where it can be regularly watered around the homestead.
Austromuellera trinervia is best planted as a small specimen tree where its lush canopy can serve a purpose in shading other plants or BBQ areas. Here it can be planted in small groups of 2 or 3 or as a standalone plant to create strong contrast to other more mundane trees. If it is surrounded by shorter plants with fine pale green foliage and red flowers it will not form a distraction at the center giving height and strength to the bed. Full sun and good viewing aspects are essential so do not overcrowd it or it will have a tendency to grow taller and become more open in habit or bend towards the light. Do not use plants with large leaves as these will be too overpowering and they will blend into each other. Planted with a mass of smaller plants and groundcovers with mixed coloured flowers and foliage types will ensure a great display during the winter and spring months and for the rest of the year. This would be particularly strong, if a mixture of different finer foliage of different colours and textures are incorporated together. This will give a strong uplifting of central height.
Two or three plants can achieve a great park scenario without taking up a lot of room. Here a few annuals strategically scattered around would complete the picture. The plants planted out below should have a mixture of bold colours radiating out from the base of the trees so use pinks and mauves directly below will contrast nicely without being too strong.
Austromuellera trinervia is suitable for hosting small and large epiphytic plants like Dendrobium graticule or ferns like Pyrrosia rupestris through to Platycerium superbum or Thelychiton speciosum. Lichens and mosses will eventually start growing on the trunk and branches when it is ten years old or older giving the effect that a rain forest is close at hand.
Propagation:
Seeds: Collect seeds from Austromuellera trinervia around the trees or when the capsules begin to dehisce is ideal but often not practical. Place the dehiscing capsules in a brown paper or calico bag where the capsules can open and dry properly. The fresh seeds of Austromuellera trinervia can be sown directly into a seed raising mix. When the seedlings are 25mm to 40mm tall, prick them out and plant them into 50mm native tubes using a seed raising mix.
Once the seedlings reach 150mm to 175mm in height plant them out into their permanent position.
When planting in small groups for a feature in parks or large gardens plant them at 10 meter to 15 meter centers.
Fertilize using seaweed, fish emulsion or organic chicken pellets soaked in water on an alternate basis. Fertilize every two months until the plants are established then annually in early September to October to maintain health, vitality and better flowering.
Further comments from readers:
Hi reader, it seems you use The Bible of Botany a lot. That’s great as we have great pleasure in bringing it to you! It’s a little awkward for us to ask, but our first aim is to purchase land approximately 1,600 hectares to link several parcels of N.P. into one at The Pinnacles NSW Australia, but we need your help. We’re not salespeople. We’re amateur botanists who have dedicated over 30 years to saving the environment in a practical way. We depend on donations to reach our goal. If you donate just $5, the price of your coffee this Sunday, We can help to keep the planet alive in a real way and continue to bring you regular updates and features on Australian plants all in one Botanical Bible. Any support is greatly appreciated. Thank you.
In the spirit of reconciliation we acknowledge the Bundjalung, Gumbaynggirr and Yaegl and all aboriginal nations throughout Australia and their connections to land, sea and community. We pay our respect to their Elders past, present and future for the pleasures we have gained.
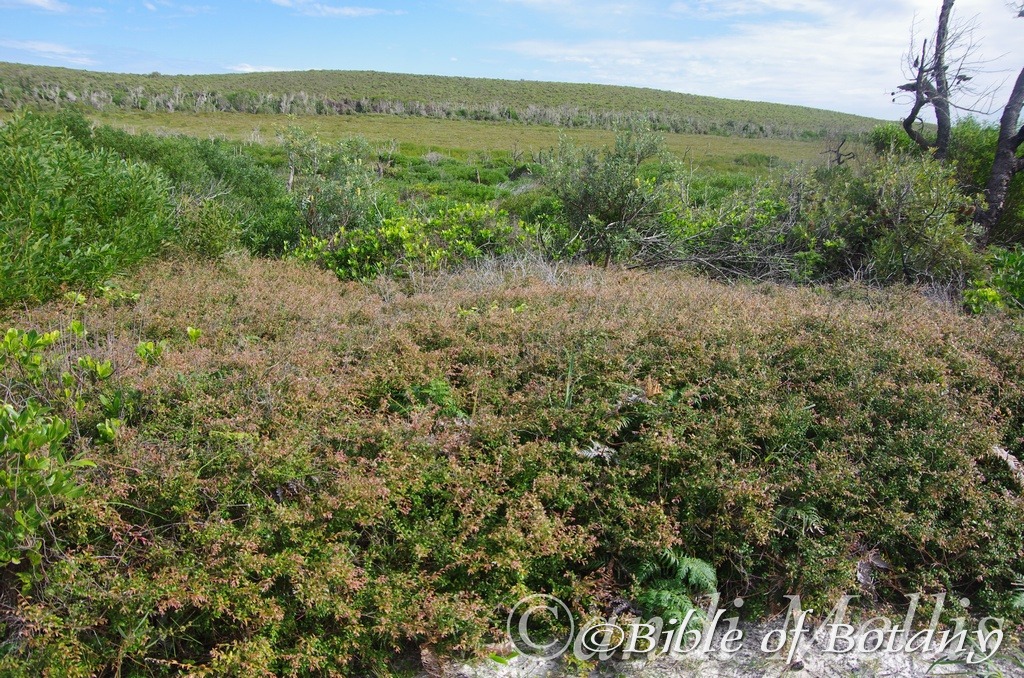
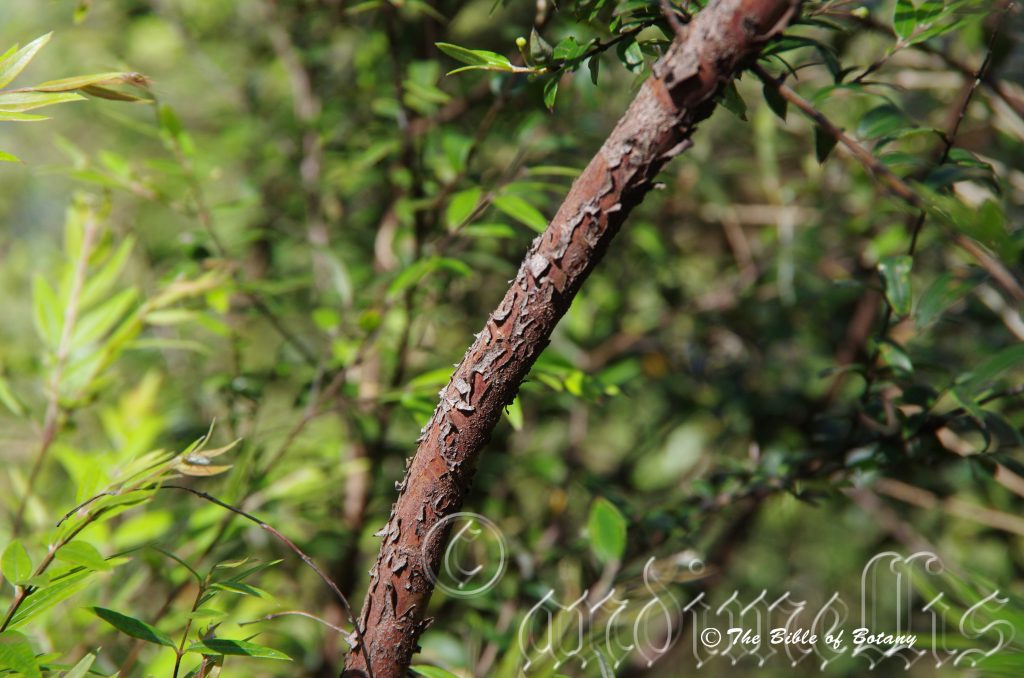
Author’s Garden The Pinnacles NSW

Author’s Garden The Pinnacles NSW
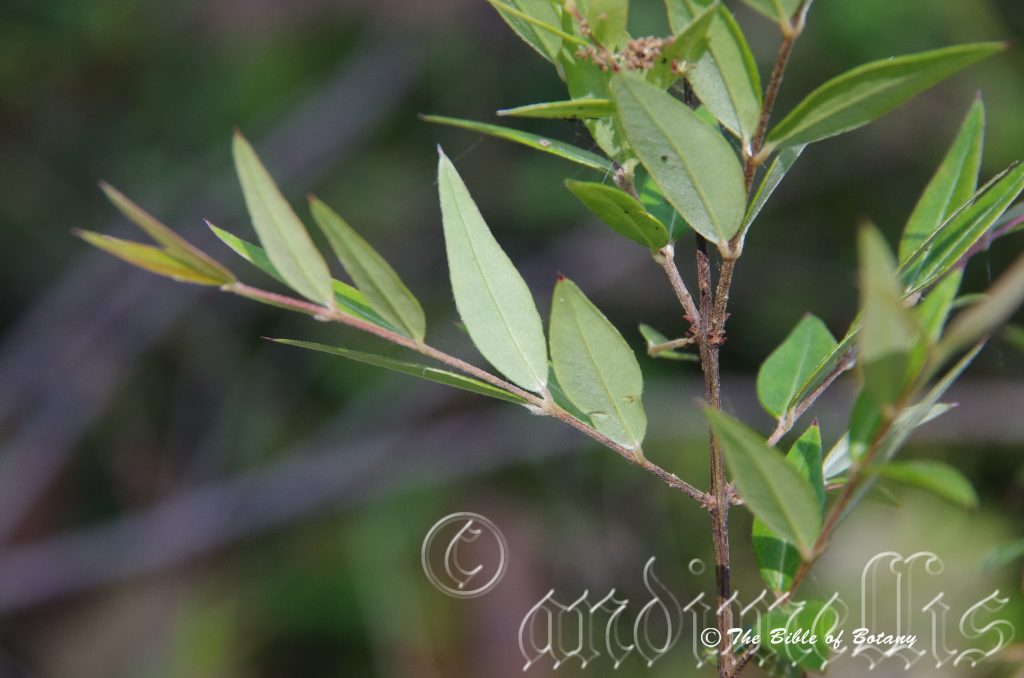
Author’s Garden The Pinnacles NSW
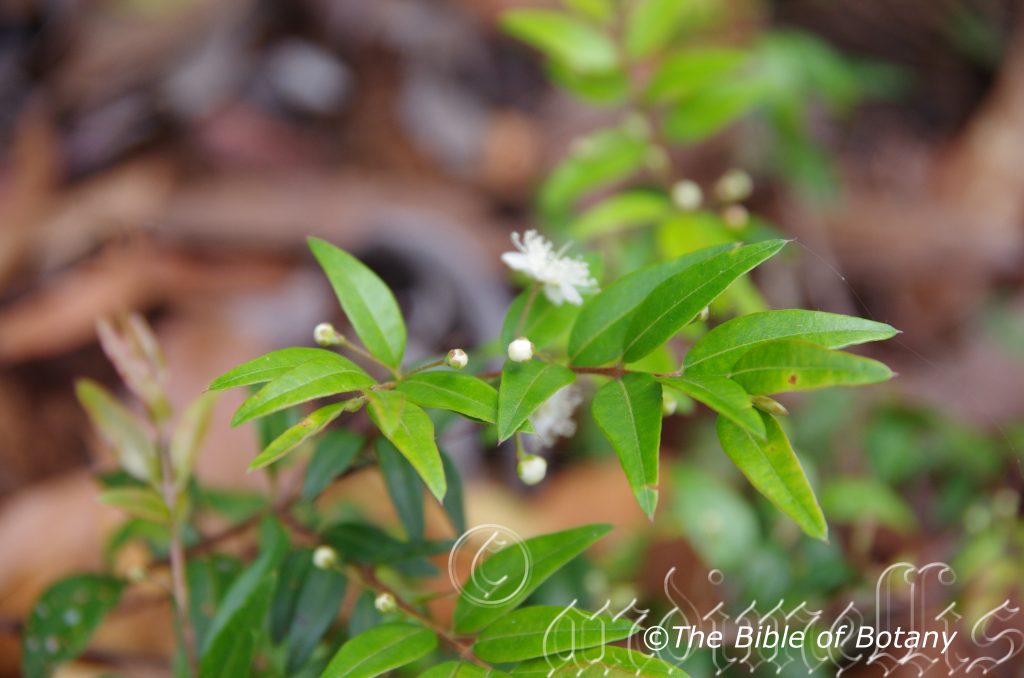
Author’s Garden The Pinnacles NSW
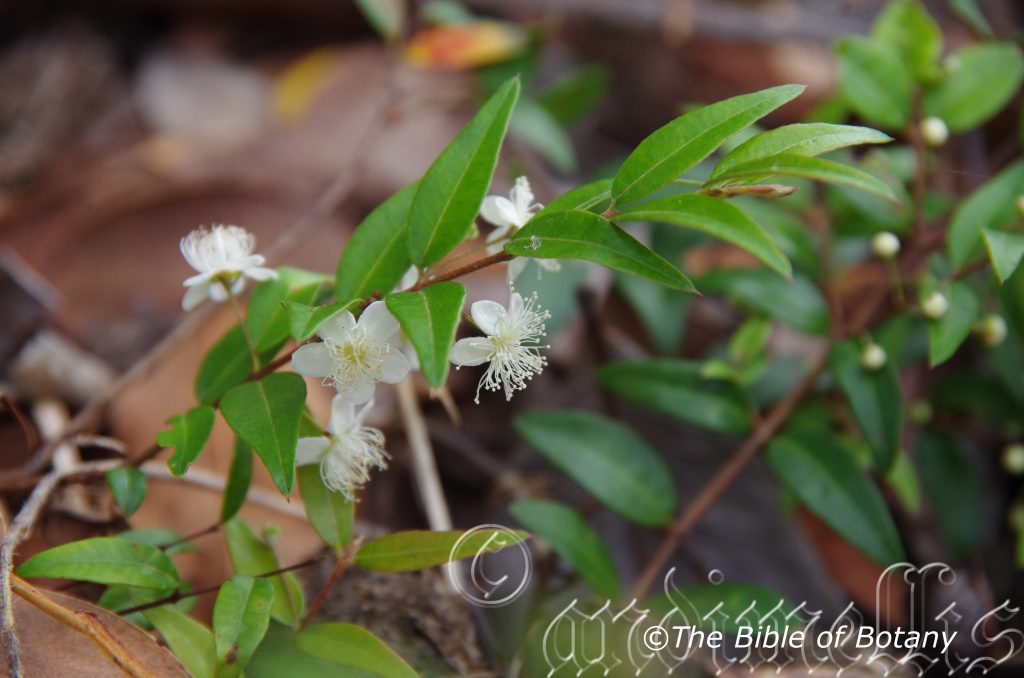
Author’s Garden The Pinnacles NSW
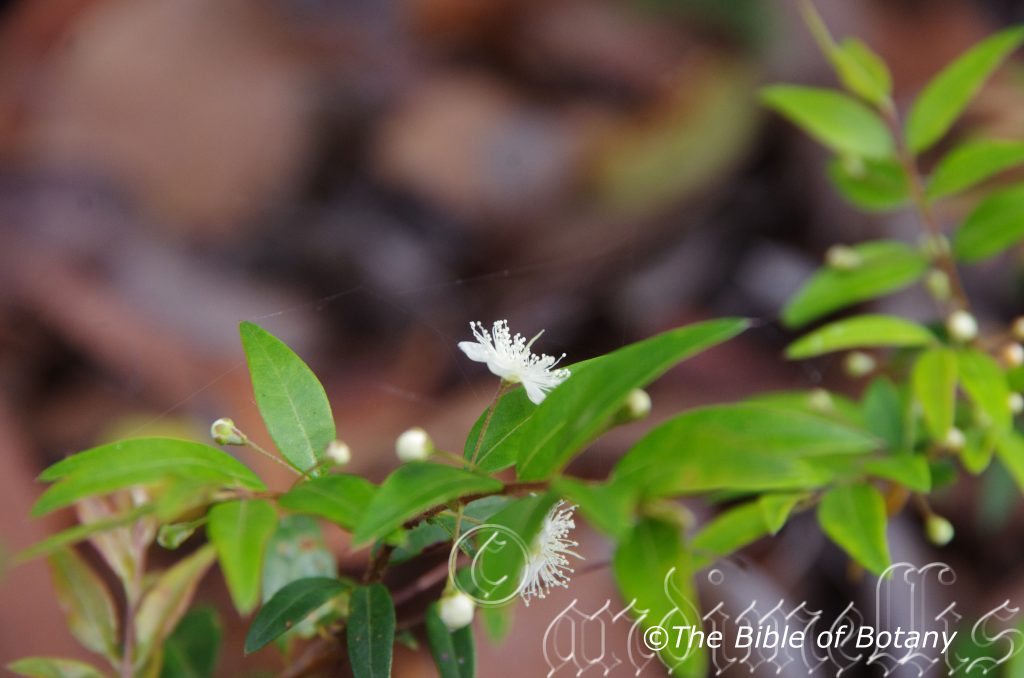
Author’s Garden The Pinnacles NSW
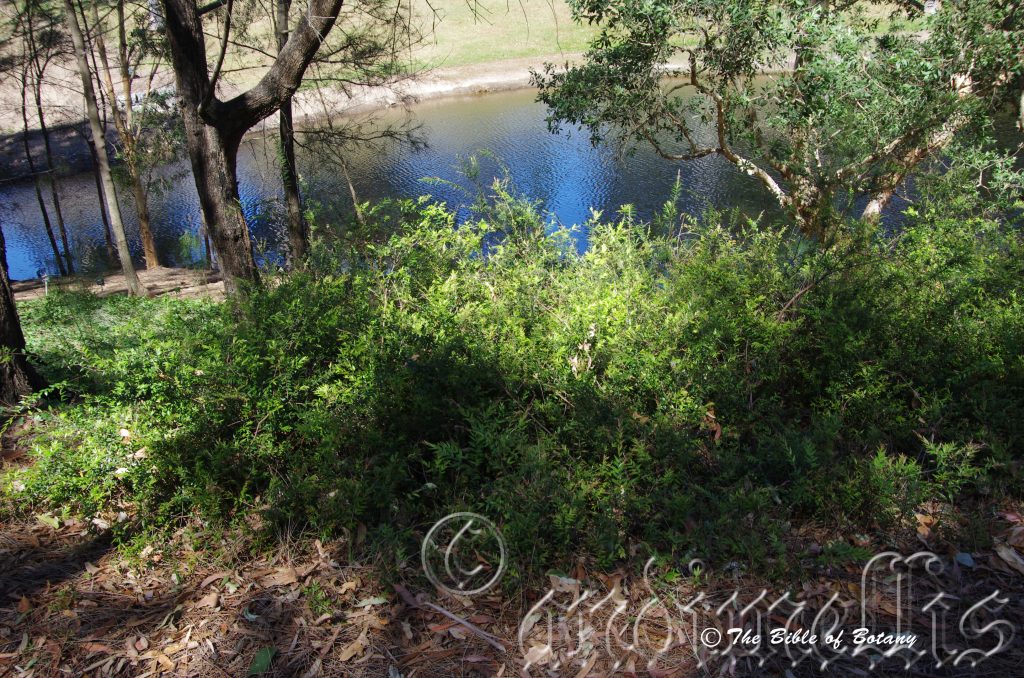
Mount Cootha Botanic gardens Qld.
Austromyrtus dulcis
Classification:
Class: Rosids
Order: Myrtales
Family: Myrtaceae
Genus: From Terra Australis, which is Latin for land of the south and Myrtus, which is Ancient Greek for a myrtle. It refers to similarities of plants, which originate from the land down under with those of the European Myrtles.
Species: From Dulcis, which is Latin for sweet. It refers to the fruits being pleasantly sweet to eat.
Common Name: Midgen Berry.
Distribution:
Austromyrtus dulcis can be found growing along the foreshores from Fraser Island in southern coastal Queensland to Urunga in Northern New South Wales.
https://avh.ala.org.au/occurrences/search?taxa=Austromyrtus+dulcis#tab_mapView
Habitat Aspect Climate:
Austromyrtus dulcis prefers partial shade to dappled sun light but have been recorded growing in full sun. It grows in open woodlands, coastal heaths, on headlands and on the margins of littoral rainforest. It is found from 1 metre to 20 metres ASL.
The temperatures range from 2 degrees in July to 38 degrees in January.
The rainfalls range from lows of 850mm to 1650mm average per annum.
Soil Requirements:
Austromyrtus dulcis prefers soil types which contain a high percentage of sand, sandy loams, peaty sands or good quality loams. The soils pH ranges from 6pH to 7pH. It does not tolerate waterlogged soils. Non saline soils to very saline soils are tolerated as are salt laden winds.
Height & Spread:
Wild Plants: 0.5m to 1.5m by 1m to 2.5m.
Characteristics:
Austromyrtus dulcis is a small shrub or ground cover with semi arching branches. The main stems are covered in a reddish brown flaky bark. The juvenile stems are densely covered in white pilose to villous hairs.
Austromyrtus dulcis’s leaves are ovate to lanceolate and measure 12mm to 30mm in length by 4mm to 12mm in width. The petiole measures 1mm to 3mm in length. The discolourous laminas are deep sea green to olive-green on the upper lamina and paler below. The lower lamina is densely covered in white to pale grey sericeous hairs. The bases are rounded while the apexes are narrow acute to broad acute with an apiculate tip. The margins are entire flat slightly recurved or slightly involute. The mid vein is prominent on the lower lamina and is visible on the upper margin. The lower leaf surface is a paler grey to olive green and pubescent. Juvenile leaves emerge in many different hues of pink to bronze. The juvenile foliage is a soft purple to pale purple-red and densely covered in white sericeous hairs.
The inflorescence of Austromyrtus dulcis is born singularly or in a small loose raceme of three to six flowers from the leaf axis. Flowers are 8mm to 10mm across. The hypanthium is creamy, silky and covered in short white or grey pilose hairs. The 5 sepals measure 1mm to 2mm in length by 4mm wide. The five white to almost transparent petals are oval and measure 3.5mm to 5mm in length by 3mm to 4mm in width. The outside is covered in short white pilose hairs while the inner surface is glabrous. They become reflexed before being discarded. The wiry pedicels measure 4mm to 5mm in length.
The 70 to 80 white filaments measure 4mm to 5mm in length. The basifixed anthers are ovoidal and creamy yellow to pale yellow.
The white style measures 2.5mm to 3.5mm long with a 2 locular ovary. Austromyrtus dulcis flowers over a wide period from late September through to early March.
The fruits of Austromyrtus dulcis are globose The berries are white to off white and are covered in fine black burgundy or navy blue spots and measure 6mm to 10mm in length by 5mm to 9mm in diameter. The berries are sparsely to densely covered in short white sericeous hairs. The sepals are persistent on the fruit. Each berry contains 1 to 9 seeds. I have found no seeds on some plants while others will have the maximum number in every berry. The season may control the quantity of seeds and the size of the fruits available. The flattish black oval seeds measure 1mm in diameter.
Wildlife:
Austromyrtus dulcis attracts a multitude of fruit eating birds. Often it is a case of who gets to the fruit first. I have seen Yellow Napped honeyeaters, Lewin honeyeaters, Eastern Spinebills, Brown honeyeaters, New Holland honeyeaters, White eared Honeyeaters and red eared wattle birds eating the fruit just to mention a few.
The berries have a dry texture with a pleasant sweet taste, though they can be a little overpowering with a clove flavour at times. When this occurs try mixing them with your favourite stewed apple pie recipe.
The berries would have great market potential if they can be bred with few seeds and larger berries. Those with a strong clove flavour certainly have the potential as a spice or condiment when dried. The other drawback is the shelf life is rather short and the problems with birds could be a real deterrent to most farmers.
Cultivation:
Austromyrtus dulcis is a beautiful bushy ground cover or small scrambling shrub. As a garden specimen it is ideally suited to positions where dappled light can be provided. It is fast growing where adequate moisture can be given and sandy to heavy loamy conditions prevail. It does not do well on shale or heavy clays.
It is an excellent rockery plant especially in mass plantings in sunnier courtyards. This makes it an excellent seaside plant where salt spray is a problem for most other plants. In cultivation it will usually grow 0.3 meters to 1.5 meters in height by 1.5 meters to 2.5 meters in diameter, however with regular tip pruning it can be trained to grow in confined spaces either horizontally or vertically.
Austromyrtus dulcis makes an excellent tub plant or large hanging basket specimen where the semi pendulous branches hang down. I have trained branches, by tying them up below the basket so that they grow out again. This gives unusual display of growth and colour when new growth appears, flowers bloom and again when the fruits become abundant. Sawdust or sand mixes are too well draining unless the sawdust has completely composted down where it exhibits a texture like plasticine to the touch. Moisture can be squeezed out between the fingers yet it remains moist. I find this a great basis to start with.
Mix equal parts of the well decomposed saw dust with the above feel with perlite and vermiculite. To this add two part sharp clean sand, one part compost and one part good crusher dust from a basalt rock quarries. Preferably black basalt but both are good. Make sure the sand comes from a source that does not have salt.
The decomposed Sawdust in this condition creates a better moisture retention mix and holds nutrient in. The perlite and vermiculite make the mix neutral and both have great water holding capacity without shrinkage with age. The sand creates good drainage and is good for good healthy root development. The crusher dust adds vital minerals which the plants need.
Court yard plants need good light and ventilation without drying breezes or wind.
Again fertilize the plants on a monthly basis with the above formula on a rotation basis.
Austromyrtus dulcis would make an interesting topiary specimens and I have seen it in a bonsai where it looked really amazing.
Propagation:
Seeds: Collect the fruits of Austromyrtus dulcis from around the shrubs in the early morning before the birds descend on the plants. Eat what fruit you want and spit the seeds into a glass. Wash the seeds and sow the fresh seeds directly into a seed raising mix. Seeds maybe erratic in germination but usually give a 100mm strike. When the seedlings are 25 to 40 mm tall, prick them out and plant them into 50mm native tubes using a good quality mix.
Once the seedlings reach 100mm to 150mm in height plant them out into their permanent position.
When mass planting for a feature in a rockery or along beach fronts plant them at 1 meter to 2 meter spacings.
Fertilize using Seaweed, fish emulsion or organic chicken pellets soaked in water on an alternate basis. Fertilize every two months until the plants are established then annually in early September or March to maintain health, vitality and better flowering.
Cuttings: Semi-hardwood cuttings are usually prepared from partially mature wood of the current season’s growth, just after a flush of growth has hardened off. This type of cutting normally is made from mid-September to early March. The wood is reasonably firm and the leaves of mature size. Use 100mm long cuttings and. remove half the leaves from the bottom section being careful not to tear the bark. Take a 10mm slice off the bark from the bottom of the cutting on one side. Using an appropriate rooting hormone, dip the cutting in and place it in a moist sterile seed raising mix. When the cuttings have obviously struck and have developed good roots treat them as for seedlings.
1 Prepare the cutting mix by adding one third sharp clean river sand, one third peat and one third perlite. These ingredients are sterile,
2 Select good material from non diseased plants,
3 Select semi green stems for cuttings. Look for a stem with two or three nodes,
4 Place the cutting on a flat, hard surface, and make a clean slice through the middle of the lower node on an angle towards the base, with a sterilized sharp knife or razor blade. – This scarification of the node will increase the chances of roots emerging from this spot. Now remove all but one or two the leaves, leaving the apex leaves in tact. If the leaves are very large in proportion to the stem, cut off the apical halves.
5 Some plants root easily, but a rooting hormone can help others by stimulating the cutting into sending out new roots. Use 100mm long cuttings and. remove half the leaves from the bottom section being careful not to tear the bark. Take a 10mm slice off the bark from the bottom of the cutting on one side. Fill a saucer with water, and place some rooting hormone into another container like a bottle top. Dip the node end of the cutting into the water and then into the rooting hormone. Tap off any excess hormone,
6 Use a small dipple stick or old pencil to poke a hole into the soilless potting mix. Ensure the hole is slightly larger than the stem diameter and be careful not to wipe the rooting hormone off the cuttings base, place the cuttings in a pattern ensuring the cuttings are not touching each other,
7 I like to place the pots in Plastic bags to help maintain temperature and moisture. Place in a semi shaded place like under 50mm shade cloth.
8 When the cuttings have struck, open the bag to allow air circulation for a few days to a week,
9 Once hardened off remove the cuttings from the bag and allow to further hardening for a few more days,
10 Transplant into a good potting mix to grow on.
Fertilize using seaweed, fish emulsion or organic chicken pellets soaked in water on an alternate basis. Fertilize every two months until the plants are established then annually in early September to October to maintain health, vitality and better flowering.
Further comments from readers:
Hi reader, it seems you use The Bible of Botany a lot. That’s great as we have great pleasure in bringing it to you! It’s a little awkward for us to ask, but our first aim is to purchase land approximately 1,600 hectares to link several parcels of N.P. into one at The Pinnacles NSW Australia, but we need your help. We’re not salespeople. We’re amateur botanists who have dedicated over 30 years to saving the environment in a practical way. We depend on donations to reach our goal. If you donate just $5, the price of your coffee this Sunday, We can help to keep the planet alive in a real way and continue to bring you regular updates and features on Australian plants all in one Botanical Bible. Any support is greatly appreciated. Thank you.
In the spirit of reconciliation we acknowledge the Bundjalung, Gumbaynggirr and Yaegl and all aboriginal nations throughout Australia and their connections to land, sea and community. We pay our respect to their Elders past, present and future for the pleasures we have gained.
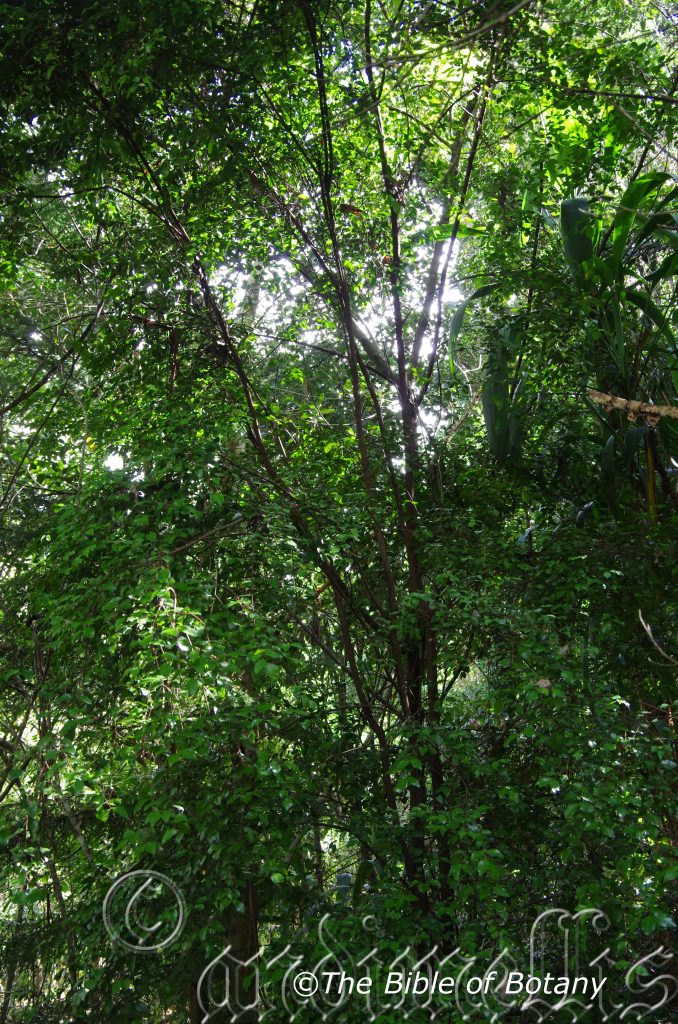
Lismore Botanic Gardens NSW
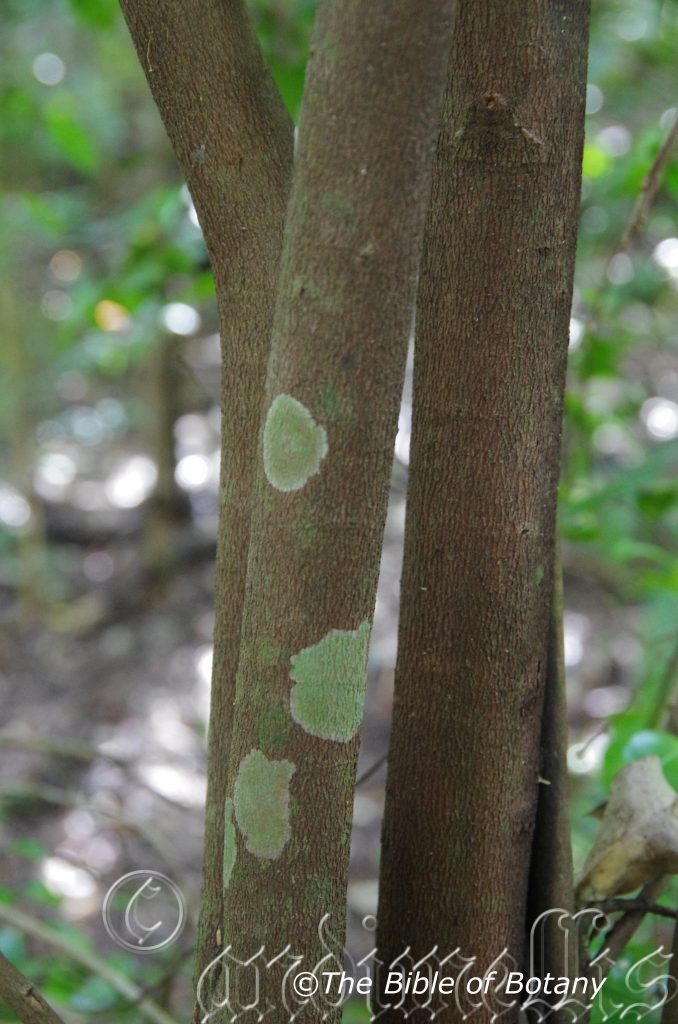
Lismore Botanic Gardens NSW
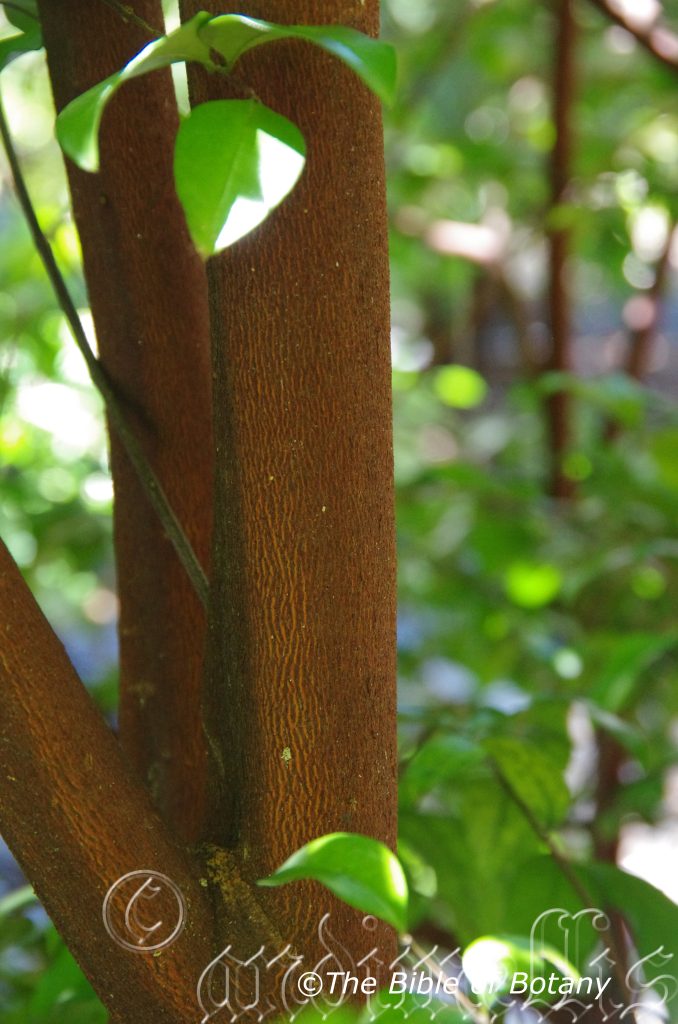
Lismore Botanic Gardens NSW
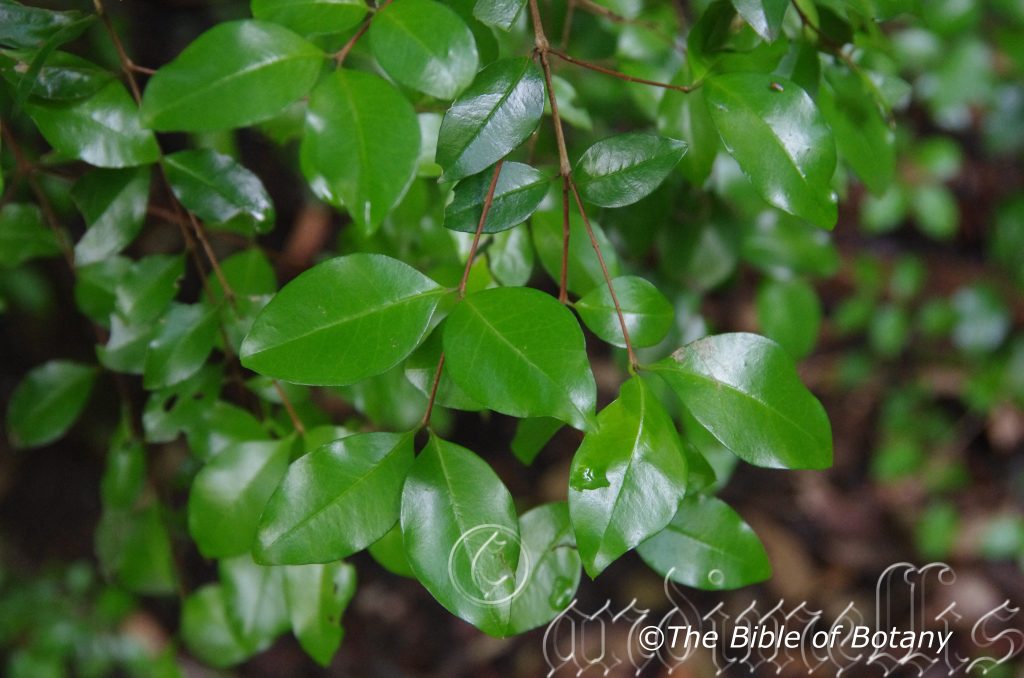
Lismore Botanic Gardens NSW
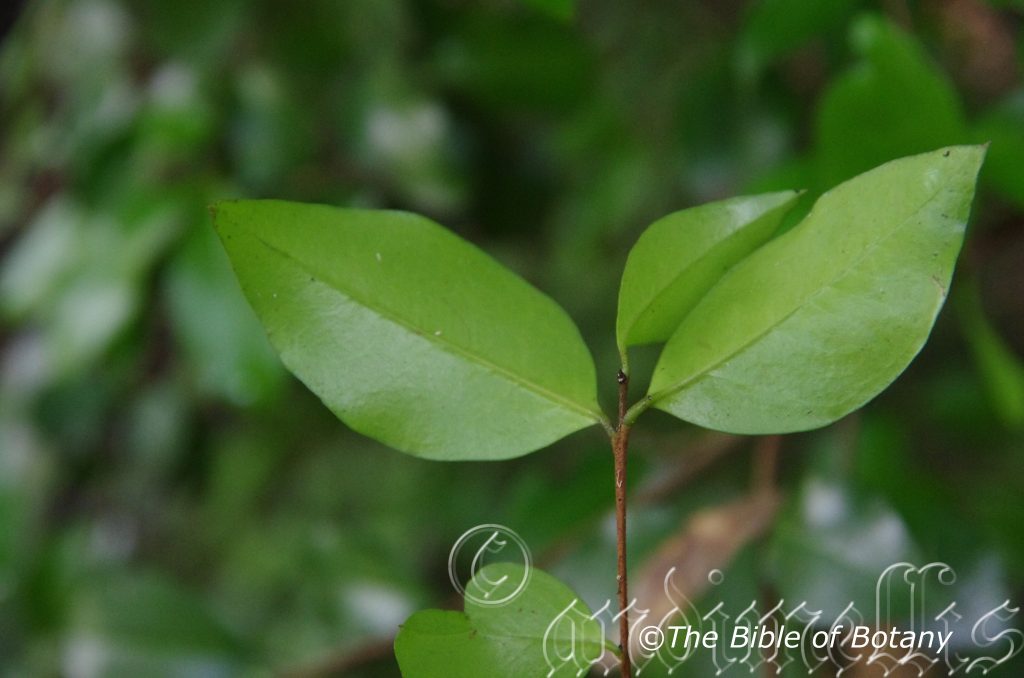
Lismore Botanic Gardens NSW
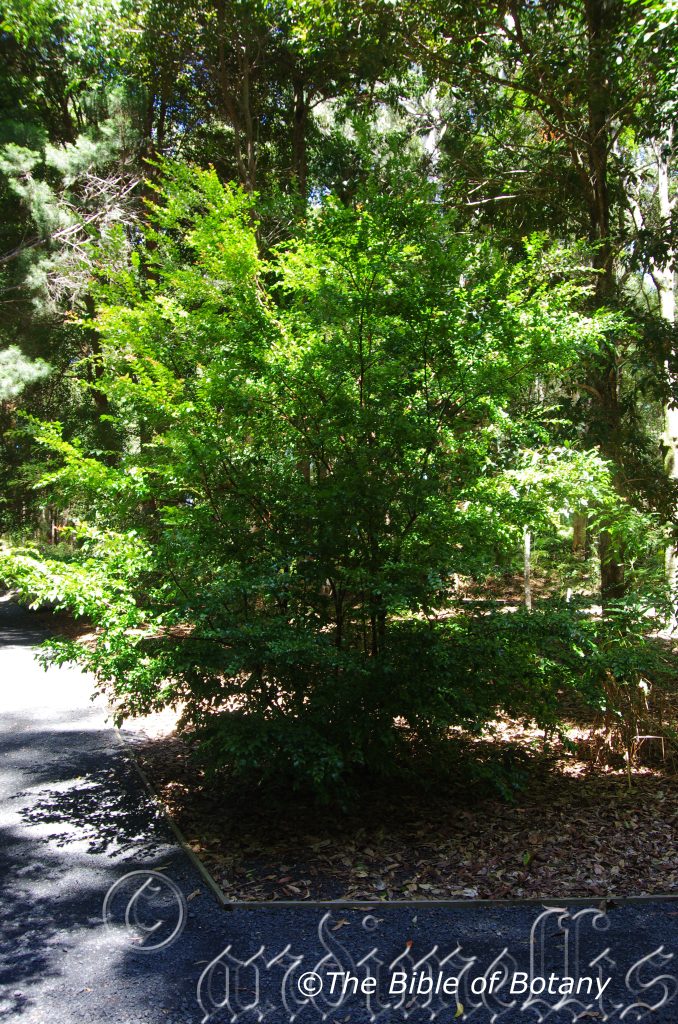
Lismore Botanic Gardens NSW
Austromyrtus fragrantissima
Classification:
Class: Rosids
Order: Myrtales
Family: Myrtaceae
Genus: From Terra Australis, which is Latin for land of the south and Myrtus, which is Ancient Greek for a myrtle. It refers to similarities of plants, which originate from the land down under with those of the European Myrtles.
Species: From Fragrans, which is Latin for I smell, have a sweet fragrance or sweetly scented and -Issima, which is Latin for the ultimate or most. It refers to plants usually the leaves or flowers which have a very strong fragrance or sweet scent.
Common Name:
Distribution:
Austromyrtus fragrantissima is found south from the Gold Coast Hinterland in far south eastern Queensland to Rocky Mouth Creek in far north eastern New South Wales. There is a disjunct population further north in Queensland near Mooloola.
https://avh.ala.org.au/occurrences/search?taxa=Austromyrtus+fragrantissima#tab_mapView
Habitat Aspect Climate:
Austromyrtus fragrantissima prefers full sun to light dappled shade. It grows in coastal subtropical rainforests, particularly along riverine rainforests and riparian zones. The altitude ranges from 20 meters ASL to 450 meters ASL.
The temperatures range from 2 degrees in July to 44 degrees in January.
The rainfalls range from lows of 850mm to 1250mm on average per annum.
Soil Requirements:
Austromyrtus fragrantissima prefers deeper fertile red soils rocky sandy loams, to rocky light medium clays or pebbly alluvial flats. The soils are usually derived from decomposed brown basalts and black basalts. The soils pH ranges from 5pH to 6.5pH are preferred. It does not tolerate waterlogged soils, however many soils have good capillary action to streams and rills nearby. Non saline soils to slightly saline soils are tolerated.
Height & Spread:
Wild Plants: 5m to 8m by 4m to 6m.
Characteristics:
Austromyrtus fragrantissima is a small erect shrub. The trunk or main stems near the ground are rough and brown with a fissured bark, while the upper stems are grey-green, or pale green and sparsely to moderately covered in short, fawn to brown hirsute hairs.
The sub-opposite leaves of Austromyrtus fragrantissima are broad lanceolate to elliptic and measure 15mm to 50mm in length by 8mm to 25mm in width. The terete, green petioles measure 1mm to 4mm in length. The bases are rounded and taper close to the petiole, while the apexes are obtuse or acute, apiculate. The mature discolourous laminas are bright glossy green and glabrous on the upper lamina, while the lower lamina is paler and dull. The laminas gently recurve upwards from the mid vein to the margins and bend downwards on the apical half to the apex. The margins are entire. The mid vein is prominent on the lower lamina only on the basal half, while the lateral veins are set at 40 degrees and are visible on both laminas.
The inflorescences of Austromyrtus fragrantissima are born singularly from the leaf axils or in small clusters occasionally in short racemes. The terete pedicels measure 2mm to 7mm in length. The 4 merous flower’s hypanthium is moderately covered in short, white pilose hairs. The sepals measure 1.5mm to 2.5mm in length, while the white, lanceolate petals have ciliate margins and measure 2mm to 3mm in length. The white stamens measure 2.5mm to 3.5mm in length. There is a 2 locular ovary with a 3mm to 4mm long erect style.
The globose berry turns yellow to orange when ripe and measures 5mm to 7mm in diameter.
Wildlife:
Austromyrtus fragrantissima’s wildlife is unknown to the author.
Cultivation:
Austromyrtus fragrantissima is a small rare rainforest tree suitable for planting in small gardens to the largest gardens. In cultivation it will grow 5 meters to 7 meters by 4 meters to 5 meters in diameter when grown in a rainforest situation with plenty of room to develop to its best.
It grows and adapts well to cultivation in coastal subtropical areas. It thrives where the weather is warm and the humidity is high however it should be tried more, in less humid areas where the soils are moisture retentive. Ensure the plants are free from competition in the early stages.
Gossia fragrantissima is well suited to positions where maximum sunlight can be guaranteed and the drainage is poor. Plants should be planted sparingly with contrasting foliage or trees with colourful fruits that appear at different times of the year. A bush scene can be achieved with smaller Syzygiums like Syzygium wilsonii or even planted between with an emperor mandarin Citrus reticulata, Carisa spinulosum or the native finger lime Citrus australisica.
Alternative it can be used as a specimen tree with spacings at 6 meters to 10 meters.
Propagation:
Seeds: Austromyrtus fragrantissima’s seeds require treatment before sowing. Pre-treat by placing the seeds into a glass off the boil water. Allow the water to cool and leave to soak for 6 hours. Seeds that have not swollen repeat the exercise. As the seedlings resent being handled sow the seeds into peat pots. When the seedlings are 50mm to 80mm tall, plant the pots out into their permanent position. Water thoroughly.
For mass plantings space the seedlings at 1 meter centers.
Fertilize using seaweed, fish emulsion or organic chicken pellets soaked in water on an alternate basis. Fertilize every two months until the plants are established then annually in early September to October to maintain health, vitality and better flowering.
Further comments from readers:
Hi reader, it seems you use The Bible of Botany a lot. That’s great as we have great pleasure in bringing it to you! It’s a little awkward for us to ask, but our first aim is to purchase land approximately 1,600 hectares to link several parcels of N.P. into one at The Pinnacles NSW Australia, but we need your help. We’re not salespeople. We’re amateur botanists who have dedicated over 30 years to saving the environment in a practical way. We depend on donations to reach our goal. If you donate just $5, the price of your coffee this Sunday, We can help to keep the planet alive in a real way and continue to bring you regular updates and features on Australian plants all in one Botanical Bible. Any support is greatly appreciated. Thank you.
In the spirit of reconciliation we acknowledge the Bundjalung, Gumbaynggirr and Yaegl and all aboriginal nations throughout Australia and their connections to land, sea and community. We pay our respect to their Elders past, present and future for the pleasures we have gained.

NCBG Coffs Harbour NSW

MCBG Brisbane Qld.
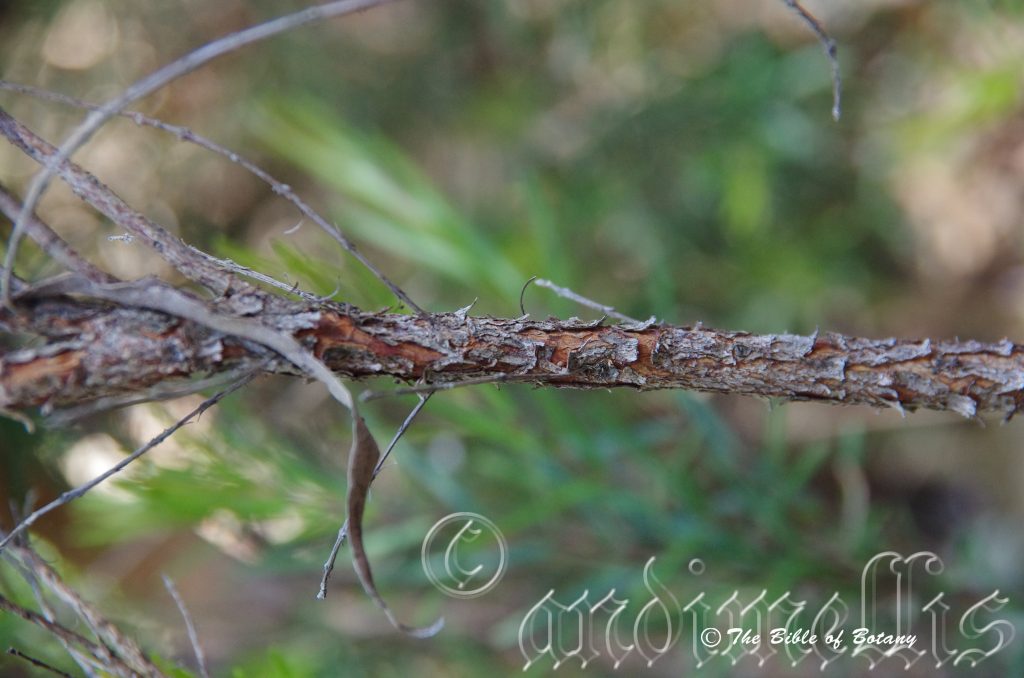
MCBG Brisbane Qld.
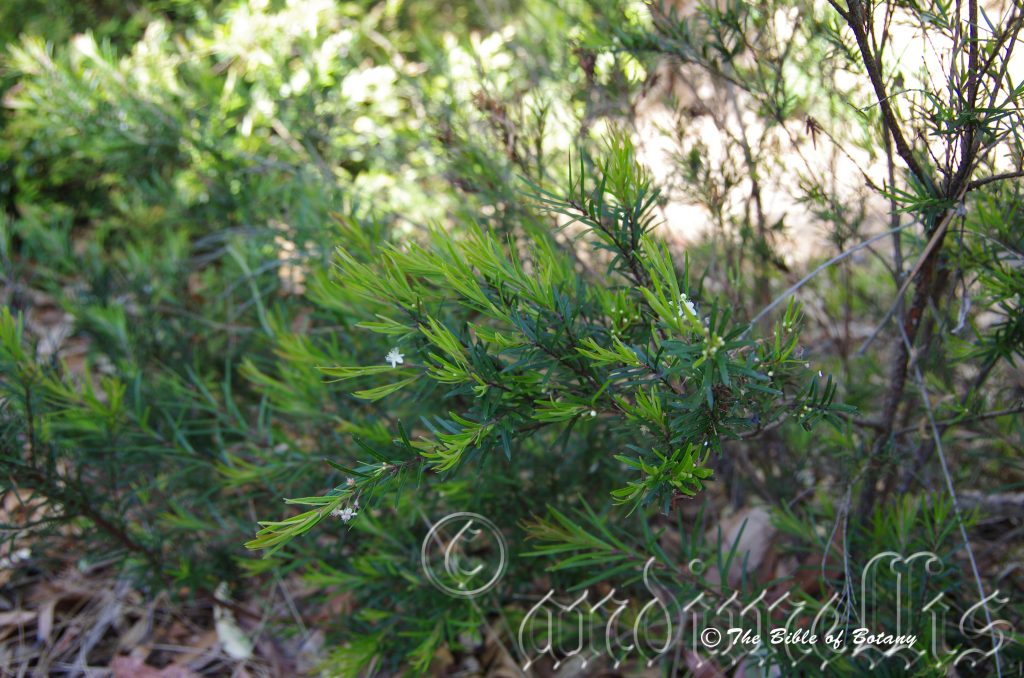
MCBG Brisbane Qld.
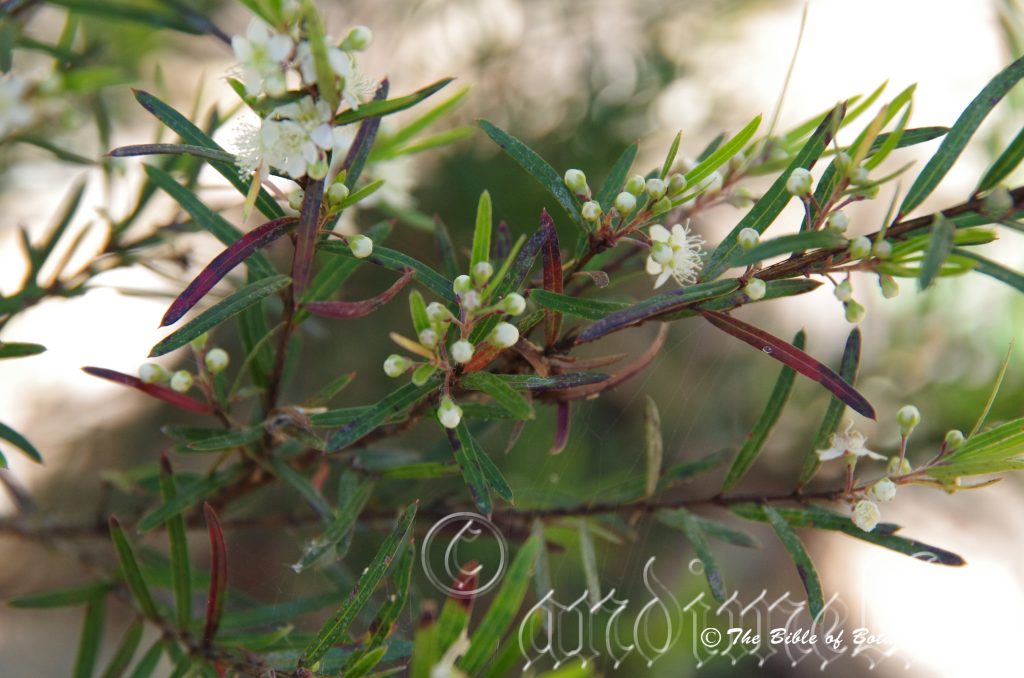
MCBG Brisbane Qld.
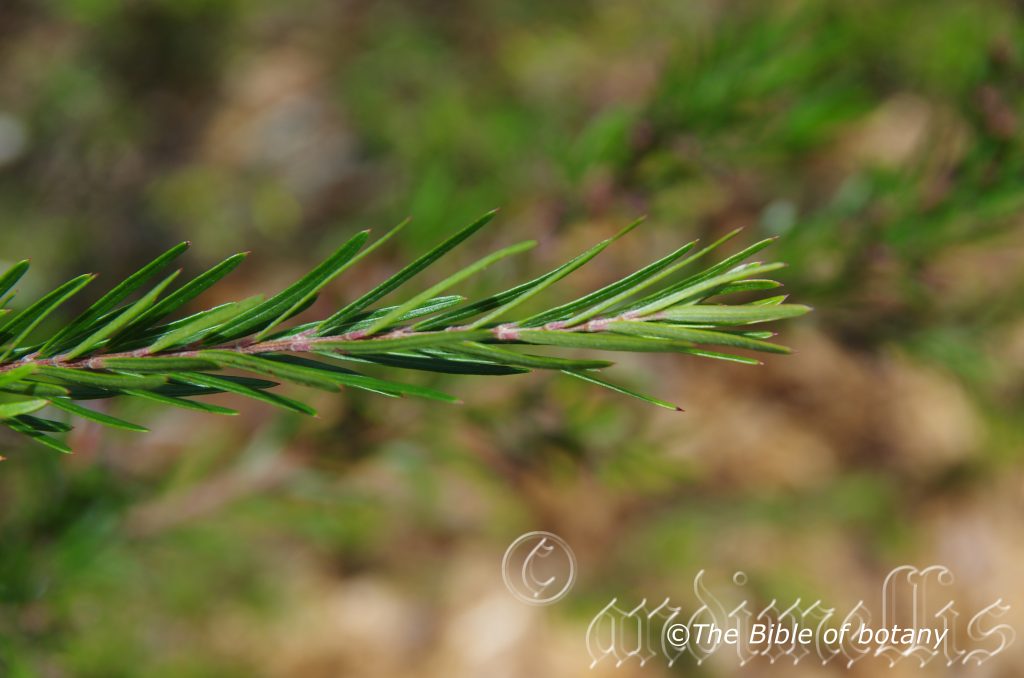
NCBG Coffs Harbour NSW
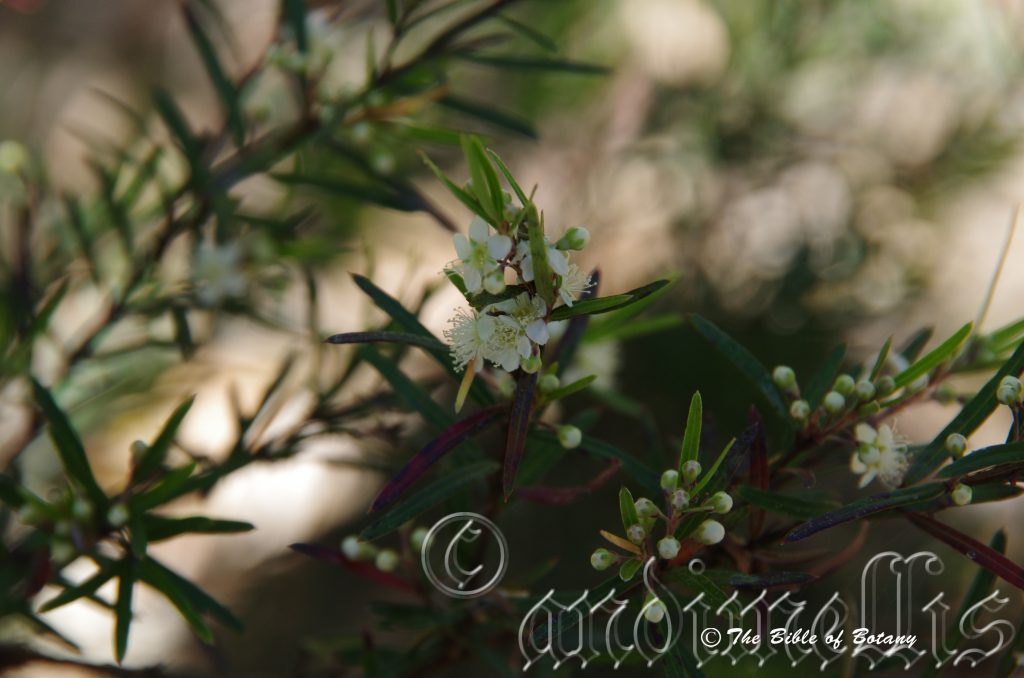
MCBG Brisbane Qld.
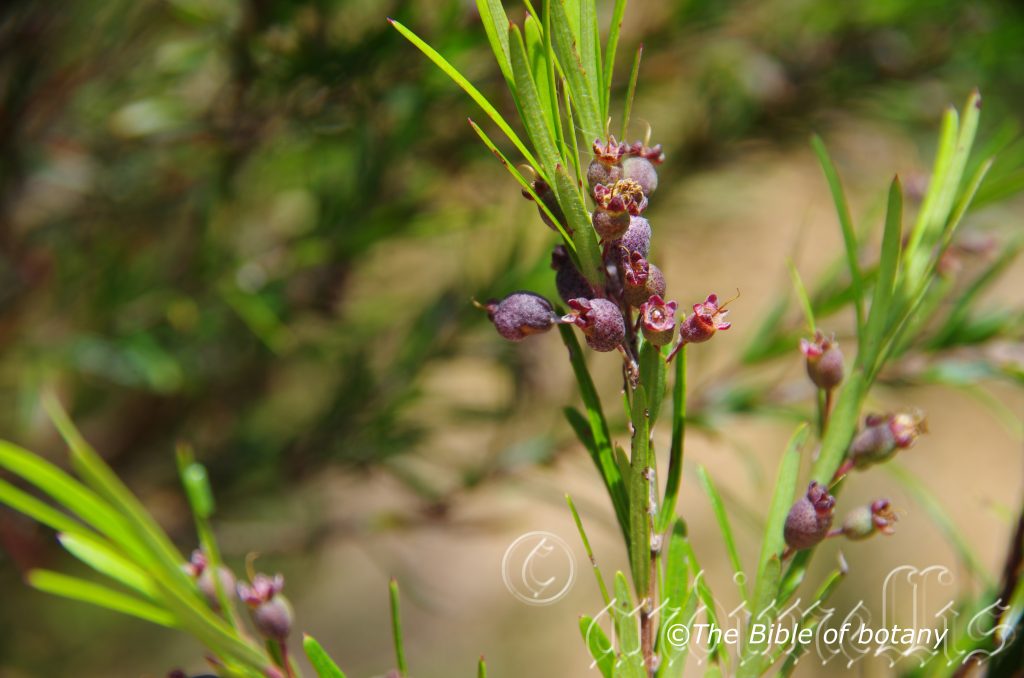
MCBG Brisbane Qld.
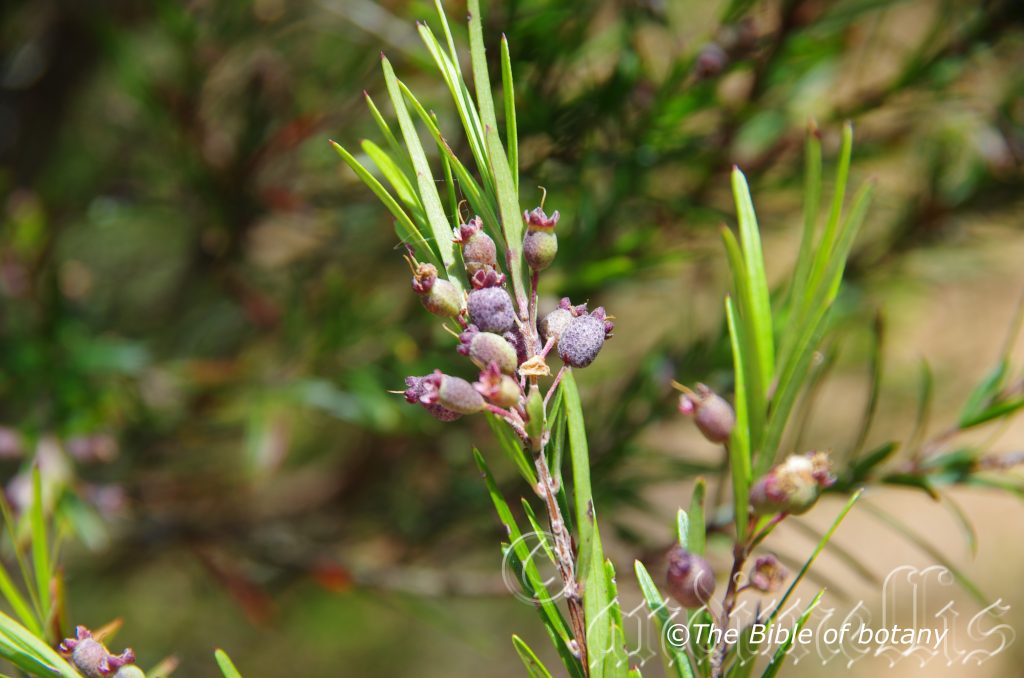
MCBG Brisbane Qld.
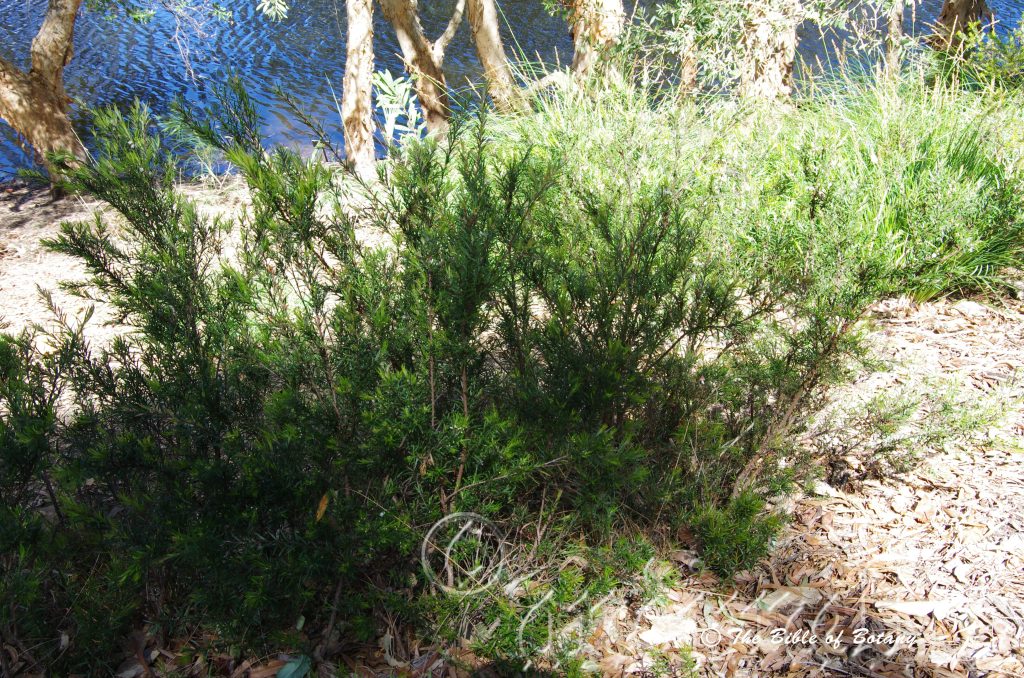
MCBG Brisbane Qld.
Austromyrtus tenuifolia
Classification:
Class: Rosids
Order: Myrtales
Family: Myrtaceae
Genus: From Terra Australis, which is Latin for land of the south and Myrtus, which is Ancient Greek for a myrtle. It refers to similarities of plants, which originate from the land down under with those of the European Myrtles.
Species: From Tenui, which is Latin for slender and fine and Folium, which is Latin for foliage. It refers to leaves, which are slenderer than other species in the genus.
Common Name: Midgen Berry.
Distribution:
Austromyrtus tenuifolia is restricted to the Sydney Basin in central coastal New South Wales.
https://avh.ala.org.au/occurrences/search?taxa=Austromyrtus+tenuifolia#tab_mapView
Habitat Aspect Climate:
Austromyrtus tenuifolia prefer full sun to dappled sun light. It grows in moist sclerophyll forest often beside streams and creeks, drainage lines or in hollow depressions. The altitude ranges from 5 meters ASL to 400 meters ASL.
The temperatures range from 2 degrees in July to 38 degrees in January.
The rainfalls range from lows of 850mm to 1250mm average per annum.
Soil Requirements:
Austromyrtus tenuifolia prefers soil types which contain a high percentage of sand, sandy loams, peaty sands or good quality loams. The soils pH ranges from 6pH to 7pH. It does not tolerate waterlogged soils. Non saline soils to very saline soils are tolerated as are salt laden winds.
Height & Spread:
Wild Plants: 1m to 2m by 1.5m to 2.5m.
Characteristics:
Austromyrtus tenuifolia is a small rounded to spreading shrub or ground cover with semi arching branches. The main stems are covered in a reddish brown flaky bark. The juvenile stems are densely covered in white pilose to villous hairs.
Austromyrtus tenuifolia’s leaves are linear to linear-lanceolate and measure 15mm to 40mm in length by 1mm to 3mm in width. The petiole measures 1mm to 3mm in length. The bases are rounded-cuneate to broadly cuneate while the apexes are narrowly acute to broad acute with an apiculate tip. The lower leaf surface is a paler grey to olive green and pubescent. The concolourous laminas are deep sea green to deep olive-green and glabrous on the upper laminas while the lower laminas are densely covered in white pilose hairs. The laminas are flat or recurve very slightly upwards from the mid vein to the margins. The margins are entire, flat or decurve. The mid vein is prominent on the lower lamina and is clearly visible on the upper margin. Juvenile leaves emerge in many different hues of pink to bronze. The juvenile foliage is pale purple to purple-red and densely covered in white sericeous hairs.
The inflorescences of Austromyrtus tenuifolia are born singularly or rarely 2 from the leaf axis. Flowers measure 8mm to 10mm in diameter. The hypanthia are pale green, silky and are covered in short white pilose or villous hairs. The hypanthia measure 1.2mm to 2mm in length by 2mm to 2.5mm in diameter. The 5 pale green sepals have an acute apex and measure 1.2mm to 2mm in length by 2mm in width. The five white petals have an ovate apex and measure 2.2mm to 4mm in length by 2.6mm to 3.2mm in width. It is covered in short white puberulent hairs externally while the inner surface is glabrous. They become reflexed before being discarded. The filiform pedicels measure 4mm to 10mm in length.
The 70 to 80 white filaments measure 3.3mm to 6mm in length. The basifixed anthers are creamy yellow to pale yellow.
The white style measures 3.5mm to 6.2mm long with a 2 locular ovary. Austromyrtus dulcis’s flowers occur from late October through to early March.
The fruits of Austromyrtus tenuifolia are globose berries. The berries are white to off white and are covered in fine black, burgundy or navy blue spots. The berries measure 4mm to 5mm in length by 4mm to 6mm in diameter. The sepals are persistent on the fruit. Each berry contains 1 to 9 seeds. The season may control the quantity of seeds and the size of the fruits available. The flattish black oval seeds measure 1mm in diameter.
Wildlife:
Austromyrtus tenuifolia attracts a multitude of fruit eating birds. Often it is a case of who gets to the fruit first. I have seen Yellow Napped honeyeaters, Lewin honeyeaters, Eastern Spinebills, Brown honeyeaters, New Holland honey eaters, White eared Honeyeaters and red eared wattle birds eating the fruit just to mention a few.
The berries have a dry texture with a pleasant sweet taste, though they can be a little overpowering with a clove flavour at times. When this occurs try mixing it with your favourite stewed apple pie recipe for something different.
Cultivation:
Austromyrtus tenuifolia is a beautiful bushy ground cover or small scrambling shrub. As a garden specimen it is ideally suited to positions where strong dappled light can be provided. It is fast growing where adequate moisture can be given and sandy to fatty sandy loams prevail. It does not grow well on shale or heavier type clays.
It is an excellent rockery plant especially in mass plantings or bright semi shaded courtyards exists. It makes an excellent seaside planting where salt spray is a problem for most other plants. In cultivation it will usually grow 0.3 meters to 1.5 meters in height by 1.5 meters to 2.5 meters in diameter, however with regular tip pruning it can be trained to grow in confined spaces either horizontally or vertically.
Austromyrtus tenuifolia makes an excellent tub plant or large hanging basket specimen where the semi pendulous branches hang down. This gives an unusual display of growth and colour when the new growth appears, flowers bloom and again when the fruits become abundant. Sawdust or sand mixes are too well draining unless the sawdust has completely composted down where it exhibits a texture like plasticine to the touch. Moisture can be squeezed out between the fingers yet it remains moist. I find this a great basis to start with.
Mix equal parts of the well decomposed saw dust with the above feel with perlite and vermiculite. To this add two part sharp clean sand, one part compost and one part good crusher dust from a basalt rock quarries. Preferably black basalt but both are good. Make sure the sand comes from a source that does not have salt.
The decomposed Sawdust in this condition creates the moisture retention and holds nutrient in. The perlite and vermiculite make the mix neutral and both have great water holing capacity without shrinkage with age. The sand creates good drainage and is good for good healthy root development. The crusher dust adds vital minerals which the plants need.
Court yard plants need good light and ventilation without drying breezes or wind.
Again fertilize the plants on a monthly basis with the above formula on a rotation basis.
The berries would have great market potential if they can be bred with fewer seeds and larger berries. Those with a strong clove flavour certainly have the potential as a spice or condiment when dried. The other drawback is the shelf life is rather short and the problems with birds could be a real deterrent to most farmers.
Austromyrtus tenuifolia would make interesting topiary specimens because of their compact bushy growth. I have seen Austromyrtus dulcis used very effectively in a bonsai where it looked really amazing, so would have no hesitation in recommending Austromyrtus tenuifolia to be used in a similar manner.
Propagation:
Seeds: Collect fruits of Austromyrtus tenuifolia from around the shrubs in the early morning before the birds descend on the plants. Eat what fruit you want and spit the seeds into a glass. Wash the seeds and sow the fresh seeds directly into a seed raising mix. Seeds maybe erratic in germination but usually give a 100mm strike. When the seedlings are 25mm to 40mm tall, prick them out and plant them into 50mm native tubes using a good quality mix.
Once the seedlings reach 100mm to 150mm in height plant them out into their permanent position.
When mass planting for a feature or along the beach fronts or hedges plant them at 1 meter to 1.5 meter centers.
Cuttings: Semi-hardwood cuttings are usually prepared from partially mature wood of the current season’s growth, just after a flush of growth has hardened off. This type of cutting normally is made from mid-September to early March. The wood is reasonably firm and the leaves of mature size. Use 100mm long cuttings and. remove half the leaves from the bottom section being careful not to tear the bark. Take a 10mm slice off the bark from the bottom of the cutting on one side. Using an appropriate rooting hormone, dip the cutting in and place it in a moist sterile seed raising mix. When the cuttings have obviously struck and have developed good roots treat them as for seedlings.
Fertilize using seaweed, fish emulsion or organic chicken pellets soaked in water on an alternate basis. Fertilize every two months until the plants are established then annually in early September to October to maintain health, vitality and better flowering.
Further comments from readers:
Hi reader, it seems you use The Bible of Botany a lot. That’s great as we have great pleasure in bringing it to you! It’s a little awkward for us to ask, but our first aim is to purchase land approximately 1,600 hectares to link several parcels of N.P. into one at The Pinnacles NSW Australia, but we need your help. We’re not salespeople. We’re amateur botanists who have dedicated over 30 years to saving the environment in a practical way. We depend on donations to reach our goal. If you donate just $5, the price of your coffee this Sunday, We can help to keep the planet alive in a real way and continue to bring you regular updates and features on Australian plants all in one Botanical Bible. Any support is greatly appreciated. Thank you.
In the spirit of reconciliation we acknowledge the Bundjalung, Gumbaynggirr and Yaegl and all aboriginal nations throughout Australia and their connections to land, sea and community. We pay our respect to their Elders past, present and future for the pleasures we have gained.
Austrosteenisia blackii
Classification:
Unranked: Eudicots
Unranked: Rosids
Order: Fabales
Family: Fabaceae
Subfamily: Faboideae
Tribe: Millettieae
Genus: From Terra Australis, which is Latin for land of the south and is named in honour of Doctor Cornellius Gisjbert Gerret Jan Von Steenis; 1901-1986, who was a Dutch marine taxonomist. It refers to plants, which are named after Steenis and were first discovered in Australia.
Species: Is named in honour of John McConnell Black; 1855-1951, who was a Scottish born Australian journalist, plant collector and botanical author.
Subspecies: Austrosteenisia blackii subsp. blackii. Is named in honour of John McConnell Black; 1855-1951, who was a Scottish born Australian journalist, plant collector and botanical author.
Common Name: Blood Vine.
Distribution:
Austrosteenisia blackii is found south from the Starcke National Park on Cape York Peninsula in far north Queensland to the Hunter River in southern coastal New South Wales.
https://avh.ala.org.au/occurrences/search?taxa=Austrosteenisia+blackii#tab_mapView
Habitat Aspect Climate:
Austrosteenisia blackii prefers full sun to dappled sun light. It grows in warm sub-tropical rainforests or tropical rainforests. The altitude ranges from 15 meters ASL to 700 meters ASL.
The temperatures range from 2 degrees in July to 38 degrees in January.
The rainfalls range from lows of 850mm to 3250mm average per annum.
Soil Requirements:
Austrosteenisia blackii prefers better quality, loams, and light fatty clays, to medium clays. The soils are usually derived from decomposed brown basalts, black basalts, shales, metamorphic rocks, alluvial deposits. The soil'[s pH ranges from 5pH to 6.5pH. It does not tolerate waterlogged soils. Non saline soils to moderately saline soils are tolerated.
Height & Spread:
Wild Plants: 15m to 20m by 5m to 10m
Characteristics:
Austrosteenisia blackii is a large liana that reaches to the top canopy of rainforest trees. The main trunks are pale grey and glabrous. The stems are olive-green and covered in shallow whitish lenticels. The young stems are covered in rusty pubescent hairs becoming glabrescent with age.
Austrosteenisia blackii’s alternate, odd pinnate leaves measure 80mm to 180mm in length by 70mm to 190mm in width. The opposite leaflets number 7 to 11 and are ovate to obovate. The leaflets measure 30mm to 90mm in length by 30mm to 50mm in width. The discolourous laminas are deep green to sea green, glabrous, tinged bronze and glossy on the upper laminas while the lower laminas are paler and covered in pale golden-rusty, short sericeous hairs. The laminas recurve slightly upwards from the mid vein to the margins. The bases are oblique being rounded on one side and broad cuneate on the other side while the apexes are acuminate to bluntly acuminate. The margins are entire and are moderately undulating. The mid vein is prominent on the lower lamina and is clearly visible on the upper margin. The petioles measure 1mm to 5mm in length. The juvenile foliage is soft purple to soft purple-red and densely covered in white sericeous hairs.
The calyxes are covered in brown sericeous hairs externally and measure 2.8mm to 3.3 mm in length while the calyxes’ lobes measure 0.6mm to 1mm in length.
The maroon corolla measures 5mm to 8mm in length. The narrow, maroon standards measure 6mm to 9mm in length while the wings measure 5 to 5.5mm in length. The central maroon keel measures 8mm to 9mm in length.
The 10 white stamens of which 9 of the filaments are fused to form a central tube open along one side. The filaments measure 6mm to 7mm in length. The filaments are free at the apexes for 1.8mm to 2.2 mm of the total length. The anthers measure 1mm to1.5mm in length and have orange pollen.
The ovaries are densely covered in fawn to golden brown puberulent hairs and measure 9mm to 11mm in length. The exserted white style measures 9mm to 11mm in length. The disk is olive-green and measures 1mm in height. The flowers appear from September to early late November when the plants are semi deciduous.
The fruits of Austrosteenisia blackii are flattened pods. The pods are pale green and turn pale brown to deep red-brown and are sparsely covered in golden-brown puberulent hairs when ripe. The pods measure 40mm to 80mm in length by 10mm to 20mm in width. Each pod contains 1 to 8 seeds. The style is persistent on the pods.
The deep olive-brown, reniform seeds measure 5mm to 7mm in length by 2.5mm to 4mm in width.
Wildlife:
Austrosteenisia blackii attracts the orange aeroplane butterfly Pantoporia consimilis.
Cultivation:
Austrosteenisia blackii is a beautiful large liana which grows to the tops of the trees. As a garden specimen it is ideally suited to rainforest gardens or pergolas. It is fast growing where adequate moisture can be given. It grows well on shale and heavier type fertile clays.
It is a
It is a magnificent large creeper that deserve a place in every warm temperate, sub-tropical, tropical, semi-arid or exotic garden. It is ideal in almost every setting on pool fences, at the edge of a rain forest in court yards, pergolas or larger rockeries where their size is balanced. In cultivation it will grow from 2 meters to 5 meters in height by 10 meters to 15 meters in width.
The maroon to deep maroon almost black flowers hang in profusion and flowering responds admirably when a regular fertilizing regime is implemented.
It often reaches its full potential in just 5 years and flowers from the third year from seed.
Be imaginative when planting on pergolas, fences or other structures. Use the plants in different configurations and with different creepers that flower at different times.
Use curves and light pruning after flowering or tip pruning will help to maintain the plant to a smaller size.
Ensure that the whole plant or at least most of it is on display from most sections of the garden as the flowers are a real bonus.
When it is in flower these plants will catch your attention and the viewer will be transfixed on the display rather than watching the path.
It would make excellent topiary specimens being quick growing, capable of training into any shape though they would need regular attention.
Propagation:
Seeds: Collect fruits of Austrosteenisia blackii from around the base of the lianas or if it is in cultivation immediately following the first pods dehiscing. Seeds maybe erratic in germination but usually give a 100mm strike. When the seedlings are 25mm to 40mm tall, prick them out and plant them into 50mm native tubes using a good quality mix.
Once the seedlings reach 100mm to 150mm in height plant them out into their permanent position.
Cuttings: Semi-hardwood cuttings are usually prepared from partially mature wood of the current season’s growth, just after a flush of growth has hardened off. This type of cutting normally is made from mid September to early March. The wood is reasonably firm and the leaves of mature size.
1 Prepare the cutting mix by adding one third sharp clean river sand, one third peat and one third perlite. These ingredients are sterile,
2 Select good material from non-diseased plants,
3 Select semi green stems for cuttings. Look for a stem with two or three nodes,
4 Place the cutting on a flat, hard surface, and make a clean slice through the middle of the lower node on an angle towards the base, with a sterilized sharp knife or razor blade. – This scarification of the node will increase the chances of roots emerging from this spot. Now remove all but one or two the leaves, leaving the apex leaves in tact. If the leaves are very large in proportion to the stem, cut off the apical halves.
5 Some plants root easily, but a rooting hormone can help others by stimulating the cutting into sending out new roots. Use 100mm long cuttings and. remove half the leaves from the bottom section being careful not to tear the bark. Take a 10mm slice off the bark from the bottom of the cutting on one side.
Fill a saucer with water, and place some rooting hormone into another container like a bottle top. Dip the node end of the cutting into the water and then into the rooting hormone. Tap off any excess hormone,
6 Use a small dipple stick or old pencil to poke a hole into the soilless potting mix. Ensure the hole is slightly larger than the stem diameter and be careful not to wipe the rooting hormone off the cuttings base, place the cuttings in a pattern ensuring the cuttings are not touching each other,
7 I like to place the pots in Plastic bags to help maintain temperature and moisture. Place in a semi shaded place like under 50mm shade cloth.
8 When the cuttings have struck, open the bag to allow air circulation for a few days to a week,
9 Once hardened off remove the cuttings from the bag and allow to further hardening for a few more days,
10 Transplant into a good potting mix to grow on.
Fertilize using seaweed, fish emulsion or organic chicken pellets soaked in water on an alternate basis. Fertilize every two months until the plants are established then annually in early September to October to maintain health, vitality and better flowering.
Further comments from readers:
Hi reader, it seems you use The Bible of Botany a lot. That’s great as we have great pleasure in bringing it to you! It’s a little awkward for us to ask, but our first aim is to purchase land approximately 1,600 hectares to link several parcels of N.P. into one at The Pinnacles NSW Australia, but we need your help. We’re not salespeople. We’re amateur botanists who have dedicated over 30 years to saving the environment in a practical way. We depend on donations to reach our goal. If you donate just $5, the price of your coffee this Sunday, We can help to keep the planet alive in a real way and continue to bring you regular updates and features on Australian plants all in one Botanical Bible. Any support is greatly appreciated. Thank you.
In the spirit of reconciliation we acknowledge the Bundjalung, Gumbaynggirr and Yaegl and all aboriginal nations throughout Australia and their connections to land, sea and community. We pay our respect to their Elders past, present and future for the pleasures we have gained.
Austrosteenisia glabristyla
Classification:
Unranked: Eudicots
Unranked: Rosids
Order: Fabales
Family: Fabaceae
Subfamily: Faboideae
Tribe: Millettieae
Genus: From Terra Australis, which is Latin for land of the south and is named in honour of Doctor Cornellius Gisjbert Gerret Jan Von Steenis; 1901-1986, who was a Dutch marine taxonomist. It refers to plants, which are named after Steenis and were first discovered in Australia.
Species: From Glabrum, which is Latin for glabrous or smooth and Stylos, which is Ancient Greek for a column. It refers to the female reproductive organ between the ovary and stigma on a flower, which is smooth, without hairs and without scales.
Common Name: Blood Vine.
Distribution:
Austrosteenisia glabristyla is restricted to a few small populations south from the Border Ranges National Park to the Bellinger River and Dorrigo National Park in north eastern New South Wales.
https://avh.ala.org.au/occurrences/search?taxa=Austrosteenisia+glabristyla#tab_mapView
Habitat Aspect Climate:
Austrosteenisia glabristyla prefers full sun to full shade. It grows in warm well developed sub-tropical rainforests. The altitude ranges from 50 meters ASL to 700 meters ASL.
The temperatures range from 2 degrees in July to 36 degrees in January.
The rainfalls range from lows of 900mm to 1650mm average per annum.
Soil Requirements:
Austrosteenisia glabristyla prefers better quality soils which contain a high percentage of leaf litter. The soils range from light clays to medium clays. The soils are derived from decomposed brown basalts or black basalts, metamorphic rocks and alluvial silts. The soils pH ranges from 5pH to 6.5pH. Waterlogged soils are not tolerated though soil moisture is always present through capillary action. Non saline soils to moderately saline soils are tolerated.
Height & Spread:
Wild Plants: 15m to 20m by 5m to 10m
Characteristics:
Austrosteenisia glabristyla is a large liana that reaches to the top canopy of rainforest trees. The main trunks are pale grey and glabrous. The stems are olive-green and covered in shallow whitish lenticels. The young stems are covered in golden-brown hairs becoming glabrescent with age.
Austrosteenisia glabristyla’s alternate, odd pinnate leaves measure 50mm to 200mm in length by 70mm to 150mm in width. The opposite leaflets number 9 to 15 and are oblong to lanceolate or oblanceolate. The leaflets measure 35mm to 90mm in length by 7mm to 22mm in width. The discolourous laminas are deep green to sea green, glabrous and semi glossy on the upper laminas while the lower laminas are paler and covered in pale golden-brown, short sericeous hairs. The laminas recurve slightly upwards from the mid vein to the margins. The bases are rounded to broad cuneate while the apexes are acuminate to mucronate. The margins are entire and are very slightly undulating. The mid vein is prominent on the lower lamina and is faintly visible on the upper margin. The petioles measure 2mm to 5mm in length. The two stipules are minute. The juvenile foliage is purple to maroon and densely covered in soft golden-brown sericeous hairs.
The inflorescences of Austrosteenisia glabristyla are compound racemes born cauliflorous behind the lower leaves or from the lower leaf axils. The flowers measure 7mm to 10mm in length. The rachises, peduncles and pedicels are pastel olive-green to pale creamy green and covered in pale soft, golden-brown brown sericeous hairs. The rachises measure 80mm to 180mm in length while the peduncles measure 5mm to 6mm in length and the pedicels measure 4mm to 5mm in length. The calyxes are covered in pale golden-brown sericeous hairs externally and measure 2.8mm to 3.3 mm in length while the calyxes’ lobes measure 0.6mm to 1mm in length.
The carmine to deep carmine corolla measures 6mm to 8mm in length. The narrow, pastel yellow standards measure 6mm to 9mm in length while the pastel yellow wings measure 5 to 5.5mm in length. The carmine keel measures 8mm to 9mm in length.
The 10 white stamens of which 9 of the filaments are fused to form a central tube open along one side. The filaments measure 6mm to 7mm in length. The filaments are free at the apexes for 1.8mm to 2.2 mm of the total length. The anthers measure 1mm to1.5mm in length and have orange pollen.
The ovaries are glabrous and measure 9mm to 11mm in length. The exserted white styles measures 9mm to 11mm in length. The disk is olive-green and measures 1mm in height. The flowers appear from mid-November to mid-January when the plants are semi deciduous.
The fruits of Austrosteenisia glabristyla are flattened pods. The pods are pale green and turn pale brown to deep red-brown and are sparsely covered in golden-brown puberulent hairs when ripe. The pods measure 40mm to 70mm in length by 10mm to 15mm in width. Each pod contains 1 to 3 seeds. The style and calyx is persistent on the pods.
The black, flattened ovoidal seeds measure 7mm to 9mm in length by 4.5mm to 6mm in diameter.
Wildlife:
Austrosteenisia glabristyla attracts the orange airplane butterfly Pantoporia consimilis.
Cultivation:
Austrosteenisia glabristyla is a beautiful large liana which grows to the tops of the trees. As a garden specimen it is ideally suited to rainforest gardens or larger pergolas. It is fast growing where adequate moisture can be given. It grows well on shale and heavier type fertile clays.
It is a magnificent large creeper that deserve a place in every warm temperate, subtropical, tropical, semi-arid or exotic garden. It is ideal in almost every setting on pool fences, at the edge of a rainforest in courtyards, pergolas or larger rockeries where their size is balanced. In cultivation it will grow from 2 meters to 5 meters in height by 10 meters to 15 meters in width when are erect and are in profusion along the spike and flowering responds admirably when a regular fertilizing regime is implemented.
It often reaches its full potential in just 5 years and flower from the third year from seed.
Be imaginative when planting on pergolas, fences or other structures. Use the plants in different configurations and with different creepers that have different flowering periods.
Use curves and light pruning after flowering or tip pruning will help to maintain the plant to a smaller size.
Ensure that the whole plant or at least most of it is on display from most sections of the garden as the flowers are a real bonus.
It would make excellent topiary specimens being quick growing, capable of training into any shape though they would need regular attention.
Propagation:
Seeds: Collect fruits of Austrosteenisia glabristyla from around the base of the lianas or if it is in cultivation immediately following the first pods dehiscing. Seeds maybe erratic in germination but usually give a 100mm strike. When the seedlings are 25mm to 40mm tall, prick them out and plant them into 50mm native tubes using a good quality mix.
Fertilize using Seaweed, fish emulsion or organic chicken pellets soaked in water and apply the liquid on an alternate basis. Fertilize every month months.
Once the seedlings reach 100mm to 150mm in height plant them out into their permanent position.
Fertilize using Seaweed, fish emulsion or organic chicken pellets soaked in water on an alternate basis. Fertilize every two months until the plants are established then annually in early September or March to maintain health, vitality and better flowering.
Cuttings: Semi-hardwood cuttings are usually prepared from partially mature wood of the current season’s growth, just after a flush of growth has hardened off. This type of cutting normally is made from mid-September to early March. The wood is reasonably firm and the leaves of mature size.
Use 100mm long cuttings and. remove half the leaves from the bottom section being careful not to tear the bark. Take a 10mm slice off the bark from the bottom of the cutting on one side.
Using an appropriate rooting hormone, dip the cutting in and place it in a moist sterile seed raising mix. When the cuttings have obviously struck and have developed good roots treat them as for seedlings.
Fertilize using seaweed, fish emulsion or organic chicken pellets soaked in water on an alternate basis. Fertilize every two months until the plants are established then annually in early September to October to maintain health, vitality and better flowering.
Further comments from readers:
Hi reader, it seems you use The Bible of Botany a lot. That’s great as we have great pleasure in bringing it to you! It’s a little awkward for us to ask, but our first aim is to purchase land approximately 1,600 hectares to link several parcels of N.P. into one at The Pinnacles NSW Australia, but we need your help. We’re not salespeople. We’re amateur botanists who have dedicated over 30 years to saving the environment in a practical way. We depend on donations to reach our goal. If you donate just $5, the price of your coffee this Sunday, We can help to keep the planet alive in a real way and continue to bring you regular updates and features on Australian plants all in one Botanical Bible. Any support is greatly appreciated. Thank you.
In the spirit of reconciliation we acknowledge the Bundjalung, Gumbaynggirr and Yaegl and all aboriginal nations throughout Australia and their connections to land, sea and community. We pay our respect to their Elders past, present and future for the pleasures we have gained.
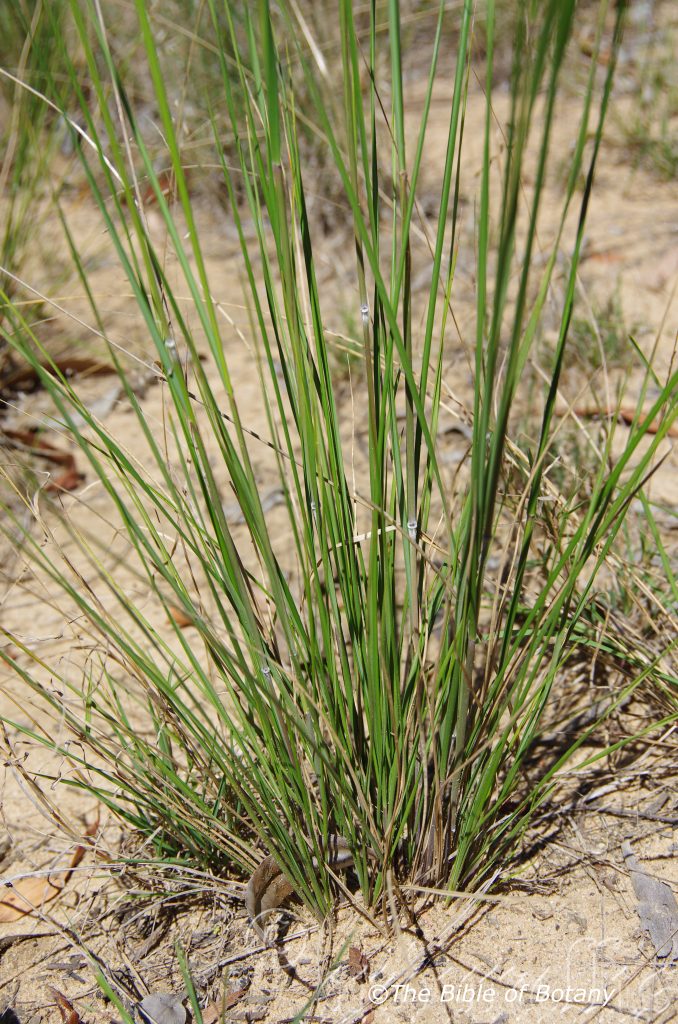
Author’s Garden The Pinnacles NSW
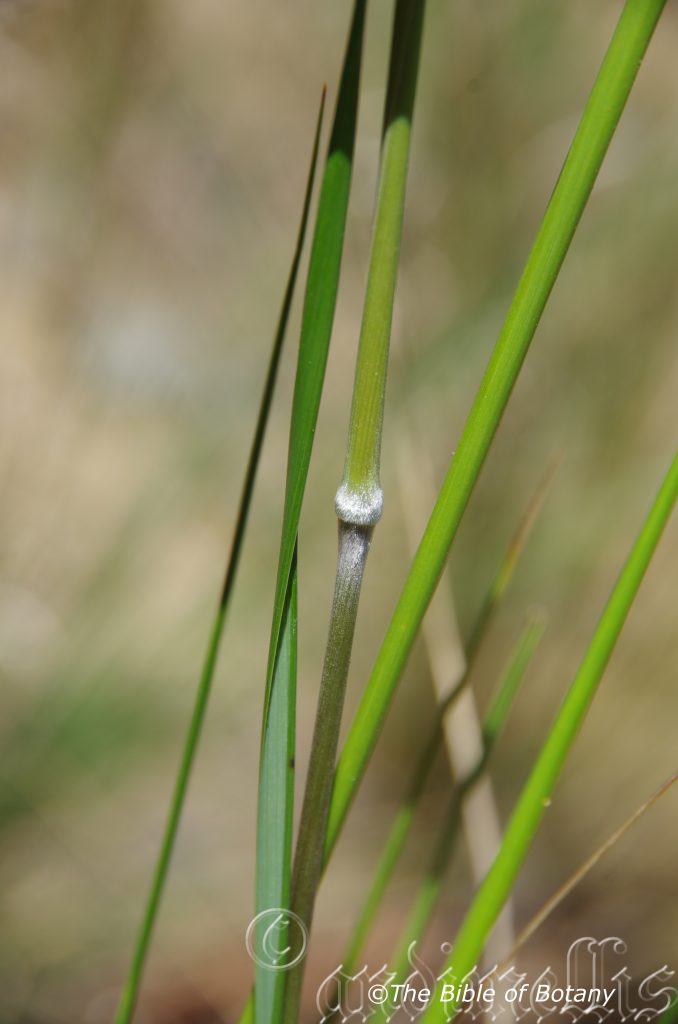
Author’s Garden The Pinnacles NSW
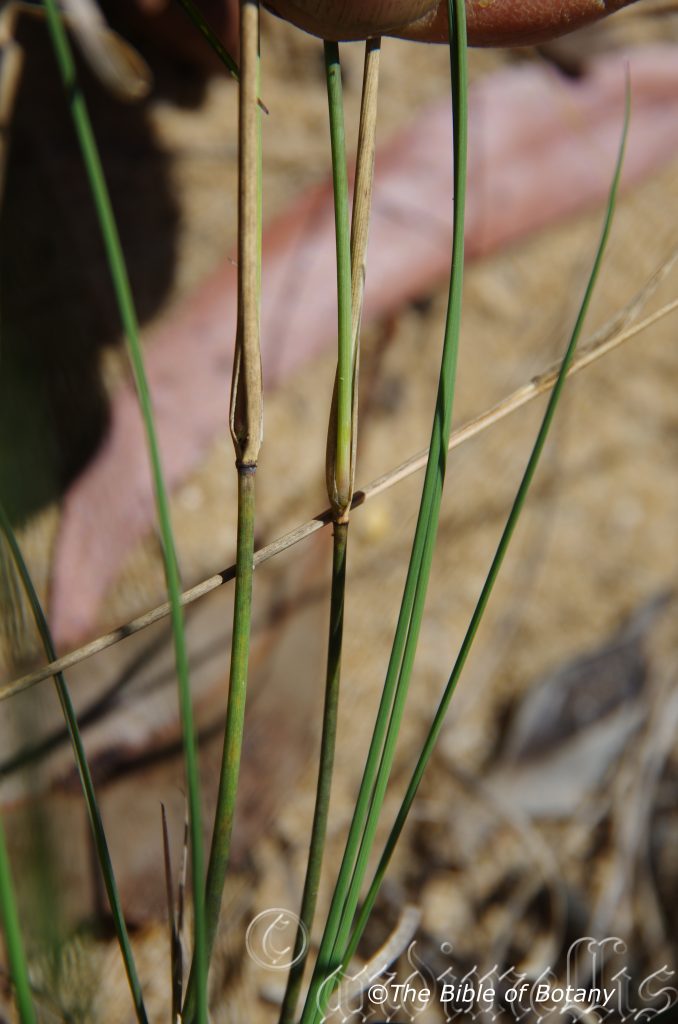
Author’s Garden The Pinnacles NSW

Author’s Garden The Pinnacles NSW
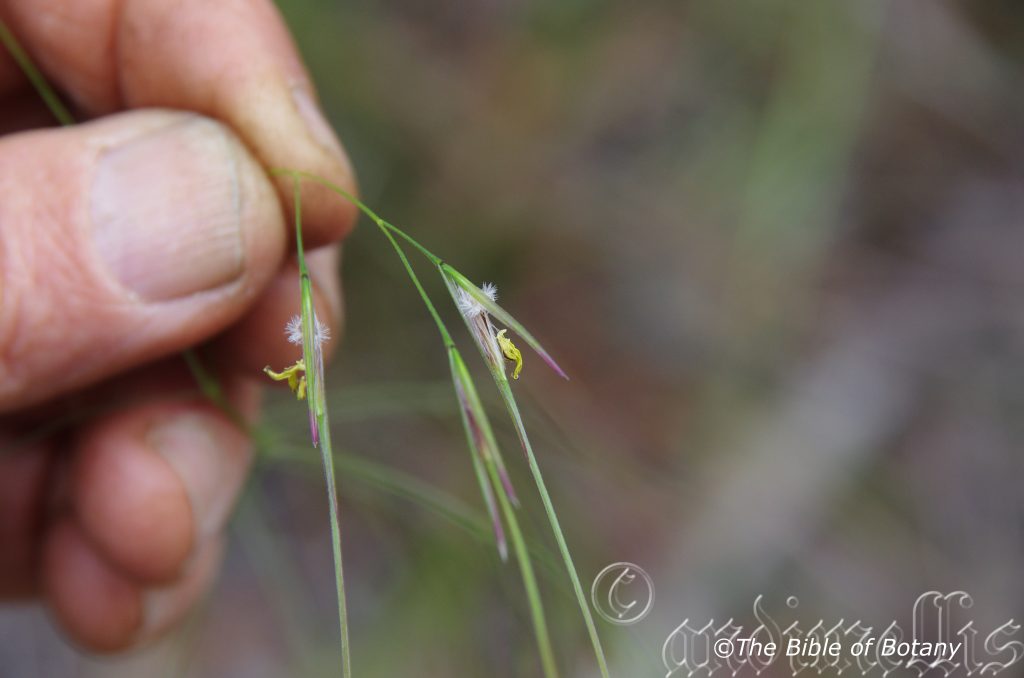
Author’s Garden The Pinnacles NSW
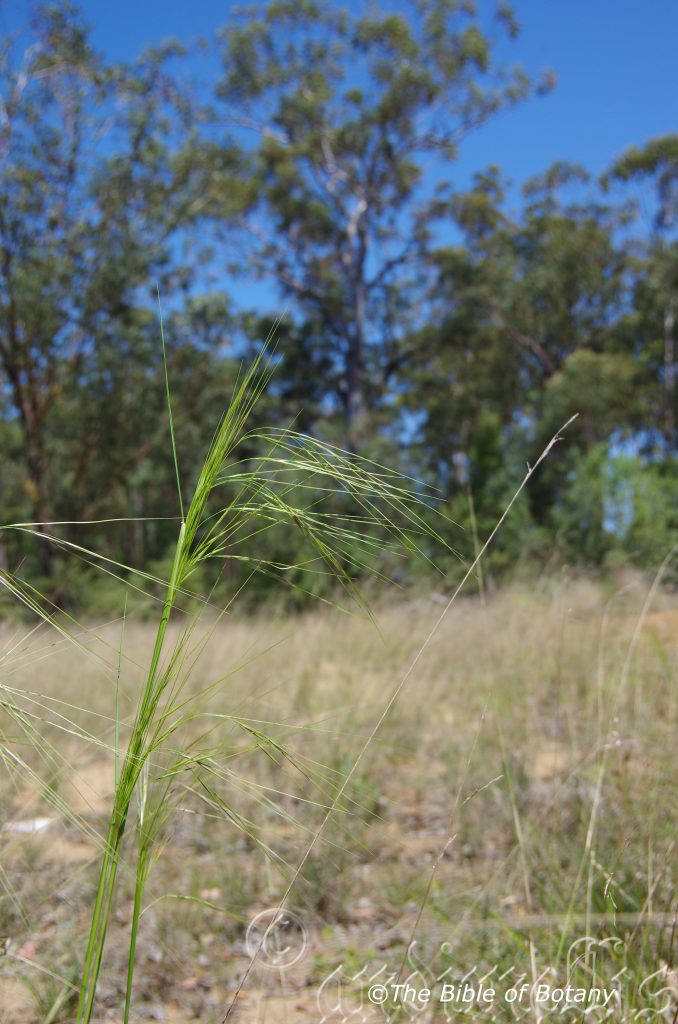
Author’s Garden The Pinnacles NSW
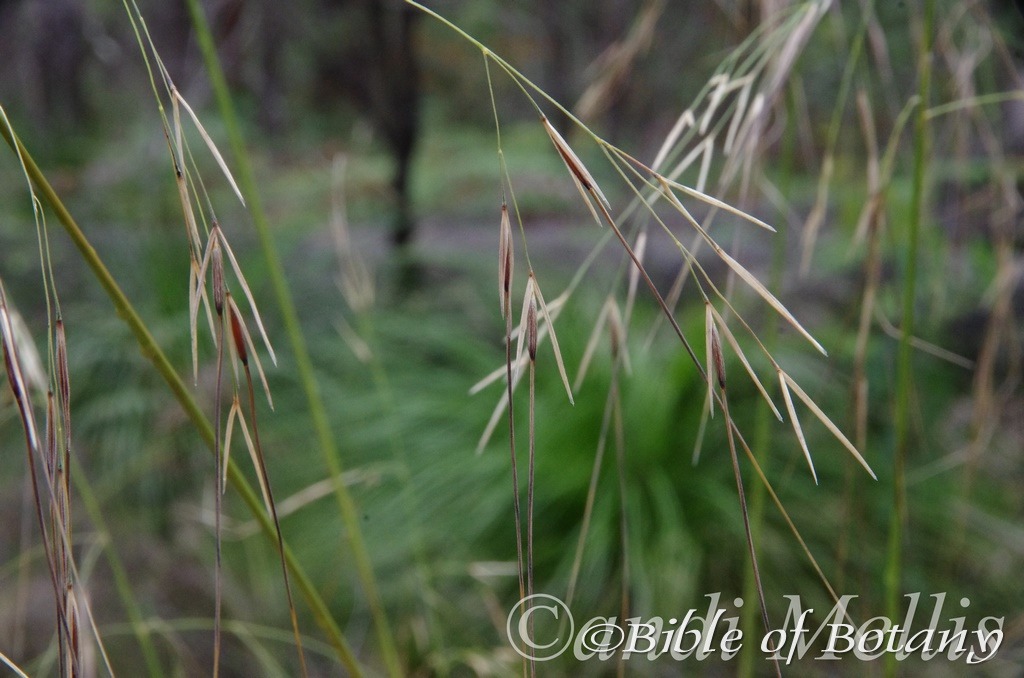
Author’s Garden The Pinnacles NSW
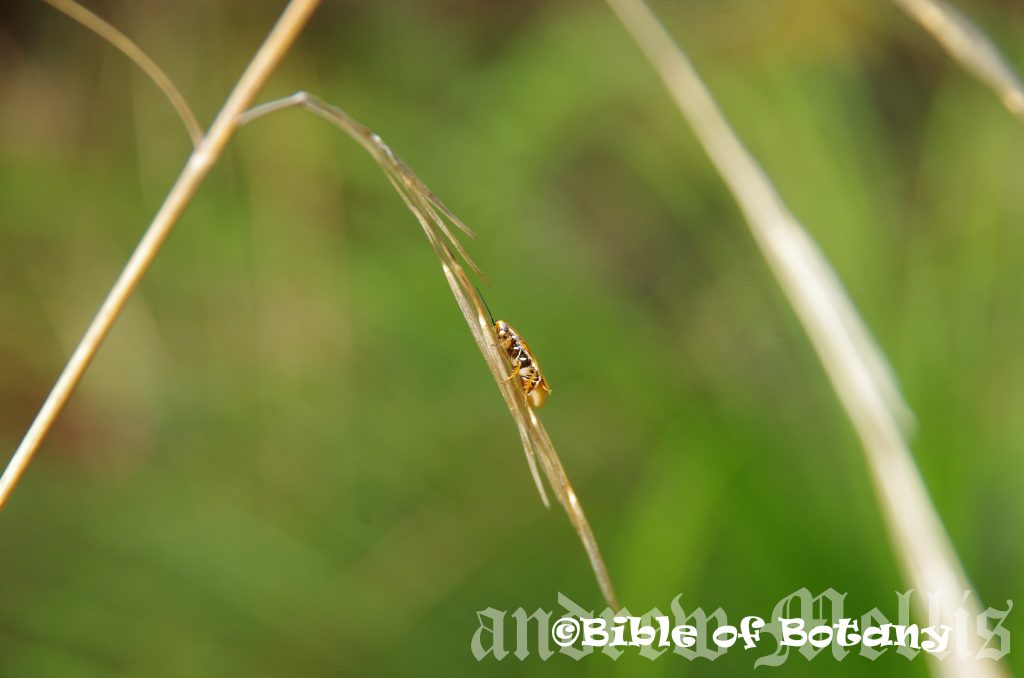
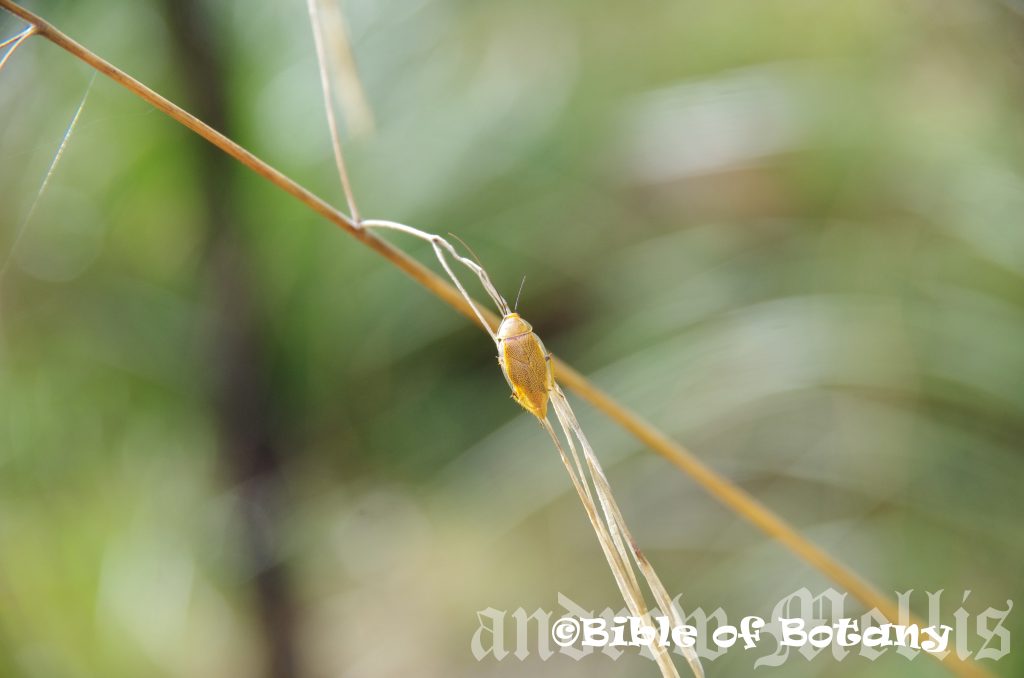
Austrostipa pubescens
Classification:
Kingdom: Plantae
Unranked: angiosperms
Clade: Commelinids
Order: Poales
Family: Poaceae
Subfamily: Pooideae
Genus: From Terra Australis, which is Latin for land of the south and Stipa, which is Ancient Greek for fibre. It refers to plants, which originate from the land down under, which have many very similar traits with the European Stipa genus.
Species: From Pubescens, which is Latin for short, very soft hairs. It refers to structures or organs, which are covered in soft, white or pale grey hairs.
Common Name:
Distribution:
Austrostipa pubescens is found in two main disjunct locations along the east coast mainly on and east of the Great Dividing Range. The northern plants are more disjunct than the southern population starting near Alpha in central Queensland in the north and extending south to Armidale in northern New South Wales. The southern population starts near Karuah Manning and extends south to Howe Flat in north east Victoria. There is an isolated population near Torquay south west of Melbourne.
https://avh.ala.org.au/occurrences/search?taxa=Austrostipa+pubescens#tab_mapView
Habitat Aspect Climate:
Austrostipa pubescens prefers dappled shade to full sun. It usually grows in moist or dry heaths in open forests, open woodland margins along drainage lines. The altitude ranges from 5 meters ASL to 800 meters ASL.
The temperatures range from minus 4 degrees in August to 40 degrees in January.
The rainfall ranges from lows of 500mm to 2000mm average per annum.
Soil Requirements:
Austrostipa pubescens prefers sandy loams to light fatty clays with a high proportion of gravel derived. The soils are derived from decomposed sandstones, sandy shales or granites. The soils pH ranges from 5pH to 7pH. It does not tolerate waterlogged soils but it is often associated ephemeral pools. Non saline soils to moderately saline soils are tolerated.
Height & Spread:
Wild Plants: 0.9m to 1.5m by 0.6m to 1m.
Characteristics:
Austrostipa pubescens is an erect open clumped perennial bamboo grass. The fawn to cream rhizomes are short and sparsely branched.
The 2 to 3 node culms are erect and measure 800mm to 1500mm in height by 1mm to 4mm diameter. The mid culms internodes and mid-culm nodes are moderately covered in white pubescent hairs. The lateral branches are simple.
The leaf sheaths are glabrous or moderately covered in white pubescent hairs. Â The ligule is usually an eciliate membrane or a fringed membrane or at times has a ciliolate membrane and measures 0.4mm to 1.5mm in length. The long linear laminas are scarious with a truncate or obtuse apex. The leaf blades measure 250mm to 500mm in length. The concolourous laminas are pale blue green and moderately covered in white pubescent hairs. The margins are flat, involute or convolute.
The compound inflorescences are panicle. The linear panicle measures 15omm to 300mm in length by 20mm to 40mm in diameter.
The spikelets are pedicelled while the fertile spikelets are single flowered comprising of a single fertile floret. The linear, terete floret is without rachillae extension and measures 17mm to 24mm in length.
The glumes are similar and thinner than the fertile lemma. The Lower glume is linear, membranous, are without keels and have 3 nerves. The lower glume measures 14mm to 19mm in length. The lower glume surface is covered in white puberulent hairs. The upper glume is linear and measures 15mm to 20mm in length. The membranous glumes are without keels and have 5 nerves. The upper glume surface is covered in white puberulent hairs.
The fertile lemma measures 11mm to 15mm in length. The lemma are without keels and has 5 nerves while the surface is covered in white puberulent hairs. The lemma apex is entire, usually with a single awn. The awn measures 60mm to 100mm in length overall with a twisted column. The column measures 30mm to 70mm in length. The palea is 2 nerved without keels. Lodicules present.
The inflorescences have 3 anthers. The flowers appear from late September to February under ideal conditions.
The oblong grains measure 5.5mm to 8mm in length.
Wildlife:
Austrostipa pubescence’s is eaten by Macropus parryi known locally as the Pretty Face Wallaby which is found in eastern Australia north from Grafton and Macropus giganteus the Grey Kangaroo which is found over much of eastern Australia.
The seeds are edible but little else is known. The plants are low nutritional value for stock probably because of the tough hard fibrous culms and low volume of leaf material.
Cultivation:
Austrostipa pubescens is a magnificent small perennial bamboo type grass for almost every garden. It should be more widely grown in temperate, semiarid and arid gardens and ornamental gardens. It is ideal at the edge of a forest to add a vertical dimension to the scene. It also makes a great rockery displays as the main feature in hot open spaces or confined sunny or semi shady positions. In cultivation it will grow from 1 meter to 1.5 meters in height by 0.3 meters to 0.4 meters in diameter when grown in the open.
A single plant or small groups planted around swimming pools or in enclosed courtyards are surprisingly beautiful despite being open and flimsy looking. The plants create a very soft look against hard walls and fences but must be used correctly as not to look weedy.
It grows exceptionally well on all soil types including pure sand and thrives on pindan soils provided deep waterings are given on a regular basis to prevent excess cracking. 2 or 3 deep watering during the growing season will suffice. It can cope with temperatures as low as minus 4 degrees and up to 44 degrees. It is drought resistant once established while at the same time can cope with periodic flooding and wet feet.
Add to the above, if it is given a little native fertilizer on being planted out as a seedling will respond with good flowering and good seed set over a long period.
Large mass plantings look weedy so should be avoided. Scattered through the bush it adds a vertical dimension and colour throughout the year. It can be rotated or used in heath settings where vertical lines are required. It can be used in desert scenes or heath scenes equally well. It should also have a clear area surrounding each plant to allow for good form otherwise they become spindly and may succumb to the competition.
Place it near old stumps and roots to make the stumps or roots look more gnarled, twisted or bolder while making 1, 2 or even 3 Austrostipa pubescens plants look more delicate. Select an area of ground and let your hair down and be imaginative and this is the plant that may just change your life. Remember this plant is rather large for this type of garden so use it sparingly with the other plants when planting and remember that deserts are rolling flat plains not steep hills so it is best to use a gentle slope or a basin with a small pool at the bottom. A billabong affect is the go, not a waterfall or cascades.
Austrostipa pubescens would make outstanding contribution to a moist heath garden. Here it can be used as the taller growing plant scattered throughout the heath scene. When you design a flat heath garden which Austrostipa ramosissima is well suited. Plants must be planted close together and be short so you can see over the tallest ones with the exception of one or two plants at the most. Remember they can be crowded out so leave a little room around them so they can develop to their full potential. The idea is to achieve a feeling of expansive flatness. This can be achieved with using the Austrostipa pubescens’s soft grey linear foliage and having them contrasting with finer pale green or fine grey to glaucous coloured foliage. Use procumbent plants like Grevillea masonii, especially Hibbertia species to enhance the vertical aspect and height. Mix it with other smaller shrubs so none of them dominate the scene but blend in to give a mosaic of foliage colours that you oversee.
Spent flowers should be removed to promote longer flowering and better quality flowers next time.
Propagation:
Seeds: Seeds of Austrostipa pubescens can be collected from the panicles as the majority of the seeds ripen. Once the flowers have died and the first seeds have appeared remove the panicle and place it in a brown paper bag. Seeds will remain viable for several years if kept cool and dry.
Sow the seeds directly into a seed raising mix, keeping them moist. When the seedlings are 40mm to 50mm tall, prick them out and plant them into 50mm native tubes using a good organic mix.
As the seedlings roots reach the bottom of the tubes plant them out into their permanent position. Do not delay as they will develop a large root system quickly and will be difficult to remove without some set back to the vigour or health of the plants.
Division: Austrostipa pubescens can also be divided, although getting large numbers is more successful from seed. It can be divided by digging up a clump and cutting the fibrous root clumps into two to four equal parts with a spade. Cut all the leaves and stems back to within 50mm to 70mm of the ground level and replant them in a reprepared hole. I usually do this by making sure the old ground level is 10mm to 20mm below that of the new ground level where you want them to be at the same level when everything settles down or plant them at the same level if a small depression is required. Water in thoroughly with a weak solution of one of our fertilizer recommendations.
Fertilize using seaweed, fish emulsion or organic chicken pellets soaked in water on an alternate basis. Fertilize every two months until the plants are established then annually in early September to October to maintain health, vitality and better flowering.
Further comments from readers:
Hi reader, it seems you use The Bible of Botany a lot. That’s great as we have great pleasure in bringing it to you! It’s a little awkward for us to ask, but our first aim is to purchase land approximately 1,600 hectares to link several parcels of N.P. into one at The Pinnacles NSW Australia, but we need your help. We’re not salespeople. We’re amateur botanists who have dedicated over 30 years to saving the environment in a practical way. We depend on donations to reach our goal. If you donate just $5, the price of your coffee this Sunday, We can help to keep the planet alive in a real way and continue to bring you regular updates and features on Australian plants all in one Botanical Bible. Any support is greatly appreciated. Thank you.
In the spirit of reconciliation we acknowledge the Bundjalung, Gumbaynggirr and Yaegl and all aboriginal nations throughout Australia and their connections to land, sea and community. We pay our respect to their Elders past, present and future for the pleasures we have gained.
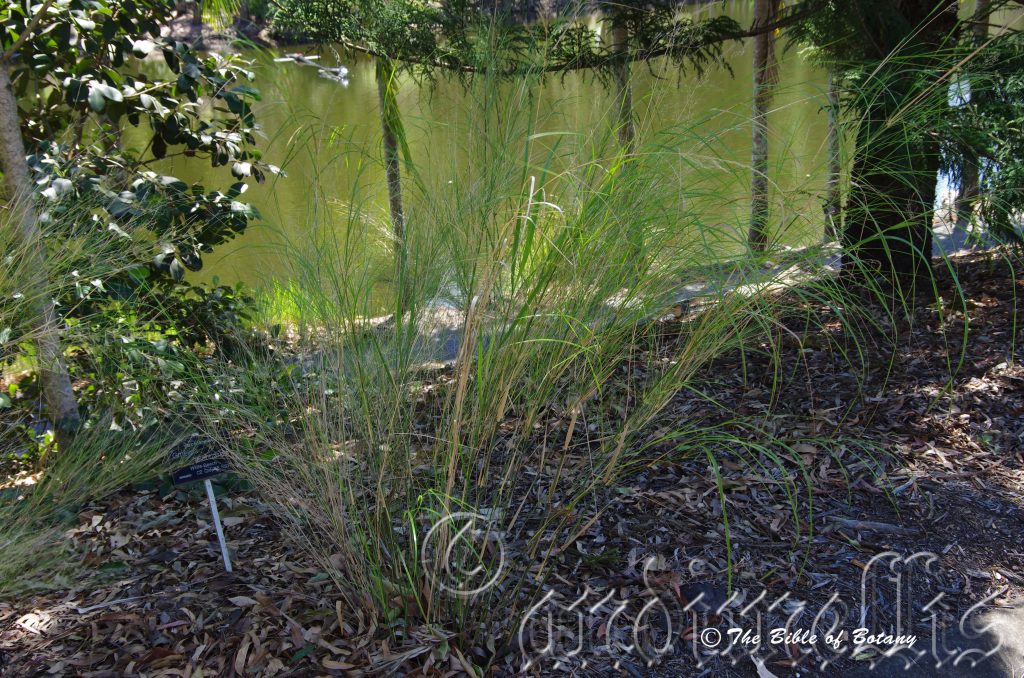
Brisbane Qld.
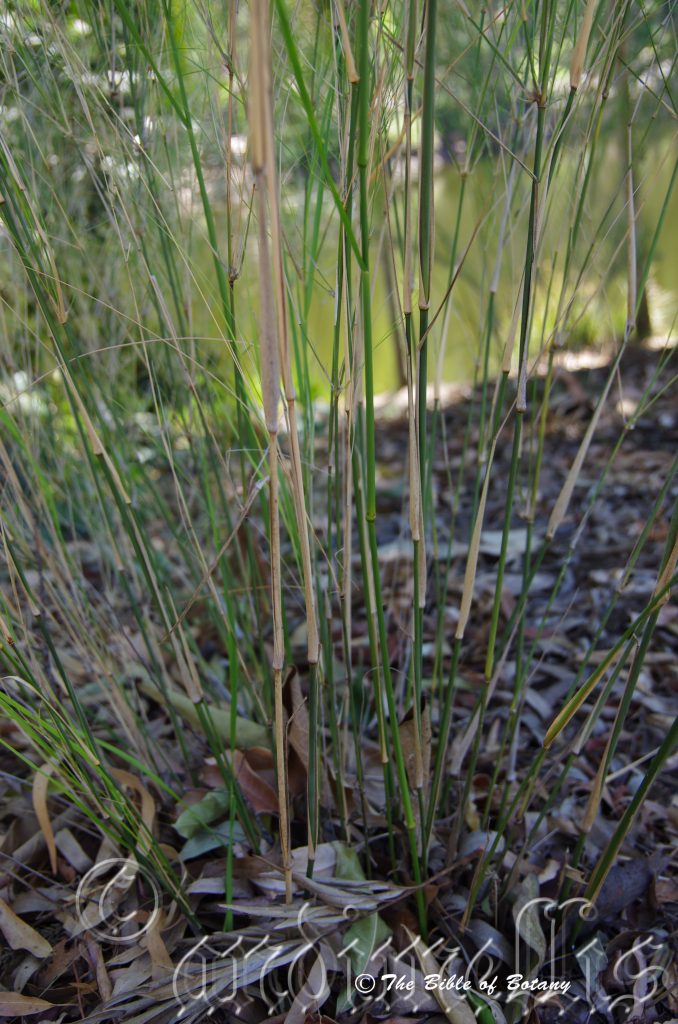
Brisbane Qld.
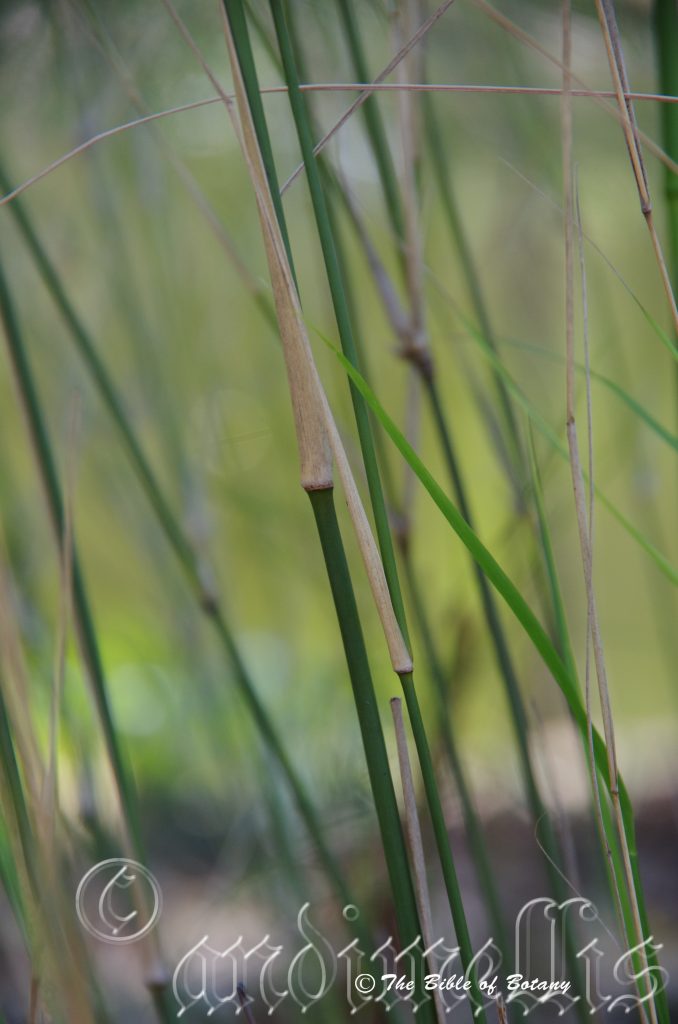
Brisbane Qld.
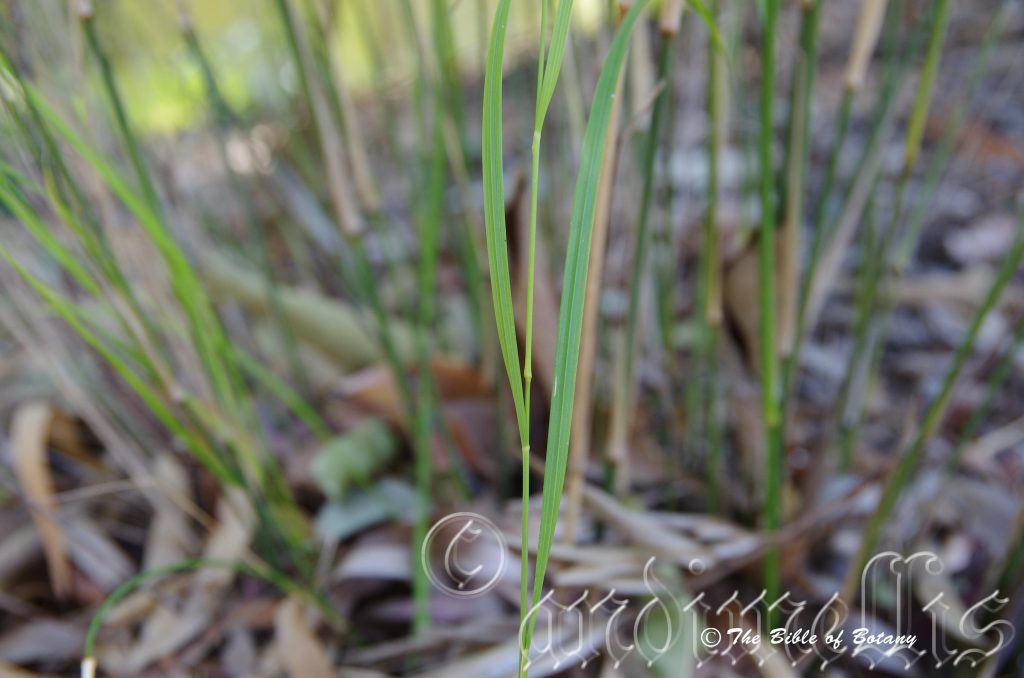
Brisbane Qld.
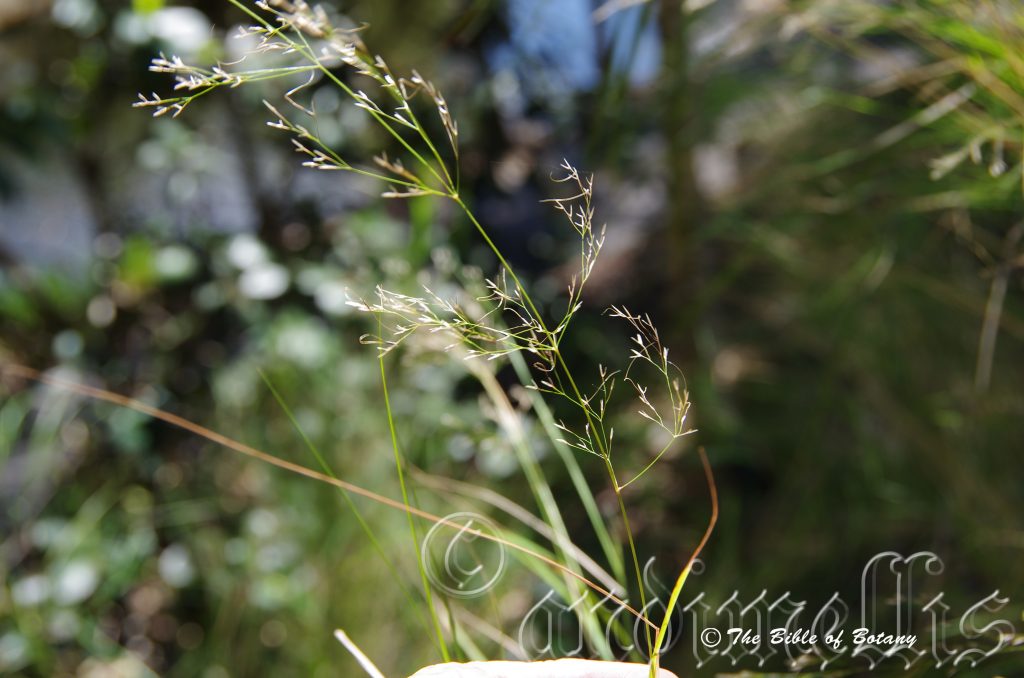
Brisbane Qld.
Austrostipa ramosissima
Classification:
Kingdom: Plantae
Unranked: angiosperms
Clade: Commelinids
Order: Poales
Family: Poaceae
Subfamily: Pooideae
Genus: From Terra Australis, which is Latin for land of the south and Stipa, which is Ancient Greek for fibre. It refers to plants, which originate from the land down under, which have many very similar traits with the European Stipa genus.
Species: From Remosum, which is Latin for a branch and -Issima, which is a Latin suffix pertaining to the superlative or very. It refers to plants, which have the most branches of all the species in their genus.
Common Name: Stout Bamboo Grass.
Distribution:
Austrostipa ramosissima is a very widespread species of grass. It is found south from the Coen in far north eastern Queensland to near the junction with the Murray River in northern Victoria. It is found on both sides of the Great Dividing Range except for the highlands or alpine regions.
https://avh.ala.org.au/occurrences/search?taxa=Austrostipa+ramosissima#tab_mapView
Habitat Aspect Climate:
Austrostipa ramosissima prefers dappled shade to full sun. It grows in moist gullies, drainage lines, wet gallery forests, woodland margins or ephemeral pools. The altitude ranges from 5 meters ASL to 600 meters ASL.
The temperatures range from minus 4 degrees in August to 40 degrees in January.
The rainfall ranges from lows of 500mm to 2000mm average per annum.
Soil Requirements:
Austrostipa ramosissima prefers sandy loams to light clays with a high proportion of gravel derived from decomposed sandstones, shales, metamorphic rocks, brown basalts and black basalts as well as peaty accumulated sands. The soils pH ranges from 5pH to 7pH. It tolerates waterlogged soils often growing in shallow surface water for several weeks of the year. Non saline soils to moderately saline soils are tolerated.
Height & Spread:
Wild Plants: 1.5m to 2.5m by 0.6m to 2m.
Characteristics:
Austrostipa ramosissima is an erect open caespitose clumped perennial bamboo grass. The stems are erect growing from a short rhizome. The fawn to pale brown rhizomes measure 8mm to 15mm in diameter. The stems produce dense branching culms. They do not produce a basal tuft of leaves like most clump grasses. The stems are glabrous as are the new shoots.
The sheathing leaves of Austrostipa ramosissima become quite loose shortly after maturing. The leaves are glabrous and measure 100mm to 500mm in length by 3mm to 3.5mm in width. The base is clasping while the apex is tapering acute. The concolourous leaf blades are pale grey-blue, pale grey-green to pale green. The leaf margins are entire, and flat. The ligules are membranous, erose, and glabrous and measure 0.25mm to 0.5mm in length. The auricles are absent on this species.
Inflorescences of Austrostipa ramosissima are born on loose panicles. The panicles measure 80mm to 600mm in length. The spikelets are gaping widely at maturity and measure 2.3mm to 5mm in length excluding the awn. The glumes are sub equal and acute while the deep brown lemmas are tuberculate and measures 1.8mm to 2.5mm in length. The calluses are bent and are covered with long white hairs. The scabrous awns are strongly bent at 90 degrees and measure 14mm to 30mm in length. The flowers appear from late September to February under ideal conditions.
Wildlife:
Austrostipa ramosissima does not appear to have any predators though the leaf blades are chewed from time to time.
The seeds are edible but little else is known. The plants are low nutritional value for stock probably because of the tough hard fibrous stems.
Cultivation:
Austrostipa ramosissima is a magnificent perennial bamboo type grass for almost every garden. It should be more widely grown in temperate, semi-arid and arid gardens as an ornamental. It is ideal at the edge of a forest or as the pioneer clump grass in open country to help bind the soil and add potash and add a vertical dimension to the scene. It also makes a good rockery display as the main feature in hot open spaces or confined sunny or semi shady positions. In cultivation it will grow from 1.5 meters to 2 meters in height by 0.1 meters to 0.3 meters in diameter when grown in the open.
A single plant or small groups planted around swimming pools or in enclosed courtyards are surprisingly beautiful despite being open and flimsy looking. This creates a very soft look against hard walls and fences.
It grows exceptionally well on all soil types except pure sand and thrive on pindan soils provided deep a watering is given on a regular basis to prevent excess cracking. 2 or 3 deep waterings during the growing season will suffice. It can cope with temperatures as low as minus 4 degrees and up to 44 degrees. It is drought resistant once established while at the same time can cope with periodic flooding and wet feet.
Mass plantings look weedy so should be avoided. Scattered through the bush they add a vertical dimension and colour throughout the year. It can be rotated or used in heath settings where vertical lines are required. It can be used in desert scenes or heath scenes equally well. It should also have a clear area surrounding each plant to allow for good form otherwise it will become spindly and may succumb to the competition.
Place it near old stumps and roots to make the stumps or roots look more gnarled, twisted or bolder while making 1, 2 or even 3 Austrostipa ramosissima plants look more delicate. Select an area of ground and let your hair down and be imaginative and this is the plant that may just change your life. Remember this plant is rather large for this type of garden so use it sparingly with the other plants when planting and remember that deserts are rolling flat plains not steep hills so it is best to use a gentle slope or a basin with a small pool at the bottom. A billabong affect is the go, not a waterfall or cascades.
Austrostipa ramosissima would make an outstanding contribution to a moist heath garden. Here It can be used as the taller growing plant scattered throughout the heath scene. When you design a flat heath garden which Austrostipa ramosissima is well suited. Plants must be planted close together and be short so you can see over the tallest ones with the exception of one or two plants at the most. It can be crowded out so leave a little room around them so they can develop to their full potential.
The idea is to achieve a feeling of expansive flatness. This can be achieved with using the Austrostipa ramosissima‘s soft grey linear foliage and having them contrasting with finer pale green broad foliage. Use a lot of procumbent plants like Grevillea masonii, Grevillea thelemanniana or Hibbertia spathulata. Mix it with other smaller shrubs so none of them dominate the scene but blend in to give a mosaic of foliage colours that you oversee.
Spent flowers should be removed to promote longer flowering and better quality flowers next time.
Propagation:
Seeds: Seeds of Austrostipa ramosissima can be collected from the panicles as the majority of the seeds ripen. Once the flowers have died and the first seeds have appeared remove the panicle and place it in a brown paper bag. Seeds will remain viable for several years if kept cool and dry.
Sow the seeds directly into a seed raising mix, keeping them moist. When the seedlings are 40mm to 50mm tall, prick them out and plant them into 50mm native tubes using a good organic mix.
As the seedlings roots reach the bottom of the tubes plant them out into their permanent position. Do not delay as they will develop a large root system quickly and will be difficult to remove without some set back to the vigour or health of the plants.
Fertilize using Seaweed, fish emulsion or organic chicken pellets soaked in water on an alternate basis. Fertilize every two months until the plants are established then annually in early September or March to maintain health, vitality and better flowering.
Division: Austrostipa ramosissima can also be divided, although getting large numbers is more successful from seed. Austrostipa ramosissima can be divided by digging up a clump and cutting the fibrous root clumps into two to four equal parts with a spade. Cut all the leaves and stems back to within 50mm to 70mm of the ground level and replant them in a reprepared hole. I usually do this by making sure the old ground level is 10mm to 20mm below that of the new ground level where you want them to be at the same level when everything settles down or plant them at the same level if a small depression is required. Water in thoroughly with a weak solution of one of our fertilizer recommendations.
Fertilize using seaweed, fish emulsion or organic chicken pellets soaked in water on an alternate basis. Fertilize every two months until the plants are established then annually in early September to October to maintain health, vitality and better flowering.
Further comments from readers:
Hi reader, it seems you use The Bible of Botany a lot. That’s great as we have great pleasure in bringing it to you! It’s a little awkward for us to ask, but our first aim is to purchase land approximately 1,600 hectares to link several parcels of N.P. into one at The Pinnacles NSW Australia, but we need your help. We’re not salespeople. We’re amateur botanists who have dedicated over 30 years to saving the environment in a practical way. We depend on donations to reach our goal. If you donate just $5, the price of your coffee this Sunday, We can help to keep the planet alive in a real way and continue to bring you regular updates and features on Australian plants all in one Botanical Bible. Any support is greatly appreciated. Thank you.
In the spirit of reconciliation we acknowledge the Bundjalung, Gumbaynggirr and Yaegl and all aboriginal nations throughout Australia and their connections to land, sea and community. We pay our respect to their Elders past, present and future for the pleasures we have gained.
Austrostipa rudis
Classification:
Kingdom: Plantae
Unranked: angiosperms
Clade: Commelinids
Order: Poales
Family: Poaceae
Subfamily: Pooideae
Genus: From Terra Australis, which is Latin for land of the south and Stipa, which is Ancient Greek for fibre. It refers to plants, which originate from the land down under, which have many very similar traits with the European Stipa genus.
Species: From Rudi/s which is Latin for unformed or roughly formed. It may refer to the growth habits, of the plants being poorly developed.
Subspecies: Austrostipa rudis subspecies australis. From Terra Australis, which is Latin for land of the south. It refers to plants, which were first discovered from the land down under.
Subspecies: Austrostipa rudis subspecies nervosa. From Neuron, which is Ancient Greek or Nervosus, which is Latin for a nerve. It refers to leaves or phyllodes which have prominent veins.
Subspecies: Austrostipa rudis subspecies rudis. From Rudi/s which is Latin for unformed or roughly formed. It may refer to the growth habits, of the plants being poorly developed.
Common Name:
Distribution:
Austrostipa rudis subspecies australis is found south from Sydney to the Victorian, South Australian border and on the eastern half of Tasmania and the Bass strait Islands. It occurs on and east of the Great Dividing Range though There is an isolated population near Tenterfield in northern New South Wales.
Austrostipa rudis subspecies nervosa is found south of Kookaburra in central Queensland to near Melbourne in southern Victoria. It occurs on and east of the Great Dividing Range.
Austrostipa rudis subspecies rudis is found south of Wallangarra in far north eastern New South Wales to Minimay Swamp Wildlife Reserve, near Wimmera in south western Victoria. It occurs on the Great Dividing Range. There is an isolated population at Kingston near Hobart Tasmania and in the south eastern portion of southern Queensland.
https://avh.ala.org.au/occurrences/search?taxa=Austrostipa+rudis#tab_mapView
Habitat Aspect Climate:
It prefers dappled shade to full sun. It usually grows in moist gullies, drainage lines, wet gallery forests woodland margins or ephemeral pools. The altitude ranges from 5 meters ASL to 760 meters ASL. The altitude ranges from 5 meters ASL to 900 meters ASL.
The temperatures range from minus 4 degrees in August to 38 degrees in January.
The rainfall ranges from lows of 350mm to 1600mm average per annum.
Soil Requirements:
Austrostipa rudis prefers soils that are sandy loams to light clays with a high proportion of gravel. The soils are derived from decomposed sandstones, shales, metamorphic rocks, brown basalts and black basalts as well as peaty accumulated beach sands. The soils pH ranges from a 5pH to 7pH. It tolerates waterlogged soils often growing in shallow surface water for several weeks of the year. Non saline soils to moderately saline soils are tolerated.
Height & Spread:
Wild Plants: 0.8m to 1.2m 0.6m to 2m.
Characteristics:
Austrostipa rudis is an erect open clumped perennial bamboo grass. The fawn to cream rhizomes are very short to short and sparsely branched.
The 2 to 4 node culms of Austrostipa rudis are geniculately ascending and measure 600mm to 1200mm in height by 2mm to 4mm diameter. The mid culms internodes and mid-culm nodes are covered in white pulverulent hairs. The lateral branches are simple.
The leaf sheaths are glabrous to sparsely covered in white puberulent hairs. The ligule is a ciliolate membrane and is scarious adaxially and covered in short, white puberulent hairs adaxially. The ligules measure 0.5mm to 2mm in length. The long linear laminas are erect, scaberulous with a truncate or obtuse apex. The leaf blades measure 200mm to 400mm in length by 2mm to 5mm in width. The concolourous laminas are pale blue green and covered in white pulverulent hairs. The margins are flat, involute or convolute.
The compound inflorescences are linear panicles that measure 250mm to 500mm in length by 20mm to 50mm in diameter.
The spikelets are pedicelled while the fertile spikelets are single flowered comprising of a single fertile floret. The linear, terete floret is without rachillae extension and measures 9mm to 16mm in length.
The glumes are similar and thinner than the fertile lemma. The Lower glume is linear or oblong membranous, are without keels and with 3 nerves. The lower glume measures 6mm to 14mm in length. The lower glume surface is glabrous to moderately covered in white pubescent hairs. The upper glume is linear or oblong and measures 7mm to 15mm in length. The membranous glumes are without keels and have 3 to 5 nerves. The upper glume’s apex is erose while the surface is covered in white puberulent hairs. The fertile lemma measures 11mm to 15mm in length. The lemma are without keels and have 5 nerves while the surface is covered in white puberulent hairs.
Austrostipa rudis subsp. australis’s glumes are broad obtuse with 1mm to 2mm a delicately membranous tip which measures 1mm to 2mm in length. The upper glume measures 11mm to 15mm in length.
Austrostipa rudis sub sp. nervosa’s glumes are narrow truncate and firm at the tip. The upper glume measures 7mm to 10mm in length.
Austrostipa rudis sub sp. rudis’s upper glume is membranous at the tip and measures 9mm to 12.5mm in length.
The lemma apex is entire, usually with a single awn. The lemma are without keels, have 5 nerves and measure 5mm to 11mm in length. The lemmas are covered in white pulverulent hairs.
The single awn measures 20mm to 90mm in length overall with a twisted column. The column measures 4.5mm to 45mm in length. The palea is 2 nerved without keels. Lodicules present.
Austrostipa rudis sub sp. australis’s awns measure 60mm to 90mm in length while the column measures 32mm to 45mm in length.
Austrostipa rudis sub sp. nervosa’s awns measure 40mm to 65mm in length while the columns measure 15mm to 25mm in length.
Austrostipa rudis sub sp. rudis’s awns measure 40mm to 65mm in length while the columns measure 15mm to 25mm in length.
The inflorescences have 3 anthers. The flowers appear from late September to February under ideal conditions.
The oblong grains measure 3m to 6m in length.
Wildlife:
Austrostipa rudis’s do not appear to have any predators though the leaf blades are chewed from time to time.
The seeds are edible but little else is known. The plants are low nutritional value for stock probably because of the tough hard fibrous stems.
Cultivation:
It is a small bamboo type grass suitable for most gardens. It should be more widely grown in temperate, semi-arid and arid gardens as an ornamental. It is ideal at the edge of a forest or as the pioneer clump grass in open country to help bind the soil and add potash and add a vertical dimension to the scene. It also makes great rockery displays as the main feature in hot open spaces or confined sunny or shady positions. In cultivation they will grow from 0.8 meters to 1.2 meters in height by 0.2 meters to 0.4 meters in diameter when grown in the open.
A single plant or small groups planted around swimming pools or in enclosed courtyards are surprisingly beautiful despite being open and flimsy looking. This creates a very soft look against hard walls and fences.
It grows well on all soil types except pure sand and thrive on pindan soils provided deep watering are given on a regular basis to prevent excess cracking. 2 or 3 deep watering during the growing season will suffice. It can cope with temperatures as low as minus 4 degrees and up to 40 degrees. It is drought resistant once established while at the same time can cope with periodic flooding and wet feet.
Mass plantings look weedy so should be avoided. Scattered through the bush it adds a vertical dimension and colour throughout the year. It can be rotated or used in heath settings where vertical lines are required. It can be used in desert scenes or heath scenes equally well. It should also have a clear area surrounding each plant to allow for good form otherwise they become spindly and may succumb to the competition.
Place it near old stumps and roots to make the stumps or roots look more gnarled, twisted or bolder while making 1, 2 or even 3 Austrostipa rudis plants look more delicate. Select an area of ground and let your hair down and be imaginative and this is the plant that may just change your life. Remember this plant is rather large for this type of garden so use it sparingly with the other plants when planting and remember that deserts are rolling flat plains not steep hills so it is best to use a gentle slope or a basin with a small pool at the bottom. A billabong affect is the go, not a waterfall or cascades.
It would make outstanding contribution to a moist heath garden. Here it can be used as the taller growing plant scattered throughout the heath scene. When you design a flat heath garden which Austrostipa rudis is well suited, plants should be planted close together and be short so you can see over the tallest ones with the exception of one or two plants at the most. Remember it can be crowded out so leave a little room around it so it can develop to its full potential.
The idea is to achieve a feeling of expansive flatness. This can be achieved with using the Austrostipa ramosissima?s soft grey linear foliage and having them contrasting with finer pale green or fine grey to glaucous coloured foliage. Use a lot of procumbent plants like Grevillea masonii, Grevillea thelemanniana or Hibbertia specie. Mix it with other smaller shrubs so none of them dominate the scene but blend in to give a mosaic of foliage colours that you oversee.
Spent flowers could be removed to promote a longer flowering period and better quality flowers next time.
Propagation:
Seeds: The seeds of Austrostipa rudis can be collected from the panicles as the majority of the seeds ripen. Once the flowers have died and the first seeds have appeared remove the panicle and place it in a brown paper bag. Seeds will remain viable for several years if kept cool and dry.
Sow the seeds directly into a seed raising mix, keeping them moist. When the seedlings are 40mm to 50mm tall, prick them out and plant them into 50mm native tubes using a good organic mix.
As the seedlings roots reach the bottom of the tubes plant them out into their permanent position. Do not delay as they will develop a large root system quickly and will be difficult to remove without some set back to the vigour or health of the plants.
Division: It can also be divided, although getting large numbers is more successful from seed. It can be divided by digging up a clump and cutting the fibrous root clumps into two to four equal parts with a spade. Cut all the leaves and stems back to within 50mm to 70mm of the ground level and replant them in a reprepared hole. I usually do this by making sure the old ground level is 10mm to 20mm below that of the new ground level where you want them to be at the same level when everything settles down or plant them at the same level if a small depression is required. Water in thoroughly with a weak solution of one of our fertilizer recommendations.
Fertilize using seaweed, fish emulsion or organic chicken pellets soaked in water on an alternate basis. Fertilize every two months until the plants are established then annually in early September to October to maintain health, vitality and better flowering.
Further comments from readers:
Hi reader, it seems you use The Bible of Botany a lot. That’s great as we have great pleasure in bringing it to you! It’s a little awkward for us to ask, but our first aim is to purchase land approximately 1,600 hectares to link several parcels of N.P. into one at The Pinnacles NSW Australia, but we need your help. We’re not salespeople. We’re amateur botanists who have dedicated over 30 years to saving the environment in a practical way. We depend on donations to reach our goal. If you donate just $5, the price of your coffee this Sunday, We can help to keep the planet alive in a real way and continue to bring you regular updates and features on Australian plants all in one Botanical Bible. Any support is greatly appreciated. Thank you.
In the spirit of reconciliation we acknowledge the Bundjalung, Gumbaynggirr and Yaegl and all aboriginal nations throughout Australia and their connections to land, sea and community. We pay our respect to their Elders past, present and future for the pleasures we have gained.
Austrostipa scabra
Classification:
Kingdom: Plantae
Unranked: angiosperms
Clade: Commelinids
Order: Poales
Family: Poaceae
Subfamily: Pooideae
Genus: From Terra Australis, which is Latin for land of the south and Stipa, which is Ancient Greek for fibre. It refers to plants, which originate from the land down under, which have many very similar traits with the European Stipa genus.
Species: From Scab, which is Latin for rough. It refers to structures or organs, which have a rough scabby surface.
Subspecies: Austrostipa scabra subspecies falcata. From Falcata, which is Latin for a scythe or sickle shape. It refers to leaves, which have a shape somewhat like a scythe or sickle shape.
Subspecies: Austrostipa scabra subspecies scabra. From Scab, which is Latin for rough. It refers to structures or organs, which have a rough scabby surface.
Common Name: Speargrass
Distribution:
Austrostipa scabra subspecies falcata is a very widespread species of grass which is found in the south eastern third of mainland Australia, extending in a few scattered populations into southern Western Australia.
Austrostipa scabra subspecies scabra is a very widespread but widely scattered species of grass which is found in the south eastern third of mainland Australia, extending in a few scattered populations into southern Western Australia and southern Northern Territory.
https://avh.ala.org.au/occurrences/search?taxa=Austrostipa+scabra#tab_mapView
Habitat Aspect Climate:
Austrostipa scabra prefers dappled shade to full sun. It usually grows in drier areas, plains, on gentle slopes or along moist gullies drainage lines. The altitude ranges from 5 meters ASL to 900 meters ASL.
The temperatures range from minus 4 degrees in August to 42 degrees in January.
The rainfall ranges from lows of 200mm to 1600mm average per annum. It is at its best in the 350mm to 450mm rainfall zones.
Soil Requirements:
It prefers soils that are sandy loams to light clays with a high proportion of course sand and gravel. The soils are usually derived from decomposed sandstones. The soils pH ranges from 5.5pH to 6.5pH. It does not tolerate waterlogged soils. Non saline soils to very saline soils are tolerated.
Height & Spread:
Wild Plants: 1m to 1.5m by 0.5m to 0.7m.
Characteristics:
It is an erect open tufted perennial bamboo type grass. The rhizomes are absent in this species.
The culms of Austrostipa scabra are mostly erect and measure 300mm to 600mm in height by 2mm to 4mm diameter. The mid culms internodes and mid-culm nodes are glabrous. The grass-green culms are compressed while the branches are few and simple.
The leaf sheaths are glabrous to slightly scabrous. The ligule is a ciliate membrane and is membranous with a bilobed to truncate apex. The ligules measure 0.3mm to 5mm in length. The long linear laminas are semi erect and measure 150mm to 650mm in length by 0.7mm to 2mm in width. The concolourous laminas are grass-green, scaberulous, scabrous or covered in white pulverulent hairs. The margins are conduplicate, involute or convolute.
The compound inflorescences are linear panicles that measure 150mm to 300mm in length by 20mm to 50mm in diameter.
The spikelets are pedicelled while the fertile spikelets are single flowered comprising of a single fertile floret. The lanceolate, terete floret is without rachillae extension and measures 8mm to 10mm in length.
The glumes are similar and thinner than the fertile lemma. The Lower hyaline glume is lanceolate membranous, without keels and have 3 nerves. The lower glume measures 6mm to 12mm in length. The lower glume surface is glabrous. The upper glume is linear or oblong and measures 7mm to 15mm in length. The membranous upper glumes are keels with 3 to 5 nerves. The upper glume’s apex is erose while the surface is glabrous. The upper glumes measure 6mm to 13mm in length.
The fertile lemma measures 4mm to 5mm in length. The lemma are without keels, have 5 nerves while the surface is covered in white puberulent hairs. The lemma apex is bilobed or rarely trilobed with a single awn. The lemma are without keels, have 5 nerves and measure 5mm to 11mm in length. The lemmas are covered in white pulverulent hairs.
The single falcate awn measures 30mm to 70mm in length overall with a twisted column. The column measures 5.5mm to 15mm in length. The palea are without keels.
The oblong grains measure 2.5m to 4.5m in length.
Austrostipa scabra subspecies falcata‘s inflorescence is spreading. The ligule measures 0.3mm to 0.6 mm in length. The asymmetrical lobe of the upper leaves usually measures greater than 1mm in length and has a row of hairs.
Austrostipa scabra subspecies scabra’s inflorescence is narrow and more erect. The ligule measures 0.3mm to 1.5mm in length. The asymmetrical auricular sheath is lobed on upper leaves and measures 3.5mm to 4.5 mm in length and is glabrous.
Wildlife:
Austrostipa scabra does not appear to have any predators though the leaf blades are chewed from time to time.
The seeds are edible but little else is known. The plants are low nutritional value for stock probably because of the tough hard fibrous stems and a low leaf stem ratio.
Cultivation:
Austrostipa scabra is a magnificent perennial bamboo type grass for almost every garden. It should be more widely grown in temperate, semi-arid and arid gardens as an ornamental. It is ideal at the edge of a forest or as the pioneer clump grass in open country to help bind the soil and add potash and add a vertical dimension to the scene. It also makes great rockery display as the main feature in hot open spaces or confined sunny or shady positions. In cultivation it will grow from 1.5 meters to 2 meters in height by 01 meters to 1.5 meters in diameter when grown in the open.
A single plant or small groups planted around swimming pools or in enclosed courtyards are surprisingly beautiful despite being open and flimsy looking. This creates a very soft look against hard walls and fences.
It grows exceptionally well on all soil types except pure sand and thrives on pindan soils provided deep watering are given on a regular basis to prevent excess cracking. 2 or 3 deep watering during the growing season will suffice. It can cope with temperatures as low as minus 4 degrees and up to 44 degrees. It is drought resistant once established while at the same time can cope with periodic flooding and wet feet.
Mass plantings look weedy so should be avoided. Scattered through the bush they add a vertical dimension and colour throughout the year. It can be rotated or used in heath settings where vertical lines are required. It can be used in desert scenes or heath scenes equally well. It should also have a clear area surrounding each plant to allow for good form otherwise they become spindly and may succumb to the competition.
Place them near old stumps and roots to make the stumps or roots look more gnarled, twisted or bolder while making 1, 2 or even 3, Austrostipa scabra plants look more delicate. Select an area of ground and let your hair down and be imaginative and this is the plant that may just change your life. Remember this plant is rather large for this type of garden so use it sparingly with the other plants when planting and remember that deserts are rolling flat plains not steep hills so it is best to use a gentle slope or a basin with a small pool at the bottom. A billabong affect is the go, not a waterfall or cascades.
Austrostipa scabra would make outstanding contribution to a moist heath garden. Here it can be used as the taller growing plant scattered throughout the heath scene. When you design a flat heath garden which Austrostipa scabra is well suited don’t use contours to display the plants as heath lands are almost always flat or have a slight rise. Plants must be planted close together and be short so you can see over the tallest ones with the exception of one or two plants at the most. Remember they can be crowded out so leave a little room around them so they can develop to their full potential.
The idea is to achieve a feeling of expansive flatness. This can be achieved with using the Austrostipa scabra‘s soft grey linear foliage and having them contrasting with finer pale green or fine grey to glaucous coloured foliage. Use a lot of procumbent plants like Grevillea masonii, Grevillea thelemanniana or Hibbertia specie. Mix them with other smaller shrubs so none of them dominate the scene but blend in to give a mosaic of foliage colours that you oversee.
Spent flowers should be removed to promote longer flowering and better quality flowers next time.
Propagation:
Seeds: Seeds of Austrostipa scabra can be collected from the panicles as the majority of the seeds ripen. Once the flowers have died and the first seeds have appeared remove the panicle and place it in a brown paper bag. Seeds will remain viable for several years if kept cool and dry.
Sow the seeds directly into a seed raising mix, keeping them moist. When the seedlings are 40mm to 50mm tall, prick them out and plant them into 50mm native tubes using a good organic mix.
As the seedlings roots reach the bottom of the tubes plant them out into their permanent position. Do not delay as they will develop a large root system quickly and will be difficult to remove without some set back to the vigour or health of the plants.
Division: It can also be divided, although getting large numbers is more successful from seed. It can be divided by digging up a clump and cutting the fibrous root clumps into two to four equal parts with a spade. Cut all the leaves and stems back to within 50mm to 70mm of the ground level and replant them in a reprepared hole. I usually do this by making sure the old ground level is 10mm to 20mm below that of the new ground level where you want them to be at the same level when everything settles down or plant them at the same level if a small depression is required. Water in thoroughly with a weak solution of one of our fertilizer recommendations.
Fertilize using seaweed, fish emulsion or organic chicken pellets soaked in water on an alternate basis. Fertilize every two months until the plants are established then annually in early September to October to maintain health, vitality and better flowering.
Further comments from readers:
Hi reader, it seems you use The Bible of Botany a lot. That’s great as we have great pleasure in bringing it to you! It’s a little awkward for us to ask, but our first aim is to purchase land approximately 1,600 hectares to link several parcels of N.P. into one at The Pinnacles NSW Australia, but we need your help. We’re not salespeople. We’re amateur botanists who have dedicated over 30 years to saving the environment in a practical way. We depend on donations to reach our goal. If you donate just $5, the price of your coffee this Sunday, We can help to keep the planet alive in a real way and continue to bring you regular updates and features on Australian plants all in one Botanical Bible. Any support is greatly appreciated. Thank you.
In the spirit of reconciliation we acknowledge the Bundjalung, Gumbaynggirr and Yaegl and all aboriginal nations throughout Australia and their connections to land, sea and community. We pay our respect to their Elders past, present and future for the pleasures we have gained.
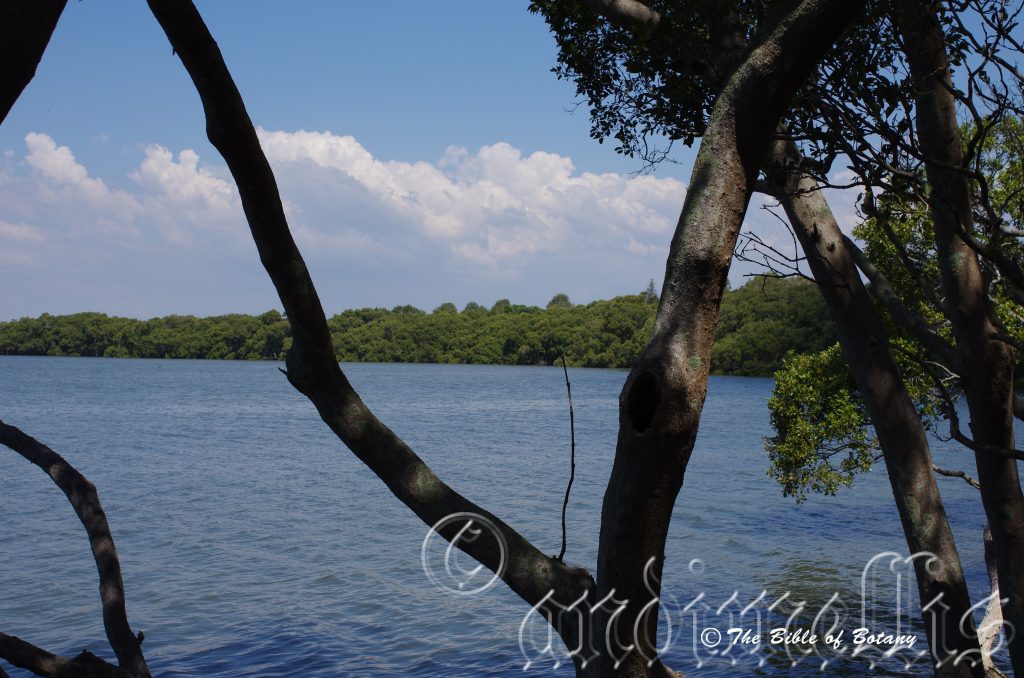
Wynnum Foreshore Qld.

Crystal Creek Qld.
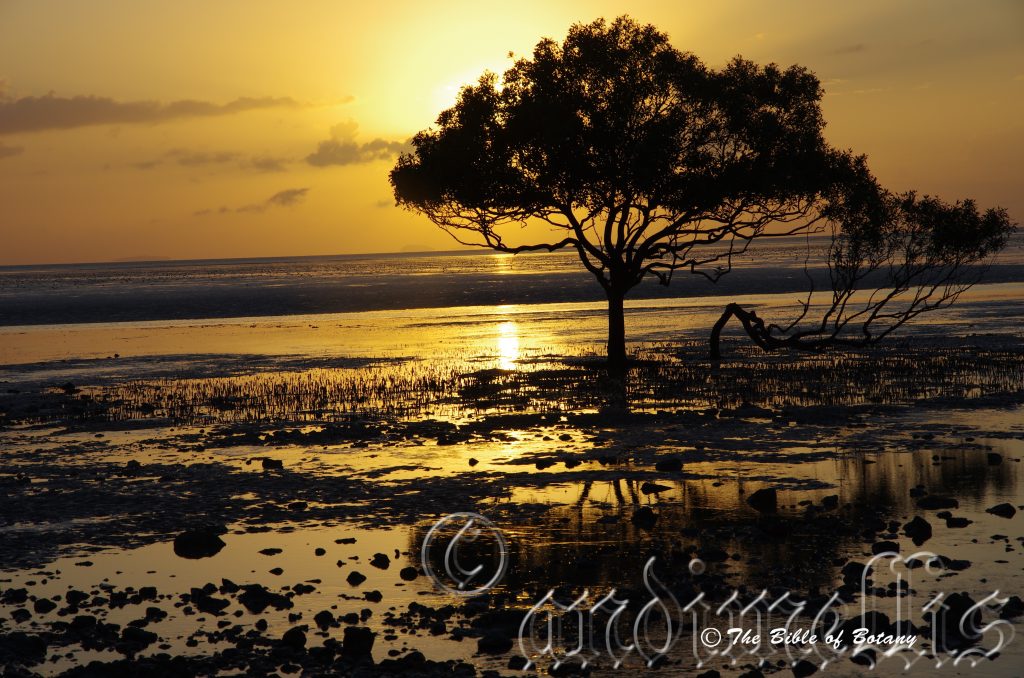
Clearview Qld.
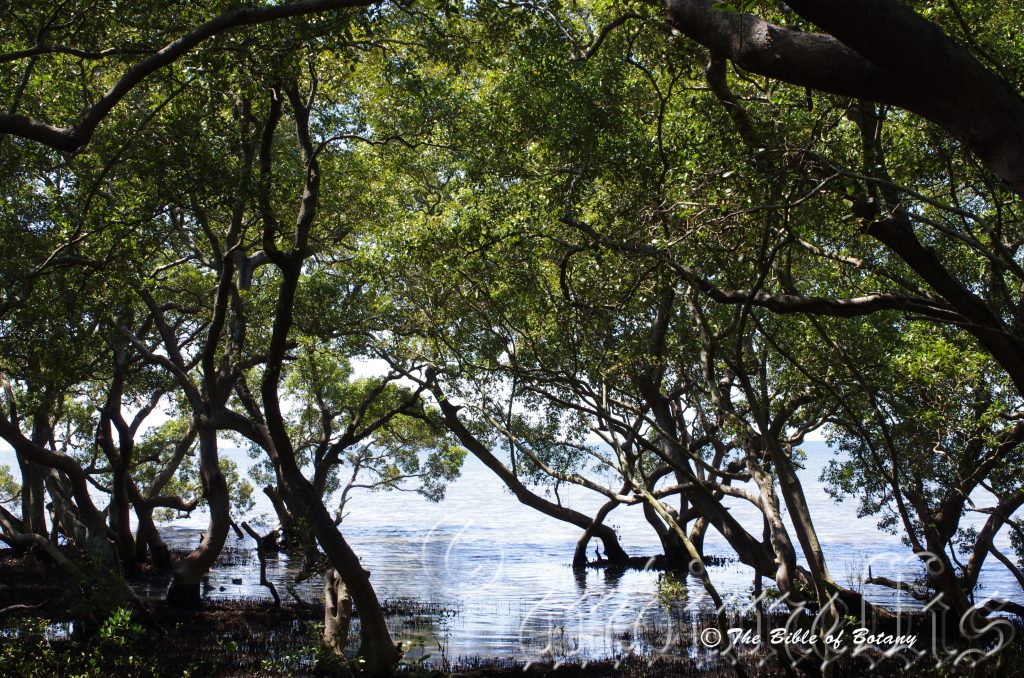
Wynnum Foreshore Qld.
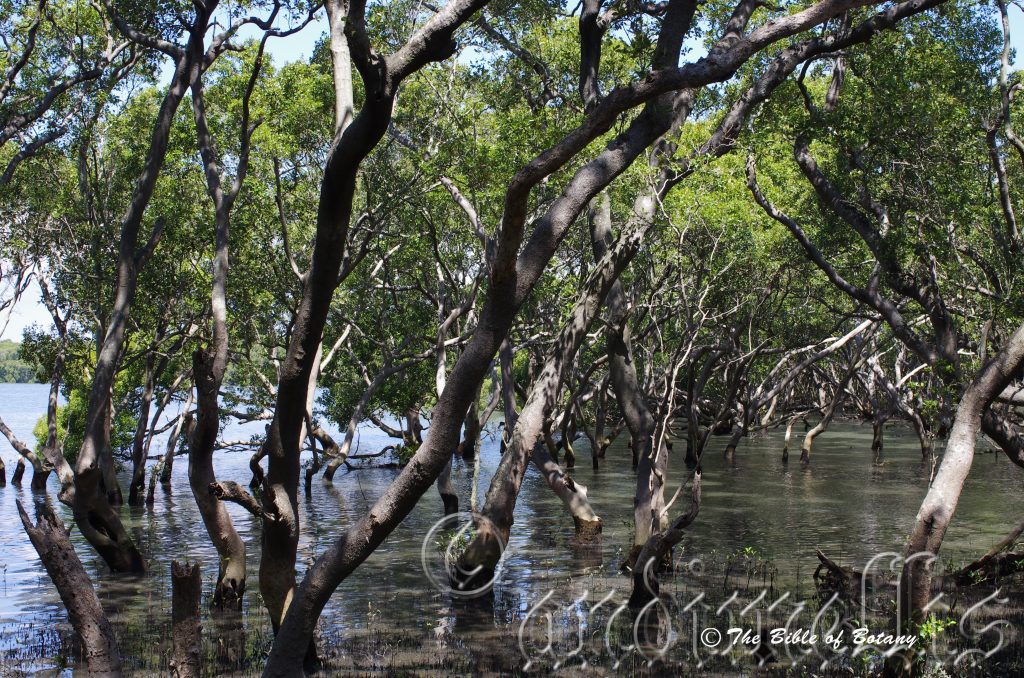
Wynnum Foreshore Qld.
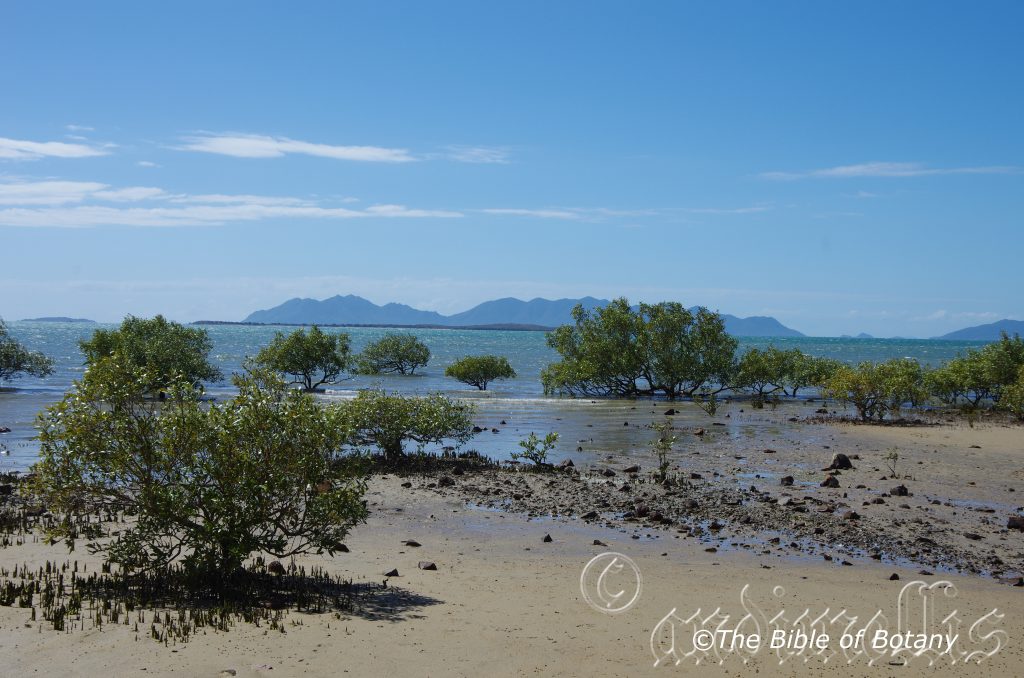
Sarina Foreshore Qld.
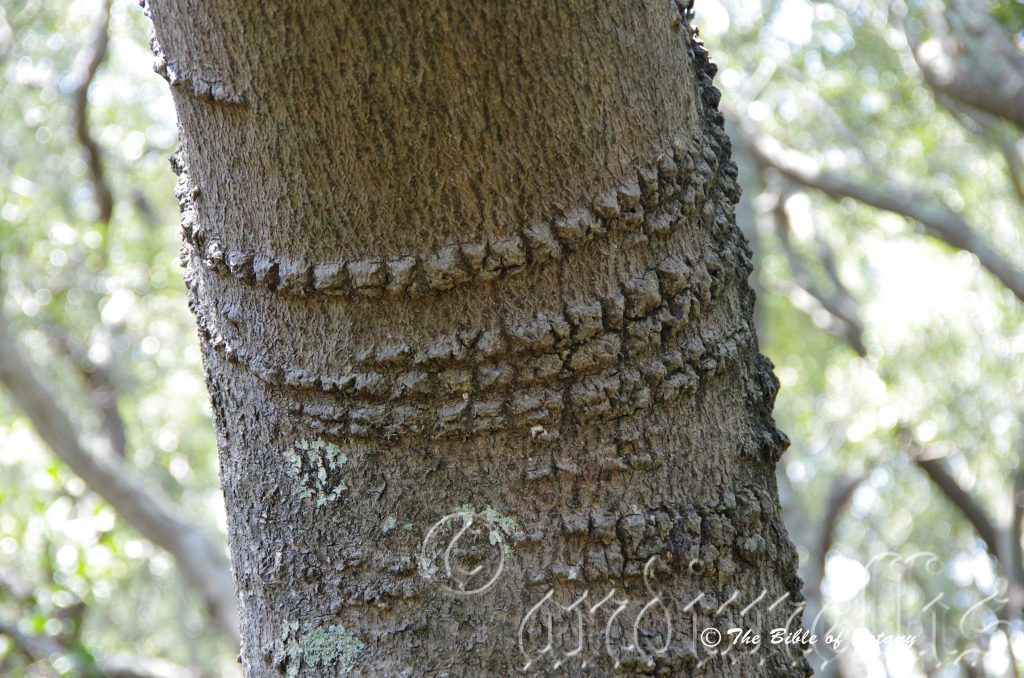
Wynnum Foreshore Qld.
Clearview Qld.
Clearview Qld.
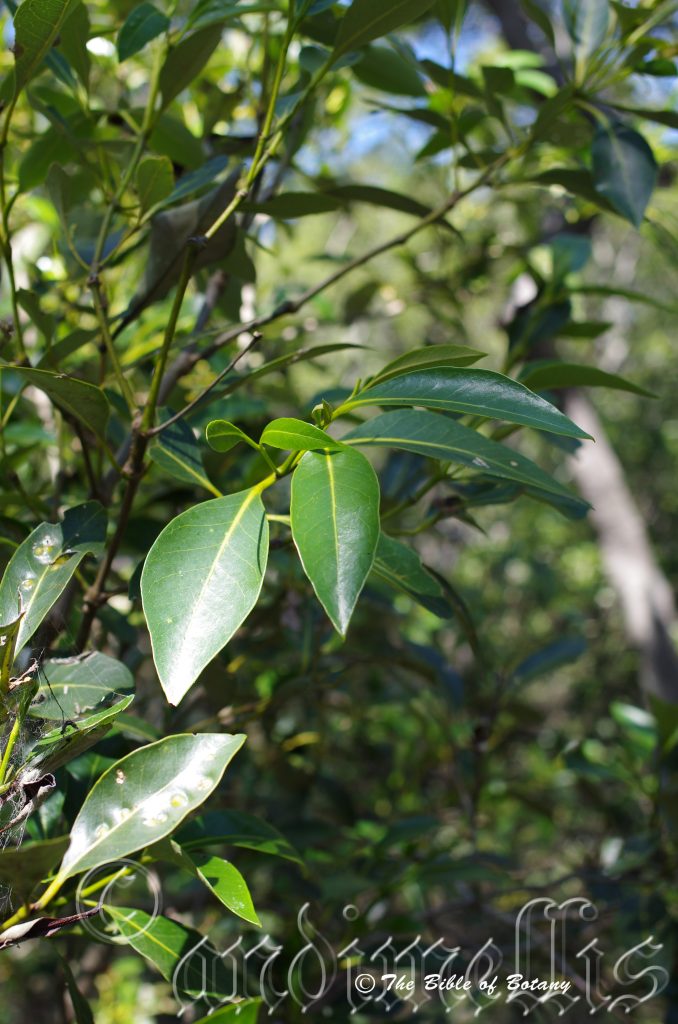
Wynnum Foreshore Qld.
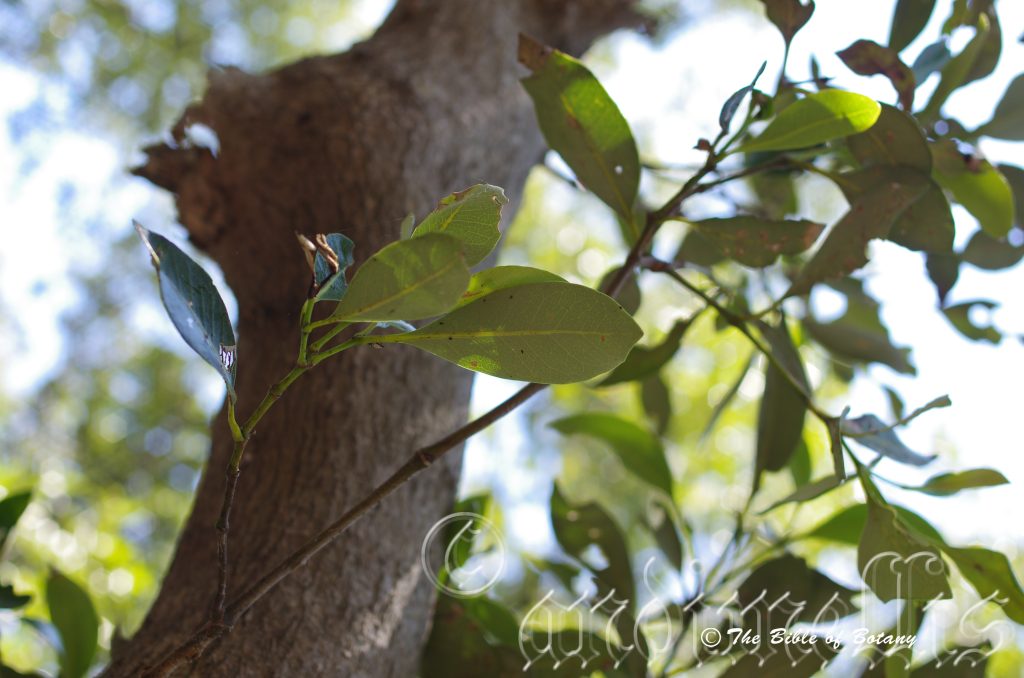
Wynnum Foreshore Qld.
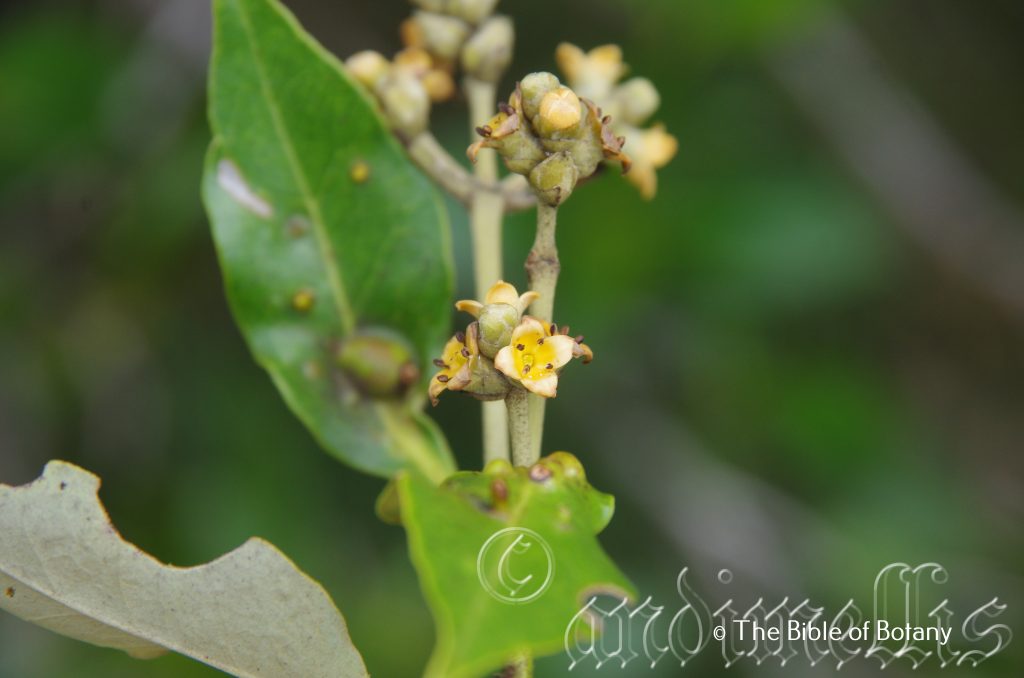
Currumbin Creek Estuary Qld.
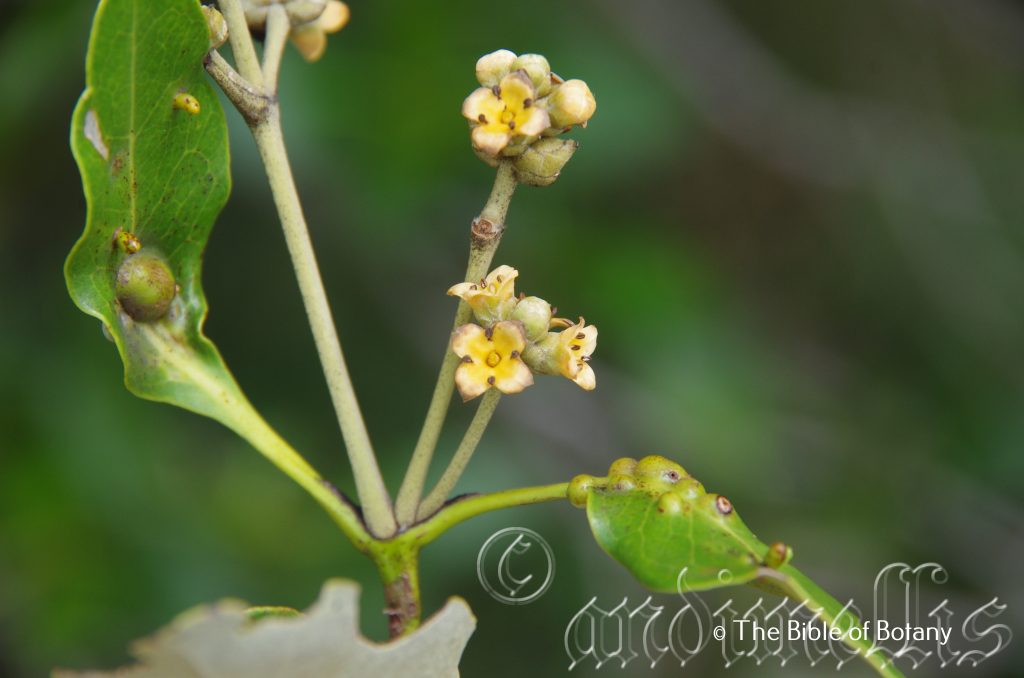
Currumbin Creek Estuary Qld.
Clearview Qld.
Clearview Qld.
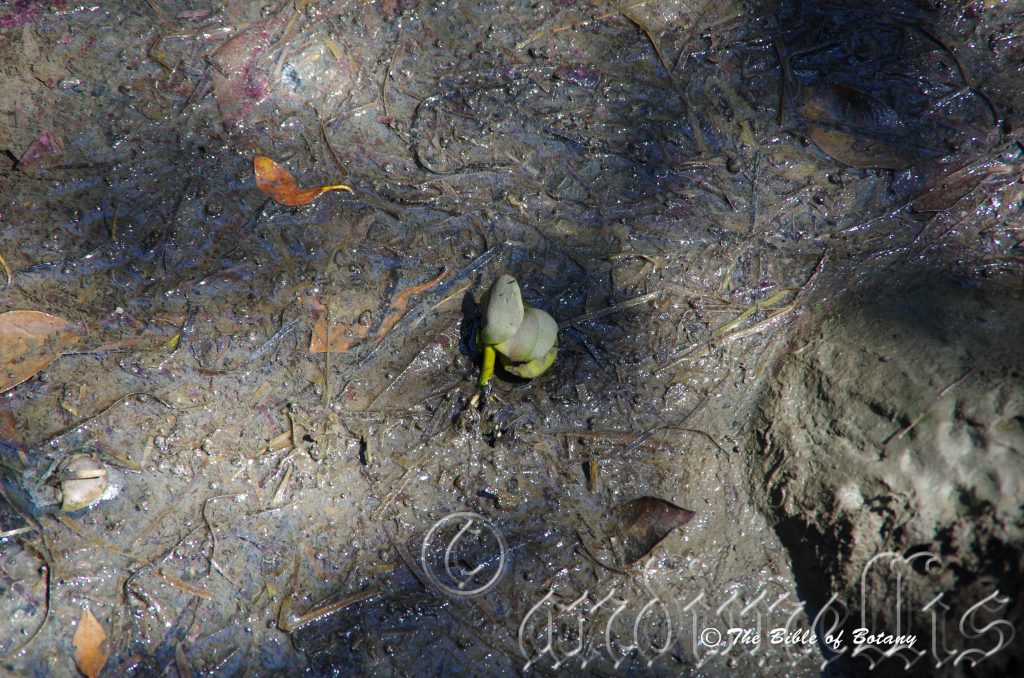
Wynnum Foreshore Qld.
Nephila species Wynumm Foreshore Qld.
Nephila species Wynumm Foreshore Qld.
Wynumm Foreshore Qld.
Royal Spoonbill Platalea regia, Wynumm Foreshore Qld.
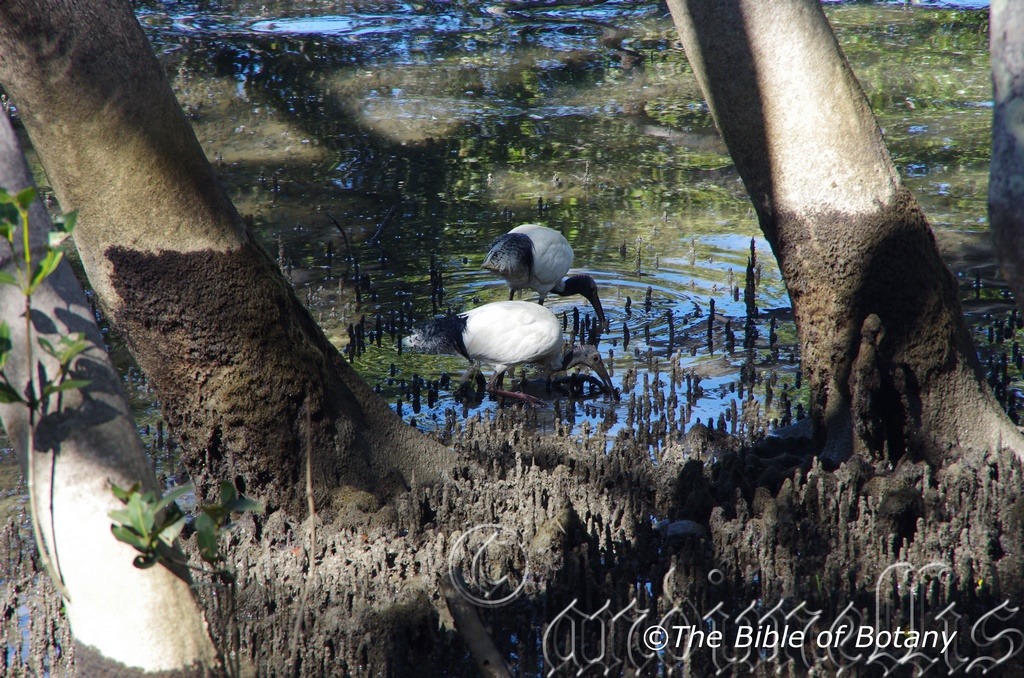
Threskiornis moluccus Wynumm Foreshore Qld.
Clearview Qld.
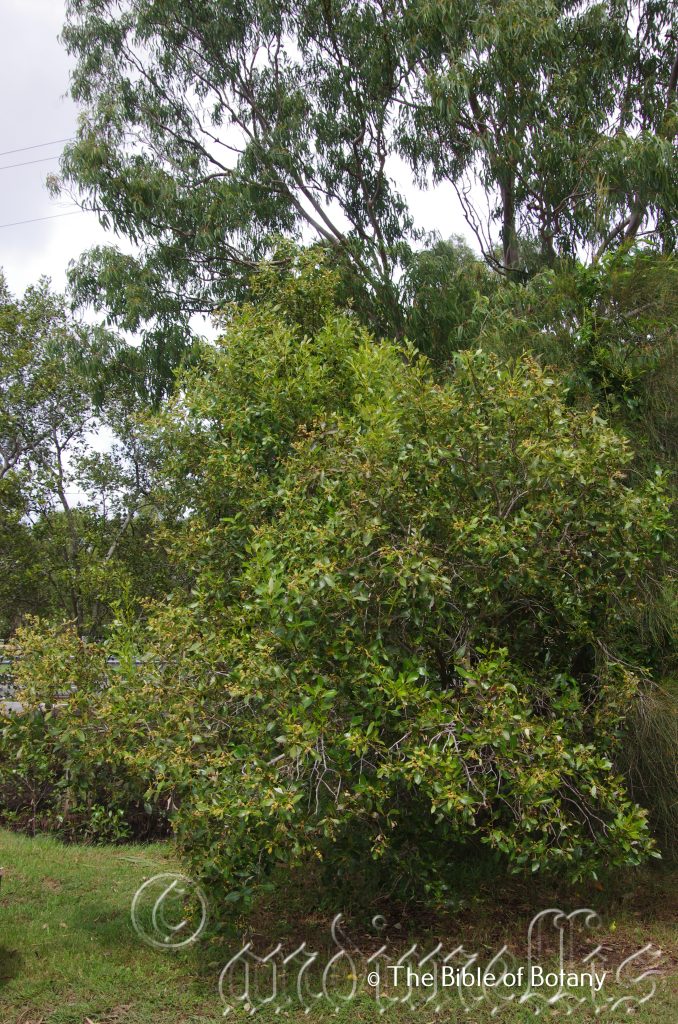
Currumbin Creek Qld.
Avicennia marina
Classification:
Kingdom: Plantae
Class: Angiosperms
Clade: Eudicots
Clade: Asterids
Order: Lamiales
Family: Acanthaceae
Genus: From Avicennia, which is Latinized from Ibna Sina and is named in honour of Ibna Sina; 980-1037, who was an Arab physician and author who was the most influential medical thinker of his time.
Species: From Marinum, which is Latin for of the sea. It refers to plants, which have a preference for a saline habitats.
Common Name: Grey Mangrove.
Distribution:
Avicennia marina is found from Broome in coastal western, Western Australia north, then east across the top end then south around the coast to Port Augusta in South Australia.
It is also found Indo West Pacific region from East Africa and the Red Sea, China, Indonesia Japan, Malaya, New Guinea, New Zealand and the Philippines.
https://avh.ala.org.au/occurrences/search?taxa=Avicennia+marina#tab_mapView
Habitat Aspect Climate:
Avicennia marina prefers full sun. It grows along the coast in saline coastal waters to brackish, estuaries on river banks, river flats especially in tidal zones. The altitude ranges from 0 meters to 5 meters ASL.
The temperatures range from 2 degrees in July to 42 degrees in January.
The rainfalls range from lows of 320mm to an average of 3200mm annually, however this is relatively unimportant because the trees grow on the mudflats and gain all of their water requirements from the ocean or high water tables adjacent to the ocean.
Soil Requirements:
Avicennia marina grows on mud banks in deep fine silts to heavy muddy clay-silts. Estuarine and mangrove mudflats have a huge variation in the PH ranging from 4.5pH to 8.5pH. This variation will vary from the type of soil being deposited, the amount of rain received in the catchment the type of leaf litter deposited, the stage of decomposition and frequency of tidal inundation. Plants could expect variation up to 1.5 points on the PH scale even in a given area over a few days or weeks. All our samples were taken along the Clarence River and near the mouth of the Brisbane River near Wynnum north and Metroplex Avenue Park Colmslie. It tolerates waterlogged soils and daily inundations are a common occurrence. Very saline soils to extremely saline soils are tolerated as are salt laden winds.
Height & Spread:
Wild Plants: 6m to 10m by 6m to 10m.
Characteristics:
Avicennia marina can grow as a multi trunked small tree or a single trunked tree attaining 400mm in diameter on very old trees. The bark is a pale silvery grey glabrous, resinous to strongly farinaceous on older trees. Young branchlets are pale silvery grey and glabrous.
Pneumatophores are present and most obvious in areas that suffer frequent inundations. The pneumatophores are 50mm to 150mm in length by 5mm to 10mm in diameter.
The dull grey green glabrous coriaceous leaves are elliptical, narrow obovate to obovate and measure 40mm to 120mm in length by 10mm to 40mm in width. The base is cuneate while the apex is obtuse or acuminate. The discolourous leaves are dull grey-green to dull olive green and glabrous on the upper lamina while the lower lamina is covered in fine grey or silvery-grey pannate hairs. The yellow green mid vein is prominent on the lower lamina and is distinctly visible on the upper lamina. The base is cuneate to slightly attenuate while the apex is acute. The leaf margins are entire and slightly involute. Petioles are 4mm to 10mm long.
The inflorescences of Avicennia marina are in dense cymes or arranged in terminal panicles. There are 35 to 50 flowers in a cyme. The calyx measures 2.5mm to 3mm in length while the calyx tube measures 1mm to 2mm in length and the 4 contorted, acute lobes measure 3mm to 4.2mm in length. The flowers are white in the early stages of blooming turning golden yellow to orange as they age. The 4 stamens measure 5mm to 6mm in length with the anther measuring 0.9 to 1mm in length. The anthers turn brown with age. Individual peduncles are angular and measure 10mm to 25mm in length. Flowers appear from November to March.
The green 20mm to 30mm diameter capsule of Avicennia marina is thin covering a is discarded leaving the two Dicotyledon with a rudimentary root system in place prior to dropping from the tree.
Wildlife:
Avicennia marina supports a myriad of life. From being a fish nursery, crab environment, bird habitat, spiders, bats, moths, butterflies and beetles, all can be observed feeding and living and breeding there. It is home of the Mangrove kingfisher Halcyon senegaloides, New Holland Honeyeater Phylidonyris novaehollandiae, and Brown Honeyeater Lichmera indistincta. Surprisingly many lichens and epiphytic ferns including the Elkhorn Platycerium bifurcatum grew amongst the mangroves. Mangrove orchids including Durabaculum undulatum were also once very common on the old branches. The trees also form a symbiotic relationships with the Notiosomus species, while ant species make their homes in the tunnels and hollows. In return they protect the trees from insect attack. Native bees use the trees for honey production and making their hives. The dark honey has a distinctively pleasant taste.
Cultivation:
It would make an good fire retardant small tree.
* Fire retardant plants act as radiant heat screens and absorb more heat from an approaching fire without burning.
* Fire retardant trees are able reduce wind speed near a house or out buildings.
* Fire retardant also trap embers and sparks carried by the wind.
* Fire retardant ground covers are able to catch burning embers without catching fire themselves, and also slow the travel of a fire through debris and litter on the ground.
Avicennia marina is a beautiful small spreading tree that looks great in the garden as a feature plant for canal developments sea side gardens or saline waterlogged environments close to the coast. The pneumatophores are not present when grown in sandy soils above normal tidal zones though they require plenty of nutrient and water in order to maintain healthy growth. Cultivated trees will grow 6 meters to 8 meters tall by 6 meters to 8 meters in diameter.
I have seen Avicennia marina used as Bonsai in China. It is much sought after for this type of culture and old trees would demand a high price.
Propagation:
Seeds: Avicennia marina is easy to propagate from fresh seed. After collecting the seeds they should be placed individually into 100mm native tubes directly using a good quality potting mix which is full of leaf litter and mulch. Use an equal part of sludge with the potting mix. Stand the pots in water for approximately 25mm of the height of the pot.
The other alternative is to plant the seed directly where it is required.
Fertilize using double strength seaweed, fish emulsion or organic chicken pellets soaked in water on an alternate basis. Fertilize every two months until the plants are established; if they are on dry land, then annually in early September to October to maintain health, vitality and better flowering.
Further comments from readers:
Hi reader, it seems you use The Bible of Botany a lot. That’s great as we have great pleasure in bringing it to you! It’s a little awkward for us to ask, but our first aim is to purchase land approximately 1,600 hectares to link several parcels of N.P. into one at The Pinnacles NSW Australia, but we need your help. We’re not salespeople. We’re amateur botanists who have dedicated over 30 years to saving the environment in a practical way. We depend on donations to reach our goal. If you donate just $5, the price of your coffee this Sunday, We can help to keep the planet alive in a real way and continue to bring you regular updates and features on Australian plants all in one Botanical Bible. Any support is greatly appreciated. Thank you.
In the spirit of reconciliation we acknowledge the Bundjalung, Gumbaynggirr and Yaegl and all aboriginal nations throughout Australia and their connections to land, sea and community. We pay our respect to their Elders past, present and future for the pleasures we have gained.
Azolla filiculoides
Classification:
Kingdom: Plantae
Unnamed: Pteridophyta
Class: Polypodiopsida
Order: Salviniales
Family: Salviniaceae
Genus: From Azo, which is Ancient Greek for dry and Ollo, to kill. It refers to the plants, which succumb quickly during dry conditions or when out of water.
Species: From Filices/filix, which is Latin for a fern and Eidos/Oides, which are Ancient Greek for alike or similar to. It refers to plants, which belong to the fern family.
Common Name: Red Water Fern or Water Fern.
Distribution:
Azolla filiculoides is found in the southern half of Australia wherever permanent fresh water exists. It is not found in the high country or Alps.
https://avh.ala.org.au/occurrences/search?taxa=Azolla+filiculoides#tab_mapView
Habitat Aspect Climate:
Azolla filiculoides are small ferns found in slow flowing streams and rivers, ponds, lakes and billabongs. The altitude ranges from 5 meters ASL to 900 meters ASL but is generally much lower.
Water temperatures range from 1 degree in July to 27 degrees in January.
Rainfalls range from lows of 120mm to an average of 3200mm annually, however this is relatively unimportant because the ferns grow on the surface of fresh water.
Soil Requirements:
Azolla filiculoides grows on water where the substratum consists of all types of decomposed or non-decomposed material. The water is close to alkaline to acid and ranges from 5.5pH to 7.7pH. This variation will vary from the type of soil being deposited; the amount of rain received in the catchment, and catchment runoff, the type of leaf and other organic material deposited in the water and the stage of decomposition of that organic matter and the number of Azolla in the water. As Azolla filiculoides are good at nitrogen fixation and deprive the water of oxygen when in a state of bloom and death the acidic levels will rise and fall dramatically. Azolla filiculoides are far more tolerant of pH changes than almost every other known plant accepting variation up to 1.5 points on the pH scale even in a given area over a few weeks.
Only non-saline water is tolerated.
Height & Spread:
Wild Plants: 12mm to 24mm by 12m to 24m
Characteristics:
Azolla filiculoides rhizomes are irregularly forked, pinnate and easily fragmented. The whole plant is fan-shaped, circular or irregular in outline. Azolla filiculoides have 1 to 3 roots per node in fully grown plants and are simple with no hair-like branches
Azolla filiculoides orbicular-ovate to rhomboidal fronds that measure 1.2mm to 2mm in length by 1.2mm to 2mm in width. The fronds are alternate, in 2 rows and are often contorted. There are 2 lobes, the upper lobes which are floating or emergent. The discolourous lobes of the upper fronds are pale grey-green, pale blue-green, green, reddish-brown or purplish orange on the upper laminas while the lower laminas are paler. The lower lobes are submersed and are generally slightly larger, translucent and pale green or pale blue-green.
The upper lobes can change to any of the above colours as a result of changes in sunlight intensity including shade as well as ambient temperature of the water. The red colour appears to be more prevalent in water that is higher in nutrient or polluted to some extent. The bases are rounded to broadly cuneate while the apexes are broadly acute to obtuse. The margins base coloured or red at the margins while the margins appear to be entire but are in fact are sparsely covered in small muricate lobes. The glabrous fronds are coriaceous. The fronds are sessile on the rachises.
Azolla filiculoides are also able to reproduce more rapidly by vegetative means. The elongation and fragmentation of the small sections of the rhizome can occur throughout the year under favourable conditions. Under ideal conditions the plants are able double their numbers every 4 to 5 days. Under favourable environmental conditions, Azolla filiculoides also undergoes sexual reproduction through spores.
The sporangia of Azolla filiculoides are formed in two distinctly different cases and usually form together as a pair. Sporangia appear throughout the year under favourable conditions.
The spherical male sporangium cases measure 1.2mm to 2mm in length by 1mm to 1.6mm in diameter. The areola apexes are obtuse acuminate and deep glossy brown while the walls are transparent.
The hemispherical or spherical female sporangium cases measure 0.3mm to 0.5mm in length by 0.2mm to 0.4mm diameter. The areola apexes are obtuse and covered in a deep brown spongy structure that aids in flotation while the walls are opaque. There is a single sessile sporangium with a single spherical spore.
Once the spore is released and sinks to the bottom a prothallus develops and is fertilized by the male spore fertilizes the prothallus relies on a symbiotic cyanobacterium to enter the prothallus and assist in photosynthesis.
Wildlife:
Azolla filiculoides can also be dispersed on the feet and feathers of water birds and by mammals such as kangaroos and dingoes that enter the water to drink. They supply a crucial habitat for water boatman Notonectidae or Corixidae, shrimp Atyidae species, Dragon fly nymph Anisoptera species and Epiproctophora Zygoptera and Damselfly nymph Zygoptera species.
Some native fish and waterfowl eat the fronds while mosquitoes eggs are laid in close proximity to the fronds, the larvae use the leaves as protection which in return attract small carnivorous freshwater fish and the above freshwater carnivores
Cultivation:
Azolla filiculoides is a beautiful small spreading fern that looks great in a water feature in the garden. They can be used in small to medium fish and frog ponds.
Propagation:
Seeds: Azolla filiculoides is easy to propagate. It is as simple as removing a few plants from an existing colony and placing them into a plastic bag. When you arrive home empty the contents of the bag into the aquarium, pond or water feature.
Further comments from readers:
Hi reader, it seems you use The Bible of Botany a lot. That’s great as we have great pleasure in bringing it to you! It’s a little awkward for us to ask, but our first aim is to purchase land approximately 1,600 hectares to link several parcels of N.P. into one at The Pinnacles NSW Australia, but we need your help. We’re not salespeople. We’re amateur botanists who have dedicated over 30 years to saving the environment in a practical way. We depend on donations to reach our goal. If you donate just $5, the price of your coffee this Sunday, We can help to keep the planet alive in a real way and continue to bring you regular updates and features on Australian plants all in one Botanical Bible. Any support is greatly appreciated. Thank you.
In the spirit of reconciliation we acknowledge the Bundjalung, Gumbaynggirr and Yaegl and all aboriginal nations throughout Australia and their connections to land, sea and community. We pay our respect to their Elders past, present and future for the pleasures we have gained.
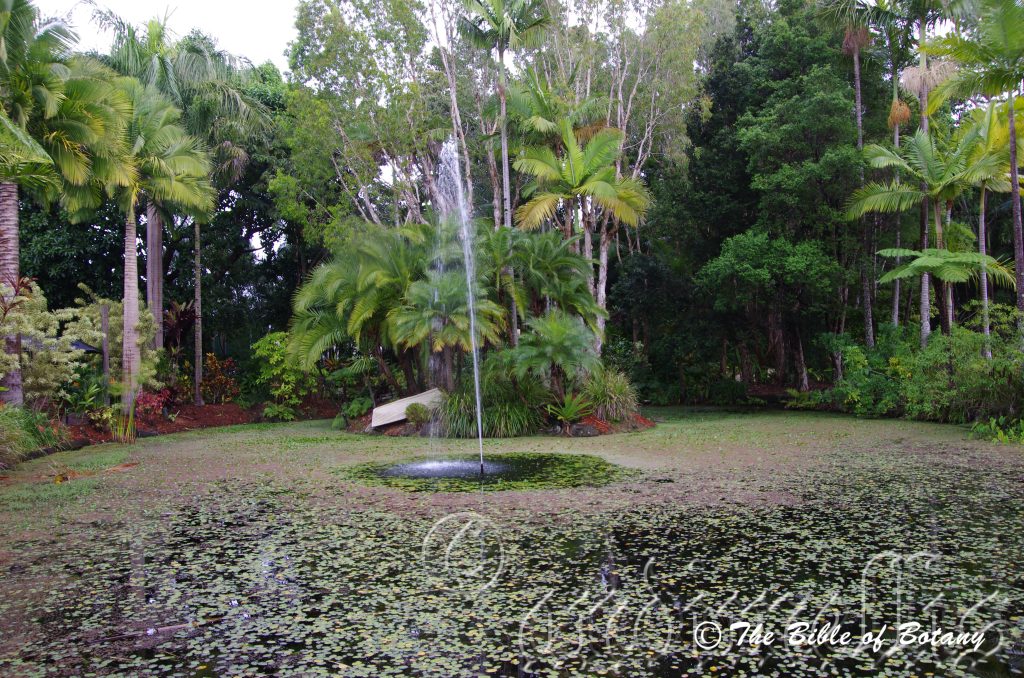
Ginger Factory Nambour Qld.

Townsville Qld.
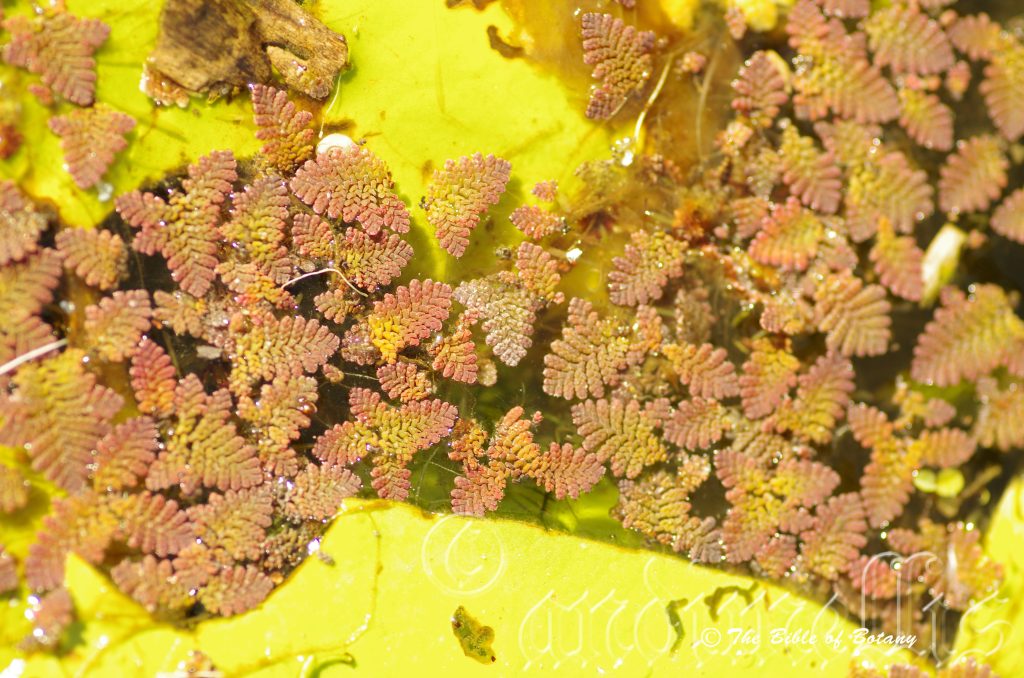
Ross river Townsville Qld.
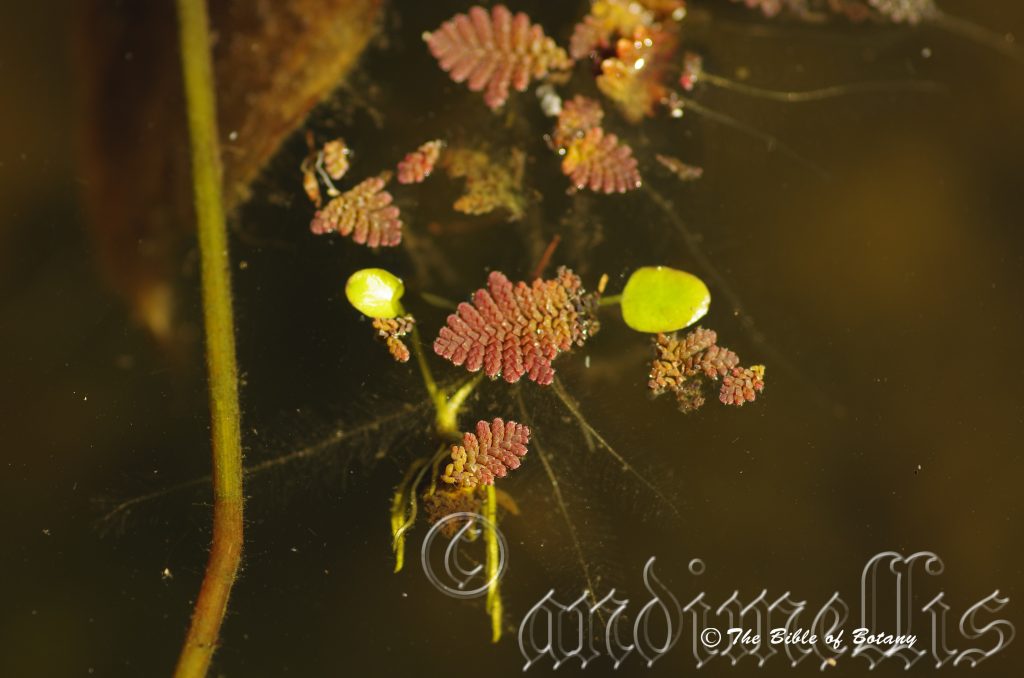
Ross river Townsville Qld.
Azolla pinnata
Classification:
Kingdom: Plantae
Unnamed: Pteridophyta
Class: Polypodiopsida
Order: Salviniales
Family: Salviniaceae
Genus: From Azo, which is Ancient Greek for dry and Ollo, to kill. It refers to the plants, which succumb quickly during dry conditions or when out of water.
Species:From Pinula, which is Latin for a pinna. It refers to one leaflet of a pinnate leaf.
Common Name:
Distribution:
Azolla pinnata is found in the eastern half of New South Wales and Queensland water ways from the Murray River in the south to Cape York Peninsula in the north. It is also found in the far north of the northern Territory and in the south western corner of Western Australia
https://avh.ala.org.au/occurrences/search?taxa=Azolla+pinnata#tab_mapView
Habitat Aspect Climate:
Azolla pinnata are small ferns found in slow flowing streams and rivers, ponds, lakes and billabongs. The altitude ranges from 5 meters ASL to 500 meters ASL.
Water temperatures range from 5 degree in August to 33 degrees in January.
Rainfalls range from lows of 120mm to an average of 3200mm annually, however this is relatively unimportant because the ferns grow on the surface of fresh water.
Soil Requirements:
Azolla pinnata grows on water where the substratum consists of all types of decomposed or non-decomposed material. The water is close to alkaline to acid and ranges from 5.5pH to 7.5pH. This variation will vary from the type of soil being deposited; the amount of rain received in the catchment, and catchment runoff, the type of leaf and other organic material deposited in the water and the stage of decomposition of that organic matter and the number of Azolla in the water. As Azolla pinnata are good at nitrogen fixation and deprive the water of oxygen when in a state of bloom and death the acidic levels will rise and fall dramatically. Azolla pinnata are far more tolerant of pH changes than almost every other known plant accepting variations up to 1.5 points on the pH scale even in a given area over a few weeks.
Only non-saline water is tolerated.
Height & Spread:
Wild Plants: 22mm to 33mm by 10m to 16m
Characteristics:
Azolla pinnata rhizomes are irregularly forked, pinnate and easily fragmented. The whole plant is more or less triangular in outline. It has 2 to 3 roots per node in fully grown plants with the roots having a fibrous network system.
Its orbicular-ovate to rhomboidal fronds that measure 1.2mm to 2mm in length by 1.4mm to 1.8mm in width. The fronds are alternate, in 2 rows and are often contorted. There are 2 lobes, the upper lobes which are floating or emergent. The discolourous lobes of the upper fronds are pale grey-green, pale blue-green, green, reddish-brown or purplish orange on the upper laminas while the lower laminas are paler. The lower lobes are submersed and are generally slightly larger, translucent and pale green or pale blue-green.
The upper lobes can change to any of the above colours as a result of changes in sunlight intensity including shade as well as ambient temperature of the water. The red colour appears to be more prevalent in water that is higher in nutrient or polluted to some extent. The bases are rounded to broadly cuneate while the apexes are broadly acute to obtuse. The margins base coloured or red at the margins while the margins appear to be entire but are in fact are sparsely covered in small muricate lobes. The glabrous fronds are coriaceous. The fronds are sessile on the rachises.
Azolla pinnata are also able to reproduce more rapidly by vegetative means . The elongation and fragmentation of the small sections of the rhizome can occur throughout the year under favourable conditions. Under ideal conditions the plants are able double their numbers every 4 to 5 days. Under favourable environmental conditions, Azolla filiculoides also undergoes sexual reproduction through spores.
The following section on sexual reproduction is based on the assumption that Azolla pinnata and Azolla filiculoides are similar as I have no records of Azolla pinnata reproducing from spore. The figures used are those of Azolla filiculoides.
The sporangia of Azolla filiculoides are formed in two distinctly different cases and usually form together as a pair. Sporangia appear throughout the year under favourable conditions.
The spherical male sporangium cases measure 1.2mm to 2mm in length by 1mm to 1.6mm in diameter. The areola apexes are obtuse acuminate and deep glossy brown while the walls are transparent.
The hemispheric or spherical female sporangium cases measure 0.3mm to 0.5mm in length by 0.2mm to 0.4mm diameter. The areola apexes are obtuse and covered in a deep brown spongy structure that aids in flotation while the walls are opaque. There is a single sessile sporangium with a single spherical spore.
Once the spore is released and sinks to the bottom a prothallus develops and is fertilized by the male spore the fertilizers prothallus relies on a symbiotic cyanobacterium to enter the prothallus and assist in photosynthesis.
Wildlife:
Azolla pinnata can also be dispersed on the feet and feathers of water birds and by mammals such as kangaroos and dingoes that enter the water to drink. They supply a crucial habitat for water boatman Notonectidae or Corixidae, shrimp Atyidae species, Dragon fly nymph Anisoptera species and Epiproctophora Zygoptera and Damselfly nymph Zygoptera species.
Some native fish and water fowl eat the fronds while mosquitoes eggs are laid in close proximity to the fronds, the larvae use the leaves as protection which in return attract small carnivorous fresh water fish and the above fresh water carnivores
Cultivation:
Azolla pinnata is a beautiful small spreading fern that looks great in a water feature in the garden. They can be used in small to medium fish and frog ponds.
Propagation:
Seeds: It is easy to propagate. It is as simple as removing a few plants from an existing colony and placing them into a plastic bag. On returning home place the contents in your fish pond or water feature.
a
Further comments from readers:
Hi reader, it seems you use The Bible of Botany a lot. That’s great as we have great pleasure in bringing it to you! It’s a little awkward for us to ask, but our first aim is to purchase land approximately 1,600 hectares to link several parcels of N.P. into one at The Pinnacles NSW Australia, but we need your help. We’re not salespeople. We’re amateur botanists who have dedicated over 30 years to saving the environment in a practical way. We depend on donations to reach our goal. If you donate just $5, the price of your coffee this Sunday, We can help to keep the planet alive in a real way and continue to bring you regular updates and features on Australian plants all in one Botanical Bible. Any support is greatly appreciated. Thank you.
In the spirit of reconciliation we acknowledge the Bundjalung, Gumbaynggirr and Yaegl and all aboriginal nations throughout Australia and their connections to land, sea and community. We pay our respect to their Elders past, present and future for the pleasures we have gained.
All information is included in good faith and has been thoroughly researched prior to printing. The website or the author does not warrant or guarantee the accuracy of any information on these pages, nor does the website or the author accept any responsibility for any loss arising from the use of the information found within. The views and opinions are strictly those of the author or those members who chose to actively participate in the contents herein.