Plant Descriptions – Dennstaedtia davallioides – Diplocyclos palmatus
Dennstaedtia davallioides
Deparia petersenii subsp. congrua
Derris involuta
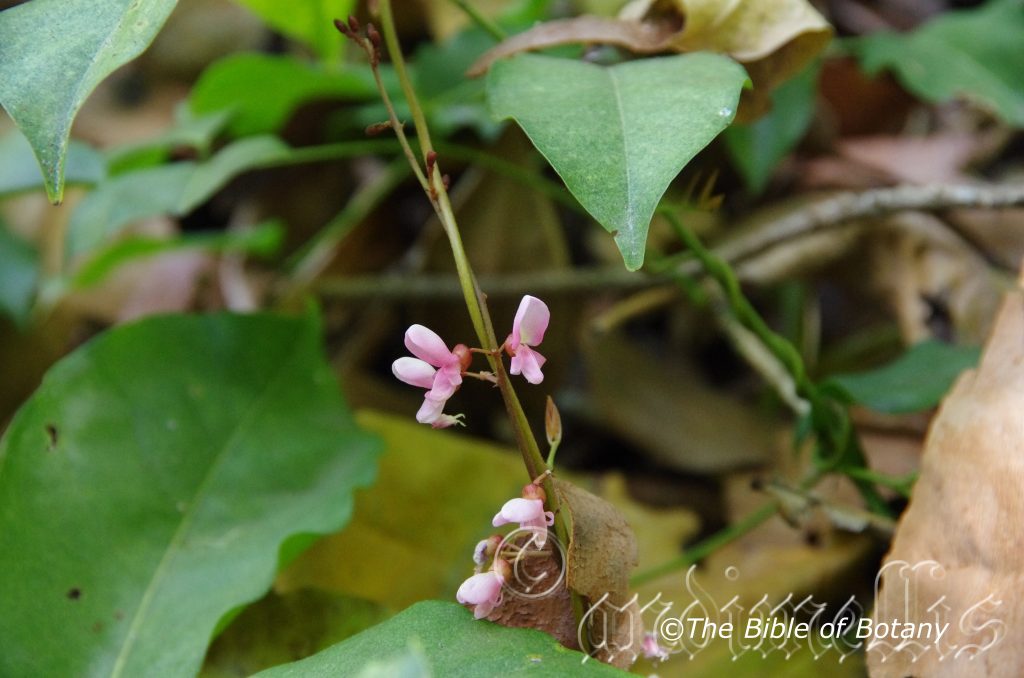
Derris trifoliata
Desmodium brachypodum
Desmodium gunnii
Desmodium heterocarpon
Desmodium nemorosum
Desmodium rhytidophyllum
Desmodium varians
Deyeuxia parviseta
Deyeuxia reflexa
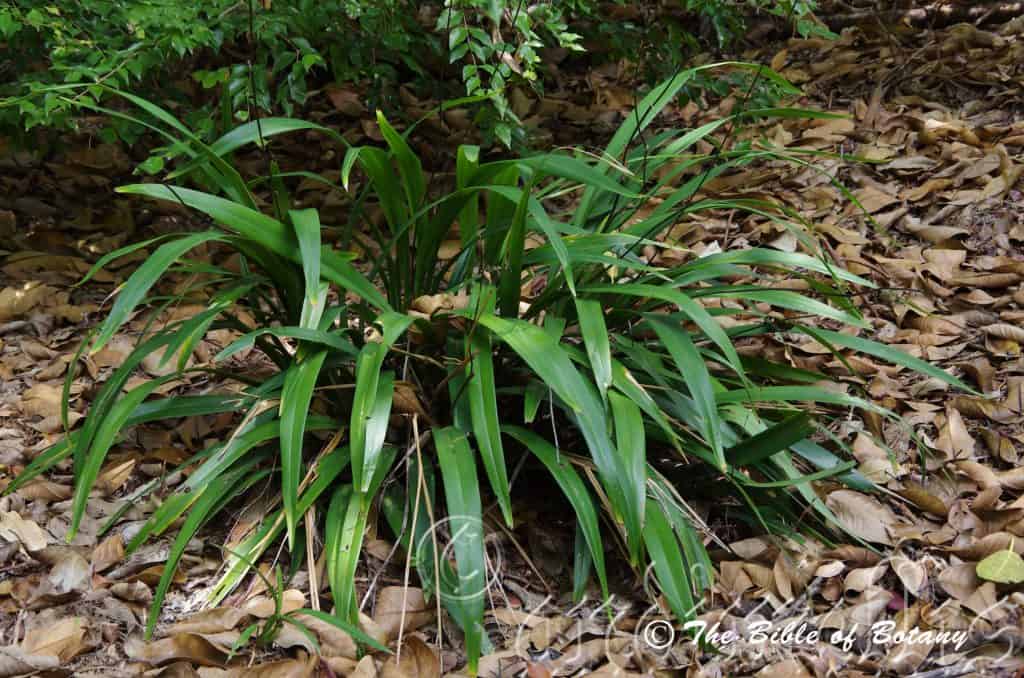
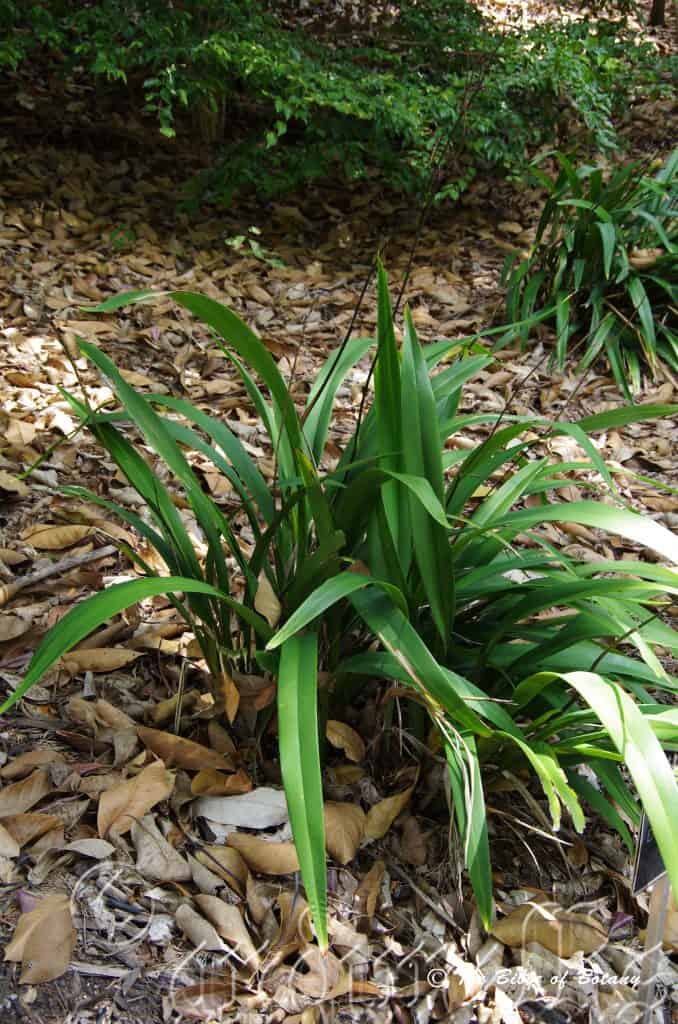
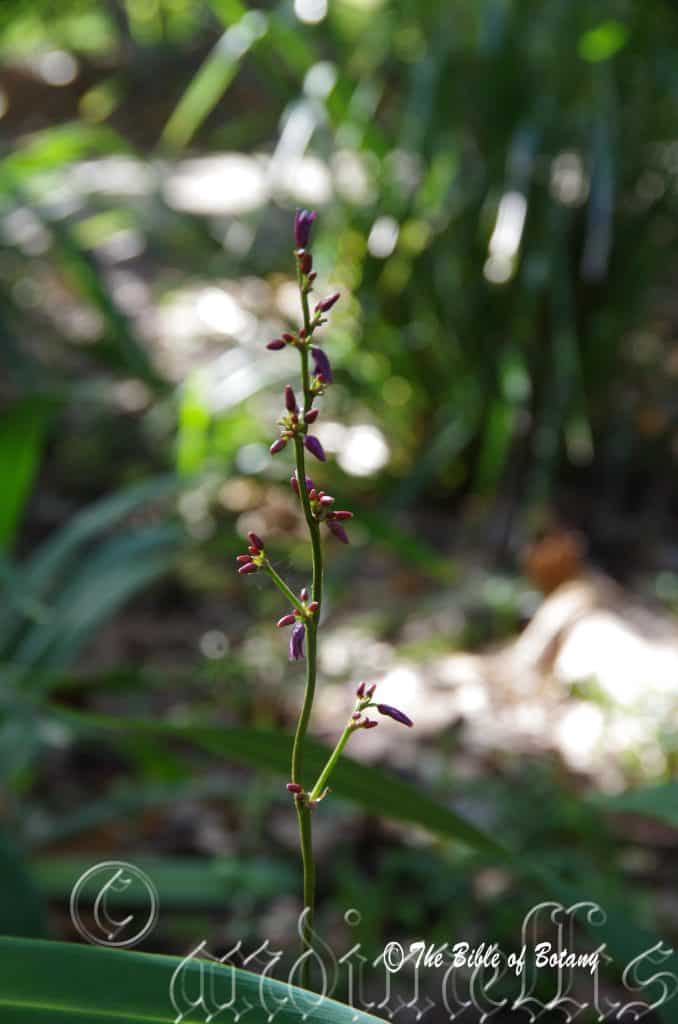
Dianella atraxis
Dianella brevipedunculata
Dianella caerulea subsp. assera
Dianella caerulea subsp. caerulea
Dianella congesta
Dianella crinoides
Dianella longifolia
Dianella pavopennacea
Dianella revoluta
Dianella tasmanica
Dichanthium tenue
Dichelachne crinita
Dichelachne micrantha
Dichondra repens
Dicksonia antarctica
Dicksonia youngiae
Dictymia brownii
Digitaria didactyla
Digitaria diffusa
Digitaria longiflora
Digitaria longiflora
Digitaria ramularis
Dillenia alata
Dillwynia glaberrima
Dillwynia phylicoides
Dillwynia retorta
Dimorphocalyx australiensis
Dinosperma erythrococcum
Dioscorea transversa
Diospyros australis
Diospyros calycantha
Diospyros fasciculosa
Diospyros pentamera
Diplachne fusca
Diplazium assimile
Diplazium australe
Diplazium dilatatum
Diplocyclos palmatus

Mount Cootha Botanic Gardens Qld.
Mount Cootha Botanic Gardens Qld.

Palmatum Gardens Townsville Qld.
Palmatum Gardens Townsville Qld.
Palmatum Gardens Townsville Qld.
Mount Cootha Botanic Gardens Qld.
Palmatum Gardens Townsville Qld.
Mount Cootha Botanic Gardens Qld.
Mount Cootha Botanic Gardens Qld.
Palmatum Gardens Townsville Qld.
Author’s Garden The Pinnacles NSW
Author’s Garden The Pinnacles NSW
Dennstaedtia davallioides
Classification
Division: Pteridophyta
Subdivision: Filicophytina
Class: Filicopsida
Order: Filicales
Family: Athyriaceae
Genus: Is named in honour of August Wilhelm Dennstaedt; 1776-1826, who was a German physician, botanist and a remarkable taxonomist.
Species: Is named in Honour of Edmund Davall; 1763-1798, who was a Swiss botanist and Eidos/Oides, which is Ancient Greek for alike or similar to. It refers to ferns which have fronds that resemble the Davallia genus.
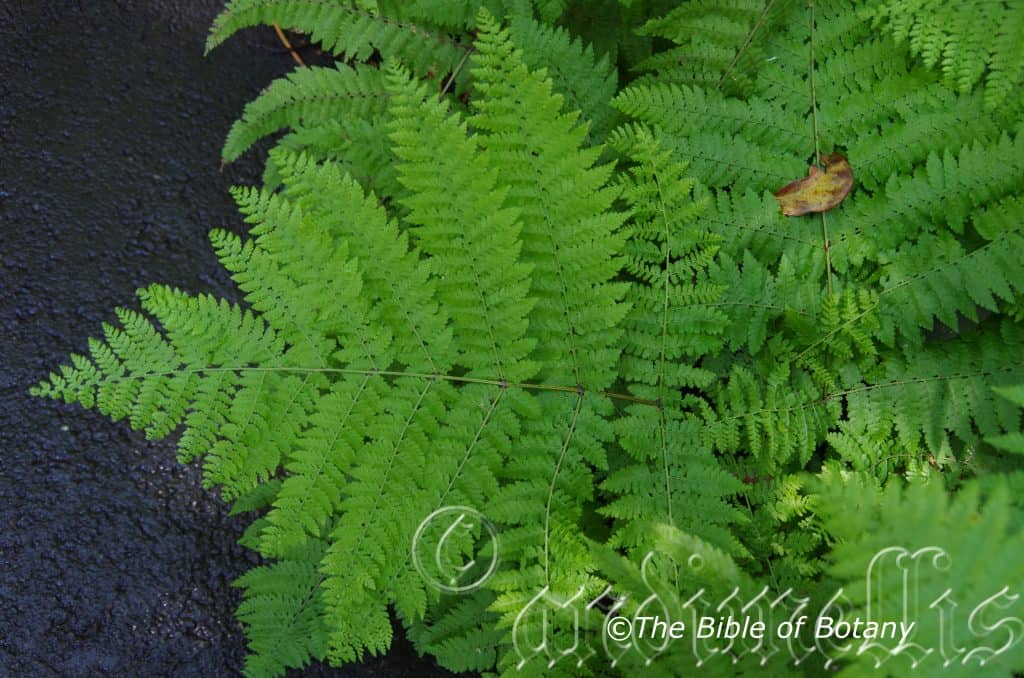
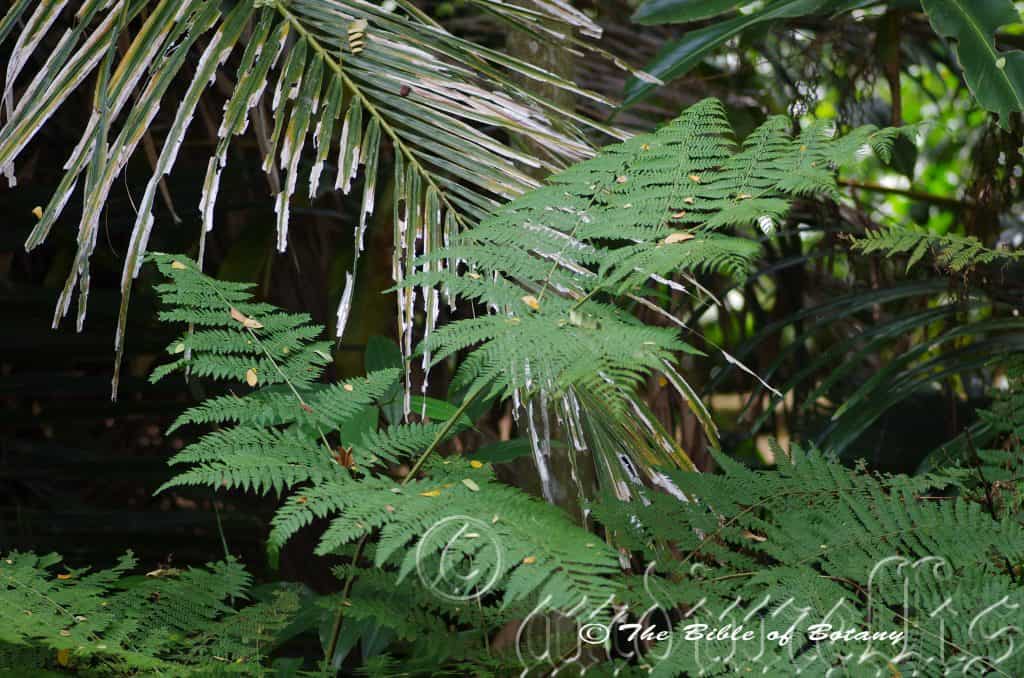
Common Name: Lacey Ground Fern.
Distribution:
Dennstaedtia davallioides is found in several disjunct populations south from the Bunya Mountains National Park in southern Queensland to Cooks Gully in south eastern Victoria. It is also found in found near Healesville, Beech Forest to the southern tip of The Great Ottway National Park in southern Victoria. In northern Queensland it is found in an isolate population on Magnetic Island and near Ayr. It is found on and east of the Great Dividing Range.
It is found further west at the Caves near Naracoorte in south eastern South Australia.
https://avh.ala.org.au/occurrences/search?taxa=Dennstaedtia+davallioides#tab_mapView
Habitat Aspect Climate:
Dennstaedtia davallioides prefers to grow in dense shade, light shade and dappled sun light. It grows in moisture retentive soils in protected positions within montane rainforests, littoral rainforests, moist open Eucalyptus forests, riparian forests, gallery forests and riparian rainforests. It is mainly found along rills, creeks, streams where it can form impenetrable thickets in the undergrowth. The altitude ranges from 10 meters ASL to 1050 meters ASL.
The temperature ranges from 2 degrees in August to 36 degrees in January.
The rainfall ranges from lows of 600mm to 1700mm average per annum.
Soil Requirements:
Dennstaedtia davallioides prefers friable sandy loams to medium clays. The soils are usually derived from decomposed brown basalt and black basalt, metamorphic rocks, fatty sandstone, shale and laterites. The soils pH ranges from 5pH to 6.5pH. It does not tolerate waterlogged soils. Non saline soils to moderately saline soils are tolerated.
Height & Spread:
Wild Plants: 1000mm to 1500mm by 850mm to 1250mm.
Characteristics:
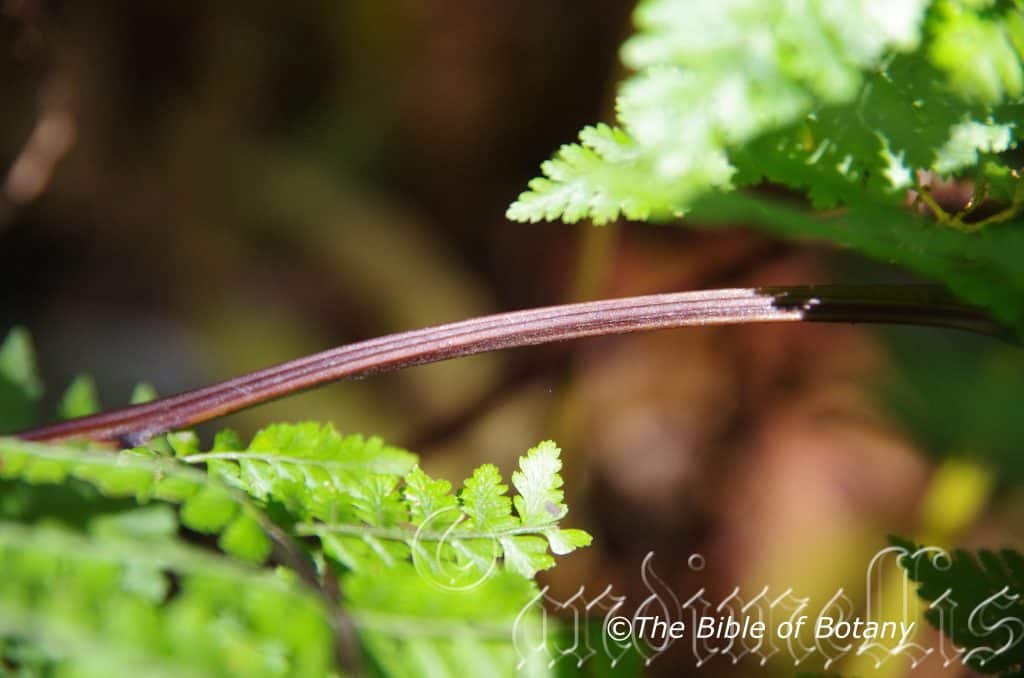
Dennstaedtia davallioides has a long, thin, creeping rhizome that measures 3mm to 5mm in diameter. The blue-green rhizome is covered in short, red-brown hirsute. The rhizomes do not form a trunk.
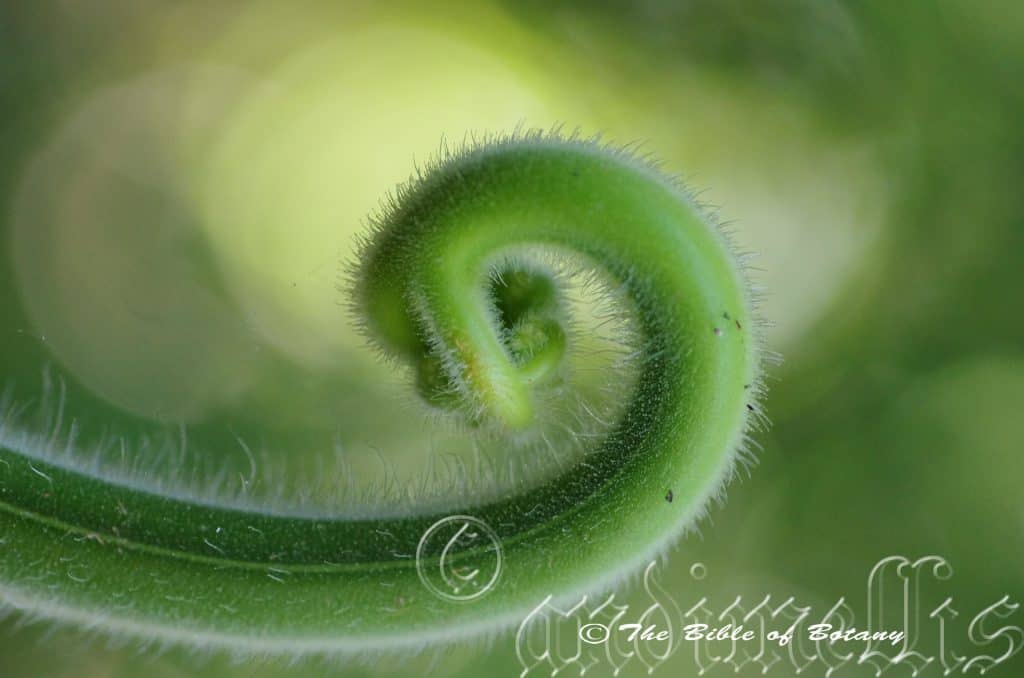
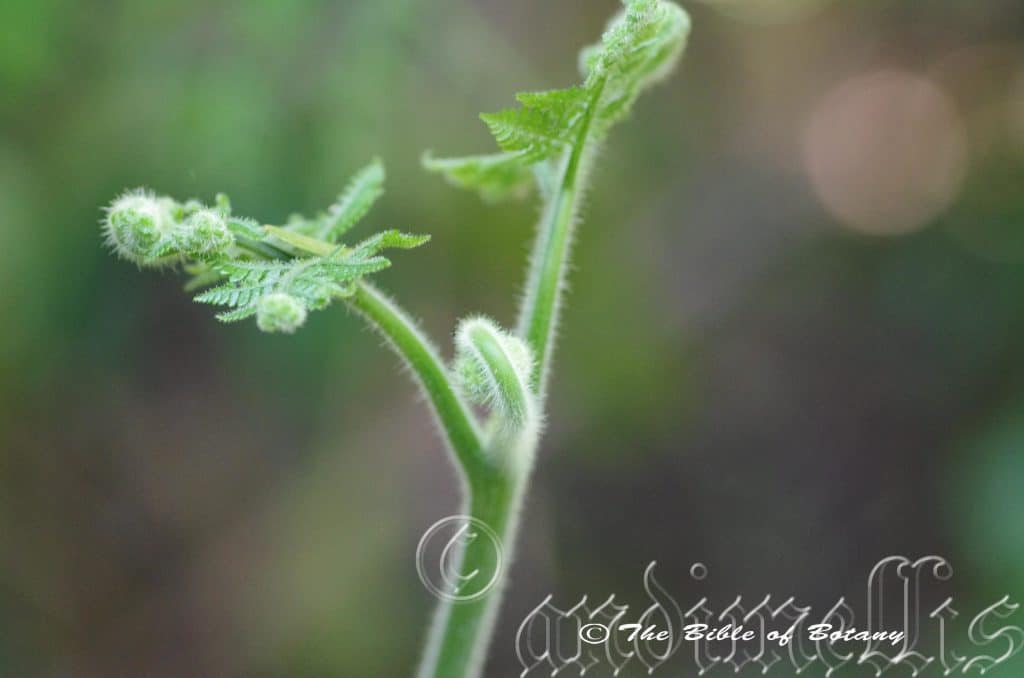
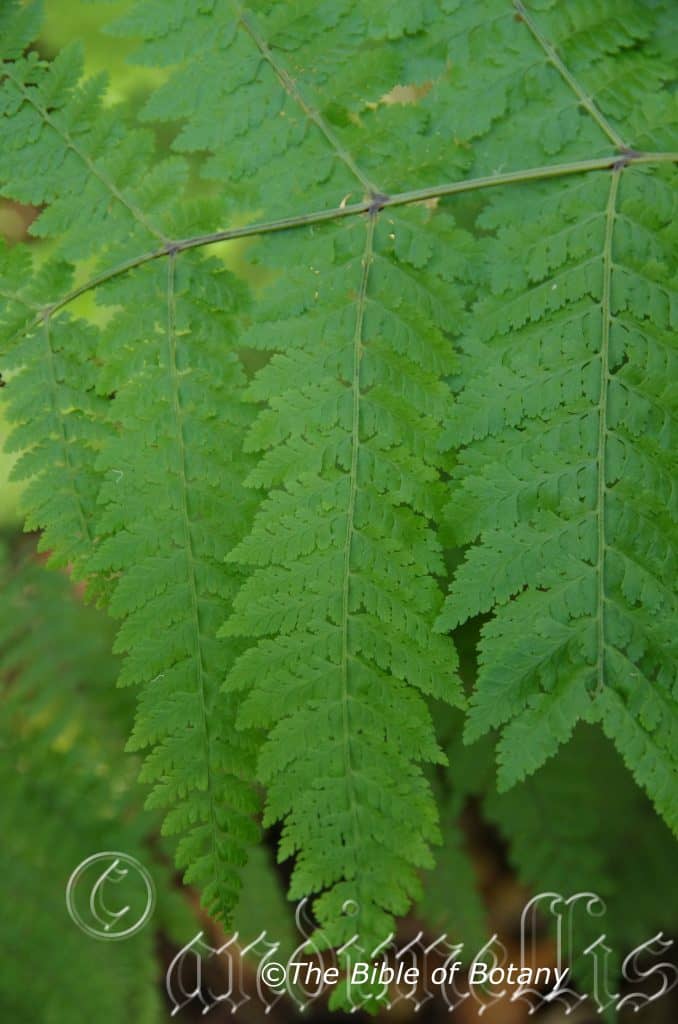
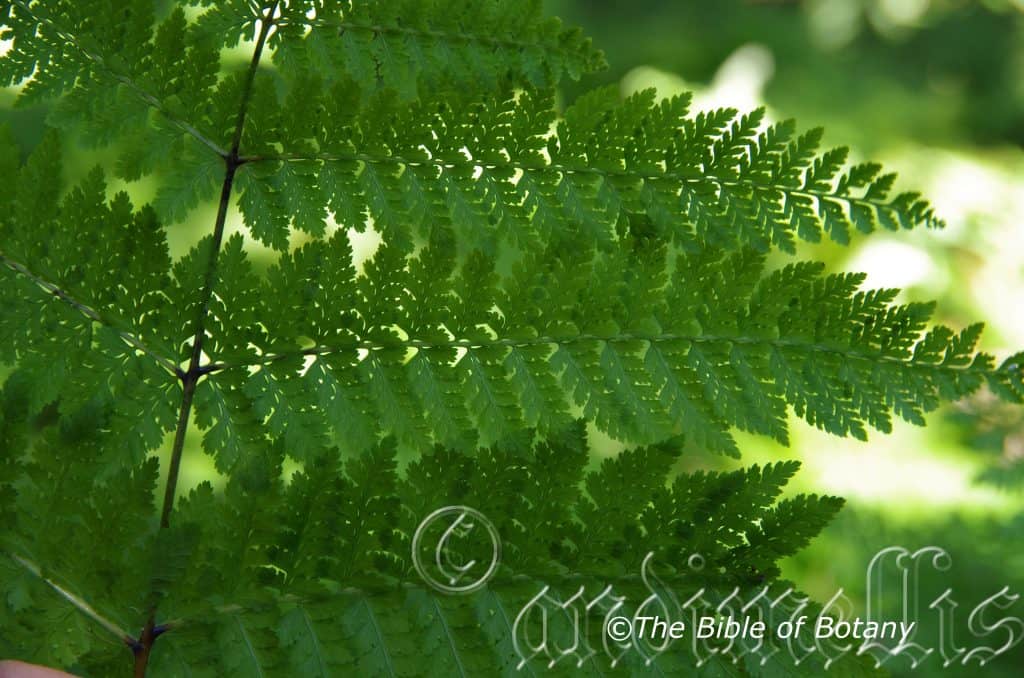
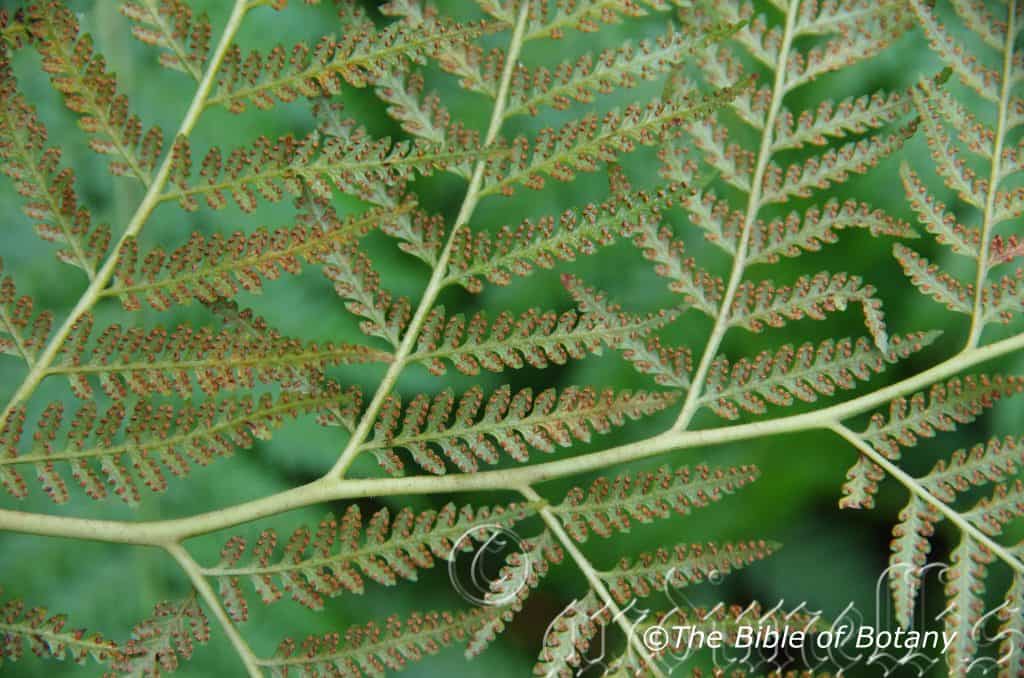
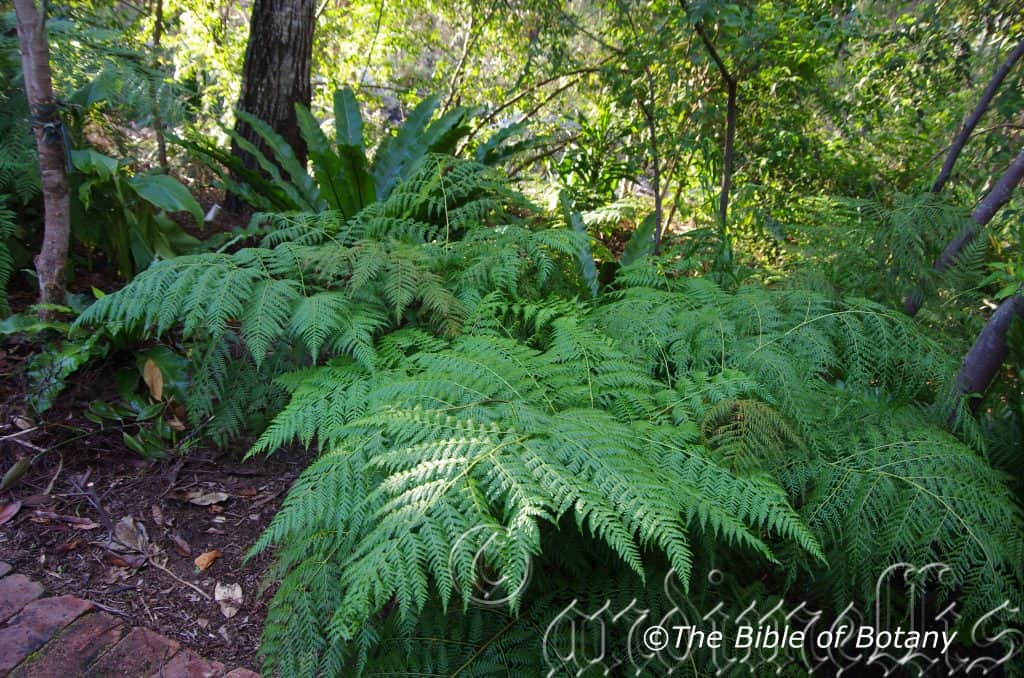
Dennstaedtia davallioides’s erect fronds grow in flushes throughout the year and decurve near the apexes. The large tripinate or 4 pinnate fronds measure 900mm to 1500mm in height by 800mm to 1250mm in width. The mature, stout stipes are deep brown and covered in reddish-brown hairs at the base and turning blue-green at the base of the rachises. The juvenile stipes are similar but covered in white linear scales or white wax. The rachises have a distinct longitudinal concave groove on the upper surface and are sparsely covered in white hairs. The ultimate segments are asymmetric with narrow lobes.
The juvenile fronds are delicately blue-green, and have a definite waxy appearance.
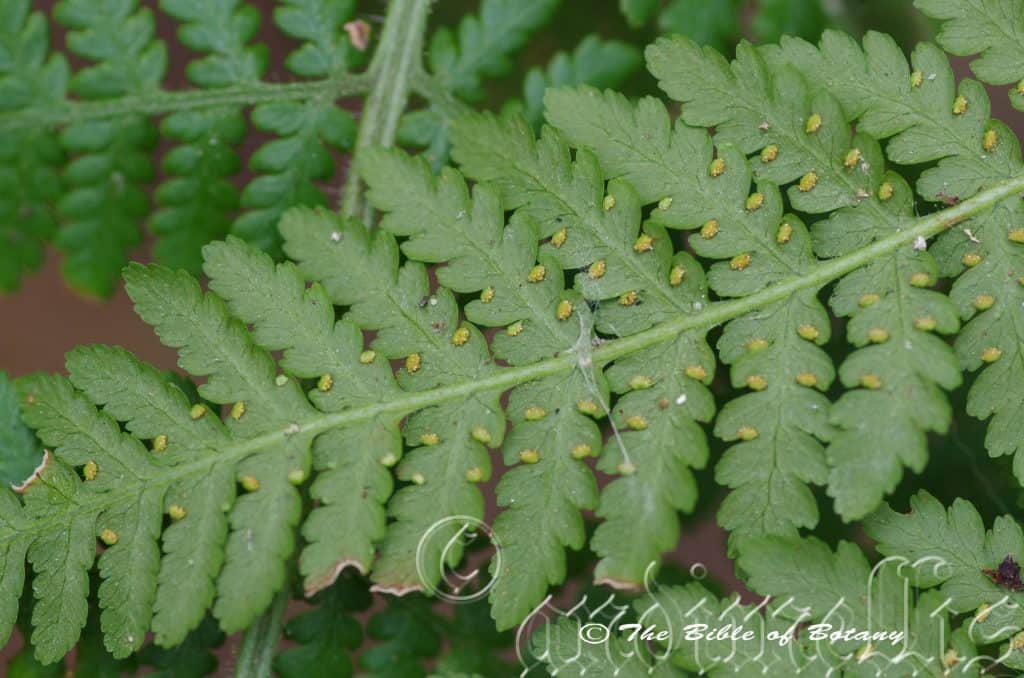
The fertile fronds are similar to the sterile fronds. The sporangia are borne at the apexes of a lobe or in the fork between the apex lobes on the final segment. The indusium is very thin with a lobed or entire margin. The indusium dehisce, peeling away from the apex. The sori measure 0.5mm to1mm in diameter and. The spore is golden-brown to yellow-fawn.
Wildlife:
Dennstaedtia davallioides‘s wildlife is unknown to the author however our plants both in Nana Glen were consistently defoliated every year by an unknown Hawk Moth larvae.
Cultivation:
Dennstaedtia davallioides is a very hardy fern for large courtyards, around swimming pools or in the garden where moist lighter conditions prevail, with light to heavy shade.
It breaks up hard fences and walls giving a pleasant vertical look. Some cleaning of spent fronds on an annual bases maybe necessary and moisture is required to keep it looking at its best. It is not drought tolerant so the occasional lapse in watering will see the fronds die and the new fronds reduced in size. If it does happen to look dead after a long holiday or during a drought prune all the fronds off to a few centimetres of the rhizome and give them a good soaking. Apply a generous watering then after two days give them a double strength of our recommended fertilizer and water again. Within two weeks the new fronds will totally rejuvenate the floor of the forest.
Propagation:
Spores: The spores of Dennstaedtia davallioides can be removed easily from the fronds as the fertile fronds begin to brown off. Cut and place a frond in a paper bag for a week or so in a cool shady place.
Step 1. Select spore from the fern fronds. Wait until the fern is just starting to release its spore. Rinse the fronds under clean running water and dry. This is to wash off any other spores from rogue ferns that may have settled onto the fronds. (There is nothing worse than having common brake or common soft bracken contaminating a prized tree fern or epiphytic fern.)
Step 2. Place the dry fronds in a clean brown paper bag and keep them in a cool dark place like the linen closet for about a week to ten days before you are ready to sow the spore. The exception to this rule applies to ferns, which produce green spores. These must be sown immediately that they are released. Todea Barbara is a good example of a fern, which produces green spore.
Step 3. Take a large ice cream container, a small ice cream container and a clean clear plastic bag large enough to seal the large ice cream container and three or four milk bottle tops.
Step 4. Punch or drill 6 to 10 5mm holes in the bottom of the small ice cream container.
Step 5. Wash both containers, tops and plastic bag so that they are very clean and sterile.
Step 6. Use a clean fine seed raising mi. We used 30mm fine sand, 30mm peat and 30mm perlite and 10mm vermiculite. We used crushed basalt, crusher dust and peat in a 50:50 ratio for epiphytes. Moisten the mix enough that water does not run out when the mix is squeezed between the fingers.
Step 7. Place the moisten mix (Enough to half fill the small ice cream container) in the microwave oven with a large glass of water for 7 or 8 minutes, until the water is boiling. Allow them to cool in the oven. You will need the water later so do not tip it out.
Step 8. Take the brown paper bag out of the linen closet. Shake the bag and remove the fronds. You should have a yellow, brown, black or rarely greenish brown or ochre powder or very fine, small round pin head size spore depending on the specie involved.
Step 9. Remove the mixture from the oven once it has cooled and place it in the small ice cream container and level.
Step 10. Sprinkle the spore sparsely over the mixture in the small ice cream container.
Step 11. Place the milk bottle tops in the large ice cream container with the flat surface facing down. Place the small ice cream container in the large ice cream container so that it is sitting on the milk bottle tops.
Step 12. Remove the water from the microwave and pour it into the larger ice cream container so there is 25mm to 30mm of water in the bottom.
Step 13. Place the ice cream containers in the plastic bag and seal. Step 14. Place the contents and bag in a warm shady place preferably 50mm to 70mm shade depending on the specie. Shade houses and some window sills are ideal.
Step 14. The surface should turn green within a week to two weeks. The prothallus will then develop. From the prtohalus the first true fronds will appear. Wait until the ferns are 20mm to 35mm in height before you attempt to transplant them. Once they are ready open the bag up slightly and allow the air to flow around the little ferns. Every 3 to 5 days open the bag a little further so the ferns get use to their new environment. Allow them a week to two weeks to harden off before you transplant them following the removal of the plastic bag. Carefully prick them out into 50mm standard squat tubes as you would any seedling.
Do not try to transplant them as single plants as they are still a little delicate.
Once the smaller ones again reach 50mm to 70mm you may wish to divide the stronger and hardier individual plants into smaller clumps in 100mm squat pots.
Fertilize using seaweed, fish emulsion or organic chicken pellets soaked in water on an alternate basis. Fertilize every two months until the plants are established then annually in early September to October to maintain health, vitality and better flowering.
Further Comments from Readers:
Hi reader, it seems you use The Bible of Botany a lot. That’s great as we have great pleasure in bringing it to you! It’s a little awkward for us to ask, but our first aim is to purchase land approximately 1,600 hectares to link several parcels of N.P. into one at The Pinnacles NSW Australia, but we need your help. We’re not salespeople. We’re amateur botanists who have dedicated over 30 years to saving the environment in a practical way. We depend on donations to reach our goal. If you donate just $5, the price of your coffee this Sunday, We can help to keep the planet alive in a real way and continue to bring you regular updates and features on Australian plants all in one Botanical Bible. Any support is greatly appreciated. Thank you.
In the spirit of reconciliation we acknowledge the Bundjalung, Gumbaynggirr and Yaegl and all aboriginal nations throughout Australia and their connections to land, sea and community. We pay our respect to their Elders past, present and future for the pleasures we have gained.
Deparia petersenii
Classification
Division: Pteridophyta
Subdivision: Filicophytina
Class: Filicopsida
Order: Filicales
Family: Athyriaceae
Genus: From Deparos which is Ancient Greek for a goblet or beaker. It refers to indusium cover, which surround the spores on most species of ferns and fern allies.
Species: Is named in honour of Petersen but which Petersen cannot be substantiated.
Common Name: Japanese Lace Fern.
Distribution:
Deparia petersenii is found in several widely disjunct populations south from Lake Barrine to Palmerston Forest Reserve in far north Queensland to Tarralgon in south eastern Victoria. It is mainly found on and east of the Great Dividing except for a few isolated populations including Liverpool Range, Carnarvon Gorge and Lord Howell Island.
This species in native to south eastern China, Indonesia to Taiwan, Japan to Australia and New Zealand, Polynesia, It is considered an invasive species in Madeira, the Azores, south eastern USA, the Hawaiian Islands, southeastern Brazil and Reunion.
https://avh.ala.org.au/occurrences/search?taxa=Deparia+petersenii#tab_mapView
Habitat Aspect Climate:
Deparia petersenii prefers dense shade, light shade and dappled light areas. It grows in moisture retentive soils in montane rainforests, littoral rainforests, moist open Eucalyptus forests, riparian forests, gallery forests and riverine rainforests. It is mainly found along creeks, streams and rills where it can form impenetrable thickets in the undergrowth. The altitude ranges from 50 meters ASL to 800 meters ASL.
The temperature ranges from minus 2 degrees in August to 32 degrees in January.
The rainfall ranges from lows of 600mm to 3200mm average per annum.
Soil Requirements:
Deparia petersenii prefers friable sandy loams to medium clays. The soils are usually derived from decomposed brown basalt, black basalt, metamorphic rocks, fatty sandstone, shale or laterites. The soils pH ranges from 5pH to 7pH. It does not tolerate waterlogged soils. Non saline soils to moderately saline soils are tolerated.
Height & Spread:
Wild Plants: 200mm to 600mm by 850mm to 1250mm.
Characteristics:
Deparia petersenii has a short, thin, creeping rhizome that measures 4mm to 5mm in diameter. The deep brown almost black rhizome is covered in long, linear, pale brown to fawn scales. The scales measure 9mm to 13mm in length by 0.8mm to 1.2mm in width near the base. The rhizomes do not form a trunk.
Deparia petersenii‘s erect fronds grow in flushes or signally. The large fronds measure 300mm to 750mm in height. The rhizomes short, creeping and measure 4mm to 5.5mm diameter. The rhizomes are covered in thin pale brown scales.
The single, lanceolate to narrow triangular bipinnatisectus laminas measure 300mm to 800mm in length by 180mm to 500mm in width for the longest base pinnae. The longest pinnae are about half way along the rachis. The stout stipes and rachises are deep brown to deep brown-black, glossy and are sparsely covered in brown scales. They measure 280mm to 400mm in length. There are 20 to 25 pairs of pinnae. The oblong to narrow lanceolate pinnae measure 50mm to 80mm in length. The oblong-lanceolate pinnules, bases are truncate and sessile while the apexes are obtuse. The longest pair measure 12mm to 20mm in length by 4mm to 8mm in width. The discolourous laminas are pale grass-green and dull on the upper laminas while the lower laminas are slightly paler in colour. The midribs are rounded prominent on the lower lamina and are covered in pastel brown to fawn triangular scales. The lamina has 5 to 8 pairs of lateral veins.
The linear to oblong sori have pascal green, chartaceous indusium. The indusium dehisce, peeling away from the midvein side. The sori measure 2mm to 3.5mm in length. The spore is pale brown.
Wildlife:
Deparia petersenii‘s wildlife is unknown to the author.
Cultivation:
Deparia petersenii is a very hardy fern for courtyards, around swimming pools or in the garden where moist lighter conditions prevail. Deparia petersenii is an excellent fern for around swimming pools where it can grow to its full potential in a small area. It breaks up hard fences and walls giving a pleasant vertical look. Some cleaning of spent fronds on an annual basis maybe necessary and moisture is required to keep it looking at its best. It is not drought tolerant so the occasional lapse in watering will see the fronds die and the new fronds reduce in size. If it does happen to look dead after a long holiday or during a drought, prune all the fronds off to a few centimetres of the rhizome and give them a good soaking. Apply a double strength dose of our recommended fertilizer two days later with another soaking and within two weeks it will reshoot but it could be the following round of new fronds that will see the size return.
Propagation:
Spores: All ferns that are declared rare, vulnerable or endangered are protected by Federal and State Laws and must not be removed from the wild unless you are a land developer, mining company or main Roads department etc. This includes bulbs, roots, leaves and flowers. No part of any plant can be removed from Federal, State or Local Government land without the prior permission of the authority and this includes the spore.
Most people are put off at the thought of growing ferns from spore. Like all plants that produce their offspring from seed or spore the methods are basically the same. Remember nature has been doing this for millions of years and has been very successful. I have had excellent results growing over 200 different species of Australian ferns so don’t be afraid. Give it a go.
Step 1. Select spore from the fern fronds. Wait until the fern is just starting to release its spore. Rinse the fronds under clean running water and dry. This is to wash off any other spores from rogue ferns that may have settled onto the fronds. (There is nothing worse than having common brake or common soft bracken contaminating a prized tree fern or epiphyte.)
Step 2. Place the dry fronds in a clean brown paper bag and keep them in a cool dark place like the linen closet for about a week to ten days before you are ready to sow the spore. The exception to this rule applies to ferns, which produce green spores. These must be sown immediately that they are released. Todea Barbara is a good example of a fern, which produces green spore.
Step 3. Take a large ice cream container, a small ice cream container and a clean clear plastic bag large enough to seal the large ice cream container and three or four milk bottle tops.
Step 4. Punch or drill 6 to 10 5mm holes in the bottom of the small ice cream container.
Step 5. Wash both containers, tops and plastic bag so that they are very clean and sterile.
Step 6. Use a clean fine seed raising mi. We used 30mm fine sand, 30mm peat and 30mm perlite and 10mm vermiculite. We used crushed basalt, crusher dust and peat in a 50:50 ratio for epiphytes. Moisten the mix enough that water does not run out when the mix is squeezed between the fingers.
Step 7. Place the moisten mix (Enough to half fill the small ice cream container) in the microwave oven with a large glass of water for 7 or 8 minutes, until the water is boiling. Allow them to cool in the oven. You will need the water later so do not tip it out.
Step 8. Take the brown paper bag out of the linen closet. Shake the bag and remove the fronds. You should have a yellow, brown, black or rarely greenish brown or ochre powder or very fine, small round pin head size spore depending on the specie involved.
Step 9. Remove the mixture from the oven once it has cooled and place it in the small ice cream container and level.
Step 10. Sprinkle the spore sparsely over the mixture in the small ice cream container.
Step 11. Place the milk bottle tops in the large ice cream container with the flat surface facing down. Place the small ice cream container in the large ice cream container so that it is sitting on the milk bottle tops.
Step 12. Remove the water from the microwave and pour it into the larger ice cream container so there is 25mm to 30mm of water in the bottom.
Step 13. Place the ice cream containers in the plastic bag and seal.
Step 14. Place the contents and bag in a warm shady place preferably 50mm to 70mm shade depending on the specie. Shade houses and some window sills are ideal.
Step 15. The surface should turn green within a week to two weeks. The prothallus will then develop. From the prthalus the first true fronds will appear. Wait until the ferns are 20mm to 35mm in height before you attempt to transplant them. Once they are ready open the bag up slightly and allow the air to flow around the little ferns. Every 3 to 5 days open the bag a little further so the ferns get use to their new environment. Allow them a week to two weeks to harden off before you transplant them following the removal of the plastic bag. Carefully prick them out into 50mm standard squat tubes as you would any seedling.
Do not try to transplant them as single plants as they are still a little delicate still.
Once the smaller ones again reach 50mm to 70mm you may wish to divide the stronger and hardier individual plants into smaller clumps in 100mm squat pots.
Plants can be grown by digging up patches and just cutting into 4 sections. Replant into a shallow saucer made in the ground, cover with 5mm to 10mm of sand and water every second day until the new shoots appear.
Fertilize using seaweed, fish emulsion or organic chicken pellets soaked in water on an alternate basis. Fertilize every two months until the plants are established then annually in early September to October to maintain health, vitality and better flowering.
Further Comments from Readers:
Hi reader, it seems you use The Bible of Botany a lot. That’s great as we have great pleasure in bringing it to you! It’s a little awkward for us to ask, but our first aim is to purchase land approximately 1,600 hectares to link several parcels of N.P. into one at The Pinnacles NSW Australia, but we need your help. We’re not salespeople. We’re amateur botanists who have dedicated over 30 years to saving the environment in a practical way. We depend on donations to reach our goal. If you donate just $5, the price of your coffee this Sunday, We can help to keep the planet alive in a real way and continue to bring you regular updates and features on Australian plants all in one Botanical Bible. Any support is greatly appreciated. Thank you.
In the spirit of reconciliation we acknowledge the Bundjalung, Gumbaynggirr and Yaegl and all aboriginal nations throughout Australia and their connections to land, sea and community. We pay our respect to their Elders past, present and future for the pleasures we have gained.
Mount Cootha Botanic Gardens Qld.
Mount Cootha Botanic Gardens Qld.
Mount Cootha Botanic Gardens Qld.
Mount Cootha Botanic Gardens Qld.
Mount Cootha Botanic Gardens Qld.
Deplanchea tetraphylla
Classification
Unranked: Eudicots
Unranked: Asterids
Order: Lamiales
Family: Bignoniaceae
Genus: Is named in honour of Emile De Planche; 1824-1874, who was French physician and botanists.
Species: From Tettares, which is Ancient Greek or Tessares, which is Latin for four and Phullon/Phyllon, which is Ancient Greek for a leaf. It refers to the leaves, which are often in whirls of four.
Subspecies: Deplanchea tetraphylla var. novoguineensis from Nova, which is Latin for new, Guinee, which is Latinised for New Guinee and Ensis/Ana, which is Latin for to originate from. It refers to plant, which were originally discovered in New Guinee.
Subspecies: Deplanchea tetraphylla var. tetraphylla from Tettares, which is Ancient Greek or Tessares, which is Latin for four and Phullon/Phyllon, which is Ancient Greek for a leaf. It refers to the leaves, which are often in whirls of four.
Common Name: Wallaby Wireless Tree or Golden Bouquet tree.
Distribution:
Deplanchea tetraphylla is found south from the tip of Cape York Peninsula and the Islands to the north down to Townseville in far northern Queensland. It is found on and east The Great Dividing Range.
It is also found in New Guinee and surrounding Islands.
https://avh.ala.org.au/occurrences/search?taxa=Deplanchea+tetraphylla#tab_mapView
Habitat Aspect Climate:
Deplanchea tetraphylla prefers full sun to dappled shade. It grows in warm moist tropical rainforests, dry tropical rainforests, in transitional zones with moist Eucalypt forests and monsoonal vine thickets all with thick under growths. The altitude ranges from 5 meters ASL to 600 meters ASL.
The temperatures range from 8 degrees in August to 38 degrees in January.
The rainfall ranges from lows of 1250mm to 3600mm average per annum. Orographic precipitation is very high in many of these areas and could equate to a doubling of the real rainfall received especially at the higher elevations.
Soil Requirements:
Deplanchea tetraphylla prefers sandy loams to medium clays. The soils are derived from decomposed brown basalt, black basalt, granite, sandstone and laterites and better quality accumulated sands and alluvial deposits. The soils pH ranges from 5pH to 7.5pH. It does not tolerate water-logged soils. Non saline soils to very saline soils are tolerated.
Height & Spread:
Wild Plants: 10m to 20m by 5m to 8m
Characteristics:
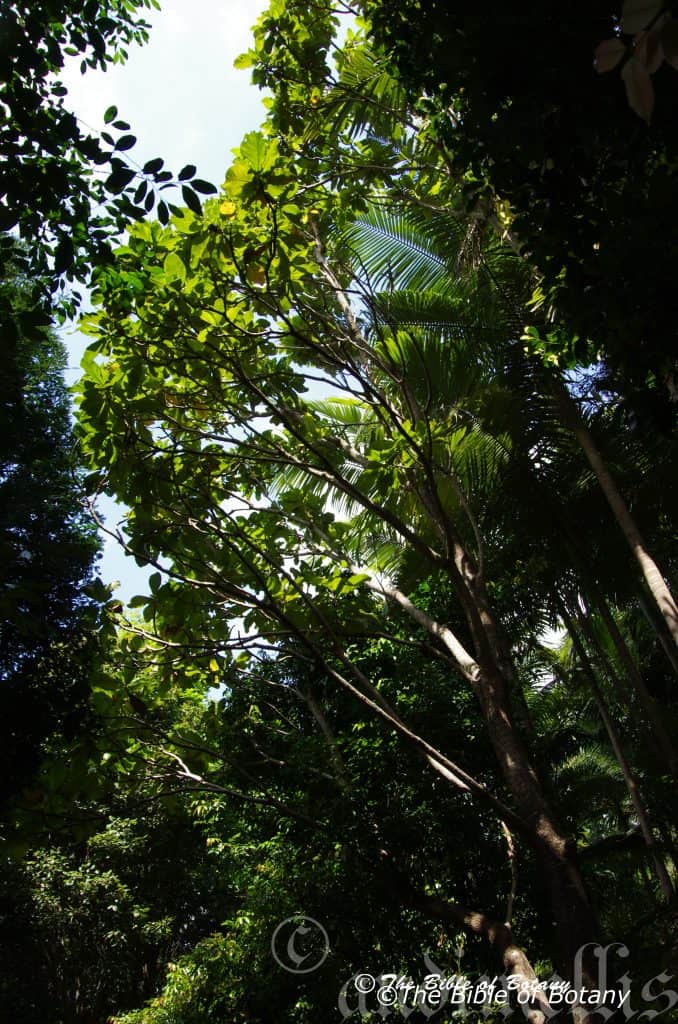
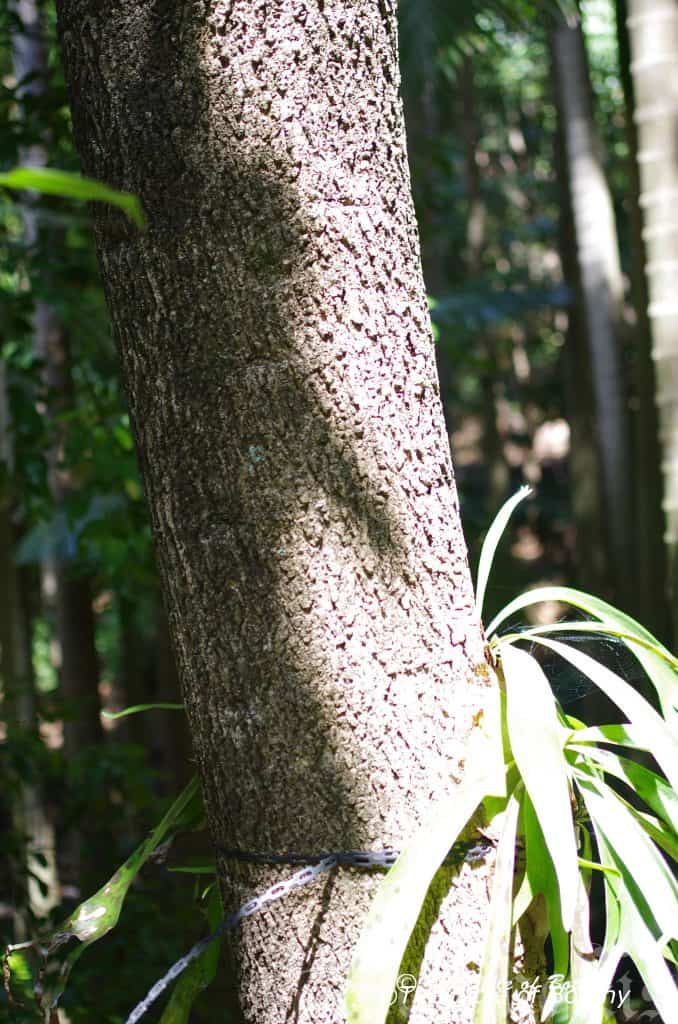
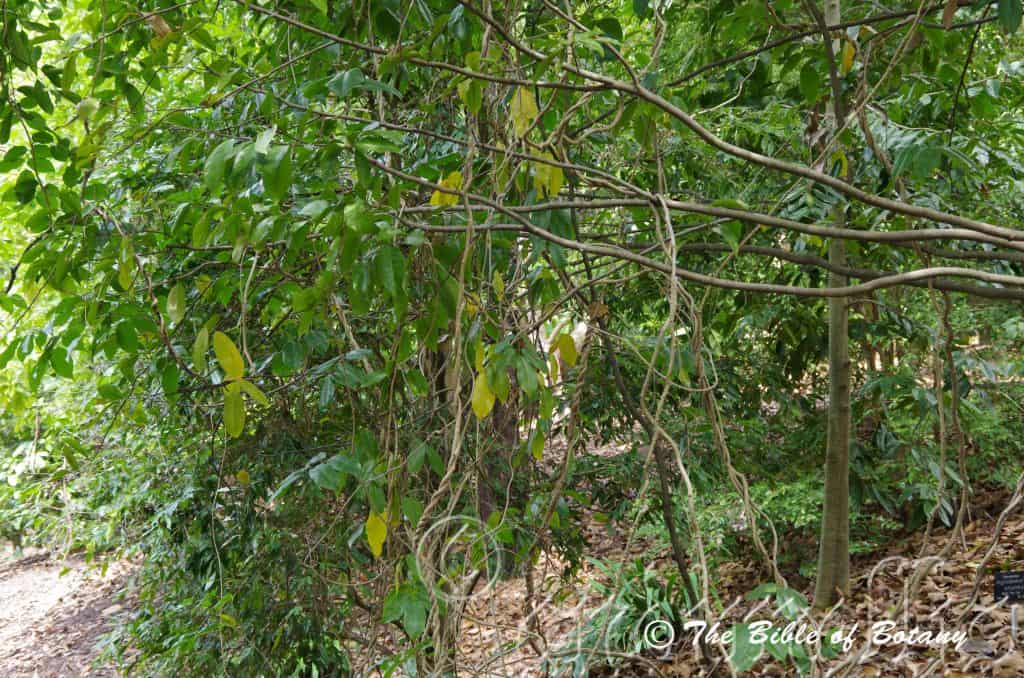
Deplanchea tetraphylla is a fast growing small tree or large shrub. The stems and branchlets are green and sparsely to moderately covered in soft, fawn tomentose hairs with the leaf scars of fallen leaves. The older branches and trunks are grey-brown, flaky and somewhat covered in course longitudinal tessellations.
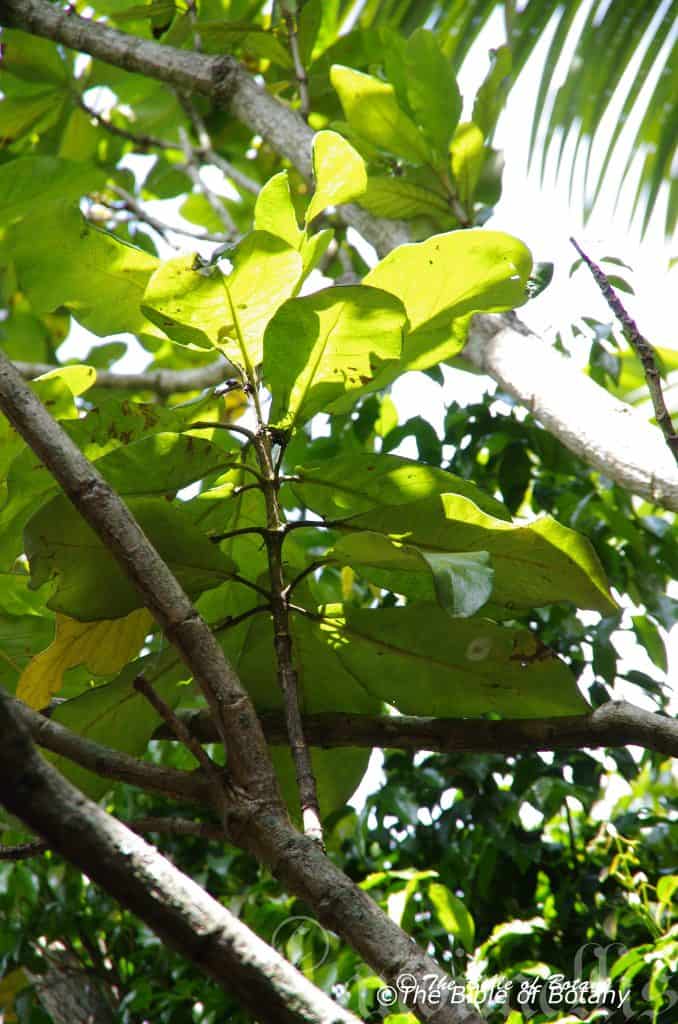
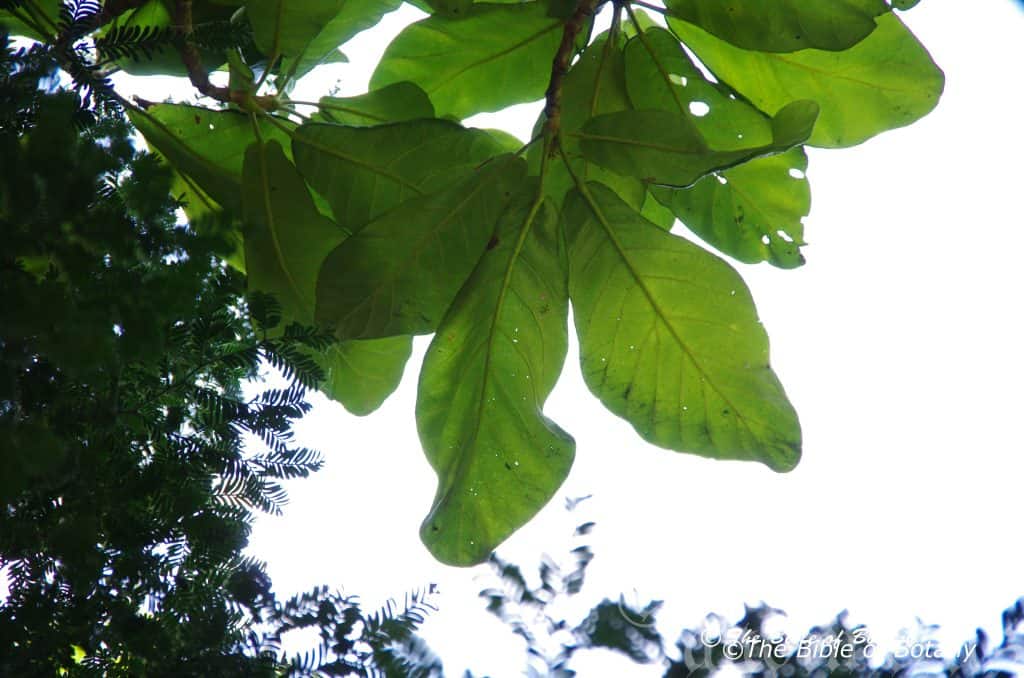
The alternate, obovate, glabrous leaves of Deplanchea tetraphylla are in somewhat of a whirl of 3 or 4 usually 4 from the same node and measure 100mm to 300mm in length by 80mm to 150mm in width. The bases are narrowly rounded, while the apexes are obtuse. The discolourous laminas are grass green, glabrous and semi glossy on the upper laminas while the lower laminas are paler. The laminas are strongly undulating, while the margins are entire. The mid vein and lateral veins are strongly prominent on the lower laminas and are clearly visible being pale yellowish-green on the upper laminas. The glabrous petioles measure 16mm to 30mm in length.
The inflorescences of Deplanchea tetraphylla are compound racemes. The grass-green to yellowish-green pedicels are glabrous and measure 100mm to 250mm in length.
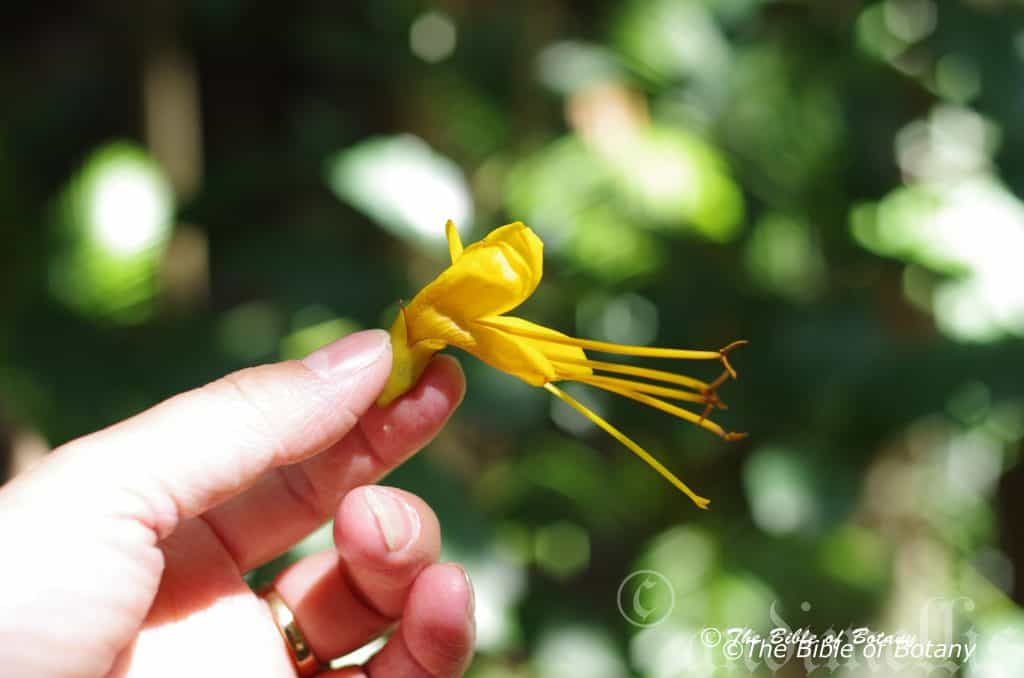
The pale yellowish-green, cupular calyxes measure 9mm to 12mm in length, while the 4 obtuse lobes measure 6mm to 8mm in length. The bright yellow corolla tube measures 18mm to 24mm in length. The 2 lower lobes have obtuse apexes and measure 15mm to 18mm in length, while the 2 lateral lobes have obtuse apexes and measure 14mm to 16mm in length and the standard petal lobe is partially divided, has acute apexes and measure 15mm to 18mm in length by a similar width.
The 4 bright yellow filaments, 2 long and 2 short are erect, free and measure 55mm to 65mm in length, while the shorter two are 5mm shorter in length. The linear, terete, brown basifixed, bilobed anthers measure 4.5mm to 5.5mm in length by 0.8mm to 1mm in diameter.
The bright yellow, bilobed pistil measure 55mm to 65mm in length. The flowers appear from June to July.
Deplanchea tetraphylla’s fruits are long, linear to narrow oblong follicles. The glabrous, green follicles turn deep brown on ripening. Â The pods measure 90mm to 140mm in length by 20mm to 38mm in diameter.
The transparent winged seeds are fragile and easily broken and measure 13mm to 18mm in diameter.
Wildlife:
Deplanchea tetraphylla‘s wildlife alludes to the common name of the tree in far northern Queensland of the “Wallaby Wireless Trees”. Wallabies are fond of eating the fallen flowers of this species and once the flowers begin to fall, the news of the feast spreads quickly throughout the local wallaby populations, who then assemble beneath the trees to join in on the banquet.
It also attracts many birds, amongst them are the rainbow lorikeet, Trichoglossus moluccanus and the scaly breasted lorikeet, Trichoglossus chlorolepidotus.
Cultivation:
Deplanchea tetraphylla is a magnificent medium tree suitable for most gardens.
With house blocks becoming smaller and smaller home owners are often deterred or frightened to use trees. Despite often having difficulties in providing privacy this is one tree that can fill that corner to offer privacy.
On larger blocks it can be spaced at 6 meter centers to offer a good screen and bird protection corridors. The flowers are full of nectar so attract all kinds of birds from larger raucus honeyeaters like the noisy friarbird, Philemon corniculatus, first thing in the morning followed by a calamity of sky larking lorikeets including the Rainbow Lorikeet, Trichoglossus moluccanus, and the Scaly Breasted Lorikeet, Trichoglossus chlorolepidotus, when in flower.
The trees are probably only suitable for frost free areas but can be grown on a wide variety of soils.
Propagation:
Seeds: Deplanchea tetraphylla’s seeds do not require treatment prior to sowing. Sow seeds directly into a seed raising mix and cover with 5mm of the mix, with 30mm perlite. Water and place the trays in a warm position with 30mm to 50mm shade. When the seedlings are 25mm to 50mm tall, prick them out and plant them into 50mm native tubes using a seed raising mix. Alternately place one or two seeds directly into the 50mm tubes
Once the seedlings reach 150mm to 200mm in height plant them out into their permanent position. If the plants are to be used for ground covers nip the tips out prior to sowing.
Plants can be grown by digging up patches and just cutting into 4 sections. Replant into a shallow saucer made in the ground, cover with 5mm to 10mm of sand and water every second day until the new shoots appear.
Fertilize using seaweed, fish emulsion or organic chicken pellets soaked in water on an alternate basis. Fertilize every two months until the plants are established then annually in early September to October to maintain health, vitality and better flowering.
Further Comments from Readers:
Hi reader, it seems you use The Bible of Botany a lot. That’s great as we have great pleasure in bringing it to you! It’s a little awkward for us to ask, but our first aim is to purchase land approximately 1,600 hectares to link several parcels of N.P. into one at The Pinnacles NSW Australia, but we need your help. We’re not salespeople. We’re amateur botanists who have dedicated over 30 years to saving the environment in a practical way. We depend on donations to reach our goal. If you donate just $5, the price of your coffee this Sunday, We can help to keep the planet alive in a real way and continue to bring you regular updates and features on Australian plants all in one Botanical Bible. Any support is greatly appreciated. Thank you.
In the spirit of reconciliation we acknowledge the Bundjalung, Gumbaynggirr and Yaegl and all aboriginal nations throughout Australia and their connections to land, sea and community. We pay our respect to their Elders past, present and future for the pleasures we have gained.
Mount Cootha Botanic Gardens Qld.
Mount Cootha Botanic Gardens Qld.
Mount Cootha Botanic Gardens Qld.
Mount Cootha Botanic Gardens Qld.
Mount Cootha Botanic Gardens Qld.
Mount Cootha Botanic Gardens Qld.
Mount Cootha Botanic Gardens Qld.
Mount Cootha Botanic Gardens Qld.
Mount Cootha Botanic Gardens Qld.
Mount Cootha Botanic Gardens Qld.
Derris trifoliata
Classification
Unranked: Eudicots
Unranked: Rosids
Order: Fabales
Family: Fabaceae
Subfamily: Faboideae
Tribe: Millettieae
Genus: From Derrhis, which is Ancient Greek for a tough leather like skin. It refers to structures usually the leaves, which are thick and leathery.
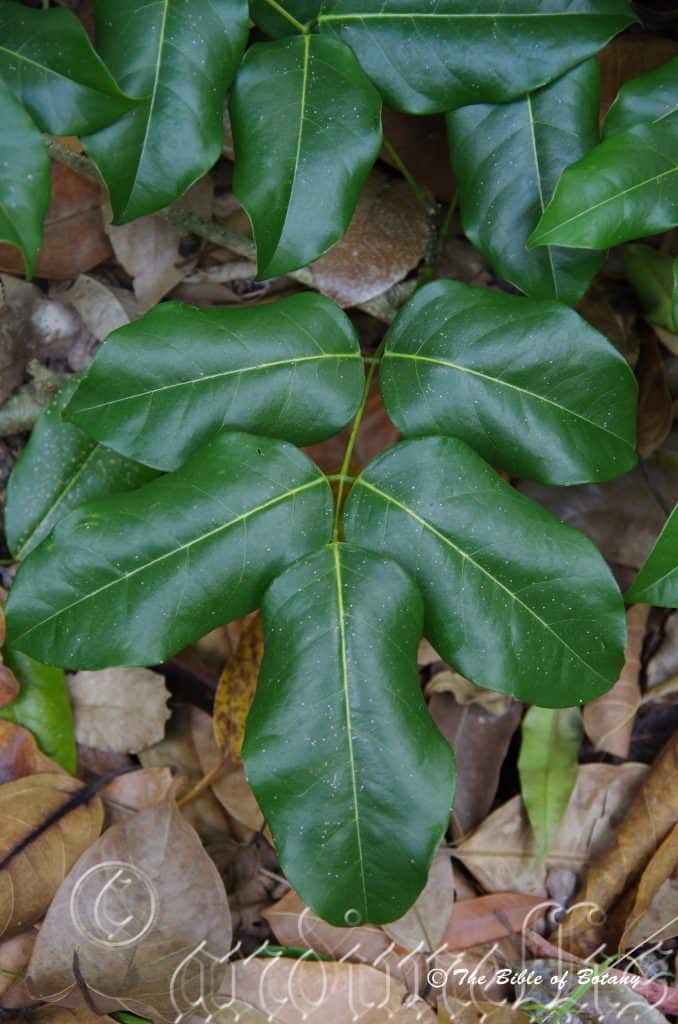
Species: From Treis/Tria, which are Ancient Greek or Tri, which is Latin for three and Folium which is Latin for a foliage. It refers plants, which have three palmate leaflets.
Common Name: Three Leaf Derris or Northern Derris.
Distribution:
Derris trifoliata is found east from Melville and Bathurst Islands to Kakadu National Park in the north west of the Northern Territory and east to the coastal islands in Gulf of Carpentaria and the Torres Strait Islands in far north east Queensland. It is found south from Cape York Peninsula to west of Mackay in central coastal Queensland. It also occurs in Malasia and the Pacific islands.
https://avh.ala.org.au/occurrences/search?taxa=Derris+trifoliata#tab_mapView
Habitat Aspect Climate:
Derris trifoliata prefers full sun to dappled shade. It is found growing in monsoon forest, vine thickets and beach forest close to the coast and along estuaries. The altitude ranges from 1 meter ASL to 15 meters ASL.
The temperatures range from minus 2 degrees in August to 36 degrees in January.
The rainfall ranges from lows of 1250mm to 3200mm average per annum. Orographic precipitation is very high in many of these areas and could equate to a doubling of the real rainfall received.
Soil Requirements:
Derris trifoliata prefers sandy loams to medium clays. The soils are derived from decomposed brown basalt, black basalt, metamorphic rocks, granite, sandstone and laterites. The soils pH ranges from 5pH to 6.5pH. It does not tolerate waterlogged soils. Non saline soils to very saline soils are tolerated.
Height & Spread:
Wild Plants: 15m to 30m by 6m to 10m
Characteristics:
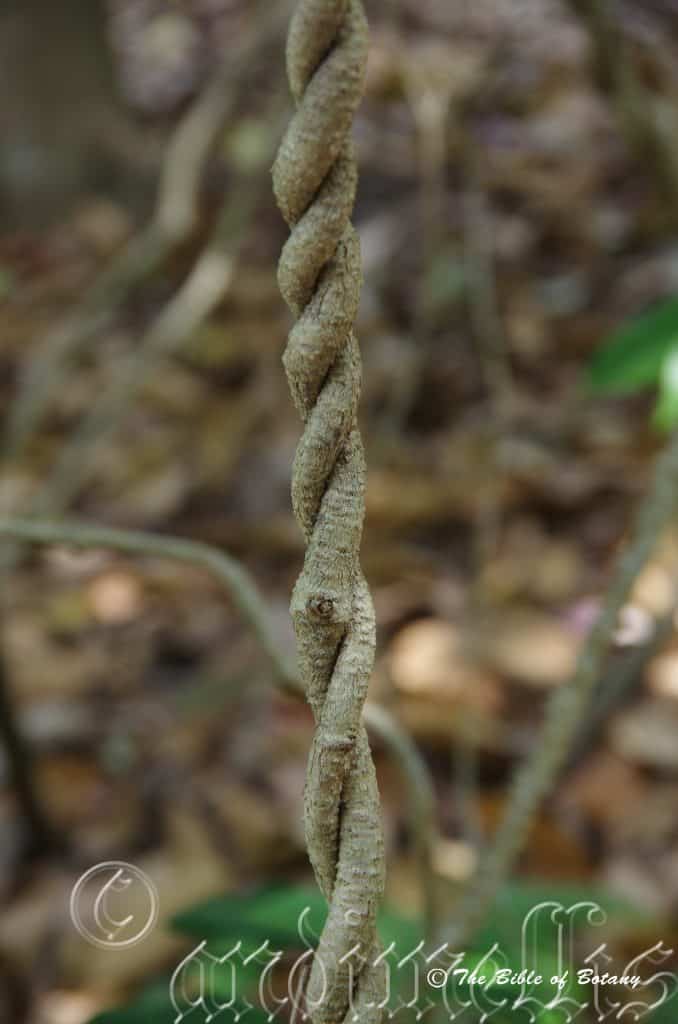
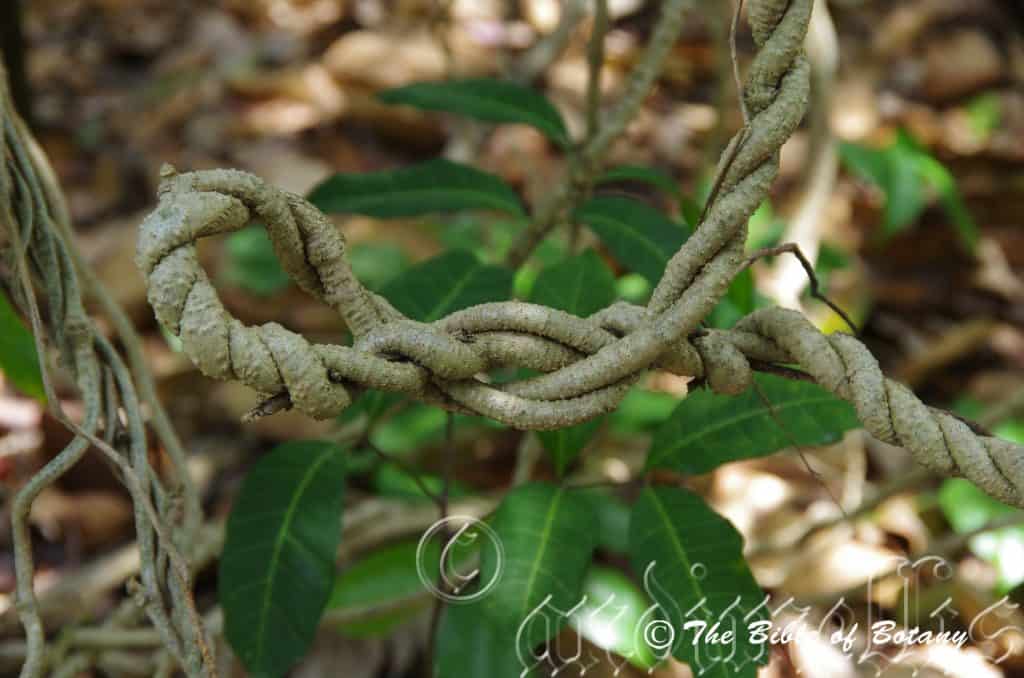
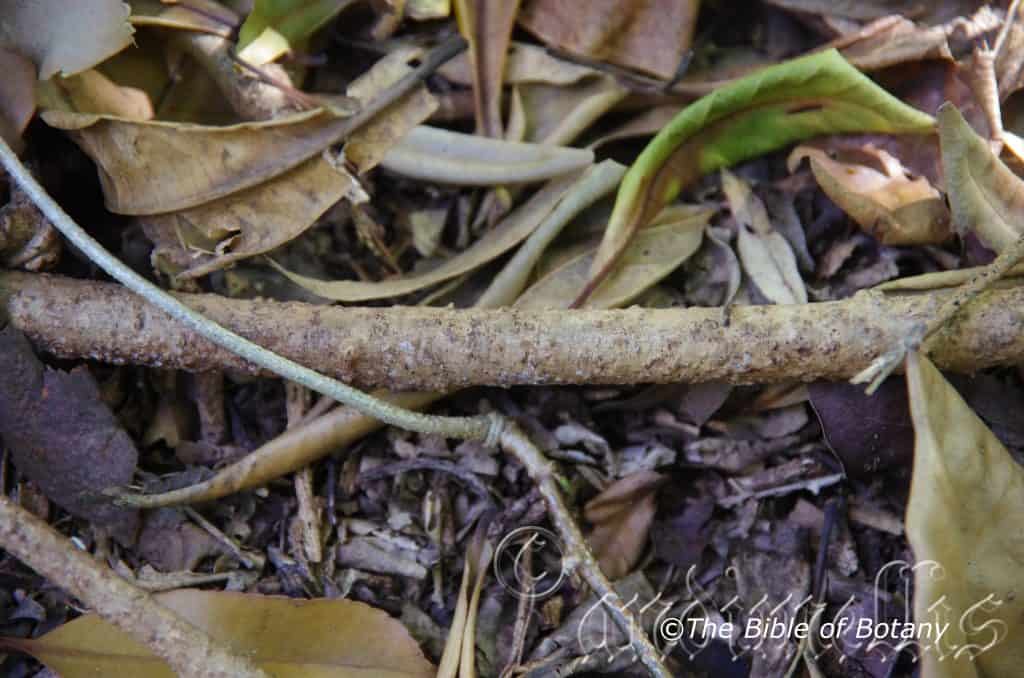
Derris trifoliata is a fast growing large creeper. The deep grey and black main stem has been recorded at 40mm in diameter. It is deeply scabrous and densely covered in farinaceous and papillate lumps. The slightly furrowed, stems and branchlets are deep green and glabrous. The stems when crushed and the blaze have a strong smell reminiscent of green beans.
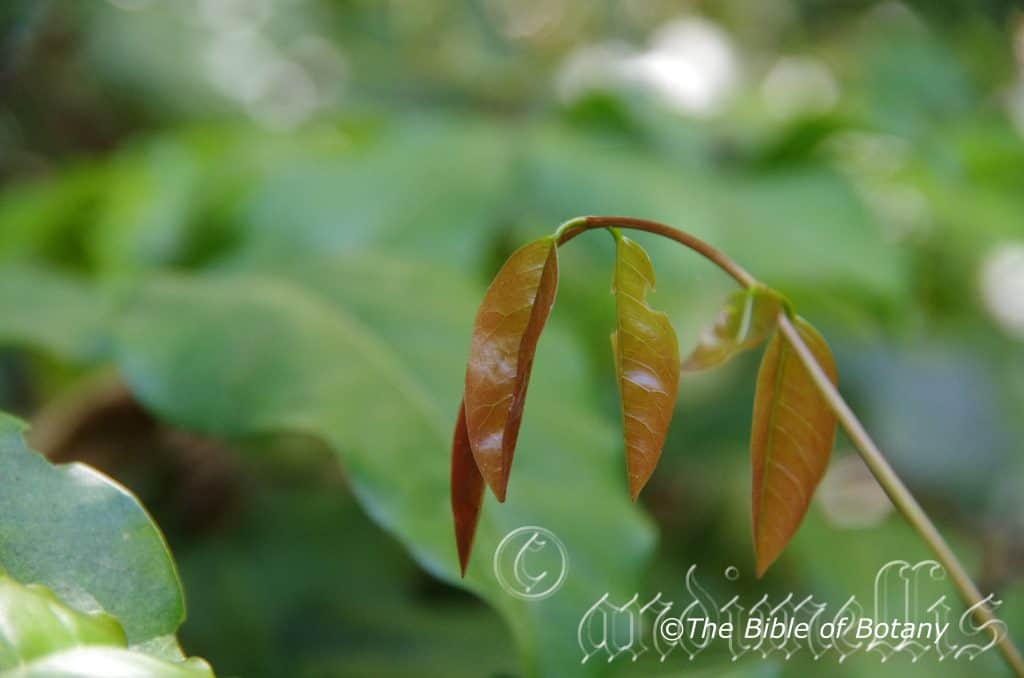
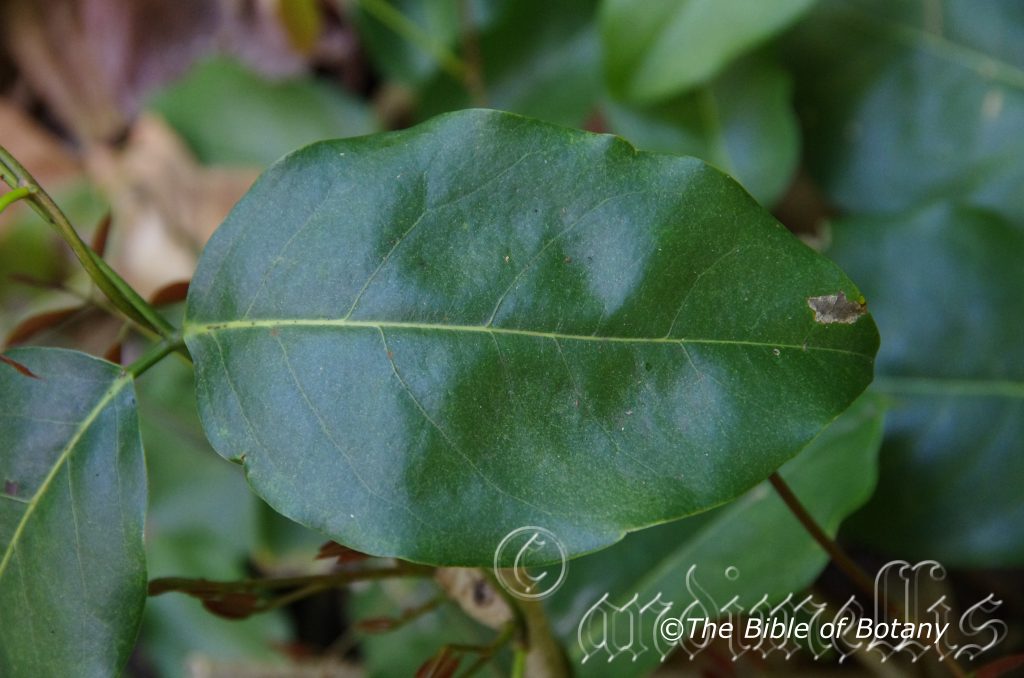
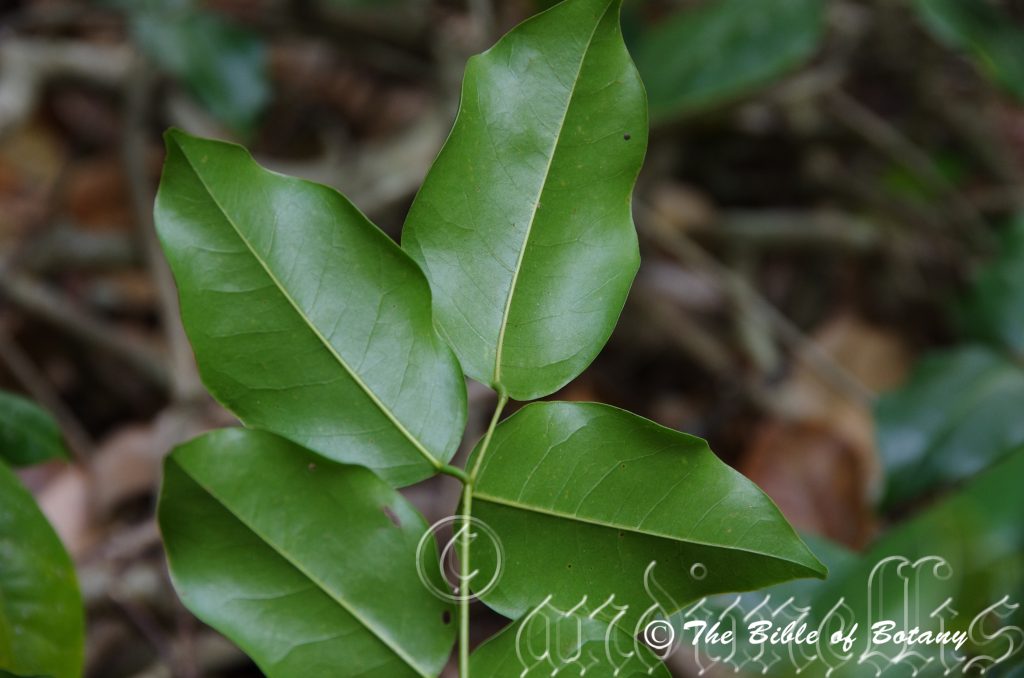
The alternate leaves of Derris trifoliata are odd pinnate and measure 60mm to 150mm in length by 40mm to 100mm in width. The 3 to 7 leaflets usually 3 are ovate to elliptical and measure 35mm to 70mm in length by 16mm to 32mm in width. The base pair of leaflets are shorter and often wider than the apex lateral leaflets and terminal leaflet.
The symmetrical leaf bases are rounded while the apexes are acute. The discolourous laminas are deep green to sea-green, glabrous and semi glossy on the upper laminas while the lower laminas are slightly paler to much paler and dull. The undulating laminas recurve upwards from the midvein to the margins and decurve downwards at the apexes. The lamina margins are entire. The mid vein and lateral veins are slightly prominent on the lower laminas and are clearly visible from the upper laminas. The stipules are broadly triangular and measure 1mm to 2mm in length. The petioles, rachises and petiolules are glabrous. The petioles measure 10mm to 20mm in length while the rachises measure 10mm to 20mm in length and the petiolules measure 6mm to 20mm in length with the terminal petiolule being 2 to 3.3 times the length of the lateral petioles.
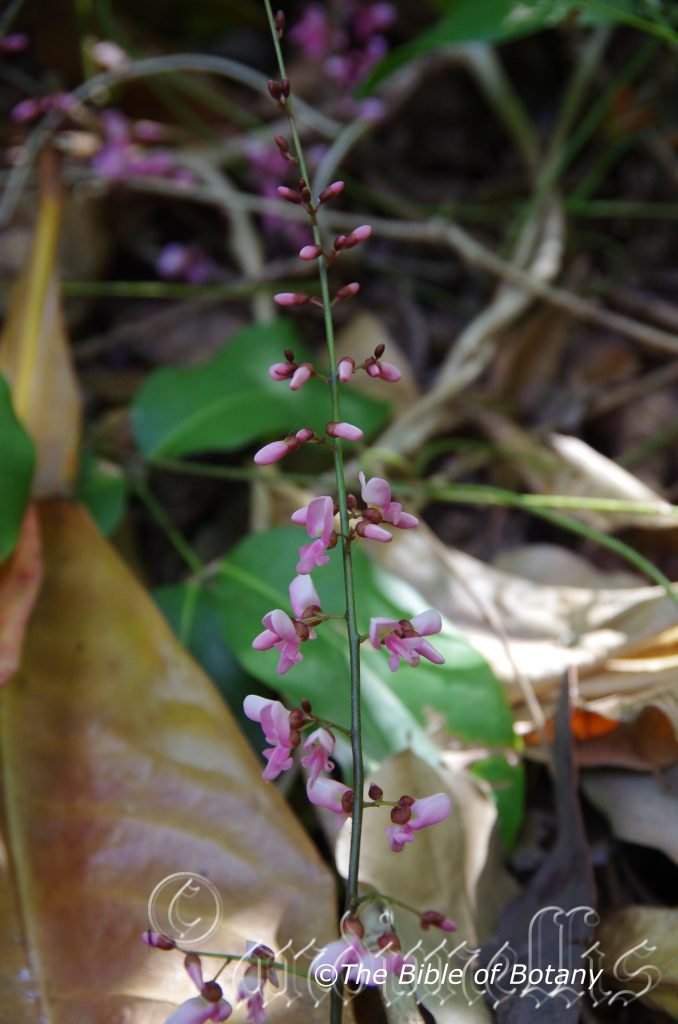
The inflorescences of Derris trifoliata are small racemes of 18 to 30 flowers born in the leaf axils. The grass-green to deep grass-green rachises and pedicels are glabrous. The rachis measures 70mm to 100mm in length while the pedicels measure 7mm to 8mm in length.
The individual flowers are typical legume and measure 12mm to 14mm in length. The olive-green tinged maroon calyxes measure 3.5mm to 4mm in length including the 5 broad acute lobes which measure 0.6mm to 1mm in length.
The united, broad ovate standard petals have an acute apex. The standards are lilac, pale purple to pink or rarely white with a pale grey-green base. The standards measure 11mm to 13mm in height by 5mm to 6mm in width. The lilac, pale purple to pink or rarely white, oblong to oblong-elliptical wing petals run parallel to the keel but do not cover them. The wing petals measure 8mm to 10mm in length by 3mm to 4.5mm in height. The lilac, pale purple to pink or rarely white keels measure 10mm to 12mm in length by 4mm to 6mm in height.
The 9 of the 10 white filaments are united to form a greater than semicircular staminal tube which is open on one side. The filaments are united for 9mm to 10mm of their length and are free for 3mm to 3.5mm in length. The free stamen measures 12mm to 13mm in length. The oblong anthers measure 0.5mm in length.
The white pistil measures 11mm to 12mm in length. The flowers appear from September to November.
Derris trifoliata‘s fruits are long, flat elliptical pods. The glabrous, green pods turn grey-brown on ripening. The upper suture has a very short longitudinal wing along each rim. The pods measure 35mm to 50mm in length by 22mm to 28mm in width by 1mm to 1.5mm in thickness. The single flattened, reniform seeds are pale brown. The seeds measure 22mm to 26mm in length by 15mm to 18mm in width. The radical measures 2mm to 2.5mm in length.
Wildlife:
Derris trifoliata’s wildlife is unknown to the author.
Cultivation:
Derris trifoliata is a beautiful large creeper for pergolas, trellises, archways, fences or other strong structures in warm temperate frost free gardens. It is also ideal for placing in an established rainforest garden.
With house blocks becoming smaller and smaller home owners are often deterred or frightened to use creepers. Despite often having difficulties in providing privacy; creepers with their vertical growth and dense foliage are usually overlooked as the solution to the problem. Derris trifoliata can overcome the problem quickly and easily.
Provided there is a structure handy this creeper is the answer for that vertical screen. Two posts with strong stainless steel horizontal wires firmly secured at either end will suffice beautifully.
Derris trifoliata is easy to care for and will tolerate a range of conditions and soil types, but it does best when grown in a sunny or partly sunny position in moist well-drained soil. A little extra moisture and native organic fertilizing regime will ensure a bountiful harvest of flowers year after year.
It can be pruned regularly to contain its growth and encourage foliage production in either a vertical or horizontal direction.
If it is placed around a pool, courtyards or other confined spaces it will make the area look more informal and natural. Against walls it will help soften them. Keep them at least 2 meters back from the pool so the flowers do not become a problem by dropping into the pool.
Derris trifoliata also makes a very good ground cover in an area where it cannot attach itself to a structure or other plants. The plant needs a large area so give it 25 to 30 square meters. I like to plant 2 plants at about 1 meter apart to give a quick coverage.
Propagation:
Seeds: Derris trifoliata‘s seeds require scarification prior to sowing. The abrasion method has proven very successful for us. This involves rubbing the seeds gently between two sheets of very fine sandpaper to reduce the thickness of the seed coat.
What we did if there are large numbers of seeds to do is a glue sheet of medium corundum to the inside surfaces of a small disposable plastic container. Place the seeds into the container and shake the container vigorously for several minutes. Check to see if the coating has been partially removed.
Sow freshly treated seeds directly into a seed raising mix and cover with 5mm of the mix. When the seedlings are 25mm to 50mm tall, prick them out and plant them into 50mm native tubes using a seed raising mix. Alternately place one or two seeds directly into the 50mm tubes
Once the seedlings reach 150mm to 200mm in height plant them out into their permanent position. If the plants are to be used for ground covers nip the tips out prior to sowing.
Plants can be grown by digging up patches and just cutting into 4 sections. Replant into a shallow saucer made in the ground, cover with 5mm to 10mm of sand and water every second day until the new shoots appear.
Fertilize using seaweed, fish emulsion or organic chicken pellets soaked in water on an alternate basis. Fertilize every two months until the plants are established then annually in early September to October to maintain health, vitality and better flowering.
Further Comments from Readers:
Hi reader, it seems you use The Bible of Botany a lot. That’s great as we have great pleasure in bringing it to you! It’s a little awkward for us to ask, but our first aim is to purchase land approximately 1,600 hectares to link several parcels of N.P. into one at The Pinnacles NSW Australia, but we need your help. We’re not salespeople. We’re amateur botanists who have dedicated over 30 years to saving the environment in a practical way. We depend on donations to reach our goal. If you donate just $5, the price of your coffee this Sunday, We can help to keep the planet alive in a real way and continue to bring you regular updates and features on Australian plants all in one Botanical Bible. Any support is greatly appreciated. Thank you.
In the spirit of reconciliation we acknowledge the Bundjalung, Gumbaynggirr and Yaegl and all aboriginal nations throughout Australia and their connections to land, sea and community. We pay our respect to their Elders past, present and future for the pleasures we have gained.
Deyeuxia parviseta
Classification
Unranked: Monocot
Unranked: Commelinids
Family: Poaceae
Subfamily: Pooideae
Tribe: Poeae
Genus: Is named in honour of Nicolas Deyeux; 1753-1837, who was a French professor of pharmacy.
Species: From Paros, which is Ancient Greek or Parvum, which is Latin for small and Setae, which is Latin for a bristle. It refers to bristles, which are usually at the base of the seeds.
Variety: Deyeuxia parviseta var. boormanii. Is named in honour of John Boorman; 1864-1938, who was an English born Australian who was a herbarium collector for the NSW state Herbarium.
Variety: Deyeuxia parviseta var. parviseta. From Paros, which is Ancient Greek or Parvum, which is Latin for small and Setae, which is Latin for a bristle. It refers to bristles, which are usually at the base of the seeds.
Common Name: Fine Bent Grass.
Distribution:
Deyeuxia parviseta var. boormanii is found in several disjunct scattered populations south from near Ebor in northern New South Wales to Bright in Victoria. It is mainly found on the Great Dividing Range.
Deyeuxia parviseta var. parviseta is found south from the Border Ranges National Park to Eurobodalla in eastern New South Wales.
There is an isolated population west of Gladstone in centralcoastal Queensland.
https://avh.ala.org.au/occurrences/search?taxa=Deyeuxia+parviseta#tab_mapView
Habitat Aspect Climate:
Deyeuxia parviseta prefers light dappled shade. It is found growing in moist schlerophyll forests, in and adjacent to temperate rainforests and sub-tropical rainforests. It often grows in steep valleys and on slopes in gallery forests near seepages and drainage lines. The altitude ranges from near sea level to 1000 meters ASL.
The temperatures range from minus 3 degrees in August to 38 degrees in January.
The rainfall ranges from lows of 800mm to 1600mm average per annum.
Soil Requirements:
Deyeuxia parviseta prefers soils that have a high sand content to light gritty clays, medium clays. The soils are usually derived from decomposed sandstones and granite. The soils pH ranges from 4.5pH to 5.5pH. It does not tolerant waterlogged soils however the soils are continuously moist. Non saline soils to moderately saline soils are tolerated.
Height & Spread:
Wild Plants: 0.6m to 1.2m by 0.4m to 0.7m
Characteristics:
Deyeuxia parviseta grows as an open spreading or loosely tufted grass. Culms are thin mid green to mid blue-green with 6 nodes. Young leading shoots are pale green to cream. Internodes and the nodes are glabrous. Plants have a fibrous root system rooting from the nodes.
Deyeuxia parviseta var. parviseta’s simple linear leaves measure 100mm to 250mm in length by 2mm to 4mm in width. The leaf sheath is cauline and antrorse scabrous to glabrous. The apex is tapering to narrow acute. The ligules are ciliate membranes and measure 1mm to 4mm in length. They are scabrous abaxially. The concolourous laminas are mid green to mid blue-green with both laminas being scabrous. The laminas are flat or involute and scabrous while the margins are entire.
Deyeuxia parviseta var. boormanii‘s simple linear leaves measure 100mm to 250mm in length by 2mm to 4mm in width. The leaf sheath is cauline and antrorse scabrous to glabrous. The apex is tapering to narrow acute. The ligules are ciliate membranes and measure 1mm to 4mm in length. They are scabrous abaxially. The concolourous laminas are mid green to mid blue-green and densely scabrous and covered in white pulverulent hairs on the upper lamina while the lower lamina is moderately scabrous. The laminas are flat or involute and scabrous while the margins are entire.
Inflorescences of Deyeuxia parviseta are born as compound lax panicles. The panicles are narrow oblong to narrow lanceolate. The panicles measure 70mm to 230mm in length with spikelets clustered towards branch tips. The branches are filiform and are 2 to 8 nate.
The slightly, laterally compressed spikelets are pedicilate, lanceolate, and measure 2mm to 2.5mm in length.
The upper and lower glumes are similar. The lower glumes are lanceolate with thin membranous margins and an obtuse apex. It has a single keel and a single nerve. The upper glumes are lanceolate with thin membranous margins and an obtuse apex. It has a single keel and a single nerve. The glumes measure 2.2mm to 2.4mm in length.
The lemmas are lanceolate, equal in length to the glumes or are longer than the glumes. The apexes are truncate while the surfaces are finely to densely scaberulous to glabrous. The lemmas are without keels and with 5 nerves and measure 2.2mm to 2.5mm in length. There is a single sub apical awn that measures 0.6mm to 1mm in length. Lodicules are present near the base.
Deyeuxia parviseta var. parviseta glumes are unequal while the lemmas exceed the glumes and are sparsely to densely scaberulous.
Deyeuxia parviseta var. boormanii glumes are slightly unequal or equal while the lemma is equal to the glumes or barely exceed the glumes and are glabrous to very sparsely scaberulous.
The callus is short, bearded with rather stiff off white 0.3mm to 1.2mm long hirtellous hairs. The palea is slightly shorter than the lemma.
There are 3 anthers on each spikelet.
The fruits of Deyeuxia parviseta are trigonous are ellipsoid seeds. The seeds measure 2mm to 2.3mm in length by 0.6mm to 0.9 in diameter. The green nuts turn pale straw-fawn when ripe.
Wildlife:
Deyeuxia parviseta fruits are eaten by most finches and larger aviary birds.
Deyeuxia parviseta is considered a good fodder crop for cattle and sheep and is presently being investigated to incorporate it into feed regime and sowing into natural pastures.
Cultivation:
Deyeuxia parviseta is a medium tussock grass with slender flower stalks and delicately soft and wispy appearance. It will grow to from 0.8 meter to 1 meter in height by 0.4 meters to 0.6 meters in diameter when grown in the open.
If it is placed in a sunny courtyard try to plant 3, 5 or more in a straight row for a very formal look or use curves for the natural look. In a corner a solitary plant can be planted or used in groups of 3 or 5 to better effect. The choice of prostrate companion plants with bright yellow, red or blue flowers will contrast the blue green strap leaves beautifully. The slender vertical growth habit with procumbent plants with yellow flowers would make small walls look longer without necessarily making them look taller.
This is a very fine grass that is well suited to being planted in confined spaces as a solitary plant where as if it is planted out with large leaves or bulky habit will diminish what it has to offer.
Propagation:
Seeds: Deyeuxia parviseta‘s seeds require treatment before sowing. Seed should be harvested in autumn and placed in the vegetable crisper over winter. The chill factor means better germination of the seeds, otherwise the germination is erratic and often over several years. Sow chilled seeds directly into a seed raising mix and cover with 5mm of the mix once the weather has warmed and all the frosts have passed. When the seedlings are 25mm to 50 mm tall, prick them out and plant them into 50mm native tubes using a seed raising mix.
Once the seedlings reach 150mm to 200mm in height plant them out into their permanent position. Mass plantings can be achieved with spacing of 1 meter to 2 meters. When planting for the fruit in an orchard plant the seedlings at 2meter to 3 meters spacing depending upon the size of the parent plant, so easy harvesting and maintenance can take place.
Division: When growing from divisions remove the plant from the soil and just cut it into 3 or 4 equal parts, first down the middle then halve those sections again. Remove unwanted dead leaves and any old small clumps that look weak or dead. Plants can be divided further but ensure each division has a strong shoot and healthy roots attached to the tuff. Replant ensuring the soil is at the same level as before. Water and fertilize. New shoots will appear within two weeks.
Plants can be grown by digging up patches and just cutting into 4 sections. Replant into a shallow saucer made in the ground, cover with 5mm to 10mm of sand and water every second day until the new shoots appear.
Fertilize using seaweed, fish emulsion or organic chicken pellets soaked in water on an alternate basis. Fertilize every two months until the plants are established then annually in early September to October to maintain health, vitality and better flowering.
Further Comments from Readers:
Hi reader, it seems you use The Bible of Botany a lot. That’s great as we have great pleasure in bringing it to you! It’s a little awkward for us to ask, but our first aim is to purchase land approximately 1,600 hectares to link several parcels of N.P. into one at The Pinnacles NSW Australia, but we need your help. We’re not salespeople. We’re amateur botanists who have dedicated over 30 years to saving the environment in a practical way. We depend on donations to reach our goal. If you donate just $5, the price of your coffee this Sunday, We can help to keep the planet alive in a real way and continue to bring you regular updates and features on Australian plants all in one Botanical Bible. Any support is greatly appreciated. Thank you.
In the spirit of reconciliation we acknowledge the Bundjalung, Gumbaynggirr and Yaegl and all aboriginal nations throughout Australia and their connections to land, sea and community. We pay our respect to their Elders past, present and future for the pleasures we have gained.
Deyeuxia reflexa
Classification
Unranked: Monocot
Unranked: Commelinids
Family: Poaceae
Subfamily: Pooideae
Tribe: Poeae
Genus: Is named in honour of Nicolas Deyeux; 1753-1837, who was a French professor of pharmacy.
Species: From Reflexsus, which is Latin for to be bent back or folded backwards. It usually refers to the corolla lobes, which are folded or bent backwards.
Common Name:
Distribution:
Deyeuxia reflexa is restricted mainly to the Dorrigo district from east of Tenterfield south to north west of Gloucester. It is found on the Great Dividing Range.
https://avh.ala.org.au/occurrences/search?taxa=Deyeuxia+reflexa#tab_mapView
Habitat Aspect Climate:
Deyeuxia reflexa prefers full sun to dappled shade. It grows beneath open montane woodlands. Its altitude ranges from 600 meters ASL to 800 meters ASL.
The temperatures range from minus 3 degrees in August to 38 degrees in January.
The rainfall ranges from lows of 820mm to 2500mm average per annum.
Soil Requirements:
Deyeuxia reflexa prefers light gritty clays to medium clays. The soils are usually derived from decomposed sandstones, basalts and shales. The soils pH ranges from 4.5pH to 5.5pH. It does not tolerate waterlogged soils. Non saline soils to moderately saline soils are tolerated.
Height & Spread:
Wild Plants: 0.6m to 1.2m by 0.4m to 0.7m
Characteristics:
Deyeuxia reflexa grows as an open tufted grass. Culms are thin mid green to mid blue-green with 6 nodes. Young leading shoots are pale green to cream. Internodes are covered in pale puberulent hairs while the nodes are glabrous. Plants have a fibrous root system.
Deyeuxia reflexa‘s simple linear leaves measure 150mm to 300mm in length by 2mm to 5mm in width. The leaf sheath is cauline and antrorse scabrous, glabrous or covered in white hirtellous hairs. The apex is tapering to narrow acute. The ligules are eciliate membranes and measure 2mm to 3mm in length. They are glabrous adaxially and covered in white hirtellous hairs abaxially. The concolourous laminas are mid green to mid blue-green. The midrib on the lower lamina is scabrous. The leaf margins are entire, flat or involute.
Inflorescences of Deyeuxia reflexa are born as a compound panicle. The panicles are narrow oblong to narrow lanceolate and effuse out from the base. The panicles measure 100mm to 200mm in length
with spikelets clustered towards branch tips.
The spikelets usually have 1 fertile floret to 2 infertile floret. The infertile rachilla extension are lanceolate, laterally compressed and measure 3mm to 3.5mm in length.
The upper and lower glumes are similar. The lower glumes are lanceolate with thin membranous margins and have a single keel and nerve. The upper glumes are lanceolate with thicker membrane on the margins and have a single keel and nerve. The glumes measure 2.5mm to 3.5mm in length.
The lemmas extend well beyond the glumes. They are lanceolate, with an acute apex or minutely 2 toothed at apex. The lemmas are very finely but densely scaberulous. The 5 nerves are very faintly visible and have a dorsal awn placed a little below the apex.
The exserted awn is strongly reflexed, distinctly scaberulous and measures 2mm to 2.5mm in length. The callus are barbed with short hairs that measure 0.2mm to 0.8mm in length.
The palea are slightly shorter than the lemma.
There are 3 anthers on each spikelet.
The fruits of Deyeuxia reflexa are trigonous, ellipsoid nuts. The nuts measure 1mm to 1.4mm in length by 0.6mm to 0.9 in diameter. The green nuts turn pale straw-fawn when ripe.
Wildlife:
Deyeuxia reflexa fruits are eaten by most finches.
Deyeuxia parviseta is considered a good fodder crop for cattle and sheep and is presently being investigated to incorporate it into feed regime and sowing into natural pastures.
Cultivation:
Deyeuxia reflexa is a medium tussock grass that deserves a place in some native or exotic gardens. it is ideal in most settings near ponds, at the edge of a rainforest in courtyards, away from swimming pools or the rockery. Deyeuxia reflexa will break up horizontal lines with its strap like leaves and the slender flower stalks delicately soft and wispy. It will grow to from 1 meter to 1.2 meters in height by 0.4 meters to 0.6 meters in diameter when grown in the open.
If it is placed around a pool or sunny courtyard try to plant 3, 4 or 5 in a straight row for a very formal look or use curves for the natural look. In a corner a solitary plant can be planted or used in groups of 3 or 5 to great effect. The choice of prostrate companion plants with bright yellow, red or blue flowers will contrast the blue green strap leaves beautifully. It would not matter whether fine or large leaf plants are used to provide all year round contrast. Small or procumbent Hibbertia species like Hibbertia diffusa or Hibbertia procumbens would look great on the ground and give the Deyeuxia reflexa extra height or make a small area look even larger than it really is. The slender vertical growth habit with procumbent plants with yellow flowers would make small walls look longer without necessarily making them look taller.
Its versatility doesn’t stop with accepting all types of soils but it can cope with temperatures as low as minus 7 degrees and up to 42 degrees. it is drought resistant and can cope with the occasional immersion where periodic down pours may make the area rather boggy.
Propagation:
Seeds Deyeuxia reflexa‘s seeds require treatment before sowing. Seed should be harvested in autumn and placed in the vegetable crisper over winter. The chill factor means better germination of the seeds, otherwise the germination is erratic and often over several years. Sow chilled seeds directly into a seed raising mix and cover with 5mm of the mix once the weather has warmed and all the frosts have passed. When the seedlings are 25mm to 50 mm tall, prick them out and plant them into 50mm native tubes using a seed raising mix.
Once the seedlings reach 150mm to 200mm in height plant them out into their permanent position. Mass plantings can be achieved with spacing of 1 meter to 2 meters. When planting for the fruit in an orchard plant the seedlings at 2meter to 3 meters spacing depending upon the size of the parent plant, so easy harvesting and maintenance can take place.
Division: When growing from divisions remove the plant from the soil and just cut it into 3 or 4 equal parts, first down the middle then halve those sections again. Remove unwanted dead leaves and any old small clumps that look weak or dead. Plants can be divided further but ensure each division has a strong shoot and healthy roots attached to the tuff. Replant ensuring the soil is at the same level as before. Water and fertilize. New shoots will appear within two weeks.
Plants can be grown by digging up patches and just cutting into 4 sections. Replant into a shallow saucer made in the ground, cover with 5mm to 10mm of sand and water every second day until the new shoots appear.
Fertilize using seaweed, fish emulsion or organic chicken pellets soaked in water on an alternate basis. Fertilize every two months until the plants are established then annually in early September to October to maintain health, vitality and better flowering.
Further Comments from Readers:
Hi reader, it seems you use The Bible of Botany a lot. That’s great as we have great pleasure in bringing it to you! It’s a little awkward for us to ask, but our first aim is to purchase land approximately 1,600 hectares to link several parcels of N.P. into one at The Pinnacles NSW Australia, but we need your help. We’re not salespeople. We’re amateur botanists who have dedicated over 30 years to saving the environment in a practical way. We depend on donations to reach our goal. If you donate just $5, the price of your coffee this Sunday, We can help to keep the planet alive in a real way and continue to bring you regular updates and features on Australian plants all in one Botanical Bible. Any support is greatly appreciated. Thank you.
In the spirit of reconciliation we acknowledge the Bundjalung, Gumbaynggirr and Yaegl and all aboriginal nations throughout Australia and their connections to land, sea and community. We pay our respect to their Elders past, present and future for the pleasures we have gained.
Mount Cootha Botanic Gardens Qld.
Mount Cootha Botanic Gardens Qld.
Townsville Qld.
Townsville Qld.
Townsville Qld.
Dianella atraxis
Classification
Unranked: Monocot
Order: Asparagales
Family: Xanthorrhoeaceae
Subfamily: Hemerocallidaceae
Genus: From Diana, which is Latin for the virginal goddess of the hunt, moon and protector of small wildlife and Elle, which is Latin suffix for petite, fine or diminitive.
Species: From Diana, which is Latin for the virginal goddess of the hunt, moon and protector of small wildlife.
Common Name: Northern Flax or Northern Flax Lily.
Distribution:
Dianella atraxis is restricted to the tip of Cape York Peninsula south to the western side of the Paluma Range National Park in far north Queensland. It is only found on the eastern side of The Great Dividing Range.
https://avh.ala.org.au/occurrences/search?taxa=Dianella+atraxis#tab_mapView
Habitat Aspect Climate:
Dianella atraxis prefers full sun to dappled shade. It grows on flat plains adjacent to rainforests and in lowland montane rainforests. Its altitude ranges from 5 meters ASL to 800 meters ASL.
The temperatures range from minus 12 degrees in July to 38 degrees in January.
The rainfall ranges from lows of 1500mm to 3000mm average per annum.
Soil Requirements:
Dianella atraxis prefers light gravelly clays to medium clays. The soils are usually derived from decomposed brown basalt, black basalt, shales and heavier types of sandstone. The soils pH ranges from 4.5pH to 6.5pH. It is not tolerant of waterlogged however it can handle wet soils and occasional inundations. Non saline soils to moderately saline soils are tolerated.
Height & Spread:
Wild Plants: 1m to 1.5m by 1m to 1.6m
Characteristics:
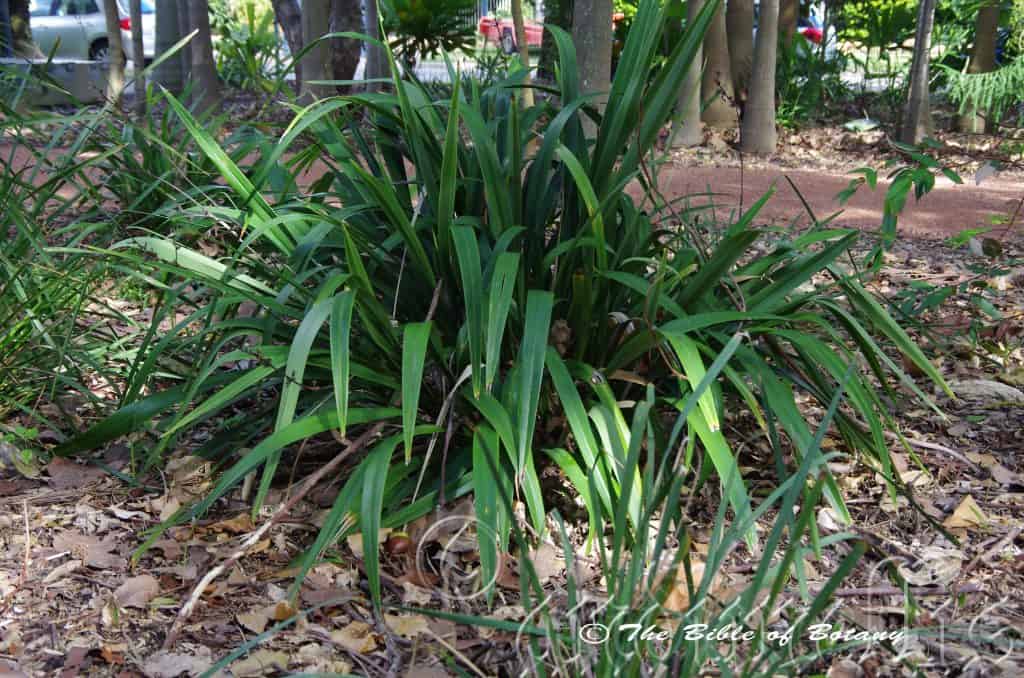
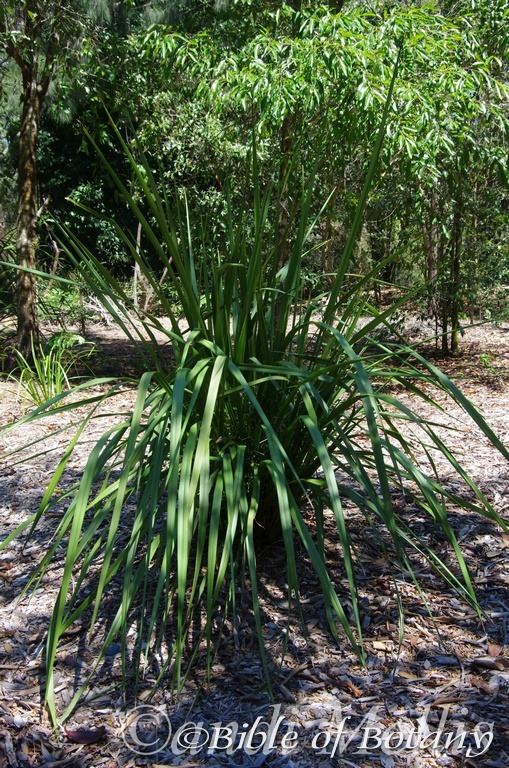
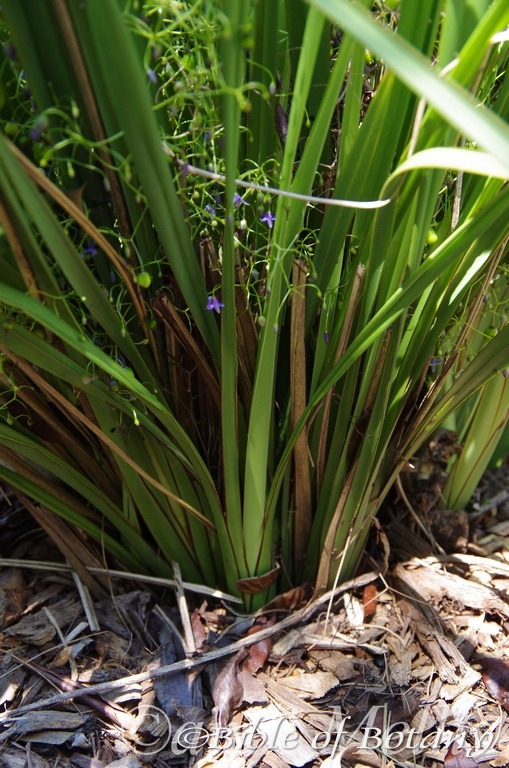
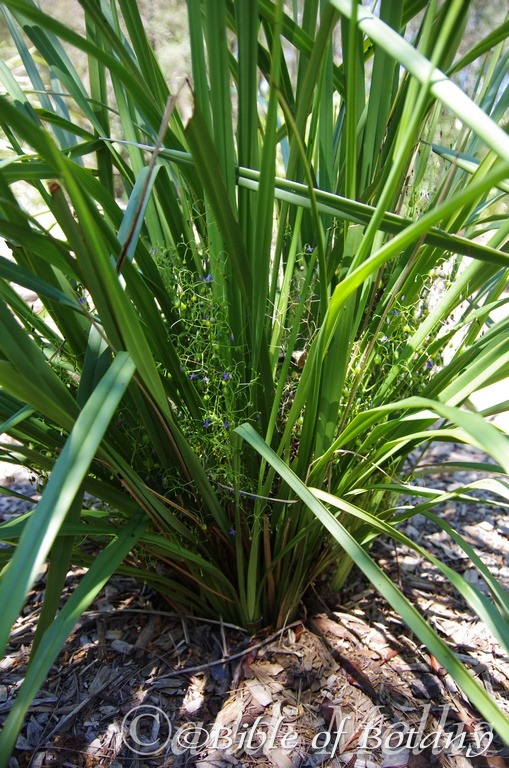
Dianella atraxis grows as a tufted grass like plant. Stems are thin reddish cream to green and glabrous. Young leading shoots are light green to cream.
Plants have a fibrous root system.
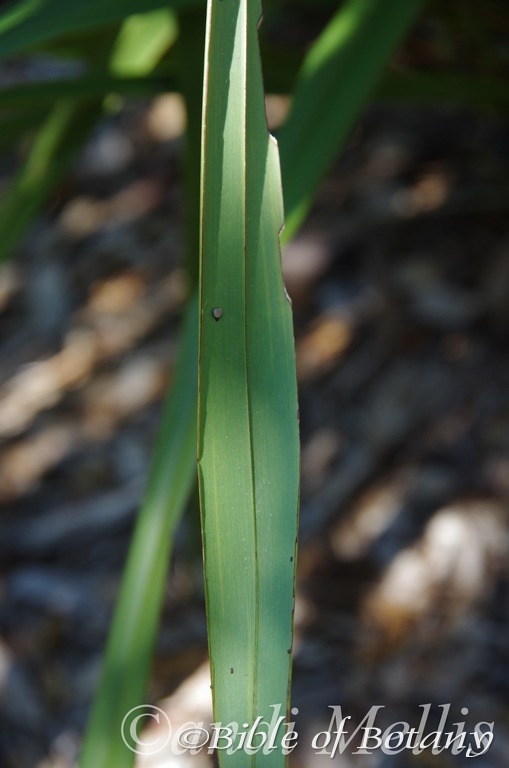
Dianella atraxis‘s broad linear leaves measure 350mm to 1000mm in length by 20mm to 40mm in width. The leaf sheathing section of the petiole measures 20mm to 55mm in length. The attenuate petiole becomes conduplicate near the base and measures 190mm to 210mm in length. The apex is tapering to narrow acute. The concolourous laminas are deep green and glabrous. The midrib is prominent on the lower lamina and is visible from the upper lamina. The margins and midrib are finely toothed. The leaf margins are entire, finely toothed or coarsely toothed. The leaf venation is finely longitudinal and parallel to the midvein.
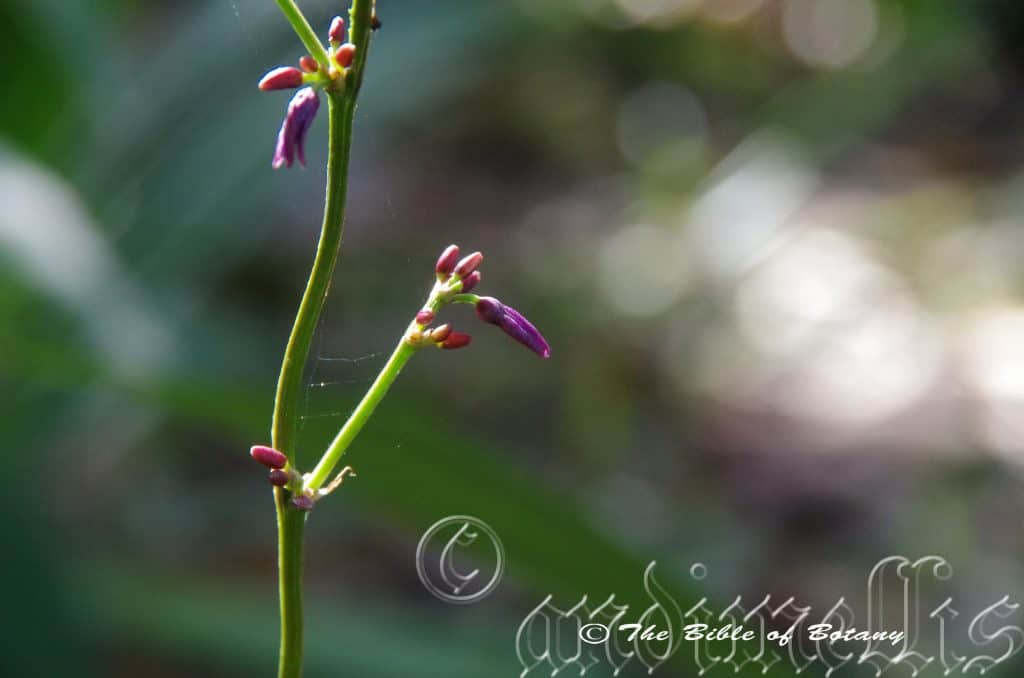
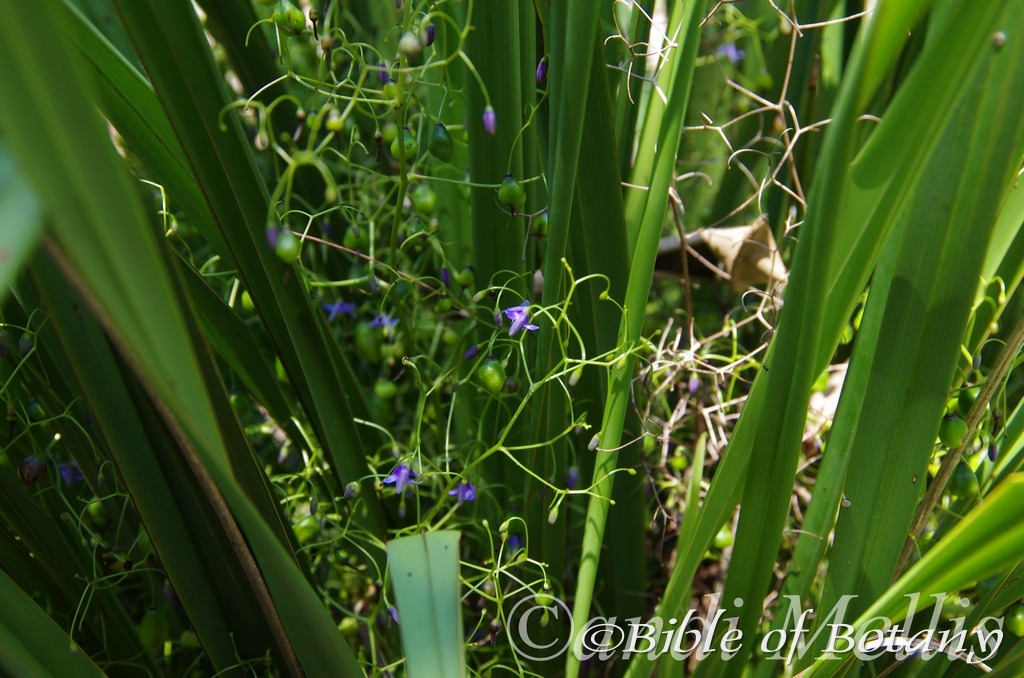
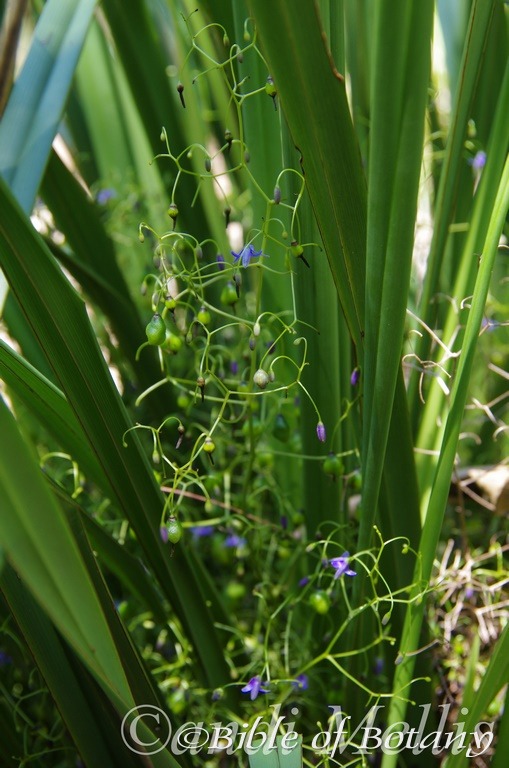
Inflorescences of Dianella atraxis are born as a cyme or helicoid cyme with 7 to 25 flowers on a cymule. The cymes arise from the center of the plants and measure 1 meter to 1.2 meters in height. The deep blue-purple flowers to deep purple-violet flowers measure 14mm to 16mm in diameter. The 3 outer tepals are narrow elliptical with acute apexes. The outer tepals measure 6mm to 7mm in length by 2mm to 2.5mm in width. There are 5 to 7 distinct veins running the length of the tepal. The 3 inner tepals are elliptical with acute apexes. The inner tepals measure 5mm to 6mm in length by 3mm to 3.5mm in width at the base. There are 5 to 7 veins running the length of the tepal. The divaricate tepals become strongly reflexed as the flowers mature.
The flattened, white filaments have a 1.4mm diameter yellow swelling at the apex. The 6 filaments are attached to the base and side of the ovary for about two thirds of their length. The white section of the filament measures 1.6mm to 1.8mm in length. The deep yellow to deep yellow-orange, basifixed anthers is long conical and measure 3mm to 4mm in length.
The pale yellow trigonous ovary measures 2mm to 2.2mm in diameter. The white style measures 3mm to 4mm in length. The tepals are persistent at the base of the berries. Dianella atraxis flowers over a long period starting in late September and finishing in late February.
The fruits of Dianella atraxis are globular to orbicular berries. The berries are round to obovate measuring 6mm to 8mm in diameter. The deep grass-green fruits turn bright deep blue to deep purple when ripe. The flesh is white and contains 3 to 6 shiny black seeds. The minutely areolate to minutely colliculate seeds are glabrous and measure 2.6mm to 3.5mm in diameter.
Wildlife:
Dianella atraxis fruits are eaten by possums, native rats and are a favourite fruit of Cat Birds, Bower Birds and small Honey Eaters.
It was also a staple part of the Australian Aborigines and first Europeans diet.
Cultivation:
Dianella atraxis is a beautiful small tussock plant that deserves a place in every native or exotic garden. It is ideal in almost every setting near ponds, at the edge of a rainforest in courtyards, around swimming pools, in the orchard or the rockery. Dianella atraxis will break up horizontal lines with its strap like leaves and the slender flower stalks followed by very pretty deep purple-blue berries. There are a few hybrids and varieties in nurseries to select from, including dwarf forms which grow to 300mm in height through to squat variegated forms with thick leathery leaves.
If it is placed around a pool or sunny courtyard try to plant 3, 4 or 5 in a straight row for a very formal look or use curves for the natural look. In a corner planted in groups of 3 or 5 give a great effect. A simplistic but affective method would be to plant various varieties in the clump with the smaller variegated forms to the front and the taller varieties at the back. The choice of companion plants with bright red or orange flowers will contrast the deep purples beautifully. It would not matter whether fine or large leaf plants are used provided it is a pale green or lime green for an all year contrast. Small or procumbent Leischenalta formosa would look great on the ground and give the Dianella atraxis extra height or make a small area look even larger than it really is. The slender vertical growth habit with procumbent plants would make small walls look longer without necessarily making them look taller.
Its versatility doesn’t stop with accepting most types of soils but they can cope with temperatures as low as minus 7 degrees and up to 42 degrees. It is drought resistant and can cope with the occasional immersion where periodic down pours may flood the land. It is neat self-cleaning and are easily controlled within a border.
Add to the above, if it is given adequate moisture, plenty of organic mulch for moisture retention and an even soil temperature, applying native fertilizers on a regular basis the plants will respond with good flowering over a long period and will yield good quality fruit with maximum size. I have always been amazed that Dianella atraxis is still not being farmed commercially. The berries have a flavour reminiscent of pears with a mild very mild Eucalyptus taste and are very sweet. It makes a great addition to a fruit salad because of the blue colour.
It often reaches its full potential in just 3 years and flower from the second year. If plants are required for fruit they should be selected for size, flavour, and a lack of seeds or at least as fewer seeds as possible. Once a good plant has been found propagation should be done by division.
Divide the plants every two or three years to keep them vigorous and healthy. This will ensure maximum production in fruit and attractiveness.
The flowers can be used in fresh floral arrangements.
Propagation:
Seeds: Dianella atraxis‘s seeds require treatment before sowing. Seed should be harvested as soon as the fruits begin to shrivel. Clean the flesh off the seeds. The abrasion method has proven very successful. This involves rubbing the seeds gently between two sheets of very fine sandpaper to reduce the thickness of the seed coat. What we did with Daniella caerulea if there were large numbers of seeds to do is a glue sheet of medium corundum to the inside surfaces of a small disposable container. Place the seeds into the container and shake the container vigorously for several minutes. Check to see if the coating has been partially removed.
Sow freshly treated seeds directly into a seed raising mix and cover with 2mm of the mix once the weather has warmed and all the frosts have passed. When the seedlings are 25mm to 50 mm tall, prick them out and plant them into 50mm native tubes using a seed raising mix.
Once the seedlings reach 150mm to 200mm in height plant them out into their permanent position. Mass plantings can be achieved with spacing of 1 meter to 2 meters. When planting for the fruit in an orchard plant the seedlings at 2meter to 3 meters spacing depending upon the size of the parent plant, so easy harvesting and maintenance can take place.
Division: When growing from divisions remove the plant from the soil and just cut it into 3 or 4 equal parts, first down the middle then halve those sections again. Remove unwanted dead leaves and any old small clumps that look weak or dead. Plants can be divided further but ensure each division has a strong shoot and healthy roots attached to the tuff. Replant ensuring the soil is at the same level as before. Water and fertilize. New shoots will appear within two weeks.
Plants can be grown by digging up patches and just cutting into 4 sections. Replant into a shallow saucer made in the ground, cover with 5mm to 10mm of sand and water every second day until the new shoots appear.
Fertilize using seaweed, fish emulsion or organic chicken pellets soaked in water on an alternate basis. Fertilize every two months until the plants are established then annually in early September to October to maintain health, vitality and better flowering.
Further Comments from Readers:
Hi reader, it seems you use The Bible of Botany a lot. That’s great as we have great pleasure in bringing it to you! It’s a little awkward for us to ask, but our first aim is to purchase land approximately 1,600 hectares to link several parcels of N.P. into one at The Pinnacles NSW Australia, but we need your help. We’re not salespeople. We’re amateur botanists who have dedicated over 30 years to saving the environment in a practical way. We depend on donations to reach our goal. If you donate just $5, the price of your coffee this Sunday, We can help to keep the planet alive in a real way and continue to bring you regular updates and features on Australian plants all in one Botanical Bible. Any support is greatly appreciated. Thank you.
In the spirit of reconciliation we acknowledge the Bundjalung, Gumbaynggirr and Yaegl and all aboriginal nations throughout Australia and their connections to land, sea and community. We pay our respect to their Elders past, present and future for the pleasures we have gained.
Greening Australia Norman Park Qld.
Greening Australia Norman Park Qld.

Greening Australia Norman Park Qld.
Greening Australia Norman Park Qld.
Greening Australia Norman Park Qld.
Greening Australia Norman Park Qld.
Greening Australia Norman Park Qld.
Dianella brevipedunculata
Classification
Unranked: Monocot
Order: Asparagales
Family: Xanthorrhoeaceae
Subfamily: Hemerocallidaceae
Genus: From Diana, which is Latin for the virginal goddess of the hunt, moon and protector of small wildlife and Elle, which is Latin suffix for petite, fine or diminitive.
Species: From Brevis, which is Latin for short and From Pous which is Ancient Greek or Pes/Pedi which are Latin for a foot or feet.
Common Name: Blue Flax Lily.
Distribution:
Dianella brevipedunculata is found south from Middle Mountain west of Rockhampton to the Queensland New South Wales border. It is found on the western side on The Great Dividing Range to the coast.
https://avh.ala.org.au/occurrences/search?taxa=Dianella+brevipedunculata#tab_mapView
Habitat Aspect Climate:
Dianella brevipedunculata prefers full sun to dappled shade. It grows on flat plains and gentle slopes adjacent to rainforests and in lowland montane forests. Its altitude ranges from 1 meters ASL to 840 meters ASL.
The temperatures range from minus 1 degree in July to 38 degrees in January.
The rainfall ranges from lows of 800mm to 1200mm average per annum.
Soil Requirements:
Dianella brevipedunculata grows in a wide range of soils from coarse sand, fine sand, peaty sands to light gravelly clays and good quality loams. The soils are usually derived from decomposed granite, sandstone and black and red basalt. The soils pH ranges from 4.5pH to 7.5pH. It is not tolerant of waterlogged however it can handle wet soils and occasional inundations. Non saline soils to moderately saline soils are tolerated.
Height & Spread:
Wild Plants: 0.3m to 0.6m by 0.4m to 0.6m
Characteristics:
Dianella brevipedunculata grows as a small, tufted grass like plant. Stems are thin reddish cream to green and glabrous. Young leading shoots are pale green to cream. The stems are usually less than 80mm I length. It has a fibrous root system.
Dianella brevipedunculatas‘s broad linear leaves measure 500mm to 1000mm in length by 10mm to 20mm in width. The sheath is conduplicate while the leaves are more or less completely occluded on the apical half. The apex is narrow acute. The concolourous laminas are deep green and glabrous. The midrib is prominent on the lower lamina and is visible from the upper lamina. The margins are entire. The leaf venation is finely longitudinal and parallel to the midvein.
Inflorescences of Dianella brevipedunculata are born as cymules with 1 to 7 flowers on a cymule. Ad are always shorter than the leaves. The pale blueish purple flowers to pale lilac flowers measure 14mm to 16mm in diameter. The 3 outer tepals are narrow elliptical with acute apexes. The outer tepals measure 10mm to 16mm in length by 2mm to 5mm in width. The divaricate tepals become strongly reflexed as the flowers mature.
The 6 filaments are attached to the base and side of the ovary for about two thirds of their length. The white section of the filament measures 1.6mm to 1.8mm in length. The pale yellow to mid yellow to basifixed anthers are long conical and measure 6mm to 8mm in length.
The pale yellow trigonous ovary measures 2mm to 2.2mm in diameter. The white style measures 8mm to 10mm in length. The tepals are persistent at the base of the berries. Dianella brevipedunculata flowers over a long period starting in late September and finishing in late February.
The fruits of Dianella brevipedunculata are globular to orbicular berries. The berries measure 6mm to 12mm in diameter. The deep grass-green fruits turn bright deep blue to deep purple when ripe. The flesh is white and contains 3 to 6 glossy, black seeds, which measure 2.5mm to 3.5mm in diameter.
Wildlife:
Dianella brevipedunculata fruits are eaten by possums, native rats and all fruit eating birds.
Many Dianella fruits were eaten by aborigines but caution should be taken as some individuals have had mild poisoning after consuming the berries.
Cultivation:
Dianella brevipedunculata is a beautiful small tussock plant that deserves a place in native or exotic garden. It is ideal in almost every setting near ponds, at the edge of a rainforest in courtyards, around swimming pools, in the orchard or the rockery. Dianella brevipedunculata will break up horizontal lines with its strap like leaves and the slender flower stalks and pretty purple blue flowers.
If it is placed around a pool or sunny courtyard try to plant 3, 4 or 5 in a straight row for a very formal look or use curves for the natural look. In a corner planted in groups of 3 or 5 give a great effect. The choice of companion plants with pink or white flowers will contrast the deep purples beautifully. It would not matter whether fine or large leaf plants are used provided it is a pale green or lime green for year contrast. Small or procumbent Leischenalta formosa would look great on the ground and give the Dianella brevipedunculata extra height or make a small area look even larger than it really is. The slender vertical growth habit with procumbent plants would make small walls look longer without necessarily making them look taller.
Its versatility doesn’t stop with accepting most types of soils but it can cope with temperatures as low as minus 5 degrees and up to 42 degrees. It is drought resistant once established and can cope with the occasional immersion where periodic down pours may flood the land. It is neat self-cleaning and is easily controlled within a border.
Add to the above, if it is given adequate moisture, plenty of mulch for moisture retention and an even soil temperature, applying native fertilizers on a regular basis the plants will respond with good flowering over a long period and will yield good quality fruit with maximum size. I have always been amazed that The berries have a flavour reminiscent of pears with a mild very mild Eucalyptus taste and are very sweet. It makes a great addition to a fruit salad because of the blue colour, but first make sure you do not have a reaction to the fruits.
It often reaches its full potential in just 2 years and flower from the second year. If plants are required for fruit it should be selected for size, flavour, and a lack of seeds or at least as fewer seeds as possible. Once a good plant has been found propagation should be done by division.
Divide the plants every two or three years to keep them vigorous and healthy. This will ensure maximum production in fruit and attractiveness.
The flowers can be used in fresh floral arrangements.
Propagation:
Seeds: Dianella brevipedunculata’s seeds require treatment before sowing. Seed should be harvested as soon as the fruits begin to shrivel. Clean the flesh off the seeds. The abrasion method has proven very successful. This involves rubbing the seeds gently between two sheets of very fine sandpaper to reduce the thickness of the seed coat. What we did with Daniella caerulea if there were large numbers of seeds to do is a glue sheet of medium corundum to the inside surfaces of a small disposable container. Place the seeds into the container and shake the container vigorously for several minutes. Check to see if the coating has been partially removed.
Sow freshly treated seeds directly into a seed raising mix and cover with 2mm of the mix once the weather has warmed and all the frosts have passed. When the seedlings are 25mm to 50 mm tall, prick them out and plant them into 50mm native tubes using a seed raising mix.
Once the seedlings reach 150mm to 200mm in height plant them out into their permanent position. Mass plantings can be achieved with spacing of 1 meter to 2 meters. When planting for the fruit in an orchard plant the seedlings at 2meter to 3 meters spacing depending upon the size of the parent plant, so easy harvesting and maintenance can take place.
Division: When growing from divisions remove the plant from the soil and just cut it into 3 or 4 equal parts, first down the middle then halve those sections again. Remove unwanted dead leaves and any old small clumps that look weak or dead. Plants can be divided further but ensure each division has a strong shoot and healthy roots attached to the tuff. Replant ensuring the soil is at the same level as before. Water and fertilize. New shoots will appear within two weeks.
Plants can be grown by digging up patches and just cutting into 4 sections. Replant into a shallow saucer made in the ground, cover with 5mm to 10mm of sand and water every second day until the new shoots appear.
Fertilize using seaweed, fish emulsion or organic chicken pellets soaked in water on an alternate basis. Fertilize every two months until the plants are established then annually in early September to October to maintain health, vitality and better flowering.
Further Comments from Readers:
Hi reader, it seems you use The Bible of Botany a lot. That’s great as we have great pleasure in bringing it to you! It’s a little awkward for us to ask, but our first aim is to purchase land approximately 1,600 hectares to link several parcels of N.P. into one at The Pinnacles NSW Australia, but we need your help. We’re not salespeople. We’re amateur botanists who have dedicated over 30 years to saving the environment in a practical way. We depend on donations to reach our goal. If you donate just $5, the price of your coffee this Sunday, We can help to keep the planet alive in a real way and continue to bring you regular updates and features on Australian plants all in one Botanical Bible. Any support is greatly appreciated. Thank you.
In the spirit of reconciliation we acknowledge the Bundjalung, Gumbaynggirr and Yaegl and all aboriginal nations throughout Australia and their connections to land, sea and community. We pay our respect to their Elders past, present and future for the pleasures we have gained.
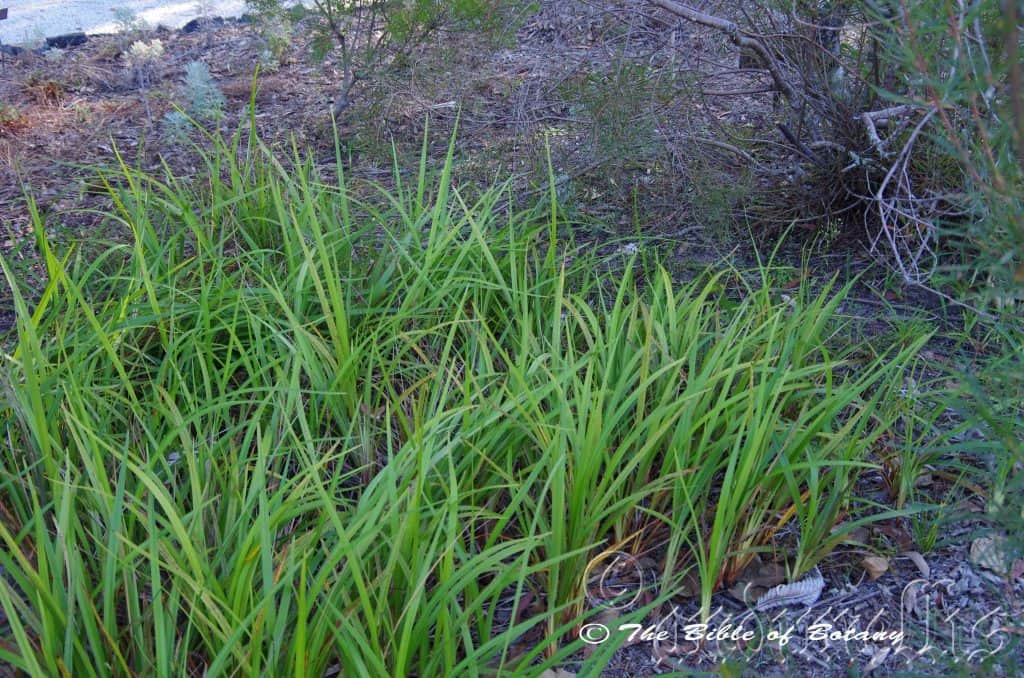
Moonee Beach NSW

Dianella caerulea subsp. assera Pillar valley NSW
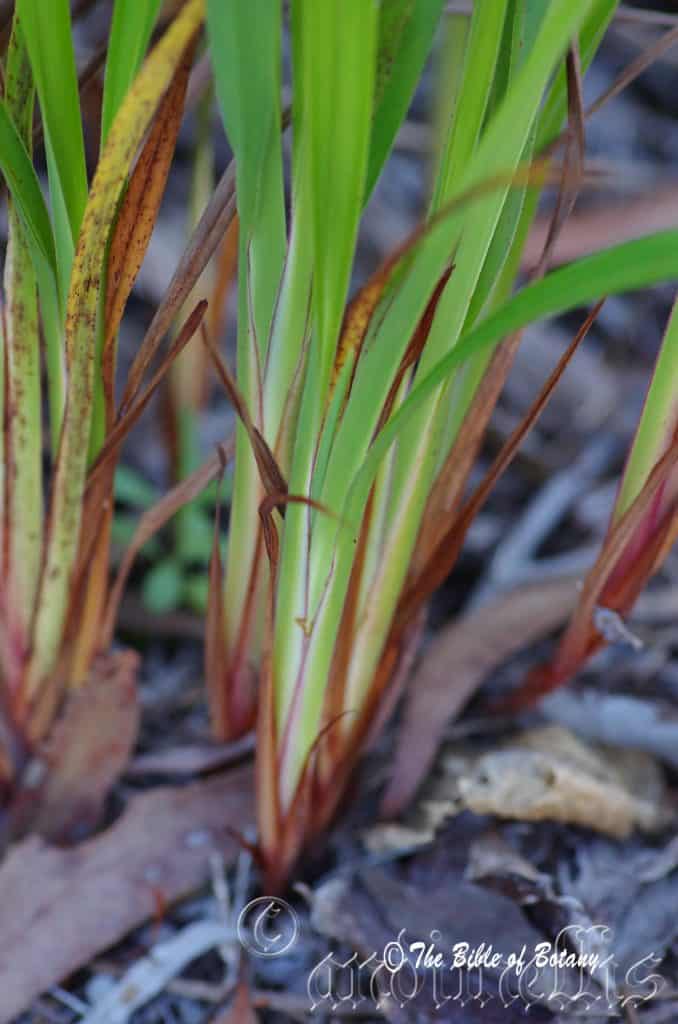
Moonee Beach NSW
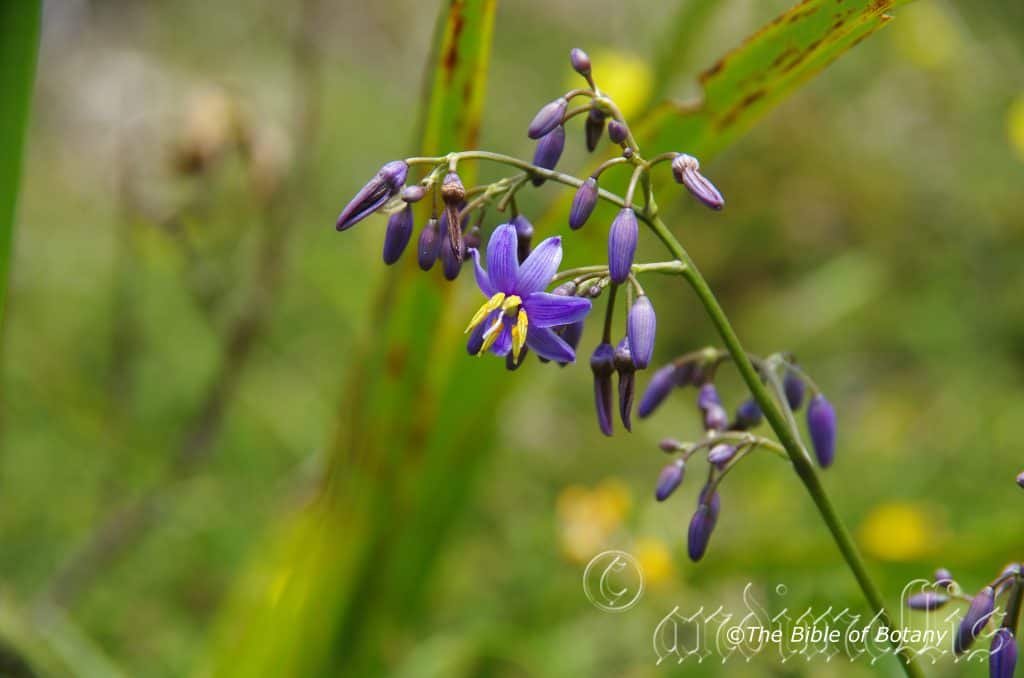
Boorkoom Yuyaigir National Park NSW.
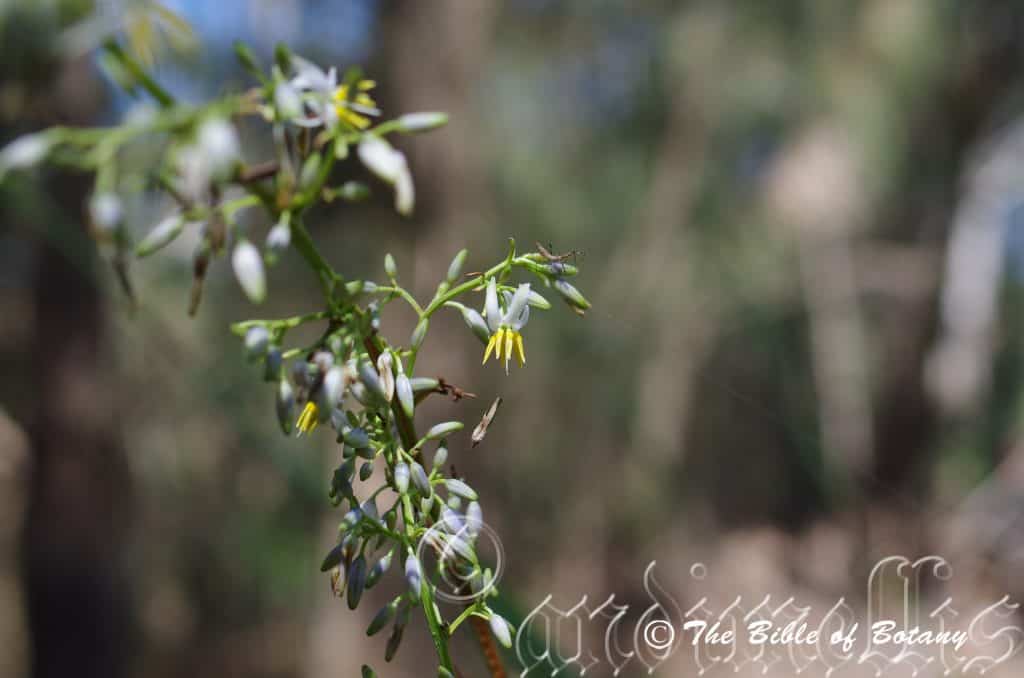
Wynnum Foreshore Qld.
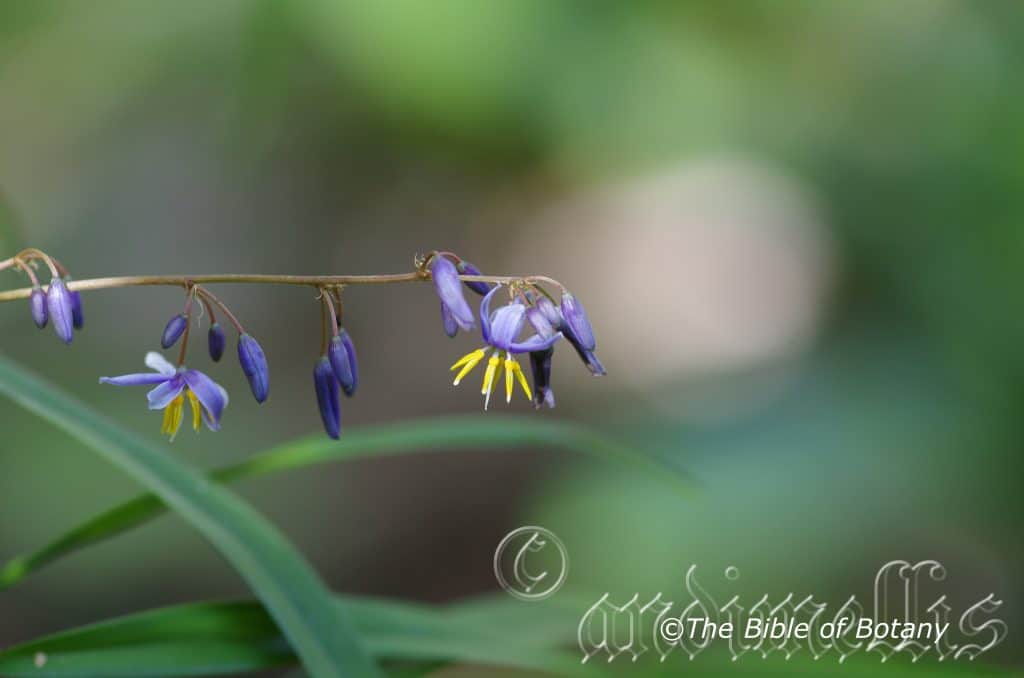
Author’s Garden The Pinnacles NSW
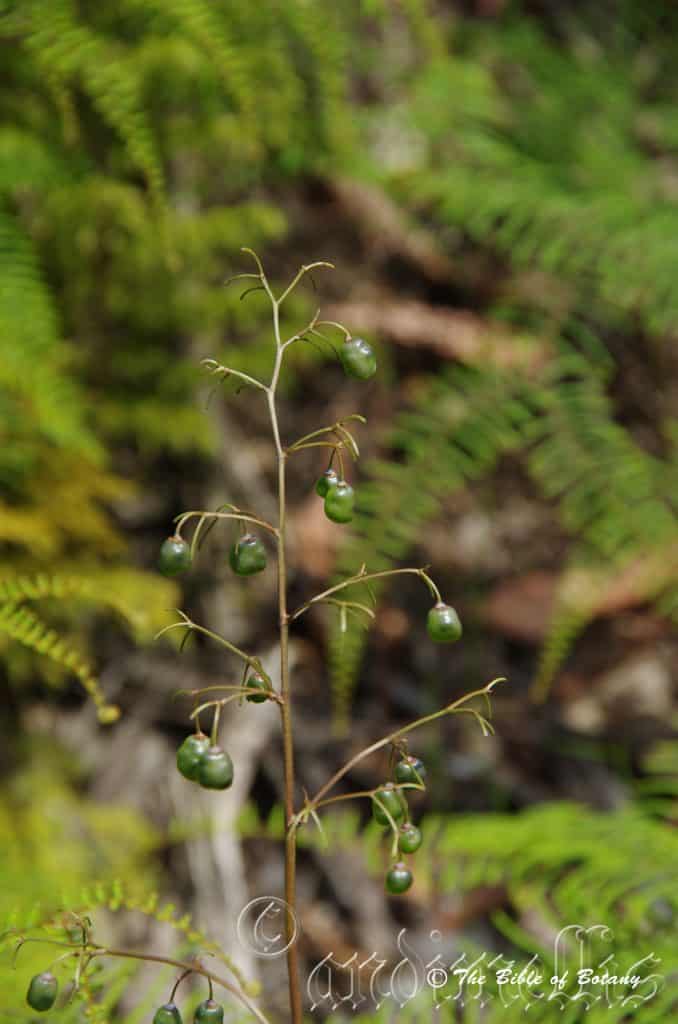
Nana Glen NSW

Nana Glen NSW
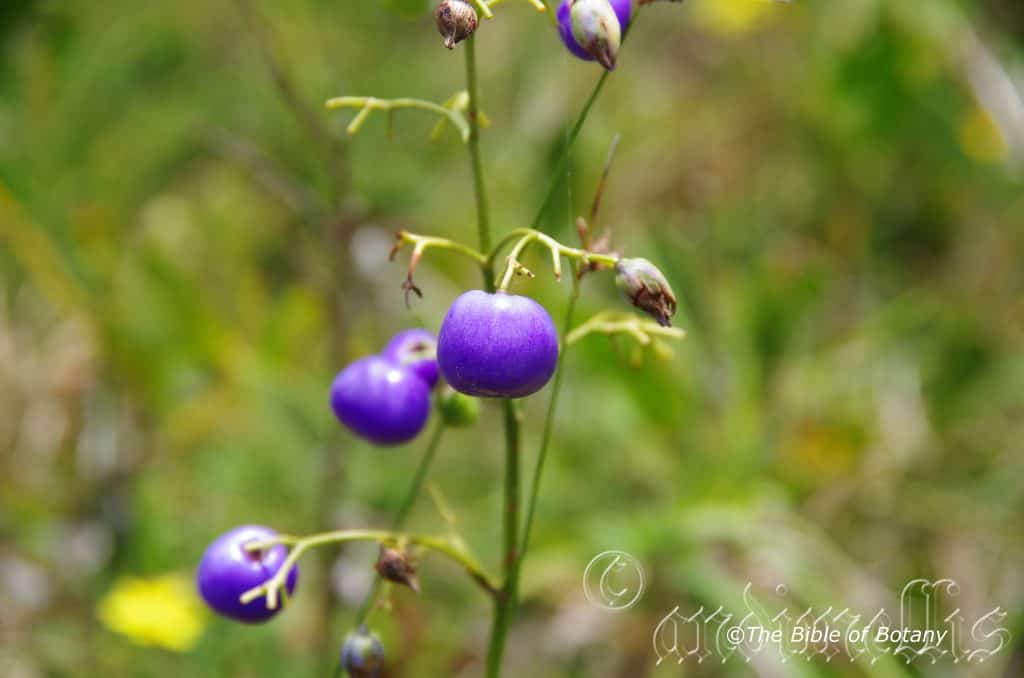
Boorkoom Yuyaigir National Park NSW.
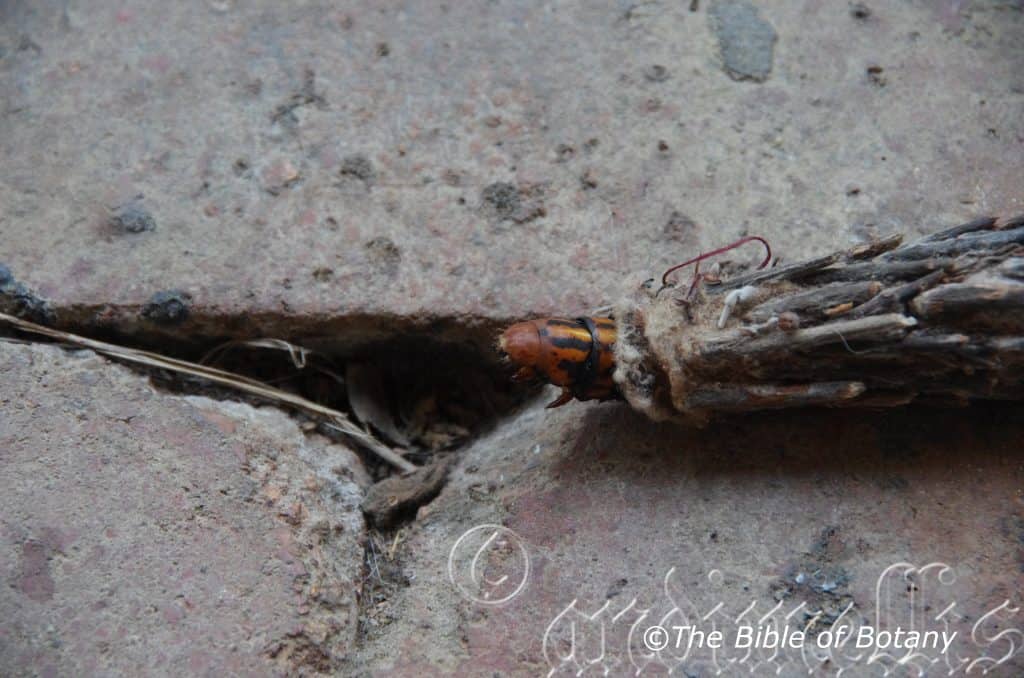
Metura elongatus Author’s Garden The Pinnacles NSW
Dianella caerulea
Classification
Unranked: Monocot
Order: Asparagales
Family: Xanthorrhoeaceae
Subfamily: Hemerocallidaceae
Genus: From Diana, which is Latin for the virginal goddess of the hunt, moon and protector of small wildlife and Elle, which is Latin suffix for petite, fine or diminitive.
Species: From Caerulus, which is Latin for deep blue. It refers to a structure or organ, which is deep blue in colour.
Subspecies: Dianella caerulea subsp. assera. May be from Assero, which is Latin for I plant. It may refer to plants, which produce extravaginal shoots distally.
Subspecies: Dianella caerulea subsp. caerulea. From Caerulus, which is Latin for deep blue. It refers to a structure or organ, which is deep blue in colour.
Subspecies: Dianella caerulea subsp. cinerascens. From Cinereous, which is Latin for ash coloured or ashen. It refers to leaves which are blueish-grey to greyish with or without a coppery tinge.
Subspecies: Dianella caerulea subsp. petasmatodes. From Petaso/Petasites, which is Latin for a wide brimmed hat or to be parachute like and Eidos/Oides, which is Ancient Greek for alike or similar to. It refers to leaf sheath, which are occluded distally or petals or sepals which have broader and thicker margin.
Subspecies: Dianella caerulea subsp. producto. From Productum, which is Latin for to lengthen or elengate. It refers to culms, which are elongated.
Subspecies: Dianella caerulea subsp. protensa. From Protensum, which is Latin for to stretch out or reach out. It may refer to the flowers, which reach out away from the culms.
Subspecies: Dianella caerulea subsp. vannata. From Vami, which is Ancient Greek or later Vannus which is Latin for a fan or winnowing basket. It refers to flowers, which somewhat resemble a winnowing basket compared to other species in the genus or sub species in the species.
Common Name: Paroo Lily or Blue Flax Lily.
The Wiradjuri aboriginal name is Nidbul while the Noongar know it as Mangar, Wergaia know it as Murmbal.
Distribution:
Dianella caerulea is found south from the Torres Strait Islands in far north Queensland to Mornington Peninsula in southern Victoria in several disjunct populations. It is mainly found on the Western Slopes, on and the east of The Great Dividing Range to the coast.
It is also found in Tasmania however it is possibly extinct from the localities of few known records available.
https://avh.ala.org.au/occurrences/search?taxa=Dianella+caerulea#tab_mapView
Habitat Aspect Climate:
Dianella caerulea prefers full sun to dappled shade. It grows in open woodlands to dry Eucalypt forests, moist Eucalypt forests or adjacent to coastal wallums including littoral rainforests and on the back dunes. The altitude ranges from 10 meters ASL to 1400 meters ASL.
The temperatures range from minus 3 degrees in July to 38 degrees in January.
The rainfall ranges from lows of 600mm to 3000mm average per annum.
Soil Requirements:
Dianella caerulea prefers light sandy loams, light gravelly clays to medium clays. The soils are derived from decomposed sandstones, basalts or shales. The soils pH ranges from 4.5pH to 7.5pH. It tolerates seasonal waterlogged soils and occasional inundations. Non saline soils to very saline soils are tolerated as are salt laden winds.
Height & Spread:
Wild Plants: 0.5m to 1m by 0.6m to 1.2m
Characteristics:
Dianella caerulea grows as a tufted grass like plant. Stems are thin reddish cream to green and glabrous. Young leading shoots are light green to cream. Plants have a fibrous root system.
The 7 sub species are dealt with separately below fruits. The following description is a general description of the plant covering all the sub specie. Dianella caerulea is a very variable species with deep green linear leaves measuring 400mm to 1500mm in length by 5mm to 25mm in width. The leaf sheath is conduplicate for about 30mm of its length. The apex is tapering to narrow acute. The leaf lamina is concolourous with a prominent midrib on the lower lamina. The midrib on the lower lamina is glabrous, rough or scabrous. The leaf margins are entire, finely toothed or coarsely toothed.
Inflorescences of Dianella caerulea are born as a cyme or helicoid cyme with 15 to 45 flowers on a cymose. The cymes arise from the center of the plants and measure 0.8 meter to 1 meter in height. The pale blue to deep purple-blue flowers measure 14mm to 16mm in diameter. The 3 outer tepals are narrow elliptical with acute apexes. The outer tepals measure 5mm to 6mm in length by 2mm to 2.5mm in width. The 3 inner tepals are narrow elliptical with acute apexes. The inner tepals measure 5mm to 6mm in length by 2mm to 2.5mm in width at the base. There are 5 to 7 veins running the length of the tepal. The divaricate tepals become strongly reflexed as the flowers mature.
The white filaments have a 1.2mm diameter yellow swelling at the apex. The 6 filaments are attached to the base and side of the ovary for about two thirds of their length. The white section of the filament measures 1.5mm to 1.8mm in length. The pale yellow to deep yellow-orange, basifixed anthers are long conical and measure 3mm to 4mm in length.
The pale dull lime green trigonous ovary measures 2mm to 2.2mm in diameter. The white style measures 3mm to 4mm in length. Dianella caerulea flowers over a long period starting in late September and finishing in late February.
The fruits of Dianella caerulea are berries. They are round to obovate measuring 7mm to 12mm in diameter. The bright pale blue to deep purple fruits are green before ripening. The tepals are persistent at the base of the berries. The flesh is white and contains 3 to 15 shiny black seeds in each fruit.
Sub Specie Differences:
Dianella caerulea subspecies: assera’s leaf sheath is occluded for more than 2/3 of the leaf’s length. The cross section in the occluded portion is biconvex in cross section. The leaves are not glaucous. The plant is solitary tufted with the true stems measuring up to 1800m in length. The inflorescence is from conical to narrow-cylindrical in outline, continuous or interrupted. The stems are scaly for most of their length. The extravaginal shoots are produced distally. The cymules expanded or contracted, few-flowered. Perianth pale to mid-blue, often with green streaks externally.
Dianella caerulea subspecies: caerulea’s leaf sheath is occluded for 1/3 to 2/3 of the leaf’s length. The cross section in the occluded portion is “Y” in cross section. The stems are more or less condensed at the base and are sparsely covered in red brown scales. They do not produce extravaginal shoots. The plant is solitary tufted, to 500mm in height. The stems are short, leafy, touching or up to 60 cm apart. Cymules more or less expanded with fewer than 10-flowers. The perianth is mid to deep blue.
Dianella caerulea subspecies: cinerascen’s leaf sheath is occluded for more than 2/3 of the leaf’s length. The cross section in the occluded portion is biconvex in cross section. The leaves are strongly glaucous. The true stems measure 100mm in length. The inflorescence’s rachis is narrow-cylindrical in outline. The plant is solitary tufted or gregariously tufted and measures up to 800mm in height. The stems are short and touching or up to 30 cm apart. Cymules contracted with a few flowers. The perianth creamy-green to pale blue.
Dianella caerulea subspecies petasmatodes‘s leaf sheath is occluded for more than 2/3 of the leaf’s length. The cross section in the occluded portion is biconvex in cross section. The leaves are not glaucous. The plant is solitary tufted with the true stems measuring up to 1800m in length. The inflorescence’s rachis is narrow-cylindrical in outline. The stems are leafy for most of their length with no extravaginal shoots. The leaf sheaths are not covered in papillose or pubescent hairs. The plants are gregarious and form dense mats to 2 meters in diameter and 1.3 meters in height. The mature leaves are not equal in length at the nodes near middle of stem. The stems are elongated, with a few scales below the several sub equal leaves. The cymules many-flowered with the perianth being deep bronze-green to blue-green
Dianella caerulea subspecies producta’s leaf sheath is occluded for 1/3 to 2/3 of the leaf’s length. The cross section in the occluded portion is “Y” in cross section. Extravaginal shoots develop distally with age. The plants are tufted, solitary and grow up to 1.3 m high. The stems are conspicuously elongated and covered in rusty red scales for most of their length, touching or up to 100mm apart. The cymules are more or less expanded with 3 to 6 flowers. The perianth are greenish white to bright blue.
Dianella caerulea subspecies protensa leaf’s sheath is occluded for more than 2/3 of the leaf’s length. The cross section in the occluded portion is biconvex in cross section. The leaves are not glaucous. The true stems grow to 1.8 m long. The inflorescence is from conical to narrow-cylindrical in outline, continuous or interrupted. The stems are leafy for most of their length with no extravaginal shoots. The leaf sheaths are densely covered in minute puberulent hairs or minute papillate lumps. Aerial shoots adjacent or up to 300mm apart. The tufted plants are solitary and grow up to 500mm in height. The cymules are more or less expanded with 3 to 5 flowers. The perianth are pale blue
Dianella caerulea subspecies vannata’s leaf sheath is occluded for more than 2/3 of the leaf’s length. The cross section in the occluded portion is biconvex in cross section. The leaves are not glaucous. The true stems grow to 1.8 m long. The inflorescence is from conical to narrow-cylindrical in outline, continuous or interrupted. The stems are leafy for most of their length with no extravaginal shoots. The leaf sheaths are densely covered in minute puberulent hairs or minute papillate lumps. Aerial shoots adjacent or up to 1300mm apart. The tufted plants are solitary and grow up to 1300mm in height. The leaves increase in length as they approach the apex of the stems. The cymules are expanded to contracted with many flowers. The perianth are very pale to mid-blue
Wildlife:
Dianella caerulea fruits are eaten by possums, native rats and are a favourite fruit of Cat Birds, Bower Birds and small Honey Eaters like the lewin honeyeater, Meliphaga lewinii.
It was also a staple part of the Australian Aborigines and first Europeans diet.
The leaves are eaten by the larvae of Metura elongatus’s moth.
Cultivation:
Dianella caerulea is a beautiful small tussock plant that deserves a place in every native or exotic garden. It is ideal in almost every setting near ponds, at the edge of a rainforest in courtyards, around swimming pools, in the orchard or the rockery. Dianella will break up horizontal lines with its strap like leaves and the slender flower stalks and pretty purple blue flowers. There are many hybrids and varieties in nurseries to select from, including dwarf forms which grow to 300mm in height through to giants which will grow to over 2 meters in height.
If it is placed around a pool or sunny courtyard try to plant 3, 4 or 5 in a straight row for a very formal look or use curves for the natural look. In a corner the solitary plants can be planted in groups of 3 or 5 to great effect. A simplistic but effective method would be to plant various varieties in the clump with smaller varieties to the front and taller varieties at the back. The choice of companion plants with bright yellow to cream flowers will contrast the deep purples beautifully. It would not matter whether fine or large leaf plants are used provided it is a pale green or lime green for an all year contrast. Small or procumbent Hibbertia species like Hibbertia aspera or Hibbertia accuminata would look great on the ground and give the Dianella species extra height or make a small area look even larger than it really is. The slender vertical growth habit with procumbent plants with yellow flowers would make small walls look longer without necessarily making them look taller.
Its versatility doesn’t stop with accepting all types of soils but they can cope with temperatures as low as minus 7 degrees and up to 42 degrees. It is drought resistant, frost tolerant and can cope with the occasional immersion where periodic down pours may flood the land.
Add to the above, if it is given adequate moisture, plenty of mulch for moisture retention and an even soil temperature, applying native fertilizers on a regular basis the plants will respond with good flowering over a long period and will yield good quality fruit with maximum size. I have always been amazed that Dianella caerulea is still not being farmed commercially for its fruits. The berries have a flavour reminiscent of pears with a mild very mild Eucalyptus taste and are very sweet. It makes a great addition to a fruit salad because of the blue colour.
It often reaches its full potential in just 2 years and flower from the second year. If plants are required for fruit they should be selected for size, flavour, and a lack of seeds or at least as fewer seeds as possible. Once a good plant has been found propagation should be done by division.
Divide the plants every two or three years to keep them vigorous and healthy. This will ensure maximum production in fruit and attractiveness.
The flowers can be used in fresh floral arrangements.
Propagation:
Seeds: Dianella caerulea‘s seeds require treatment before sowing. Seed should be harvested in autumn and placed in the vegetable crisper over winter. The chill factor means better germination of the seeds, otherwise the germination is erratic and often over several years. Sow chilled seeds directly into a seed raising mix and cover with 5mm of the mix once the weather has warmed and all the frosts have passed. When the seedlings are 25mm to 50mm tall, prick them out and plant them into 50mm native tubes using a seed raising mix.
Once the seedlings reach 150mm to 200mm in height plant them out into their permanent position. Mass plantings can be achieved with spacing of 1 meter to 2 meters. When planting for the fruit in an orchard plant the seedlings at 2meter to 3 meters spacing depending upon the size of the parent plant, so easy harvesting and maintenance can take place.
Division: When growing from divisions remove the plant from the soil and just cut it into 3 or 4 equal parts, first down the middle then halve those sections again. Remove unwanted dead leaves and any old small clumps that look weak or dead. Plants can be divided further but ensure each division has a strong shoot and healthy roots attached to the tuff. Replant ensuring the soil is at the same level as before. Water and fertilize. New shoots will appear within two weeks.
Plants can be grown by digging up patches and just cutting into 4 sections. Replant into a shallow saucer made in the ground, cover with 5mm to 10mm of sand and water every second day until the new shoots appear.
Fertilize using seaweed, fish emulsion or organic chicken pellets soaked in water on an alternate basis. Fertilize every two months until the plants are established then annually in early September to October to maintain health, vitality and better flowering.
Further Comments from Readers:
Hi reader, it seems you use The Bible of Botany a lot. That’s great as we have great pleasure in bringing it to you! It’s a little awkward for us to ask, but our first aim is to purchase land approximately 1,600 hectares to link several parcels of N.P. into one at The Pinnacles NSW Australia, but we need your help. We’re not salespeople. We’re amateur botanists who have dedicated over 30 years to saving the environment in a practical way. We depend on donations to reach our goal. If you donate just $5, the price of your coffee this Sunday, We can help to keep the planet alive in a real way and continue to bring you regular updates and features on Australian plants all in one Botanical Bible. Any support is greatly appreciated. Thank you.
In the spirit of reconciliation we acknowledge the Bundjalung, Gumbaynggirr and Yaegl and all aboriginal nations throughout Australia and their connections to land, sea and community. We pay our respect to their Elders past, present and future for the pleasures we have gained.
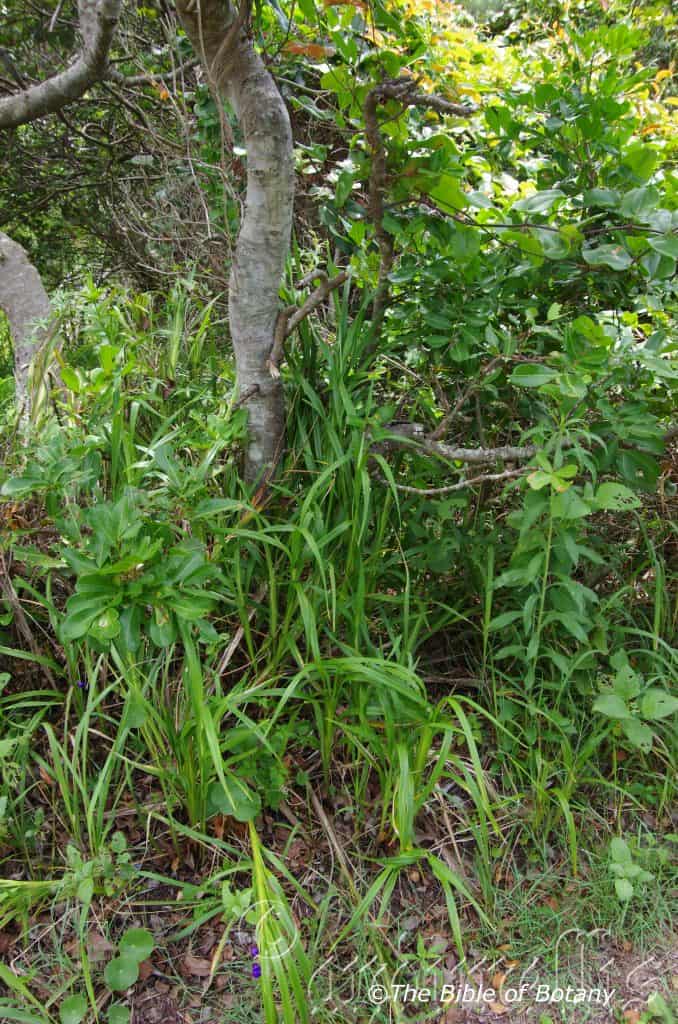
Boorkoom Yuyaigir National Park NSW

Boorkoom Yuyaigir National Park NSW
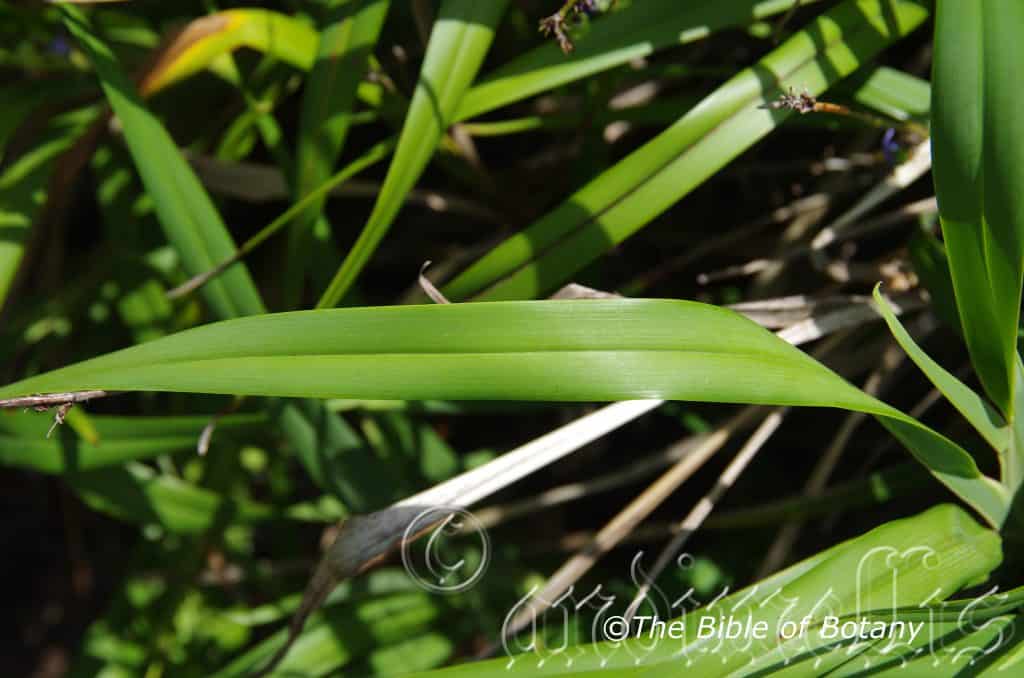
Coffs Harbour NSW
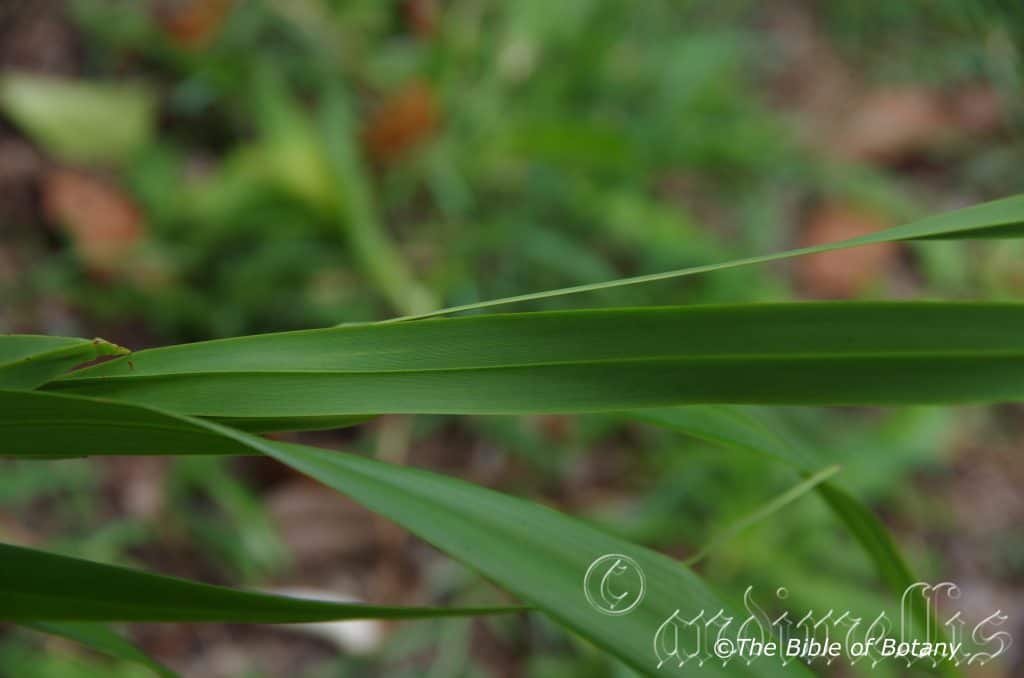
Coffs Harbour NSW

Coffs Harbour NSW
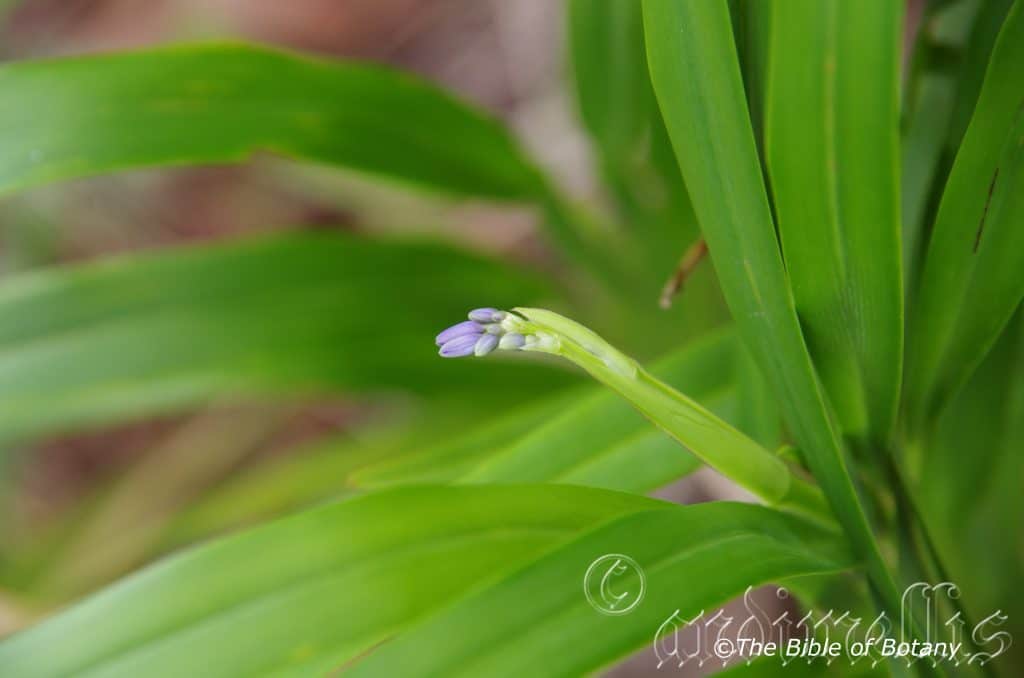
Coffs Harbour NSW
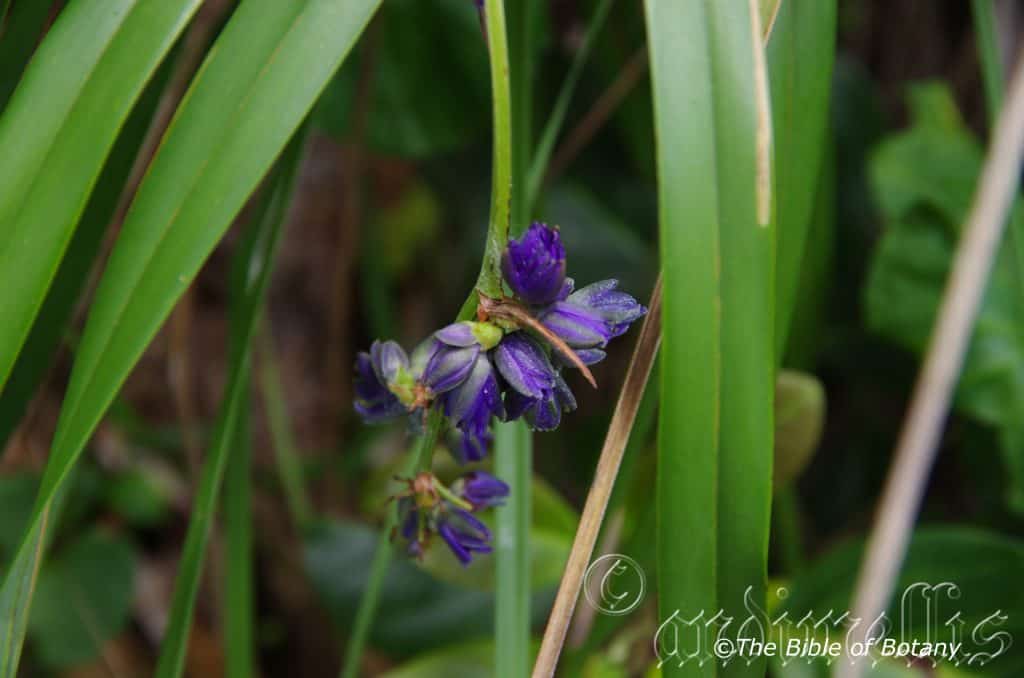
Coffs Harbour NSW
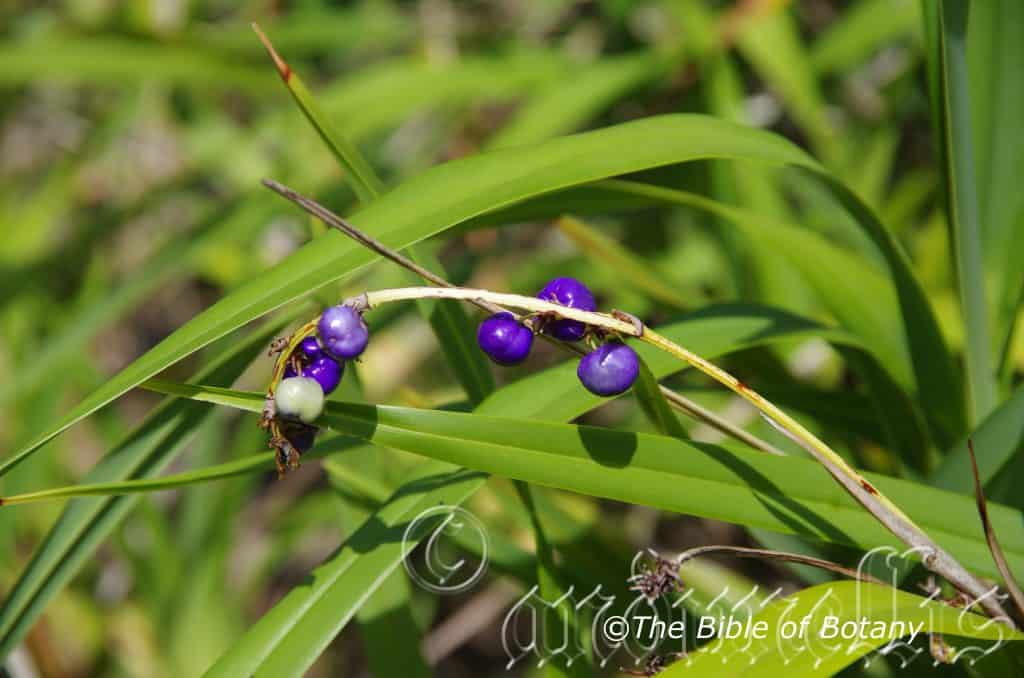
Coffs Harbour NSW
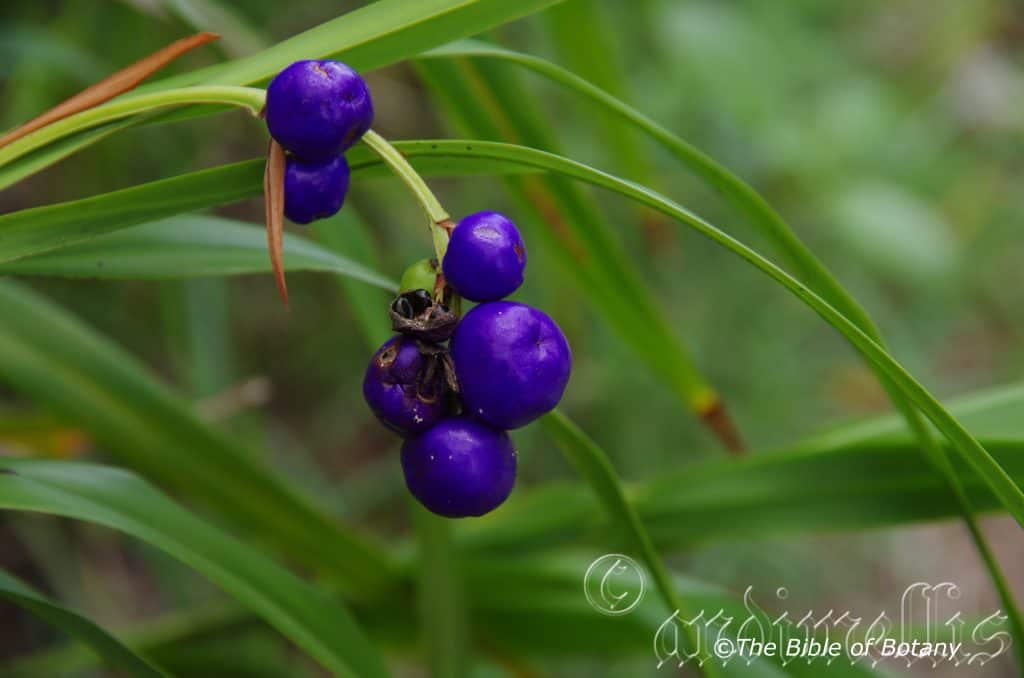
Boorkoom Yuyaigir National Park NSW
Dianella congesta
Classification
Unranked: Monocot
Order: Asparagales
Family: Xanthorrhoeaceae
Subfamily: Hemerocallidaceae
Genus: From Diana, which is Latin for the virginal goddess of the hunt, moon and protector of small wildlife and Elle, which is Latin suffix for petite, fine or diminitive.
Species: From Com/Con, which is Greek/Latin for to come together or with and Genus, which is Latin for a kind or type. It refers to flowers and/or fruits, which are more tightly packed along the spikes than other species in the genus.
Common Name: Beach Flax or Coastal Flax Lily.
Distribution:
Dianella congesta is restricted to the coastal strip from Fraser Island and the Burrum Coast National Park in coastal southern Queensland and to Bawley Point in coastal central New South Wales. There are several isolated populations in far north Queensland including Cairns, Cedar Bay National Park, Wenlock River Swamps and Bamaga all on Cape York Peninsula.
https://avh.ala.org.au/occurrences/search?taxa=Dianella+congesta#tab_mapView
Habitat Aspect Climate:
Dianella congesta prefer full sun to light dappled shade. It usually grows adjacent to coastal wallums including littoral rainforests, back dunes and frontal dunes. Its altitude ranges from 5 meters ASL to 30 meters ASL.
The temperatures range from 1 degree in August to 38 degrees in January.
The rainfall ranges from lows of 1150mm to 3000mm average per annum.
Soil Requirements:
Dianella congesta prefers fine sandy loams, light gravelly clays or peaty sands. The soils are derived from accumulated sands along the coast or decomposed coastal sandstones. The soils pH ranges from 4.5pH to 7.5pH. It is not tolerant of waterlogged however it can handle annually high water tables. Non saline soils to very saline soils are tolerated.
Height & Spread:
Wild Plants: 0.6m to 1m by 0.6m to 20m.
Characteristics:
Dianella congesta grows as a tufted grass like plant. The stems are thin reddish cream to green and glabrous. Young leading shoots are light green to cream. The plants have a fibrous root system.
Dianella congesta is a very variable species with dark green linear leaves that measure 200mm to 450mm in length by 10mm to 15mm in width. The petiole is conduplicate and completely occluded. The apex is tapering to narrow acute. The discolourous laminas are deep green, glabrous and dull to semi glossy on the upper laminas while the lower laminas are much paler to almost glaucous green. The midrib on the lower lamina is glabrous, rough or scabrous. The leaf margins are entire, finely toothed or coarsely toothed.
Inflorescences of Dianella congesta are born as a cyme or helicoid cyme with 2 to 8 flowers on a cymule. The cymes arise from the center of the plants and measure 0.8 meter to 1 meter in height. The pale blue to deep purple-blue flowers measure 17mm to 19mm in diameter. The 3 outer tepals are narrow elliptical with acute apexes. The outer tepals measure 7.5mm to 8.5mm in length by 3mm to 3.5mm in width. The 3 inner tepals are narrow elliptical with acute apexes. The inner tepals measure 5mm to 7mm in length by 2mm to 2.5mm in width at the base. There are 5 to 7 veins running the length of the tepal. The divaricate tepals become strongly reflex as the flowers mature.
The white filaments have a 1mm to 1.5mm diameter yellow swelling at the apex. The 6 filaments are attached to the base and side of the ovary for about two thirds of their length. The white section of the filament measures 1.5mm to 1.8mm in length. The pale yellow-brown to orange-brown, basifixed anthers are long conical and measure 3mm to 4mm in length.
The pale dull lime green trigonous ovary measures 2mm to 2.2mm in diameter. The white style measures 5mm to 6mm in length. Dianella caerulea flowers over a long period starting in late September and finishing in late February.
The fruits of Dianella congesta are berries. The berries are round to obovate and measure 6mm to 12mm in length by 5mm to 10mm in diameter. The grass-green berries turn pale blue to deep purple when ripe. The flesh is white and contains 6 to 14 shiny black seeds in each fruit. The tepals are persistent at the base of the berries. The black glossy seeds are glabrous and measure 3mm to 3.5mm in length by 2mm to 2.5mm in diameter.
Wildlife:
Dianella congesta fruits are eaten by possums, native rats and are a favourite fruit of Cat Birds, Bower Birds and small Honey Eaters.
It was also a staple part of the Australian Aborigines and first Europeans diet. Note some Dianella species are somewhat toxic so should be consumed in small quantities or avoided all together. This species is not toxic.
Cultivation:
Dianella congesta is a beautiful small tussock plant that deserves a place in every native or exotic garden. It is ideal in almost every setting near ponds, at the edge of a rainforest in courtyards, around swimming pools, in the orchard or the rockery where large areas are needed to be covered. Dianella congesta will break up horizontal lines with its strap like leaves and the slender flower stalks and pretty purple blue flowers. Cultivated plants grow from 300mm to 800mm in height when grown in the open. Dianella congesta is best suited to pure sand to sandy loams. It is slow to establish on clay and will not form the large mats which is a part of its character on sand.
Its versatility doesn’t stop with accepting most types of soils but it can cope with temperatures as low as minus 7 degrees and up to 42 degrees. It is drought resistant and can cope with the occasional immersion where periodic down pours may flood the land. It is neat self-cleaning and are easily controlled within a border even those that grow in large mats.
Add to the above, if it is given adequate moisture, plenty of mulch for moisture retention and an even soil temperature, applying native fertilizers on a regular basis the plants will respond with good flowering over a longer period and will yield good quality fruit with maximum size.
The berries have a flavour reminiscent of pears with a mild very mild Eucalyptus taste and are very sweet but much drier than other specie in this genus.
It often reaches its full potential in just 3 years and flower from the second year. The flowers can be used in fresh floral arrangements.
Propagation:
Seeds: Dianella congesta‘s seeds require treatment before sowing. Seed should be harvested in autumn and placed in the vegetable crisper over winter. The chill factor means better germination of the seeds, otherwise the germination is erratic and often over several years. Sow chilled seeds directly into a seed raising mix and cover with 5mm of the mix once the weather has warmed and all the frosts have passed. When the seedlings are 25mm to 5 mm tall, prick them out and plant them into 50mm native tubes using a seed raising mix.
Once the seedlings reach 150mm to 200mm in height plant them out into their permanent position. Mass plantings can be achieved by planting them at 1 meter to 2 meters.
Division: When growing from divisions remove the plant from the soil and just cut it into 3 or 4 equal parts, first down the middle then halve those sections again. Remove unwanted dead leaves and any old small clumps that look weak or dead. Plants can be divided further but ensure each division has a strong shoot and healthy roots attached to the tuff. Replant ensuring the soil is at the same level as before. Water and fertilize. New shoots will appear within two weeks.
Plants can be grown by digging up patches and just cutting into 4 sections. Replant into a shallow saucer made in the ground, cover with 5mm to 10mm of sand and water every second day until the new shoots appear.
Fertilize using seaweed, fish emulsion or organic chicken pellets soaked in water on an alternate basis. Fertilize every two months until the plants are established then annually in early September to October to maintain health, vitality and better flowering.
Further Comments from Readers:
Hi reader, it seems you use The Bible of Botany a lot. That’s great as we have great pleasure in bringing it to you! It’s a little awkward for us to ask, but our first aim is to purchase land approximately 1,600 hectares to link several parcels of N.P. into one at The Pinnacles NSW Australia, but we need your help. We’re not salespeople. We’re amateur botanists who have dedicated over 30 years to saving the environment in a practical way. We depend on donations to reach our goal. If you donate just $5, the price of your coffee this Sunday, We can help to keep the planet alive in a real way and continue to bring you regular updates and features on Australian plants all in one Botanical Bible. Any support is greatly appreciated. Thank you.
In the spirit of reconciliation we acknowledge the Bundjalung, Gumbaynggirr and Yaegl and all aboriginal nations throughout Australia and their connections to land, sea and community. We pay our respect to their Elders past, present and future for the pleasures we have gained.
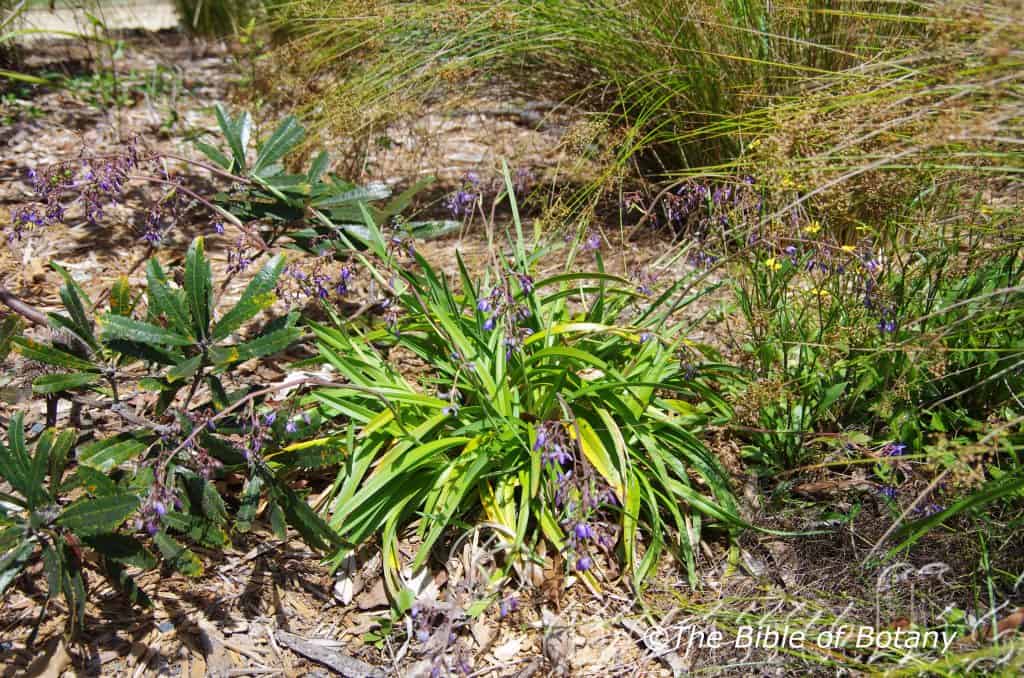
NCBG Coffs Harbour NSW
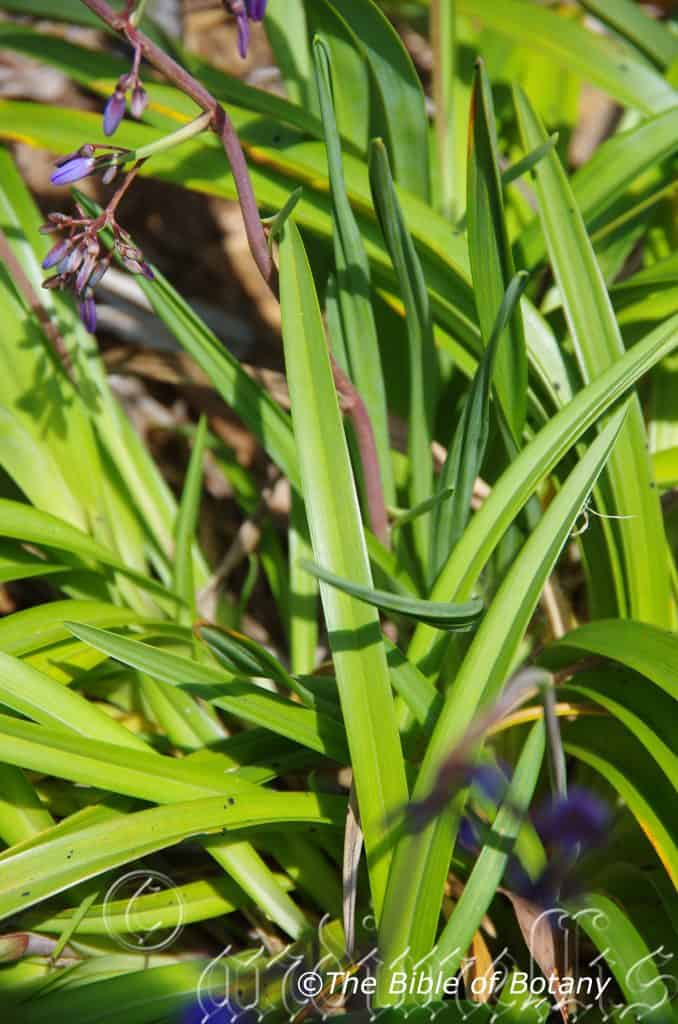
NCBG Coffs Harbour NSW
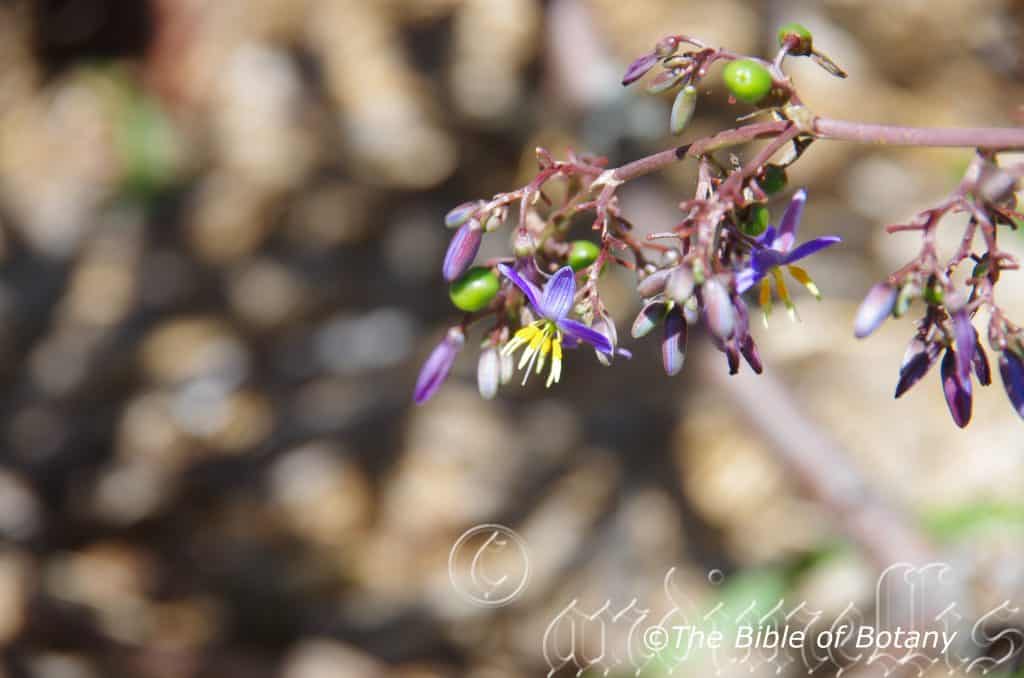
NCBG Coffs Harbour NSW
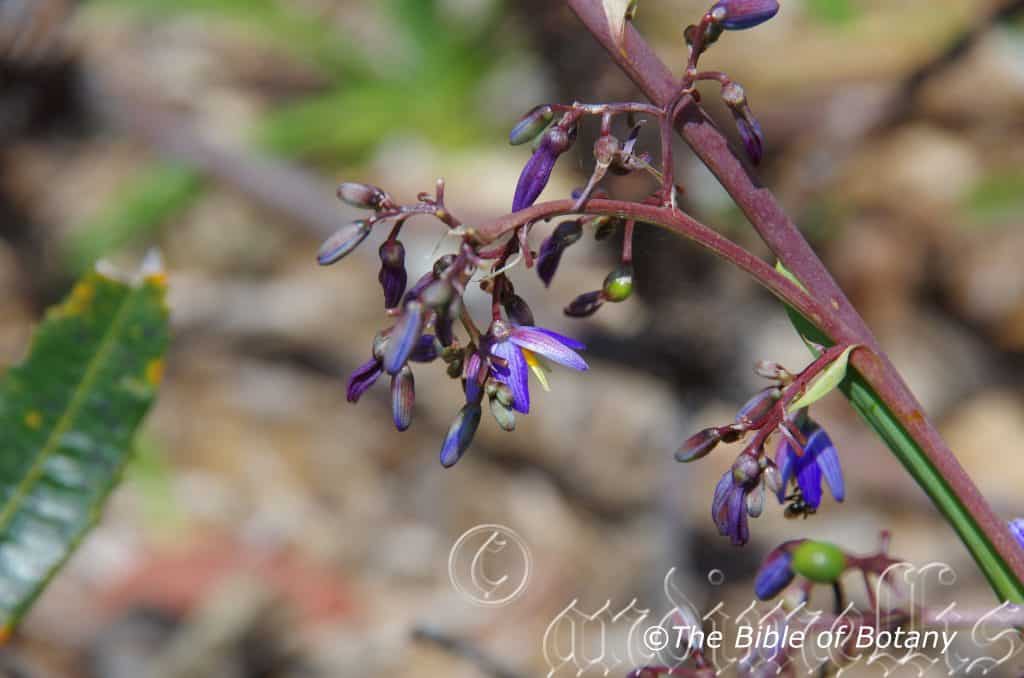
NCBG Coffs Harbour NSW
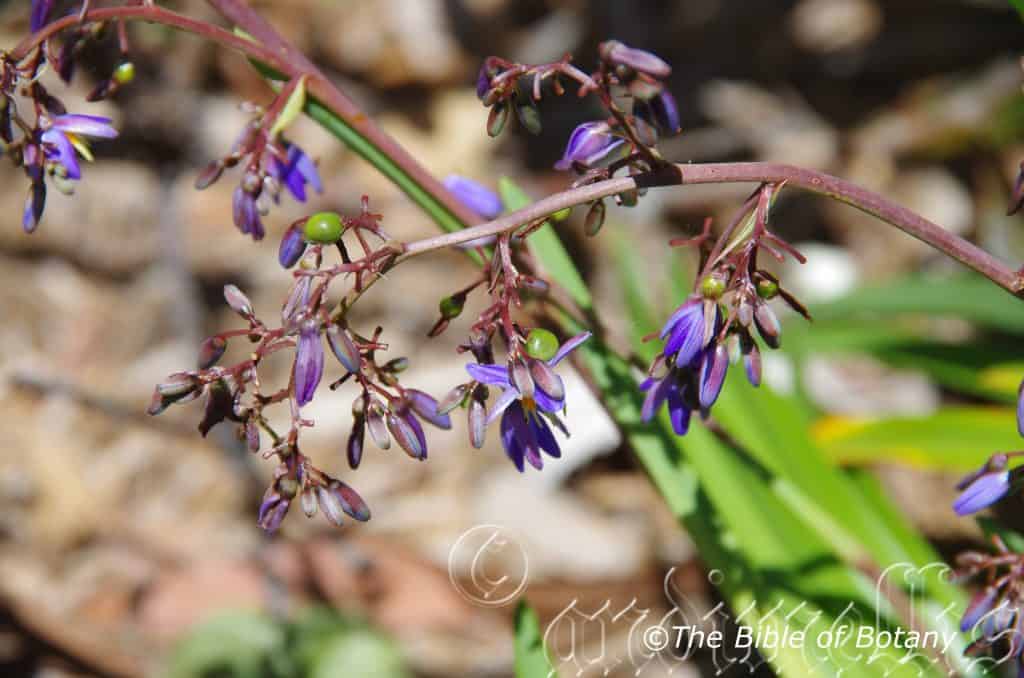
NCBG Coffs Harbour NSW
Dianella crinoides
Classification
Unranked: Monocot
Order: Asparagales
Family: Xanthorrhoeaceae
Subfamily: Hemerocallidaceae
Genus: FFrom Diana, which is Latin for the virginal goddess of the hunt, moon and protector of small wildlife and Elle, which is Latin suffix for petite, fine or diminitive.
Species: From Crinatum, which is Latin for long hair and Eidos/Oides, which is Ancient Greek for alike or similar to. It refers to plants, which have a lot of long, silky hairs.
Common Name:
Distribution:
Daniela crinoides is restricted to the coastal strip in several disjunction populations from Molle Islands National Park to the South Cumberland Islands National Park, Byfield National Park to the Narrows, the Keppel Bay National Park and south Fraser Island in coastal Queensland south to Bermagui in coastal central New South Wales.
https://avh.ala.org.au/occurrences/search?taxa=Dianella+crinoides#tab_mapView
Habitat:
Aspect / Climate:
Dianella crinoides prefer full sun to light dappled shade. It usually grows adjacent to coastal wallums including littoral rainforests, back dunes, frontal dunes, estuaries and adjacent to and sandy mangrove swamps. The altitude ranges from 5 meters ASL to 30 meters ASL.
The temperatures range from 1 degree in August to 38 degrees in January.
The rainfall ranges from lows of 1150mm to 3000mm average per annum.
Soil Requirements:
Dianella crinoides prefers coarse sands, fine sands, peaty sands or light silts to medium silts. The soils are derived from accumulated sands along the coast or alluvial deposits along estuaries. The soils pH ranges from 5pH to 7.5pH. It is tolerant of waterlogged soils and high water tables. Non saline soils to very saline soils are tolerated.
Height & Spread:
Wild Plants: 0.5m to 0.8m by 0.3m to 1m
Characteristics:
Dianella crinoides grows as a tufted grass like plant that measure 200mm in diameter near the base. The stems are thin reddish cream to green and glabrous. Young leading shoots are light green to cream. The plants have a fibrous root system.
Dianella crinoides long, linear leaves measure 400mm to 700mm in length by 6mm to 18mm in width. The leaf sheath is occluded about less than 50mm of its length. The apex is tapering to narrow acute. The concolourous or slightly discolourous laminas are deep grass-green to sea green and glabrous on the upper laminas and similar or slightly paler on the lower laminas. The midrib is strongly keeled on the lower lamina while the 5 to 7 longitudinal parallel veins are very conspicuous. The leaf margins are entire, finely toothed or coarsely toothed.
Inflorescences of Dianella crinoides are born as a cyme or helicoid cyme with 5 to 15 tightly packed flowers on a cymule. The cymes arise from the center of the plants and measure 0.6 meter to 0.9 meter in height. The mid purple-blue to deep purple-blue flowers measure 17mm to 21mm in diameter. The 3 outer tepals are narrow elliptical with acute apexes. The outer tepals measure 7.5mm to 9.5mm in length by 3.5mm to 4mm in width. There are 5 to 9 veins running the length of the tepal. The 3 inner tepals are narrow elliptical with acute apexes. The inner tepals measure 7mm to 8.5mm in length by 3mm to 3.5mm in width. There are 3 to 5 veins running the length of the tepal. The divaricate tepals become strongly reflexed as the flowers mature.
The white filaments have a twist near the apex and a 1.3mm to 2mm long deep yellow to yellow-orange swelling at the apex. The 6 filaments are attached to the base and side of the ovary for about two thirds of their length. The white section of the filament measures 1.5mm to 2mm in length. The pale creamy yellow-green to yellow-green, basifixed anthers are long conical and measure 2.5mm to 3mm in length.
The pale dull lime green trigonous ovary measures 1mm to 1.5mm in length by 1.5mm to 2mm diameter. The white style measures 2.5mm to 4mm in length. Dianella caerulea flowers over a long period starting in late September and finishing in late February.
The fruits of Dianella crinoides are orbicular berries. The berries measure 6mm to 8mm in length by 6mm to 18mm in diameter. The grass-green berries turn glossy, deep purple when ripe. The flesh is white and contains 6 to 12 glossy black seeds in each fruit. The tepals are persistent at the base of the berries. The seeds are glabrous and measure 2.5mm to 3mm in length by 1.8mm to 2mm in diameter.
Wildlife:
Dianella congesta fruits are eaten by possums, native rats and are a favourite fruit of Cat Birds, Bower Birds and small Honey Eaters.
Note some Dianella species are somewhat toxic so should be consumed in small quantities or avoided all together. This species edibility is unknown to the author.
Cultivation:
Dianella crinoides is a beautiful small tussock plant that deserves a place in every native or exotic garden. It is ideal in almost every setting near ponds, at the edge of a rainforest in courtyards, around swimming pools, in the orchard or the rockery. Dianella crinoides will break up horizontal lines with its strap like leaves and the slender flower stalks and pretty purple blue flowers. This is good compact specie for smaller areas that does not form mats. It grows from 300mm to 600mm in height by 150mm to 250mm in diameter at the base and foliage spread of around 800mm when grown in the open.
Placed around a pool or sunny courtyard 3, 4 or 5 in a straight row for a very formal look or use curves for the natural look. In a corner the solitary plants can be planted in groups of 3 or 5 to great effect. A simplistic but effective method would be to plant various varieties in the clump with smaller varieties to the front and taller varieties at the back. The choice of companion plants with bright yellow to cream flowers will contrast the deep purples beautifully. It would not matter whether fine or large leaf plants are used provided it is a pale green or lime green for an all year contrast. Small or procumbent Hibbertia species would look great on the ground and give Dianella crinoides extra height or make a small area look even larger than it really is. The slender vertical growth habit with procumbent plants with yellow flowers would make small walls look longer without necessarily making them look taller.
Its versatility doesn’t stop with accepting most types of soils but they can cope with temperatures as low as minus 4 degrees and up to 42 degrees. It is drought resistant and can cope with the occasional immersion where periodic down pours may flood the land. It is a neat self-cleaning and are easily controlled within a border even those that grow in large mats.
Add to the above, if it is given adequate moisture, plenty of mulch for moisture retention and an even soil temperature, applying native fertilizers on a regular basis the plants will respond with good flowering over a long period and will yield good quality fruit with maximum size. I have always been amazed that Dianella caerulea is still not being farmed commercially. The berries have a flavour reminiscent of pears with a mild very mild Eucalyptus taste and are very sweet. It makes a great addition to a fruit salad because of the blue colour.
In just 3 years it will reach its full potential and flower from the second year. If plants are required for fruit they should be selected for size, flavour, and a lack of seeds or at least as fewer seeds as possible. Once a good plant has been found propagation should be done by division.
Divide the plants every two or three years to keep them vigorous and healthy. This will ensure maximum production in fruit and attractiveness. The flowers can be used in fresh floral arrangements.
Propagation:
Seeds: Dianella crinoides‘s seeds require treatment before sowing. Seed should be harvested as soon as the fruits begin to shrivel. Clean the flesh off the seeds. The abrasion method has proven very successful. This involves rubbing the seeds gently between two sheets of very fine sandpaper to reduce the thickness of the seed coat. What we did with Dianella caerulea if there were large numbers of seeds to do is a glue sheet of medium corundum to the inside surfaces of a small disposable container. Place the seeds into the container and shake the container vigorously for several minutes. Check to see if the coating has been partially removed.
Sow freshly treated seeds directly into a seed raising mix and cover with 2mm of the mix once the weather has warmed and all the frosts have passed. When the seedlings are 25mm to 50 mm tall, prick them out and plant them into 50mm native tubes using a seed raising mix.
Once the seedlings reach 150mm to 200mm in height plant them out into their permanent position. Mass plantings can be achieved with spacing of 1 meter to 2 meters. When planting for the fruit in an orchard plant the seedlings at 2meter to 3 meters spacing depending upon the size of the parent plant, so easy harvesting and maintenance can take place.
Division: When growing from divisions remove the plant from the soil and just cut it into 3 or 4 equal parts, first down the middle then halve those sections again. Remove unwanted dead leaves and any old small clumps that look weak or dead. Plants can be divided further but ensure each division has a strong shoot and healthy roots attached to the tuff. Replant ensuring the soil is at the same level as before. Water and fertilize. New shoots will appear within two weeks.
Plants can be grown by digging up patches and just cutting into 4 sections. Replant into a shallow saucer made in the ground, cover with 5mm to 10mm of sand and water every second day until the new shoots appear.
Fertilize using seaweed, fish emulsion or organic chicken pellets soaked in water on an alternate basis. Fertilize every two months until the plants are established then annually in early September to October to maintain health, vitality and better flowering.
Further Comments from Readers:
Hi reader, it seems you use The Bible of Botany a lot. That’s great as we have great pleasure in bringing it to you! It’s a little awkward for us to ask, but our first aim is to purchase land approximately 1,600 hectares to link several parcels of N.P. into one at The Pinnacles NSW Australia, but we need your help. We’re not salespeople. We’re amateur botanists who have dedicated over 30 years to saving the environment in a practical way. We depend on donations to reach our goal. If you donate just $5, the price of your coffee this Sunday, We can help to keep the planet alive in a real way and continue to bring you regular updates and features on Australian plants all in one Botanical Bible. Any support is greatly appreciated. Thank you.
In the spirit of reconciliation we acknowledge the Bundjalung, Gumbaynggirr and Yaegl and all aboriginal nations throughout Australia and their connections to land, sea and community. We pay our respect to their Elders past, present and future for the pleasures we have gained.

Greening Australia Norman Park Qld.
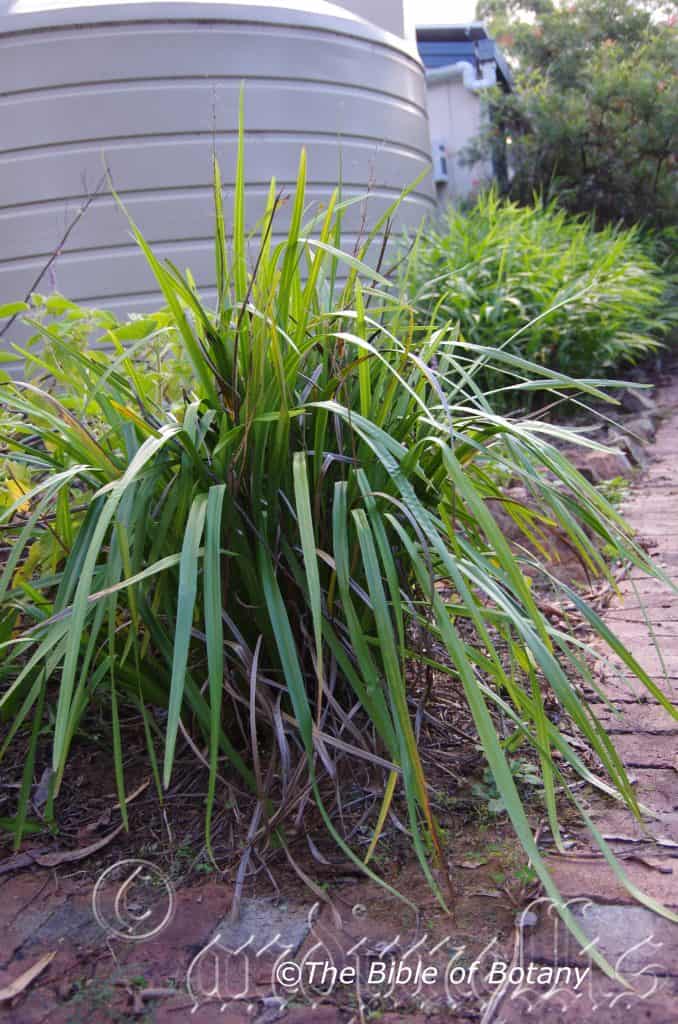
Author’s Garden The Pinnacles NSW
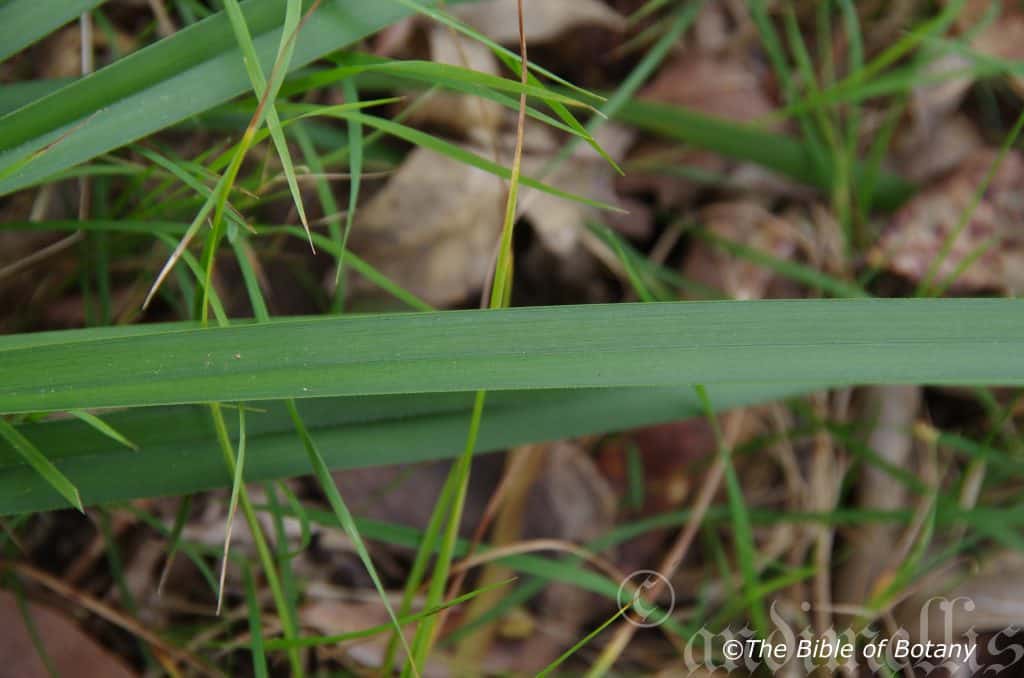
Author’s Garden The Pinnacles NSW
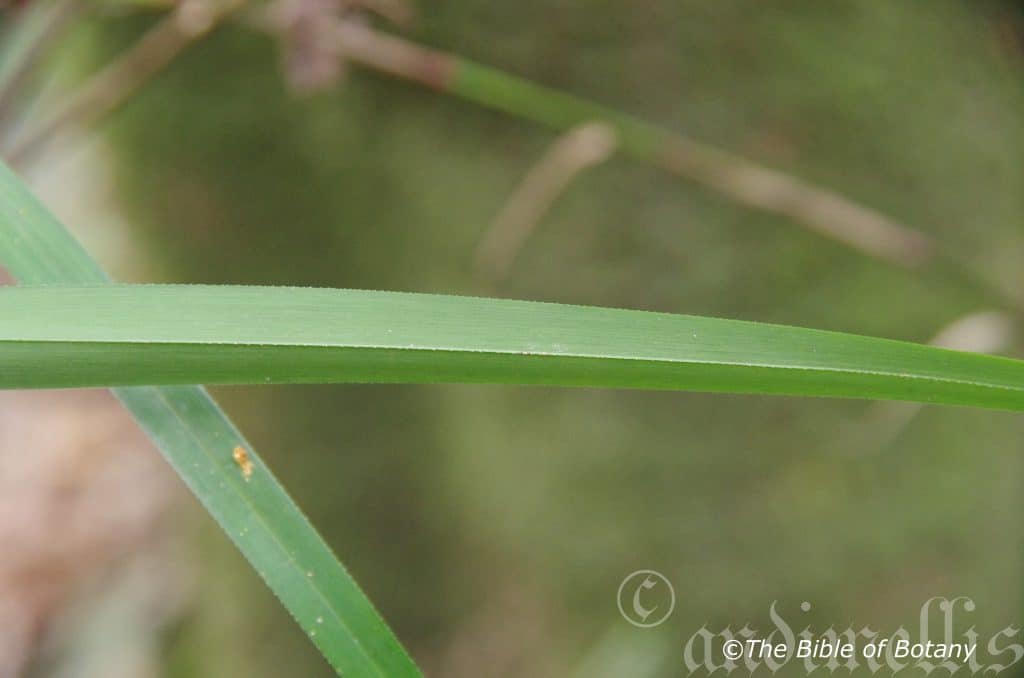
Author’s Garden The Pinnacles NSW
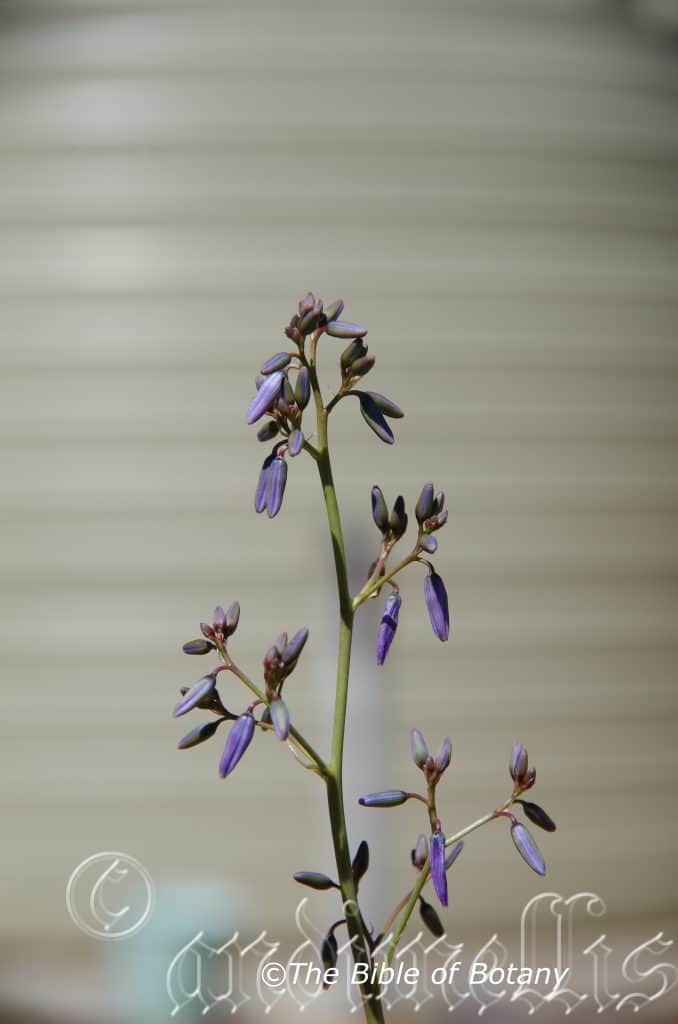
Author’s Garden The Pinnacles NSW
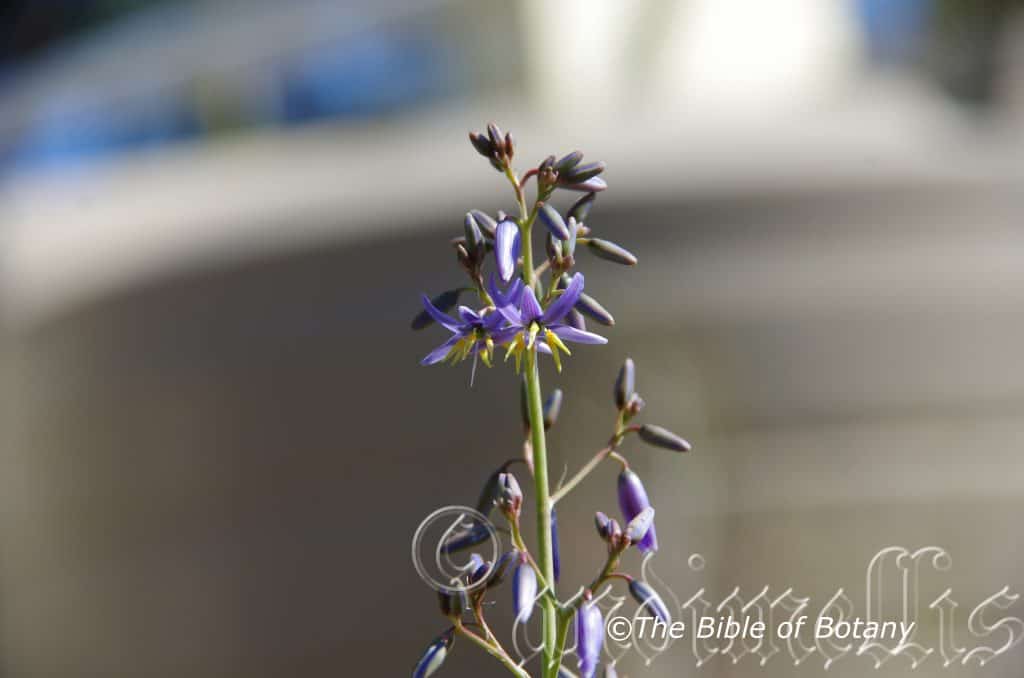
Author’s Garden The Pinnacles NSW
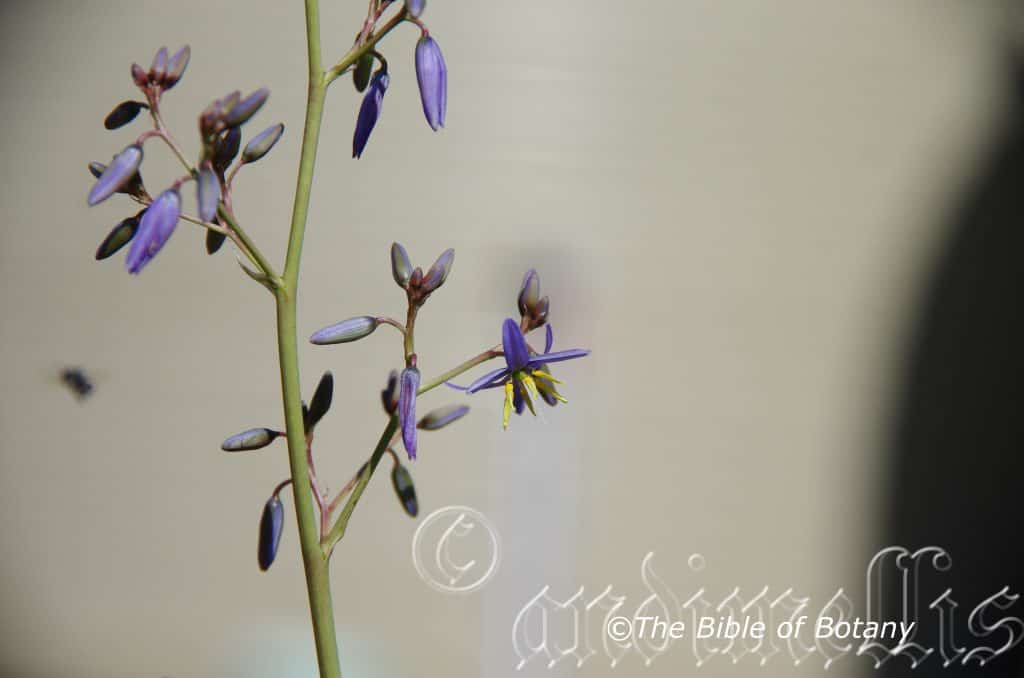
Author’s Garden The Pinnacles NSW
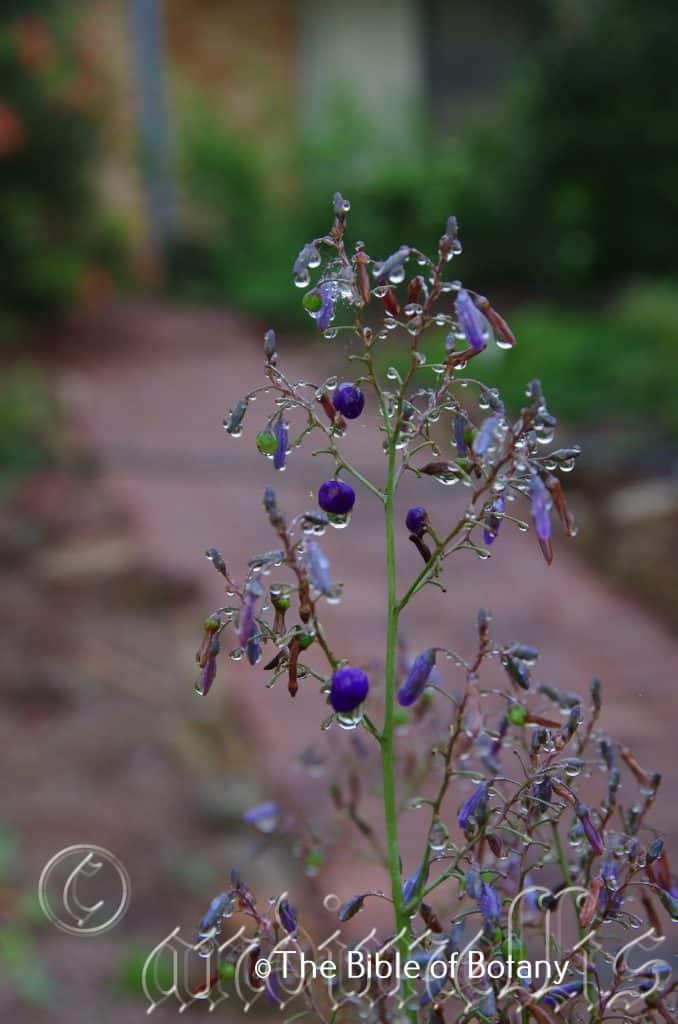
Author’s Garden The Pinnacles NSW
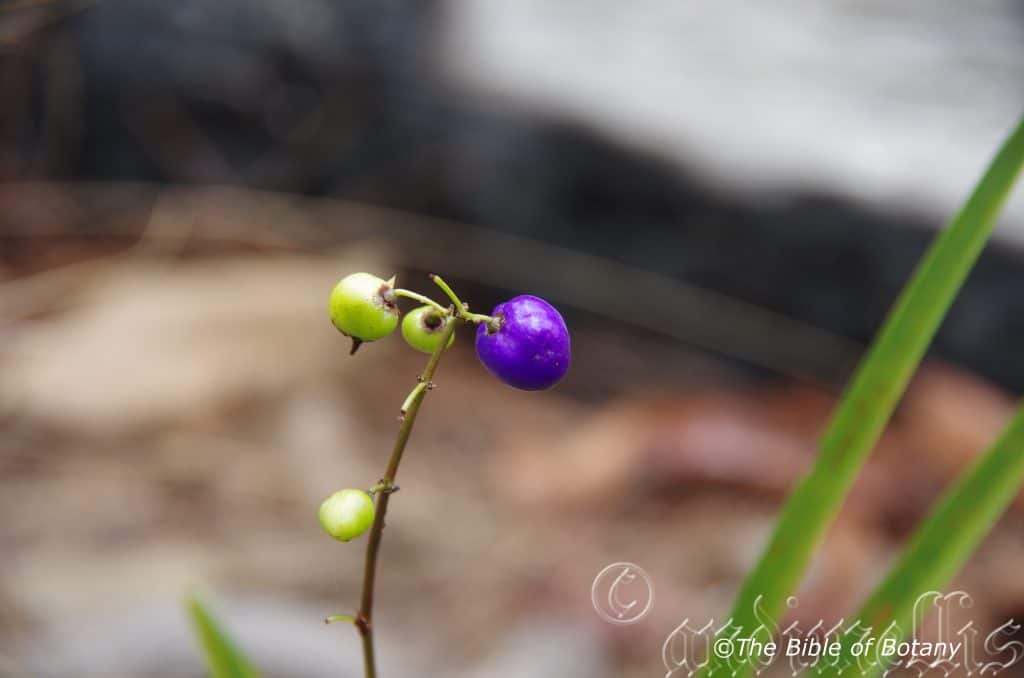
Author’s Garden The Pinnacles NSW
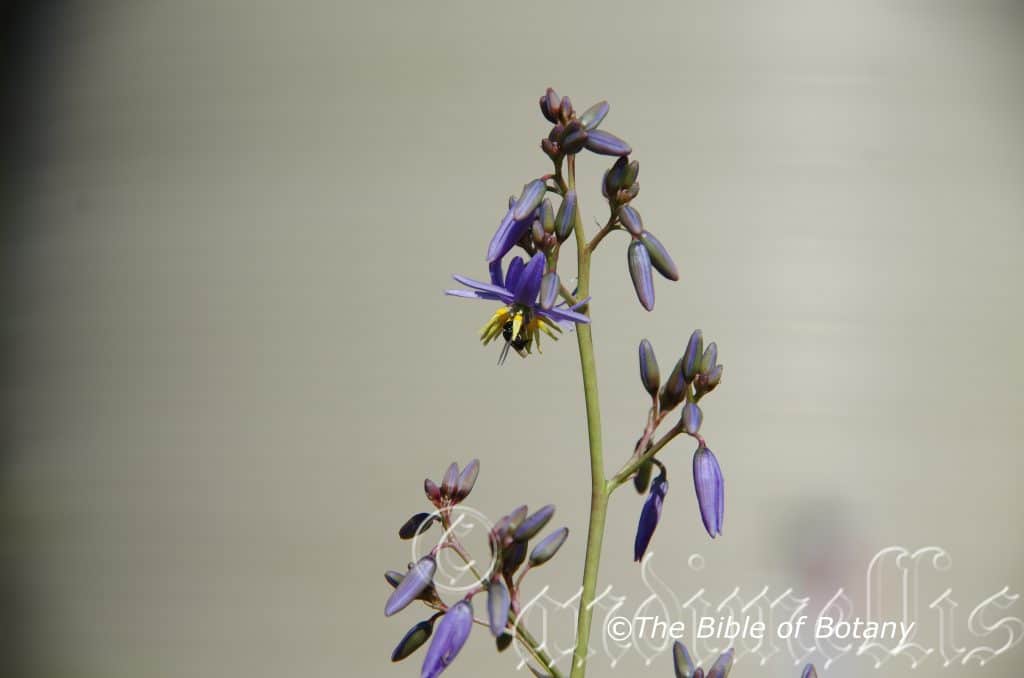
Author’s Garden The Pinnacles NSW
Dianella longifolia
Classification
Unranked: Monocot
Order: Asparagales
Family: Xanthorrhoeaceae
Subfamily: Hemerocallidaceae
Genus: From Diana, which is Latin for the virginal goddess of the hunt, moon and protector of small wildlife and Elle, which is Latin suffix for petite, fine or diminitive.
Species: From Longitia/Longus, which is Latin for long in length and Folium, which is Latin for foliage. It refers to leaves, which are long and strap like.
Subspecies: Dianella longifolia subsp. aspera. From Asper, which is Ancient Greek for rough. It refers to surfaces, which are rather rougher than other sub species.
Subspecies: Dianella longifolia subsp. fragrans From Fragrantia, which is Latin for fragrant. It refers to the flowers, which have a sweet scent.
Subspecies: Dianella longifolia subsp. grandis.From Grandis which is Latin for large and spectacular. It refers to plants, which are rather larger and more spectacular than the other sub species.
Subspecies: Dianella longifolia subsp. humilis From Humilius, which is Latin for to be humble or the lowest. It refers to plants, which are low growing or do not gain as much attention as the other sub species.
Subspecies: Dianella longifolia subsp. laevis From Laevis, which is Latin for polished smooth and Nodosus, which is Latin for a joint or swelling. It refers to the structures or organs, which are much smoother than the other sub species.
Subspecies: Dianella longifolia subsp. longifolia. From Longitia/Longus, which is Latin for long in length and Folium, which is Latin for foliage. It refers to leaves, which are long and strap like.
Subspecies: Dianella longifolia subsp. porracea.From Porrectus, which is Latin for leek green. It refers to leaves, which are a deeper leek green in colour than the other sub species.
Subspecies: Dianella longifolia subsp. rara. From Rarus which is Latin for uncommon. It refers to plants, which are rarer than the other sub species.
Subspecies: Dianella longifolia subsp. stenophylla.From Stenos, which is Ancient Greek for narrow and Phullon/Phyllon, which is Ancient Greek for a leaf. It refers to leaves, which are narrower on this species compared to other sub species in the species.
Common Name: Blueberry Flax Lily or Blue Flax Lily.
Distribution:
Dianella longifolia is widespread from the Kymberley Ranges in north western Western Australia across the top end to Groote Eyelandt in the Northern Territory. In the east it is found west from the coast and south from the Torres Strait Islands to Weipa south to Bourke in north western New South Wales.
It is found in a south westerly direction to Port Augusta and south to Victor Harbour. There is an isolated population near the Serpentine Lakes on the border of South Australia and Western Australia.
It is also found on King Island and the eastern half of Tasmania.
https://avh.ala.org.au/occurrences/search?taxa=Dianella+longifolia#tab_mapView
Habitat Aspect Climate:
Dianella longifolia prefers full sun to light dappled shade. It grows adjacent on coastal hills to semi-arid areas in open woodlands, open dry sclerophyll forests and along river and creek riparian zones further to the west. Its altitude ranges from 5 meters ASL to 810 meters ASL.
The temperatures range from minus 4 degrees in August to 42 degrees in January.
The rainfall ranges from lows of 50mm to 3000mm average per annum.
Soil Requirements:
Dianella longifolia prefers sandy loams to heavy clays. The soils are derived from most types of parent rocks. The soils pH ranges from 4.5pH to 7.5pH. It is not tolerant of waterlogged however it is often inundated for short periods. Non saline soils to very saline soils are tolerated.
Height & Spread:
Wild Plants: 0.5m to 0.8m by 0.3m to 1m
Characteristics:
Dianella longifolia grows as a tufted lily like plants with a base to around 500mm in diameter. The stems are sub erect, green to glaucous, pale brown to purplish, and glabrous at the base. Young leading shoots are light green to cream.
Dianella longifolia subsp. longifolia have a fleshy to fibrous root system.
Dianella longifolia subsp. stenophylla have a tuberous root system.
Dianella longifolia subsp. longifolia linear leaves measure 600mm to 800mm in length by 4mm to 25mm in width. The leaf blade and sheath are both narrowing to the zone of occlusion. The leaf sheaths are green or purplish and purplish near the base. The apex is tapering to narrow acute. The leaf lamina is concolourous with a prominent midrib on the lower lamina. The midrib on the lower lamina is strongly recurved glabrous. The leaf margins are entire, finely toothed or coarsely toothed.
Dianella longifolia subsp. stenophylla linear leaves measure 600mm to 800mm in length by 2mm to 4mm in width. The leaf blade and sheath are both narrowing to the zone of occlusion. The leaf sheaths are grey-green or purplish and red near the base. The apex is tapering to narrow acute. The leaf lamina is concolourous with a prominent midrib on the lower lamina. The midrib on the lower lamina is strongly recurved and rough or scabrous. The leaf margins are entire, finely toothed or coarsely toothed.
Inflorescences of Dianella longifolia are born as a cyme or helicoid cyme with 3 to 22 tightly packed flowers on a cymule. The cymes arise from the center of the plants and extend well above the foliage and measure 0.6 meter to 0.9 meter in height. The lilac to mid purple-blue flowers measure 14mm to 21mm in diameter. The 3 outer tepals are narrow elliptical with acute apexes. The outer tepals measure 6mm to 10mm in length by 3.5mm to 4mm in width. There are 5 veins running the length of the tepal. The 3 inner tepals are narrow elliptical with acute apexes. The inner tepals measure 5.5mm to 9mm in length by 3mm to 3.5mm in width. There are 3 veins running the length of the tepal. The divaricate tepals become strongly reflexed as the flowers mature.
The creamy yellow filaments twist like a corkscrew and have a 1.3mm to 2.3mm long bright yellow swelling at the apex. The 6 filaments are attached to the base and side of the ovary for about two thirds of their length. The creamy yellow section of the filament measures 1.5mm to 2mm in length not including the twist. The pale creamy yellow-green to deep yellow, basifixed hastate anthers are long conical and measure 2.8mm to 3.3mm in length.
The pale deep grass-green trigonous ovary measures 1mm to 1.5mm in length by 1.5mm to 2mm diameter. The white style measures 2.5mm to 4mm in length. Dianella longifolia flowers over a long period starting in late September and finishing in late February.
The fruits of Dianella longifolia are orbicular berries. The berries measure 3mm to 8mm in length by 3mm to 7mm in diameter. The grass-green berries turn glossy, deep purple when ripe. The tepals are persistent at the base of the berries. The flesh is white and contains 6 to 12 glossy black seeds in each fruit. The seeds are glabrous and measure 2.8mm to 3.3mm in length by 1.8mm to 2mm in diameter.
Wildlife:
Dianella longifolia fruits are eaten by possums, native rats and are a favourite fruit of Cat Birds, Bower Birds and small Honey Eaters.
It was also a staple part of the Australian Aborigines and first Europeans diet. Note some Dianella species are somewhat toxic so should be consumed in small quantities or avoided all together. This species is not toxic.
Cultivation:
Dianella longifolia is a beautiful medium tussock plant that deserves a place in every native or exotic garden. It is ideal in almost every setting near ponds, at the edge of a rainforest in courtyards, around swimming pools or the large rockery. Dianella longifolia will break up horizontal lines with its strap like leaves and the slender flower stalks and pretty purple blue flowers. In cultivation it will grow from 500mm to 950mm in height by 500mm at the base with a leaf spread of 850mm in diameter.
If it is placed around a pool or sunny courtyard try to plant 3, 4 or 5 in a straight row for a very formal look or use curves for the natural look. In a corner a solitary plant can be planted or placed in groups of 3 or 5 to great effect. A simplistic but effective method would be to plant various varieties in the clump with smaller varieties to the front and taller varieties at the back. The choice of companion plants with bright yellow to cream flowers will contrast the deep purple fruits beautifully. It would not matter whether fine or large leaf plants are used provided they are a pale green or lime green for an all year contrast. Small or procumbent Hibbertia species like Hibbertia aspera or Hibbertia diffusa would look great on the ground and give the Dianella longifolia even more height or make a small area look even larger than it really is. The slender vertical growth habit with procumbent plants with yellow flowers would make small walls look longer without necessarily making them look taller.
Its versatility doesn’t stop with accepting all types of soils but they can cope with temperatures as low as minus 7 degrees and up to 42 degrees. It is drought resistant and can cope with the occasional immersion where periodic down pours may flood the land. It is neat self-cleaning and is easily controlled within a border.
Add to the above, if it is given adequate moisture, plenty of mulch for moisture retention and an even soil temperature, applying native fertilizers on a regular basis the plants will respond with good flowering over a long period and will yield good quality fruit with maximum size. I have always been amazed that Dianella longifolia is still not being farmed commercially. The berries have a flavour reminiscent of pears with a very mild eucalyptus taste and are very sweet. They make a great addition to a fruit salad especially if non seeding forms can be obtained because of the blue colour.
It often reaches its full potential in just 3 years and flower from the second year. If plants are required for fruit it should be selected for size, flavour, and a lack of seeds or at least as fewer seeds as possible. Once a good plant has been found propagation should be done by division.
Fertilize every two months until established. Plants grown for fruit should be fertilized on a twice annual basis in mid-July and again in early November to encourage prolonged flowering and fruiting. We fertilized our plants with the Hoods Blood and Bone, All rock and organic dynamic lifter. (All are certified organic while Hoods B&B is 100mm blood and bone with a higher percentage of blood)
Divide the plants every two or three years to keep them vigorous and healthy. This will ensure maximum production in fruit and attractiveness. The flowers can be used in fresh floral arrangements.
Propagation:
Seeds: Dianella longifolia’s seeds require treatment before sowing. Seed should be harvested as soon as the fruits begin to shrivel. Clean the flesh off the seeds. The abrasion method has proven very successful. This involves rubbing the seeds gently between two sheets of very fine sandpaper to reduce the thickness of the seed coat. What we did with Dianella caerulea if there were large numbers of seeds to do is a glue sheet of medium corundum to the inside surfaces of a small disposable container. Place the seeds into the container and shake the container vigorously for several minutes. Check to see if the coating has been partially removed.
Sow freshly treated seeds directly into a seed raising mix and cover with 2mm of the mix once the weather has warmed and all the frosts have passed. When the seedlings are 25mm to 50 mm tall, prick them out and plant them into 50mm native tubes using a seed raising mix.
Once the seedlings reach 150mm to 200mm in height plant them out into their permanent position. Mass plantings can be achieved with spacing of 1 meter to 2 meters. When planting for the fruit in an orchard plant the seedlings at 2meter to 3 meters spacing depending upon the size of the parent plant, so easy harvesting and maintenance can take place.
Division: When growing from divisions remove the plant from the soil and just cut it into 3 or 4 equal parts, first down the middle then halve those sections again. Remove unwanted dead leaves and any old small clumps that look weak or dead. Plants can be divided further but ensure each division has a strong shoot and healthy roots attached to the tuff. Replant ensuring the soil is at the same level as before. Water and fertilize. New shoots will appear within two weeks.
Plants can be grown by digging up patches and just cutting into 4 sections. Replant into a shallow saucer made in the ground, cover with 5mm to 10mm of sand and water every second day until the new shoots appear.
Fertilize using seaweed, fish emulsion or organic chicken pellets soaked in water on an alternate basis. Fertilize every two months until the plants are established then annually in early September to October to maintain health, vitality and better flowering.
Further Comments from Readers:
Hi reader, it seems you use The Bible of Botany a lot. That’s great as we have great pleasure in bringing it to you! It’s a little awkward for us to ask, but our first aim is to purchase land approximately 1,600 hectares to link several parcels of N.P. into one at The Pinnacles NSW Australia, but we need your help. We’re not salespeople. We’re amateur botanists who have dedicated over 30 years to saving the environment in a practical way. We depend on donations to reach our goal. If you donate just $5, the price of your coffee this Sunday, We can help to keep the planet alive in a real way and continue to bring you regular updates and features on Australian plants all in one Botanical Bible. Any support is greatly appreciated. Thank you.
In the spirit of reconciliation we acknowledge the Bundjalung, Gumbaynggirr and Yaegl and all aboriginal nations throughout Australia and their connections to land, sea and community. We pay our respect to their Elders past, present and future for the pleasures we have gained.
Dianella pavopennacea
Classification
Unranked: Monocot
Order: Asparagales
Family: Xanthorrhoeaceae
Subfamily: Hemerocallidaceae
Genus: From Diana, which is Latin for the virginal goddess of the hunt, moon and protector of small wildlife and Elle, which is Latin suffix for petite, fine or diminitive.
Species: From pavoninus, which is Latin for a peacock. It refers to flowers, which are bright blue and yellow followed by the deep blue-purple fruits, which are very conspicuous like the feathers of a peacock.
Common Name: Paroo Lily or Blue Flax Lily.
Distribution:
Dianella pavopennacea is found south from the tip of Cape York Peninsula to near Innisfail with a population further south near Townsville in the far north coast of Queensland. It is found on both side of The Great Dividing Range.
https://avh.ala.org.au/occurrences/search?taxa=Dianella+pavopennacea#tab_mapView
Habitat Aspect Climate:
Dianella pavopennacea prefers full sun to dappled shade. It grows in low mountain open woodlands, dry Eucalyptus forests, moist Eucalyptus forests or adjacent to littoral rainforests and montane rainforests. Its altitude ranges from 5 meters ASL to 475 meters ASL.
The temperatures range from 10 degrees in July to 38 degrees in January.
The rainfall ranges from lows of 950mm to 3200mm average per annum.
Soil Requirements:
Dianella pavopennacea prefers sandy loams, light gravelly clays to medium clays. The soils are derived from decomposed basalts or shales. The soils pH ranges from 5pH to 7pH. It is not tolerant of waterlogged however it can handle wet soils and occasional inundations. Non saline soils to moderately saline soils are tolerated.
Height & Spread:
Wild Plants: 0.4mm to 1m by 0.6mm to 1m
Characteristics:
Dianella pavopennacea grows as a tufted rush like plant, often forming dense mats over several square meters. Stems are thin reddish cream to green, sigmoidal and glabrous. Young leading shoots are light green or cream. The plants have a white fibrous root system.
Dianella pavopennacea leaves are clustered along the apex half of the stems. The leaves measure 300mm to 550mm in length by 8mm to 15mm in width. The conduplicate petiole measures 60mm to 80mm in length. The sheath measures 50mm to 60mm in length. The apex is tapering to acute. The concolourous laminas are deep grass-green. The midrib is strongly keeled and glabrous on the lower and clearly visible from the upper lamina. The leaf margins are entire.
The inflorescences of Dianella pavopennacea are born as a cyme or helicoid cyme with 5 to 20 tightly packed flowers on a cymule. The cymes arise from the apexes of the stems and extend well above the foliage and measure 300mm to 400mm in length. The sky blue to mid blue flowers measure 14mm to 17mm in diameter. The 3 outer tepals are narrow elliptical with acute apexes. The apexes are covered in white ciliate hairs. The outer tepals measure 5mm to 7.5mm in length by 3mm to 3.5mm in width. There are 5 to 7 veins running the length of the tepal. The 3 inner tepals are narrow elliptical with acute apexes. The margins are undulating while the apexes are covered in white ciliate hairs. The inner tepals measure 5mm to 7.5mm in length by 3mm to 3.5mm in width. There are 3 to 4 veins running the length of the tepal. The divaricate tepals become strongly reflexed as the flowers mature.
The white filaments are sigmoidal near the bright yellow swollen apex which measures 0.8mm to 1.2mm in length by 1mm to 1.3mm in diameter. The 6 filaments are attached to the base and side of the ovary for about two thirds of their length. The white section of the filament measures 1.8mm to 2mm in length not including the stigmoidal section. The pale olive-yellow to khaki-green, basifixed anthers are long conical and measure 2.8mm to 3.3mm in length.
The yellow trigonous ovary measures 1mm to 1.2mm in length by 1.5mm to 2mm diameter. The white style measures 3mm to 4mm in length. Dianella caerulea flowers over a long period starting in late September and finishing in late February.
The fruits of Dianella pavopennacea are orbicular berries. The berries measure 5mm to 8mm in length by 3mm to 7mm in diameter. The grass-green berries turn glossy, deep purple-blue when ripe. The tepals are persistent at the base of the berries. The flesh is white and contains several large, glossy, black seeds in each fruit. The minutely areolate seeds measure 2.8mm to 3.7mm in length by 2mm to 3mm in diameter.
Wildlife:
Dianella pavopennacea fruit is eaten by possums, native rats and is a favourite fruit of Cat Birds, Bower Birds and small Honey Eaters.
Note some Dianella species are somewhat toxic so should be consumed in small quantities or avoided all together. This species edability is unknown to the author.
Cultivation:
Dianella pavopennacea is a beautiful small tussock plant that deserves a place in every native or exotic garden. It is ideal in almost every setting near ponds, at the edge of a rainforest in courtyards, around swimming pools, in the orchard or the rockery. Dianella will break up horizontal lines with its strap like leaves and the slender flower stalks and pretty sky blue flowers are attractive
Its versatility doesn’t stop with accepting most types of soils but it is also drought resistant and can cope with the occasional immersion where periodic down pours may flood the land. It is neat self-cleaning and are easily controlled within a border.
Add to the above, if it is given adequate moisture, plenty of mulch for moisture retention and an even soil temperature, applying native fertilizers on a regular basis the plants will respond with good flowering over a long period and will yield good quality fruit with maximum size.
The berries have a flavour reminiscent of pears with a very mild Eucalyptus taste and are very sweet. The plants would have potential in cultivation if seedless forms can be grown.
It often reaches its full potential in just 3 years and flower from the second year.
Propagation:
Seeds: Dianella pavopennacea‘s seeds require treatment before sowing. Seed should be harvested as soon as the fruits begin to shrivel. Clean the flesh off the seeds. The abrasion method has proven very successful. This involves rubbing the seeds gently between two sheets of very fine sandpaper to reduce the thickness of the seed coat. What we did with Dianella caerulea if there were large numbers of seeds to do is a glue sheet of medium corundum to the inside surfaces of a small disposable container. Place the seeds into the container and shake the container vigorously for several minutes. Check to see if the coating has been partially removed.
Sow the freshly treated seeds directly into a seed raising mix and cover with 5mm of the mix once the weather has warmed and all the frosts have passed. When the seedlings are 25mm to 50mm tall, prick them out and plant them into 50mm native tubes using a seed raising mix.
Once the seedlings reach 150mm to 200mm in height plant them out into their permanent position. Mass plantings can be achieved by planting them at 1 meter to 2 meter centers. When planting for the fruit in an orchard plant the seedlings at 2 meter to 3 meter centers depending upon the size of the parent plant, so easy harvesting and maintenance can take place.
Division: When growing from divisions remove the plant from the soil and just cut it into 3 or 4 equal parts, first down the middle then halve those sections again. Remove unwanted dead leaves and any old small clumps that look weak or dead. Plants can be divided further but ensure each division has a strong shoot and healthy roots attached to the tuff. Replant ensuring the soil is at the same level as before. Water and fertilize. New shoots will appear within two weeks.
Plants can be grown by digging up patches and just cutting into 4 sections. Replant into a shallow saucer made in the ground, cover with 5mm to 10mm of sand and water every second day until the new shoots appear.
Fertilize using seaweed, fish emulsion or organic chicken pellets soaked in water on an alternate basis. Fertilize every two months until the plants are established then annually in early September to October to maintain health, vitality and better flowering.
Further Comments from Readers:
Hi reader, it seems you use The Bible of Botany a lot. That’s great as we have great pleasure in bringing it to you! It’s a little awkward for us to ask, but our first aim is to purchase land approximately 1,600 hectares to link several parcels of N.P. into one at The Pinnacles NSW Australia, but we need your help. We’re not salespeople. We’re amateur botanists who have dedicated over 30 years to saving the environment in a practical way. We depend on donations to reach our goal. If you donate just $5, the price of your coffee this Sunday, We can help to keep the planet alive in a real way and continue to bring you regular updates and features on Australian plants all in one Botanical Bible. Any support is greatly appreciated. Thank you.
In the spirit of reconciliation we acknowledge the Bundjalung, Gumbaynggirr and Yaegl and all aboriginal nations throughout Australia and their connections to land, sea and community. We pay our respect to their Elders past, present and future for the pleasures we have gained.
Dianella revoluta
Classification
Unranked: Monocot
Order: Asparagales
Family: Xanthorrhoeaceae
Subfamily: Hemerocallidaceae
Genus: From Diana, which is Latin for the virginal goddess of the hunt, moon and protector of small wildlife and Elle, which is Latin suffix for petite, fine or diminitive.
Species: From Revolutum, which is Latin for to make a full turn. It usually refers to leaves, leaflets, pinnules or at times flower petal margins which roll downwards, towards the underside of the leaf forming more than a complete circle.
Subspecies: Dianella revoluta subsp. revoluta. From Revolutum, which is Latin for to make a full turn. It usually refers to leaves, leaflets, pinnules or at times flower petal margins which roll downwards, towards the underside of the leaf forming more than a complete circle.
Subspecies: Dianella revoluta subsp. vinosa. From Vinosus, which is Latin for wine colour. It refers to plants, usually the flowers or Lichens which have various shades of colours which resemble the various colours of wine.
Common Name: Blueberry Lily or Blueberry Flax Lily.
In the Wergaia Aboriginal language it is known as Murmbal.
Distribution:
Dianella revoluta subsp. revoluta is found south from Cardabia Station Carnarvon to Kalbarri then south east to Cape Arid National Park. It is also found north to around Lake Carnagie. From Cape Arid National Park it is found east along the coast to the border with South Australia.
In South Australia it moves in a north easterly direction to Four Mile Creek north east of Arkaroola and in a line to Sheparton then north north-east to Cracow in southern Queensland. From Cracow it then is found in a line north west to the Carnarvon Gorge to Emerald and back to the coast at Cape Palmerston National Park. There are several isolated populations are found at Paluma National Park and near Buloo in Queensland, Anangu Pitjantjatjara and the unnamed National Park on the eastern side of the Great Victoria Desert in South Australia.
It is found on the Bass Strait Islands and Tasmania especially on the eastern two thirds.
Dianella revoluta subsp. vinosa is restricted to a small area on the Granite belt between Wollomombi Falls and north west to the Emmaville district in north eastern New South Wales.
https://avh.ala.org.au/occurrences/search?taxa=Dianella+revoluta#tab_mapView
Habitat Aspect Climate:
Dianella revoluta prefers full sun to light dappled shade. It grows in low mountains in dry Eucalyptus forests, open woodlands, mallee country, in riparian zones in semi-arid zones and drainage lines skirting the Great Victoria Desert. The altitude ranges from 5 meters ASL to 750 meters ASL.
The temperatures range from minus 3 degrees in July to 38 degrees in January.
The rainfall ranges from lows of 950mm to 3200mm average per annum.
Soil Requirements:
Dianella revoluta prefers sandy loams, light gravelly clays to medium clays. The soils are derived from decomposed basalts and shales. The soils pH ranges from 5pH to 7.5pH. It does not tolerate waterlogged however it can handle wet soils and occasional inundations. Non saline soils to moderately saline soils are tolerated.
Height & Spread:
Wild Plants: 0.3m to 1m by 0.4m to 1.2m
Characteristics:
Dianella revoluta grows as a tufted rush like solitary plant but can form dense mats over several square meters. Stems are thin reddish cream to green, sigmoidal and glabrous. Young leading shoots are light green or cream. The plants have a white fibrous root system.
Dianella revoluta subsp. revoluta are tufted to mat-forming herbs with clumps to 1.5 meters diameter at the base.
Dianella revoluta subsp. Vinosa are tufted herbs with clumps to 300mm in diameter at the base.
Dianella revoluta subsp. revoluta long linear leaves measure 500mm to 800mm in length by 4mm to 12mm in width. The conduplicate sheaths are occluded on the petioles and measure 60mm to 80mm in length. The apexes are tapering to acute. The discolourous laminas are deep grass-green often glaucous or rarely reddish at base on the upper laminas while the lower laminas are slightly paler. The midrib is prominent rounded-keeled to keeled and glabrous on the lower and clearly visible from the upper lamina being deeply furrowed. The leaf margins are entire, revolute and glabrous. The parallel venation is regular and densely covered in fine off white papillate lumps at times entirely covering the venation.
Dianella revoluta subsp. vinosa long linear leaves measure 500mm to 800mm in length by 4mm to 12mm in width. The conduplicate sheaths are occluded on the petioles and measure 60mm to 80mm in length. The apexes are tapering to acute and become more pallid the closer to the apex they become. The discolourous laminas are glaucous to glaucous-green, usually purplish red towards base on the upper laminas while the lower laminas are more glaucous. The laminas are flat or slightly convex on the upper laminas. The midrib is prominent rounded-keeled to keeled and glabrous on the lower and clearly visible from the upper lamina being furrowed. The leaf margins are covered in irregular fragile cilia like teeth to 1 mm in length. The 18 to 24 parallel veins are usually regular or at times irregularly positioned along the laminas.
The inflorescences of Dianella revoluta are born as a cyme or helicoid cyme with 2 to 9 flowers on a cymule. The cymes arise from the leaf bases and extend well above the foliage and measure 700mm to 1000mm in length. The mid blue to violet flowers measure 13mm to 22mm in diameter. The 3 outer tepals are narrow elliptical to elliptical with acute apexes. The apexes are covered in a tuft of white ciliate hairs. The outer tepals are very sparsely covered in white ciliate hairs near the center line and are strongly decurve backwards. The outer tepals measure 5.5mm to 10mm in length by 1.8mm to 2.5mm in width. There are 5 to 7 veins running the length of the tepal. The 3 inner tepals are narrow elliptical to elliptical with acute apexes. The margins are undulating while the apexes are covered in white ciliate hairs. The inner tepals measure 5.2mm to 9.5mm in length by 2.5mm to 3.5mm in width. There are 5 veins running the length of the tepal. The divaricate tepals become strongly reflexed as the flowers mature.
The white flattened filaments have a bright yellow swollen section near the apex which measures 0.6mm to 2.3mm in length by 0.5mm to 1.6mm in diameter. The 6 filaments are attached to the base and side of the ovary for about two thirds of their length. The basal section of the filament measures 1.6mm to 2mm in length. The olive-brown to deep brown almost black, basifixed anthers are long conical and measure 3.5mm to 4mm in length.
The pale green trigonous ovary measures 1mm to 1.2mm in length by 1.5mm to 2mm diameter. The white style measures 5.5mm to 6.5mm in length. Dianella revoluta flowers over a long period; especially from September to late November, however it is normal to see flowers as late as mid-March in favourable seasons.
The fruits of Dianella revoluta are often distorted spherical berries. The berries measure 4mm to 10mm in length by 5mm to 11mm in diameter. The tepals are persistent at the base of the berries. The flesh is white and contains several large, glossy, black seeds in each fruit. The minutely areolate seeds measure 2.8mm to 3.7mm in length by 2mm to 3mm in diameter.
The grass-green berries of Dianella revoluta subsp. revoluta turn glossy, mid blue to deep blue when ripe.
The grass-green berries of Dianella revoluta subsp. vinosa turn glossy, deep purple when ripe.
Wildlife:
Dianella revoluta fruits are eaten by possums, native rats and are relished by Cat Birds, Bower Birds and small Honey Eaters.
It was also a staple part of the Australian Aborigines diet. Note some Dianella species are somewhat toxic so should be consumed in small quantities or avoided all together. This species is not toxic.
Cultivation:
Dianella revoluta is a beautiful small tussock plant that deserves a place in every native or exotic garden. Itis ideal in almost every setting near medium ponds, at the edge of a rainforest in courtyards, around swimming pools, in the orchard or the rockery. Dianella will break up horizontal lines with its strap like leaves and the slender flower stalks and pretty sky blue flowers are attractive. In cultivation growing in the open it will grow from 400mm to 800mm in height by 250mm to 1200mm in diameter near the base. Select Dianella revoluta subsp. vinosa where a smaller compact plant is required.
Its versatility doesn’t stop with accepting all types of soils but it is also drought resistant and can cope with the occasional immersion where periodic down pours may flood the land. It is neat self-cleaning and are easily controlled within a border. The plants are frost hardy to temperatures of at least minus 5 degrees in Nana Glen where it is growing beneath an open tree canopy of mixed Eucalyptus trees.
Add to the above, if it is given adequate moisture, plenty of mulch for moisture retention and an even soil temperature, applying native fertilizers on a regular basis the plants will respond with good flowering over a long period and will yield good quality fruit with maximum size.
The berries have a flavour reminiscent of pears and are very sweet. The plants would have great potential in cultivation if seedless forms can be grown. They often reach their full potential in just 3 years and flower from the second year.
Propagation:
Seeds: Dianella revoluta‘s seeds require treatment before sowing. Seed should be harvested as soon as the fruits begin to shrivel. Clean the flesh off the seeds. The abrasion method has proven very successful. This involves rubbing the seeds gently between two sheets of very fine sandpaper to reduce the thickness of the seed coat. If there were large numbers of seeds to do is a glue sheet of medium corundum to the inside surfaces of a small disposable container. Place the seeds into the container and shake the container vigorously for several minutes. Check to see if the coating has been partially removed.
Sow the freshly treated seeds directly into a seed raising mix and cover with 5mm of the mix once the weather has warmed and all the frosts have passed. When the seedlings are 25mm to 50mm tall, prick them out and plant them into 50mm native tubes using a seed raising mix.
Fertilize using Seaweed, fish emulsion or organic chicken pellets soaked in water on an alternate basis. Fertilize every two months until established. Plants grown for fruit should be fertilized on a twice annual basis in mid-July and again in early November to encourage prolonged flowering and fruiting. We fertilized our plants with the Hoods Blood and Bone, All rock and organic dynamic lifter.
Once the seedlings reach 150mm to 200mm in height plant them out into their permanent position. Mass plantings can be achieved by planting them at 1 meter to 2 meter centers. When planting for the fruit in an orchard plant the seedlings at 2 meter to 3 meter centers depending upon the size of the parent plant, so easy harvesting and maintenance can take place.
Division: When growing from divisions remove the plant from the soil and just cut it into 3 or 4 equal parts, first down the middle then halve those sections again. Remove unwanted dead leaves and any old small clumps that look weak or dead. Plants can be divided further but ensure each division has a strong shoot and healthy roots attached to the tuff. Replant ensuring the soil is at the same level as before. Water and fertilize. New shoots will appear within two weeks.
Plants can be grown by digging up patches and just cutting into 4 sections. Replant into a shallow saucer made in the ground, cover with 5mm to 10mm of sand and water every second day until the new shoots appear.
Fertilize using seaweed, fish emulsion or organic chicken pellets soaked in water on an alternate basis. Fertilize every two months until the plants are established then annually in early September to October to maintain health, vitality and better flowering.
Further Comments from Readers:
Hi reader, it seems you use The Bible of Botany a lot. That’s great as we have great pleasure in bringing it to you! It’s a little awkward for us to ask, but our first aim is to purchase land approximately 1,600 hectares to link several parcels of N.P. into one at The Pinnacles NSW Australia, but we need your help. We’re not salespeople. We’re amateur botanists who have dedicated over 30 years to saving the environment in a practical way. We depend on donations to reach our goal. If you donate just $5, the price of your coffee this Sunday, We can help to keep the planet alive in a real way and continue to bring you regular updates and features on Australian plants all in one Botanical Bible. Any support is greatly appreciated. Thank you.
In the spirit of reconciliation we acknowledge the Bundjalung, Gumbaynggirr and Yaegl and all aboriginal nations throughout Australia and their connections to land, sea and community. We pay our respect to their Elders past, present and future for the pleasures we have gained.
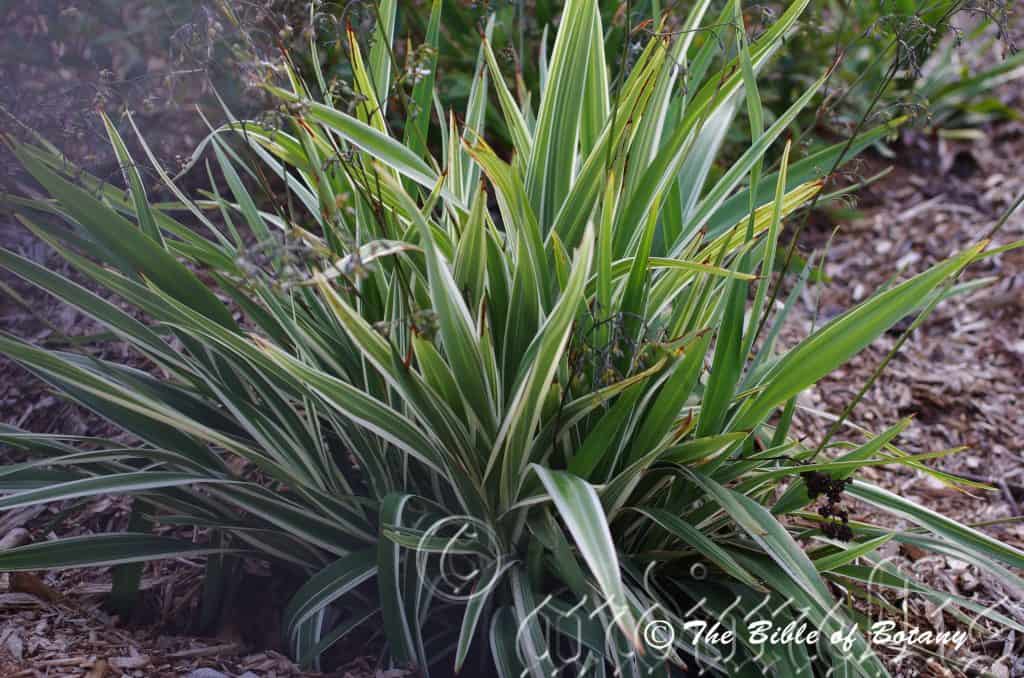
QE2 Hospital Sunnybank Qld
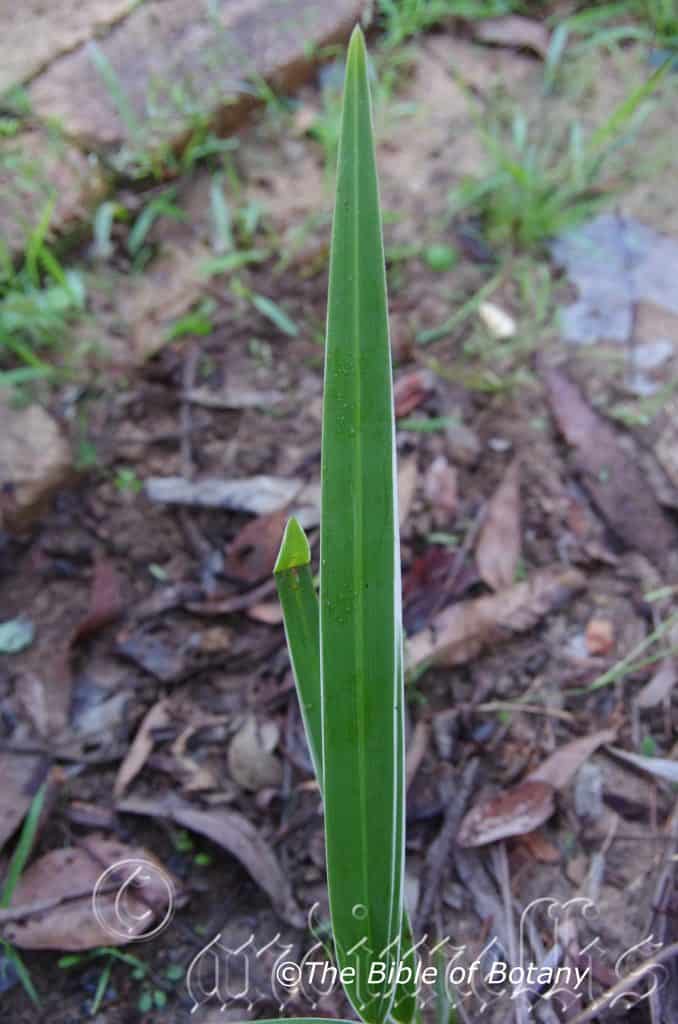
Author’s Garden The Pinnacles NSW
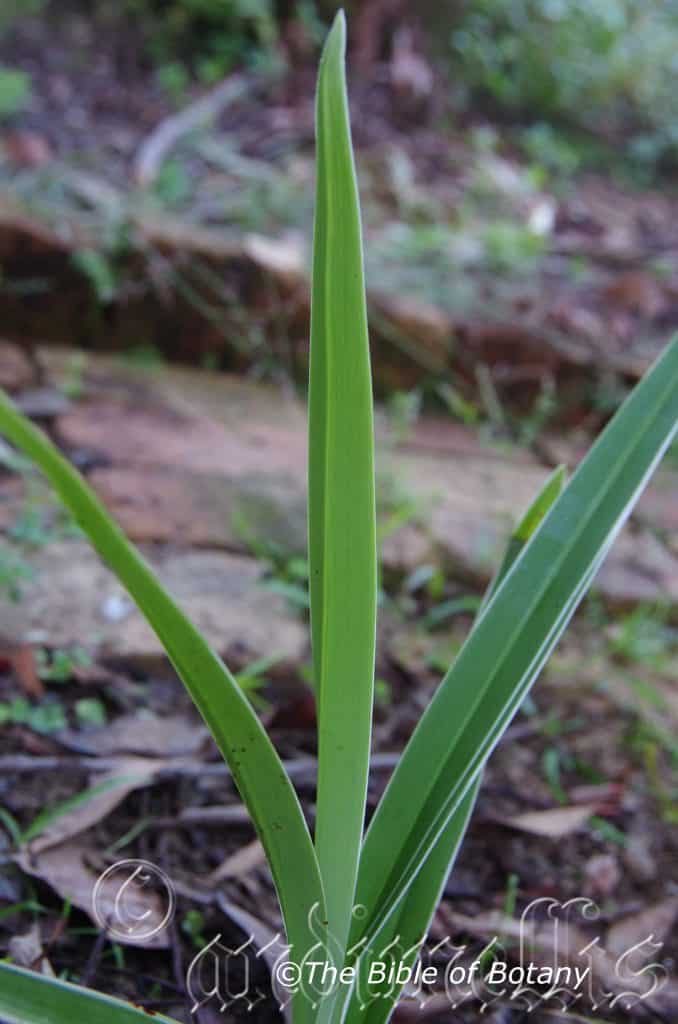
Author’s Garden The Pinnacles NSW
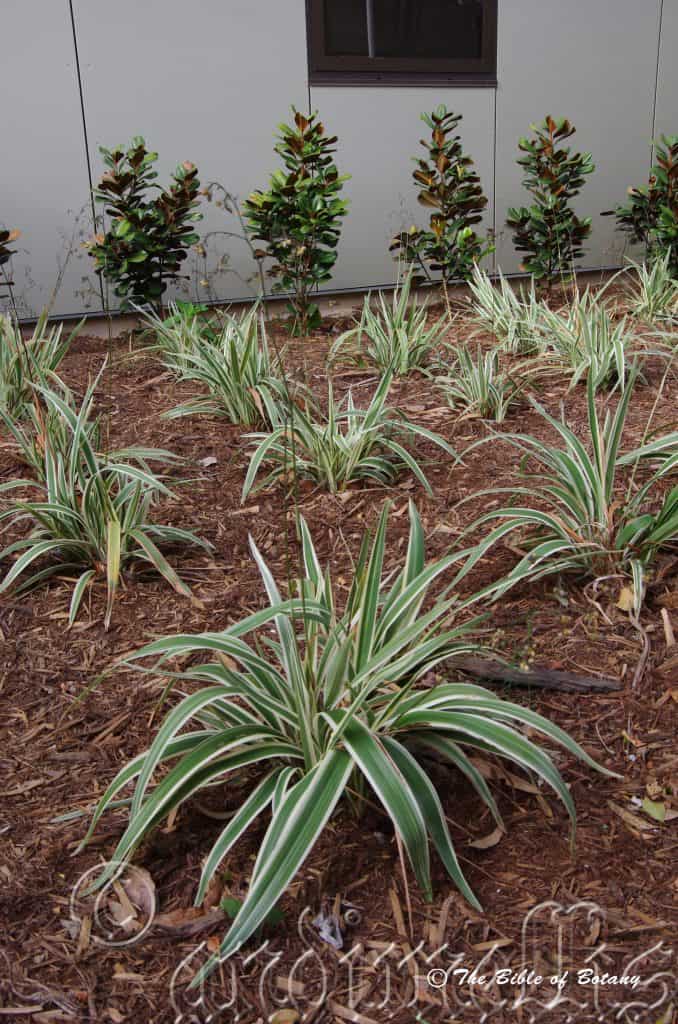
QE2 Hospital Sunnybank Qld
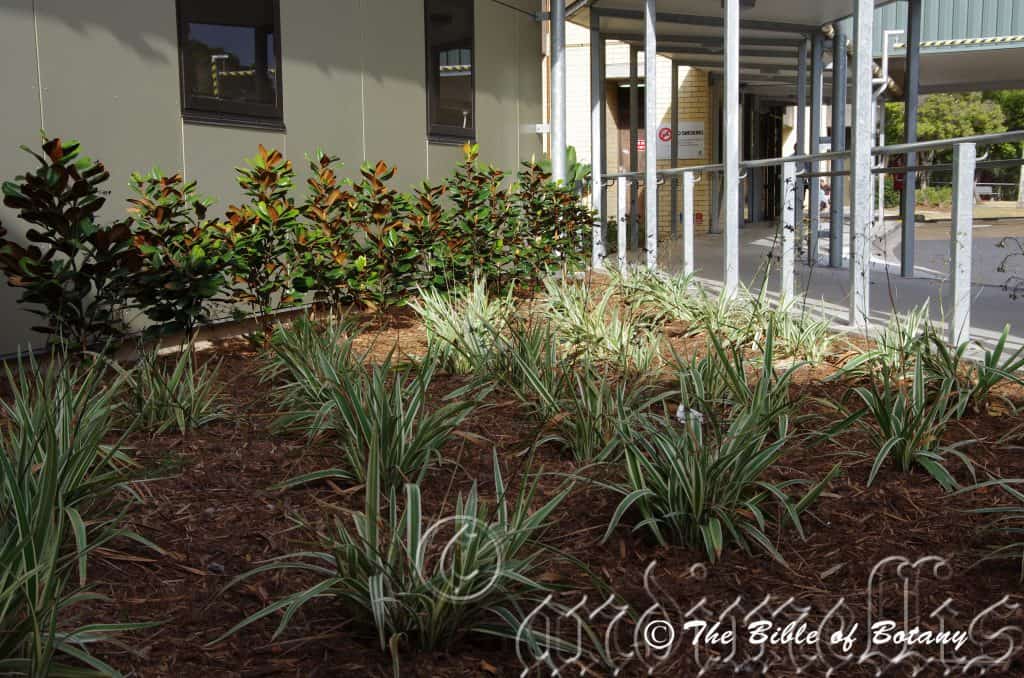
QE2 Hospital Sunnybank Qld
Dianella tasmanica
Classification
Unranked: Monocot
Order: Asparagales
Family: Xanthorrhoeaceae
Subfamily: Hemerocallidaceae
Genus: From Diana, which is Latin for the virginal goddess of the hunt, moon and protector of small wildlife and Elle, which is Latin suffix for petite, fine or diminitive.
Species: Is named in honour of Abel Janszoon Tasman; 1603-1659, who circumnavigated the south coast of Tasmania. Plants with the name Tasmanica refers to plants which come from or were originally found in Tasmania.
Common Name: Tasman Flax Lily.
Distribution:
Dianella tasmanica is found south from Dorrigo to Warmambool with a population on the Grampians in Victoria. It is mainly found on the Great Dividing Range to the coast.
It is also found on the Bass Strait Islands and over most of Tasmania.
https://avh.ala.org.au/occurrences/search?taxa=Dianella+tasmanica#tab_mapView
Habitat Aspect Climate:
Dianella tasmanica prefers full sun to dappled shade. It grows in sclerophyll forest, open woodlands, dry open Eucalyptus forests, moist Eucalyptus forests or adjacent to warm temperate rainforests. The altitude ranges from 150 meters ASL to 1050 meters ASL.
The temperatures range from minus 5 degrees in July to 38 degrees in January.
The rainfall ranges from lows of 950mm to 3200mm average per annum.
Soil Requirements:
Dianella tasmanica prefers light fatty clays, light gravelly clays and medium clays. The soils are often skeletal soils over the parent rock. The soils are usually derived from partially decomposed to decomposed granites. The soils pH ranges from 4.5pH to 6pH. It does not tolerate waterlogged however it can handle continually moist soils and occasional inundations. Non saline soils to moderately saline soils are tolerated.
Height & Spread:
Wild Plants: 0.4mm to 0.9m by 0.6mm to 0.8m
Characteristics:
Dianella tasmanica grows as a solitary tufted rush like plant. Stems are reddish cream to green and glabrous. Young leading shoots are pale green or cream. The plants have a white fibrous root system.
Dianella tasmanica leaves are clustered along the stems. The broad linear to narrow oblong leaves measure 500mm to 950mm in length by 14mm to 32mm in width including the conduplicate petioles. The petioles and sheaths measure 180mm to 300mm in length. The apex is tapering to acute. The discolourous laminas are grass-green, deep grass-green to deep olive-green and glabrous on the upper laminas while the lower laminas are paler to sub glaucus. The midrib is strongly keeled with fine teeth on the lower lamina and is clearly visible from the upper lamina. The leaf margins are entire and covered in a row of fine teeth becoming more apparent close to the apex.
The inflorescences of Dianella tasmanica are born as a cyme or helicoid cyme with 2 to 5 flowers on a cymule. The cymes arise from the base of the leaves and extend to just below the foliage or only exceed the foliage by several centimetres. They measure 700mm to 900mm in length. The pale lavender to violet flowers measure 18mm to 22mm in diameter. The 3 outer tepals are oblong-elliptical with acute apexes. The apexes are mucronate and sparsely covered in white ciliate hairs. The outer tepals measure 8mm to 10mm in length by 5mm to 6mm in width. There are 5 to 7 veins running the length of the tepal. The 3 inner tepals are elliptical with acute apexes. The inner tepals measure 7mm to 9.5mm in length by 4.5mm to 5mm in width. There are 5 veins running the length of the tepal. The divaricate tepals become strongly reflexed as the flowers mature.
The white filaments are sigmoidal near the bright yellow to bright yellow-orange swollen apex which measures 2.3mm to 3mm in length by 1.2mm to 1.6mm in diameter. The white section of the filament measures 2mm to 2.5mm in length not including the sigmoidal section. The pale olive-yellow, khaki or khaki-yellow, basifixed anthers are long conical and measure 2mm to 2.8mm in length.
The grass-green ovate ovary measures 2mm to 2.8mm in length by 2mm to 2.8mm diameter. The white style measures 6mm to 7mm in length. Dianella caerulea flowers from September to early February.
The fruits of Dianella tasmanica are oblong berries. The berries measure 12mm to 25mm in length by 8mm to 17mm in diameter. The grass-green berries turn glossy, deep purple-blue when ripe. The flesh is white and contains several large, glossy, black seeds in each fruit. The minutely areolate seeds measure 2.8mm to 4mm in length by 2mm to 4mm in diameter.
Wildlife:
Dianella tasmanica‘s fruit is eaten by possums, native rats and is a favourite fruit of all fruit eating birds.
Note some Dianella species are somewhat toxic so should be consumed in small quantities or avoided all together. This species berries are somewhat toxic.
Cultivation:
Dianella tasmanica is a beautiful small tussock plant that deserves a place in every native or exotic garden especially since many new hybrids and varieties are now on the market. The variation varies from green leaves to variegated leaves and leaves with various amounts of red and maroon as well as size and compactness. It is ideal in almost every setting near ponds, at the edge of a rainforest in courtyards, around swimming pools, in the orchard or the rockery. Dianella tasmanica will break up horizontal lines with its strap like leaves and the slender flower stalks and pretty sky blue flowers are attractive.
Its versatility doesn’t stop with accepting all types of soils but it is also drought resistant and can cope with the occasional immersion where periodic down pours may flood the land. It is neat self-cleaning and are easily controlled within a border.
Dianella tasmanica needs little or no work to keep it at its best. Once established minimal water is required as it is drought and frost tolerant. It does prefer some shade but can grow in heavy shade. It would be a great choice for mass planting under large trees in a bush garden. Here mix the various hybrids and cultivars with other forest plants to give an array of colour and foliage for a year round attraction.
Add to the above, if it is given adequate moisture, plenty of mulch for moisture retention and an even soil temperature, applying native fertilizers on a regular basis the plants will respond with good flowering over a long period and will yield good quality fruit with maximum size.
The berries have a flavour reminiscent of grapes crossed with pears and are very sweet. The plants have great potential in as an alternative culinary delight. For mass cultivation seedless forms need to be grown while maintaining the larger fruit of this species and the better flavoured forms. Its hardiness coupled with frost tolerances and drought resistance all add up to dollars in the bank for the astute farmer.
Fertilize every two months until established. Plants grown for fruit should be fertilized on a twice annual basis in mid-July and again in late September to encourage prolonged flowering and fruiting. We fertilized our plants with Hoods Blood and Bone, All rock and organic dynamic lifter. (All are certified organic while Hoods B&B is 100mm blood and bone with a higher percentage of blood)
It often reaches its full potential in just 3 years and flower from the second year.
Propagation:
Seeds: Dianella tasmanica‘s seeds require treatment before sowing. Seed should be harvested as soon as the fruits begin to shrivel. Clean the flesh off the seeds. The abrasion method has proven very successful. This involves rubbing the seeds gently between two sheets of very fine sandpaper to reduce the thickness of the seed coat. What we did with Dianella caerulea if there were large numbers of seeds to do is a glue sheet of medium corundum to the inside surfaces of a small disposable container. Place the seeds into the container and shake the container vigorously for several minutes. Check to see if the coating has been partially removed.
Sow the freshly treated seeds directly into a seed raising mix and cover with 5mm of the mix once the weather has warmed and all the frosts have passed. When the seedlings are 25mm to 50mm tall, prick them out and plant them into 50mm native tubes using a seed raising mix.
Once the seedlings reach 150mm to 200mm in height plant them out into their permanent position. Mass plantings can be achieved by planting them at 1 meter to 2 meter centers. When planting for the fruit in an orchard plant the seedlings at 2 meter to 3 meter centers depending upon the size of the parent plant, so easy harvesting and maintenance can take place.
Division: If a particular form or varigation is required division is the best way to ensure the traits remain.
When growing for fruit division is the only reliable way to guarantee purity of form. The divisions are made by removing the plants from the soil. Remove the soil and cut the plant into 3 or 4 equal parts, first down the middle then halve those sections again. Remove unwanted dead leaves and any old small clumps that look weak or dead. Plants can be divided further but ensure each division has a strong shoot and healthy roots attached to the stem. Replant ensuring the soil is at the same level as before. Water and fertilize with seaweed. New shoots will appear within two weeks.
Plants can be grown by digging up patches and just cutting into 4 sections. Replant into a shallow saucer made in the ground, cover with 5mm to 10mm of sand and water every second day until the new shoots appear.
Fertilize using seaweed, fish emulsion or organic chicken pellets soaked in water on an alternate basis. Fertilize every two months until the plants are established then annually in early September to October to maintain health, vitality and better flowering.
Further Comments from Readers:
Hi reader, it seems you use The Bible of Botany a lot. That’s great as we have great pleasure in bringing it to you! It’s a little awkward for us to ask, but our first aim is to purchase land approximately 1,600 hectares to link several parcels of N.P. into one at The Pinnacles NSW Australia, but we need your help. We’re not salespeople. We’re amateur botanists who have dedicated over 30 years to saving the environment in a practical way. We depend on donations to reach our goal. If you donate just $5, the price of your coffee this Sunday, We can help to keep the planet alive in a real way and continue to bring you regular updates and features on Australian plants all in one Botanical Bible. Any support is greatly appreciated. Thank you.
In the spirit of reconciliation we acknowledge the Bundjalung, Gumbaynggirr and Yaegl and all aboriginal nations throughout Australia and their connections to land, sea and community. We pay our respect to their Elders past, present and future for the pleasures we have gained.
Dichanthium tenue
Classification
Unranked: Monocot
Unranked: Commelinids
Family: Poaceae
Subfamily: Pooideae
Tribe: Poeae
Genus: From Dikha, which is Ancient Greek for splitting in two and Antha/Anthos, which are Ancient Greek for the male reproductive organs in a flower or the flower. It refers to flowers, which have two barren spikelets.
Species: From Tanu, which is Ancient Greek or later Tenue, which is Latin for slender and fine. It refers to structures or organs, which are slenderer than other species in the genus.
Common Name: Small Blue Grass.
Distribution:
Dichanthium tenue is found south from Cairns in far north Queensland to Charters Towers then in a south south easterly direction to the upper Hastings River Catchment in central coastal New South Wales. There are 2 isolated populations near Mungkan Kandju National Park on Cape York Peninsula and Normanton in the Gulf of Carpentaria.
https://avh.ala.org.au/occurrences/search?taxa=Dichanthium+tenue#tab_mapView
Habitat Aspect Climate:
Dichanthium tenue prefers full sun to light dappled shade. It grows in open woodlands. The altitude ranges from 15 meters ASL to 300 meters ASL.
The temperatures range from minus 2 degrees in August to 38 degrees in January.
The rainfall ranges from lows of 400mm to 3000mm average per annum.
Soil Requirements:
Dichanthium tenue prefers better quality sandy loams, light clays or medium clays. The soils are usually derived from decomposed sandstones, granites, brown basalts, black basalts, shale or metamorphic rocks. The soils pH ranges from 5pH to 6pH. It does not tolerant of waterlogged soils but prefers constant soil moisture to promote active growth. Non saline soils to moderately saline soils are tolerated.
Height & Spread:
Wild Plants: 0.6m to 1m by 0.4m to 0.6m
Characteristics:
Dichanthium tenue grows as an erect perennial tufted grass. Culms are thin pale blue-green and glabrous. The culms measure 300mm to 700mm in height with 2 to 4 nodes. The mid culm nodes are sparsely covered in white pubescent to hirtellus hairs. The lateral branches are simple. Plants have a fibrous root system.
Dichanthium tenue leaf sheaths are glabrous while the ligule has a ciliolate membrane which measures 0.5mm to 1mm in length. The linear leaves measure 70mm to 150mm in length by 2mm to 3.5mm in width. The apex is tapering to narrow acute. The concolourous laminas are scabrous, glabrous or covered in dense white pubescent hairs. The midrib is faintly prominent on the lower lamina and is faintly visible from the upper lamina. The leaf margins are entire.
The inflorescences of Dichanthium tenue are subdigitate racemes with ramose branches. The rachises are fragile at the nodes and measure 10mm to 30mm in length while the ramose measure 30mm to 60mm in length. The rachises and ramose are glabrous to sparsely covered in white puberulent hairs.
The spikelets are sessile with 1 fertile to 2 to 4 infertile spikelet in the cluster. The male spikelets are well developed and measure 4mm to 6mm in length.
The dissimilar glumes are firmer than fertile lemma. The lower glumes are oblong, chartaceous or indurate and are without keels. There are 8 to 9 nerves. The upper glabrous glumes are lanceolate with a single keel and 3 nerves.
The upper lemmas are stipe-like. The awn has a twisted column and measures 20mm to 30mm in length. The palea is absent.
The lower lemma’s hyaline is nerveless. The upper lemma hyaline is very slender and short or absent.
There are 3 anthers on each spikelet. The flowers appear from late December to early March.
The fruits of Dichanthium tenue seeds measure 2.5mm in length. The green seeds turn pale straw-fawn when ripe.
Wildlife:
Dichanthium tenue is a valuable grass for kangaroos and wallabies. The seeds are also eaten by various small seeds eating birds.
Cultivation:
Dichanthium tenue is a valuable native grass for cattle, sheep and other grazing animals. It has a rapid growth rate from late spring after the spring rains to late autumn.
This grass is often classified as a weed by gardeners, despite being fairly easy to control it will break off and reroot at the nodes and grow year after year from seed reserves in the soil.
Propagation:
Seeds: Dichanthium tenue‘s seeds can be scattered over an area of pre-prepared ground and lightly raked over for a perennial mixed lawn.
Plants can be grown by digging up patches and just cutting into 4 sections. Replant into a shallow saucer made in the ground, cover with 5mm to 10mm of sand and water every second day until the new shoots appear.
Fertilize using seaweed, fish emulsion or organic chicken pellets soaked in water on an alternate basis. Fertilize every two months until the plants are established then annually in early September to October to maintain health, vitality and better flowering.
Further Comments from Readers:
Hi reader, it seems you use The Bible of Botany a lot. That’s great as we have great pleasure in bringing it to you! It’s a little awkward for us to ask, but our first aim is to purchase land approximately 1,600 hectares to link several parcels of N.P. into one at The Pinnacles NSW Australia, but we need your help. We’re not salespeople. We’re amateur botanists who have dedicated over 30 years to saving the environment in a practical way. We depend on donations to reach our goal. If you donate just $5, the price of your coffee this Sunday, We can help to keep the planet alive in a real way and continue to bring you regular updates and features on Australian plants all in one Botanical Bible. Any support is greatly appreciated. Thank you.
In the spirit of reconciliation we acknowledge the Bundjalung, Gumbaynggirr and Yaegl and all aboriginal nations throughout Australia and their connections to land, sea and community. We pay our respect to their Elders past, present and future for the pleasures we have gained.
Dichelachne crinita
Classification
Unranked: Monocots
Unranked: Commelinids
Order: Poales
Family: Poaceae
Subfamily: Pooideae
Tribe: Poeae
Genus: From Di/Dis, which are Ancient Greek for two, Khelos, which is Ancient Greek for split and Achne which is Ancient Greek for chaff. It refers to glumes which split into two.
Species: From Crinatum, which is Latin for long hair. It refers to plants, which have long, silky hairs.
Common Name: Long Hair Plume Grass.
Distribution:
Dichelachne crinita is found from the Swan River Coastal Plains to new Year Island east of Cape Arid national Park off the south west Western Australian coast.
In the east it is found south from Jericho to Bendigo in Victoria then west to Port Augusta and down to Streaky Bay in southern South Australia. It is found on the Western Plains, Western Slopes, on and east of the Great Dividing Range to the coast.
It is found on most the Bass Strait Islands and circumnavigates Tasmania mostly at the lower elevations.
https://avh.ala.org.au/occurrences/search?taxa=Dichelachne+crinita#tab_mapView
Habitat Aspect Climate:
Dichelachne crinita prefers full sun to dappled shade. It grows beneath open Eucalyptus forests, open woodlands, savannah woodlands. Its altitude ranges from 10 meters ASL to 700 meters ASL.
The temperatures range from minus 3 degrees in August to 38 degrees in January.
The rainfall ranges from lows of 820mm to 2500mm average per annum.
Soil Requirements:
Dichelachne crinita prefers sand, sandy loams or fatty sands. The soils are derived from decomposed sandstones. The soils pH ranges from 5pH to 6pH. It does not tolerate waterlogged soils. Non saline soils to very saline soils are tolerated.
Height & Spread:
Wild Plants: 0.6m to 1.5m by 0.6m to 1m
Characteristics:
Dichelachne crinita grows as an erect or spreading perennial tufted grass. The culms are thin pale blue-green and glabrous. The culms measure 500mm to 1250mm in height. Plants have a fibrous root system.
Dichelachne crinita leaf sheaths are glabrous while the ligule are truncate and measure 4mm to 5mm in length. The ligule has an entire, eciliate membrane which measures 0.8mm to 1mm in length. The linear leaves measure 55mm to 200mm in length by 2mm to 7mm in width. The apex is tapering to narrow acute. The concolourous laminas are grass-green, glabrous or densely covered in white pubescent hairs. The midrib is faintly prominent on the lower lamina and is faintly visible from the upper lamina. The leaf margins are entire. The sheath is glabrous or covered in white puberulent hairs.
The inflorescences of Dichelachne crinita are densely packed, oblong or narrow elliptical cylindrical racemes. The racemes measure 60mm to 290mm in length. The rachises and ramose are glabrous to sparsely covered in white puberulent hairs.
The spikelets are pedicilate with a single flower without a rachilla or a single infertile flower with a sort rachilla. The male spikelets measure 5mm to 10mm in length.
The dissimilar glumes are subulate and firmer than fertile lemma. The lower glumes are lanceolate, membranous and measure 5mm to 7mm in length. They are single keeled with a single nerve. The lower glume’s apex is mucronate. The upper glumes are lanceolate, membranous and measure 5.5mm to 9.4mm in length. They are single keeled with a single nerve.
The upper lemmas are subulate and shorter than the glumes and measure 4.5mm to 6.5mm in length. The awn curves as it approaches the apex and is barely twisted. The awn measures 22mm to 33mm in length. The 2 nerved palea is shorter than the lemma.
The lower lemma’s hyaline is nerveless. The upper lemma hyaline is very slender and short or absent.
There are 1 to 3 stamens on each spikelet. The flowers appear from late September to November.
The fruits of Dichelachne crinita measure 2.8mm to 3.5mm in length. The green seeds turn pale straw-fawn when ripe.
Wildlife:
Dichelachne crinita is unknown to the author.
Cultivation:
Dichelachne crinita is not considered to be a good fodder crop. Its only potential is when it is in flower and seed when horses and cattle consume the softer flower heads and seeds. It has a rapid growth rate from late spring after the spring rains to early summer.
This grass is often classified as a weed by gardeners, despite being fairly easy to control. It gives good quantities of trash for mulch thus improves soils structure and fertility. It has good potential as a landscaping grass in large areas especially against hard walls and structures that need softening.
In cultivation it looks at its best when grown along narrow borders, medium to large rockeries or as feature plants where it grows from 600mm to 1000mm in height by 300mm to 500mm in diameter. The spectacular long creamy or pale purple-pink plumes in spring offers the landscaper a change in form and colour over a short period.
In cultivation it can be grown on most types of soil however full sun is essential for best results.
It should be trimmed back immediately after the flower heads start to fade and before the seeds begin to fall. Cut the plants back to approximately 100mm in early summer and mulch. For best results trim it again in late April or early May.
The flowering heads can be used in floral arrangements and dyed for greater affect.
Propagation:
Seeds: Dichelachne crinita‘s seeds can be sown directly into a seed raising mix in early autumn. Cover them with 2mm of the mix. When the seedlings are 25mm to 50mm tall, prick them out and plant them into 50mm native tubes using a seed raising mix.
Once the seedlings reach 150mm to 200mm in height plant them out into their permanent position. Mass plantings can be achieved with spacing of 0.6 meters to 2 meters depending on the desired effect.
Plants can be grown by digging up patches and just cutting into 4 sections. Replant into a shallow saucer made in the ground, cover with 5mm to 10mm of sand and water every second day until the new shoots appear.
Fertilize using seaweed, fish emulsion or organic chicken pellets soaked in water on an alternate basis. Fertilize every two months until the plants are established then annually in early September to October to maintain health, vitality and better flowering.
Further Comments from Readers:
Hi reader, it seems you use The Bible of Botany a lot. That’s great as we have great pleasure in bringing it to you! It’s a little awkward for us to ask, but our first aim is to purchase land approximately 1,600 hectares to link several parcels of N.P. into one at The Pinnacles NSW Australia, but we need your help. We’re not salespeople. We’re amateur botanists who have dedicated over 30 years to saving the environment in a practical way. We depend on donations to reach our goal. If you donate just $5, the price of your coffee this Sunday, We can help to keep the planet alive in a real way and continue to bring you regular updates and features on Australian plants all in one Botanical Bible. Any support is greatly appreciated. Thank you.
In the spirit of reconciliation we acknowledge the Bundjalung, Gumbaynggirr and Yaegl and all aboriginal nations throughout Australia and their connections to land, sea and community. We pay our respect to their Elders past, present and future for the pleasures we have gained.
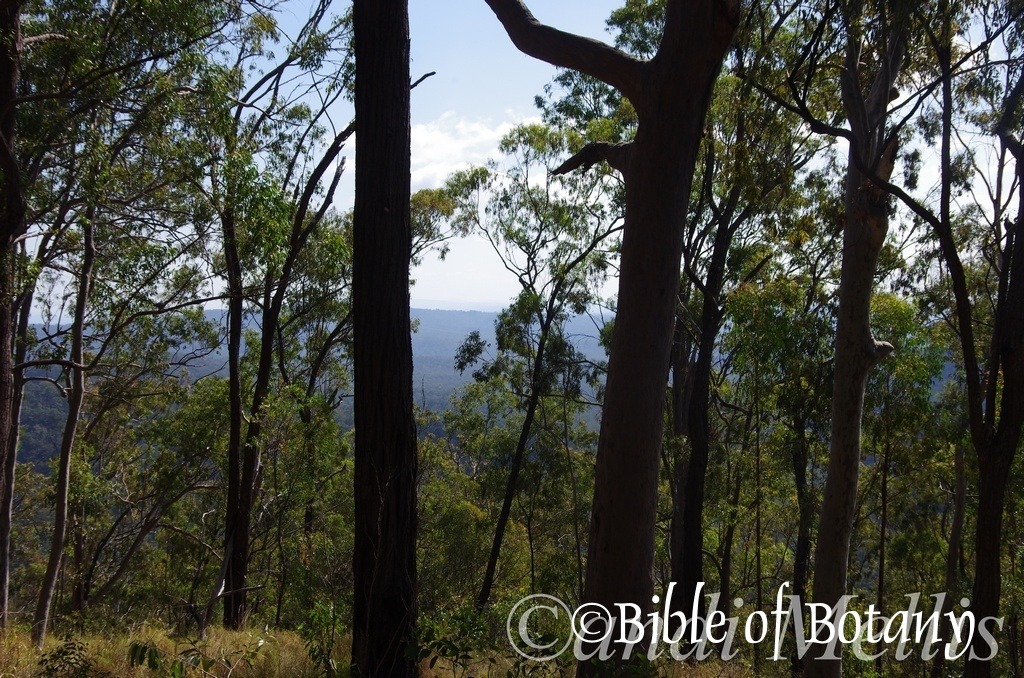
Ramourni National Park NSW
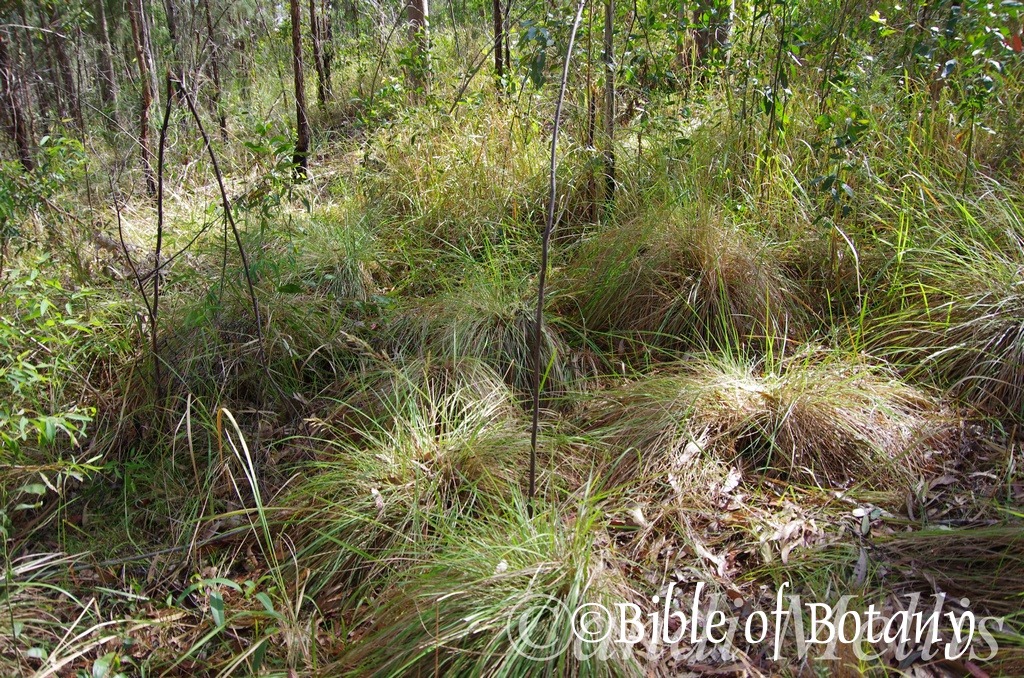
Ramourni National Park NSW
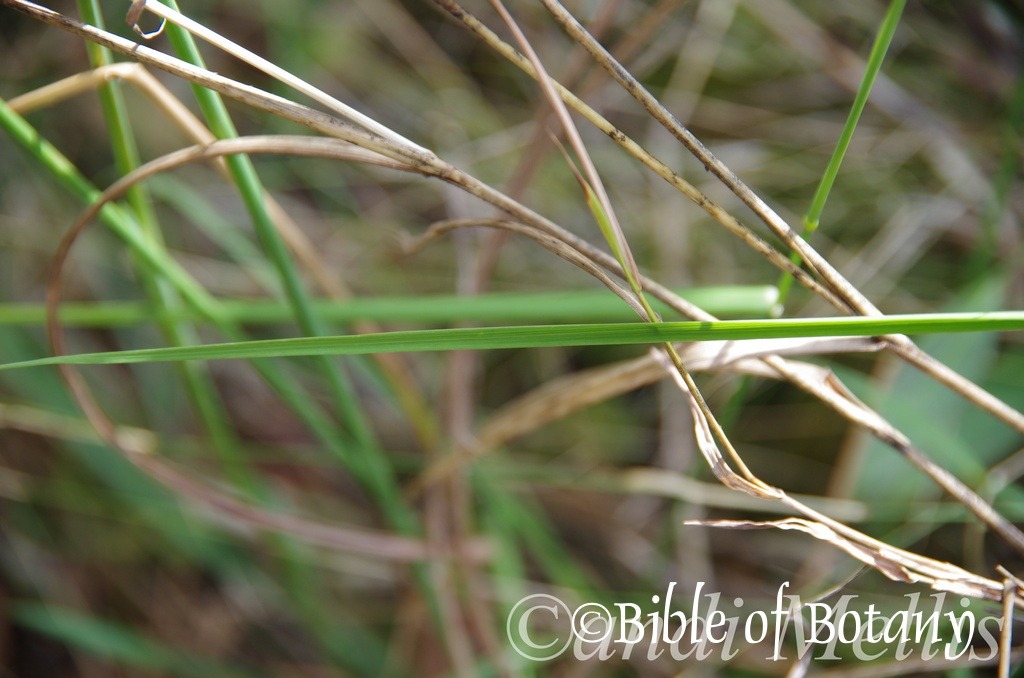
Ramourni National Park NSW
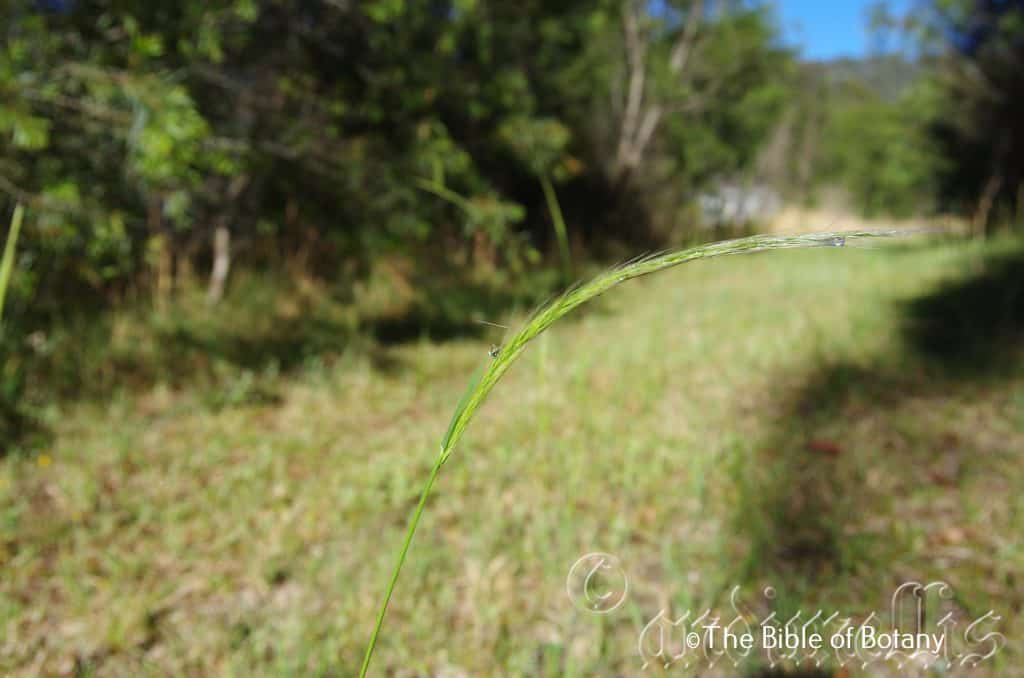
Author’s Garden The Pinnacles NSW
Dichelachne micrantha
Classification
Unranked: Monocots
Unranked: Commelinids
Order: Poales
Family: Poaceae
Genus: From Di/Dis, which are Ancient Greek for two, Khelos, which is Ancient Greek for split and Achne which is Ancient Greek for chaff. It refers to glumes which split into two.
Species: From Mikros, which is Ancient Greek for small or very small and Antha/Anthos, which are Ancient Greek for the male reproductive organs on a flower or the flower. It refers to flowers, which are smaller than those of other species in the genus.
Common Name: Short Hair Plume Grass.
Distribution:
Dichelachne micrantha is found in Western Australia south from Mundaring, near Perth to Beedelup National Park.
In South Australia it is found south from north of Adelaide to Wilpena and from Birdwood to Kangaroo Island with a disjunct population around Mount Gambier.
In the east it is found south from Eungella National Park in central eastern Queensland to Warmambool in southern Victoria. It is found on the eastern side of the Western Plains, Western Slopes, on and east of the Great Dividing Range to the coast. It is also found on Lord Howell Island and Norfolk Island.
It is also found on the eastern Bass Strait Islands and the eastern half of mainland Tasmania with an isolated population on Mount Bertha in the north west of the state.
https://avh.ala.org.au/occurrences/search?taxa=Dichelachne+micrantha#tab_mapView
Habitat Aspect Climate:
Dichelachne micrantha prefers full sun to light dappled shade. It grows in dry open forests and dry open woodlands on flat plains which are subject to seasonal flooding or water logging. The altitude ranges from 5 meters ASL to 1400 meters ASL.
The temperatures range from minus 3 degrees in August to 39 degrees in January.
The rainfall ranges from lows of 250mm to 1200mm average per annum.
Soil Requirements:
Dichelachne micrantha prefers sandy loams to heavy clays. The soils are usually derived from decomposed sandstones, brown basalts or black basalts, shale or metamorphic rocks. The soils pH ranges from 4.5pH to 5.5pH. It does tolerate seasonal waterlogged soils. Non saline soils to extremely saline soils are tolerated.
Height & Spread:
Wild Plants: 0.6m to 1.2m by 0.4m to 0.7m
Characteristics:
Dichelachne micrantha grows as a tufted grass with erect culms. The culms measure 300mm to 950mm in height or rarely to120mm in height. The mid-culm internodes are glabrous while the Lateral branches are simple and wiry. The ligules are entire, eciliate membranes that measure 0.3mm to 1.5mm in length. Plants have a fibrous root system.
Dichelachne micrantha‘s linear leaves measure 70mm to 230mm in length by 1.5mm to 6mm in width. The leaf sheath is glabrous or covered in white, puberulent hairs. The apex is tapering to narrow acute. The ligule is glabrous or sparsely to moderately covered in white pubescent hairs and has an obtuse or lacerated apex. The concolourous laminas are pale grass-green to pale blue-green and glabrous or sparsely covered in white puberulent hairs. The midrib is rounded and slightly prominent on the on the lower lamina. The leaf margins are entire.
The inflorescences of Dichelachne micrantha are loose panicles or at times compact panicles. The panicles measure 40mm to 220mm in length by 2mm to 3.5mm in width. The spikelets are pedicilate with a single flower without a rachilla or a single infertile flower with a sort rachilla. The flattened spikelets measure 3mm to 5.5mm in length.
The similar glumes are subulate and firmer than fertile lemma. The lower glumes are lanceolate, membranous and measure 2.5mm to 8mm in length. They are single keeled with a single nerve. The lower glume’s apex is mucronate. The upper glumes are lanceolate, membranous and measure 3mm to 6mm in length. They are single keeled with a single nerve.
The upper lemmas are shorter than the glumes and usually measure 3.4mm to 4mm in length however at times can be much shorter or longer at 2.5mm to 4.7mm in length. The apex is acuminate. The awn curves as it approaches the apex and is twisted. The purple awn measures 6mm to 33mm in length. The 2, nerved palea are shorter than the lemma.
There are 1 or rarely 3 stamens on each spikelet. The flowers appear from late October to January.
The fruits of Dichelachne micrantha seeds measure 2mm to 4.4mm in length. The green seeds turn pale straw-fawn when ripe.
Wildlife:
Dichelachne micrantha is unknown to the author.
Cultivation:
Dichelachne micrantha is not considered to be a good fodder crop. Its potential is mainly found when it is in flower and seed. At this stage horses and cattle consume the softer flower heads and seeds. The leaves and stems are eaten but probably are mainly used as bulk. It has a rapid growth rate from late spring after the spring rains to autumn. It recovers well from moderate grazing and is best managed as to not allowing it to form culms.
This grass is classified as a weed by gardeners, despite being fairly easy to control. It gives good quantities of trash for mulch thus improves soils structure and fertility. It has good potential as a landscaping grass in large areas especially against hard walls and structures that need softening when inter planted with small perennials like Hibbertia acuminata.
In cultivation it looks at its best when grown along narrow borders, medium to large rockeries or as feature plants where it grows from 400mm to 800mm in height by 200mm to 300mm in diameter. The spectacular long, pale purple-pink plumes in spring offers the landscaper a change in form and colour over a short period.
In cultivation it has be grown on most types of soil however full sun is essential for best results.
It should be trimmed back immediately after the flower heads start to fade and before the seeds begin to fall. Cut the plants back to approximately 100mm in early summer and mulch. For best results trim them again in late April or early May. The flowering heads can be used in floral arrangements and dyed for greater affect.
Propagation:
Seeds: Dichelachne micrantha‘s seeds can be sown directly into a seed raising mix in early autumn. Cover them with 2mm of the mix. When the seedlings are 25mm to 50mm tall, prick them out and plant them into 50mm native tubes using a seed raising mix.
Fertilize using Seaweed, fish emulsion or organic chicken pellets soaked in water on an alternate basis. Fertilize every two months until established.
Once the seedlings reach 150mm to 200mm in height plant them out into their permanent position. Mass plantings can be achieved with spacing of 0.6 meters to 2 meters depending on the desired effect.
Plants can be grown by digging up patches and just cutting into 4 sections. Replant into a shallow saucer made in the ground, cover with 5mm to 10mm of sand and water every second day until the new shoots appear.
Fertilize using seaweed, fish emulsion or organic chicken pellets soaked in water on an alternate basis. Fertilize every two months until the plants are established then annually in early September to October to maintain health, vitality and better flowering.
Further Comments from Readers:
Hi reader, it seems you use The Bible of Botany a lot. That’s great as we have great pleasure in bringing it to you! It’s a little awkward for us to ask, but our first aim is to purchase land approximately 1,600 hectares to link several parcels of N.P. into one at The Pinnacles NSW Australia, but we need your help. We’re not salespeople. We’re amateur botanists who have dedicated over 30 years to saving the environment in a practical way. We depend on donations to reach our goal. If you donate just $5, the price of your coffee this Sunday, We can help to keep the planet alive in a real way and continue to bring you regular updates and features on Australian plants all in one Botanical Bible. Any support is greatly appreciated. Thank you.
In the spirit of reconciliation we acknowledge the Bundjalung, Gumbaynggirr and Yaegl and all aboriginal nations throughout Australia and their connections to land, sea and community. We pay our respect to their Elders past, present and future for the pleasures we have gained.
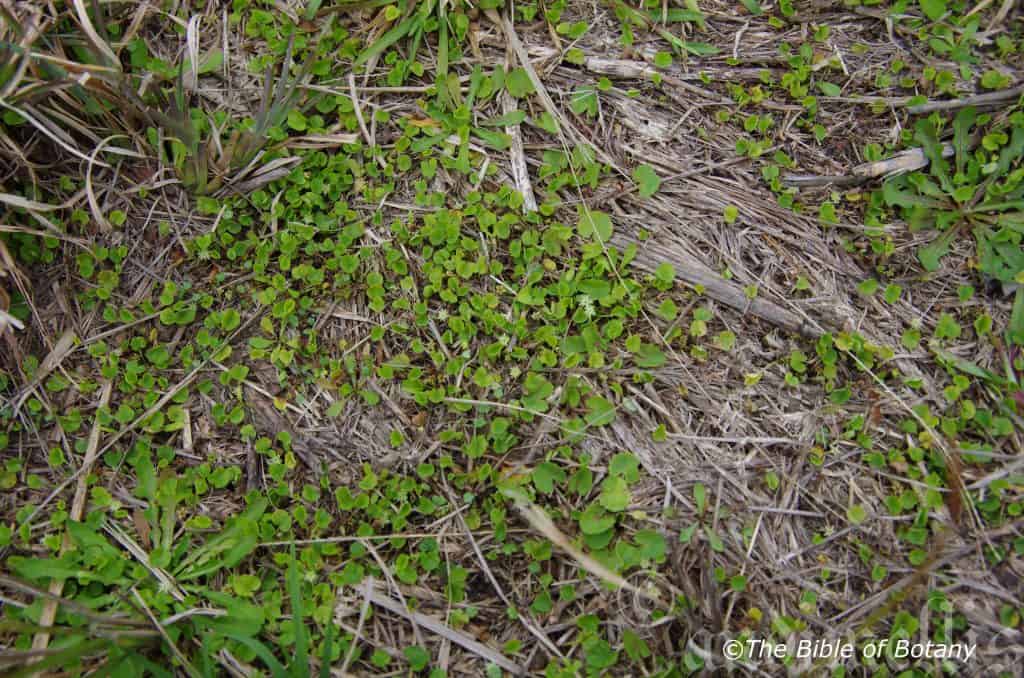
Pillar Valley NSW
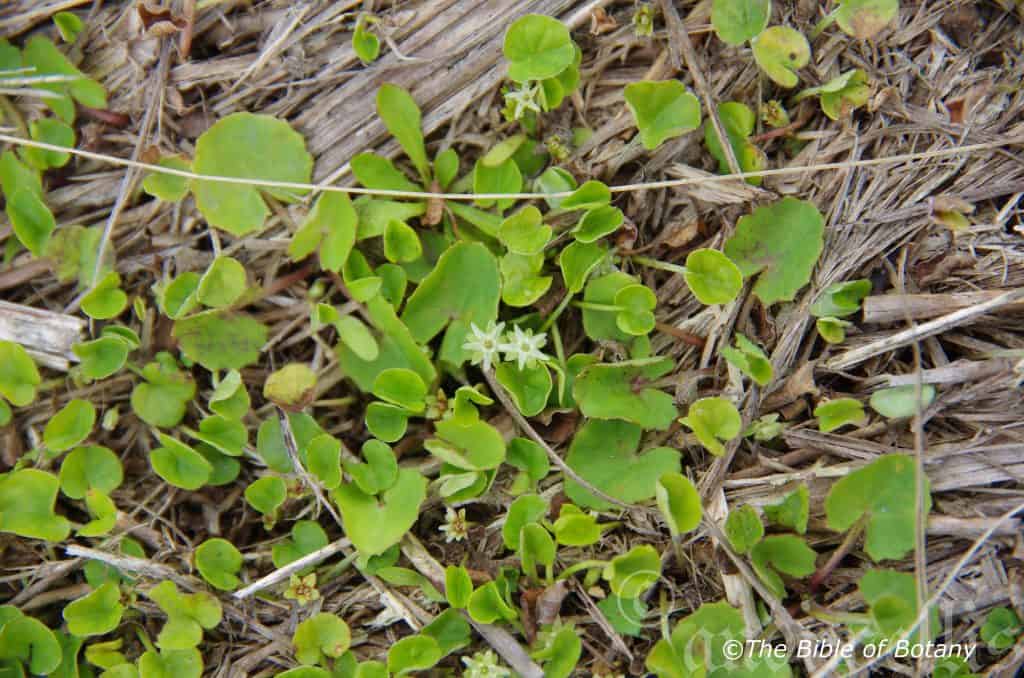
Pillar Valley NSW
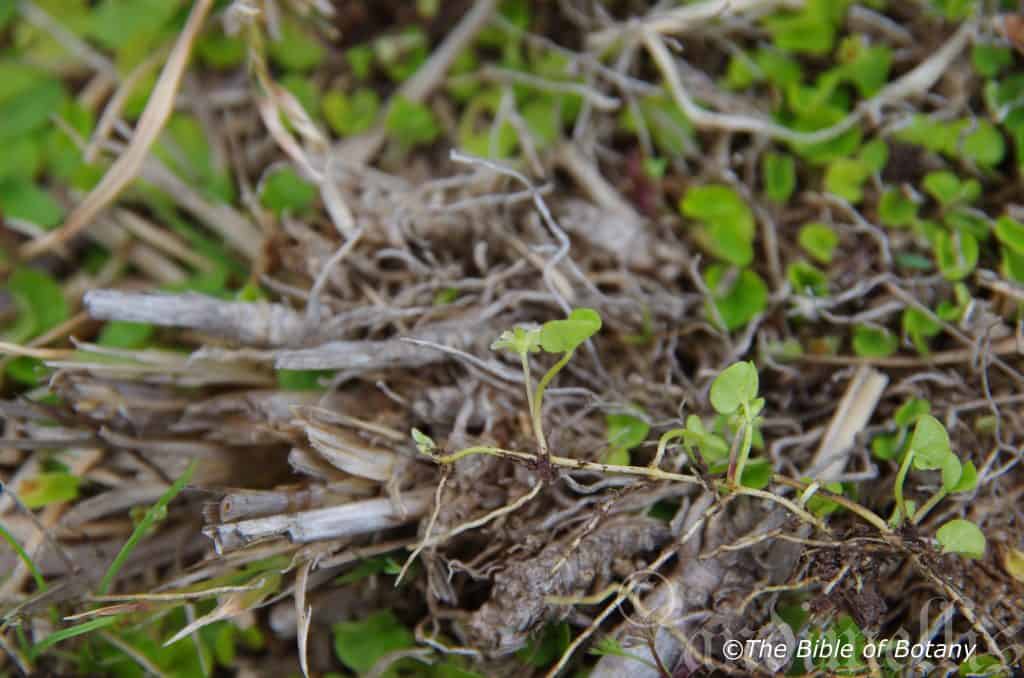
Pillar Valley NSW
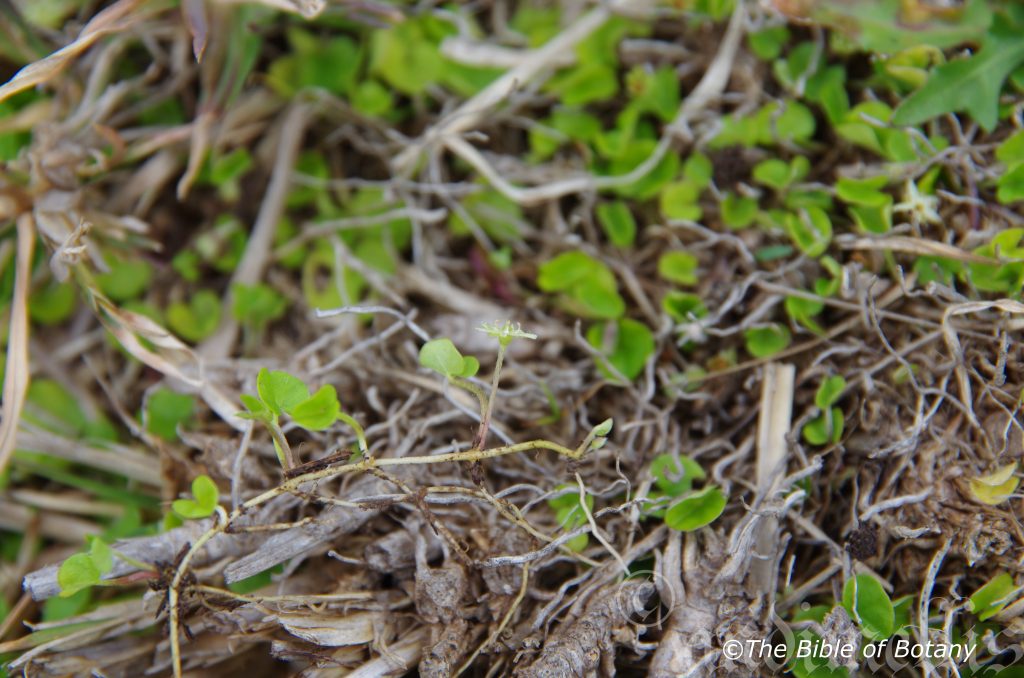
Pillar Valley NSW
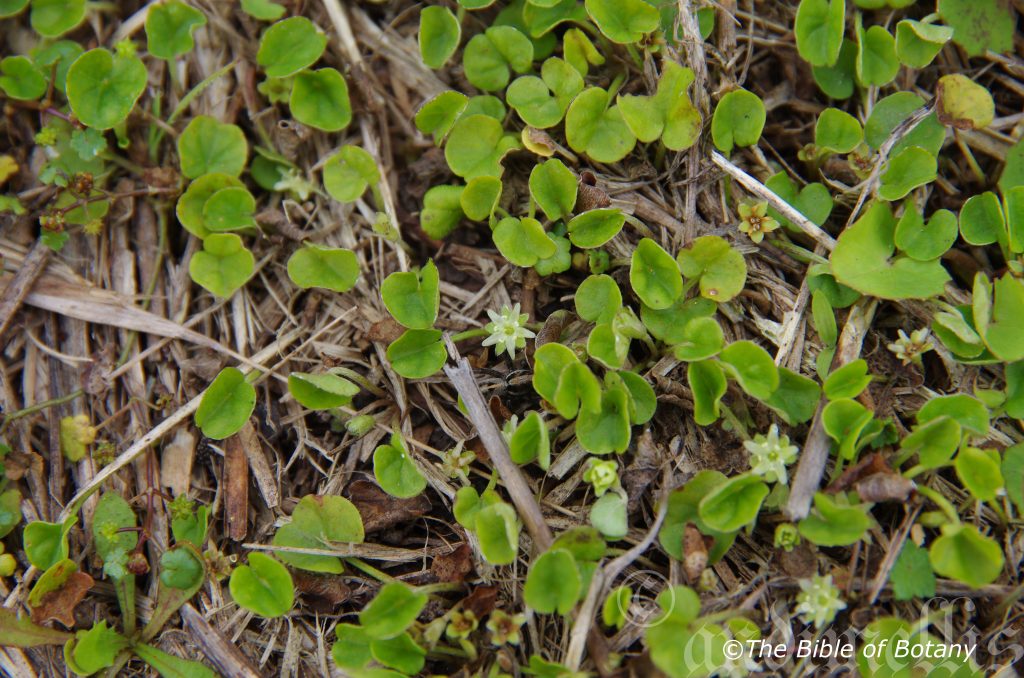
Pillar Valley NSW
Dichondra repens
Classification
Unranked: Eudicots
Unranked: Asterids
Order: Solanales
Family: Convolvulaceae
Genus: From Di/Dis, which are Ancient Greek for two and Khondros, which is Ancient Greek for a grain. It refers to the two fruitlets appearing similar to two united grains.
Species: From Repens, which is Latin for creeping. It refers to plants, which have a habit of creeping along the ground’s surface.
Common Name: Kydney Weed or Yilibili.
Distribution:
Dichondra repens is found south from the Swan River Plains to Nuytsland Nature Reserve.
In the east it is found from west of Ingham in the north south to the Victorian border then from East Gippsland through to Adelaide, Port Augusta and southern Eyre Peninsula in southern South Australian. It is found on the Western Plains, Western Slopes, on and east of the Great Dividing Range to the coast.
It is found on Flinders Island, King Island and most the larger Bass Strait Islands as well as most of the warmer parts of Tasmania.
https://avh.ala.org.au/occurrences/search?taxa=Dichondra+repens#tab_mapView
Habitat Aspect Climate:
Dichondra repens prefers full sun to dappled shade. It grows in the mountains, on plains, in moist open woodlands, open moist Eucalyptus forests, alluvial flats and areas adjacent to coastal wallums. Its altitude ranges from 10 meters ASL to 1500 meters ASL.
The temperatures range from minus 4 degrees in July to 33 degrees in January.
The rainfall ranges from lows of 260mm to 2800mm average per annum.
Soil Requirements:
Dichondra repens prefers light sandy loams, light gravelly clays, medium clays, heavy clays, medium silts to heavy silts. The soils are derived from decomposed fatty sandstones, brown basalts, black basalt, shale, heavier silty alluvial deposits, and medium muddy silts to heavy muddy silts. The soils pH ranges 5pH to 7pH. It does tolerate waterlogged soils often being submerged for long periods of time during the wet season. Non saline soils to moderately saline soils are tolerated.
Height & Spread:
Wild Plants: 20mm to 50mm by very large areas with a repent habit
Characteristics:
Dichondra repens grows on soft stoloniferous stems. Stems are thin pale green, white and may have pink markings. They are glabrous. Young leading shoots are light green with white or pale pink base silky hairs. The white roots are produced at the nodes.
The reniform to oblong circular leaves measure 5mm to 25mm in length by 6mm to 28mm in diameter. The base is cordate while the apex is emarginated to obtuse. The concolourous laminas are pale grass green and slightly to moderately covered in white pilose hairs. The colouration is a deeper green when grown in the shade however leaf drop develops if the shade is too strong. The leaf margins are entire. The petioles measure 15mm to 30mm in length.
The inflorescences of Dichondra repens are born singularly from the leaf axils. The flowers are a pale yellow to pale yellow-green. The pedicels measure 10mm to 50mm in length. The calyx lobes are elliptical, measure 3mm to 4mm in length and are densely covered in long white pilose hairs. The corolla is 3mm to 4mm long with 5 spreading oblong, glabrous lobes which measure 4mm to 5mm in length. The creamy green coloured filaments measure 3mm to 4mm in length including the ovate creamy yellow anthers. The two styles measure 1.5mm to 2.5mm in length. Dichondra repens flowers most of the year with a peak in late spring or following good rains.
The fruits of Dichondra repens are a 2 deeply divided obovate lobed capsules. The capsules are measure 5mm to 6mm in length by 5mm to 7mm across and 2mm to 3mm in width. The styles are persistent on the capsules. The green capsules turn a burgundy red with 5 distinct yellow longitudinal lines before splitting. The capsules are sparsely to densely covered in white pilose hairs. There is 1 seed in each capsule.
Wildlife:
Dichondra repens leaves are eaten by various army worms but infestations never seem to do much damage. It was a staple part of the Australian Aborigines and first Europeans diet, as a green salad vegetable.
The young leaves when harvested and eaten have a mild parsley taste and can easily be substituted for parsley. It is sweeter and softer on the palate. It is also being investigated as a good anti-cancer vegetable similar to broccoli. The leaves can be added to deserts, salads, fruit salad or juiced and mixed with fruits for a pleasant drink.
Cultivation:
This is a beautiful low growing ground cover that can easily be substituted for your existing lawn. It is ideal for medium traffic areas that are continually moist or dry out in dry periods for short times, in semi shade, dappled light or full sun. It is not attacked by lawn grubs or army worms to the extent that exotic lawns are. Dichondra repens is great if mowing is not your style. It is also an ideal addition around paths between paths and around fish ponds and beneath fern fronds as it is not overpowering.
Cultivated plants in ideal conditions in semi shade will reach up to 100mm in height.
Its versatility doesn’t stop with accepting all types of soils but they can cope with temperatures as low as minus 7 degrees and the odd day at 42 degrees may see some leaf wilt but will again become turgid on dusk or given a drink. It is drought resistant and can cope with the occasional immersion where periodic down pours may flood the land.
Add to the above, if it is given adequate moisture, plenty of mulch for moisture retention and an even soil temperature, applying native fertilizers on a regular basis the plants will respond with a lush glossy deep green coverage that will prevent weed growth. In Nana Glen we used Dichondra near Allocasuarina trees and over the septic trenches where it blanketed everything else out. It was only as the Allocasuarina trees laid their thick mulch that Dichondra succumbed close to the trunks.
Another advantage of Dichondra repens is, it can be harvested and added to coleslaws or mixed with tomato salads. The seeds have a nutty parsley flavour but are very time consuming to collect. We have even added chopped fresh young leaves to ice cream and stewed fruit for a cold treat on hot days. The young leaves are high in vitamin “C”
To harvest young leaves successfully slash the area with a lawn mower a week before you intend to use the leaves to encourage new softer growth.
Propagation:
Seeds: Dichondra repens’s seeds do not require treatment before sowing. Sow fresh seeds directly into a seed raising mix and cover with 5mm of the mix. When the seedlings are 15 to 20 mm tall, prick them out and plant them into standard 50mm tubes using a seed raising mix.
Fertilize using Seaweed, fish emulsion or organic chicken pellets soaked in water on an alternate basis. Fertilize every two months.
Once the seedlings roots reach the bottom of the tube and runners start developing plant them out into their permanent position. Mass plantings can be achieved with spacing every 200mm to 300mm.
Runners: Use runners that already have roots. Dig up a patch rinse under the tap and cut into sections ensuring each runner has some root and place in a bucket of water containing sea weed extract. Dig a small divot plant the runner ensuring that the crown or heart is above the surface. Cover the roots and water in well with the fertilizer mix. Keep moist until new runners appear then the watering can be reduced. The best time to use runners is just after rain or as the wet season approaches. Do not attempt using runners in extreme hot or dry weather conditions or failures will be encountered.
Plants can be grown by digging up patches and just cutting into 4 sections. Replant into a shallow saucer made in the ground, cover with 5mm to 10mm of sand and water every second day until the new shoots appear.
Fertilize using seaweed, fish emulsion or organic chicken pellets soaked in water on an alternate basis. Fertilize every two months until the plants are established then annually in early September to October to maintain health, vitality and better flowering.
Further Comments from Readers:
Hi reader, it seems you use The Bible of Botany a lot. That’s great as we have great pleasure in bringing it to you! It’s a little awkward for us to ask, but our first aim is to purchase land approximately 1,600 hectares to link several parcels of N.P. into one at The Pinnacles NSW Australia, but we need your help. We’re not salespeople. We’re amateur botanists who have dedicated over 30 years to saving the environment in a practical way. We depend on donations to reach our goal. If you donate just $5, the price of your coffee this Sunday, We can help to keep the planet alive in a real way and continue to bring you regular updates and features on Australian plants all in one Botanical Bible. Any support is greatly appreciated. Thank you.
In the spirit of reconciliation we acknowledge the Bundjalung, Gumbaynggirr and Yaegl and all aboriginal nations throughout Australia and their connections to land, sea and community. We pay our respect to their Elders past, present and future for the pleasures we have gained.
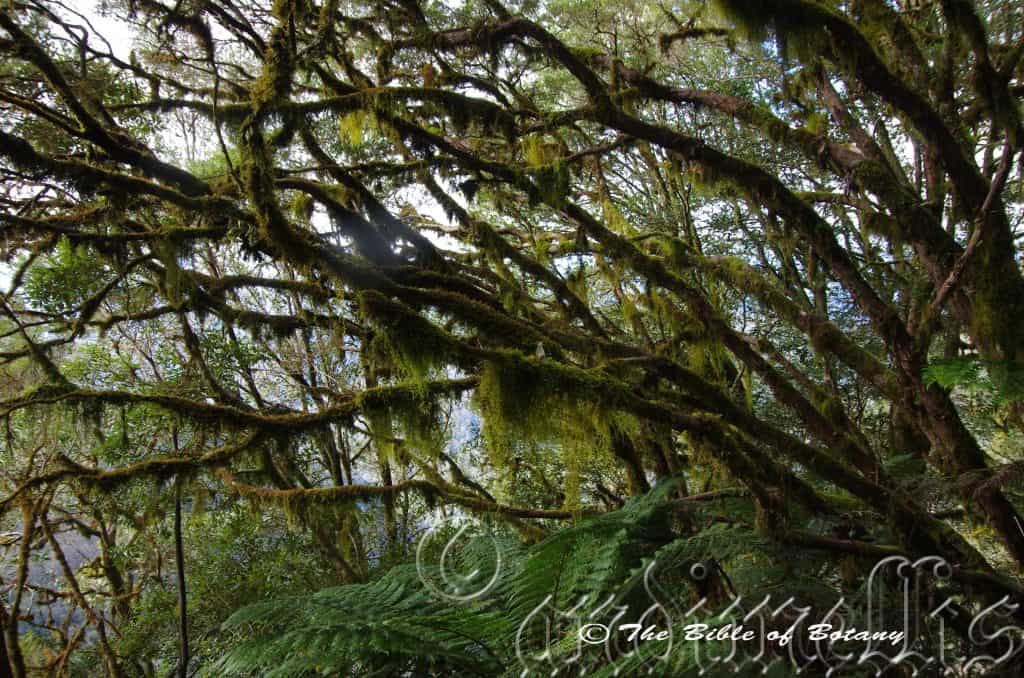
Point Lookout National Park Ebor NSW
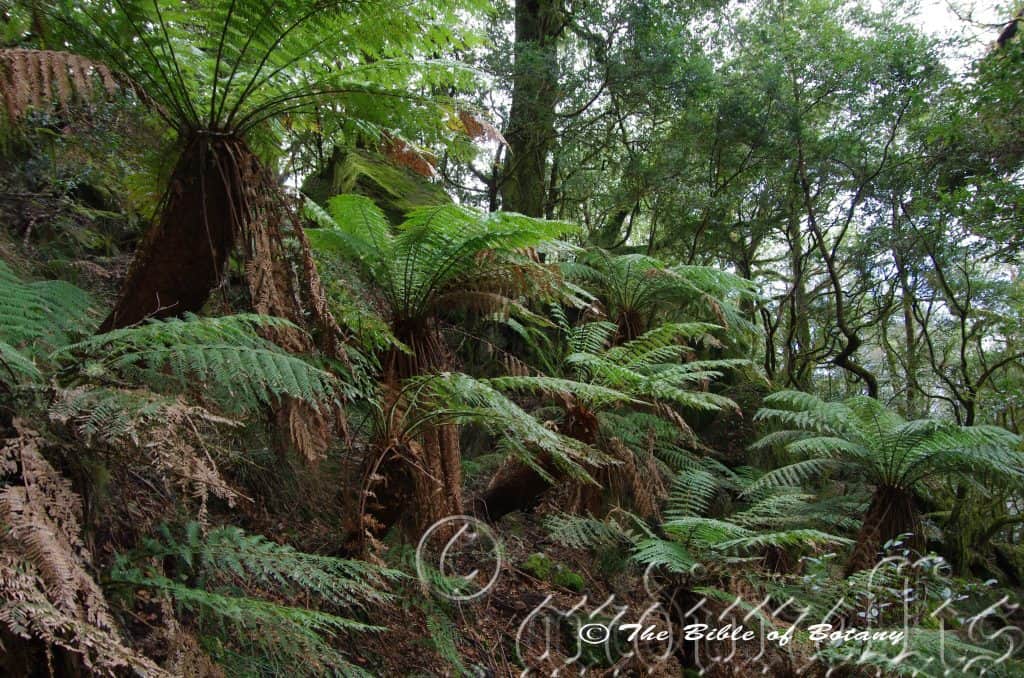
Point Lookout National Park Ebor NSW
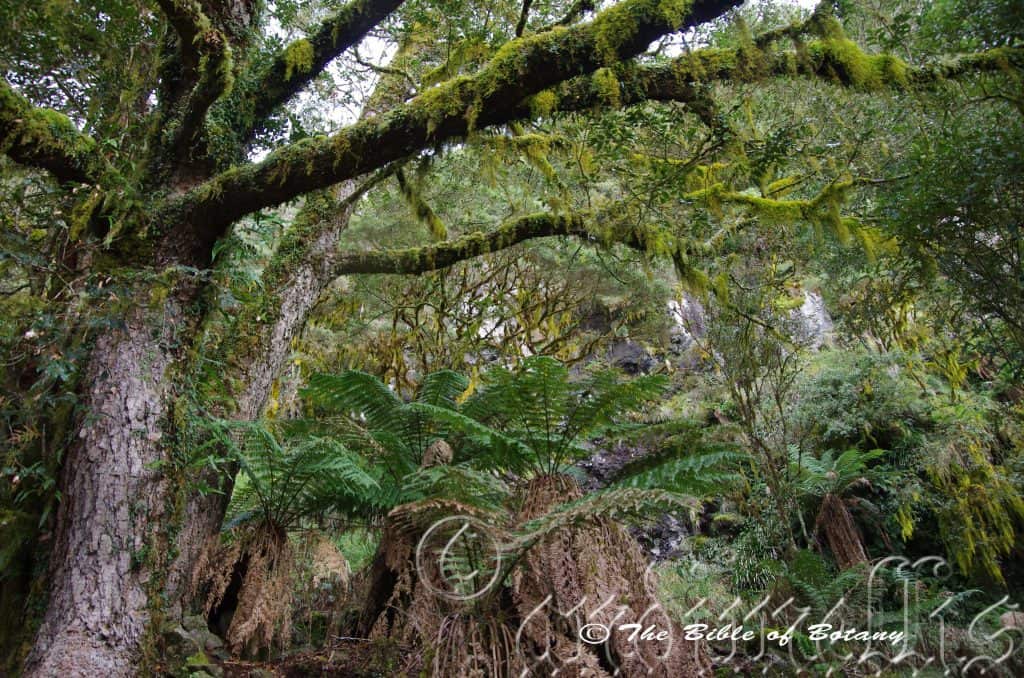
Point Lookout National Park Ebor NSW
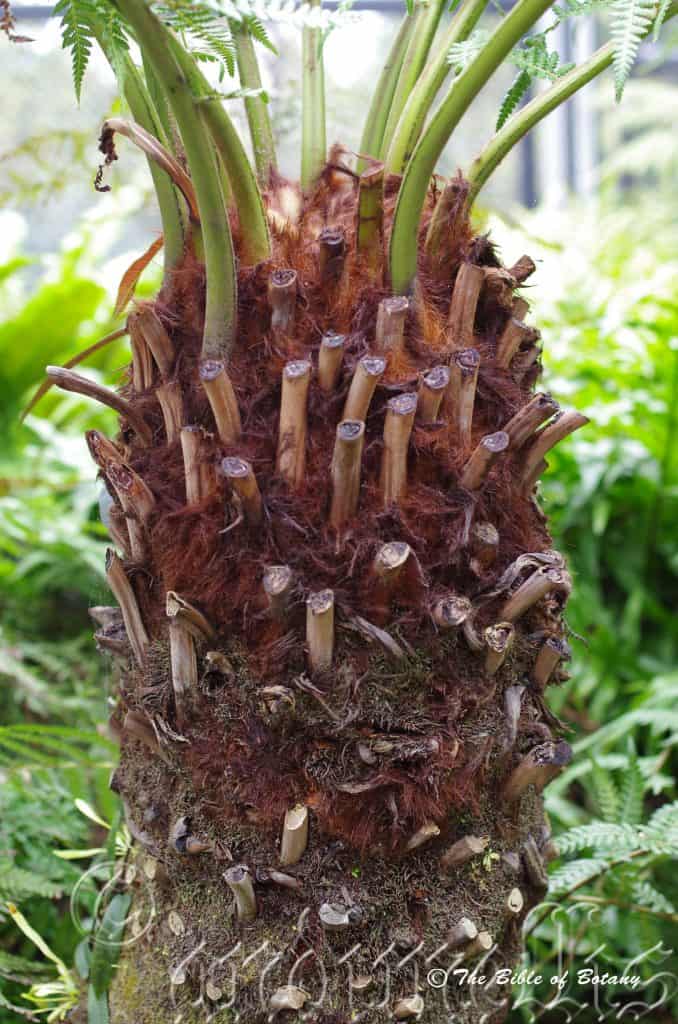
Point Lookout National Park Ebor NSW
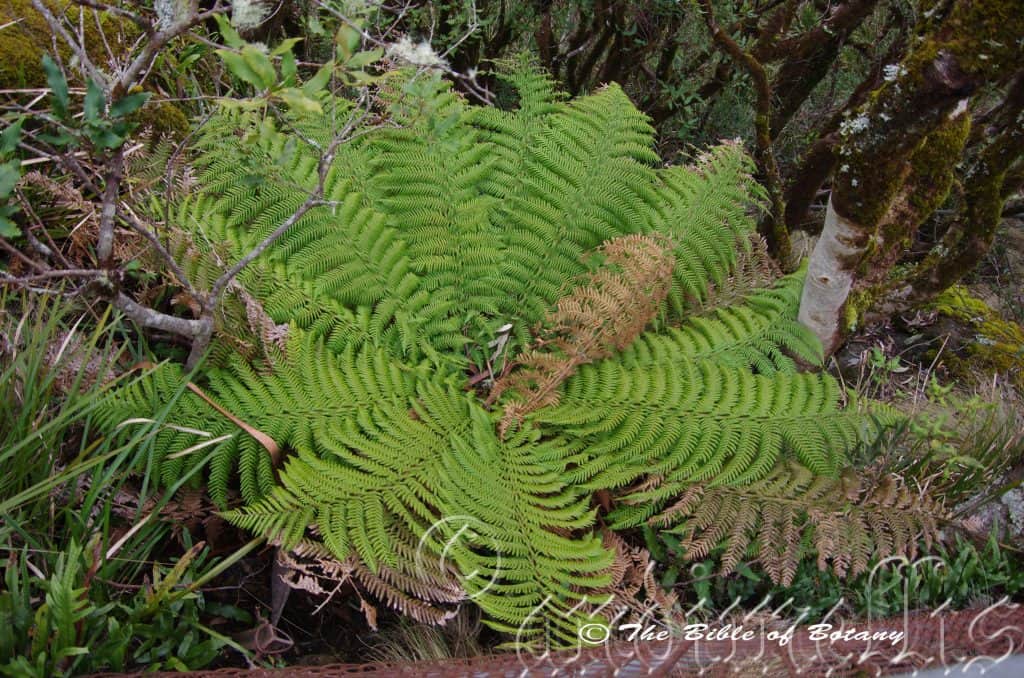
Point Lookout National Park Ebor NSW
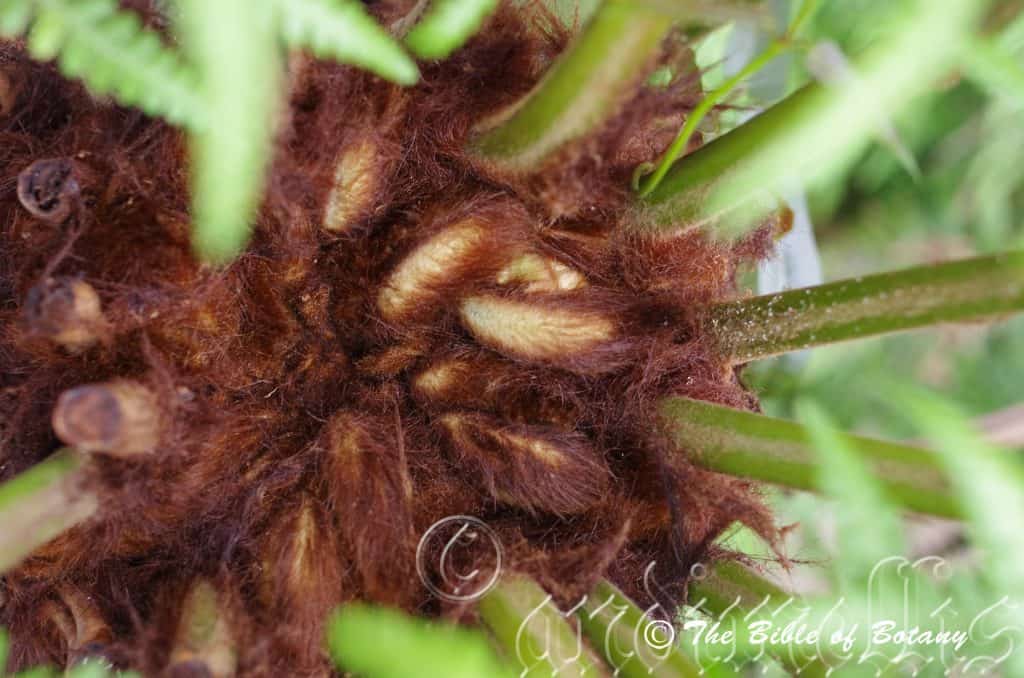
Point Lookout National Park Ebor NSW
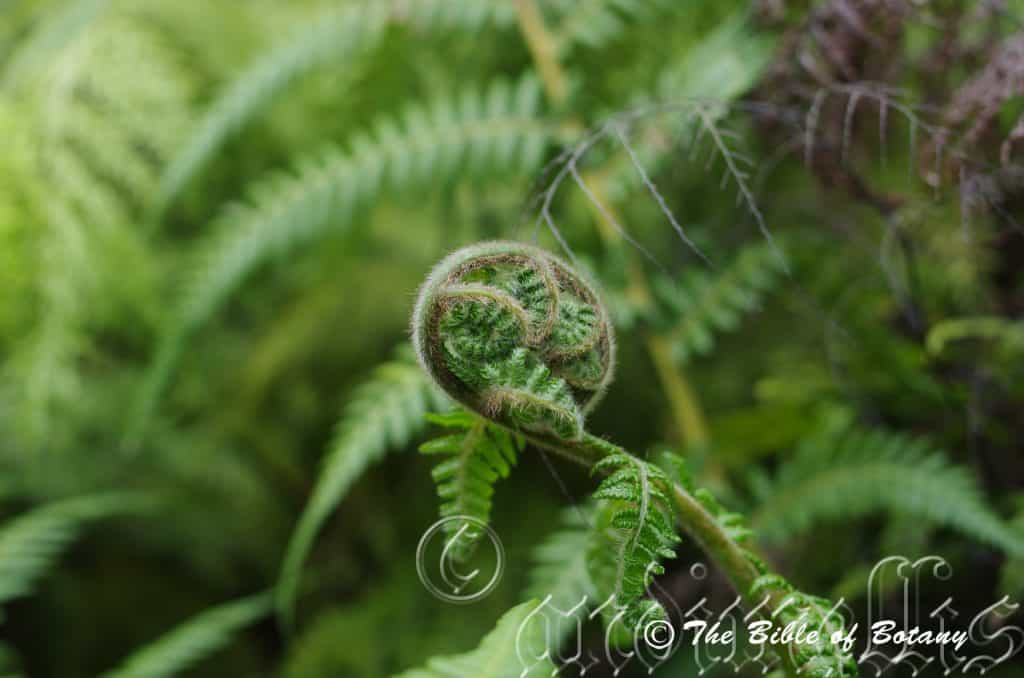
Point Lookout National Park Ebor NSW
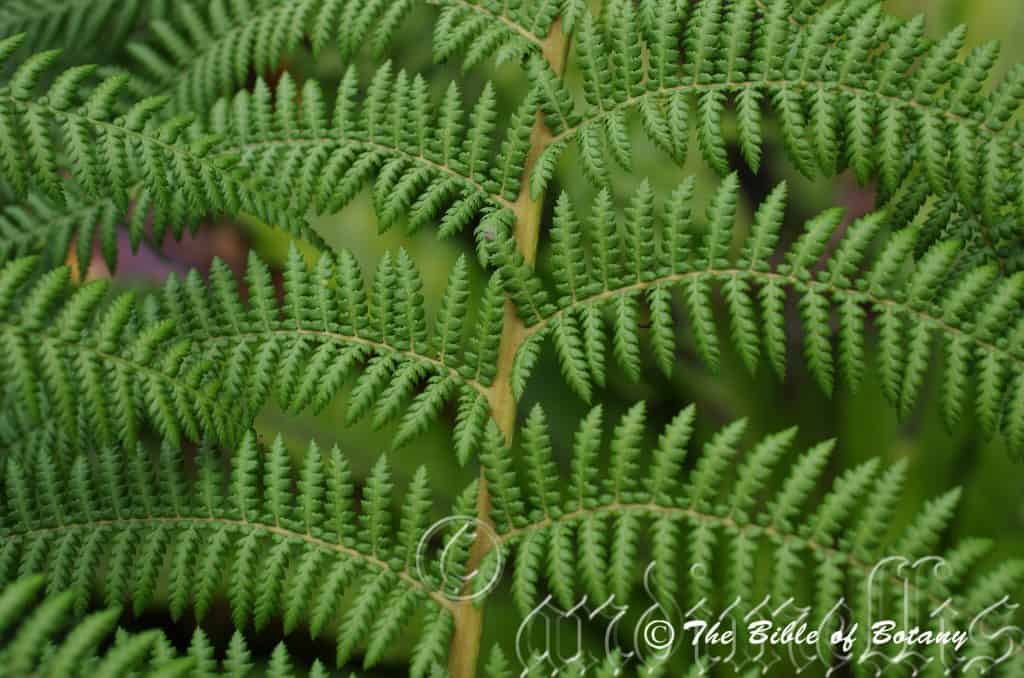
Point Lookout National Park Ebor NSW
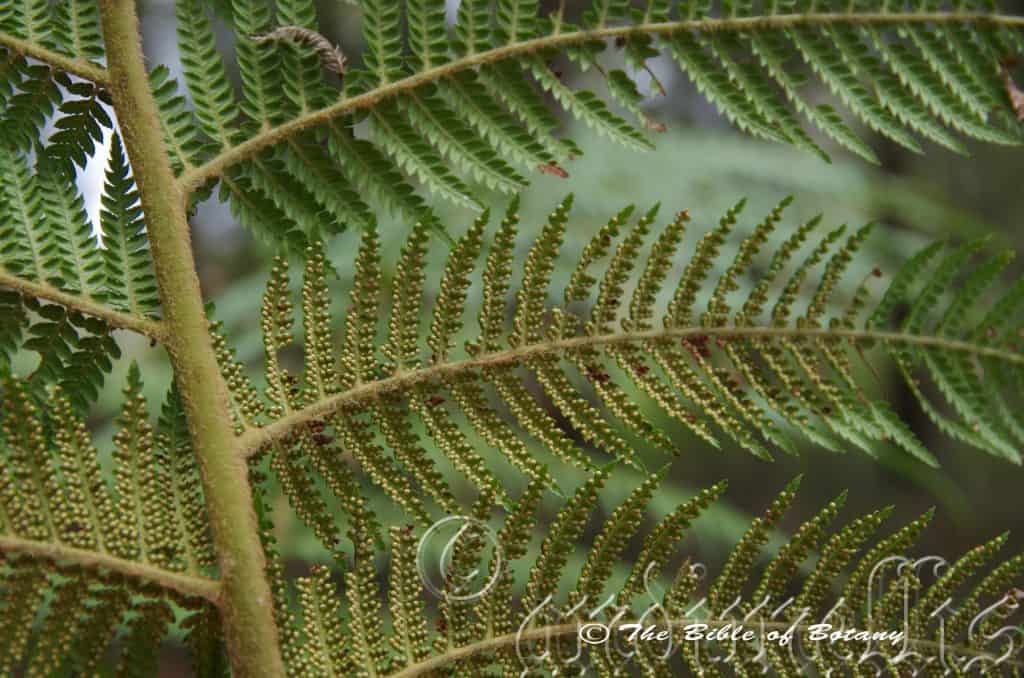
Point Lookout National Park Ebor NSW
Dicksonia antarctica
Classification
Division: Polypodiophyta
Class: Polypodopsida
Order: Cyatheales
Family: Dicksoniaceae
Genus: Is named in Honour of named in honour of James Dickson; 1738-1822, who was a Scottish nurseryman.
Species: From Antarktik‘s, which is Ancient Greek, for southern. It refer to plants, which grow in the southern hemisphere especially those that have historical links to fossils from Antarctica.
Common Name: Australian Hares Foot Fern.
Distribution:
Dicksonia antarctica is found south from Fraser Island in southern coastal Queensland to Mount Gambier in far south eastern South Australia. It is found on and east of the Great dividing Range to the coast.
There is an isolated population further west at Yankalilla and the Adelaide Hills in South Australia and further north at Mount Bellenden Ker in far north eastern Queensland.
It is found throughout Tasmania and the Bass Strait Islands except for the highest peaks.
https://avh.ala.org.au/occurrences/search?taxa=Dicksonia+antarctica#tab_mapView
Habitat Aspect Climate:
Dicksonia antarctica prefers dappled light to full shade. It grows in damp, sheltered moist woodland slopes, moist gullies and temperate rainforests. It is particularly common in transitional zones between temperate rainforests and moist open woodlands. It strongly resents drought or dryness at the roots, and does best in moist soil. It is found from 10 meters ASL to 900 meters ASL.
The temperature ranges from minus 4 degrees in August to 34 degrees in January.
The rainfall ranges from lows of 900mm to 3600mm average per annum.
Soil Requirements:
Dicksonia antarctica prefers soils with high leaf litter content on light clays to heavy clays and laterites. The soils pH ranges from 5pH to 8pH, due to the high leaf litter decomposing which releases the nutrient for the ferns to grow.
Height & Spread:
Wild Plants:12 meters to 15 meters by 3.5 meters to 4 meters.
Characteristics:
Dicksonia antarctica The thick trunk is densely covered in the old stipes and long red-brown hairs and often reaches 8 meters to 15 meters in height by 300mm in diameter. The base is covered with coarse, brown, fibrous roots. The trunk is made from the decaying remains of earlier growth of the plant with decomposing leaf matter that falls onto the crown and forms the medium inwhich the roots grow.
The bright green fronds are wide spreading and measure 1.5 meters to 3 meters in length, while the green to yellowish-brown stipe measures 200mm to 300mm in length. The stipe is glabrous except for a dense covering of red-brown hairs near the base which become less so over 50mm t080mm. The discolourous, tripinnate lamina is leathery, deep grass-green and glossy on the upper lamina and paler and less glossy on the lower lamina and measures 2 meters to 3.5 meters in length by 0.7meters to 1.2 meters in width.
The fronds are borne in flushes usually with a fertile then sterile fronds often in alternating layers after matururation at 20 years. The sori measure 1mm in diameter, while the indusium is persistent.
Wildlife:
Dicksonia antarctica is host for a small orchids, epiphytic ferns, lichens and mosses.
Cultivation:
Dicksonia antarctica is a magnificent tree fern for shaded courtyards, enhancing both tropical and temperate rainforest gardens. Dicksonia antarctica is excellent for growing near large fish ponds or water features away from the house giving an immediate cooling effect.
It is ideal for rainforest settings and open moist woodland settings especially when you can look down on the scene from above. To gain the best from mass plantings where it is best planted staggered over several years so various heights are found throughout the garden. With a regular fertilizing program this tree ferns will spread to the maximum by the time it has developed a 100mm trunk.
It looks particularly good planted along creek banks, rills and riparian zones on larger properties. This can be achieved by planting them in two roughly parallel meandering lines through a property as though you are walking along the creek bed. Imagine the scene with tall rainforest trees in the back ground with Rhododendron species and Cuttsia viburnum planted a little behind and intermingled with Curculigo capitata and feather palms like Archontophoenix alexandra or Archontophoenix cunninghamiana. Scenes like this are not difficult to create; they just take imagination and snap shots of real scenes from nature.
Propagation:
Spores: All ferns that are declared rare, vulnerable or endangered are protected by Federal and State Laws and must not be removed from the wild unless you are a land developer, mining company or main Roads department etc. This includes bulbs, roots, leaves and flowers. No part of any plant can be removed from Federal, State or Local Government land without the prior permission of the authority and this includes the spore.
Most people are put off at the thought of growing ferns from spore. Like all plants that produce their offspring from seed or spore the methods are basically the same. Remember nature has been doing this for millions of years and has been very successful. I have had excellent results growing over 200 different species of Australian ferns so don’t be afraid. Give it a go. Dicksonia antarctica is one of the easiest ferns to grow from spore as are all the ferns found in the  Cyatheales order so let your hair down and go for it knowing you are saving the life of ferns found in the wild.
Step 1. Select spore from the fern fronds. Wait until the fern is just starting to release its spore. Rinse the fronds under clean running water and dry. This is to wash off any other spores from rogue ferns that may have settled onto the fronds. (There is nothing worse than having common brake or common soft bracken contaminating a prized tree fern or epiphyte.)
Step 2. Place the dry fronds in a clean brown paper bag and keep them in a cool dark place like the linen closet for about a week to ten days before you are ready to sow the spore. The exception to this rule applies to ferns, which produce green spores. These must be sown immediately that they are released. Todea Barbara is a good example of a fern, which produces green spore.
Step 3. Take a large ice cream container, a small ice cream container and a clean clear plastic bag large enough to seal the large ice cream container and three or four milk bottle tops.
Step 4. Punch or drill 6 to 10 5mm holes in the bottom of the small ice cream container.
Step 5. Wash both containers, tops and plastic bag so that they are sterile.
Step 6. Use a clean fine seed raising mi. We used 30mm fine sand, 30mm peat and 30mm perlite and 10mm vermiculite. We used crushed basalt, crusher dust and peat in a 50:50 ratio for epiphytes. Moisten the mix enough that water does not run out when the mix is squeezed between the fingers.
Step 7. Place the moisten mix (Enough to half fill the small ice cream container) in the microwave oven with a large glass of water for 7 or 8 minutes, until the water is boiling. Allow them to cool in the oven. You will need the water later so do not tip it out.
Step 8. Take the brown paper bag out of the linen closet. Shake the bag and remove the fronds. You should have a yellow, brown, black or rarely greenish brown or ochre powder or very fine, small round pin head size spore depending on the specie involved.
Step 9. Remove the mixture from the oven once it has cooled and place it in the small ice cream container and level.
Step 10. Sprinkle the spore sparsely over the mixture in the small ice cream container.
Step 11. Place the milk bottle tops in the large ice cream container with the flat surface facing down. Place the small ice cream container in the large ice cream container so that it is sitting on the milk bottle tops.
Step 12. Remove the water from the microwave and pour it into the larger ice cream container so there is 25mm to 30mm of water in the bottom.
Step 13. Place the ice cream containers in the plastic bag and seal.
Step 14. Place the contents and bag in a warm shady place preferably 50mm to 70mm shade depending on the specie. Shade houses and some window sills are ideal.
Step 15. The surface should turn green within a week to two weeks. The prothallus will then develop. From the prthalus the first true fronds will appear. Wait until the ferns are 20mm to 35mm in height before you attempt to transplant them. Once they are ready open the bag up slightly and allow the air to flow around the little ferns. Every 3 to 5 days open the bag a little further so the ferns get use to their new environment. Allow them a week to two weeks to harden off before you transplant them following the removal of the plastic bag. Carefully prick them out into 50mm standard squat tubes as you would any seedling.
Do not try to transplant them as single plants as they are still a little delicate still.
Once the smaller ones again reach 50mm to 70mm you may wish to divide the stronger and hardier individual plants into smaller clumps in 100mm squat pots.
Step 16. We fertilized with seaweed, fish emulsion or organic chicken pellets soaked in water on an alternate basis until established. Fertilize every two months for one year even when in the ground.
Plants can be grown by digging up patches and just cutting into 4 sections. Replant into a shallow saucer made in the ground, cover with 5mm to 10mm of sand and water every second day until the new shoots appear.
Fertilize using seaweed, fish emulsion or organic chicken pellets soaked in water on an alternate basis. Fertilize every two months until the plants are established then annually in early September to October to maintain health, vitality and better flowering.
Further Comments from Readers:
Hi reader, it seems you use The Bible of Botany a lot. That’s great as we have great pleasure in bringing it to you! It’s a little awkward for us to ask, but our first aim is to purchase land approximately 1,600 hectares to link several parcels of N.P. into one at The Pinnacles NSW Australia, but we need your help. We’re not salespeople. We’re amateur botanists who have dedicated over 30 years to saving the environment in a practical way. We depend on donations to reach our goal. If you donate just $5, the price of your coffee this Sunday, We can help to keep the planet alive in a real way and continue to bring you regular updates and features on Australian plants all in one Botanical Bible. Any support is greatly appreciated. Thank you.
In the spirit of reconciliation we acknowledge the Bundjalung, Gumbaynggirr and Yaegl and all aboriginal nations throughout Australia and their connections to land, sea and community. We pay our respect to their Elders past, present and future for the pleasures we have gained.
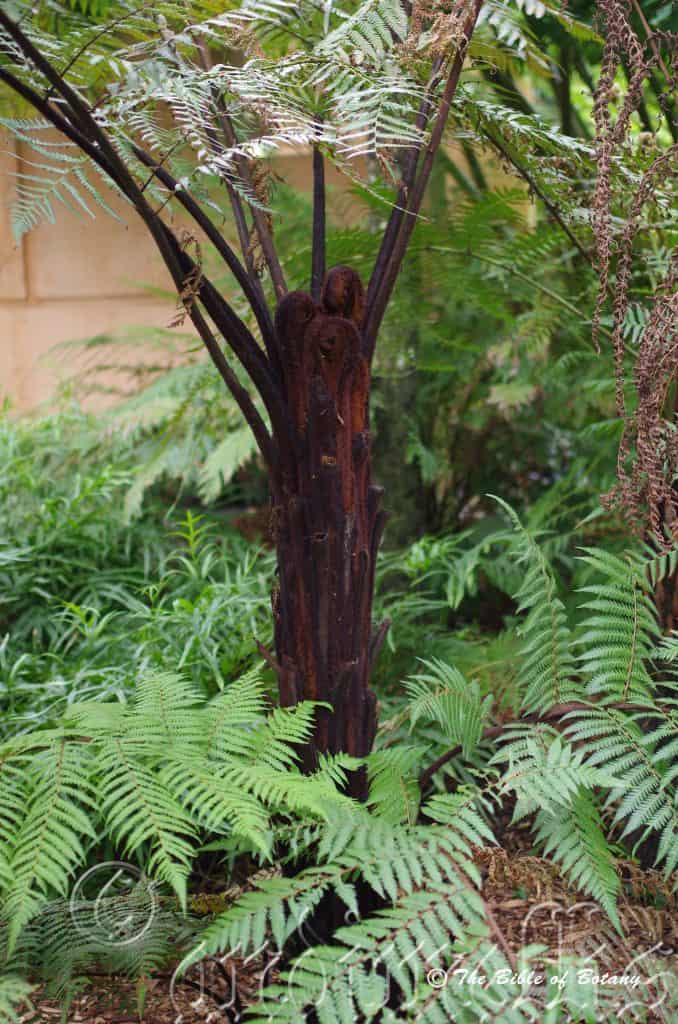
Mount Cootha Botanic Gardens Qld.
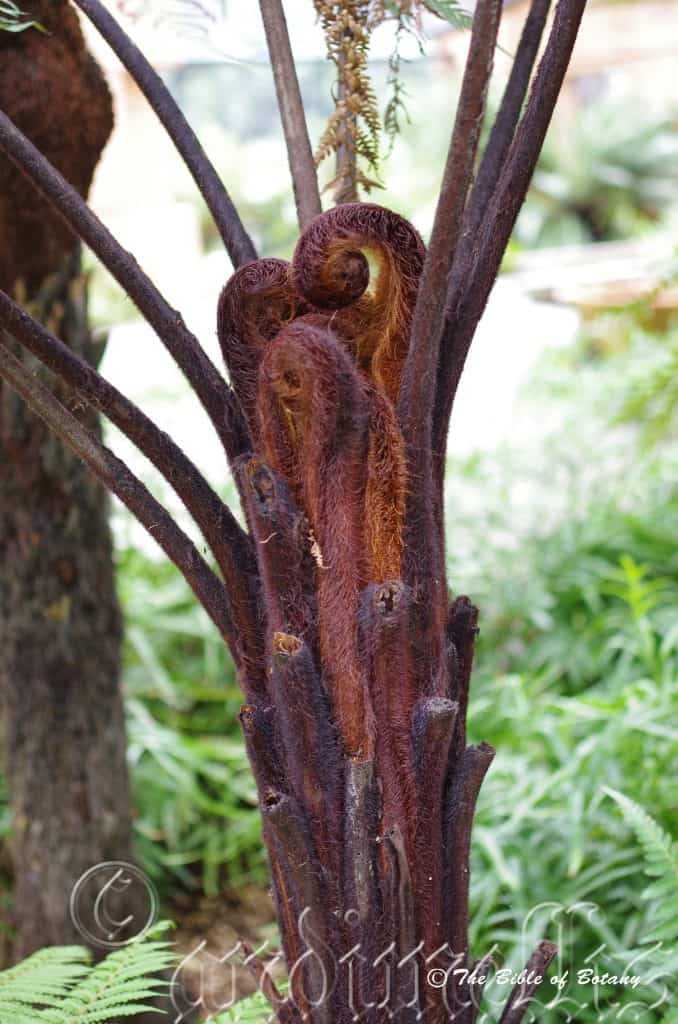
Mount Cootha Botanic Gardens Qld.
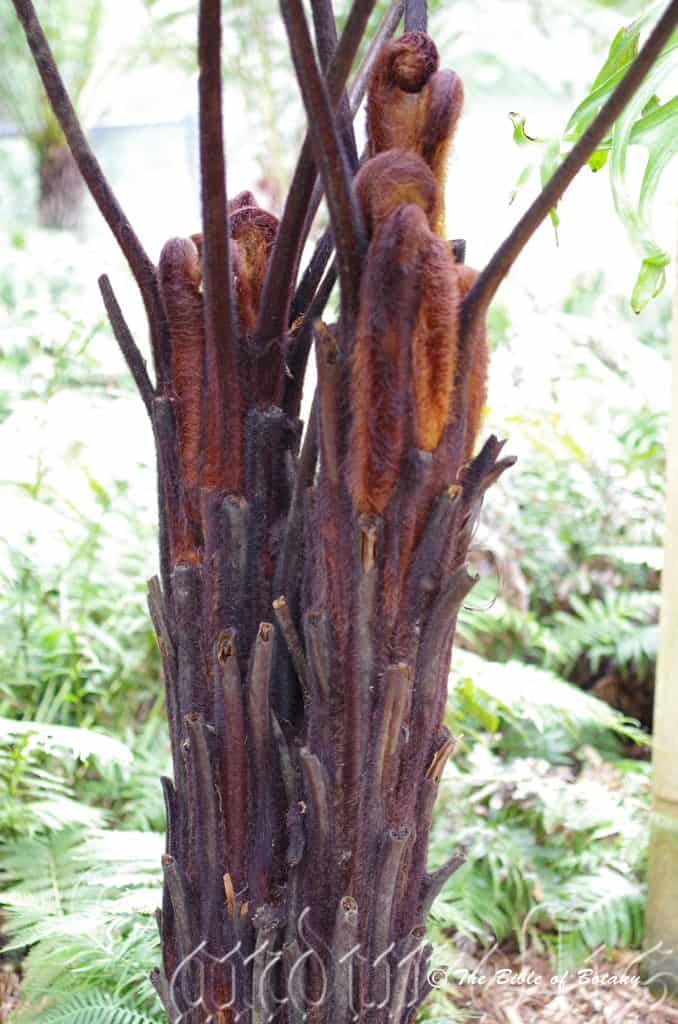
Mount Cootha Botanic Gardens Qld.
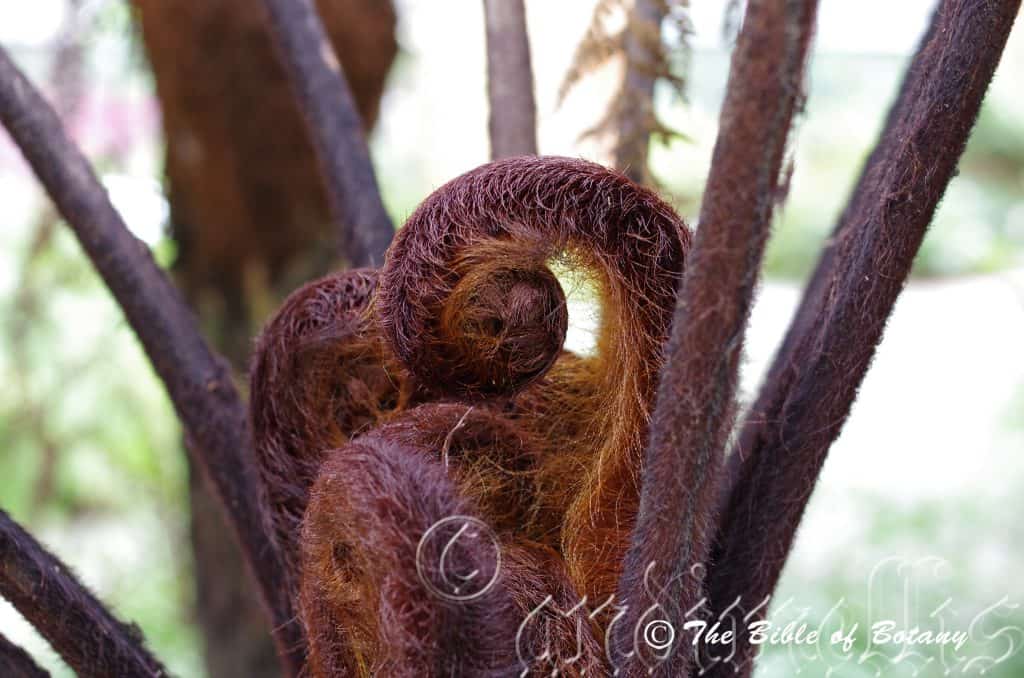
Mount Cootha Botanic Gardens Qld.
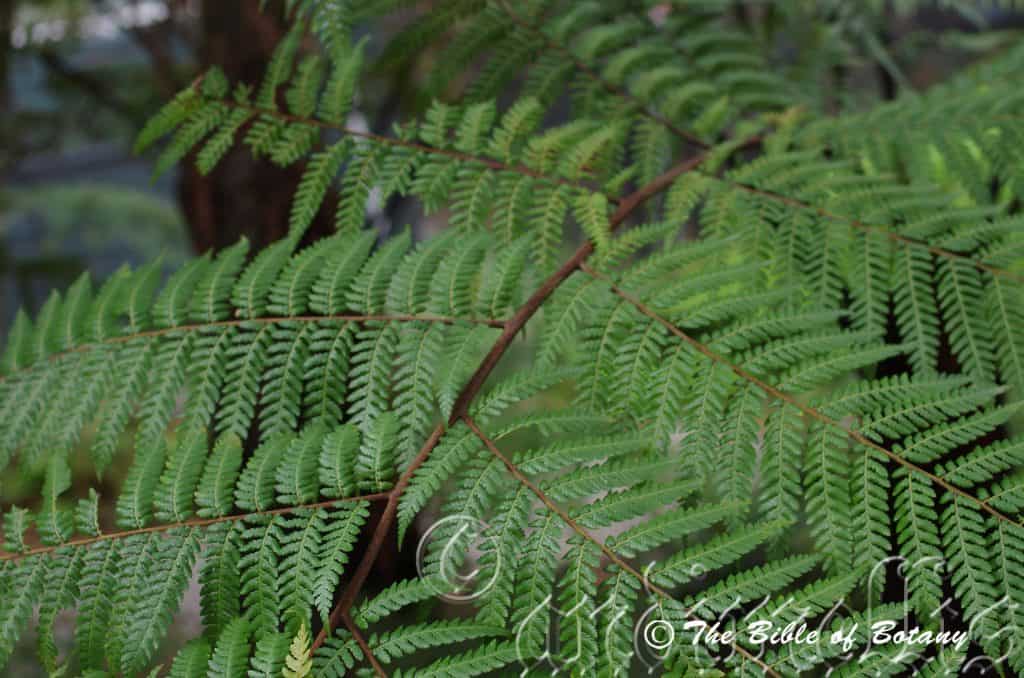
Mount Cootha Botanic Gardens Qld.
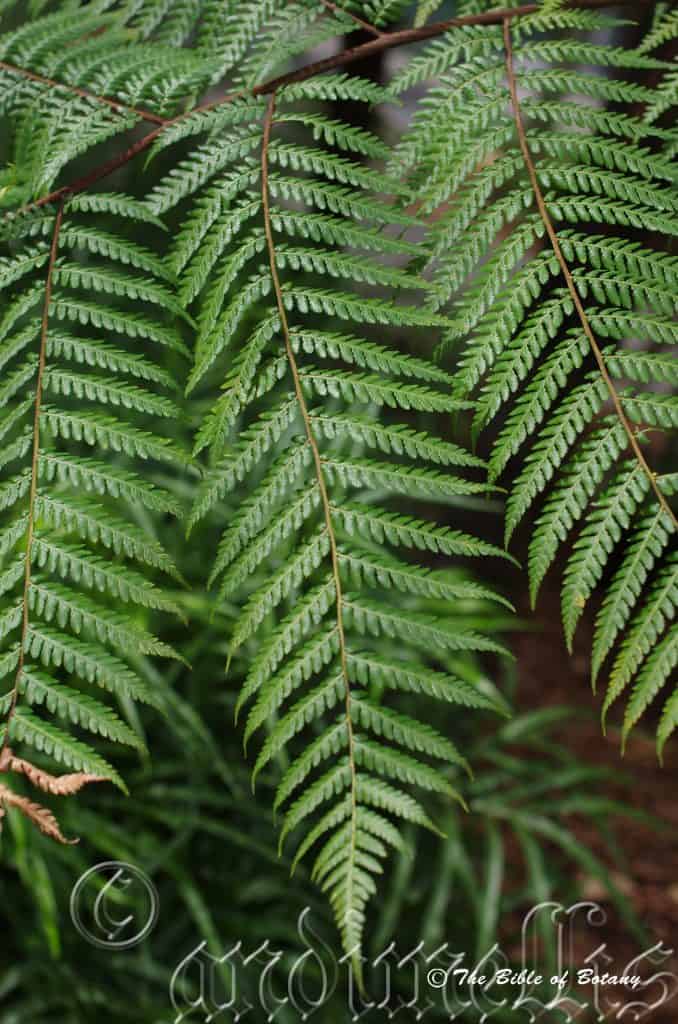
Mount Cootha Botanic Gardens Qld.
Dicksonia youngiae
Classification
Division: Polypodiophyta
Class: Polypodopsida
Order: Cyatheales
Family: Dicksoniaceae
Genus: Is named in Honour of named in honour of James Dickson; 1738-1822, who was a Scottish nurseryman.
Species: Is named in honour of Young but which Young cannot be confirmed.
Common Name:
Distribution:
Dicksonia youngiae is found south from Fraser Island in southern coastal Queensland to Kempsey in central coastal New South Wales. It is found on and east of the Great Dividing Range to the coast.
There are two isolated populations further north at Barrows Creek and Tinaroo Hills in far north eastern Queensland.
https://avh.ala.org.au/occurrences/search?taxa=Dicksonia+youngiae#tab_mapView
Habitat Aspect Climate:
Dicksonia youngiae prefers dappled light to full shade. It grows in damp, sheltered moist woodland slopes, moist gullies and temperate rainforests. It is particularly common in transitional zones between temperate rainforests and moist open woodlands. It strongly resents drought or dryness at the roots, and does best in moist soil. It is found from 10 meters ASL to 900 meters ASL.
The temperature ranges from minus 4 degrees in August to 34 degrees in January.
The rainfall ranges from lows of 900mm to 3600mm average per annum.
Soil Requirements:
Dicksonia youngiae prefers soils with high leaf litter content on light clays to heavy clays and laterites. The soils pH ranges from 5pH to 7.5pH, due to the high leaf litter decomposing which releases the nutrient for the ferns to grow.
Height & Spread:
Wild Plants:4 meters to 5 meters by 3.5 meters to 4 meters.
Characteristics:
Dicksonia youngiae‘s slender trunk is densely covered in deep reddish-brown fibrous and bristly hairs and old deep reddish-brown persistent stipes on the upper section with the deep brown roots near the base. The trunk often bears small, lateral accessory shoots with 2 or 3 or rarely 4 small fronds that remain static until the trunk falls.
The fronds are usually 1.55 meters in length, erect to spreading; The finely warty and bearing stiff, dark red-brown hairs for much of its length stipe measures 300mm to 400mm in length. The discolourous, coriaceous, lamina is bright green, glossy, glabrous, tripinnate upper lamina, while the lower lamina is paler and dull. It measures 2.5 meters to 3 meters in length. The sori measure 2mm in diameter.
The fronds are borne in flushes usually with a fertile then sterile fronds often in alternating layers after matururation at 20 years. The sori measure 1mm in diameter, while the indusium is persistent.
Wildlife:
Dicksonia youngiae is host for a small orchids, epiphytic ferns, lichens and mosses.
Cultivation:
Dicksonia youngiae is a magnificent tree fern for shaded courtyards, enhancing both tropical and temperate rain forest gardens. Cyathea cooperi is excellent for growing near large fish ponds or water features away from the house giving an immediate cooling effect.
I do not recommend Dicksonia youngiae as a planting in mass near the house or up wind of the clothes drying area as when they drop spore the can coat the windows clothing and furniture in a very fine layer of spore and spore trash.
It is ideal for rainforest settings and open moist woodland settings especially when you can look down on the scene from above. To gain the best from mass plantings, they are best planted staggered over several years so various heights are found throughout the garden. With a regular fertilizing program these tree ferns will spread to the maximum by the time they have developed a 100mm trunk.
It looks particularly good planted along creek banks, rills and riparian zones on larger properties. This can be achieved by planting them in two roughly parallel meandering lines through a property as though you are walking along the creek bed. Imagine the scene with tall rainforest trees in the back ground with Rhododendron species and Cuttsia viburnum planted a little behind and intermingled with Curculigo capitata and feather palms like Archontophoenix alexandra or Archontophoenix cunninghamiana. Scenes like this are not difficult to create; they just take imagination and snap shots of real scenes from nature.
Propagation:
Spores: All ferns that are declared rare, vulnerable or endangered are protected by Federal and State Laws and must not be removed from the wild unless you are a land developer, mining company or main Roads department etc. This includes bulbs, roots, leaves and flowers. No part of any plant can be removed from Federal, State or Local Government land without the prior permission of the authority and this includes the spore.
Most people are put off at the thought of growing ferns from spore. Like all plants that produce their offspring from seed or spore the methods are basically the same. Remember nature has been doing this for millions of years and has been very successful. I have had excellent results growing over 200 different species of Australian ferns so don’t be afraid. Give it a go. Dicksonia antarctica is one of the easiest ferns to grow from spore as are all the ferns found in the  Cyatheales order so let your hair down and go for it knowing you are saving the life of ferns found in the wild.
Step 1. Select spore from the fern fronds. Wait until the fern is just starting to release its spore. Rinse the fronds under clean running water and dry. This is to wash off any other spores from rogue ferns that may have settled onto the fronds. (There is nothing worse than having common brake or common soft bracken contaminating a prized tree fern or epiphyte.)
Step 2. Place the dry fronds in a clean brown paper bag and keep them in a cool dark place like the linen closet for about a week to ten days before you are ready to sow the spore. The exception to this rule applies to ferns, which produce green spores. These must be sown immediately that they are released. Todea Barbara is a good example of a fern, which produces green spore.
Step 3. Take a large ice cream container, a small ice cream container and a clean clear plastic bag large enough to seal the large ice cream container and three or four milk bottle tops.
Step 4. Punch or drill 6 to 10 5mm holes in the bottom of the small ice cream container.
Step 5. Wash both containers, tops and plastic bag so that they are very clean and sterile.
Step 6. Use a clean fine seed raising mi. We used 30mm fine sand, 30mm peat and 30mm perlite and 10mm vermiculite. We used crushed basalt, crusher dust and peat in a 50:50 ratio for epiphytes. Moisten the mix enough that water does not run out when the mix is squeezed between the fingers.
Step 7. Place the moisten mix (Enough to half fill the small ice cream container) in the microwave oven with a large glass of water for 7 or 8 minutes, until the water is boiling. Allow them to cool in the oven. You will need the water later so do not tip it out.
Step 8. Take the brown paper bag out of the linen closet. Shake the bag and remove the fronds. You should have a yellow, brown, black or rarely greenish brown or ochre powder or very fine, small round pin head size spore depending on the specie involved.
Step 9. Remove the mixture from the oven once it has cooled and place it in the small ice cream container and level.
Step 10. Sprinkle the spore sparsely over the mixture in the small ice cream container.
Step 11. Place the milk bottle tops in the large ice cream container with the flat surface facing down. Place the small ice cream container in the large ice cream container so that it is sitting on the milk bottle tops.
Step 12. Remove the water from the microwave and pour it into the larger ice cream container so there is 25mm to 30mm of water in the bottom.
Step 13. Place the ice cream containers in the plastic bag and seal.
Step 14. Place the contents and bag in a warm shady place preferably 50mm to 70mm shade depending on the specie. Shade houses and some window sills are ideal.
Step 15. The surface should turn green within a week to two weeks. The prothallus will then develop. From the prthalus the first true fronds will appear. Wait until the ferns are 20mm to 35mm in height before you attempt to transplant them. Once they are ready open the bag up slightly and allow the air to flow around the little ferns. Every 3 to 5 days open the bag a little further so the ferns get use to their new environment. Allow them a week to two weeks to harden off before you transplant them following the removal of the plastic bag. Carefully prick them out into 50mm standard squat tubes as you would any seedling.
Do not try to transplant them as single plants as they are still a little delicate still.
Once the smaller ones again reach 50mm to 70mm you may wish to divide the stronger and hardier individual plants into smaller clumps in 100mm squat pots.
Plants can be grown by digging up patches and just cutting into 4 sections. Replant into a shallow saucer made in the ground, cover with 5mm to 10mm of sand and water every second day until the new shoots appear.
Fertilize using seaweed, fish emulsion or organic chicken pellets soaked in water on an alternate basis. Fertilize every two months until the plants are established then annually in early September to October to maintain health, vitality and better flowering.
Further Comments from Readers:
Hi reader, it seems you use The Bible of Botany a lot. That’s great as we have great pleasure in bringing it to you! It’s a little awkward for us to ask, but our first aim is to purchase land approximately 1,600 hectares to link several parcels of N.P. into one at The Pinnacles NSW Australia, but we need your help. We’re not salespeople. We’re amateur botanists who have dedicated over 30 years to saving the environment in a practical way. We depend on donations to reach our goal. If you donate just $5, the price of your coffee this Sunday, We can help to keep the planet alive in a real way and continue to bring you regular updates and features on Australian plants all in one Botanical Bible. Any support is greatly appreciated. Thank you.
In the spirit of reconciliation we acknowledge the Bundjalung, Gumbaynggirr and Yaegl and all aboriginal nations throughout Australia and their connections to land, sea and community. We pay our respect to their Elders past, present and future for the pleasures we have gained.
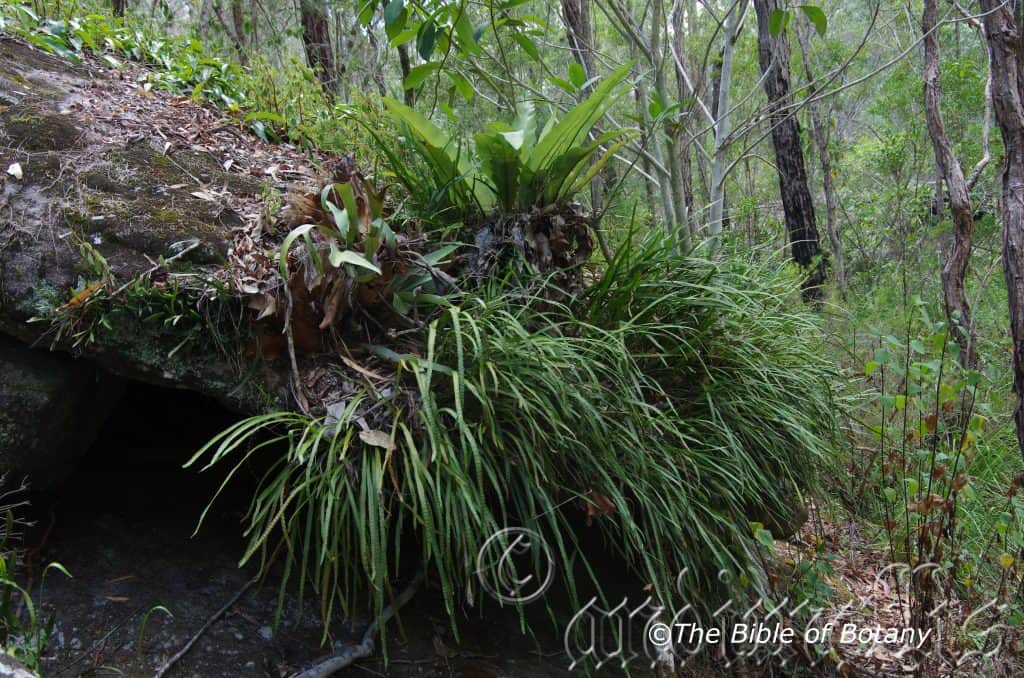
The Pinnacles NSW
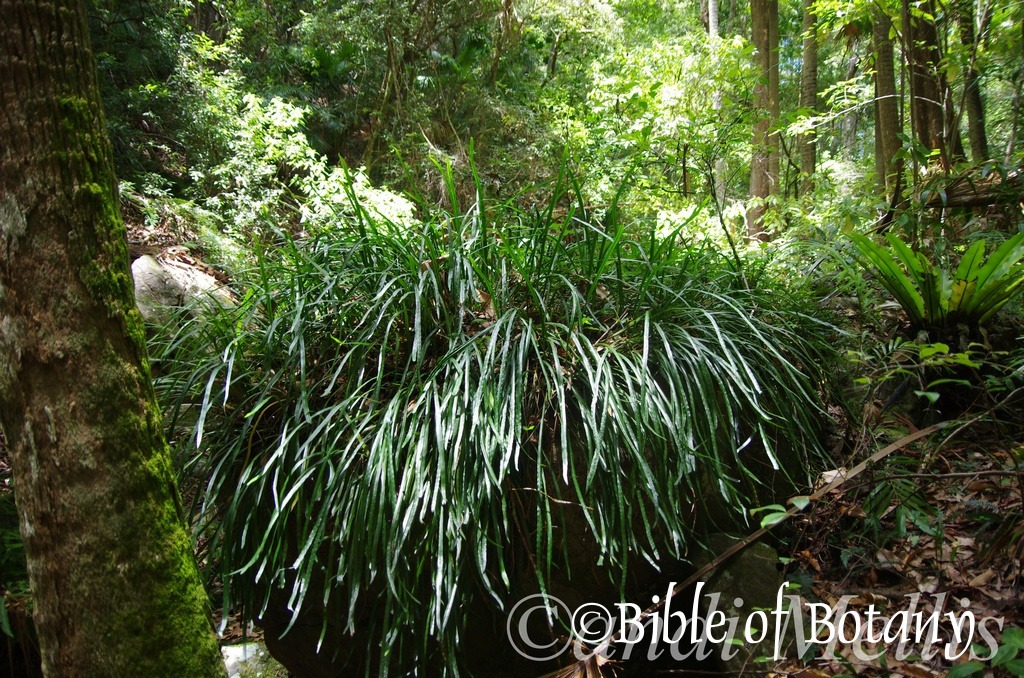
Stockyard Creek Coaldale NSW
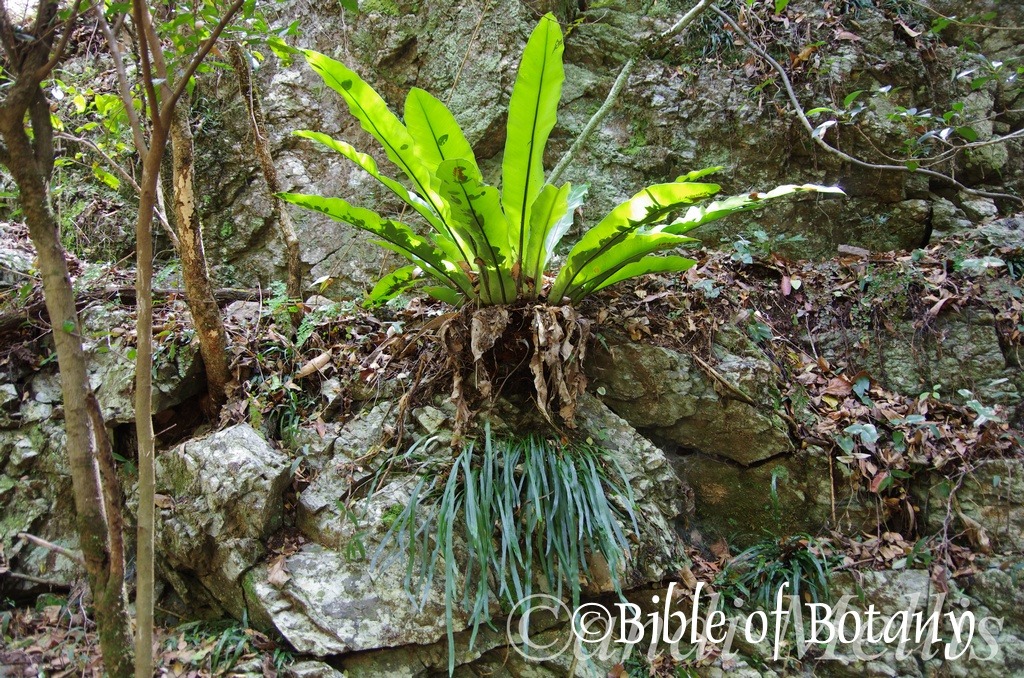
Dictymia brownii below Asplenium australisica Ramourni National Park NSW
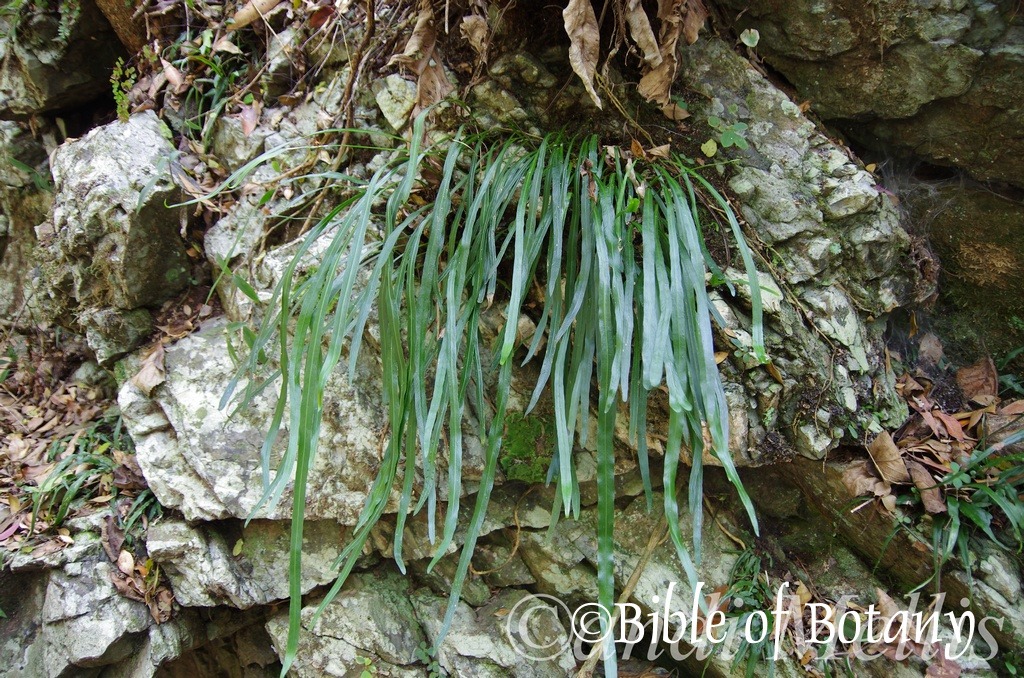
Ramourni National Park NSW
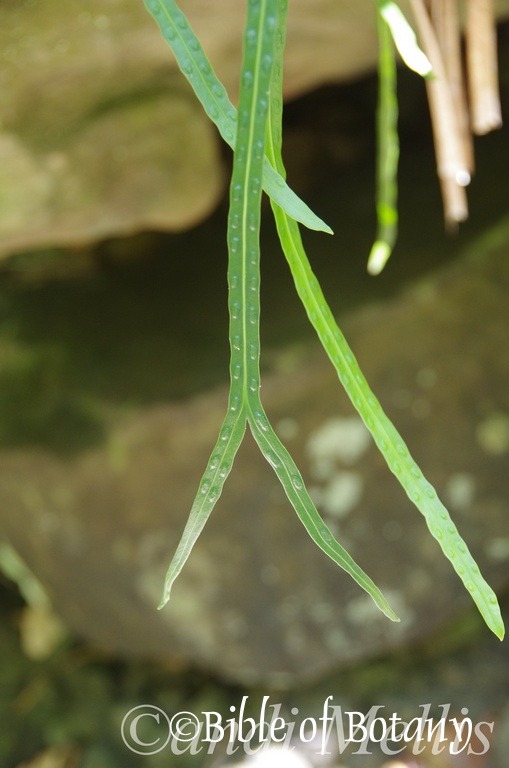
Stockyard Creek Coaldale NSW
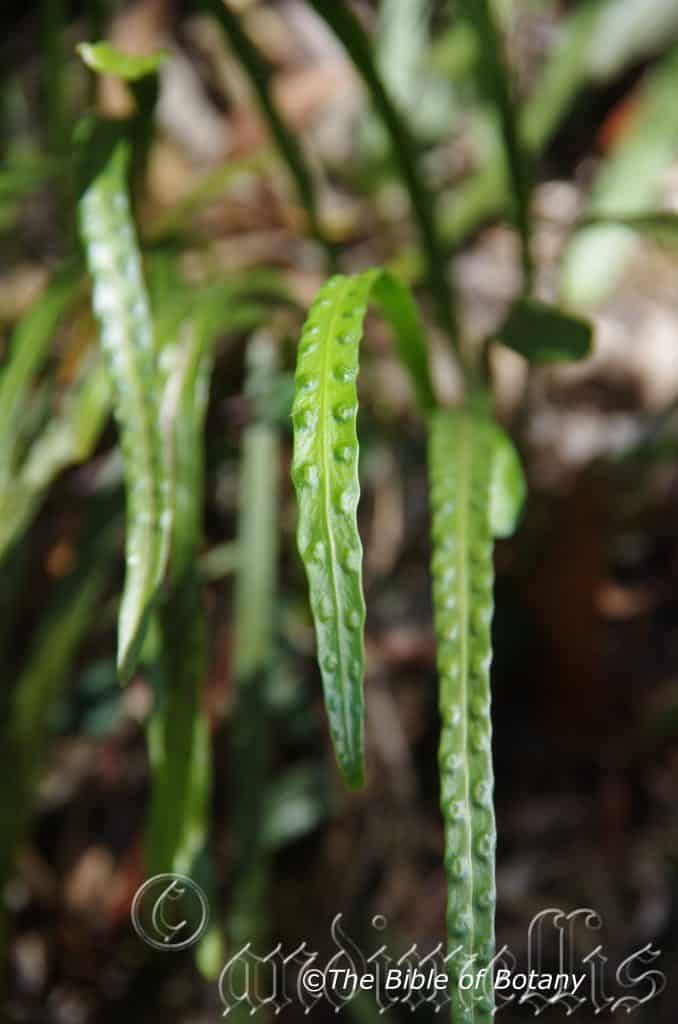
The Pinnacles NSW
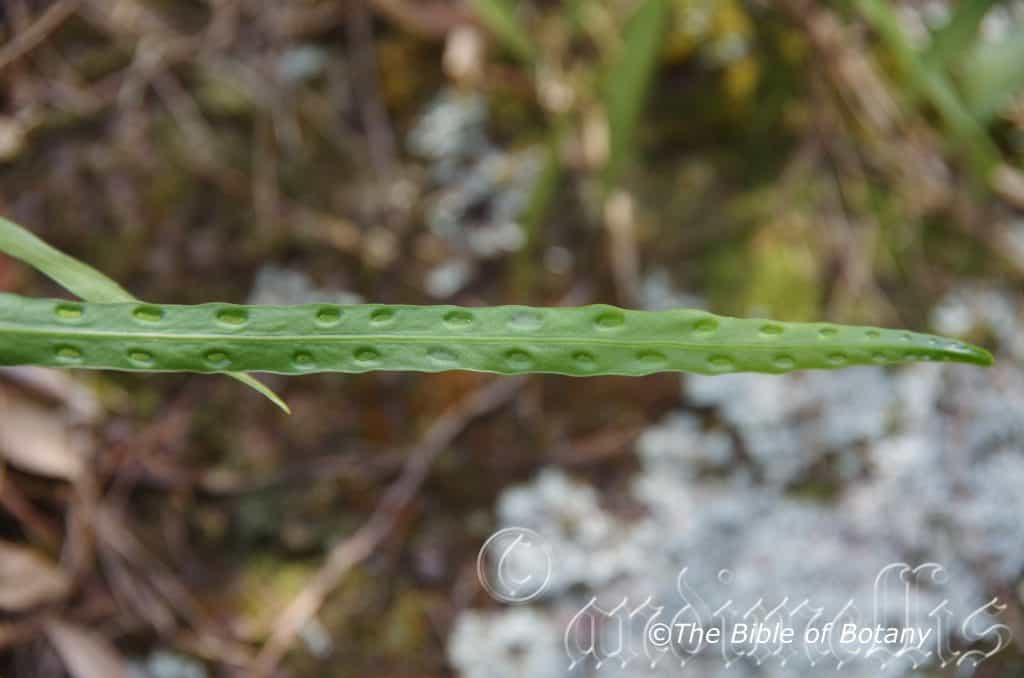
The Pinnacles NSW
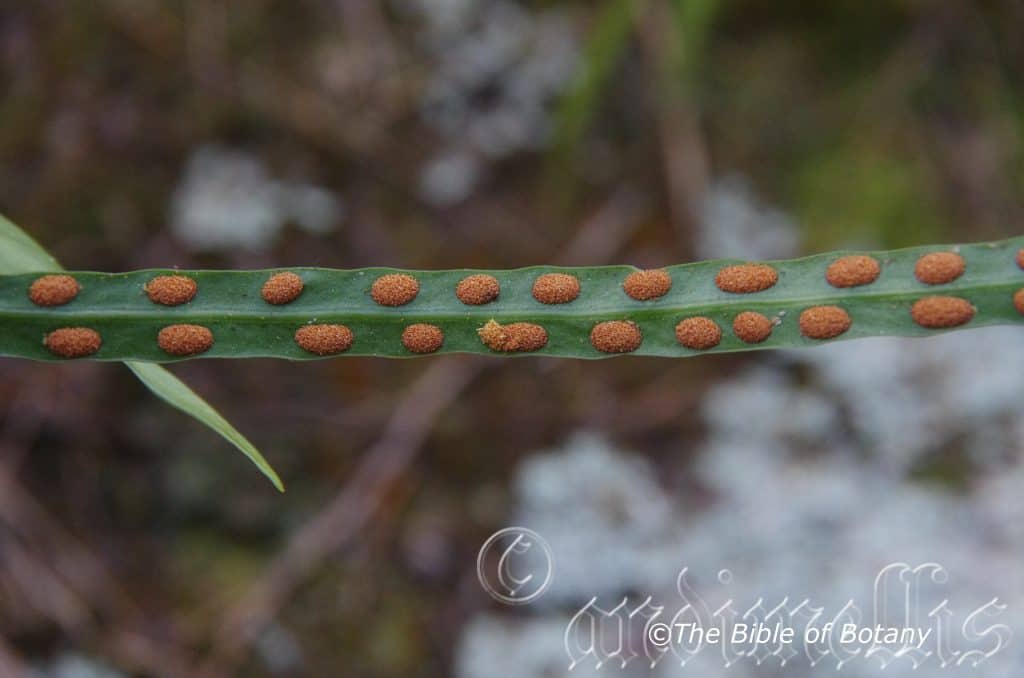
The Pinnacles NSW
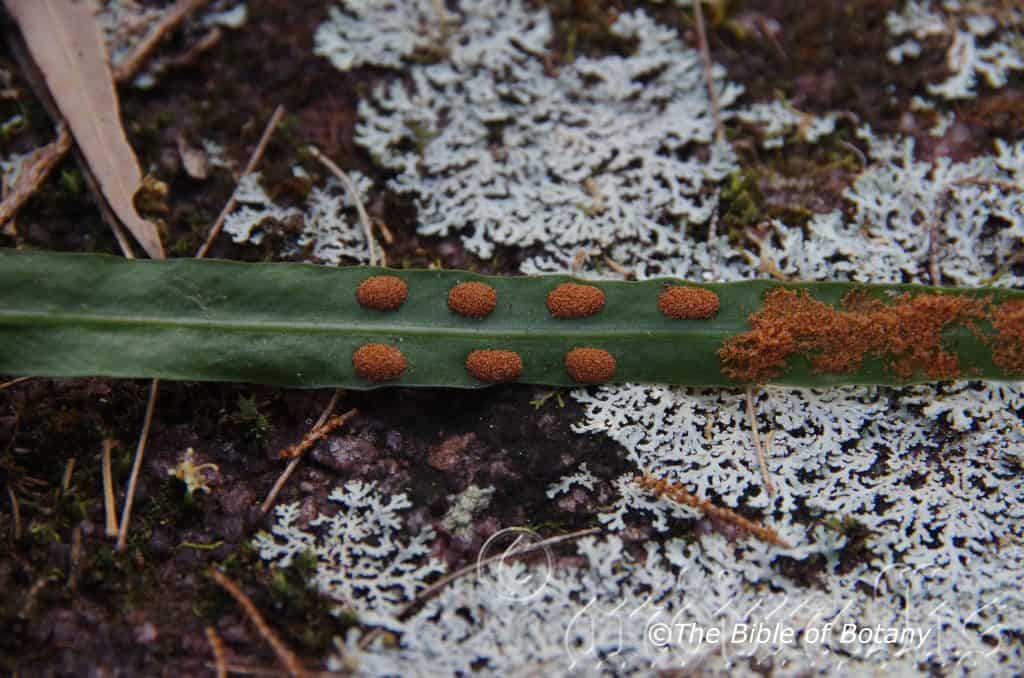
The Pinnacles NSW
Dictymia brownii
Classification
Division: Pteridophyta
Class: Pteridospida
Order: Polypodopsida
Family: Davalliaceae
Genus: From Diktyon, which is Ancient Greek for a network. It refers to the mid vein, which is strongly raised on the lower lamina and has a prominent or faint network of lateral veins.
Species: Is named in honour of Robert Brown; 1773-1858, who was a naturalist who sailed with Mathew Flinders when he circumnavigated Australia and became South Australia’s first botanical collector.
Common Name: Strap Fern.
Distribution:
Dictymia brownii is found in 3 disjunct populations from west of Innisfail south to the Paluma National Park, The Whitsunday Islands southeast to the Eungella National park and from the Bunya Mountains National Park in Queensland south to the Blue Mountains in New South Wales. There is also an isolated population near Batlow in southern New South Wales. It is found on and east of the Great Dividing Range.
https://avh.ala.org.au/occurrences/search?taxa=Dictymia+brownii#tab_mapView
Habitat Aspect Climate:
Dictymia brownii grows in dense shade, light shade and dappled sunlight. It grows as an epiphyte or lithophyte in and adjacent to montane rainforests, littoral rainforests, moist Eucalyptus forests, warm temperate rainforests, cool subtropical rainforests or cool tropical rainforests. It often forms large dense mats on porous and none rocks or in crevices where leaf litter accumulates. The altitude ranges from 150 meters ASL to 1050 meters ASL
The temperature ranges from minus 1 degree in August to 36 degrees in January.
The rainfall ranges from lows of 800mm to 1600mm average per annum.
Soil Requirements:
Dictymia brownii prefers high leaf litter content beneath a rainforest canopy or open Eucalyptus forests. The soils pH ranges from 5pH to 6pH, due to the high leaf litter decomposing which releases the nutrient for the ferns to grow.
Height & Spread:
Wild Plants:150mm to 600mm by several square meters.
Characteristics:
Dictymia brownii has a long green creeping rhizome which is densely covered in deep brown, deep grey or black clathrate scales. The rhizome is 2.5mm to 5.5mm in diameter.
Dictymia brownii’s simple, fronds are very narrow oblanceolate. The fronds are coriaceous and measure 150mm to 600mm by 15mm to 20mm wide. The stipes are glabrous except for a few scales near the bases. The bases are attenuate while the apexes are long tapering. The discolourous laminas are deep green to sea-green and glabrous on the upper laminas while the lower laminas are paler. The margins are entire. The sterile and fertile fronds are similar. The narrow, oblong to orbicular sporangia are sunken into the lower laminas and form flat, papillate lumps on the upper laminas. The sori measure 2mm to 6mm in length by 1.5mm to 3mm in width. The indusium is absent.
Wildlife:
Dictymia brownii’s wildlife is unknown to the author however the fronds are often damaged in the wild.
Cultivation:
Dictymia brownii is a beautiful strap fern for courtyards, around swimming pools or in the garden where part shade or dappled light prevails or in the garden used as an epiphytic plant in the forks of larger trees where leaf litter will acuminate or on the trunks of tree ferns provided adequate moisture and humidity prevails all year. Dictymia brownii is excellent for around swimming pools where it can grow to its full potential over carefully placed rocks or as a hanging basket specimen or growing out on an old stump. If used correctly it can make medium size areas look larger. It is drought tolerant once established so the occasional lapse in watering won’t affect them. If they do happen to look dead after a long holiday during a drought thoroughly soak the plants every day for a week until the fronds recuperate and new fronds begin to shoot. Apply a half to full strength dose of our recommended fertilize between the soakings will see them back to their former glory.
It can be placed in hanging baskets but looks more natural grown in conjunction with medium to large orchids. It also can be grown on cork slabs and slabs of timber that are kept in a drier section of the bush house once established. It often reaches its full potential in just over 3 years from 125 squat pots.
Propagation:
Spores: Dictymia brownie is easy to cultivate from spore however high death rates can be expected until the plants have established themselves.
All ferns that are declared rare, vulnerable or endangered are protected by Federal and State Laws and must not be removed from the wild unless you are a land developer, mining company or main Roads department etc. This includes bulbs, roots, leaves and flowers. No part of any plant can be removed from Federal, State or Local Government land without the prior permission of the authority and this includes the spore.
Most people are put off at the thought of growing ferns from spore. Like all plants that produce their offspring from seed or spore the methods are basically the same. Remember nature has been doing this for millions of years and has been very successful. I have had excellent results growing over 200 different species of Australian ferns so don’t be afraid. Give it a go.
Step 1. Select spore from the fern fronds. Wait until the fern is just starting to release its spore. Rinse the fronds under clean running water and dry. This is to wash off any other spores from rogue ferns that may have settled onto the fronds. (There is nothing worse than having common brake or common soft bracken contaminating a prized tree fern or epiphyte.)
Step 2. Place the dry fronds in a clean brown paper bag and keep them in a cool dark place like the linen closet for about a week to ten days before you are ready to sow the spore. The exception to this rule applies to ferns, which produce green spores. These must be sown immediately that they are released. Todea Barbara is a good example of a fern, which produces green spore.
Step 3. Take a large ice cream container, a small ice cream container and a clean clear plastic bag large enough to seal the large ice cream container and three or four milk bottle tops.
Step 4. Punch or drill 6 to 10 5mm holes in the bottom of the small ice cream container.
Step 5. Wash both containers, tops and plastic bag so that they are very clean and sterile.
Step 6. Use a clean fine seed raising mi. We used 30mm fine sand, 30mm peat and 30mm perlite and 10mm vermiculite. We used crushed basalt, crusher dust and peat in a 50:50 ratio for epiphytes. Moisten the mix enough that water does not run out when the mix is squeezed between the fingers.
Step 7. Place the moisten mix (Enough to half fill the small ice cream container) in the microwave oven with a large glass of water for 7 or 8 minutes, until the water is boiling. Allow them to cool in the oven. You will need the water later so do not tip it out.
Step 8. Take the brown paper bag out of the linen closet. Shake the bag and remove the fronds. You should have a yellow, brown, black or rarely greenish brown or ochre powder or very fine, small round pin head size spore depending on the specie involved.
Step 9. Remove the mixture from the oven once it has cooled and place it in the small ice cream container and level.
Step 10. Sprinkle the spore sparsely over the mixture in the small ice cream container.
Step 11. Place the milk bottle tops in the large ice cream container with the flat surface facing down. Place the small ice cream container in the large ice cream container so that it is sitting on the milk bottle tops.
Step 12. Remove the water from the microwave and pour it into the larger ice cream container so there is 25mm to 30mm of water in the bottom.
Step 13. Place the ice cream containers in the plastic bag and seal.
Step 14. Place the contents and bag in a warm shady place preferably 50mm to 70mm shade depending on the specie. Shade houses and some window sills are ideal.
Step 15. The surface should turn green within a week to two weeks. The prothallus will then develop. From the prthalus the first true fronds will appear. Wait until the ferns are 20mm to 35mm in height before you attempt to transplant them. Once they are ready open the bag up slightly and allow the air to flow around the little ferns. Every 3 to 5 days open the bag a little further so the ferns get use to their new environment. Allow them a week to two weeks to harden off before you transplant them following the removal of the plastic bag. Carefully prick them out into 50mm standard squat tubes as you would any seedling.
Do not try to transplant them as single plants as they are still a little delicate still.
Once the smaller ones again reach 50mm to 70mm you may wish to divide the stronger and hardier individual plants into smaller clumps in 100mm squat pots.
Plants can be grown by digging up patches and just cutting into 4 sections. Replant into a shallow saucer made in the ground, cover with 5mm to 10mm of sand and water every second day until the new shoots appear.
Fertilize using seaweed, fish emulsion or organic chicken pellets soaked in water on an alternate basis. Fertilize every two months until the plants are established then annually in early September to October to maintain health, vitality and better flowering.
Further Comments from Readers:
Hi reader, it seems you use The Bible of Botany a lot. That’s great as we have great pleasure in bringing it to you! It’s a little awkward for us to ask, but our first aim is to purchase land approximately 1,600 hectares to link several parcels of N.P. into one at The Pinnacles NSW Australia, but we need your help. We’re not salespeople. We’re amateur botanists who have dedicated over 30 years to saving the environment in a practical way. We depend on donations to reach our goal. If you donate just $5, the price of your coffee this Sunday, We can help to keep the planet alive in a real way and continue to bring you regular updates and features on Australian plants all in one Botanical Bible. Any support is greatly appreciated. Thank you.
In the spirit of reconciliation we acknowledge the Bundjalung, Gumbaynggirr and Yaegl and all aboriginal nations throughout Australia and their connections to land, sea and community. We pay our respect to their Elders past, present and future for the pleasures we have gained.
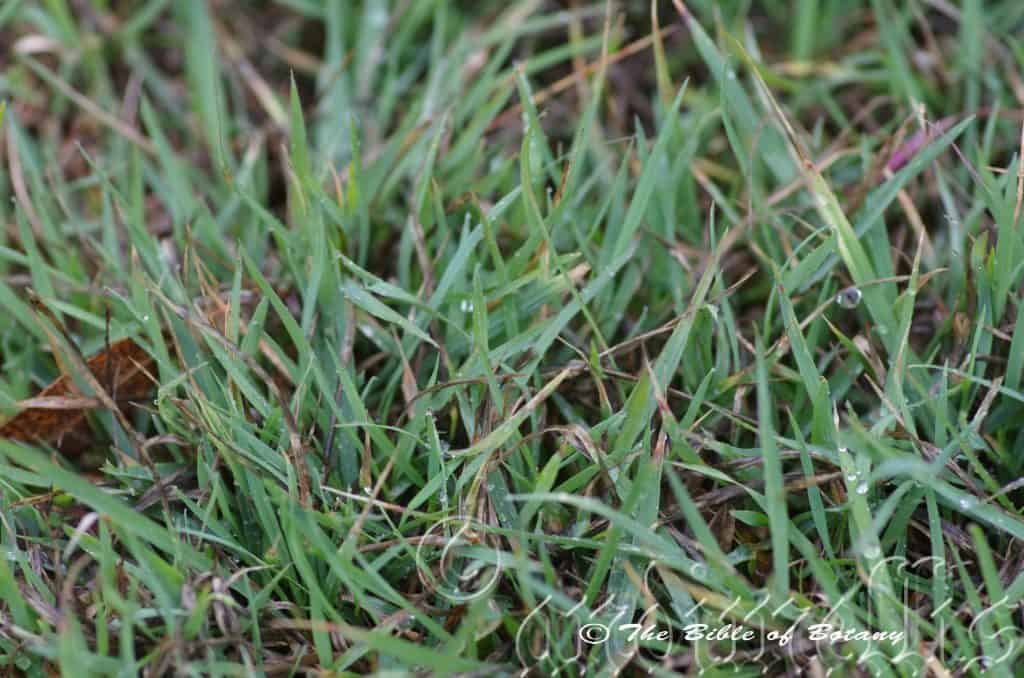
The Pinnacles NSW
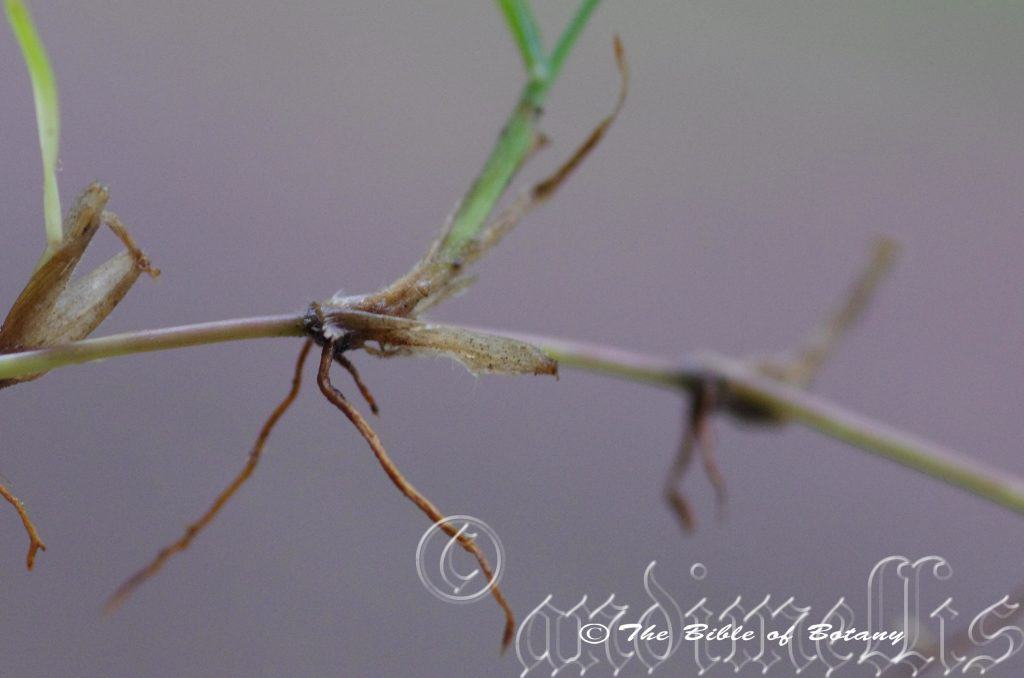
The Pinnacles NSW
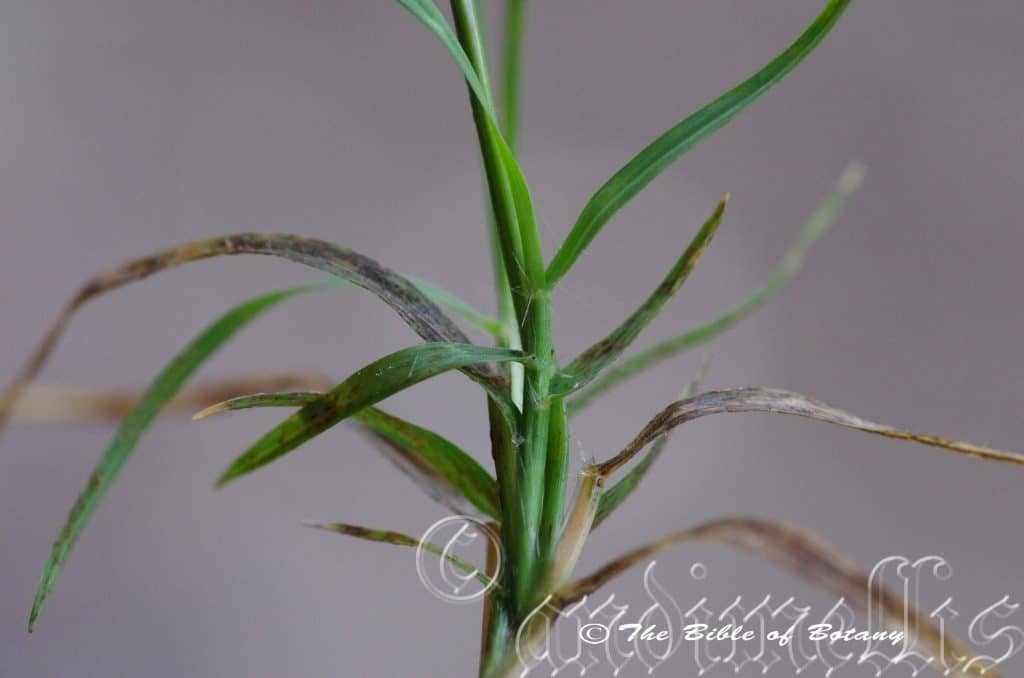
The Pinnacles NSW
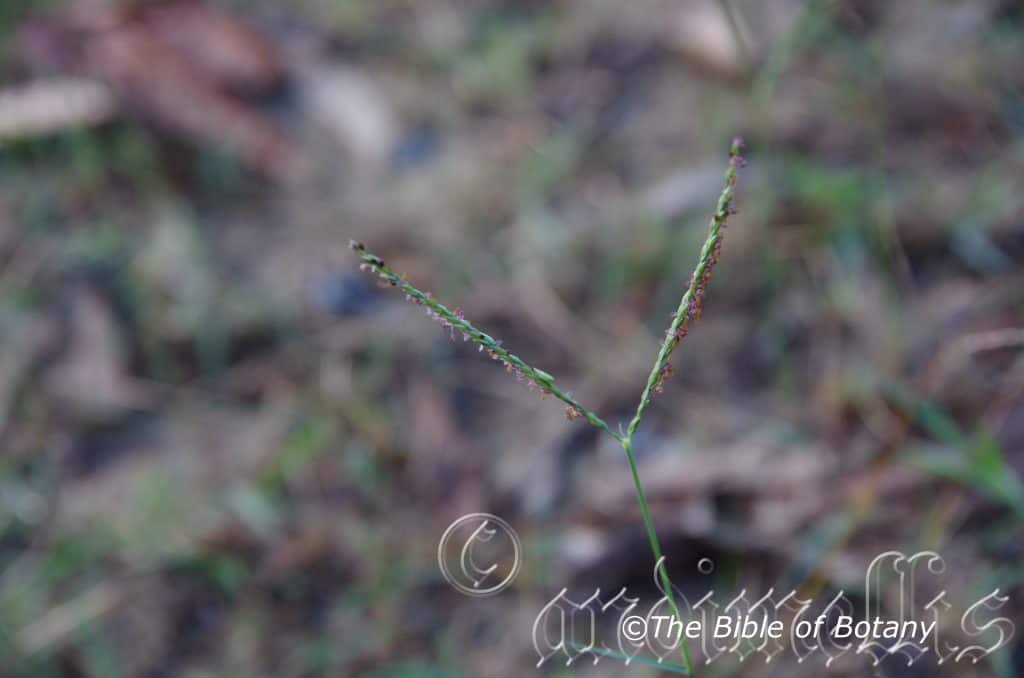
The Pinnacles NSW
Digitaria didactyla
Classification
Unranked: Monocots
Unranked: Commelinids
Order: Poales
Family: Poaceae
Subfamily: Panicoideae
Tribe: Panicaea
Genus: From Digitatus, which is Latin for a finger. It refers to flower spikes which spreadout like fingers on a hand.
Species: From Di/Dis, which are Ancient Greek for two and dactylus which is Latin for a toe or finger. It refers to flower spikes, which only have two arms or spikelets.
Common Name: Queensland Blue Couch.
Distribution:
Digitaria didactyla is found south from the Paluma National Park in coastal northern Queensland to Batemans Bay in southern coastal New South Wales. It is mainly found east of the Great Dividing Range.
Isolated populations are found around Derby in Western Australia, between the Great basalt Wall National Park and the White Mountains National Park in far north Queensland, Young district in southern New South Wales and Lord Howell Island. This indicates that the specie may be more widespread than has been reported.
https://avh.ala.org.au/occurrences/search?taxa=Digitaria+didactyla#tab_mapView
Habitat Aspect Climate:
Digitaria didactyla prefers full sun. It grows in dry open forests and dry open woodlands in shallow depressions which are subject to seasonal flooding and are well drained. The altitude ranges from 1 meter ASL to 500 meters ASL.
The temperatures range from minus 4 degrees in August to 40 degrees in January.
The rainfall ranges from lows of 500mm to 2000mm average per annum.
Soil Requirements:
Digitaria didactyla prefers sandy loams to light gritty clays. The soils are usually derived from decomposed fatty sandstone, at times granite, accumulated sands or alluvial sandy loams. The soils pH ranges from 6pH to 7pH are preferred. It does not tolerate waterlogged soils. Non saline soils to very saline soils are tolerated.
Height & Spread:
Wild Plants: 0.2m to 0.6m by hundreds of square meters.
Characteristics:
Digitaria didactyla grows as a stoloniferous perennial rooting and branching at the nodes. The decumbent culms measure 60mm to 100mm in length by 1.5mm to 3.5mm in diameter. The mid-culm and internodes are glabrous. Plants have a fibrous root system.
Digitaria didactyla‘s linear leaves measure 20mm to 100mm in length by 1.5mm to 6mm in width. The leaf sheaths are glabrous or scaberulous or covered in white, puberulent hairs. Leaf sheath auricles are absent. The ligules are entire with eciliate membranes that measure 0.6mm to 0.8mm in length. The bases are clasping while the apexes are tapering to narrow acute. The concolourous laminas are pale grass-green to pale blue-green and glabrous or covered in white puberulent hairs. The laminas are flat to conduplicate. The midrib is rounded and slightly prominent on the on the lower lamina. The leaf margins are entire.
The inflorescences of Digitaria didactyla are loose racemes and measure 20mm to 40mm in height with the 2 digital arms measuring 20mm to 70mm in length.
The spikelets are appressed, rather crowded and somewhat imbricate. The paired spikelets are on unequal pedicels with the longer pedicel measuring 2mm in length while the shorter pedicel measures less than 0.5 mm in length. The spikelets measure 2mm to 2.7mm in length.
The minute, similar glumes measure 1.2mm to 1.9mm in length. The glumes keels are absent and have 3 nerves. The glumes are covered in fine white puberulent hairs along the margins.
The upper lemmas are equal to the spikelets and usually measure 2mm to 2.7mm in length. The apex is acute. The awn is absent.
There are 1 or rarely 2 stamens with deep pink to purple-pink on each spikelet. The flowers appear from late November to February.
The fruits of Digitaria didactyla seeds measure 1.2mm to 1.8mm in length. The green seeds turn pale straw-grey when ripe.
Wildlife:
Digitaria didactyla is consumed by most native and domesticated herbaceous animals and is fairly high in protein.
Cultivation:
Digitaria didactyla is considered to be a good fodder crop. The leaves and stems are eaten but probably are mainly used as bulk. It has a rapid growth rate from mid-spring after the spring rains to late autumn. It recovers well from moderate grazing and is best managed by allowing a free period between grazing.
This grass is both classified as a weed and lawn by gardeners. It gives good quantities of trash for mulch thus improves soils structure and fertility. It has good potential as a landscaping grass in lawns as it mows low and recovers quickly. It is hard wearing and drought tolerant.
In cultivation it can be grown on most types of soil even heavy clay with a skeletal covering of sand. It requires full sun for best results and medium growth height to sustain best colour and vigour.
It does suffer from mosaic fungi attack during the autumn. The best method of prevention is to grow it in sunlight and to with draw overhead watering during the onset of the wet season.
Mention Lawn grub and people head strait to the poison cupboard. But wait there are affective controls which are cheap and safe for the environment. Let’s first look at the culprits.
The black African Scarab beetle (Heteronychus arator), the native brown Scarab beetle (Sericesthis geminata) and the Argentine Scarab beetle (Cyclocephala signaticollis) in the third instar stage is where the beetle does most of their damage. Scarab beetle larvae are those large, white, curled grubs with a large yellow, brown or orange head.
The army worm or army grub; Spodoptera spp., are villains in the turf. These villains are sleek, smooth and devastate your lawn at night.
Break the cycle break the damage. Too much fertilizer and water means a soft unhealthy lawn that may look great but it is far more susceptible to attack. I have had lawns go season after season without damage while my neighbours poured poisons on their lawns at the first sign and still ended up with grub damage.
The first line of deuense is to grow a hardier lawn that is maintained at around 50mm to 75mm in height. This encourages the grubs to stay closer to the surface during the day. Encourage birds by placing safe water stations around the yard.
In the case of the army grubs look for their egg sacks. Small fluffy white or pale pink cottony sacks with pale yellow eggs inside are easily squashed or removed. They maybe under the eaves, under hand rails, on the clothes lines or even your clothes and just need removing.
If the grubs are noticed, place a large piece of wet hessian upon the lawn overnight, where they have been feeding. The lawn grubs will be attracted to the hessian and stay there until it warms up. Early next morning pick the hessian up and dispose of the grubs by leaving them unprotected to feed the birds. This is affective as the birds will stay around and clean up a lot more.
If all else fails effective control of later larval stages can be only achievable with insect killing nematodes. These are known as entomopathogenic nematodes or “ENs” for short. It is active only against specific soil-dwelling insects, safe to handle, safe for baby crawling on the lawn and safe for plants. These nematodes have been commercialized since 1999 after extensive research by the CSIRO Division of Entomology in Canberra. So get in and buy a few. It is cheaper and easier to distribute than poisons and are safe for the birds to ingest.
Propagation:
Seeds: Digitaria didactyla‘s seeds can be sown directly onto prepared ground. Cover the area to be sown with about 10mm of sharp sand. Rake the surface gently and water in. Keep the area moist for around 10 days. Deeper watering and longer periods between watering will ensure deeper root penetration which means stronger healthier lawns.
Division:
Plants can be grown by digging up patches and just cutting into 4 sections. Replant into a shallow saucer made in the ground, cover with 5mm to 10mm of sand and water every second day until the new shoots appear.
Fertilize using seaweed, fish emulsion or organic chicken pellets soaked in water on an alternate basis. Fertilize every two months until the plants are established then annually in early September to October to maintain health, vitality and better flowering.
Further Comments from Readers:
Hi reader, it seems you use The Bible of Botany a lot. That’s great as we have great pleasure in bringing it to you! It’s a little awkward for us to ask, but our first aim is to purchase land approximately 1,600 hectares to link several parcels of N.P. into one at The Pinnacles NSW Australia, but we need your help. We’re not salespeople. We’re amateur botanists who have dedicated over 30 years to saving the environment in a practical way. We depend on donations to reach our goal. If you donate just $5, the price of your coffee this Sunday, We can help to keep the planet alive in a real way and continue to bring you regular updates and features on Australian plants all in one Botanical Bible. Any support is greatly appreciated. Thank you.
In the spirit of reconciliation we acknowledge the Bundjalung, Gumbaynggirr and Yaegl and all aboriginal nations throughout Australia and their connections to land, sea and community. We pay our respect to their Elders past, present and future for the pleasures we have gained.
Digitaria diffusa
Classification
Unranked: Monocots
Unranked: Commelinids
Order: Poales
Family: Poaceae
Subfamily: Panicoideae
Tribe: Panicaea
Genus: From Digitatus, which is Latin for a finger. It refers to flower spikes which spreadout like fingers on a hand.
Species: From Difusa, which is Ancient Greek for to spread out thinly, as in a scattered manner or profusely. It refers to the plants, which spread out over large areas.
Common Name: Open Summer Grass.
Distribution:
Digitaria diffusa is found south from Straaten National Park and Cairns in far north Queensland to Moruya in southern New South Wales and along the Murray River east of Albury in northern Victoria.
https://avh.ala.org.au/occurrences/search?taxa=Digitaria+diffusa#tab_mapView
Habitat Aspect Climate:
Digitaria diffusa prefers full sun to light dappled shade. It grows in dry open Eucalyptus forests, dry open woodlands on mountain slopes or flat plains which are subject to seasonal flooding or water logging. The altitude ranges from 5 meters ASL to 850 meters ASL.
The temperatures range from minus 3 degrees in August to 39 degrees in January.
The rainfall ranges from lows of 250mm to 1200mm average per annum.
Soil Requirements:
Digitaria diffusa prefers sandy loams to light gritty clays. The soils are derived from decomposed brown basalt, black basalt, sandstones, granites or shale. The soils pH ranges from 5.5pH to 7pH are preferred. It does not tolerate waterlogged soils. Non saline soils to very saline soils are tolerated.
Height & Spread:
Wild Plants: 0.4m to 0.7m by several meters
Characteristics:
Digitaria diffusa grows as a slender decumbent perennial which branches and roots at the nodes. The rhizomes are short while the culms are decumbent. The 3 to 6 node culms are slender. The culms measure 100mm to 400mm in height. The culm nodes and culm internodes are glabrous or covered in white puberulent hairs. The lateral branches are further branched. The plants have a fibrous root system.
Digitaria diffusa‘s linear leaves measure 15mm to 80mm in length by 0.75mm to 5mm in width. The leaf sheath is glabrous or sparsely covered in white, pilose hairs. The apex is tapering to narrow acute. The ligule is glabrous or covered in white puberulent hairs and has an acute apex. The eciliate ligules measure 1.5mm to 2.5mm in length. Auricles are absent. The concolourous laminas are pale grass-green to pale blue-green and glabrous or covered in white puberulent hairs. The laminas are flat to involute. The midrib is rounded and slightly prominent on the on the lower lamina. The leaf margins are entire.
The inflorescences of Digitaria diffusa are sub digitate racemes. The racemes measure 30mm to 100mm in length while the 2 to 7 racemosus 30mm to 70mm in length.
The spikelets are paired or at times single near the base and apex or at times are trinate. The longer pedicel is often sub equal to the spikelet while the shorter pedicel is about half as long as the longer spikelet. The spikelets measure 1.3mm to 2mm in length.
The lower glumes measure 0.2mm to 0.5 in length while the upper glumes measure 1.2mm to 2mm in length. The glumes are without keels and have 3 nerves with longitudinal rows of white puberulent of hairs between the nerves. The hairs of the upper glumes and sterile lemmas are first appressed later spreading at anthesis.
The lemmas have 5 to 7 nerves with longitudinal rows of white puberulent of hairs between the nerves. The sterile lemmas measure 1.3mm to 2mm in length. The dark brown to black mature florets fertile florets measure 1mm to 2mm in length and are minutely punctulata to finely streak.
There are 1 or rarely 3 stamens on each spikelet. The flowers appear from late November to March.
The fruits of Digitaria diffusa seeds measure 2mm to 2.2mm in length. The green seeds turn pale straw-fawn when ripe.
Wildlife:
Digitaria diffusa is a valuable grass for most herbaceous native animals like kangaroos and wallabies.
Cultivation:
Digitaria diffusa is considered to be a good fodder crop. The leaves and stems are eaten but probably are used mainly as bulk. It has a rapid growth rate from mid-spring after the spring rains to late autumn. It recovers well from moderate grazing and is best managed by allowing a free period between grazing.
This grass is classified as a weed by gardeners. It gives good quantities of trash for mulch thus improves soils structure and fertility. The seed is much sought after by finches and small parrots and is a great addition for aviary birds. Small parrots especially budgerigahs relish the sweet juicy stems.
It does suffer from mosaic fungi attack during the autumn. The best method of prevention is to grow it in sunlight and to with draw overhead watering during the onset of the wet season. Do not feed affected plants to aviary birds.
Propagation:
Seeds: Digitaria diffusa‘s seeds can be sown directly onto prepared ground. Cover the area to be sown with about 10mm of sharp sand. Rake the surface gently and water in. Keep the area moist for around 10 days. Deeper watering and longer periods between watering will ensure deeper root penetration which means stronger healthier lawns.
Division:
Plants can be grown by digging up patches and just cutting into 4 sections. Replant into a shallow saucer made in the ground, cover with 5mm to 10mm of sand and water every second day until the new shoots appear.
Fertilize using seaweed, fish emulsion or organic chicken pellets soaked in water on an alternate basis. Fertilize every two months until the plants are established then annually in early September to October to maintain health, vitality and better flowering.
Further Comments from Readers:
Hi reader, it seems you use The Bible of Botany a lot. That’s great as we have great pleasure in bringing it to you! It’s a little awkward for us to ask, but our first aim is to purchase land approximately 1,600 hectares to link several parcels of N.P. into one at The Pinnacles NSW Australia, but we need your help. We’re not salespeople. We’re amateur botanists who have dedicated over 30 years to saving the environment in a practical way. We depend on donations to reach our goal. If you donate just $5, the price of your coffee this Sunday, We can help to keep the planet alive in a real way and continue to bring you regular updates and features on Australian plants all in one Botanical Bible. Any support is greatly appreciated. Thank you.
In the spirit of reconciliation we acknowledge the Bundjalung, Gumbaynggirr and Yaegl and all aboriginal nations throughout Australia and their connections to land, sea and community. We pay our respect to their Elders past, present and future for the pleasures we have gained.
Digitaria longiflora
Classification
Unranked: Monocots
Unranked: Commelinids
Order: Poales
Family: Poaceae
Subfamily: Panicoideae
Tribe: Panicaea
Genus: From Digitatus, which is Latin for a finger. It refers to flower spikes which spreadout like fingers on a hand.
Species: From Longitia/Longus, which is Latin for long in length and Floris, which is Latin for a flower or Flos, which is the Roman goddess for spring and flowers. It refers to the flower spikelets, which are rather long.
Common Name:
Distribution:
Digitaria longiflora is a widespread species in the northern half of Australia and the Sydney basin. It is more common in the center of the continent and on the Western Plains.
https://avh.ala.org.au/occurrences/search?taxa=Digitaria+longiflora#tab_mapView
Habitat Aspect Climate:
Digitaria longiflora prefers full sun to light dappled shade. It is found growing in dry open forests, dry open woodland, open savannah woodlands, mulga shrubs or sparse heaths. The altitude ranges from 1 meter ASL to 550 meters ASL.
The temperatures range from minus 3 degrees in August to 39 degrees in January.
The rainfall ranges from lows of 250mm to 3200mm average per annum.
Soil Requirements:
Digitaria longiflora prefers fine sands, sandy loams, and light gritty clays to medium clays. The soils are usually derived from decomposed brown basalt, black basalt, shale, metamorphic rocks, sandstone or at times accumulated beach sands. The soils pH ranges from 4.5pH to 7pH are preferred. It does not tolerate waterlogged soils. Non saline soils to very saline soils are tolerated.
Height & Spread:
Wild Plants: 0.3m to 0.7m by several meters
Characteristics:
Digitaria longiflora grows as an annual or perennial grass with erect decumbent or spreading culms. The culms measure 300mm to 600mm in height. The mid-culm internodes are glabrous. Plants have a fibrous root system.
Digitaria longiflora‘s linear leaves measure 25mm to 130mm in length by 1mm to 5mm in width. The leaf sheath is glabrous or covered in white, puberulent hairs. The apex is tapering to narrow acute. The leaf sheath auricles are absent while the ligule is a ciliate membrane. The ligule is glabrous or sparsely covered in white puberulent hairs. The ligules measure 1mm to 2mm in length. The concolourous laminas are pale grass-green to pale blue-green and glabrous or covered in white puberulent hairs. The midrib is rounded and slightly prominent on the on the lower lamina. The leaf margins are entire.
The digitate inflorescences of Digitaria usually have 2 to 3 racemose branches or at times 4 and rarely 5.The racemosa measure 30mm to 100mm in length.
The spikelets are pedicilate in clusters of 3 arranged in 2 rows either side of the rachis. The spikelets measure 1.3mm to 2.3mm in length. The spikelets are covered in short white puberulent hairs.
The dissimilar glumes are firmer than fertile lemma. The lower glumes are insignificant. The upper glumes measure 1.3mm to 1.8mm in length. The glumes are without keels and have 3 nerves with longitudinal rows of white puberulent of hairs between the nerves.
The sterile lemmas measure 1.3mm to 1.8 mm in length. The 7 nerves are obscured by the white puberulent hairs on the margins of the nerves. Fertile floret lemmas are compressed and measure 1.2mm to 2.1mm in length. The palea is insignificant.
There is 1 stamen on each spikelet. The flowers appear from late November to March.
The fruits of Digitaria longiflora seeds measure 2mm to 2.2mm in length. The green seeds turn pale straw-fawn when ripe.
Wildlife:
Digitaria longiflora is a staple part of many native herbaceous animals like kangaroos, wallabies and native field mice.
The seed is much sought after by finches and small parrots and is a great addition for aviary birds. Small parrots especially budgerigahs relish the sweet juicy stems.
Cultivation:
Digitaria longiflora is considered to be a good fodder crop. The leaves and stems are eaten but probably are mainly used as bulk. It has a rapid growth rate from mid-spring after the spring rains to late autumn. It recovers well from moderate grazing and is best managed by allowing a free period between grazing.
This grass is both classified as a weed and lawn by gardeners. It gives good quantities of trash for mulch thus improves soils structure and fertility. It has good potential as a landscaping grass in lawns as it mows low and recovers quickly. It is hard wearing and drought tolerant.
In cultivation it can be grown on most types of soil even heavy clay with a skeletal covering of sand. It requires full sun for best results and medium growth height to sustain best colour and vigour.
It does suffer from mosaic fungi attack during the autumn. The best method of prevention is to grow it in sunlight and to with draw overhead watering during the onset of the wet season. Do not feed affected plants to aviary birds.
Mention Lawn grub and people head straight to the poison cupboard. But wait there are affective controls which are cheap and safe for the environment. Let‘s first look at the culprits.
The black African Scarab beetle (Heteronychus arator), the native brown Scarab beetle (Sericesthis geminata) and the Argentine Scarab beetle (Cyclocephala signaticollis) in the third instar stage is where the beetle does most of their damage. Scarab beetle larvae are those large, white, curled grubs with a large yellow, brown or orange head.
The army worm or army grub; Spodoptera spp., are villains in the turf. These villains are sleek, smooth and devastate your lawn at night.
Break the cycle break the damage. Too much fertilizer and water means a soft unhealthy lawn that may look great but it is far more susceptible to attack. I have had lawns go season after season without damage while my neighbours poured poisons on their lawns at the first sign and still ended up with grub damage.
The first line of defence is to grow a hardier lawn that is maintained at around 50mm to 75mm in height. This encourages the grubs to stay closer to the surface during the day. Encourage birds by placing safe water stations around the yard.
In the case of the army grubs look for their egg sacks. Small fluffy white or pale pink cottony sacks with pale yellow eggs inside are easily squashed or removed. They maybe under the eaves, under hand rails, on the clothes lines or even your clothes and just need removing.
If the grubs are noticed, place a large piece of wet hessian upon the lawn overnight, where they have been feeding. The lawn grubs will be attracted to the hessian and stay there until it warms up. Early next morning pick the hessian up and dispose of the grubs by leaving them unprotected to feed the birds. This is affective as the birds will stay around and clean up a lot more.
If all else fails effective control of later larval stages can be only achievable with insect killing nematodes. These are known as entomopathogenic nematodes or “ENs” for short. They are active only against specific soil-dwelling insects, safe to handle, safe for baby crawling on the lawn and safe for plants. These nematodes have been commercialized since 1999 after extensive research by the CSIRO Division of Entomology in Canberra. So get in and buy a few. It is cheaper and easier to distribute than poisons and are safe for the birds to ingest.
Propagation:
Seeds: Digitaria longiflora‘s seeds can be sown directly onto prepared ground. Cover the area to be sown with about 10mm of sharp sand. Rake the surface gently and water in. Keep the area moist for around 10 days. Deeper watering and longer periods between watering will ensure deeper root penetration which means stronger healthier lawns.
Fertilize using Seaweed, fish emulsion or organic chicken pellets soaked in water on an alternate basis. Fertilize every two months until the plants are established then twice annually in early September or March to maintain health and vitality.
Division:
Plants can be grown by digging up patches and just cutting into 4 sections. Replant into a shallow saucer made in the ground, cover with 5mm to 10mm of sand and water every second day until the new shoots appear.
Fertilize using seaweed, fish emulsion or organic chicken pellets soaked in water on an alternate basis. Fertilize every two months until the plants are established then annually in early September to October to maintain health, vitality and better flowering.
Further Comments from Readers:
Hi reader, it seems you use The Bible of Botany a lot. That’s great as we have great pleasure in bringing it to you! It’s a little awkward for us to ask, but our first aim is to purchase land approximately 1,600 hectares to link several parcels of N.P. into one at The Pinnacles NSW Australia, but we need your help. We’re not salespeople. We’re amateur botanists who have dedicated over 30 years to saving the environment in a practical way. We depend on donations to reach our goal. If you donate just $5, the price of your coffee this Sunday, We can help to keep the planet alive in a real way and continue to bring you regular updates and features on Australian plants all in one Botanical Bible. Any support is greatly appreciated. Thank you.
In the spirit of reconciliation we acknowledge the Bundjalung, Gumbaynggirr and Yaegl and all aboriginal nations throughout Australia and their connections to land, sea and community. We pay our respect to their Elders past, present and future for the pleasures we have gained.
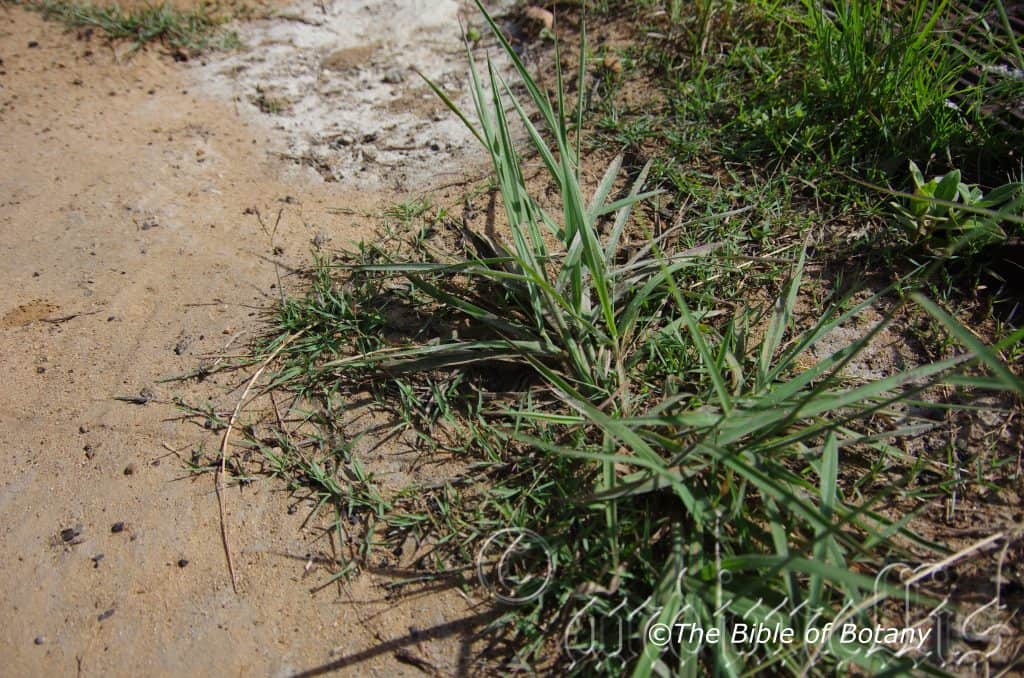
The Pinnacles NSW
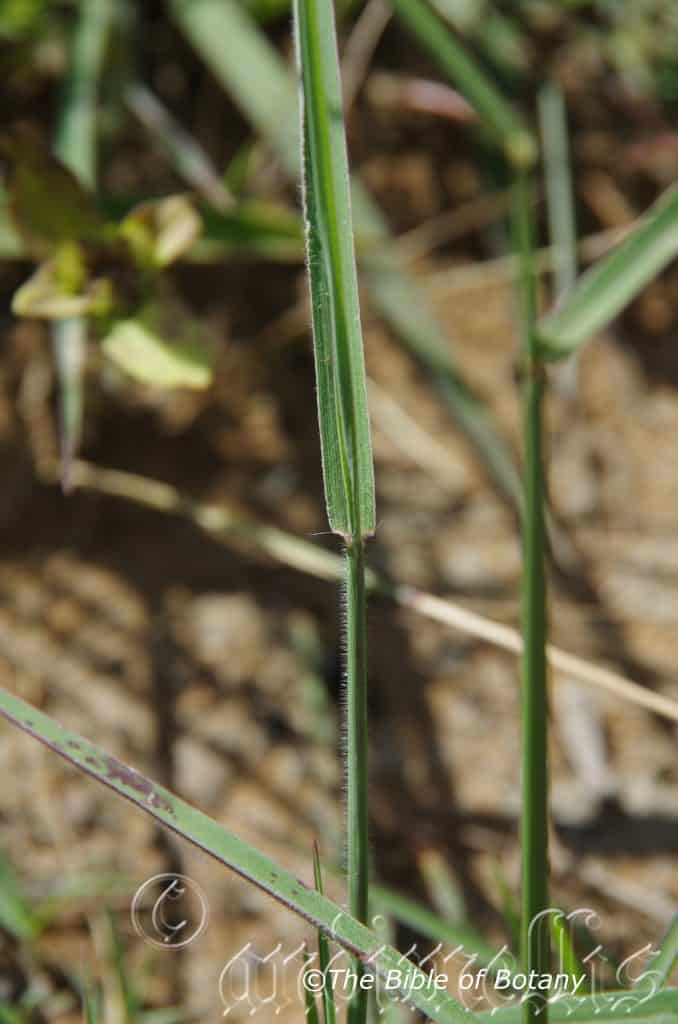
The Pinnacles NSW
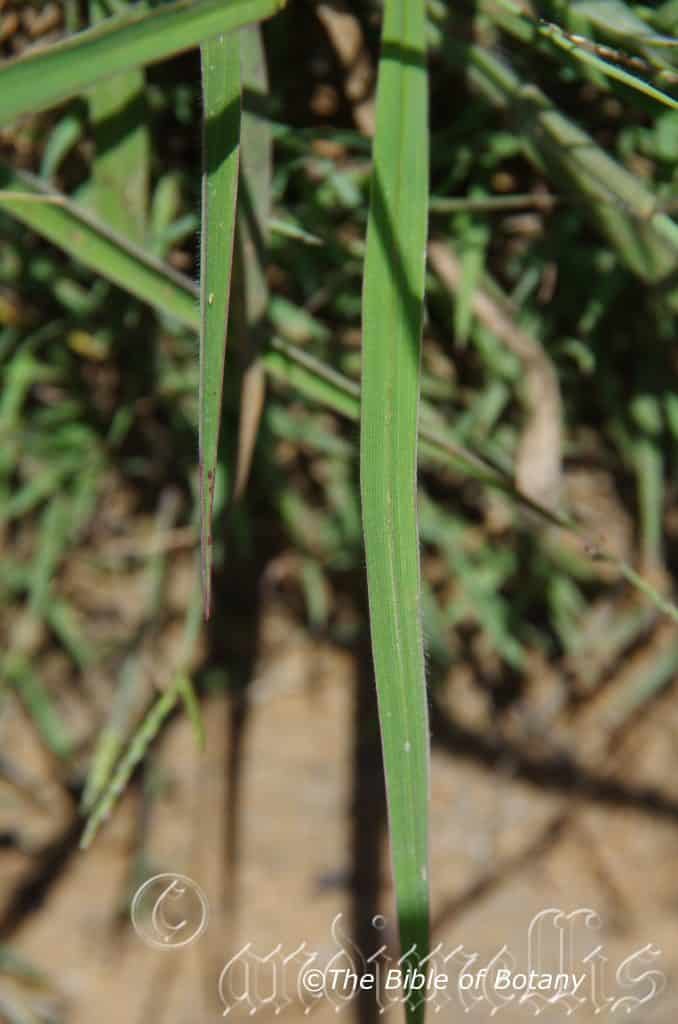
The Pinnacles NSW
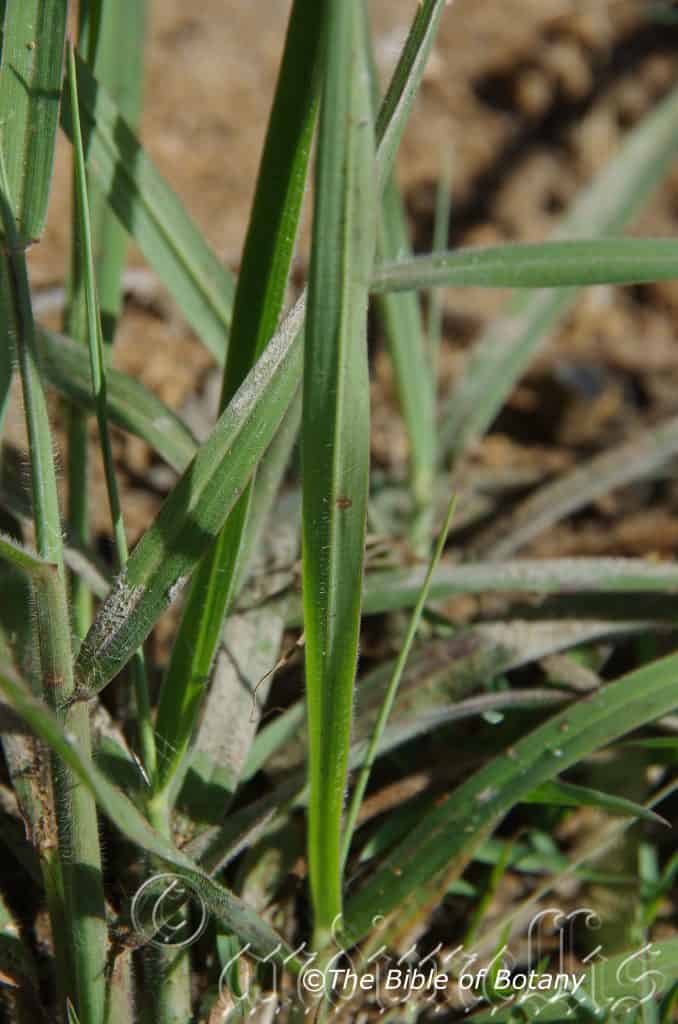
The Pinnacles NSW
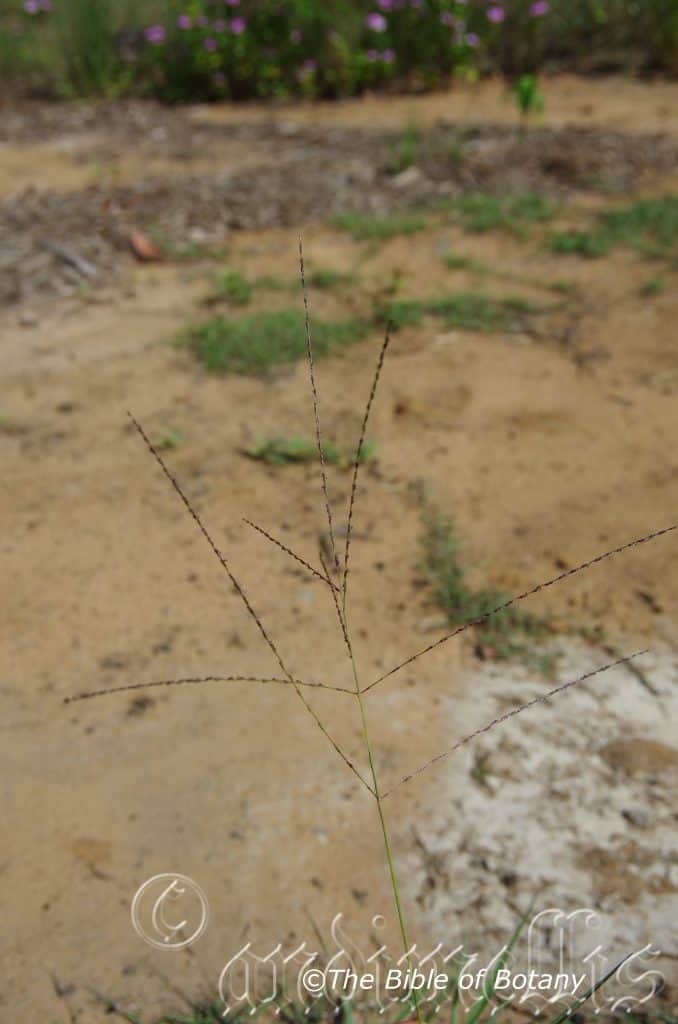
The Pinnacles NSW
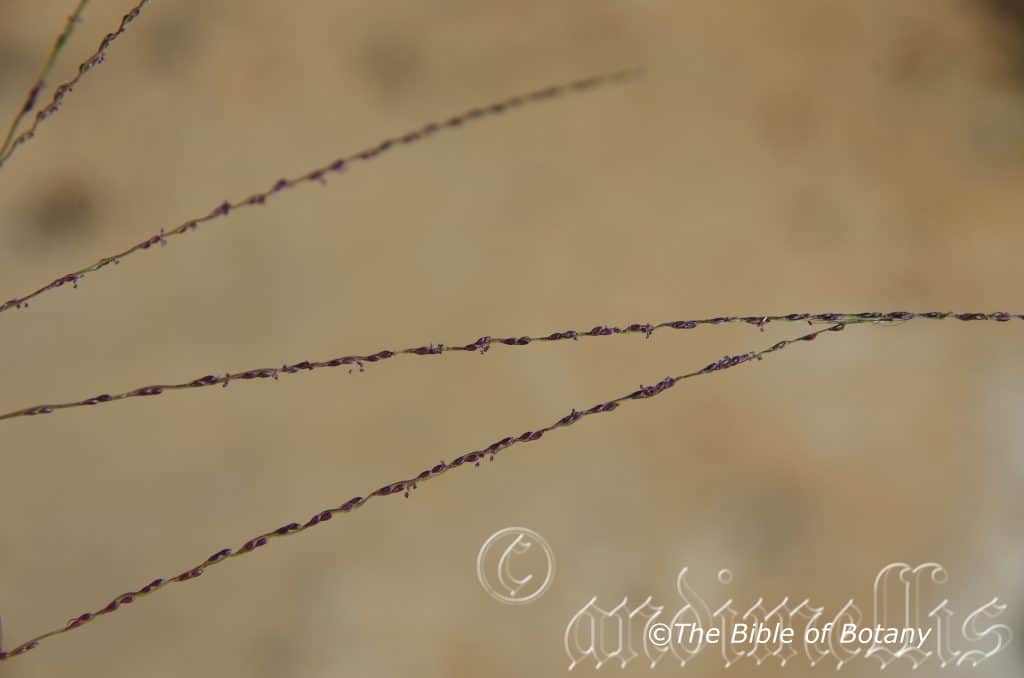
The Pinnacles NSW
Digitaria parviflora
Classification
Unranked: Monocots
Unranked: Commelinids
Order: Poales
Family: Poaceae
Subfamily: Panicoideae
Tribe: Panicaea
Genus: From Digitatus, which is Latin for a finger. It refers to flower spikes which spreadout like fingers on a hand.
Species: From Parvus, which is Latin for small and Floris, which is Latin for a flower or Flos, which is the Roman goddess of spring and flowers.
Common Name:
Distribution:
Digitaria parviflora is found south from the Lake Field Ranger Base on Cape York Peninsula in far north Queensland to Batemans Bay in southern coastal New South Wales. It is mainly found on the western slopes of the Great Dividing Range to the coast. There is a disjunct population further north on Cape York Peninsula and an isolated population on Robsons Knob in southern South Australia.
https://avh.ala.org.au/occurrences/search?taxa=Digitaria+parviflora#tab_mapView
Habitat Aspect Climate:
Digitaria parviflora prefers full partial shade to light dappled shade. In tropical and subtropical rain forests, tropical and subtropical wet sclerophyll forests, dry sclerophyll forests, and tropical and subtropical sub-humid woodlands. The altitude ranges from 2 meter ASL to 950 meters ASL.
The temperatures range from minus 3 degrees in August to 40 degrees in January.
The rainfall ranges from lows of 500mm to 3000mm average per annum.
Soil Requirements:
Digitaria parviflora prefers sandy loams, light gritty clays to medium clays or medium silts to heavy silts. The soils are usually derived from decomposed sandstone, granites, brown or black basalts or alluvial deposits. The soils pH ranges from 4.5pH to 7pH are preferred. It does not tolerate waterlogged soils though seasonal inundations are frequent in its habitat. Non saline soils to very saline soils are tolerated.
Height & Spread:
Wild Plants: 0.6m to 1m by 0.4m to 0.7m
Characteristics:
Digitaria parviflora is a perennial grass with elongated rhizomes. The erect, glabrous culms have 4 to 7 nodes and measure 400mm to 900mm in height. The lateral branches sparsely branched. The leaf sheaths are antrorsely scabrous and glabrous on the surface. Leaf-sheath auricles absent, while the ligule is a ciliate membrane with erose, obtuse or acute apex and measure 1.5mm to 4mm in length. The flat laminas are scabrous, glabrous or sparsely covered in soft white inducement and measure 30mm to 350mm in length by 3mm to 8mm in width.
The compound inflorescence is a loose panicle of racemes. The ascending, racemes bear 50 to 80 fertile spikelets on the 4 to 15 spikes and measure 60mm to 200mm in length. The central inflorescence axis measures 20mm to 70mm in length.
The pedicelled pikelet have 2 to 4 in the cluster. Fertile spikelets number 2 per flower, with the lower floret barren or rarely a male. The the upper fertile floret comprise of 1 basal sterile floret and 1 fertile floret, without rachilla extension.
The glumes are thinner than the fertile lemma. Lower ovate glume is membranous, without nerves, while the upper elliptic membranous glume measures 1.6mm to 2mm in length and has 3 to 5 nerves. the upper glumes are glabrous or sparsely covered in indument. The basal sterile floret is barren, without a significant palea. The lower sterile, membranous lemma’s floret is equal in length to the spikelet and has 7 nerves. The keelless fertile lemma measures 1.6mm to 2mm in length. It flowers between February to July.
Wildlife:
Digitaria parviflora is a staple part of many native herbaceous animals like kangaroos, wallabies and native field mice.
The seed is much sought after by finches and small parrots and is a great addition for aviary birds. Small parrots especially budgerigahs relish the sweet juicy stems.
Cultivation:
Digitaria parviflora is considered to be a useful fodder crop in semi shaded areas. The leaves and stems are eaten but probably are mainly used as bulk. It has a rapid growth rate from mid-spring after the spring rains to late autumn. It recovers well from moderate grazing and is best managed by allowing a free period between grazing.
This grass is both classified as a weed and lawn by gardeners. It gives good quantities of trash for mulch thus improves soils structure and fertility. It has good potential as a landscaping grass in lawns as it mows low and recovers quickly. It is hard wearing and drought tolerant.
In cultivation it can be grown on most types of soil even heavy clay with a skeletal covering of sand. It requires full sun for best results and medium growth height to sustain best colour and vigour.
It does not suffer from mosaic fungi attack during the autumn. The best method of prevention is to grow it in sunlight and to with draw overhead watering during the onset of the wet season. Do not feed affected plants to aviary birds.
Mention Lawn grub and people head straight to the poison cupboard. But wait there are affective controls which are cheap and safe for the environment. Let’s first look at the culprits.
The black African Scarab beetle (Heteronychus arator), the native brown Scarab beetle (Sericesthis geminata) and the Argentine Scarab beetle (Cyclocephala signaticollis) in the third instar stage is where the beetle does most of their damage. Scarab beetle larvae are those large, white, curled grubs with a large yellow, brown or orange head.
The army worm or army grub; Spodoptera spp., are villains in the turf. These villains are sleek, smooth and devastate your lawn at night.
Break the cycle break the damage. Too much fertilizer and water means a soft unhealthy lawn that may look great but it is far more susceptible to attack. I have had lawns go season after season without damage while my neighbours poured poisons on their lawns at the first sign and still ended up with grub damage.
The first line of defence is to grow a hardier lawn that is maintained at around 50mm to 75mm in height. This encourages the grubs to stay closer to the surface during the day. Encourage birds by placing safe water stations around the yard.
In the case of the army grubs look for their egg sacks. Small fluffy white or pale pink cottony sacks with pale yellow eggs inside are easily squashed or removed. They maybe under the eaves, under hand rails, on the clothes lines or even your clothes and just need removing.
If the grubs are noticed, place a large piece of wet hessian upon the lawn overnight, where they have been feeding. The lawn grubs will be attracted to the hessian and stay there until it warms up. Early next morning pick the hessian up and dispose of the grubs by leaving them unprotected to feed the birds. This is affective as the birds will stay around and clean up a lot more.
If all else fails effective control of later larval stages can be only achievable with insect killing nematodes. These are known as entomopathogenic nematodes or “ENs” for short. It is active only against specific soil-dwelling insects, safe to handle, safe for baby crawling on the lawn and safe for plants. These nematodes have been commercialized since 1999 after extensive research by the CSIRO Division of Entomology in Canberra. So get in and buy a few. It is cheaper and easier to distribute than poisons and are safe for the birds to ingest.
Propagation:
Seeds: Digitaria parviflora’s seeds can be sown directly onto prepared ground. Cover the area to be sown with about 10mm of sharp sand. Rake the surface gently and water in. Keep the area moist for around 10 days. Deeper watering and longer periods between watering will ensure deeper root penetration which means stronger healthier lawns.
Division:
Plants can be grown by digging up patches and just cutting into 4 sections. Replant into a shallow saucer made in the ground, cover with 5mm to 10mm of sand and water every second day until the new shoots appear.
Fertilize using seaweed, fish emulsion or organic chicken pellets soaked in water on an alternate basis. Fertilize every two months until the plants are established then annually in early September to October to maintain health, vitality and better flowering.
Further Comments from Readers:
Hi reader, it seems you use The Bible of Botany a lot. That’s great as we have great pleasure in bringing it to you! It’s a little awkward for us to ask, but our first aim is to purchase land approximately 1,600 hectares to link several parcels of N.P. into one at The Pinnacles NSW Australia, but we need your help. We’re not salespeople. We’re amateur botanists who have dedicated over 30 years to saving the environment in a practical way. We depend on donations to reach our goal. If you donate just $5, the price of your coffee this Sunday, We can help to keep the planet alive in a real way and continue to bring you regular updates and features on Australian plants all in one Botanical Bible. Any support is greatly appreciated. Thank you.
In the spirit of reconciliation we acknowledge the Bundjalung, Gumbaynggirr and Yaegl and all aboriginal nations throughout Australia and their connections to land, sea and community. We pay our respect to their Elders past, present and future for the pleasures we have gained.
Digitaria ramularis
Classification
Unranked: Monocots
Unranked: Commelinids
Order: Poales
Family: Poaceae
Subfamily: Panicoideae
Tribe: Panicaea
Genus: From Digitatus, which is Latin for a finger. It refers to flower spikes which spreadout like fingers on a hand.
Species: From RÄmulus/RÄmulÄ«, which is Latin for a twig or small stem. It refers to plants, which have many twiggy type branches.
Common Name:
Distribution:
Digitaria ramularis is found south from the tip of Cape York Peninsula in far north Queensland to Bega in New South Wales. It is found from the coast to the western slopes of the Great Dividing Range. There is an isolated population on the Nicholson River in far north western Queensland. It is found on the Western Plains, Western Slopes, on and east of the Great Dividing Range to the coast.
https://avh.ala.org.au/occurrences/search?taxa=Digitaria+ramularis#tab_mapView
Habitat Aspect Climate:
Digitaria ramularis prefers full sun to light dappled shade. It grows in dry open forests and dry open woodlands on flat plains, which are subject to seasonal flooding and slopes and hills. The altitude ranges from 2 meter ASL to 950 meters ASL.
The temperatures range from minus 3 degrees in August to 40 degrees in January.
The rainfall ranges from lows of 500mm to 3000mm average per annum.
Soil Requirements:
Digitaria ramularis prefers sandy loams, light gritty clays to medium clays or medium silts to heavy silts. The soils are usually derived from decomposed sandstone, granites or alluvial deposits. The soils pH ranges from 4.5pH to 7pH are preferred. It does not tolerate waterlogged soils though seasonal inundations are frequent in its habitat. Non saline soils to very saline soils are tolerated.
Height & Spread:
Wild Plants: 0.6m to 1m by 0.4m to 0.7m
Characteristics:
Digitaria ramularis grows as an annual or perennial grass with erect decumbent or spreading culms. The culms measure 300mm to 900mm in height. The mid culms have 3 to 11 nodes. The mid culms are glabrous while the nodes are glabrous or covered in white puberulent hairs. Plants have a fibrous root system.
Digitaria ramularisFrom RÄmulus/RÄmulÄ«, which is Latin for a twig or small stem. It refers to plants, which have many twiggy type branches. linear leaves measure 50mm to 250mm in length by 1.5mm to 5.5mm in width. The leaf sheath is glabrous or covered in white villous or hirsute hairs with tuberculate based hairs near the base. The apex is tapering to narrow acute. The leaf sheath auricles are absent. The eciliate membranous ligules measure 2mm to 4mm in length by 5mm to 7mm in width near the base. The apexes are truncate to obtuse. The ligules are sparsely covered in white hirsute hairs. The concolourous laminas are pale grass-green to pale blue-green and glabrous or scabrous or sparsely covered in white puberulent hairs. The laminas are flat. The midrib is rounded and slightly prominent on the on the lower lamina. The leaf margins are entire.
The inflorescences of Digitaria ramularis usually have 3 to 10 racemose branches or at times 4 and rarely 5.The rachis measures 20mm to 100mm in length while the racemes measure 30mm to 150mm in length.
The spikelets are loosely and irregularly arranged and obscurely paired. The longer pedicel is much longer than the spikelet. The spikelets measure 1.5mm to 2mm in length.
The lower glumes measure 0.2mm to 0.3mm in length while the upper glumes measure 0.6mm to 1.6mm in length. The lemmas have 3 to 5 nerves and are glabrous.
Sterile lemma usually measure 1.4mm to 1.8mm in length. The lemmas have 5 to 7-nerves and are usually glabrous or occasionally covered in white puberulent hairs between the nerves. The fertile lemmas are deep brown or brownish black at maturity. The basal sterile floret is barren without a significant palea. The lemma of lower sterile floret measures 1.4mm to 2mm in length. The fertile lemmas measure 1.4mm to 2mm in length.
There is 1 stamen on each spikelet. The flowers appear from late November to early March.
The fruits of Digitaria ramularis seeds measure 2mm to 2.2mm in length. The green seeds turn pale straw-fawn when ripe.
Wildlife:
Digitaria ramularis is a staple part of many native herbaceous animals like kangaroos, wallabies and native field mice.
The seed is much sought after by finches and small parrots and is a great addition for aviary birds. Small parrots especially budgerigahs relish the sweet juicy stems.
Cultivation:
Digitaria ramularis is considered to be a good fodder crop. The leaves and stems are eaten but probably are mainly used as bulk. It has a rapid growth rate from mid-spring after the spring rains to late autumn. It recovers well from moderate grazing and is best managed by allowing a free period between grazing.
This grass is both classified as a weed and lawn by gardeners. It gives good quantities of trash for mulch thus improves soils structure and fertility. It has good potential as a landscaping grass in lawns as it mows low and recovers quickly. It is hard wearing and drought tolerant.
In cultivation it can be grown on most types of soil even heavy clay with a skeletal covering of sand. It requires full sun for best results and medium growth height to sustain best colour and vigour.
It does suffer from mosaic fungi attack during the autumn. The best method of prevention is to grow it in sunlight and to with draw overhead watering during the onset of the wet season. Do not feed affected plants to aviary birds.
Mention Lawn grub and people head straight to the poison cupboard. But wait there are affective controls which are cheap and safe for the environment. Let’s first look at the culprits.
The black African Scarab beetle (Heteronychus arator), the native brown Scarab beetle (Sericesthis geminata) and the Argentine Scarab beetle (Cyclocephala signaticollis) in the third instar stage is where the beetle does most of their damage. Scarab beetle larvae are those large, white, curled grubs with a large yellow, brown or orange head.
The army worm or army grub; Spodoptera spp., are villains in the turf. These villains are sleek, smooth and devastate your lawn at night.
Break the cycle break the damage. Too much fertilizer and water means a soft unhealthy lawn that may look great but V far more susceptible to attack. I have had lawns go season after season without damage while my neighbours poured poisons on their lawns at the first sign and still ended up with grub damage.
The first line of defence is to grow a hardier lawn that is maintained at around 50mm to 75mm in height. This encourages the grubs to stay closer to the surface during the day. Encourage birds by placing safe water stations around the yard.
In the case of the army grubs look for their egg sacks. Small fluffy white or pale pink cottony sacks with pale yellow eggs inside are easily squashed or removed. They maybe under the eaves, under hand rails, on the clothes lines or even your clothes and just need removing.
If the grubs are noticed, place a large piece of wet hessian upon the lawn overnight, where they have been feeding. The lawn grubs will be attracted to the hessian and stay there until it warms up. Early next morning pick the hessian up and dispose of the grubs by leaving them unprotected to feed the birds. This is affective as the birds will stay around and clean up a lot more.
If all else fails effective control of later larval stages can be only achievable with insect killing nematodes. These are known as entomopathogenic nematodes or “ENs” for short. It is active only against specific soil-dwelling insects, safe to handle, safe for baby crawling on the lawn and safe for plants. These nematodes have been commercialized since 1999 after extensive research by the CSIRO Division of Entomology in Canberra. So get in and buy a few. It is cheaper and easier to distribute than poisons and are safe for the birds to ingest.
Propagation:
Seeds: Digitaria ramularis‘s seeds can be sown directly onto prepared ground. Cover the area to be sown with about 10mm of sharp sand. Rake the surface gently and water in. Keep the area moist for around 10 days. Deeper watering and longer periods between watering will ensure deeper root penetration which means stronger healthier lawns.
Division:
Plants can be grown by digging up patches and just cutting into 4 sections. Replant into a shallow saucer made in the ground, cover with 5mm to 10mm of sand and water every second day until new shoots appear.
Fertilize using seaweed, fish emulsion or organic chicken pellets soaked in water on an alternate basis. Fertilize every two months until the plants are established then annually in early September to October to maintain health, vitality and better flowering.
Further Comments from Readers:
Hi reader, it seems you use The Bible of Botany a lot. That’s great as we have great pleasure in bringing it to you! It’s a little awkward for us to ask, but our first aim is to purchase land approximately 1,600 hectares to link several parcels of N.P. into one at The Pinnacles NSW Australia, but we need your help. We’re not salespeople. We’re amateur botanists who have dedicated over 30 years to saving the environment in a practical way. We depend on donations to reach our goal. If you donate just $5, the price of your coffee this Sunday, We can help to keep the planet alive in a real way and continue to bring you regular updates and features on Australian plants all in one Botanical Bible. Any support is greatly appreciated. Thank you.
In the spirit of reconciliation we acknowledge the Bundjalung, Gumbaynggirr and Yaegl and all aboriginal nations throughout Australia and their connections to land, sea and community. We pay our respect to their Elders past, present and future for the pleasures we have gained.
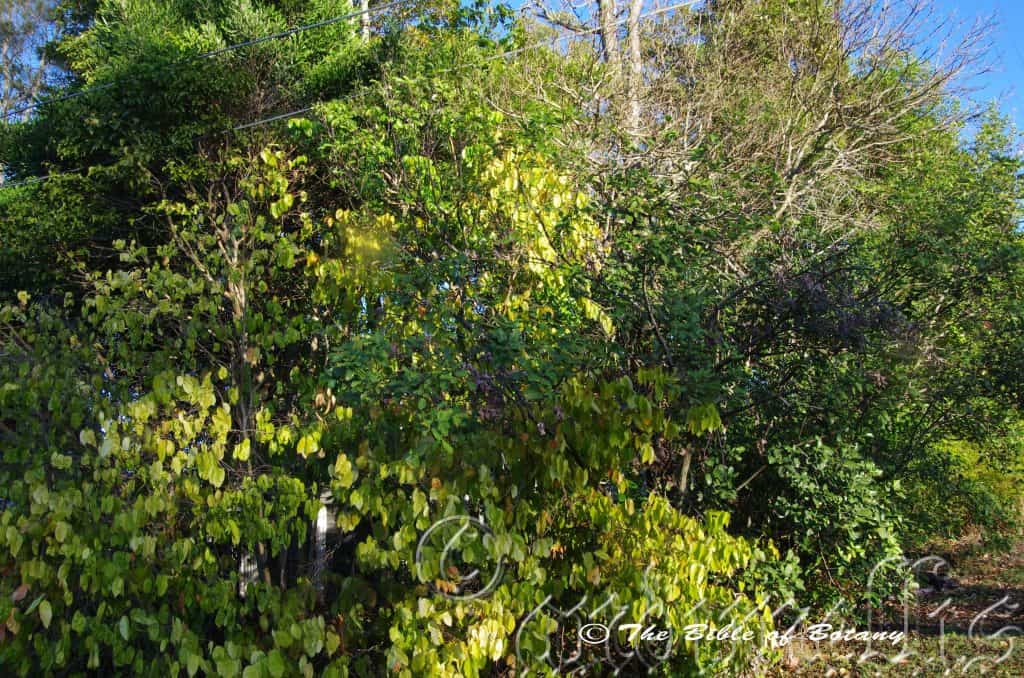
Greening Australia Norman Park Qld.
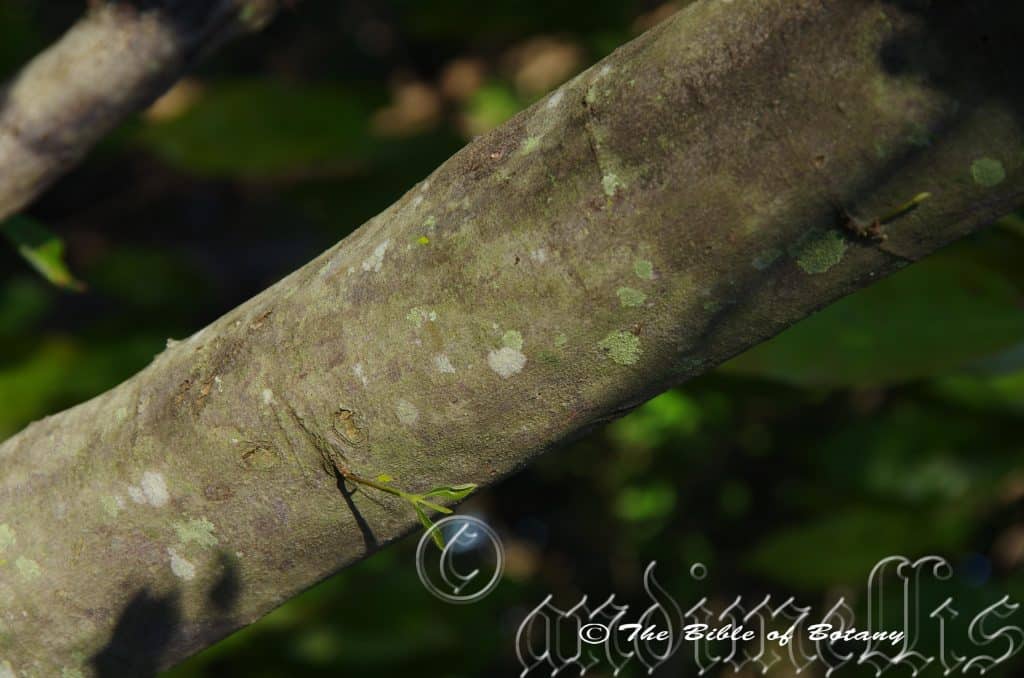
Greening Australia Norman Park Qld.
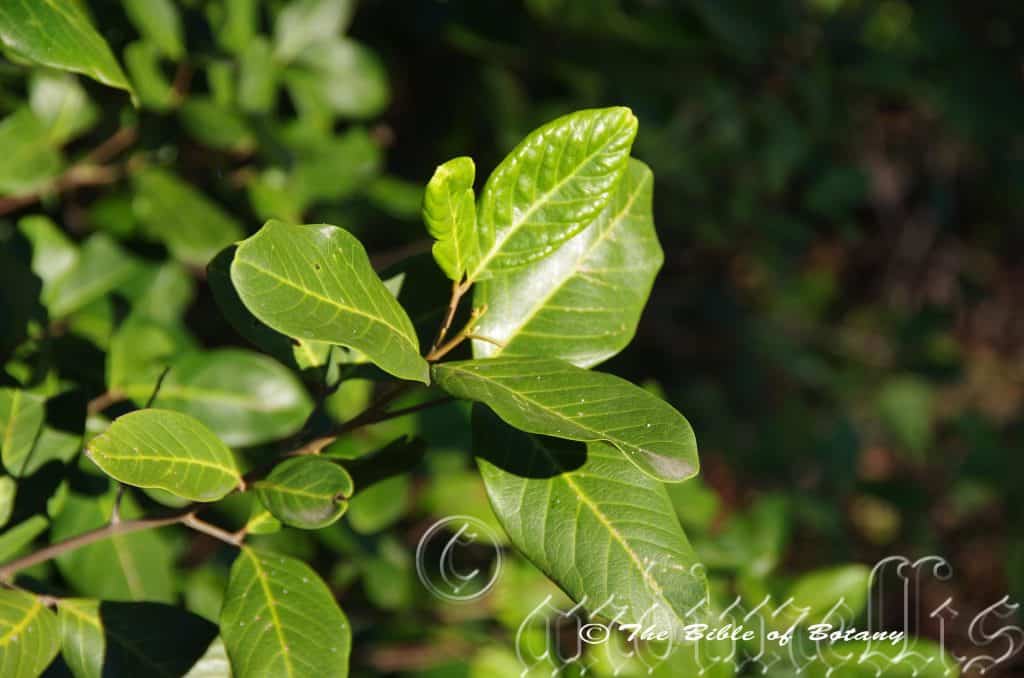
Greening Australia Norman Park Qld.
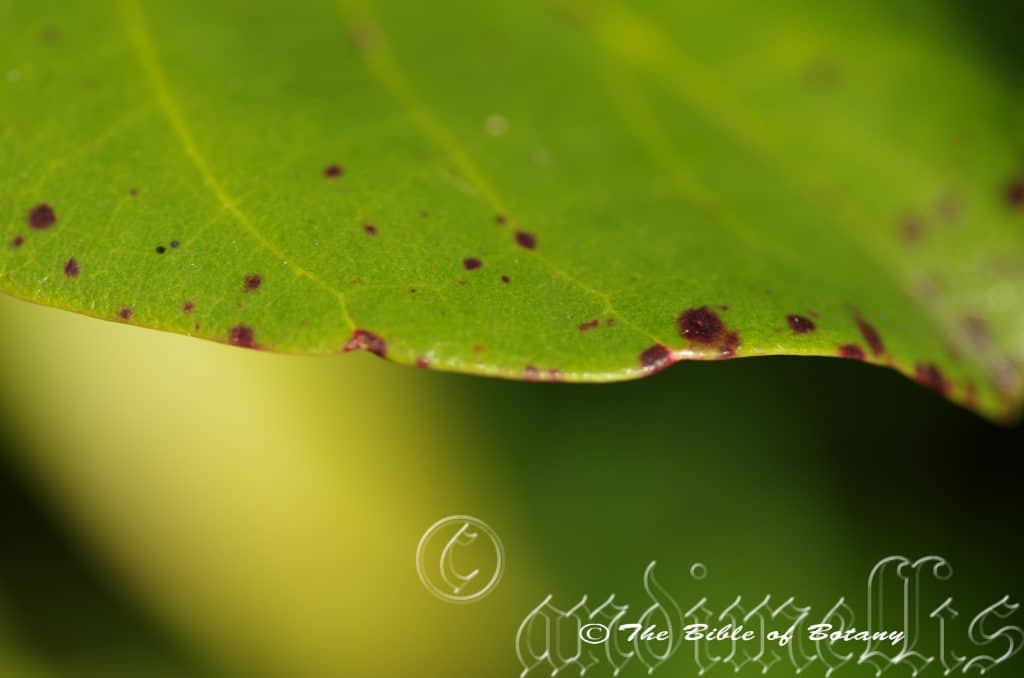
Anderson Botanical Gardens Townwsville Qld.
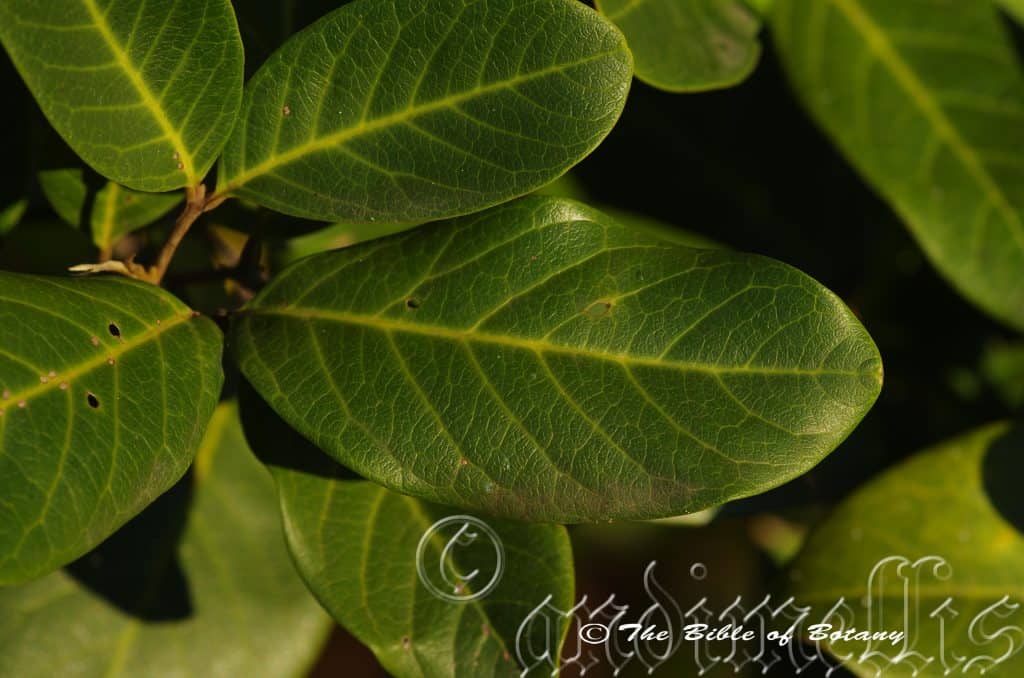
Greening Australia Norman Park Qld.

Greening Australia Norman Park Qld.
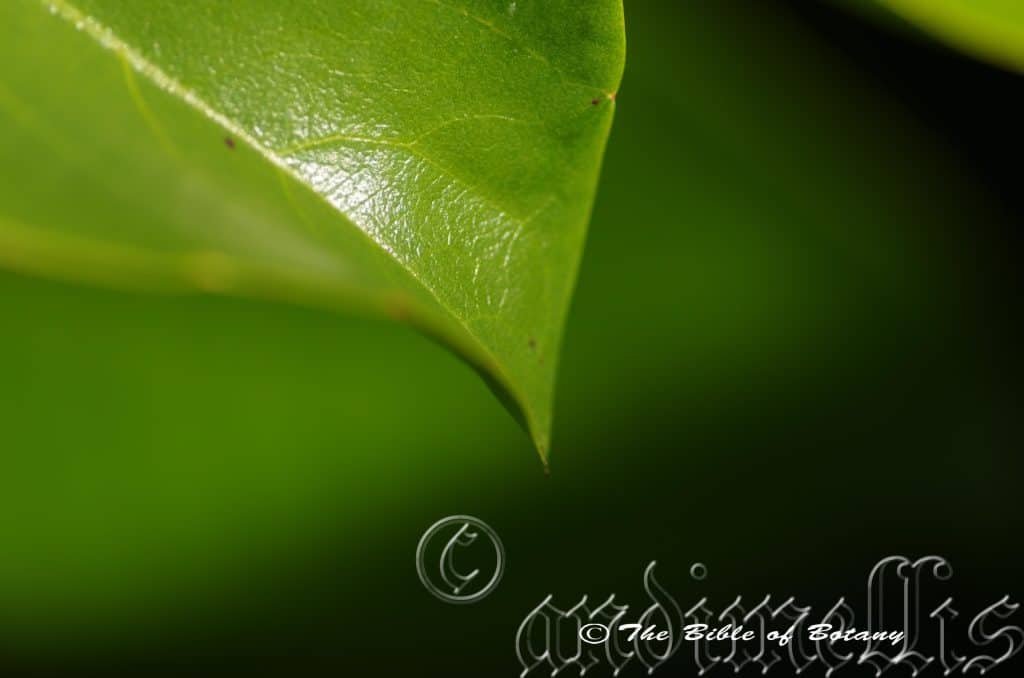
Anderson Botanical Gardens Townwsville Qld.
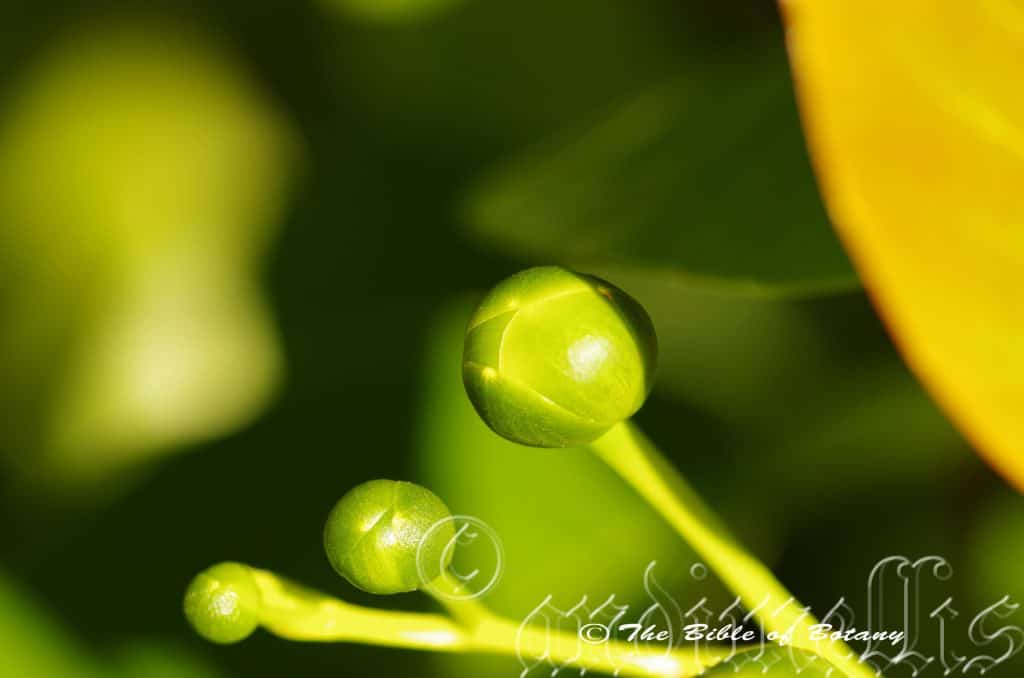
Anderson Botanical Gardens Townwsville Qld.
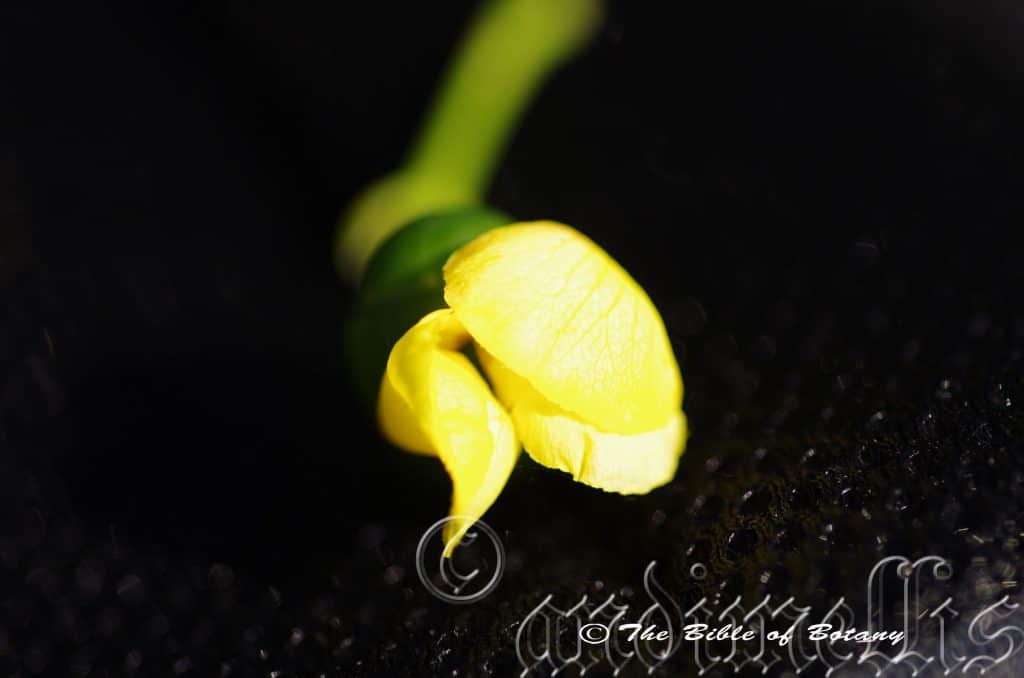
Anderson Botanical Gardens Townwsville Qld.
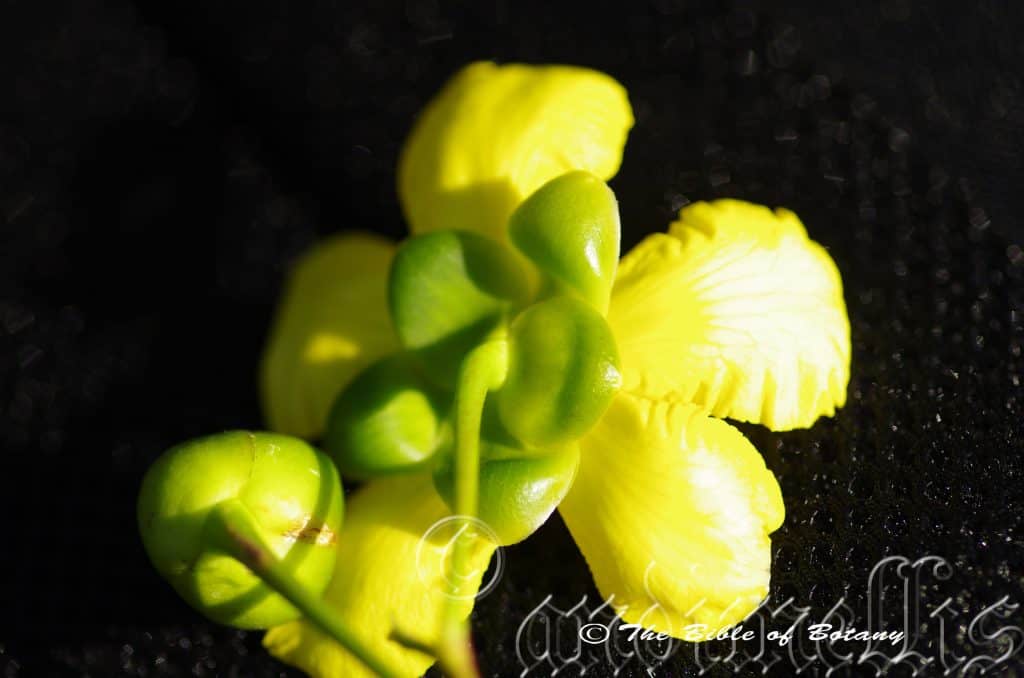
Anderson Botanical Gardens Townwsville Qld.
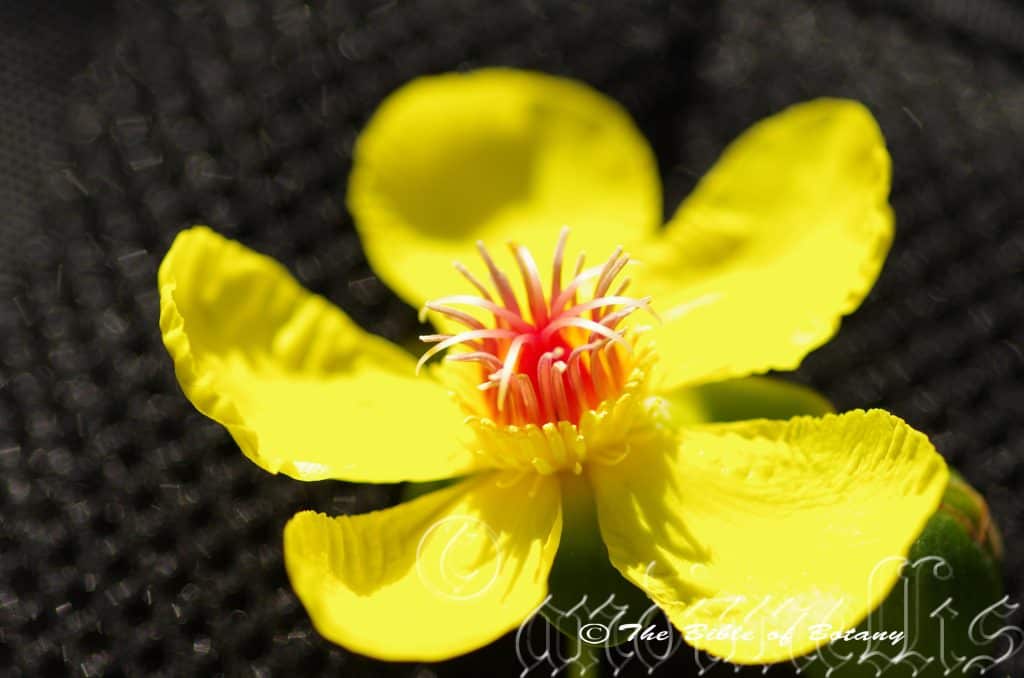
Anderson Botanical Gardens Townwsville Qld.
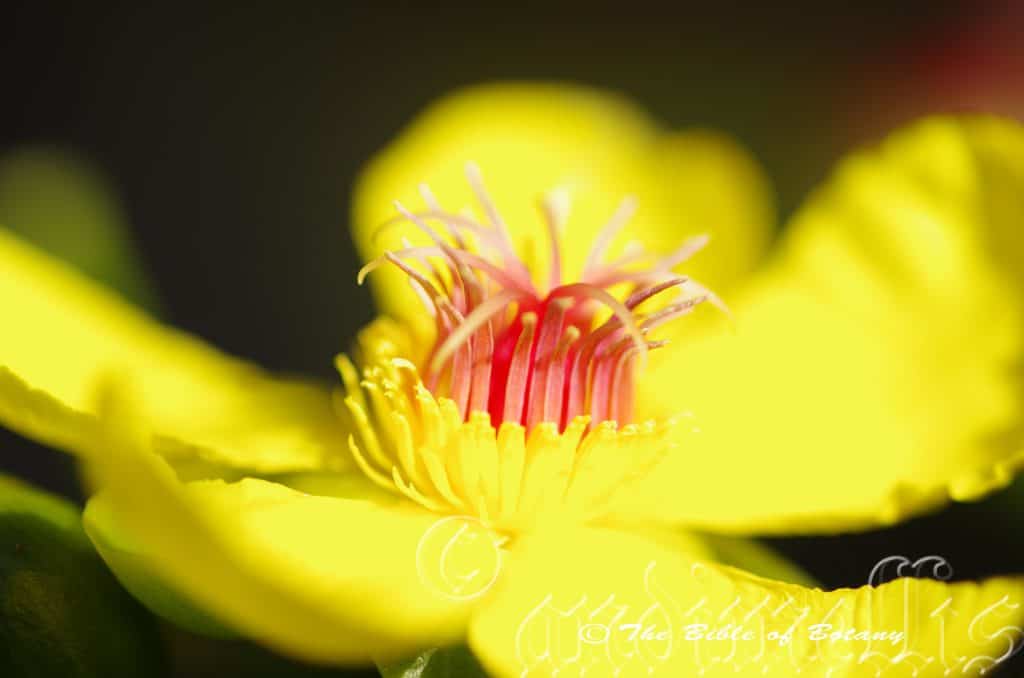
Anderson Botanical Gardens Townwsville Qld.
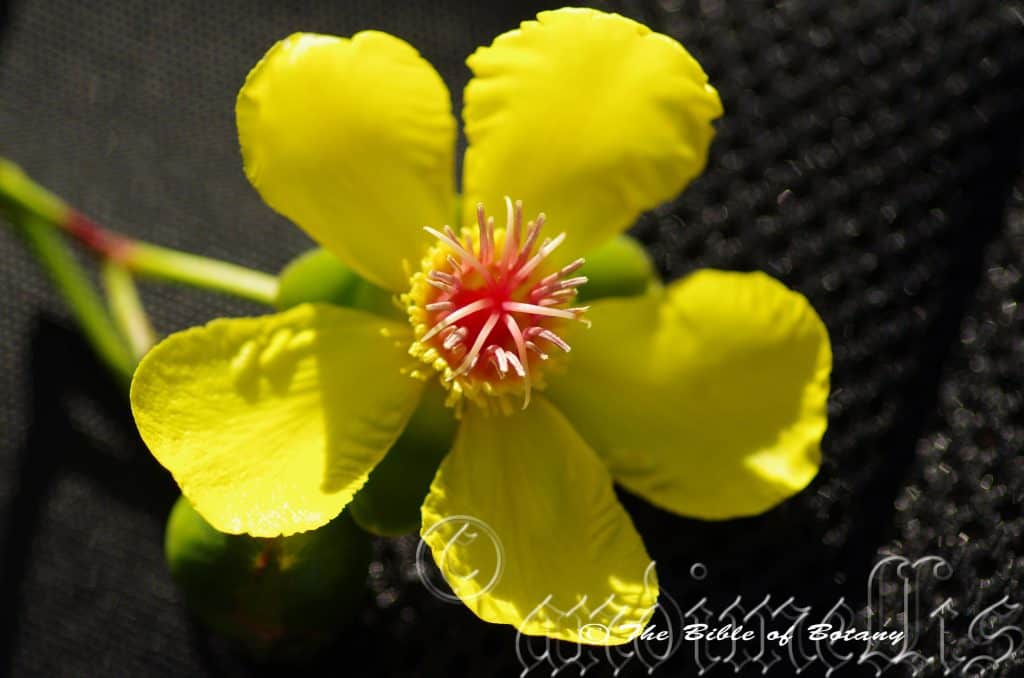
Anderson Botanical Gardens Townwsville Qld.
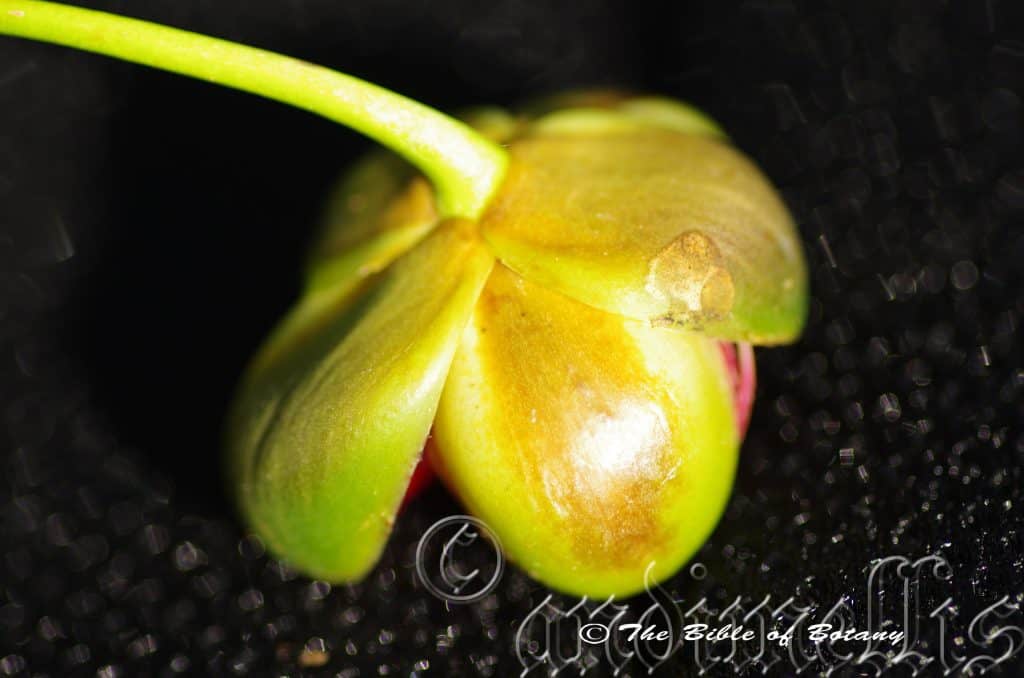
Anderson Botanical Gardens Townwsville Qld.

Anderson Botanical Gardens Townwsville Qld.
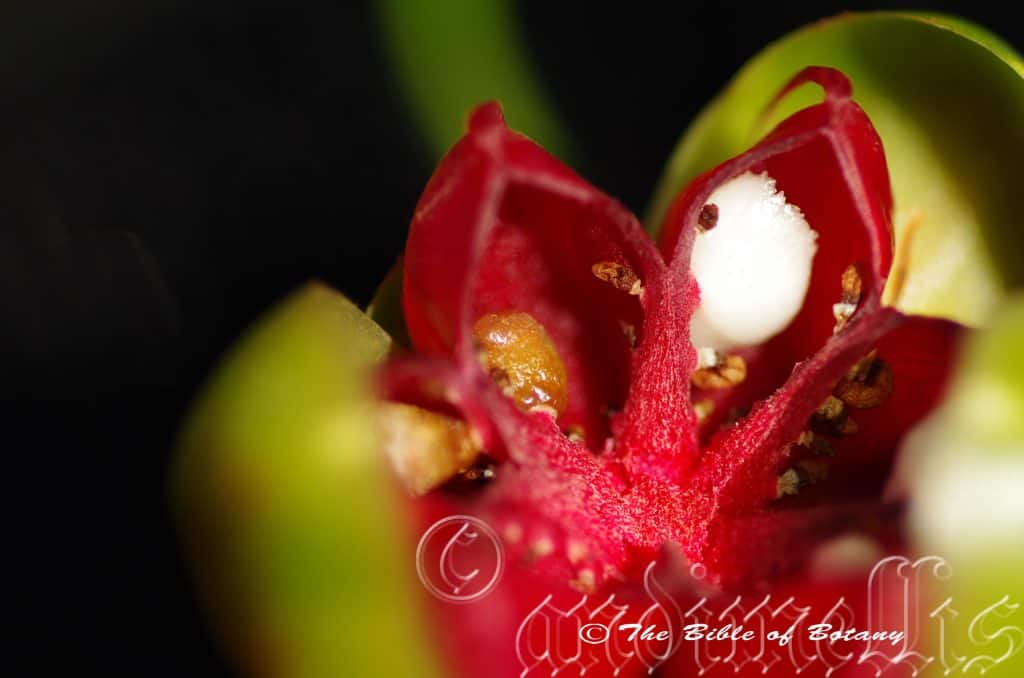
Anderson Botanical Gardens Townwsville Qld.
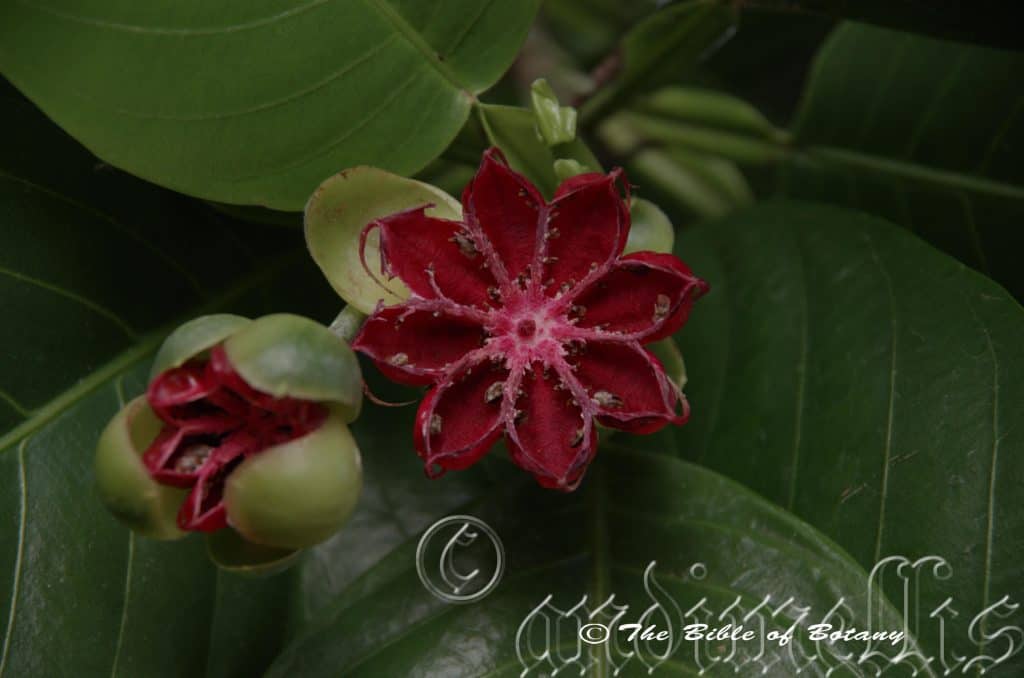
Anderson Botanical Gardens Townwsville Qld.
Anderson Botanical Gardens Townwsville Qld.
Dillenia alata
Classification
Unranked: Eudicots
Order: Dilleniales
Family: Dilleniaceae
Genus: Is named in honour of John Dillenius; 1684-1747, who was a German Botanical professor working in England.
Specie: From Alatus, which is Latin for to have a wing or wings. It refers to stems, which have distinct longitudinal wings.
Common Name: Red Beech or Golden Guinee Flower.
Distribution:
Dillenia alata is found east from Bathurst Melville Island and Darwin through most of Northern Arnhem land to the Gulf of Carpentaria below the Roper River and Groote Eylandt in the Northern Territory.
In the east it is found from the tip of Cape York Peninsula and some of the Torres Strait Islands to Townsville.
https://avh.ala.org.au/occurrences/search?taxa=Dillenia+alata#tab_mapView
Habitat Aspect Climate:
Dillenia alata prefers full sun to light dappled shade. It grows in moist open Eucalyptus forests, moist open tall woodland forests, and monsoonal vine thickets or in moist positions in dry rainforests. The altitude ranges from 5 meters ASL to 600 meters ASL.
The temperatures range from 10 degrees in July to 40 degrees in January.
The rainfall ranges from lows of 1000mm to an average of 3200mm annually.
Soil Requirements:
Dillenia alata prefers better quality sandy loams, light gritty clays to medium clays. The soils are derived from decomposed brown basalt, black basalt, sandstones, granites or podsolic soils. The soils pH ranges from 5.5pH to 7pH are preferred. It does not tolerate waterlogged soils. Non saline soils to extremely saline soils are tolerated.
Height & Spread:
Wild Plants: 4m to 7m by 3m to 7m.
Characteristics:
Dillenia alata’s deep maroon and black bark is chartaceous, tessellated, flaky but tight adhering. The branches are a light pinkish grey glabrous with some flaky patches. The branchlets and young shoots are deep green while the buds are rusty-red to rusty-bronze.
Dillenia alata’s simple ovate leaves measure 110mm to 230mm in length by 60mm to 130mm in width. The petiole’s narrow wing semi clasps the stem leaving a prominent leaf scar when the leaves are discarded. The petioles measure 30mm to 60mm in length with large 4mm to 6mm wide wings. The bases are rounded while the apexes are obtuse. The margins are entire and slightly undulating while they curve upwards from the mid vein. The discolourous laminas are deep sea-green to deep green glabrous and dull to semi glossy on the upper lamina while the lower lamina is blueish-green and dull. The mid vein is strongly prominent on the lower lamina and distinctly visible above being a paler green while the lateral veins are prominent on the lower lamina. The new leaves are a glossy pale green when they first emerge gradually turning bronze then to the adult green.
The leaf opposed inflorescences of Dillenia alata measure 80mm to 95mm in diameter. The pale grass-green, concave ovate sepals measure 20mm to 26mm in length by 20mm to 26mm in width. The 5 ovate to spathulate petals measure 35mm to 42mm in length by 20mm to 26mm in diameter. The flowers are deep yellow and are slightly recurved near the margins. The 50 to 70 pink to red or rarely yellow stamens and staminodes measure 8mm to 11mm in length. The anthers are bright yellow. The 7 to 10 pink to red styles measure 10mm to 13mm long. The pedicles measure 20mm to 30mm long. Flowering occurs from July to October.
Dillenia alata fruits are 5 chamber carpals. The carpels measure 10mm to 18mm across by 10mm to 14mm high. The chartaceous red to crimson carpels contain the 4 to 6 black seeds. The seeds are surrounded by a white or rarely carmine-red aril and measure 3mm to 4.5mm in diameter.
Wildlife:
Dillenia alata’s seeds are eaten by most fruit eating birds.
The aril surrounding the seeds is edible and is reminiscent of a tangy pear.
Cultivation:
Dillenia alata is a very beautiful small tree which should be more widely grown in tropical and subtropical small gardens everywhere. Garden subjects will grow into a dense small shade trees to 8 meters tall by 8 meters in diameter when grown in the open. It can be used as a specimen tree, in small rainforest gardens or an orchard for something very different. The tree is always in motion. The leaves and leaf wings add beauty and freshness as they are large and glossy. The trunk can give a rainforest garden colour at eye level or add interest planted next to trees or differing barks. The flowers are large and showy and while they may only last one day. They are produced over a long period of time from August to January. Then there is the fruit with its glorious carmine reds, white pulp and black seeds.
Propagation:
Seeds: Dillenia alata‘s seeds are very easy to grow. Sow the seeds into a seed raising mix. Cover with 5mm of the mix and place the trays in a warm place to germinate. When the seedlings are 25mm to 50mm tall, prick them out and plant them into 50mm native tubes using a seed raising mix.
Once the seedlings reach 200mm to 250mm in height plant them out into their permanent position. For mass plantings plant them at 8 meter to 10 meter spacing if the trees are being used for fruit or in a park like scene or closer at 5 meters to 6 meters for the rainforest look.
Fertilize using seaweed, fish emulsion or organic chicken pellets soaked in water on an alternate basis. Fertilize every two months until the plants are established then annually in early September to October to maintain health, vitality and better flowering.
Further Comments from Readers:
Hi reader, it seems you use The Bible of Botany a lot. That’s great as we have great pleasure in bringing it to you! It’s a little awkward for us to ask, but our first aim is to purchase land approximately 1,600 hectares to link several parcels of N.P. into one at The Pinnacles NSW Australia, but we need your help. We’re not salespeople. We’re amateur botanists who have dedicated over 30 years to saving the environment in a practical way. We depend on donations to reach our goal. If you donate just $5, the price of your coffee this Sunday, We can help to keep the planet alive in a real way and continue to bring you regular updates and features on Australian plants all in one Botanical Bible. Any support is greatly appreciated. Thank you.
In the spirit of reconciliation we acknowledge the Bundjalung, Gumbaynggirr and Yaegl and all aboriginal nations throughout Australia and their connections to land, sea and community. We pay our respect to their Elders past, present and future for the pleasures we have gained.
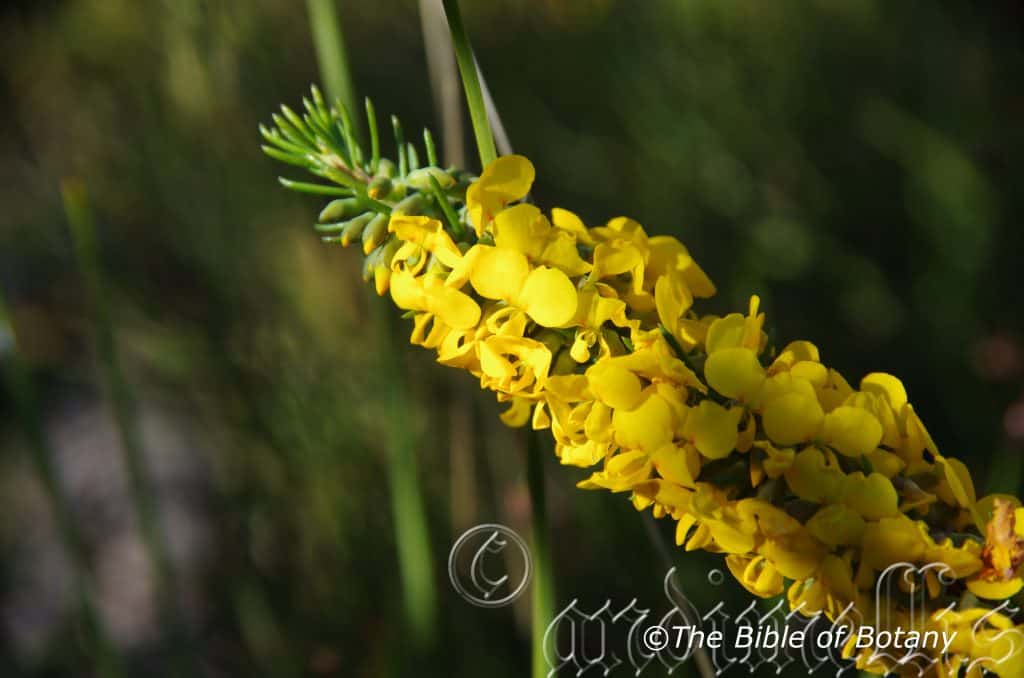
Yuraygir National Park NSW
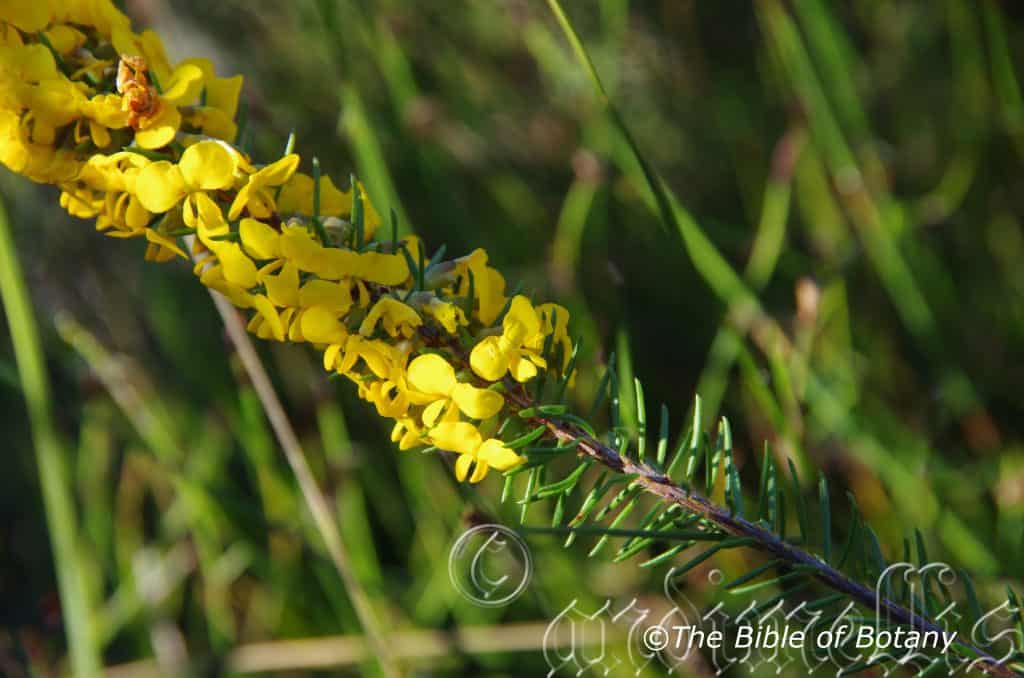
Yuraygir National Park NSW
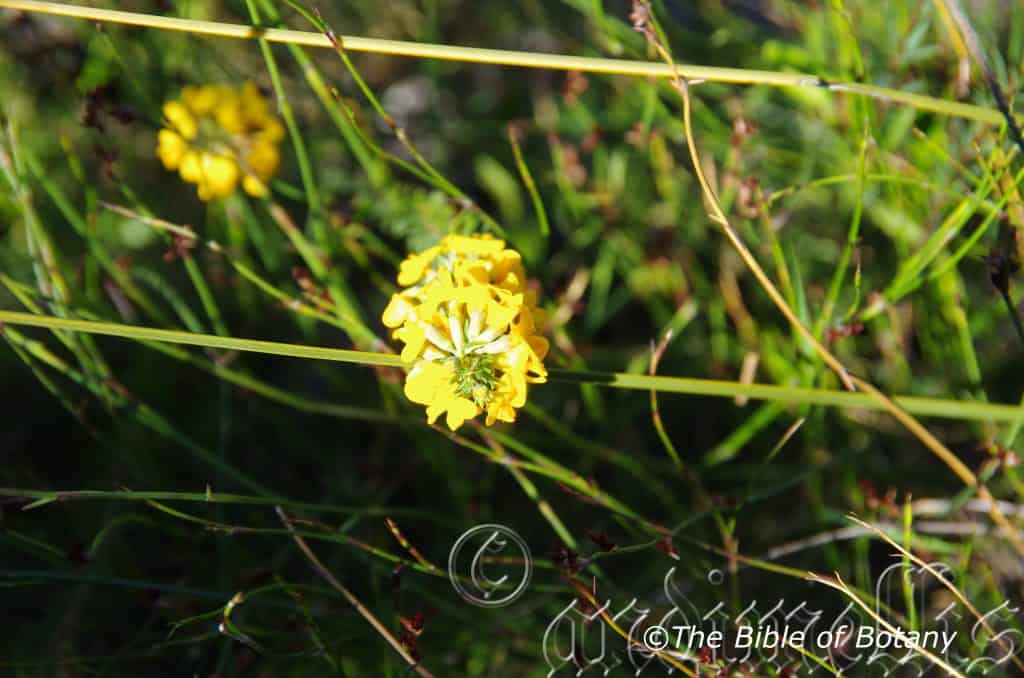
Yuraygir National Park NSW
Dillwynia floribunda
Classification
Unranked: Eudicots
Unranked: Rosids
Order: Fabales
Family: Fabaceae
Genus: Is named in honour of L. W. Dillwyn; 1788- 1855, who was a Welsh Botanist.
Species: From Flora, which is Latin for a flower or Flos, which is the Roman goddess of spring and flowers and Abundans, which is Latin for overflowing, abounding, abundant or copious. It refers to plants, which have a great number of flowers.
Common Name: Showy Parrot Pea.
Distribution:
Dillwynia floribunda is a widespread species found south from Deepwater in coastal southern Queensland to Mount Imay in far south eastern coastal New South Wales. It is mainly found on and east of the Great Dividing Range to the coast.
It is found in the Grampians and western Victoria and south west from the Onkaparinga River to Kangaroo Island in South Australia.
It is also found around Georgetown and Hobart on mainland Tasmania.
https://avh.ala.org.au/occurrences/search?taxa=Dillwynia+floribunda#tab_mapView
Habitat Aspect Climate:
Dillwynia floribunda prefers full sun to light dappled shade. It mainly grows below medium size trees, in dry open schlerophyll forests in moist heaths particularly along the coastal fringe. The altitude ranges from 5 meter ASL to 900 meters ASL.
The temperatures range from minus 5 degrees in August to 40 degrees in January.
The rainfall ranges from lows of 800mm to an average of 1500mm annually however the heathy habitats are always moist.
Soil Requirements:
Dillwynia floribunda prefers sandy loams to light gritty clays. The soils are usually derived from decomposed sandstone, granite or accumulated peaty sands behind the back dunes. The soils pH ranges from 5.5pH to 7pH are preferred. It does not tolerate waterlogged soils however high water tables are usually associated within its environment. Non saline soils to moderately saline soils are tolerated.
Height & Spread:
Wild Plants: 0.2m to 2.5m by 0.5m to 2.5m.
Characteristics:
Dillwynia floribunda’s is an erect small shrub with a reddish-brown bark that is moderately covered in long white matted hairs. The stems are reddish-brown and moderately covered in long white matted hairs.
Dillwynia floribunda‘s simple, crowded, thick linear leaves are randomly placed along the stems and are almost terete. They measure 5mm to 20mm in length by 1mm to 3mm in width. The bases taper slightly to the yellow, terete, glabrous, appressed petioles, while the apexes are shortly acuminate. The petioles measure 3mm to 5mm in length. The concolourous laminas are deep green to sea-green and semi glossy, glabrous or very rarely, very sparsely covered in long, white hairs. The margins are entire. The mid vein is not visible on either lamina.
The inflorescences of Dillwynia floribunda are in pairs along the upper stems and often extending well down the branches. The bracts measure 1mm to 2mm in length, while the concave bracteoles measure 1mm in length. The calyxes are mostly glabrous or very rarely, very sparsely covered in long, white hairs and measure 4mm to 7mm in length. The glabrous, bright yellow, standard petals are much broader than longmeasure 7mm to 13mm in length by 12mm to 21mm in width. The glabrous, bright yellow, oblong wing petals curve inwards near the margins and measure 5mm to 8mm in length by 3mm to 5mm in width. The glabrous, bright yellow, ovate keel petals measure 1.5mm to 2.5mm in diameter. The flowers appear from August to October.
Dillwynia floribunda fruits are long linear glabrous pods that measure 4mm to 7mm in length by 3.5mm to 5mm diameter. The green pods turn dark brown and brittle when ripe. The smooth flattish, reniform brown seeds measure 2.5mm to 3mm in length.
Wildlife:
Dillwynia floribunda‘s wildlife is unknown to the author.
Cultivation:
Dillwynia floribunda is a beautiful small shrub which could be more widely grown in sub-tropical and temperate gardens everywhere. Garden subjects will grow into small dense semi prostrate shrubs from 0.6 meters to 1.2 meters in height by 1 meter to 1.6 meters in diameter when grown in the open.
Dillwynia floribunda would make a good contribution to a sandy or rocky terrain garden. Here it can be used as a fill in plant, or scattered throughout the terrain. When you use it in an area that is strewn with large boulders do not over crowd the scene as the boulders are a formidable part of the scene. Dillwynia floribunda is well suited to such conditions so use contours to display the plants. Boulder country are almost always rising and falling in contour and can have sharp rises. Plants must be planted sparingly with short annuals between to give vibrant colour. Make the scene so you can see over the tallest ones with the exception of one or two plants with broad leaves at the most. The idea is to achieve a feeling of ruggedness. This can be achieved with using Dillwynia floribunda’s deep green linear leaves contrasting with courser pale green or soft grey to glaucous coloured foliage. If large deep green leaf plants are wanted try using them as prostrate plants. Use a lot of procumbent plants like Leischenalta formosa or Leischenalta biloba which will contrast magnificently when in flower. This type of planting will also make the rocks look larger and the spaces between the plants bigger.
When you design a tall heath garden which Dillwynia floribunda is well suited to don’t use contours to display the plants as heath lands are almost always flat or have a slight rise. Place it back from the path as it is rather brittle and will be easily broken or passer bys will continually remove the flower heads. Make the heath garden path narrow so you have to feel the plants as you walk through the garden bed. This gives an extra dimension which many people forget about when designing heath gardens. Plants must be planted close together and be short so you can see over the tallest ones with the exception of one or two plants at the most. These will be feature plants. The idea is to achieve a feeling of expansive flatness. This can be achieved with using the Dillwynia floribunda‘s yellow flowers contrasting pink flowers of plants like Comesperma ericinum‘s brilliant pink flowers. Mix them with other smaller shrubs so none of them dominate the scene but blend in to give a mosaic of foliage colours that you oversee. Here I immediately think of Actinotis helianthi, Melaleuca pearsonii or other sub shrubs like Chloanthes parviflora, Pelargonium australe or Pelargonium inodorum. Even Hibiscus diversifolia could be pruned and used in the back ground or allowed to straggle between clumps with Comesperma defoliatum.
Propagation:
Seeds: Dillwynia floribunda‘s seeds have a hard testa that inhibits moisture absorption. As the plants are usually associated with frequent heath and scrub fires either abrasion or hot water is needed to break the dormancy.
Place the seeds into a container and pour near boiling water onto the seeds and allow the water to cool. Let the seeds soak for 4 to 6 hours. The seeds that have not swollen from 1.5 times to twice their original size after soaking should be retreated before sowing. The seeds that have swollen from 1.5 to 2 times their original size should be sown immediately.
Note: Any seeds which are floating on the surface are infertile and should be discarded.
Seeds that have not swollen after repeating the boiling water technique should be treated using the abrasion technique.
Sow the treated seeds into a seed raising mix. Cover with 5mm of the mix and place the trays in a warm place to germinate. When the seedlings are 25mm to 50mm tall, prick them out and plant them into 50mm native tubes using a seed raising mix.
Once the seedlings reach 200mm to 250mm in height plant them out into their permanent position. For mass plantings plant them at 8 meter to 10 meter spacing if the trees are being used for fruit or in a park like scene or closer at 5 meters to 6 meters for the rainforest look.
Fertilize using seaweed, fish emulsion or organic chicken pellets soaked in water on an alternate basis. Fertilize every two months until the plants are established then annually in early September to October to maintain health, vitality and better flowering.
Further Comments from Readers:
Hi reader, it seems you use The Bible of Botany a lot. That’s great as we have great pleasure in bringing it to you! It’s a little awkward for us to ask, but our first aim is to purchase land approximately 1,600 hectares to link several parcels of N.P. into one at The Pinnacles NSW Australia, but we need your help. We’re not salespeople. We’re amateur botanists who have dedicated over 30 years to saving the environment in a practical way. We depend on donations to reach our goal. If you donate just $5, the price of your coffee this Sunday, We can help to keep the planet alive in a real way and continue to bring you regular updates and features on Australian plants all in one Botanical Bible. Any support is greatly appreciated. Thank you.
In the spirit of reconciliation we acknowledge the Bundjalung, Gumbaynggirr and Yaegl and all aboriginal nations throughout Australia and their connections to land, sea and community. We pay our respect to their Elders past, present and future for the pleasures we have gained.
Dillwynia glaberrima
Classification
Unranked: Eudicots
Unranked: Rosids
Order: Fabales
Family: Fabaceae
Genus: Is named in honour of L. W. Dillwyn; 1788- 1855, who was a Welsh Botanist.
Species: From Glabrum, which is Latin for glabrous or smooth. It refers to a structure or organ, which has no hairs or scales and is very smooth to touch.
Common Name: Smooth Parrot Pea.
Distribution:
Dillwynia glaberrima is a widespread species found south from Maryborough in coastal southern Queensland to the Grampians and west to Deep Creek Conservation Center in South Australia.
It is also found on the Bass Strait Islands and lowland areas on mainland Tasmania.
https://avh.ala.org.au/occurrences/search?taxa=Dillwynia+glaberrima#tab_mapView
Habitat Aspect Climate:
Dillwynia glaberrima prefers full sun to light dappled shade. It grows below medium size trees, in dry open schlerophyll forests and dry heaths particularly along the coastal fringe. The altitude ranges from 5 meter ASL to 1100 meters ASL.
The temperatures range from minus 3 degrees in August to 40 degrees in January.
The rainfall ranges from lows of 500mm to an average of 1600mm annually.
Soil Requirements:
Dillwynia glaberrima prefers sandy loams to light gritty clays. The soils are usually derived from decomposed sandstone, granite or accumulated peaty sands. The soils pH ranges from 5.5pH to 7pH are preferred. It does not tolerate waterlogged soils. Non saline soils to moderately saline soils are tolerated.
Height & Spread:
Wild Plants: 1m to 2m by 1m to 2m.
Characteristics:
Dillwynia glaberrima‘s bark is deep grey and glabrous or minutely tuberculate. The branchlets are reddish-grey and glabrous.
Dillwynia glaberrima‘s simple, appressed, linear leaves measure 5mm to 20mm in length by 1mm to 2mm in width. The bases are truncate while the apexes are shortly acuminate and usually recurved. The concolourous laminas are deep green to sea-green and glabrous or very rarely sparsely covered in pale grey puberulent hairs. The margins are entire. The mid vein is slightly prominent on the lower lamina and not visible from the upper lamina. The new growth is glossy lime-green.
The inflorescences of Dillwynia glaberrima are racemose or umbellate born from the terminals and in the upper axils. The 1 to 5 flowers measure 7mm to 12mm in diameter. The pedicels are very short or long measure 2mm to 4mm in length or 15mm to 2mm in length. The mid green, cupular bracts measure 1mm to 2mm in length. The mid green bracteoles are glabrous or sparsely covered in pale grey hirtellous hairs and measure 1mm to 2mm in length. The olive-brown to olive-green calyxes are usually glabrous or rarely covered in off white sericeous hairs and measure 4mm to 6mm in length. The yellow standard petal has a deep emarginated apex and is marked red near the base. The standard petal measures 8mm to 11mm in width by 5mm to 6mm in height. The yellow wing petals are plain or marked red near the base on the upper surface and measure 3mm to 4mm in length by 2.2mm to 3mm in height. The yellow keel petals measure 1.5mm to 2mm in length by 1mm to 1.5mm in height. Tasmanian plants have all yellow flowers. There are 10 stamens. Flowering occurs from August to November.
Dillwynia glaberrima fruits are long linear glabrous pods. The pods measure 4mm to 6mm in length by 3.5mm to 5.5mm diameter. The green pods turn dark brown and brittle when ripe. Each pod usually contains only one or at times two smooth flattish, reniform brown seeds that measure 2.5mm to 3mm in length.
Wildlife:
Dillwynia glaberrima‘s wildlife is unknown to the author.
Cultivation:
Dillwynia glaberrima is a beautiful small shrub which could be more widely grown in subtropical and temperate gardens everywhere. Garden subjects will grow into small dense semi prostrate shrubs from 0.6 meters to 1.2 meters in height by 1 meter to 1.6 meters in diameter when grown in the open.
Dillwynia glaberrima would make a good contribution to a sandy garden. Here it can be used as fill in plants, scattered throughout the garden. Dillwynia glaberrima is well suited to sandy conditions so try to use contours to display the plants. Plants should be planted sparingly with short annuals between to give vibrant colour. Make the scene so you can see over the tallest ones with the exception of one or two plants with broad leaves at the most. The idea is to achieve a feeling of calmness. This can be achieved with using Dillwynia glaberrima‘s deep olive green linear leaves contrasting with courser pale green or soft grey to glaucous coloured foliage. If large deep green leaf plants are wanted try using them as prostrate plants. Use a lot of procumbent plants like Leischenalta formosa or Leischenalta biloba which will contrast magnificently when in flower. This type of planting will also make the spaces between the plants look and feel bigger.
When you design a tall heath garden which Dillwynia glaberrima is well suited to don’t use contours to display the plants as heath lands are almost always flat or have a slight rise. Place it back from the path as it is rather brittle and will be easily broken or passer-byes will continually remove the flower heads. Make the heath garden path narrow so you have to feel the plants as you walk through the garden bed. This gives an extra dimension which many people forget about when designing heath gardens. Plants must be planted close together and be short so you can see over the tallest ones with the exception of one or two plants at the most. These will be feature plants. The idea is to achieve a feeling of expansive flatness. This can be achieved with using the Dillwynia glaberrima‘s yellow flowers contrasting pink flowers of plants like Comesperma ericinum‘s brilliant pink flowers. Mix them with other smaller shrubs so none of them dominate the scene but blend in to give a mosaic of foliage colours that you oversee. Here I immediately think of Actinotis helianthi, Melaleuca pearsonii or other sub shrubs like Chloanthes parviflora, Pelargonium australe or Pelargonium inodorum. Even Hibiscus diversifolia could be pruned and used in the back ground or allowed to straggle between clumps with Comesperma defoliatum.
Propagation:
Seeds: Dillwynia glaberrima‘s seeds have a hard testa that inhibits moisture absorption. As the plants are usually associated with frequent heath and scrub fires either abrasion or hot water is needed to break the dormancy.
Place the seeds into a container and pour near boiling water onto the seeds and allow the water to cool. Let the seeds soak for 4 to 6 hours. The seeds that have not swollen from 1.5 times to twice their original size after soaking should be retreated before sowing. The seeds that have swollen from 1.5 to 2 times their original size should be sown immediately. The seeds that have not swollen should again be retreated.
Note: Any seeds which are floating on the surface are infertile and should be discarded.
Seeds that have not swollen after repeating the boiling water technique should be treated using the abrasion technique.
Sow the treated seeds into a seed raising mix. Cover with 5mm of the mix and place the trays in a warm place to germinate. When the seedlings are 25mm to 50mm tall, prick them out and plant them into 50mm native tubes using a seed raising mix.
Once the seedlings reach 200mm to 250mm in height plant them out into their permanent position. For mass plantings plant them at 8 meter to 10 meter spacing if the trees are being used for fruit or in a park like scene or closer at 5 meters to 6 meters for the rainforest look.
Fertilize using seaweed, fish emulsion or organic chicken pellets soaked in water on an alternate basis. Fertilize every two months until the plants are established then annually in early September to October to maintain health, vitality and better flowering.
Further Comments from Readers:
Hi reader, it seems you use The Bible of Botany a lot. That’s great as we have great pleasure in bringing it to you! It’s a little awkward for us to ask, but our first aim is to purchase land approximately 1,600 hectares to link several parcels of N.P. into one at The Pinnacles NSW Australia, but we need your help. We’re not salespeople. We’re amateur botanists who have dedicated over 30 years to saving the environment in a practical way. We depend on donations to reach our goal. If you donate just $5, the price of your coffee this Sunday, We can help to keep the planet alive in a real way and continue to bring you regular updates and features on Australian plants all in one Botanical Bible. Any support is greatly appreciated. Thank you.
In the spirit of reconciliation we acknowledge the Bundjalung, Gumbaynggirr and Yaegl and all aboriginal nations throughout Australia and their connections to land, sea and community. We pay our respect to their Elders past, present and future for the pleasures we have gained.
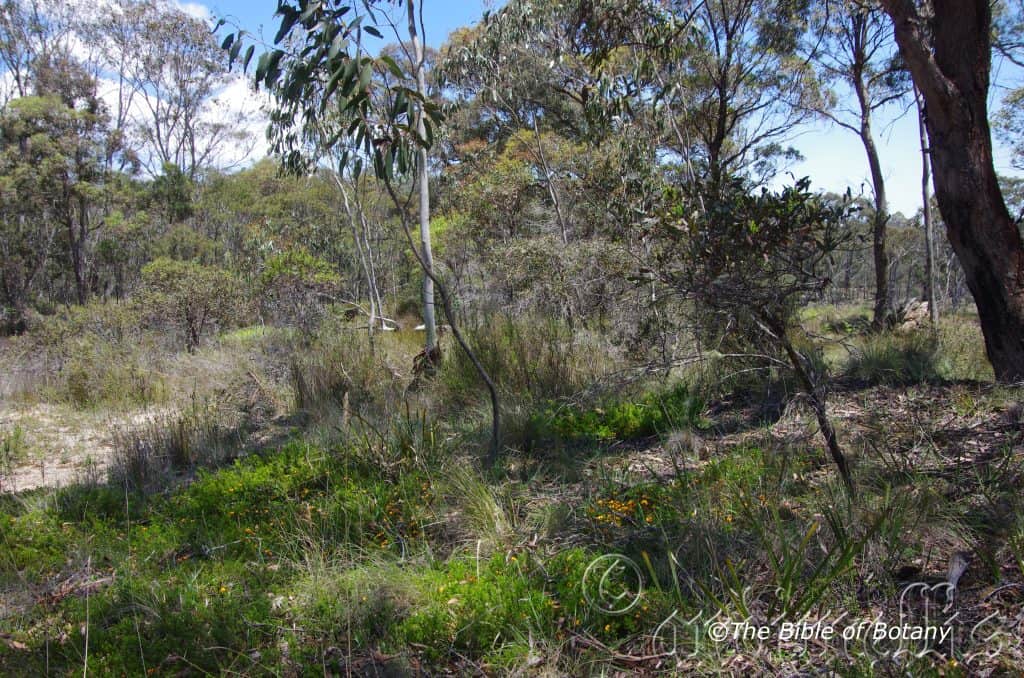
The Pinnacles NSW
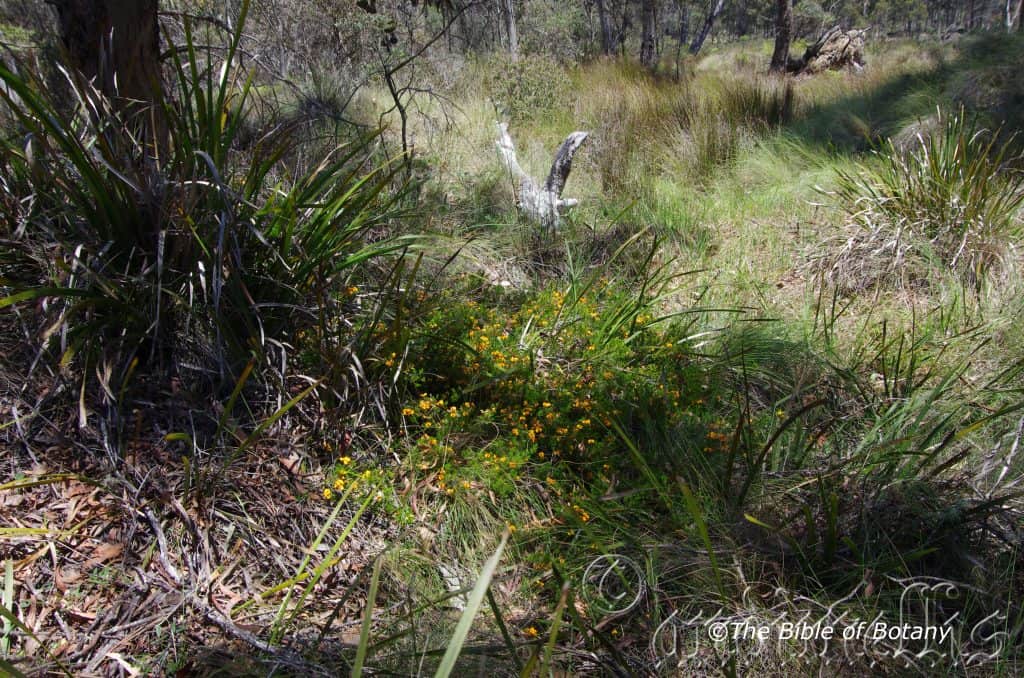
The Pinnacles NSW
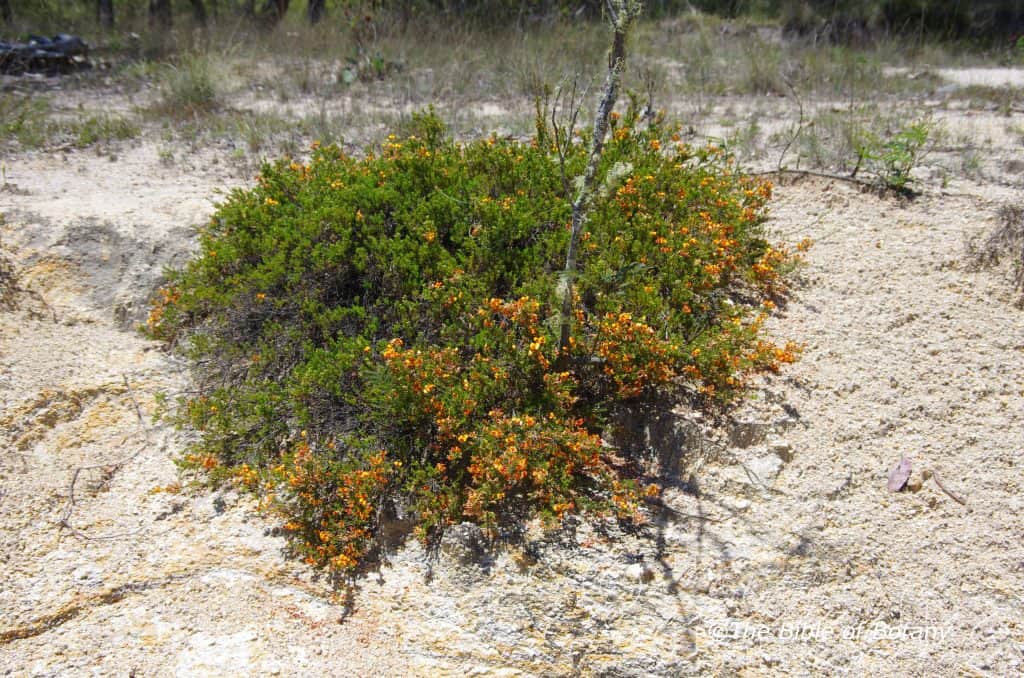
The Pinnacles NSW
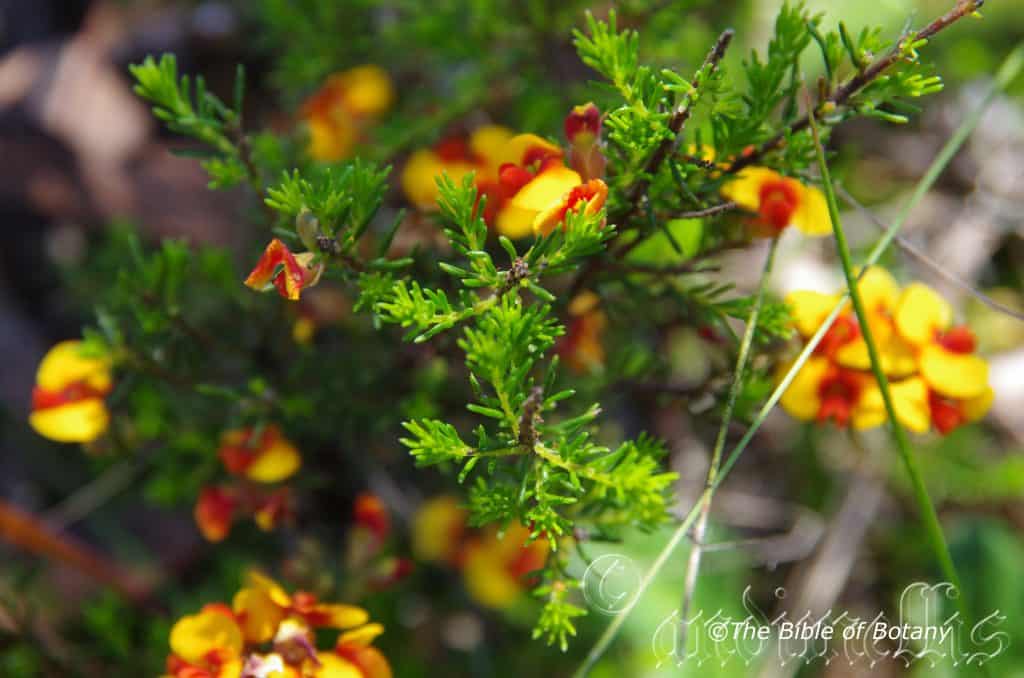
The Pinnacles NSW
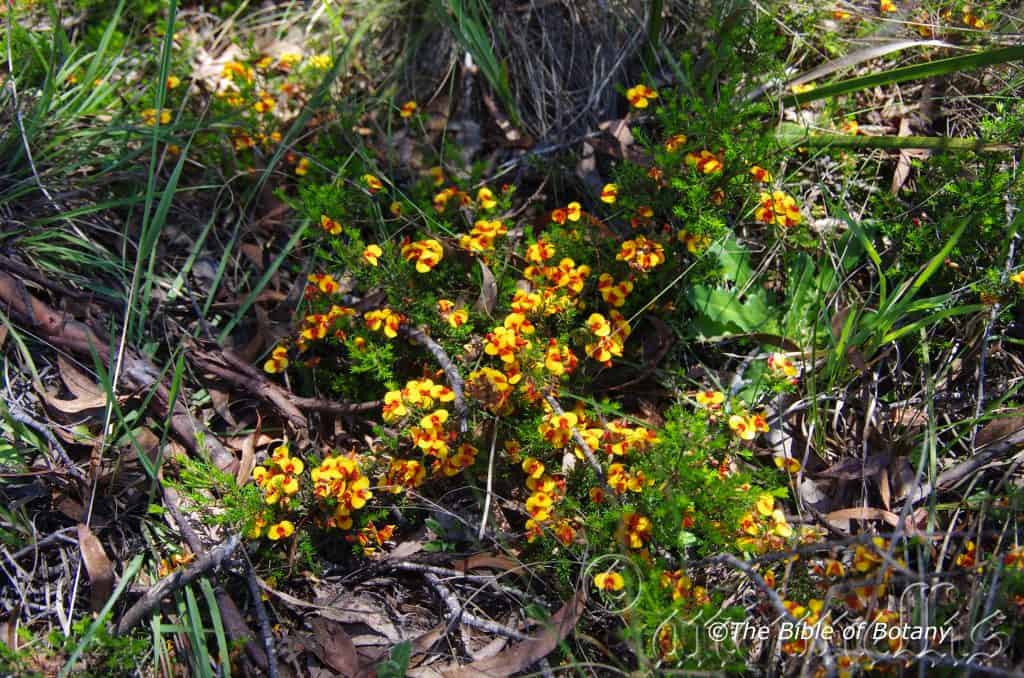
The Pinnacles NSW
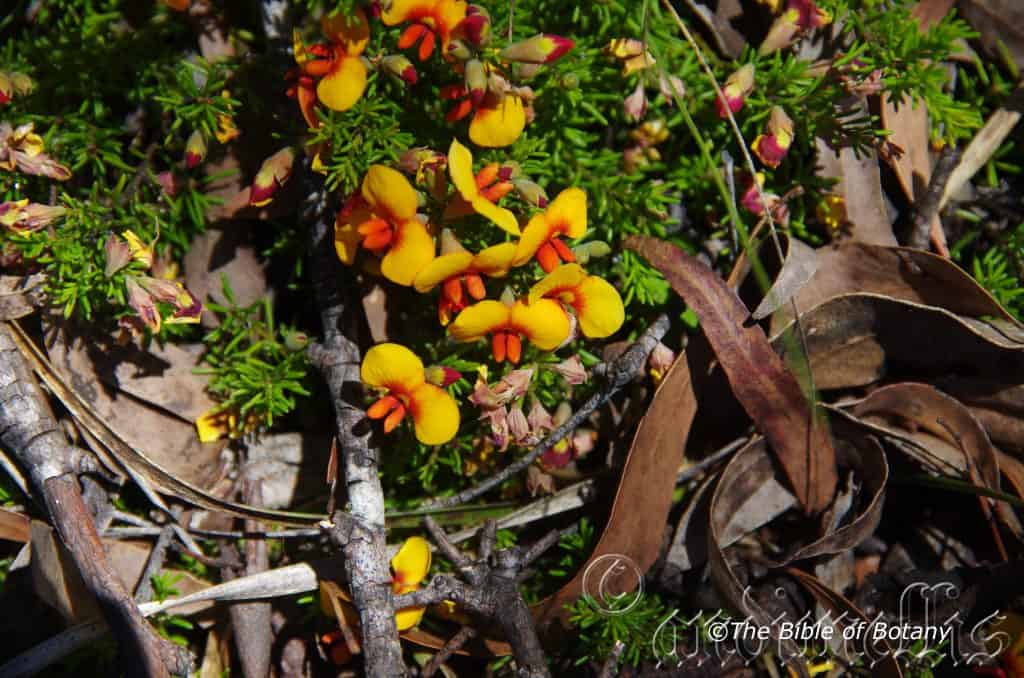
The Pinnacles NSW
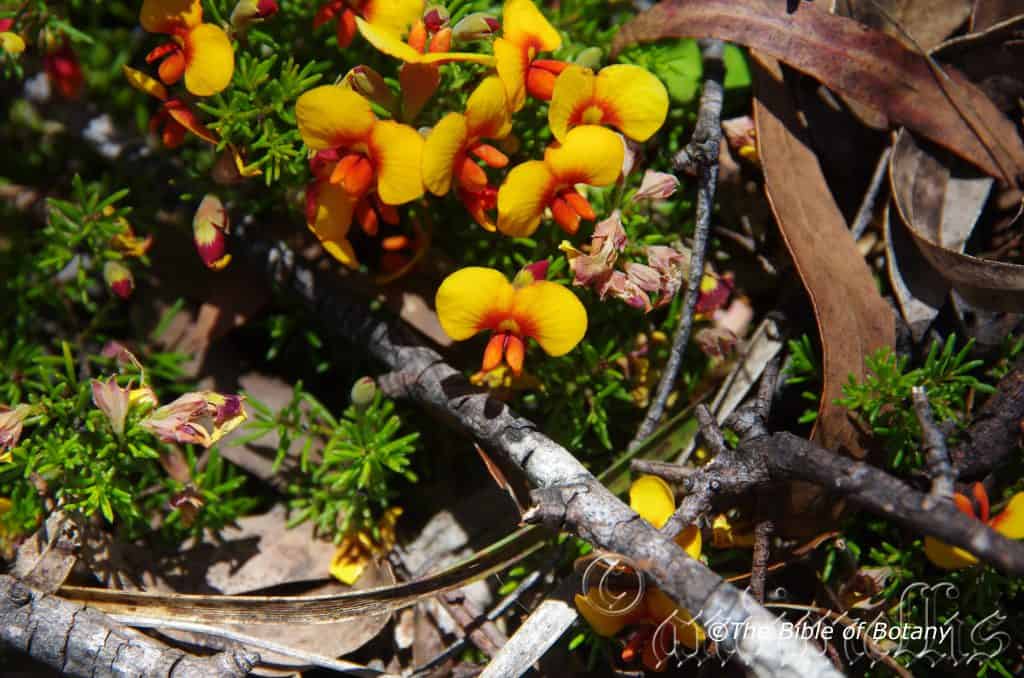
The Pinnacles NSW
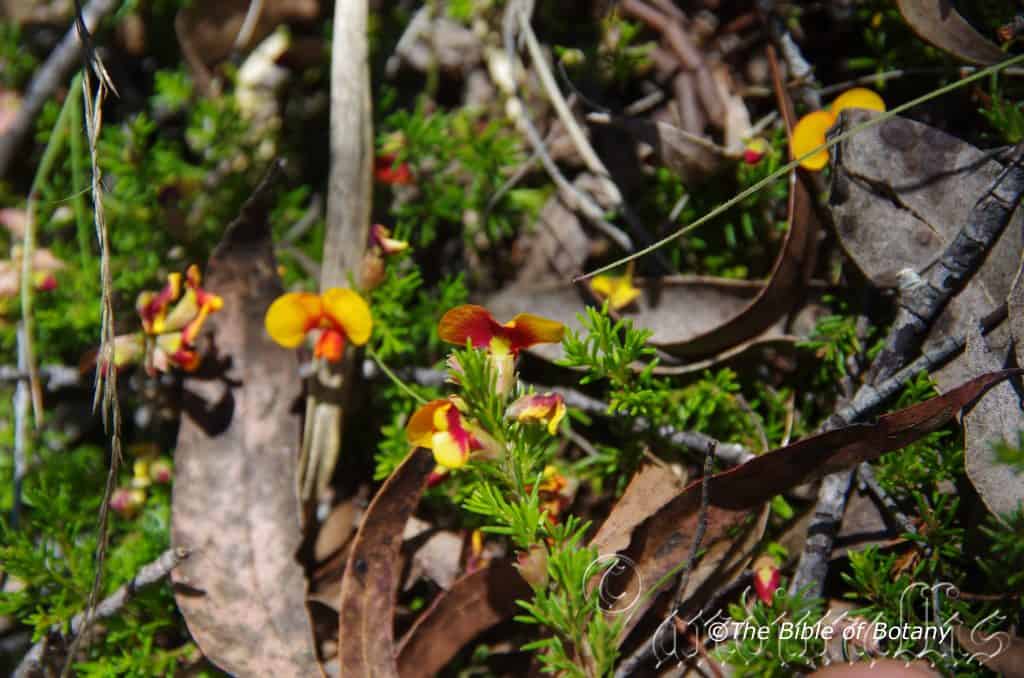
The Pinnacles NSW
Dillwynia phylicoides
Classification
Unranked: Eudicots
Unranked: Rosids
Order: Fabales
Family: Fabaceae
Genus: Is named in honour of L. W. Dillwyn; 1788- 1855, who was a Welsh Botanist.
Species: From Phyllikos, which is Ancient Greek for an abundance or plenty and Eidos/Oides, which is Ancient Greek for alike or similar to. It refers to plants, which have dense foliage, which resemble plants that have very dense foliage.
Common Name:
Distribution:
Dillwynia phylicoides is a widespread species which is found south from near Howard in central coastal Queensland to Mount Buangor State Park in central western Victoria. It is also found in several isolated populations further north to Carnarvon Gorge National Park in central eastern Queensland and north of the Grampians in Victoria. It mainly grows on and east of the Great Dividing Range.
https://avh.ala.org.au/occurrences/search?taxa=Dillwynia+phylicoides#tab_mapView
Habitat Aspect Climate:
Dillwynia phylicoides prefers full sun to light dappled shade. It grows below medium size trees, in dry, open schlerophyll forests and open dry woodlands. The altitude ranges from 10 meter ASL to 950 meters ASL.
The temperatures range from minus 4 degrees in August to 39 degrees in January.
The rainfall ranges from lows of 500mm to an average of 1300mm annually.
Soil Requirements:
Dillwynia phylicoides prefers sandy loams, medium gritty clays or gravelly clays. The soils are usually derived from decomposed shale sandstone or granite. The soils pH ranges from 4.5pH to 5.5pH. It does not tolerate waterlogged soils. Non saline soils to moderately saline soils are tolerated.
Height & Spread:
Wild Plants: 0.4m to 1.5m by 1m to 2m.
Characteristics:
Dillwynia phylicoides is a prostrate to erect shrub. The stem’s bark is grey and glabrous. The branchlets are a reddish-brown to fawn-brown and moderately covered in course white hirtellous and hirsute hairs. The new growth is pale green and densely covered in white hirtellous and hirsute hairs.
Dillwynia phylicoides‘s simple, spirally twisted, and linear to linear-oblong leaves measure 3mm to 9mm in length by 1mm to 2mm in width. The petioles measure 0.2mm to 0.5mm in length. The bases are truncate to rounded while the apexes are shortly acuminate and usually strongly incurved. The discolourous laminas are mid green and are sparsely to moderately covered in white hirtellous and hirsute hairs especially near the apexes on the upper laminas while the lower laminas are paler and glabrous.The margins are entire and strongly decurve touching the lower lamina. The mid vein is slightly prominent on the lower lamina and is not visible from the upper lamina.
The inflorescences of Dillwynia phylicoides are usually capitate with 1 to 8 flowers born from the terminals or leaf axils. The flowers measure 7mm to 12mm in diameter. The pedicels usually measure 10mm to 15mm in length. The mid green, cupular bracts measure 1mm to 2mm in length. The mid green bracteoles are glabrous or sparsely covered in pale grey hirtellous hairs and measure 1mm to 2mm in length. The olive-brown to olive-green calyxes are usually sparsely to moderately covered in off white hirtellous hairs and measure 4mm to 6mm in length. The yellow standard petal has a deep broad emarginated apex and is marked red near the base and often tinged on the margins. The standard petal measures 8mm to 14mm in width by 5mm to 6mm in height. The usually red or at times yellow oblong to oblong-spathulate wing petals measure 5mm to 7mm in length by 2mm to 3mm in height. The red keel petals measure 3mm to 5mm in length by 1.5mm to 2.5mm in height. There are 10 stamens. The flowers appear from August to November.
Dillwynia phylicoides fruits are long linear glabrous pods. The pods measure 5mm to 7mm in length by 4mm to 6mm diameter. The green pods turn dark brown and brittle when ripe. Each pod usually contains only one or at times two smooth flattish, reniform brown seeds that measure 2.5mm to 3mm in length.
Wildlife:
Dillwynia phylicoides‘s wildlife is unknown to the author.
Cultivation:
Dillwynia phylicoides is a very beautiful small shrub which should be more widely grown in sub-tropical and temperate gardens everywhere. Garden subjects will grow into small dense semi prostrate shrubs from 0.4 meters to 1.2 meters in height by 1 meter to 1.6 meters in diameter when grown in the open.
Dillwynia phylicoides would make a good contribution to a sandy garden. Here it can be used as the fill in plant, scattered throughout the scene. Dillwynia phylicoides is well suited to sandy soil conditions so use contours to display the plants. Plants should be planted sparingly with short annuals between to give vibrant colour. Make the scene so you can see over the tallest ones with the exception of one or two plants with broad leaves at the most. The idea is to achieve a feeling of ruggedness. This can be achieved with using Dillwynia phylicoides‘s deep olive green linear leaves contrasting with courser pale green or soft grey to glaucous coloured foliage. If large deep green leaf plants are wanted try using them as prostrate plants. Use a lot of procumbent plants like Hibbertia diffusa or Xerochrysum bracteatum which will contrast magnificently when in flower. This type of planting will also make the rocks look larger and the spaces between the plants bigger.
It is best used adjacent to small areas of bush close to paths or the house so their magnificent yellow flowers can be viewed regularly. Here it can be planted in small groups of 2 or 3 as a standalone plant to create a harsher barren look with other arid or bush plants. Garden beds would need to be open with plenty of space between the plants to allow air flow as well as to give the branchlets a chance to spread and be appreciated for their unique shapes. Crowding this type of foliage with other plants will see them lose all the effectiveness of the colour and form you require or want. Correct spacing with gaps between the plants will contrast the foliage better without one overpowering the other. For mass planting, plant the plants with at least 1.5 meters to 2 meter centers if you are considering it for a shrub. If you are using them amongst boulders or around the small desert garden, plant them sparingly to attain a barren scene. Do not overplant or the area will very cluttered detracting from the other features.
The use of annuals helps to attract the viewer to the foliage of the permanent plant’s as it is the dominant foliage you want people to notice in the patch. In the case of Dillwynia phylicoides you could substitute very small Grevillea in place of the native annuals. In addition most annuals flower when Dillwynia phylicoides has finished during the summer. Annuals mixed with Dillwynia phylicoides help to give a small garden depth and make them look larger than what they really are. It works well with Grevillea masonii or another Grevillea specie of similar size but contrasting foliage is the key to success with the flowers being a bonus. Actinotis helianthi, Melaleuca pearsonii or other sub shrubs like Chloanthes parviflora, Pelargonium australe or Pelargonium inodorum will add colour and texture. Even Hibiscus diversifolia could be pruned and used in the background or allowed to grow straggle between clumps with Comesperma defoliatum.
Propagation:
Seeds: Dillwynia phylicoides‘s seeds have a hard testa that inhibits moisture absorption. As the plants are usually associated with frequent heath and scrub fires either abrasion or hot water is needed to break the dormancy.
Place the seeds into a container and pour near boiling water onto the seeds and allow the water to cool. Let the seeds soak for 4 to 6 hours. The seeds that have not swollen from 1.5 times to twice their original size after soaking should be retreated before sowing. The seeds that have swollen from 1.5 to 2 times their original size should be sown immediately. The seeds that have not swollen should again be retreated.
Note: Any seeds which are floating on the surface are infertile and should be discarded.
Seeds that have not swollen after repeating the boiling water technique should be treated using the abrasion technique.
Sow the treated seeds into a seed raising mix. Cover with 5mm of the mix and place the trays in a warm place to germinate. When the seedlings are 25mm to 50mm tall, prick them out and plant them into 50mm native tubes using a seed raising mix.
Once the seedlings reach 200mm to 250mm in height plant them out into their permanent position. For mass plantings plant them at 8 meter to 10 meter spacing if the trees are being used for fruit or in a park like scene or closer at 5 meters to 6 meters for the rainforest look.
Fertilize using seaweed, fish emulsion or organic chicken pellets soaked in water on an alternate basis. Fertilize every two months until the plants are established then annually in early September to October to maintain health, vitality and better flowering.
Further Comments from Readers:
Hi reader, it seems you use The Bible of Botany a lot. That’s great as we have great pleasure in bringing it to you! It’s a little awkward for us to ask, but our first aim is to purchase land approximately 1,600 hectares to link several parcels of N.P. into one at The Pinnacles NSW Australia, but we need your help. We’re not salespeople. We’re amateur botanists who have dedicated over 30 years to saving the environment in a practical way. We depend on donations to reach our goal. If you donate just $5, the price of your coffee this Sunday, We can help to keep the planet alive in a real way and continue to bring you regular updates and features on Australian plants all in one Botanical Bible. Any support is greatly appreciated. Thank you.
In the spirit of reconciliation we acknowledge the Bundjalung, Gumbaynggirr and Yaegl and all aboriginal nations throughout Australia and their connections to land, sea and community. We pay our respect to their Elders past, present and future for the pleasures we have gained.
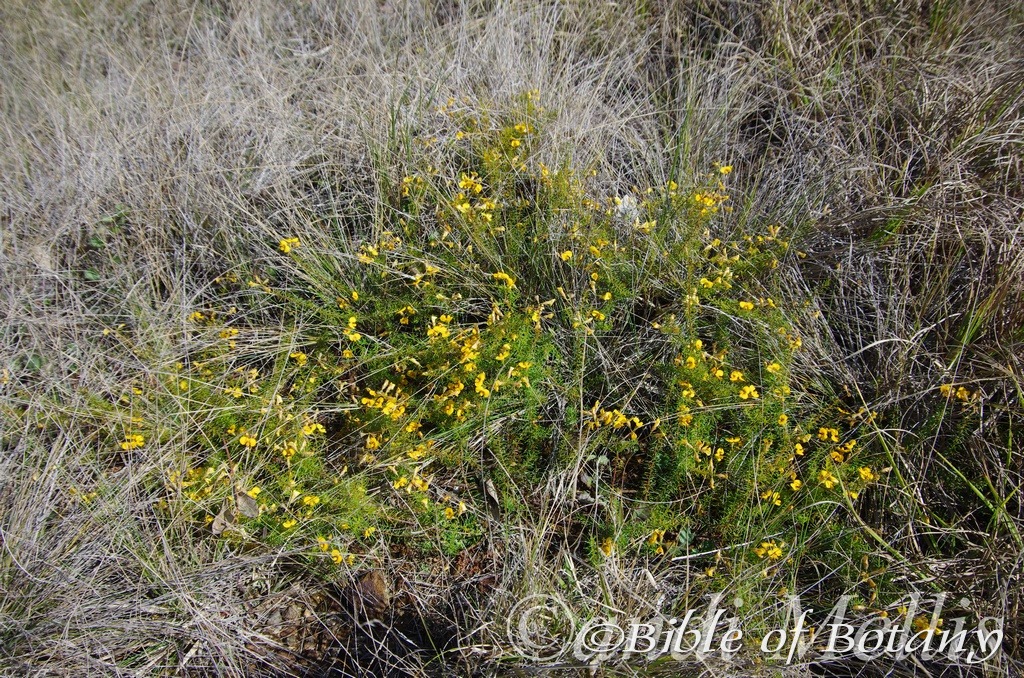
Mountain View NSW
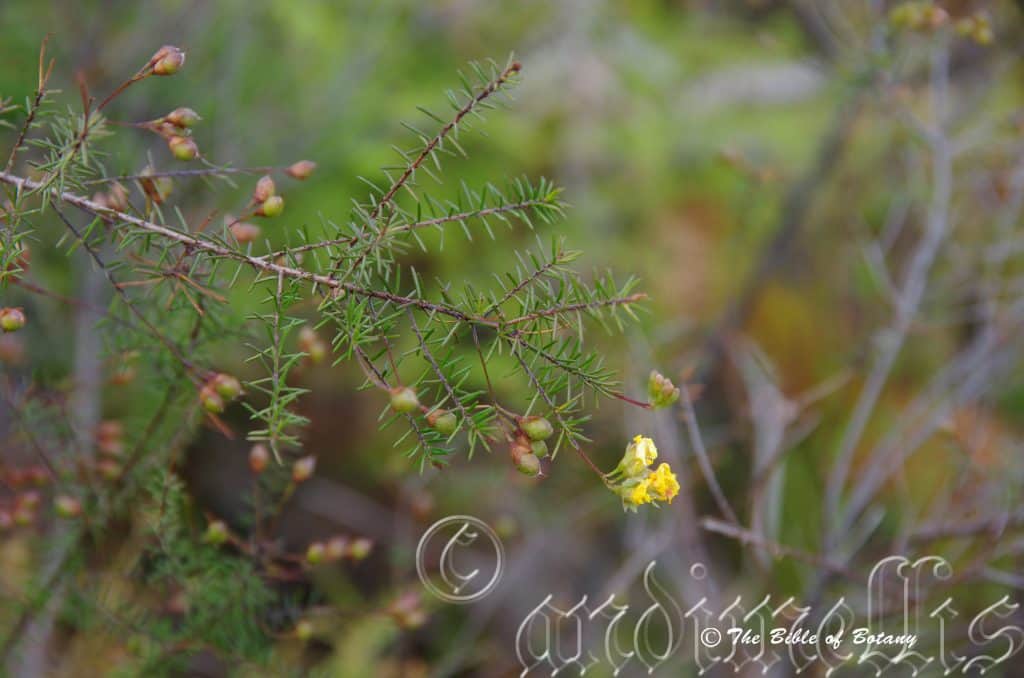
Innes Lake National Park NSW
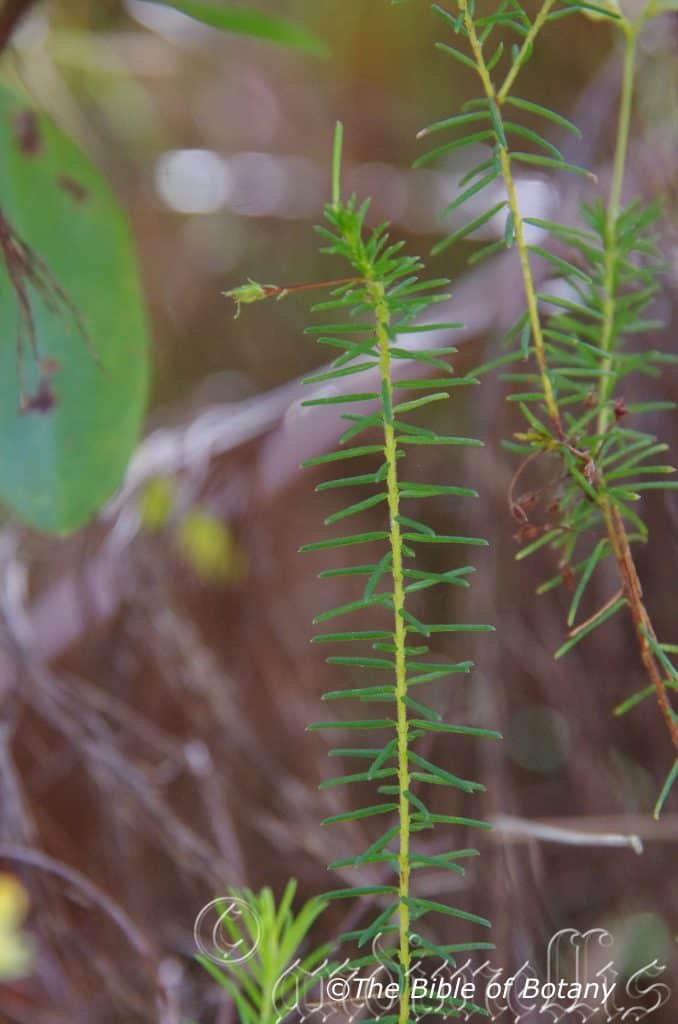
Author’s Garden The Pinnacles NSW

Innes Lake National Park NSW
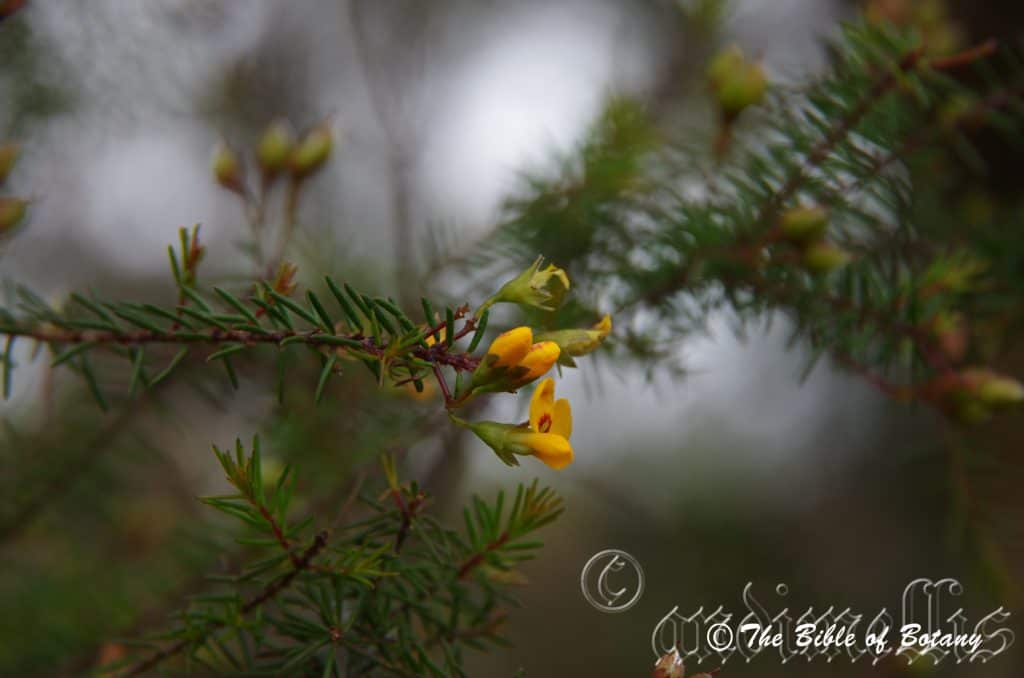
Innes Lake National Park NSW
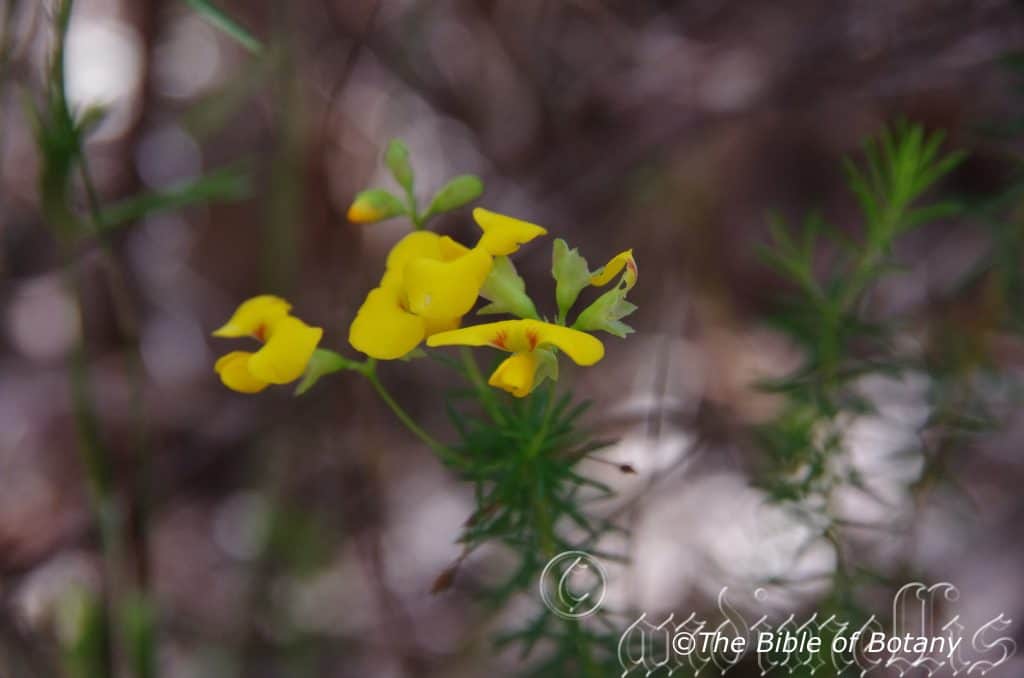
Author’s Garden The Pinnacles NSW
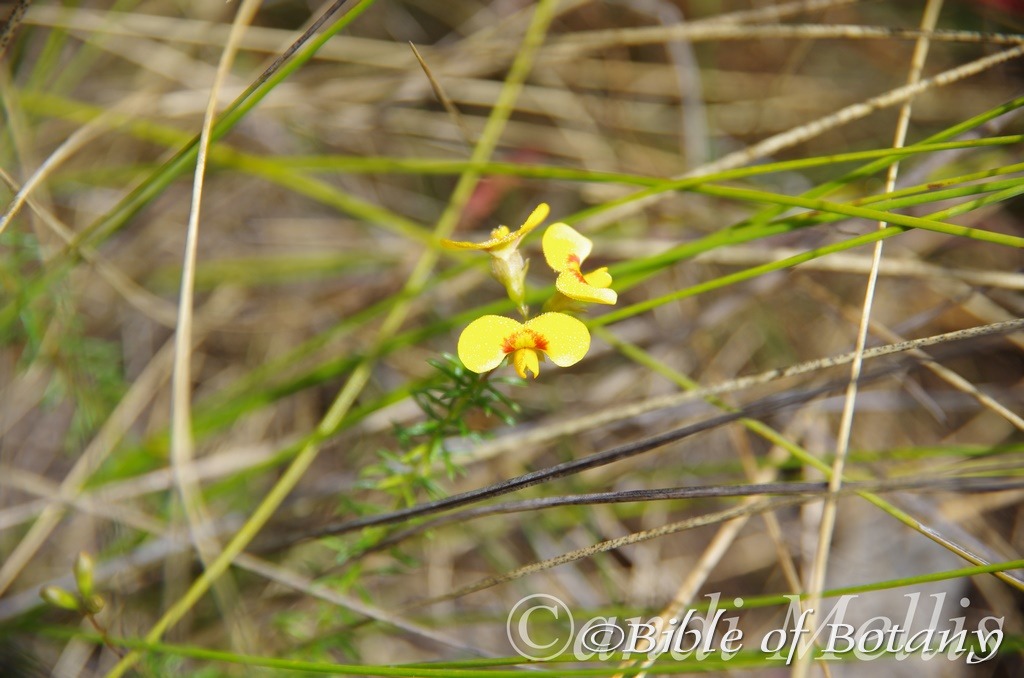
The Pinnacles NSW
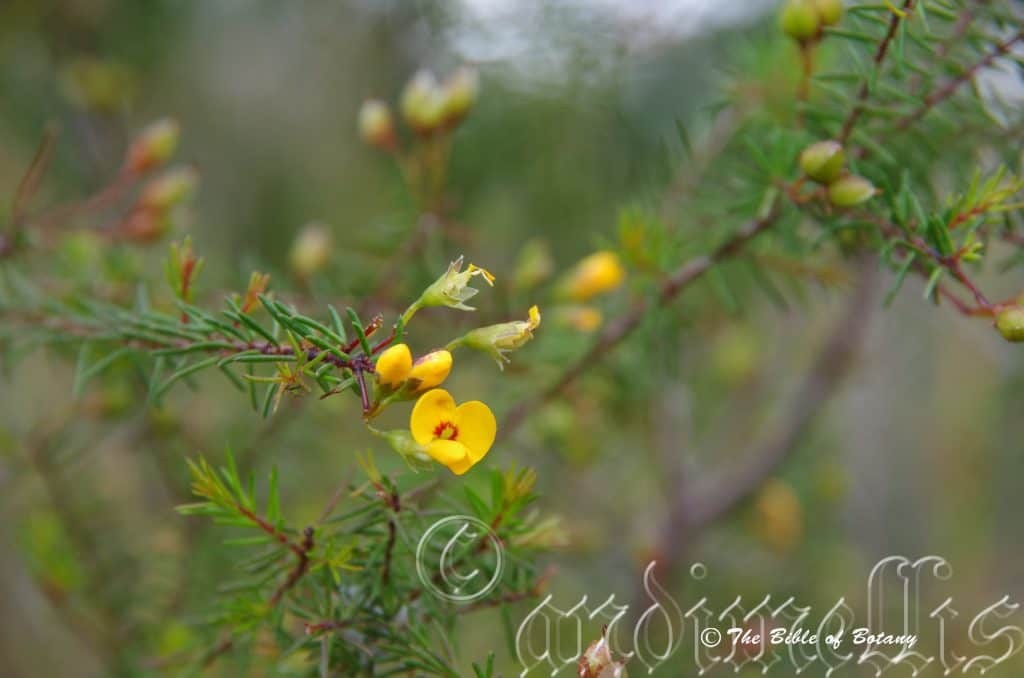
Innes Lake National Park NSW
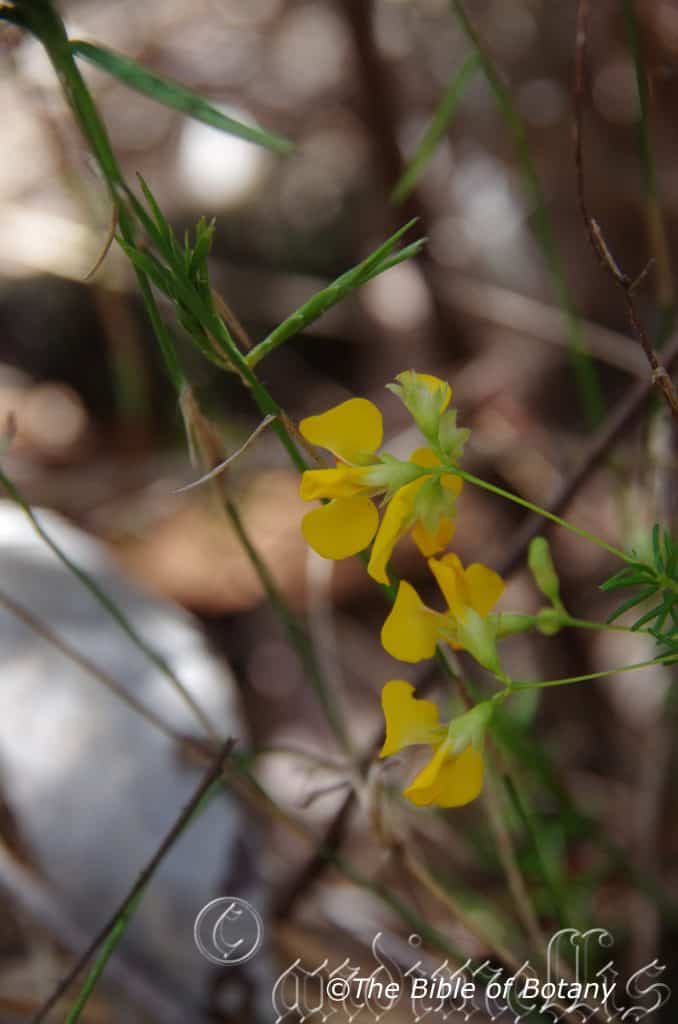
Author’s Garden The Pinnacles NSW

Innes Lake National Park NSW

Innes Lake National Park NSW
Dillwynia retorta
Classification
Unranked: Eudicots
Unranked: Rosids
Order: Fabales
Family: Fabaceae
Genus: Is named in honour of L. W. Dillwyn; 1788- 1855, who was a Welsh Botanist.
Species: From Retortum, which is Latin for twisted, turned or bent. It refers to structures or organs, which are twisted or bent.
Common Name: Eggs and Bacon.
Distribution:
Dillwynia retorta is a widespread species which is found south from Taunton National Park and the Carnarvon Gorge National Park in central Queensland to near Ballarat in Victoria. It is found on the Western plains in the north and on the Western Slopes, on and east of the Great Dividing Range to the coast in the central and southern parts of its range.
https://avh.ala.org.au/occurrences/search?taxa=Dillwynia+retorta#tab_mapView
Habitat Aspect Climate:
Dillwynia retorta prefers full sun to light dappled shade. It grows below medium size trees, in dry, open schlerophyll forests, open dry woodlands or woodland heaths. The altitude ranges from 5 meter ASL to 1350 meters ASL.
The temperatures range from minus 4 degrees in August to 39 degrees in January.
The rainfall ranges from lows of 500mm to an average of 1300mm annually.
Soil Requirements:
Dillwynia retorta prefers sandy loams to medium gritty or gravelly clays. The soils are usually derived from decomposed shale, sandstones, granites or accumulated peaty beach sands. The soils pH ranges from 4.5pH to 5.5pH are preferred. It does not tolerate waterlogged soils. Non saline soils to moderately saline soils are tolerated.
Height & Spread:
Wild Plants: 2m to 3m by 2m to 2.5m.
Characteristics:
Dillwynia retorta‘s grows as an erect open shrub with pale grey pale glabrous stems. The smaller stems are pale reddish-brown turning pale green near the apexes. The new growth is pale green, glabrous and glossy.
Dillwynia retorta‘s simple, spirally twisted, and linear to linear-oblong leaves measure 4mm to 12mm in length by 1mm to 2mm in width. The petioles measure 0.5mm to 1mm in length. The bases taper to the petioles while the apexes are shortly acuminate and usually decurve downwards. The concolourous laminas are mid green, glabrous or sparsely covered in fine tuberculate lumps.The margins are entire. The mid vein is slightly prominent on the lower lamina and is not visible from the upper lamina.
The inflorescences of Dillwynia retorta are capitate, umbellate or racemose with 1 to 9 flowers born from the terminals or upper leaf axils. The flowers measure 7mm to 12mm in diameter. The pedicels usually measure 1mm to 20mm in length. The mid green, cupular bracts measure 1mm to 2mm in length. The mid green bracteoles are glabrous or sparsely covered in pale grey hirtellous hairs and measure 1mm to 3mm in length. The olive-brown to olive-green calyxes are glabrous and measure 3mm to 6mm in length. The calyx margins are covered in white ciliate hairs along the acute lobes. The yellow standard petal has a deep broad emarginated apex and is marked yellow near the base with a splash of red surrounding the yellow. The standard petal measures 5mm to 12mm in width by 3mm to 6.5mm in height. The oblong wing petals are scarlet red on the basal half and bright yellow on the apex half. They measure 5mm to 6mm in length by 2mm to 2.5mm in height. The mostly yellow keel petals measure 4mm to 5mm in length by 2mm to 2.5mm in height. There are 10 stamens. The flowers appear from August to November.
Dillwynia retorta fruits are long linear glabrous pods. The pods measure 4mm to 7mm in length by 3.5mm to 6mm diameter. The green pods turn dark brown and brittle when ripe. Each pod usually contains only one or at times two smooth flattish, reniform brown seeds that measure 2.5mm to 3mm in length.
Wildlife:
Dillwynia retorta‘s wildlife is unknown to the author.
Cultivation:
Dillwynia retorta is a very beautiful small shrub which could be more widely grown in subtropical and temperate gardens. Garden subjects will grow into small dense semi prostrate shrubs from 2 meters to 2.5 meters in height by 1.5 meter to 2 meters in diameter when grown in the open.
It is best used adjacent to small areas of bush close to paths or the house so their magnificent yellow flowers can be viewed regularly. Here it can be planted in small groups of 2 or 3 as a standalone plant to create a harsher, more barren look with other arid or bush plants. Garden beds would need to be open with plenty of space between the plants to allow air flow as well as to give the branchlets a chance to spread and be appreciated for their unique shapes. Crowding this type of foliage with other plants will see them lose all the effectiveness of the colour and form you require or want. Correct spacing with gaps between the plants will contrast the foliage better without one overpowering the other. For mass planting, plant the plants with at least 1.5 meters to 2 meter centers if you are considering it for a shrub. If you are using it amongst boulders or around the small desert garden, plant it sparingly to attain a barren scene. Do not overplant or the area will look cluttered detracting from the other features.
The use of annuals helps to attract the viewer to the foliage of the permanent plant’s as it is the dominant foliage you want people to notice in the patch. In the case of Dillwynia retorta you could plant a very small Grevillea species like Grevillea thelemanniana in place of the native annuals. In addition most annuals flower when Dillwynia retorta has finished during the summer. Annuals mixed with Dillwynia retorta help to give small gardens depth and make it look larger than what it really is. It works well with Grevillea masonii or other Grevillea species of similar size but contrasting foliage is the key to success with the flowers being a bonus. Here I immediately think of Actinotis helianthi, Melaleuca pearsonii or other sub shrubs like Chloanthes parviflora Pelargonium australe or Pelargonium inodorum. Even Hibiscus diversifolia could be pruned and used in the background or allowed to straggle between clumps with Comesperma defoliatum.
Propagation:
Seeds: Dillwynia retorta‘s seeds have a hard testa that inhibits moisture absorption. As the plants are usually associated with frequent heath and scrub fires either abrasion or hot water is needed to break the dormancy.
Place the seeds into a container and pour near boiling water onto the seeds and allow the water to cool. Let the seeds soak for 4 to 6 hours. The seeds that have not swollen from 1.5 times to twice their original size after soaking should be retreated before sowing. The seeds that have swollen from 1.5 to 2 times their original size should be sown immediately. The seeds that have not swollen should again be retreated.
Note: Any seeds which are floating on the surface are infertile and should be discarded.
Seeds that have not swollen after repeating the boiling water technique should be treated using the abrasion technique.
Sow the treated seeds into a seed raising mix. Cover with 5mm of the mix and place the trays in a warm place to germinate. When the seedlings are 25mm to 50mm tall, prick them out and plant them into 50mm native tubes using a seed raising mix.
Once the seedlings reach 200mm to 250mm in height plant them out into their permanent position. For mass plantings plant them at 8 meter to 10 meter spacing if the trees are being used for fruit or in a park like scene or closer at 5 meters to 6 meters for the rainforest look.
Fertilize using seaweed, fish emulsion or organic chicken pellets soaked in water on an alternate basis. Fertilize every two months until the plants are established then annually in early September to October to maintain health, vitality and better flowering.
Further Comments from Readers:
Hi reader, it seems you use The Bible of Botany a lot. That’s great as we have great pleasure in bringing it to you! It’s a little awkward for us to ask, but our first aim is to purchase land approximately 1,600 hectares to link several parcels of N.P. into one at The Pinnacles NSW Australia, but we need your help. We’re not salespeople. We’re amateur botanists who have dedicated over 30 years to saving the environment in a practical way. We depend on donations to reach our goal. If you donate just $5, the price of your coffee this Sunday, We can help to keep the planet alive in a real way and continue to bring you regular updates and features on Australian plants all in one Botanical Bible. Any support is greatly appreciated. Thank you.
In the spirit of reconciliation we acknowledge the Bundjalung, Gumbaynggirr and Yaegl and all aboriginal nations throughout Australia and their connections to land, sea and community. We pay our respect to their Elders past, present and future for the pleasures we have gained.
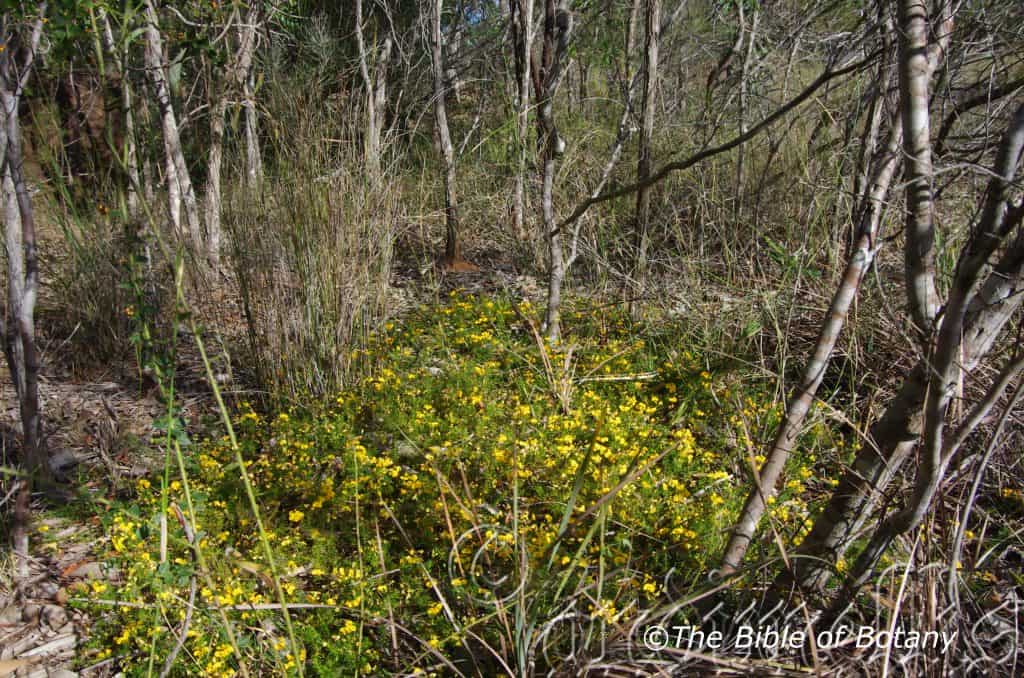
The Pinnacles NSW
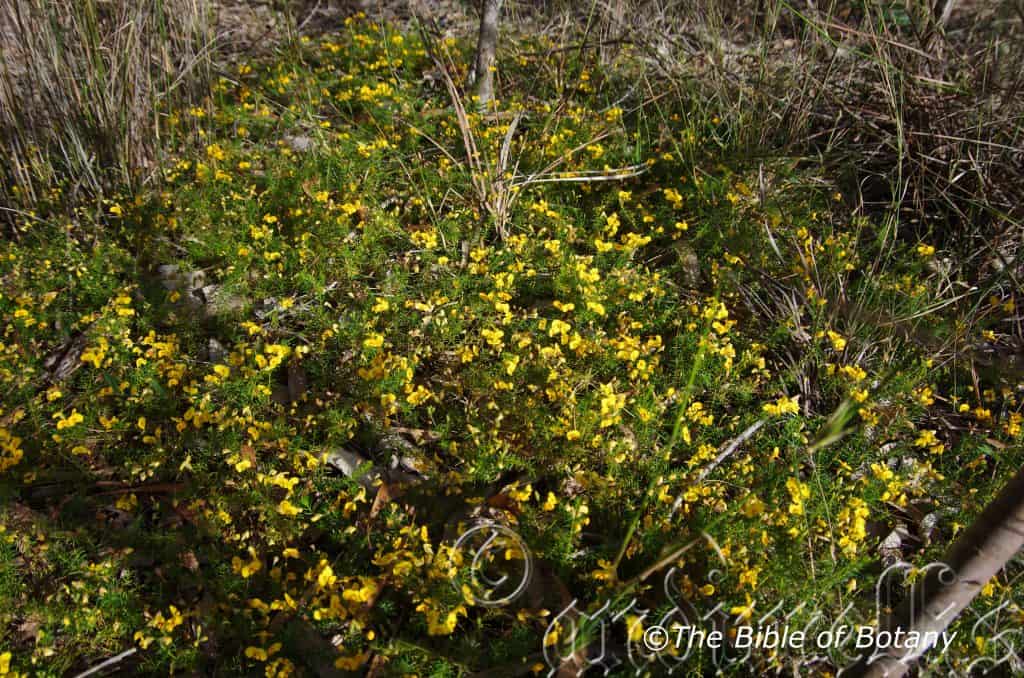
The Pinnacles NSW
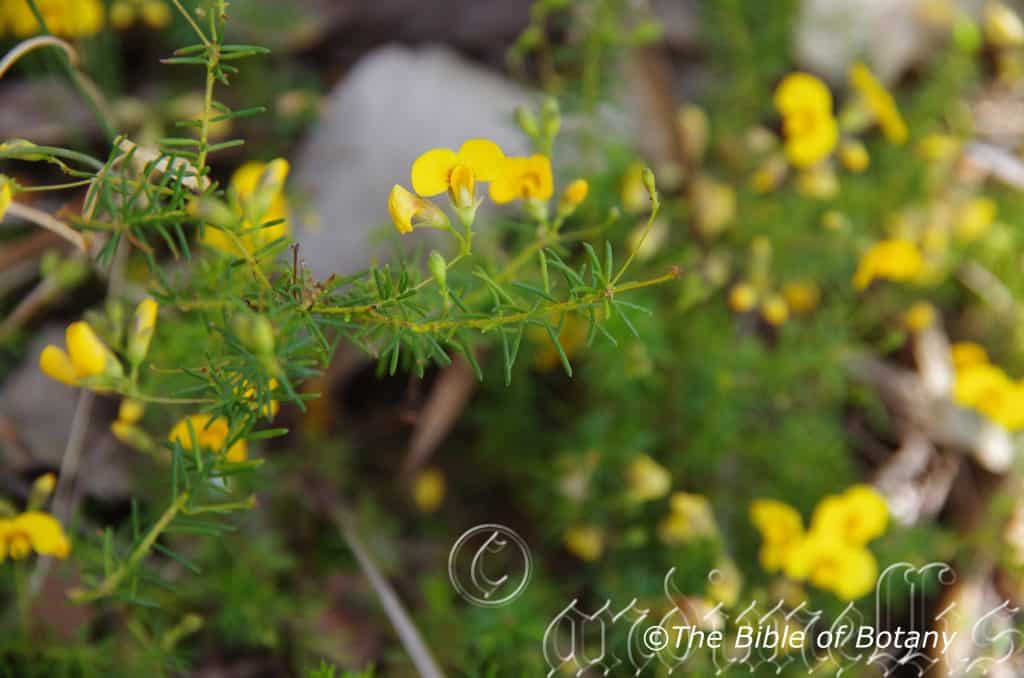
The Pinnacles NSW
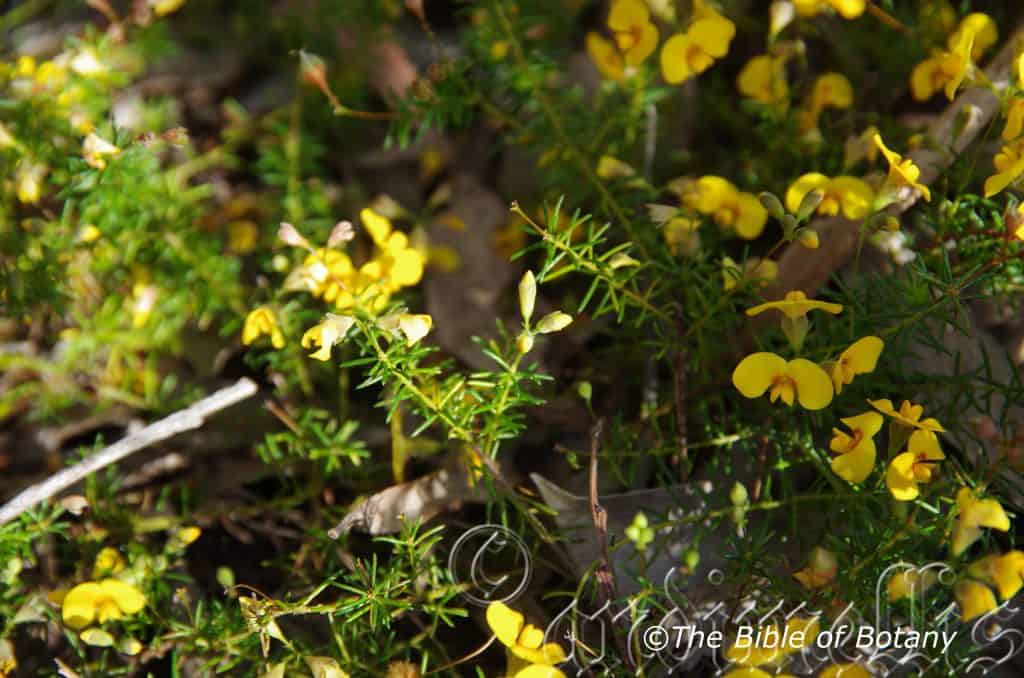
The Pinnacles NSW
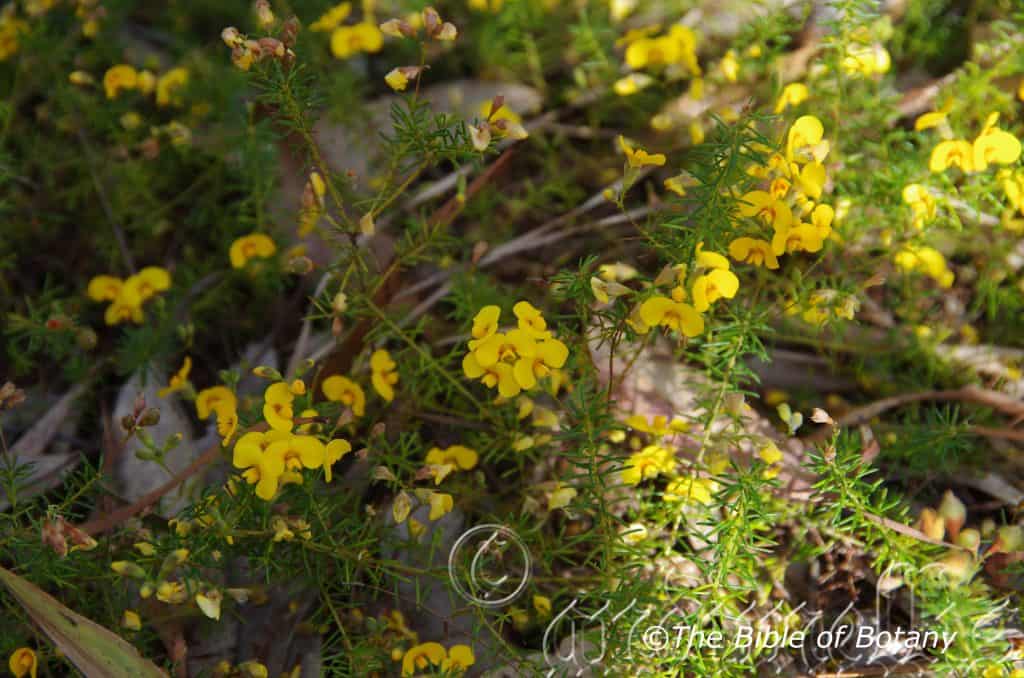
The Pinnacles NSW
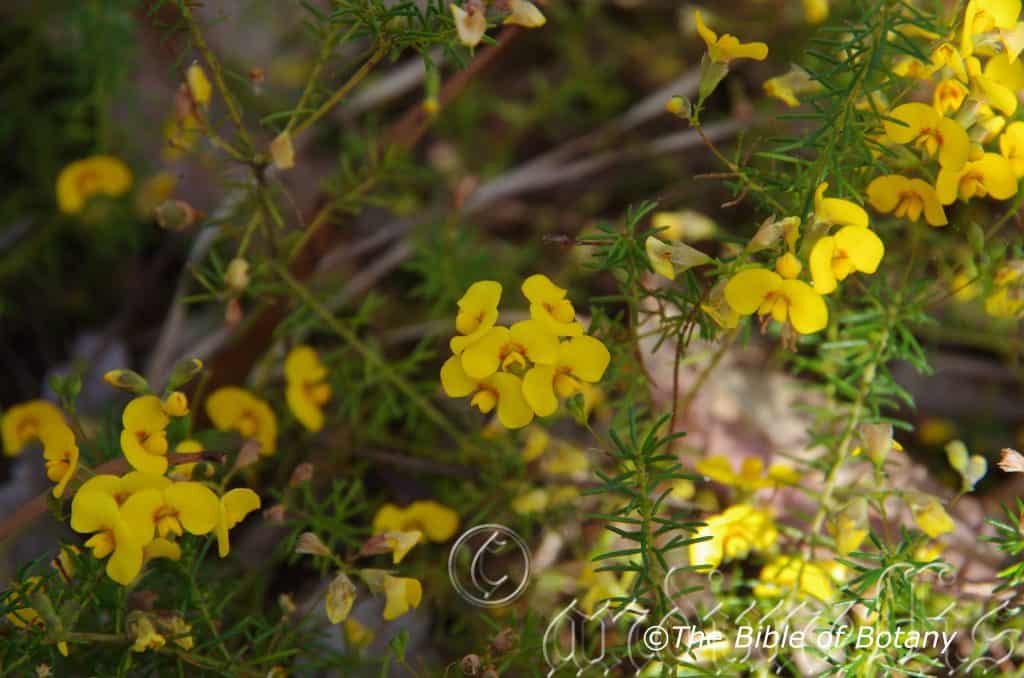
The Pinnacles NSW
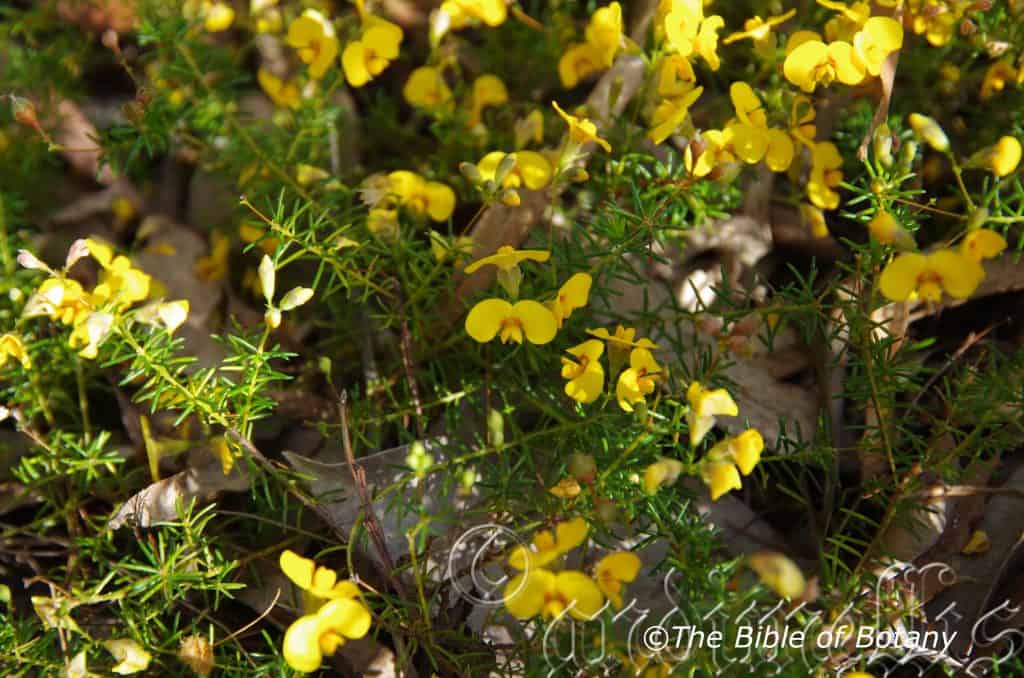
The Pinnacles NSW
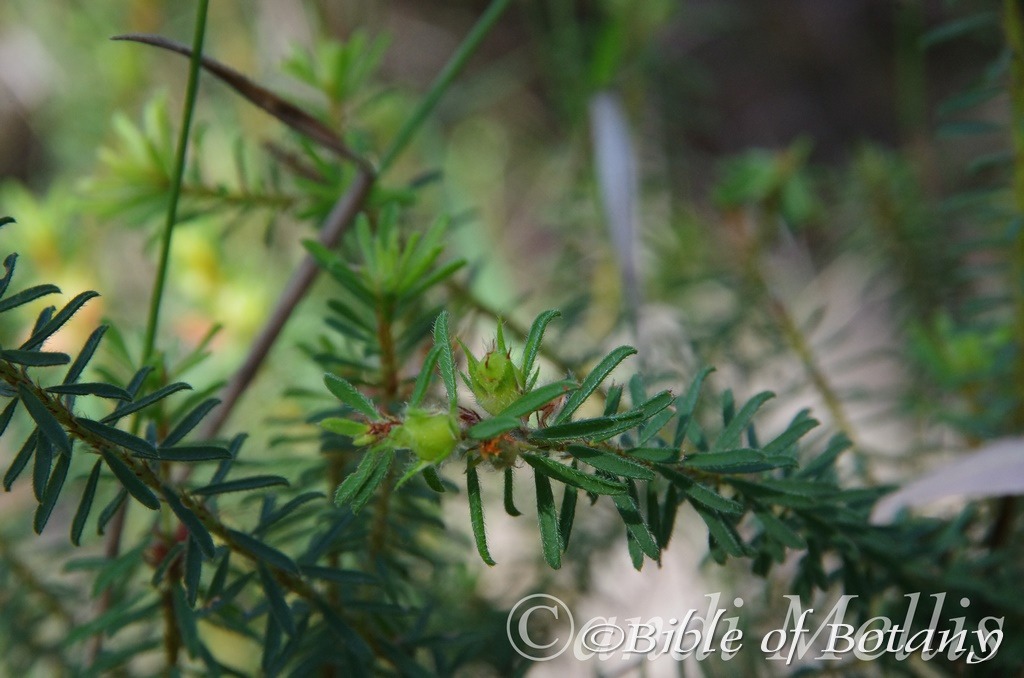
Morgan’s Camp Trail Fortis Creek National Park NSW
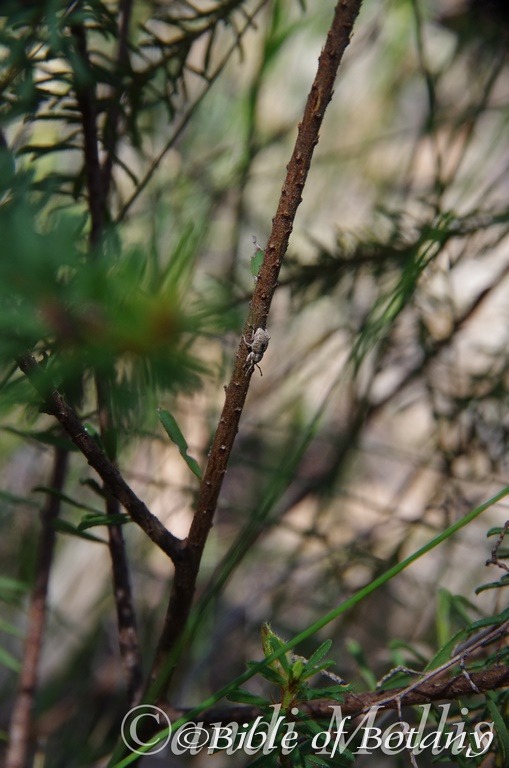
Morgan’s Camp Trail Fortis Creek National Park NSW
Dillwynia trichopoda
Classification
Unranked: Eudicots
Unranked: Rosids
Order: Fabales
Family: Fabaceae
Genus: Is named in honour of L. W. Dillwyn; 1788- 1855, who was a Welsh Botanist.
Species: From Retortum, which is Latin for twisted, turned or bent. It refers to structures or organs, which are twisted or bent.
Common Name:
Distribution:
Dillwynia trichopoda is found south from Noosa Heads in southern coastal Queensland to Shoalhaven in southern New South Wales.
There are isolated populations between Tambo and Gurulmundi in southern central Queensland and the Warrumbungle Ranges.in central New South Wales.
https://avh.ala.org.au/occurrences/search?taxa=Dillwynia+trichopoda#tab_mapView
Habitat Aspect Climate:
Dillwynia trichopoda prefers full sun to light dappled shade. It grows in dry sclerophyll forest and woodlands, rarely on coastal headlands. The altitude ranges from 5 meter ASL to 1350 meters ASL.
The temperatures range from minus 4 degrees in August to 39 degrees in January.
The rainfall ranges from lows of 500mm to an average of 1300mm annually.
Soil Requirements:
Dillwynia trichopoda prefers sandy loams to medium gritty or gravelly clays. The soils are usually derived from decomposed sandstones, or at time granites or accumulated peaty beach sands. The soils pH ranges from 4.5pH to 6pH are preferred. It does not tolerate waterlogged soils. Non saline soils to moderately saline soils are tolerated.
Height & Spread:
Wild Plants: 0.6m to 1m by 1m to 1.5m.
Characteristics:
Dillwynia trichopoda is a prostrate to low spreading shrub with long, slender, grey-brown branches and pale green terete stems. The new growth is covered in short, white antrorse hairs.
The spirally twisted, narrow oblong to terete, glabrous leaves are smooth or faintly tuberculate and measure 2mm to 6mm in length. The yellow petioles measure 0.5mm to 0.8mm in length. The apex is shortly incurved and acuminate.
The umbellate inflorescences are terminally born and have 1 to 6 individual flowers. The peduncle measures 5mm to 15mm in length often bearing bracts below the flowers. The lanceolate bracts and bracteoles measure 0.5mm to 1mm in length. The margins are moderately covered in fine, white ciliate hairs. The glabrous calyxes have fine, white ciliate margins and measure 4mm to 6mm in length. The bright yellow standard petal is blotched scarlet-red near the base and measures 4mm to 6mm in height by 10mm to 14mm in width. The minute, bright yellow wing petals measure 3mm to 4mm in length, while the minute, bright yellow keel petals measure 3mm to 3.5mm in length. The flowers appear in September to October.
The terete pods measure 4mm to 6mm in length while the deep brown seeds are reticulate.
Wildlife:
Dillwynia trichopoda‘s wildlife is unknown to the author.
Cultivation:
Dillwynia trichopoda is a very beautiful small shrub which should be more widely grown in sub-tropical and temperate gardens everywhere. Garden subjects will grow into small open semi prostrate shrubs from 0.8 meters to 1 meters in height by 1.5 meter to 2 meters in diameter when grown in the open.
It is best used adjacent to small areas of bush close to paths or the house so their magnificent yellow flowers can be viewed regularly. Here it can be planted as a standalone plant to create a harsher, more barren look with other arid plants or in small groups to help enhance a bushier look. Garden beds would need to be open with plenty of space between the plants to allow air flow as well as to give the branchlets a chance to spread and be appreciated for its unique shapes. Crowding this type of foliage with other plants will see it lose all the effectiveness of the colour and form you require or want. Correct spacing with gaps between the plants will contrast the foliage better without one overpowering the other. For mass planting, plant the plants with at least 0.5 meters to 0.8 meter centers if you are considering it for a shrub. If you are using them amongst boulders or around the small desert garden, plant them sparingly to attain a barren scene. Do not overplant or the area will very cluttered detracting from the other features.
The use of annuals helps to attract the viewer to the foliage of the permanent plants as it is the dominant foliage you want people to notice in the patch. In the case of Dillwynia trichopoda you could substitute the purple flowered Scaevola aemula or another yellow flower in Goddenea ovata in place of the native annuals as both have very attractive foliage. For some height variation the white flowering Actinotis helianthi would be a good choice with Chloanthes parviflora, Pelargonium australe or Pelargonium inodorum.
Propagation:
Seeds: Dillwynia trichopoda‘s seeds have a hard testa that inhibits moisture absorption. As the plants are usually associated with frequent heath and scrub fires either abrasion or hot water is needed to break the dormancy.
Place the seeds into a container and pour near boiling water onto the seeds and allow the water to cool. Let the seeds soak for 4 to 6 hours. The seeds that have not swollen from 1.5 times to twice their original size after soaking should be retreated before sowing. The seeds that have swollen from 1.5 to 2 times their original size should be sown immediately. The seeds that have not swollen should again be retreated.
Note: Any seeds which are floating on the surface are infertile and should be discarded.
Seeds that have not swollen after repeating the boiling water technique should be treated using the abrasion technique.
Sow the treated seeds into a seed raising mix. Cover with 5mm of the mix and place the trays in a warm place to germinate. When the seedlings are 25mm to 50mm tall, prick them out and plant them into 50mm native tubes using a seed raising mix.
Once the seedlings reach 200mm to 250mm in height plant them out into their permanent position. For mass plantings plant them at 8 meter to 10 meter spacing if the trees are being used for fruit or in a park like scene or closer at 5 meters to 6 meters for the rainforest look.
Fertilize using seaweed, fish emulsion or organic chicken pellets soaked in water on an alternate basis. Fertilize every two months until the plants are established then annually in early September to October to maintain health, vitality and better flowering.
Further Comments from Readers:
Hi reader, it seems you use The Bible of Botany a lot. That’s great as we have great pleasure in bringing it to you! It’s a little awkward for us to ask, but our first aim is to purchase land approximately 1,600 hectares to link several parcels of N.P. into one at The Pinnacles NSW Australia, but we need your help. We’re not salespeople. We’re amateur botanists who have dedicated over 30 years to saving the environment in a practical way. We depend on donations to reach our goal. If you donate just $5, the price of your coffee this Sunday, We can help to keep the planet alive in a real way and continue to bring you regular updates and features on Australian plants all in one Botanical Bible. Any support is greatly appreciated. Thank you.
In the spirit of reconciliation we acknowledge the Bundjalung, Gumbaynggirr and Yaegl and all aboriginal nations throughout Australia and their connections to land, sea and community. We pay our respect to their Elders past, present and future for the pleasures we have gained.
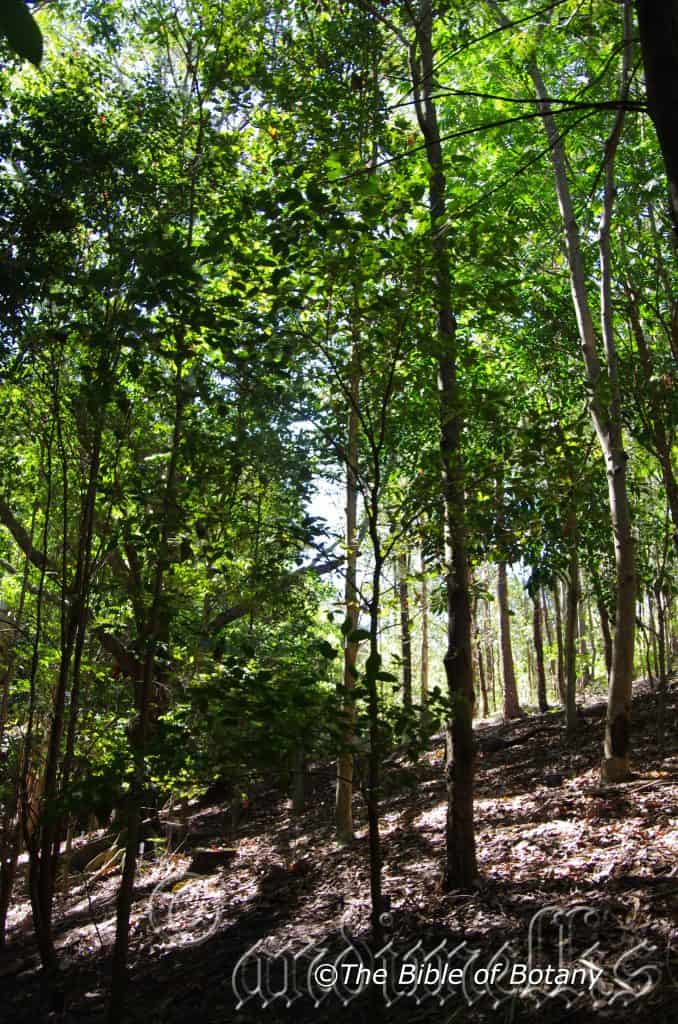
Mount Cootha Botanic Gardens Qld.

Mount Cootha Botanic Gardens Qld.
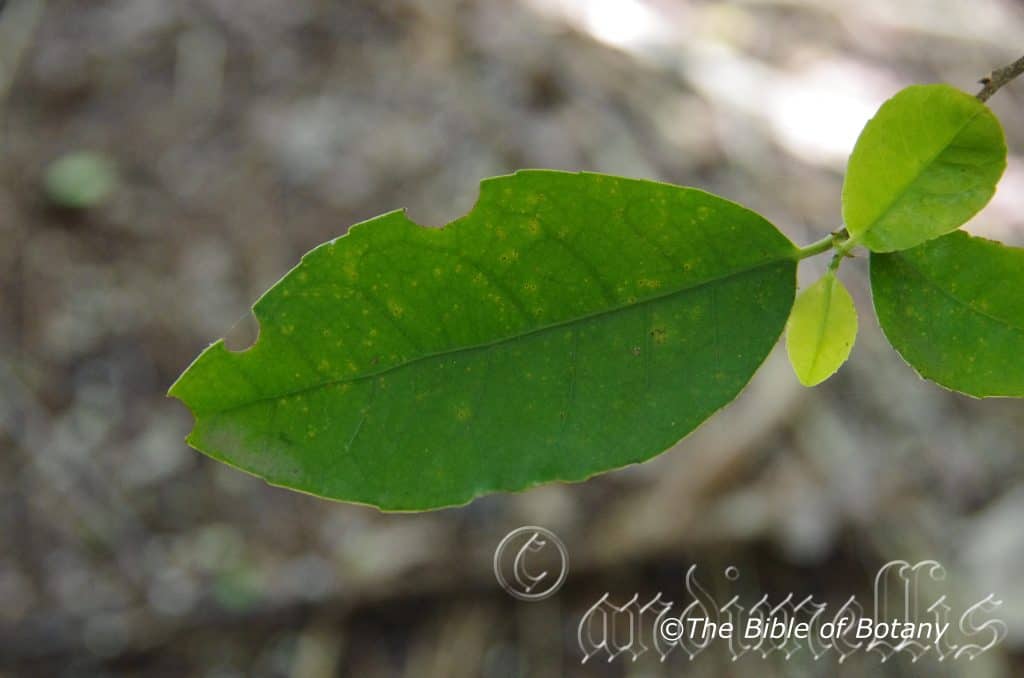
Mount Cootha Botanic Gardens Qld.
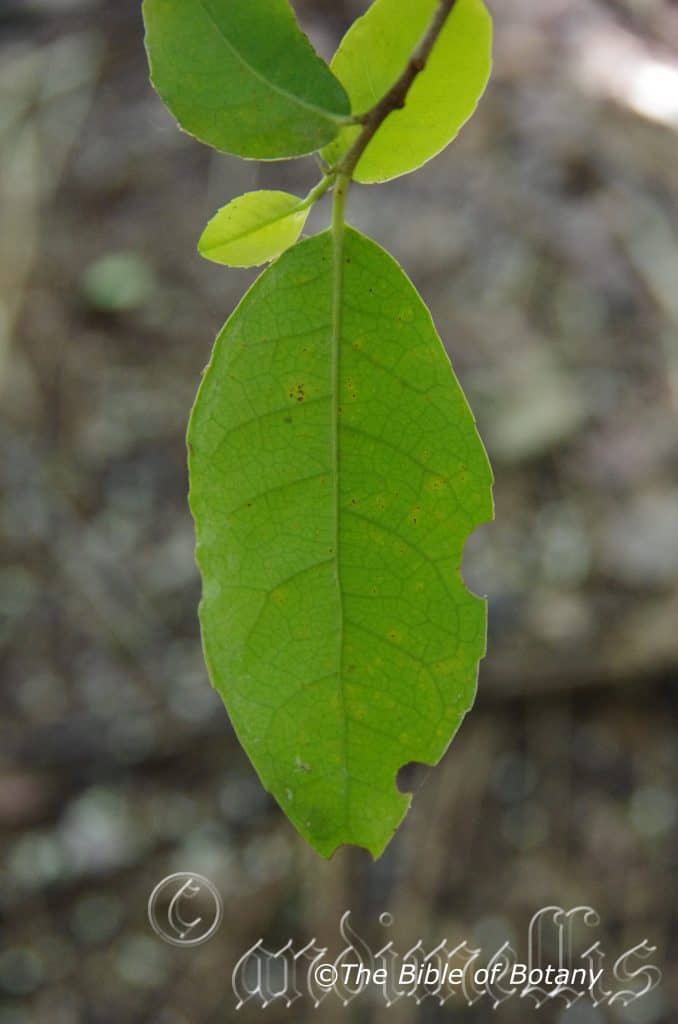
Mount Cootha Botanic Gardens Qld.
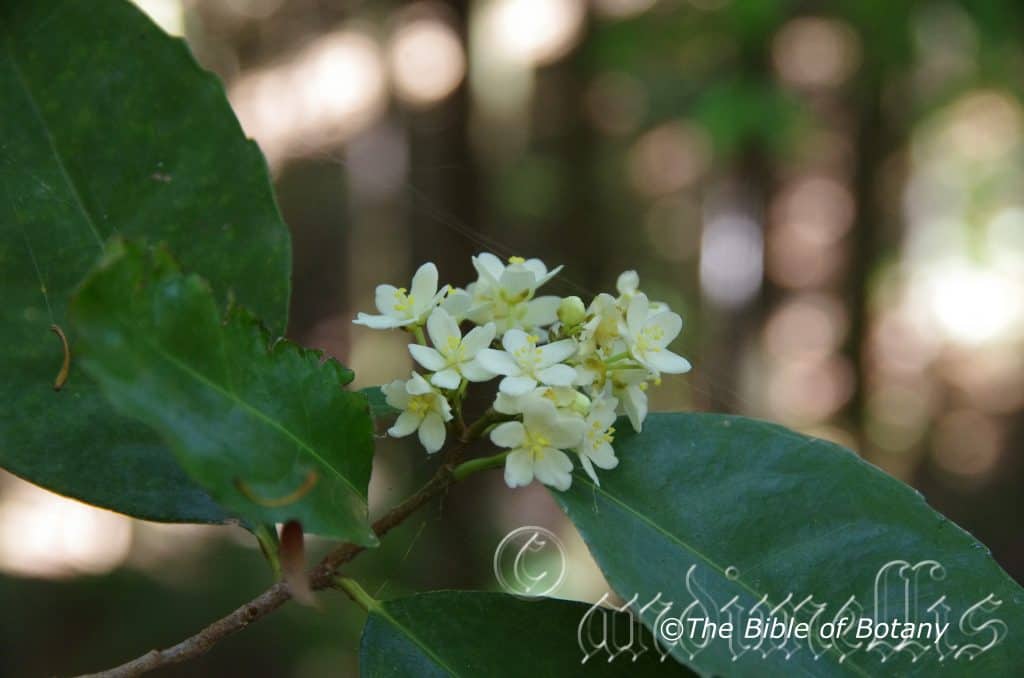
Mount Cootha Botanic Gardens Qld.
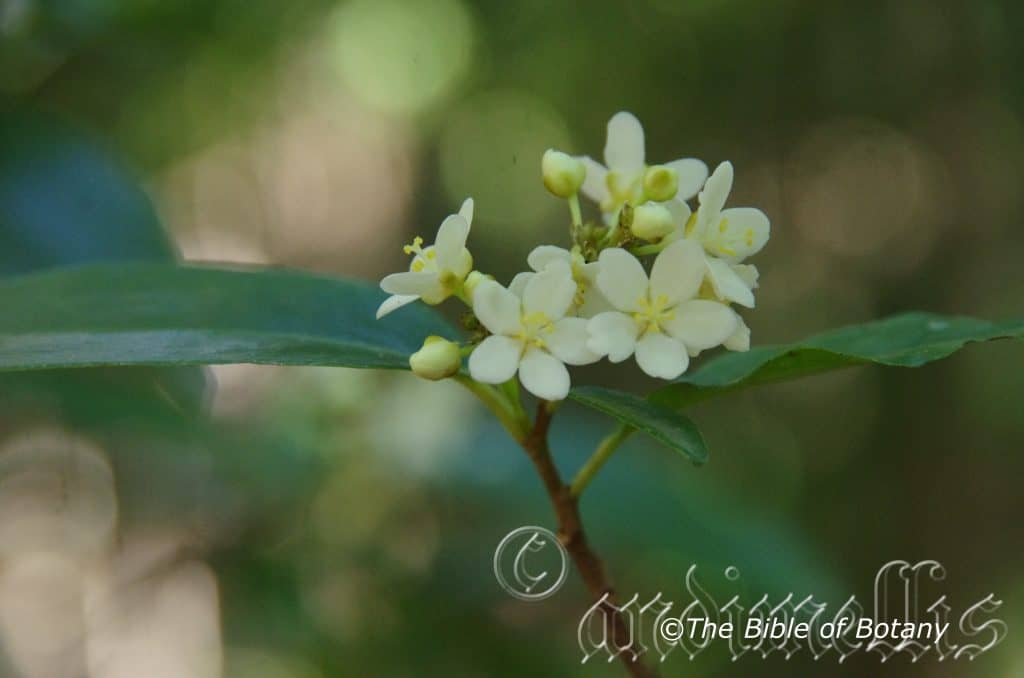
Mount Cootha Botanic Gardens Qld.
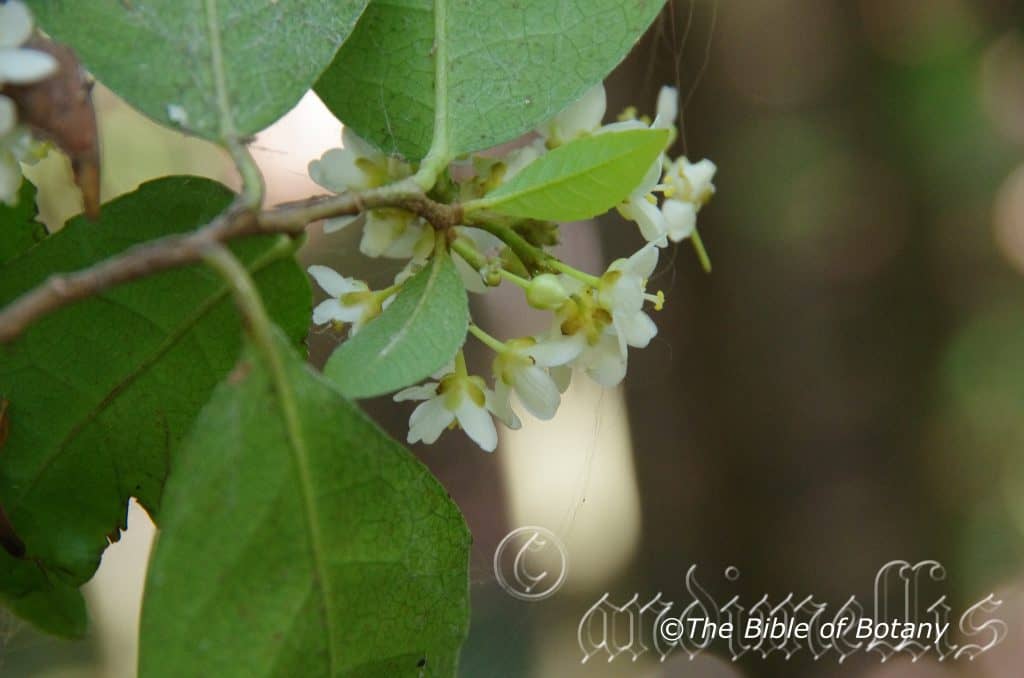
Mount Cootha Botanic Gardens Qld.
Dimorphocalyx australiensis
Classification
Phylum: Charophyta
Class: Equisetopsida
Order: Malpighiales
Family: Euphorbiaceae
Subfamily: Crotonoideae
Tribe: Codiaeae
Genus: From Di/Dis, which are Ancient Greek for two, Morphos, which is Ancient Greek for a form or structure and Kalux, which is Greek for a calyx or Kalaptein, which is Ancient Greek for to cover up. It refers to flowers, which have two distinct forms of calyxes.
Species: From Terra Australis, which is Latin for land of the south and Anum/Ensis, which is Latin for to originate from. It refers to plants, which were first discovered from the land down under.
Common Name:
Distribution:
Dimorphocalyx australiensis is found in 2 isolated populations and 2 disjunct populations. It is found along the Kimberley Coast in north western, eastern Australia.
The eastern disjunct populations are found from the tip of Cape York Peninsula south to O’Keefe Creek near Rossville and further south between Mount Charlton and St. Helens Gap in central coastal Queensland.
https://avh.ala.org.au/occurrences/search?taxa=Dimorphocalyx+australiensis#tab_mapView
Habitat Aspect Climate:
Dimorphocalyx australiensis prefers full sun to light dappled shade. It grows in monsoonal forests, drier, more seasonal rain forests and marginal moist tropical rainforests in the south. It is found from 5 meters ASL to 450 meters above sea level.
The temperatures range from 6 degrees in July to 38 degrees in January.
The rainfall ranges from lows of 950mm to an average of 3200mm annually.
Soil Requirements:
Dimorphocalyx australiensis prefers growing on better quality light gravelly clays to medium rocky clays. The soils are usually derived from decomposed brown basalt, black basalt and granites. The soils pH ranges from 5.5pH to 6.5pH. It does not tolerate waterlogged soils. Non saline soils to moderately saline soils are tolerated.
Height & Spread:
Wild Plants: 6m to 20m by 5m to 8m.
Characteristics:
Dimorphocalyx australiensis’s trunk is straight and fluted on relatively young trees as small as 4 meters. The grey bark is glabrous. The brown branches are scabrous with some flaky patches. The branchlets and young shoots are lime green, covered in cream lenticels, brownish scales and sparsely covered in white appressed hairs.
Dimorphocalyx australiensis’s usually opposite or sub opposite leaves are elliptical to narrow ovate and measure 80mm to 150mm to in length by 35mm to 65mm in width. The small stipules are lanceolate. The lime green petioles are grooved on the upper surface and are covered in brownish scales and sparsely covered in white appressed hairs. The petioles measure 10mm to 16mm to in length. The bases are cuneate while the apexes are tapering acute with an obtuse tip obtuse. The discolourous laminas are deep green, glabrous and semi glossy on the upper laminas while the lower laminas are paler, mid yellowish-green and dull. The laminas recurved slightly upwards from the midvein to the margins and are flat or decurve slightly downwards near the apex. The margins are regularly serrate especially on the basal two thirds. The rounded mid vein is prominent on the lower lamina and slightly prominent on the upper lamina while the lateral veins are slightly prominent on the lower lamina and form rather indistinct loops inside the blade margin. The laminas are flat or areolate between the mid vein and the lateral veins. The new growth leaves are a glossy lime-green.
The monoecious inflorescences of Dimorphocalyx australiensis are produced on short panicles from the terminals. The rachises, peduncles and pedicels are glabrous and very sparsely covered in white or reddish-brown appressed hairs. The peduncle measures 8mm to 12mm in length while the rachis measures 1mm to 3mm in length and the pedicels measure 1mm to 3mm in length. The lime-green sepals are sparsely to moderately covered in reddish appressed hairs. The lower 2 keeled sepals are lanceolate, strongly cupular and measure 3mm in length by 3mm in width while the 5 sepals immediately below the ovary are divaricularly cupular, obtuse to orbicular and measure 4.5mm to 5.5mm in length by 4mm to 5mm in width. The 5 oblong to orbicular white petals are glabrous. The petals measure 5mm to 6mm in length by 4mm to 5mm in width.
The 11 pale yellow to cream filaments are glabrous with 5 being opposite the petals while the other 6 are paired on common very short filament lobes atop a central stamina column. The basal filaments measure 1mm to 1.5mm in length while the anthers are golden-yellow.
A creamy-yellow ovary is glabrous. The style is covered in white pulverulent hairs on the basal half and is glabrous on the apex half. The style measures 0.8mm to 1.2mm in length. The sweetly scented flowers appear from October to early January.
Dimorphocalyx australiensis fruits are spherical capsules. The capsules measure 6mm to 9mm in length by 6mm to 9mm diameter.
The green capsules turn grey-brown when ripe and split or dehisce violently to release the seeds some distance from the tree. The surface of the capsules is moderately covered in fine white hairs and short bristles.
Wildlife:
Dimorphocalyx australiensis’s wildlife is unknown to the author.
Cultivation:
Dimorphocalyx australiensis is a very beautiful small tree which could be more widely grown in tropical and subtropical gardens. Garden subjects will grow into dense small shade trees from 8 meters to 12 meters in height by 6 meters to 10 meters in diameter when grown in the open. It can be used as specimen tree, or a feature tree, in a small rainforest garden.
The trunk can give a rainforest garden colour and add interest planted next to trees or differing barks while the white and cream flowers add another dimension of colour during the summer months with their sweetly scented perfume.
The trees would make a very good accent tree in front of low set or 2 homes, story commercial buildings, industrial sheds and low set school buildings where they will break up hard rigid architectural lines and give warmth and breadth to a building. In front of high rise buildings they give balance especially where they could be grown in curves meandering to the entry doors or formality along the nature strip.
Propagation:
Seeds: Dimorphocalyx australiensis‘s seeds are very easy to grow. Sow the seeds into a seed raising mix. Cover them with 5mm of the mix and place the trays in a warm place to germinate. When the seedlings are 25mm to 50 mm tall, prick them out and plant them into 50mm native tubes using a seed raising mix.
Once the seedlings reach 200mm to 250mm in height plant them out into their permanent position. For mass plantings plant them at 8 meter to 10 meter spacing if the trees are being used for fruit or in a park like scene or closer at 5 meters to 6 meters for the rainforest look.
Fertilize using seaweed, fish emulsion or organic chicken pellets soaked in water on an alternate basis. Fertilize every two months until the plants are established then annually in early September to October to maintain health, vitality and better flowering.
Further Comments from Readers:
Hi reader, it seems you use The Bible of Botany a lot. That’s great as we have great pleasure in bringing it to you! It’s a little awkward for us to ask, but our first aim is to purchase land approximately 1,600 hectares to link several parcels of N.P. into one at The Pinnacles NSW Australia, but we need your help. We’re not salespeople. We’re amateur botanists who have dedicated over 30 years to saving the environment in a practical way. We depend on donations to reach our goal. If you donate just $5, the price of your coffee this Sunday, We can help to keep the planet alive in a real way and continue to bring you regular updates and features on Australian plants all in one Botanical Bible. Any support is greatly appreciated. Thank you.
In the spirit of reconciliation we acknowledge the Bundjalung, Gumbaynggirr and Yaegl and all aboriginal nations throughout Australia and their connections to land, sea and community. We pay our respect to their Elders past, present and future for the pleasures we have gained.
Dinosperma erythrococcum
Classification
Unranked: Magnoliophyta
Class: Eudicots
Sub Class: Rosidae
Unranked: Eurosids
Order: Sapindales
Family: Rutaceae
Subfamily: Toddalioideae
Genus: From Deinos, which is Ancient Greek or later Dinos, which is Latin for horrible terrible, fearful or awesome and Sperma, which is Ancient Greek for a seed. It refers to fruits usually the seeds, which are very toxic in some species but in others give a peculiar tingling or numbing sensation in the tongue inner cheeks and lips.
Species: From Erythros, which is Ancient Greek for scarlet-red and Kokos, which is Ancient Greek for a dry berry. It refers to dry berries, ripe fruits or seeds, which are scarlet-red when ripe.
Common Name: Clubwood or Tingle Tongue.
Distribution:
Dinosperma erythrococcum is a widespread species from the Iron Range National Park in far north Queensland south to the catchment areas of the Richmond River and the Clarence River in far north east New South Wales. It is mainly found on and east of the Great Dividing Range.
https://avh.ala.org.au/occurrences/search?taxa=Dinosperma+erythrococcum#tab_mapView
Habitat Aspect Climate:
Dinosperma erythrococcum prefers full sun to light dappled shade. It grows in monsoon forests, drier, more seasonal rain forests often associated with Agatha robusta in the north and marginal moist tropical rainforests in the south. It is found from 50 meters ASL to 750 meters above sea level.
The temperatures range from 10 degrees in July to 40 degrees in January.
The rainfall ranges from lows of 800mm to an average of 2800mm annually.
Soil Requirements:
Dinosperma erythrococcum prefers growing on light gravelly clays to medium clays. The soils are derived from decomposed brown basalt, black basalt, shale fatty well decomposed granites and sandstones. The soils pH ranges from 5.5pH to 6.5pH. It does not tolerate waterlogged soils. Non saline soils to moderately saline soils are tolerated.
Height & Spread:
Wild Plants: 18m to 23m by 5m to 7m.
Characteristics:
Dinosperma erythrococcum’s grey mottled bark is glabrous. The branches are a pale grey, glabrous with some flaky patches. The branchlets and young shoots are lime green and glossy.
Dinosperma erythrococcum’s usually opposite or sub opposite leaves are usually trifoliate or rarely single in pairs or four foliate. They measure 25mm to 100mm in length by 12mm to 30mm in width. The petioles and petiolules are glabrous. The petiole measures 10mm to 30mmin length while the lateral petiolules measure 1mm to 7mm in length while the terminal petiolule measures 1.5mm to 20mm long.
The bases are cuneate to slightly attenuate, asymmetrical on the lateral leaflets and symmetrical on the terminal leaflet. The apexes are tapering acute with an obtuse tip obtuse. The discolourous laminas are deep green to sea-green, glabrous and glossy to semi glossy on the upper laminas while the lower laminas are much paler and dull. The laminas recurved upwards from the midvein to the margins, maybe slightly undulating and are sparsely covered in dull oil dots. The margins are entire or slightly crenate. The rounded mid vein is strongly prominent while the lateral veins are faintly prominent on the lower lamina. They are visible on the upper lamina.
The new leaves are a glossy lime-green. The inflorescences of Dinosperma erythrococcum are produced on panicles from the terminals. The panicles measure 60mm to 85mm in length by 60mm to 85mm in diameter. The rachises, peduncles and pedicels are glabrous. The rachis measures 20mm to 40mm in length while the peduncles measure 15mm to 30mm in length and the pedicels measure 1mm to 5mm in length. The lime-green calyx and calyx lobes are covered in minute oil glands while the lobes measure 0.8mm to 1.2mm in length. The 4 sepals are sparsely covered in white puberulent hairs and measure 1mm to 1.5 mm in length. The 4 elliptical white petals are covered in white pulverulent hairs externally and are glabrous internally. The petals measure 3mm to 4mm in length.
The 8 white filaments are covered in white puberulent hairs on the basal half and are glabrous on the apex half. The filaments measure 2.5mm to 3.5mm in length while the anthers are golden yellow.
A disk encloses the lower half of the ovary. The style is covered in white pulverulent hairs on the basal half and is glabrous on the apex half. The style measures 0.8mm to 1.2mm in length. The flowers appear from October to early January.
Dinosperma erythrococcum fruits are ovoidal follicles. The follicles measure 5mm to 8mm in length by 4mm to 6.5mm diameter. The coriaceous green follicles turn yellow-orange then to orange-red or crimson-red when ripe. The follicles contain a single semi glossy deep purple-blue seed. The follicle dehisces leaving the seed attached to a long fawn strap like aril down one side. The aril measures 5mm to 6mm in length by 1.3mm to 1.5mm in width. The ellipsoidal seeds measure 4mm to 5.5mm in length by 3mm to 3.5mm in diameter. The aril peels to leave hilum scar. The sepals are persistent at the base of the fruit even after the fruit has opened to reveal the seeds. The fruits ripen from late December through to late February.
Wildlife:
Dinosperma erythrococcum’s wildlife is unknown to the author.
The leaflets are aromatic when crushed and when chewed, produce a tingling or numbing sensation on the tongue and lips, stimulating the taste buds similar to fresh Sichuan Pepper Zanthoxylum bungeanum.
WARNING: Different species in this genus may be very toxic and should be treated as such until proven otherwise.
Cultivation:
Dinosperma erythrococcum is a beautiful small bushy tree which should be more widely grown in tropical and subtropical gardens. Garden subjects will grow into dense small shade trees from 8 meters to 12 meters in height by 8 meters to 10 meters in diameter when grown in the open. It can be used as a specimen tree, or a feature tree, in small rainforest garden.
The trunk can give a rainforest garden colour and add interest planted next to trees or differing barks while the fruits add another dimension of colour during the summer months.
The tree would make a very good accent tree in front of low set or 2 story home, commercial buildings, industrial sheds and low set school buildings where they will break up hard rigid architectural lines and give warmth and breadth to a building.
Try using them in the foyer of commercial entrances or in shopping malls to break the ice and give a feeling of business as usual but somehow make the business more relaxing.
Propagation:
Seeds: Dinosperma erythrococcum seeds are very easy to grow. Sow the seeds into a seed raising mix. Cover with 5mm of the mix and place the trays in a warm place to germinate. When the seedlings are 25mm to 50 mm tall, prick them out and plant them into 50mm native tubes using a seed raising mix.
Once the seedlings reach 200mm to 250mm in height plant them out into their permanent position. For mass plantings plant them at 8 meter to 10 meter spacing if the trees are being used for fruit or in a park like scene or closer at 5 meters to 6 meters for the rainforest look.
Fertilize using seaweed, fish emulsion or organic chicken pellets soaked in water on an alternate basis. Fertilize every two months until the plants are established then annually in early September to October to maintain health, vitality and better flowering.
Further Comments from Readers:
Hi reader, it seems you use The Bible of Botany a lot. That’s great as we have great pleasure in bringing it to you! It’s a little awkward for us to ask, but our first aim is to purchase land approximately 1,600 hectares to link several parcels of N.P. into one at The Pinnacles NSW Australia, but we need your help. We’re not salespeople. We’re amateur botanists who have dedicated over 30 years to saving the environment in a practical way. We depend on donations to reach our goal. If you donate just $5, the price of your coffee this Sunday, We can help to keep the planet alive in a real way and continue to bring you regular updates and features on Australian plants all in one Botanical Bible. Any support is greatly appreciated. Thank you.
In the spirit of reconciliation we acknowledge the Bundjalung, Gumbaynggirr and Yaegl and all aboriginal nations throughout Australia and their connections to land, sea and community. We pay our respect to their Elders past, present and future for the pleasures we have gained.
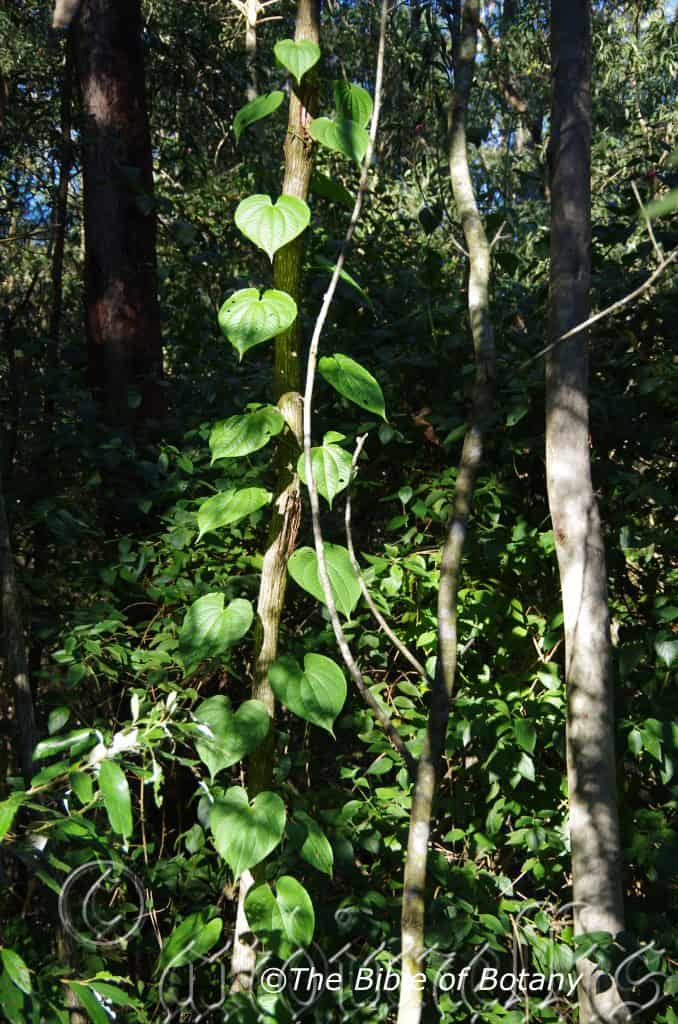
Tabbimoble Swamp NSW
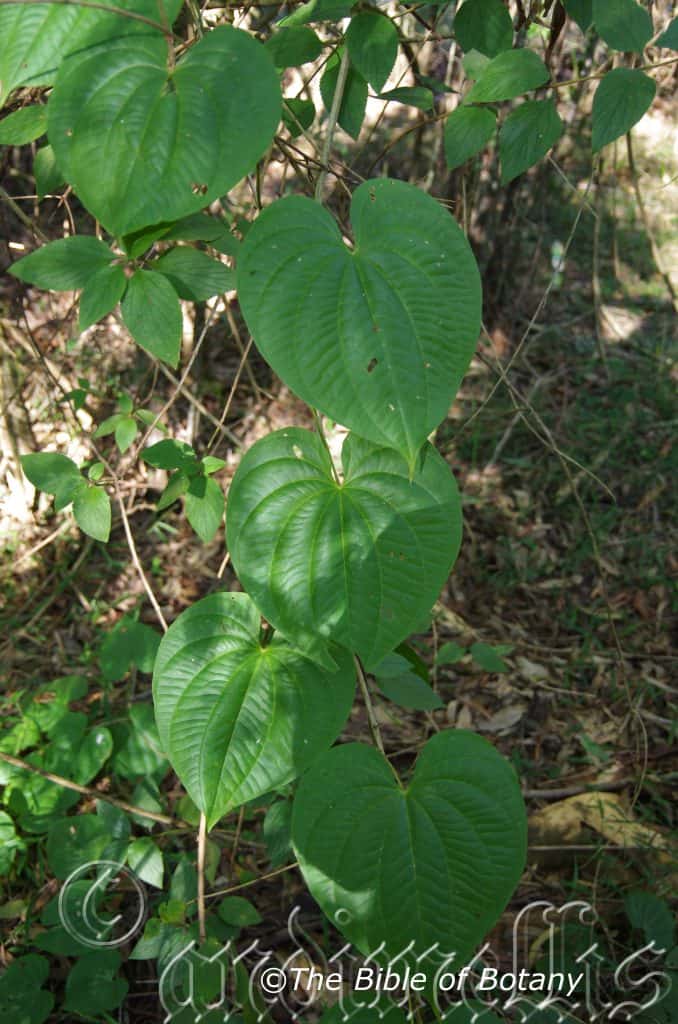
Tabbimoble Swamp NSW
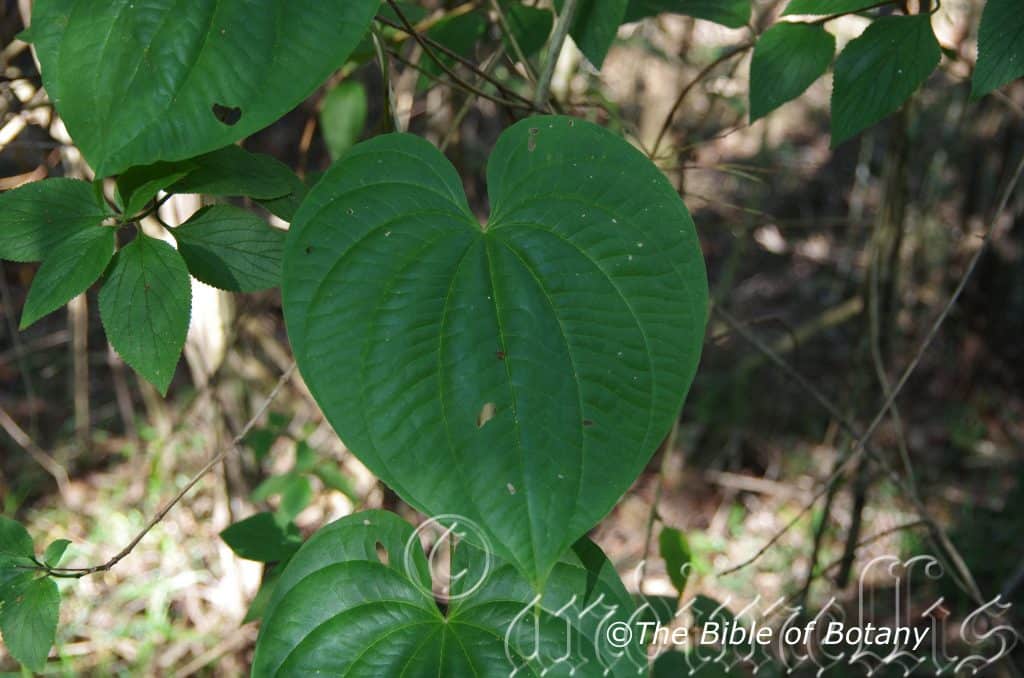
Tabbimoble Swamp NSW
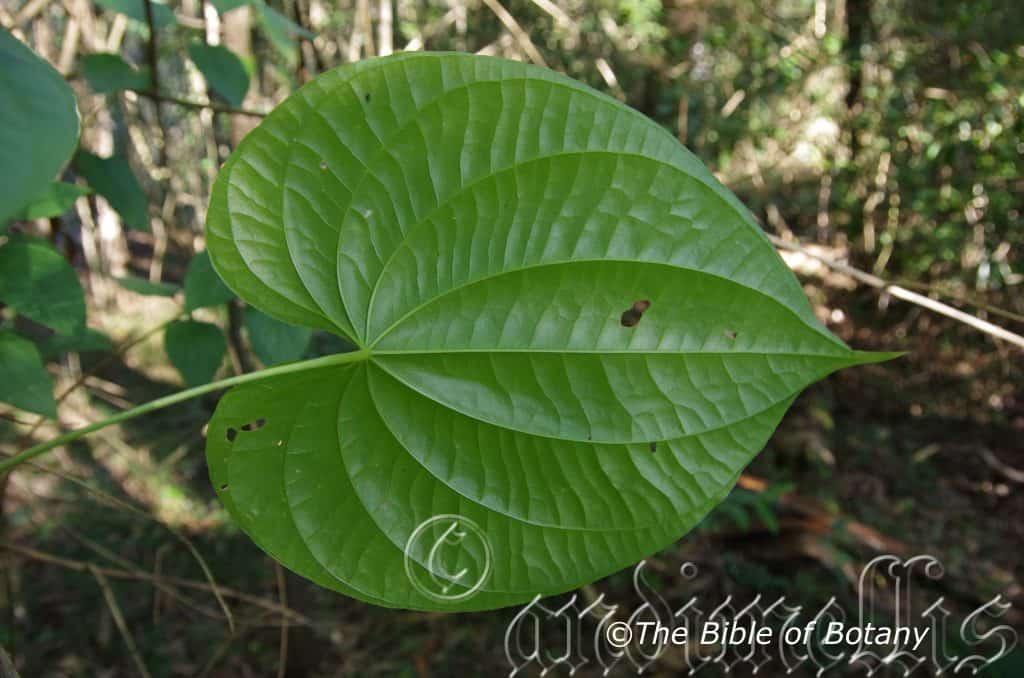
Tabbimoble Swamp NSW
Dioscorea bulbifera
Classification
Unranked: Monocots
Order: Dioscoreales
Family: Dioscoreacea
Genus: From Dioskourides, which is Latinized and named in honour of Dioscorides who was a stoic philosopher, which is predominantly a philosophy of personal ethics informed by its system of logic with views taken from the natural world.
Species: From Bolbos, which is Ancient Greek, for a bulb or a round swelling on underground stem and Fera, which is Ancient Greek /Latin for to bear or to carry. It refer to plants, which have rather large bulbs or tubers.
Common Name: Air potato, Air yam, Aerial yam, Bitter yam, Cheeky yam, Potato yam or Parsnip yam.
Distribution:
Dioscorea bulbifera is found north of a line from Halls Creek in far northern Western Australia to the Robertson River in far north eastern Queensland then along the Great Dividing Range to Runaway Bay in south eastern coastal Queensland.
It is also found in tropical northern Africa, the Middle East, IndoChina Indonesia New Guinee and many of the Pacific Islands.
https://avh.ala.org.au/occurrences/search?taxa=Dioscorea+bulbifera#tab_mapView
Habitat Aspect Climate:
Dioscorea bulbifera prefers full shade to dappled shade. It grows in the mountains in open woodlands, monsoonal vine forests, moist Eucalyptus forests or dry rainforests. The altitude ranges from 5 meter ASL to 1150 meters ASL.
The temperatures range from minus 2 degrees in July to 43 degrees in January.
The rainfall ranges from lows of 600mm to 3200mm average per annum.
Soil Requirements:
Dioscorea bulbifera prefers better quality sandy loams to medium gravelly clays. The soils are derived from decomposed brown basalt, black basalt, shale, podsolics, granites or at times fine sandstones or accumulated peaty sands and alluvial deposits. The soils pH ranges from 5.5pH to 7.5pH are preferred. It does not tolerate waterlogged soils. Non saline soils to very saline soils are tolerated.
Height & Spread:
Wild Plants: 12m to 20m by 2m to 8m
Characteristics:
Dioscorea bulbifera glabrous, grass-green stems to branching freely from the nodes. The stems are terete to somewhat squarish stems.
The alternate, glabrous, ovate to ovate-cordate bright grass-green leaves are chartaceous and measure 90mm to 125mm in length by 55mm to 110mm in width. There are 9 to 11 prominent parallel veins with the main lateral on the lower lamina, which are clearly visible from the upper lamina. The base is cordate, while the apex is acuminate. The margins are slightly undulating. The glabrous, bright grass-green petioles measure 120mm to 160mm in length.
The dioecious inflorescences are axillary and simple fasciculate. The individual, small flowers are white to white tinged pinkish tinged and sessile.
The staminate flowers have a perianth that measures 1mm to 1.2mm in length and have 6 fertile stamens surrounded by the 6 narrow oblong petals that measure 4mm in length.
The pistillate flowers have a perianth approximately 1.2mm to 1.4mm in length and a hypanthium that is 1.8mm to 2mm in length and is surrounded by the 6 narrow oblong petals that measure 4mm in length. The ovary is glabrous.
The 3 winged capsules measure 25mm in diameter. Bulbils are axillary, somewhat tuburculate and measure 50mm to 80mm in diameter.
Wildlife:
Dioscorea bulbifera is the host plant for several Australian butterflies including Tagiades japetes, Paralacydes maculifascia, Theretra nessus and Tiracola plagiata. I have seen Theretra nessus defoliate a plant in a couple of days in Nana Glen.
The aerial yams were a staple part of the Australian Aborigines diet and still play an important role in a cultural ceremonies on the Tiwi Islands.
Cultivation:
Dioscorea bulbifera is a beautiful medium to large creeper that deserves a place in a native or exotic garden. It is an ideal plant where summer growth is needed. It is fast growing with the added attraction of having beautiful seed capsules in autumn. The plants grow best in a good quality soil which has generous quantities of good quality mulch like Lucerne or clover. Fertilize during the growing season and the plants will provide longer racemes of flowers and set more seed. Withdraw fertilizers in autumn. Plants will store starches below the ground in the form of long finger shape yams for the following spring when growth will resume.
It often reaches its full potential in just 3 years from seed and flower from the second year. It is best planted close together to increase competition and to give a better foliage coverage as the leaves are sparsely placed on individual plants.
Propagation:
Seeds: Dioscorea bulbifera seeds do not require treatment before sowing. Sow fresh seeds directly into a seed raising mix and cover with 2mm of the mix. When the seedlings are 25mm to 50mm tall, prick them out and plant them into 50mm native tubes using a seed raising mix.
Once the seedlings reach 150mm to 200mm in height plant them out into their permanent position. Mass plantings can be achieved by planting them at 1.5 meters to 2 meter centers.
Cuttings: Use 80mm to 120mm long cuttings from the present season’s growth. Take them in early autumn, after the last frosts or in early summer once the cutting material has hardened off.
1 Prepare the cutting mix by adding one third sharp clean river sand, one third peat and one third perlite. These ingredients are sterilize,
2 Select good material from non diseased plants,
3 Select semi green stems for cuttings. Look for a stem with two or three nodes,
4 Place the cutting on a flat, hard surface, and make a clean down one side of the cutting for 10mm to 15mm with a sharp sterile knife or razor blade. – This scarification of the node will increase the chances of roots emerging from this spot. Now remove all but one or two the leaves, leaving the apex leaves in tact. If the leaves are very large in proportion to the stem, cut off the apical halves.
5 Fill a saucer with water, and place a little mild to medium rooting hormone into another container like a milk bottle top. Dip the node end of the cutting into the water and then into the rooting hormone. Tap off any excess hormone,
6 Use a small dipple stick or old pencil to poke a hole into the soilless potting mix. Ensure the hole is slightly larger than the stem diameter and be careful not to wipe the rooting hormone off the cuttings base, place the cuttings in a pattern ensuring the cuttings are not touching each other,
7 I like to place the pots in Plastic bags to help maintain temperature and moisture. Place in a semi shaded place like under 50mm shade cloth.
8 When the cuttings have struck, open the bag to allow air circulation for a few days to a week,
9 Once hardened off remove the cuttings from the bag and allow to further hardening for a few more days,
10 Transplant into a good potting mix to grow on.
Fertilize using seaweed, fish emulsion or organic chicken pellets soaked in water on an alternate basis. Fertilize every two months until the plants are established then annually in early September to October to maintain health, vitality and better flowering.
Further Comments from Readers:
Hi reader, it seems you use The Bible of Botany a lot. That’s great as we have great pleasure in bringing it to you! It’s a little awkward for us to ask, but our first aim is to purchase land approximately 1,600 hectares to link several parcels of N.P. into one at The Pinnacles NSW Australia, but we need your help. We’re not salespeople. We’re amateur botanists who have dedicated over 30 years to saving the environment in a practical way. We depend on donations to reach our goal. If you donate just $5, the price of your coffee this Sunday, We can help to keep the planet alive in a real way and continue to bring you regular updates and features on Australian plants all in one Botanical Bible. Any support is greatly appreciated. Thank you.
In the spirit of reconciliation we acknowledge the Bundjalung, Gumbaynggirr and Yaegl and all aboriginal nations throughout Australia and their connections to land, sea and community. We pay our respect to their Elders past, present and future for the pleasures we have gained.
Kendall NSW
Kendall NSW
Kendall NSW
Kendall NSW
Kendall NSW
Kendall NSW
Kendall NSW
Kendall NSW
Male flowers on Dioscorea transversa Washpool National Park NSW
Dioscorea transversa
Classification
Unranked: Monocots
Order: Dioscoreales
Family: Dioscoreacea
Genus: From Dioskouridos, which is Latinized and named in honour of Dioscorides; 40-90AD who was a Greek physician, pharmacologist, botanist, and author, who predominantly a philosophy of personal ethics informed by its system of logic with views taken from the natural world.
Species: From Trans, which is Latin for across or beyond thus Transversus is Latin for lying across. It refers to structures or organs, which is at right angles to a long axis.
Common Name: Native Yam or Finger Yam.
In the Gumbaynggirr language it is known as Daam. It is also known as Kowar in other languages.
Distribution:
Dioscorea transversa is found east from Coulomb Nature reserve north of Broome to Kulumbaru north of the Drysdale River National Park in far north western, Western Australia.
In the Northern territory it is found along the west coast north to Bathurst Melville Island and east to Groote Eyelandt and along the coast of the Gulf of Carpentaria.
In the east it is found south from the Torres Strait Island and the tip of Cape York Peninsula to Stanwell Tops on the central New South Wales coast. It is found on and east of the Great Dividing Range to the coast.
https://avh.ala.org.au/occurrences/search?taxa=Dioscorea+transversa#tab_mapView
Habitat Aspect Climate:
Dioscorea transversa prefers full shade to dappled shade. It grows in the mountains in open woodlands, monsoonal vine forests, moist Eucalyptus forests or dry rainforests. The altitude ranges from 10 meter ASL to 1150 meters ASL.
The temperatures range from minus 4 degrees in July to 43 degrees in January.
The rainfall ranges from lows of 760mm to 3200mm average per annum.
Soil Requirements:
Dioscorea transversa prefers better quality sandy loams to medium gravelly clays. The soils are derived from decomposed brown basalt, black basalt, shale, podsolics, granites or at times fine sandstones. The soils pH ranges from 5.5pH to 7pH are preferred. It does not tolerate waterlogged soils. Non saline soils to very saline soils are tolerated.
Height & Spread:
Wild Plants: 2m to 4m by 2m to 3m
Characteristics:
Dioscorea transversa grows as a weak scrambling contact climber, climbing over other small shrubs. Stems are thin dark red-brown to a dark greenish brown and glabrous. Dioscorea transversa is an annual which develops long cylindrical yams deep in the soil. The pale fawn yams measure 50mm to 150mm in length by 5mm to 20mm in diameter.
The alternate ovate to broadly triangular leaves of Dioscorea transversa measure 50mm to 120mm in length by 20mm to 80mm in width. The petioles are 2mm to 9mm long, becoming thicker near the leaf base and often twisted at the axil with the stem. The bases are cordate to hastate while the apexes are acuminate to broadly acute. The discolourous laminas are deep sea green and glabrous on the upper lamina while the lower lamina is paler or slightly glaucescent. The leaf margins are entire or widely and shallowly sinuate. Mid vein is prominent below as are the 5 to 7 lateral veins. The veins are not visible on the upper lamina.
Inflorescences of Dioscorea transversa are monoecious. There are male spikes and female racemes. There are 1 or 5 male spikes and 1 or 2 female racemes at each axis.
The male spikes measure 30mm to 70mm in length while the female racemes are 100mm to 200mm long. The flowers are a pale yellow to pale yellow green.
The male flowers are sessile and globose and measure 1.5mm to 2mm in diameter. Both the outer 3 and inner 3 tepals measure 1.5mm to 2mm in length. The 6 stamens are united at the base of the tepals to form a short column. They measure 0.5mm to 0.7mm in length
The female flowers are sessile and globose and measure 1.5mm to 2.5mm in length. The outer 3 tepals are slightly longer and broader than the inner 3 tepals. They measure 0.1mm to 1.4mm in length. The 6 staminodes are reduced to glands at the base of the ovary. Dioscorea transversa’s sweetly scented flowers appear from late September through to early November.
The fruits of Dioscorea transversa are thin chartaceous 3 winged capsules and hang in long pendulous clusters. The individual capsules measure 20mm to 30mm in length by 23mm to 26mm in width. The 3 wings surrounding the capsules measure 13mm to 16mm in length by 12mm to 15mm in width. The capsules have a cuspidate base with a cordate apex. The style is persistent on the fruit. The green fruits turn a pale pink before becoming papery dry.
There is one dark brown to black seed in each capsule. The seeds measure 4mm to 5.5mm in length.
Wildlife:
Dioscorea transversa yams were a staple part of the Australian Aborigines diet. It is also the host plant for several Australian butterflies including Tagiades japetes, Paralacydes maculifascia, Theretra nessus, and Tiracola plagiata. I have seen Theretra nessus defoliated a plant in a couple of days in Nana Glen.
Cultivation:
Dioscorea transversa is a beautiful small creeper that deserves a place in every native or exotic garden. It is an ideal plants where summer growth is needed. It is fast growing with the added attraction of having beautiful seed capsules in autumn. The plant grows best in a good quality soil which has generous quantities of good, quality, organic mulch like Lucerne or clover. Fertilize during the growing season and the plants will provide longer racemes of flowers and set more seed. Withdraw fertilizers in autumn. Plants will store starches below the ground in the form of long finger shape yams for the following spring when growth will resume.
It often reaches its full potential in just 3 years from seed and flower from the second year. It is best planted close together to increase competition and to give a better foliage coverage as the leaves are sparsely placed on individual plants.
Propagation:
Seeds: Dioscorea transversa seeds do not require treatment before sowing. Sow fresh seeds directly into a seed raising mix and cover with 2mm of the mix. When the seedlings are 25mm to 50mm tall, prick them out and plant them into 50mm native tubes using a seed raising mix.
Once the seedlings reach 150mm to 200mm in height plant them out into their permanent position. Mass plantings can be achieved by planting them at 1.5 meters to 2 meter centers.
Cuttings: Use 80mm to 120mm long cuttings from the present season’s growth. Take them in early autumn, after the last frosts or in early summer once the cutting material has hardened off.
1 Prepare the cutting mix by adding one third sharp clean river sand, one third peat and one third perlite. These ingredients are sterilize,
2 Select good material from non diseased plants,
3 Select semi green stems for cuttings. Look for a stem with two or three nodes,
4 Place the cutting on a flat, hard surface, and make a clean down one side of the cutting for 10mm to 15mm with a sharp sterile knife or razor blade. – This scarification of the node will increase the chances of roots emerging from this spot. Now remove all but one or two the leaves, leaving the apex leaves in tact. If the leaves are very large in proportion to the stem, cut off the apical halves.
5 Fill a saucer with water, and place a little mild to medium rooting hormone into another container like a milk bottle top. Dip the node end of the cutting into the water and then into the rooting hormone. Tap off any excess hormone,
6 Use a small dipple stick or old pencil to poke a hole into the soilless potting mix. Ensure the hole is slightly larger than the stem diameter and be careful not to wipe the rooting hormone off the cuttings base, place the cuttings in a pattern ensuring the cuttings are not touching each other,
7 I like to place the pots in Plastic bags to help maintain temperature and moisture. Place in a semi shaded place like under 50mm shade cloth.
8 When the cuttings have struck, open the bag to allow air circulation for a few days to a week,
9 Once hardened off remove the cuttings from the bag and allow to further hardening for a few more days,
10 Transplant into a good potting mix to grow on.
Fertilize using seaweed, fish emulsion or organic chicken pellets soaked in water on an alternate basis. Fertilize every two months until the plants are established then annually in early September to October to maintain health, vitality and better flowering.
Further Comments from Readers:
Hi reader, it seems you use The Bible of Botany a lot. That’s great as we have great pleasure in bringing it to you! It’s a little awkward for us to ask, but our first aim is to purchase land approximately 1,600 hectares to link several parcels of N.P. into one at The Pinnacles NSW Australia, but we need your help. We’re not salespeople. We’re amateur botanists who have dedicated over 30 years to saving the environment in a practical way. We depend on donations to reach our goal. If you donate just $5, the price of your coffee this Sunday, We can help to keep the planet alive in a real way and continue to bring you regular updates and features on Australian plants all in one Botanical Bible. Any support is greatly appreciated. Thank you.
In the spirit of reconciliation we acknowledge the Bundjalung, Gumbaynggirr and Yaegl and all aboriginal nations throughout Australia and their connections to land, sea and community. We pay our respect to their Elders past, present and future for the pleasures we have gained.
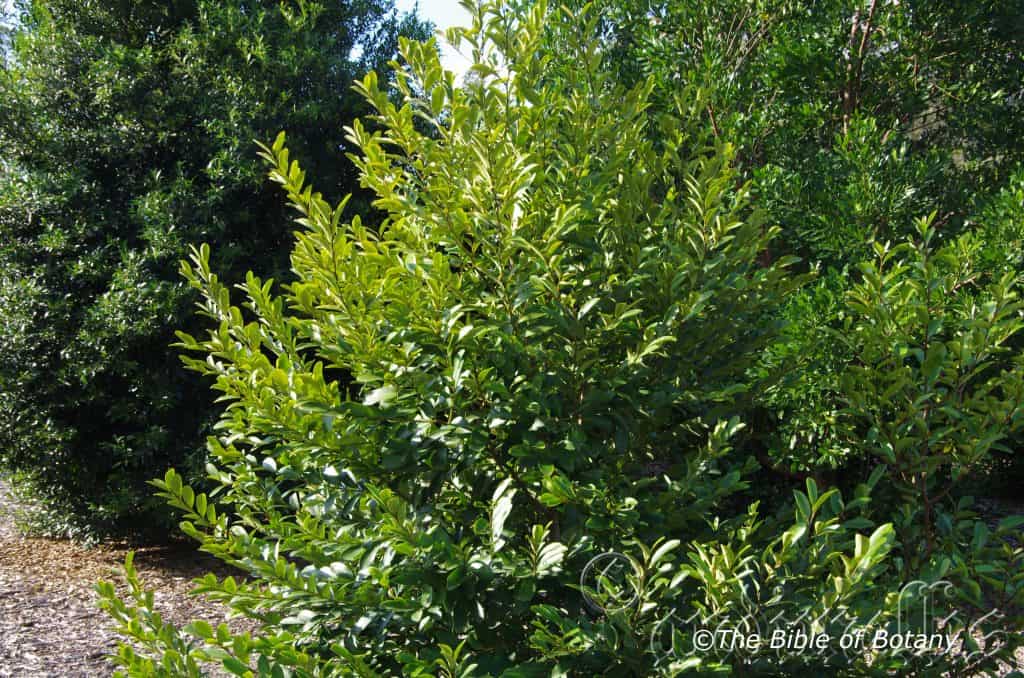
Rosser Park Benowa Qld.
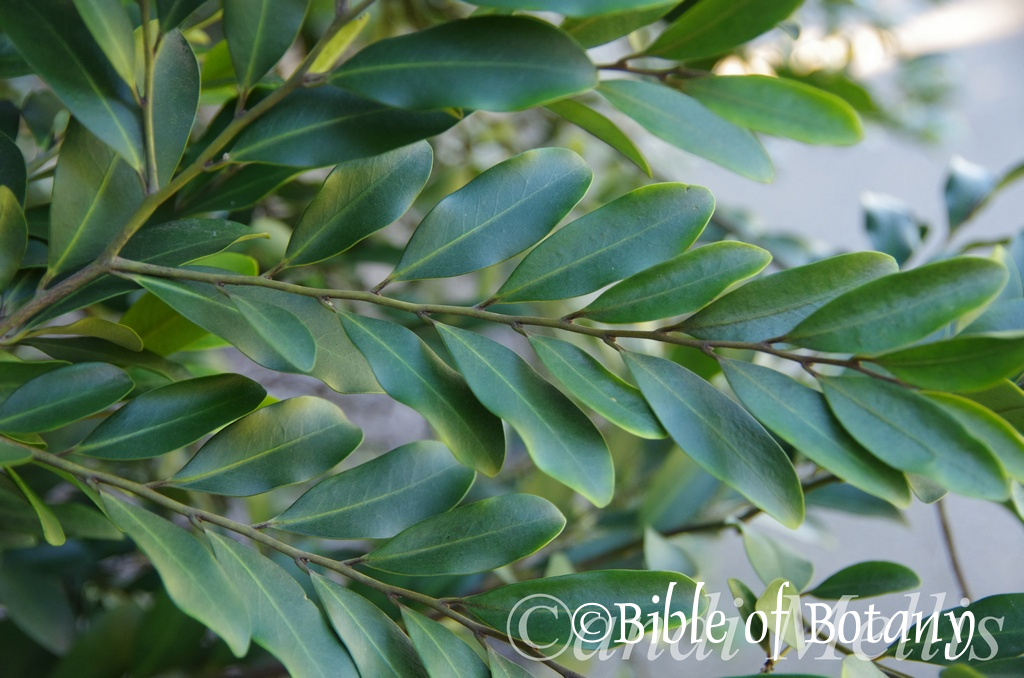
Rosser Park Benowa Qld.
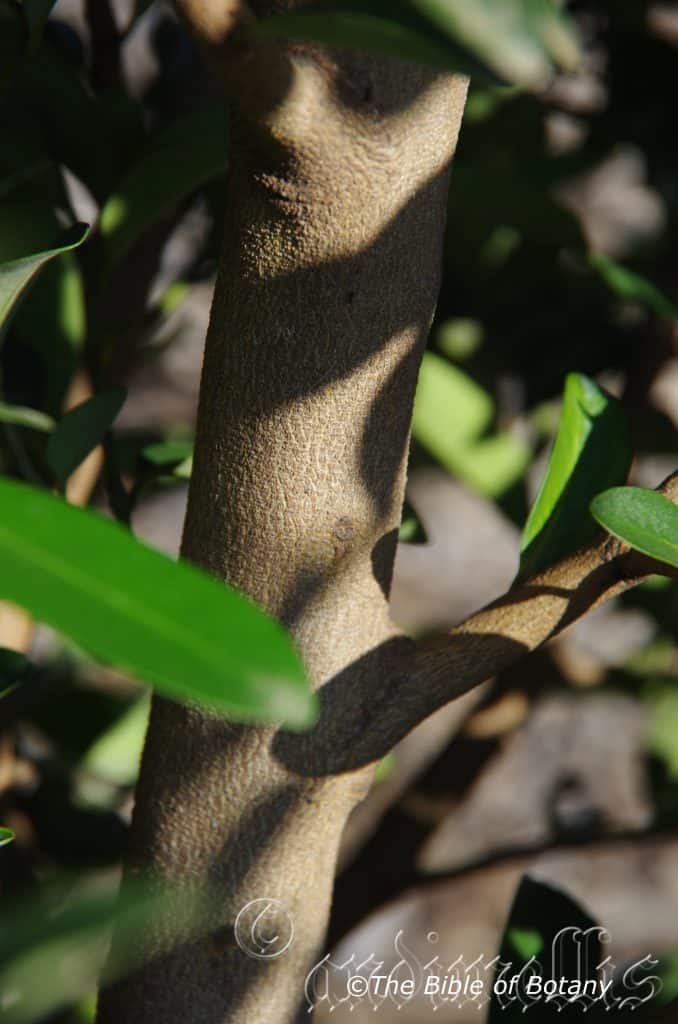
Rosser Park Benowa Qld.
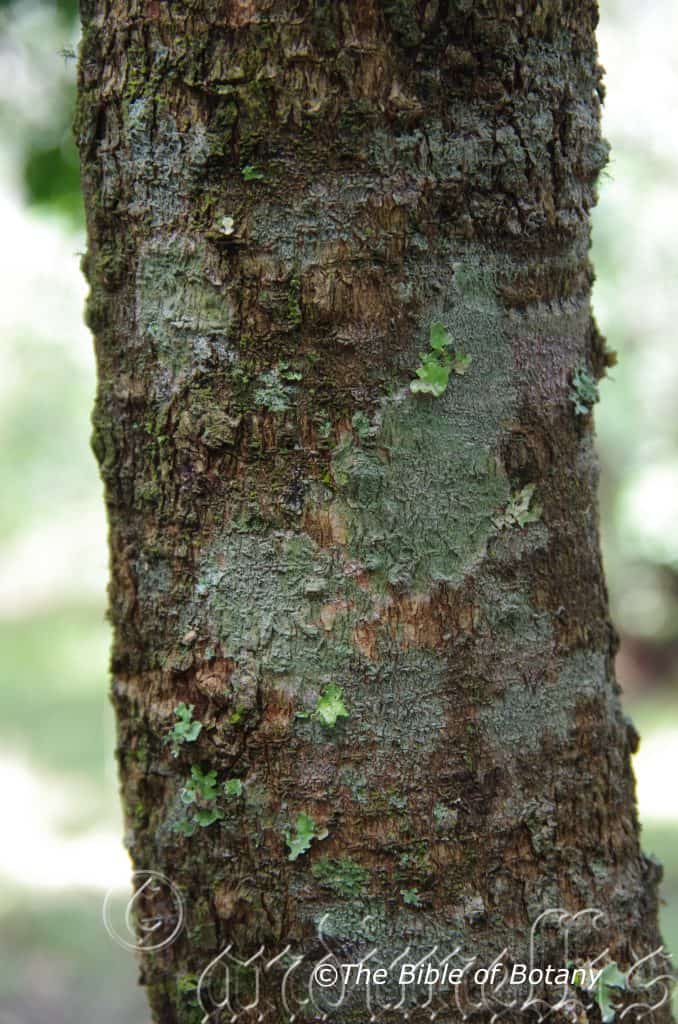
LBG Lismore NSW
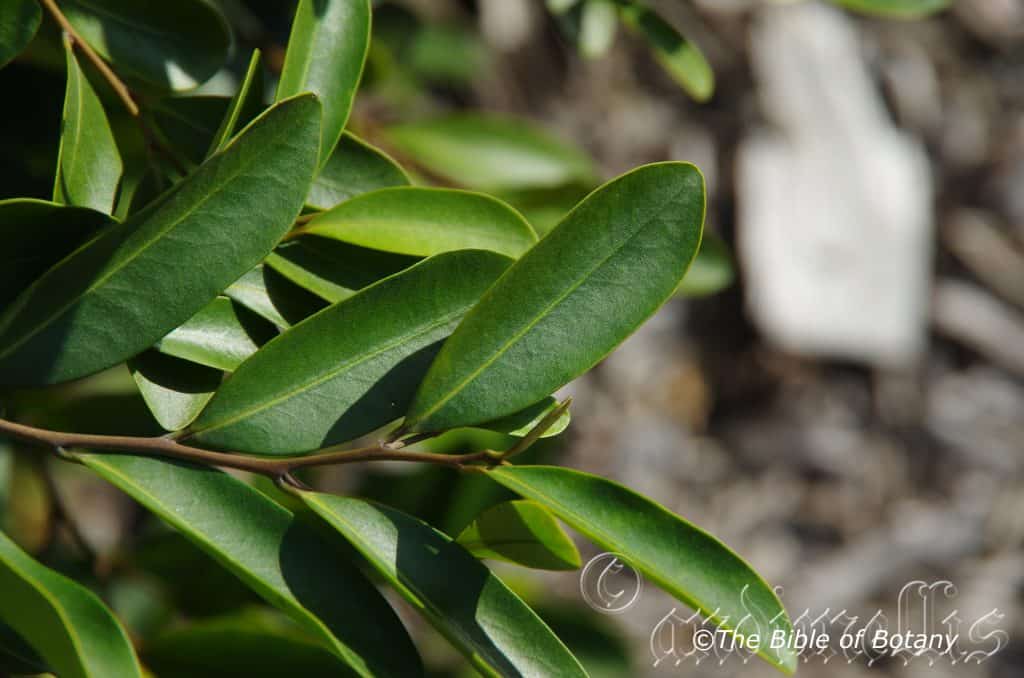
Rosser Park Benowa Qld.
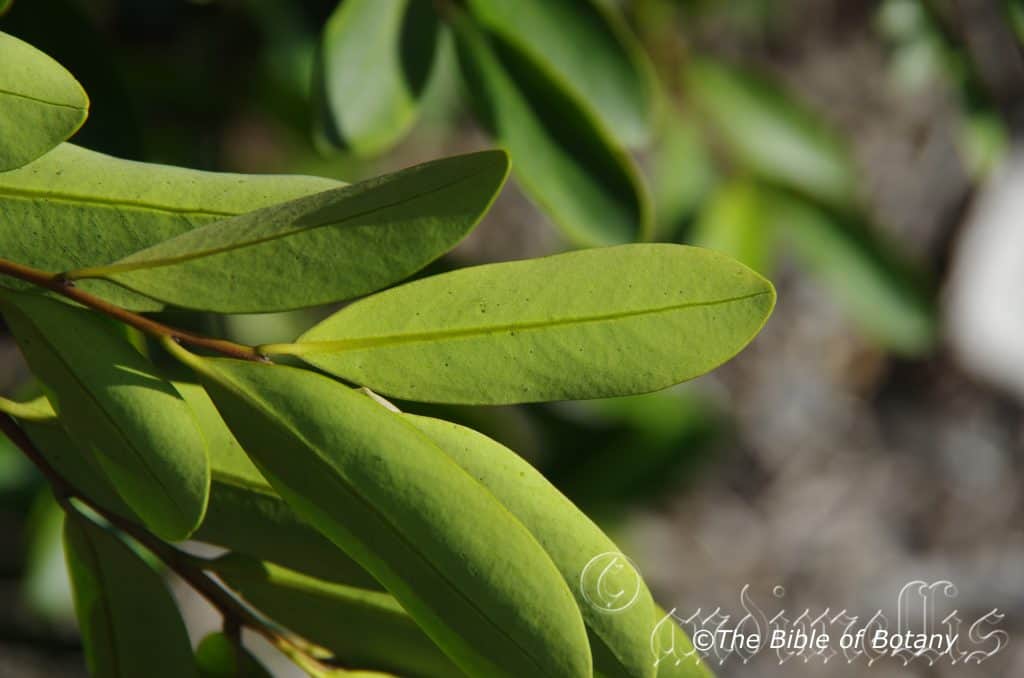
Rosser Park Benowa Qld.
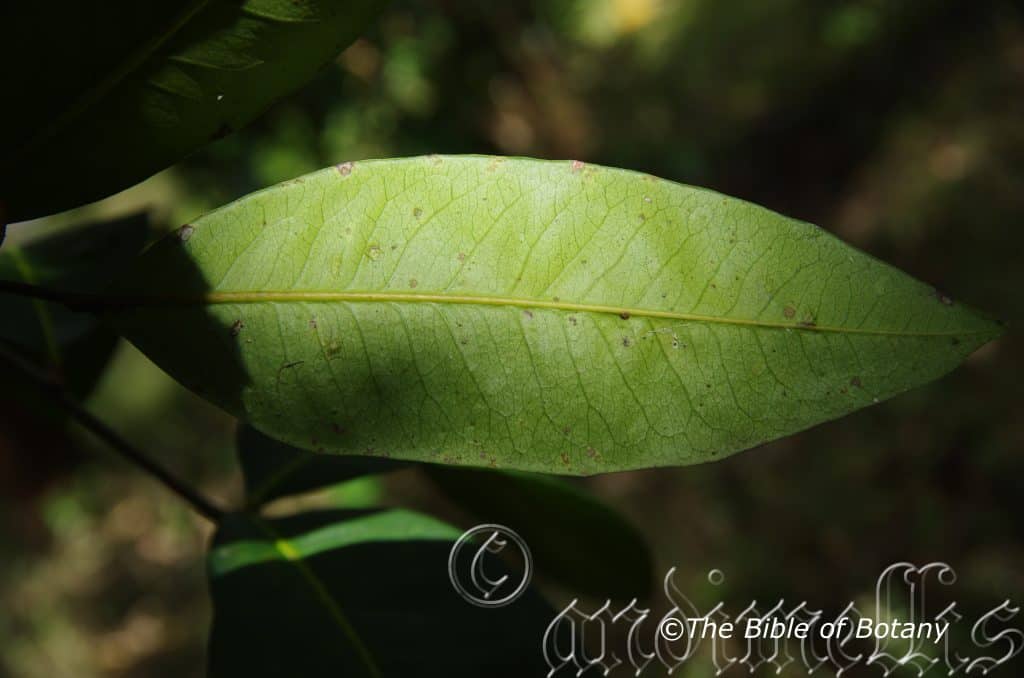
LBG Lismore NSW
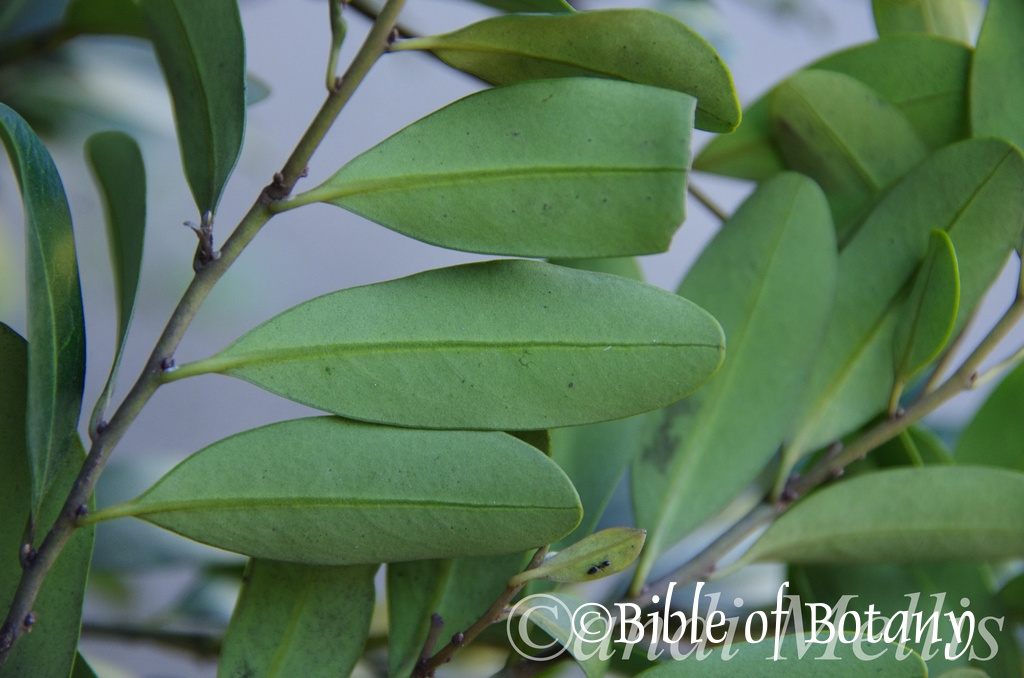
Rosser Gardens Qld.
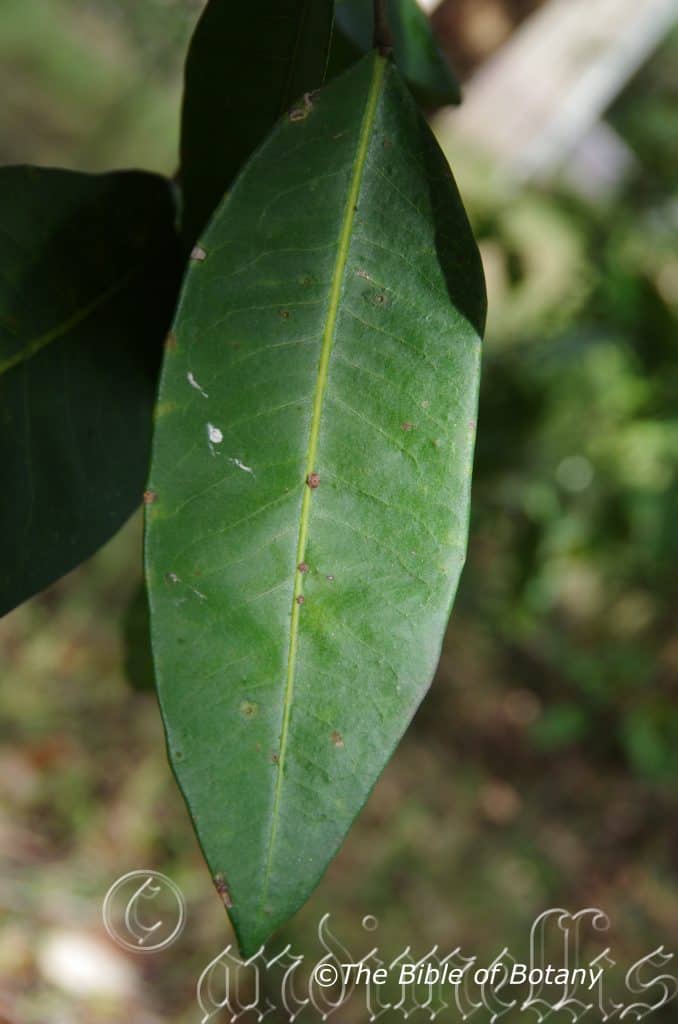
LBG Lismore NSW
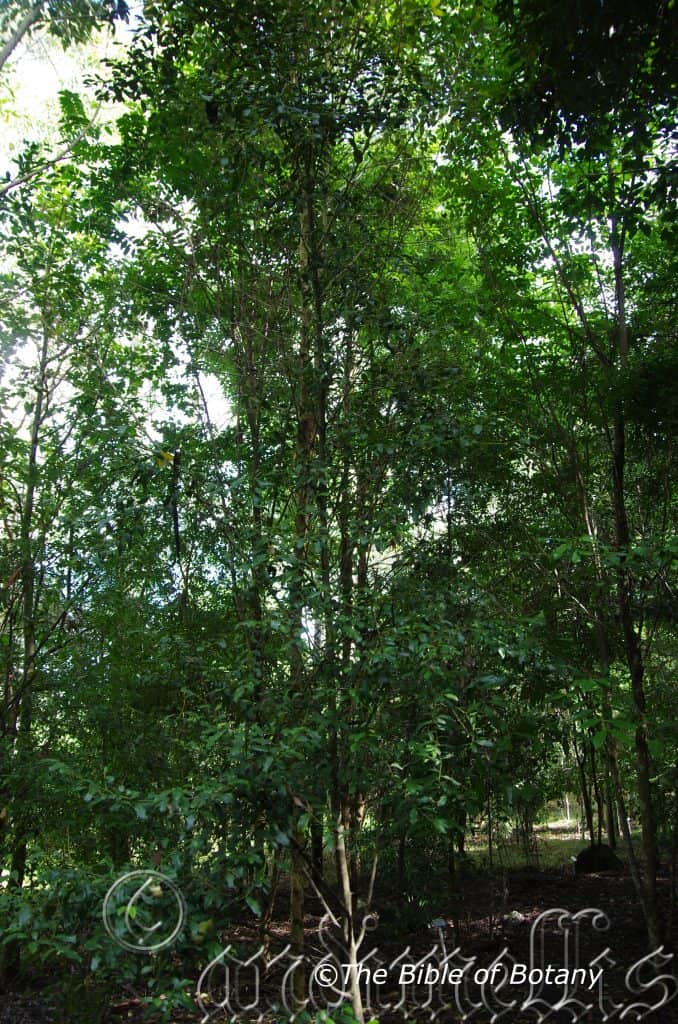
LBG Lismore NSW
Diospyros australis
Classification
Unranked: Eudicots
Unranked: Asterids
Order: Ericales
Family: Ebenaceae
Subfamily: Mimosoideae
Genus: From Dios, which is Ancient Greek for Zeus and Puros, which is Ancient Greek for wheat. It literally refers to the wheat of Zeus.
Species: From Terra Australis, which is Latin for land of the south. It refers to plants, which were first discovered from the land down under.
Common Name: Black Plum or Yellow Persimmon or Grey Plum
Distribution:
Diospyros australis is found south from Cairns to east of Canberra. It is found on and east of the Great Dividing Range.
https://avh.ala.org.au/occurrences/search?taxa=Diospyros+australis#tab_mapView
Habitat Aspect Climate:
Diospyros australis prefers full sun to light dappled shade. It grows adjacent to dry rainforests, in moist open woodlands and littoral rainforests. It is most common in riparian zones and gallery rainforests. The altitude ranges from 5 meter ASL to 1150 meters ASL.
The temperatures range from 10 degrees in July to 40 degrees in January.
The rainfall ranges from lows of 800mm to an average of 3200mm annually.
Soil Requirements:
Diospyros australis prefers better quality light clays to medium clays. The soils are derived from decomposed brown basalt, black basalt or shale. The soils pH ranges from 4.5pH to 6pH are preferred. It does not tolerate of waterlogged soils. Non saline soils to moderately saline soils are tolerated.
Height & Spread:
Wild Plants: 8m to 20m by 6m to 10m.
Characteristics:
Diospyros australis‘s bark is deep grey-brown, deep grey to almost black and scabrous. The branches are a light grey glabrous to scabrous with some flaky patches. The branchlets are deep red-brown and glabrous while the buds are paler green. Juvenile growth is pale green and covered in a glaucous film.
Diospyros australis‘s simple oblong to elliptical leaves measure 30mm to 100mm in length by 15mm to 40mm in width. The petioles measure 3mm to 6mm in length. The bases are rounded while the apexes are obtuse to broadly acute. The margin is entire and slightly undulating. The discolourous, coriaceous laminas are deep sea-green and semi glossy to glossy on the upper laminas while the lower laminas are much paler and covered in a thick waxy, glaucous film. The laminas are flat to recurve upwards from the mid vein to the margins and are slightly undulating. The rounded mid vein is strongly prominent on the lower lamina and visible on the upper lamina. The margins are entire.
The inflorescences of Diospyros australis are imperfect. The male and female flowers are 4 merous. The calyx and the 4 dull broadly obtuse pale green erect lobes measure 3mm to 4mm in length including the lobes. The corolla measures 3mm to 4mm in length while the 4 petals measure 5mm to 7mm in length by 2.5mm to 3mm in width. The flowers are white or cream. The peduncles are 2.5mm to 3mm in length.
The male flowers are clustered in the leaf axils. The 8 yellow-ochre stamens measure 3mm to 3.5mm in length.
The female flowers are born singularly, in pairs or usually threes from the leaf axils. The 8 pale yellow staminodes in the female flowers measure 1mm to 1.6mm in length. The single stout, plump style measures 3.5mm to 4mm in length. The petioles measure 5mm to 6mm in length. Flowering occurs from December to March.
Diospyros australis‘s fruits are large globular indehiscent berries. The berries measure 10mm to 15mm in length by 12mm to 18mm in diameter. The chartaceous sepals are persistent at the base of the fruit. The green berries turn pale red-green then to black when mature. The calyx is persistent and swells with the development of the fruit. Fruits ripen from early June to early August.
The 4 chamber berries contain 1 or 2 linear seeds in each chamber. They measure 8mm to 10mm in length by 3 to 6mm in diameter.
Wildlife:
It is difficult to find ripe fruit of Diospyros australis in the wild that has not been partially or fully consumed by birds. I have seen the Leather head or Noisy Friarbird Philemon corniculatus, along with the Noisy Miner Manorina melanocephala, eating the fruit. On our orchard it was interesting to note that silver eyes Zosterops lateralis, and noisy miners only ate fruit that had already been damaged or the skins had already been peeled back by other birds like the Rainbow Lorikeet Trichoglossus moluccanus. In the case of the silver eyes it was probably because the fruits were too large for them to break into. As for the noisy minor I would suspect it is because it is lazy or more opportunistic thinkers, more intelligent, or being more aggressive it is easier to let someone else do the hard work first then move in on their spoils.
Cultivation:
Diasporas australis is a beautiful small tree which could be more widely grown in tropical and subtropical gardens. Garden subjects will grow into dense small shade trees to 10 meters to 12 meters by 8 meters. It can be used as a specimen tree, or feature tree, in rainforest gardens with similar size trees like Harpullia pendula or Acmena smithii. The leaves are large and glossy. The trunk can give a rainforest garden colour at eye level or add interest planted next to trees or differing barks. The flowers are sweetly scented on the males and then there is the fruit which is reminiscent of a tangy pear crossed with a fig.
It is very useful as a backdrop small tree with smaller shrubs or trees being planted adjacent to them in the larger or medium garden. It is not necessary to have contrasting foliages if a strong silhouette affect is sought. Use broader spreading shrubs if a tree is grown centrally or small slimline trees if a large shrub is the central feature. This gives the impression that they like being the center of attention which they deserve.
Contrasting finer, pale green leaf shrubs with a profusion of flowers can be used in a central garden bed. Here Diospyros australis can be used as a small tree in a small area or a large shrub in a larger garden bed.
Propagation:
Seeds: Diospyros australis seeds are very easy to grow. Sow the seeds into a seed raising mix. Cover with 5mm of the mix and place the trays in a warm place to germinate. When the seedlings are 25mm to 50mm tall, prick them out and plant them into 50mm native tubes using a seed raising mix.
Once the seedlings reach 200mm to 250mm in height plant them out into their permanent position. For mass plantings plant them at 10 meter to 12 meter spacing if the trees are being used for fruit or in a park like atmosphere or closer at 10 meters for the rainforest look. In an orchard they could be planted at 8 meter centers and remove the annual growth annually.
Fertilize using seaweed, fish emulsion or organic chicken pellets soaked in water on an alternate basis. Fertilize every two months until the plants are established then annually in early September to October to maintain health, vitality and better flowering.
Further Comments from Readers:
Hi reader, it seems you use The Bible of Botany a lot. That’s great as we have great pleasure in bringing it to you! It’s a little awkward for us to ask, but our first aim is to purchase land approximately 1,600 hectares to link several parcels of N.P. into one at The Pinnacles NSW Australia, but we need your help. We’re not salespeople. We’re amateur botanists who have dedicated over 30 years to saving the environment in a practical way. We depend on donations to reach our goal. If you donate just $5, the price of your coffee this Sunday, We can help to keep the planet alive in a real way and continue to bring you regular updates and features on Australian plants all in one Botanical Bible. Any support is greatly appreciated. Thank you.
In the spirit of reconciliation we acknowledge the Bundjalung, Gumbaynggirr and Yaegl and all aboriginal nations throughout Australia and their connections to land, sea and community. We pay our respect to their Elders past, present and future for the pleasures we have gained.
Diospyros calycantha
Classification
Unranked: Eudicots
Unranked: Asterids
Order: Ericales
Family: Ebenaceae
Subfamily: Mimosoideae
Genus: From Dios, which is Ancient Greek for Zeus and Puros, which is Ancient Greek for wheat. It literally refers to the wheat of Zeus.
Species: From Kalyx/Kalyptein, which are Greek for a husk or covering and Antha/Anthos, which are Ancient Greek for the male reproductive organ in a flower or the flower. It refers to the overall, unusual beauty of the flowers and stamens.
Common Name: Cape Ebony.
Distribution:
Diospyros calycantha is found along the Kimberley coast in north western, Western Australia.
It would be quite reasonable to assume the plants do occur across the top end in Australia though I have no conclusive proof that it does.
In the east it is found south from some of the Torres Strait Islands and the tip of Cape York Peninsula to Mackay.
https://avh.ala.org.au/occurrences/search?taxa=Diospyros+calycantha#tab_mapView
Habitat Aspect Climate:
Diospyros calycantha prefers full sun to light dappled shade. It grows adjacent to dry rainforests, monsoonal forests, in open woodlands and dry vine forests. It is most common in the corridors between various types of rainforests. The altitude ranges from 5 meters ASL to 260 meters ASL.
The temperatures range from 10 degrees in July to 40 degrees in January.
The rainfall ranges from lows of 1200mm to an average of 3200mm annually.
Soil Requirements:
Diospyros calycantha prefers light clays to medium clays. The soils are derived from decomposed granites, brown basalt, black basalt, shale or sandstone. The soils pH ranges from 5pH to 6pH are preferred. It does not tolerate of waterlogged soils. Non saline soils to moderately saline soils are tolerated.
Height & Spread:
Wild Plants: 10m to 20m by 6m to 17m.
Characteristics:
Diospyros calycantha‘s bark is deep brown, deep grey to almost black and scabrous. The branches are a pale grey glabrous to scabrous with some flaky patches. The branchlets and young juvenile shoots are deep green and glabrous while the buds are paler green.
Diospyros calycantha‘s simple alternate elliptical leaves measure 60mm to 120mm in length by 30mm to 45mm in width. The glabrous petioles measure 3mm to 5mm in length. The bases are rounded-cuneate while the apexes are broadly acute to broadly acuminate with an obtuse apiculate tip. The discolourous laminas are semi glossy, glabrous and deep sea green on the upper lamina while the lower lamina is paler. The margin is entire and slightly undulating. The margins curve slightly upwards from the mid vein. The mid vein is prominent on the lower lamina and distinctly visible from the upper lamina.
The inflorescences of Diospyros calycantha are 4 merous and dioecious. The male and female flowers appear on the same tree. The pedicels measure 5mm to 6mm in length.
The 4 merous male calyxes have rounded apexes and measure 2.5mm to 3mm in length with 0.5mm long round lobes. The corollas measure 8mm to 10mm in length by 3mm to 4.5mm in diameter. The 4 cupular lobes are broad elliptical, glabrous with an obtuse apex. They measure 5mm to 6.5mm in length by 5mm to 6.5mm in diameter. The 16 dimorphic white to cream filaments are fused near the base to form a short tube. They measure 1.5mm to 3.5mm in length. The dimorphic anthers are yellow to yellow-orange and measure 1.2mm to 2mm in length.
The calyxes in the female flowers are thicker and fleshy than in the male flowers and have an acuminate apex. The single stout, plump style measures 5mm to 6mm in length. The ovary is sparsely covered in short white pannate hairs. The ovary has 4 locules. The 8 yellow staminodes in the female flowers measure 1mm to 3mm in length. The sweetly scented flowers appear from July to October.
Diospyros calycantha fruits are large globular or depressed globular indehiscent berries. The coriaceous sepals are persistent at the base of the berries, swell and become reflexed. The calyx is glabrous on the outer surface and densely covered in short white pannate hairs on the lower surface. The glabrous berries measure 30mm to 50mm across by 80mm to 100mm high. The green berries turn a pale lemon green pink, red or orange and sometimes black.
The 4 chamber berries contain 1 or 2 linear seeds in each chamber. They measure 8mm to 12mm in length by 6mm to 8mm in diameter.
Wildlife:
It is difficult to find ripe fruit of Diospyros calycantha in the wild that has not been eaten by birds.
Cultivation:
Diospyros calycantha is a beautiful small tree which should be more widely grown in tropical and subtropical gardens everywhere. Garden subjects will grow into dense small shade trees to 8 meters to 12 meters tall by 8 meters to 10 meters in diameter when grown in the open. It can be used as specimen trees, features, in rainforest gardens or an orchard for something very different. The leaves are large and glossy. The trunk can give a rainforest garden colour at eye level or add interest planted next to trees or differing barks like Harpullaia pendula or Duboisia myoporoides. The flowers are sweetly scented on the males and then there is the fruit which is reminiscent of a tangy pear crossed with a fig.
It is very useful as a backdrop small tree with smaller shrubs or trees being planted adjacent to them in the larger or medium garden. It is not necessary to have contrasting foliages if a strong silhouette affect is sought. Use broader spreading shrubs if a tree is grown centrally or small slimline trees if a large shrub is the central feature. This gives the impression that they like being the center of attention which they deserve.
It makes an ideal shade tree for parks, nature strips or home gardens and can be used as a starter plant for small rainforest.
It is suitable for all types of epiphytic ferns and orchids.
Propagation:
Seeds: Diospyros calycantha seeds are very easy to grow. Sow the seeds into a seed raising mix. Cover with 5mm of the mix and place the trays in a warm place to germinate. When the seedlings are 25mm to 50mm tall, prick them out and plant them into 50mm native tubes using a seed raising mix.
Once the seedlings reach 150mm to 200mm in height plant them out into their permanent position. For mass plantings plant them at 10 meter to 12 meter centers if the trees are being used for fruit or in a park like atmosphere or closer at 6 meter to 8 meter centers for the rainforest look.
Fertilize using seaweed, fish emulsion or organic chicken pellets soaked in water on an alternate basis. Fertilize every two months until the plants are established then annually in early September to October to maintain health, vitality and better flowering.
Further Comments from Readers:
Hi reader, it seems you use The Bible of Botany a lot. That’s great as we have great pleasure in bringing it to you! It’s a little awkward for us to ask, but our first aim is to purchase land approximately 1,600 hectares to link several parcels of N.P. into one at The Pinnacles NSW Australia, but we need your help. We’re not salespeople. We’re amateur botanists who have dedicated over 30 years to saving the environment in a practical way. We depend on donations to reach our goal. If you donate just $5, the price of your coffee this Sunday, We can help to keep the planet alive in a real way and continue to bring you regular updates and features on Australian plants all in one Botanical Bible. Any support is greatly appreciated. Thank you.
In the spirit of reconciliation we acknowledge the Bundjalung, Gumbaynggirr and Yaegl and all aboriginal nations throughout Australia and their connections to land, sea and community. We pay our respect to their Elders past, present and future for the pleasures we have gained.
Diospyros fasciculosa
Classification
Unranked: Eudicots
Unranked: Asterids
Order: Ericales
Family: Ebenaceae
Subfamily: Mimosoideae
Genus: From Dios, which is Ancient Greek for Zeus and Puros, which is Ancient Greek for wheat. It literally refers to the wheat of Zeus.
Species: From Fasiculus, which is Latin for a small, close cluster or to be bundled together. It refers to the description of leaves which are somewhat closely imbricated together.
Common Name: Grey Ebony or Clustered Persimmon or Long Tom.
Distribution:
Diospyros fasciculosa is a widespread species found in several disjunct populations south from the tip of Cape York Peninsula in far north east Queensland to near Iluka in far northern coastal New South Wales.
https://avh.ala.org.au/occurrences/search?taxa=Diospyros+fasciulosa#tab_mapView
Habitat Aspect Climate:
Diospyros fasciculosa prefers full sun to light dappled shade. It grows in dry rainforests, monsoonal forests, littoral rainforests and gallery forests. It is more common close to the coast. The altitude ranges from 5 meter ASL to 500 meters ASL.
The temperatures range from 3 degrees in August to 40 degrees in January.
Its disjunct range is influenced on the annual rainfall which ranges from lows of 1200mm to an average of 3200mm annually.
Soil Requirements:
Diospyros fasciculosa prefers better quality coarse sands, fine sands, light clays to medium clays. The soils are usually derived from decomposed granites, black basalt, metamorphic rocks, sandstone or accumulated peaty beach sands. The soils pH ranges from 4.5pH to 6pH are preferred. It does not tolerate of waterlogged soils. Non saline soils to moderately saline soils are tolerated.
Height & Spread:
Wild Plants: 16m to 30m by 6m to 17m.
Characteristics:
Diospyros fasciculosa’s trunk is straight and fluted on larger specimens. The bark is grey to deep grey and glabrous to scabrous papillate lumps. The branchlets are a pale grey to mid-grey and covered in paler or brown-fawn papillate lumps. The new growth is deep green and glabrous soon turning grey.
Diospyros fasciculosa‘s simple alternate elliptical to elliptical-oblong leaves measure 50mm to 170mm in length by 15mm to 60mm in width. The glabrous petioles are slightly grooved on the upper surface and measure 5mm to 10mm in length. The bases are rounded-cuneate to cuneate while the apexes are acuminate, bluntly acute, tapering acute with an obtuse tip to obtuse. The discolourous laminas are semi glossy, glabrous and deep green to sea-green on the upper laminas while the lower laminas are yellow-green and dull. The laminas are flat to recurve upwards from the mid vein to the margins and may decurve from the middle section to the apexes and are flat or undulating. The margins are entire. The pale yellow-green, rounded mid vein is strongly prominent on the lower lamina and distinctly visible from the upper lamina. The lateral veins are slightly prominent on the lower laminas and are clearly visible on the upper laminas and curve to form loops but the loops are not completed. The minute, dull oil dots are barely visible with the naked eye and are scattered across the lamina. The laminas are convex between the lateral veins.
The inflorescences of Diospyros fasciculosa are usually 3 or at times 4 merous, are imperfect and born in dense clusters from the leaf axils. The pedicels measure 1.5mm to 3.5mm in length.
The male inflorescences’ have rounded apexes and measure 2.5mm to 4.5mm to 5.5mm in length with obtuse lobes. The green calyx tubes are glabrous and measure 1.5mm to 2mm in length including the 4 broad obtuse lobes. The white to cream corollas are covered in pale creamy fawn sericeous hairs externally and are glabrous internally. The corollas measure 4mm to 5mm in length by 4mm to 5mm in diameter. The 16 to 20 dimorphic white to cream filaments are fused near the base and form two distinct rows. The dimorphic anthers are yellow to yellow-orange.
The female flowers are similar to the male flowers. The single stout, pale green style measures 4mm to 5mm in length. The staminodes in the female flowers are cream. The sweetly scented flowers appear from September to November and again in May in favourable seasons.
Diospyros fasciculosa fruits are large globular to ovoidal berries. The coriaceous sepals are persistent at the base of the berries, swell and become reflexed while the style is persistent at the apex. The glabrous berries measure 15mm to 19mm in length by 12mm to 15mm in diameter. Usually only one fruit matures from each cluster. The green berries turn orange-red then black when ripe. The berries ripen from April to July.
Wildlife:
Diospyros fasciculosa supports wildlife in every nook and cranny from the fluted trunks which are great habitat for spiders and insects which in return foster insectivorous birds. Top Knot Pigeons (Lopholaimus antarcticus), Wompoo Pigeons (Ptilinopus magnificus), White Headed Pigeons (Columba leucomela), Green Winged Pigeons (Chalcophaps indica), Wonga Pigeons (Leucosarcia melanoleuca), Satin Bower Birds (Ptilonorhynchus violaceus) are amongst some of the local birds which attend the plants.
The leaves are also the preferred tree for the Bright Forest Blue Butterfly Pseudodipsas cephenes.
Cultivation:
Diospyros fasciculosa is a beautiful small tree which could be more widely grown in tropical and subtropical gardens. Garden subjects of will grow into dense small shade trees to 8 meters to 12 meters tall by 8 meters to 10 meters in diameter when grown in the open. It can be used as specimen tree in rainforest gardens or an orchard for something very different. The leaves are large and glossy. The trunk can give a rainforest garden colour at eye level or add interest planted next to trees or differing barks. The flowers are sweetly scented on the males and then there is the fruit which is reminiscent of a tangy pear crossed with a fig.
It is useful as a backdrop tree with smaller shrubs or trees being planted adjacent to them in the larger or medium garden. It is not necessary to have contrasting foliages if a strong silhouette affect is sought. Use broader spreading shrubs if a tree is grown centrally or small slim line trees if a large shrub is the central feature. This gives the impression that they like being the center of attention which they deserve.
It makes an ideal shade tree for parks, nature strips or home gardens and can be used as a starter plant for small rainforests.
It is suitable for all types of epiphytic ferns and orchids.
Contrasting finer, pale green leaf shrubs with a profusion of flowers can be used in a central garden bed. Here Diospyros fasiculosa can be used as a small tree in a small area or a large shrub in a larger garden bed.
The tree would make a very good accent trees in front of low set or 2 story homes, commercial, industrial sheds or school buildings where it will break up hard rigid architectural lines and give warmth and breadth to a building.
Try using it in a courtyard, foyer or indoor garden in commercial entrances to break the ice and give a feeling of business as usual but somehow make the business more relaxing.
The plant has good potential as a future horticultural crop particularly if good tasting berries can be maintained on larger fruit. In cultivation where optimum conditions can be replicated then the trees will produce 2 crops one in April to July and a second in November to early December would be encouraging. Both these times are when the maximum number of pickers would be available for harvesting and packing. The trees are long lived which is another plus in the orchard. Birds and Flying foxes could be the downside to large scale orchards and the ultimate height of the trees.
Propagation:
Seeds: Diospyros fasciculosa seeds are slow and erratic to germinate and may take over a year to sprout. Sow the seeds sparingly into a seed raising mix so that the juvenile plants can be pricked out at odd times during the year without disturbing the other seeds. Cover with 5mm of the mix and place the trays in a warm place to germinate. When the seedlings are 25mm to 50mm in height, prick them out and plant them into 50mm native tubes using a seed raising mix.
Once the seedlings reach 150mm to 200mm in height plant them out into their permanent position. For mass plantings plant them at 10 meter to 12 meter centers if the trees are being used for fruit or in a park like atmosphere or closer at 6 meter to 8 meter centers for the rainforest look.
Fertilize using seaweed, fish emulsion or organic chicken pellets soaked in water on an alternate basis. Fertilize every two months until the plants are established then annually in early September to October to maintain health, vitality and better flowering.
Further Comments from Readers:
Hi reader, it seems you use The Bible of Botany a lot. That’s great as we have great pleasure in bringing it to you! It’s a little awkward for us to ask, but our first aim is to purchase land approximately 1,600 hectares to link several parcels of N.P. into one at The Pinnacles NSW Australia, but we need your help. We’re not salespeople. We’re amateur botanists who have dedicated over 30 years to saving the environment in a practical way. We depend on donations to reach our goal. If you donate just $5, the price of your coffee this Sunday, We can help to keep the planet alive in a real way and continue to bring you regular updates and features on Australian plants all in one Botanical Bible. Any support is greatly appreciated. Thank you.
In the spirit of reconciliation we acknowledge the Bundjalung, Gumbaynggirr and Yaegl and all aboriginal nations throughout Australia and their connections to land, sea and community. We pay our respect to their Elders past, present and future for the pleasures we have gained.
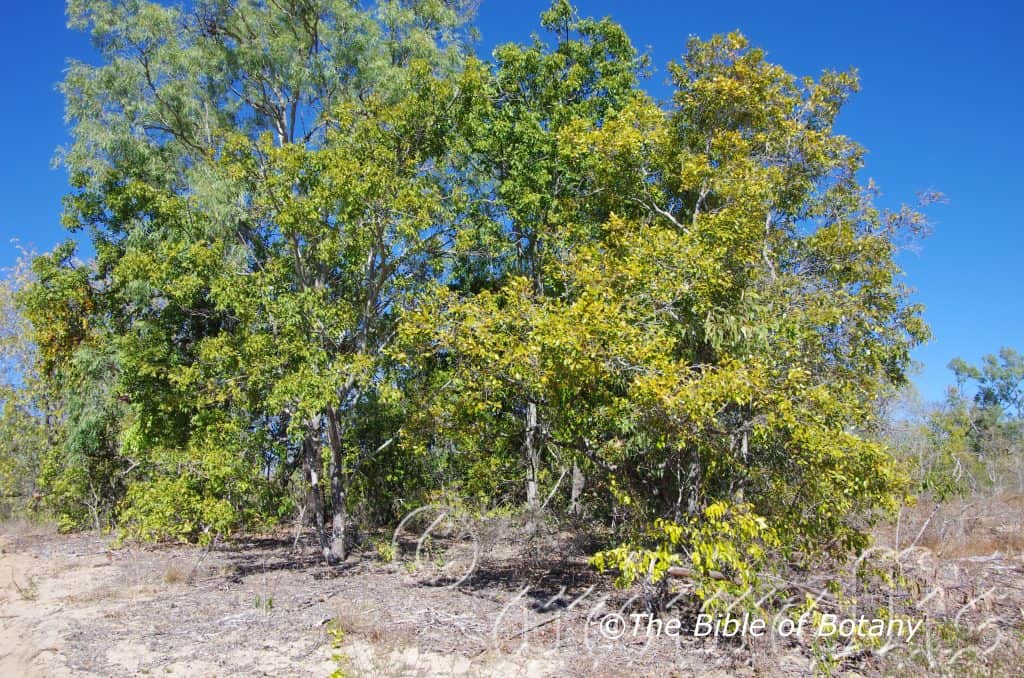
Bushland Beach Qld.
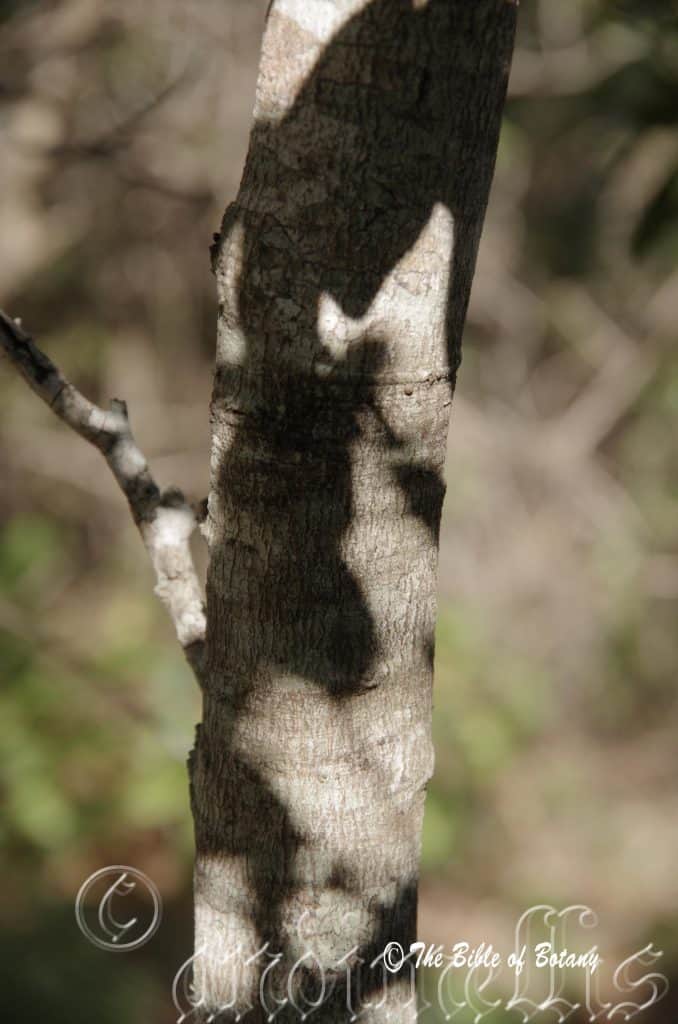
Bushland Beach Qld.
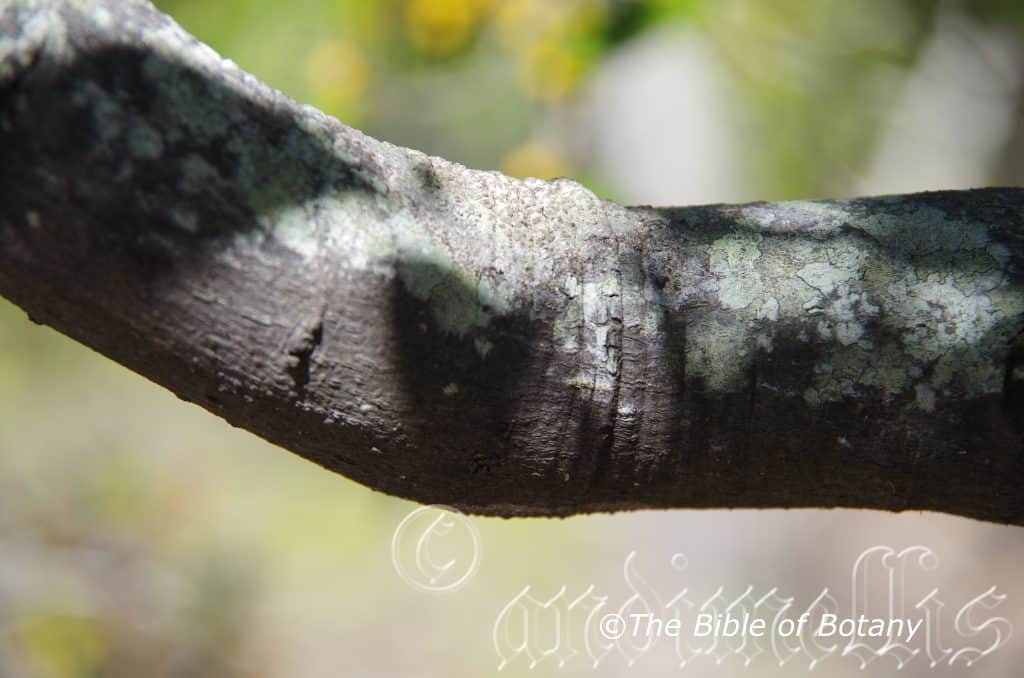
Bushland Beach Qld.
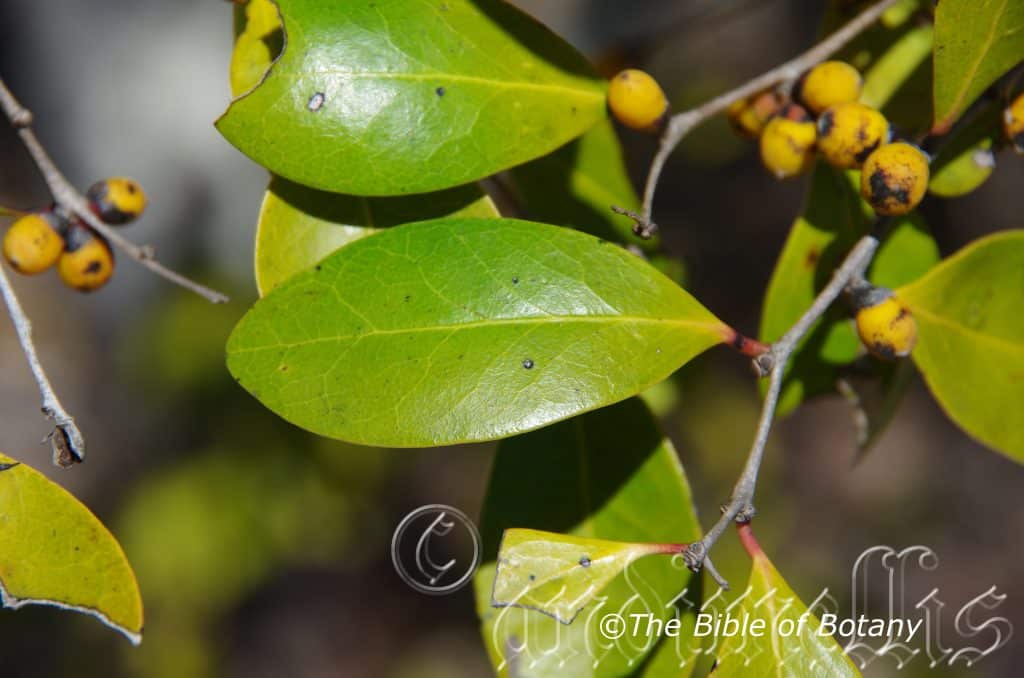
Bushland Beach Qld.
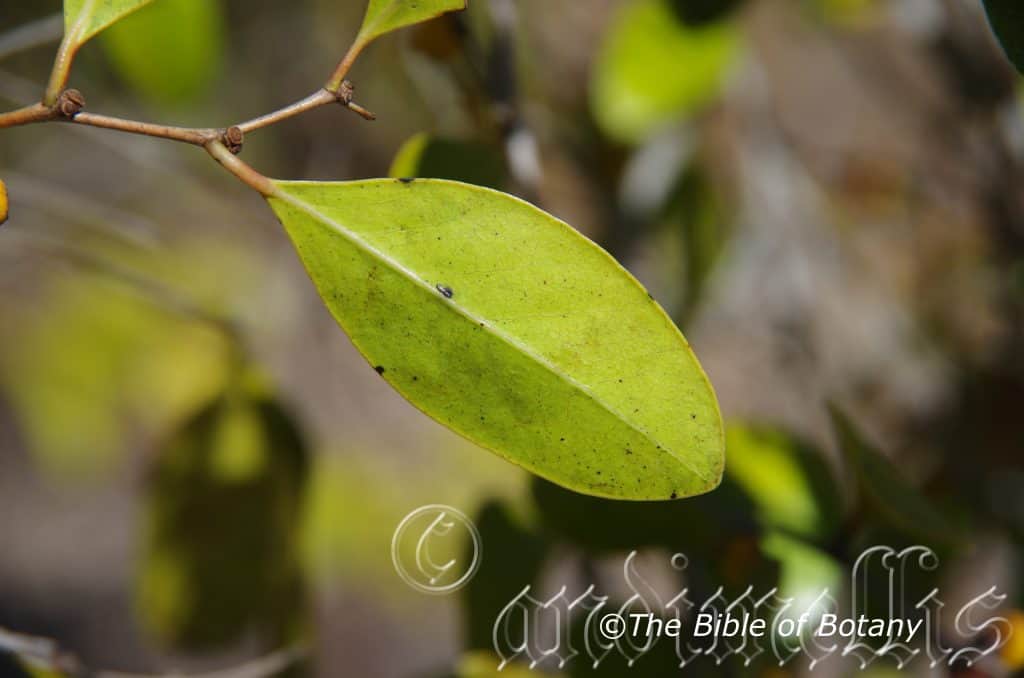
Bushland Beach Qld.
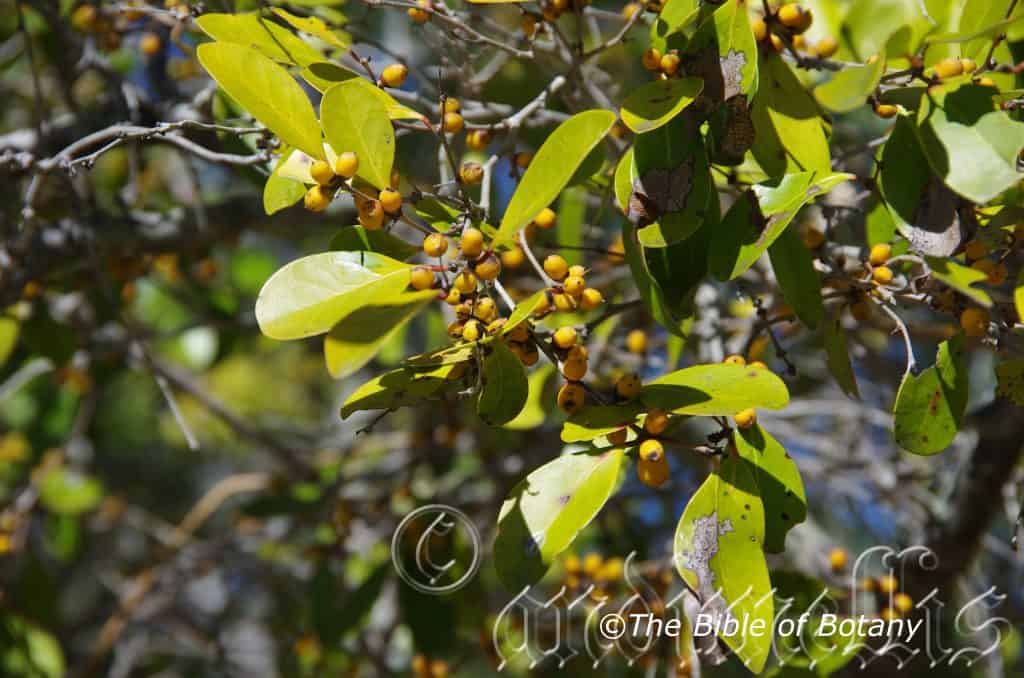
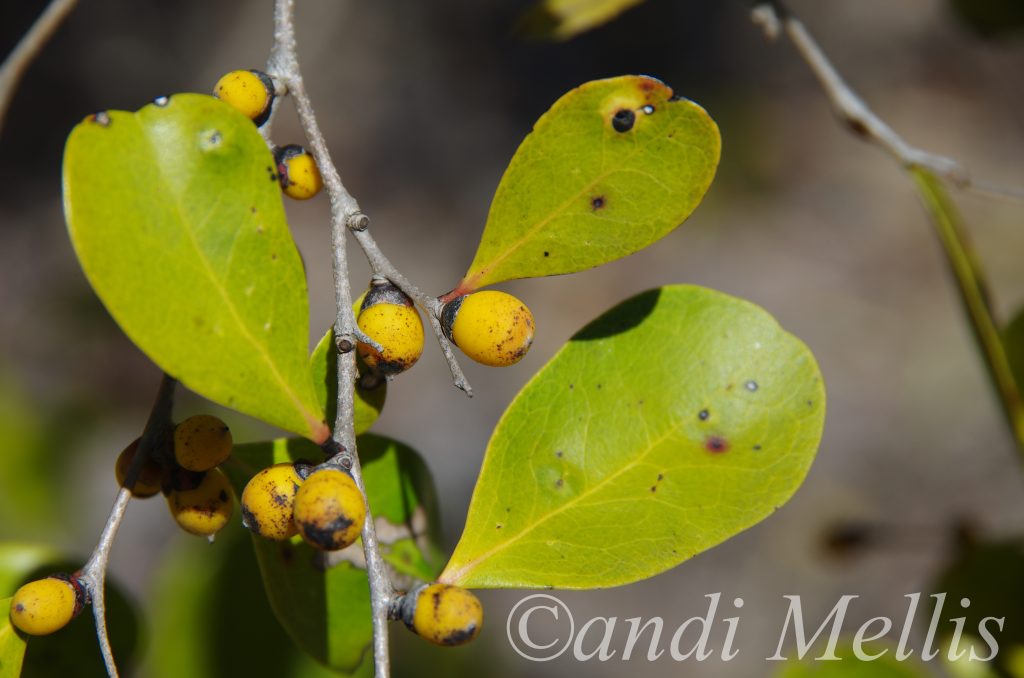
Bushland Beach Qld.
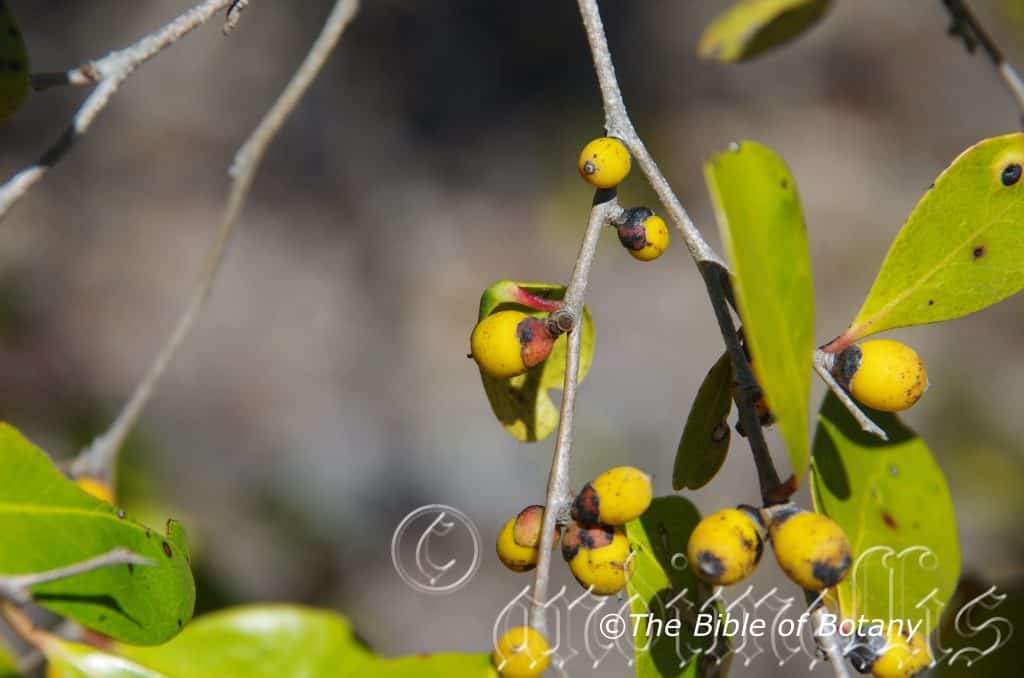
Bushland Beach Qld.
Diospyros geminata
Classification
Unranked: Eudicots
Unranked: Asterids
Order: Ericales
Family: Ebenaceae
Subfamily: Mimosoideae
Genus: From Dios, which is Ancient Greek for Zeus and Puros, which is Ancient Greek for wheat. It literally refers to the wheat of Zeus.
Species: From Gemini, which is Latin for a twin. It refers to the yellow fruit ripening to orange/red and often having two fruits to the cupular calyxes.
Common Name:
Distribution:
Diospyros geminata is a widespread species found continuously from The Thursday Islands north of Cape York Peninsula in far north east Queensland to Mount Lindesay on the Queensland New South Wales border. It is mainly found on and east of The Great dividing range to the coast.
It is also found in new Guinee.
https://avh.ala.org.au/occurrences/search?taxa=Diospyros+geminata#tab_mapView
Habitat Aspect Climate:
Diospyros geminata prefers full sun to light dappled shade. It grows in dry rainforests, gallery forests and vine coastal littoral rainforests. It is more common close to the coast. The altitude ranges from 5 meter ASL to 500 meters ASL.
The temperatures range from 3 degrees in August to 40 degrees in January.
The annual rainfall ranges from lows of 1200mm to an average of 3200mm annually.
Soil Requirements:
Diospyros geminata prefers better quality coarse sands, fine sands, light clays to medium clays. The soils are usually derived from decomposed granites, black basalt, metamorphic rocks, sandstone or accumulated peaty beach sands. The soils pH ranges from 4.5pH to 6pH are preferred. It does not tolerate of waterlogged soils. Non saline soils to moderately saline soils are tolerated.
Height & Spread:
Wild Plants: 8m to 12m by 4m to 6m.
Characteristics:
Diospyros geminata‘s trunk is straight and fluted on larger specimens. The bark is grey to deep grey finely fissured and sparsely covered in papillate lumps. The branchlets are a pale grey to mid-grey and sparsely covered in papillate lumps.
Diospyros fasciculosa‘s simple alternate ovate to broad elliptical leaves measure 30mm to 100mm in length by 12mm to 50mm in width. The glabrous, deep pink to reddish-pink petioles measure 2mm to 6mm in length. The bases are rounded-cuneate to broad cuneate while the apexes are broad acute bluntly acute. The discolourous laminas are semi glossy, glabrous and deep green to sea-green on the upper laminas while the lower laminas are paler and somewhat duller. The laminas recurve upwards from the mid vein to the entire margins and decurve slightly on the apical haly to the apex. The pale yellow-green, rounded mid vein and main lateral veins are prominent on the upper lamina and faintly visible from the lower lamina. The lateral veins. The minute, dull oil dots are barely visible with the naked eye and are scattered across the lamina. The laminas are convex between the 5 to 8 lateral veins form rather irregular loops inside the blade margin. There are 1 to 5 glands each side or midvein on basal half, while the numerous, small oil dots can be seen with a hand lens.
The inflorescences of Diospyros geminata are usually 3 or at times 4 merous, are imperfect and born in clusters of 3 or at times 4 from the leaf axils. The stout pedicels are sessile or subsessile.
The male flowers are fasciculate on several condensed axes with 7 to 20individual flowers in each axil. The greenish-yellow calyx tubes measure 1.4mm to 2mm in length, while the 3 or at times 4 obtuse lobes measure 0.7mm to 1mm in length. They are sparsely covered in short, fine, white appressed hairs. The corolla is sparsely covered in short, fine, white appressed hairs externally and measures 2.5mm to 3.7mm in length, while the 3 or at times 4 lobes mostly measure 2mm to 3mm in length. The 6 or 9 stamens are free, while the pistillode measures 0.5mm to 1mm in length.
The female flowers are fasciculate, sessile to subsessile, with 2 to 4 on a short, stout common peduncle. The calyx tube measures 1.3mm to 2mm in length and is covered in short, white, appressed hairs externally. The 3 lobes measure 2.5mm to 3.5mm in length is covered in short, white, appressed hairs externally. Staminodes absent while the 3 locular ovary measures 1.5mm to 2mm in length. The style is moderately to densely covered in long white hairs and measures 0.5mm in length.
Diospyros geminata fruits are large globular to ovoidal berries. The coriaceous sepals are persistent at the base of the berries, swell and become reflexed while the stout style is persistent at the apex. The 1 or 2 ar at times up to 4 glabrous berries measure 12mm to 14mm in length by 8mm to 12mm in diameter. The green berries turn bright yellow when ripe. The 1 to 3 seeds per berry measure 6mm to 7mm in length. The berries ripen from June to August.
Wildlife:
Diospyros geminata supports wildlife the Bright Forest Blue Butterfly, Pseudodipsas cephenes.
The fruit is reminiscent of a tangy pear crossed with a fig.
Cultivation:
Diospyros geminata is a beautiful small tree which should be more widely grown in tropical and subtropical to semi arid gardens. Garden subjects will grow into dense small shade trees to 6 meters to 8 mete. It can be used as specimen tree in rainforest gardens. The leaves are large and glossy. The trunk can give a rainforest garden colour at eye level or add interest planted next to trees or differing barks. The flowers are sweetly scented on the male flowers.
It is very useful as a backdrop tree with smaller shrubs or trees being planted adjacent to them in the larger or medium garden. It is not necessary to have contrasting foliages if a strong silhouette affect is sought. Use broader spreading shrubs if a tree is grown centrally or small slim line trees if a large shrub is the central feature. This gives the impression that they like being the center of attention which they deserve.
This tree makes an ideal shade tree for parks, nature strips or home gardens and can be used as a starter plant for small rainforests.
The bark is suitable for all types of epiphytic ferns and orchids.
Contrasting finer, pale green leaf shrubs with a profusion of flowers can be used in a central garden bed. Here Diospyros geminata can be used as a small tree in a small area or a large shrub in a larger garden bed.
The tree would make a good accent tree in front of low set or 2 story homes, commercial, industrial sheds or school buildings where they will break up hard rigid architectural lines and give warmth and breadth to a building.
Diospyros geminata has good potential as a future horticultural crop particularly if good tasting berries can be maintained, larger fruiting trees and smaller seeds culled for propagating from. In cultivation where optimum conditions can be replicated then the trees will produce 2 crops one in April to July and a second in November or early December would be encouraging. Both these times are when the maximum number of pickers would be available for harvesting and packing. The trees are long lived which is another plus in the orchard. Birds and Flying foxes could be the downside to large scale orchards and the ultimate height of the trees.
Propagation:
Seeds: Diospyros geminata seeds are slow and erratic to germinate and may take over a year to sprout. Sow the seeds sparingly into a seed raising mix so that the juvenile plants can be pricked out at odd times during the year without disturbing the other seeds. Cover with 5mm of the mix and place the trays in a warm place to germinate. When the seedlings are 25mm to 50mm in height, prick them out and plant them into 50mm native tubes using a seed raising mix.
Once the seedlings reach 150mm to 200mm in height plant them out into their permanent position. For mass plantings plant them at 10 meter to 12 meter centers if the trees are being used for fruit or in a park like atmosphere or closer at 6 meter to 8 meter centers for the rainforest look.
Fertilize using seaweed, fish emulsion or organic chicken pellets soaked in water on an alternate basis. Fertilize every two months until the plants are established then annually in early September to October to maintain health, vitality and better flowering.
Further Comments from Readers:
Hi reader, it seems you use The Bible of Botany a lot. That’s great as we have great pleasure in bringing it to you! It’s a little awkward for us to ask, but our first aim is to purchase land approximately 1,600 hectares to link several parcels of N.P. into one at The Pinnacles NSW Australia, but we need your help. We’re not salespeople. We’re amateur botanists who have dedicated over 30 years to saving the environment in a practical way. We depend on donations to reach our goal. If you donate just $5, the price of your coffee this Sunday, We can help to keep the planet alive in a real way and continue to bring you regular updates and features on Australian plants all in one Botanical Bible. Any support is greatly appreciated. Thank you.
In the spirit of reconciliation we acknowledge the Bundjalung, Gumbaynggirr and Yaegl and all aboriginal nations throughout Australia and their connections to land, sea and community. We pay our respect to their Elders past, present and future for the pleasures we have gained.
Diospyros pentamera
Classification
Unranked: Eudicots
Unranked: Asterids
Order: Ericales
Family: Ebenaceae
Subfamily: Mimosoideae
Genus: From Dios, which is Ancient Greek for Zeus and Puros, which is Ancient Greek for wheat. It literally refers to the wheat of Zeus.
Species: From Penta, which is Ancient Greek for five and Merus, which is Latin for five rows. It refers to flowers, which have five members -5 sepals, 5 petals and 5 or at times 10 stamens.
Common Name: Myrtle Ebony or Grey Persimmon or Grey Plum.
Distribution:
Diospyros pentamera is found in several disjunct populations south from the Atherton Tablelands and possibly the Daintree National Park in far northern Queensland to the Durras Mountains in central coastal New South Wales. It is found on and east of the Great Dividing Range to the coast and off shore islands.
https://avh.ala.org.au/occurrences/search?taxa=Diospyros+pentamera#tab_mapView
Habitat Aspect Climate:
Diospyros pentamera prefers full sun to light dappled shade. It grows in dry rainforests, gallery forests or littoral rainforests. The altitude ranges from 400 meter ASL to 1100 meters ASL.
The temperatures range from minus 2 degrees in August to 38 degrees in January.
Its disjunct range is influenced on the annual rainfall which ranges from lows of 1000mm to an average of 3200mm annually.
Soil Requirements:
Diospyros pentamera prefers better quality light clays to medium clays. The soils are derived from decomposed granites, brown basalt, black basalt, sandstone or accumulated peaty beach sands. The soils pH ranges from 5pH to 6pH are preferred. It does not tolerate of waterlogged soils. Non saline soils to moderately saline soils are tolerated.
Height & Spread:
Wild Plants: 16m to 30m by 6m to 17m.
Characteristics:
Diospyros pentamera‘s trunk is straight and fluted on larger specimens. The bark is deep grey to deep grey-black, scabrous with widely spaced shallow furrows. The branchlets are grey to mid-grey and scabrous. The new growth is mid blue-green to mid grey-green, with a slight zig-zag growth pattern and covered in pale brown sericeous hairs.
Diospyros pentamera‘s simple alternate lanceolate to narrow elliptical leaves measure 30mm to 110mm in length by 10mm to 35mm in width. The glabrous petioles are slightly grooved on the upper surface and measure 2mm to 5mm in length. The bases are cuneate with asymmetrical attenuation while the apexes are tapering acute with a small obtuse tip to acute. The discolourous laminas are deep olive-green to sea-green, glabrous and semi glossy to dull on the upper laminas while the lower laminas are much paler to yellowish-green, glabrous or more often covered in pale brown sericeous hairs. The laminas are flat to strongly recurve upwards from the mid vein to the margins and may decurve from the middle section to the apexes and maybe undulating. The margins are entire. The pale yellow-green, rounded mid vein is prominent on the lower lamina and visible on the upper lamina. The main lateral veins are slightly prominent on the lower laminas while the reticulated veins are visible on both laminas and form a number of loops inside the margins. The 4 to 12 minute, dull oil glands are barely visible with the naked eye and are scattered across the lower lamina.
The inflorescences of Diospyros pentamera are 5 merous, are imperfect and born on small umbels of 3 to 5 or rarely 6 from the leaf axils. The peduncles and pedicels are densely covered in silver to silvery white sericeous hairs. The peduncles measure 6mm to 10mm in length while the pedicels measure 2mm to 2.5mm in length. The mid green to mid olive-green calyx and 5 calyx lobes are densely covered in pale fawn-brown sericeous hairs externally and measure 2mm to 2.2mm in length including the 0.4mm to 0.5mm acute lobes. The white sepals are densely covered in silvery to silvery-white sericeous hairs externally and measure 4mm to 4.5mm in length. The corolla and corolla lobes are densely covered in silver to silvery-white sericeous hairs externally and sparsely covered in silver to silvery-white sericeous hairs internally. The corolla measures 4mm to 5mm in length including the lobes.
The male inflorescence’s 20 white filaments are fused near the base and form two distinct rows. The filaments are densely covered in long silver to silvery-white sericeous hairs. The anthers are white.
The female flowers are similar to the male flowers. The single stout, pale green style measures 4mm to 4.5mm in length. The staminodes in the female flowers are white. The sweetly scented flowers appear from October to December.
Diospyros pentamera fruits are large globular, ovoidal flattened ovoidal or orbicular berries. The coriaceous, sericeous sepals, swell and become reflexed are persistent at the base of the berries, while the style is persistent at the apex. The green berries turn orange-red then black when ripe. The glabrous berries measure 15mm to 19mm in length by 12mm to 16mm in diameter. Usually only one fruit matures from each cluster. The berries ripen from August to September.
Wildlife:
Diospyros pentamera supports wildlife in every nook and cranny from the fluted trunks which are great habitat for spiders and insects which in return foster insectivorous birds. Top Knot Pigeons (Lopholaimus antarcticus), Wompoo Pigeons (Ptilinopus magnificus), White Headed Pigeons (Columba leucomela), Green Winged Pigeons (Chalcophaps indica), Wonga Pigeons (Leucosarcia melanoleuca), Satin Bower Birds (Ptilonorhynchus violaceus) are amongst some of the local birds which attend to the fruits.
The Grey Headed Flying Fox Pteropus poliocephalus, have been reported as eating the fruit in northern New South Wales.
Cultivation:
Diospyros pentamera is a beautiful small tree which should be more widely grown in medium to large tropical and subtropical gardens. Garden subjects will grow into dense small shade trees to 8 meters to 12 meters tall by 8 meters to 10 meters in diameter when grown in the open. It can be used as specimen trees, in rainforest gardens. The trunk can give a rainforest garden colour at eye level or add interest planted next to trees or differing barks like Harpullia pendula or Duboisia myoporoides. The flowers are sweetly scented on the males and then there is the fruit which is reminiscent of a tangy pear crossed with a fig.
It is a useful backdrop tree with smaller shrubs or trees being planted adjacent to them in the larger or medium garden. It is not necessary to have contrasting foliages if a strong silhouette affect is sought. Use broader spreading shrubs if a tree is grown centrally or smaller slimline trees if a large shrub is the central feature. This gives the impression that they like being the center of attention which they deserve.
This tree would make an ideal shade tree for parks, nature strips or the home garden can be used as a starter plant for small rainforests.
It is suitable for all types of epiphytic ferns and orchids.
The tree would make a good accent trees in front of low set or 2 story homes, commercial, industrial sheds or school buildings where it will break up hard rigid architectural lines and give warmth and breadth to a building. Try using it in an entry foyer or indoor garden in commercial entrances to break the ice and give a feeling of business as usual but somehow make the business more relaxing.
Propagation:
Seeds: Diospyros pentameras’ seeds are slow and erratic to germinate and may take over a year to sprout. Sow the seeds sparingly into a seed raising mix so that the juvenile plants can be pricked out at odd times during the year without disturbing the other seeds. Cover with 5mm of the mix and place the trays in a warm place to germinate. When the seedlings are 25mm to 50mm in height, prick them out and plant them into 50mm native tubes using a seed raising mix.
Once the seedlings reach 150mm to 200mm in height plant them out into their permanent position. For mass plantings plant them at 10 meter to 12 meter centers if the trees are being used for fruit or in a park like atmosphere or closer at 6 meter to 8 meter centers for the rainforest look.
Fertilize using seaweed, fish emulsion or organic chicken pellets soaked in water on an alternate basis. Fertilize every two months until the plants are established then annually in early September to October to maintain health, vitality and better flowering.
Further Comments from Readers:
Hi reader, it seems you use The Bible of Botany a lot. That’s great as we have great pleasure in bringing it to you! It’s a little awkward for us to ask, but our first aim is to purchase land approximately 1,600 hectares to link several parcels of N.P. into one at The Pinnacles NSW Australia, but we need your help. We’re not salespeople. We’re amateur botanists who have dedicated over 30 years to saving the environment in a practical way. We depend on donations to reach our goal. If you donate just $5, the price of your coffee this Sunday, We can help to keep the planet alive in a real way and continue to bring you regular updates and features on Australian plants all in one Botanical Bible. Any support is greatly appreciated. Thank you.
In the spirit of reconciliation we acknowledge the Bundjalung, Gumbaynggirr and Yaegl and all aboriginal nations throughout Australia and their connections to land, sea and community. We pay our respect to their Elders past, present and future for the pleasures we have gained.
Diplachne fusca
Classification
Unranked: Monocots
Sub Class: Commelinids
Order: Cyperales
Family: Poaceae
Subfamily: Chloridiodeae
Genus: From Diploos, which is Ancient Greek for to double or be doubled and Akhne, which is Ancient Greek for a lemma or chaff. It refers to lemmas, which have two lobes.
Species: From Fuscus, which is Latin for a deep or pale grey-brown to reddish-brown colour or dusky brown. It refers to structures or organs or the soil preference of plants, which are grey-brown to reddish-brown in colour.
Common Name: Brown Beetle Grass.
Distribution:
Diplachne fusca is found from Gregory River catchment east of the Blackbraes Resources Reserves to Townsville on the east coast and south to Currawinya National Park in Queensland on the New South Wales border.
It is found west north west to Alice Springs and Palm valley in the MacDonald Ranges and south to the Fink River at Oodnadatta then South east to the Murray River to Albury where it heads north back to the coast near the Illawarra district. It is very common between Barham, Albury and Griffith.
https://avh.ala.org.au/occurrences/search?taxa=Diplachne+fusca#tab_mapView
Habitat Aspect Climate:
Diplachne fusca prefers full sun to very light dappled shade. It grows in dry open forests and dry open woodlands on flat plains especially in shallow depressions. It is also found along backwaters of inland streams, creeks, rivers and around billabongs, lakes ponds and dams. The altitude ranges from 15 meter ASL to 750 meters ASL.
The temperatures range from minus 3 degrees in August to 44 degrees in January.
The rainfall ranges from lows of 100mm to 2600mm average per annum.
Soil Requirements:
Diplachne fusca prefers sandy loams to heavy silty soils. The soils are usually derived from decomposed sandstone. The soils pH ranges from 5pH to 7pH are preferred. It tolerates seasonal waterlogged soils. Non saline soils to very saline soils are tolerated.
Height & Spread:
Wild Plants:0.5m to 1.5m by 0.1m to 0.3m.
Characteristics:
Diplachne fusca grows as a fine, slender, erect annual with few to many culms. The 1 to 3 node culms are reddish near the base and pale lime-green towards the apexes. The culms measure 100mm to 400mm in height. The culm nodes and culm internodes are glabrous. The plants have a fibrous root system.
Diplachne fusca‘s linear leaves measure 50mm to 190mm in length by 1.5mm to 5mm in width. The leaf loose sheath is scabrous. The apex is tapering to narrow acute. The ligule is scabrous with laciniata margins. The ligules measure 3mm to 8mm in length. Auricles are absent. The concolourous laminas are pale grass-green to pale blue-green and glabrous to scabrous. The laminas are convex to flat. The midribs are rounded and slightly prominent on the lower lamina. The leaf margins are entire.
The inflorescences of Diplachne fuscaare wispy panicles. The panicles measure 150mm to 400mm in length and densely branched. The branches are erect to spreading but not divaricate.
The lower glumes are narrow ovate with a narrow elliptic and almost sessile. There are 6 to 14 contorted individual florets to a spike.
The spikelets measure 1.3mm to 2mm in length. The apexes are acute to acuminate and measure 2.5mm to 3mm in length. The upper glumes are narrow oblong with acute to obtuse or mucronate apexes and measure 3.5mm to 5mm in length. The glumes keeled with 1 or 2 nerves.
The narrow oblong lemmas have 2 to 8 nerves and are glabrous. The sterile lemmas measure 3.5mm to 5mm in length. The dark brown to black mature florets fertile florets measure 1mm to 2mm in length and are minutely punctulata to finely streak. The lemmas are mucronate to shortly awn and are densely covered in white pilose hairs on the basal half. The palea is ciliate along the nerves.
There is 1 stamen on each spikelet. The flowers appear throughout the year in response to flooding or prolonged rain.
The fruits of Diplachne fusca seeds measure 2mm to 2.2mm in length. The green seeds turn pale straw-fawn when ripe.
Wildlife:
Diplachne fusca is a valuable grass for most herbaceous native animals like kangaroos and wallabies.
Cultivation:
Diplachne fusca is considered to be a good fodder crop. The leaves and stems are eaten and considered nutritional. It has a rapid growth rate once the soils become waterlogged. It recovers well from moderate grazing and is best managed by allowing a free period between grazing.
This grass is classified as a weed by gardeners. It gives small quantities of trash for mulch. The seed is much sought after by finches and small parrots and is a great addition for aviary birds. Small parrots especially budgerigahs relish the sweet juicy stems at least in aviary birds.
This is an ideal clump grass around medium pools and wet rockeries. It is best cut back as it starts to clump in order to gain more culms. It has a fine light wispy growth that offers frog protection during the breeding season. The reddish lower stems and lime green apexes offer a beautiful contrast of colour around the garden when used correctly. Do not over plant or they look weedy and the same can be said if it is under planted. Several small clumps of 3 to 5 plants planted at 150mm to 250mm centres look very smart.
Propagation:
Seeds: Diplachne fusca seeds can be sown directly onto prepared ground. Cover the area to be sown with about 10mm of sharp sand. Rake the surface gently and water in. Keep the area moist for around 10 days. Deeper watering and longer periods between watering will ensure deeper root penetration which means stronger healthier lawns.
Fertilize using seaweed, fish emulsion or organic chicken pellets soaked in water on an alternate basis. Fertilize every two months until the plants are established then annually in early September to October to maintain health, vitality and better flowering.
Further Comments from Readers:
Hi reader, it seems you use The Bible of Botany a lot. That’s great as we have great pleasure in bringing it to you! It’s a little awkward for us to ask, but our first aim is to purchase land approximately 1,600 hectares to link several parcels of N.P. into one at The Pinnacles NSW Australia, but we need your help. We’re not salespeople. We’re amateur botanists who have dedicated over 30 years to saving the environment in a practical way. We depend on donations to reach our goal. If you donate just $5, the price of your coffee this Sunday, We can help to keep the planet alive in a real way and continue to bring you regular updates and features on Australian plants all in one Botanical Bible. Any support is greatly appreciated. Thank you.
In the spirit of reconciliation we acknowledge the Bundjalung, Gumbaynggirr and Yaegl and all aboriginal nations throughout Australia and their connections to land, sea and community. We pay our respect to their Elders past, present and future for the pleasures we have gained.
Diplazium assimile
Classification
Unranked: Eupolypods
Division: Pteridophyta
Class: Polypodiopspida
Order: Polypodiales
Family: Athyriaceae
Tribe: Diplazieae
Subtribe: Diplaziineae
Genus: From Diplasios, which is Greek for to double or be doubled. It refers to ferns, which have a double covering over the spores.
Species: From Assimilis, which is Latin for alike or similar to. It refers to species, which resemble other species in the genus.
Common Name:
Distribution:
Diplazium assimile is found in several disjunct populations south from the Daintree National Park to the Millstream Falls National Park, the Eungella National Park, Carnarvon Gorge National Park and from Mount Bauple National Park in Queensland to Kiwarrak National Park near Nabiac in central coastal New South Wales. It is found on and east of the Great Dividing Range.
https://avh.ala.org.au/occurrences/search?taxa=Diplazium+assimile#tab_mapView
Habitat Aspect Climate:
Diplazium assimile prefers dense shade to light shade. It grows in cool, moist, sheltered positions in montane rainforests margins, tall open forests and moist gallery forests. The altitude ranges from 40 meter ASL to 1100 meters ASL.
The temperatures range from minus 2 degrees in August to 36 degrees in January.
The rainfalls range from lows of 950mm to 3200mm average per annum. Lower rainfall areas often have some orographic precipitation.
Soil Requirements:
Diplazium assimile prefers light clays to medium clays. The soils are derived from decomposed brown basalt, black basalt, metamorphic rocks. The soils pH ranges from 5pH to 6.5pH are preferred. It does not tolerate of waterlogged soils. Non saline soils to slightly saline soils are tolerated.
Height & Spread:
Wild Plants: 0.5m to 1m by 1.2m to 1.5m.
Characteristics:
Diplazium assimile has a short, thick and erect or short and creeping rhizome. The rhizome is covered in deep brown to deep rusty-brown glossy scales.
Diplazium assimile has large triangular tripinnate fronds. The divaricate fronds usually measure 450mm to 800mm in length but have been measured at 1200mm in length by 400mm to 750mm wide near the basal pinnae. The stipes and rachises are glabrous. The stipe is stout, fleshy and deep red-brown near the base and becomes paler and turns grass-green, olive-green or yellow-green as it proceeds towards the apex. The lower surfaces are paler than the upper surfaces. The stipes measure 100mm to 250mm in length while the main rachis measures 300mm to 600mm in length and the longest secondary rachises measure 50mm to 400mm in length with the longest pair being at the base.
The discolourous laminas are grass-green, on the upper laminas while the lower laminas are paler. The oblong pinnules are pale green, broad, membranous and lacy and mainly bipinnate. The pinnae are pinnatifid with the ultimate segments being oblong. The ultimate pinnules measure 5mm to 12mm in length by 3.5mm to 8mm in width. The margins are obtusely toothed.
The sterile pinnules and fertile pinnules are similar. Sporangia are arranged close to the base of the lobes along the veins on the lobes. The narrow oblong sori are inconspicuous and measure 0.8mm to 1.1mm in length. The indusium is persistent.
Wildlife:
Diplazium assimile‘s wildlife is unknown to the author.
Cultivation:
Diplazium assimile is a magnificent larger fern or small sub tree fern for courtyards, around sheltered swimming pools or in the rainforest garden where part shade or dappled light prevails all day. Diplazium assimile is excellent for inclusion in established rainforests where soil moisture is guaranteed.
It is best planted as single plants at random distances on shady raised garden beds or along streams and riparian zones. It would make a good feature especially if it is surrounded by small leafy plants with scarlet red flowers. Shrubs like Graptophyllum excelsum, Graptophyllum ilicifolium or Rhododendron loche would suffice beautifully with the lacy foliage contrasting against the small stiff leaves and red flowers. Viola hederacea, the native Peperomia blanda var. Floribunda, Peperomia tetraphylla and the dwarf Lomandra confertifolia all can add colour and leaf variation to good effect.
Propagation:
Spore: Diplazium assimile is one of the easier ferns to propagate from spore. Follow steps 1 to 13 and ensure good hygiene levels are maintained when dealing with this fern. It can easily contaminate other spore tray and will overpower more delicate and slower growing prothallus.
All ferns that are declared rare, vulnerable or endangered are protected by Federal and State Laws and must not be removed from the wild unless you are a land developer, mining company or main Roads department etc. This includes bulbs, roots, leaves and flowers. No part of any plant can be removed from Federal, State or Local Government land without the prior permission of the authority and this includes the spore.
Most people are put off at the thought of growing ferns from spore. Like all plants that produce their offspring from seed or spore the methods are basically the same. Remember nature has been doing this for millions of years and has been very successful. I have had excellent results growing over 200 different species of Australian ferns so don’t be afraid. Give it a go.
Step 1. Select spore from the fern fronds. Wait until the fern is just starting to release its spore. Rinse the fronds under clean running water and dry. This is to wash off any other spores from rogue ferns that may have settled onto the fronds. (There is nothing worse than having common brake or common soft bracken contaminating a prized tree fern or epiphyte.)
Step 2. Place the dry fronds in a clean brown paper bag and keep them in a cool dark place like the linen closet for about a week to ten days before you are ready to sow the spore. The exception to this rule applies to ferns, which produce green spores. These must be sown immediately that they are released. Todea Barbara is a good example of a fern, which produces green spore.
Step 3. Take a large ice cream container, a small ice cream container and a clean clear plastic bag large enough to seal the large ice cream container and three or four milk bottle tops.
Step 4. Punch or drill 6 to 10 5mm holes in the bottom of the small ice cream container.
Step 5. Wash both containers, tops and plastic bag so that they are very clean and sterile.
Step 6. Use a clean fine seed raising mi. We used 30mm fine sand, 30mm peat and 30mm perlite and 10mm vermiculite. We used crushed basalt, crusher dust and peat in a 50:50 ratio for epiphytes. Moisten the mix enough that water does not run out when the mix is squeezed between the fingers.
Step 7. Place the moisten mix (Enough to half fill the small ice cream container) in the microwave oven with a large glass of water for 7 or 8 minutes, until the water is boiling. Allow them to cool in the oven. You will need the water later so do not tip it out.
Step 8. Take the brown paper bag out of the linen closet. Shake the bag and remove the fronds. You should have a yellow, brown, black or rarely greenish brown or ochre powder or very fine, small round pin head size spore depending on the specie involved.
Step 9. Remove the mixture from the oven once it has cooled and place it in the small ice cream container and level.
Step 10. Sprinkle the spore sparsely over the mixture in the small ice cream container.
Step 11. Place the milk bottle tops in the large ice cream container with the flat surface facing down. Place the small ice cream container in the large ice cream container so that it is sitting on the milk bottle tops.
Step 12. Remove the water from the microwave and pour it into the larger ice cream container so there is 25mm to 30mm of water in the bottom.
Step 13. Place the ice cream containers in the plastic bag and seal.
Step 14. Place the contents and bag in a warm shady place preferably 50mm to 70mm shade depending on the specie. Shade houses and some window sills are ideal.
Step 15. The surface should turn green within a week to two weeks. The prothallus will then develop. From the prthalus the first true fronds will appear. Wait until the ferns are 20mm to 35mm in height before you attempt to transplant them. Once they are ready open the bag up slightly and allow the air to flow around the little ferns. Every 3 to 5 days open the bag a little further so the ferns get use to their new environment. Allow them a week to two weeks to harden off before you transplant them following the removal of the plastic bag. Carefully prick them out into 50mm standard squat tubes as you would any seedling.
Do not try to transplant them as single plants as they are still a little delicate still.
Once the smaller ones again reach 50mm to 70mm you may wish to divide the stronger and hardier individual plants into smaller clumps in 100mm squat pots.
Fertilize using seaweed, fish emulsion or organic chicken pellets soaked in water on an alternate basis. Fertilize every two months until the plants are established then twice annually in early September and again in February to maintain health, vitality and better frond colour.
Further Comments from Readers:
Hi reader, it seems you use The Bible of Botany a lot. That’s great as we have great pleasure in bringing it to you! It’s a little awkward for us to ask, but our first aim is to purchase land approximately 1,600 hectares to link several parcels of N.P. into one at The Pinnacles NSW Australia, but we need your help. We’re not salespeople. We’re amateur botanists who have dedicated over 30 years to saving the environment in a practical way. We depend on donations to reach our goal. If you donate just $5, the price of your coffee this Sunday, We can help to keep the planet alive in a real way and continue to bring you regular updates and features on Australian plants all in one Botanical Bible. Any support is greatly appreciated. Thank you.
In the spirit of reconciliation we acknowledge the Bundjalung, Gumbaynggirr and Yaegl and all aboriginal nations throughout Australia and their connections to land, sea and community. We pay our respect to their Elders past, present and future for the pleasures we have gained.
Diplazium australe
Classification
Division: Pteridophyta
Class: Polypodiopspida
Order: Polypodiales
Unranked: Eupolypods
Family: Athyriaceae
Tribe: Diplazieae
Subtribe: Diplaziineae
Genus: From Diplasios, which is Greek for to double or be doubled. It refers to ferns, which have a double covering over the spores.
Species: From Terra Australis, which is Latin for land of the south. It refers to plants, which were first discovered from the land down under.
Common Name: Australe Lady Fern.
Distribution:
Diplazium australe is found in several disjunct populations south from Barron Gorge National Park to Herberton, Eungella National Park, Carnarvon National Park and from the Brisbane Valley in Queensland to the Grampians in south western Victoria. It is mainly found on the eastern and southern side of the Great Dividing Range.
It is also found on King Island and Deal Island in Bass Strait. In Tasmania it is found from the north eastern coast to the central south west coast.
https://avh.ala.org.au/occurrences/search?taxa=Diplazium+australe#tab_mapView
Habitat Aspect Climate:
Diplazium australe prefers dense shade to light shade. It grows in moist to wet areas within cool montane rainforests and moist gallery forests particularly along drainage lines, near rooks and rills. The altitude ranges from 10 meter ASL to 800 meters ASL.
The temperature ranges from minus 2 degrees in August to 36 degrees in January.
The rainfall ranges from lows of 600mm to 2800mm average per annum. Lower rainfall areas have heavy orographic precipitation.
Soil Requirements:
Diplazium australe prefers light clays to medium clays. The soils are derived from decomposed granites, brown basalt, black basalt, metashales or sandstone. The soils pH ranges from 5pH to 6.5pH are preferred. It does not tolerate of waterlogged soils. Non saline soils to slightly saline soils are tolerated.
Height & Spread:
Wild Plants: 0.5m to 1.7m by 1.2m to 1.8m.
Characteristics:
Diplazium australe has a long, thick, erect rhizome which is at times erect to 100mm in height. The rhizome is densely covered dull black scales.
Diplazium australe‘s has large triangular tripinnate fronds. The semi fronds usually measure 400mm to 1200mm in length but has been recorded at almost 2000mm in length by 400mm to 750mm wide near the basal pinnae. The stipe has a few deep brown almost black scales near the base. The scales measure 10mm to 50mm in length. The main rachis and secondary rachises are glabrous. The stipe is stout, fleshy and deep red-brown near the base and becomes paler and turns grass-green, olive-green or yellow-green as it proceeds towards the apex. The lower surfaces are paler than the upper surfaces. The stipes measure 200mm to 700mm in length while the main rachis measures 100mm to 600mm in length and the longest secondary rachises measure 50mm to 350mm in length with the longest pair being the base pair.
The discolourous laminas are grass-green on the upper laminas while the lower laminas are paler. The oblong pinnules are pale green, broad, membranous and lacy and mainly bipinnate. The pinnae are pinnatifid with the ultimate segments being oblong and divided almost to the midvein. The ultimate pinnules measure 5mm to 25mm in length by 3.5mm to 8mm in width. The margins are toothed.
The sterile pinnules and fertile pinnules are similar. Sporangia are arranged close to the bases along the veins on the lobes. There are 3 to 5 narrow oblong sori each side of the pinnules vein which are conspicuous. They measure 1.5mm to 2.2mm in length. The pale brown to fawn indusium is persistent.
Wildlife:
Diplazium australe‘s wildlife is unknown to the author.
Cultivation:
Diplazium australe is magnificent larger fern or small trunkless tree fern for courtyards, around sheltered swimming pools or in the rainforest garden where heavy shade or dappled light prevails and the ground remains continuously moist. Diplazium australe is excellent for inclusion in established rainforests where soil moisture is guaranteed. Apply a half strength organic native fertilizers several times a year to encourage larger fresher looking fronds. Trim the old fronds back on an annual basis.
It is best planted as single plants at random distances on shady raised garden beds or along streams and riparian zones. They make great features especially if it is surrounded by small leafy plants with scarlet red flowers. Shrubs like Graptophyllum excelsum, Graptophyllum ilicifolium or Rhododendron loche would suffice beautifully with the lacy foliage contrasting against the small stiff leaves and red flowers. Viola hederacea, the native Peperomia blanda var. Floribunda, Peperomia tetraphylla and the dwarf Lomandra confertifolia all can add colour and leaf variation to good effect.
Propagation:
Spore: All ferns that are declared rare, vulnerable or endangered are protected by Federal and State Laws and must not be removed from the wild unless you are a land developer, mining company or main Roads department etc. This includes bulbs, roots, leaves and flowers. No part of any plant can be removed from Federal, State or Local Government land without the prior permission of the authority and this includes the spore.
Most people are put off at the thought of growing ferns from spore. Like all plants that produce their offspring from seed or spore the methods are basically the same. Remember nature has been doing this for millions of years and has been very successful. I have had excellent results growing over 200 different species of Australian ferns so don’t be afraid. Give it a go.
The spores of Diplazium australe can be removed easily from the fronds as the fertile fronds begin to brown off. Cut and place a frond in a paper bag for a week or so in a cool shady place. it is one of the easier ferns to grow from spore.
Step 1. Select spore from the fern fronds. Wait until the fern is just starting to release its spore. Rinse the fronds under clean running water and dry. This is to wash off any other spores from rogue ferns that may have settled onto the fronds. (There is nothing worse than having common brake or common soft bracken contaminating a prized tree fern or epiphyte.)
Step 2. Place the dry fronds in a clean brown paper bag and keep them in a cool dark place like the linen closet for about a week to ten days before you are ready to sow the spore. The exception to this rule applies to ferns, which produce green spores. These must be sown immediately that they are released. Todea Barbara is a good example of a fern, which produces green spore.
Step 3. Take a large ice cream container, a small ice cream container and a clean clear plastic bag large enough to seal the large ice cream container and three or four milk bottle tops.
Step 4. Punch or drill 6 to 10 5mm holes in the bottom of the small ice cream container.
Step 5. Wash both containers, tops and plastic bag so that they are very clean and sterile.
Step 6. Use a clean fine seed raising mi. We used 30mm fine sand, 30mm peat and 30mm perlite and 10mm vermiculite. We used crushed basalt, crusher dust and peat in a 50:50 ratio for epiphytes. Moisten the mix enough that water does not run out when the mix is squeezed between the fingers.
Step 7. Place the moisten mix (Enough to half fill the small ice cream container) in the microwave oven with a large glass of water for 7 or 8 minutes, until the water is boiling. Allow them to cool in the oven. You will need the water later so do not tip it out.
Step 8. Take the brown paper bag out of the linen closet. Shake the bag and remove the fronds. You should have a yellow, brown, black or rarely greenish brown or ochre powder or very fine, small round pin head size spore depending on the specie involved.
Step 9. Remove the mixture from the oven once it has cooled and place it in the small ice cream container and level.
Step 10. Sprinkle the spore sparsely over the mixture in the small ice cream container.
Step 11. Place the milk bottle tops in the large ice cream container with the flat surface facing down. Place the small ice cream container in the large ice cream container so that it is sitting on the milk bottle tops.
Step 12. Remove the water from the microwave and pour it into the larger ice cream container so there is 25mm to 30mm of water in the bottom.
Step 13. Place the ice cream containers in the plastic bag and seal. Step 14. Place the contents and bag in a warm shady place preferably 50mm to 70mm shade depending on the specie. Shade houses and some window sills are ideal.
Step 14. The surface should turn green within a week to two weeks. The prothallus will then develop. From the prtohalus the first true fronds will appear. Wait until the ferns are 20mm to 35mm in height before you attempt to transplant them. Once they are ready open the bag up slightly and allow the air to flow around the little ferns. Every 3 to 5 days open the bag a little further so the ferns get use to their new environment. Allow them a week to two weeks to harden off before you transplant them following the removal of the plastic bag. Carefully prick them out into 50mm standard squat tubes as you would any seedling.
Do not try to transplant them as single plants as they are still a little delicate.
Once the smaller ones again reach 50mm to 70mm you may wish to divide the stronger and hardier individual plants into smaller clumps in 100mm squat pots.
Fertilize using seaweed, fish emulsion or organic chicken pellets soaked in water on an alternate basis. Fertilize every two months until the plants are established then twice annually in early September and again in February to maintain health, vitality and better frond colour.
Further Comments from Readers:
Hi reader, it seems you use The Bible of Botany a lot. That’s great as we have great pleasure in bringing it to you! It’s a little awkward for us to ask, but our first aim is to purchase land approximately 1,600 hectares to link several parcels of N.P. into one at The Pinnacles NSW Australia, but we need your help. We’re not salespeople. We’re amateur botanists who have dedicated over 30 years to saving the environment in a practical way. We depend on donations to reach our goal. If you donate just $5, the price of your coffee this Sunday, We can help to keep the planet alive in a real way and continue to bring you regular updates and features on Australian plants all in one Botanical Bible. Any support is greatly appreciated. Thank you.
In the spirit of reconciliation we acknowledge the Bundjalung, Gumbaynggirr and Yaegl and all aboriginal nations throughout Australia and their connections to land, sea and community. We pay our respect to their Elders past, present and future for the pleasures we have gained.
Diplazium dilatatum
Classification
Division: Pteridophyta
Class: Polypodiopspida
Order: Polypodiales
Unranked: Eupolypods 11
Family: Athyriaceae
Tribe: Diplazieae
Subtribe: Diplaziineae
Genus: From Diplasios, which is Greek for to double or be doubled. It refers to ferns, which have a double covering over the spores.
Species: From Dilatare, which is Ancient Greek for to widen or dilate. It refers to the stomata on the leaves, which can open very wide on temperature changes.
Common Name:
Distribution:
Diplazium dilatatum is found in several disjunct populations south from the Endeavour River to Mackay in coastal north Queensland and from Childers, Gin Gin in central coastal Queensland to Wauchope in central northern New South Wales. It is found on the Great Dividing Range down to the coast.
https://avh.ala.org.au/occurrences/search?taxa=Diplazium+dilatatum#tab_mapView
Habitat Aspect Climate:
Diplazium dilatatum prefers dense shade to light shade. It grows in cool moist montane rainforests, moist gallery forests open Eucalyptus forests or open woodlands. The altitude ranges from 10 meter ASL to 650 meters ASL.
The temperature ranges from minus 2 degrees in August to 36 degrees in January.
The rainfall ranges from lows of 950mm to 3200mm average per annum. Lower rainfall areas often have some orographic precipitation.
Soil Requirements:
Diplazium dilatatum prefers light clays to medium clays. The soils are derived from decomposed black basalt or granites. The soils pH ranges from 5pH to 6.5pH are preferred. It does not tolerate of waterlogged soils. Non saline soils to slightly saline soils are tolerated.
Height & Spread:
Wild Plants: 0.5m to 1.7m by 1.2m to 1.8m.
Characteristics:
Diplazium dilatatum has a long, thick, erect rhizome which at times reaches 600mm in height. The rhizome is densely covered in elongated, dull, black scales.
Diplazium dilatatum‘s has large triangular tripinnate fronds. The semi fronds usually measure 800mm to 1500mm in length but has been recorded at almost 2000mm in length by 600mm to 800mm wide at the basal pinnae. The stipe is covered with black scales near the base. The scales measure 10mm to 50mm in length. The main rachis and secondary rachises are glabrous. The stipe is stout, fleshy and deep brown almost black near the base and becomes paler and turns grass-green, olive-green or yellow-green as it proceeds towards the apex. The rachises lower surfaces are paler than the upper surfaces. The stipes, main rachises are sparsely covered in fine, linear, black scales while the basal section of the secondary rachises are sparsely covered in fine, linear, black scales becoming glabrous about half way along the rachises. The stipes measure 200mm to 600mm in length while the main rachis measures 100mm to 600mm in length and the longest secondary rachises measure 50mm to 400mm in length with the longest pair being the base pair.
The discolourous laminas are deep grass-green on the upper laminas while the lower laminas are paler. The pinnules are broad, membranous and lacy and mainly bipinnate. The pinnae are usually not pinnatifid or at times with some pinnae scarcely pinnatifid near the base with the ultimate segments being oblong. The margins are usually, entire on the lower pinnae, with the obtuse apexes being crenate. The ultimate pinnules measure 8mm to 12mm in length by 4mm to 8mm in width. The terminal pinnules are longer and have crenate margins.
The sterile pinnules and fertile pinnules are similar. Sporangia are arranged close to the bases along the veins on the lobes. There are 3 to 5 narrow oblong sori each side of the pinnules vein which are conspicuous. They measure 1.5mm to 2.2mm in length. The brown indusium is persistent with a laciniata margin.
Wildlife:
Diplazium dilatatum’s wildlife is unknown to the author.
Cultivation:
Diplazium dilatatum is magnificent larger fern or small trunkless tree fern for courtyards, around sheltered swimming pools or in the rainforest garden where heavy shade or dappled light prevails and the ground remains continuously moist. Diplazium dilatatum is excellent for inclusion in established rainforests where soil moisture is guaranteed. Apply a half strength organic native fertilizers several times a year to encourage larger fresher looking fronds. Trim the old fronds back on an annual basis.
It is best planted as single plants at random distances on shady raised garden beds or along streams and riparian zones. It would make a good features especially if it is surrounded by small leafy plants with scarlet red flowers. Shrubs like Graptophyllum excelsum, Graptophyllum ilicifolium or Rhododendron loche would suffice beautifully with the lacy foliage contrasting against the small stiff leaves and red flowers. Viola hederacea, the native Peperomia blanda var. Floribunda, Peperomia tetraphylla and the dwarf Lomandra confertifolia all can add colour and leaf variation to good effect.
An entirely different scene can be mastered by using boulders, rocks and logs on a slope with a few strap leaf plants like Lomandra hystrix or Lomandra longifolia in the back ground and both terrestrial and epiphytic ferns and orchids on the boulders and logs to give the effect of walking along a fern clad gully.
Propagation:
Spores: Diplazium dilatatum is one of the easier ferns to propagate from spore. Follow steps 1 to 13 and ensure good hygiene levels are maintained when dealing with this fern. It can easily contaminate other spore tray and will overpower more delicate and slower growing prothallus.
All ferns that are declared rare, vulnerable or endangered are protected by Federal and State Laws and must not be removed from the wild unless you are a land developer, mining company or main Roads department etc. This includes bulbs, roots, leaves and flowers. No part of any plant can be removed from Federal, State or Local Government land without the prior permission of the authority and this includes the spore.
Most people are put off at the thought of growing ferns from spore. Like all plants that produce their offspring from seed or spore the methods are basically the same. Remember nature has been doing this for millions of years and has been very successful. I have had excellent results growing over 200 different species of Australian ferns so don’t be afraid. Give it a go.
Step 1. Select spore from the fern fronds. Wait until the fern is just starting to release its spore. Rinse the fronds under clean running water and dry. This is to wash off any other spores from rogue ferns that may have settled onto the fronds. (There is nothing worse than having common brake or common soft bracken contaminating a prized tree fern or epiphyte.)
Step 2. Place the dry fronds in a clean brown paper bag and keep them in a cool dark place like the linen closet for about a week to ten days before you are ready to sow the spore. The exception to this rule applies to ferns, which produce green spores. These must be sown immediately that they are released. Todea Barbara is a good example of a fern, which produces green spore.
Step 3. Take a large ice cream container, a small ice cream container and a clean clear plastic bag large enough to seal the large ice cream container and three or four milk bottle tops.
Step 4. Punch or drill 6 to 10 5mm holes in the bottom of the small ice cream container.
Step 5. Wash both containers, tops and plastic bag so that they are very clean and sterile.
Step 6. Use a clean fine seed raising mi. We used 30mm fine sand, 30mm peat and 30mm perlite and 10mm vermiculite. We used crushed basalt, crusher dust and peat in a 50:50 ratio for epiphytes. Moisten the mix enough that water does not run out when the mix is squeezed between the fingers.
Step 7. Place the moisten mix (Enough to half fill the small ice cream container) in the microwave oven with a large glass of water for 7 or 8 minutes, until the water is boiling. Allow them to cool in the oven. You will need the water later so do not tip it out.
Step 8. Take the brown paper bag out of the linen closet. Shake the bag and remove the fronds. You should have a yellow, brown, black or rarely greenish brown or ochre powder or very fine, small round pin head size spore depending on the specie involved.
Step 9. Remove the mixture from the oven once it has cooled and place it in the small ice cream container and level.
Step 10. Sprinkle the spore sparsely over the mixture in the small ice cream container.
Step 11. Place the milk bottle tops in the large ice cream container with the flat surface facing down. Place the small ice cream container in the large ice cream container so that it is sitting on the milk bottle tops.
Step 12. Remove the water from the microwave and pour it into the larger ice cream container so there is 25mm to 30mm of water in the bottom.
Step 13. Place the ice cream containers in the plastic bag and seal.
Step 14. Place the contents and bag in a warm shady place preferably 50mm to 70mm shade depending on the specie. Shade houses and some window sills are ideal.
Step 15. The surface should turn green within a week to two weeks. The prothallus will then develop. From the prthalus the first true fronds will appear. Wait until the ferns are 20mm to 35mm in height before you attempt to transplant them. Once they are ready open the bag up slightly and allow the air to flow around the little ferns. Every 3 to 5 days open the bag a little further so the ferns get use to their new environment. Allow them a week to two weeks to harden off before you transplant them following the removal of the plastic bag. Carefully prick them out into 50mm standard squat tubes as you would any seedling.
Do not try to transplant them as single plants as they are still a little delicate still.
Once the smaller ones again reach 50mm to 70mm you may wish to divide the stronger and hardier individual plants into smaller clumps in 100mm squat pots.
Fertilize using seaweed, fish emulsion or organic chicken pellets soaked in water on an alternate basis. Fertilize every two months until the plants are established then twice annually in early September and again in February to maintain health, vitality and better frond colour.
Further Comments from Readers:
Hi reader, it seems you use The Bible of Botany a lot. That’s great as we have great pleasure in bringing it to you! It’s a little awkward for us to ask, but our first aim is to purchase land approximately 1,600 hectares to link several parcels of N.P. into one at The Pinnacles NSW Australia, but we need your help. We’re not salespeople. We’re amateur botanists who have dedicated over 30 years to saving the environment in a practical way. We depend on donations to reach our goal. If you donate just $5, the price of your coffee this Sunday, We can help to keep the planet alive in a real way and continue to bring you regular updates and features on Australian plants all in one Botanical Bible. Any support is greatly appreciated. Thank you.
In the spirit of reconciliation we acknowledge the Bundjalung, Gumbaynggirr and Yaegl and all aboriginal nations throughout Australia and their connections to land, sea and community. We pay our respect to their Elders past, present and future for the pleasures we have gained.
Diplocyclos palmatus
Classification
Unranked: Eudicots
Unranked: rosids
Order: Cucurbitales
Family: Cuccurbitacea
Subfamily: Cucurcubitoideae
Tribe: Benincaseae
Genus: From Diploos which is Ancient Greek for to double or be doubled and kyklos, which is Ancient Greek or Cyclos, which is Latin for a circle. It refers to axis, which have two round fruit.
Species: From Palmatus, which is Latin for the shape of a hand. It refers to structures usually the leaves or fronds, which is sectioned or divided palmately into distinct segments like a hand.
Common Name: Native Bryony.
Distribution:
Diplocyclos palmatus is found from Windjana Gorge National Park, along the Kimberley Coast to north of Kununurra in Western Australia.
In the Northern Territory it is found on the coastal side of a line from Gregory National Park in the west to Nhulunbuy in the north east and most of the rivers draining into the Gulf of Carpentaria.
In the east it is found south from the tip of Cape York Peninsula and the Islands of the Great Barrier Reef in Queensland to the upper Hastings River catchment area in central coastal central New South Wales. It is found on the western slopes, on and east of the Great Dividing to the coast.
https://avh.ala.org.au/occurrences/search?taxa=Diplocyclos+palmatus#tab_mapView
Habitat Aspect Climate:
Diplocyclos palmatus prefers dappled full sun to shade. It grows in vine thickets, monsoonal forests disturbed areas in lowland, upland and mountain rain forest. The altitude ranges from 5 meters ASL to 1050 meters ASL.
The temperatures range from Minus 2 degrees in July to 44 degrees in January.
The rainfall ranges from lows of 550mm to 3200mm average per annum.
Soil Requirements:
Diplocyclos palmatus prefers better quality sandy loams to medium clays. The soils are derived from decomposed sandstones, granites, brown basalt, black basalts, shale, laterites or metamorphic rocks. The soils pH ranges from 5.5pH to 7pH are preferred. It does not tolerate waterlogged soils. Non saline soils to moderately saline soils are tolerated.
Height & Spread:
Wild Plants: 2m to 6m by 1m to 3m
Characteristics:
Diplocyclos palmatus grows as a scrambling tendril climber, climbing over other small shrubs and vines. The stems are thin mid green, scabrous and sparsely covered in small prickles. The stems also have fine longitudinal furrows. The tendrils divide into 2 and are leaf opposed. The new growth is similar but paler than the mature growth.
The alternate leaves of Diplocyclos palmatus are deeply palmate with 3 to 7 lobes. The leaves measure 40mm to 120mm in length by 60mm to 180mm in width. The petioles are channelled on the upper surface with the leaf margins forming an attenuate wing along each side of the petiole. The petioles are sparsely covered in short prickles and measure 20mm to 80mm in length by 4mm to 5mm in diameter at the base. The bases are truncate-sagittate while the lobes apexes are acuminate to acute. The discolourous laminas are deep grass-green, scabrous, with a few scattered, white, scabrous hairs on the upper lamina while the lower lamina is much paler to slightly glaucescent. The leaf margins are widely toothed or widely and shallowly sinuate with a small prickle. The laminas are raised between the lateral and main veins on the upper lamina. The mid vein is prominent below as are the lateral veins. The veins are not visible on the upper lamina. The leaves emit an unpleasant odour when crushed.
The inflorescences of Diplocyclos palmatus are imperfect. There are usually 1 female flower to 3 male flowers born from each leaf axil however 1 female flower to 2 male flowers or 1 female flower up to 8 male flowers are known to occur.
The male flowers measure 20mm to 22mm in diameter. The hypanthium measures 3mm to 4mm in length. The broad cupular calyxes measure 3.5mm to 4mm in length not including the 1.8mm to 2.1mm long lobes. The lobes are wide spreading. The narrow elliptical to elliptical, pale creamy yellow-green petals are covered in pale creamy-green hirsute hairs internally and are glabrous externally. The petals measure 9mm to 10mm in length by 7mm to 8mm in width. The filaments are covered in long white hirsute hairs on the basal half and measure 2mm to 2.1mm in length while the yellow anthers measure 3mm to 4mm length. There are two bilocular anthers and one unilocular anther. The anther locules are bent and twisted.
The female flowers measure 15mm to 17mm in diameter. The broad cupular calyxes measure 3.5mm to 4mm in length not including the 1.8mm to 2.1mm long lobes. The narrow elliptical to elliptical, pale creamy yellow-green petals are covered in pale creamy-green hirsute hairs internally and are glabrous externally. The petals measure 8mm to 9 mm in length. The 3 staminodes are covered in long white hirsute hairs on the basal half and measure 3mm to 3.5mm in length. The style measures 3mm to 3.5 mm in length with a papillate, trigonous stigma. Diplocyclos palmatus’s scented flowers appear from March to April.
The fruits of Diplocyclos palmatus are globose, chartaceous berries. The berries measure 15mm to 26mm in length by 25mm to 25mm in width. The glabrous, green fruits turn a deep pink to carmine red with white stripes when ripe.
The 4 to 9 off white seeds in each capsule are surrounded by a translucent pulp. The irregular shaped seeds measure 5mm to 8mm in length by 3.5mm to 6mm in width.
Wildlife:
Diplocyclos palmatus‘s wildlife is unknown to the author. Despite its common name and relationship to the well-known cucumbers, all parts of this plant are poisonous.
Early studies in India are indicating that the dried seed powder of Diplocyclos palmatus, using the methanol extract method has good potential for assisting people with Diabetis mellitus. http://ijperonline.com/oct_dec_2012/60-67
Cultivation:
Diplocyclos palmatus is a beautiful small creeper that deserves a place in native or exotic gardens where it can be kept away from young children. It is an ideal plant where quick summer growth is needed. It is fast growing with the added attraction of having beautifully coloured fruits. The plants grow best in a good quality soil which has generous quantities of good quality mulch like Lucerne or clover. Fertilize during the growing season and the plants will provide prolific quantities of fruit. Withdraw fertilizers in autumn.
Cultivated plants usually cover between 2 and 3 square meters. It is best planted in groups of 3 with the individual plants spaced at 100mm to 200mm apart.
This plant may have a possible future potential in the pharmaceutical industry.
Propagation:
Seeds: Diplocyclos palmatus seeds do not require treatment before sowing. Sow freshly cleaned seeds directly into a seed raising mix and cover with 2mm of the mix. When the seedlings are 25mm to 50mm tall, prick them out and plant them into 50mm native tubes using a seed raising mix.
Once the seedlings reach 100mm to 200mm in height nip the tips out to promote lateral growth and plant them out into their permanent position.
Cuttings: Use 50mm to 70mm long cuttings taken from the present season’s growth. Vigorously growing plants of the form you desire should be used when growing from cuttings. Remove the leaves from the lower node being careful not to tear the stem or damage the node. 1 Prepare the cutting mix by adding one third sharp clean river sand, one third peat and one third perlite. These ingredients are sterilize,
2 Select good material from non diseased plants,
3 Select semi green stems for cuttings. Look for a stem with two or three nodes,
4 Place the cutting on a flat, hard surface, and make a clean down one side of the cutting for 10mm with a sharp sterile knife or razor blade. – This scarification of the node will increase the chances of roots emerging from this spot. Now remove all but one or two the leaves, leaving the apex leaves in tact. If the leaves are very large in proportion to the stem, cut off the apical halves.
5 No hormone is required,
6 Use a small dipple stick or old pencil to poke a hole into the soilless potting mix. Ensure the hole is slightly larger than the stem diameter and be careful not to wipe the rooting hormone off the cuttings base, place the cuttings in a pattern ensuring the cuttings are not touching each other,
7 I like to place the pots in Plastic bags to help maintain temperature and moisture. Place in a semi shaded place like under 50mm shade cloth.
8 When the cuttings have struck, open the bag to allow air circulation for a few days to a week,
9 Once hardened off remove the cuttings from the bag and allow to further hardening for a few more days,
10 Transplant into a good potting mix to grow on.
Fertilize using seaweed, fish emulsion or organic chicken pellets soaked in water on an alternate basis. Fertilize every two months until the plants are established then annually in early September to October to maintain health, vitality and better flowering.
Further Comments from Readers:
Hi reader, it seems you use The Bible of Botany a lot. That’s great as we have great pleasure in bringing it to you! It’s a little awkward for us to ask, but our first aim is to purchase land approximately 1,600 hectares to link several parcels of N.P. into one at The Pinnacles NSW Australia, but we need your help. We’re not salespeople. We’re amateur botanists who have dedicated over 30 years to saving the environment in a practical way. We depend on donations to reach our goal. If you donate just $5, the price of your coffee this Sunday, We can help to keep the planet alive in a real way and continue to bring you regular updates and features on Australian plants all in one Botanical Bible. Any support is greatly appreciated. Thank you.
In the spirit of reconciliation we acknowledge the Bundjalung, Gumbaynggirr and Yaegl and all aboriginal nations throughout Australia and their connections to land, sea and community. We pay our respect to their Elders past, present and future for the pleasures we have gained.
All information is included in good faith and has been thoroughly researched prior to printing. The website or the author does not warrant or guarantee the accuracy of any information on these pages, nor does the website or the author accept any responsibility for any loss arising from the use of the information found within. The views and opinions are strictly those of the author or those members who chose to actively participate in the contents herein.