Pseudanthus orientalis
Pseudanthus pauciflorus
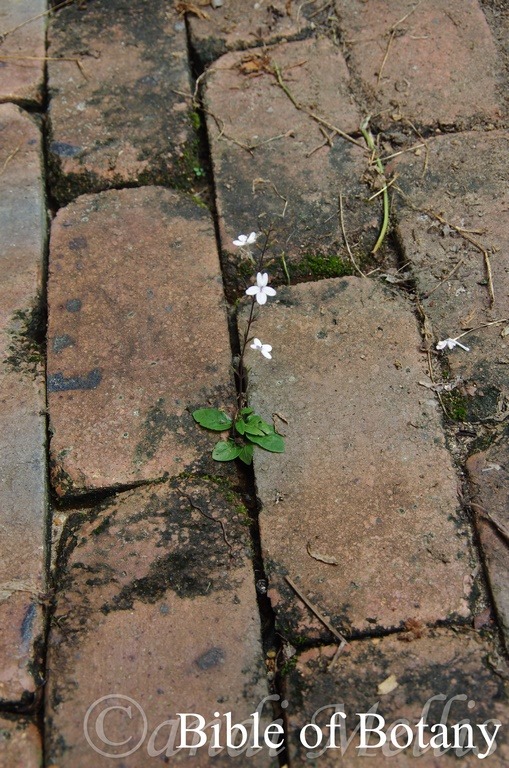
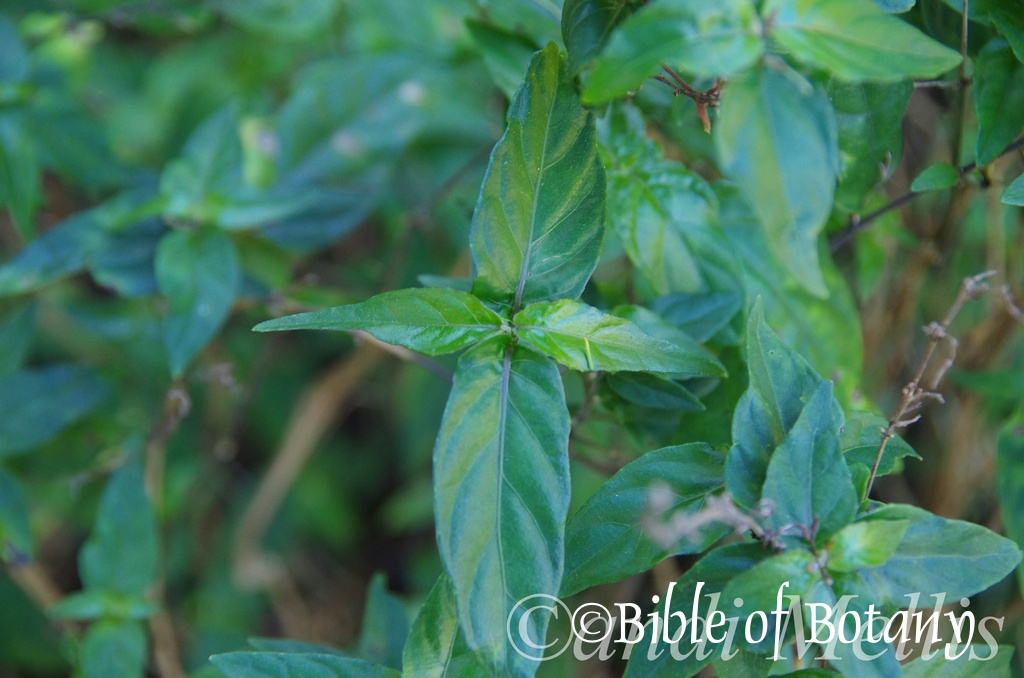
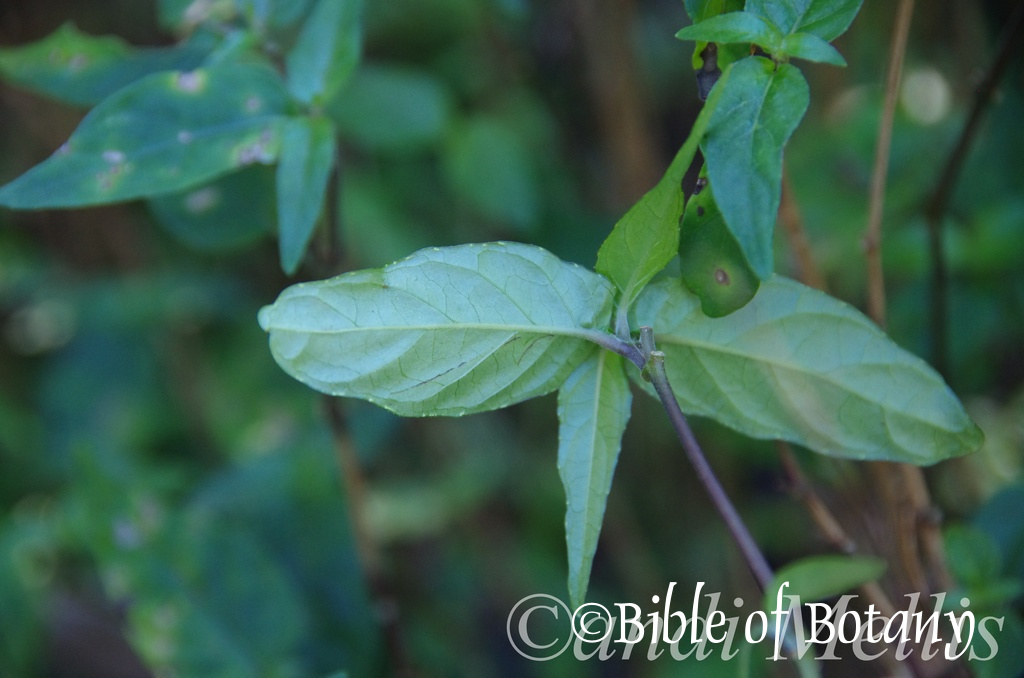
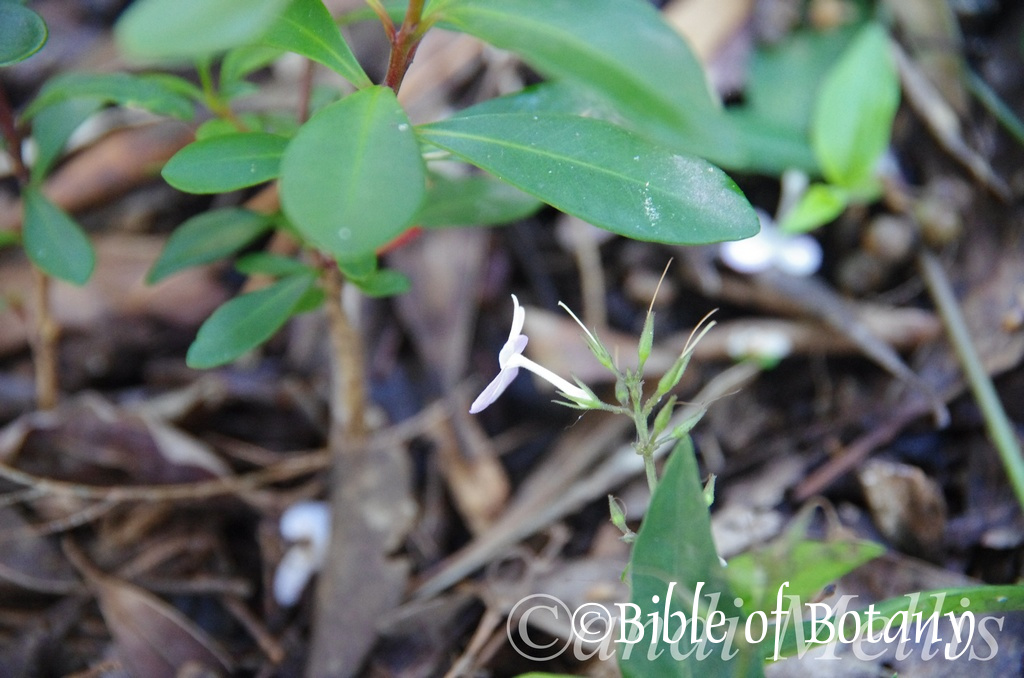
Pseuderanthemum variabile
Pseudognaphalium luteoalbum
Pseudoraphis paradoxa
Pseudovanilla foliata
Pseudoweinmannia lachnocarpa
Pseuduvaria froggattii
Pseuduvaria villosa
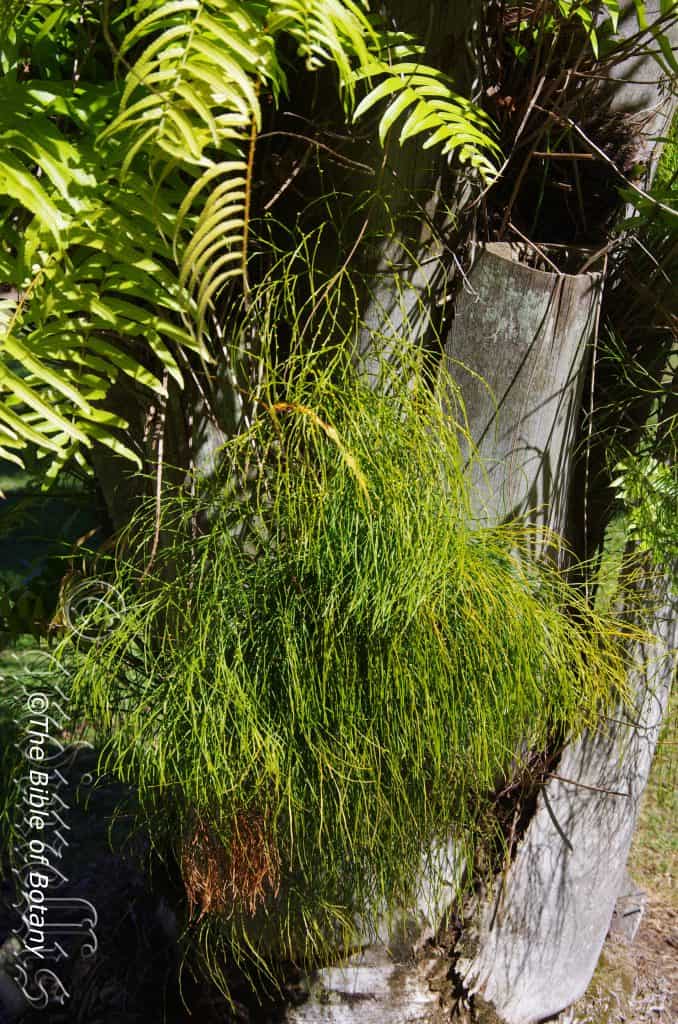
Psilotum complanatum
Psilotum nudum
Psychotria loniceroides
Psychotria daphnoides
Psychotria simmondsiana
Psydrax attenuata
Psydrax lamprophylla var. lamprophylla
Psydrax odorata subsp. australiana
Psydrax odorata subsp. buxifolia
Pteridium esculentum
Pteris acuminata
Pteris baptistii
Pteris comans
Pteris curta
Pteris daintreana
Pteris ensiformis
Pteris pacifica
Pteris tremula
Pteris umbrosa
Pteris vittata
Pterocaulon redolens
Pterostylis erecta
Pterostylis fischii
Pterostylis furcata
Pterostylis grandiflora
Pterostylis hildae
Pterostylis hispidula
Pterostylis longifolia
Pterostylis mutica
Pterostylis nutans
Pterostylis obtusa
Pterostylis ophioglossa
Pterostylis parviflora
Pterostylis pedunculata
Pterostylis russellii
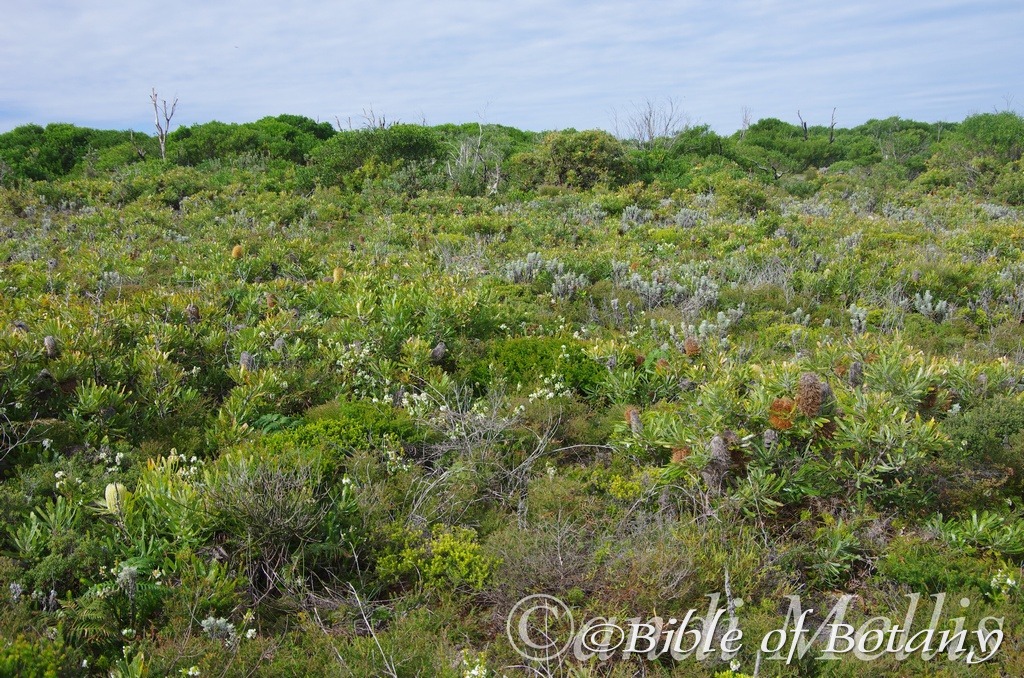
North Yuraygir National Park NSW
North Yuraygir National Park NSW
North Yuraygir National Park NSW
North Yuraygir National Park NSW
Pseudanthus orientalis
Classification:
Unranked: Eudicots
Unranked: Rosids
Order: Malpighiales
Family: Picrodendraceae
Genus: From Pseudos, which is Ancient Greek for false and ántha/ánthos, which are Ancient Greek for the male reproductive organ of a flower or the flower. It refers to the male flowers, which have a rudimentary or false ovary.
Species: From Orientalis, which is Latin for the oriental or eastern. It refers to plants, which were first discovered in the east or the orient.
Common Name:
Distribution:
Pseudanthus orientalis is found south from Shoalwater Bay in central coastal Queensland to Botany Bay in central coastal New South Wales with 4 isolated populations found on the Grampians in south western Victoria, Flinders Island in Bass Strait, The Blackdown Tablelands west of Rockhampton in central Queensland and Davies Creek National Park west of Cairns.
https://avh.ala.org.au/occurrences/search?taxa=Pseudanthus+orientalis#tab_mapView
Habitat Aspect Climate:
Pseudanthus orientalis prefers full sun to dappled shade. It usually grows in open situations on coastal dunes, coastal heaths or at times on granitic heaths. The altitude ranges from 2 meters ASL to 950 meters ASL.
The temperatures range from minus 4 degree in July to 39 degrees in January.
The rainfall ranges from lows of 500mm to 2000mm average per annum.
Soil Requirements:
Pseudanthus orientalis prefers to grow on coarse sands, fine sands or light fatty clays often with copious quantities of forest litter. The soils are usually derived from accumulated peaty beach sands or at times decomposed granites. The soils pH ranges from 5.5pH to 6.5pH. It does not tolerate waterlogged soils. Non saline soils to moderately saline soils are tolerated as are salt laden winds.
Height & Spread:
Wild Plants: 0.2m to 0.3m by 0.4m to 0.6m.
Characteristics:
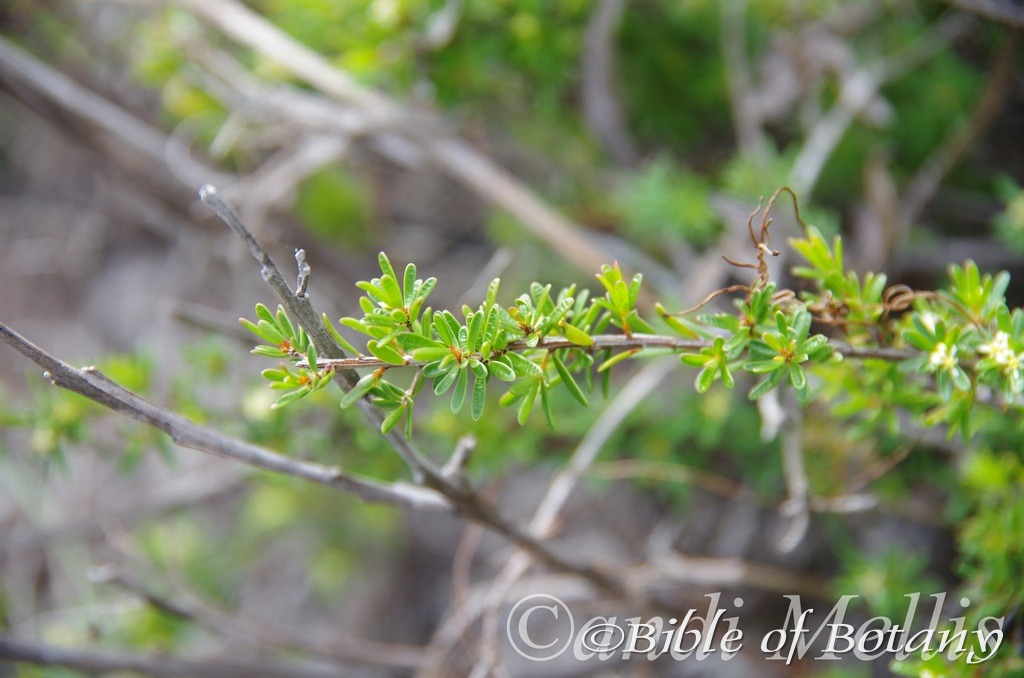
Pseudanthus orientalis grows as a small rigid shrub with decumbent angular stems. The older stems are grey-brown with chartacea like wings on the angles while the younger stems and new growth are yellowish-brown and glabrous.
The opposite or alternate leaves are often crowded along the apexes of the stems becoming more disjunct as the stems mature. The sessile, oblong-linear to linear-spathulate measure 4mm to 10mm in length by 1mm to 1.5mm in width. The bases are rounded while the apexes are obtuse. The concolourous or discolourous laminas are deep grass-green, glabrous and semi glossy on the upper laminas while the lower laminas are paler. The laminas are concave on the upper surface and decurve downwards near the apexes while the margins are entire. The mid vein is faintly prominent on the lower lamina while the pinnate lateral veins are at 90 degrees and are slightly prominent on the upper lamina.
Inflorescences are born singularly from the leaf axils. The pale yellow flowers are dioecious.
The male flowers are on short pedicels that measure 1mm to 3mm in length. The bright yellow stamens are crowded in the center with the inner stamens slightly longer than the outer stamens. The stamens measure 1.5mm to 2.2mm in length.
The female flowers are sessile. The perianth segments measure 1.5mm to 2mm in length and are often slightly reddish. The flowers appear from January early April.
The fruits are obloidal capsules. The glossy capsules are mid brown, glabrous and measure 4mm to 5mm in length. The green capsules turn pale grey-brown when ripe and contain a single black seed when ripe.
Wildlife:
Pseudanthus orientalis’s wildlife is unknown to the author.
Cultivation:
Pseudanthus orientalis is an interesting small sub shrub. It is classified as a weed by most gardeners. In cultivation they will grow from 0.2 meters to 0.4 meters in height by 0.4 meters to 0.8 meters in diameter.
It grows exceptionally well on lighter soils where deep leaf litter keeps the soil cool and moisture at an even level. If these requirements are met they can cope with temperatures as low as minus 4 degrees and up to 42 degrees. It is moderately drought tolerant in most districts that receive over 500mm of rainfall a year.
Propagation:
Seeds: The seeds can be removed easily from the fruits that have fallen to the ground.
Sow fresh seeds directly into a seed raising mix, keeping them moist not wet. When the seedlings are 20mm to 25mm tall, prick them out and plant them into 50mm native tubes using a good organic mix.
As the seedlings roots reach the bottom of the tubes plant them out into their permanent position.
Further Comments from Readers:
“Hi reader, it seems you use The Bible of Botany a lot. That’s great as we have great pleasure in bringing it to you! It’s a little awkward for us to ask, but our first aim is to purchase land approximately 1,600 hectares to link several parcels of N.P. into one at The Pinnacles NSW Australia, but we need your help. We’re not salespeople. We’re amateur botanists who have dedicated over 30 years to saving the environment in a practical way. We depend on donations to reach our goal. If you donate just $5, the price of your coffee this Sunday, We can help to keep the planet alive in a real way and continue to bring you regular updates and features on Australian plants all in one Botanical Bible. Any support is greatly appreciated. Thank you.”
In the spirit of reconciliation we acknowledge the Bundjalung, Gumbaynggirr and Yaegl and all aboriginal nations throughout Australia and their connections to land, sea and community. We pay our respect to their Elders past, present and future for the pleasures we have gained.
Pseudanthus pauciflorus
Classification:
Unranked: Eudicots
Unranked: Rosids
Order: Malpighiales
Family: Picrodendraceae
Genus: From Pseudos, which is Ancient Greek for false and ántha/ánthos, which are Ancient Greek for the male reproductive organ of a flower or the flower. It refers to the male flowers, which have a rudimentary or false ovary.
Species: From Paucī, which is Latin for a few and Flōris, which is Latin for a flower or Flōs, which is the Roman goddess of spring and flowers. It refers to plants, which produce fewer flowers or which are poorer bloomers than other species in the genus.
Subspecies: Pseudanthus pauciflorus subsp. arenicola. From Arena, which is Latin for sand and Kola, which is Ancient Greek or Cola, which is Latin for to dwell or reside at. It refers to plants, which prefer sandy flat, habitats.
Subspecies: Pseudanthus pauciflorus subsp. pauciflorus. From Paucī, which is Latin for a few and Flōris, which is Latin for a flower or Flōs, which is the Roman goddess of spring and flowers. It refers to plants, which produce fewer flowers or which are poorer bloomers than other species in the genus.
Common Name:
Distribution:
Pseudanthus pauciflorus subsp. arenicola is found in 2 disjunct populations in central Queensland on the Blackdown Tablelands National Park to Robinson’s Gorge and south from Mount Ernest on the Queensland, New South Wales border to Bellangry State Forest in north eastern New South Wales.
Pseudanthus pauciflorus subsp. pauciflorus is found in several disjunct populations south from the Border Ranges National Park in far south eastern Queensland to Port Macquarrie in north eastern New South Wales.
https://avh.ala.org.au/occurrences/search?taxa=Pseudanthus+pauciflorus#tab_mapView
Habitat Aspect Climate:
Pseudanthus pauciflorus prefers full sun to dappled shade. It grows in dry montane open heaths or open Eucalyptus woodland heaths. The altitude ranges from 200 meters ASL to 820 meters ASL.
The temperatures range from minus 2 degree in July to 39 degrees in January.
The rainfall ranges from lows of 450mm to 1450mm average per annum.
Soil Requirements:
Pseudanthus pauciflorus prefers to grow on coarse sands, fine sands to light fatty clays often with copious quantities of forest litter. The soils are usually derived from decomposed poor, reddish sandstones or granites. The soils pH ranges from 5pH to 6pH. It does not tolerate waterlogged soils. Non saline soils to moderately saline soils are tolerated.
Height & Spread:
Wild Plants: 0.3m to 0.6m by 0.5m to 0.7m
Characteristics:
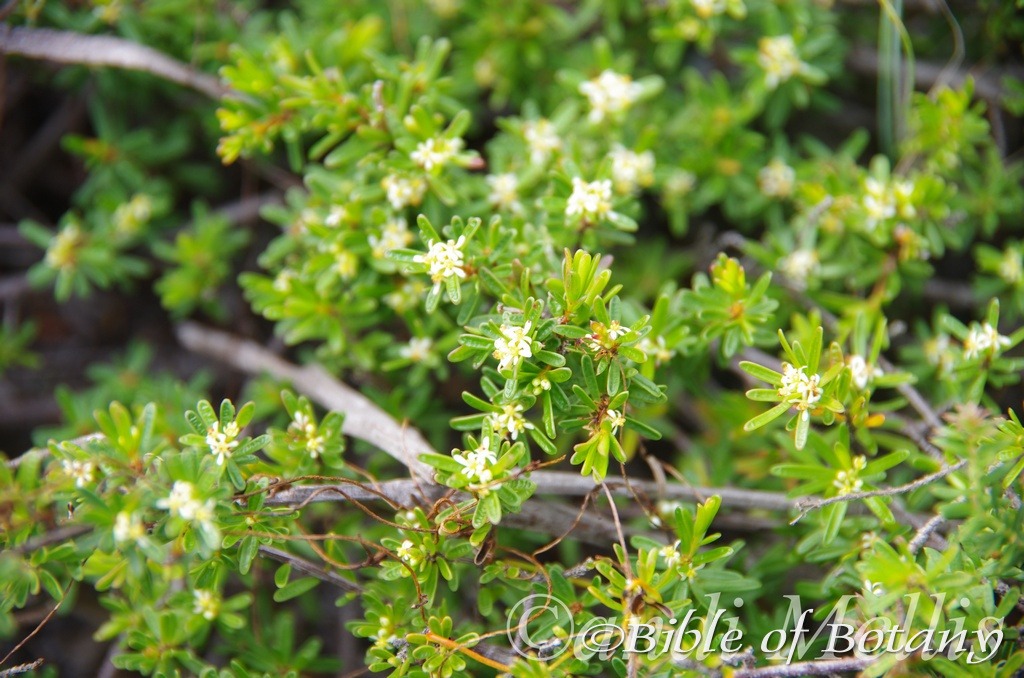
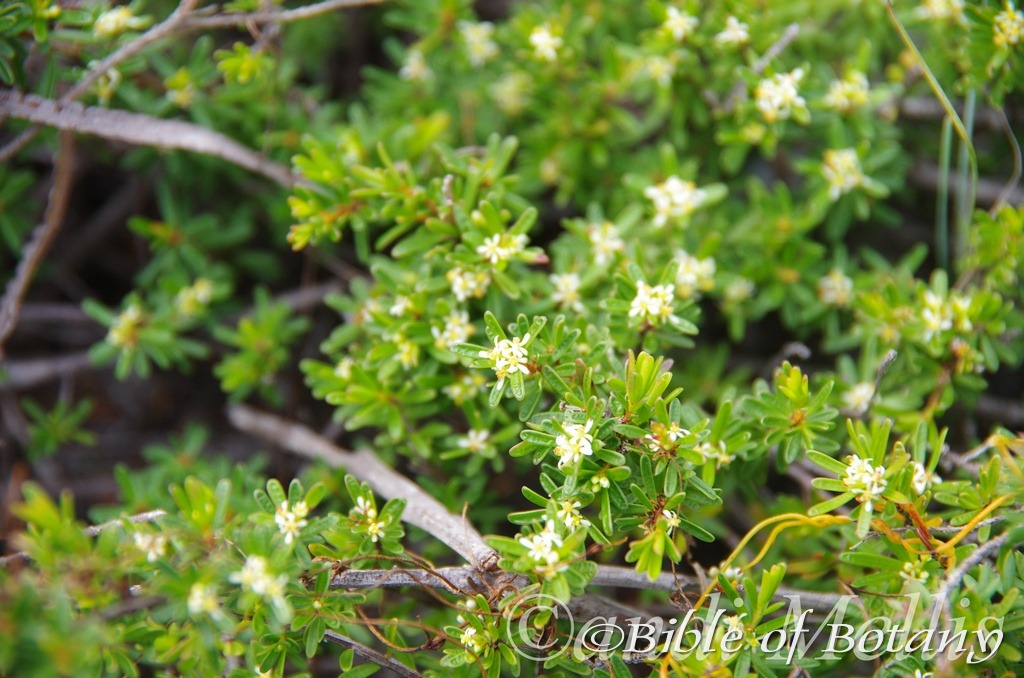
Pseudanthus pauciflorus grows as a densely branched, compact shrub with ascending stems. The pale reddish-brown stems are glabrous.
The alternate or decussate leaves are sessile, narrow-elliptic to narrow-obovate and measure 3mm to 8mm in length by 1.3mm to 2.2mm in width. The bases taper to the stems while the apexes are obtuse to sub-acute. The concolourous laminas are mid green to grass-green, glabrous and semi glossy. The laminas are concave on the upper surface and decurve downwards near the apexes while the margins are entire. The mid vein is faintly prominent on the lower lamina while the pinnate lateral veins are at 90 degrees and are slightly prominent on the upper lamina.
Inflorescences are born singularly from the leaf axils. The white flowers are dioecious.
The male flowers are on short pedicels that measure 1.2mm to 2.2mm in length. The creamy-white stamens are crowded in the center and measure 2.7mm to 4.8mm in length.
The female flowers are sessile. The 4 to 6 perianth segments measure 0.5mm to 2.9mm in length and are acute to acuminate and green to reddish-brown. The flowers appear from September to November.
The fruits are ovoidal capsules. The semi glossy capsules are green, distally tuberculate and measure 2.7mm to 4mm in length. The green capsules turn pale grey-brown when ripe and contain a single black seed when ripe.
Confusing Subspecie:
Pseudanthus pauciflorus subsp. pauciflorus stems are glabrous.
Pseudanthus pauciflorus subsp. arenicola stems are floccose.
Wildlife:
Pseudanthus pauciflorus’s do not appear to have any predators.
Cultivation:
Pseudanthus pauciflorus is an interesting small sub shrub that could be more widely grown in subtropical to cool temperate gardens. It is ideal in rockeries or against north and west facing walls. In cultivation it will grow from 0.2 meters to 0.4 meters in height by 0.4 meters to 0.8 meters in diameter.
It grows exceptionally well on lighter soils where deep leaf litter keeps the soil cool and moisture at an even level. If these requirements are met it can cope with temperatures as low as minus 4 degrees and up to 42 degrees. It is moderately drought tolerant in most districts that receive over 500mm of rainfall a year.
Pseudanthus pauciflorus would make outstanding contribution to a moist heath gardens especially where it is mass planted. Here it can be used adjacent to the smaller growing plants scattered throughout the heath scene in small groups. When you design a flat heath garden which it is well suited don’t use contours to display the plants as heath lands are almost always flat or have a slight rise. Plants should be planted close together and be short so you can see over the tallest ones with the exception of one or two plants at the most. These will be feature plants. The idea is to achieve a feeling of expansive flatness. This can be achieved with using the Pseudanthus pauciflorus’s grass-green leaves and having them contrasting with finer or larger deep green, soft grey to glaucous coloured foliages. Make sure it is kept in small areas devoid of plants that will over grow it and it will have plenty of sunshine. Use a lot of procumbent plants like Lechenaultia biloba or Lechenaultia formosa which would look stunning in flower together. Mix it with other smaller shrubs so none of them dominate the scene but blend in to give a mosaic of foliage colours that you oversee. For taller shrubs and annuals Actinotis helianthi, Dianella atrax, Dianella caerulea or Patersonia glabrata are five great contrasting foliages.
It is ideal in settings near ponds in courtyards or on the sunny side of a home. Sparingly use other plants when planting and remember that this plants foliage and form is the center of attraction. Planted in clusters using a gentle slope or a basin with a small to medium pool at the bottom would also give a strong contrast for most of the year. A billabong effect would give a quiet tranquil affect where as a waterfall or cascades would give more stimulation and energy to the scene. When using this plant as a feature only grow small plants that do not reach more than 150mm in height and have a compact habit with either blue or grey leaves, but be careful that these plants do not steal the stage. Taller plants can be grown in the background for balance. Annuals and perennials would really compliment the scene especially during the winter when the leaves are not present.
Propagation:
Seeds: The seeds can be removed easily from the mature fruits that have fallen to the ground.
Sow freshly treated seeds directly into a seed raising mix, keeping them moist not wet. When the seedlings are 20mm to 25mm tall, prick them out and plant them into 50mm native tubes using a good organic mix.
As the seedlings roots reach the bottom of the tubes plant them out into their permanent position.
Cuttings: Fortunately cuttings should be easy to strike. Use 100mm to 200mm long tip cuttings or lateral shoots from the present season’s growth. Take them in warmer months of the year. Remove half the leaves from the bottom section being careful not to tear the bark.
1 Prepare the cutting mix by adding two thirds sharp clean river sand, one third peat or one third perlite. These ingredients must be sterilized,
2 Select good material from non diseased plants,
3 Select semi green stems for cuttings. Look for a stem with two or three nodes,
4 Place the cutting on a flat, hard surface, and make a clean cut down one side of the cutting at the base for 10mm with a sharp sterile knife or razor blade. – This scarification of the node will increase the chances of roots emerging from this spot. Now remove all but one or two the leaves, leaving the apex leaves in tact. If the leaves are very large in proportion to the stem, cut off the apical halves.
5 Hormones are not required,
6 Use a small dipple stick or old pencil to poke a hole into the soilless potting mix. Ensure the hole is slightly larger than the stem diameter and be careful not to wipe the rooting hormone off the cuttings base. Place 2 to 4 cuttings in each of the 50mm native tubes,
7 I like to place the tubes in bucket with holes drilled in the bottom to allow excess water to drain out. A plastic bag that fits over the bucket is ideal to help maintain temperature and moisture. Place in a semi shaded, warm position like under 50mm shade cloth.
8 When the cuttings have struck, open the bag to allow air circulation for a few days to a week,
9 Once hardened off remove the cuttings from the bag and allow to further hardening for a few more days to a week,
10 Transplant into a good potting mix to grow on.
Fertilize using seaweed, fish emulsion or organic chicken pellets soaked in water on an alternate basis. Fertilize every two months until the plants are established then annually in early September to October to maintain health, vitality and better flowering.
Further Comments from Readers:
“Hi reader, it seems you use The Bible of Botany a lot. That’s great as we have great pleasure in bringing it to you! It’s a little awkward for us to ask, but our first aim is to purchase land approximately 1,600 hectares to link several parcels of N.P. into one at The Pinnacles NSW Australia, but we need your help. We’re not salespeople. We’re amateur botanists who have dedicated over 30 years to saving the environment in a practical way. We depend on donations to reach our goal. If you donate just $5, the price of your coffee this Sunday, We can help to keep the planet alive in a real way and continue to bring you regular updates and features on Australian plants all in one Botanical Bible. Any support is greatly appreciated. Thank you.”
In the spirit of reconciliation we acknowledge the Bundjalung, Gumbaynggirr and Yaegl and all aboriginal nations throughout Australia and their connections to land, sea and community. We pay our respect to their Elders past, present and future for the pleasures we have gained.
Author’s Garden The Pinnacles NSW
Rosser BG Gold Coast Qld.

Fortis Creek National Park NSW
Pillar Valley NSW
Pillar Valley NSW
Author’s Garden The Pinnacles NSW

Author’s Garden The Pinnacles NSW
Fortis Creek National Park NSW
Pillar Valley NSW
Author’s Garden The Pinnacles NSW
Fortis Creek National Park NSW
Author’s Garden The Pinnacles NSW
Author’s Garden The Pinnacles NSW
Author’s Garden The Pinnacles NSW
Rosser BG Gold Coast Qld.
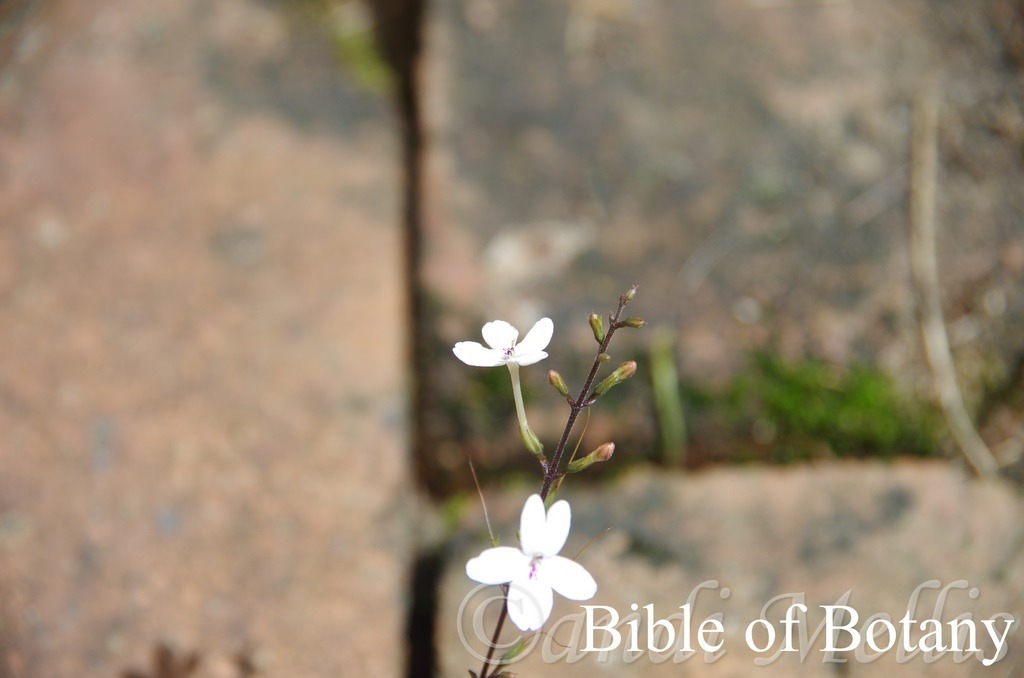
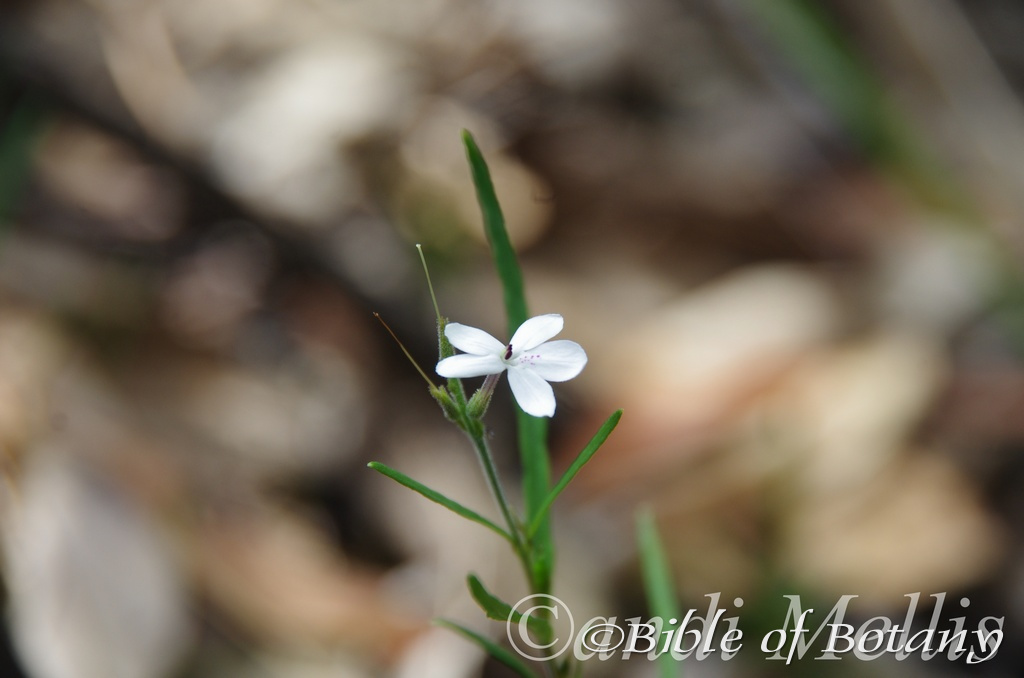
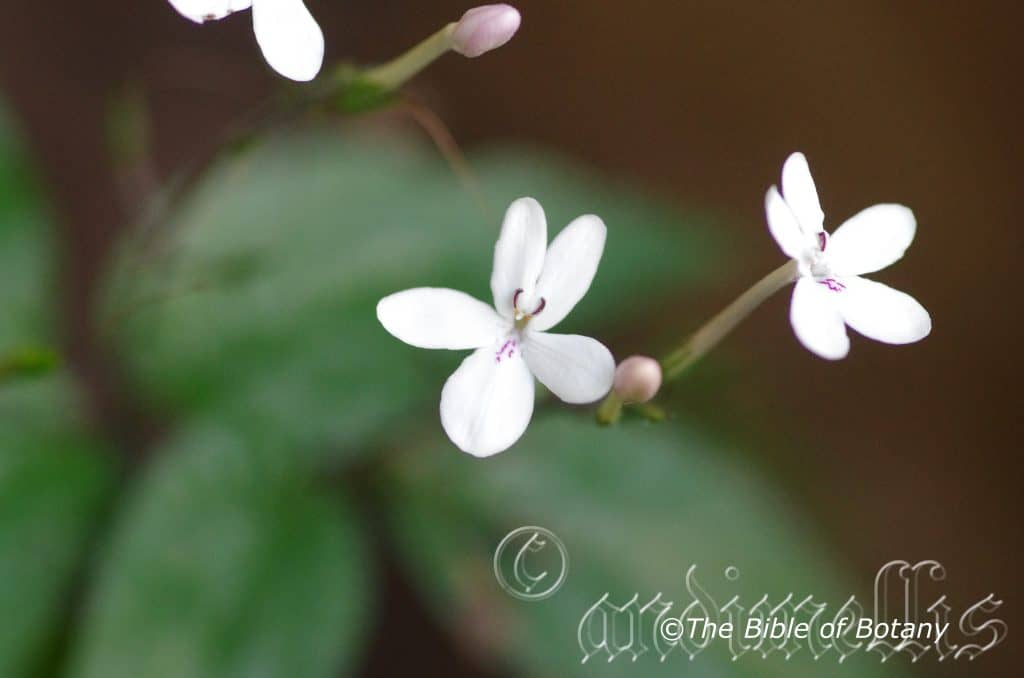
Pseuderanthemum variabile
Classification:
Unranked: Eudicots
Unranked: Rosids
Order: Malpighiales
Family: Picrodendraceae
Genus: From Pseudos, which is Ancient Greek for false and ántha/ánthos, which are Ancient Greek for the male reproductive organ of a flower or the flower. It refers to plants, which resemble the Anthemum genus.
Species: From Varius, which is Latin for different. It refers to the leaves and or flowers, which have great variation in colour, shape or size.
Common Name: Pastel Flower.
Distribution:
Pseuderanthemum variabile is found north of a line from Port Keates to Groote Eyelandt in the Northern Territory.
In the east it is found south from the Torres Strait Islands in far North Queensland to Bouilli then to Goondiwindi in southern Queensland where it contracts to the being found on and east of the Great Dividing Range to the coast, south to Mumbulla State Forest near Bega in southern coastal New South Wales with the exception of 2 populations near Maneroo and Walgett.
https://avh.ala.org.au/occurrences/search?taxa=Pseuderanthemum+variabile#tab_mapView
Habitat Aspect Climate:
Pseuderanthemum variabile prefers full sun to dappled shade. It grows in openings, adjacent to warm well developed moist rainforests, littoral rainforests, moist sclerophyll forests, monsoonal forests or moist gallery forests on the ranges and along the coast and along river courses, billabongs, gorges, shallow depressions adjacent to where ephemeral pools congregate or river meanders further inland. The altitude ranges from 10 meters ASL to 680 meters ASL.
The temperatures range from minus 5 degree in August to 40 degrees in January.
The rainfall ranges from lows of 200mm to 3200mm average per annum.
Soil Requirements:
Pseuderanthemum variabile prefers course sands, fine sands, light fatty clays to medium silts. The soils are usually derived from decomposed granites or at times accumulated beach sands or alluvial deposits. The soils pH ranges from 4.5pH to 7pH. It does not tolerate waterlogged soils but prefers to grow where the soils remain moist. Non saline soils to very saline soils are tolerated as are salt laden winds.
Height & Spread:
Wild Plants: 0.15m to 1m by 0.5m to 0.7m
Characteristics:
Pseuderanthemum variabile grows as a perennial herb with soft pale grey-green stems. The stems are densely covered in white hirsute hairs.
The opposite leaves are often jointed at the base. The lanceolate to ovate leaves measure 20mm to 70mm in length by 3mm to 40mm in width. The petiole is densely covered in white hirsute hairs and measures 8mm to 25mm in length. The bases are rounded, truncate and attenuate while the apexes are acute to obtuse. The discolourous laminas are usually deep green, sea-green or at times deep green mottled grey-green, glabrous dull and sparsely covered in pale cystolithic hairs on the upper laminas while the lower laminas are paler, reddish-maroon, purple or white and are glabrous or covered in white hirsute hairs and or whitish sessile glands. The laminas are flat, slightly recurved upwards from the mid vein to the margins or slightly decurve downwards from the mid vein to the margins and decurve downwards on the apical third. The margins are entire, flat or slightly undulating. The mid vein and 6 to 12 lateral veins are prominent on the lower lamina and are distinctly visible on the upper lamina.
The inflorescences are born on terminal scapes. The scapes measure 30mm to 100mm in length while the pedicels measure 1mm to 8mm in length. The terminal flowers are usually showy and measure 16mm to 17mm in diameter while the lower smaller flowers are often cleistogamous. The bracteoles measure 2mm to 4mm in length.
The pale green calyxes measure 4mm to 8mm in length while the 6 lobes are linear to narrow triangular and moderately clothed in glandular hirtellous hairs. The white to mauve corollas are often covered in deep purplish carmine spots on the lower lobe. The corolla tube usually measures 10mm to 16mm in length.
The corolla tube is sparsely covered in white puberulent hairs externally and internally near the base. The lobes are dimorphic with the 2 upper, shorter, oblong lobes being united on the basal third and measure 5mm to 7mm in length by 3.5mm to 4.5mm in width. The lateral lobes are oblong and measure 5mm to 8mm in length by 4mm to 5mm in width. The lower, longest, lobe is oblong-ovate to ovate and measures 10mm to 11mm in length by 6mm to 8mm in width.
Anthers about 1.5 mm long, filaments about 2 mm long, attached to the throat of the corolla. The pollen is white. The 2 locule ovary measures 1.5mm to 2mm in length. The bifid style measures 10mm to 15mm in length. The flowers appear from early December through to May.
The fruits are globose to ovoidal capsules. The capsules are usually covered in white pulverulent hairs or at times are glabrous and measure 10mm to 15mm in length. The green capsules turn grey when ripe.
Wildlife:
Pseuderanthemum variabile does not appear to have any predators.
Cultivation:
Pseuderanthemum variabile is a magnificent small herb that should be more widely grown in tropical, subtropical and monsoonal gardens. It is ideal at the edge of a rainforest or set in a rainforests, shaded areas around a swimming pool or courtyards. It also make great bush house plants in medium size pots. In cultivation it will grow from 0.3 meters to 0.8 meters in height by 0.5 meters to 0.8meters in diameter.
It grows exceptionally well on lighter soils where deep leaf litter keeps the soil cool and moisture at an even level. If these requirements are met it can cope with temperatures as low as minus 1 degree and up to 37 degrees. It is moderately drought resistant.
Pseuderanthemum variabile would make an outstanding contribution to a small moist bed, in a semi shaded areas and look very attractive on the floor of suburban rainforest gardens. because of its size it needs to be mass planted to be effective.
It grows well adjacent to ponds in courtyards or on window sills. It contrasts very well when grown with small ferns so that a dwarf garden is created. like Cheilanthes sieberi, Cheilanthes distans, Pellaea falcata or Pellaea nana to mention a few
Propagation:
Seeds: The seeds of Pseuderanthemum variabile can be removed easily from the fruits that have fallen to the ground.
Sow freshly treated seeds directly into a seed raising mix, keeping them moist not wet. When the seedlings are 20mm to 25mm tall, prick them out and plant them into 50mm native tubes using a good organic mix.
As the seedlings roots reach the bottom of the tubes plant them out into their permanent position. Do not delay.
They can also be grown from bulb division at the start of the dry season.
Cuttings: Fortunately cuttings should be easy to strike. Use 100mm to 200mm long tip cuttings or lateral shoots from the present season’s growth. Take them in warmer months of the year. Remove half the leaves from the bottom section being careful not to tear the bark.
1 Prepare the cutting mix by adding two thirds sharp clean river sand, one third peat or one third perlite. These ingredients must be sterilized,
2 Select good material from non diseased plants,
3 Select semi green stems for cuttings. Look for a stem with two or three nodes,
4 Place the cutting on a flat, hard surface, and make a clean cut down one side of the cutting at the base for 10mm with a sharp sterile knife or razor blade. – This scarification of the node will increase the chances of roots emerging from this spot. Now remove all but one or two the leaves, leaving the apex leaves in tact. If the leaves are very large in proportion to the stem, cut off the apical halves.
5 Hormones are not required,
6 Use a small dipple stick or old pencil to poke a hole into the soilless potting mix. Ensure the hole is slightly larger than the stem diameter and be careful not to wipe the rooting hormone off the cuttings base. Place 2 to 4 cuttings in each of the 50mm native tubes,
7 I like to place the tubes in bucket with holes drilled in the bottom to allow excess water to drain out. A plastic bag that fits over the bucket is ideal to help maintain temperature and moisture. Place in a semi shaded, warm position like under 50mm shade cloth.
8 When the cuttings have struck, open the bag to allow air circulation for a few days to a week,
9 Once hardened off remove the cuttings from the bag and allow to further hardening for a few more days to a week,
10 Transplant into a good potting mix to grow on.
Fertilize using seaweed, fish emulsion or organic chicken pellets soaked in water on an alternate basis. Fertilize every two months until the plants are established then annually in early September or March to maintain health, vitality and better flowering.
Further Comments from Readers:
“Hi reader, it seems you use The Bible of Botany a lot. That’s great as we have great pleasure in bringing it to you! It’s a little awkward for us to ask, but our first aim is to purchase land approximately 1,600 hectares to link several parcels of N.P. into one at The Pinnacles NSW Australia, but we need your help. We’re not salespeople. We’re amateur botanists who have dedicated over 30 years to saving the environment in a practical way. We depend on donations to reach our goal. If you donate just $5, the price of your coffee this Sunday, We can help to keep the planet alive in a real way and continue to bring you regular updates and features on Australian plants all in one Botanical Bible. Any support is greatly appreciated. Thank you.”
In the spirit of reconciliation we acknowledge the Bundjalung, Gumbaynggirr and Yaegl and all aboriginal nations throughout Australia and their connections to land, sea and community. We pay our respect to their Elders past, present and future for the pleasures we have gained.
Pseudognaphalium luteoalbum
Classification:
Class: Equisetopsida
Subclass: Magnoliidae
Superorder: Asteranae
Order: Asterales
Family: Asteraceae
Tribe: Gnaphalieae
Genus: From Pseudos, which is Ancient Greek for false and Gnaphaliu, which is Ancient Greek for a tuft of wool. It refers to plants, which resemble the European genus that has large, soft, white leaves. The leaves were used to stuff pillows whereas the Australian Compositaeae genus has small leaves and stems which are also densely covered in soft white floccose hairs and were used in a similar way by early settlers.
Species: From Lūteus, which is Latin for yellow often with a red or orange tinge and Albo, which is Latin for white. It refers to the colour of the flowers, which are white and yellow, orange or pale reddish in colour.
Common Name:
Distribution:
Pseudognaphalium luteoalbum is found throughout Australia except for the monsoonal zones and true deserts. It is also found on most the offshore islands in these zones.
In Tasmania it is found throughout the main Island and all the bass Strait Islands.
https://avh.ala.org.au/occurrences/search?taxa=Pseudognaphalium+luteoalbum#tab_mapView
Habitat Aspect Climate:
Pseudognaphalium luteoalbum prefers full sun to light dappled shade. It grows in open Eucalyptus woodlands, sclerophyll woodlands open heaths, mallee communities or savannah woodlands. The altitude ranges from 8 meters BSL to 990 meters ASL.
The temperatures range from minus 5 degree in July to 40 degrees in January.
The rainfall ranges from lows of 150mm to 2400mm average per annum.
Soil Requirements:
Pseudognaphalium luteoalbum prefers light sandy loams to heavy clays or light silts to heavy silts often with or without copious quantities of forest litter. The soils are derived from most decomposed rocks accumulated sands, corals sands or alluvial deposits. The soils pH ranges from 5pH to 6pH. It does not tolerate waterlogged soils. Non saline soils to very saline soils are tolerated as are salt laden winds.
Height & Spread:
Wild Plants: 0.3m to 0.45m by 0.3m to 0.4m
Characteristics:
Pseudognaphalium luteoalbum grows as an annual herb with erect, greyish to white floccose stems. The stems are usually branched from the base but can branch corymbosly from the apical half.
The basal leaves wither early while the oblanceolate to linear cauline leaves measure 40mm to 50mm in length by 3mm to 5mm in width. The semi clasping bases are truncate or shallowly cordate while the apexes are acute. The concolourous laminas are blue-green to bluish-green, dull and covered in white floccose hairs. The laminas strongly but gently decurve downwards from the mid vein to the margins and recurve upwards on the apical half. The margins are slightly to strongly undulating. The obtuse mid vein is strongly prominent on the lower lamina on the basal half then becomes less prominent on the apical quarter. It is distinctly visible on the upper lamina.
The inflorescences are born in dense heads at the end of a stout scape. The individual heads are ovoid and measure 4mm to 4.5mm in length with glossy creamy-yellow outer involucral bracts. The bracts are equal to the florets. The receptacles are tuberculate. Florets bright yellow florets are compact and numerous.
The flowers appear from September to December.
The fruits are linear achenes. The pale brown achenes are covered in short, sharp prickles and measure 0.5mm to 1mm in length. The 8 to 10 pappus bristles are cohering by spreading to semi erect ciliate hairs at the base and measure 3mm to 4mm in length.
Wildlife:
Pseudognaphalium luteoalbum’s supports a number of pollen flies and small moths that are usually attracted to other native daisies.
Cultivation:
Pseudognaphalium luteoalbum is a small herb that is considered a weed by most gardeners.
Propagation:
Seeds: Seeds can be removed easily from the fruits that have fallen to the ground.
Sow freshly treated seeds directly into a seed raising mix, keeping them moist not wet. When the seedlings are 20mm to 25mm tall, prick them out and plant them into 50mm native tubes using a good organic mix.
As the seedlings roots reach the bottom of the tubes plant them out into their permanent position. Do not delay.
It can also be grown from bulb division at the start of the dry season.
Further Comments from Readers:
“Hi reader, it seems you use The Bible of Botany a lot. That’s great as we have great pleasure in bringing it to you! It’s a little awkward for us to ask, but our first aim is to purchase land approximately 1,600 hectares to link several parcels of N.P. into one at The Pinnacles NSW Australia, but we need your help. We’re not salespeople. We’re amateur botanists who have dedicated over 30 years to saving the environment in a practical way. We depend on donations to reach our goal. If you donate just $5, the price of your coffee this Sunday, We can help to keep the planet alive in a real way and continue to bring you regular updates and features on Australian plants all in one Botanical Bible. Any support is greatly appreciated. Thank you.”
In the spirit of reconciliation we acknowledge the Bundjalung, Gumbaynggirr and Yaegl and all aboriginal nations throughout Australia and their connections to land, sea and community. We pay our respect to their Elders past, present and future for the pleasures we have gained.
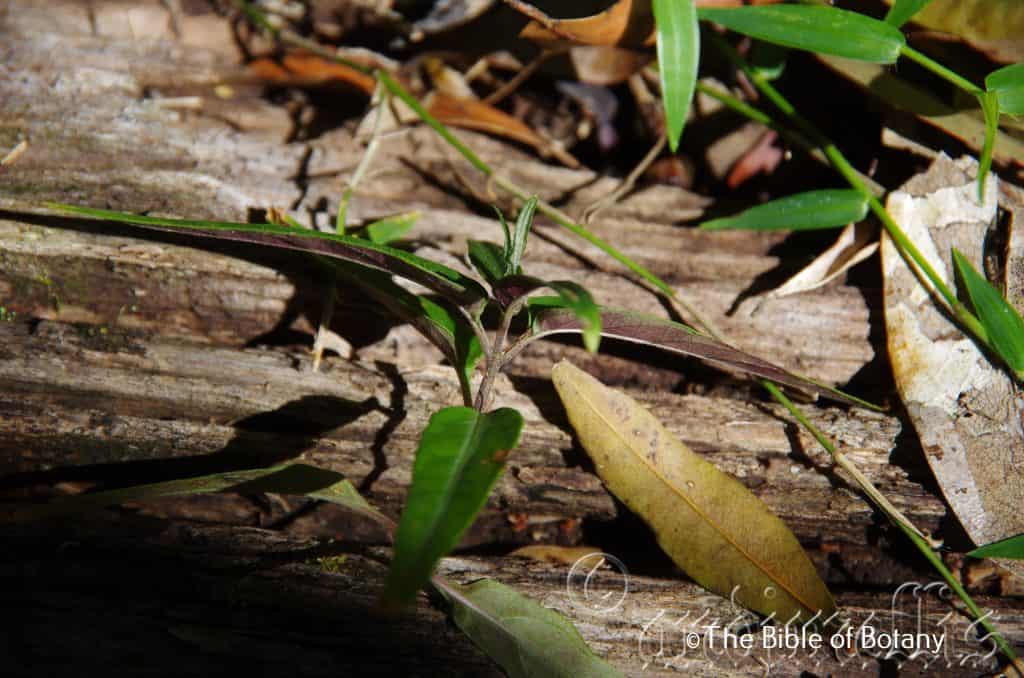
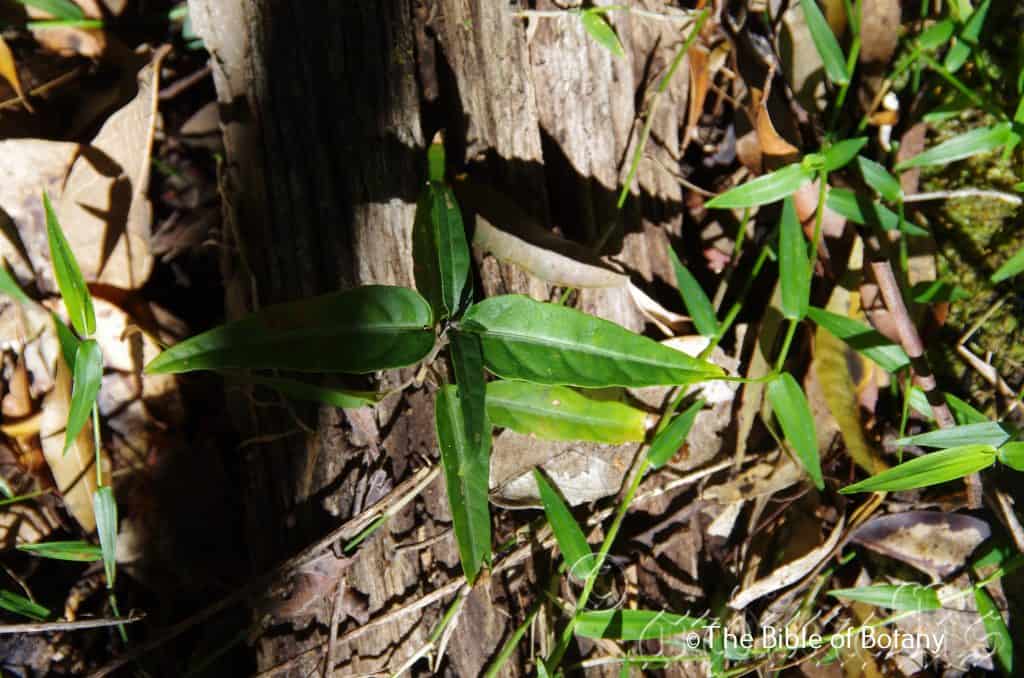
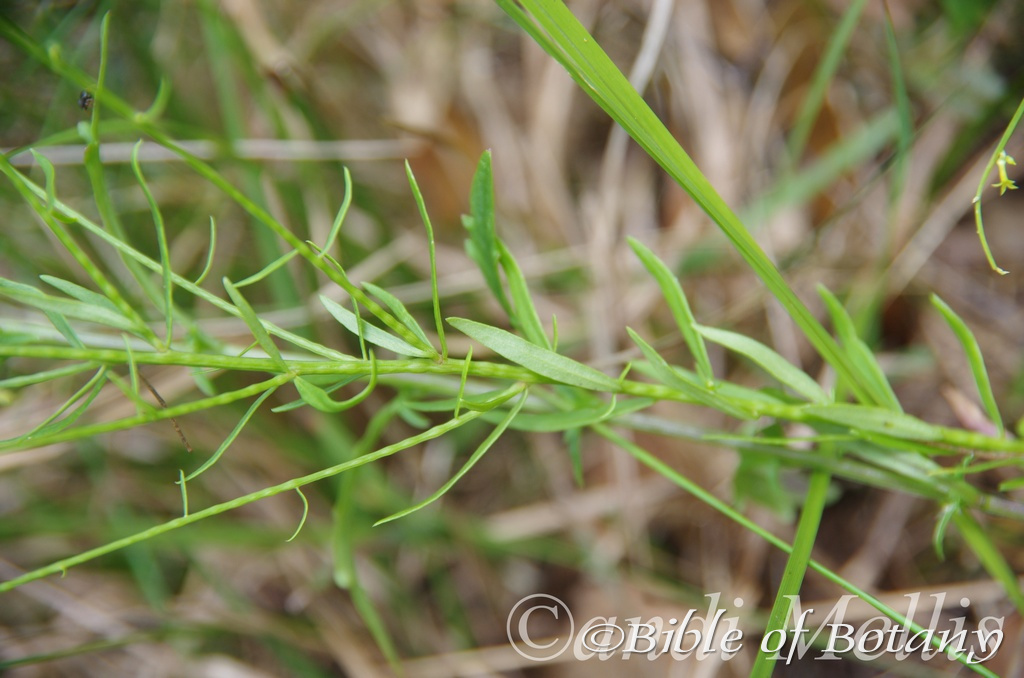
Pseudoraphis paradoxa
Classification:
Unranked: Monocots
Unranked: Commelinids
Order: Poales
Family: Poaceae
Subamily: anicoideae
Supertribe: Panicodae
Tribe: Paniceae
Genus: From Pseudos, which is Ancient Greek for false and Raphis, which is Ancient Greek for a needle. It refers to plants, which have false needles like the Raphis palm.
Species: From Pará, which is a Greek prefix that is usually attached to a descriptive verb and stands for to be close to, near, side by side or beside and Doxos, which is Greek for unbelievable. It usually refers to grasses, which have the growth habit of bushes in the desert rather than a typical grass.
Common Name: Slender Mud Grass.
Distribution:
Pseudoraphis paradoxa is restricted to a small area south of Bussleton to the Augusta-Margarette River in south west Western Australia.
In the east it is found south from Lake Glen Maggie near Mareeba in far north eastern Queensland to the upper Murray head waters in Gippsland in south eastern Victoria. It is found on and east of the Great Dividing Range to the coast.
https://avh.ala.org.au/occurrences/search?taxa=Pseudoraphis+paradoxa#tab_mapView
Habitat Aspect Climate:
Pseudoraphis paradoxa prefers full sun light to dappled shade to full sun. It grows in and around ephemeral pools or permanent pools and slow moving watercourses, backwashes and stream meanders often forming floating mats close to the banks or a dense turf on drying mud. The altitude ranges from 2 meters ASL to 750 meters ASL.
The temperatures range from minus 3 degree in August to 36 degrees in January.
The rainfalls range from lows of 550mm to an average of 2000mm.
Soil Requirements:
Pseudoraphis paradoxa prefers better quality gravelly loams and light silts to heavy silts or wet and seasonal mud. The soils are deep or close to permanent water. The soils are derived from alluvial deposits or at times wet podzolic depressions. The soils pH ranges from 4.5pH to 6pH. It tolerates waterlogged soils. Non saline soils to moderately saline soils are tolerated.
Height & Spread:
Wild Plants: 0.2m to 0.5m by 0.5m to 1m.
Characteristics:
Pseudoraphis paradoxa grows as a short, spreading perennial grass which is semi aquatic or fully emergent. The stolons are present as are the prostrate culms. The mid culm nodes are
glabrous. The ligule is a ciliate membrane, a fringed membrane or a ciliolate membrane. The ligules measure 0.8mm to 1.5mm in length.
The alternate, linear leaves measure 10mm to 80mm in length by 2mm to 6mm in width. The bases taper to the sheath while the apexes are acute. The concolourous laminas are grass-green to blue-green, dull and smooth to scaberulous. The laminas are flat while the margins are entire. The mid vein and parallel lateral veins are slightly prominent on the lower lamina and are visible on the upper lamina.
The inflorescence are semi dense, cylindrical, panicles born from the terminals of a culm. The panicles measure 30mm to 85mm in length by 6mm to 14mm in diameter by 6mm to 14mm in diameter while the racemes measure 10mm to 15mm in length.
The spikelets are sessile. There are 1 or 2 fertile spikelets on each raceme with the lowest floret being sterile without rachilla extension. The rachilla internodes are elongated below the proximal fertile floret. The lanceolate dorsally compressed spikelets measure 7.5mm to 11mm in length. The slender pedicels are glabrous and disarticulating above the glumes.
The glumes are dissimilar and are thinner than the fertile lemmas. The lower and upper glumes surfaces are smooth to asperulus. The lower glume is oblate, hyaline, without keels and are nerveless. The upper glume measures 5.5mm to 8.5mm in length. The upper glume is elliptic, membranous, without keels and have 13 to 19 faint nerves. The upper glume measures 7.5mm to 11mm in length.
The 2 sterile basal florets are barren without a significant palea. The basal sterile floret is a male which has a palea. The lemma of the lower sterile floret measures 100 mm of the length of the spikelet. It is membranous with 13 to19 faint nerves. The fertile florets are female. The fertile lemmas are without keels and have 5 nerves and measure 3.3mm to 3.7mm in length. The palea are without keels.
The 3 stamens measure 1.4mm to 2mm in length. The flowers appear from late November to early March.
The fruits are depressed to concaved obloidal to ellipsoidal grains. The grains measure 2mm to 2.5mm in length by 1.5mm to 2mm in diameter. The pale green grains turn pastel fawnish-yellow when ripe.
Wildlife:
Pseudoraphis paradoxa is the host plant for the Little Native Mouse, Pseudomys delicatulus and probably most other native mice and rats. It is also probably a stable food source for many small Parrots, Rosellas. The Double Bar Finch, Taeniopygia bichenovii and the Red Browed Finch, Neochmia temporalis have been seen eating the seeds.
The leaves and stems are a source of food for the Swamp Wallaby, Wallabia bicolor and a stand by food source for the Red Neck Wallaby, Macropus parryi in times of drought.
Cultivation:
Pseudoraphis paradoxa is a large spreading grass for large gardens around the edges of dams or along slow moving water courses where its culms can spread out over the water’s surface. It can be slashed and will recover very quickly but is not suitable for long term heavy grazing.
It is ideally suitable for full sun areas in low depressions where water lies for extended periods in ephemeral pools or the ground remains wet throughout the year.
It is a preferred food source of grazing stock but has the disadvantage of coursing heavy erosion around dams and along creeks and streams due to heavy traffic when foraging the grass. It is a poor to moderate soil stabilizer.
Propagation:
Seeds: Sow the seeds directly into a seed raising mix. Cover them with 2mm of fine sand and keep moist not wet or scatter in the area you wish to cover.
Place the tray in a warm sunny position. When the seedlings are 25mm to 50mm tall, prick them out in small groups and plant them into 20mm tubes using a good organic mix.
Once the seedlings reach 75mm to 80mm in height, plant them out into their permanent position and water thoroughly with our recommended fertilizer. Plant them at 500mm centers.
Alternatively the seed can be broadcast out in small areas or used in a seeder on broad acreage.
Fertilize using organic chicken pellets at the time of sowing.
Further Comments from Readers:
“Hi reader, it seems you use The Bible of Botany a lot. That’s great as we have great pleasure in bringing it to you! It’s a little awkward for us to ask, but our first aim is to purchase land approximately 1,600 hectares to link several parcels of N.P. into one at The Pinnacles NSW Australia, but we need your help. We’re not salespeople. We’re amateur botanists who have dedicated over 30 years to saving the environment in a practical way. We depend on donations to reach our goal. If you donate just $5, the price of your coffee this Sunday, We can help to keep the planet alive in a real way and continue to bring you regular updates and features on Australian plants all in one Botanical Bible. Any support is greatly appreciated. Thank you.”
In the spirit of reconciliation we acknowledge the Bundjalung, Gumbaynggirr and Yaegl and all aboriginal nations throughout Australia and their connections to land, sea and community. We pay our respect to their Elders past, present and future for the pleasures we have gained.
Pseudovanilla foliata
Classification:
Unranked: Monocots
Order: Asparagales
Family: Orcidaceae
Subfamily: Vanilloideae
Tribe: Vanilleae
Genus: From pseudos, which is Ancient Greek for false and Vainilla, which is Spanish for a little pod or sheath or from modern Latin for Vagina for a sheath. It refers to pods, resemble the pods of the real Vanilla genus.
Species: From Folium, which is Latin for foliage. It refers to plants, which are rather leafy or the leaves are scarce.
Common Name: Great Climbing Orchid.
Distribution:
Pseudovanilla foliata is found south from Cooktown in far northern coastal Queensland to South Brother and the John’s River in central coastal New South Wales. It is mainly found on the eastern side of the Great Dividing Range to the coast.
https://avh.ala.org.au/occurrences/search?taxa=Pseudovanilla+foliata#tab_mapView
Habitat Aspect Climate:
Pseudovanilla foliata prefers medium shade to dappled shade. It grows in well developed, moist lowland, moist upland rainforest moist sclerophyll forests especially in sheltered southerly slopes. It is somewhat saprophytic in nature, deriving some or most of its nourishment from rotting wood in old stumps and logs. Its altitude ranges from 10 meters ASL to 700 meters ASL.
The temperatures range from minus 5 degrees in August to 38 degrees in January.
The rainfall ranges from lows of 500mm to 2000mm average per annum. The plants are more reliant on capillary action from nearby permanent water sources to keep the soils permanently moist.
Soil Requirements:
Pseudovanilla foliata grows as a terrestrial orchid on coarse sands, fine sands and sandy loams to light gritty fatty clays. The soils are derived from decomposed granites, sandstones and accumulated peaty beach sands. The soils pH ranges from 4.5pH to 6pH. It does not tolerate waterlogged soils however soil moisture is essential for survival throughout the year. Non saline soils to slightly saline soils are tolerated.
Height & Spread:
Wild Plants: 8m to 15m by 0.15m to 0.4m.
Characteristics:
Pseudovanilla foliata grows as a slender erect vine not exceeding a stem diameter of 20mm in diameter. It climbs by means of adventitious roots produced at the nodes. The stems are yellowish green and contain chlorophyll though it is considered to be more saprophytic. Field evidence supports this as the plants are more concentrated near large rotting stumps, logs or at times dead standing trees. More work needs to be done on this to determine the fungi symbiotic relationships.
The true leaves are absent. The alternate, divaricate, lanceolate bracts that replace the leaves measure 45mm to 75mm in length by 13mm to 45mm in width. The cauline bases of the bracts are rounded to slightly cordate while the apexes are acute. The concolourous, thick coriaceous laminas are pale olive-green to yellowish-green and glabrous and lack genuine, efficient sugar producing chlorophyll. The laminas are flat and decurve downwards on the apical half while the margins are entire. The broad, obtuse midvein is more like a thickening of the lamina on the lower lamina. The parallel longitudinal lateral veins with 3 to 5 more prominent than the others are faintly prominent on the upper lamina.
The inflorescences are long, gently curving, pendulant racemes branching to the first or second order and are born from the bracteole axils. The racemes usually have 150 or more individual flowers that are somewhat porrect. The ultimate branches measure 30mm to 140mm in length with 7 to 40 individual flowers. The pedicels measure 24mm to 32mm in length. The floral bracts are scale like, triangular and measure 1mm to 3mm in length. The flowers are star shaped and measure 50mm to 60mm in length by 6mm to 8mm in width. The flowers are golden yellow with pink and red markings on the labellum.
The glabrous linear to oblong, erect dorsal sepal is slightly incurved ate the acuminate apex. The margins are entire and straight or slightly undulating. The dorsal sepal measures 22mm to 25mm in length by 5mm to 7mm in width.
The glabrous oblong to ovate, spreading downward lateral sepals are slightly incurved at the acuminate apex. The margins are entire and straight or slightly undulating. The lateral sepals measures 22mm to 25mm in length by 6mm to 9mm in width.
The glabrous oblong to ovate, spreading upward lateral petals has an acuminate apex. The surface curves slightly backwards from the central, longitudinal, obtuse keel which is prominent on the abaxial surface margins while the margins are entire. The lateral petals measure 15mm to 22mm in length by 4mm to 6mm in width.
The labellum is carmine to carmine-red with except for the pastel yellow to pale yellow margin and central channel. The channel has irregular margins, is narrow at the base and expands to the margins at the apex. The labellum measures 15mm to 20mm in length by 15mm to 17mm in width. The labellum’s margins are crisped and contorted.
The stamens and stigma are fused to form a column that measures 12mm in length. The sweetly scented honey-vanilla flowers appear from October to January.
The fruits are obloidal capsules. The mid green glabrous capsules turn deep grey-brown almost black externally and mid tan internally when ripe. The capsules split longitudinally along the sides. The split segments remain attached at the base and the apex. The capsules dehisce just prior to the following seasons flowers emerging.
The capsules measure 150mm to 270mm in length by 8mm to 14mm in diameter. The seeds are relatively large for an orchid and are winged around the margins. The seeds are usually uniform in size and measure 1.5mm in diameter including the wing.
Wildlife:
Pseudovanilla foliata’s flowers are a rich source of pollen and nectar for local native bees like Tetragonula carbonaria and the Blue banded bee Amegilla cingulata.
The plants are saprophytic and typically reach a peak of vigor and flowering coinciding with the ultimate decay of fallen trees, after which they decline rapidly and die as conditions are unsuitable. It is often conspicuous in the years following logging operations, roadworks and cyclones which coincide with the death of the living trees in the forests.
Cultivation:
Pseudovanilla foliata is a beautiful saprophytic orchid that has proven impossible to grow in cultivation to date. If you are fortunate enough to have it growing on your property it would be worthwhile fencing it off and protecting it. An annual feeding of blood and bone or top dressing with an animal carcarcus may help or induce good flowering.
Propagation:
Seeds: The seeds are easy to acquire and the seed requires treatment before sowing. Really Orchid seeds are meant for professionals with time, equipment and space. This orchid because of its symbiotic relationship with a fungus or fungi would be extremely difficult to maintain for any period of time when propagating.
Further Comments from Readers:
“Hi reader, it seems you use The Bible of Botany a lot. That’s great as we have great pleasure in bringing it to you! It’s a little awkward for us to ask, but our first aim is to purchase land approximately 1,600 hectares to link several parcels of N.P. into one at The Pinnacles NSW Australia, but we need your help. We’re not salespeople. We’re amateur botanists who have dedicated over 30 years to saving the environment in a practical way. We depend on donations to reach our goal. If you donate just $5, the price of your coffee this Sunday, We can help to keep the planet alive in a real way and continue to bring you regular updates and features on Australian plants all in one Botanical Bible. Any support is greatly appreciated. Thank you.”
In the spirit of reconciliation we acknowledge the Bundjalung, Gumbaynggirr and Yaegl and all aboriginal nations throughout Australia and their connections to land, sea and community. We pay our respect to their Elders past, present and future for the pleasures we have gained.
Dangar Falls National Park Dorrigo NSW
Dangar Falls National Park Dorrigo NSW
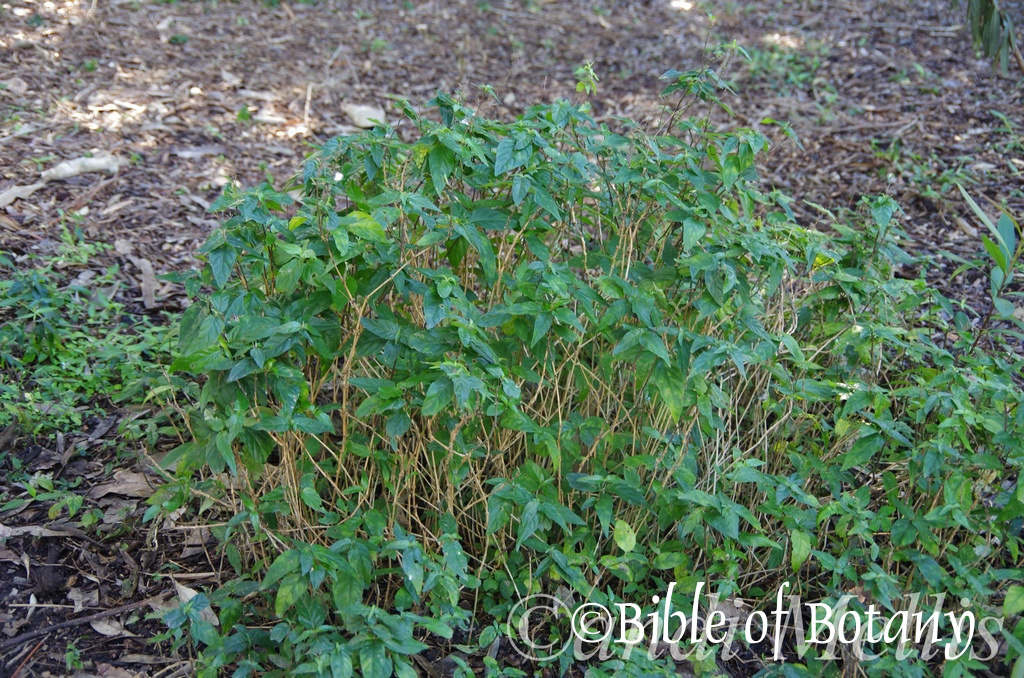
Pseudoweinmannia lachnocarpa
Classification:
Unranked: Eudicots
Unranked: Rosids
Order: Oxalidales
Family: Cunoniaceae
Genus: From Pseudos, which is Ancient Greek for false and Weinmannia which is named in honour of Johann Wilhelm Weinmann; 1683-1741, who was a German botanist and apothecaryist. It refers to the trees, which were once members of the Weinmannia genus and being closely related thus it was a false representative of that genus.
Species: From Lakhne, which is Ancient Greek for woolly type hair and Karpós, which is Ancient Greek for fruit. It refers to the fruits or seeds, which are covered in long woolly hairs.
Common Name: Rose wood or Red Caribbean.
Distribution:
Pseudoweinmannia lachnocarpa is found in 2 disjunct populations. The northern population is found south from Jarra Creek near Tully to Cooktown on Cape York Peninsula while the southern population is found south from Maryborough in coastal southern Queensland to the Richmond River near Casino in northern New South Wales.
https://avh.ala.org.au/occurrences/search?taxa=Pseudoweinmannia+lachnocarpa#tab_mapView
Habitat Aspect Climate:
Pseudoweinmannia lachnocarpa prefers full sun to partial shade. It grows in openings in warm well developed rainforests and littoral rainforests. The altitude ranges from 10 meters ASL to 850 meters ASL.
The temperatures range from minus 1 degree in July to 36 degrees in January.
The rainfall ranges from lows of 900mm to 3200mm average per annum.
Soil Requirements:
Pseudoweinmannia lachnocarpa prefers to grow on light sandy clays to medium clays often with copious quantities of leaf litter. The soils are usually derived from decomposed black basalts. The soils pH ranges from 5pH to 6pH. It does not tolerate waterlogged soils. Non saline soils to moderately saline soils are tolerated.
Height & Spread:
Wild Plants:25m to 30m by 10m to 12m.
Characteristics:
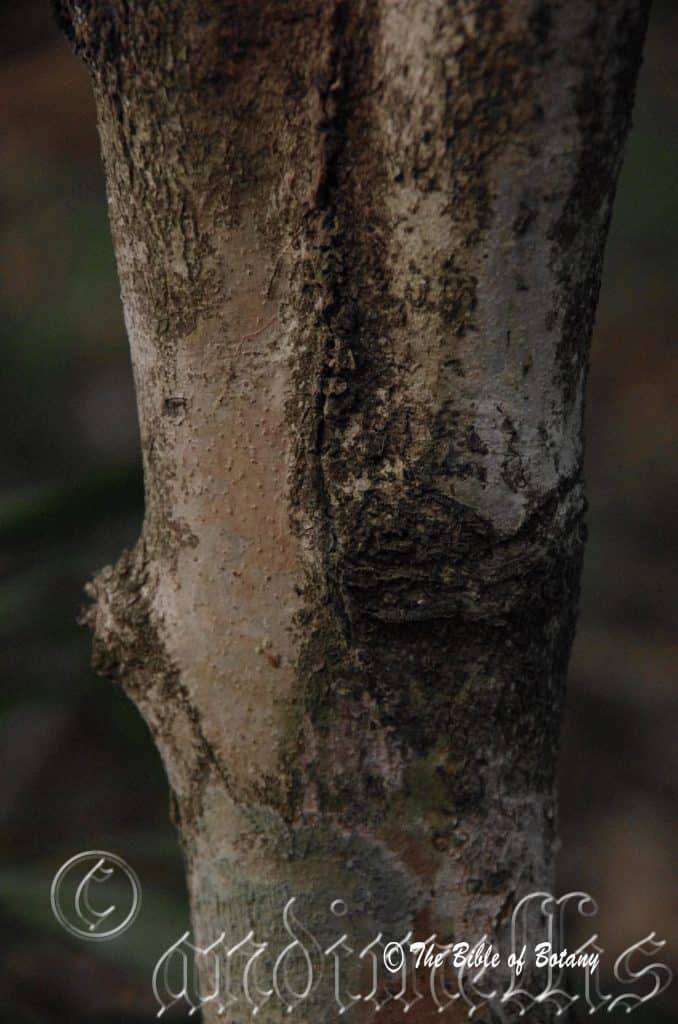
Pseudoweinmannia lachnocarpa grows as a densely foliaged small tree. The trunk is tall, straight, pale pinkish brown to mid pinkish brown, scabrous and usually powdery. The trunk forms large flying buttresses on mature trees. The stems are thin deep brown and becoming green-brown only near the apex with newer leaf growth. These stems are sparsely covered in lighter coloured lenticels. The new growth is deep sea-green and sparsely covered in white lenticels and fine white hirsute hairs.
The opposite trifoliate leaves of Pseudoweinmannia lachnocarpa are elliptical to lanceolate or oblanceolate. The leaflets measure 35mm to 90mm in length by 20mm to 40mm in width. The bases are tapering, cuneate or attenuate while the apexes are acute. The discolourous laminas are sea-green to olive green, glabrous and glossy on the upper lamina while the lower laminas are paler and semi glossy. The leaf margins are regularly toothed and slightly undulating, flat and curve slightly upwards from the mid vein. The mid vein and lateral veins are prominent on the upper lamina and distinctly visible on the lower lamina. The petioles measure 10mm to 40mm in length while the leaflet’s petiolules are sessile tor subsessile. The caduceus stipules are lanceolate and measure 3mm to 5mm in length.
Inflorescences of Pseudoweinmannia lachnocarpa are born in small raceme from the leaf axils. The pale blue green racemes measure 45mm to 55mm in length and are covered in white sericeous hairs. The pale blue green filiform pedicels measure 3mm to 9mm in length. The 6 persistent, white elliptical tepals curve upwards near the apex. They measure 2.5mm to 3mm in length. The tepals are covered in white puberulent hairs externally and internally.
The 12 stamens filaments measure 3mm to 3.6mm in length while the orange-yellow, oblong anthers measure 0.3mm to 0.5mm in length.
The white style is glabrous and measures 3mm to 3.5mm in length and tapers to the stigma. The ovaries measure 1mm in diameter and are densely covered in white pulverulent hairs. The base of the ovary is burgundy and covered in small glands. The sweet honey scented flowers appear from early September through to late November or early December.
Pseudoweinmannia lachnocarpa’s fruits are an ovoidal capsule. The capsules are densely covered in 3mm to 4mm long honey coloured tomentose hairs. The capsules measure 3mm to 4.5mm in length by 3mm to 4.5mm in diameter. The green capsules turn deep brown when ripe. The single ovoidal seed is glossy brown and measures 1mm in length. The style and calyx lobes are persistent on the capsules
Wildlife:
Pseudoweinmannia lachnocarpa does not appear to have any predators though the flowers are visited by hundreds of small native nectar eating flies, native bees and beetles.
Cultivation:
Pseudoweinmannia lachnocarpa is a magnificent tall tree that should be more widely grown in tropical, subtropical and monsoonal gardens. It is ideal at the edge of a moist rain forest or as the pioneer trees for a rainforest garden. It also makes a great park tree offering quick growth, and good shade and forming the beginning of a buttress within 10 year under ideal conditions. In cultivation it will grow from 15 meters to 20 meters in height by 10 meters to 14 meters in diameter when grown in the open or taller and narrower if grown closer together as a rainforest tree.
It grows better on lighter soils where deep leaf litter keeps the soil cool and moisture at an even level. If these requirements are met they can cope with temperatures as low as minus 4 degrees and up to 42 degrees. It is moderately drought resistant.
It is prolific in flowers and when it is given an adequate supply of water and a little native fertilizer on a regular basis the plants will respond with excellent flowering and possibly good fruit set over a longer period.
It often reaches its full potential in just 12 to 15 years and flower from the eighth to tenth year from seed.
Propagation:
Seeds: The seeds of Pseudoweinmannia lachnocarpa can be easily collected from the ripe fruits that have fallen to the ground.
Sow fresh seeds directly into a seed raising mix, keeping them moist not wet. When the seedlings are 20mm to 25mm tall, prick them out and plant them into 50mm native tubes using a good organic mix.
As the seedlings roots reach the bottom of the tubes plant them out into their permanent position. Do not delay.
Fertilize using seaweed, fish emulsion or organic chicken pellets soaked in water on an alternate basis. Fertilize every two months until the plants are established then annually in early September to October to maintain better colour, health, vitality and flowering.
Further Comments from Readers:
“Hi reader, it seems you use The Bible of Botany a lot. That’s great as we have great pleasure in bringing it to you! It’s a little awkward for us to ask, but our first aim is to purchase land approximately 1,600 hectares to link several parcels of N.P. into one at The Pinnacles NSW Australia, but we need your help. We’re not salespeople. We’re amateur botanists who have dedicated over 30 years to saving the environment in a practical way. We depend on donations to reach our goal. If you donate just $5, the price of your coffee this Sunday, We can help to keep the planet alive in a real way and continue to bring you regular updates and features on Australian plants all in one Botanical Bible. Any support is greatly appreciated. Thank you.”
In the spirit of reconciliation we acknowledge the Bundjalung, Gumbaynggirr and Yaegl and all aboriginal nations throughout Australia and their connections to land, sea and community. We pay our respect to their Elders past, present and future for the pleasures we have gained.
Pseuduvaria froggattii
Classification:
Unranked: Magnoliids
Order: Magnoliales
Family: Annonaceae
Tribe: Miliuseae
Genus: From Pseudos, which is Ancient Greek for false and Varius, which is Latin for various or variable or miscellaneous. It refers to trees which were once members of the Mitrephora genus and also have a close relationship to the Uvaria genus. Thus a false representative of the two genre so the present use of false in the name was used. The plants physically are more representative to the Mitrephora genus but DNA sampling is required to place the plants in their correct genus.
Species: Is named in honour of Walter Wilson Froggatt; 1858-1937, who was an Australian born entomologist and keen plant collector.
Common Name:
Distribution:
Pseuduvaria froggattii is found south from the Cape Tribulation and the Bloomfield River to the Mowbray River in Northern Queensland.
https://avh.ala.org.au/occurrences/search?taxa=Pseuduvaria+froggattii#tab_mapView
Habitat Aspect Climate:
Pseuduvaria froggattii prefers full sun to partial shade. It grows in openings, adjacent to warm well developed rainforests, littoral rainforests or gallery forests. The altitude ranges from 5 meters ASL to 100 meters ASL.
The temperatures range from minus 10 degrees in July to 36 degrees in January.
The rainfall ranges from lows of 1550mm to 3200mm average per annum.
Soil Requirements:
Pseuduvaria froggattii prefers light sandy clays to medium clays often with copious quantities of leaf litter. The soils are usually derived from decomposed black basalts. The soils pH ranges from 5.5pH to 7pH. It does not tolerate waterlogged soils however plants in riparian zones are often inundated for short periods. Non saline soils to moderately saline soils are tolerated.
Height & Spread:
Wild Plants: 15m to 18m by 8m to 10m.
Characteristics:
Pseuduvaria froggattii grows as a densely foliaged small tree. The trunk is tall, straight, deep grey to mid brown with fine longitudinal furrows, scabrous, rough and usually covered in green lichens especially on the upper branches. The branchlets are thin deep grey becoming green-brown only near the apex with newer leaf growth. These stems are deep grey and covered in lighter coloured lenticels and fine ridges. The new growth is olive green to sea-green and densely covered in olive brown hirtellous hairs. The freshly broken twigs and petioles have a distinct incense odour.
The alternate leaves are elliptical to broad elliptical. Pseuduvaria froggattii leaves measure 100mm to 300mm in length by 30mm to 70mm in width. The petioles are transversely wrinkled and have a groove on the upper surface. They measure 4mm to 6mm in length.
The bases are broad cuneate to narrow rounded while the apexes are acuminate with a caudate tip. The concolourous or discolourous laminas are mid olive green to deep green, glabrous to densely covered in small oil dots and yellow brown hirtellous hairs on the upper laminas while the lower laminas are the same or slightly paler. The leaf margins are entire, undulating and curve slightly upwards from the mid vein. The mid vein and main lateral veins are strongly prominent on the lower lamina and are distinctly visible on the upper lamina.
Inflorescences of Pseuduvaria froggattii are born in small clusters of 4 to 15 individual flowers on the older wood and cauliforosly. The slender, glabrous, hanging pedicels are glabrous to sparsely covered in white hirtellous hairs. They measure 15mm to 32mm in length.
The 3 cream, ovate sub medial bracts measure 1.2mm to 2mm in diameter. The 3 cream or cream tipped purple-pink calyx lobes are ovate to sub orbicular and measure 2.5mm to 3mm in length by 2.5mm to 3mm in width. It is sparsely covered in white puberulent hairs externally and are glabrous internally while the margins are sparsely covered in white ciliate hairs.
The 3 cream outer petals are obovate to sub orbicular and measure 9mm to 9.5mm in length by 7.5mm to 8mm in width. They curve upwards from the base to the apex and downwards from the mid vein to the margins. It is sparsely covered in white puberulent hairs externally and are glabrous internally.
The 3 cream to creamy pink tipped purple inner petals are obovate to suborbicular forming a perfect dome and measure 8.5mm to 12mm in length by 9mm to 12mm in width. It is covered in white puberulent hairs externally and are glabrous internally.
There are about 36 to 42 yellow ovaries are clustered at the base within the inner petals. The stigmas are sessile on the ovaries. The ovaries are noticeable when the petals and calyxes turn deep grey and wither and fall as small yellow papillate lumps. Pseuduvaria froggattii’s flowers appear throughout the year.
Pseuduvaria froggattii’s fruits are globose to ovoidal to ellipsoidal berries. The berries are glabrous and measure 15mm to 20mm in length by 10mm to 12mm in diameter. The green capsules turn bright yellow-orange while the flesh turns a paler colour of the skin. The 2 seeds are separated in the fruit by a thick layer of flesh. The 1 or 2 laterally flattened disc, oval seeds are pale creamy fawn and woody. The seeds are strongly rugose on the flattened sections spiralling outwards from the centre like the spokes on a wheel. The seeds are similar in appearance to a cream biscuit from the side view. The seeds measure 5mm to 7mm in diameter by 3mm to 3.2mm in depth.
Wildlife:
Pseuduvaria froggattii’s leaves are eaten by the green spotted triangle butterfly, Graphium agamemnon and the pale green triangle butterfly, Graphium eurypylus.
The flowers maybe visited by small fruit eating bats for fertilization.
The fruits have a rather bland taste despite the unpleasant odour which lingers on the person eating the fruit.
Cultivation:
Pseuduvaria froggattii is a magnificent medium tree that should be more widely grown in tropical, subtropical and monsoonal gardens. The very unusual flowers on the older wood, branches and trunk make it an extraordinary beautiful specimen for the garden.
It is ideal at the edge of a rainforest or as the pioneer trees for a moist rainforest garden. It also makes a great park tree offering quick growth, and good shade. In cultivation it will grow from 10 meters to 12 meters in height by 8 meters to 10 meters in diameter when grown in the open or taller and narrower if grown closer together as an enclosed rainforest tree.
It grows exceptionally well on lighter soils where deep organic leaf litter keeps the soil cool and moisture at an even level. Add to this, if it is given an adequate supply of water and a little native fertilizer on a regular basis the plants will respond with good flowering and possibly better fruit set over a long period. The orange fruits contrast strongly against the deep grey almost black trunks. This is further highlighted with the smooth skins of the fruit and the roughness of the bark
If these requirements are met it can cope with temperatures as low as minus 4 degrees and up to 42 degrees. It is moderately drought resistant.
It often reaches a reasonable size and shape in just 12 to 15 years and flowers from the eighth to tenth year from seed.
Propagation:
Seeds: Seeds of Pseuduvaria froggattii can be removed easily from the fruits that have fallen to the ground.
Sow fresh seeds directly into a seed raising mix, keeping them moist not wet. When the seedlings are 20 to 25 mm tall, prick them out and plant them into 50mm native tubes using a good organic mix.
As the seedlings roots reach the bottom of the tubes plant them out into their permanent position. Do not delay.
Fertilize using seaweed, fish emulsion or organic chicken pellets soaked in water on an alternate basis. Fertilize every two months until the plants are established then annually in early September to October to maintain better colour, health, vitality and flowering.
Further Comments from Readers:
“Hi reader, it seems you use The Bible of Botany a lot. That’s great as we have great pleasure in bringing it to you! It’s a little awkward for us to ask, but our first aim is to purchase land approximately 1,600 hectares to link several parcels of N.P. into one at The Pinnacles NSW Australia, but we need your help. We’re not salespeople. We’re amateur botanists who have dedicated over 30 years to saving the environment in a practical way. We depend on donations to reach our goal. If you donate just $5, the price of your coffee this Sunday, We can help to keep the planet alive in a real way and continue to bring you regular updates and features on Australian plants all in one Botanical Bible. Any support is greatly appreciated. Thank you.”
In the spirit of reconciliation we acknowledge the Bundjalung, Gumbaynggirr and Yaegl and all aboriginal nations throughout Australia and their connections to land, sea and community. We pay our respect to their Elders past, present and future for the pleasures we have gained.
Pseuduvaria villosa
Classification:
Unranked: Magnoliids
Order: Magnoliales
Family: Annonaceae
Tribe: Miliuseae
Genus: From Pseudo is Latin for false and Varian which is Latin for variable. It refers to the flowers, which have some variation of from the flowers of the exotic Custard Apples in the Annona genus, thus false custard apple.
Species: From Villōsa, which is Latin for shaggy. It refers to organs or structures, which bear short or long, shaggy or curly, “villose” hairs.
Common Name:
Distribution:
Pseuduvaria villosa is found south from the Johnstone River near Innisfail to the Liverpool River near Cardwell in far north eastern Queensland.
https://avh.ala.org.au/occurrences/search?taxa=Pseuduvaria+villosa#tab_mapView
Habitat Aspect Climate:
Pseuduvaria villosa prefers dappled light to full shade. It grows as an understory plant in warm moist well developed rainforests, littoral rainforests or gallery forests. The altitude ranges from 5 meters ASL to 300 meters ASL.
The temperatures range from minus 10 degrees in July to 36 degrees in January.
The rainfall ranges from lows of 1550mm to 3200mm average per annum.
Soil Requirements:
Pseuduvaria villosa prefers light sandy clays to medium clays often with copious quantities of forest litter. The soils are usually derived from decomposed brown basalt, black basalts, sandstones, shales, granites or metamorphic rocks. The soils pH ranges from 5pH to 6pH. It does not tolerate waterlogged soils. Non saline soils to moderately saline soils are tolerated as are salt laden winds.
Height & Spread:
Wild Plants: 2m to 4m by 2m to 4m
Characteristics:
Pseuduvaria villosa grows as a densely foliaged small tree or medium shrub. The branches are rough and usually covered in green lichens. The branchlets are thin deep grey becoming green-brown only near the apex with newer leaf growth. These stems are deep grey and covered in lighter coloured lenticels and fine ridges. The new growth is olive green to sea-green and densely covered in amber hirtellous hairs. The freshly broken twigs and petioles have a distinct incense odour.
The alternate leaves are elliptical to broad elliptical or ovate. Pseuduvaria villosa leaves measure 80mm to 200mm in length by 20mm to 80mm in width. The petioles are densely covered in honey amber hirtellous hairs and measure 0.2mm to 0.6mm in length. The bases are rounded while the apexes are acuminate. The concolourous laminas are mid sea-green to deep sea-green and densely covered in small honey amber hirtellous hairs. The leaf margins are entire, undulating and curve slightly downwards from the mid vein. The lamina is convexed between the lateral veins. The mid vein and main lateral veins are strongly prominent on the lower lamina and are distinctly visible on the upper lamina. The mid vein is covered in honey amber hirtellous hairs on the upper lamina.
The male and female flowers are produced separately. The inflorescences of Pseuduvaria villosa are born in small clusters of 2 to 6 individual flowers on the older wood, cauliflorously and from the lower leaf axils. The slender, glabrous, hanging pedicels are sparsely covered in white hirtellous hairs. They measure 20mm to 50mm in length.
The 3 cream, ovate sub medial bracts measure 1.2mm to 2mm in diameter. The 3 cream or cream tipped purple-pink calyx lobes are ovate and measure 2.5mm to 4mm in length by 2.5mm to 4mm in width. It is covered in white puberulent hairs externally and are glabrous internally while the margins are sparsely covered in white ciliate hairs.
The 3 pale cream to pale creamy green outer petals are obovate to sub orbicular and measure 10mm to 15mm in length by 8mm to 10mm in width. They divaricate and curve slightly downwards from the base to the apex and. It is covered in white puberulent hairs externally and are glabrous internally.
The 3 white inner petals are tipped pink near the base and are obovate to sub orbicular forming a perfect dome. The inner petals are fused at the apex and along the lateral margins and measure 11mm to 15mm in length by 13mm to 16mm in width. It is covered in white puberulent hairs externally and are glabrous internally.
The anthers are sessile and measure 1.1mm to 1.3mm length by 0.8mm to 1mm in width. Staminodes surround the ovaries.
There are about 40 to 50 yellow ovaries clustered at the base within the inner petals. The stigmas are sessile on the ovaries. The ovaries are noticeable when the petals and calyxes turn deep grey and wither and fall as small yellow papillate lumps. Pseuduvaria villosa’s flowers appear throughout the year.
The fruits of Pseuduvaria villosa are globular berries. The berries are covered in white villose hairs and measure 15mm to 20mm in length by 10mm to 12mm in diameter. The green capsules turn bright yellow-orange while the flesh turns a paler colour of the skin. The 1 or 2 irregularly shaped seeds are pale brown and woody. The 2 seeds are separated in the fruit by a thick layer of flesh. The seeds are strongly scrobiculata and measure 11mm to 13mm in length.
Wildlife:
Pseuduvaria villosa’s leaves are eaten by the green spotted triangle butterfly Graphium agamemnon, and the pale green triangle butterfly, Graphium eurypylus.
The flowers maybe visited by small fruit eating bats for fertilization.
The fruits have a rather bland taste despite the unpleasant odour which lingers on the person eating the fruit.
Cultivation:
Pseuduvaria villosa is a magnificent small tree or large shrub that could be more widely grown in tropical, subtropical and monsoonal gardens. The very unusual flowers on the older wood and branches makes it an extraordinary beautiful specimen for the garden.
It is ideal at the edge of a rainforest or as an understory shrub for a moist rainforest garden. It also makes a great hedge row being densely foliaged. In cultivation it will grow from 3.5 meters to 4.5 meters in height by 3 meters to 4 meters in diameter when grown in the open or taller and narrower if grown closer together or are enclosed beneath other rainforest trees.
It grows well on lighter soils where deep leaf litter keeps the soil cool and moisture at an even level. If these requirements are met they can cope with temperatures as low as minus 4 degrees and up to 42 degrees. It is moderately drought resistant.
Add to the above, if it is given an adequate supply of water and a little native fertilizer on a regular basis the plants will respond with good flowering and possibly better fruit set over a long period. The orange fruits contrast strongly against the deep grey almost black trunks. This is further highlighted with the smooth skins of the fruit and the roughness of the bark
They often reach their full potential in just 12 to 15 years and flower from the sixth to seventh year from seed.
Propagation:
Seeds: The seeds of Pseuduvaria villosa can be removed easily from the fruits that have fallen to the ground.
Sow fresh seeds directly into a seed raising mix, keeping them moist not wet. When the seedlings are 20mm to 25mm tall, prick them out and plant them into 50mm native tubes using a good organic mix.
As the seedlings roots reach the bottom of the tubes plant them out into their permanent position. Do not delay.
Fertilize using seaweed, fish emulsion or organic chicken pellets soaked in water on an alternate basis. Fertilize every two months until the plants are established then annually in early September to October to maintain better colour, health, vitality and flowering.
Further Comments from Readers:
“Hi reader, it seems you use The Bible of Botany a lot. That’s great as we have great pleasure in bringing it to you! It’s a little awkward for us to ask, but our first aim is to purchase land approximately 1,600 hectares to link several parcels of N.P. into one at The Pinnacles NSW Australia, but we need your help. We’re not salespeople. We’re amateur botanists who have dedicated over 30 years to saving the environment in a practical way. We depend on donations to reach our goal. If you donate just $5, the price of your coffee this Sunday, We can help to keep the planet alive in a real way and continue to bring you regular updates and features on Australian plants all in one Botanical Bible. Any support is greatly appreciated. Thank you.”
In the spirit of reconciliation we acknowledge the Bundjalung, Gumbaynggirr and Yaegl and all aboriginal nations throughout Australia and their connections to land, sea and community. We pay our respect to their Elders past, present and future for the pleasures we have gained.
Townsville Qld.
Townsville Qld.
Enogera Qld.
Townsville Qld.
Townsville Qld.
Townsville Qld.
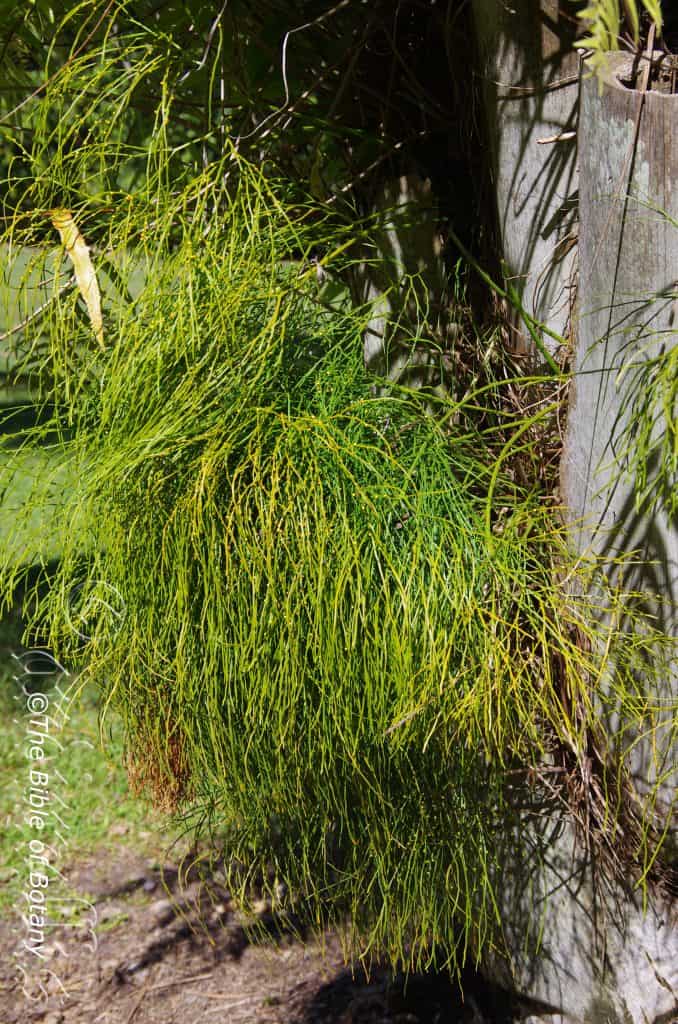
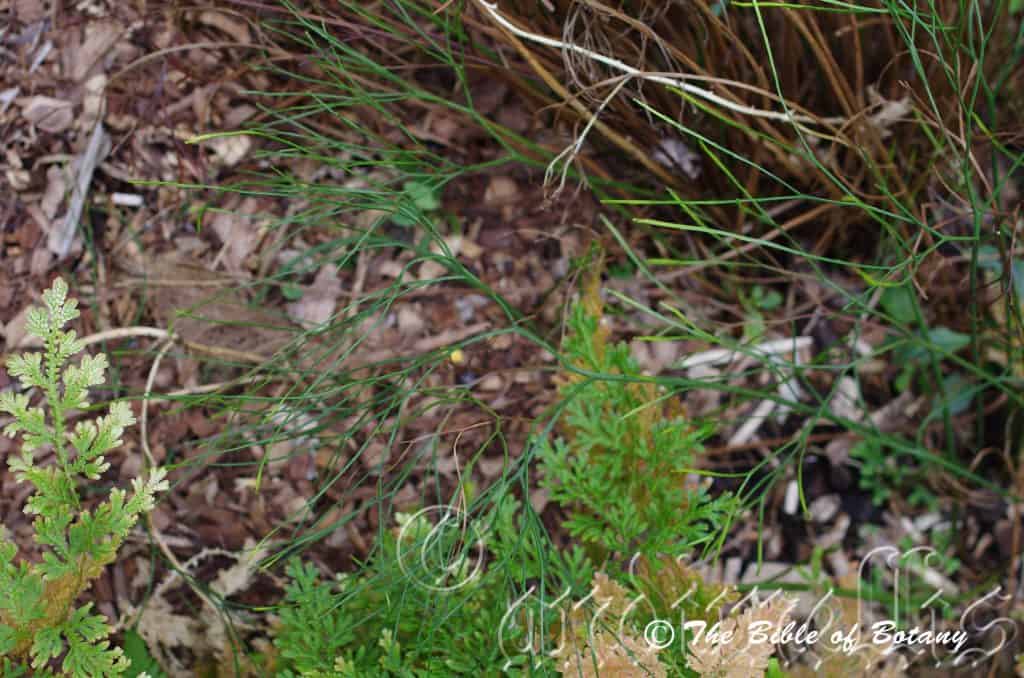
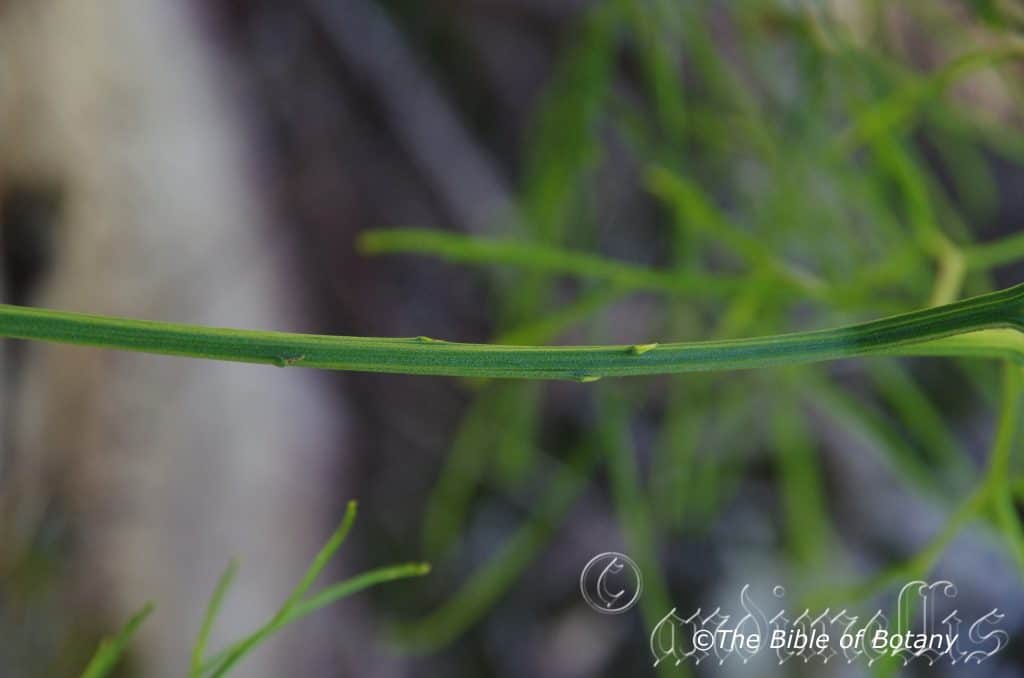
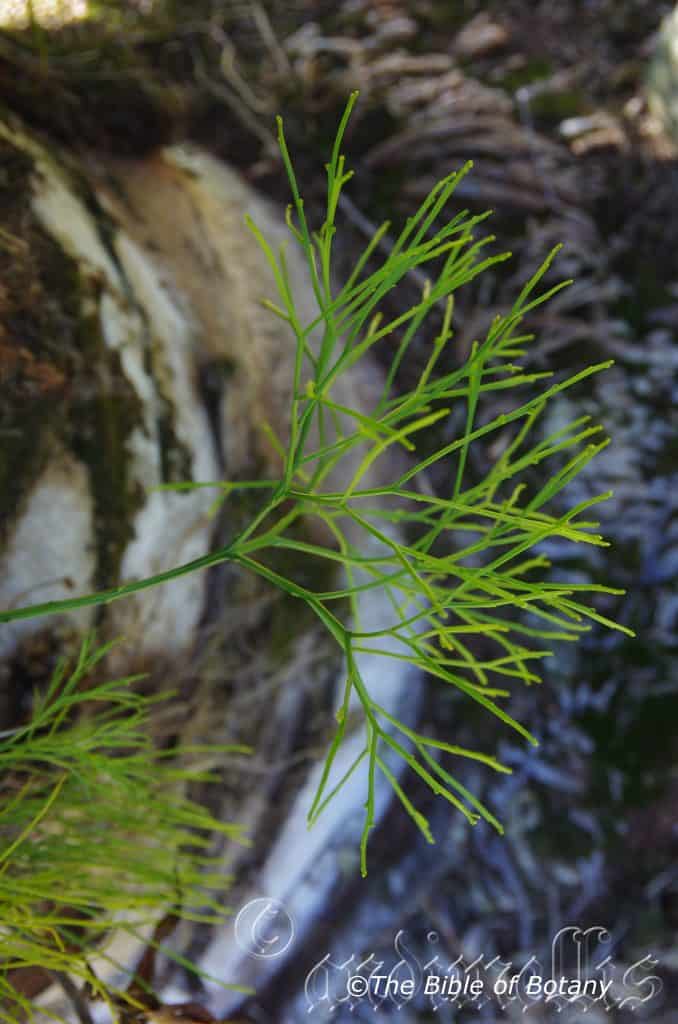
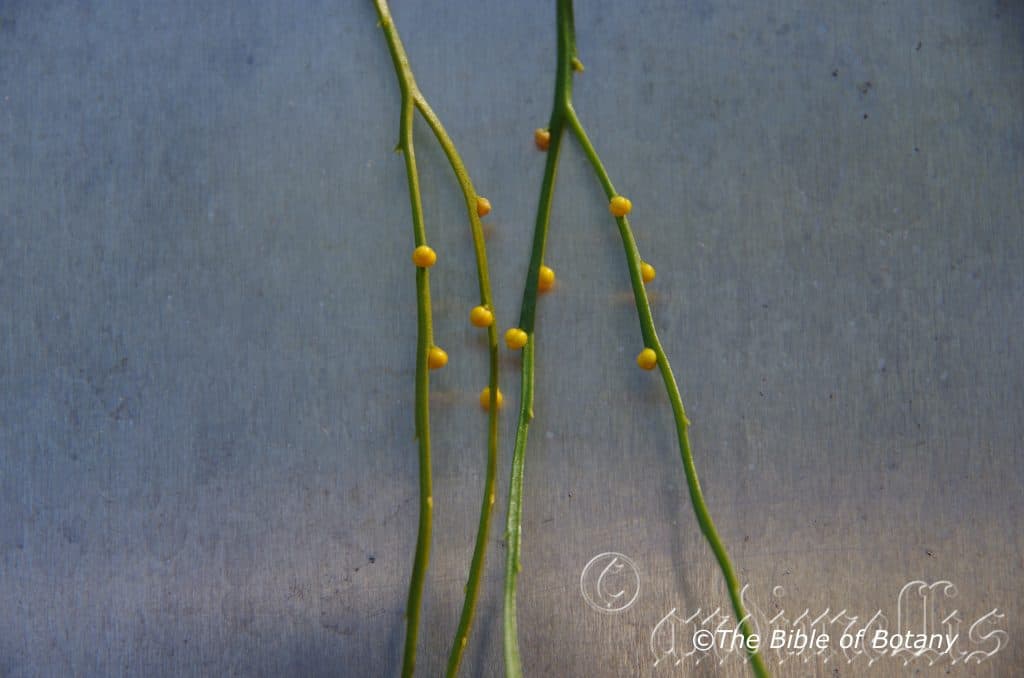
Psilotum complanatum
Classification:
Class: Equisetopsida
Subclass: Ophioglossida
Order: Psilotales
Family: Psilotaceae
Genus: From Psilo, which is Ancient Greek for bare, naked or glabrous. It refers to the rachis, rhyzomes and fronds, which are very smooth and glabrous.
Species: From Complanatum, which is Latin for flat or to make level. It usually refers to plants, which have flattened stems.
Common Name: Flat Fork Fern.
Distribution:
Psilotum complanatum is found in 3 disjunct populations form the MacIlwraith Range to Bowen in far north eastern coastal Queensland, from around Eumundi in central Queensland and in the south from around Ballina in north eastern New South Wales.
https://avh.ala.org.au/occurrences/search?taxa=Psilotum+complanatum#tab_mapView
Habitat Aspect Climate:
Psilotum complanatum prefers dappled light to full shade. It grows as an epiphyte in well-developed rainforest and is often found growing from the bases of other large epiphytic clumps. The altitude ranges from 5 meters ASL to 600 meters ASL.
The temperatures range from 3 degree in July to 38 degrees in January.
The rainfall ranges from lows of 1100mm to 3200mm average per annum.
Soil Requirements:
Psilotum complanatum grows as an epiphyte particularly from the bases of larger peaty forming epiphytes or occasionally as a lithophyte. The peaty fibres pH ranges from 5.5pH to 6pH. It does not tolerate waterlogged soils.
Height & Spread:
Wild Plants: 0.4m to 0.7m by 0.25mm to 0.35mm.
Characteristics:
Psilotum complanatum is a terrestrial, lithophyte or epiphytic plant often growing out the bottom of other epiphytic plants. The rhizomes are short, creeping and covered in deep brown to deep brown lanceolate scales. Psilotum complanatum’s pendant slender aerial stems are regularly branched from the base and measure 150mm to 750mm in length. The concolourous flattened to elliptic in cross section are deep green and glabrous. The basal stems measure 3mm to 5mm in width while the ultimate branches measure 1.5mm to 2mm in width.
Psilotum complanatum’s leaves are small to minute scales.
The fertile fronds are similar to the sterile fronds. Psilotum complanatum’s orbicular sporangia appear from near the base to almost the apex along both margins.
Spores are small irregular and reddish brown in colour.
The synangia are 3 lobed sporangia and measure 1.5mm to 2mm in length by 1.5mm to 2mm diameter. The spore is pale brown to tan.
Wildlife:
Psilotum complanatum’s wildlife is unknown to the author.
Cultivation:
Psilotum complanatum is an excellent fern for cultivation and makes a great fern where dappled light occurs. It is ideal as a bush house specimen in an area, where there is heavy to light shade. In cultivation it will grow from 500mm to 750mm in length with a similar spread. It is cold tolerant to temperatures as low as 1 degree once established but detest frosts.
It is most suitable in rainforests where it can break the monotony of large deep green leaves and add texture to the trunks and forks of rainforest trees. It likes plenty of leaf litter to help increase fertility and once established can be fed with apple or banana peels.
Medium to large frog or fish ponds are made the more attractive when surrounded by this fern when it is placed on rocks and boulders. Their size makes for a balance setting.
Repot annually to revitalize soil and increase the growth rate. Repot using our recommended potting mix for ferns for best results.
Propagation:
Fern Spores:
All ferns that are declared rare, vulnerable or endangered are protected by Federal and State Laws and must not be removed from the wild unless you are a land developer, mining company or main Roads department etc. This includes bulbs, roots, leaves and flowers. No part of any plant can be removed from Federal, State or Local Government land without the prior permission of the authority and this includes the spore.
Most people are put off at the thought of growing ferns from spore. Like all plants that produce their offspring from seed or spore the methods are basically the same. Remember nature has been doing this for millions of years and has been very successful. I have had excellent results growing over 200 different species of Australian ferns so don’t be afraid. Give it a go.
Step 1. Select spore from the fern fronds. Wait until the fern is just starting to release its spore. Rinse the fronds under clean running water and dry. This is to wash off any other spores from rogue ferns that may have settled onto the fronds. (There is nothing worse than having common brake or common soft bracken contaminating a prized tree fern or epiphyte.)
Step 2. Place the dry fronds in a clean brown paper bag and keep them in a cool dark place like the linen closet for about a week to ten days before you are ready to sow the spore. The exception to this rule applies to ferns, which produce green spores. These must be sown immediately that they are released. Todea Barbara is a good example of a fern, which produces green spore.
Step 3. Take a large ice cream container, a small ice cream container and a clean clear plastic bag large enough to seal the large ice cream container and three or four milk bottle tops.
Step 4. Punch or drill 6 to 10 5mm holes in the bottom of the small ice cream container.
Step 5. Wash both containers, tops and plastic bag so that they are very clean and sterile.
Step 6. Use a clean fine seed raising mi. We used 3 parts fine sand, 3parts peat and 3 parts perlite and 1 part vermiculite. We used crushed basalt, crusher dust and peat in a 25:25:50 ratio for epiphytes. Moisten the mix enough that water does not run out when the mix is squeezed between the fingers.
Step 7. Place the moisten mix (Enough to half fill the small ice cream container) in the microwave oven with a large glass of water for 7 or 8 minutes, until the water is boiling. Allow them to cool in the oven. You will need the water later so do not tip it out.
Step 8. Take the brown paper bag out of the linen closet. Shake the bag and remove the fronds. You should have a yellow, brown, black or rarely greenish brown or ochre powder or very fine, small round pin head size spore depending on the specie involved.
Step 9. Remove the mixture from the oven once it has cooled and place it in the small ice cream container and level.
Step 10. Sprinkle the spore sparsely over the mixture in the small ice cream container.
Step 11. Place the milk bottle tops in the large ice cream container with the flat surface facing down. Place the small ice cream container in the large ice cream container so that it is sitting on the milk bottle tops.
Step 12. Remove the water from the microwave and pour it into the larger ice cream container so there is 25mm to 30mm of water in the bottom.
Step 13. Place the ice cream containers in the plastic bag and seal. Step 14. Place the contents and bag in a warm shady place preferably 50mm to 70mm shade depending on the specie. Shade houses and some window sills are ideal.
Step 15. The surface should turn green within a week to two weeks. The prothallus will then develop. From the prothallus the first true fronds will appear. Wait until the ferns are 20mm to 35mm in height before you attempt to transplant them. Once they are ready open the bag up slightly and allow the air to flow around the little ferns. Every 3 to 5 days open the bag a little further so the ferns get use to their new environment. Allow them a week to two weeks to harden off before you transplant them following the removal of the plastic bag. Carefully prick them out into 50mm standard squat tubes as you would any seedling.
Do not try to transplant them as single plants as they are still a little delicate still.
Once the smaller ones again reach 50mm to 70mm you may wish to divide the stronger and hardier individual plants into smaller clumps in 100mm squat pots.
Step 16. We fertilized with seaweed, fish emulsion or organic chicken pellets soaked in water on an alternate basis until established. Fertilize every two months for one year even when in a tree fork or on a rock or boulder then twice annually in September and again in March.
Further Comments from Readers:
“Hi reader, it seems you use The Bible of Botany a lot. That’s great as we have great pleasure in bringing it to you! It’s a little awkward for us to ask, but our first aim is to purchase land approximately 1,600 hectares to link several parcels of N.P. into one at The Pinnacles NSW Australia, but we need your help. We’re not salespeople. We’re amateur botanists who have dedicated over 30 years to saving the environment in a practical way. We depend on donations to reach our goal. If you donate just $5, the price of your coffee this Sunday, We can help to keep the planet alive in a real way and continue to bring you regular updates and features on Australian plants all in one Botanical Bible. Any support is greatly appreciated. Thank you.”
In the spirit of reconciliation we acknowledge the Bundjalung, Gumbaynggirr and Yaegl and all aboriginal nations throughout Australia and their connections to land, sea and community. We pay our respect to their Elders past, present and future for the pleasures we have gained.
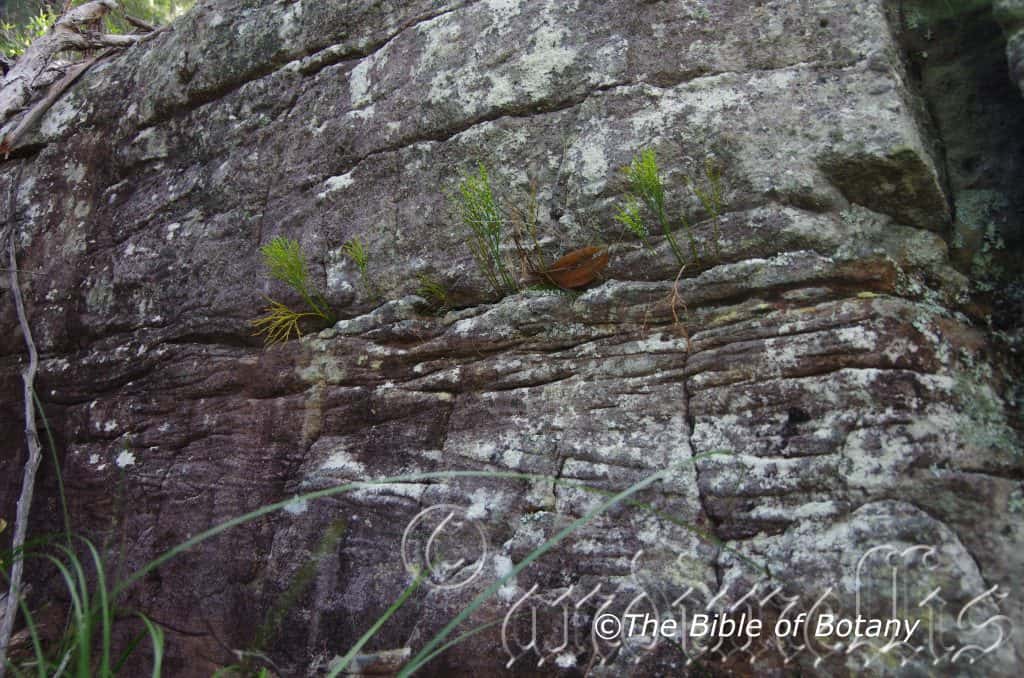
The Pinnacles NSW
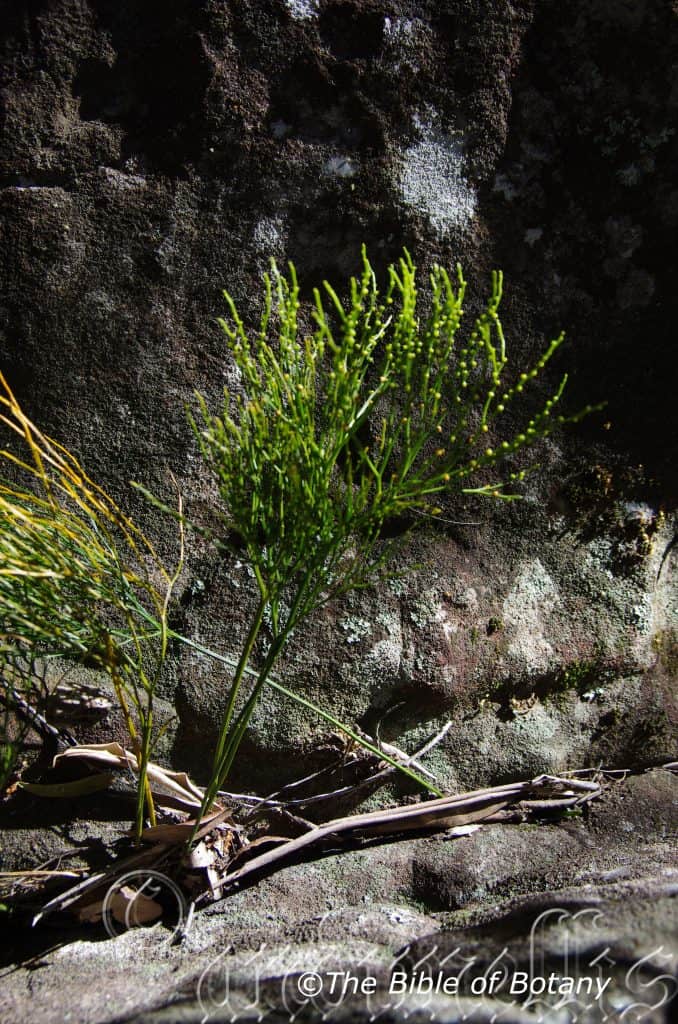
The Pinnacles NSW
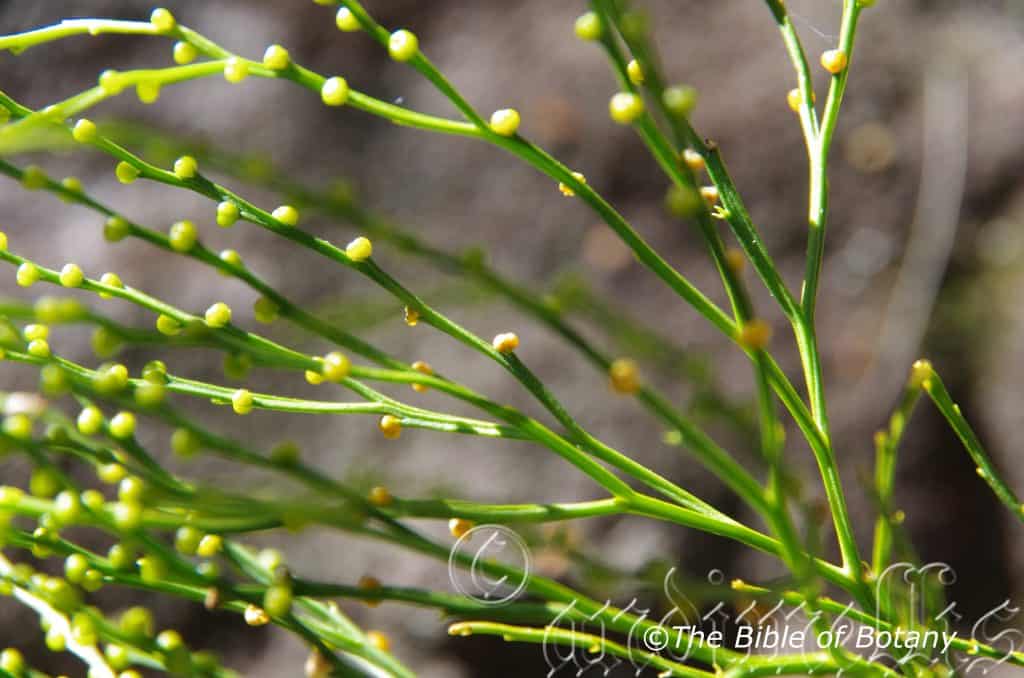
The Pinnacles NSW
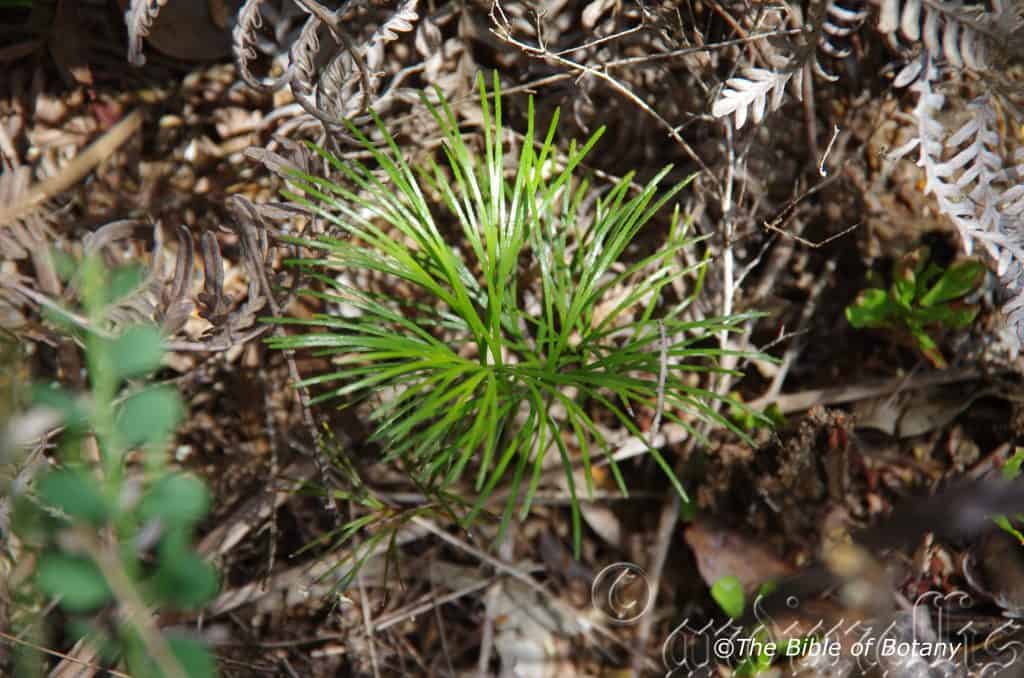
Author’s Garden The Pinnacles NSW
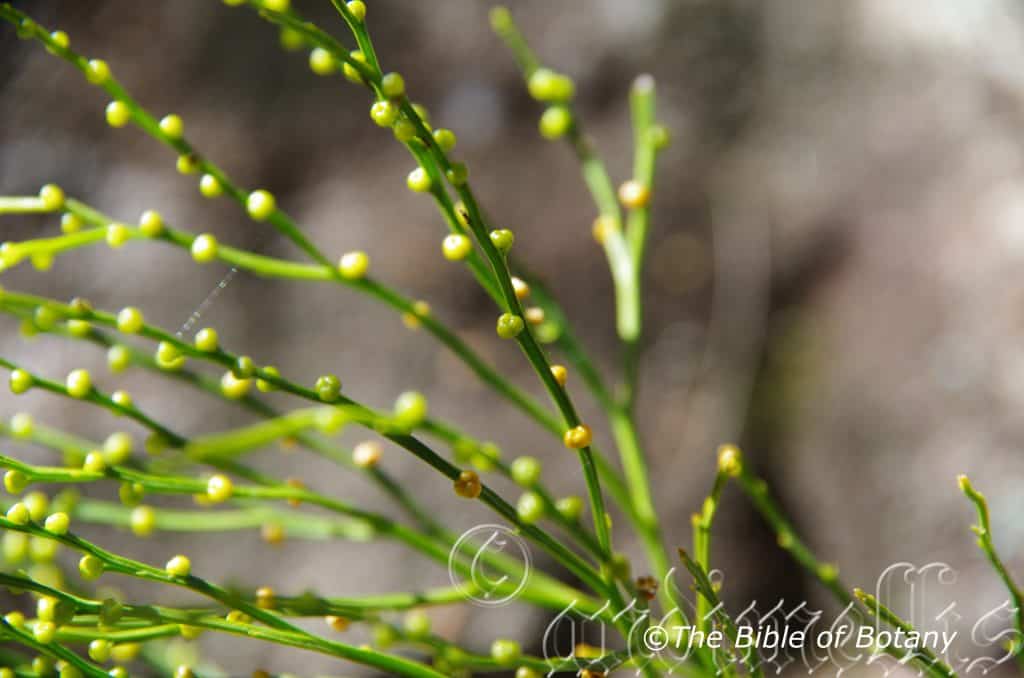
The Pinnacles NSW
Psilotum nudum
Classification:
Division: Polypodiophyta
Class: Polypodiopsida
Order: Psilotales
Family: Psilotaceae
Genus: From Psilo, which is Ancient Greek for bare, naked or glabrous. It refers to the rachis, rhyzomes and fronds, which are very smooth and glabrous.
Species: From Nūdum, which is Latin for being naked. It refers to lacking a pericarp in certain conifers or lacking scales around a bud or spores.
Common Name: Skeleton Fork Fern.
Distribution:
Psilotum nudum is found in several disjunct populations in the northern half of Western Australia. In the Northern Territory it is found in the top quarter and central Australia where adequate moisture and shade is found. In the east it is found south from Cape York Peninsula in the far north east Queensland to Shoalhaven in south east ern New South Wales, where it is mainly found on and east of the Great Dividing Range to the coast. It is also found in east Gipsland and Mount Arapiles in the west.
Psilotum nudum is basically pan tropical in its distribution being found in Tropical Northern Africa, Central America, tropical and subtropical North America, tropical South America, Bougainville, China, Fiji, India, Indonesia, Hawaii, southern Japan, Laos, Lord Howe Island, Malaya, Myanmar, Philippines, New Guinee, New Zealand, Papua, Spain, Samoa, Thailand and Vietnam.
https://avh.ala.org.au/occurrences/search?taxa=Psilotum+nudum#tab_mapView
Habitat Aspect Climate:
Psilotum nudum prefers dappled light to full shade. It grows as an epiphyte in well-developed rainforest and is often found growing from the bases of other large epiphytic clumps. The altitude ranges from 5 meters ASL to 600 meters ASL.
The temperatures range from 3 degree in July to 38 degrees in January.
The rainfall ranges from lows of 1100mm to 3200mm average per annum.
Soil Requirements:
Psilotum nudum grows as an epiphyte particularly from the bases of larger peaty forming epiphytes or occasionally as a lithophyte. The peaty fibres pH ranges from 5.5pH to 6pH. It does not tolerate waterlogged soils.
Height & Spread:
Wild Plants: 0.4m to 0.6m by 0.3m to 0.5m.
Characteristics:
Psilotum nudum is a terrestrial, lithophyte or epiphytic plant often growing out the bottom of other epiphytic plants. The rhizomes are short, creeping and covered in deep brown to deep brown lanceolate scales. Psilotum complanatum’s pendant slender aerial stems are regularly branched from the base and measure 250mm to 650mm in length. The concolourous flattened to elliptic in cross section are deep green and glabrous. The basal stems measure 3mm to 5mm in width while the ultimate branches measure 1.5mm to 2mm in width.
The fronds are small to minute scales.
The fertile fronds are similar to the sterile fronds. Psilotum nudum’s orbicular sporangia appear from near the base to almost the apex along both margins.
Spores are small irregular and reddish brown in colour.
The Synangia are 3 lobed sporangia and measure 2mm to 3mm in length by 2mm to 3mm diameter. The spore is pale golden-brown to tan.
Wildlife:
Psilotum nudum’s wildlife is unknown to the author.
Cultivation:
Psilotum nudum is a beautiful fern for cultivation and makes a great fern on exposed rock crevices in a sheltered position. At The Pinnacles it has self spored and is found growing between paving bricks laid on concrete. It is ideal as a bush house specimen for areas where there is heavy to light shade. In cultivation it will grow from 500mm to 650mm in length with a similar spread. It is cold tolerant to temperatures as low as 1 degree once established but detest frosts.
It is most suitable in rainforests where it can break the monotony of large deep green leaves adding texture to the trunks and forks of rainforest trees. It likes plenty of leaf litter to help increase fertility and once established can be fed with apple or banana peels.
Medium to large frog or fish ponds are made the more attractive when surrounded by this fern when it is placed on rocks and boulders. Their size makes for a balance setting.
Psilotum nudum is quite hardy and we have also successfully used it as a potted houseplant in a well lit bathroom setting using tank water.
Repot annually to revitalize soil and increase the growth rate. Repot using our recommended potting mix for ferns for best results.
Propagation:
Fern Spores:
All ferns that are declared rare, vulnerable or endangered are protected by Federal and State Laws and must not be removed from the wild unless you are a land developer, mining company or main Roads department etc. This includes bulbs, roots, leaves and flowers. No part of any plant can be removed from Federal, State or Local Government land without the prior permission of the authority and this includes the spore.
Most people are put off at the thought of growing ferns from spore. Like all plants that produce their offspring from seed or spore the methods are basically the same. Remember nature has been doing this for millions of years and has been very successful. I have had excellent results growing over 200 different species of Australian ferns so don’t be afraid. Give it a go.
Step 1. Select spore from the fern fronds. Wait until the fern is just starting to release its spore. Rinse the fronds under clean running water and dry. This is to wash off any other spores from rogue ferns that may have settled onto the fronds. (There is nothing worse than having common brake or common soft bracken contaminating a prized tree fern or epiphyte.)
Step 2. Place the dry fronds in a clean brown paper bag and keep them in a cool dark place like the linen closet for about a week to ten days before you are ready to sow the spore. The exception to this rule applies to ferns, which produce green spores. These must be sown immediately that they are released. Todea Barbara is a good example of a fern, which produces green spore.
Step 3. Take a large ice cream container, a small ice cream container and a clean clear plastic bag large enough to seal the large ice cream container and three or four milk bottle tops.
Step 4. Punch or drill 6 to 10mm holes in the bottom of the small ice cream container.
Step 5. Wash both containers, tops and plastic bag so that they are very clean and sterile.
Step 6. Use a clean fine seed raising mi. We used 30mm fine sand, 30mm peat and 30mm perlite and 10mm vermiculite. We used crushed basalt, crusher dust and peat in a 50:50 ratio for epiphytes. Moisten the mix enough that water does not run out when the mix is squeezed between the fingers.
Step 7. Place the moisten mix (Enough to half fill the small ice cream container) in the microwave oven with a large glass of water for 7 or 8 minutes, until the water is boiling. Allow them to cool in the oven. You will need the water later so do not tip it out.
Step 8. Take the brown paper bag out of the linen closet. Shake the bag and remove the fronds. You should have a yellow, brown, black or rarely greenish brown or ochre powder or very fine, small round pin head size spore depending on the specie involved.
Step 9. Remove the mixture from the oven once it has cooled and place it in the small ice cream container and level.
Step 10. Sprinkle the spore sparsely over the mixture in the small ice cream container.
Step 11. Place the milk bottle tops in the large ice cream container with the flat surface facing down. Place the small ice cream container in the large ice cream container so that it is sitting on the milk bottle tops.
Step 12. Remove the water from the microwave and pour it into the larger ice cream container so there is 25mm to 30mm of water in the bottom.
Step 13. Place the ice cream containers in the plastic bag and seal. Step 14. Place the contents and bag in a warm shady place preferably 50mm to 70mm shade depending on the specie. Shade houses and some window sills are ideal.
Step 15. The surface should turn green within a week to two weeks. The prothallus will then develop. From the prothallus the first true fronds will appear. Wait until the ferns are 20mm to 35mm in height before you attempt to transplant them. Once they are ready open the bag up slightly and allow the air to flow around the little ferns. Every 3 to 5 days open the bag a little further so the ferns get use to their new environment. Allow them a week to two weeks to harden off before you transplant them following the removal of the plastic bag. Carefully prick them out into 50mm standard squat tubes as you would any seedling.
Do not try to transplant them as single plants as they are still a little delicate still.
Once the smaller ones again reach 50mm to 70mm you may wish to divide the stronger and hardier individual plants into smaller clumps in 100mm squat pots.
Step 16. We fertilized with seaweed, fish emulsion or organic chicken pellets soaked in water on an alternate basis until established. Fertilize every two months for one year even when in a tree fork or on a rock or boulder then twice annually in september and again in March.
Further Comments from Readers:
“Hi reader, it seems you use The Bible of Botany a lot. That’s great as we have great pleasure in bringing it to you! It’s a little awkward for us to ask, but our first aim is to purchase land approximately 1,600 hectares to link several parcels of N.P. into one at The Pinnacles NSW Australia, but we need your help. We’re not salespeople. We’re amateur botanists who have dedicated over 30 years to saving the environment in a practical way. We depend on donations to reach our goal. If you donate just $5, the price of your coffee this Sunday, We can help to keep the planet alive in a real way and continue to bring you regular updates and features on Australian plants all in one Botanical Bible. Any support is greatly appreciated. Thank you.”
In the spirit of reconciliation we acknowledge the Bundjalung, Gumbaynggirr and Yaegl and all aboriginal nations throughout Australia and their connections to land, sea and community. We pay our respect to their Elders past, present and future for the pleasures we have gained.
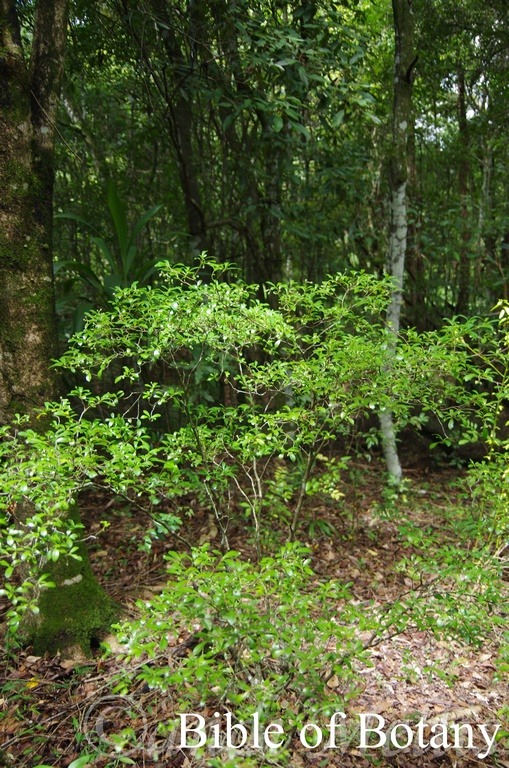
LBG Lismore NSW

LBG Lismore NSW
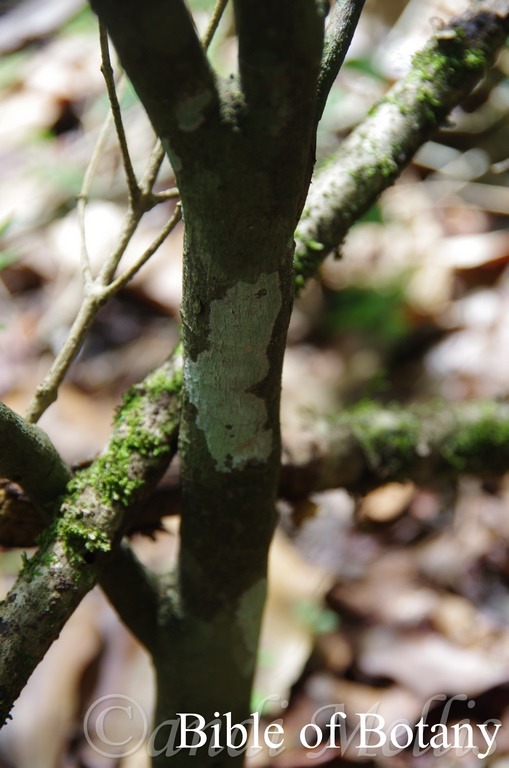
LBG Lismore NSW
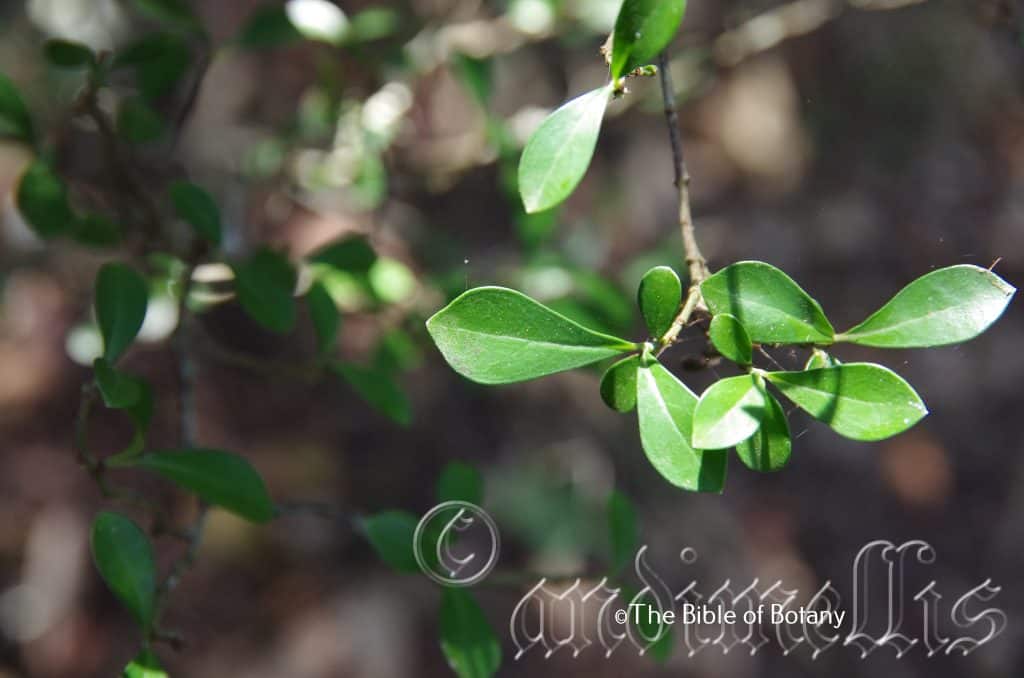
LBG Lismore NSW

LBG Lismore NSW
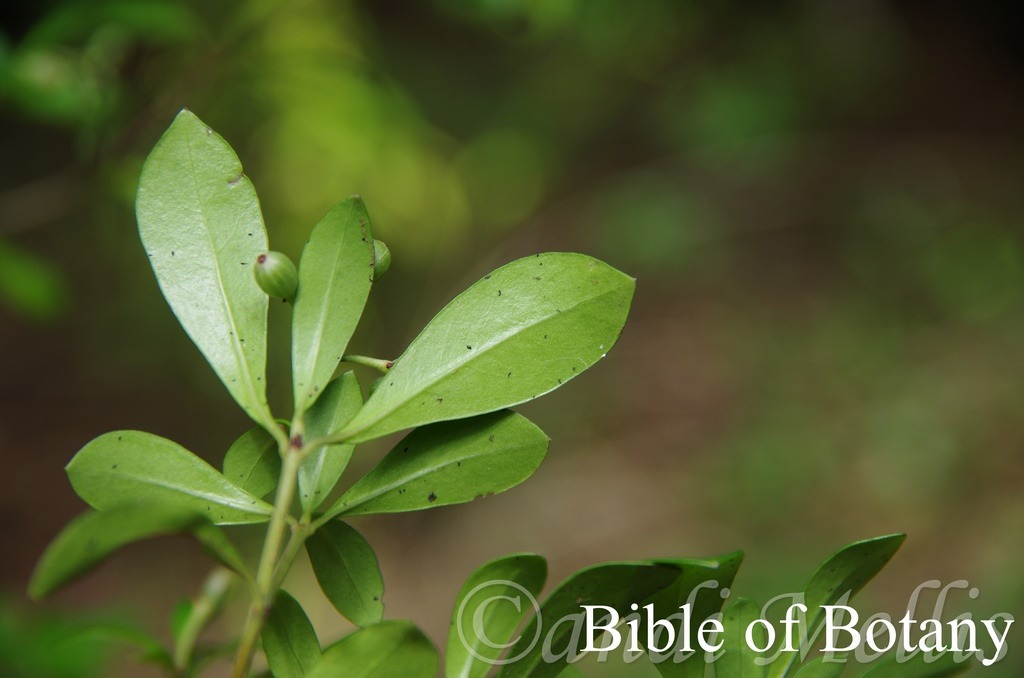
LBG Lismore NSW
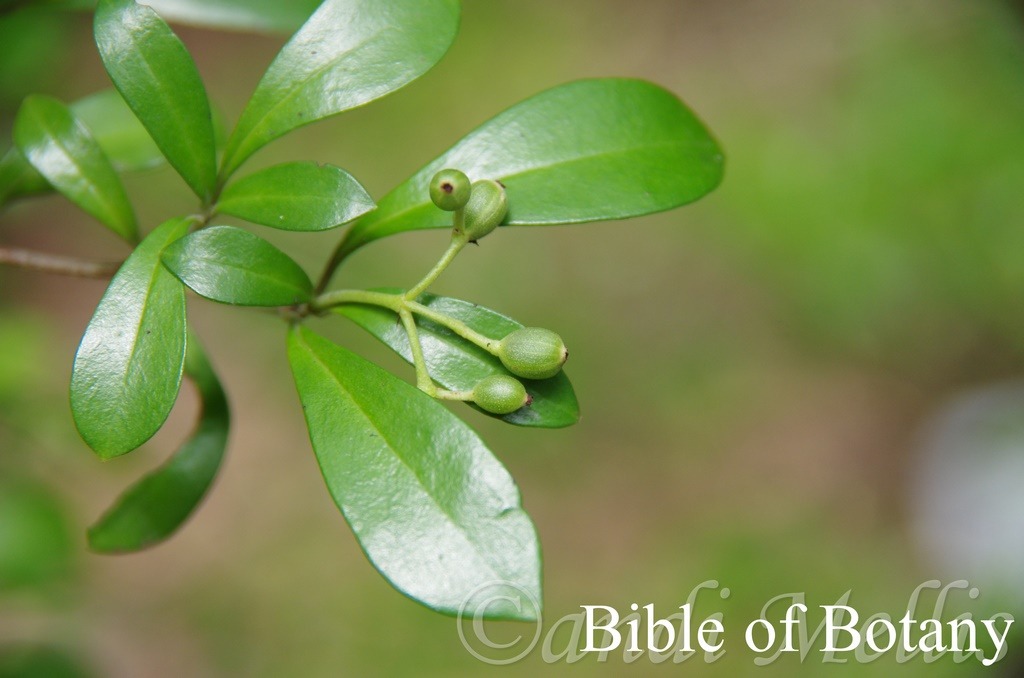
LBG Lismore NSW

LBG Lismore NSW
Psychotria daphnoides
Classification:
Class: Equisetopsida
Class: Magnoliidae
Superorder: Asterales
Order: Gentianales
Family: Rubiaceae
Genus: From Psyche, which is Ancient Greek for the human mind of soul and Trephos, which is Ancient Greek for support or to nurture. It refers to a Greek mythological beautiful woman who was loved by Eros/Cupid and who was the personification of the soul with powerful medicinal properties which is found in some early known species.
Species: From Dáphnē, which is Ancient Greek for the name of the nymph who was changed into a Laurel to escape Apollo and Eîdos/Oides, which is Ancient Greek for alike or similar to. It refers to plants, which resemble the exotic Daphne.
Variety: Psychotria daphnoides var. angustifolia. From Angusta, which is Latin for narrow and Folium, which is Latin for foliage. It usually refers to leaves or at times the calyx lobes or petals, which are narrower than other species in the genus.
Variety: Psychotria daphnoides var. daphinoides. From Dáphnē, which is Ancient Greek for the name of the nymph who was changed into a Laurel to escape Apollo and Eîdos/Oides, which is Ancient Greek for alike or similar to. It refers to plants, which resemble the exotic Daphne.
Variety: Psychotria daphnoides var. pubescent. From Pūbēscēns, which is Latin for short, very soft hairs. It refers to structures or organs, which are covered in soft, white or pale grey hairs.
Common Name: Smooth Psychotria.
Distribution:
Psychotria daphnoides subsp. angustifolia is found in two disjunct populations in far North Queensland. The first occurs south from Mount Mulligan to The Crater north west of Hughenden while the southern population occurs south from Mount Slopeaway to Banana in central coastal Queensland. It is found west, on and east of the Great Dividing Range.
Psychotria daphnoides subsp. daphinoide is found in several disjunct populations across the top end of the Northern Territory including Kakadu National Park and Cato River mouth near Djurlpungbuy in the far north east.
In the east it is found on and east of the Great Dividing Range south from Cooktown in far North Queensland to Kyogle with a small population further south on the Manning River near Taree in central coastal New South Wales.
Psychotria daphnoides var. pubescent is found in several disjunct populations south from Rockhampton in central coastal Queensland to the Border Ranges National Park in far south east Queensland with a disjunct population further west in the Carnarvon Gorge. It also occurs near Maitland in coastal New South Wales.
https://avh.ala.org.au/occurrences/search?taxa=Psychotria+daphnoides#tab_mapView
Habitat Aspect Climate:
Psychotria daphnoides prefers dappled light to full sun. It grows in moist to wet openings, adjacent to warm well developed rainforests, littoral rainforests or moist Eucalyptus forests. The altitude ranges from 450 meters ASL to 750 meters ASL.
The temperatures range from 0 degrees in July to 36 degrees in January.
The rainfall ranges from lows of 650mm to 3200mm average per annum.
Soil Requirements:
Psychotria daphnoides prefers to grow on light sandy clays to medium clays often with copious quantities of forest litter. The soils are usually derived from decomposed brown basalt, black basalts, sandstones, shales granites or metamorphic rocks. The soils pH ranges from 5pH to 6.5pH. It does not tolerate waterlogged soils. Non saline soils to moderately saline soils are tolerated.
Height & Spread:
Wild Plants: 1m to 3m by 1.5m to 2.5m.
Characteristics:
Psychotria daphnoides grows as a densely foliaged small shrub. The stems are thin deep brown and becoming green-brown or olive green only near the apex with newer leaf growth. These stems are sparsely covered in lighter coloured longitudinal lenticels. The new growth is blue green and glabrous to sparsely covered in white to fawn hirsute hairs and covered in pale brown spots and markings.
The opposite leaves oblanceolate to obovate or oblong in Psychotria daphnoides var. daphnoides and narrow oblong linear in Psychotria daphnoides var. angustifolia. The leaves measure 20mm to 95mm in length by 5mm to 36mm in width. The base is cuneate while the apex is acute-obtuse to shortly acuminate. The discolourous laminas are deep grass-green, glabrous and glossy on the upper lamina while the lower lamina is paler and glabrous to sparsely covered in off white sericeous hairs. The leaf margins are entire, curve slightly upwards from the mid vein and are recurved or revolute. The mid vein is slightly prominent on the lower lamina and visible from the upper lamina. The petiole measures 2mm to 13mm in length.
Inflorescences of Psychotria daphnoides are born in small terminal cymes. The pale green rachis measures 20mm to 30mm in length while the pedicels measure 7mm to 10mm in length. The peduncules measure 3mm to 5mm while the individual flowers pedicels are sessile to 0.6mm in length. The pale green calyxes measure 1mm to 1.5mm in length. The lobes are reduced to minute teeth. The white corollas measure 2.5mm to 5mm in length while the lobes measure 2mm to 3mm in length. The elliptical lobes have an inflexed, acute apex.
Psychotria daphnoides fruits are ellipsoidal berries. The berries are glabrous to sparsely covered in off white sericeous hairs and measure 5mm to 7mm in length by 4mm to 8mm in diameter. The green capsules turn white to creamy white with creamy white flesh when ripe. The calyx is persistent. The small brown ellipsoidal seeds are longitudinally ribbed and furrowed and measure 1.5mm to 2.5mm in length.
Wildlife:
Psychotria daphnoides’s do not appear to have any predators.
The fruits are succulent and have a taste reminiscent of plums crossed with eucalyptus leaves. The texture is that of a plum.
Cultivation:
Psychotria daphnoides is a magnificent medium shrub that should be more widely grown in tropical, subtropical and monsoonal gardens. The flowers glossy green leaves and white fruits make them beautiful specimens for the garden.
It is ideal at the edge of a rainforest or as an understory shrub in a moist rainforest garden. It would also make a great hedge being densely foliaged and can be trimmed to maintain a hedge row to 2 meters without any problem. For hedges it can be planted at 3 meter centres. In cultivation it will grow from 2.5 meters to 3.5 meters in height by 2 meters to 3 meters in diameter when grown in the open.
It grows exceptionally well on lighter soils where deep leaf litter keeps the soil cool and moisture at an even level. If these requirements are met they can cope with temperatures as low as minus 4 degrees and up to 42 degrees. It is moderately drought resistant but are slow in the initial years.
Add to the above, if it is given an adequate supply of water and a little native fertilizer on a regular basis the plants will respond with good flowering and possibly better fruit set over a longer period. The white fruits contrast strongly against the large glossy leaves.
It often reaches its full potential in just 12 to 15 years and flower from the sixth to seventh year from seed.
It would make a very good bonsai plants.
Propagation:
Seeds: The seeds of Psychotria daphnoides can be removed easily from the fruits that have fallen to the ground or picked when the fruits are mature from the shrubs.
Sow fresh seeds directly into a seed raising mix, keeping them moist not wet. When the seedlings are 20mm to 25mm tall, prick them out and plant them into 50mm native tubes using a good organic mix.
As the seedlings roots reach the bottom of the tubes plant them out into their permanent position. Do not delay.
Fertilize using seaweed, fish emulsion or organic chicken pellets soaked in water on an alternate basis. Fertilize every two months until the plants are established then annually in early September to October to maintain better colour, health, vitality and flowering.
Further Comments from Readers:
“Hi reader, it seems you use The Bible of Botany a lot. That’s great as we have great pleasure in bringing it to you! It’s a little awkward for us to ask, but our first aim is to purchase land approximately 1,600 hectares to link several parcels of N.P. into one at The Pinnacles NSW Australia, but we need your help. We’re not salespeople. We’re amateur botanists who have dedicated over 30 years to saving the environment in a practical way. We depend on donations to reach our goal. If you donate just $5, the price of your coffee this Sunday, We can help to keep the planet alive in a real way and continue to bring you regular updates and features on Australian plants all in one Botanical Bible. Any support is greatly appreciated. Thank you.”
In the spirit of reconciliation we acknowledge the Bundjalung, Gumbaynggirr and Yaegl and all aboriginal nations throughout Australia and their connections to land, sea and community. We pay our respect to their Elders past, present and future for the pleasures we have gained.
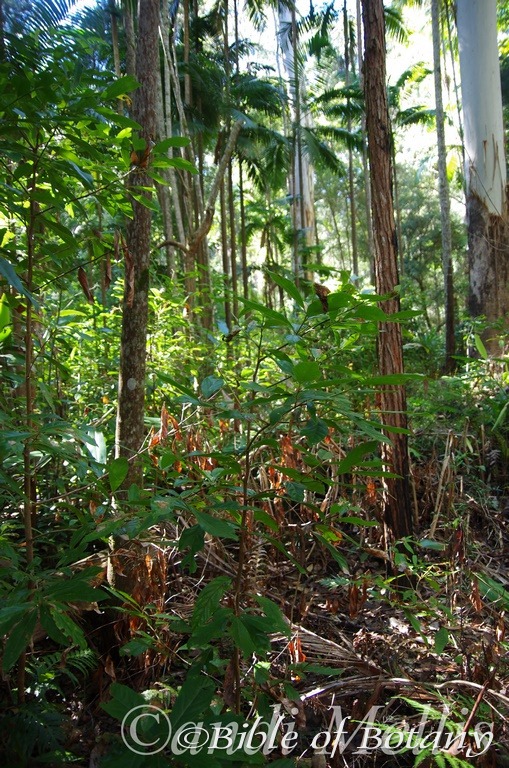
Pigeon Gully Yuraygir National Park NSW
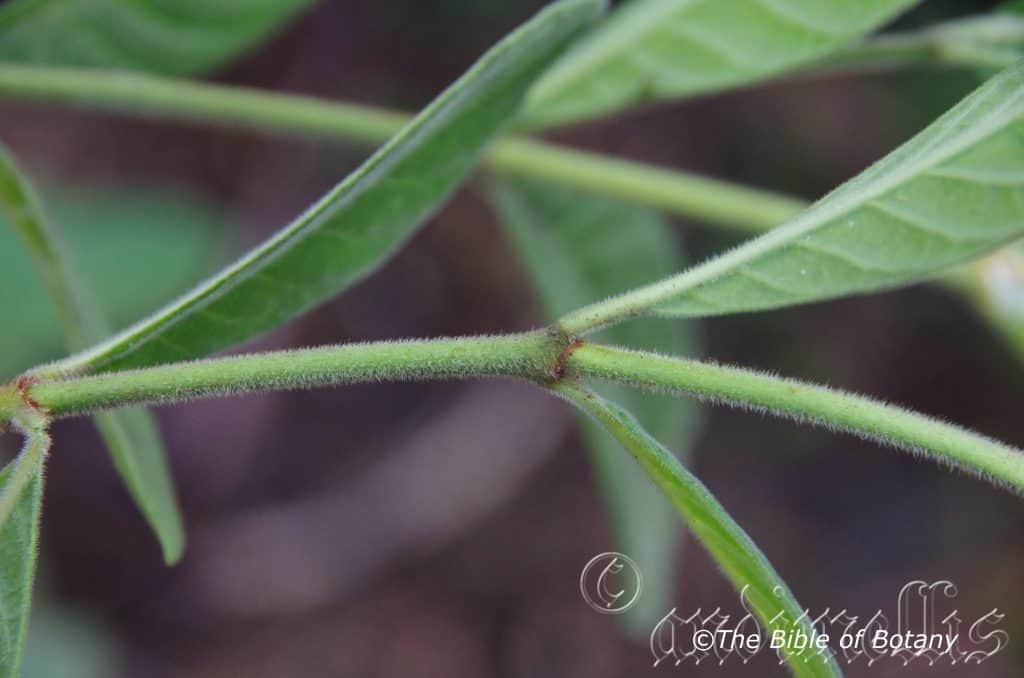
Goolawar National Park NSW
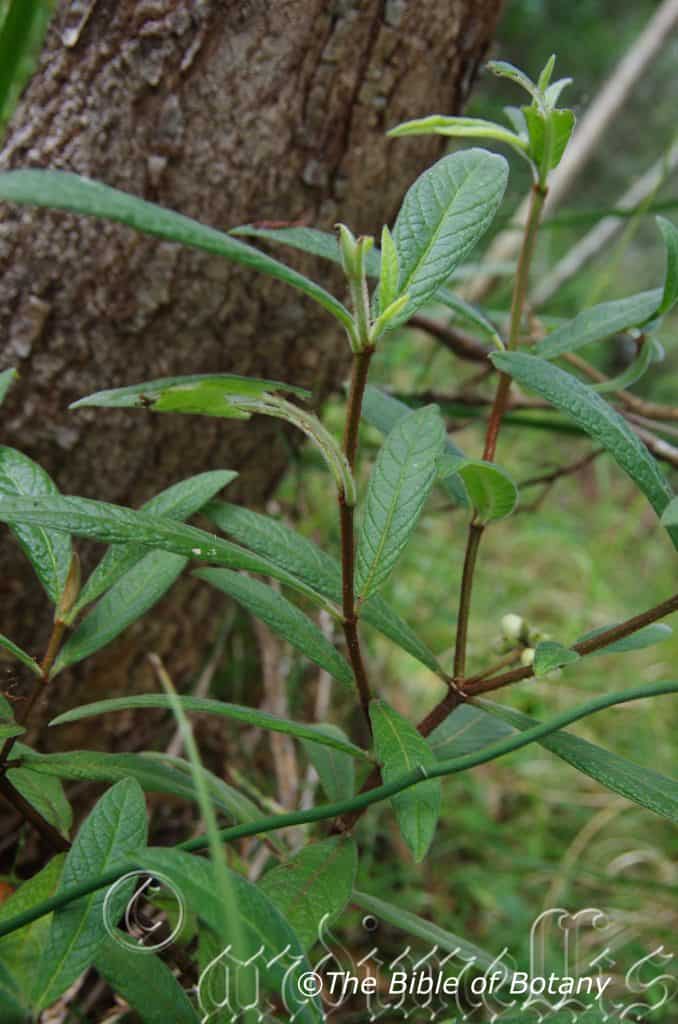
Rosser Gardens Benowa Qld.
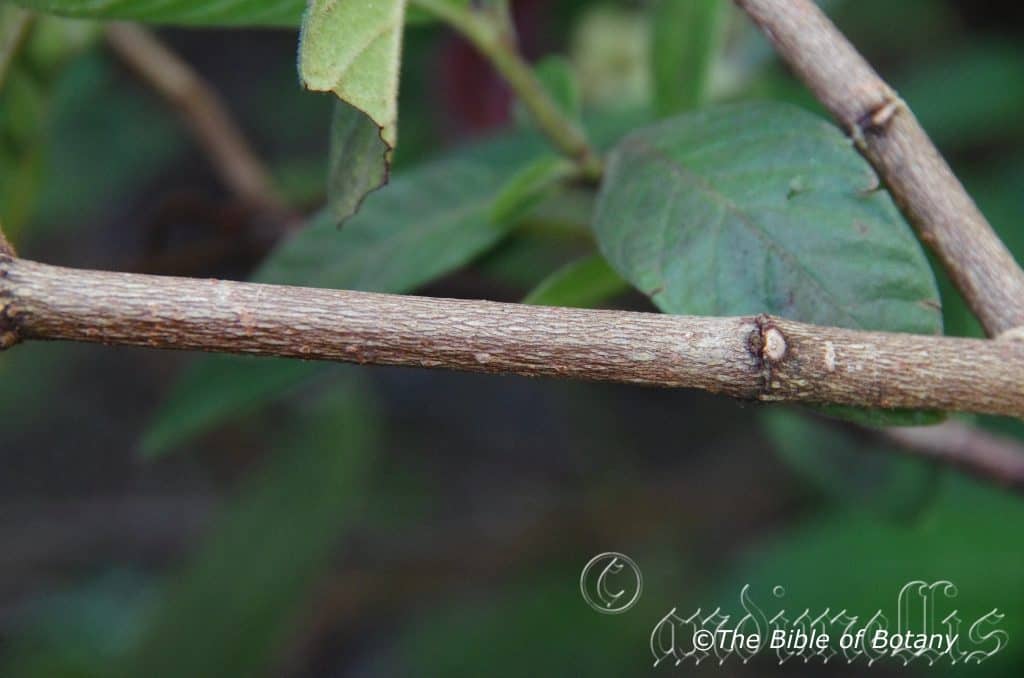
Rosser Gardens Benowa Qld.
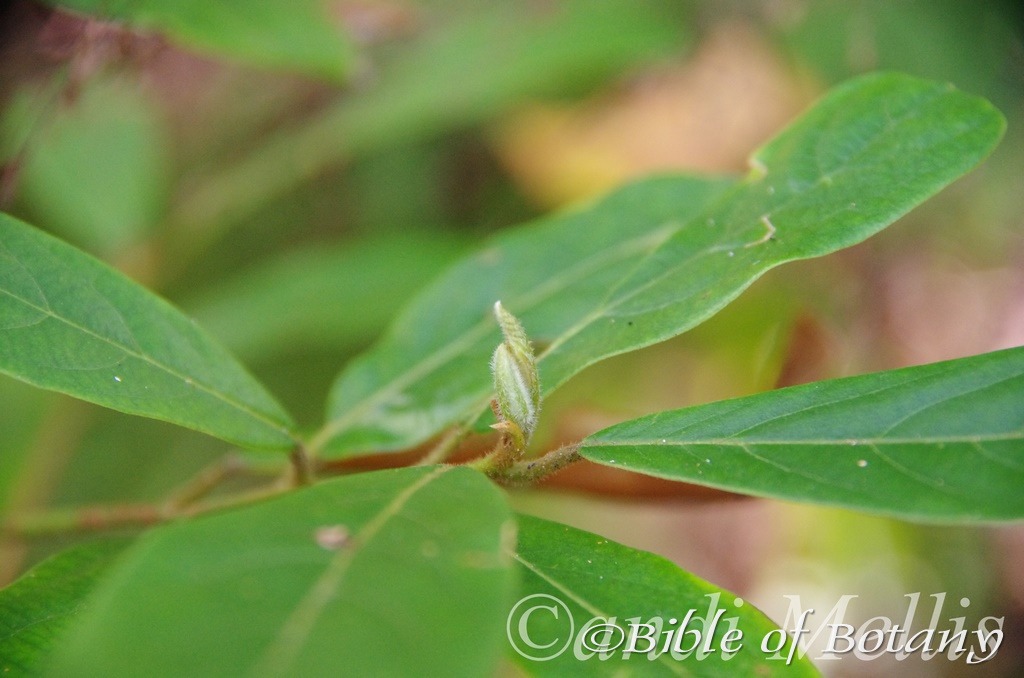
Pigeon Gully Yuraygir National Park NSW
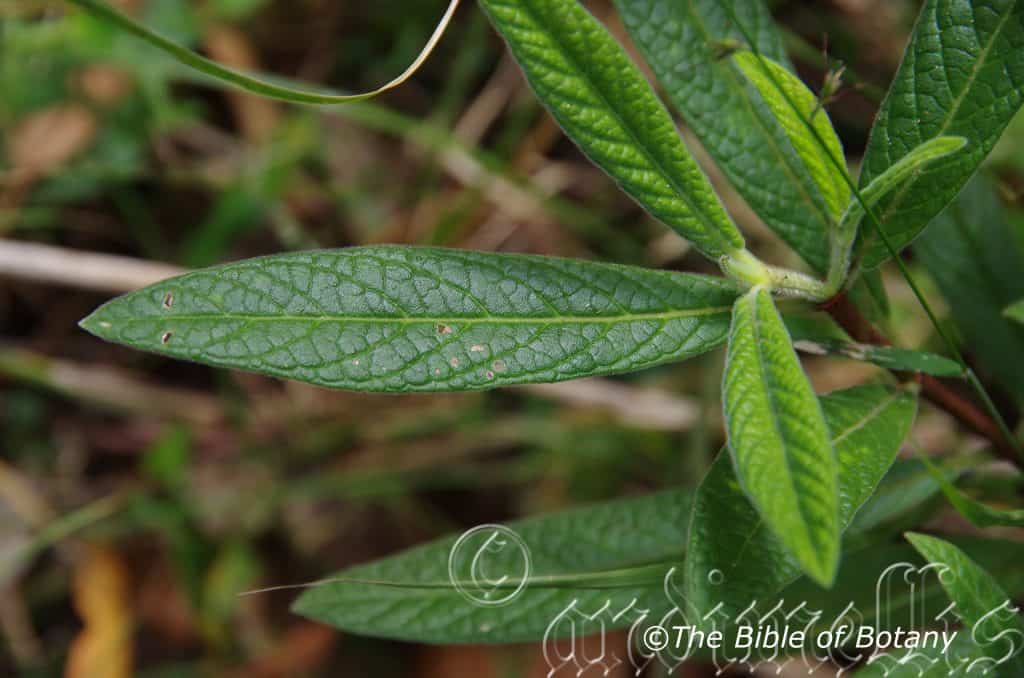
Rosser Gardens Benowa Qld.
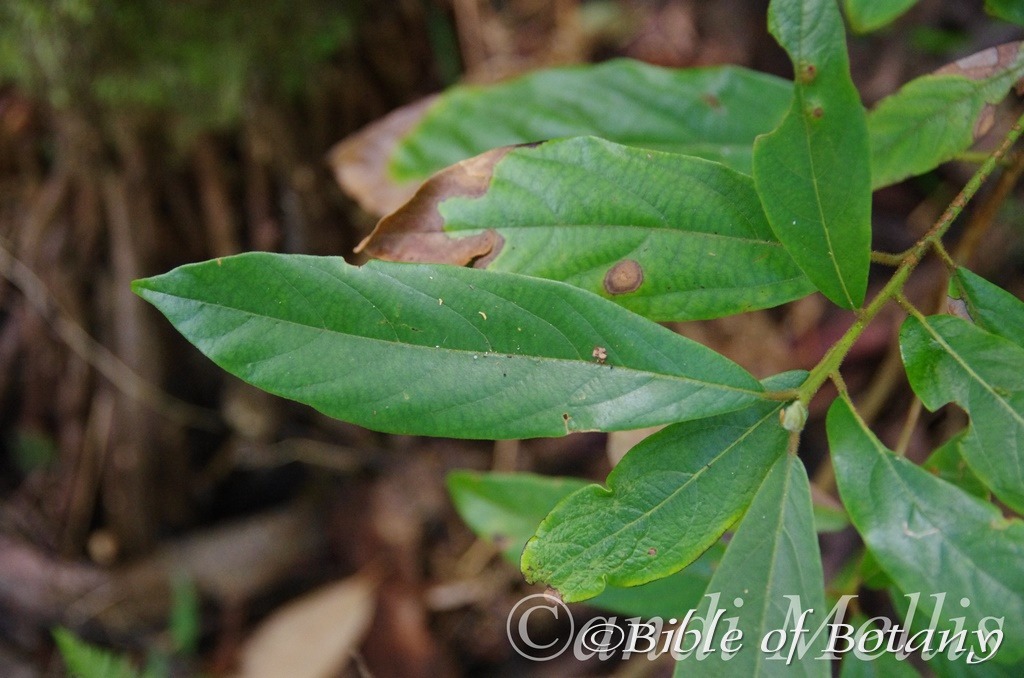
Pigeon Gully Yuraygir National Park NSW
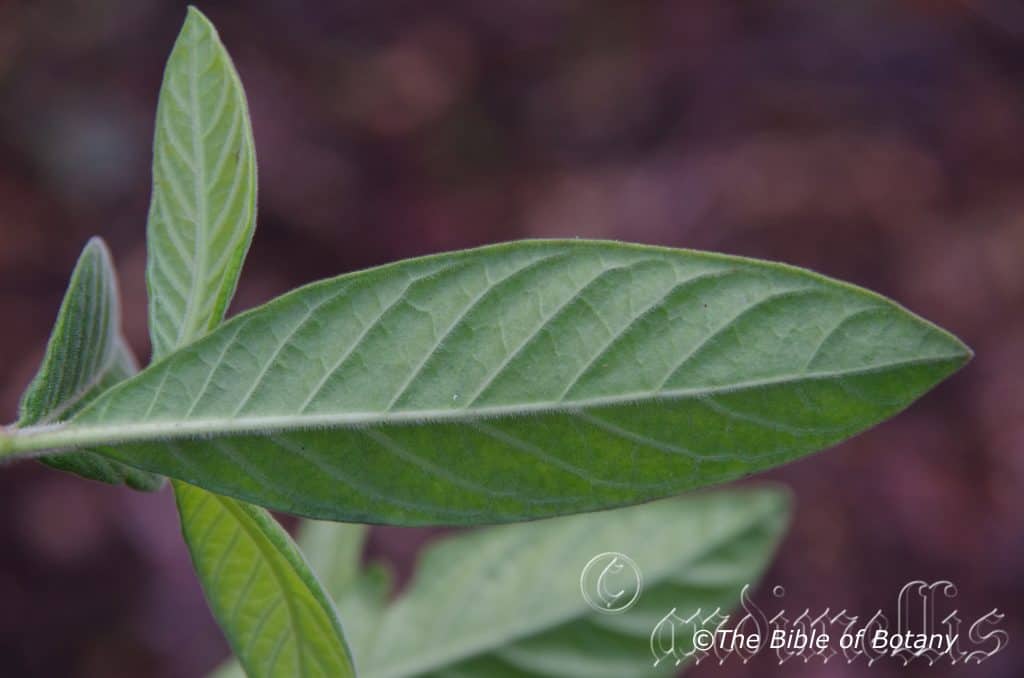
Rosser Gardens Benowa Qld.
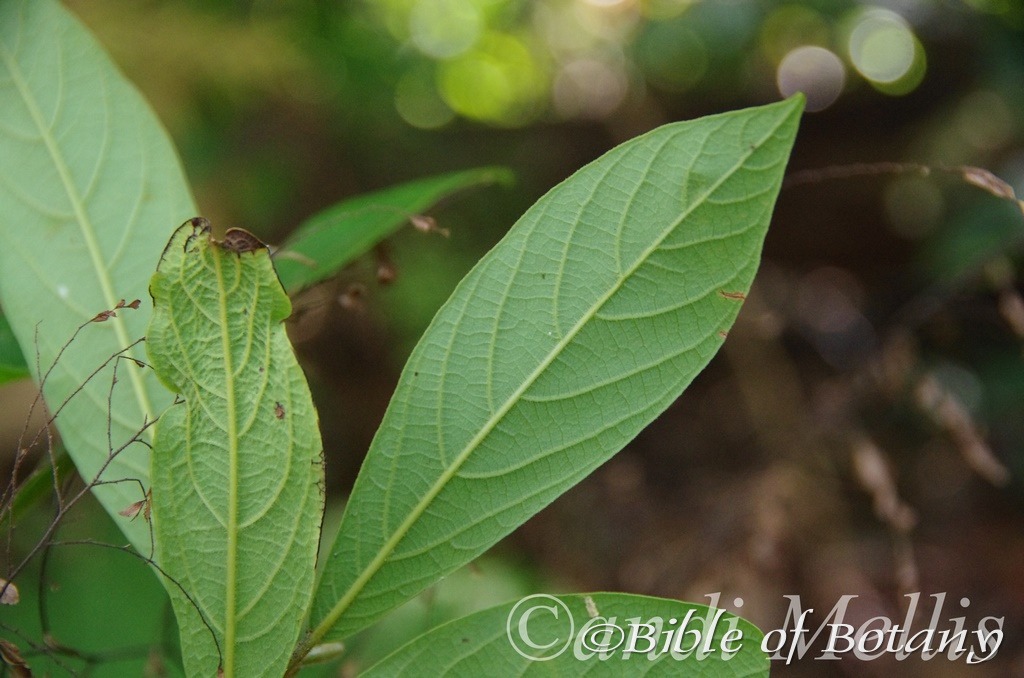
Pigeon Gully Yuraygir National Park NSW
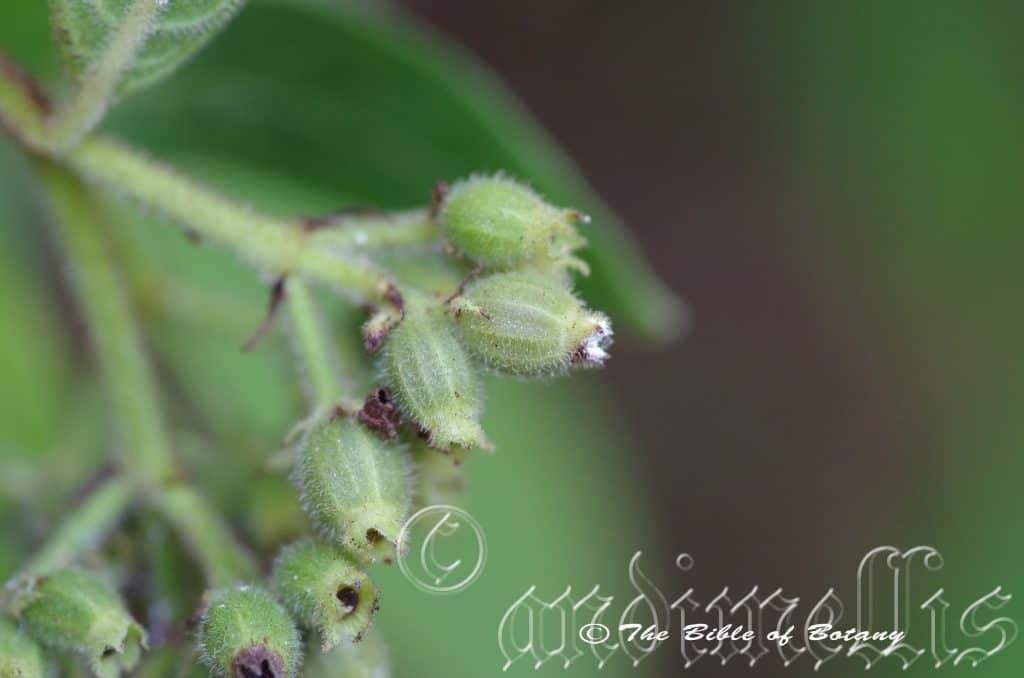
Rosser Gardens Benowa Qld.
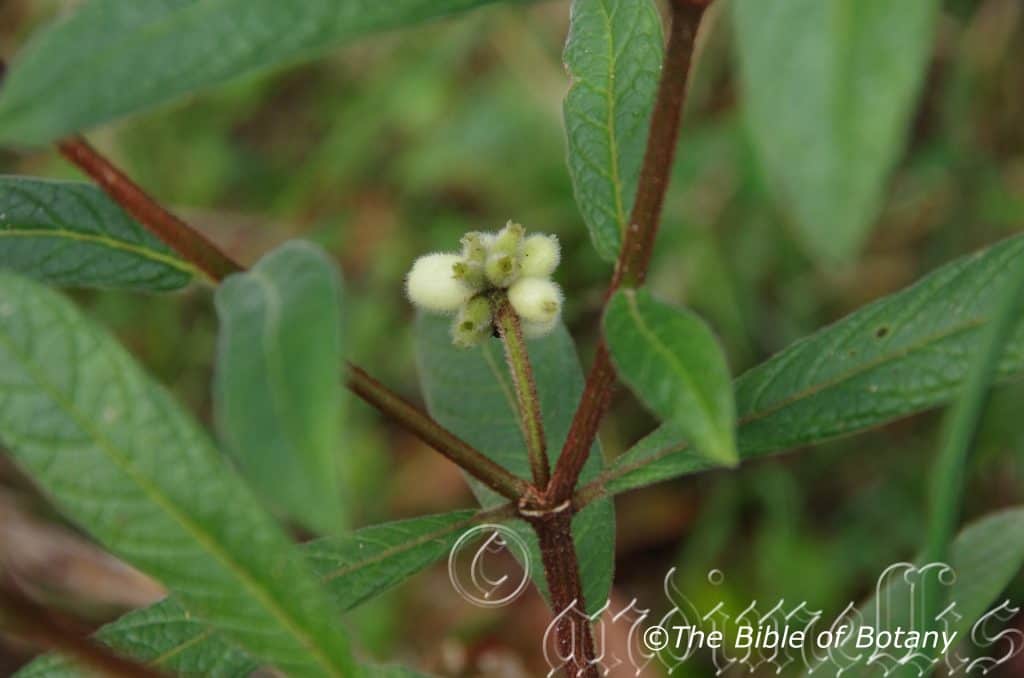
Goolawar National Park NSW
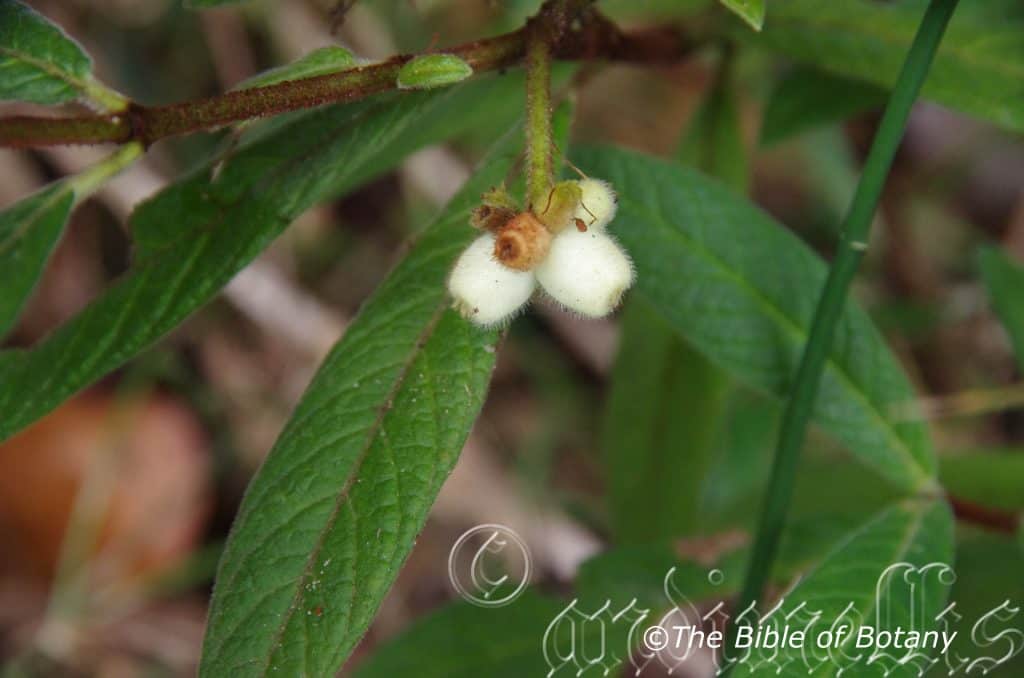
Goolawar National Park NSW

Goolawar National Park NSW
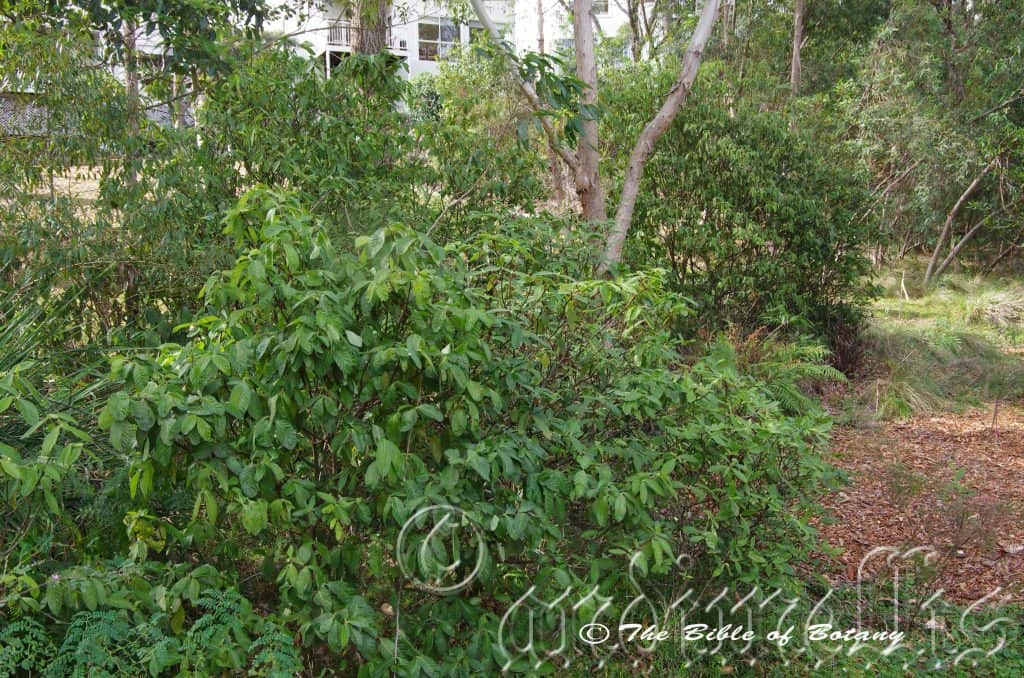
Rosser Gardens Benowa Qld.
Psychotria loniceroides
Classification:
Unranked: Eudicots
Unranked: Asterids
Order: Gentianales
Family: Rubiaceae
Genus: From Psyche, which is Ancient Greek for the human mind of soul and Trephos, which is Ancient Greek for support or to nurture. It refers to a Greek mythological beautiful woman who was loved by Eros/Cupid and who was the personification of the soul with powerful medicinal properties which is found in some early known species.
Species: Is named in honour of Adam Lonitza was a German botanist and author and Oides, which is Ancient Greek for alike or similar to. It refers to leaves, which resemble those of the exotic honeysuckle Lonicera japonica.
Common Name: Hairy Psychotria.
Distribution:
Psychotria loniceroides is found in the top end of the Northern Territory in Kakadu National Park.
In the east it is found on and east of the Great Dividing Range south from the tip of Cape York Peninsula and the Torres Strait Islands in far North Queensland to the Bega district in southern coastal New South Wales.
https://avh.ala.org.au/occurrences/search?taxa=Psychotria+loniceroides#tab_mapView
Habitat Aspect Climate:
Psychotria loniceroides prefers dappled light to full sun. It grows in moist to wet openings and adjacent to, warm well developed rainforests, littoral rainforests or gallery forests. The altitude ranges from 10 meters ASL to 1100 meters ASL.
The temperatures range from minus 3 degrees in July to 36 degrees in January.
The rainfall ranges from lows of 650mm to 3200mm average per annum.
Soil Requirements:
Psychotria loniceroides prefers to grow on light sandy clays to medium clays often with copious quantities of forest litter. The soils are usually derived from decomposed brown basalt, black basalts, sandstones, granites, shale or metamorphic rocks. The soils pH ranges from 5pH to 6pH. It does not tolerate waterlogged soils however the plants are always associated with moist soils and those in riparian zones are often inundated for short periods. Non saline soils to moderately saline soils are tolerated.
Height & Spread:
Wild Plants: 3m to 5m by 2m to 3m
Characteristics:
Psychotria loniceroides grows as a small tree or densely foliaged shrub. The trunk is tall, straight, pale grey, scabrous and usually covered in green lichens. The stems are thin deep red-brown and becoming green-brown only near the apex with newer leaf growth. These stems are sparsely covered in rusty-brown lenticels. The new growth is deep sea-green and covered in rusty-brown hirtellous to hirsute hairs.
The opposite or off set opposite leaves of Psychotria loniceroides are elliptical, oblong to oblanceolate. The leaves measure 50mm to 140mm in length by 15mm to 50mm in width. The bases are rounded tending cuneate close to the petiole while the apexes are shortly acuminate to acute. The discolourous laminas are deep green to sea-green and sparsely to densely covered in rusty-brown to rusty-red hirtellous to hirsute hairs on the upper lamina while the lower lamina is paler. The leaf margins are shallowly sinuate, flat and curve slightly upwards from the mid vein. The mid vein and the main lateral veins are strongly prominent, white or pale pink on the lower lamina and are distinctly visible on the upper lamina. The upper lamina is convexed between the lateral veins. The petioles measure 2mm to 23mm in length.
Inflorescences of Psychotria loniceroides are born in small terminal cymes. The pale green calyxes are covered in white pannate to villose hairs externally and glabrous internally. The pale green rachis measures 20mm to 30mm in length while the pedicels measure 10mm to 13mm in length. The peduncules on the individual flowers are sessile for the lateral flowers and measure 8mm to 10mm in length on the terminal flower. The pale green calyxes measure 1.5mm to 2mm in length. The calyx lobes measure 0.8mm to 1mm in length. The white corollas measure 4mm to 5mm in length while the lobes measure 4mm to 5mm in length. The elliptical lobes have an inflexed, acute apex. Psychotria loniceroides’s sweet scented flowers appear from early December through to late March.
The 5 white stamens measure 2mm to 3mm in length while the white style measures 3.5mm to 4mm in length.
Psychotria loniceroides’s fruits are ellipsoidal berries. The berries are glabrous to sparsely covered in off white sericeous hairs and measure 6mm to 8mm in length by 6mm to 8mm in diameter. The green capsules turn creamy yellow to pale yellow when ripe. The calyx is persistent. The small brown ovoid seeds are compressed on one side and measure 2mm to 3mm in length.
Wildlife:
Psychotria loniceroides’s do not appear to have any predators.
The fruits are succulent and have a taste reminiscent of plums crossed with eucalyptus leaves. The texture is that of a plum.
Cultivation:
Psychotria loniceroides is a magnificent medium shrub that could be more widely grown in warm temperate, subtropical, tropical and monsoonal gardens. The flowers glossy green leaves and white fruits makes it a beautiful specimen shrub for the garden.
It is ideal at the edge of a rainforest or as an understory shrub for a dry rainforest garden. It also makes a great hedge being densely foliaged and can be trimmed to maintain a hedge row to 2 meters without any problem. For hedges they can be planted at 3.5 meter centers. In cultivation it will grow from 3.5 meters to 5 meters in height by 2.5 meters to 3.5 meters in diameter when grown in the open.
It grows exceptionally well on lighter soils where deep leaf litter keeps the soil cool and moisture at an even level. If these requirements are met it can cope with temperatures as low as minus 4 degrees and up to 42 degrees. It is moderately drought resistant but is slow in the initial years and will drop leaf if moisture is restricted.
Add to the above, if it is given an adequate supply of water and a little native fertilizer on a regular basis it will respond with good flowering and possibly better fruit set over a longer period. The pale yellow fruits contrast strongly against the large glossy leaves.
Garden beds would need to be open with plenty of space between plants to allow air flow as well as to give the branchlets a chance to spread and be appreciated for their unique beauty. Crowding this type of foliage with other plants will see it lose all the effectiveness of the colour and form you require or want. Place it near paths so the interesting leaf venation can be viewed regularly. Correct spacing will contrast the foliage better without one overpowering the other. For mass planting space the plants at least 4 meters to 5 meter centres. If you are using it amongst rocks or boulders on rocky ground, plant it sparingly to attain a more barren scene, or interplant it with wild flowers to make strong uplifting of colour. 2 or 3 in an area of 100 square meters would be ample. The use of annuals helps to attract the viewer to the permanent plants foliage as it is the predominant foliage you want people to notice in the patch. In the case of Psychotria loniceroides you could substitute very small Grevillea species like Grevillea masonii or Grevillea thelminiana. Most annuals flower have bold colour flowers so will not clash and the constant whiff of perfume will complete the scene. Annuals mixed with Psychotria loniceroides helps to give small gardens depth and make it look larger than what it really is, especially if the plants are pruned to maintain a smaller bushier shrub.
It would probably make a very good bonsai plant as it is easy to work and the stems have good flexibility.
Propagation:
Seeds: The seeds of Psychotria loniceroides can be removed easily from the fruits that have fallen to the ground.
Sow fresh seeds directly into a seed raising mix, keeping them moist not wet. When the seedlings are 20mm to 25mm tall, prick them out and plant them into 50mm native tubes using a good organic mix.
As the seedlings roots reach the bottom of the tubes plant them out into their permanent position. Do not delay.
Fertilize using seaweed, fish emulsion or organic chicken pellets soaked in water on an alternate basis. Fertilize every two months until the plants are established then annually in early September to October to maintain better colour, health, vitality and flowering.
Further Comments from Readers:
“Hi reader, it seems you use The Bible of Botany a lot. That’s great as we have great pleasure in bringing it to you! It’s a little awkward for us to ask, but our first aim is to purchase land approximately 1,600 hectares to link several parcels of N.P. into one at The Pinnacles NSW Australia, but we need your help. We’re not salespeople. We’re amateur botanists who have dedicated over 30 years to saving the environment in a practical way. We depend on donations to reach our goal. If you donate just $5, the price of your coffee this Sunday, We can help to keep the planet alive in a real way and continue to bring you regular updates and features on Australian plants all in one Botanical Bible. Any support is greatly appreciated. Thank you.”
In the spirit of reconciliation we acknowledge the Bundjalung, Gumbaynggirr and Yaegl and all aboriginal nations throughout Australia and their connections to land, sea and community. We pay our respect to their Elders past, present and future for the pleasures we have gained.
Psychotria simmondsiana
Classification:
Unranked: Eudicots
Unranked: Asterids
Order: Gentianales
Family: Rubiaceae
Genus: From Psyche, which is Ancient Greek for the human mind of soul and Trephos, which is Ancient Greek for support or to nurture. It refers to a Greek mythological beautiful woman who was loved by Eros/Cupid and who was the personification of the soul with powerful medicinal properties which is found in some early known species.
Species: Is named in honour of Mrs. J.H. (Rose) Simmonds (née Culpin) (1877–1960), who collected the type specimen from Tambourine Mountain, her husband John Howard Simmonds Snr.;1862–1955, who was an amateur collector of botanical specimens in southeast Queensland and northern New South Wales, and their son John who was also a keen collector.
Variety: Psychotria simmondsiana var. exigua. From Exigua, which is Latin for slender, scanty meagre or petty. It refers to an organ, which is very scanty, slender or meagre.
Variety: Psychotria simmondsiana var. glabrescens. From Glabrum, which is Latin for glabrous or smooth. It refers to structures or organs, which have no hairs or scales and are very smooth.
Variety: Psychotria simmondsiana var. simmondsiana. Is named in honour of Mrs. J.H. (Rose) Simmonds (née Culpin) (1877–1960), who collected the type specimen from Tambourine Mountain, her husband John Howard Simmonds Snr.;1862–1955, who was an amateur collector of botanical specimens in southeast Queensland and northern New South Wales, and their son John who was also a keen collector.
Common Name: Small Psychotria.
Distribution:
Psychotria simmondsiana var. exigua is found south from Canondale in south eastern Queensland to Lismore in north eastern New South Wales. It grows on the Great Dividing Range.
Psychotria simmondsiana var. glabrescens is found south from Eumundi in south eastern Queensland to Casino north eastern New South Wales. It grows on the Great Dividing Range.
Psychotria simmondsiana var. simmondsiana is found south from Caloundra in south eastern Queensland to Dorrigo north eastern New South Wales. It grows on the Great Dividing Range.
https://avh.ala.org.au/occurrences/search?taxa=Psychotria+simmondsiana#tab_mapView
Habitat Aspect Climate:
Psychotria simmondsiana prefers dappled medium shade to full shade. It grows in subtropical rainforests to cool temperate rainforest. The altitude ranges from 10 meters ASL to 1100 meters ASL.
The temperatures range from minus 3 degrees in July to 38 degrees in January.
The rainfall ranges from lows of 1100mm to 2350mm average per annum.
Soil Requirements:
Psychotria simmondsiana prefers better quality light clays to medium clays often with copious quantities of leaf litter. The soils are usually derived from decomposed black basalts. The soils pH ranges from 5pH to 6pH. It does not tolerate waterlogged soils however the plants are always associated with deep moist soils and those in riparian zones are often inundated for short periods in flash flooding during storms. Non saline soils to moderately saline soils are tolerated.
Height & Spread:
Wild Plants: 3m to 4m by 2m to 3m.
Characteristics:
Psychotria simmondsiana grows as a densely foliaged, erect or spreading small tree or medium shrub. The pale brown trunk and larger branches are covered in small irregular lenticels. The smaller branches are glabrous to sparsely covered in off white puberulent hairs.
The opposite leaves of Psychotria simmondsiana are usually narrow elliptical to elliptical or at times ovate or obovate and usually measure 20mm to 90mm in length by 4mm to 20mm in width or rarely to 32mm in width. The petioles measure 2mm to 10mm in length. The bases are narrow cuneate to slightly attenuate while the apexes are broad acuminate to acuminate-caudate. The discolourous laminas are deep green to sea-green and sparsely covered in glandular punctate on the upper lamina while the lower lamina is paler. The laminas are flat or recurve upwards slightly from the mid vein to the margins and decurve close to the apexes. The upper lamina is slightly convexed between themed vein and lateral veins on the upper surface. The margins are entire. The mid vein is prominent near the base and is less prominent as it approaches the apex while the 7 to 11 lateral veins are faintly prominent on the lower laminas and are not visible from the upper laminas.
Inflorescences of Psychotria simmondsiana are born in small clusters of 2 or 3 usually for the terminals or at times from the leaf axils. The pedicels measure 10mm to 20mm in length. The pale green calyxes are glabrous and measures 1mm to 1.5mm in length. The pale green calyxes measure 1.5mm to 2mm in length. The calyx lobes measure 0.8mm to 1mm in length. The usually white or rarely pastel pink corollas measure 5mm to 8mm in length including the 5 or 6 oblong lobes that measure 2mm to 5mm in length.The white stamens are clustered around the base of the style.
The bifid white pistil measures 2mm to 4mm in length. Psychotria simmondsiana’s sweet scented flowers appear from early December through to early March.
Psychotria simmondsiana fruits are globose, angulated berries. The berries are glabrous with the persistent calyx at the apex. The faintly longitudinal ribbed or furrowed berries measure 6mm to 8mm in length by 6mm to 8mm in diameter. The green berries turn pale, glossy yellow when ripe. The small brown ovoid seeds are compressed on one side and measure 2mm to 3mm in length.
Wildlife:
Psychotria simmondsiana’s fruits are succulent and have a taste reminiscent of plums crossed with Eucalyptus leaves. The texture is that of a plum. The fruits are eaten by most native fruit eating Pigeons like the now vulnerable (NSW 2010) Woompoo dove, Ptilinopus magnificus and Regent Bower Bird, Sericulus chrysocephalus.
Cultivation:
Psychotria simmondsiana is a beautiful medium shrub that should be more widely grown in temperate, subtropical, tropical and monsoonal gardens. The flowers glossy green leaves and white fruits make them beautiful specimens for the garden.
It is ideal at the edge of a rain forest or as an understory shrub for a dry rainforest garden or moist Eucalyptus forest. In cultivation it will grow from 3 meters to 4 meters in height by 3 meters to 3.5 meters in diameter when grown in the open.
It grows well on lighter soils where deep leaf litter keeps the soil cool and moisture at an even level. If these requirements are met they can cope with temperatures as low as minus 4 degrees and up to 38 degrees. It is moderately drought resistant but are slow in the initial years.
This makes it great for hedges being densely foliaged and can be trimmed to maintain a hedge row to 2 meters without any problem. For hedges it is best planted at 3.5 meter centres.
Garden beds would need to be open with plenty of space between plants to allow air flow as well as to give the branchlets a chance to spread and be appreciated for their unique beauty. Crowding this type of foliage with other plants will see them lose all the effectiveness of the colour and form you require or want. Place it near paths so the interesting leaf venation can be viewed regularly. Correct spacing will contrast the foliages better without one overpowering the other. For mass planting space the plants at least 4 meters to 4.5 meter centres. If you are using it amongst rocks or boulders on rocky ground, plant them sparingly to attain a barren scene, or interplant them with wild flowers to make strong uplifting of colour. 2 or 3 in an area of 100 square meters would be ample.
The use of annuals helps to attract the viewer to the permanent plants foliage as it is the predominant foliage you want people to notice in the patch. In the case of Psychotria loniceroides you could substitute very small Grevillea specie or natives for native annuals like Xerochrysum bracteatum, Xerochrysum viscosum and Dampiera purpurea. Most annual flowers have bold colour flowers so will not clash and the constant whiff of perfume will complete the scene. Annuals mixed with Psychotria simmondsiana help to give small gardens depth and make them look larger than what they really are especially if the plants are pruned to maintain a smaller bushier shrub.
It would make very good bonsai plants.
Propagation:
Seeds: The seeds of Psychotria simmondsiana can be removed easily from the fruits that have fallen to the ground.
Sow fresh seeds directly into a seed raising mix, keeping them moist not wet. When the seedlings are 20mm to 25mm tall, prick them out and plant them into 50mm native tubes using a good organic mix.
As the seedlings roots reach the bottom of the tubes plant them out into their permanent position. Do not delay.
Fertilize using seaweed, fish emulsion or organic chicken pellets soaked in water on an alternate basis. Fertilize every two months until the plants are established then annually in early September to October to maintain better colour, health, vitality and flowering.
Further Comments from Readers:
“Hi reader, it seems you use The Bible of Botany a lot. That’s great as we have great pleasure in bringing it to you! It’s a little awkward for us to ask, but our first aim is to purchase land approximately 1,600 hectares to link several parcels of N.P. into one at The Pinnacles NSW Australia, but we need your help. We’re not salespeople. We’re amateur botanists who have dedicated over 30 years to saving the environment in a practical way. We depend on donations to reach our goal. If you donate just $5, the price of your coffee this Sunday, We can help to keep the planet alive in a real way and continue to bring you regular updates and features on Australian plants all in one Botanical Bible. Any support is greatly appreciated. Thank you.”
In the spirit of reconciliation we acknowledge the Bundjalung, Gumbaynggirr and Yaegl and all aboriginal nations throughout Australia and their connections to land, sea and community. We pay our respect to their Elders past, present and future for the pleasures we have gained.
Psydrax attenuata
Classification:
Unranked: Eudicots
Unranked: Asterids
Order: Gentiales
Family: Rubiaceae
Subfamily: Ixoriodeae
Tribe: Vanguerieae
Genus: From Psydrax, which is Ancient Greek for a lump or bump. It refers to the fruits and or seeds of some of the original species, which have lumps on the fruits and or seeds.
Species: From Attenuāta, which is Latin for thin, slender or weak looking. It usually refers to leaves or phyllodes, which are slender and fine.
Common Name:
Distribution:
Psydrax attenuata is a widespread specie found in the northern half of the continent.
https://avh.ala.org.au/occurrences/search?taxa=Psydrax+attenuata#tab_mapView
Habitat Aspect Climate:
Psydrax attenuata prefers full sun. It is found in drier areas where moisture is retained in the soil, like riparian zones on undulating plains especially on pindan soil depressions. The altitude ranges from 500 meters ASL to 800 meters ASL.
The temperatures range from minus 3 degrees in July to 36 degrees in January.
The rainfall ranges from lows of 150mm to 1600mm average per annum.
Soil Requirements:
Psydrax attenuata prefers red sands, red clay loams with gravel, stony loams, red aluminium soils and pindan clays. The soils are usually derived from decomposed brown basalt, black basalts, sandstones, granites, shale or metamorphic rock sediments, which are often laid down on creek or stream meanders. The soils pH ranges from 4pH to 6.8pH. Plants are subject to wide fluctuations in available moisture from droughts to water logging in the wet season. Non saline soils to very saline soils are tolerated.
Height & Spread:
Wild Plants:3m to 10m by 2m to 6m
Characteristics:
Psydrax attenuata grows as a wide spreading densely foliaged small tree. The trunk is crooked, grey, with irregular tessellated patches and usually covered in green lichens in cooler moist coastal terrains. The stems are thin grey and glabrous becoming brown only near the apex with newer leaf growth. The new growth is olive green and glabrous.
The alternate, disjunct leaves are near the apex of the branchlets. The narrowly elliptical to linear leaves measure 50mm to 140mm in length by 15mm to 30mm in width. The bases are attenuate while the apexes are acuminate. The concolourous laminas are olive-green, glabrous and dull to semi glossy on the upper laminas while the lower laminas are paler and dull. The leaf margins are entire or shallowly sinuate and are flat or slightly undulating on those leaves that are broader. The mid vein is prominent on the upper lamina and is distinctly visible on the lower lamina while the lateral veins are level or slightly prominent on the upper lamina. The petiole measures 3mm to 5mm in length. The linear stipules are caducous. The domatia are protected by foveola with very small openings. Leaves are brittle and crack when bent or folded.
Inflorescences of Psydrax attenuata are born in large terminal cymes. The pale green calyxes measure 0.4mm to 0.6mm in length. The white corollas measure 5mm to 9mm in length while the 6 lobes measure 6mm to 10mm in length by 2mm in width. The linear lobes recurve with the apexes being obtuse to acute-obtuse. The lobe margins are covered in papillose lumps.
The 6 exerted white stamens are free for their entire length. There is a ring of downward pointing, white, hirtellous hairs at the same point where the filaments are attached to the hypanthium. The filaments measure 6mm to 8mm in length while the anthers measure 3mm to 4mm in length.
The yellow style is glabrous and measures 8mm to 10mm in length while the peltate stigmas measure 2mm to 3mm in length by 1.5mm to 2.2mm in diameter. Psydrax attenuata’s sweet scented flowers appear in April.
Psydrax attenuata’s fruits are globose to ovoidal drupes. The drupes contain 3 seeds and are glabrous. The trigonous berries measure 5mm to 6mm in length by 5mm to 6mm in diameter. The green capsules turn deep purple-black when ripe. The 3 to 5 laterally ovoidal seeds are glossy brown to black.
Wildlife:
Psydrax attenuata’s are known to host many species of the Papilio butterflies like the citrus swallow tail, Papilio aegeus.
The succulent fruits are edible however I have not eaten these fruits and are not able to comment on the flavour.
Cultivation:
Psydrax attenuata is useful small tree that could be more widely grown in tropical, subtropical and monsoonal gardens. It is an ideal small tree for semi-arid home gardens. It offers quick growth, and reasonable shade when cultivated compared to its wild cousins that are rather more spindly. In cultivation it will grow from 8 meters to 10 meters in height by 6 meters to 8 meters in diameter when grown in the open.
It can be pruned to maintain a smaller bushier shrub of around 3 meters to 4 meters in height by 3 meters to 4 meters in diameter.
It is moderately drought resistant once established even in its habitat.
Add to the above, if it is given an adequate supply of water and a little native fertilizer on a regular basis it will respond with good flowering and possibly good fruit set over a long period.
Garden beds with rocky embankments would be open with plenty of space between plants to allow air flow as well as to give the branchlets a chance to spread and be appreciated for their unique beauty. Crowding this type of foliage with other plants will see it lose all the effectiveness of the colour and form you require or want. For mass planting space it at least 8 meters to 10 meter centres.
If you are using it amongst rocks or boulders on rocky ground, plant them sparingly to attain a barren scene, or interplant them with wild flowers to make strong uplifting of colour. The use of annuals helps to attract the viewer to the permanent plants foliage as it is the predominant foliage you want people to notice in the patch. Most annual flowers have bold colours so will not clash and the constant whiff of perfume will complete the scene. Annuals mixed with Psydrax attenuata will help to give small gardens depth and make them look larger than what they really are especially if the plants are pruned to maintain a smaller bushier shrub. I would not use any more than two small shrubs as fill in plants and in fact one correctly placed would give balance and make the trees look taller than they really are.
Propagation:
Seeds: The seeds of Psydrax attenuata can be removed easily from the fruits that have fallen to the ground or collected from the trees.
Sow fresh seeds directly into a seed raising mix, keeping them moist not wet. When the seedlings are 20 to 25 mm tall, prick them out and plant them into 50mm native tubes using a good organic mix.
As the seedlings roots reach the bottom of the tubes plant them out into their permanent position. Do not delay.
Fertilize using seaweed, fish emulsion or organic chicken pellets soaked in water on an alternate basis. Fertilize every two months until the plants are established then annually in early September to October to maintain better colour, health, vitality and flowering.
Further Comments from Readers:
“Hi reader, it seems you use The Bible of Botany a lot. That’s great as we have great pleasure in bringing it to you! It’s a little awkward for us to ask, but our first aim is to purchase land approximately 1,600 hectares to link several parcels of N.P. into one at The Pinnacles NSW Australia, but we need your help. We’re not salespeople. We’re amateur botanists who have dedicated over 30 years to saving the environment in a practical way. We depend on donations to reach our goal. If you donate just $5, the price of your coffee this Sunday, We can help to keep the planet alive in a real way and continue to bring you regular updates and features on Australian plants all in one Botanical Bible. Any support is greatly appreciated. Thank you.”
In the spirit of reconciliation we acknowledge the Bundjalung, Gumbaynggirr and Yaegl and all aboriginal nations throughout Australia and their connections to land, sea and community. We pay our respect to their Elders past, present and future for the pleasures we have gained.present and future for the pleasures we have gained.
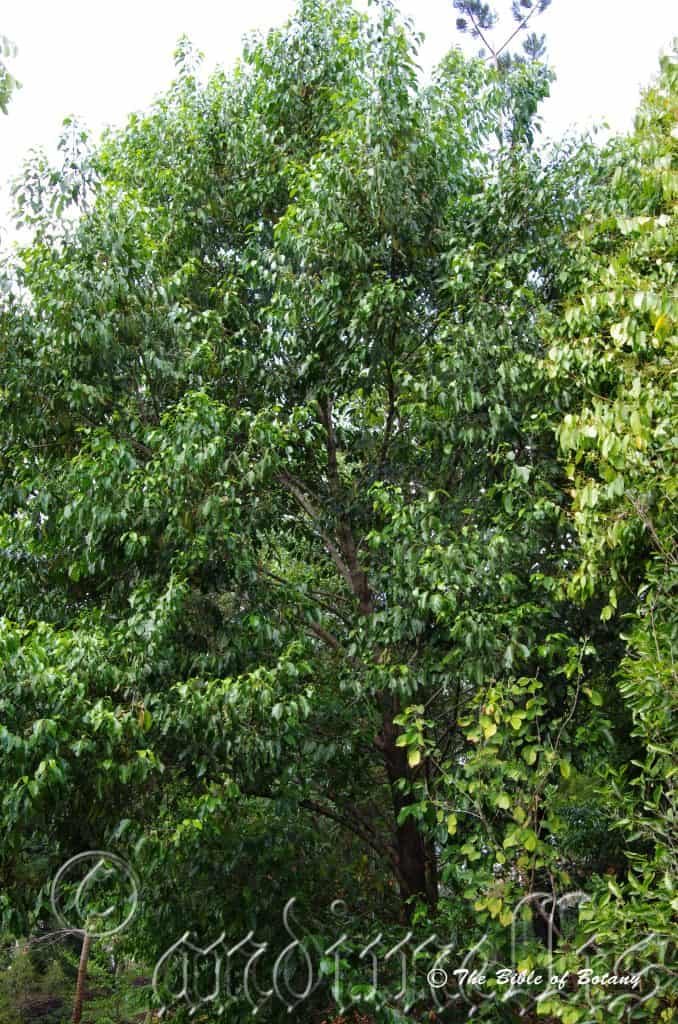
Mount Cootha Botanical Gardens Qld.
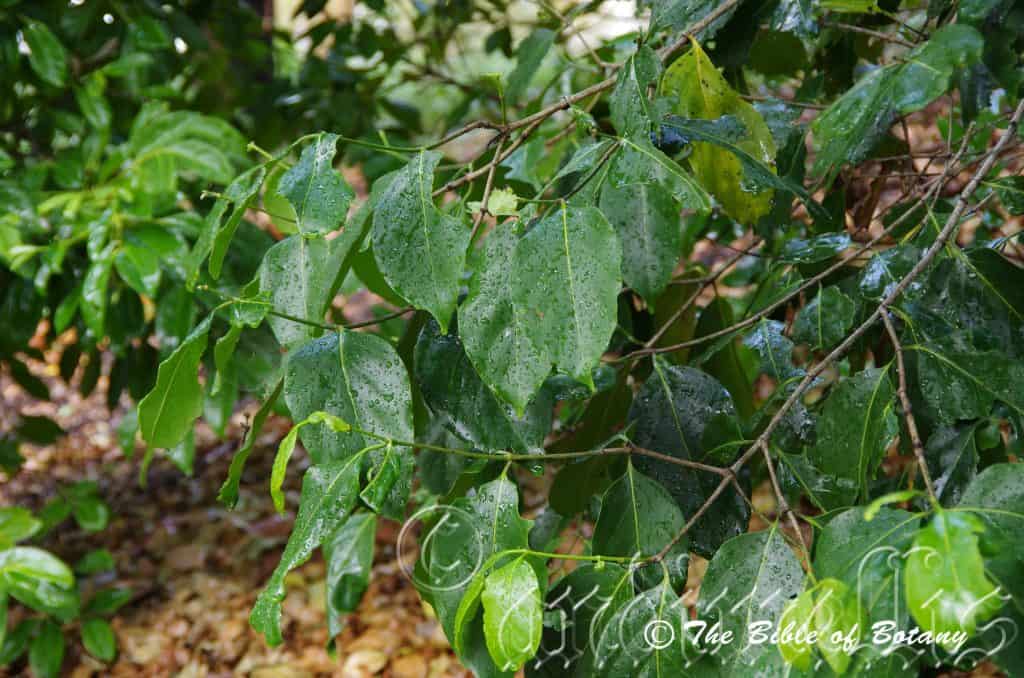
Mount Cootha Botanical Gardens Qld.
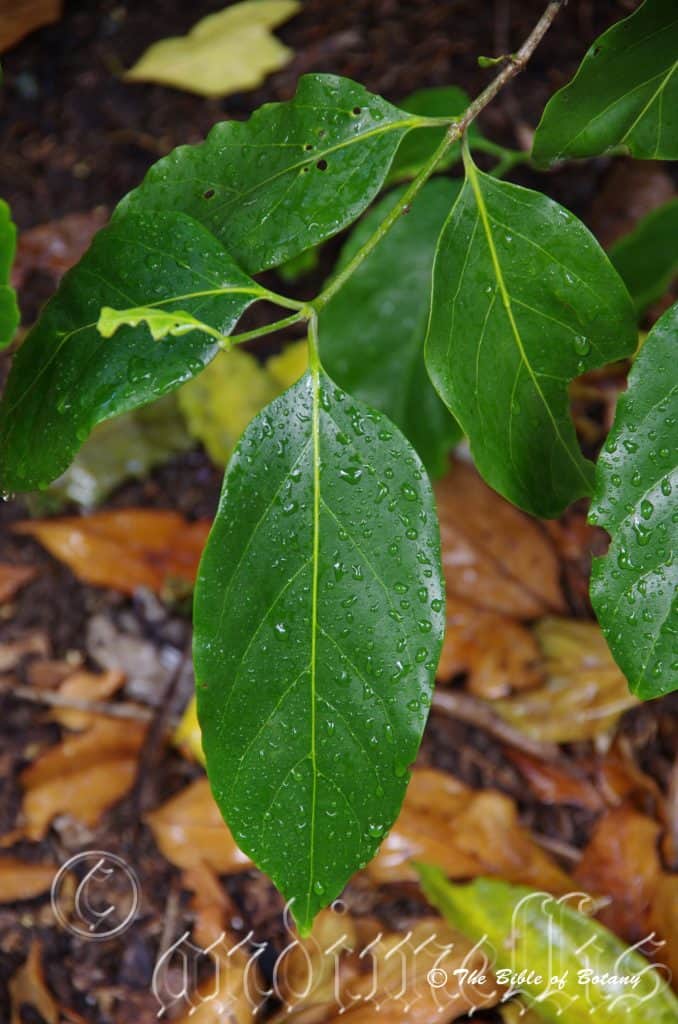
Mount Cootha Botanical Gardens Qld.
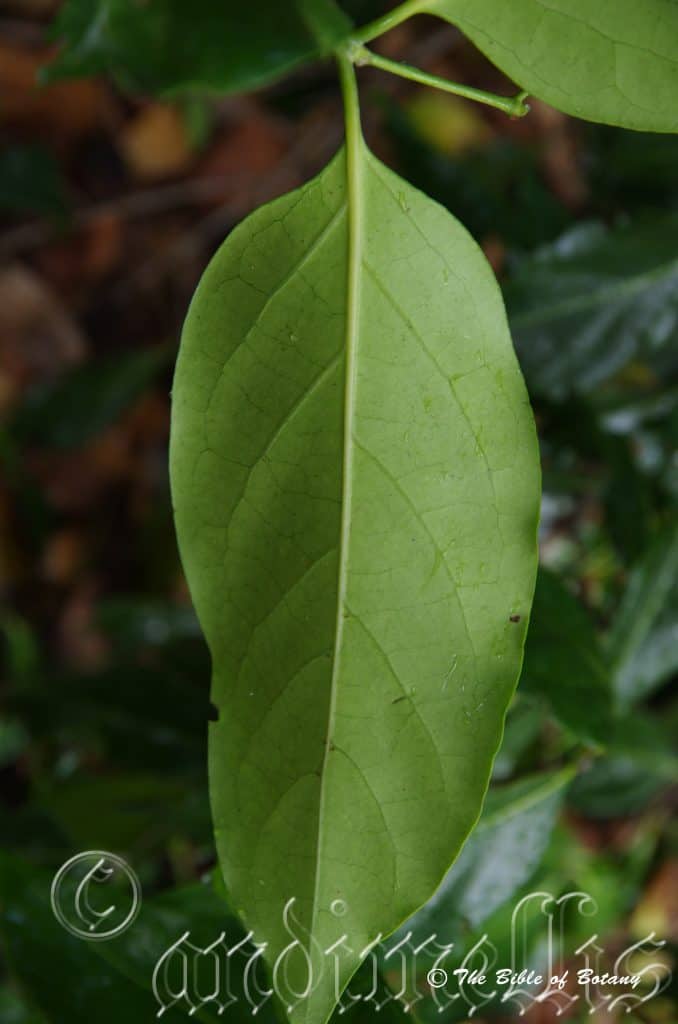
Mount Cootha Botanical Gardens Qld.
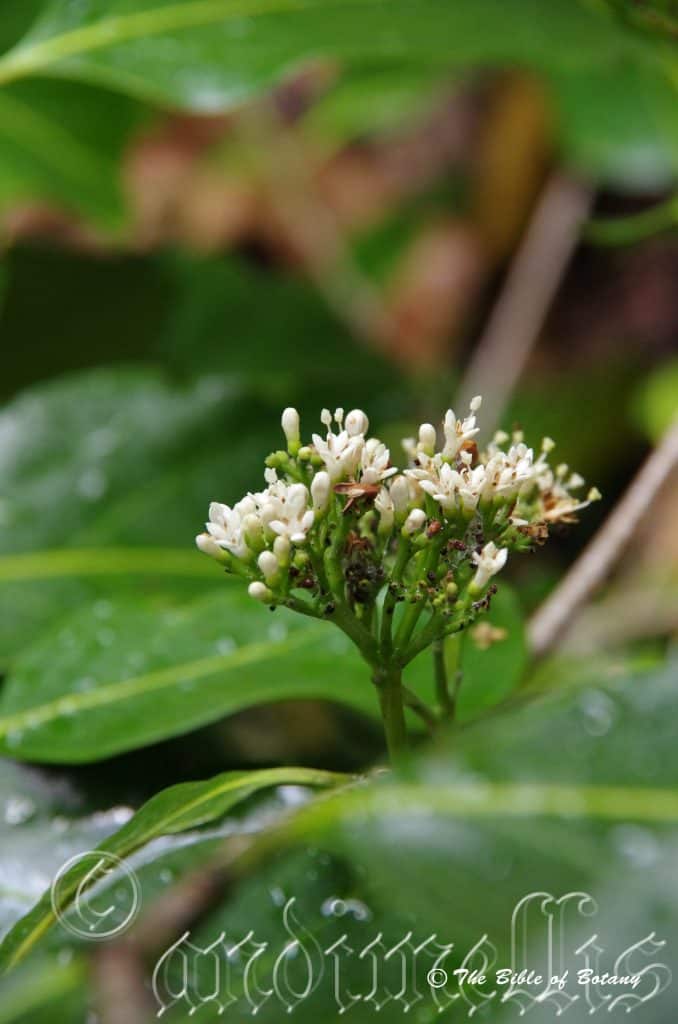
Mount Cootha Botanical Gardens Qld.

Mount Cootha Botanical Gardens Qld.
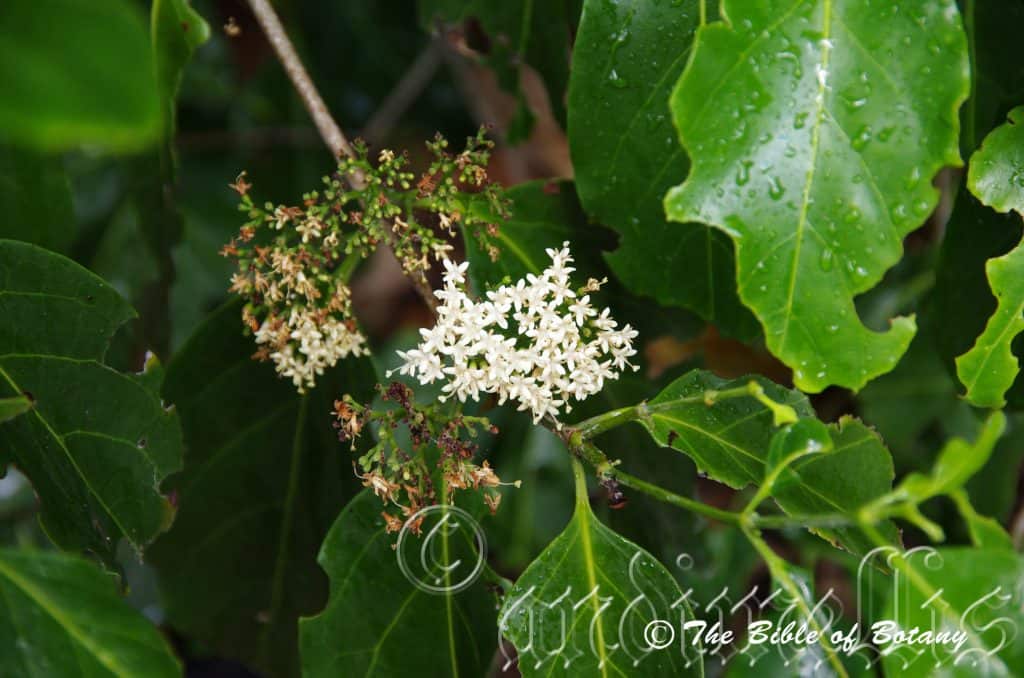
Mount Cootha Botanical Gardens Qld.
Psydrax lamprophylla
Classification:
Unranked: Eudicots
Class: Asterids
Order: Gentiales
Family: Rubiaceae
Subfamily: Ixoriodeae
Tribe: Vanguerieae
Genus: From Psydrax, which is Ancient Greek for a lump or bump. It refers to the fruits and or seeds of some of the original species, which have lumps on the fruits and or seeds.
Species: From Lampro, which is Ancient Greek for very glossy or shinny and Phullon/Phýllon, which is Ancient Greek for a leaf. It refers to leaves, which are very glossy.
Variety: Psydrax lamprophylla var. lamprophylla. From Lampro, which is Ancient Greek for very glossy or shinny and Phullon/Phýllon, which is Ancient Greek for a leaf. It refers to leaves, which are very glossy.
Variety: Psydrax lamprophylla var. latissima. From Latus, which is Latin for broad and Sima, which is Latin for very. It refers to leaves, which are very broad for the genus.
Common Name: Large Leaf Canthium.
Distribution:
Psydrax lamprophylla var. lamprophylla is found south from Rockhampton to Woolgoolga Creek.
Psydrax lamprophylla var. latissima is found south from the Torres Strait Island to Rockhampton.
https://avh.ala.org.au/occurrences/search?taxa=Psydrax+lamprophylla#tab_mapView
Habitat Aspect Climate:
Psydrax lamprophylla prefers full sun to part shade. It grows in dry in littoral rainforests, subtropical coastal monsoonal rainforests or coastal dry rainforest.The altitude ranges from 30 meters ASL to 980 meters ASL.
The temperatures range from minus 3 degrees in July to 38 degrees in January.
The rainfall ranges from lows of 850mm to 3200mm average per annum.
Soil Requirements:
Psydrax lamprophylla prefers light clays to medium clays. The soils are derived from brown basalts, black basalts or metamorphic rocks. The soils pH ranges from 4.5pH to 6.5pH. It does not tolerate waterlogged soils. Non saline soils to moderately saline soils are tolerated.
Height & Spread:
Wild Plants: 8m to 12m by 4m to 6m.
Characteristics:
Psydrax lamprophylla grows as a wide spreading densely foliaged small tree. The grey-brown trunks are finely, longitudinally corrugated and covered in lighter patches for lichens. The branches are usually covered in paler coloured lenticels. The young stems are angulated, grass-green and covered in paler lenticels.
The opposite leaves of Psydrax lamprophylla are broad ovate to oblong-ovate and measure 80mm to 150mm in length by 25mm to 60mm in width. The stipules are triangular and measure 3mm to 4mm in length and are often enclosed in resin. The glabrous petioles measure 10mm to 15mm in length. The bases are cuneate to shortly attenuate while the apexes are acuminate. The discolourous laminas are deep grass-green to deep green, glabrous and semi glossy to glossy on the upper lamina while the lower lamina is paler, dull and are usually sparsely covered in foveole domatia. The laminas are gently convexed from the mid vein to the margins and decurve downwards near the apexes. The laminas are convexed between the mid vein and the lateral veins on the upper surface. The margins are entire and undulating. The mid vein is prominent near the base and is less prominent at the apex.
The inflorescences are born in dense cymose panicles. The pedicels measure 1mm to 2.23mm in length. The green, glabrous calyxes measure 1mm to 1.5mm in length while the 4 lobes are covered on minute puberulent hairs. The white corolla tubes measure 4mm to 5mm in length while the 4 lobes measure 4mm to 5mm in length. The elliptical lobes are glabrous except for papillose hairs along the margins.
The 4 exserted white filaments are adjacent to the petals. The filaments measure 5mm to 6mm in length while the oblong, fawn anthers measure 2mm to 2.5mm in length.
The white stigma is peltate with a 2 lipped mitriform apex. Psydrax lamprophylla’s sweet scented flowers appear February to early May.
Psydrax lamprophylla’s fruits are compressed ovoidal drupes. The drupes are glabrous and measure 6mm to 8.5mm in length by 7mm to 10mm in diameter. The green capsules turn deep purple-black when ripe.
Confusing Varieties:
Psydrax lamprophylla var. lamprophylla’s leaves measure 80mm to 120mm in length by 25mm to 45mm in width. The domatia are usually present. The calyx and calyx lobes are covered in white puberulent hairs externally.
Psydrax lamprophylla var. latissima’s leaves measure 100mm to 150mm in length by 40mm to 60mm in width. The domatia if present are present as foveola. The calyx and calyx lobes are glabrous.
Wildlife:
Psydrax lamprophylla’s are known to host most the species of the Papilio butterfly known as the Citrus Swallowtails.
The succulent fruits are edible however I have not eaten these fruits and are not able to comment on the flavour.
Cultivation:
Psydrax lamprophylla is a useful small tree that could be more widely grown in tropical, subtropical and monsoonal gardens. It is an ideal small tree for semi-arid home gardens where it offers quick growth, and reasonable shade when cultivated compared to their wild cousins. In cultivation it will grow from 8 meters to 10 meters in height by 6 meters to 8 meters in diameter when grown in the open.
The tree would make a very good accent trees in front of low set homes, commercial buildings industrial sheds and car parks and low set school buildings and courtyards where they will break up hard rigid architectural lines and give warmth and breadth to a building. In semi-arid areas it would also help in suppressing dust around buildings especially when planted out beneath with Grevillea or Myoporum specie. In front of high rise buildings they give balance.
It is moderately drought resistant. Add to the above, if it is given an adequate supply of water and a little native fertilizer on a regular basis the plants will respond with good flowering and possibly better fruit set.
Propagation:
Seeds: The seeds of Psydrax lamprophylla can be removed easily from the fruits that have fallen to the ground or collected from the trees.
Sow fresh seeds directly into a seed raising mix, keeping them moist not wet. When the seedlings are 20mm to 25mm tall, prick them out and plant them into 50mm native tubes using a good organic mix.
As the seedlings roots reach the bottom of the tubes plant them out into their permanent position. Do not delay.
Fertilize using seaweed, fish emulsion or organic chicken pellets soaked in water on an alternate basis. Fertilize every two months until the plants are established then annually in early September to October to maintain better colour, health, vitality and flowering.
Further Comments from Readers:
“Hi reader, it seems you use The Bible of Botany a lot. That’s great as we have great pleasure in bringing it to you! It’s a little awkward for us to ask, but our first aim is to purchase land approximately 1,600 hectares to link several parcels of N.P. into one at The Pinnacles NSW Australia, but we need your help. We’re not salespeople. We’re amateur botanists who have dedicated over 30 years to saving the environment in a practical way. We depend on donations to reach our goal. If you donate just $5, the price of your coffee this Sunday, We can help to keep the planet alive in a real way and continue to bring you regular updates and features on Australian plants all in one Botanical Bible. Any support is greatly appreciated. Thank you.”
In the spirit of reconciliation we acknowledge the Bundjalung, Gumbaynggirr and Yaegl and all aboriginal nations throughout Australia and their connections to land, sea and community. We pay our respect to their Elders past, present and future for the pleasures we have gained.
Psydrax odorata
Classification:
Unranked: Eudicots
Unranked: Asterids
Order: Gentianales
Family: Rubiaceae
Subfamily: Ixoriodeae
Tribe: Vanguerieae
Genus: From Psydrax, which is Ancient Greek for a lump or bump. It refers to the fruits and or seeds of some of the original species, which have lumps on the fruits and or seeds.
Species: From Odōrāta, which is Latin for a smell or a bad aroma. It refers to the leaves or flowers, which have a smell or fragrance which is often unpleasant.
Subspecies: Psydrax odorata subsp. arnhemica. From Arnhemica, which is Latinized for the vernacular aboriginal word for Arnhem Land. It refers to plants, which originated from Arnhem Land.
Subspecies: Psydrax odorata subsp. australiana. From Terra Australis, which is Latin for land of the south. It refers to plants, which were first discovered from the land down under.
Subspecies: Psydrax odorata subsp. buxifolia. From Buxus which is Latin for a European genus and Folium, which is Latin for foliage. It refers to leaves, which resembles the European Buxus genus.
Subspecies: Psydrax odorata subsp. odorata. From Odōrāta, which is Latin for a smell or a bad aroma. It refers to the leaves or flowers, which have a smell or fragrance which is often unpleasant.
Common Name: Sweet Scented Canthium.
Distribution:
Psydrax odorata subsp. arnhemica is widespread specie found east from the Kimberley Range in north east of Western Australia to Arnhem Land and Groote Eyelandt in the north east of the north of the Northern Territory.
Psydrax odorata subsp. australiana is found south from the Torres Strait Islands and Cape York Peninsula to the Hunter Valley and the Blow Clear State Forest in central New South Wales. It is found on the eastern side of the Western plains, on the Western Slopes, on and east of the Great Dividing Range to the coast.
Psydrax odorata subsp. buxifolia is found south from Bowling Green National Park to Singleton in central coastal New South Wales. It is found on the Western Slopes, on and east of the Great Dividing Range to the coast.
Psydrax odorata subsp. odorata is not found in Australia.
It is also found in Papua, New Guinee and many of the tropical Pacific Island Nations through to Hawaii.
https://avh.ala.org.au/occurrences/search?taxa=Psydrax+odorata#tab_mapView
Habitat Aspect Climate:
Psydrax odorata prefers full sun to part shade. It grows in dry rainforests, open Eucalyptus forests, open Eucalyptus woodlands, open savannah woodlands on undulating plains, and along riparian zones of creeks in the drier parts of its range.
Psydrax odorata subsp. arnhemica’s altitude ranges from 10 meters ASL to 300 meters ASL.
Psydrax odorata subsp. australiana altitude ranges from 10 meters ASL to 1500 meters ASL.
Psydrax odorata subsp. buxifolia altitude ranges from 10 meters ASL to 700 meters ASL.
The temperatures range from minus 3 degrees in July to 36 degrees in January.
The rainfall ranges from lows of 250mm to 3000mm average per annum.
Soil Requirements:
Psydrax odorata prefers a wide range of soils from light pindan soils in the Kimberley’s to rocky ridges, crevices where water accumulates and screes below sandstone cliffs in semi-arid areas west of the Great Dividing Range. The soils pH ranges from 4.5pH to 6.5pH. The plants are subject to wide fluctuations in available moisture from droughts to water logging in the wet season. Non saline soils to very saline soils are tolerated.
Height & Spread:
Wild Plants: 3m to 8m by 2m to 6m
Characteristics:
Psydrax odorata grows as a wide spreading densely foliaged small tree, bushy shrub or prostrate ground cover in exposed windblown sites. The branches are usually twisted, pale grey, smooth and glabrous. It is often covered in green or blue lichens especially when growing adjacent to moist riparian rainforests. The stems are thick grass-grey and becoming green only where the leaves appear. Large plants are often seen on cliff faces and in rocky exposed places where the main plants have all but died and a new shoots have reappeared from the lower branches.
The opposite, elliptical to obovate leaves measure 30mm to 80mm in length by 10mm to 35mm in width. The petiole measures 2mm to 8mm in length. The bases are cuneate-attenuate or rounded-attenuate while the apexes are obtuse or bluntly acuminate. The discolourous laminas are deep grass-green to deep green, glabrous and semi glossy to glossy on the upper lamina while the lower lamina is paler, dull and with a number of domatia. The leaf margins are entire, flat and curve slightly upwards from the mid vein and curve slightly downwards from the base to the apex. The mid vein is level with both laminas and barely visible.
Inflorescences of Psydrax odorata are born in dense terminal panicles. The grass green calyxes are glabrous and measure 1mm to 1.5mm in length. The calyx and the 4 small lobes are glabrous. The white to cream corollas measure 5mm to 6mm in length while the lobes measure 10mm to 13mm in length. The 4 or 5 linear lobes strongly recurve with the apexes being obtuse to acute-obtuse. The pedicels measure 3mm to 3.5mm in length.
The 4 or 5 exerted white filaments are free for their entire length. The filaments measure 5mm to 6mm in length while the yellow anthers measure 2mm to 2.5mm in length.
The white style is glabrous and measures 10mm to 12mm in length while the ovoid stigma measures 3mm to 4mm in length by 2.5mm to 3mm in diameter. Psydrax odorata’s sweet scented flowers appear throughout the year.
The fruits of Psydrax odorata are compressed ovoidal drupes. The drupes are glabrous and measure 6mm to 7mm in length by 7mm to 8.5mm in diameter. The green capsules turn deep purple-black when ripe. The 3 to 5 laterally reniform seeds are glossy brown and woody.
Wildlife:
Psydrax odorata’s is known to host most the species of the Papilio butterfly known as the Citrus Swallow tails.
The succulent fruits are edible however I have not eaten these fruits so cannot comment on the flavour.
Cultivation:
Psydrax odorata is useful small tree that should be more widely grown in tropical, subtropical and monsoonal gardens. It is an ideal small tree for semi-arid home gardens. It offers quick growth, and reasonable shade when cultivated compared to its wild cousins that are rather spindly. In cultivation it grows from 8 meters to 10 meters in height by 6 meters to 8 meters in diameter when grown in the open.
It can be pruned to maintain a smaller bushier shrub of around 3 meters to 4 meters in height by 3 meters to 4 meters in diameter.
Garden beds would need to be open with plenty of space between plants to allow air flow as well as to give the branchlets a chance to spread and be appreciated for their unique beauty. Crowding this type of foliage with other plants will see them lose all the effectiveness of the colour and form you require or want. Correct spacing will contrast the foliage better without one overpowering the other. For mass planting space the plants at least 4 meters to 4.5 meter centres. If you are using it amongst rocks or boulders on rocky ground, plant it sparingly to attain a barren scene, or interplant them with wild flowers to make strong uplifting of colour. 2 or 3 in an area of 100 square meters would be ample. The use of annuals helps to attract the viewer to the permanent plants foliage as it is the predominant foliage you want people to notice in the patch. In the case of Psydrax odorata you could substitute very small Grevillea species or natives for the native annuals. Most annuals flower have bold colour flowers so will not clash and the constant whiff of perfume will complete the scene. Annuals mixed with Psydrax odorata help to give small gardens depth and make them look larger than what they really are especially if the plants are pruned to maintain a smaller bushier shrub.
It is moderately drought resistant. Add to the above, if it is given an adequate supply of water and a little native fertilizer on a regular basis the plants will respond with good flowering and possibly better fruit set.
Propagation:
Seeds: The seeds of Psydrax odorata can be removed easily from the fruits that have fallen to the ground or collected from the trees.
Sow fresh seeds directly into a seed raising mix, keeping them moist not wet. When the seedlings are 20mm to 25mm tall, prick them out and plant them into 50mm native tubes using a good organic mix.
As the seedlings roots reach the bottom of the tubes plant them out into their permanent position. Do not delay.
Fertilize using seaweed, fish emulsion or organic chicken pellets soaked in water on an alternate basis. Fertilize every two months until the plants are established then annually in early September to October to maintain better colour, health, vitality and flowering.
Further Comments from Readers:
“Hi reader, it seems you use The Bible of Botany a lot. That’s great as we have great pleasure in bringing it to you! It’s a little awkward for us to ask, but our first aim is to purchase land approximately 1,600 hectares to link several parcels of N.P. into one at The Pinnacles NSW Australia, but we need your help. We’re not salespeople. We’re amateur botanists who have dedicated over 30 years to saving the environment in a practical way. We depend on donations to reach our goal. If you donate just $5, the price of your coffee this Sunday, We can help to keep the planet alive in a real way and continue to bring you regular updates and features on Australian plants all in one Botanical Bible. Any support is greatly appreciated. Thank you.”
In the spirit of reconciliation we acknowledge the Bundjalung, Gumbaynggirr and Yaegl and all aboriginal nations throughout Australia and their connections to land, sea and community. We pay our respect to their Elders past, present and future for the pleasures we have gained.
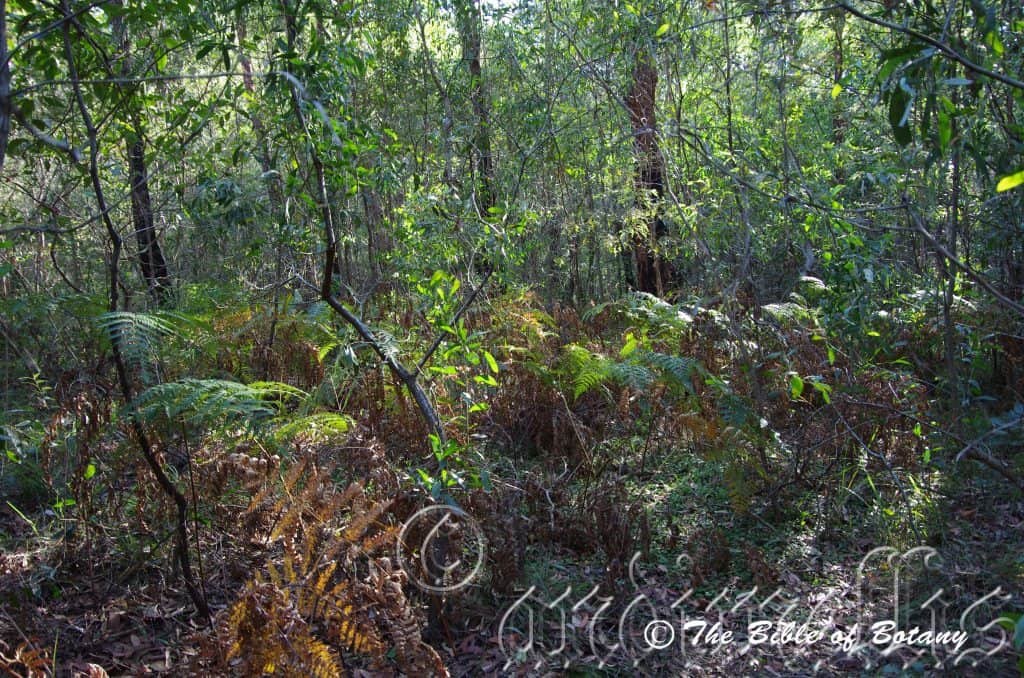
Seven Hills Qld.
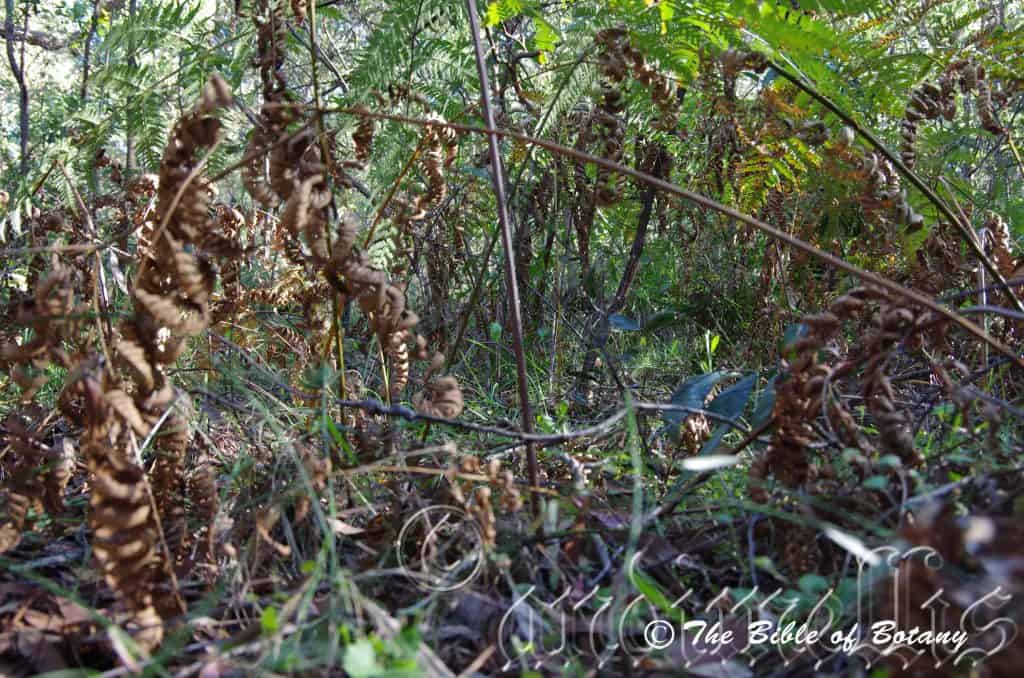
Seven Hills Qld.
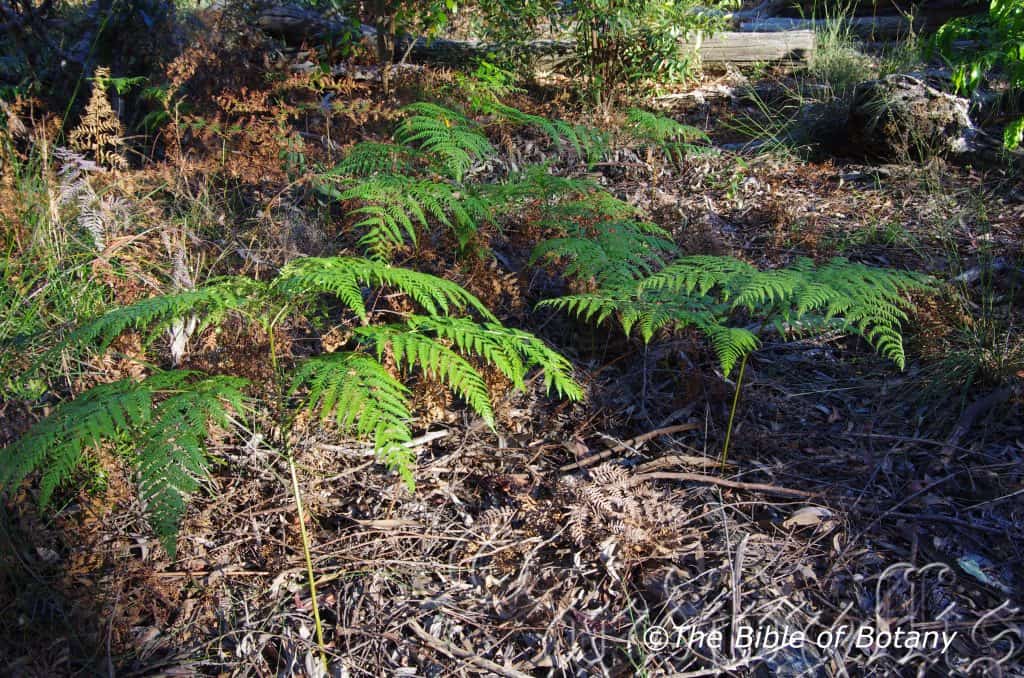
Author’s Garden The Pinnacles NSW
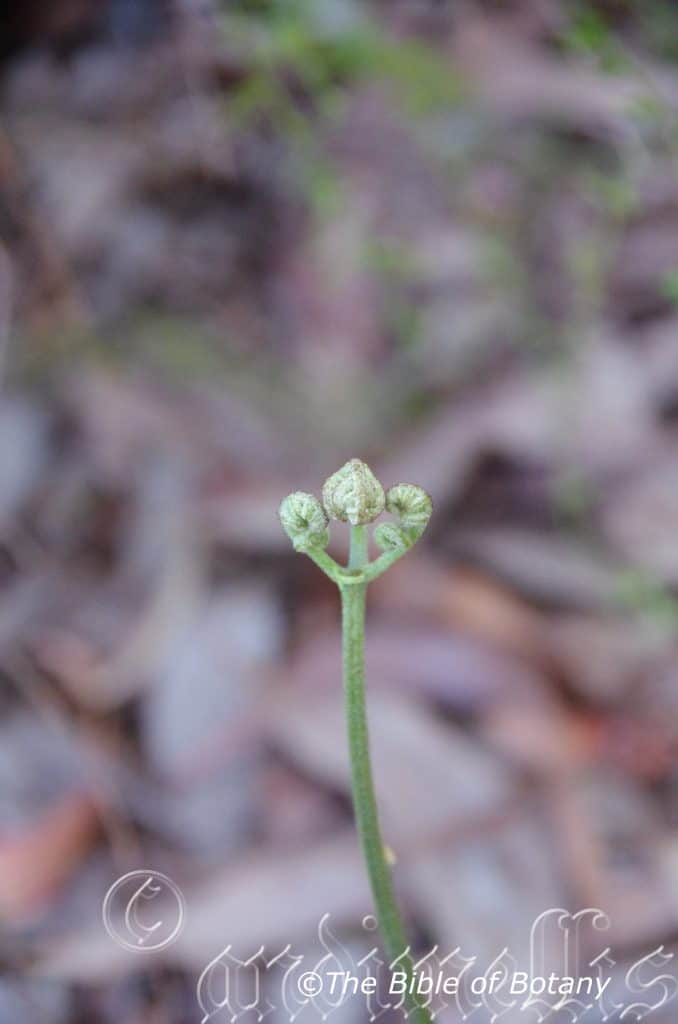
Author’s Garden The Pinnacles NSW

Seven Hills Qld.
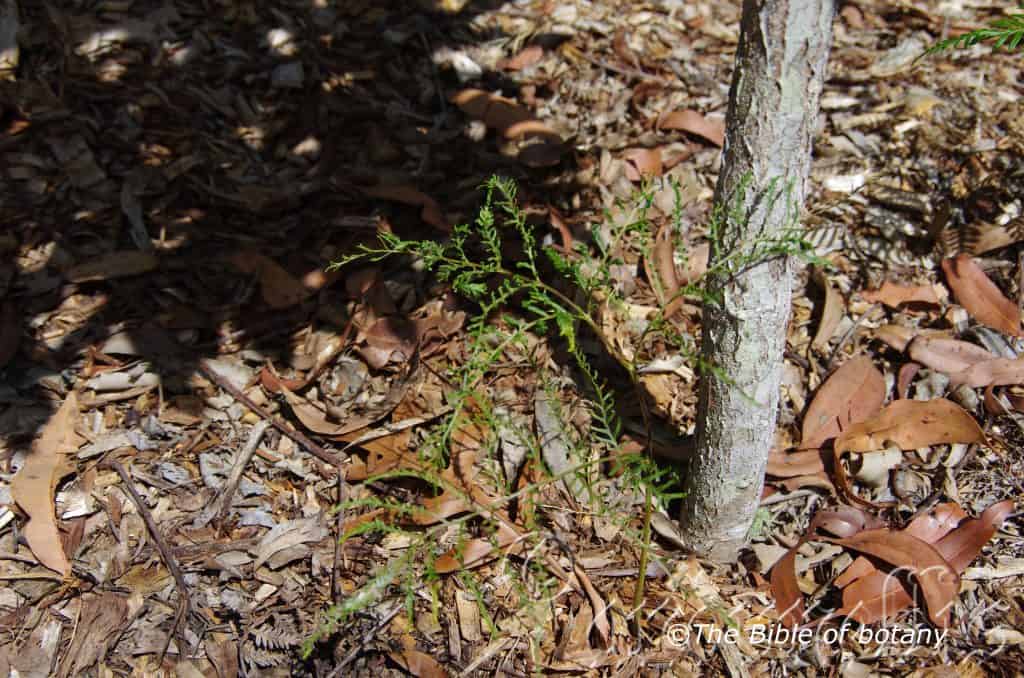
Seven Hills Qld.
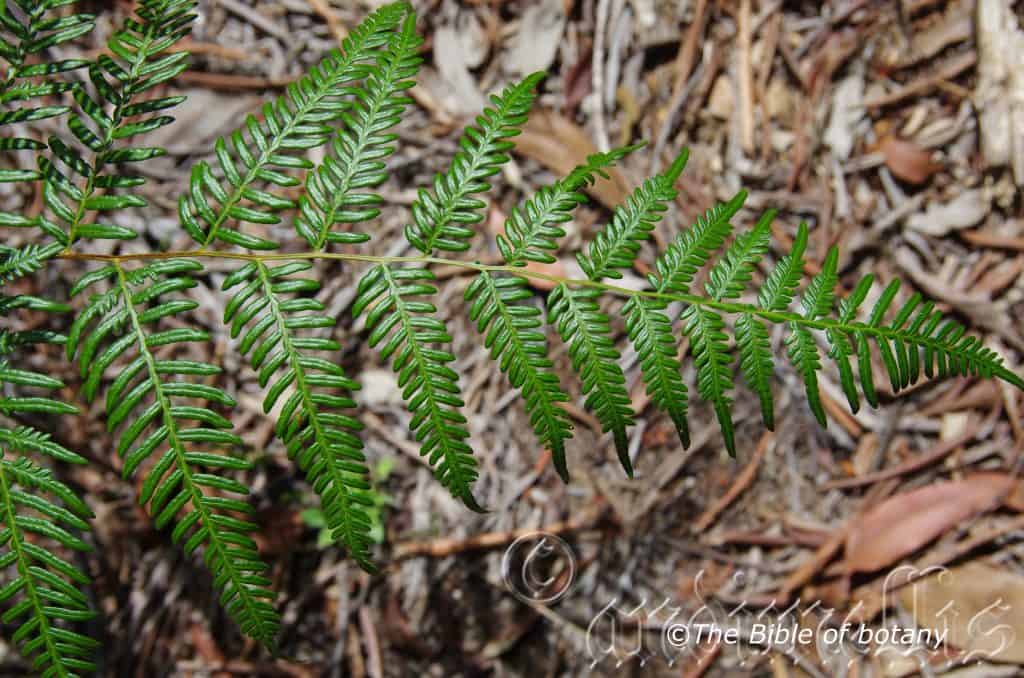
Seven Hills Qld.
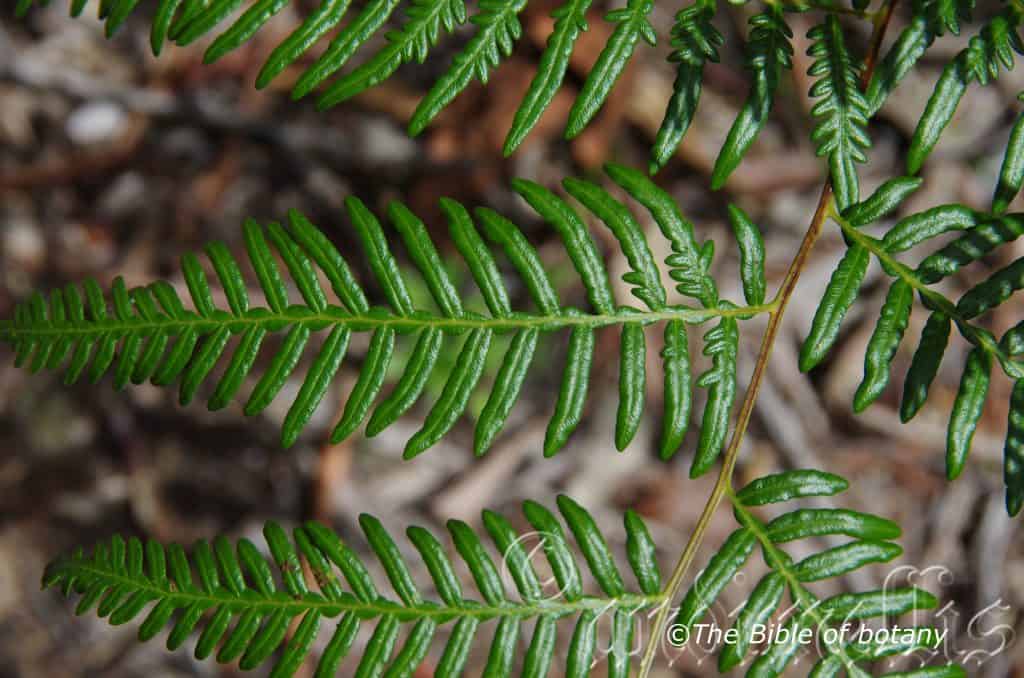
Seven Hills Qld.
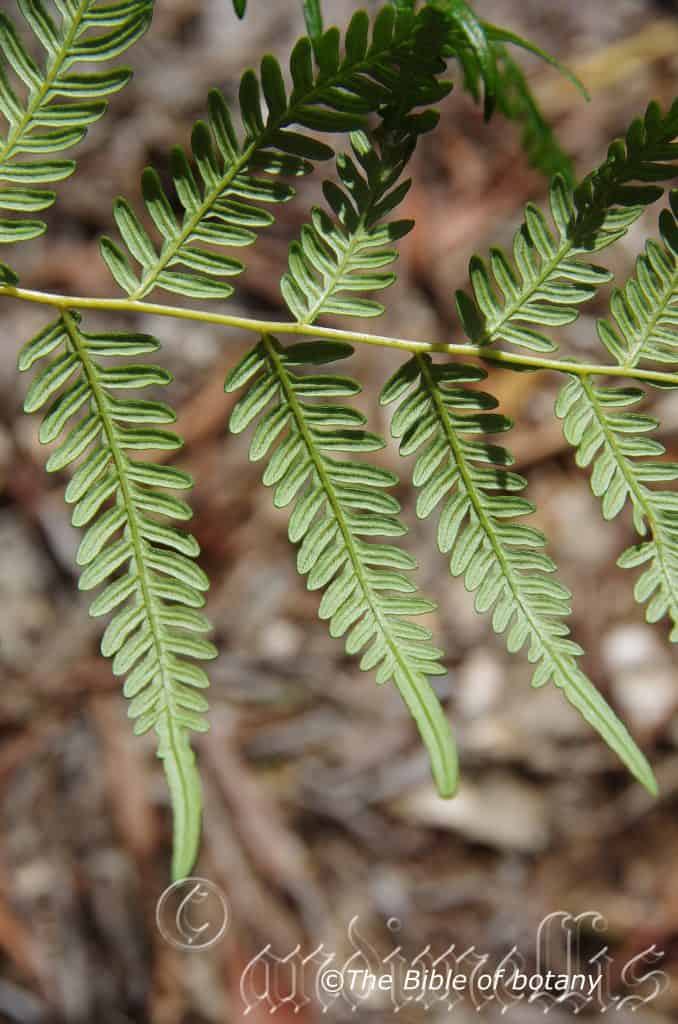
Seven Hills Qld.
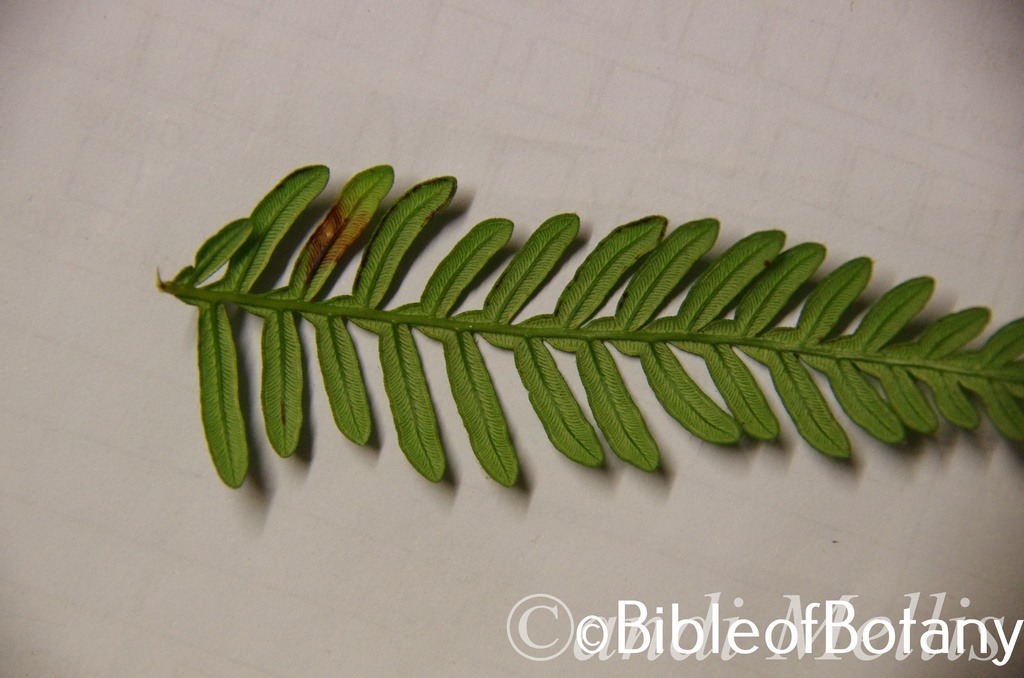
Note the small lobes between the pinnae which are lacking on Pteridium yarrabense, which is found with P. esculentum in north Queensland Author’s Garden The Pinnacles NSW
Pteridium esculentum
Classification:
Unranked: Pteridiophyta
Class: Pteridopsida or Filicinae
Order: Dennstadtiales
Family: Dennstadtiaceae
Genus: From Ptéris, which is Ancient Greek for a fern. It refers to plants, which is any seedless, nonflowering vascular plant of the class Filicinae, of tropical to temperate regions, characterized by true roots produced from a rhizome, with fronds that uncoil upward and have a branching vein system, and reproduction by spores contained in sporangia that usually appear as brown or yellow grains or powder from on the underside of the fronds.
Species: From ēsculentum, which is Latin for edible, to nourish or delicious. It refers to plants, which have good eating qualities.
Common Name: Bracken Fern.
It is known as Gurgi in the Eora Aboriginal language, while in the local Gumbaynggirr know it as Gamiiny.
.
Distribution:
Pteridium esculentum is widespread specie which circumnavigates most of Australia including Tasmania and many of the larger Islands off the coast.
It is a fern that is found worldwide. It is presently being looked at as possibly having several species or subspecies.
Note: Pteridium esculentum needs to be reassessed as there appears to be more than one species. As the species is worldwide and well spread it will be a massive job to collate any possible new species for identification. The Australian plants will be reallocated a new name under nomenclature rules if found to be different from the type species.
https://avh.ala.org.au/occurrences/search?taxa=Pteridium+esculentum#tab_mapView
Habitat Aspect Climate:
Pteridium esculentum prefers full sun to part shade. It grows in most habitats including wet Eucalyptus forests to open Woodlands. The altitude ranges from 2 meters ASL to 1080 meters ASL.
The temperatures range from minus 6 degrees in July to 36 degrees in January.
The rainfall ranges from lows of 400mm to 3200mm average per annum.
Soil Requirements:
Pteridium esculentum prefers a wide range of soils from those derived from decomposed sandstones, brown basalts, black basalts, shale metamorphic, conglomerates or at times heavier sandstones, heavier granites or limestones. The soils pH ranges from 2.8pH to 8PH, however extreme PH’s limit healthy growth. Best growth is achieved when the pH is between 4.5PH and 7PH. Plants are subject to wide fluctuations in available moisture from droughts to seasonal waterlogged soils. Non saline soils to very saline soils are tolerated.
Height & Spread:
Wild Plants: 1m to 2m by 2m to several hundred square meters.
Characteristics:
Pteridium esculentum rhizome is very long creeping slender and fleshy with a diameter of 3mm to 10mm. The deep green to a mid blue-green or amber honey rhizomes are covered in deep red-brown to deep rusty brown hairs.
Pteridium esculentum’s has broad triangular fronds. The fronds measure 600mm to 1800mm in height by 400mm to 550mm in length by 400 to 600mm in overall width. The slender 600mm to 2000mm stipes are glossy brown and glabrous except for a dense covering of red- brown hairs close to the base. The minor rachis has two wing like lobes between the segments.
The lamina on the 3 to 4 pinnatifid fronds is glabrous. The laminas are thick but not coriaceous. The discolourous laminas are deep glossy green. The lobes along the final rachis are linear with entire margins. The lobes vary considerably with the apex lobe being much longer than the lateral lobes. The lateral lobes measure 7mm to 13mm in length by 4mm to 7mm in width. The mid vein and main lateral veins on the lobes are prominent on the lower lamina and are visible on the upper lamina.
The fertile fronds are similar to the sterile fronds but the lobes are narrower and measure 5mm to 10mm in length by 2mm to 3.5mm in width. Pteridium esculentum’s sori are a continuous strip beneath the in rolled margins to almost the mid vein. The bilipped indusium has one pale green lip while the other lip is pale yellow-brown.
Spores are very small. They are a pale fawn to pale yellow brown in colour.
Wildlife:
Pteridium esculentum’s is known to be the host for the Idiodes apicata butterfly. A study conducted near Sydney revealed that over 33 different insects inhabit Pteridium esculentum while at the same time there was a lack of ants, bees, wasps and beetles. (Shuter, E. and Westoby, M. (1982). Herbivorous arthropods on bracken)
This plant has not been accepted into the diets of westerners probably because of the carcinogen ptaquiloside. If the new croziers are cooked or the roots are roasted and the starch removed the carcinogens are destroyed.
Cultivation:
Pteridium esculentum makes an excellent ground cover and phytoremediator for areas where there is filtered light to dense shade. It always look green and fresh especially where adequate ground moisture is retained in the soil. It is excellent on heavy clay soils where it can be used for breaking the heavy clays up and making them more porous. As garden subject it will colonize rocks especially those of a more porous nature. It is cold tolerant to temperatures as low as minus 4 degree once established.
Most people consider it a weed and an annoyance where it grows naturally.
We had some Chinese friends here from inner Chong Qing city. One lady; knowing I loved ferns, commented on the beauty of the ferns growing in the north west corner beside the path. On querying her I realised she was talking about Pteridium esculentum. I took it as a compliment and let her believe it was required there. In fact I had recently cut it back and the new growth to her looked stunning. The moral of the story is different people find beauty in the different forms that plants exhibit.
Further Comments from Readers:
“Hi reader, it seems you use The Bible of Botany a lot. That’s great as we have great pleasure in bringing it to you! It’s a little awkward for us to ask, but our first aim is to purchase land approximately 1,600 hectares to link several parcels of N.P. into one at The Pinnacles NSW Australia, but we need your help. We’re not salespeople. We’re amateur botanists who have dedicated over 30 years to saving the environment in a practical way. We depend on donations to reach our goal. If you donate just $5, the price of your coffee this Sunday, We can help to keep the planet alive in a real way and continue to bring you regular updates and features on Australian plants all in one Botanical Bible. Any support is greatly appreciated. Thank you.”
In the spirit of reconciliation we acknowledge the Bundjalung, Gumbaynggirr and Yaegl and all aboriginal nations throughout Australia and their connections to land, sea and community. We pay our respect to their Elders past, present and future for the pleasures we have gained.
Pteris comans
Classification:
Unranked: Pteridiophyta
Class: Pteridopsida or Filicinae
Order: Polypodiales
Family: Pteridaceae
Subfamily: Pteridoideae
Genus: From Ptéris, which is Ancient Greek for a fern, which is any seedless, nonflowering vascular plant of the class Filicinae, of tropical to temperate regions, characterized by true roots produced from a rhizome, with fronds that uncoil upward and have a branching vein system, and reproduction by spores contained in sporangia that usually appear as brown or yellow grains or powder from on the underside of the fronds and Graphos, which is Ancient Greek for written or to draw. It refers to plants, which is very typical of a fern.
Species: From Kómē which is Ancient Greek or Comōsum, which is Latin for hairy. It refers to the leaves or fronds growing bushy like a head of hair.
Common Name: Hairy Brake Fern or Coastal Brake.
Distribution:
Pteris comans is found in several disjunct populations south from the Macpherson Ranges in south east Queensland to Wilson’s Promontory in southern Victoria. It is also found south of the Grampians from Warrnambool to Geelong close to the coast
In Tasmania it is mainly found west of George Town on the north western coast south to the South West Conservation area and around South Cape Bay, Tasman National Park and Freycinet National Park.
https://avh.ala.org.au/occurrences/search?taxa=Pteris+comans#tab_mapView
Habitat Aspect Climate:
Pteris comans prefers full sun to part shade. It grows in the mountains below the snow lines in cool wet temperate rainforests. The altitude ranges from 20 meters ASL to 700 meters ASL.
The temperatures range from minus 4 degrees in July to 32 degrees in January.
The rainfall ranges from lows of 500mm to 2000mm average per annum.
Soil Requirements:
Pteris comans prefers light fatty clays to medium clays often with copious quantities of forest litter. The soils are usually derived from decomposed brown basalt, black basalts, sandstones, granite, shale, conglomerates or metamorphic rocks. The soils pH ranges from 4.5pH to 7pH. It does not tolerate waterlogged soils. Non saline soils to moderately saline soils are tolerated.
Height & Spread: Wild Plants: 0.6m to 1m by 0.6m to 1m.
Characteristics:
Pteris comans rhizome are tufted, erect and covered in deep brown to deep brown hairy scales.
Pteris comans’s slender 400mm to 200mm stipes are deep purple-brown near the base, glossy brown above turning green and glabrous with a groove on the upper side.
The lamina on the tripinnatifid fronds is deeply divided. The rachis is golden yellow. The fronds measure 350mm to 450mm in length by 180mm to 250mm in width. The laminas are thin but not coriaceous, glabrous. The laminas lobes number 6 to 12 pairs with a terminal pinna. The concolourous laminas are green to a mid blue-green, dull and glabrous or are very sparsely covered in white pilose hairs. The opposite ultimate lobes are oblong and measure 15mm to 25mm in length by 6mm to 10mm in width. The margins are finely, irregularly toothed.
The fertile fronds are not much narrower than the sterile fronds. Pteris comans’s linear sori are continuous from near the base to over half way to the apex on the lower margin. The upper margin may have a continuous or interrupted line near the margin.
Spores are very small. It is a pale fawn to pale yellow brown in colour.
Wildlife:
Pteris comans’s wildlife is unknown to the author.
Cultivation:
Pteris comans makes an excellent ground cover for areas where there is heavy shade that is always moist. It always looks green and fresh especially where adequate ground moisture is retained in the soil. It is very suitable on medium clays to heavy clay soils and are most suitable for small medium and large gardens close to the coast in warm temperate, warm subtropical or cool tropical gardens. As a garden subject it will colonize soils that have established rainforests or at the bottom of moist shady banks. It is cold tolerant to temperatures as low as minus 3 degrees once established.
It is most suitable for use as a rainforest understory plant where they can break the monotony of large deep green leaves. They like plenty of leaf litter to help increase soil fertility, maintain soil moisture and to maintain a cool root zone.
Medium to large frog or fish ponds are made the more attractive when surrounded by this fern which can spread over large areas if given the opportunity without becoming problem some. Their size makes for a balance setting.
Propagation:
Fern Spores:
All ferns that are declared rare, vulnerable or endangered are protected by Federal and State Laws and must not be removed from the wild unless you are a land developer, mining company or main Roads department etc. This includes bulbs, roots, leaves and flowers. No part of any plant can be removed from Federal, State or Local Government land without the prior permission of the authority and this includes the spore.
Most people are put off at the thought of growing ferns from spore. Like all plants that produce their offspring from seed or spore the methods are basically the same. Remember nature has been doing this for millions of years and has been very successful. I have had excellent results growing over 200 different species of Australian ferns so don’t be afraid. Give it a go.
Step 1. Select spore from the fern fronds. Wait until the fern is just starting to release its spore. Rinse the fronds under clean running water and dry. This is to wash off any other spores from rogue ferns that may have settled onto the fronds. (There is nothing worse than having common brake or common soft bracken contaminating a prized tree fern or epiphyte.)
Step 2. Place the dry fronds in a clean brown paper bag and keep them in a cool dark place like the linen closet for about a week to ten days before you are ready to sow the spore. The exception to this rule applies to ferns, which produce green spores. These must be sown immediately that they are released. Todea Barbara is a good example of a fern, which produces green spore.
Step 3. Take a large ice cream container, a small ice cream container and a clean clear plastic bag large enough to seal the large ice cream container and three or four milk bottle tops.
Step 4. Punch or drill 6 to 10 5mm holes in the bottom of the small ice cream container.
Step 5. Wash both containers, tops and plastic bag so that they are very clean and sterile.
Step 6. Use a clean fine seed raising mi. We used 30mm fine sand, 30mm peat and 30mm perlite and 10mm vermiculite. We used crushed basalt, crusher dust and peat in a 50:50 ratio for epiphytes. Moisten the mix enough that water does not run out when the mix is squeezed between the fingers.
Step 7. Place the moisten mix (Enough to half fill the small ice cream container) in the microwave oven with a large glass of water for 7 or 8 minutes, until the water is boiling. Allow them to cool in the oven. You will need the water later so do not tip it out.
Step 8. Take the brown paper bag out of the linen closet. Shake the bag and remove the fronds. You should have a yellow, brown, black or rarely greenish brown or ochre powder or very fine, small round pin head size spore depending on the specie involved.
Step 9. Remove the mixture from the oven once it has cooled and place it in the small ice cream container and level.
Step 10. Sprinkle the spore sparsely over the mixture in the small ice cream container.
Step 11. Place the milk bottle tops in the large ice cream container with the flat surface facing down. Place the small ice cream container in the large ice cream container so that it is sitting on the milk bottle tops.
Step 12. Remove the water from the microwave and pour it into the larger ice cream container so there is 25mm to 30mm of water in the bottom.
Step 13. Place the ice cream containers in the plastic bag and seal. Step 14. Place the contents and bag in a warm shady place preferably 50mm to 70mm shade depending on the specie. Shade houses and some window sills are ideal.
Step 15. The surface should turn green within a week to two weeks. The prothallus will then develop. From the prothallus the first true fronds will appear. Wait until the ferns are 20mm to 35mm in height before you attempt to transplant them. Once they are ready open the bag up slightly and allow the air to flow around the little ferns. Every 3 to 5 days open the bag a little further so the ferns get use to their new environment. Allow them a week to two weeks to harden off before you transplant them following the removal of the plastic bag. Carefully prick them out into 50mm standard squat tubes as you would any seedling.
Do not try to transplant them as single plants as they are still a little delicate still.
Once the smaller ones again reach 50mm to 70mm you may wish to divide the stronger and hardier individual plants into smaller clumps in 100mm squat pots.
Step 16. We fertilized with seaweed, fish emulsion or organic chicken pellets soaked in water on an alternate basis until established. Fertilize every two months for one year even when in the ground and keep moist at all times.
Further Comments from Readers:
“Hi reader, it seems you use The Bible of Botany a lot. That’s great as we have great pleasure in bringing it to you! It’s a little awkward for us to ask, but our first aim is to purchase land approximately 1,600 hectares to link several parcels of N.P. into one at The Pinnacles NSW Australia, but we need your help. We’re not salespeople. We’re amateur botanists who have dedicated over 30 years to saving the environment in a practical way. We depend on donations to reach our goal. If you donate just $5, the price of your coffee this Sunday, We can help to keep the planet alive in a real way and continue to bring you regular updates and features on Australian plants all in one Botanical Bible. Any support is greatly appreciated. Thank you.”
In the spirit of reconciliation we acknowledge the Bundjalung, Gumbaynggirr and Yaegl and all aboriginal nations throughout Australia and their connections to land, sea and community. We pay our respect to their Elders past, present and future for the pleasures we have gained.
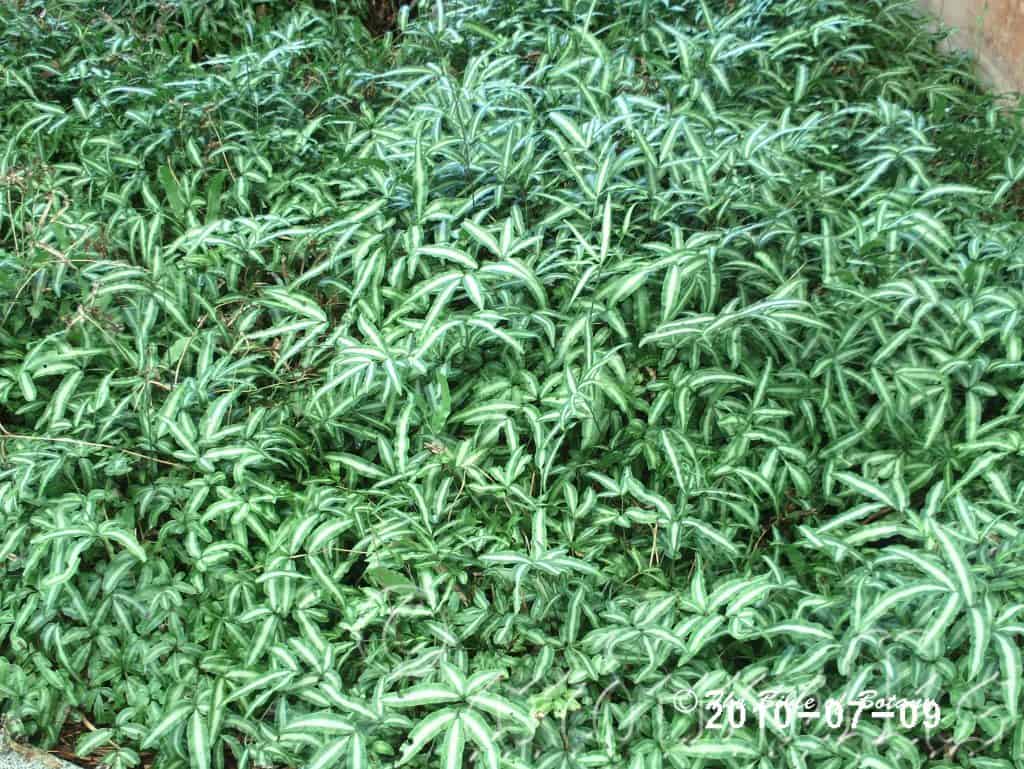
Lu Xian China
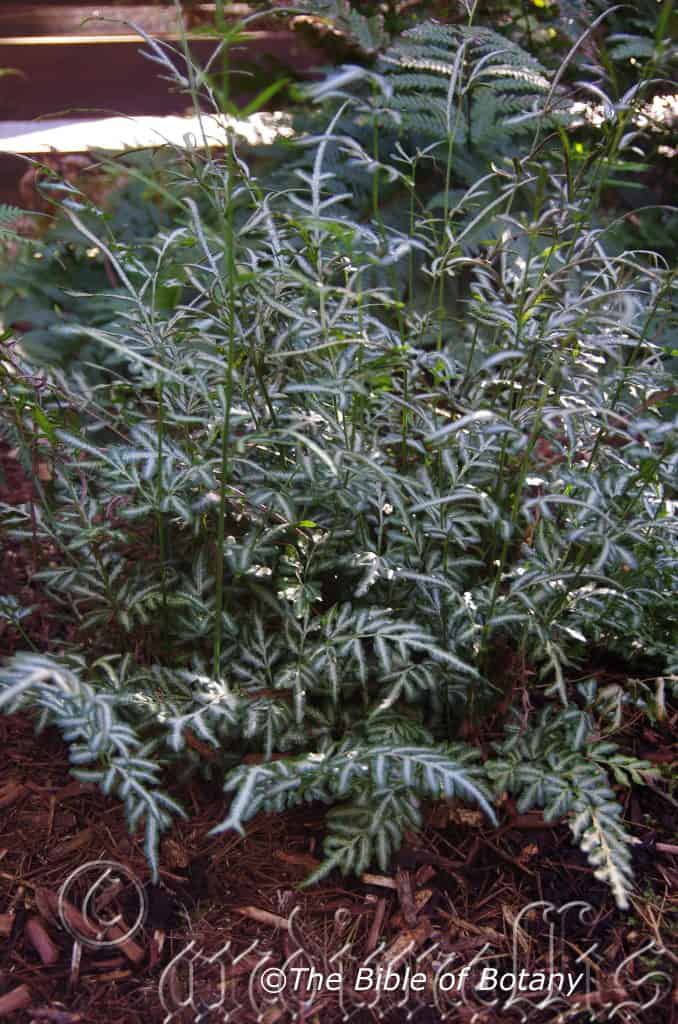
Mount Cootha Botanic gardens Qld.
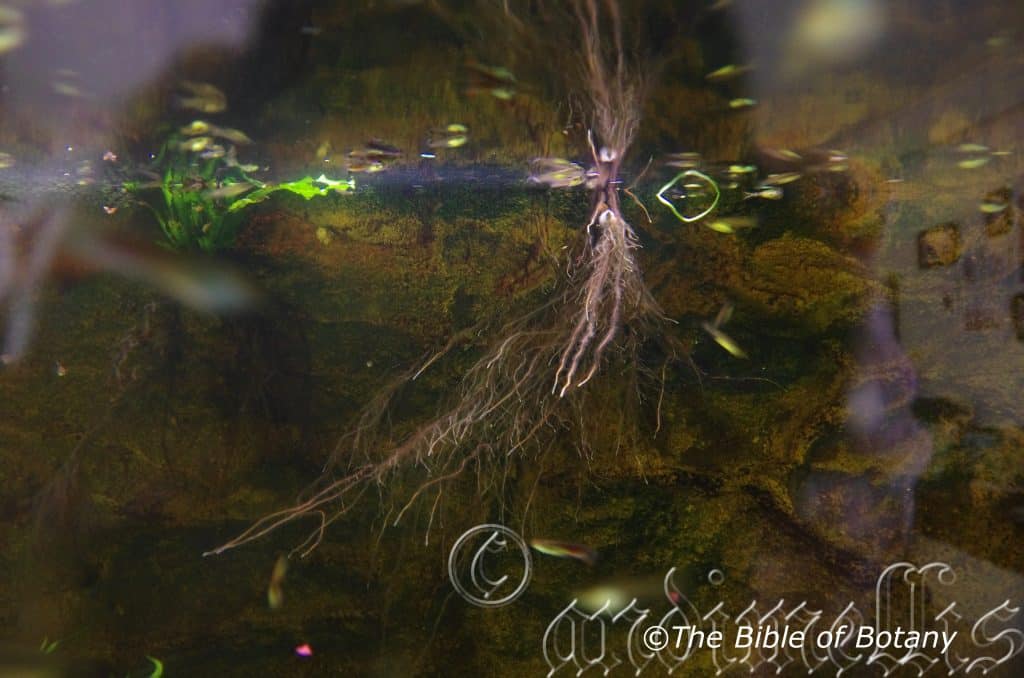
Roots in Fish Tank Author’s Home The Pinnacles NSW
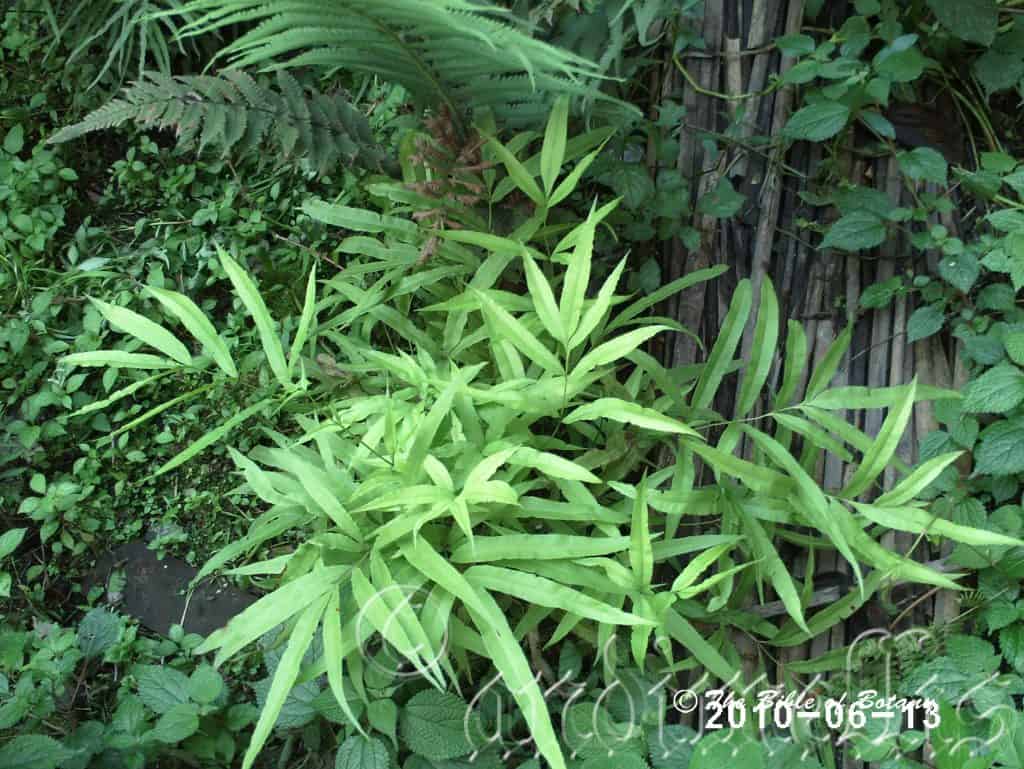
Lu Xian China
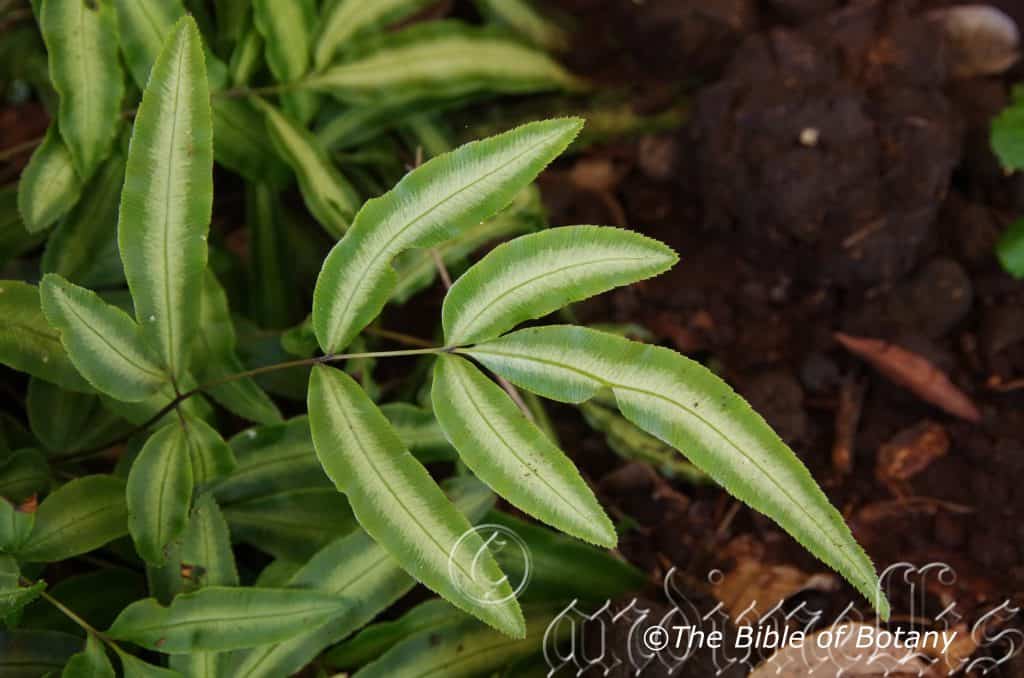
Author’s Garden The Pinnacles NSW
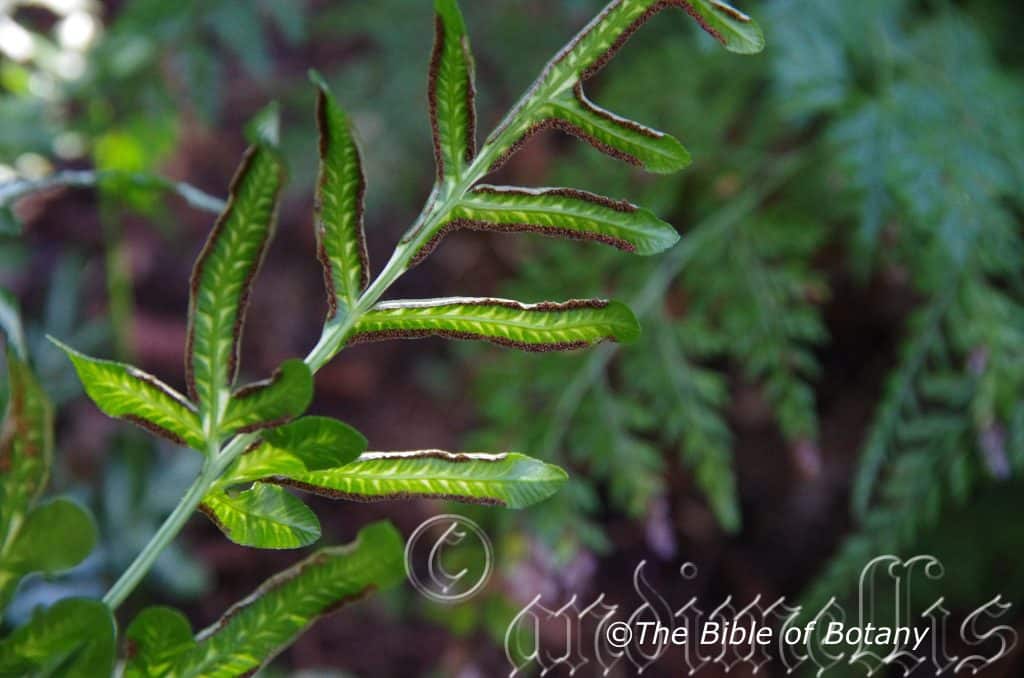
Mount Cootha Botanic gardens Qld.

Author’s Garden The Pinnacles NSW
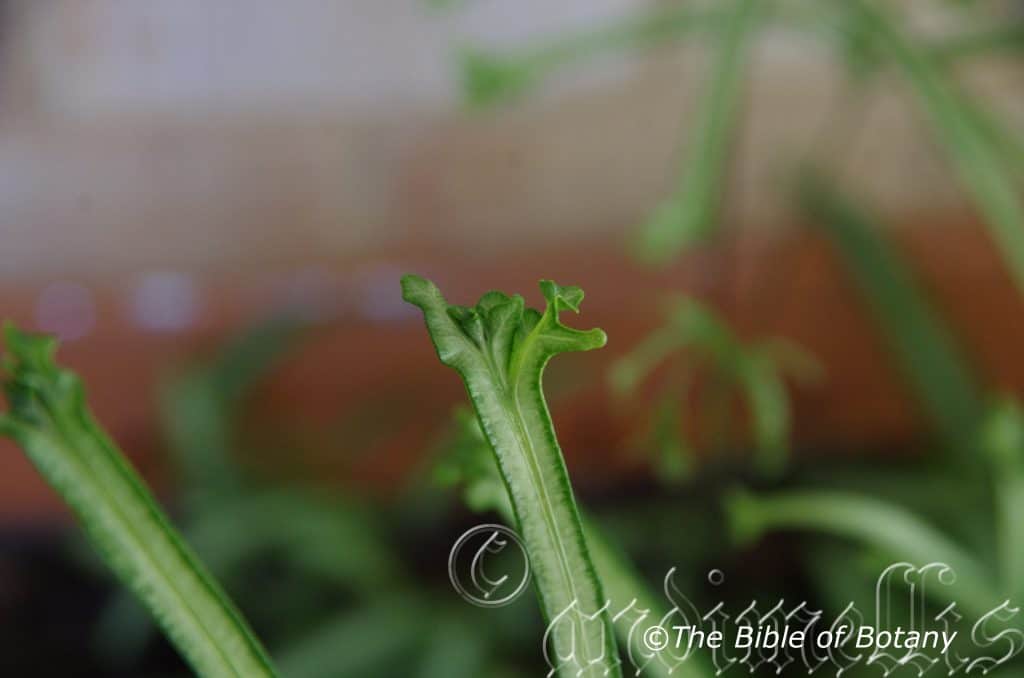
Author’s Garden The Pinnacles NSW
Pteris ensiformis
Classification:
Unranked: Pteridiophyta
Class: Pteridopsida or Filicinae
Order: Polypodiales
Family: Pteridaceae
Subfamily: Pteridoideae
Genus: From Ptéris, which is Ancient Greek for a fern, which is any seedless, nonflowering vascular plant of the class Filicinae, of tropical to temperate regions, characterized by true roots produced from a rhizome, with fronds that uncoil upward and have a branching vein system, and reproduction by spores contained in sporangia that usually appear as brown or yellow grains or powder from on the underside of the fronds and Graphos, which is Ancient Greek for written or to draw. It refers to plants, which is very typical of a fern.
Species: From Anum/Ensis, which is Latin for a sword and Forme, which is Latin for to take the shape or form of. It refers to fronds, which take the form of a sword.
Common Name: Slender Brake Fern.
Distribution:
Pteris ensiformis is found south from the Iron Range National Park and Mapoon on Cape York Peninsula in far north eastern Queensland to the Macpherson Ranges in south east Queensland through New South Wales, Victoria and Tasmania.
It is also found in Afghanistan, Algeria, Andaman Island, Angola, Argentina Northeast, Argentina Northwest, Argentina South, Ascension, Assam, Azores, Bahamas, Baleares, Bangladesh, Belize, Benin, Bismarck Archipelago, Bolivia, Borneo, Botswana, Brazil North, Brazil Northeast, Brazil South, Brazil Southeast, Brazil West-Central, Burundi, Cambodia, Cameroon, Canary Island, Cape Provinces, Cape Verde, Caroline Island, Cayman Island, Central African Repu, Central American Pac, Chagos Archipelago, Chatham Island, Chile Central, Chile South, China North-Central, China South-Central, China Southeast, Christmas Island, Colombia, Comoros, Cook Island, Corse, Costa Rica, Cuba, Cyprus, Djibouti, Dominican Republic, East Himalaya, Ecuador, El Salvador, Equatorial Guinea, Ethiopia, Fiji, Florida, France, Free State, French Guiana, Gabon, Galápagos, Ghana, Gilbert Island, Greece, Guatemala, Guinea, Gulf of Guinea Island, Guyana, Hainan, Haiti, Hawaii, Honduras, India, Iran, Italy, Ivory Coast, Jamaica, Japan, Jawa, Juan Fernández Island, Kazan-retto, Kenya, Kermadec Island, Korea, Kriti, Krym, KwaZulu-Natal, Laos, Lebanon-Syria, Leeward Island, Lesotho, Lesser Sunda Island, Liberia, Libya, Madagascar, Madeira, Malawi, Malaya, Mali, Maluku, Marianas, Marquesas, Marshall Island, Mauritius, Mexico Central, Mexico Gulf, Mexico Northeast, Mexico Northwest, Mexico Southeast, Mexico Southwest, Morocco, Mozambique, Myanmar, Namibia, Nansei-shoto, Nauru, Nepal, New Caledonia, New Guinea, New Zealand North, New Zealand South, Nicaragua, Nicobar Island, Nigeria, Niue, Norfolk Island, Northern Provinces, Ogasawara-shoto, Oman, Pakistan, Palestine, Panamá, Papua, Paraguay, Peru, Philippines, Portugal, Puerto Rico, Rodrigues, Rwanda, Réunion, Samoa, Santa Cruz Island, Sardegna, Saudi Arabia, Senegal, Seychelles, Sicilia, Sierra Leone, Society Island, Socotra, Solomon Island, Somalia, South Australia, Spain, Sri Lanka, St.Helena, Sudan, Sulawesi, Sumatera, Suriname, Swaziland, Switzerland, Taiwan, Tanzania, Thailand, Tibet, Togo, Tonga, Transcaucasus, Trinidad-Tobago, Tubuai Island, Tunisia, Turkey, Tuvalu, Uganda, Uruguay, Vanuatu, Venezuela, Venezuelan Antilles, Vietnam, Wallis-Futuna Is., West Himalaya, Windward Island, Yemen, Zambia, Zaïre and Zimbabwe
https://avh.ala.org.au/occurrences/search?taxa=Pteris+ensiformis#tab_mapView
Habitat Aspect Climate:
Pteris ensiformis prefers dappled light to full shade. It grows in well-developed cool tropical rainforests. The altitude ranges from 10 meters ASL to 900 meters ASL.
The temperatures range from minus 1 degree in July to 38 degrees in January.
The rainfall ranges from lows of 900mm to 3200mm average per annum.
Soil Requirements:
Pteris ensiformis prefers to grow on light sandy clays to medium clays often with copious quantities of leaf litter. The soils are usually derived from decomposed brown basalt, black basalts, granites or metamorphic rocks. The soils pH ranges from 5.5pH to 7pH. It does not tolerate waterlogged soils. Non saline soils to moderately saline soils are tolerated.
Height & Spread:
Wild Plants: 0.2m to 0.4m by 0.3m to 0.6m.
Characteristics:
Pteris ensiformis rhizomes are short, creeping and covered in deep brown to deep brown lanceolate scales.
Pteris ensiformis’s slender 100mm to 200mm long stipes are deep brown almost black near the base turning deep green to pale green as they approach the rachis.
The lamina on the pinnatifid or rarely bipinnatifid fronds are deeply divided. The rachis is pale green to deep sea-green. The fronds measure 200mm to 320mm in length by 100mm to 320mm in width. The laminas are thin but not coriaceous, glabrous and somewhat dimorphic. The laminas lobes number 3 to 5 pairs with a terminal pinna. The concolourous laminas are green to a deep sea-green, dull, semi glossy and glabrous. The opposite ultimate lobes vary but are mainly broad linear to lanceolate or oblong and measure 120mm to 160mm in length by 6mm to 20mm in width with the base lobes decreasing in length and width as they approach the apex of the rachis. The margins are entire or finely, irregularly toothed.
The fertile fronds are not much narrower and longer than the sterile fronds. Pteris ensiformis’s linear sori are continuous from near the base to almost the apex on both margins.
Spores are small irregular and reddish brown in colour.
Wildlife:
Pteris ensiformis’s wildlife is unknown to the author.
Cultivation:
Pteris ensiformis is a beautiful hardy fern for cultivation and makes a great basket fern for one or two growing seasons. It is ideal as a ground cover for areas where there is heavy to light shade that is always moist. It always looks green and fresh especially where adequate ground moisture is retained in the soil. It is very suitable on medium clays to heavy clay soils and are most suitable for small medium and large gardens close to the coast in warm temperate, warm sub-tropical or cool tropical gardens. As a garden subject it will colonize soils that have established rainforests or at the bottom of moist shady banks. It is cold tolerant to temperatures as low as minus 3 degrees once established.
It is most suitable for use as a rainforest understory plant where they can break the monotony of large deep green leaves. It likes plenty of leaf litter to help increase soil fertility, maintain soil moisture and to maintain a cool root zone.
Medium to large frog or fish ponds are made the more attractive when surrounded by this fern which can spread over large areas if given the opportunity without becoming problemsome. Their size makes for a balance setting.
Pteris ensiformis is an attractive clump-forming ferns with many spectacular variegated and unusual frond formations. Some display narrow leaflets banded in silvery white throughout the midsections and radiate towards the contrasting dark green and slightly ruffled margins like the cultivar Victoriae or a wider growing frond in silver lace. Then there are the forms with unusual spreading lobe tips like the one we marketed in the early eighties called frog’s feet.
The fronds can be bipinnate to tripinnate and arranged on their slender and variable leaf stems of medium green, which are erect when young and become pendulous with age. This dainty species form clusters of fertile and sterile fronds, with the long, narrow stemmed fertile fronds rising above the sterile ones.
Pteris ensiformis is quite hardy and is another of those easy to grow ferns that just require a moist garden position where it can get filtered sunlight or bright light and cool air with fairly high level of moisture.
If grown as a potted houseplant, place the pot on a saucer filled with gravel and water to ensure proper humidity and mist frequently. Trim or pinch off dried fronds to keep it tidy and at its beautiful best. Fertilize every month during the growing season or during the warmer months with recommended organic fertilizer.
Repot annually to revitalize soil and increase the growth rate. Repot using our recommended potting mix for ferns for best results. Ferns can be increased by dividing older plants into 2 or 3 new plants using a sharp knife and cutting them into 2 or 3 equal sections.
Propagation:
Fern Spores:
All ferns that are declared rare, vulnerable or endangered are protected by Federal and State Laws and must not be removed from the wild unless you are a land developer, mining company or main Roads department etc. This includes bulbs, roots, leaves and flowers. No part of any plant can be removed from Federal, State or Local Government land without the prior permission of the authority and this includes the spore.
Most people are put off at the thought of growing ferns from spore. Like all plants that produce their offspring from seed or spore the methods are basically the same. Remember nature has been doing this for millions of years and has been very successful. I have had excellent results growing over 200 different species of Australian ferns so don’t be afraid. Give it a go.
Step 1. Select spore from the fern fronds. Wait until the fern is just starting to release its spore. Rinse the fronds under clean running water and dry. This is to wash off any other spores from rogue ferns that may have settled onto the fronds. (There is nothing worse than having common brake or common soft bracken contaminating a prized tree fern or epiphyte.)
Step 2. Place the dry fronds in a clean brown paper bag and keep them in a cool dark place like the linen closet for about a week to ten days before you are ready to sow the spore. The exception to this rule applies to ferns, which produce green spores. These must be sown immediately that they are released. Todea Barbara is a good example of a fern, which produces green spore.
Step 3. Take a large ice cream container, a small ice cream container and a clean clear plastic bag large enough to seal the large ice cream container and three or four milk bottle tops.
Step 4. Punch or drill 6 to 10 5mm holes in the bottom of the small ice cream container.
Step 5. Wash both containers, tops and plastic bag so that they are very clean and sterile.
Step 6. Use a clean fine seed raising mi. We used 30mm fine sand, 30mm peat and 30mm perlite and 10mm vermiculite. We used crushed basalt, crusher dust and peat in a 50:50 ratio for epiphytes. Moisten the mix enough that water does not run out when the mix is squeezed between the fingers.
Step 7. Place the moisten mix (Enough to half fill the small ice cream container) in the microwave oven with a large glass of water for 7 or 8 minutes, until the water is boiling. Allow them to cool in the oven. You will need the water later so do not tip it out.
Step 8. Take the brown paper bag out of the linen closet. Shake the bag and remove the fronds. You should have a yellow, brown, black or rarely greenish brown or ochre powder or very fine, small round pin head size spore depending on the specie involved.
Step 9. Remove the mixture from the oven once it has cooled and place it in the small ice cream container and level.
Step 10. Sprinkle the spore sparsely over the mixture in the small ice cream container.
Step 11. Place the milk bottle tops in the large ice cream container with the flat surface facing down. Place the small ice cream container in the large ice cream container so that it is sitting on the milk bottle tops.
Step 12. Remove the water from the microwave and pour it into the larger ice cream container so there is 25mm to 30mm of water in the bottom.
Step 13. Place the ice cream containers in the plastic bag and seal. Step 14. Place the contents and bag in a warm shady place preferably 50mm to 70mm shade depending on the specie. Shade houses and some window sills are ideal.
Step 15. The surface should turn green within a week to two weeks. The prothallus will then develop. From the prthalus the first true fronds will appear. Wait until the ferns are 20mm to 35mm in height before you attempt to transplant them. Once they are ready open the bag up slightly and allow the air to flow around the little ferns. Every 3 to 5 days open the bag a little further so the ferns get use to their new environment. Allow them a week to two weeks to harden off before you transplant them following the removal of the plastic bag. Carefully prick them out into 50mm standard squat tubes as you would any seedling.
Do not try to transplant them as single plants as they are still a little delicate still.
Once the smaller ones again reach 50mm to 70mm you may wish to divide the stronger and hardier individual plants into smaller clumps in 100mm squat pots.
Step 16. We fertilized with seaweed, fish emulsion or organic chicken pellets soaked in water on an alternate basis until established. Fertilize every two months for one year even when in the ground.
Further Comments from Readers:
“Hi reader, it seems you use The Bible of Botany a lot. That’s great as we have great pleasure in bringing it to you! It’s a little awkward for us to ask, but our first aim is to purchase land approximately 1,600 hectares to link several parcels of N.P. into one at The Pinnacles NSW Australia, but we need your help. We’re not salespeople. We’re amateur botanists who have dedicated over 30 years to saving the environment in a practical way. We depend on donations to reach our goal. If you donate just $5, the price of your coffee this Sunday, We can help to keep the planet alive in a real way and continue to bring you regular updates and features on Australian plants all in one Botanical Bible. Any support is greatly appreciated. Thank you.”
In the spirit of reconciliation we acknowledge the Bundjalung, Gumbaynggirr and Yaegl and all aboriginal nations throughout Australia and their connections to land, sea and community. We pay our respect to their Elders past, present and future for the pleasures we have gained.
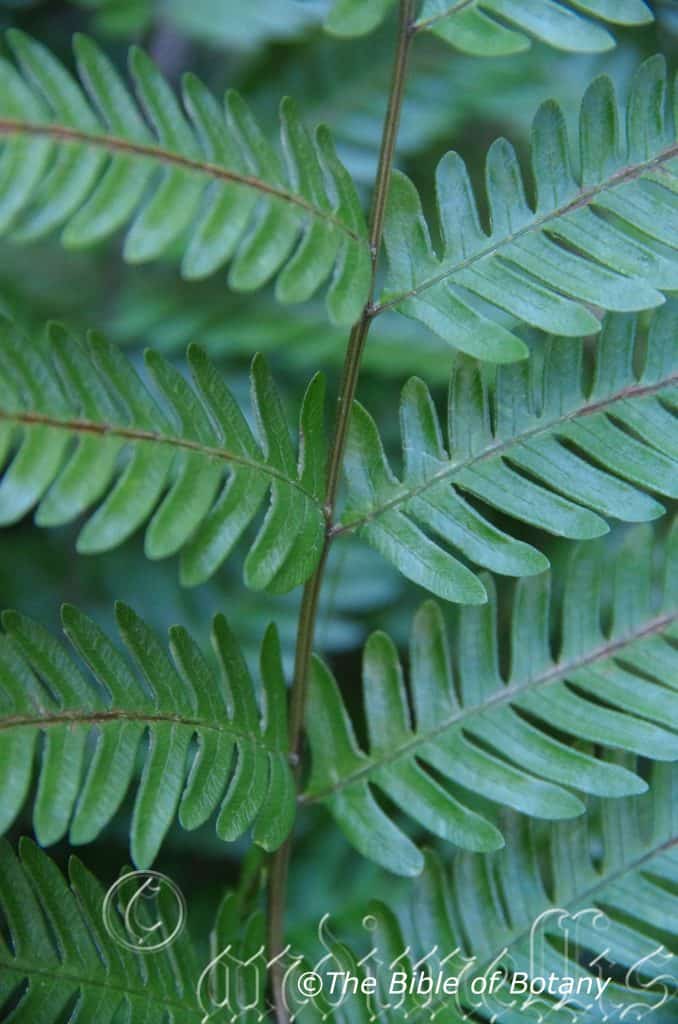
Author’s Garden The Pinnacles NSW

Author’s Garden The Pinnacles NSW
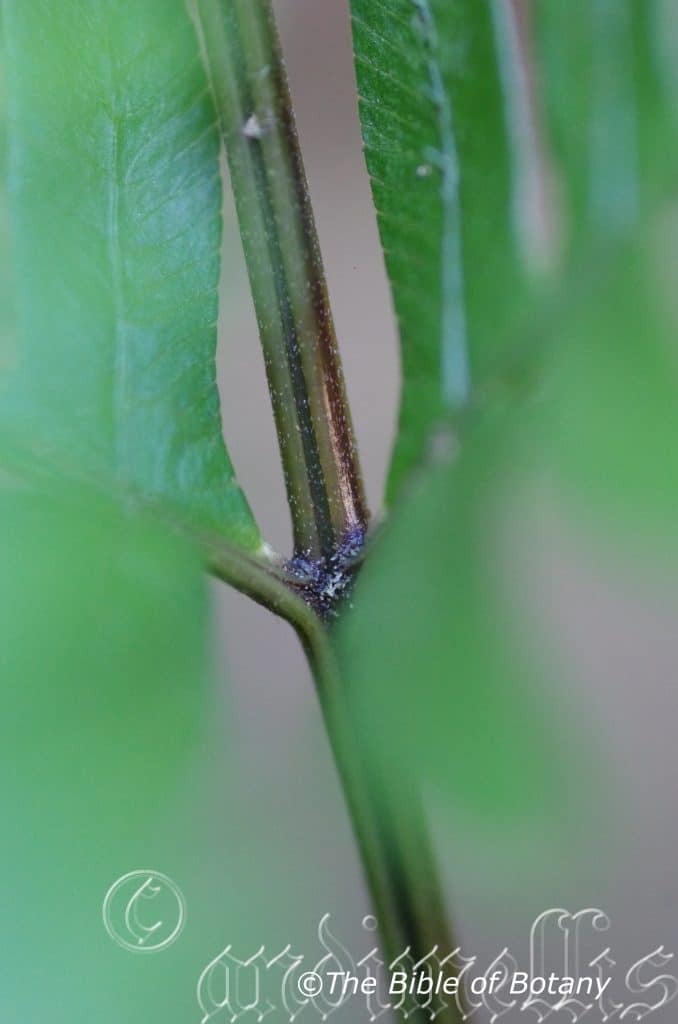
Author’s Garden The Pinnacles NSW
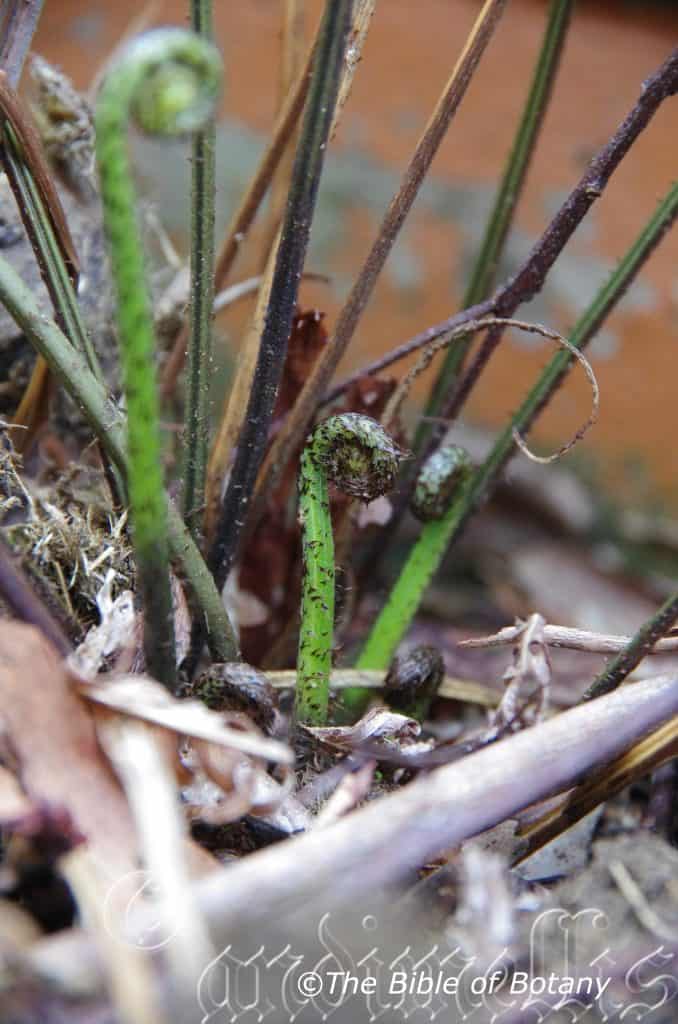
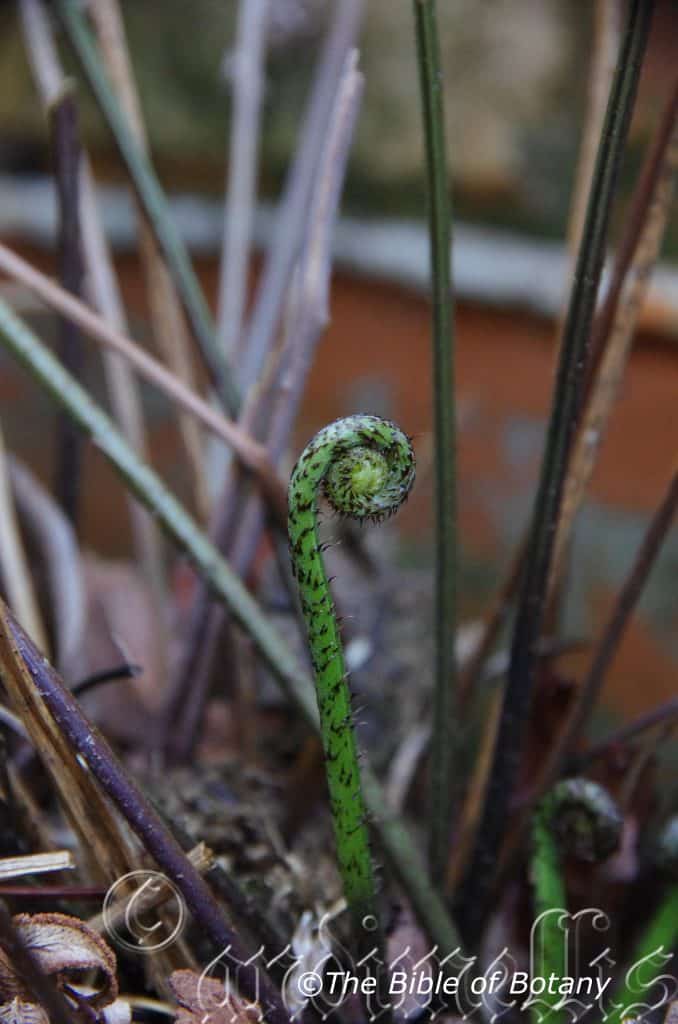
Author’s Garden The Pinnacles NSW
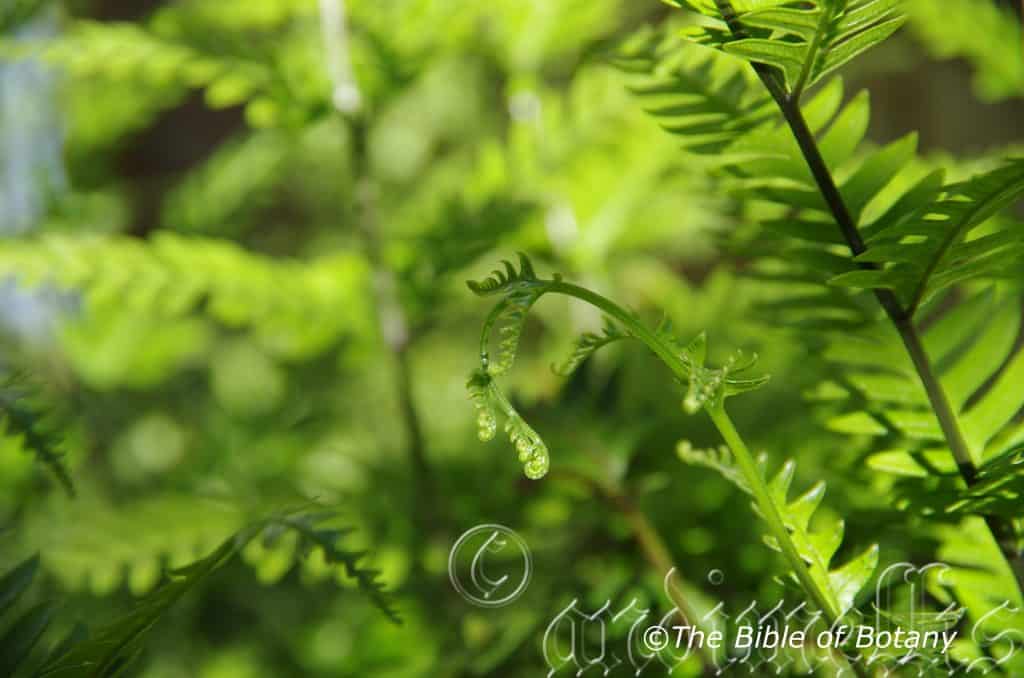
Author’s Garden The Pinnacles NSW
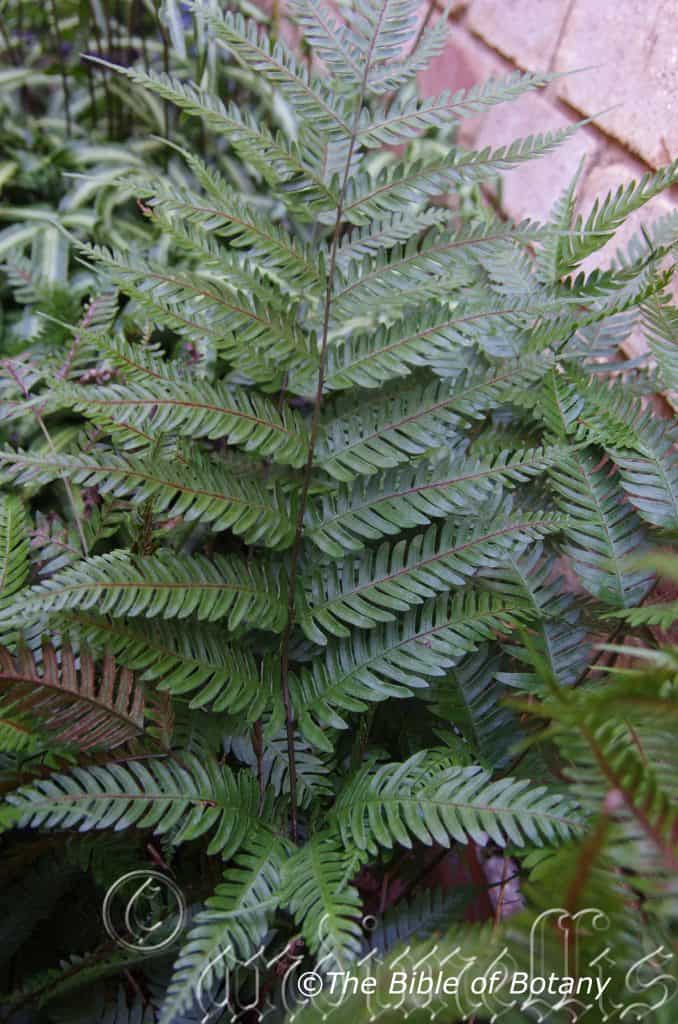
Author’s Garden The Pinnacles NSW
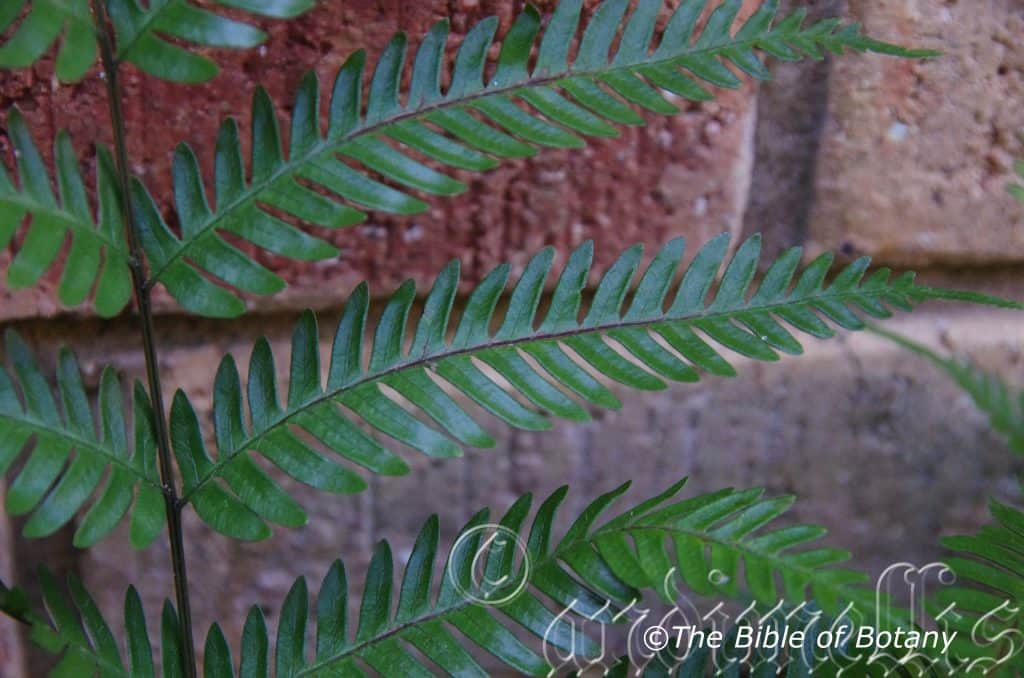
Author’s Garden The Pinnacles NSW
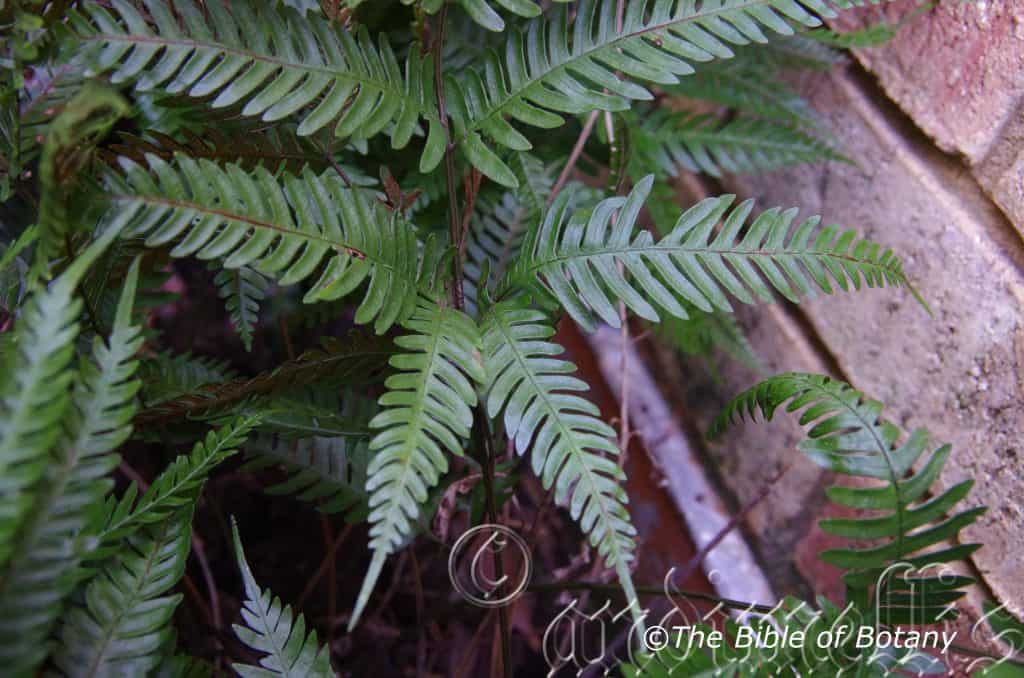
Author’s Garden The Pinnacles NSW
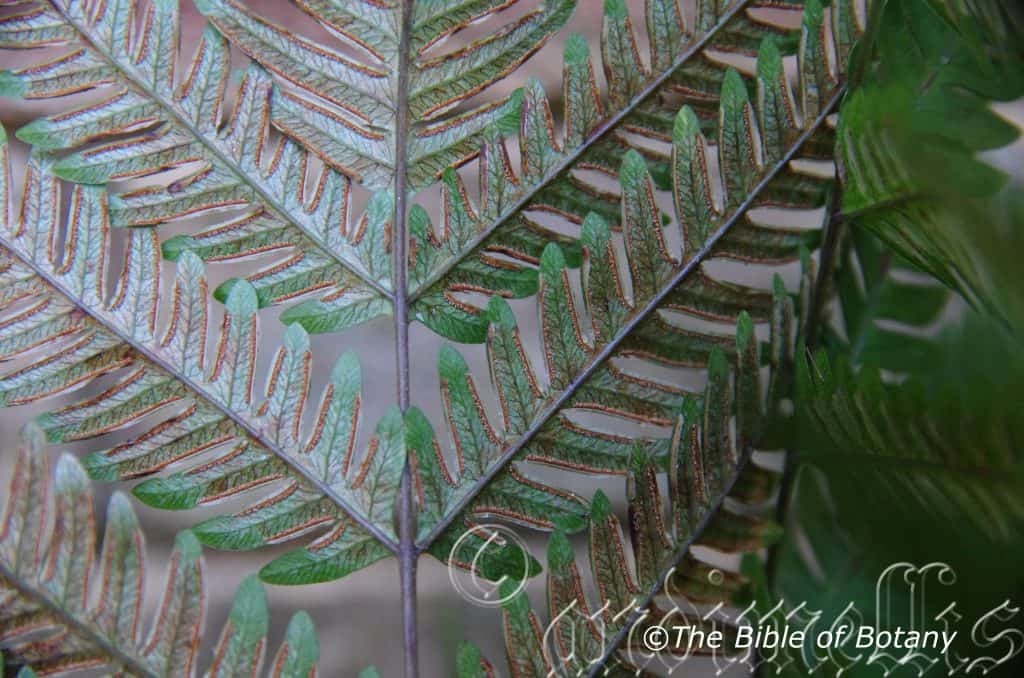
Author’s Garden The Pinnacles NSW
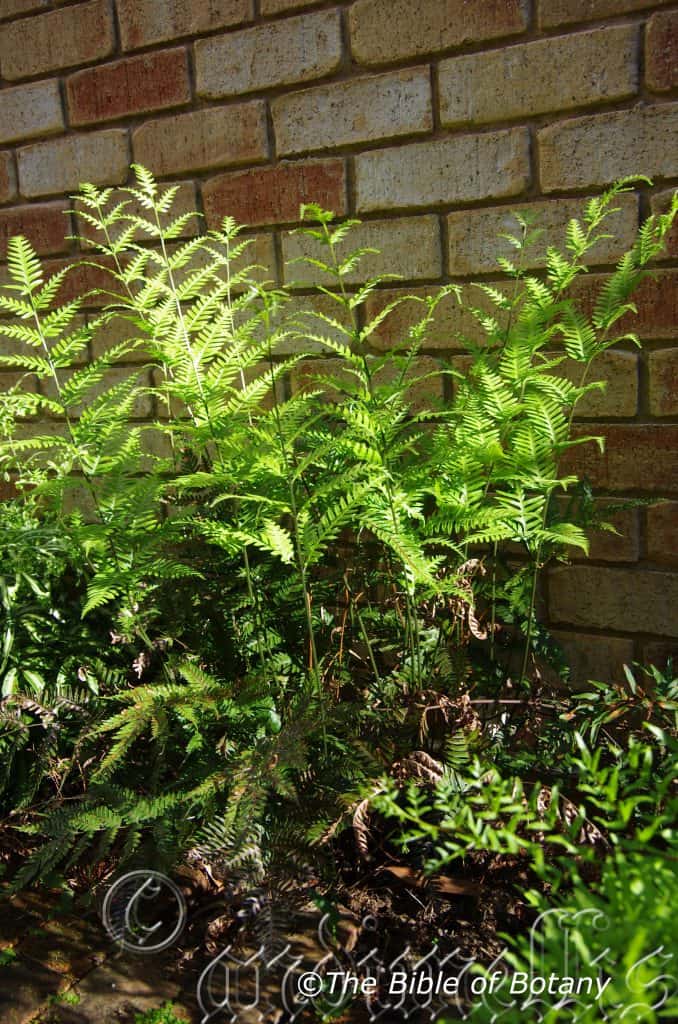
Author’s Garden The Pinnacles NSW
Pteris pacifica
Classification:
Unranked: Pteridiophyta
Class: Pteridopsida or Filicinae
Order: Polypodiales
Family: Pteridaceae
Subfamily: Pteridoideae
Genus: From Ptéris, which is Ancient Greek for a fern, which is any seedless, nonflowering vascular plant of the class Filicinae, of tropical to temperate regions, characterized by true roots produced from a rhizome, with fronds that uncoil upward and have a branching vein system, and reproduction by spores contained in sporangia that usually appear as brown or yellow grains or powder from on the underside of the fronds and Graphos, which is Ancient Greek for written or to draw. It refers to plants, which is very typical of a fern.
Species: From Pacifica, which is Latin for the Pacific Ocean. It refers to plants which grow on most of the Pacific Island nations and or the east coast of Australia.
Common Name: Pacific Brake.
Distribution:
Pteris pacifica is found south from the Monkhouse Timber Reserve to Paluma Range National Park in far north eastern Queensland. There is a disjunct population further north at Mungkan Kandju National Park and further south along the Upper reaches of the Gregory River.
It is also found in American Somoa, East Timor, Fiji, Moluccus, New Guinee, North Island of New Zealand, Papua, Solomon Islands, Tonga, Niau Island and Vanuatu.
https://avh.ala.org.au/occurrences/search?taxa=Pteris+pacifica#tab_mapView
Habitat Aspect Climate:
Pteris pacifica prefers dappled light to full shade. It grows in well-developed tropical rainforests, littoral rainforests and riparian rainforests. The altitude ranges from 10 meters ASL to 900 meters ASL.
The temperatures range from 6 degrees in July to 40 degrees in January.
The rainfall ranges from lows of 2000mm to 3600mm average per annum.
Soil Requirements:
Pteris pacifica prefers to grow on course or fine sandy soils to light sandy clays often with copious quantities of leaf litter. The soils are usually derived from decomposed brown granites, brown basalts, pumice or accumulated beach sands. The soils pH ranges from 5.5pH to 8.5pH. It does not tolerate waterlogged soils. Non saline soils to moderately saline soils are tolerated.
Height & Spread: Wild Plants: 0.2m to 0.8m by 0.3m to 1m.
Characteristics:
Pteris pacifica’s rhizomes are short, creeping and covered in narrow, eep chocolate brown to black, triangular scales with a central band and a broad hyaline erose margins. The oblong to narrow triangular scales measure 13mm in length by 0.5mm in width.
The erect stipe is deep green turning deep chocolate brown to black and measures 150mm to 1000mm in length. The yellow-green, pinnatifid fronds are oblong to ovate and are herbaceous to chartaceous and measure 150mm to 1000mm in length by 150mm to 1000mm in width. The pinnae are narrow ovate, attenuate with the largest pinnae measuring 100mm to 300mm by 25mm to 40mm in width. The lower most pinna have 1 or 2 large pinnatifid pinnules growing from the lower side close to the rachis. The pinna lobes cut almost to costa are linear to obtuse and measure 2.5mm to 3.5mm in width. They are sparsely covered in minute hairs abaxially, while adaxially they are glabrous. Adaxially there are spine like growths on the costules. The veins are free and usually forked once.
The fronds slightly dimorphic with the fertile fronds being slightly smaller. The sori not usually extending to the bases and apices of the pinna segments. The indusium is very narrow, entire and paraphyses abundant.
Spores are small irregular and deep chocolate brown in colour.
Wildlife:
Pteris pacifica’s wildlife is unknown to the author.
Cultivation:
Pteris pacifica is easy to grown, provided it is planted in a warm, sheltered with semi-shadee. Despite requiring a permanent supply of moisture good drainage is important. Fertile, which are humus enriched, with an annual top up of both green manures and a dash of brown manure. Pteris pacifica also benefits from an initial application of lime. It is frost sensitive.
Pteris pacific is an excellent fern for cultivation as a ground cover for areas where there is heavy to light shade that is always moist. It always looks green and fresh especially where adequate ground moisture is retained in the soil. It prefers lighter soils than most ferns and is thriving here at The Pinnacles on a sandy soil on the southern side of the house. As a garden subject it will colonize soils that have established moist rainforests or at the bottom of moist shady banks.
Medium to large frog or fish ponds are made the more attractive when surrounded by this fern which can spread over large areas if given the opportunity without becoming problemsome. Its size makes for a balance setting. Pteris pacifica is a attractive clump-forming fern with glossy fronds.
Propagation:
Fern Spores:
All ferns that are declared rare, vulnerable or endangered are protected by Federal and State Laws and must not be removed from the wild unless you are a land developer, mining company or main Roads department etc. This includes bulbs, roots, leaves and flowers. No part of any plant can be removed from Federal, State or Local Government land without the prior permission of the authority and this includes the spore.
Most people are put off at the thought of growing ferns from spore. Like all plants that produce their offspring from seed or spore the methods are basically the same. Remember nature has been doing this for millions of years and has been very successful. I have had excellent results growing over 200 different species of Australian ferns so don’t be afraid. Give it a go.
Step 1. Select spore from the fern fronds. Wait until the fern is just starting to release its spore. Rinse the fronds under clean running water and dry. This is to wash off any other spores from rogue ferns that may have settled onto the fronds. (There is nothing worse than having common brake or common soft bracken contaminating a prized tree fern or epiphyte.)
Step 2. Place the dry fronds in a clean brown paper bag and keep them in a cool dark place like the linen closet for about a week to ten days before you are ready to sow the spore. The exception to this rule applies to ferns, which produce green spores. These must be sown immediately that they are released. Todea Barbara is a good example of a fern, which produces green spore.
Step 3. Take a large ice cream container, a small ice cream container and a clean clear plastic bag large enough to seal the large ice cream container and three or four milk bottle tops.
Step 4. Punch or drill 6 to 10 5mm holes in the bottom of the small ice cream container.
Step 5. Wash both containers, tops and plastic bag so that they are very clean and sterile.
Step 6. Use a clean fine seed raising mi. We used 30mm fine sand, 30mm peat and 30mm perlite and 10mm vermiculite. We used crushed basalt, crusher dust and peat in a 50:50 ratio for epiphytes. Moisten the mix enough that water does not run out when the mix is squeezed between the fingers.
Step 7. Place the moisten mix (Enough to half fill the small ice cream container) in the microwave oven with a large glass of water for 7 or 8 minutes, until the water is boiling. Allow them to cool in the oven. You will need the water later so do not tip it out.
Step 8. Take the brown paper bag out of the linen closet. Shake the bag and remove the fronds. You should have a yellow, brown, black or rarely greenish brown or ochre powder or very fine, small round pin head size spore depending on the specie involved.
Step 9. Remove the mixture from the oven once it has cooled and place it in the small ice cream container and level.
Step 10. Sprinkle the spore sparsely over the mixture in the small ice cream container.
Step 11. Place the milk bottle tops in the large ice cream container with the flat surface facing down. Place the small ice cream container in the large ice cream container so that it is sitting on the milk bottle tops.
Step 12. Remove the water from the microwave and pour it into the larger ice cream container so there is 25mm to 30mm of water in the bottom.
Step 13. Place the ice cream containers in the plastic bag and seal. Step 14. Place the contents and bag in a warm shady place preferably 50mm to 70mm shade depending on the specie. Shade houses and some window sills are ideal.
Step 15. The surface should turn green within a week to two weeks. The prothallus will then develop. From the prthalus the first true fronds will appear. Wait until the ferns are 20mm to 35mm in height before you attempt to transplant them. Once they are ready open the bag up slightly and allow the air to flow around the little ferns. Every 3 to 5 days open the bag a little further so the ferns get use to their new environment. Allow them a week to two weeks to harden off before you transplant them following the removal of the plastic bag. Carefully prick them out into 50mm standard squat tubes as you would any seedling.
Do not try to transplant them as single plants as they are still a little delicate still.
Once the smaller ones again reach 50mm to 70mm you may wish to divide the stronger and hardier individual plants into smaller clumps in 100mm squat pots.
Step 16. We fertilized with seaweed, fish emulsion or organic chicken pellets soaked in water on an alternate basis until established. Fertilize every two months for one year even when in the ground.
Further Comments from Readers:
“Hi reader, it seems you use The Bible of Botany a lot. That’s great as we have great pleasure in bringing it to you! It’s a little awkward for us to ask, but our first aim is to purchase land approximately 1,600 hectares to link several parcels of N.P. into one at The Pinnacles NSW Australia, but we need your help. We’re not salespeople. We’re amateur botanists who have dedicated over 30 years to saving the environment in a practical way. We depend on donations to reach our goal. If you donate just $5, the price of your coffee this Sunday, We can help to keep the planet alive in a real way and continue to bring you regular updates and features on Australian plants all in one Botanical Bible. Any support is greatly appreciated. Thank you.”
In the spirit of reconciliation we acknowledge the Bundjalung, Gumbaynggirr and Yaegl and all aboriginal nations throughout Australia and their connections to land, sea and community. We pay our respect to their Elders past, present and future for the pleasures we have gained.
Pteris tremula
Classification:
Unranked: Pteridiophyta
Class: Pteridopsida
Order: Polypodiales
Family: Pteridaceae
Subfamily: Pteridoideae
Genus: From Ptéris, which is Ancient Greek for a fern, which is any seedless, nonflowering vascular plant of the class Filicinae, of tropical to temperate regions, characterized by true roots produced from a rhizome, with fronds that uncoil upward and have a branching vein system, and reproduction by spores contained in sporangia that usually appear as brown or yellow grains or powder from on the underside of the fronds and Graphos, which is Ancient Greek for written or to draw. It refers to plants, which is very typical of a fern.
Species: From Tremulenta, which is Latin for a drunk or Tremulant, which is Latin for to tremble or shake. It refers to the distinct fluttering of structures usually the fronds in the breeze.
Common Name: Tender Brake Fern.
Distribution:
Pteris tremula is found in several disjunct populations from around Darwin, near the Haemasburgh mission, Uluru and most the natural gorges in and around Alice Springs in the Northern Territory.
In Queensland it is mainly found on the Western Slopes, on and east of the Great Dividing Range to the coast. It is found south from Starke National Park on Cape York Peninsula to Port Lincoln National Park, Marion Bay in South Australia.
https://avh.ala.org.au/occurrences/search?taxa=Pteris+tremula#tab_mapView
Habitat Aspect Climate:
Pteris tremula prefers dappled light to full shade. It grows in well all types of rainforests and sheltered positions in moist Eucalyptus forests and gallery forests. The altitude ranges from 2 meters ASL to 1080 meters ASL. The altitude ranges from 10 meters ASL to 1080 meters ASL.
The temperatures range from minus 1 degree in July to 38 degrees in January.
The rainfall ranges from lows of 300mm to 3200mm average per annum.
Soil Requirements:
Pteris tremula prefers to grow on light sandy clays to medium clays often with copious quantities of forest litter. The soils are usually derived from decomposed brown basalt, black basalts, sandstones, granites, shale or metamorphic rocks. The soils pH ranges from 5pH to 7pH. It does not tolerate waterlogged soils however plants can cope with periodic inundations during storms. Non saline soils to moderately saline soils are tolerated.
Height & Spread: Wild Plants: 0.5m to 0.8m by 1m to 2m
Characteristics:
Pteris tremula rhizomes are short, tufted and covered in linear brown scales.
Pteris tremula’s broad 700mm to 1100mm long stipes are deep brown glossy and with a deep narrow groove near from the base to close to the rachis. The rachis is glossy brown. Young croziers are pale green and covered in white caducous hirsute-pilose hairs.
The lamina on the tripinnatifid fronds is lacy. The rachis is pale green to deep sea-green. The fronds measure 800mm to 950mm in length by 650mm to 800mm in width. The laminas are thin but not coriaceous, glabrous and somewhat. The concolourous laminas are pale green to a mid green, dull and glabrous or very sparsely covered in white pilose hairs. The opposite ultimate petiolules are pale green with narrow oblong to linear lobes. They measure 2mm to 22mm in length by 1.8mm to 2.2mm in width near on the base lobes decreasing in length and width as they approach the apex of the rachis and petiolules. The margins are finely and irregularly toothed.
The fertile fronds are not much narrower than the sterile fronds. Pteris tremula’s linear sori are not continuous between segments and from near the base to almost the apices of the lobes.
Spores are small pale honey brown in colour.
Wildlife:
Pteris tremula’s is the known host for several butterflies including Teia anartoides, Musotima ochropteralis, Chaetolopha pseudooxyntis, Chaetolopha decipiens, Chaetolopha emporias, Chaetolopha leucophragma, Chaetolopha niphosticha, Chaetolopha oxyntis and Cryptoptila immersana. Despite the large number of moths the plants are very rarely damaged to any extent in which the damage has been extensive and recovery is quite quick.
All that is needed is to cut the fronds back to just above the ground and water thoroughly with a double dose of our fertilizer.
Cultivation:
Pteris tremula are excellent ferns for cultivation and make great basket ferns for one or two growing seasons provided it is kept moist at all times.
It is ideal as a ground cover for areas where there is heavy to light shade that is always moist. It always looks green and fresh especially where adequate ground moisture is retained in the soil. It is very suitable on medium clays to heavy clay soils and are most suitable for small medium and large gardens close to the coast in warm temperate, warm sub-tropical or cool tropical gardens. As a garden subject it will colonize soils that have established rainforests or at the bottom of moist shady banks. It is cold tolerant to temperatures as low as minus 3 degrees once established.
It is most suitable for use as a rainforest understory plant where they can break the monotony of large deep green leaves. It likes plenty of leaf litter to help increase soil fertility, maintain soil moisture and to maintain a cool root zone.
Propagation:
Fern Spores:
All ferns that are declared rare, vulnerable or endangered are protected by Federal and State Laws and must not be removed from the wild unless you are a land developer, mining company or main Roads department etc. This includes bulbs, roots, leaves and flowers. No part of any plant can be removed from Federal, State or Local Government land without the prior permission of the authority and this includes the spore.
Most people are put off at the thought of growing ferns from spore. Like all plants that produce their offspring from seed or spore the methods are basically the same. Remember nature has been doing this for millions of years and has been very successful. I have had excellent results growing over 200 different species of Australian ferns so don’t be afraid. This is one of the easier ferns to grow from spore. Give it a go.
Step 1. Select spore from the fern fronds. Wait until the fern is just starting to release its spore. Rinse the fronds under clean running water and dry. This is to wash off any other spores from rogue ferns that may have settled onto the fronds. (There is nothing worse than having common brake or common soft bracken contaminating a prized tree fern or epiphyte.)
Step 2. Place the dry fronds in a clean brown paper bag and keep them in a cool dark place like the linen closet for about a week to ten days before you are ready to sow the spore. The exception to this rule applies to ferns, which produce green spores. These must be sown immediately that they are released. Todea Barbara is a good example of a fern, which produces green spore.
Step 3. Take a large ice cream container, a small ice cream container and a clean clear plastic bag large enough to seal the large ice cream container and three or four milk bottle tops.
Step 4. Punch or drill 6 to 10 5mm holes in the bottom of the small ice cream container.
Step 5. Wash both containers, tops and plastic bag so that they are very clean and sterile.
Step 6. Use a clean fine seed raising mi. We used 30mm fine sand, 30mm peat and 30mm perlite and 10mm vermiculite. We used crushed basalt, crusher dust and peat in a 50:50 ratio for epiphytes. Moisten the mix enough that water does not run out when the mix is squeezed between the fingers.
Step 7. Place the moisten mix (Enough to half fill the small ice cream container) in the microwave oven with a large glass of water for 7 or 8 minutes, until the water is boiling. Allow them to cool in the oven. You will need the water later so do not tip it out.
Step 8. Take the brown paper bag out of the linen closet. Shake the bag and remove the fronds. You should have a yellow, brown, black or rarely greenish brown or ochre powder or very fine, small round pin head size spore depending on the specie involved.
Step 9. Remove the mixture from the oven once it has cooled and place it in the small ice cream container and level.
Step 10. Sprinkle the spore sparsely over the mixture in the small ice cream container.
Step 11. Place the milk bottle tops in the large ice cream container with the flat surface facing down. Place the small ice cream container in the large ice cream container so that it is sitting on the milk bottle tops.
Step 12. Remove the water from the microwave and pour it into the larger ice cream container so there is 25mm to 30mm of water in the bottom.
Step 13. Place the ice cream containers in the plastic bag and seal. Step 14. Place the contents and bag in a warm shady place preferably 50mm to 70mm shade depending on the specie. Shade houses and some window sills are ideal.
Step 15. The surface should turn green within a week to two weeks. The prothallus will then develop. From the prthalus the first true fronds will appear. Wait until the ferns are 20mm to 35mm in height before you attempt to transplant them. Once they are ready open the bag up slightly and allow the air to flow around the little ferns. Every 3 to 5 days open the bag a little further so the ferns get use to their new environment. Allow them a week to two weeks to harden off before you transplant them following the removal of the plastic bag. Carefully prick them out into 50mm standard squat tubes as you would any seedling.
Do not try to transplant them as single plants as they are still a little delicate still.
Once the smaller ones again reach 50mm to 70mm you may wish to divide the stronger and hardier individual plants into smaller clumps in 100mm squat pots.
Step 16. We fertilized with seaweed, fish emulsion or organic chicken pellets soaked in water on an alternate basis until established. Fertilize every two months for one year even when in the ground.
Further Comments from Readers:
“Hi reader, it seems you use The Bible of Botany a lot. That’s great as we have great pleasure in bringing it to you! It’s a little awkward for us to ask, but our first aim is to purchase land approximately 1,600 hectares to link several parcels of N.P. into one at The Pinnacles NSW Australia, but we need your help. We’re not salespeople. We’re amateur botanists who have dedicated over 30 years to saving the environment in a practical way. We depend on donations to reach our goal. If you donate just $5, the price of your coffee this Sunday, We can help to keep the planet alive in a real way and continue to bring you regular updates and features on Australian plants all in one Botanical Bible. Any support is greatly appreciated. Thank you.”
In the spirit of reconciliation we acknowledge the Bundjalung, Gumbaynggirr and Yaegl and all aboriginal nations throughout Australia and their connections to land, sea and community. We pay our respect to their Elders past, present and future for the pleasures we have gained.
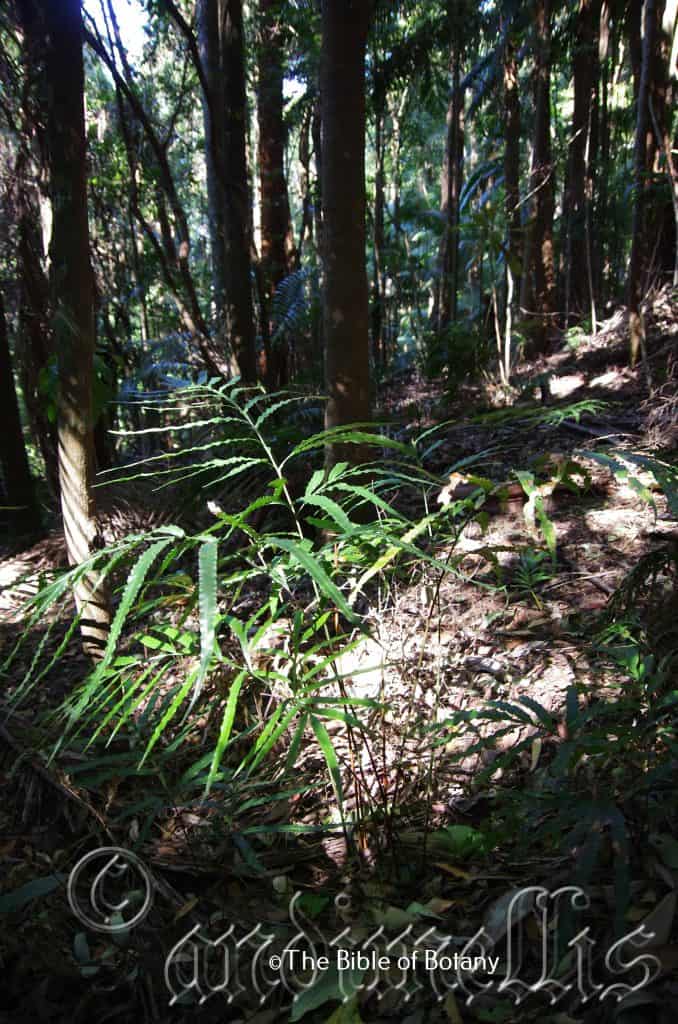
Washpool National Park NSW
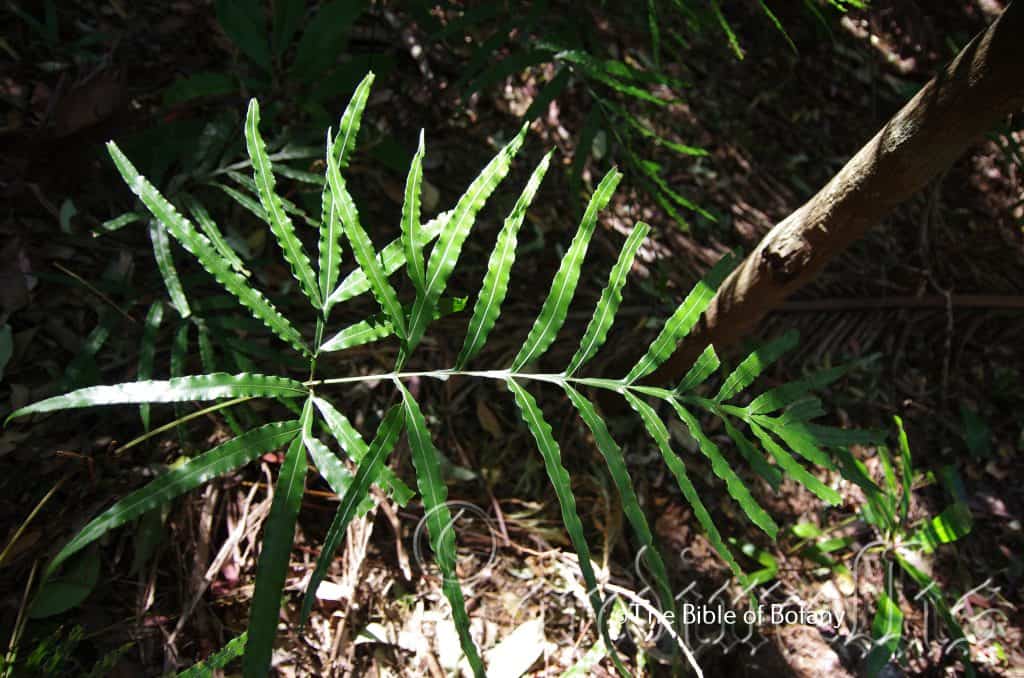
Washpool National Park NSW
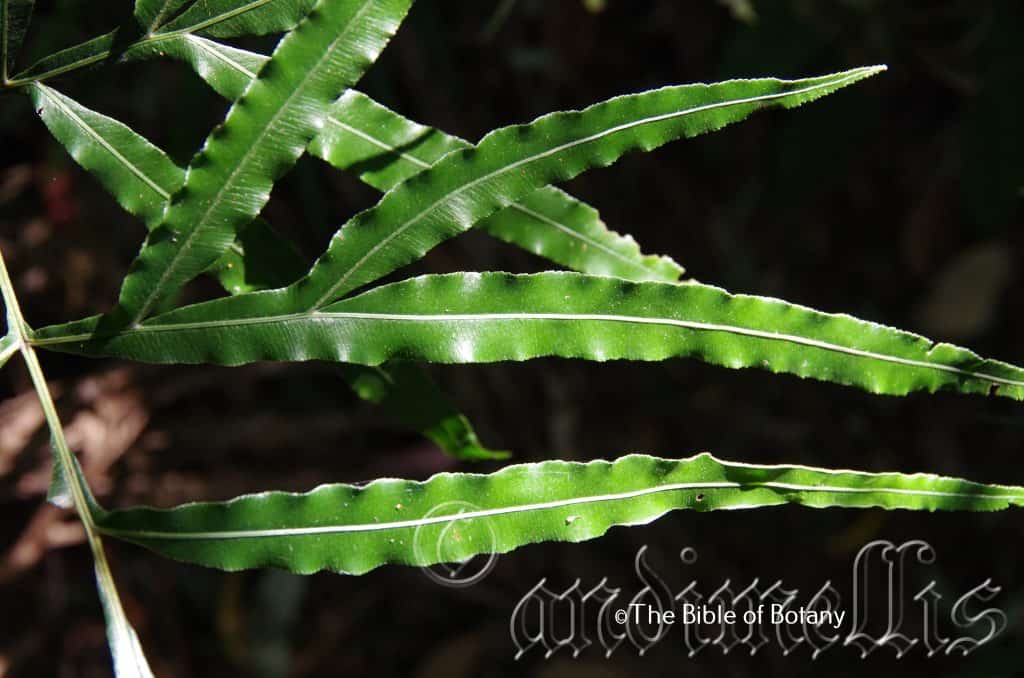
Washpool National Park NSW
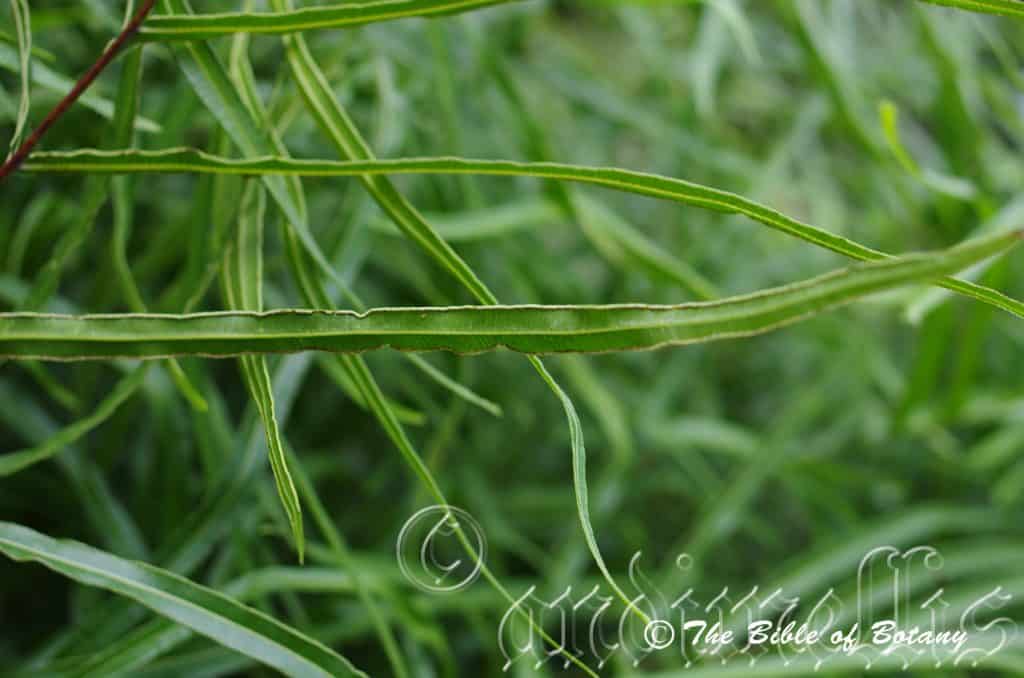
Washpool National Park NSW
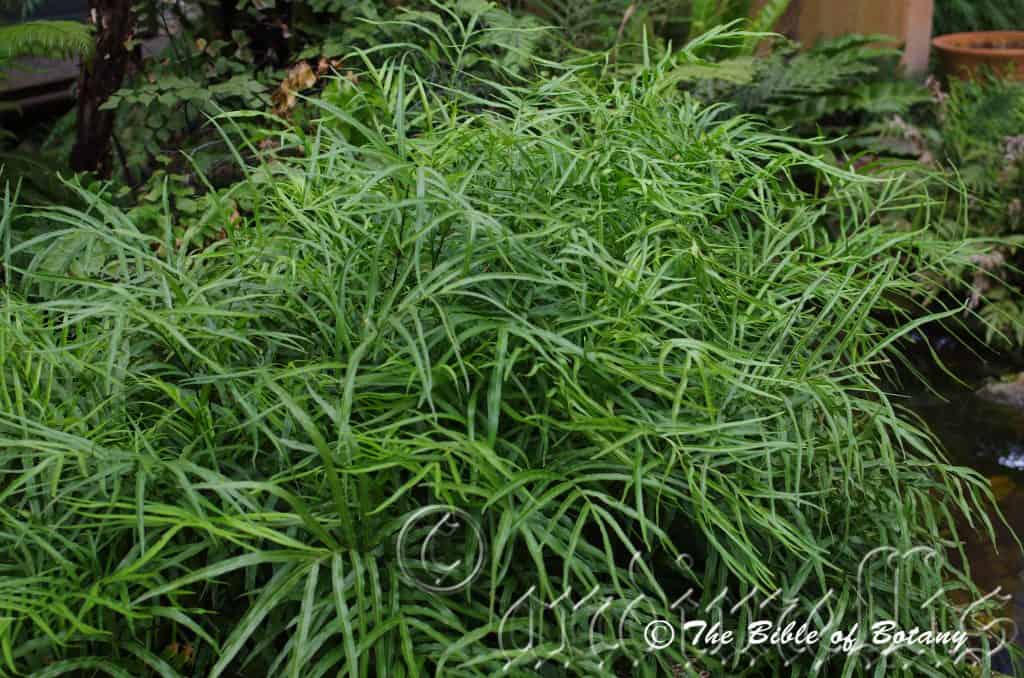
Mount Cootha Botanic Gardens Qld.
Pteris umbrosa
Classification:
Unranked: Pteridiophyta
Class: Pteridopsida
Order: Polypodiales
Family: Pteridaceae
Subfamily: Pteridoideae
Genus: From Ptéris, which is Ancient Greek for a fern, which is any seedless, nonflowering vascular plant of the class Filicinae, of tropical to temperate regions, characterized by true roots produced from a rhizome, with fronds that uncoil upward and have a branching vein system, and reproduction by spores contained in sporangia that usually appear as brown or yellow grains or powder from on the underside of the fronds and Graphos, which is Ancient Greek for written or to draw. It refers to plants, which is very typical of a fern.
Species: From Umbrōsus which is Latin for shadowy. It refers to plants, which prefer to grow in light shade or dappled light.
Common Name: Jungle Brake.
Distribution:
Pteris umbrosa is found in several disjunct populations south from Childers and Gin Gin to Lake Eildon in Victoria and from Bairnsdale with 2 disjunct populations, one near Mansfield to Dromana in Victoria while the other is from the Daintree National Park to the Atherton Tablelands.
It is also found around Devonport in northern Tasmania.
https://avh.ala.org.au/occurrences/search?taxa=Pteris+umbrosa#tab_mapView
Habitat Aspect Climate:
Pteris umbrosa prefers dense shade. It grows in well-developed cool, moist sub-tropical rainforests or moist warm temperate rainforests. The altitude ranges from 20 meters ASL to 1150 meters ASL.
The temperatures range from minus 2 degree in July to 38 degrees in January.
The rainfall ranges from lows of 800mm to 3200mm average per annum.
Soil Requirements:
Pteris umbrosa prefers better quality light gritty clays to medium clays often with copious quantities of forest litter. The soils are usually derived from decomposed brown basalt, black basalts, granites or metamorphic rocks. The soils pH ranges from 5pH to 7pH. It does not tolerate waterlogged soils however plants can cope with periodic inundations during storms. Non saline soils to moderately saline soils are tolerated.
Height & Spread: Wild Plants: 0.5m to 0.8m by 1m to 1.2m
Characteristics:
The rhizomes of Pteris umbrosa are short, creeping with the apex covered in linear deep brown-black scales.
Pteris umbrosa slender 100mm to 350mm long stipes are deep sea-green turning deep red-brown as the frond begins to die.
The laminas on the single pinnatifid or rarely bipinnatifida fronds which are incomplete are deeply divided. Bipinnatifida fronds have the base lobes dividing further. The rachis is mid green to deep sea-green and measures 60mm to 160mm in length. The fronds measure 200mm to 450mm in length by 200mm to 400mm in width. The laminas are thin but not coriaceous, glabrous and somewhat dimorphic. The laminas lobes are divaricate and number 5 to 8 pairs with a terminal pinna. The concolourous laminas are deep green to a deep sea-green, semi glossy to glossy and glabrous on the upper lamina while the lower lamina is dull to slightly semi glossy. The alternate and opposite ultimate lobes on the same plant vary but are mainly broad linear or narrowly oblong and measure 100mm to 250mm in length by 6mm to 20mm in width with the base lobes decreasing in length and width as they approach the apex of the rachis. The margins are entire or minutely toothed, flat or undulating while the apex is long tapering.
The fertile fronds are slightly narrower than the sterile fronds. The fertile fronds’ margins are always entire. Pteris umbrosa’s linear sori are continuous from near the base to the apex on both margins.
Spores are small circular and reddish brown in colour.
Wildlife:
Pteris umbrosa’s wildlife is unknown to the author.
Cultivation:
Pteris umbrosa is an excellent fern in cultivation and makes a great tub specimen for one or two growing seasons when they must be repotted or divided. it accepts much darker conditions than most ferns, making it ideal for small rainforest gardens or courtyards.
It is ideal as a ground cover for areas where there is heavy to light shade that is always moist. It always looks green and fresh especially where adequate ground moisture is retained in the soil. It is most suitable on medium clays to heavy clay soils and are great for small medium and large gardens close to the coast in warm temperate, warm sub-tropical or cool tropical gardens. As garden subjects it will colonize soils that have established rainforests, at the bottom of moist shady banks or between houses particularly on the southern side. It is cold tolerant to temperatures as low as minus 3 degrees once established.
It is most suitable for use as a rainforest understory plant where it can break the monotony of large deep green leaves. It likes plenty of leaf litter to help increase soil fertility, maintain soil moisture and to maintain a cool root zone.
Medium to large frog or fish ponds are made even more attractive when surrounded by this fern which can spread over large areas if given the opportunity without becoming problem some. Its size makes for a balance setting in a small garden bed or where it is set against large rocks or boulders.
Pteris umbrosa is an attractive clump-forming fern with 2 spectacularly unusual frond formations. The first has narrower fronds with entire margins while the second form has margins that have short undulations.
Pteris umbrosa is very hardy and is another of those easy to grow ferns that just require a moist garden position where it can get deep shade and cool air with fairly high level of moisture.
If grown as a potted houseplant, place the pot on a saucer filled with gravel and water to ensure proper humidity and mist frequently. Trim or pinch off dried fronds to keep it tidy and at its beautiful best. Fertilize every month during the growing season or during the warmer months with recommended organic fertilizer.
Repot annually to revitalize soil and increase the growth rate. Repot using our recommended potting mix for ferns for best results. Ferns can be increased by dividing older plants into 2 or 3 new plants using a sharp knife and cutting it into 2 or 3 equal sections.
Propagation:
Fern Spores:
All ferns that are declared rare, vulnerable or endangered are protected by Federal and State Laws and must not be removed from the wild unless you are a land developer, mining company or main Roads department etc. This includes bulbs, roots, leaves and flowers. No part of any plant can be removed from Federal, State or Local Government land without the prior permission of the authority and this includes the spore.
Most people are put off at the thought of growing ferns from spore. Like all plants that produce their offspring from seed or spore the methods are basically the same. Remember nature has been doing this for millions of years and has been very successful. I have had excellent results growing over 200 different species of Australian ferns so don’t be afraid. This one of the easier ferns for beginners to start with because of its hardiness and ease of collecting ripe spore. Give it a go.
Step 1. Select spore from the fern fronds. Wait until the fern is just starting to release its spore. Rinse the fronds under clean running water and dry. This is to wash off any other spores from rogue ferns that may have settled onto the fronds. (There is nothing worse than having common brake or common soft bracken contaminating a prized tree fern or epiphyte.)
Step 2. Place the dry fronds in a clean brown paper bag and keep them in a cool dark place like the linen closet for about a week to ten days before you are ready to sow the spore. The exception to this rule applies to ferns, which produce green spores. These must be sown immediately that they are released. Todea Barbara is a good example of a fern, which produces green spore.
Step 3. Take a large ice cream container, a small ice cream container and a clean clear plastic bag large enough to seal the large ice cream container and three or four milk bottle tops.
Step 4. Punch or drill 6 to 10 5mm holes in the bottom of the small ice cream container.
Step 5. Wash both containers, tops and plastic bag so that they are very clean and sterile.
Step 6. Use a clean fine seed raising mi. We used 30mm fine sand, 30mm peat and 30mm perlite and 10mm vermiculite. We used crushed basalt, crusher dust and peat in a 50:50 ratio for epiphytes. Moisten the mix enough that water does not run out when the mix is squeezed between the fingers.
Step 7. Place the moisten mix (Enough to half fill the small ice cream container) in the microwave oven with a large glass of water for 7 or 8 minutes, until the water is boiling. Allow them to cool in the oven. You will need the water later so do not tip it out.
Step 8. Take the brown paper bag out of the linen closet. Shake the bag and remove the fronds. You should have a yellow, brown, black or rarely greenish brown or ochre powder or very fine, small round pin head size spore depending on the specie involved.
Step 9. Remove the mixture from the oven once it has cooled and place it in the small ice cream container and level.
Step 10. Sprinkle the spore sparsely over the mixture in the small ice cream container.
Step 11. Place the milk bottle tops in the large ice cream container with the flat surface facing down. Place the small ice cream container in the large ice cream container so that it is sitting on the milk bottle tops.
Step 12. Remove the water from the microwave and pour it into the larger ice cream container so there is 25mm to 30mm of water in the bottom.
Step 13. Place the ice cream containers in the plastic bag and seal. Step 14. Place the contents and bag in a warm shady place preferably 50mm to 70mm shade depending on the specie. Shade houses and some window sills are ideal.
Step 15. The surface should turn green within a week to two weeks. The prothallus will then develop. From the prthalus the first true fronds will appear. Wait until the ferns are 20mm to 35mm in height before you attempt to transplant them. Once they are ready open the bag up slightly and allow the air to flow around the little ferns. Every 3 to 5 days open the bag a little further so the ferns get use to their new environment. Allow them a week to two weeks to harden off before you transplant them following the removal of the plastic bag. Carefully prick them out into 50mm standard squat tubes as you would any seedling.
Do not try to transplant them as single plants as they are still a little delicate still.
Once the smaller ones again reach 50mm to 70mm you may wish to divide the stronger and hardier individual plants into smaller clumps in 100mm squat pots.
Step 16. We fertilized with seaweed, fish emulsion or organic chicken pellets soaked in water on an alternate basis until established. Fertilize every two months for one year even when in the ground.
Further Comments from Readers:
“Hi reader, it seems you use The Bible of Botany a lot. That’s great as we have great pleasure in bringing it to you! It’s a little awkward for us to ask, but our first aim is to purchase land approximately 1,600 hectares to link several parcels of N.P. into one at The Pinnacles NSW Australia, but we need your help. We’re not salespeople. We’re amateur botanists who have dedicated over 30 years to saving the environment in a practical way. We depend on donations to reach our goal. If you donate just $5, the price of your coffee this Sunday, We can help to keep the planet alive in a real way and continue to bring you regular updates and features on Australian plants all in one Botanical Bible. Any support is greatly appreciated. Thank you.”
In the spirit of reconciliation we acknowledge the Bundjalung, Gumbaynggirr and Yaegl and all aboriginal nations throughout Australia and their connections to land, sea and community. We pay our respect to their Elders past, present and future for the pleasures we have gained.
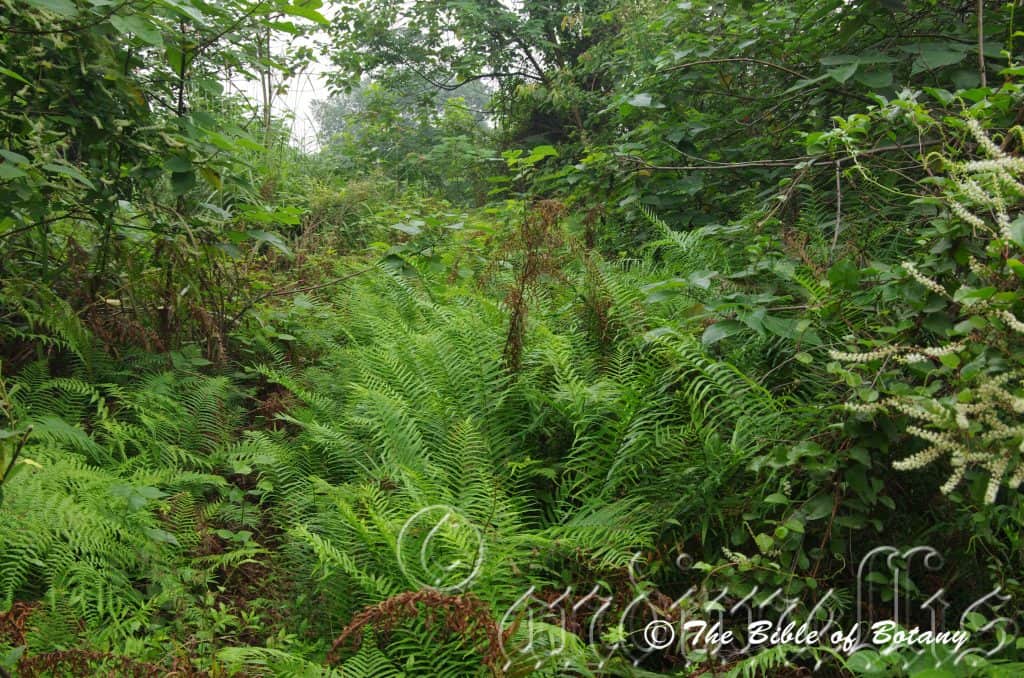
Typical rainforest understory habitat Bei Da Cun Yunan China
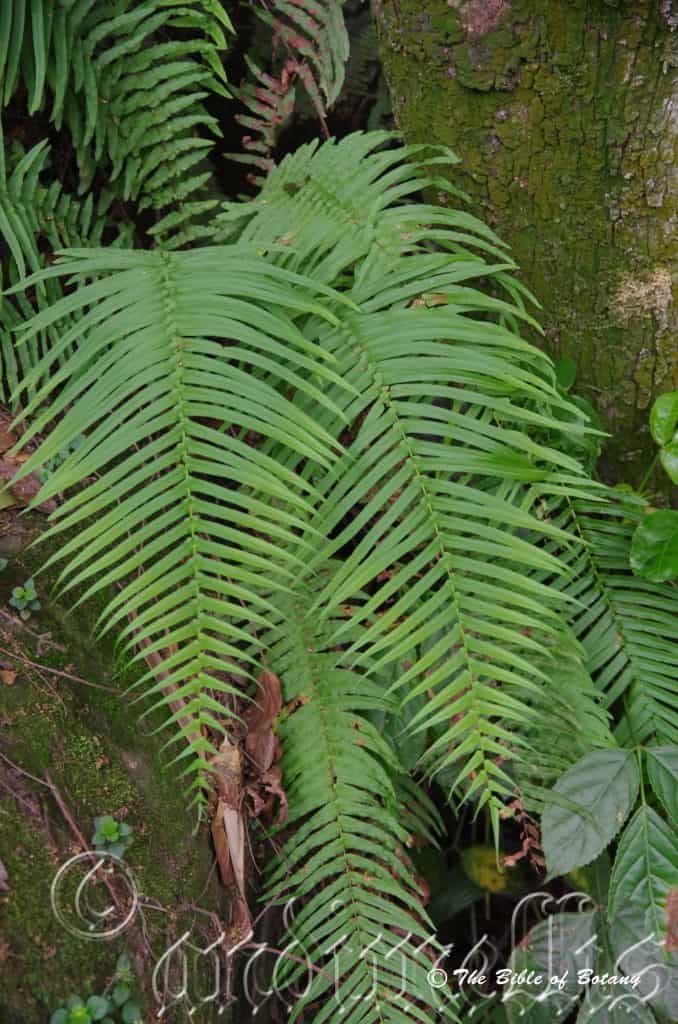
Growing between boulders and trunks Chong Qing China
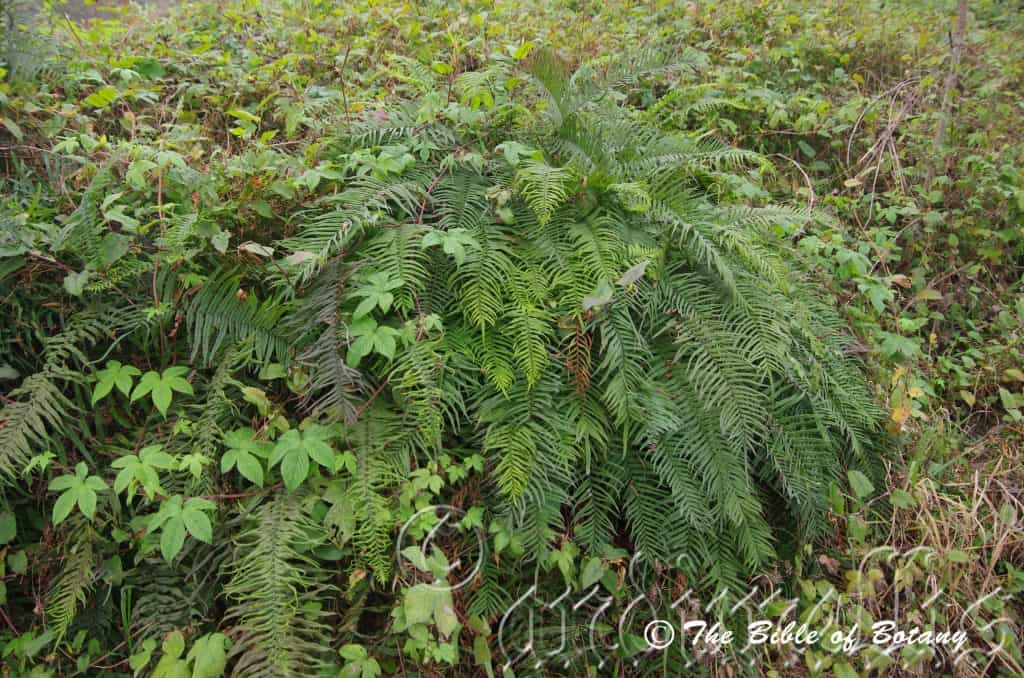
Competing with vines in a vine habitat Sichuan China
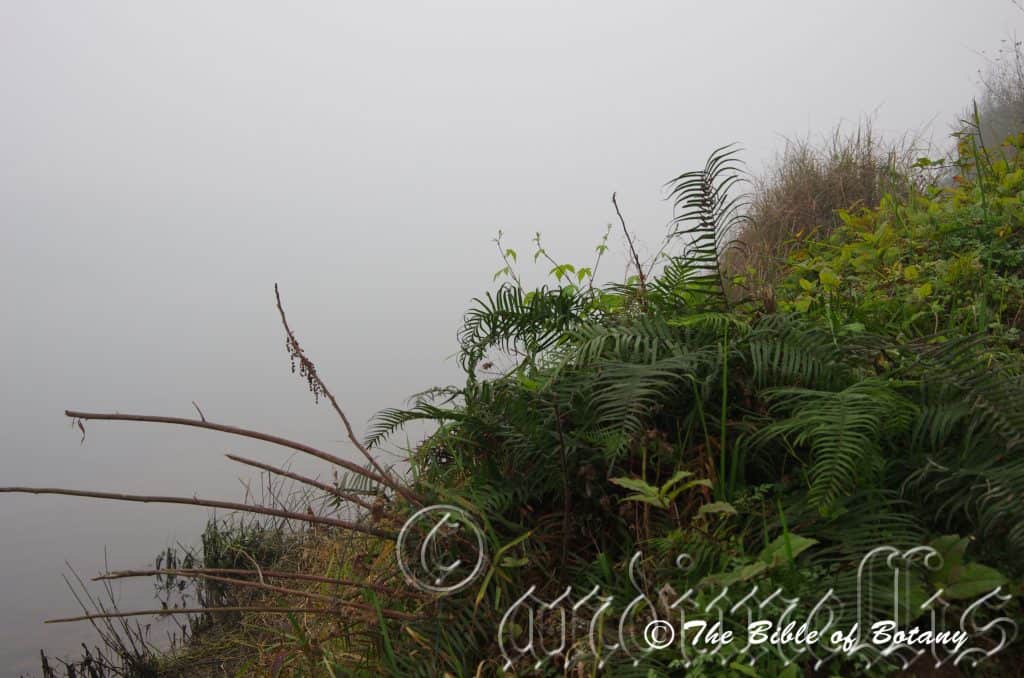
Early morning fog amongst grasses along the Jiang River China
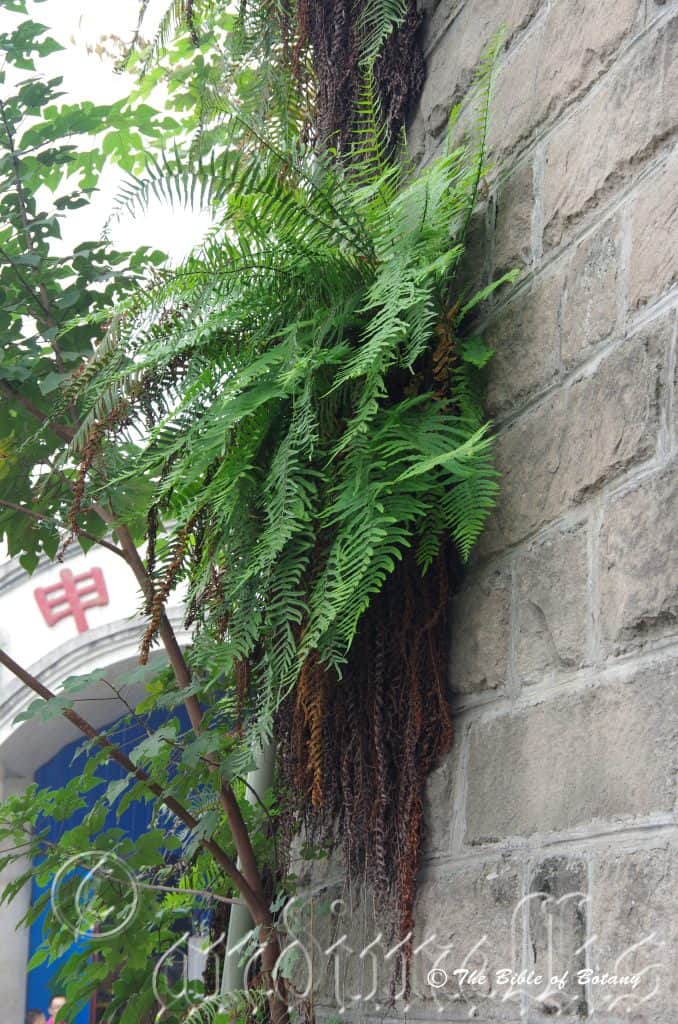
Displaying its hardiness on a brick wall in a north-easterly aspect in fog city Chong Qing in western China.
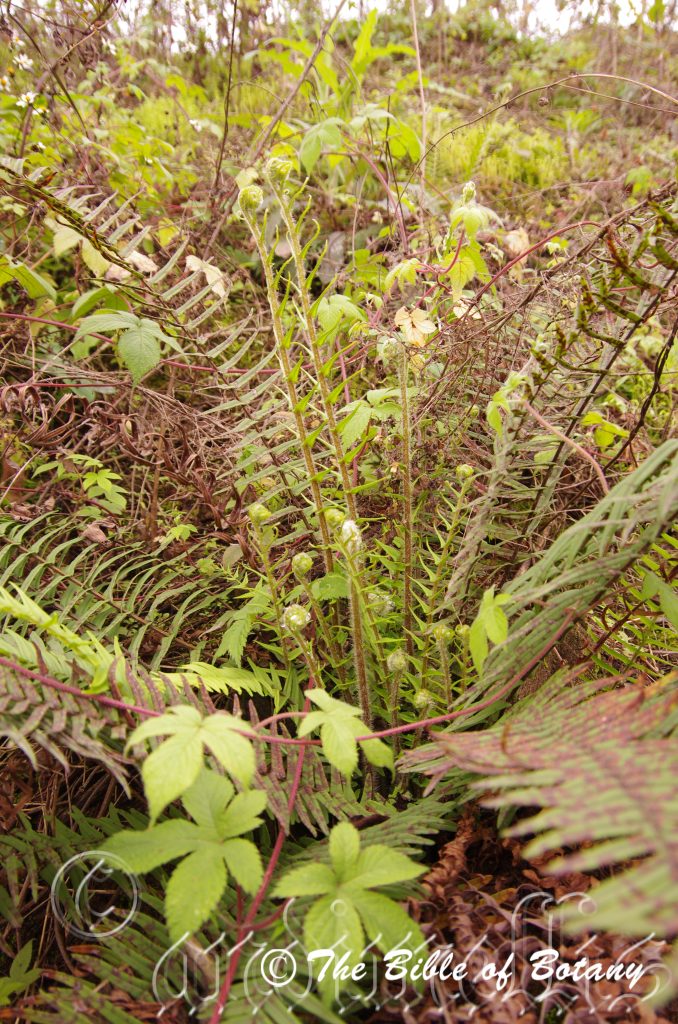
Early greening of fronds in coziers Chong Qing China.
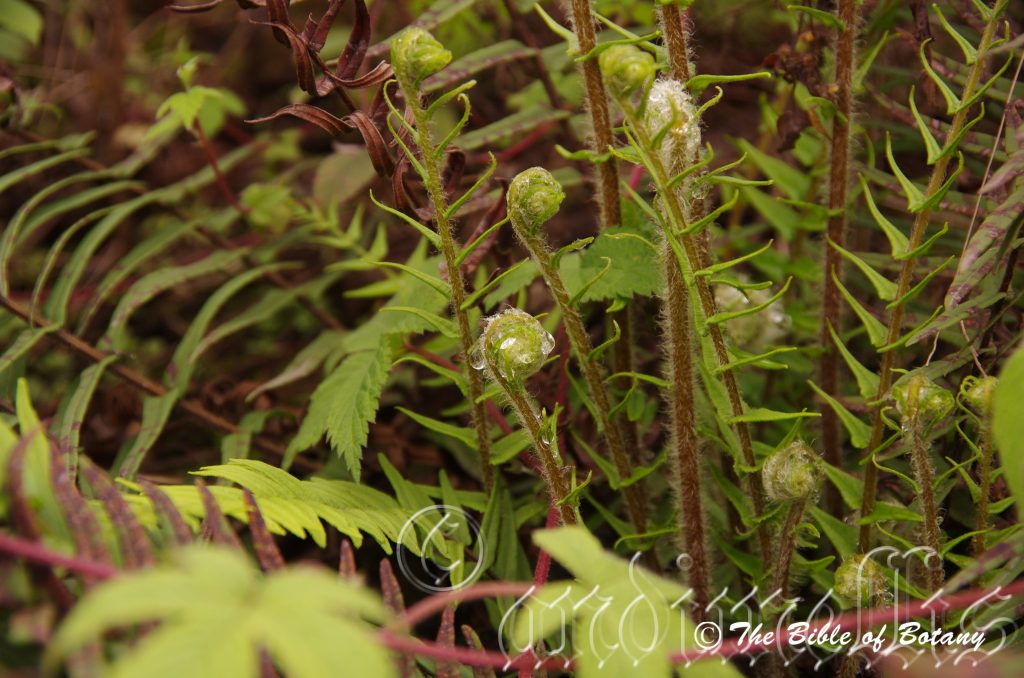
Displaying a lack of greening of fronds in coziers. Aust.
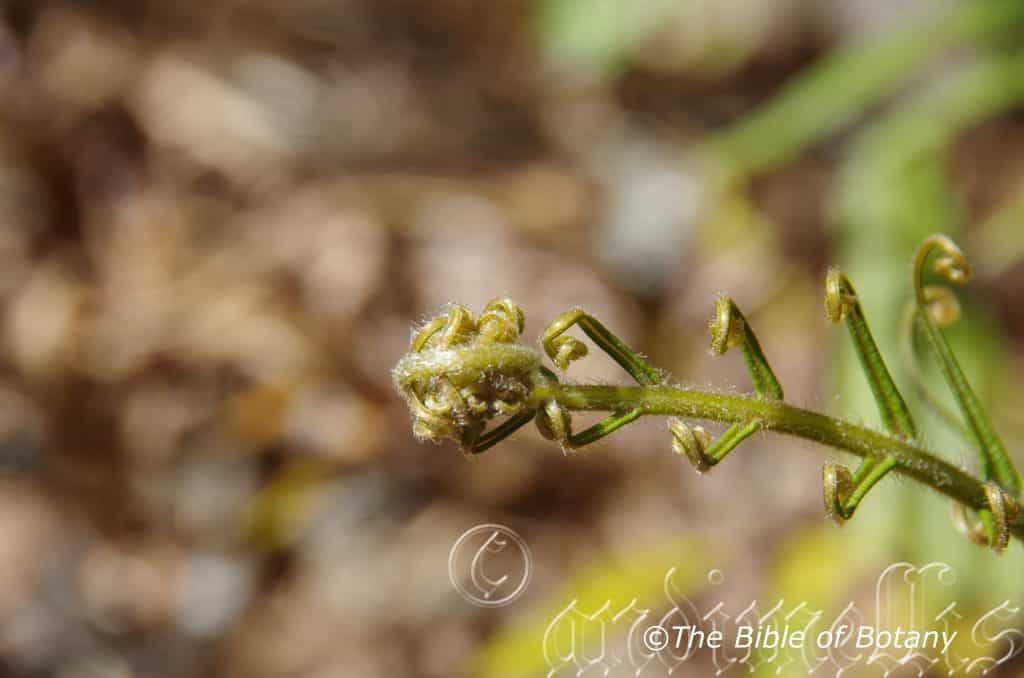
Author’s Garden The Pinnacles NSW
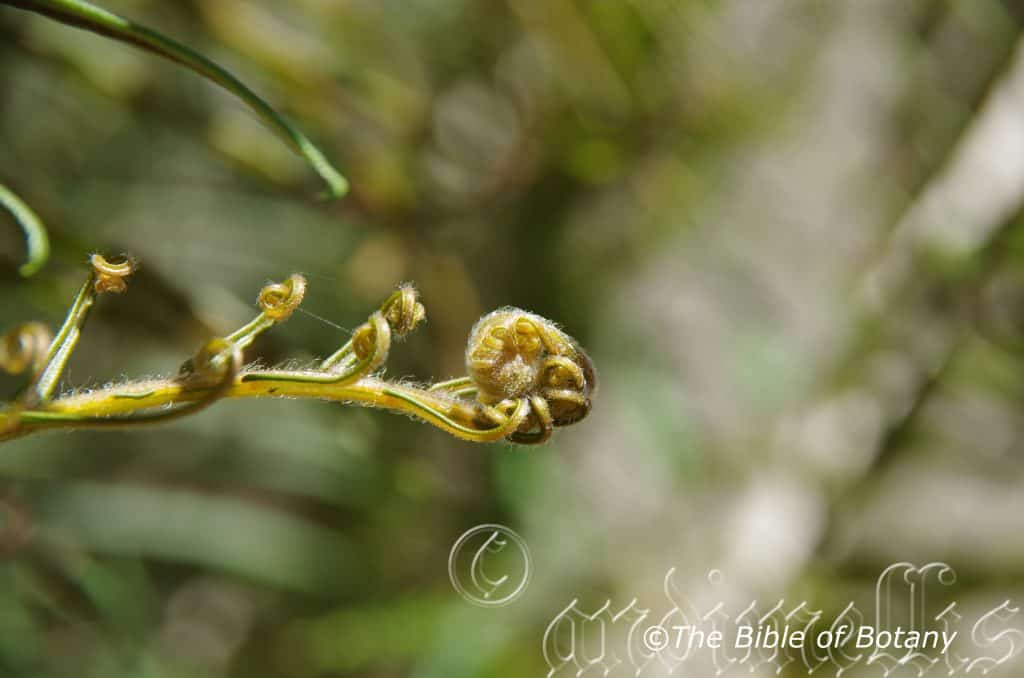
Author’s Garden The Pinnacles NSW
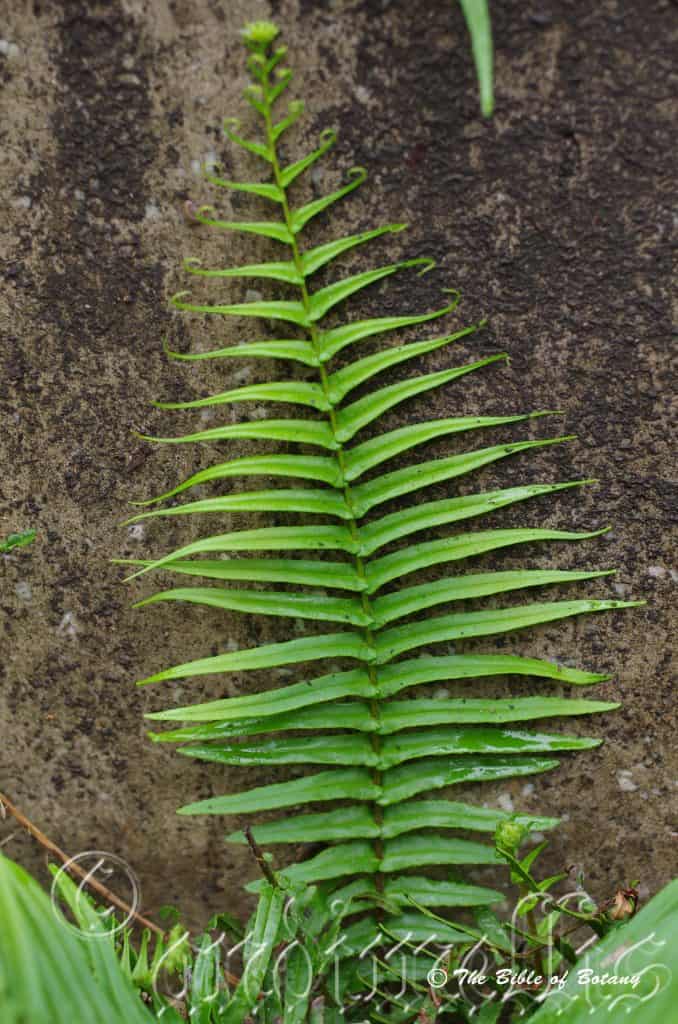
Sha ping Ba China

Chang Sheng Qiao 长生桥 China
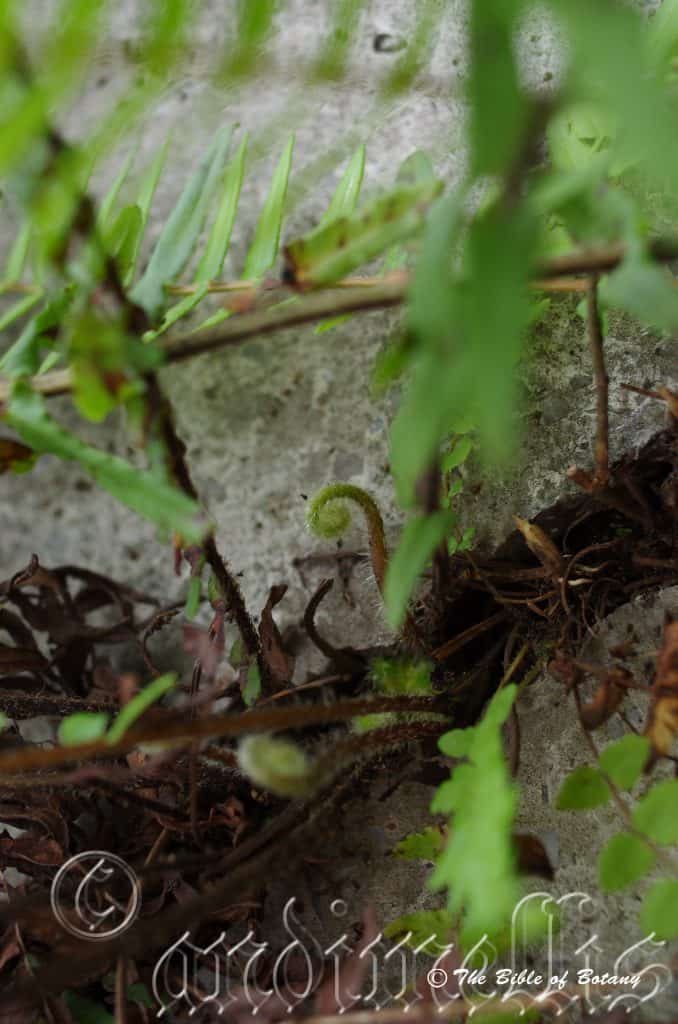
Sha Ping Ba China
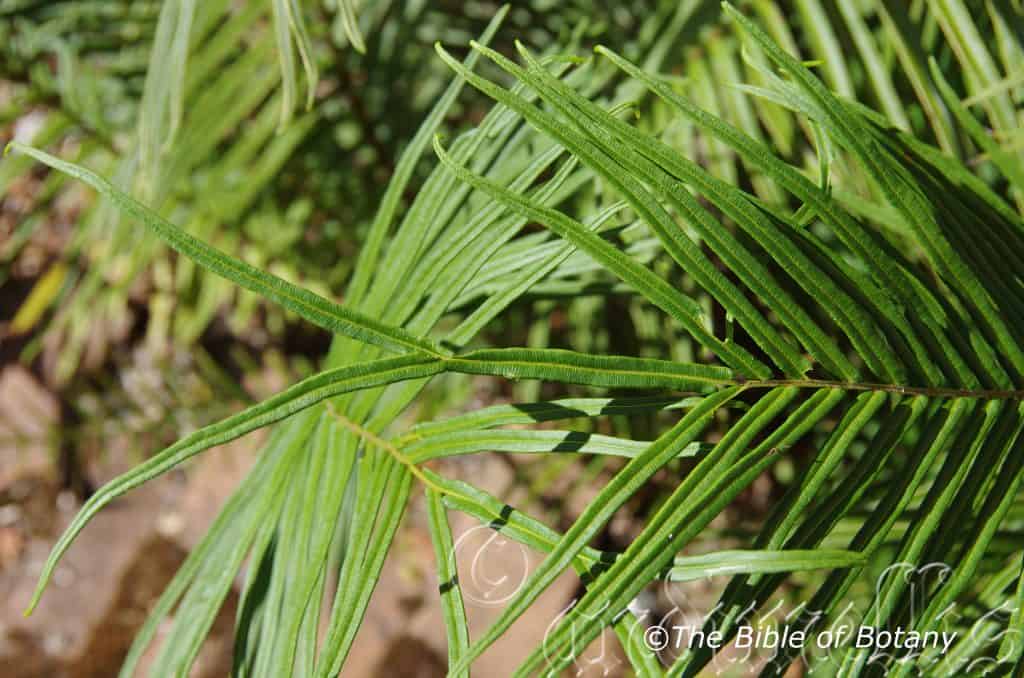
Author’s Garden The Pinnacles NSW

Upper photo shows auricles with distinct teeth and smooth laminas, Lu Xian China
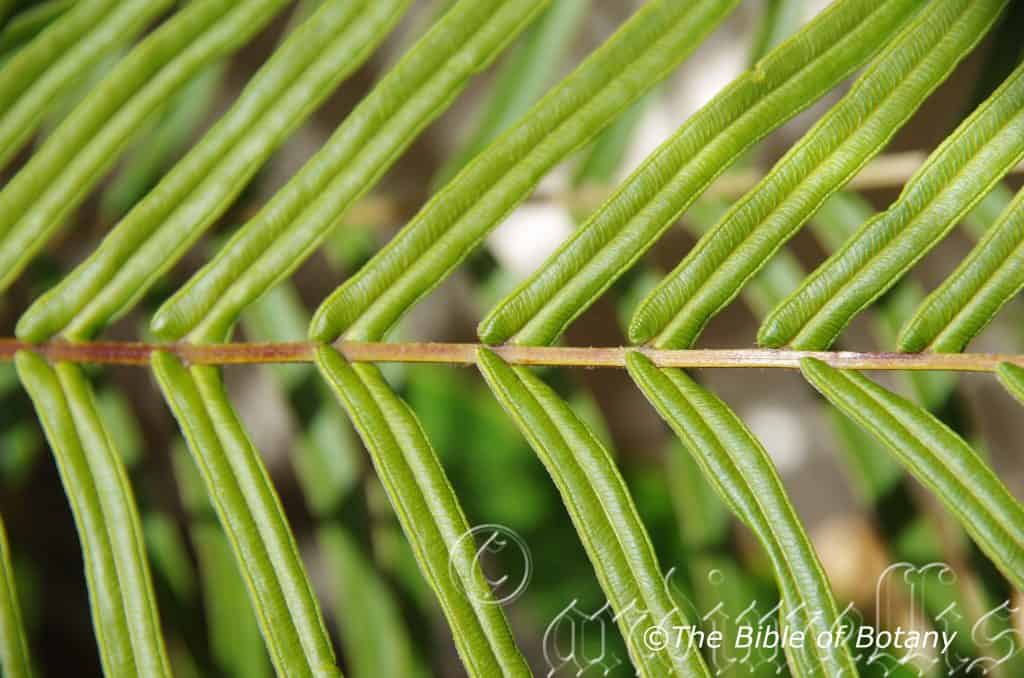
Shows the lack of auricles, lack of teeth and distinct raised lateral venation, Grafton NSW
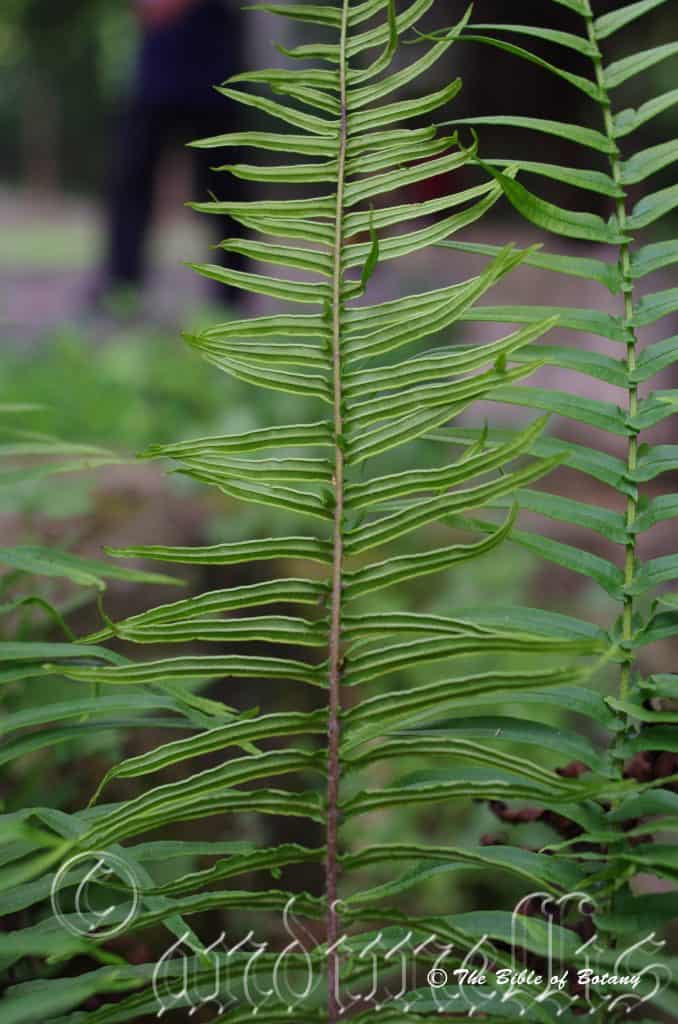
Above Note sporangia only covering 85% of pinnae length.
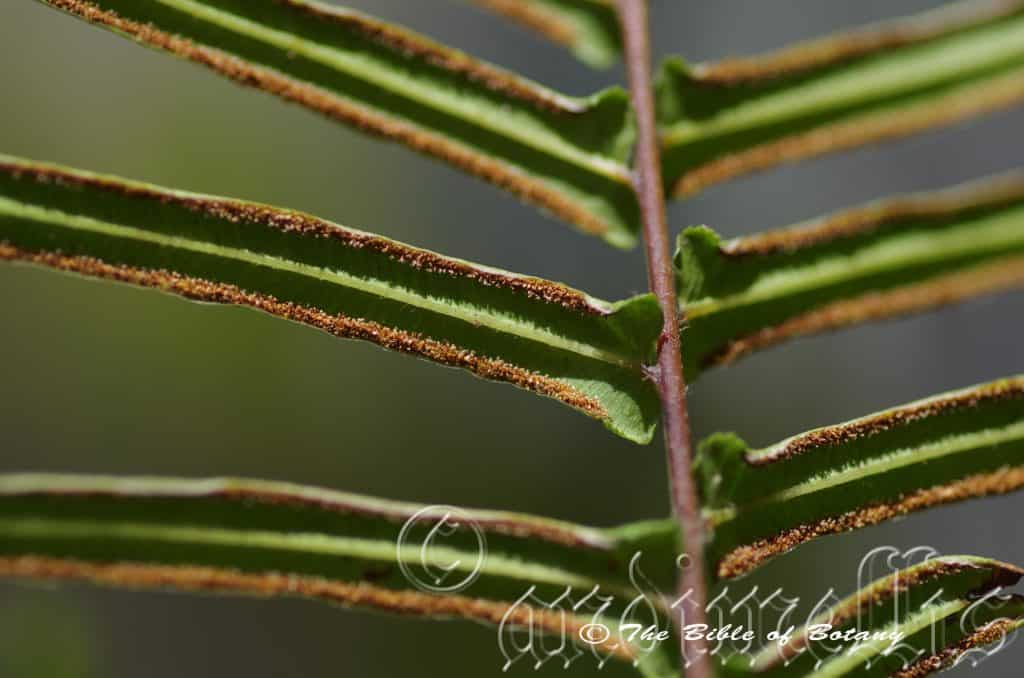
Note sporangia cease before the auricles and ends prior to the apex above from china and extend to the rachis and extends to the tip of the pinnae below from Australia.
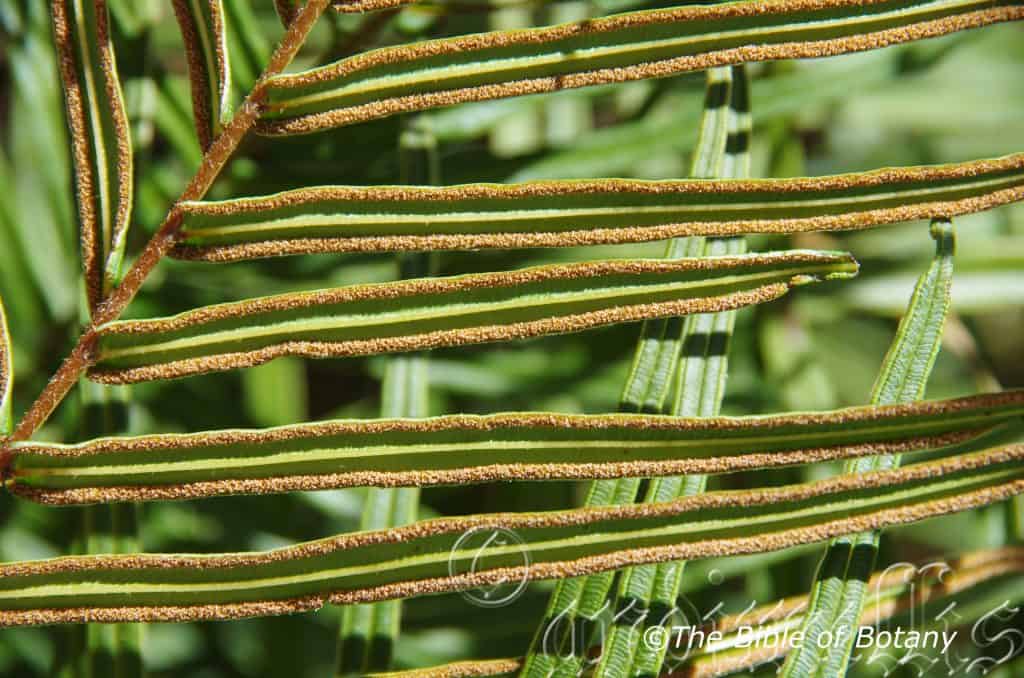
Grafton NSW
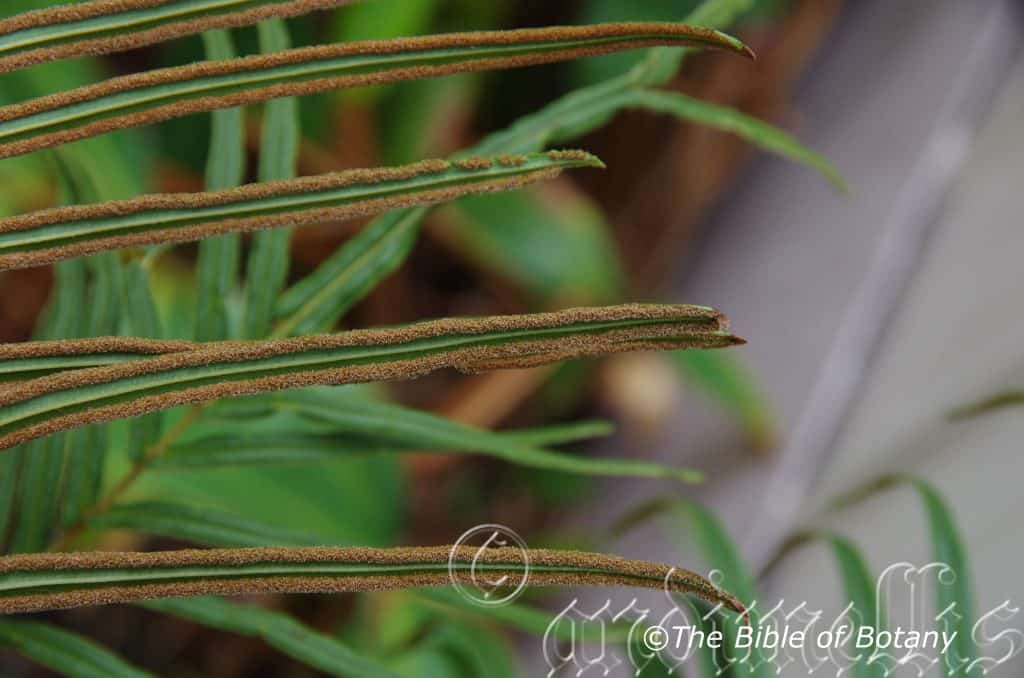
Grafton NSW
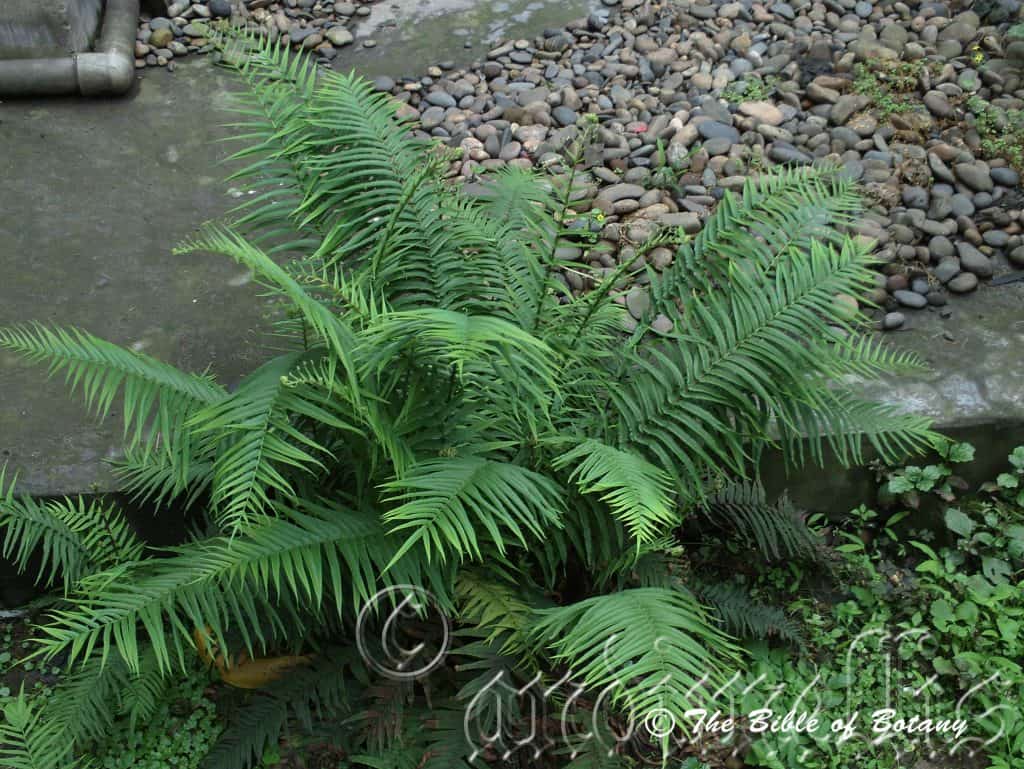
Above shows the lushness of the plant in my new garden in Lu Xian China. Below shows the hardiness of the fern on a southerly aspect above the water line of a dam in Sha Ping Ba.

University Pond Sha Ping Ba China
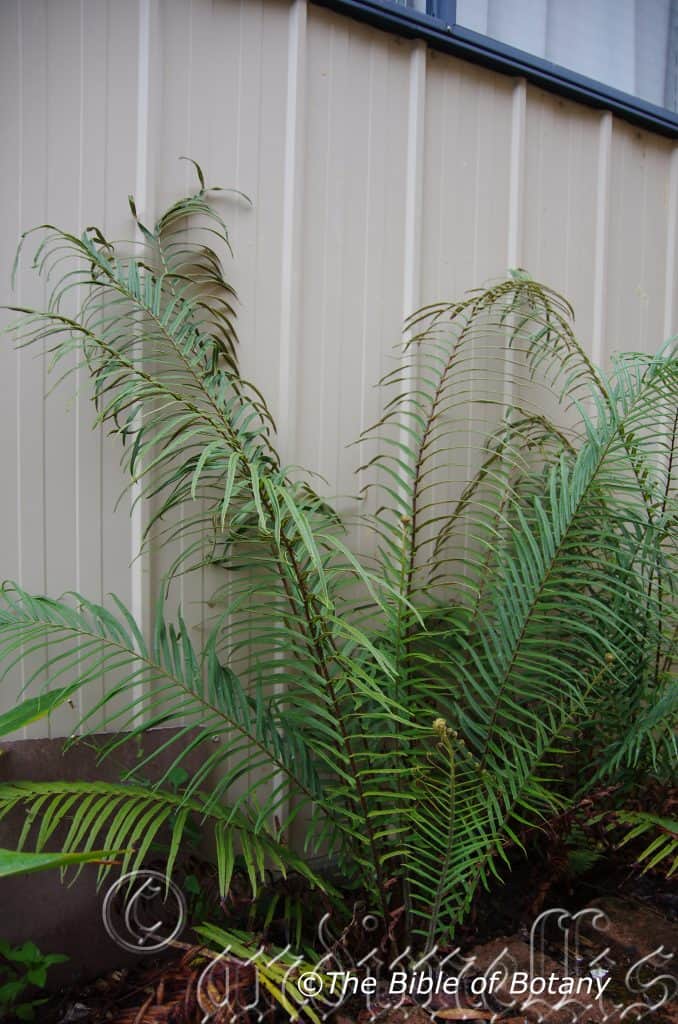
The north wall of the garage in mid summer showing no ill affects, The Pinnacles NSW
Pteris vittata
Classification:
Unranked: Pteridiophyta
Class: Pteridopsida
Order: Polypodiales
Family: Pteridaceae
Subfamily: Pteridoideae
Genus: From Ptéris, which is Ancient Greek for a fern, which is any seedless, nonflowering vascular plant of the class Filicinae, of tropical to temperate regions, characterized by true roots produced from a rhizome, with fronds that uncoil upward and have a branching vein system, and reproduction by spores contained in sporangia that usually appear as brown or yellow grains or powder from on the underside of the fronds and Graphos, which is Ancient Greek for written or to draw. It refers to plants, which is very typical of a fern.
Species: From Vittatus, which is Latin for a stripe. It refers to pinna, which are long and often display fine brown stripes, especially where the uptake of certain minerals are in excess in the soil..
Subspecies: Note while there is only one recognised specie of Pteris vittata worldwide, without any subsepcies or varieties, I have noted significant differences between the Australian ferns from around the Clarence Valley and the ferns found in south western China, in southern Sichuan, northern Yunan and southern Chong Qing. If there is more than one species the Australian specie will be given a new name under strict Nomenclature rules. See Photos.
China: 1. Pinnae are subopposite at base becoming decisively alternate at least on the apical section 70 to 80%.
2. Upper lamina smooth, mid vein and lateral veins not conspicuous. Lateral veins divide close to the midvein.
3. The auricles are hastate at the base. Basal side auricle much larger than apical sided auricles. Auricles coarsely toothed.
4. Sori do not extend to the auricles, Sori extend approximately 80 to 90 of the length of the pinnae. Sori deep brown with cream spore.
5. Apical pinnae is narrow tapering.
Australia: 1. Pinnae are opposite for entire length or sub opposite close to the apex.
2. Upper lamina lateral veins very conspicuous and slightly raised. Lateral veins do not divide.
3. Auricles lacking at the base of the pinnae. The pinnae are entire.
4. Sori extend to the base. Sori extend the whole length of the pinnae. Sori tan with cream spore.
5. The apical pair of pinnae are often divided or forked at least in the Clarence Valley.
Common Name: Chinese Brake or Ladder Fern.
Distribution:
Pteris vittata is found in several disjunct populations throughout Australia. It is very difficult to distinguish its natural distribution to that of its distribution since settlement as this fern quite often establishes itself in crevices where moisture and dust accumulates on concrete walls, rockeries and bare rock faces where water seeps or accumulates.
It is found on all continents except Antarctica.
https://avh.ala.org.au/occurrences/search?taxa=Pteris+vittata#tab_mapView
Habitat Aspect Climate:
Pteris vittata prefers dappled light to almost full sun. It grows in open forests, adjacent to rainforests on rocky outcrops or in grasslands along river banks. It is more common near waterfalls where seepages occur or in soil transitional zones. The altitude ranges from 5 meters ASL to 900 meters ASL.
The temperatures range from minus 4 degrees in July to 42 degrees in January.
The rainfall ranges from lows of 180mm to 3200mm average per annum.
Soil Requirements:
Pteris vittata prefers to grow on light fatty clays to medium clays often with copious quantities of forest litter or grass mulch. The soils are usually derived from decomposed brown basalt, black basalts, sandstones, granites, shales or metamorphic rocks. The soils pH ranges from 5.5pH to 8.6pH. It does not tolerate waterlogged soils however periods of high rainfall may result in flash flooding on a regular basis especially in drainage lines. Non saline soils to moderately saline soils are tolerated.
Height & Spread: Wild Plants: 0.5m to 1m by 1m to 2m.
Characteristics:
Pteris vittata rhizomes are short, thick, creeping and covered in chartaceous linear to narrow triangular scales which are pale honey amber in colour. Pteris vittata’s slender 50mm to 100mm long stipes are deep brown to reddish-maroon and are densely covered in pastel green translucent to opaque scales.
The lamina on the single pinnatifid fronds is erect. The rachis is mid green turning deep brown-black as the frond matures and measures 250mm to 700mm in length. The fronds measure 450mm to 700mm in length by 200mm to 300mm in width. The laminas are thin but not coriaceous and glabrous. The laminas lobes are divaricate and number 12 to 32 pairs with a terminal pinna. The lobes are shortly petiole from 0.5mm to 1mm in length. The discolourous laminas are mid green to a mid blue green, dull and glabrous often marked with deep brown to black bands with soil deficiencies or toxicities. The ultimate lobes are adjacent or opposite even on the same rachis. It is narrow linear or narrowly oblong and measure 100mm to 150mm in length by 4.5mm to 9mm in width with the base lobes increasing in length with the longest being 60mm from the base along the rachis. The base is rounded, truncate or hastate while the apex is long tapering to a point. The hastate lobes are larger and is lanceolate or broad ovate and contorted over the rachis. The lanceolate lobes margins are entire while those plants with the broad ovate lobes margins are finely toothed. The margins are entire and flat while the apex is long tapering.
The fertile fronds are similar to the sterile fronds.
I have noticed several differences between the plants from Chong Qing and northern Yunan, in south western China and the Australian plants in the Clarence Valley, which to me indicates that there is more than a single species or several subspecies. See photos. Pteris vittata’s sporangia cease before the auricles and extends to around 80-85mm of the pinnae’s length from china, while the Australian ferns are found from the rachis and extends to the tip of the pinnae, as seen in the photographs. The auricles are more pronounced in the Chinese ferns. Further the croziers in China are a distinct green while the Australian ferns have a brownish colouration until fully extended. Spores are small circular and yellow-brown in colour.
Wildlife:
Pteris vittata’s wildlife is unknown to the author.
Phytoremediation:
Pteris vittata is an arsenic phytoremediator meaning that it can take up large amounts of arsenic from the soil. They can be used very successfully in controlling soils which have been contaminated with arsenic from past poor farming practices. It is a safer method than using chemicals, is more cost effective, and is environmentally friendly, non-disruptive as opposed to physically digging the soil up, pumping water into the soil to leach the chemicals which in the case of arsenic can spread it further. One disadvantage is that the method is reliant on a long term soft commitment, is dependent upon plant growth and the tolerance to toxicity and bioaccumulation capacity.
Other good phytomediator plants are Cannabis sativa for arsenic, Melastoma polyanthum for aluminium and Beta vulgaris or Beetroot for boron. We used beetroot very successfully on our farm at Nana Glen to remove large amounts of boron from the soil and Atriplex nummularia for the removal of sodium which then saw us grow some of the best organic mandarins in Australia on what was some of the poorest soils in the district. It did however take 5 years to turn the soil around so that it was again productive and 8 years to reach a point where high yields were better than those experienced by conventional farmers were experiencing. (Further information on Pteris vittata phytoremediation can be found at:
http://www.researchgate.net/publication/44680025_Arsenic_hyperaccumulation_by_Pteris_vittata_and_Pityrogramma_calomelanos_a_comparative_study_of_uptake_efficiency_in_arsenic-treated_soils_and_waters)
Cultivation:
Pteris vittata is an excellent fern for cultivation and makes a great tub specimen for one or two growing seasons when it must be repotted or divided. When cultivated under ideal conditions the fronds look spectacular and will grow two meters in length.
Pteris vittata is very hardy and is another of those easy to grow ferns that just requires a little moisture to grow at its best. It is ideal as against walls and other structures where there is light shade with a little morning or afternoon sun where moisture is reliable. It is ideal in areas where full sun is experienced for half the day with light dappled shade for the remainder provided adequate moisture is maintained. It accepts more direct sunlight than most ferns. Our plants are grown against a north facing colour bond wall where it gets full sun in the middle of summer for several hours a day without any damage.
It always displays deep green fronds and looks fresh giving a tropical look in a short time. It is at home on sand, medium clays to heavy clay soils and is great for small medium and large gardens close to the coast in warm temperate, warm sub-tropical or cool tropical gardens. As garden subjects it will colonize soils that have established rainforests, at the bottom of moist shady banks or between houses either with southerly or northerly aspacts. It is cold tolerant to temperatures as low as minus 5 degrees once established though some frond burning may occur.
It is most suitable for use as a rainforest understory plant where they can break the monotony of large deep green leaves. It can also be used affectively in dry sclerophyll forest gardens provided plenty of leaf litter is applied to the soil to assist to help increase soil fertility, maintain soil moisture and to maintain a cool root zone.
Medium to large frog or fish ponds are made even more attractive when surrounded by this fern which can spread over large areas if given the opportunity without becoming problem some.
Its size can make for a truly interesting setting if used sparingly as individual clumps where large rocks or boulders are used opening up a completely different rock garden scene.
Pteris vittata is a very attractive clump-forming fern and can be used very affectively especially when individual plants are scattered throughout the garden.
If grown as a potted houseplant, place the pot on a saucer filled with gravel and water to ensure better humidity and mist frequently. Trim or pinch off dried fronds to keep it tidy and at its beautiful best. Fertilize every month during the growing season or during the warmer months with recommended organic fertilizer.
Repot annually to revitalize soil and increase the growth rate. Repot using our recommended potting mix for ferns for best results. Ferns can be increased by dividing older plants into 2 or 3 new plants using a sharp knife and cutting them into 2 or 3 equal sections.
Just be imaginative when using this magnificent example of a hardy fern that deserves far more recognition than it presently has.
Propagation of Fern Spores:
All ferns that are declared rare, vulnerable or endangered are protected by Federal and State Laws and must not be removed from the wild unless you are a land developer, mining company or main Roads department etc. This includes bulbs, roots, leaves and flowers. No part of any plant can be removed from Federal, State or Local Government land without the prior permission of the authority and this includes the spore.
Most people are put off at the thought of growing ferns from spore. Like all plants that produce their offspring from seed or spore the methods are basically the same. Remember nature has been doing this for millions of years and has been very successful. I have had excellent results growing over 200 different species of Australian ferns so don’t be afraid. This one of the easier ferns for beginners to start with because of its hardiness and ease of collecting ripe spore. Give it a go.
Step 1. Select spore from the fern fronds. Wait until the fern is just starting to release its spore. Rinse the fronds under clean running water and dry. This is to wash off any other spores from rogue ferns that may have settled onto the fronds. (There is nothing worse than having common brake or common soft bracken contaminating a prized tree fern or epiphyte.)
Step 2. Place the dry fronds in a clean brown paper bag and keep them in a cool dark place like the linen closet for about a week to ten days before you are ready to sow the spore. The exception to this rule applies to ferns, which produce green spores. These must be sown immediately that they are released. Todea Barbara is a good example of a fern, which produces green spore.
Step 3. Take a large ice cream container, a small ice cream container and a clean clear plastic bag large enough to seal the large ice cream container and three or four milk bottle tops.
Step 4. Punch or drill 6 to 10 5mm holes in the bottom of the small ice cream container.
Step 5. Wash both containers, tops and plastic bag so that they are very clean and sterile.
Step 6. Use a clean fine seed raising mi. We used 30mm fine sand, 30mm peat and 30mm perlite and 10mm vermiculite. We used crushed basalt, crusher dust and peat in a 50:50 ratio for epiphytes. Moisten the mix enough that water does not run out when the mix is squeezed between the fingers.
Step 7. Place the moisten mix (Enough to half fill the small ice cream container) in the microwave oven with a large glass of water for 7 or 8 minutes, until the water is boiling. Allow them to cool in the oven. You will need the water later so do not tip it out.
Step 8. Take the brown paper bag out of the linen closet. Shake the bag and remove the fronds. You should have a yellow, brown, black or rarely greenish brown or ochre powder or very fine, small round pin head size spore depending on the specie involved.
Step 9. Remove the mixture from the oven once it has cooled and place it in the small ice cream container and level.
Step 10. Sprinkle the spore sparsely over the mixture in the small ice cream container.
Step 11. Place the milk bottle tops in the large ice cream container with the flat surface facing down. Place the small ice cream container in the large ice cream container so that it is sitting on the milk bottle tops.
Step 12. Remove the water from the microwave and pour it into the larger ice cream container so there is 25mm to 30mm of water in the bottom.
Step 13. Place the ice cream containers in the plastic bag and seal. Step 14. Place the contents and bag in a warm shady place preferably 50mm to 70mm shade depending on the specie. Shade houses and some window sills are ideal.
Step 15. The surface should turn green within a week to two weeks. The prothallus will then develop. From the prthalus the first true fronds will appear. Wait until the ferns are 20mm to 35mm in height before you attempt to transplant them. Once they are ready open the bag up slightly and allow the air to flow around the little ferns. Every 3 to 5 days open the bag a little further so the ferns get use to their new environment. Allow them a week to two weeks to harden off before you transplant them following the removal of the plastic bag. Carefully prick them out into 50mm standard squat tubes as you would any seedling.
Do not try to transplant them as single plants as they are still a little delicate still.
Once the smaller ones again reach 50mm to 70mm you may wish to divide the stronger and hardier individual plants into smaller clumps in 100mm squat pots.
Step 16. We fertilized with seaweed, fish emulsion or organic chicken pellets soaked in water on an alternate basis until established. Fertilize every two months for one year even when in the ground.
Further Comments from Readers:
“Hi reader, it seems you use The Bible of Botany a lot. That’s great as we have great pleasure in bringing it to you! It’s a little awkward for us to ask, but our first aim is to purchase land approximately 1,600 hectares to link several parcels of N.P. into one at The Pinnacles NSW Australia, but we need your help. We’re not salespeople. We’re amateur botanists who have dedicated over 30 years to saving the environment in a practical way. We depend on donations to reach our goal. If you donate just $5, the price of your coffee this Sunday, We can help to keep the planet alive in a real way and continue to bring you regular updates and features on Australian plants all in one Botanical Bible. Any support is greatly appreciated. Thank you.”
In the spirit of reconciliation we acknowledge the Bundjalung, Gumbaynggirr and Yaegl and all aboriginal nations throughout Australia and their connections to land, sea and community. We pay our respect to their Elders past, present and future for the pleasures we have gained.
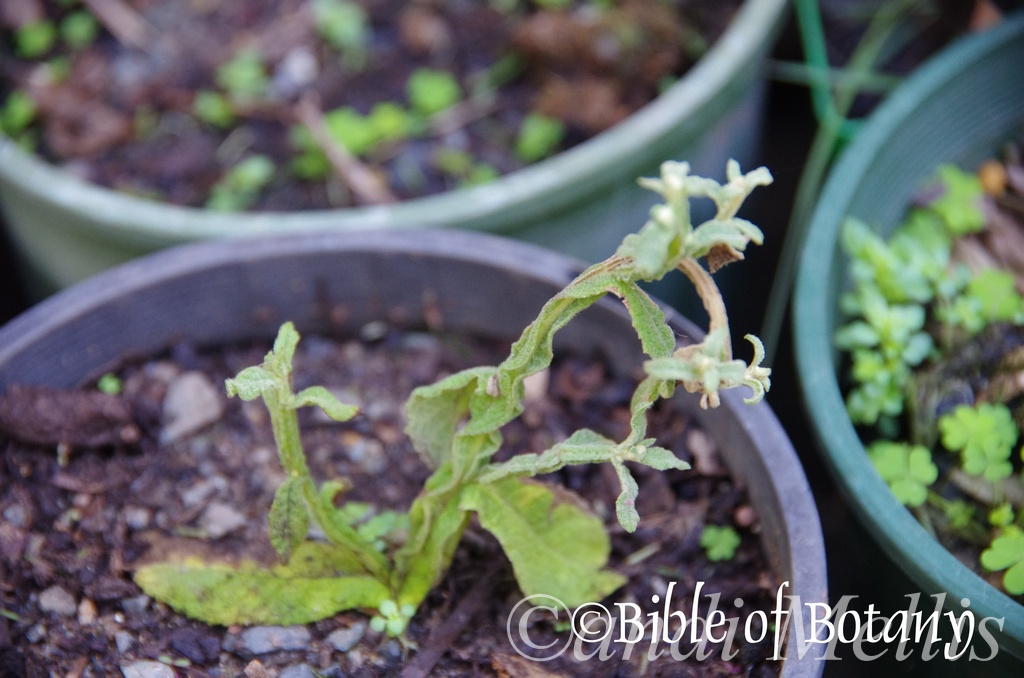
Pterocaulon redolens
Classification:
Unranked: Eudicots
Unranked: Asterids
Order: Asterales
Family: Campanulaceae
Genus: From Pterón, which is Ancient Greek and Latin for a bird’s wing and Kaulos, which is Ancient Greek or Caulus, which is Latin for a branch or a stem. It refers to stems or smaller branches, which have a very distinct wing that runs down each side.
Species: From Redolens, which is Latin for to emit an odour. It refers to plant organs usually the flowers, leaves or phyllodes, which have a sweet fragrance.
Common Name:
Distribution:
Pterocaulon redolens is found on the eastern two thirds of Queensland and New South Wales from Weipa in the north to between Cobar and Bourke in the south but is more common closer to the coast.
https://avh.ala.org.au/occurrences/search?taxa=Pterocaulon+redolens#tab_mapView
Habitat Aspect Climate:
Pterocaulon redolens prefers light dappled shade to full sun. It grows on well drained sites in open woodlands, open Eucalyptus forests or coastal heaths.The altitude ranges from 20m meters ASL to 1000 meters ASL.
The temperatures range from minus 2 degree in August to 40 degrees in January.
The rainfall ranges from lows of 300mm to an average of 3000mm.
Soil Requirements:
Pterocaulon redolens prefers to grow on fine sands, sandy loams to light clays. The soils are usually derived from decomposed sandstones, and accumulated beach sands. The soils pH ranges from 5pH to 7pH. It does not tolerate waterlogged soils. Non saline soils to very saline soils are tolerated as are salt laden winds.
Height & Spread: Wild Plants: 0.5m to 1mm by 0.3m to 0.4.
Characteristics:
Pterocaulon redolens is a small erect herb with fleshy, strongly angulated stems with chartaceous wing. The stem is densely covered in soft, white tomentose to floccose hairs.
The alternate, obovate to oblong leaves measure 18mm to 50mm in length by 6mm to 20mm in width. The lower leaves are larger than the upper leaves. The bases taper to be cauline while the apexes are obtuse. The discolourous laminas are blue-green to grey-green on the upper laminas the lower laminas are paler and densely covered in white tomentose to floccose hairs. The laminas are flat and decurve strongly on the apical third. The laminas are strongly raised between the mid vein and the lateral veins on the upper surface. The margins are crenate on the lower leaves and entire to crenate on the upper leaves. The mid vein is strongly prominent while the lateral and reticulated veins are prominent on the lower lamina and are clearly visible on the upper lamina.
The inflorescences are sessile clustered heads born along the terminal spikes. There are 10 to 20 individual florets in a cluster and 10 to 30 clusters on a spike.
The spikes measure 20mm to 65mm in length by 7mm to 12mm in diameter. The involucre bracts are absent in this species. The outer bracts are oblanceolate while and covered in white tomentose to floccose hairs while the inner bracts are linear to lanceolate and are scarious, glabrous or ciliate. The florets are pale pink to purplish-pink.
The receptacle is naked and flat. The outer disc florets are female numerous and filiform with 2 or 3 teeth. The inner disc florets are few bisexual or sterile. The tubular inner florets have 4 or 5 teeth.
The white anthers have a linear appendage. The style branches are glabrous and filiformis. The flowers appear from April to July.
The fruits are linear achenes. The achenes measure 0.8mm to 1mm in length with long pappus that measure 2mm to 3mm in length.
Wildlife:
Pterocaulon redolens’s wildlife is unknown to the author.
Cultivation:
Pterocaulon redolens at this stage has not been introduced into domestic gardens. It is an unusual plant with the stems having strong cauline wings.
Propagation:
Seeds: Pterocaulon redolens can be removed easily from the heads as they start to open. Prune the flower heads off and store them for a couple of days in a brown paper bag.
Sow the freshly picked seeds directly into a seed raising mix, keeping them moist not wet. When the seedlings are 20mm to 25mm tall, prick them out and plant them into 50mm native tubes using a good organic mix. Store the excess seeds in the vegetable crisper of the fridge.
As the seedlings roots reach the bottom of the tubes plant them out into their permanent position. Do not delay as some set back will result before the new roots emerge. Fertilize every two months until the plants have establish themselves then fertilize annually in September to October.
Further Comments from Readers:
“Hi reader, it seems you use The Bible of Botany a lot. That’s great as we have great pleasure in bringing it to you! It’s a little awkward for us to ask, but our first aim is to purchase land approximately 1,600 hectares to link several parcels of N.P. into one at The Pinnacles NSW Australia, but we need your help. We’re not salespeople. We’re amateur botanists who have dedicated over 30 years to saving the environment in a practical way. We depend on donations to reach our goal. If you donate just $5, the price of your coffee this Sunday, We can help to keep the planet alive in a real way and continue to bring you regular updates and features on Australian plants all in one Botanical Bible. Any support is greatly appreciated. Thank you.”
In the spirit of reconciliation we acknowledge the Bundjalung, Gumbaynggirr and Yaegl and all aboriginal nations throughout Australia and their connections to land, sea and community. We pay our respect to their Elders past, present and future for the pleasures we have gained.

Clarence Valley NSW
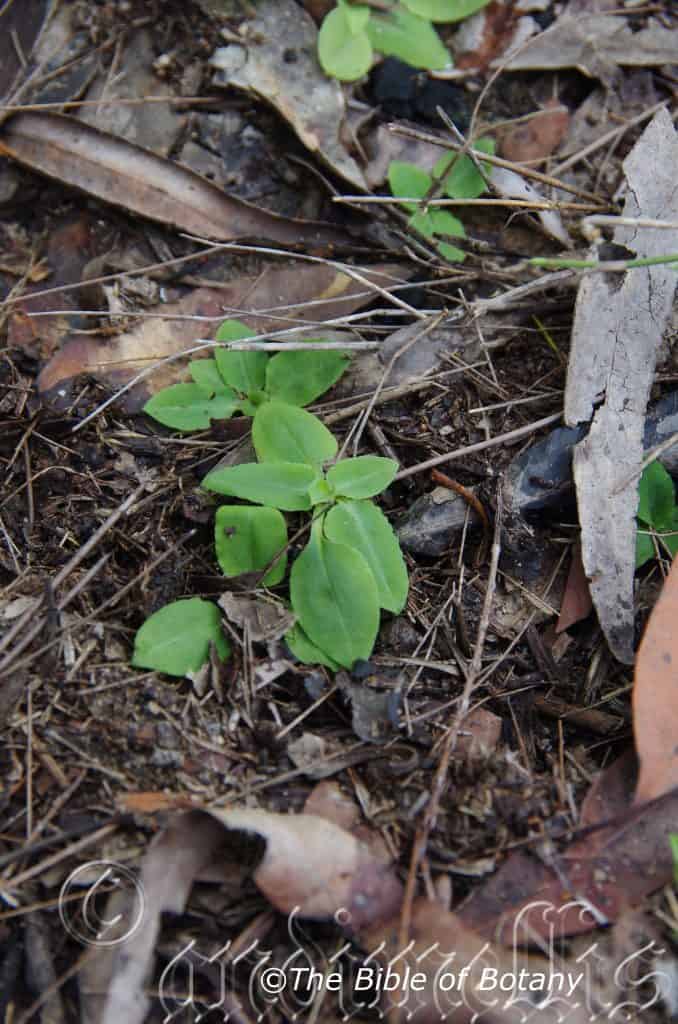
Clarence Valley NSW
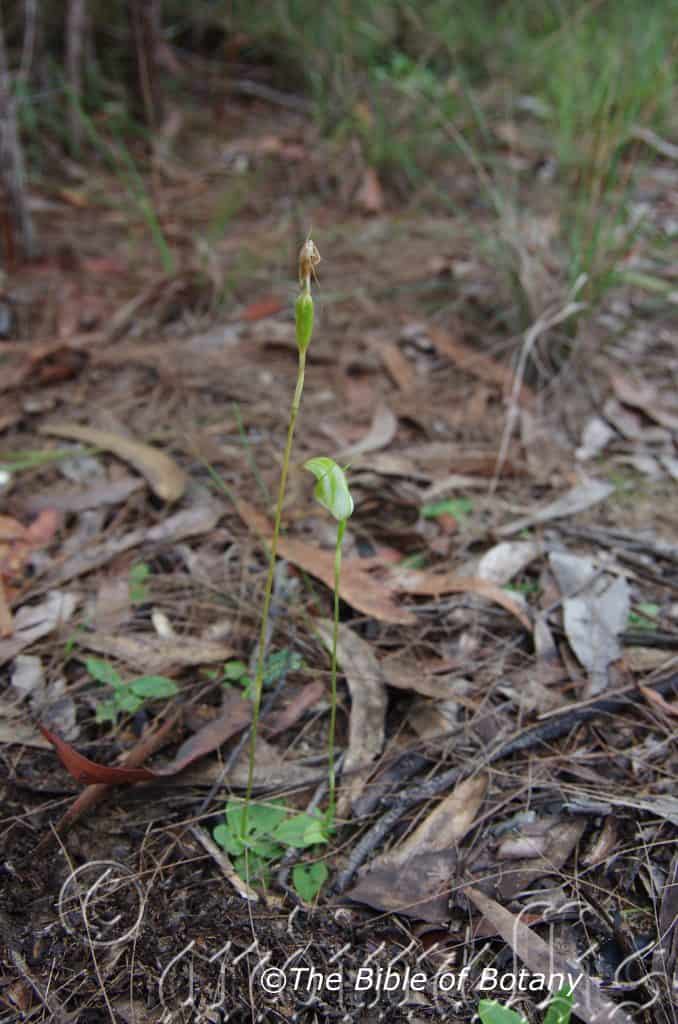
Clarence Valley NSW
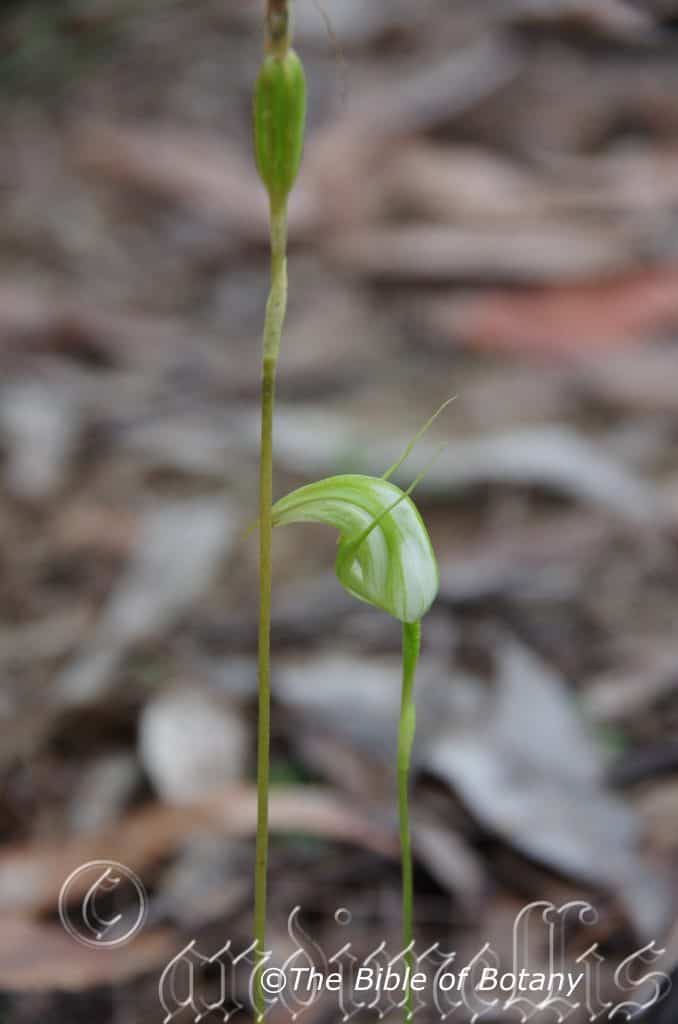
Clarence Valley NSW

Clarence Valley NSW
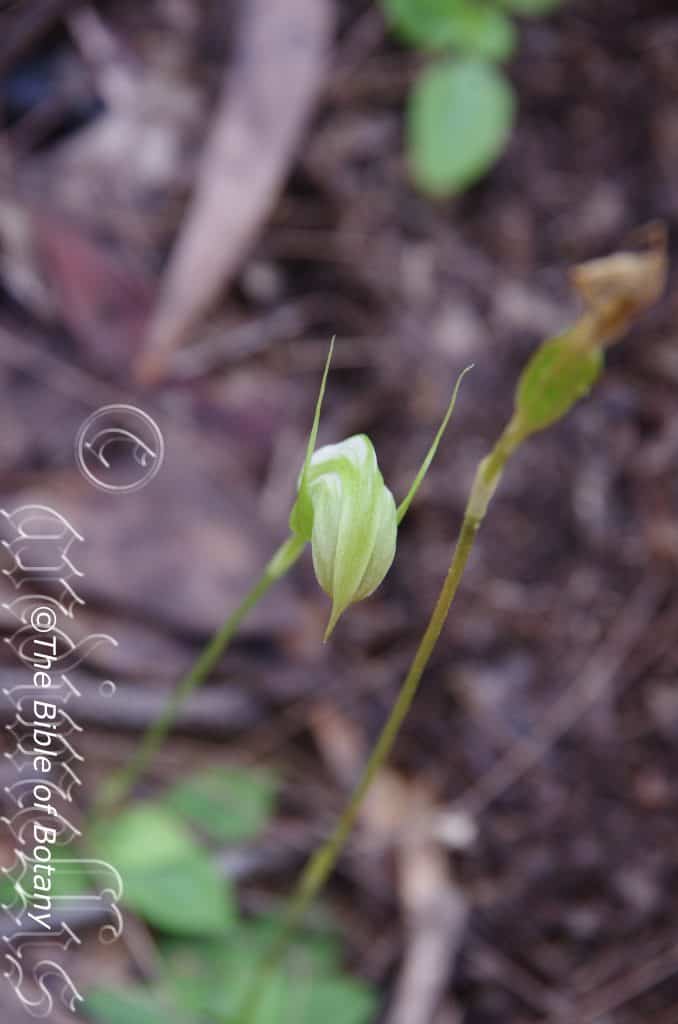
Clarence Valley NSW
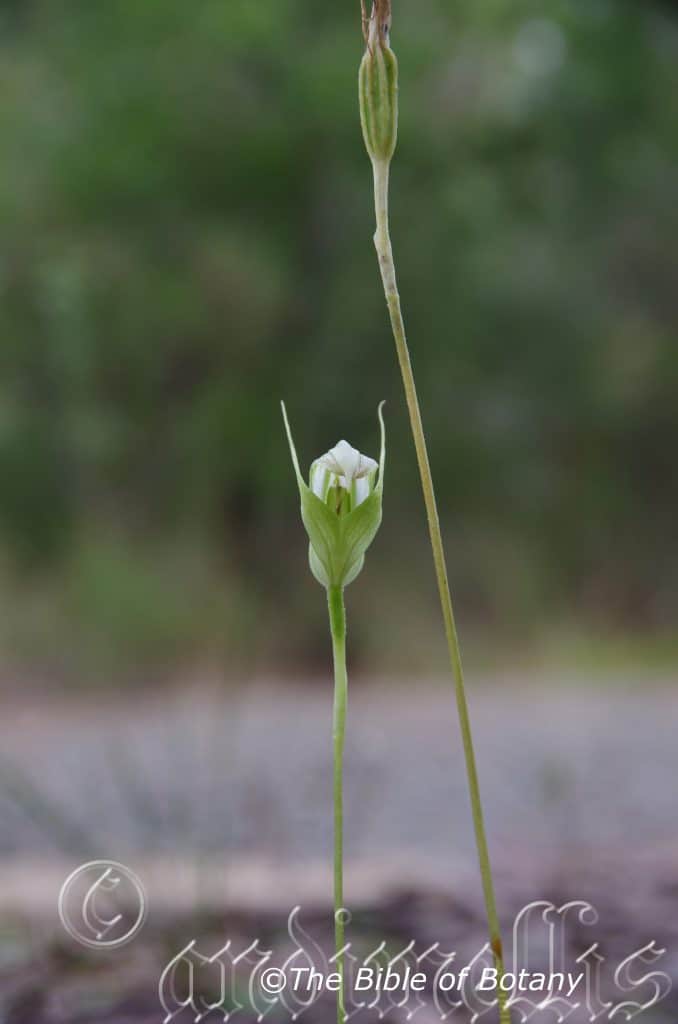
Clarence Valley NSW
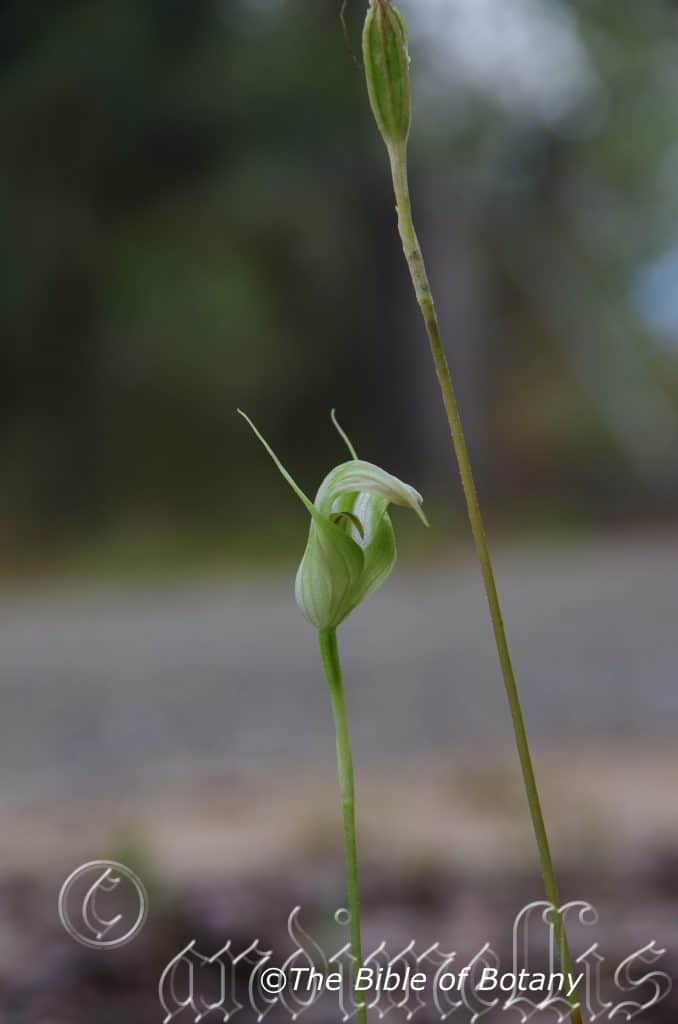
Clarence Valley NSW
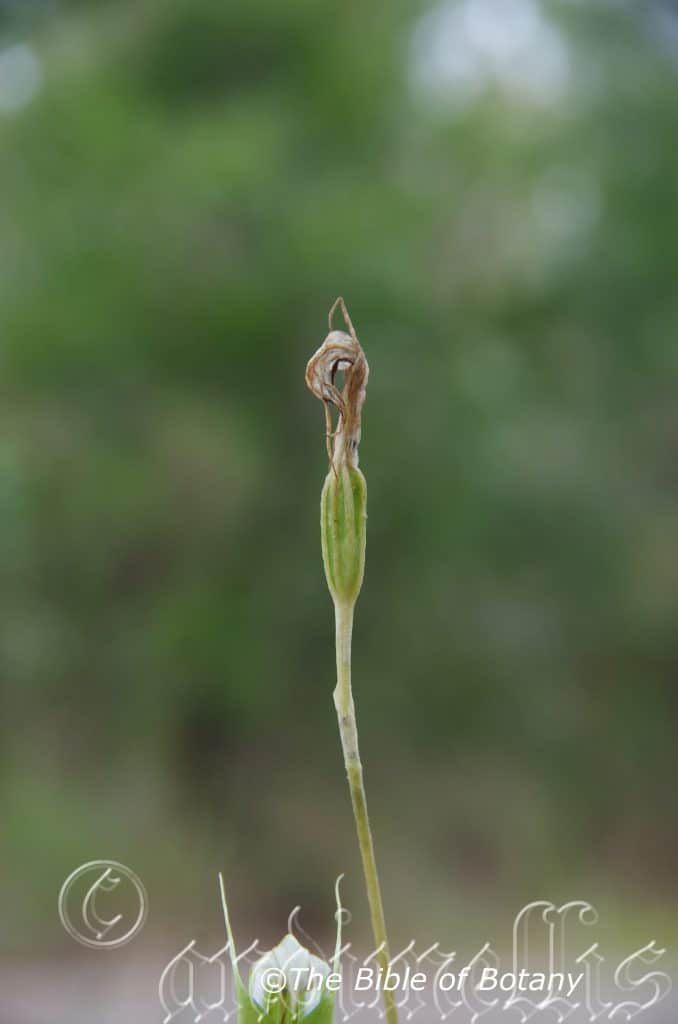
Clarence Valley NSW
Pterostylis acuminata
Classification:
Unranked: Monocots
Order: Asparagales
Family: Orcidaceae
Subfamily: Orcidaoideae
Tribe: Pterostylidinae
Genus: From Pterón, which is Ancient Greek and Latin for a bird’s wing and Stŷlos, which is Ancient Greek for a part of the female reproductive organ between the ovaries and the stigma. It refers to styles, which are flattened like wings or have distinct extension like wings.
Species: From Acūmināta, which is Latin for being contracted or concave on the sides before protracting to a sharp point. It refers to apexes on the leaves or phyllodes, which have short sharp points.
Common Name: Greenhood Orchid.
Distribution:
Pterostylis acuminata is found in 3 disjunct populations south from west of Cairns, Townsville and south from Fraser Island in central coastal Queensland to Casino in far northeastern New South Wales and south from Forster to the Bega Valley in far south eastern coastal New South Wales. There has been a recent sighting at Woodford near Armidale as well as a single sighting at The Pinnacles by the author between these two disjunct populations, indicating it may be more wide spread than previously thought. It is found on and east of the Great Dividing Range to the coast.
There are also two sightings in central Tasmania.
https://avh.ala.org.au/occurrences/search?taxa=Pterostylis+acuminata#tab_mapView
Habitat Aspect Climate:
Pterostylis acuminata prefer medium shade to dappled shade. It grows in moist to wet soils on sheltered slopes in closed sclerophyll forest.
Its altitude ranges from 5 meters ASL to 1057 meters ASL.
The temperatures range from minus 3 degrees in August to 38 degrees in January.
The rainfall ranges from lows of 800mm to 3000mm average per annum. The plants are more reliant on capillary action from nearby permanent water sources to keep the soils permanently moist.
Soil Requirements:
Pterostylis acuminata grows on coarse sands, fine sands and sandy loams to medium clays. The soils are derived from decomposed granites, sandstones, brown basalts, black basalts, metamorphic rocks, podzolic soils, alluvial deposits or accumulated peaty beach sands. The soils pH ranges from 4.5pH to 6pH. It does not tolerate waterlogged soils however soil moisture is essential for survival. Non saline soils to moderately saline soils are tolerated.
Height & Spread:
Wild Plants: 0.3m to 0.4m by 0.1m to 0.15m.
Characteristics:
Pterostylis acuminata grows as a slender erect, deciduous terrestrial orchid. The orchids usually begin to sprout from underground tubers in late April to May but have been known to commence growing as early as Late March.
The 1 or upto 8 rosette ovate to oblong leaves measure 15mm to 80mm in length by 15mm to 25mm in width. The pale bluish-green petioles measure 2mm to 5mm in length. The bases are rounded while the apexes are acuminate. The concolourous, laminas are pale bluish-greens and glabrous. The laminas are flat and decurve downwards on the apical third. The margins are crisped. The midvein is prominent on the lower laminas while the reticulate veins are slightly prominent none the upper laminas.
The inflorescences are long, erect scapes born from the center of the rosette of leaves. The scape has a single flower and measure 300mm to 400mm in length. The green and white with brown in the apex of the galea on the flowers are roughly longitudinally cupuliform. The flowers measure 50mm to 60mm in length by 20mm to 26mm in diameter. The apex of the galea is also obliquely erect to flat.
The glabrous oblong dorsal sepal is strongly curved forming a hood and has an acute apex. The margins are entire. The dorsal sepal measures 60mm to 70mm in length by 6mm to 8mm in width.
The lime green lateral sepals loosely embrace the galea leaving a lateral gap and measure 45mm to 70mm in length overall. The sinus is almost flat, notched longitudinally at the centre and protrudes in a prominent bulge when viewed from the side. The reflexed, free apexes are linear tapering to a filiform point and measure 20mm to 30mm in length.
The glabrous oblong to obspathulate lateral petals strongly incurves forming a hood with an acuminate apex. The margins are entire or more often crisped. The dorsal petals measure 55mm to 65mm in length by 15mm to 20mm in width.
The labellum is white and lime-green with a brownish-maroon longitudinal stripe. The narrow elliptic to lanceolate labellum’s measure 22mm to 28mm in length by 3.5mm to 5mm in width. The apexes are sub-acute while the distal quarter protrudes from the sinus in the set position. The flowers appear from July to October.
The fruits are obloidal capsules. The green capsules turn deep grey-brown when ripe.
Wildlife:
Pterostylis acuminata’s wildlife is unknown to the author.
Cultivation:
Pterostylis acuminata is a beautiful terrestrial orchid that can form dense colonies once established in a satisfactory environment. It is not a difficult orchid to grow in the garden but it needs a cool, moist, light shady position to survive and thrive. The best place is in a greenhouse or bush house where the environment can be controlled better.
In a littoral rainforest or rainforest setting free of frost or sub zero temperatures and a humid microclimate will see the plants thrive.
Fertilize using a mixture of seaweed, fish emulsion and organic chicken pellets soaked in water and apply the liquid as soon as the first leaves appear to maintain health, vigour and better flowering. Fertilize again as the blooms die to assist in better tubers and flowers in the following season.
Care of Terestrial Orchids:
Native terrestrial orchids comprise of many Genre with their individual specie which range from being relatively easy to cultivate to those that are damn near impossible and definitely frustrating to say the least.
Most terrestrial orchids are deciduous during the dry season. These usually commence their growing season with the onset of the wet season through to the end of the wet season. The flowering occurs shortly after the leaves have been established sending up the new scape flowering then dying back to a subterranean tuber in a yearly cycle of growth.
The delicate Caladenia specie (Spider Orchids), the amazing Caleana specie (Duck Orchids), the brilliantly coloured Diuris specie (Donkey Orchids), the curious Pterostylis specie (Green hoods) and the spectacular Thelymitra specie (Sun Orchids) all have some the most amazing colour combinations and shapes of any orchids found anywhere in the world.
The saprophytic orchids have been deliberately excluded because they are highly specialized orchids in nature that replicating their growing conditions is near impossible for any period of time. This intriguing group of orchids has some of the most amazing blooms of any orchid with the above mentioned groups worthwhile persevering with.
The life cycle needs to be fully understood prior to any attempt to grow these beautiful orchids or failure is assured. The best advice I can give is if you are lucky enough to have these orchids growing naturally preserve their environment as nature has done for millions of years. I marked all the active growth areas on my Nana Glen property with survey pegs and kept the areas mulched with their local mulch and fertilized once I saw the new shoot commencing their seasonal cycle.
Failing the above notice that terrestrial orchids usually flower, then are followed by a period of dormancy, very similar to many other exotic and native epiphytic orchids. The biggest difference is that the majority’s period of growth and flowering tends to be in the cooler months of the year following the wet season not during the wet season, while the dormant period is in the warmer drier months.
They can be dormant for 6 to 8 months of the year and need to be kept reasonably dry during this period. Ideal shade house conditions would be 30mm to 50mm shade with a solid alsynite roof. Our Fern Nursery comprised of a shade cloth section with alternating 30mm and 50mm shade cloth and the dry area was 2 sheet of alsynite with 2 sheets of corrugated iron running in a north south direction. This gave all the plants shade that was of different intensities during the day. This situation is ideal during the dormancy period for all plants.
Watering is by far the most crucial part growing terrestrial orchids successfully. When in active growth the plants should be watered regularly so that the potting mix remains moist at all times. As the plants finish flowering and start to die back they will commence to develop the new tubers. Watering at this stage needs to be decreased so that the mix is almost completely dry. If the mix remains wet at this time the tubers have a good chance of rotting. From early January start to water lightly occasionally (if it rains lightly water lightly and if it storms water the plants thoroughly.) As the new growth appears and accelerates increase the water accordingly. I will stress here that rain water is far more beneficial than tap water.
Light varies depending on the genus, Pterostylis and Acianthus prefer shadier conditions (40mm to 60mm) than the Caladenia, Caleana and Diuris (20mm to 30mm) the aptly named Sun Orchids Thelymitra (10mm to 20mm) (Named because the flowers open as the sun rises and close by night). Too often enthusiast treat the orchids like babies locking them up in too dense a shade and create to humid conditions which lead to fungal and mite problems. All these species resent stagnant humid conditions so place them in a position where they receive good light and air flow.
Fertilizing is necessary for optimum growth and organic fertilizers offer the best method. Organic fertilizer like the ones we recommend delivered on a monthly basis from the onset of the leaves from early April to the opening of the flowers is the best method we have learned over the years.
Pests may not be wanted but they do appear from time to time. The usual suspects are Slugs and Snails which can do immense damage in a very short period of time. Start placing upturned half orange and mandarin skins around near the plants as you begin to water. These baits will attract them as soon as they appear and before they increase in numbers. Keep the benches dry by watering in the mornings or keep the plants suspended on mesh benches is also a good deterrent. Thrips and Red Spider can at times also cause problems. Good air flow and drier conditions is usually enough to keep them at bay. If the problem doesn’t abate then a light application of natural pyrethrum or Garlic usually does the trick.
Potting mixes are important so use a good mix. Use our recommended open dry mix for terrestrial orchids. Add a small teaspoon of 100mm natural blood and bone to the mix for each 250mm standard pot. Repotting should be carried out annually during the dormant period. Remove the plants from the pots and gently remove the old soil being careful not to damage the tubers. Fill the new pot with the new mix to about 30mm below the surface. Replace the tubers on the new mix. Cover the tubers with 5mm of mix. Cover the surface with 10mm to 15mm of fine broken forest litter. Some enthusiasts insist on using Casuarina or Allocasuarina needles. If the latter is used the logic is that it is more likely to prevent fungal problems and are easier for the orchid’s leaves to penetrate.
Pot size will depend on the number of tubers you have. A 100mm pot will handle 5 to 7 tubers, while a 150mm pot can handle 10 tubers and a 200mm pot 20 tubers. (The best plantings and flowerings appear in the 200mm pots.)
Propagation:
All orchids that are declared rare, vulnerable or endangered are protected by Federal and State Laws and must not be removed from the wild unless you are a land developer, mining company or main Roads department etc. This includes bulbs, roots, leaves and flowers. No part of any plant can be removed from Federal, State or Local Government land without the prior permission of the authority and this includes the spore.
1. Obtain relevant materials
The first step in growing orchid from seed will be sourcing and having at the ready all materials that will be required in the propagation process.
This includes all of the following:
Unripe orchid seed capsule. If there are 2 capsules secure the second capsule immediately after the first capsule splits or if only one capsule as soon as it changes colour.
Orchid gelling medium with agar which can be purchased from an orchid society or a specialist nursery.
Distilled water
Cooking pot
Spoon
Oven-safe glass or polypropylene containers with lids
Sealable bags
Clean, sterilized cutting board
Rubber gloves
Paper towels
Tweezers or forceps
70 percent ethanol
Bleach
Scalpel or sharp knife
Planting pot
Orchid compost
Length of wire metal
Plastic spray bottle.
deep petri dishes or sterile jars.
2. Prepare agar medium
The agar medium is a special orchid gelling mixture that distilled water will be added to distilled water.
To prepare the medium, mix equal parts of orchid gelling medium with distilled water in a cooking pot.
Place the pot on a stove and bring the mixture to boil for while stirring continuously for two minutes.
Pour the mixture into the petri dishes glass or propylene containers while ensuring not to fill the containers above 20 percent of their volume.
Loosely replace the lids to the containers. Sterilize the containers by heating them up in a microwave oven for between 2 to 3 minutes.
Spray 70 percent ethanol into a sealable bag to create a sterile environment. Transfer the heated containers into the sealable bag.
Allow the containers to cool a bit before tightening their lids and then sealing the bag. Leave the containers to stand for a few days until the mixture solidifies.
3. Prepare seed capsule and work surface
Place an open pot of water on a stove and bring to boil. Place the cutting board in the oven and sterilize.
Put on rubber gloves and sterilize the forceps, and scalpel with 70 percent ethanol.
Insert the seed capsule into a bowel filled with bleach for about fifteen minutes.
Sterilize seed capsule again with 70 percent ethanol and place on grill.
Using the sterilized scalpel, cut open the seed capsule to reveal the seeds. Using a scalpel or sharp knife, scrape out the seeds from the capsule unto an ethanol soaked paper towel.
4. Flasking of the seed
Take out the petri dishes or glass jars containers holding the agar medium. Over the steam, open up the containers and transfer seeds from the ethanol soaked paper towel into the individual containers using the sterilized forceps.
The amount of seeds will determine the number of containers required. Replace the lid of the containers and place them on a window sill that receives indirect sunlight.
5. Wait and exercise patience
All that can be done at this point is to wait until the seeds germinate. The amount of time that this might take varies and is dependent on the particular species.
Generally, the time can range from a few months to a few years. During this period of waiting, ensure the containers are free from contamination to ensure that germination is not disrupted.
6. Emergence of protocorms
Protocorms are tuber-shaped bodies with rhizoids that are produced by the young seedlings of various orchids. Protocorms represent the embryonic form of the orchid plant.
Their emergence after the period of waiting at an affirmation that everything in the propagation process is on track.
7. Transflask orchid seedlings is done after they have developed roots
Upon the emergence of the protocorms, consistently observe the growth of the seedlings. At the point when the seedlings appear to overcrowd the flask, transflasking should be carried out, typically within 30 and 60 days.
* This is done by removing individual seedlings using sterilized tweezers from the original containers and placing them in new containers also filled, in a proportion similar to the original, with agar medium. 6 to 8 in a standard petri dish or 1or 2 to a test tube
8. Transplant seedlings into planting pots
On the presumption that there are no disruptions to the plant growth, the seedlings will eventually outgrow the containers.
At this point, they are to be transplanted into planting pots. A good rule of thumb to determine when they are ready to be transplanted is when the seedlings have developed roots that have grown up to the length of one-quarter of an inch.
To transplant, prepare a planting pot or other container for receiving the seedling by majorly filling it up with coarse fir bark and possibly some slightly moist orchid compost mixture containing perlite, fine charcoal, redwood bark shavings, etc.
To extract the seedlings, submerge the containers in warm water to help loosen the agar gel.
Once the agar medium is softened, twist a piece of metal to form a loop and in turn, use it to carefully pull out the seedlings from the container. It is best done if the agar and seedling can be removed together.
The seedlings can be further rinsed in lukewarm water to remove any excess agar mixture still stuck to them.
Following this, the seedlings can now be planted into the prepared pot with at least 50mm of space between each individual seedling.
9. Positioning the orchid
The seedling once fully transplanted should be placed in a location that is warm with good indirect sun light.
Slowly position the pots into an area that closely assimilates the conditions it will be growing under.
The choice as to whether the plant should be exposed to full sun or in direct sunlight will be dependent on the particular orchid specie.
10. Subsequent care of the plant
After the first week, the seedling can be misted several times a day and watered just once a week.
A guide in watering the plant will be using the dryness of the fir back that is, water the plant until the fir back is completely moistened and wait till it has completely dried out before watering again.
Do not fertilize until the seedlings have fully established themselves then fertilize annually in September to October.
Further Comments from Readers:
“Hi reader, it seems you use The Bible of Botany a lot. That’s great as we have great pleasure in bringing it to you! It’s a little awkward for us to ask, but our first aim is to purchase land approximately 1,600 hectares to link several parcels of N.P. into one at The Pinnacles NSW Australia, but we need your help. We’re not salespeople. We’re amateur botanists who have dedicated over 30 years to saving the environment in a practical way. We depend on donations to reach our goal. If you donate just $5, the price of your coffee this Sunday, We can help to keep the planet alive in a real way and continue to bring you regular updates and features on Australian plants all in one Botanical Bible. Any support is greatly appreciated. Thank you.”
In the spirit of reconciliation we acknowledge the Bundjalung, Gumbaynggirr and Yaegl and all aboriginal nations throughout Australia and their connections to land, sea and community. We pay our respect to their Elders past, present and future for the pleasures we have gained.
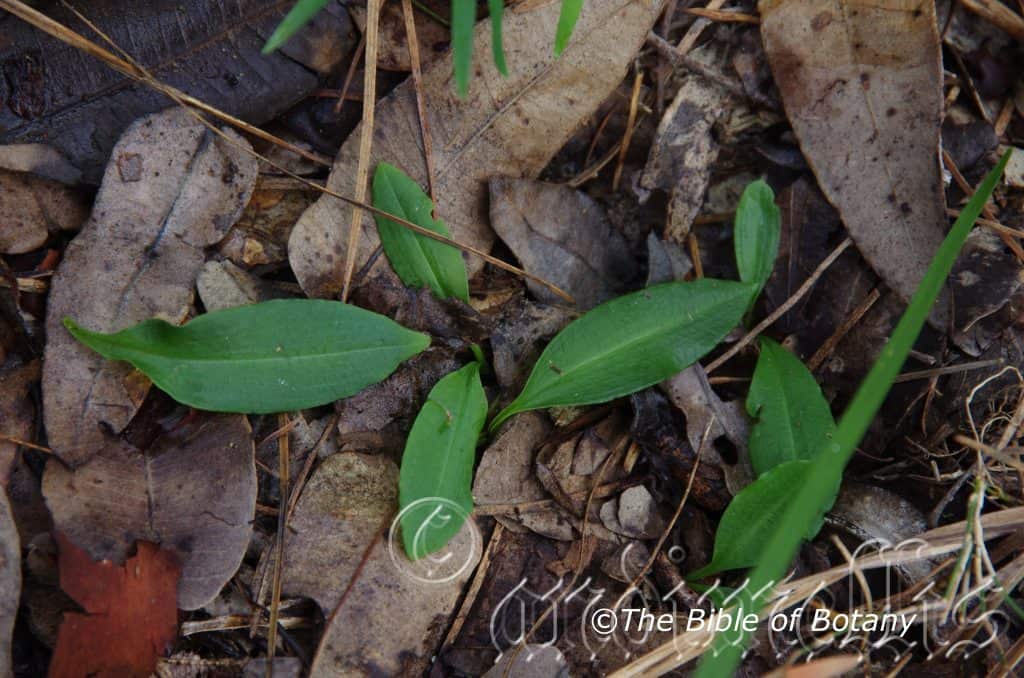
Clarence Valley NSW

Clarence Valley NSW
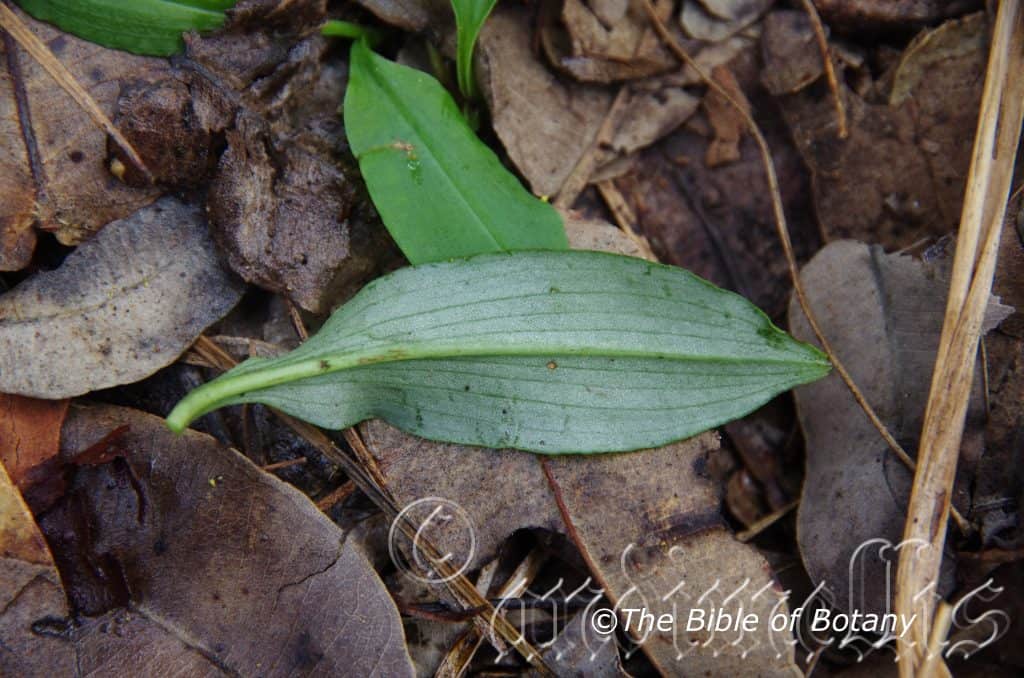
Clarence Valley NSW
Pterostylis baptistii
Classification:
Unranked: Monocots
Order: Asparagales
Family: Orcidaceae
Subfamily: Orcidaoideae
Tribe: Pterostylidinae
Genus: From Pterón, which is Ancient Greek and Latin for a wing and Stŷlos, which is Ancient Greek for a part of the female reproductive organ between the ovaries and the stigma. It refers to styles, which are flattened like wings or have distinct extension like wings.
Species: Is probably named in honour of John Baptist; who was an English born Australian horticulturalist and nurseryman.
Common Name: King Green Orchid.
Distribution:
Pterostylis baptistii is found in 3 disjunct populations south from Mareeba to near Cardwell in far northern coastal Queensland, between from Eungella National Park, the Blackdown National Park and the Fitzroy River in central coastal Queensland with the southern population being found south from Fraser Island in south east Queensland to the Marlo Airport in eastern Victoria. It is found on and east of the Great Dividing Range to the coast.
https://avh.ala.org.au/occurrences/search?taxa=Pterostylis+baptistii#tab_mapView
Habitat Aspect Climate:
Pterostylis baptistii prefer medium shade to dappled shade. It grows in moist to wet soils on sheltered slopes in closed sclerophyll forest. Its altitude ranges from 5 meters ASL to 1057 meters ASL.
The temperatures range from minus 3 degrees in August to 38 degrees in January.
The rainfall ranges from lows of 800mm to 3000mm average per annum. The plants are more reliant on capillary action from nearby permanent water sources to keep the soils permanently moist.
Soil Requirements:
Pterostylis baptistii grows on coarse sands, fine sands and sandy loams to medium clays. The soils are derived from decomposed granites, sandstones, brown basalts, black basalts, metamorphic rocks, podzolic soils, alluvial deposits or accumulated peaty beach sands. The soils pH ranges from 4.5pH to 6pH. It does not tolerate waterlogged soils however soil moisture is essential for survival. Non saline soils to moderately saline soils are tolerated.
Height & Spread: Wild Plants: 0.3m to 0.4m by 0.1m to 0.15m.
Characteristics:
Pterostylis baptistii grows as a slender erect, deciduous terrestrial orchid. The orchids usually begin to sprout from underground tubers in late April to May but have been known to commence growing as early as Late March.
Pterostylis baptistii has 4 to 8 rosette ovate to oblong leaves measure 15mm to 80mm in length by 15mm to 25mm in width. The pale bluish-green petioles measure 2mm to 5mm in length. The bases are rounded while the apexes are acuminate. The concolourous, laminas are pale bluish-greensand glabrous. The laminas are flat and decurve downwards on the apical third. The margins are crisped. The midvein is prominent on the lower laminas while the reticulate veins are slightly prominent none the upper laminas.
The inflorescences are long, erect scapes born from the center of the rosette of leaves. The scape has a single flower and measure 300mm to 400mm in length. The green and white with brown in the apex of the galea on the flowers are roughly longitudinally cupuliform. The flowers measure 50mm to 60mm in length by 20mm to 26mm in diameter. The apex of the galea is also obliquely erect to flat.
The glabrous oblong dorsal sepal is strongly curved forming a hood and has an acute apex. The margins are entire. The dorsal sepal measures 60mm to 70mm in length by 6mm to 8mm in width.
The lime green lateral sepals loosely embrace the galea leaving a lateral gap and measure 45mm to 70mm in length overall. The sinus is almost flat, notched longitudinally at the centre and protrudes in a prominent bulge when viewed from the side. The reflexed, free apexes are linear tapering to a filiform point and measure 20mm to 30mm in length.
The glabrous oblong to obspathulate lateral petals strongly incurves forming a hood with an acuminate apex. The margins are entire or more often crisped. The dorsal petals dorsal petals measure 55mm to 65mm in length by 15mm to 20mm in width.
The labellum is white and lime-green with a brownish-maroon longitudinal stripe. The narrow elliptic to lanceolate labellum’s measure 22mm to 28mm in length by 3.5mm to 5mm in width. The apexes are sub-acute while the distal quarter protrudes from the sinus in the set position. The flowers appear from July to October.
The fruits are obloidal capsules. The green capsules turn deep grey-brown when ripe.
Wildlife:
Pterostylis baptistii’s wildlife is unknown to the author.
Cultivation:
Pterostylis baptistii is a beautiful terrestrial orchid that can form dense colonies once established in a satisfactory environment. It is not a difficult orchid to grow in the garden but it needs a cool, moist, light shady position to survive and thrive. The best place is in a green house or bush house where the environment can be controlled better.
In a littoral rainforest or rainforest setting free of frost or sub zero temperatures and a humid microclimate will see the plants thrive.
Care of: Native terrestrial orchids comprise of many Genre with their individual specie which range from being relatively easy to cultivate to those that are damn near impossible and definitely frustrating to say the least.
Most terrestrial orchids are deciduous during the dry season. These usually commence their growing season with the onset of the wet season through to the end of the wet season. The flowering occurs shortly after the leaves have been established sending up the new scape flowering then dying back to a subterranean tuber in a yearly cycle of growth.
The delicate Caladenia specie (Spider Orchids), the amazing Caleana specie (Duck Orchids), the brilliantly coloured Diuris specie (Donkey Orchids), the curious Pterostylis specie (Green hoods) and the spectacular Thelymitra specie (Sun Orchids) all have some of the most amazing colour combinations and shapes of any orchids found anywhere in the world.
The saprophytic orchids have been deliberately excluded because they are highly specialized orchids in nature that replicating their growing conditions is near impossible for any period of time. This intriguing group of orchids has some of the most amazing blooms of any orchid with the above mentioned groups worthwhile persevering with.
The life cycle needs to be fully understood prior to any attempt to grow these beautiful orchids or failure is assured. The best advice I can give is if you are lucky enough to have these orchids growing naturally preserve their environment as nature has done for millions of years. I marked all the active growth areas on my Nana Glen property with survey pegs and kept the areas mulched with their local mulch and fertilized once I saw the new shoot commencing their seasonal cycle.
Failing the above notice that terrestrial orchids usually flower, then are followed by a period of dormancy, very similar to many other exotic and native epiphytic orchids. The biggest difference is that the majority’s period of growth and flowering tends to be in the cooler months of the year following the wet season not during the wet season, while the dormant period is in the warmer drier months.
It can be dormant for 6 to 8 months of the year and need to be kept reasonably dry during this period. Ideal shade house conditions would be 30mm to 50mm shade with a solid alsynite roof. Our Fern Nursery comprised of a shade cloth section with alternating 30mm and 50mm shade cloth and the dry area was 2 sheet of alsynite with 2 sheets of corrugated iron running in a north south direction. This gave all the plants shade that was of different intensities during the day. This situation is ideal during the dormancy period for all plants.
Watering is by far the most crucial part growing terrestrial orchids successfully. When in active growth the plants should be watered regularly so that the potting mix remains moist at all times. As the plants finish flowering and start to die back they will commence to develop the new tubers. Watering at this stage needs to be decreased so that the mix is almost completely dry. If the mix remains wet at this time the tubers have a good chance of rotting. From early January start to water lightly occasionally (if it rains lightly water lightly and if it storms water the plants thoroughly.) As the new growth appears and accelerates increase the water accordingly. I will stress here that rain water is far more beneficial than tap water.
Light varies depending on the genus, Pterostylis and Acianthus prefer shadier conditions (40mm to 60mm) than the Caladenia, Caleana and Diuris (20mm to 30mm) the aptly named Sun Orchids Thelymitra (10mm to 20mm) (Named because the flowers open as the sun rises and close by night). Too often enthusiast treat the orchids like babies locking them up in too dense a shade and create to humid conditions which lead to fungal and mite problems. All these species resent stagnant humid conditions so place them in a position where they receive good light and air flow.
Fertilizing is necessary for optimum growth and organic fertilizers offer the best method. Organic fertilizer like the ones we recommend delivered on a monthly basis from the onset of the leaves from early April to the opening of the flowers is the best method we have learned over the years.
Pests may not be wanted but they do appear from time to time. The usual suspects are Slugs and Snails which can do immense damage in a very short period of time. Start placing upturned half orange and mandarin skins around near the plants as you begin to water. These baits will attract them as soon as they appear and before they increase in numbers. Keep the benches dry by watering in the mornings or keep the plants suspended on mesh benches is also a good deterrent. Thrips and Red Spider can at times also cause problems. Good air flow and drier conditions is usually enough to keep them at bay. If the problem doesn’t abate then a light application of natural pyrethrum or Garlic usually does the trick.
Potting mixes are important so use a good mix. Use our recommended open dry mix for terrestrial orchids. Add a small teaspoon of 100mm natural blood and bone to the mix for each 250mm standard pot. Repotting should be carried out annually during the dormant period. Remove the plants from the pots and gently remove the old soil being careful not to damage the tubers. Fill the new pot with the new mix to about 30mm below the surface. Replace the tubers on the new mix. Cover the tubers with 5mm of mix. Cover the surface with 10mm to 15mm of fine broken forest litter. Some enthusiasts insist on using Casuarina or Allocasuarina needles. If the latter is used the logic is that it is more likely to prevent fungal problems and are easier for the orchid’s leaves to penetrate.
Pot size will depend on the number of tubers you have. A 100mm pot will handle 5 to 7 tubers, while a 150mm pot can handle 10 tubers and a 200mm pot 20 tubers. (The best plantings and flowerings appear in the 200mm pots.)
Propagation:
All orchids that are declared rare, vulnerable or endangered are protected by Federal and State Laws and must not be removed from the wild unless you are a land developer, mining company or main Roads department etc. This includes bulbs, roots, leaves and flowers. No part of any plant can be removed from Federal, State or Local Government land without the prior permission of the authority and this includes the spore.
1. Obtain relevant materials
The first step in growing orchid from seed will be sourcing and having at the ready all materials that will be required in the propagation process.
This includes all of the following:
Unripe orchid seed capsule. If there are 2 capsules secure the second capsule immediately after the first capsule splits or if only one capsule as soon as it changes colour.
Orchid gelling medium with agar which can be purchased from an orchid society or a specialist nursery.
Distilled water
Cooking pot
Spoon
Oven-safe glass or polypropylene containers with lids
Sealable bags
Clean, sterilized cutting board
Rubber gloves
Paper towels
Tweezers or forceps
70 percent ethanol
Bleach
Scalpel or sharp knife
Planting pot
Orchid compost
Length of wire metal
Plastic spray bottle.
deep petri dishes or sterile jars.
2. Prepare agar medium
The agar medium is a special orchid gelling mixture that distilled water will be added to distilled water.
To prepare the medium, mix equal parts of orchid gelling medium with distilled water in a cooking pot.
Place the pot on a stove and bring the mixture to boil for while stirring continuously for two minutes.
Pour the mixture into the petri dishes glass or propylene containers while ensuring not to fill the containers above 20 percent of their volume.
Loosely replace the lids to the containers. Sterilize the containers by heating them up in a microwave oven for between 2 to 3 minutes.
Spray 70 percent ethanol into a sealable bag to create a sterile environment. Transfer the heated containers into the sealable bag.
Allow the containers to cool a bit before tightening their lids and then sealing the bag. Leave the containers to stand for a few days until the mixture solidifies.
3. Prepare seed capsule and work surface
Place an open pot of water on a stove and bring to boil. Place the cutting board in the oven and sterilize.
Put on rubber gloves and sterilize the forceps, and scalpel with 70 percent ethanol.
Insert the seed capsule into a bowel filled with bleach for about fifteen minutes.
Sterilize seed capsule again with 70 percent ethanol and place on grill.
Using the sterilized scalpel, cut open the seed capsule to reveal the seeds. Using a scalpel or sharp knife, scrape out the seeds from the capsule unto an ethanol soaked paper towel.
4. Flasking of the seed
Take out the petri dishes or glass jars containers holding the agar medium. Over the steam, open up the containers and transfer seeds from the ethanol soaked paper towel into the individual containers using the sterilized forceps.
The amount of seeds will determine the number of containers required. Replace the lid of the containers and place them on a window sill that receives indirect sunlight.
5. Wait and exercise patience
All that can be done at this point is to wait until the seeds germinate. The amount of time that this might take varies and is dependent on the particular species.
Generally, the time can range from a few months to a few years. During this period of waiting, ensure the containers are free from contamination to ensure that germination is not disrupted.
6. Emergence of protocorms
Protocorms are tuber-shaped bodies with rhizoids that are produced by the young seedlings of various orchids. Protocorms represent the embryonic form of the orchid plant.
Their emergence after the period of waiting at an affirmation that everything in the propagation process is on track.
7. Transflask orchid seedlings is done after they have developed roots
Upon the emergence of the protocorms, consistently observe the growth of the seedlings. At the point when the seedlings appear to overcrowd the flask, transflasking should be carried out, typically within 30 and 60 days.
* This is done by removing individual seedlings using sterilized tweezers from the original containers and placing them in new containers also filled, in a proportion similar to the original, with agar medium. 6 to 8 in a standard petri dish or 1or 2 to a test tube
8. Transplant seedlings into planting pots
On the presumption that there are no disruptions to the plant growth, the seedlings will eventually outgrow the containers.
At this point, they are to be transplanted into planting pots. A good rule of thumb to determine when they are ready to be transplanted is when the seedlings have developed roots that have grown up to the length of one-quarter of an inch.
To transplant, prepare a planting pot or other container for receiving the seedling by majorly filling it up with coarse fir bark and possibly some slightly moist orchid compost mixture containing perlite, fine charcoal, redwood bark shavings, etc.
To extract the seedlings, submerge the containers in warm water to help loosen the agar gel.
Once the agar medium is softened, twist a piece of metal to form a loop and in turn, use it to carefully pull out the seedlings from the container. It is best done if the agar and seedling can be removed together.
The seedlings can be further rinsed in lukewarm water to remove any excess agar mixture still stuck to them.
Following this, the seedlings can now be planted into the prepared pot with at least 50mm of space between each individual seedling.
9. Positioning the orchid
The seedling once fully transplanted should be placed in a location that is warm with good indirect sun light.
Slowly position the pots into an area that closely assimilates the conditions it will be growing under.
The choice as to whether the plant should be exposed to full sun or in direct sunlight will be dependent on the particular orchid specie.
10. Subsequent care of the plant
After the first week, the seedling can be misted several times a day and watered just once a week.
A guide in watering the plant will be using the dryness of the fir back that is, water the plant until the fir back is completely moistened and wait till it has completely dried out before watering again.
Fertilize using a mixture of seaweed, fish emulsion and organic chicken pellets soaked in water and apply the liquid as soon as the first leaves appear to maintain health, vigour and better flowering. Fertilize again as the blooms die to assist in better tubers and flowers in the following season.
Further Comments from Readers:
“Hi reader, it seems you use The Bible of Botany a lot. That’s great as we have great pleasure in bringing it to you! It’s a little awkward for us to ask, but our first aim is to purchase land approximately 1,600 hectares to link several parcels of N.P. into one at The Pinnacles NSW Australia, but we need your help. We’re not salespeople. We’re amateur botanists who have dedicated over 30 years to saving the environment in a practical way. We depend on donations to reach our goal. If you donate just $5, the price of your coffee this Sunday, We can help to keep the planet alive in a real way and continue to bring you regular updates and features on Australian plants all in one Botanical Bible. Any support is greatly appreciated. Thank you.”
In the spirit of reconciliation we acknowledge the Bundjalung, Gumbaynggirr and Yaegl and all aboriginal nations throughout Australia and their connections to land, sea and community. We pay our respect to their Elders past, present and future for the pleasures we have gained.
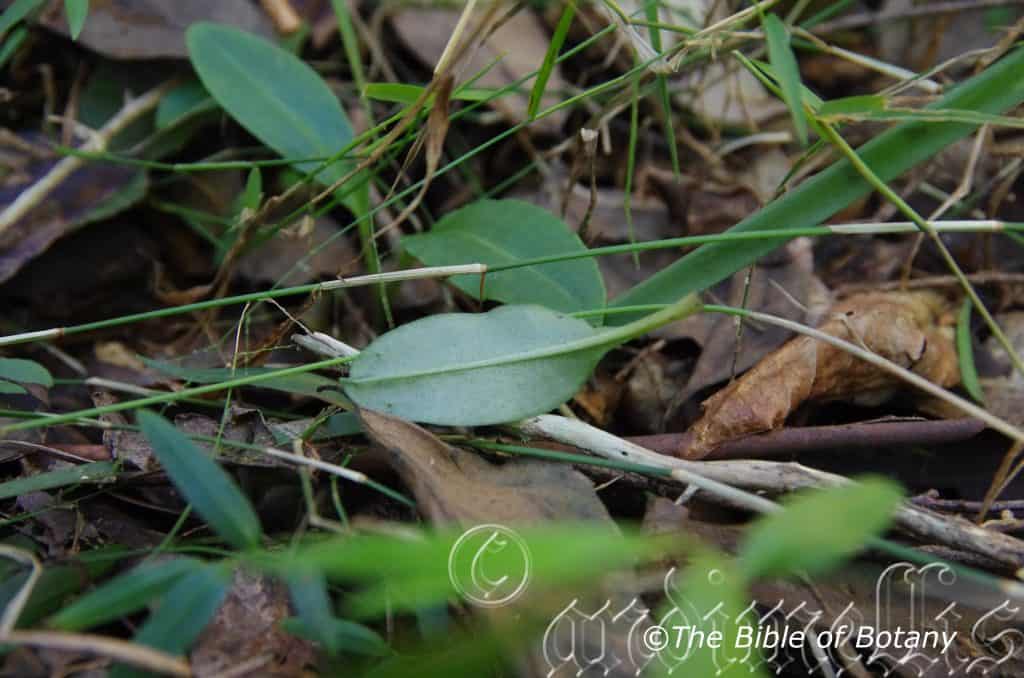
Clarence Valley NSW
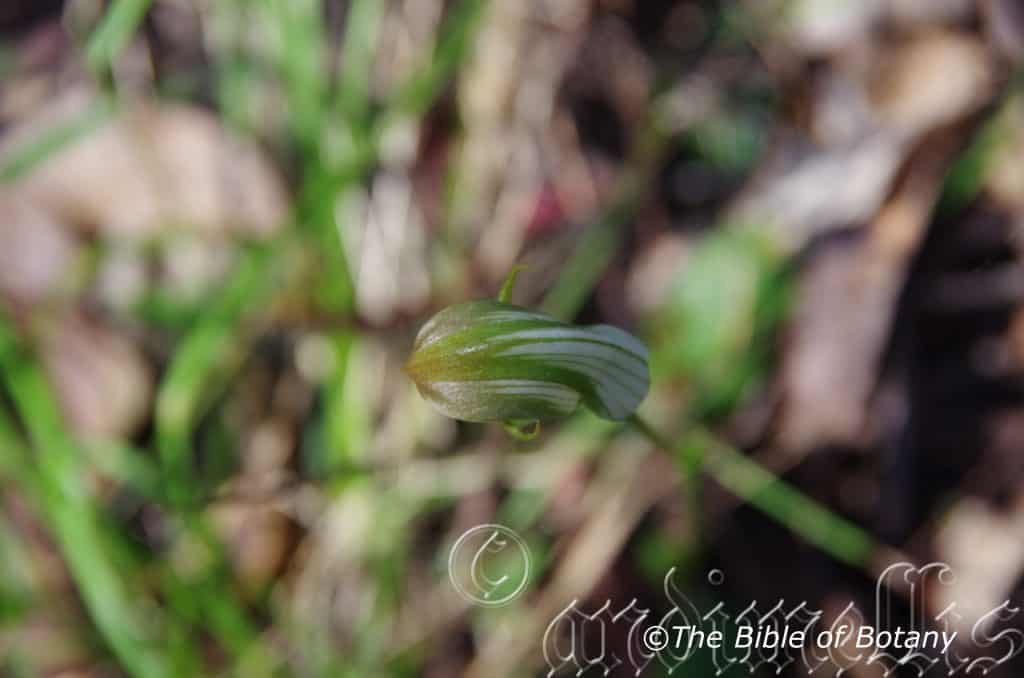
Clarence Valley NSW
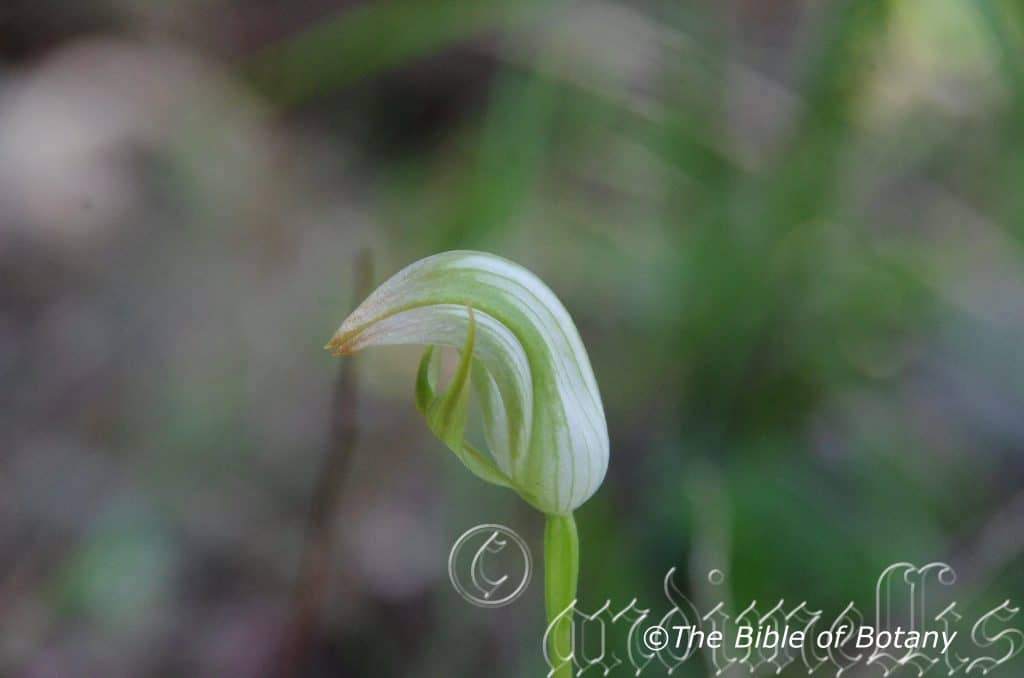
Clarence Valley NSW
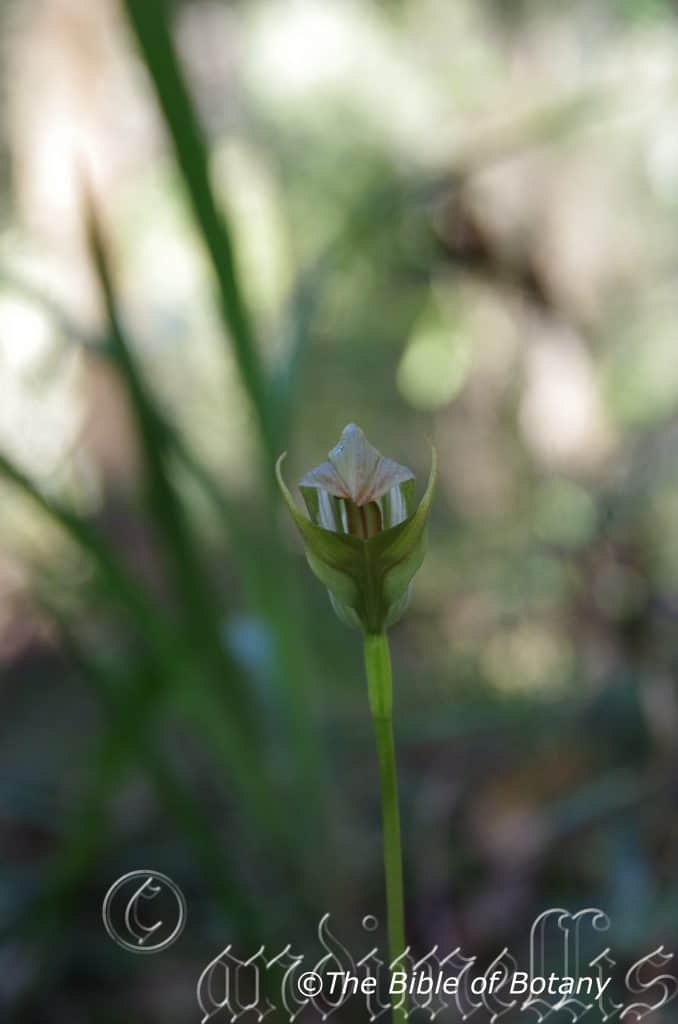
Clarence Valley NSW
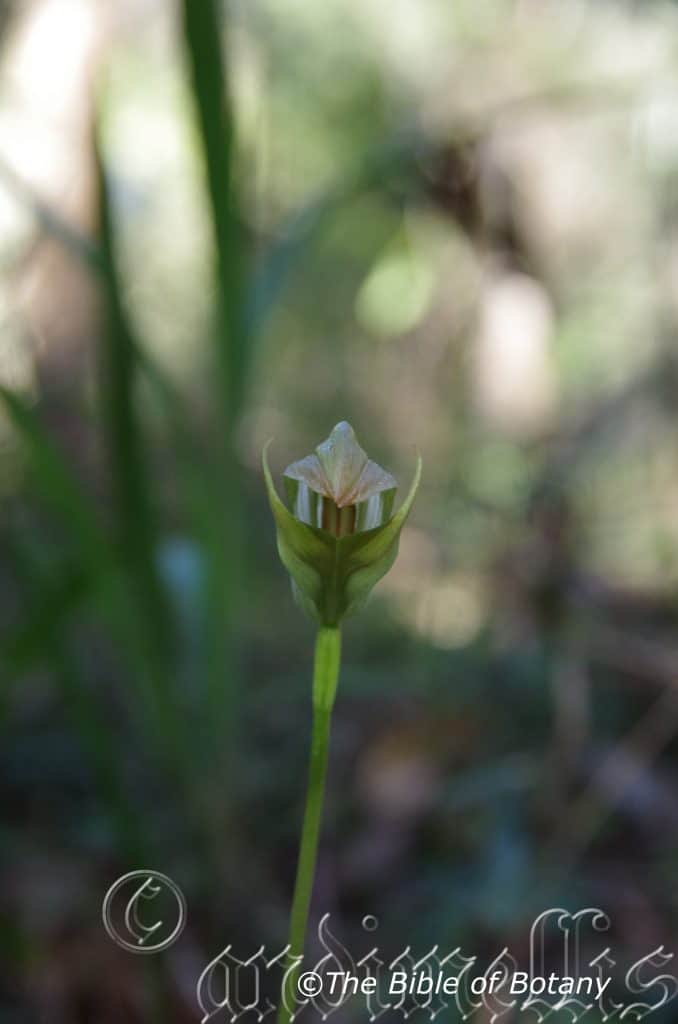
Clarence Valley NSW
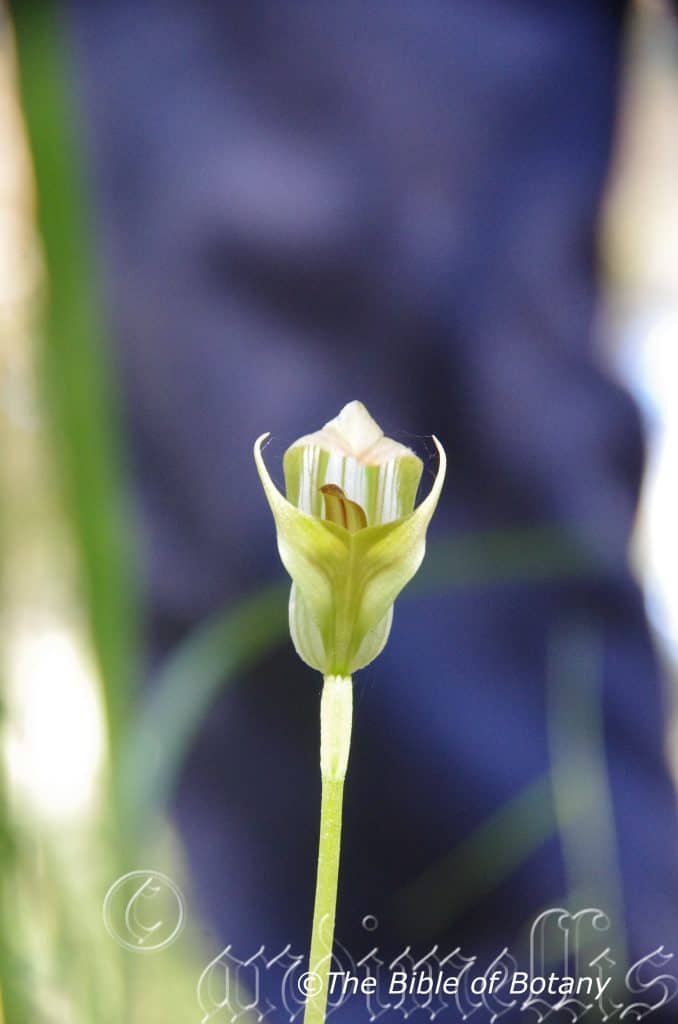
Clarence Valley NSW
Pterostylis curta
Classification:
Unranked: Monocots
Order: Asparagales
Family: Orcidaoideae
Tribe: Pterostylidinae
Genus: From Pterón, which is Ancient Greek and Latin for a wing and Stŷlos, which is Ancient Greek for a part of the female reproductive organ between the ovaries and the stigma. It refers to styles, which are flattened like wings or have distinct extension like wings.
Species: From Curta, which is Latin for blunt, mutilated, shortened or incomplete. It refers to flowers, which are either incomplete, appear to be torn or are much shorter than other species in the genus.
Common Name: Blunt Greenhood Orchid.
Distribution:
Pterostylis curta is found south from Fraser Island in central coastal Queensland to the Barossa Range in the Flinders Lofty Block in South Australia. It is also found further north in the Mount Remarkable National Park in South Australia. It is found on the western slopes, on and east of the Great Dividing Range to the coast with a disjunct population further west in the Carnarvon Gorge National Park and one further north between Mareeba and Herberton.
It is also found on the eastern Bass Strait Islands and the eastern half of mainland Tasmania.
https://avh.ala.org.au/occurrences/search?taxa=Pterostylis+curta#tab_mapView
Habitat Aspect Climate:
Pterostylis curta prefer medium shade to dappled shade. It grows in closed sclerophyll forest or open woodlands. Its altitude ranges from 5 meters ASL to 950 meters ASL.
The temperatures range from minus 3 degrees in August to 38 degrees in January.
The rainfall ranges from lows of 400mm to 2000mm average per annum. The plants are more reliant on capillary action from nearby permanent water sources to keep the soils permanently moist.
Soil Requirements:
Pterostylis curta grows on fine sands, light fatty sandy clays to medium clays. The soils are derived from decomposed granites, sandstones, brown basalts, black basalts, metamorphic rocks, podzolic soils, alluvial deposits or accumulated peaty beach sands. The soils pH ranges from 4.5pH to 6pH. It does not tolerate waterlogged soils however soil moisture is essential for survival during the growing season. Non saline soils to moderately saline soils are tolerated.
Height & Spread: Wild Plants: 8m to 15m by 0.15m to 0.4m.
Characteristics:
Pterostylis curta grows as a slender erect, deciduous terrestrial orchid. The orchids usually begin to sprout from underground tubers in late April to May but have been known to commence growing as early as Late March.
Pterostylis curta has 2 to 6 rosette ovate, elliptic or oblong leaves measure 15mm to 100mm in length by 815mm to 30mm in width. The pale bluish-green petioles measure 2mm to 5mm in length. The bases are rounded while the apexes are obtuse to broad acuminate. The concolourous, laminas are pale bluish-green and glabrous. The laminas are flat and decurve downwards on the apical third. The margins are entire or finely crisped. The midvein is prominent on the lower laminas while the reticulate veins are slightly prominent on the upper laminas.
The inflorescences are long, erect scapes born from the center of the rosette of leaves. The scape has a single flower and measures 200mm to 300mm in length. The green and white with brown in the apex of the galea flowers are roughly longitudinally cupuliform. The flowers measure 30mm to 40mm in length by 16mm to 20mm in diameter. The apex of the galea is obliquely erect to flat.
The glabrous oblong dorsal sepal is obliquely erect to horizontal and forms a hood with an acute apex. The margins are entire. The dorsal sepal measures 25mm to 30mm in length by 16mm to 18mm in width. The flower is erect, white and green with pinkish-brown suffusions in the galea.
The white and green with pinkish-brown suffusions near the apex lateral sepals loosely embrace the galea leaving a lateral gap and measure 45mm to 70mm in length overall. The sinus is almost flat, notched longitudinally at the centre and protrudes in a prominent bulge when viewed from the side. The reflexed, free apexes are linear tapering to a filiform point and measure 20mm to 30mm in length.
The sinus is broadly V shaped when viewed from the front and shallowly mounded when viewed from the side. The free apical halves are linear, divergent, recurved and measure 10mm to 12mm in length.
The white and pale green glabrous oblong to obspathulate lateral petals is strongly incurved. The margins are entire or more often crisped. The lateral petals measure 29mm to 30mm in length by 15mm to 18mm in width.
The labellum is yellow-ochre with a reddish longitudinal stripe. The oblong to obovate labellum’s twist to one side and measure 12mm to 16mm in length by 4.5mm to 5mm in width. The apexes are obtuse while the distal quarter protrudes from the sinus in the set position. The flowers appear from July to October.
The fruits are obloidal capsules. The green capsules turn deep grey-brown when ripe.
Wildlife:
Pterostylis curta’s wildlife is unknown to the author.
Cultivation:
Pterostylis curta is a beautiful terrestrial orchid that can form dense colonies once established in a satisfactory environment. It is not a difficult orchid to grow in the garden but it needs a cool, moist, light shady position to survive and thrive. The best place is in a greenhouse or bush house where the environment can be controlled better.
In a littoral rainforest or rainforest setting free of frost or sub zero temperatures and a humid microclimate will see the plants thrive.
Propagation:
Native terrestrial orchids comprise of many Genre with their individual specie which range from being relatively easy to cultivate to those that are damn near impossible and definitely frustrating to say the least. NOTE: All native orchids are protected by law.
Most terrestrial orchids are deciduous during the dry season. These usually commence their growing season with the onset of the wet season through to the end of the wet season. The flowering occurs shortly after the leaves have been established sending up the new scape flowering then dying back to a subterranean tuber in a yearly cycle of growth.
The delicate Caladenia specie (Spider Orchids), the amazing Caleana specie (Duck Orchids), the brilliantly coloured Diuris specie (Donkey Orchids), the curious Pterostylis specie (Green hoods) and the spectacular Thelymitra specie (Sun Orchids) all have some the most amazing colour combinations and shapes of any orchids found anywhere in the world.
The saprophytic orchids have been deliberately excluded because they are highly specialized orchids in nature that replicating their growing conditions is near impossible for any period of time. This intriguing group of orchids has some of the most amazing blooms of any orchid with the above mentioned groups worthwhile persevering with.
The life cycle needs to be fully understood prior to any attempt to grow these beautiful orchids or failure is assured. The best advice I can give is if you are lucky enough to have these orchids growing naturally preserve their environment as nature has done for millions of years. I marked all the active growth areas on my Nana Glen property with survey pegs and kept the areas mulched with their local mulch and fertilized once I saw the new shoot commencing their seasonal cycle.
Failing the above notice that terrestrial orchids usually flower, then are followed by a period of dormancy, very similar to many other exotic and native epiphytic orchids. The biggest difference is that the majority’s period of growth and flowering tends to be in the cooler months of the year following the wet season not during the wet season, while the dormant period is in the warmer drier months.
They can be dormant for 6 to 8 months of the year and need to be kept reasonably dry during this period. Ideal shade house conditions would be 30mm to 50mm shade with a solid alsynite roof. Our Fern Nursery comprised of a shade cloth section with alternating 30mm and 50mm shade cloth and the dry area was 2 sheet of alsynite with 2 sheets of corrugated iron running in a north south direction. This gave all the plants shade that was of different intensities during the day. This situation is ideal during the dormancy period for all plants.
Watering is by far the most crucial part growing terrestrial orchids successfully. When in active growth the plants should be watered regularly so that the potting mix remains moist at all times. As the plants finish flowering and start to die back they will commence to develop the new tubers. Watering at this stage needs to be decreased so that the mix is almost completely dry. If the mix remains wet at this time the tubers have a good chance of rotting. From early January start to water lightly occasionally (if it rains lightly water lightly and if it storms water the plants thoroughly.) As the new growth appears and accelerates increase the water accordingly. I will stress here that rain water is far more beneficial than tap water.
Light varies depending on the genus, Pterostylis and Acianthus prefer shadier conditions (40mm to 60mm) than the Caladenia, Caleana and Diuris (20mm to 30mm) the aptly named Sun Orchids Thelymitra (10mm to 20mm) (Named because the flowers open as the sun rises and close by night). Too often enthusiast treat the orchids like babies locking them up in too dense a shade and create to humid conditions which lead to fungal and mite problems. All these species resent stagnant humid conditions so place them in a position where they receive good light and air flow.
Fertilizing is necessary for optimum growth and organic fertilizers offer the best method. Organic fertilizer like the ones we recommend delivered on a monthly basis from the onset of the leaves from early April to the opening of the flowers is the best method we have learned over the years.
Pests may not be wanted but they do appear from time to time. The usual suspects are Slugs and Snails which can do immense damage in a very short period of time. Start placing upturned half orange and mandarin skins around near the plants as you begin to water. These baits will attract them as soon as they appear and before they increase in numbers. Keep the benches dry by watering in the mornings or keep the plants suspended on mesh benches is also a good deterrent. Thrips and Red Spider can at times also cause problems. Good air flow and drier conditions is usually enough to keep them at bay. If the problem doesn’t abate then a light application of natural pyrethrum or Garlic usually does the trick.
Potting mixes are important so use a good mix. Use our recommended open dry mix for terrestrial orchids. Add a small teaspoon of 100mm natural blood and bone to the mix for each 250mm standard pot. Repotting should be carried out annually during the dormant period. Remove the plants from the pots and gently remove the old soil being careful not to damage the tubers. Fill the new pot with the new mix to about 30mm below the surface. Replace the tubers on the new mix. Cover the tubers with 5mm of mix. Cover the surface with 10mm to 15mm of fine broken forest litter. Some enthusiasts insist on using Cassuarina or Allocasuarina needles. If the latter is used the logic is that it is more likely to prevent fungal problems and are easier for the orchid’s leaves to penetrate.
Pot size will depend on the number of tubers you have. A 100mm pot will handle 5 to 7 tubers, while a 150mm pot can handle 10 tubers and a 200mm pot 20 tubers. (The best plantings and flowerings appear in the 200mm pots.)
Propagation:
All orchids that are declared rare, vulnerable or endangered are protected by Federal and State Laws and must not be removed from the wild unless you are a land developer, mining company or main Roads department etc. This includes bulbs, roots, leaves and flowers. No part of any plant can be removed from Federal, State or Local Government land without the prior permission of the authority and this includes the spore.
1. Obtain relevant materials
The first step in growing orchid from seed will be sourcing and having at the ready all materials that will be required in the propagation process.
This includes all of the following:
Unripe orchid seed capsule. If there are 2 capsules secure the second capsule immediately after the first capsule splits or if only one capsule as soon as it changes colour.
Orchid gelling medium with agar which can be purchased from an orchid society or a specialist nursery.
Distilled water
Cooking pot
Spoon
Oven-safe glass or polypropylene containers with lids
Sealable bags
Clean, sterilized cutting board
Rubber gloves
Paper towels
Tweezers or forceps
70 percent ethanol
Bleach
Scalpel or sharp knife
Planting pot
Orchid compost
Length of wire metal
Plastic spray bottle.
deep petri dishes or sterile jars.
2. Prepare agar medium
The agar medium is a special orchid gelling mixture that distilled water will be added to distilled water.
To prepare the medium, mix equal parts of orchid gelling medium with distilled water in a cooking pot.
Place the pot on a stove and bring the mixture to boil for while stirring continuously for two minutes.
Pour the mixture into the petri dishes glass or propylene containers while ensuring not to fill the containers above 20 percent of their volume.
Loosely replace the lids to the containers. Sterilize the containers by heating them up in a microwave oven for between 2 to 3 minutes.
Spray 70 percent ethanol into a sealable bag to create a sterile environment. Transfer the heated containers into the sealable bag.
Allow the containers to cool a bit before tightening their lids and then sealing the bag. Leave the containers to stand for a few days until the mixture solidifies.
3. Prepare seed capsule and work surface
Place an open pot of water on a stove and bring to boil. Place the cutting board in the oven and sterilize.
Put on rubber gloves and sterilize the forceps, and scalpel with 70 percent ethanol.
Insert the seed capsule into a bowel filled with bleach for about fifteen minutes.
Sterilize seed capsule again with 70 percent ethanol and place on grill.
Using the sterilized scalpel, cut open the seed capsule to reveal the seeds. Using a scalpel or sharp knife, scrape out the seeds from the capsule unto an ethanol soaked paper towel.
4. Flasking of the seed
Take out the petri dishes or glass jars containers holding the agar medium. Over the steam, open up the containers and transfer seeds from the ethanol soaked paper towel into the individual containers using the sterilized forceps.
The amount of seeds will determine the number of containers required. Replace the lid of the containers and place them on a window sill that receives indirect sunlight.
5. Wait and exercise patience
All that can be done at this point is to wait until the seeds germinate. The amount of time that this might take varies and is dependent on the particular species.
Generally, the time can range from a few months to a few years. During this period of waiting, ensure the containers are free from contamination to ensure that germination is not disrupted.
6. Emergence of protocorms
Protocorms are tuber-shaped bodies with rhizoids that are produced by the young seedlings of various orchids. Protocorms represent the embryonic form of the orchid plant.
Their emergence after the period of waiting at an affirmation that everything in the propagation process is on track.
7. Transflask orchid seedlings is done after they have developed roots
Upon the emergence of the protocorms, consistently observe the growth of the seedlings. At the point when the seedlings appear to overcrowd the flask, transflasking should be carried out, typically within 30 and 60 days.
* This is done by removing individual seedlings using sterilized tweezers from the original containers and placing them in new containers also filled, in a proportion similar to the original, with agar medium. 6 to 8 in a standard petri dish or 1or 2 to a test tube
8. Transplant seedlings into planting pots
On the presumption that there are no disruptions to the plant growth, the seedlings will eventually outgrow the containers.
At this point, they are to be transplanted into planting pots. A good rule of thumb to determine when they are ready to be transplanted is when the seedlings have developed roots that have grown up to the length of one-quarter of an inch.
To transplant, prepare a planting pot or other container for receiving the seedling by majorly filling it up with coarse fir bark and possibly some slightly moist orchid compost mixture containing perlite, fine charcoal, redwood bark shavings, etc.
To extract the seedlings, submerge the containers in warm water to help loosen the agar gel.
Once the agar medium is softened, twist a piece of metal to form a loop and in turn, use it to carefully pull out the seedlings from the container. It is best done if the agar and seedling can be removed together.
The seedlings can be further rinsed in lukewarm water to remove any excess agar mixture still stuck to them.
Following this, the seedlings can now be planted into the prepared pot with at least 50mm of space between each individual seedling.
9. Positioning the orchid
The seedling once fully transplanted should be placed in a location that is warm with good indirect sun light.
Slowly position the pots into an area that closely assimilates the conditions it will be growing under.
The choice as to whether the plant should be exposed to full sun or in direct sunlight will be dependent on the particular orchid specie.
10. Subsequent care of the plant
After the first week, the seedling can be misted several times a day and watered just once a week.
A guide in watering the plant will be using the dryness of the fir back that is, water the plant until the fir back is completely moistened and wait till it has completely dried out before watering again.
Fertilize using a mixture of seaweed, fish emulsion and organic chicken pellets soaked in water and apply the liquid as soon as the first leaves appear to maintain health, vigour and better flowering. Fertilize again as the blooms die to assist in better tubers and flowers in the following season.
Further Comments from Readers:
“Hi reader, it seems you use The Bible of Botany a lot. That’s great as we have great pleasure in bringing it to you! It’s a little awkward for us to ask, but our first aim is to purchase land approximately 1,600 hectares to link several parcels of N.P. into one at The Pinnacles NSW Australia, but we need your help. We’re not salespeople. We’re amateur botanists who have dedicated over 30 years to saving the environment in a practical way. We depend on donations to reach our goal. If you donate just $5, the price of your coffee this Sunday, We can help to keep the planet alive in a real way and continue to bring you regular updates and features on Australian plants all in one Botanical Bible. Any support is greatly appreciated. Thank you.”
In the spirit of reconciliation we acknowledge the Bundjalung, Gumbaynggirr and Yaegl and all aboriginal nations throughout Australia and their connections to land, sea and community. We pay our respect to their Elders past, present and future for the pleasures we have gained.
Pterostylis daintreana
Classification:
Unranked: Monocots
Order: Asparagales
Family: Orcidaoideae
Tribe: Pterostylidinae
Genus: From Pterón, which is Ancient Greek and Latin for a wing and Stŷlos, which is Ancient Greek for a part of the female reproductive organ between the ovaries and the stigma. It refers to styles, which are flattened like wings or have distinct extension like wings.
Species: From Daintree, which is Latin for the Daintree National Park and Ana/Ensis which is Latin for to originate from. It refers to plants, which were first discovered in the Daintree National Park.
Common Name:
Distribution:
Pterostylis daintreana is found south from the Moreton Bay Islands and Brookfield in southern coastal Queensland and further south to and adjacent to Sassafras National Park in the southern Sydney Basin. It is found on and east of the Great Dividing Range.
https://avh.ala.org.au/occurrences/search?taxa=Pterostylis+daintreana#tab_mapView
Habitat Aspect Climate:
Pterostylis daintreana prefer medium shade to dappled shade. It grows in moist to wet soils among low shrubs, heaths or closed woodlands, often in moss gardens over sandstone sheets. Its altitude ranges from 15 meters ASL to 877 meters ASL.
The temperatures range from minus 3 degrees in August to 38 degrees in January.
The rainfall ranges from lows of 800mm to 1600mm average per annum. The plants are often more reliant on capillary action from nearby permanent water sources to keep the soils permanently moist.
Soil Requirements:
Pterostylis daintreana grows in fine sands and light fatty clays over sandstone. The soils are usually derived from decomposed sandstones or at times granites or black basalts. The soils pH ranges from 4.5pH to 6pH. It does not tolerate waterlogged soils however soil moisture is essential for survival. Non saline soils to moderately saline soils are tolerated.
Height & Spread:
Wild Plants: 0.2m to 0.3m by 0.15m to 0.2m.
Characteristics:
Pterostylis daintreana grows as a slender erect, deciduous terrestrial orchid. The orchids usually begin to sprout from underground tubers in late December to January.
The 1 or 2 rosettes of 3 to 10 ovate to cordate leaves when mature. The leaves measure 30mm to 100mm in length by 6mm to 13mm in width. The pale bluish-green petioles measure 2mm to 5mm in length. The bases are rounded to cordate while the apexes are obtuse-acuminate. The concolourous, laminas are bluish-green and glabrous. The laminas are flat and straight or decurve downwards on the apical quarter. The margins are entire or crenulate. The midvein is prominent on the lower laminas while the reticulate veins are slightly prominent none the upper laminas.
The are long, erect scapes born from the center of the rosette of leaves. The scape has 3 to 10 individual flowers and measure 200mm to 300mm in. It has 3 to 5 sheathing scape leaves. The green and white glossy flowers are roughly longitudinally cupuliform. The flowers measure 10mm to 12mm in length by 6mm to 7mm in diameter. The apex of the galea is obliquely erect to flat.
The glabrous oblong dorsal sepal is strongly curved forming a hood and has an acute apex. The margins are entire. The galea curves forward then abruptly decurve downwards on the apical quarter. The dorsal sepals measures 5mm to 6mm in length by 2.5mm to 3.5mm in width. The dorsal sepal has a decurved, filiform tip that measures 5mm to 6mm in length.
The lime green lateral sepals loosely embrace the galea leaving a lateral gap and measure 1mm to 3mm in length overall. The sinus is “V” shaped at the centre and protrudes when viewed from the side. The reflexed, free apexes are linear tapering to a filiform point, measure 7mm to 10mm in length and are slightly divergent.
The glabrous lateral petals are strongly incurved forming wings on the galea. The margins are entire or more often crisped. The dorsal petals measure 5mm to 6mm in length by 3mm to 3.5mm in width.
The trilobed labellum is deep brown. The lateral lobes are enlarged at the base while the mid lobe is obtuse. The narrow elliptic to lanceolate labellum’s measure 4mm to 6mm in length by 2mm to 2.5mm in width. The apexes are sub-acute while the distal quarter protrudes from the sinus in the set position. The flowers appear from late February to early July.
The fruits are obloidal capsules. The green capsules turn deep grey-brown when ripe.
Wildlife:
Pterostylis daintreana’s wildlife is unknown to the author.
Cultivation:
Pterostylis daintreana is a beautiful terrestrial orchid that can form dense colonies once established in a satisfactory environment. It is not a difficult orchid to grow in the garden but it needs a cool, moist, light shady position to survive and thrive. The best place is in a green house or bush house where the environment can be controlled better.
In a littoral rainforest or rainforest setting free of frost or sub zero temperatures and a humid microclimate will see the plants thrive.
Fertilize using a mixture of seaweed, fish emulsion and organic chicken pellets soaked in water and apply the liquid as soon as the first leaves appear to maintain health, vigour and better flowering. Fertilize again as the blooms die to assist in better tubers and flowers in the following season.
Propagation:
Native terrestrial orchids comprise of many Genre with their individual specie which range from being relatively easy to cultivate to those that are damn near impossible and definitely frustrating to say the least. NOTE: All native orchids are protected by law.
Most terrestrial orchids are deciduous during the dry season. These usually commence their growing season with the onset of the wet season through to the end of the wet season. The flowering occurs shortly after the leaves have been established sending up the new scape flowering then dying back to a subterranean tuber in a yearly cycle of growth.
The delicate Caladenia specie (Spider Orchids), the amazing Caleana specie (Duck Orchids), the brilliantly coloured Diuris specie (Donkey Orchids), the curious Pterostylis specie (Green hoods) and the spectacular Thelymitra specie (Sun Orchids) all have some the most amazing colour combinations and shapes of any orchids found anywhere in the world.
The saprophytic orchids have been deliberately excluded because they are highly specialized orchids in nature that replicating their growing conditions is near impossible for any period of time. This intriguing group of orchids has some of the most amazing blooms of any orchid with the above mentioned groups worthwhile persevering with.
The life cycle needs to be fully understood prior to any attempt to grow these beautiful orchids or failure is assured. The best advice I can give is if you are lucky enough to have these orchids growing naturally preserve their environment as nature has done for millions of years. I marked all the active growth areas on my Nana Glen property with survey pegs and kept the areas mulched with their local mulch and fertilized once I saw the new shoot commencing their seasonal cycle.
Failing the above notice that terrestrial orchids usually flower, then are followed by a period of dormancy, very similar to many other exotic and native epiphytic orchids. The biggest difference is that the majority’s period of growth and flowering tends to be in the cooler months of the year following the wet season not during the wet season, while the dormant period is in the warmer drier months.
They can be dormant for 6 to 8 months of the year and need to be kept reasonably dry during this period. Ideal shade house conditions would be 30mm to 50mm shade with a solid alsynite roof. Our Fern Nursery comprised of a shade cloth section with alternating 30mm and 50mm shade cloth and the dry area was 2 sheet of alsynite with 2 sheets of corrugated iron running in a north south direction. This gave all the plants shade that was of different intensities during the day. This situation is ideal during the dormancy period for all plants.
Watering is by far the most crucial part growing terrestrial orchids successfully. When in active growth the plants should be watered regularly so that the potting mix remains moist at all times. As the plants finish flowering and start to die back they will commence to develop the new tubers. Watering at this stage needs to be decreased so that the mix is almost completely dry. If the mix remains wet at this time the tubers have a good chance of rotting. From early January start to water lightly occasionally (if it rains lightly water lightly and if it storms water the plants thoroughly.) As the new growth appears and accelerates increase the water accordingly. I will stress here that rain water is far more beneficial than tap water.
Light varies depending on the genus, Pterostylis and Acianthus prefer shadier conditions (40mm to 60mm) than the Caladenia, Caleana and Diuris (20mm to 30mm) the aptly named Sun Orchids Thelymitra (10mm to 20mm) (Named because the flowers open as the sun rises and close by night). Too often enthusiast treat the orchids like babies locking them up in too dense a shade and create to humid conditions which lead to fungal and mite problems. All these species resent stagnant humid conditions so place them in a position where they receive good light and air flow.
Fertilizing is necessary for optimum growth and organic fertilizers offer the best method. Organic fertilizer like the ones we recommend delivered on a monthly basis from the onset of the leaves from early April to the opening of the flowers is the best method we have learned over the years.
Pests may not be wanted but they do appear from time to time. The usual suspects are Slugs and Snails which can do immense damage in a very short period of time. Start placing upturned half orange and mandarin skins around near the plants as you begin to water. These baits will attract them as soon as they appear and before they increase in numbers. Keep the benches dry by watering in the mornings or keep the plants suspended on mesh benches is also a good deterrent. Thrips and Red Spider can at times also cause problems. Good air flow and drier conditions is usually enough to keep them at bay. If the problem doesn’t abate then a light application of natural pyrethrum or Garlic usually does the trick.
Potting mixes are important so use a good mix. Use our recommended open dry mix for terrestrial orchids. Add a small teaspoon of 100mm natural blood and bone to the mix for each 250mm standard pot. Repotting should be carried out annually during the dormant period. Remove the plants from the pots and gently remove the old soil being careful not to damage the tubers. Fill the new pot with the new mix to about 30mm below the surface. Replace the tubers on the new mix. Cover the tubers with 5mm of mix. Cover the surface with 10mm to 15mm of fine broken forest litter. Some enthusiasts insist on using Casuarina or Allocasuarina needles. If the latter is used the logic is that it is more likely to prevent fungal problems and are easier for the orchid’s leaves to penetrate.
Pot size will depend on the number of tubers you have. A 100mm pot will handle 5 to 7 tubers, while a 150mm pot can handle 10 tubers and a 200mm pot 20 tubers. (The best plantings and flowerings appear in the 200mm pots.)
Propagation:
All orchids that are declared rare, vulnerable or endangered are protected by Federal and State Laws and must not be removed from the wild unless you are a land developer, mining company or main Roads department etc. This includes bulbs, roots, leaves and flowers. No part of any plant can be removed from Federal, State or Local Government land without the prior permission of the authority and this includes the spore.
1. Obtain relevant materials
The first step in growing orchid from seed will be sourcing and having at the ready all materials that will be required in the propagation process.
This includes all of the following:
Unripe orchid seed capsule. If there are 2 capsules secure the second capsule immediately after the first capsule splits or if only one capsule as soon as it changes colour.
Orchid gelling medium with agar which can be purchased from an orchid society or a specialist nursery.
Distilled water
Cooking pot
Spoon
Oven-safe glass or polypropylene containers with lids
Sealable bags
Clean, sterilized cutting board
Rubber gloves
Paper towels
Tweezers or forceps
70 percent ethanol
Bleach
Scalpel or sharp knife
Planting pot
Orchid compost
Length of wire metal
Plastic spray bottle.
deep petri dishes or sterile jars.
2. Prepare agar medium
The agar medium is a special orchid gelling mixture that distilled water will be added to distilled water.
To prepare the medium, mix equal parts of orchid gelling medium with distilled water in a cooking pot.
Place the pot on a stove and bring the mixture to boil for while stirring continuously for two minutes.
Pour the mixture into the petri dishes glass or propylene containers while ensuring not to fill the containers above 20 percent of their volume.
Loosely replace the lids to the containers. Sterilize the containers by heating them up in a microwave oven for between 2 to 3 minutes.
Spray 70 percent ethanol into a sealable bag to create a sterile environment. Transfer the heated containers into the sealable bag.
Allow the containers to cool a bit before tightening their lids and then sealing the bag. Leave the containers to stand for a few days until the mixture solidifies.
3. Prepare seed capsule and work surface
Place an open pot of water on a stove and bring to boil. Place the cutting board in the oven and sterilize.
Put on rubber gloves and sterilize the forceps, and scalpel with 70 percent ethanol.
Insert the seed capsule into a bowel filled with bleach for about fifteen minutes.
Sterilize seed capsule again with 70 percent ethanol and place on grill.
Using the sterilized scalpel, cut open the seed capsule to reveal the seeds. Using a scalpel or sharp knife, scrape out the seeds from the capsule unto an ethanol soaked paper towel.
4. Flasking of the seed
Take out the petri dishes or glass jars containers holding the agar medium. Over the steam, open up the containers and transfer seeds from the ethanol soaked paper towel into the individual containers using the sterilized forceps.
The amount of seeds will determine the number of containers required. Replace the lid of the containers and place them on a window sill that receives indirect sunlight.
5. Wait and exercise patience
All that can be done at this point is to wait until the seeds germinate. The amount of time that this might take varies and is dependent on the particular species.
Generally, the time can range from a few months to a few years. During this period of waiting, ensure the containers are free from contamination to ensure that germination is not disrupted.
6. Emergence of protocorms
Protocorms are tuber-shaped bodies with rhizoids that are produced by the young seedlings of various orchids. Protocorms represent the embryonic form of the orchid plant.
Their emergence after the period of waiting at an affirmation that everything in the propagation process is on track.
7. Transflask orchid seedlings is done after they have developed roots
Upon the emergence of the protocorms, consistently observe the growth of the seedlings. At the point when the seedlings appear to overcrowd the flask, transflasking should be carried out, typically within 30 and 60 days.
* This is done by removing individual seedlings using sterilized tweezers from the original containers and placing them in new containers also filled, in a proportion similar to the original, with agar medium. 6 to 8 in a standard petri dish or 1or 2 to a test tube
8. Transplant seedlings into planting pots
On the presumption that there are no disruptions to the plant growth, the seedlings will eventually outgrow the containers.
At this point, they are to be transplanted into planting pots. A good rule of thumb to determine when they are ready to be transplanted is when the seedlings have developed roots that have grown up to the length of one-quarter of an inch.
To transplant, prepare a planting pot or other container for receiving the seedling by majorly filling it up with coarse fir bark and possibly some slightly moist orchid compost mixture containing perlite, fine charcoal, redwood bark shavings, etc.
To extract the seedlings, submerge the containers in warm water to help loosen the agar gel.
Once the agar medium is softened, twist a piece of metal to form a loop and in turn, use it to carefully pull out the seedlings from the container. It is best done if the agar and seedling can be removed together.
The seedlings can be further rinsed in lukewarm water to remove any excess agar mixture still stuck to them.
Following this, the seedlings can now be planted into the prepared pot with at least 50mm of space between each individual seedling.
9. Positioning the orchid
The seedling once fully transplanted should be placed in a location that is warm with good indirect sun light.
Slowly position the pots into an area that closely assimilates the conditions it will be growing under.
The choice as to whether the plant should be exposed to full sun or in direct sunlight will be dependent on the particular orchid specie.
10. Subsequent care of the plant
After the first week, the seedling can be misted several times a day and watered just once a week.
A guide in watering the plant will be using the dryness of the fir back that is, water the plant until the fir back is completely moistened and wait till it has completely dried out before watering again.
Do not fertilize until the seedlings have fully established themselves then annually as the first new shoot appears.
Further Comments from Readers:
“Hi reader, it seems you use The Bible of Botany a lot. That’s great as we have great pleasure in bringing it to you! It’s a little awkward for us to ask, but our first aim is to purchase land approximately 1,600 hectares to link several parcels of N.P. into one at The Pinnacles NSW Australia, but we need your help. We’re not salespeople. We’re amateur botanists who have dedicated over 30 years to saving the environment in a practical way. We depend on donations to reach our goal. If you donate just $5, the price of your coffee this Sunday, We can help to keep the planet alive in a real way and continue to bring you regular updates and features on Australian plants all in one Botanical Bible. Any support is greatly appreciated. Thank you.”
In the spirit of reconciliation we acknowledge the Bundjalung, Gumbaynggirr and Yaegl and all aboriginal nations throughout Australia and their connections to land, sea and community. We pay our respect to their Elders past, present and future for the pleasures we have gained.

Clarence Valley NSW
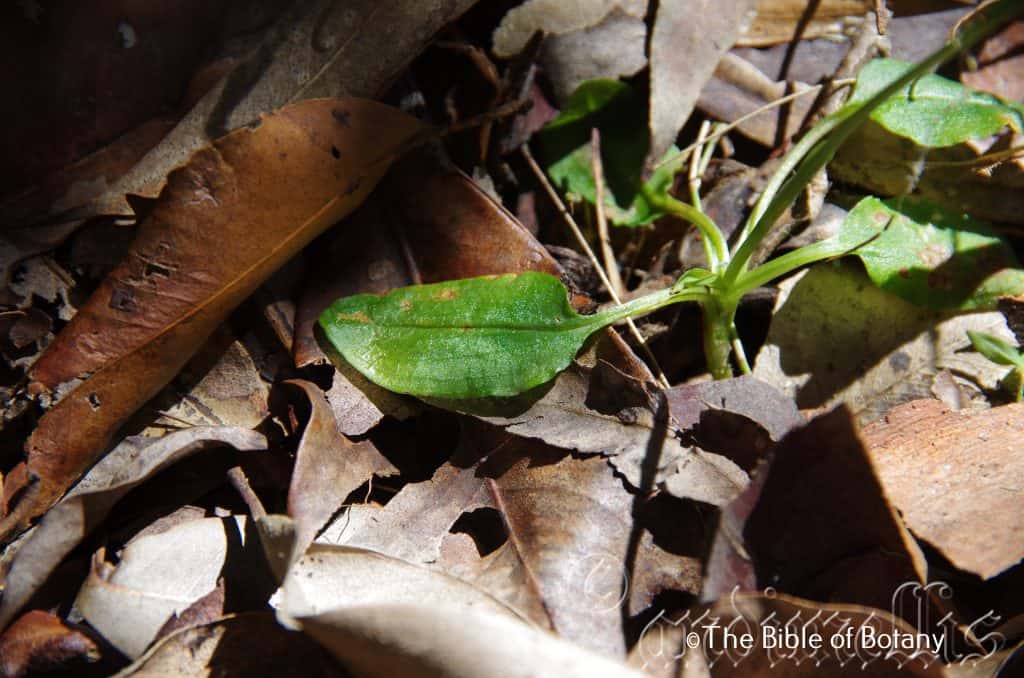
Clarence Valley NSW
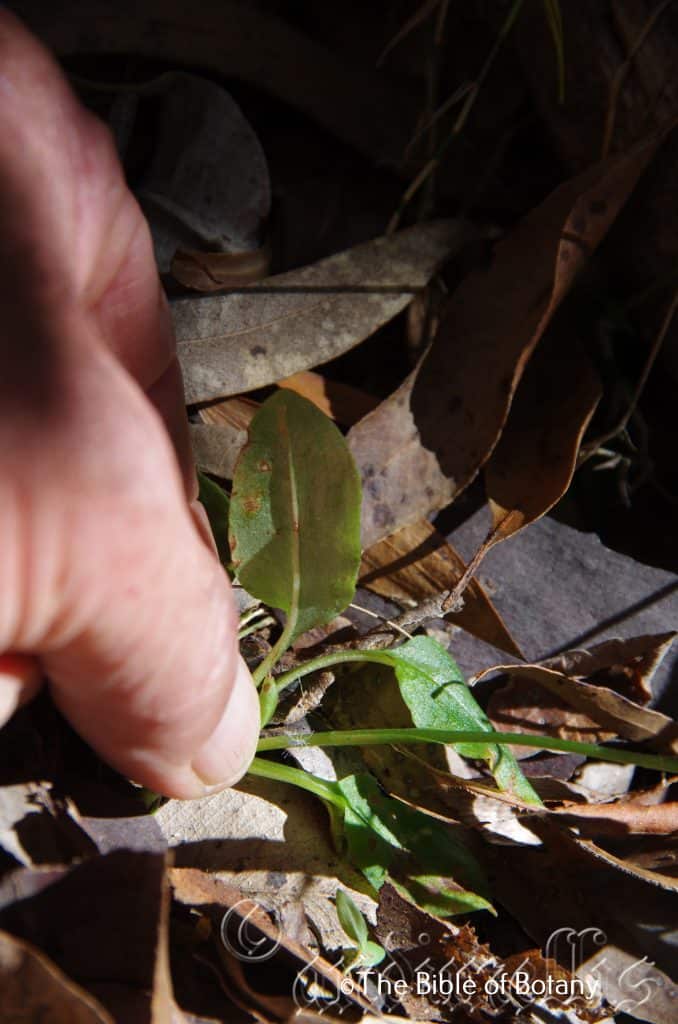
Clarence Valley NSW
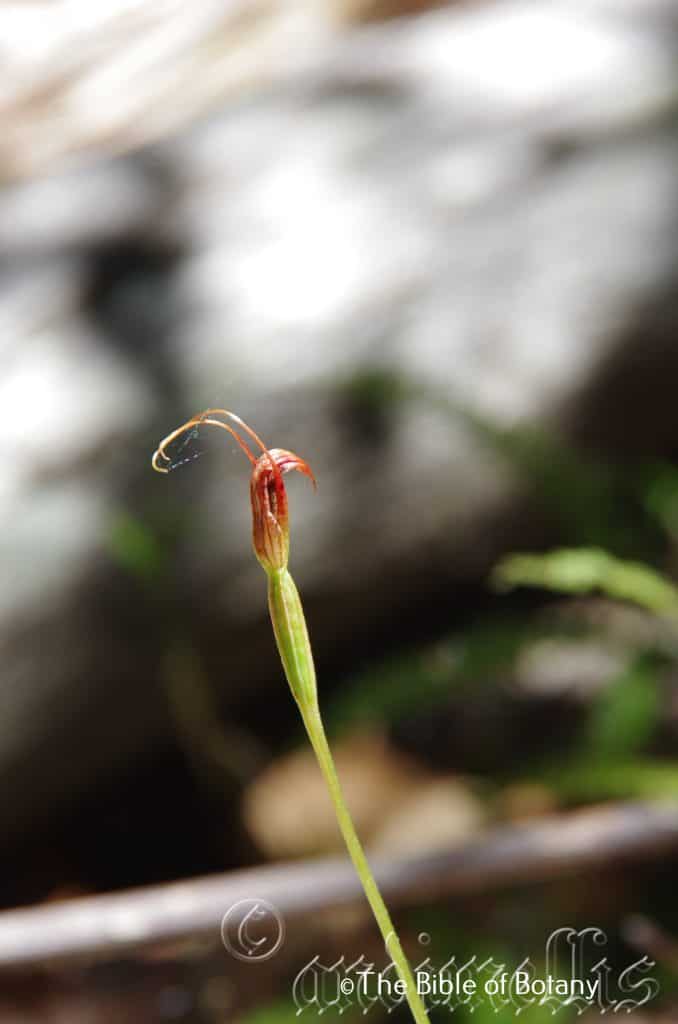
Clarence Valley NSW
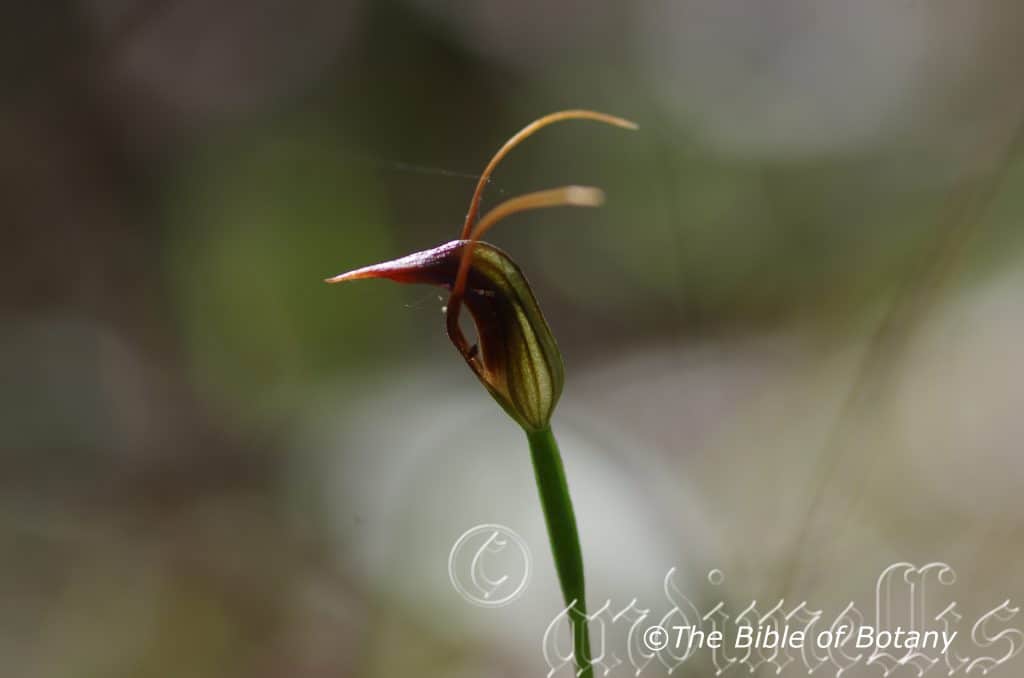
Clarence Valley NSW
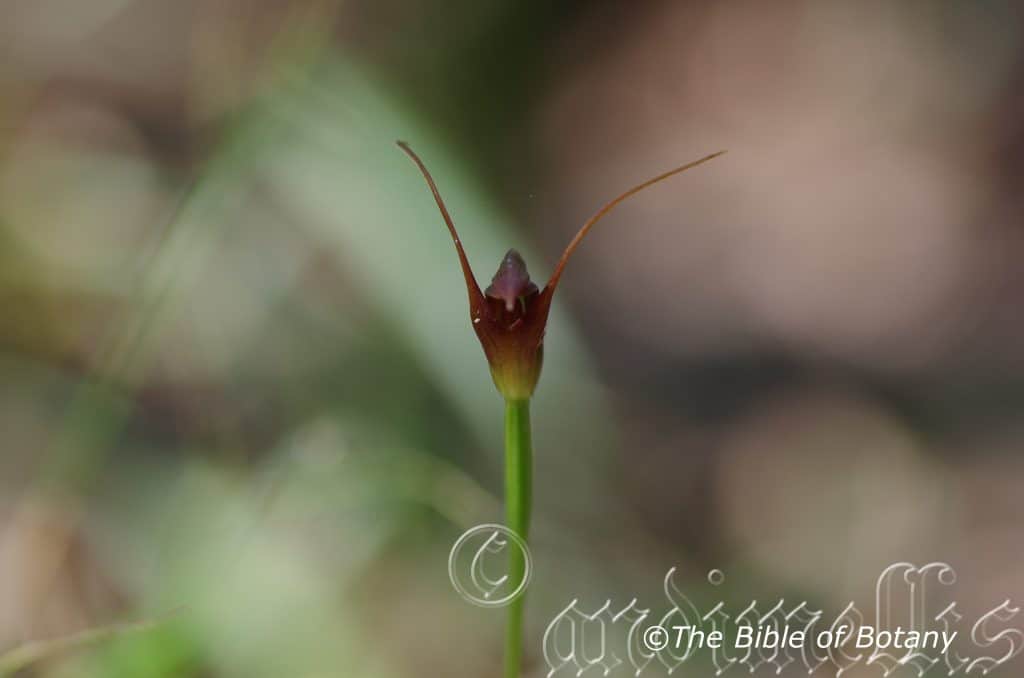
Clarence Valley NSW
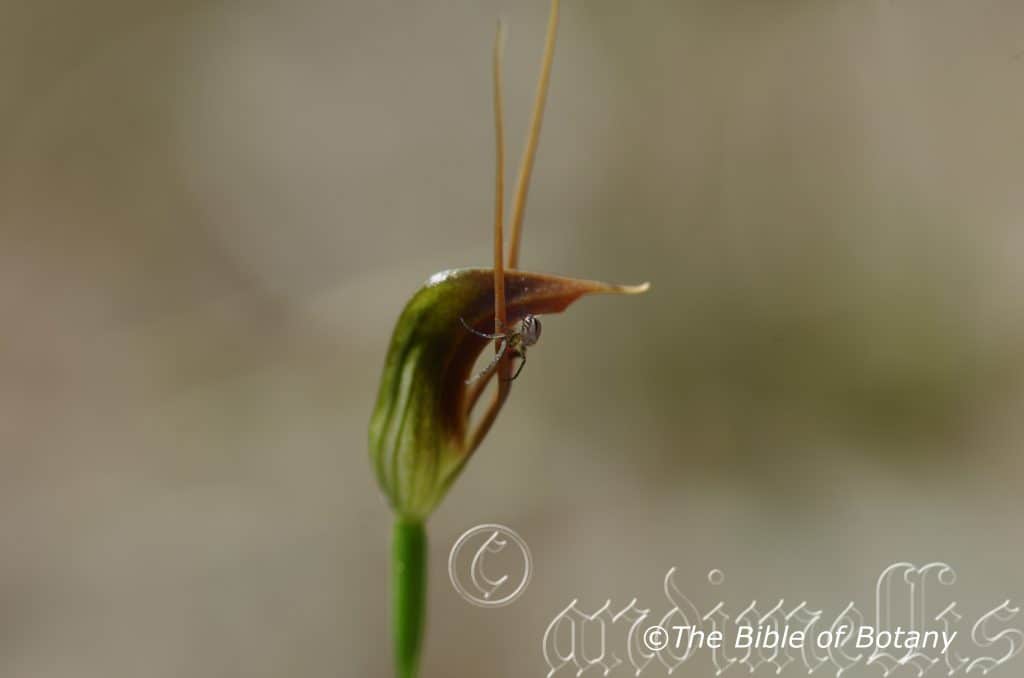
Clarence Valley NSW

Clarence Valley NSW
Pterostylis erecta
Classification:
Unranked: Monocots
Order: Asparagales
Family: Orcidaoideae
Tribe: Pterostylidinae
Genus: From Pterón, which is Ancient Greek and Latin for a wing and Stŷlos, which is Ancient Greek for a part of the female reproductive organ between the ovaries and the stigma. It refers to styles, which are flattened like wings or have distinct extension like wings.
Species: From Erectus, which is Latin for upright in posture. It refers to plants, structures or organs very erect.
Common Name: Erect Maroon Hood.
Distribution:
Pterostylis erecta is found south from Fraser Island in southern coastal Queensland to Moruya in southern coastal New South Wales. It is mainly found on and east of the Great Dividing Range to the coast.
https://avh.ala.org.au/occurrences/search?taxa=Pterostylis+erecta#tab_mapView
Habitat Aspect Climate:
Pterostylis erecta prefers medium shade to dappled shade. It grows in moist to wet soils on sheltered flats or gentle slopes in closed sclerophyll forest, chiefly coastal. Its altitude ranges from 15 meters ASL to 570 meters ASL.
The temperatures range from minus 3 degrees in August to 38 degrees in January.
The rainfall ranges from lows of 800mm to 2000mm average per annum.
Soil Requirements:
Pterostylis erecta grows in fine sands, light fatty loams to medium clays. The soils are derived from decomposed granites, sandstones, brown basalts, black basalts, metamorphic rocks or accumulated peaty beach sands. The soils pH ranges from 4.5pH to 6pH. It does not tolerate waterlogged soils however soil moisture is essential for survival. Non saline soils to moderately saline soils are tolerated.
Height & Spread: Wild Plants: 0.25m to 0.35m by 0.08m to 0.1m.
Characteristics:
Pterostylis erecta grows as a slender erect, deciduous terrestrial orchid that can form dense colonies. The orchids usually begin to sprout from underground tubers in late March to May.
The 4 to 7 rosette are ovate to oblong leaves measure 15mm to 50mm in length by 10mm to 25mm in width. The bluish-green petioles measure 5mm to 15mm in length. The bases are truncate often rounded near the edges while the apexes are obtuse to broad acuminate. The concolourous, laminas are deep bluish-green and glabrous. The laminas are flat or gently decurve downwards from the midvein to the margins and decurve downwards on the apical half. The margins are entire or crinkled. The midvein is prominent on the lower laminas while the reticulate veins are slightly prominent none the upper laminas.
The inflorescences are long, erect scapes born from the center of the rosette of leaves. The scape has a single flower and measures 300mm to 350mm in length. The flowers are roughly longitudinally cupuliform. The flowers measure 16mm to 20mm in length by 9mm to 11mm in width. The apex of the galea is obliquely erect.
The glabrous, oblong dorsal sepal is strongly curved forming a hood and has an acute apex. The galea and dorsal sepal is white with greenish brown to dark brown markings and suffusions. The margins are entire. The dorsal sepal measures 16mm to 19mm in length by 9mm to 11mm in width.
The lateral sepals are white with greenish brown to deep brown markings and suffusions. The lateral sepals loosely embrace the galea leaving a lateral gap and measure 21mm to 27mm in length overall. The sinus is “V” shaped when viewed from the front and shallowly mounded when viewed from the side notched at the centre. The reflexed, free apexes are linear and taper to a filiform point and measure 15mm to 18mm in length.
The glabrous oblong lateral petals are narrow oblong with an acute apex. The margins are entire. The lateral petals measure 50mm to 60mm in length by 15mm to 20mm in width.
The labellum is glossy and deep brownish-maroon. The ovate-oblong labellum’s measure 5mm to 8mm in length by 2mm to 2.5mm in width. The apexes are obtuse while the distal quarter protrudes through the sinus in the set position. The flowers appear from July to September.
The fruits are obloidal capsules. The green capsules turn deep grey-brown when ripe.
Wildlife:
Pterostylis erecta’s wildlife is unknown to the author.
Cultivation:
Pterostylis erecta is a beautiful terrestrial orchid that can form very dense colonies once established in a satisfactory environment. It is not a difficult orchid to grow in the garden but it needs a cool, moist, light shady position to survive and thrive. The best place is in a green house or bush house where the environment can be controlled better.
In a littoral rainforest or rainforest setting free of frost or sub zero temperatures and a humid microclimate will see the plants thrive.
Fertilize using a mixture of seaweed, fish emulsion and organic chicken pellets soaked in water and apply the liquid as soon as the first leaves appear to maintain health, vigour and better flowering. Fertilize again as the blooms die to assist in better tubers and flowers in the following season.
Propagation:
Native terrestrial orchids comprise of many Genre with their individual specie which range from being relatively easy to cultivate to those that are damn near impossible and definitely frustrating to say the least. NOTE: All native orchids are protected by law.
Most terrestrial orchids are deciduous during the dry season. These usually commence their growing season with the onset of the wet season through to the end of the wet season. The flowering occurs shortly after the leaves have been established sending up the new scape flowering then dying back to a subterranean tuber in a yearly cycle of growth.
The delicate Caladenia specie (Spider Orchids), the amazing Caleana specie (Duck Orchids), the brilliantly coloured Diuris specie (Donkey Orchids), the curious Pterostylis specie (Green hoods) and the spectacular Thelymitra specie (Sun Orchids) all have some the most amazing colour combinations and shapes of any orchids found anywhere in the world.
The saprophytic orchids have been deliberately excluded because they are highly specialized orchids in nature that replicating their growing conditions is near impossible for any period of time. This intriguing group of orchids has some of the most amazing blooms of any orchid with the above mentioned groups worthwhile persevering with.
The life cycle needs to be fully understood prior to any attempt to grow these beautiful orchids or failure is assured. The best advice I can give is if you are lucky enough to have these orchids growing naturally preserve their environment as nature has done for millions of years. I marked all the active growth areas on my Nana Glen property with survey pegs and kept the areas mulched with their local mulch and fertilized once I saw the new shoot commencing their seasonal cycle.
Failing the above notice that terrestrial orchids usually flower, then are followed by a period of dormancy, very similar to many other exotic and native epiphytic orchids. The biggest difference is that the majority’s period of growth and flowering tends to be in the cooler months of the year following the wet season not during the wet season, while the dormant period is in the warmer drier months.
They can be dormant for 6 to 8 months of the year and need to be kept reasonably dry during this period. Ideal shade house conditions would be 30mm to 50mm shade with a solid alsynite roof. Our Fern Nursery comprised of a shade cloth section with alternating 30mm and 50mm shade cloth and the dry area was 2 sheet of alsynite with 2 sheets of corrugated iron running in a north south direction. This gave all the plants shade that was of different intensities during the day. This situation is ideal during the dormancy period for all plants.
Watering is by far the most crucial part growing terrestrial orchids successfully. When in active growth the plants should be watered regularly so that the potting mix remains moist at all times. As the plants finish flowering and start to die back they will commence to develop the new tubers. Watering at this stage needs to be decreased so that the mix is almost completely dry. If the mix remains wet at this time the tubers have a good chance of rotting. From early January start to water lightly occasionally (if it rains lightly water lightly and if it storms water the plants thoroughly.) As the new growth appears and accelerates increase the water accordingly. I will stress here that rain water is far more beneficial than tap water.
Light varies depending on the genus, Pterostylis and Acianthus prefer shadier conditions (40mm to 60mm) than the Caladenia, Caleana and Diuris (20mm to 30mm) the aptly named Sun Orchids Thelymitra (10mm to 20mm) (It is named because the flowers open as the sun rises and close as the sun sets). Too often enthusiast treat the orchids like babies locking them up in too dense a shade and create to humid conditions which lead to fungal and mite problems. All these species resent stagnant humid conditions so place them in a position where they receive good light and air flow.
Fertilizing is necessary for optimum growth and organic fertilizers offer the best method. Organic fertilizer like the ones we recommend delivered on a monthly basis from the onset of the leaves from early April to the opening of the flowers is the best method we have learned over the years.
Pests may not be wanted but they do appear from time to time. The usual suspects are Slugs and Snails which can do immense damage in a very short period of time. Start placing upturned half orange and mandarin skins around near the plants as you begin to water. These baits will attract them as soon as they appear and before they increase in numbers. Keep the benches dry by watering in the mornings or keep the plants suspended on mesh benches is also a good deterrent. Thrips and Red Spider can at times also cause problems. Good air flow and drier conditions is usually enough to keep them at bay. If the problem doesn’t abate then a light application of natural pyrethrum or Garlic usually does the trick.
Potting mixes are important so use a good mix. Use our recommended open dry mix for terrestrial orchids. Add a small teaspoon of 100mm natural blood and bone to the mix for each 250mm standard pot. Repotting should be carried out annually during the dormant period. Remove the plants from the pots and gently remove the old soil being careful not to damage the tubers. Fill the new pot with the new mix to about 30mm below the surface. Replace the tubers on the new mix. Cover the tubers with 5mm of mix. Cover the surface with 10mm to 15mm of fine broken forest litter. Some enthusiasts insist on using Casuarina or Allocasuarina needles. If the latter is used the logic is that it is more likely to prevent fungal problems and are easier for the orchid’s leaves to penetrate.
Pot size will depend on the number of tubers you have. A 100mm pot will handle 5 to 7 tubers, while a 150mm pot can handle 10 tubers and a 200mm pot 20 tubers. (The best plantings and flowerings appear in the 200mm pots.)
Propagation:
All orchids that are declared rare, vulnerable or endangered are protected by Federal and State Laws and must not be removed from the wild unless you are a land developer, mining company or main Roads department etc. This includes bulbs, roots, leaves and flowers. No part of any plant can be removed from Federal, State or Local Government land without the prior permission of the authority and this includes the spore.
1. Obtain relevant materials
The first step in growing orchid from seed will be sourcing and having at the ready all materials that will be required in the propagation process.
This includes all of the following:
Unripe orchid seed capsule. If there are 2 capsules secure the second capsule immediately after the first capsule splits or if only one capsule as soon as it changes colour.
Orchid gelling medium with agar which can be purchased from an orchid society or a specialist nursery.
Distilled water
Cooking pot
Spoon
Oven-safe glass or polypropylene containers with lids
Sealable bags
Clean, sterilized cutting board
Rubber gloves
Paper towels
Tweezers or forceps
70 percent ethanol
Bleach
Scalpel or sharp knife
Planting pot
Orchid compost
Length of wire metal
Plastic spray bottle.
deep petri dishes or sterile jars.
2. Prepare agar medium
The agar medium is a special orchid gelling mixture that distilled water will be added to distilled water.
To prepare the medium, mix equal parts of orchid gelling medium with distilled water in a cooking pot.
Place the pot on a stove and bring the mixture to boil for while stirring continuously for two minutes.
Pour the mixture into the petri dishes glass or propylene containers while ensuring not to fill the containers above 20 percent of their volume.
Loosely replace the lids to the containers. Sterilize the containers by heating them up in a microwave oven for between 2 to 3 minutes.
Spray 70 percent ethanol into a sealable bag to create a sterile environment. Transfer the heated containers into the sealable bag.
Allow the containers to cool a bit before tightening their lids and then sealing the bag. Leave the containers to stand for a few days until the mixture solidifies.
3. Prepare seed capsule and work surface
Place an open pot of water on a stove and bring to boil. Place the cutting board in the oven and sterilize.
Put on rubber gloves and sterilize the forceps, and scalpel with 70 percent ethanol.
Insert the seed capsule into a bowel filled with bleach for about fifteen minutes.
Sterilize seed capsule again with 70 percent ethanol and place on grill.
Using the sterilized scalpel, cut open the seed capsule to reveal the seeds. Using a scalpel or sharp knife, scrape out the seeds from the capsule unto an ethanol soaked paper towel.
4. Flasking of the seed
Take out the petri dishes or glass jars containers holding the agar medium. Over the steam, open up the containers and transfer seeds from the ethanol soaked paper towel into the individual containers using the sterilized forceps.
The amount of seeds will determine the number of containers required. Replace the lid of the containers and place them on a window sill that receives indirect sunlight.
5. Wait and exercise patience
All that can be done at this point is to wait until the seeds germinate. The amount of time that this might take varies and is dependent on the particular species.
Generally, the time can range from a few months to a few years. During this period of waiting, ensure the containers are free from contamination to ensure that germination is not disrupted.
6. Emergence of protocorms
Protocorms are tuber-shaped bodies with rhizoids that are produced by the young seedlings of various orchids. Protocorms represent the embryonic form of the orchid plant.
Their emergence after the period of waiting at an affirmation that everything in the propagation process is on track.
7. Transflask orchid seedlings is done after they have developed roots
Upon the emergence of the protocorms, consistently observe the growth of the seedlings. At the point when the seedlings appear to overcrowd the flask, transflasking should be carried out, typically within 30 and 60 days.
* This is done by removing individual seedlings using sterilized tweezers from the original containers and placing them in new containers also filled, in a proportion similar to the original, with agar medium. 6 to 8 in a standard petri dish or 1or 2 to a test tube
8. Transplant seedlings into planting pots
On the presumption that there are no disruptions to the plant growth, the seedlings will eventually outgrow the containers.
At this point, they are to be transplanted into planting pots. A good rule of thumb to determine when they are ready to be transplanted is when the seedlings have developed roots that have grown up to the length of one-quarter of an inch.
To transplant, prepare a planting pot or other container for receiving the seedling by majorly filling it up with coarse fir bark and possibly some slightly moist orchid compost mixture containing perlite, fine charcoal, redwood bark shavings, etc.
To extract the seedlings, submerge the containers in warm water to help loosen the agar gel.
Once the agar medium is softened, twist a piece of metal to form a loop and in turn, use it to carefully pull out the seedlings from the container. It is best done if the agar and seedling can be removed together.
The seedlings can be further rinsed in lukewarm water to remove any excess agar mixture still stuck to them.
Following this, the seedlings can now be planted into the prepared pot with at least 50mm of space between each individual seedling.
9. Positioning the orchid
The seedling once fully transplanted should be placed in a location that is warm with good indirect sun light.
Slowly position the pots into an area that closely assimilates the conditions it will be growing under.
The choice as to whether the plant should be exposed to full sun or in direct sunlight will be dependent on the particular orchid specie.
10. Subsequent care of the plant
After the first week, the seedling can be misted several times a day and watered just once a week.
A guide in watering the plant will be using the dryness of the fir back that is, water the plant until the fir back is completely moistened and wait till it has completely dried out before watering again.
Fertilize using a mixture of seaweed, fish emulsion and organic chicken pellets soaked in water and apply the liquid as soon as the first leaves appear to maintain health, vigour and better flowering. Fertilize again as the blooms die to assist in better tubers and flowers in the following season.
Further Comments from Readers:
“Hi reader, it seems you use The Bible of Botany a lot. That’s great as we have great pleasure in bringing it to you! It’s a little awkward for us to ask, but our first aim is to purchase land approximately 1,600 hectares to link several parcels of N.P. into one at The Pinnacles NSW Australia, but we need your help. We’re not salespeople. We’re amateur botanists who have dedicated over 30 years to saving the environment in a practical way. We depend on donations to reach our goal. If you donate just $5, the price of your coffee this Sunday, We can help to keep the planet alive in a real way and continue to bring you regular updates and features on Australian plants all in one Botanical Bible. Any support is greatly appreciated. Thank you.”
In the spirit of reconciliation we acknowledge the Bundjalung, Gumbaynggirr and Yaegl and all aboriginal nations throughout Australia and their connections to land, sea and community. We pay our respect to their Elders past, present and future for the pleasures we have gained.
Pterostylis fischii
Classification:
Unranked: Monocots
Order: Asparagales
Family: Orcidaoideae
Tribe: Pterostylidinae
Genus: From Pterón, which is Ancient Greek or Pterón which is Latin for a wing and Stŷlos, which is Ancient Greek for a part of the female reproductive organ between the ovaries and the stigma. It refers to styles, which are flattened like wings or have distinct extension like wings.
Species: Is named in honour of Paul Fisch; 1908–1962 who was an Australian orchardist and naturalist.
Common Name: Fisch’s Green Hood.
Distribution:
Pterostylis fischii is found in several disjunct populations south from the New England Tablelands north eastern in New South Wales near Yarraman and the Little River in southern Victoria. It is found on and east of the Great Dividing Range.
https://avh.ala.org.au/occurrences/search?taxa=Pterostylis+fischii#tab_mapView
Habitat Aspect Climate:
Pterostylis fischii prefer medium shade to dappled shade. It grows in moist to wet soils in sheltered heaths, grass lands or open woodlands. Its altitude ranges from 440 meters ASL to 1330 meters ASL.
The temperatures range from minus 5 degrees in August to 38 degrees in January.
The rainfall ranges from lows of 500mm to 1600mm average per annum.
Soil Requirements:
Pterostylis fischii grows in coarse sands, fine sands and sandy loams to light fatty clays. The soils are usually derived from decomposed granites or at times sandstones. The soils pH ranges from 5pH to 6.5pH. It does not tolerate waterlogged soils however soil moisture is essential for survival. Non saline soils to moderately saline soils are tolerated.
Height & Spread: Wild Plants: 8m to 15m by 0.15m to 0.4m.
Characteristics:
Pterostylis fischii grows as a slender erect, deciduous terrestrial orchid. The orchids usually begin to sprout from underground tubers in January to early February.
The 3 to 6 rosette ovate to oblong leaves measure 10mm to 20mm in length by 6mm to 15mm in width. The pale bluish-green petioles measure 5mm to 10mm in length. The bases are truncate with rounded edges and attenuate while the apexes are broad obtuse. The concolourous, laminas are pale bluish-green and glabrous. The laminas are flat and straight or gently decurve downwards near the apex. The margins are entire and at times are slightly undulating. The midvein is prominent on the lower laminas while the reticulate veins are slightly prominent none the upper laminas.
The inflorescences are long, erect scapes born from the center of the rosette of leaves. The scape has a single flower with 3 to 5 closely sheathing leaves on the stems. The scapes measure 200mm to 250mm in length. The flowers are roughly longitudinally cupuliform. The flowers measure 25mm to 30mm in length by 15mm to 18mm in diameter. The apex of the galea is obliquely erect to flat and is green, white and rusty brown becoming deep reddish-brown towards apex of galea.
The glabrous oblong dorsal sepal is strongly curved forming a hood and has an acute apex. The margins are entire. The dorsal sepals measures 25mm to 30mm in length by 12mm to 18mm in width while the filiform point measures 5mm to 8mm in length. It is not flared but tapers to the galea apex.
The lime green lateral sepals tightly embrace the galea and measure 45mm to 70mm in length overall. The sinus is broadly “V” notched at the centre and protrudes in a prominent bulge below the notch when viewed from the side. The reflexed, free apexes are erect, linear and taper to a filiform. The lateral sepals measure 28mm to 33mm in length overall while the free sections measure 20mm to 25mm in length.
The glabrous oblong lateral petals are strongly incurved forming a hood with tapering apex to the galea. The margins are entire. The dorsal petals measure 20mm to 25mm in length by 15mm to 20mm in width.
The labellum is white and lime-green with a brownish-maroon longitudinal stripe. The narrow oblong-elliptic labellum’s measure 8mm to 10mm in length by 3mm to 3.5mm in width. The apexes are obtuse to truncate or at times slightly notched while the apex does not protrude from the sinus in the set position. The flowers appear from July to October.
The fruits are obloidal capsules. The green capsules turn deep grey-brown when ripe.
Wildlife:
Pterostylis fischii’s wildlife is unknown to the author.
Cultivation:
Pterostylis fischii is a beautiful terrestrial orchid that can form dense colonies once established in a satisfactory environment. It is not a difficult orchid to grow in the garden but it needs a cool, moist, light shady position to survive and thrive. The best place is in a green house or bush house where the environment can be controlled better.
In a littoral rainforest or rainforest setting free of frost or sub zero temperatures and a humid microclimate will see the plants thrive.
Fertilize using a mixture of seaweed, fish emulsion and organic chicken pellets soaked in water and apply the liquid as soon as the first leaves appear to maintain health, vigour and better flowering. Fertilize again as the blooms die to assist in better tubers and flowers in the following season.
Care of Terrestrial Orchids:
Most terrestrial orchids are deciduous during the dry season. These usually commence their growing season with the onset of the wet season through to the end of the wet season. The flowering occurs shortly after the leaves have been established sending up the new scape flowering then dying back to a subterranean tuber in a yearly cycle of growth.
The delicate Caladenia specie (Spider Orchids), the amazing Caleana specie (Duck Orchids), the brilliantly coloured Diuris specie (Donkey Orchids), the curious Pterostylis specie (Green hoods) and the spectacular Thelymitra specie (Sun Orchids) all have some the most amazing colour combinations and shapes of any orchids found anywhere in the world.
The saprophytic orchids have been deliberately excluded because they are highly specialized orchids in nature that replicating their growing conditions is near impossible for any period of time. This intriguing group of orchids has some of the most amazing blooms of any orchid with the above mentioned groups worthwhile persevering with.
The life cycle needs to be fully understood prior to any attempt to grow these beautiful orchids or failure is assured. The best advice I can give is if you are lucky enough to have these orchids growing naturally preserve their environment as nature has done for millions of years. I marked all the active growth areas on my Nana Glen property with survey pegs and kept the areas mulched with their local mulch and fertilized once I saw the new shoot commencing their seasonal cycle.
Failing the above notice that terrestrial orchids usually flower, then are followed by a period of dormancy, very similar to many other exotic and native epiphytic orchids. The biggest difference is that the majority’s period of growth and flowering tends to be in the cooler months of the year following the wet season not during the wet season, while the dormant period is in the warmer drier months.
They can be dormant for 6 to 8 months of the year and need to be kept reasonably dry during this period. Ideal shade house conditions would be 30mm to 50mm shade with a solid alsynite roof. Our Fern Nursery comprised of a shade cloth section with alternating 30mm and 50mm shade cloth and the dry area was 2 sheet of alsynite with 2 sheets of corrugated iron running in a north south direction. This gave all the plants shade that was of different intensities during the day. This situation is ideal during the dormancy period for all plants.
Watering is by far the most crucial part growing terrestrial orchids successfully. When in active growth the plants should be watered regularly so that the potting mix remains moist at all times. As the plants finish flowering and start to die back they will commence to develop the new tubers. Watering at this stage needs to be decreased so that the mix is almost completely dry. If the mix remains wet at this time the tubers have a good chance of rotting. From early January start to water lightly occasionally (if it rains lightly water lightly and if it storms water the plants thoroughly.) As the new growth appears and accelerates increase the water accordingly. I will stress here that rain water is far more beneficial than tap water.
Light varies depending on the genus, Pterostylis and Acianthus prefer shadier conditions (40mm to 60mm) than the Caladenia, Caleana and Diuris (20mm to 30mm) the aptly named Sun Orchids Thelymitra (10mm to 20mm) (Named because the flowers open as the sun rises and close by night). Too often enthusiast treat the orchids like babies locking them up in too dense a shade and create to humid conditions which lead to fungal and mite problems. All these species resent stagnant humid conditions so place them in a position where they receive good light and air flow.
Fertilizing is necessary for optimum growth and organic fertilizers offer the best method. Organic fertilizer like the ones we recommend delivered on a monthly basis from the onset of the leaves from early April to the opening of the flowers is the best method we have learned over the years.
Pests may not be wanted but they do appear from time to time. The usual suspects are Slugs and Snails which can do immense damage in a very short period of time. Start placing upturned half orange and mandarin skins around near the plants as you begin to water. These baits will attract them as soon as they appear and before they increase in numbers. Keep the benches dry by watering in the mornings or keep the plants suspended on mesh benches is also a good deterrent. Thrips and Red Spider can at times also cause problems. Good air flow and drier conditions is usually enough to keep them at bay. If the problem doesn’t abate then a light application of natural pyrethrum or Garlic usually does the trick.
Potting mixes are important so use a good mix. Use our recommended open dry mix for terrestrial orchids. Add a small teaspoon of 100mm natural blood and bone to the mix for each 250mm standard pot. Repotting should be carried out annually during the dormant period. Remove the plants from the pots and gently remove the old soil being careful not to damage the tubers. Fill the new pot with the new mix to about 30mm below the surface. Replace the tubers on the new mix. Cover the tubers with 5mm of mix. Cover the surface with 10mm to 15mm of fine broken forest litter. Some enthusiasts insist on using Casuarina or Allocasuarina needles. If the latter is used the logic is that it is more likely to prevent fungal problems and are easier for the orchid’s leaves to penetrate.
Pot size will depend on the number of tubers you have. A 100mm pot will handle 5 to 7 tubers, while a 150mm pot can handle 10 tubers and a 200mm pot 20 tubers. (The best plantings and flowerings appear in the 200mm pots.)
Prpagation:
All orchids that are declared rare, vulnerable or endangered are protected by Federal and State Laws and must not be removed from the wild unless you are a land developer, mining company or main Roads department etc. This includes bulbs, roots, leaves and flowers. No part of any plant can be removed from Federal, State or Local Government land without the prior permission of the authority and this includes the spore.
1. Obtain relevant materials
The first step in growing orchid from seed will be sourcing and having at the ready all materials that will be required in the propagation process.
This includes all of the following:
Unripe orchid seed capsule. If there are 2 capsules secure the second capsule immediately after the first capsule splits or if only one capsule as soon as it changes colour.
Orchid gelling medium with agar which can be purchased from an orchid society or a specialist nursery.
Distilled water
Cooking pot
Spoon
Oven-safe glass or polypropylene containers with lids
Sealable bags
Clean, sterilized cutting board
Rubber gloves
Paper towels
Tweezers or forceps
70 percent ethanol
Bleach
Scalpel or sharp knife
Planting pot
Orchid compost
Length of wire metal
Plastic spray bottle.
deep petri dishes or sterile jars.
2. Prepare agar medium
The agar medium is a special orchid gelling mixture that distilled water will be added to distilled water.
To prepare the medium, mix equal parts of orchid gelling medium with distilled water in a cooking pot.
Place the pot on a stove and bring the mixture to boil for while stirring continuously for two minutes.
Pour the mixture into the petri dishes glass or propylene containers while ensuring not to fill the containers above 20 percent of their volume.
Loosely replace the lids to the containers. Sterilize the containers by heating them up in a microwave oven for between 2 to 3 minutes.
Spray 70 percent ethanol into a sealable bag to create a sterile environment. Transfer the heated containers into the sealable bag.
Allow the containers to cool a bit before tightening their lids and then sealing the bag. Leave the containers to stand for a few days until the mixture solidifies.
3. Prepare seed capsule and work surface
Place an open pot of water on a stove and bring to boil. Place the cutting board in the oven and sterilize.
Put on rubber gloves and sterilize the forceps, and scalpel with 70 percent ethanol.
Insert the seed capsule into a bowel filled with bleach for about fifteen minutes.
Sterilize seed capsule again with 70 percent ethanol and place on grill.
Using the sterilized scalpel, cut open the seed capsule to reveal the seeds. Using a scalpel or sharp knife, scrape out the seeds from the capsule unto an ethanol soaked paper towel.
4. Flasking of the seed
Take out the petri dishes or glass jars containers holding the agar medium. Over the steam, open up the containers and transfer seeds from the ethanol soaked paper towel into the individual containers using the sterilized forceps.
The amount of seeds will determine the number of containers required. Replace the lid of the containers and place them on a window sill that receives indirect sunlight.
5. Wait and exercise patience
All that can be done at this point is to wait until the seeds germinate. The amount of time that this might take varies and is dependent on the particular species.
Generally, the time can range from a few months to a few years. During this period of waiting, ensure the containers are free from contamination to ensure that germination is not disrupted.
6. Emergence of protocorms
Protocorms are tuber-shaped bodies with rhizoids that are produced by the young seedlings of various orchids. Protocorms represent the embryonic form of the orchid plant.
Their emergence after the period of waiting at an affirmation that everything in the propagation process is on track.
7. Transflask orchid seedlings is done after they have developed roots
Upon the emergence of the protocorms, consistently observe the growth of the seedlings. At the point when the seedlings appear to overcrowd the flask, transflasking should be carried out, typically within 30 and 60 days.
* This is done by removing individual seedlings using sterilized tweezers from the original containers and placing them in new containers also filled, in a proportion similar to the original, with agar medium. 6 to 8 in a standard petri dish or 1or 2 to a test tube
8. Transplant seedlings into planting pots
On the presumption that there are no disruptions to the plant growth, the seedlings will eventually outgrow the containers.
At this point, they are to be transplanted into planting pots. A good rule of thumb to determine when they are ready to be transplanted is when the seedlings have developed roots that have grown up to the length of one-quarter of an inch.
To transplant, prepare a planting pot or other container for receiving the seedling by majorly filling it up with coarse fir bark and possibly some slightly moist orchid compost mixture containing perlite, fine charcoal, redwood bark shavings, etc.
To extract the seedlings, submerge the containers in warm water to help loosen the agar gel.
Once the agar medium is softened, twist a piece of metal to form a loop and in turn, use it to carefully pull out the seedlings from the container. It is best done if the agar and seedling can be removed together.
The seedlings can be further rinsed in lukewarm water to remove any excess agar mixture still stuck to them.
Following this, the seedlings can now be planted into the prepared pot with at least 50mm of space between each individual seedling.
9. Positioning the orchid
The seedling once fully transplanted should be placed in a location that is warm with good indirect sun light.
Slowly position the pots into an area that closely assimilates the conditions it will be growing under.
The choice as to whether the plant should be exposed to full sun or in direct sunlight will be dependent on the particular orchid specie.
10. Subsequent care of the plant
After the first week, the seedling can be misted several times a day and watered just once a week.
A guide in watering the plant will be using the dryness of the fir back that is, water the plant until the fir back is completely moistened and wait till it has completely dried out before watering again.
Do not fertilize until the seedlings have fully established themselves then annually as the first new shoot appears.
Further Comments from Readers:
“Hi reader, it seems you use The Bible of Botany a lot. That’s great as we have great pleasure in bringing it to you! It’s a little awkward for us to ask, but our first aim is to purchase land approximately 1,600 hectares to link several parcels of N.P. into one at The Pinnacles NSW Australia, but we need your help. We’re not salespeople. We’re amateur botanists who have dedicated over 30 years to saving the environment in a practical way. We depend on donations to reach our goal. If you donate just $5, the price of your coffee this Sunday, We can help to keep the planet alive in a real way and continue to bring you regular updates and features on Australian plants all in one Botanical Bible. Any support is greatly appreciated. Thank you.”
In the spirit of reconciliation we acknowledge the Bundjalung, Gumbaynggirr and Yaegl and all aboriginal nations throughout Australia and their connections to land, sea and community. We pay our respect to their Elders past, present and future for the pleasures we have gained.
Pterostylis furcata
Classification:
Unranked: Monocots
Order: Asparagales
Family: Orcidaoideae
Tribe: Pterostylidinae
Genus: From Pterón, which is Ancient Greek or Pterón which is Latin for a wing and Stŷlos, which is Ancient Greek for a part of the female reproductive organ between the ovaries and the stigma. It refers to styles, which are flattened like wings or have distinct extension like wings.
Species: From Furcata, which is Latin for a small two pronged fork. It refers to the leaf-stems, which are very deeply divided like a fork. It usually refers to branches in a tree or at times the peduncles on a flower which are forked.
Common Name: Forked Green Hood or Sickle Green Hood.
Distribution:
Pterostylis furcata is found in several disjunct populations south from Warwick in south eastern coastal Queensland to Hawkesdale in south western Victoria. It is found on the Great Dividing Range except for a small population found on Wilson’s Promontory.
It is also found in Tasmania through the center bounded by Exeter, Lake Eyre and Ben Lomond and further east at Horse shoe Marsh.
https://avh.ala.org.au/occurrences/search?taxa=Pterostylis+furcata#tab_mapView
Habitat Aspect Climate:
Pterostylis furcata prefers medium shade to dappled shade. It grows in moist to wet soils on sheltered flats on the ranges near seepages, drainage lines or shallow depressions. Its altitude ranges from 50 meters ASL to 950 meters ASL.
The temperatures range from minus 4 degrees in August to 38 degrees in January.
The rainfall ranges from lows of 600mm to 2000mm average per annum. The plants are more reliant on capillary action from nearby permanent water sources to keep the soils permanently moist.
Soil Requirements:
Pterostylis furcata grows on coarse sands, fine sands and sandy loams to medium clays. The soils are derived from decomposed granites. The soils pH ranges from 5pH to 6pH. It does not tolerate waterlogged soils however soil moisture is essential for survival. Non saline soils to moderately saline soils are tolerated.
Height & Spread:
Wild Plants: 0.2m to 0.3m by 0.1m to 0.16m.
Characteristics:
Pterostylis furcata grows as a slender erect, deciduous terrestrial orchid. The orchids usually begin to sprout from underground tubers in late September to November.
The 3 to 5 rosette ovate, lanceolate to elliptic spread on the basal section of the stem. The leaves measure 20mm to 80mm in length by 15mm to 24mm in width. The sessile bases are rounded while the apexes are acuminate. The concolourous, laminas are pale bluish-green and glabrous. The laminas are flat and decurve downwards on the apical third. The margins are entire. The midvein is prominent on the lower laminas while the reticulate veins are slightly prominent none the upper laminas.
The inflorescences are long, erect scapes born from the center of the rosette of leaves. The glabrous scape has a single flower and measure 200mm to 300mm in length. The deep green and white flowers are roughly longitudinally cupuliform. The flowers measure 45mm to 60mm in length by 18mm to 22mm in width. The apex of the galea is obliquely erect to flat.
The glabrous oblong dorsal sepal is strongly curved forming a hood and has an acute apex. The margins are entire. The dorsal sepals measures 60mm to 70mm in length by 6mm to 8mm in width. The apex of the galea is flat or is a long, sweeping curve. The dorsal sepal is acuminate.
The deep green and white lateral sepals loosely embrace the galea and lateral petals leaving a lateral gap. They measure 45mm to 60mm in length overall. The sinus is deeply V-shaped when viewed from the front, protruding in a shallow curve when viewed from the side. The erect or recurved apexes are often toothed and measure 35mm to 40mm in length.
The glabrous oblong lateral petals are strongly curved forming a hood with a tapering apex to the galea. The margins are entire. The dorsal petals measure 55mm to 50mm in length by 15mm to 20mm in width.
The labellum deep brown, narrow-ovate to lanceolate and measure 17mm to 22mm in length by 3mm to 4mm in width. The labellum bends forward distal half protruding from the sinus in the set position. The apex is obtuse to sub-acute. The flowers appear from July to October.
The fruits are obloidal capsules. The green capsules turn deep grey-brown when ripe.
Wildlife:
Pterostylis furcata’s wildlife is unknown to the author.
Cultivation:
Pterostylis furcata is a beautiful terrestrial orchid that can form dense colonies once established in a satisfactory environment. It is not a difficult orchid to grow in the garden but it needs a cool, moist, light shady position to survive and thrive. The best place is in a greenhouse or bush house where the environment can be controlled better.
In a littoral rainforest or rainforest setting free of frost or sub zero temperatures and a humid microclimate will see the plants thrive.
Caring for Terrestrial orchids:
Native terrestrial orchids comprise of many Genre with their individual specie which range from being relatively easy to cultivate to those that are damn near impossible and definitely frustrating to say the least. NOTE: All native orchids are protected by law.
Most terrestrial orchids are deciduous during the dry season. It usually commence its growing season with the onset of the wet season through to the end of the wet season. The flowering occurs shortly after the leaves have been established sending up the new scape flowering then dying back to a subterranean tuber in a yearly cycle of growth.
The delicate Caladenia specie (Spider Orchids), the amazing Caleana specie (Duck Orchids), the brilliantly coloured Diuris specie (Donkey Orchids), the curious Pterostylis specie (Green hoods) and the spectacular Thelymitra specie (Sun Orchids) all have some the most amazing colour combinations and shapes of any orchids found anywhere in the world.
The saprophytic orchids have been deliberately excluded because they are highly specialized orchids in nature that replicating their growing conditions is near impossible for any period of time. This intriguing group of orchids has some of the most amazing blooms of any orchid with the above mentioned groups worthwhile persevering with.
The life cycle needs to be fully understood prior to any attempt to grow these beautiful orchids or failure is assured. The best advice I can give is if you are lucky enough to have these orchids growing naturally preserve their environment as nature has done for millions of years. I marked all the active growth areas on my Nana Glen property with survey pegs and kept the areas mulched with their local mulch and fertilized once I saw the new shoot commencing their seasonal cycle.
Failing the above notice that terrestrial orchids usually flower, then are followed by a period of dormancy, very similar to many other exotic and native epiphytic orchids. The biggest difference is that the majority’s period of growth and flowering tends to be in the cooler months of the year following the wet season not during the wet season, while the dormant period is in the warmer drier months.
They can be dormant for 6 to 8 months of the year and need to be kept reasonably dry during this period. Ideal shade house conditions would be 30mm to 50mm shade with a solid alsynite roof. Our Fern Nursery comprised of a shade cloth section with alternating 30mm and 50mm shade cloth and the dry area was 2 sheet of alsynite with 2 sheets of corrugated iron running in a north south direction. This gave all the plants shade that was of different intensities during the day. This situation is ideal during the dormancy period for all plants.
Watering is by far the most crucial part growing terrestrial orchids successfully. When in active growth the plants should be watered regularly so that the potting mix remains moist at all times. As the plants finish flowering and start to die back they will commence to develop the new tubers. Watering at this stage needs to be decreased so that the mix is almost completely dry. If the mix remains wet at this time the tubers have a good chance of rotting. From early January start to water lightly occasionally (if it rains lightly water lightly and if it storms water the plants thoroughly.) As the new growth appears and accelerates increase the water accordingly. I will stress here that rain water is far more beneficial than tap water.
Light varies depending on the genus, Pterostylis and Acianthus prefer shadier conditions (40mm to 60mm) than the Caladenia, Caleana and Diuris (20mm to 30mm) the aptly named Sun Orchids Thelymitra (10mm to 20mm) (It is named because the flowers open as the sun rises and close as the sun sets). Too often enthusiast treat the orchids like babies locking them up in too dense a shade and create to humid conditions which lead to fungal and mite problems. All these species resent stagnant humid conditions so place them in a position where they receive good light and air flow.
Fertilizing is necessary for optimum growth and organic fertilizers offer the best method. Organic fertilizer like the ones we recommend delivered on a monthly basis from the onset of the leaves from early April to the opening of the flowers is the best method we have learned over the years.
Pests may not be wanted but they do appear from time to time. The usual suspects are Slugs and Snails which can do immense damage in a very short period of time. Start placing upturned half orange and mandarin skins around near the plants as you begin to water. These baits will attract them as soon as they appear and before they increase in numbers. Keep the benches dry by watering in the mornings or keep the plants suspended on mesh benches is also a good deterrent. Thrips and Red Spider can at times also cause problems. Good air flow and drier conditions is usually enough to keep them at bay. If the problem doesn’t abate then a light application of natural pyrethrum or Garlic usually does the trick.
Potting mixes are important so use a good mix. Use our recommended open dry mix for terrestrial orchids. Add a small teaspoon of 100mm natural blood and bone to the mix for each 250mm standard pot. Repotting should be carried out annually during the dormant period. Remove the plants from the pots and gently remove the old soil being careful not to damage the tubers. Fill the new pot with the new mix to about 30mm below the surface. Replace the tubers on the new mix. Cover the tubers with 5mm of mix. Cover the surface with 10mm to 15mm of fine broken forest litter. Some enthusiasts insist on using Casuarina sp. or Allocasuarina sp. needles. If the latter is used the logic is that it is more likely to prevent fungal problems and are easier for the orchid’s leaves to penetrate.
Pot size will depend on the number of tubers you have. A 100mm pot will handle 5 to 7 tubers, while a 150mm pot can handle 10 tubers and a 200mm pot 20 tubers. (The best plantings and flowerings appear in the 200mm pots.)
Fertilize using a mixture of seaweed, fish emulsion and organic chicken pellets soaked in water and apply the liquid as soon as the first leaves appear to maintain health, vigour and better flowering. Fertilize again as the blooms die to assist in better tubers and flowers in the following season.
Further Comments from Readers:
“Hi reader, it seems you use The Bible of Botany a lot. That’s great as we have great pleasure in bringing it to you! It’s a little awkward for us to ask, but our first aim is to purchase land approximately 1,600 hectares to link several parcels of N.P. into one at The Pinnacles NSW Australia, but we need your help. We’re not salespeople. We’re amateur botanists who have dedicated over 30 years to saving the environment in a practical way. We depend on donations to reach our goal. If you donate just $5, the price of your coffee this Sunday, We can help to keep the planet alive in a real way and continue to bring you regular updates and features on Australian plants all in one Botanical Bible. Any support is greatly appreciated. Thank you.”
In the spirit of reconciliation we acknowledge the Bundjalung, Gumbaynggirr and Yaegl and all aboriginal nations throughout Australia and their connections to land, sea and community. We pay our respect to their Elders past, present and future for the pleasures we have gained.
Pterostylis grandiflora
Classification:
Unranked: Monocots
Order: Asparagales
Family: Orcidaoideae
Tribe: Pterostylidinae
Genus: From Pterón, which is Ancient Greek or Pterón which is Latin for a wing and Stŷlos, which is Ancient Greek for a part of the female reproductive organ between the ovaries and the stigma. It refers to styles, which are flattened like wings or have distinct extension like wings.
Species: From Grandis which is Latin for large and Flōris, which is Latin for a flower or Flōs, which is the Roman goddess of spring and flowers. It refers to plants, which produce larger flowers than most other species in the genus.
Common Name: Cobra Green Orchid.
Distribution:
Pterostylis grandiflora is found south from Wondai in southern Queensland to between Red Hill and Flinders on Mornington Peninsula in southern Victoria. It is found on and east of the Great Dividing Range with 2 disjunct populations further north at Atherton and Mount Spec.
It is also found between Underwood, Launceston, St Marys and St. Helens and further south along the coast at Coles Bay and Hazards Beach in Tasmania.
https://avh.ala.org.au/occurrences/search?taxa=Pterostylis+grandiflora#tab_mapView
Habitat Aspect Climate:
Pterostylis grandiflora prefers medium shade to dappled shade. It grows in moist to wet soils on sheltered slopes in closed sclerophyll forest, chiefly coastal. Its altitude ranges from 50 meters ASL to 700 meters ASL.
The temperatures range from minus 3 degrees in August to 38 degrees in January.
The rainfall ranges from lows of 800mm to 3000mm average per annum. The plants are more reliant on capillary action from nearby permanent water sources to keep the soils permanently moist.
Soil Requirements:
Pterostylis grandiflora grows on fine sands, light fatty clays. The soils are usually derived from decomposed granites or at times sandstones. The soils pH ranges from 4.5pH to 6pH. It does not tolerate waterlogged soils however soil moisture is essential for survival. Non saline soils to moderately saline soils are tolerated.
Height & Spread: Wild Plants: 0.3m to 0.4m by 0.5m to 0.6m.
Characteristics:
Pterostylis grandiflora grows as a slender erect, deciduous terrestrial orchid. The orchids usually begin to sprout from underground tubers in April but have been known to commence growing as early as mid-March.
Pterostylis grandiflora has 4 to 9 rosette ovate leaves measure 10mm to 30mm in length by 10mm to 30mm in width. The bluish-green petioles measure 6mm to 20mm in length. The bases are rounded while the apexes are obtuse. The concolourous, laminas are bluish-green and glabrous. The laminas are flat and decurve downwards on the apical third. The margins are crisped. The midvein is prominent on the lower laminas while the reticulate veins are slightly prominent none the upper laminas.
The inflorescences are long, erect scapes born from the center of the rosette of leaves. The scape has a single flower that measure 300mm to 400mm in length. The green and white with brown in the apex of the galea flowers are roughly. The stems have 4 to 9 stem clasping leaves with very short sheaths. The erect cupuliform flowers measure 35mm to 40mm in length overall. The green and white with deep reddish-brown suffusions on the galea of the upper petals apex.
The green and white with brown glabrous oblong dorsal sepal is strongly curved forming a hood and has a long acuminate apex which decurve strongly. The margins are entire. The dorsal sepals measures 60mm to 70mm in length by 6mm to 8mm in width.
The pale green and white often tinged brown lateral sepals tightly embrace the lateral petals and measure 35mm to 40mm in length overall. The sinus is flat or raised and protrudes like a platform when viewed from the side. The erect, free apexes are linear tapering to a filiform point and measure 24mm to 30mm in length.
The pale green and white with wide brown striped, glabrous lateral petals strongly curved forming a hood with the dorsal petal. The margins are entire. The dorsal petals measure 35mm to 40mm in length by 15mm to 18mm in width.
The labellum is white and lime-green with a brownish-maroon longitudinal stripe. The labellum are oblong to ovate on the basal half then strongly taper to a long linear to filiform apical half. The labellum measure 18mm to 22mm in length by 3 mm to 3.5mm in width. The apexes protrude from the sinuses in the set position. The flowers appear from May to August.
Pterostylis grandiflora’s fruits are obloidal capsules. The green capsules turn deep grey-brown when ripe.
Wildlife:
Pterostylis grandiflora’s wildlife is unknown to the author.
Cultivation:
Pterostylis grandiflora is a beautiful terrestrial orchid that can form dense colonies once established in a satisfactory environment. It is not a difficult orchid to grow in the garden but it needs a cool, moist, light shady position to survive and thrive. The best place is in a greenhouse or bush house where the environment can be controlled better.
In a littoral rainforest or rainforest setting free of frost or sub zero temperatures and a humid microclimate will see the plants thrive.
Care of Terrestrial Orchids:
Native terrestrial orchids comprise of many Genre with their individual specie which range from being relatively easy to cultivate to those that are damn near impossible and definitely frustrating to say the least. NOTE: All native orchids are protected by law.
Most terrestrial orchids are deciduous during the dry season. These usually commence their growing season with the onset of the wet season through to the end of the wet season. The flowering occurs shortly after the leaves have been established sending up the new scape flowering then dying back to a subterranean tuber in a yearly cycle of growth.
The delicate Caladenia specie (Spider Orchids), the amazing Caleana specie (Duck Orchids), the brilliantly coloured Diuris specie (Donkey Orchids), the curious Pterostylis specie (Green hoods) and the spectacular Thelymitra specie (Sun Orchids) all have some the most amazing colour combinations and shapes of any orchids found anywhere in the world.
The saprophytic orchids have been deliberately excluded because they are highly specialized orchids in nature that replicating their growing conditions is near impossible for any period of time. This intriguing group of orchids has some of the most amazing blooms of any orchid with the above mentioned groups worthwhile persevering with.
The life cycle needs to be fully understood prior to any attempt to grow these beautiful orchids or failure is assured. The best advice I can give is if you are lucky enough to have these orchids growing naturally preserve their environment as nature has done for millions of years. I marked all the active growth areas on my Nana Glen property with survey pegs and kept the areas mulched with their local mulch and fertilized once I saw the new shoot commencing their seasonal cycle.
Failing the above notice that terrestrial orchids usually flower, then are followed by a period of dormancy, very similar to many other exotic and native epiphytic orchids. The biggest difference is that the majority’s period of growth and flowering tends to be in the cooler months of the year following the wet season not during the wet season, while the dormant period is in the warmer drier months.
They can be dormant for 6 to 8 months of the year and need to be kept reasonably dry during this period. Ideal shade house conditions would be 30mm to 50mm shade with a solid alsynite roof. Our Fern Nursery comprised of a shade cloth section with alternating 30mm and 50mm shade cloth and the dry area was 2 sheet of alsynite with 2 sheets of corrugated iron running in a north south direction. This gave all the plants shade that was of different intensities during the day. This situation is ideal during the dormancy period for all plants.
Watering is by far the most crucial part growing terrestrial orchids successfully. When in active growth the plants should be watered regularly so that the potting mix remains moist at all times. As the plants finish flowering and start to die back they will commence to develop the new tubers. Watering at this stage needs to be decreased so that the mix is almost completely dry. If the mix remains wet at this time the tubers have a good chance of rotting. From early January start to water lightly occasionally (if it rains lightly water lightly and if it storms water the plants thoroughly.) As the new growth appears and accelerates increase the water accordingly. I will stress here that rain water is far more beneficial than tap water.
Light varies depending on the genus, Pterostylis and Acianthus prefer shadier conditions (40mm to 60mm) than the Caladenia, Caleana and Diuris (20mm to 30mm) the aptly named Sun Orchids Thelymitra (10mm to 20mm) (It is named because the flowers open as the sun rises and close as the sun sets). Too often enthusiast treat the orchids like babies locking them up in too dense a shade and create to humid conditions which lead to fungal and mite problems. All these species resent stagnant humid conditions so place them in a position where they receive good light and air flow.
Fertilizing is necessary for optimum growth and organic fertilizers offer the best method. Organic fertilizer like the ones we recommend delivered on a monthly basis from the onset of the leaves from early April to the opening of the flowers is the best method we have learned over the years.
Pests may not be wanted but they do appear from time to time. The usual suspects are Slugs and Snails which can do immense damage in a very short period of time. Start placing upturned half orange and mandarin skins around near the plants as you begin to water. These baits will attract them as soon as they appear and before they increase in numbers. Keep the benches dry by watering in the mornings or keep the plants suspended on mesh benches is also a good deterrent. Thrips and Red Spider can at times also cause problems. Good air flow and drier conditions is usually enough to keep them at bay. If the problem doesn’t abate then a light application of natural pyrethrum or Garlic usually does the trick.
Potting mixes are important so use a good mix. Use our recommended open dry mix for terrestrial orchids. Add a small teaspoon of 100mm natural blood and bone to the mix for each 250mm standard pot. Repotting should be carried out annually during the dormant period. Remove the plants from the pots and gently remove the old soil being careful not to damage the tubers. Fill the new pot with the new mix to about 30mm below the surface. Replace the tubers on the new mix. Cover the tubers with 5mm of mix. Cover the surface with 10mm to 15mm of fine broken forest litter. Some enthusiasts insist on using Cassuarina or Allocasuarina needles. If the latter is used the logic is that it is more likely to prevent fungal problems and are easier for the orchid’s leaves to penetrate.
Pot size will depend on the number of tubers you have. A 100mm pot will handle 5 to 7 tubers, while a 150mm pot can handle 10 tubers and a 200mm pot 20 tubers. (The best plantings and flowerings appear in the 200mm pots.)
Propagation:
All orchids that are declared rare, vulnerable or endangered are protected by Federal and State Laws and must not be removed from the wild unless you are a land developer, mining company or main Roads department etc. This includes bulbs, roots, leaves and flowers. No part of any plant can be removed from Federal, State or Local Government land without the prior permission of the authority and this includes the spore.
1. Obtain relevant materials
The first step in growing orchid from seed will be sourcing and having at the ready all materials that will be required in the propagation process.
This includes all of the following:
Unripe orchid seed capsule. If there are 2 capsules secure the second capsule immediately after the first capsule splits or if only one capsule as soon as it changes colour.
Orchid gelling medium with agar which can be purchased from an orchid society or a specialist nursery.
Distilled water
Cooking pot
Spoon
Oven-safe glass or polypropylene containers with lids
Sealable bags
Clean, sterilized cutting board
Rubber gloves
Paper towels
Tweezers or forceps
70 percent ethanol
Bleach
Scalpel or sharp knife
Planting pot
Orchid compost
Length of wire metal
Plastic spray bottle.
deep petri dishes or sterile jars.
2. Prepare agar medium
The agar medium is a special orchid gelling mixture that distilled water will be added to distilled water.
To prepare the medium, mix equal parts of orchid gelling medium with distilled water in a cooking pot.
Place the pot on a stove and bring the mixture to boil for while stirring continuously for two minutes.
Pour the mixture into the petri dishes glass or propylene containers while ensuring not to fill the containers above 20 percent of their volume.
Loosely replace the lids to the containers. Sterilize the containers by heating them up in a microwave oven for between 2 to 3 minutes.
Spray 70 percent ethanol into a sealable bag to create a sterile environment. Transfer the heated containers into the sealable bag.
Allow the containers to cool a bit before tightening their lids and then sealing the bag. Leave the containers to stand for a few days until the mixture solidifies.
3. Prepare seed capsule and work surface
Place an open pot of water on a stove and bring to boil. Place the cutting board in the oven and sterilize.
Put on rubber gloves and sterilize the forceps, and scalpel with 70 percent ethanol.
Insert the seed capsule into a bowel filled with bleach for about fifteen minutes.
Sterilize seed capsule again with 70 percent ethanol and place on grill.
Using the sterilized scalpel, cut open the seed capsule to reveal the seeds. Using a scalpel or sharp knife, scrape out the seeds from the capsule unto an ethanol soaked paper towel.
4. Flasking of the seed
Take out the petri dishes or glass jars containers holding the agar medium. Over the steam, open up the containers and transfer seeds from the ethanol soaked paper towel into the individual containers using the sterilized forceps.
The amount of seeds will determine the number of containers required. Replace the lid of the containers and place them on a window sill that receives indirect sunlight.
5. Wait and exercise patience
All that can be done at this point is to wait until the seeds germinate. The amount of time that this might take varies and is dependent on the particular species.
Generally, the time can range from a few months to a few years. During this period of waiting, ensure the containers are free from contamination to ensure that germination is not disrupted.
6. Emergence of protocorms
Protocorms are tuber-shaped bodies with rhizoids that are produced by the young seedlings of various orchids. Protocorms represent the embryonic form of the orchid plant.
Their emergence after the period of waiting at an affirmation that everything in the propagation process is on track.
7. Transflask orchid seedlings is done after they have developed roots
Upon the emergence of the protocorms, consistently observe the growth of the seedlings. At the point when the seedlings appear to overcrowd the flask, transflasking should be carried out, typically within 30 and 60 days.
* This is done by removing individual seedlings using sterilized tweezers from the original containers and placing them in new containers also filled, in a proportion similar to the original, with agar medium. 6 to 8 in a standard petri dish or 1or 2 to a test tube
8. Transplant seedlings into planting pots
On the presumption that there are no disruptions to the plant growth, the seedlings will eventually outgrow the containers.
At this point, they are to be transplanted into planting pots. A good rule of thumb to determine when they are ready to be transplanted is when the seedlings have developed roots that have grown up to the length of one-quarter of an inch.
To transplant, prepare a planting pot or other container for receiving the seedling by majorly filling it up with coarse fir bark and possibly some slightly moist orchid compost mixture containing perlite, fine charcoal, redwood bark shavings, etc.
To extract the seedlings, submerge the containers in warm water to help loosen the agar gel.
Once the agar medium is softened, twist a piece of metal to form a loop and in turn, use it to carefully pull out the seedlings from the container. It is best done if the agar and seedling can be removed together.
The seedlings can be further rinsed in lukewarm water to remove any excess agar mixture still stuck to them.
Following this, the seedlings can now be planted into the prepared pot with at least 50mm of space between each individual seedling.
9. Positioning the orchid
The seedling once fully transplanted should be placed in a location that is warm with good indirect sun light.
Slowly position the pots into an area that closely assimilates the conditions it will be growing under.
The choice as to whether the plant should be exposed to full sun or in direct sunlight will be dependent on the particular orchid specie.
10. Subsequent care of the plant
After the first week, the seedling can be misted several times a day and watered just once a week.
A guide in watering the plant will be using the dryness of the fir back that is, water the plant until the fir back is completely moistened and wait till it has completely dried out before watering again.
Fertilize using a mixture of seaweed, fish emulsion and organic chicken pellets soaked in water and apply the liquid as soon as the first leaves appear to maintain health, vigour and better flowering. Fertilize again as the blooms die to assist in better tubers and flowers in the following season.
Further Comments from Readers:
“Hi reader, it seems you use The Bible of Botany a lot. That’s great as we have great pleasure in bringing it to you! It’s a little awkward for us to ask, but our first aim is to purchase land approximately 1,600 hectares to link several parcels of N.P. into one at The Pinnacles NSW Australia, but we need your help. We’re not salespeople. We’re amateur botanists who have dedicated over 30 years to saving the environment in a practical way. We depend on donations to reach our goal. If you donate just $5, the price of your coffee this Sunday, We can help to keep the planet alive in a real way and continue to bring you regular updates and features on Australian plants all in one Botanical Bible. Any support is greatly appreciated. Thank you.”
In the spirit of reconciliation we acknowledge the Bundjalung, Gumbaynggirr and Yaegl and all aboriginal nations throughout Australia and their connections to land, sea and community. We pay our respect to their Elders past, present and future for the pleasures we have gained.
Pterostylis hildae
Classification:
Unranked: Monocots
Order: Asparagales
Family: Orcidaoideae
Tribe: Pterostylidinae
Genus: From Pterón, which is Ancient Greek or Pterón which is Latin for a wing and Stŷlos, which is Ancient Greek for a part of the female reproductive organ between the ovaries and the stigma. It refers to styles, which are flattened like wings or have distinct extension like wings.
Species: Is named in honour of Hilda Geissmann for her contributions to nature study in Queensland especially flora and birds on Mount Tamborine and the Gold coast Hinterland.
Common Name: Rainforest Green Orchid.
Distribution:
Pterostylis hildae is found in 2 disjunct populations south from Mareeba to near Cardwell in far northern coastal Queensland and south from Wide Bay in central coastal Queensland to Macquarie Pass National Park in central coastal New South Wales with a single population between the 2 populations near Calliope. It is mainly found on and east of the Great Dividing Range to the coast except for a single population at Delorain in Tasmania and on Lord Howe Island.
https://avh.ala.org.au/occurrences/search?taxa=Pterostylis+hildae#tab_mapView
Habitat Aspect Climate:
Pterostylis hildae prefers medium shade to dappled shade. It usually grows in wet sclerophyll forest and cool well developed subtropical rainforest or moist warm temperate rainforests on the coastal ranges. Its altitude ranges from 15 meters ASL to 750 meters ASL.
The temperatures range from minus 3 degrees in August to 38 degrees in January.
The rainfall ranges from lows of 600mm to 2000mm average per annum. The plants are more reliant on capillary action from nearby permanent water sources to keep the soils permanently moist.
Soil Requirements:
Pterostylis hildae grows on fine sands and sandy loams to medium clays. The soils are usually derived from decomposed granites, sandstones, brown basalts, black basalts or metamorphic rocks. The soils pH ranges from 4.5pH to 6pH. It does not tolerate waterlogged soils however soil moisture is essential for survival. Non saline soils to moderately saline soils are tolerated.
Height & Spread: Wild Plants: 0.1m to 0.15m by 0.1m to 0.16m.
Characteristics:
Pterostylis hildae grows as a slender erect, deciduous terrestrial orchid. The orchids usually begin to sprout from underground tubers in April to early May.
The 2 to 4 rosette elliptical leaves that measure 20mm to 80mm in length by 8mm to 25mm in width. The pale bluish-green petioles measure 2.5mm to 4mm in length. The bases are rounded to broad cuneate while the apexes are acuminate. The concolourous, laminas are mid to deep bluish-green and glabrous. The laminas are flat, slightly recurved upwards or slightly decurve downwards from the mid vein to the margins and are straight or decurve slightly downwards near the apexes. The margins are entire. The midvein is prominent on the lower laminas while the reticulate veins are slightly prominent none the upper laminas.
The inflorescences are long, erect scapes born from the center of the rosette of leaves. The scape has a single flower that measure 100mm to 150mm in length. The white and green with brown suffusions on the galea’s apexes flowers are roughly longitudinally cupuliform. The flowers measure 20mm to 26mm in length by 12mm to 14mm in diameter. The apex of the galea is obliquely erect to flat.
The glabrous oblong dorsal sepal is horizontal to obliquely decurve forming a hood and has a broad acuminate apex. The dorsal sepals measures 20mm to 26mm in length by 2mm to 4mm in width.
The lime green lateral sepals are lanceolate and loosely embrace the galea leaving a lateral gap. They measure 18mm to 22mm in length overall. The sinus is a deep “V when viewed from the front and shallowly mounded when viewed from the side. The reflexed, free apexes taper to a narrow triangular point and measure 10mm to 14mm in length.
The glabrous, broad linear lateral petals are united on the sides of the dorsal sepal and form a hood with the dorsal sepal and have acute apexes. The margins are entire and are opaque to translucent. The dorsal petals measure 18mm to 24mm in length by 15mm to 20mm in width.
The labellum is lime green with a deep brown stripe down the middle or tinged brown with an obtuse apex. The elliptic to obovate labellum measure 9mm to 12mm in length by 3.5mm to 4mm in width. The apex from the sinus is in the set position. The flowers appear from July to September.
The fruits are obloidal capsules. The green capsules turn deep grey-brown when ripe.
Wildlife:
Pterostylis hildae’s wildlife is unknown to the author.
Cultivation:
Pterostylis hildae is a beautiful terrestrial orchid that can form dense colonies once established in a satisfactory environment. It is not a difficult orchid to grow in the garden but it needs a cool, moist, light shady position to survive and thrive. The best place is in a green house or bush house where the environment can be controlled better.
In a littoral rainforest or rainforest setting free of frost or sub zero temperatures and a humid microclimate will see the plants thrive.
Fertilize using a mixture of seaweed, fish emulsion and organic chicken pellets soaked in water and apply the liquid as soon as the first leaves appear to maintain health, vigour and better flowering. Fertilize again as the blooms die to assist in better tubers and flowers in the following season.
Care of Terestrial Orchids:
Native terrestrial orchids comprise of many Genre with their individual specie which range from being relatively easy to cultivate to those that are damn near impossible and definitely frustrating to say the least. NOTE: All native orchids are protected by law.
Most terrestrial orchids are deciduous during the dry season. These usually commence their growing season with the onset of the wet season through to the end of the wet season. The flowering occurs shortly after the leaves have been established sending up the new scape flowering then dying back to a subterranean tuber in a yearly cycle of growth.
The delicate Caladenia specie (Spider Orchids), the amazing Caleana specie (Duck Orchids), the brilliantly coloured Diuris specie (Donkey Orchids), the curious Pterostylis specie (Green hoods) and the spectacular Thelymitra specie (Sun Orchids) all have some the most amazing colour combinations and shapes of any orchids found anywhere in the world.
The saprophytic orchids have been deliberately excluded because they are highly specialized orchids in nature that replicating their growing conditions is near impossible for any period of time. This intriguing group of orchids has some of the most amazing blooms of any orchid with the above mentioned groups worthwhile persevering with.
The life cycle needs to be fully understood prior to any attempt to grow these beautiful orchids or failure is assured. The best advice I can give is if you are lucky enough to have these orchids growing naturally preserve their environment as nature has done for millions of years. I marked all the active growth areas on my Nana Glen property with survey pegs and kept the areas mulched with their local mulch and fertilized once I saw the new shoot commencing their seasonal cycle.
Failing the above notice that terrestrial orchids usually flower, then are followed by a period of dormancy, very similar to many other exotic and native epiphytic orchids. The biggest difference is that the majority’s period of growth and flowering tends to be in the cooler months of the year following the wet season not during the wet season, while the dormant period is in the warmer drier months.
They can be dormant for 6 to 8 months of the year and need to be kept reasonably dry during this period. Ideal shade house conditions would be 30mm to 50mm shade with a solid alsynite roof. Our Fern Nursery comprised of a shade cloth section with alternating 30mm and 50mm shade cloth and the dry area was 2 sheet of alsynite with 2 sheets of corrugated iron running in a north south direction. This gave all the plants shade that was of different intensities during the day. This situation is ideal during the dormancy period for all plants.
Watering is by far the most crucial part growing terrestrial orchids successfully. When in active growth the plants should be watered regularly so that the potting mix remains moist at all times. As the plants finish flowering and start to die back they will commence to develop the new tubers. Watering at this stage needs to be decreased so that the mix is almost completely dry. If the mix remains wet at this time the tubers have a good chance of rotting. From early January start to water lightly occasionally (if it rains lightly water lightly and if it storms water the plants thoroughly.) As the new growth appears and accelerates increase the water accordingly. I will stress here that rain water is far more beneficial than tap water.
Light varies depending on the genus, Pterostylis and Acianthus prefer shadier conditions (40mm to 60mm) than the Caladenia, Caleana and Diuris (20mm to 30mm) the aptly named Sun Orchids Thelymitra specie (10mm to 20mm) (It is named because the flowers open as the sun rises and close as the sun sets). Too often enthusiast treat the orchids like babies locking them up in too dense a shade and create to humid conditions which lead to fungal and mite problems. All these species resent stagnant humid conditions so place them in a position where they receive good light and air flow.
Fertilizing is necessary for optimum growth and organic fertilizers offer the best method. Organic fertilizer like the ones we recommend delivered on a monthly basis from the onset of the leaves from early April to the opening of the flowers is the best method we have learned over the years.
Pests may not be wanted but they do appear from time to time. The usual suspects are Slugs and Snails which can do immense damage in a very short period of time. Start placing upturned half orange and mandarin skins around near the plants as you begin to water. These baits will attract them as soon as they appear and before they increase in numbers. Keep the benches dry by watering in the mornings or keep the plants suspended on mesh benches is also a good deterrent. Thrips and Red Spider can at times also cause problems. Good air flow and drier conditions is usually enough to keep them at bay. If the problem doesn’t abate then a light application of natural pyrethrum or Garlic usually does the trick.
Potting mixes are important so use a good mix. Use our recommended open dry mix for terrestrial orchids. Add a small teaspoon of 100mm natural blood and bone to the mix for each 250mm standard pot. Repotting should be carried out annually during the dormant period. Remove the plants from the pots and gently remove the old soil being careful not to damage the tubers. Fill the new pot with the new mix to about 30mm below the surface. Replace the tubers on the new mix. Cover the tubers with 5mm of mix. Cover the surface with 10mm to 15mm of fine broken forest litter. Some enthusiasts insist on using Casuarina or Allocasuarina needles. If the latter is used the logic is that it is more likely to prevent fungal problems and are easier for the orchid’s leaves to penetrate.
Pot size will depend on the number of tubers you have. A 100mm pot will handle 5 to 7 tubers, while a 150mm pot can handle 10 tubers and a 200mm pot 20 tubers. (The best plantings and flowerings appear in the 200mm pots.)
Propagation:
All orchids that are declared rare, vulnerable or endangered are protected by Federal and State Laws and must not be removed from the wild unless you are a land developer, mining company or main Roads department etc. This includes bulbs, roots, leaves and flowers. No part of any plant can be removed from Federal, State or Local Government land without the prior permission of the authority and this includes the spore.
1. Obtain relevant materials
The first step in growing orchid from seed will be sourcing and having at the ready all materials that will be required in the propagation process.
This includes all of the following:
Unripe orchid seed capsule. If there are 2 capsules secure the second capsule immediately after the first capsule splits or if only one capsule as soon as it changes colour.
Orchid gelling medium with agar which can be purchased from an orchid society or a specialist nursery.
Distilled water
Cooking pot
Spoon
Oven-safe glass or polypropylene containers with lids
Sealable bags
Clean, sterilized cutting board
Rubber gloves
Paper towels
Tweezers or forceps
70 percent ethanol
Bleach
Scalpel or sharp knife
Planting pot
Orchid compost
Length of wire metal
Plastic spray bottle.
deep petri dishes or sterile jars.
2. Prepare agar medium
The agar medium is a special orchid gelling mixture that distilled water will be added to distilled water.
To prepare the medium, mix equal parts of orchid gelling medium with distilled water in a cooking pot.
Place the pot on a stove and bring the mixture to boil for while stirring continuously for two minutes.
Pour the mixture into the petri dishes glass or propylene containers while ensuring not to fill the containers above 20 percent of their volume.
Loosely replace the lids to the containers. Sterilize the containers by heating them up in a microwave oven for between 2 to 3 minutes.
Spray 70 percent ethanol into a sealable bag to create a sterile environment. Transfer the heated containers into the sealable bag.
Allow the containers to cool a bit before tightening their lids and then sealing the bag. Leave the containers to stand for a few days until the mixture solidifies.
3. Prepare seed capsule and work surface
Place an open pot of water on a stove and bring to boil. Place the cutting board in the oven and sterilize.
Put on rubber gloves and sterilize the forceps, and scalpel with 70 percent ethanol.
Insert the seed capsule into a bowel filled with bleach for about fifteen minutes.
Sterilize seed capsule again with 70 percent ethanol and place on grill.
Using the sterilized scalpel, cut open the seed capsule to reveal the seeds. Using a scalpel or sharp knife, scrape out the seeds from the capsule unto an ethanol soaked paper towel.
4. Flasking of the seed
Take out the petri dishes or glass jars containers holding the agar medium. Over the steam, open up the containers and transfer seeds from the ethanol soaked paper towel into the individual containers using the sterilized forceps.
The amount of seeds will determine the number of containers required. Replace the lid of the containers and place them on a window sill that receives indirect sunlight.
5. Wait and exercise patience
All that can be done at this point is to wait until the seeds germinate. The amount of time that this might take varies and is dependent on the particular species.
Generally, the time can range from a few months to a few years. During this period of waiting, ensure the containers are free from contamination to ensure that germination is not disrupted.
6. Emergence of protocorms
Protocorms are tuber-shaped bodies with rhizoids that are produced by the young seedlings of various orchids. Protocorms represent the embryonic form of the orchid plant.
Their emergence after the period of waiting at an affirmation that everything in the propagation process is on track.
7. Trans flask orchid seedlings is done after they have developed roots
Upon the emergence of the protocorms, consistently observe the growth of the seedlings. At the point when the seedlings appear to overcrowd the flask, trans flasking should be carried out, typically within 30 and 60 days.
* This is done by removing individual seedlings using sterilized tweezers from the original containers and placing them in new containers also filled, in a proportion similar to the original, with agar medium. 6 to 8 in a standard petri dish or 1or 2 to a test tube
8. Transplant seedlings into planting pots
On the presumption that there are no disruptions to the plant growth, the seedlings will eventually outgrow the containers.
At this point, they are to be transplanted into planting pots. A good rule of thumb to determine when they are ready to be transplanted is when the seedlings have developed roots that have grown up to the length of one-quarter of an inch.
To transplant, prepare a planting pot or other container for receiving the seedling by majorly filling it up with coarse fir bark and possibly some slightly moist orchid compost mixture containing perlite, fine charcoal, redwood bark shavings, etc.
To extract the seedlings, submerge the containers in warm water to help loosen the agar gel.
Once the agar medium is softened, twist a piece of metal to form a loop and in turn, use it to carefully pull out the seedlings from the container. It is best done if the agar and seedling can be removed together.
The seedlings can be further rinsed in lukewarm water to remove any excess agar mixture still stuck to them.
Following this, the seedlings can now be planted into the prepared pot with at least 50mm of space between each individual seedling.
9. Positioning the orchid
The seedling once fully transplanted should be placed in a location that is warm with good indirect sun light.
Slowly position the pots into an area that closely assimilates the conditions it will be growing under.
The choice as to whether the plant should be exposed to full sun or in direct sunlight will be dependent on the particular orchid specie.
10. Subsequent care of the plant
After the first week, the seedling can be misted several times a day and watered just once a week.
A guide in watering the plant will be using the dryness of the fir back that is, water the plant until the fir back is completely moistened and wait till it has completely dried out before watering again.
Do not fertilize until the seedlings have fully established themselves then annually as the first new shoot appears.
Further Comments from Readers:
“Hi reader, it seems you use The Bible of Botany a lot. That’s great as we have great pleasure in bringing it to you! It’s a little awkward for us to ask, but our first aim is to purchase land approximately 1,600 hectares to link several parcels of N.P. into one at The Pinnacles NSW Australia, but we need your help. We’re not salespeople. We’re amateur botanists who have dedicated over 30 years to saving the environment in a practical way. We depend on donations to reach our goal. If you donate just $5, the price of your coffee this Sunday, We can help to keep the planet alive in a real way and continue to bring you regular updates and features on Australian plants all in one Botanical Bible. Any support is greatly appreciated. Thank you.”
In the spirit of reconciliation we acknowledge the Bundjalung, Gumbaynggirr and Yaegl and all aboriginal nations throughout Australia and their connections to land, sea and community. We pay our respect to their Elders past, present and future for the pleasures we have gained.
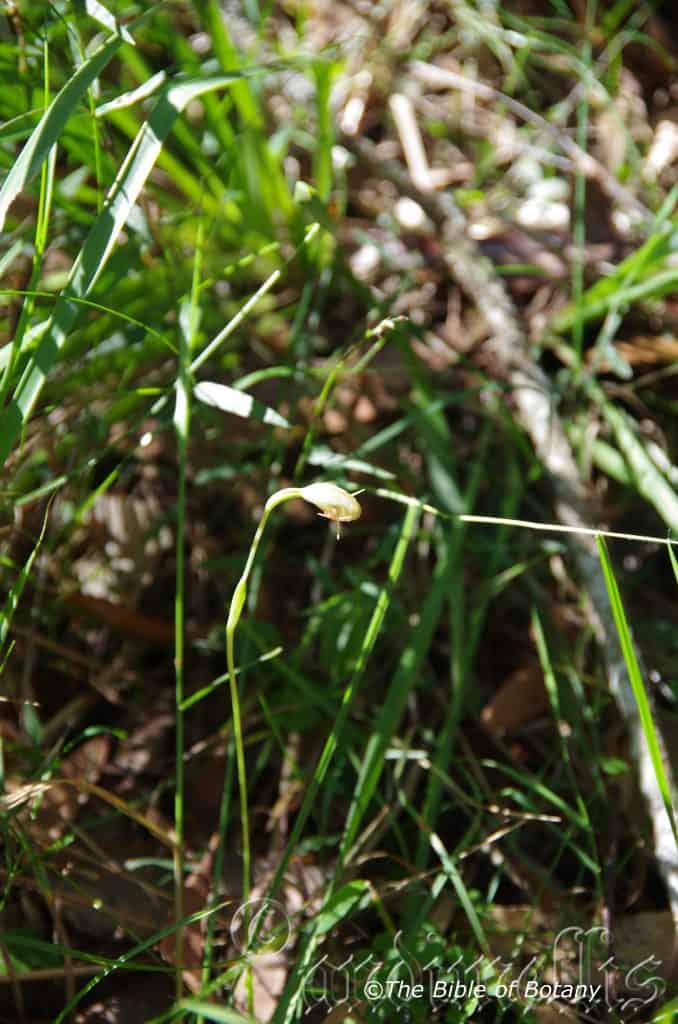
Clarence Valley NSW
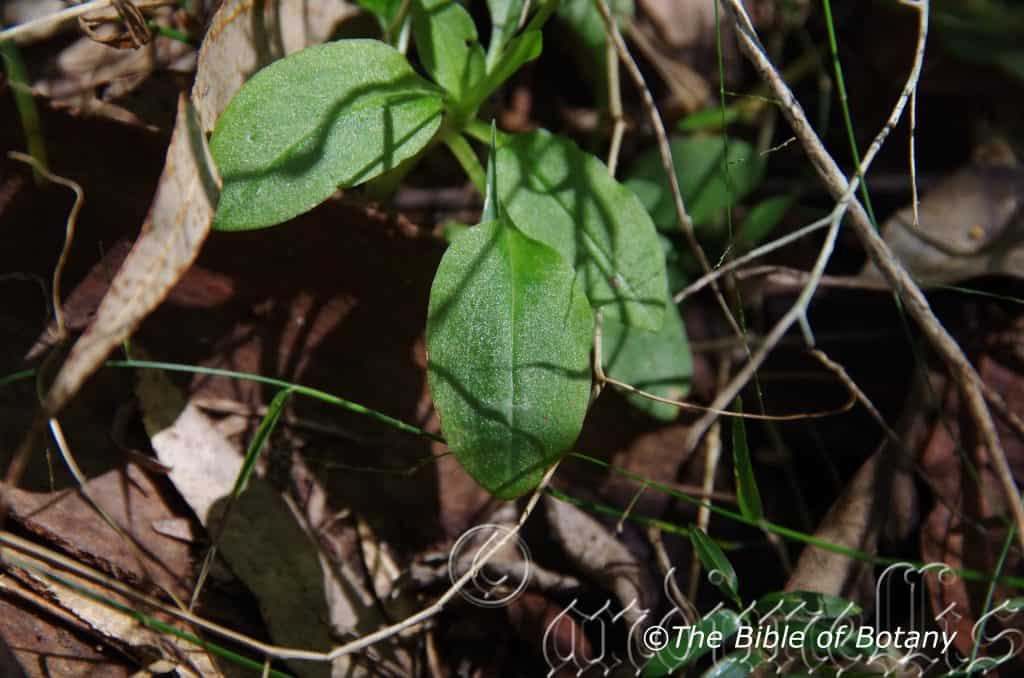
Clarence Valley NSW
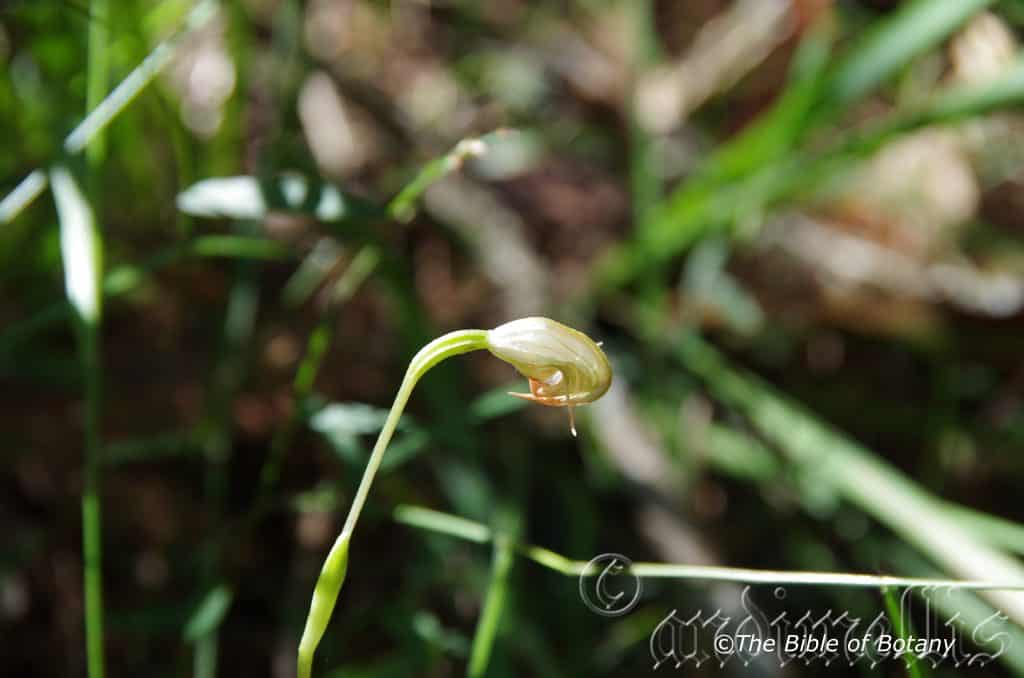
Clarence Valley NSW
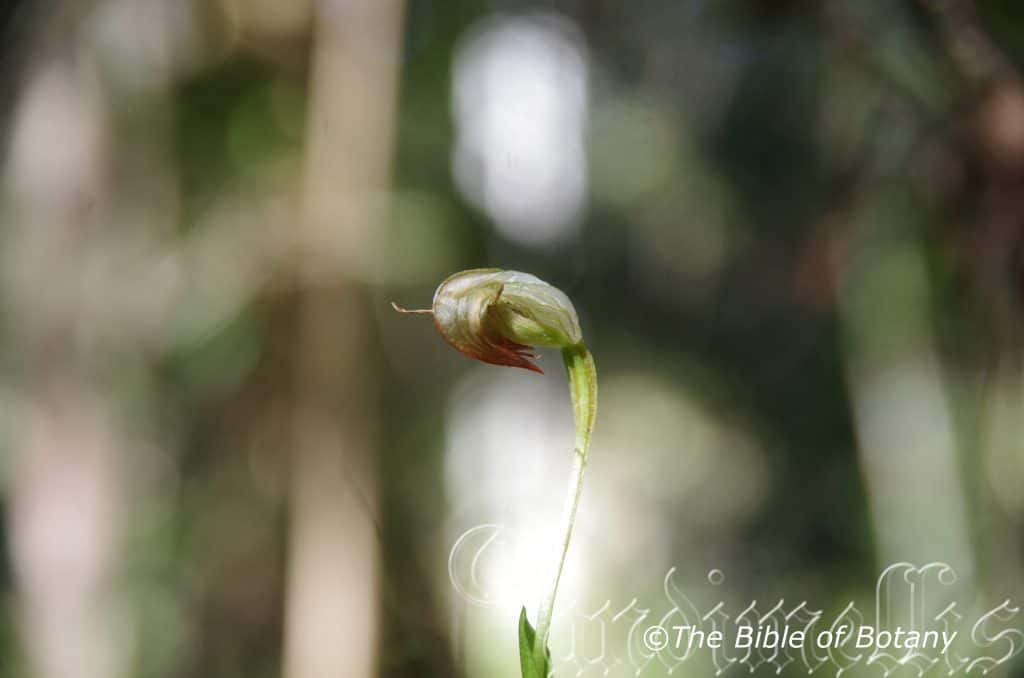
Clarence Valley NSW
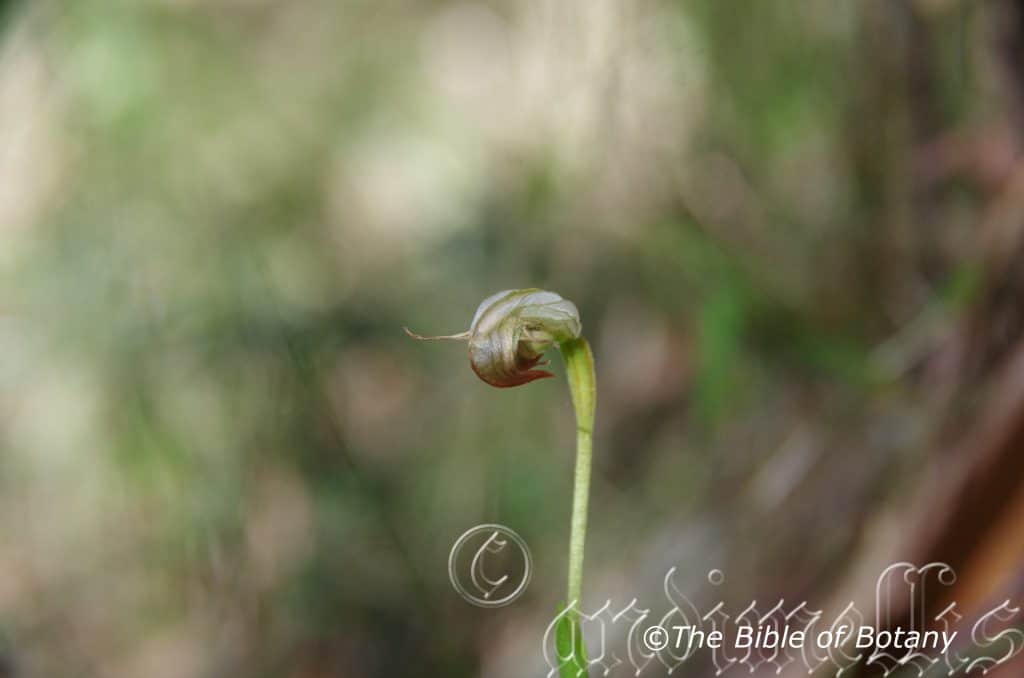
Clarence Valley NSW
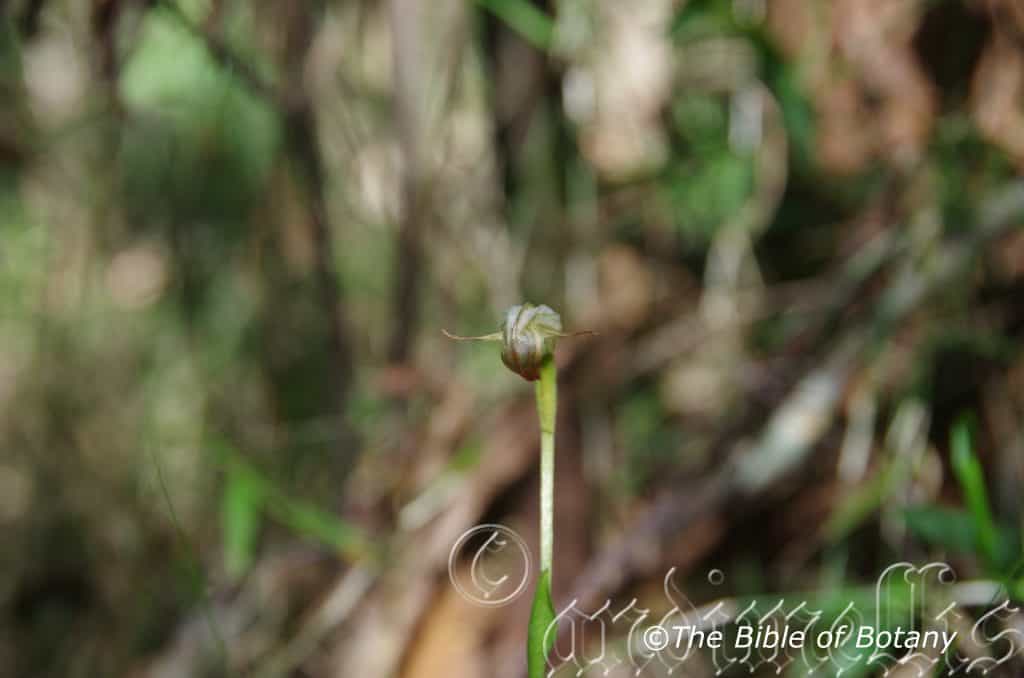
Clarence Valley NSW
Pterostylis hispidula
Classification:
Unranked: Monocots
Order: Asparagales
Family: Orcidaoideae
Tribe: Pterostylidinae
Genus: From Pterón, which is Ancient Greek or Pterón which is Latin for a wing and Stŷlos, which is Ancient Greek for a part of the female reproductive organ between the ovaries and the stigma. It refers to styles, which are flattened like wings or have distinct extension like wings.
Species: From Hispidus, which is Latin for short bristly hairs. It refers to a structure or organ, which has short, bristly course hairs.
Common Name: Small Nodding Green Hood.
Distribution:
Pterostylis hispidula is found in several disjunct populations south from Fraser Island in southern coastal Queensland to Congo in southern coastal New South Wales. It is found on and east of the Great Dividing Range to the coast except for a single population near Humula near Wagga Wagga.
https://avh.ala.org.au/occurrences/search?taxa=Pterostylis+hispidula#tab_mapView
Habitat Aspect Climate:
Pterostylis hispidula prefers medium shade to dappled shade. It grows in moist areas of within dry sclerophyll forest or moist sclerophyll forest in coastal and near-coastal districts. Its altitude ranges from 5 meters ASL to 900 meters ASL.
The temperatures range from minus 3 degrees in August to 38 degrees in January.
The rainfall ranges from lows of 650mm to 2000mm average per annum. The plants are just as reliant on capillary action from nearby permanent water sources to keep the soils permanently moist.
Soil Requirements:
Pterostylis hispidula grows on coarse sands, fine sands or sandy loams to medium clays. The soils are derived from decomposed granites, sandstones, brown basalts, black basalts or metamorphic rocks. The soils pH ranges from 5pH to 6pH. It does not tolerate waterlogged soils however soil moisture is essential for survival. Non saline soils to moderately saline soils are tolerated.
Height & Spread:
Wild Plants: 0.15m to 0.2m by 0.02m to 0.1m.
Characteristics:
Pterostylis hispidula grows as a slender erect, deciduous terrestrial orchid. The orchids usually begin to sprout from underground tubers in late January to February.
Pterostylis hispidula has 3 to 6 rosette ovate, elliptic or oblong leaves measure 10mm to 45mm in length by 8mm to 20mm in width. The mid bluish-green petioles measure 2mm to 5mm in length. The bases are rounded while the apexes are acuminate. The concolourous, laminas are bluish-green and glabrous. The laminas are flat and decurve downwards on the apical third. The margins are slightly undulating to crisped. The midvein is prominent on the lower laminas while the reticulate veins are slightly prominent none the upper laminas.
The inflorescences are long, erect scapes born from the centre of the rosette of leaves. The scape has a single flower that measure 100mm to 200mm in length. The flowers are longitudinally cupuliform. The flowers measure 15mm to 18mm in length by 8mm to 10mm in diameter. The apex of the galea is semi nodding to nodding to nodding, translucent with green and brown in the galea.
The translucent to opaque, green with a brownish-red acute apex is sparsely covered in short white puberulent hairs externally and is glabrous internally. The oblong dorsal sepal is semi nodding to nodding and measures 15mm to 18mm in length by 6mm to 9mm in width.
The lime green, lanceolate lateral sepals loosely embrace the dorsal sepal leaving a lateral gap and measure 12mm to 14mm in length overall. The sinus nearly flat with a central notch when viewed from the front, abruptly curved when viewed from the side. The free section of the lateral sepals are linear and taper to a blunt acute apex and measure 5mm to 8mm in length. The lateral sepals are sparsely covered in short white puberulent hairs externally and are glabrous internally.
The oblong strongly curved lateral petals are strongly incurved forming a hood with an acute apex. The margins are entire. The dorsal sepals measure 15mm to 18mm in length by 15mm to 20mm in width. The lateral petals are sparsely covered in short white puberulent hairs externally and are glabrous internally.
The labellum is deep reddish-maroon with a mid lime-green marginal stripe. The ovate to lanceolate labellum measure 9mm to 13mm in length by 4mm to 5mm in width. The apexes are obtuse while the distal third is retrorse and protrudes from the sinus in the set position. The scabrid labellum are sparsely covered in short white puberulent hairs internally on the basal half and white, antrorse, hirsute hairs and are glabrous externally. The flowers appear from March to July.
The fruits are obloidal capsules. The green capsules turn deep grey-brown when ripe.
Wildlife:
Pterostylis hispidula’s wildlife is unknown to the author.
Cultivation:
Pterostylis hispidula is a beautiful terrestrial orchid that can form dense colonies once established in a satisfactory environment. It is not a difficult orchid to grow in the garden but it needs a cool, moist, light shady position to survive and thrive. The best place is in a green house or bush house where the environment can be controlled better.
In a littoral rainforest or rainforest setting free of frost or sub zero temperatures and a humid microclimate will see the plants thrive.
Fertilize using a mixture of seaweed, fish emulsion and organic chicken pellets soaked in water and apply the liquid as soon as the first leaves appear to maintain health, vigour and better flowering. Fertilize again as the blooms die to assist in better tubers and flowers in the following season.
Care of Terrestrial Orchids:
Native terrestrial orchids comprise of many Genre with their individual species which range from being relatively easy to cultivate to those that are damn near impossible and definitely frustrating to say the least. NOTE: All native orchids are protected by law.
Most terrestrial orchids are deciduous during the dry season. These usually commence their growing season with the onset of the wet season through to the end of the wet season. The flowering occurs shortly after the leaves have been established sending up the new scape flowering then dying back to a subterranean tuber in a yearly cycle of growth.
The delicate Caladenia specie (Spider Orchids), the amazing Caleana specie (Duck Orchids), the brilliantly coloured Diuris specie (Donkey Orchids), the curious Pterostylis specie (Green hoods) and the spectacular Thelymitra specie (Sun Orchids) all have some the most amazing colour combinations and shapes of any orchids found anywhere in the world.
The saprophytic orchids have been deliberately excluded because they are highly specialized orchids in nature that replicating their growing conditions is near impossible for any period of time. This intriguing group of orchids has some of the most amazing blooms of any orchid with the above mentioned groups worthwhile persevering with.
The life cycle needs to be fully understood prior to any attempt to grow these beautiful orchids or failure is assured. The best advice I can give is if you are lucky enough to have these orchids growing naturally preserve their environment as nature has done for millions of years. I marked all the active growth areas on my Nana Glen property with survey pegs and kept the areas mulched with their local mulch and fertilized once I saw the new shoot commencing their seasonal cycle.
Failing the above notice that terrestrial orchids usually flower, then are followed by a period of dormancy, very similar to many other exotic and native epiphytic orchids. The biggest difference is that the majority’s period of growth and flowering tends to be in the cooler months of the year following the wet season not during the wet season, while the dormant period is in the warmer drier months.
They can be dormant for 6 to 8 months of the year and need to be kept reasonably dry during this period. Ideal shade house conditions would be 30mm to 50mm shade with a solid alsynite roof. Our Fern Nursery comprised of a shade cloth section with alternating 30mm and 50mm shade cloth and the dry area was 2 sheet of alsynite with 2 sheets of corrugated iron running in a north south direction. This gave all the plants shade that was of different intensities during the day. This situation is ideal during the dormancy period for all plants.
Watering is by far the most crucial part growing terrestrial orchids successfully. When in active growth the plants should be watered regularly so that the potting mix remains moist at all times. As the plants finish flowering and start to die back they will commence to develop the new tubers. Watering at this stage needs to be decreased so that the mix is almost completely dry. If the mix remains wet at this time the tubers have a good chance of rotting. From early January start to water lightly occasionally (if it rains lightly water lightly and if it storms water the plants thoroughly.) As the new growth appears and accelerates increase the water accordingly. I will stress here that rain water is far more beneficial than tap water.
Light varies depending on the genus, Pterostylis and Acianthus prefer shadier conditions (40mm to 60mm) than the Caladenia, Caleana and Diuris (20mm to 30mm) the aptly named Sun Orchids Thelymitra (10mm to 20mm) (It is named because the flowers open as the sun rises and close as the sun sets). Too often enthusiast treat the orchids like babies locking them up in too dense a shade and create to humid conditions which lead to fungal and mite problems. All these species resent stagnant humid conditions so place them in a position where they receive good light and air flow.
Fertilizing is necessary for optimum growth and organic fertilizers offer the best method. Organic fertilizer like the ones we recommend delivered on a monthly basis from the onset of the leaves from early April to the opening of the flowers is the best method we have learned over the years.
Pests may not be wanted but they do appear from time to time. The usual suspects are Slugs and Snails which can do immense damage in a very short period of time. Start placing upturned half orange and mandarin skins around near the plants as you begin to water. These baits will attract them as soon as they appear and before they increase in numbers. Keep the benches dry by watering in the mornings or keep the plants suspended on mesh benches is also a good deterrent. Thrips and Red Spider can at times also cause problems. Good air flow and drier conditions is usually enough to keep them at bay. If the problem doesn’t abate then a light application of natural pyrethrum or Garlic usually does the trick.
Potting mixes are important so use a good mix. Use our recommended open dry mix for terrestrial orchids. Add a small teaspoon of 100mm natural blood and bone to the mix for each 250mm standard pot. Repotting should be carried out annually during the dormant period. Remove the plants from the pots and gently remove the old soil being careful not to damage the tubers. Fill the new pot with the new mix to about 30mm below the surface. Replace the tubers on the new mix. Cover the tubers with 5mm of mix. Cover the surface with 10mm to 15mm of fine broken forest litter. Some enthusiasts insist on using Casuarina sp. or Allocasuarina sp. needles. If the latter is used the logic is that it is more likely to prevent fungal problems and are easier for the orchid’s leaves to penetrate.
Pot size will depend on the number of tubers you have. A 100mm pot will handle 5 to 7 tubers, while a 150mm pot can handle 10 tubers and a 200mm pot 20 tubers. (The best plantings and flowerings appear in the 200mm pots.)
Propagation:
All orchids that are declared rare, vulnerable or endangered are protected by Federal and State Laws and must not be removed from the wild unless you are a land developer, mining company or main Roads department etc. This includes bulbs, roots, leaves and flowers. No part of any plant can be removed from Federal, State or Local Government land without the prior permission of the authority and this includes the spore.
1. Obtain relevant materials
The first step in growing orchid from seed will be sourcing and having at the ready all materials that will be required in the propagation process.
This includes all of the following:
Unripe orchid seed capsule. If there are 2 capsules secure the second capsule immediately after the first capsule splits or if only one capsule as soon as it changes colour.
Orchid gelling medium with agar which can be purchased from an orchid society or a specialist nursery.
Distilled water
Cooking pot
Spoon
Oven-safe glass or polypropylene containers with lids
Sealable bags
Clean, sterilized cutting board
Rubber gloves
Paper towels
Tweezers or forceps
70 percent ethanol
Bleach
Scalpel or sharp knife
Planting pot
Orchid compost
Length of wire metal
Plastic spray bottle.
deep petri dishes or sterile jars.
2. Prepare agar medium
The agar medium is a special orchid gelling mixture that distilled water will be added to distilled water.
To prepare the medium, mix equal parts of orchid gelling medium with distilled water in a cooking pot.
Place the pot on a stove and bring the mixture to boil for while stirring continuously for two minutes.
Pour the mixture into the petri dishes glass or propylene containers while ensuring not to fill the containers above 20 percent of their volume.
Loosely replace the lids to the containers. Sterilize the containers by heating them up in a microwave oven for between 2 to 3 minutes.
Spray 70 percent ethanol into a sealable bag to create a sterile environment. Transfer the heated containers into the sealable bag.
Allow the containers to cool a bit before tightening their lids and then sealing the bag. Leave the containers to stand for a few days until the mixture solidifies.
3. Prepare seed capsule and work surface
Place an open pot of water on a stove and bring to boil. Place the cutting board in the oven and sterilize.
Put on rubber gloves and sterilize the forceps, and scalpel with 70 percent ethanol.
Insert the seed capsule into a bowel filled with bleach for about fifteen minutes.
Sterilize seed capsule again with 70 percent ethanol and place on grill.
Using the sterilized scalpel, cut open the seed capsule to reveal the seeds. Using a scalpel or sharp knife, scrape out the seeds from the capsule unto an ethanol soaked paper towel.
4. Flasking of the seed
Take out the petri dishes or glass jars containers holding the agar medium. Over the steam, open up the containers and transfer seeds from the ethanol soaked paper towel into the individual containers using the sterilized forceps.
The amount of seeds will determine the number of containers required. Replace the lid of the containers and place them on a window sill that receives indirect sunlight.
5. Wait and exercise patience
All that can be done at this point is to wait until the seeds germinate. The amount of time that this might take varies and is dependent on the particular species.
Generally, the time can range from a few months to a few years. During this period of waiting, ensure the containers are free from contamination to ensure that germination is not disrupted.
6. Emergence of protocorms
Protocorms are tuber-shaped bodies with rhizoids that are produced by the young seedlings of various orchids. Protocorms represent the embryonic form of the orchid plant.
Their emergence after the period of waiting at an affirmation that everything in the propagation process is on track.
7. Transflask orchid seedlings is done after they have developed roots
Upon the emergence of the protocorms, consistently observe the growth of the seedlings. At the point when the seedlings appear to overcrowd the flask, transflasking should be carried out, typically within 30 and 60 days.
* This is done by removing individual seedlings using sterilized tweezers from the original containers and placing them in new containers also filled, in a proportion similar to the original, with agar medium. 6 to 8 in a standard petri dish or 1or 2 to a test tube
8. Transplant seedlings into planting pots
On the presumption that there are no disruptions to the plant growth, the seedlings will eventually outgrow the containers.
At this point, they are to be transplanted into planting pots. A good rule of thumb to determine when they are ready to be transplanted is when the seedlings have developed roots that have grown up to the length of one-quarter of an inch.
To transplant, prepare a planting pot or other container for receiving the seedling by majorly filling it up with coarse fir bark and possibly some slightly moist orchid compost mixture containing perlite, fine charcoal, redwood bark shavings, etc.
To extract the seedlings, submerge the containers in warm water to help loosen the agar gel.
Once the agar medium is softened, twist a piece of metal to form a loop and in turn, use it to carefully pull out the seedlings from the container. It is best done if the agar and seedling can be removed together.
The seedlings can be further rinsed in lukewarm water to remove any excess agar mixture still stuck to them.
Following this, the seedlings can now be planted into the prepared pot with at least 50mm of space between each individual seedling.
9. Positioning the orchid
The seedling once fully transplanted should be placed in a location that is warm with good indirect sun light.
Slowly position the pots into an area that closely assimilates the conditions it will be growing under.
The choice as to whether the plant should be exposed to full sun or in direct sunlight will be dependent on the particular orchid specie.
10. Subsequent care of the plant
After the first week, the seedling can be misted several times a day and watered just once a week.
A guide in watering the plant will be using the dryness of the fir back that is, water the plant until the fir back is completely moistened and wait till it has completely dried out before watering again.
Do not fertilize until the seedlings have fully established themselves then annually as the first new shoot appears.
Further Comments from Readers:
“Hi reader, it seems you use The Bible of Botany a lot. That’s great as we have great pleasure in bringing it to you! It’s a little awkward for us to ask, but our first aim is to purchase land approximately 1,600 hectares to link several parcels of N.P. into one at The Pinnacles NSW Australia, but we need your help. We’re not salespeople. We’re amateur botanists who have dedicated over 30 years to saving the environment in a practical way. We depend on donations to reach our goal. If you donate just $5, the price of your coffee this Sunday, We can help to keep the planet alive in a real way and continue to bring you regular updates and features on Australian plants all in one Botanical Bible. Any support is greatly appreciated. Thank you.”
In the spirit of reconciliation we acknowledge the Bundjalung, Gumbaynggirr and Yaegl and all aboriginal nations throughout Australia and their connections to land, sea and community. We pay our respect to their Elders past, present and future for the pleasures we have gained.
Pterostylis longifolia
Classification:
Unranked: Monocots
Order: Asparagales
Family: Orcidaoideae
Tribe: Pterostylidinae
Genus: From Pterón, which is Ancient Greek or Pterón which is Latin for a wing and Stŷlos, which is Ancient Greek for a part of the female reproductive organ between the ovaries and the stigma. It refers to styles, which are flattened like wings or have distinct extension like wings.
Species: From Longitia/Longus, which is Latin for long in length and Folium, which is Latin for foliage. It refers to leaves, which are long and strap like or are much longer than other species in the genus.
Common Name: Tall Green Hood.
Distribution:
Pterostylis longifolia is found south from Caloundra in southern coastal Queensland to Streaky Bay in Southern South Australia within 200 kilometres of the coast.
In Tasmania it is found along the north coast and east coast from Woolnorth in the north west to Hobart in the south east and Flinders Island.
https://avh.ala.org.au/occurrences/search?taxa=Pterostylis+longifolia#tab_mapView
Habitat Aspect Climate:
Pterostylis longifolia prefers medium shade to dappled shade. It grows in moist to wet soils on sheltered slopes in closed sclerophyll forest, chiefly coastal. Its altitude ranges from 10 meters ASL to 1050 meters ASL.
The temperatures range from minus 3 degrees in August to 38 degrees in January.
The rainfall ranges from lows of 300mm to 2000mm average per annum. The plants are more reliant on capillary action from nearby permanent water sources to keep the soils permanently moist.
Soil Requirements:
Pterostylis longifolia grows on fine sands and fatty sandy loams to medium clays. The soils are usually derived from decomposed granites, sandstones, brown basalts, black basalts, metamorphic rocks or at times podzolic soils. The soils pH ranges from 4.5pH to 6pH. It does not tolerate waterlogged soils however soil moisture is essential for survival. Non saline soils to moderately saline soils are tolerated.
Height & Spread:
Wild Plants: 0.15m to 0.4m by 0.05m to 0.08m.
Characteristics:
Pterostylis longifolia grows as a slender erect, deciduous terrestrial orchid. The orchids usually begin to sprout from underground tubers in late February to late March.
The 3 to 6 rosette linear to lanceolate leaves measure 20mm to 40mm in length by 3mm to 4mm in width. The mid deep bluish-green petioles measure 2mm to 5mm in length. The bases are rounded while the apexes are acuminate. The concolourous, laminas are pale bluish-green and glabrous. The laminas are flat and decurve downwards on the apical third. The margins are crisped. The midvein is prominent on the lower laminas while the reticulate veins are slightly prominent none the upper laminas.
The inflorescences are long, erect scapes born from the center of the rosette of leaves. The scape has a single flower that measure 150mm to 400mm in length. There are 5 to 8 linear to lanceolate spreading shortly sheathed stem leaves that measure 30mm to 70mm in length by 3mm to 5mm in width. The green and white, glossy galea has a reddish-brown pyramidal apex. The 1 to 8 flowers are spreading cupuliform. The flowers measure 15mm to 20mm in length by 8mm to 10mm in width.
The glabrous oblong dorsal sepal is strongly decurve, forms a hood and has a pyramidal apex. The dorsal sepals measures 15mm to 20mm in length by 3mm to 5mm in width.
The lime green lateral sepals are pendant parallel to slightly divergent and measure 10mm to 14mm in length overall. The sinus is almost flat, notched longitudinally at the centre and protrudes in a prominent bulge when viewed from the side. The free apexes are broad linear to narrow oblong with an acute apex and measure 8mm to 12mm in length.
The glabrous oblong to slightly falcate lateral petals strongly follows the curves of the dorsal sepal and forms the sides of the hood. The apexes are acute while the margins are entire. The lateral petals are straight or undulate. The lateral petals measure 10mm to 14mm in length overall by 5mm to 6mm in width. The free section measures 2mm to 3mm in length.
The labellum is pale green, ovate to oblong and measures 4.5mm to 5.5mm in length by 2.5mm to 3mm in width. The apexes are bluntly acute and notched while the distal quarter protrudes from the sinus in the set position. The labellum is densely covered in opaque to translucent hirsute hairs at the basal third and shorter and sparsely covered on the apical two thirds with white antrorse hairs and white ciliate marginal hairs. The flowers appear from May to November with a peak between June and August.
The fruits are obloidal capsules. The green capsules turn deep grey-brown when ripe.
Confusing Species:
Pterostylis longifolia’s has a large, emerald green labellum and basal petaline flanges are currently under investigation as possibly a separate species which further compounds the problem of correct identification in the field by amateurs and professionals. The safest bet is those plants found in central and northern New South Wales are The labellum is yellow-green with a maroon central longitudinal stripe that does not extend to the apex. The labellum is densely covered in opaque to translucent hirsute hairs at the basal third and shorter and sparsely covered on the apical two thirds with white antrorse hairs and white ciliate marginal hairs. The scape measures 400mm in height.
Pterostylis melagramma’s labellum is yellowish tinged brownish-maroon with a deep maroon central longitudinal stripe that extends almost to the apex. The labellum is sparsely to moderately covered in long opaque to translucent hirsute hairs at the basal third and shorter and very sparsely to sparsely covered on the apical two thirds with white hirsute hairs and short, white puberulent marginal hairs or are glabrous. The scape measures 800mm in height.
Wildlife:
Pterostylis longifolia’s wildlife is unknown to the author.
Cultivation:
Pterostylis longifolia is a beautiful terrestrial orchid that can form dense colonies once established in a satisfactory environment. It is not a difficult orchid to grow in the garden but it needs a cool, moist, light shady position to survive and thrive. The best place is in a green house or bush house where the environment can be controlled better.
In a littoral rainforest or rainforest setting free of frost or sub zero temperatures and a humid microclimate will see the plants thrive.
Care of Terrestrial Orchids:
Native terrestrial orchids comprise of many Genre with their individual specie which range from being relatively easy to cultivate to those that are damn near impossible and definitely frustrating to say the least. NOTE: All native orchids are protected by law.
Most terrestrial orchids are deciduous during the dry season. These usually commence their growing season with the onset of the wet season through to the end of the wet season. The flowering occurs shortly after the leaves have been established sending up the new scape flowering then dying back to a subterranean tuber in a yearly cycle of growth.
The delicate Caladenia specie (Spider Orchids), the amazing Caleana specie (Duck Orchids), the brilliantly coloured Diuris specie (Donkey Orchids), the curious Pterostylis specie (Green hoods) and the spectacular Thelymitra specie (Sun Orchids) all have some the most amazing colour combinations and shapes of any orchids found anywhere in the world.
The saprophytic orchids have been deliberately excluded because they are highly specialized orchids in nature that replicating their growing conditions is near impossible for any period of time. This intriguing group of orchids has some of the most amazing blooms of any orchid with the above mentioned groups worthwhile persevering with.
The life cycle needs to be fully understood prior to any attempt to grow these beautiful orchids or failure is assured. The best advice I can give is if you are lucky enough to have these orchids growing naturally preserve their environment as nature has done for millions of years. I marked all the active growth areas on my Nana Glen property with survey pegs and kept the areas mulched with their local mulch and fertilized once I saw the new shoot commencing their seasonal cycle.
Failing the above notice that terrestrial orchids usually flower, then are followed by a period of dormancy, very similar to many other exotic and native epiphytic orchids. The biggest difference is that the majority’s period of growth and flowering tends to be in the cooler months of the year following the wet season not during the wet season, while the dormant period is in the warmer drier months.
They can be dormant for 6 to 8 months of the year and need to be kept reasonably dry during this period. Ideal shade house conditions would be 30mm to 50mm shade with a solid alsynite roof. Our Fern Nursery comprised of a shade cloth section with alternating 30mm and 50mm shade cloth and the dry area was 2 sheet of alsynite with 2 sheets of corrugated iron running in a north south direction. This gave all the plants shade that was of different intensities during the day. This situation is ideal during the dormancy period for all plants.
Watering is by far the most crucial part growing terrestrial orchids successfully. When in active growth the plants should be watered regularly so that the potting mix remains moist at all times. As the plants finish flowering and start to die back they will commence to develop the new tubers. Watering at this stage needs to be decreased so that the mix is almost completely dry. If the mix remains wet at this time the tubers have a good chance of rotting. From early January start to water lightly occasionally (if it rains lightly water lightly and if it storms water the plants thoroughly.) As the new growth appears and accelerates increase the water accordingly. I will stress here that rain water is far more beneficial than tap water.
Light varies depending on the genus, Pterostylis and Acianthus prefer shadier conditions (40mm to 60mm) than the Caladenia, Caleana and Diuris (20mm to 30mm) the aptly named Sun Orchids Thelymitra (10mm to 20mm) (It is named because the flowers open as the sun rises and close as the sun sets). Too often enthusiast treat the orchids like babies locking them up in too dense a shade and create to humid conditions which lead to fungal and mite problems. All these species resent stagnant humid conditions so place them in a position where they receive good light and air flow.
Fertilizing is necessary for optimum growth and organic fertilizers offer the best method. Organic fertilizer like the ones we recommend delivered on a monthly basis from the onset of the leaves from early April to the opening of the flowers is the best method we have learned over the years.
Pests may not be wanted but they do appear from time to time. The usual suspects are Slugs and Snails which can do immense damage in a very short period of time. Start placing upturned half orange and mandarin skins around near the plants as you begin to water. These baits will attract them as soon as they appear and before they increase in numbers. Keep the benches dry by watering in the mornings or keep the plants suspended on mesh benches is also a good deterrent. Thrips and Red Spider can at times also cause problems. Good air flow and drier conditions is usually enough to keep them at bay. If the problem doesn’t abate then a light application of natural pyrethrum or Garlic usually does the trick.
Potting mixes are important so use a good mix. Use our recommended open dry mix for terrestrial orchids. Add a small teaspoon of 100mm natural blood and bone to the mix for each 250mm standard pot. Repotting should be carried out annually during the dormant period. Remove the plants from the pots and gently remove the old soil being careful not to damage the tubers. Fill the new pot with the new mix to about 30mm below the surface. Replace the tubers on the new mix. Cover the tubers with 5mm of mix. Cover the surface with 10mm to 15mm of fine broken forest litter. Some enthusiasts insist on using Casuarina or Allocasuarina needles. If the latter is used the logic is that it is more likely to prevent fungal problems and are easier for the orchid’s leaves to penetrate.
Pot size will depend on the number of tubers you have. A 100mm pot will handle 5 to 7 tubers, while a 150mm pot can handle 10 tubers and a 200mm pot 20 tubers. (The best plantings and flowerings appear in the 200mm pots.)
Propagation:
All orchids that are declared rare, vulnerable or endangered are protected by Federal and State Laws and must not be removed from the wild unless you are a land developer, mining company or main Roads department etc. This includes bulbs, roots, leaves and flowers. No part of any plant can be removed from Federal, State or Local Government land without the prior permission of the authority and this includes the spore.
1. Obtain relevant materials
The first step in growing orchid from seed will be sourcing and having at the ready all materials that will be required in the propagation process.
This includes all of the following:
Unripe orchid seed capsule. If there are 2 capsules secure the second capsule immediately after the first capsule splits or if only one capsule as soon as it changes colour.
Orchid gelling medium with agar which can be purchased from an orchid society or a specialist nursery.
Distilled water
Cooking pot
Spoon
Oven-safe glass or polypropylene containers with lids
Sealable bags
Clean, sterilized cutting board
Rubber gloves
Paper towels
Tweezers or forceps
70 percent ethanol
Bleach
Scalpel or sharp knife
Planting pot
Orchid compost
Length of wire metal
Plastic spray bottle.
deep petri dishes or sterile jars.
2. Prepare agar medium
The agar medium is a special orchid gelling mixture that distilled water will be added to distilled water.
To prepare the medium, mix equal parts of orchid gelling medium with distilled water in a cooking pot.
Place the pot on a stove and bring the mixture to boil for while stirring continuously for two minutes.
Pour the mixture into the petri dishes glass or propylene containers while ensuring not to fill the containers above 20 percent of their volume.
Loosely replace the lids to the containers. Sterilize the containers by heating them up in a microwave oven for between 2 to 3 minutes.
Spray 70 percent ethanol into a sealable bag to create a sterile environment. Transfer the heated containers into the sealable bag.
Allow the containers to cool a bit before tightening their lids and then sealing the bag. Leave the containers to stand for a few days until the mixture solidifies.
3. Prepare seed capsule and work surface
Place an open pot of water on a stove and bring to boil. Place the cutting board in the oven and sterilize.
Put on rubber gloves and sterilize the forceps, and scalpel with 70 percent ethanol.
Insert the seed capsule into a bowel filled with bleach for about fifteen minutes.
Sterilize seed capsule again with 70 percent ethanol and place on grill.
Using the sterilized scalpel, cut open the seed capsule to reveal the seeds. Using a scalpel or sharp knife, scrape out the seeds from the capsule unto an ethanol soaked paper towel.
4. Flasking of the seed
Take out the petri dishes or glass jars containers holding the agar medium. Over the steam, open up the containers and transfer seeds from the ethanol soaked paper towel into the individual containers using the sterilized forceps.
The amount of seeds will determine the number of containers required. Replace the lid of the containers and place them on a window sill that receives indirect sunlight.
5. Wait and exercise patience
All that can be done at this point is to wait until the seeds germinate. The amount of time that this might take varies and is dependent on the particular species.
Generally, the time can range from a few months to a few years. During this period of waiting, ensure the containers are free from contamination to ensure that germination is not disrupted.
6. Emergence of protocorms
Protocorms are tuber-shaped bodies with rhizoids that are produced by the young seedlings of various orchids. Protocorms represent the embryonic form of the orchid plant.
Their emergence after the period of waiting at an affirmation that everything in the propagation process is on track.
7. Transflask orchid seedlings is done after they have developed roots
Upon the emergence of the protocorms, consistently observe the growth of the seedlings. At the point when the seedlings appear to overcrowd the flask, transflasking should be carried out, typically within 30 and 60 days.
* This is done by removing individual seedlings using sterilized tweezers from the original containers and placing them in new containers also filled, in a proportion similar to the original, with agar medium. 6 to 8 in a standard petri dish or 1or 2 to a test tube
8. Transplant seedlings into planting pots
On the presumption that there are no disruptions to the plant growth, the seedlings will eventually outgrow the containers.
At this point, they are to be transplanted into planting pots. A good rule of thumb to determine when they are ready to be transplanted is when the seedlings have developed roots that have grown up to the length of one-quarter of an inch.
To transplant, prepare a planting pot or other container for receiving the seedling by majorly filling it up with coarse fir bark and possibly some slightly moist orchid compost mixture containing perlite, fine charcoal, redwood bark shavings, etc.
To extract the seedlings, submerge the containers in warm water to help loosen the agar gel.
Once the agar medium is softened, twist a piece of metal to form a loop and in turn, use it to carefully pull out the seedlings from the container. It is best done if the agar and seedling can be removed together.
The seedlings can be further rinsed in lukewarm water to remove any excess agar mixture still stuck to them.
Following this, the seedlings can now be planted into the prepared pot with at least 50mm of space between each individual seedling.
9. Positioning the orchid
The seedling once fully transplanted should be placed in a location that is warm with good indirect sun light.
Slowly position the pots into an area that closely assimilates the conditions it will be growing under.
The choice as to whether the plant should be exposed to full sun or in direct sunlight will be dependent on the particular orchid specie.
10. Subsequent care of the plant
After the first week, the seedling can be misted several times a day and watered just once a week.
A guide in watering the plant will be using the dryness of the fir back that is, water the plant until the fir back is completely moistened and wait till it has completely dried out before watering again.
Fertilize using a mixture of seaweed, fish emulsion and organic chicken pellets soaked in water and apply the liquid as soon as the first leaves appear to maintain health, vigour and better flowering. Fertilize again as the blooms die to assist in better tubers and flowers in the following season.
Further Comments from Readers:
“Hi reader, it seems you use The Bible of Botany a lot. That’s great as we have great pleasure in bringing it to you! It’s a little awkward for us to ask, but our first aim is to purchase land approximately 1,600 hectares to link several parcels of N.P. into one at The Pinnacles NSW Australia, but we need your help. We’re not salespeople. We’re amateur botanists who have dedicated over 30 years to saving the environment in a practical way. We depend on donations to reach our goal. If you donate just $5, the price of your coffee this Sunday, We can help to keep the planet alive in a real way and continue to bring you regular updates and features on Australian plants all in one Botanical Bible. Any support is greatly appreciated. Thank you.”
In the spirit of reconciliation we acknowledge the Bundjalung, Gumbaynggirr and Yaegl and all aboriginal nations throughout Australia and their connections to land, sea and community. We pay our respect to their Elders past, present and future for the pleasures we have gained.
Pterostylis mutica
Classification:
Unranked: Monocots
Order: Asparagales
Family: Orcidaoideae
Tribe: Pterostylidinae
Genus: From Pterón, which is Ancient Greek or Pterón which is Latin for a wing and Stŷlos, which is Ancient Greek for a part of the female reproductive organ between the ovaries and the stigma. It refers to styles, which are flattened like wings or have distinct extension like wings.
Species: From Mutica, which is Latin for blunt. It refers to structures or organs, which have an obtuse or thick round apex or edge that offers no apparent defence.
Common Name: Midget Green Hood.
Distribution:
Pterostylis mutica is found between Karroun Hill near Coolgardie to Tambellup, Israelite Bay and Balladonia, it is also found further east along the coast to Madura in southern Western Australia.
In the east it is found in the eastern half of Queensland and New South Wales south from Duaringa in southern Queensland to Brown Hill on the eastern edge of Wahgunya National Park in southern South Australia.
In Tasmania it has been found near Launceston and Hobart.
https://avh.ala.org.au/occurrences/search?taxa=Pterostylis+mutica#tab_mapView
Habitat Aspect Climate:
Pterostylis mutica prefers medium shade to dappled shade. It grows in moist open forests, moist open woodlands, in grasslands, on slopes along drainage lines, near soaks and near clay pans or ephemeral pools. Its altitude ranges from 5 meters ASL to 1057 meters ASL.
The temperatures range from minus 3 degrees in August to 40 degrees in January.
The rainfall ranges from lows of 250mm to 1500mm average per annum. The plants are more reliant on capillary action from nearby permanent water sources to keep the soils permanently moist especially in the lower rainfall areas.
Soil Requirements:
Pterostylis mutica grows in white peaty sands, sandy red loams, reddish-brown gritty clays, gravelly clays to medium clays and light silts to medium silts. The soils are usually derived from decomposed granites, sandstones, podzolic soils, alluvial deposits and accumulated sands, limestones and quartzes. The soils pH ranges from 4.5pH to 8pH. It does not tolerate waterlogged soils however soil moisture is essential for its survival. Non saline soils to very saline soils are tolerated.
Height & Spread: Wild Plants: 0.3m to 0.35m by 0.04m to 0.06m.
Characteristics:
Pterostylis mutica grows as a slender erect, deciduous terrestrial orchid. The orchids usually begin to sprout from underground tubers in late April to May but have been known to commence growing as early as Late March.
The 4 to 87 rosette ovate to oblong leaves measure 10mm to 30mm in length by 5mm to 15mm in width. The mid to deep bluish-green petioles measure 0.5mm to 5mm in length. The bases are rounded to caudate while the apexes are apiculate. The concolourous laminas are mid to deep bluish-green and glabrous. The laminas are flat and straight or gently decurve downwards at the base. The margins are entire. The midvein is prominent on the lower laminas while the reticulate veins are slightly prominent none the upper laminas.
The inflorescences are long, erect scapes born from the center of the rosette of leaves. The scape has a single flower that measure 100mm to 350mm in length with 5 to 10 closely sheathing stem leaves. The 2 to 20 pale green, yellowish-green or lime-green translucent flowers are longitudinally cupuliform. The flowers measure 8mm to 10mm in length by 6mm to 8mm in width. The apex of the galea is acute.
The glabrous broad oblong, translucent dorsal sepal is strongly curved to form a hood and has an acute apex. The dorsal sepals measures 8mm to 10mm in length by 2mm to 2.5mm in width.
The lime green, translucent lateral sepals broad ovate in outline when flattened out and are strongly cupuliform when live. It is united for most their length and measure 6mm to 7mm in length overall by 3.6mm to 4mm in width. The free apexes are broad triangular, not divergent and measure 1.5mm to 2.5mm in length.
The glabrous broad oblong, falcate, translucent lateral petals are attached to the dorsal sepal to form the sides of the hood while the apex tapers to a narrow obtuse apex. The margins are entire. The dorsal petals are widest at the base and measure 6mm to 7.5mm in length by 2.5mm to 3mm in width.
The labellum is lime-green with a yellow apex. The ovate to oblong labellum have a basal appendage and measure 3mm to 4mm in length by 2.2mm to 3mm in width. The appendage measures 2mm to 2.5mm in length. The inserted apex is obtuse. The flowers appear from July to November.
The fruits are obloidal capsules. The green capsules turn deep grey-brown when ripe.
Wildlife:
Pterostylis mutica’s wildlife is unknown to the author.
Cultivation:
Pterostylis mutica is a beautiful terrestrial orchid that can form dense colonies once established in a satisfactory environment. It is not a difficult orchid to grow in the garden but it needs a cool, moist, light shady position to survive and thrive. The best place is in a greenhouse or bush house where the environment can be controlled better.
In a littoral rainforest or rainforest setting free of frost or sub zero temperatures and a humid microclimate will see the plants thrive.
Propagation:
Native terrestrial orchids comprise of many Genre with their individual specie which range from being relatively easy to cultivate to those that are damn near impossible and definitely frustrating to say the least. NOTE: All native orchids are protected by law.
Most terrestrial orchids are deciduous during the dry season. These usually commence their growing season with the onset of the wet season through to the end of the wet season. The flowering occurs shortly after the leaves have been established sending up the new scape flowering then dying back to a subterranean tuber in a yearly cycle of growth.
The delicate Caladenia specie (Spider Orchids), the amazing Caleana specie (Duck Orchids), the brilliantly coloured Diuris specie (Donkey Orchids), the curious Pterostylis specie (Green hoods) and the spectacular Thelymitra specie (Sun Orchids) all have some the most amazing colour combinations and shapes of any orchids found anywhere in the world.
The saprophytic orchids have been deliberately excluded because they are highly specialized orchids in nature that replicating their growing conditions is near impossible for any period of time. This intriguing group of orchids has some of the most amazing blooms of any orchid with the above mentioned groups worthwhile persevering with.
The life cycle needs to be fully understood prior to any attempt to grow these beautiful orchids or failure is assured. The best advice I can give is if you are lucky enough to have these orchids growing naturally preserve their environment as nature has done for millions of years. I marked all the active growth areas on my Nana Glen property with survey pegs and kept the areas mulched with their local mulch and fertilized once I saw the new shoot commencing their seasonal cycle.
Failing the above notice that terrestrial orchids usually flower, then are followed by a period of dormancy, very similar to many other exotic and native epiphytic orchids. The biggest difference is that the majority’s period of growth and flowering tends to be in the cooler months of the year following the wet season not during the wet season, while the dormant period is in the warmer drier months.
They can be dormant for 6 to 8 months of the year and need to be kept reasonably dry during this period. Ideal shade house conditions would be 30mm to 50mm shade with a solid alsynite roof. Our Fern Nursery comprised of a shade cloth section with alternating 30mm and 50mm shade cloth and the dry area was 2 sheet of alsynite with 2 sheets of corrugated iron running in a north south direction. This gave all the plants shade that was of different intensities during the day. This situation is ideal during the dormancy period for all plants.
Watering is by far the most crucial part growing terrestrial orchids successfully. When in active growth the plants should be watered regularly so that the potting mix remains moist at all times. As the plants finish flowering and start to die back they will commence to develop the new tubers. Watering at this stage needs to be decreased so that the mix is almost completely dry. If the mix remains wet at this time the tubers have a good chance of rotting. From early January start to water lightly occasionally (if it rains lightly water lightly and if it storms water the plants thoroughly.) As the new growth appears and accelerates increase the water accordingly. I will stress here that rain water is far more beneficial than tap water.
Light varies depending on the genus,Pterostylis andAcianthus prefer shadier conditions (40mm to 60mm) than the Caladenia, Caleana and Diuris (20mm to 30mm) the aptly named Sun Orchids Thelymitra (10mm to 20mm) (It is named because the flowers open as the sun rises and close as the sun sets). Too often enthusiast treat the orchids like babies locking them up in too dense a shade and create to humid conditions which lead to fungal and mite problems. All these species resent stagnant humid conditions so place them in a position where they receive good light and air flow.
Fertilizing is necessary for optimum growth and organic fertilizers offer the best method. Organic fertilizer like the ones we recommend delivered on a monthly basis from the onset of the leaves from early April to the opening of the flowers is the best method we have learned over the years.
Pests may not be wanted but they do appear from time to time. The usual suspects are Slugs and Snails which can do immense damage in a very short period of time. Start placing upturned half orange and mandarin skins around near the plants as you begin to water. These baits will attract them as soon as they appear and before they increase in numbers. Keep the benches dry by watering in the mornings or keep the plants suspended on mesh benches is also a good deterrent. Thrips and Red Spider can at times also cause problems. Good air flow and drier conditions is usually enough to keep them at bay. If the problem doesn’t abate then a light application of natural pyrethrum or Garlic usually does the trick.
Potting mixes are important so use a good mix. Use our recommended open dry mix for terrestrial orchids. Add a small teaspoon of 100mm natural blood and bone to the mix for each 250mm standard pot. Repotting should be carried out annually during the dormant period. Remove the plants from the pots and gently remove the old soil being careful not to damage the tubers. Fill the new pot with the new mix to about 30mm below the surface. Replace the tubers on the new mix. Cover the tubers with 5mm of mix. Cover the surface with 10mm to 15mm of fine broken forest litter. Some enthusiasts insist on using Casuarina or Allocasuarina needles. If the latter is used the logic is that it is more likely to prevent fungal problems and are easier for the orchid’s leaves to penetrate.
Pot size will depend on the number of tubers you have. A 100mm pot will handle 5 to 7 tubers, while a 150mm pot can handle 10 tubers and a 200mm pot 20 tubers. (The best plantings and flowerings appear in the 200mm pots.)
Propagation:
All orchids that are declared rare, vulnerable or endangered are protected by Federal and State Laws and must not be removed from the wild unless you are a land developer, mining company or main Roads department etc. This includes bulbs, roots, leaves and flowers. No part of any plant can be removed from Federal, State or Local Government land without the prior permission of the authority and this includes the spore.
1. Obtain relevant materials
The first step in growing orchid from seed will be sourcing and having at the ready all materials that will be required in the propagation process.
This includes all of the following:
Unripe orchid seed capsule. If there are 2 capsules secure the second capsule immediately after the first capsule splits or if only one capsule as soon as it changes colour.
Orchid gelling medium with agar which can be purchased from an orchid society or a specialist nursery.
Distilled water
Cooking pot
Spoon
Oven-safe glass or polypropylene containers with lids
Sealable bags
Clean, sterilized cutting board
Rubber gloves
Paper towels
Tweezers or forceps
70 percent ethanol
Bleach
Scalpel or sharp knife
Planting pot
Orchid compost
Length of wire metal
Plastic spray bottle.
deep petri dishes or sterile jars.
2. Prepare agar medium
The agar medium is a special orchid gelling mixture that distilled water will be added to distilled water.
To prepare the medium, mix equal parts of orchid gelling medium with distilled water in a cooking pot.
Place the pot on a stove and bring the mixture to boil for while stirring continuously for two minutes.
Pour the mixture into the petri dishes glass or propylene containers while ensuring not to fill the containers above 20 percent of their volume.
Loosely replace the lids to the containers. Sterilize the containers by heating them up in a microwave oven for between 2 to 3 minutes.
Spray 70 percent ethanol into a sealable bag to create a sterile environment. Transfer the heated containers into the sealable bag.
Allow the containers to cool a bit before tightening their lids and then sealing the bag. Leave the containers to stand for a few days until the mixture solidifies.
3. Prepare seed capsule and work surface
Place an open pot of water on a stove and bring to boil. Place the cutting board in the oven and sterilize.
Put on rubber gloves and sterilize the forceps, and scalpel with 70 percent ethanol.
Insert the seed capsule into a bowel filled with bleach for about fifteen minutes.
Sterilize seed capsule again with 70 percent ethanol and place on grill.
Using the sterilized scalpel, cut open the seed capsule to reveal the seeds. Using a scalpel or sharp knife, scrape out the seeds from the capsule unto an ethanol soaked paper towel.
4. Flasking of the seed
Take out the petri dishes or glass jars containers holding the agar medium. Over the steam, open up the containers and transfer seeds from the ethanol soaked paper towel into the individual containers using the sterilized forceps.
The amount of seeds will determine the number of containers required. Replace the lid of the containers and place them on a window sill that receives indirect sunlight.
5. Wait and exercise patience
All that can be done at this point is to wait until the seeds germinate. The amount of time that this might take varies and is dependent on the particular species.
Generally, the time can range from a few months to a few years. During this period of waiting, ensure the containers are free from contamination to ensure that germination is not disrupted.
6. Emergence of protocorms
Protocorms are tuber-shaped bodies with rhizoids that are produced by the young seedlings of various orchids. Protocorms represent the embryonic form of the orchid plant.
Their emergence after the period of waiting at an affirmation that everything in the propagation process is on track.
7. Transflask orchid seedlings is done after they have developed roots
Upon the emergence of the protocorms, consistently observe the growth of the seedlings. At the point when the seedlings appear to overcrowd the flask, transflasking should be carried out, typically within 30 and 60 days.
* This is done by removing individual seedlings using sterilized tweezers from the original containers and placing them in new containers also filled, in a proportion similar to the original, with agar medium. 6 to 8 in a standard petri dish or 1or 2 to a test tube
8. Transplant seedlings into planting pots
On the presumption that there are no disruptions to the plant growth, the seedlings will eventually outgrow the containers.
At this point, they are to be transplanted into planting pots. A good rule of thumb to determine when they are ready to be transplanted is when the seedlings have developed roots that have grown up to the length of one-quarter of an inch.
To transplant, prepare a planting pot or other container for receiving the seedling by majorly filling it up with coarse fir bark and possibly some slightly moist orchid compost mixture containing perlite, fine charcoal, redwood bark shavings, etc.
To extract the seedlings, submerge the containers in warm water to help loosen the agar gel.
Once the agar medium is softened, twist a piece of metal to form a loop and in turn, use it to carefully pull out the seedlings from the container. It is best done if the agar and seedling can be removed together.
The seedlings can be further rinsed in lukewarm water to remove any excess agar mixture still stuck to them.
Following this, the seedlings can now be planted into the prepared pot with at least 50mm of space between each individual seedling.
9. Positioning the orchid
The seedling once fully transplanted should be placed in a location that is warm with good indirect sun light.
Slowly position the pots into an area that closely assimilates the conditions it will be growing under.
The choice as to whether the plant should be exposed to full sun or in direct sunlight will be dependent on the particular orchid specie.
10. Subsequent care of the plant
After the first week, the seedling can be misted several times a day and watered just once a week.
A guide in watering the plant will be using the dryness of the fir back that is, water the plant until the fir back is completely moistened and wait till it has completely dried out before watering again.
Fertilize using a mixture of seaweed, fish emulsion and organic chicken pellets soaked in water and apply the liquid as soon as the first leaves appear to maintain health, vigour and better flowering. Fertilize again as the blooms die to assist in better tubers and flowers in the following season.
Further Comments from Readers:
“Hi reader, it seems you use The Bible of Botany a lot. That’s great as we have great pleasure in bringing it to you! It’s a little awkward for us to ask, but our first aim is to purchase land approximately 1,600 hectares to link several parcels of N.P. into one at The Pinnacles NSW Australia, but we need your help. We’re not salespeople. We’re amateur botanists who have dedicated over 30 years to saving the environment in a practical way. We depend on donations to reach our goal. If you donate just $5, the price of your coffee this Sunday, We can help to keep the planet alive in a real way and continue to bring you regular updates and features on Australian plants all in one Botanical Bible. Any support is greatly appreciated. Thank you.”
In the spirit of reconciliation we acknowledge the Bundjalung, Gumbaynggirr and Yaegl and all aboriginal nations throughout Australia and their connections to land, sea and community. We pay our respect to their Elders past, present and future for the pleasures we have gained.
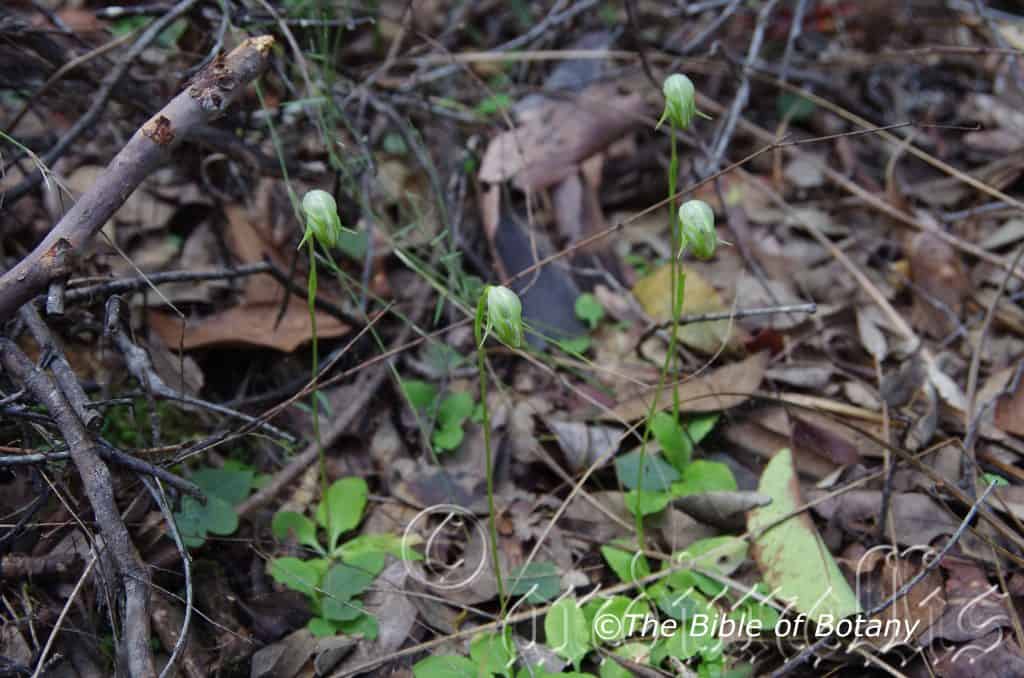
Clarence Valley NSW
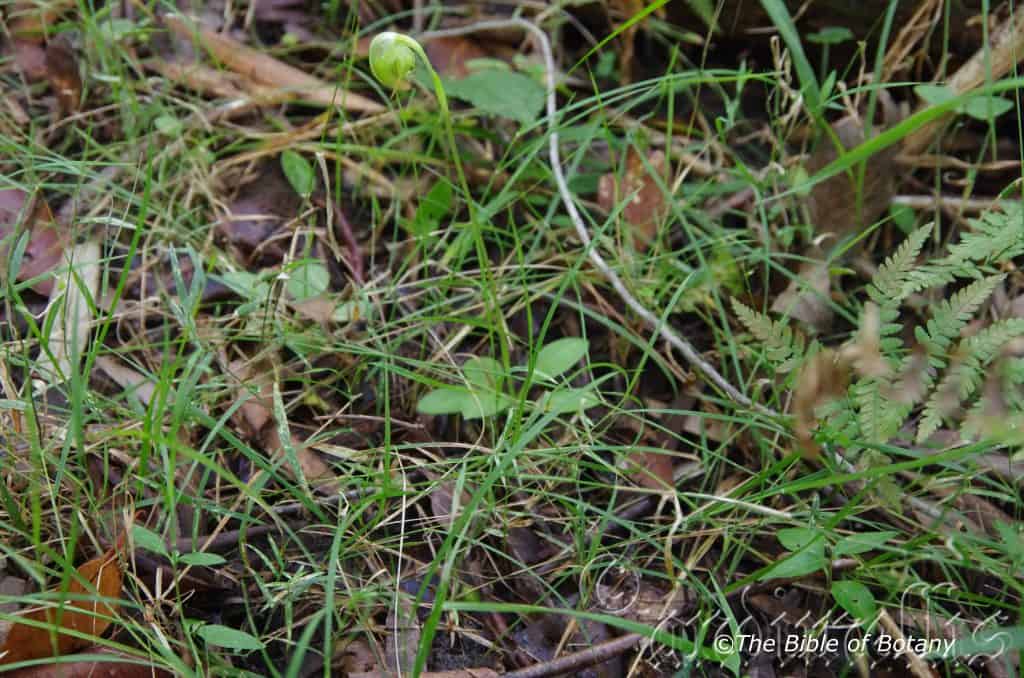
Clarence Valley NSW
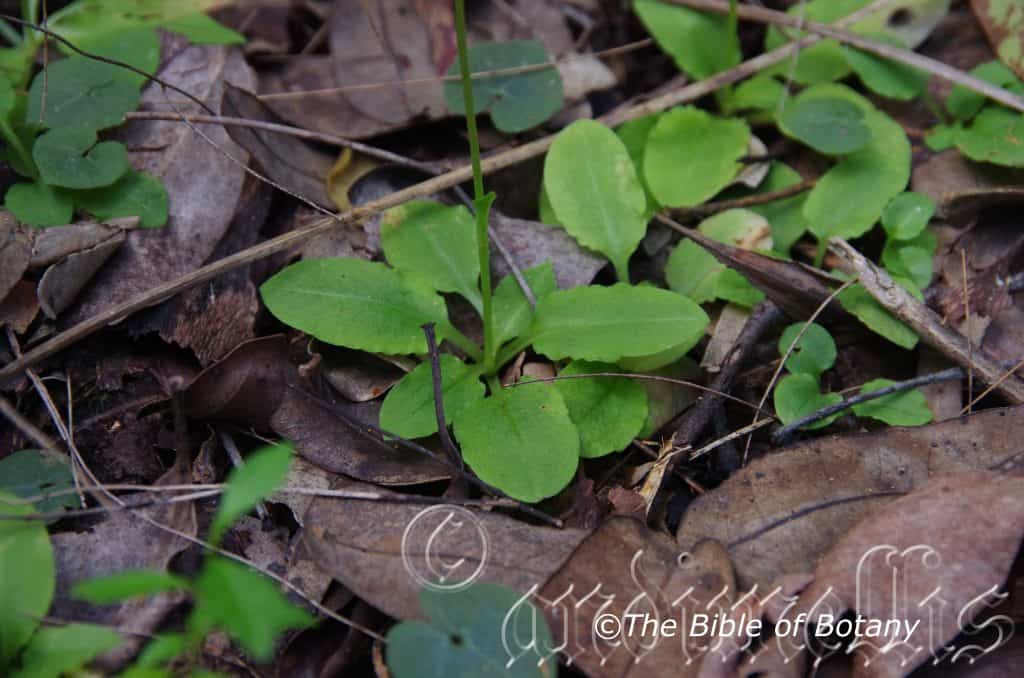
Clarence Valley NSW
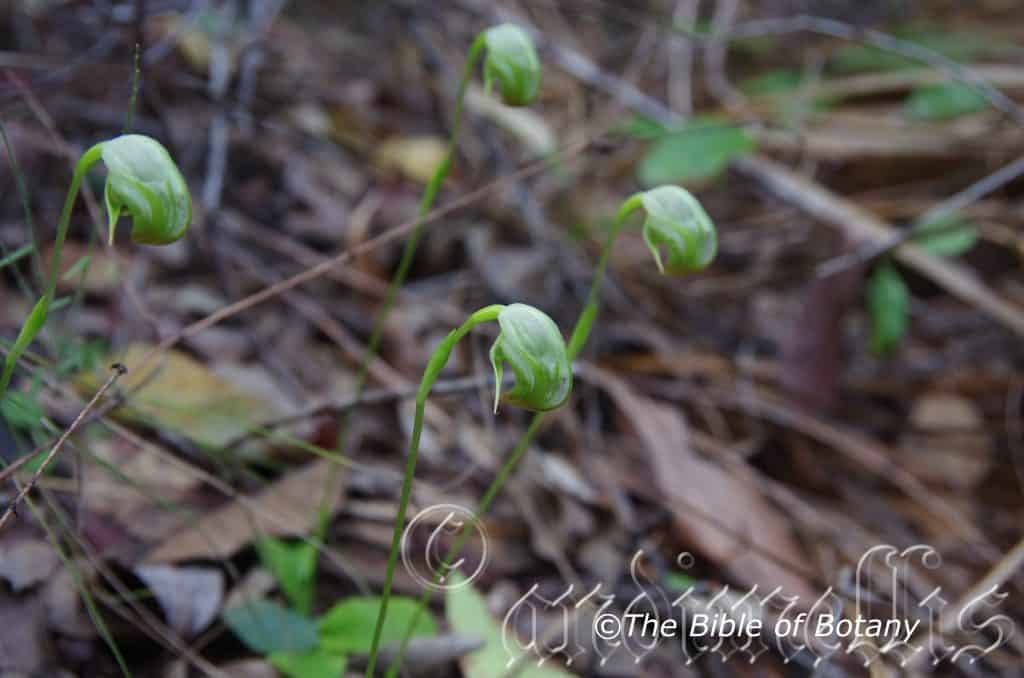
Clarence Valley NSW
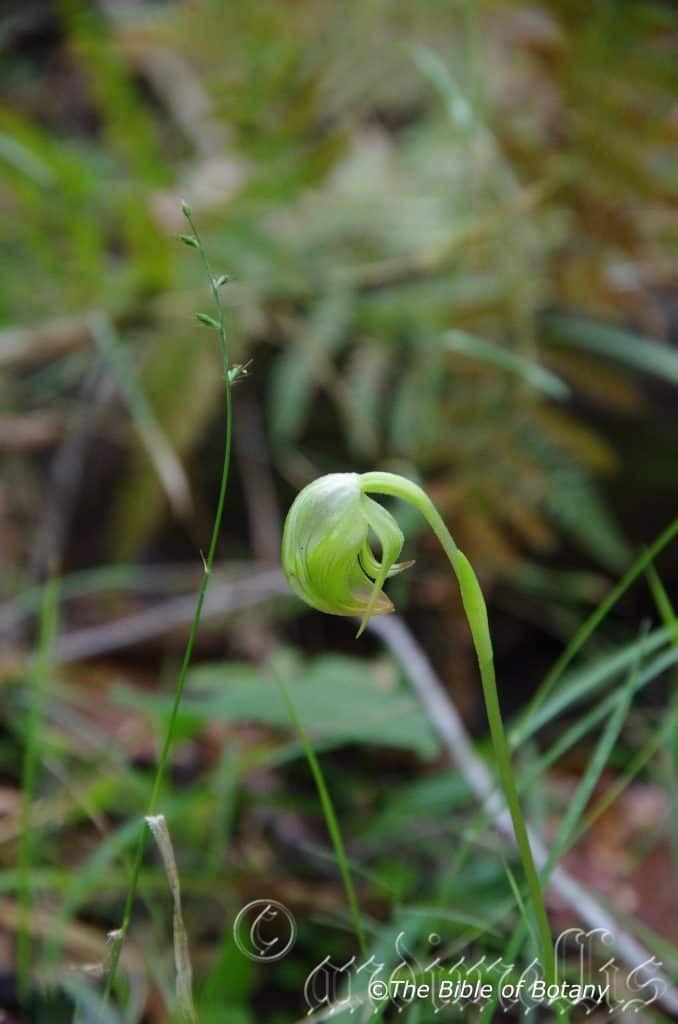
Clarence Valley NSW
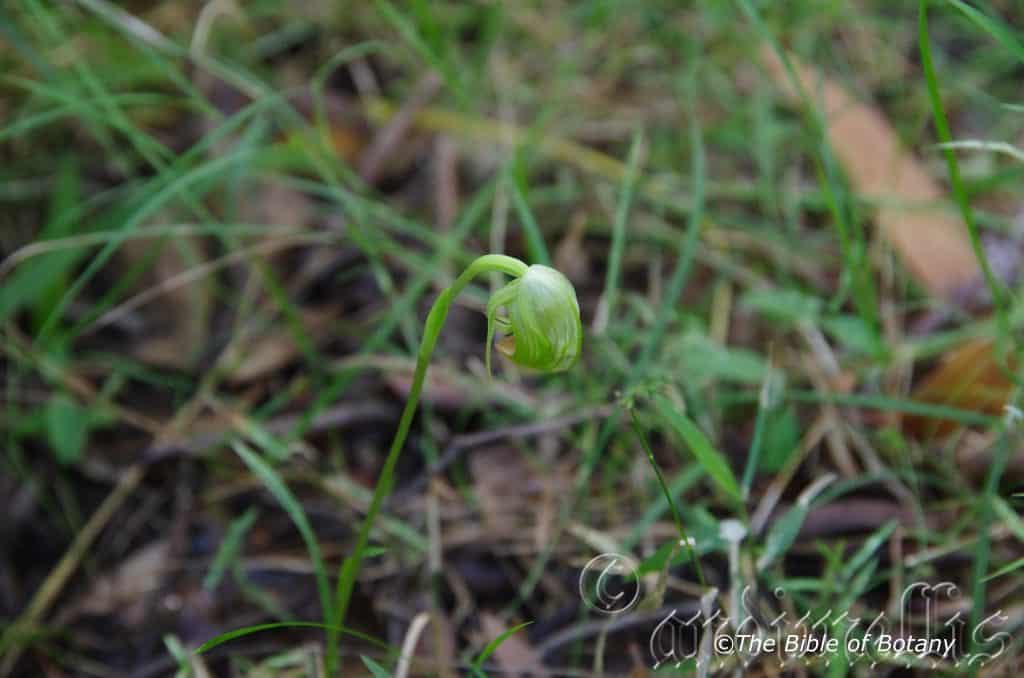
Clarence Valley NSW
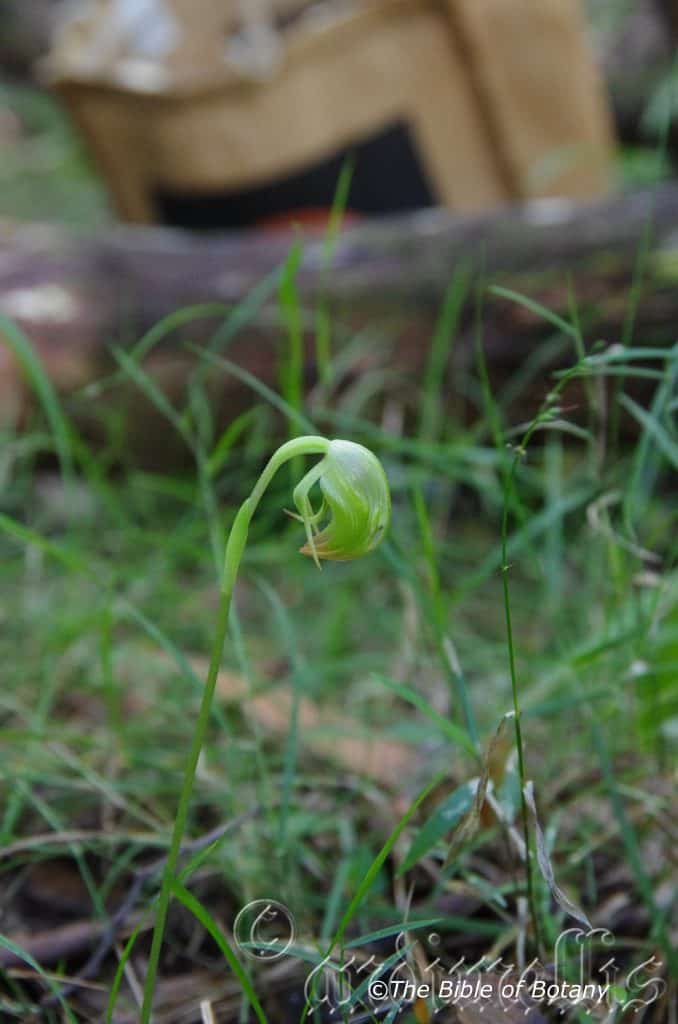
Clarence Valley NSW
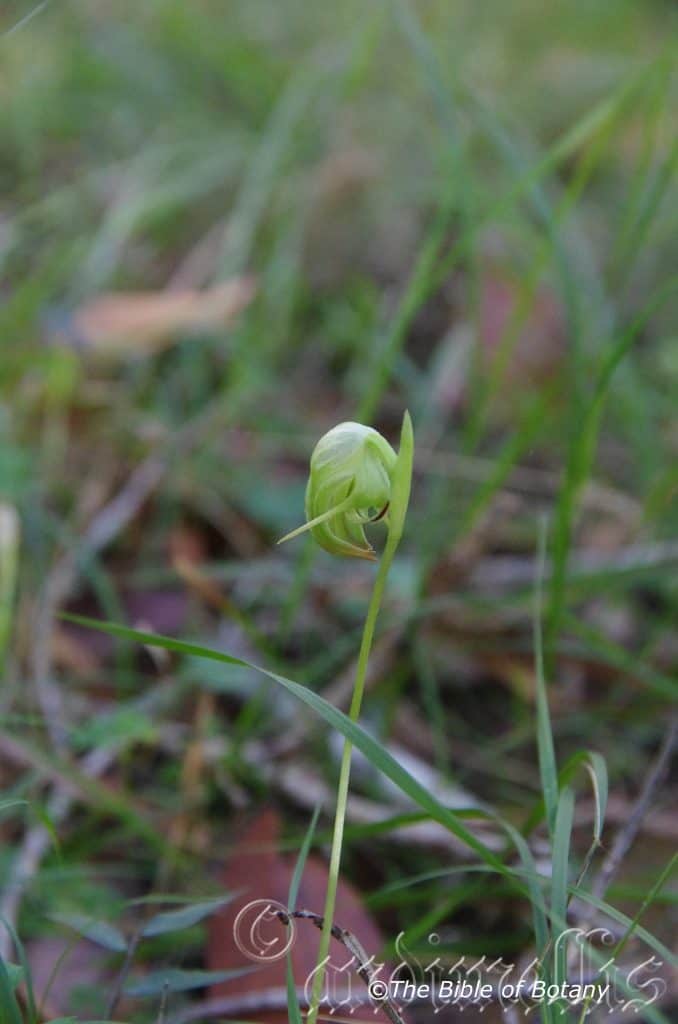
Clarence Valley NSW
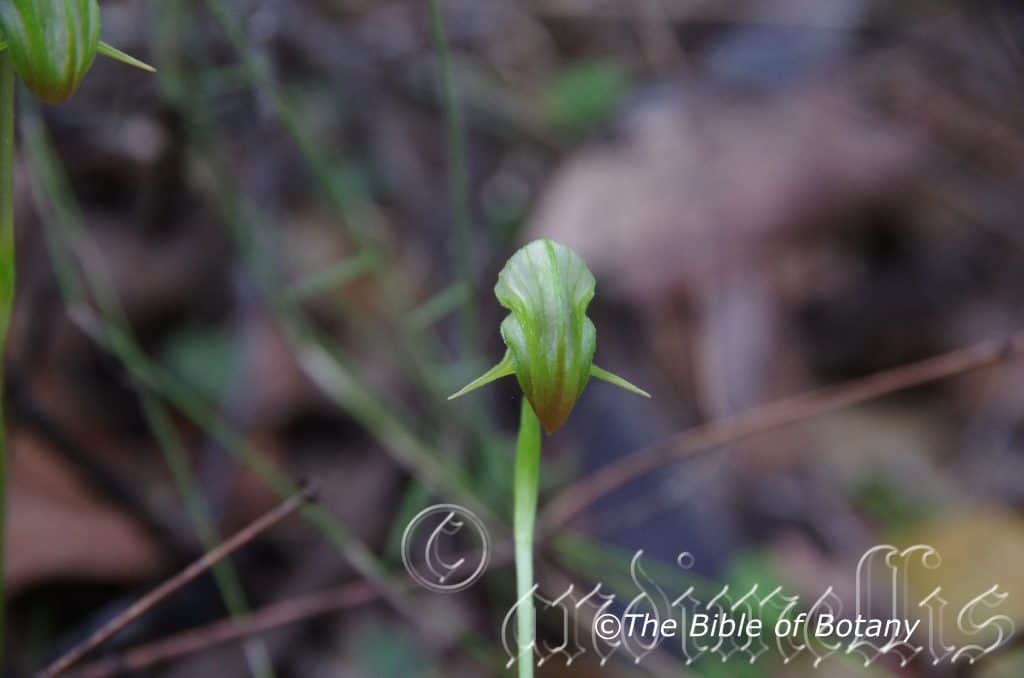
Clarence Valley NSW
Pterostylis nutans
Classification:
Unranked: Monocots
Order: Asparagales
Family: Orcidaoideae
Tribe: Pterostylidinae
Genus: From Pterón, which is Ancient Greek or Pterón which is Latin for a wing and Stŷlos, which is Ancient Greek for a part of the female reproductive organ between the ovaries and the stigma. It refers to styles, which are flattened like wings or have distinct extension like wings.
Species: From Nutans, which is Latin for nodding or pendant. It usually refers to flowers, which hang down.
Common Name: Nodding Green Hood or Parrots beak Orchid.
Distribution:
Pterostylis nutans is found south from Duaringa and Carnarvon National Park in central eastern Queensland to Mount Gambier and then from the Adelaide Hills in the Flinders Ranges south to Kangaroo Island. It is found on the Western Slopes, on and east of the Great Dividing Range to the coast including Fraser Island, Moreton Island, Stradbroke Island and Lord Howe Island.
It is also found further north on the tip of Cape York Peninsula, Cardwell, Bowen and the Eungella National Park.
It is found over most of Tasmania except the south west corner and including all the Bass Strait Islands.
https://avh.ala.org.au/occurrences/search?taxa=Pterostylis+nutans#tab_mapView
Habitat Aspect Climate:
Pterostylis nutans prefers medium shade to dappled shade. It grows in moist to wet soils on sheltered slopes in closed dry sclerophyll forest, moist sclerophyll forests or especially in coastal heaths. Its altitude ranges from 5 meters ASL to 1200 meters ASL.
The temperatures range from minus 4 degrees in August to 38 degrees in January.
The rainfall ranges from lows of 500mm to 3200mm average per annum. The plants are more reliant on capillary action from nearby permanent water sources to keep the soils permanently moist.
Soil Requirements:
Pterostylis nutans grows on coarse peaty sands, fine sands and sandy loams to medium clays. The soils are derived from decomposed granites, sandstones, brown basalts, black basalts, metamorphic rocks, podzolic soils, alluvial deposits or accumulated peaty beach sands. The soils pH ranges from 4.5pH to 7pH. It does not tolerate waterlogged soils however soil moisture is essential for survival. Non saline soils to moderately saline soils are tolerated.
Height & Spread: Wild Plants: 0.2m to 0.3m by 0.15m to 0.2m.
Characteristics:
Pterostylis nutans grows as a slender erect, deciduous terrestrial orchid. The orchids usually begin to sprout from underground tubers in March.
The 3 to 6 rosette, elliptic or oblong leaves measure 20mm to 90mm in length by 10mm to 20mm in width. The pale bluish-green petioles measure 7mm to 15mm in length. The bases are truncate with rounded edges while the apexes are acuminate. The concolourous, laminas are mid to deep bluish-green and glabrous. The laminas are flat and decurve downwards on the apical quarter. The margins are undulating or crisped. The midvein is prominent on the lower laminas while the lateral and reticulate veins are slightly prominent none the upper laminas.
The inflorescences are long, erect scapes born from the center of the rosette of leaves. The scape has a single flower that measure 200mm to 300mm in length. The translucent, lime-green flowers have a brownish-ochre apex on the nodding flowers. The flowers measure 25mm to 30mm in length by 11mm to 13mm in width.
The glabrous oblong dorsal sepal is strongly curved forming a hood and has an acute apex. The margins are entire. The sepals measures 25mm to 30mm in length by 6mm to 7.5mm in width.
The lime green lateral sepals are loosely embrace the galea leaving a lateral gap and measure 26mm to 32mm in length overall. The lateral sepals are sparsely covered in very short white puberulent hairs. The sinus is a broad “V” when viewed from the front and abruptly curved when viewed from the side. The free apexes are linear, taper to an acute apex and are projected forward. They measure 12mm to 16mm in length.
The glabrous lime green lateral petals have pale brownish-ochre acute apexes. The oblong lateral petals are strongly incurved, united on the dorsal sepal and form a hood with an acuminate apex. The upper crease between the dorsal sepal and the lateral petals are covered in white ciliate hairs. The margins are entire or more often crisped. The dorsal petals measure 20mm to 25mm in length by 2.5mm to 3.3mm in width.
The scabrid labellum is lime-green on the basal two thirds, with a maroon apical third and at times the maroon extends along the margins. The strongly decurve, narrow ovate to lanceolate labellum measure 12mm to 16mm in length by 3.5mm to 4mm in width. The apexes are obtuse while the apical third to two thirds protrude from the deep “V” sinus in the set position. The flowers appear from late April to October.
The fruits are obloidal capsules. The green capsules turn deep grey-brown when ripe.
Wildlife:
Pterostylis nutans’s wildlife is unknown to the author.
Cultivation:
Pterostylis nutans is a beautiful terrestrial orchid that can form dense colonies once established in a satisfactory environment. It is not a difficult orchid to grow in the garden but it needs a cool, moist, light shady position to survive and thrive. The best place is in a greenhouse or bush house where the environment can be controlled better.
In a littoral rainforest or rainforest setting free of frost or sub zero temperatures and a humid microclimate will see the plants thrive.
Propagation:
Native terrestrial orchids comprise of many Genre with their individual specie which range from being relatively easy to cultivate to those that are damn near impossible and definitely frustrating to say the least.
Most terrestrial orchids are deciduous during the dry season. These usually commence their growing season with the onset of the wet season through to the end of the wet season. The flowering occurs shortly after the leaves have been established sending up the new scape flowering then dying back to a subterranean tuber in a yearly cycle of growth.
The delicate Caladenia specie (Spider Orchids), the amazing Caleana specie (Duck Orchids), the brilliantly coloured Diuris specie (Donkey Orchids), the curious Pterostylis specie (Green hoods) and the spectacular Thelymitra specie (Sun Orchids) all have some the most amazing colour combinations and shapes of any orchids found anywhere in the world.
The saprophytic orchids have been deliberately excluded because they are highly specialized orchids in nature that replicating their growing conditions is near impossible for any period of time. This intriguing group of orchids has some of the most amazing blooms of any orchid with the above mentioned groups worthwhile persevering with.
The life cycle needs to be fully understood prior to any attempt to grow these beautiful orchids or failure is assured. The best advice I can give is if you are lucky enough to have these orchids growing naturally preserve their environment as nature has done for millions of years. I marked all the active growth areas on my Nana Glen property with survey pegs and kept the areas mulched with their local mulch and fertilized once I saw the new shoot commencing their seasonal cycle.
Failing the above notice that terrestrial orchids usually flower, then are followed by a period of dormancy, very similar to many other exotic and native epiphytic orchids. The biggest difference is that the majority’s period of growth and flowering tends to be in the cooler months of the year following the wet season not during the wet season, while the dormant period is in the warmer drier months.
They can be dormant for 6 to 8 months of the year and need to be kept reasonably dry during this period. Ideal shade house conditions would be 30mm to 50mm shade with a solid alsynite roof. Our Fern Nursery comprised of a shade cloth section with alternating 30mm and 50mm shade cloth and the dry area was 2 sheet of alsynite with 2 sheets of corrugated iron running in a north south direction. This gave all the plants shade that was of different intensities during the day. This situation is ideal during the dormancy period for all plants.
Watering is by far the most crucial part growing terrestrial orchids successfully. When in active growth the plants should be watered regularly so that the potting mix remains moist at all times. As the plants finish flowering and start to die back they will commence to develop the new tubers. Watering at this stage needs to be decreased so that the mix is almost completely dry. If the mix remains wet at this time the tubers have a good chance of rotting. From early January start to water lightly occasionally (if it rains lightly water lightly and if it storms water the plants thoroughly.) As the new growth appears and accelerates increase the water accordingly. I will stress here that rain water is far more beneficial than tap water.
Light varies depending on the genus, Pterostylis and Acianthus prefer shadier conditions (40mm to 60mm) than the Caladenia, Caleana and Diuris (20mm to 30mm) the aptly named Sun Orchids Thelymitra (10mm to 20mm) (It is named because the flowers open as the sun rises and close as the sun sets). Too often enthusiast treat the orchids like babies locking them up in too dense a shade and create to humid conditions which lead to fungal and mite problems. All these species resent stagnant humid conditions so place them in a position where they receive good light and air flow.
Fertilizing is necessary for optimum growth and organic fertilizers offer the best method. Organic fertilizer like the ones we recommend delivered on a monthly basis from the onset of the leaves from early April to the opening of the flowers is the best method we have learned over the years.
Pests may not be wanted but they do appear from time to time. The usual suspects are Slugs and Snails which can do immense damage in a very short period of time. Start placing upturned half orange and mandarin skins around near the plants as you begin to water. These baits will attract them as soon as they appear and before they increase in numbers. Keep the benches dry by watering in the mornings or keep the plants suspended on mesh benches is also a good deterrent. Thrips and Red Spider can at times also cause problems. Good air flow and drier conditions is usually enough to keep them at bay. If the problem doesn’t abate then a light application of natural pyrethrum or Garlic usually does the trick.
Potting mixes are important so use a good mix. Use our recommended open dry mix for terrestrial orchids. Add a small teaspoon of 100mm natural blood and bone to the mix for each 250mm standard pot. Repotting should be carried out annually during the dormant period. Remove the plants from the pots and gently remove the old soil being careful not to damage the tubers. Fill the new pot with the new mix to about 30mm below the surface. Replace the tubers on the new mix. Cover the tubers with 5mm of mix. Cover the surface with 10mm to 15mm of fine broken forest litter. Some enthusiasts insist on using Casuarina or Allocasuarina needles. If the latter is used the logic is that it is more likely to prevent fungal problems and are easier for the orchid’s leaves to penetrate.
Pot size will depend on the number of tubers you have. A 100mm pot will handle 5 to 7 tubers, while a 150mm pot can handle 10 tubers and a 200mm pot 20 tubers. (The best plantings and flowerings appear in the 200mm pots.)
Propagation:
All orchids that are declared rare, vulnerable or endangered are protected by Federal and State Laws and must not be removed from the wild unless you are a land developer, mining company or main Roads department etc. This includes bulbs, roots, leaves and flowers. No part of any plant can be removed from Federal, State or Local Government land without the prior permission of the authority and this includes the spore.
1. Obtain relevant materials
The first step in growing orchid from seed will be sourcing and having at the ready all materials that will be required in the propagation process.
This includes all of the following:
Unripe orchid seed capsule. If there are 2 capsules secure the second capsule immediately after the first capsule splits or if only one capsule as soon as it changes colour.
Orchid gelling medium with agar which can be purchased from an orchid society or a specialist nursery.
Distilled water
Cooking pot
Spoon
Oven-safe glass or polypropylene containers with lids
Sealable bags
Clean, sterilized cutting board
Rubber gloves
Paper towels
Tweezers or forceps
70 percent ethanol
Bleach
Scalpel or sharp knife
Planting pot
Orchid compost
Length of wire metal
Plastic spray bottle.
deep petri dishes or sterile jars.
2. Prepare agar medium
The agar medium is a special orchid gelling mixture that distilled water will be added to distilled water.
To prepare the medium, mix equal parts of orchid gelling medium with distilled water in a cooking pot.
Place the pot on a stove and bring the mixture to boil for while stirring continuously for two minutes.
Pour the mixture into the petri dishes glass or propylene containers while ensuring not to fill the containers above 20 percent of their volume.
Loosely replace the lids to the containers. Sterilize the containers by heating them up in a microwave oven for between 2 to 3 minutes.
Spray 70 percent ethanol into a sealable bag to create a sterile environment. Transfer the heated containers into the sealable bag.
Allow the containers to cool a bit before tightening their lids and then sealing the bag. Leave the containers to stand for a few days until the mixture solidifies.
3. Prepare seed capsule and work surface
Place an open pot of water on a stove and bring to boil. Place the cutting board in the oven and sterilize.
Put on rubber gloves and sterilize the forceps, and scalpel with 70 percent ethanol.
Insert the seed capsule into a bowel filled with bleach for about fifteen minutes.
Sterilize seed capsule again with 70 percent ethanol and place on grill.
Using the sterilized scalpel, cut open the seed capsule to reveal the seeds. Using a scalpel or sharp knife, scrape out the seeds from the capsule unto an ethanol soaked paper towel.
4. Flasking of the seed
Take out the petri dishes or glass jars containers holding the agar medium. Over the steam, open up the containers and transfer seeds from the ethanol soaked paper towel into the individual containers using the sterilized forceps.
The amount of seeds will determine the number of containers required. Replace the lid of the containers and place them on a window sill that receives indirect sunlight.
5. Wait and exercise patience
All that can be done at this point is to wait until the seeds germinate. The amount of time that this might take varies and is dependent on the particular species.
Generally, the time can range from a few months to a few years. During this period of waiting, ensure the containers are free from contamination to ensure that germination is not disrupted.
6. Emergence of protocorms
Protocorms are tuber-shaped bodies with rhizoids that are produced by the young seedlings of various orchids. Protocorms represent the embryonic form of the orchid plant.
Their emergence after the period of waiting at an affirmation that everything in the propagation process is on track.
7. Transflask orchid seedlings is done after they have developed roots
Upon the emergence of the protocorms, consistently observe the growth of the seedlings. At the point when the seedlings appear to overcrowd the flask, transflasking should be carried out, typically within 30 and 60 days.
* This is done by removing individual seedlings using sterilized tweezers from the original containers and placing them in new containers also filled, in a proportion similar to the original, with agar medium. 6 to 8 in a standard petri dish or 1or 2 to a test tube
8. Transplant seedlings into planting pots
On the presumption that there are no disruptions to the plant growth, the seedlings will eventually outgrow the containers.
At this point, they are to be transplanted into planting pots. A good rule of thumb to determine when they are ready to be transplanted is when the seedlings have developed roots that have grown up to the length of one-quarter of an inch.
To transplant, prepare a planting pot or other container for receiving the seedling by majorly filling it up with coarse fir bark and possibly some slightly moist orchid compost mixture containing perlite, fine charcoal, redwood bark shavings, etc.
To extract the seedlings, submerge the containers in warm water to help loosen the agar gel.
Once the agar medium is softened, twist a piece of metal to form a loop and in turn, use it to carefully pull out the seedlings from the container. It is best done if the agar and seedling can be removed together.
The seedlings can be further rinsed in lukewarm water to remove any excess agar mixture still stuck to them.
Following this, the seedlings can now be planted into the prepared pot with at least 50mm of space between each individual seedling.
9. Positioning the orchid
The seedling once fully transplanted should be placed in a location that is warm with good indirect sun light.
Slowly position the pots into an area that closely assimilates the conditions it will be growing under.
The choice as to whether the plant should be exposed to full sun or in direct sunlight will be dependent on the particular orchid specie.
10. Subsequent care of the plant
After the first week, the seedling can be misted several times a day and watered just once a week.
A guide in watering the plant will be using the dryness of the fir back that is, water the plant until the fir back is completely moistened and wait till it has completely dried out before watering again.
Do not fertilize until the seedlings have fully established themselves then annually as the first new shoot appears.
Further Comments from Readers:
“Hi reader, it seems you use The Bible of Botany a lot. That’s great as we have great pleasure in bringing it to you! It’s a little awkward for us to ask, but our first aim is to purchase land approximately 1,600 hectares to link several parcels of N.P. into one at The Pinnacles NSW Australia, but we need your help. We’re not salespeople. We’re amateur botanists who have dedicated over 30 years to saving the environment in a practical way. We depend on donations to reach our goal. If you donate just $5, the price of your coffee this Sunday, We can help to keep the planet alive in a real way and continue to bring you regular updates and features on Australian plants all in one Botanical Bible. Any support is greatly appreciated. Thank you.”
In the spirit of reconciliation we acknowledge the Bundjalung, Gumbaynggirr and Yaegl and all aboriginal nations throughout Australia and their connections to land, sea and community. We pay our respect to their Elders past, present and future for the pleasures we have gained.
Pterostylis obtusa
Classification:
Unranked: Monocots
Order: Asparagales
Family: Orcidaoideae
Tribe: Pterostylidinae
Genus: From Pterón, which is Ancient Greek or Pterón which is Latin for a wing and Stŷlos, which is Ancient Greek for a part of the female reproductive organ between the ovaries and the stigma. It refers to styles, which are flattened like wings or have distinct extension like wings.
Species: From Obtūsum, which is Latin for rounded. It refers to the apex of the leaves, sepals or petals which are round.
Common Name: Blunt Green Hood.
Distribution:
Pterostylis obtusa is found in south from Wide Bay in southern coastal Queensland to Colac Otway Ranges in southern Victoria. It is mainly found on and east of the Great Dividing Range with single population found at Backwater near Narromine on the western slopes, Serantine in northern Victoria, Campbelltown in Tasmania and on Lord Howe Island.
https://avh.ala.org.au/occurrences/search?taxa=Pterostylis+obtusa#tab_mapView
Habitat Aspect Climate:
Pterostylis obtusa prefers medium shade to dappled shade. It grows in moist to wet soils on sheltered among grasses on slopes or ridges in open sclerophyll forest on the ranges and tablelands. Its altitude ranges from 5 meters ASL to 1000 meters ASL.
The temperatures range from minus 3 degrees in August to 39 degrees in January.
The rainfall ranges from lows of 400mm to 2000mm average per annum. The plants are more reliant on capillary action from nearby permanent water sources to keep the soils permanently moist.
Soil Requirements:
Pterostylis obtusa grows on coarse sands, fine sands, and sandy loams to medium clays. The soils are derived from decomposed granites, sandstones, brown basalts, black basalts, metamorphic rocks, podzolic soils or creek and alluvial deposits on stream meander. The soils pH ranges from 5pH to 6pH. It does not tolerate waterlogged soils however soil moisture is essential for survival. Non saline soils to moderately saline soils are tolerated.
Height & Spread: Wild Plants: 0.2m to 0.25m by 0.03m to 0.05m.
Characteristics:
Pterostylis obtusa grows as a slender erect, deciduous terrestrial orchid. The orchids usually begin to sprout from underground tubers in late April to May but have been known to commence growing as early as Late March.
The 3 to 6 rosette oblong to ovate leaves measure 25mm to 28mm in length by 10mm to 15mm in width. The mid bluish-green petioles measure 2mm to 5mm in length. The bases are rounded while the apexes are acuminate. The concolourous, laminas are mid to deep bluish-green and glabrous. The laminas are flat and decurve downwards on the apical third. The margins are crisped. The midvein is prominent on the lower laminas while the reticulate veins are slightly prominent none the upper laminas.
The inflorescences are long, erect scapes born from the center of the rosette of leaves. The scape has a single flower and measures 150mm to 250mm in length with 3 to 5 stem clasping leaves. The glossy, deep green and white flowers are roughly vertically cupuliform. The flowers measure 25mm to 28mm in length by 15mm to 18mm in width.
The glabrous, glossy, deep green and white oblong dorsal sepal is strongly curved forming a hood with a long 4mm appendage. The dorsal sepals measures 25mm to 28mm in length by 1.2mm to 2mm in width.
The deep lime-green lateral sepals tightly embrace the lateral petals and measure 25mm to 29mm in length overall. The sinus is raised at the middle and protrudes prominently like the rim of a cup when viewed from the side. The free apexes of the lateral sepals taper to a filiform tip and measure 16mm to 20mm in length.
The glabrous oblong to obspathulate lateral petals are flared and are united with the dorsal sepal to form a rather flat hood. The margins are entire or more often crisped. The dorsal petals measure 22mm to 25mm in length by 2.4mm to 4mm in width.
The erect labellum is deep lime-green tinged maroon and deep maroon at the apex and often with a longitudinal central stripe. The oblong to obtuse labellum measure 9mm to 11mm in length by 3mm to 3.5mm in width. The apex is obtuse while the tip is slightly exserted above the flat sinus in the set position. The flowers appear from July to October.
The fruits are obloidal capsules. The green capsules turn deep grey-brown when ripe.
Wildlife:
Pterostylis obtusa’s wildlife is unknown to the author.
Cultivation:
Pterostylis obtusa is a beautiful terrestrial orchid that can form dense colonies once established in a satisfactory environment. It is not a difficult orchid to grow in the garden but it needs a cool, moist, light shady position to survive and thrive. The best place is in a green house or bush house where the environment can be controlled better.
In a littoral rainforest or a wet rainforest setting free of frost or sub zero temperatures and a humid microclimate will see the plants thrive.
Care of Terrestrial Orchids:
Native terrestrial orchids comprise of many Genre with their individual specie which range from being relatively easy to cultivate to those that are damn near impossible and definitely frustrating to say the least. NOTE: All native orchids are protected by law.
Most terrestrial orchids are deciduous during the dry season. These usually commence their growing season with the onset of the wet season through to the end of the wet season. The flowering occurs shortly after the leaves have been established sending up the new scape flowering then dying back to a subterranean tuber in a yearly cycle of growth.
The delicate Caladenia specie (Spider Orchids), the amazing Caleana specie (Duck Orchids), the brilliantly coloured Diuris specie (Donkey Orchids), the curious Pterostylis specie (Green hoods) and the spectacular Thelymitra specie (Sun Orchids) all have some the most amazing colour combinations and shapes of any orchids found anywhere in the world.
The saprophytic orchids have been deliberately excluded because they are highly specialized orchids in nature that replicating their growing conditions is near impossible for any period of time. This intriguing group of orchids has some of the most amazing blooms of any orchid with the above mentioned groups worthwhile persevering with.
The life cycle needs to be fully understood prior to any attempt to grow these beautiful orchids or failure is assured. The best advice I can give is if you are lucky enough to have these orchids growing naturally preserve their environment as nature has done for millions of years. I marked all the active growth areas on my Nana Glen property with survey pegs and kept the areas mulched with their local mulch and fertilized once I saw the new shoot commencing their seasonal cycle.
Failing the above notice that terrestrial orchids usually flower, then are followed by a period of dormancy, very similar to many other exotic and native epiphytic orchids. The biggest difference is that the majority’s period of growth and flowering tends to be in the cooler months of the year following the wet season not during the wet season, while the dormant period is in the warmer drier months.
They can be dormant for 6 to 8 months of the year and need to be kept reasonably dry during this period. Ideal shade house conditions would be 30mm to 50mm shade with a solid alsynite roof. Our Fern Nursery comprised of a shade cloth section with alternating 30mm and 50mm shade cloth and the dry area was 2 sheet of alsynite with 2 sheets of corrugated iron running in a north south direction. This gave all the plants shade that was of different intensities during the day. This situation is ideal during the dormancy period for all plants.
Watering is by far the most crucial part growing terrestrial orchids successfully. When in active growth the plants should be watered regularly so that the potting mix remains moist at all times. As the plants finish flowering and start to die back they will commence to develop the new tubers. Watering at this stage needs to be decreased so that the mix is almost completely dry. If the mix remains wet at this time the tubers have a good chance of rotting. From early January start to water lightly occasionally (if it rains lightly water lightly and if it storms water the plants thoroughly.) As the new growth appears and accelerates increase the water accordingly. I will stress here that rain water is far more beneficial than tap water.
Light varies depending on the genus, Pterostylis and Acianthus prefer shadier conditions (40mm to 60mm) than the Caladenia, Caleana and Diuris (20mm to 30mm) the aptly named Sun Orchids Thelymitra (10mm to 20mm) (It is named because the flowers open as the sun rises and close as the sun sets). Too often enthusiast treat the orchids like babies locking them up in too dense a shade and create to humid conditions which lead to fungal and mite problems. All these species resent stagnant humid conditions so place them in a position where they receive good light and air flow.
Fertilizing is necessary for optimum growth and organic fertilizers offer the best method. Organic fertilizer like the ones we recommend delivered on a monthly basis from the onset of the leaves from early April to the opening of the flowers is the best method we have learned over the years.
Pests may not be wanted but they do appear from time to time. The usual suspects are Slugs and Snails which can do immense damage in a very short period of time. Start placing upturned half orange and mandarin skins around near the plants as you begin to water. These baits will attract them as soon as they appear and before they increase in numbers. Keep the benches dry by watering in the mornings or keep the plants suspended on mesh benches is also a good deterrent. Thrips and Red Spider can at times also cause problems. Good air flow and drier conditions is usually enough to keep them at bay. If the problem doesn’t abate then a light application of natural pyrethrum or Garlic usually does the trick.
Potting mixes are important so use a good mix. Use our recommended open dry mix for terrestrial orchids. Add a small teaspoon of 100mm natural blood and bone to the mix for each 250mm standard pot. Repotting should be carried out annually during the dormant period. Remove the plants from the pots and gently remove the old soil being careful not to damage the tubers. Fill the new pot with the new mix to about 30mm below the surface. Replace the tubers on the new mix. Cover the tubers with 5mm of mix. Cover the surface with 10mm to 15mm of fine broken forest litter. Some enthusiasts insist on using Casuarina or Allocasuarina needles. If the latter is used the logic is that it is more likely to prevent fungal problems and are easier for the orchid’s leaves to penetrate.
Pot size will depend on the number of tubers you have. A 100mm pot will handle 5 to 7 tubers, while a 150mm pot can handle 10 tubers and a 200mm pot 20 tubers. (The best plantings and flowerings appear in the 200mm pots.)
Propagation:
All orchids that are declared rare, vulnerable or endangered are protected by Federal and State Laws and must not be removed from the wild unless you are a land developer, mining company or main Roads department etc. This includes bulbs, roots, leaves and flowers. No part of any plant can be removed from Federal, State or Local Government land without the prior permission of the authority and this includes the spore.
1. Obtain relevant materials
The first step in growing orchid from seed will be sourcing and having at the ready all materials that will be required in the propagation process.
This includes all of the following:
Unripe orchid seed capsule. If there are 2 capsules secure the second capsule immediately after the first capsule splits or if only one capsule as soon as it changes colour.
Orchid gelling medium with agar which can be purchased from an orchid society or a specialist nursery.
Distilled water
Cooking pot
Spoon
Oven-safe glass or polypropylene containers with lids
Sealable bags
Clean, sterilized cutting board
Rubber gloves
Paper towels
Tweezers or forceps
70 percent ethanol
Bleach
Scalpel or sharp knife
Planting pot
Orchid compost
Length of wire metal
Plastic spray bottle.
deep petri dishes or sterile jars.
2. Prepare agar medium
The agar medium is a special orchid gelling mixture that distilled water will be added to distilled water.
To prepare the medium, mix equal parts of orchid gelling medium with distilled water in a cooking pot.
Place the pot on a stove and bring the mixture to boil for while stirring continuously for two minutes.
Pour the mixture into the petri dishes glass or propylene containers while ensuring not to fill the containers above 20 percent of their volume.
Loosely replace the lids to the containers. Sterilize the containers by heating them up in a microwave oven for between 2 to 3 minutes.
Spray 70 percent ethanol into a sealable bag to create a sterile environment. Transfer the heated containers into the sealable bag.
Allow the containers to cool a bit before tightening their lids and then sealing the bag. Leave the containers to stand for a few days until the mixture solidifies.
3. Prepare seed capsule and work surface
Place an open pot of water on a stove and bring to boil. Place the cutting board in the oven and sterilize.
Put on rubber gloves and sterilize the forceps, and scalpel with 70 percent ethanol.
Insert the seed capsule into a bowel filled with bleach for about fifteen minutes.
Sterilize seed capsule again with 70 percent ethanol and place on grill.
Using the sterilized scalpel, cut open the seed capsule to reveal the seeds. Using a scalpel or sharp knife, scrape out the seeds from the capsule unto an ethanol soaked paper towel.
4. Flasking of the seed
Take out the petri dishes or glass jars containers holding the agar medium. Over the steam, open up the containers and transfer seeds from the ethanol soaked paper towel into the individual containers using the sterilized forceps.
The amount of seeds will determine the number of containers required. Replace the lid of the containers and place them on a window sill that receives indirect sunlight.
5. Wait and exercise patience
All that can be done at this point is to wait until the seeds germinate. The amount of time that this might take varies and is dependent on the particular species.
Generally, the time can range from a few months to a few years. During this period of waiting, ensure the containers are free from contamination to ensure that germination is not disrupted.
6. Emergence of protocorms
Protocorms are tuber-shaped bodies with rhizoids that are produced by the young seedlings of various orchids. Protocorms represent the embryonic form of the orchid plant.
Their emergence after the period of waiting at an affirmation that everything in the propagation process is on track.
7. Transflask orchid seedlings is done after they have developed roots
Upon the emergence of the protocorms, consistently observe the growth of the seedlings. At the point when the seedlings appear to overcrowd the flask, transflasking should be carried out, typically within 30 and 60 days.
* This is done by removing individual seedlings using sterilized tweezers from the original containers and placing them in new containers also filled, in a proportion similar to the original, with agar medium. 6 to 8 in a standard petri dish or 1or 2 to a test tube
8. Transplant seedlings into planting pots
On the presumption that there are no disruptions to the plant growth, the seedlings will eventually outgrow the containers.
At this point, they are to be transplanted into planting pots. A good rule of thumb to determine when they are ready to be transplanted is when the seedlings have developed roots that have grown up to the length of one-quarter of an inch.
To transplant, prepare a planting pot or other container for receiving the seedling by majorly filling it up with coarse fir bark and possibly some slightly moist orchid compost mixture containing perlite, fine charcoal, redwood bark shavings, etc.
To extract the seedlings, submerge the containers in warm water to help loosen the agar gel.
Once the agar medium is softened, twist a piece of metal to form a loop and in turn, use it to carefully pull out the seedlings from the container. It is best done if the agar and seedling can be removed together.
The seedlings can be further rinsed in lukewarm water to remove any excess agar mixture still stuck to them.
Following this, the seedlings can now be planted into the prepared pot with at least 50mm of space between each individual seedling.
9. Positioning the orchid
The seedling once fully transplanted should be placed in a location that is warm with good indirect sun light.
Slowly position the pots into an area that closely assimilates the conditions it will be growing under.
The choice as to whether the plant should be exposed to full sun or in direct sunlight will be dependent on the particular orchid specie.
10. Subsequent care of the plant
After the first week, the seedling can be misted several times a day and watered just once a week.
A guide in watering the plant will be using the dryness of the fir back that is, water the plant until the fir back is completely moistened and wait till it has completely dried out before watering again.
Fertilize using a mixture of seaweed, fish emulsion and organic chicken pellets soaked in water and apply the liquid as soon as the first leaves appear to maintain health, vigour and better flowering. Fertilize again as the blooms die to assist in better tubers and flowers in the following season.
Further Comments from Readers:
“Hi reader, it seems you use The Bible of Botany a lot. That’s great as we have great pleasure in bringing it to you! It’s a little awkward for us to ask, but our first aim is to purchase land approximately 1,600 hectares to link several parcels of N.P. into one at The Pinnacles NSW Australia, but we need your help. We’re not salespeople. We’re amateur botanists who have dedicated over 30 years to saving the environment in a practical way. We depend on donations to reach our goal. If you donate just $5, the price of your coffee this Sunday, We can help to keep the planet alive in a real way and continue to bring you regular updates and features on Australian plants all in one Botanical Bible. Any support is greatly appreciated. Thank you.”
In the spirit of reconciliation we acknowledge the Bundjalung, Gumbaynggirr and Yaegl and all aboriginal nations throughout Australia and their connections to land, sea and community. We pay our respect to their Elders past, present and future for the pleasures we have gained.
Pterostylis ophioglossa
Classification:
Unranked: Monocots
Order: Asparagales
Family: Orcidaoideae
Tribe: Pterostylidinae
Genus: From Pterón, which is Ancient Greek or Pterón which is Latin for a wing and Stŷlos, which is Ancient Greek for a part of the female reproductive organ between the ovaries and the stigma. It refers to styles, which are flattened like wings or have distinct extension like wings.
Species: From Ophī́s/Ophī́tēs, which is Ancient Greek for a snake and Glossum, which is Ancient Greek for a tongue. It refers to labellum on some orchids, which are long, forked and thin like a snakes tongue.
Common Name: Snake Tongue Green Orchid.
Distribution:
Pterostylis ophioglossa is found south from the Whitsunday Islands central coastal Queensland to the Burragorang Valley in central eastern New South Wales. It is mainly found on and east of the Great Dividing Range to the coast except for an area in Queensland where it extends as far west as the Carnarvon National Park.
https://avh.ala.org.au/occurrences/search?q=taxamm3Amm22Pterostylis+ophioglossamm22#tab_mapView
Habitat Aspect Climate:
Pterostylis ophioglossa prefers medium shade to dappled shade. It grows in moist to wet soils on sheltered slopes in closed sclerophyll forest, chiefly coastal. Its altitude ranges from 5 meters ASL to 700 meters ASL.
The temperatures range from minus 2 degrees in August to 40 degrees in January.
The rainfall ranges from lows of 400mm to 2000mm average per annum. The plants are more reliant on capillary action from nearby permanent water sources to keep the soils permanently moist.
Soil Requirements:
Pterostylis ophioglossa grows on fine sands and sandy loams to medium clays. The soils are derived from decomposed granites, sandstones, brown basalts, black basalts, metamorphic rocks, podzolic soils, limestones, alluvial deposits or accumulated peaty beach sands. The soils pH ranges from 4.5pH to 8pH. It does not tolerate waterlogged soils however soil moisture is essential for survival. Non saline soils to moderately saline soils are tolerated.
Height & Spread: Wild Plants: 0.15m to 0.2m by 0.3m to 0.1m.
Characteristics:
Pterostylis ophioglossa grows as a slender erect, deciduous terrestrial orchid. The orchids usually begin to sprout from underground tubers in late April to May but have been known to commence growing as early as Late March.
The 4 to 6 rosette ovate to oblong leaves measure 12mm to 45mm in length by 5mm to 20mm in width. The mid green petioles measure 0mm to 8mm in length. The bases are rounded then attenuate while the apexes are broad mucronate to broad acuminate. The concolourous, laminas are pale green and glabrous. The laminas are flat and decurve downwards on the apical third. The margins are crisped. The midvein is prominent on the lower laminas while the reticulate veins are slightly prominent none the upper laminas.
The inflorescences are long, erect scapes born from the center of the rosette of leaves. The scape has a single flower that measure 100mm to 200mm in length. The green and white flowers are tinged tan or reddish with tan or reddish stripes and suffusions. The flowers are roughly longitudinally cupuliform. The flowers measure 30mm to 50mm in length by 10mm to 13mm in diameter. The apex of the galea is obliquely erect to flat.
The glabrous green and white flowers are tinged tan or reddish with tan or reddish stripes oblong dorsal sepal and are strongly curved forming a hood and has an acute apex. The margins are entire. The dorsal sepal measures 30mm to 50mm in length by 2.5mm to 4.5mm in width with a long 3mm to 6mm appendage.
The green and white flowers are tinged tan or reddish with tan or reddish stripes lateral sepals tightly embrace the lateral sepals and measure 30mm to 50mm in length overall. The sinus is a broad “V” when viewed from the front and is flat at the base to the sinus or flat at the base and very shallowly mounded near the sinus when viewed from the side. The free apexes taper to a filiform point, are erect or curve forwards at the apexes and measure 20mm to 40mm in length.
The glabrous, green and white flowers are tinged tan or reddish with tan or reddish striped, broad lunar, lateral petals are strongly decurve to form the sides of the hood. The margins are entire to slightly crisped or undulating. The dorsal petals measure 16mm to 25mm in length by 4mm to 5mm in width.
The labellum is reddish-maroon with elliptic to lanceolate and measure 12mm to 18mm in length by 3mm to 4mm in width. The apexes are deeply triangularly notched while the distal third decurve strongly and protrudes from the sinus in the set position. The flowers appear from July to October.
The fruits are obloidal capsules. The green capsules turn deep grey-brown when ripe.
Wildlife:
Pterostylis ophioglossa’s wildlife is unknown to the author.
Cultivation:
Pterostylis ophioglossa is a beautiful terrestrial orchid that can form dense colonies once established in a satisfactory environment. It is not a difficult orchid to grow in the garden but it needs a cool, moist, light shady position to survive and thrive. The best place is in a greenhouse or bush house where the environment can be controlled better.
In a littoral rainforest or rainforest setting free of frost or sub zero temperatures and a humid microclimate will see the plants thrive.
Care of Terrestrial Orchids:
Native terrestrial orchids comprise of many Genre with their individual specie which range from being relatively easy to cultivate to those that are damn near impossible and definitely frustrating to say the least. NOTE: All native orchids are protected by law.
Most terrestrial orchids are deciduous during the dry season. These usually commence their growing season with the onset of the wet season through to the end of the wet season. The flowering occurs shortly after the leaves have been established sending up the new scape flowering then dying back to a subterranean tuber in a yearly cycle of growth.
The delicate Caladenia specie (Spider Orchids), the amazing Caleana specie (Duck Orchids), the brilliantly coloured Diuris specie (Donkey Orchids), the curious Pterostylis specie (Green hoods) and the spectacular Thelymitra specie (Sun Orchids) all have some the most amazing colour combinations and shapes of any orchids found anywhere in the world.
The saprophytic orchids have been deliberately excluded because they are highly specialized orchids in nature that replicating their growing conditions is near impossible for any period of time. This intriguing group of orchids has some of the most amazing blooms of any orchid with the above mentioned groups worthwhile persevering with.
The life cycle needs to be fully understood prior to any attempt to grow these beautiful orchids or failure is assured. The best advice I can give is if you are lucky enough to have these orchids growing naturally preserve their environment as nature has done for millions of years. I marked all the active growth areas on my Nana Glen property with survey pegs and kept the areas mulched with their local mulch and fertilized once I saw the new shoot commencing their seasonal cycle.
Failing the above notice that terrestrial orchids usually flower, then are followed by a period of dormancy, very similar to many other exotic and native epiphytic orchids. The biggest difference is that the majority’s period of growth and flowering tends to be in the cooler months of the year following the wet season not during the wet season, while the dormant period is in the warmer drier months.
They can be dormant for 6 to 8 months of the year and need to be kept reasonably dry during this period. Ideal shade house conditions would be 30mm to 50mm shade with a solid alsynite roof. Our Fern Nursery comprised of a shade cloth section with alternating 30mm and 50mm shade cloth and the dry area was 2 sheet of alsynite with 2 sheets of corrugated iron running in a north south direction. This gave all the plants shade that was of different intensities during the day. This situation is ideal during the dormancy period for all plants.
Watering is by far the most crucial part growing terrestrial orchids successfully. When in active growth the plants should be watered regularly so that the potting mix remains moist at all times. As the plants finish flowering and start to die back they will commence to develop the new tubers. Watering at this stage needs to be decreased so that the mix is almost completely dry. If the mix remains wet at this time the tubers have a good chance of rotting. From early January start to water lightly occasionally (if it rains lightly water lightly and if it storms water the plants thoroughly.) As the new growth appears and accelerates increase the water accordingly. I will stress here that rain water is far more beneficial than tap water.
Light varies depending on the genus, Pterostylis andAcianthus prefer shadier conditions (40mm to 60mm) than the Caladenia, Caleana and Diuris (20mm to 30mm) the aptly named Sun Orchids Thelymitra (10mm to 20mm) (It is named because the flowers open as the sun rises and close as the sun sets). Too often enthusiast treat the orchids like babies locking them up in too dense a shade and create to humid conditions which lead to fungal and mite problems. All these species resent stagnant humid conditions so place them in a position where they receive good light and air flow.
Fertilizing is necessary for optimum growth and organic fertilizers offer the best method. Organic fertilizer like the ones we recommend delivered on a monthly basis from the onset of the leaves from early April to the opening of the flowers is the best method we have learned over the years.
Pests may not be wanted but they do appear from time to time. The usual suspects are Slugs and Snails which can do immense damage in a very short period of time. Start placing upturned half orange and mandarin skins around near the plants as you begin to water. These baits will attract them as soon as they appear and before they increase in numbers. Keep the benches dry by watering in the mornings or keep the plants suspended on mesh benches is also a good deterrent. Thrips and Red Spider can at times also cause problems. Good air flow and drier conditions is usually enough to keep them at bay. If the problem doesn’t abate then a light application of natural pyrethrum or Garlic usually does the trick.
Potting mixes are important so use a good mix. Use our recommended open dry mix for terrestrial orchids. Add a small teaspoon of 100mm natural blood and bone to the mix for each 250mm standard pot. Repotting should be carried out annually during the dormant period. Remove the plants from the pots and gently remove the old soil being careful not to damage the tubers. Fill the new pot with the new mix to about 30mm below the surface. Replace the tubers on the new mix. Cover the tubers with 5mm of mix. Cover the surface with 10mm to 15mm of fine broken forest litter. Some enthusiasts insist on using Cassuarina or Allocasuarina needles. If the latter is used the logic is that it is more likely to prevent fungal problems and are easier for the orchid’s leaves to penetrate.
Pot size will depend on the number of tubers you have. A 100mm pot will handle 5 to 7 tubers, while a 150mm pot can handle 10 tubers and a 200mm pot 20 tubers. (The best plantings and flowerings appear in the 200mm pots.)
Propagation:
Propagation:
All orchids that are declared rare, vulnerable or endangered are protected by Federal and State Laws and must not be removed from the wild unless you are a land developer, mining company or main Roads department etc. This includes bulbs, roots, leaves and flowers. No part of any plant can be removed from Federal, State or Local Government land without the prior permission of the authority and this includes the spore.
1. Obtain relevant materials
The first step in growing orchid from seed will be sourcing and having at the ready all materials that will be required in the propagation process.
This includes all of the following:
Unripe orchid seed capsule. If there are 2 capsules secure the second capsule immediately after the first capsule splits or if only one capsule as soon as it changes colour.
Orchid gelling medium with agar which can be purchased from an orchid society or a specialist nursery.
Distilled water
Cooking pot
Spoon
Oven-safe glass or polypropylene containers with lids
Sealable bags
Clean, sterilized cutting board
Rubber gloves
Paper towels
Tweezers or forceps
70 percent ethanol
Bleach
Scalpel or sharp knife
Planting pot
Orchid compost
Length of wire metal
Plastic spray bottle.
deep petri dishes or sterile jars.
2. Prepare agar medium
The agar medium is a special orchid gelling mixture that distilled water will be added to distilled water.
To prepare the medium, mix equal parts of orchid gelling medium with distilled water in a cooking pot.
Place the pot on a stove and bring the mixture to boil for while stirring continuously for two minutes.
Pour the mixture into the petri dishes glass or propylene containers while ensuring not to fill the containers above 20 percent of their volume.
Loosely replace the lids to the containers. Sterilize the containers by heating them up in a microwave oven for between 2 to 3 minutes.
Spray 70 percent ethanol into a sealable bag to create a sterile environment. Transfer the heated containers into the sealable bag.
Allow the containers to cool a bit before tightening their lids and then sealing the bag. Leave the containers to stand for a few days until the mixture solidifies.
3. Prepare seed capsule and work surface
Place an open pot of water on a stove and bring to boil. Place the cutting board in the oven and sterilize.
Put on rubber gloves and sterilize the forceps, and scalpel with 70 percent ethanol.
Insert the seed capsule into a bowel filled with bleach for about fifteen minutes.
Sterilize seed capsule again with 70 percent ethanol and place on grill.
Using the sterilized scalpel, cut open the seed capsule to reveal the seeds. Using a scalpel or sharp knife, scrape out the seeds from the capsule unto an ethanol soaked paper towel.
4. Flasking of the seed
Take out the petri dishes or glass jars containers holding the agar medium. Over the steam, open up the containers and transfer seeds from the ethanol soaked paper towel into the individual containers using the sterilized forceps.
The amount of seeds will determine the number of containers required. Replace the lid of the containers and place them on a window sill that receives indirect sunlight.
5. Wait and exercise patience
All that can be done at this point is to wait until the seeds germinate. The amount of time that this might take varies and is dependent on the particular species.
Generally, the time can range from a few months to a few years. During this period of waiting, ensure the containers are free from contamination to ensure that germination is not disrupted.
6. Emergence of protocorms
Protocorms are tuber-shaped bodies with rhizoids that are produced by the young seedlings of various orchids. Protocorms represent the embryonic form of the orchid plant.
Their emergence after the period of waiting at an affirmation that everything in the propagation process is on track.
7. Transflask orchid seedlings is done after they have developed roots
Upon the emergence of the protocorms, consistently observe the growth of the seedlings. At the point when the seedlings appear to overcrowd the flask, transflasking should be carried out, typically within 30 and 60 days.
* This is done by removing individual seedlings using sterilized tweezers from the original containers and placing them in new containers also filled, in a proportion similar to the original, with agar medium. 6 to 8 in a standard petri dish or 1or 2 to a test tube
8. Transplant seedlings into planting pots
On the presumption that there are no disruptions to the plant growth, the seedlings will eventually outgrow the containers.
At this point, they are to be transplanted into planting pots. A good rule of thumb to determine when they are ready to be transplanted is when the seedlings have developed roots that have grown up to the length of one-quarter of an inch.
To transplant, prepare a planting pot or other container for receiving the seedling by majorly filling it up with coarse fir bark and possibly some slightly moist orchid compost mixture containing perlite, fine charcoal, redwood bark shavings, etc.
To extract the seedlings, submerge the containers in warm water to help loosen the agar gel.
Once the agar medium is softened, twist a piece of metal to form a loop and in turn, use it to carefully pull out the seedlings from the container. It is best done if the agar and seedling can be removed together.
The seedlings can be further rinsed in lukewarm water to remove any excess agar mixture still stuck to them.
Following this, the seedlings can now be planted into the prepared pot with at least 50mm of space between each individual seedling.
9. Positioning the orchid
The seedling once fully transplanted should be placed in a location that is warm with good indirect sun light.
Slowly position the pots into an area that closely assimilates the conditions it will be growing under.
The choice as to whether the plant should be exposed to full sun or in direct sunlight will be dependent on the particular orchid specie.
10. Subsequent care of the plant
After the first week, the seedling can be misted several times a day and watered just once a week.
A guide in watering the plant will be using the dryness of the fir back that is, water the plant until the fir back is completely moistened and wait till it has completely dried out before watering again.
Do not fertilize until the seedlings have fully established themselves then annually as the first new shoot appears.
Further Comments from Readers:
“Hi reader, it seems you use The Bible of Botany a lot. That’s great as we have great pleasure in bringing it to you! It’s a little awkward for us to ask, but our first aim is to purchase land approximately 1,600 hectares to link several parcels of N.P. into one at The Pinnacles NSW Australia, but we need your help. We’re not salespeople. We’re amateur botanists who have dedicated over 30 years to saving the environment in a practical way. We depend on donations to reach our goal. If you donate just $5, the price of your coffee this Sunday, We can help to keep the planet alive in a real way and continue to bring you regular updates and features on Australian plants all in one Botanical Bible. Any support is greatly appreciated. Thank you.”
In the spirit of reconciliation we acknowledge the Bundjalung, Gumbaynggirr and Yaegl and all aboriginal nations throughout Australia and their connections to land, sea and community. We pay our respect to their Elders past, present and future for the pleasures we have gained.
Pterostylis parviflora
Classification:
Unranked: Monocots
Order: Asparagales
Family: Orcidaoideae
Tribe: Pterostylidinae
Genus: From Pterón, which is Ancient Greek and Latin for a wing and Stŷlos, which is Ancient Greek for a part of the female reproductive organ between the ovaries and the stigma. It refers to styles, which are flattened like wings or have distinct extension like wings.
Species: From Paûros, which is Ancient Greek or Parvum which is Latin for small and Flōris which is Latin for a flower or Flōs from the Roman goddess of spring and flowers. It refers to flowers, which are smaller than other species in the genus.
Common Name: Tiny Green Hood.
Distribution:
Pterostylis parviflora is found south from and Carnarvon National Park, Calliope and Fraser Island in central coastal Queensland to Chiltern in Victoria then in a line south west to Mount Gambier in south eastern South Australia with a population found further west on the banks of Lake Alexandrina. It is found on the Western Slopes, on and east of the Great Dividing Range to the coast including Fraser Island and Stradbroke Island.
In Tasmania it is found from the Arthur River in the north west to Bruny Island in the south east excluding the central highlands and the Flinders Island group of islands in Bass Strait.
https://avh.ala.org.au/occurrences/search?taxa=Pterostylis+parviflora#tab_mapView
Habitat Aspect Climate:
Pterostylis parviflora prefers medium shade to dappled shade. It grows in moist to wet soils on sheltered flats in open sclerophyll forests especially in coastal heaths and montane heaths usually at lower altitudes. Its altitude ranges from 5 meters ASL to 1350 meters ASL.
The temperatures range from minus 3 degrees in August to 38 degrees in January.
The rainfall ranges from lows of 400mm to 2000mm average per annum. The plants are more reliant on capillary action from nearby permanent water sources to keep the soils permanently moist.
Soil Requirements:
Pterostylis parviflora grows on coarse sands, fine sands and sandy loams to medium clays. The soils are derived from decomposed granites, sandstones, brown basalts, black basalts, metamorphic rocks, podsolic soils, alluvial deposits or accumulated peaty beach sands. The soils pH ranges from 4.5pH to 7pH. It does not tolerate waterlogged soils however soil moisture is essential for survival. Non saline soils to moderately saline soils are tolerated.
Height & Spread: Wild Plants: 0.1m to 0.15m by 0.2m to 0.7m.
Characteristics:
Pterostylis parviflora grows as a slender erect, deciduous terrestrial orchid. The orchids usually begin to sprout from underground tubers in late April to May but have been known to commence growing as early as Late March.
The 3 to 8 rosette ovate to cordate leaves measure 7mm to 30mm in length by 4mm to 15mm in width. The bluish-green petioles measure 0mm to 5mm in length. The bases are rounded to cordate while the apexes are broad acuminate. The concolourous laminas are bluish-green and glabrous. The laminas are flat and decurve slightly downwards on the apical third. The margins are entire to slightly crisp. The midvein is prominent on the lower laminas while the reticulate veins are slightly prominent none the upper laminas.
The inflorescences are long, erect scapes born from the center of the rosette of leaves. The wiry scape has 1 to 12 individual flowers and measures 80mm to 150mm in length. There are 3 to 6 closely sheathing stem leaves. The usually green and white flowers at times have a reddish-brown tinge or reddish-brown stripes and are roughly longitudinally cupuliform. The flowers measure 7mm to 10mm in length by 3mm to 5mm in width.
The glabrous green and white striped dorsal sepals are at times tinged reddish-brown near the apex and at times striped reddish-brown internally. The oblong dorsal sepal is erect in the basal half and curves forward in the apical half. The dorsal sepals measures 7mm to 10mm in length by 3mm to 4.5mm in width.
The green finely striped white lateral sepals are tightly embrace the galea and measure 6mm to 7mm in length overall. The sinus is shallowly notched when viewed from the front, stepped when viewed from the side. The free apexes are linear, taper to a filiform point and measure 2mm to 2.5mm in length. They very rarely exceeded the height of the dorsal sepal.
The glabrous falcate lateral petals curve with the dorsal sepal to form the hood and have an acuminate apex. The margins are entire. The dorsal petals measure 5mm to 6mm in length by 0.6mm to 1mm in width.
The labellum is deep lime-green with a deep reddish-brownish to reddish-maroon apex. The narrow elliptic labellum measure 3mm to 4mm in length by 1mm to 1.5mm in width. The apexes are obtuse while the apex does not protrude above the sinus in the set position. The flowers appear from July to October.
The fruits are obloidal capsules. The green capsules turn deep grey-brown when ripe.
Wildlife:
Pterostylis parviflora’s wildlife is unknown to the author.
Cultivation:
Pterostylis parviflora is a beautiful terrestrial orchid that can form dense colonies once established in a satisfactory environment. It is not a difficult orchid to grow in the garden but it needs a cool, moist, light shady position to survive and thrive. The best place is in a greenhouse or bush house where the environment can be controlled better.
In a littoral rainforest or rainforest setting free of frost or sub zero temperatures and a humid microclimate will see the plants thrive.
Fertilize using a mixture of seaweed, fish emulsion and organic chicken pellets soaked in water and apply the liquid as soon as the first leaves appear to maintain health, vigour and better flowering. Fertilize again as the blooms die to assist in better tubers and flowers in the following season.
Care of Terrestrial Orchids:
Native terrestrial orchids comprise of many Genre with their individual specie which range from being relatively easy to cultivate to those that are damn near impossible and definitely frustrating to say the least. NOTE: All native orchids are protected by law.
Most terrestrial orchids are deciduous during the dry season. These usually commence their growing season with the onset of the wet season through to the end of the wet season. The flowering occurs shortly after the leaves have been established sending up the new scape flowering then dying back to a subterranean tuber in a yearly cycle of growth.
The delicate Caladenia specie (Spider Orchids), the amazing Caleana specie (Duck Orchids), the brilliantly coloured Diuris specie (Donkey Orchids), the curious Pterostylis specie (Green hoods) and the spectacular Thelymitra specie (Sun Orchids) all have some the most amazing colour combinations and shapes of any orchids found anywhere in the world.
The saprophytic orchids have been deliberately excluded because they are highly specialized orchids in nature that replicating their growing conditions is near impossible for any period of time. This intriguing group of orchids has some of the most amazing blooms of any orchid with the above mentioned groups worthwhile persevering with.
The life cycle needs to be fully understood prior to any attempt to grow these beautiful orchids or failure is assured. The best advice I can give is if you are lucky enough to have these orchids growing naturally preserve their environment as nature has done for millions of years. I marked all the active growth areas on my Nana Glen property with survey pegs and kept the areas mulched with their local mulch and fertilized once I saw the new shoot commencing their seasonal cycle.
Failing the above notice that terrestrial orchids usually flower, then are followed by a period of dormancy, very similar to many other exotic and native epiphytic orchids. The biggest difference is that the majority’s period of growth and flowering tends to be in the cooler months of the year following the wet season not during the wet season, while the dormant period is in the warmer drier months.
They can be dormant for 6 to 8 months of the year and need to be kept reasonably dry during this period. Ideal shade house conditions would be 30mm to 50mm shade with a solid alsynite roof. Our Fern Nursery comprised of a shade cloth section with alternating 30mm and 50mm shade cloth and the dry area was 2 sheet of alsynite with 2 sheets of corrugated iron running in a north south direction. This gave all the plants shade that was of different intensities during the day. This situation is ideal during the dormancy period for all plants.
Watering is by far the most crucial part growing terrestrial orchids successfully. When in active growth the plants should be watered regularly so that the potting mix remains moist at all times. As the plants finish flowering and start to die back they will commence to develop the new tubers. Watering at this stage needs to be decreased so that the mix is almost completely dry. If the mix remains wet at this time the tubers have a good chance of rotting. From early January start to water lightly occasionally (if it rains lightly water lightly and if it storms water the plants thoroughly.) As the new growth appears and accelerates increase the water accordingly. I will stress here that rain water is far more beneficial than tap water.
Light varies depending on the genus, Pterostylis andAcianthus prefer shadier conditions (40mm to 60mm) than the Caladenia, Caleana and Diuris (20mm to 30mm) the aptly named Sun Orchids Thelymitra (10mm to 20mm) (It is named because the flowers open as the sun rises and close as the sun sets). Too often enthusiast treat the orchids like babies locking them up in too dense a shade and create to humid conditions which lead to fungal and mite problems. All these species resent stagnant humid conditions so place them in a position where they receive good light and air flow.
Fertilizing is necessary for optimum growth and organic fertilizers offer the best method. Organic fertilizer like the ones we recommend delivered on a monthly basis from the onset of the leaves from early April to the opening of the flowers is the best method we have learned over the years.
Pests may not be wanted but they do appear from time to time. The usual suspects are Slugs and Snails which can do immense damage in a very short period of time. Start placing upturned half orange and mandarin skins around near the plants as you begin to water. These baits will attract them as soon as they appear and before they increase in numbers. Keep the benches dry by watering in the mornings or keep the plants suspended on mesh benches is also a good deterrent. Thrips and Red Spider can at times also cause problems. Good air flow and drier conditions is usually enough to keep them at bay. If the problem doesn’t abate then a light application of natural pyrethrum or Garlic usually does the trick.
Potting mixes are important so use a good mix. Use our recommended open dry mix for terrestrial orchids. Add a small teaspoon of 100mm natural blood and bone to the mix for each 250mm standard pot. Repotting should be carried out annually during the dormant period. Remove the plants from the pots and gently remove the old soil being careful not to damage the tubers. Fill the new pot with the new mix to about 30mm below the surface. Replace the tubers on the new mix. Cover the tubers with 5mm of mix. Cover the surface with 10mm to 15mm of fine broken forest litter. Some enthusiasts insist on using Casuarina sp. or Allocasuarina sp. needles. If the latter is used the logic is that it is more likely to prevent fungal problems and are easier for the orchid’s leaves to penetrate.
Pot size will depend on the number of tubers you have. A 100mm pot will handle 5 to 7 tubers, while a 150mm pot can handle 10 tubers and a 200mm pot 20 tubers. (The best plantings and flowerings appear in the 200mm pots.)
Propagation:
All orchids that are declared rare, vulnerable or endangered are protected by Federal and State Laws and must not be removed from the wild unless you are a land developer, mining company or main Roads department etc. This includes bulbs, roots, leaves and flowers. No part of any plant can be removed from Federal, State or Local Government land without the prior permission of the authority and this includes the spore.
1. Obtain relevant materials
The first step in growing orchid from seed will be sourcing and having at the ready all materials that will be required in the propagation process.
This includes all of the following:
Unripe orchid seed capsule. If there are 2 capsules secure the second capsule immediately after the first capsule splits or if only one capsule as soon as it changes colour.
Orchid gelling medium with agar which can be purchased from an orchid society or a specialist nursery.
Distilled water
Cooking pot
Spoon
Oven-safe glass or polypropylene containers with lids
Sealable bags
Clean, sterilized cutting board
Rubber gloves
Paper towels
Tweezers or forceps
70 percent ethanol
Bleach
Scalpel or sharp knife
Planting pot
Orchid compost
Length of wire metal
Plastic spray bottle.
deep petri dishes or sterile jars.
2. Prepare agar medium
The agar medium is a special orchid gelling mixture that distilled water will be added to distilled water.
To prepare the medium, mix equal parts of orchid gelling medium with distilled water in a cooking pot.
Place the pot on a stove and bring the mixture to boil for while stirring continuously for two minutes.
Pour the mixture into the petri dishes glass or propylene containers while ensuring not to fill the containers above 20 percent of their volume.
Loosely replace the lids to the containers. Sterilize the containers by heating them up in a microwave oven for between 2 to 3 minutes.
Spray 70 percent ethanol into a sealable bag to create a sterile environment. Transfer the heated containers into the sealable bag.
Allow the containers to cool a bit before tightening their lids and then sealing the bag. Leave the containers to stand for a few days until the mixture solidifies.
3. Prepare seed capsule and work surface
Place an open pot of water on a stove and bring to boil. Place the cutting board in the oven and sterilize.
Put on rubber gloves and sterilize the forceps, and scalpel with 70 percent ethanol.
Insert the seed capsule into a bowel filled with bleach for about fifteen minutes.
Sterilize seed capsule again with 70 percent ethanol and place on grill.
Using the sterilized scalpel, cut open the seed capsule to reveal the seeds. Using a scalpel or sharp knife, scrape out the seeds from the capsule unto an ethanol soaked paper towel.
4. Flasking of the seed
Take out the petri dishes or glass jars containers holding the agar medium. Over the steam, open up the containers and transfer seeds from the ethanol soaked paper towel into the individual containers using the sterilized forceps.
The amount of seeds will determine the number of containers required. Replace the lid of the containers and place them on a window sill that receives indirect sunlight.
5. Wait and exercise patience
All that can be done at this point is to wait until the seeds germinate. The amount of time that this might take varies and is dependent on the particular species.
Generally, the time can range from a few months to a few years. During this period of waiting, ensure the containers are free from contamination to ensure that germination is not disrupted.
6. Emergence of protocorms
Protocorms are tuber-shaped bodies with rhizoids that are produced by the young seedlings of various orchids. Protocorms represent the embryonic form of the orchid plant.
Their emergence after the period of waiting at an affirmation that everything in the propagation process is on track.
7. Transflask orchid seedlings is done after they have developed roots
Upon the emergence of the protocorms, consistently observe the growth of the seedlings. At the point when the seedlings appear to overcrowd the flask, transflasking should be carried out, typically within 30 and 60 days.
* This is done by removing individual seedlings using sterilized tweezers from the original containers and placing them in new containers also filled, in a proportion similar to the original, with agar medium. 6 to 8 in a standard petri dish or 1or 2 to a test tube
8. Transplant seedlings into planting pots
On the presumption that there are no disruptions to the plant growth, the seedlings will eventually outgrow the containers.
At this point, they are to be transplanted into planting pots. A good rule of thumb to determine when they are ready to be transplanted is when the seedlings have developed roots that have grown up to the length of one-quarter of an inch.
To transplant, prepare a planting pot or other container for receiving the seedling by majorly filling it up with coarse fir bark and possibly some slightly moist orchid compost mixture containing perlite, fine charcoal, redwood bark shavings, etc.
To extract the seedlings, submerge the containers in warm water to help loosen the agar gel.
Once the agar medium is softened, twist a piece of metal to form a loop and in turn, use it to carefully pull out the seedlings from the container. It is best done if the agar and seedling can be removed together.
The seedlings can be further rinsed in lukewarm water to remove any excess agar mixture still stuck to them.
Following this, the seedlings can now be planted into the prepared pot with at least 50mm of space between each individual seedling.
9. Positioning the orchid
The seedling once fully transplanted should be placed in a location that is warm with good indirect sun light.
Slowly position the pots into an area that closely assimilates the conditions it will be growing under.
The choice as to whether the plant should be exposed to full sun or in direct sunlight will be dependent on the particular orchid specie.
10. Subsequent care of the plant
After the first week, the seedling can be misted several times a day and watered just once a week.
A guide in watering the plant will be using the dryness of the fir back that is, water the plant until the fir back is completely moistened and wait till it has completely dried out before watering again.
Fertilize using a mixture of seaweed, fish emulsion and organic chicken pellets soaked in water and apply the liquid as soon as the first leaves appear to maintain health, vigour and better flowering. Fertilize again as the blooms die to assist in better tubers and flowers in the following season.
Further Comments from Readers:
“Hi reader, it seems you use The Bible of Botany a lot. That’s great as we have great pleasure in bringing it to you! It’s a little awkward for us to ask, but our first aim is to purchase land approximately 1,600 hectares to link several parcels of N.P. into one at The Pinnacles NSW Australia, but we need your help. We’re not salespeople. We’re amateur botanists who have dedicated over 30 years to saving the environment in a practical way. We depend on donations to reach our goal. If you donate just $5, the price of your coffee this Sunday, We can help to keep the planet alive in a real way and continue to bring you regular updates and features on Australian plants all in one Botanical Bible. Any support is greatly appreciated. Thank you.”
In the spirit of reconciliation we acknowledge the Bundjalung, Gumbaynggirr and Yaegl and all aboriginal nations throughout Australia and their connections to land, sea and community. We pay our respect to their Elders past, present and future for the pleasures we have gained.
Pterostylis pedunculata
Classification::
Unranked: Monocots
Order: Asparagales
Family: Orcidaoideae
Tribe: Pterostylidinae
Genus: From Pterón, which is Ancient Greek or Pterón which is Latin for a wing and Stŷlos, which is Ancient Greek for a part of the female reproductive organ between the ovaries and the stigma. It refers to styles, which are flattened like wings or have distinct extension like wings.
Species: From Pous, which is Ancient Greek or Pes/Pedi, which is Latin for a foot or feet. It refers to flowers, which have a peduncle and pedicel. The primary or main stalk which all the pedicels are derived.
Common Name: Maroon Green Hood.
Distribution:
Pterostylis pedunculata is found from Fraser Island in southern coastal Queensland to Warrenben Conservation Park near Corny Point in southern South Australia with a population further west at Charlton Gully on south eastern Yorke Peninsula. It is found on and east of the Great Dividing Range within 200 kilometres of the coast and on Lord Howe Island.
It is also found on the Bass Strait Islands and from the Southland Arthur River Protected area in the north west to South Cape Bay in the south east corner excluding the central highlands.
https://avh.ala.org.au/occurrences/search?taxa=Pterostylis+pedunculata#tab_mapView
Habitat Aspect Climate:
Pterostylis pedunculata prefers medium shade to dappled shade. It grows in moist to wet soils on sheltered slopes in closed moist sclerophyll forest, dry sclerophyll forests especially on the coastal ranges. Its altitude ranges from 5 meters ASL to 1057 meters ASL.
The temperatures range from minus 3 degrees in August to 38 degrees in January.
The rainfall ranges from lows of 800mm to 3000mm average per annum. The plants are more reliant on capillary action from nearby permanent water sources to keep the soils permanently moist.
Soil Requirements:
Pterostylis pedunculata grows on coarse sands, fine sands or sandy loams to medium clays. The soils are derived from decomposed granites, sandstones, brown basalts, black basalts, metamorphic rocks, podzolic soils or alluvial deposits. The soils pH ranges from 4.5pH to 6pH. It does not tolerate waterlogged soils however soil moisture is essential for survival. Non saline soils to moderately saline soils are tolerated.
Height & Spread: Wild Plants: 0.2m to 0.25m by 0.03m to 0.14m.
Characteristics:
Pterostylis pedunculata grows as a slender erect, deciduous terrestrial orchid. The orchids usually begin to sprout from underground tubers in late April to May but have been known to commence growing as early as Late March.
Pterostylis pedunculata has 2 to 6 rosette ovate to oblong leaves measure 10mm to 65mm in length by 6mm to 18mm in width. The mid bluish-green petioles measure 2mm to 20mm in length. The bases are truncate with rounded edges and are attenuate at the petiole while the apexes are broad obtuse. The concolourous, laminas are mid bluish-green to deep and glabrous. The laminas are flat and decurve downwards at the semi erect petiole to be horizontal. The margins are entire or wrinkled. The midvein is prominent on the lower laminas while the reticulate veins are slightly prominent none the upper laminas.
The inflorescences are long, erect scapes born from the center of the rosette of leaves. The scape has a single flower and measure 200mm to 250mm in length. The white and green heavily suffused with reddish-brown, brownish-maroon or black at the apex of the galea. The flowers are roughly longitudinally cupuliform on the basal third. The flowers measure 15mm to 20mm in length by 7mm to 10mm in width. The apex of the galea is obliquely erect to flat.
The glabrous white and green, heavily suffused with reddish-brown, brownish-maroon or black oblong dorsal sepal forms a hood and has a long acute apex. The apex of the galea is horizontal. The dorsal sepals measures 15mm to 20mm in length by 7mm to 10mm in width.
The lateral sepals are green at the base and are heavily suffused with reddish-brown, brownish-maroon or black as they approach the apexes. The lateral sepal loosely embrace the galea leaving a lateral gap and measure 20mm to 27mm in length overall. The sinus is a deep “V” when viewed from the front, shallowly mounded when viewed from the side. The free apexes are linear, taper to a filiform point and measure 15mm to 20mm in length.
The white and green based lateral petals are heavily suffused with reddish-brown, brownish-maroon or black at the apex. The narrow oblong strongly falcate lateral petals are strongly incurved to form the sides of the hood and have an acute apex. The margins are entire or more often crisped. The dorsal petal measure 9mm to 11mm in length by 1mm to 1.5mm in width.
The labellum is reddish-brown, brownish-maroon or black. The ovate labellum measure 4mm to 7mm in length by 3mm to 3.5mm in width. The apex is obtuse and is slightly exserted at the sinus in the set position but does not protrude through the sinus. The flowers appear from July to early November.
Pterostylis pedunculata’s fruits are obloidal capsules. The green capsules turn deep grey-brown when ripe.
Wildlife:
Pterostylis pedunculata’s wildlife is unknown to the author.
Cultivation:
Pterostylis pedunculata is a beautiful terrestrial orchid that can form dense colonies once established in a satisfactory environment. It is not a difficult orchid to grow in the garden but it needs a cool, moist, light shady position to survive and thrive. The best place is in a green house or bush house where the environment can be controlled better.
In a littoral rainforest or rainforest setting free of frost or sub zero temperatures and a humid microclimate will see the plants thrive.
Care of Terrestrial orchids:
Native terrestrial orchids comprise of many Genre with their individual specie which range from being relatively easy to cultivate to those that are damn near impossible and definitely frustrating to say the least. NOTE: All native orchids are protected by law.
Most terrestrial orchids are deciduous during the dry season. These usually commence their growing season with the onset of the wet season through to the end of the wet season. The flowering occurs shortly after the leaves have been established sending up the new scape flowering then dying back to a subterranean tuber in a yearly cycle of growth.
The delicate Caladenia specie (Spider Orchids), the amazing Caleana specie (Duck Orchids), the brilliantly coloured Diuris specie (Donkey Orchids), the curious Pterostylis specie (Green hoods) and the spectacular Thelymitra specie (Sun Orchids) all have some the most amazing colour combinations and shapes of any orchids found anywhere in the world.
The saprophytic orchids have been deliberately excluded because they are highly specialized orchids in nature that replicating their growing conditions is near impossible for any period of time. This intriguing group of orchids has some of the most amazing blooms of any orchid with the above mentioned groups worthwhile persevering with.
The life cycle needs to be fully understood prior to any attempt to grow these beautiful orchids or failure is assured. The best advice I can give is if you are lucky enough to have these orchids growing naturally preserve their environment as nature has done for millions of years. I marked all the active growth areas on my Nana Glen property with survey pegs and kept the areas mulched with their local mulch and fertilized once I saw the new shoot commencing their seasonal cycle.
Failing the above notice that terrestrial orchids usually flower, then are followed by a period of dormancy, very similar to many other exotic and native epiphytic orchids. The biggest difference is that the majority’s period of growth and flowering tends to be in the cooler months of the year following the wet season not during the wet season, while the dormant period is in the warmer drier months.
They can be dormant for 6 to 8 months of the year and need to be kept reasonably dry during this period. Ideal shade house conditions would be 30mm to 50mm shade with a solid alsynite roof. Our Fern Nursery comprised of a shade cloth section with alternating 30mm and 50mm shade cloth and the dry area was 2 sheet of alsynite with 2 sheets of corrugated iron running in a north south direction. This gave all the plants shade that was of different intensities during the day. This situation is ideal during the dormancy period for all plants.
Watering is by far the most crucial part growing terrestrial orchids successfully. When in active growth the plants should be watered regularly so that the potting mix remains moist at all times. As the plants finish flowering and start to die back they will commence to develop the new tubers. Watering at this stage needs to be decreased so that the mix is almost completely dry. If the mix remains wet at this time the tubers have a good chance of rotting. From early January start to water lightly occasionally (if it rains lightly water lightly and if it storms water the plants thoroughly.) As the new growth appears and accelerates increase the water accordingly. I will stress here that rain water is far more beneficial than tap water.
Light varies depending on the genus, Pterostylis andAcianthus prefer shadier conditions (40mm to 60mm) than the Caladenia, Caleana and Diuris (20mm to 30mm) the aptly named Sun Orchids Thelymitra (10mm to 20mm) (It is named because the flowers open as the sun rises and close as the sun sets). Too often enthusiast treat the orchids like babies locking them up in too dense a shade and create to humid conditions which lead to fungal and mite problems. All these species resent stagnant humid conditions so place them in a position where they receive good light and air flow.
Fertilizing is necessary for optimum growth and organic fertilizers offer the best method. Organic fertilizer like the ones we recommend delivered on a monthly basis from the onset of the leaves from early April to the opening of the flowers is the best method we have learned over the years.
Pests may not be wanted but they do appear from time to time. The usual suspects are Slugs and Snails which can do immense damage in a very short period of time. Start placing upturned half orange and mandarin skins around near the plants as you begin to water. These baits will attract them as soon as they appear and before they increase in numbers. Keep the benches dry by watering in the mornings or keep the plants suspended on mesh benches is also a good deterrent. Thrips and Red Spider can at times also cause problems. Good air flow and drier conditions is usually enough to keep them at bay. If the problem doesn’t abate then a light application of natural pyrethrum or Garlic usually does the trick.
Potting mixes are important so use a good mix. Use our recommended open dry mix for terrestrial orchids. Add a small teaspoon of 100mm natural blood and bone to the mix for each 250mm standard pot. Repotting should be carried out annually during the dormant period. Remove the plants from the pots and gently remove the old soil being careful not to damage the tubers. Fill the new pot with the new mix to about 30mm below the surface. Replace the tubers on the new mix. Cover the tubers with 5mm of mix. Cover the surface with 10mm to 15mm of fine broken forest litter. Some enthusiasts insist on using Casuarina sp. or Allocasuarina sp. needles. If they used the logic is that it is more likely to prevent fungal problems and are easier for the orchid’s leaves to penetrate.
Pot size will depend on the number of tubers you have. A 100mm pot will handle 5 to 7 tubers, while a 150mm pot can handle 10 tubers and a 200mm pot 20 tubers. (The best plantings and flowerings appear in the 200mm pots.)
Propagation:
All orchids that are declared rare, vulnerable or endangered are protected by Federal and State Laws and must not be removed from the wild unless you are a land developer, mining company or main Roads department etc. This includes bulbs, roots, leaves and flowers. No part of any plant can be removed from Federal, State or Local Government land without the prior permission of the authority and this includes the spore.
1. Obtain relevant materials
The first step in growing orchid from seed will be sourcing and having at the ready all materials that will be required in the propagation process.
This includes all of the following:
Unripe orchid seed capsule. If there are 2 capsules secure the second capsule immediately after the first capsule splits or if only one capsule as soon as it changes colour.
Orchid gelling medium with agar which can be purchased from an orchid society or a specialist nursery.
Distilled water
Cooking pot
Spoon
Oven-safe glass or polypropylene containers with lids
Sealable bags
Clean, sterilized cutting board
Rubber gloves
Paper towels
Tweezers or forceps
70 percent ethanol
Bleach
Scalpel or sharp knife
Planting pot
Orchid compost
Length of wire metal
Plastic spray bottle.
deep petri dishes or sterile jars.
2. Prepare agar medium
The agar medium is a special orchid gelling mixture that distilled water will be added to distilled water.
To prepare the medium, mix equal parts of orchid gelling medium with distilled water in a cooking pot.
Place the pot on a stove and bring the mixture to boil for while stirring continuously for two minutes.
Pour the mixture into the petri dishes glass or propylene containers while ensuring not to fill the containers above 20 percent of their volume.
Loosely replace the lids to the containers. Sterilize the containers by heating them up in a microwave oven for between 2 to 3 minutes.
Spray 70 percent ethanol into a sealable bag to create a sterile environment. Transfer the heated containers into the sealable bag.
Allow the containers to cool a bit before tightening their lids and then sealing the bag. Leave the containers to stand for a few days until the mixture solidifies.
3. Prepare seed capsule and work surface
Place an open pot of water on a stove and bring to boil. Place the cutting board in the oven and sterilize.
Put on rubber gloves and sterilize the forceps, and scalpel with 70 percent ethanol.
Insert the seed capsule into a bowel filled with bleach for about fifteen minutes.
Sterilize seed capsule again with 70 percent ethanol and place on grill.
Using the sterilized scalpel, cut open the seed capsule to reveal the seeds. Using a scalpel or sharp knife, scrape out the seeds from the capsule unto an ethanol soaked paper towel.
4. Flasking of the seed
Take out the petri dishes or glass jars containers holding the agar medium. Over the steam, open up the containers and transfer seeds from the ethanol soaked paper towel into the individual containers using the sterilized forceps.
The amount of seeds will determine the number of containers required. Replace the lid of the containers and place them on a window sill that receives indirect sunlight.
5. Wait and exercise patience
All that can be done at this point is to wait until the seeds germinate. The amount of time that this might take varies and is dependent on the particular species.
Generally, the time can range from a few months to a few years. During this period of waiting, ensure the containers are free from contamination to ensure that germination is not disrupted.
6. Emergence of protocorms
Protocorms are tuber-shaped bodies with rhizoids that are produced by the young seedlings of various orchids. Protocorms represent the embryonic form of the orchid plant.
Their emergence after the period of waiting at an affirmation that everything in the propagation process is on track.
7. Transflask orchid seedlings is done after they have developed roots
Upon the emergence of the protocorms, consistently observe the growth of the seedlings. At the point when the seedlings appear to overcrowd the flask, transflasking should be carried out, typically within 30 and 60 days.
* This is done by removing individual seedlings using sterilized tweezers from the original containers and placing them in new containers also filled, in a proportion similar to the original, with agar medium. 6 to 8 in a standard petri dish or 1or 2 to a test tube
8. Transplant seedlings into planting pots
On the presumption that there are no disruptions to the plant growth, the seedlings will eventually outgrow the containers.
At this point, they are to be transplanted into planting pots. A good rule of thumb to determine when they are ready to be transplanted is when the seedlings have developed roots that have grown up to the length of one-quarter of an inch.
To transplant, prepare a planting pot or other container for receiving the seedling by majorly filling it up with coarse fir bark and possibly some slightly moist orchid compost mixture containing perlite, fine charcoal, redwood bark shavings, etc.
To extract the seedlings, submerge the containers in warm water to help loosen the agar gel.
Once the agar medium is softened, twist a piece of metal to form a loop and in turn, use it to carefully pull out the seedlings from the container. It is best done if the agar and seedling can be removed together.
The seedlings can be further rinsed in lukewarm water to remove any excess agar mixture still stuck to them.
Following this, the seedlings can now be planted into the prepared pot with at least 50mm of space between each individual seedling.
9. Positioning the orchid
The seedling once fully transplanted should be placed in a location that is warm with good indirect sun light.
Slowly position the pots into an area that closely assimilates the conditions it will be growing under.
The choice as to whether the plant should be exposed to full sun or in direct sunlight will be dependent on the particular orchid specie.
10. Subsequent care of the plant
After the first week, the seedling can be misted several times a day and watered just once a week.
A guide in watering the plant will be using the dryness of the fir back that is, water the plant until the fir back is completely moistened and wait till it has completely dried out before watering again.
Fertilize using a mixture of seaweed, fish emulsion and organic chicken pellets soaked in water and apply the liquid as soon as the first leaves appear to maintain health, vigour and better flowering. Fertilize again as the blooms die to assist in better tubers and flowers in the following season.
Further Comments from Readers:
“Hi reader, it seems you use The Bible of Botany a lot. That’s great as we have great pleasure in bringing it to you! It’s a little awkward for us to ask, but our first aim is to purchase land approximately 1,600 hectares to link several parcels of N.P. into one at The Pinnacles NSW Australia, but we need your help. We’re not salespeople. We’re amateur botanists who have dedicated over 30 years to saving the environment in a practical way. We depend on donations to reach our goal. If you donate just $5, the price of your coffee this Sunday, We can help to keep the planet alive in a real way and continue to bring you regular updates and features on Australian plants all in one Botanical Bible. Any support is greatly appreciated. Thank you.”
In the spirit of reconciliation we acknowledge the Bundjalung, Gumbaynggirr and Yaegl and all aboriginal nations throughout Australia and their connections to land, sea and community. We pay our respect to their Elders past, present and future for the pleasures we have gained.
Pterostylis russellii
Classification:
Unranked: Monocots
Order: Asparagales
Family: Orcidaoideae
Tribe: Pterostylidinae
Genus: From Pterón, which is Ancient Greek and Latin for a wing and Stŷlos, which is Ancient Greek for a part of the female reproductive organ between the ovaries and the stigma. It refers to styles, which are flattened like wings or have distinct extension like wings.
Species: Is named in honour of Russell but which Russell cannot be substantiated.
Common Name:
Distribution:
Pterostylis russellii is restricted to a small area between south eastern Queensland between Kilkivan, Gatton, Pine Rivers and Cooloola with several disjunct populations further south at Beaudesert, Grafton, Fenwick Creek west of Wauchope and Nowendoc. It is mainly found on the Great Dividing Range.
https://avh.ala.org.au/occurrences/search?taxa=Pterostylis+russellii#tab_mapView
Habitat Aspect Climate:
Pterostylis russellii prefers medium shade to dappled shade. It grows in moist to wet soils in sheltered moist sclerophyll forest. Its altitude ranges from 30 meters ASL to 400 meters ASL.
The temperatures range from minus 1 degree in August to 38 degrees in January.
The rainfall ranges from lows of 800mm to 1250mm average per annum. The plants are more reliant on capillary action from nearby permanent water sources to keep the soils permanently moist.
Soil Requirements:
Pterostylis russellii grows on medium loams to medium clays. The soils are usually derived from decomposed brown basalts or black basalts. The soils pH ranges from 5pH to 6pH. It does not tolerate waterlogged soils however soil moisture is essential for survival. Non saline soils to moderately saline soils are tolerated.
Height & Spread: Wild Plants: 0.3m to 0.35m by 0.05m to 0.1m.
Characteristics:
Pterostylis russellii grows as a slender erect, deciduous terrestrial orchid. The orchids usually begin to sprout from underground tubers in late April to May but have been known to commence growing as early as Late March.
The 3 to 6 rosette oblong to cordate leaves measure 15mm to 40mm in length by 10mm to 18mm in width. The mid bluish-green petioles measure 5mm to 20mm in length. The bases are rounded while the apexes are very broad acute to broad acuminate. The concolourous, laminas are mid to deep bluish-green and glabrous. The laminas recurve gently upwards from the mid vein to the margins and decurve gently downwards on the apical third. The margins are irregularly and slightly undulating. The midvein is prominent on the lower laminas while the reticulate veins are slightly prominent none the upper laminas.
The inflorescences are long, erect scapes born from the center of the rosette of leaves. The scape has a single flower and measure 300mm to 350mm in length. There are 3 to 5 clasping, spreading stem leaves. The glossy white and green flowers are roughly longitudinally cupuliform. The flowers measure in 25mm to 30mm in length by 10mm to 13mm in width. The apex of the galea is obliquely decurve.
The glabrous oblong dorsal sepal is strongly curved forming a hood and has a 7mm long filiform appendage. The dorsal sepal measures 25mm to 30mm in length by 9mm to 11mm in width.
The white, lime-green to grass-green lateral sepals tightly embrace the lateral petals. The lateral sepals measure 37mm to 42mm in length overall. The flat sinus is a revolute like rim with a shallowly notch at the centre and protrudes abruptly when viewed from the side. The erect free apexes are linear, taper to a filiform point. They measure 25mm to 30mm in length.
The glabrous, oblong-lanceolate lateral petals are strongly incurved and form an extended brim to the hood and have an obtuse apex. It is green at the base and remain green or turn reddish-brown at the apex. The slightly flared margins are entire and straight or slightly undulating. The lateral petals measure 23mm to 27mm in length by 15mm to 20mm in width.
The labellum is white and lime-green with a brownish-maroon longitudinal stripe. The narrow elliptic to lanceolate labellum measure13mm to 15mm in length by 3mm to 3.5mm in width. The apex is obtuse while the distal third protrudes from the sinus in the set position. The flowers appear from late April to August.
Pterostylis russellii’s fruits are obloidal capsules. The green capsules turn deep grey-brown when ripe.
Wildlife:
Pterostylis russellii’s wildlife is unknown to the author.
Cultivation:
Pterostylis russellii is a beautiful terrestrial orchid that can form dense colonies once established in a satisfactory environment. It is not a difficult orchid to grow in the garden but it needs a cool, moist, light shady position to survive and thrive. The best place is in a greenhouse or bush house where the environment can be controlled better.
In a littoral rainforest or rainforest setting free of frost or sub zero temperatures and a humid microclimate will see the plants thrive.
Care of Terrestrial Orchids:
Native terrestrial orchids comprise of many Genre with their individual specie which range from being relatively easy to cultivate to those that are damn near impossible and definitely frustrating to say the least. NOTE: All native orchids are protected by law.
Most terrestrial orchids are deciduous during the dry season. These usually commence their growing season with the onset of the wet season through to the end of the wet season. The flowering occurs shortly after the leaves have been established sending up the new scape flowering then dying back to a subterranean tuber in a yearly cycle of growth.
The delicate Caladenia specie (Spider Orchids), the amazing Caleana specie (Duck Orchids), the brilliantly coloured Diuris specie (Donkey Orchids), the curious Pterostylis specie (Green hoods) and the spectacular Thelymitra specie (Sun Orchids) all have some the most amazing colour combinations and shapes of any orchids found anywhere in the world.
The saprophytic orchids have been deliberately excluded because they are highly specialized orchids in nature that replicating their growing conditions is near impossible for any period of time. This intriguing group of orchids has some of the most amazing blooms of any orchid with the above mentioned groups worthwhile persevering with.
The life cycle needs to be fully understood prior to any attempt to grow these beautiful orchids or failure is assured. The best advice I can give is if you are lucky enough to have these orchids growing naturally preserve their environment as nature has done for millions of years. I marked all the active growth areas on my Nana Glen property with survey pegs and kept the areas mulched with their local mulch and fertilized once I saw the new shoot commencing their seasonal cycle.
Failing the above notice that terrestrial orchids usually flower, then are followed by a period of dormancy, very similar to many other exotic and native epiphytic orchids. The biggest difference is that the majority’s period of growth and flowering tends to be in the cooler months of the year following the wet season not during the wet season, while the dormant period is in the warmer drier months.
They can be dormant for 6 to 8 months of the year and need to be kept reasonably dry during this period. Ideal shade house conditions would be 30mm to 50mm shade with a solid alsynite roof. Our Fern Nursery comprised of a shade cloth section with alternating 30mm and 50mm shade cloth and the dry area was 2 sheet of alsynite with 2 sheets of corrugated iron running in a north south direction. This gave all the plants shade that was of different intensities during the day. This situation is ideal during the dormancy period for all plants.
Watering is by far the most crucial part growing terrestrial orchids successfully. When in active growth the plants should be watered regularly so that the potting mix remains moist at all times. As the plants finish flowering and start to die back they will commence to develop the new tubers. Watering at this stage needs to be decreased so that the mix is almost completely dry. If the mix remains wet at this time the tubers have a good chance of rotting. From early January start to water lightly occasionally (if it rains lightly water lightly and if it storms water the plants thoroughly.) As the new growth appears and accelerates increase the water accordingly. I will stress here that rain water is far more beneficial than tap water.
Light varies depending on the genus, Pterostylis and Acianthus prefer shadier conditions (40mm to 60mm) than the Caladenia, Caleana and Diuris (20mm to 30mm) the aptly named Sun Orchids Thelymitra (10mm to 20mm) (It is named because the flowers open as the sun rises and close as the sun sets). Too often enthusiast treat the orchids like babies locking them up in too dense a shade and create to humid conditions which lead to fungal and mite problems. All these species resent stagnant humid conditions so place them in a position where they receive good light and air flow.
Fertilizing is necessary for optimum growth and organic fertilizers offer the best method. Organic fertilizer like the ones we recommend delivered on a monthly basis from the onset of the leaves from early April to the opening of the flowers is the best method we have learned over the years.
Pests may not be wanted but they do appear from time to time. The usual suspects are Slugs and Snails which can do immense damage in a very short period of time. Start placing upturned half orange and mandarin skins around near the plants as you begin to water. These baits will attract them as soon as they appear and before they increase in numbers. Keep the benches dry by watering in the mornings or keep the plants suspended on mesh benches is also a good deterrent. Thrips and Red Spider can at times also cause problems. Good air flow and drier conditions is usually enough to keep them at bay. If the problem doesn’t abate then a light application of natural pyrethrum or Garlic usually does the trick.
Potting mixes are important so use a good mix. Use our recommended open dry mix for terrestrial orchids. Add a small teaspoon of 100mm natural blood and bone to the mix for each 250mm standard pot. Repotting should be carried out annually during the dormant period. Remove the plants from the pots and gently remove the old soil being careful not to damage the tubers. Fill the new pot with the new mix to about 30mm below the surface. Replace the tubers on the new mix. Cover the tubers with 5mm of mix. Cover the surface with 10mm to 15mm of fine broken forest litter. Some enthusiasts insist on using Casuarina sp. or Allocasuarina sp. needles. If the latter is used the logic is that it is more likely to prevent fungal problems and are easier for the orchid’s leaves to penetrate.
Pot size will depend on the number of tubers you have. A 100mm pot will handle 5 to 7 tubers, while a 150mm pot can handle 10 tubers and a 200mm pot 20 tubers. (The best plantings and flowerings appear in the 200mm pots.)
Propagation:
All orchids that are declared rare, vulnerable or endangered are protected by Federal and State Laws and must not be removed from the wild unless you are a land developer, mining company or main Roads department etc. This includes bulbs, roots, leaves and flowers. No part of any plant can be removed from Federal, State or Local Government land without the prior permission of the authority and this includes the spore.
1. Obtain relevant materials
The first step in growing orchid from seed will be sourcing and having at the ready all materials that will be required in the propagation process.
This includes all of the following:
Unripe orchid seed capsule. If there are 2 capsules secure the second capsule immediately after the first capsule splits or if only one capsule as soon as it changes colour.
Orchid gelling medium with agar which can be purchased from an orchid society or a specialist nursery.
Distilled water
Cooking pot
Spoon
Oven-safe glass or polypropylene containers with lids
Sealable bags
Clean, sterilized cutting board
Rubber gloves
Paper towels
Tweezers or forceps
70 percent ethanol
Bleach
Scalpel or sharp knife
Planting pot
Orchid compost
Length of wire metal
Plastic spray bottle.
deep petri dishes or sterile jars.
2. Prepare agar medium
The agar medium is a special orchid gelling mixture that distilled water will be added to distilled water.
To prepare the medium, mix equal parts of orchid gelling medium with distilled water in a cooking pot.
Place the pot on a stove and bring the mixture to boil for while stirring continuously for two minutes.
Pour the mixture into the petri dishes glass or propylene containers while ensuring not to fill the containers above 20 percent of their volume.
Loosely replace the lids to the containers. Sterilize the containers by heating them up in a microwave oven for between 2 to 3 minutes.
Spray 70 percent ethanol into a sealable bag to create a sterile environment. Transfer the heated containers into the sealable bag.
Allow the containers to cool a bit before tightening their lids and then sealing the bag. Leave the containers to stand for a few days until the mixture solidifies.
3. Prepare seed capsule and work surface
Place an open pot of water on a stove and bring to boil. Place the cutting board in the oven and sterilize.
Put on rubber gloves and sterilize the forceps, and scalpel with 70 percent ethanol.
Insert the seed capsule into a bowel filled with bleach for about fifteen minutes.
Sterilize seed capsule again with 70 percent ethanol and place on grill.
Using the sterilized scalpel, cut open the seed capsule to reveal the seeds. Using a scalpel or sharp knife, scrape out the seeds from the capsule unto an ethanol soaked paper towel.
4. Flasking of the seed
Take out the petri dishes or glass jars containers holding the agar medium. Over the steam, open up the containers and transfer seeds from the ethanol soaked paper towel into the individual containers using the sterilized forceps.
The amount of seeds will determine the number of containers required. Replace the lid of the containers and place them on a window sill that receives indirect sunlight.
5. Wait and exercise patience
All that can be done at this point is to wait until the seeds germinate. The amount of time that this might take varies and is dependent on the particular species.
Generally, the time can range from a few months to a few years. During this period of waiting, ensure the containers are free from contamination to ensure that germination is not disrupted.
6. Emergence of protocorms
Protocorms are tuber-shaped bodies with rhizoids that are produced by the young seedlings of various orchids. Protocorms represent the embryonic form of the orchid plant.
Their emergence after the period of waiting at an affirmation that everything in the propagation process is on track.
7. Transflask orchid seedlings is done after they have developed roots
Upon the emergence of the protocorms, consistently observe the growth of the seedlings. At the point when the seedlings appear to overcrowd the flask, transflasking should be carried out, typically within 30 and 60 days.
* This is done by removing individual seedlings using sterilized tweezers from the original containers and placing them in new containers also filled, in a proportion similar to the original, with agar medium. 6 to 8 in a standard petri dish or 1or 2 to a test tube
8. Transplant seedlings into planting pots
On the presumption that there are no disruptions to the plant growth, the seedlings will eventually outgrow the containers.
At this point, they are to be transplanted into planting pots. A good rule of thumb to determine when they are ready to be transplanted is when the seedlings have developed roots that have grown up to the length of one-quarter of an inch.
To transplant, prepare a planting pot or other container for receiving the seedling by majorly filling it up with coarse fir bark and possibly some slightly moist orchid compost mixture containing perlite, fine charcoal, redwood bark shavings, etc.
To extract the seedlings, submerge the containers in warm water to help loosen the agar gel.
Once the agar medium is softened, twist a piece of metal to form a loop and in turn, use it to carefully pull out the seedlings from the container. It is best done if the agar and seedling can be removed together.
The seedlings can be further rinsed in lukewarm water to remove any excess agar mixture still stuck to them.
Following this, the seedlings can now be planted into the prepared pot with at least 50mm of space between each individual seedling.
9. Positioning the orchid
The seedling once fully transplanted should be placed in a location that is warm with good indirect sun light.
Slowly position the pots into an area that closely assimilates the conditions it will be growing under.
The choice as to whether the plant should be exposed to full sun or in direct sunlight will be dependent on the particular orchid specie.
10. Subsequent care of the plant
After the first week, the seedling can be misted several times a day and watered just once a week.
A guide in watering the plant will be using the dryness of the fir back that is, water the plant until the fir back is completely moistened and wait till it has completely dried out before watering again.
Do not fertilize until the seedlings have fully established themselves then annually as the first new shoot appears.
Further Comments from Readers:
“Hi reader, it seems you use The Bible of Botany a lot. That’s great as we have great pleasure in bringing it to you! It’s a little awkward for us to ask, but our first aim is to purchase land approximately 1,600 hectares to link several parcels of N.P. into one at The Pinnacles NSW Australia, but we need your help. We’re not salespeople. We’re amateur botanists who have dedicated over 30 years to saving the environment in a practical way. We depend on donations to reach our goal. If you donate just $5, the price of your coffee this Sunday, We can help to keep the planet alive in a real way and continue to bring you regular updates and features on Australian plants all in one Botanical Bible. Any support is greatly appreciated. Thank you.”
In the spirit of reconciliation we acknowledge the Bundjalung, Gumbaynggirr and Yaegl and all aboriginal nations throughout Australia and their connections to land, sea and community. We pay our respect to their Elders past, present and future for the pleasures we have gained.
All information is included in good faith and has been thoroughly researched prior to printing. The website or the author does not warrant or guarantee the accuracy of any information on these pages, nor does the website or the author accept any responsibility for any loss arising from the use of the information found within. The views and opinions are strictly those of the author or those members who chose to actively participate in the contents herein.