Plant Descriptions – Gahnia aspera – Goodenia stelligera
Gahnia aspera
Gahnia clarkei
Gahnia melanocarpa
Gahnia sieberiana
Gahnia subaequiglumis
Gallionella ferruginea
Garcinia warrenii
Gardenia scabrella
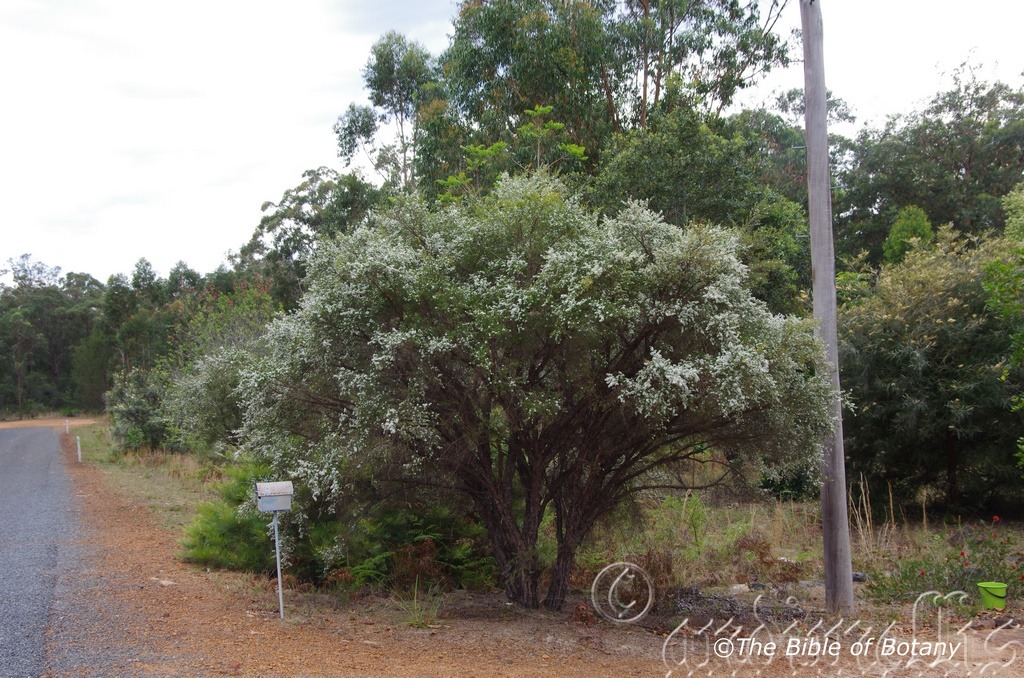
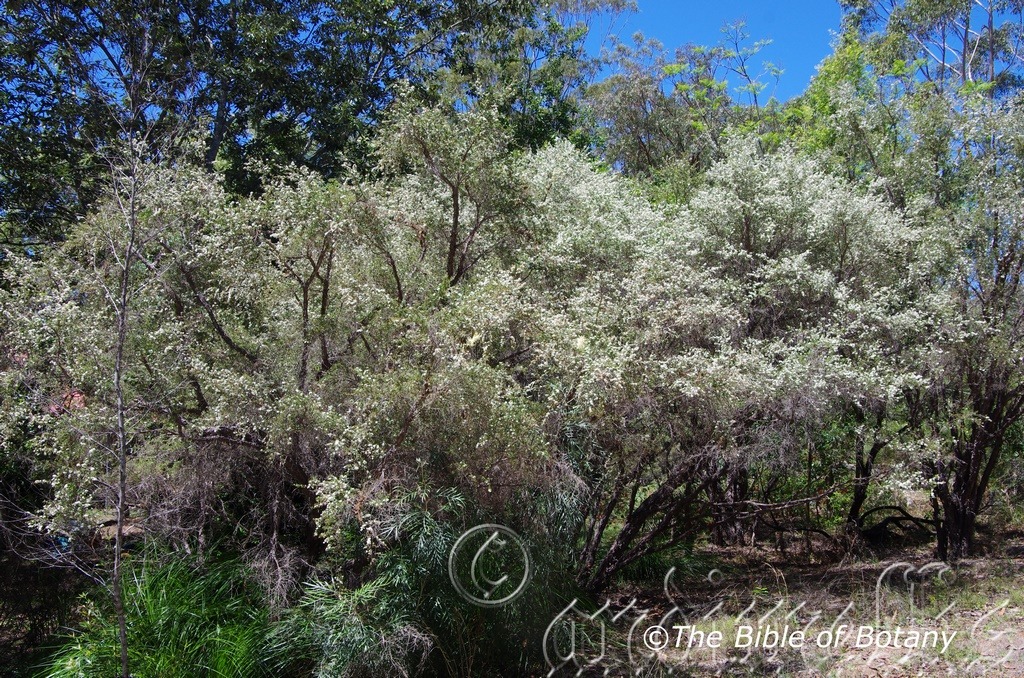
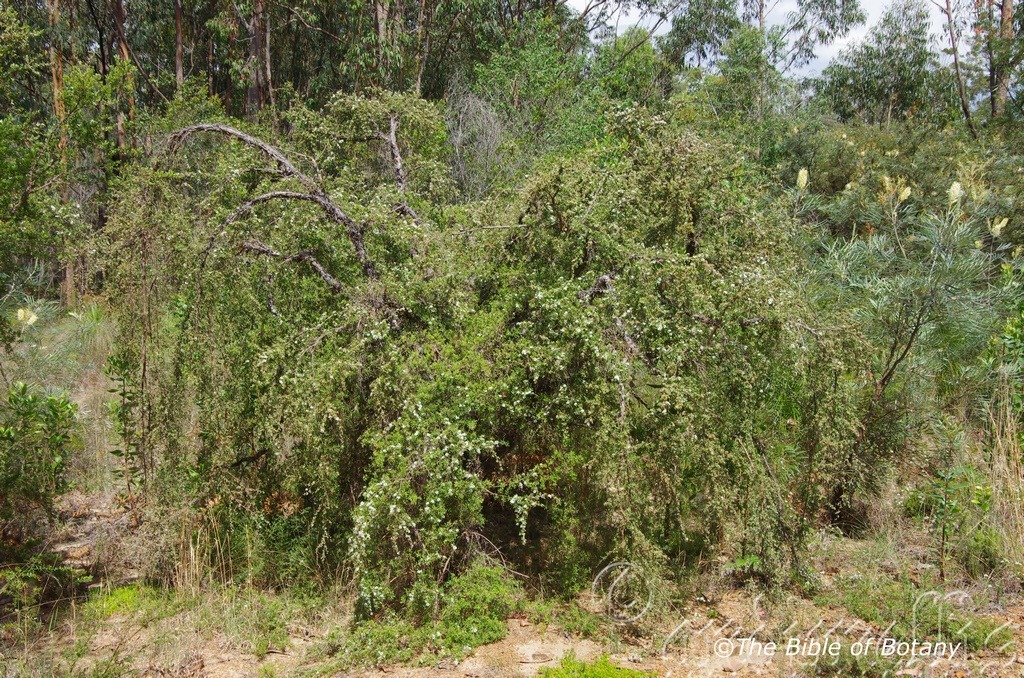
Gaudium trinervium
Gaultheria appressa
Gaultheria viridicarpa
Geijera parviflora
Geijera salicifolia
Geitonoplesium cymosum
Genoplesium acuminatum
Genoplesium fimbriatum
Genoplesium rufum
Geodorum densiflorum
Geranium homeanum
Geranium neglectum
Geranium solanderi
Gleichenia dicarpa
Gleichenia mendellii
Gleichenia microphylla
Gleichenia rupestris
Glinus oppositifolius
Glochidion benthamianum
Glochidion ferdinandi
Glochidion sumatranum
Glossocardia bidens
Glossodia major
Glossodia minor
Glycine clandestina
Glycine cyrtoloba
Glycine microphylla
Glycine pacifica
Glycine tabacina
Glycine tomentella
Glycosmis trifoliata
Glycyrrhiza acanthocarpa
Gmelina dalrympleana
Gmelina fasciculiflora
Gmelina leichhardtii
Gompholobium latifolium
Gompholobium pinnatum
Gompholobium virgatum
Gonocarpus chinensis
Gonocarpus micranthus
Gonocarpus oreophilus
Gonocarpus teucrioides
Goodenia bellidifolia
Goodenia glabra
Goodenia grandiflora
Goodenia hederacea
Goodenia heterophylla
Goodenia ovata
Goodenia paniculata
Goodenia rotundifolia
Goodenia stelligera
xxxxxxxxxxxxxxxxxxxxxxxxxxxxxxxxxxxxxxxxx
The Pinnacles NSW
The Pinnacles NSW
The Pinnacles NSW
The Pinnacles NSW
The Pinnacles NSW
The Pinnacles NSW
The Pinnacles NSW
The Pinnacles NSW
The Pinnacles NSW
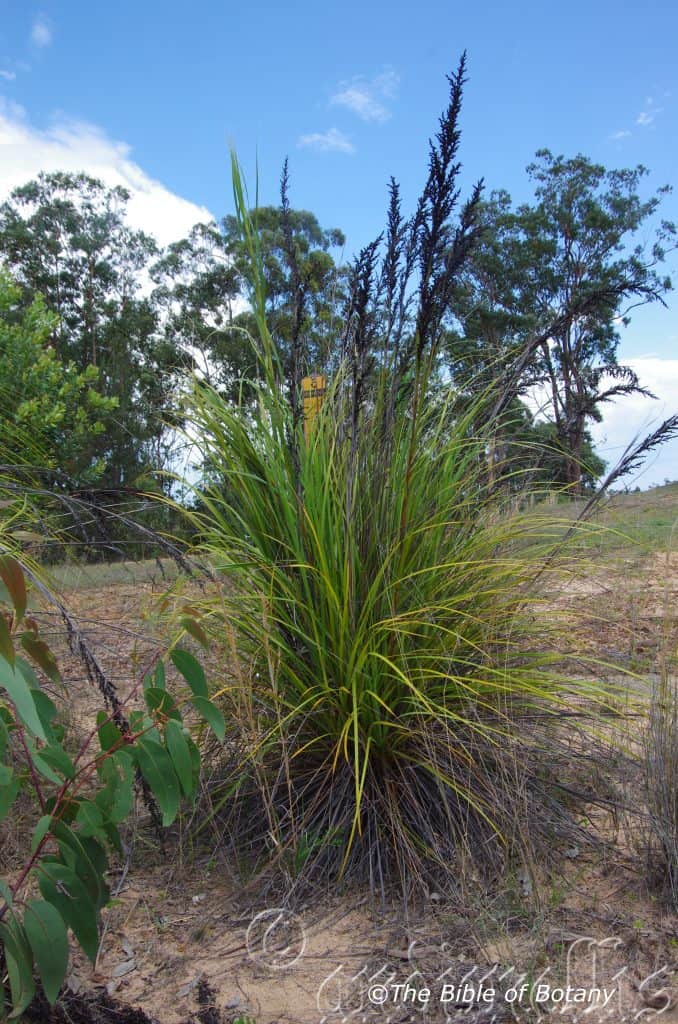
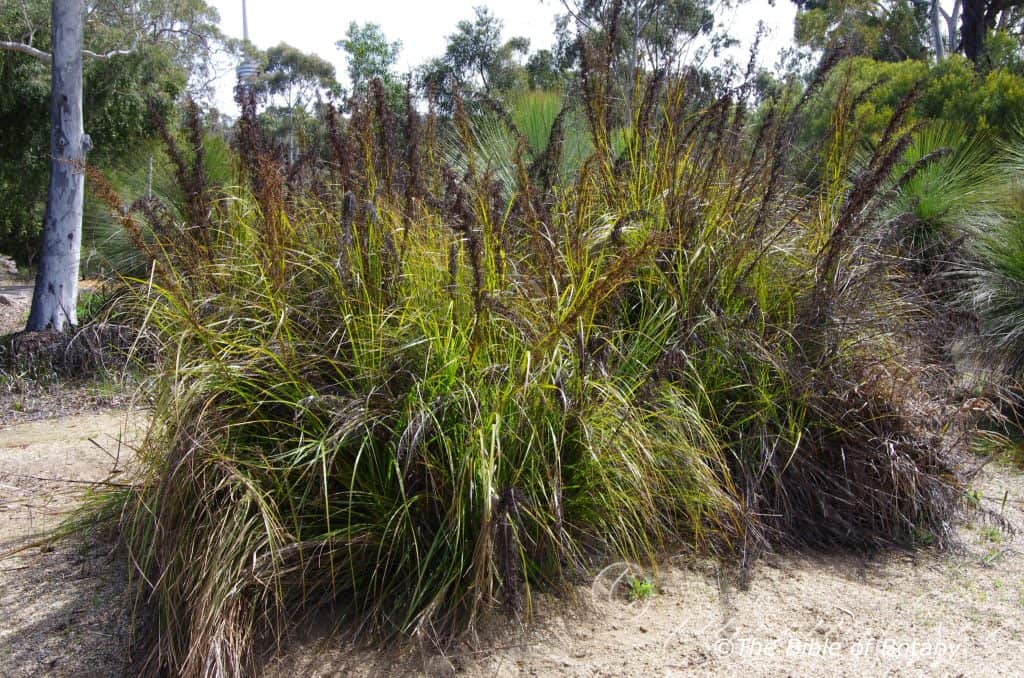
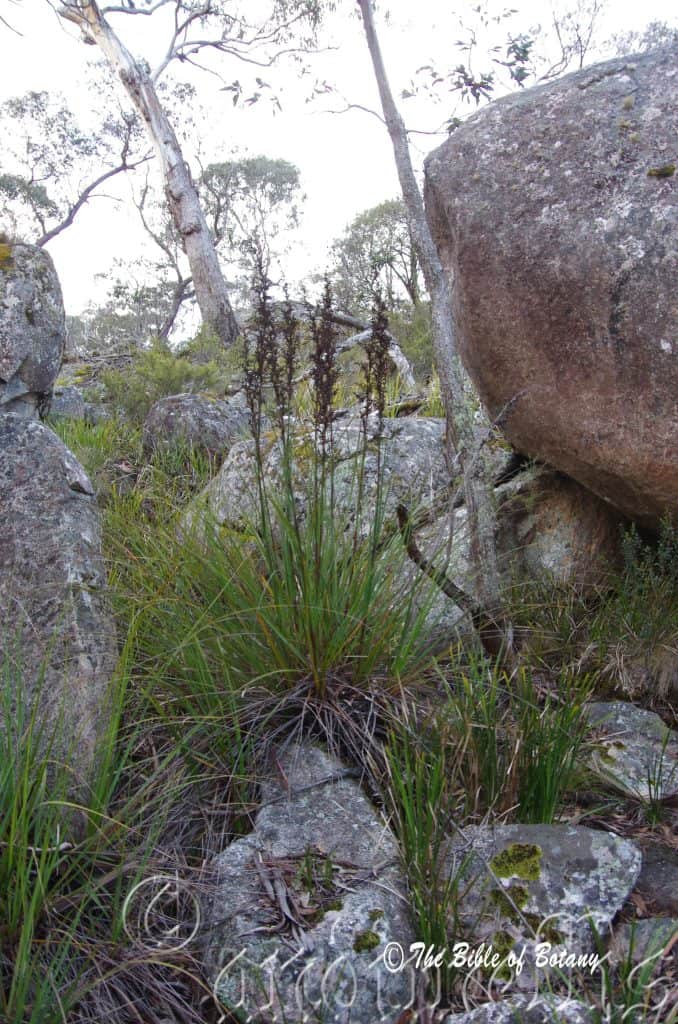
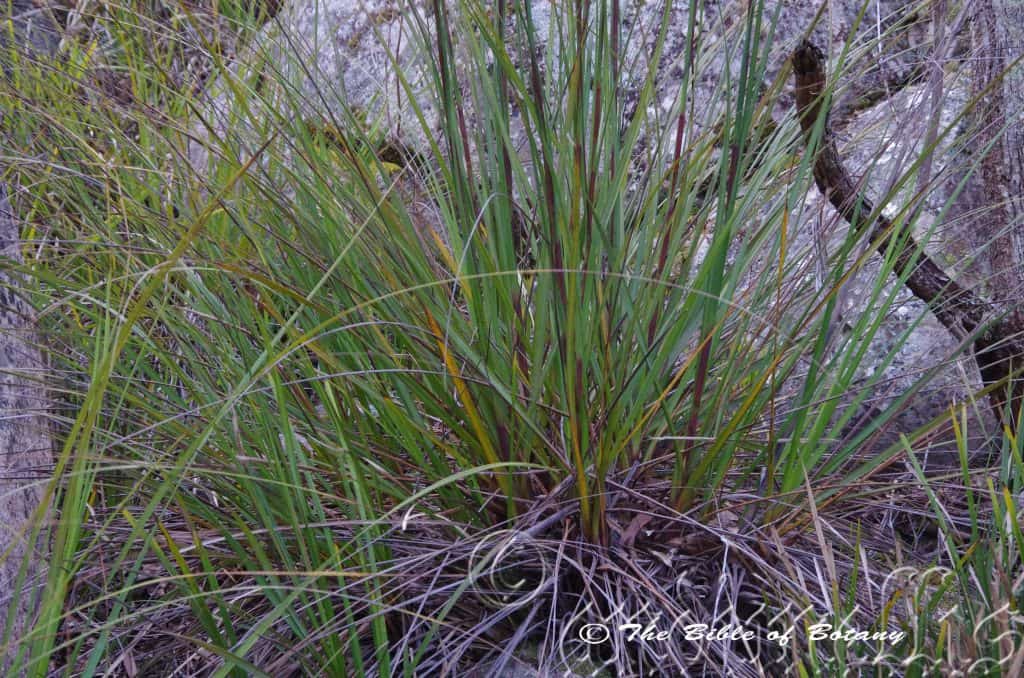
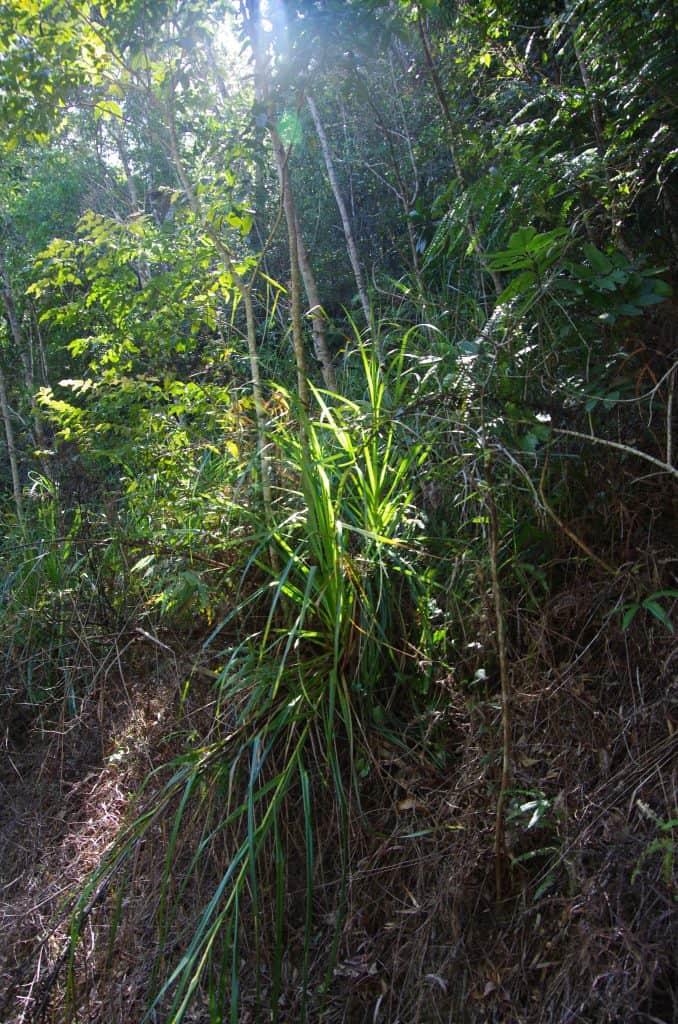
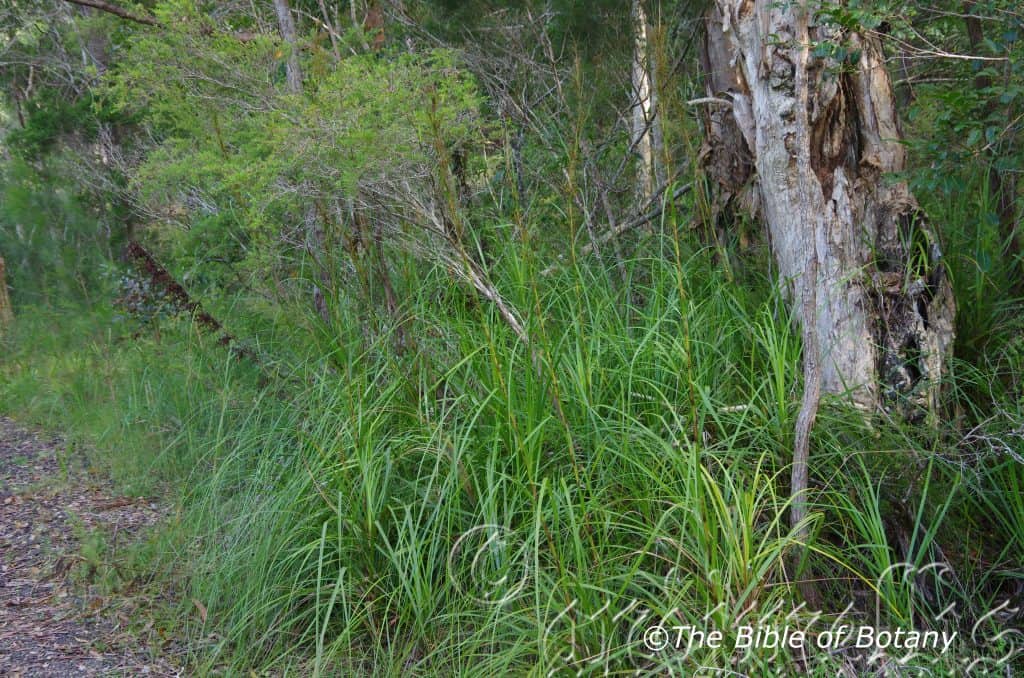
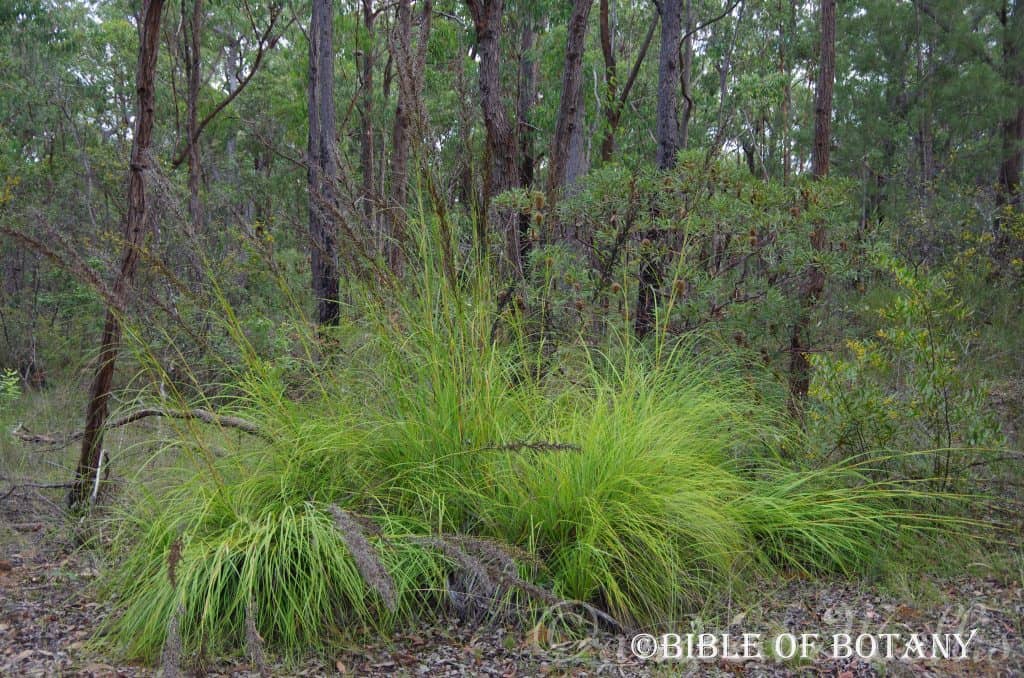
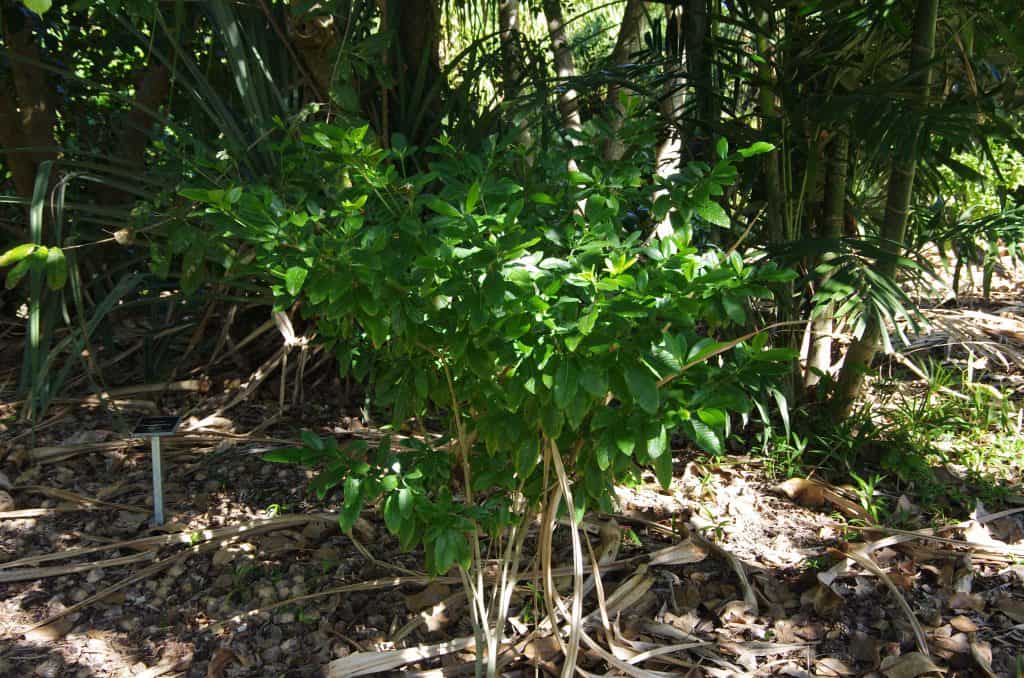
Gahnia aspera
Classification:
Unranked: Monocots
Unranked: Commelinids
Order: Poales
Family: Cyperaceae
Genus: Is named in honour of Dr. Henry Gahn who was a Swedish botanist and friend of Karl Linnaeus.
Species: From Asper, which is Ancient Greek for rough like a rasp. It refers to surfaces, which are rather rough.
Common Name: Saw Grass or Saw Sedge.
Distribution:
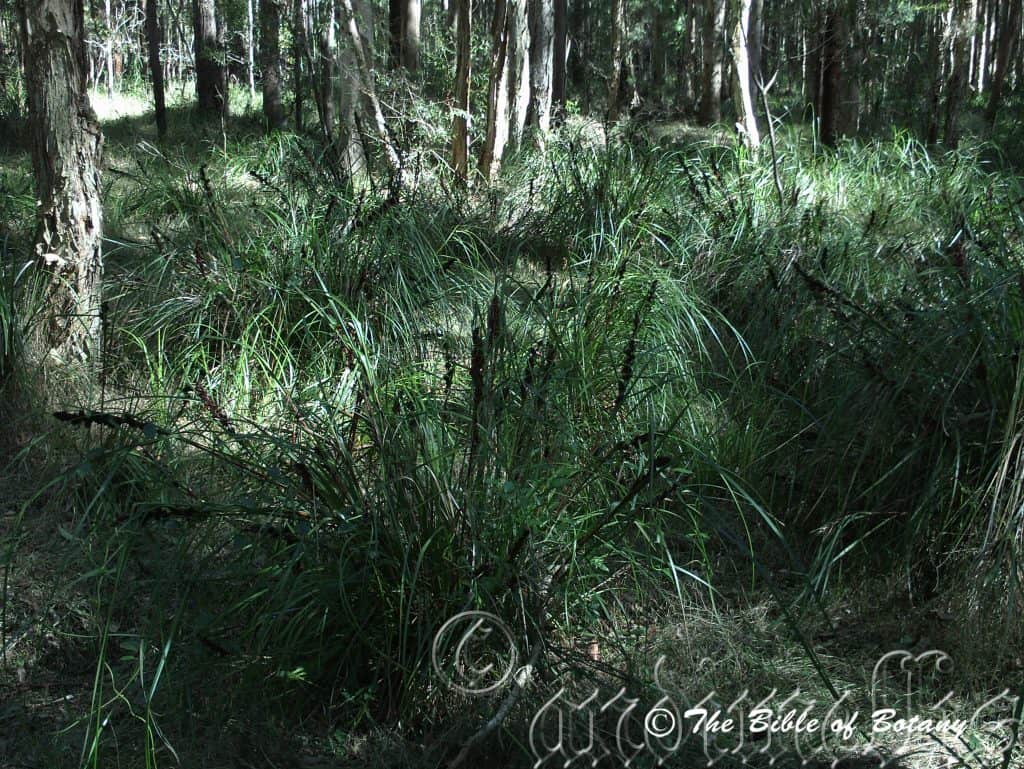
Gahnia aspera is found south from the Torres Strait Islands and Cape York Peninsula in far north Queensland to near Eden in southern New South Wales. It is found on the Western Plains, Western Slopes, on and east of the Great Dividing Range where it follows most of the major inland rivers and streams to the back dunes along the coast and off shore Islands. It is commonly found on the off shore islands.
https://avh.ala.org.au/occurrences/search?taxa=Gahnia+aspera#tab_mapView
Habitat Aspect Climate:
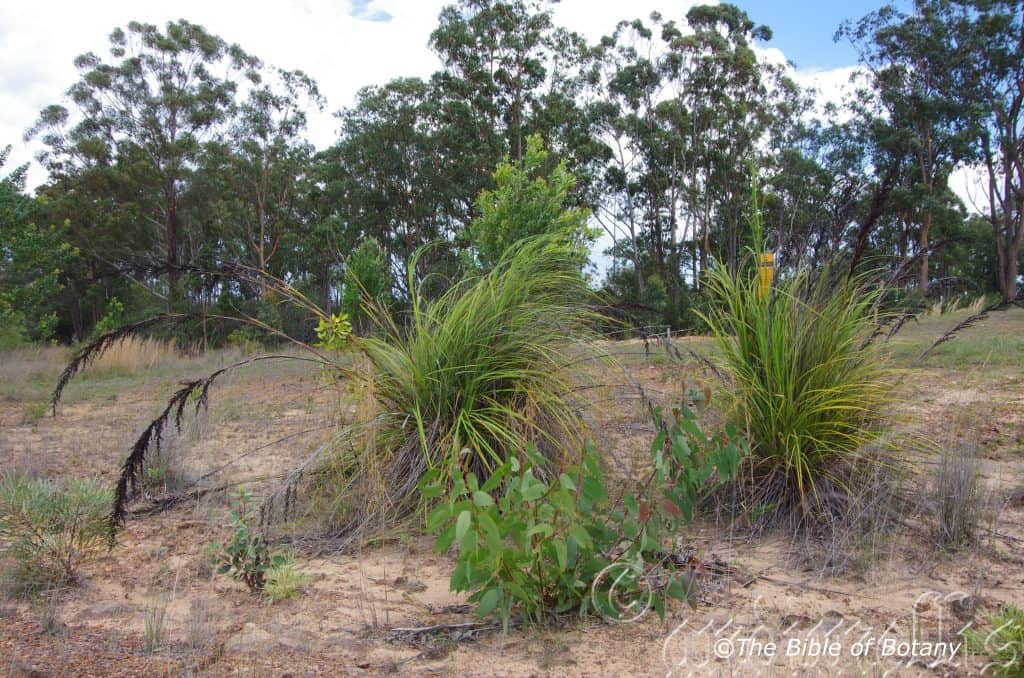
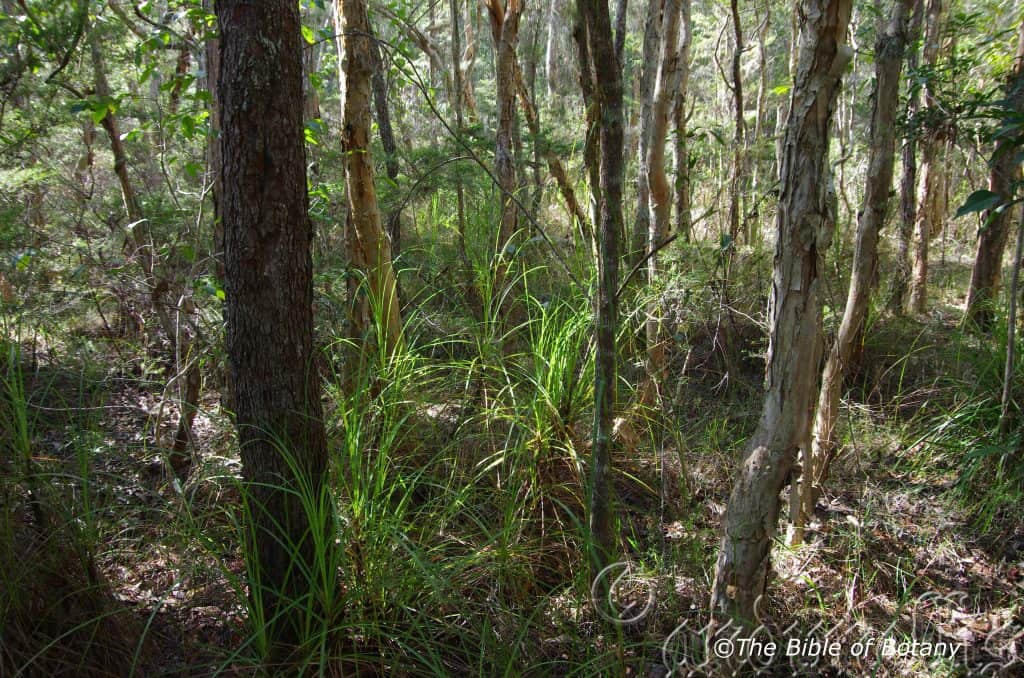
Gahnia aspera prefers full sun, dappled shade to quite dark situations. It grows on drier sites along riverine rainforests, riparian zones, moist Eucalyptus forests or dry Eucalyptus forests east of the Great Dividing Range and along rivers, streams and soaks and plains on the western side of the Great Dividing Range. It is also common on disturbed lands. The altitude ranges from sea level to 1200 meters ASL.
The temperatures range from minus 4.degrees in July to 40 degrees in January.
The rainfall ranges from lows of 250mm to an average of 2900mm annually.
Soil Requirements:
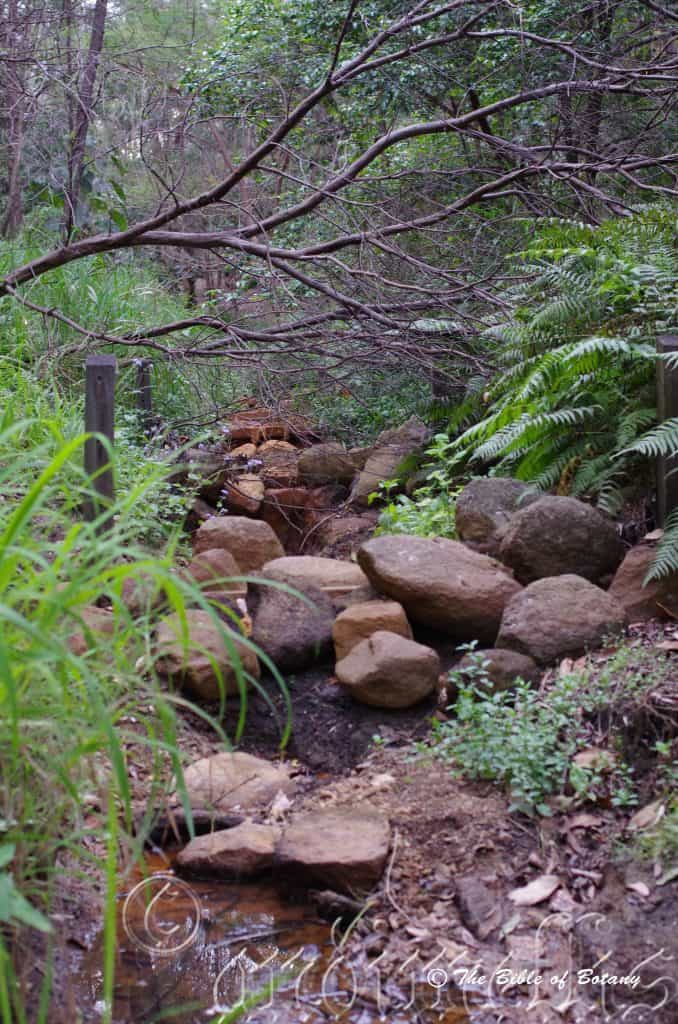
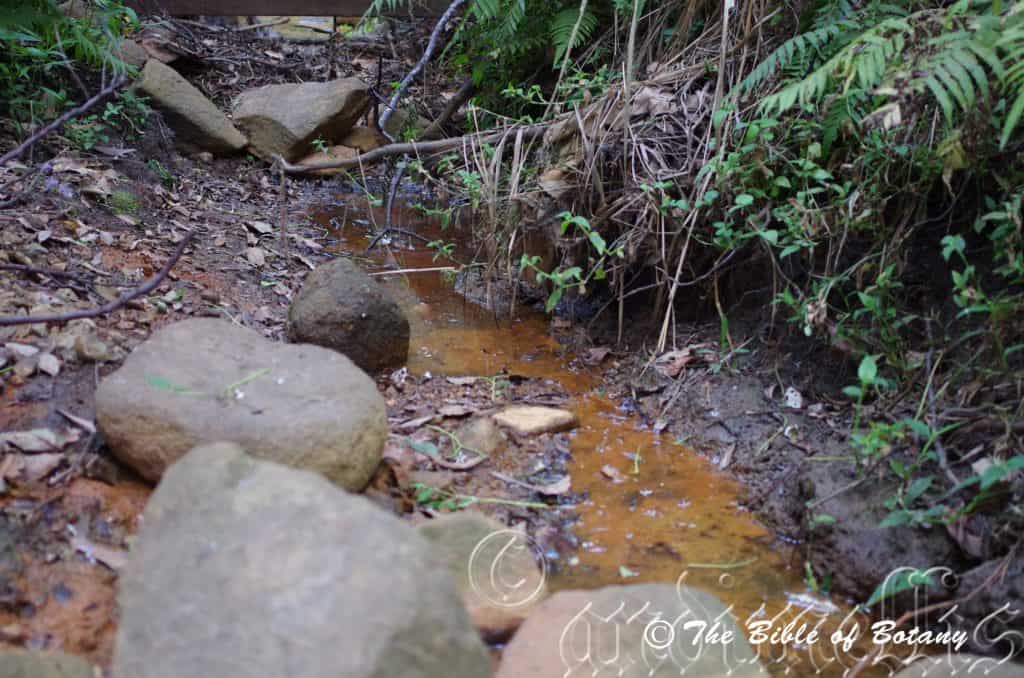
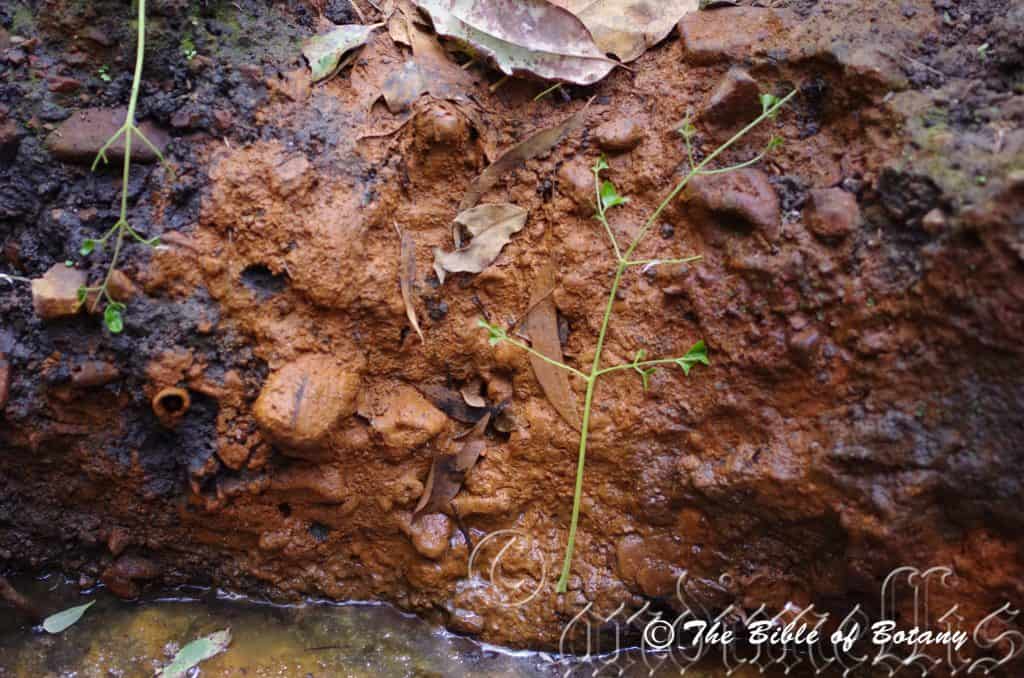
Gahnia aspera prefers better quality fertile sandy loams, light clay loams, medium clays or light silts to heavy silts. The soils are usually derived from decomposed brown basalts, black basalts, sandstones, granites, shales or alluvial flats. The soils pH ranges from 4pH to 6.5pH. It tolerates waterlogged soils for short periods and seasonal high water tables. It often grows in association with iron oxide bacteria. (See article on Fungus and Bacteria) Non saline soils to moderately saline soils are tolerated.
Height & Spread:
Wild Plants: 150mm to 1000mm by 750mm to 1000mm.
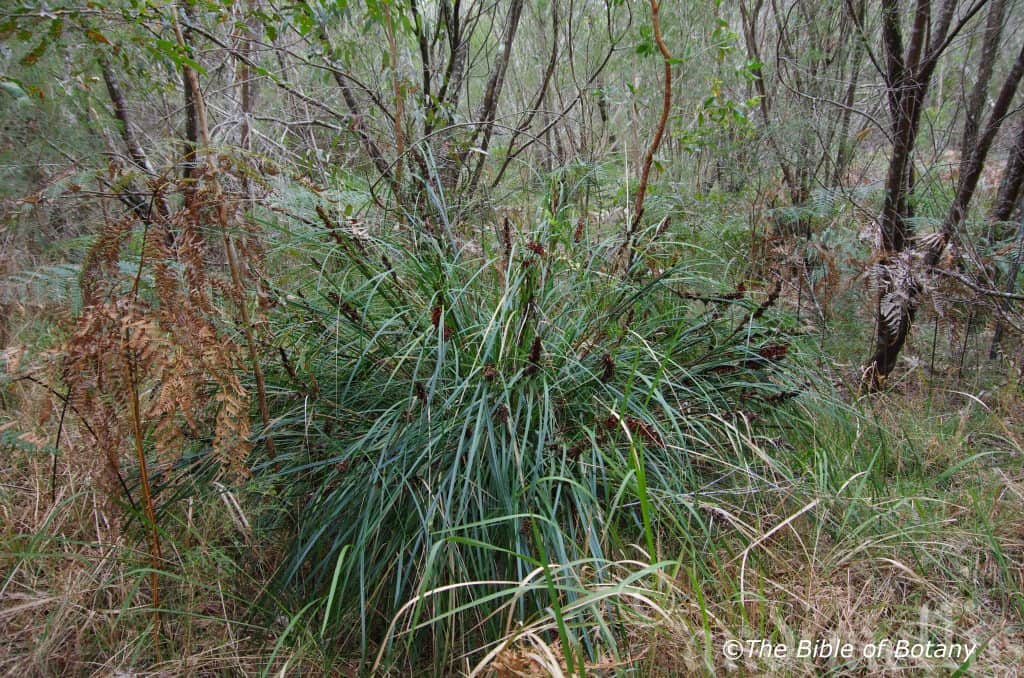
Characteristics:
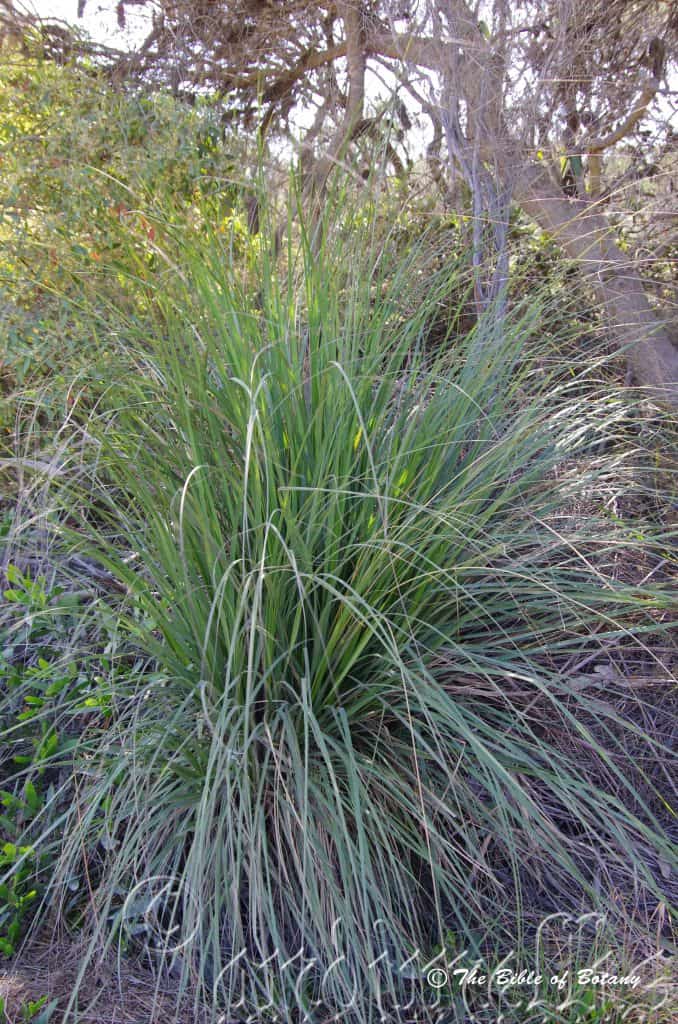
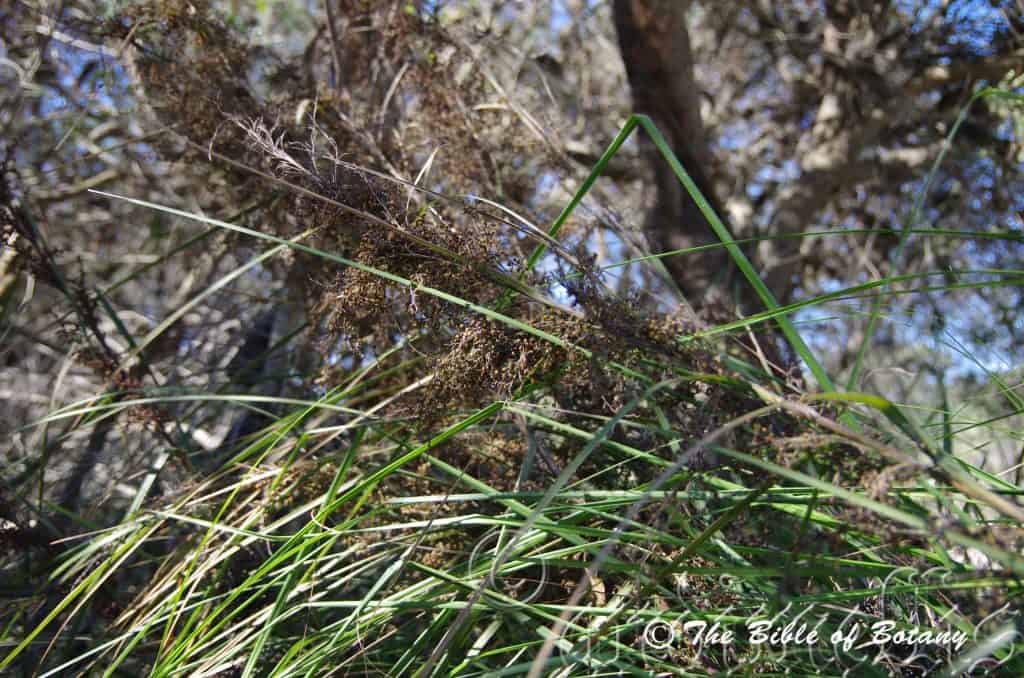
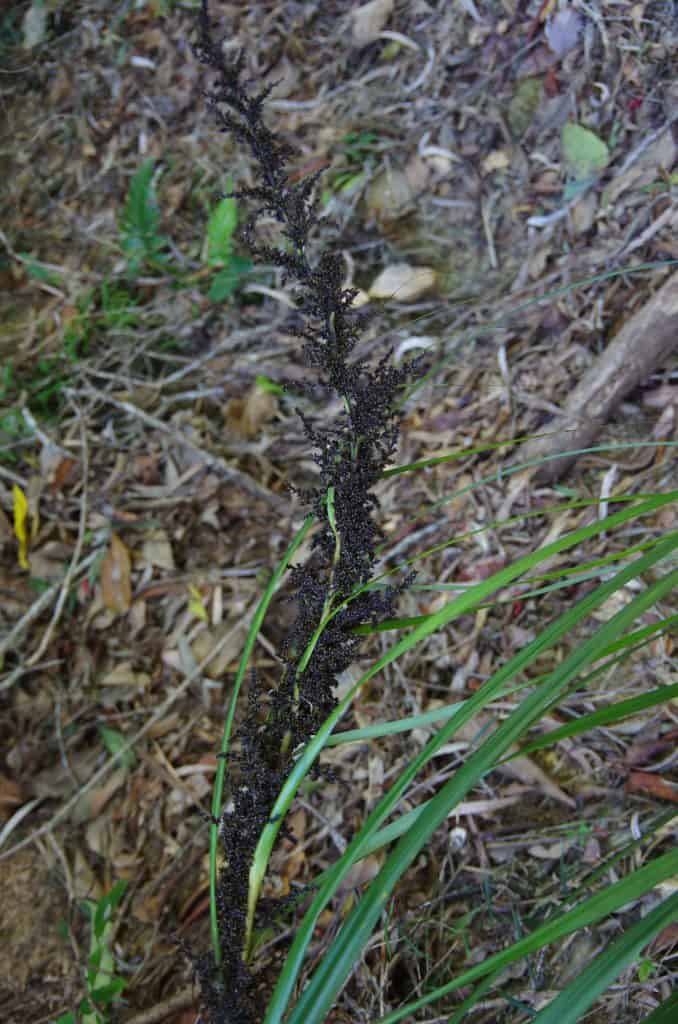
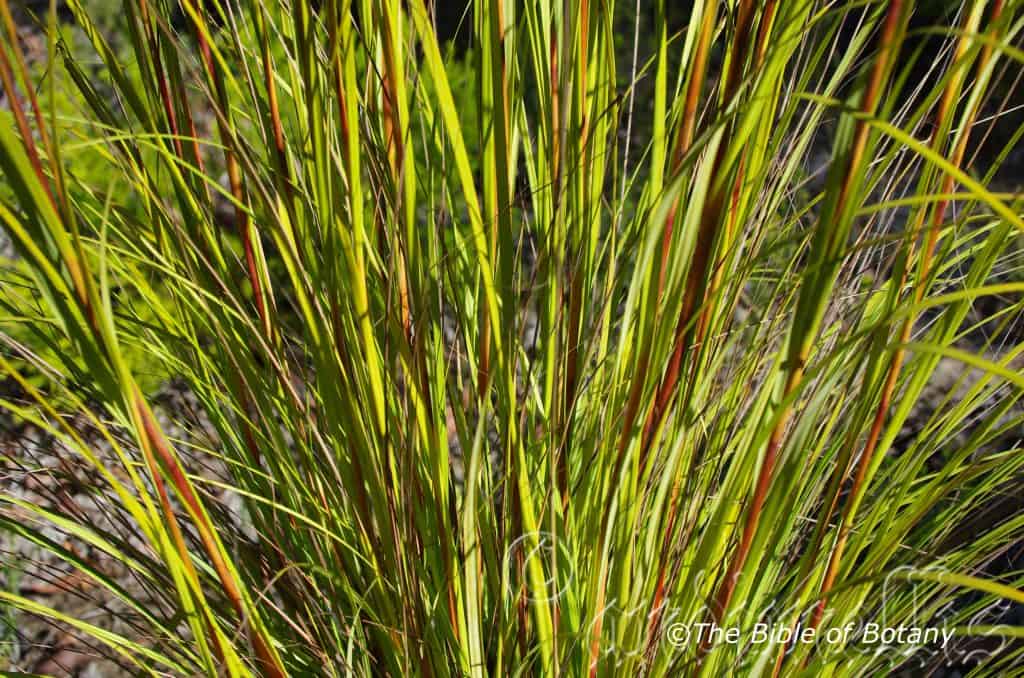
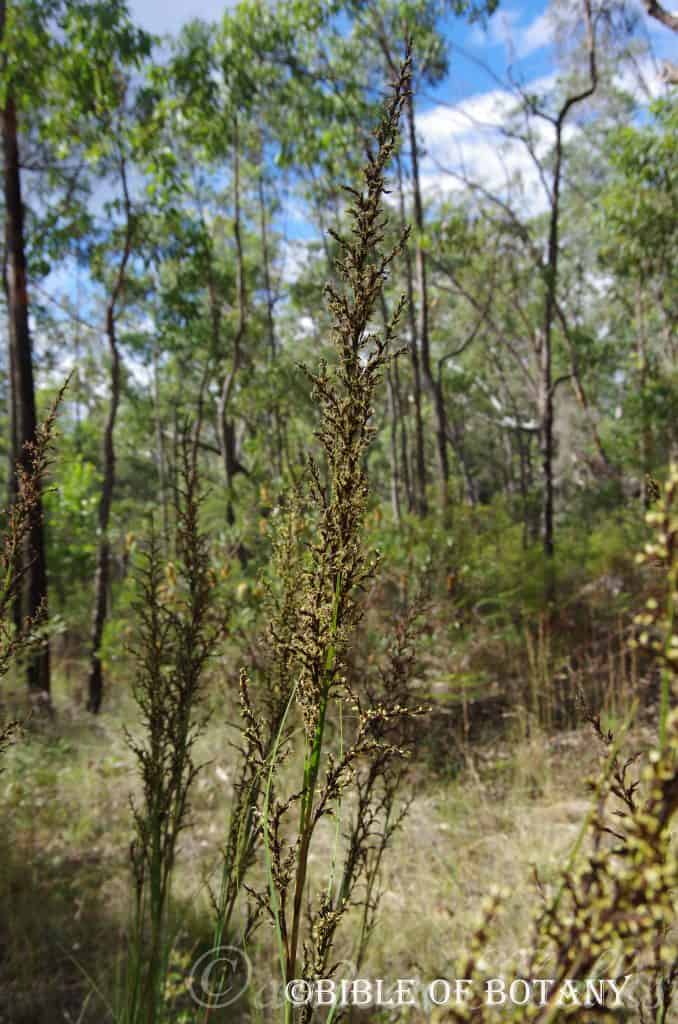
Gahnia aspera is a tufted perennial grass. The culms measure 150mm to 650mm in height by 2mm to 4mm in diameter.
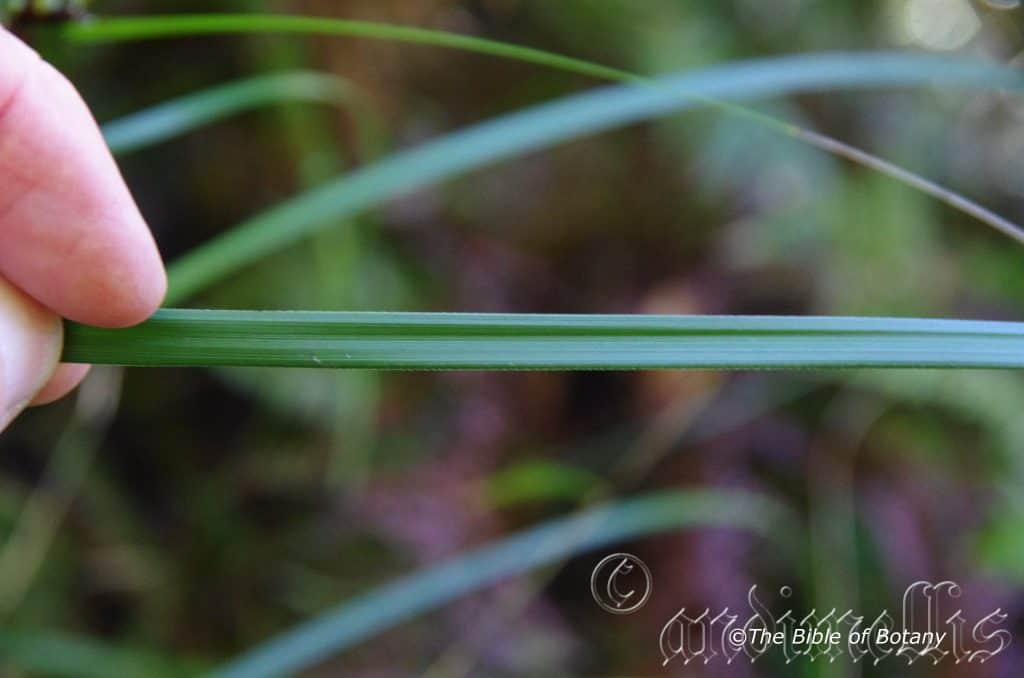
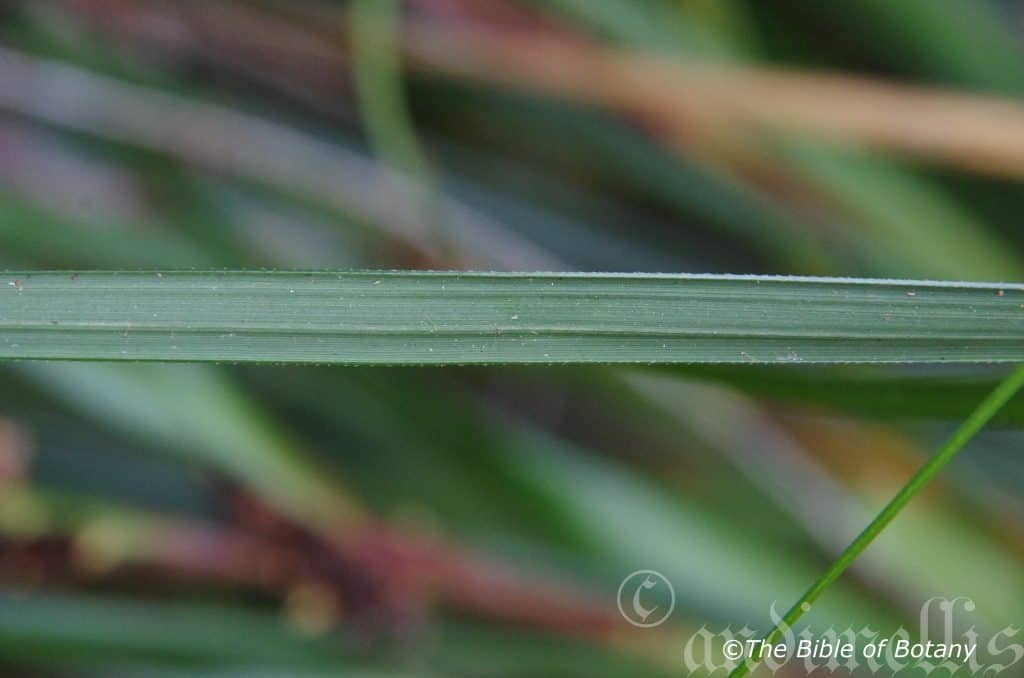
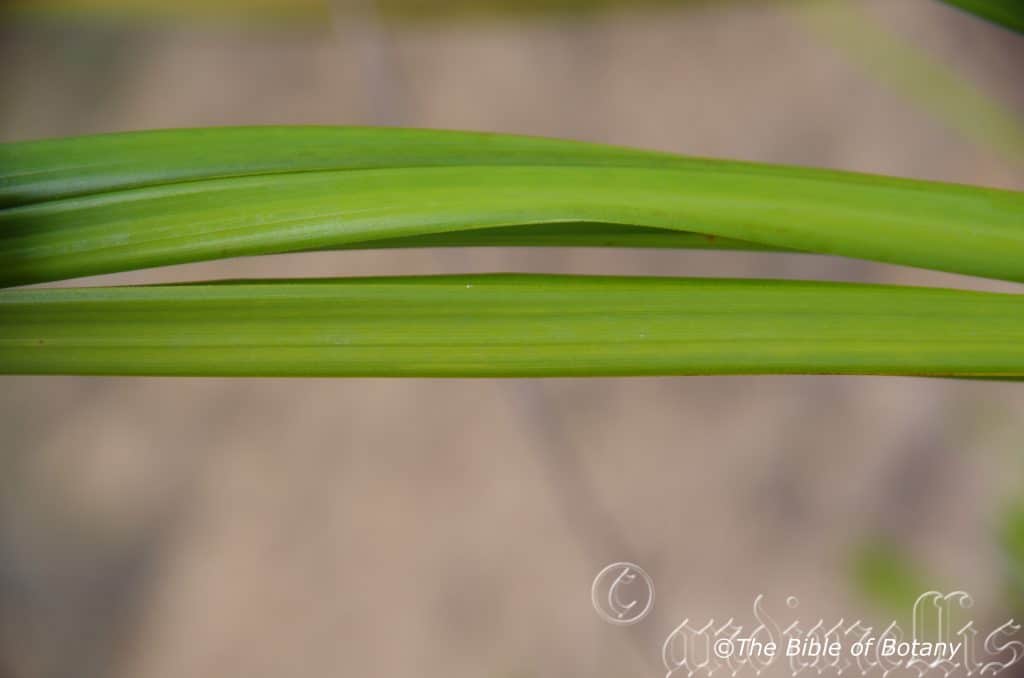
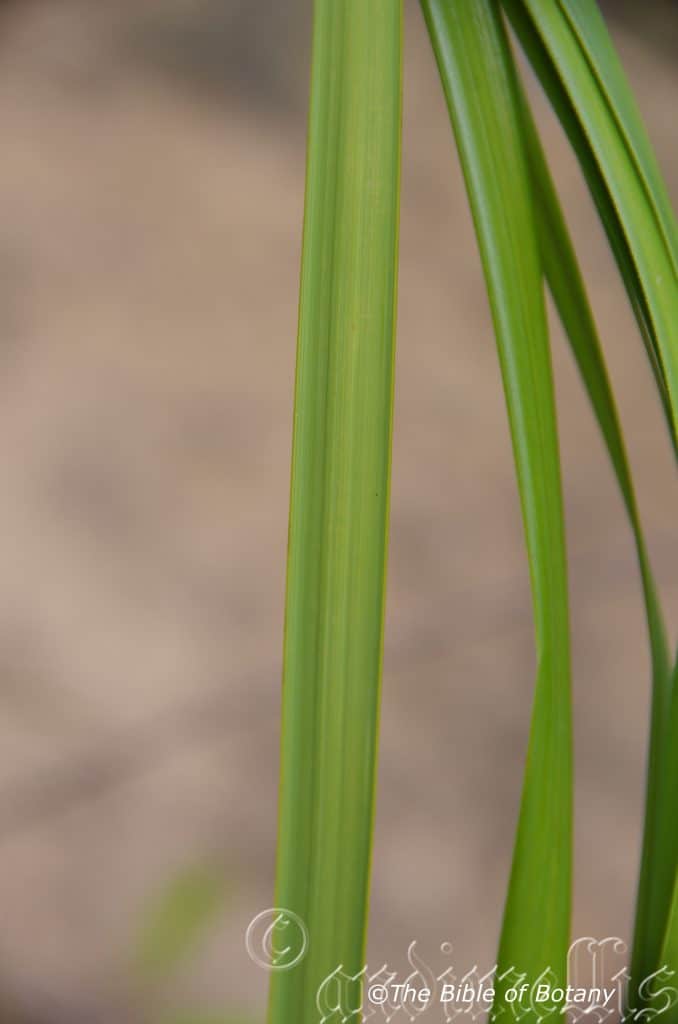
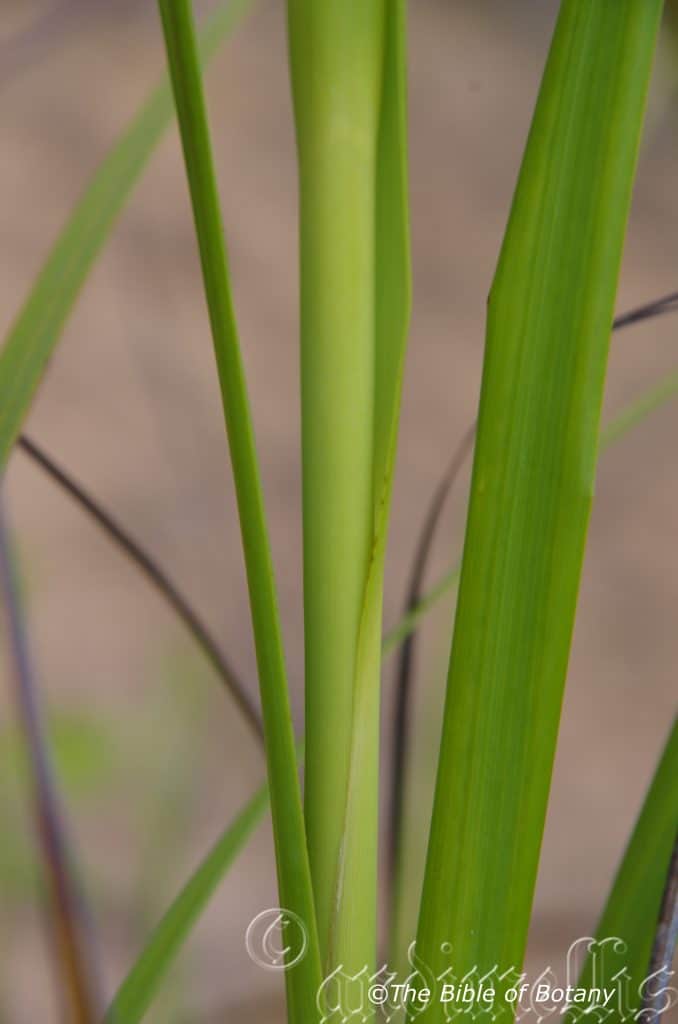
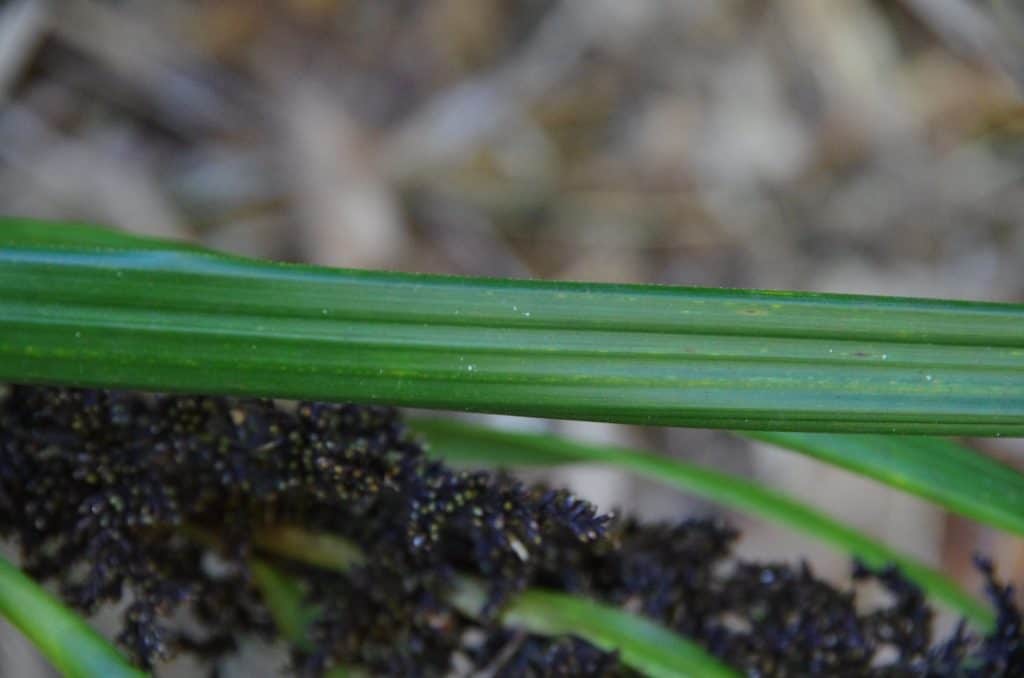
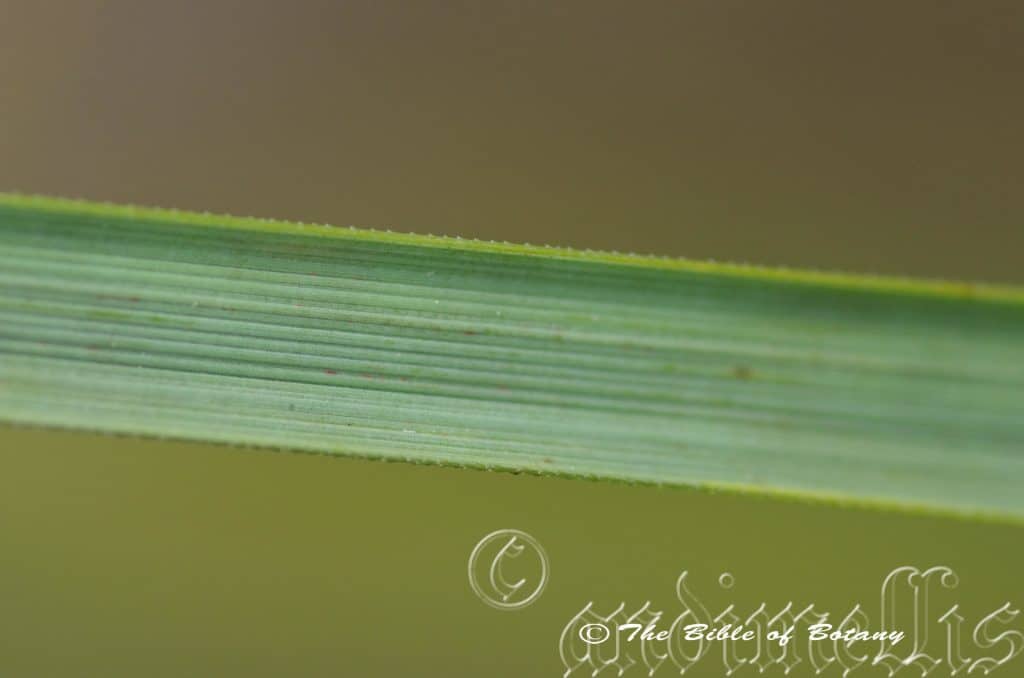
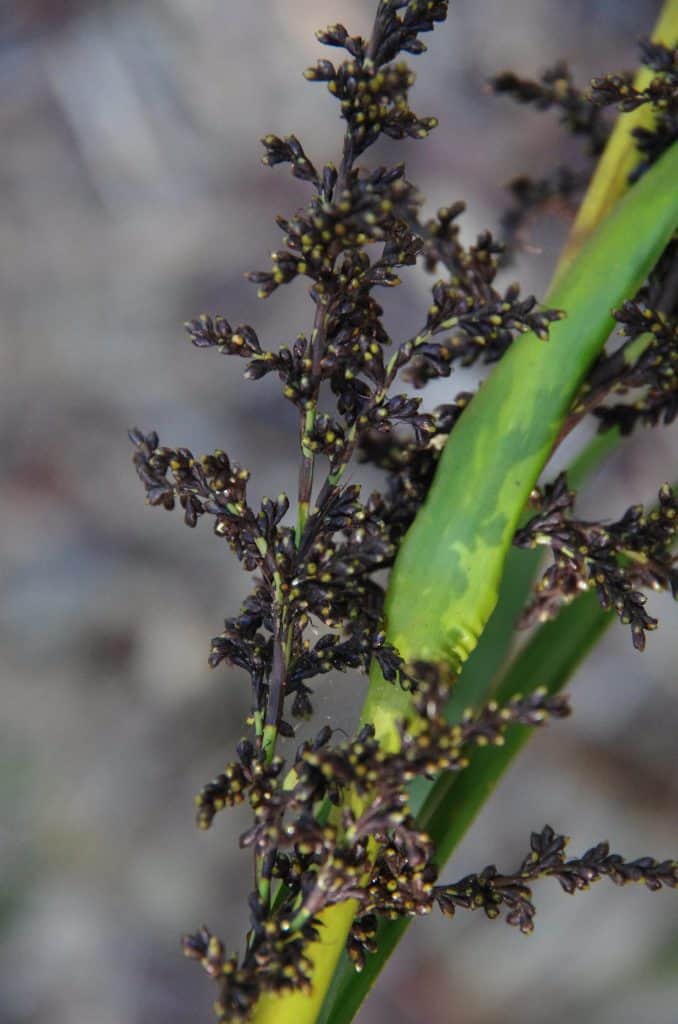
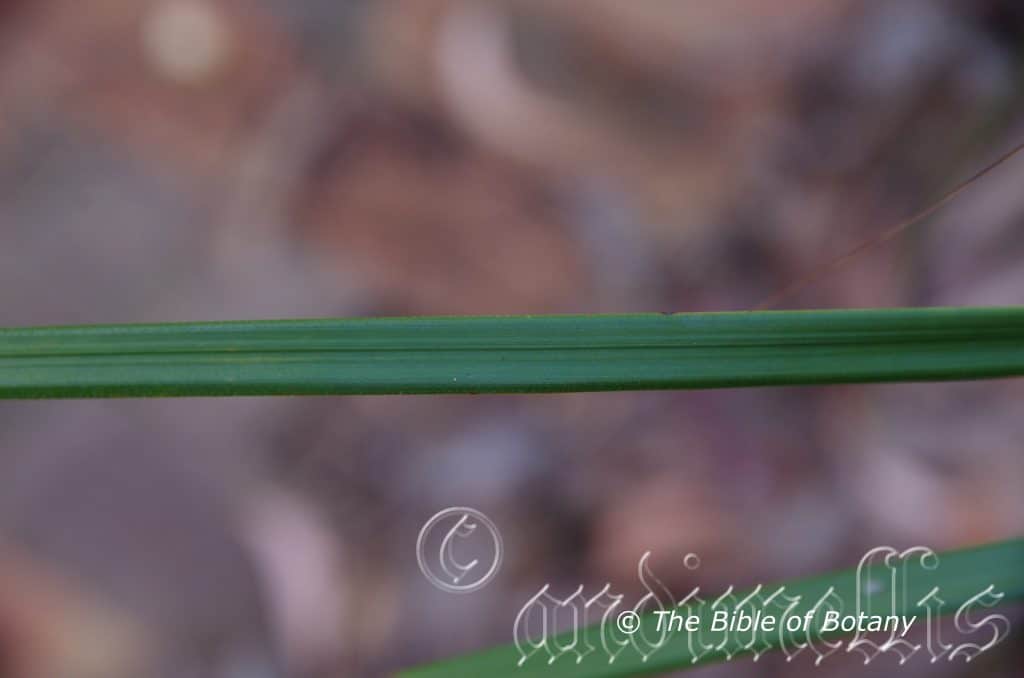
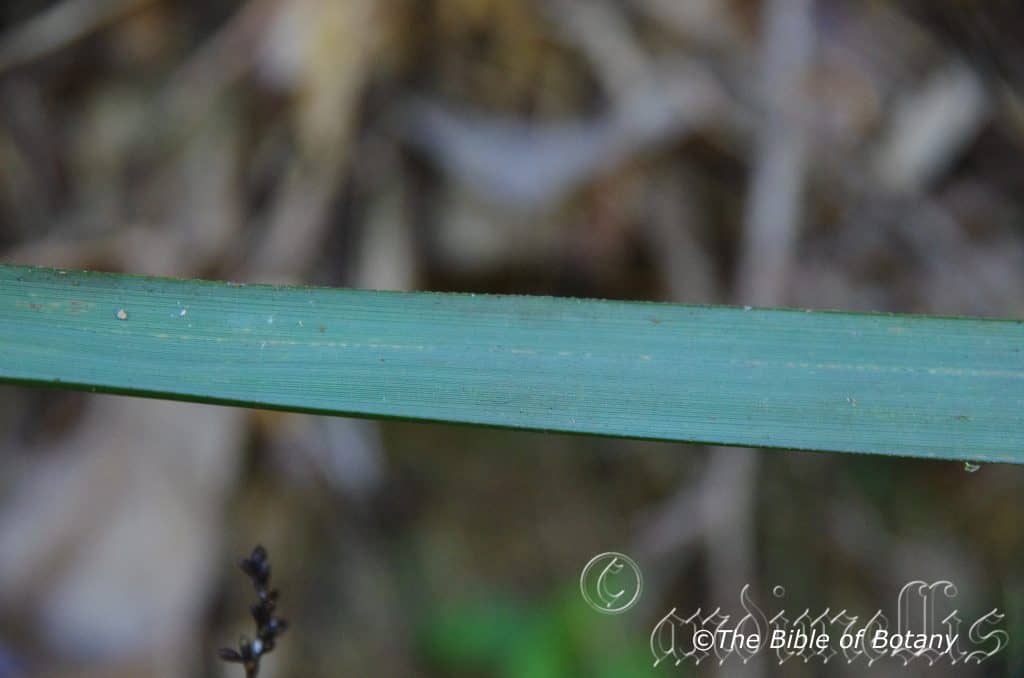
The linear erect to pendant leaves measure 600mm to 950mm in length by 3mm to 6mm in width. The sheaths are dark brown to reddish brown below and a shiny pink above while the ligule is narrow and papery. The bases are clasping while the apexes are narrow tapering. The concolourous laminas are deep grass-green. The laminas are flat and slightly decurve at the margins. The midvein is prominent on the lower lamina and is clearly visible on the upper lamina. The margins are finely serrated.
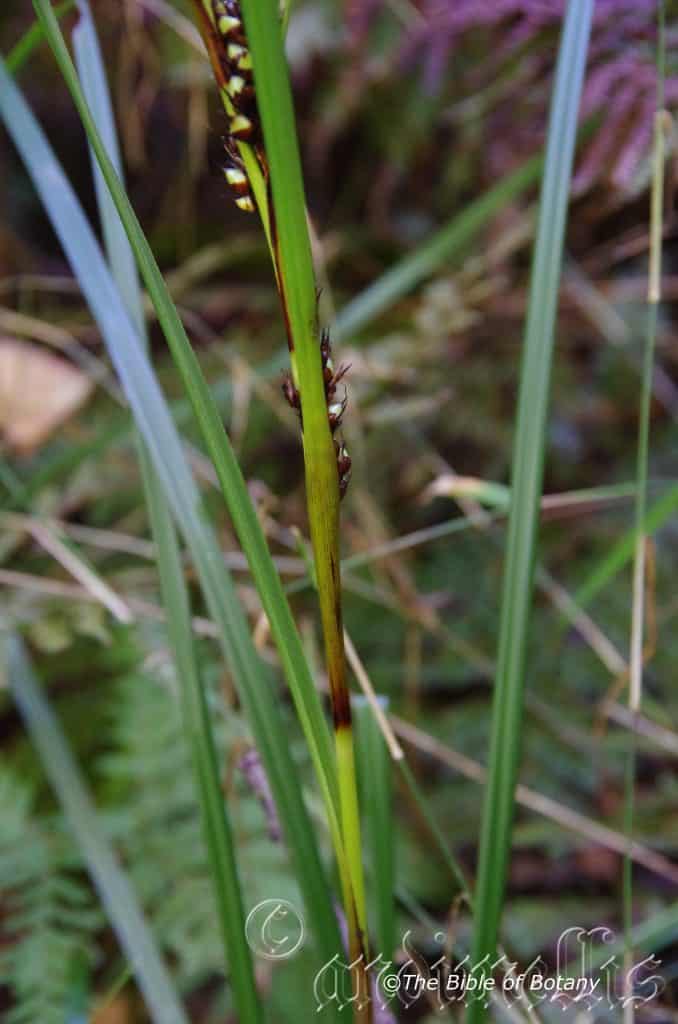
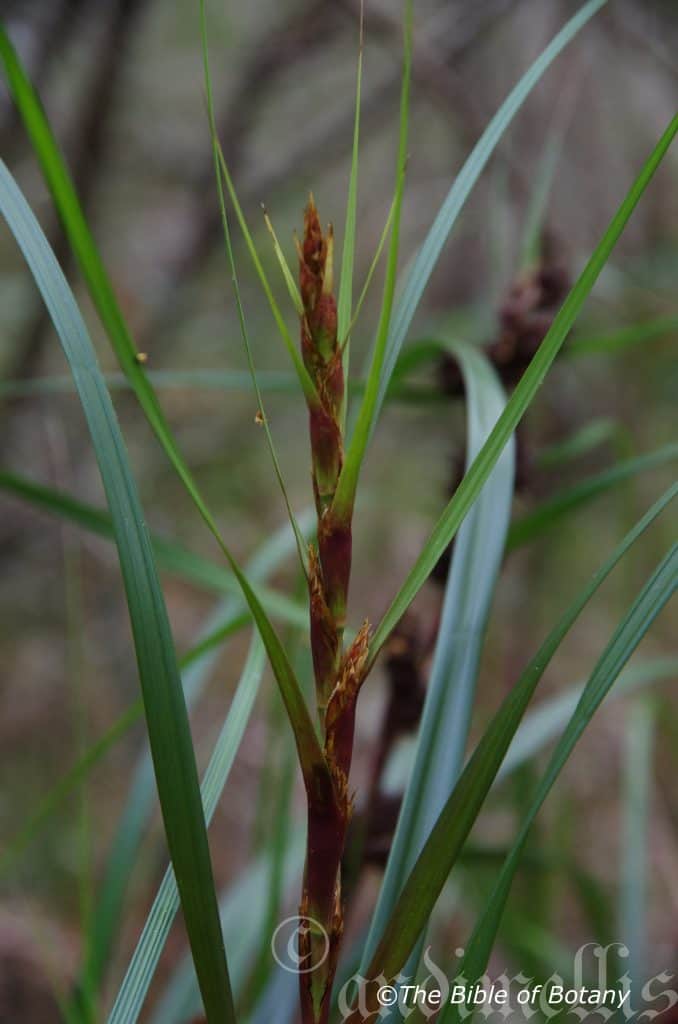
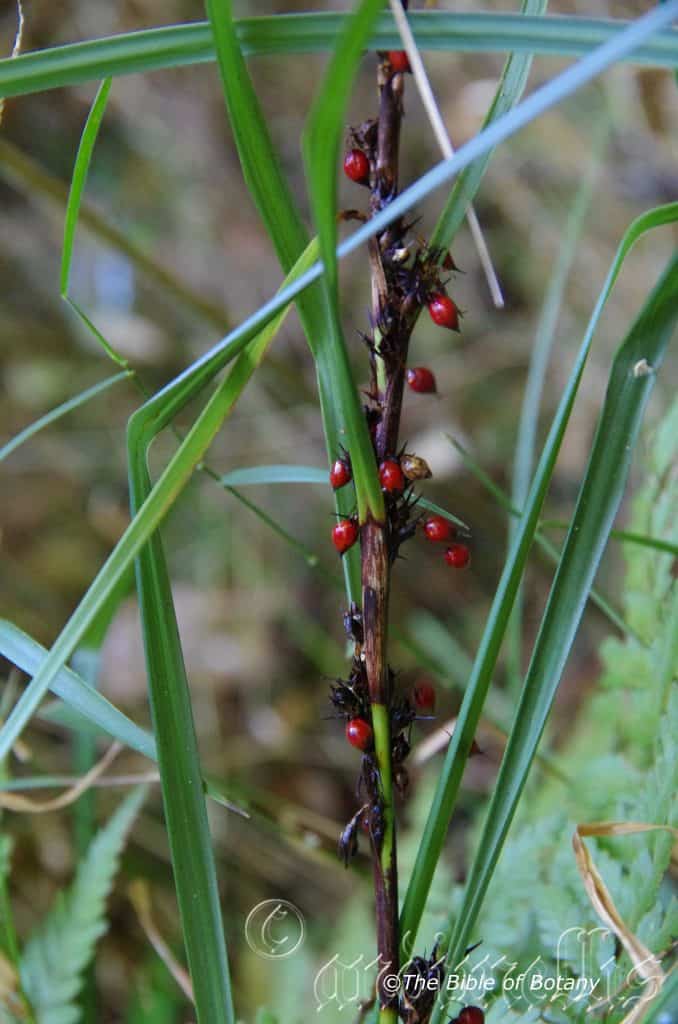
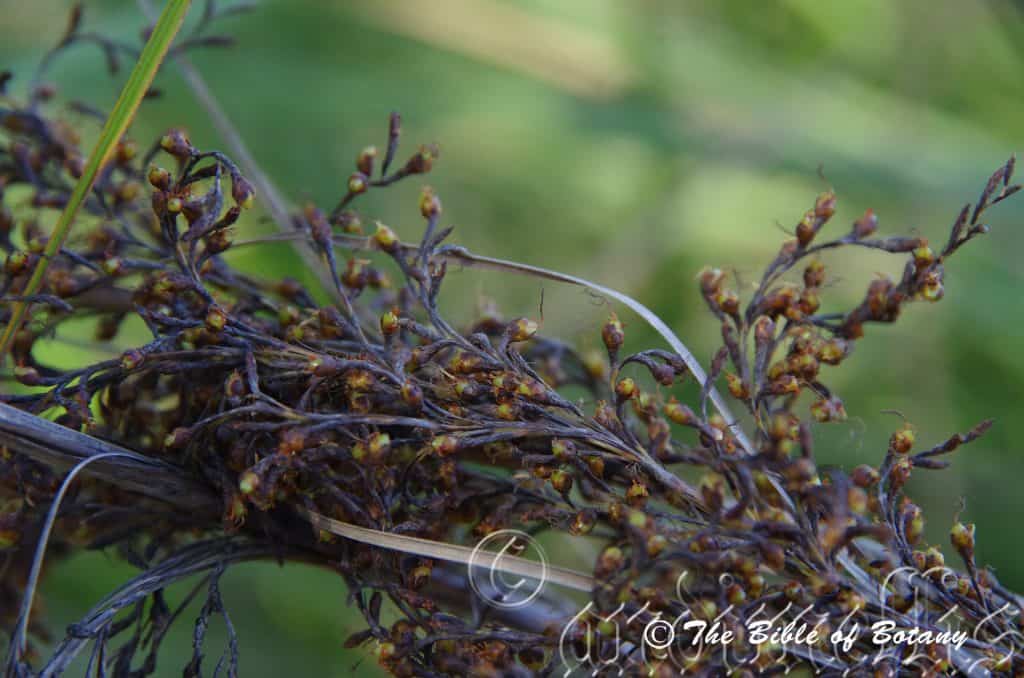
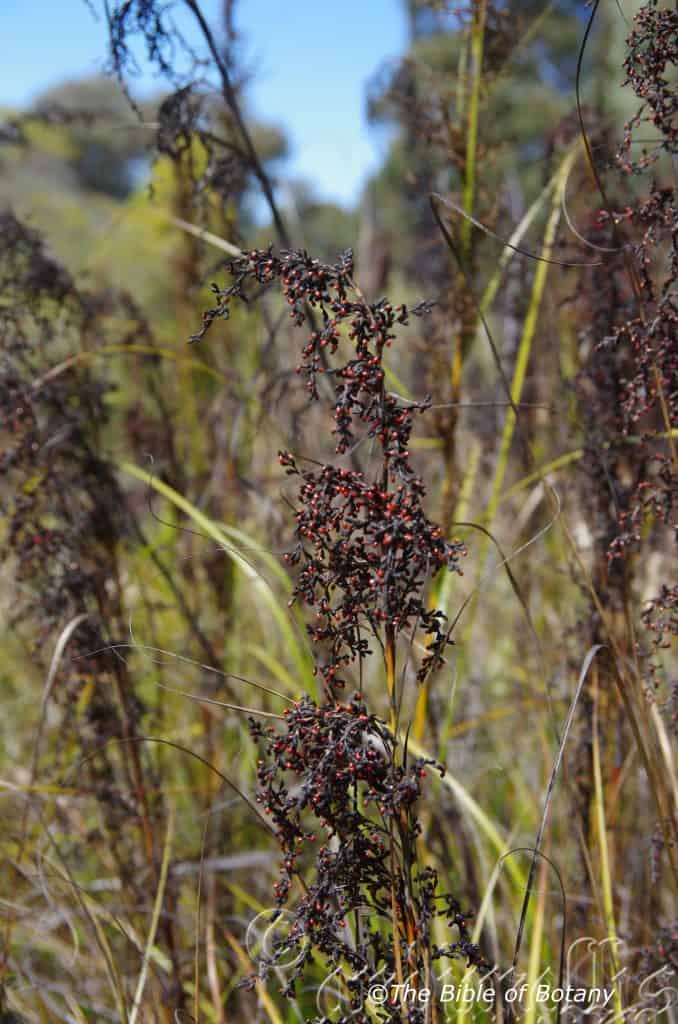
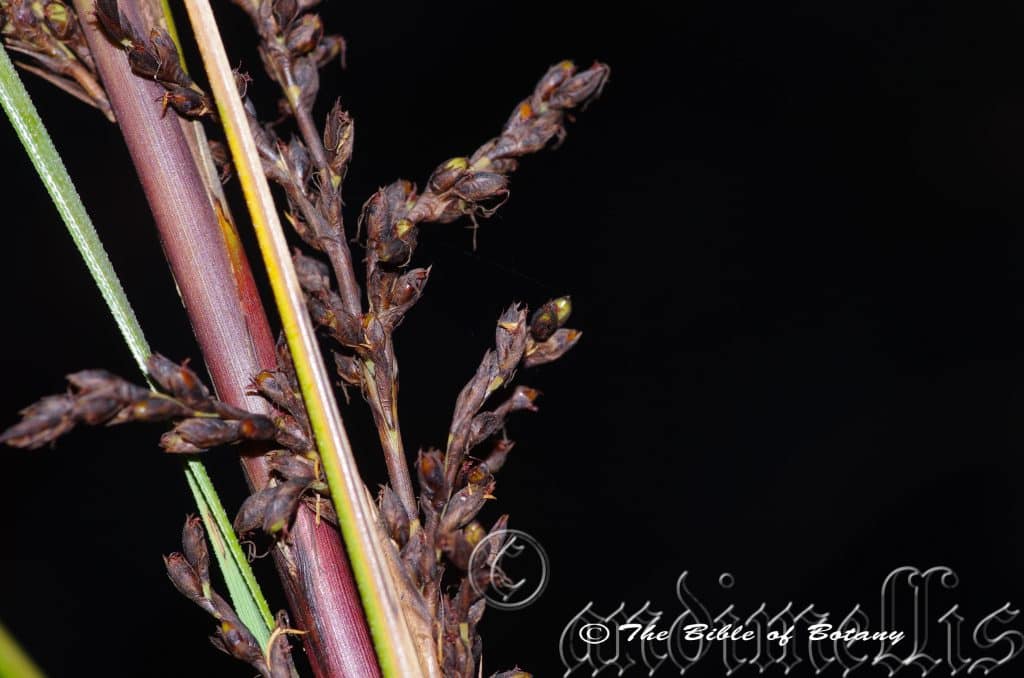
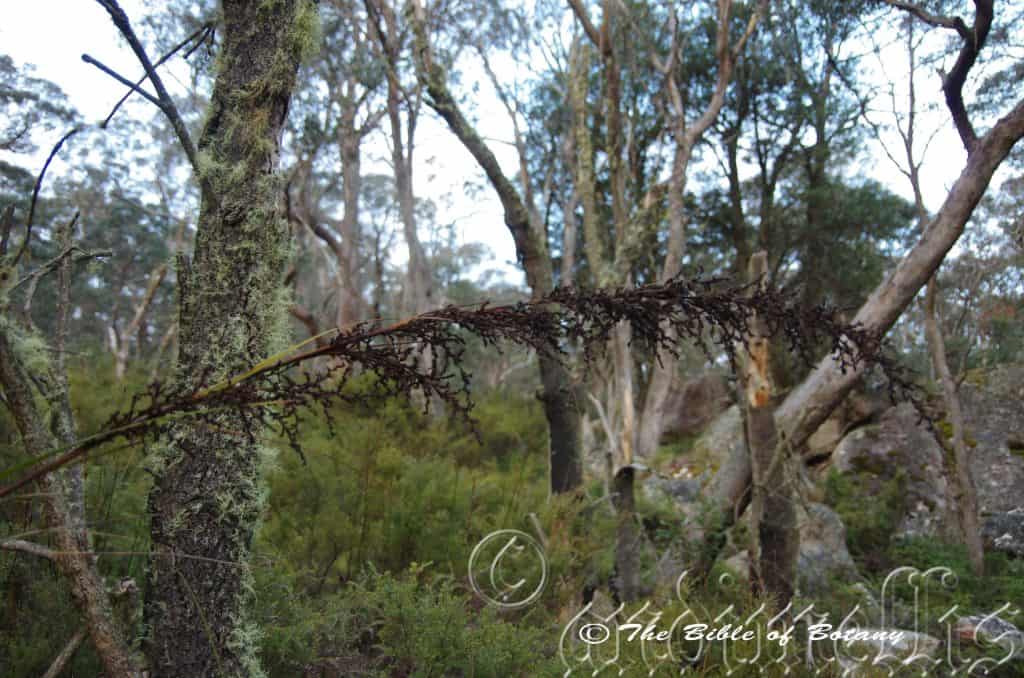
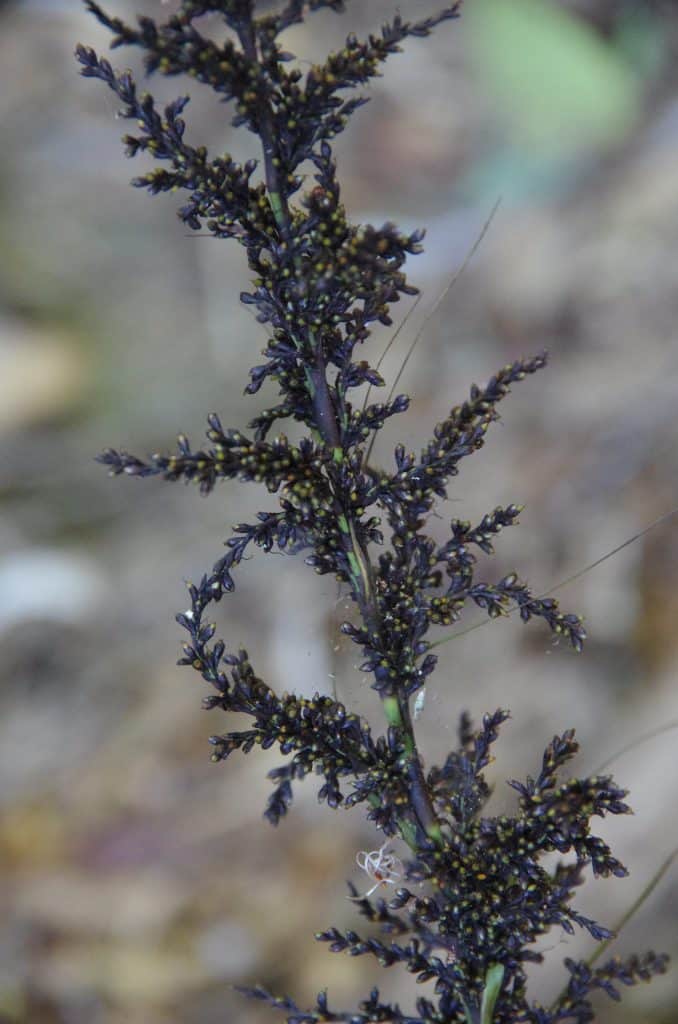
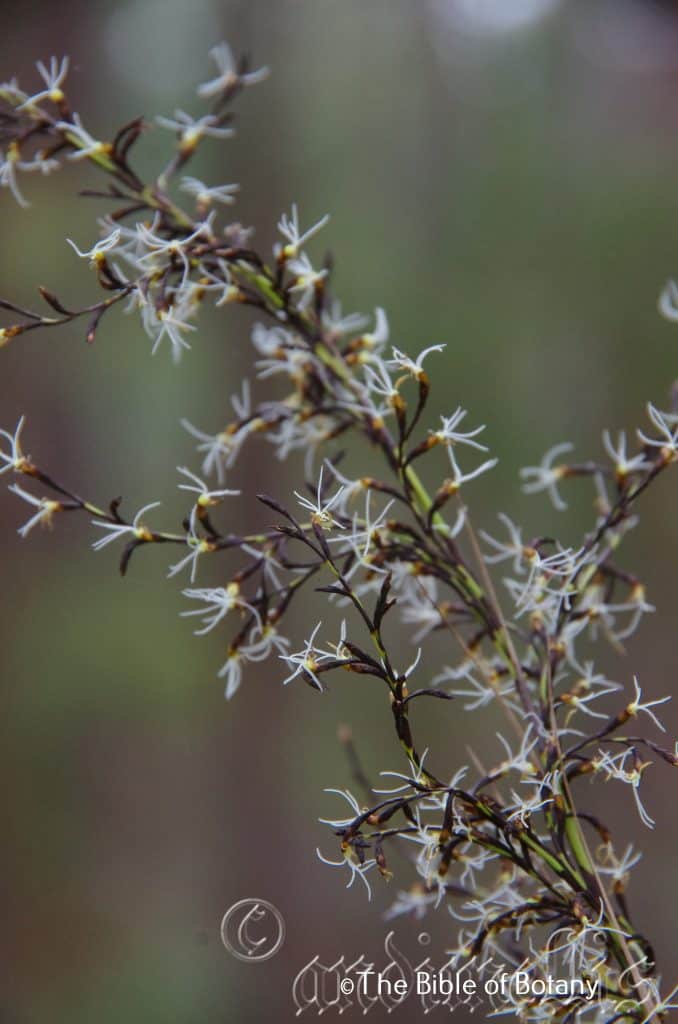
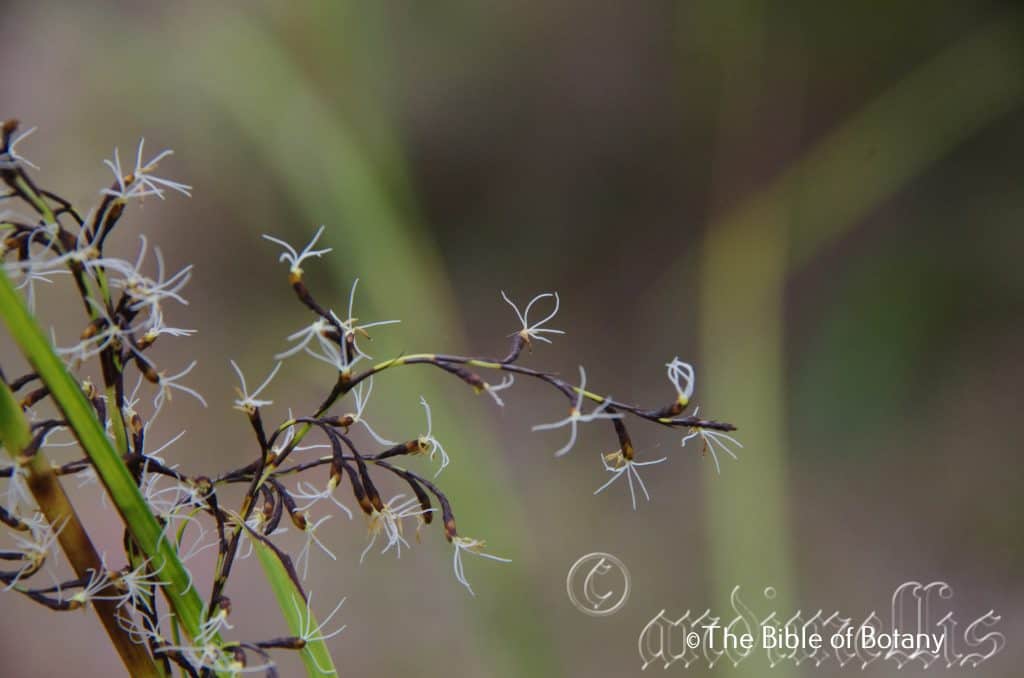
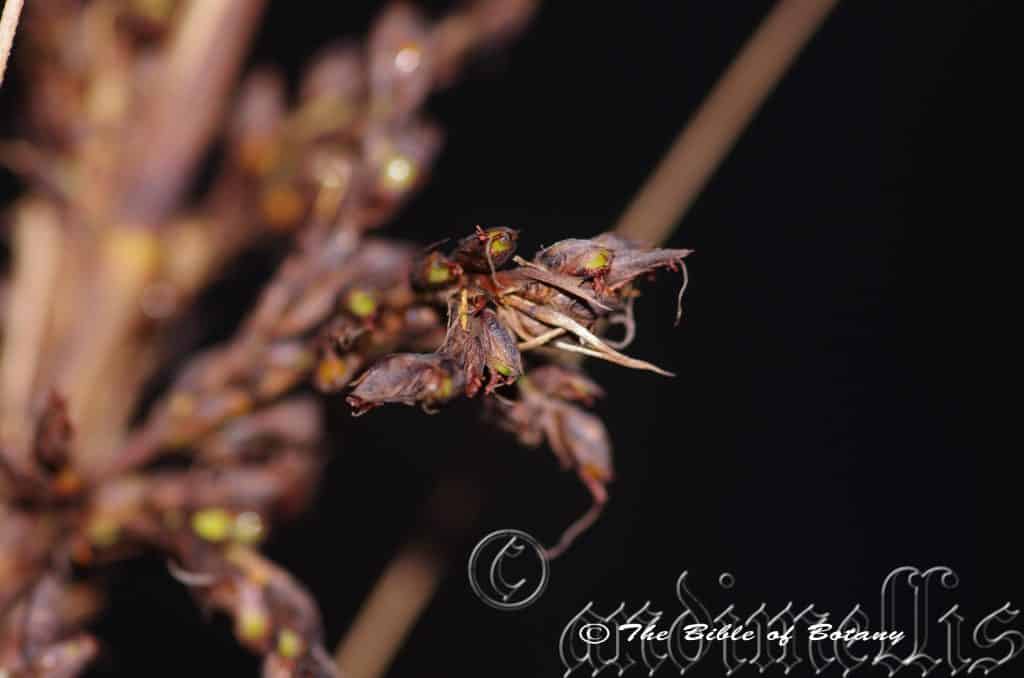
Inflorescences are erect, narrow spike with spikelets of dense clusters of small cream flowers. The spikes measure 150mm to 350mm in length with 5 to 10 nodes. Spikelets number 6 to 8 glumes with the 3 upper glumes being the shortest. The lower glumes have an aristate to acuminate apex while the upper 3 are obtuse. The 4.to 6 stamens are cream with cream anthers measuring 1mm to 1.3mm in length.
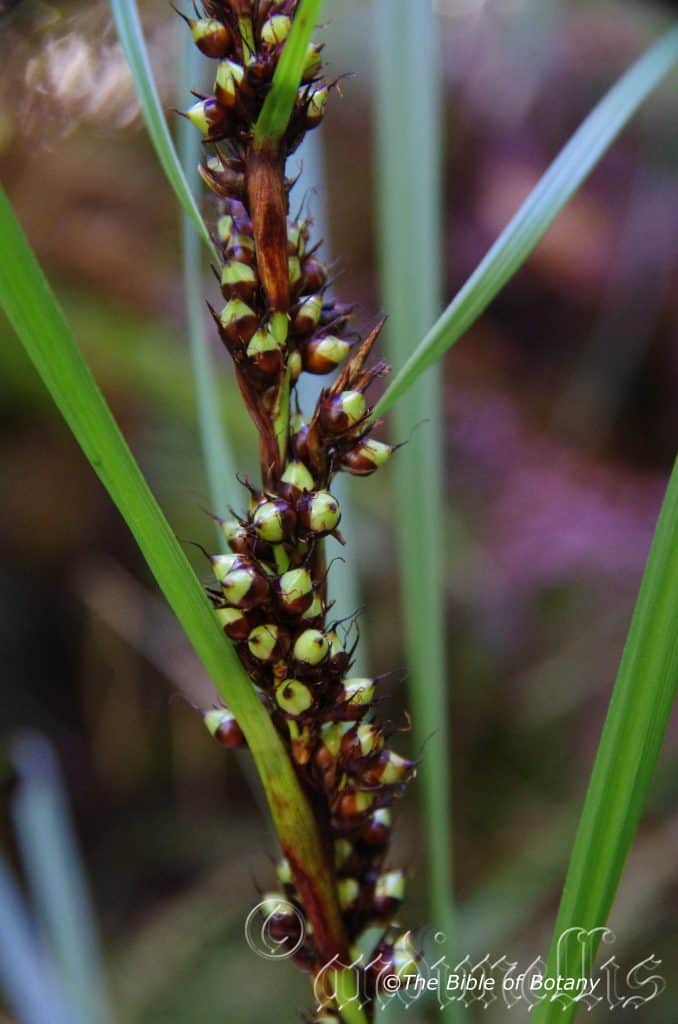
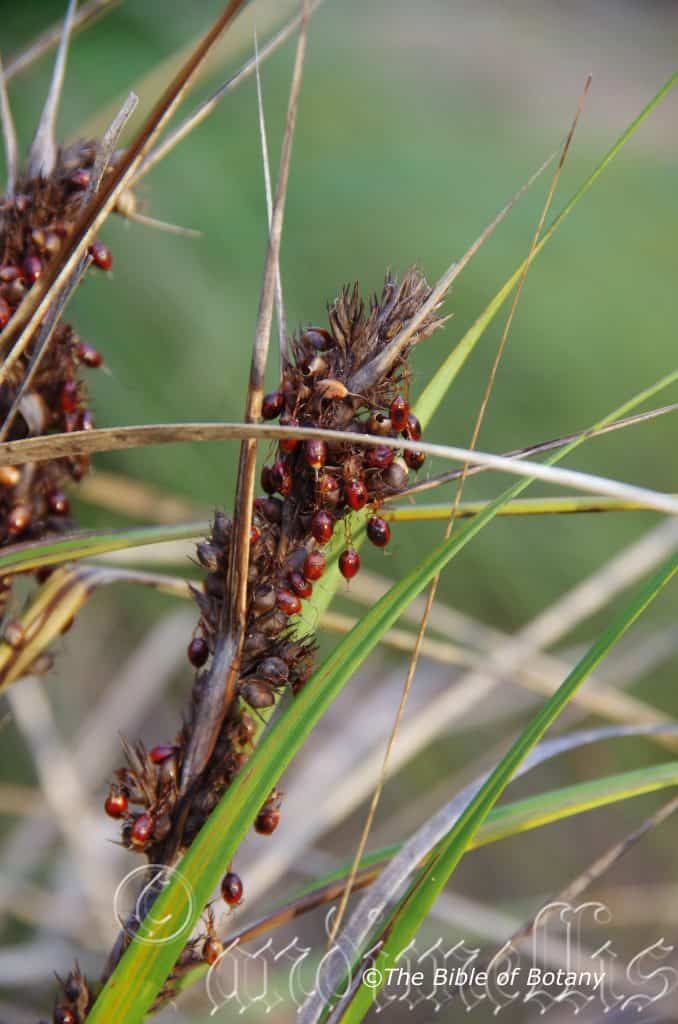
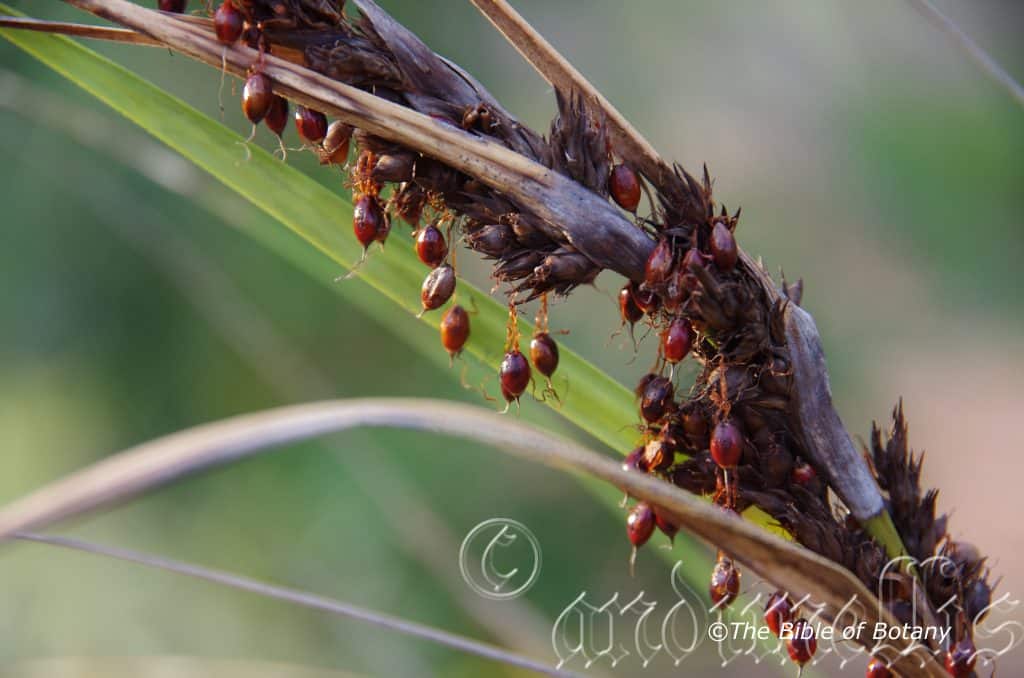
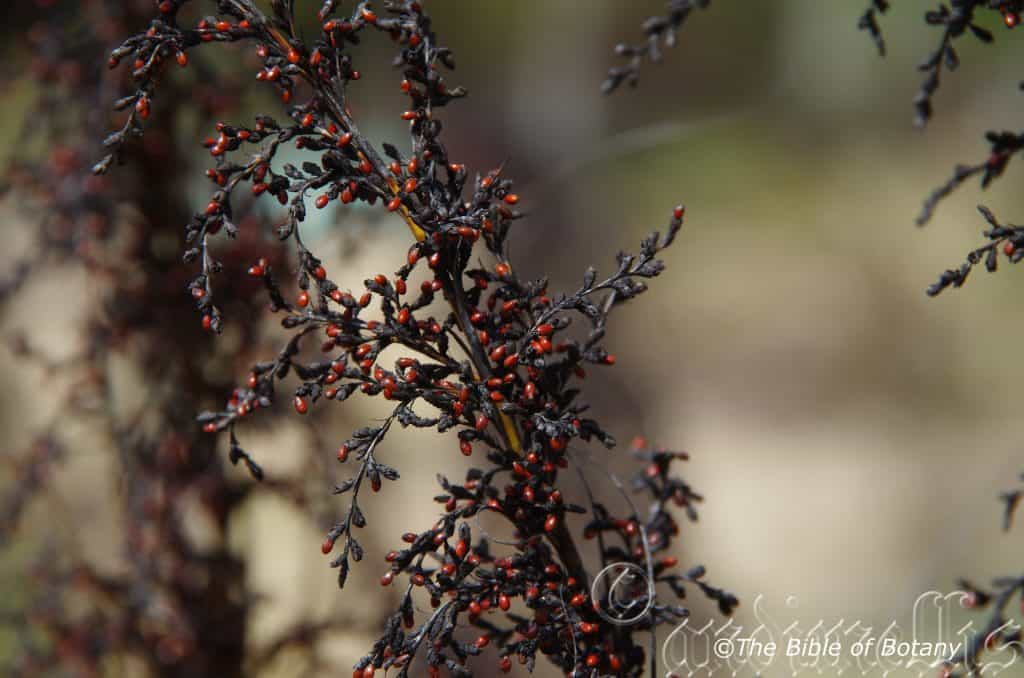
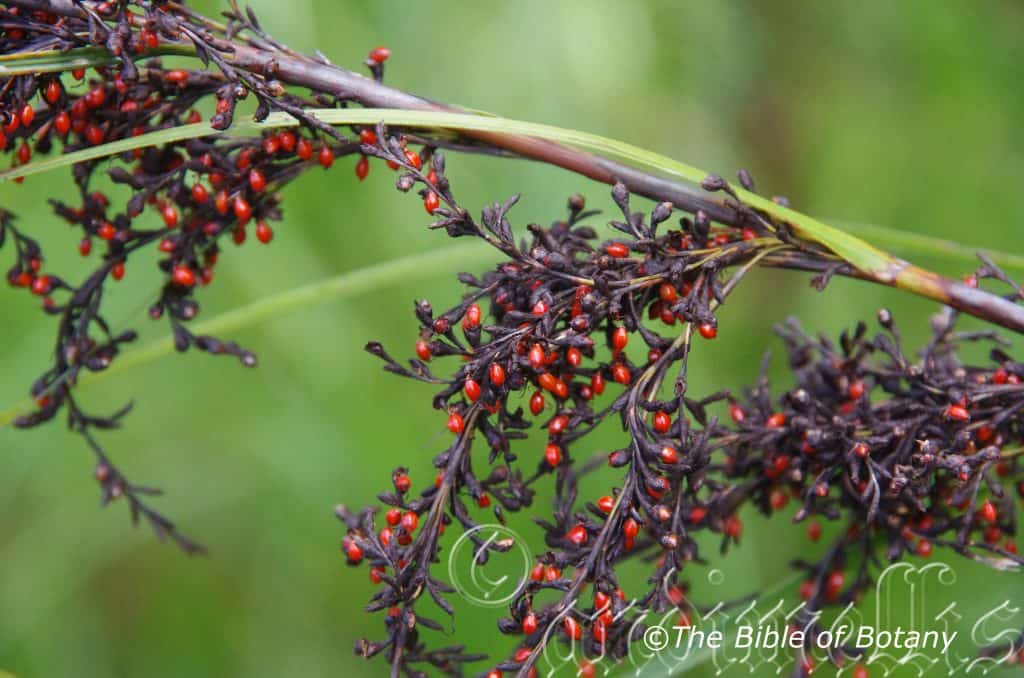
Gahnia aspera fruits are a terete or globose nut. The fruits are produced in clusters along the spike. They measure 5mm to 6mm in length by 3mm to 5mm in diameter. It is semi glossy and a reddish brown to an orange red colour. I have seen plants with white nuts in Nana Glen and near Lowana. The nuts are attached by long thin black flagella. Fruits are born most of the year in warmer zones and during the warmer months in the cooler zones.
Wildlife:
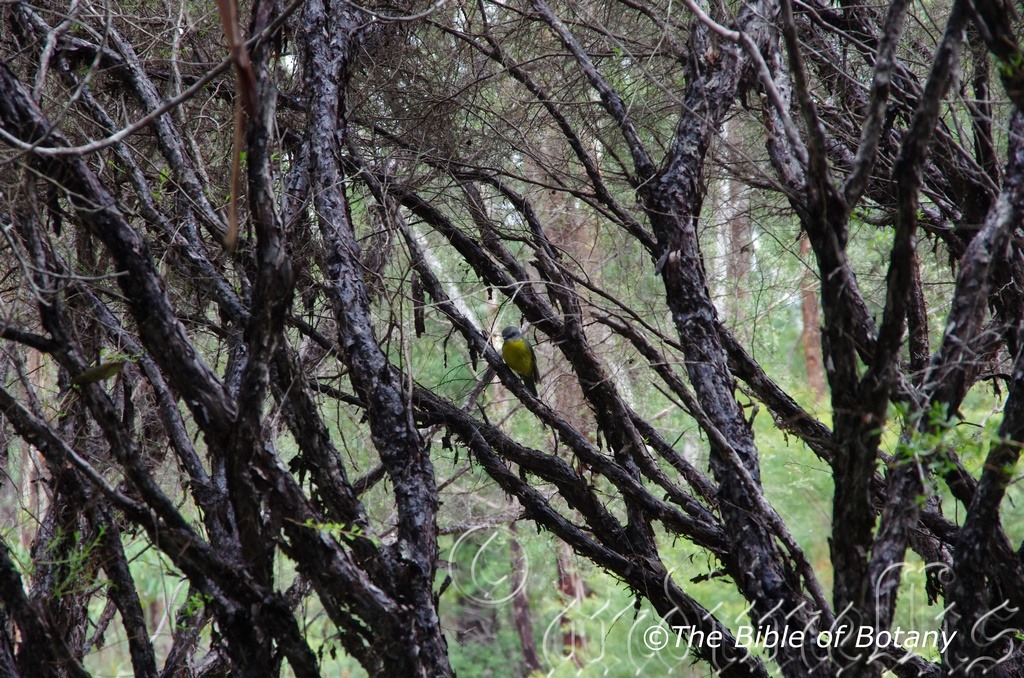
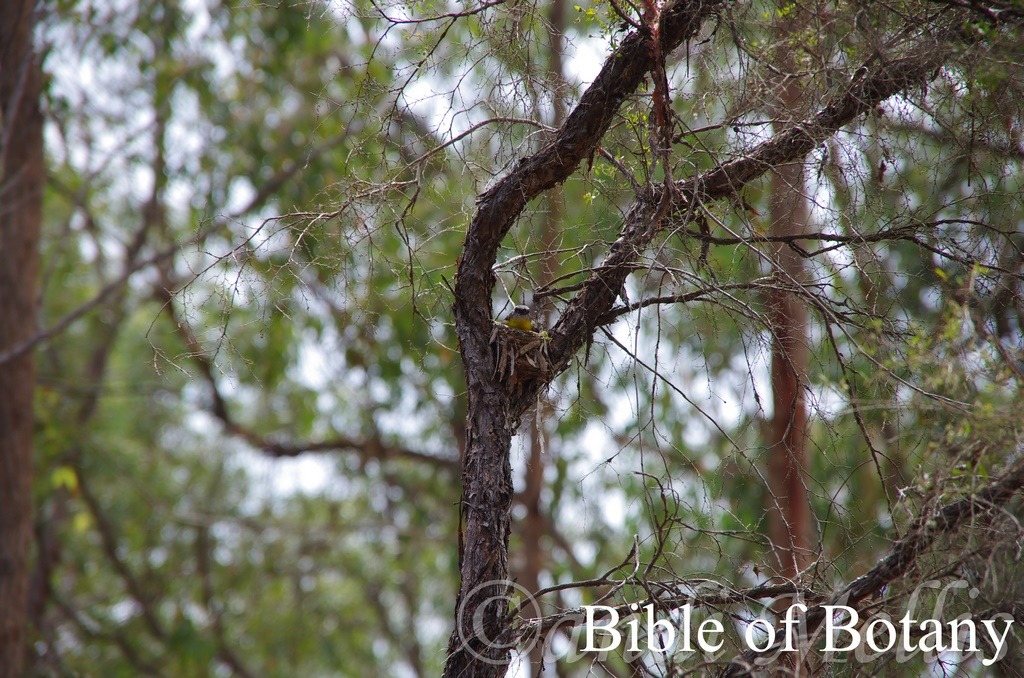
Gahnia aspera nuts are eaten by a number of birds and native mice but are passed through the birds and mice without being digested due to the very hard testa.
The leaves are eaten by the Saw Edge Skipper larvae Hesperilla idothea.
Aborigines used the leaves as a saw to cut meat and fibre
Cultivation:
Gahnia aspera is an excitingly different plant to grow in small to large gardens. The nuts are particularly attractive despite, the leaves, which can give some nasty cuts. Plant it away from paths and heavy traffic areas to minimize the risk of being cut. Plants are best rejuvenated with fire or being cut back to just above the ground level following seed dispersal. Plants recover very quickly and usually flower soon after.
It makes an excellent rockery plant when placed near the center or along long walls where it can be placed to the rear. Try planting small ground covers or annuals in the foreground to add height and length to the bed. It always look green and fresh whether the ground is dry or where adequate ground moisture is retained. It can be grown in light shade or full sun. It is very suitable on sandy to heavy clay soils. In fact I have found areas where it has been growing on heavy clays to be far more friable after these plants have been growing there for a few years. It is suitable for gardens close to the coast in temperate, subtropical, tropical or semi-arid gardens or west of the Great Dividing Range. As garden subjects it grows from 600m to 900mm by 600mm to 700mm in diameter when grown in the open. It is cold tolerant to temperatures at least as low as minus 3 degrees once established.
Propagation:
Seeds: Seeds are very difficult to germinate and even when germination is good is highly erratic. The best results I have seen come with weathered seeds that are at least 12 months old. Even fresh seeds that have been found in bird and animal faeces have not germinated much better. First treat the old seeds by placing them in a calico bag with some sharp sand and place them in the weekly washing. I have to admit that I have not attempted to freeze scarify seeds and this may be another option worth trying to break the seeds resistance to germination. Scarifying relies on the seeds being frozen or chilled for several weeks prior to sowing.
Sow the treated seeds of Gahnia aspera seeds into a seed raising mix. When the seedlings are 30mm to 50mm tall, prick them out and plant them into 50mm native tubes using a good organic mix.
Once the seedlings reach 200mm to 250mm in height plant them out into their permanent position. Mass plantings would need the seedlings to be planted at 1.2 meters to 1.5 meters centers.
Fertilize using seaweed, fish emulsion or organic chicken pellets soaked in water on an alternate basis. Fertilize every two months until the plants are established then annually in early September to October to maintain health, vitality and better flowering.
Further Comments from Readers:
Hi reader, it seems you use The Bible of Botany a lot. That’s great as we have great pleasure in bringing it to you! It’s a little awkward for us to ask, but our first aim is to purchase land approximately 1,600 hectares to link several parcels of N.P. into one at The Pinnacles NSW Australia, but we need your help. We’re not salespeople. We’re amateur botanists who have dedicated over 30 years to saving the environment in a practical way. We depend on donations to reach our goal. If you donate just $5, the price of your coffee this Sunday, We can help to keep the planet alive in a real way and continue to bring you regular updates and features on Australian plants all in one Botanical Bible. Any support is greatly appreciated. Thank you.
In the spirit of reconciliation we acknowledge the Bundjalung, Gumbaynggirr and Yaegl and all aboriginal nations throughout Australia and their connections to land, sea and community. We pay our respect to their Elders past, present and future for the pleasures we have gained.
The Pinnacles NSW
The Pinnacles NSW
The Pinnacles NSW
The Pinnacles NSW
The Pinnacles NSW
The Pinnacles NSW
Diamond Beach to Kylie’s Beach Nature Reserve NSW
Diamond Beach to Kylie’s Beach Nature Reserve NSW
National Botanic Gardens ACT
National Botanic Gardens ACT
National Botanic Gardens ACT
Gahnia clarkei
Classification:
Unranked: Monocots
Unranked: Commelinids
Order: Poales
Family: Cyperaceae
Genus: Is named in honour of Dr. Henry Gahn who was a Swedish botanist and friend of Karl Linnaeus.
Species: Is named in honour of Charles Baron Clarke; 1832-1906, who was a British botanist who specialized in the Cyperaceae Family.
Common Name: Giant Saw Sedge.
Distribution:
Gahnia clarkei is found south from Fraser Island in southern coastal Queensland to Orbost in Victoria and west to the Narracoorte Coastal Plains in south eastern South Australia. There are 2 outlying populations in far north Queensland near Ingham and south of Cairns. It is mainly found on and east of the Great Dividing Range.
It is also found on Flinders Island in Bass Strait and the south eastern corner of Tasmania.
https://avh.ala.org.au/occurrences/search?taxa=Gahnia+clarkei#tab_mapView
Habitat Aspect Climate:
Gahnia clarkei prefers full sun or dappled shade. It grows along riverine rain forests, adjacent to Melaleuca swamps, in wallums and in natural depressions. The altitude ranges from 5 meters ASL to 300 meters ASL.
The temperatures range from 0 degrees in July to 36 degrees in January.
The rainfall ranges from lows of 500mm to an average of 2700mm annually.
Soil Requirements:
Gahnia clarkei prefers better quality, fertile fine sands, and sandy loams, to light fatty clay loams. The soils are usually derived from decomposed sandstones or accumulated peaty beach sands. The soils pH ranges from 4.5pH to 6.5pH. It tolerates waterlogged soils for short periods and seasonal high water tables. It often grows in association with iron oxide bacteria. (See article on Fungus and Bacteria) Non saline soils to moderately saline soils are tolerated.
Height & Spread:
Wild Plants: 1500mm to 2250mm by 650mm to 1200mm.
Characteristics:
Gahnia clarkei grows as a tall tufted perennial. The culms are erect and measure 800mm to 2000mm in height by 3mm to 8mm in diameter.
The linear leaves are erect to pendant and measure 600mm to 1900mm in length by 3mm to 7mm in width. The sheaths are dark brown to reddish brown below and a shiny pink above while the ligule is narrow and papery. The bases are clasping while the apexes are narrow tapering. The concolourous laminas are deep grass-green. The laminas are flat and slightly decurve at the margins. The midvein is prominent on the lower lamina and is clearly visible on the upper lamina. The margins are finely serrated.
The inflorescences are erect, long, narrow spikes with spikelets of dense clusters of small cream flowers. The spikes measure 500mm to 1300mm in length with 10 to 14.nodes. Glumes number 12 to 17 with the lower glumes being shorter than the upper ones. The lower glumes apexes are mucronate or split apically while the upper glumes are obtuse. It is dark brown to black. The 3 to 6 stamens are cream with the cream anthers and measure 1.5mm to 2mm in length.
Gahnia clarkei’s fruits are an ovoid or ellipsoidal nut. The nuts are produced in clusters along the spike at the nodes. They measure 2.5mm to 3mm in length by 1.5mm to 1.8mm in diameter. It is glabrous, glossy, red to orange and reticulated. The nuts are attached by long thin black flagella. Fruits are born most of the year in warmer zones and during the warmer months in the cooler zones.
Confusing Species Varieties:
Gahnia clarkei grows in wet swampy locations. It is heavier and bulkier. The flowers extend beyond the leaves. The glossy red seeds are obscurely trigonous.
Gahnia melanocarpa grows in damp locations on better soils within moist forests and rainforests. The flowers extend beyond the leaves. The glossy brown to black seeds are more evidently trigonous.
Gahnia sieberiana grows in damp and drier locations on slopes locations on sandy or fine silty soils. It is lighter and finer built. The flowers extend beyond the leaves. The glossy orange to orange-red seeds are more evidently trigonous.
Gahnia subaequiglum is grows in damp to wet locations on better soils within moist forests and rainforests around swamps. The flowers do not extend beyond the leaves. The glossy red seeds are trigonous.
Wildlife:
Gahnia clarkei nuts are eaten by a number of birds but are passed through the birds without being digested.
The leaves are a favourite food source of the Saw Edge Skipper larvae, Hesperilla idothea.
Cultivation:
Gahnia clarkei is an excitingly different plant to grow in small to large gardens. The nuts are particularly attractive despite, the leaves, which can give some nasty cuts. Plant it away from paths and heavy traffic areas to minimize the risk of being cut. Plants are best rejuvenated with fire or being cut back to just above the ground level following seed dispersal. Plants recover very quickly and usually flower soon after.
It makes an excellent larger rockery plant when placed near the center or along long walls or fence lines. Try planting small ground covers or annuals in the foreground to add height and length to the bed. It always look green and fresh whether the ground is dry or where adequate ground moisture is retained. It can be grown in light shade or full sun. It is very suitable on sandy to heavy clay soils. It is suitable for gardens close to the coast in temperate, subtropical, tropical or semi-arid gardens or west of the Great Dividing Range. As garden subjects it will grow from 1600m to 2500mm by 600mm to 900mm in diameter when grown in the open. It is cold tolerant to temperatures at least as low as minus 3 degrees once established.
Propagation:
Seeds: Seeds are very difficult to germinate and even when germination is good is highly erratic. The best results I have seen come with weathered seeds that are at least 12 months old. Even fresh seeds that have been found in bird and animal faeces have not germinated much better. First treat the old seeds by placing them in a calico bag with some sharp sand and place them in the weekly washing. I have to admit that I have not attempted to freeze scarify seeds and this may be another option worth trying to break the seeds resistance to germination. Scarifying relies on the seeds being frozen or chilled for several weeks prior to sowing.
Sow the treated seeds of Gahnia clarkei seeds into a seed raising mix. When the seedlings are 30mm to 50mm tall, prick them out and plant them into 50mm native tubes using a good organic mix.
Once the seedlings reach 200mm to 250mm in height plant them out into their permanent position. Mass plantings would need the seedlings to be planted at 1.2 meters to 1.5 meters centers.
Fertilize using seaweed, fish emulsion or organic chicken pellets soaked in water on an alternate basis. Fertilize every two months until the plants are established then annually in early September to October to maintain health, vitality and better flowering.
Further Comments from Readers:
Hi reader, it seems you use The Bible of Botany a lot. That’s great as we have great pleasure in bringing it to you! It’s a little awkward for us to ask, but our first aim is to purchase land approximately 1,600 hectares to link several parcels of N.P. into one at The Pinnacles NSW Australia, but we need your help. We’re not salespeople. We’re amateur botanists who have dedicated over 30 years to saving the environment in a practical way. We depend on donations to reach our goal. If you donate just $5, the price of your coffee this Sunday, We can help to keep the planet alive in a real way and continue to bring you regular updates and features on Australian plants all in one Botanical Bible. Any support is greatly appreciated. Thank you.
In the spirit of reconciliation we acknowledge the Bundjalung, Gumbaynggirr and Yaegl and all aboriginal nations throughout Australia and their connections to land, sea and community. We pay our respect to their Elders past, present and future for the pleasures we have gained.
Cathedral Rocks National Park Ebor NSW
Cathedral Rocks National Park Ebor NSW
Cathedral Rocks National Park Ebor NSW
Paluma Range National Park Qld.
Paluma Range National Park Qld.
Paluma Range National Park Qld.
Cathedral Rocks National Park Ebor NSW
Paluma Range National Park Qld.
Paluma Range National Park Qld.
Paluma Range National Park Qld.
Gahnia melanocarpa
Classification:
Unranked: Monocots
Unranked: Commelinids
Order: Poales
Family: Cyperaceae
Genus: Is named in honour of Dr. Henry Gahn who was a Swedish botanist and friend of Karl Linnaeus.
Species: From Melas, which is Ancient Greek for black and Karpos, which is Ancient Greek for a fruit. It refers to fruits, which are black.
Common Name: Black fruit Saw Sedge.
Distribution:
Gahnia melanocarpa is found south from Gympie in southern central Queensland to the Strzelecki Ranges in eastern coastal Victoria. It is mainly found on and east of the Great Dividing Range to the coastal back dunes.
https://avh.ala.org.au/occurrences/search?taxa=Gahnia+melanocarpa#tab_mapView
Habitat Aspect Climate:
Gahnia melanocarpa prefers full sun or dappled shade. It grows along riparian zones and drainage lines in well-developed rainforests, littoral rainforests, in Melaleuca swamps, wallum heaths or in natural shallow depressions. The altitude ranges from 3 meters ASL to 1200 meters ASL.
The temperatures range from minus 3 degrees in July to 38 degrees in January.
The rainfall ranges from lows of 600mm to an average of 2000mm annually.
Soil Requirements:
Gahnia melanocarpa prefers better quality fertile sandy loams, to medium clay loams or light silts to heavy silts. The soils are usually derived from decomposed brown basalt, black basalt, sandstones, granites, shales or accumulated peaty beach sands. The soils pH ranges from 4.5pH to 6.5pH are preferred. It tolerates waterlogged soils for short periods and seasonal high water tables. It often grows in association with iron oxide bacteria. (See article on Fungus and Bacteria) Non saline soils to moderately saline soils are tolerated.
Height & Spread:
Wild Plants: 800mm to 1250mm by 650mm to 1200mm.
Characteristics:
Gahnia melanocarpa grow as a tall, erect, tufted perennial which grows in large dense clumps. The culms measure 800mm to 1200mm in height by 4mm to 5mm in diameter.
The linear, semi erect to pendulant leaves of Gahnia melanocarpa measure 400mm to 650mm in length by 4mm to 6mm in width. The sheaths are pale, dull pink to pale brown on both surfaces while the ligule is narrow and chartacea. The bases are clasping while the apexes are narrow tapering. The concolourous laminas are deep grass-green and glabrous to finely scabrous. The laminas recurve slightly from the mid vein to the margins while the margins are finely serrated. The midvein is prominent on the lower lamina and is clearly visible on the upper lamina.
Inflorescences of Gahnia melanocarpa are long, narrow, and erect to ascending. There are 7 to 9 nodes with secondary branches. The inflorescences measure 300mm to 450mm in length by 30mm to 40mm in diameter at the spikes. The spikes contain 5 to 20 spikelets and measure 30mm to 120mm in length by 12mm to 18mm in diameter
The spikelets contain a single flower.
The 4.or 5 upper and lower glumes are dissimilar. The reddish-brown glumes are glabrous and measure 2.5mm to 3mm. The lower glumes apexes are long mucronate while the 2 upper glumes are much shorter and broader with acute to mucronate upper margin.
There is 3 or 4.filiform, white filaments measure 2mm to 2.5mm in length while the pale yellow anthers measure 0.7mm to 1.1mm in length excluding the apical appendage which measures 0.2mm to 0.3mm in length. The white style is trifid. The flowers appear from October to January.
Gahnia melanocarpa‘s fruits are obovoidal to obscurely trigonous nuts. The nuts measure 2.2mm to 2.5mm in length by 1.5mm to 2mm in diameter. The green nuts turn glossy black with fine reticulated or granulated markings when ripe. The fruits ripen from February to March and hang by long filiform thread for months after ripening.
Confusing Species Varieties:
Gahnia melanocarpa grows in damp locations on better soils within moist forests and rainforests. The flowers extend beyond the leaves. The glossy brown to black seeds are more evidently trigonous.
Gahnia clarkei grows in wet swampy locations. It is heavier and bulkier. The flowers extend beyond the leaves. The glossy red seeds are obscurely trigonous.
Gahnia sieberiana grows in damp and drier locations on slopes locations on sandy or fine silty soils. It is lighter and finer built. The flowers extend beyond the leaves. The glossy orange to orange-red seeds are more evidently trigonous.
Gahnia subaequiglum is grows in damp to wet locations on better soils within moist forests and rainforests around swamps. The flowers do not extend beyond the leaves. The glossy red seeds are trigonous.
Wildlife:
Gahnia melanocarpa nuts are eaten by a number of birds but are passed through the birds without being digested.
The leaves are a favourite food source of the Saw Edge Skipper larvae, Hesperilla idothea.
Cultivation:
Gahnia melanocarpa is an excitingly different plant to grow in medium to large gardens. The black nuts are particularly attractive despite, the leaves, which can give some nasty cuts. Plant it away from paths and heavy traffic areas to minimize the risk of being cut. Plants are best rejuvenated with fire or being cut back to just above the ground level following seed dispersal. Plants recover very quickly and usually again flower soon after.
It makes an excellent rockery plant when placed near the center or along long walls where it can be placed to the rear. Try planting small ground covers or annuals in the foreground to add height and length to the bed. It contrasts well with all the Hibbertia species, Rhodanthe species and Xerochrysum species, which add vibrant colours of yellow and pinks to red. It always look green and fresh whether the ground is dry or where adequate ground moisture is retained. It can be grown in light shade, dappled sunlight or full sun. It is very suitable on sandy to heavy clay soils. It is suitable for gardens close to the coast in temperate, subtropical, tropical or semi-arid gardens or on the Great Dividing Range at lower altitudes. As a garden subject it will grow from 900m to 1200mm by 800mm to 900mm in diameter when grown in the open. It is cold tolerant to temperatures at least as low as minus 3 degrees once established.
Propagation:
Seeds: Seeds are very difficult to germinate and even when germination is good is highly erratic. The best results I have seen come with weathered seeds that are at least 12 months old. Even fresh seeds that have been found in bird and animal faeces have not germinated much better. First treat the old seeds by placing them in a calico bag with some sharp sand and place them in the weekly washing. I have to admit that I have not attempted to scarify seeds in the refrigerator and this may be another option worth trying to break the seeds resistance to germination. Scarifying relies on the seeds being chilled for several weeks prior to sowing.
Sow the treated seeds of Gahnia melanocarpa seeds into a seed raising mix. When the seedlings are 30mm to 50mm tall, prick them out and plant them into 50mm native tubes using a good organic mix.
Once the seedlings reach 100mm to 150mm in height plant them out into their permanent position. Mass plantings are best achieved by planting them at 1.2 meters to 1.5 meters centers.
Fertilize using seaweed, fish emulsion or organic chicken pellets soaked in water on an alternate basis. Fertilize every two months until the plants are established then annually in early September to October to maintain health, vitality and better flowering.
Further Comments from Readers:
Hi reader, it seems you use The Bible of Botany a lot. That’s great as we have great pleasure in bringing it to you! It’s a little awkward for us to ask, but our first aim is to purchase land approximately 1,600 hectares to link several parcels of N.P. into one at The Pinnacles NSW Australia, but we need your help. We’re not salespeople. We’re amateur botanists who have dedicated over 30 years to saving the environment in a practical way. We depend on donations to reach our goal. If you donate just $5, the price of your coffee this Sunday, We can help to keep the planet alive in a real way and continue to bring you regular updates and features on Australian plants all in one Botanical Bible. Any support is greatly appreciated. Thank you.
In the spirit of reconciliation we acknowledge the Bundjalung, Gumbaynggirr and Yaegl and all aboriginal nations throughout Australia and their connections to land, sea and community. We pay our respect to their Elders past, present and future for the pleasures we have gained.
Paluma Range National Park Qld.

Author’s Garden The Pinnacles NSW
Innes Lake National park NSW
Rocky Creek Fortis Creek National Park NSW
Banyabba National Park NSW
Author’s Garden The Pinnacles NSW

Author’s Garden The Pinnacles NSW
Rocky Creek Fortis Creek National Park NSW

Pillar Valley NSW
Author’s Garden The Pinnacles NSW
Author’s Garden The Pinnacles NSW

Banyabba National Park NSW
Cathedral Rocks National Park Ebor NSW
Innes Lake National Park NSW
Gahnia sieberiana
Classification:
Unranked: Monocots
Unranked: Commelinids
Order: Poales
Family: Cyperaceae
Genus: Is named in honour of Dr. Henry Gahn who was a Swedish botanist and friend of Karl Linnaeus.
Species: Is named in honour of Franz Wilhelm Sieber; 1789-1844, who was a Prague botanist who travelled around the world collecting plants, which included venturing to New South Wales in 1823.
Common Name: Red Fruit Saw Sedge.
Distribution:
Gahnia sieberiana is found south from the tip of Cape York Peninsula in far north Queensland to Wallaby Creek Floral Reserve in northern Victoria. From Wallaby Creek Floral Reserve it is found in a westerly direction to Nelson in the south western corner of Victoria. It is mainly found on and east of the Great Dividing Range.
In South Australia it is found near Port Augusta and south from the Lofty Ranges to the western tip of Kangaroo Island.
In Tasmania it is found along the northern coastal strip to as far south as Launceston. It is also found on Flinders Island in Bass Strait.
https://avh.ala.org.au/occurrences/search?taxa=Gahnia+sieberiana#tab_mapView
Habitat Aspect Climate:
Gahnia sieberiana prefers full sun or dappled shade. It grows in drainage lines, moist situations and shallow depressions on drier hillsides in open woodlands or moist open Eucalyptus forests often verging on rainforests. The altitude ranges from 5 meters ASL to 1400 meters ASL.
The temperatures range from minus 5 degrees in July to 39 degrees in January.
The rainfall ranges from lows of 800mm to an average of 2700mm annually.
Soil Requirements:
Gahnia sieberiana prefers better quality fertile sandy loams, to light gritty clay loams or alluvial silts trapped in depressions or along creeks and in riparian zones. The soils are usually derived from decomposed basalts, sandstones, granites shales metamorphic rocks or alluvial deposits. The soils pH ranges from 4pH to 6.5pH are preferred. It tolerates waterlogged soils for short periods and seasonal high water tables. It often grows in association with iron oxide bacteria. (See article on Fungus and Bacteria) Non saline soils to moderately saline soils are tolerated.
Height & Spread:
Wild Plants: 1200mm to 2000mm by 650mm to 1200mm.
Characteristics:
Gahnia sieberiana grows as a tall, erect tufted perennial which grows in large dense clumps. The culms measure 1000mm to 2000mm in height by 5mm to 12mm in diameter.
The linear, semi erect or pendulant leaves of Gahnia sieberiana measure 1000mm to 2000mm in length by 5.5mm to 8mm in width. The sheaths are deep brown to black and dull on both surfaces while the ligule is narrow and chartacea. The bases are clasping while the apexes are narrow tapering. The discolourous laminas are deep grass-green and finely scabrous on the upper laminas while the lower laminas are paler. The laminas decurve slightly from near the edge to the margins while the margins are finely serrated and scabrous. The midvein is strongly prominent on the lower lamina and is clearly visible on the upper lamina.
The inflorescences of Gahnia sieberiana are long, narrow and erect. There are 12 to 30 nodes with secondary branching spikes. The inflorescences measure 300mm to 1000mm in length by 30mm to 90mm in diameter at the spikes. The spikes contain 10 to 60 spikelets and measure 30mm to 160mm in length by 12mm to 60mm in diameter.
The spikelets contain 2 flowers.
The 5 to 8 upper and lower glumes are dissimilar. The reddish-brown to deep chocolate-brown almost black glumes are glabrous to scabrous and measure 3.5mm to 5mm by 1.5mm to 2mm in width. The lower glumes apexes are acute with a long mucronate tip while the upper glumes are much shorter and broader.
There are 3 or 4, white filaments measure 0.4mm to 0.6mm in length while the pale yellow anthers measure 2.3mm to 3mm in length excluding the apical appendage which measures 0.3mm to 0.5mm in length. The white style is trifid. We have observed the flowers during October to January and April to May.
Gahnia sieberiana‘s fruits are ellipsoidal to obscurely trigonous or with 4.roughly angled nuts. The nuts measure 2.5mm to 4mm in length by 1.5mm to 2mm in diameter. The green nuts turn glossy orange-red to red and smooth and finely reticulate or finely granulated when ripe. The fruits ripen from February to March and hang by long filiform thread for months after ripening.
Confusing Species:
Gahnia sieberiana grows in damp and drier locations on slopes locations on sandy or fine silty soils. It is lighter and finer built. The flowers extend beyond the leaves. The glossy orange to orange-red seeds are more evidently trigonous.
Gahnia clarkei grows in wet swampy locations. It is heavier and bulkier. The flowers extend beyond the leaves. The glossy red seeds are obscurely trigonous.
Gahnia melanocarpa grows in damp locations on better soils within moist forests and rainforests. The flowers extend beyond the leaves. The glossy brown to black seeds are more evidently trigonous.
Gahnia subaequiglumis grows in damp to wet locations on better soils within moist forests and rainforests around swamps. The flowers do not extend beyond the leaves. The glossy red seeds are trigonous.
Wildlife:
Gahnia sieberiana nuts are eaten by a number of birds but are passed through the birds without being digested.
The leaves are a favourite food source of the Saw Edge Skipper larvae, Hesperilla idothea.
Cultivation:
Gahnia sieberiana is an excitingly different plant to grow in medium to large gardens. The red nuts are particularly attractive despite, the leaves, which can give some nasty cuts. Plant it away from paths and heavy traffic areas to minimize the risk of being cut. Plants are best rejuvenated with fire or being cut back to just above the ground level following seed dispersal. Plants recover very quickly and usually flower soon after.
It makes an excellent rockery plant when placed near the center or along long walls where it can be placed near the rear. Try planting small ground covers or annuals in the foreground to add height and length to the bed. It always look green and fresh whether the ground is dry or where adequate ground moisture is retained. It can be grown in light shade or full sun. It is very suitable on sandy to heavy clay soils. It is suitable for gardens close to the coast in temperate, subtropical, tropical or semi-arid gardens or west of the Great Dividing Range. It is cold tolerant to temperatures at least as low as minus 3 degrees once established. As a garden subject it will grow from 900m to 1800mm by 800mm to 1000mm in diameter when grown in the open. It is cold tolerant to temperatures at least as low as minus 5 degrees once established.
It looks particularly striking when surrounded by Hibbertia diffusa or Hibbertia vestita.
Propagation:
Seeds: Seeds are very difficult to germinate and even when germination is good is highly erratic. The best results I have seen come with weathered seeds that are at least 12 months old. Even fresh seeds that have been found in bird and animal faeces have not germinated much better. First treat the old seeds by placing them in a calico bag with some sharp sand and place them in the weekly washing. I have to admit that I have not attempted to scarify seeds in the refrigerator and this may be another option worth trying to break the seeds resistance to germination. Scarifying relies on the seeds being chilled for several weeks prior to sowing.
Sow the treated seeds of Gahnia sieberiana seeds into a seed raising mix. When the seedlings are 30mm to 50mm tall, prick them out and plant them into 50mm native tubes using a good organic mix.
Once the seedlings reach 100mm to 150mm in height plant them out into their permanent position. Mass plantings are best achieved by planting them at 1.2 meters to 1.5 meters centers.
Fertilize using seaweed, fish emulsion or organic chicken pellets soaked in water on an alternate basis. Fertilize every two months until the plants are established then annually in early September to October to maintain health, vitality and better flowering.
Further Comments from Readers:
Hi reader, it seems you use The Bible of Botany a lot. That’s great as we have great pleasure in bringing it to you! It’s a little awkward for us to ask, but our first aim is to purchase land approximately 1,600 hectares to link several parcels of N.P. into one at The Pinnacles NSW Australia, but we need your help. We’re not salespeople. We’re amateur botanists who have dedicated over 30 years to saving the environment in a practical way. We depend on donations to reach our goal. If you donate just $5, the price of your coffee this Sunday, We can help to keep the planet alive in a real way and continue to bring you regular updates and features on Australian plants all in one Botanical Bible. Any support is greatly appreciated. Thank you.
In the spirit of reconciliation we acknowledge the Bundjalung, Gumbaynggirr and Yaegl and all aboriginal nations throughout Australia and their connections to land, sea and community. We pay our respect to their Elders past, present and future for the pleasures we have gained.
Gahnia subaequiglumis
Classification:
Unranked: Monocots
Unranked: Commelinids
Order: Poales
Family: Cyperaceae
Genus: Is named in honour of Dr. Henry Gahn who was a Swedish botanist and friend of Karl Linnaeus.
Species: From Sub, which is Ancient Greek/Latin for below or lower, Aequalis, which is Latin for equal to and Glumis which is Latin for a husk or chaff. It refers to glumes, which are not quite equal in length shape or form.
Common Name: Bog Saw Grass.
Distribution:
Gahnia subaequiglumis is found south from Mount Barney in far south eastern Queensland to Orbost in north eastern Victoria. It is mainly found on the Western Slopes, on and east of the Great Dividing Range to the coast. There is an isolated population further north in Carnarvon Gorge National Park in central eastern queensland.
https://avh.ala.org.au/occurrences/search?taxa=Gahnia+subaequiglumis#tab_mapView
Habitat Aspect Climate:
Gahnia subaequiglumis prefers full sun or medium shade. It grows along riverine rain forests, in swamps, coastal wallums and in the adjacent drier sections of coastal heaths and in natural depressions in open woodlands, sclerophyll forests or open Eucalyptus forests. The altitude ranges from 5 meters ASL to 1600 meters ASL.
The temperatures range from minus 3 degrees in July to 38 degrees in January.
The rainfall ranges from lows of 450mm to an average of 1600mm annually.
Soil Requirements:
Gahnia subaequiglumis prefers better quality fertile sandy loams, to light clay loams and alluvial flats. The soils are usually derived from decomposed basalts, sandstones, granites or shales or accumulated peaty beach sands. The soils pH ranges from 4.5pH to 6pH are preferred. It tolerates waterlogged soils for short periods and seasonal high water tables. It grows in association with iron oxide bacteria. (See article on Fungus and Bacteria) Non saline soils to moderately saline soils are tolerated
Height & Spread:
Wild Plants: 300mm to 600mm by 500mm to 1000mm.
Characteristics:
Gahnia subaequiglumis grows as a tall, erect tufted perennial which grows in medium dense clumps. The culms measure 300mm to 600mm in height by 3mm to 5mm in diameter.
The basal linear leaves of Gahnia subaequiglumis are erect, semi erect to spreading and arching. They measure 450mm to 750mm in length by 4mm to 6mm in width. The sheaths are pale brown on both surfaces while the ligule is narrow and chartacea. The bases are clasping while the apexes are narrow tapering. The discolourous laminas are deep grass-green and glabrous to finely scabrous on the upper laminas while the lower laminas are paler. The laminas decurve slightly from the mid vein to the margins while the margins are finely serrated. The midvein is prominent on the lower lamina and is faintly visible on the upper lamina.
Inflorescences of Gahnia subaequiglumis are long, narrow and erect. There are 7 to 9 nodes with secondary branches. The inflorescences measure 200mm to 650mm in length by 30mm to 40mm in diameter at the spikes. The culms have 10 to 12 nodes where the spikes are numerous and measure 20mm to 30mm in length by 4mm to 6mm in diameter
The spikelets contain a single flower.
The 6 or 7 upper and lower glumes are dissimilar. The deep brown to black glumes are slightly scabrous and measure 2.5mm to 3mm. The lower glumes apexes are mucronate while the upper glumes are much shorter and broader with a shorter or longer mucronate apex.
There are 3 or 4.filiform filaments are white while the pale yellow anthers measure 1.7mm to 2.3mm in length excluding the apical appendage which measures about 0.2mm in length. The white style is trifid. The flowers appear from October to January.
Gahnia subaequiglumis fruits are narrow ellipsoid to ellipsoid, trigonous or rarely 4-angled nuts. The nuts measure 4mm to 4.5mm in length by 1.5mm to 2mm in diameter. The green nuts turn glossy red with fine reticulated markings when ripe. The fruits ripen from February to March and hang by long filiform thread for months after ripening.
Confusing Species Varieties:
Gahnia subaequiglumis grows in damp to wet locations on better soils within moist forests and rainforests around swamps. The flowers do not extend beyond the leaves. The glossy red seeds are trigonous.
Gahnia clarkei grows in wet swampy locations. It is heavier and bulkier. The flowers extend beyond the leaves. The glossy red seeds are obscurely trigonous.
Gahnia melanocarpa grows in damp locations on better soils within moist forests and rainforests. The flowers extend beyond the leaves. The glossy brown to black seeds are more evidently trigonous.
Gahnia sieberiana grows in damp and drier locations on slopes locations on sandy or fine silty soils. It is lighter and finer built. The flowers extend beyond the leaves. The glossy orange to orange-red seeds are more evidently trigonous.
Wildlife:
Gahnia subaequiglumis nuts are eaten by a number of birds but are passed through the birds without being digested.
The leaves are a favourite food source of the Saw Edge Skipper larvae which causes minimal damage, Hesperilla idothea.
Cultivation:
Gahnia subaequiglumis is an excitingly different plant to grow in small to large gardens. The nuts are particularly attractive despite, the leaves, which can give some nasty cuts. Plant it away from paths and heavy traffic areas to minimize the risk of being cut. Plants are best rejuvenated with fire or being cut back to just above the ground level following seed dispersal. Plants recover very quickly and usually flower soon after.
It makes an excellent small to large rockery plant when placed near the center or along long walls where it can be placed near the rear. Try planting small ground covers or annuals in the foreground to add height and length to the bed. All Hibbertia species and Rhodanthe species will add colour and contrasting foliages. It always looks green and fresh whether the ground is dry or where adequate ground moisture is retained. It can be grown in light shade, dappled sunlight or full sun. It is very suitable on sandy to heavy clay soils. It is suitable for gardens close to the coast in temperate, subtropical, tropical or semi-arid gardens or west of the Great Dividing Range. As a garden subject it is more spreading than the other Gahnia species so give it the room to spread out. lt will grow from 500m to 600mm by 700mm to 900mm in diameter when grown in the open. It is cold tolerant to temperatures at least as low as minus 3 degrees once established.
Propagation:
Seeds: Seeds are very difficult to germinate and even when germination is good is highly erratic. The best results I have seen come with weathered seeds that are at least 12 months old. Even fresh seeds that have been found in bird and animal faeces have not germinated much better. First treat the old seeds by placing them in a calico bag with some sharp sand and place them in the weekly washing. I have to admit that I have not attempted to scarify seeds in the refrigerator and this may be another option worth trying to break the seeds resistance to germination. Scarifying relies on the seeds being chilled for several weeks prior to sowing.
Sow the treated seeds of Gahnia subaequiglumis seeds into a seed raising mix. When the seedlings are 30mm to 50mm tall, prick them out and plant them into 50mm native tubes using a good organic mix.
Once the seedlings reach 100mm to 150mm in height plant them out into their permanent position. Mass plantings are best achieved by planting them at 1.2 meters to 1.5 meters centers.
Fertilize using seaweed, fish emulsion or organic chicken pellets soaked in water on an alternate basis. Fertilize every two months until the plants are established then annually in early September to October to maintain health, vitality and better flowering.
Further Comments from Readers:
Hi reader, it seems you use The Bible of Botany a lot. That’s great as we have great pleasure in bringing it to you! It’s a little awkward for us to ask, but our first aim is to purchase land approximately 1,600 hectares to link several parcels of N.P. into one at The Pinnacles NSW Australia, but we need your help. We’re not salespeople. We’re amateur botanists who have dedicated over 30 years to saving the environment in a practical way. We depend on donations to reach our goal. If you donate just $5, the price of your coffee this Sunday, We can help to keep the planet alive in a real way and continue to bring you regular updates and features on Australian plants all in one Botanical Bible. Any support is greatly appreciated. Thank you.
In the spirit of reconciliation we acknowledge the Bundjalung, Gumbaynggirr and Yaegl and all aboriginal nations throughout Australia and their connections to land, sea and community. We pay our respect to their Elders past, present and future for the pleasures we have gained.
Galium leptogonium
Classification
Unranked: Eudicots
Unranked: Asterids
Order: Gentinales
Family: Rubiaceae
Genus: From Galactos, which is Ancient Greek for milk. It refers to the foliage from Galium verum, which was used to curdle milk and is still used as a natural colouring to colour cheese.
Species: From Leptos, which is Ancient Greek for delicate, fine or slender and Gonos, which is Ancient Greek or Gonium, which is Latin for an individual seed. It refers to plants, which produce a single, long, thin seed compared to other species in the genus.
Common Name:
Distribution:
Galium leptogonium is found south along the coastal strip from the Swan basin in south western, Western Australia to Port Augusta where it spreads out to Innes National Park and Kangaroo Island in South Australia. It is also found in southern central South Australia, south from Mount Wallaby along the Gawler Ranges.
In the east it is found south from Kenilworth in south eastern Queensland to Mount Gambier in far south eastern South Australia. It is mainly found on the Western Slopes, on and east of the Great Dividing Range to the coast. It is also found in Carnarvon National Park and Kroombit Tablelands west of Gladstone.
https://avh.ala.org.au/occurrences/search?taxa=Galium+leptogonium#tab_mapView
Habitat Aspect Climate:
Galium leptogonium prefers full sun to light dappled shade. It grows on moist sites along riparian zones, adjacent to swamps and coastal wallums and in the adjacent drier sections of coastal heaths and in natural depressions in moist open woodlands and moist open sclerophyll forests. The altitude ranges from 5 meters ASL to 1060 meters ASL.
The temperatures range from minus 3 degrees in July to 38 degrees in January.
The rainfall ranges from lows of 450mm to an average of 1600mm annually.
Soil Requirements:
Galium leptogonium prefers better quality fertile sandy loams, to medium clays or medium silts to heavy silts. The soils are usually derived from decomposed basalts, sandstones or shales or alluvial deposits. The soils pH ranges from 5pH to 6.5pH. It tolerates seasonal waterlogged soils Non saline soils to moderately saline soils are tolerated.
Height & Spread:
Wild Plants: 1m to 3m by 1m to 3m.
Characteristics:
Galium leptogonium grows as an annual herb with slender pale blue-green stems. The angulated stems are densely covered in short, white, and decurve, hispid hairs. The stems adhere to the stems, trunks, other herbs and yes fur and clothing by the decurve hairs on the stems.
The 4 variable, whorled leaves of Galium leptogonium are spathulate, elliptic, narrow elliptic, narrow obovate or narrow oblanceolate. The leaves measure 3mm to 15mm in length by 2mm to 6mm in width. The petioles measure 0mm to 0.5mm in length. The bases are cuneate while the apexes are acute often with a single white hispid hair. The concolourous laminas are pale blue-green and are moderately covered in white, decurve, hispid-antrorse hairs. The laminas are flat, recurve slightly upwards or decurve slightly downwards from the mid vein to the margins. The mid vein is prominent on the lower lamina is faintly visible from the upper lamina. The leaf margins are entire.
The inflorescences of Galium leptogonium are born with 2 to 10 individual flowers on a cyme, from the leaf axils. The cyme and pedicels are pale green-blue and are sparsely to moderately covered in white decurve hispid-antrorse hairs. The cymes measure 5mm to 16mm in length while the pedicels measure 3mm to 12mm in length and often bear 2 flowers on a single pedicel.
The 4 stipules are similar to the leaves and are born in a whorl below the inflorescences and measure 2mm to 10mm in length by 1.8mm to 3.5mm in width. The cupular calyxes are glabrous or rarely sparsely covered in short hirsute hairs and measure 0.4mm to 0.5mm in length by 0.9mm to 1.1mm in diameter. The pastel yellow, cream or white corolla and lobes are glabrous or rarely covered in white hirsute hairs. The corollas measure 0.5mm to 0.9mm in length while the lobes measure 1mm to 1.3mm in length.
The 4 pastel yellow slightly exserted filaments are adjacent to the petals and bear pastel yellow anthers. The stamens measure 0.4mm to 0.5mm in length while the pistil measures 0.6mm to 0.7mm in length. The pastel yellow style is exserted. The flowers appear from October to May.
Galium leptogonium fruits are usually ellipsoidal to sub globose or at times reniform mericarps. The mericarps measure 1mm to 1.2mm in length by 0.5mm to 0.7mm in diameter. The pale green-blue mericarps are sparsely covered in white antrorse, hispid hairs and turn pale grey-brown when ripe. The seeds are deep reddish-brown and are reticular rugose. The fruits ripen from May to February.
Wildlife:
Galium leptogonium‘s wildlife is unknown to the author however I know from my experiences in an organic orchard the growth rate was extraordinary where fortnightly slashing would see the plants grow 2 or 3 meters flower and fruit on new stems in the 2 or 3 weeks. It gave copious quantities of soft high nitrogenous mulch which was eagerly sought out by our ducks.
Cultivation:
Galium leptogonium is considered a weed in the garden with its only virtue at this stage being good quality mulch. It is presently under investigation for anti-carcinogenic properties which may lead to a small niche market in the future.
Propagation:
Seeds: Sow fresh seeds or the previous season’s seeds after removing them from the refrigerator over winter for small quantities. Galium leptogonium seeds into a seed raising mix. Place the trays beneath 50mm shade cloth and keep moist. When the seedlings are 30mm to 50mm tall, prick them out and plant them into 50mm native tubes using a good organic mix.
Once the seedlings reach 200mm to 250mm in height plant them out into their permanent position adjacent to a tree with non-decorticating bark.
For larger areas or acreage collect the seed in Autumn and spread sparsely over the area which is intended to be cropped and water thoroughly as soon as the weather warms or the first spring rains are expected.
Fertilize using seaweed, fish emulsion or organic chicken pellets soaked in water on an alternate basis. Fertilize every two months until the plants are established then annually in early September to October to maintain health, vitality and better flowering.
Further Comments from Readers:
Hi reader, it seems you use The Bible of Botany a lot. That’s great as we have great pleasure in bringing it to you! It’s a little awkward for us to ask, but our first aim is to purchase land approximately 1,600 hectares to link several parcels of N.P. into one at The Pinnacles NSW Australia, but we need your help. We’re not salespeople. We’re amateur botanists who have dedicated over 30 years to saving the environment in a practical way. We depend on donations to reach our goal. If you donate just $5, the price of your coffee this Sunday, We can help to keep the planet alive in a real way and continue to bring you regular updates and features on Australian plants all in one Botanical Bible. Any support is greatly appreciated. Thank you.
In the spirit of reconciliation we acknowledge the Bundjalung, Gumbaynggirr and Yaegl and all aboriginal nations throughout Australia and their connections to land, sea and community. We pay our respect to their Elders past, present and future for the pleasures we have gained.
Grange Qld.
Grange Qld.
Grange Qld.
Gallionella ferruginea
Classification:
Order:
Family:
Genus: From Gallion, which is unknown and Ella which is the female form or lady like.
Species: From ferruginea, which is Latin for of the colour of iron rust (ferric oxide), dark red, ferruginous or to have the taste of iron.
Common Name:
Distribution:
Gallionella ferruginea is found throughout Australia.
Habitat Aspect Climate:
Gallionella ferruginea prefers partial shade or filtered sunlight. It usually grows best in areas with slow moving water or where water prculates through to the surface. The altitude ranges from many meters below ASL to 2000 meters ASL in Australian waters.
The temperatures range from minus 6 degrees in July to 44 degrees in January.
The rainfalls range from lows of 400mm to an average of 3200mm.
Soil Requirements:
Gallionella ferruginea prefer soils with high iron content and plenty of moisture. The soils pH ranges from 3.5pH to 4pH are preferred. It tolerates waterlogged soils. Non saline soils to very strong saline soils are tolerated.
Height & Spread:
Characteristics:
As I have mentioned Gallionella ferruginea a lot throughout several articles I thought it best if we learnt a little about this unusual bacteria. It is an iron-oxidizing, chemolithotrophic bacteria that lives in low-oxygen water.
Gallionella ferruginea is also commonly known as iron bacteria.
The molecular and electrochemical properties of Gallionella ferruginea allow this bacteria to:
Remove dissolved iron from bodies of water
Produce an insoluble precipitate of ferric hydroxide on the surface seen as a pale brown to yellow-brown sludge,
Gallionella ferruginea can be found in many different types of habitats, such as:
Freshwater mineral springs
Brackish waters
Marine shallow waters
Deep sea venting sites
For more information see Chapter on Bacteria, Fungus phytomediation.
Further Comments from Readers:
Hi reader, it seems you use The Bible of Botany a lot. That’s great as we have great pleasure in bringing it to you! It’s a little awkward for us to ask, but our first aim is to purchase land approximately 1,600 hectares to link several parcels of N.P. into one at The Pinnacles NSW Australia, but we need your help. We’re not salespeople. We’re amateur botanists who have dedicated over 30 years to saving the environment in a practical way. We depend on donations to reach our goal. If you donate just $5, the price of your coffee this Sunday, We can help to keep the planet alive in a real way and continue to bring you regular updates and features on Australian plants all in one Botanical Bible. Any support is greatly appreciated. Thank you.
In the spirit of reconciliation we acknowledge the Bundjalung, Gumbaynggirr and Yaegl and all aboriginal nations throughout Australia and their connections to land, sea and community. We pay our respect to their Elders past, present and future for the pleasures we have gained.
Mount Cootha Botanic Gardens Qld.
Mount Cootha Botanic Gardens Qld.
Anderson Gardens Townsville Qld.
Anderson Gardens Townsville Qld.
Mount Cootha Botanic Gardens Qld.
Mount Cootha Botanic Gardens Qld.
Mount Cootha Botanic Gardens Qld.
Mount Cootha Botanic Gardens Qld.
Mount Cootha Botanic Gardens Qld.
Mount Cootha Botanic Gardens Qld.
Anderson Gardens Townsville Qld.
Garcinia warrenii
Classification:
Unranked: Rosids
Order: Malpighiales
Family: Clusiaceae
Subfamily: Clusioideae
Tribe: Garciniea
Genus: Is named after Dr. Laurent Garcin; 1683-1791, who was a French Botanist who discovered several new species notably from the Middle East.
Species: Is named in honour of Laurent Garcin, who was a French naturalist with the East India company. He travelled in the orient collecting plants in the 18th century.
Common Name: Native Mangsteen.
Distribution:
Garcinia warrenii is a found south from the tip of Cape York Peninsula to Merapah on the Western side of Cape York Peninsula then to the Johnson River near Innisfail in Queensland east of the Great Dividing Range.
https://avh.ala.org.au/occurrences/search?taxa=Garcinia+warrenii#tab_mapView
Habitat Aspect Climate:
Garcinia warrenii prefers dense shade, partial shade or filtered sunlight. It usually grows in well-developed rain forest, well developed littoral rainforests, moist gallery forests and protected riparian forests. The altitude ranges from 5 meters ASL to 650 meters ASL in Australia but I have seen it growing at 1500 meters ASL in southern Asia.
The temperatures range from 12 degrees in July to 38 degrees in January.
The rainfalls range from lows of 1800mm to an average of 3200mm.
Soil Requirements:
Garcinia warrenii prefers better quality light clays to medium clays. The soils are usually derived from decomposed brown basalts, black basalts, granites or podsolics. The soils pH ranges from 4.5pH to 6pH are preferred. It does not tolerate waterlogged soils. Non saline soils to moderately saline soils are tolerated.
Height & Spread:
Wild Plants: 12m to 18m by 9m to 12m.
Characteristics:
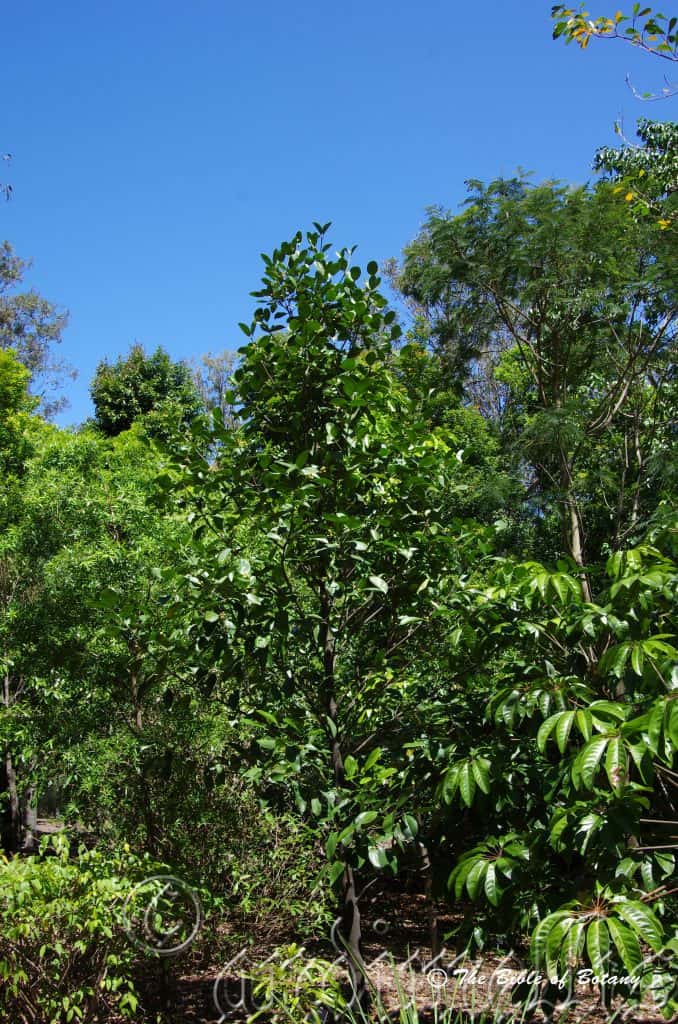
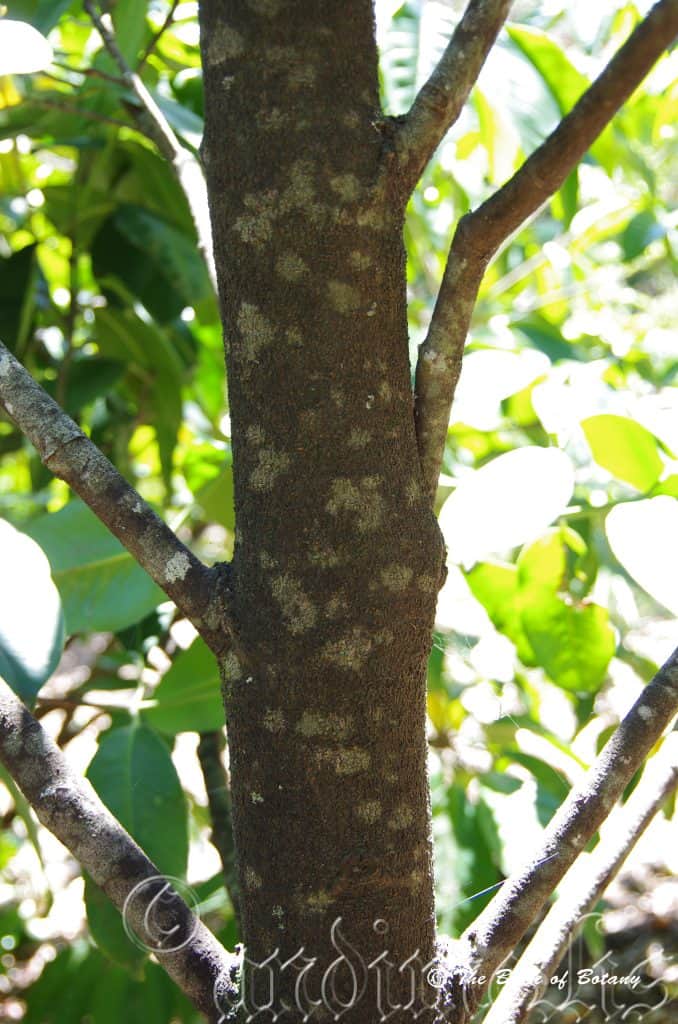
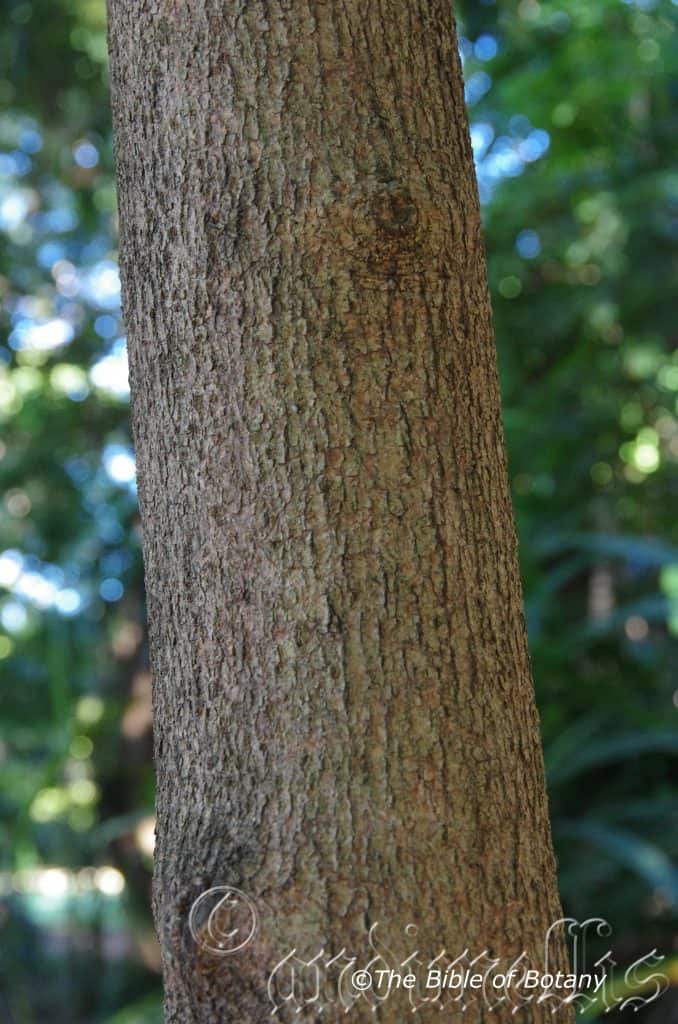
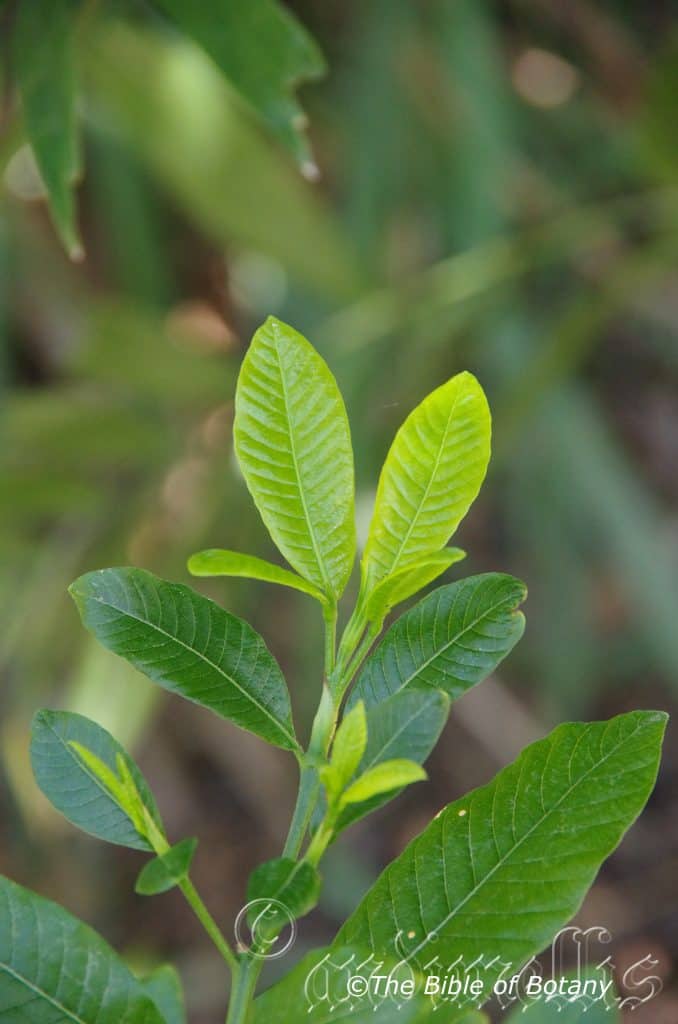
Garcinia warrenii grows as a small tree with a straight grey deep brown to deep grey-brown rough bole. The trunks and larger branches densely covered in mosses and lichens. The branchlets are glabrous and smooth while the branchlets are mid green, smooth and glabrous with scattered lenticels grey turning pale olive green near the apex. All parts of the plant exude clear yellow latex when damaged.
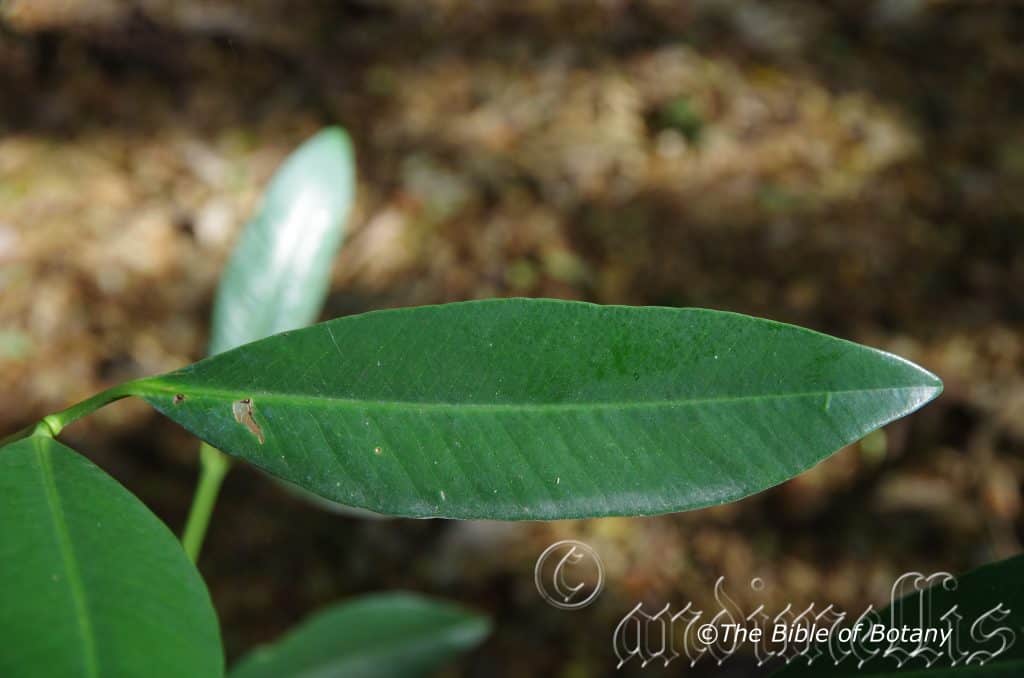
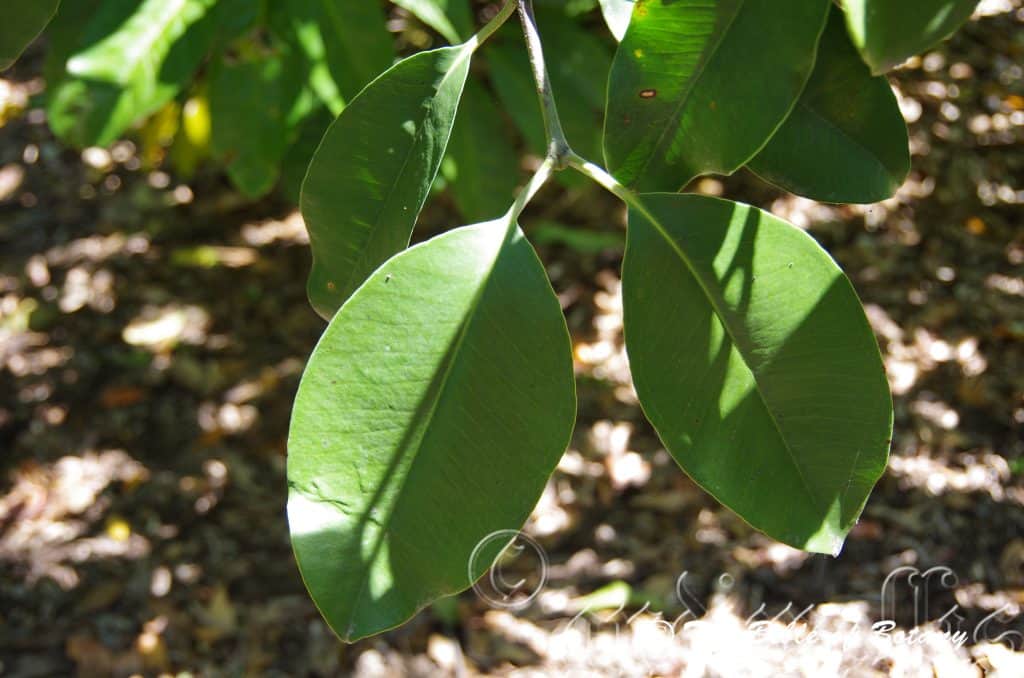
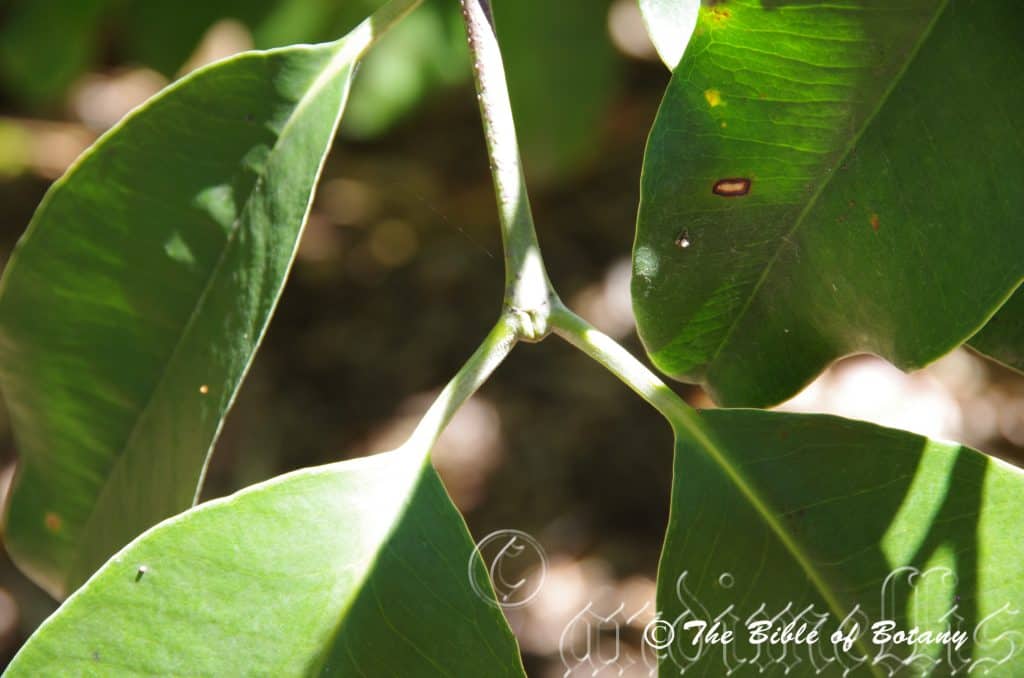
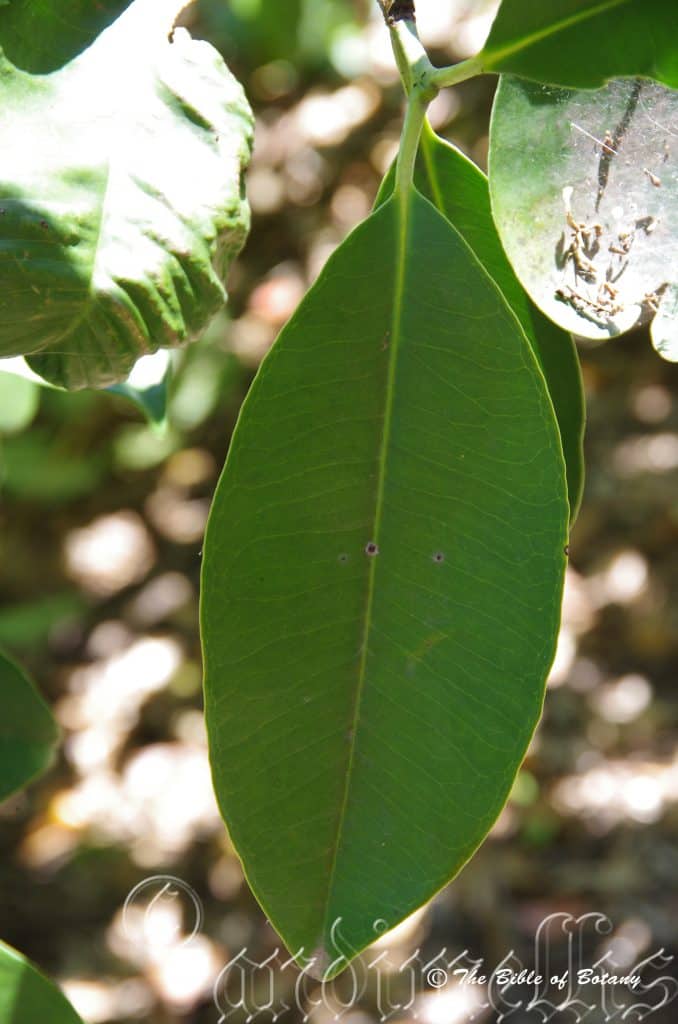
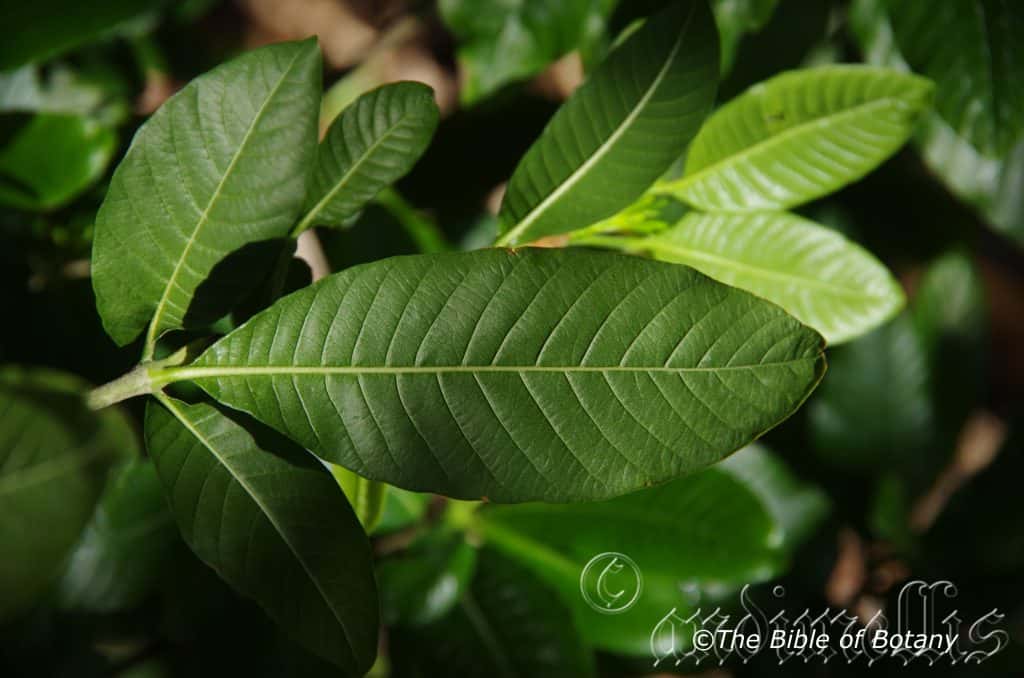
The coriaceous, opposite leaves of Garcinia warrenii‘s are elliptical to broad elliptical. The leaves measure 80mm to 160mm in length and 35mm to 80mm in width. The glabrous petioles measure 8mm to 13mm in length. The slightly oblique bases are broad cuneate to rounded while the apexes are acuminate. The discolourous laminas are mid green to deep green, smooth and glabrous on the upper laminas while the lower laminas are paler. The laminas recurve slightly upwards from the mid vein to the margins while the margins are entire. The mid vein is prominent while the lateral veins are clearly visible on the lower lamina and mid vein is distinctly visible on the upper lamina. The new growth is pale green to lime-green, smooth and glossy.
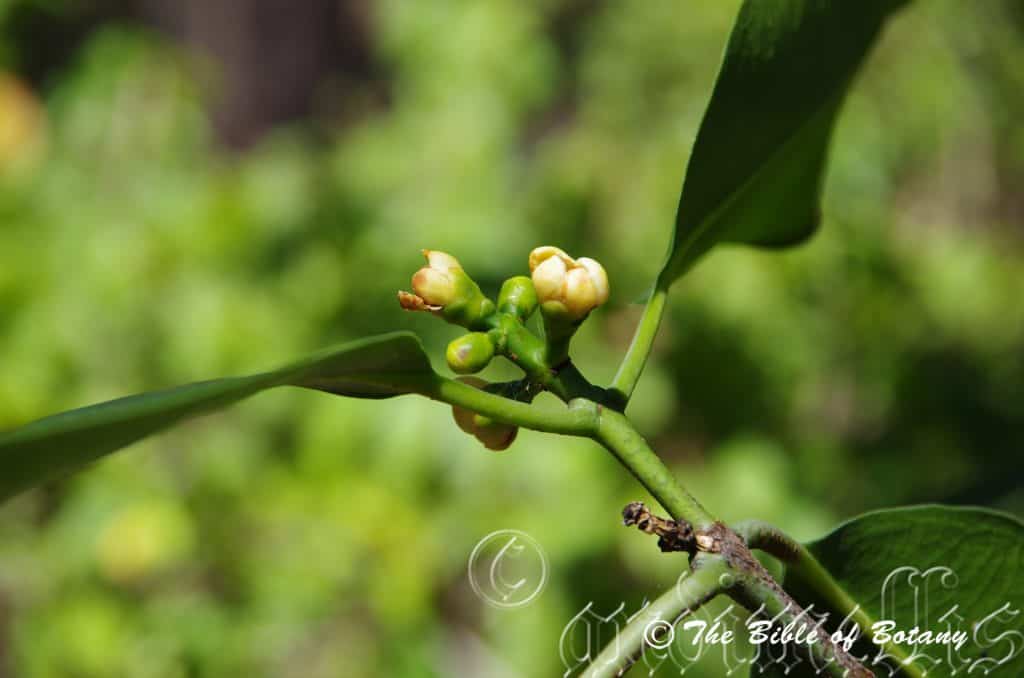
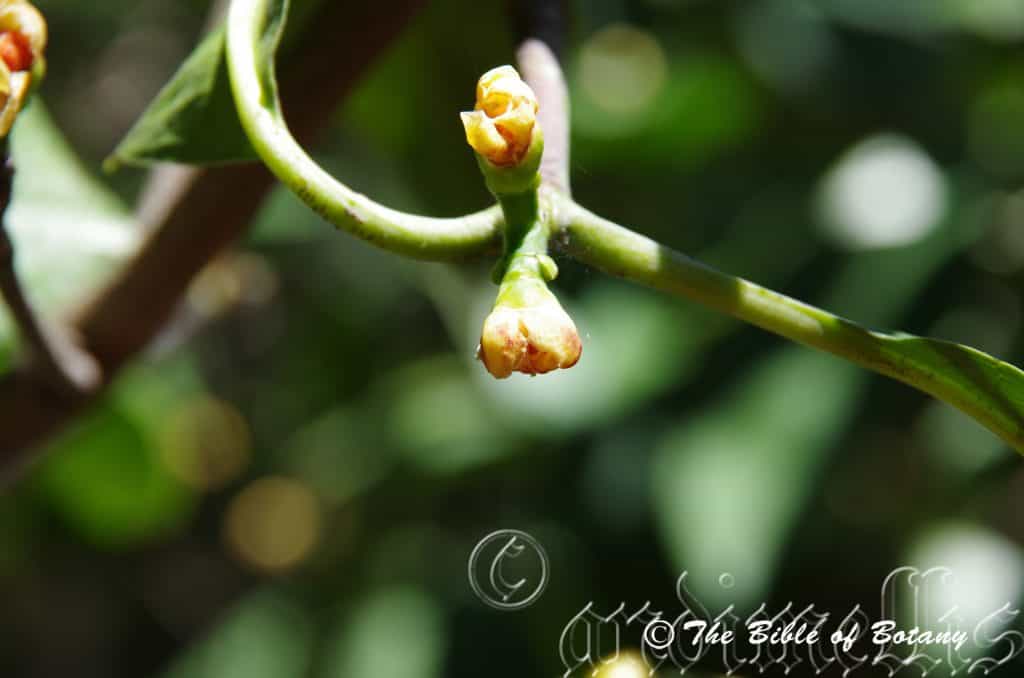
The dioecious inflorescences of Garcinia warrenii are born either singularly or in pairs; as in the female flowers or in small panicles in the case of the male flowers, from the center where a branch will occur.
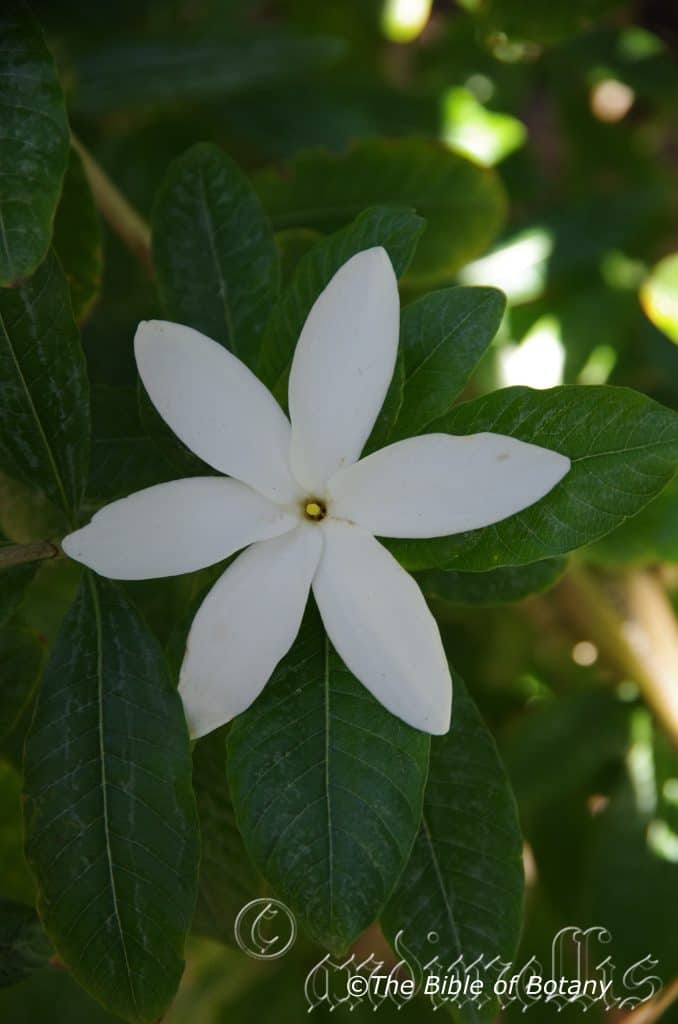
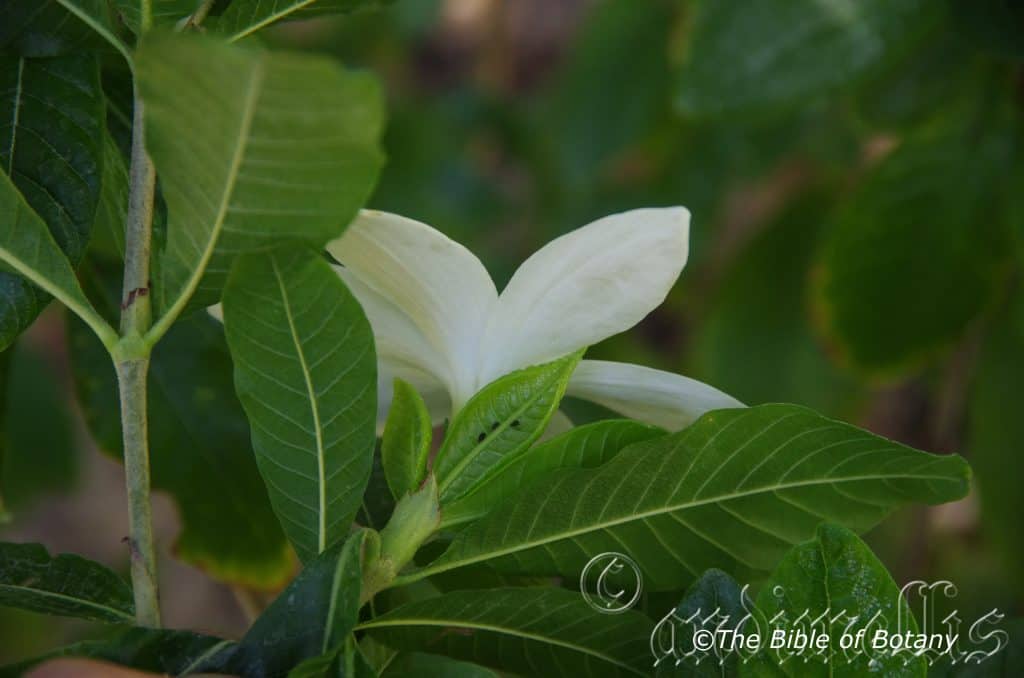
The short, stout peduncles on the male flowers measure 10mm to 12mm in length. The 4.orbicular sepals when present measure 6mm to 8mm in diameter. The 4 orbicular, strongly saccate, creamy yellow to creamy pastel pink petals measure 7mm to 9mm in diameter. The mounded disk is absent in the male flowers. The 4.stamens are grouped into four stout phalanges. The burgundy anthers measure 1.5mm to 2mm in diameter and have cream pollen.
The short, stout peduncles on the female flowers measure 3mm to 4mm in length. The 4.orbicular sepals measure 8mm to 10mm in diameter. The 4, broadly spathulate, strongly saccate, creamy yellow to creamy pastel pink petals measure 10mm to 12mm in diameter. The mounded disk is creamy yellow to creamy pastel pink, strongly perfumed with a dash of cloves in the female flowers. The flowers appear from October to January.
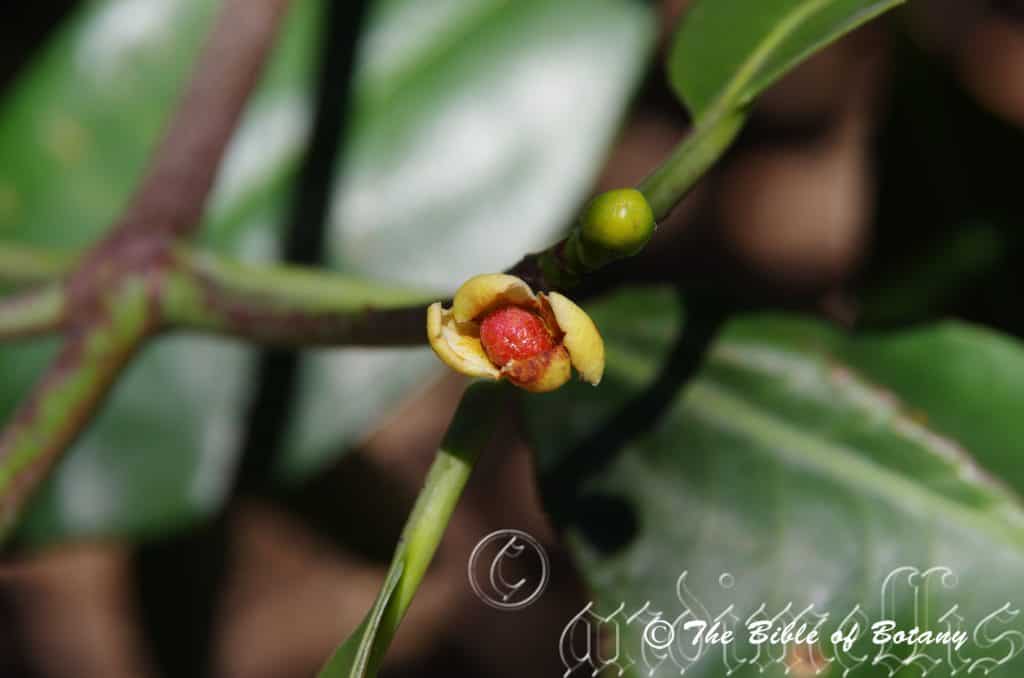
Garcinia warrenii fruits are depressed globular berries. The berries measure 40mm to 50mm in length by 50mm to 60mm in diameter. The green berries turn deep purple externally and reddish-maroon internally when ripe.
The 4 sepal lobes are persistent at the base while the stigma is persistent at the apex. The ripe fruits appear from January to June.
The 8, flattenned slight reniform seeds are surrounded by a white succulent pulp. Usually only one of the seeds is viable. The seeds measure 30mm to 33mm in length by 20mm to 30mm.
Wildlife:
The flowers Garcinia warrenii are attractive to several different species of butterflies while the fruit is eaten by the Cassowary, Casuarius casuarius.
Cultivation:
Garcinia warrenii is a beautiful small growing tree for use in the rainforest garden that is on very wet soils. It is suitable for small to large gardens parks and street planting. The large leaves give the rainforest affect at an early age.
It is relatively fast growing with a dense canopy. In cultivation the trees will grow to from 8 meters to 15 meters by 6 meters to 9 meters in diameter when grown in the open. It makes an excellent specimen trees or starter in a rainforest as they have an attractive bark which will soon become covered in lichens. The upper branches are also good for epiphytic ferns and orchids.
Garcinia warrenii is at its best when grown on rich organic, fertile, well drained, moist, acid soils. The tree will need additional moisture added throughout the year if grown in areas that have less than the ideal rainfall. Even in brief periods of drought or drying out will stress the trees which will lead to many leaves and flowers being aborted. It is not suitable for areas that suffer temperatures lower than 4 degrees even for short periods
Trees should be fertilized every 3-4 months during the first 3 years of growth, and thereafter once or twice a year. Mulching is highly recommended to add nutrients and organic matter to the soil which the trees are highly dependent upon for trace nutrients, to conserve moisture and control weeds. Well nurtured orchard trees have been known to produce fruit in the fifth year however 6 to 8 years from seed is the norm. Young trees starting production will produce 100 to 200 fruits per year, while well maintained mature trees; at 12 years of age, will produce over 1000 fruits a year.
It is sensitive to high levels of fertilizer, and must be fertilized with a dilute fertilizer solution similar to our recommended organic fertilizing programmed on a regular basis.
Nutritional Composition per 100 g of Mangosteen Fruit.
Carbohydrate 6 to 20g
Fat 0.1 to 1g
Protein 0.6g
Calcium 7 to 11g
Phosphorous 4 to 17g
Potassium 19mg
Iron 0.2 to 1mg
Vitamin A 14IU
Vitamin B1 0.03mg
Vitamin B2 0.03mg
Niacin 0.3mg
Vitamin C 12 to 66mg
Chinese Department of Primary Industries.
Propagation:
Seeds: Garcinia warrenii are usually propagated by seed. Seed production is the best method for production as the seeds are apomictic. (grow true to form)
The seeds lose viability quickly therefore are best planted as it is harvested. Germination usually occurs in 2 to 3 weeks. Sow fresh Garcinia warrenii‘s seeds directly into 50mm native tubes using a good organic mix. When the seedlings are 100mm to 150mm tall, prick them out and plant them into 200mm or 250mm native bags using a very good organic mix.
The seedlings are rather slow to establish. Place them beneath 50mm to 75mm shade cloth until 6 months prior to being planted out into their permanent positions. At this stage they should be hardened off over several months to full sun unless shade cloth is being supplied over the orchard.
Once the seedlings reach 300mm to 400mm in height plant them out into their permanent position. Orchard plantings need to be planted at 10 meter by 10 meter rows.
Mangosteen can be successfully grafted onto rootstocks of Garcinia species like Garcinia xanthochymus or Garcinia hombroniana using any of the grafting techniques listed under propagation.
Fertilize using seaweed, fish emulsion or organic chicken pellets soaked in water on an alternate basis. Fertilize every two months until the plants are established then annually in early September to October to maintain health, vitality and better flowering.
Further Comments from Readers:
Hi reader, it seems you use The Bible of Botany a lot. That’s great as we have great pleasure in bringing it to you! It’s a little awkward for us to ask, but our first aim is to purchase land approximately 1,600 hectares to link several parcels of N.P. into one at The Pinnacles NSW Australia, but we need your help. We’re not salespeople. We’re amateur botanists who have dedicated over 30 years to saving the environment in a practical way. We depend on donations to reach our goal. If you donate just $5, the price of your coffee this Sunday, We can help to keep the planet alive in a real way and continue to bring you regular updates and features on Australian plants all in one Botanical Bible. Any support is greatly appreciated. Thank you.
In the spirit of reconciliation we acknowledge the Bundjalung, Gumbaynggirr and Yaegl and all aboriginal nations throughout Australia and their connections to land, sea and community. We pay our respect to their Elders past, present and future for the pleasures we have gained.
Anderson Gardens Townsville Qld.
Anderson Gardens Townsville Qld.
Anderson Gardens Townsville Qld.
Anderson Gardens Townsville Qld.
Anderson Gardens Townsville Qld.
Gardenia scabrella
Classification:
Unranked: Eudicots
Unranked: Asterids
Order: Gentianales
Family: Rubiaceae
Genus: Is named in honour of Alexander Garden; 1730-1791, who was a Scottish physician, botanist and zoologist.
Species: From Scaber, which is Latin for rough or scabrous. It refers to an organ or structure which is rather rough to the touch.
Common Name: Native Gardenia.
Distribution:
Gardenia scabrella is a found in the central zones of tip of Cape York Peninsula. There are several disjunct populations recorded at Statton River, Babinda, Topaz and Mount Surprise in far north east Queensland.
https://avh.ala.org.au/occurrences/search?taxa=Gardenia+scabrella#tab_mapView
Habitat Aspect Climate:
Gardenia scabrella prefers dense shade, partial shade or filtered sunlight. It usually grows in well-developed rain forest, well developed littoral rainforests, moist gallery forests and protected riparian forests. The altitude ranges from 2 meters ASL to 120 meters ASL.
The temperatures range from 12 degrees in July to 38 degrees in January.
The rainfalls range from lows of 1700mm to an average of 2200mm.
Soil Requirements:
Gardenia scabrella prefers better quality sandy loams, light clays to gritty medium clays. The soils are usually derived from decomposed sandstones, accumulated sands or alluvial deposits. The soils pH ranges from 4.5pH to 6pH are preferred. It does not tolerate waterlogged soils. Non saline soils to moderately saline soils are tolerated.
Height & Spread:
Wild Plants: 4m to 8m by 3m to 5m.
Characteristics:
Gardenia scabrella grows as a small tree with a straight pale fawn to pale grey-brown rough trunk and branches. The pale green juvenile shoots are often sticky or varnished. The trunks and larger branches densely covered in mosses and lichens.
The pale green, lanceolate stipules measure 4mm to 6mm in length and completely encircling the twigs. The juvenile stipules are often sticky or varnished.
Mature elliptical leaves measure 45mm to 125mm in length by 14mm to 46mm in width. The discolourous leaves are deep green and semi glossy on the upper laminas while the lower laminas are paler. The bases are cuneate, while the apexes are broad acute with a small accuminate tip. The mid vein is strongly prominent on the lower lamina and is sparsly covered in short white hairs on the upper lamina particularly along the midrib. The lateral veins are alternate on each side of the mid vein and are set at around 70 degrees. The domatia are foveoles with hairs at the orifice.
The long narrow acute calyx lobes measure 6mm to 12mm in length. The 6 white or cream, narrow elliptical corolla lobes measure 28mm to 40mm in length by 10mm to 16mm in width. The cylindrical corolla tube measures 5mm to 8mm in length. The 6 anthers are inserted while the pale yellow-green style and yellow stigma is level with the mouth of the corolla tube. Flowers appear throughout the year in warmer climates or in the warmer months in cooler climates.
The elongate to ellipsoid fruits are hexagonal in transverse section and measure 30mm to 65mm in length by 12mm to 18mm in diameter. The fruits are longitudinally ribbed.
The flat, cuboidal, sherical or elliptical-triangular, pale brown seeds measure 2.5mm to 3mm tin length by 1.8mm to 2mm in width, while the embryo measures 1.3mm in length.
Wildlife:
The flowers Gardenia scabrella are attractive to several different species of small black beatles. The flowers are edible and can be used as a tea, pickled, boiled or cooked with fish or pork to give a sweet aromatic flavour reminiscent of the flowers themselves.
Cultivation:
Gardenia scabrella is a beautiful small growing bushy tree, which is suitable for growing in the rainforest garden where reasonable moisture levels are retained throughout the year. It is suitable for small to large gardens, parks and street planting. The large leaves give the rainforest affect at an early age.
It is relatively fast growing once established with a dense canopy. In cultivation the trees will grow to from 6 meters to 8 meters by 4 meters to 6 meters in diameter when grown in the open. It makes an excellent specimen tree or starter in a rainforest as it has an attractive bark which will soon become covered in lichens. The upper branches are also excellent for small epiphytic ferns and orchids.
Gardenia scabrella are at their best when grown on rich organic, fertile, well drained, acid soils. The trees will need additional moisture added in the drier months of the year if grown in areas that have less than the ideal rainfall. Even in brief periods of drought or drying out will stress the trees which will lead to many flowers and leaves being aborted. It is not suitable for areas that suffer temperatures lower than 4 degrees even for short periods.
As a small tree or large shrub it should be fertilized every 3 to 4 months during the first 3 years of growth, and thereafter annually. Mulching is highly recommended to add nutrients and organic matter to the soil which the trees are highly dependent upon for trace nutrients, to conserve moisture and control weeds.
It is sensitive to high levels of fertilizer, and must be fertilized with a dilute fertilizer solution similar to our recommended organic fertilizing programmed on a regular basis.
Plants are susceptable to black scale where synthetic fertilizers are used to promote soft, fast growth. Capnodium oleaginum, or Fumago salicina are the most common sooty moulds. Spores from these moulds develop on sweet honeydew produced by parasitic mites so these need to be locate as it is the root cause of the problem. The pink scale, white scale or aphids are the most common ones found in the garden.
Plant diversity in your garden, is the best method of protection as it assists in the natural build up of their predators. The use of snthetic sprays kills not only the cause of the problem but ahnilates the predators which take longer to recover.
Spray the areas where it is with neem oil,
or mix one tablespoon of vegetable oil, one teaspoon of dishwashing liquid and one teaspoon of metholated spirits to one litre of water.
Propagation:
Seeds: Gardenia scabrella are usually propagated by seed. Seed production is the best method for.
The seeds lose viability rather quickly therefore are best planted as it is harvested. Germination usually occurs in 2 to 3 weeks. Sow the fresh seeds of Gardenia scabrella directly into deep seed trays using a good organic mix. When the seedlings are 40mm to 50mm tall, prick them out and plant them into 50mm native tubes using a very good organic mix.
The seedlings are rather slow to establish themselves, so place them beneath 50mm to 75mm shade cloth until they reach 100mm to 150mm in height prior to being planted out into their permanent positions. At this stage they should be hardened off over several weeks to full sun unless it is being planted into a shady habitat.
Cuttings:
Cuttings from older wood can be taken in early October onwards are apparently rather easy to strike. 100mm to 200mm cuttings from the previos seasons growth are best.
1 Prepare the cutting mix by adding one third sharp clean river sand, one third peat and one third perlite. These ingredients are sterilize,
2 Select good material from non diseased plants,
3 Select semi green stems for cuttings. Look for a stem with several nodes and remove all flower buds being careful not to tear the stem,
4 Place the cutting on a flat, hard surface, and make a clean cut down one side of the cutting at the base for 10mm with a sharp sterile knife or razor blade. – This scarification of the node will increase the chances of roots emerging from this spot. Now remove all but one or two the leaves, leaving the apex leaves in tact. If the leaves are very large in proportion to the stem, cut off the apical halves.
5 Fill a saucer with water, and place a little weak to medium rooting hormone into another container like a milk bottle top. Dip the node end of the cutting into the water and then into the rooting hormone. Tap off any excess hormone,
6 Use a small dipple stick or old pencil to poke a hole into the soilless potting mix. Ensure the hole is slightly larger than the stem diameter and be careful not to wipe the rooting hormone off the cuttings base, place the cuttings in a pattern ensuring the cuttings are not touching each other,
7 I like to place the pots in Plastic bags to help maintain temperature and moisture. Place in a semi shaded place like under 50mm shade cloth.
8 When the cuttings have struck, open the bag to allow air circulation for a few days to a week,
9 Once hardened off remove the cuttings from the bag and allow to further hardening for a few more days,
10 Transplant into a good potting mix to grow on.
Fertilize using seaweed, fish emulsion or organic chicken pellets soaked in water on an alternate basis. Fertilize every two months until the plants are established then annually in early September to October to maintain health, vitality and better flowering.
Further Comments from Readers:
Hi reader, it seems you use The Bible of Botany a lot. That’s great as we have great pleasure in bringing it to you! It’s a little awkward for us to ask, but our first aim is to purchase land approximately 1,600 hectares to link several parcels of N.P. into one at The Pinnacles NSW Australia, but we need your help. We’re not salespeople. We’re amateur botanists who have dedicated over 30 years to saving the environment in a practical way. We depend on donations to reach our goal. If you donate just $5, the price of your coffee this Sunday, We can help to keep the planet alive in a real way and continue to bring you regular updates and features on Australian plants all in one Botanical Bible. Any support is greatly appreciated. Thank you.
In the spirit of reconciliation we acknowledge the Bundjalung, Gumbaynggirr and Yaegl and all aboriginal nations throughout Australia and their connections to land, sea and community. We pay our respect to their Elders past, present and future for the pleasures we have gained.

xxxxxxxxxxxxxxxxxxxxxxxxxxxxxxxxxxxxxxxxxxxxxxxxxxGaudium trinervium
Classification:
Unranked: Magnoliophyta
Class:Magnoliopsida
Order: Myrtales
Family: Myrtaceae
Genus: From Leptós, which is Ancient Greek for delicate, fine or slender and Spérma, which is Ancient Greek for a seed. It refers to seeds, which are rather fine and slenderer than other genus in the family.
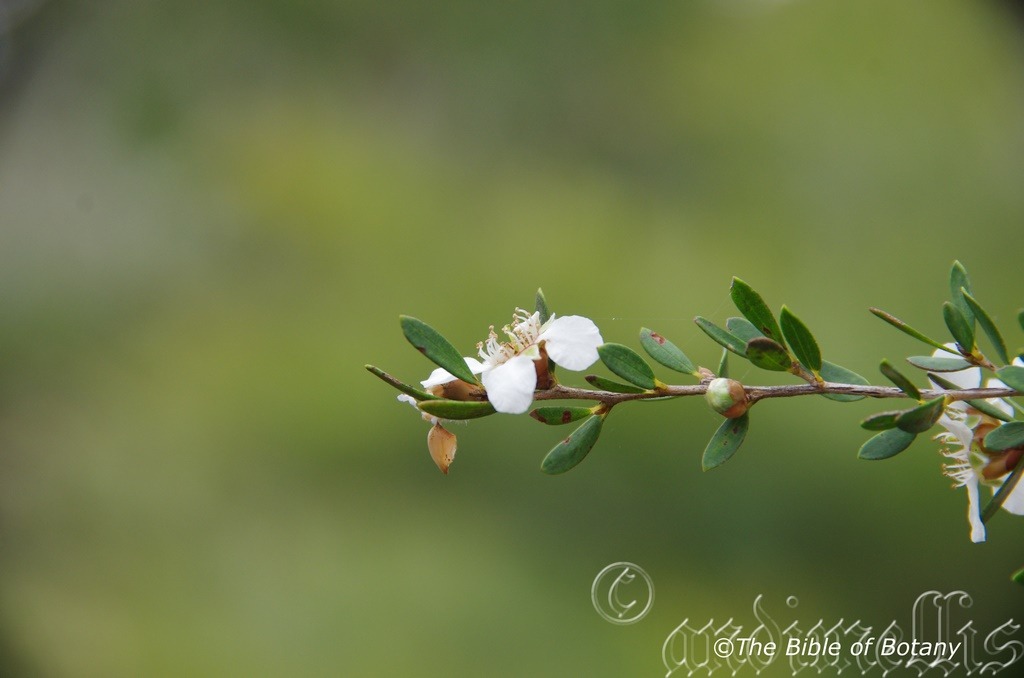
Species: From Treîs/Tría, which are Ancient Greek or Tri, which is Latin for three and Neûron, which is Ancient Greek or nervus, which is Latin for a nerve. It refers to leaves or phyllodes, which have three, prominent parallel veins.
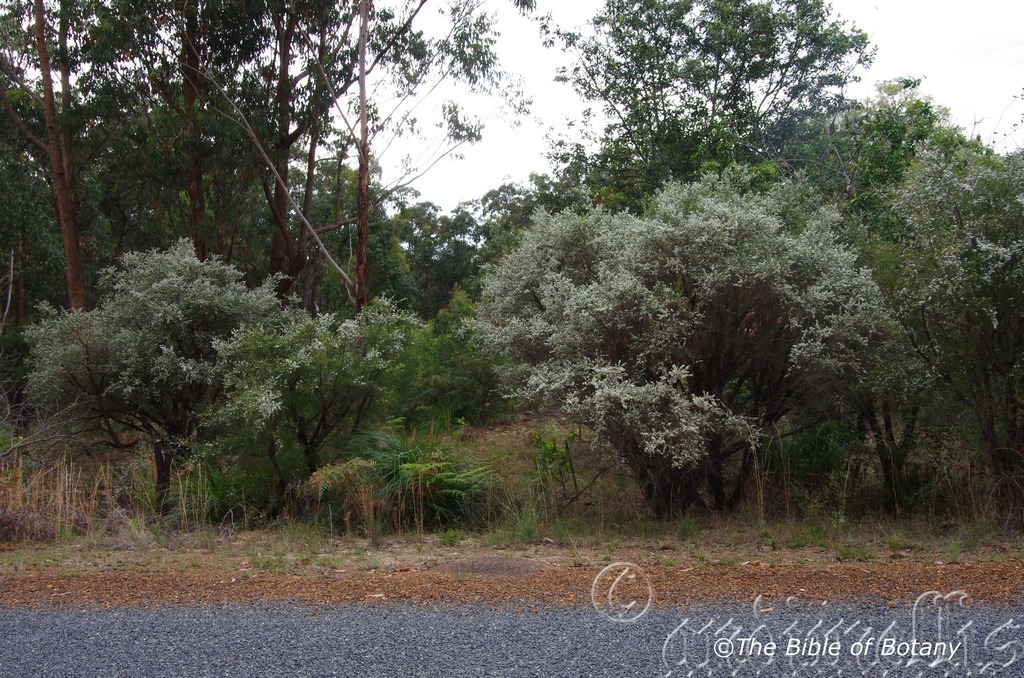
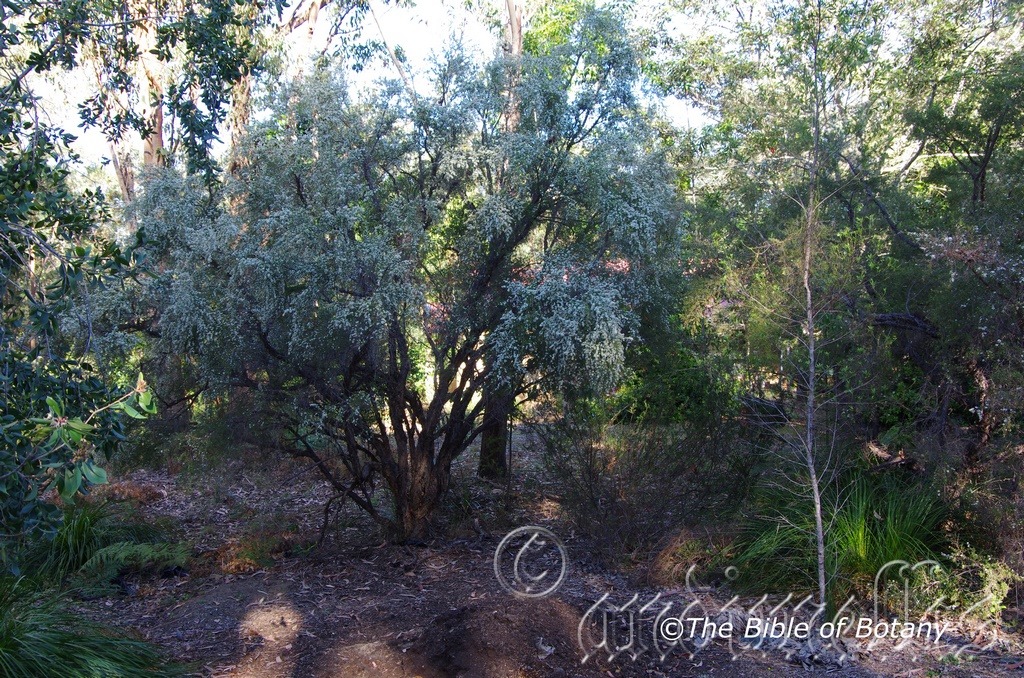
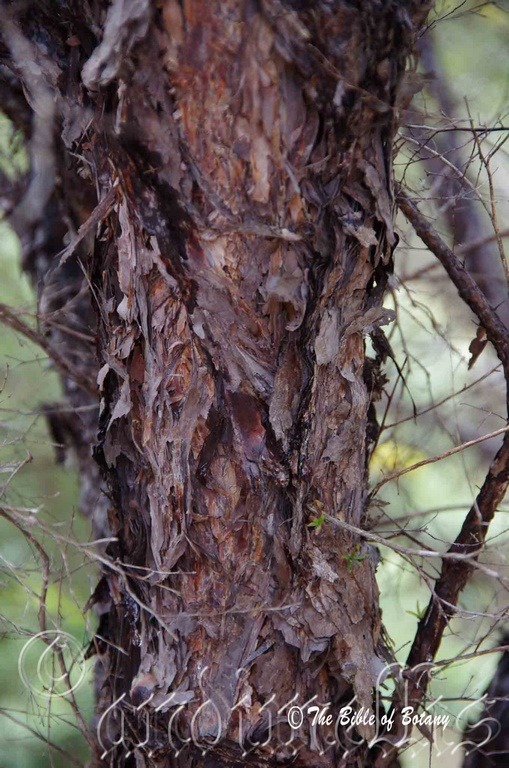
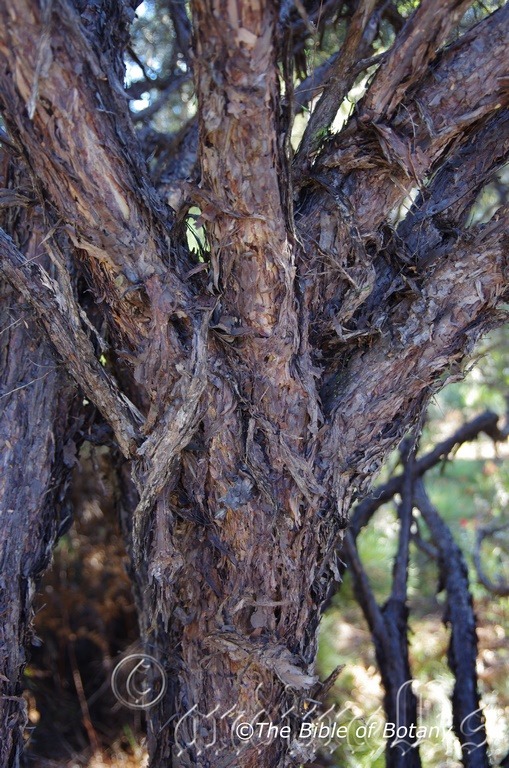
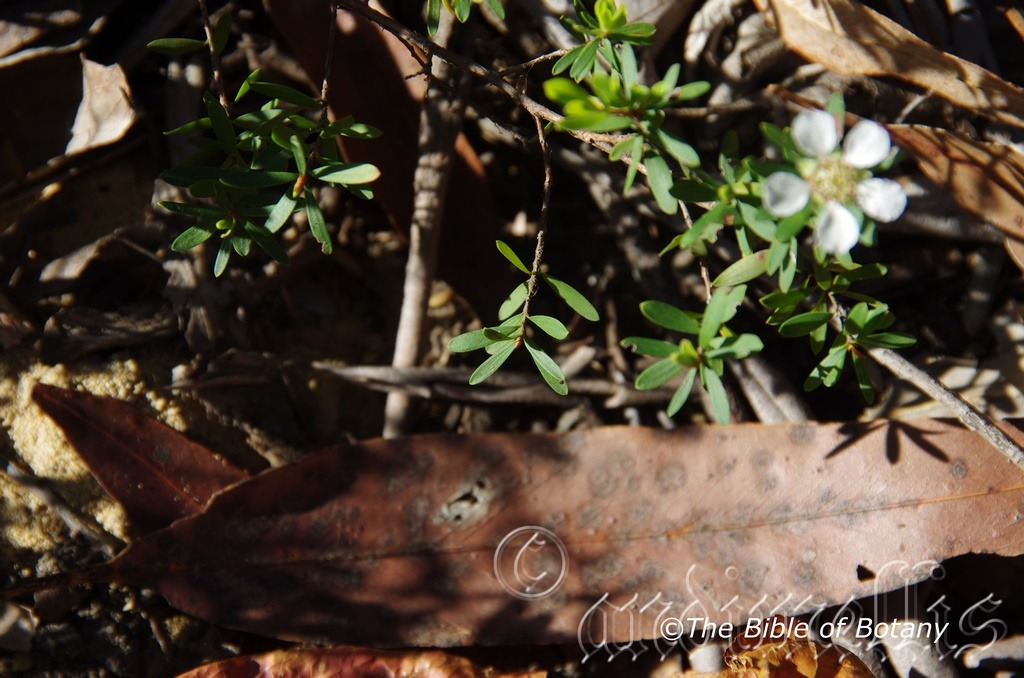
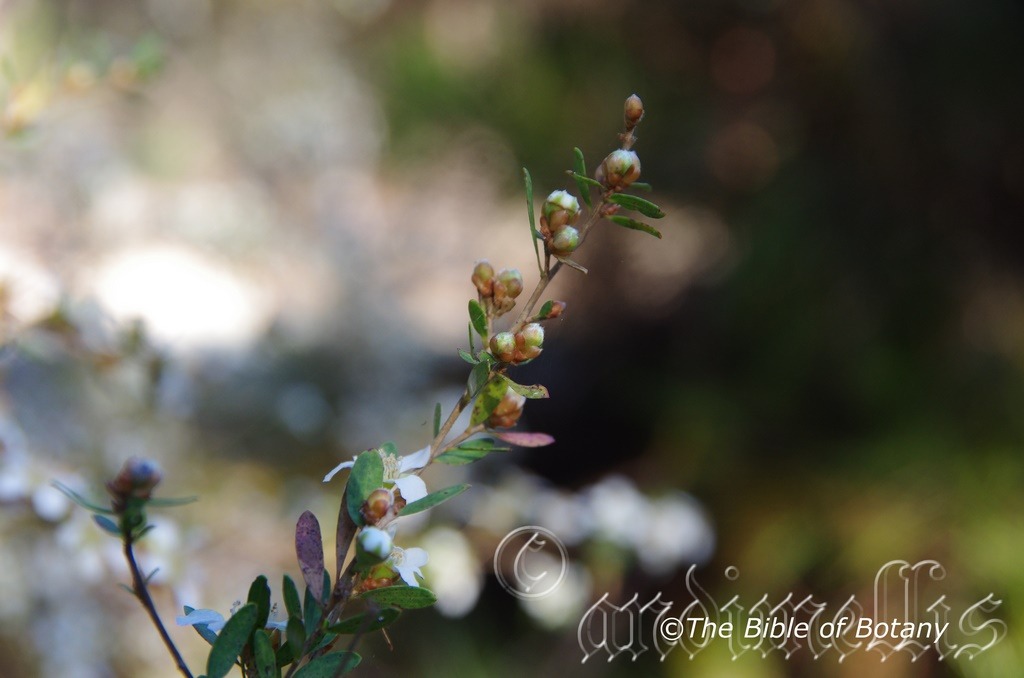
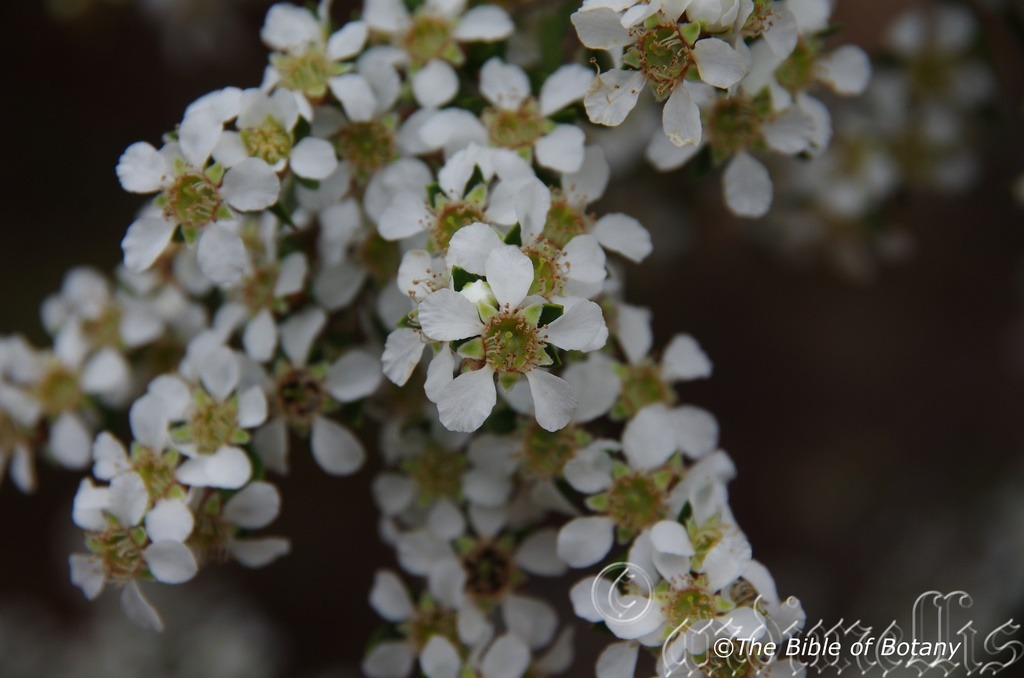
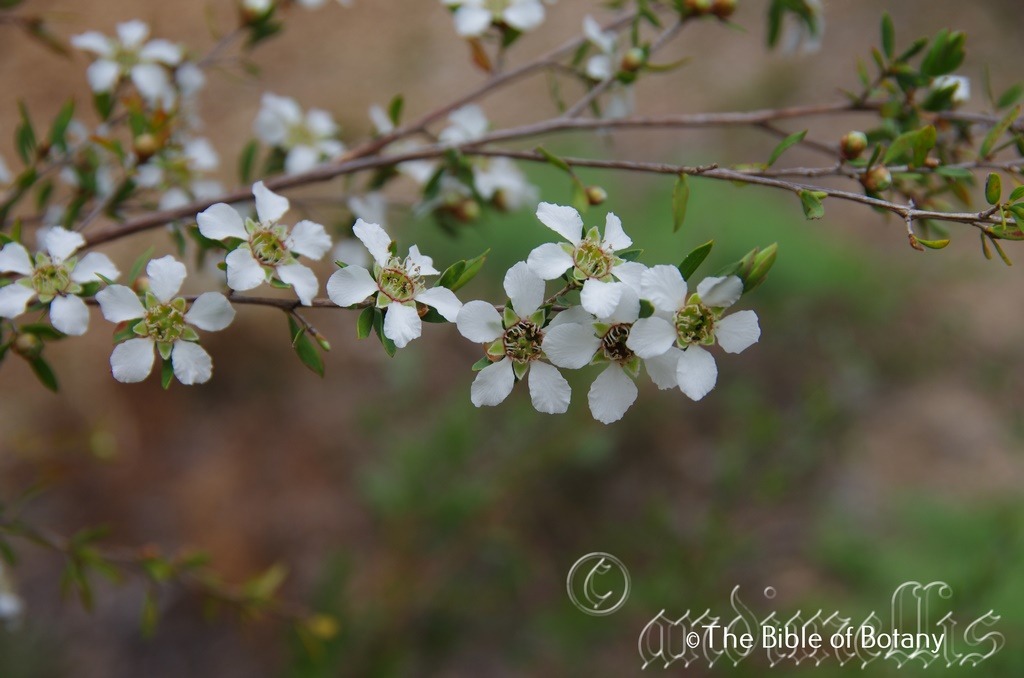
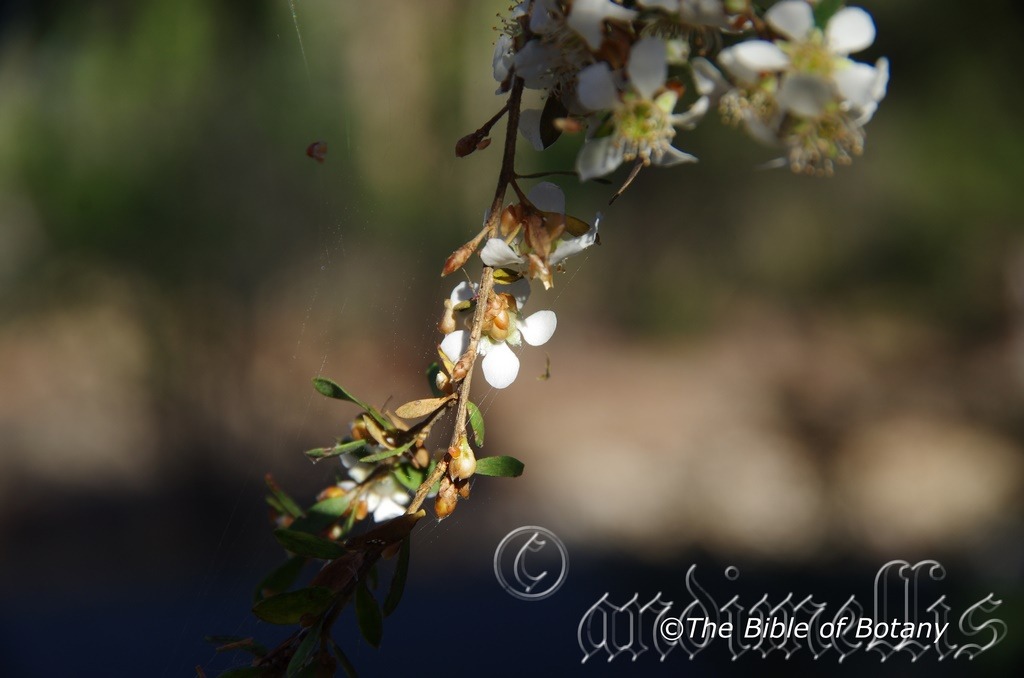
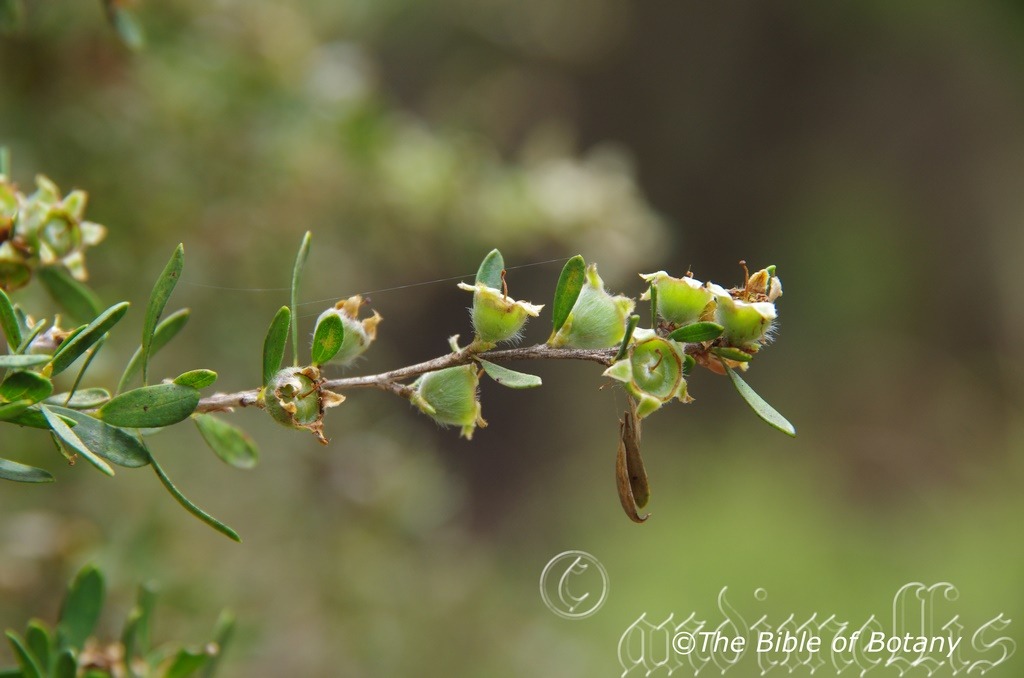
Common Name: Flaky Bark Tea Tree or Slender Tea Tree.
Distribution:
Gaudium trinervium is found south from Mount Wheeler near Rockhampton in central coastal Queensland to Tonghi Creek in the lower Cann Valley in north eastern coastal Victoria. It is mainly found on the Great Dividing Range and the coastal ranges but ventures further inland around the Carnarvon Gorge National Park in central Queensland, the Mount Kosciusko National Park in New South Wales and Falls Creek in northern Victoria.
https://avh.ala.org.au/occurrences/search?taxa=Gaudium+trinervium#tab_mapView
Habitat Aspect Climate:
Gaudium trinervium prefers full sun to light dappled shade. It grows in dry schlerophyll forests, dry Eucalyptus forests dry heaths on ridges, escarpments and shelves. It is also found adjacent to higher altitude wallum heaths. The altitude ranges from 5 meter ASL to 1850 meters ASL.
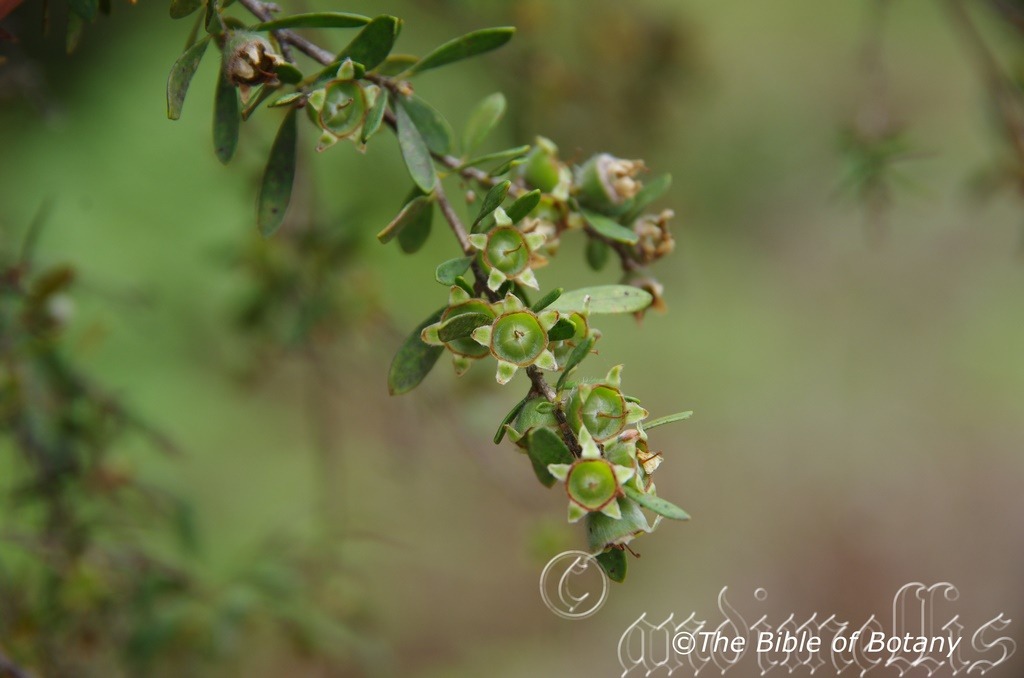
The temperatures range from minus 6 degrees in August to 36 degrees in January.
The rainfalls range from lows of 550mm to an average of 1900mm
Soil Requirements:
Gaudium trinervium prefers to grow on skeletal to deep sands, peaty sands, and sandy loams to light fatty clays to rocky ledges. The soils are usually derived from partially decomposed to decomposed granites, sandstones or accumulated peaty beach sands. The soils pH ranges from 5pH to 6pH. It tolerates short seasonal water-logged soils. Non saline soils to moderately saline soils are tolerated.
Height & Spread:
Wild Plants: 2m to 5m by 2m to 3m.
Characteristics:
Gaudium trinervium grows as a medium shrub or small tree with deep grey flaky bark. The bark decorticates in irregular in broad strips and patches from the trunk through to the lower branches. The pale grass-green branchlets are moderately covered in white, caduceous pubescent hairs and are usually glabrous by the time the stems turn grey.
Gaudium trinervium’s crowded, whirled or closely alternate, broad obovate to very narrow elliptic leaves are straight to slightly falcate and measure 10mm to 20mm in length by 1.5mm to 6mm in width. The bases are tapering to rounded while the apexes are acuminate to obtuse with a short pungent mucronate tip. The concolourous laminas are sea-green to deep green, and covered in white, caduceous pubescent hairs. The laminas are flat while the margins are entire. The mid vein and main lateral veins are slightly prominent on the lower lamina and are faintly visible on the upper lamina. The appressed petioles measure 0.5mm to 1.5mm in length
The inflorescences of Gaudium trinervium are born solitary or in pairs from the leaf axils and measure 7mm to 15mm in diameter. The lime green to deep green, glabrous hypanthium measure 3mm to 4mm in length and are covered in long, white pubescent hairs. The 5 white, obtuse sepals are strongly decurve and moderately covered in white pulverulent hairs. The sepals measure 1.5mm to 2.5mm in length. The 5 glabrous circular to broad ovate petals are entire or shallowly lobed. The petals measure 4mm to 7mm in length by 4mm to 8.5mm in width.
The 25 white filaments are fused to the deep maroon rim of the lime-green to grass-green hypanthia. The filaments measure 1.5mm to 2mm in length. The anthers are white or cream with white pollen. The lime-green to mid-green style is centrally located in the sunken lime green to mid green disc. The disc and style turn red-purple to deep purple following anthesis. The flowers appear from September to November on coastal plants and from late November to mid-February on plants at higher altitudes.
Gaudium trinervium’s fruits are small broad conical capsules. The usually 4 or 5 or rarely 6 locular capsules measure 3mm to 6mm in diameter at the rim. The sepals are persistent and become erect on the ripe capsules. The pale purple to red capsules turn deep grey and sub woody when ripe. The valves are inserted or level with the rim.
Wildlife:
Gaudium trinervium flowers are very attractive to numerous small butterflies, native bees, native beetles, wasps and flies. Small nectar feeding birds are also attracted to the flowers.
Cultivation:
Gaudium trinervium grows particularly well on drier soils to moisture retentive soils. It is suitable for small, medium and large gardens close to the coast or high in the mountains in temperate to subtropical gardens. As garden subjects they will grow from 4 meter to 6 meters in height by 3 meter to 4 meters in diameter when grown in the open. It is cold tolerant to temperatures at least as low as minus 6 degrees once established. They can be lightly tip pruned if a smaller bushier shrub is required.
It is best used adjacent to small areas of bush close to paths or the house so their white flowers can be viewed regularly. It is great in small rockeries as the main feature where there gnarled trunk can be displayed to great effect. Here the dwarf pink and red flowering plants can be planted in small groups while of 2 or 3 while taller Leptospermum trinervium can be used to create a great display especially amongst large boulders and rocks.
If it is surrounded by shorter plants with broader leaves and paler coloured flowers they will dominate the scene at the center. They will soften a harsh scene especially when it is in flower. This is one plant that benefits highly from not being mass planted but strategically planted singularly or in scattered clumps. There small tree status enables this to be achieved even in small or medium size gardens. The deep pink, smaller forms like Leptospermum scoparium blend fantastic with other Leptospermum trinervium as do the pink prostrate forms of Leptospermum rotundifolium or the deep erect red forms of Leptospermum scoparium.
They would add some real height to a medium or large heath garden. When you design a flat heath garden which is well suited don’t use contours to display the plants as heath lands are almost always flat or have a slight rise. Plants must be planted close together and be short so you can see over the tallest ones with the exception of one or two plants at the most. These will be feature plants. The idea is to achieve a feeling of expansive flatness. This can be achieved with using Leptospermum squarrosum’s deep green leaves, having them contrasting with finer pale green or soft grey to glaucous coloured foliages. Use a lot of procumbent plants like Carpobrotus edulis or Hibbertia specie. Mix them with other smaller shrubs so none of them dominate the scene but blend in to give a mosaic of foliage colours that you oversee. Here I immediately think of Actinotis helianthi or Grevillea specie for two great contrasting foliages.
They would make excellent bonsai plants and I know of plants that are over 30 years old so age would add to value in such collections.
Propagation:
Seeds: Gaudium trinervium seeds may not come true to parent type. If the parent type is required then plants should be grown from cuttings. Seed can be sown directly into a seed raising mix after roughing the sides with fine sandpaper to assist in germination. Cover the seeds with 15mm to 20mm of fine weed free mulch and keep moist. Place the tray in a warm sunny position. When the seedlings are 20mm to 30mm tall, prick them out and plant them into 50mm native tubes using a good organic mix.
Once the seedlings reach 100mm to 150mm in height they can be planted out into their permanent position.
Cuttings: Use 80mm to 100mm long half ripened material when growing from cuttings from the present season’s growth. Take them in warmer months of the year. Remove half the leaves from the bottom section being careful not to tear the bark.
1 Prepare the cutting mix by adding one third sharp clean river sand, one third peat and one third perlite. These ingredients are sterilize,
2 Select good material from non diseased plants,
3 Select semi green stems for cuttings. Look for a stem with two or three nodes,
4 Place the cutting on a flat, hard surface, and make a clean cut down one side of the cutting at the base for 10mm with a sharp sterile knife or razor blade. – This scarification of the node will increase the chances of roots emerging from this spot. Now remove all but one or two the leaves, leaving the apex leaves in tact. If the leaves are very large in proportion to the stem, cut off the apical halves.
5 Fill a saucer with water, and place a little medium strength rooting hormone into another container like a milk bottle top. Dip the node end of the cutting into the water and then into the rooting hormone. Tap off any excess hormone,
6 Use a small dipple stick or old pencil to poke a hole into the soilless potting mix. Ensure the hole is slightly larger than the stem diameter and be careful not to wipe the rooting hormone off the cuttings base, place the cuttings in a pattern ensuring the cuttings are not touching each other,
7 I like to place the pots in Plastic bags to help maintain temperature and moisture. Place in a semi shaded place like under 50% shade cloth.
8 When the cuttings have struck, open the bag to allow air circulation for a few days to a week,
9 Once hardened off remove the cuttings from the bag and allow to further hardening for a few more days,
10 Transplant into a good potting mix to grow on.
Fertilize using seaweed, fish emulsion or organic chicken pellets soaked in water on an alternate basis. Fertilize every two months until the plants are established then annually in early September to October to maintain health, vitality and better flowering.
Further Comments from Readers:
Hi reader, it seems you use The Bible of Botany a lot. That’s great as we have great pleasure in bringing it to you! It’s a little awkward for us to ask, but our first aim is to purchase land approximately 1,600 hectares to link several parcels of N.P. into one at The Pinnacles NSW Australia, but we need your help. We’re not salespeople. We’re amateur botanists who have dedicated over 30 years to saving the environment in a practical way. We depend on donations to reach our goal. If you donate just $5, the price of your coffee this Sunday, We can help to keep the planet alive in a real way and continue to bring you regular updates and features on Australian plants all in one Botanical Bible. Any support is greatly appreciated. Thank you.
In the spirit of reconciliation we acknowledge the Bundjalung, Gumbaynggirr and Yaegl and all aboriginal nations throughout Australia and their connections to land, sea and community. We pay our respect to their Elders past, present and future for the pleasures we have gained.
Gaultheria appressa
Classification:
Unranked: Eudicots
Unranked: Asterids
Order: Ericales
Family: Ericaeae
Subfamily: Styphelioideae
Genus: Is named in honour of Dr. Hugues Jean Gaulthier; 1708-1756, who was a Canadian Botanist and physician.
Species: From Appressus, which is Latin for lying close together. It refers to structures or organs usually hairs, which are lying close together or close against another’s surface.
Common Name: White Wax Berry.
Distribution:
Gaultheria appressa is a found south from the Bellinger River in north eastern coastal New South Wales to the Cumberland River in southern coastal Victoria. It is mainly found on the Western Slopes, on and east of the Great Dividing Range to the coast. There is an isolated population near Narrabri in northern New South Wales west of the range.
https://avh.ala.org.au/occurrences/search?taxa=Gaultheria+appressa#tab_mapView
Habitat Aspect Climate:
Gaultheria appressa prefers dense shade, partial shade or full sun. It usually grows in woodlands, moist sclerophyll forest or dry sclerophyll forest or on rainforest margins. It is often found in gullies and riparian zones and among rocks close to edges of cliffs and escarpments. The altitude ranges from 700 meters ASL to 1450 meters ASL.
The temperatures range from minus 3 degrees in July to 38 degrees in January.
The rainfalls range from lows of 550mm to an average of 2000mm.
Soil Requirements:
Gaultheria appressa prefers better quality light clays to medium clays. The soils are usually derived from decomposed brown basalts, shales, metamorphic rocks or granite. The soils pH ranges from 4.5pH to 6pH are preferred. It does not tolerate waterlogged soils. Non saline soils to moderately saline soils are tolerated.
Height & Spread:
Wild Plants: 0.5m to 2m by 0.8m to 2m.
Characteristics:
Gaultheria appressa grows as a small shrub with brown to reddish-brown stems. The stems are covered in reddish-brown appressed, hispid hairs.
The alternate elliptical, oblong-elliptical or narrow ovate leaves of Gultheri appressa measure 30mm to 80mm in length and 10mm to 30mm in width. The bases are cuneate while the apexes are truncate to obtuse with a broad apiculate tip. The discolourous laminas are mid green to deep green, semi glossy to glossy and glabrous on the upper laminas while the lower laminas are slightly paler. The laminas are flat or very slightly recurve upwards from the mid vein to the margins which are more noticeable near the base and decurve downwards near the apex. The laminas are raised between the mid vein and lateral and lateral and secondary veins. The margins are finely and evenly toothed. The mid vein is prominent while the lateral and secondary veins are slightly prominent on the lower lamina and are sparsely covered in reddish, appressed, hispid hairs. The mid vein is distinctly visible as are the lateral and secondary veins on the upper lamina. The reddish-brown petioles are covered in reddish-brown appressed hispid hairs and measure 1mm to 3mm in length.
The new growth is pale green to lime-green, smooth and glossy.
The inflorescences of Gaultheria appressa are born on racemes from the upper leaf axils or as small terminal clusters. There are 2 basal bracteoles on the pedicel while the individual flowers are subtended by a small bract.
The 5 ovate to broad lanceolate sepals enlarge; turn creamy white to surround the fruit. The sepals measure 7mm to 11mm in length when fully enlarged. The corolla measures 2.5mm to 4mm in length. The flowers appear from October to February.
Gaultheria appressa fruits measure 7mm to 10mm in diameter including the white calyxes.
Wildlife:
The flowers Gaultheria appressa are attractive to several different species of butterflies when in flower while the fruit is eaten by most fruit eating birds.
The fruits and sepals are edible but are rather insipid.
Cultivation:
Gaultheria appressa make excellent plants placed along dry riverine gullies or along embankments. Try planting small ground covers or annuals in the foreground to add height and length to the bed. It always looks green and fresh especially where adequate ground moisture is retained whether it is grown in medium shade or full sun.
It is suitable on fatty sands to heavy clay soils whether it is deep or skeletal. As a garden subject it will grow from 800mm to 1200mm by 800mm to 1500mm in diameter when grown in the open. It is cold tolerant to temperatures at least as low as minus 5 degrees once established and can withstand severe frosts.
It should be more widely grown within temperate areas of Australia and tried at least as far north as Toowoomba where basalt or granite outcrops prevail. It has never been popular due to the difficulty in establishing shrubs in the garden. It suits small to large gardens and can be lightly tipped pruned annually to increase bushiness and flowering. It is most suited to being be used as an understory plant at the verges of rainforest gardens or for hedges and screens in semi shaded areas.
If mild native fertilizers are used it will develop deep sea green leaves.
Propagation:
Seeds: Seeds are very difficult to germinate and even when germination is good is highly erratic. The seeds are very fine and probably need to go through an extended period of scarifying in the freezer of the refrigerator. Place the fresh seeds in a calico bag and place the bag in the freezer for at least 10 weeks prior to sowing.
Sow the treated seeds of Gaultheria appressa seeds into a seed raising mix and cover with1mm of fine sand. When the seedlings are 20mm to 30mm tall, prick them out and plant them into 20mm native tubes using a good organic mix and be careful not to damage the roots as like all members of the Ericaeae family have very fine roots that are susceptible to damage killing the seedlings once disturbed.
Once the seedlings reach 60mm to 80mm in height plant them out into their permanent position. Mass plantings are best achieved by planting them at 1.5 meters to 2 meters centers.
Cuttings: Cuttings need to be taken in Spring following the last frosts.
Cuttings with 2 or 3 pairs of nodes are required.
As the plants are susecptable to root damage cuttings are best placed into individual tubes or small peat pots.
Place 2 or 3 cuttings oin each tube for best results.
1 Prepare the cutting mix by adding one third sharp clean river sand, one third peat and one third perlite. These ingredients are sterilize,
2 Select good material from non diseased plants,
3 Select semi green stems for cuttings. Look for a stem with two or three nodes,
4 Place the cutting on a flat, hard surface, and make a clean cut down one side of the cutting at the base for 10mm with a sharp sterile knife or razor blade. – This scarification of the node will increase the chances of roots emerging from this spot. Now remove all but one or two the leaves, leaving the apex leaves in tact. If the leaves are very large in proportion to the stem, cut off the apical halves.
5 Fill a saucer with water, and place a little weak to medium rooting hormone into another container like a milk bottle top. Dip the node end of the cutting into the water and then into the rooting hormone. Tap off any excess hormone,
6 Use a small dipple stick or old pencil to poke a hole into the soilless potting mix. Ensure the hole is slightly larger than the stem diameter and be careful not to wipe the rooting hormone off the cuttings base, place the cuttings in a pattern ensuring the cuttings are not touching each other,
7 I like to place the pots in Plastic bags to help maintain temperature and moisture. Place in a semi shaded place like under 50mm shade cloth.
8 When the cuttings have struck, open the bag to allow air circulation for a few days to a week,
9 Once hardened off remove the cuttings from the bag and allow to further hardening for a few more days,
10 Transplant into a good potting mix to grow on.
Fertilize using seaweed, fish emulsion or organic chicken pellets soaked in water on an alternate basis. Fertilize every two months until the plants are established then annually in early September to October to maintain health, vitality and better flowering.
Further Comments from Readers:
Hi reader, it seems you use The Bible of Botany a lot. That’s great as we have great pleasure in bringing it to you! It’s a little awkward for us to ask, but our first aim is to purchase land approximately 1,600 hectares to link several parcels of N.P. into one at The Pinnacles NSW Australia, but we need your help. We’re not salespeople. We’re amateur botanists who have dedicated over 30 years to saving the environment in a practical way. We depend on donations to reach our goal. If you donate just $5, the price of your coffee this Sunday, We can help to keep the planet alive in a real way and continue to bring you regular updates and features on Australian plants all in one Botanical Bible. Any support is greatly appreciated. Thank you.
In the spirit of reconciliation we acknowledge the Bundjalung, Gumbaynggirr and Yaegl and all aboriginal nations throughout Australia and their connections to land, sea and community. We pay our respect to their Elders past, present and future for the pleasures we have gained.
Gaultheria viridicarpa
Classification:
Unranked: Eudicots
Unranked: Asterids
Order: Ericales
Family: Ericaeae
Subfamily: Styphelioideae
Genus: Is named in honour of Dr. Hugues Jean Gaulthier; 1708-1756, who was a Canadian Botanist and physician.
Species: From Virens, which is Latin for green and Karpos, which is Ancient Greek for a fruit. It refers to fruits, which are bright green in colour.
Subspecies: Gaultheria viridicarpa subsp. merinoensis From Merino, which is Latin/Spanish for the wool of a sheep or sheep and Anum/Ensis, which is Latin for to originate from. It refers to plants which were first discovered on Mount Merinos in far south eastern Queensland.
Subspecies: Gaultheria viridicarpa subsp. Viridicarpa. From Virens, which is Latin for green and Karpos, which is Ancient Greek for a fruit. It refers to fruits, which are bright green in colour.
Common Name: Green Wax Berry.
Distribution:
Gaultheria viridicarpa subsp. Merinoensis is found west from Springbrook National Park and Mount Merino on the MacPherson Range and near Warwick in far south eastern Queensland.
Gaultheria viridicarpa subsp. viridicarpa is found the New England National Park to Majors Point near Ebor in northern New South Wales.
https://avh.ala.org.au/occurrences/search?taxa=Gaultheria+viridicarpa#tab_mapView
Habitat Aspect Climate:
Gaultheria viridicarpa prefers dense shade to partial shade. It usually grows in montane woodlands on cliff faces and ledges, gullies or riparian zones, among rocks close to edges of cliffs and escarpments. The altitude ranges from 1000 meters ASL to 1560 meters ASL.
The temperatures range from minus 4.degrees in July to 38 degrees in January.
The rainfalls range from lows of 900mm to an average of 1000mm.
Soil Requirements:
Gaultheria viridicarpa prefers better quality light clays to medium clays soils mixed with rocks or screes. The soils are usually derived from partially decomposed black basalts. The soils pH ranges from 5.5pH to 6pH are preferred. It does not tolerate waterlogged soils. Non saline soils to slightly saline soils are tolerated.
Height & Spread:
Wild Plants: 0.2m to 0.7m by 1m to 1.6m.
Characteristics:
Gaultheria viridicarpa grows as a small spreading shrub with glabrous stems or stems that are sparsely covered in reddish-brown appressed, hispid hairs.
The alternate, coriaceous leaves of Gaultheria viridicarpa‘s are narrow elliptical, broad ovate. The leaves measure 15mm to 60mm in length and 6mm to 20mm in width. The bases are tapering rounded while the apexes are acute with an apiculate tip. The discolourous laminas are mid green to deep green, semi glossy to glossy and glabrous on the upper laminas while the lower laminas are slightly paler. The laminas are flat or very slightly recurve upwards from the mid vein to the margins and decurve downwards near the apex. The margins are finely and evenly toothed. The mid vein is prominent while the lateral and secondary veins are slightly prominent on the lower lamina. The mid vein is distinctly visible while the lateral and secondary veins are impressed on the upper lamina. The mid green often tinged reddish-brown petioles and measure 1mm to 3mm in length.
The new growth is pale green to lime-green, smooth and glossy.
The inflorescences of Gaultheria viridicarpa are born singularly from the upper leaf axils or as small terminal clusters or on a short panicle from the terminals. There are 4.to 9 white tipped lime-green, elliptical basal bracteoles on the pedicel while the individual flowers are subtended by a small white lime-green tipped elliptical bract.
The 5 white tipped lime-green, ovate to lanceolate sepals enlarge, become fleshy and surround the fruit. The sepals measure 7mm to 11mm in length when fully enlarged. The corolla measures 4mm to 5.5mm in length. The flowers appear from October to February.
Gaultheria viridicarpa fruits measure 5mm to 6.5mm in diameter including the green calyxes.
Wildlife:
The flowers Gaultheria viridicarpa are attractive to several different species of butterflies when in flower while the fruit is eaten by most fruit eating birds.
The fruits and sepals are edible but are rather insipid.
Cultivation:
Gaultheria viridicarpa would make excellent plants placed along dry riverine gullies or along steep embankments. Try planting small ground covers or annuals in the fore ground to add height and length to the bed. It always looks green and fresh especially where adequate ground moisture is retained whether it is grown in medium shade or full sun.
It is suitable on heavy clay soils whether it is deep or skeletal provided there is a lot of gravel present. As a garden subject it will probably grow from 0.5 meters to 0.6 meters in height by 0.8 meters to 1.7 meters in diameter when grown in the open. It is cold tolerant to temperatures at least as low as minus 5 degrees once established and can withstand severe frosts.
It should be more widely grown in temperate areas of Australia and tried at least as far north as Toowoomba where basalt or granite outcrops prevail. It has never been popular due to the difficulty in establishing shrubs in the garden. It suits small to large gardens and can be lightly tipped pruned annually to increase bushiness and flowering. It would be most suited to being be used as an understory plant at the verges of rainforest gardens or for hedges and screens in semi shaded areas.
If mild native fertilizers are used it will develop deep sea green leaves.
Propagation:
Seeds: The seeds of Gaultheria viridicarpa are very difficult to obtain and may be similar to Gaultheria appressa to germinate and even when germination is good is highly erratic. The seeds are very fine. The seeds probably need to go through an extended period of scarifying in the freezer of the refrigerator. Place the fresh seeds in a calico bag and place the bag in the freezer for at least 10 weeks prior to sowing.
Sow the treated seeds of Gaultheria viridicarpa seeds into a seed raising mix and cover with1mm of fine sand. When the seedlings are 20mm to 30mm tall, prick them out and plant them into 20mm native tubes using a good organic mix and be careful not to damage the roots as like all members of the Ericaeae family have very fine roots that are susceptible to damage killing the seedlings once disturbed.
Once the seedlings reach 60mm to 80mm in height plant them out into their permanent position. Mass plantings are best achieved by planting them at 1.5 meters to 2 meters centers.
Cuttings: Cuttings need to be taken in Spring following the last frosts.
Cuttings with 2 or 3 pairs of nodes are required.
As the plants are susecptable to root damage cuttings are best placed into individual tubes or small peat pots.
Place 2 or 3 cuttings oin each tube for best results.
1 Prepare the cutting mix by adding one third sharp clean river sand, one third peat and one third perlite. These ingredients are sterilize,
2 Select good material from non diseased plants,
3 Select semi green stems for cuttings. Look for a stem with two or three nodes,
4 Place the cutting on a flat, hard surface, and make a clean cut down one side of the cutting at the base for 10mm with a sharp sterile knife or razor blade. – This scarification of the node will increase the chances of roots emerging from this spot. Now remove all but one or two the leaves, leaving the apex leaves in tact. If the leaves are very large in proportion to the stem, cut off the apical halves.
5 Fill a saucer with water, and place a little weak to medium rooting hormone into another container like a milk bottle top. Dip the node end of the cutting into the water and then into the rooting hormone. Tap off any excess hormone,
6 Use a small dipple stick or old pencil to poke a hole into the soilless potting mix. Ensure the hole is slightly larger than the stem diameter and be careful not to wipe the rooting hormone off the cuttings base, place the cuttings in a pattern ensuring the cuttings are not touching each other,
7 I like to place the pots in Plastic bags to help maintain temperature and moisture. Place in a semi shaded place like under 50mm shade cloth.
8 When the cuttings have struck, open the bag to allow air circulation for a few days to a week,
9 Once hardened off remove the cuttings from the bag and allow to further hardening for a few more days,
10 Transplant into a good potting mix to grow on.
Fertilize using seaweed, fish emulsion or organic chicken pellets soaked in water on an alternate basis. Fertilize every two months until the plants are established then annually in early September to October to maintain health, vitality and better flowering.
Further Comments from Readers:
Hi reader, it seems you use The Bible of Botany a lot. That’s great as we have great pleasure in bringing it to you! It’s a little awkward for us to ask, but our first aim is to purchase land approximately 1,600 hectares to link several parcels of N.P. into one at The Pinnacles NSW Australia, but we need your help. We’re not salespeople. We’re amateur botanists who have dedicated over 30 years to saving the environment in a practical way. We depend on donations to reach our goal. If you donate just $5, the price of your coffee this Sunday, We can help to keep the planet alive in a real way and continue to bring you regular updates and features on Australian plants all in one Botanical Bible. Any support is greatly appreciated. Thank you.
In the spirit of reconciliation we acknowledge the Bundjalung, Gumbaynggirr and Yaegl and all aboriginal nations throughout Australia and their connections to land, sea and community. We pay our respect to their Elders past, present and future for the pleasures we have gained.
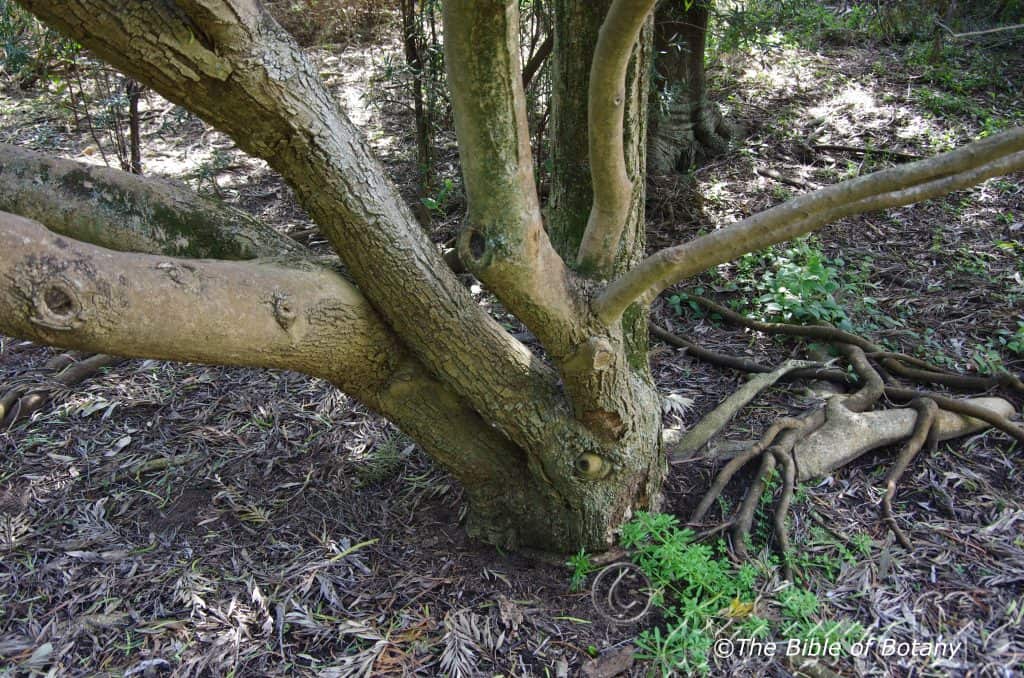
National Botanic Gardens ACT
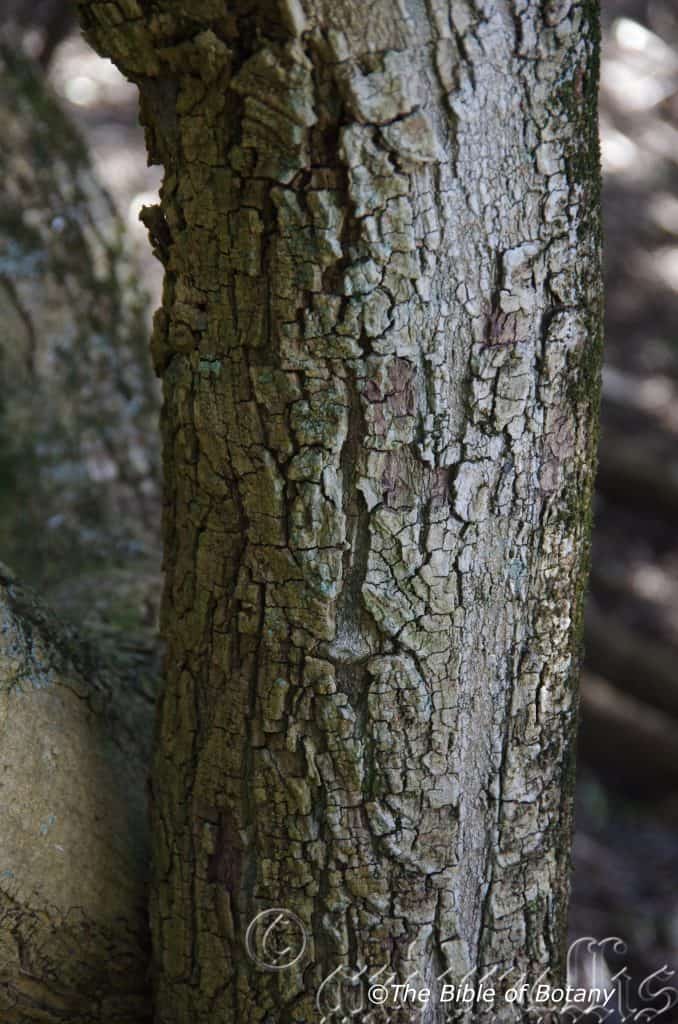
National Botanic Gardens ACT
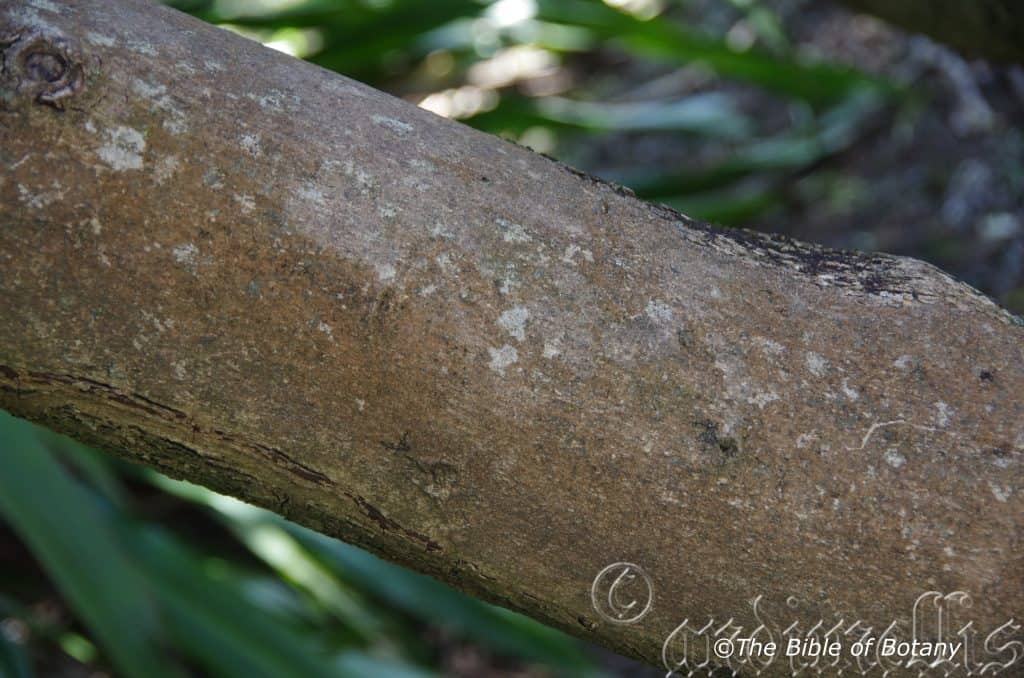
National Botanic Gardens ACT
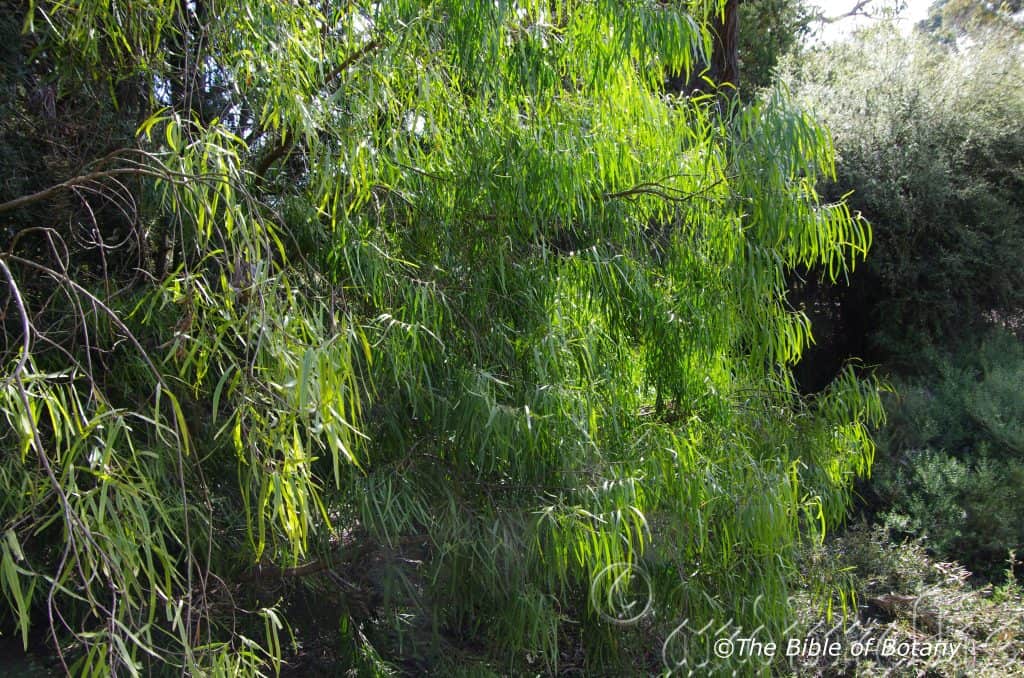
National Botanic Gardens ACT
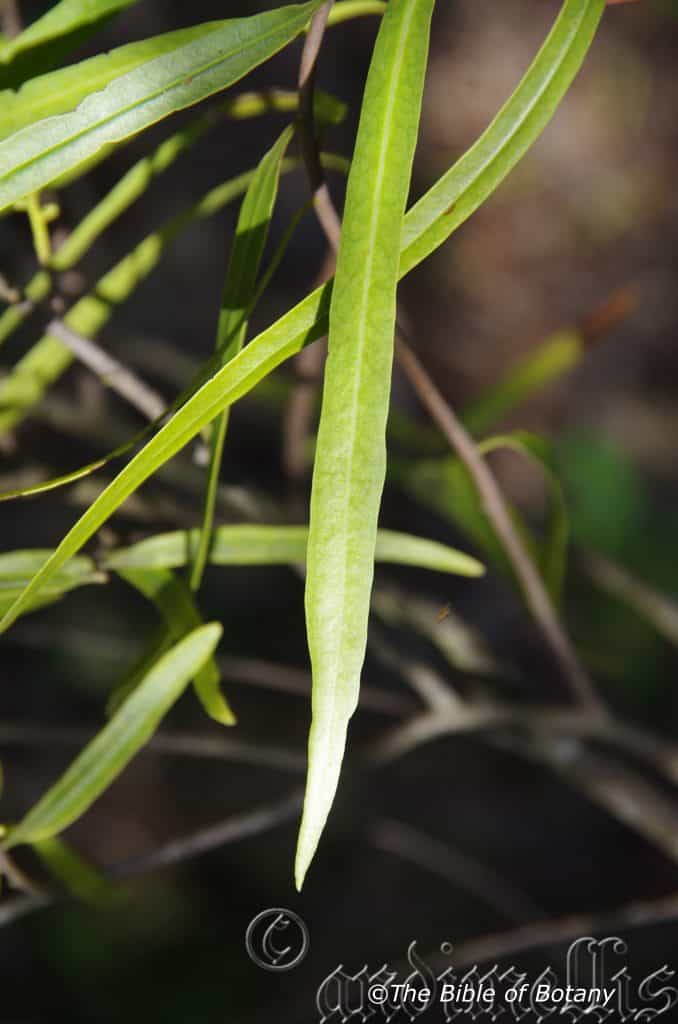
National Botanic Gardens ACT
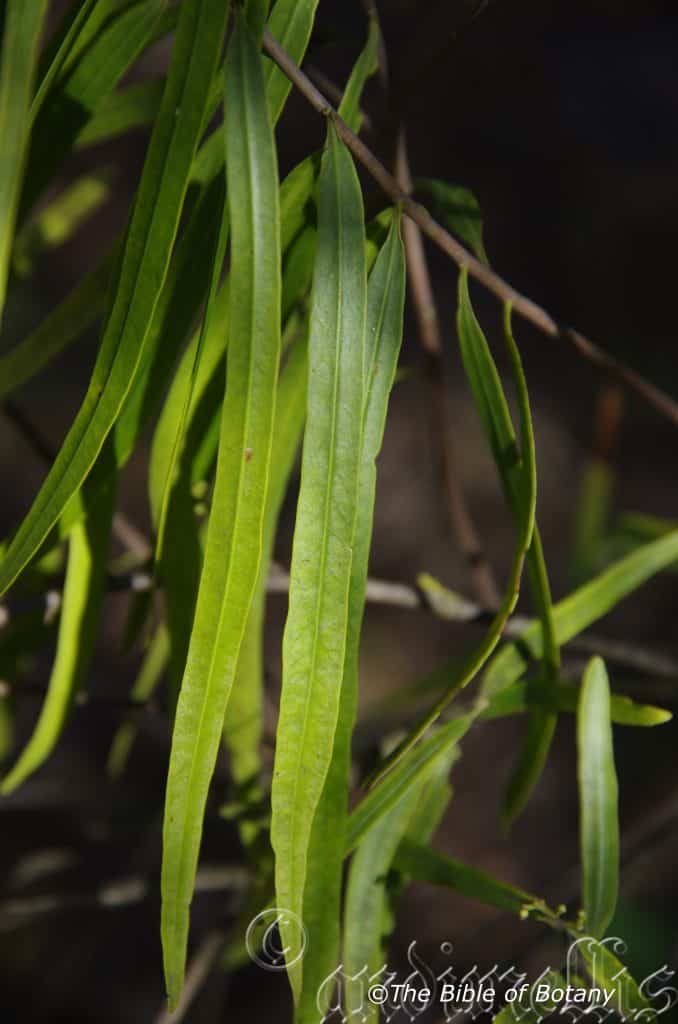
National Botanic Gardens ACT
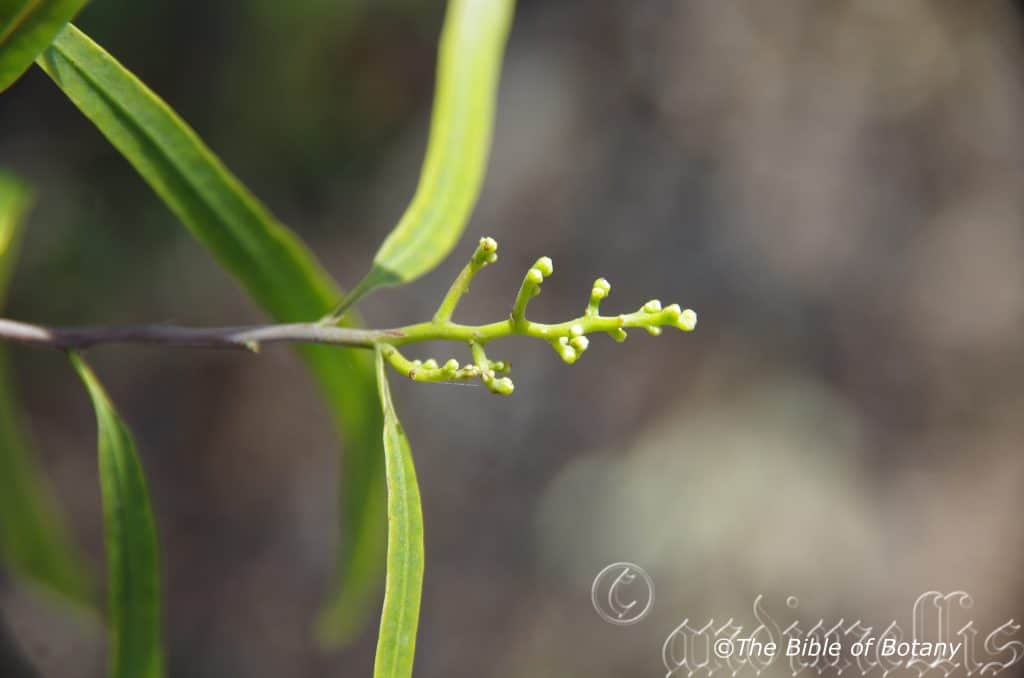
National Botanic Gardens ACT
Geijera parviflora
Classification:
Unranked: Eudicots
Unranked: Rosids
Class: Equisetopsida
Subclass: Magnoliidae
Order: Sapindales
Family: Rutaceae
Genus: Is named in honour of J. D. Geijer; 1708-1756, who was a Swedish botanist.
Species: From Parvum, which is Latin for small, little or puny and and Floris, which is Latin for a flower or Flos, which is the Roman goddess of spring and flowers. It refers to flowers which are much smaller than other species in the genus.
Subspecies: Geijera parviflora subsp. parviflora From Parvum, which is Latin for small, little or puny and Floris, which is Latin for a flower or Flos, which is the Roman goddess of spring and flowers. It refers to flowers which are much smaller than other species in the genus.
Subspecies: Geijera parviflora subsp. crassifolia From Crassum, which is Latin for thick and Folium, which is Latin for foliage. It refers to the foliage or leaves, which are thicker than other sub species in the species.
Common Name: In the Aboriginal language it is known as Wilgarr.
Distribution:
Geijera parviflora subsp. parviflora is mainly found on the eastern two thirds of Queensland south of Charters Towers and most of New South Wales west of the Great Dividing Range and into the eastern side of South Australia. There are some isolated populations further west in coastal South Australia and into coastal Western Australia
Geijera parviflora subsp. crassifolia is found east from Lake Sharpe in southern central Western Australia to Berri and Barmera in the southern quarter of South Australia.
https://avh.ala.org.au/occurrences/search?taxa=Geijera+parviflora#tab_mapView
Habitat Aspect Climate:
Geijera parviflora prefers full sun. It usually grows in dry inland regions in mixed open woodlands. The altitude ranges from 5 meters ASL to 1000 meters ASL.
The temperatures range from minus 3 degrees in July to 44 degrees in January.
The rainfalls range from lows of 250mm to an average of 750mm.
Soil Requirements:
Geijera parviflora prefers skeletal to deep sandy loams, light clays to medium, stony clays, deep rock screes in gorges or beneath cliffs and ledges. The soils are usually derived from decomposed sandstones, or at times granites. The soils pH ranges from 5pH to 6pH. It does not tolerate waterlogged soils. Non saline soils to moderately saline soils are tolerated.
Height & Spread:
Wild Plants: 9m to 26m by 9m to 12m.
Characteristics:
Geijera parviflora grows as a small tree with weeping habit similar to the weeping willow. The trunks and larger branches are glabrous and smooth. The branchlets and juvenile stems are mid green, glabrous and covered in pale grey, caduceus, puberulent hairs.
The linear to linear-lanceolate leaves measure 35mm to 180mm in length by 4mm to 12mm in width. The concolourous leaves are deep green, glabrous and covered in pale grey, caduceus, puberulent hairs. The bases are attenuate or cuneate, while the apexes are acute or obtuse. The mid vein is strongly raised on lower lamina, while the lateral veins are at 70 degrees and barely visible. The margins are entire, slightly incurved and may be slightly undulating. The petiole measures 3mm to 12mm in length.
The inflorescences of Geijera parviflora are born as small, loose terminal panicles. The panicles measure 40mm to 70mm in length by 20mm to 50mm in diameter. The pedicels measure 0.5mm to 2mm in length.
The 5 yellowish-green elliptical sepals are glabrous to sparsely covered in pale grey pubescent hairs. The sepals measure 0.8mm to 1mm in length. The 5 triangular, valvate petals are glabrous and measure 1.5mm to 2mm in length.
The pale green convex disc has 5 erect, white filaments that measure 1.5mm to 2mm in length while the pale green, erect style measures 1mm to 1.5mm in length. The 5 sherical, yellow anthers are basifixed. The flowers appear from June to November.
Geijera parviflora has globose drupes contain a single black seed that measure 4mm to 5mm in diameter.
Wildlife:
The leaves of Geijera parviflora have a fetid odour, which attracts many species of blowflies as pollinators.
Cultivation:
Geijera parviflora is a beautiful small growing tree for use in gardens both small and large. It has been used frequently by various councils as a street tree in regional areas west of the Great Dividing Range.
It is relatively slow to establish itself but when it does it has a dense weeping canopy. In cultivation the trees will grow to from 8 meters to 10 meters by 6 meters to 8 meters in diameter when grown in the open. It makes an excellent specimen tree or very attractive tree around homesteads in formal or informal plantings especially when there is a consistent supply of organic mulch.
It would make an excellent tree for around B-B-Que areas especially if planted with native arid annuals below for added colour.
Propagation:
Seeds: The seeds of Geijera parviflora are slow and erratic to germinate. Sow fresh seeds or seeds from the previous season after moving them from the refrigerator over winter. Place Geijera salicifolia seeds into a seed raising mix and place the trays beneath 30mm shade cloth and keep moist. When the seedlings are 50mm to 60mm tall, prick them out and plant them into 50mm native tubes using a good organic mix.
Once the seedlings reach 200mm to 250mm in height plant them out into their permanent position.
Fertilize using seaweed, fish emulsion or organic chicken pellets soaked in water on an alternate basis. Fertilize every two months until the plants are established then annually in early September to October to maintain health, vitality and better flowering.
Further Comments from Readers:
Hi reader, it seems you use The Bible of Botany a lot. That’s great as we have great pleasure in bringing it to you! It’s a little awkward for us to ask, but our first aim is to purchase land approximately 1,600 hectares to link several parcels of N.P. into one at The Pinnacles NSW Australia, but we need your help. We’re not salespeople. We’re amateur botanists who have dedicated over 30 years to saving the environment in a practical way. We depend on donations to reach our goal. If you donate just $5, the price of your coffee this Sunday, We can help to keep the planet alive in a real way and continue to bring you regular updates and features on Australian plants all in one Botanical Bible. Any support is greatly appreciated. Thank you.
In the spirit of reconciliation we acknowledge the Bundjalung, Gumbaynggirr and Yaegl and all aboriginal nations throughout Australia and their connections to land, sea and community. We pay our respect to their Elders past, present and future for the pleasures we have gained.
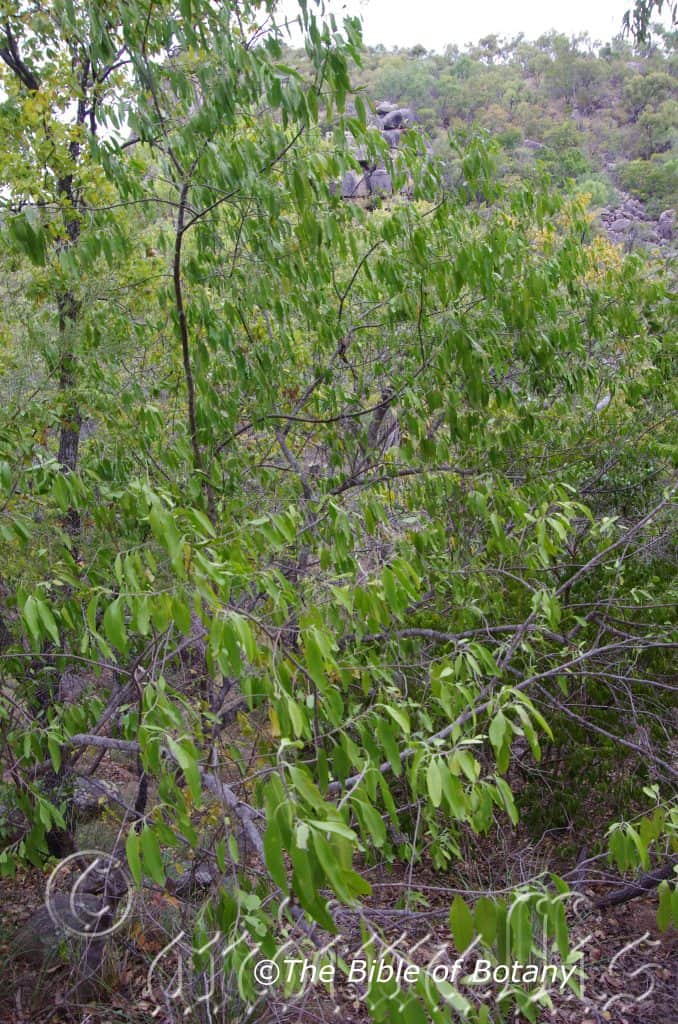
Magnetic Island Qld.
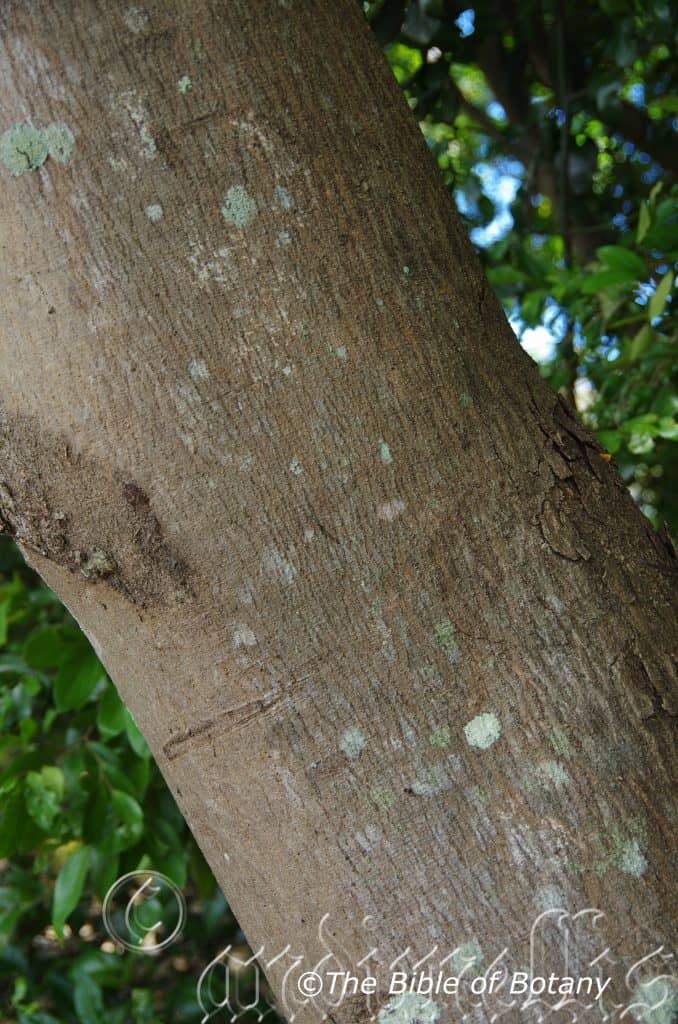
NCBG Coffs Harbour NSW
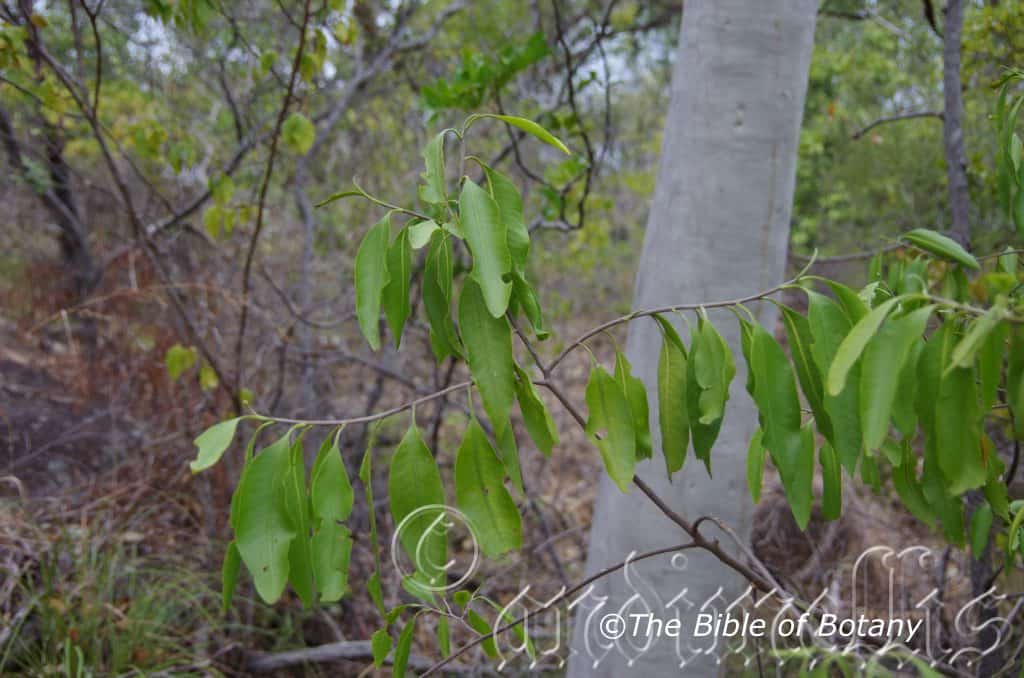
Magnetic Island Qld.
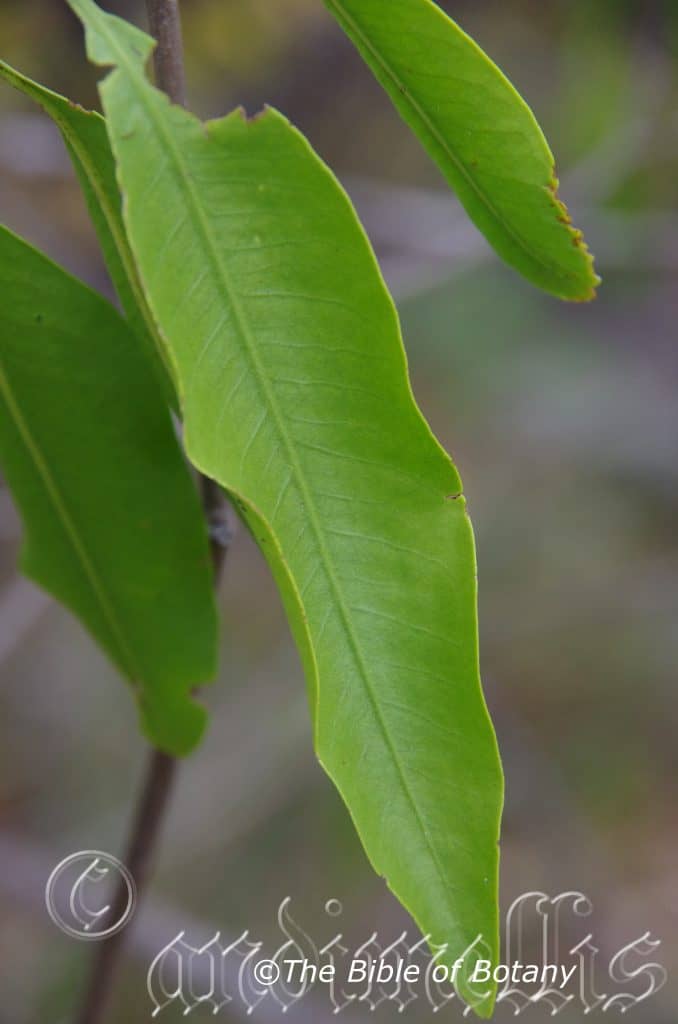
Magnetic Island Qld.
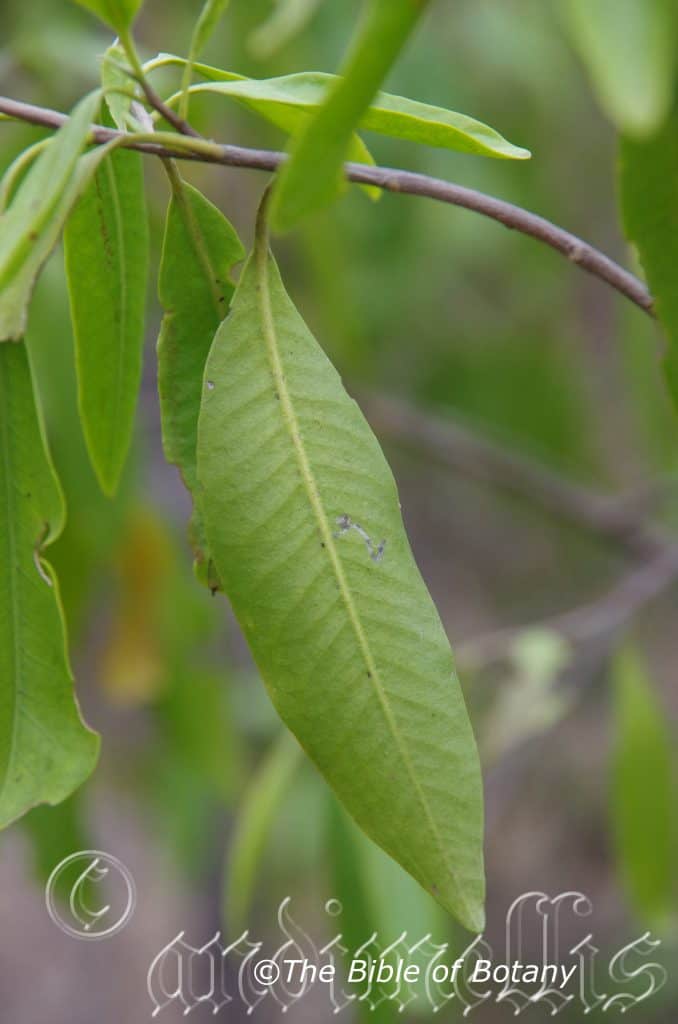
Magnetic Island Qld.
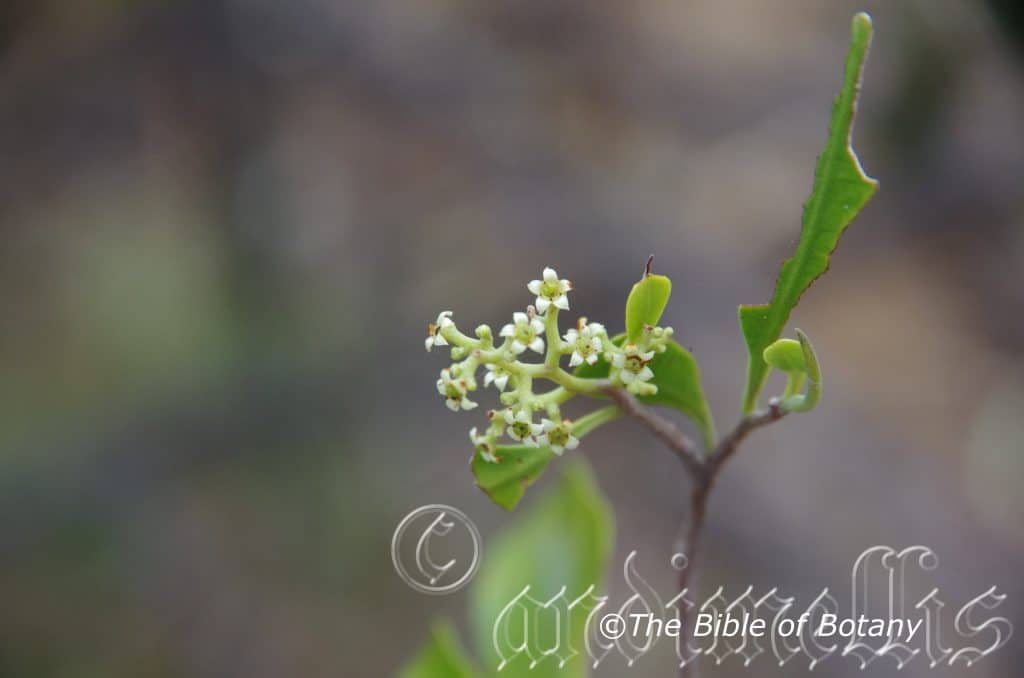
Magnetic Island Qld.
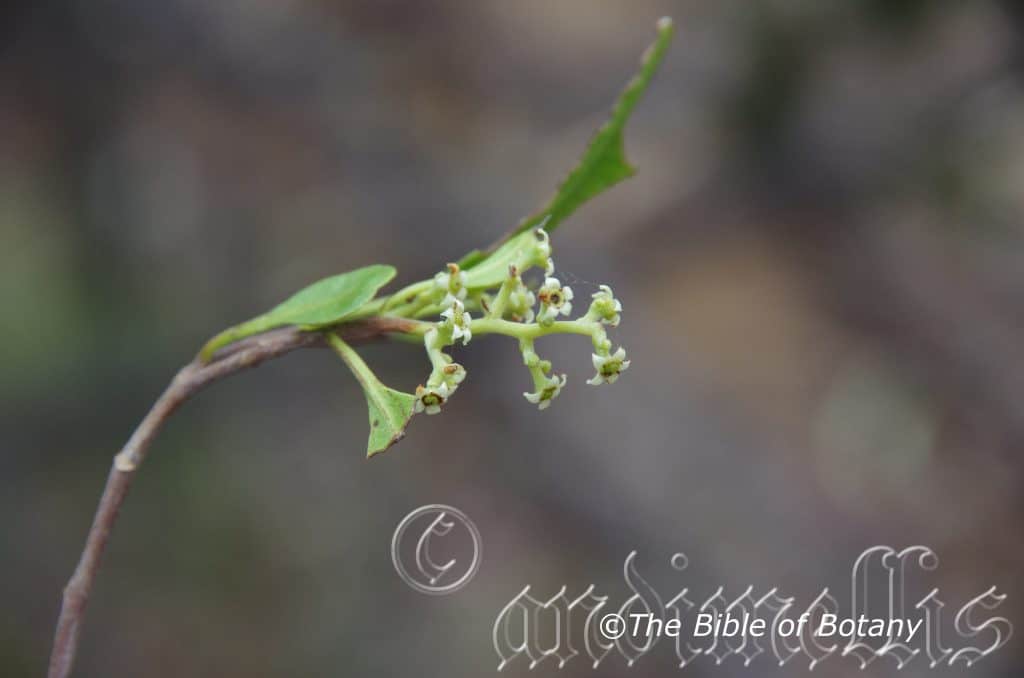
Magnetic Island Qld.
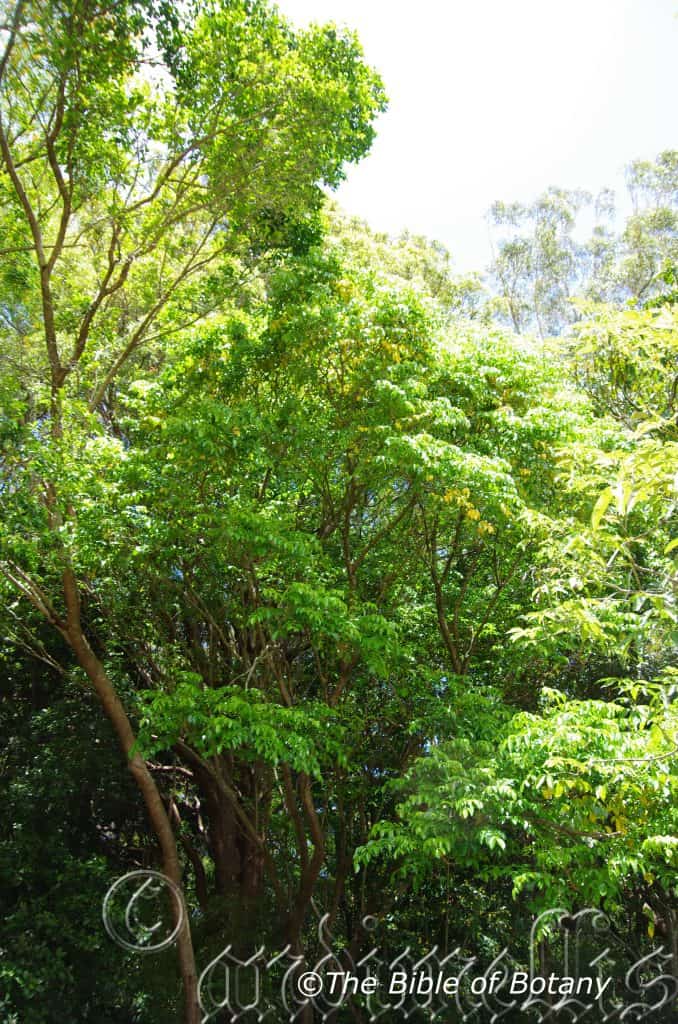
NCBG Coffs Harbour NSW
Geijera salicifolia
Classification:
Unranked: Eudicots
Unranked: Rosids
Class: Equisetopsida
Subclass: Magnoliidae
Order: Sapindales
Family: Rutaceae
Genus: Is named in honour of J. D. Geijer; 1708-1756, who was a Swedish botanist.
Species: From Salix, which is Latin for the weeping willow and Folium, which is Latin for foliage. It refers to the foliage being similar to that of the weeping willow in the Salix genus.
Common Name:
Distribution:
Geijera salicifolia is a found east of a line south from Cliff Island National Park on Cape York Peninsula to Bladdensburg National Park across to Carnarvon National Park and south to Jervis Bay in New South Wales. It is found on and east of the Great Dividing Range.
It is also found south and east of West Island and Vanderin Islands in the Gulf of Carpentaria south to Carrinbirini Conservation Park and Djumberana Clay Pan in the Northern Territory then east to Lawn Hill National Park on the Northern Territory Queensland border north to the coast.
https://avh.ala.org.au/occurrences/search?taxa=Geijera+salicifolia#tab_mapView
Habitat Aspect Climate:
Geijera salicifolia prefers dense shade, partial shade or full sun. It usually grows in dry monsoonal forests dry rain forest and drier positions in well-developed rain forest, well developed littoral rainforests, exposed dry riparian forests or moist inland gorges. The altitude ranges from 5 meters ASL to 1000 meters ASL.
The temperatures range from 12 degrees in July to 38 degrees in January.
The rainfalls range from lows of 350mm to an average of 3200mm.
Soil Requirements:
Geijera salicifolia prefers skeletal to deep sandy loams, light clays to medium, stony clays, deep rock screes in gorges or beneath cliffs and ledges. The soils are usually derived from decomposed sandstones, or at times granites and accumulated beach sands. The soils pH ranges from 5pH to 6pH. It does not tolerate waterlogged soils. Non saline soils to moderately saline soils are tolerated.
Height & Spread:
Wild Plants: 6m to 9m by 5m to 8m.
Characteristics:
Geijera salicifolia grows as a small tree with a straight grey deep brown to deep grey-brown rough bole. The trunks and larger branches are often covered in lichens in eastern populations growing adjacent to rainforests. The branchlets are glabrous and smooth while the branchlets are mid green, smooth and glabrous or covered in pale grey, caduceus, and puberulent hairs. All parts of the plant exude clear yellow latex when damaged.
The coriaceous, alternate leaves of Geijera salicifolia‘s are oblong-elliptical, narrow elliptical ovate. The leaves measure 35mm to 190mm in length and 10mm to 70mm in width. The involute margins of the petioles are glabrous to sparsely covered white puberulent hairs and measure 3mm to 22mm in length. The bases are usually cuneate or rarely rounded while the apexes are acuminate. The discolourous laminas are mid green to deep green, smooth, dull and glabrous or sparsely covered in fine off white puberulent hairs on the upper laminas while the lower laminas are paler. The laminas recurve upwards from the mid vein to the margins while the margins are entire and slightly undulating. The mid vein and lateral veins are prominent on both laminas but are more prominent on the lower laminas. The minute oil are numerous. The leaves are aromatic when crushed.
The undeveloped terminal leaves roll lengthways into a cylinder or narrow cone resembling the sheathing stipules on Ficus. The new growth is pale green to lime-green, smooth and glossy.
The inflorescences of Geijera salicifolia are born as small, loose terminal panicles. The panicles measure 40mm to 100mm in length by 25mm to 55mm in diameter. There are 100 to 230 individual flowers to a panicle. The pedicels measure 1mm to 1.2mm in length.
The 5 yellowish-green elliptical sepals are glabrous to sparsely covered in fawn ciliate hairs. The sepals measure 0.5mm to 1.2mm in length. The 5 oblong petals have a broad acute apex and measure 2mm to 3mm in length. The petals contain 20 to 25 relatively large oil glands.
The white, filiform filaments are attached to the outer rim of the disk and are opposite the petals. The stamens measure 0.1mm to 0.3mm while the anthers are brown. The mounded bright yellow disk encloses the lower part of the ovary and style. The style is yellow-green and measures 0.2mm to 0.4mm in length. The flowers appear from September to November.
Geijera salicifolia‘s fruits are orbicular to ovoid drupes. The drupes measure 5mm to 7mm in diameter. The green berries turn olive-brown externally and creamy fawn to creamy pastel yellow internally when ripe. The external surface is glandular-rugose due to large oil glands below the epidermis and is smooth and glabrous internally.
The orbicular seeds measure 3.5mm to 4mm in length 5mm to 6mm in diameter. The seeds have a glossy, black sarcotesta completely enclosing the seed. The testa is comparatively thick.
Wildlife:
The flowers Geijera salicifolia‘s leaves are the food source for the beautiful Macleay’s Swallowtail larvae Graphium macleayanus, and the beautiful Orchard Butterfly’s larvae Papilio aegeus. Common & Waterhouse.
Cultivation:
Geijera salicifolia is a beautiful small growing tree for use in gardens both small and large. It has been used frequently by various councils as a street tree in drier locations on both sides of The Great Dividing Range.
It is relatively slow to establish itself but when it does it has a dense weeping canopy. In cultivation the trees will grow to from 8 meters to 10 meters by 6 meters to 8 meters in diameter when grown in the open. It makes an excellent specimen tree or very attractive tree around homesteads in formal or informal plantings.
Geijera salicifolia is at its best when given a little extra water and a native organic fertilizer blend on an annual basis. Trees should be fertilized every 6 months during the first couple of years and annually thereafter. Mulching is highly recommended to add nutrients and organic matter to help conserve moisture and control weeds.
It would make an excellent tree for around BBQ areas especially if planted with native arid annuals below for added colour.
Propagation:
Seeds: The seeds of Geijera salicifolia are slow and erratic to germinate. Sow fresh seeds or seeds from the previous season after moving them from the refrigerator over winter. Place Geijera salicifolia seeds into a seed raising mix and place the trays beneath 30mm shade cloth and keep moist. When the seedlings are 50mm to 60mm tall, prick them out and plant them into 50mm native tubes using a good organic mix.
Once the seedlings reach 200mm to 250mm in height plant them out into their permanent position.
Fertilize using seaweed, fish emulsion or organic chicken pellets soaked in water on an alternate basis. Fertilize every two months until the plants are established then annually in early September to October to maintain health, vitality and better flowering.
Further Comments from Readers:
Hi reader, it seems you use The Bible of Botany a lot. That’s great as we have great pleasure in bringing it to you! It’s a little awkward for us to ask, but our first aim is to purchase land approximately 1,600 hectares to link several parcels of N.P. into one at The Pinnacles NSW Australia, but we need your help. We’re not salespeople. We’re amateur botanists who have dedicated over 30 years to saving the environment in a practical way. We depend on donations to reach our goal. If you donate just $5, the price of your coffee this Sunday, We can help to keep the planet alive in a real way and continue to bring you regular updates and features on Australian plants all in one Botanical Bible. Any support is greatly appreciated. Thank you.
In the spirit of reconciliation we acknowledge the Bundjalung, Gumbaynggirr and Yaegl and all aboriginal nations throughout Australia and their connections to land, sea and community. We pay our respect to their Elders past, present and future for the pleasures we have gained.
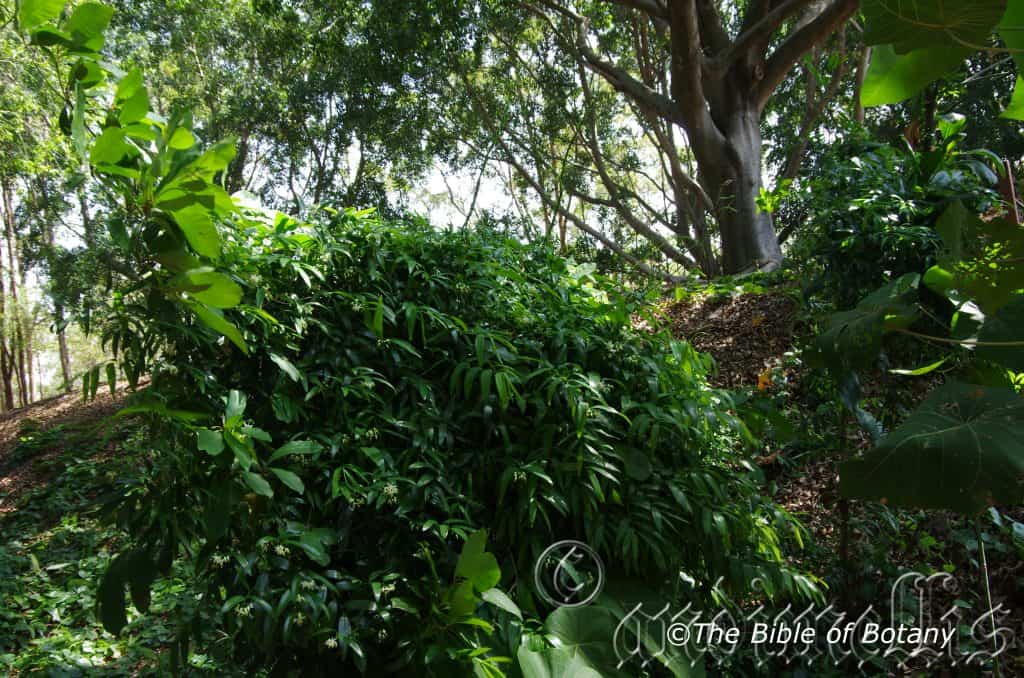
Greening Australia Norman Park Qld.
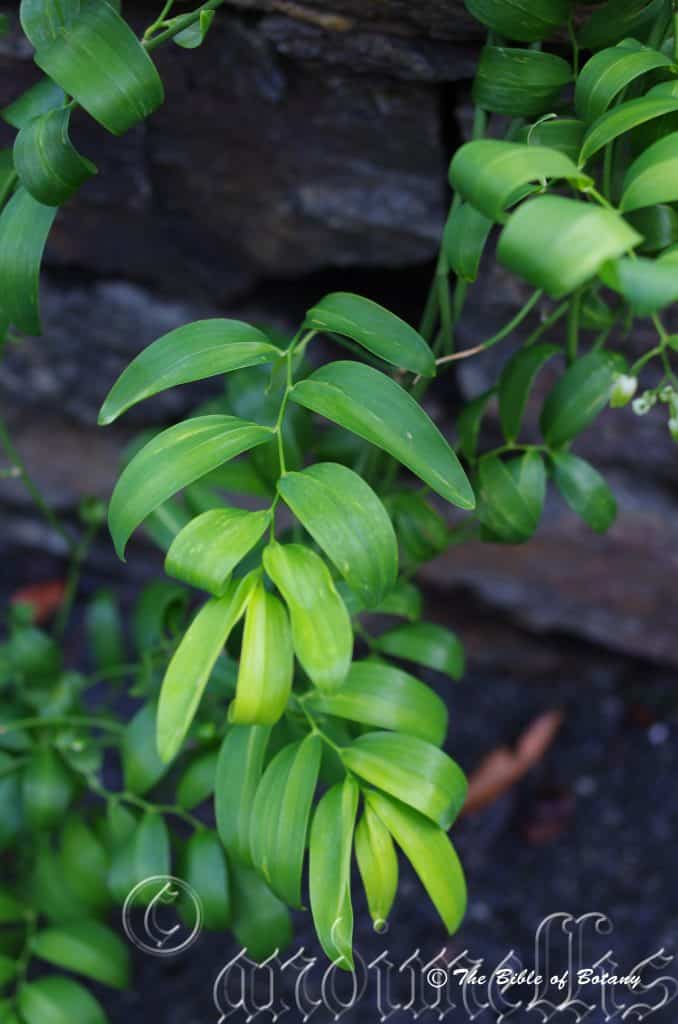
Mount Cootha Botanic Gardens Qld.
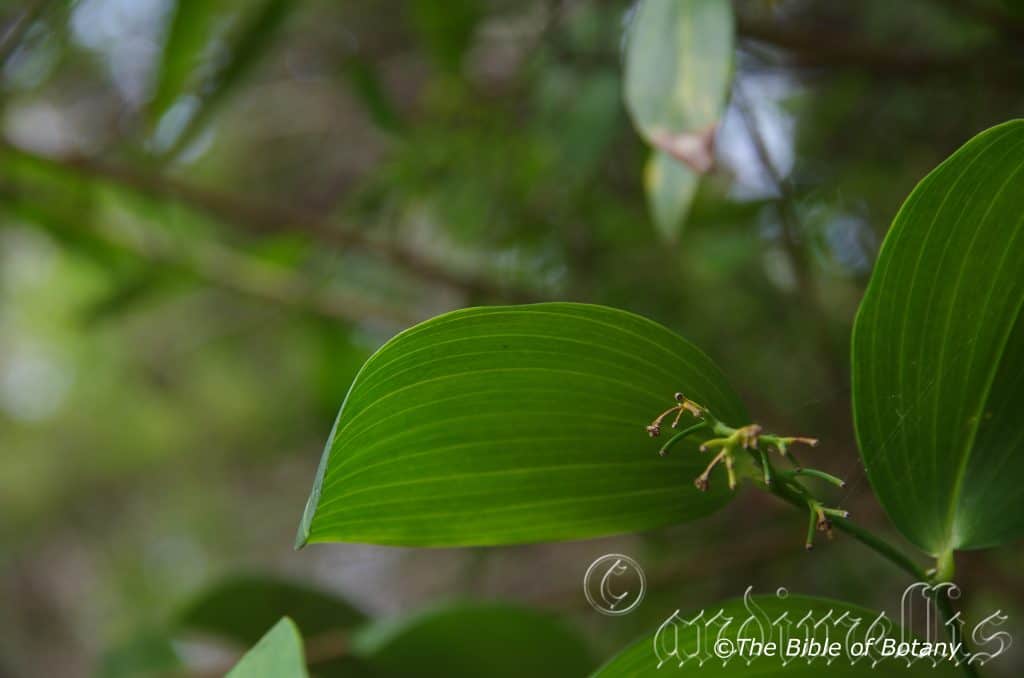
Yuraigir National Park NSW
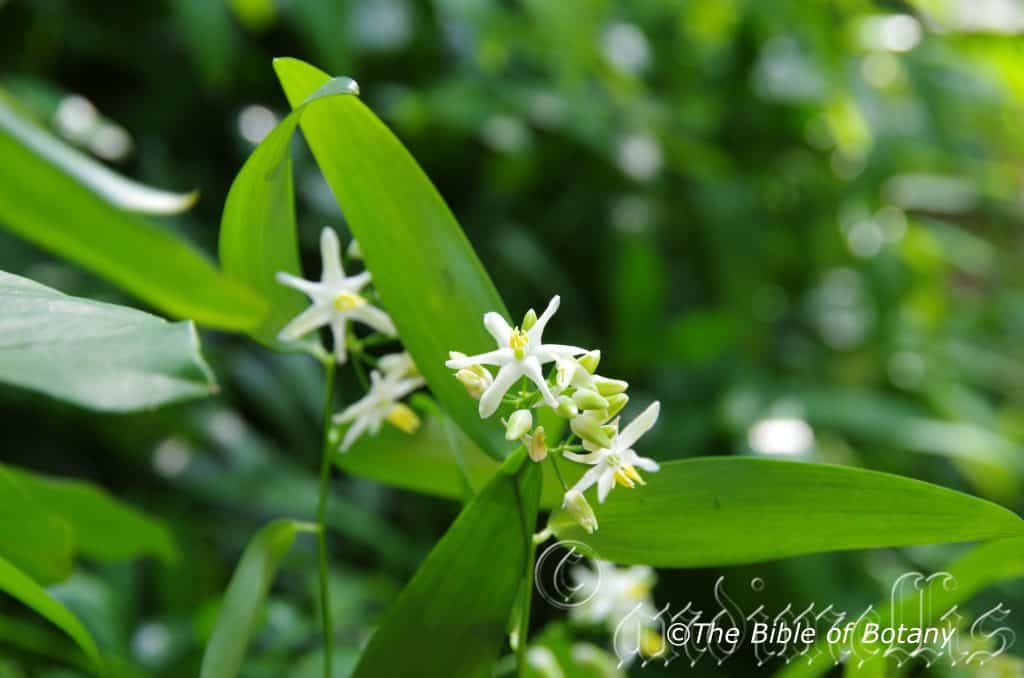
Mount Cootha Botanic Gardens Qld.
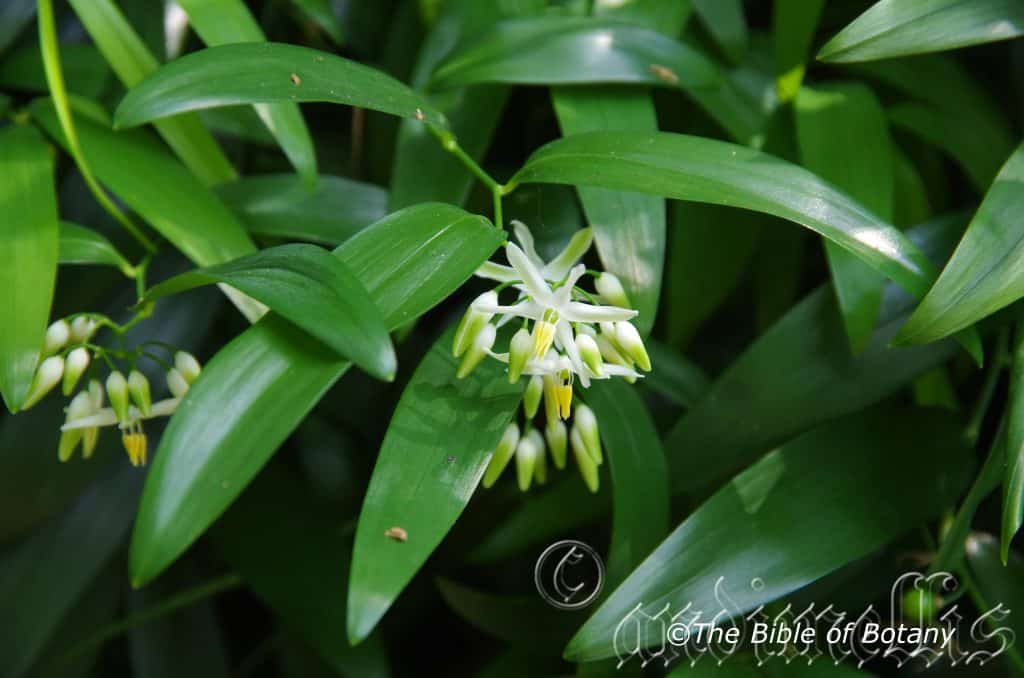
Mount Cootha Botanic Gardens Qld.
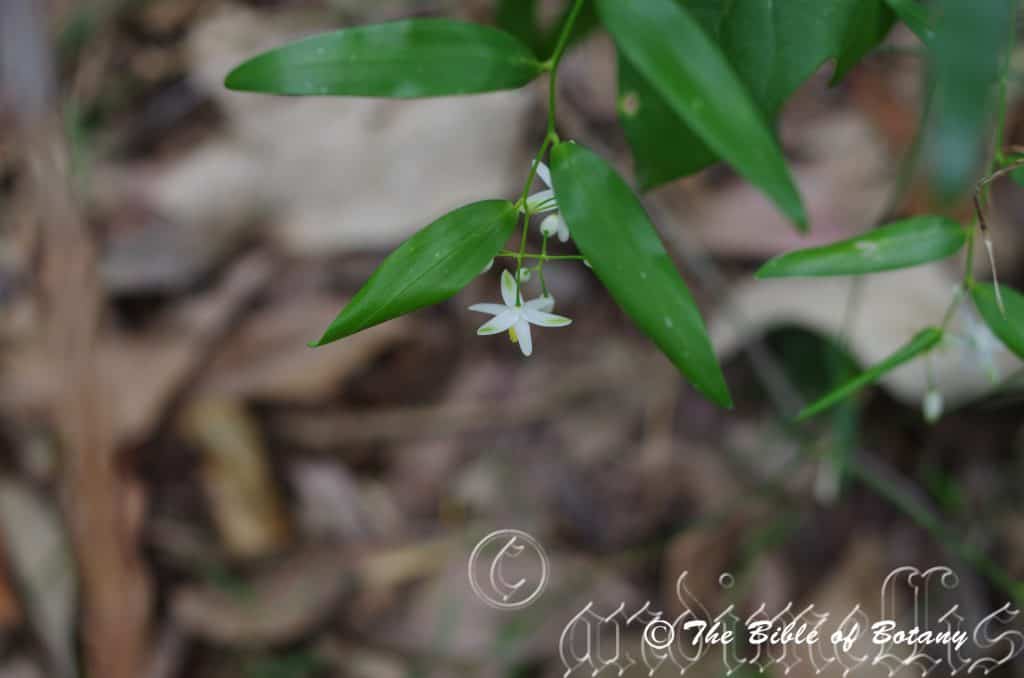
Toohey Forest Qld.
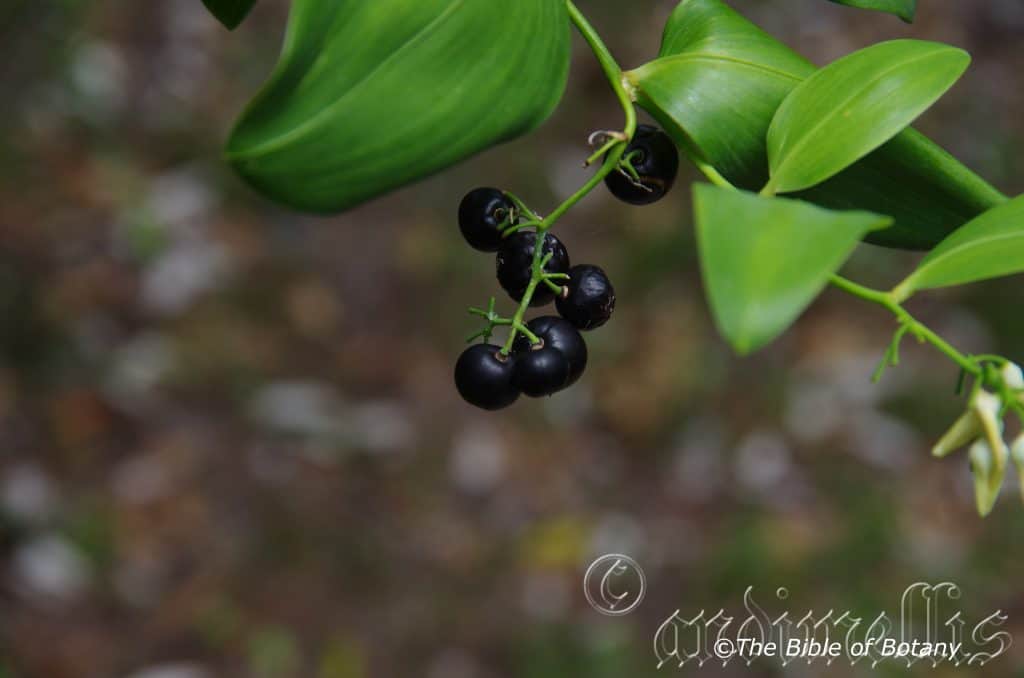
Yuraigir National Park NSW
Geitonoplesium cymosum
Classification:
Unranked: Monocots
Order: Liliales
Family: Hemerocallidaceae
Genus: From Geiton, which is Ancient Greek for a neighbour and Plesion which is Ancient Greek for near. It refers to plants, which are very closely related to the Luzuriaga genus.
Species: From Kyma, which is Ancient Greek or Cyma, which is Latin for a type of flower cluster. It refers to flowers, which open from the centre first, then in succession outward toward the periphery.
Common Name: Scrambling Lily.
Distribution:
Geitonoplesium cymosum is found south from Cardwell in northern Queensland to Orbost in north eastern Victoria. It is mainly found on and east of the Great Dividing Range.
https://avh.ala.org.au/occurrences/search?taxa=Geitonoplesium+cymosum#tab_mapView
Habitat:
Aspect / Climate:
Geitonoplesium cymosum prefers full sun to light shade or dappled shade usually starting life in light shade as an understory plant adjacent to rainforests and wet Eucalyptus forests. It grows along riverine rainforests and disturbed land. The altitude ranges from 5 meters ASL to 900 meters ASL.
The temperatures range from 0 degrees in July to 34.degrees in January.
The rainfall ranges from lows of 450mm to an average of 1800mm annually.
Soil Requirements:
Geitonoplesium cymosum prefers better quality fertile sandy loams, to medium clays. The soils are usually derived from decomposed basalts, sandstones, granites, shales or metamorphic rocks. The soils pH ranges from 5pH to 7pH. It does tolerate waterlogged. Non saline soils to moderately saline soils are tolerated.
Height & Spread:
Wild Plants: 5m to 8m by 5m to 6m.
Characteristics:
Geitonoplesium cymosum grows as a strong wiry climber which twines around anything it comes in contact with. The deep sea green, glabrous stems are wiry and very strong almost impossible to break with bare hands. The stems branch from the leaf nodes or from ground level where it forms a medium size white lignotuber.
The adjacent, ovate to narrow lanceolate or linear leaves measure 30mm to 100mm in length 5mm to 25mm in width. The bases are rounded with the margin twisting as it approaches the petiole while the apexes are acute. The leaf margins are entire and flat. The petioles measure 1mm to 2mm in length. The leaves are concolourous, mid green, semi glossy to glossy. The mid vein is prominent on both the upper and lower laminas.
Geitonoplesium cymosum inflorescences are branched into small cymes at the apex of a stem. The peduncles measure 20mm to 25mm in length while the pedicles measure 5mm to 10mm in length. Flowers number 9 to 27 on a cyme. The 6 tepals measure 5mm to 10mm in length and are oblong with a broadly acuminate apex. Margins are entire on both the back 3 tepals (sepals) and the front 3 tepals (petals). The 12 stamens are erect and surround the ovary. The anthers are bright yellow and measure 6 to 8mm in length while the tepals are white to mauve. The style is white. The flowers appear from late September though to late February.
Geitonoplesium cymosum fruits are a globose berry. The black berries measure 10mm to 20mm in diameter and contain several black glossy seeds. Fruits are born from January to August.
Wildlife:
Geitonoplesium cymosum‘s wildlife includes the small Native Bee Tetragonula carbonaria.
Cultivation:
Geitonoplesium cymosum is a beautiful small creeper for fences but looks its best when allowed to scramble over objects on the ground and where it receives some shade or dappled light during the day. It can be used successfully around pools and ponds because of its size. The attractive glossy foliage and wiry stems are self-cleaning and maintenance is minimal. Hard pruning of larger plants to within a couple of centimetres of the ground will rejuvenate it to vigorously return to its former best. After pruning water with a deep watering and use a double dose of one of our fertilizer recommendations. Plants recover and send out new shoots within a week.
It can be used to scramble over logs or between large rocks as a versatile ground cover. Cultivated plants will cover a low fence to around 2 to 3 square meters.
Regular use of an organic native fertilizer with adequate and even soil moisture will ensure a prolonged flowering and fruiting season. Tip pruning is also beneficial to ensure the plants remain dense.
Purchasing old woody plants from a nursery is not a problem, just cut all the growth off at a few centimetres from the ground after planting and give a good soaking with our recommended double strength fertilizer. In fact you may be purchasing a plant that already has a well-developed tuber which is ready to be invigorated.
Propagation:
Seeds: Sow fresh Geitonoplesium cymosum seeds into a seed raising mix. When the seedlings are 30mm to 50mm tall, prick them out and plant them into 50mm native tubes using a good organic mix.
Once the seedlings reach 200mm to 250mm in height plant them out into their permanent position. Mass plantings as a ground cover would need the seedlings to be planted at 2 meters to 3 meter centers.
Fertilize using seaweed, fish emulsion or organic chicken pellets soaked in water on an alternate basis. Fertilize every two months until the plants are established then annually in early September to October to maintain health, vitality and better flowering.
Further Comments from Readers:
Hi reader, it seems you use The Bible of Botany a lot. That’s great as we have great pleasure in bringing it to you! It’s a little awkward for us to ask, but our first aim is to purchase land approximately 1,600 hectares to link several parcels of N.P. into one at The Pinnacles NSW Australia, but we need your help. We’re not salespeople. We’re amateur botanists who have dedicated over 30 years to saving the environment in a practical way. We depend on donations to reach our goal. If you donate just $5, the price of your coffee this Sunday, We can help to keep the planet alive in a real way and continue to bring you regular updates and features on Australian plants all in one Botanical Bible. Any support is greatly appreciated. Thank you.
In the spirit of reconciliation we acknowledge the Bundjalung, Gumbaynggirr and Yaegl and all aboriginal nations throughout Australia and their connections to land, sea and community. We pay our respect to their Elders past, present and future for the pleasures we have gained.
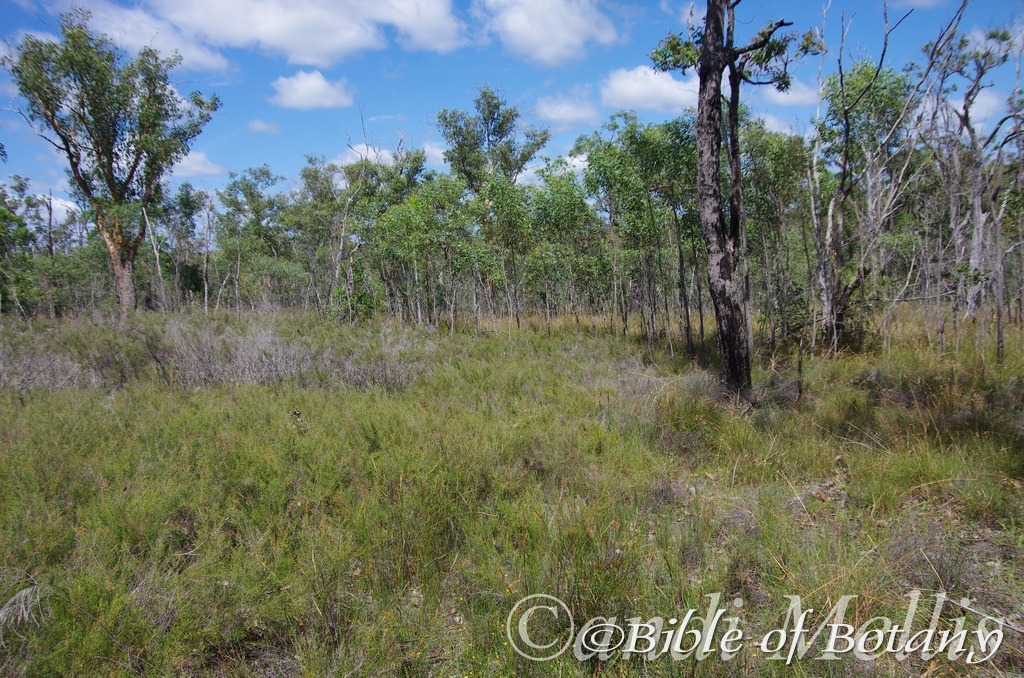
Clarence Valley NSW
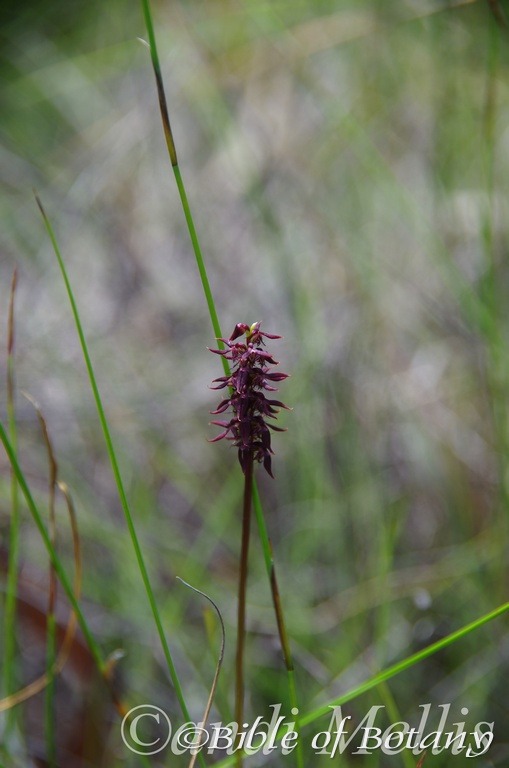
Clarence Valley NSW
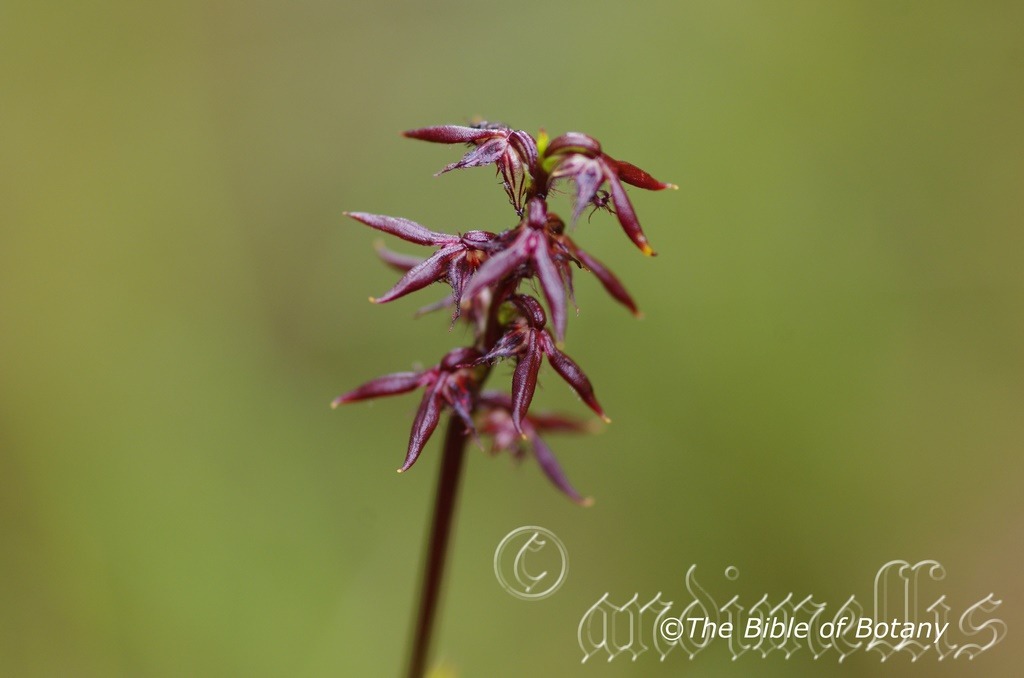
Clarence Valley NSW
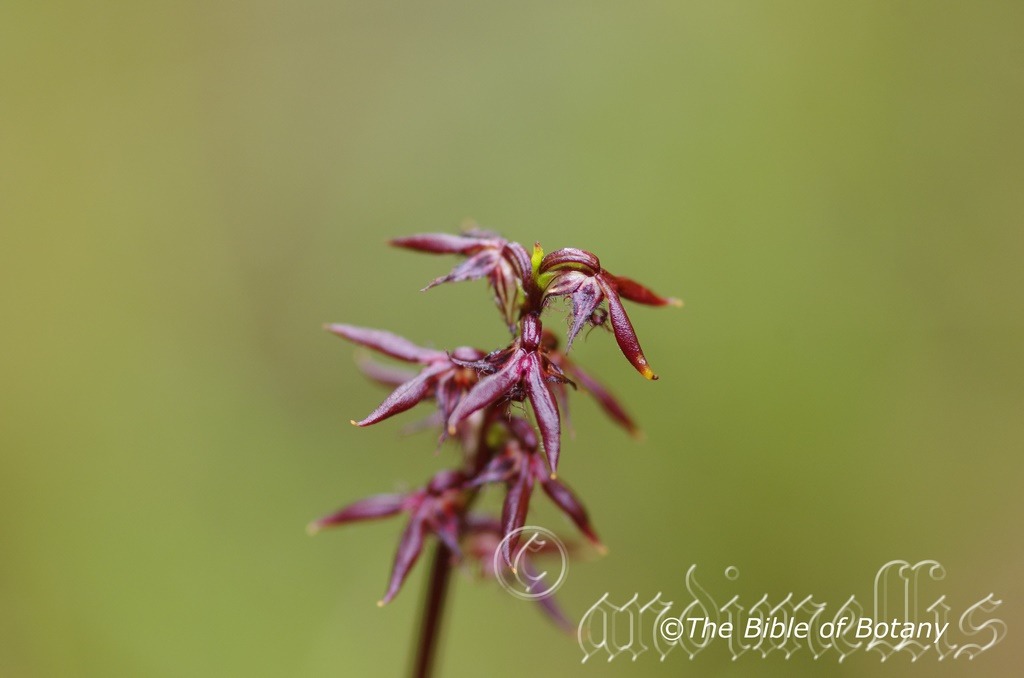
Clarence Valley NSW
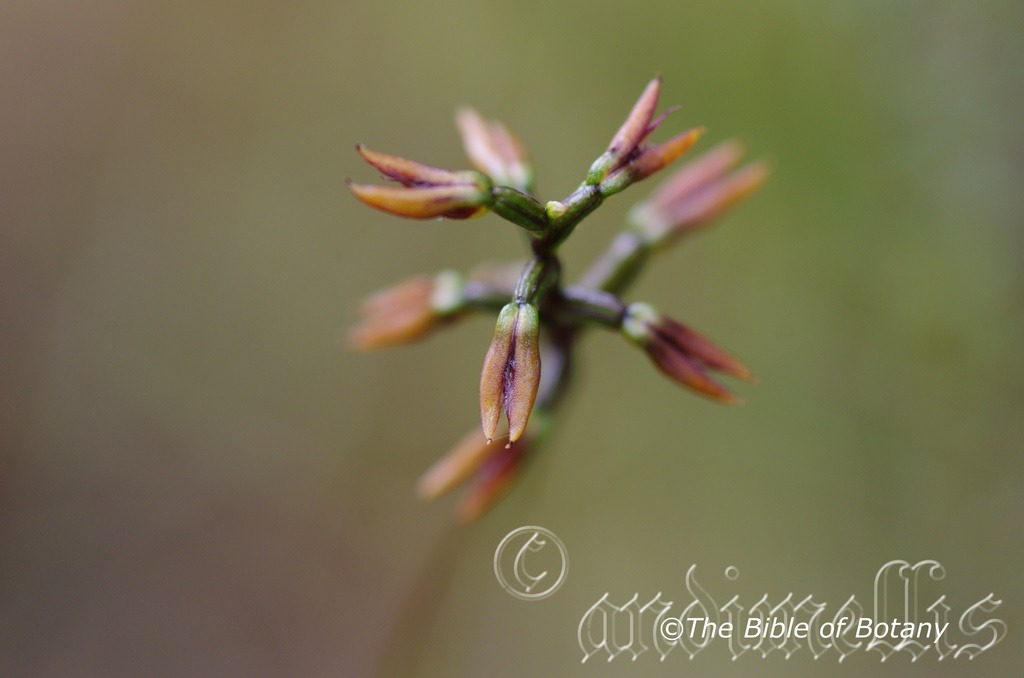
Clarence Valley NSW
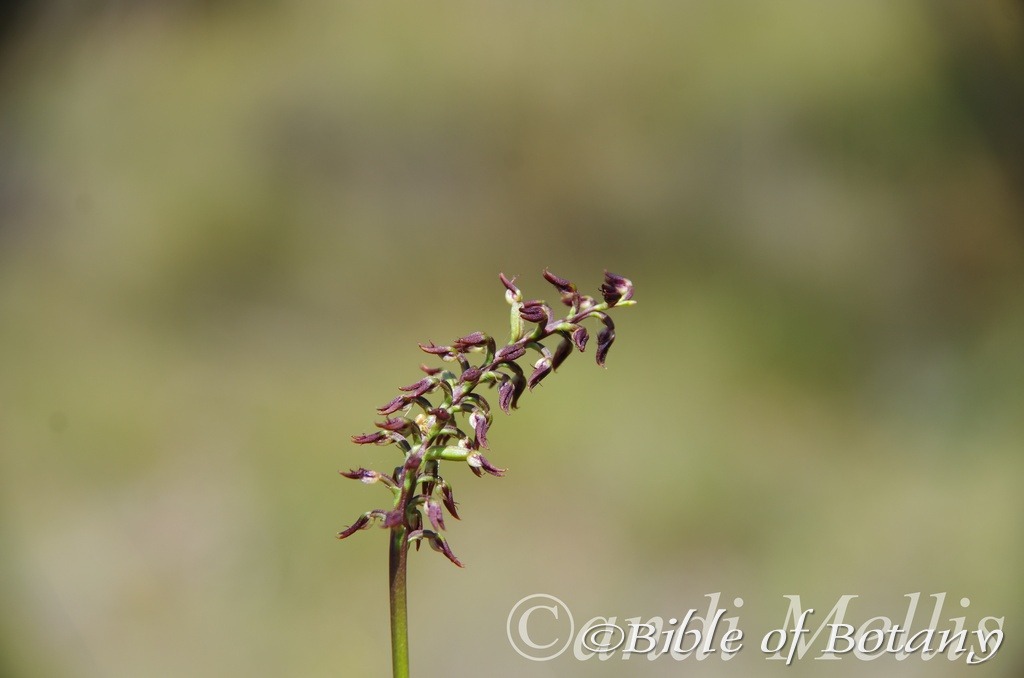
Clarence Valley NSW
Genoplesium acuminatum
Classification:
Class: Equisetopsida
Subclass: Magnoliidae
Superorder: Lilianae
Order: Asparagales
Family: Orcidaceae
Genus: From Genos which is Ancient Greek for a race and Plesion which is Ancient Greek for to be near to. It refers to plants, which are closely related to the Prasophyllum genus. – This orchid was first described in 1927 by Richard Sanders Rogers who gave it the name Prasophyllum acuminatum and published the description in Transactions and Proceedings of the Royal Society of South Australia. In 1989, David Jones and Mark Clements changed transferred it the new genus Genoplesium acuminatum. In 1998 they moved it again to Corunastylis acuminata. The latter name change has not been accepted by Plants of the World Online and still remains as Genoplesium acuminatum in New South Wales publications.
Species: From Acuminatum, which is Latin for a sharp tapering point. It refers to the apexes on the sepals.
Common Name: Midge Orchid.
Distribution:
Genoplesium acuminatum is found south from Fraser Island in south eastern coastal Queensland to Karingai in central coastal New South Wales. It is found east of the Great Dividing Range near the coast.
https://avh.ala.org.au/occurrences/search?taxa=Genoplesium+acuminatum#tab_mapView
Habitat Aspect Climate:
Genoplesium acuminatum prefers medium shade to dappled shade. It grows in sparse sclerophyll coastal forest especially adjacent to heaths and wallums and in heath. The altitude ranges from 5 meters ASL to 850 meters ASL.
The temperatures range from 5 degrees in August to 36 degrees in January.
The rainfall ranges from lows of 850mm to 1650mm average per annum.
Soil Requirements:
Genoplesium acuminatum prefers to grow on better quality sandy loams to light gritty fatty sandy loams. The soils are usually derived from decomposed sandstone over sandstone, or accumulated peaty sands behind the back dunes. The soils pH ranges from 5pH to 6.5pH are preferred where the water can drain freely. It does not tolerate waterlogged soils but moisture is a strong requirement for good growth through capillary action. Non saline soils to slightly saline soils are tolerated.
Height & Spread:
Wild Plants: 0.2m to 0.4m by 0.03m to 0.05m.
Characteristics:
Genoplesium acuminatum grows as a terrestrial orchid on short horizontal tuberous, unbranched rhizomes. The plants grow rapidly with the onset of the wet season to produce flowers and seeds dying back completely during the drier months of the year.
Genoplesium acuminatum has a single clasping leaf like sheath that is appressed against the spike. The orchids lack chlorophyll except for the spikes and the single diminutive leaf, growing most likely as saprophytes on decomposing vegetable or animal matter.
The inflorescences of Genoplesium acuminatum is a long, moderately dense, stiff, erect spike. The spikes usually have 6 to 16 individual flowers. The erect, inflorescence measure 20mm to 60mm in length while the pedicel measure 3mm to 5mm in length. The ovary which appears to be part of the pedicel is slightly swollen at the base.
The nodding deep maroon flowers measure 6mm to 9mm in length overall by 6mm to 7mm in width overall.
Thew dorsal sepal is broad-ovate and measures 3.5mm to4mm in length by 2.1mm to 2.2mm in width. The margins are coarsely ciliate. The 2 linear to lanceolate lateral sepals measure 4.5mm to 5mm in length by 1mm to 1.5mm in width. It is not gibbous at the base but widely divergent.
The 3 petals are broad-ovate to lanceolate, and measure 3.5mm to 4.5mm in length by 1.2mm to 1.4mm in width. The apexes are noticably long acuminate to filiform, with coarsely ciliate margins.
The labellum is ovate to lanceolate and measures 6mm to 7.3mm in length by 2.5mm in width. The apexes are long acuminate, with recurved, margins and coarse ciliat hairs that measure 1.2mm in length. It is oblong callus with a retuse or emarginate apex, extending about half way to the labellum apex. The flowers appear from December to May.
Genoplesium acuminatum‘s capsules are nodding and turn pale grey-brown when ripe.
Wildlife:
Genoplesium acuminatum‘s wildlife is unknown to the author.
Cultivation:
Genoplesium acuminatum is an unusual terrestrial orchid to grow in the garden. If you are lucky enough to have it growing it is worthwhile preserving with in situation. Not much is known about its cultivation outside their natural habitat. The best method to establish a colony is to mark the area with stakes where plants are known to occur. Use local mulch to lightly top dress the area on an annual basis.
Propagation: All orchids are declared rare, vulnerable or endangered are protected by Federal and State Laws and must not be removed from the wild unless you are a land developer, mining company or main Roads department etc. This includes bulbs, roots, leaves, seeds and flowers. No part of any plant can be removed from Federal, State or Local Government land without the prior permission of the authority and this includes the spore.
Genoplesium acuminatum seeds require treatment before sowing. Really Orchid seeds are meant for professionals with time, equipment and space. However if you wish to persevere then here are the basics and you are learning from an amateur. Once the orchids are large enough to handle treat them similarly to the genre Liparis.
1. Obtain relevant materials
The first step in growing orchid from seed will be sourcing and having at the ready all materials that will be required in the propagation process.
This includes all of the following:
Unripe orchid seed capsule. If there are 2 capsules secure the second capsule immediately after the first capsule splits or if only one capsule as soon as it changes colour.
Orchid gelling medium with agar which can be purchased from an orchid society or a specialist nursery.
Distilled water
Cooking pot
Spoon
Oven-safe glass or polypropylene containers with lids
Sealable bags
Clean, sterilized cutting board
Rubber gloves
Paper towels
Tweezers or forceps
70 percent ethanol
Bleach
Scalpel or sharp knife
Planting pot
Orchid compost
Length of wire metal
Plastic spray bottle.
deep petri dishes or sterile jars.
2. Prepare agar medium
The agar medium is a special orchid gelling mixture that distilled water will be added to distilled water.
To prepare the medium, mix equal parts of orchid gelling medium with distilled water in a cooking pot.
Place the pot on a stove and bring the mixture to boil for while stirring continuously for two minutes.
Pour the mixture into the petri dishes glass or propylene containers while ensuring not to fill the containers above 20 percent of their volume.
Loosely replace the lids to the containers. Sterilize the containers by heating them up in a microwave oven for between 2 to 3 minutes.
Spray 70 percent ethanol into a sealable bag to create a sterile environment. Transfer the heated containers into the sealable bag.
Allow the containers to cool a bit before tightening their lids and then sealing the bag. Leave the containers to stand for a few days until the mixture solidifies.
3. Prepare seed capsule and work surface
Place an open pot of water on a stove and bring to boil. Place the cutting board in the oven and sterilize.
Put on rubber gloves and sterilize the forceps, and scalpel with 70 percent ethanol.
Insert the seed capsule into a bowel filled with bleach for about fifteen minutes.
Sterilize seed capsule again with 70 percent ethanol and place on grill.
Using the sterilized scalpel, cut open the seed capsule to reveal the seeds. Using a scalpel or sharp knife, scrape out the seeds from the capsule unto an ethanol soaked paper towel.
4. Flasking of the seed
Take out the petri dishes or glass jars containers holding the agar medium. Over the steam, open up the containers and transfer seeds from the ethanol soaked paper towel into the individual containers using the sterilized forceps.
The amount of seeds will determine the number of containers required. Replace the lid of the containers and place them on a window sill that receives indirect sunlight.
5. Wait and exercise patience
All that can be done at this point is to wait until the seeds germinate. The amount of time that this might take varies and is dependent on the particular species.
Generally, the time can range from a few months to a few years. During this period of waiting, ensure the containers are free from contamination to ensure that germination is not disrupted.
6. Emergence of protocorms
Protocorms are tuber-shaped bodies with rhizoids that are produced by the young seedlings of various orchids. Protocorms represent the embryonic form of the orchid plant.
Their emergence after the period of waiting at an affirmation that everything in the propagation process is on track.
7. Transflask orchid seedlings is done after they have developed roots
Upon the emergence of the protocorms, consistently observe the growth of the seedlings. At the point when the seedlings appear to overcrowd the flask, transflasking should be carried out, typically within 30 and 60 days.
* This is done by removing individual seedlings using sterilized tweezers from the original containers and placing them in new containers also filled, in a proportion similar to the original, with agar medium. 6 to 8 in a standard petri dish or 1or 2 to a test tube
8. Transplant seedlings into planting pots
On the presumption that there are no disruptions to the plant growth, the seedlings will eventually outgrow the containers.
At this point, it is to be transplanted into planting pots. A good rule of thumb to determine when it is ready to be transplanted is when the seedlings have developed roots that have grown up to the length of one-quarter of an inch.
To transplant, prepare a planting pot or other container for receiving the seedling by majorly filling it up with coarse fir bark and possibly some slightly moist orchid compost mixture containing perlite, fine charcoal, redwood bark shavings, etc.
To extract the seedlings, submerge the containers in warm water to help loosen the agar gel.
Once the agar medium is softened, twist a piece of metal to form a loop and in turn, use it to carefully pull out the seedlings from the container. It is best done if the agar and seedling can be removed together.
The seedlings can be further rinsed in lukewarm water to remove any excess agar mixture still stuck to them.
Following this, the seedlings can now be planted into the prepared pot with at least 50mm of space between each individual seedling.
9. Positioning the orchid
The seedling once fully transplanted should be placed in a location that is warm with good indirect sun light.
Slowly position the pots into an area that closely assimilates the conditions it will be growing under.
The choice as to whether the plant should be exposed to full sun or in direct sunlight will be dependent on the particular orchid specie.
10. Subsequent care of the plant
After the first week, the seedling can be misted several times a day and watered just once a week.
A guide in watering the plant will be using the dryness of the fir back that is, water the plant until the fir back is completely moistened and wait till it has completely dried out before watering again.
Fertilize using seaweed, fish emulsion or organic chicken pellets soaked in water on an alternate basis. Fertilize only after the plantss are fully established then annually in early September to October to maintain health, vitality and better flowering.
Further Comments from Readers:
Hi reader, it seems you use The Bible of Botany a lot. That’s great as we have great pleasure in bringing it to you! It’s a little awkward for us to ask, but our first aim is to purchase land approximately 1,600 hectares to link several parcels of N.P. into one at The Pinnacles NSW Australia, but we need your help. We’re not salespeople. We’re amateur botanists who have dedicated over 30 years to saving the environment in a practical way. We depend on donations to reach our goal. If you donate just $5, the price of your coffee this Sunday, We can help to keep the planet alive in a real way and continue to bring you regular updates and features on Australian plants all in one Botanical Bible. Any support is greatly appreciated. Thank you.
In the spirit of reconciliation we acknowledge the Bundjalung, Gumbaynggirr and Yaegl and all aboriginal nations throughout Australia and their connections to land, sea and community. We pay our respect to their Elders past, present and future for the pleasures we have gained.
Genoplesium fimbriatum
Classification:
Class: Equisetopsida
Subclass: Magnoliidae
Superorder: Lilianae
Order: Asparagales
Family: Orcidaceae
Genus: From Genos which is Ancient Greek for a race and Plesion which is Ancient Greek for to be near to. It refers to plants, which are closely related to the Prasophyllum genus. – This orchid was first described in 1927 by Richard Sanders Rogers who gave it the name Prasophyllum acuminatum and published the description in Transactions and Proceedings of the Royal Society of South Australia. In 1989, David Jones and Mark Clements changed transferred it the new genus Genoplesium acuminatum. In 1998 they moved it again to Corunastylis acuminata. The latter name change has not been accepted by Plants of the World Online and still remains as Genoplesium acuminatum in New South Wales publications.
Species: From Fimbriatum, which is Latin for a fringe. It refers to the margins of a structure or organ, which has a long course fringe.
Common Name: Fringed Midge Orchid.
Distribution:
Genoplesium fimbriatum is found south from Morayfield in south eastern Queensland to Nowra in coastal New South Wales with a disjunct population near Batlow west of the ACT. It is found on and east of the Great Dividing Range.
https://avh.ala.org.au/occurrences/search?taxa=Genoplesium+fimbriatum#tab_mapView
Habitat Aspect Climate:
Genoplesium fimbriatum prefers medium shade to dappled shade. It grows as an understory terrestrial orchid in open moist schlerophyll forests and in closed woodlands. It is found in low lying areas close to the coast adjacent to coastal heaths and wallums and plateau or montane moss heaths which have rising water tables close to the surface. The altitude ranges from 5 meters ASL to 850 meters ASL.
The temperatures range from minus 5 degrees in August to 36 degrees in January.
The rainfall ranges from lows of 850mm to 1150mm average per annum.
Soil Requirements:
Genoplesium fimbriatum prefers to grow on better quality sandy loams to light gritty fatty sandy loams or light clays. The soils are usually derived from decomposed sandstone over sandstone, brown basalt, black basalt granites and accumulated peaty sands behind the back dunes. The soils pH ranges from 5pH to 6.5pH are preferred where the water can drain freely. It does not tolerate waterlogged soils but moisture is a strong requirement for good growth through capillary action. Non saline soils to slightly saline soils are tolerated.
Height & Spread:
Wild Plants: 0.2m to 0.4m by 0.03m to 0.05m.
Characteristics:
Genoplesium fimbriatum grows as a terrestrial orchid on short horizontal tuberous, unbranched rhizomes. The plants grow rapidly with the onset of the wet season to produce leaves, flowers and seeds dying back completely during the drier months of the year.
Genoplesium fimbriatum‘s has a single clasping leaf like sheath that is appressed to the spike. The orchids lack chlorophyll except for the spikes growing most likely growing as saprophytes on decomposing vegetable matter.
The inflorescences of Genoplesium fimbriatum is a long stiff, erect spike. The spikes usually have 5 to 30 individual flowers. The erect, spikes measure 200mm to 400mm in length while the inflorescence measure 50mm to 120mm in length while the pedicel measure 3mm to 5mm in length. The ovary which appears to be part of the pedicel is slightly swollen at the base. The flowers have a mild lemon scent.
The nodding pastel yellow flowers measure 12mm to 16mm in length overall by 9mm to 12mm in width overall.
The dorsal sepal is narrow ovate to ovate with an acuminate apex while the margins and apex are densely covered in long purplish ciliate hairs. The yellow dorsal sepal is striped in purple. The dorsal sepal measures 4mm to 5.5mm in length by 2mm to 2.8mm in width.
The linear to lanceolate lateral sepals are yellowish tinged purple, glabrous, with an acute apex. The margins are entire. The lateral sepals measure 5mm to 6mm in length by 1.2mm to 1.5mm in width.
The narrow ovate to ovate lateral petals are yellowish with purple stripes and have a narrow acute apex. The lateral petals measure 2.5mm to 3mm in length by 0.8mm to 1mm in width. The lateral petals margins are entire with short to long ciliate hairs.
The linear, thin chartaceous labellum measures 4mm to 4.5mm in length by 0.9mm to 1.1mm in width. The apex is recurved while the margins are entire and covered in coarse pink to purplish-red ciliate hairs which measure 1mm to 1.3mm in length. The flowers appear from January to May.
Genoplesium fimbriatum‘s capsules are nodding and turn pale grey-brown when ripe.
Wildlife:
Genoplesium fimbriatum‘s wildlife is unknown to the author.
Cultivation:
It is an unusual terrestrial orchid to grow in the garden. If you are lucky enough to have it growing it is worthwhile preserving with in situation. Not much is known about its cultivation outside their natural habitat. The best method to establish a colony is to mark the area with stakes where plants are known to occur. Use local mulch to lightly top dress the area on an annual basis.
Propagation:
Seeds: All orchids are declared rare, vulnerable or endangered are protected by Federal and State Laws and must not be removed from the wild unless you are a land developer, mining company or main Roads department etc. This includes bulbs, roots, leaves, seeds and flowers. No part of any plant can be removed from Federal, State or Local Government land without the prior permission of the authority and this includes the spore.
The seeds require treatment before sowing. Really Orchid seeds are meant for professionals with time, equipment and space. However if you wish to persevere then here are the basics and you are learning from an amateur. Once the orchids are large enough to handle treat them similarly to the genre Liparis.
1. Obtain relevant materials
The first step in growing orchid from seed will be sourcing and having at the ready all materials that will be required in the propagation process.
This includes all of the following:
Unripe orchid seed capsule. If there are 2 capsules secure the second capsule immediately after the first capsule splits or if only one capsule as soon as it changes colour.
Orchid gelling medium with agar which can be purchased from an orchid society or a specialist nursery.
Distilled water
Cooking pot
Spoon
Oven-safe glass or polypropylene containers with lids
Sealable bags
Clean, sterilized cutting board
Rubber gloves
Paper towels
Tweezers or forceps
70 percent ethanol
Bleach
Scalpel or sharp knife
Planting pot
Orchid compost
Length of wire metal
Plastic spray bottle.
deep petri dishes or sterile jars.
2. Prepare agar medium
The agar medium is a special orchid gelling mixture that distilled water will be added to distilled water.
To prepare the medium, mix equal parts of orchid gelling medium with distilled water in a cooking pot.
Place the pot on a stove and bring the mixture to boil for while stirring continuously for two minutes.
Pour the mixture into the petri dishes glass or propylene containers while ensuring not to fill the containers above 20 percent of their volume.
Loosely replace the lids to the containers. Sterilize the containers by heating them up in a microwave oven for between 2 to 3 minutes.
Spray 70 percent ethanol into a sealable bag to create a sterile environment. Transfer the heated containers into the sealable bag.
Allow the containers to cool a bit before tightening their lids and then sealing the bag. Leave the containers to stand for a few days until the mixture solidifies.
3. Prepare seed capsule and work surface
Place an open pot of water on a stove and bring to boil. Place the cutting board in the oven and sterilize.
Put on rubber gloves and sterilize the forceps, and scalpel with 70 percent ethanol.
Insert the seed capsule into a bowel filled with bleach for about fifteen minutes.
Sterilize seed capsule again with 70 percent ethanol and place on grill.
Using the sterilized scalpel, cut open the seed capsule to reveal the seeds. Using a scalpel or sharp knife, scrape out the seeds from the capsule unto an ethanol soaked paper towel.
4. Flasking of the seed
Take out the petri dishes or glass jars containers holding the agar medium. Over the steam, open up the containers and transfer seeds from the ethanol soaked paper towel into the individual containers using the sterilized forceps.
The amount of seeds will determine the number of containers required. Replace the lid of the containers and place them on a window sill that receives indirect sunlight.
5. Wait and exercise patience
All that can be done at this point is to wait until the seeds germinate. The amount of time that this might take varies and is dependent on the particular species.
Generally, the time can range from a few months to a few years. During this period of waiting, ensure the containers are free from contamination to ensure that germination is not disrupted.
6. Emergence of protocorms
Protocorms are tuber-shaped bodies with rhizoids that are produced by the young seedlings of various orchids. Protocorms represent the embryonic form of the orchid plant.
Their emergence after the period of waiting at an affirmation that everything in the propagation process is on track.
7. Transflask orchid seedlings is done after they have developed roots
Upon the emergence of the protocorms, consistently observe the growth of the seedlings. At the point when the seedlings appear to overcrowd the flask, transflasking should be carried out, typically within 30 and 60 days.
* This is done by removing individual seedlings using sterilized tweezers from the original containers and placing them in new containers also filled, in a proportion similar to the original, with agar medium. 6 to 8 in a standard petri dish or 1or 2 to a test tube
8. Transplant seedlings into planting pots
On the presumption that there are no disruptions to the plant growth, the seedlings will eventually outgrow the containers.
At this point, it is to be transplanted into planting pots. A good rule of thumb to determine when it is ready to be transplanted is when the seedlings have developed roots that have grown up to the length of one-quarter of an inch.
To transplant, prepare a planting pot or other container for receiving the seedling by majorly filling it up with coarse fir bark and possibly some slightly moist orchid compost mixture containing perlite, fine charcoal, redwood bark shavings, etc.
To extract the seedlings, submerge the containers in warm water to help loosen the agar gel.
Once the agar medium is softened, twist a piece of metal to form a loop and in turn, use it to carefully pull out the seedlings from the container. It is best done if the agar and seedling can be removed together.
The seedlings can be further rinsed in lukewarm water to remove any excess agar mixture still stuck to them.
Following this, the seedlings can now be planted into the prepared pot with at least 50mm of space between each individual seedling.
9. Positioning the orchid
The seedling once fully transplanted should be placed in a location that is warm with good indirect sun light.
Slowly position the pots into an area that closely assimilates the conditions it will be growing under.
The choice as to whether the plant should be exposed to full sun or in direct sunlight will be dependent on the particular orchid specie.
10. Subsequent care of the plant
After the first week, the seedling can be misted several times a day and watered just once a week.
A guide in watering the plant will be using the dryness of the fir back that is, water the plant until the fir back is completely moistened and wait till it has completely dried out before watering again.
Fertilize using seaweed, fish emulsion or organic chicken pellets soaked in water on an alternate basis. Fertilize only after the plants are fully established then annually in early September to October to maintain health, vitality and better flowering.
Further Comments from Readers:
Hi reader, it seems you use The Bible of Botany a lot. That’s great as we have great pleasure in bringing it to you! It’s a little awkward for us to ask, but our first aim is to purchase land approximately 1,600 hectares to link several parcels of N.P. into one at The Pinnacles NSW Australia, but we need your help. We’re not salespeople. We’re amateur botanists who have dedicated over 30 years to saving the environment in a practical way. We depend on donations to reach our goal. If you donate just $5, the price of your coffee this Sunday, We can help to keep the planet alive in a real way and continue to bring you regular updates and features on Australian plants all in one Botanical Bible. Any support is greatly appreciated. Thank you.
In the spirit of reconciliation we acknowledge the Bundjalung, Gumbaynggirr and Yaegl and all aboriginal nations throughout Australia and their connections to land, sea and community. We pay our respect to their Elders past, present and future for the pleasures we have gained.
Genoplesium rufum
Classification:
Class: Equisetopsida
Subclass: Magnoliidae
Superorder: Lilianae
Order: Asparagales
Family: Orcidaceae
Genus: From Genos which is Ancient Greek for a race and Plesion which is Ancient Greek for to be near to. It refers to plants, which are closely related to the Prasophyllum genus. – This orchid was first described in 1927 by Richard Sanders Rogers who gave it the name Prasophyllum acuminatum and published the description in Transactions and Proceedings of the Royal Society of South Australia. In 1989, David Jones and Mark Clements changed transferred it the new genus Genoplesium acuminatum. In 1998 they moved it again to Corunastylis acuminata. The latter name change has not been accepted by Plants of the World Online and still remains as Genoplesium acuminatum in New South Wales publications.
Species: From Rufescere, which is Latin for deep rusty-red to tawny-red. It refers to leaves and/or stems, which are covered in deep rusty-red hairs.
Common Name: Red Midge Orchid.
Distribution:
Genoplesium rufum is found in several disjunct populations south from the Blackdown Tablelands National Park and then east in a line south of Maryborough in central eastern Queensland to Ararat in south western Victoria. It is also found south from Tumby Bay to the southern tip of Eyre Peninsula, south from Bagnall Hill to Totol Hill on York Peninsula and south from Billiat Conservation Park to Mount Gambier in the south eastern corner of South Australia. Though wide spread it is not common in any area.
https://avh.ala.org.au/occurrences/search?taxa=Genoplesium+rufum#tab_mapView
Habitat Aspect Climate:
Genoplesium rufum prefers medium shade to dappled shade. It grows as an understory terrestrial orchid in open moist schlerophyll forests and in closed woodlands. It is found in low lying areas close to the coast adjacent to coastal heaths and wallums and plateau or montane moss heaths which have rising water tables close to the surface. The plants grow rapidly with the onset of the wet season to produce leaves, flowers and seeds dying back completely during the drier months of the year. The altitude ranges from 5 meters ASL to 950 meters ASL.
The temperatures range from minus 5 degrees in August to 36 degrees in January.
The rainfall ranges from lows of 300mm to 1600mm average per annum.
Soil Requirements:
Genoplesium rufum prefers better quality sandy loams to light gritty fatty sandy loams. The soils are usually derived from decomposed sandstone over sandstone, brown basalt, black basalt granite, accumulated peaty sands behind the back dunes and silty alluviums. The soils pH ranges from 5.5pH to 7pH are preferred where the water can drain freely. It does not tolerate waterlogged soils but moisture is a strong requirement for good growth through capillary action. Non saline soils to slightly saline soils are tolerated.
Height & Spread:
Wild Plants: 0.1m to 0.25m by 0.03m to 0.05m.
Characteristics:
Genoplesium rufum grows as a terrestrial orchid on short horizontal tuberous, unbranched rhizomes.
Genoplesium has a single clasping leaf like sheath that is appressed to the spike. The orchids lack chlorophyll except for the spikes growing most likely growing as saprophytes on decomposing vegetable matter.
The inflorescences of Genoplesium rufum is a long stiff, dense, erect spike. The spikes usually have 1 to 25 individual flowers. The erect, spikes measure 150mm to 250mm in length while the inflorescence measure 5mm to 50mm in length while the pedicel measure 1mm to 2mm in length. The ovary which appears to be part of the pedicel but is slightly swollen at the base measures 2.5mm to 3mm in length. The flowers have a mild lemon scent.
The nodding deep maroon red to deep rusty red flowers measure 4mm to 6mm in length overall by 3mm to 4mm in width overall.
The dorsal sepal is ovate with an acuminate apex while the margins and apex are entire. The deep maroon to rusty red dorsal sepal measures 2mm to 3mm in length by 1.2mm to 2mm in width.
The linear to lanceolate, gibbous lateral sepals are purple-maroon to yellowish-brown tinged purple or reddish-maroon, glabrous, with an acute apex. The margins are entire. The lateral sepals measure 3mm to 3.6mm in length by 0.8mm to 1mm in width.
The ovate lateral petals are purple-maroon to yellowish with purple stripes and have an acute to acuminate apex. The lateral petals measure 1.8mm to 2.4mm in length by 0.8mm to 1mm in width. The lateral petals margins are entire or erose.
The ovate to obovate labellum measures 2mm to 3.5mm in length by 1.3mm to 2mm in width. The apex is obtuse to acute while the margins are entire or erose.
The callus is narrow ovate to narrow oblong and extends almost to the apex of the labellum.
The flowers appear from January to May.
Genoplesium rufum‘s capsules are nodding and turn pale grey-brown when ripe.
Wildlife:
Genoplesium rufum‘s wildlife is unknown to the author.
Cultivation:
Genoplesium rufum is an unusual terrestrial orchid to grow in the garden. If you are lucky enough to have it growing it is worthwhile preserving with in situation. Not much is known about its cultivation outside their natural habitat. The best method to establish a colony is to mark the area with stakes where plants are known to occur. Use local mulch to lightly top dress the area on an annual basis.
Propagation:
Seeds: All orchids are declared rare, vulnerable or endangered are protected by Federal and State Laws and must not be removed from the wild unless you are a land developer, mining company or main Roads department etc. This includes bulbs, roots, leaves, seeds and flowers. No part of any plant can be removed from Federal, State or Local Government land without the prior permission of the authority and this includes the spore.
Genoplesium rufum seeds require treatment before sowing. Really Orchid seeds are meant for professionals with time, equipment and space. However if you wish to persevere then here are the basics and you are learning from an amateur. Once the orchids are large enough to handle treat them similarly to the genre Liparis.
1. Obtain relevant materials
The first step in growing orchid from seed will be sourcing and having at the ready all materials that will be required in the propagation process.
This includes all of the following:
Unripe orchid seed capsule. If there are 2 capsules secure the second capsule immediately after the first capsule splits or if only one capsule as soon as it changes colour.
Orchid gelling medium with agar which can be purchased from an orchid society or a specialist nursery.
Distilled water
Cooking pot
Spoon
Oven-safe glass or polypropylene containers with lids
Sealable bags
Clean, sterilized cutting board
Rubber gloves
Paper towels
Tweezers or forceps
70 percent ethanol
Bleach
Scalpel or sharp knife
Planting pot
Orchid compost
Length of wire metal
Plastic spray bottle.
deep petri dishes or sterile jars.
2. Prepare agar medium
The agar medium is a special orchid gelling mixture that distilled water will be added to distilled water.
To prepare the medium, mix equal parts of orchid gelling medium with distilled water in a cooking pot.
Place the pot on a stove and bring the mixture to boil for while stirring continuously for two minutes.
Pour the mixture into the petri dishes glass or propylene containers while ensuring not to fill the containers above 20 percent of their volume.
Loosely replace the lids to the containers. Sterilize the containers by heating them up in a microwave oven for between 2 to 3 minutes.
Spray 70 percent ethanol into a sealable bag to create a sterile environment. Transfer the heated containers into the sealable bag.
Allow the containers to cool a bit before tightening their lids and then sealing the bag. Leave the containers to stand for a few days until the mixture solidifies.
3. Prepare seed capsule and work surface
Place an open pot of water on a stove and bring to boil. Place the cutting board in the oven and sterilize.
Put on rubber gloves and sterilize the forceps, and scalpel with 70 percent ethanol.
Insert the seed capsule into a bowel filled with bleach for about fifteen minutes.
Sterilize seed capsule again with 70 percent ethanol and place on grill.
Using the sterilized scalpel, cut open the seed capsule to reveal the seeds. Using a scalpel or sharp knife, scrape out the seeds from the capsule unto an ethanol soaked paper towel.
4. Flasking of the seed
Take out the petri dishes or glass jars containers holding the agar medium. Over the steam, open up the containers and transfer seeds from the ethanol soaked paper towel into the individual containers using the sterilized forceps.
The amount of seeds will determine the number of containers required. Replace the lid of the containers and place them on a window sill that receives indirect sunlight.
5. Wait and exercise patience
All that can be done at this point is to wait until the seeds germinate. The amount of time that this might take varies and is dependent on the particular species.
Generally, the time can range from a few months to a few years. During this period of waiting, ensure the containers are free from contamination to ensure that germination is not disrupted.
6. Emergence of protocorms
Protocorms are tuber-shaped bodies with rhizoids that are produced by the young seedlings of various orchids. Protocorms represent the embryonic form of the orchid plant.
Their emergence after the period of waiting at an affirmation that everything in the propagation process is on track.
7. Transflask orchid seedlings is done after they have developed roots
Upon the emergence of the protocorms, consistently observe the growth of the seedlings. At the point when the seedlings appear to overcrowd the flask, transflasking should be carried out, typically within 30 and 60 days.
* This is done by removing individual seedlings using sterilized tweezers from the original containers and placing them in new containers also filled, in a proportion similar to the original, with agar medium. 6 to 8 in a standard petri dish or 1or 2 to a test tube
8. Transplant seedlings into planting pots
On the presumption that there are no disruptions to the plant growth, the seedlings will eventually outgrow the containers.
At this point, it is to be transplanted into planting pots. A good rule of thumb to determine when it is ready to be transplanted is when the seedlings have developed roots that have grown up to the length of one-quarter of an inch.
To transplant, prepare a planting pot or other container for receiving the seedling by majorly filling it up with coarse fir bark and possibly some slightly moist orchid compost mixture containing perlite, fine charcoal, redwood bark shavings, etc.
To extract the seedlings, submerge the containers in warm water to help loosen the agar gel.
Once the agar medium is softened, twist a piece of metal to form a loop and in turn, use it to carefully pull out the seedlings from the container. It is best done if the agar and seedling can be removed together.
The seedlings can be further rinsed in lukewarm water to remove any excess agar mixture still stuck to them.
Following this, the seedlings can now be planted into the prepared pot with at least 50mm of space between each individual seedling.
9. Positioning the orchid
The seedling once fully transplanted should be placed in a location that is warm with good indirect sun light.
Slowly position the pots into an area that closely assimilates the conditions it will be growing under.
The choice as to whether the plant should be exposed to full sun or in direct sunlight will be dependent on the particular orchid specie.
10. Subsequent care of the plant
After the first week, the seedling can be misted several times a day and watered just once a week.
A guide in watering the plant will be using the dryness of the fir back that is, water the plant until the fir back is completely moistened and wait till it has completely dried out before watering again.
Fertilize using seaweed, fish emulsion or organic chicken pellets soaked in water on an alternate basis. Fertilize only after the plants are fully established then annually in early September to October to maintain health, vitality and better flowering.
Further Comments from Readers:
Hi reader, it seems you use The Bible of Botany a lot. That’s great as we have great pleasure in bringing it to you! It’s a little awkward for us to ask, but our first aim is to purchase land approximately 1,600 hectares to link several parcels of N.P. into one at The Pinnacles NSW Australia, but we need your help. We’re not salespeople. We’re amateur botanists who have dedicated over 30 years to saving the environment in a practical way. We depend on donations to reach our goal. If you donate just $5, the price of your coffee this Sunday, We can help to keep the planet alive in a real way and continue to bring you regular updates and features on Australian plants all in one Botanical Bible. Any support is greatly appreciated. Thank you.
In the spirit of reconciliation we acknowledge the Bundjalung, Gumbaynggirr and Yaegl and all aboriginal nations throughout Australia and their connections to land, sea and community. We pay our respect to their Elders past, present and future for the pleasures we have gained.
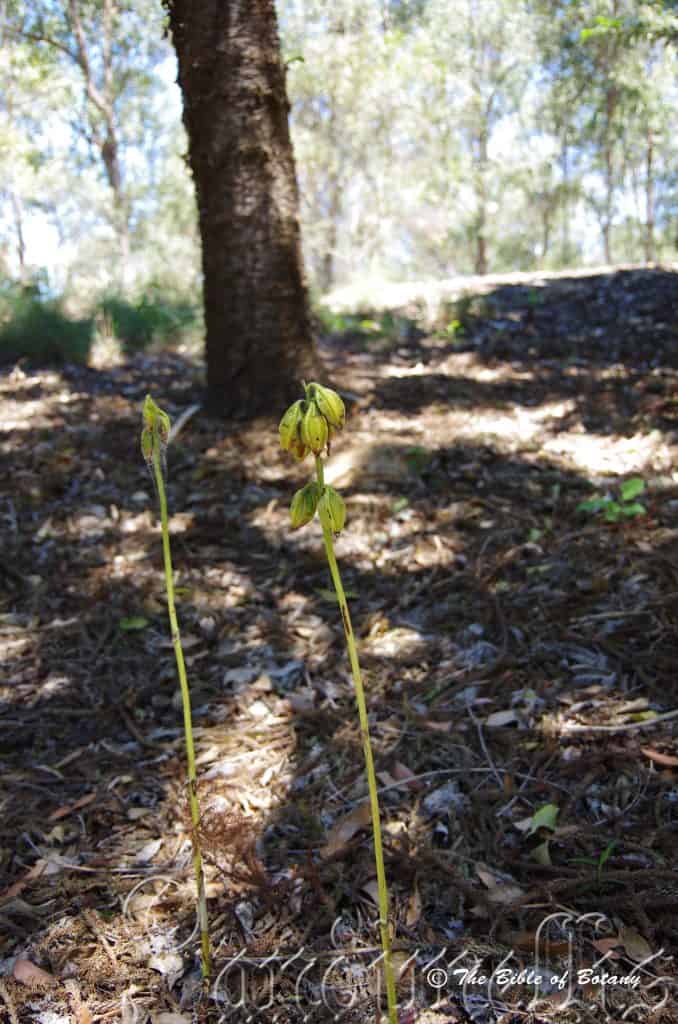
Mount Cootha Botanic Gardens Qld.
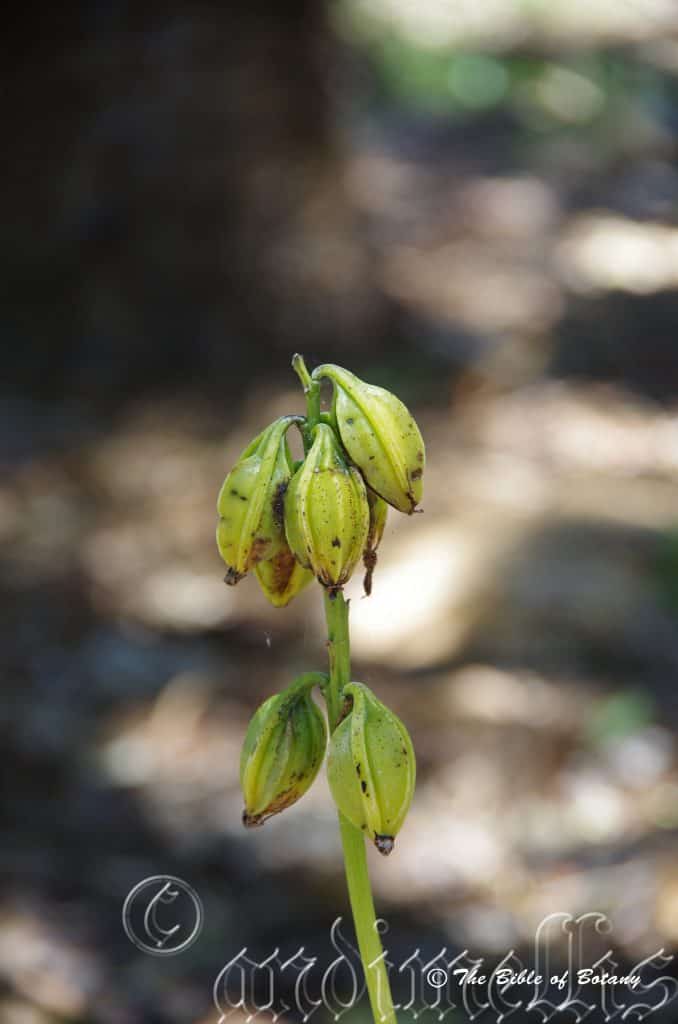
Mount Cootha Botanic Gardens Qld.
Geodorum densiflorum
Classification:
Unranked: Monocots
Division: Magnoliophyta
Class: Liliopsida
Sub Class: Liliidae
Order: Asparagales
Family: Orcidaceae
Subfamily: Epidendroideae
Tribe: Cymbidieae
Sub Tribe: Eulophiinae
Alliance: Dipodium
Genus: From Geos, which is Ancient Greek for the soil or ground and Dorum, which is Ancient Greek for a gift. It refers to flowers, which are a beautiful gift from the soil.
Species: From Densus, which is Latin for packed close together and Floris, which is Latin for a flower or Flos, which is the Roman goddess of spring and flowers. It refers to flowers, which are densely packed along the spike.
Common Name: Ground Nodding Orchid or Shepherds Crook.
Distribution:
Geodorum densiflorum is found from the southern and western coastal areas of King Sound to the south western areas of the Kimberley coast in north western, Western Australia.
It is also found along the northern coast of the Northern Territory east from Melville Bathurst Islands, the Daly River south of Darwin to north western Kakadu and east to Nuhlinbuy.
In the east it is found south from Cape York Peninsula, the Torres Strait Islands and Mornington Island in the Gulf of Carpentaria to Bundjalung National Park east of Grafton in far north eastern New South Wales. It is found east of the Great Dividing Range.
https://avh.ala.org.au/occurrences/search?taxa=Geodorum+densiflorum#tab_mapView
Habitat Aspect Climate:
Geodorum densiflorum prefers medium shade or dappled shade in dry Eucalyptus forests adjacent to rainforests, monsoonal forests, coastal wallum heaths or moist coastal woodland heaths. The altitude ranges from sea level to 700 meters ASL.
The temperatures range from 2 degrees in July to 34.degrees in January.
The rainfalls range from lows of 900mm to an average of 2800mm annually.
Soil Requirements:
Geodorum densiflorum prefers sandy loams, to light fatty clays with thick layers of forest litter. The soils are derived from decomposed basalts, sandstones, shales or metamorphic rocks. The soils pH ranges from 5pH to 7pH. It does not tolerate of waterlogged soils but often it is found growing close to and in association plants that prefer moist soils or high water tables. Non saline soils to slightly saline soils are tolerated.
Height & Spread:
Wild Plants: 0.6mm to 0.8m by 0.5m to 0.6m
Characteristics:
Geodorum densiflorum grows on pseudobulbs as a terrestrial orchid. The depressed globose pseudobulbs are usually half buried in the ground. The pseudobulbs measure 10mm to 13mm long by 10mm to 13mm in diameter. Leaves die back in winter and the plants become dormant over the cooler months.
The long ovate to lanceolate leaves are glabrous semi glossy or dull. The 3 to 5 leaves measure 150mm to 300mm in length by 40mm to 80mm in width. The petioles are clasping and are 20mm to 80mm in length. The concolourous laminas are pale green. The leaf margins are entire and are undulating. The laminas have 3 prominent longitudinal ribs and 4.prominent longitudinal veins.
The inflorescences of Geodorum densiflorum are on a long erect peduncle which recurves 180 degrees towards the apex. The recurve section has 8 to 20 flowers. The peduncles vary from 150mm to 300mm in length. The pedicles measure 5mm to 10mm in length including the 2mm to 3mm ovary which appears to be part of the pedicel but is slightly swollen. The sepals and petals are only slightly spreading when fully open curving forward from the ovary. It is oblong and measure 11mm to 18mm in length by 2.5mm to 5mm in width. The sepals and petals are entire with a mucronate apex and are pale pink to a mid-pink or mauve-pink in colour. The labellum measures 10mm to 15mm in length by 6mm to 8mm in width. The margins are entire while the apex is truncate with a mucronate tip. The labellum is mid pink to white with deep pink to purple striations. Flowering occurs during late November to early February.
The recurved peduncle becomes erect as the seed pods ripen. The seed pods measure 25mm to 30mm in length by 8mm to 10mm in width. It is cylindrical to elliptical in shape with 4.or 5 very prominent keels. The flowers are persistent and dry to a light pinkish yellow colour. Seed pods ripen to a light yellow olive green colour.
Wildlife:
Geodorum densiflorum is the host to numerous small native bees when in flower.
Cultivation:
Geodorum densiflorum is a beautiful orchid which is easy to grow and to propagate. It would look great planted in mass at the edge of a forest or in a sheltered area away from winds and excessive moisture. The shape and colour of the leaves is an instant attraction. Because of its dormancy you tend to forget about it in the winter but as soon as the new leaves appear a strong interest develops. For best results ensure the plants get dappled light throughout the day even some late afternoon or early morning sun is beneficial. The best time to fertilize the plants is on father’s day or as the first rains fall in spring. This will ensure good flowering and flowers of a maximum size. Plants require a good covering of natural mulch or leaf litter. If the seed is not required remove the spent flowers as the die.
Propagation:
Seeds: All orchids are declared rare, vulnerable or endangered are protected by Federal and State Laws and must not be removed from the wild unless you are a land developer, mining company or main Roads department etc. This includes bulbs, roots, leaves, seeds and flowers. No part of any plant can be removed from Federal, State or Local Government land without the prior permission of the authority and this includes the spore.
Geodorum densiflorum seeds require treatment before sowing. Really Orchid seeds are meant for professionals with time, equipment and space. However if you wish to persevere then here are the basics and you are learning from an amateur. You will need the following, a flask, Chloros solution, boiled water, an eye dropper, paper bag, a warm sheltered position and a lot of patience and luck. This is an easy orchid to grow so is a good one for beginners to start with.
1.Collecting the seed: seed can only be collected from fully ripe pods. You may need to watch a pod for several days or even weeks following the time it stops swelling for it to turn olive yellow. At this stage the pod must be watched carefully for the pod to commence spitting along the placenta. If possible place the paper bag over the pod and tie it off. If necessary place a plastic bag over the paper bag to prevent rain or moisture contacting the seeds.
- Knowledge is very important now, as different species and genre have various numbers of viable seed in a pod. Viable seeds may be as few as 20 or as many as several million. Check the bag daily and remove once the seed begins to disperse. Shake all the seeds from the pod into the bag.
- Purchase the appropriate agar solution from an orchid society as they will know what you want and which one will be best for your species. Prepare the agar solution and pour into the flask.
- Remove some of the seeds by shaking them into a solution of 1 part chloros to 20 parts water and allow soaking for 10 minutes.
- Remove the seeds with the eye dropper in the solution and spread evenly over the set agar.
- Place the flasks in a room that is will lit with indirect light and the temperature is a consistent 20 to 25 degrees centigrade.
- Wait 4.to 7 months for the seedlings to develop to a stage where they can be removed and planted on into a fine orchid mix. Do not remove the seedlings from their environment of light or temperature for at least another two months. Even at this stage it is best to place the seedlings in a hot house where their environment can be controlled.
Mass plantings can be achieved with planting them at 150mm centers.
Fertilize using seaweed, fish emulsion or organic chicken pellets soaked in water on an alternate basis. Fertilize every two months until the plants are established then annually in early September to October to maintain health, vitality and better flowering.
Further Comments from Readers:
Hi reader, it seems you use The Bible of Botany a lot. That’s great as we have great pleasure in bringing it to you! It’s a little awkward for us to ask, but our first aim is to purchase land approximately 1,600 hectares to link several parcels of N.P. into one at The Pinnacles NSW Australia, but we need your help. We’re not salespeople. We’re amateur botanists who have dedicated over 30 years to saving the environment in a practical way. We depend on donations to reach our goal. If you donate just $5, the price of your coffee this Sunday, We can help to keep the planet alive in a real way and continue to bring you regular updates and features on Australian plants all in one Botanical Bible. Any support is greatly appreciated. Thank you.
In the spirit of reconciliation we acknowledge the Bundjalung, Gumbaynggirr and Yaegl and all aboriginal nations throughout Australia and their connections to land, sea and community. We pay our respect to their Elders past, present and future for the pleasures we have gained.
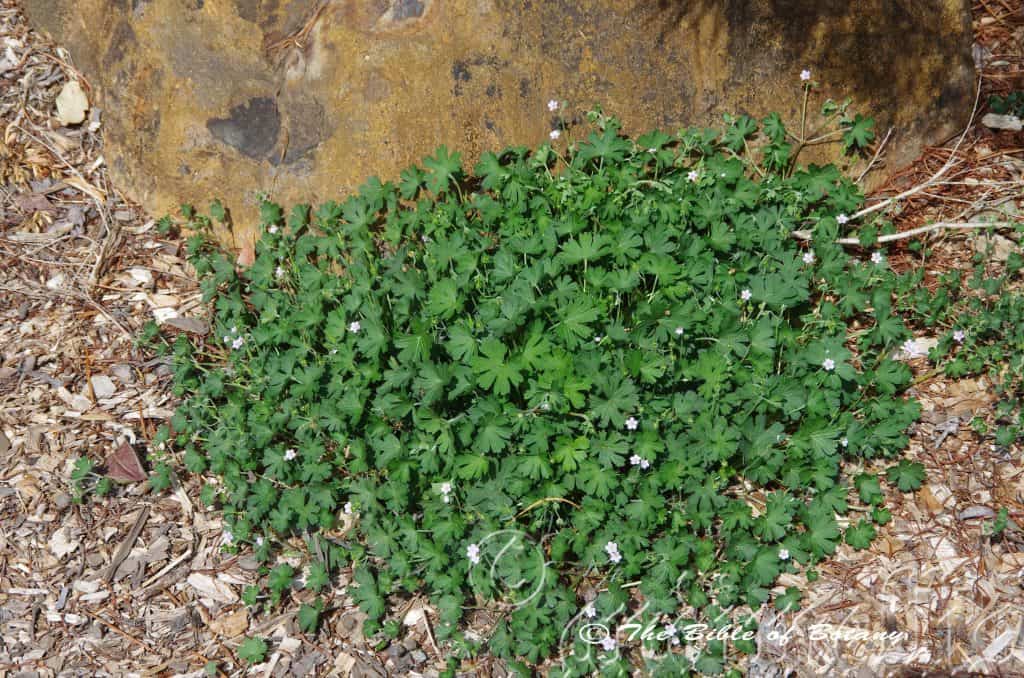
Mount Cootha Botanic Gardens Qld.
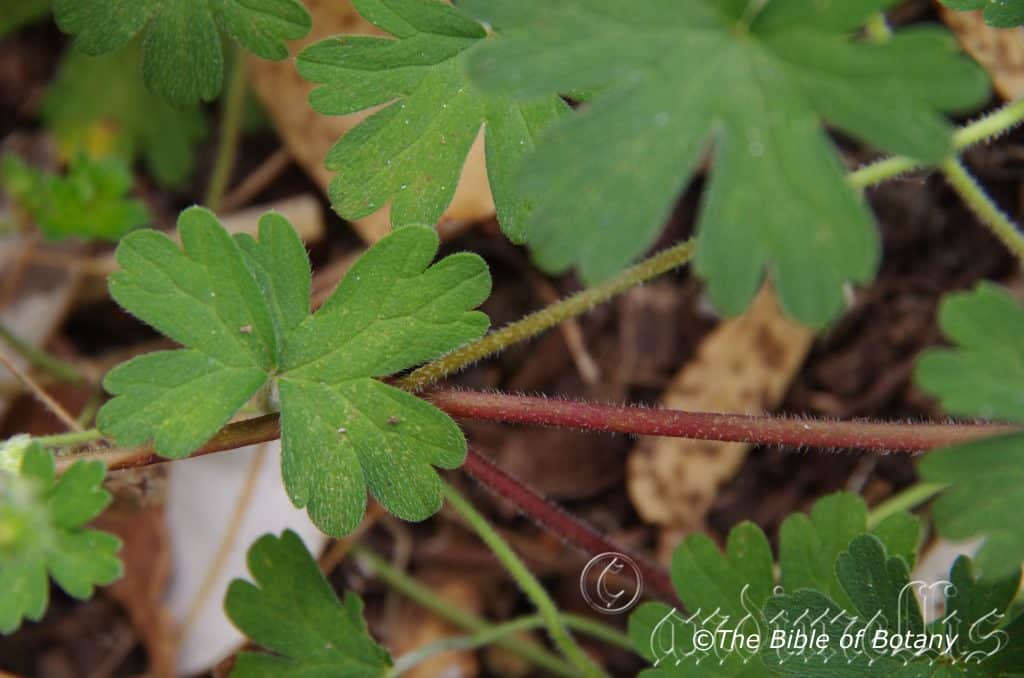
Nana Glen NSW
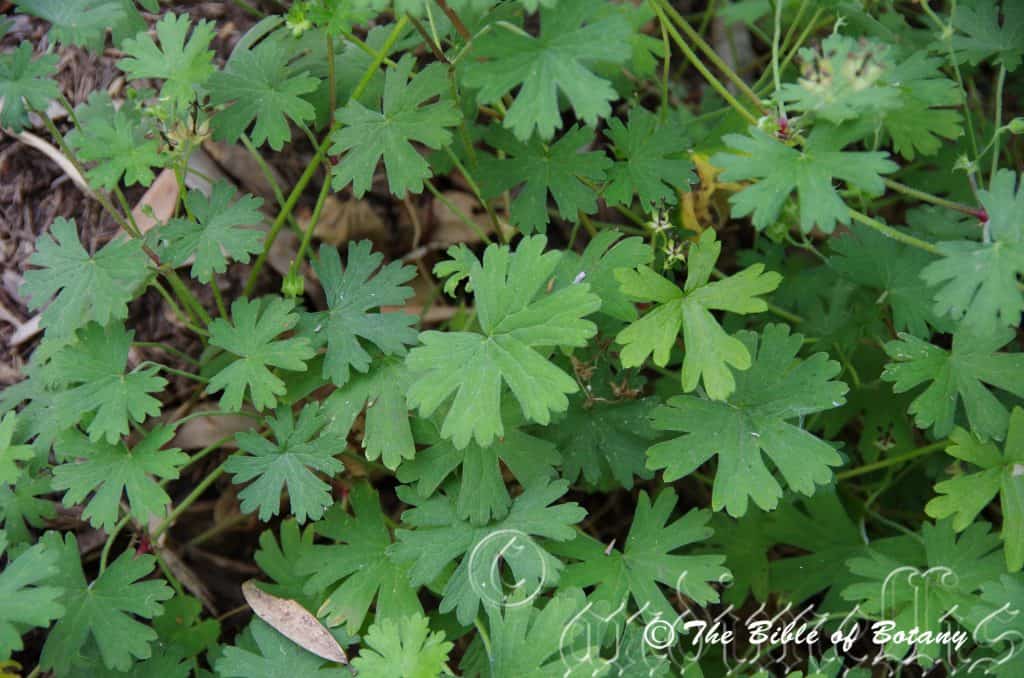
Mount Cootha Botanic Gardens Qld.
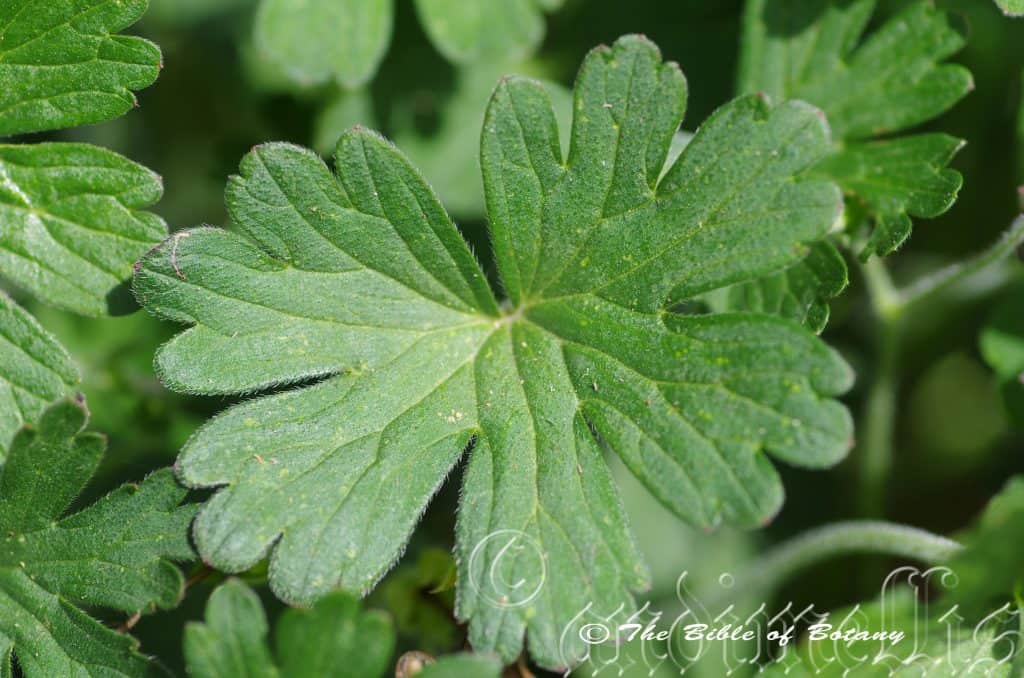
Mount Cootha Botanic Gardens Qld.
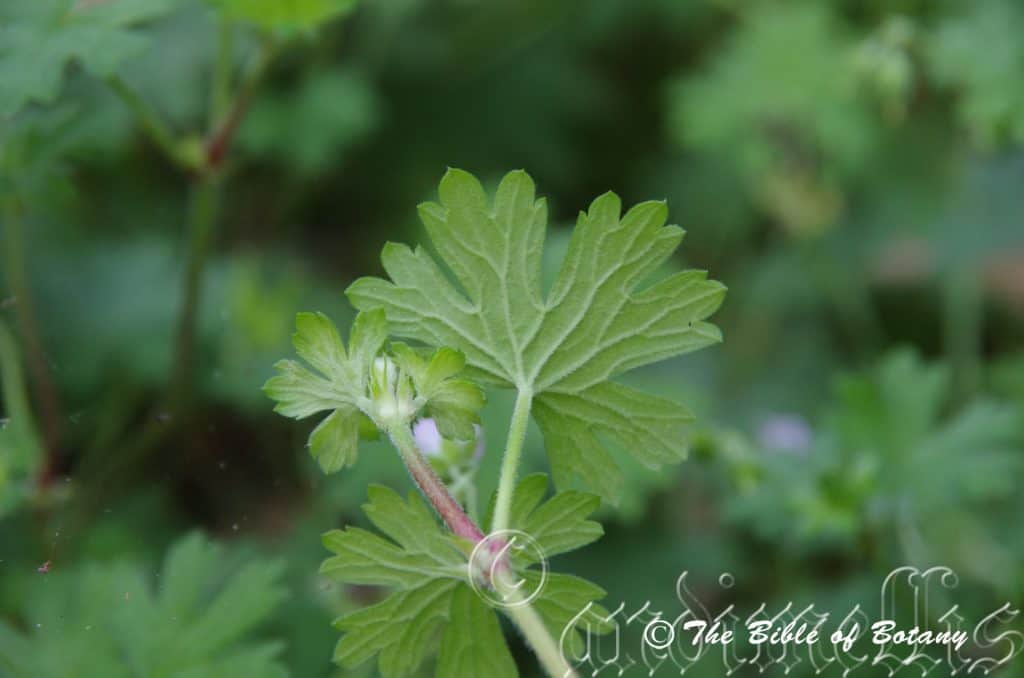
Mount Cootha Botanic Gardens Qld.
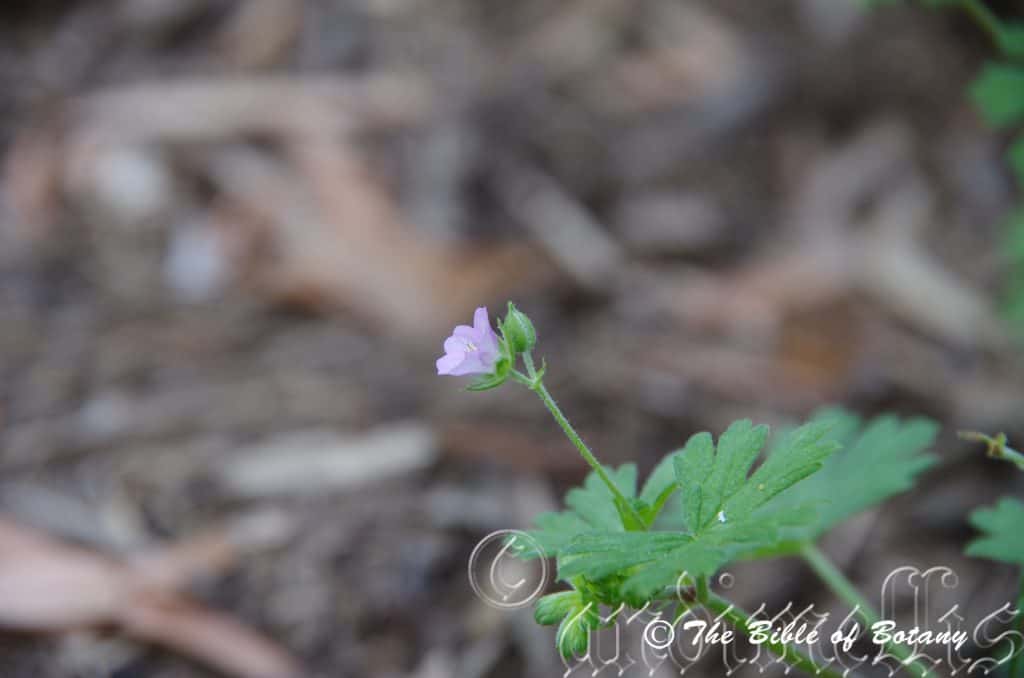
Mount Cootha Botanic Gardens Qld.

Mount Cootha Botanic Gardens Qld.
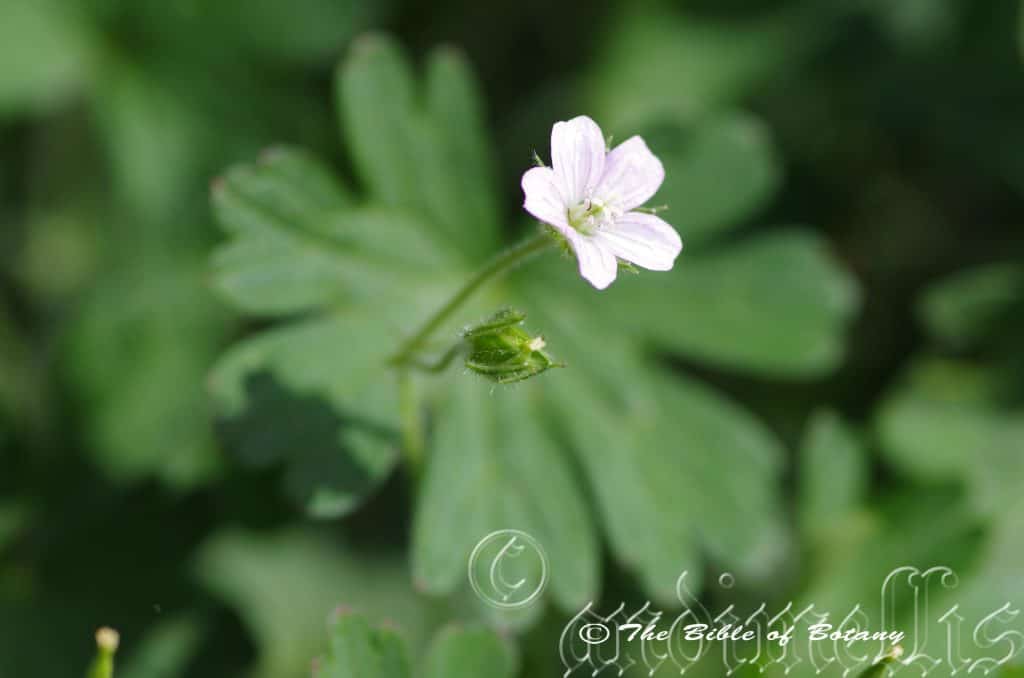
Nana Glen NSW
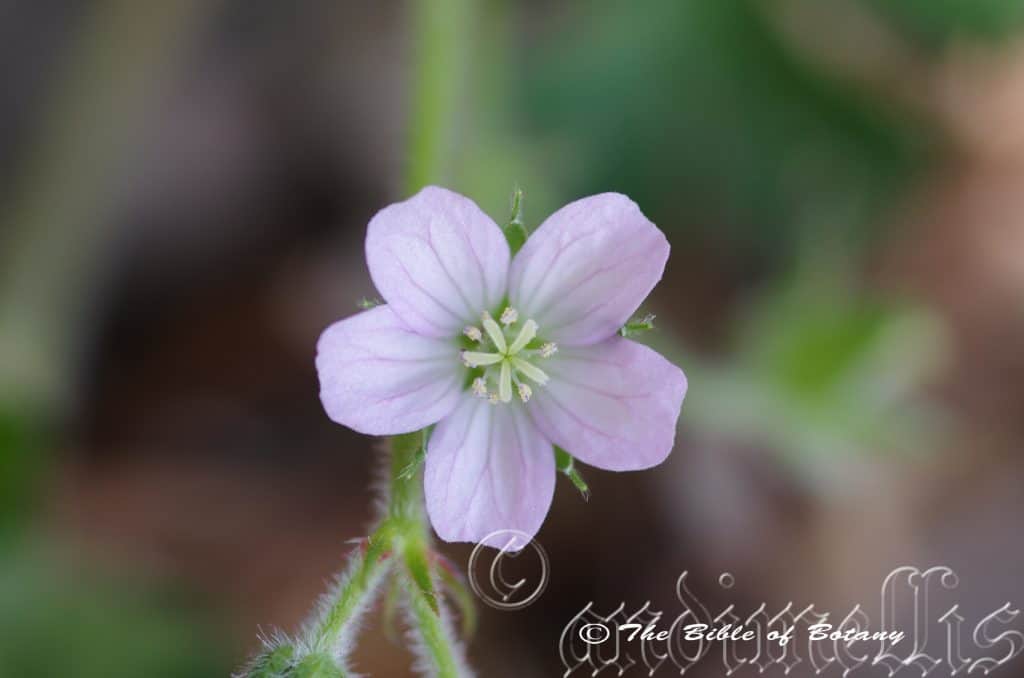
Nana Glen NSW
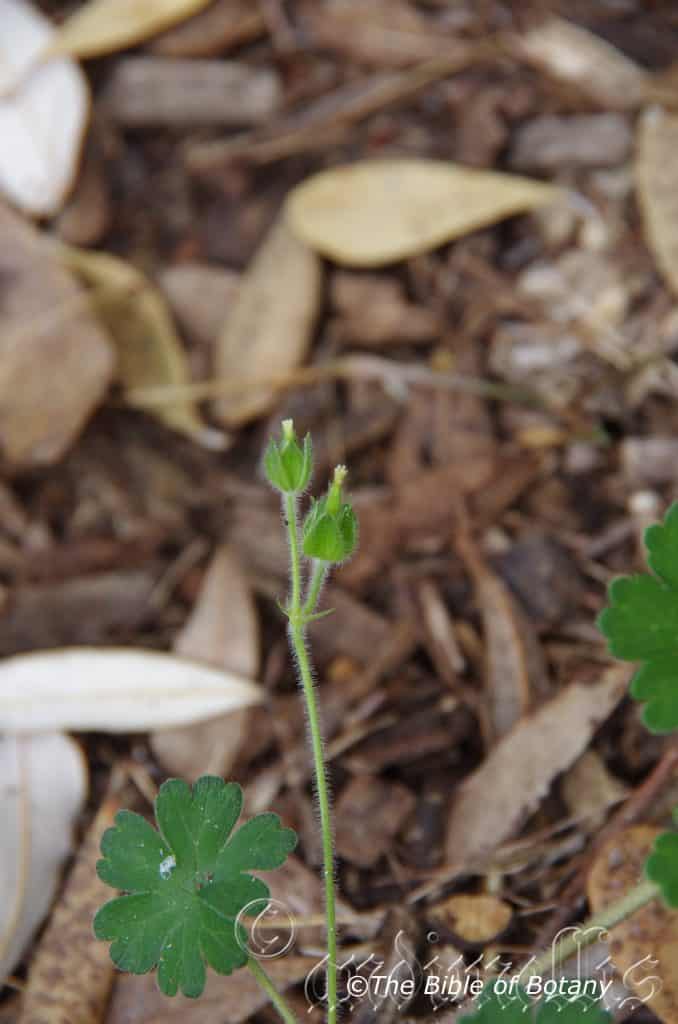
Nana Glen NSW
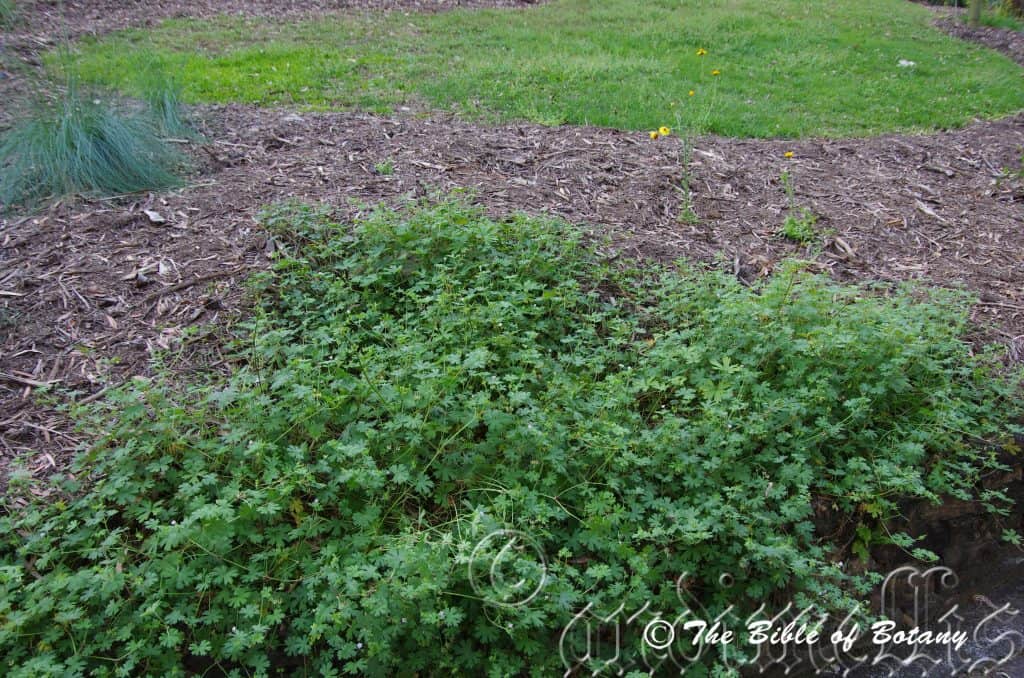
Mount Cootha Botanic Gardens Qld.
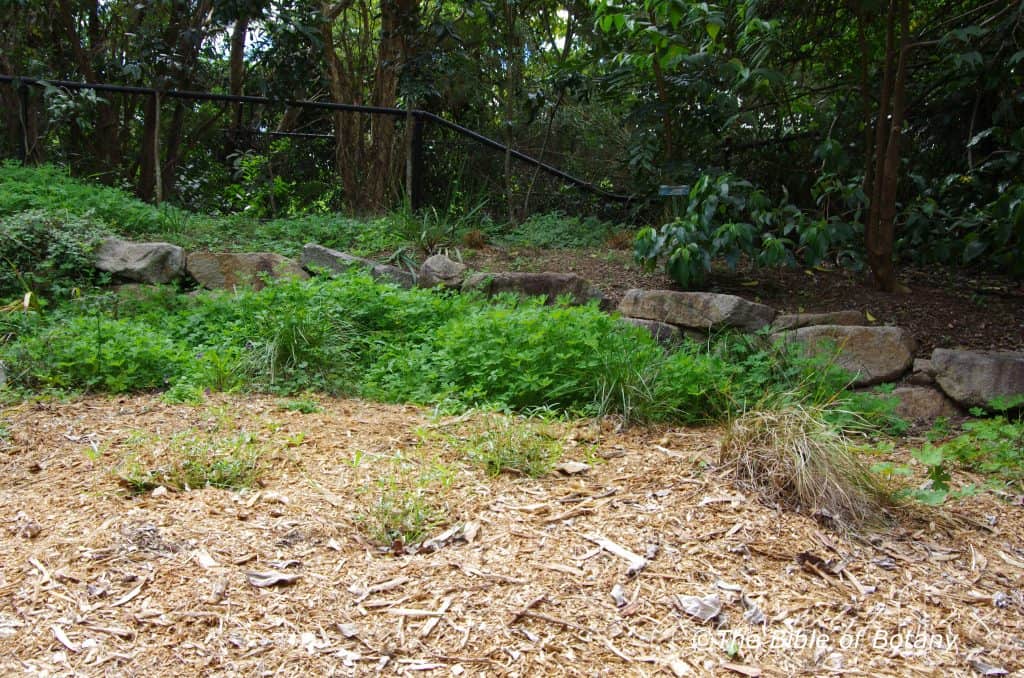
Mount Cootha Botanic Gardens Qld.
Geranium homeanum
Classification:
Class: Equisetopsida
Subclass: Magloliidae
Superorder: Rosannae
Order: Geraniales
Family: Geraniaceae
Genus: From Geranion, which is Ancient Greek for a crane’s bill. It refers to flowers, which look similar to a crane’s bill.
Species: Maybe is named in honour of the great Greek poet Homer.
Common Name: In the Aboriginal language it is known as Wurundjeri.
Distribution:
Geranium homeanum is found south from Gladstone and the Calliope River in central coastal Queensland to the Glenelg Coastal Plain in south western Victoria. It is found on the Western slopes, on and east of the Great Dividing Range to the coast.
It is also found east of Eungella National park in Queensland and from Mount Wellington to Hobart in Tasmania.
https://avh.ala.org.au/occurrences/search?taxa=Geranium+homeanum#tab_mapView
Habitat Aspect Climate:
Geranium homeanum prefers full sun to light dappled shade. It grows on moister sites along riparian zones, adjacent to swamps and coastal wallums and open schlerophyll forests and adjacent to subtropical rainforests. The altitude ranges from 5 meters ASL to 1400 meters ASL.
The temperatures range from minus 5 degrees in July to 40 degrees in January.
The rainfall ranges from lows of 600mm to an average of 2000mm annually.
Soil Requirements:
Geranium homeanum prefers fertile sandy loams, to light clay loams or light silts to medium silts. The soils are derived from decomposed brown basalt, black basalt, sandstones, mudstone, granites, shale, metamorphic rocks, alluvial deposits or accumulated peaty beach sand flats behind the frontal dunes. The soils pH ranges from 4.5pH to 5.5pH. It tolerates seasonal wet soils but does not grow in the water Non saline soils to moderately saline soils are tolerated.
Height & Spread:
Wild Plants: 0.1m to 0.2m by 1m to 1.5m.
Characteristics:
Geranium homeanum are decumbent annual or perennial herbs with slender pale blue-green to mid purplish or reddish stems. The terete stems are often densely branched and are densely covered in short, straight, white hirtellous and hirsute hairs. The white tap root is fleshy.
The opposite, 3 to 5 lobed palmatetisect leaves of Geranium homeanumare orbicular to reniform. The lobes are oblong to obovate and are divided to more than halfway to midrib often with 3 secondary lobes. The lobes measure 2mm to 5mm in length by 3mm to 6mm in width. The slender pale blue-green to mid purplish or reddish petioles measure 10mm to 50mm in length.
The petioles are densely covered in short, straight, white hirtellous and hirsute hairs. The bases are strongly cordate while the apexes are obtuse to broadly acute. The concolourous laminas are pale blue-green often with a purplish sheen; when growing on phosphate deficient soils, are sparsely to moderately covered in white, appressed hirsute hairs. The laminas are flat or recurve slightly upwards from the base to the lobe apexes. The mid vein and main lateral veins are prominent on the lower lamina and are visible from the upper lamina. The lobe margins are entire or toothed near the apexes.
The inflorescences of Geranium homeanum are usually born pairs on a single peduncle from the leaf axils. The peduncles and pedicels are mid green and glabrous to sparsely covered in white appressed hirsute hairs and 2 linear stipules at the base of the pedicels. The peduncles measure 18mm to 24mm in length while the pedicels measure 15mm to22mm in length.
The 5 obovate sepals are mid green and glabrous or sparsely covered in white appressed eglandular hairs with a few erect hairs externally and are glabrous internally. The apexes are obtuse with a long aristate tip. The sepals measure 2.5mm to 4mm in length not including the 1mm to 1.6mm aristate tip. The white or usually pink fading to pastel lavender or pastel lilac petals are glabrous with usually 3 violet longitudinal stripes. The obovate petals have a truncate or retuse apex and measure 4mm to 5.5mm in length by 2.8mm to 4.4mm in width.
The 10 white filiform filaments measure 1mm in length while the cream anthers have purple margins along where they dehisce. The creamy pastel green style has a white, pink or deep red-maroon 5 fid stigma and measures 1.5mm to 1.7mm in length while the stigma branches measure 0.7mm to 1mm in length. The flowers appear from October to February but in favourable areas may have odd flowers throughout the year.
Geranium homeanum fruits are usually cylindrical mericarps. The mericarps measure 11mm to 14mm in length by 2mm to 2.2mm in diameter. The pale green-blue mericarps are sparsely to moderately covered in white pulverulent hairs. The 2 short awns are covered in short, white eglandular hairs. The mericarps turn mid brown while the sepals remain green and persistent at the base of the ripe fruits. The isodiametric seeds are deep brown and densely covered in short pulverulent hairs. The mericarps split from the base remaining attached at the apex. The seeds are deep brown, rugose and sparsely covered in elongated aveolae.
Wildlife:
Geranium homeanum‘s wildlife is unknown to the author however I know from my experiences in an organic orchard the growth rate was extraordinary where fortnightly slashing would see the plants grow 200mm to 300mm and flower throughout the summer months. It gave copious quantities of soft high nitrogenous mulch which was eagerly sought out by the ducks or mulched quickly.
The roots were collected and eaten after roasting by early aborigines.
Cultivation:
Geranium homeanum is considered a weed in the garden with its only virtue at this stage is it yields good quality mulch. This should change as the plants have exquisite beauty all of its own that is easy to control and manipulate.
While the exotic Geranium specie has stolen the limelight the native plants have gone mainly unrecognized. It would ideally suit for moist rockeries or bush gardens as the fill in plant between shrubs. In cultivation the plants will grow 100mm to 200mm in height by 600mm to 700mm in diameter provided it is trimmed to encourage full ground coverage. It offers quick growth with delicate little flowers within months from seed.
In formal Gardens it can be used as the fill in plants or as the main plant beside a water feature. Imagine a small pond with fish swimming beside it are several Geranium homeanum manicured contrasting white pebbles an old gnarled log sits beyond the pool and the scene is set. Cool formal inviting and colourful but not overpowering in reds and yellows. This is very powerful yet formal and relaxing. It can partially surround such a scene and still look effective.
Use it in small groups with larger rocks or in front of a large log. The large log gives a strong horizontal affect with depth if placed on an angle. Right along the front plant the Hybanthus specie. It can be mixed with purple flowered Hybanthus monopetalus with one of the yellow or orange flowering forms. The vertical stems and linear leaves will create a longer looking log that has greater diameter. The plants will dainty yet display a very relaxing and thought provoking scene.
Using plants with deep green, broad, simple leaves to the rear Geranium homeanum will draw attention to its prostrate, delicate, palmate, pale blue-green leaves in the foreground. Ensure that curves and bends are used to increase the contrasts and allow the plants to spread to their full potential. This is not a plant for mass planting but for contrast. 2 or 3 in an area can be magical in lifting the other plants around them.
Propagation:
Seeds: Sow fresh seeds or the previous season’s seeds after removing them from the refrigerator over winter into a seed raising mix. Place the trays beneath 30mm shade cloth and keep moist not wet. When the seedlings are 40mm to 60mm tall, prick them out, nip the tips out to encourage side shoots and plant them into 50mm native tubes using a good organic mix.
Once the seedlings reach 150mm to 200mm in height again nip the tips out and plant them out into their permanent position. Group plantings are best achieved by planting them at 600mm to 800mm centers.
Fertilize using Seaweed, fish emulsion or organic chicken pellets soaked in water and apply the liquid on an alternate basis. Fertilize every 3 to 4.months in areas where it flowers all year or twice annually in early September or March to maintain health, vitality and better flowering.
Cuttings:
Cuttings are easy and can be taken anytime of the year in frost free areas. Use stems from the previos seasons growth which have 2 or 3 pairs of nodes.
1 Prepare the cutting mix by adding one third sharp clean river sand, one third peat and one third perlite. These ingredients are sterilize,
2 Select good material from non diseased plants,
3 Select semi green stems for cuttings. Look for a stem with two or three nodes,
4 Place the cutting on a flat, hard surface, and make a clean cut down one side of the cutting at the base for 10mm with a sharp sterile knife or razor blade. – This scarification of the node will increase the chances of roots emerging from this spot. Now remove all but one or two the leaves, leaving the apex leaves in tact. If the leaves are very large in proportion to the stem, cut off the leaves on the basal half.
5 Fill a saucer with water. Dip the node end of the cutting into the water to clean it,
6 With a small dipple stick or old pencil to poke a hole into the soilless potting mix. Ensure the hole is slightly larger than the stem diameter and be careful not to wipe the rooting hormone off the cuttings base, place the cuttings in a pattern ensuring the cuttings are not touching each other,
7 I like to place the pots in Plastic bags to help maintain temperature and moisture. Place in a semi shaded place like under 50mm shade cloth.
8 When the cuttings have struck, open the bag to allow air circulation for a few days to a week,
9 Once hardened off remove the cuttings from the bag and allow to further hardening for a few more days,
10 Transplant into a good potting mix to grow on.
Fertilize using seaweed, fish emulsion or organic chicken pellets soaked in water on an alternate basis. Fertilize every two months until the plants are established then annually in early September to October to maintain health, vitality and better flowering.
Further Comments from Readers:
Hi reader, it seems you use The Bible of Botany a lot. That’s great as we have great pleasure in bringing it to you! It’s a little awkward for us to ask, but our first aim is to purchase land approximately 1,600 hectares to link several parcels of N.P. into one at The Pinnacles NSW Australia, but we need your help. We’re not salespeople. We’re amateur botanists who have dedicated over 30 years to saving the environment in a practical way. We depend on donations to reach our goal. If you donate just $5, the price of your coffee this Sunday, We can help to keep the planet alive in a real way and continue to bring you regular updates and features on Australian plants all in one Botanical Bible. Any support is greatly appreciated. Thank you.
In the spirit of reconciliation we acknowledge the Bundjalung, Gumbaynggirr and Yaegl and all aboriginal nations throughout Australia and their connections to land, sea and community. We pay our respect to their Elders past, present and future for the pleasures we have gained.
Geranium neglectum
Classification:
Class: Equisetopsida
Subclass: Magloliidae
Superorder: Rosannae
Order: Geraniales
Family: Geraniaceae
Genus: From Geranion, which is Ancient Greek for a crane’s bill. It refers to the flowers, which look similar to a crane’s bill.
Species: From Neglectum/Neclectum, which is Latin for to pay no attention to. It refers to the plants, which are often being over looked because they have no or few stand out qualities.
Common Name:
Distribution:
Geranium neglectum is found south from Queen Mary falls in southern Queensland to the Bemm River, the Coombinbah River and the upper Rodger River in north eastern Victoria. It is found on the Western S
lopes, on and east of the Great Dividing Range to the coast.
https://avh.ala.org.au/occurrences/search?taxa=Geranium+neglectum#tab_mapView
Habitat Aspect Climate:
Geranium neglectum prefers full sun to light dappled shade. It grows on moister sites along riparian zones and adjacent to coastal and montane swamps and wallums in open woodlands and open forests. The altitude ranges from 10 meters ASL to 1000 meters ASL.
The temperatures range from minus 3 degrees in July to 40 degrees in January.
The rainfall ranges from lows of 600mm to an average of 1400mm annually.
Soil Requirements:
Geranium neglectum prefers better quality fertile sandy loams to light silty clay loams. The soils are usually derived from decomposed brown basalt, black basalt, sandstones, mudstone, granite, shale and metamorphic rocks. The soils pH ranges from 4.5pH to 5.5pH are preferred. It tolerates seasonal wet soils but does not grow in the water. Non saline soils to moderately saline soils are tolerated.
Height & Spread:
Wild Plants: 0.1m to 0.2m by 2m to 2.5m.
Characteristics:
Geranium neglectum grows as a decumbent perennial herb with slender pale blue-green to mid purplish or reddish stems. The terete stems are often densely branched and are densely covered in short, white appressed, hirsute hairs. The white tap root is short and fleshy.
The opposite, 5 to 7 lobed palmatetisect leaves of Geranium neglectum are orbicular to reniform. The lobes are obovate to oblong and are further divided into 2 to 5 mucronate lobes. The lobes measure 1mm to 3mm in length by 2.5mm to 5.5mm in width. The slender pale blue-green petioles measure 25mm to 70mm in length.
The bases are cordate to peltate while the lobes apexes are obtuse. The discolourous laminas are pale blue-green often with a purplish sheen; when growing on phosphate deficient soils, are sparsely to moderately covered in white, appressed hirtellous and pubescent hairs on the upper laminas while the lower laminas are paler. The laminas are flat while the mid vein and main lateral veins are slightly prominent on the lower lamina and are visible from the upper lamina. The lobe margins are entire.
The inflorescences of Geranium neglectum are usually born solitary on a single peduncle from the leaf axils. The pedicels are mid green and glabrous to sparsely covered in white appressed hirsute hairs with 2 small stipules ate the base and another 2 minute linear stipules about 15mm to 20mm below the sepals. The pedicels measure 70mm to 150mm in length.
The 5 obovate sepals are mid green and covered in white, red tipped eglandular hairs externally and are glabrous internally. The apexes are acute with a long aristate tip. The sepals measure 6mm to 10mm in length not including the 3.5mm to 4.5mm aristate tip. The petals are white or usually deep pink fading to pale pink or white near the base. The petals fade to pastel pink during the day and are glabrous with usually 3 violet or deep pink longitudinal stripes which fork near the apexes. The obovate petals have a truncate or wide shallow retuse apex and measure 13mm to 15mm in length by 11mm to 13mm in width.
The 10 dimorphic, white filaments measure 4mm to 7mm in length while the deep purple anthers dehisce to release the cream pollen. The pale green style has a yellow 5 fid stigma and measures 5mm to 6.5mm in length while the stigma branches measure 2mm to 3mm in length. The flowers appear from November to February.
Geranium neglectum fruits are usually cylindrical mericarps. The mericarps measure 15mm to 19mm in length by 2.5mm to 3.5mm in diameter. The pale green-blue mericarps are sparsely to moderately covered in short, white hirtellous hairs. The awns are covered in short, white eglandular hairs. The mericarps turn mid brown while the sepals remain green and persistent at the base of the ripe fruits. The isodiametric seeds are deep brown and densely covered in short pubescent hairs. The mericarps split from the base remaining attached at the apex. The seeds are deep brown and sparsely covered in aveolae.
Wildlife:
Geranium neglectum‘s wildlife is unknown to the author however I know from my experiences in an organic orchard the growth rate was extraordinary where fortnightly slashing would see the plants grow half a meter and flower throughout the summer months. They gave copious quantities of soft high nitrogenous mulch which was eagerly sought out by the ducks or mulched quickly.
Cultivation:
Geranium neglectum is considered a weed in the garden with its only virtue at this stage is it yields good quality mulch. This should change as the plants have exquisite beauty all of its own that is easy to control and manipulate.
While the exotic Geranium specie has stolen the limelight the native plants have gone mainly unrecognized. It would ideally suit moist rockeries or bush gardens as the fill in plant between shrubs.
This is not usually a plant for mass planting but for contrast but imagine stepping out onto a path and there in front of you is a long narrow bed or embankment bare and ugly. Now let’s add 18 to 25 Geranium neglectum lying prostrate along the front densely covering the bed with Eragrostis parviflora giving height and elegance in the background against the wall or leading into a bush scene. The heads of delicate flowers wafting in the breeze enticing you to look beyond the path and into the bush but you are transfixed on this beautiful contrasting display. It is because of their vertical open spindly nature with long pendulant panicles that you stop and look twice contrasting the dense matting in the foreground. For something bulkier and heavier Lomandra hystrix or for an intermediate scene one of the Baumea like Baumea juncea has the ideal culms and the rigid erect growth for the perfect contrast.
Using plants with deep green, broad, simple leaves to the rear Geranium neglectum will draw attention to its prostrate, delicate, palmate, pale blue-green leaves in the foreground. Ensure that curves and bends are used to increase the contrasts and allow the plants to spread to their full potential.
2 or 3 in an area can be magical in lifting the other plants around them. In cultivation the plants will grow 100mm to 200mm in height by 600mm to 700mm in diameter provided it is trimmed to encourage full ground coverage. It offers quick growth with delicate little flowers within months from seed.
Propagation:
Seeds: Sow fresh seeds or the previous season’s seeds of Geranium neglectum after removing them from the refrigerator over winter into a seed raising mix. Place the trays beneath 30mm shade cloth and keep moist not wet. When the seedlings are 40mm to 60mm tall, prick them out, nip the tips out to encourage side shoots and plant them into 50mm native tubes using a good organic mix.
Once the seedlings reach 150mm to 200mm in height again nip the tips out and plant them out into their permanent position. Group plantings are best achieved by planting them at 600mm to 800mm centers.
Fertilize using Seaweed, fish emulsion or organic chicken pellets soaked in water and apply the liquid on an alternate basis. Fertilize every 3 months in areas where they flower all year or in spring and mid-summer where it flowers during the warmer months of spring to autumn.
Fertilize using Seaweed, fish emulsion or organic chicken pellets soaked in water and apply the liquid on an alternate basis. Fertilize every 3 to 4.months in areas where it flowers all year or twice annually in early September or March to maintain health, vitality and better flowering.
Cuttings:
Cuttings are easy and can be taken anytime of the year in frost free areas. Use stems from the previos seasons growth which have 2 or 3 pairs of nodes.
1 Prepare the cutting mix by adding one third sharp clean river sand, one third peat and one third perlite. These ingredients are sterilize,
2 Select good material from non diseased plants,
3 Select semi green stems for cuttings. Look for a stem with two or three nodes,
4 Place the cutting on a flat, hard surface, and make a clean cut down one side of the cutting at the base for 10mm with a sharp sterile knife or razor blade. – This scarification of the node will increase the chances of roots emerging from this spot. Now remove all but one or two the leaves, leaving the apex leaves in tact. If the leaves are very large in proportion to the stem, cut off the leaves on the basal half.
5 Fill a saucer with water. Dip the node end of the cutting into the water to clean it,
6 With a small dipple stick or old pencil to poke a hole into the soilless potting mix. Ensure the hole is slightly larger than the stem diameter and be careful not to wipe the rooting hormone off the cuttings base, place the cuttings in a pattern ensuring the cuttings are not touching each other,
7 I like to place the pots in Plastic bags to help maintain temperature and moisture. Place in a semi shaded place like under 50mm shade cloth.
8 When the cuttings have struck, open the bag to allow air circulation for a few days to a week,
9 Once hardened off remove the cuttings from the bag and allow to further hardening for a few more days,
10 Transplant into a good potting mix to grow on.
Fertilize using seaweed, fish emulsion or organic chicken pellets soaked in water on an alternate basis. Fertilize every two months until the plants are established then annually in early September to October to maintain health, vitality and better flowering.
Further Comments from Readers:
Hi reader, it seems you use The Bible of Botany a lot. That’s great as we have great pleasure in bringing it to you! It’s a little awkward for us to ask, but our first aim is to purchase land approximately 1,600 hectares to link several parcels of N.P. into one at The Pinnacles NSW Australia, but we need your help. We’re not salespeople. We’re amateur botanists who have dedicated over 30 years to saving the environment in a practical way. We depend on donations to reach our goal. If you donate just $5, the price of your coffee this Sunday, We can help to keep the planet alive in a real way and continue to bring you regular updates and features on Australian plants all in one Botanical Bible. Any support is greatly appreciated. Thank you.
In the spirit of reconciliation we acknowledge the Bundjalung, Gumbaynggirr and Yaegl and all aboriginal nations throughout Australia and their connections to land, sea and community. We pay our respect to their Elders past, present and future for the pleasures we have gained.
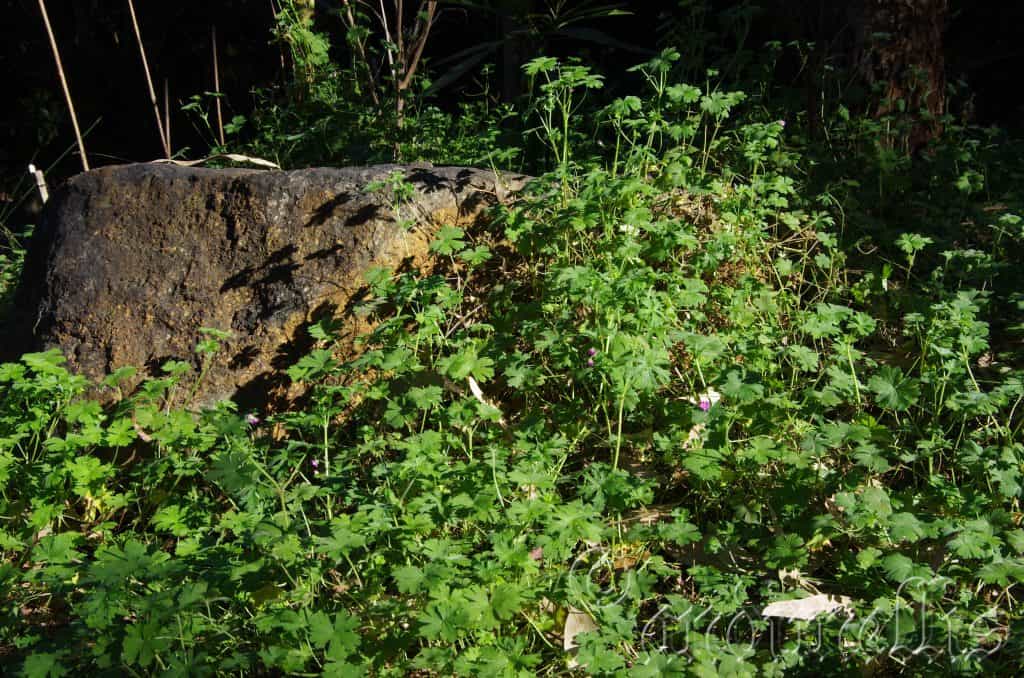
LBG Lismore NSW
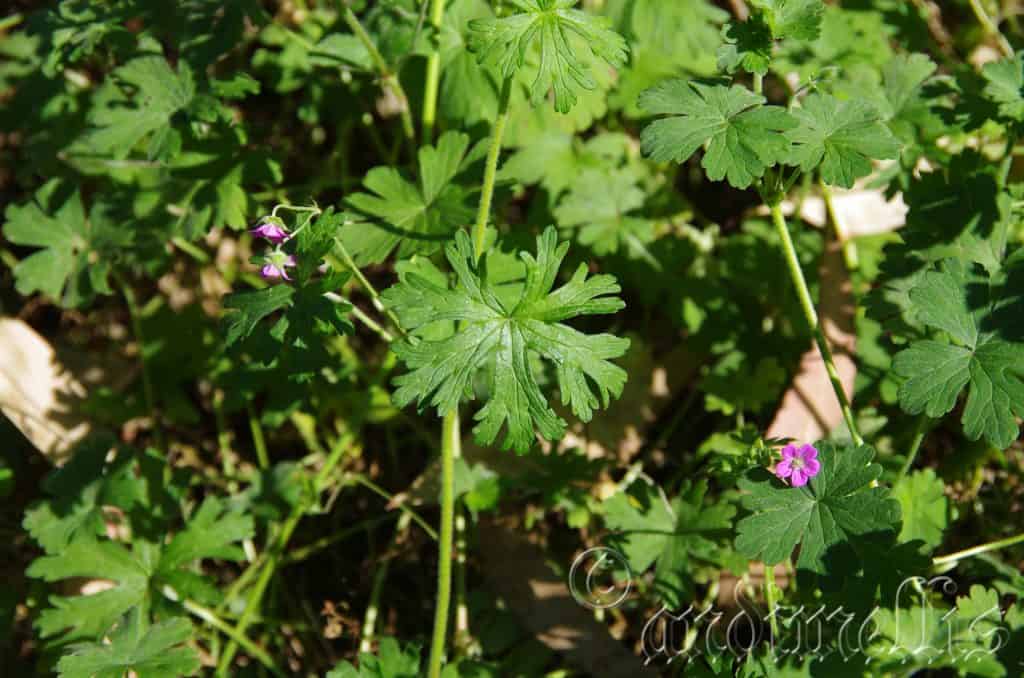
LBG Lismore NSW
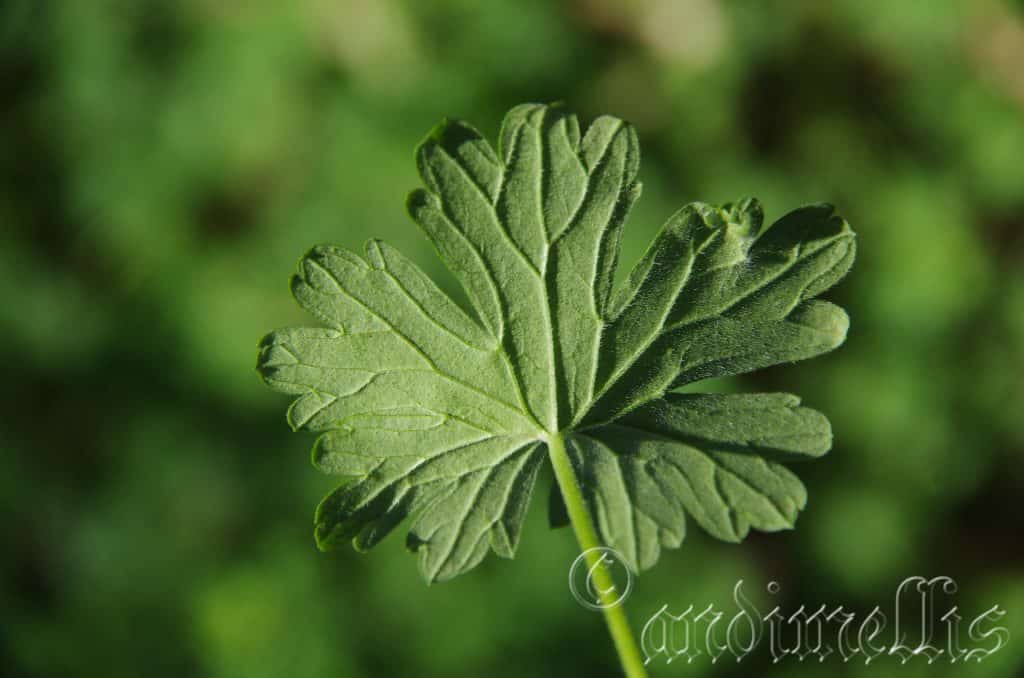
LBG Lismore NSW
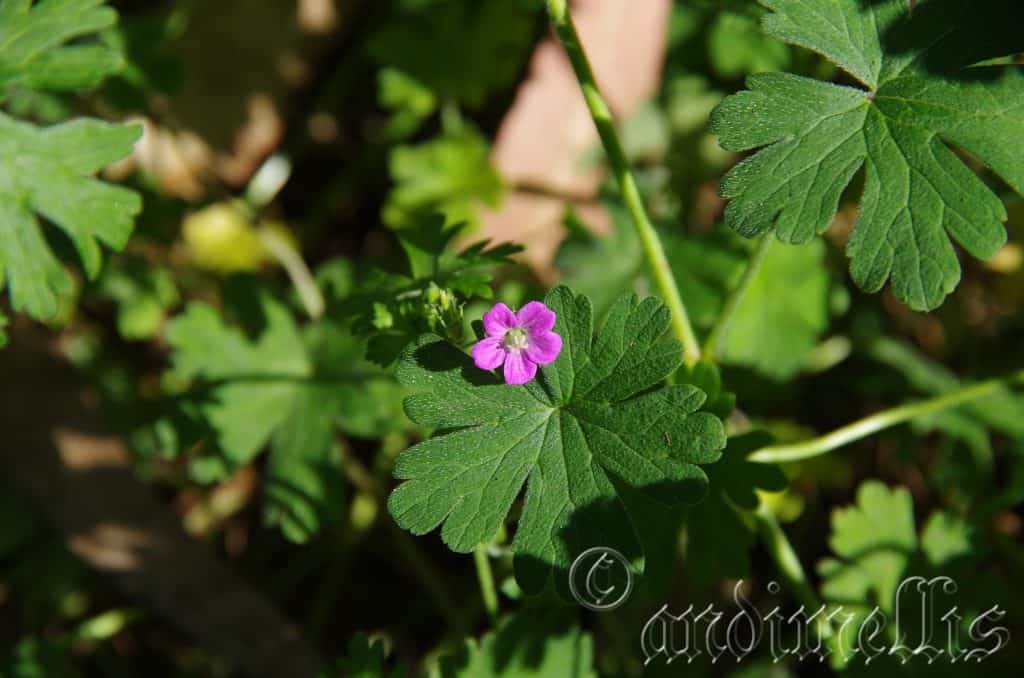
LBG Lismore NSW
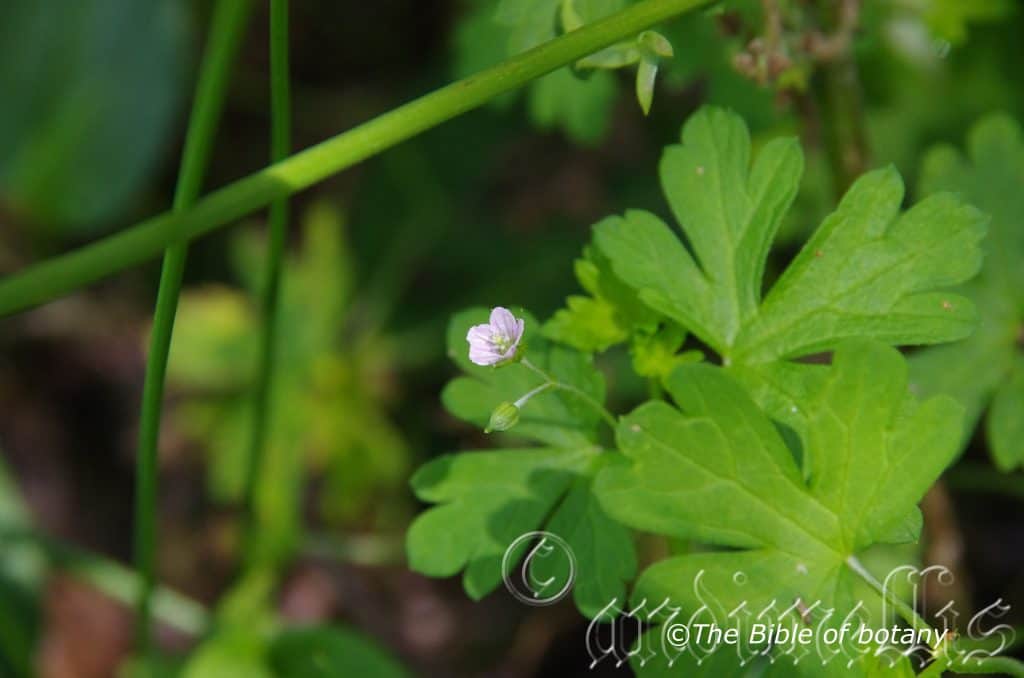
LBG Lismore NSW
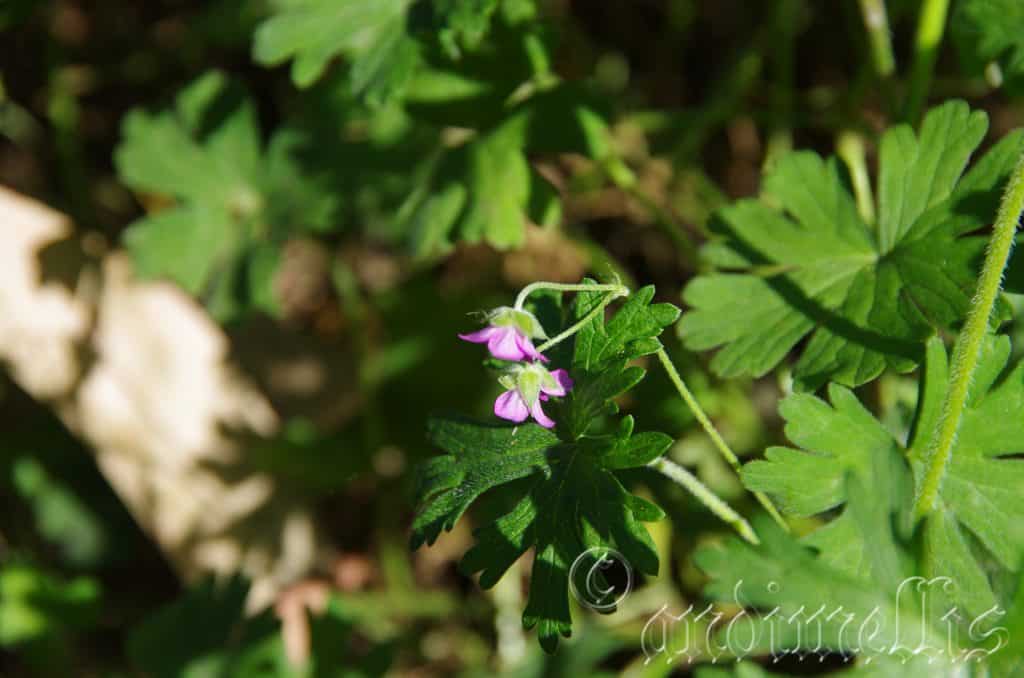
LBG Lismore NSW
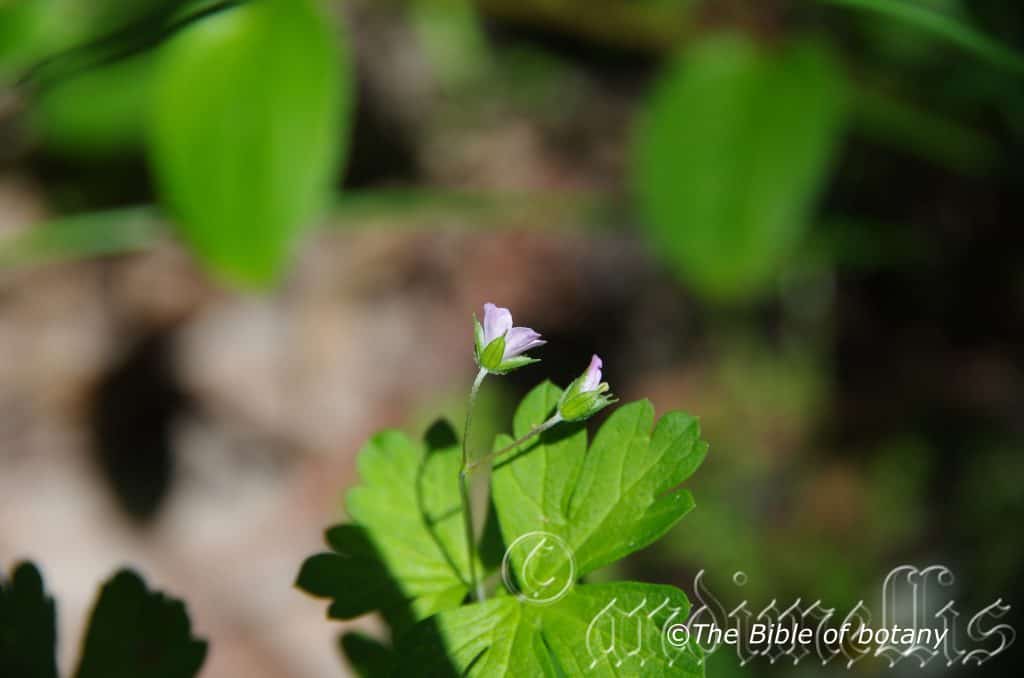
LBG Lismore NSW
Geranium solanderi
Classification:
Class: Equisetopsida
Subclass: Magloliidae
Superorder: Rosannae
Order: Geraniales
Family: Geraniaceae
Genus: From Geranion, which is Ancient Greek for a crane’s bill. It refers to the flowers, which look similar to a crane’s bill.
Species: Is named in honour of Daniel Carlsson Solander; 1733-1782, who was a Swedish naturalist and an Apostle of Carl Linnaeus. Solander was the first university educated scientist to set foot on Australian soil at Botany Bay with Sir Joseph banks and suggested the name of the bay as Botanist Bay.
Common Name: Australian Cranes Beak.
Distribution:
Geranium solanderi is found south and west in a line from Dandaragan to Albany in the south west and east from Observatory Island and Frasers Range to Cape Arid National Park in southern coastal Western Australia.
In the east it is found south and east of a line from Maryborough, Kroombit Tableland, Carnarvon National Park and Cunnamulla in Queensland to Narrabri and Cobar in New South Wales then to Daylesford in Victoria then west to Cliffs at Big End, Oulnina Park, Mawson Plateau and Streaky Bay in southern South Australia. There are several isolated populations that indicate this species may be more wide spread than the map and description indicates. These include Watraba in South Australia and Credit Forest Reserve and Malanda in Queensland.
It is also found on all the Bass Straight Islands and most the mainland of Tasmania.
https://avh.ala.org.au/occurrences/search?taxa=Geranium+solanderi#tab_mapView
Habitat Aspect Climate:
Geranium solanderi prefers full sun to light dappled shade. It grows in moist open woodlands and drier wallum margins. The altitude ranges from 5 meters ASL to 1300 meters ASL.
The temperatures range from minus 4.degrees in July to 42 degrees in January.
The rainfall ranges from lows of 150mm to an average of 2800mm annually.
Soil Requirements:
Geranium solanderi prefers better quality fertile sandy loams, to light silty clay loams and alluvial flats. The soils are usually derived from decomposed brown basalt, black basalt, sandstones, granite, mudstone, shale and metamorphic rocks as well as alluvial slits or accumulated peaty beach sands. The soils pH ranges from 4.5pH to 7.5pH. It tolerates seasonal wet soils but does not grow in the water. Non saline soils to moderately saline soils are tolerated.
Height & Spread:
Wild Plants: 0.05m to 0.1m by 0.8m to 1m.
Characteristics:
Geranium solanderi grows as a decumbent perennial herb with slender pale blue-green to mid purplish or reddish stems. The terete stems are often densely branched and are densely covered in course, white hirsute hairs. The white tap root is napiform, that is short and round like a beetroot.
The opposite, 5 to 7 lobed palmatetisect leaves of Geranium solanderiare orbicular to reniform and measure 10mm to 30mm in length by 15mm to 50mm in width. The 5 to 7 obovate lobes are further divided into 2 to 5 smaller lobes or teeth on the apical half. The lobes measure 1mm to 3mm in length by 2.5mm to 5.5mm in width. The stipules are narrow triangular and lacinate. The slender pale blue-green petioles are sparsely covered in white appressed and erect hirsute hairs and measure 15mm to 40mm in length.
The bases are cordate while the lobes apexes are obtuse or rarely broad acute. The concolourous laminas are pale blue-green to mid blue-green often with a purplish sheen; when growing on phosphate deficient soils, are sparsely to moderately covered in white, appressed and erect hirsute hairs on the upper laminas while the lower laminas are glabrous to sparsely covered in white appressed white hairs. The laminas are flat or slightly decurve on the apical half. The mid vein and main lateral veins are slightly prominent on the lower lamina and are visible from the upper lamina. The lobe margins are entire.
The inflorescences are usually born in pairs or rarely solitary on a single peduncle from the leaf axils. The peduncles and pedicels are mid green and sparsely to densely covered in white appressed or semi appressed hirsute hairs. There are 2 small stipules at the base and another 2 triangular stipules about 2.5mm to 15mm below the sepals. The peduncles measure 6mm to 40mm in length while the pedicels measure 6mm to 50mm in length.
The 5 elliptical sepals are mid green and glabrous to sparsely covered in short eglandular hairs, with long dense covering of white ciliate hairs along the margins. The apexes are acute with a long aristate tip. The sepals measure 4mm to 10mm in length not including the 1mm to 3.5mm aristate tip. The petals are deep pink, usually with 3 deeper pink or yellowish-green longitudinal stripes on the basal half. The oblong petals have a truncate or wide shallow retuse apex and measure 5mm to 12mm in length by 3mm to 10mm in width.
The 10 white filaments measure 5mm to 9mm in length while the creamy-yellow anthers dehisce to release the creamy-yellow pollen. The pale green style has a pale yellow, 5 fid, clavate, narrow spathulate or linear stigma and measures 6mm to 10mm in length while the stigma branches measure 1.2mm to 2mm in length. The flowers appear from October to May in the southern plants or alpine plants while those in the northern warmer areas may flower all year with a peak from late July to late November. The northern plants have larger flowers than those growing in cooler southern areas.
Geranium solanderi fruits are usually cylindrical mericarps. The mericarps measure 10mm to 25mm in length by 3mm to 4.5mm in diameter. The pale green-blue mericarps are moderately covered in, white pubescent hairs which are longest near the base and shortest near the apex. The awns are covered in short, white eglandular hairs. The mericarps turn mid brown while the sepals remain green and persistent at the base of the ripe fruits. The isodiametric seeds are deep brown and densely covered in short pulverulent hairs. The mericarps split from the base remaining attached at the apex. The large, rugose seeds measure 4.5mm to 5mm in length by 2.2mm to 2.5mm in diameter.
Wildlife:
Geranium solanderi‘s wildlife is unknown to the author.
Cultivation:
Geranium solanderi is still considered a weed in the garden with its only virtue at this stage is it yields of good quality mulch. This should change as the plants have exquisite beauty all of their own that is easy to control and manipulate. I have found it difficult to grow on pure sand yet I am still prepared to persevere because of its overall beauty.
While the exotic Geranium specie has stolen the limelight, our native plants have gone mainly unrecognized. It would ideally suit moist rockeries or bush gardens as fill in plants between shrubs of different heights.
Using plants with deep green, broad, simple leaves to the rear or midground Geranium solanderi will draw attention to its prostrate, delicate, palmate, pale blue-green leaves in the foreground. Ensure that curves and bends are used to increase the contrasts and allow the plants to spread to their full potential.
2 or 3 in an area can be magical in lifting the other plants around them. In cultivation the plants will grow 50mm to 80mm in height by 300mm to 400mm in diameter provided it is trimmed to encourage full ground coverage. It offers quick growth with delicate large flowers within months from seed.
Another method would be to mass plant them amongst upright annuals for year round colour. It would not matter if the annuals flowering clashed at the same time as there leaves would break the bright colours and give texture to the bed. Once the annuals have ceased flowering the bed is not completely barren and bare and offers that transitional piece of greenery.
Propagation:
Seeds: Sow fresh seeds or the previous season’s seeds of Geranium solanderi after removing them from the refrigerator over winter into a seed raising mix. Place the trays beneath 30mm shade cloth and keep moist not wet. When the seedlings are 40mm to 60mm tall, prick them out, nip the tips out to encourage side shoots and plant them into 50mm native tubes using a good organic mix.
Once the seedlings reach 150mm to 200mm in height again nip the tips out and plant them out into their permanent position. Group plantings are best achieved by planting them at 600mm to 800mm centers.
Fertilize using Seaweed, fish emulsion or organic chicken pellets soaked in water and apply the liquid on an alternate basis. Fertilize every 3 to 4.months in areas where it flowers all year or twice annually in early September or March to maintain health, vitality and better flowering.
Cuttings:
Cuttings are easy and can be taken anytime of the year in frost free areas. Use stems from the previos seasons growth which have 2 or 3 pairs of nodes.
1 Prepare the cutting mix by adding one third sharp clean river sand, one third peat and one third perlite. These ingredients are sterilize,
2 Select good material from non diseased plants,
3 Select semi green stems for cuttings. Look for a stem with two or three nodes,
4 Place the cutting on a flat, hard surface, and make a clean cut down one side of the cutting at the base for 10mm with a sharp sterile knife or razor blade. – This scarification of the node will increase the chances of roots emerging from this spot. Now remove all but one or two the leaves, leaving the apex leaves in tact. If the leaves are very large in proportion to the stem, cut off the leaves on the basal half.
5 Fill a saucer with water. Dip the node end of the cutting into the water to clean it,
6 With a small dipple stick or old pencil to poke a hole into the soilless potting mix. Ensure the hole is slightly larger than the stem diameter and be careful not to wipe the rooting hormone off the cuttings base, place the cuttings in a pattern ensuring the cuttings are not touching each other,
7 I like to place the pots in Plastic bags to help maintain temperature and moisture. Place in a semi shaded place like under 50mm shade cloth.
8 When the cuttings have struck, open the bag to allow air circulation for a few days to a week,
9 Once hardened off remove the cuttings from the bag and allow to further hardening for a few more days,
10 Transplant into a good potting mix to grow on.
Fertilize using seaweed, fish emulsion or organic chicken pellets soaked in water on an alternate basis. Fertilize every two months until the plants are established then annually in early September to October to maintain health, vitality and better flowering.
Further Comments from Readers:
Hi reader, it seems you use The Bible of Botany a lot. That’s great as we have great pleasure in bringing it to you! It’s a little awkward for us to ask, but our first aim is to purchase land approximately 1,600 hectares to link several parcels of N.P. into one at The Pinnacles NSW Australia, but we need your help. We’re not salespeople. We’re amateur botanists who have dedicated over 30 years to saving the environment in a practical way. We depend on donations to reach our goal. If you donate just $5, the price of your coffee this Sunday, We can help to keep the planet alive in a real way and continue to bring you regular updates and features on Australian plants all in one Botanical Bible. Any support is greatly appreciated. Thank you.
In the spirit of reconciliation we acknowledge the Bundjalung, Gumbaynggirr and Yaegl and all aboriginal nations throughout Australia and their connections to land, sea and community. We pay our respect to their Elders past, present and future for the pleasures we have gained.

Ebor NSW
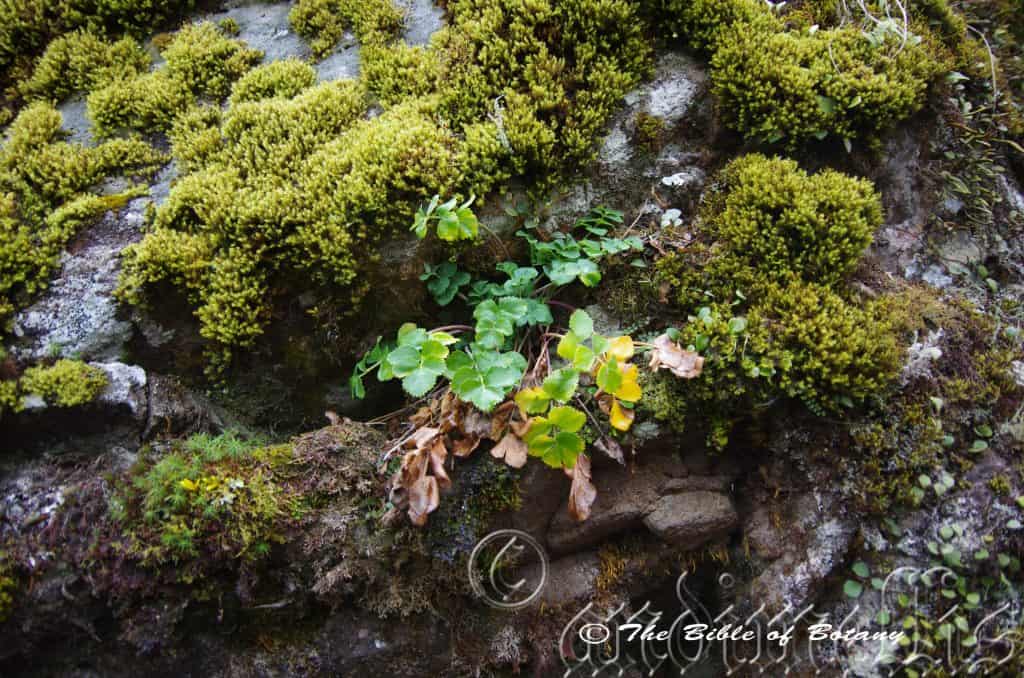
Ebor NSW
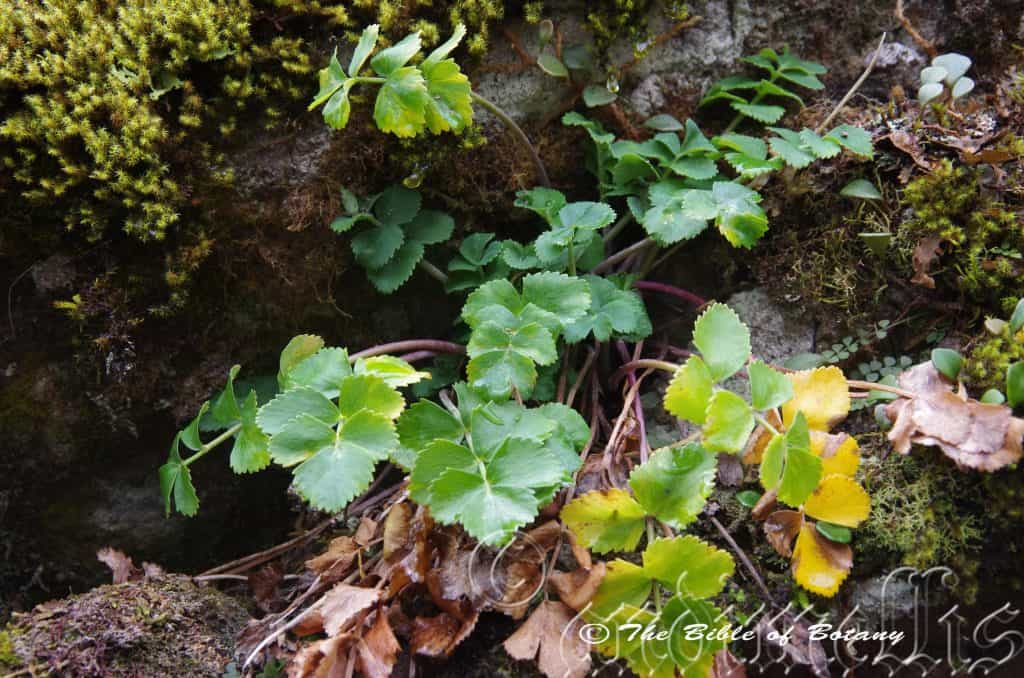
Ebor NSW
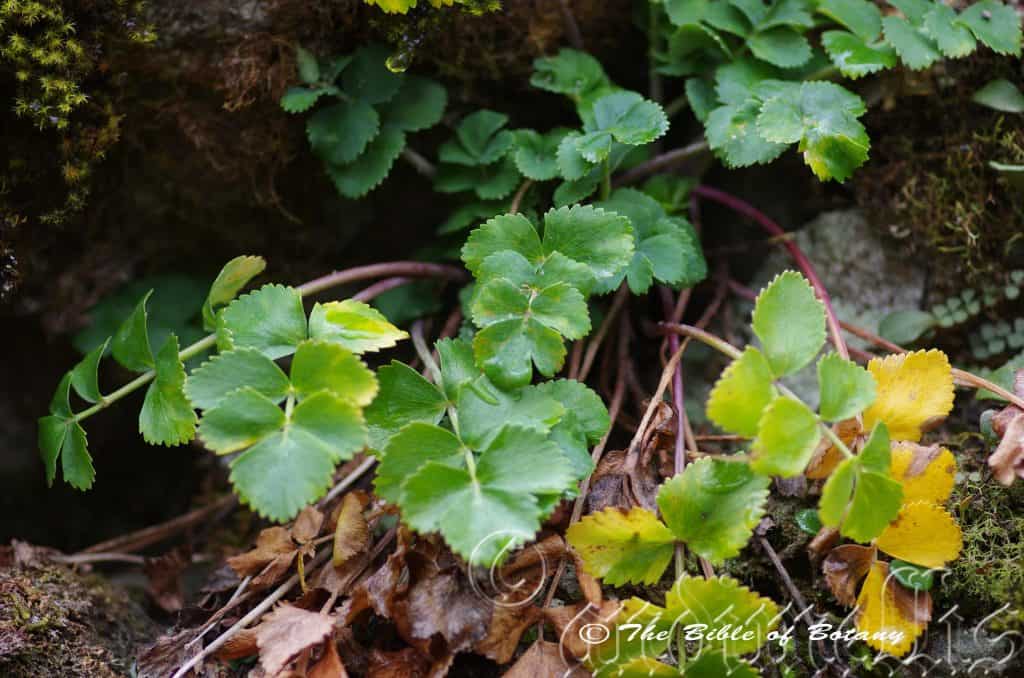
Ebor NSW
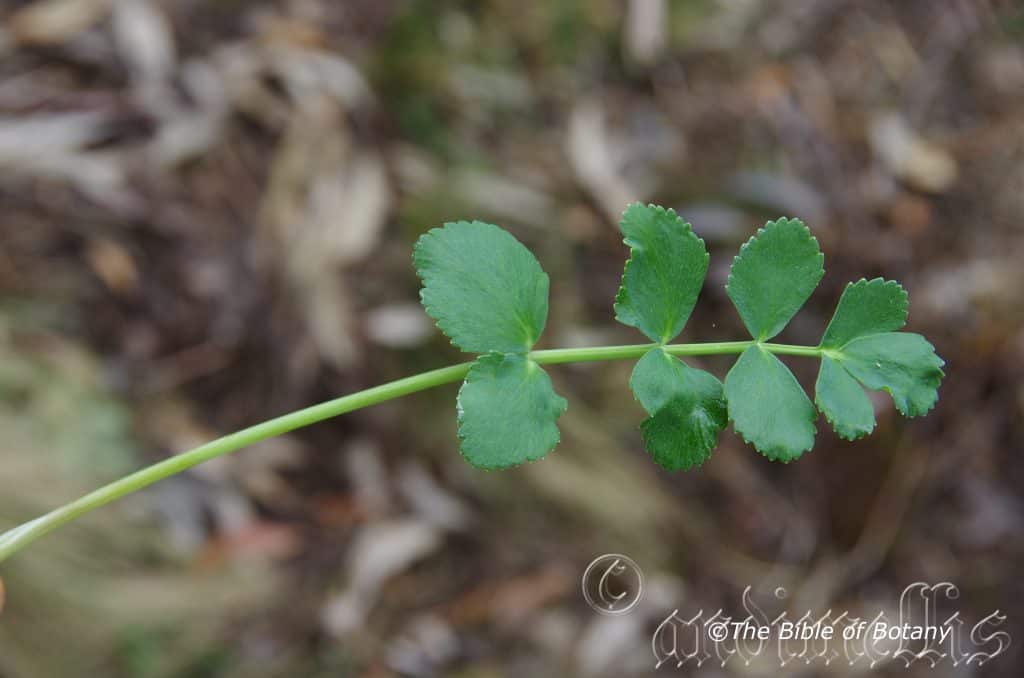
Ebor NSW
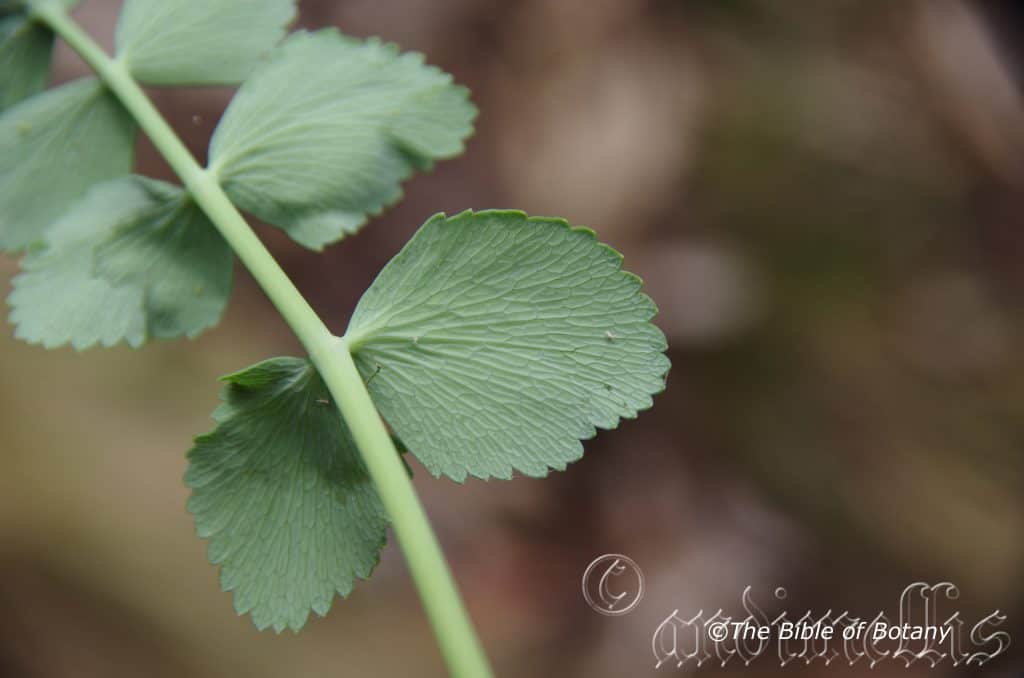
Ebor NSW
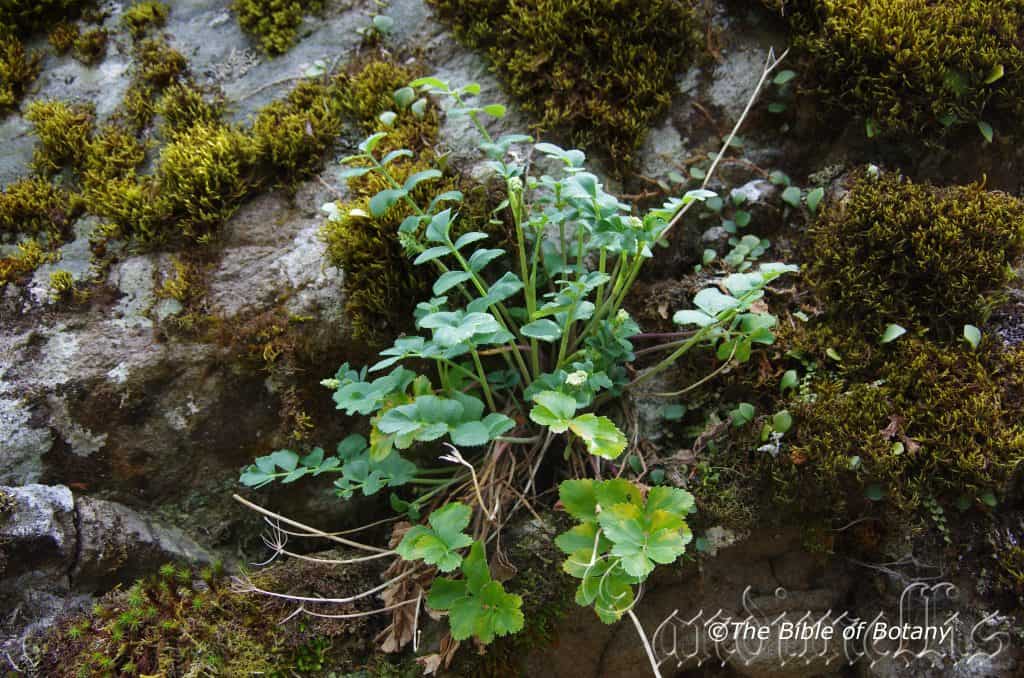
Ebor NSW
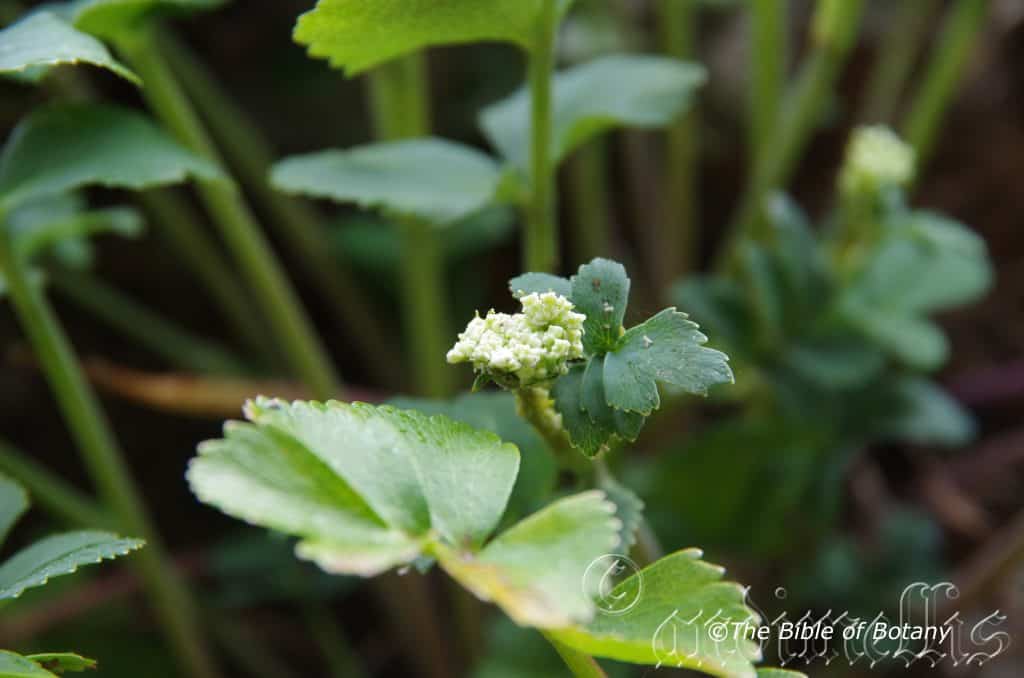
Ebor NSW
Gingidia rupicola
Classification:
Class: Equisetopsida
Subclass: Magloliidae
Superorder: Rosannae
Order: Geraniales
Family: Apiaceae
Genus: From Gingidion, which is Ancient Greek for a small Syrian plant Daucus gingidium. It refers to the close resemblance of the plant to the Syrian plant.
Species: From Rupis, which is Latin for a cliff or rocky and Cola which is Latin for to dwell or reside at. It refers to plants, which occur naturally on cliff faces or steep rocky terrain.
Common Name:
Distribution:
Gingidia rupicola is only known from 2 small populations in the Ebor and the New England National Park in north eastern New South Wales.
https://avh.ala.org.au/occurrences/search?taxa=Gingidia+rupicola#tab_mapView
Habitat Aspect Climate:
Gingidia rupicola prefers light dappled shade to dense shade. It grows in moist closed temperate rainforest. The altitude ranges from 1400 meters ASL to 1500 meters ASL.
The temperatures range from minus 6 degrees in July to 34 degrees in January.
The rainfall ranges from lows of 800mm to an average of 1080mm annually. Orographic precipitation would contribute substantially to the soil moisture and humidity where the plants grow.
Soil Requirements:
Gingidia rupicola prefers better quality fertile pockets within boulders and along cliff faces. The soils are derived from decomposing granite. The soils pH ranges from 6.5pH to 7pH. It does not tolerate waterlogged soils. Non saline soils are tolerated.
Height & Spread:
Wild Plants: 0.25m to 0.5m by 0.2m to 0.5m.
Characteristics:
Gingidia rupicola grows as a herbaceous perennial to 50 cm tall, with a thick fleshy rootstock and erect stems.
The leaves form rosettes of 6to 10 individual leaves. The imparipinnate leaves measure 150mm to 350mm in length, while the leaflets have 1 to 4 pairs often overlapping with the terminal pinnule often trilobed. The subcoriaceous, discolourous, upper laminas are a soft grey-green, while the lower laminas are glaucous. The terete petiole has a shallow channel on the upper surface and measures 4.5mm to 23.5mm in length. The bases sheath the short stem and have a short marginal wing. The cauline leaves measure 90mm in length and have 1 to 3 pairs of leaflets.
There are 1 to 6 auxillary inflorescences on each plant bearing a terminal compound umbel and 1 to 3 lateral compound umbels, which measure 60mm to 110mm in length. There are 5 involucral bracts with 6 to 11 primary rays. The simple umbels bear 10 to 14 individual flowers.
The narrow elliptic or narrow ovate fruits are mericarps, which measure 6.8mm to 7.6mm in length by 1.8mm to 2.3mm in width. The fruits turn grey-brown when ripe. The bases are rounded, while the dorsal surface is convex with 5 ribs and 2 lateral ribs with wings that measure 0.4mm to 0.6mm in width. The ventral surface is flat, carpophore and measures 4.5mm to 6.8mm in length.
Wildlife:
Gingidia rupicola‘s wildlife is unknown to the author.
Cultivation:
Gingidia rupicola would be considered a valuable addition to any rockery garden. It would ideally suit moist rockeries or bush gardens as a fill in plant between boulders or on a rock shelf.
To extract its real potential it would be best planted with no other competition in the immediate vicinity.
2 or 3 in a small area would be a magical highlight in the crevices between rocks.
Propagation:
Seeds: All plants declared vulnerable or endangered are protected by Federal and State Laws and must not be removed from the wild unless you are a land developer, mining company or main Roads department etc. This includes bulbs, roots, leaves, seeds and flowers. No part of any plant can be removed from Federal, State or Local Government land without the prior permission of the authority and this includes the spore.
Sow fresh seeds or the previous season’s seeds of Gingidia rupicola after removing them from the refrigerator over winter into a seed raising mix. Place the trays beneath 30mm shade cloth and keep moist not wet. When the seedlings are 40mm to 60mm tall, prick them out, nip the tips out to encourage side shoots and plant them into 50mm native tubes using a good organic mix.
Once the seedlings reach 150mm to 200mm in height again nip the tips out and plant them out into their permanent position. Group plantings are best achieved by planting them at 600mm to 800mm centers.
Fertilize using seaweed, fish emulsion or organic chicken pellets soaked in water on an alternate basis. Fertilize every two months until the plants are established then annually in early September to October to maintain health, vitality and better flowering.
Further Comments from Readers:
Hi reader, it seems you use The Bible of Botany a lot. That’s great as we have great pleasure in bringing it to you! It’s a little awkward for us to ask, but our first aim is to purchase land approximately 1,600 hectares to link several parcels of N.P. into one at The Pinnacles NSW Australia, but we need your help. We’re not salespeople. We’re amateur botanists who have dedicated over 30 years to saving the environment in a practical way. We depend on donations to reach our goal. If you donate just $5, the price of your coffee this Sunday, We can help to keep the planet alive in a real way and continue to bring you regular updates and features on Australian plants all in one Botanical Bible. Any support is greatly appreciated. Thank you.
In the spirit of reconciliation we acknowledge the Bundjalung, Gumbaynggirr and Yaegl and all aboriginal nations throughout Australia and their connections to land, sea and community. We pay our respect to their Elders past, present and future for the pleasures we have gained.
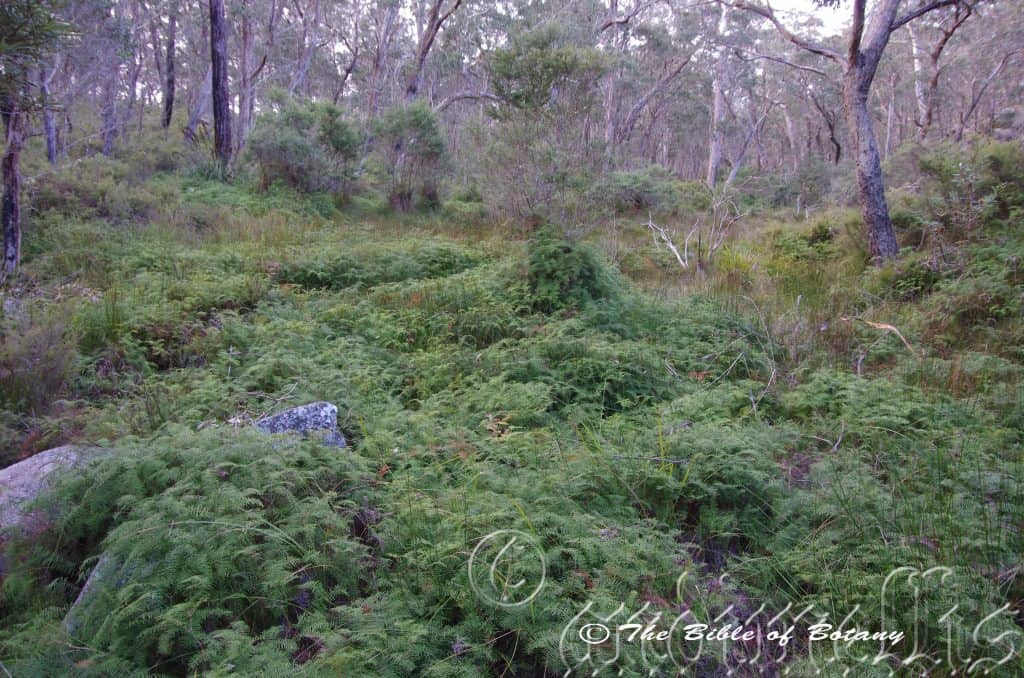
Cathedral Rocks National Park NSW
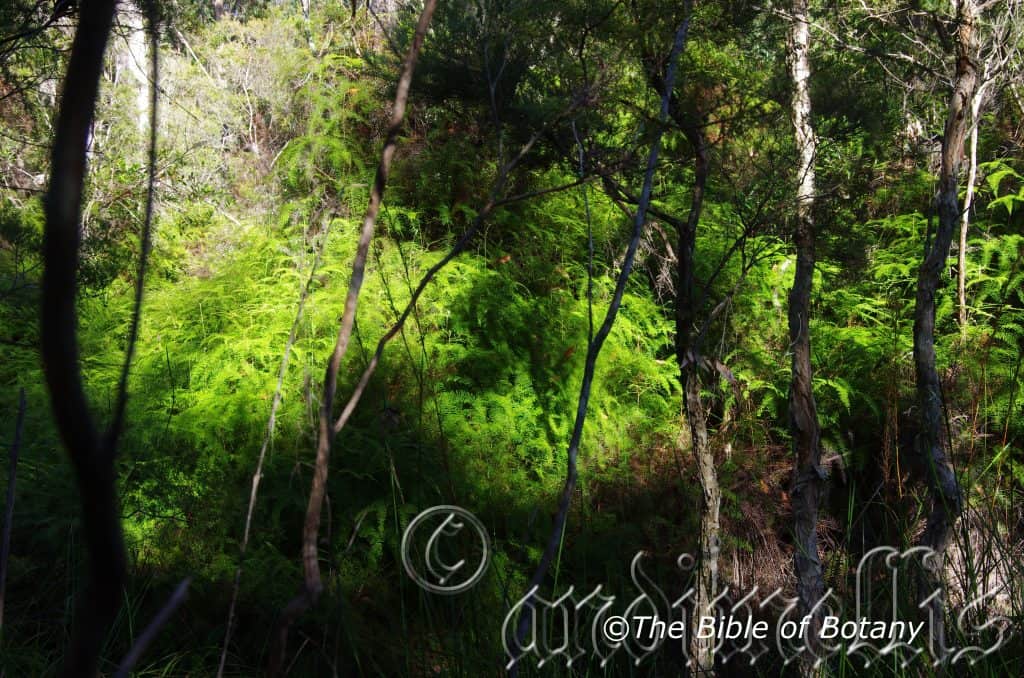
The Pinnacles NSW
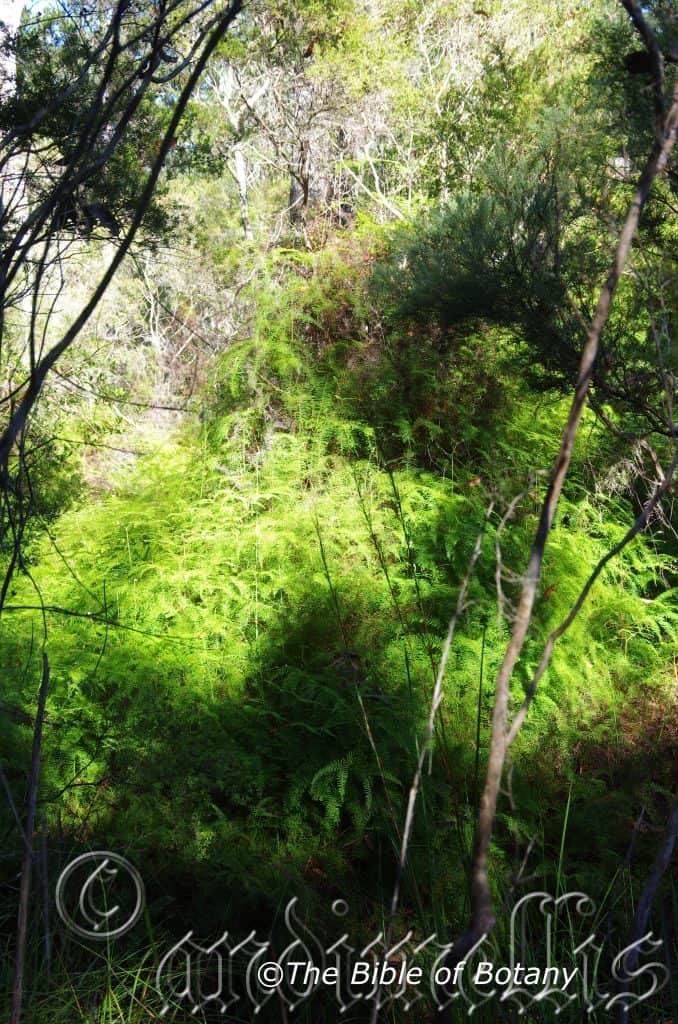
The Pinnacles NSW
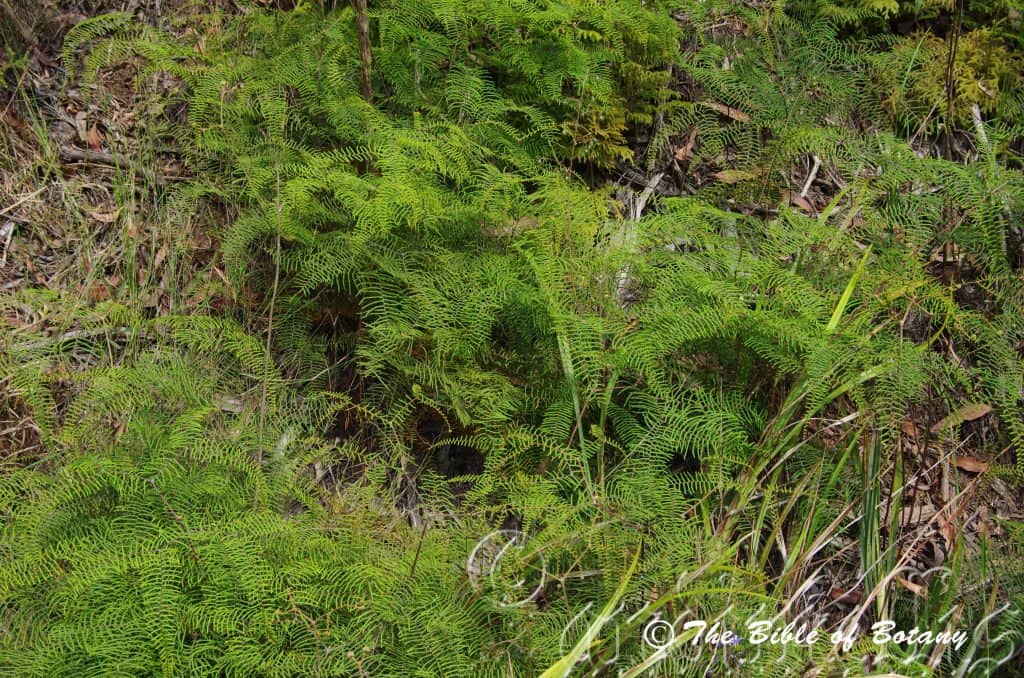
Nambucca Heads NSW
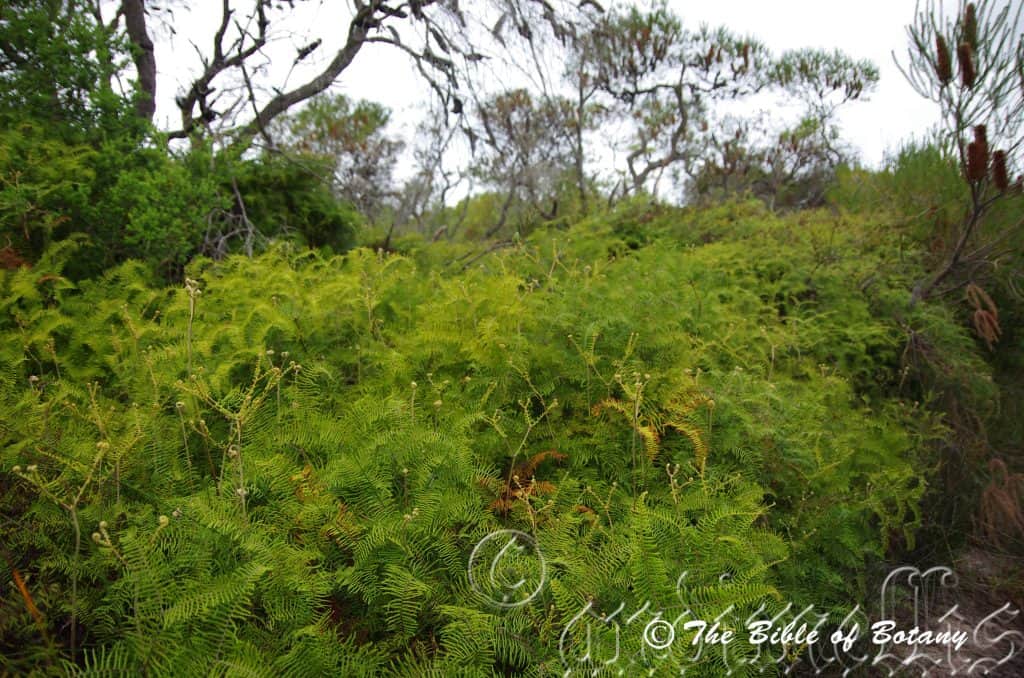
Innes Lake National Park NSW
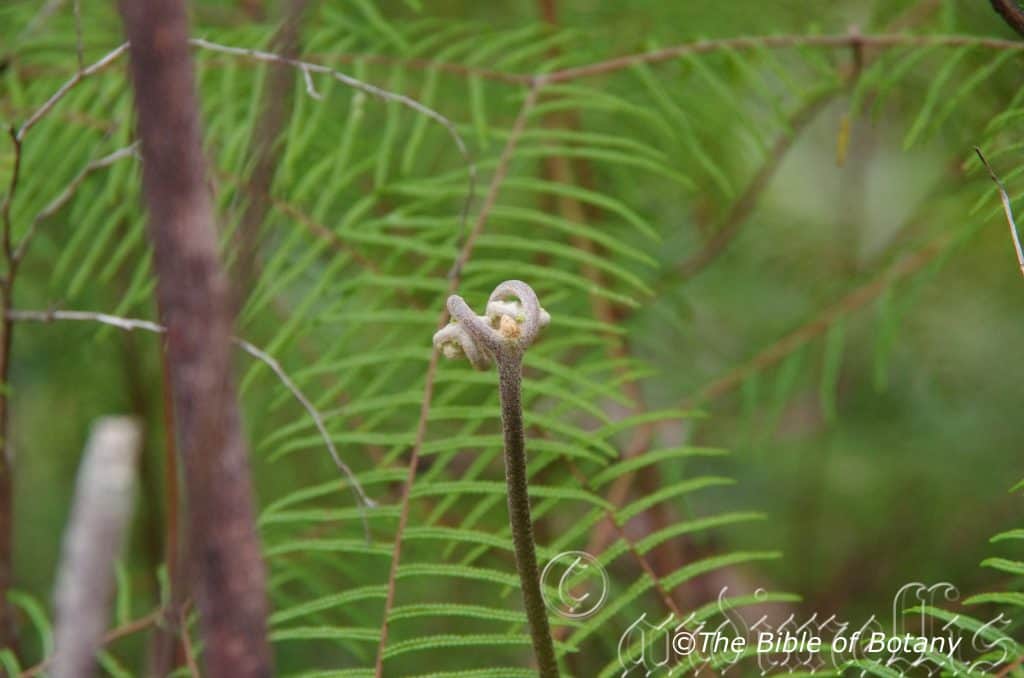
The Pinnacles NSW
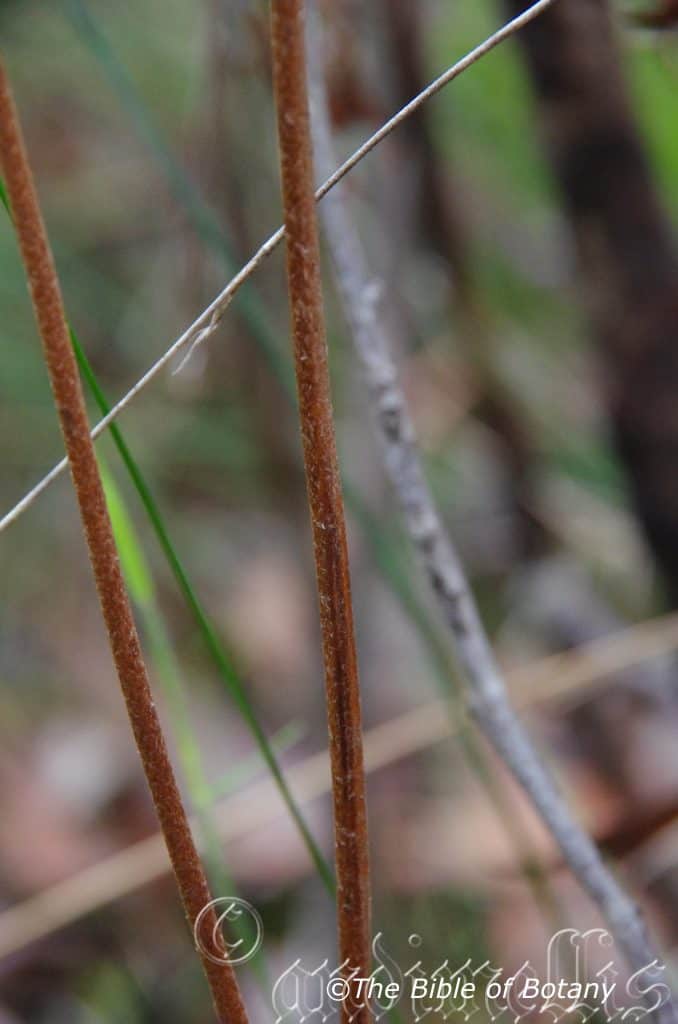
The Pinnacles NSW
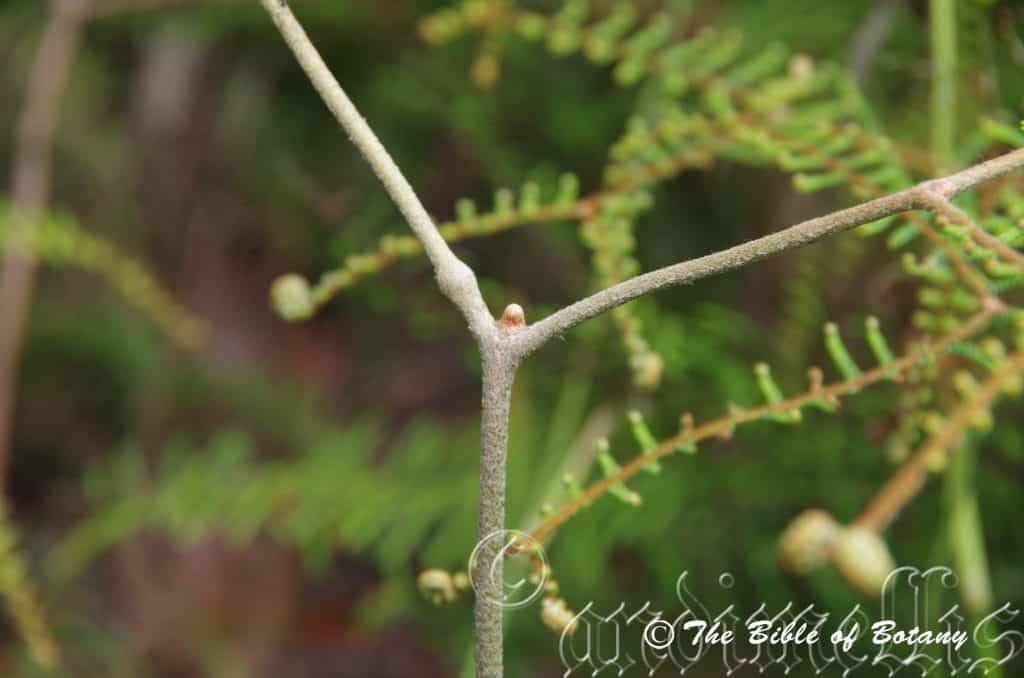
Nambucca Heads NSW
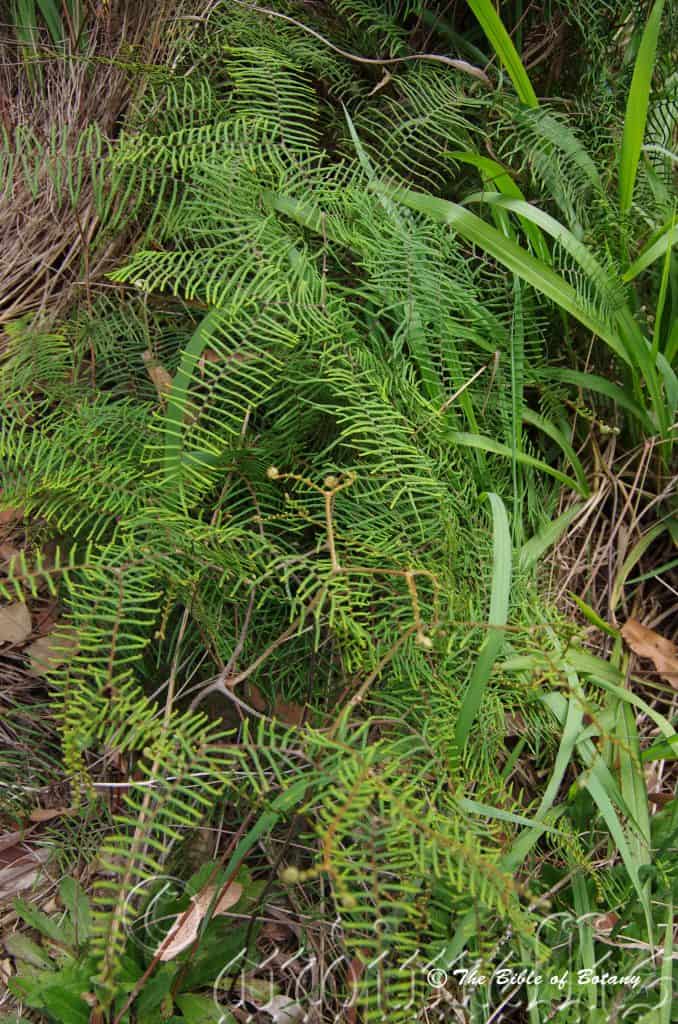
Nambucca Heads NSW
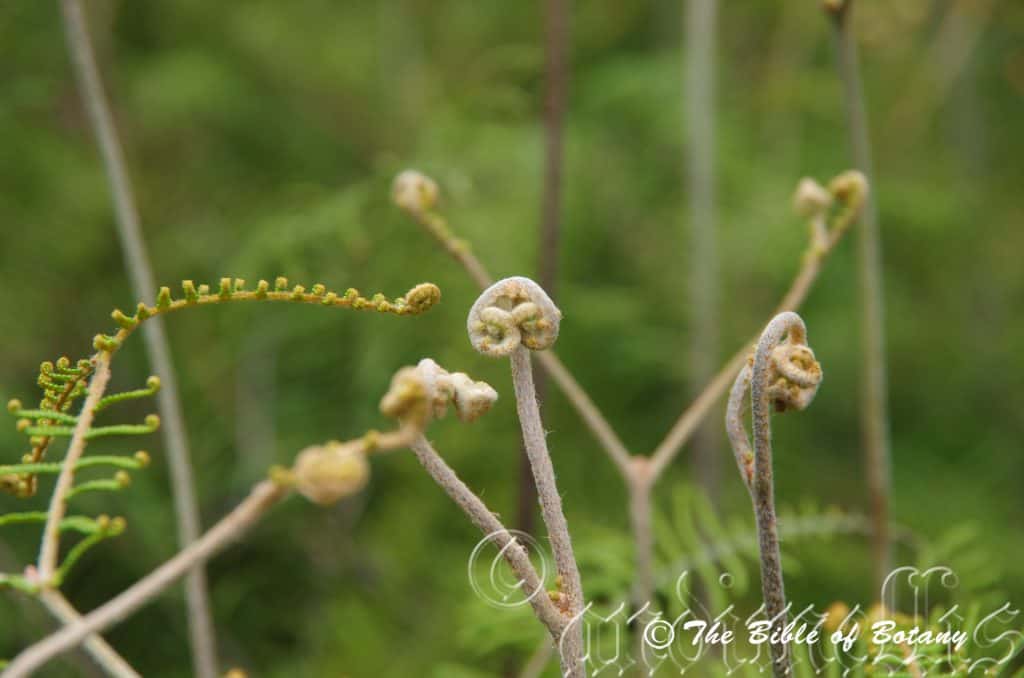
Innes Lake National Park NSW
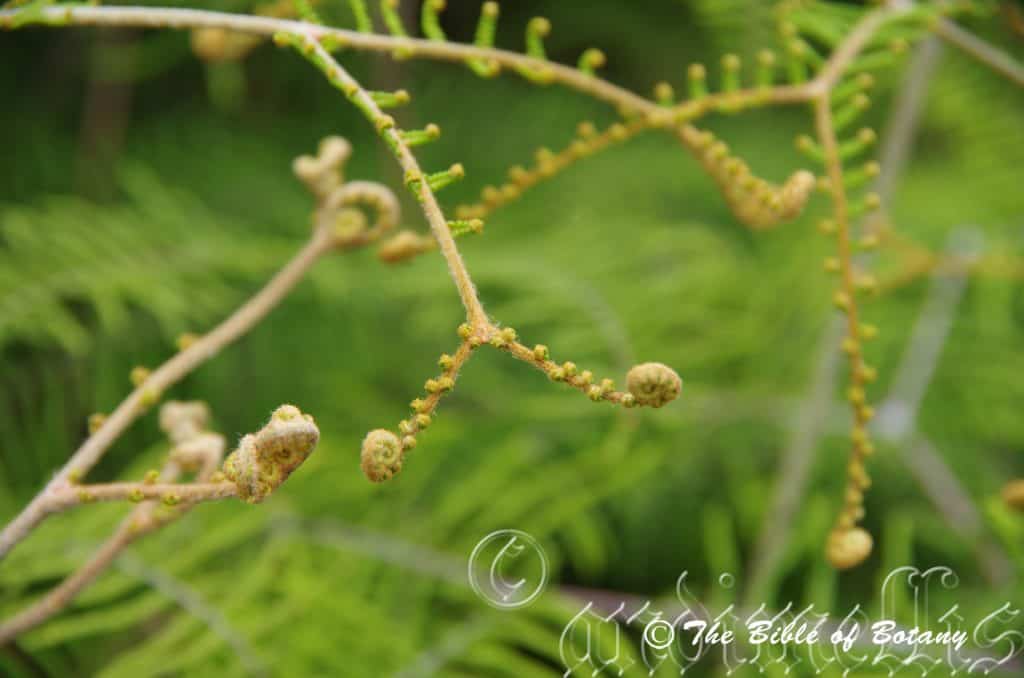
Innes Lake National Park NSW
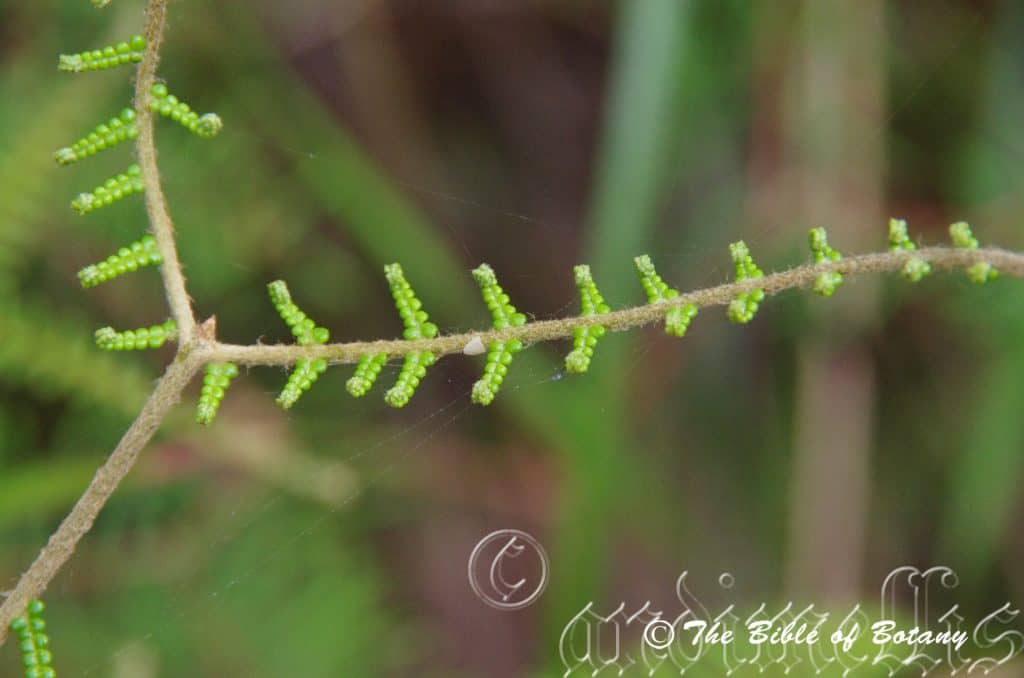
Innes Lake National Park NSW
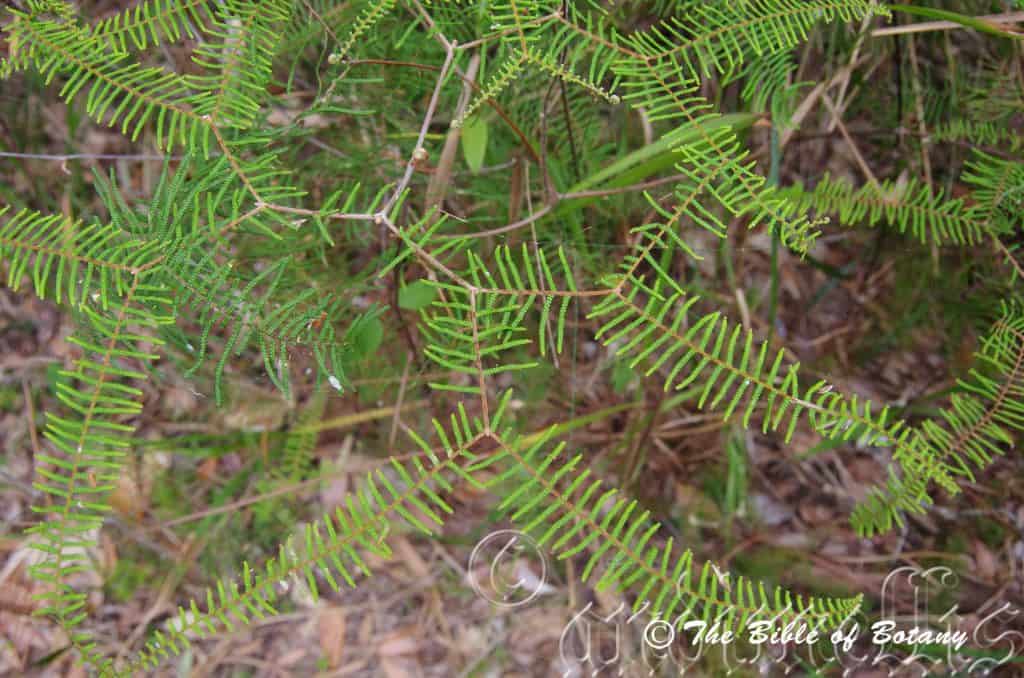
Innes Lake National Park NSW
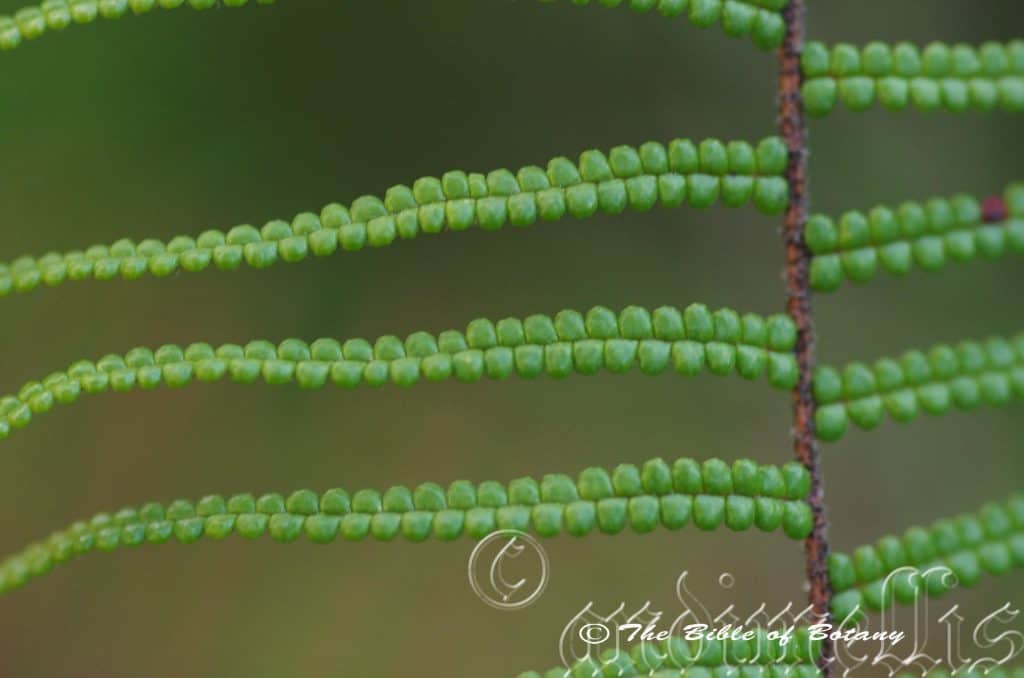
Cathedral Rocks National Park NSW
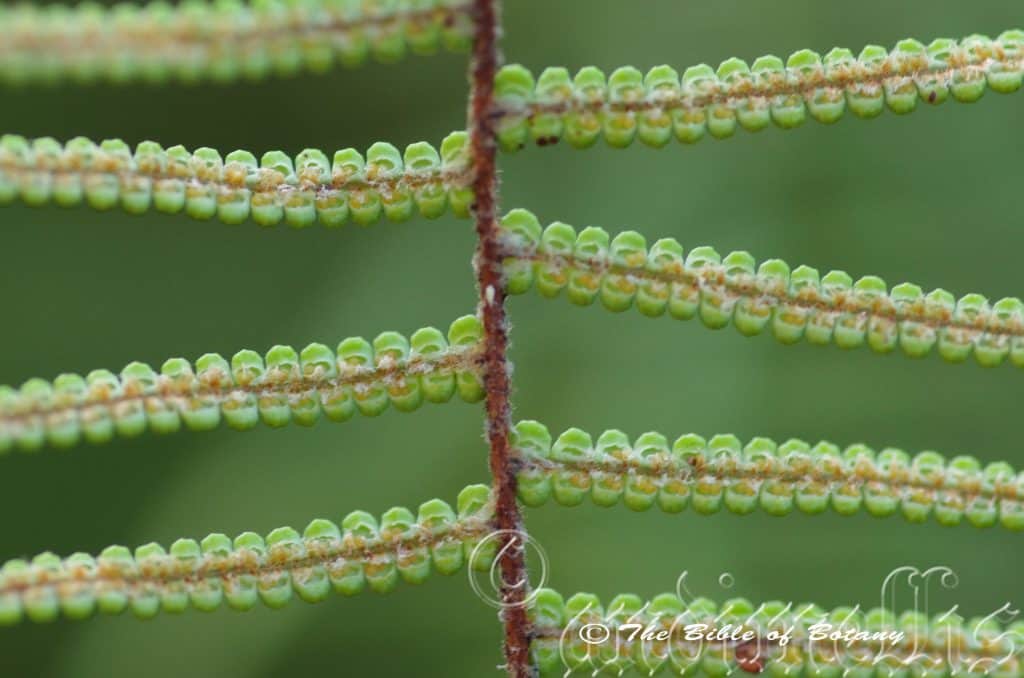
Cathedral Rocks National Park NSW

Gleichenia dicarpa
Classification:
Division: Pteridophyta
Class: Pteridospida
Order: Gleicheniales
Family: Gleicheniacea
Genus: Is named in honour of Baron von Gleichen; 1717-1783, who was a German botanist. He discovered the method of staining microorganisms with blue indigo or carmine.
Species: From Di/Dis which are Ancient Greek for two and Karpos, which is Ancient Greek for a fruit. It refers to plants, which have two fruits per axis.
Common Name:
Distribution:
Gleichenia dicarpa is found south from Fraser Island in southern coastal Queensland to Nambucca Heads in northern coastal New South Wales. It is found on the eastern side of the Great Dividing Range to the coast.
https://avh.ala.org.au/occurrences/search?taxa=Gleichenia+dicarpa#tab_mapView
Habitat Aspect Climate:
Gleichenia dicarpa grows in light shade, dappled light to full sun. It is found in moisture retentive soils in littoral rainforests, stream banks, wallums or road side drainage lines, swamps on cliffs where seepages exist and around waterfalls close to the coast. The altitude ranges from 5 meters ASL to 800 meters ASL.
The temperatures range from 1 degree in August to 36 degrees in January.
The rainfalls range from lows of 900mm to 1800mm average per annum though this is of little importance as permanent water by way of seepages, sprays and a high water table with good capillary action is a far more reliable and important source.
Soil Requirements:
Gleichenia dicarpa prefers fertile fine sands, sandy loams, to light clays. The soils are usually derived from decomposed sandstone, granites, basalts, accumulated sands or alluvial deposits. The soils pH ranges from 4.pH to 7pH. It tolerates waterlogged soils and seasonal high water tables where the water comes to the surface. It often grows in acid water associated with iron oxide bacteria. (See article on Fungus and Bacteria) Non saline soils to moderately saline soils are tolerated.
Height & Spread:
Wild Plants: 500mm to 2000mm by 650mm to several hundred square meters under favourable conditions.
Characteristics:
Gleichenia dicarpa grows as a large fern with long, thin, creeping rhizomes that are covered in fine, appressed, dark brown scales. The scales are soon lost leaving the rachis and rhizomes glabrous. The rhizome measures 2.5mm to 4mm in diameter.
Gleichenia dicarpa‘s dimorphic fronds divide once to three times. The rachis measures 500mm to 2000mm in length with the stipe measuring 120mm to 400mm in length. The stipe is pale to deep brown and covered in pale to deep brown, dull off white stellate hairs and scales. The alternate pinnules are pouched like and measure 1mm to 1.5mm in diameter. The discolourous laminas are deep sea green on the upper lamina while the lower lamina is paler. The bases are truncated sessile while the apexes are obtuse. The margin is finely toothed or entire. The rachis is covered in deep red-brown stellate hairs. The sori number 2 per pinnae.
Confusing Species:
Gleichenia dicarpa: Sori mostly consisting of only 2 sporangia inside the recurved pinnules.
Gleichenia mendellii: Sori usually with 2 to 4.sporangia. Indusium absent. Dense stellate hairs on rachis.
Gleichenia microphylla: Sori usually consisting of 3 or 4.sporangia to one side on the basal half of the pinnules.
Gleichenia rupestris: Sori usually consisting of 3 or 4.sporangia. Hairs absent from the rachis.
Wildlife:
Gleichenia dicarpa‘s wildlife is unknown to the author.
Cultivation:
Gleichenia dicarpa is a beautiful fern for courtyards, around swimming pools or in the garden where moist lighter conditions prevail. Gleichenia mendellii is an excellent choice for around large fish ponds and pools where it can grow to its full potential. It breaks up hard fences and walls giving a pleasant vertical look. If used correctly it can make medium size areas look larger. Some cleaning of spent fronds on a biannual base is necessary and moisture is required to keep it at its best. When planted in mass give a natural wild look.
It often reaches its full potential of 1500mm in just over 2 years. The problem being it is a most difficult genus to grow from spore and just as difficult to grow small plants on. It took us a long time to establish a wild plant in our nursery to use for spore despite all the right conditions being offered. Many failures later we found that a large plant removed from a construction site was our only success and it took ages to re-establish itself.
Propagation:
Spores:
All ferns that are declared rare, vulnerable or endangered are protected by Federal and State Laws and must not be removed from the wild unless you are a land developer, mining company or main Roads department etc. This includes bulbs, roots, leaves and flowers. No part of any plant can be removed from Federal, State or Local Government land without the prior permission of the authority and this includes the spore.
Most people are put off at the thought of growing ferns from spore. Like all plants that produce their offspring from seed or spore the methods are basically the same. Remember nature has been doing this for millions of years and has been very successful. I have had excellent results growing over 200 different species of Australian ferns so don’t be afraid. Give it a go.
Step 1. Select spore from the fern fronds. Wait until the fern is just starting to release its spore. Rinse the fronds under clean running water and dry. This is to wash off any other spores from rogue ferns that may have settled onto the fronds. (There is nothing worse than having common brake or common soft bracken contaminating a prized tree fern or epiphyte.)
Step 2. Place the dry fronds in a clean brown paper bag and keep them in a cool dark place like the linen closet for about a week to ten days before you are ready to sow the spore. The exception to this rule applies to ferns, which produce green spores. These must be sown immediately that it is released. Todea Barbara is a good example of a fern, which produces green spore.
Step 3. Take a large ice cream container, a small ice cream container and a clean clear plastic bag large enough to seal the large ice cream container and three or four milk bottle tops.
Step 4. Punch or drill 6 to 10 5mm holes in the bottom of the small ice cream container.
Step 5. Wash both containers, tops and plastic bag so that it is very clean and sterile.
Step 6. Use a clean fine seed raising mi. We used 30mm fine sand, 30mm peat and 30mm perlite and 10mm vermiculite. We used crushed basalt, crusher dust and peat in a 50:50 ratio for epiphytes. Moisten the mix enough that water does not run out when the mix is squeezed between the fingers.
Step 7. Place the moisten mix (Enough to half fill the small ice cream container) in the microwave oven with a large glass of water for 7 or 8 minutes, until the water is boiling. Allow them to cool in the oven. You will need the water later so do not tip it out.
Step 8. Take the brown paper bag out of the linen closet. Shake the bag and remove the fronds. You should have a yellow, brown, black or rarely greenish brown or ochre powder or very fine, small round pin head size spore depending on the specie involved.
Step 9. Remove the mixture from the oven once it has cooled and place it in the small ice cream container and level.
Step 10. Sprinkle the spore sparsely over the mixture in the small ice cream container.
Step 11. Place the milk bottle tops in the large ice cream container with the flat surface facing down. Place the small ice cream container in the large ice cream container so that it is sitting on the milk bottle tops.
Step 12. Remove the water from the microwave and pour it into the larger ice cream container so there is 25mm to 30mm of water in the bottom.
Step 13. Place the ice cream containers in the plastic bag and seal.
Step 14. Place the contents and bag in a warm shady place preferably 50mm to 70mm shade depending on the specie. Shade houses and some window sills are ideal.
Step 15. The surface should turn green within a week to two weeks. The prothallus will then develop. From the prthalus the first true fronds will appear. Wait until the ferns are 20mm to 35mm in height before you attempt to transplant them. Once it is ready open the bag up slightly and allow the air to flow around the little ferns. Every 3 to 5 days open the bag a little further so the ferns get use to their new environment. Allow them a week to two weeks to harden off before you transplant them following the removal of the plastic bag. Carefully prick them out into 50mm standard squat tubes as you would any seedling.
Do not try to transplant them as single plants as it is still a little delicate still.
Once the smaller ones again reach 50mm to 70mm you may wish to divide the stronger and hardier individual plants into smaller clumps in 100mm squat pots.
Fertilize using seaweed, fish emulsion or organic chicken pellets soaked in water on an alternate basis. Fertilize every two months until the plants are established then annually in early September to October to maintain health, vitality and better flowering.
Further Comments from Readers:
Hi reader, it seems you use The Bible of Botany a lot. That’s great as we have great pleasure in bringing it to you! It’s a little awkward for us to ask, but our first aim is to purchase land approximately 1,600 hectares to link several parcels of N.P. into one at The Pinnacles NSW Australia, but we need your help. We’re not salespeople. We’re amateur botanists who have dedicated over 30 years to saving the environment in a practical way. We depend on donations to reach our goal. If you donate just $5, the price of your coffee this Sunday, We can help to keep the planet alive in a real way and continue to bring you regular updates and features on Australian plants all in one Botanical Bible. Any support is greatly appreciated. Thank you.
In the spirit of reconciliation we acknowledge the Bundjalung, Gumbaynggirr and Yaegl and all aboriginal nations throughout Australia and their connections to land, sea and community. We pay our respect to their Elders past, present and future for the pleasures we have gained.

Indigiscapes Capalaba Qld.
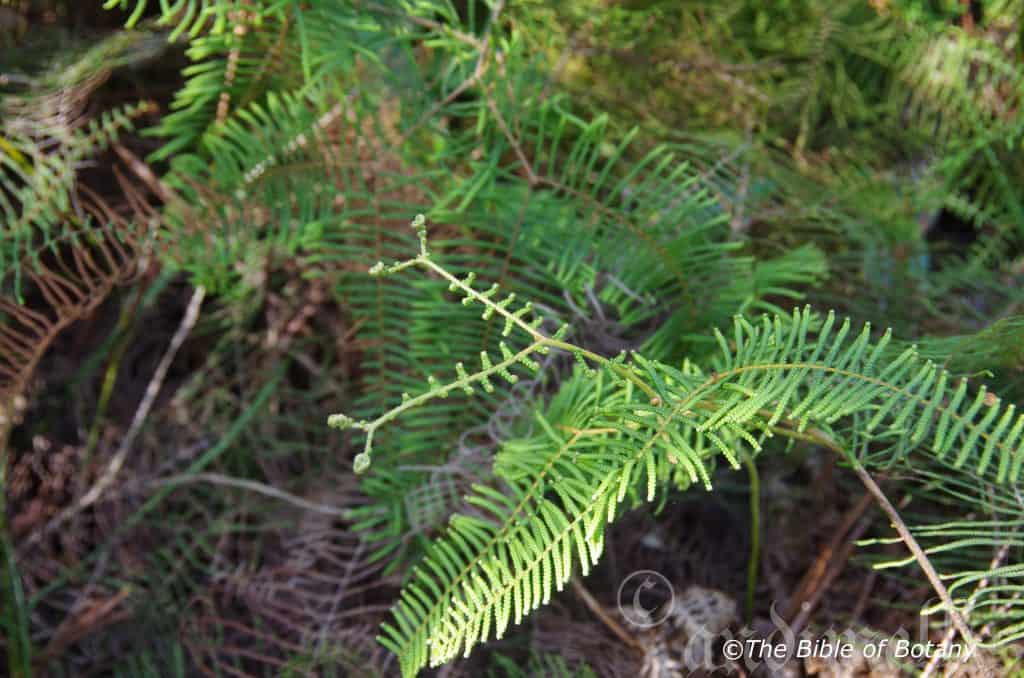
Indigiscapes Capalaba Qld.
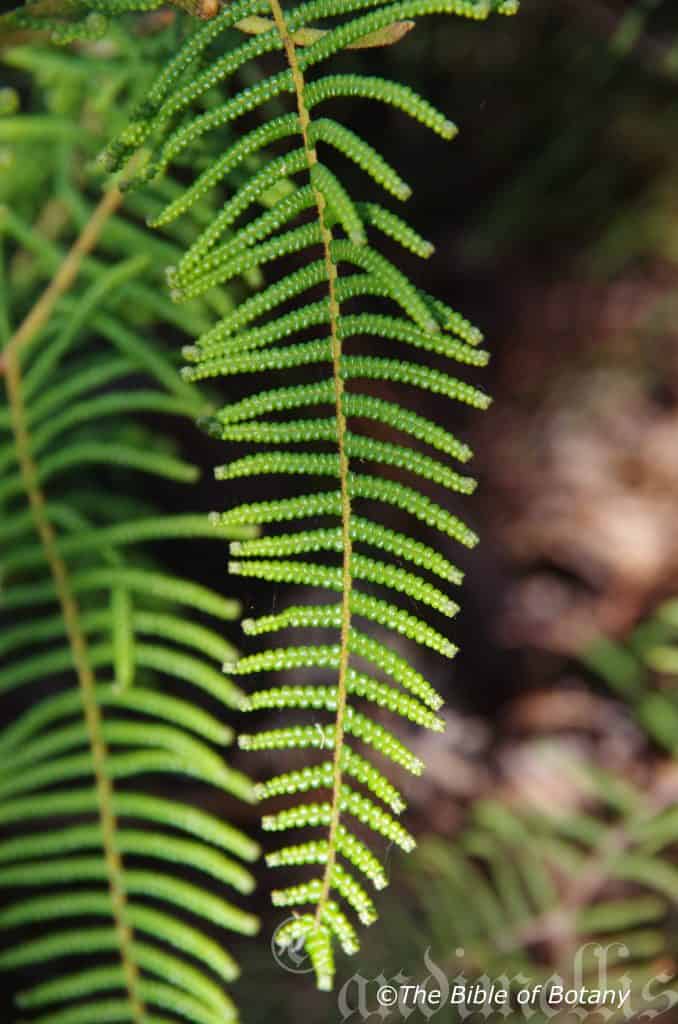
Indigiscapes Capalaba Qld.
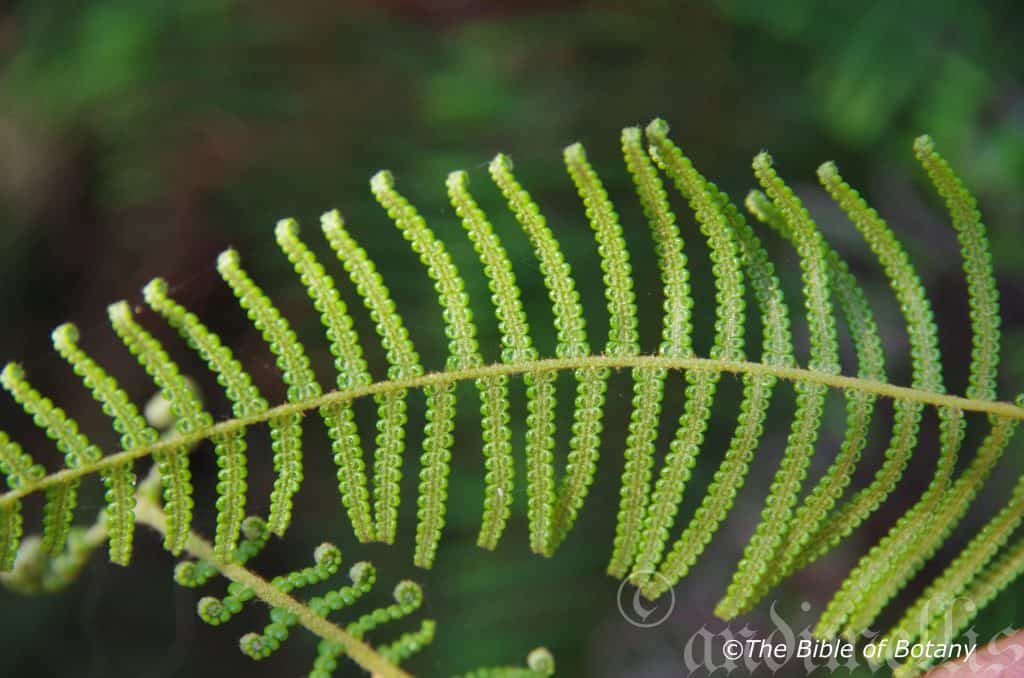
Indigiscapes Capalaba Qld.

Gleichenia mendellii
Classification:
Division: Pteridophyta
Class: Pteridospida
Order: Gleicheniales
Family: Gleicheniacea
Genus: Is named in honour of Baron von Gleichen; 1717-1783, who was a German botanist. He discovered the method of staining microorganisms with blue indigo or carmine.
Species: Is named in honour of Gregor Johann Mandell; 1822-1884.who was an Austrian monk and botanist who discovered the science of genetics supported by his experiments on green peas, which was published but remained unrecognised until the early 1900’s.
Common Name: Soft Water fern or Gristle Fern.
Distribution:
Gleichenia mendellii is found south from Fraser Island in southern coastal Queensland to Nambucca Heads in northern coastal New South Wales. It is found on the eastern side of the Great Dividing Range to the coast.
https://avh.ala.org.au/occurrences/search?taxa=Gleichenia+mendellii#tab_mapView
Habitat Aspect Climate:
Gleichenia mendellii grows in light shade, dappled light to full sun. It is found in moisture retentive soils in littoral rainforests, stream banks, wallums or road side drainage lines, swamps on cliffs where seepages exist or around waterfalls close to the coast. The altitude ranges from 5 meters ASL to 800 meters ASL.
The temperatures range from 1 degree in August to 36 degrees in January.
The rainfalls range from lows of 900mm to 1800mm average per annum though this is of little importance as permanent water by way of seepages, sprays and a high water table with good capillary action is a far more reliable and important source.
Soil Requirements:
Gleichenia mendellii prefers fertile fine sands, sandy loams, to light clays. The soils are usually derived from decomposed accumulated sands or alluvial deposits. The soils pH ranges from 4.pH to 7pH. It tolerates waterlogged soils and seasonal high water tables where the water comes to the surface. It often grows in acid water associated with iron oxide bacteria. (See article on Fungus and Bacteria) Non saline soils to moderately saline soils are tolerated.
Height & Spread:
Wild Plants: 500mm to 1000mm by 650mm to several hundred square meters under favourable conditions.
Characteristics:
Gleichenia mendellii grows as a large fern with long thin creeping rhizome is covered in fine, appressed, dark brown scales. The scales are soon lost leaving the rachis and rhizomes glabrous. The rhizome measures 2.5mm to 4mm in diameter.
Gleichenia mendellii‘s dimorphic fronds divide once to three times. The rachis measures 500mm to 1000mm in length with the stipe measuring 120mm to 400mm in length. The stipe is pale to deep brown and covered in pale to deep brown, dull off white stellate hairs and scales. The alternate pinnules number 25 to 35 pairs and measure 1mm to 1.5mm in diameter. The discolourous laminas are deep sea green while the lower lamina is white. The base is truncated sessile while the apex is obtuse. The margin is finely toothed or entire. The rachis is covered in deep red-brown stellate hairs. The sori number 2 to 4.
Confusing Species Varieties:
Gleichenia mendellii: Sori usually with 2 to 4 sporangia. Indusium absent. Dense stellate hairs on rachis.
Gleichenia microphylla: Sori usually consisting of 3 or 4.sporangia to one side on the basal half of the pinnules.
Gleichenia dicarpa: Sori mostly consisting of only 2 sporangia inside the recurved pinnules.
Gleichenia rupestris: Sori usually consisting of 3 or 4 sporangia. Hairs absent from the rachis.
Wildlife:
Gleichenia mendellii‘s wildlife is unknown to the author.
Cultivation:
Gleichenia mendellii is a beautiful fern for courtyards, around swimming pools or in the garden where moist lighter conditions prevail. Gleichenia mendellii is an excellent choice for around large fish ponds and pools where it can grow to its full potential. It breaks up hard fences and walls giving a pleasant vertical look. If used correctly it can make medium size areas look larger. Some cleaning of spent fronds on a biannual base is necessary and moisture is required to keep it at its best. When planted in mass give a natural wild look.
It often reaches its full potential of 1500mm in just over 2 years. The problem being it is a most difficult genus to grow from spore and just as difficult to grow small plants on. It took us a long time to establish a wild plant in our nursery to use for spore despite all the right conditions being offered. Many failures later we found that a large plant removed from a construction site was our only success and it took ages to re-establish itself.
Propagation:
Spores:
Most people are put off at the thought of growing ferns from spore. Like all plants that produce their offspring from seed or spore the methods are basically the same. Remember nature has been doing this for millions of years and has been very successful. I have had excellent results growing over 200 different species of Australian ferns so don’t be afraid. Give it a go.
Step 1. Select spore from the fern fronds. Wait until the fern is just starting to release its spore. Rinse the fronds under clean running water and dry. This is to wash off any other spores from rogue ferns that may have settled onto the fronds. (There is nothing worse than having common brake or common soft bracken contaminating a prized tree fern or epiphyte.)
Step 2. Place the dry fronds in a clean brown paper bag and keep them in a cool dark place like the linen closet for about a week to ten days before you are ready to sow the spore. The exception to this rule applies to ferns, which produce green spores. These must be sown immediately that it is released. Todea Barbara is a good example of a fern, which produces green spore.
Step 3. Take a large ice cream container, a small ice cream container and a clean clear plastic bag large enough to seal the large ice cream container and three or four milk bottle tops.
Step 4. Punch or drill 6 to 10 5mm holes in the bottom of the small ice cream container.
Step 5. Wash both containers, tops and plastic bag so that it is very clean and sterile.
Step 6. Use a clean fine seed raising mi. We used 30mm fine sand, 30mm peat and 30mm perlite and 10mm vermiculite. We used crushed basalt, crusher dust and peat in a 50:50 ratio for epiphytes. Moisten the mix enough that water does not run out when the mix is squeezed between the fingers.
Step 7. Place the moisten mix (Enough to half fill the small ice cream container) in the microwave oven with a large glass of water for 7 or 8 minutes, until the water is boiling. Allow them to cool in the oven. You will need the water later so do not tip it out.
Step 8. Take the brown paper bag out of the linen closet. Shake the bag and remove the fronds. You should have a yellow, brown, black or rarely greenish brown or ochre powder or very fine, small round pin head size spore depending on the specie involved.
Step 9. Remove the mixture from the oven once it has cooled and place it in the small ice cream container and level.
Step 10. Sprinkle the spore sparsely over the mixture in the small ice cream container.
Step 11. Place the milk bottle tops in the large ice cream container with the flat surface facing down. Place the small ice cream container in the large ice cream container so that it is sitting on the milk bottle tops.
Step 12. Remove the water from the microwave and pour it into the larger ice cream container so there is 25mm to 30mm of water in the bottom.
Step 13. Place the ice cream containers in the plastic bag and seal.
Step 14. Place the contents and bag in a warm shady place preferably 50mm to 70mm shade depending on the specie. Shade houses and some window sills are ideal.
Step 15. The surface should turn green within a week to two weeks. The prothallus will then develop. From the prthalus the first true fronds will appear. Wait until the ferns are 20mm to 35mm in height before you attempt to transplant them. Once it is ready open the bag up slightly and allow the air to flow around the little ferns. Every 3 to 5 days open the bag a little further so the ferns get use to their new environment. Allow them a week to two weeks to harden off before you transplant them following the removal of the plastic bag. Carefully prick them out into 50mm standard squat tubes as you would any seedling.
Do not try to transplant them as single plants as it is still a little delicate still.
Once the smaller ones again reach 50mm to 70mm you may wish to divide the stronger and hardier individual plants into smaller clumps in 100mm squat pots.
Fertilize using seaweed, fish emulsion or organic chicken pellets soaked in water on an alternate basis. Fertilize every two months until the plants are established then annually in early September to October to maintain health, vitality and better flowering.
Further Comments from Readers:
Hi reader, it seems you use The Bible of Botany a lot. That’s great as we have great pleasure in bringing it to you! It’s a little awkward for us to ask, but our first aim is to purchase land approximately 1,600 hectares to link several parcels of N.P. into one at The Pinnacles NSW Australia, but we need your help. We’re not salespeople. We’re amateur botanists who have dedicated over 30 years to saving the environment in a practical way. We depend on donations to reach our goal. If you donate just $5, the price of your coffee this Sunday, We can help to keep the planet alive in a real way and continue to bring you regular updates and features on Australian plants all in one Botanical Bible. Any support is greatly appreciated. Thank you.
In the spirit of reconciliation we acknowledge the Bundjalung, Gumbaynggirr and Yaegl and all aboriginal nations throughout Australia and their connections to land, sea and community. We pay our respect to their Elders past, present and future for the pleasures we have gained.
The Pinnacles NSW

Gleichenia microphylla
Classification:
Division: Pteridophyta
Class: Pteridospida
Order: Gleicheniales
Family: Gleicheniacea
Genus: Is named in honour of Baron von Gleichen; 1717-1783, who was a German botanist. He discovered the method of staining microorganisms with blue indigo or carmine.
Species: From Mikros, which is Ancient Greek for small or very small and Phullon/Phyllon, which is Ancient Greek for a leaf. It refers to leaves, phyllodes or fronds, which are notably smaller or finer than other species in the genus.
Common Name: Soft Water fern or Gristle Fern.
Distribution:
Gleichenia microphylla is found south from Maryborough in southern Queensland to Warnambool in southern Victoria. It is then found along the coast from Portland in south western Victoria to Milicent, Kangaroo Island, Victor Harbour and north to Murray Bridge and Loxton in South Australia. There is an outlying population on the Daly River in the Northern Territory south of Darwin.
It is found on the Bass Strait Islands and circumnavigates mainland Tasmania in land to below the alpine regions.
https://avh.ala.org.au/occurrences/search?taxa=Gleichenia+microphylla#tab_mapView
Habitat Aspect Climate:
Gleichenia microphylla prefers light shade, dappled sunlight to full sun. It grows on moisture retentive soils in littoral rainforests, stream banks, wallums, drainage lines or road culverts on cliffs with seepages or around waterfalls close to the coast. The altitude ranges from 20 meters ASL to 850 meters ASL.
The temperatures range from minus 1 degree in August to 36 degrees in January.
The rainfalls range from lows of 900mm to 1800mm average per annum though this is of little importance as permanent water by way of seepages, sprays and a high water table with good capillary action is a far more reliable source.
Soil Requirements:
Gleichenia microphylla prefers sandy loams, to light clay loams. The soils are derived from decomposed basalts, sandstones, shales or metamorphic rocks or accumulated sands. The soils pH ranges from 4PH to 7PH are preferred. It tolerates waterlogged soils and seasonal high water tables where the water comes to the surface. It often grows in acid water associated with iron oxide bacteria. (See article on Fungus and Bacteria) Non saline soils to moderately saline soils are tolerated.
Height & Spread:
Wild Plants: 500mm to 2000mm by 650mm to several hundred square meters under favourable conditions.
Characteristics:
Gleichenia microphylla has a long thin creeping rhizome covered in fine, appressed, dark brown scales. The scales are soon lost leaving the rachises and rhizomes glabrous. The rhizome is 2mm to 4mm in diameter.
Gleichenia macrophylla‘s dimorphic fronds divide once to three times. The rachis is 1500mm to 2000mm with the stipe measuring 20mm to 40mm in length. The stipe is light to dark brown and covered in pale to deep brown stellate hairs. The individual pinnules are triangular, number 25 to 35 and measure 1mm to 2mm in length by 1mm to 2mm in width. The discolourous laminas are deep sea green on the upper lamina and pale green on the lower lamina. It is dull oblong with an obtuse apex. The margin is finely toothed or entire. The sori number 3 or 4.
Confusing Species Varieties:
Gleichenia microphylla: Sori usually consisting of 3 or 4.sporangia to one side on the basal half of the pinnule.
Gleichenia dicarpa: Sori mostly consisting of only 2 sporangia inside the recurved pinnules.
Gleichenia mendellii: Sori usually with 2 to 4.sporangia. Indusium absent. Dense stellate hairs on rachis.
Gleichenia rupestris: Sori usually consisting of 3 or 4.sporangia. Hairs absent from the rachis.
Wildlife:
Gleichenia microphyla‘s wildlife is unknown to the author.
Cultivation:
Gleichenia microphylla is a beautiful fern for large wet areas, where lies or seeps for long periods following rain or in the garden where moist lighter conditions prevail. Gleichenia microphylla is an excellent choice for around large fish ponds and pools where it can grow to its full potential. It breaks up hard fences and walls giving a strong contrast in colour if used for that reason against paler walls and fences. Some cleaning of spent fronds on a biannual base is necessary and moisture is required to keep it at its best. When planted in mass they give a natural wild look.
It often reaches its full potential of 1500mm in just over 2 years. The problem being it is a most difficult genus to grow from spore and just as difficult to grow small plants on. It took us a long time to establish a wild plant in our nursery to use for spore despite all the right conditions being offered. Many failures later we found that a large plant removed from a construction site was our only success and it took ages to re-establish itself.
Propagation:
Spores Most people are put off at the thought of growing ferns from spore. Like all plants that produce their offspring from seed or spore the methods are basically the same. Remember nature has been doing this for millions of years and has been very successful. I have had excellent results growing over 200 different species of Australian ferns so don’t be afraid. Give it a go.
Step 1. Select spore from the fern fronds. Wait until the fern is just starting to release its spore. Rinse the fronds under clean running water and dry. This is to wash off any other spores from rogue ferns that may have settled onto the fronds. (There is nothing worse than having common brake or common soft bracken contaminating a prized tree fern or epiphyte.)
Step 2. Place the dry fronds in a clean brown paper bag and keep them in a cool dark place like the linen closet for about a week to ten days before you are ready to sow the spore. The exception to this rule applies to ferns, which produce green spores. These must be sown immediately that it is released. Todea Barbara is a good example of a fern, which produces green spore.
Step 3. Take a large ice cream container, a small ice cream container and a clean clear plastic bag large enough to seal the large ice cream container and three or four milk bottle tops.
Step 4. Punch or drill 6 to 10 5mm holes in the bottom of the small ice cream container.
Step 5. Wash both containers, tops and plastic bag so that it is very clean and sterile.
Step 6. Use a clean fine seed raising mi. We used 30mm fine sand, 30mm peat and 30mm perlite and 10mm vermiculite. We used crushed basalt, crusher dust and peat in a 50:50 ratio for epiphytes. Moisten the mix enough that water does not run out when the mix is squeezed between the fingers.
Step 7. Place the moisten mix (Enough to half fill the small ice cream container) in the microwave oven with a large glass of water for 7 or 8 minutes, until the water is boiling. Allow them to cool in the oven. You will need the water later so do not tip it out.
Step 8. Take the brown paper bag out of the linen closet. Shake the bag and remove the fronds. You should have a yellow, brown, black or rarely greenish brown or ochre powder or very fine, small round pin head size spore depending on the specie involved.
Step 9. Remove the mixture from the oven once it has cooled and place it in the small ice cream container and level.
Step 10. Sprinkle the spore sparsely over the mixture in the small ice cream container.
Step 11. Place the milk bottle tops in the large ice cream container with the flat surface facing down. Place the small ice cream container in the large ice cream container so that it is sitting on the milk bottle tops.
Step 12. Remove the water from the microwave and pour it into the larger ice cream container so there is 25mm to 30mm of water in the bottom.
Step 13. Place the ice cream containers in the plastic bag and seal.
Step 14. Place the contents and bag in a warm shady place preferably 50mm to 70mm shade depending on the specie. Shade houses and some window sills are ideal.
Step 15. The surface should turn green within a week to two weeks. The prothallus will then develop. From the prthalus the first true fronds will appear. Wait until the ferns are 20mm to 35mm in height before you attempt to transplant them. Once it is ready open the bag up slightly and allow the air to flow around the little ferns. Every 3 to 5 days open the bag a little further so the ferns get use to their new environment. Allow them a week to two weeks to harden off before you transplant them following the removal of the plastic bag. Carefully prick them out into 50mm standard squat tubes as you would any seedling.
Do not try to transplant them as single plants as it is still a little delicate still.
Once the smaller ones again reach 50mm to 70mm you may wish to divide the stronger and hardier individual plants into smaller clumps in 100mm squat pots.
Fertilize using seaweed, fish emulsion or organic chicken pellets soaked in water on an alternate basis. Fertilize every two months until the plants are established then annually in early September to October to maintain health, vitality and better flowering.
Further Comments from Readers:
Hi reader, it seems you use The Bible of Botany a lot. That’s great as we have great pleasure in bringing it to you! It’s a little awkward for us to ask, but our first aim is to purchase land approximately 1,600 hectares to link several parcels of N.P. into one at The Pinnacles NSW Australia, but we need your help. We’re not salespeople. We’re amateur botanists who have dedicated over 30 years to saving the environment in a practical way. We depend on donations to reach our goal. If you donate just $5, the price of your coffee this Sunday, We can help to keep the planet alive in a real way and continue to bring you regular updates and features on Australian plants all in one Botanical Bible. Any support is greatly appreciated. Thank you.
In the spirit of reconciliation we acknowledge the Bundjalung, Gumbaynggirr and Yaegl and all aboriginal nations throughout Australia and their connections to land, sea and community. We pay our respect to their Elders past, present and future for the pleasures we have gained.
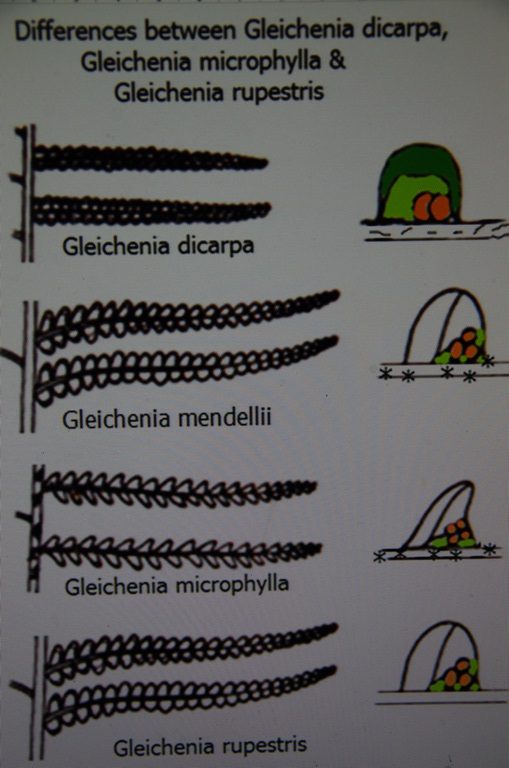
Gleichenia rupestris
Classification:
Division: Pteridophyta
Class: Pteridospida
Order: Gleicheniales
Family: Gleicheniacea
Genus: Is named in honour of Baron von Gleichen; 1717-1783, who was a German botanist. He discovered the method of staining microorganisms with blue indigo or carmine.
Species: From Rupestre, which is Latin for a cliff or craggy outcrop. It refers to plants, which prefer to grow or were thought to favour rocky crags on cliffs.
Common Name: Soft Water fern or Gristle Fern.
Distribution:
Gleichenia rupestris is found south from Noosa Heads in southern Queensland to Croajingalong National Park in north eastern Victoria.
There is also an isolated population in the Blackdown Tablelands National Park.
https://avh.ala.org.au/occurrences/search?taxa=Gleichenia+rupestris#tab_mapView
Habitat Aspect Climate:
Gleichenia rupestris prefers light shade, dappled sunlight to full sun. It grows on moisture retentive soils adjacent to rainforests and at the base of cliffs and rock ledges. The altitude ranges from 20 meters ASL to 850 meters ASL.
The temperatures range from 1 degree in August to 36 degrees in January.
The rainfalls range from lows of 700mm to 1600mm average per annum though this is of minor importance as permanent water by way of seepages and sprays are a feature of its terraines.
Soil Requirements:
Gleichenia rupestris prefers sandy loams, to light clay loams. The soils are derived from decomposed basalts, sandstones, shales or metamorphic rocks or accumulated sands. The soils pH ranges from 4PH to 6PH are preferred. It tolerates waterlogged soils and seasonal high water tables where the water comes to the surface. It often grows in acid water associated with iron oxide bacteria. (See article on Fungus and Bacteria) Non saline soils to moderately saline soils are tolerated.
Height & Spread:
Wild Plants: 1000mm to 2000mm by 650mm to several hundred square meters under favourable conditions.
Characteristics:
Gleichenia rupestris have a long thin creeping rhizome covered in fine, appressed, dark brown scales. The scales are soon lost leaving the rachises and rhizomes glabrous. The rhizome is 2mm to 4mm in diameter.
Gleichenia rupestris‘s dimorphic fronds divide once to three times. The rachis is 1000mm to 2000mm with the pinnules measuring 20mm to 40mm in length. The stipe is light to dark brown and covered in pale to deep brown stellate hairs. The individual pinnules are oblong-triangular, number 25 to 35 and measure 2mm to 4.5mm in length by 2mm to 3mm in width. The concolourous laminas are lime-green to deep sea green. It is dull oblong with an obtuse apex. The margins are entire. The sori number 3 or 4.
Confusing Species Varieties:
Gleichenia rupestris: Sori usually consisting of 3 or 4.sporangia. Hairs absent from the rachis.
Gleichenia microphylla: Sori usually consisting of 3 or 4.sporangia to one side on the basal half of the pinnules.
Gleichenia dicarpa: Sori mostly consisting of only 2 sporangia inside the recurved pinnules.
Gleichenia mendellii: Sori usually with 2 to 4.sporangia. Indusium absent. Dense stellate hairs on rachis.
Wildlife:
Gleichenia rupestris‘s wildlife is unknown to the author.
Cultivation:
Gleichenia rupestris is a beautiful fern for large courtyards, around swimming pools or in the garden where moist lighter conditions prevail. Gleichenia rupestris is an excellent choice for around large fish ponds and pools where it can grow to its full potential. It breaks up hard fences and walls giving a strong contrast in colour if used for that reason against paler walls and fences. Some cleaning of spent fronds on a biannual base is necessary and moisture is required to keep it at its best. When planted in mass they give a natural wild look.
Propagation:
Spores: Most people are put off at the thought of growing ferns from spore. Like all plants that produce their offspring from seed or spore the methods are basically the same. Remember nature has been doing this for millions of years and has been very successful. I have had excellent results growing over 200 different species of Australian ferns so don’t be afraid. Give it a go.
Step 1. Select spore from the fern fronds. Wait until the fern is just starting to release its spore. Rinse the fronds under clean running water and dry. This is to wash off any other spores from rogue ferns that may have settled onto the fronds. (There is nothing worse than having common brake or common soft bracken contaminating a prized tree fern or epiphyte.)
Step 2. Place the dry fronds in a clean brown paper bag and keep them in a cool dark place like the linen closet for about a week to ten days before you are ready to sow the spore. The exception to this rule applies to ferns, which produce green spores. These must be sown immediately that it is released. Todea Barbara is a good example of a fern, which produces green spore.
Step 3. Take a large ice cream container, a small ice cream container and a clean clear plastic bag large enough to seal the large ice cream container and three or four milk bottle tops.
Step 4. Punch or drill 6 to 10 5mm holes in the bottom of the small ice cream container.
Step 5. Wash both containers, tops and plastic bag so that it is very clean and sterile.
Step 6. Use a clean fine seed raising mi. We used 30mm fine sand, 30mm peat and 30mm perlite and 10mm vermiculite. We used crushed basalt, crusher dust and peat in a 50:50 ratio for epiphytes. Moisten the mix enough that water does not run out when the mix is squeezed between the fingers.
Step 7. Place the moisten mix (Enough to half fill the small ice cream container) in the microwave oven with a large glass of water for 7 or 8 minutes, until the water is boiling. Allow them to cool in the oven. You will need the water later so do not tip it out.
Step 8. Take the brown paper bag out of the linen closet. Shake the bag and remove the fronds. You should have a yellow, brown, black or rarely greenish brown or ochre powder or very fine, small round pin head size spore depending on the specie involved.
Step 9. Remove the mixture from the oven once it has cooled and place it in the small ice cream container and level.
Step 10. Sprinkle the spore sparsely over the mixture in the small ice cream container.
Step 11. Place the milk bottle tops in the large ice cream container with the flat surface facing down. Place the small ice cream container in the large ice cream container so that it is sitting on the milk bottle tops.
Step 12. Remove the water from the microwave and pour it into the larger ice cream container so there is 25mm to 30mm of water in the bottom.
Step 13. Place the ice cream containers in the plastic bag and seal.
Step 14. Place the contents and bag in a warm shady place preferably 50mm to 70mm shade depending on the specie. Shade houses and some window sills are ideal.
Step 15. The surface should turn green within a week to two weeks. The prothallus will then develop. From the prthalus the first true fronds will appear. Wait until the ferns are 20mm to 35mm in height before you attempt to transplant them. Once it is ready open the bag up slightly and allow the air to flow around the little ferns. Every 3 to 5 days open the bag a little further so the ferns get use to their new environment. Allow them a week to two weeks to harden off before you transplant them following the removal of the plastic bag. Carefully prick them out into 50mm standard squat tubes as you would any seedling.
Do not try to transplant them as single plants as it is still a little delicate still.
Once the smaller ones again reach 50mm to 70mm you may wish to divide the stronger and hardier individual plants into smaller clumps in 100mm squat pots.
Fertilize using seaweed, fish emulsion or organic chicken pellets soaked in water on an alternate basis. Fertilize every two months until the plants are established then annually in early September to October to maintain health, vitality and better flowering.
Further Comments from Readers:
Hi reader, it seems you use The Bible of Botany a lot. That’s great as we have great pleasure in bringing it to you! It’s a little awkward for us to ask, but our first aim is to purchase land approximately 1,600 hectares to link several parcels of N.P. into one at The Pinnacles NSW Australia, but we need your help. We’re not salespeople. We’re amateur botanists who have dedicated over 30 years to saving the environment in a practical way. We depend on donations to reach our goal. If you donate just $5, the price of your coffee this Sunday, We can help to keep the planet alive in a real way and continue to bring you regular updates and features on Australian plants all in one Botanical Bible. Any support is greatly appreciated. Thank you.
In the spirit of reconciliation we acknowledge the Bundjalung, Gumbaynggirr and Yaegl and all aboriginal nations throughout Australia and their connections to land, sea and community. We pay our respect to their Elders past, present and future for the pleasures we have gained.
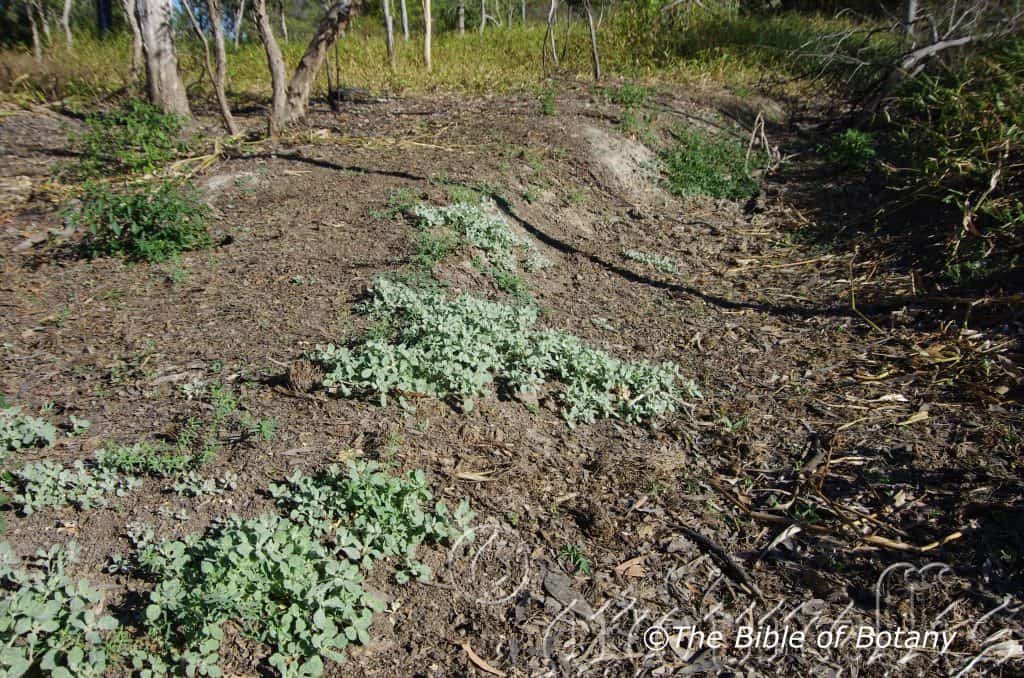
Toolaccia Beach Back Dunes Qld.
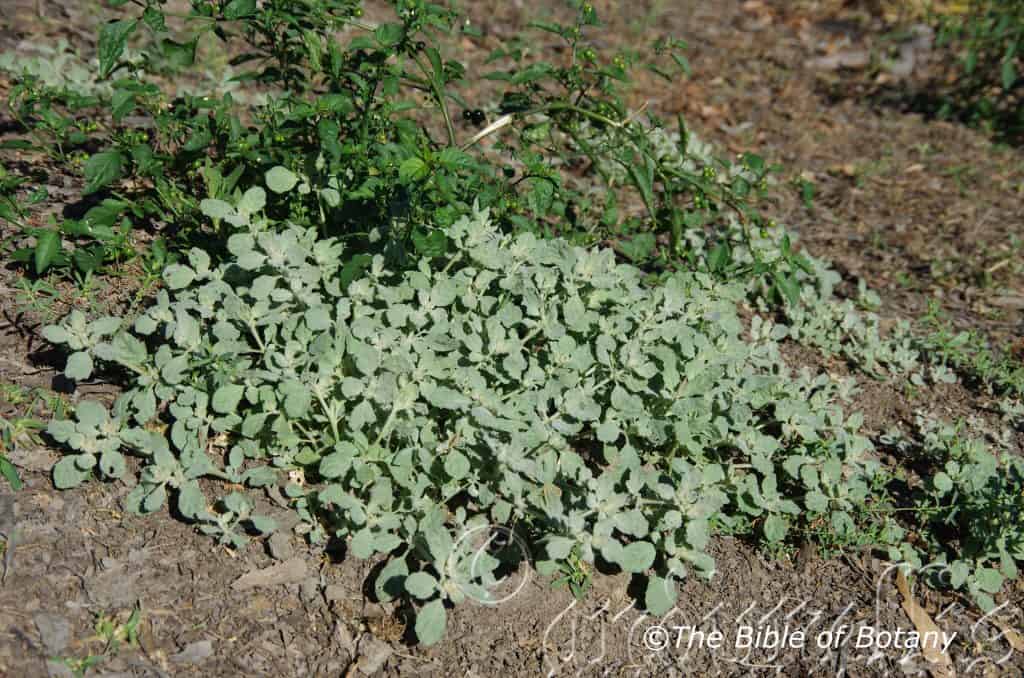
Toolaccia Beach Back Dunes Qld.
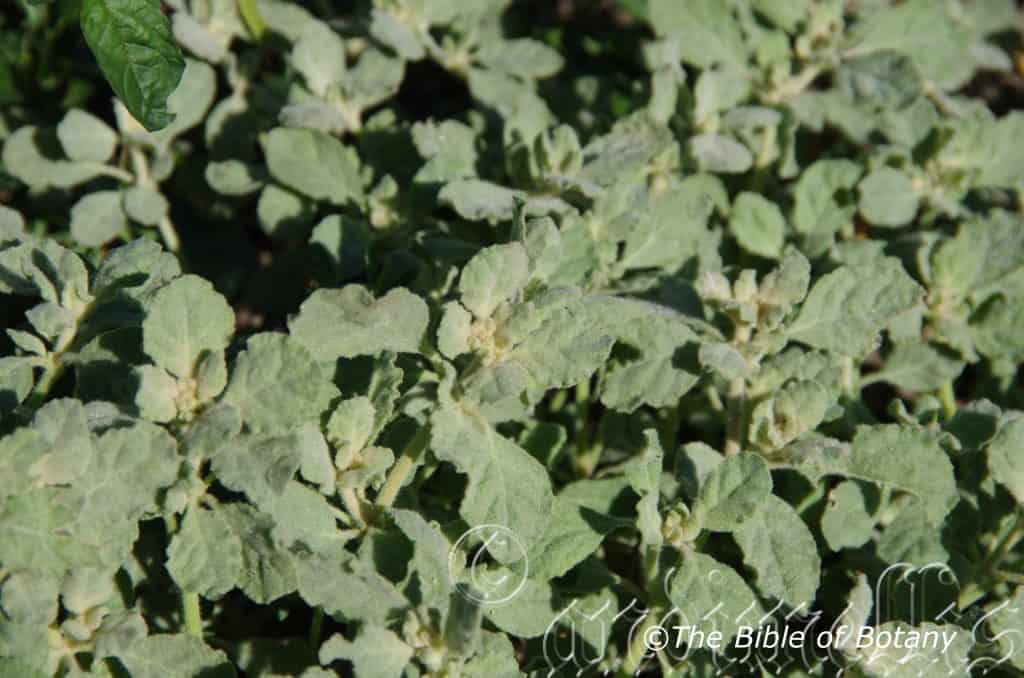
Toolaccia Beach Back Dunes Qld.

Toolaccia Beach Back Dunes Qld.
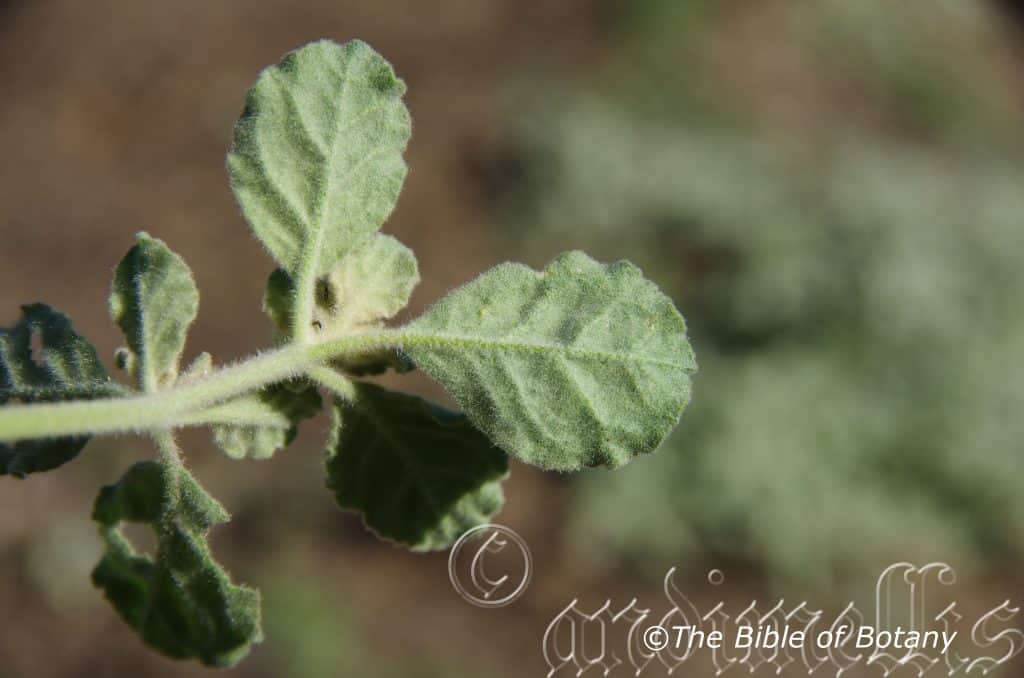
Toolaccia Beach Back Dunes Qld.
Glinus lotoides
Classification:
Class: Equisetopsida
Subclass: Magloliidae
Superorder: Caryophyllanae
Order: Caryophyllales
Family: Molluginaceae
Genus: From Glinos, which is Ancient Greek for a plant with sweet sap. It refers to some of the species, which have a sweet, maple like sap.
Species: Maybe from Loto, which is Ancient Greek or later Lotum, which is Latin for to wash or bathe and Eidos/Oides, which is Ancient Greek for alike or similar to. It may refer to the general appearance of many of the lotus plants or the fact that its habitat is associated with frequent flooding thus the reference to being awash or bathed.
Subspecies: Glinus lotoides var. typicus. From Tupikus, which is Ancient Greek or later Typicum, which is Latin for being figurative or very typical of the genus. It refers to the overall appearance being very typical of other species or subspecies in the genus.
Common Name: Hairy Carpet Weed.
Distribution:
Glinus lotoides var. typicus is the only variety found in Australia. It is found north west of a line from King George Sound to the Kimberley Research Station in Western Australia. It is the found on the eastern half of mainland Australia to the coast north of the Richmond River. South of the Richmond River it is found south to Dowdle Swamp, north of Wilby In central Victoria then west to the Murray River near Wellington in South Australia.
It is also found in Albania, Algeria, Angola, Assam, Bangladesh, Benin, Botswana, Bulgaria, Burkina, Burundi, Cambodia, Cameroon, Cape Provinces, Central African Repu, Chad, Southern to Central China, Congo, Cyprus, Djibouti, East Aegean Island, East Himalaya, Egypt, Eritrea, Ethiopia, Free State, Gambia, Ghana, Greece, Guinea, Guinea-Bissau, Hainan, India, Iran, Iraq, Italy, Ivory Coast, Jawa, Kenya, Kriti, KwaZulu-Natal, Laos, Lebanon-Syria, Lesser Sunda Island, Malawi, Mali, Mauritania, Morocco, Mozambique, Myanmar, Namibia, Nepal, Niger, Nigeria, Oman, Pakistan, Palestine, Philippines, Portugal, Romania, Sardegna, Saudi Arabia, Senegal, Sicilia, Sierra Leone, Socotra, Somalia, South Australia, Spain, Sri Lanka, Sudan, Sulawesi, Sumatera, Taiwan, Tanzania, Thailand, Transcaucasus, Tunisia, Turkey, Uganda, Victoria, Vietnam, Western Australia, Yemen, Yugoslavia, Zambia, Zaire and Zimbabwe.
https://avh.ala.org.au/occurrences/search?taxa=Glinus+lotoides#tab_mapView
Habitat Aspect Climate:
Glinus lotoides prefers full sun to light dappled shade. It is a widespread common species in dry open woodlands, often in ephemeral riparian zones, channels and seasonal waterlogged flats. The altitude ranges from 20 meters ASL to 900 meters ASL.
The temperatures range from minus 4 degrees in July to 46 degrees in January.
The rainfall ranges from lows of 150mm to an average of 2600mm annually.
Soil Requirements:
Glinus lotoides prefers poor to average quality sandy loams to light silty clay loams or medium to gravelly heavy silts. The soils are usually derived from decomposed brown basalt, black basalt, sandstones, granite, mudstone, granites, shale or metamorphic rocks most of which are laid down as alluvial deposits. The soils pH ranges from 5.5pH to 7pH are preferred. It tolerates seasonal waterlogged soils. Non saline soils to very saline soils are tolerated as are salt lasen winds.
Height & Spread:
Wild Plants: 100mm to 500mm by 700mm to 1000mm.
Characteristics:
Glinus lotoides grows as a prostrate or procumbent annual with slender pale blueish-grey stems that are moderately to densely covered in soft, grey stellate and tomentose hairs. The terete stems are densely branched. The plants develop a relatively long tap root.
The opposite, alternate or at times clustered leaves of Glinus lotoides are elliptic to broadly obovate and measure 6mm to 30mm in length by 6mm to 23mm in width. The short, slender, terete petioles are sparsely to densely covered in pale soft, grey tomentose hairs and measure 2mm to 8mm in length.
The bases are cuneate to broad cuneate while the apexes are broad obtuse. The concolourous laminas are pale blueish-grey stems that are moderately to densely covered in soft, grey stellate and tomentose hairs or rarely glabrous. The laminas are undulating between the lateral veins. The mid vein and lateral veins are prominent on the lower lamina. The margins are entire and undulated.
The inflorescences are born in in leaf opposed clusters of 1 to 10 individual flowers. The peduncles and pedicels are mid green and sparsely to densely covered in white appressed or semi appressed hirsute hairs. The off white, yellowish or pale greenish, oblong to elliptic or at times ovate, flowers are pentamerous and consist of tepals, which measure 6mm to 8 mm in length. The ovate tepals are sparsely to densely covered in soft, pale grey tomentose hairs externally and are glabrous internally.
The 8 to 20, usually 12 free stamens are often surrounded by a series of narrow, long bifid staminodes. The white stamens are variable in length and measure 2mm to 3.6mm in length, while the white basifixed anthers are white.
The ovary consists of 5 locules surmounted by 5 united pale green styles, while the white stigmas are free. The flowers appear form January to May.
The capsules are narrowly ovoid, slightly shorter than perianth segments. The redish-brown, tuberculated, reniform seeds measure 0.7mm to 0.9mm in length. The caruncle is inflated and resembles a bladder.
Wildlife:
Glinus lotoides‘s wildlife is unknown to the author.
The young leaves and shoots are eaten in many countries as a vegetable. Glinus lotoides is stomachic and aperient which assists in stimulating appetite.
Cultivation:
Glinus lotoides has not made its way into Australian gardens as a delightful small ground cover that is easy to grow in a wide variety of situations and soils.
In fact Glinus lotoides would be an easy crop to produce organically for the medicinal herb industry for an entrepreneurial young farmer wanting something different. A lot of research has been done in both India and China in regards to this herb which grows wild over most of Australia without many pests.
Its blueish-grey foliage adds interest to small to medium size rockeries and contrasts any rocks, boulders or even large roots and logs beautifully. Its hardiness in semi arid situations would make it an ideal procumbent plant along pathways. Mixed with more erect annuals its foliage again would contrast Xerochrysum bracteatum admirably, irrespective of whether the flowers chosen are mixtures of yellow, orange, purple, cream or red. Rhodanthe chlorocephala can also offer a great visual effect in various shades of pinks and white.
Instead of treating it as a common bush plant use innovative ideas and use the variation in colours and patterns to enhance dull corners and hard to manage areas.
Propagation:
Seeds: Many people consider Glinus lotoides a weed and not worthy of growing but for those who wish to partake in it for herbal medical reasons or the stunning rockery plant it makes, I have included an account of how to propagate it. Sow fresh seeds or the previous season’s seeds of Glinus lotoides after removing them from the refrigerator over winter into a seed raising mix. Place the trays beneath 30mm shade cloth and keep moist not wet. When the seedlings are 40mm to 60mm tall, prick them out, nip the tips out to encourage side shoots and plant them into 50mm native tubes using a good organic mix.
Once the seedlings reach 150mm to 200mm in height again nip the tips out and plant them out into their permanent position. Group plantings are best achieved by planting them at 600mm to 800mm centers.
Fertilize using seaweed, fish emulsion or organic chicken pellets soaked in water on an alternate basis. Fertilize every two months until the plants are established then twice annually in early September or March to maintain health, vitality and better flowering.
Cuttings:
Fortunately Glinus lotoides cuttings can be almost as stubborn to strike. Use 100mm to 200mm long semi hardwood to hardwood cuttings. Take them in warmer months of the year. Remove half the leaves from the bottom section being careful not to tear the bark.
1 Prepare the cutting mix by adding two thirds sharp clean river sand, one third peat or one third perlite. These ingredients must be sterilized,
2 Select good material from non diseased plants,
3 Select semi hardwood stems for cuttings,
4 Place the cutting on a flat, hard surface, and make a clean cut down one side of the cutting at the base for 10mm with a sharp sterile knife or razor blade. – This scarification of the node will increase the chances of roots emerging from this spot. Now remove all but one or two the leaves, leaving the apex leaves in tact. If the leaves are very large in proportion to the stem, cut off the apical halves.
5 Hormones will not be required,
6 Use a small dipple stick or old pencil to poke a hole into the soilless potting mix. Ensure the hole is slightly larger than the stem diameter and be careful not to damage the cuttings base,
7 If the cuttings cannot be placed in a controlled hot house environment, I like to place the tubes in bucket with holes drilled in the bottom to allow excess water to drain out. A plastic bag that fits over the bucket is ideal to help maintain temperature and moisture. Place in a semi shaded, warm position like under 50mm shade cloth.
8 When the cuttings have struck, open the bag to allow air circulation for a few days to a week,
9 Once hardened off remove the cuttings from the bag and allow to further hardening for a few more days to a week,
10 Transplant into a good potting mix to grow on.
Fertilize using seaweed, fish emulsion or organic chicken pellets soaked in water on an alternate basis. Fertilize every two months until the plants are established then annually in early September to October to maintain health, vitality and better flowering.
Further Comments from Readers:
Hi reader, it seems you use The Bible of Botany a lot. That’s great as we have great pleasure in bringing it to you! It’s a little awkward for us to ask, but our first aim is to purchase land approximately 1,600 hectares to link several parcels of N.P. into one at The Pinnacles NSW Australia, but we need your help. We’re not salespeople. We’re amateur botanists who have dedicated over 30 years to saving the environment in a practical way. We depend on donations to reach our goal. If you donate just $5, the price of your coffee this Sunday, We can help to keep the planet alive in a real way and continue to bring you regular updates and features on Australian plants all in one Botanical Bible. Any support is greatly appreciated. Thank you.
In the spirit of reconciliation we acknowledge the Bundjalung, Gumbaynggirr and Yaegl and all aboriginal nations throughout Australia and their connections to land, sea and community. We pay our respect to their Elders past, present and future for the pleasures we have gained.
Glinus oppositifolius
Classification:
Class: Equisetopsida
Subclass: Magloliidae
Superorder: Caryophyllanae
Order: caryophyllales
Family: Molluginaceae
Genus: From Glinos, which is Ancient Greek for a plant with sweet sap. It refers to some of the species, which have a sweet, maple like sap.
Species: From Oppositus, which is Latin for being on the other side and Folium, which is Latin for foliage. It refers to leaves, which appear at 180 degrees to each other and on the same axis on the stem.
Common Name: Slender Carpet Weed.
Distribution:
Glinus oppositifolius is found in most of the top half of the continent and extends down the western side in Western Australia to Pretty Pool in the upper Gascoyne down the center to Mintabie and on the east coast to Maclean on the Clarence River. It is also found along the Murrumbidgee River and the Murray River to Lake Alexandrina.
https://avh.ala.org.au/occurrences/search?taxa=Glinus+oppositifolius#tab_mapView
Habitat Aspect Climate:
Glinus oppositifolius prefers full sun to light dappled shade. It is a widespread but not common in moist open woodlands, in ephemeral pools and seasonal watercourses. The altitude ranges from 20 meters ASL to 500 meters ASL.
The temperatures range from minus 4.degrees in July to 42 degrees in January.
The rainfall ranges from lows of 150mm to an average of 2600mm annually.
Soil Requirements:
Glinus oppositifolius prefers poor to average quality sandy loams to light silty clay loams or medium to heavy silts. The soils are usually derived from decomposed brown basalt, black basalt, sandstones, granite, mudstone, granites, shale or metamorphic rocks most of which are laid down as alluvial deposits. The soils pH ranges from 5.5pH to 7pH are preferred. It does tolerate seasonal waterlogged soils. Non saline soils to slightly saline soils are tolerated.
Height & Spread:
Wild Plants: 0.05m to 0.1m by 0.3m to 0.6m.
Characteristics:
Glinus oppositifolius grows as a decumbent perennial herbs with slender pale green to mid green stems. The terete stems are densely branched and rebranched. The stems are glabrous to densely covered in white floccose and soft, appressed hirsute hairs especially in the axils. The fawn tap root is long and tapering.
The opposite or 3 to 6 whirled leaves of Glinus oppositifolius are usually obovate to oblanceolate or at times spathulate, oblong-elliptical or orbicular. They measure 6mm to 40mm in length by 2mm to 18mm in width. The slender pale green petioles are sparsely to densely covered in white appressed floccose and soft, appressed pilose hairs and measure 1mm to 4mm in length.
The bases are broad cordate to narrow cuneate while the apexes are broad obtuse, broad acuminate or mucronate. The concolourous or discolourous laminas are pale green to deep green often with a purplish sheen; when growing on phosphate deficient soils, are sparsely covered in soft, white appressed pilose hairs on the veins on the upper laminas while the lower laminas are similar or slightly paler glabrous to sparsely covered in soft, white appressed pilose hairs. The laminas are flat or are slightly undulating and slightly decurve on the apical half. The mid vein is prominent on the lower lamina while the lateral veins are slightly prominent on the lower lamina. The main vein and lateral veins are visible from the upper lamina. The margins are entire or obscurely serrulate on the apical half.
The inflorescences of Glinus oppositifolius are usually born in pairs or rarely solitary on a single peduncle from the leaf axils. The peduncles and pedicels are mid green and sparsely to densely covered in white appressed or semi appressed hirsute hairs. There are 2 small stipules at the base and another 2 triangular stipules about 2.5mm to 15mm below the sepals. The slender pedicels are glabrous or sparsely covered in soft, white, appressed, pilose hairs and measure 5mm to 18mm in length.
The 2 to 7 flowers are born in a fascicle like formation from the leaf axils, adjacent to the leaf axils or what appears to be a terminal point. The 5 saccate, oblong-elliptical tepals are white tinged green externally and tinged pastel yellow or pastel pink internally especially on the apical half. The tepals have a tapering obtuse apex and measure 3mm to 4.5mm in length by 1.5mm to 2.2mm in width.
The 3 to 5 or rarely 6 white filaments measure 1.5mm to 2mm in length while the cream anthers are dorsifixed. There are 3 or 4.carpels and 3 or 4.white or pastel yellow styles that measure 1.5mm to 2.2mm in length. The flowers appear throughout the year when weather or local conditions are favourable.
Glinus oppositifolius fruits are usually ellipsoidal capsules. The capsules measure 2.5mm to 4mm in length by 1.5mm to 3mm in width. The pale green capsules turn mid brown while the sepals are persistent at the base of the ripe fruits.
The mid brown, semi glossy seeds are subreniform and granulose. The strophiole on the seeds measure 0.5mm to 1mm in length.
Wildlife:
Glinus wildlife is unknown to the author.
Cultivation:
It is considered a weed which is easy to remove in the garden with its only virtue at this stage is it yields small quantities of good quality mulch.
Glinus oppositifolius is stomachic and aperient which stimulates appetite.
It is used in Asia extensively as an antiseptic in treating skin diseases and for the suppression of lochia infection and the fresh sap from the leaves and stems are mixed with castor oil is reported to be a good cure for earache. Glinus oppositifolius would be an easy crop to produce organically for the medicinal herb industry for an entrepreneurial young farmer wanting something different. A lot of research has been done in both India and China in regards to this herb which grows wild over most of Australia without many pests.
Propagation:
Seeds: Many people consider Glinus oppositifolius a weed and not worthy of growing but for those who wish to partake in it for herbal medical reasons I have included an account of how to propagate it. Sow fresh seeds or the previous season’s seeds after removing them from the refrigerator over winter into a seed raising mix. Place the trays beneath 30mm shade cloth and keep moist not wet. When the seedlings are 40mm to 60mm tall, prick them out, nip the tips out to encourage side shoots and plant them into 50mm native tubes using a good organic mix.
Once the seedlings reach 150mm to 200mm in height again nip the tips out and plant them out into their permanent position. Group plantings are best achieved by planting them at 600mm to 800mm centers.
Fertilize using seaweed, fish emulsion or organic chicken pellets soaked in water on an alternate basis. Fertilize every two months until the plants are established then annually in early September to October to maintain health, vitality and better flowering.
Further Comments from Readers:
Hi reader, it seems you use The Bible of Botany a lot. That’s great as we have great pleasure in bringing it to you! It’s a little awkward for us to ask, but our first aim is to purchase land approximately 1,600 hectares to link several parcels of N.P. into one at The Pinnacles NSW Australia, but we need your help. We’re not salespeople. We’re amateur botanists who have dedicated over 30 years to saving the environment in a practical way. We depend on donations to reach our goal. If you donate just $5, the price of your coffee this Sunday, We can help to keep the planet alive in a real way and continue to bring you regular updates and features on Australian plants all in one Botanical Bible. Any support is greatly appreciated. Thank you.
In the spirit of reconciliation we acknowledge the Bundjalung, Gumbaynggirr and Yaegl and all aboriginal nations throughout Australia and their connections to land, sea and community. We pay our respect to their Elders past, present and future for the pleasures we have gained.
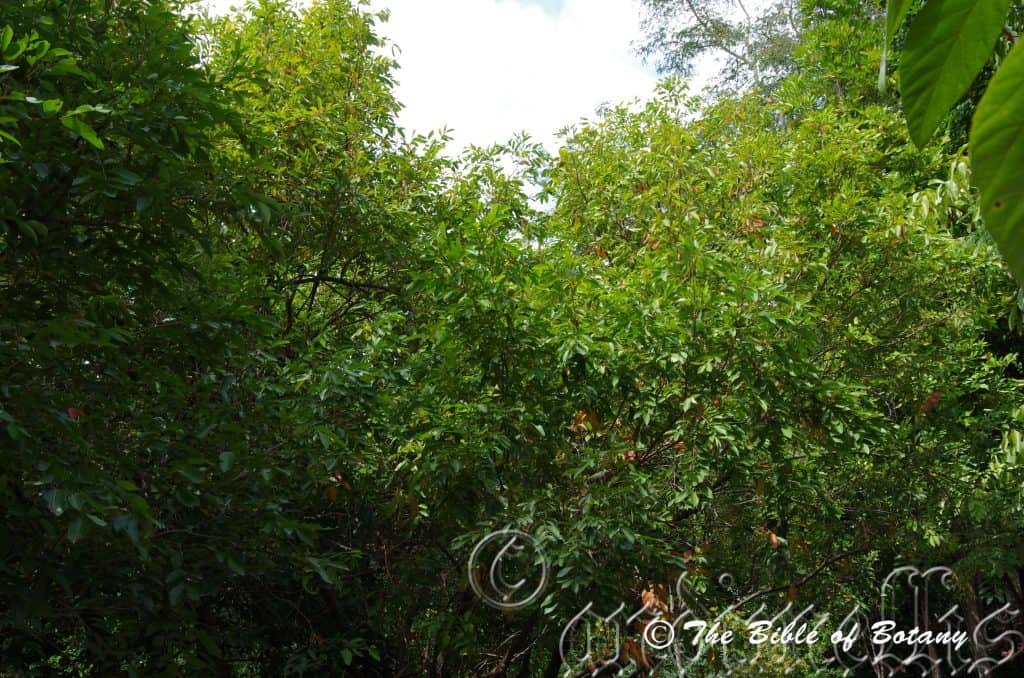
Mount Cootha Botanical Gardens Qld.
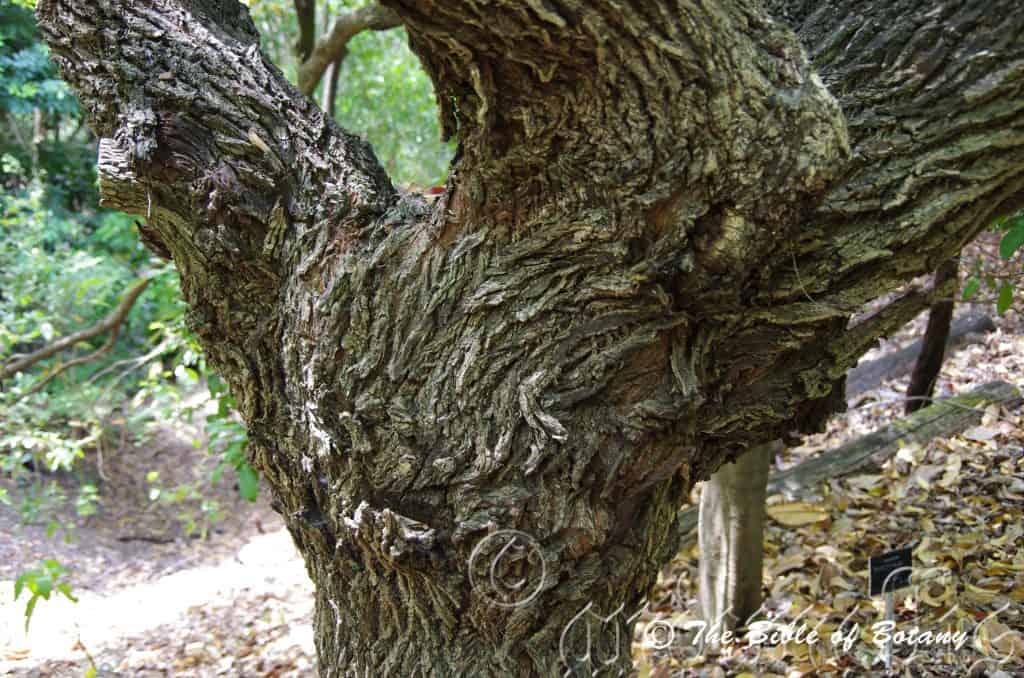
Mount Cootha Botanical Gardens Qld.
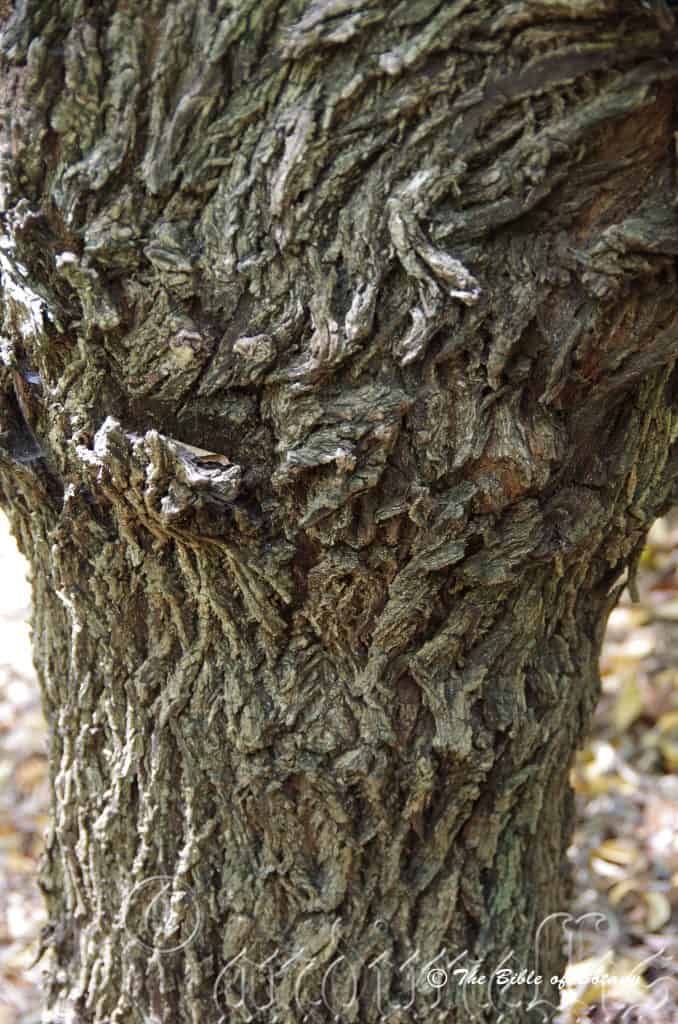
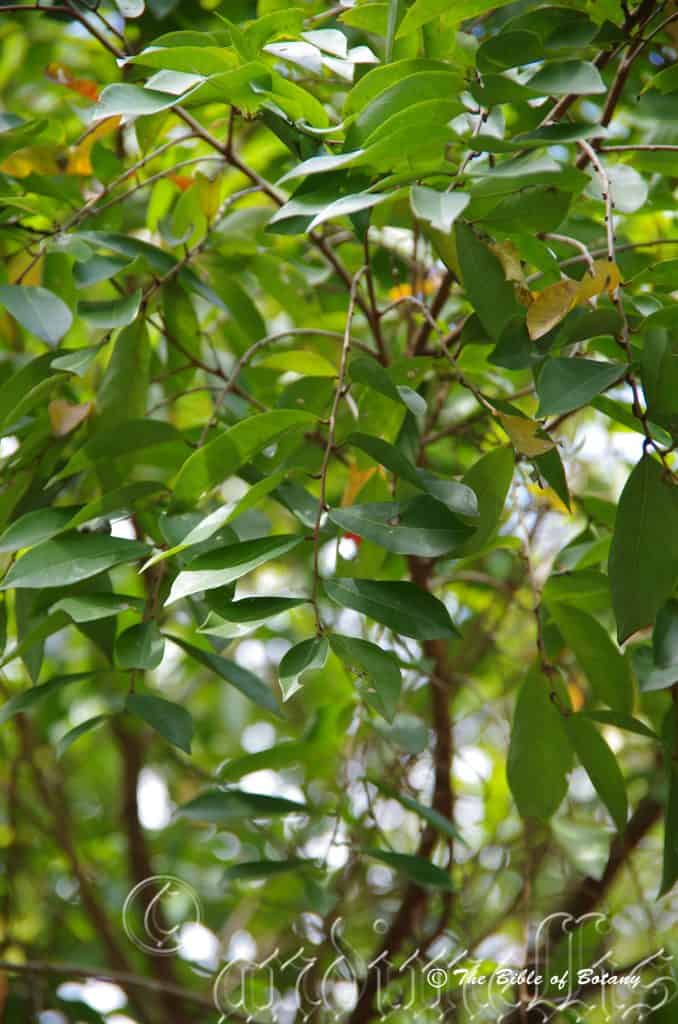
Mount Cootha Botanical Gardens Qld.
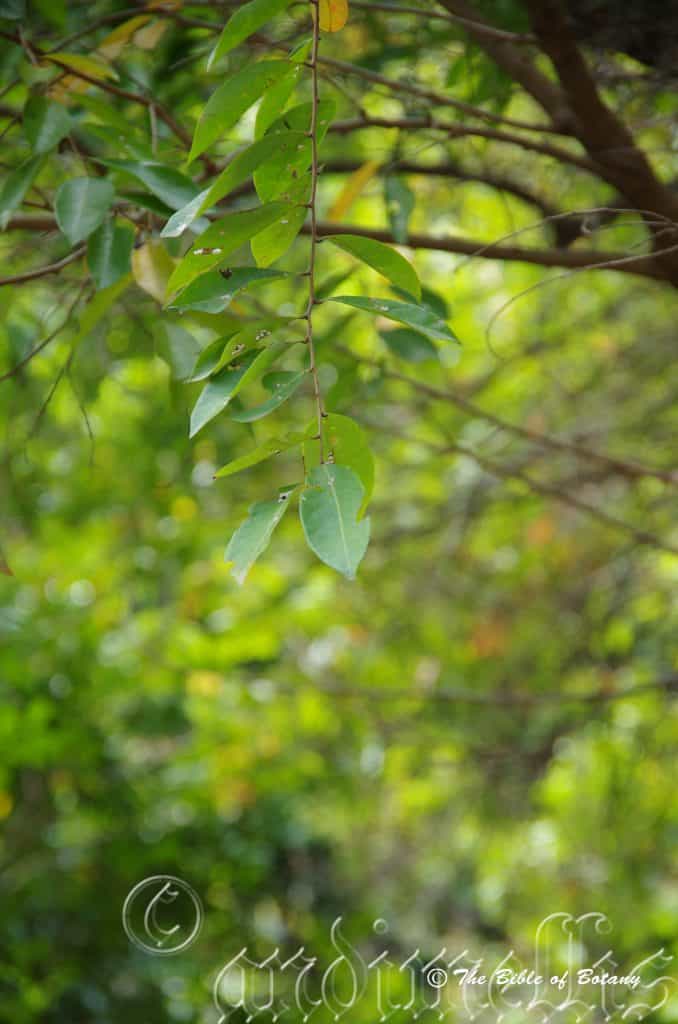
Mount Cootha Botanical Gardens Qld.
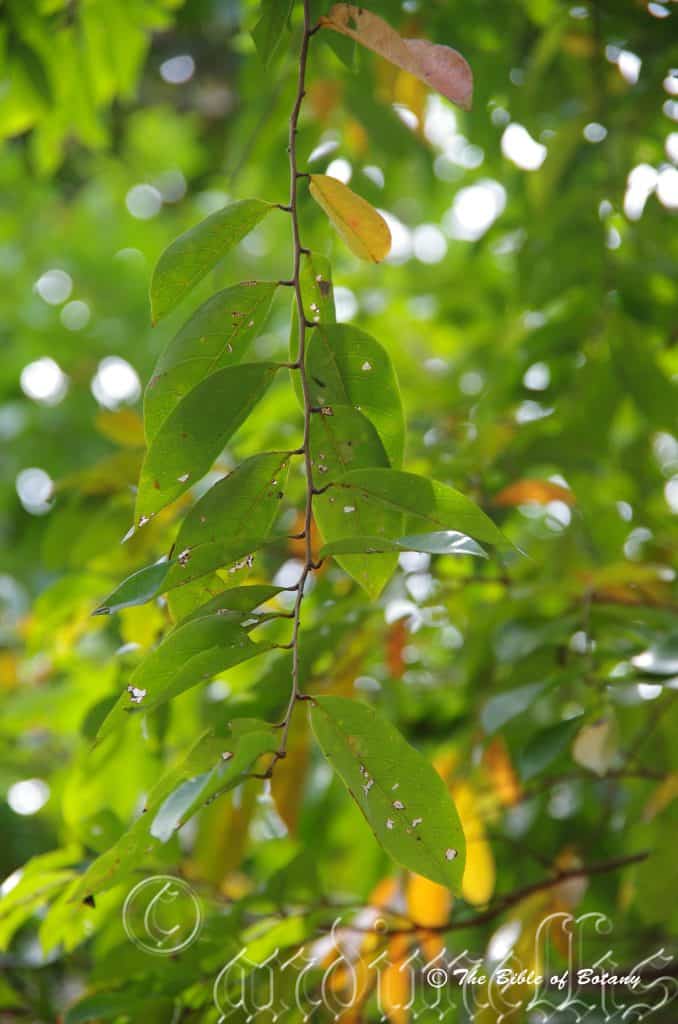
Mount Cootha Botanical Gardens Qld.
Glochidion benthamianum
Classification:
Class: Magnoliopsida
Order: Malphighiales
Family: Euphorbiaceae
Genus: From Glochidium, which is Latin for the barb on an arrow or fishing hook. It refers to a structure or organ, which has a barb.
Species: Is named in honour of George Bentham; 1800-1884, who was an English botanist who undertook the reclassification of seed plants into families.
Common Name: Buttonwood or Cheese Tree or Bentham’s Buttonwood.
Distribution:
Glochidion benthamianum is found south from the tip of Cape York Peninsula to the mouth of Kokialah Creek on the western side of Cape York Peninsula and to Cardwell on the eastern side. There is a disjunct population on Butterfly Springs on the Einasleigh uplands in northern Queensland.
https://avh.ala.org.au/occurrences/search?taxa=Glochidion+benthamianum#tab_mapView
Habitat Aspect Climate:
Glochidion benthamianum prefers full sun to dappled shade. It grows in moist open forests, vine forests, adjacent to rainforests or monsoonal vine forests. It is very quick to recolonize disturbed land. The altitude ranges from 5meters ASL to 380 meters ASL.
The temperatures range from 8 degrees in July to 38 degrees in January.
The rainfalls range from lows of 900mm to an average of 3200mm annually.
Soil Requirements:
Glochidion benthamianum prefers poor red sandy loams, to medium red or grey podsolic clay loams. The soils are usually derived from decomposed basalts, sandstones, shales or metamorphic rocks. The soils pH ranges from 4.5pH to 6pH. It does not tolerate waterlogged soils however it accepts seasonally wet soils. Non saline soils to very saline soils are tolerated.
Height & Spread:
Wild Plants: 6m to 18m by 10m to 12m.
Characteristics:
Glochidion benthamianum grows as a small tree with deep grey bark. The bark is deeply and irregularly furrowed and persistent to the larger branches. The branches are pale brown, glabrous or slightly scabrous while the branchlets are pale green and covered in off white puberulent hairs.
Glochidion benthamianum alternate, elliptical leaves measure 35mm to 67mm in length by 15mm to 25mm in width. The leaf stipules are triangular and measure 1mm to 1.5mm in length. The petioles measure 22mm to 50mm length. The bases are broad cuneate to rounded while the apexes are broadly acuminate. The discolourous laminas are mid green to mid blue-green, glabrous and semi glossy on the upper laminas while the lower laminas are paler and glabrous or covered in off white pulverulent hairs. The laminas are flat or slightly recurve upwards from the midvein to the margins while the margins are entire. The mid vein is prominent on the lower lamina while the 10 to 16 lateral veins are slightly prominent on the lower lamina and form loops well in from the margin. The mid vein and lateral veins are distinctly visible above being yellowish.
The dioecious inflorescences of Glochidion benthamianum are born in small clusters of 2 to 7 individual flowers from the leaf axils or the axils of old leaves. The minute pale green calyxes are 6 lobed and are covered in off white pulverulent hairs.
The 6 male sepals are moderately covered in off white pubescent hairs externally and are joined to the petals. They measure 1.8mm to 2.3mm in length by 1mm to 1.5mm in width. The 6 ovate, yellow petals are spreading when fully open and measure 2mm to 2.5mm in length by 1.5mm to 2mm in width. The pedicels are covered in off white pulverulent hairs and measure 4mm to 5mm in length.
The 6 dull, brown anthers are fused for their entire length and measure 0.6mm in length.
The female flowers are similar to the male flowers. The pedicels are covered in off white pulverulent hairs and measure 12mm to 15mm in length. The styles and stigmas are fused together to form a dome on the top of the ovary. The flowers appear from February to early April.
Glochidion benthamianum fruits are flattened globose capsule. The capsules are produced singularly from the leaf axis on a long filiform pedicel that measures 15mm to 20mm in length. The capsules measure 3.5mm to 4.5mm in length by 8mm to 12mm in diameter. The capsules are divided into 6 to 12 segments. The green capsules are covered in off white pulverulent hairs and turn brilliant scarlet red and glabrous when ripe. The calyxes are persistent at the base.
The deep hard, brown, testa on the seeds is flat orbicular and measures 4mm in length by 4mm in diameter. The aril is reddish-orange and covers most of the seed. The seeds ripen from late April to May.
Wildlife:
Glochidion ferdinandi supports a wide variety of wildlife from butterflies to fruit eating birds. Beetles consume the leaves and fallen leaves support a myriad of flora and fauna in their rapid decomposition.
Rainbow Lorikeets are known to seasonally eat the leaves of new shoots. The leaves also support the larvae of Candalides hellineta or the Shining Pencil blue butterfly and the Common blue oak butterfly Arhopala micale. Lady beetles and silver eyes are also commonly found as the trees are frequently visited by aphids.
Many birds like Pigeons, Honeyeaters, Bower birds, Oriels, Doves, King Parrots and Cat birds are just a few to mention which frequent the trees for the fruits and seeds. At night possums and Flying foxes with tree kangaroos in the north join the feast to be had and any fruits that may fall to the ground are eagerly sought out by native Mice and Wallabies.
Cultivation:
Glochidion benthamianum is a beautiful tree for medium size gardens. It is very fast growing and suitable for animal shelters because of its bushy canopy. In cultivation the tree will grow from 10 meters to 15 meters by 6 meters to 8 meters in diameter when grown in the open. The trees are rather messy every year when the fruit is ripe and continually drop their leaves during the rest of the year and are semi deciduous in cooler climates. It makes good specimen trees for starting a rainforest as they have an attractive bark and are fast growing.
With this in mind and the fact that the plants feed a host of wildlife it is best used in garden beds and not as specimen trees in a lawn or park setting.
It does require better soils with adequate moisture and an annual application of a native fertilizer. Mulch and leaf litter is always recommended for best results.
Propagation:
Seeds: Seeds of Glochidion benthamianum need to be treated prior to sowing. Place seeds in a sock with clean sharp sand and place in with the weekly wash. Soak the seeds in a diluted mix of 5 to 1 of vinegar for 2 to 3 hours rinse and sow the freshly treated Glochidion ferdinandi seeds into a seed raising mix. Place the trays beneath 30mm shade cloth and keep moist. When the seedlings are 30mm to 50mm tall, prick them out and plant them into 50mm native tubes using a good organic mix.
Once the seedlings reach 200mm to 250mm in height plant them out into their permanent position. Mass plantings for a starter rainforest are best planted at 6meter to 8 meter centers.
Fertilize using seaweed, fish emulsion or organic chicken pellets soaked in water on an alternate basis. Fertilize every two months until the plants are established then annually in early September to October to maintain health, vitality and better flowering.
Further Comments from Readers:
Hi reader, it seems you use The Bible of Botany a lot. That’s great as we have great pleasure in bringing it to you! It’s a little awkward for us to ask, but our first aim is to purchase land approximately 1,600 hectares to link several parcels of N.P. into one at The Pinnacles NSW Australia, but we need your help. We’re not salespeople. We’re amateur botanists who have dedicated over 30 years to saving the environment in a practical way. We depend on donations to reach our goal. If you donate just $5, the price of your coffee this Sunday, We can help to keep the planet alive in a real way and continue to bring you regular updates and features on Australian plants all in one Botanical Bible. Any support is greatly appreciated. Thank you.
In the spirit of reconciliation we acknowledge the Bundjalung, Gumbaynggirr and Yaegl and all aboriginal nations throughout Australia and their connections to land, sea and community. We pay our respect to their Elders past, present and future for the pleasures we have gained.
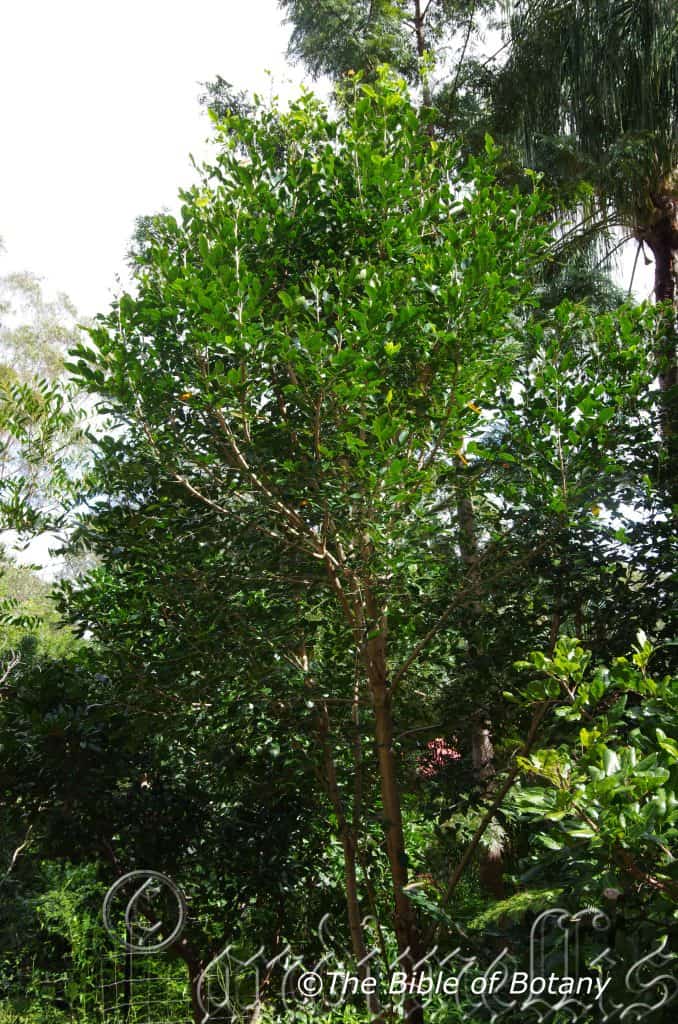
Author’s Garden The Pinnacles NSW
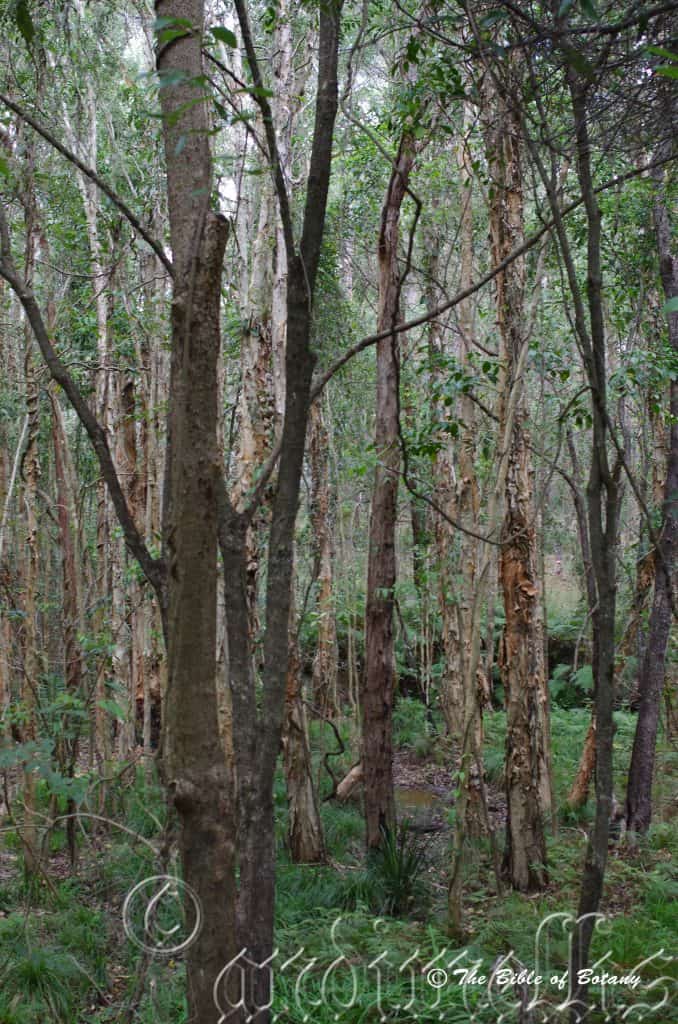
Toohey Forest Qld.
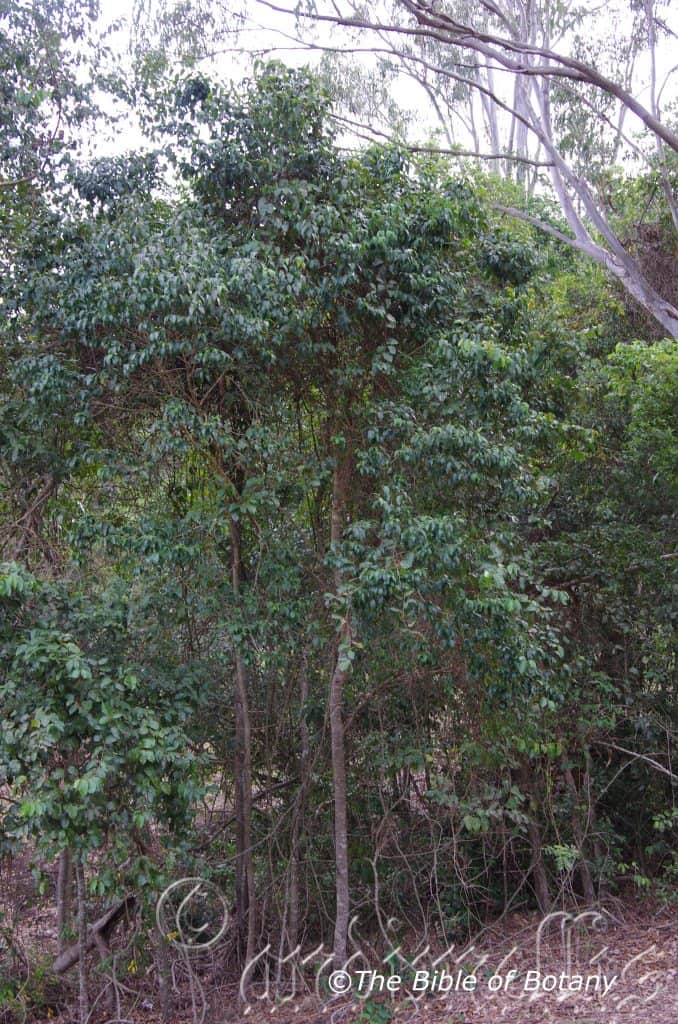
Mount Chinghee National Park Qld.
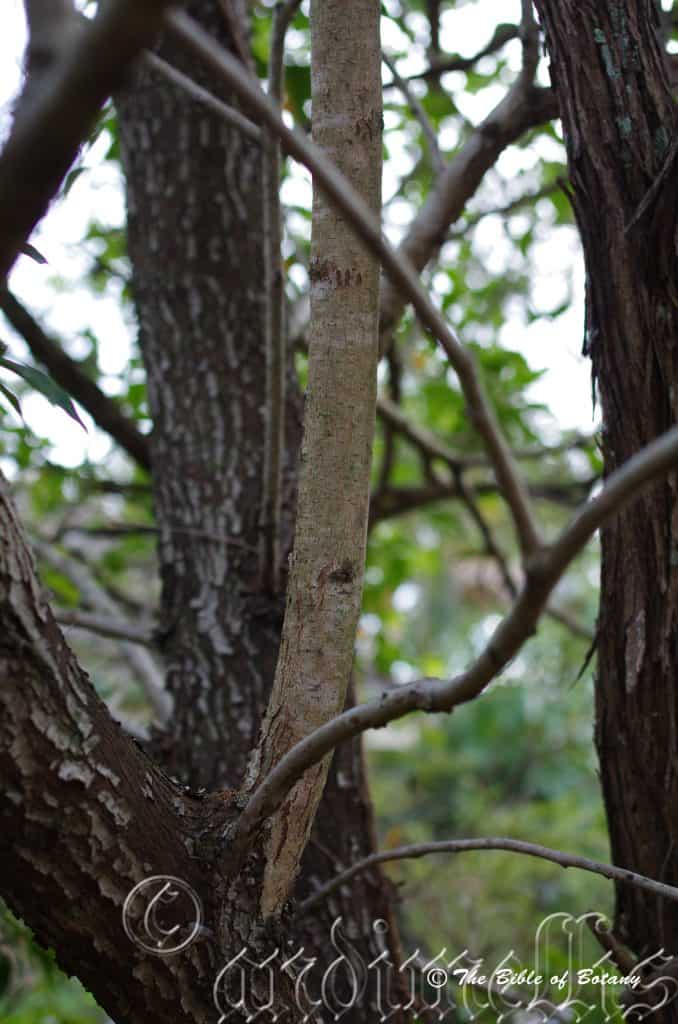
Kedron Brook Qld.
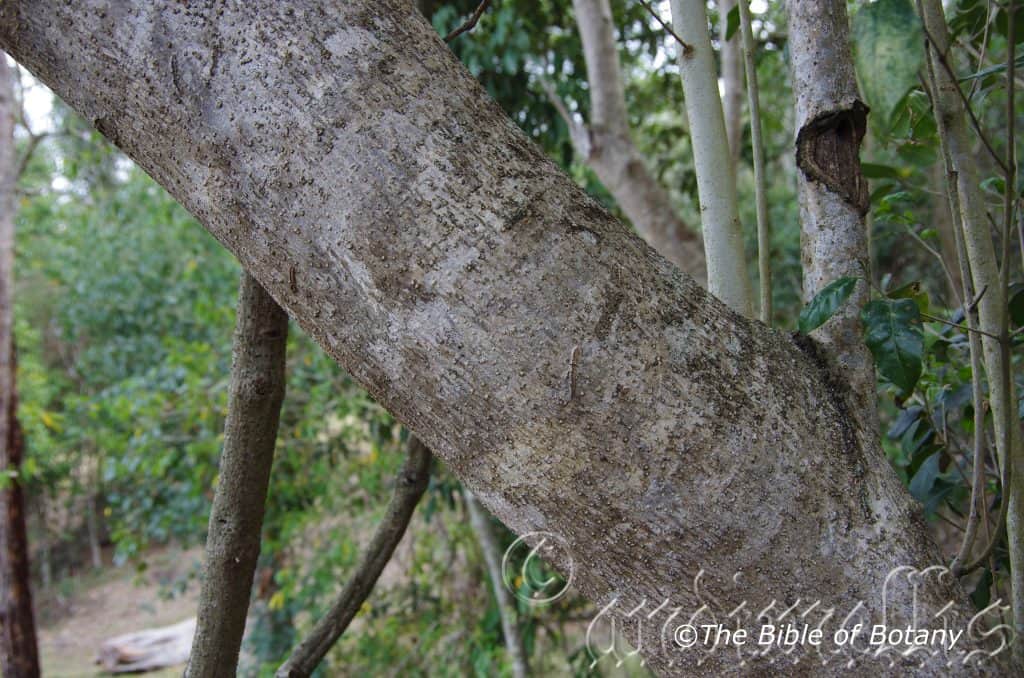
Mount Chinghee National Park Qld.
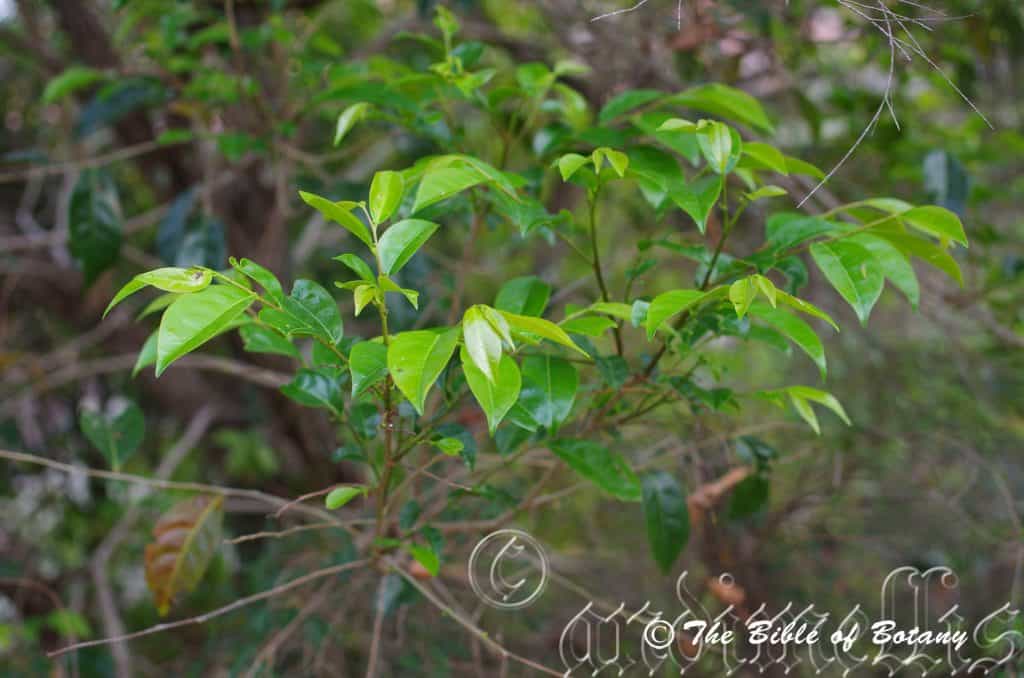
Kedron Brook Qld.

Kedron Brook Qld.
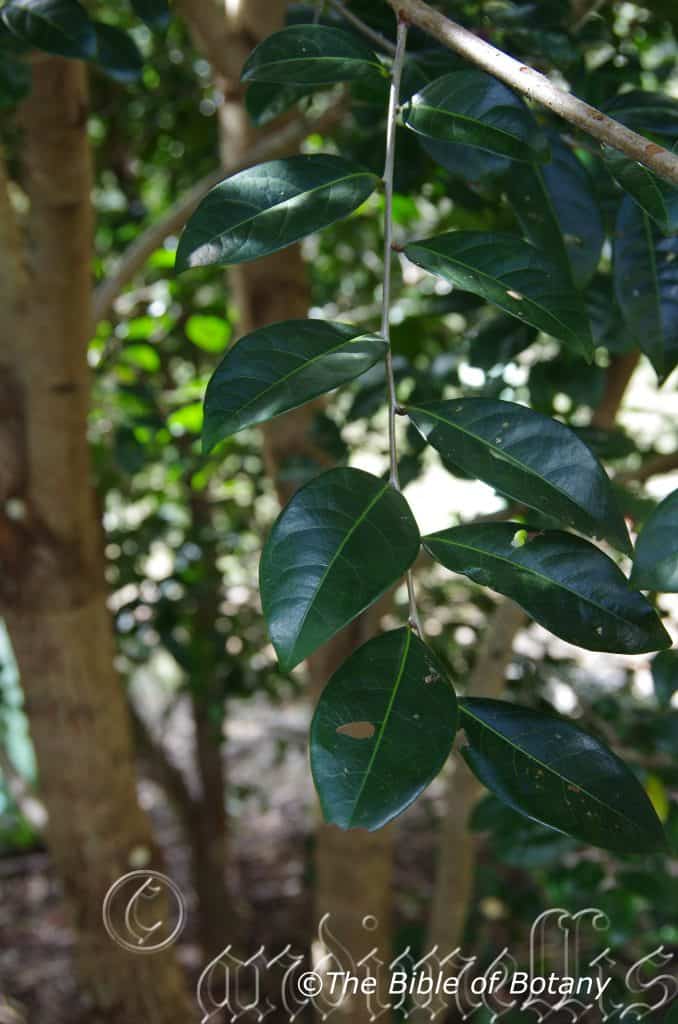
The Pinnacles NSW
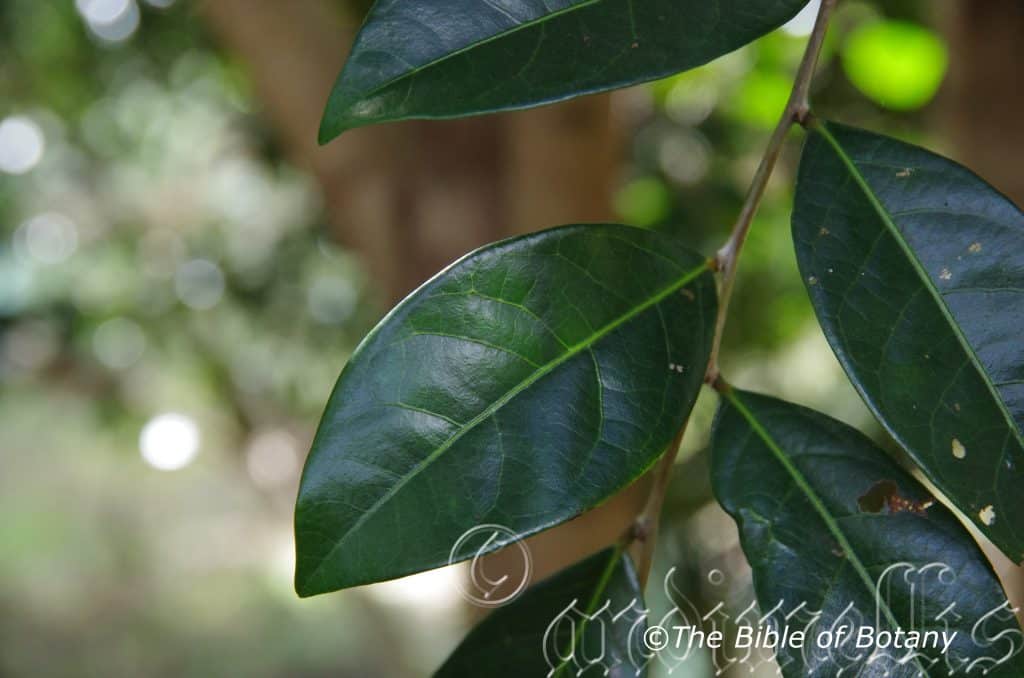
The Pinnacles NSW
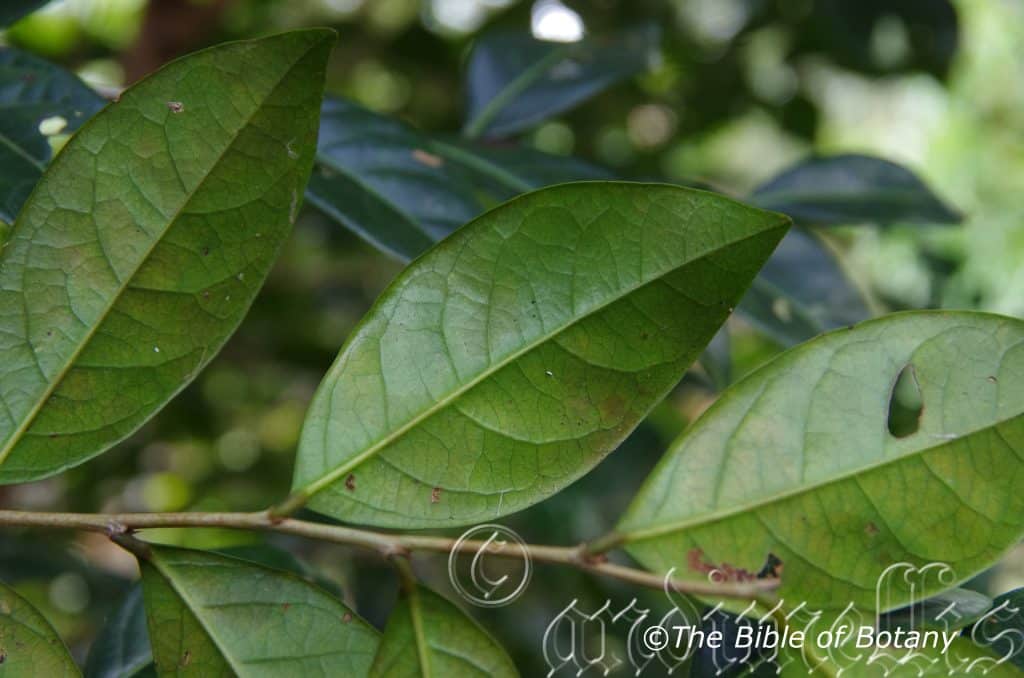
The Pinnacles NSW
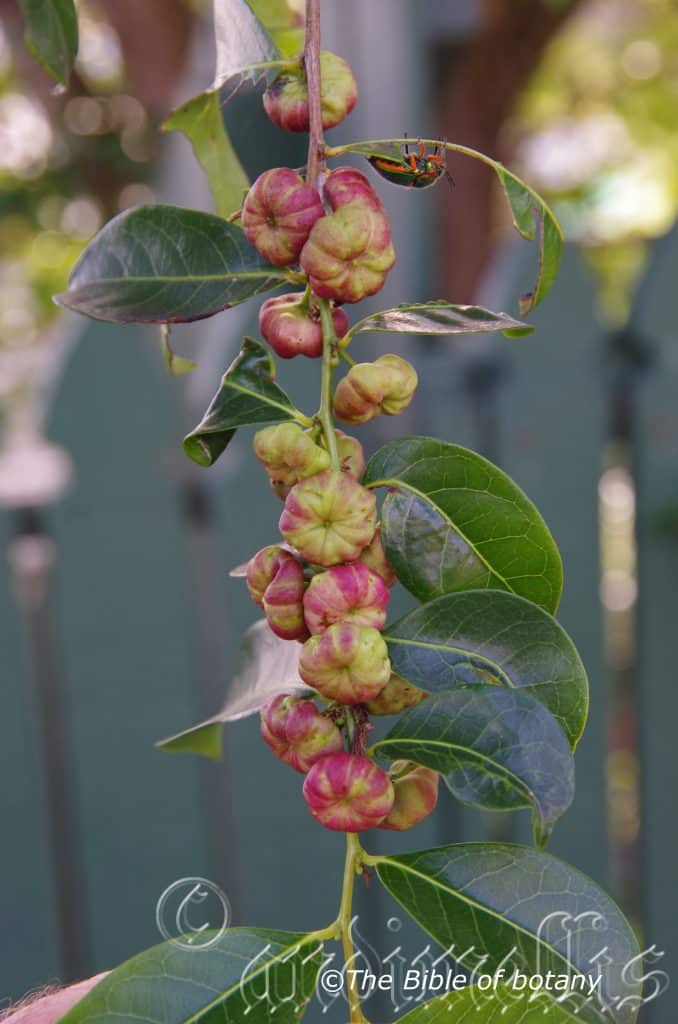
Kedron Brook Qld.
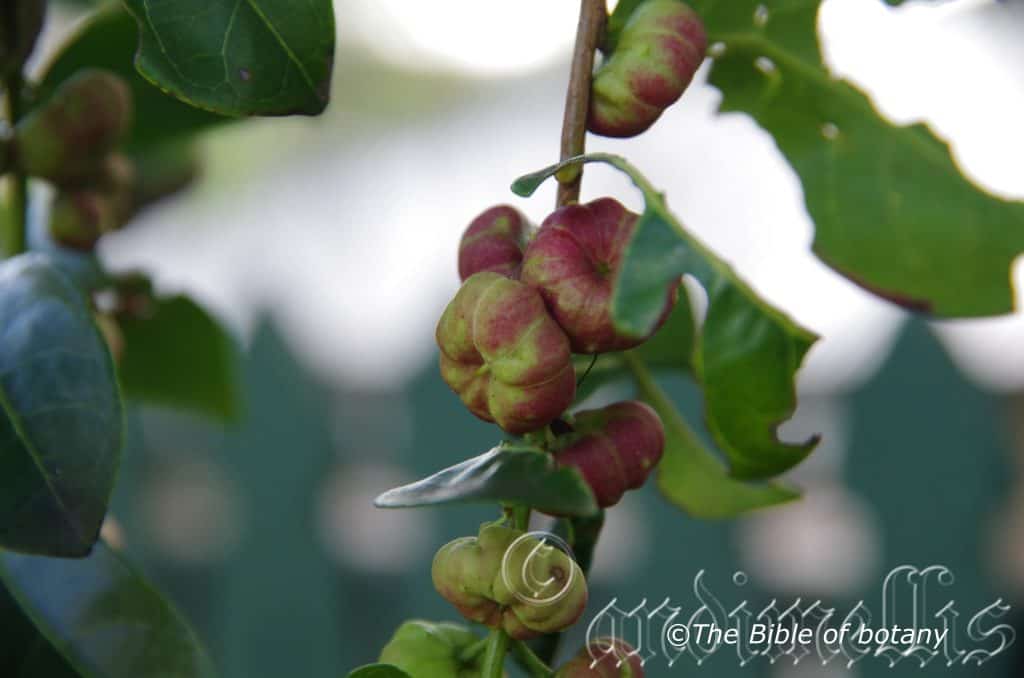
Kedron Brook Qld.
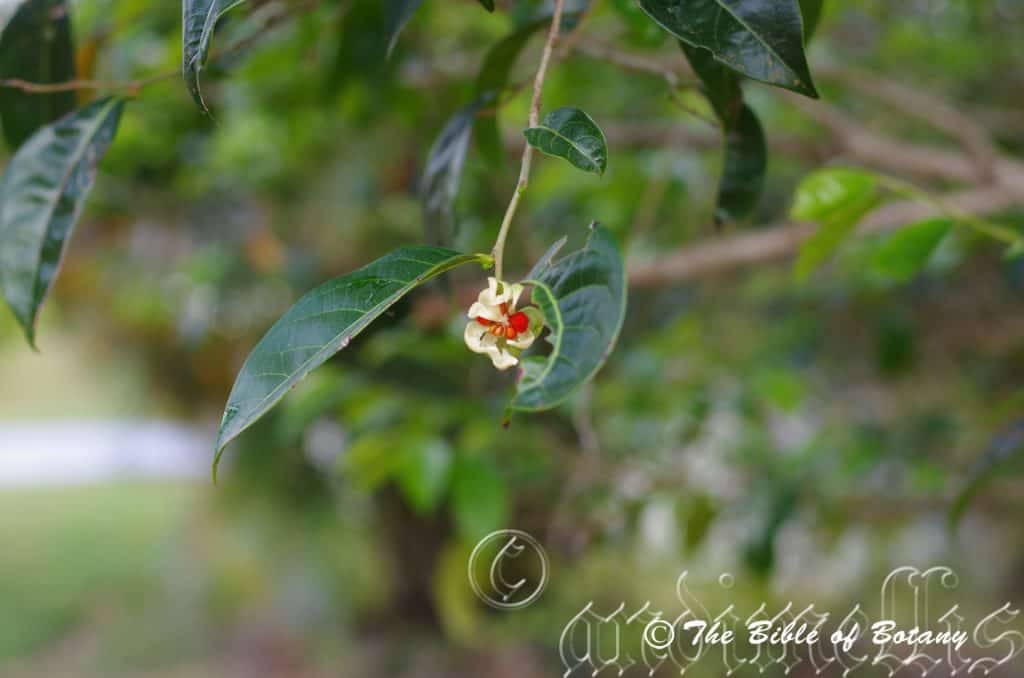
Kedron Brook Qld.

probably Liriomyza sp. Kedron Brook Qld.
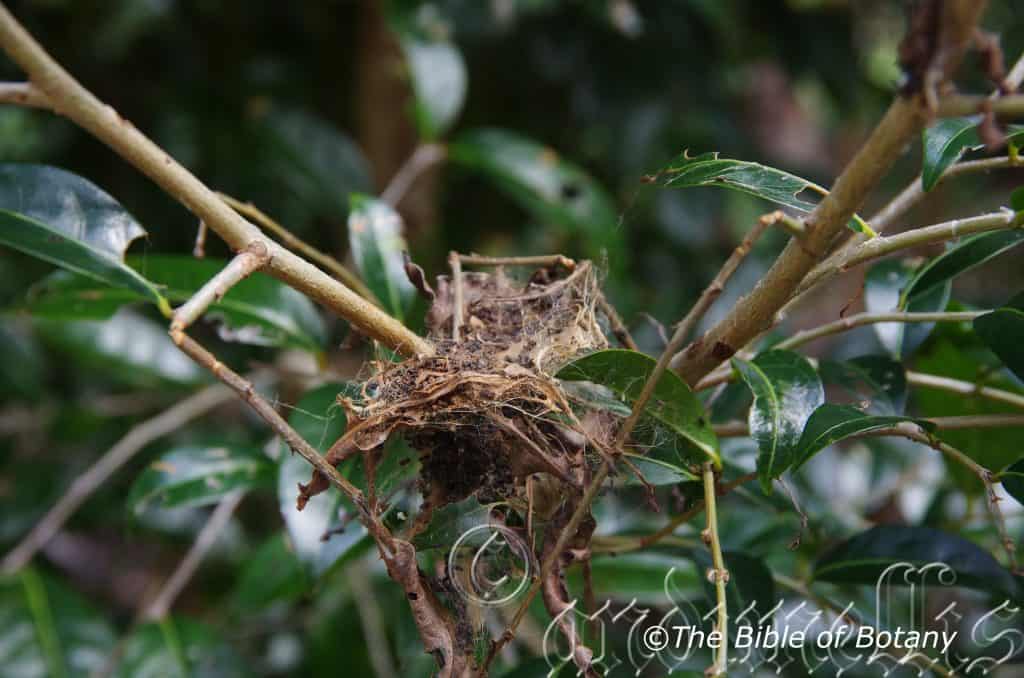
Unknown leaf curl caterpillar The Pinnacles NSW
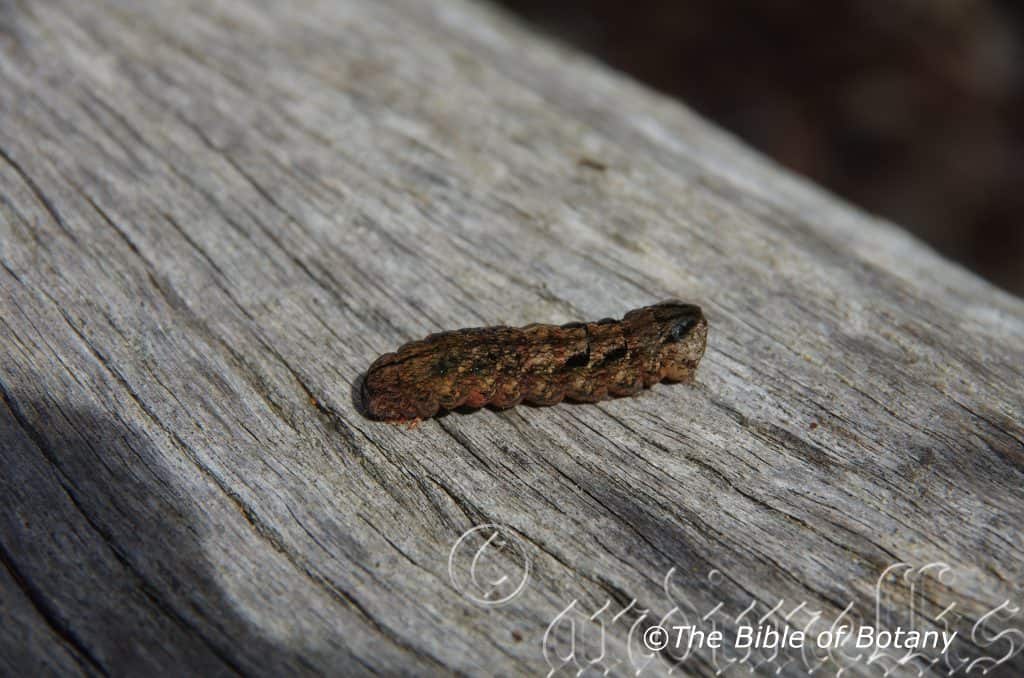
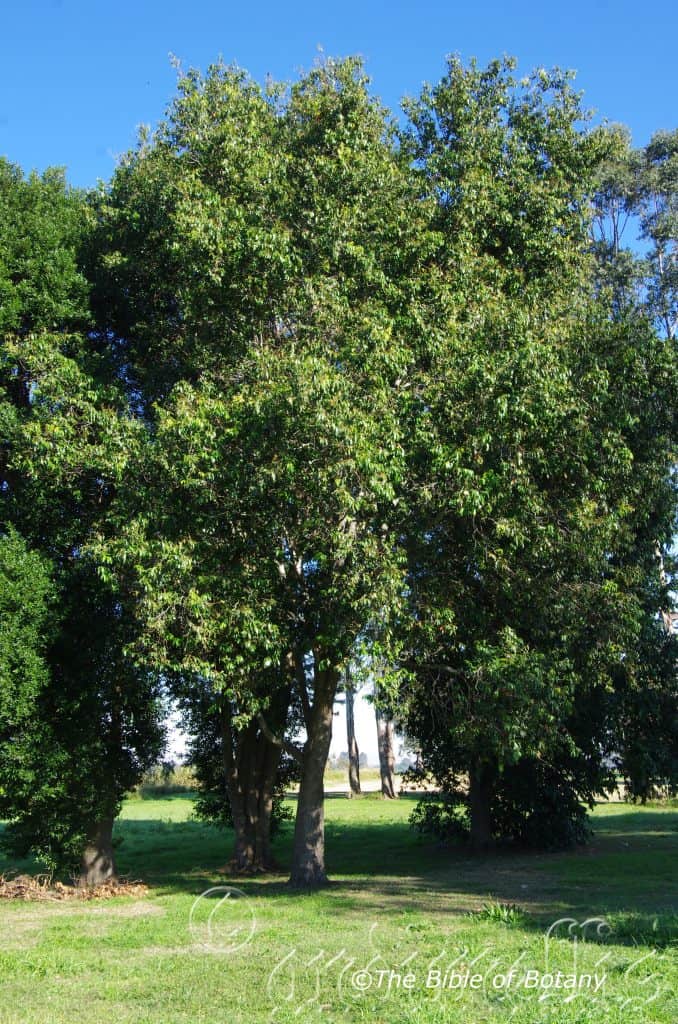
Grafton NSW
Glochidion ferdinandi
Classification:
Class: Magnoliopsida
Order: Malphighiales
Family: Euphorbiaceae
Genus: From Glochidium, which is Latin for the barb on an arrow or fishing hook. It refers to a structure or organ, which has a barb.
Species: Is named in honour of Ferdinand von Mueller; 1825-1896, who was a German born Australian physician and botanist who was founded the Victorian herbarium.
Subspecies: Glochidion ferdinandi var. ferdinandi. Is named in honour of Ferdinand von Mueller; 1825-1896, who was a German born Australian physician and botanist who was the founder the Victorian herbarium.
Subspecies: Glochidion ferdinandi var. mollis. From Mollis, which is Latin for long, softly hairy and supple. It usually refers to leaves or phyllodes, which have long, soft white hairs on a supple lamina however the young stems and leaf bearing stems are covered in long soft tortuous hairs.
Subspecies: Glochidion ferdinandi subsp. pubens. From Pubescens, which is Latin for short, very soft hairs. It refers to structures or organs, which are covered in short, soft, white or pale grey hairs.
Common Name: Cheese Tree.
Distribution:
Glochidion ferdinandi subsp. ferdinandi is found south from Port Douglas in north eastern Queensland to Eden in southern coastal New South Wales.
Glochidion ferdinandi var. mollis is found from the tip of Cape York Peninsula south to Innisfail.
Glochidion ferdinandi var. pubens is found in isolated populations south from Yeppoon in central coastal Queensland to the Blue Mountains.
https://avh.ala.org.au/occurrences/search?taxa=Glochidion+ferdinandi#tab_mapView
Habitat Aspect Climate:
Glochidion ferdinandi prefers full sun to light shade or dappled shade usually starting life in dense shade as an understory plant. It grows adjacent to rainforests, wet Eucalyptus forests or deep within the rainforests. It is also very quick to colonize disturbed land. The altitude ranges from 20 meters ASL to 350 meters ASL.
The temperatures range from 2 degrees in July to 34.degrees in January.
The rainfalls range from lows of 750mm to an average of 3200mm annually.
Soil Requirements:
Glochidion ferdinandi prefers better quality fertile coarse sands, fine sands, and sandy loams, to light clay loams. The soils are derived from decomposed basalts, sandstones, granites, shales, metamorphic rocks or accumulated beach sands. The soils pH ranges from 4.5PH to 7PH are preferred. It tolerates seasonal waterlogged soils or seasonal high water tables. It often grows in association with iron oxide bacteria. (See bacteria and Fungus section) Non saline soils to slightly saline soils are tolerated.
Height & Spread:
Wild Plants: Glochidion ferdinandi var. ferdinandigrows 6m to 18m by 10m to 12m.
Glochidion ferdinandi subsp. pubens grows 4m to 8m by 4m to 8m.
Glochidion ferdinandi var. mollis grows 8m to 12m by 4m to 10m.
Characteristics:
Glochidion ferdinandi has a light pinkish grey or fawn flaky bark. The trunk of Glochidion ferdinandi var. ferdinandi forms a small buttress on large trees. Branchlets are glabrous grey and red and slightly scabrous. The young shoots are pale green and glabrous.
Young shoots of Glochidion ferdinandi subsp. pubens are pale green and covered in white or red puberulent to pulverulent hairs.
Young shoots and leaf stems of Glochidion ferdinandi var. mollis are covered in long soft tortuous hairs.
Glochidion ferdinandi has adjacent; elliptical to oblong-elliptical leaves that measure 40mm to 100mm in length by 20mm to 40mm in width. The leaves are concolourous with the laminas being mid green, glabrous and semi glossy. The bases are rounded while the apexes are broadly acuminate. The leaf margins are entire and flat. The mid vein is prominent on the lower lamina and distinctly visible above being yellow. The petioles measure 3mm to 5mm length.
Inflorescences are born from the leaf axils or the axils of old leaves. The 3 to 7 flowers are born on individual panicles. The panicles measures 4mm to 6mm in length. The sepals and petals are spreading when fully open. The sepals are broadly elliptical with a broadly acute apex while the petals are elliptical. The petals and sepals measure 2mm to 3.5mm in length by 1mm to 1.5mm in width. The sepals and petals are entire and are yellow with or without a red margin or red markings. The flowers appear from October through to early February.
Glochidion ferdinandi fruits are flattened globose capsule. The capsules are produced singularly from the leaf axis. They measure 5mm to 8mm in length by 12mm to 20mm in diameter.
The capsules on Glochidion ferdinandi sub sp. ferdinandi are glabrous, smooth and semi glossy to glossy.
The capsules on Glochidion ferdinandi subsp. pubens are densely covered in white puberulent hairs. The capsules of both sub sp. are pale green turning cream with red markings or red with the individual locules separated by a green or cream stripe. The capsules are slightly restricted between the seeds.
The capsules on Glochidion ferdinandi var. mollis resemble small purplish or maroon, Queensland Blue pumpkin with 12-15-lobed and measure 10mm to 12mm in diameter.
Each capsule has 4.to 6 usually 6 locules each developing 2 flattened round black to deep brown seeds. The seeds are covered by a red aril. Seeds ripen from late October to late February.
Wildlife:
Glochidion ferdinandi supports a wide variety of wildlife from butterflies to fruit eating birds. Beetles consume the leaves and fallen leaves support a myriad of flora and fauna in their rapid decomposition. Many birds like Pigeons, Honeyeaters, Bower birds, Oriels, Doves, King Parrots and Cat birds are just a few to mention which frequent the trees for the fruits and seeds. At night possums and Flying foxes with tree kangaroos in the north join the feast to be had and any fruits that may fall to the ground are eagerly sought out by native Mice and Wallabies. Rainbow Lorikeets are known to seasonally eat the leaves of new shoots. The leaves also support the larvae of Candalides hellineta or the Shining Pencil blue butterfly and the Common blue oak butterfly Arhopala micale. Lady beetles and silver eyes are also commonly found as the trees are frequently visited by aphids.
Cultivation:
Glochidion ferdinandi is a beautiful tree for medium size gardens. It is very fast growing and suitable for animal shelters because of its bushy canopy. In cultivation the tree will grow to a maximum of 15 meters by 8 meters in diameter for Glochidion ferdinandi sub sp. ferdinandi and 4 meters to 5 meters in height by 4 meters to 5 meters in diameter for Glochidion ferdinandi subsp. pubens when grown in the open. Trees are rather messy every year when the fruit is ripe and continually drop their leaves during the rest of the year. It is also semi deciduous in cooler climates. They make good specimen trees for starting a rainforest as they have an attractive bark and are fast growing.
With this in mind and the fact that the plants feed a host of wildlife it is best used in garden beds and not as specimen trees in a lawn or park setting.
They do require better soils with adequate moisture and an annual application of a native fertilizer. Mulch and leaf litter is always recommended.
Propagation:
Seeds: Seeds need to be treated prior to sowing. Place seeds in a sock with clean sharp sand and place in with the weekly wash. Soak the seeds in a diluted mix of 4.to 1 of vinegar for 2 to 3 hours rinse and sow the freshly treated Glochidion ferdinandi seeds into a seed raising mix. When the seedlings are 30mm to 50mm tall, prick them out and plant them into 50mm native tubes using a good organic mix.
Once the seedlings reach 200mm to 250mm in height plant them out into their permanent position. Mass plantings for a starter rainforest are best planted at 6meter to 8 meter centers.
Fertilize using seaweed, fish emulsion or organic chicken pellets soaked in water on an alternate basis. Fertilize every two months until the plants are established then annually in early September to October to maintain health, vitality and better flowering.
Further Comments from Readers:
Hi reader, it seems you use The Bible of Botany a lot. That’s great as we have great pleasure in bringing it to you! It’s a little awkward for us to ask, but our first aim is to purchase land approximately 1,600 hectares to link several parcels of N.P. into one at The Pinnacles NSW Australia, but we need your help. We’re not salespeople. We’re amateur botanists who have dedicated over 30 years to saving the environment in a practical way. We depend on donations to reach our goal. If you donate just $5, the price of your coffee this Sunday, We can help to keep the planet alive in a real way and continue to bring you regular updates and features on Australian plants all in one Botanical Bible. Any support is greatly appreciated. Thank you.
In the spirit of reconciliation we acknowledge the Bundjalung, Gumbaynggirr and Yaegl and all aboriginal nations throughout Australia and their connections to land, sea and community. We pay our respect to their Elders past, present and future for the pleasures we have gained.Fertilize using seaweed, fish emulsion or organic chicken pellets soaked in water on an alternate basis. Fertilize every two months until the plants are established then annually in early September to October to maintain health, vitality and better flowering.
Glochidion sumatranum
Classification:
Class: Magnoliopsida
Order: Malphighiales
Family: Euphorbiaceae
Genus: From Glochidium, which is Latin for the barb on an arrow or fishing hook. It refers to a structure or organ, which has a barb.
Species: From Sumatra, which is Latinized from the vernacular local word for the large western Indonesian Island and Ana, which is Latin for originating from. It refers to plants, which were first discovered on the Island of Sumatra.
Common Name: Cheese Tree.
Distribution:
Glochidion sumatranum is found along the coast bounded by Derby West in north west, Western Australia to Annie Springs in Arhnam Land and Darwin in the Northern Territory. It is also found from Cape York Peninsula in far north Queensland to the Clarence River in far north eastern New South Wales, on the eastern side of the Great Dividing Range except for an isolated population in the Carnarvon National Park.
https://avh.ala.org.au/occurrences/search?taxa=Glochidion+sumatranum#tab_mapView
Habitat Aspect Climate:
Glochidion sumatranum prefer full sun to dappled shade. It grows in moist open forests, vine forests, adjacent to rainforests and is especially common along riparian zones and ephemeral creeks and pools in drier areas of the interior. The altitude ranges from 5 meters ASL to 880 meters ASL.
The temperatures range from minus 3 degrees in July to 44.degrees in January.
The rainfalls range from lows of 150mm to an average of 3000mm annually.
Soil Requirements:
Glochidion sumatranum prefers average red sandy loams, to medium red or grey podsolic clay loams. The soils are derived from decomposed brown basalt, black basalt, sandstones, shales or metamorphic rocks. The soils pH ranges from 4.5pH to 7pH are preferred. It does not tolerate waterlogged soils however it accepts seasonally wet conditions especially in the interior. Non saline soils to very saline soils are tolerated.
Height & Spread:
Wild Plants: 6m to 15m by 5m to 12m.
Characteristics:
Glochidion sumatranum deep grey bark is irregularly tessellated, layered and persistent to the larger branches. The branches are pale brown, glabrous or slightly scabrous while the branchlets are pale green and covered in pale green lenticels.
Glochidion sumatranum adjacent, elliptical leaves measure 70mm to 130mm in length by 25mm to 40mm in width. The triangular leaf stipules measure 2mm to 4mm in length. The petioles measure 8mm to 12mm length. The bases are broad cuneate to rounded while the apex is broadly acuminate. The discolourous laminas are mid green to deep green, glabrous and semi glossy on the upper laminas while the lower laminas are paler. The laminas recurve slightly upwards from the midvein to the margins while the margins are entire. The yellow-green mid vein is prominent on the lower lamina and slightly prominent on the upper lamina while the 10 to 14.yellow-green lateral veins are slightly prominent on both laminas and form loops well in from the margin.
The dioecious inflorescences of Glochidion sumatranum have minute pale green calyxes are 6 lobed and are glabrous.
The male flowers are usually born supra Axillary in small clusters of 4.to 12 individual flowers or rarely from the leaf axils the axils of old leaves with the female flowers. The 3 deep yellow sepals are revolute. It is ovate with an obtuse apex and measure 1mm to 1.5mm in length by 0.6mm to 1mm in width. The 3 spathulate, yellow petals are revolute when fully open and measure 1mm to 1.5mm in length by 0.6mm to 0.8mm in width. The pedicels are glabrous and measure 7mm to 10mm in length.
The 6 dull, golden-brown anthers are fused for their entire length and measure 0.3mm in length.
The female flowers are similar to the male flowers and are born in small clusters of 4.to 12 individual flowers with the male flowers from the leaf axils the axils of old leaves. The pedicels are glabrous and measure 5mm to 7mm in length. The styles and stigmas are fused together to form a dome on the top of the ovary. The flowers appear from February to early April.
Glochidion sumatranum fruits are flattened globose capsule. The pedicels thicken measure 5mm to 7mm in length. The capsules measure 4mm to 5mm in length by 7mm to 9.5mm in diameter. The capsules are divided into 10 segments. The green capsules are densely covered in white pulverulent hairs and turn pinkish when ripe. The calyxes are persistent at the base.
The deep hard, brown, testa on the seeds is flat orbicular and measures 3mm in length by 3mm in diameter. The aril is reddish-orange and covers the entire seed. The seeds ripen from April to May.
Wildlife:
Glochidion sumatranum supports a wide variety of wildlife from butterflies to fruit eating birds. Beetles consume the leaves and fallen leaves support a myriad of flora and fauna in their rapid decomposition. Many birds like Pigeons, Honeyeaters, Bower birds, Oriels, Doves, King Parrots and Cat birds are just a few to mention which frequent the trees for the fruits and seeds. At night possums and Flying foxes with tree kangaroos join the feast to be had and any fruits that may fall to the ground are eagerly sought out by native Mice and Wallabies. Rainbow Lorikeets are known to seasonally eat the leaves of new shoots. The leaves also support the larvae of Candalides hellineta or the Shining Pencil blue butterfly and the Common blue oak butterfly Arhopala micale. Lady beetles and silver eyes are also commonly found as the trees looking for aphids and other small insects.
Cultivation:
Glochidion sumatranum is a beautiful tree for medium size gardens. It is very fast growing and suitable for animal shelters because of its bushy canopy. In cultivation the trees will grow from 6 meters to 10 meters by 6 meters to 8 meters in diameter when grown in the open. The trees are rather messy every year when the fruit is ripe and continually drop their leaves during the rest of the year and are semi deciduous in cooler climates. They make good specimen trees for starting a rainforest as they have an attractive bark and are fast growing.
With this in mind and the fact that the plants feed a host of wildlife it is best used in garden beds and not as specimen trees in a lawn or park setting.
It does require better soils with adequate moisture and an annual application of a native fertilizer. Mulch and leaf litter is always recommended for best results.
Propagation:
Seeds: Seeds of Glochidion sumatranum need to be treated prior to sowing. Place seeds in a sock with clean sharp sand and place in with the weekly wash. Soak the seeds in a diluted mix of 4 to 1 of vinegar for 2 to 3 hours rinse and sow the freshly treated seeds into a seed raising mix. Place the trays beneath 30mm shade cloth and keep moist. When the seedlings are 30mm to 50mm tall, prick them out and plant them into 50mm native tubes using a good organic mix.
Once the seedlings reach 200mm to 250mm in height plant them out into their permanent position. Mass plantings for a starter rainforest are best planted at 6meter to 8 meter centers.
Fertilize using seaweed, fish emulsion or organic chicken pellets soaked in water on an alternate basis. Fertilize every two months until the plants are established then annually in early September to October to maintain health, vitality and better flowering.
Further Comments from Readers:
Hi reader, it seems you use The Bible of Botany a lot. That’s great as we have great pleasure in bringing it to you! It’s a little awkward for us to ask, but our first aim is to purchase land approximately 1,600 hectares to link several parcels of N.P. into one at The Pinnacles NSW Australia, but we need your help. We’re not salespeople. We’re amateur botanists who have dedicated over 30 years to saving the environment in a practical way. We depend on donations to reach our goal. If you donate just $5, the price of your coffee this Sunday, We can help to keep the planet alive in a real way and continue to bring you regular updates and features on Australian plants all in one Botanical Bible. Any support is greatly appreciated. Thank you.
In the spirit of reconciliation we acknowledge the Bundjalung, Gumbaynggirr and Yaegl and all aboriginal nations throughout Australia and their connections to land, sea and community. We pay our respect to their Elders past, present and future for the pleasures we have gained.
Glossocardia bidens
Classification:
Class: Equisetopsida
Subclass: Magloliidae
Superorder: Asteranae
Order: Asterales
Family: Asteraceae
Genus: From Glossa, which is Ancient Greek for a tongue and Kardia, which is Ancient Greek for the heart. It refers to a tongue like appendage or ray florets which resemble a tongue.
Species: From Bi/Bis, which is Latin for two and Dentata, which is Latin for to have a tooth or teeth or Bidens which is Latin for to be two pronged. It refers to structures or organs, which have two blades, two teeth or two rows of teeth. It often refers to organs especially the petals which have two rows.
Common Name: Cobblers Pegs.
Distribution:
Glossocardia bidens is found in the far north west of Western Australia and the far north of the Northern Territory. It is then found south of Tennant creek south to the border with South Australia then south to Port Augusta.
In the eastern states it is mainly found in the eastern half of Queensland and the northern half of New South Wales extending down the eastern side of the Great Dividing Range into north eastern Victoria.
https://avh.ala.org.au/occurrences/search?taxa=Glossocardia+bidens#tab_mapView
Habitat Aspect Climate:
Glossocardia bidens prefers full sun to light dappled shade. It grows in moist open types of open forests, woodlands, adjacent to rainforests, monsoonal forests, vine forests and in beds of ephemeral watercourses in the interior. The altitude ranges from 5 meters ASL to 1380 meters ASL.
The temperatures range from minus 4.degrees in July to 42 degrees in January.
The rainfall ranges from lows of 150mm to an average of 3000mm annually.
Soil Requirements:
Glossocardia bidens prefers poor to average quality sandy loams, to heavy clays and alluvial flats. The soils are derived from most decomposed parent rocks including brown basalt, black basalt, sandstones, granite, mudstone, shale and metamorphic rocks and alluvial slits. The soils pH ranges from 5pH to 7pH are preferred. It tolerates seasonal waterlogged soils. Non saline soils to very saline soils are tolerated.
Height & Spread:
Wild Plants: 0.5m to 1m by 0.3m to 0.5m.
Characteristics:
Glossocardia bidens grows as a straggly perennial, semi tufted herb with slender pale green to mid blue green woody stems. The terete stems branch from near the ground. The stems are glabrous. The fawn tap root is long and tapering.
The radical leaves are usually pinnately divided with linear lobes or at times undivided and linear. The leaves measure 40mm to 90mm in length with 2 or 3 divaricate segments. The lower segments measure 8mm to 20mm in length by 1.8mm to 2mm in width.
The slender pale green to mid blue-green petioles are glabrous and measure 20mm to 60mm in length. The bases are clasping while the apexes are acute to obtuse. The concolourous laminas are pale green to deep green and glabrous. The laminas are flat and decurve slightly on the apical half. The mid vein is prominent on the lower lamina while the lateral veins are slightly prominent on the lower lamina. The main vein is slightly prominent on the lower lamina and is visible from the upper lamina. The margins are entire.
The inflorescences Glossocardia bidens are born in 1 or 2 heads at the end of a long spike or divided spike. The slender peduncles and pedicels are mid green and glabrous. There is a single or at time 2 disjunct narrow triangular stipules along the petiole that measure 2mm to 2.5mm in length. The peduncle measures 60mm to 80mm in length while the pedicels measure 25mm to 35mm in length.
The heads measure 7mm to 8mm in diameter. The 6 to 8 linear-oblong involucral bracts measure 3mm to 3.5mm in length. The 30 to 40 deep yellow ray florets are oblong with obtuse apexes. The fertile yellow corollas measure 3mm to 3.5mm in length and have 3 teeth at the apexes. The disc floret’s corolla measures 2.5mm in length and has 4.teeth at the apex. The flowers appear from September to May.
Glossocardia bidens fruits are terete linear achenes. The achenes measure 5mm to 7mm in length by 0.8mm to 1.2mm in diameter.
The 2 deep brown erect awns are finely barbed and measure 1.5mm to 2mm in length. The pale green achenes turn black and semi glossy when ripe.
Wildlife:
Glossocardia bidens‘s wildlife is unknown to the author.
Cultivation:
Glossocardia bidens is considered a weed which is easy to remove in the garden with its only virtue at this stage, being it yields small quantities of good quality mulch.
Propagation:
Seeds: It is not worthy of home cultivation and has no commercial value at the present time.
Further Comments from Readers:
Hi reader, it seems you use The Bible of Botany a lot. That’s great as we have great pleasure in bringing it to you! It’s a little awkward for us to ask, but our first aim is to purchase land approximately 1,600 hectares to link several parcels of N.P. into one at The Pinnacles NSW Australia, but we need your help. We’re not salespeople. We’re amateur botanists who have dedicated over 30 years to saving the environment in a practical way. We depend on donations to reach our goal. If you donate just $5, the price of your coffee this Sunday, We can help to keep the planet alive in a real way and continue to bring you regular updates and features on Australian plants all in one Botanical Bible. Any support is greatly appreciated. Thank you.
In the spirit of reconciliation we acknowledge the Bundjalung, Gumbaynggirr and Yaegl and all aboriginal nations throughout Australia and their connections to land, sea and community. We pay our respect to their Elders past, present and future for the pleasures we have gained.
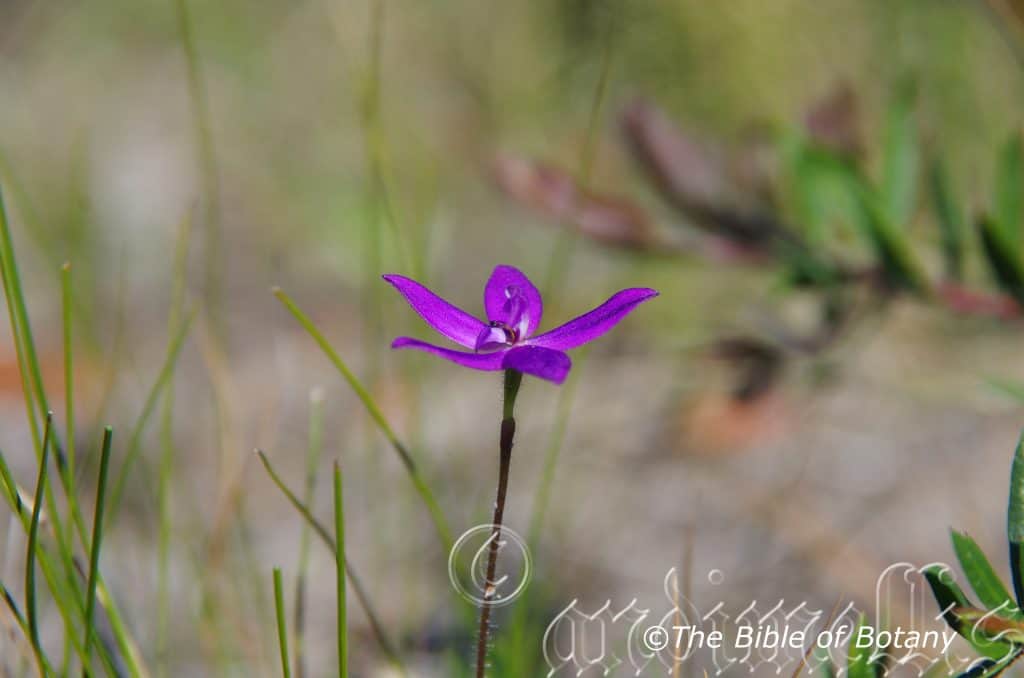
Clarence Valley NSW

Clarence Valley NSW

Clarence Valley NSW
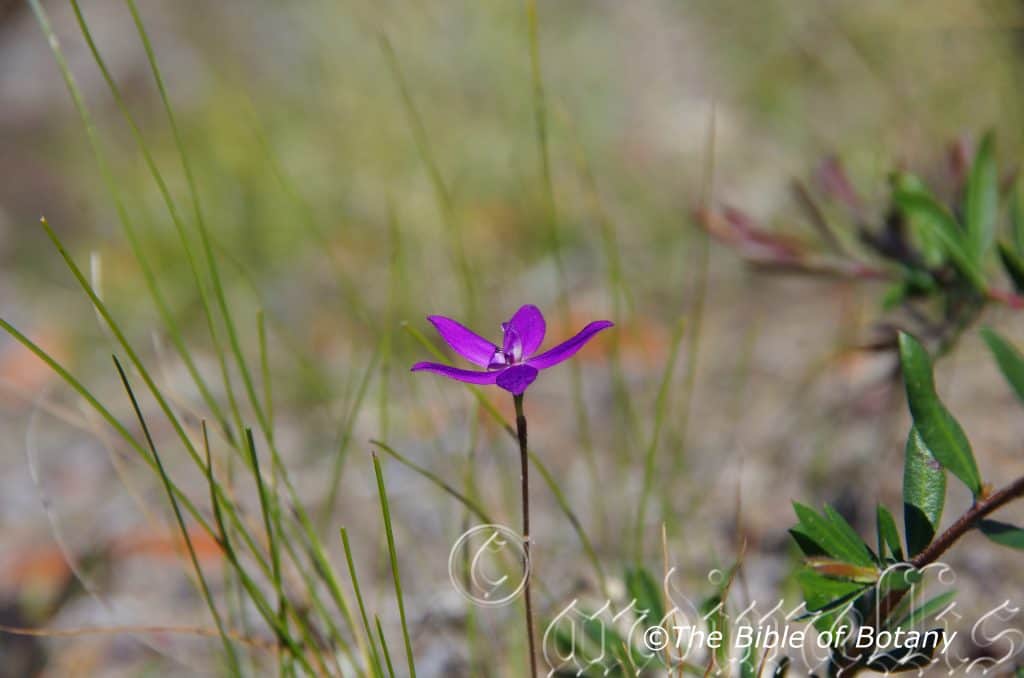
Clarence Valley NSW
Glossodia major
Classification:
Unranked: Monocots
Class: Equisetopsida
Superorder: Lilianae
Order: Asparagales
Family: Orcidaceae
Alliance: Dipodium
Genus: From Glossa, which is Ancient Greek for a tongue. It refers to a tongue like appendage at the base of the labellum.
Species: From Magnus, which is Latin for larger, bigger or greater. It refers to plant structures, organs or the complete plant, which are of great size.
Common Name: Wax Lip Orchid.
Distribution:
Glossodia major is found south from Maryborough in central coastal Queensland to Bumbaldry Hills in New South Wales and Benalla in Victoria where it is found south of a line to the Bugle Ranges in South Australia. From here it is found west to the coast and as far north as Seven Hill in South Australia. It is also found further north at Alligator Creek in the Flinders Rangers, near Moonee, along the Condamine River near Manilla, Carnarvon National Park and around MacKay to Eungella which may indicate it may be a little more widespread than reported.
In Tasmania it is found in a line north of Couta Rocks on the west coast east to Launceston, east to the coast and south to Southport. There are a few populations around Hamilton. It is also found on Flinders Island and the Furneaux Group of Islands in Bass Strait.
https://avh.ala.org.au/occurrences/search?taxa=Glossodia+major#tab_mapView
Habitat Aspect Climate:
Glossodia prefers medium shade to dappled sunlight. It grows in dry schlerophyll forest, moist schlerophyll forests, moist woodlands, coastal and montane heaths. The altitude ranges from 5 meters ASL to 1350 meters ASL.
The temperatures range from minus 4.degrees in July to 37 degrees in January.
The rainfalls range from lows of 450mm to an average of 1800mm annually.
Soil Requirements:
Glossodia major prefers better quality fertile sandy loams, to light clay loams. The soils are derived from decomposed basalts, sandstones, granite, shales or metamorphic rocks. The soils pH ranges from 4.5pH to 6.5pH. It does not tolerate waterlogged soils. Non saline soils to slightly saline soils are tolerated.
Height & Spread:
Wild Plants: 0.12mm to 0.33m by 0.05mm to 0.06mm.
Characteristics:
Glossodia major grows from a tuber beneath the ground as a terrestrial orchid. The spike and ovary are glabrous.
The long oblong to lanceolate, prostrate leaf is glabrous semi glossy to dull. The leaf measures 40mm to 150mm in length by 15mm to 50mm in width. The bases are clasping while the apexes are tapering acute. The concolourous laminas are deep green and sparsely covered in white hirsute hairs. The laminas recurve from the midrib to the margins while the margins are entire. The leaves have a characteristic vanilla scent when crushed or dried.
The 1 or 2 rarely 3 inflorescences of Glossodia major are usually deep purple or purple-pink or rarely white. The coloured forms are white near the base. The flowers measure 4mm to 6mm in length overall by 30mm to 60mm in width overall.
The dorsal sepal is lanceolate with an obtuse apex while the margins are entire. The dorsal sepal is deep purple or purple-pink or rarely white abaxially and paler adaxially in the coloured forms. It measures 15mm to 25mm in length by 4.5mm to 6mm in width.
The lateral sepals are broad lanceolate with obtuse apexes while the margins are entire. The lateral sepals are deep purple or purple-pink or rarely white abaxially, paler adaxially in the coloured forms. They measure 20mm to 30mm in length by 8mm to 10.5mm in width.
The petals are lanceolate with an obtuse apex while the margins are entire. The petals is deep purple or purple-pink or rarely white abaxially and paler adaxially in the coloured forms. They measure 18mm to 27mm in length by 7mm to 9mm in width.
The labellum is ovate to lanceolate and is strongly narrowed at the base and has a long tapered acute apex. The labellum measures 8mm to 11mm length by 5mm to 6.5 mm at the widest point. The basal quarter to three quarters is white and covered in white pulverulent hairs. The labellum recurves upwards to 90 degrees before spreading laterally with a deep furrow between. The basal callus is solitary, purple, with a 2 lobed yellow head.
The erect ovate to narrow oblong column is incurved above the acute anther and measures 6mm to 8.5mm in length by 5mm to 6.5mm in width. Flowering occurs during late August to October.
Wildlife:
Glossodia major is the host to numerous small native pollen flies when in flower.
Cultivation:
Glossodia major is an unusual terrestrial orchid to grow in the garden. If you are lucky enough to have them growing it is worthwhile preserving with in situation. Not much is known about their cultivation outside their natural habitat. The best method to establish a colony is to mark the area with stakes where plants are known to occur. Use local mulch to lightly top dress the area on an annual basis.
Propagation:
Seeds: Glossodia major seeds require treatment before sowing. Really Orchid seeds are meant for professionals with time, equipment and space. However if you wish to persevere then here are the basics and you are learning from an amateur.
1. Obtain relevant materials
The first step in growing orchid from seed will be sourcing and having at the ready all materials that will be required in the propagation process.
This includes all of the following:
Unripe orchid seed capsule. If there are 2 capsules secure the second capsule immediately after the first capsule splits or if only one capsule as soon as it changes colour.
Orchid gelling medium with agar which can be purchased from an orchid society or a specialist nursery.
Distilled water
Cooking pot
Spoon
Oven-safe glass or polypropylene containers with lids
Sealable bags
Clean, sterilized cutting board
Rubber gloves
Paper towels
Tweezers or forceps
70 percent ethanol
Bleach
Scalpel or sharp knife
Planting pot
Orchid compost
Length of wire metal
Plastic spray bottle.
deep petri dishes or sterile jars.
2. Prepare agar medium
The agar medium is a special orchid gelling mixture that distilled water will be added to distilled water.
To prepare the medium, mix equal parts of orchid gelling medium with distilled water in a cooking pot.
Place the pot on a stove and bring the mixture to boil for while stirring continuously for two minutes.
Pour the mixture into the petri dishes glass or propylene containers while ensuring not to fill the containers above 20 percent of their volume.
Loosely replace the lids to the containers. Sterilize the containers by heating them up in a microwave oven for between 2 to 3 minutes.
Spray 70 percent ethanol into a sealable bag to create a sterile environment. Transfer the heated containers into the sealable bag.
Allow the containers to cool a bit before tightening their lids and then sealing the bag. Leave the containers to stand for a few days until the mixture solidifies.
3. Prepare seed capsule and work surface
Place an open pot of water on a stove and bring to boil. Place the cutting board in the oven and sterilize.
Put on rubber gloves and sterilize the forceps, and scalpel with 70 percent ethanol.
Insert the seed capsule into a bowel filled with bleach for about fifteen minutes.
Sterilize seed capsule again with 70 percent ethanol and place on grill.
Using the sterilized scalpel, cut open the seed capsule to reveal the seeds. Using a scalpel or sharp knife, scrape out the seeds from the capsule unto an ethanol soaked paper towel.
4. Flasking of the seed
Take out the petri dishes or glass jars containers holding the agar medium. Over the steam, open up the containers and transfer seeds from the ethanol soaked paper towel into the individual containers using the sterilized forceps.
The amount of seeds will determine the number of containers required. Replace the lid of the containers and place them on a window sill that receives indirect sunlight.
5. Wait and exercise patience
All that can be done at this point is to wait until the seeds germinate. The amount of time that this might take varies and is dependent on the particular species.
Generally, the time can range from a few months to a few years. During this period of waiting, ensure the containers are free from contamination to ensure that germination is not disrupted.
6. Emergence of protocorms
Protocorms are tuber-shaped bodies with rhizoids that are produced by the young seedlings of various orchids. Protocorms represent the embryonic form of the orchid plant.
Their emergence after the period of waiting at an affirmation that everything in the propagation process is on track.
7. Transflask orchid seedlings is done after they have developed roots
Upon the emergence of the protocorms, consistently observe the growth of the seedlings. At the point when the seedlings appear to overcrowd the flask, transflasking should be carried out, typically within 30 and 60 days.
* This is done by removing individual seedlings using sterilized tweezers from the original containers and placing them in new containers also filled, in a proportion similar to the original, with agar medium. 6 to 8 in a standard petri dish or 1or 2 to a test tube
8. Transplant seedlings into planting pots
On the presumption that there are no disruptions to the plant growth, the seedlings will eventually outgrow the containers.
At this point, it is to be transplanted into planting pots. A good rule of thumb to determine when it is ready to be transplanted is when the seedlings have developed roots that have grown up to the length of one-quarter of an inch.
To transplant, prepare a planting pot or other container for receiving the seedling by majorly filling it up with coarse fir bark and possibly some slightly moist orchid compost mixture containing perlite, fine charcoal, redwood bark shavings, etc.
To extract the seedlings, submerge the containers in warm water to help loosen the agar gel.
Once the agar medium is softened, twist a piece of metal to form a loop and in turn, use it to carefully pull out the seedlings from the container. It is best done if the agar and seedling can be removed together.
The seedlings can be further rinsed in lukewarm water to remove any excess agar mixture still stuck to them.
Following this, the seedlings can now be planted into the prepared pot with at least 50mm of space between each individual seedling.
9. Positioning the orchid
The seedling once fully transplanted should be placed in a location that is warm with good indirect sun light.
Slowly position the pots into an area that closely assimilates the conditions it will be growing under.
The choice as to whether the plant should be exposed to full sun or in direct sunlight will be dependent on the particular orchid specie.
10. Subsequent care of the plant
After the first week, the seedling can be misted several times a day and watered just once a week.
A guide in watering the plant will be using the dryness of the fir back that is, water the plant until the fir back is completely moistened and wait till it has completely dried out before watering again.
Fertilize using seaweed, fish emulsion or organic chicken pellets soaked in water on an alternate basis. Fertilize only after the plants are fully established then annually in early September to October to maintain health, vitality and better flowering.
Further Comments from Readers:
Hi reader, it seems you use The Bible of Botany a lot. That’s great as we have great pleasure in bringing it to you! It’s a little awkward for us to ask, but our first aim is to purchase land approximately 1,600 hectares to link several parcels of N.P. into one at The Pinnacles NSW Australia, but we need your help. We’re not salespeople. We’re amateur botanists who have dedicated over 30 years to saving the environment in a practical way. We depend on donations to reach our goal. If you donate just $5, the price of your coffee this Sunday, We can help to keep the planet alive in a real way and continue to bring you regular updates and features on Australian plants all in one Botanical Bible. Any support is greatly appreciated. Thank you.
In the spirit of reconciliation we acknowledge the Bundjalung, Gumbaynggirr and Yaegl and all aboriginal nations throughout Australia and their connections to land, sea and community. We pay our respect to their Elders past, present and future for the pleasures we have gained.
Glossodia minor
Classification
Unranked: Monocots
Class: Equisetopsida
Superorder: Lilianae
Order: Asparagales
Family: Orcidaceae
Alliance: Dipodium
Genus: From Glossa, which is Ancient Greek for a tongue. It refers to a tongue like appendage at the base of the labellum.
Species: From Minor, which is Latin for smaller. It refers to plants, which are smaller than other species in the genus.
Common Name: Small Wax Lip Orchid.
Distribution:
Glossodia minor is found south from Maryborough in central coastal Queensland to Orbost in Victoria with a disjunct population on Wilsons Promontory. It is mainly found on and east of the Great Dividing Range.
https://avh.ala.org.au/occurrences/search?taxa=Glossodia+minor#tab_mapView
Habitat Aspect Climate:
Glossodia minor prefers medium shade or dappled shade. It usually grows in moist coastal woodlands behind the frontal dunes or back dunes or at times is associated with heaths on the western tablelands.
The altitude ranges from 5 meters ASL to 800 meters ASL.
The rainfalls range from lows of 800mm to an average of 1600mm annually.
Soil Requirements:
Glossodia minor prefers rich fertile sandy loams, to light clay loams. The soils are derived from decomposed sandstones, granites, shale, metamorphic rocks or accumulated beach sands. The soils pH ranges from 5.5pH to 6.5pH are preferred. It does not tolerate waterlogged soils. Non saline soils to slightly saline soils are tolerated.
Height & Spread:
Wild Plants: 0.05mm to 0.16m by 0.15mm to 0.2mm.
Characteristics:
Glossodia minor grows from a tuber beneath the ground as a terrestrial orchid. The spike and ovary are moderately covered in white hirsute hairs.
The long broad lanceolate, leaves measures 20mm to 40mm in length by 6mm to 20mm in width. The bases are clasping while the apexes are tapering acute. The concolourous laminas are deep green and is densely covered in off white pubescent hairs. The laminas recurve from the midrib to the margins while the margins are entire.
The 1 or 2 inflorescences of Glossodia minor are usually deep violet or pinkish-violet, deep pink or rarely white. The coloured forms are white near the base. The flowers measure 4mm to 6mm in length overall by 30mm to 60mm in width overall.
The dorsal sepal is lanceolate with an obtuse apex while the margins are entire. The dorsal sepal is usually deep violet or pinkish-violet, deep pink or rarely white abaxially and paler adaxially in the coloured forms. It measures 7mm to 13mm in length by 2.5mm to 3mm in width.
The lateral sepals are broad lanceolate with obtuse apexes while the margins are entire. The lateral sepals are usually deep violet or pinkish-violet, deep pink or rarely white abaxially, paler adaxially in the coloured forms and are glabrous with reddish ciliate hairs on the margins hairs. They measure 8mm to 15mm in length by 4mm to 5.5mm in width.
The petals are lanceolate with an obtuse apex while the margins are entire. The petals are usually deep violet or pinkish-violet, deep pink or rarely white abaxially and paler adaxially in the coloured forms. They measure 9mm to 14mm in length by 3.5mm to 4.5mm in width.
The labellum is ovate to lanceolate and is strongly narrowed at the base and has a long tapered acute apex. The labellum measures 3.5mm to 5.5mm length by 2.5mm to 3.2mm at the widest point. The labellum is usually deep violet or pinkish-violet, deep pink or rarely white abaxially and paler adaxially in the coloured forms and are glabrous with reddish ciliate hairs on the margins hairs. The labellum recurves upwards to 90 degrees before spreading laterally with a deep furrow between. The basal calli are fused at the base. The deep violet almost black head is united with a groove on the upper surface.
The erect ovate to narrow oblong column is decurve above the acute anthers and measure 1.5mm to 2.2mm in length by 1.2mm to 1.5mm in width. Flowering occurs during late July to September.
Wildlife:
Glossodia minor is the host to numerous small native pollen flies when in flower.
Cultivation:
It is an unusual terrestrial orchid to grow in the garden.
If you are lucky enough to have them growing it is worthwhile preserving with in situation. Not much is known about their cultivation outside their natural habitat.
The best method to establish a colony is to mark the area with stakes where plants are known to occur. Use local mulch to lightly top dress the area on an annual basis.
Propagation:
Seeds: Glossodia minor seeds require treatment before sowing. Really Orchid seeds are meant for professionals with time, equipment and space. However if you wish to persevere then here are the basics and you are learning from an amateur.
1. Obtain relevant materials
The first step in growing orchid from seed will be sourcing and having at the ready all materials that will be required in the propagation process.
This includes all of the following:
Unripe orchid seed capsule. If there are 2 capsules secure the second capsule immediately after the first capsule splits or if only one capsule as soon as it changes colour.
Orchid gelling medium with agar which can be purchased from an orchid society or a specialist nursery.
Distilled water
Cooking pot
Spoon
Oven-safe glass or polypropylene containers with lids
Sealable bags
Clean, sterilized cutting board
Rubber gloves
Paper towels
Tweezers or forceps
70 percent ethanol
Bleach
Scalpel or sharp knife
Planting pot
Orchid compost
Length of wire metal
Plastic spray bottle.
deep petri dishes or sterile jars.
2. Prepare agar medium
The agar medium is a special orchid gelling mixture that distilled water will be added to distilled water.
To prepare the medium, mix equal parts of orchid gelling medium with distilled water in a cooking pot.
Place the pot on a stove and bring the mixture to boil for while stirring continuously for two minutes.
Pour the mixture into the petri dishes glass or propylene containers while ensuring not to fill the containers above 20 percent of their volume.
Loosely replace the lids to the containers. Sterilize the containers by heating them up in a microwave oven for between 2 to 3 minutes.
Spray 70 percent ethanol into a sealable bag to create a sterile environment. Transfer the heated containers into the sealable bag.
Allow the containers to cool a bit before tightening their lids and then sealing the bag. Leave the containers to stand for a few days until the mixture solidifies.
3. Prepare seed capsule and work surface
Place an open pot of water on a stove and bring to boil. Place the cutting board in the oven and sterilize.
Put on rubber gloves and sterilize the forceps, and scalpel with 70 percent ethanol.
Insert the seed capsule into a bowel filled with bleach for about fifteen minutes.
Sterilize seed capsule again with 70 percent ethanol and place on grill.
Using the sterilized scalpel, cut open the seed capsule to reveal the seeds. Using a scalpel or sharp knife, scrape out the seeds from the capsule unto an ethanol soaked paper towel.
4. Flasking of the seed
Take out the petri dishes or glass jars containers holding the agar medium. Over the steam, open up the containers and transfer seeds from the ethanol soaked paper towel into the individual containers using the sterilized forceps.
The amount of seeds will determine the number of containers required. Replace the lid of the containers and place them on a window sill that receives indirect sunlight.
5. Wait and exercise patience
All that can be done at this point is to wait until the seeds germinate. The amount of time that this might take varies and is dependent on the particular species.
Generally, the time can range from a few months to a few years. During this period of waiting, ensure the containers are free from contamination to ensure that germination is not disrupted.
6. Emergence of protocorms
Protocorms are tuber-shaped bodies with rhizoids that are produced by the young seedlings of various orchids. Protocorms represent the embryonic form of the orchid plant.
Their emergence after the period of waiting at an affirmation that everything in the propagation process is on track.
7. Transflask orchid seedlings is done after they have developed roots
Upon the emergence of the protocorms, consistently observe the growth of the seedlings. At the point when the seedlings appear to overcrowd the flask, transflasking should be carried out, typically within 30 and 60 days.
* This is done by removing individual seedlings using sterilized tweezers from the original containers and placing them in new containers also filled, in a proportion similar to the original, with agar medium. 6 to 8 in a standard petri dish or 1or 2 to a test tube
8. Transplant seedlings into planting pots
On the presumption that there are no disruptions to the plant growth, the seedlings will eventually outgrow the containers.
At this point, it is to be transplanted into planting pots. A good rule of thumb to determine when it is ready to be transplanted is when the seedlings have developed roots that have grown up to the length of one-quarter of an inch.
To transplant, prepare a planting pot or other container for receiving the seedling by majorly filling it up with coarse fir bark and possibly some slightly moist orchid compost mixture containing perlite, fine charcoal, redwood bark shavings, etc.
To extract the seedlings, submerge the containers in warm water to help loosen the agar gel.
Once the agar medium is softened, twist a piece of metal to form a loop and in turn, use it to carefully pull out the seedlings from the container. It is best done if the agar and seedling can be removed together.
The seedlings can be further rinsed in lukewarm water to remove any excess agar mixture still stuck to them.
Following this, the seedlings can now be planted into the prepared pot with at least 50mm of space between each individual seedling.
9. Positioning the orchid
The seedling once fully transplanted should be placed in a location that is warm with good indirect sun light.
Slowly position the pots into an area that closely assimilates the conditions it will be growing under.
The choice as to whether the plant should be exposed to full sun or in direct sunlight will be dependent on the particular orchid specie.
10. Subsequent care of the plant
After the first week, the seedling can be misted several times a day and watered just once a week.
A guide in watering the plant will be using the dryness of the fir back that is, water the plant until the fir back is completely moistened and wait till it has completely dried out before watering again.
Fertilize using seaweed, fish emulsion or organic chicken pellets soaked in water on an alternate basis. Fertilize only after the plants are fully established then annually in early September to October to maintain health, vitality and better flowering.
Further Comments from Readers:
Hi reader, it seems you use The Bible of Botany a lot. That’s great as we have great pleasure in bringing it to you! It’s a little awkward for us to ask, but our first aim is to purchase land approximately 1,600 hectares to link several parcels of N.P. into one at The Pinnacles NSW Australia, but we need your help. We’re not salespeople. We’re amateur botanists who have dedicated over 30 years to saving the environment in a practical way. We depend on donations to reach our goal. If you donate just $5, the price of your coffee this Sunday, We can help to keep the planet alive in a real way and continue to bring you regular updates and features on Australian plants all in one Botanical Bible. Any support is greatly appreciated. Thank you.
In the spirit of reconciliation we acknowledge the Bundjalung, Gumbaynggirr and Yaegl and all aboriginal nations throughout Australia and their connections to land, sea and community. We pay our respect to their Elders past, present and future for the pleasures we have gained.
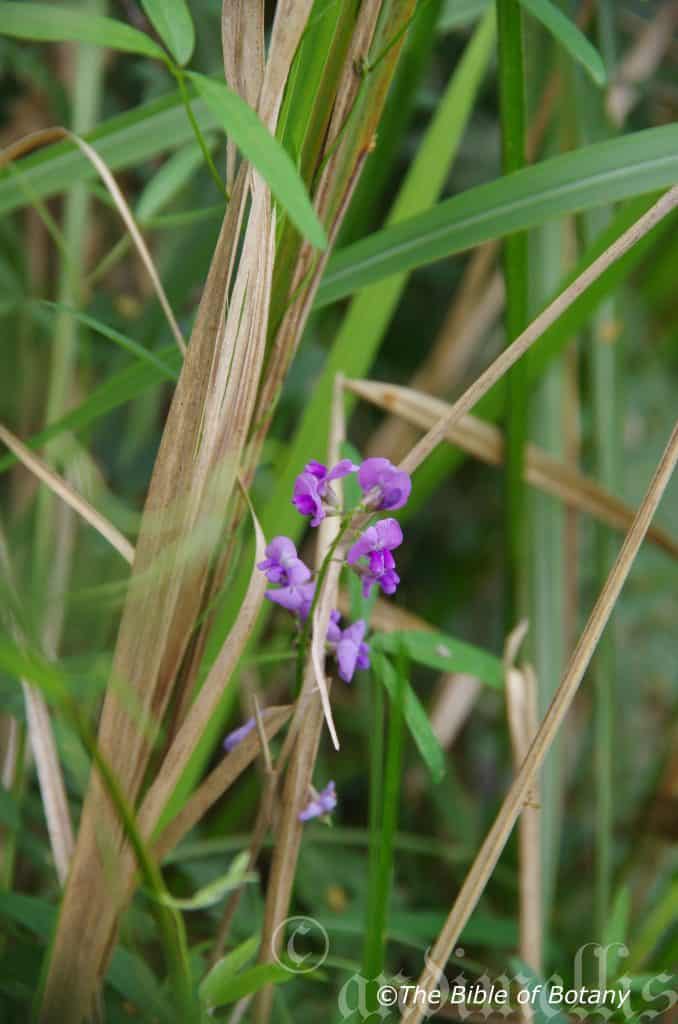
Pillar Valley NSW
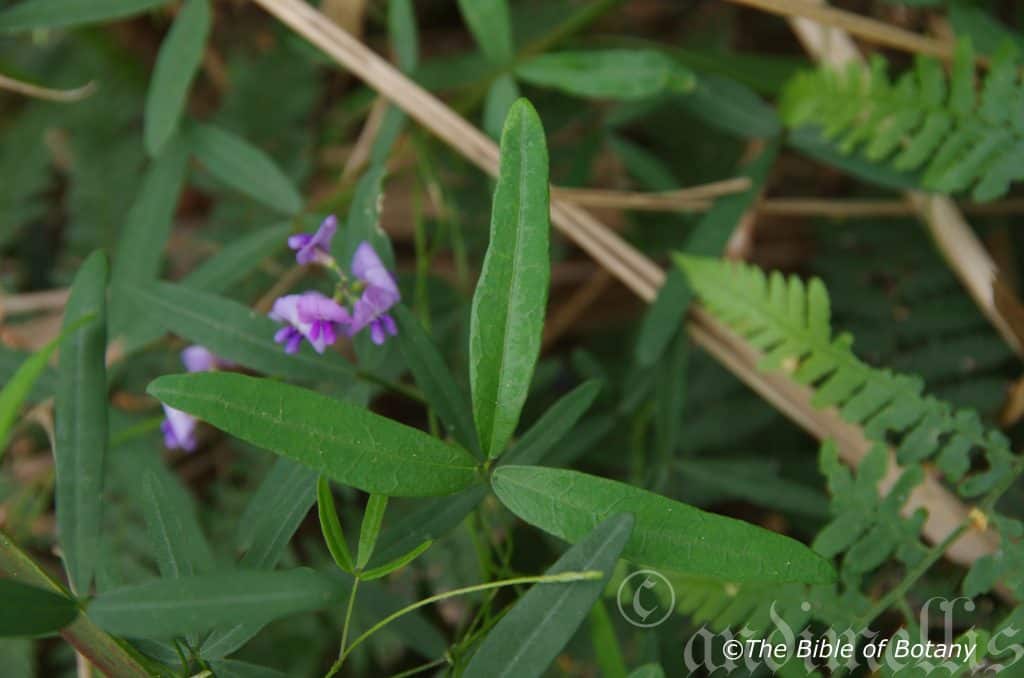
Pillar Valley NSW

Pillar Valley NSW
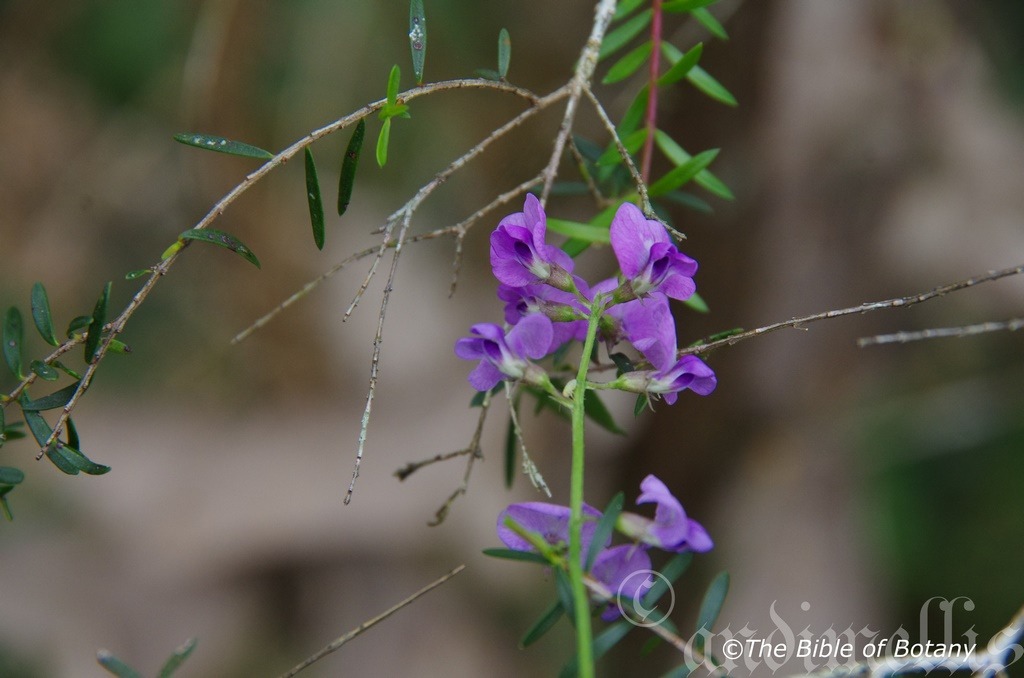
Pillar Valley NSW
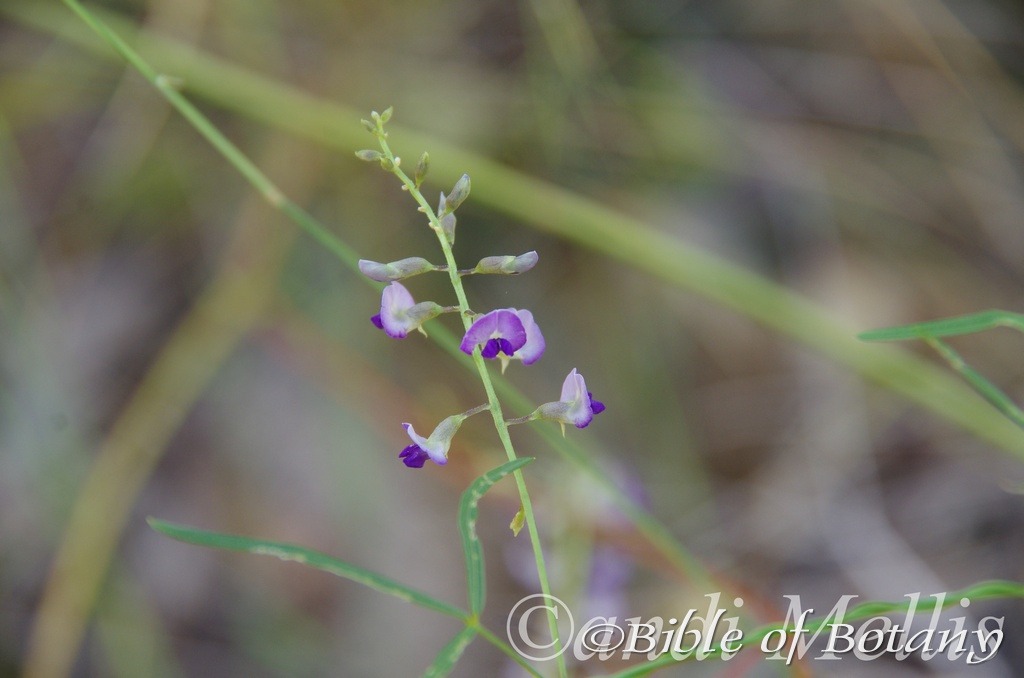
Fortis Creek National Park NSW
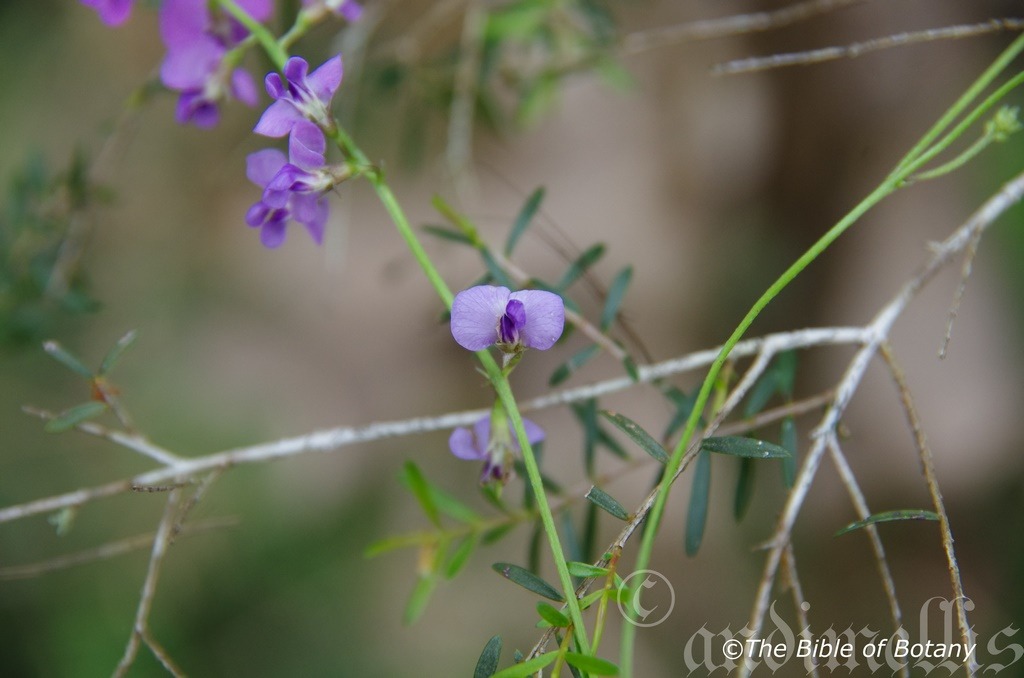
Pillar Valley NSW
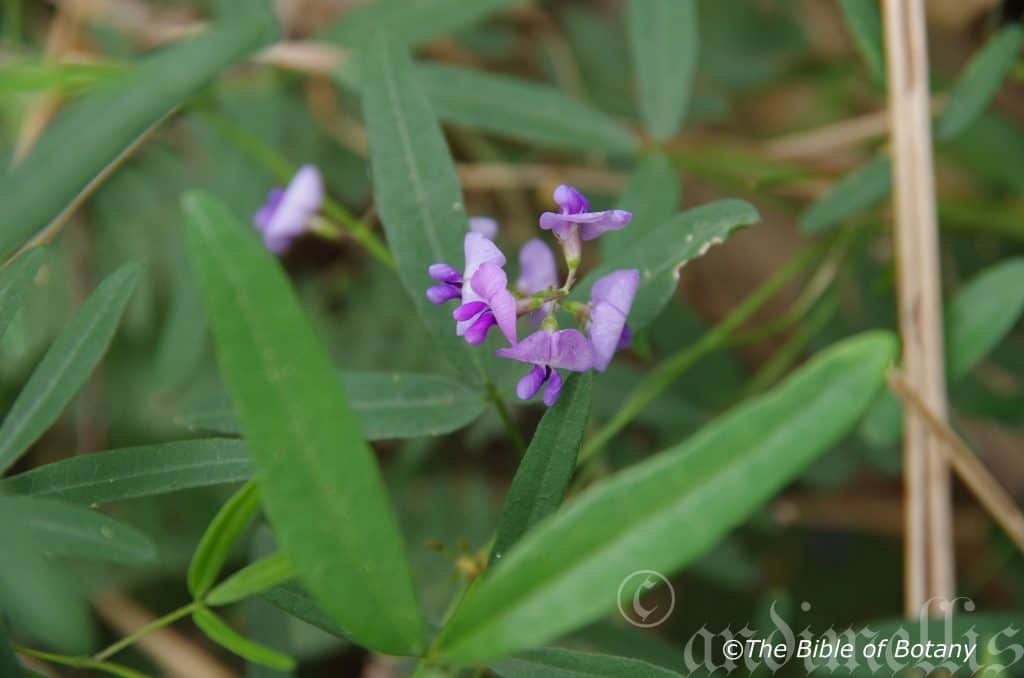
Pillar Valley NSW
Glycine clandestina
Classification:
Class: Equisetopsida
Subclass: Magnoliidae
Order: Fabales
Family: Fabaceae
Genus: From Glykys, which is Ancient Greek for sweet tasting. It refers to roots or leaves, which have a sweet taste.
Species: From Clande, which is Latin for to be executed in secrecy and Stinus, which is Latin for internal or Clandestinus which is Latin for hidden and covered in secrecy. It refers to the fungi’s ability to kill its host from the inside out that is by killing off the phloem and xylem system or being insignificant that they go unnoticed in their environment or for the plants which often go unnoticed.
Common Name:
Distribution:
Glycine clandestina is widespread in both Western Australia and in the east of the country. In Western Australia it is found between the Wooramel River in the north to Dadyun Rockhole in the east and back to the coast at Perth with a disjunct population on the Gardener River on the south coast.
In the east it is found in a line east of Port Douglas in Queensland in the north, south to Milewa State Forest then south of a line to Dimboola and Portland in Victoria.
In Tasmania it is found east of a line from the Detention River in the north west to Hobart in the South east.
In the interior it is found in sparsely disjunct populations from the Macdonnell Ranges south to northern section of Eyre Peninsula, the Flinders Ranges and near Innamincka. There is also an isolated population on Cape York Peninsula near the Moreton Telegraph Station.
https://avh.ala.org.au/occurrences/search?taxa=Glycine+clandestina#tab_mapView
Habitat Aspect Climate:
Glycine prefer full sun to light dappled shade. It grows in open scrublands, dry schlerophyll forests dry open woodlands or heaths, from the coast to sub alpine regions and moist riparian zones in the interior parts of the country. The altitude ranges from 5 meters ASL to 1800 meters ASL.
The temperatures range from minus 6 degree in July to 37 degrees in January.
The rainfalls range from lows of 150mm to an average of 2800mm annually.
Soil Requirements:
Glycine clandestina prefers sandy loams, light gravelly clays to heavy gravelly clays. The soils are usually derived from decomposed brown basalt, black basalt, sandstones, granites, metamorphic rocks, shale laterites, limestones or accumulated peaty sands. The soils pH ranges from 4.5pH to 7pH. It does not tolerate waterlogged soils. Non saline soils to very saline soils are tolerated.
Height & Spread:
Wild Plants: 0.1m to 2m x 1m to 2m.
Characteristics:
Glycine clandestina‘s grows as a very variable twiner with wiry stems. The stems are covered in soft, white, grey, brown, straight or retrorse, rusty-brown puberulent, pulverulent or hirsute hairs.
Glycine clandestina‘s alternate trifoliate leaves are dimorphic from the lower leaves to upper leaves and dimorphic in the leaflets. The oblanceolate to broad obovate or orbicular lower leaflets measure 5mm to 30mm in length by 2mm to 8mm in width. The linear to narrow elliptic, elliptical or oblong-lanceolate upper leaflets measure 10mm to 80mm in length by 2mm to 10mm in width. There are several minute stipules at the base of the petiole. The Petioles and petiolules are glabrous or covered in soft, white, grey, brown, straight or retrorse, rusty-brown puberulent or hirtellous hairs. The petioles measure 10mm to 18mm in length while the petiolules measure 0.5mm to 5mm in length.
The bases are cuneate to rounded while the apexes are obtuse, broad acute to acute. The asymmetrical concolourous laminas vary considerably from a mid-green to grey-green, blue-green, deep green, dull, glabrous to sparsely covered in soft, white, grey, brown, rusty-brown, straight or retrorse, rusty-brown puberulent, or hirtellous hairs on the upper lamina while the lower lamina is covered in soft, white, grey, brown, rusty-brown appressed or spreading pulverulent or hirsute hairs. The laminas are flat or recurve slightly upwards from the midvein to margins while the margins are entire. The midvein and lateral reticulate veins are prominent on the lower lamina and faintly prominent on the upper lamina.
The inflorescences of Glycine clandestina are racemes born from the leaf axis. The racemes contain 4.to 18 individual flowers. The rachis measure 10mm to 90mm in length. The mid green calyxes are covered in soft white, grey, brown or rusty-brown pulverulent hairs and measure 1mm to 1.8mm in length while 4.dimorphic lobes measure 0.5mm to 1.8mm in length.
The standards are mauve to rose-purple or white becoming paler towards the center. The standards measure 5mm to 12mm in height by 7mm to 16mm in width. The mauve to rose-purple or white wings completely cover the keel and measure 3.5mm to 4.5mm in length by 3.5mm to 4mm in width. The deep purple keels measure 3mm to 3.5mm in length by 2mm to 2.5mm in height. The flowers appear throughout the year when conditions are favourable with a peak from late August to early December.
Glycine clandestina‘s fruit are long straight terete pods. The pods are deep green and sparsely to moderately covered in soft, white, grey, brown, rusty-brown appressed or spreading hirsute hairs, turning a papery brown to black when ripe. They measure 15mm to 60mm length by 2.5mm to 4mm in diameter.
Wildlife:
Ants are the means to an end for this plant as it is the seed distributors. The seeds are coated in a sweet sugary substance which the ants and I find attractive to eat.
Cultivation:
Glycine clandestina is a beautiful ground covering small creeper or climber. It is very suitable for small gardens in most areas in Australia. As a garden subject it will grow to 1 meter to 1.5 meter high by 1 meter to 1.5 meter wide when cultivated in the open. Light tip pruning can be done to increase the number of stems and consequently the number of flowers the following season. Hard pruning can be done once the plants are established but some set back will occur so it is better to trim the plants on a regular or annual basis. It is fast growing, drought tolerant once established and are cold tolerant to temperatures as low as minus 6 degrees. Because of their disjunct fine foliage it is best mass planted or at least planted in groups of 3 or 5 so they can scramble over each other.
It is great in small rockeries planted in the foreground with bolder foliage and flowering plants to the rear. Here it can be planted in small groups of 2 to 5 to create a delicate look with other natives taking the strong stance especially when in flower. As the flowers taper off, Glycine clandestina comes to the fore.
Planted with annuals it will dominate the foliage but contrast the flowers with patches of grey green which will ensure a great display during the spring and autumn months while the other seasons. Mass plant them amongst upright annuals for year round colour. It would not matter if the annuals flowering clashed at the same time as there leaves would break the bright colours and give texture to the bed. Once the annuals have ceased flowering the bed is not completely barren and bare and offers that transitional piece of greenery.
Propagation:
Seeds: Glycine clandestina seeds need to be treated prior to sowing. Rub the seeds gently between fine sandpaper. Another method is to place the seeds in a calico bag with sharp sand and place the bag in the weekends washing for two or three washes. Another method is to soak the seeds in hot near boiling water and allow the water to cool. Leave them there for two hours. Do not place them in boiling water as this will kill the seeds.
The seeds can be sown directly into a seed raising mix after treatment. Cover them with 5mm of fine sand and keep moist not wet. Place the tray in a warm sunny position. When the seedlings are 25mm to 50mm tall, prick them out and plant them into 50mm native tubes using a good organic mix.
Once the seedlings reach 150mm to 200mm in height, nip the tips out before planting them out into their permanent position.
Fertilize using seaweed, fish emulsion or organic chicken pellets soaked in water on an alternate basis. Fertilize every two months until the plants are established then annually in early September to October to maintain health, vitality and better flowering.
Further Comments from Readers:
Hi reader, it seems you use The Bible of Botany a lot. That’s great as we have great pleasure in bringing it to you! It’s a little awkward for us to ask, but our first aim is to purchase land approximately 1,600 hectares to link several parcels of N.P. into one at The Pinnacles NSW Australia, but we need your help. We’re not salespeople. We’re amateur botanists who have dedicated over 30 years to saving the environment in a practical way. We depend on donations to reach our goal. If you donate just $5, the price of your coffee this Sunday, We can help to keep the planet alive in a real way and continue to bring you regular updates and features on Australian plants all in one Botanical Bible. Any support is greatly appreciated. Thank you.
In the spirit of reconciliation we acknowledge the Bundjalung, Gumbaynggirr and Yaegl and all aboriginal nations throughout Australia and their connections to land, sea and community. We pay our respect to their Elders past, present and future for the pleasures we have gained.

Wombat Creek National Park NSW
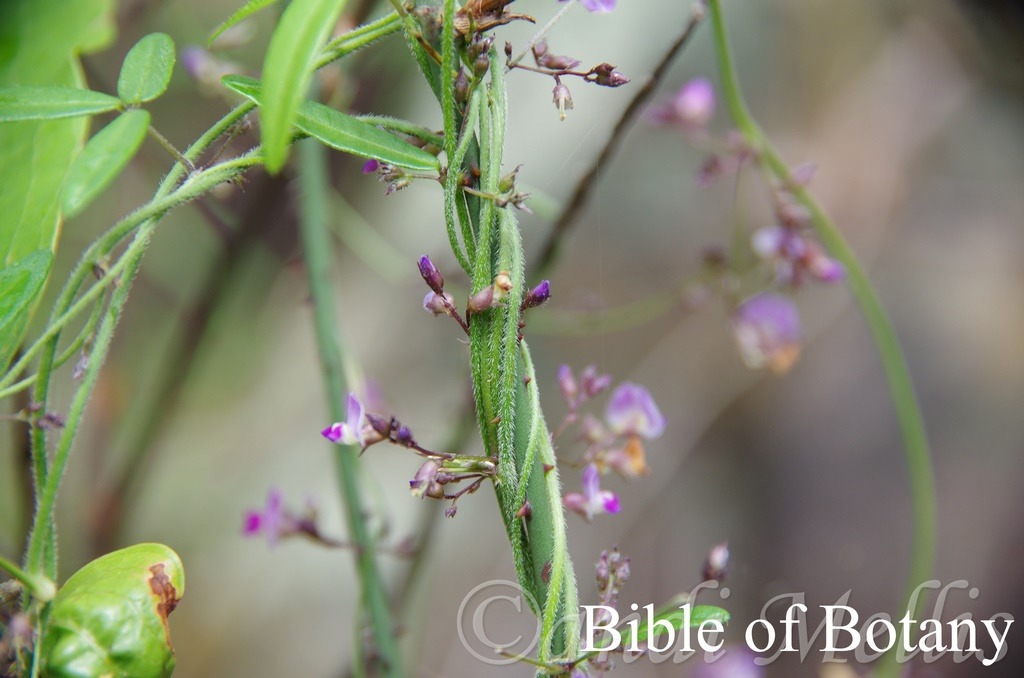
Wombat Creek National Park NSW
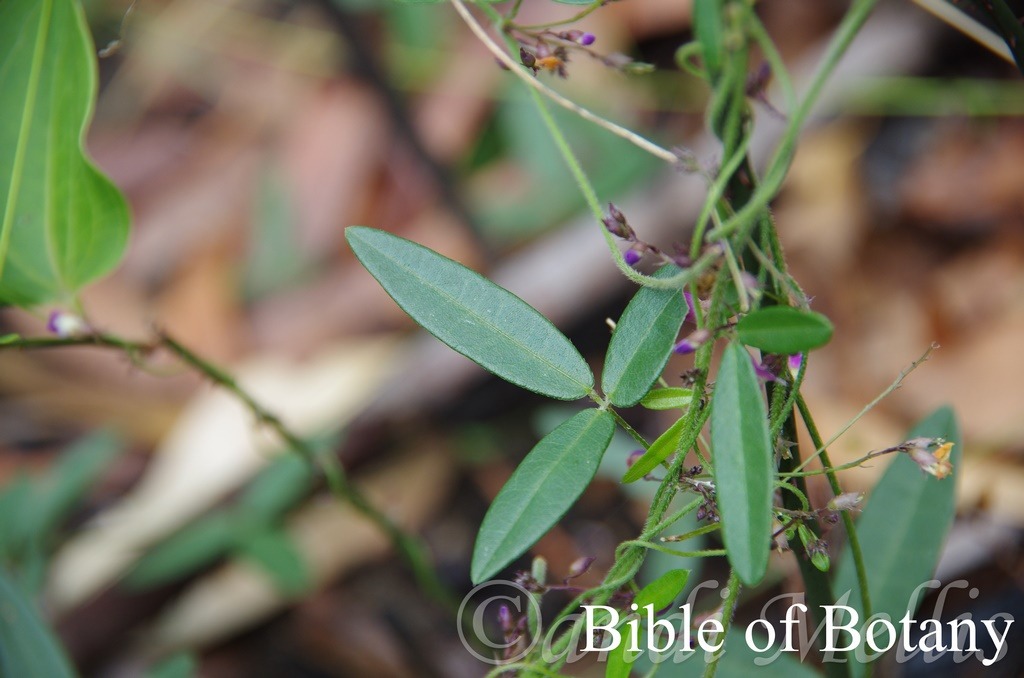
Wombat Creek National Park NSW

Wombat Creek National Park NSW
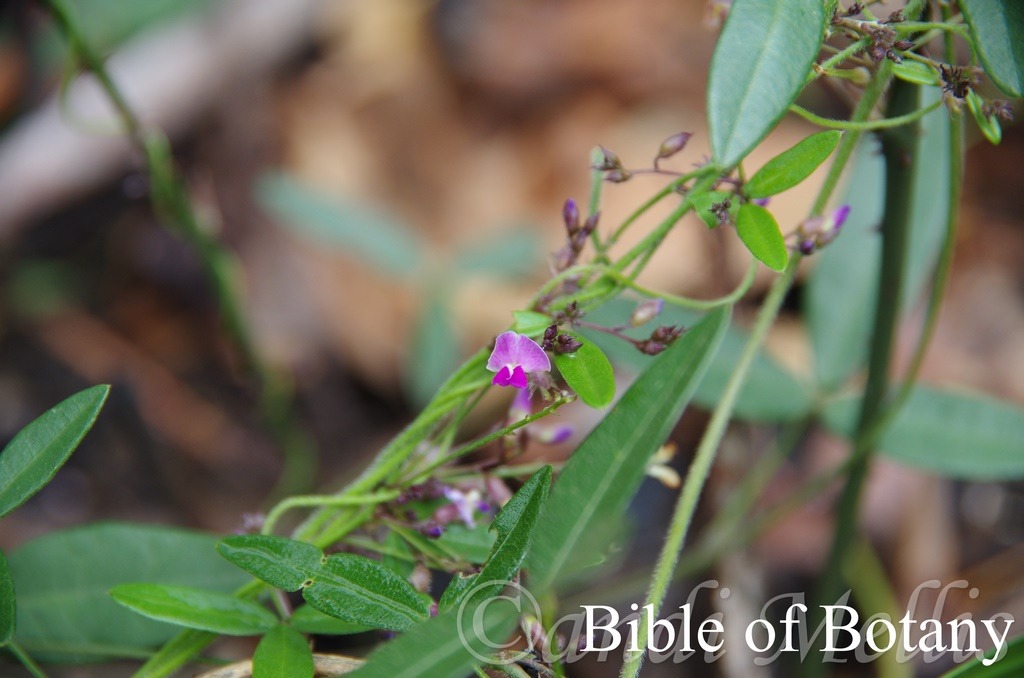
Wombat Creek National Park NSW
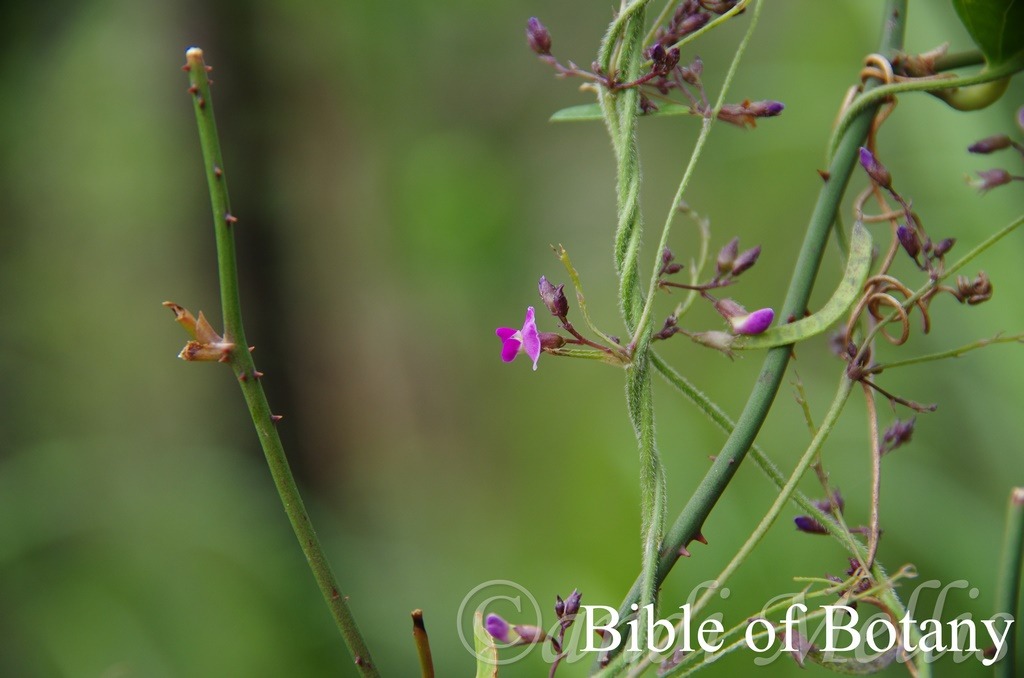
Wombat Creek National Park NSW
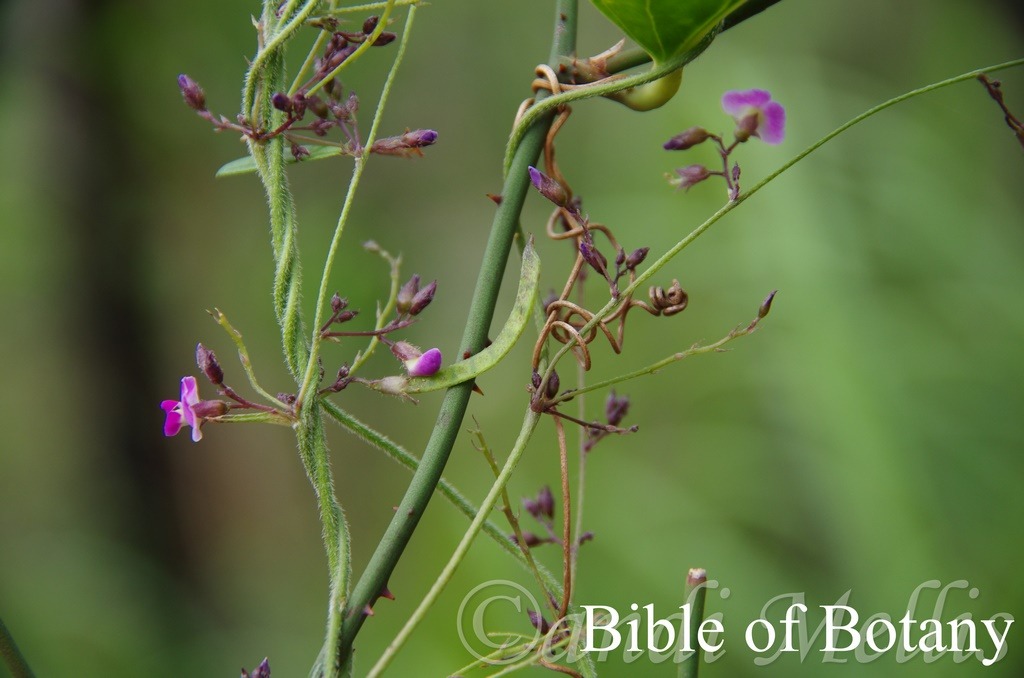
Wombat Creek National Park NSW
Glycine cyrtoloba
Classification:
Class: Equisetopsida
Subclass: Magnoliidae
Order: Fabales
Family: Fabaceae
Genus: From Glykys, which is Ancient Greek for sweet tasting. It refers to roots or leaves, which have a sweet taste.
Species: From Kyrtos, which is Ancient Greek for a curve and Lobos, which is Ancient Greek for an ear. It refers to leaflets which have three very distinct lobes.
Common Name:
Distribution:
Glycine cyrtoloba is found south from Duffer Creek near Cooktown in far north Queensland to Kangaroo Creek south of Grafton in north eastern coastal New South Wales. There are several disjunct populations near the tip of Cape York Peninsula from Bolt Head north of the Iron Range and Castle Hill in Queensland. It is found on and east of the Great Dividing Range to the coast including many off shore islands.
https://avh.ala.org.au/occurrences/search?taxa=Glycine+crytoloba#tab_mapView
Habitat Aspect Climate:
Glycine cyrtoloba prefer full sun to light dappled shade. It grows in dry and moist schlerophyll forests, open woodlands or littoral rainforest, on flats, in gullies or rocky hillsides including headlands. The altitude ranges from 5 meters ASL to 900 meters ASL.
Temperatures range from minus 2 degree in July to 37 degrees in January.
Rainfalls range from lows of 850mm to an average of 2400mm annually.
Soil Requirements:
Glycine cyrtoloba prefers to grow in skeletal to deep sandy loams, light gravelly clays to heavy gravelly clays. The soils are usually derived from decomposed sandstone, granite, metamorphic rocks, laterites, limestones, accumulated peaty sands and coral sands. The soils pH ranges from 5.5pH to 7pH. Non saline soils to very saline soils are tolerated.
Glycine cyrtoloba prefer full sun to light dappled shade. It grows in dry and moist sclerophyll forests, open woodlands or littoral rainforest, on flats, in gullies or rocky hillsides including headlands. The altitude ranges from 5 meters ASL to 900 meters ASL.Glycine cyrtoloba prefers to grow in skeletal to deep sandy loams, light gravelly clays to heavy gravelly clays. The soils are usually derived from decomposed sandstone, granite, metamorphic rocks, laterites, limestones, accumulated peaty sands and coral sands. The soils pH ranges from 5.5pH to 7pH. It does not tolerate waterlogged soils. Non saline soils to very saline soils are tolerated.
Height & Spread:
Wild Plants: 0.1m to 1.5m x 1m to 1.5m.
Characteristics:
Glycine cyrtoloba‘s grows as a twiner with wiry stems. The stems are rarely stoloniferous and are sparsely covered in of white retrorse strigose hairs.
The alternate trifoliate leaves are dimorphic with the middle leaflet being longer than the lateral leaflets. The leaflets are oblong-elliptic, elliptic or ovate. The lateral leaflets measure 12mm to 25mm in length by 4mm to 8mm in width while the terminal leaflet measures 18mm to 40mm in length by 4.5mm to 10mm in width. The minute triangular stipels are present at the junction of the lateral petiolules, are covered in white sericeous hairs and measure 1.5mm to 2mm in length. The petiole is covered in white strigose hairs and measures 8mm to 13mm in length. The lateral petiolules measure 0.5mm to 1mm in length while the middle leaflet’s petiolule measures 1.5mm to 2mm in length. A pulvinus is only present on the middle leaflet’s petiolule.
The bases are cuneate to rounded while the apexes are acute to obtuse-acute. The slightly asymmetrical lateral leaflets and symmetrical middle leaflets are concolourous. The laminas mid green to grey-green, deep green to deep grey-green and dull. The upper laminas are glabrous to very sparsely covered in soft, white strigose hairs while the lower lamina is sparsely to moderately covered in soft, white strigose hairs. The laminas are flat or recurve slightly upwards from the midvein to margins while the margins are entire. The midvein is prominent on both laminas while the 16 to 26 lateral veins are slightly prominent on the upper laminas.
The inflorescences of Glycine cyrtoloba are racemes born from the leaf axils. The racemes contain 2 to 6 individual flowers on a rachis that measures 30mm to 50mm in length.
The deep green or greenish-red calyxes and 4.calyx lobes are covered in white strigose hairs externally and are glabrous internally while 3 of the lobes apexes are acute and the fourth is bi dentate. The calyxes measure 0.4mm to 0.6mm in length while the 4 dimorphic lobes measure 2mm to 3mm in length. The 5 sepals are glabrous or covered in white strigose hairs externally and are glabrous internally and measure 4mm to 5mm in length while 5 lobes measure 4mm to 8mm in length.
The mauve to deep pink standards are white at the base and measure 6mm to 8.5mm in height by 13mm to 16mm in width. The deep mauve to deep rose-pink clawed wings completely cover the keel and measure 6mm to 8mm in length by 4.5mm to 5mm in width. The white to pastel green keels measure 5mm to 6mm in length by 3mm to 3.5mm in height. The pedicels measure 4mm to 6mm in length.
9 of the 10 white filaments are fused to form a tube open on one side to allow the single free filament to be exposed. There are 6 to 10 ovules in an ovary. The flowers appear from December to early March.
Glycine cyrtoloba‘s fruit are long curved terete pods. The pods are grass-green and sparsely to moderately covered in soft, white sericeous hairs and densely covered in purple spots, blotches and streaks. The pods turn papery brown to deep grey when ripe while the calyxes are persistent at the base of the pods. They measure 10mm to 40mm length by 2mm to 4mm in diameter.
There are 6 to 9 flattish oblong seeds in each pod that measure 4mm to 5mm in length by 2mm to 3mm in width.
Wildlife:
Glycine cyrtoloba‘s wildlife is unknown to the author.
Cultivation:
Glycine cyrtoloba is a beautiful ground covering small creeper or climber. It is very suitable for small gardens in most areas in Australia. As a garden subject it will grow to 0.05 meter to 0.2 meter in height by 1 meter to 1.5 meter in diameter when cultivated in the open as a ground cover. Light tip pruning can be done to increase the number of stems and consequently the number of flowers the following season. Hard pruning can be done once the plants are established but some set back will occur so it is better to trim the plants on a regular or annual basis. It is fast growing, drought tolerant once established and are cold tolerant to temperatures as low as minus 6 degrees. Because of its disjunct fine foliage it is best mass planted or at least planted in groups of 3 or 5 so they can scramble over each other.
It can be mass planted in long curving lines with irregular patterns to guide a viewer through the garden. The leaves with the prostrate growth should be used to highlight the midground plants so use high contrasting and variable foliage with different foliage to the rear.
It is great in small rockeries planted in the foreground with bolder foliage and flowering plants to the rear. Here it can be planted in small groups of 2 to 5 to create a delicate look with other natives taking the strong stance especially when in flower. As the flowers taper off, Glycine cyrtoloba comes to the fore.
Planted with annuals it will dominate the foliage but contrast the flowers with patches of grey green which will ensure a great display during the spring and autumn months while the other seasons. Mass plant them amongst upright annuals for year round colour. It would not matter if the annuals flowering clashed at the same time as there leaves would break the bright colours and give texture to the bed. Once the annuals have ceased flowering the bed is not completely barren and bare and offers that transitional piece of greenery.
Propagation:
Seeds: Glycine cyrtoloba seeds need to be treated prior to sowing. Rub the seeds gently between fine sandpaper. Another method is to place the seeds in a calico bag with sharp sand and place the bag in the weekends washing for two or three washes. Another method is to soak the seeds in hot near boiling water and allow the water to cool. Leave them there for two hours. Do not place them in boiling water as this will kill the seeds.
The seeds can be sown directly into a seed raising mix after treatment. Cover them with 5mm of fine sand and keep moist not wet. Place the tray in a warm sunny position. When the seedlings are 25mm to 50mm tall, prick them out and plant them into 50mm native tubes using a good organic mix.
Once the seedlings reach 150mm to 200mm in height, nip the tips out before planting them out into their permanent position.
Fertilize using seaweed, fish emulsion or organic chicken pellets soaked in water on an alternate basis. Fertilize every two months until the plants are established then twice annually in early September to October to maintain health, vitality and better flowering.
Further Comments from Readers:
Hi reader, it seems you use The Bible of Botany a lot. That’s great as we have great pleasure in bringing it to you! It’s a little awkward for us to ask, but our first aim is to purchase land approximately 1,600 hectares to link several parcels of N.P. into one at The Pinnacles NSW Australia, but we need your help. We’re not salespeople. We’re amateur botanists who have dedicated over 30 years to saving the environment in a practical way. We depend on donations to reach our goal. If you donate just $5, the price of your coffee this Sunday, We can help to keep the planet alive in a real way and continue to bring you regular updates and features on Australian plants all in one Botanical Bible. Any support is greatly appreciated. Thank you.
In the spirit of reconciliation we acknowledge the Bundjalung, Gumbaynggirr and Yaegl and all aboriginal nations throughout Australia and their connections to land, sea and community. We pay our respect to their Elders past, present and future for the pleasures we have gained.
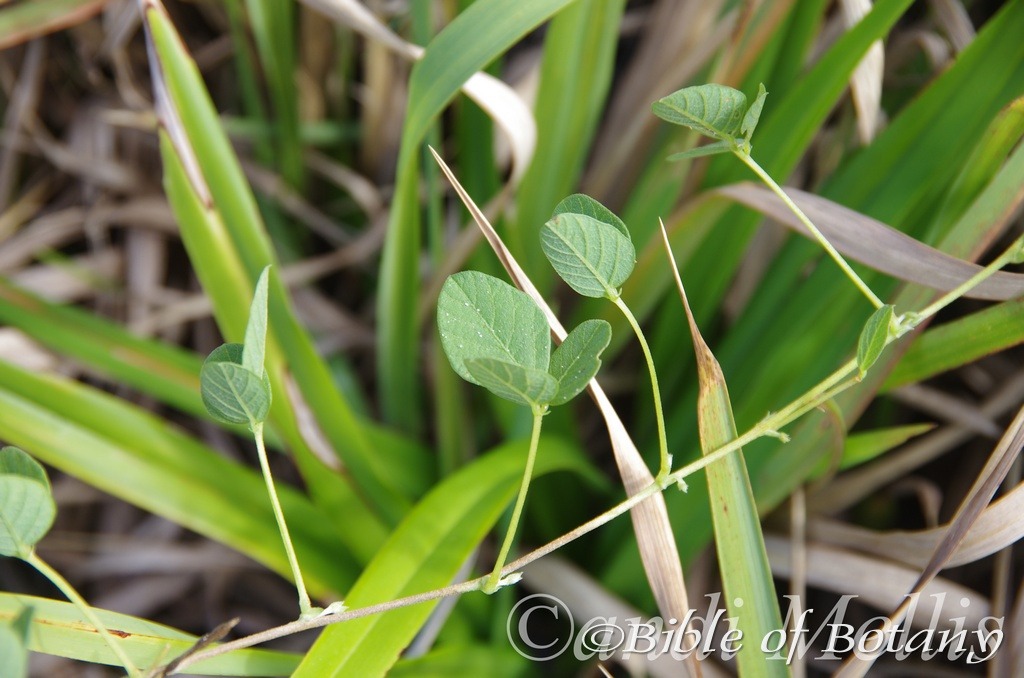
North Yuraygir National Park NSW
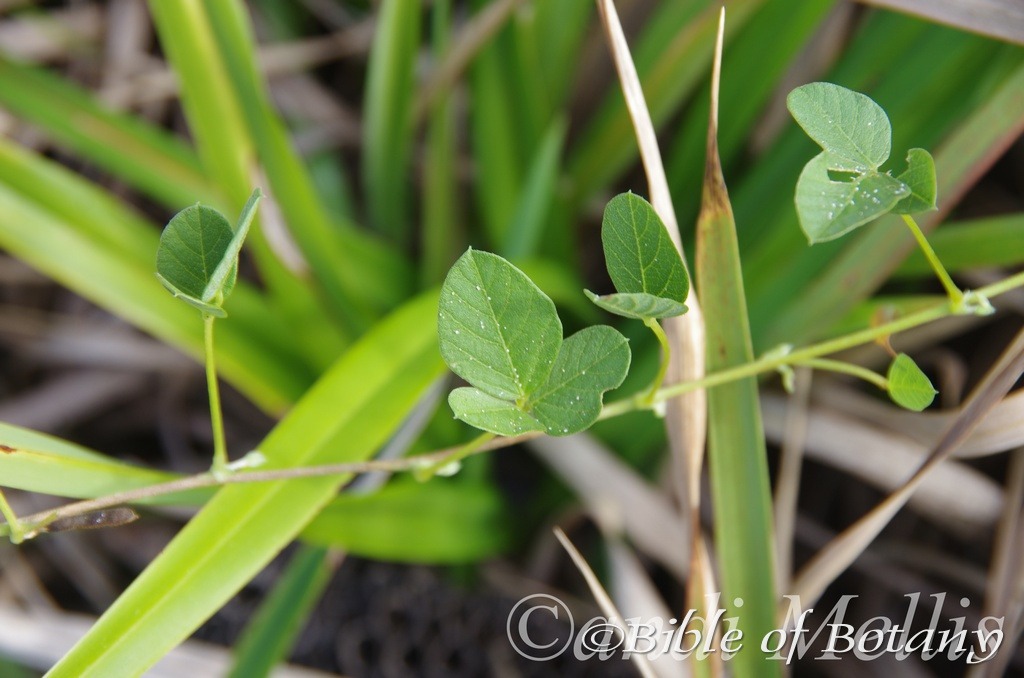
North Yuraygir National Park NSW
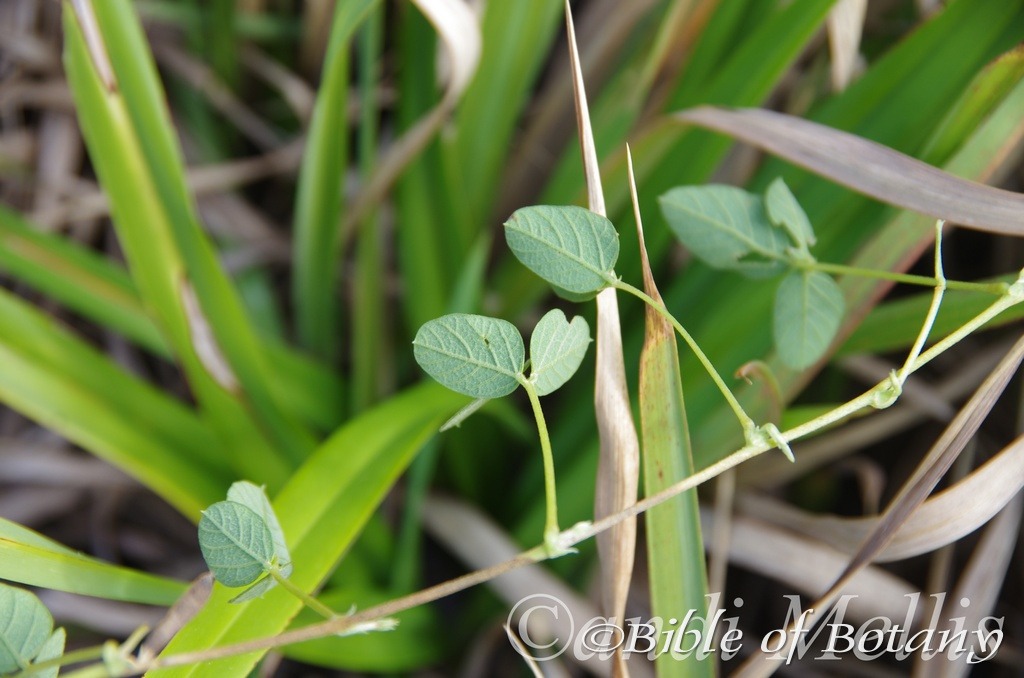
North Yuraygir National Park NSW
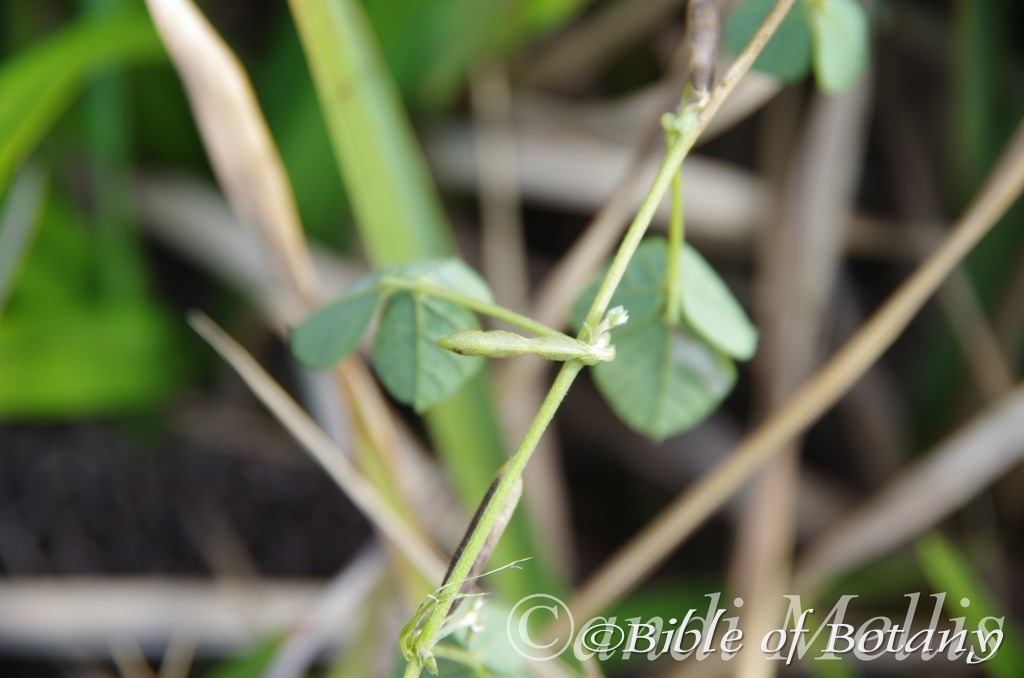
North Yuraygir National Park NSW
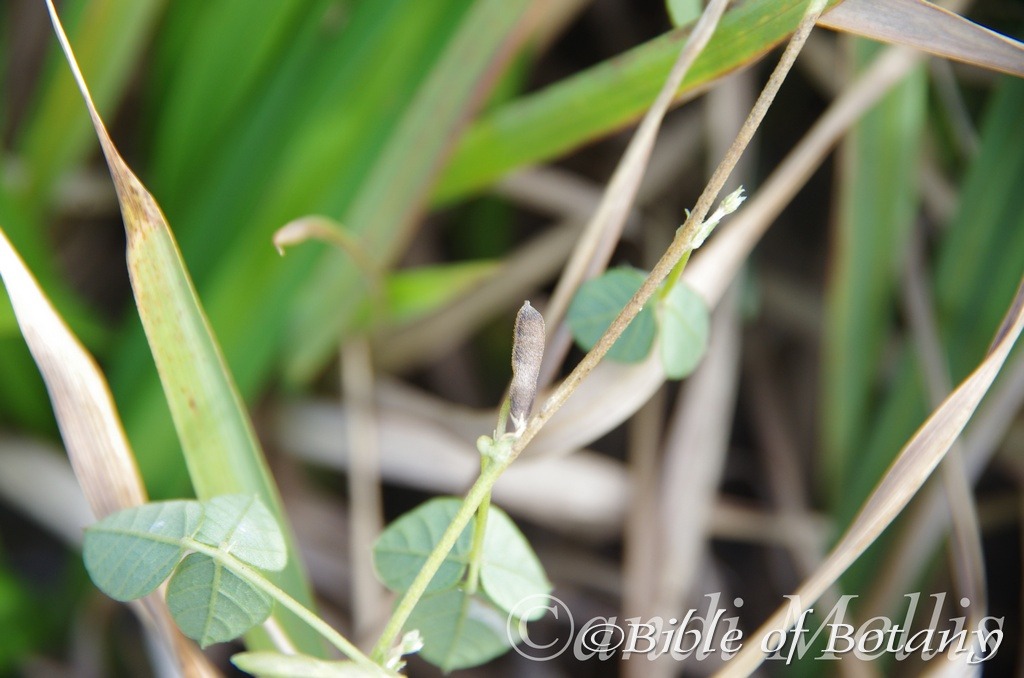
North Yuraygir National Park NSW
xxxxxxxxxxxxxxxxxxxxxxxxxxxxxxxxxxxxxxxxxxxxxGlycine latifolia
Classification:
Class: Equisetopsida
Subclass: Magnoliidae
Order: Fabales
Family: Fabaceae
Genus: From Glykys, which is Ancient Greek for sweet tasting. It refers to roots or leaves, which have a sweet taste.
Species: From Latus, which is Latin for broad and Folium, which is Latin for foliage. It refers to leaves, which are very broad or very broad when compared to other species in the genus. It refers to the leaves being very broad.
Common Name:
Distribution:
Glycine latifolia is found south of Burdekin falls south west of Townsville in far north Queensland to Nelungaloo in central eastern New South Wales. It is more commonly found on the Western slopes than on and east of the Great Dividing Range to the coast.
https://avh.ala.org.au/occurrences/search?taxa=Glycine+latifolia#tab_mapView
Habitat Aspect Climate:
Glycine latifolia prefers full sun to light dappled shade. It grows in dry to moist open forests, open woodlands and coastal heaths. The altitude ranges from sea level to 1250 meters ASL.
The temperatures range from minus 3 degree in July to 37 degrees in January.
The rainfalls range from lows of 450mm to an average of 2400mm annually.
Soil Requirements:
Glycine latifolia prefers skeletal to deep sands through to black sandy loams. The soils are usually derived from partially decomposed to decomposed shale, metamorphic rocks, lateritic clays, sandstone and accumulated beach sands. The soils pH ranges from 5.5pH to 7pH are preferred. It does not tolerate waterlogged soils. Non saline soils to moderately saline soils are tolerated as are salt laden winds.
Height & Spread:
Wild Plants: 0.1m x 1m to 1.5m.
Characteristics:
Glycine latifolia grows as a scrambler with stoloniferous stems. (Stolons are stems that grow horizontally along the ground or slightly below the surface, forming roots and new plants at the nodes) The stems are densely covered in white, or at times fawn or pale golden brown hirsute or silky hairs.
Glycine latifolia’s alternate trifoliate leaves are dimorphic with the apex leaflet being larger than the base leaflets. The leaflets are broad elliptic to rhombic, rarely ovate or obovate and measure 20mm to 55mm in length by 10mm to 35mm in width. The petiolule measres 45mm to 100mm in length. The apexes are obtuse to rounded acute, while the bases are broadly rounded to truncate. The upper lamina is moderately covered long white, or at times fawn or pale golden brown hirsute or silky hairs especially along the veins, while the lower lamina is sconcolourous or very slightly paler and moderately covered long white, or at times fawn or pale golden brown hirsute or silky hairs especially along the veins.
There are two linear stipels at the base of the apical leaflet on the petiolule. The laminas are flat and curve upwards from the midvein to the margins while the margins are entire. The midvein and 4 to 6 lateral veins are is strongly prominent, while the reticulate veins are faintly prominent on the lower lamina. The mid vein and lateral veins are visible from the upper lamina.
The inflorescences of Glycine latifolia are racemes born from the leaf axils. The racemes contain 4 to 18 individual flowers on a rachis that measures 90mm to 180mm in length.
The pale green calyx is densely covered in white villous hairs. The 3 lower sepals are equal to or usually longer than calyx tube. The pale purple to pale reddish-purple standard measures 6mm to 10mm in length. The pale purple wing petals barely cover the base of the keel petals and measure 2mm to 3mm in length. The deep purple keels measure 4mm to 6mm in length by 1.5mm to 2mm in height. The flowers appear from October to April.
Glycine latifolia’s fruit are long, linear, straight terete pods. The pods are pale blue-green to pale grass-green and moderately to densely covered in long, white villose, hirsute or at times strigose hairs. The pods turn deep grey when ripe and measure 15mm to 30mm length by 3mm to 6mm in diameter. There are 2 to 6 flattish oblong seeds in each pod.
Wildlife:
Glycine latifolia’s wildlife is unknown to the author.
Cultivation:
Glycine latifolia is a spindly ground cover for small rockeries or difficult corners for small gardens. As a garden subject it can cover a larger area if allowed and trained to root at the nodes when. Light tip pruning is essential to increase the number of stolons and thus rooted nodes.
It needs to be mass planted to achieve an affective cover. The leaves with the prostrate growth should be used to highlight the midground plants so use high contrasting and variable foliages with different foliages to the rear.
Planted with annuals it will help highlite the foliage and contrasting flower colours are of yellow or orange would be beneficial. Mass plant it amongst small upright annuals for colour over a long period. Once the annuals have ceased flowering the bed is not completely barren and bare and offers that transitional piece of greenery.
Propagation:
Seeds: Glycine latifolia seeds need to be treated prior to sowing. Rub the seeds gently between fine sandpaper. Another method is to place the seeds in a calico bag with sharp sand and place the bag in the weekends washing for two or three washes. Another method is to soak the seeds in hot near boiling water and allow the water to cool. Leave them there for two hours. Do not place them in boiling water as this kills the seeds.
Glycine latifolia seeds can be sown directly into a seed raising mix after treatment. Cover them with 5mm of fine sand and keep moist not wet. Place the tray in a warm sunny position. When the seedlings are 25mm to 50mm tall, prick them out and plant them into 50mm native tubes using a good organic mix.
Once the seedlings reach 150mm to 200mm in height, nip the tips out before planting them out into their permanent position.
Fertilize using seaweed, fish emulsion or organic chicken pellets soaked in water on an alternate basis. Fertilize every two months until the plants are established then twice annually in early September to October to maintain health, vitality and better flowering.
Further Comments from Readers:
Hi reader, it seems you use The Bible of Botany a lot. That’s great as we have great pleasure in bringing it to you! It’s a little awkward for us to ask, but our first aim is to purchase land approximately 1,600 hectares to link several parcels of N.P. into one at The Pinnacles NSW Australia, but we need your help. We’re not salespeople. We’re amateur botanists who have dedicated over 30 years to saving the environment in a practical way. We depend on donations to reach our goal. If you donate just $5, the price of your coffee this Sunday, We can help to keep the planet alive in a real way and continue to bring you regular updates and features on Australian plants all in one Botanical Bible. Any support is greatly appreciated. Thank you.
In the spirit of reconciliation we acknowledge the Bundjalung, Gumbaynggirr and Yaegl and all aboriginal nations throughout Australia and their connections to land, sea and community. We pay our respect to their Elders past, present and future for the pleasures we have gained.
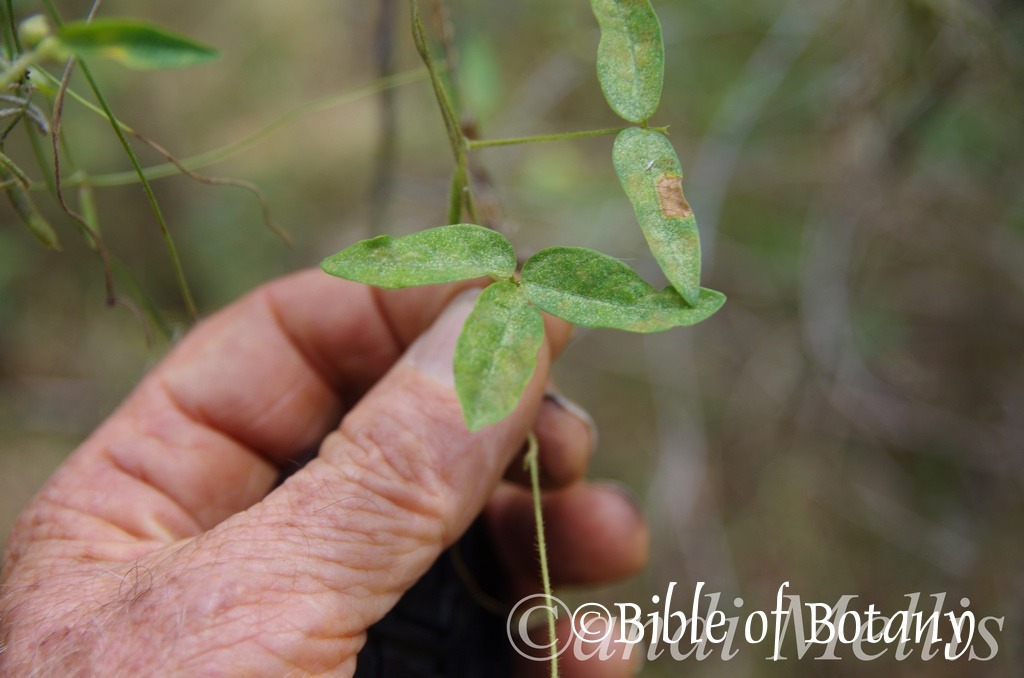

Glycine microphylla
Classification:
Class: Equisetopsida
Subclass: Magnoliidae
Order: Fabales
Family: Fabaceae
Genus: From Glykys, which is Ancient Greek for sweet tasting. It refers to roots or leaves, which have a sweet taste.
Species: From Mikros, which is Ancient Greek for small or very small and Phullon/Phyllon, which is Ancient Greek for a leaf. It refers to leaves, phyllodes or fronds, which are notably smaller or finer than other species in the genus.
Common Name:
Distribution:
Glycine microphylla is found in several disjunct populations south from the McIvor River in far north Queensland to Murgon and Medway Creek in central coastal Queensland then it is found continuously south to Mount Gambier in south eastern coastal South Australia. It is found on Western slopes, on and east of the Great Dividing Range to the coast.
In Tasmania it is found along the northern and eastern coastline from Marrawah in the north west and Mount Paul in the south east. There are 2 isolated populations near little Billop Hill and the upper Ouse River in central Tasmania.
It is also found on Norfolk Island.
https://avh.ala.org.au/occurrences/search?taxa=Glycine+microphylla#tab_mapView
Habitat Aspect Climate:
Glycine microphylla prefers full sun to light dappled shade. It grows in moist semi shady closed forests, open forests and open woodlands on the coastal ranges. The altitude ranges from sea level to 1250 meters ASL.
The temperatures range from minus 2 degree in July to 37 degrees in January.
The rainfalls range from lows of 550mm to an average of 2400mm annually.
Soil Requirements:
Glycine microphylla prefers skeletal to deep light gravelly clays through to heavy gravelly clays. The soils are usually derived from partially decomposed to decomposed shale, metamorphic rocks, lateritic clays and at times heavy sandstone/mudstone. The soils pH ranges from 5.5pH to 6pH are preferred. It does not tolerate waterlogged soils. Non saline soils to moderately saline soils are tolerated.
Height & Spread:
Wild Plants: 0.1m to 1.5m x 1m to 1.5m.
Characteristics:
Glycine microphylla grows as a very variable twiner with wiry stems. The stems are glabrous or covered in white or pale brown pubescent to hirsute hairs.
Glycine microphylla‘s alternate tri foliate leaves are dimorphic from the lower leaves to upper leaves and dimorphic in the leaflets. The oblanceolate to broad ovate to narrow elliptical lower leaves leaflets measure 10mm to 40mm in length by 2mm to 9mm in width. The narrow lanceolate to lanceolate upper leaves leaflets measure 15mm to 50mm in length by 1mm to 6mm in width. There are 2 broad triangular stipules at the base of the petiole and several minute stipules at the base of the terminal petiolule. The Petioles and petiolules are sparsely covered in short white to pale brown retrorse hirsute hairs. The petioles measure 10mm to 18mm in length while the petiolules measure 0.5mm to 5mm in length.
The bases are cuneate to cuneate-rounded while the apexes are obtuse, broad acute to acute. The slightly asymmetrical lateral leaflets and symmetrical middle leaflet are discolourous. The laminas vary considerably from a mid-green to grey-green, deep green, dull and moderately covered in white to pale brown retrorse hirsute hairs on the upper lamina while the lower lamina is much paler. The laminas are flat or recurve slightly upwards from the midvein to margins while the margins are entire. The midvein is strongly prominent on the lower lamina while the 14.to 18 lateral reticulate veins are faintly prominent on the lower lamina. The mid vein is visible from the upper lamina.
The inflorescences of Glycine microphylla are racemes born from the leaf axils. The racemes contain 5 to 13 individual flowers on a rachis that measures 90mm to 130mm in length.
The pale green calyxes and 4.calyx lobes are glabrous or covered in short, white to pale brown hirsute hairs externally and are glabrous internally. The calyxes measure 1mm to 1.5mm in length including the minute lobes.
The five, pale green sepal lobes are glabrous or covered in short, white to pale brown hirsute hairs externally and are glabrous internally. The sepals measure 4mm to 5mm in length including the 2mm to 2.5mm lobes.
The mauve to pink standards is white at the base and has a deeply retuse apex. They measure 4.5mm to 8.5mm in height by 10mm to 17mm in width. The mauve to rose-pink spathulate wings completely cover the keel and measure 4mm to 7mm in length by 2mm to 2.5mm in width. The deep mauve to purple keels measure 2mm to 3mm in length by 1.5mm to 2mm in height. The pedicels measure 2.5mm to 3mm in length.
9 of the 10 white filaments are fused to form a tube open on one side to allow the single free filament to be exposed. There are 6 to 10 ovules in an ovary. The flowers appear throughout the year with a peak from October to early March.
The fruits are long, linear, straight terete pods. The pods are pale blue-green to grass-green and sparsely to moderately covered in white to pale reddish-brown hirsute hairs. They turn papery brown to deep grey when ripe. They measure 15mm to 27mm length by 2.5mm to 4mm in diameter. There are 3 to 6 flattish oblong seeds in each pod.
Wildlife:
Glycine microphylla‘s wildlife is unknown to the author.
Cultivation:
Glycine microphylla is a beautiful ground covering small creeper or climber. It is very suitable for small gardens in most areas in Australia. As a garden subject it grows to 0.2 meter to 0.3 meter in height by 1 meter to 1.5 meter in diameter when cultivated in the open as a ground cover. Light tip pruning can be done to increase the number of stems and consequently the number of flowers the following season. Hard pruning can be done once the plants are established but some set back will occur so it is better to trim the plants on a regular or annual basis. It is fast growing, drought tolerant once established and are cold tolerant to temperatures as low as minus 6 degrees. Because of its disjunct fine foliage it is best mass planted or at least planted in groups of 3 or 5 so it can scramble over each other.
It can be mass planted in long curving lines with irregular patterns to guide a viewer through the garden. The leaves with the prostrate growth should be used to highlight the midground plants so use high contrasting and variable foliages with different foliages to the rear.
It is great in small rockeries planted in the foreground with bolder foliage and flowering plants to the rear. Here it can be planted in small groups of 2 to 5 to create a delicate look with other natives taking the strong stance especially when in flower.
Planted with annuals it will dominate the foliage but contrast the flowers with patches of grey green which will ensure a great display during the spring and autumn months while the other seasons. Mass plant them amongst upright annuals for year round colour. It would not matter if the annuals flowering clashed at the same time as there leaves would break the bright colours and give texture to the bed. Once the annuals have ceased flowering the bed is not completely barren and bare and offers that transitional piece of greenery.
Propagation:
Seeds: Glycine microphylla seeds need to be treated prior to sowing. Rub the seeds gently between fine sandpaper. Another method is to place the seeds in a calico bag with sharp sand and place the bag in the weekends washing for two or three washes. Another method is to soak the seeds in hot near boiling water and allow the water to cool. Leave them there for two hours. Do not place them in boiling water as this kills the seeds.
Glycine microphylla seeds can be sown directly into a seed raising mix after treatment. Cover them with 5mm of fine sand and keep moist not wet. Place the tray in a warm sunny position. When the seedlings are 25mm to 50mm tall, prick them out and plant them into 50mm native tubes using a good organic mix.
Once the seedlings reach 150mm to 200mm in height, nip the tips out before planting them out into their permanent position.
Fertilize using seaweed, fish emulsion or organic chicken pellets soaked in water on an alternate basis. Fertilize every two months until the plants are established then annually in early September to October to maintain health, vitality and better flowering.
Further Comments from Readers:
Hi reader, it seems you use The Bible of Botany a lot. That’s great as we have great pleasure in bringing it to you! It’s a little awkward for us to ask, but our first aim is to purchase land approximately 1,600 hectares to link several parcels of N.P. into one at The Pinnacles NSW Australia, but we need your help. We’re not salespeople. We’re amateur botanists who have dedicated over 30 years to saving the environment in a practical way. We depend on donations to reach our goal. If you donate just $5, the price of your coffee this Sunday, We can help to keep the planet alive in a real way and continue to bring you regular updates and features on Australian plants all in one Botanical Bible. Any support is greatly appreciated. Thank you.
In the spirit of reconciliation we acknowledge the Bundjalung, Gumbaynggirr and Yaegl and all aboriginal nations throughout Australia and their connections to land, sea and community. We pay our respect to their Elders past, present and future for the pleasures we have gained.
Glycine pacifica
Classification:
Class: Equisetopsida
Subclass: Magnoliidae
Order: Fabales
Family: Fabaceae
Genus: From Glykys, which is Ancient Greek for sweet tasting. It refers to roots or leaves, which have a sweet taste.
Species: From Pacifica, which is Latin for the Pacific Ocean. It refers to plants, which grow close to the Pacific Ocean or Islands or in the Pacific Ocean.
Common Name:
Distribution:
Glycine pacifica is found in several disjunct populations in the Broad sound Shire and Bauhinia in south eastern Queensland then from Horse Shoe Creek Gwyder to Forbes in central southern New South Wales. It is found on the Western slopes close to the Great Dividing Range and on the Great Dividing Range to the coast.
https://avh.ala.org.au/occurrences/search?taxa=Glycine+pacifica#tab_mapView
Habitat Aspect Climate:
Glycine pacifica prefers full sun to light dappled shade. It grows in dry semi open forests and open woodlands. The altitude ranges from 250 meters ASL level to 600 meters ASL.
The temperatures range from minus 2 degree in July to 39 degrees in January.
The rainfalls range from lows of 460mm to an average of 1100mm annually.
Soil Requirements:
Glycine pacifica prefers skeletal to deep light gravelly clays through to heavy gravelly clays and medium silts to heavy silts. The soils are usually derived from partially decomposed to decomposed shale, metamorphic rocks, lateritic clays, at times heavy sandstone, mudstone and fine alluvial deposits. The soils pH ranges from 5.5pH to 6pH are preferred. It does not tolerate waterlogged soils. Non saline soils to moderately saline soils are tolerated.
Height & Spread:
Wild Plants: 0.1m to 1.5m x 1m to 1.5m.
Characteristics:
Glycine pacifica grows as a small very variable twiner with wiry stems. The stems are usually sparsely to moderately covered in white or rarely pale rusty-brown pubescent hairs.
Glycine pacifica‘s alternate tri foliate leaves are dimorphic from the lower leaves to upper leaves and dimorphic in the leaflets. The broad linear to broad elliptical or ovate leaflets measure 40mm to 100mm in length by 8mm to 14mm in width. The 2 stipules measure 1.5mm to 2mm in length. The rachis and petioles are sparsely to moderately covered in short white appressed hairs. The rachis measures 40mm to 90mm in length while the petioles measure 1mm to 5mm in length.
The bases are broad cuneate to rounded-cuneate while the apexes are usually acute or at times obtuse on the lower leaflets. The lateral leaflets and middle leaflet are discolourous. The laminas vary considerably from a mid-green to grey-green, deep green, dull and are sparsely to moderately covered in white appressed and pubescent hairs on the upper lamina while the lower lamina is much paler. The laminas are flat or recurve slightly upwards from the midvein to margins while the margins are entire. The midvein is strongly prominent on the lower lamina while the 10 to 18 lateral reticulate veins are faintly prominent on the lower lamina. The mid vein is visible from the upper lamina.
The inflorescences are racemes born from the leaf axils. The racemes are sparsely to moderately covered in white appressed hairs and measures 90mm to 125mm in length.
The mid green calyxes and 4 calyx lobes are glabrous to moderately or densely covered in white to rarely pale rusty-brown pubescent and appressed hairs and are glabrous internally. The calyx lobes measure 0.3mm to 1.5mm in length including the minute lobes.
The mauve to pink standards are mauve, pale purple to mid purple and measure 5mm to 9.5mm in height by 5mm to 9mm in width. The mauve to rose-pink spathulate wings completely cover the keel and measure 5mm to 8mm in length by 2mm to 2.5mm in width. The deep mauve to mid purple keels measure 4.5mm to 7.5mm in length by 1.8mm to 2.2mm in height. The pedicels measure 4.5mm to 6.5mm in length.
9 of the 10 white filaments are fused to form a tube which is open on one side to allow the single free filament to be exposed. There are 6 to 10 ovules in an ovary. The flowering period is unknown to the author however flowers and buds have been recorded in early November with clean seed from another district being found in August suggesting flowering may continue through to as late as late May or early June.
Glycine pacifica‘s fruit are long, linear, straight terete pods. The pods are mid blue-green to grass-green and usually sparsely to moderately covered in white or rarely pale reddish-brown appressed or pubescent hairs. They turn papery brown to deep grey-brown and twisting following dehiscing. They measure 28mm to 42mm in length by 3mm to 3.5mm in diameter. There are 6 to 8 flattish oblong seeds in each pod which have a rough scurfy surface.
Wildlife:
Glycine pacifica‘s wildlife is unknown to the author.
Cultivation:
Glycine pacifica is a small scrambly ground covering small creeper or climber. It is suitable for small gardens in most areas in Australia. As a garden subject it grows to 1 meter to 1.3 meters in height by 1 meter to 1.3 meter in diameter when cultivated in the open as a ground cover. Light tip pruning and mass planting is required to increase the number of stems and consequently the number of flowers the following season. It is fast growing, drought tolerant once established and is cold tolerant to temperatures as low as minus 2 degrees.
It can be mass planted in long curving lines with irregular patterns to guide a viewer through the garden. The leaves with the prostrate growth should be used to highlight the midground plants so use high contrasting and variable foliages with different foliages to the rear.
It is great in small rockeries planted in the foreground with bolder foliage and flowering plants to the rear. Here they can be planted in small groups of 2 to 5 to create a delicate look with other natives taking the strong stance especially when in flower.
Planted with annuals it will dominate the foliage but contrast the flowers with patches of grey green which will ensure a great display during the spring and autumn months while the other seasons. Mass plant them amongst upright annuals for year round colour. It would not matter if the annuals flowering clashed at the same time as there leaves would break the bright colours and give texture to the bed. Once the annuals have ceased flowering the bed is not completely barren and bare and offers that transitional piece of greenery.
Propagation:
Seeds: The seeds need to be treated prior to sowing. Rub the seeds gently between fine sandpaper. Another method is to place the seeds in a calico bag with sharp sand and place the bag in the weekends washing for two or three washes. Another method is to soak the seeds in hot near boiling water and allow the water to cool. Leave them there for two hours. Do not place them in boiling water as this kills the seeds.
Glycine pacifica seeds can be sown directly into a seed raising mix after treatment. Cover them with 5mm of fine sand and keep moist not wet. Place the tray in a warm sunny position. When the seedlings are 25mm to 50mm tall, prick them out and plant them into 50mm native tubes using a good organic mix.
Once the seedlings reach 150mm to 200mm in height, nip the tips out before planting them out into their permanent position.
Fertilize using seaweed, fish emulsion or organic chicken pellets soaked in water on an alternate basis. Fertilize every two months until the plants are established then annually in early September to October to maintain health, vitality and better flowering.
Further Comments from Readers:
Hi reader, it seems you use The Bible of Botany a lot. That’s great as we have great pleasure in bringing it to you! It’s a little awkward for us to ask, but our first aim is to purchase land approximately 1,600 hectares to link several parcels of N.P. into one at The Pinnacles NSW Australia, but we need your help. We’re not salespeople. We’re amateur botanists who have dedicated over 30 years to saving the environment in a practical way. We depend on donations to reach our goal. If you donate just $5, the price of your coffee this Sunday, We can help to keep the planet alive in a real way and continue to bring you regular updates and features on Australian plants all in one Botanical Bible. Any support is greatly appreciated. Thank you.
In the spirit of reconciliation we acknowledge the Bundjalung, Gumbaynggirr and Yaegl and all aboriginal nations throughout Australia and their connections to land, sea and community. We pay our respect to their Elders past, present and future for the pleasures we have gained.
Glycine tabacina
Classification:
Class: Equisetopsida
Subclass: Magnoliidae
Order: Fabales
Family: Fabaceae
Genus: From Glykys, which is Ancient Greek for sweet tasting. It refers to roots or leaves, which have a sweet taste.
Species: From Tabacinus, which is Latin for a tobacco like. It possibly refers to the roots or leaves, which were chewed similar to tobacco.
Common Name:
Distribution:
Glycine tabacina is found in Western Australia between the coast from Exmouth to Weeli Wolli Creek to Marshal Pool and Harvey Reserve in the far south west corner.
Through the center it is found on Cox Peninsula, Groote Eylandt, and Tea Tree Well north of Alice Springs, Nilpina Creek and the northern Flinders Ranges south to Adelaide and Watiparinga National Trust Reserve near Eden Hills.
In the east it is found in the eastern third of Queensland and the eastern half of New South Wales and from Kanyapella on the border south westward to Mount Gambier in south eastern South Australia.
https://avh.ala.org.au/occurrences/search?taxa=Glycine+tabacina#tab_mapView
Habitat Aspect Climate:
Glycine tabacina prefers full sun to light dappled shade. It mainly grows in moist semi shady places in closed forests, open forests, open woodlands and grasslands. The altitude ranges from 5 meters ASL to 1300 meters ASL.
The temperatures range from minus 5 degree in July to 40 degrees in January.
The rainfalls range from lows of 100mm to an average of 2800mm annually.
Soil Requirements:
Glycine tabacina prefers skeletal or deep sands, light gravelly clays through to heavy clays including heavy podsolics. The soils are usually derived from partially decomposed to decomposed brown basalt, black basalt, sandstones, granites, mudstone, shale, metamorphic rocks, lateritic clays or accumulated sands behind the frontal dunes. The soils pH ranges from 5pH to 7pH. It does not tolerate waterlogged soils. Non saline soils to moderately saline soils are tolerated.
Height & Spread:
Wild Plants: 0.3m to 1.5m x 1m to 1.5m.
Characteristics:
Glycine tabacina‘s grows as a very variable, wiry twiner with stoloniferous stems. The stems are glabrous or covered in white retrorse, strigose hirsute hairs.
The alternate tri foliate leaves are dimorphic. The linear, narrow lanceolate, broad lanceolate to broad obovate leaflets lateral leaflets measure 25mm to 60mm in length by 5mm to 17mm in width. The linear, narrow lanceolate, broad lanceolate to broad obovate terminal leaflets measure 25mm to 70mm in length by 6mm to 2mm in width. There are several minute stipules at the base of the petiolules and rachis. The Petioles and petiolules are glabrous or covered in white retrorse, strigose hirsute hairs. The petioles measure 30mm to 90mm in length while the lateral petiolules measure 0.5mm to 1mm in length and the terminal rachis measures 2mm to 6mm in length.
The leaflet’s bases are rounded while the apexes are obtuse to acute. The slightly asymmetrical lateral leaflets and symmetrical terminal leaflets are discolourous. The laminas vary considerably from a mid-green to grey-green, blue-green, deep green or deep blue-green, dull and glabrous on the upper lamina while the lower laminas are sparsely covered in white, strigose, hirsute hairs. The laminas are flat or curve slightly upwards from the midvein to margins while the margins are entire. The midvein and lateral reticulate veins are prominent on the lower lamina and faintly prominent on the upper lamina.
The inflorescences are racemes born from the leaf axils. The racemes contain 2 to 15 individual flowers on a rachis that measures 90mm to 140mm in length.
The deep purple-brown calyxes and 4.calyx lobes are sparsely covered in short, white hirsute hairs externally and are glabrous internally. The calyxes measure 5mm to 9mm in length excluding the 2mm to 3mm lobes.
The fruit are long straight terete pods. The pods are deep green and sparsely covered in white hirsute hairs. They turn deep chocolate brown, semi glossy and usually twist longitudinally when ripe. They measure 14mm to 30mm length by 3mm to 4.5mm in diameter.
The 2 to 6 cuboidal, deep grey to black, resinous and pitted seeds in each pod. The seeds measure 3mm to 3.5mm in length by 2.5mm to 3mm in diameter.
Wildlife:
Glycine tabacina‘s wildlife is unknown to the author.
Cultivation:
Glycine tabacina is a beautiful ground covering small creeper or climber. It is very suitable for small gardens in most areas in Australia. As a garden subject it will grow to 0.1 meter to 0.2 meter in height by 1 meter to 1.5 meter in diameter when cultivated in the open as a ground cover. The broader leaf forms are particularly attractive when used as a ground cover. Light tip pruning can be done to increase the number of stems and consequently the number of flowers the following season. Hard pruning can be done once the plant is established but some set back will occur so it is better to trim the plants on a regular or annual basis. It is fast growing, drought tolerant once established and are cold tolerant to temperatures as low as minus 6 degrees. Because of their disjunct fine foliage it is best mass planted or at least planted in groups of 3 or 5 so they can scramble over each other.
It can be mass planted in long curving lines with irregular patterns to guide a viewer through the garden. The leaves with the prostrate growth should be used to highlight the midground plants so use high contrasting and variable foliages with different foliages to the rear.
It looks good in small rockeries planted in the foreground with bolder foliage and flowering plants to the rear. Here they can be planted in small groups of 2 to 5 to create a delicate look with other natives taking the strong stance especially when in flower.
Planted with annuals it will dominate the foliage but contrast the flowers with patches of grey green which will ensure a great display during the spring and autumn months while the other seasons. Mass plant them amongst upright annuals for year round colour. It would not matter if the annuals flowering clashed at the same time as there leaves would break the bright colours and give texture to the bed. Once the annuals have ceased flowering the bed is not completely barren and bare and offers that transitional piece of greenery.
Propagation:
Seeds: Glycine tabacina seeds need to be treated prior to sowing. Rub the seeds gently between fine sandpaper. Another method is to place the seeds in a calico bag with sharp sand and place the bag in the weekends washing for two or three washes. Another method is to soak the seeds in hot near boiling water and allow the water to cool. Leave them there for two hours. Do not place them in boiling water as this will kill the seeds.
Glycine tabacina seeds can be sown directly into a seed raising mix after treatment. Cover them with 5mm of fine sand and keep moist not wet. Place the tray in a warm sunny position. When the seedlings are 25mm to 50mm tall, prick them out and plant them into 50mm native tubes using a good organic mix.
Once the seedlings reach 150mm to 200mm in height, nip the tips out before planting them out into their permanent position.
Fertilize using seaweed, fish emulsion or organic chicken pellets soaked in water on an alternate basis. Fertilize every two months until the plants are established then annually in early September to October to maintain health, vitality and better flowering.
Further Comments from Readers:
Hi reader, it seems you use The Bible of Botany a lot. That’s great as we have great pleasure in bringing it to you! It’s a little awkward for us to ask, but our first aim is to purchase land approximately 1,600 hectares to link several parcels of N.P. into one at The Pinnacles NSW Australia, but we need your help. We’re not salespeople. We’re amateur botanists who have dedicated over 30 years to saving the environment in a practical way. We depend on donations to reach our goal. If you donate just $5, the price of your coffee this Sunday, We can help to keep the planet alive in a real way and continue to bring you regular updates and features on Australian plants all in one Botanical Bible. Any support is greatly appreciated. Thank you.
In the spirit of reconciliation we acknowledge the Bundjalung, Gumbaynggirr and Yaegl and all aboriginal nations throughout Australia and their connections to land, sea and community. We pay our respect to their Elders past, present and future for the pleasures we have gained.
Glycine tomentella
Classification:
Class: Equisetopsida
Subclass: Magnoliidae
Order: Fabales
Family: Fabaceae
Genus: From Glykys, which is Ancient Greek for sweet tasting. It refers to roots or leaves, which have a sweet taste.
Species: From Tomentosum, which is Latin for to be covered in long down. It refers to hairs which are long, soft and wavy or matted similar to a duck’s down.
Common Name: Woolly Glycine.
Distribution:
Glycine tomentella is found in a line north, from Port Headland in Western Australia to Hughenden in Queensland then east of a line from Hughenden to the Bega Valley in southern coastal New South Wales. Isolated populations have been recorded from Indabiddy Creek, Lake Austin and Port Gregory in central Western Australia and Willochra Creek near Melrose in southern South Australia. It is also found on the off shore islands around the coast.
https://avh.ala.org.au/occurrences/search?taxa=Glycine+tomentella#tab_mapView
Habitat Aspect Climate:
Glycine tomentella prefers full sun to light dappled shade. It grows in dry open woodlands, moist open woodlands, littoral rainforests, riverine floodplains, monsoonal forests, vine forests, inland ephemeral pools and dry seasonal creek beds or spinifex savannah grasslands. The altitude ranges from 5 meters ASL to 1350 meters ASL.
The temperatures range from minus 3 degree in July to 44.degrees in January.
The rainfalls range from lows of 150mm to an average of 2800mm annually.
Soil Requirements:
Glycine tomentella prefers skeletal or deep sands, light gravelly clays through to heavy clays including heavy podsolics and lateritic clays. The soils are usually derived from partially decomposed to decomposed brown basalt, black basalt, sandstones, granites, mudstone, shale, metamorphic rocks, lateritic clays and accumulated sands behind the frontal dunes. The soils pH ranges from 5.5pH to 6pH are preferred. It does not tolerate waterlogged soils. Non saline soils to very saline soils are tolerated as are salt laden winds.
Height & Spread:
Wild Plants: 0.1m to 1.5m x 1m to 1.5m.
Characteristics:
Glycine tomentella is a very variable, wiry twiner. The stems are covered in soft, white, fawn, golden and golden-brown hirsute hairs.
The alternate trifoliate leaves leaflets are not dimorphic. The oblong, elliptic to ovate leaflets are covered in soft, white, fawn, golden and golden-brown tomentose and strigose hairs. They measure 10 to 65mm in length by 4mm to 35mm in width. There are 2 stipules at the base of the petiole that measure 2.5mm to 5mm in length. The stipules are densely in soft, white, fawn, golden and golden-brown tomentose and strigose hairs. The Petioles and petiolules are covered in soft, white, fawn, golden and golden-brown tomentose and strigose hairs. The petioles measure 5mm to 10.5mm in length while the lateral petiolules measure 0.8mm to 1.2mm in length and the terminal petiolule measures 3.5mm to 5mm in length.
The bases are rounded while the apexes are obtuse, emarginate or mucronate. The symmetrical concolourous laminas are mid grass-green to mid olive-green, dull and covered in soft, white, fawn, golden and golden-brown tomentose and strigose hairs. The laminas are flat to recurve upwards from the midvein to margins while the margins are entire. The midvein and lateral penniveins are prominent on the lower lamina and distinctly visible on upper lamina.
The inflorescences are racemes born from the leaf axils. The racemes contain 7 to 15 individual flowers on a rachis. The rachis and pedicels are covered in soft, white, fawn, golden and golden-brown tomentose and strigose hairs. The rachis measures 10mm to 190mm in length while the pedicels measure 2mm to 3mm in length.
The pale green calyxes and 4.dimorphic calyx lobes are moderately covered in long, soft, white, fawn, golden and golden-brown hirsute or villous hairs externally and are glabrous internally. The calyxes measure 3mm to 4.5mm in length including the lobes.
The 3 lower sepals are moderately covered in long, soft, white, fawn, golden and golden-brown hirsute or villous hairs externally and are glabrous internally. They measure 9mm to 12mm in length. The 2 upper sepals are moderately covered in long, soft, white, fawn, golden and golden-brown hirsute or villous hairs externally and are glabrous internally. They measure 6mm to 8mm in length.
The purple to reddish-purple standards are white at the base and have a deeply retuse apex. They measure 5.5mm to 10mm in height by 7mm to 14mm in width. The blue to purple or mauve ovate wings curl over the keel and measure 4mm to 7mm in length by 3.5mm to 6mm in width. The deep mauve to deep purple keels measure 2.5mm to 4mm in length by 2mm to 3mm in height. The pedicels measure 2.5mm to 3mm in length.
9 of the 10 white filaments are fused to form a tube open on one side to allow the single free filament to be exposed. There are 6 to 10 ovules in an ovary. The flowers appear from September to early May.
The fruits are long straight terete pods. The pods are grass-green and are sparsely covered in long, soft, white, fawn, golden and golden-brown hirsute or villous hairs externally and are glabrous internally. They measure 12mm to 23mm length by 2mm to 3.5mm in diameter. There are 2 to 10 seeds in each pod.
Wildlife:
Glycine tomentella‘s wildlife is unknown to the author.
Cultivation:
It is suitable for small gardens in most areas in Australia. As a garden subject it will grow to 1 meter to 1.5 meter high by 1 meter to 1.5 meter wide when cultivated in the open. Light tip pruning can be done to increase the number of stems and consequently the number of flowers the following season. Hard pruning can be done once the plants are established but some set back will occur so it is better to trim the plants on a regular or annual basis. It is fast growing, drought tolerant once established and are cold tolerant to temperatures as low as minus 6 degrees. Because of their disjunct fine foliage it is best mass planted or at least planted in groups of 3 or 5 so they can scramble over each other.
It is suitable for small rockeries planted in the foreground with bolder foliage and flowering plants to the rear. Here planted in small groups, of 2 to 5 to create a delicate look with other natives taking the strong stance especially when in flower.
Planted with annuals it will dominate the foliage but contrast the flowers with patches of grey green which will ensure a great display during the spring and autumn months while the other seasons. Mass plant them amongst upright annuals for year round colour. It would not matter if the annuals flowering clashed at the same time as there leaves would break the bright colours and give texture to the bed. Once the annuals have ceased flowering the bed is not completely barren and bare and offers that transitional piece of greenery.
Propagation:
Seeds: Glycine tomentella seeds need to be treated prior to sowing. Rub the seeds gently between fine sandpaper. Another method is to place the seeds in a calico bag with sharp sand and place the bag in the weekends washing for two or three washes. Another method is to soak the seeds in hot near boiling water and allow the water to cool. Leave them there for two hours. Do not place them in boiling water as this will kill the seeds.
The seeds can be sown directly into a seed raising mix after treatment. Cover them with 5mm of fine sand and keep moist not wet. Place the tray in a warm sunny position. When the seedlings are 25mm to 50mm tall, prick them out and plant them into 50mm native tubes using a good organic mix.
Once the seedlings reach 150mm to 200mm in height, nip the tips out before planting them out into their permanent position.
Fertilize using seaweed, fish emulsion or organic chicken pellets soaked in water on an alternate basis. Fertilize every two months until the plants are established then annually in early September to October to maintain health, vitality and better flowering.
Further Comments from Readers:
Hi reader, it seems you use The Bible of Botany a lot. That’s great as we have great pleasure in bringing it to you! It’s a little awkward for us to ask, but our first aim is to purchase land approximately 1,600 hectares to link several parcels of N.P. into one at The Pinnacles NSW Australia, but we need your help. We’re not salespeople. We’re amateur botanists who have dedicated over 30 years to saving the environment in a practical way. We depend on donations to reach our goal. If you donate just $5, the price of your coffee this Sunday, We can help to keep the planet alive in a real way and continue to bring you regular updates and features on Australian plants all in one Botanical Bible. Any support is greatly appreciated. Thank you.
In the spirit of reconciliation we acknowledge the Bundjalung, Gumbaynggirr and Yaegl and all aboriginal nations throughout Australia and their connections to land, sea and community. We pay our respect to their Elders past, present and future for the pleasures we have gained.
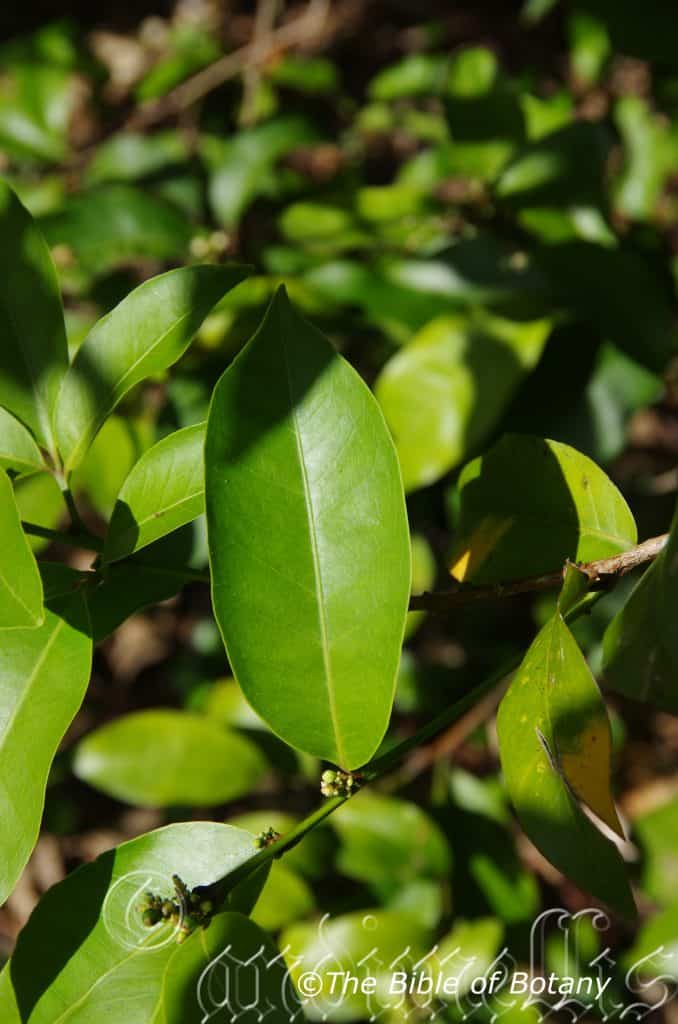
Juvenile Plant Leaf NCBG Coffs Harbour NSW
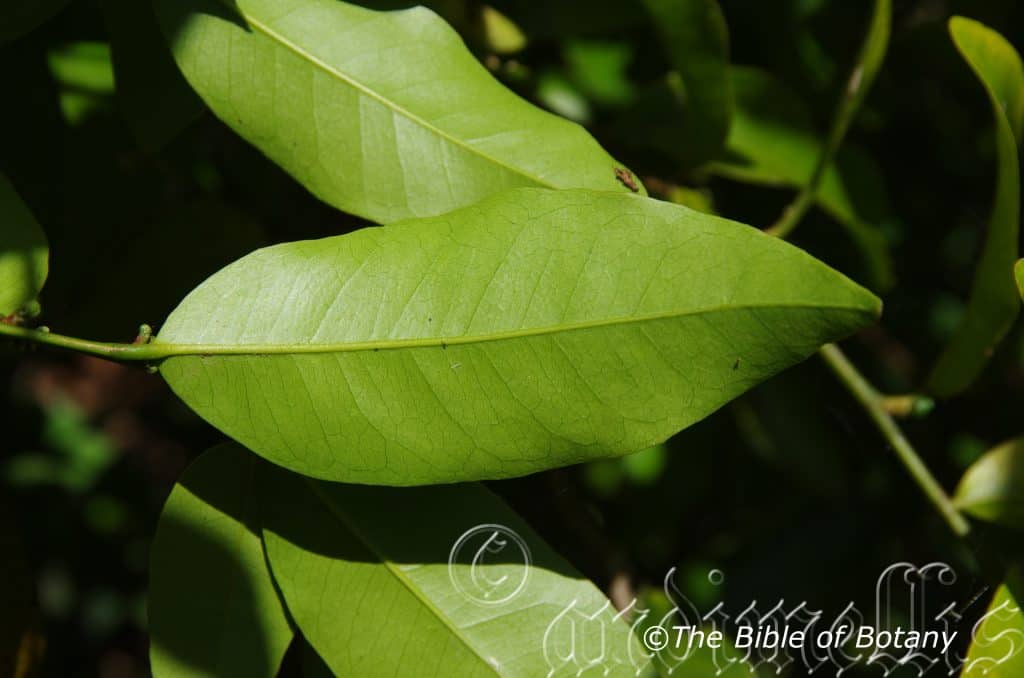
Juvenile Plant Leaf NCBG Coffs Harbour NSW
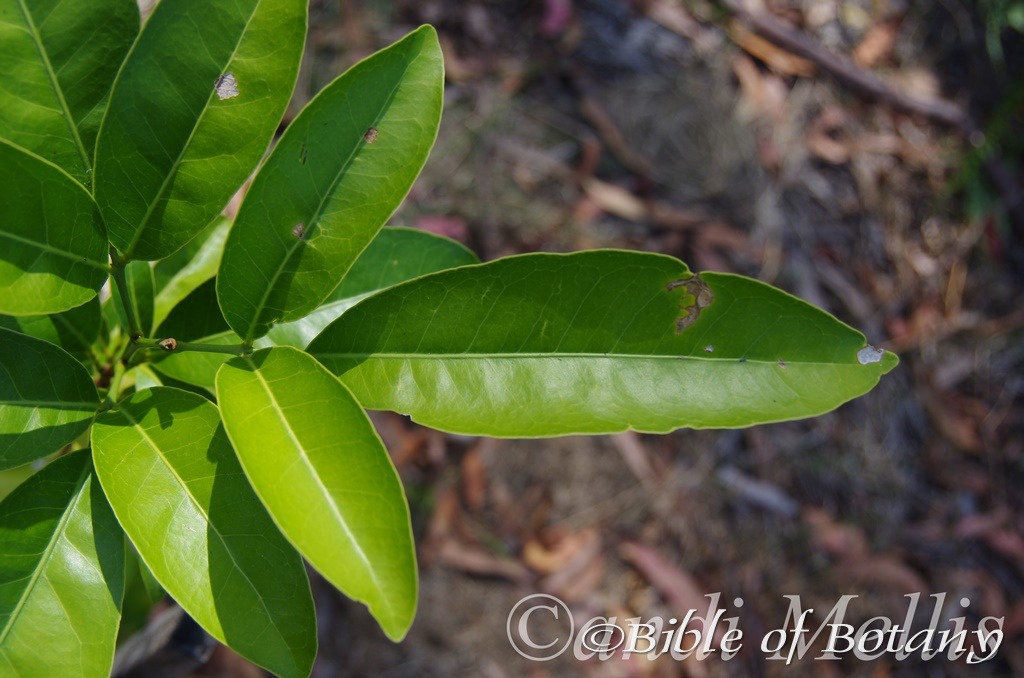
Mature Plant Leaf Author’s garden The Pinnacles NSW
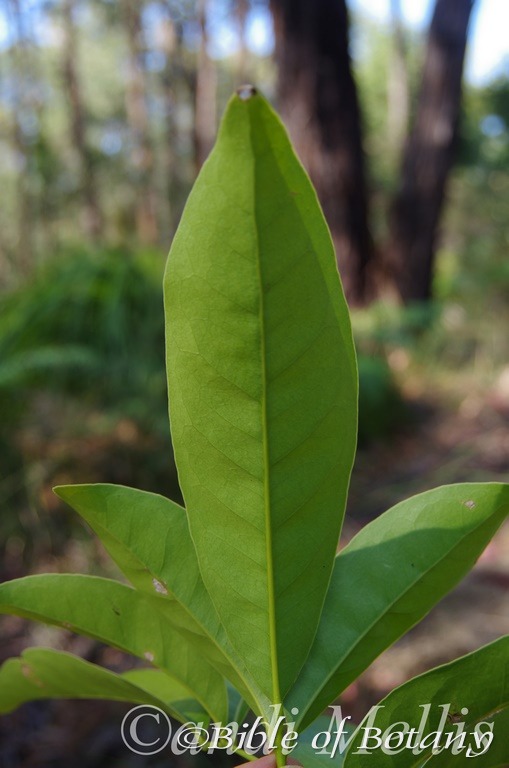
Mature Plant Leaflet Author’s garden The Pinnacles NSW
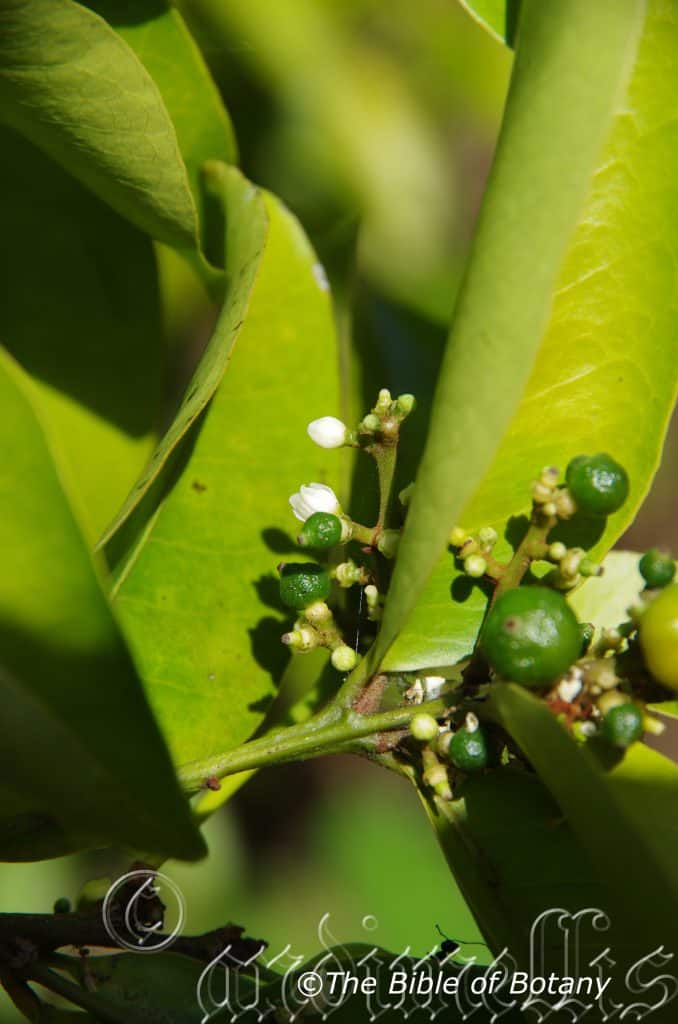
NCBG Coffs Harbour NSW
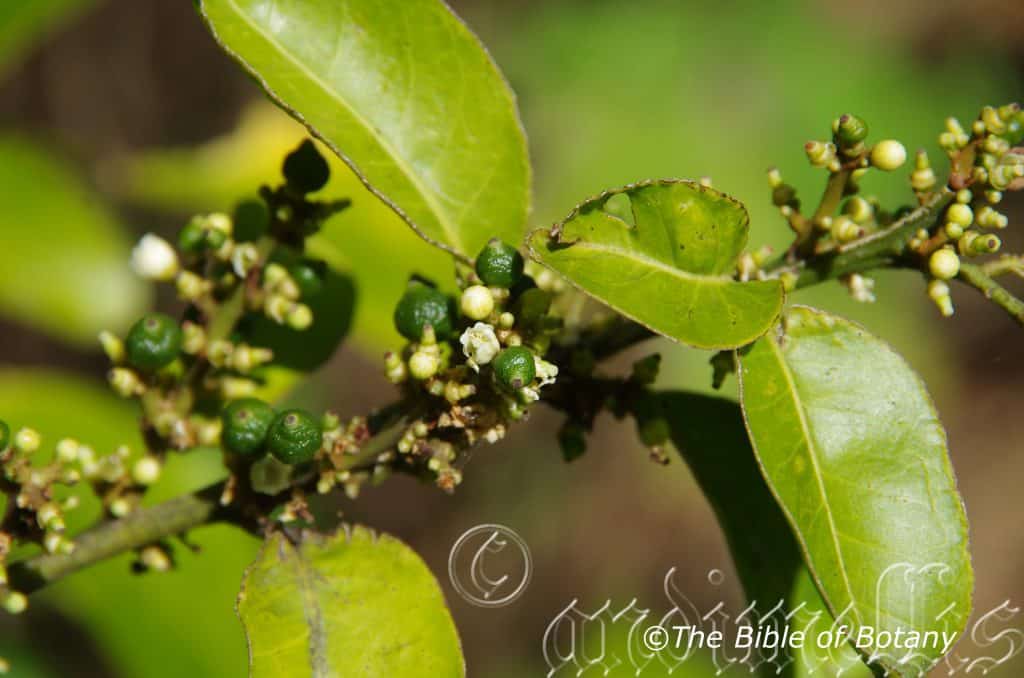
NCBG Coffs Harbour NSW
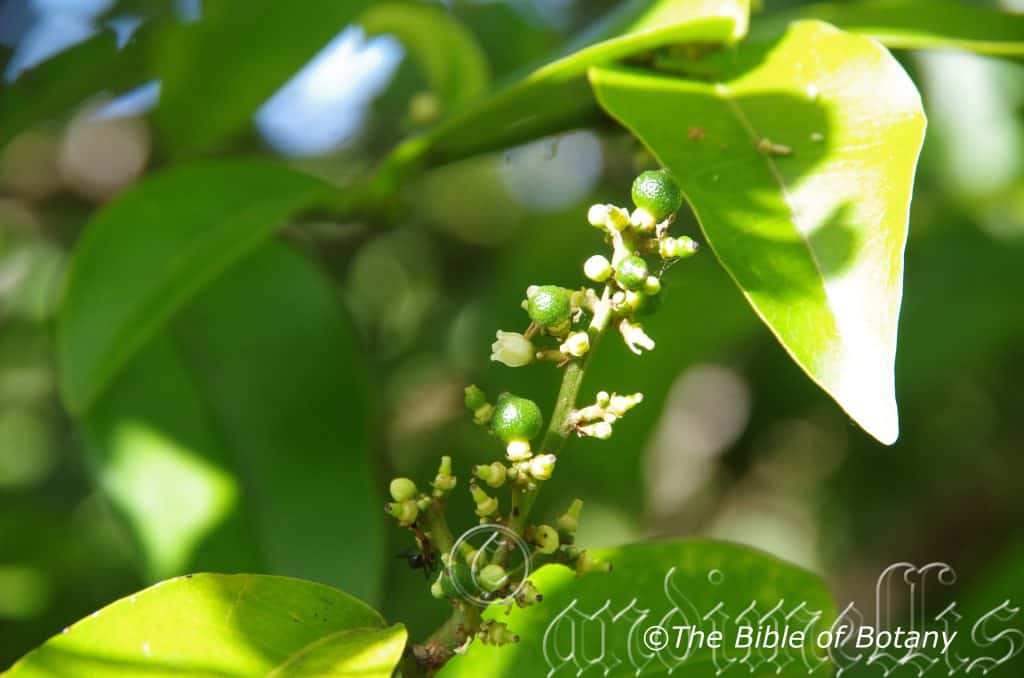
NCBG Coffs Harbour NSW
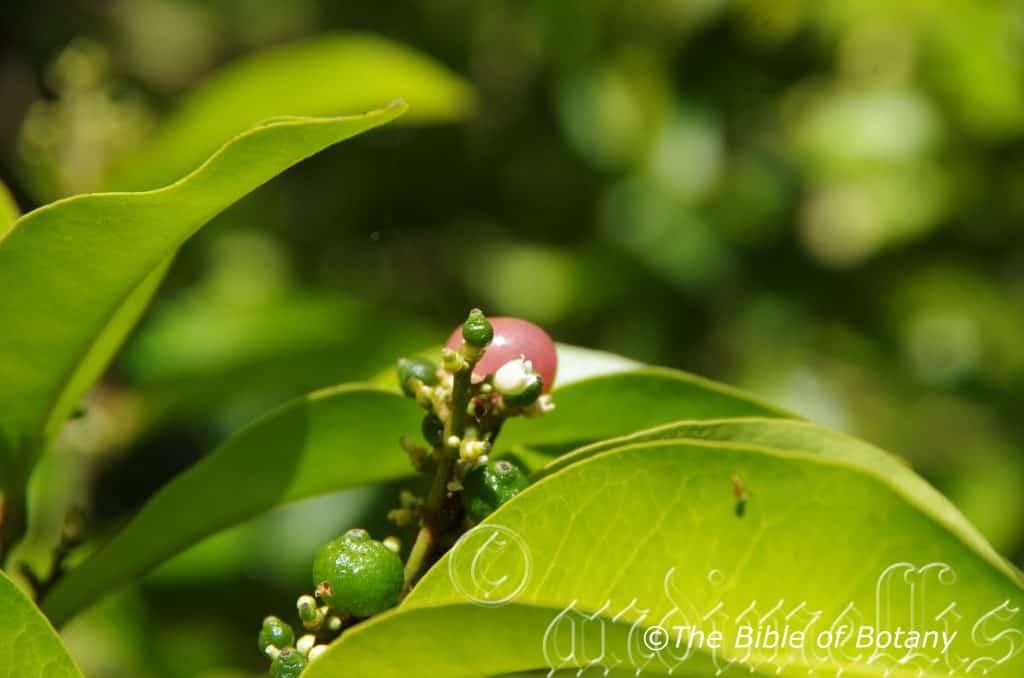
NCBG Coffs Harbour NSW
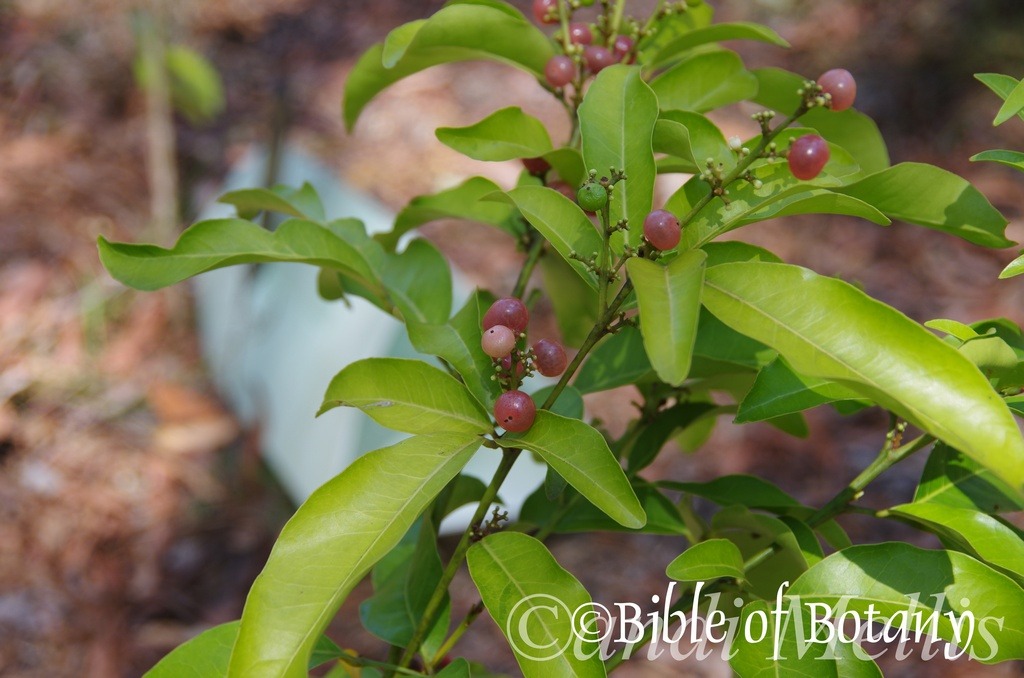
Author’s garden The Pinnacles NSW
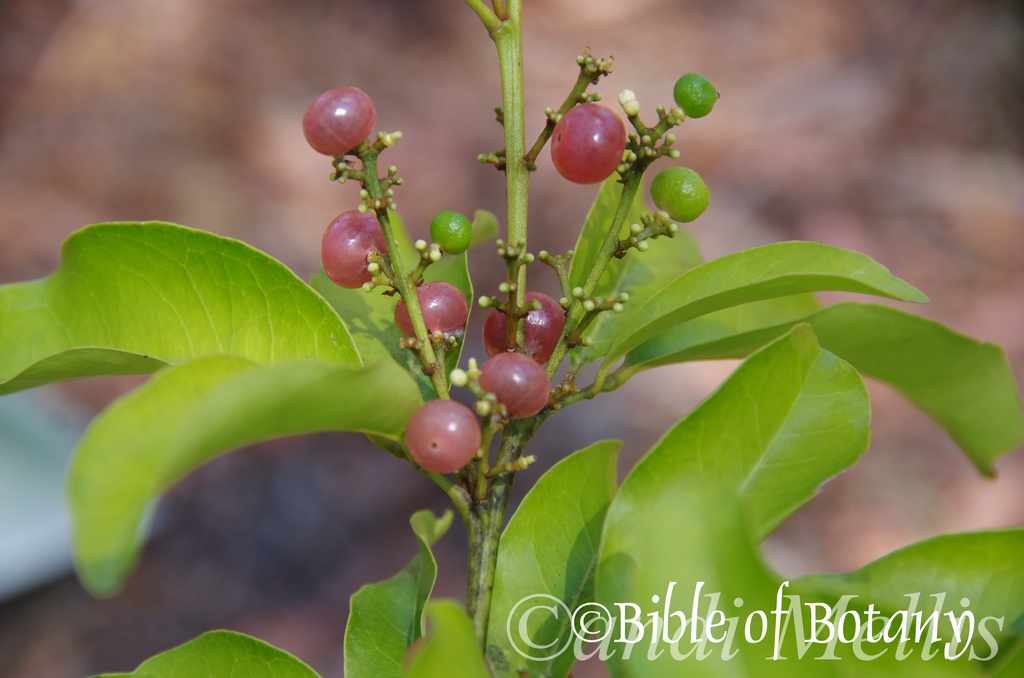
Author’s garden The Pinnacles NSW
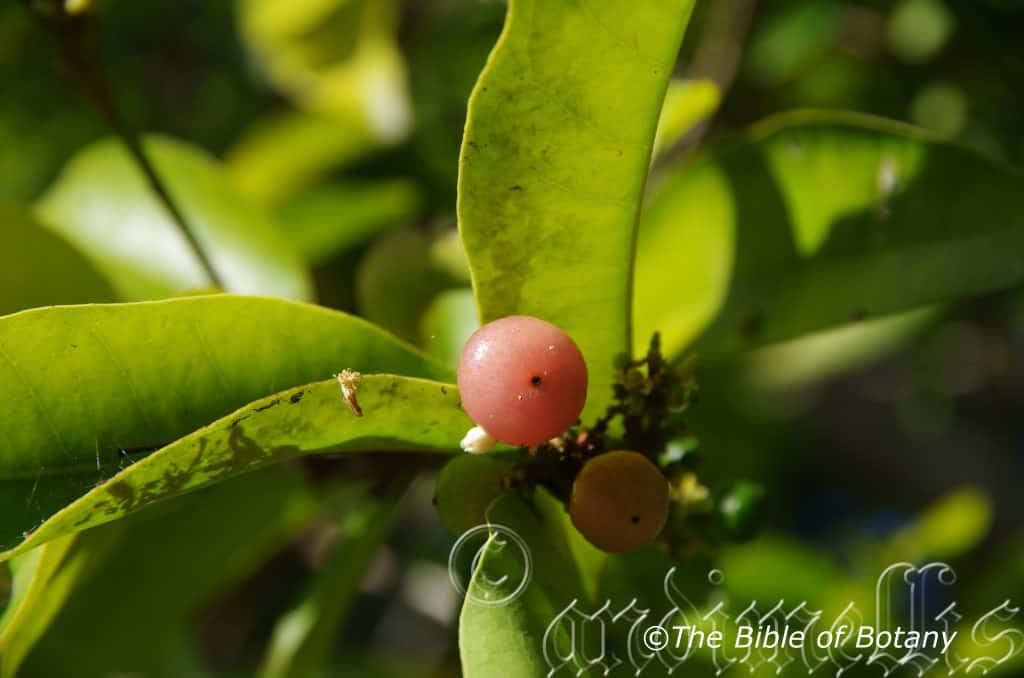
NCBG Coffs Harbour NSW
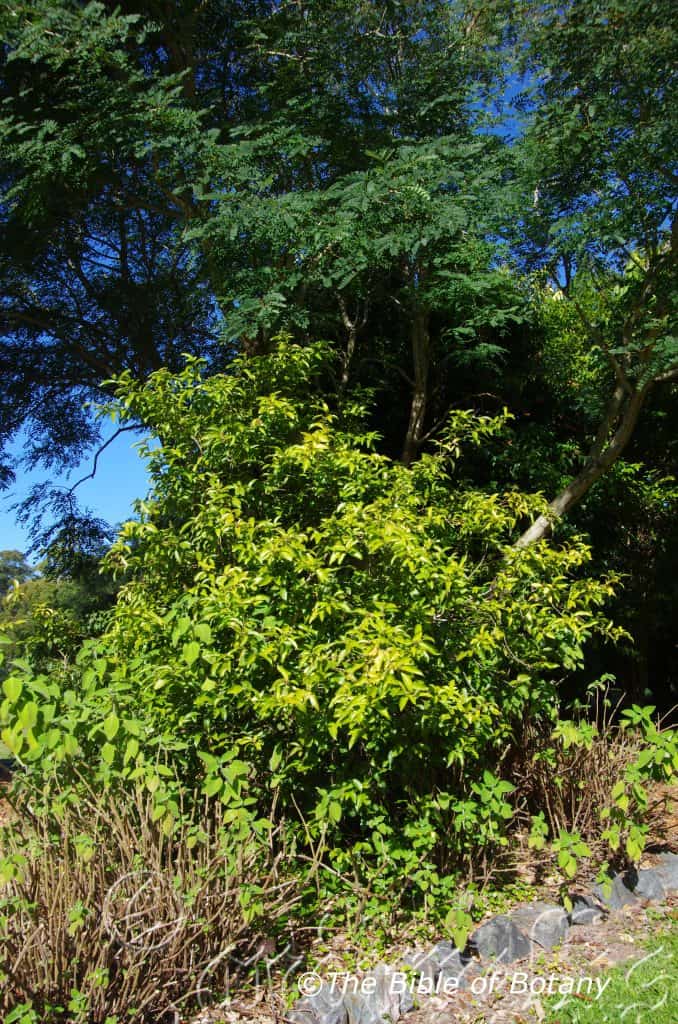
NCBG Coffs Harbour NSW
Glycosmis trifoliata
Classification:
Class: Eudicots
Class: Rosids
Order: Sapindales
Family: Rutaceae
Subfamily: Aurantiodeae
Tribe: Clauseneae
Genus: Most likely from Glykys, which is Ancient for all at once the universe, the cosmos but also the ornament (as in cosmetics for beauty). It refers to the overall plant having an aura of beauty with fruits, which have a sweet taste as some would say out of this world.
Species: From Treis/Tria, which is Ancient Greek or later Tri, which is Latin for three and Foliata, which is Latin for a leaf or foliage. It refers to leaves that have three leaflets.
Common Name: Gin Brerry, Orange Berry or Pink-fruited Limeberry.
Distribution:
Glycosmis trifoliata is found north from James Point in the Kymberlies in north west Western Australia around the coast to Walla Island in central coastal Queensland. It is mainly found close to the coast in the west and north and on and east of the Great Dividing Range in the east.
It is also found in Cambodia, southern China, Indonesia, Java, Laos, Malaysia, Myanmar, New Guinee, Papua, Philippines, Thailand, East Timor and Vietnam.
https://avh.ala.org.au/occurrences/search?taxa=Glycosmis+trifoliata#tab_mapView
Habitat Aspect Climate:
Glycosmis trifoliata prefers full sun to light dappled shade. It grows in monsoon forest, beach forest and vine thickets. The altitude ranges from 5 meters ASL to 550 meters ASL.
The temperatures range from 6 degree in July to 44 degrees in January.
The rainfalls range from lows of 1500mm to an average of 3600mm annually.
Soil Requirements:
Glycosmis trifoliata prefers better quality deep well drained, sands, light gravelly clays through to medium clays including podsolic and lateritic clays. The soils are usually derived from partially decomposed to decomposed brown basalt, black basalt, sandstones, mudstone, shale, metamorphic rocks and accumulated sands behind the frontal dunes. The soils pH ranges from 5.5pH to 8pH are preferred. It does not tolerate waterlogged soils. Non saline soils to moderately saline soils are tolerated as are salt laden winds.
Height & Spread:
Wild Plants: 4m to 8m x 2m to 5m.
Characteristics:
Glycosmis trifoliata usually grows as a medium in the open or as a small tree when confined with in the shadows of taller rainforest trees. It is most frequently seen along riparian zones or where breaks in the tree canopy occur. The trunk and branches are pale green-brown and smooth. The terete stems are mid green and glabrous.
The juvenile leaves are elliptical to broad elliptical and may persist on older trees well after maturing. The leaves measure 90mm to 150mm in length by 45mm to 65mm in width. The terete petiole measures 5mm to 8mm in length. The bases are rounded while the apexes are broad accuminate. The symmetrical concolourous laminas are mid grass-green, semi glossy and glabrous. The laminas recurve upwards from the midvein to margins while the margins are entire. The midvein and lateral penniveins are prominent on the lower lamina and distinctly visible on upper lamina. The lateral veins form loops well inside the margin.
The terminal buds and young stems are glabrous to moderately covered in short brownish-red pubescent hairs. Glycosmis trifoliata‘s alternate tri foliate leaflets are elliptical. The terminal or middle leaflet has a pulvinus, while the lateral leaflets do not. The leaflets measure 60mm to 150mm in length by 25mm to 65mm in width. The terete petiole measures 20mm to 25mm in length, while the terminal petiolule measures 4mm to 6mm in length and the two lateral petiolules measure 2mm to 3mm in length. The bases are rounded while the apexes are narrow obtuse. The symmetrical concolourous laminas are mid grass-green, semi glossy and glabrous. The laminas recurve upwards from the midvein to margins while the margins are entire. The midvein and lateral penniveins are prominent on the lower lamina and distinctly visible on upper lamina. The lateral veins form loops well inside the margin.
The inflorescences of Glycosmis trifoliata are short stout racemes born from the upper leaf axis. The racemes contain 8 to 30 individual flowers. The 5 pale green, obtuse sepals measure 04mm to 0.5mm in length.
The 5 white, glabrous petals measure 4mm to 5 mm in length. The 10 dimorphic stamens have 5 long alternating with the petals and 5 short opposite the petals. The globose yellow anthers are basifixed
The pendulous ovules have one per locule in the ovary. The stout green style is shorter than the ovary and short filaments. The flowers appear from February to early May.
The globular or depressed globular berries measure 8mm to 12mm in diameter. The style is persistent at the apex of the pink or orange berries. The globular seeds measure 6mm to 8mm in diameter.
Wildlife:
Glycosmis trifoliata‘s leaves provide food for the larval stages of the Canopus and Capaneus Butterflies. Common & Waterhouse “Butterflies of Australia”.
The green fruits ripens to a semi translucent, pinkish color and have a sweet, juicy honey lime flavor. The leaves are often used in Asia as a substitute for a mild curry flavour to stir fries.
Glycosmis trifoliata, produces edible fruits with significant nutritional and health-promoting properties. The fruits are typically 10mm to 14mm in diameter when grown in the garden on good organic soils. The translucent pink to orange berries are sweet, juicy, have a honey-like flavor when fully ripe and, at times, have a resinous or peppery aftertaste.
The fruit is high in Vitamin C, and has significant amounts of total sugar and soluble solids, which contributes to its tangy sweetness. It contains essential minerals, including potassium, calcium, phosphorus, and magnesium along with various organic acids, including citric acid, malic acid (C4H6O5 It is naturally occurring dicarboxylic acid found in fruits like apples, scherries,and plums providing a tart taste), and fumaric acid (C4H4O4 is a white crystalline organic acid, which has a strong tart taste), which contribute to the flavor profile.
It is also high phenolic compound content, which is an antioxidant. Anti-inflammatory and Anti-cancer Potential. The plant has traditionally been used for its medicinal properties, including suspected anti-inflammatory with anticancer effects. It is also rich in Bioactive Compounds, like flavonoids and terpenoids, typical of the Rutaceae (citrus) family.
Cultivation:
Glycosmis trifoliata is a beautiful small tree or large shrub for small to medium gardens in tropical, subtropical or warm temperate locations that are frost free. As a garden subject it is slow growing and will attain a height of 4 meters to 5 meters by 2 meters to 3 meters in diameter when grown in the open. Light tip pruning can be done to increase the number of stems and consequently the number of flowers the following season.
It is suitable for small rainforest gardens as either the main feature tree or as medium shrub growing on the edges. Here it can be planted in small groups, of 3 or more to create a delicate, lush look with other small native rainforest shrubs like Zieria smithii taking advantage of the different flowering seasons and soft scent of the flowers.
Planted as a small feature tree in the centre of an English Cottage style garden with native annuals below will see it will dominate, where the foliage contrast with the flowers of annuals like Xerochrysum viscosum, Rhodanthe chlorocephala subsp. rosea or Schoenia filifolia subsp. subulifolia. Mass planted native annuals always grab attention when in flower. It would not matter if the annuals flowering clashed at the same time as the leaves would break the bright colours and give texture to the bed. Once the annuals have ceased flowering the bed is not completely barren and bare as it will offer a transitional piece of greenery until the annuals again bloom.
Propagation:
Seeds: Glycosmis trifoliata seeds can be sown directly into a seed raising mix once the flesh has been removed. Cover them with 5mm of fine sand and keep moist not wet. Place the tray in a warm sunny position. When the seedlings are 25mm to 50mm tall, prick them out and plant them into 50mm native tubes using a good organic mix.
Once the seedlings reach 150mm to 200mm in height, nip the tips out before planting them out into their permanent position.
Fertilize using seaweed, fish emulsion or organic chicken pellets soaked in water on an alternate basis. Fertilize every two months until the plants are established then annually in early September to October to maintain health, vitality and better flowering.
Further Comments from Readers:
Hi reader, it seems you use The Bible of Botany a lot. That’s great as we have great pleasure in bringing it to you! It’s a little awkward for us to ask, but our first aim is to purchase land approximately 1,600 hectares to link several parcels of N.P. into one at The Pinnacles NSW Australia, but we need your help. We’re not salespeople. We’re amateur botanists who have dedicated over 30 years to saving the environment in a practical way. We depend on donations to reach our goal. If you donate just $5, the price of your coffee this Sunday, We can help to keep the planet alive in a real way and continue to bring you regular updates and features on Australian plants all in one Botanical Bible. Any support is greatly appreciated. Thank you.
In the spirit of reconciliation we acknowledge the Bundjalung, Gumbaynggirr and Yaegl and all aboriginal nations throughout Australia and their connections to land, sea and community. We pay our respect to their Elders past, present and future for the pleasures we have gained.
Glycyrrhiza acanthocarpaa
Classification:
Unranked: Equisetopsida
Class: Magnoliidae
Order: Fabales
Family: Fabaceae
Genus: From Glykys, which is Ancient Greek for sweet tasting and Rrhyza which is Ancient Greek for a root. It refers to the roots, which have a sweet taste.
Species: From Akantha, which is Ancient Greek for to have a thorn or spine and Karpos, which is Ancient Greek for a fruit. It refers to the fruits, which are thorny.
Common Name: Native Liquorice.
Distribution:
Glycyrrhiza acanthocarpa is a found in 4 disjunct populations in the southern half of the continent. In Western Australia it is found between Beacon near Mount Marshal to Kalgoorlie, Esperence and Katanning with an isolated population further north at Mount Murchison.
In South Australia it is found in a triangle between Jacobs Well to Parakylia and Blackoak Bore.
In the east it is found in an area bounded by Lake Pinaroo in the north, Dubbo in the east, Bendigo in the south east, Warne Swamp Wildlife Reserve in the south west to Murray Bridge and Bundaleer Resevoir in the west. It is also found along the Condamine and Warrego Rivers further north in Queensland.
https://avh.ala.org.au/occurrences/search?taxa=Glycyrrhiza+acanthocarpa#tab_mapView
Habitat Aspect Climate:
Glycyrrhiza acanthocarpa prefers partial shade to full sun. It grows in dry Eucalyptus forests, dry open woodlands, and grass lands especially on clay pans, shallow depressions and in ephemeral pools and along stretches of ephemeral creek beds. The altitude ranges from 26 meters ASL to 700 meters ASL.
The temperatures range from 10 degrees in July to 36 degrees in January.
The rainfalls range from lows of 50mm to an average of 600mm annually but this has little relevance as it is the permanent ground water that is more important.
Soil Requirements:
Glycyrrhiza acanthocarpa prefer better quality medium clays to heavy clays or medium silts to heavy silts. The soils are usually derived from decomposed basalts, shales, metamorphic rocks or alluvial deposits. The soils pH ranges from 5.5PH to 7.2PH. It does not tolerate waterlogged soils however seasonally wet soils and inundations for short periods are tolerated. Non saline soils to the high end of moderately saline soils are tolerated.
Height & Spread:
Wild Plants: 0.4m to 1m by 0.3m to 1.2m.
Characteristics:
Glycyrrhiza acanthocarpa grows as a small subshrub to straggly erect shrub. The bark is reddish-brown turning deep purplish to deep greenish-purple then deep semi glossy green near the apex. The terete to angular stems are winged and are moderately covered in pale coloured puberulent to hirtellous hairs.
Glycyrrhiza acanthocarpa‘s alternate, oblong odd pinnate leaves measure 25mm to 80mm in length by 25mm to 30mm in width overall. The 9 to 13 linear, elliptic to obovate leaflets measure 15mm to 20mm in length by 2.5mm to 8mm in width. The deep green to sea-green narrow elliptical stipules are discolourous and measure 3mm to 5mm in length. The petiole, rachis and petiolules are covered in off white to reddish curved hirtellous hairs. The petioles measure 7mm to 8.5mm in length while the rachises measures 20mm to 35mm in length and the petiolules measure 0.2mm to 0.5mm in length. Basal leaflets are the shortest while the terminal leaflet is the longest.
The bases are broad cuneate to rounded while the apexes are broad acute often with a mucronate tip. The discolourous laminas are pale sea-green to deep green and glabrous on the upper lamina while the lower laminas are slightly paler. The oil glands are minute dots. The lamina recurves strongly upwards from the midvein to the margins. The margins are entire and covered in short off white to reddish hirtellous hairs. The mid vein is moderately prominent on the lower lamina and is distinctly visible on the upper lamina. It is sparsely to moderately covered in off white to reddish hirtellous hairs.
The inflorescences of Glycyrrhiza acanthocarpa are racemes born from the leaf axils or the terminals. The angular peduncle and rachis are scabrous. The peduncle measures 20mm to 60mm in length while the rachis measures 30mm to 90mm in length. The pedicels measure 1mm to 2mm in length.
The pale green filiform calyx bracts measure 3mm to 4mm in length. The pale green and tan calyx tube measures 3mm to 4mm in length which includes the 4.lobes which measure 1.5mm to 2.25mm in length.
The broad lanceolate standards are purple to lilac and become paler towards the base and have an obtuse to acuminate apex. They measure 5mm to 9mm in length by 4mm to 8mm in width. The purple linear to oblong wing petals curl inwards near the apex to surround the keel and measure 4mm to 6mm in length by 3mm to 5mm in width. The mid purple, acute keels measure 3mm to 5mm in length by 2mm to 3mm in height.
9 of the 10 white filaments are fused to form a tube open on one side to allow the single free filament to be exposed. The style is persistent on the ripe pods. The flowers appear from September to late May.
Glycyrrhiza acanthocarpa‘s fruits are ovoidal pods. The pods are pale grass-green and are densely covered in reddish to reddish-pink or reddish-brown hirtellous hairs externally and are glabrous internally. The pods measure 5mm to 6mm length by 3.5mm to 4mm in diameter and turn deep brown-black when ripe. The single seed in each pod is drab greenish-grey mottled black and measures 2.4mm to 2.8mm in length by 2.5mm in diameter.
Wildlife:
Glycyrrhiza acanthocarpa‘s wildlife is unknown to the author.
Cultivation:
Glycyrrhiza acanthocarpa is a beautiful small shrub that has potential in dry arid gardens or dry heaths. It is very suitable for small gardens in most areas in Australia. As garden subjects it grows to 0.6 meter to 1.2 meter high by 1 meter to 1.5 meter wide when cultivated in the open. Light tip pruning can be done to increase the bushiness and consequently the number of flowers the following season. Hard pruning can be done once the plants are established but some set back will occur so it is better to trim the plants on a regular or annual basis. It is fast growing; drought tolerant once established and cold tolerant to temperatures as low as minus 3 degrees. It is best mass planted or at least planted in groups of 3 or 5 in arid areas to give a mass green ground cover or low shrubbery.
It is great in medium to large rockeries; planted in the midground with bolder foliage and flowering plants to the rear. It can become a great focal and talking point. Here it can be planted in small groups of 2 to 5 to create a delicate look with other natives taking the strong stance especially when in flower. Its long flowering period is a real bonus and it does not disappoint under cultivation.
Planted singularly with annuals in the foreground and between the circular patterns it will dominate the foliage but contrast beautifully with the flowers with patches of grey green which will ensure a great display during the spring and autumn months while the other seasons.
Mass plant it to the rear amongst upright annuals for year round colour. It would not matter if the annuals flowering clashed at the same time as there leaves would break the bright colours and give texture to the bed. Once the annuals have ceased flowering the bed is not completely barren and bare and offers that transitional piece of greenery.
It can be scattered or mass planted amongst other similar size shrubs adjacent to paths so that the foliage can be brushed against or the odd leaflet crushed to emit the strong aniseed or liquorice scent.
Propagation:
Seeds: The seeds of Glycyrrhiza acanthocarpa need to be treated by removing part of the hard outer shell. Even then germination may take up to 12 months. I perform this by filing the outer shell down until the embryo is almost in sight. Sow treated seed directly into a seed raising mix. Cover the seeds with 2mm to 3mm of fine sand and place the trays in a warm sunny position. Keep moist at all times. When the seedlings are 25mm to 50mm tall, prick them out and plant them into 50mm native tubes using a good organic mix.
Once the seedlings reach 200mm to 250mm in height plant them out into their permanent position.
Fertilize using seaweed, fish emulsion or organic chicken pellets soaked in water on an alternate basis. Fertilize every two months until the plants are established then annually in early September to October to maintain health, vitality and better flowering.
Further Comments from Readers:
Hi reader, it seems you use The Bible of Botany a lot. That’s great as we have great pleasure in bringing it to you! It’s a little awkward for us to ask, but our first aim is to purchase land approximately 1,600 hectares to link several parcels of N.P. into one at The Pinnacles NSW Australia, but we need your help. We’re not salespeople. We’re amateur botanists who have dedicated over 30 years to saving the environment in a practical way. We depend on donations to reach our goal. If you donate just $5, the price of your coffee this Sunday, We can help to keep the planet alive in a real way and continue to bring you regular updates and features on Australian plants all in one Botanical Bible. Any support is greatly appreciated. Thank you.
In the spirit of reconciliation we acknowledge the Bundjalung, Gumbaynggirr and Yaegl and all aboriginal nations throughout Australia and their connections to land, sea and community. We pay our respect to their Elders past, present and future for the pleasures we have gained.
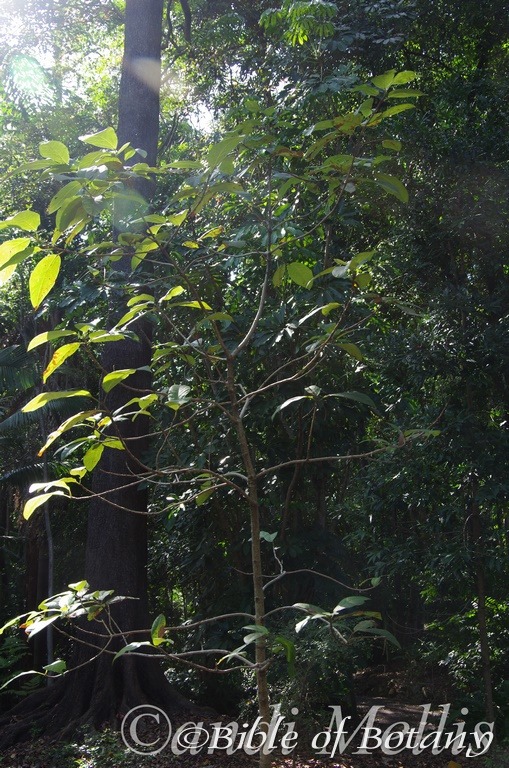
Mount Cootha Botanic Gardens Qld.
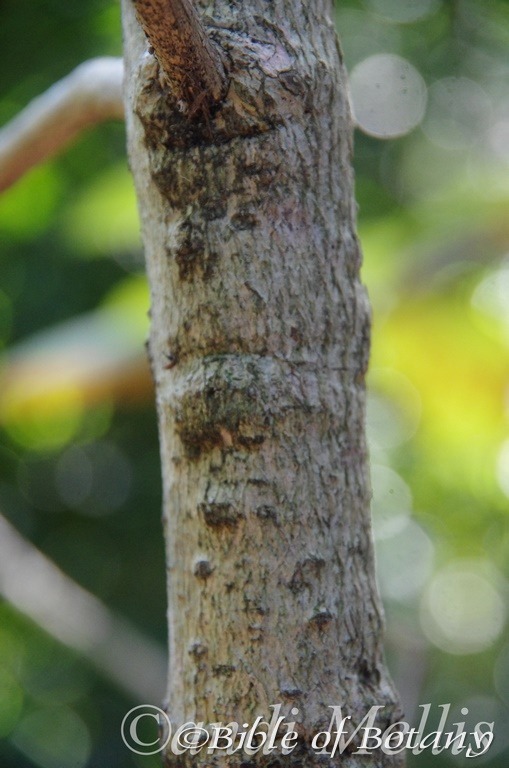
Mount Cootha Botanic Gardens Qld.
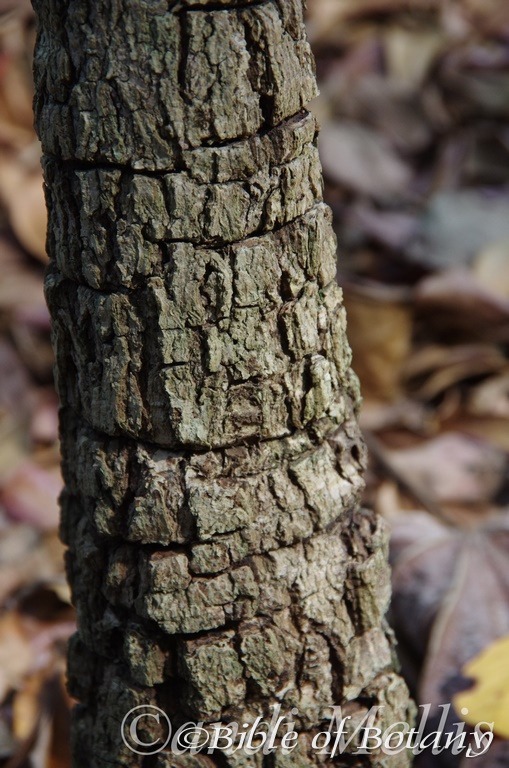

Mount Cootha Botanic Gardens Qld.
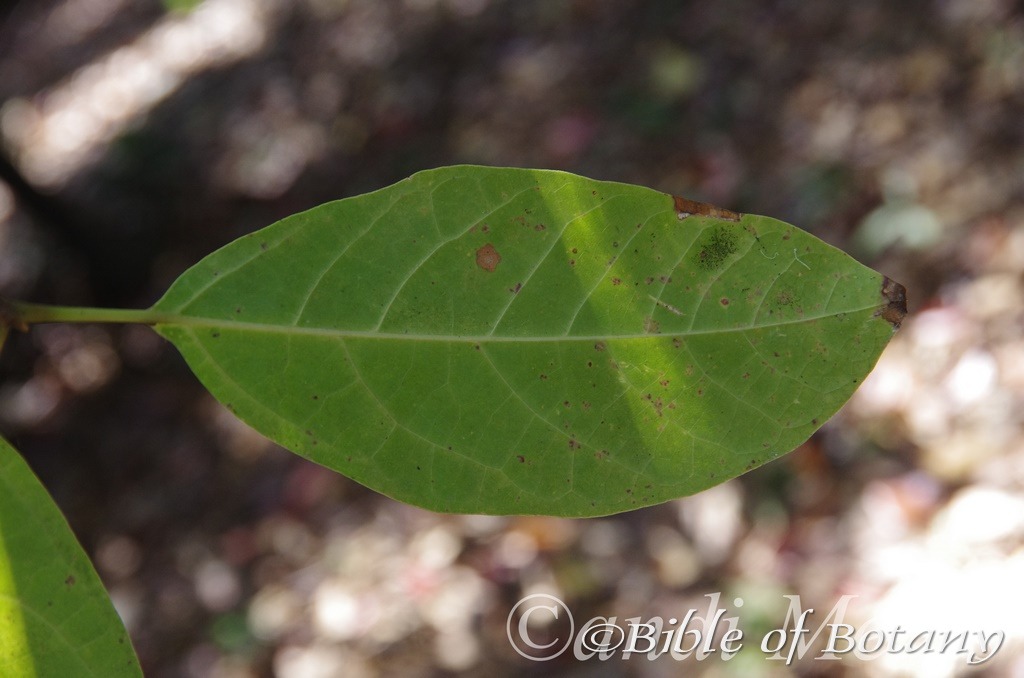
Mount Cootha Botanic Gardens Qld.
Gmelina dalrympleana
Classification
Unranked: Magnoliophyta
Class: Magnoliopsida
Order: Lamiales
Family: Lamiaceae
Genus: Is named in honour of Johan Georg Gmelin; 1709-1755, who was a German botanist.
Species: Is named in Honour of R. Dalrymple Hay; 1861-1943, who was Commissioner for forestry in NSW.
Common Name: Grey Teak.
Distribution:
Gmelina dalrympleana is a found south from the Torres Strait Islands and Cape York Peninsula Townsville to in north east Queensland.
There are several small outlying populations in the Northern Territory, in northern Kakadu National Park, Melville Island and another on the Daly River south of Darwin.
https://avh.ala.org.au/occurrences/search?taxa=Gmelina+dalrympleana#tab_mapView
Habitat Aspect Climate:
Gmelina dalrympleana prefers partial shade, dense shade or full sun. It grows adjacent to warm tropical lowland rainforests, vine forests, wet Eucalyptus forests, or littoral rainforests in wet to swampy locations or in wet gallery forests. The altitude ranges from 50 meters ASL to 500 meters ASL.
The temperatures range from 10 degrees in July to 36 degrees in January.
The rainfalls range from lows of 1050mm to an average of 3000mm annually but this has little relevance as it is the permanent ground water that is important.
Soil Requirements:
Gmelina dalrympleana prefers better quality light clays to medium clays soils. The soils are usually derived from decomposed brown basalts, black basalts, shales or metamorphic rocks. The soils pH ranges from 4.5PH to 7PH are preferred. It does not tolerate waterlogged soils. Non saline soils to slightly saline soils are tolerated.
Height & Spread:
Wild Plants: 12m to 18m by 9m to 12m.
Characteristics:
Gmelina dalrympleana grows as a small tree with a straight grey bole. The bark is grey-brown and slightly flaky. The stems are glabrous with scattered lenticels grey turning pale olive green near the apex.
Gmelina dalrympleana‘s oblong to broad elliptical, glabrous leaves measure 150mm to 300mm in length and 70mm to 190mm in width. The bases are rounded with two large flat glands near the petiole while the apexes are obtuse to broadly acuminate. The discolourous laminas are pale green to mid green on the upper lamina while the lower lamina is very pale green to almost white or very pale fawn-green. The lamina recurves from the mid vein to the margins a while the margins are entire. The mid vein and lateral veins are prominent on the lower lamina and are distinctly visible on the upper lamina. The mid vein is slightly depressed becoming deeper, especially as it approaches the apex. The petiole is channelled on the upper surface and measures 20mm to 35mm in length.
Inflorescences of Gmelina dalrympleana are panicles born from the apical leaf axis. The cupular calyx and minute acute lobes are densely covered in short, soft, rusty-brown pulverulent hairs externally and are glabrous internally and measure 4mm to 5mm in length. The corolla tubes is moderately covered in short, soft, rusty-brown pulverulent hairs externally and is moderately covered in short, soft, white pulverulent hairs internally. It measures 12mm to 13mm in length and is white with lilac and yellow markings internally. The 4.oblong lobes measure 6mm to 10mm in length by 3.5mm to 4.5mm in width. The 2 upper lobes and 2 lateral lobes strongly curve backwards and are revolute. The upper 2 lobes are united for most of their length. The lower triangular lobe is longer with an obtuse apex and measures 8mm to 12mm in length.
The 4.white, dimorphic filaments, 2 short and 2 long are exserted within the corolla. The shorter pair measure 10mm to 12mm in length while the longer pair measure 12mm to 15mm in length. The hastate anthers are white and measure 2mm to 3mm in width. The filaments and style are is sparsely to moderately covered in short, soft, white pulverulent hairs on the basal half. The style is exserted with one being longer than the other 2. The longer style measure 12mm to 15mm in length. The ovary is moderately covered in short, soft, white pulverulent hairs on the apical half and measures 1.5mm to 2mm in length. The fragrant flowers appear from October to January.
Gmelina dalrympleana‘s fruits are obovoid drupes with an emarginated apex. The drupes measure 8mm to 18mm in length by 5mm to 12mm in diameter.
Wildlife:
The flowers Gmelina dalrympleana are attractive to several different species of butterflies while the fruit is eaten by fruit eating pigeons including the Emerald Dove.
Cultivation:
Gmelina dalrympleana is a beautiful small growing tree for use in the rainforest garden that is on very wet terrain. The large leaves give the rainforest affect at an early age.
This is a beautiful tree for medium size gardens that has very unusual flowers. It is very fast growing and suitable for animal shelters because of its bushy canopy and provides good quantities of fruit for many birds. In cultivation the trees will grow to from 12 meters to 15 meters by 10 meters to12 meters in diameter when grown in the open. It is also semi deciduous in cooler climates. They make good specimen trees for starting a rainforest as they have an attractive bark and are fast growing.
These tree can be tip pruned early to create a bushy smaller tree or cut back hard as they grow to create a particular shape. With this in mind and the fact that the plants feed a host of wildlife it is best used in garden beds and not as specimen trees in a lawn or park setting.
They do require better soils with adequate moisture and an annual application of a native fertilizer. Mulch and leaf litter is always recommended.
Propagation:
Seeds: The seeds need to be treated by removing part of the hard outer shell. Even then germination may take up to 12 months. I perform this by filing the outer shell down until the seed is almost in sight. Sow treated Gmelina dalrympleana’s seed directly into a seed raising mix. Cover the seeds with 2mm to 3mm of fine sand and place the trays in a warm sunny position. Keep moist at all times. When the seedlings are 25mm to 50mm tall, prick them out and plant them into 50mm native tubes using a good organic mix.
Once the seedlings reach 200mm to 250mm in height plant them out into their permanent position.
Fertilize using seaweed, fish emulsion or organic chicken pellets soaked in water on an alternate basis. Fertilize every two months until the plants are established then annually in early September to October to maintain health, vitality and better flowering.
Further Comments from Readers:
Hi reader, it seems you use The Bible of Botany a lot. That’s great as we have great pleasure in bringing it to you! It’s a little awkward for us to ask, but our first aim is to purchase land approximately 1,600 hectares to link several parcels of N.P. into one at The Pinnacles NSW Australia, but we need your help. We’re not salespeople. We’re amateur botanists who have dedicated over 30 years to saving the environment in a practical way. We depend on donations to reach our goal. If you donate just $5, the price of your coffee this Sunday, We can help to keep the planet alive in a real way and continue to bring you regular updates and features on Australian plants all in one Botanical Bible. Any support is greatly appreciated. Thank you.
In the spirit of reconciliation we acknowledge the Bundjalung, Gumbaynggirr and Yaegl and all aboriginal nations throughout Australia and their connections to land, sea and community. We pay our respect to their Elders past, present and future for the pleasures we have gained.
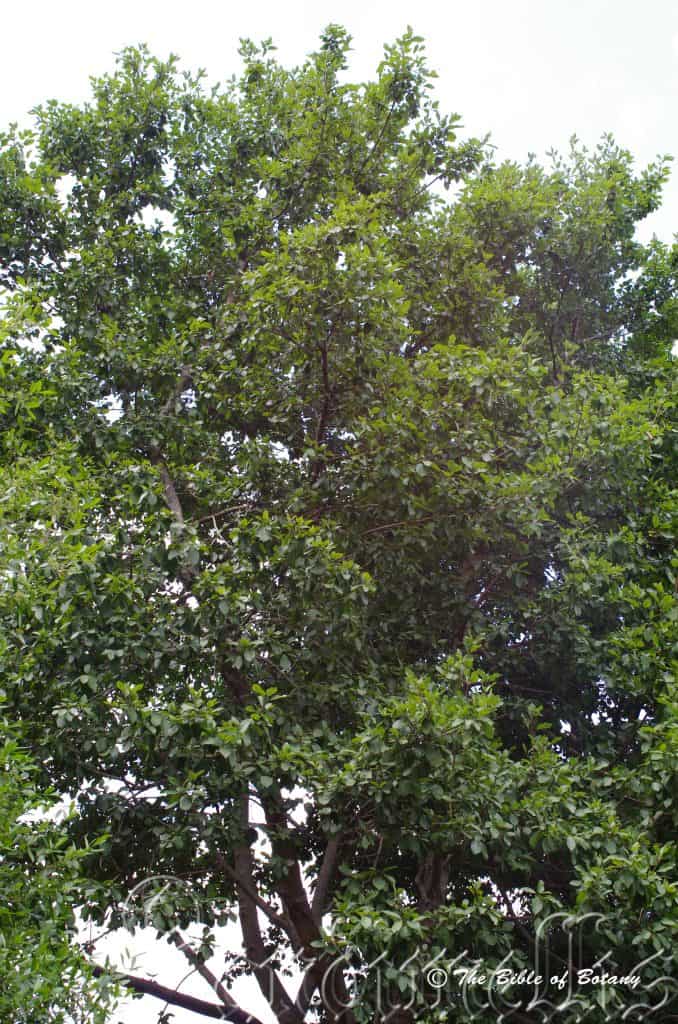
Mount Cootha Botanic Gardens Qld.
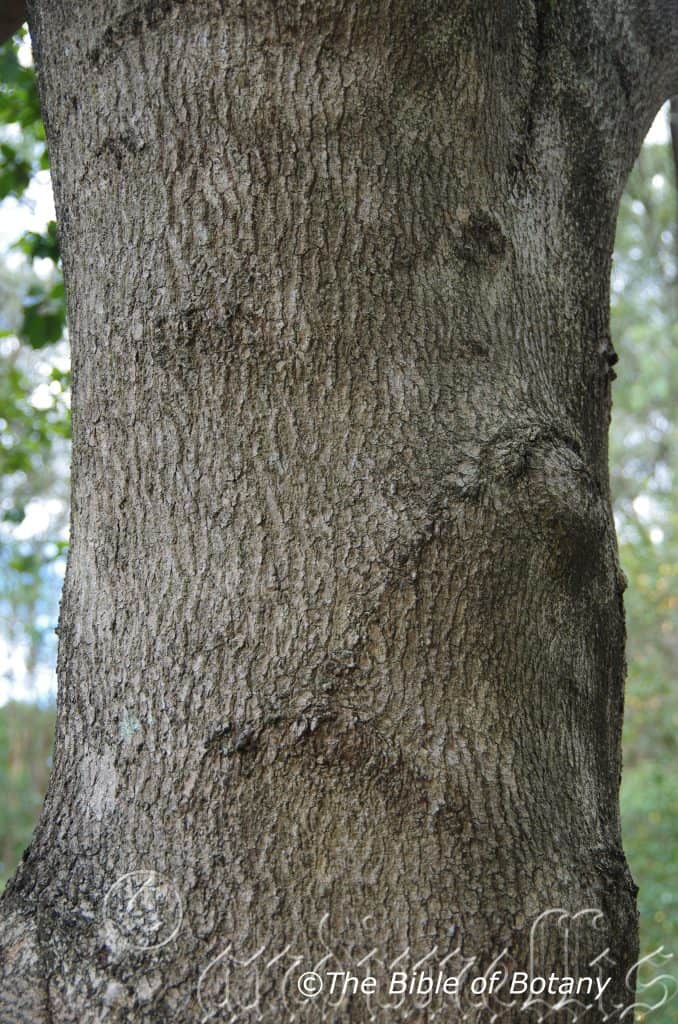
NCBG Coffs Harbour NSW
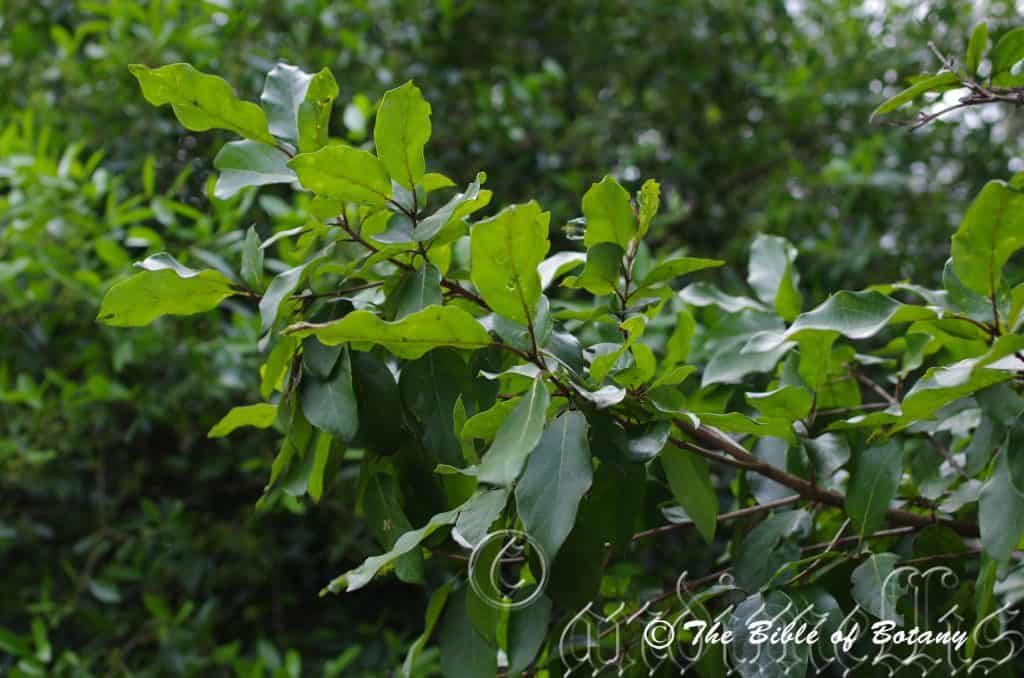
Mount Cootha Botanic Gardens Qld.
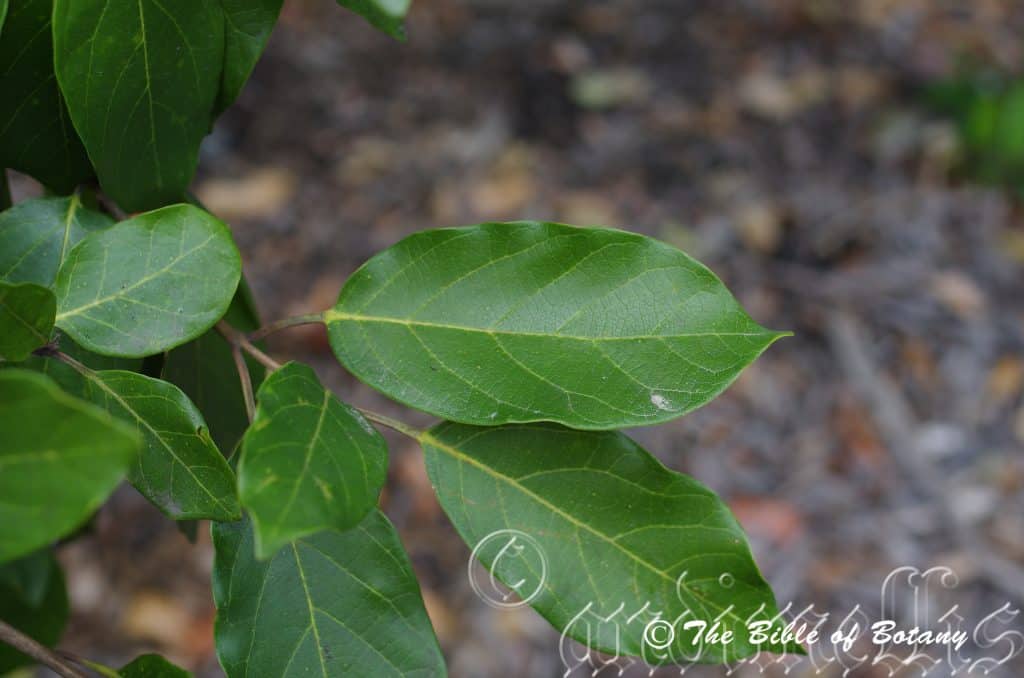
Mount Cootha Botanic Gardens Qld.
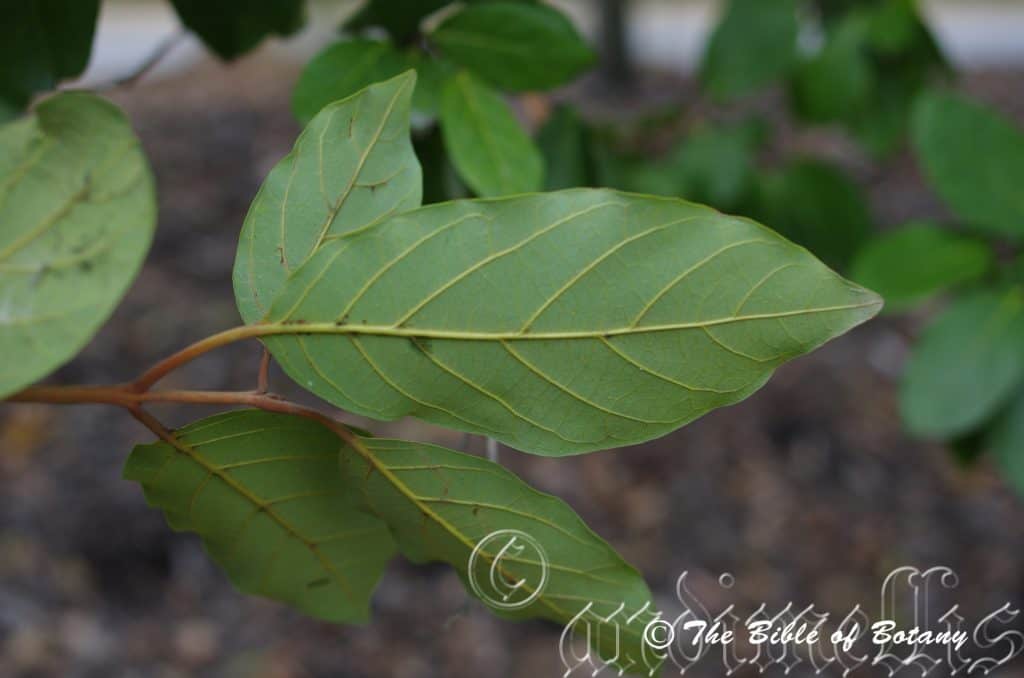
Mount Cootha Botanic Gardens Qld.
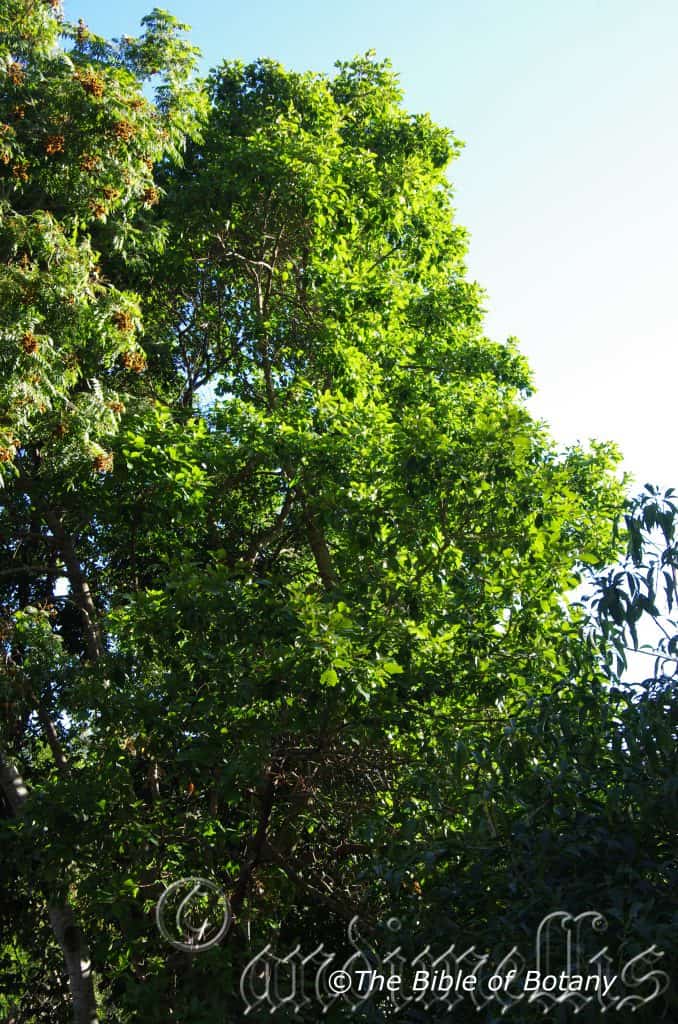
Mount Cootha Botanic Gardens Qld.
Gmelina fasciculiflora
Classification:
Unranked: Magnoliophyta
Class: Magnoliopsida
Order: Lamiales
Family: Lamiaceae
Genus: Is named in honour of Johan Georg Gmelin; 1709-1755, who was a German botanist.
Species: From Fasiculus, which is Latin for a small, close cluster or to be bundled together and Ferae/FerÄrum which is Latin for firm. It refers to the description of flowers being closely imbricated together.
Common Name: Grey Teak or White Beech.
Distribution:
Gmelina fasciculiflora is a found south from the southern boundary of Cedar National Park to the Paluma Range National Park in far north eastern coastal Queensland.
https://avh.ala.org.au/occurrences/search?taxa=Gmelina+fasciculiflora#tab_mapView
Habitat Aspect Climate:
Gmelina fasciculiflora prefers partial shade, dense shade or full sun. It grows well developed littoral rainforests, well developed tropical rainforests or in wet gallery forests. The altitude ranges from 15 meters ASL to 860 meters ASL.
The temperatures range from 10 degrees in July to 36 degrees in January.
The rainfalls range from lows of 1550mm to an average of 3200mm annually but this has little relevance as it is the permanent ground water that is important.
Soil Requirements:
Gmelina fasciculiflora prefers better quality light clays to medium clays or heavy silty alluvial soils. The soils are derived from decomposed brown basalt, black basalt, granites or accumulated beach sands. The soils pH ranges from 5PH to 6.5PH. It does not tolerate waterlogged soils. Non saline soils to moderately saline soils are tolerated.
Height & Spread:
Wild Plants: 12m to 20m by 9m to 12m.
Characteristics:
Gmelina fasciculiflora grows as a medium to large tree with a straight grey bole. The bark is grey-brown and slightly flaky. The grey branches are glabrous with scattered creamy lenticels. The branchlets pale olive-green to pale grass-green and densely are covered in short, soft, rusty-brown pulverulent hairs.
Gmelina fasciculiflora‘s broad elliptical, glabrous leaves measure 150mm to 300mm in length and 70mm to 190mm in width. The petiole has a shallow groove on the upper surface which measure 30mm to 50mm in length. The bases are broad cuneate to rounded while the apex is obtuse or obtuse-acuminate. The discolourous laminas are mid green to sea-green and glabrous on the upper lamina while the lower lamina is a much paler bluish-green. The undulating laminas recurve upwards from the mid vein to the margins while the margins are entire. The mid vein and 10 to 14.lateral veins are densely, covered in short, soft, rusty-brown pulverulent hairs, are prominent on the lower lamina. The depressed mid vein is distinctly visible on the upper lamina. There are 2 minute flat glands visible on the lower lamina near the base just before its junction with the petiole.
Inflorescences of Gmelina fasciculiflora are born as compound panicles from the upper leaf axis. The flowers are white with a purple lower lobe. The grass-green peduncle, rachis, pedunculates and pedicels are densely covered in short, soft, rusty-brown pulverulent hairs. The peduncle measures 7mm to 11mm in length while the rachis measure 50mm to 70mm in length, the pedunculates measure 10mm to 35mm in length and the pedicels measures 0.5mm to 2mm in length.
The cupular calyx and minute acute lobes are densely covered in short, soft, rusty-brown pulverulent hairs externally and are glabrous internally and measure 4mm to 5mm in length. The corolla tubes are moderately covered in short, soft, rusty-brown pubescent hairs externally and are moderately covered in short, soft, white pubescent hairs internally. It measures 12mm to 13mm in length and is white with lilac and yellow markings internally. The 4.oblong lobes measure 6mm to 10mm in length by 3.5mm to 4.5mm in width. The 2 upper lobes and 2 lateral lobes strongly curve backwards and are revolute. The upper 2 lobes are united for most of their length. The lower triangular lobe is longer with an obtuse apex and measures 8mm to 12mm in length.
The 4.white, dimorphic filaments, 2 short and 2 long are exserted within the corolla. The shorter pair measure 10mm to 12mm in length while there longer pair measure 12mm to 15mm in length. The hastate anthers are white and measure 2mm to 3mm in width. The filaments and style are is sparsely to moderately covered in short, soft, white pulverulent hairs on the basal half. The style is exserted with one being longer than the other 2.The longer style measure 12mm to 15mm in length. The ovary is moderately covered in short, soft, white pulverulent hairs on the apical half and measures 1.5mm to 2mm in length. The fragrant flowers appear from October to January.
Gmelina fasciculiflora‘s fruit are obovoid deep blue-purple drupes with an emarginated apex. The drupes measure 8mm to 18mm in length by 5mm to 12mm in diameter.
Wildlife:
The flowers of Gmelina fasciculiflora are attractive to several different species of butterflies while the fruit is eaten by fruit eating pigeons including the Emerald Dove.
Cultivation:
Gmelina fasciculiflora is a beautiful small growing tree for use in the rainforest garden or for a park scene that does well on very wet terrain. The large leaves give the rainforest affect at an early age.
This is a beautiful tree for medium to large size gardens that has very unusual flowers. It is very fast growing and suitable for animal shelters because of its bushy canopy and provides good quantities of fruit for many birds. In cultivation the trees will grow to from 10 meters to 15 meters by 8 meters to 12 meters in diameter when grown in the open. It is also semi deciduous in cooler climates. They make good specimen trees for starting a rainforest as they have an attractive bark and are fast growing.
The trees make excellent accent trees in front of low set commercial or industrial sheds and low set or 2 story school buildings where they will break up hard rigid architectural lines and give warmth and breadth to a building. In front of high rise buildings they give balance especially where they could be grown in curves meandering to the entry doors.
Try using them in large tubs in court yards or foyers or planted where the only other feature is a large rock, stump or formal or informal frog or fish pond. Next to such features their large leaves, attractive flowers and purple fruit are acquisitively beautiful but certainly noticed. I am surprised that they have never been used in commercial entrances and foyers to break the ice and give a feeling of business as usual but somehow make the business more relaxing.
Propagation:
Seeds: The seeds of Gmelina fasciculiflora need to be treated by removing part of the hard outer shell. Even then germination may take up to 12 months. I perform this by filing the outer shell down until the seed is almost in sight. Sow treated Gmelina dalrympleana’s seed directly into a seed raising mix. Cover the seeds with 2mm to 3mm of fine sand and place the trays in a warm sunny position. Keep moist at all times. When the seedlings are 25mm to 50mm tall, prick them out and plant them into 50mm native tubes using a good organic mix.
Once the seedlings reach 200mm to 250mm in height plant them out into their permanent position.
Fertilize using seaweed, fish emulsion or organic chicken pellets soaked in water on an alternate basis. Fertilize every two months until the plants are established then annually in early September to October to maintain health, vitality and better flowering.
Further Comments from Readers:
Hi reader, it seems you use The Bible of Botany a lot. That’s great as we have great pleasure in bringing it to you! It’s a little awkward for us to ask, but our first aim is to purchase land approximately 1,600 hectares to link several parcels of N.P. into one at The Pinnacles NSW Australia, but we need your help. We’re not salespeople. We’re amateur botanists who have dedicated over 30 years to saving the environment in a practical way. We depend on donations to reach our goal. If you donate just $5, the price of your coffee this Sunday, We can help to keep the planet alive in a real way and continue to bring you regular updates and features on Australian plants all in one Botanical Bible. Any support is greatly appreciated. Thank you.
In the spirit of reconciliation we acknowledge the Bundjalung, Gumbaynggirr and Yaegl and all aboriginal nations throughout Australia and their connections to land, sea and community. We pay our respect to their Elders past, present and future for the pleasures we have gained.

Mount Cootha Botanic Gardens Qld.
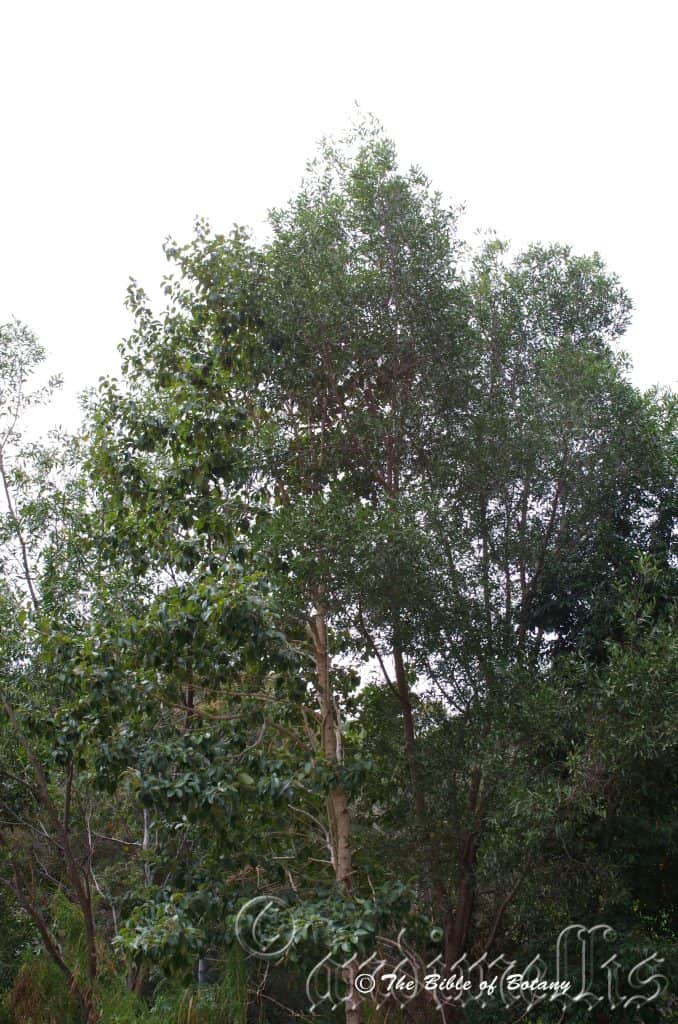
Kedron Brook Qld.

Kedron Brook Qld.

Stockyard Creek Coaldale NSW
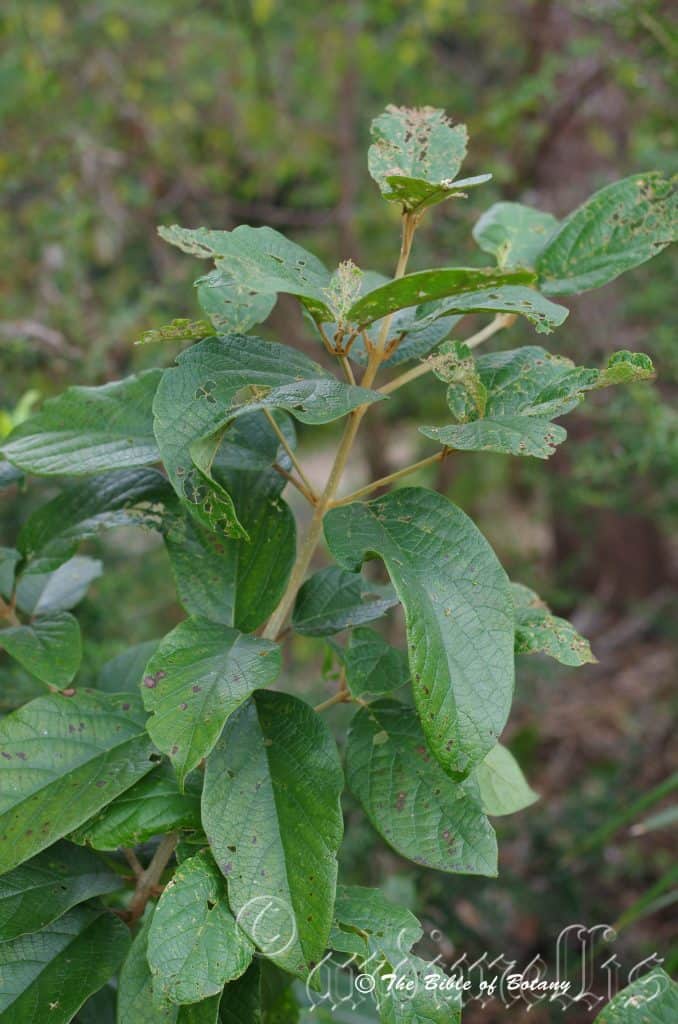
Kedron Brook Qld.
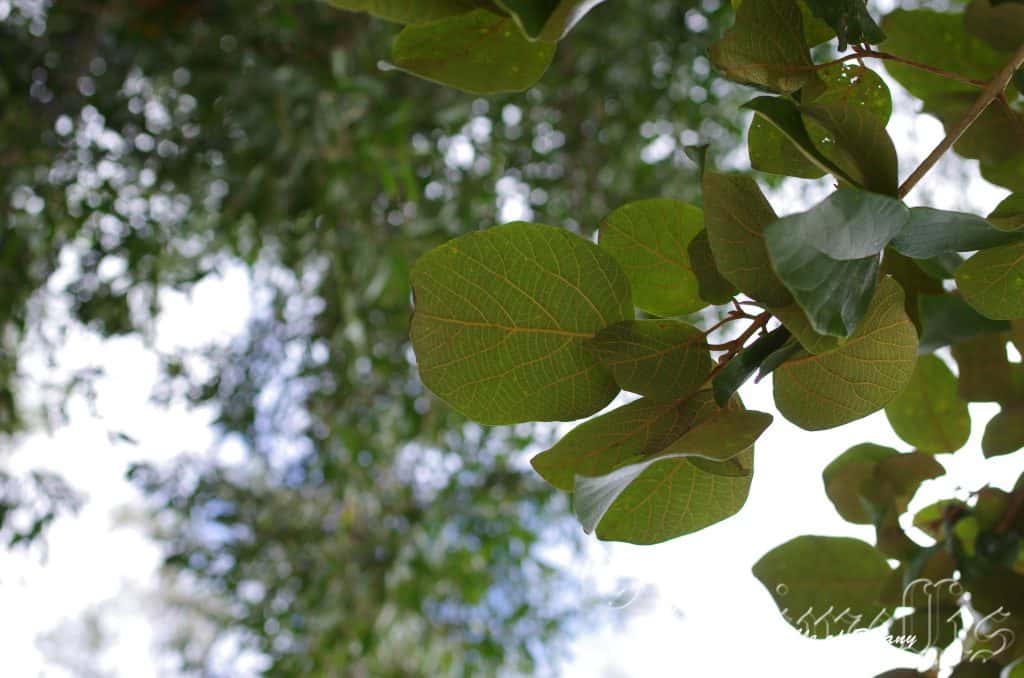
Kedron Brook Qld.
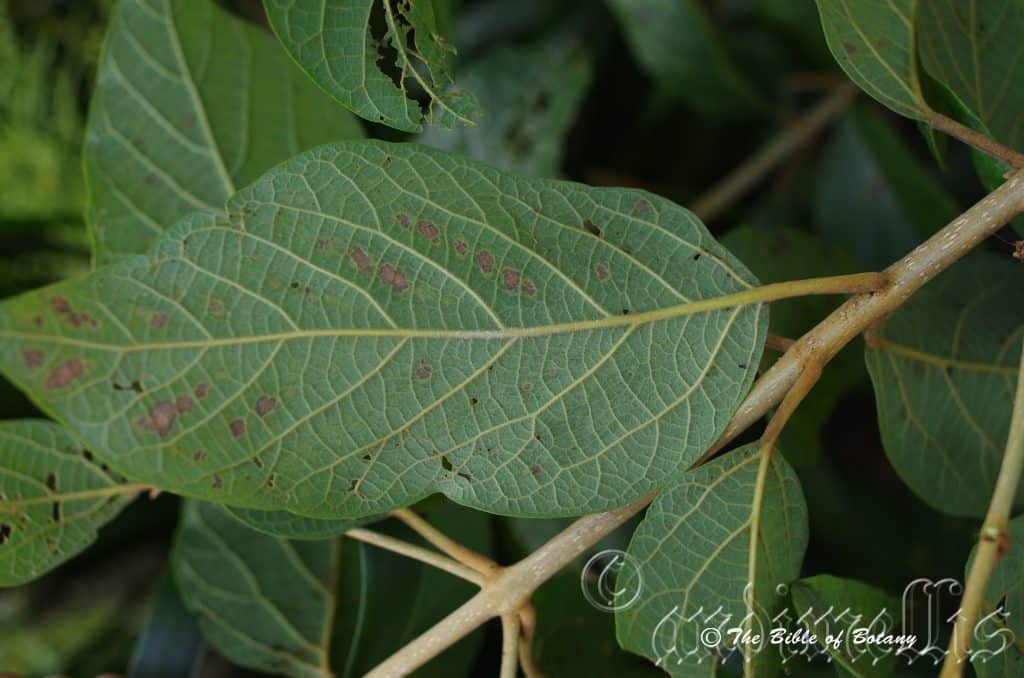
Kedron Brook Qld.
Gmelina leichhardtii
Unranked: Magnoliophyta
Unranked: Magnoliopsida
Order: Lamiales
Family: Lamiaceae
Genus: Is named in honour of Johan Georg Gmelin; 1709-1755, who was a German botanist.
Species: Is named in honour of Ludwig Leichhardt 1813-1848, who was a German explorer and botanist in Australia.
Common Name: White Beech.
Distribution:
Gmelina leichhardtii is a found in several disjunct populations south from Eungella National Park in the central Queensland coast west of Mackay to Berry on the southern New South Wales coast. It is found on and east of the Great Dividing Range. Its populations have suffered greatly as a result of over harvesting of timber during early settlement.
https://avh.ala.org.au/occurrences/search?taxa=Gmelina+leichadtii#tab_mapView
Habitat Aspect Climate:
Gmelina leichhardtii prefer dense shade, partial shade or full sun. It grows in well-developed warm sub-tropical lowland rainforests, riverine rainforests, gallery forests, dry rainforests, moist Eucalyptus forests or littoral rainforests. The altitude ranges from 10 meters ASL to 800 meters ASL.
The temperatures range from 10 degrees in July to 36 degrees in January.
The rainfall ranges from lows of 800mm to an average of 3000mm annually.
Soil Requirements:
Gmelina leichhardtii prefers better quality light clays to medium clays. The soils are usually derived from decomposed basalts, shales or metamorphic rocks. The soils pH ranges from 4.5PH to 7PH are preferred. It does not tolerate waterlogged soils but often grows close to drainage lines or seepages where iron oxide bacteria is present. Non saline soils to moderately saline soils are tolerated.
Height & Spread:
Wild Plants: 20m to 40m by 8m to 12m.
Characteristics:
Gmelina leichhardtii is a tree with a straight bole at least two thirds of its height. The trunk is flanged at the base on larger trees up to 3 meters. The bark is pale grey-brown, scaly and with small fissures as it ages. The branches are glabrous, pale grey-brown. The branchlets and buds are pale olive green and densely covered in rusty red tomentose hairs.
Gmelina leichhardtii‘s opposite broad elliptical to ovate, glabrous leaves measure 80mm to 200mm in length by 50mm to 100mm in width. The discolourous laminas are sea green to deep sea green and glossy on the upper lamina while the lower lamina is paler, dull and sparsely covered in rusty red tomentose hairs. The petiole measures 16mm to 50mm in length and is covered in rusty-red tomentose hairs. The base is rounded to rounded-cuneate while the apex is broadly acuminate to broadly apiculate. The margins are entire or very slightly irregularly sinuate on mature trees while juvenile trees the leaves are more oblong with the margins have large irregularly spaced teeth. The mid vein is prominent on the lower lamina and is distinctly visible and on the upper lamina. The lamina is coriaceous
Inflorescences of Gmelina leichhardtii are born as terminal compound panicles. The flowers are white with a purple lower lobe. The grass-green peduncle, rachis, pedunculates and pedicels are densely covered in short, soft, rusty-brown pulverulent hairs. The peduncle measures 7mm to 11mm in length while the rachis measure 50mm to 70mm in length, the pedunculates measure 10mm to 35mm in length and the pedicels measures 0.5mm to 2mm in length.
The cupular calyx and minute acute lobes are densely covered in short, soft, rusty-brown pulverulent hairs externally and are glabrous internally and measure 4mm to 6mm in length. The corolla tubes are moderately covered in short, soft, rusty-brown pulverulent hairs externally and are moderately covered in short, soft, white pulverulent hairs internally. It measures 18mm to 25mm in length and is white with lilac and yellow markings internally. The 4.oblong lobes measure 6mm to 10mm in length by 3.5mm to 4.5mm in width. The 2 upper lobes and 2 lateral lobes strongly curve backwards and are revolute. The upper 2 lobes are united for most of their length. The lower triangular lobe is longer with an obtuse apex and measures 8mm to 12mm in length.
The 4.white, dimorphic filaments, 2 short and 2 long are exserted within the corolla. The shorter pair measure 10mm to 12mm in length while there longer pair measure 12mm to 15mm in length. The hastate anthers are white and measure 2mm to 3mm in width. The filaments and style are is sparsely to moderately covered in short, soft, white pulverulent hairs on the basal half. The style is exserted with one being longer than the other 2.The longer style measure 12mm to 15mm in length. The ovary is moderately covered in short, soft, white pulverulent hairs on the apical half and measures 1.5mm to 2mm in length. The fragrant flowers appear from November to January.
Gmelina leichhardtii‘s fruits are bright glossy blue to purple, flattened globose drupes. The drupes measure 12mm to 18mm in length by 15mm to 23mm in diameter. Trees at Nana Glen are biennial produces having a heavy crop followed by a lighter crop the following season.
Wildlife:
The flowers Gmelina leichhardtii are attractive to several different species of butterflies when in flower while the fruit is eaten by fruit eating pigeons including the Emerald Dove. Bower Birds Cat birds and Friar Birds have all been witnessed stealing the fruit. Flying foxes also are attracted to the trees at night.
Cultivation:
Gmelina leichhardtii is a beautiful slow growing tree for use in the rainforest garden that is on very moist terrain in sub-tropical to tropical areas. It is better in large gardens for use in a park like scenes or used in rainforest regeneration projects. Larger trees are suitable for growing epiphytes and lichens while the lower trunk is often covered in mosses and lichens. This tree is natural host to the Beautiful Beech orchid Thelychiton falcorostrus.
They prefer a cool root run and even moisture in the ground to look their best. Juvenile leaves are very attractive and as the tree gains height the appealing trunk makes its statement. The fruits are large and very attractive covering the ground from March to early April. Flowering is consistent every year from about 7 to 11 years of age however fruit set varies considerably from season to season. While the trees are not frost tolerant it is cold tolerant. In cultivation the trees will grow from 15 meters to 25 meters in height in the open by 10 meters to 15 meters in diameter.
Several juvenile trees; at Nana Glen, on our property were trimmed and maintained as shrubs 4.meters to 5 meters in height by 3 meters to 3.5 meters in diameter for over 15 years. In this time the shrubs maintained their unusual juvenile foliage were very bushy but never flowered during this time. In this state they made a beautiful shrub and I would suspect they would make excellent bonsai specimen.
The trees make excellent accent trees in front of low set commercial or industrial sheds and low set or 2 story school buildings where they will break up hard rigid architectural lines and give warmth and breadth to a building. In front of high rise buildings they give balance especially where they could be grown in curves meandering to the entry doors.
Try using them in large tubs in court yards or foyers or planted where the only other feature is a large rock, stump or formal or informal frog or fish pond. Next to such features their large leaves, attractive flowers and purple fruit are acquisitively beautiful but certainly noticed. I am surprised that they have never been used in commercial entrances and foyers to break the ice and give a feeling of business as usual but somehow make the business more relaxing.
Propagation:
Seeds: The seeds need to be treated by removing part of the hard outer shell. Even then germination may take up to 12 months. I perform this by filing the outer shell down until the seed is almost in sight. Sow treated Gmelina leichhardtii seed directly into a seed raising mix. Cover the seeds with 2mm to 3mm of fine sand and place the trays in a warm sunny position. Keep moist at all times. When the seedlings are 25mm to 50mm tall, prick them out and plant them into 50mm native tubes using a good organic mix.
Once the seedlings reach 200mm to 250mm in height plant them out into their permanent position.
Fertilize using seaweed, fish emulsion or organic chicken pellets soaked in water on an alternate basis. Fertilize every two months until the plants are established then annually in early September to October to maintain health, vitality and better flowering.
Further Comments from Readers:
Hi reader, it seems you use The Bible of Botany a lot. That’s great as we have great pleasure in bringing it to you! It’s a little awkward for us to ask, but our first aim is to purchase land approximately 1,600 hectares to link several parcels of N.P. into one at The Pinnacles NSW Australia, but we need your help. We’re not salespeople. We’re amateur botanists who have dedicated over 30 years to saving the environment in a practical way. We depend on donations to reach our goal. If you donate just $5, the price of your coffee this Sunday, We can help to keep the planet alive in a real way and continue to bring you regular updates and features on Australian plants all in one Botanical Bible. Any support is greatly appreciated. Thank you.
In the spirit of reconciliation we acknowledge the Bundjalung, Gumbaynggirr and Yaegl and all aboriginal nations throughout Australia and their connections to land, sea and community. We pay our respect to their Elders past, present and future for the pleasures we have gained.
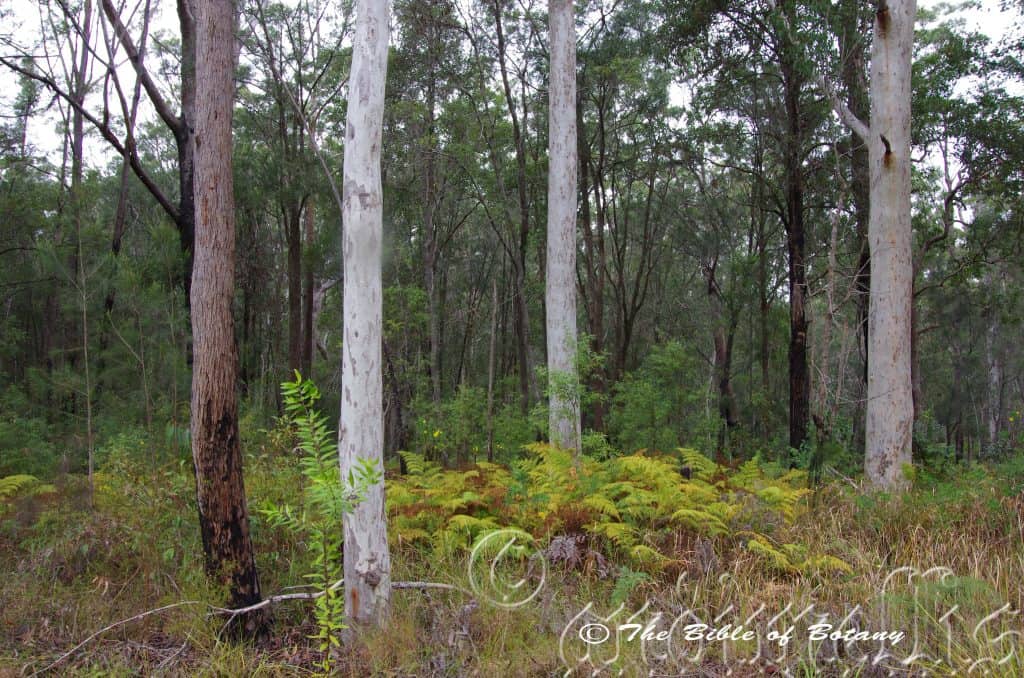
The Pinnacles NSW

The Pinnacles NSW

The Pinnacles NSW
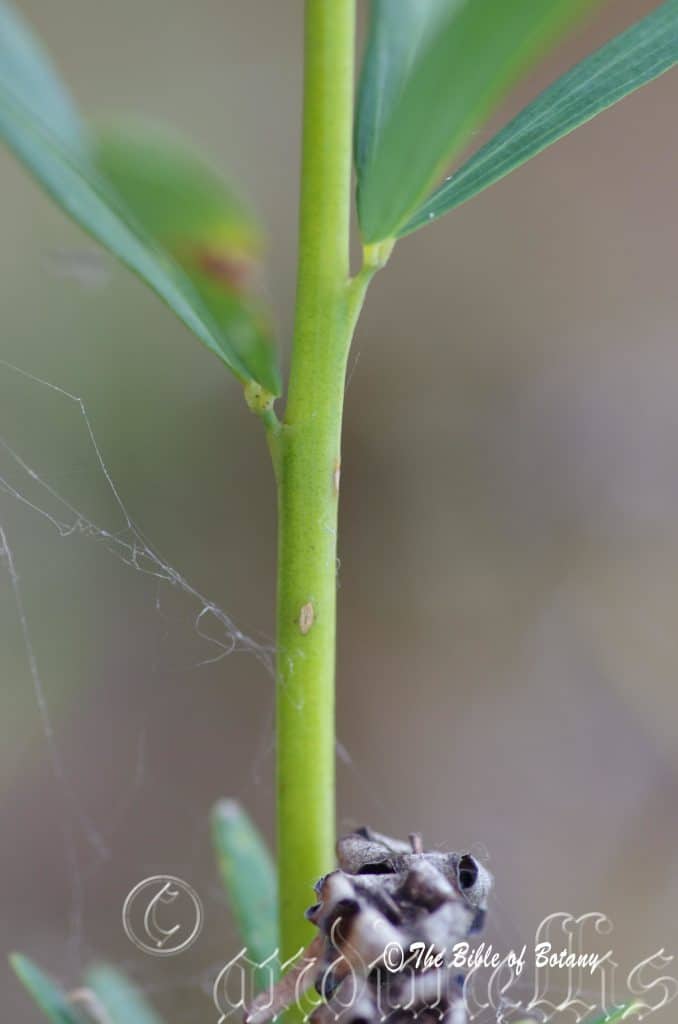
The Pinnacles NSW

The Pinnacles NSW
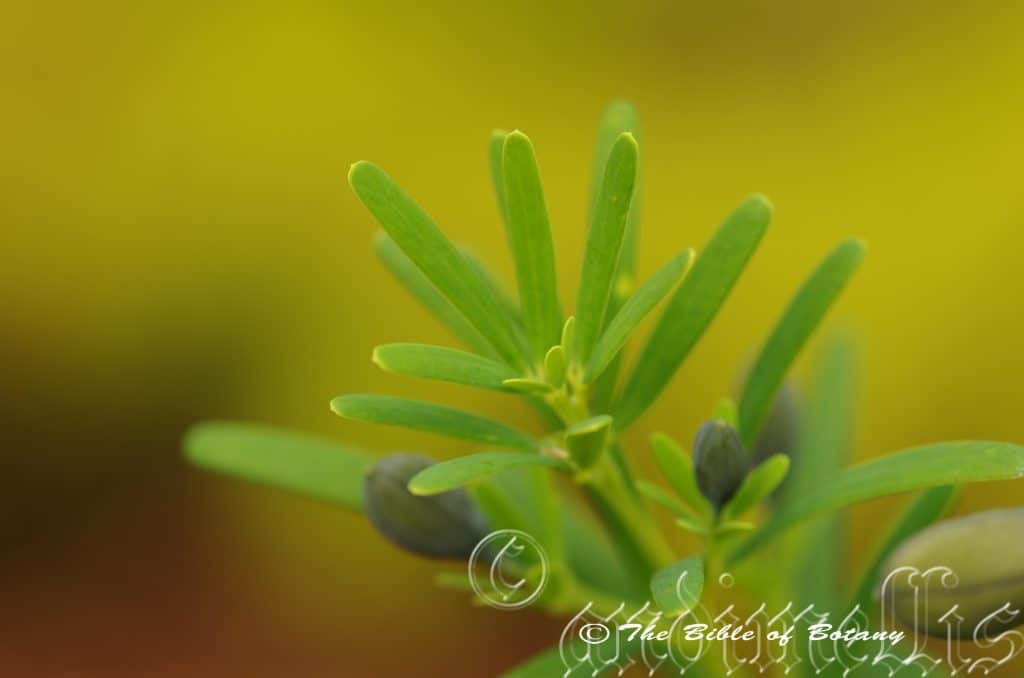
The Pinnacles NSW
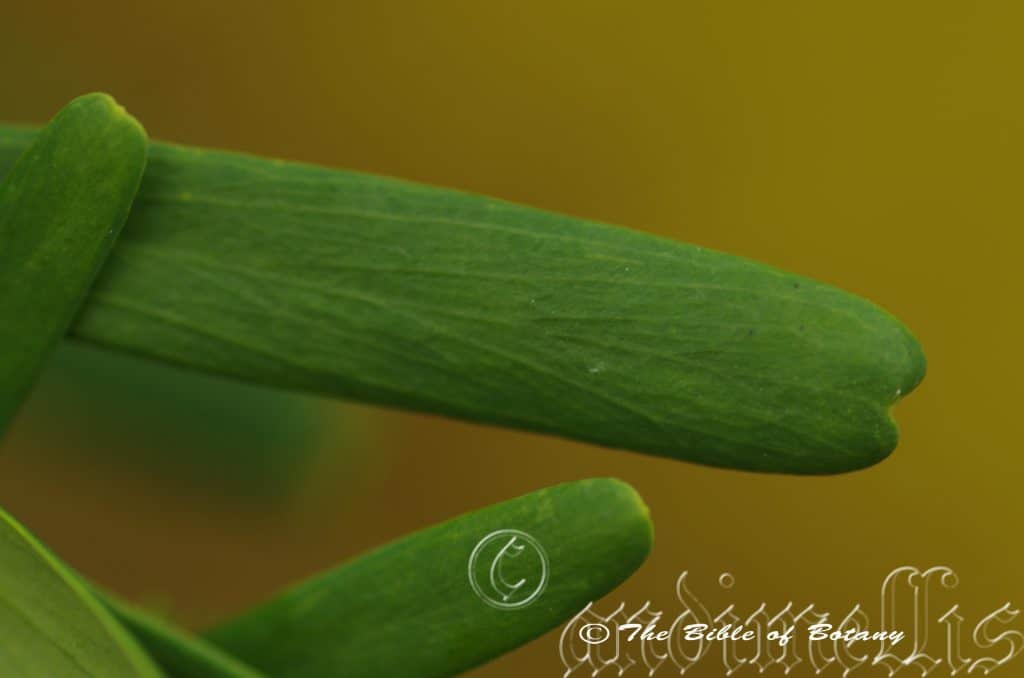
The Pinnacles NSW
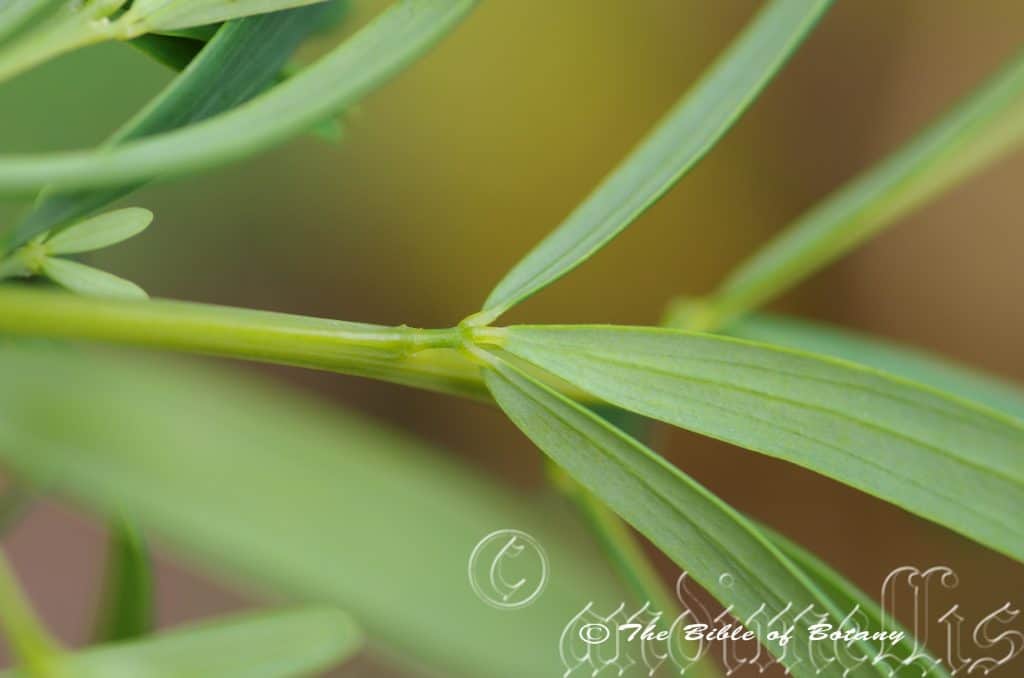
The Pinnacles NSW
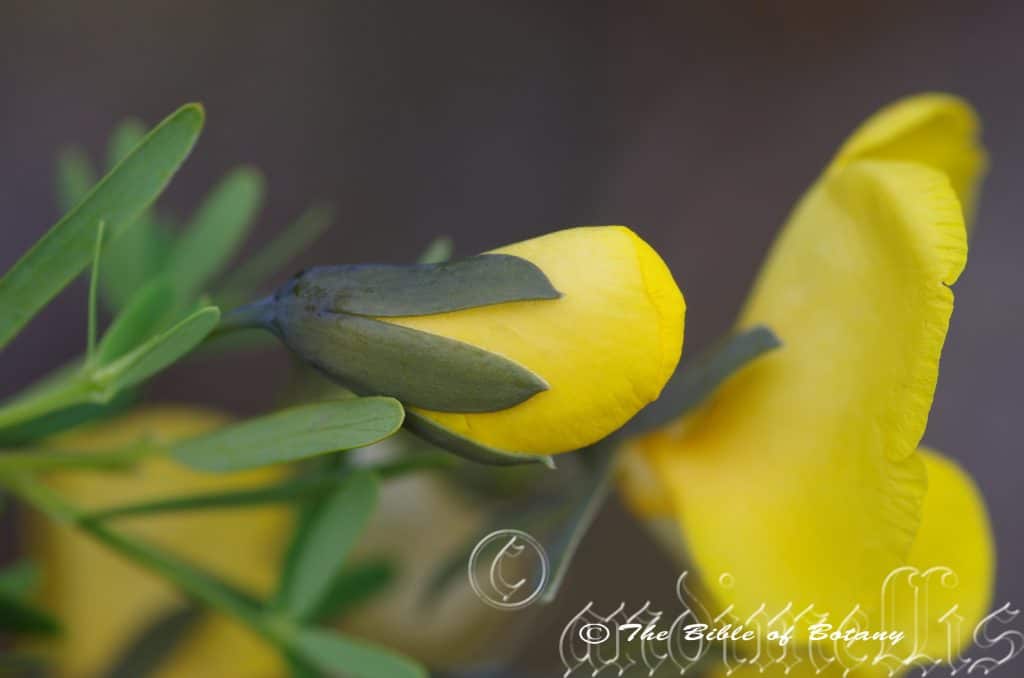
The Pinnacles NSW
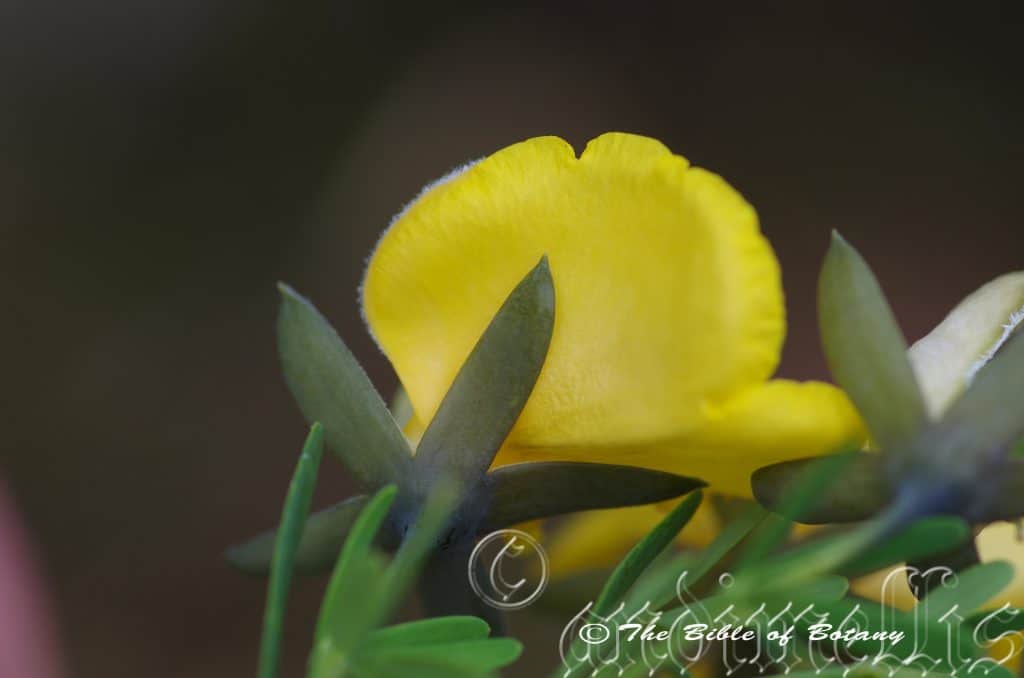
The Pinnacles NSW
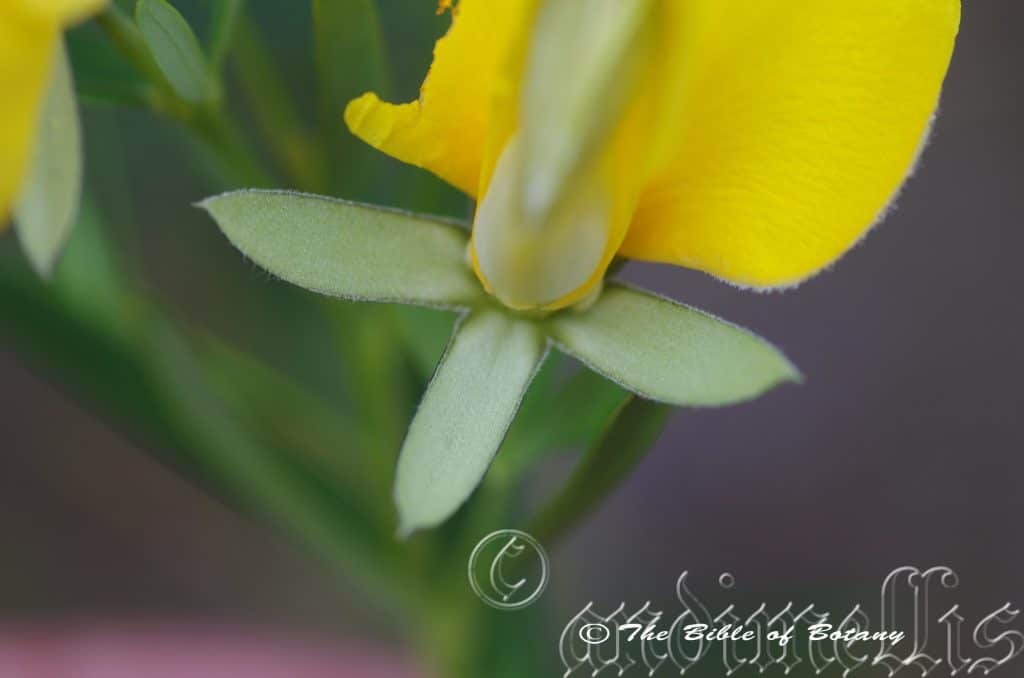
The Pinnacles NSW
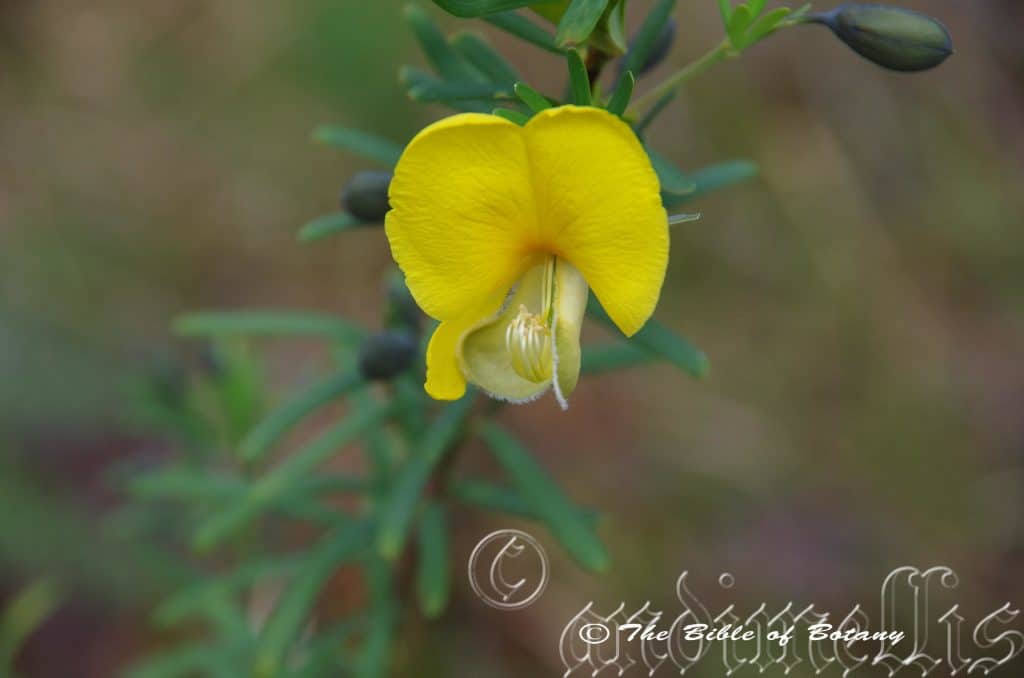
The Pinnacles NSW
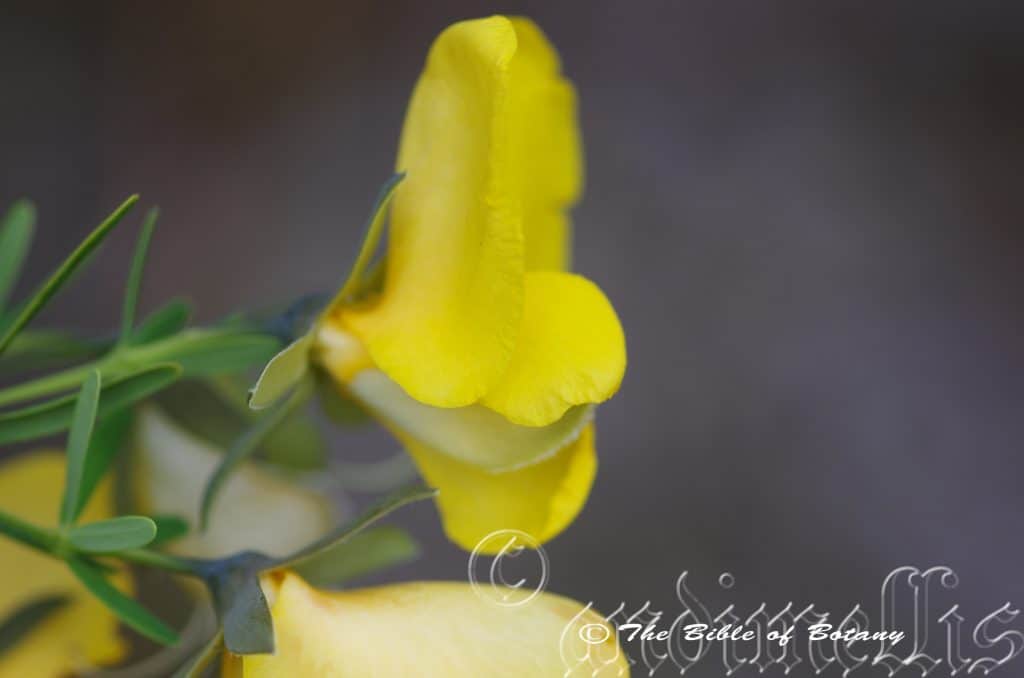
The Pinnacles NSW
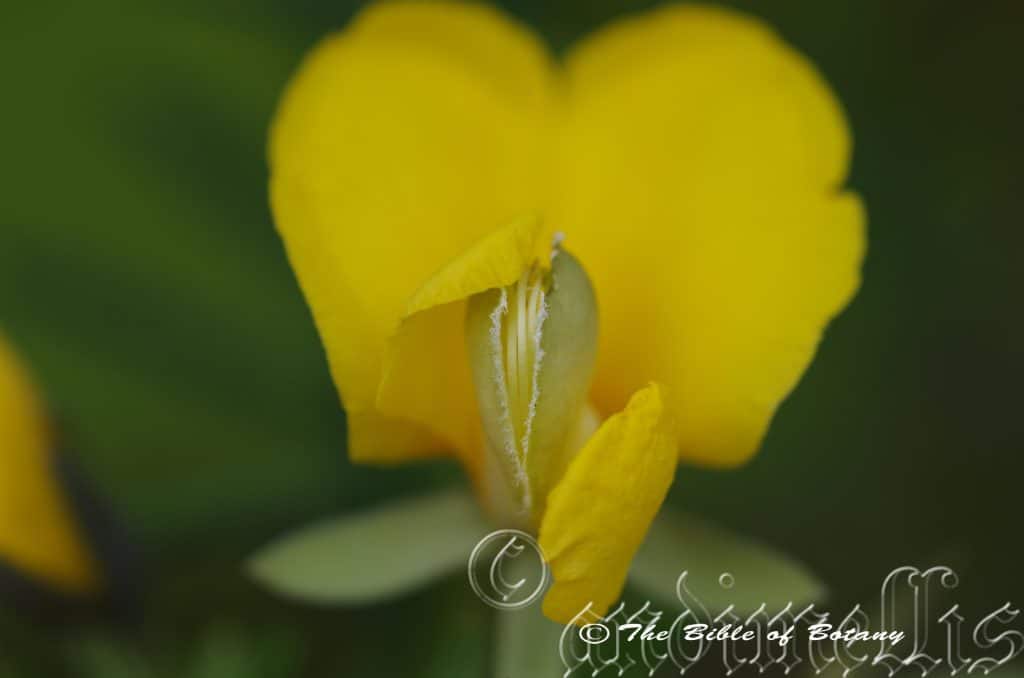
The Pinnacles NSW
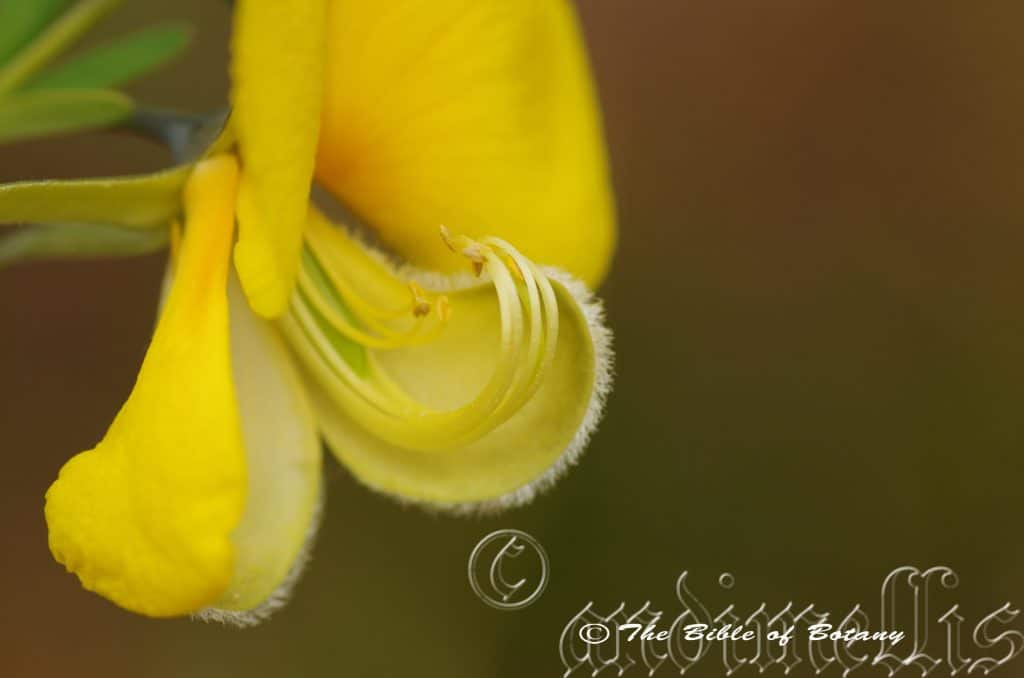
The Pinnacles NSW
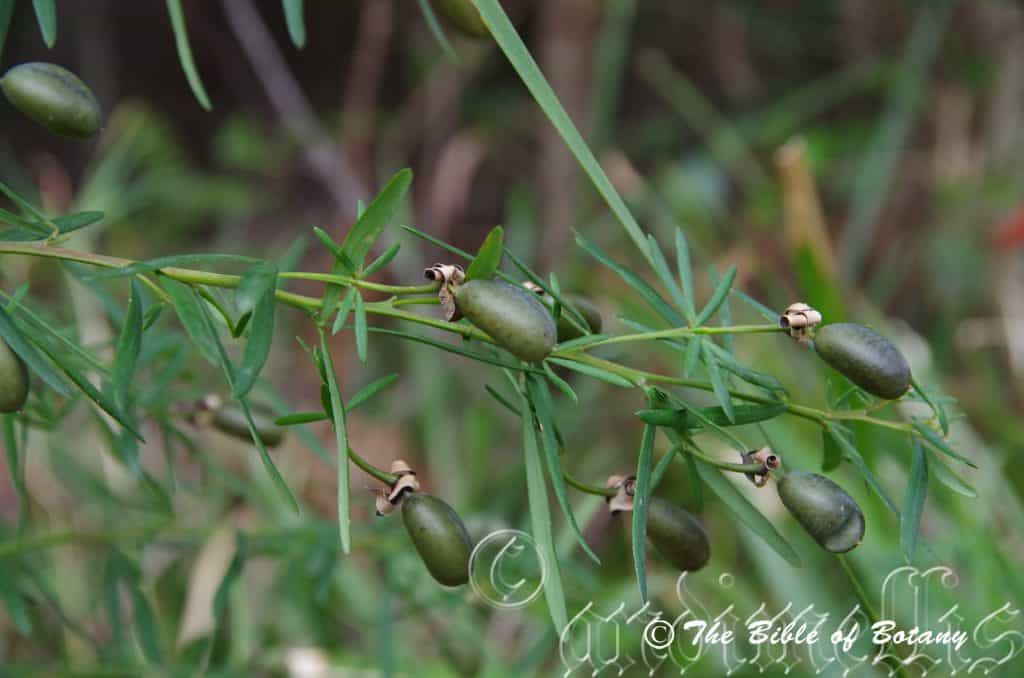
The Pinnacles NSW
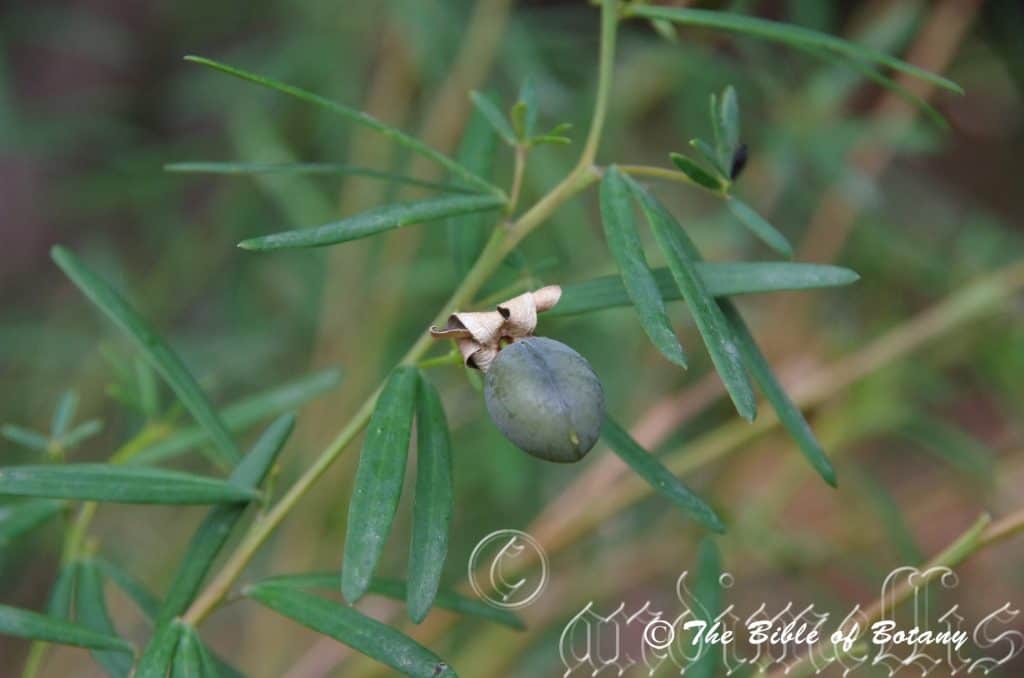
The Pinnacles NSW
Gompholobium latifolium
Classification:
Division: Magnoliophyta
Class: Magnoliopsida
Order: Fabales
Family: Fabaceae
Subfamily: Faboideae
Genus: From Gomphos, which is Ancient Greek for a pin, a bolt or nail and Lobos, which is Ancient Greek for a pod or capsule. It refers to pods, which have strong, stout pedicles.
Species: From Latus, which is Latin for broad and Folium, which is Latin for foliage. It refers to leaves which are much broader than other species in the genus.
Common Name: Balloon Pea.
Distribution:
Gompholobium latifolium is found south from Gladstone in southern Queensland to Melbourne. It is found on and east of the Great Dividing Range.
https://avh.ala.org.au/occurrences/search?taxa=Gompholobium+latifolium#tab_mapView
Habitat Aspect Climate:
Gompholobium latifolium prefers full sun to light shade or dappled shade. It is very quick to recolonize disturbed land adjacent to coastal wallums. It grows well above the water table in dry Eucalyptus forests coastal woodland heaths or on the coastal ranges. The altitude ranges from 5 meters ASL to 250 meters ASL.
The temperatures range from minus 2 degrees in July to 36 degrees in January.
The rainfalls range from lows of 450mm to 1600mm annually.
Soil Requirements:
Gompholobium latifolium prefers rich fertile sandy loams, peaty loams to light sandy clays, alluvial flats or dry podsolics. The soils are usually derived from decomposed sandstones, shales, brown basalts, black basalts, granites or accumulated peaty beach sands. The soils pH ranges from 4.5PH to 7PH are preferred. It does not tolerate waterlogged soils. Non saline soils to moderately saline soils are tolerated.
Height & Spread:
Wild Plants: 1.5m to 3m by 1.5m to 2m.
Characteristics:
Gompholobium latifolium grows as a small shrub with deep reddish brown stems which are glabrous. Branchlets are glabrous deep reddish green turning a deep green close to the apex. Young shoots are pale green and glabrous.
Gompholobium latifolium‘s alternate leaves are trifoliate. The linear to linear-lanceolate or narrow oblanceolate leaflets measure 35mm to 50mm in length by 2mm to 6mm in width. The discolourous laminas are dull, pale grass green on the upper lamina while the lower lamina is slightly paler. The bases are cuneate while the apexes are acute to obtuse with a small mucronate point. The leaflet margins are entire and flat. The mid vein is prominent below and faintly visible above. The petiole measures 1mm to 2mm in length while the petiolules are sessile to 1mm in length. Stipules are absent or minute less than 0.5mm in length.
Inflorescences of Gompholobium latifolium‘s are born auxiliary or terminally as single, paired or in small groups of three. The wiry pedicles measure 8mm to 12mm in length. The calyx measures 2mm to 3mm in length with the deeply divided linear lobes measuring 8mm to 11mm in length and have an acute apex. The standard measures 25mm to 30mm in width and is broadly retuse. The butter yellow standard is fully spread when fully open. The keels are broadly spathulate and measure 14mm to 19mm in length by 10mm to 12mm in width and are sparsely to densely cover in white ciliate hairs to 1mm in length. The standard and keel petals remain on the plant until the pod almost fully develops. The flowers appear from August through to early December.
Gompholobium latifolium fruits are a single ovoidal to oblong pod. The pods measure 15mm to 18mm in length by 7mm to 9mm in width and 6mm to 7.5mm in depth. The green pods turn grey-brown when ripe and split longitudinally to reveal the dark brown to black seeds. The calyx is persistent at the base while the style is persistent at the apex. The pods ripen from late November to early December.
Wildlife:
Gompholobium latifolium is unknown to the author though the seeds in the pods are often eaten by a weevil or beetle larvae.
Cultivation:
Gompholobium latifolium is a beautiful small shrub that has largely been ignored in cultivation by gardeners. In cultivation the shrubs will grow from 1.5 meters to 2.5 meters in height by 1.5 meters to 2 meters in diameter. Gompholobium latifolium can be planted close to paths and other permanent structures as it is soft and can be tip pruned to keep them more compact and bushy. It does require better soils which are allowed to dry out between watering. Mulch and leaf litter is always recommended to gently increase soil fertility. I have seen them growing very well on heavy clays where the owners have supplied them with copious amounts of leaf litter and given them one application of a native fertilizer when they were planted out. While the flowers are the main feature, the foliage is a pleasant soft green than contrasts most other greens in the garden.
Gompholobium latifolium is at home in the bush garden setting through to exotic gardens and English style formal gardens. They can be used very effectively near paths or corners. They tend to become straggly in later years so pruning and replacement planting is very necessary after 5 year.
The secret to their success is to ignore them do not give them attention and to allow the root area to dry out completely between watering.
It is best used adjacent to small areas of bush close to paths or the house so their bright yellow flowers can be viewed regularly. It is great in small rockeries as a fill in plant. If it is surrounded by shorter plants with fine foliages and red flowers they will dominate at the center giving an expansive look to the bed especially when it is in flower and kept trimmed below 1.5 meters. This is one plant that benefits highly from being mass planted or planted in scattered clumps. There small size enables this to be achieved even in medium size gardens.
Six or more planted back from a bend will become a very strong focal point when in flower gain a lot of attention whether you are coming or going because of the fresh clean look of the foliage even in the driest of times. They can be regularly tip pruned if a smaller shrub is required. They respond well to pruning recovering quickly and often increasing the number of flowers in the following season. Place them in the mid ground with other fine pale green or deep green leaf ground covers and very small shrubs in front and large deep green shrubs to the rear. Plants with white, deep red or deep purple flowers can be used in both the midground and background but use one colour scheme or the other don’t try mixing the colours otherwise a Kaleidoscope effect becomes very boring and sickening after a few weeks. Red and yellow is hot, fast and active while yellow and white gives a sense of a slower pace in the garden. The viewer’s eyes will be directed to the yellow flowers and move from the yellow and white in a slow relaxing shift rather than quickly glancing at the reds that can steal all the limelight if you are not careful.
Ensure that the whole plant or at least most of it is on display from most sections of the garden as the flowers are a real bonus.
When it is in flower these plants will catch your attention and the viewer will be transfixed on the display rather than watching the path. Plant them at 0.8 meter to 1 meter centers.
Propagation:
Seeds: Gompholobium latifolium seeds require treatment before sowing. Pre-treat by placing the seeds into a glass of warm to hot water. Allow the water to cool and leave to soak for 4.to 6 hours. Seeds that have not swollen repeat the exercise. Sow into a seed raising mix. When the seedlings are 25mm to 50mm tall, prick them out and plant them into 50mm native tubes using a seed raising mix.
Once the seedlings reach 150mm to 200mm in height plant them out into their permanent position. For mass plantings space the seedlings at 1 meter centers.
Fertilize using seaweed, fish emulsion or organic chicken pellets soaked in water on an alternate basis. Fertilize every two months until the plants are established then annually in early September to October to maintain health, vitality and better flowering.
Further Comments from Readers:
Hi reader, it seems you use The Bible of Botany a lot. That’s great as we have great pleasure in bringing it to you! It’s a little awkward for us to ask, but our first aim is to purchase land approximately 1,600 hectares to link several parcels of N.P. into one at The Pinnacles NSW Australia, but we need your help. We’re not salespeople. We’re amateur botanists who have dedicated over 30 years to saving the environment in a practical way. We depend on donations to reach our goal. If you donate just $5, the price of your coffee this Sunday, We can help to keep the planet alive in a real way and continue to bring you regular updates and features on Australian plants all in one Botanical Bible. Any support is greatly appreciated. Thank you.
In the spirit of reconciliation we acknowledge the Bundjalung, Gumbaynggirr and Yaegl and all aboriginal nations throughout Australia and their connections to land, sea and community. We pay our respect to their Elders past, present and future for the pleasures we have gained.
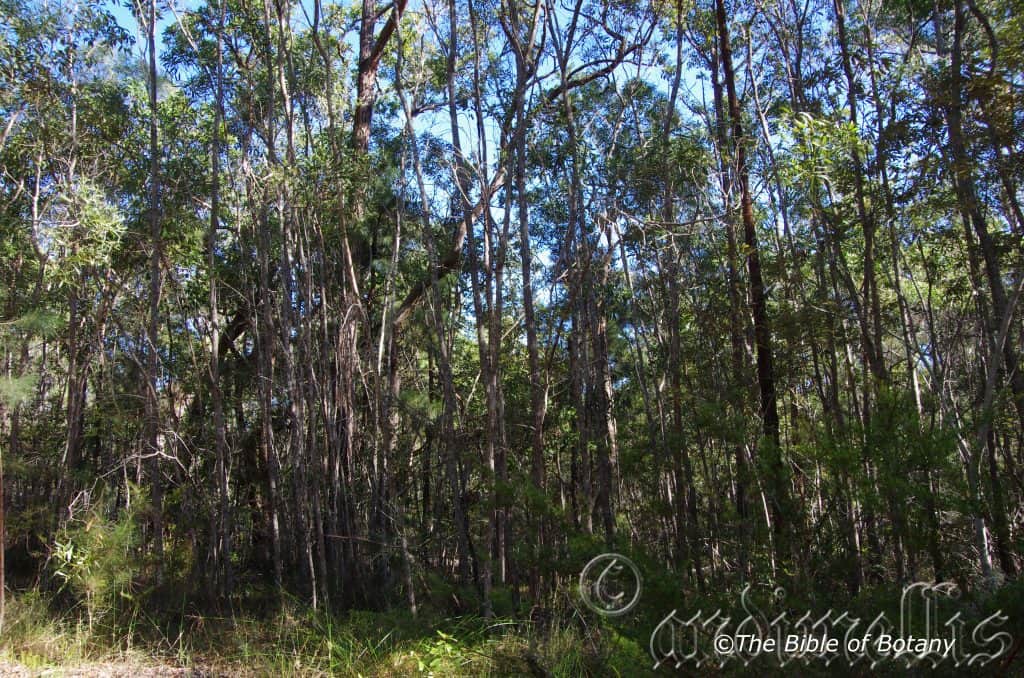
The Pinnacles NSW
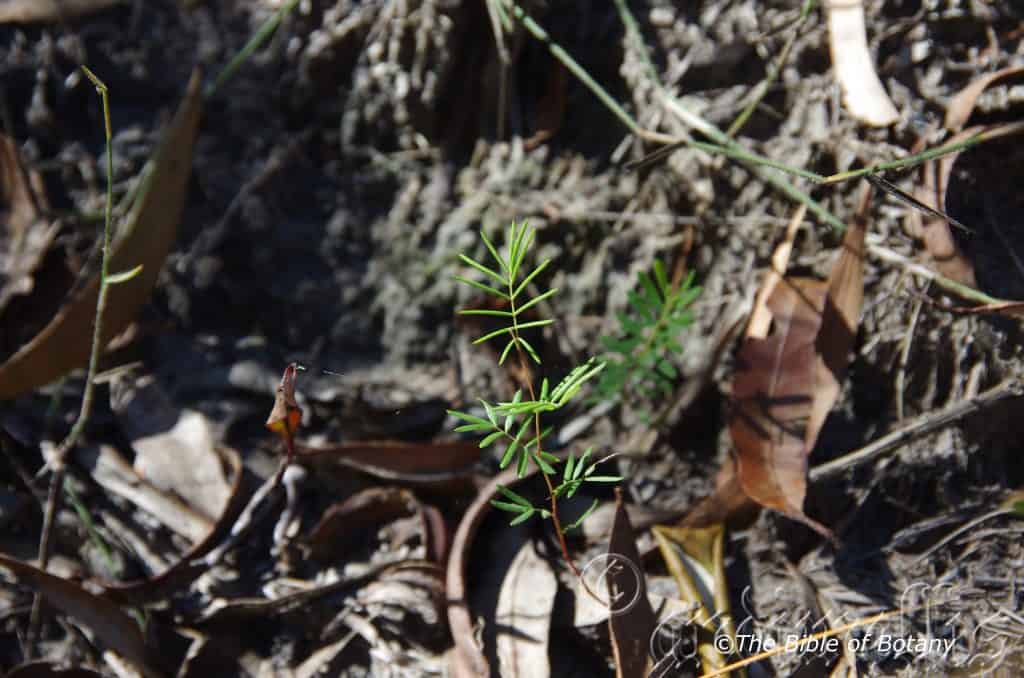
The Pinnacles NSW
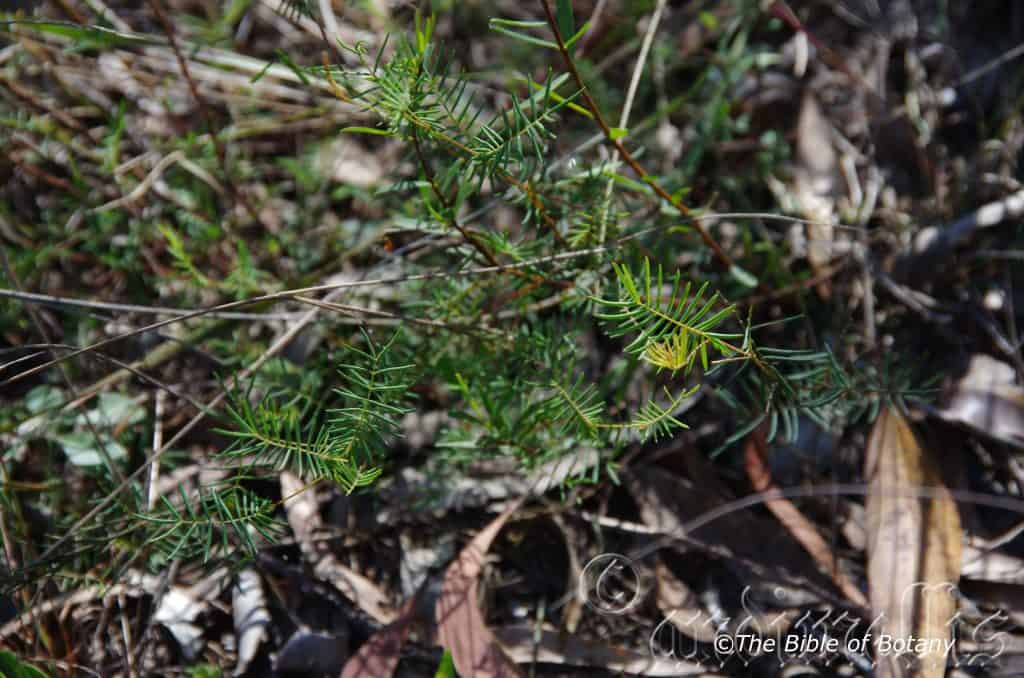
The Pinnacles NSW
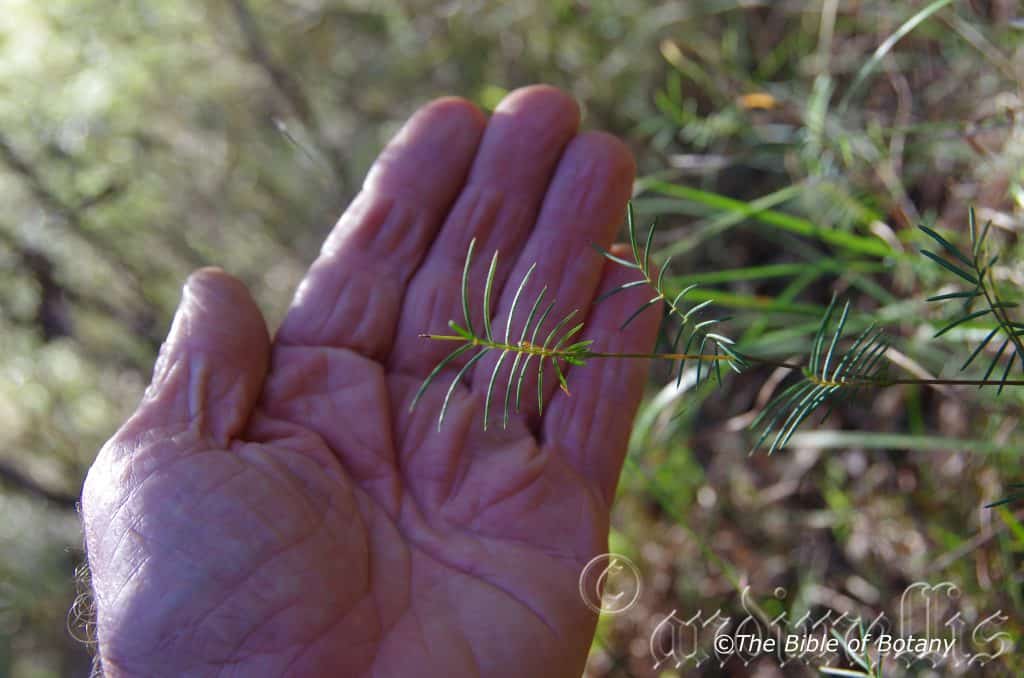
The Pinnacles NSW
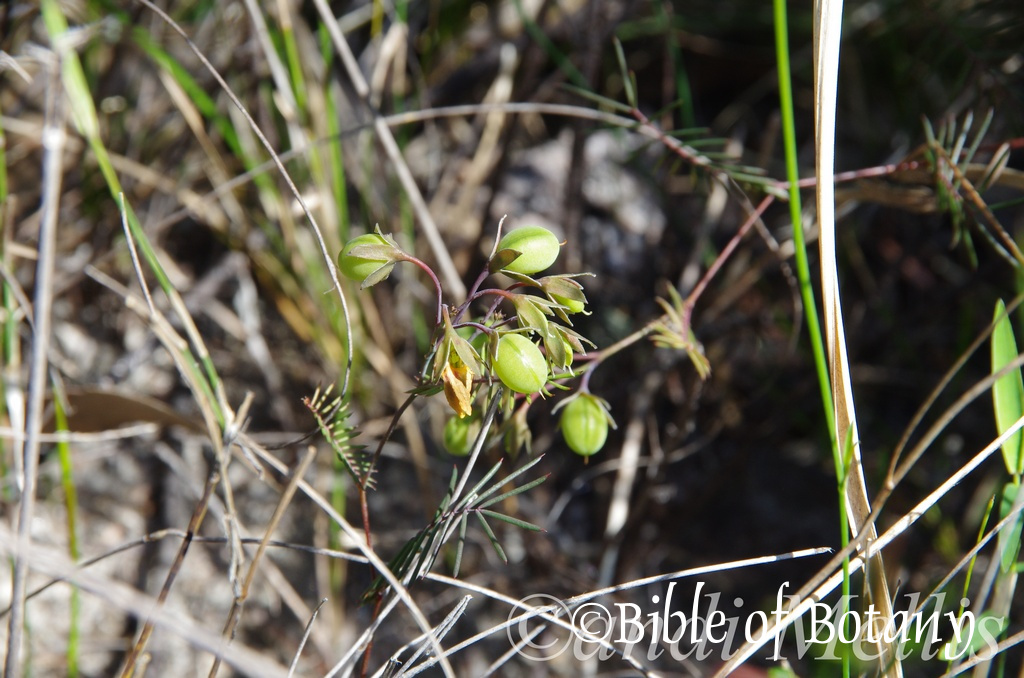
Fortis Creek National Park NSW
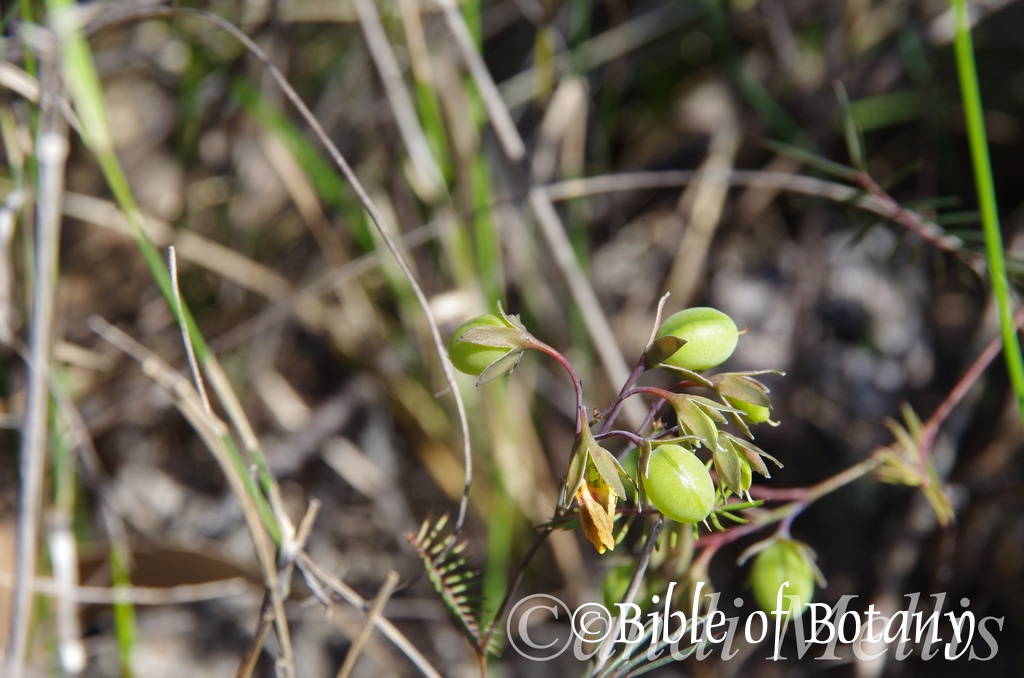
Fortis Creek National Park NSW
Gompholobium pinnatum
Classification:
Division: Magnoliophyta
Class: Magnoliopsida
Order: Fabales
Family: Fabaceae
Subfamily: Faboideae
Genus: From Gomphos, which is Ancient Greek for a pin, a bolt or nail and Lobos, which is Ancient Greek for a pod or capsule. It refers to pods, which have strong, stout pedicles.
Species: From Pinna, which is Latin for a pinnules. It refers to leaves, which have several leaflets with those nearer the apex being the largest.
Common Name: Pinnate Wedge Pea.
Distribution:
Gompholobium pinnatum is found in 4.disjunct populations south from Middle Peak near Shelburne Bay to Topaz Gap on the Lockhart River.
The second population is found south from Saddle Hill to Mareeba while the southern population is found south from the Byfield National Park in southern Queensland to Moruya in southern coastal New South Wales. It is also found in the Blackdown National Park west of the Range.
https://avh.ala.org.au/occurrences/search?taxa=Gompholobium+pinnatum#tab_mapView
Habitat Aspect Climate:
Gompholobium pinnatum prefers full sun to light shade or dappled shade. It grows in dry schlerophyll forest, coastal woodland heaths sort Eucalyptus forests often in moist situations along the coast and adjacent ranges. The altitude ranges from 5 meters ASL to 650 meters ASL.
The temperatures range from minus 2 degrees in July to 36 degrees in January.
The rainfalls range from lows of 450mm to 3000mm annually.
Soil Requirements:
Gompholobium pinnatum prefers fine sands, sandy loams to light fatty clays. The soils are usually derived from accumulated peaty beach sands behind the frontal dunes or at times decomposed sandstone. The soils pH ranges from 5.5PH to 7PH are preferred. It does not tolerate waterlogged soils but needs continual soil moisture which is usually derived from capillary action from permanent sub surface water. Non saline soils to moderately saline soils are tolerated as are salt laden winds.
Height & Spread:
Wild Plants: 0.2m to 0.4m by 0.3m to 0.6m.
Characteristics:
Gompholobium pinnatum grows as a small shrub with deep reddish-brown glabrous stems. The thin terete, stems are flexuous. The young stems are glabrous deep reddish-brown with only the new growth being soft pale green.
Gompholobium pinnatum‘s alternate pinnate leaves measure 30mm to 45mm in length by 16mm to 25mm in width. The linear to linear-lanceolate or narrow oblanceolate leaflets measure 6mm to 12mm in length by 0.5mm to 1.5mm in width. The petiole measures 1.5mm to 3mm in length while the rachis measures 10mm to 30mm in length and the petiolules measure 0mm to 1.5mm in length. The bases are truncate while the apexes are obtuse with a small stiff apiculate point. The concolourous laminas are dull, pale grass green to pale bluish-green. The laminas recurve or are revolute while the mid vein is prominent on the lower lamina and is faintly visible on the upper lamina. The minute stipules are hirtellous bristles. The glabrous petiole, rachis and petiolules are pale green, pale bluish-green with deep purple markings.
Gompholobium pinnatum‘s inflorescences are born singularly, in pairs or in small racemes of three from the leaf axils. The pedicles measure 5mm to 10mm in length.
The pale green calyxes measure 5mm to 7mm in length including the deeply divided elliptical lobes that measure 4mm to 6mm in length and have an acute apex. The yellow standard has a retuse apex while the margins are entire to ruffled. The standard measures 6mm to 12mm in height by 11mm to 21mm in width. The yellow divaricate keels are broadly, one sided spathulate and measure 5mm to 9mm in length by 4mm to 6.5mm in width. The standard and keel petals remain on the plant until the pod almost fully develops.
The stamens are pale yellow while the ovary contains 8 to 10 ovules.
The flowers appear from August through to early December.
Gompholobium pinnatum‘s fruits are single ovoidal to oblong-globose pods. The pods measure 6mm to 10mm in length by 5mm to 8mm in width and 4mm to 6.5mm in depth. The green pods turn deep grey-black when ripe and split longitudinally to reveal the dark brown to black seeds. The calyx is persistent at the base while the style is persistent at the apex. The pods ripen from late November to early December.
Wildlife:
Gompholobium pinnatum is unknown to the author though the seeds in the pods are often eaten by a weevil or beetle larvae.
Cultivation:
Gompholobium pinnatum is a beautiful small shrub that has largely been ignored in cultivation by gardeners. In cultivation the shrubs grow from 0.3 meters to 0.5 meters in height by 0.3 meters to 0.5 meters in diameter. Gompholobium latifolium is best planted close to paths so there flowers can be appreciated. It can be tip pruned to keep them more compact and bushy or left alone to straggle over nearby plants. Mulch and leaf litter is always recommended to gently increase soil fertility. I have seen it growing very well on light clays where the owners have supplied them with copious amounts of leaf litter and given them one application of a native fertilizer when it is planted out. While the flowers are the main feature, the foliage is a pleasant soft green than contrasts most other greens and greys in the garden.
Gompholobium latifolium is at home in the bush garden setting through to exotic gardens and English style formal gardens. It can be used very effectively near paths or corners. It tends to become straggly in later years so pruning and replacement planting is very necessary after 5 year.
The secret to its success is to ignore it, give it only a little attention and it will thrive.
It is great in small rockeries as a fill in plant. If it is surrounded by shorter plants with fine foliages and red flowers it dominates at the center giving an expansive look to the bed especially when it is in flower and kept trimmed to about 0.4. meters. This is one plant that benefits highly from being mass planted or planted in scattered dense clumps. There small size enables this to be achieved even in small gardens.
Six or more planted back from a bend will become a very strong focal point when in flower gain a lot of attention whether you are coming or going because of the fresh clean look of the foliage even in the driest of times. Plants with white, deep red or deep purple flowers lift yellows making it the center of attraction. Red and yellow is hot, fast and active while yellow and white or lilacs gives a sense of a slower pace more relaxing pace in the garden. The viewer’s eyes will be directed to the yellow flowers and move from the yellow and white in a slow relaxing shift rather than quickly glancing at the reds that can steal the limelight.
When it is in flower these plants will catch your attention and the viewer will be transfixed on the display even if it is planted in a heath garden. For mass plantings plant them at 0.2 meter to 0.3 meter centers.
Propagation:
Seeds: Gompholobium pinnatum seeds require treatment before sowing. Pre-treat by placing the seeds into a glass of warm to hot water. Allow the water to cool and leave to soak for 2 to 4 hours before sowing. Seeds that have not swollen repeat the exercise. Sow into a seed raising mix then place the trays beneath 30mm shade cloth and keep moist not wet. When the seedlings are 25mm to 50mm tall, prick them out and plant them into 50mm native tubes using a seed raising mix.
Once the seedlings reach 100mm to 120mm in height nip the tips out and plant them out into their permanent position.
Fertilize using seaweed, fish emulsion or organic chicken pellets soaked in water on an alternate basis. Fertilize every two months until the plants are established then annually in early September to October to maintain health, vitality and better flowering.
Further Comments from Readers:
Hi reader, it seems you use The Bible of Botany a lot. That’s great as we have great pleasure in bringing it to you! It’s a little awkward for us to ask, but our first aim is to purchase land approximately 1,600 hectares to link several parcels of N.P. into one at The Pinnacles NSW Australia, but we need your help. We’re not salespeople. We’re amateur botanists who have dedicated over 30 years to saving the environment in a practical way. We depend on donations to reach our goal. If you donate just $5, the price of your coffee this Sunday, We can help to keep the planet alive in a real way and continue to bring you regular updates and features on Australian plants all in one Botanical Bible. Any support is greatly appreciated. Thank you.
In the spirit of reconciliation we acknowledge the Bundjalung, Gumbaynggirr and Yaegl and all aboriginal nations throughout Australia and their connections to land, sea and community. We pay our respect to their Elders past, present and future for the pleasures we have gained.
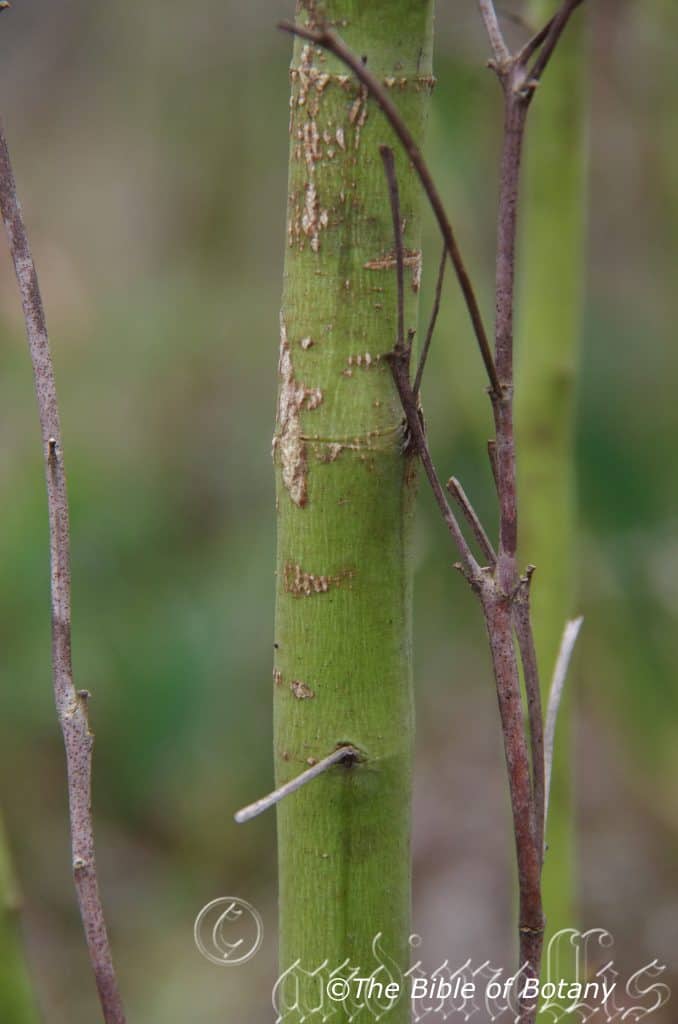
The Pinnacles NSW
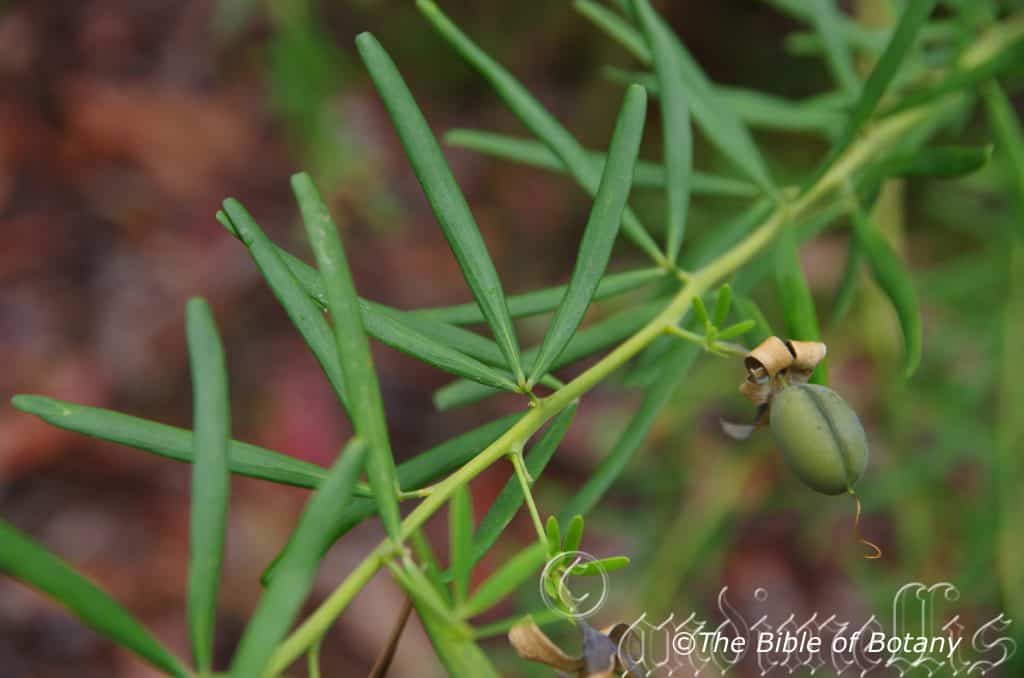
The Pinnacles NSW
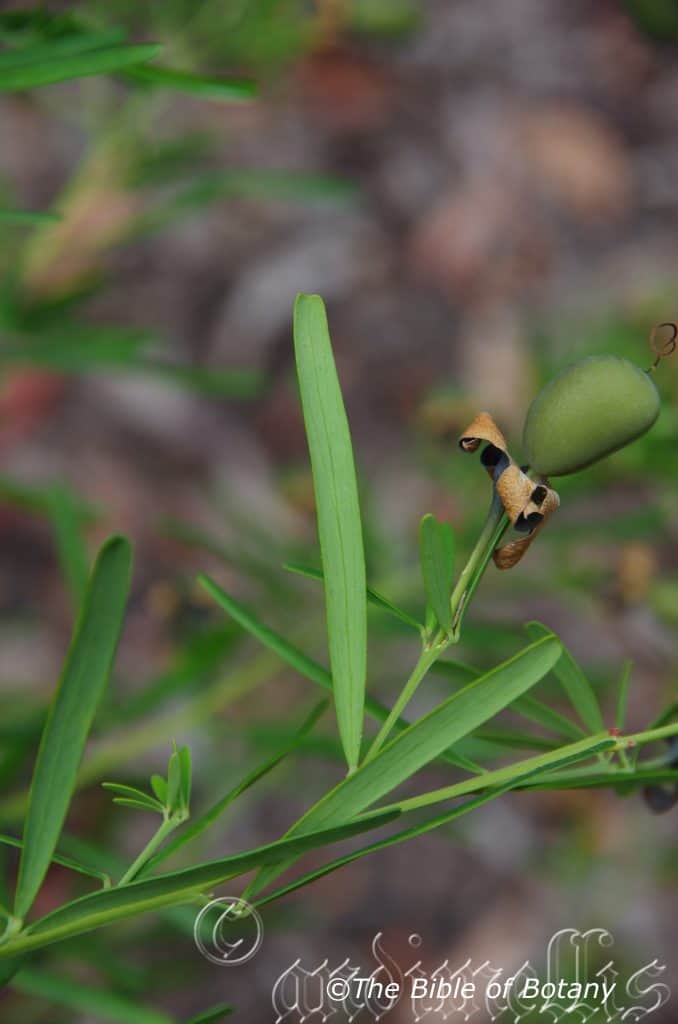
The Pinnacles NSW
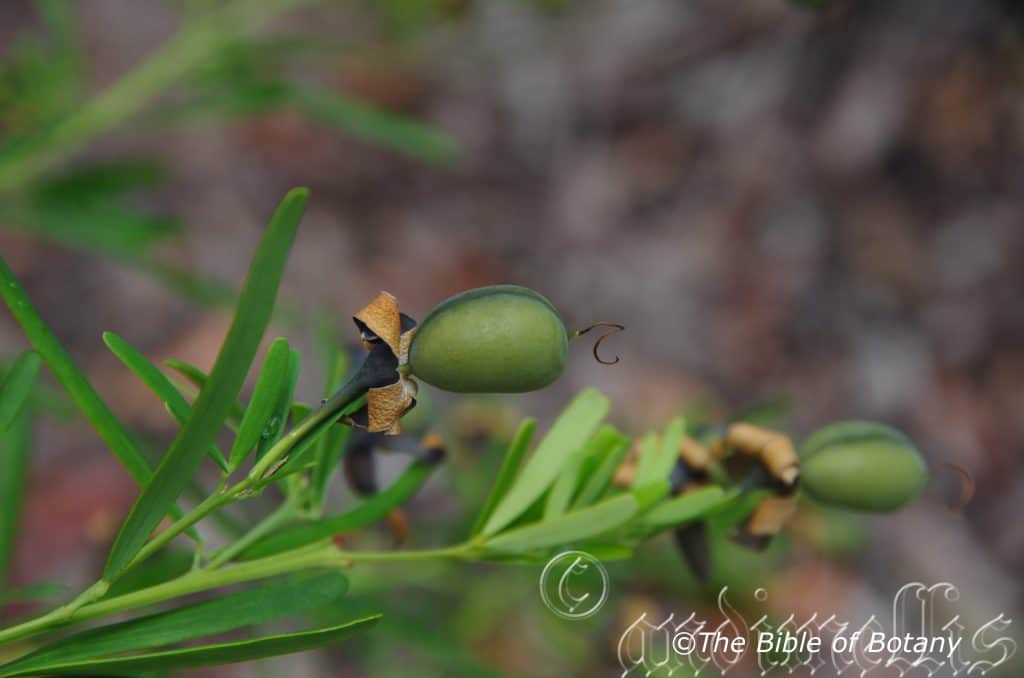
The Pinnacles NSW

The Pinnacles NSW
Gompholobium virgatum
Classification:
Division: Magnolio
Order: Fabales
Family: Fabaceae
Subfamily: Faboideae
Genus: From Gomphos, which is Ancient Greek for a pin, a bolt or nail and Lobos, which is Ancient Greek for a pod or capsule. It refers to pods, which have strong, stout pedicles.
Species: From Virgatum, which is Latin for a wand or stick. It refers to stems, which are straight and thin like a wand.
Common Name: Leafy Wedge Pea.
Distribution:
Gompholobium virgatum is found south from Gladstone in central coastal Queensland to of Eden in southern coastal New South Wales while an outlying population is found north south of the Byfield National Park north of Yeppoon. It is found on the Western Slopes, on and east of the Great Dividing Range to the coast.
https://avh.ala.org.au/occurrences/search?taxa=Gompholobium+virgatum#tab_mapView
Habitat Aspect Climate:
Gompholobium virgatum prefers full sun to light dappled shade. It is very quick to colonize disturbed land especially near coastal wallums. It grows well above the high water table mark in coastal woodland heaths or open coastal eucalyptus forests. The altitude ranges from 5 meters ASL to 1100 meters ASL.
The temperatures range from minus 2 degrees in July to 36 degrees in January.
The rainfalls range from lows of 550mm to an average of 2000mm annually.
Soil Requirements:
Gompholobium virgatum are widespread on sandy soils, sandy loams or light gravelly clays. The soils are usually derived from decomposed sandstones or accumulated sand or at times decomposed basalt or granite. It is often associated with skeletal sandy soils close to the parent rock. The soils pH ranges from 5.5pH to 7pH. It does not tolerate waterlogged soils. Non saline soils to moderately soils are tolerated.
Height & Spread:
Wild Plants: 1.5m to 2m by 0.7m to 1m.
Characteristics:
Gompholobium virgatum has mid reddish-brown to deep reddish-brown, erect stems are glabrous and semi glossy. The branchlets are glabrous deep reddish-brown turning a deep olive-green close to the apex on the new growth. The new growth is glabrous or sparsely covered in soft, off white puberulent hairs.
Gompholobium virgatum trifoliate leaves, leaflets are usually narrow obovate or at times linear. The leaflets measure 7.5mm to 20mm in length by 0.8mm to 4.4mm in width. The petiole measures 1mm to 2mm in length while the petiolules measure 0.8mm to 1.5mm in length. The bases are attenuate while the apexes are acute, obtuse or truncate often with a small mucronate tip. The discolourous laminas are pale blue-green dull and glabrous on the upper laminas while the lower lamina is paler. The laminas are flat or slightly decurve close to the margins while the margins are entire. The mid vein is very slightly prominent on the lower lamina and is not visible from the upper lamina.
The inflorescences of Gompholobium virgatum are born on small racemes of 1 to 3 rarely 4.individual flowers from the upper leaf axils. The wiry pedicles measure 5mm to 8.5mm in length.
The pale blue-green calyxes measures 5.2mm to 7.3mm in length including the 5 deeply divided oblong lobes that measure 4mm to 6mm in length. The lobes have an acute apex and are sparsely covered in white ciliate hairs. The yellow standard measures 12mm to 20mm in height by 15mm to 24mm in width. The apex has a deep, broadly retuse center. The yellow keels are spathulate and at times are covered in minute white ciliate hairs. The keels measure 8mm to 11mm in length by 4.5mm to 6mm in width. The standard and keel petals remain on the plant until the pod almost fully develops.
The stamens are pale yellow with scarlet red anthers while the ovary contains 6 to 8 ovules. The flowers appear throughout the year with a peak from October to early December.
Gompholobium virgatum fruits are a single ovoid to oblique pods. The pods measure 7mm to 10mm in length by 5mm to 7.5mm in diameter. The pods are grey-brown when ripe and split along a longitudinal furrow on the lower side of the pod to reveal the glossy brown seeds. The calyx is persistent at the base while the style is persistent at the apex.
The ellipsoidal seeds measure 2.5mm to 2.8mm in length and ripen from late November to early December.
Wildlife:
Gompholobium virgatum is unknown to the author though the seeds in the pods are often eaten by a weevil or beetle larvae.
Cultivation:
Gompholobium virgatum is a beautiful small shrub that has largely been ignored in cultivation by gardeners. In cultivation it will grow as a dense pale blue-green foliaged shrub with beautiful contrasting deep reddish stems. It will grow from 1.5 meters to 2 meters in height by 0.7 meters to 1 meter in diameter. Gompholobium virgatum can be planted close to paths and other permanent structures as it is soft and can be tip pruned to keep them more compact and bushy. They do require better quality soils which are kept moist but not wet. Mulch and leaf litter is always recommended to gently increase soil fertility and to maintain a more even soil temperature and moisture. While the flowers are the main feature, the foliage and erect stems make an interesting addition.
Gompholobium virgatum are at home in the bush garden setting through to exotic gardens and English style formal gardens. They can be used very effectively near paths or corners. It tends to become straggly in later years so pruning and replacement planting is very necessary after 5 years.
The secret to its success is to ignore it and give it the smallest amount of attention, to allow the root area to remain moist at all times and give them room to fully develop, do not over crowd it.
It is best used adjacent to small areas of bush close to paths or the house so its bright yellow flowers can be viewed regularly. If it is surrounded by shorter plants with fine foliages and red flowers they will dominate at the center giving a very formal look to the bed especially as it flowers all year. This is one plant that benefits highly from being scatter planted or planted in small clumps. Its size enables gardener to use it in the background in small gardens or as a mid-ground shrub in bush scenes, in the background or center within large rockeries. “Versatility personified”
Six or more planted back from a bend will become a very strong focal point considering it flowers all year will draw a lot of attention because of the fresh clean sentinel look. They can be regularly tip pruned if a smaller shrub is required. It responds well to pruning recovering quickly and often increasing the number of flowers in the following season. Place them in the mid ground with other fine pale green or deep green leaf ground covers or annuals in front and large deep green shrubs to the rear. Plants with white, deep red or deep purple flowers can be used in both the midground and background but use one colour scheme or the other don’t try mixing the colours otherwise a Kaleidoscope affects becomes very boring and sickening after a few weeks. Red and yellow is hot, fast and active while yellow and white gives a sense of a slower pace in the garden.
Imagine Gompholobium virgatum at the center with a carpet of red flowering Grevillea or purple flowering Scaevola in the foreground and to the sides, with large deep green or blue foliage Hibiscus splendens or Hibiscus diversifolia to the rear and beyond that in a large garden Eucalyptus towering overhead.
Ensure that the whole plant or at least most of it is on display from most sections of the garden as the flowers are a real bonus.
Propagation:
Seeds: Gompholobium virgatum seeds require treatment before sowing. Pre-treat by placing the seeds into a glass of boiling water. Allow the water to cool and leave to soak for 4.hours. Seeds that have not swollen repeat the exercise. Sow into a seed raising mix. When the seedlings are 25mm to 50mm tall, prick them out and plant them into 50mm native tubes using a seed raising mix.
Once the seedlings reach 150mm to 200mm in height plant them out into their permanent position. For mass plantings space the seedlings at 1 meter centers.
Fertilize using seaweed, fish emulsion or organic chicken pellets soaked in water on an alternate basis. Fertilize every two months until the plants are established then annually in early September to October to maintain health, vitality and better flowering.
Further Comments from Readers:
Hi reader, it seems you use The Bible of Botany a lot. That’s great as we have great pleasure in bringing it to you! It’s a little awkward for us to ask, but our first aim is to purchase land approximately 1,600 hectares to link several parcels of N.P. into one at The Pinnacles NSW Australia, but we need your help. We’re not salespeople. We’re amateur botanists who have dedicated over 30 years to saving the environment in a practical way. We depend on donations to reach our goal. If you donate just $5, the price of your coffee this Sunday, We can help to keep the planet alive in a real way and continue to bring you regular updates and features on Australian plants all in one Botanical Bible. Any support is greatly appreciated. Thank you.
In the spirit of reconciliation we acknowledge the Bundjalung, Gumbaynggirr and Yaegl and all aboriginal nations throughout Australia and their connections to land, sea and community. We pay our respect to their Elders past, present and future for the pleasures we have gained.
Gonocarpus chinensis
Classification:
Unranked: Magnoliidae
Unranked: Myrothamnanae
Order: Saxifragales
Family: Haloragaceae
Genus: From GÅnÃa/Gónos, which are Ancient Greek for an angle and Karpós, which is Ancient Greek for a fruit. It refers to fruits, which have several corners or angles.
Species: From Qing which is Latinized from the Chinese word for the Qing Dynasty and Anum/Ensis, which is Latin for to originate from. It refers to plants, which were first discovered and named from China or more precisely from within the boundaries of the old Ching Dynasty.
Subspecies: Gonocarpus chinensis subsp. chinensis. From Qing which is Latinized from the Chinese word for the Qing Dynasty and Anum/Ensis, which is Latin for to originate from. It refers to plants, which were first discovered and named from China or more precisely from within the boundaries of the old Ching Dynasty.
Subspecies: Gonocarpus chinensis subsp. verrucosus. From Verracose, which is Latin for warty or ulcerated lumps. It refers to a structures or organs, which have swellings or enlargements on the surface.
Common Name:
Distribution:
Gonocarpus chinensis subsp. chinensis is found over the northern half of Australia from Broome in central western coastal Western Australian to Halls Creek, Wongalara, the Macarthur River and to Cycad Creek and in the norther half of the Northern Territory.
Gonocarpus chinensis subsp. verrucosus is found in the east south from Weipa in far north Queensland to the Sydney Basin in New South Wales, on the Western Slopes, on and east of the Great Dividing Range to the coast.
https://avh.ala.org.au/occurrences/search?taxa=Gonocarpus+chinensis#tab_mapView
Habitat Aspect Climate:
Aspect / Climate:
Gonocarpus chinensis prefers full sun to light dappled shade. It grows on wet sites in coastal woodland heaths swamps, coastal heath wallums, montane heath swamps and wet shallow depressions in open woodlands, savannah woodlands, savannah grasslands around billabongs and inland ephemeral pools. The altitude ranges from sea level to 960 meters ASL.
The temperatures range from minus 3 degrees in July to 38 degrees in January.
The rainfall ranges from lows of 250mm to an average of 2000mm annually.
Soil Requirements:
Gonocarpus chinensis prefers sandy loams, fatty sandy clays to medium clays. The soils are derived from decomposed sandstones, brown basalts, black basalts, granites, alluvial deposits or accumulated sands. The soils pH ranges from 4.5pH to 7pH are preferred. It does not tolerate waterlogged soils. Non saline soils to moderately saline soils are tolerated.
Height & Spread:
Wild Plants: 0.2m to 0.5m by 0.2m to 0.4m.
Characteristics:
Gonocarpus chinensis grows as an erect or ascending perennial herb with slender mid green stems. The angulated stems have 4.distinct wings at the corners and are scabrous or sparsely covered in white, appressed hirsute hairs.
The decussate leaves on juvenile plants often become alternate or remain decussate. The sessile narrow lanceolate or elliptic leaves of Gonocarpus chinensis measure 10mm to 30mm in length by 2mm to 8mm in width.
The bases are rounded while the apexes are obtuse. The discolourous laminas are mid green to mid olive-green and are sparsely covered in white, appressed, hirsute hairs. The laminas are flat to recurve slightly upwards from the mid vein to the margins and decurve slightly downwards on the apical half. The leaf margins are thickened with disjunct teeth. The obtuse mid vein is strongly prominent on the lower lamina and is visible from the upper lamina.
The inflorescences of Gonocarpus chinensis are born with 10 to 20 individual flowers on a raceme, from the leaf axils. The racemes and pedicels are mid green and glabrous or sparsely covered in white appressed hirsute hairs. The peduncles measure 50mm to 70mm in length while the racemes measure 80mm to 120mm in length.
There is a single triangular stipule at the base of the flower. The elliptical stipule margins are hyaline and measure 1mm to 1.6mm in length by 0.4mm to 0.6mm in width. The 4.triangular mid green sepals measure 0.8mm to 1mm in length. The 4.hyaline pastel yellow tinged red petals are oblong with an obtuse apex. The petals are strongly decurve at the base measure 1mm to 1.6mm in length by 0.4mm to 0.6mm in width.
The 8 white, filiform filaments measure 0.6mm to 0.8mm in length while the oblong, basifixed, pastel yellow, fawn or pale brown anthers measure 0.6mm to 0.8mm in length by 0.2mm to 0.3mm in diameter. The 4.translucent white stigma sits directly on the ovary. The translucent pastel yellow ovary measures 0.8mm to 1mm in length by 0.9mm to 1.2mm in diameter. The flowers appear from September to mid-December.
The fruits are orbicular to sub globose, 8 ribbed fleshy nuts. The nuts measure 0.8mm to 1mm in length by 0.9mm to 1.2mm in diameter. The pastel yellow nuts are covered in shiny papillae and turn pale silvery-grey to deep grey when ripe. The seeds are deep grey. The nuts ripen from late September to late December.
Wildlife:
Gonocarpus chinensis’s wildlife includes the mane goose, Chenonetta jubata which eagerly forages on the leaves.
Cultivation:
It is considered a weed in the garden with its only virtue at this stage being good quality mulch. It is presently under investigation for anti-carcinogenic properties which may lead to a small niche market in the future.
Propagation:
Seeds: Sow fresh seeds or the previous season’s seeds after removing them from the refrigerator over winter. Gonocarpus chinensis’s seeds into a seed raising mix. Place the trays beneath 50mm shade cloth and keep moist. When the seedlings are 30mm to 50mm tall, prick them out and plant them into 50mm native tubes using a good organic mix.
Fertilize using seaweed, fish emulsion or organic chicken pellets soaked in water on an alternate basis. Fertilize every two months until the plants are established then annually in early September to October to maintain health, vitality and better flowering.
Further Comments from Readers:
Hi reader, it seems you use The Bible of Botany a lot. That’s great as we have great pleasure in bringing it to you! It’s a little awkward for us to ask, but our first aim is to purchase land approximately 1,600 hectares to link several parcels of N.P. into one at The Pinnacles NSW Australia, but we need your help. We’re not salespeople. We’re amateur botanists who have dedicated over 30 years to saving the environment in a practical way. We depend on donations to reach our goal. If you donate just $5, the price of your coffee this Sunday, We can help to keep the planet alive in a real way and continue to bring you regular updates and features on Australian plants all in one Botanical Bible. Any support is greatly appreciated. Thank you.
In the spirit of reconciliation we acknowledge the Bundjalung, Gumbaynggirr and Yaegl and all aboriginal nations throughout Australia and their connections to land, sea and community. We pay our respect to their Elders past, present and future for the pleasures we have gained.
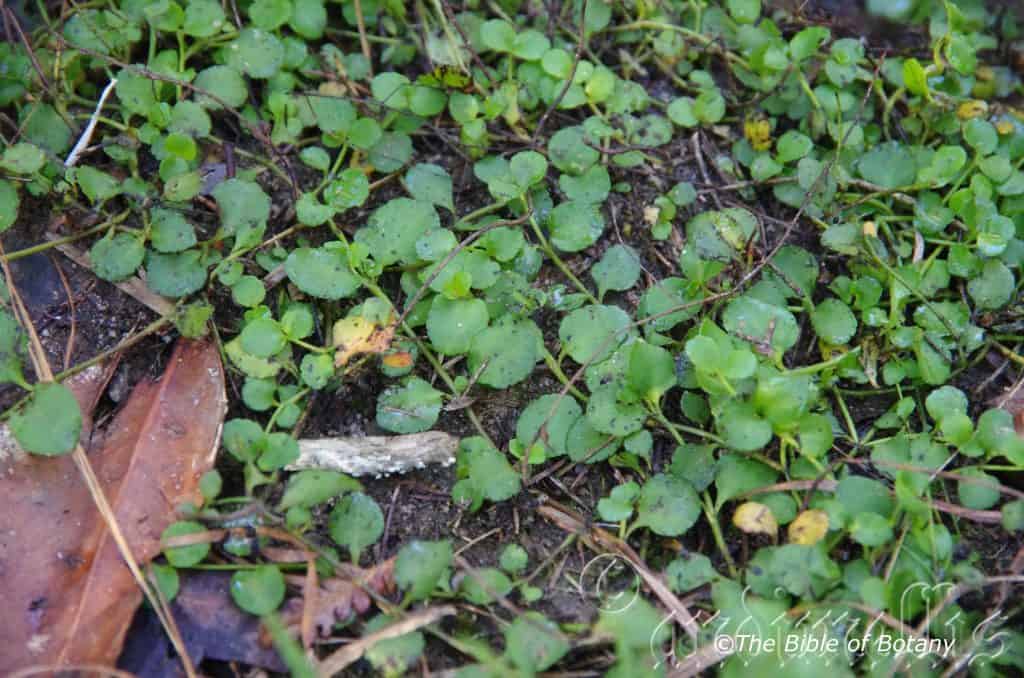
The Pinnacles NSW
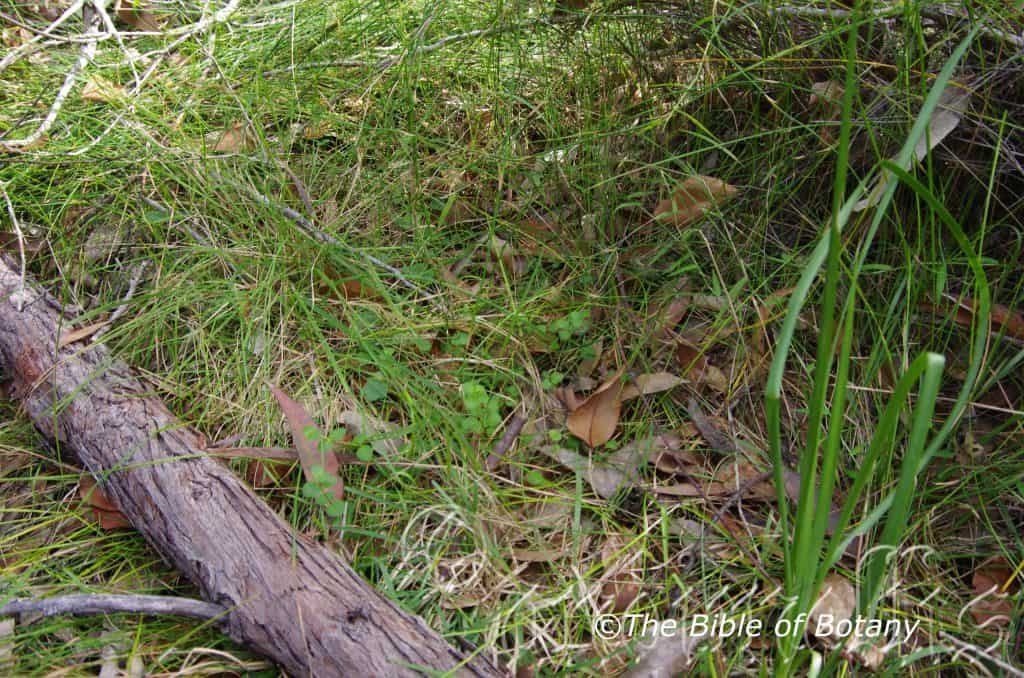
The Pinnacles NSW
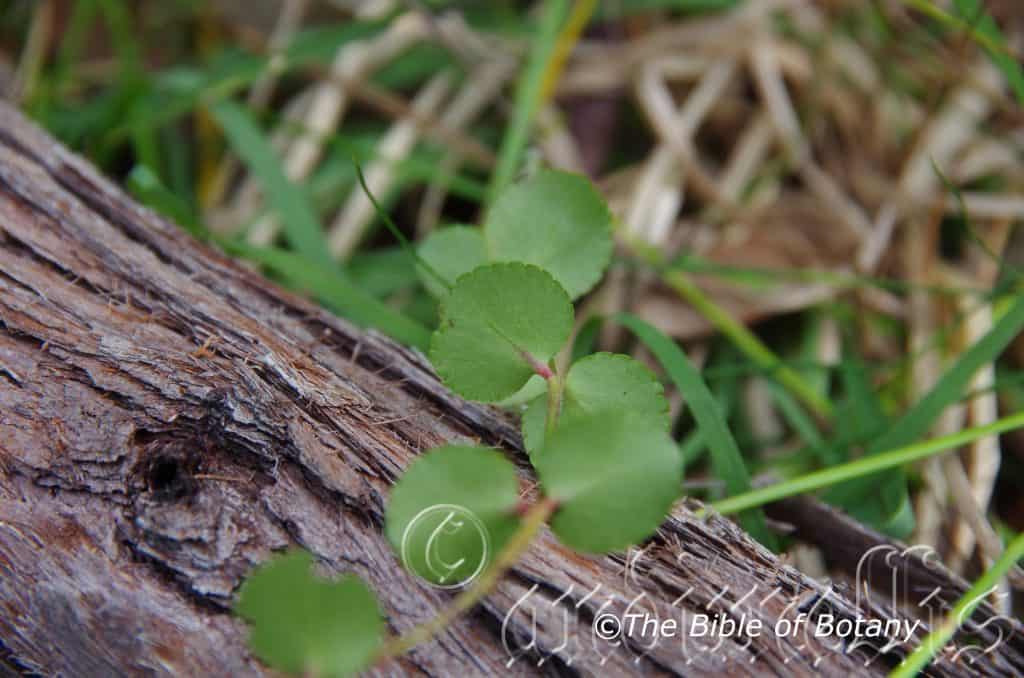
The Pinnacles NSW
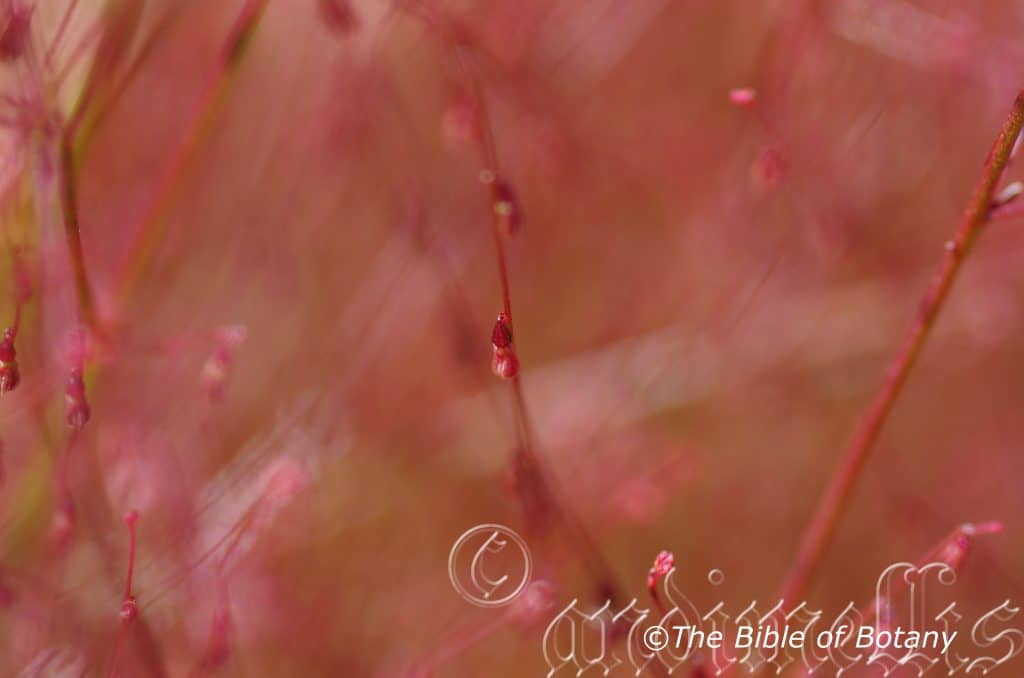
The Pinnacles NSW
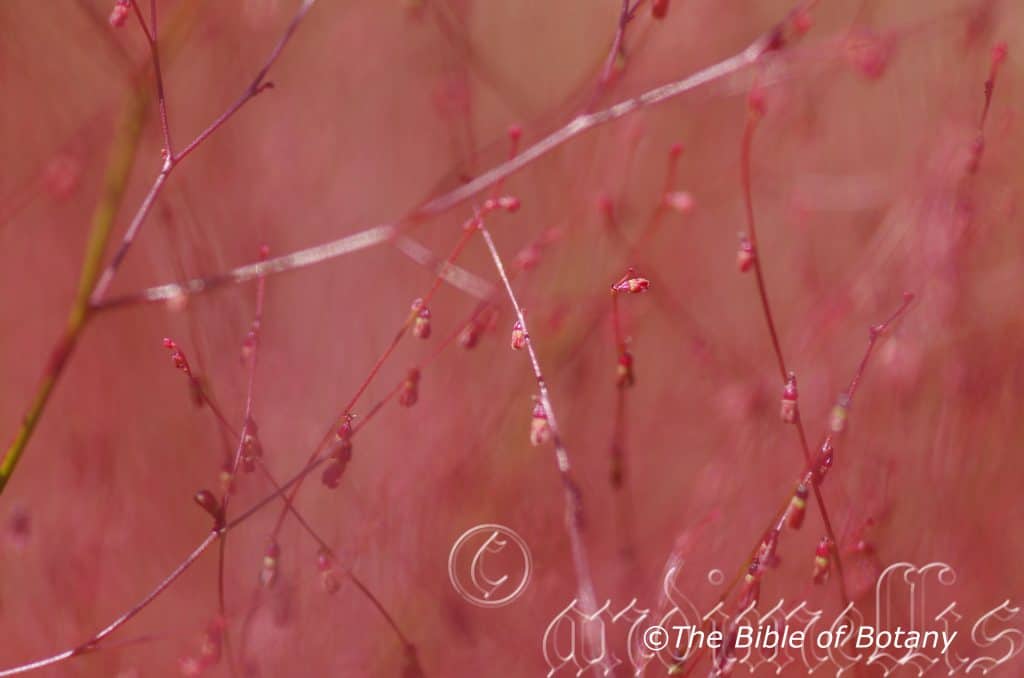
The Pinnacles NSW
Gonocarpus micranthus
Classification:
Unranked: Magnoliidae
Unranked: Myrothamnanae
Order: Saxifragales
Family: Haloragaceae
Genus: From Gonos, which is Ancient Greek for an angle and Karpos, which is Ancient Greek for a fruit. It refers to fruits, which have several corners or angles.
Species: From Mikros, which is Ancient Greek for small or very small and Antha/Anthos, which are Ancient Greek for the male reproductive organs on a flower or the flower. It refers to the flowers, which are somewhat smaller than those of other species in the genus or smaller again than other subspecies or varieties in the species.
Subspecies: Gonocarpus micranthus subsp. micranthus. From Mikros, which is Ancient Greek for small or very small and Antha/Anthos, which are Ancient Greek for the male reproductive organs on a flower or the flower. It refers to the flowers, which are somewhat smaller than those of other species in the genus or smaller again than other subspecies or varieties in the species.
Sub species: Gonocarpus micranthus subsp. ramosissimus. From Ramosum, which is Latin for a branch and -Issima, which is a Latin suffix pertaining to the superlative or very. It refers to plants, which have the most branches of all the species in their genus.
Common Name: Creeping Raspwort.
Distribution:
Gonocarpus micranthus subsp. micranthus is found in three isolated populations near the Queensland New South Wales border, near Woolongong in New South Wales and Marlow Plains in eastern Victoria.
Gonocarpus micranthus subsp. ramosissimus is found east and south of a line from near in central coastal Queensland to Cape Conran in eastern Victoria. It is also found near the coast in south west of Western Australia.
https://avh.ala.org.au/occurrences/search?taxa=Gonocarpus+micranthus#tab_mapView
Habitat Aspect Climate:
Gonocarpus micranthus prefers full sun to light dappled shade. It grows in heath, swampy areas, in shallow wet depressions or on moist drainage lines along the coast, adjacent ranges and tablelands, in open moist schlerophyll forests, dry sclerophyll forest or open woodlands. The altitude ranges from 5 meters ASL to 1050 meters ASL.
The temperatures range from minus 5 degrees in July to 38 degrees in January.
The rainfall ranges from lows of 400mm to an average of 2000mm annually.
Soil Requirements:
Gonocarpus micranthus prefers sandy loams, to light clays. The soils are usually derived from decomposed sandstone, alluvial deposits or accumulated sands behind the frontal dunes. The soils pH ranges from 4pH to 7pH. It tolerates seasonal waterlogged soils and seasonal high water tables. At times it grows in wet sandy acid soils adjacent to iron oxide bacteria. (See article on Fungus and Bacteria) Non saline soils to moderately saline soils are tolerated.
Height & Spread:
Wild Plants:
Gonocarpus micranthus subsp. micranthus 0.2m to 0.5m by 0.2m to 1m.
Gonocarpus micranthus subsp. ramosissimus 0.3m to 0.6m by 0.2m to 0.8m.
Characteristics:
Gonocarpus micranthus subsp. micranthus grows as a prostrate or ascending perennial herb with slender, terete, mid green stems. The branched stems are usually glabrous or at times sparsely covered in white, appressed hirsute hairs.
Gonocarpus micranthus subsp. ramosissimus grows as an erect or prostrate perennial herb with slender, terete, mid green stems. The stems branched are usually glabrous or at times sparsely covered in white, appressed hirsute hairs.
The decussate leaves of Gonocarpus micranthus subsp. micranthus are ovate to orbicular and measure 4mm to 10mm in length by 3mm to 7mm in width.
The decussate leaves of Gonocarpus micranthus subsp. ramosissimus are ovate to orbicular and measure 8mm to 15mm in length by 6mm to 12mm in width.
The bases are rounded to cordate while the apexes are obtuse-acuminate to obtuse-acute. The discolourous glabrous laminas are mid green to grass-green and are often tinged scarlet red especially when the plants are in full bloom. The laminas are flat to recurve slightly upwards from the mid vein to the margins and decurve slightly downwards on the apical third. The leaf margins are thickened and regularly toothed. The obtuse mid vein is strongly prominent on the lower lamina and is grooved on the basal third on the upper lamina. The succulent yellow-green petioles are grooved on the upper surface and measure 2mm to 3.5mm in length.
The inflorescences of Gonocarpus micranthus subsp. micranthus are born with 6 to 10 individual flowers on a panicle with many racemes from the leaf axils. The peduncles are green tinged red while the rachis and racemes are usually scarlet red, orange-red or at times mid green with strong reddish tinges. It is glabrous and are unbranched or branched to the first order. The peduncles measure 20mm to 45mm in length while the racemes measure 100mm to 130mm in length. The pedicels measure 0.2mm to 0.5mm in length.
The inflorescences of Gonocarpus micranthus subsp. ramosissimus are born with 6 to 10 individual flowers on a panicle with many racemes from the leaf axils. The peduncles are green tinged red while the rachis and racemes are usually scarlet red, orange-red or at times mid green with strong reddish tinges. It is glabrous and branched to the third or fourth order. The peduncles measure 25mm to 50mm in length while the racemes measure 120mm to 160mm in length. The pedicels measure 0.2mm to 0.5mm in length.
There is a single, minute, scarlet red to red, triangular stipule at the base of the flower. The elliptical stipule margins are hyaline and measure 1mm to 1.6mm in length by 0.4mm to 0.6mm in width. The 4.triangular mid green, reddish or scarlet red sepals measure 0.3mm to 0.5mm in length. The 4.hyaline reddish to scarlet-red petals are oblong with an obtuse apex. The petals measure 1mm to 1.6mm in length by 0.4mm to 0.6mm in width.
The 16, 24.or 32 pastel scarlet-red, filiform filaments measure 1mm to 1.7mm in length while the oblong, basifixed anthers are pastel yellow. The 4.glistening white stigmas sit directly on the ovary. The glistening red to scarlet-red, globose ovary measures 0.7mm to 1mm in length by 0.8mm to 1.1mm in diameter. The flowers appear from September to October and February to March but may flower to a lesser extent between these 2 periods.
Gonocarpus micranthus fruits are orbicular to sub globose, 8 ribbed fleshy nuts. The nuts measure 0.8mm to 1mm in length by 0.9mm to 1.2mm in diameter. The reddish nuts are covered in shiny papillae and turn pale silvery-grey to deep grey when ripe. The seeds are deep grey.
Wildlife:
Gonocarpus micranthus‘s wildlife includes the mane goose, Chenonetta jubata, which eagerly forages the foliage.
Cultivation:
Gonocarpus micranthus is considered a weed in the garden with its only virtue at this stage being good quality mulch. When viewed as a single plant they do not appear to have much to offer even when in flower, however things change dramatically when mass planted in a rockery and used as an annual to give a drab bed a new lease of life.
Now imagine this Gompholobium virgatum standing at 1.8 meters to 2 meters high meandering parallel back from the path with a mass carpet of scarlet-red flowers, stems and leaves from Gonocarpus micranthus blanketing the ground in the foreground and to the sides. The yellow and scarlet-red are of interest for the fine detail.
Propagation:
Seeds: Sow fresh seeds or the previous season’s seeds of Gonocarpus micranthus after removing them from the refrigerator over winter. Galium leptogonium seeds into a seed raising mix. Place the trays beneath 50mm shade cloth and keep moist. When the seedlings are 30mm to 50mm tall, prick them out and plant them into 50mm native tubes using a good organic mix.
Once the seedlings reach 200mm to 250mm in height plant them out into their permanent position adjacent to a tree with non-decorticating bark.
Fertilize using seaweed, fish emulsion or organic chicken pellets soaked in water on an alternate basis. Fertilize every two months until the plants are established then annually in early September to October to maintain health, vitality and better flowering.
Further Comments from Readers:
Hi reader, it seems you use The Bible of Botany a lot. That’s great as we have great pleasure in bringing it to you! It’s a little awkward for us to ask, but our first aim is to purchase land approximately 1,600 hectares to link several parcels of N.P. into one at The Pinnacles NSW Australia, but we need your help. We’re not salespeople. We’re amateur botanists who have dedicated over 30 years to saving the environment in a practical way. We depend on donations to reach our goal. If you donate just $5, the price of your coffee this Sunday, We can help to keep the planet alive in a real way and continue to bring you regular updates and features on Australian plants all in one Botanical Bible. Any support is greatly appreciated. Thank you.
In the spirit of reconciliation we acknowledge the Bundjalung, Gumbaynggirr and Yaegl and all aboriginal nations throughout Australia and their connections to land, sea and community. We pay our respect to their Elders past, present and future for the pleasures we have gained.
Gonocarpus oreophilus
Classification
Unranked: Eudicots
Unranked: Asterids
Order: Gentinales
Family: Rubiaceae
Genus: From Gonos, which is Ancient Greek for an angle and Karpos, which is Ancient Greek for a fruit. It refers to fruits, which have several corners or angles.
Species: From Oreias/Oreios, which is Ancient Greek or Oreas, which is Latin for of the mountains and Philos, which is Ancient Greek for loving or to be loved. It refers to plants, which love to grow high in the mountains.
Common Name:
Distribution:
Gonocarpus oreophilus is found south from Flinders Peak in south western Queensland to Careys Peak in the Barrington Tops National Park in central coastal New South Wales. There is a disjunct population further north at Eel Creek west of Gympie.
https://avh.ala.org.au/occurrences/search?taxa=Gonocarpus+oreophilus#tab_mapView
Habitat Aspect Climate:
Gonocarpus oreophilus prefers full sun to light to filtered sunlight or dappled shade. It grows in wet sites in wet, heaths, wet schlerophyll forests where breaks occur in rainforests canopy. The altitude ranges from 200 meters ASL to 1520 meters ASL.
The temperatures range from minus 4.degrees in July to 38 degrees in January.
The rainfall ranges from lows of 800mm to an average of 2000mm annually.
Soil Requirements:
Gonocarpus oreophilus prefers sandy loams to medium clays. The soils are usually derived from decomposed granites. The soils pH ranges from 5pH to 6.5pH. It tolerates waterlogged soils often growing in creeks and drainage lines. Non saline soils to moderately saline soils are tolerated.
Height & Spread:
Wild Plants: 1m to 1.5m by 1.5m to 2.5m.
Characteristics:
Gonocarpus oreophilus grows as an erect or ascending, semi succulent, perennial herb with slender mid green to reddish succulent stems. The angulated to terete stems are moderately to densely covered in short, white, appressed, spreading hirsute hairs.
The decussate leaves on juvenile plants, soon become either opposite or remain decussate. The leaves of Gonocarpus oerophilus are elliptic to oblong and measure 10mm to 35mm in length by 5mm to 15mm in width. The petioles measure 8mm to 13mm in length.
The bases are broad cuneate to almost rounded and attenuate while the apexes are obtuse. The discolourous laminas are mid green to mid grass-green and are glabrous or very sparsely covered in white, appressed, hirsute hairs on the upper lamina while the lower lamina is paler. The laminas are flat to recurve slightly upwards from the mid vein to the margins. The leaf margins are thickened with 15 to 30 regularly crenate teeth. The obtuse mid vein is strongly prominent on the lower lamina and is sunken on the upper lamina.
The inflorescences are born with 8 to 18 individual flowers on a raceme, from the leaf axils. The racemes and pedicels are mid green to mid grass-green and glabrous or very sparsely covered in white spreading hirsute hairs. The peduncles measure 10mm to 20mm in length while the racemes measure 50mm to 80mm in length.
There is a single, elliptical, leaf like stipule at the base of the flower. The stipules decrease in size as they approach the apex and measure 3mm to 9mm in length by 2mm to 5mm in width. The 4.triangular mid green sepals measure 0.6mm to 1.2mm in length. The 4.hyaline pastel yellow to pastel pink petals have a distinct green mid rib and are oblong with an obtuse apex. The petals measure 2.3mm to 3.2mm in length by 0.8mm to 1mm in width.
The 8 white, filiform filaments measure 2mm to 3mm in length while the oblong, basifixed, pastel yellow anthers measure 0.4mm to 0.6mm in length. The 4.translucent white stigma sits directly on the ovary. The purple ovary measures 0.8mm to 1mm in length by 0.7mm to 0.9mm in diameter. The flowers appear from September to mid-December.
The fruits are sub globose, 8 ribbed fleshy nuts. The nuts measure 1mm to 1.5mm in length by 0.9mm to 1.3mm in diameter. The silvery-grey to purplish-red nuts are faintly callused between the ribs.
Wildlife:
Gonocarpus oreophilus‘s is eagerly sought over by the mane goose, Chenonetta jubata for its leaves.
Cultivation:
Gonocarpus oreophilus is considered a weed in the garden with its only virtue at this stage being good quality mulch. It is presently under investigation for anti-carcinogenic properties which may lead to a small niche market in the future.
Propagation:
Seeds: Sow fresh seeds or the previous season’s seeds of Gonocarpus oreophilus after removing them from the refrigerator over winter. Place the seeds into a seed raising mix. Place the trays beneath 50mm shade cloth and keep moist. When the seedlings are 30mm to 50mm tall, prick them out and plant them into 50mm native tubes using a good organic mix.
Once the seedlings reach 200mm to 250mm in height plant them out into their permanent position adjacent to a tree with non-decorticating bark.
Fertilize using seaweed, fish emulsion or organic chicken pellets soaked in water on an alternate basis. Fertilize every two months until the plants are established then annually in early September to October to maintain health, vitality and better flowering.
Further Comments from Readers:
Hi reader, it seems you use The Bible of Botany a lot. That’s great as we have great pleasure in bringing it to you! It’s a little awkward for us to ask, but our first aim is to purchase land approximately 1,600 hectares to link several parcels of N.P. into one at The Pinnacles NSW Australia, but we need your help. We’re not salespeople. We’re amateur botanists who have dedicated over 30 years to saving the environment in a practical way. We depend on donations to reach our goal. If you donate just $5, the price of your coffee this Sunday, We can help to keep the planet alive in a real way and continue to bring you regular updates and features on Australian plants all in one Botanical Bible. Any support is greatly appreciated. Thank you.
In the spirit of reconciliation we acknowledge the Bundjalung, Gumbaynggirr and Yaegl and all aboriginal nations throughout Australia and their connections to land, sea and community. We pay our respect to their Elders past, present and future for the pleasures we have gained.
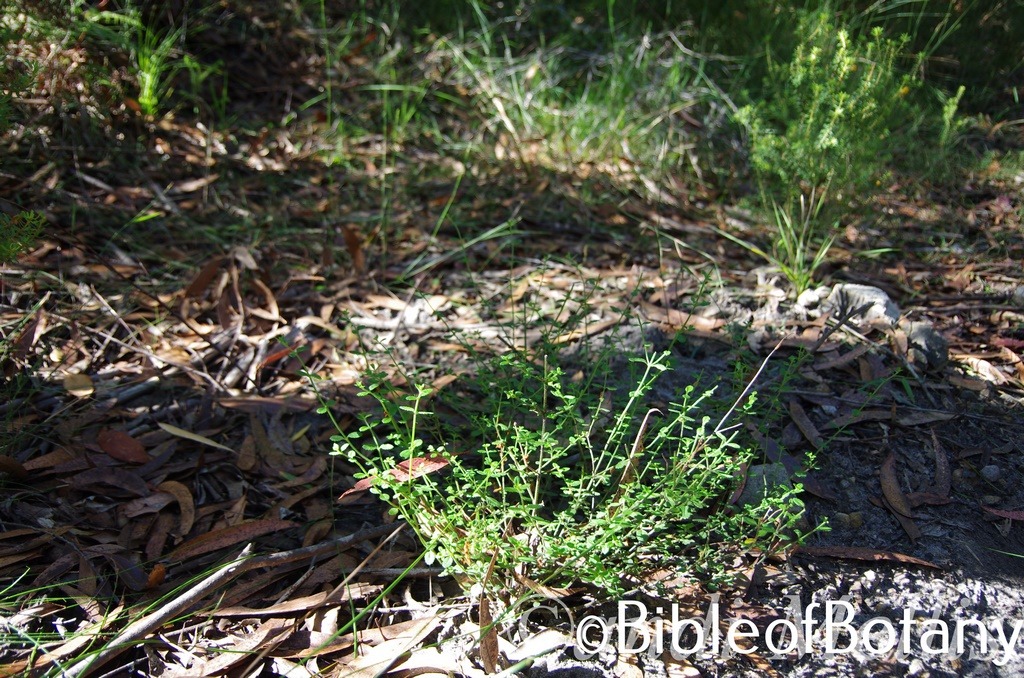
Pigeon Gully National Park NSW

Pigeon Gully National Park NSW

Pigeon Gully National Park NSW
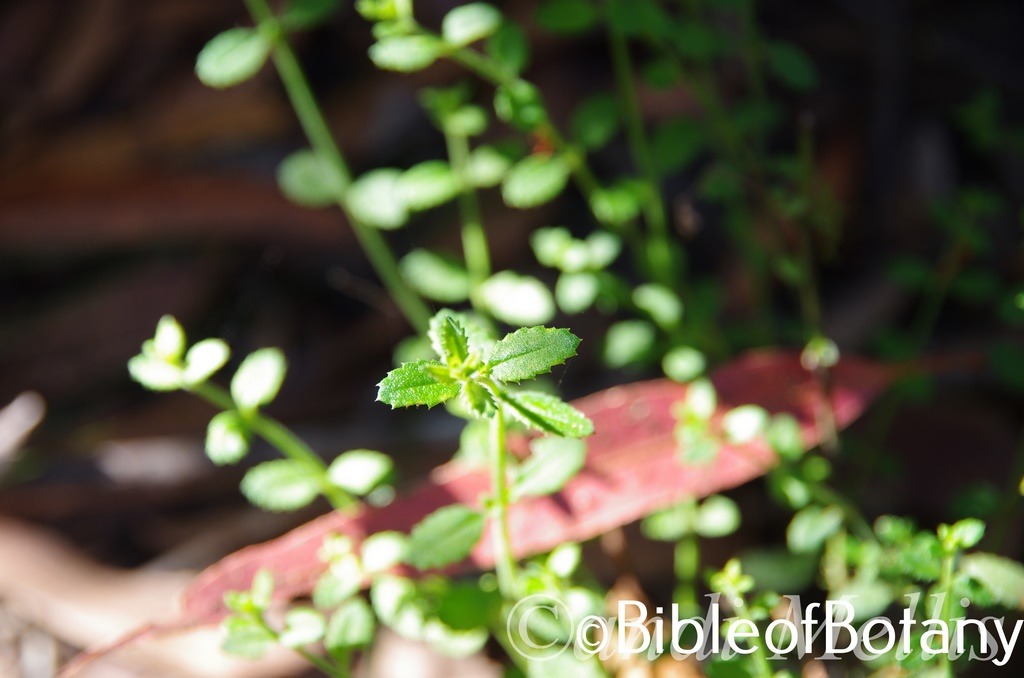
Pigeon Gully National Park NSW
Gonocarpus teucrioides
Classification
Unranked: Eudicots
Unranked: Asterids
Order: Gentinales
Family: Rubiaceae
Genus: From Gonos, which is Ancient Greek for an angle and Karpos, which is Ancient Greek for a fruit. It refers to fruits, which have several corners or angles.
Species: Is named in honour of Teuker the first king of the Trojans and Eidos, which is Ancient Greek for alike or similar to. It refers to plants which resemble the Teucrium genus, mainly from around the Mediterraneum Sea.
Common Name: Raspwort or Germander Raspwort.
Distribution:
Gonocarpus teucrioides is found south from Kroombit Tops on the Dawes Range in central coastal Queensland to the Grampians in south western Victoria the Bass Strait Islands and all of Tasmania. There is a disjunct population further west around Minlaton in South Australia and further north in Queensland around Mount Finnigan north of Wujal Wujal, Mount Elliot west of Townsville and Ropers peak near Capella.
https://avh.ala.org.au/occurrences/search?taxa=Gonocarpus+teucrioides#tab_mapView
Habitat Aspect Climate:
Gonocarpus teucrioides prefers full sun to light filtered sunlight or dappled shade. It grows in dry to moist heaths to dry to moist open woodlands. The altitude ranges from 5 meters ASL to 1220 meters ASL.
The temperatures range from minus 4 degrees in July to 38 degrees in January.
The rainfall ranges from lows of 800mm to an average of 2200mm annually.
Soil Requirements:
Gonocarpus teucrioides prefers sandy loams to medium clays. The soils are usually derived from decomposed granites, sandstone, alluvial sands and sandy clays. The soils pH ranges from 5pH to 6.5pH. It does not tolerate waterlogged soils but is often found growing just above creeks and drainage lines. Non saline soils to moderately saline soils are tolerated.
Height & Spread:
Wild Plants: 0.2m to 0.8m by 1m to 1.5m.
Characteristics:
Gonocarpus teucrioides grows as an erect or ascending, multi stemmed, semi succulent, perennial herb or small sub shrub. The 4 angled grooved stems are sparsely to densely covered in short, spreading to erect white, hispid hairs.
The opposite, decussate, ovate to narrow ovate leaves measure 5mm to 15mm in length by 5mm to 10mm in width. The bases are rounded or almost rounded while the apexes are obtuse with a mucronate tip. The discolourous laminas are mid green to mid blue-green and are sparselyto densely covered in short, spreading to erect white, hispid hairs on the upper lamina while the lower lamina is paler. The laminas recurve slightly upwards from the mid vein to the margins and recurve stronger from the basees to the apexes. The leaf margins are thickened with several small irregularly spaced teeth. The obtuse mid vein is strongly prominent on the lower lamina and is sunken on the upper lamina. The petioles measure 2mm to 5mm in length.
The monoecious inflorescences of Gonocarpus teucrioides born individually from the lower leaf axis or on racemes with 8 to 18 individual flowers from the apical leaf axils. The racemes and pedicels are mid green to red and are sparsely to densely covered in white spreading hispid hairs.
The male flowers petals are shorter while the basifixed anthers are much longer than the filaments.
Female flowers’ primary bracts are opposite at the base sreading irregularly outwards at the apex. The green to red petals measure 2.6mm to 3.3mm in length. The ovay is sparsely to densely covered in white spreading hispid hairs. The flowers appear from Late September to January.
The fruit is a silver-grey, ovoid nut that measures 1.2 to 1.6mm in length. The 8 ribbed nut has 2 or 3 oblique calluses between each of the ribs.
Wildlife:
Gonocarpus teucrioides‘s flowers are eagerly sought after by local native bees like Tetragonula sp. and pollen flies.
Cultivation:
Gonocarpus teucrioides is considered a weed in the garden with its only virtue at this stage being good quality mulch. It is presently under investigation for anti-carcinogenic properties which may lead to a small niche market in the future.
Propagation:
Seeds: Sow fresh seeds or the previous season’s seeds after removing them from the refrigerator over winter. Sow seeds into a seed raising mix. Place the trays beneath 50% shade cloth and keep moist. When the seedlings are 30mm to 50mm tall, prick them out and plant them into 50mm native tubes using a good organic mix.
Once the seedlings reach 200mm to 250mm in height plant them out into their permanent position adjacent to a tree with non-decorticating bark.
Fertilize using seaweed, fish emulsion or organic chicken pellets soaked in water on an alternate basis. Fertilize every two months until the plants are established then annually in early September to October to maintain health, vitality and better flowering.
Further Comments from Readers:
Hi reader, it seems you use The Bible of Botany a lot. That’s great as we have great pleasure in bringing it to you! It’s a little awkward for us to ask, but our first aim is to purchase land approximately 1,600 hectares to link several parcels of N.P. into one at The Pinnacles NSW Australia, but we need your help. We’re not salespeople. We’re amateur botanists who have dedicated over 30 years to saving the environment in a practical way. We depend on donations to reach our goal. If you donate just $5, the price of your coffee this Sunday, We can help to keep the planet alive in a real way and continue to bring you regular updates and features on Australian plants all in one Botanical Bible. Any support is greatly appreciated. Thank you.
In the spirit of reconciliation we acknowledge the Bundjalung, Gumbaynggirr and Yaegl and all aboriginal nations throughout Australia and their connections to land, sea and community. We pay our respect to their Elders past, present and future for the pleasures we have gained.
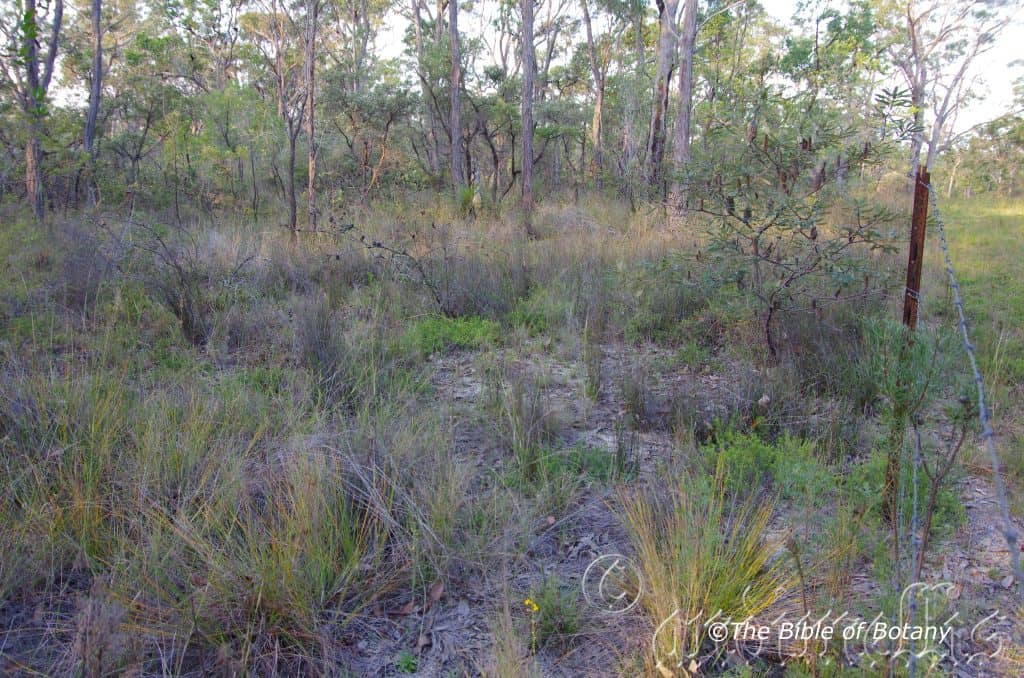
The Pinnacles NSW
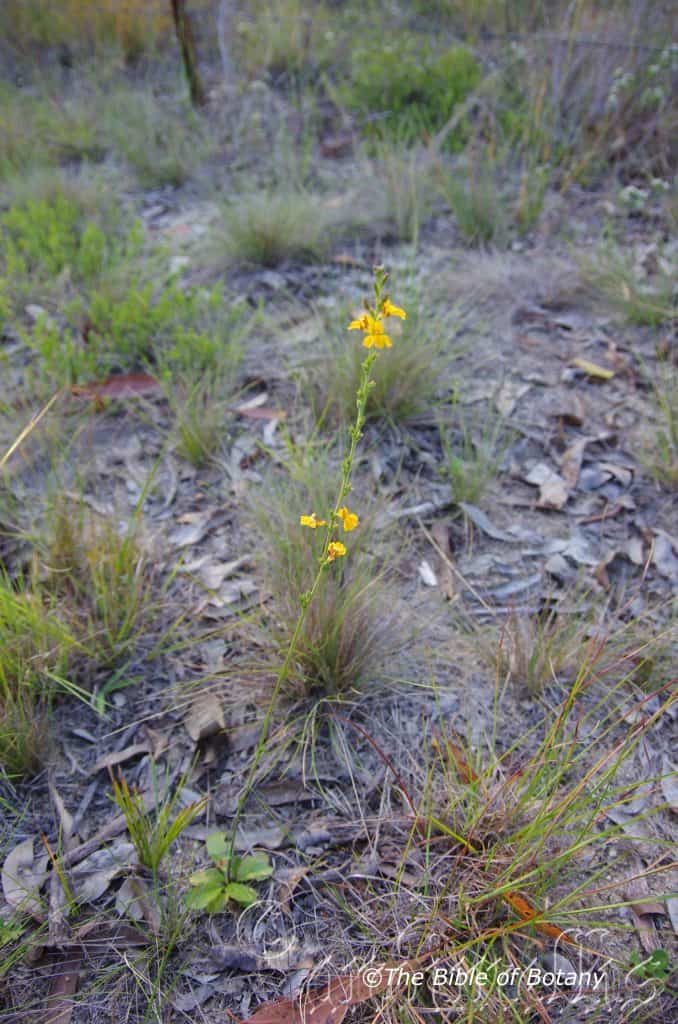
The Pinnacles NSW
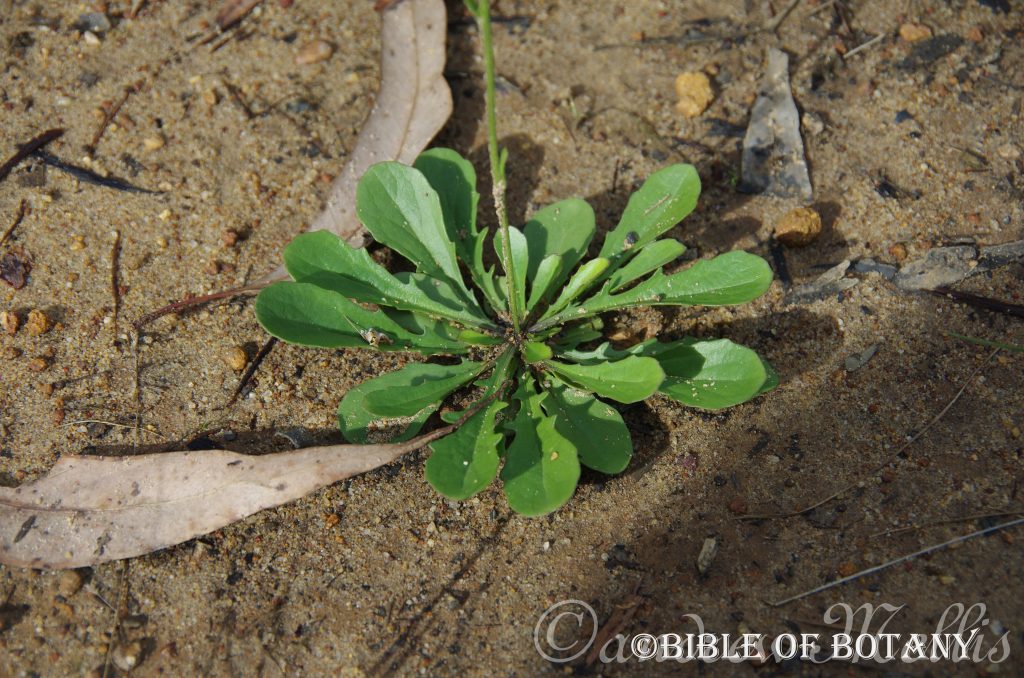
Yuraygir National Park NSW
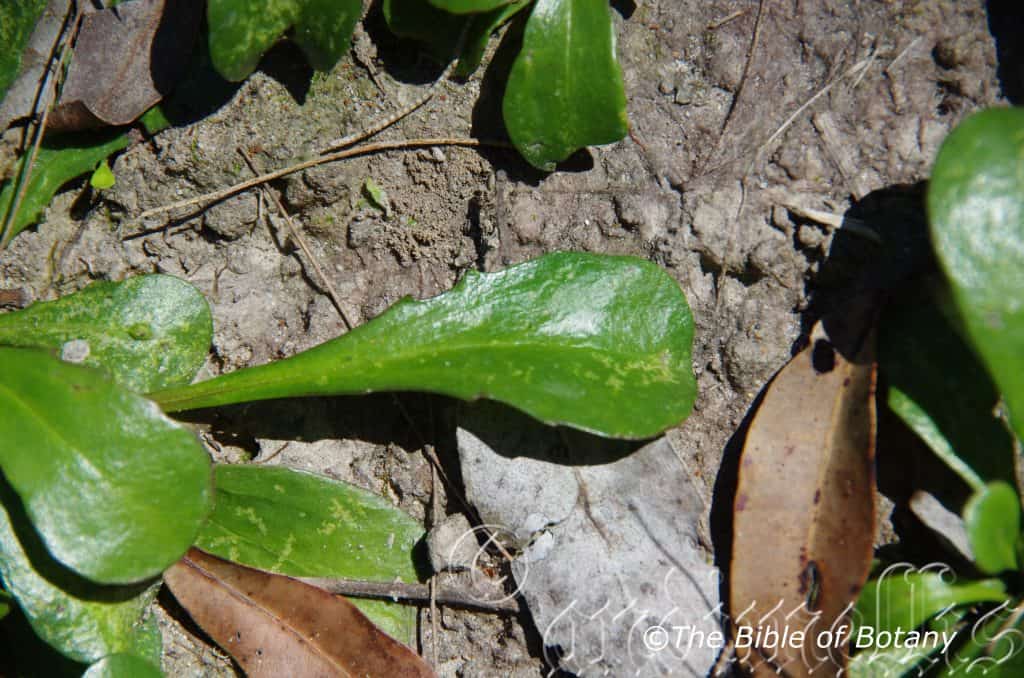
Yuraygir National Park NSW
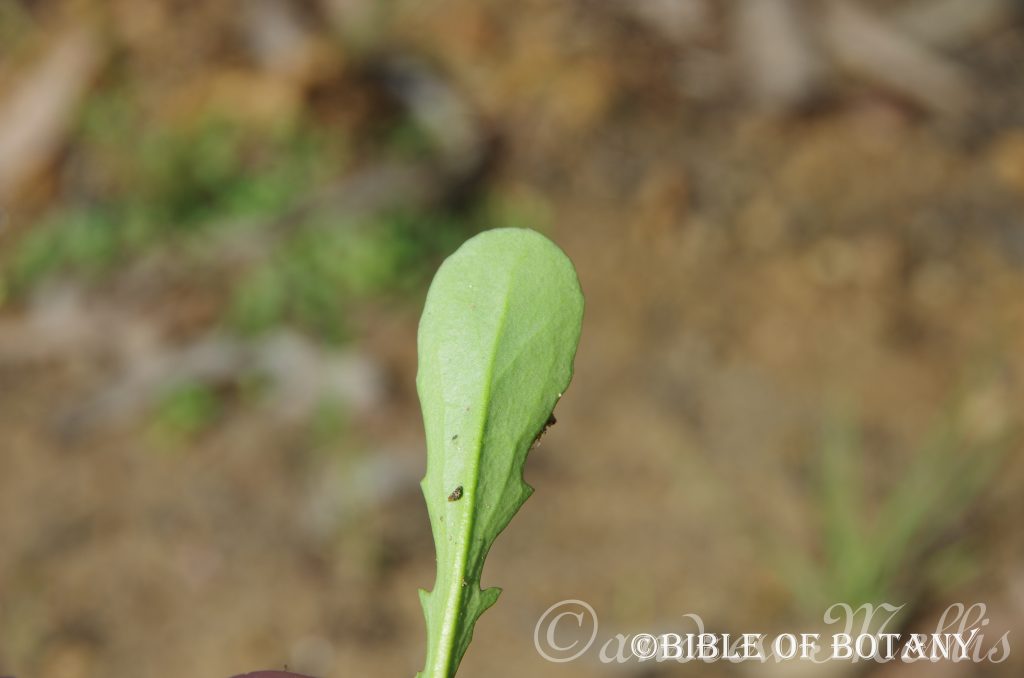
Yuraygir National Park NSW
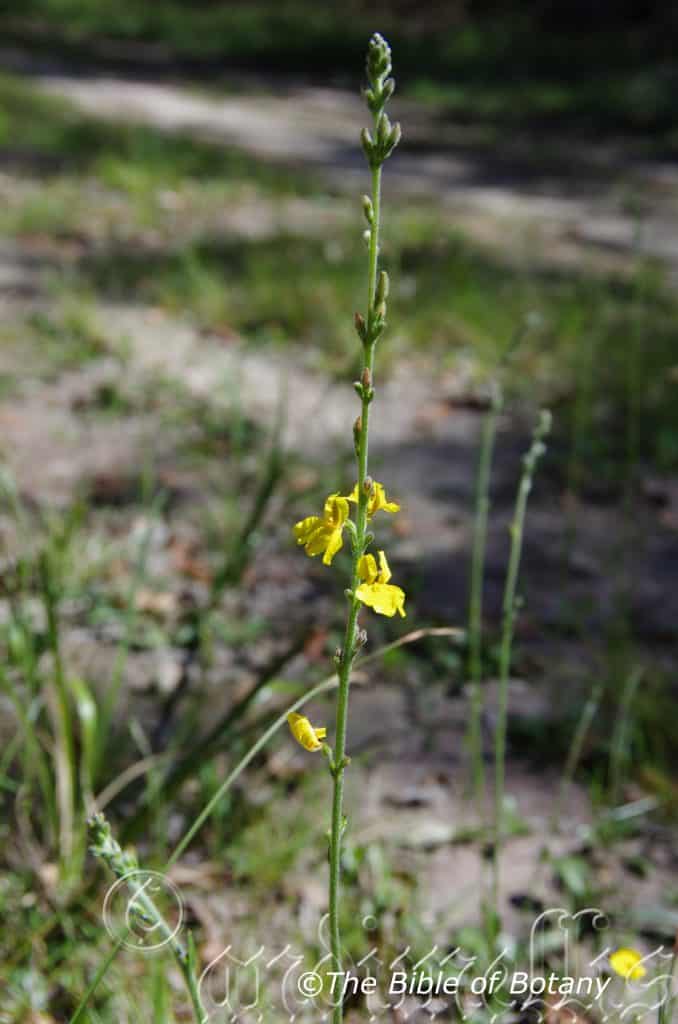
Yuraygir National Park NSW
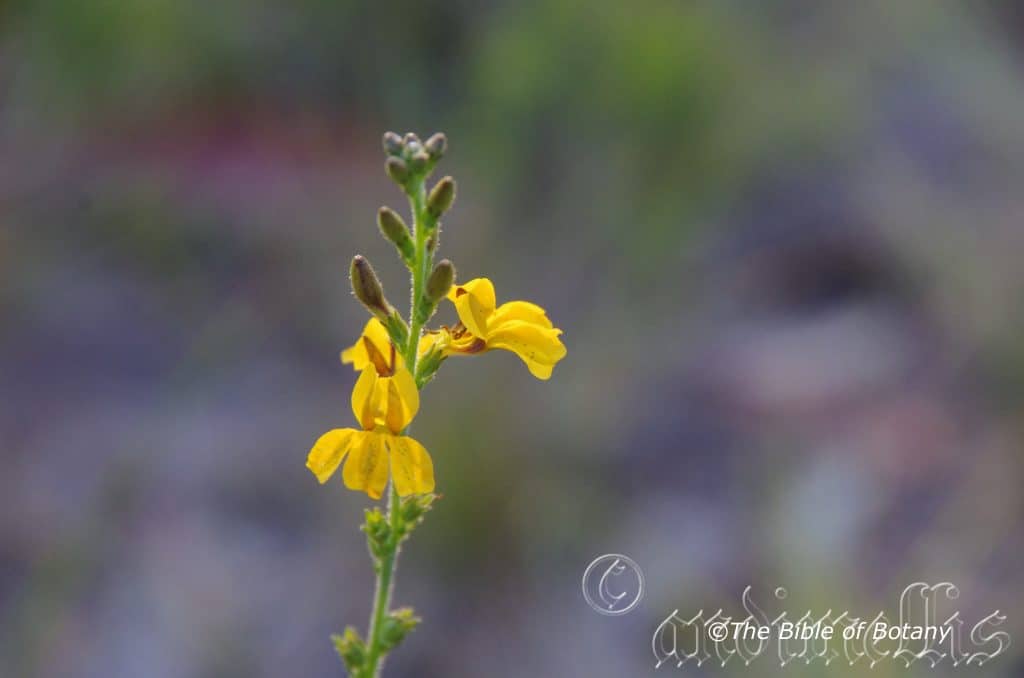
The Pinnacles NSW
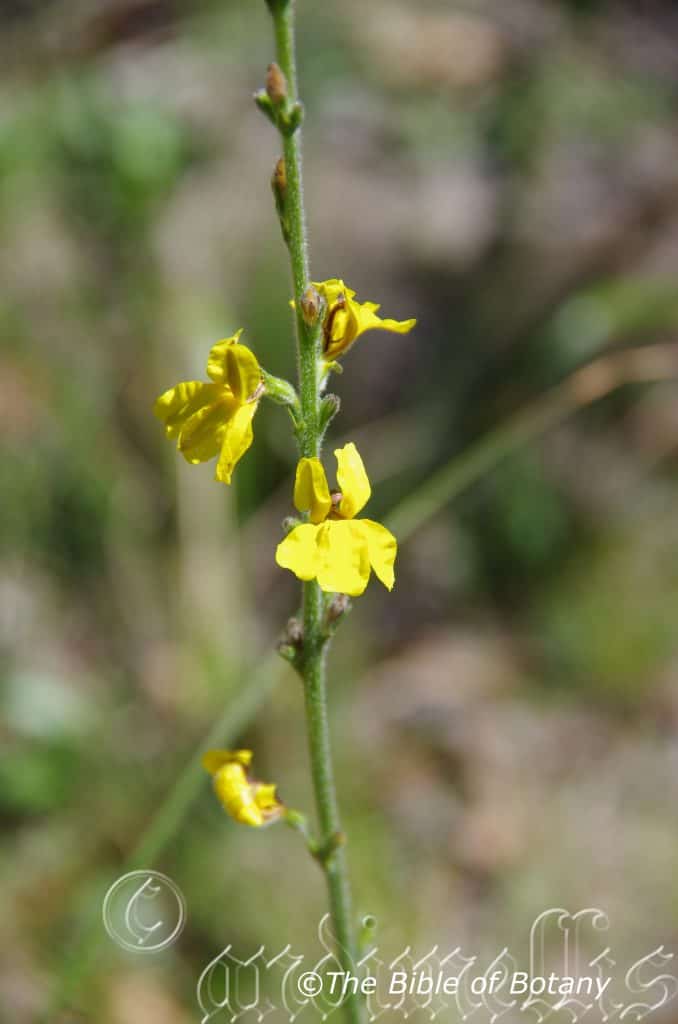
Yuraygir National Park NSW
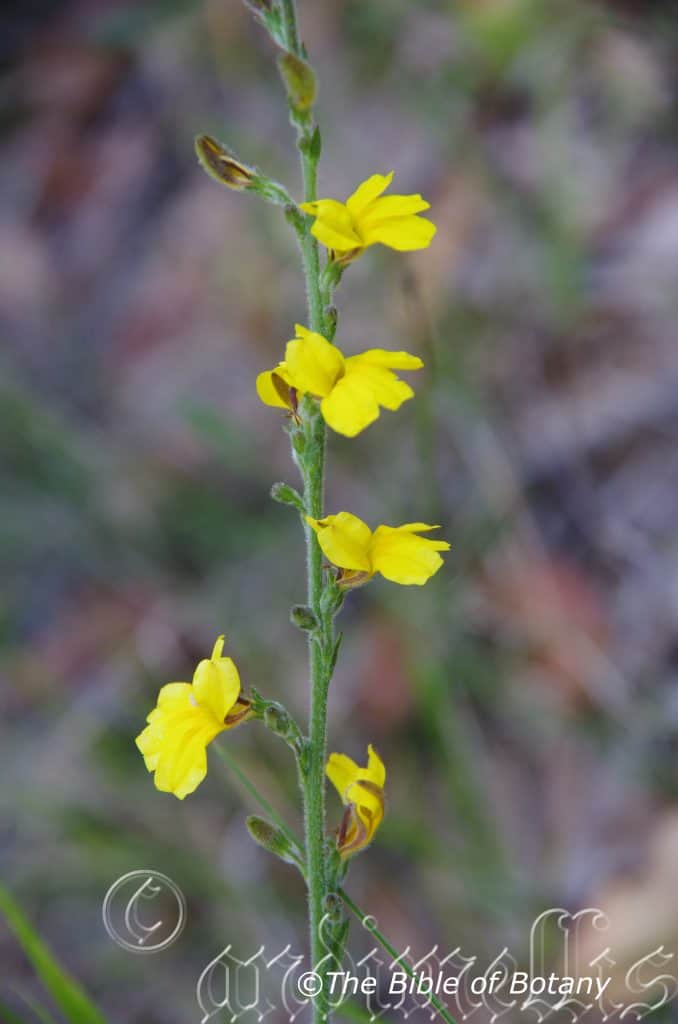
Yuraygir National Park NSW
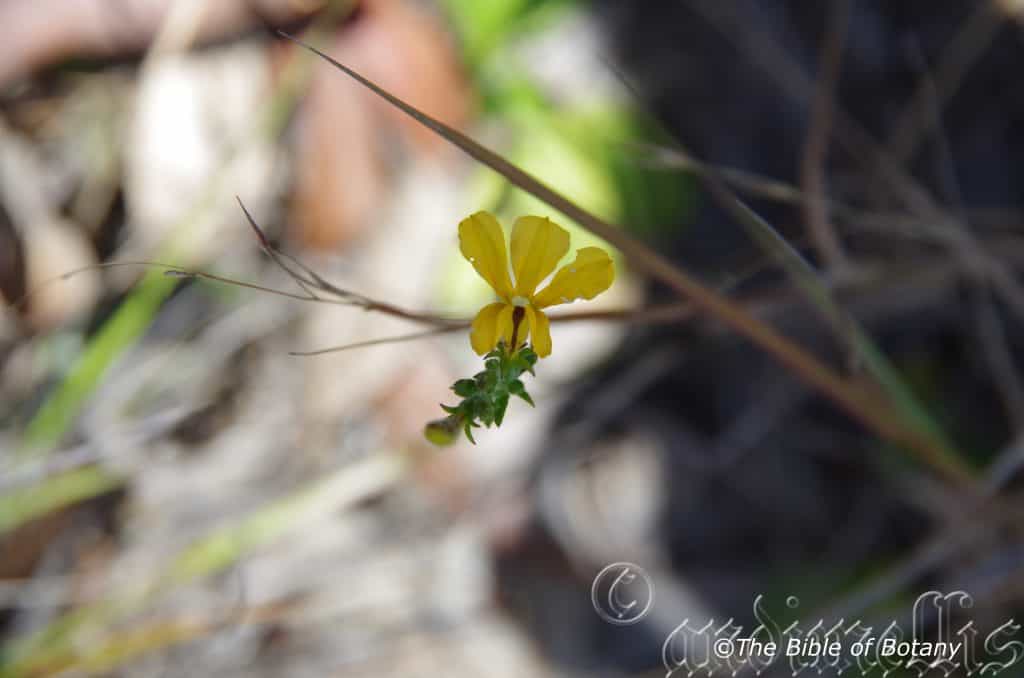
The Pinnacles NSW
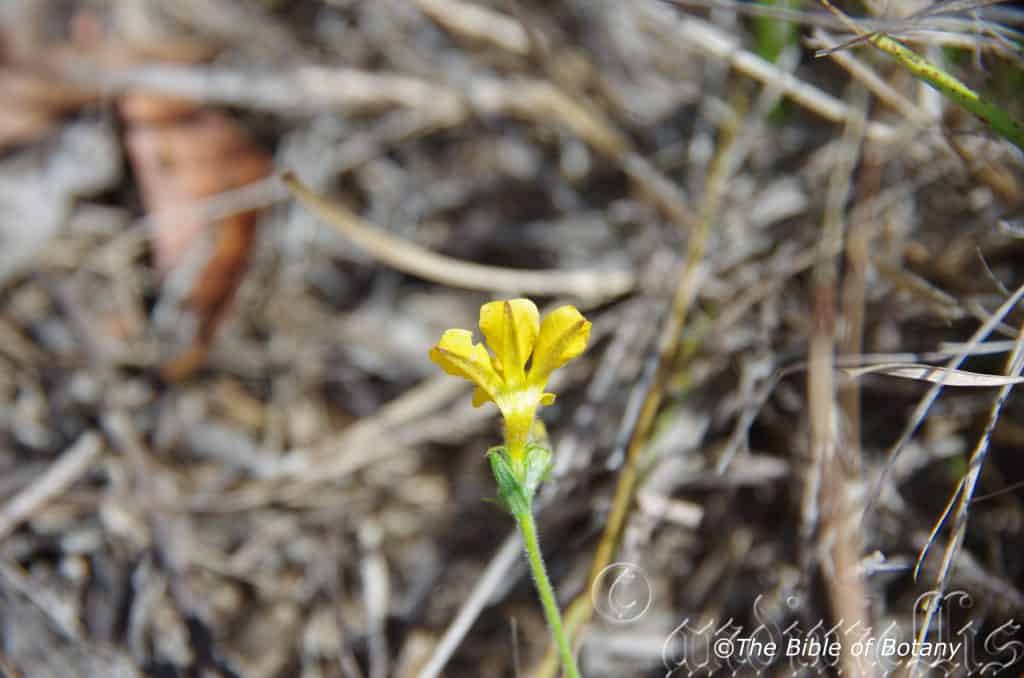
The Pinnacles NSW
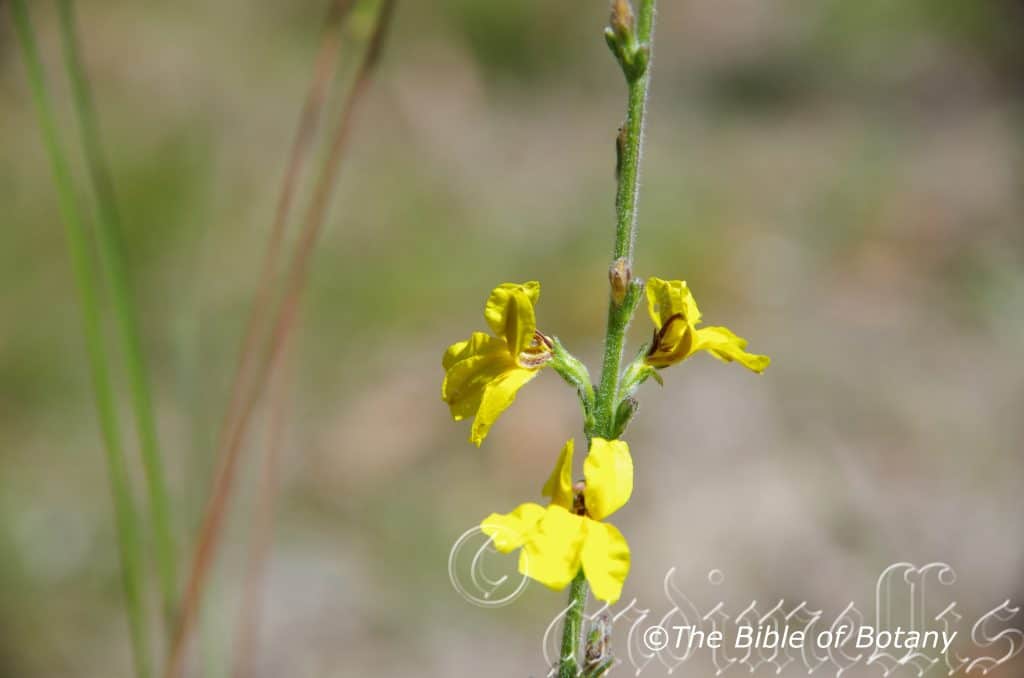
Yuraygir National Park NSW
Goodenia bellidifolia
Classification:
Unranked: Eudicots
Unranked: Asterids
Order: Asterales
Family: Goodeniaceae
Subfamily: Mimosoideae
Genus: Is named in honour of Dr. Goodenough; 1743-1827, who wrote on sea weeds and coastal sedges.
Species: From Bella, which is Latin for a pretty girl and Folium, which is Latin for foliage. It refers to plants, which have leaves similar to the European Bellis genus.
Subspecies: Goodenia bellidifolia subsp. bellidifolia. From Bella, which is Latin for a pretty girl and Folium, which is Latin for foliage. It refers to plants, which have leaves similar to the European Bellis genus.
Subspecies: Goodenia bellidifolia subsp. argentea. From árgillos, which is Greek and later Latin for silver. It refers to structures or organs usually the foliage and stems, which are silvery.
Common Name: Forest Goodenia.
Distribution:
Goodenia bellidifolia subsp. bellidifolia is found south from the Clarence Valley in north eastern New South Wales to Dinner Creek in north eastern coastal Victoria. It is found on the Western slopes, on and east of the Great Dividing Range to the coast.
There is an isolated population in Western Australia on the Tweed River in the south west corner of the state.
Goodenia bellidifolia subsp. argentea is found south from the Blackdown Tablelands National Park and Carnarvon National Park in central Queensland to Newcastle in central coastal New South Wales.
https://avh.ala.org.au/occurrences/search?taxa=Goodenia+bellidifolia#tab_mapView
Habitat Aspect Climate:
Goodenia bellidifolia prefers full sun to light shade or dappled shade. It is very quick to recolonize disturbed land but slow to establish itself in any sought of numbers to dominate an area of land. It grows in open woodlands, tall dry open Eucalyptus forests or woodland heaths. The altitude ranges from 2 meters ASL to 1150 meters ASL.
The temperatures range from minus 4.degrees in August to 38 degrees in February.
The rainfalls range from lows of 550mm to 2000mm annually.
Soil Requirements:
Goodenia bellidifolia prefers sandy loams, peaty loams to light sandy clays, light gritty clays, moist podsolics or light silts to heavy silts. The soils are usually derived from decomposed, sandstones, granites or at times metamorphic rocks or shales. The soils pH ranges from 4.5pH to 7pH are preferred. It does not tolerate waterlogged soils. Non saline soils to moderately saline soils are tolerated.
Height & Spread:
Wild Plants: 20mm to 60mm by 60mm to 100mm.
Characteristics:
Goodenia bellidifolia grows as an erect, annual herb with a rosette base. The bases and spikes are glabrous to covered in white villous hairs.
Goodenia bellidifolia subsp. bellidifolia oblanceolate to obovate basal leaves measure 40mm to 95mm in length by 5mm to 20mm in width. The bases are tapered to narrow cuneate and attenuate while the apex are obtuse. The discolourous laminas are deep green often tinged maroon or deep purple and are glabrous or covered in white villous hairs on the upper lamina while the lower lamina is paler. The laminas are usually flat or at times recurve upwards from the midvein to the margins and may decurve on the apical half while the margins are entire or with 2 to 7 irregular blunt or crenate teeth. The mid vein is prominent on the lower laminas and are distinctly visible on the upper laminas being a paler green. The petiole measures 15mm to 28mm in length.
Goodenia bellidifolia subsp. argentea obovate basal leaves measure 40mm to 95mm in length by 5mm to 20mm in width. The bases taper more abruptly and are minutely attenuate while the apex are obtuse. The discolourous laminas are deep green often tinged maroon or deep purple and are glabrous or covered in white villous hairs on the upper lamina while the lower lamina is paler. The laminas are usually flat or at times recurve upwards from the midvein to the margins and may decurve on the apical half while the margins are entire or with 2 to 7 irregular blunt or crenate teeth. The mid vein is prominent on the lower laminas and are distinctly visible on the upper laminas, which are a paler green. The petiole measures 15mm to 28mm in length.
The inflorescences of Goodenia bellidifolia subsp. bellidifolia are born with 10 to 25 individual flowers on an erect, usually leafless, narrow thyrse or spike. The peduncles measure 100mm to 200mm in length while the rachises measures 250mm to 400mm in length. The pale green calyx and lobes are glabrous or densely covered in spreading hirsute hairs externally and glabrous internally. The calyxes measure 0.5mm to 1mm in length while the linear calyx lobes measure 6mm to 8mm in length. The corolla is mid yellow to bright yellow with reddish-brown longitudinal markings and are sparsely covered in white spreading hirsute hairs externally and are bright yellow and sparsely covered in yellow villous hairs internally. The corolla measures 10mm to 12mm in length before it divides to form 5 dimorphic lobes which are divaricate when fully opened.
The upper lobes are broad linear to lanceolate with an acute apex. The upper lobes measure 7mm to 9mm in length by 2mm to 2.5mm in width while the wings measure 2mm to 3mm in width.
The lower lobes are truncate at the apexes. The lower lobes measure 8mm to 10mm in length by 2mm to 2.5mm in width while the wings measure 2mm to 3mm in width. The flowers appear throughout the year when conditions are favourable. The flowers appear from mid-September to late May.
The inflorescences of Goodenia bellidifolia subsp. argentea are born with 10 to 20 individual flowers on an erect, usually leafless, narrow thyrse or spike. The peduncles measure 100mm to 200mm in length while the rachises measures 250mm to 400mm in length. The pale green calyx and lobes are glabrous or densely covered in spreading hirsute hairs externally and glabrous internally. The calyxes measure 0.5mm to 1mm in length while the linear calyx lobes measure 6mm to 8mm in length. The corolla is mid yellow to bright yellow with reddish-brown longitudinal markings are sparsely covered in white tomentose hairs externally and are bright yellow and sparsely covered in yellow hirtellus hairs internally. The corolla measures 10mm to 12mm in length before it divides to form 5 dimorphic lobes which are divaricate when fully opened.
The upper lobes are broad linear to lanceolate with an acute apex. The upper lobes measure 7mm to 9mm in length by 2mm to 2.5mm in width while the emarginate wings measure 2mm to 3mm in width.
The lower lobes are truncate at the apexes. The lower lobes measure 8mm to 10mm in length by 2mm to 2.5mm in width while the wings measure 2mm to 3mm in width. The flowers appear throughout the year when conditions are favourable. The flowers appear from mid-September to late May.
Goodenia bellidifolia subsp. bellidifolia fruit are obovoidal capsules. The 2 valved capsules measure 3.6mm to 4mm in length by 2.5mm to 3.5mm in width near the apex. The green capsules turn grey-brown when ripe. The compressed single ovate seed is deep reddish-brown and measure 1mm to 1.2mm in diameter.
Goodenia bellidifolia subsp. argentea fruit are sub globose to obovoidal capsules. The 2 valved capsules measure 2mm to 2.5mm in length by 1.5mm to 2mm in width near the apex. The green capsules turn grey-brown when ripe. The flattened single ovate seed is deep brown to black with a reticulated and pitted surface. They measure 0.8mm to 1mm in diameter.
Wildlife:
Goodenia bellidifolia support of wildlife is unknown to the author apart from a few small unidentified black beetles that forage amongst the flowers.
Cultivation:
Goodenia bellidifolia is a beautiful small rosette annual for small bush gardens, small moist rockeries or at the edge of a heath garden. It would work well in a bog garden with carnivorous plants especially the many species of Drosera like Drosera spathulata or Drosera auricular and the Western Australian Pitcher plant, Cephalotus follicularis.
It would make a great display; when mass planted, during spring, summer and autumn. It is ideal when mass planted for sunny areas around swimming pools, fish or frog ponds which are used for an oasis affect, hot sunny court yards besides paths or small tight sections that would benefit from a small prostrate plant. Its prostrate habit makes it an ideal plant for planting amongst smaller rocks logs to medium boulders.
Propagation:
Seeds: Goodenia bellidifolia seeds require treatment before sowing. Pre-treat by placing the seeds into a glass of boiling water. Allow the water to cool and leave to soak for 6 hours. Sow the seeds into a seed raising mix. When the seedlings are 25mm to 50mm tall, gently prick them out and plant them into 50mm squat tubes using a seed raising mix.
Once the seedlings reach 70mm to 100mm in diameter plant them out into their permanent position. Prick the terminal shoot out so that the plants send out more lateral shoots. For mass plantings space the seedlings at 500mm centers.
Fertilize using seaweed, fish emulsion or organic chicken pellets soaked in water on an alternate basis. Fertilize every two months until the plants are established then annually in early September to October to maintain health, vitality and better flowering.
Further Comments from Readers:
Hi reader, it seems you use The Bible of Botany a lot. That’s great as we have great pleasure in bringing it to you! It’s a little awkward for us to ask, but our first aim is to purchase land approximately 1,600 hectares to link several parcels of N.P. into one at The Pinnacles NSW Australia, but we need your help. We’re not salespeople. We’re amateur botanists who have dedicated over 30 years to saving the environment in a practical way. We depend on donations to reach our goal. If you donate just $5, the price of your coffee this Sunday, We can help to keep the planet alive in a real way and continue to bring you regular updates and features on Australian plants all in one Botanical Bible. Any support is greatly appreciated. Thank you.
In the spirit of reconciliation we acknowledge the Bundjalung, Gumbaynggirr and Yaegl and all aboriginal nations throughout Australia and their connections to land, sea and community. We pay our respect to their Elders past, present and future for the pleasures we have gained.
Goodenia glabra
Classification:
Unranked: Eudicots
Unranked: Asterids
Order: Asterales
Family: Goodeniaceae
Subfamily: Mimosoideae
Genus: Is named in honour of Dr. Goodenough; 1743-1827, who wrote on sea weeds and coastal sedges.
Species: From Glabra, which is Latin for glabrous or smooth. It refers to structures or organs, which have no hairs or scales.
Common Name:
Distribution:
Goodenia glabra is found south and east of a line from Porphrey Creek, Quilpie and Wanaaring on the Paroo River in Queensland to Griffith and Leeton in the south then west of the Range and south from the Clarence River in north eastern New South Wales.
It is found in central Australia bounded by Illeuwurra between Tennant Creek, Alice Springs, Ayliffe Swamp Yard, Illogwa Creek, Tallaringa Well, Carriewerlie, Buckleboo, and Cook in the Great Victoria Desert, the Blackstone Mine and Robert Range in Western Australia near the border with the northern Territory and South Australia.
There are several isolated populations between the main 2 locations including Lawn Hill National Park and Winathee in the Simpson-Strezlecki Dune fields.
https://avh.ala.org.au/occurrences/search?taxa=Goodenia+glabra#tab_mapView
Habitat Aspect Climate:
Goodenia glabra prefers full sun to light shade or dappled shade. It is very quick to colonize disturbed land but slow to establish itself in any sought of numbers to dominate an area of land. It grows in open Eucalyptus woodlands, dry open savannah woodlands or dry woodland heaths. The altitude ranges from 5 meters ASL to 1150 meters ASL.
The temperatures range from minus 3 degrees in August to 38 degrees in February.
The rainfalls range from lows of 150mm to 2400mm annually.
Soil Requirements:
Goodenia glabra prefers fertile sandy loams, peaty loams to light sandy clays, light gritty clays, alluvial flats or moist podsolics. The soils are usually derived from decomposed, sandstone or at times or granite. The soils pH ranges from 5pH to 6pH are preferred. It does not tolerate waterlogged soils. Non saline soils to moderately saline soils are tolerated.
Height & Spread:
Wild Plants: 100mm to 300mm by 500mm to 1000mm.
Characteristics:
Goodenia glabra grows as a prostrate to document ground cover which has a light to brownish to greenish-brown stems. Young shoots are pale lime-green to pale grass-green. The stems are glabrous or with villous hairs.
Goodenia glabra‘s basal leaves on the stock are narrow oblong to oblanceolate and measure 30mm to 90mm in length by 7mm to 12mm in width. The petiole measures 15mm to 28mm in length. The bases are tapering attenuate while the apexes are broad acute to obtuse-acute. The discolourous laminas are deep green and glabrous on the upper laminas while the lower laminas are paler. The laminas recurve upwards from the mid vein to the margins while the margins are sub sinuate to shortly lobed. The mid vein is prominent on the lower lamina and distinctly visible above being somewhat sunken.
The cauline leaves are smaller and cuneate then attenuate at the base with a basal lobe on one side.
The inflorescences of Goodenia glabra are born on leafy raceme from the leaf axils. The peduncles, racemes and pedicels are greenish-brown to brownish and glabrous. The peduncles measure 15mm to 30mm in length while the racemes measure 100mm to 250mm in length and the pedicels measure 10mm to 35mm in length.
The bright yellow to bright reddish-yellow corolla externally while internally the throat’s striations are deep purple to red. The short, triangular bracteoles are deep green. The sepals are linear to lanceolate and measure 3mm to 4mm in length. The corolla divides to form 5 dimorphic lobes which spread when fully opened. The corolla measures 10mm to 18mm in length.
The slightly falcate upper lobes are broad linear to lanceolate with an acute apex. The upper lobes measure 5mm to 6mm in length by 2mm to 2.5mm in width while the wings measure 2mm to 3mm in width.
The lower spathulate lobes are deeply emarginated at the apexes and crenate on the upper petal. The lower lobes measure 6mm to 7.5mm in length by 2mm to 2.5mm in width while the wings measure 2mm to 3mm in width. The flowers appear throughout the year when conditions are favourable.
Goodenia glabra fruit is a globose to ovoidal capsule. The capsules measure 7mm to 10mm in length by 5mm to 8mm in diameter. The grey brown coloured pods split open down the center into two equal valves. The oblong to elliptical, khaki-brown seeds are covered in short hirtellous bristles and measure 2.6mm to 3mm in length,
Wildlife:
Goodenia glabra support of wildlife is unknown to the author.
Cultivation:
Goodenia glabra is a beautiful small prostrate plant for the small garden or rockeries of any size. Plants make great displays throughout the year especially when mass planted. It is ideal for sunny areas around swimming pools, fish or frog ponds which are used for an oasis affect hot sunny court yards besides paths or small tight sections that would benefit from a small prostrate plant. There prostrate habit makes them an ideal plant for planting amongst smaller rocks logs or boulders.
It can add year round colour when planted at the edge of a heath garden and look spectacular when mixed with other small decumbent natives like Lechenaultia biloba, Lechenaultia formosum or Scaevola aemula.
Propagation:
Seeds: Goodenia glabra seeds require treatment before sowing. Pre-treat by placing the seeds into a glass of boiling water. Allow the water to cool and leave to soak for 6 hours. Sow the seeds into a seed raising mix. When the seedlings are 25mm to 50mm tall, gently prick them out and plant them into 50mm squat tubes using a seed raising mix.
Once the seedlings reach 70mm to 100mm in diameter plant them out into their permanent position. Prick the terminal shoot out so that the plants send out more lateral shoots. For mass plantings space the seedlings at 500mm centers.
Fertilize using seaweed, fish emulsion or organic chicken pellets soaked in water on an alternate basis. Fertilize every two months until the plants are established then annually in early September to October to maintain health, vitality and better flowering.
Further Comments from Readers:
Hi reader, it seems you use The Bible of Botany a lot. That’s great as we have great pleasure in bringing it to you! It’s a little awkward for us to ask, but our first aim is to purchase land approximately 1,600 hectares to link several parcels of N.P. into one at The Pinnacles NSW Australia, but we need your help. We’re not salespeople. We’re amateur botanists who have dedicated over 30 years to saving the environment in a practical way. We depend on donations to reach our goal. If you donate just $5, the price of your coffee this Sunday, We can help to keep the planet alive in a real way and continue to bring you regular updates and features on Australian plants all in one Botanical Bible. Any support is greatly appreciated. Thank you.
In the spirit of reconciliation we acknowledge the Bundjalung, Gumbaynggirr and Yaegl and all aboriginal nations throughout Australia and their connections to land, sea and community. We pay our respect to their Elders past, present and future for the pleasures we have gained.
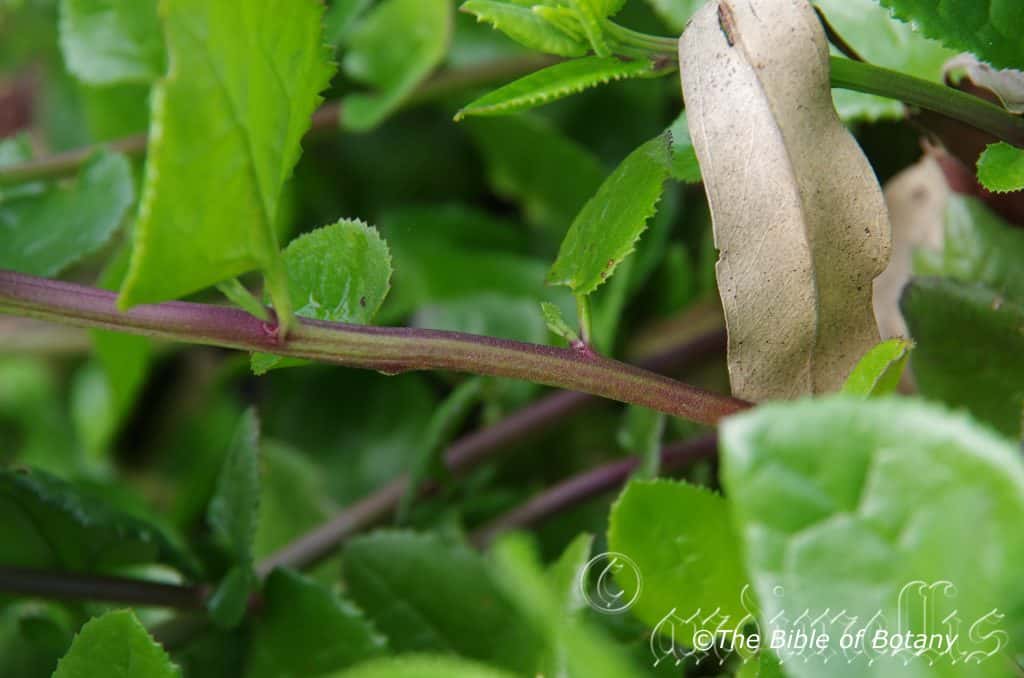
Rosser gardens Benowa Qld.
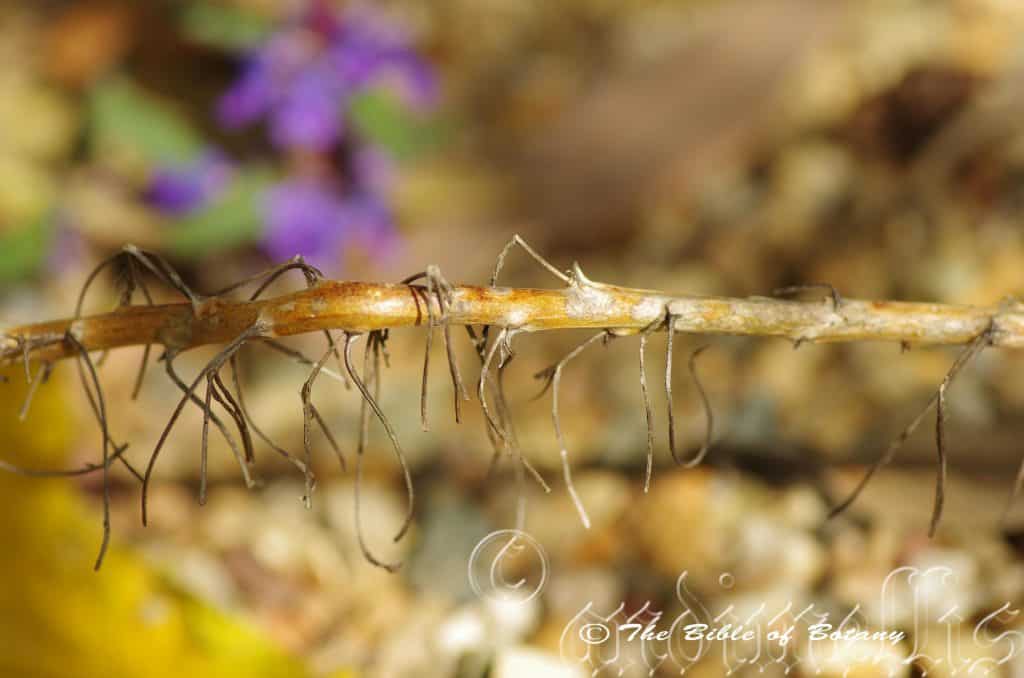
Anderson Gardens Townsville Qld.
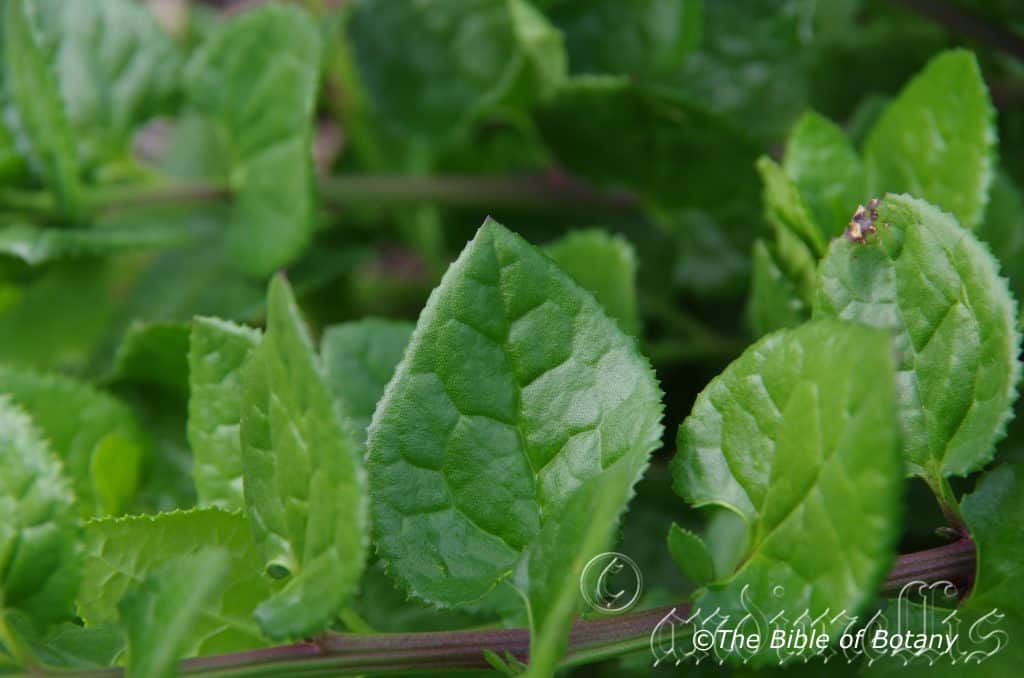
Rosser gardens Benowa Qld.
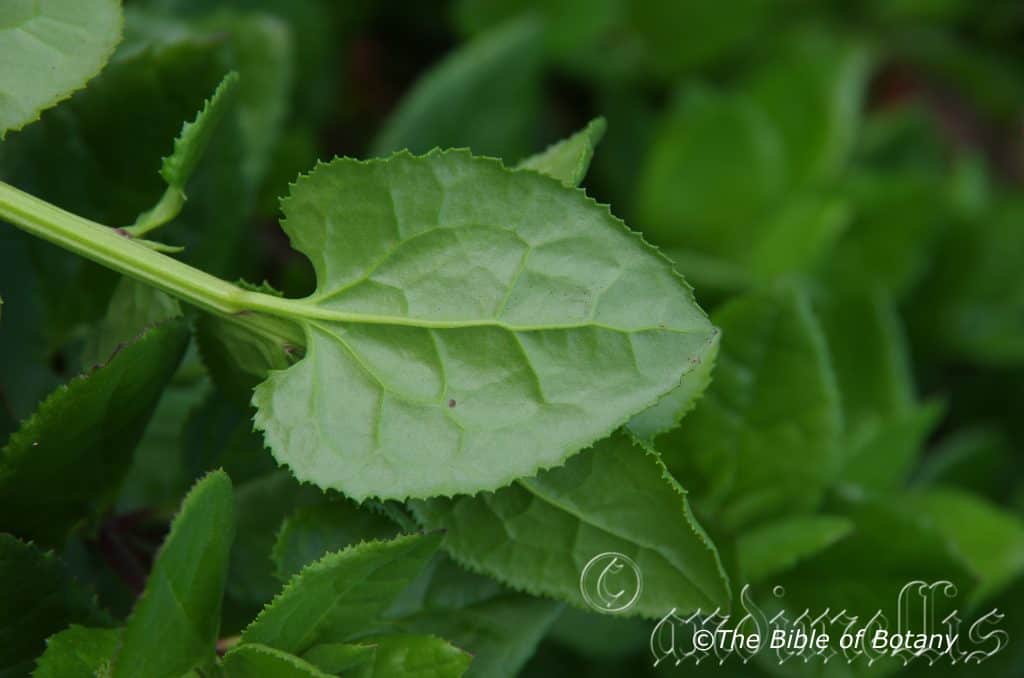
Rosser gardens Benowa Qld.
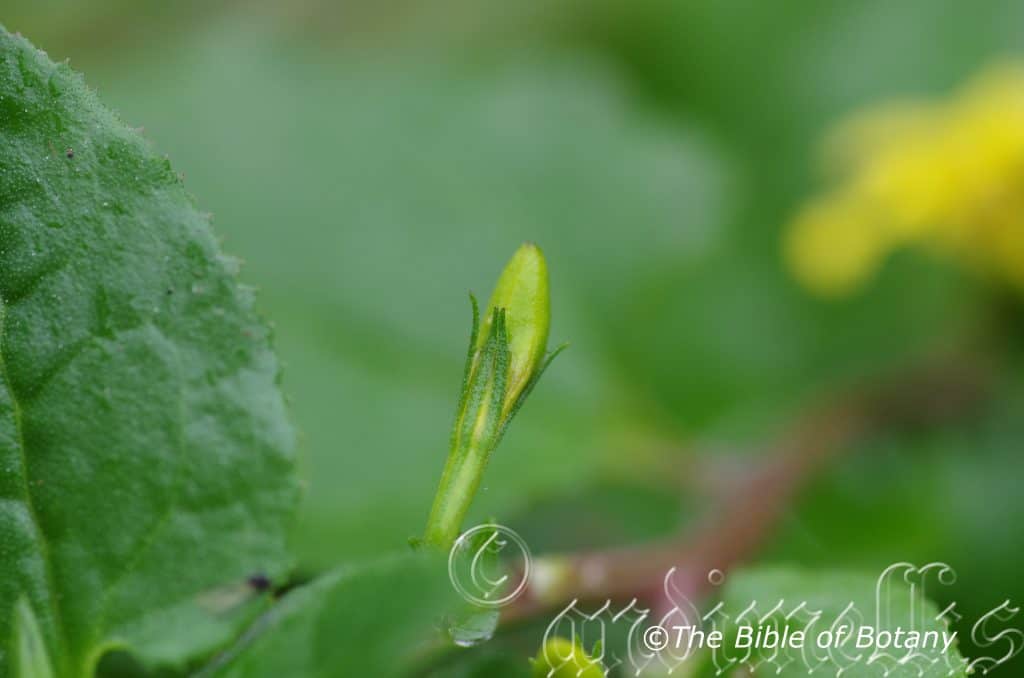
Author’s Garden The Pinnacles NSW
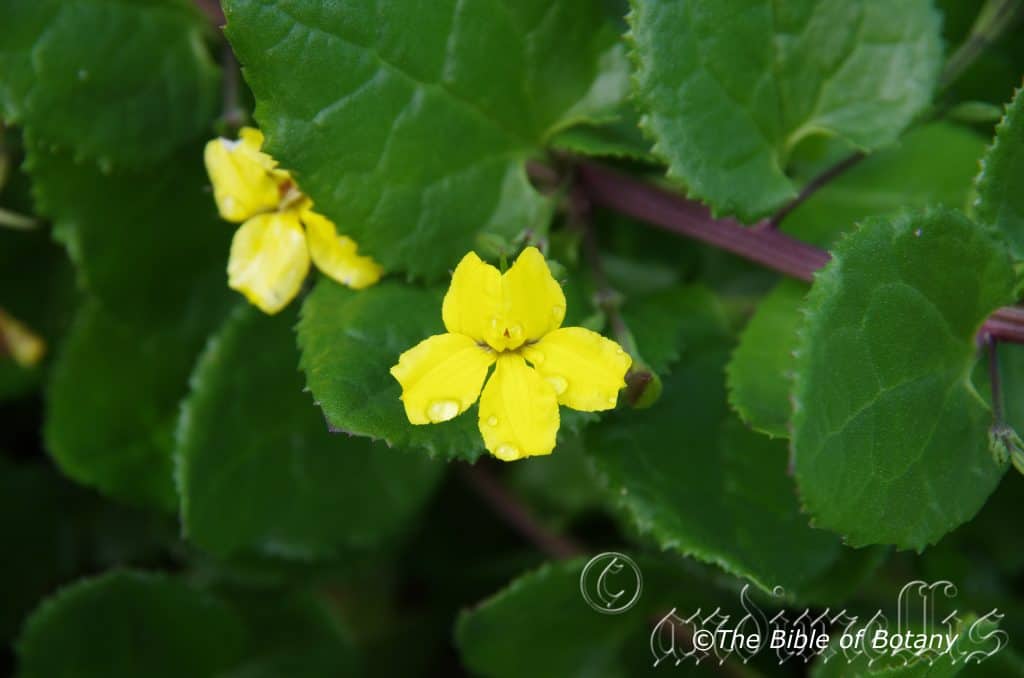
Rosser gardens Benowa Qld.
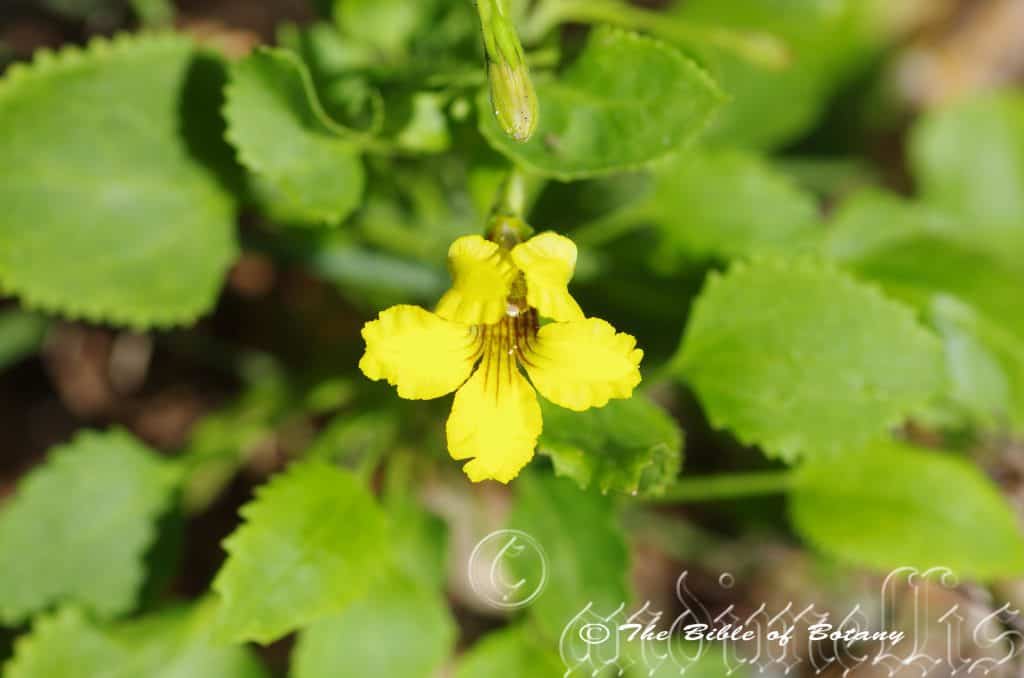
Anderson Gardens Townsville Qld.
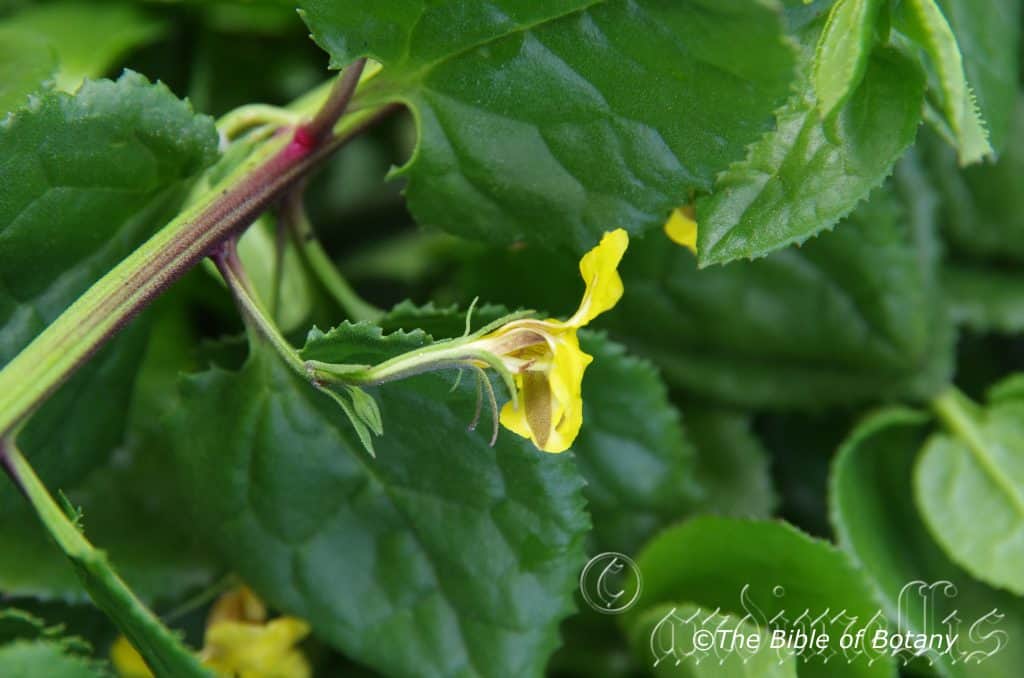
Rosser gardens Benowa Qld.
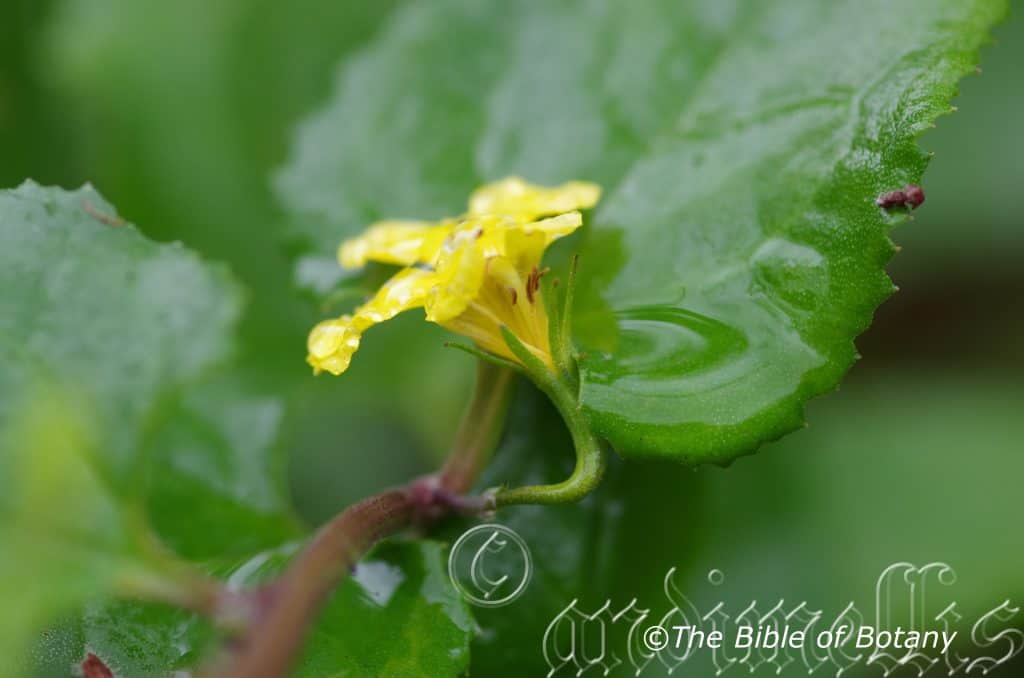
Author’s Garden The Pinnacles NSW
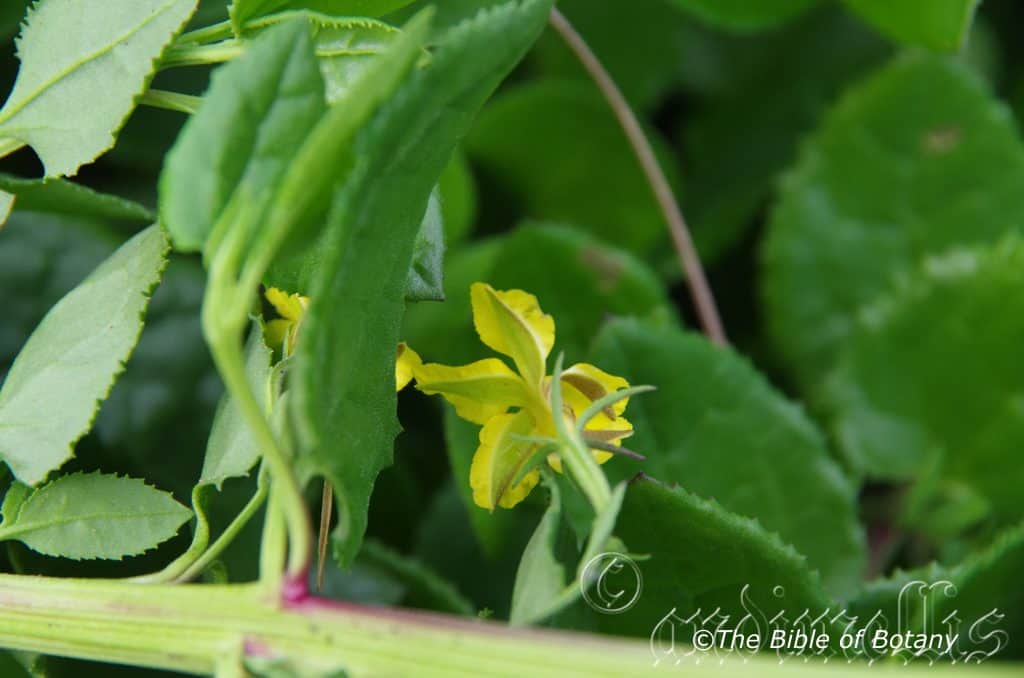
Rosser gardens Benowa Qld.
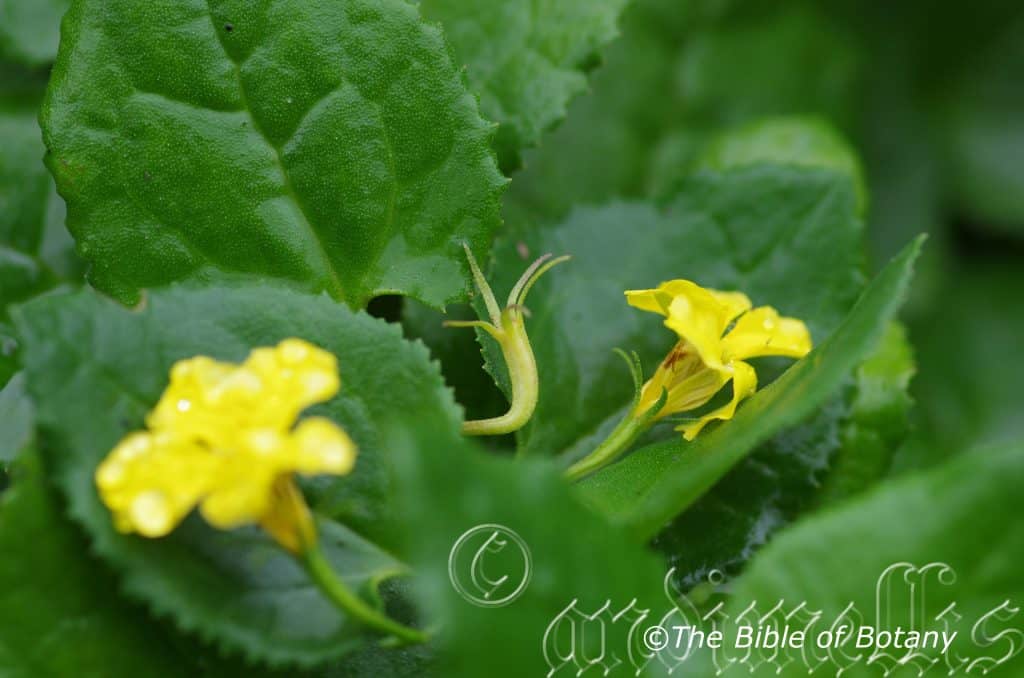
Author’s Garden The Pinnacles NSW
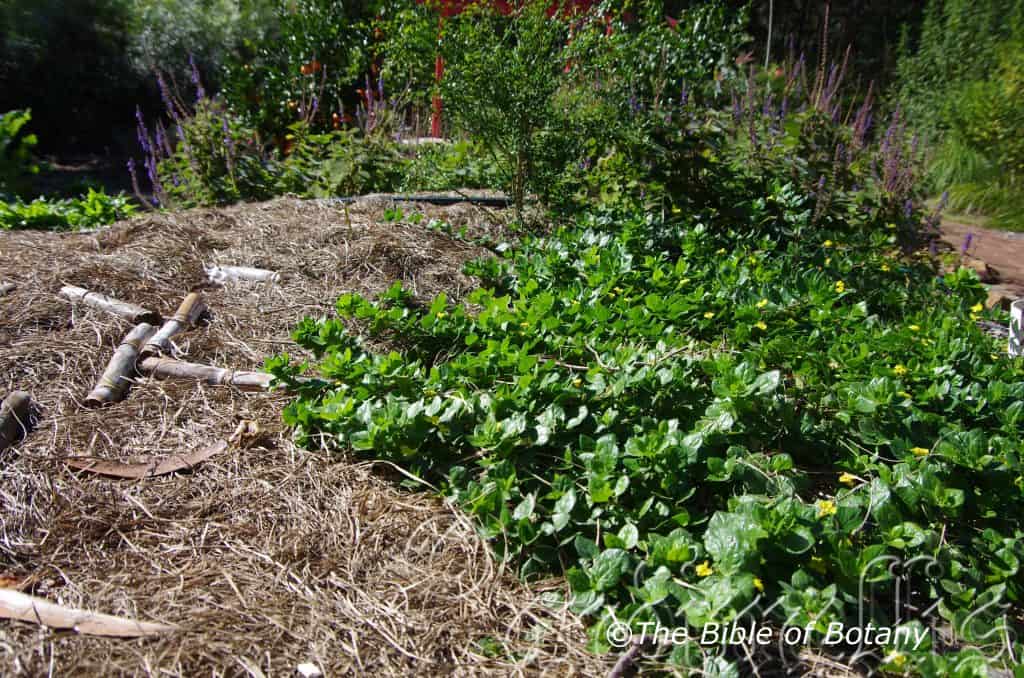
Author’s Garden The Pinnacles NSW
Author’s Garden The Pinnacles NSW
Goodenia grandiflora
Classification
Unranked: Eudicots
Unranked: Asterids
Order: Asterales
Family: Goodeniaceae
Subfamily: Mimosoideae
Genus: Is named in honour of Dr. Goodenough; 1743-1827, who wrote on sea weeds and coastal sedges.
Species: From Grandis which is Latin for large and Floris, which is Latin for a flower or Flos, which is the Roman goddess of spring and flowers. It refers to plants, which produce larger flowers than most other species in the genus.
Common Name:
Distribution:
Goodenia grandiflora is found south and east of a line from Nabunga Gorge in the Northern Territory to Trinity Bay in far north eastern Queensland then from Wigunyah in Queensland and Gunnudah in New South Wales where it is found on the Great Dividing Range south to Coongulla in eastern Victoria.
It is found in central Australia bounded by Burt Plains to Mount Leichardt, Amarata Waterhole in the Northern Territory to Musgrave Ranges and Schwerin Mural Crescent in South Australia.
There are several disjunct populations further west in the southern Tanami and south including Oodnadatta and from Arcoona Bluff to Parachilna Gorge while there is an isolated population in Western Australia between Wooleen and Murgo Stations.
https://avh.ala.org.au/occurrences/search?taxa=Goodenia+grandiflora#tab_mapView
Habitat Aspect Climate:
Goodenia grandiflora prefers full sun to light shade or dappled shade. It is very quick to recolonize disturbed land but slow to establish itself in any sought of numbers to dominate an area of land. It grows in tall open Eucalyptus woodlands, dry open savannah woodlands or dry woodland heaths. The altitude ranges from 10 meters ASL to 1000 meters ASL.
The temperatures range from minus 4.degrees in August to 40 degrees in February.
The rainfalls range from lows of 150mm to 2800mm annually.
Soil Requirements:
Goodenia grandiflora prefers skeletal sandy loams to light sandy clays close to the parent rocks or alluvial flats or moist podzolics. The soils are usually derived from partially decomposed sandstones, granites, brown basalts, black basalts or metamorphic rocks. The soils pH ranges from 5PH to 6.5PH. It does not tolerate waterlogged soils. Non saline soils to moderately saline soils are tolerated.
Height & Spread:
Wild Plants: 1meter to 1.5 meters by 500mm to 1000mm.
Characteristics:
Goodenia grandiflora grows as an erect, bushy, small shrub with grass-green to deep purple-green stems. The stems are often viscid and covered in white glandular or hirsute hairs. The new growth is pale glossy lime-green.
Goodenia grandiflora‘s alternate, ovate to orbicular leaves measure 25mm to 50mm in length by 20mm to 60mm in width. The cauline petioles measure 20mm to 50mm in length. The bases are rounded to cordate while the apex is obtuse, acuminate or acute. The concolourous laminas are mid green and glabrous. The laminas recurve from the midvein to the margins while the margins are toothed. The mid vein is prominent below, distinctly visible above as are the reticulated lateral veins. There is a single stipule at the base that measures 5mm in length while there are 2 stipule like leaflets half way along the petiole that measure 6mm to 8mm in length.
The inflorescences of Goodenia grandiflora are born on leafy raceme or thrice from the leaf axils. The peduncles, racemes and pedicels are mid green and glabrous. The peduncles measure 5mm to 8mm in length while the racemes measure 8mm to 15mm in length and the pedicels measure 6mm to 12mm in length.
The bright yellow corolla’s throats striations are deep reddish-brown to purplish. The short basal triangular bracteoles are deep green. The sepals are narrow triangular and measure 3mm to 6.5mm in length. The corolla divides to form 5 dimorphic lobes which spread when fully opened. The corolla measures 18mm to 23mm in length overall.
The lanceolate upper lobes are yellow with purple bases, have an acute apex and are covered in white glandular or puberulent hairs externally and are covered in white villous hairs internally. The upper lobes measure 14mm to 20mm in length by 3mm to 3.5mm in width at the base while the wings measure 2.5mm to 3mm in width.
The deep yellow lower lobes have shallowly emarginated wings at the apexes with undulating margins. The lower lobes are covered in white glandular or puberulent hairs externally and are covered in white villous hairs internally. The lower lobes measure 16mm to 21mm in length by 3mm to 4mm in width while the wings measure 2.6mm to 3.2mm in width.
The white, dimorphic filiform stamens measure 1mm to 2.5mm in length while the fawn anthers measure 1mm in length. The linear deep purple almost black style measures 10mm to 15mm in length while the conical stigma is recurved while the pollen presenter is white. The style is moderately covered in long, white pilose hairs. The flowers appear from May to November.
Goodenia grandiflora‘s fruit is an ovoidal capsule. The capsules measure 10mm to 13mm in length by 5mm to 8mm in diameter. The green capsules turn grey brown when ripe and split open down the center into two equal valves. The ovate to elliptic, grey-brown seeds are colliculate to tuberculate and measure 2.6mm to 3mm in length.
Wildlife:
Goodenia grandiflora support of wildlife is unknown to the author.
Cultivation:
Goodenia grandiflora is a beautiful small shrub for the small garden or medium rockeries. The plants make great displays from autumn to early summer especially when mass planted. In cultivation they will grow 1 meter to 1.5 meters in height by 0.6 meters to 1.2 meters in diameter when grown in the open. They respond well to tip pruning and are moderately frost hardy and drought resistant. In fact it is grossly underestimated and under used as its uses in cultivation and landscaping projects are unlimited.
This is undoubtily one of the best low growing ground covers in Australia. It flowers continuously throughout the year with a peak in the warmer months. It is ideal for sunny areas around swimming pools, hot sunny courtyards or semi shaded courtyards or in the foreground of a bush garden.
It is best used adjacent to small areas of bush close to paths or the house so their deep yellow flowers can be viewed regularly. Here they can be planted in small groups of 2 or 3 or as a standalone plant to create a lush semi tropical look. If it is surrounded by shorter plants with fine foliages and red flowers they will give a strong affect or surrounded in pinks and lilacs a serene peaceful scene can be created. This is one plant that benefits from high exposure from standing alone or planted in small scattered clumps of 3. Your imagination is the only limitation to its use in the garden.
Propagation:
Seeds: Goodenia grandiflora seeds require treatment before sowing. Pre-treat by placing the seeds into a glass of boiling water. Allow the water to cool and leave to soak for 6 hours. Sow the seeds into a seed raising mix. When the seedlings are 25mm to 50mm tall, gently prick them out and plant them into 50mm squat tubes using a seed raising mix.
Once the seedlings reach 70mm to 100mm in diameter plant them out into their permanent position. Prick the terminal shoot out so that the plants send out more lateral shoots. For mass plantings space the seedlings at 500mm centers.
Cuttings: Use 50mm to 70mm long herbaceous cuttings taken at any time of the year while the plants are growing vigorously. Vigorously growing plants of the form you desire should be used when growing from cuttings. Remove the leaves from the lower one-third to one-half of the stem being careful not to tear the stem. A rooting hormone is not required as the cuttings strike easily and within a couple of weeks in the warmer months. Place the cuttings in a warm semi shaded position preferably under 30mm shade cloth and keep moist at all times.
Once the cuttings reach 70mm to 100mm in length repot them or transplant them into their permanent position and fertilize using seaweed, fish emulsion or organic chicken pellets soaked in water on an alternate basis. Fertilize every two months until the plants are established then annually in early September or March to maintain health, vitality and better flowering.
Fertilize using seaweed, fish emulsion or organic chicken pellets soaked in water on an alternate basis. Fertilize every two months until the plants are established then annually in early September to October to maintain health, vitality and better flowering.
Further Comments from Readers:
Hi reader, it seems you use The Bible of Botany a lot. That’s great as we have great pleasure in bringing it to you! It’s a little awkward for us to ask, but our first aim is to purchase land approximately 1,600 hectares to link several parcels of N.P. into one at The Pinnacles NSW Australia, but we need your help. We’re not salespeople. We’re amateur botanists who have dedicated over 30 years to saving the environment in a practical way. We depend on donations to reach our goal. If you donate just $5, the price of your coffee this Sunday, We can help to keep the planet alive in a real way and continue to bring you regular updates and features on Australian plants all in one Botanical Bible. Any support is greatly appreciated. Thank you.
In the spirit of reconciliation we acknowledge the Bundjalung, Gumbaynggirr and Yaegl and all aboriginal nations throughout Australia and their connections to land, sea and community. We pay our respect to their Elders past, present and future for the pleasures we have gained.
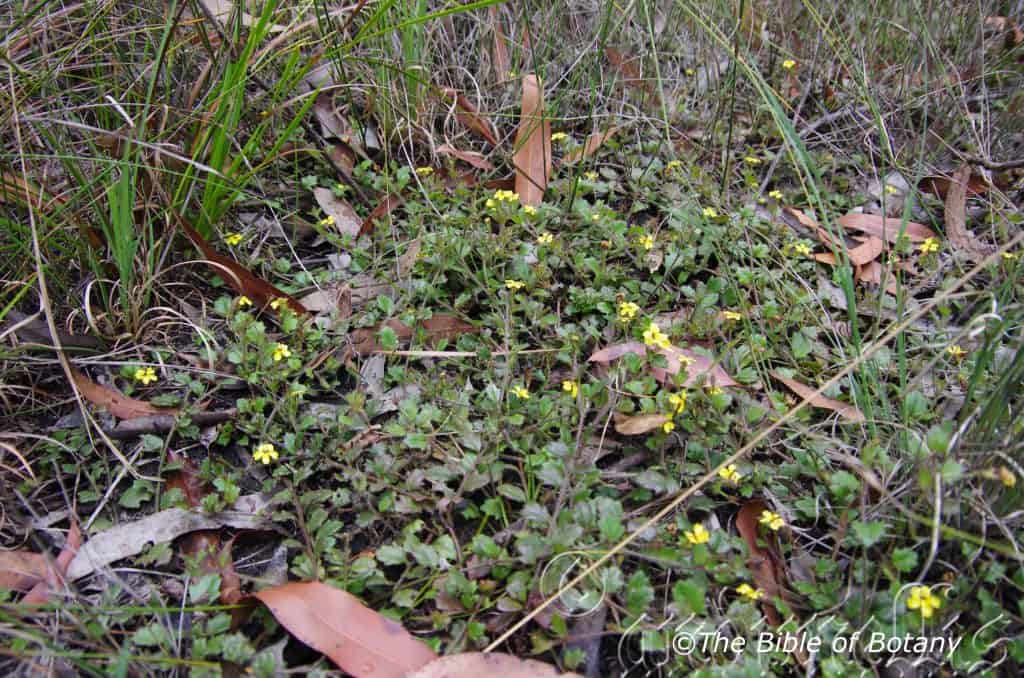
Author’s Garden The Pinnacles NSW
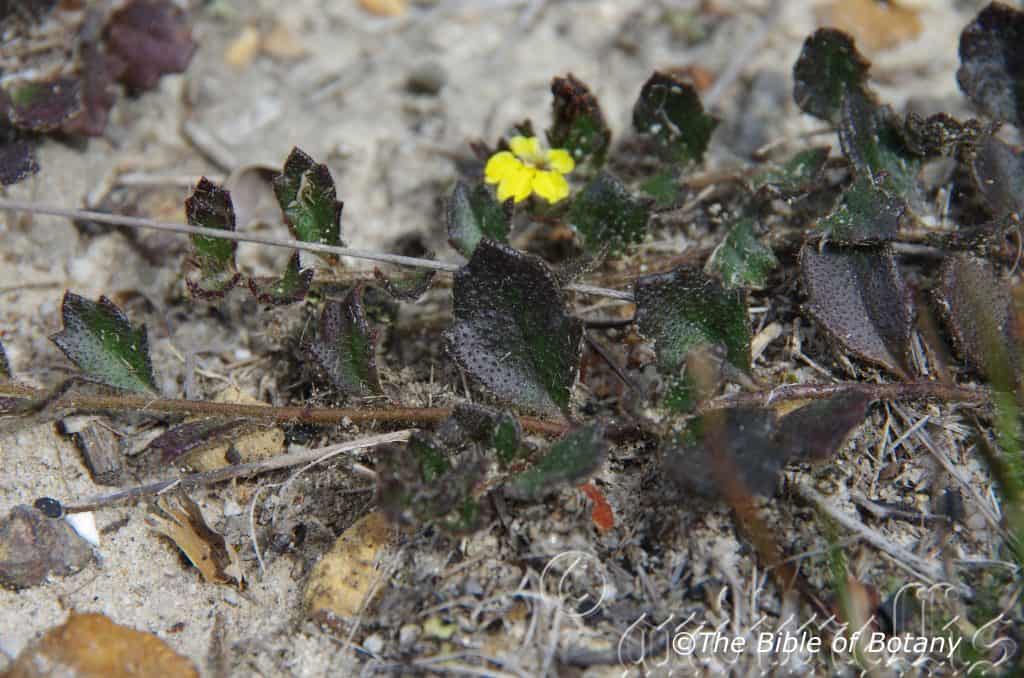
Author’s Garden The Pinnacles NSW

Wombat Creek National Park NSW

Wombat Creek National Park NSW
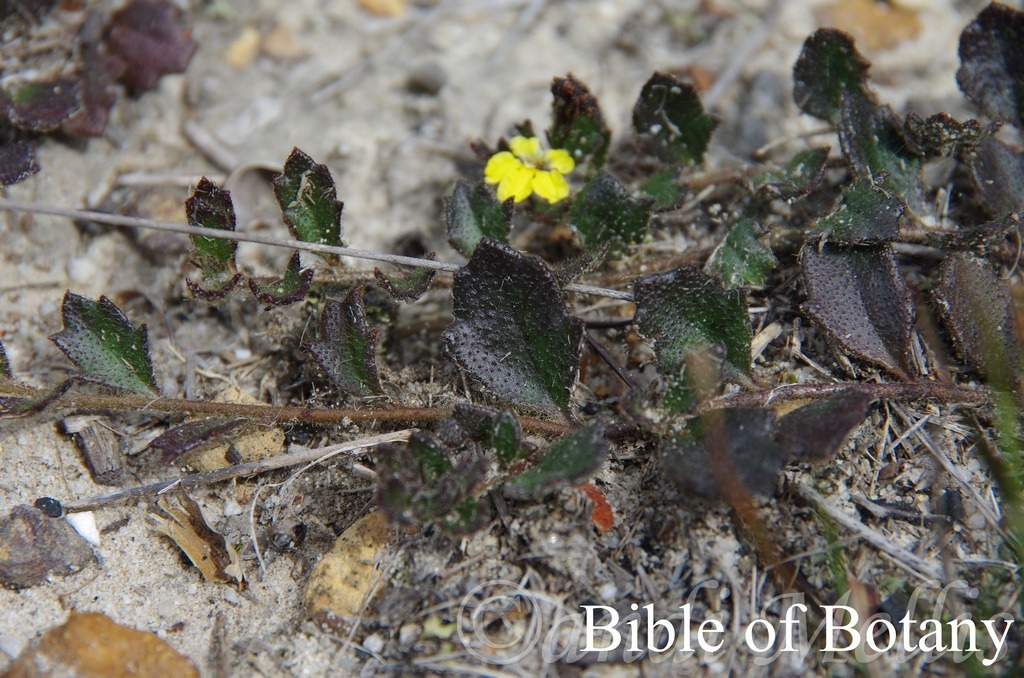
The Pinnacles NSW
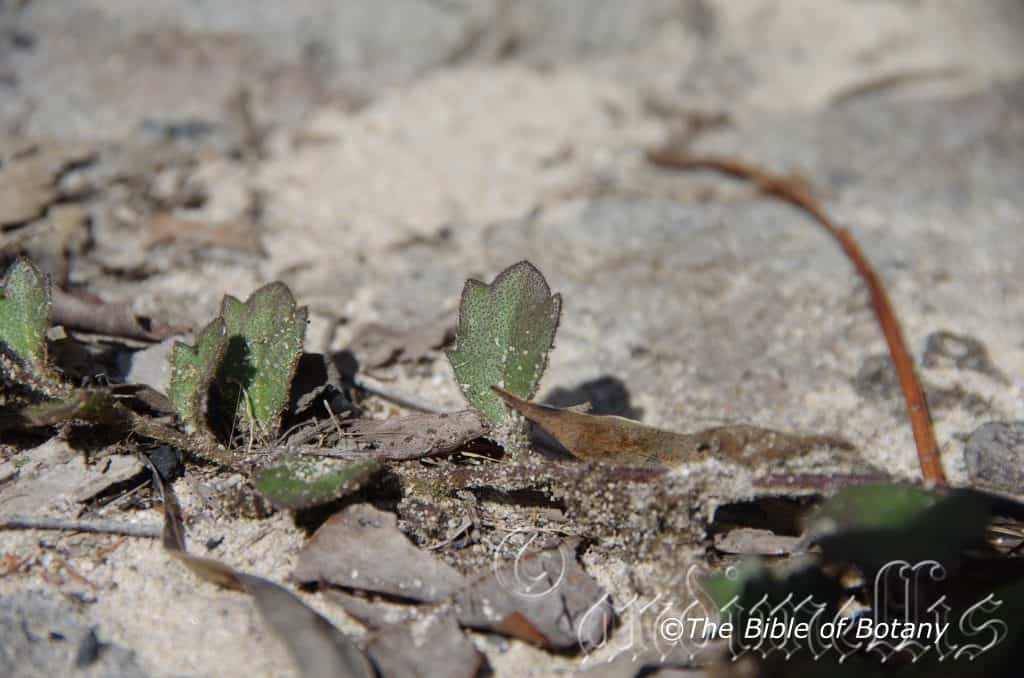
Author’s Garden The Pinnacles NSW
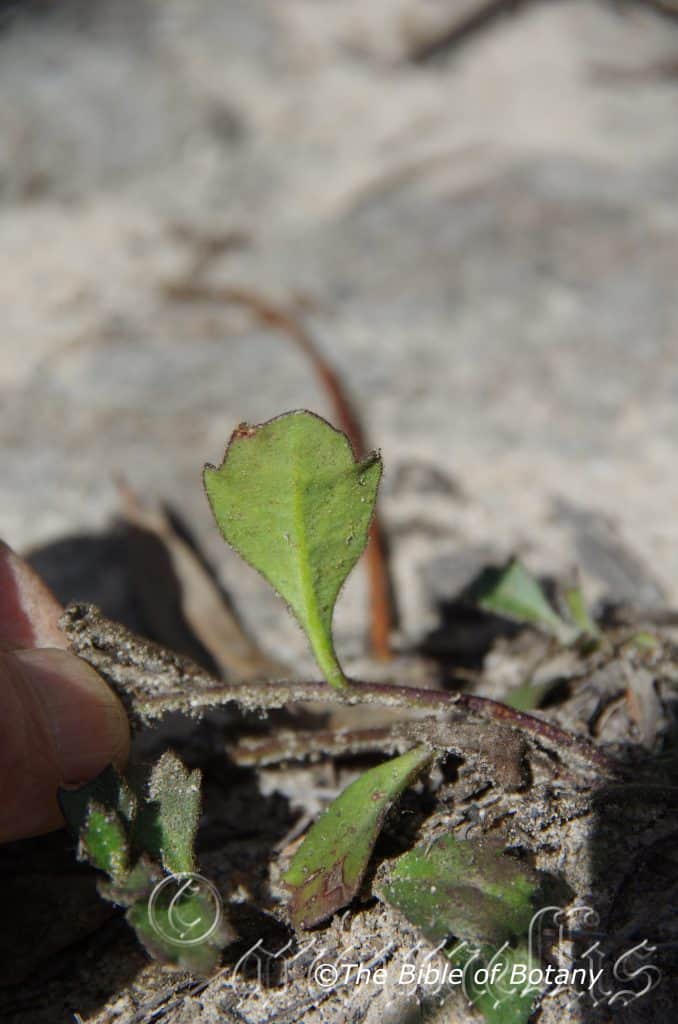
Author’s Garden The Pinnacles NSW
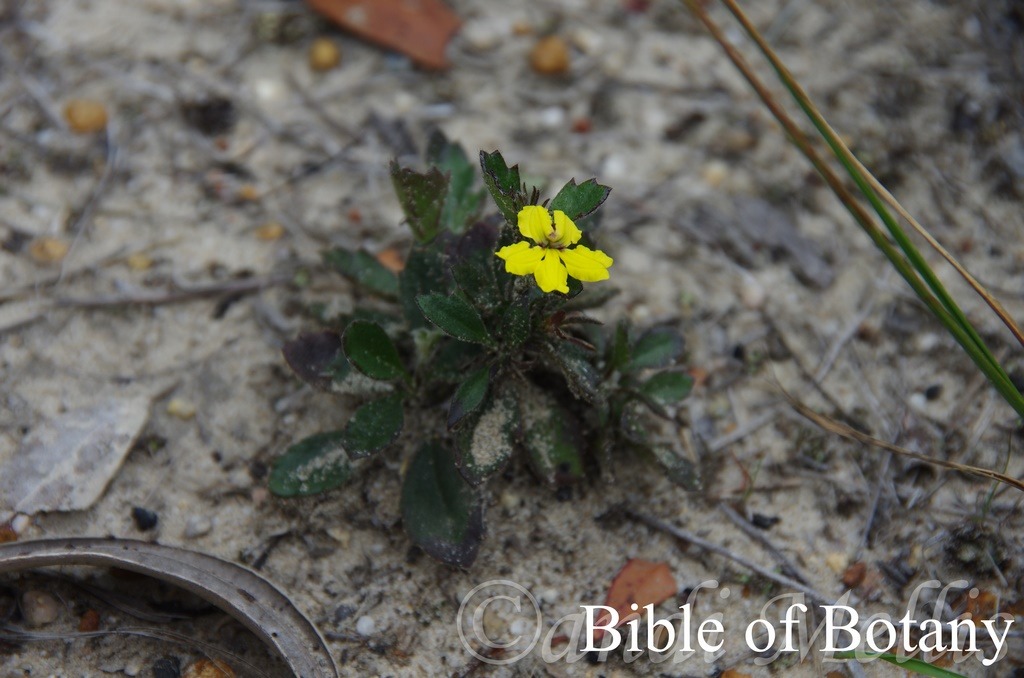
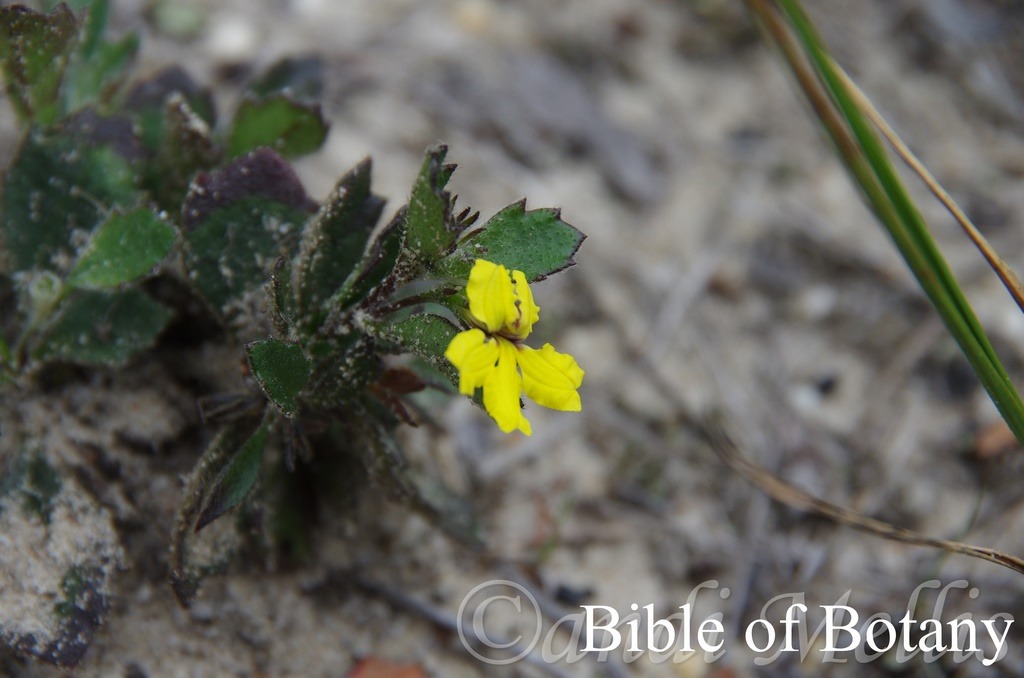
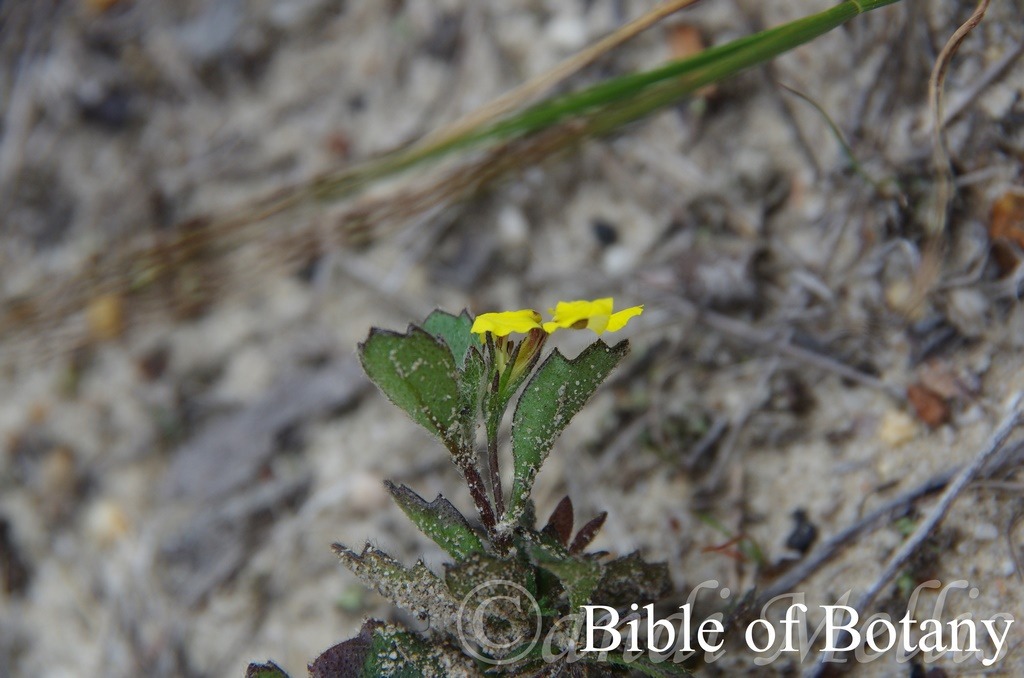
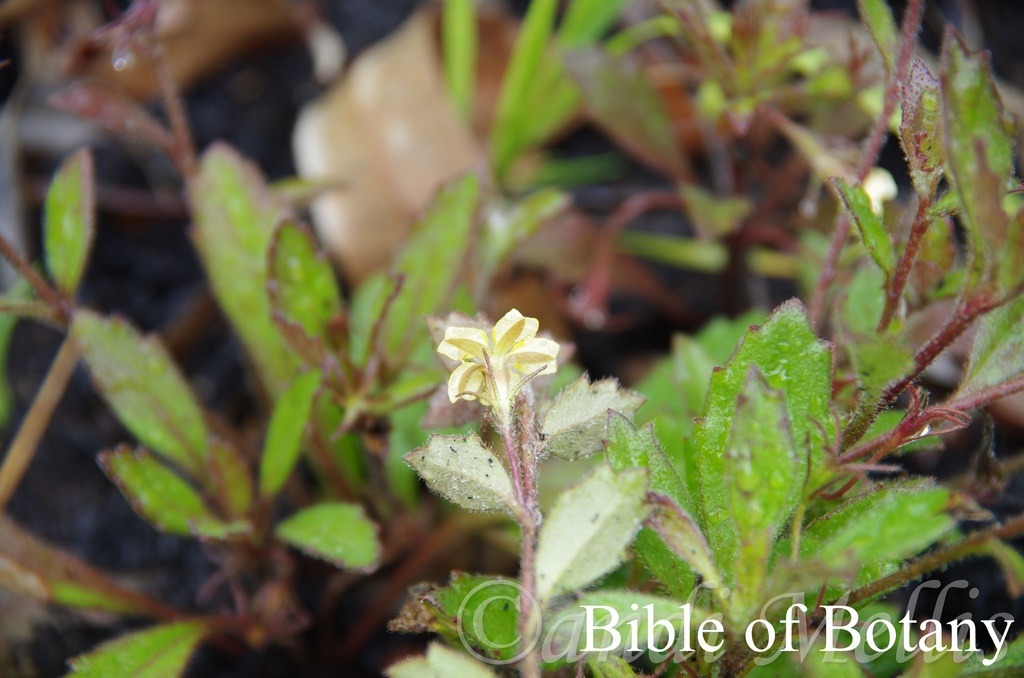
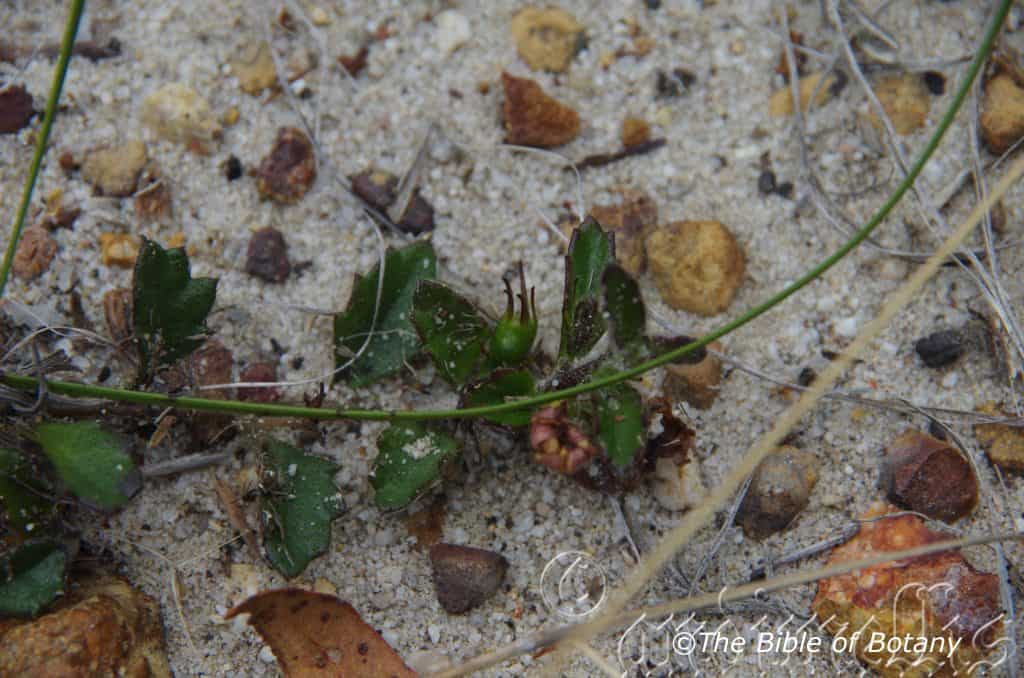
The Pinnacles NSW
Goodenia hederacea
Classification:
Unranked: Eudicots
Unranked: Asterids
Order: Asterales
Family: Goodeniaceae
Subfamily: Mimosoideae
Genus: Is named in honour of Dr. Goodenough; 1743-1827, who wrote on sea weeds and coastal sedges.
Species: From Hedera, which is Latin for an ivy. It refers to plants, which are somewhat like an ivy.
Subspecies: Goodenia hederacea subsp. alpestris. From Alpestris, which is Latin for the Alps. It refers to plants, which prefer subalpine areas of mountains below the permanent snow line or in spring thaw zones in warmer areas.
Subspecies: Goodenia hederacea subsp. hederacea. From Hedera, which is Latin for an ivy. It refers to plants, which are somewhat like an ivy.
Common Name: Forest Goodenia.
Distribution:
Goodenia hederacea subsp. hederacea is found from south from the Black down Tablelands west of Rockhampton in central Queensland to Canberra in southern New South Wales.
Goodenia hederacea subsp. alpestris is mainly found south from Canberra with some overlapping at higher altitudes north of Canberra and around Ebor.
It is found on the Western Slopes, on and east of the Great Dividing Range to the coast.
https://avh.ala.org.au/occurrences/search?taxa=Goodenia+hederacea#tab_mapView
Habitat Aspect Climate:
Goodenia hederacea prefers full sun to light shade or dappled shade. It is very quick to colonize disturbed land but slow to establish themselves in any sought of numbers to dominate an area of land. The altitude ranges from 10 meters ASL to 1750 meters ASL.
The temperatures range from minus 8 degrees in August to 28 degrees in February for Goodenia hederacea sub sp. alpestris while Goodenia hederacea sub sp. hederacea the temperatures range from minus 4.in August and 36 degrees in February.
The rainfalls range from lows of 550mm to 2400mm annually.
Soil Requirements:
Goodenia hederacea prefers fertile sandy loams, peaty loams to light sandy clays, medium clays, alluvial flats or moist podzolics. The soils are usually derived from decomposed sandstones, granites or at times metamorphic rocks, shales, brown basalt or black basalt. The soils pH ranges from 4.5PH to 7PH are preferred. It does not tolerate waterlogged soils. Non saline soils to slightly saline soils are tolerated.
Height & Spread:
Wild Plants: 100mm to 300mm by 500mm to 1000mm.
Characteristics:
Goodenia hederacea grows as a prostrate ground cover with pale green to mid green, pinkish-green or even deep purplish-brown stems. Young shoots are light pinkish green to deep purplish brown.
Goodenia hederacea sub sp. alpestris young stems are densely covered in pale grey tomentose hairs or rarely glabrous. Usually roots at the nodes naturally.
Goodenia hederacea sub sp. hederacea young stems are glabrous to densely covered in white to pale grey pubescent hairs. The plants do not root at the nodes naturally.
Goodenia hederacea sub sp. alpestris‘s alternate, orbicular to broad ovate leaves measure 25mm to 30mm in length by 20mm to 25mm in width. The discolourous laminas are deep green and glabrous on the upper lamina while the lower lamina is sparsely to densely covered in white tomentose hairs. The base is broadly rounded while the apex is obtuse. The leaf margins are crenate to sinuate. The mid vein is prominent below, distinctly visible above and white or light green. The petiole measures 15mm to 28mm in length.
Goodenia hederacea sub sp. hederacea’s alternate has adjacent ovate or narrow oblong leaves measure 14mm to 90mm in length by 5mm to 10mm in width. The discolourous laminas are deep green to purple-green and glabrous to sparsely covered in white pulverulent hairs on the upper lamina while the lower lamina is glabrous to densely covered in white pubescent hairs. The base is attenuate while the apex is broadly acuminate with a mucronate tip. The leaf margins are deeply dentate to entire. The mid vein is prominent below and is not distinctly visible above. The petiole measures 3mm to 10mm in length.
The inflorescences of Goodenia hederacea sub sp. alpestris are born singularly or in a short leafy raceme from the leaf axils. The peduncles measure 10mm to 20mm in length. The creamy yellow to bright yellow corolla divides to form 5 petals which spread when fully opened. The throat has deep purple to red striations coming from within. The short bracteoles apexes end at the base of the ovaries. The narrow lanceolate sepal lobes measure 5mm to 7.5mm in length while the sepal measures 5mm to 6mm in length. The corolla measures 8mm to 10mm in length.
The upper lobes are broad linear to lanceolate with an acute apex. The upper lobes measure 6mm to 8mm in length by 2mm to 2.5mm in width while the wings measure 2mm to 3mm in width.
The lower lobes are deeply emarginated at the apexes and crenate on the upper petal. The lower lobes measure 7mm to 9mm in length by 2mm to 2.5mm in width while the wings measure 2mm to 3mm in width. The flowers appear from November through to early April.
The inflorescences of Goodenia hederacea sub sp. hederacea are born singularly or in a short leafy raceme from the leaf axils. The peduncles measure 5mm to 15mm in length. The creamy yellow to bright yellow corolla divides to form 5 petals which spread when fully opened. The throat has deep purple to red striations coming from within. The short bracteoles apexes end at the base of the ovaries. The narrow lanceolate sepal lobes measure 5mm to 7.5mm in length while the sepal measures 7mm to 8mm in length. The corolla measures 10mm to 14mm in length.
The slightly falcate upper lobes are broad linear to lanceolate with an acute apex. The upper lobes measure 6mm to 8mm in length by 2mm to 2.5mm in width while the wings measure 2mm to 2.5mm in width.
The lower lobes are deeply emarginated at the apexes and crenate on the upper petal. The lower lobes measure 7mm to 9mm in length by 2mm to 2.5mm in width while the wings measure 2mm to 3mm in width. The flowers appear from August through to early March.
Goodenia hederacea fruit is a sub globose to ovoidal capsules. The capsules measure 5mm to 9mm in length by 3mm to 5mm in diameter. The grey brown coloured pods split open down the center into two equal valves. The elliptic to oblong, pale yellow to pale khaki-brown, bristly seeds measure 2.6mm to 2.6mm in length,
Goodenia hederacea sub sp. alpestris yellow-brown or khaki seeds are strongly papillate.
Goodenia hederacea sub sp. hederacea seeds are glabrous to very finely papillae.
Wildlife:
Goodenia hederacea’s wildlife is unknown to the author.
Cultivation:
Goodenia hederacea is a beautiful small prostrate plant for the small garden or rockeries of any size. Plants make great displays during spring summer and autumn especially when mass planted. There are ideal for sunny areas around swimming pools, fish or frog ponds which are used for an oasis affect hot sunny court yards besides paths or small tight sections that would benefit from a small prostrate plant. There prostrate habit makes them an ideal plant for planting amongst smaller rocks logs or boulders.
Propagation:
Seeds: Goodenia hederacea seeds require treatment before sowing. Pre-treat by placing the seeds into a glass of boiling water. Allow the water to cool and leave to soak for 6 hours. Sow the seeds into a seed raising mix. When the seedlings are 25mm to 50mm tall, gently prick them out and plant them into 50mm squat tubes using a seed raising mix.
Once the seedlings reach 70mm to 100mm in diameter plant them out into their permanent position. Prick the terminal shoot out so that the plants send out more lateral shoots. For mass plantings space the seedlings at 500mm centers.
Cuttings: Use 50mm to 70mm long herbaceous cuttings taken at any time of the year while the plants are growing vigorously. Vigorously growing plants of the form you desire should be used when growing from cuttings. Remove the leaves from the lower one-third to one-half of the stem being careful not to tear the stem. A rooting hormone is not required as the cuttings strike easily and within a couple of weeks. Place the cuttings in a cool semi shaded position preferably under 30mm shade cloth and keep moist not wet.
Fertilize using seaweed, fish emulsion or organic chicken pellets soaked in water on an alternate basis. Fertilize every two months until the plants are established then annually in early September to October to maintain health, vitality and better flowering.
Further Comments from Readers:
Hi reader, it seems you use The Bible of Botany a lot. That’s great as we have great pleasure in bringing it to you! It’s a little awkward for us to ask, but our first aim is to purchase land approximately 1,600 hectares to link several parcels of N.P. into one at The Pinnacles NSW Australia, but we need your help. We’re not salespeople. We’re amateur botanists who have dedicated over 30 years to saving the environment in a practical way. We depend on donations to reach our goal. If you donate just $5, the price of your coffee this Sunday, We can help to keep the planet alive in a real way and continue to bring you regular updates and features on Australian plants all in one Botanical Bible. Any support is greatly appreciated. Thank you.
In the spirit of reconciliation we acknowledge the Bundjalung, Gumbaynggirr and Yaegl and all aboriginal nations throughout Australia and their connections to land, sea and community. We pay our respect to their Elders past, present and future for the pleasures we have gained.
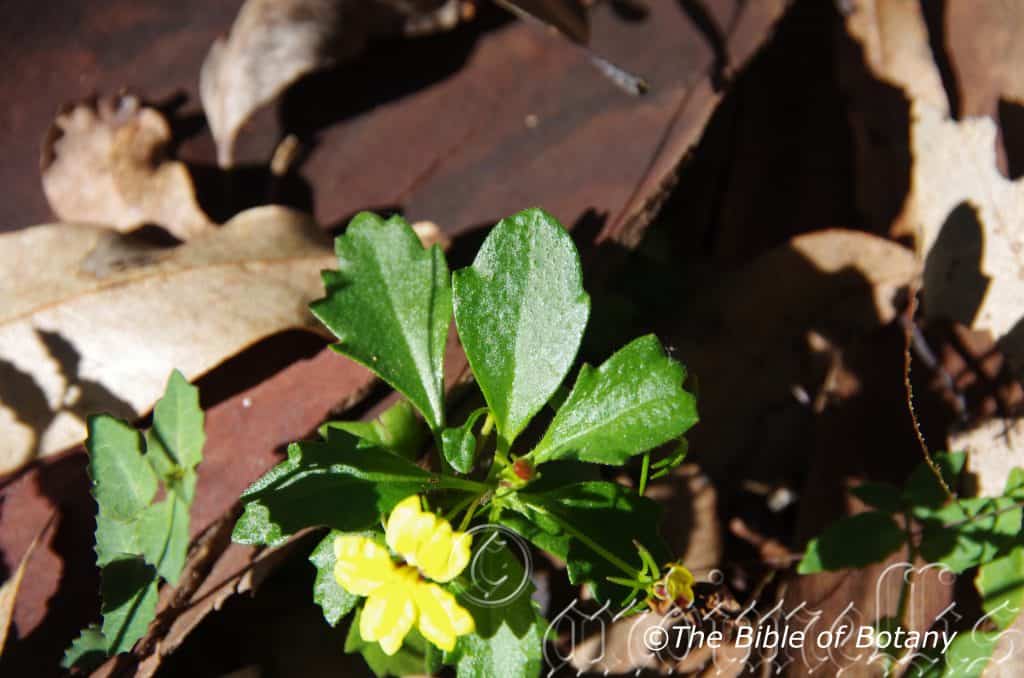
Mount Cootha Botanic Gardens Qld.
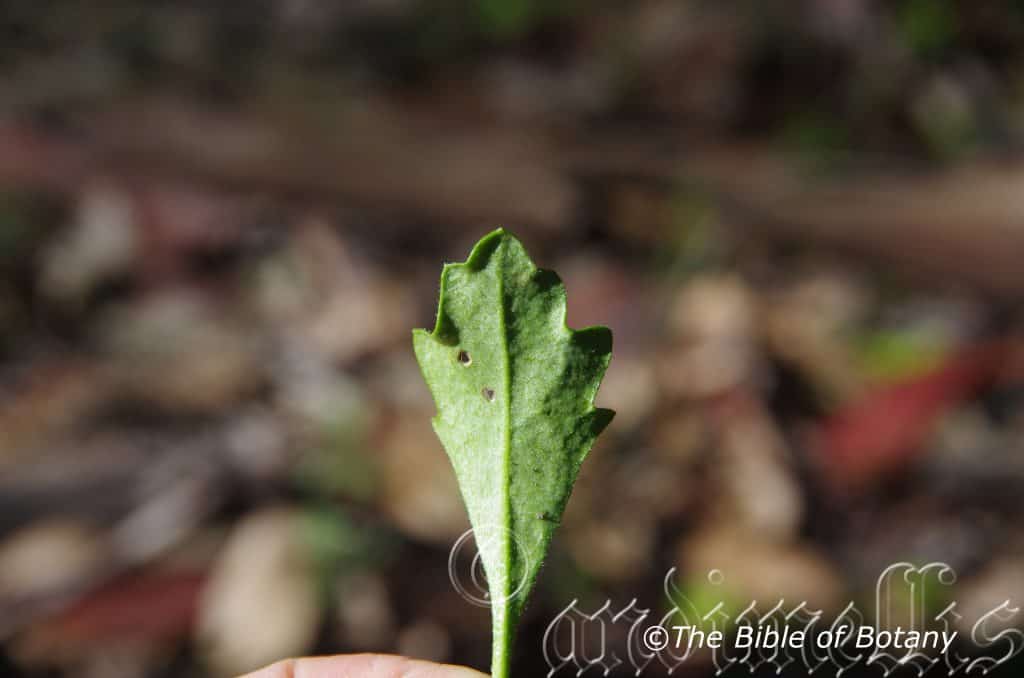
Mount Cootha Botanic Gardens Qld.
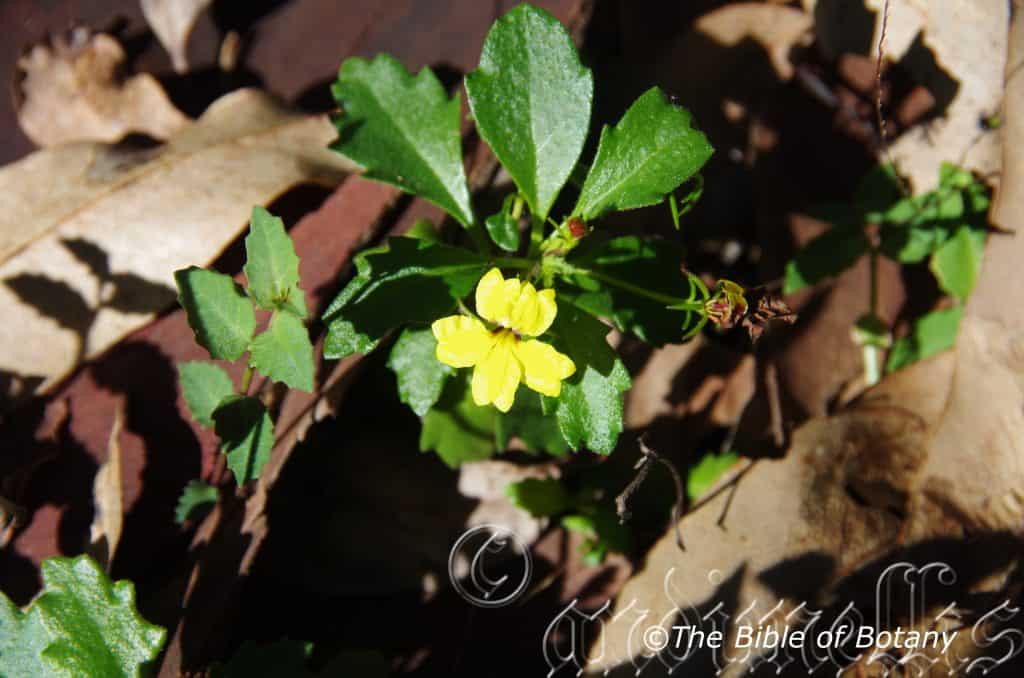
Mount Cootha Botanic Gardens Qld.
Goodenia heterophylla
Classification:
Unranked: Eudicots
Unranked: Asterids
Order: Asterales
Family: Goodeniaceae
Subfamily: Mimosoideae
Genus: Is named in honour of Dr. Goodenough; 1743-1827, who wrote on sea weeds and coastal sedges.
Species: From Heteros, which is Ancient Greek for other or different and Phullon/Phyllon, which is Ancient Greek for a leaf. It refers to leaves, which are of different sizes and or shapes.
Subspecies: Goodenia heterophylla subsp. eglandulosa. From Ex, which is Greek/Latin for out of the ordinary or outside and Glandula, which is Latin for glands. It refers to a description of a plant that does not have any glands.
Subspecies: Goodenia heterophylla subsp. heterophylla. From Heteros, which is Ancient Greek for other or different and Phullon/Phyllon, which is Ancient Greek for a leaf. It refers to leaves, which are of different sizes and or shapes.
Subspecies: Goodenia heterophylla subsp. montana. From Montana, which is Latinized from the Spanish word for a mountain. It refers to plants, which prefer mountainous habitats.
Common Name:
Distribution:
Goodenia heterophylla is found south from Bundaberg in southern coastal Queensland to the Macalister Range in coastal eastern Victoria. There are several isolated populations west of the Western Slopes on the Western Plains including Bendemere to Miles, Gilrath Plains in Queensland and Kamarah to Moombooldool in New South Wales. Goodenia heterophylla subsp. Heterophylla is mainly found north of Lismore while Goodeniaheterophylla subsp. eglandulosa is mainly found south of Lismore to the Blue Mountains. Goodeniaheterophylla subsp. montana is found along ranges from the Blue Mountains south to Nerriga.
https://avh.ala.org.au/occurrences/search?taxa=Goodenia+heterophylla#tab_mapView
Habitat Aspect Climate:
Goodenia heterophylla prefers full sun to light shade or dappled shade. It grows adjacent to coastal heaths and montane swamps in dry woodlands, dry open sclerophyll forests or dry woodland heaths. The altitude ranges from 5 meters ASL to 1150 meters ASL.
The temperatures range from minus 4.degrees in August to 38 degrees in February.
The rainfalls range from lows of 200mm to 2400mm annually.
Soil Requirements:
Goodenia heterophylla prefers poor to fertile sandy loams, peaty loams to light sandy clays to gravelly medium clays, medium silts to heavy silts or moist podzolics. The soils are usually derived from decomposed sandstones, granite or accumulated beach sands or alluvial deposits on creek and steam meanders. The soils pH ranges from 4.5PH to 6.5PH. It does not tolerate waterlogged soils. Non saline soils to moderately saline soils are tolerated.
Height & Spread:
Wild Plants: 10mm to 400mm by 500mm to 1000mm.
Characteristics:
Goodenia heterophylla grows as an erect to ascending, prostrate herb or small subshrub. The mid green to deep grey-green or even deep purplish-green stems are covered in off white glandular or hirsute hairs. The new growth is purplish-green.
Goodenia heterophylla‘s alternate, linear, ovate leaves have 2 small caduceus basal leaves. The leaves measure 10mm to 40mm in length by 2mm to 10mm in width. The discolourous laminas are deep green to deep grey-green tinged purple and glabrous or more usually covered in white or off white glandular or hirsute hairs on the upper lamina while the lower lamina is sparsely to densely covered in white or off white glandular or hirsute hairs. The base is broadly rounded to truncate while the apex is acute. The laminas are flat, recurve slightly downwards from the midvein to the margins or decurve slightly downwards from the midvein to the margins while the margins are disjunct lobed or toothed. The mid vein is prominent on the lower lamina and is faintly to distinctly visible on the upper lamina. The leaves are cauline and sessile.
The inflorescences of Goodenia heterophyllaare born on short leafy racemes or thyrse from the leaf axils. The pedicles measure 10mm to 25mm in length. The creamy yellow to bright yellow corolla divides to form 5 dimorphic lobes which spread when fully opened. The corollas throat is plain or has deep red to reddish-maroon striations at the base. The calyx and 5 linear to narrow lanceolate sepal lobes are covered in white glandular or hirsute hairs. The calyxes measure 3mm to 6mm in length while the sepal measures 2mm to 4mm in length. The corolla measures 10mm to 12mm in length.
The narrow lanceolate upper lobes have a truncate, mucronate apex and are sparsely covered in white glandular or soft hirsute hairs abaxially and are glabrous or sparsely covered in white hirsute hairs adaxially. The upper lobes measure 4mm to 5.5mm in length by 1mm to 1.5mm in width while the asymmetrical semi ovate wings are undulating and measure 1.2mm to 1.6mm in width.
The lanceolate lower lobes are shallowly emarginated at the apexes and are in white glandular or soft hirsute hairs abaxially and are glabrous or sparsely covered in white hirsute hairs adaxially. The lower lobes measure 6.5mm to 7.5mm in length by 1.2mm to 1.6mm in width while the semi ovate wings are undulating and measure 1.5mm to 2mm in width.
Goodenia heterophylla fruit is a broad ovoidal capsule. The capsules measure 2.5mm to 3mm in length by 3mm to 3.5mm in diameter. The green capsules turn grey-brown and split open down the center into two equal valves when ripe. The oblong khaki seeds are strongly papillate and measure 1.8mm to 2mm in length.
Goodenia heterophylla yellow-brown or khaki seeds are strongly papillate.
Confusing subspecies Varieties
Goodenia heterophylla subsp. heterophylla is an erect to ascending herb with simple, glandular and multicellular hairs. Leaves usually ovate or at times linear and measure 15mm to 30mm in length by 3mm to 8mm in width. The margins are sparsely lobed or with acute to minutely acuminate teeth. The flowers appear from August to May.
Goodenia heterophylla subsp. eglandulosa is an ascending herb which is covered in soft, white pulverulent hairs. The leaves are ovate and measure 10mm to 30mm in length by 3mm to 8mm in width. The margins are usually toothed with a mucronate tip and recurve at the edges or at times have 2 basal lobes. The flowers appear from August to May.
Goodenia heterophylla subsp. montana is an ascending to erect shrubby herb usually hairy but without glandular hairs or at times glabrescent and covered in white villous or pilose hairs when young and scabrous with short, white hirtellous hairs when mature. The leaves are linear to narrow oblong and measure 15mm to 25mm in length by 2mm to 3mm in width. The margins are entire or disjunct and sparsely toothed and revolute. The flowers appear from September to March.
Wildlife:
Goodenia heterophylla‘s wildlife is unknown to the author.
Cultivation:
Goodenia heterophylla is a beautiful small prostrate plant for the small garden or rockeries of any size. Plants make great displays throughout the year especially when mass planted. It is ideal for sunny areas around swimming pools, fish or frog ponds which are used for an oasis affect hot sunny court yards besides paths or small tight sections that would benefit from a small prostrate plant. There prostrate habit makes them an ideal plant for planting amongst smaller rocks logs or boulders.
It can add year round colour when planted at the edge of a heath garden and look spectacular when mixed with other small decumbent natives like Lechenaultia biloba, Lechenaultia formosa or Scaevola aemula.
Propagation:
Seeds: Goodenia heterophylla seeds require treatment before sowing. Pre-treat by placing the seeds into a glass of boiling water. Allow the water to cool and leave to soak for 6 hours. Sow the seeds into a seed raising mix. When the seedlings are 25mm to 50mm tall, gently prick them out and plant them into 50mm squat tubes using a seed raising mix.
Once the seedlings reach 70mm to 100mm in diameter plant them out into their permanent position. Prick the terminal shoot out so that the plants send out more lateral shoots. For mass plantings space the seedlings at 500mm centers.
Cuttings: Use 50mm to 70mm long herbaceous cuttings taken at any time of the year while the plants are growing vigorously. Vigorously growing plants of the form you desire should be used when growing from cuttings. Remove the leaves from the lower one-third to one-half of the stem being careful not to tear the stem. A rooting hormone is not required as the cuttings strike easily and within a couple of weeks. Place the cuttings in a cool semi shaded position preferably under 30mm shade cloth and keep moist not wet.
Fertilize using seaweed, fish emulsion or organic chicken pellets soaked in water on an alternate basis. Fertilize every two months until the plants are established then annually in early September to October to maintain health, vitality and better flowering.
Further Comments from Readers:
Hi reader, it seems you use The Bible of Botany a lot. That’s great as we have great pleasure in bringing it to you! It’s a little awkward for us to ask, but our first aim is to purchase land approximately 1,600 hectares to link several parcels of N.P. into one at The Pinnacles NSW Australia, but we need your help. We’re not salespeople. We’re amateur botanists who have dedicated over 30 years to saving the environment in a practical way. We depend on donations to reach our goal. If you donate just $5, the price of your coffee this Sunday, We can help to keep the planet alive in a real way and continue to bring you regular updates and features on Australian plants all in one Botanical Bible. Any support is greatly appreciated. Thank you.
In the spirit of reconciliation we acknowledge the Bundjalung, Gumbaynggirr and Yaegl and all aboriginal nations throughout Australia and their connections to land, sea and community. We pay our respect to their Elders past, present and future for the pleasures we have gained.
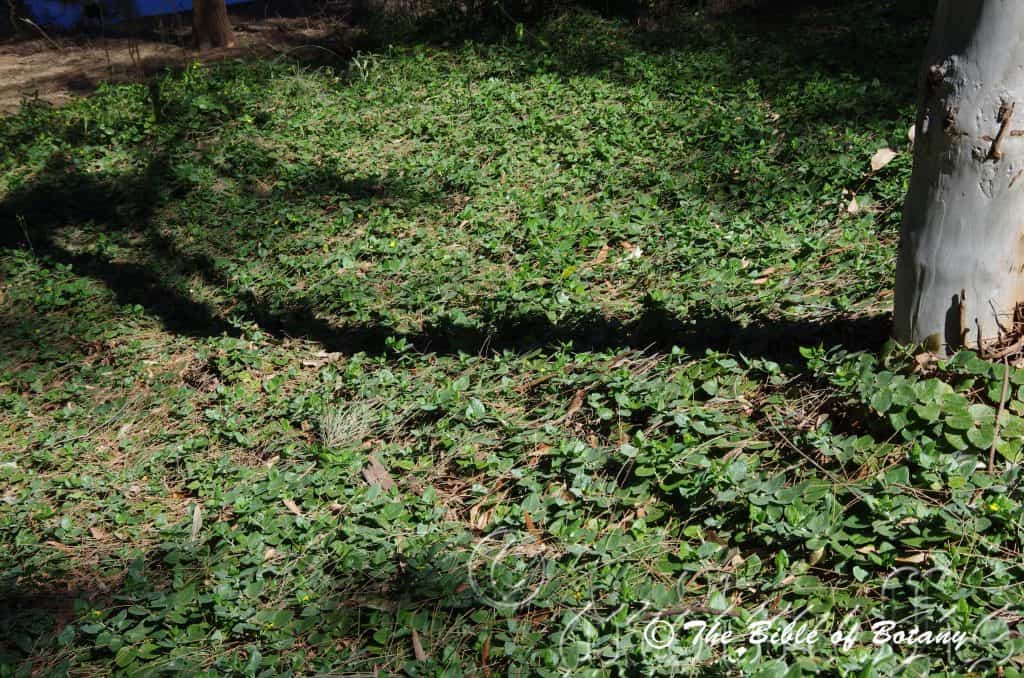
Mount Cootha Botanic Gardens Qld.
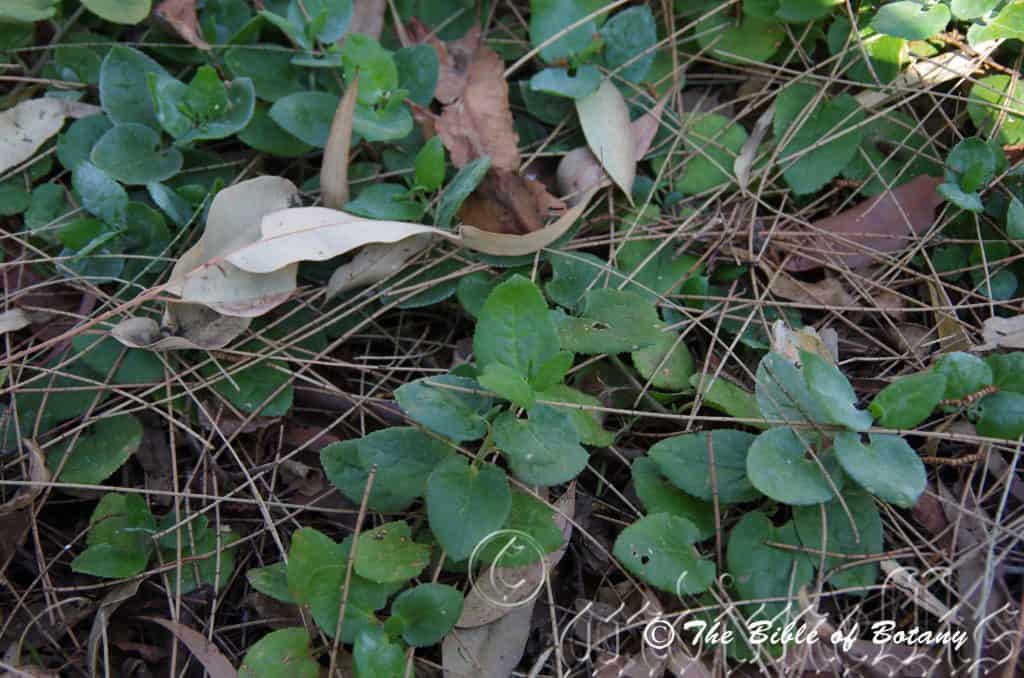
Mount Cootha Botanic Gardens Qld.
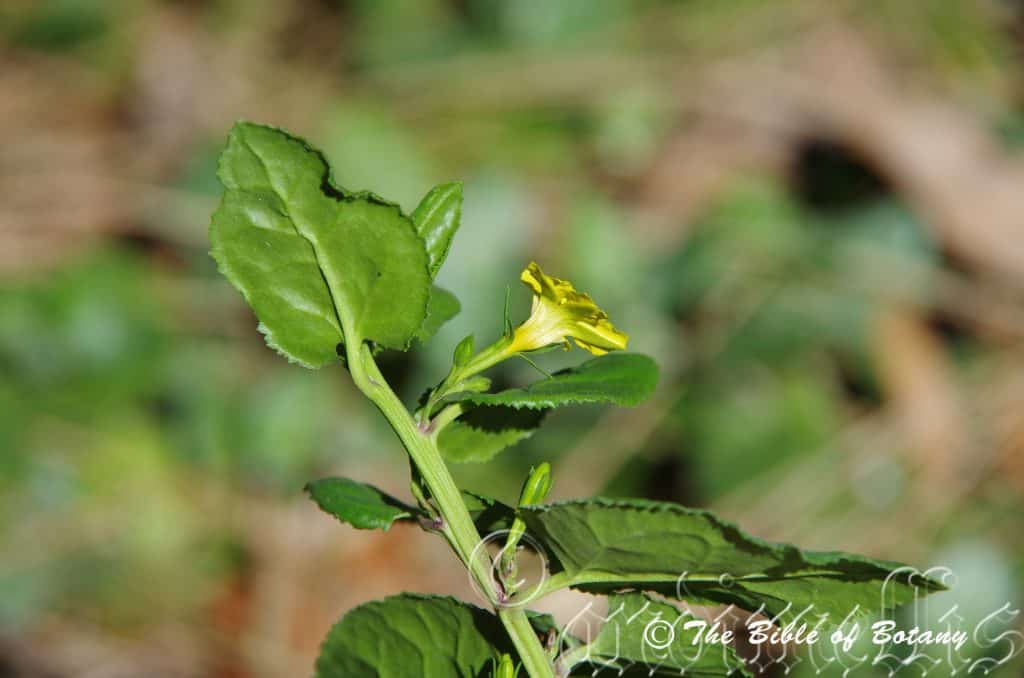
Mount Cootha Botanic Gardens Qld.
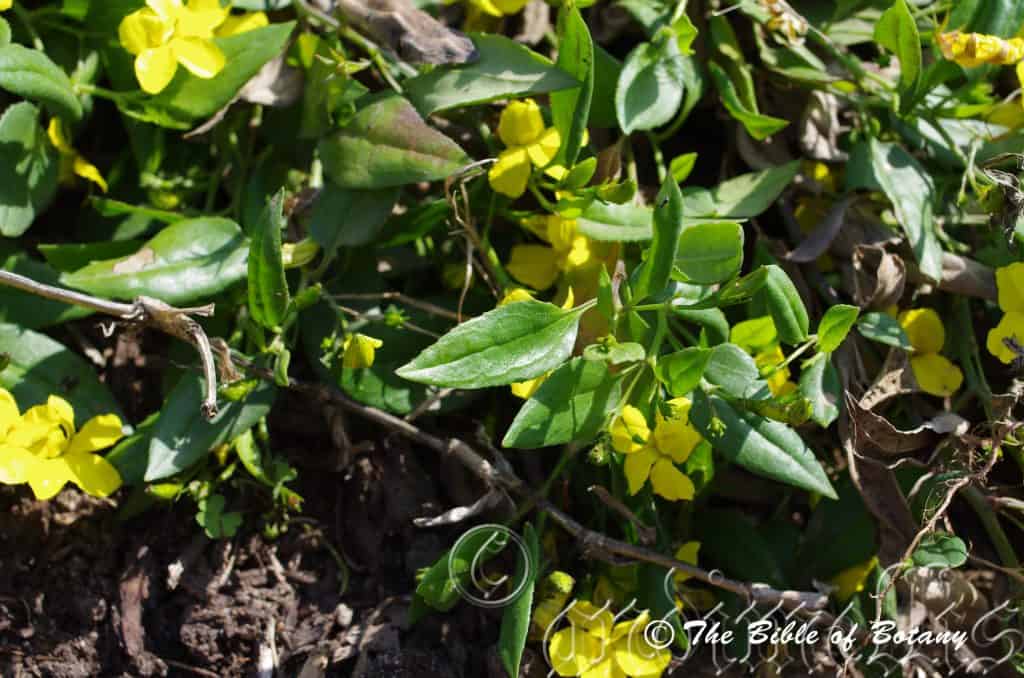
Mount Cootha Botanic Gardens Qld.
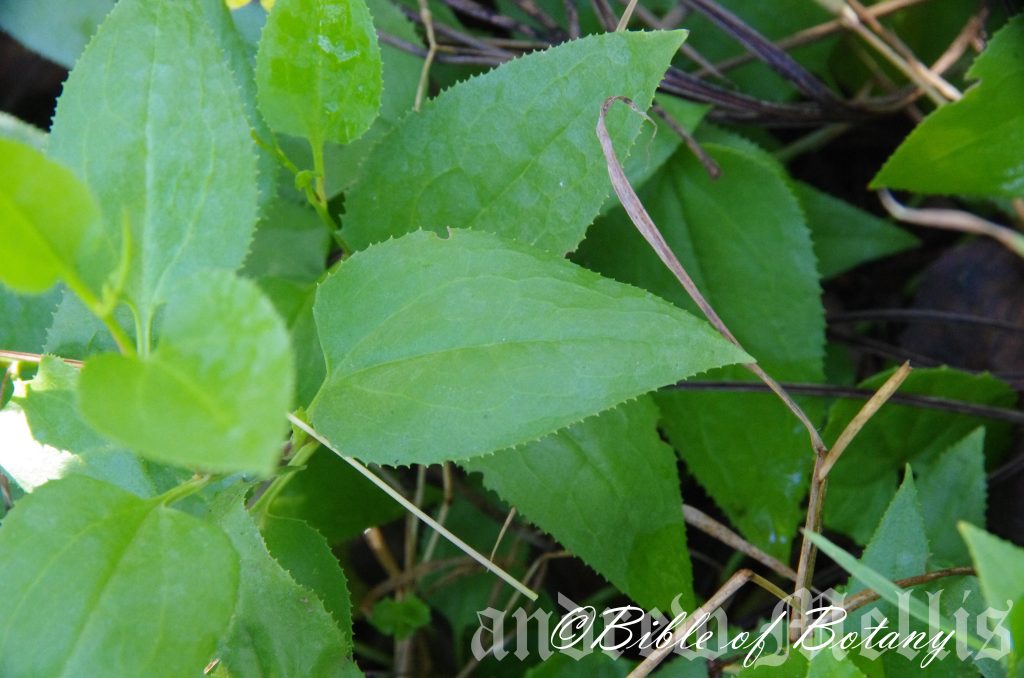
Grafton NSW
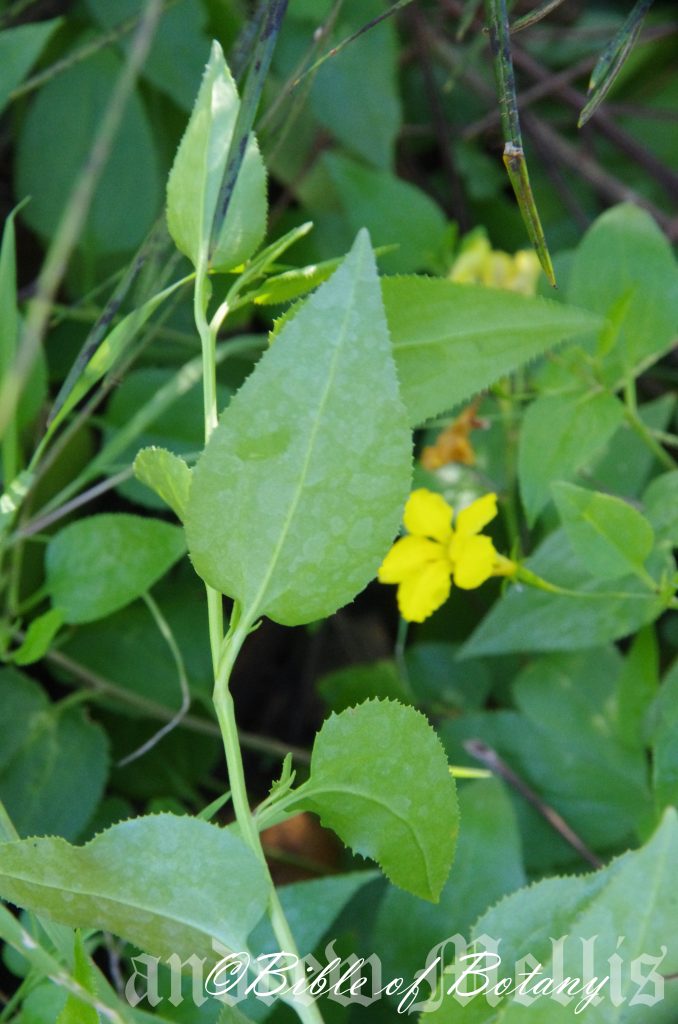
Grafton NSW
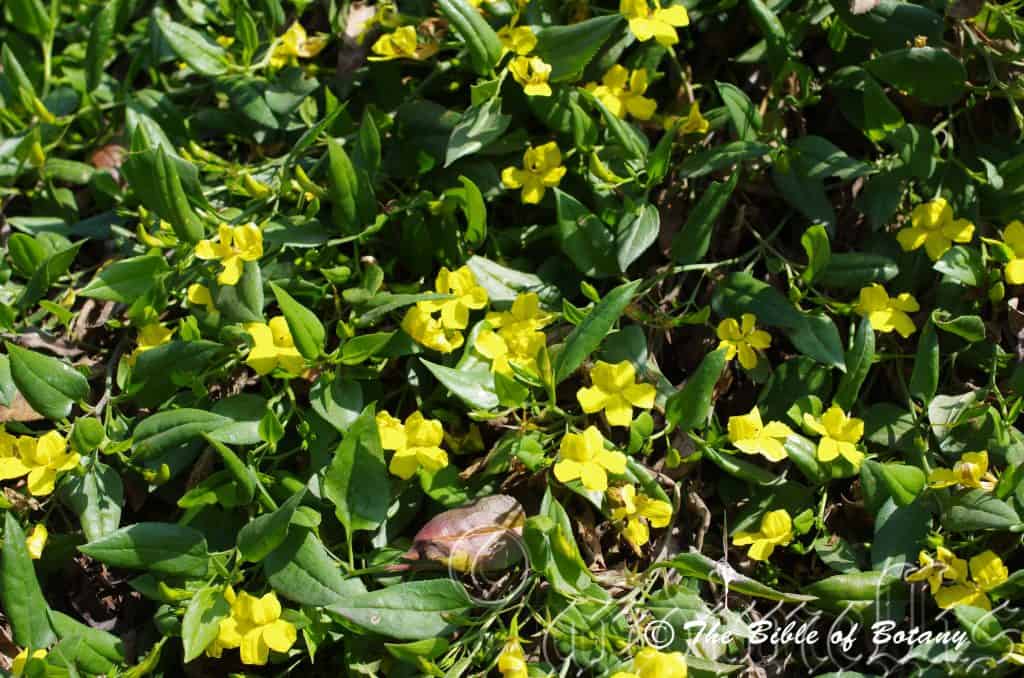
Mount Cootha Botanic Gardens Qld.
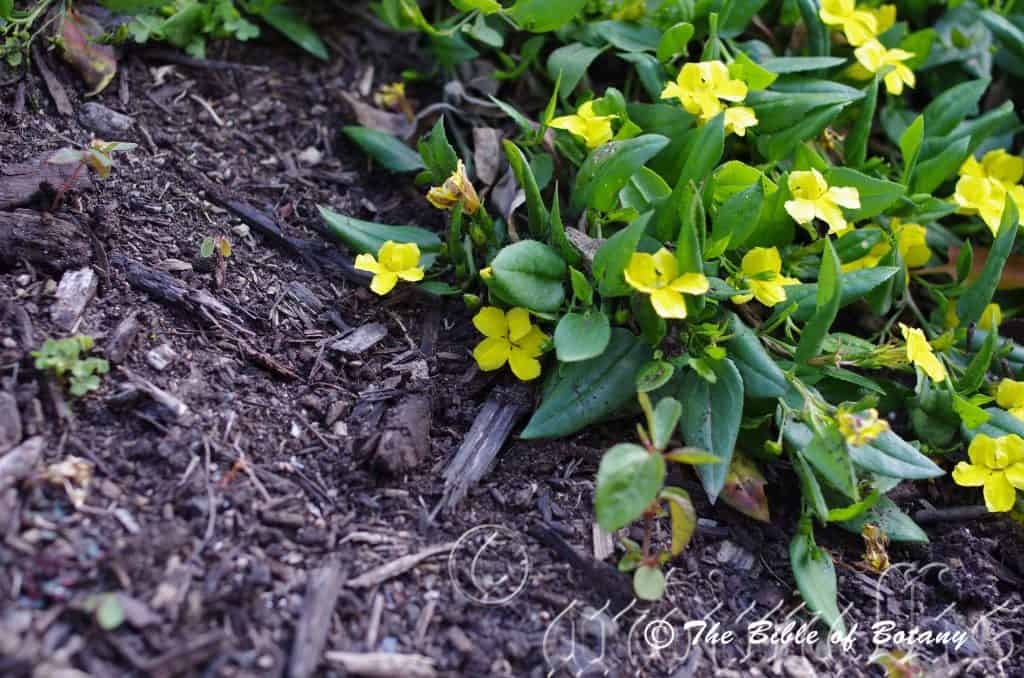
Mount Cootha Botanic Gardens Qld.
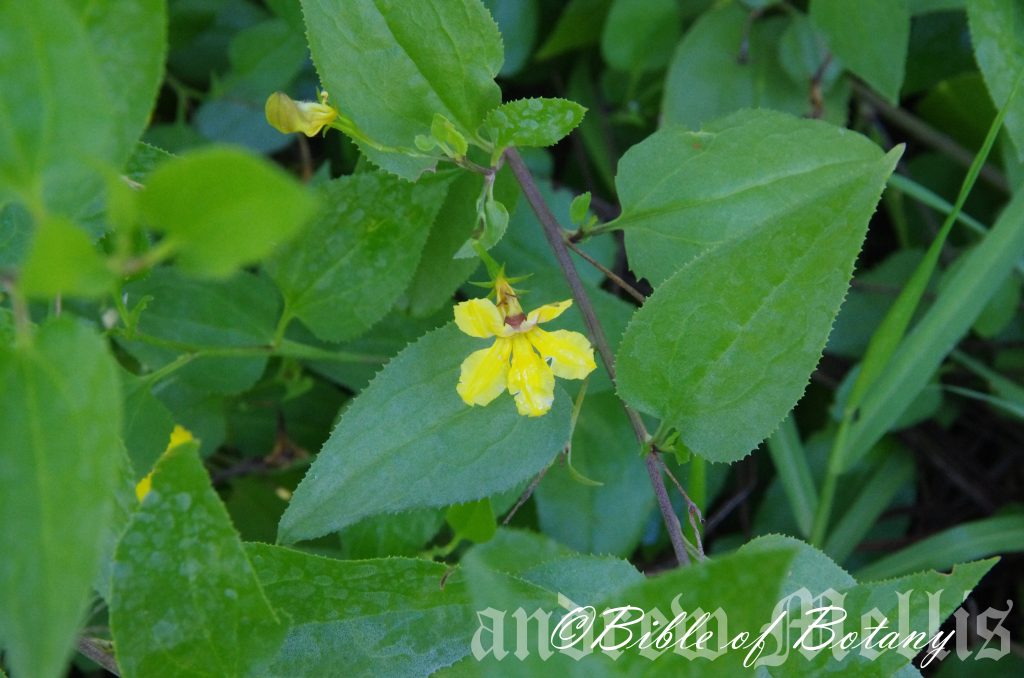
Grafton NSW
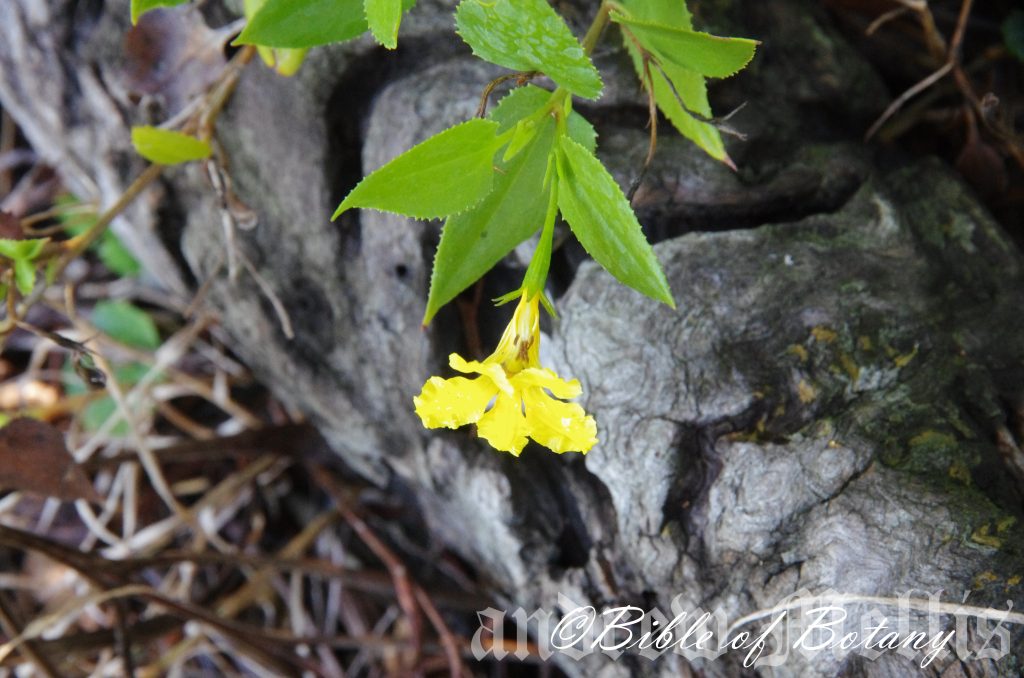
Grafton NSW

Mount Cootha Botanic Gardens Qld.
Goodenia ovata
Classification:
Unranked: Eudicots
Unranked: Asterids
Order: Asterales
Family: Goodeniaceae
Subfamily: Mimosoideae
Genus: Is named in honour of Dr. Goodenough; 1743-1827, who wrote on sea weeds and coastal sedges.
Species: From Ovatis, which is Latin for almost an egg shape. It usually refers to organs, which have an ovate shape or form like an egg.
Common Name: Hop Goodenia.
Distribution:
Goodenia ovata is found south from Maryborough in south eastern Queensland to Wilsons Promontory in south eastern Victoria then west to the Grampians and the Narracoorte Coastal Plains. It is found further north on Anniversary Creek near Herberton and Blackwater in central Queensland.
In South Australia it is found south from Mount Lyndhurst to Caloote and Gilberts near Alexandrina and west on Kangaroo Island. It is also found on the southern tip of Yorke Peninsula and the lower third of Eyre Peninsula.
It is found on Flinders Island in Bass Strait Islands and along the north coast and down the eastern quarter of Tasmania with several isolated populations including near Zeehan and between Varna Bay and Hibbs Bay.
https://avh.ala.org.au/occurrences/search?taxa=Goodenia+ovata#tab_mapView
Habitat Aspect Climate:
Goodenia ovata prefers full sun to light shade or dappled shade. It grows along exposed headlands, dry coastal wallum heaths, open schlerophyll forests, open woodlands exposed rocky cliffs and ledges and often on disturbed land. The altitude ranges from 5 meters ASL to 850 meters ASL.
The temperatures range from minus 5 degrees in August to 40 degrees in February.
The rainfalls range from lows of 250mm to 1600mm annually.
Soil Requirements:
Goodenia ovata prefers poor skeletal to deep sandy loams, peaty loams to light sandy clays, medium clays, medium silts or moist podzolics. The soils are usually derived from decomposed sandstones, granites, accumulated peaty beach sands, or at times metamorphic rocks, brown basalts, black basalts or limestone shales. The soils pH ranges from 4.5pH to 7.5pH. It does not tolerate waterlogged soils. Non saline soils to very saline soils are tolerated as are salt laden winds.
Height & Spread:
Wild Plants: 80mm to 2000mm by 500mm to 2000mm.
Characteristics:
Goodenia ovata grows as an erect ascending shrub or prostrate ground cover or at times a prostrate repent ground cover. The pale green to mid green succulent stems are angulated with distinct fleshy to succulent wings. Young shoots are viscid, pale green and semi glossy.
The alternate, ovate to elliptical succulent leaves of Goodenia ovata measure 30mm to 80mm in length by 10mm to 40mm in width. The pale green petioles are glabrous to densely covered in small white papillate lumps and measure 6mm to 12mm in length. The bases are broadly rounded cordate while the apexes are obtuse. The discolourous laminas are mid green to deep grass-green, glossy and glabrous to densely covered in small white papillate lumps on the upper lamina while the lower lamina is paler and glabrous to sparsely covered in small white papillate lumps more so near the base than the apex. The laminas are flat and convex between the lateral veins and the main vein and lateral veins and lateral veins on the upper surface and decurve near the margins while the margins are undulating and regularly toothed. The mid vein is strongly oblong to obtusely prominent on the lower laminas and is distinctly visible on the upper laminas.
The inflorescences of Goodenia ovata are born on short leafy racemes or thryses from the leaf axils. The pedicles measure 5mm to 20mm in length. There are 2 broad elliptical stipules below the ovary that measure 1.5mm to 2mm in length. The bright yellow, glossy corolla divides to form 5 dimorphic lobes which spread when fully opened. The pale grass-green calyx and 5 linear to narrow lanceolate lobes are covered in minute white papillate lumps. The calyxes have 5 longitudinal obtuse ridges and measure 3mm to 9mm in length while the lobes measures 3mm to 11mm in length. The bright glossy, yellow, corolla is glabrous abaxially and are glabrous to sparsely covered in short white puberulent hairs abaxially and measure 10mm to 19mm in length overall. The auriculate enation is deep purple to reddish-violet.
The lanceolate upper lobes extend past the lobes to make a short mucronate apex. The lobes are sparsely covered in minute yellow papillate lumps abaxially and are glabrous adaxially. The upper lobes measure 9mm to 12mm in length by 1mm to 1.5mm in width while the oblong, lacerated wings measure 2mm to 2.6mm in width.
The lanceolate lower lobes extend past the lobes to make a short mucronate apex. The lobes are sparsely covered in minute yellow papillate lumps abaxially and are glabrous adaxially. The lower lobes measure 11mm to 14mm in length by 1.2mm to 1.6mm in width while the oblong, lacerated wings measure 2mm to 2.6mm in width. The flowers appear from October to March.
Goodenia ovata‘s fruit is a cylindrical capsule. The capsules measure 8mm to 12mm in length by 7mm to 9mm in diameter. The green capsules turn grey-brown and split open down the center into two equal valves. The flattened ellipsoidal fawn to off white seeds are covered in white hirtellus hairs and measure 1.9mm to 2.2mm in length.
Confusing Species:
Goodenia ovata has smaller leaves with a cuneate, truncate or rounded base.
Goodenia grandiflora has larger leaves with a cordate base.
Wildlife:
Goodenia ovata support of wildlife is unknown to the author.
Cultivation:
Goodenia ovata is a beautiful medium prostrate plant for medium to large bush gardens or rockeries. The prostrate form will grow 0.1 meter to 0.2 meters in height by 1.5meters to 2 meters in diameter while the shrub form will grow from 1.8 meters to 2.2 meters in height by 0.5 meters to 21 meter in diameter when grown in the open.
The erect form makes an excellent plant mixed with other shrubs in a bush garden where the bright glossy green leaves always look fresh and clean. It makes an excellent hedge, screens and wildlife corridors because of their upright bushy growth habit and their abundance of flowers.
The prostrate plants make great displays during spring summer and autumn especially when mass planted beneath a single large tree or surrounding a tall erect shrub. It is particularly striking when mixed with large shrubs with red or deep orange flowers.
It should be more widely grown in temperate areas of Australia and tried at least as far north as Townsville where skeletal soils over sandstone, between granite boulders or outcrops of basalt prevail. It has never been popular with gardeners despite being drought tolerant making it suitable for semi-arid gardens, frost hardy making it suitable for sub alpine regions, salt tolerant which makes it ideal for beach front properties and headlands overlooking the sea or around salt pools and resistant to pests eliminating the need for hazardous chemicals all together. In fact it would be an ideal starter plant for beginners not to say that old hands could always find a place in the garden around water features or the swimming pool.
It can be lightly tipped on a regular basis to increase bushiness and increase flowering. If mild native fertilizers are used they will develop deep sea green leaves.
Propagation:
Seeds: The form must be carefully selected for the position that is required. If a particular form is required it is best to grow it from cuttings. Goodenia ovata seeds require treatment before sowing. Pre-treat by placing the seeds into a glass of boiling water. Allow the water to cool and leave to soak for 6 hours. Sow the seeds into a seed raising mix. When the seedlings are 25mm to 50mm tall, gently prick them out and plant them into 50mm squat tubes using a seed raising mix.
Once the seedlings reach 70mm to 100mm in diameter plant them out into their permanent position. Prick the terminal shoot out so that the plants send out more lateral shoots. For mass plantings space the seedlings at 500mm centers.
Cuttings: Use 50mm to 70mm long herbaceous cuttings taken at any time of the year while the plants are growing vigorously. Vigorously growing plants of the form you desire should be used when growing from cuttings. Remove the leaves from the lower one-third to one-half of the stem being careful not to tear the stem. A rooting hormone is not required as the cuttings strike easily and within a couple of weeks. Place the cuttings in a cool semi shaded position preferably under 30mm shade cloth and keep moist not wet.
Fertilize using seaweed, fish emulsion or organic chicken pellets soaked in water on an alternate basis. Fertilize every two months until the plants are established then annually in early September to October to maintain health, vitality and better flowering.
Further Comments from Readers:
Hi reader, it seems you use The Bible of Botany a lot. That’s great as we have great pleasure in bringing it to you! It’s a little awkward for us to ask, but our first aim is to purchase land approximately 1,600 hectares to link several parcels of N.P. into one at The Pinnacles NSW Australia, but we need your help. We’re not salespeople. We’re amateur botanists who have dedicated over 30 years to saving the environment in a practical way. We depend on donations to reach our goal. If you donate just $5, the price of your coffee this Sunday, We can help to keep the planet alive in a real way and continue to bring you regular updates and features on Australian plants all in one Botanical Bible. Any support is greatly appreciated. Thank you.
In the spirit of reconciliation we acknowledge the Bundjalung, Gumbaynggirr and Yaegl and all aboriginal nations throughout Australia and their connections to land, sea and community. We pay our respect to their Elders past, present and future for the pleasures we have gained.
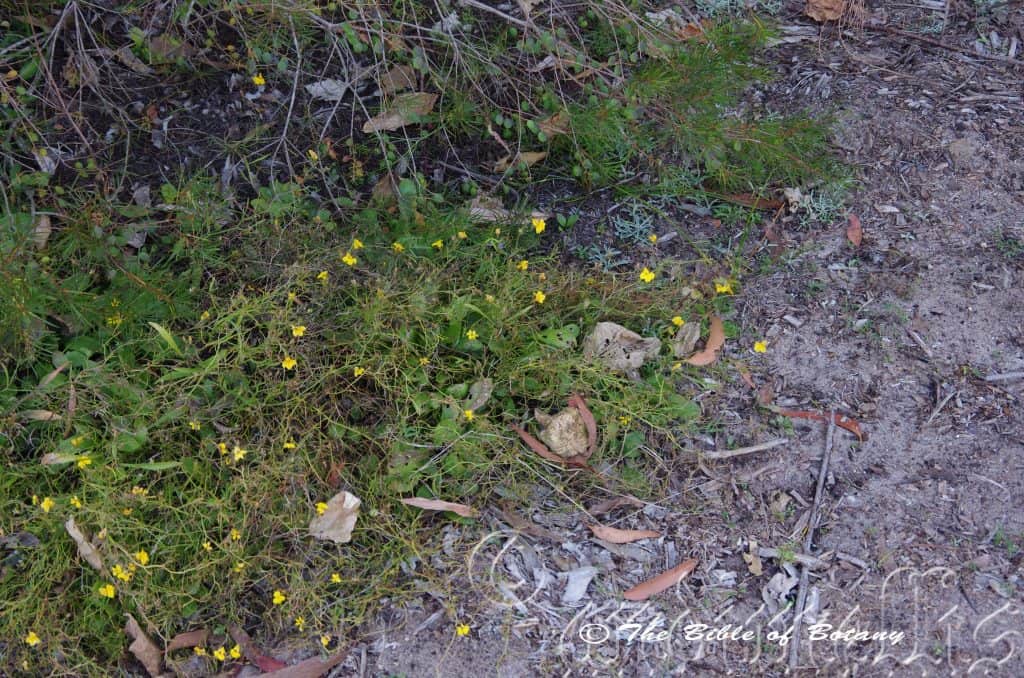
Coffs Harbour NSW
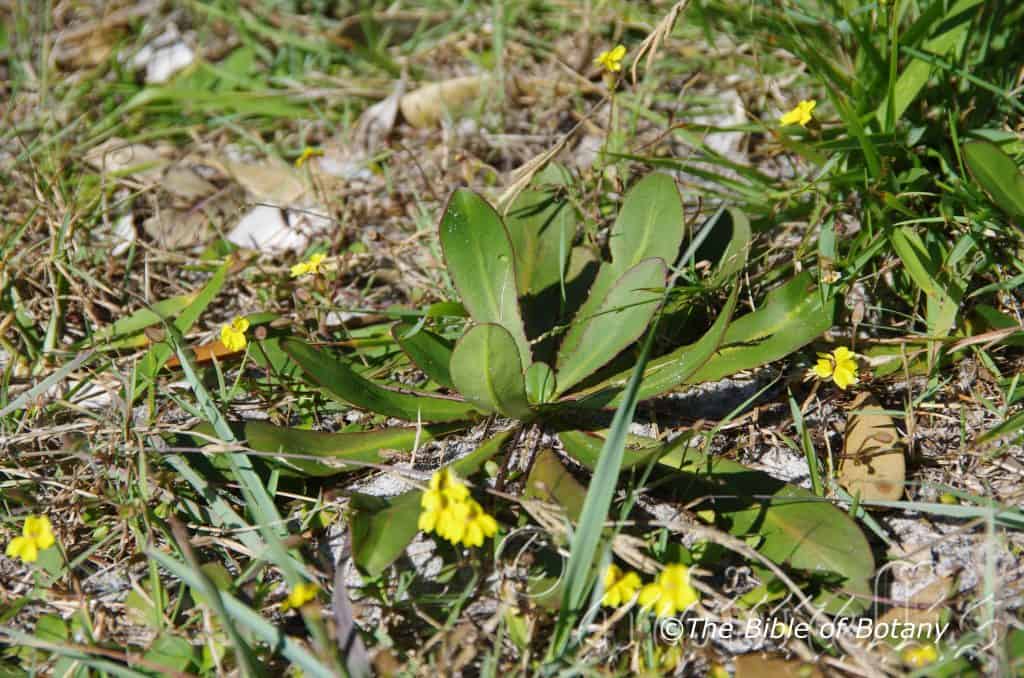
Yuraygir National Park NSW
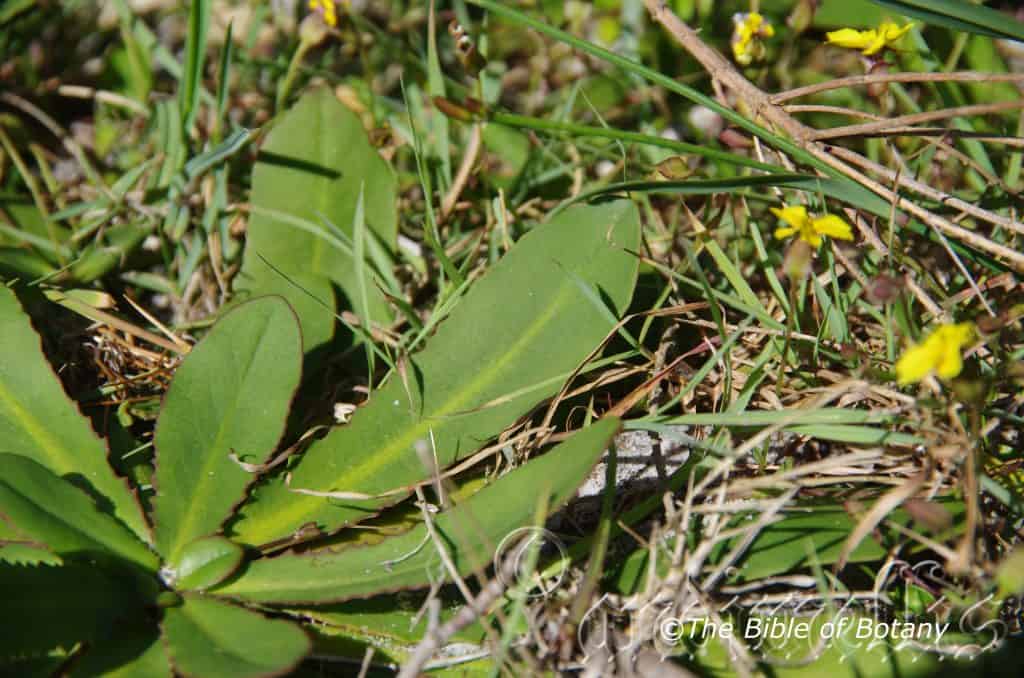
Yuraygir National Park NSW
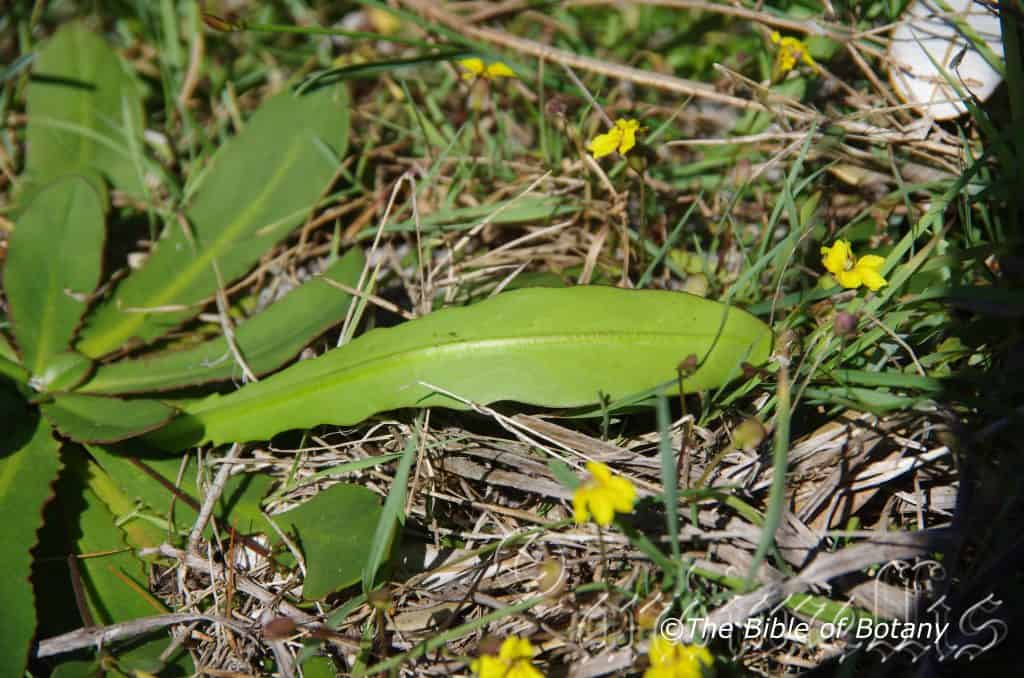
Yuraygir National Park NSW
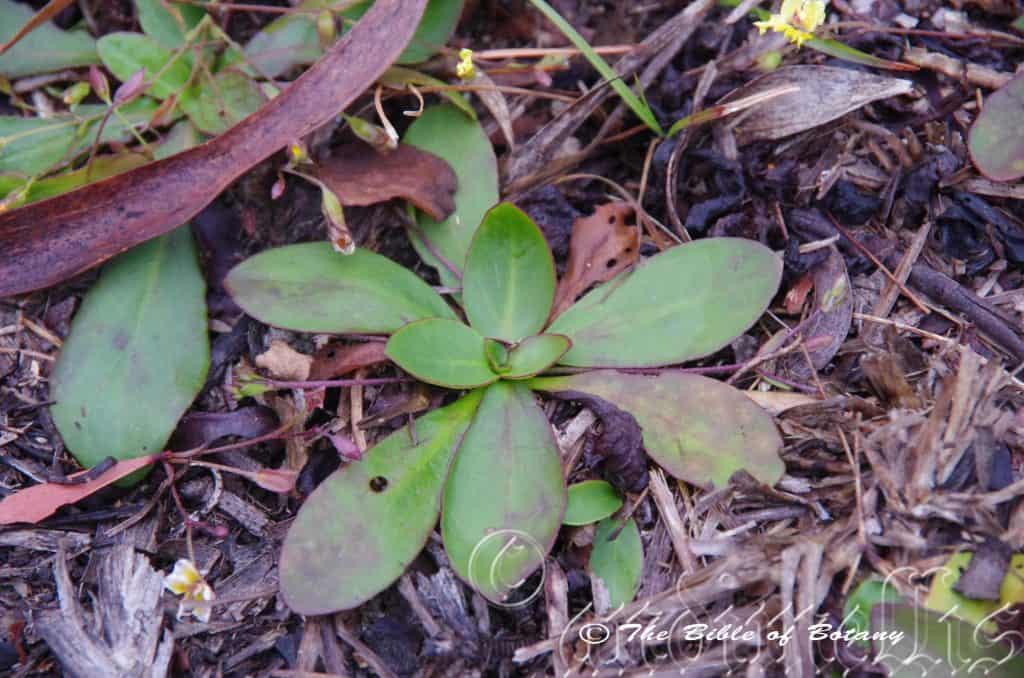
The Pinnacles NSW

Fortis Creek National Park NSW
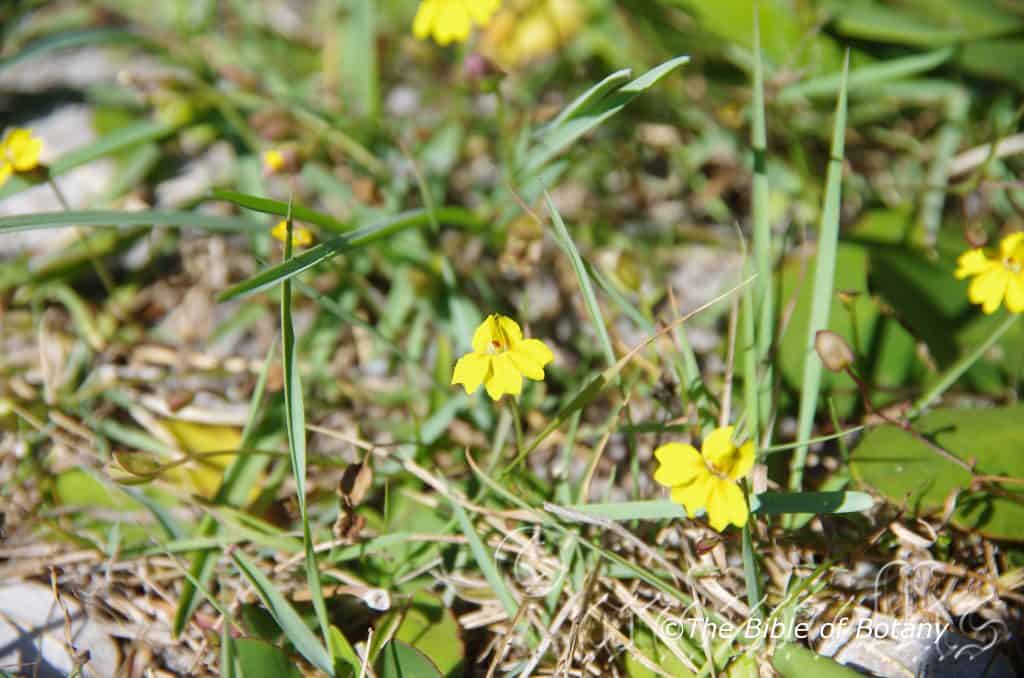
Yuraygir National Park NSW
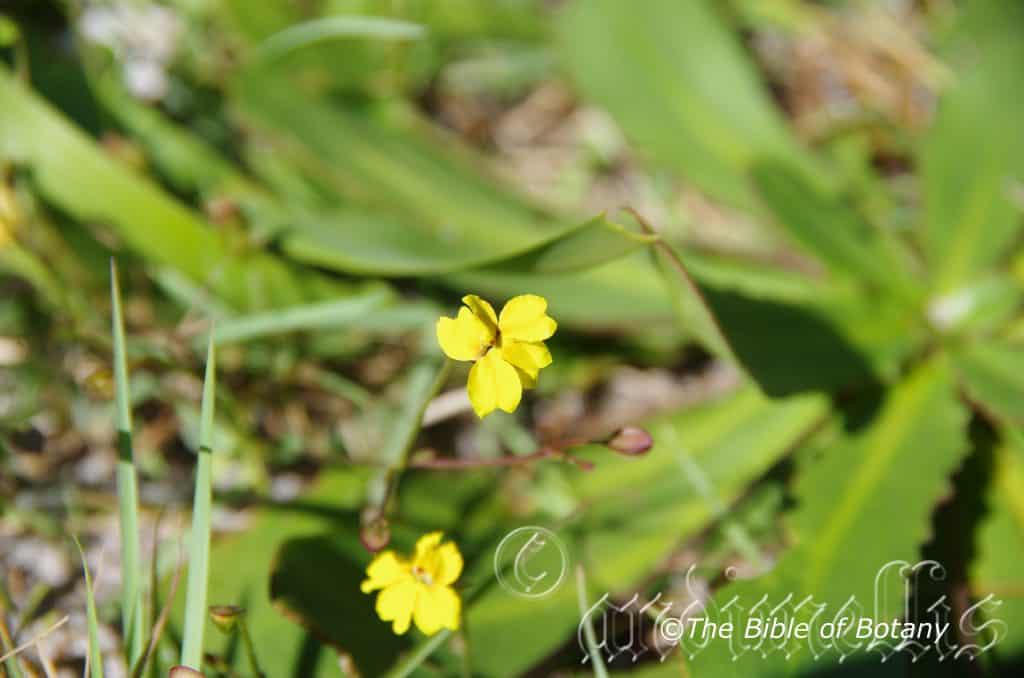
Yuraygir National Park NSW
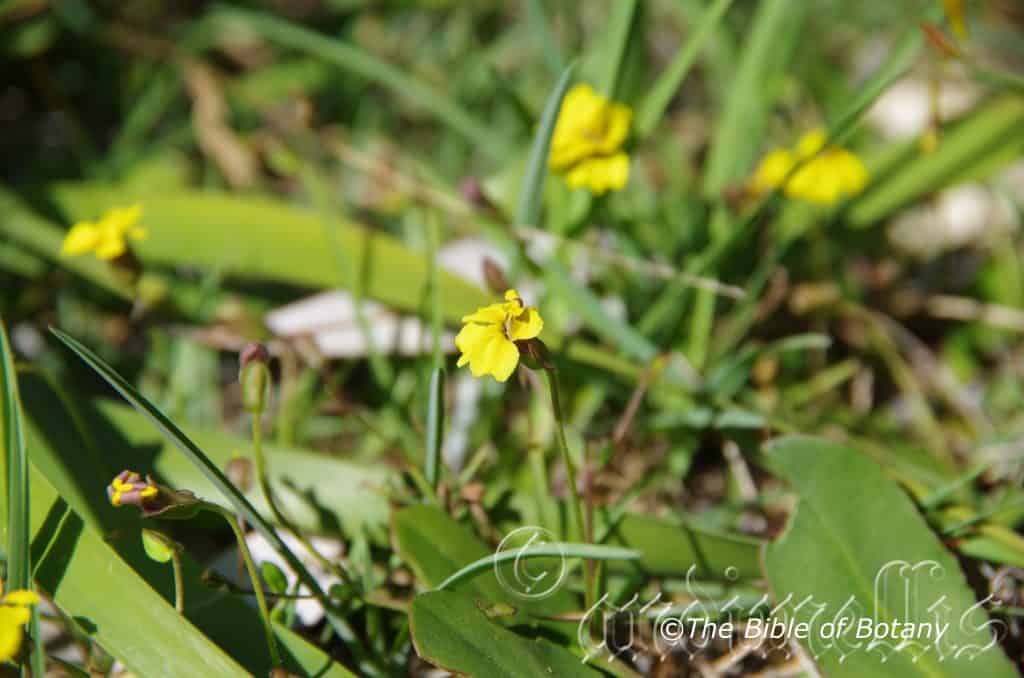
Yuraygir National Park NSW
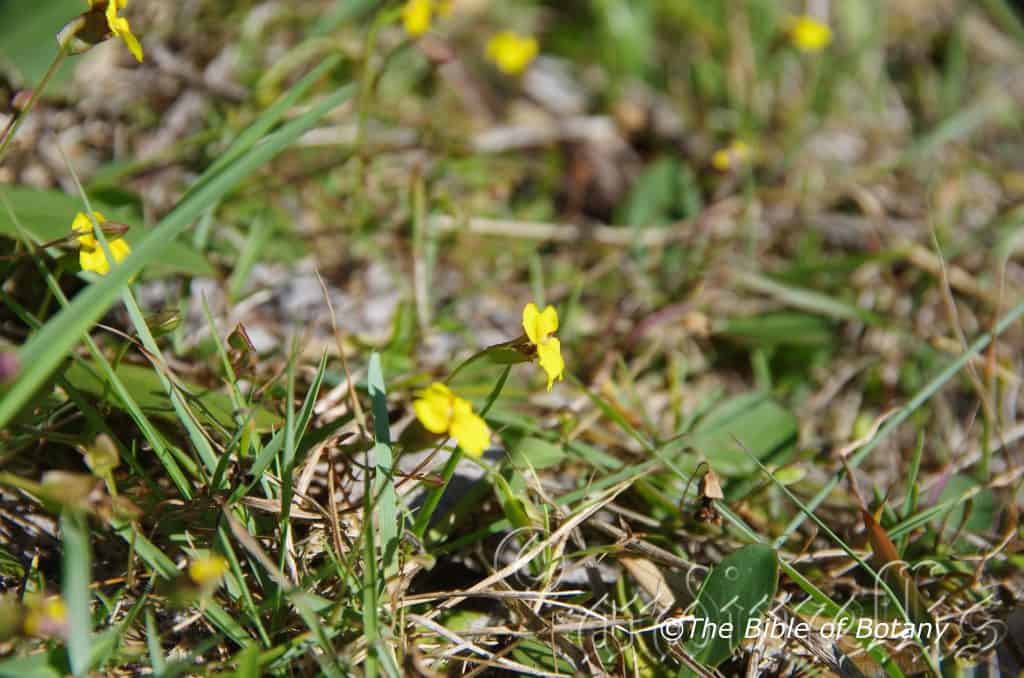
Yuraygir National Park NSW
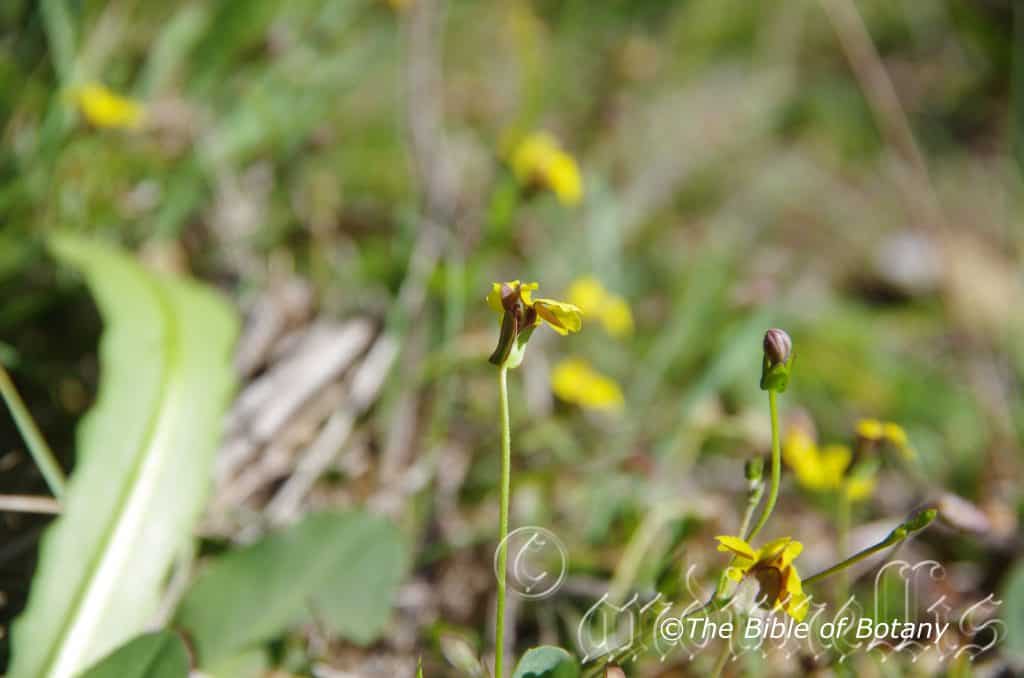
Yuraygir National Park NSW
Goodenia paniculata
Classification:
Unranked: Eudicots
Unranked: Asterids
Order: Asterales
Family: Goodeniaceae
Subfamily: Mimosoideae
Genus: Is named in honour of Dr. Goodenough; 1743-1827, who wrote on sea weeds and coastal sedges.
Species: From Panos, which is Ancient Greek or Panicula, which is Latin for a flower head. It refers to flowers, which are arranged in a head.
Common Name: Branched Goodenia.
Distribution:
Goodenia paniculata is found south from Mareeba in far north Queensland to Toongabbie in south eastern Victoria. There is a disjunct population on Cape York Peninsula at Strathaven and another further south from White Mountain National Park to Carnarvon National Park.
https://avh.ala.org.au/occurrences/search?taxa=Goodenia+paniculata#tab_mapView
Habitat Aspect Climate:
Goodenia paniculata prefers full sun to dappled shade. It grows along sandy headlands, coastal moist heaths, shallow depressions open sclerophyll forests or open woodlands close to the coast. The altitude ranges from 2 meters ASL to 550 meters ASL.
The temperatures range from minus 3 degrees in August to 38 degrees in February.
The rainfalls range from lows of 450mm to 2200mm annually.
Soil Requirements:
Goodenia paniculata prefers average quality sandy loams, peaty sandy loams to light lateritic clays. The soils are usually derived from decomposed sandstone or at times granite, metamorphic rocks, black basalt or shale. The soils pH ranges from 5PH to 6.5PH are preferred. It does not tolerate waterlogged soils however the soils usually remain moist through capillary action from subsurface water bodies. Non saline soils to slightly saline soils are tolerated.
Height & Spread:
Wild Plants: 100mm to 500mm by 500mm to 1000mm.
Characteristics:
Goodenia paniculata grows as an erect annual with basal leaves and a small thick tap root. The growing point is glabrous to moderately covered in white pubescent hairs.
Goodenia paniculata obovate, lanceolate to elliptical basal leaves measure 14mm to 100mm in length by 6mm to 10mm in width. The narrow lanceolate cauline leaves measure 8mm to 20mm in length by 2mm to 3.5mm in width. The bases are tapered while the apexes are obtuse. The discolourous laminas are deep green often tinged purple and glabrous on the upper lamina while the lower lamina is paler. The leaf margins are crenate to sinuate. The laminas are flat to very slightly recurve at the margins more so when the plants are under stress. The margins are bluntly toothed. The mid vein is prominent on the lower lamina and is faintly visible on the upper lamina.
The inflorescences of Goodenia paniculata are born on short racemes born on a scape from the center of the basal leafs. The pedicles measure 6mm to 30mm in length. There are 2 linear stipules at the junction of the stem and a petiole that measure 2mm to 3mm in length. The glossy lobes divide to form 5 divaricate dimorphic lobes when fully opened. The 5 glabrous, grass-green calyxes and lobes are linear to narrow lanceolate. The calyxes measure 1mm to 1.5mm in length while the lobes measures 3mm to 6.5mm in length. The corolla is bright yellow-orange abaxially and bright yellow adaxially. The corolla is bright glossy, yellow-orange and sparsely covered in short, white glandular or hirsute hairs externally and is glabrous internally except for near the base which is sparsely covered in white villous hairs around the indusium. The corollas measure 10mm to 14mm in length overall. The auriculate enation is deep purple to reddish-violet.
The lanceolate upper lobes extend past the lobes to make a short mucronate apex. The lobes are yellow-orange and sparsely covered in white glandular or hirsute hairs externally, glabrous internally. The upper lobes measure 5mm to 7mm in length by 1.2mm to 1.5mm in width and extend past the wings while the oblong, wings measure 1.2mm to 1.5mm in width.
The lanceolate lower lobes extend past the lobes to make a short mucronate apex. The lobes are sparsely covered in minute yellow papillate lumps abaxially and are glabrous adaxially. The lower lobes measure 8mm to 9mm in length by 1.2mm to 1.6mm in width while the oblong wings measure 1.3mm to 1.6mm in width. The flowers appear from August to September.
Goodenia paniculata fruit is a globose to ovoidal capsule. The capsules measure 5mm to 6mm in length by 4mm to 4.5mm in diameter. The green capsules turn grey-brown and dehisce down the center into two equal valves. The ovate, brown, bristly seeds measure 1.6mm to 2mm in length,
Wildlife:
Goodenia paniculata‘s wildlife is unknown to the author.
Cultivation:
Goodenia paniculata is an annual that is best planted out at the end of autumn in frosty areas and to mid-winter in frost free zones. It is a beautiful small rosette plant for a small sunny moist garden bed or moist rockeries. Plants make great displays during spring especially when mass planted.
It is ideal for sunny areas around swimming pools, fish or frog ponds, and hot sunny court yards or besides paths.
It is well suited to a small bog garden mixed with small carnivorous plants like Drosera binata, Drosera auricular or Drosera spathulata and the Western Australian pitcher plant, Cephalotus follicularis.
Propagation:
Seeds: Goodenia paniculata seeds require treatment before sowing. Pre-treat by placing the seeds into a glass of boiling water. Allow the water to cool and leave to soak for 6 hours. Sow the seeds into a seed raising mix. When the seedlings are 25mm to 50mm tall, gently prick them out and plant them into 50mm squat tubes using a seed raising mix.
Once the seedlings reach 70mm to 100mm in diameter plant them out into their permanent position. Prick the terminal shoot out so that the plants send out more lateral shoots. For mass plantings space the seedlings at 500mm centers.
Fertilize using seaweed, fish emulsion or organic chicken pellets soaked in water on an alternate basis. Fertilize every two months until the plants are established then annually in early September to October to maintain health, vitality and better flowering.
Further Comments from Readers:
Hi reader, it seems you use The Bible of Botany a lot. That’s great as we have great pleasure in bringing it to you! It’s a little awkward for us to ask, but our first aim is to purchase land approximately 1,600 hectares to link several parcels of N.P. into one at The Pinnacles NSW Australia, but we need your help. We’re not salespeople. We’re amateur botanists who have dedicated over 30 years to saving the environment in a practical way. We depend on donations to reach our goal. If you donate just $5, the price of your coffee this Sunday, We can help to keep the planet alive in a real way and continue to bring you regular updates and features on Australian plants all in one Botanical Bible. Any support is greatly appreciated. Thank you.
In the spirit of reconciliation we acknowledge the Bundjalung, Gumbaynggirr and Yaegl and all aboriginal nations throughout Australia and their connections to land, sea and community. We pay our respect to their Elders past, present and future for the pleasures we have gained.
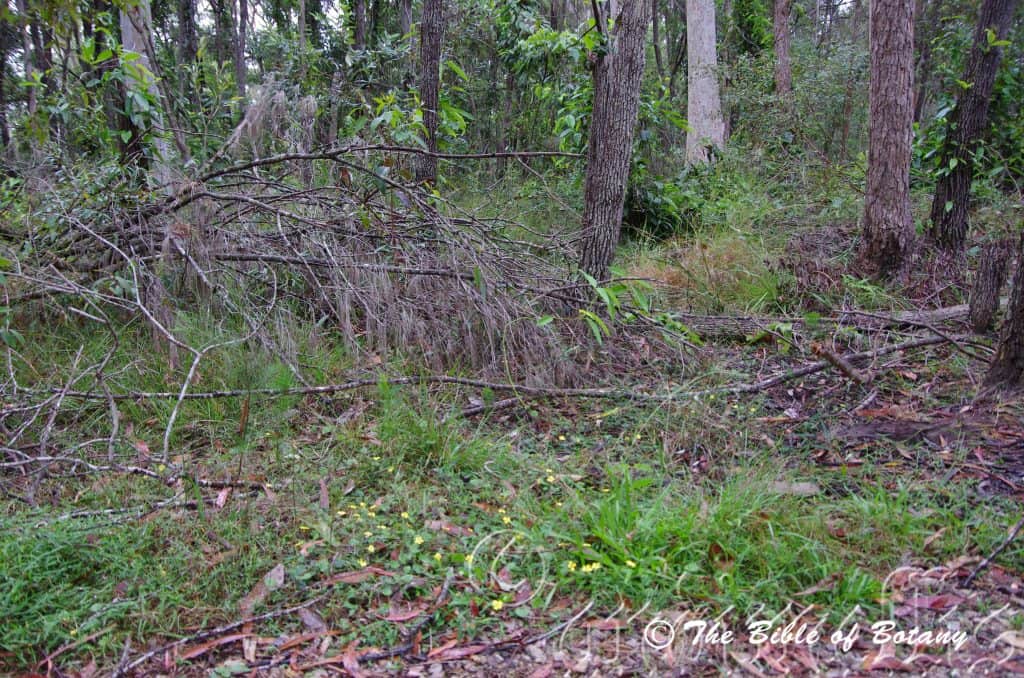
Indigiscapes Botanical Gardens Capalaba Qld.
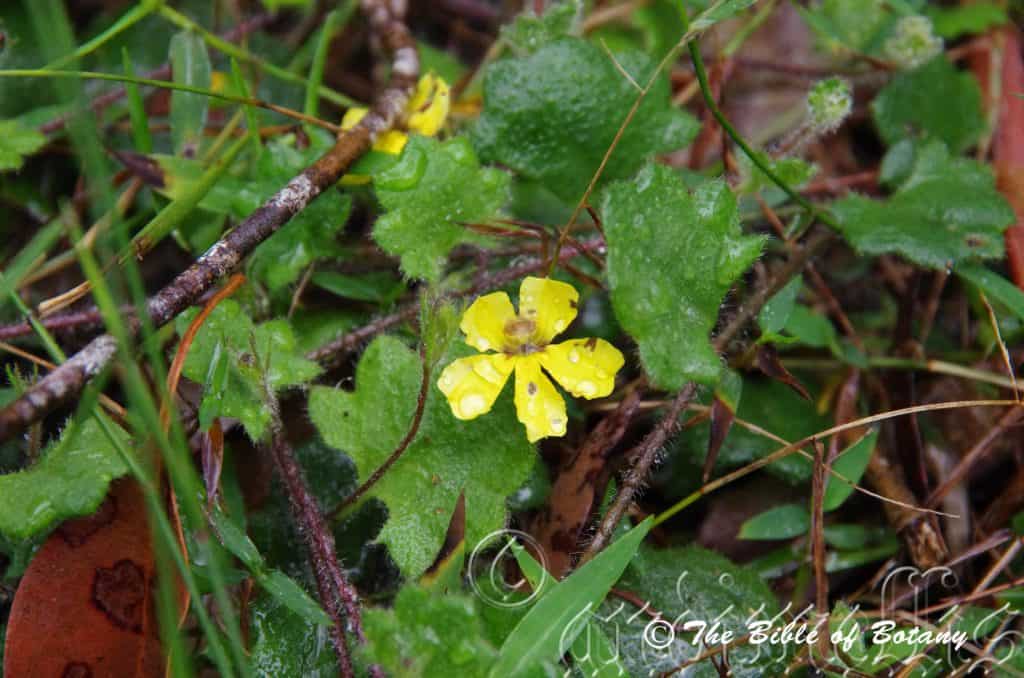
Indigiscapes Botanical Gardens Capalaba Qld.
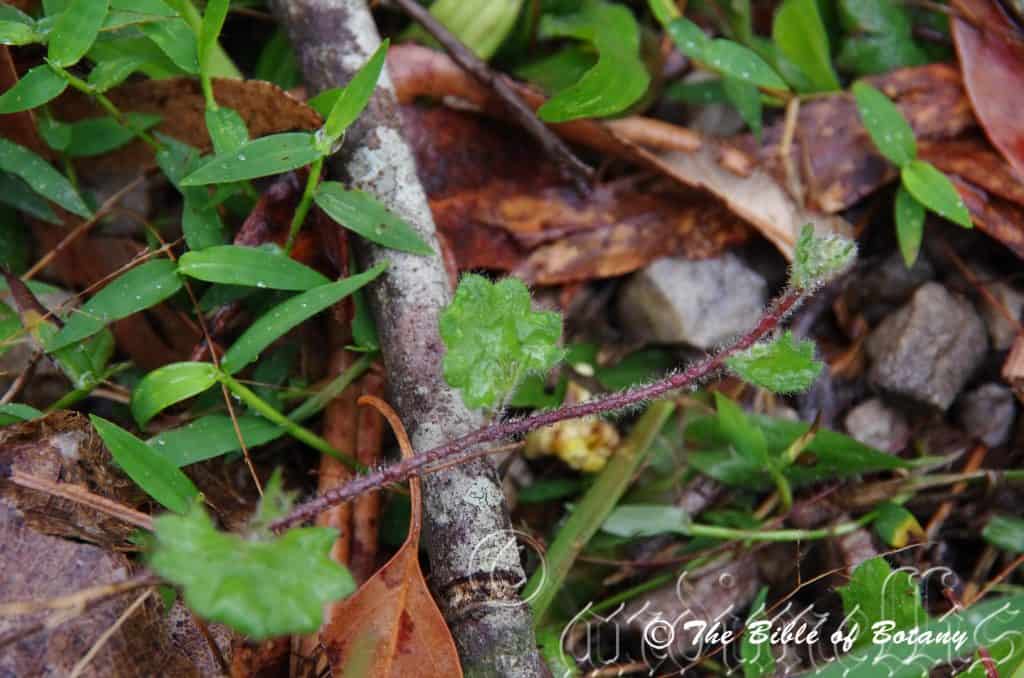
Indigiscapes Botanical Gardens Capalaba Qld.
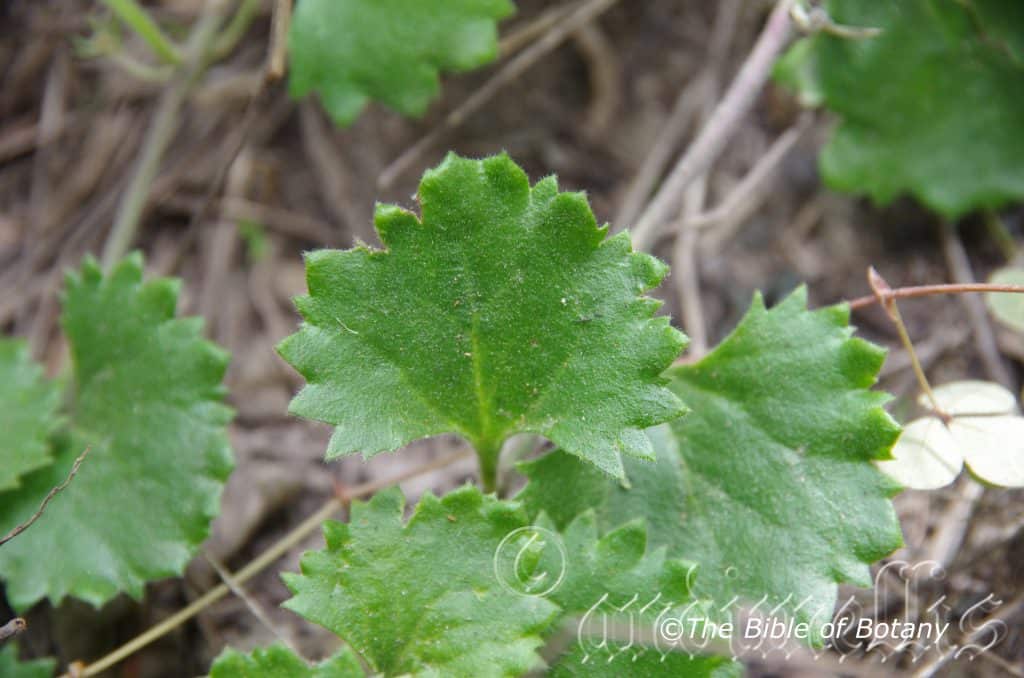
Mount Barney Qld.
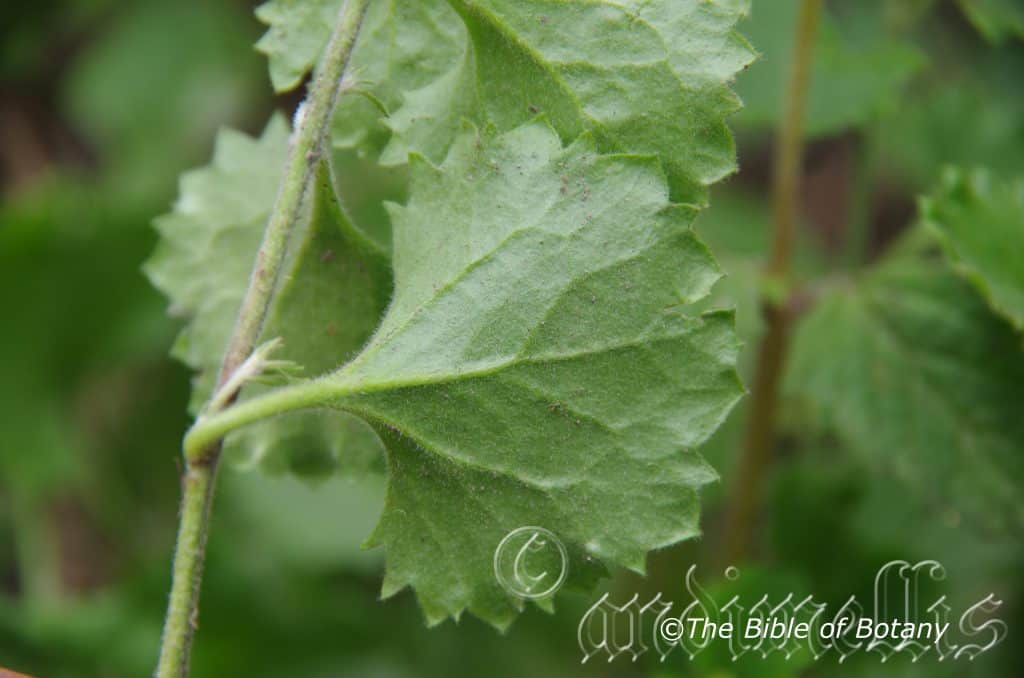
Mount Barney Qld.
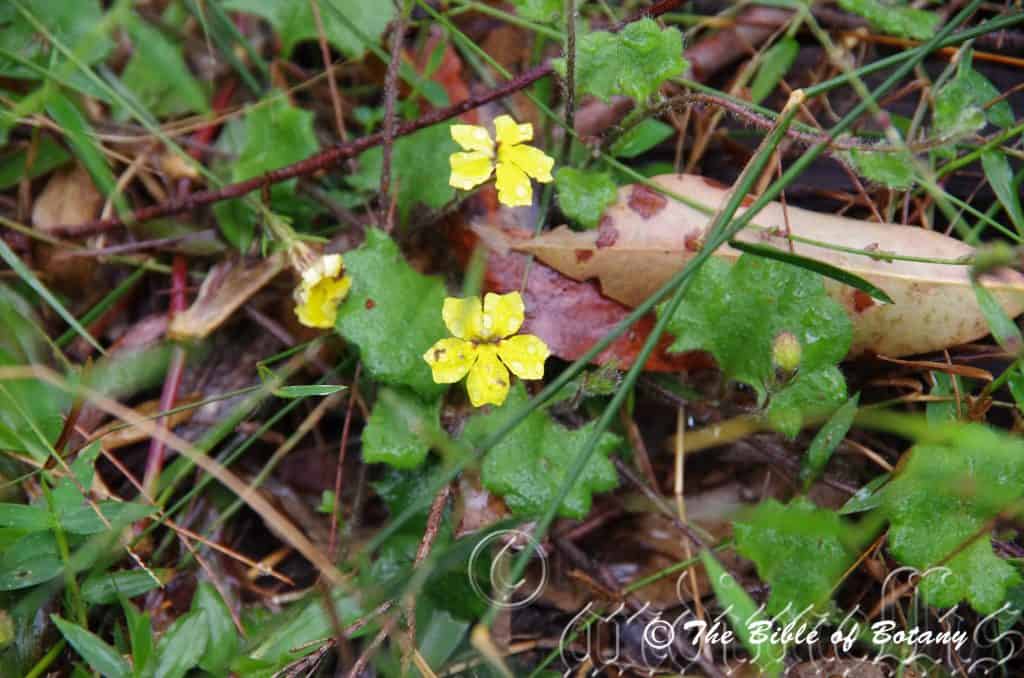
Indigiscapes Botanical Gardens Capalaba Qld.
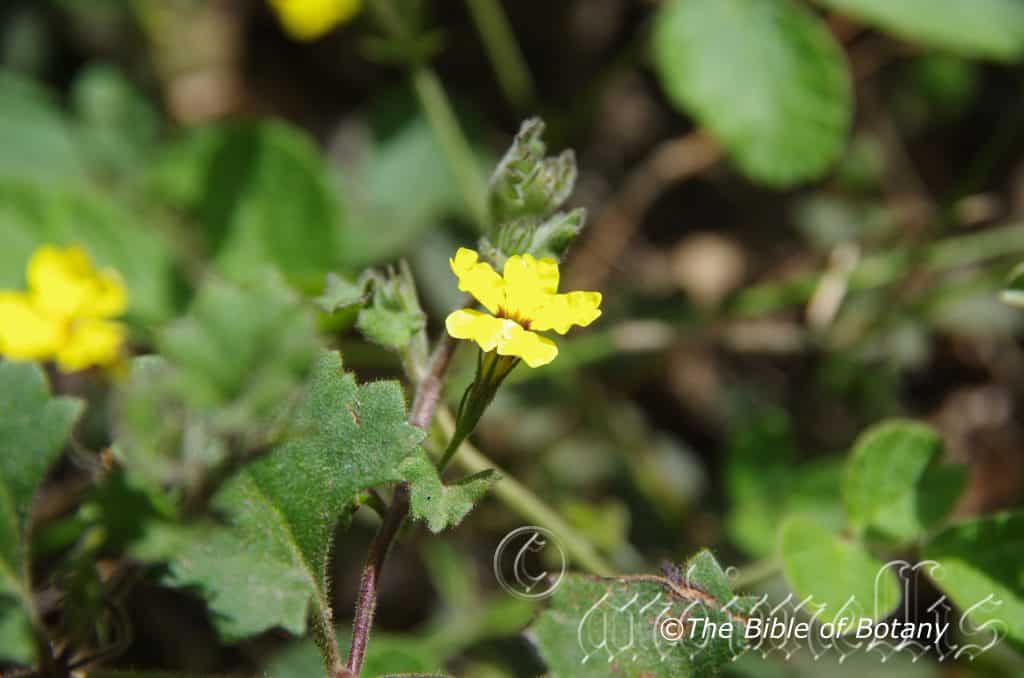
Mount Barney Qld.
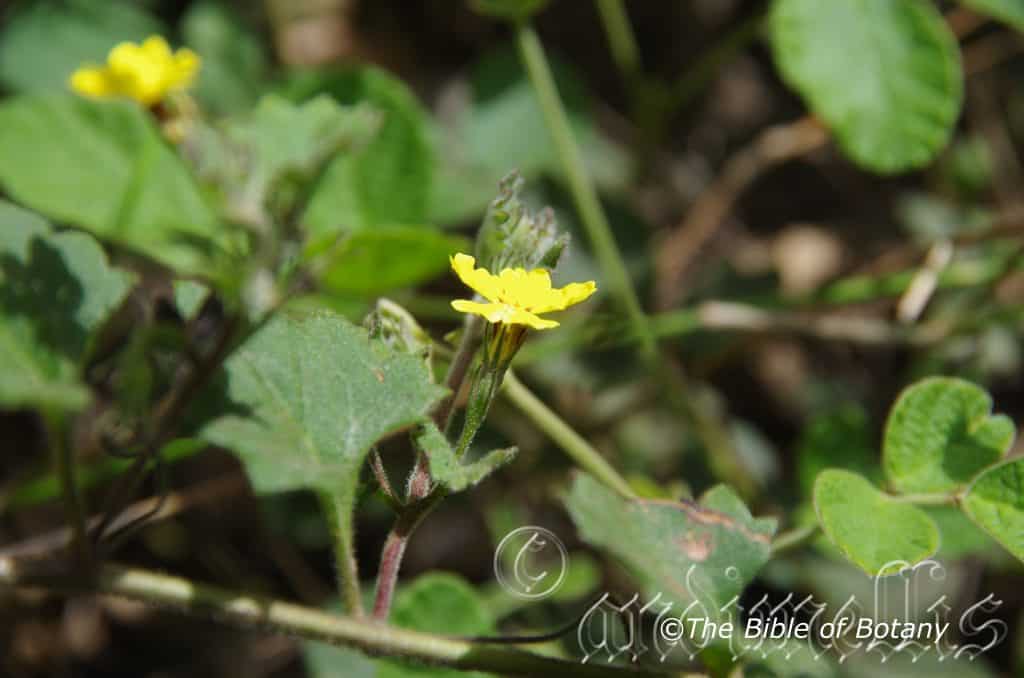
Mount Barney Qld.
Goodenia rotundifolia
Classification:
Unranked: Eudicots
Unranked: Asterids
Order: Asterales
Family: Goodeniaceae
Subfamily: Mimosoideae
Genus: Is named in honour of Dr. Goodenough; 1743-1827, who wrote on sea weeds and coastal sedges.
Species: From Rotundatus, which is Latin for round and Folium, which is Latin for foliage. It refers to leaves, which are round or much rounder than other species in the genus.
Common Name: Prostrate Goodenia.
Distribution:
Goodenia rotundifolia is found south from Mackay in central eastern Queensland to the Hunter Valley in the central eastern New South Wales. It is found west on the Western Plains, the Western Slopes, on and east of the Great Dividing Range to the coast.
https://avh.ala.org.au/occurrences/search?taxa=Goodenia+rotundifolia#tab_mapView
Habitat Aspect Climate:
Goodenia rotundifolia prefers full sun to light dappled shade. It grows in dry schlerophyll forests, open woodlands and dry riparian zones. The altitude ranges from 20 meters ASL to 850 meters ASL.
The temperatures range from 2 degrees in July to 34.degrees in January.
The rainfalls range from lows of 550mm to 1500mm annually.
Soil Requirements:
Goodenia rotundifolia prefers fertile sandy loams, light sandy clays to medium clays, light silts to heavy silts or moist podzolics. The soils are usually derived from decomposed brown basalt, black basalt, sandstones, granites, metamorphic rocks or shales. The soils pH ranges from 4.5PH to 7PH are preferred. It does not tolerate waterlogged soils. Non saline soils to slightly saline soils are tolerated.
Height & Spread:
Wild Plants: 100mm to 300mm by 500mm to 1000mm.
Characteristics:
Goodenia rotundifolia grows as a prostrate ground cover with light to mid green, pinkish green or even deep purplish brown stems. Young shoots are light pinkish green to dark purplish brown, glabrous or covered in with white or grey hirsute hairs.
Goodenia rotundifolia alternate, cauline, orbicular or orbicular obovate leaves measure 8mm to 20mm in length by 5mm to 20mm in width. The petiole is covered in white to pale grey hirsute hairs and measures 9mm to 11mm in length. The bases are truncate to broadly rounded while the apexes are broad acuminate with a mucronate tip. The discolourous leaves are deep green, purple-green to grey-green, glabrous or hirsute, dull to semi glossy on the upper laminas while the lower laminas are paler. The leaf margins are deeply dentate, crenate or sinuate. The mid vein is prominent below, distinctly visible above and white or light green.
The inflorescences of Goodenia rotundifolia are born singularly or in a short leafy raceme. The peduncles are 22mm to 25mm in length. The creamy yellow to bright yellow corolla divides to form 5 petals which spread when fully opened. The throat has dark purple striations coming from within. The short bracteoles apexes end at the base of the ovaries. The green, linear to lanceolate calyxes measure 2.5mm to 3.5mm in length while the calyx lobes measure 3mm to 4mm in length. The corolla measures 12mm to 16mm in length.
The slightly falcate upper lobes are broad linear to lanceolate with an acute apex. The upper lobes measure 8mm to 10mm in length by 2.5mm to 3mm in width while the wings measure 2mm to 3mm in width.
The lower lobes are deeply emarginated at the apexes and crenate on the upper petal. The lower lobes measure 9mm to 11mm in length by 2.5mm to 3mm in width while the wings measure 3mm to 4mm in width. The flowers appear throughout the year when conditions are favourable. Its flowers appear from September through to early May.
Goodenia rotundifolia fruit is a sub globose to ovoidal pod. The pods are 5mm to 7mm in length by 2mm to 3mm in diameter. The grey brown coloured lobes split open down the center into two equal valves. The brown spiny seeds ripen from October to June.
Wildlife:
Goodenia rotundifolia‘s wildlife is unknown to the author.
Cultivation:
Goodenia rotundifolia is a beautiful small prostrate plant for the small garden or rockeries of any size. Plants make great displays during spring summer and autumn especially when mass planted. It is ideal for sunny areas around swimming pools; ponds which are used for an oasis affect hot sunny court yards besides paths or as a fill in plant that would benefit from a small prostrate plant. There prostrate habit makes them an ideal plant for planting amongst rocks logs or boulders.
I have used a good dense clumping form from The Pinnacles to grow over a small rock wall where the leading stems looked very strong against the brown rocks.
Propagation:
Seeds: Goodenia rotundifolia seeds require treatment before sowing. Pre-treat by placing the seeds into a glass of boiling water. Allow the water to cool and leave to soak for 6 hours. Seeds that have not swollen repeat the exercise. Sow into a seed raising mix. When the seedlings are 25mm to 50mm tall, prick them out and plant them into 50mm native tubes using a seed raising mix.
Once the seedlings reach 150mm to 200mm in height plant them out into their permanent position. For mass plantings space the seedlings at 1 meter centers.
Cuttings: Use 50mm to 70mm long herbaceous cuttings taken at any time of the year while the plants are growing vigorously. Vigorously growing plants of the form you desire should be used when growing from cuttings. Remove the leaves from the lower one-third to one-half of the stem being careful not to tear the stem. A rooting hormone is not required as the cuttings strike easily and within a couple of weeks. Place the cuttings in a cool semi shaded position preferably under 30mm shade cloth and keep moist not wet.
Fertilize using seaweed, fish emulsion or organic chicken pellets soaked in water on an alternate basis. Fertilize every two months until the plants are established then annually in early September to October to maintain health, vitality and better flowering.
Further Comments from Readers:
Hi reader, it seems you use The Bible of Botany a lot. That’s great as we have great pleasure in bringing it to you! It’s a little awkward for us to ask, but our first aim is to purchase land approximately 1,600 hectares to link several parcels of N.P. into one at The Pinnacles NSW Australia, but we need your help. We’re not salespeople. We’re amateur botanists who have dedicated over 30 years to saving the environment in a practical way. We depend on donations to reach our goal. If you donate just $5, the price of your coffee this Sunday, We can help to keep the planet alive in a real way and continue to bring you regular updates and features on Australian plants all in one Botanical Bible. Any support is greatly appreciated. Thank you.
In the spirit of reconciliation we acknowledge the Bundjalung, Gumbaynggirr and Yaegl and all aboriginal nations throughout Australia and their connections to land, sea and community. We pay our respect to their Elders past, present and future for the pleasures we have gained.
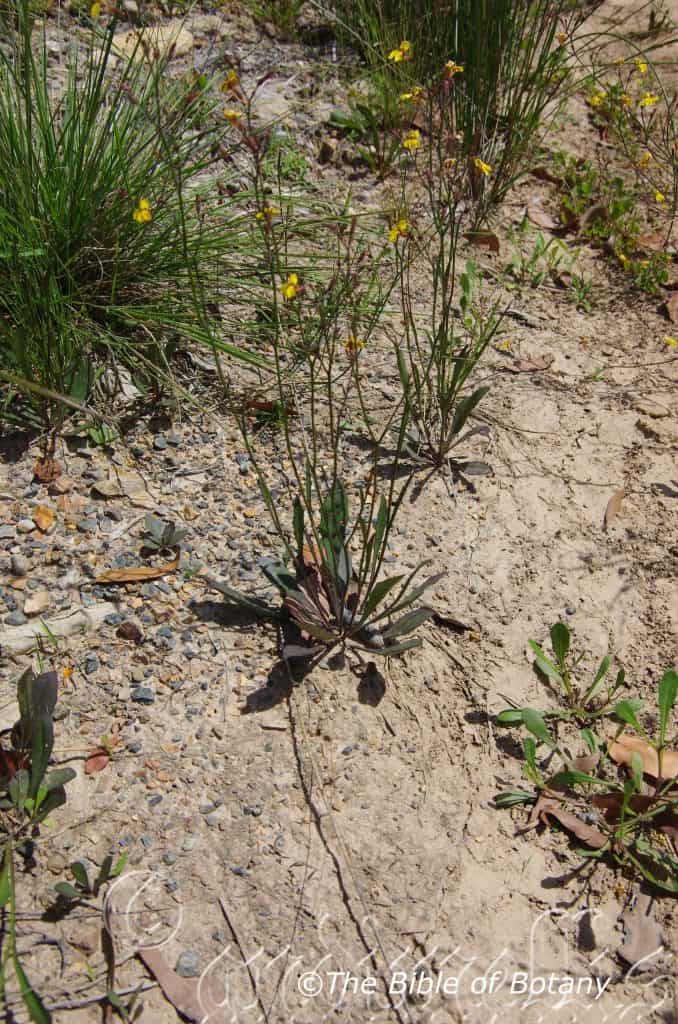
Boorkoom Yuryaigir National Park NSW
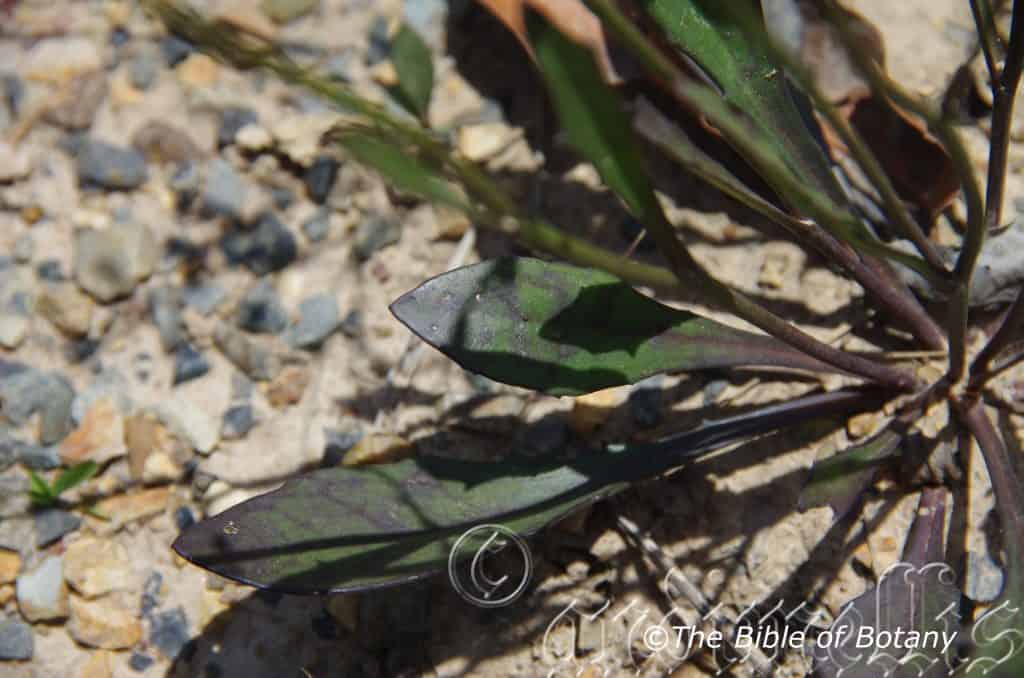
Boorkoom Yuryaigir National Park NSW
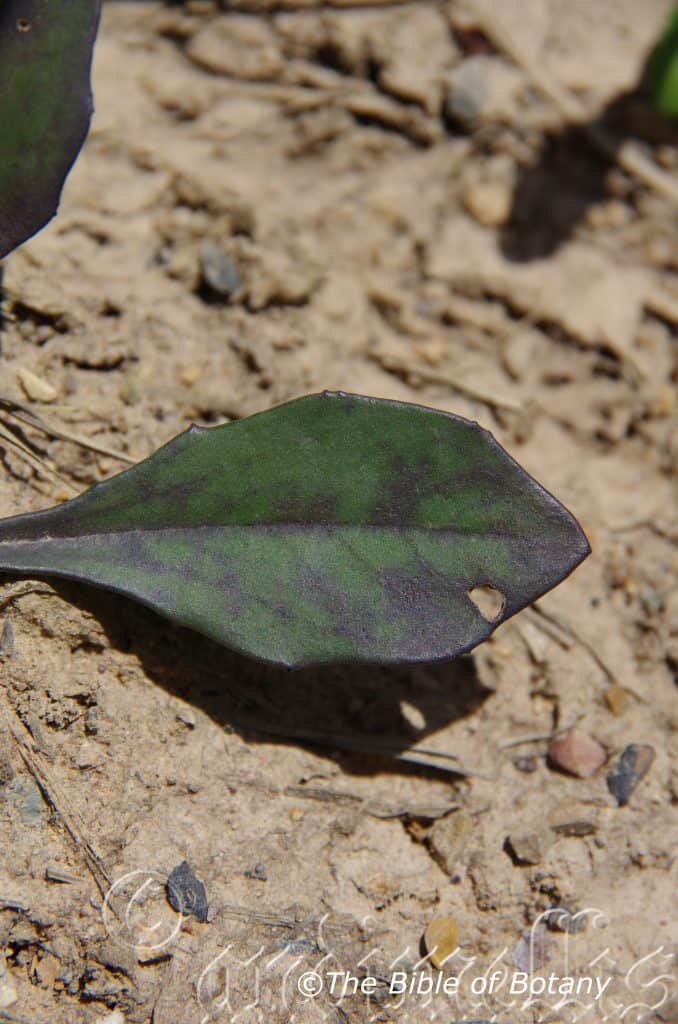
Boorkoom Yuryaigir National Park NSW
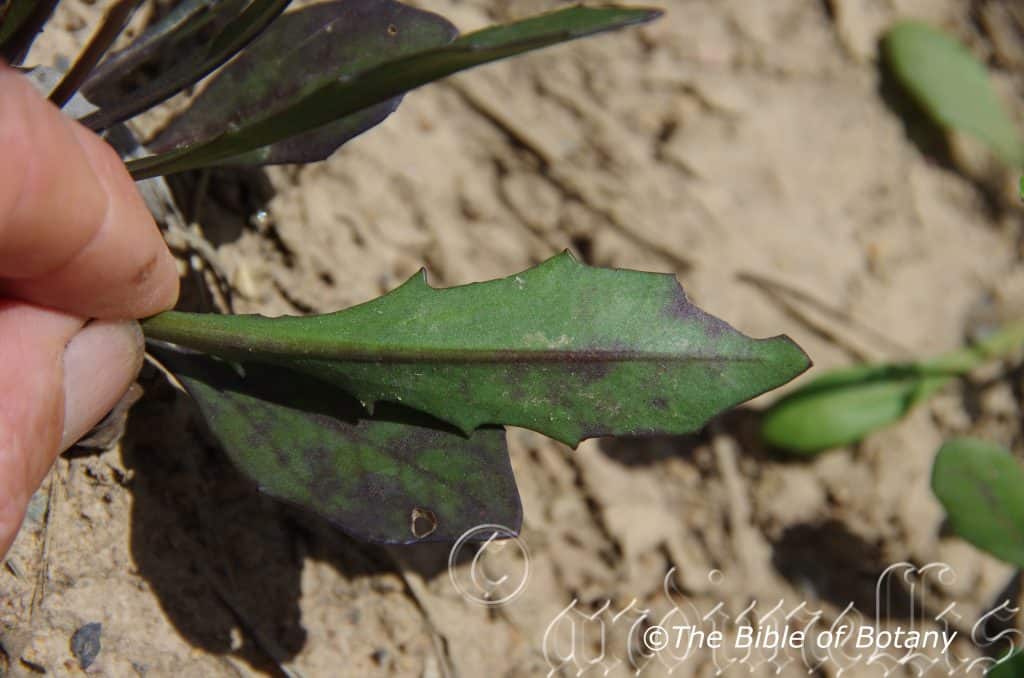
Boorkoom Yuryaigir National Park NSW
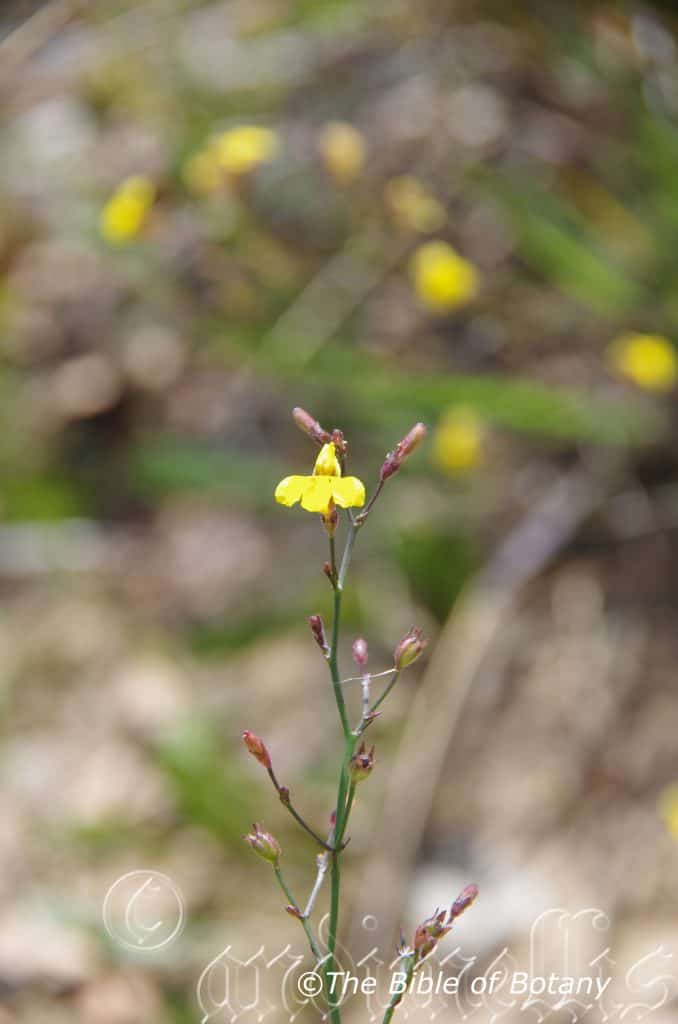
Boorkoom Yuryaigir National Park NSW
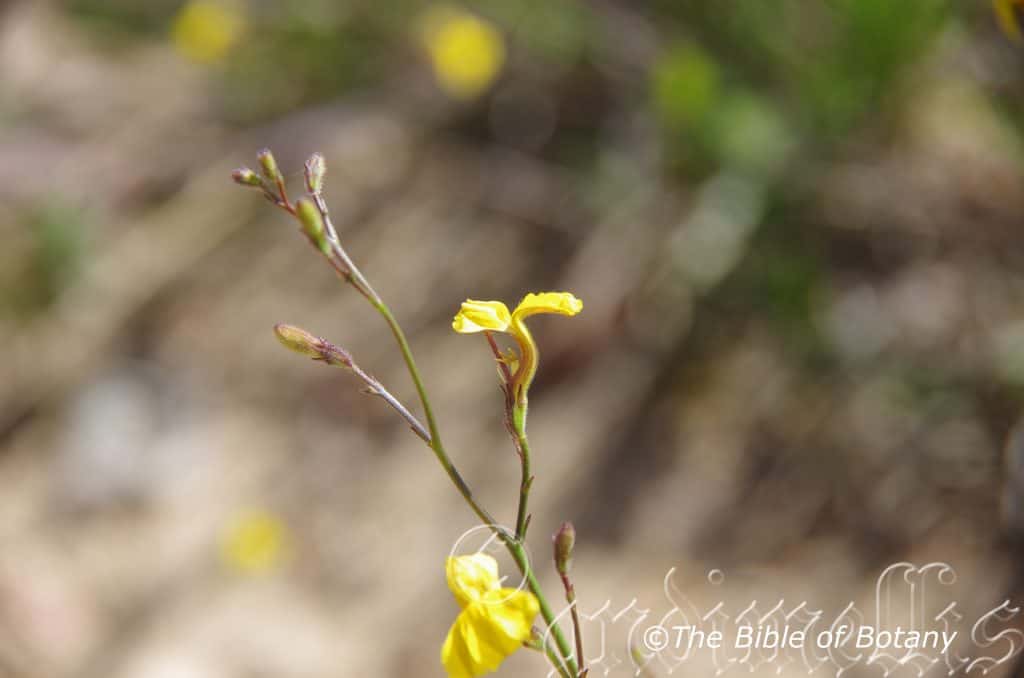
Boorkoom Yuryaigir National Park NSW
Goodenia stelligera
Classification:
Unranked: Eudicots
Unranked: Asterids
Order: Asterales
Family: Goodeniaceae
Subfamily: Mimosoideae
Genus: Is named in honour of Dr. Goodenough; 1743-1827, who wrote on sea weeds and coastal sedges.
Species: From Astar, which is Ancient Greek or Stellaris/Stellatus, which is Latin for a star or star shape and Gera/Fera which is Latin for to bear. It refers to structures which bear star like organs.
Common Name: Spiked Goodenia.
Distribution:
Goodenia stelligera is found south from the tip of Fraser Island in central coastal Queensland to the Cann River in north eastern Victoria. There is an isolated population in far north Queensland at Herberton. It is mainly found on and east of the Great Dividing Range.
https://avh.ala.org.au/occurrences/search?taxa=Goodenia+stelligera#tab_mapView
Habitat Aspect Climate:
Goodenia stelligera prefers full sun to dappled shade. It usually grows along the coastal strip in moist wallums and swamp, open woodlands especially behind the frontal dunes. The altitude ranges from 2 meters ASL to 280 meters ASL.
The temperatures range from minus 5 degrees in July to 37 degrees in January.
The rainfalls range from lows of 800mm to 2000mm annually.
Soil Requirements:
Goodenia stelligera prefers pure sand, sandy loams, peaty loams to light fatty sands. The soils are usually derived from accumulated sands behind the frontal dunes or at times decomposed sandstone or alluvial deposits along estuaries. The soils pH ranges from 5pH to 6pH are preferred. It does not tolerate waterlogged soils however the soils remain moist throughout the year. Non saline soils to moderately saline soils are tolerated.
Height & Spread:
Wild Plants: 100mm to 600mm by 400mm to 1000mm.
Characteristics:
Goodenia stelligera grows a small annual herb with a short, glabrous stem and adventitious roots.
Goodenia stelligera‘s mainly basal leaves with a few cauline leaves are linear to oblanceolate. The basal leaves measure 50mm to 250mm in length by 3mm to 18mm in width while the cauline leaves measure 10mm to 60mm in length by 1mm to 6mm in width. The bases are tapering attenuate while the apexes are acute. The discolourous laminas are deep green, to purple-green or deep green with a purplish tinge and glabrous and dull to semi glossy on the upper laminas while the lower laminas are a paler reddish-green or a paler green deeply tinged red. The laminas recurve slightly upwards from the midvein to the margins while the margins are entire to slightly dentate. The mid vein is strongly prominent on the lower lamina and is distinctly visible on the upper lamina. The leaves are sessile.
The inflorescences of Goodenia stelligera are born on a stout thryse or spikes. The peduncles measure 100mm to 600mm in length. The yellow to bright yellow corolla divides to form 5 dimorphic lobes which spread when fully opened. The short bracteoles measure 0.5mm to 1.5mm in length. The mid grass-green calyxes lobes are narrow lanceolate. The calyxes measure 3.5mm to 4.5mm in length while the lobes measure 4mm to 5mm in length. The reddish to reddish-brown corolla is reddish to reddish-brown and covered in reddish stellate hairs externally and is yellow and glabrous to very slightly covered in yellow stellate hairs and minute auriculate enate growths internally. The corolla measures 13mm to 16mm in length. Lower flowers are petiolate while the upper flowers are sessile.
The upper lobes are broad linear with an acute apex which extends past the apex of the wings. The upper lobes measure 10mm to 12mm in length by 1.5mm to 2mm in width while the wings measure 1.5mm to 2.5mm in width.
The lower lobes are broad linear with an acute apex which extends past the apex of the wings. The lower lobes measure 13mm to 16mm in length by 1.5mm to 2mm in width while the wings measure 1.5mm to 2.5mm in width. The flowers appear throughout the year when conditions are favourable.
The stamens and pistil are free of the corolla as they emerge from the calyx on the upper surface. The fawn, filiform filaments measure 3mm to 4mm in length while the fawn, oblong, basifixed anthers dehisce longitudinally and measure 1mm to 1.3mm in length. The deep reddish-maroon stigma is sparsely covered in short stellate hairs and measures 15mm to 17mm in length while the pollen presenter is deep reddish-maroon almost black. Its flowers appear from August to February.
Goodenia stelligera fruit is an ovoidal capsule. The capsules are 5mm to 9mm in length by 4mm to 7mm in diameter. The green capsules turn grey brown and splits open down the center into two bifid equal valves. The elliptical brown seeds are reticulate to densely pitted.
Wildlife:
Goodenia stelligera‘s wildlife is unknown to the author.
Cultivation:
Goodenia stelligera is a beautiful small tufted perennial for the small moist bush garden or moist rockery. Plants make great displays during spring and summer especially when mass planted. It is ideal for sunny areas around swimming pools, fish or frog ponds that are used for an oasis affect or breaking away from a fernery. Hot sunny court yards or besides paths or as a fill in plant that would benefit from a small tufted plant with yellow flowers. There tufted habit makes them an ideal plant for planting amongst rocks logs or boulders.
Propagation:
Seeds: Goodenia stelligera seeds require treatment before sowing. Pre-treat by placing the seeds into a glass of boiling water. Allow the water to cool and leave to soak for 6 hours. Seeds that have not swollen repeat the exercise. Sow into a seed raising mix. When the seedlings are 25mm to 50mm tall, prick them out and plant them into 50mm native tubes using a seed raising mix.
Once the seedlings reach 150mm to 200mm in height plant them out into their permanent position. For mass plantings space the seedlings at 1 meter centers.
Fertilize using seaweed, fish emulsion or organic chicken pellets soaked in water on an alternate basis. Fertilize every two months until the plants are established then annually in early September to October to maintain health, vitality and better flowering.
Further Comments from Readers:
Hi reader, it seems you use The Bible of Botany a lot. That’s great as we have great pleasure in bringing it to you! It’s a little awkward for us to ask, but our first aim is to purchase land approximately 1,600 hectares to link several parcels of N.P. into one at The Pinnacles NSW Australia, but we need your help. We’re not salespeople. We’re amateur botanists who have dedicated over 30 years to saving the environment in a practical way. We depend on donations to reach our goal. If you donate just $5, the price of your coffee this Sunday, We can help to keep the planet alive in a real way and continue to bring you regular updates and features on Australian plants all in one Botanical Bible. Any support is greatly appreciated. Thank you.
In the spirit of reconciliation we acknowledge the Bundjalung, Gumbaynggirr and Yaegl and all aboriginal nations throughout Australia and their connections to land, sea and community. We pay our respect to their Elders past, present and future for the pleasures we have gained.
All information is included in good faith and has been thoroughly researched prior to printing. The website or the author does not warrant or guarantee the accuracy of any information on these pages, nor does the website or the author accept any responsibility for any loss arising from the use of the information found within. The views and opinions are strictly those of the author or those members who chose to actively participate in the contents herein.