Plant Descriptions – Diploglottis australis – Dysphania pumilio
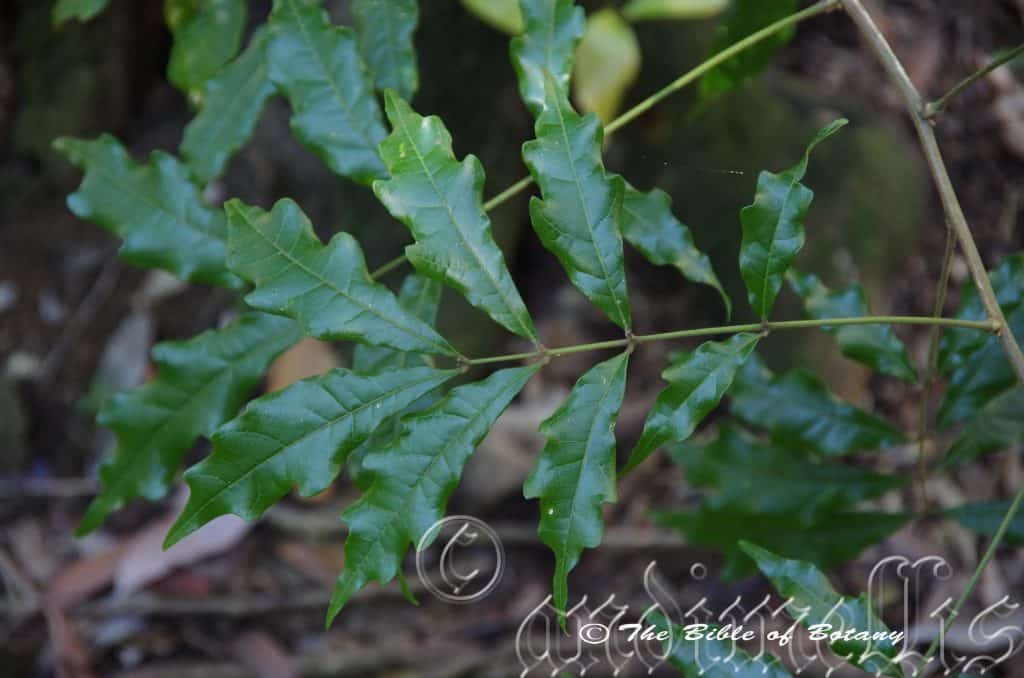
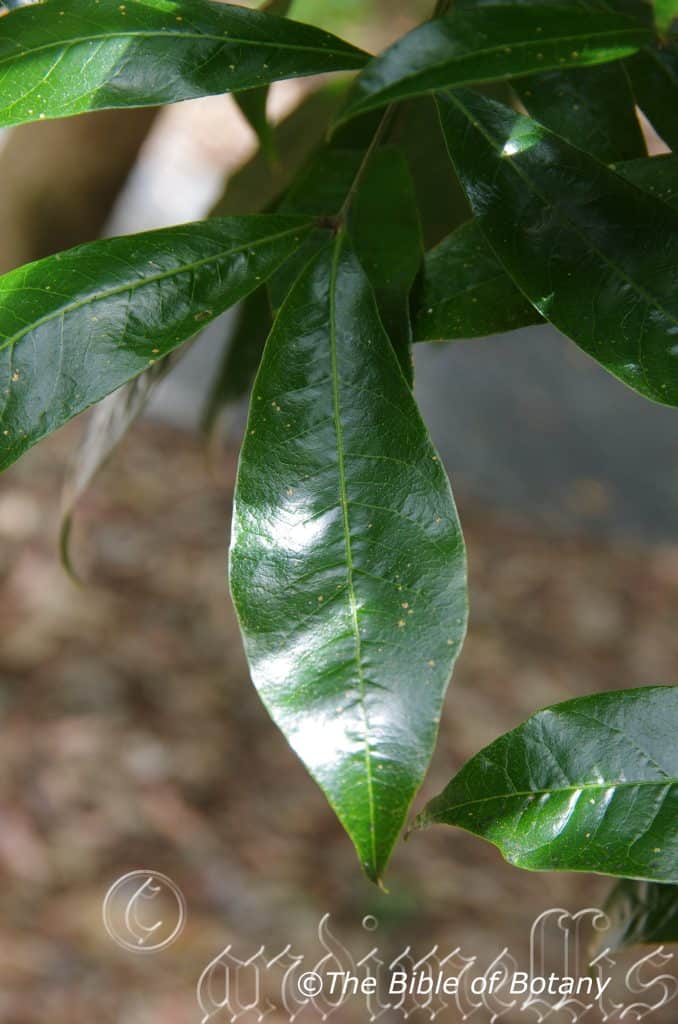
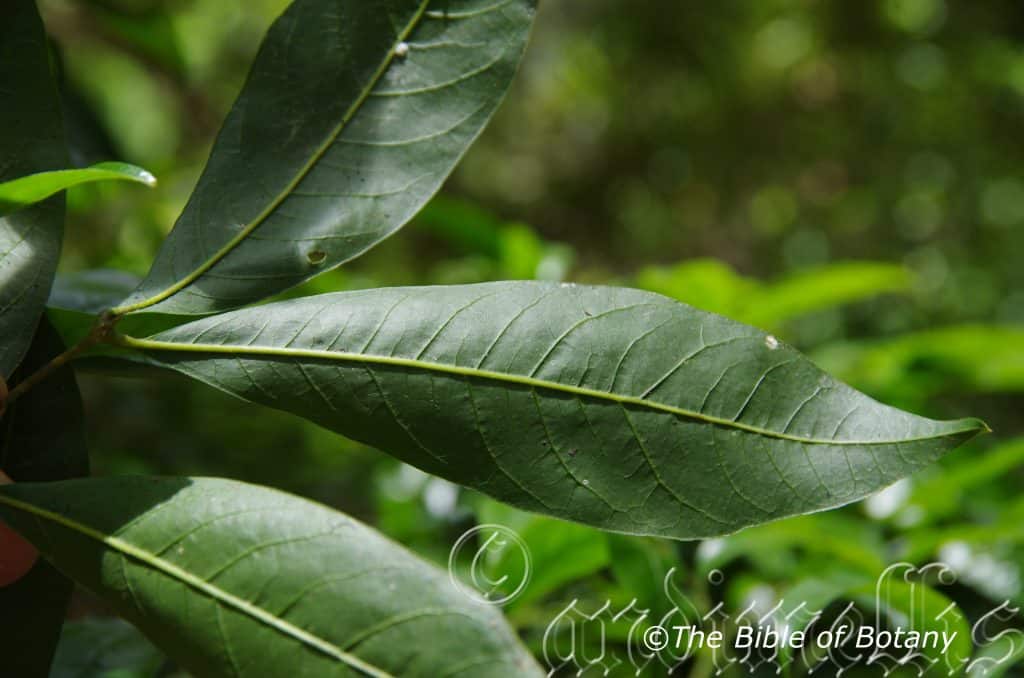
Diploglottis australis
Diploglottis bernieana
Diploglottis campbellii
Diploglottis obovata
Diplolaena grandiflora
Dipodium atropurpureum
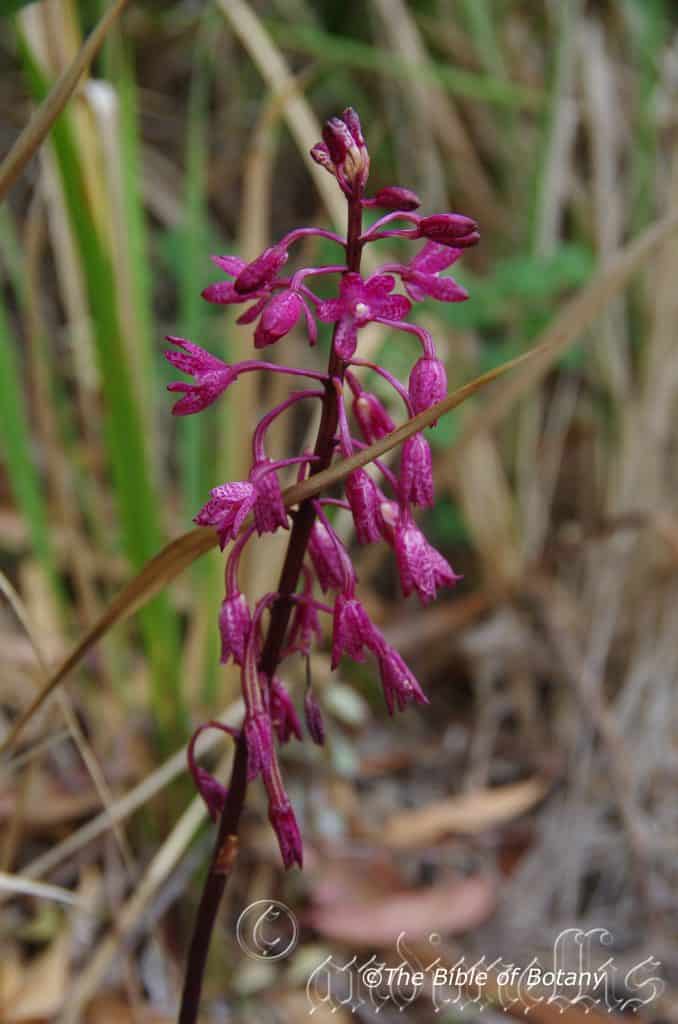
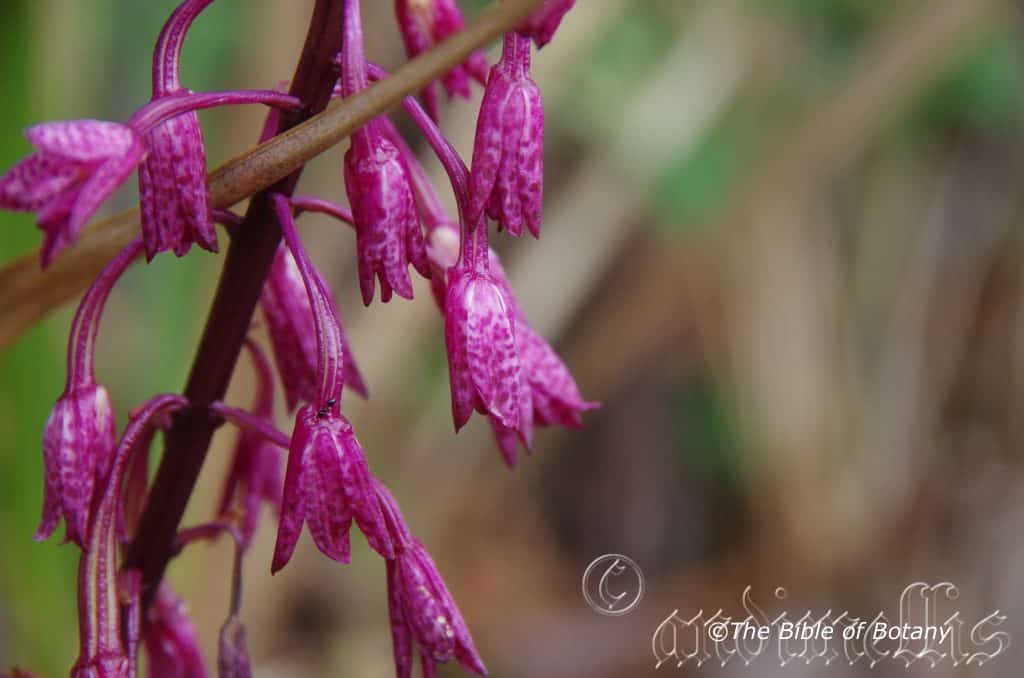
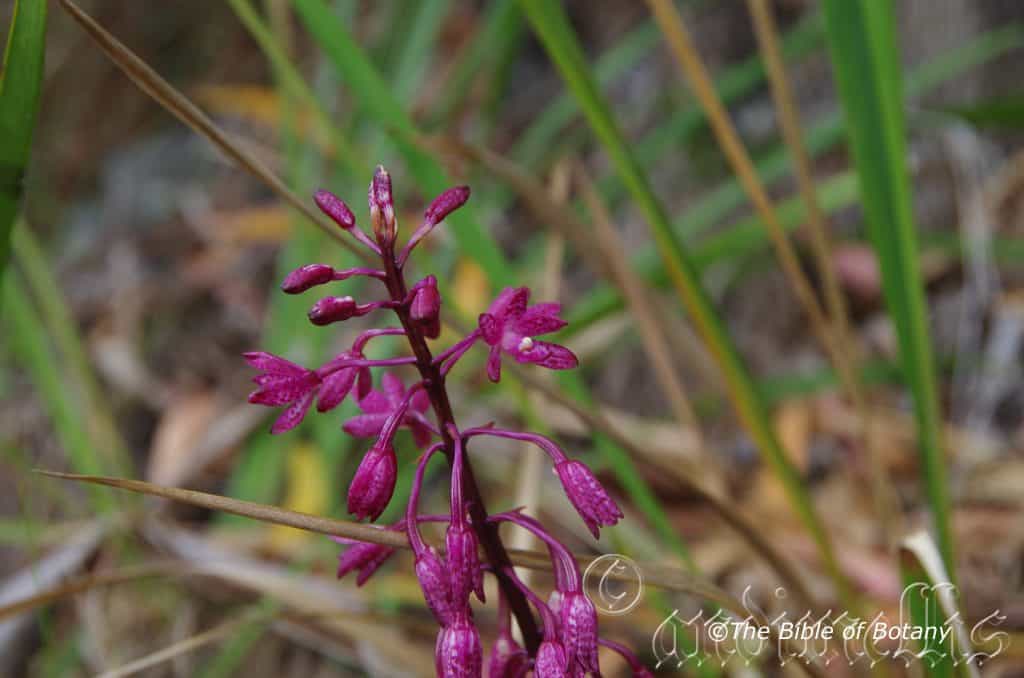
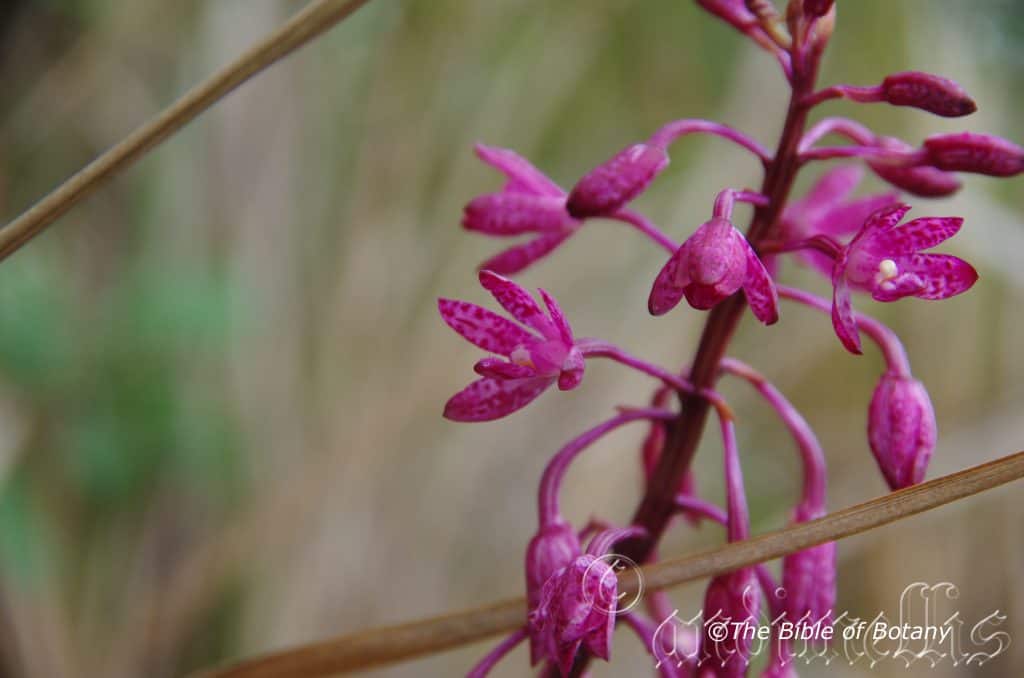
Dipodium punctatum
Dipodium variegatum
Dischidia nummularia
Diuris alba
Diuris chrysantha
Diuris punctata
Diuris sulphurea
Dodonaea boroniifolia
Dodonaea hirsuta
Dodonaea megazyga
Dodonaea multijuga
Dodonaea rhombifolia
Dodonaea sinuolata
Dodonaea triquetra
Dodonaea viscosa subsp. angustifolia
Dodonaea viscosa subsp. angustissima
Dodonaea viscosa subsp. cuneata
Doodia australis
Doryanthes excelsa
Doryanthes palmeri
Doryphora sassafras
Dracophyllum macranthum
Dracophyllum secundum
Drosera adelae
Drosera auriculata
Drosera binata
Drosera burmanni
Drosera peltata
Drosera pygmaea
Drosera spatulata
Drymophila moorei
Drynaria quercifolia
Drynaria rigidula
Drynaria sparsisora
Drypetes deplanchei
Duboisia myoporoides
Dubouzetia saxatilis
Durabaculum undulatum
Durringtonia paludosa
Dysoxylum fraserianum
Dysoxylum mollissimum
Dysoxylum rufum
Dysphania pumilio
Kedron Brook Qld.
NCBG Coffs Harbour NSW
Mount Cootha Botanic Gardens Qld.
Kedron Brook Qld.
Roma Street Floral Gardens Qld.
Rosser Park Benowa Qld.
Rosser Park Benowa Qld.
Rosser Park Benowa Qld.
Rosser Park Benowa Qld.
Roma Street Floral Gardens Qld.
NCBG Coffs Harbour NSW
NCBG Coffs Harbour NSW
NCBG Coffs Harbour NSW
NCBG Coffs Harbour NSW
Diploglottis australis
Classification
Unranked: Eudicots
Unranked: Roside
Order: Sapindales
Family: Sapindacea
Genus: From Diploos, which is Ancient Greek for to double or doubled and Glottis, which is Ancient Greek for a tongue or throat. It refers to petals, which have two glands at their base.
Species: From Terra Australis, which is Latin for land of the south. It refers to plants, which were first discovered from the land down under.
Common Name: Hairy Apple Berry native Tamarind.
Distribution:
Diploglottis australis is found south from Mount Walsh national Park in coastal south eastern Queensland to Shoalhaven in coastal south eastern of New South Wales. It is found on and east of the Great Dividing Range.
There are two disjunct populations in far north eastern coastal Queensland at Pine Creek to Cardwell.
https://avh.ala.org.au/occurrences/search?taxa=Diploglottis+australis#tab_mapView
Habitat Aspect Climate:
Diploglottis australis prefers full sun to dappled shade. It grows in warmer, moist well developed sub-tropical rainforests or cool tropical rainforests. The altitude ranges from 40 meters ASL to 820 meters ASL.
The temperatures range from 4 degrees in July to 36 degrees in January.
The rainfall ranges from lows of 900mm to 2400mm average per annum.
Soil Requirements:
Diploglottis australis prefers better quality sandy loams to medium clays. The soils are derived from decomposed brown basalt, black basalt, shale or metamorphic rocks. The soils pH ranges from 5pH to 6pH are preferred. It does not tolerate waterlogged soils. Non saline soils to moderately saline soils are tolerated.
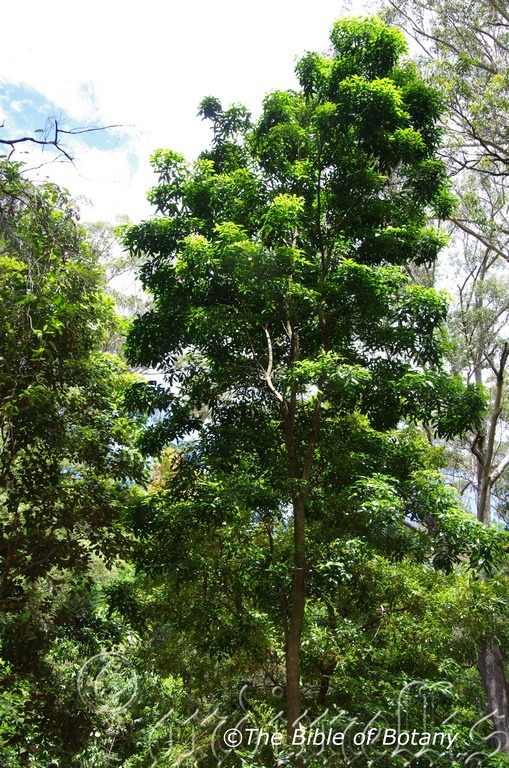
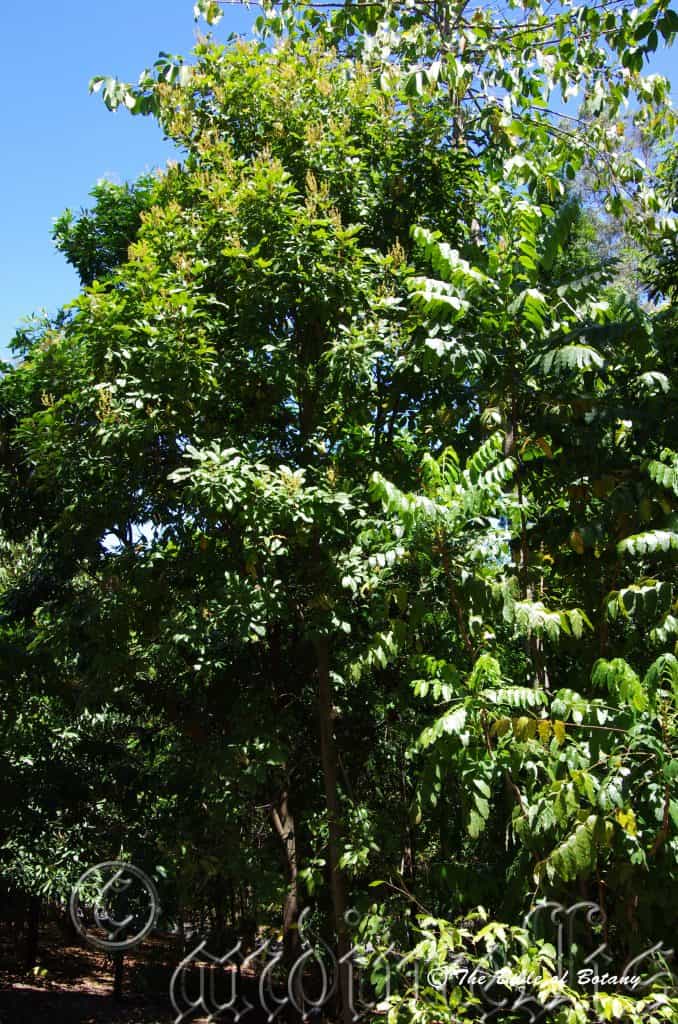
Height & Spread:
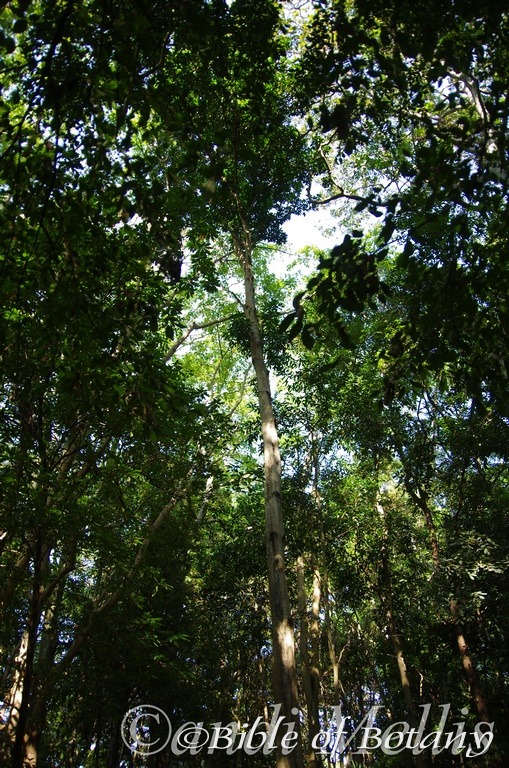
Wild Plants: 20m to 30m by 5m to 8m.
Characteristics:
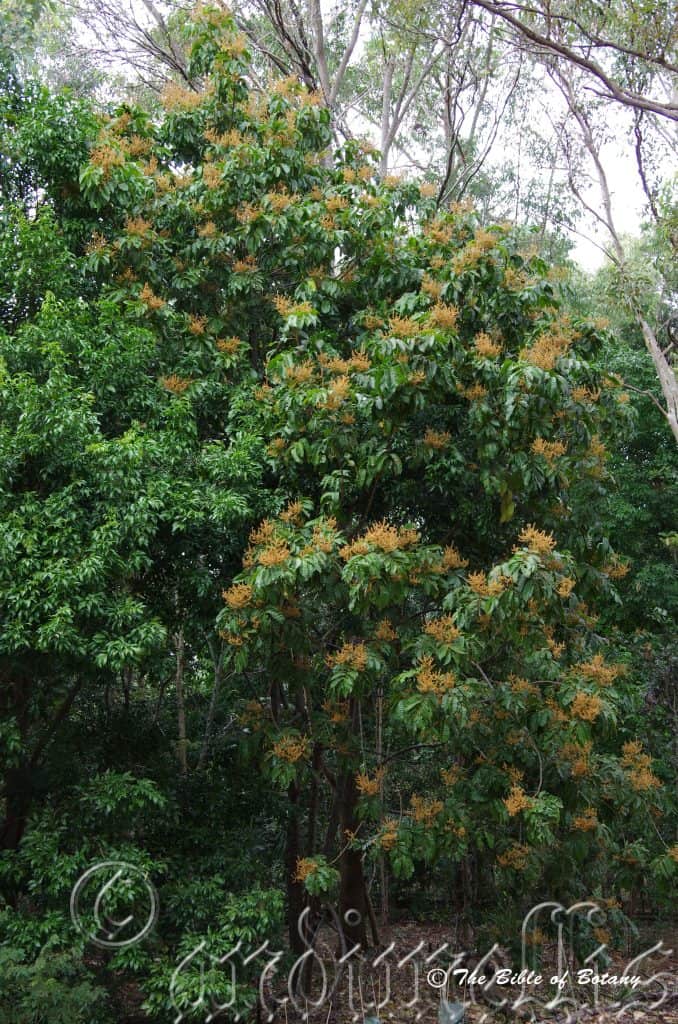
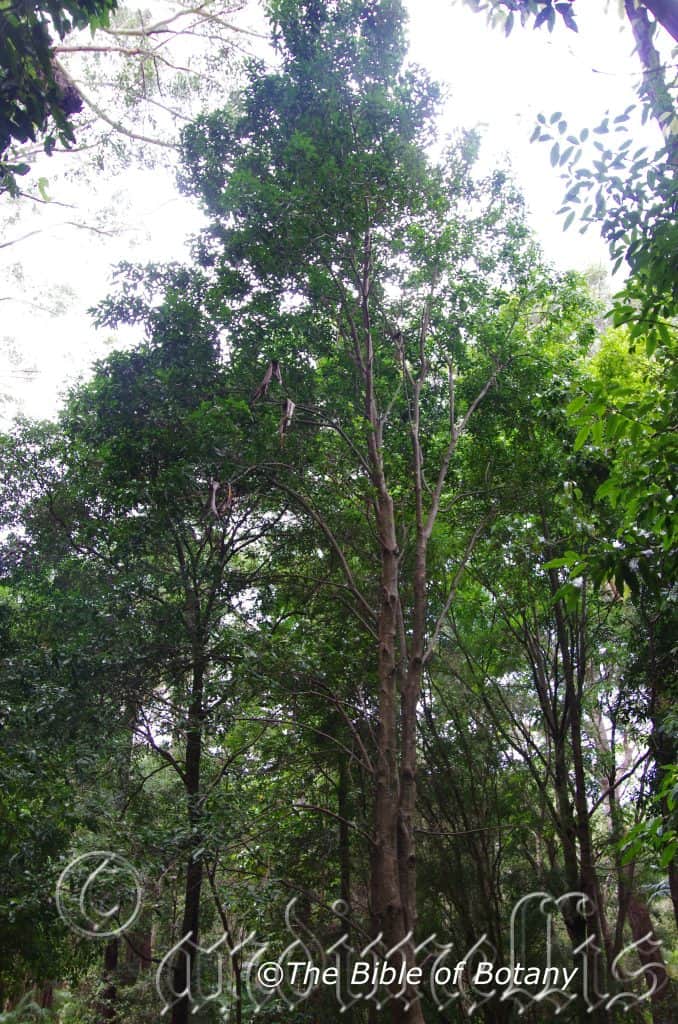
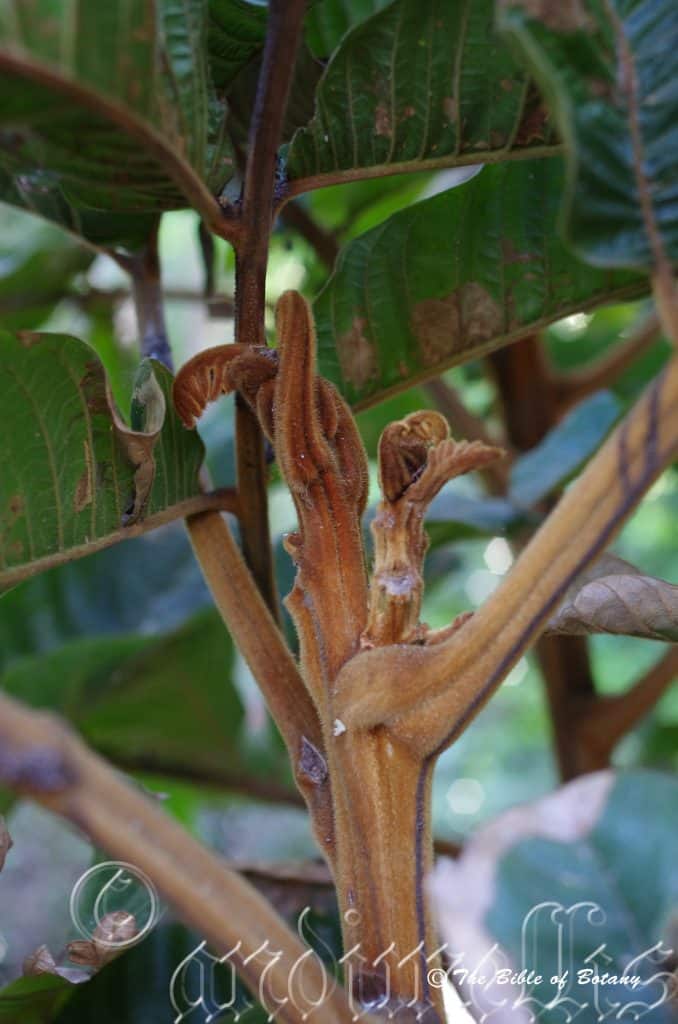
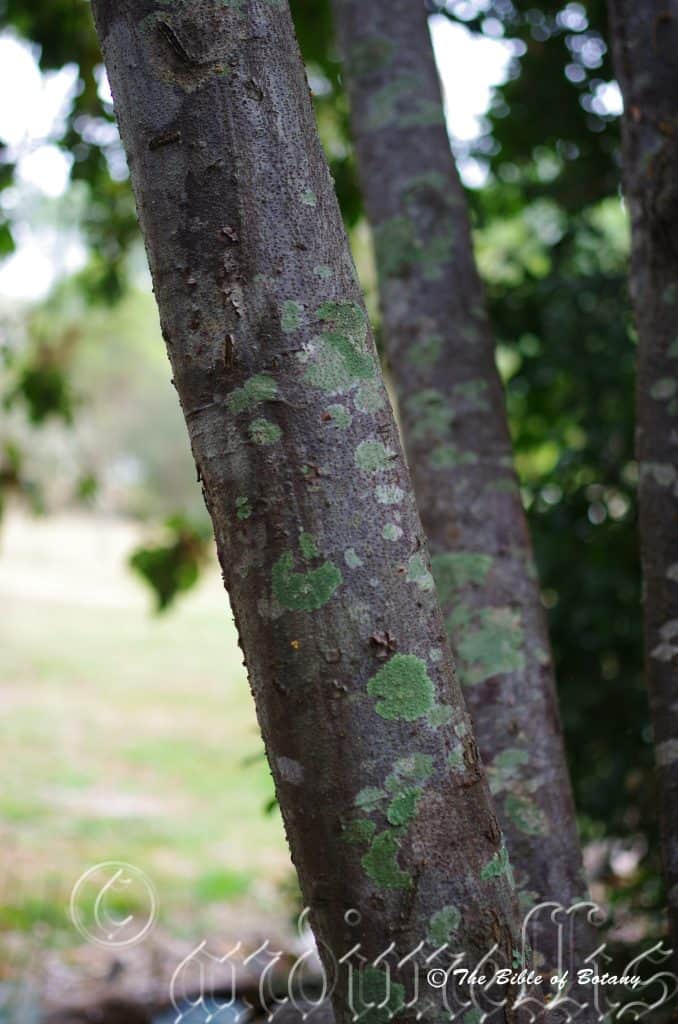
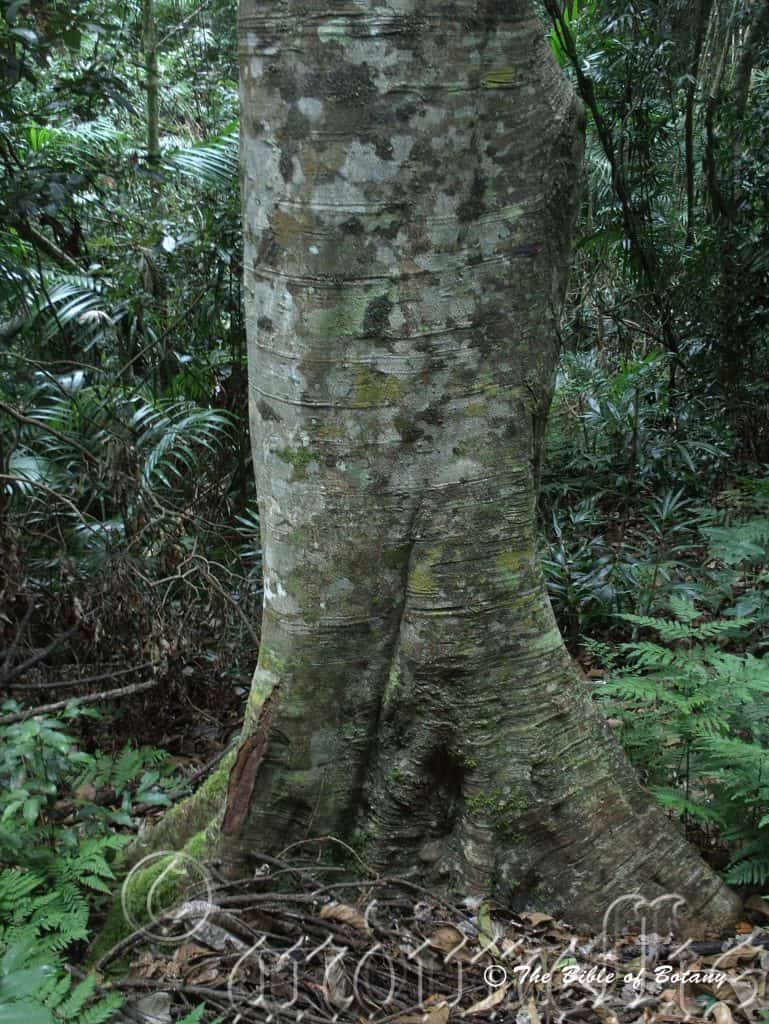
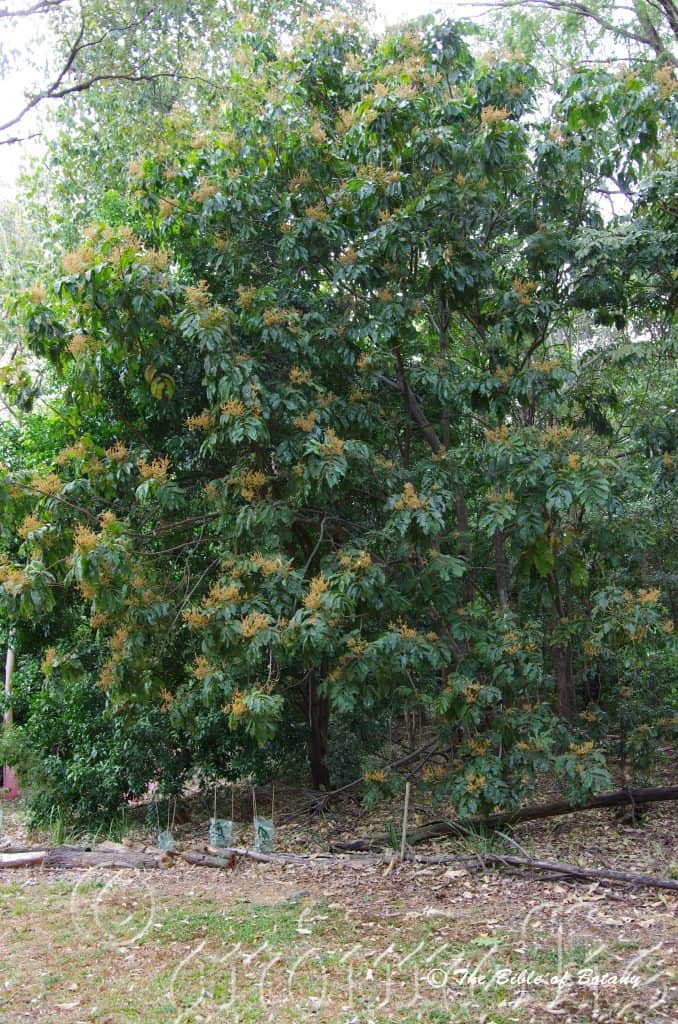
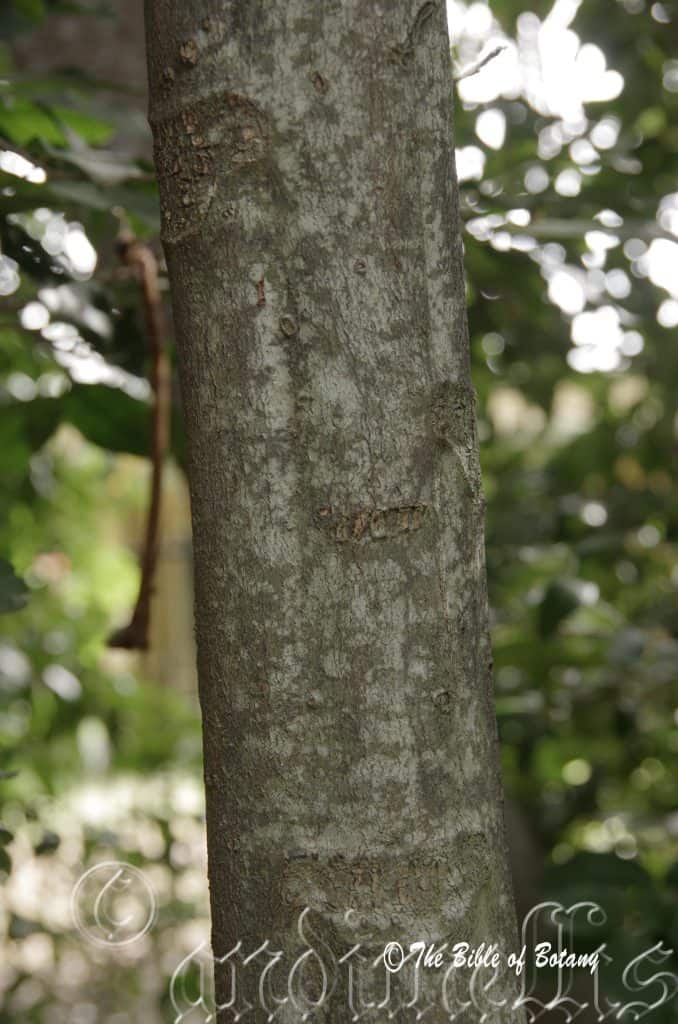
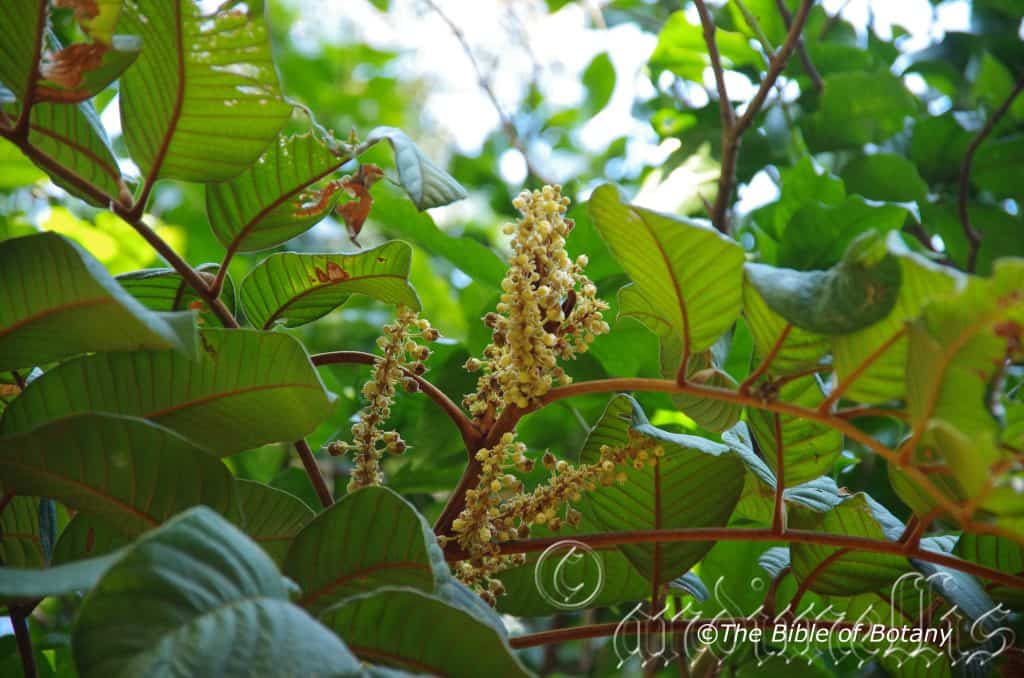
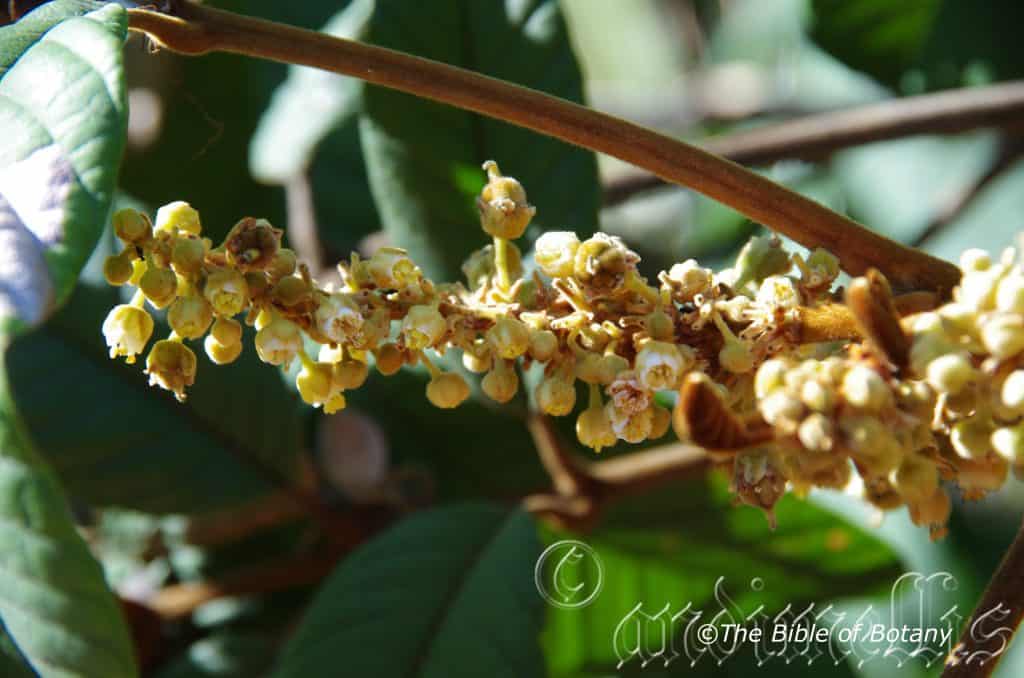
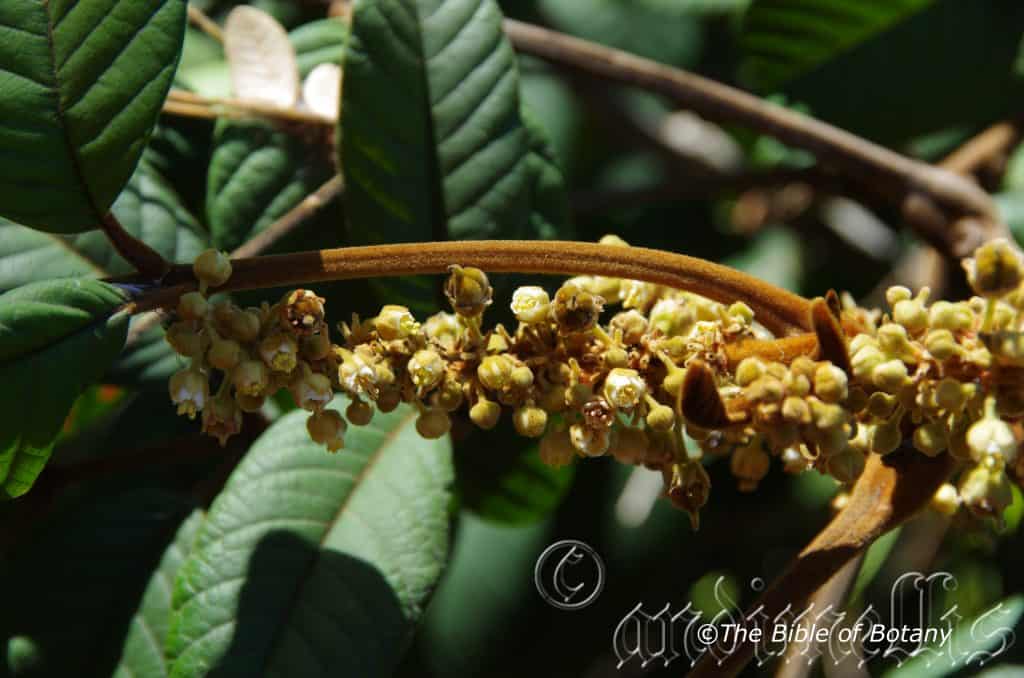
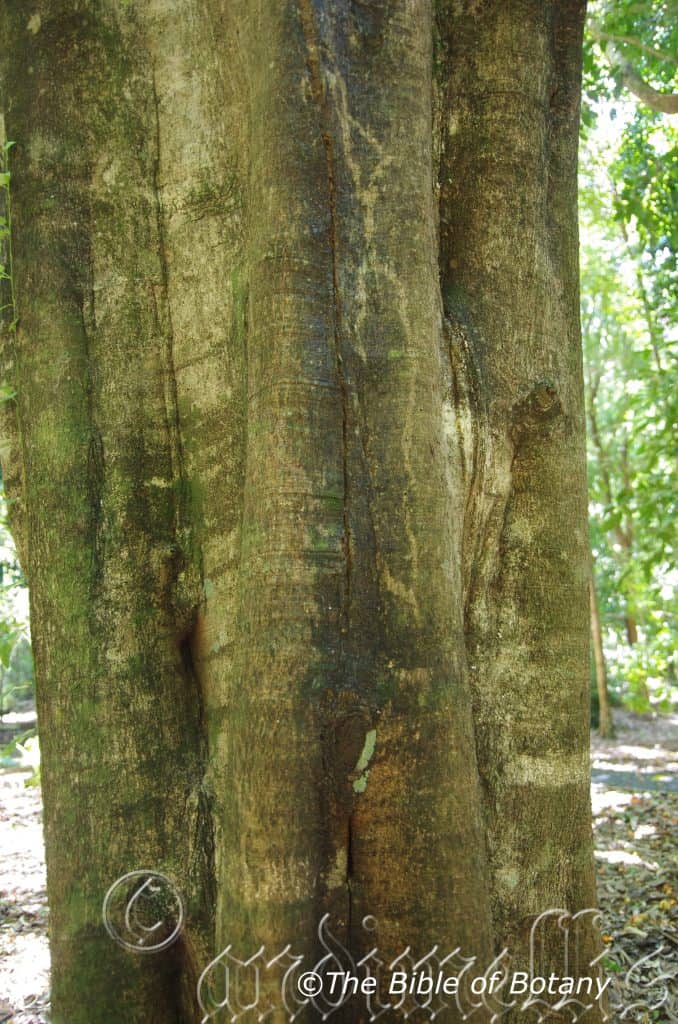
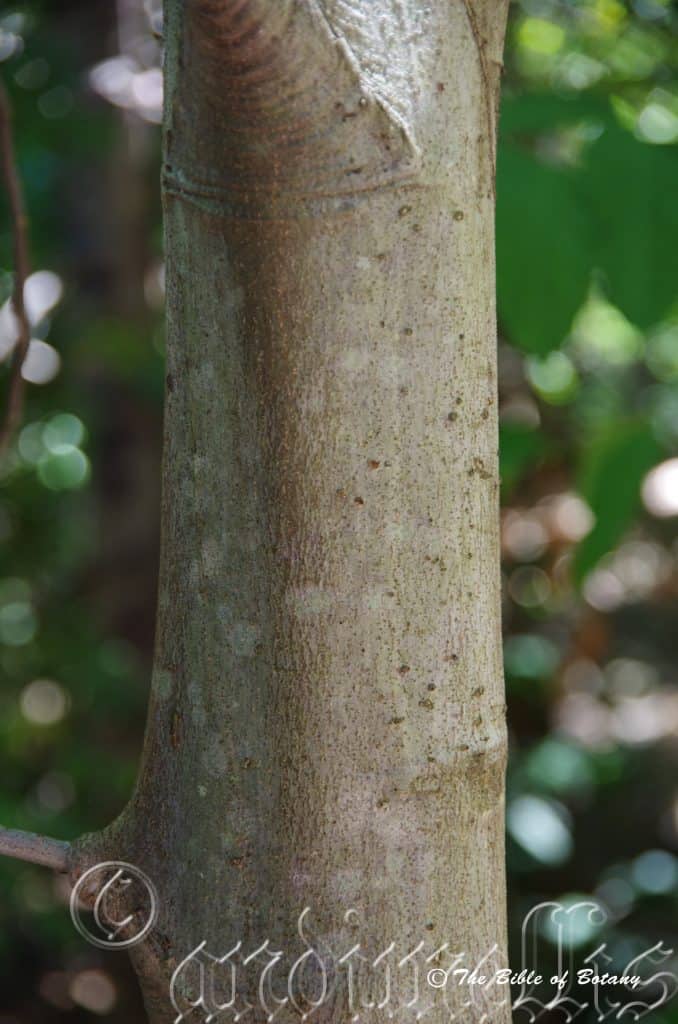
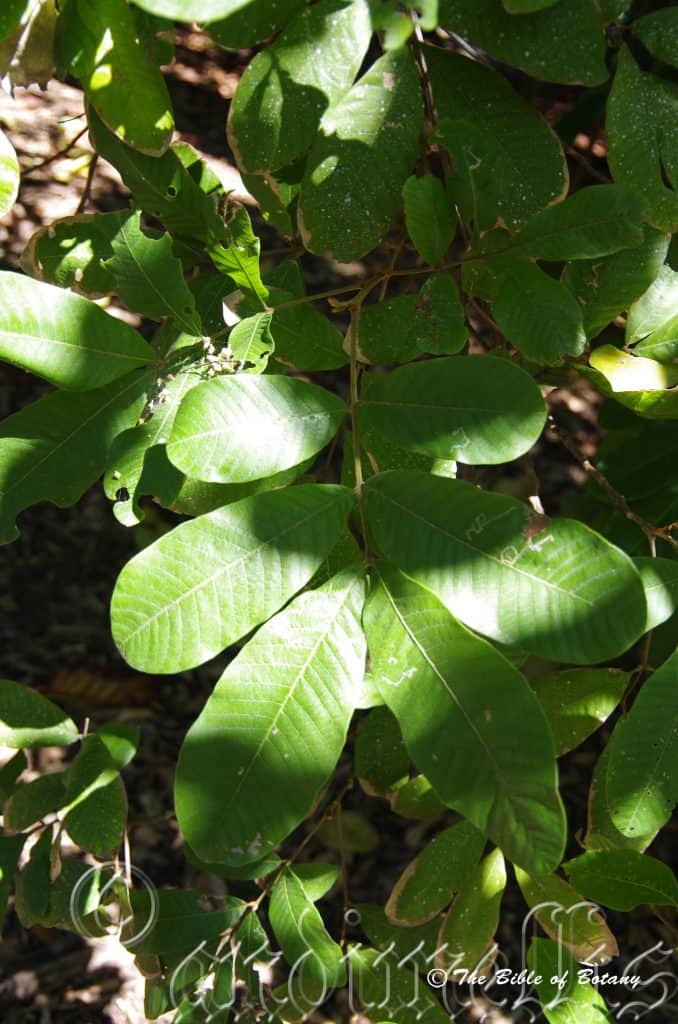
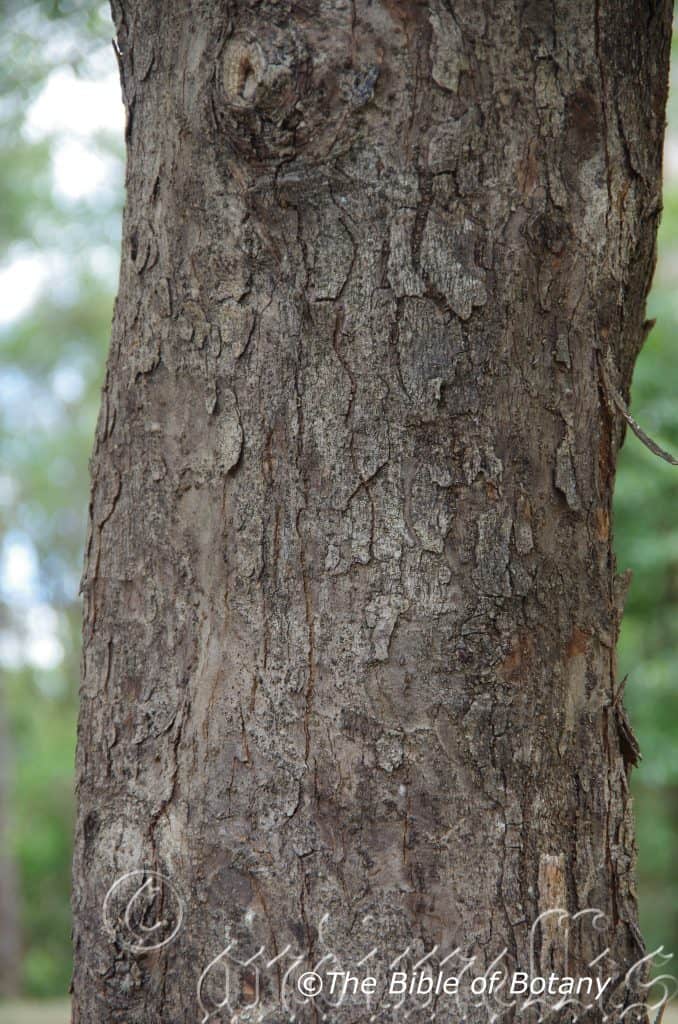
Diploglottis australis is a fast growing tree usually with a single straight bole for 2/3 of its height. It is cylindrical and flanged near the base. The grey brown bark is often difficult to see as it is heavily encrusted in lichens and mosses even from an early age. The 750mm diameter trunks have horizontal raised sections irregularly spaced along its length. The branchlets are square and strongly ribbed on the new juvenile growth. It is densely covered in short rusty to golden fawn tomentose hairs.
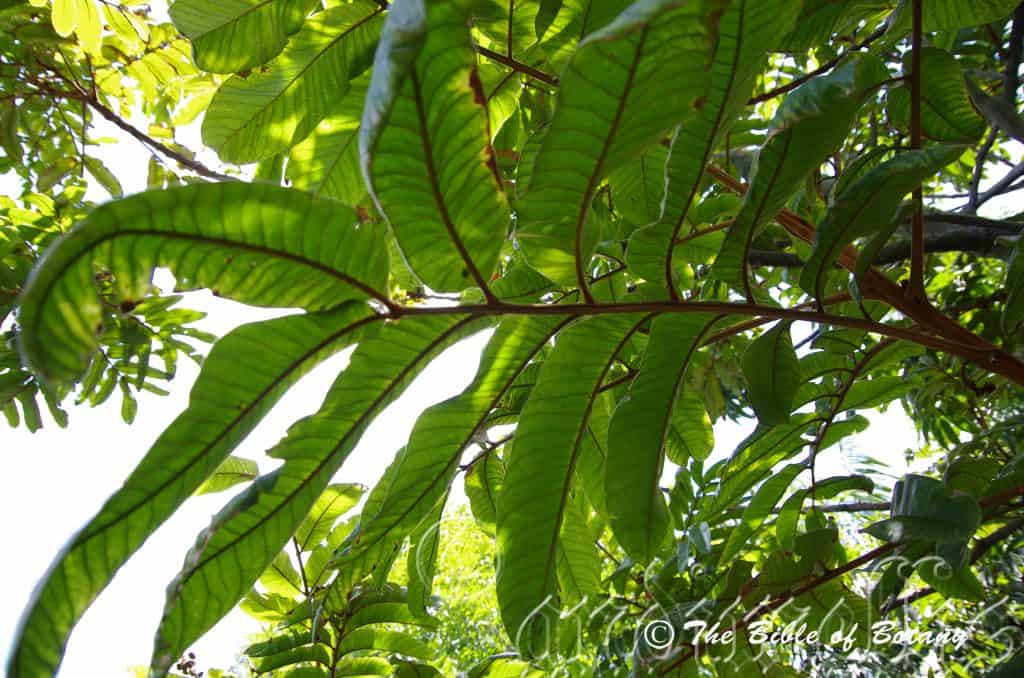
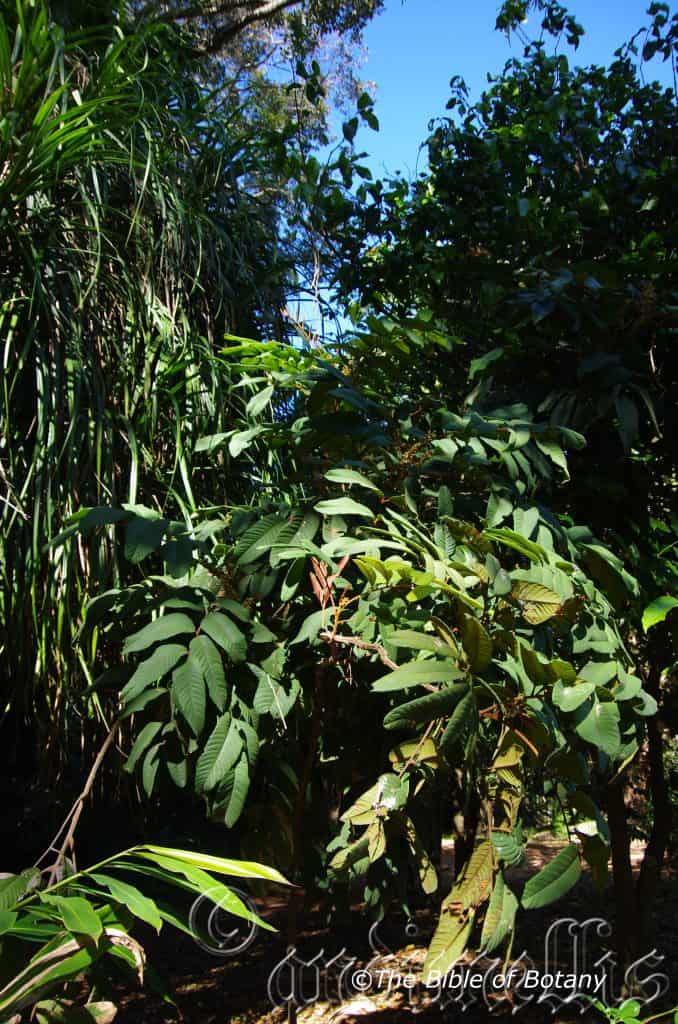
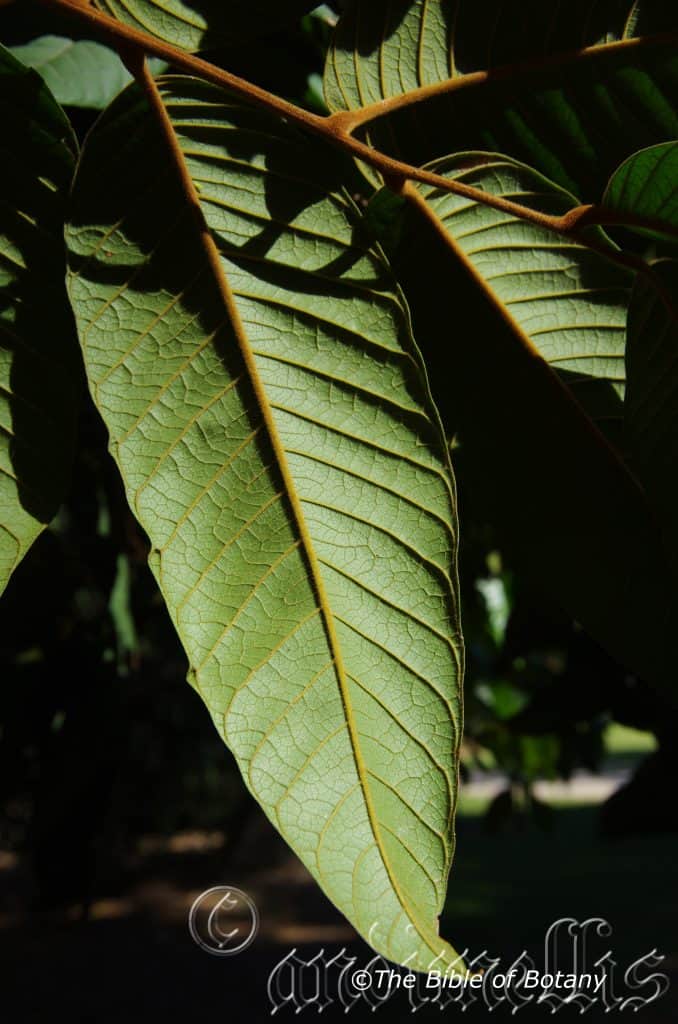
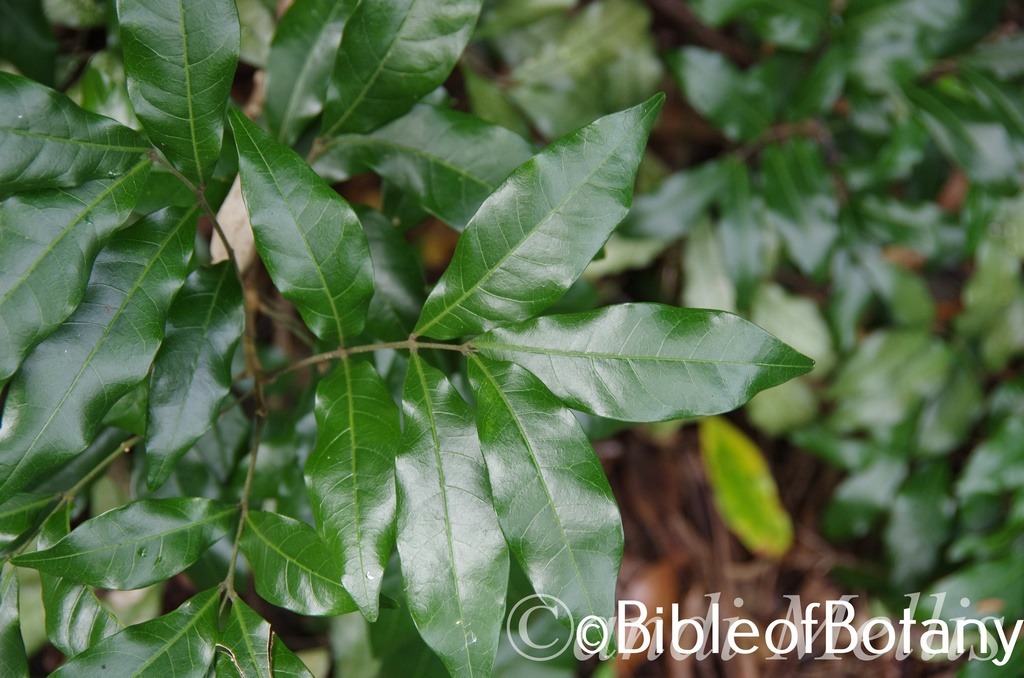
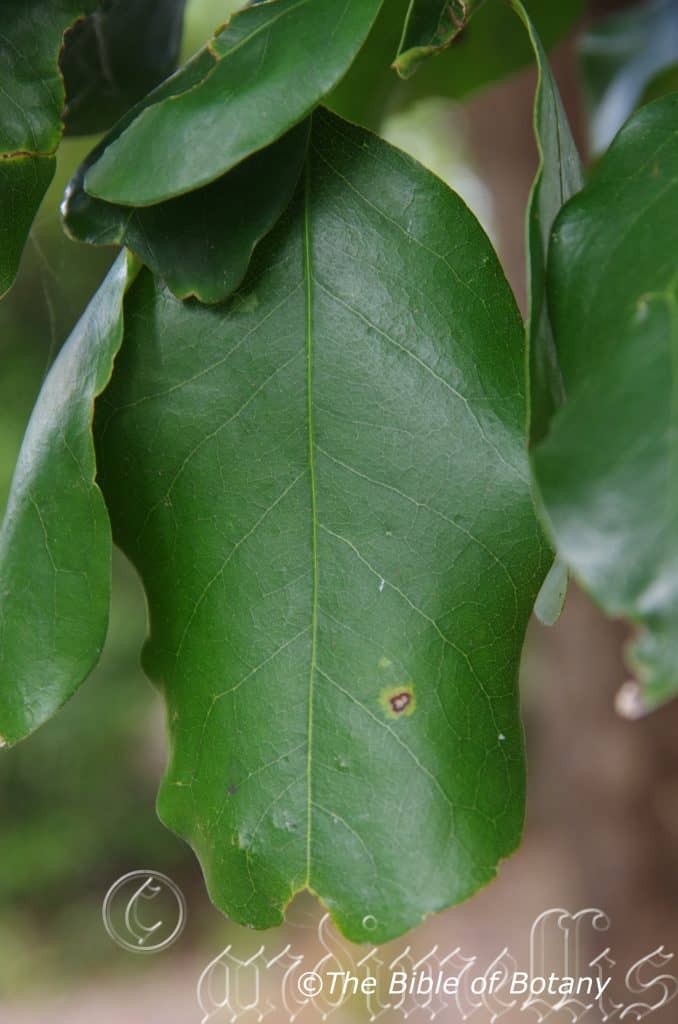
The alternate even pinnate leaves of Diploglottis australis measure 400mm to 1200mm in length. Juvenile trees have 3 to 5 leaflets increasing to 6 to 12 leaflets on mature trees. The sub-opposite leaflets on mature trees are oblong to oblong elliptical and measure 100mm to 300mm in length by 40mm to 80mm in width. The petioles measure 50mm to 150mm in length while the petiolules measure 2mm to 5mm in length. The bases are rounded to slightly asymmetrical while the apexes are broadly acute with a blunt obtuse tip. The discolourous laminas are mid grass green and glabrous while the lower laminas are slightly paler with short rusty to golden-brown tomentose hairs along the mid veins, lateral veins and sparsely covering the lamina. The leaf margins are entire to shallow crenate and are flat to slightly curve upwards from the mid vein. The mid vein is strongly prominent on the lower lamina and is distinctly visible on the upper lamina being slightly prominent and a golden fawn in colour. The mid vein is slightly prominent on the upper lamina.
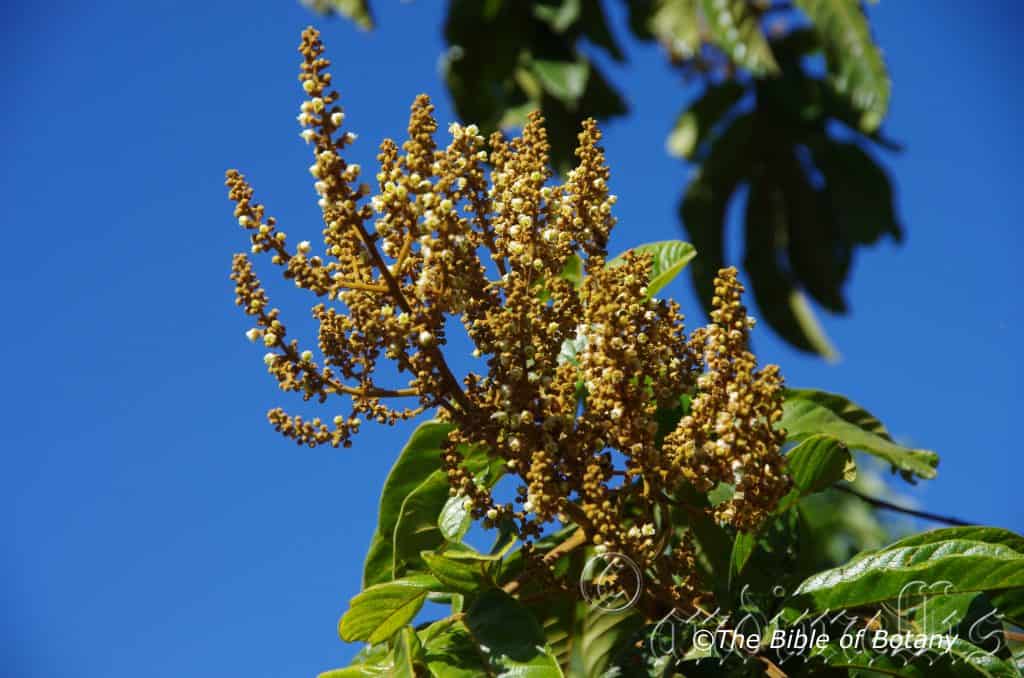
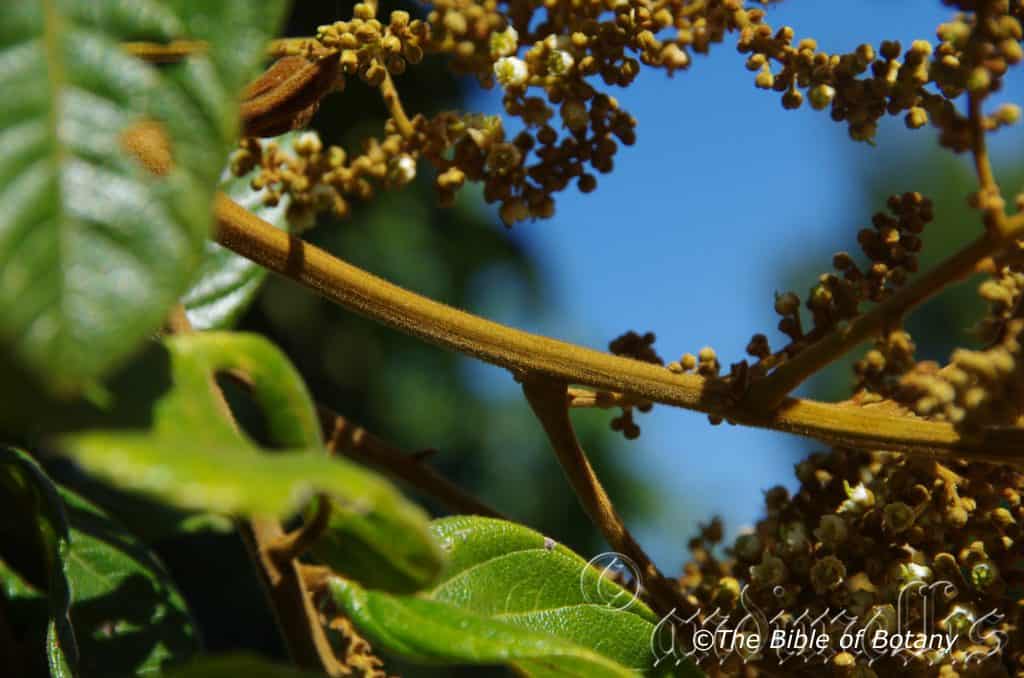
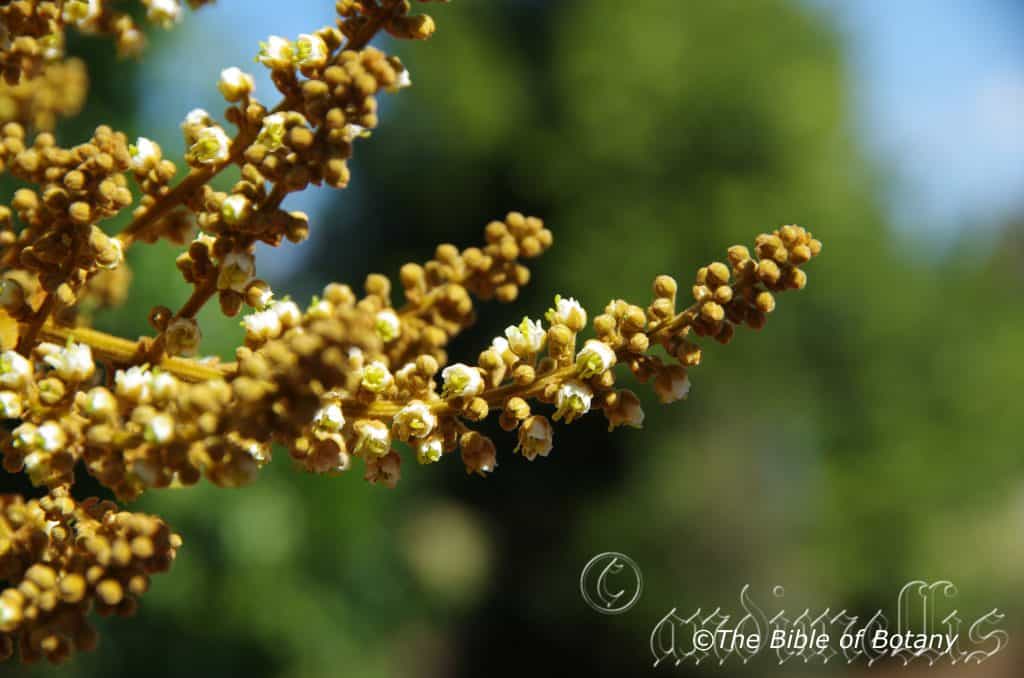
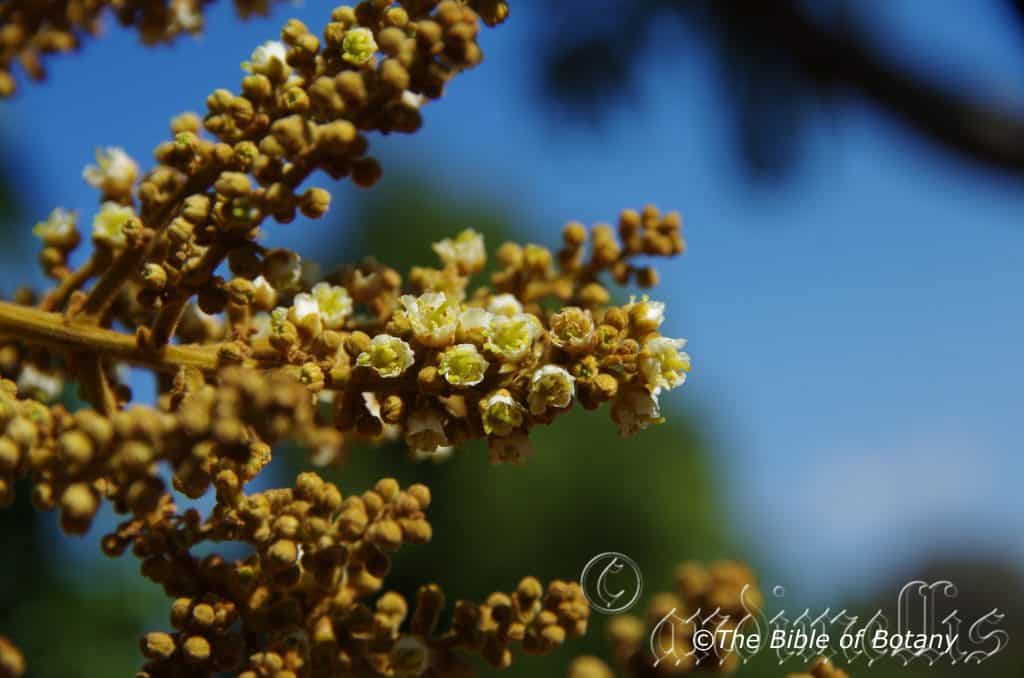
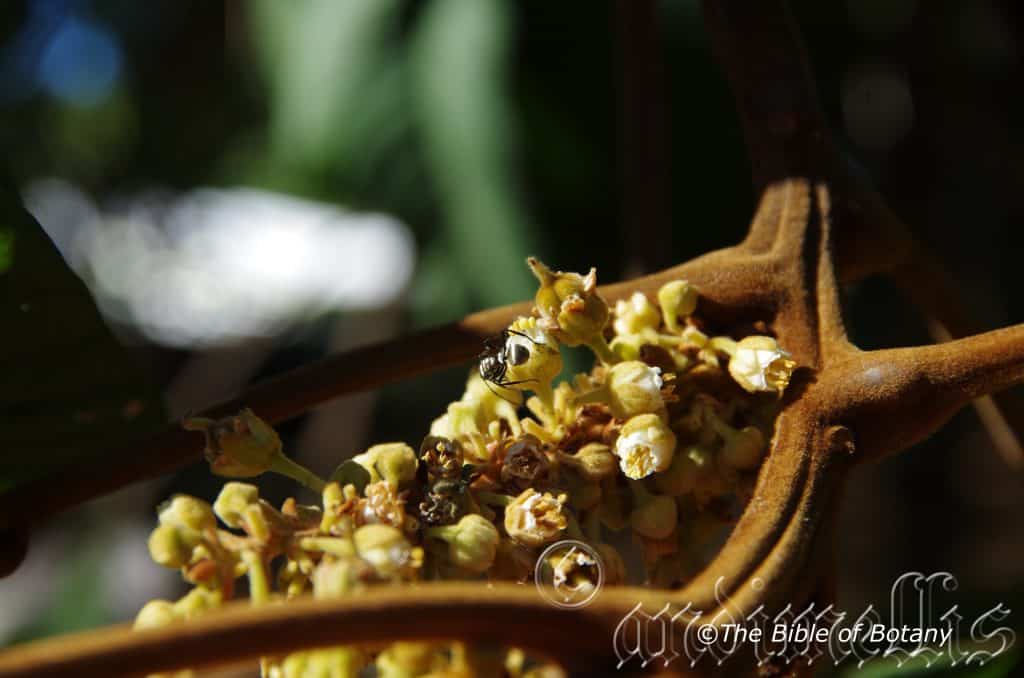
Diploglottis australis inflorescences are born as panicles from the leaf axis. The panicles measure 150mm to 500mm in length and are covered in rusty to golden fawn tomentose hairs. The 5 creamy fawn petals measure 3mm to 3.5mm in length. Diploglottis cunninghamii flowers occur from late July through to early September.
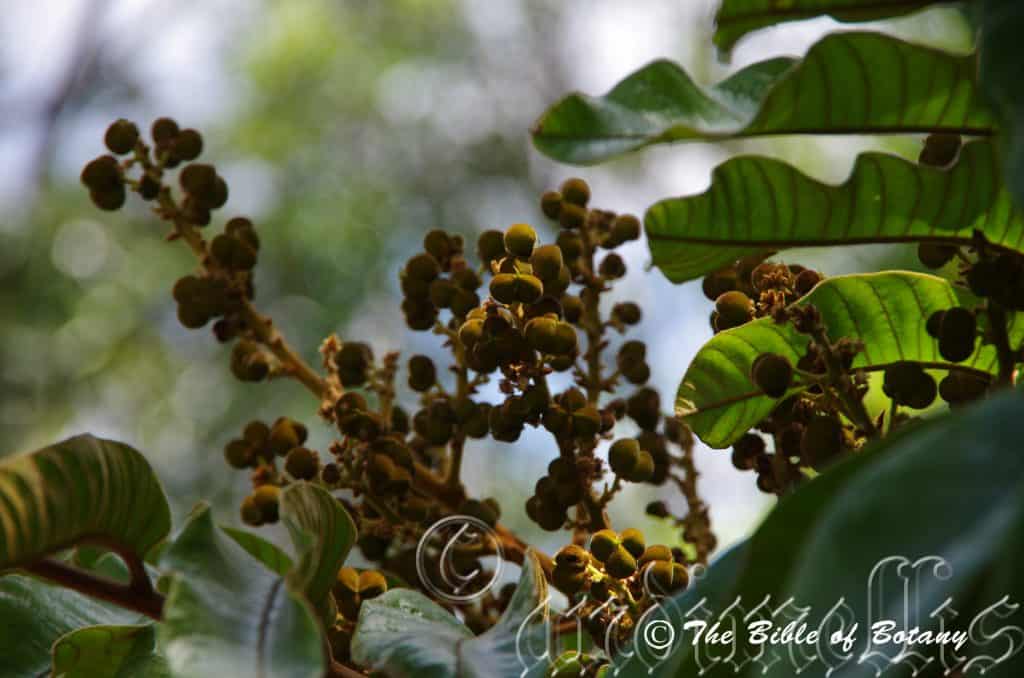
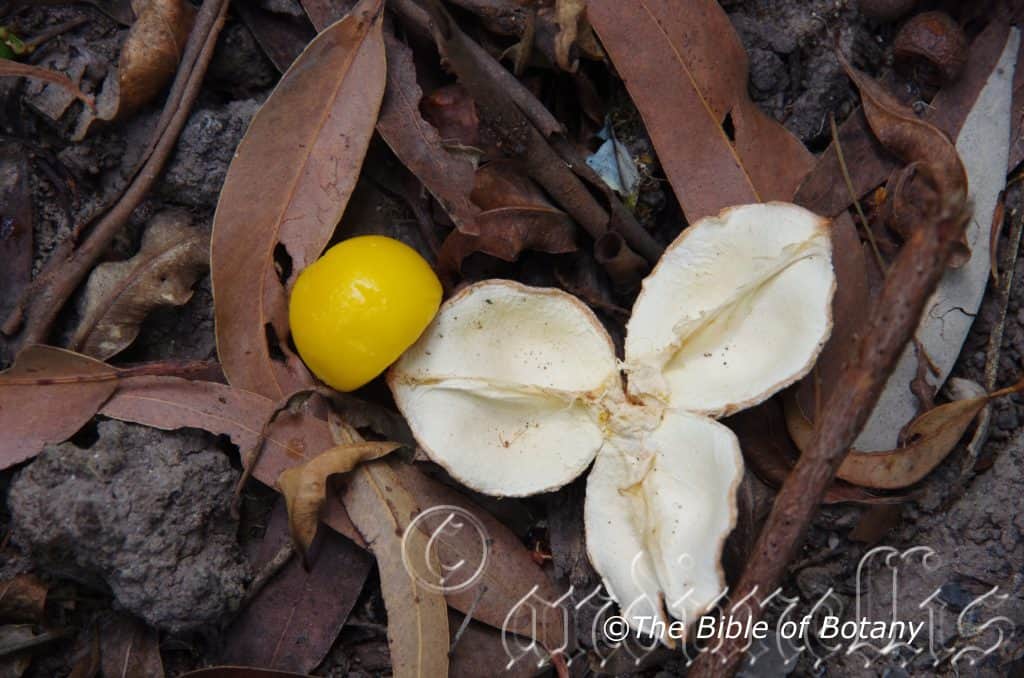
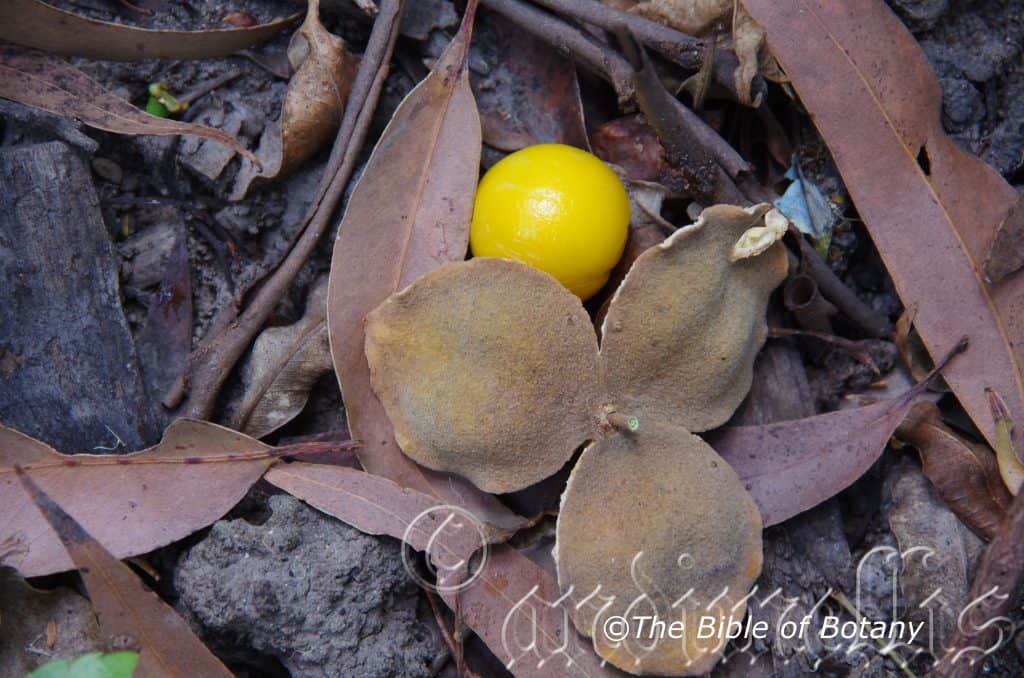
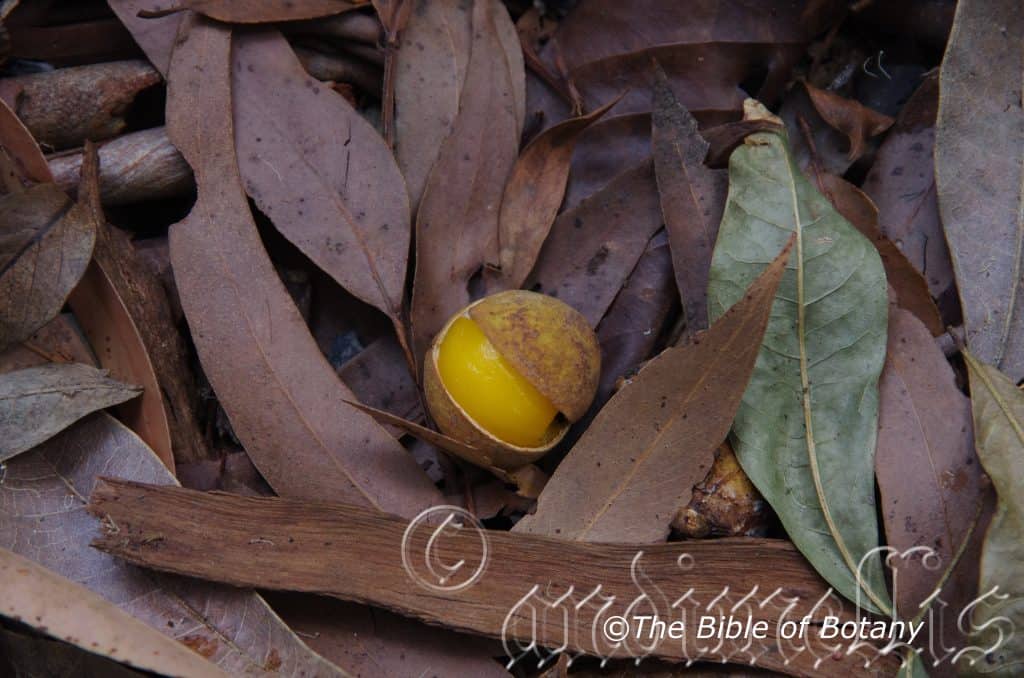
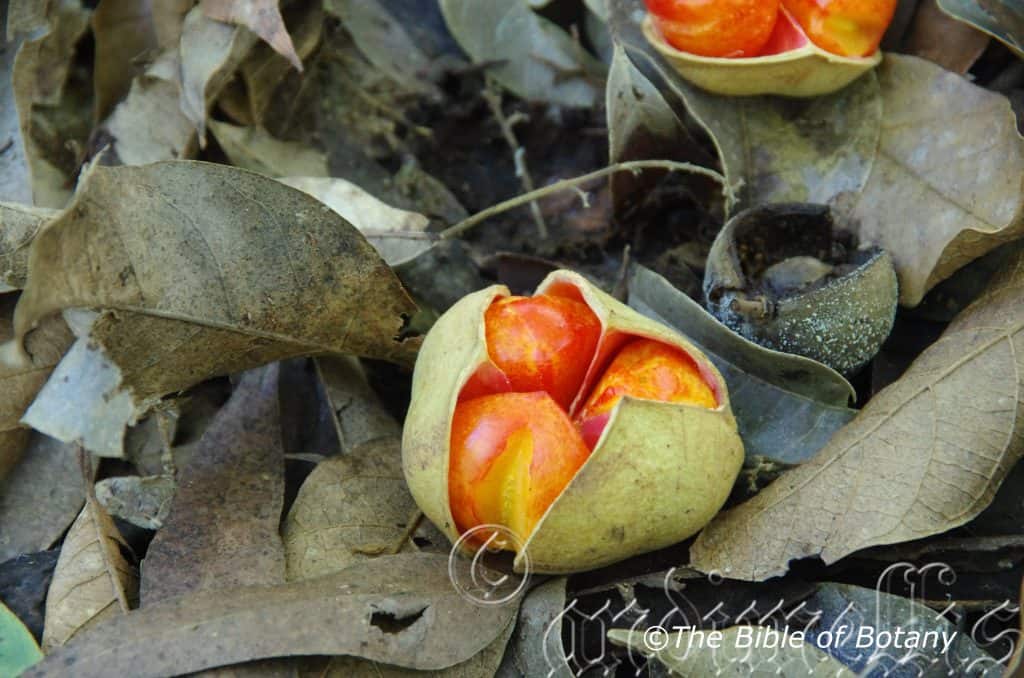
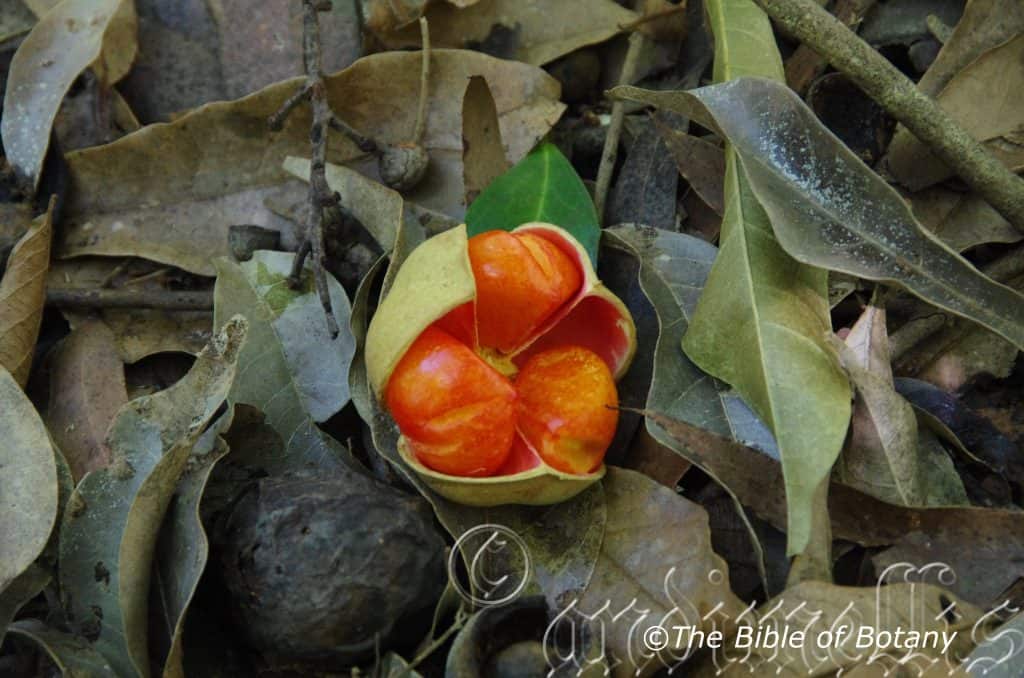
The trees are prolific producers of globose capsules. Each capsule has three lobes with one seed in each lobe. They measure 10mm to 15mm in diameter. The capsules have a round base with a round apex. The golden fawn capsules are covered in rusty to golden fawn tomentose hairs externally and glabrous internally. The capsules turn yellow brown when ripe before dropping to the ground. The capsules ripen from November to early January. The fruits are similar to the closely related Chinese Lychees in appearance except the aril surrounding the seed is a bright yellow to orange instead of white.
Wildlife:
Diploglottis australis was a staple part of the Australian Aborigines diet. The trees support a wide variety of animals including Possums, Brown Cuckoo, Crimson Rosella, King Parrott, Fig Bird, Regent Bower Bird, Satin Bower Bird, Rose Crowned Pigeon, Top Knot pigeon, Wompoo Pigeon and Currawongs. When the fruits fall to the ground it is eagerly sought after by Native Bush Rats and native mice as well as Bush Turkeys and as they start to ferment myriads of weevils and vinegar flies will join in on the feast.
The fruits have a distinctive lychee crossed tamarind flavour. It is sweet yet have a twist of unripe Valencia orange to them. It must contain a high sugar level as the fruits always ferment very rapidly especially those that have fallen to the ground.
Cultivation:
Diploglottis australis’s is a beautiful tall tree that should be included in the rainforest garden. It is very fast growing and given room can be coaxed into forming a larger canopy than that it would naturally have in the wild. Ornamental trees will grow to 15 meters to 20 meters tall by 10 meters in diameter when grown in the open. The tree will need to be tip pruned above head height to encourage lateral growth. Many trees will still try to grow as a single trunk or multi trunk tree so some perseverance may be needed especially if the trees are planted in any type of shade or if competition is nearby. Due to the large leaves Diploglottis cunninghamii should be planted in a protected area in the garden away from winds which will tear the leaves making them look tatty.
If Diploglottis australis is given adequate moisture, plenty of mulch for moisture retention and an even soil temperature, applying native fertilizers on a regular basis the plants will respond with good flowering over a long period and will yield copious quantities of good fruit with maximum size. The fruits make an excellent substitute for lemonade, topping for ice cream, used in fruit salads or made into sweet sources for pork dishes, chicken, duck or turkey or even confectionary. I have always been amazed that Diploglottis cunninghamii is still not being grown commercially at least on trial plantations and in niche orchards. While the tree is a heavy producer of good quality fruit harvesting problems exist on of mature trees. Fruit is consumed by birds and flying foxes. The short shelf life of the fruit would mean that processing would need to be done on the property or close to the orchard to avoid spoiling and loss of production.
Vinegar flies and it should be noted that it is not a fruit fly as it does not feed on fruit directly on the fresh fruit. The name ‘fruit fly’ is applied to flies in the family Tephritidae. The true vinegar flies; Drosophila melanogaster’s, larvae feed on the yeasts associated with decaying or fermenting fruit. The larvae can cause great problems for wineries and fruit juice producers. Their existence around fermenting fruit or even fresh fruit can cause the fruits to produce acidic acid which will spoil the partly processed fruits.
On the other hand the onsite production would be value adding for the orchardist but would need marketing expertise to take full advantage of the end product. We have also made a wine from the fruits which were something to behold. Like over the kitchen sink but that could have been the wine makers fault not that of the fruit. Trees often flower from the sixth to ninth year.
Propagation:
Seeds: Diploglottis australis’s seeds do not require treatment before sowing apart from cleaning and removal of the aril. Try using the aril first in the kitchen and the seeds as the bi product. Sow freshly cleaned seeds directly into a seed raising mix and cover with 5mm of the mix. Place in a warm position where they can receive some sunlight daily. Also protect the seed trays from mice and rats. When the seedlings are 25mm to 50mm tall, prick them out and plant them into 50mm native tubes using a seed raising mix.
Once the seedlings reach 150mm to 200mm in height plant them out into their permanent position. Mass plantings can be achieved by planting them at 8 meter to 10 meter centers when used in a rainforest or 15 meters as specimen trees and I would try 8 meters as an orchard tree. Trees in an orchard would need to be tip pruned regularly to encourage a smaller tree with multiple branches for fruiting.
Fertilize using seaweed, fish emulsion or organic chicken pellets soaked in water on an alternate basis. Fertilize every two months until the plants are established then annually in early September to October to maintain health, vitality and better flowering.
Further Comments from Readers:
Hi reader, it seems you use The Bible of Botany a lot. That’s great as we have great pleasure in bringing it to you! It’s a little awkward for us to ask, but our first aim is to purchase land approximately 1,600 hectares to link several parcels of N.P. into one at The Pinnacles NSW Australia, but we need your help. We’re not salespeople. We’re amateur botanists who have dedicated over 30 years to saving the environment in a practical way. We depend on donations to reach our goal. If you donate just $5, the price of your coffee this Sunday, We can help to keep the planet alive in a real way and continue to bring you regular updates and features on Australian plants all in one Botanical Bible. Any support is greatly appreciated. Thank you.
In the spirit of reconciliation we acknowledge the Bundjalung, Gumbaynggirr and Yaegl and all aboriginal nations throughout Australia and their connections to land, sea and community. We pay our respect to their Elders past, present and future for the pleasures we have gained.
Palmatum Gardens Townsville Qld.
Anderson Gardens Townsville Qld.
Mount Cootha Botanic Gardens Qld
Anderson Gardens Townsville Qld.
Anderson Gardens Townsville Qld.
Anderson Gardens Townsville Qld.
Anderson Gardens Townsville Qld.
Anderson Gardens Townsville Qld.
Anderson Gardens Townsville Qld.
Anderson Gardens Townsville Qld.
Diploglottis bernieana
Classification
Unranked: Eudicots
Unranked: Roside
Order: Sapindales
Family: Sapindacea
Genus: From Diploos, which is Ancient Greek for to double or doubled and Glottis, which is Ancient Greek for a tongue or throat. It refers to petals, which have two glands at their base.
Species: Is named in honour of Bernie but which Bernie cannot be substantiated.
Common Name:
Distribution:
Diploglottis bernieana is found south from Alexandra Creek north of Douglas to Tolga in far north eastern coastal Queensland. It is found on the eastern slopes of the Great Dividing Range.
https://avh.ala.org.au/occurrences/search?taxa=Diploglottis+bernieana#tab_mapView
Habitat Aspect Climate:
Diploglottis bernieana prefers full sun to dappled shade. It grows in warmer, moist well developed lowland tropical rainforests and upland rainforests. The altitude ranges from 5 meters ASL to 600 meters ASL.
The temperatures range from 7 degrees in July to 36 degrees in January.
The rainfall ranges from lows of 1800mm to 3200mm average per annum.
Soil Requirements:
Diploglottis bernieana prefers better quality medium clays. The soils are usually derived from decomposed brown basalt or black basalt. The soils pH ranges from 6pH to 7pH are preferred. It does not tolerate waterlogged soils. Non saline soils to moderately saline soils are tolerated.
Height & Spread:
Wild Plants: 20m to 25m by 5m to 8m.
Characteristics:
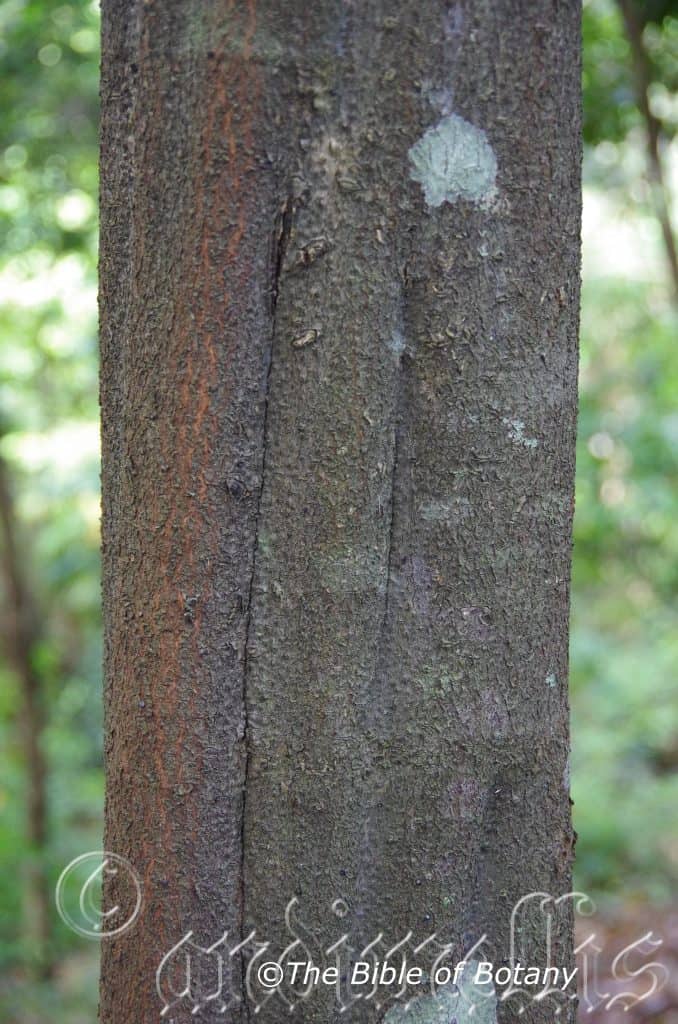
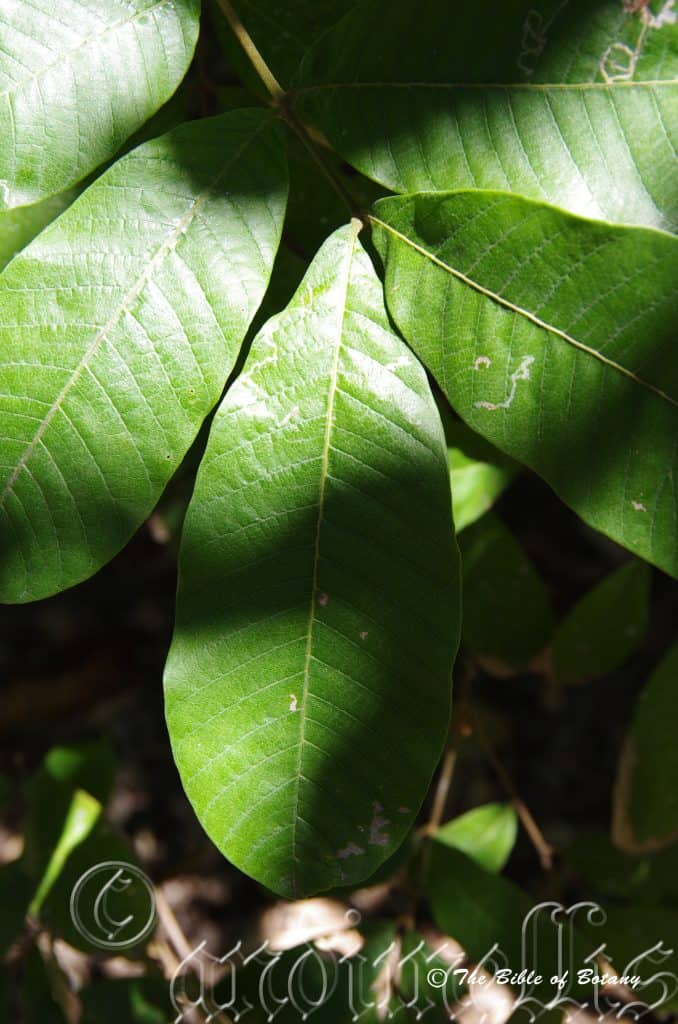
Diploglottis bernieana is a fast growing tree usually with a single straight bole for 2/3 of its height. The cylindrical trunks are strongly flanged near the base. The grey brown bark is often difficult to see as it is heavily encrusted in lichens and mosses even from an early age. The trunks have horizontal raised sections irregularly spaced along its length. The branchlets are square, often winged and strongly ribbed on the new juvenile growth. It is densely covered in short, deep reddish-brown to golden-brown hirsute hairs.
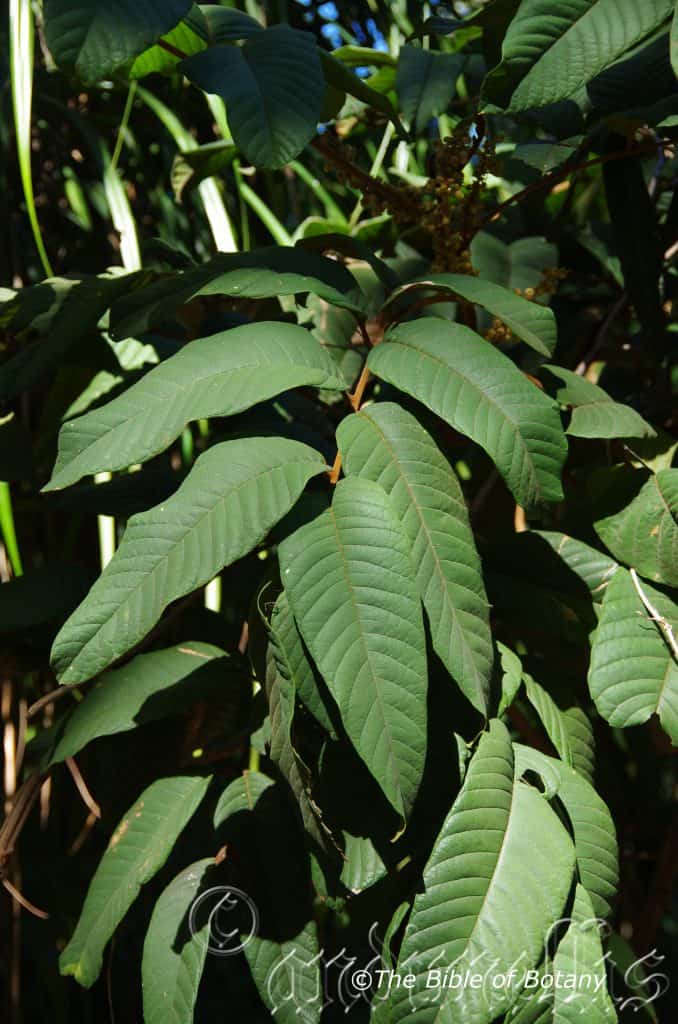
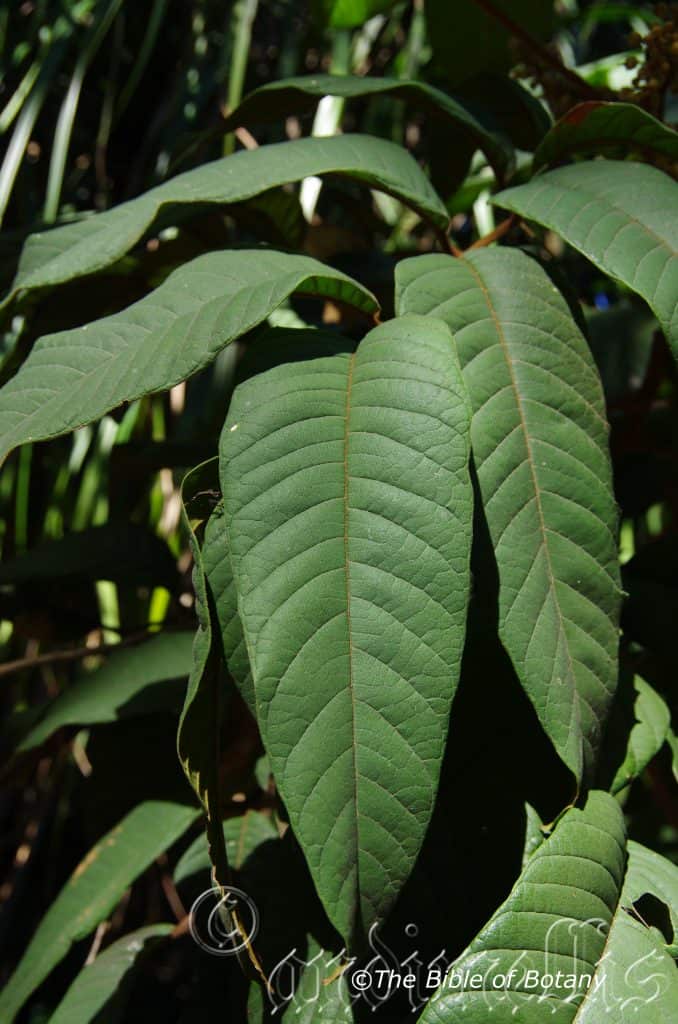
The alternate odd or even pinnate leaves of Diploglottis bernieana measure 800mm to 1200mm in length. Juvenile trees have 3 to 5 leaflets increasing to 10 to 16 leaflets on mature trees. The sub-opposite leaflets on mature trees are oblong to oblong-elliptical and measure 200mm to 350mm in length by 100mm to 180mm in width. The petiole, rachis and petiolules are densely covered in deep reddish-brown hirsute hairs. The petioles measure 150mm to 250mm in length while the rachis measures 700mm to 900mm in length and the petioles measure 50mm to 150mm in length while the petiolules measure 5mm to 10mm in length. The asymmetrical bases are rounded while the apexes are obtuse-emarginate. The discolourous laminas are mid grass-green and glabrous while the lower laminas are paler and covered in short reddish brown hirsute hairs. The laminas decurve strongly in an arch from the mid vein to the margins and decurve near the base and again at the apex. The leaf margins are entire. The mid vein is strongly prominent on the lower lamina and is distinctly visible on the upper lamina. The mid vein is densely covered in deep reddish-brown hairs on the upper and lower surfaces. The lateral veins are prominent on the lower lamina and curve strongly towards the apex close to the margins.
Diploglottis bernieana’s inflorescences are born as panicles from the terminals. The panicles are densely covered in reddish-brown hirsute hairs. The flowers measure 6mm to 8mm in diameter. The calyxes are shortly cupilar with the 5 ovate, morphic lobes are densely covered in reddish-brown hirsute hairs. The flat lobes measure 3.5mm to 4.5mm in length. The obovate petals measure 4.5mm to 6mm in length. Each petal has 2 glands near the base on the adaxial surface. One petal is slightly smaller than the other 4. Diploglottis bernieana’s flowers appear from July through to early September.
The 8 stamens filiform white filaments measure 7mm to 9mm in length. The oblong, pale lemon-yellow anthers measure 1mm in length.
Diploglottis bernieana is a prolific producers of globose capsules. Each capsule has three lobes with one seed in each lobe. They measure 20mm to 45mm in diameter. The trigonous capsules have a round base with an obtuse apex. The golden-khaki to yellow-orange capsules are moderately covered in rusty to golden-brown hirsute hairs externally and glabrous internally. The green capsules turn colour when ripe and split before dropping to the ground. The brown ovoidal seeds are compressed and completely enveloped in the orange-yellow aril. The seeds measure 16mm to 22mm in length by 15mm to 20mm in width and 12mm to 18mm in thickness.
Wildlife:
Diploglottis bernieana was a staple part of the Australian Aborigines diet. The trees support a wide variety of animals including Possums, Brown Cuckoo, Parrots, Fig Bird, Regent Bowerbird, Satin Bowerbird, Rose Crowned Pigeon, Top Knot pigeon, Wompoo Pigeon and Currawongs. When the fruits fall to the ground it is eagerly sought after by Native Bush Rats and native mice as well as Bush Turkeys and as they start to ferment myriads of weevils and vinegar flies will join in on the feast and help distribute the seeds away from the parent tree.
The fruits have a distinctive lychee crossed tamarind flavour. It is sweet yet have a twist of unripe Valencia orange and lemon to them. It must contain a high sugar level as the fruit always ferment very rapidly.
Cultivation:
Diploglottis bernieana is a beautiful tall tree that should be included in the rainforest garden. It is very fast growing and given room can be coaxed into forming a larger canopy than that it wouldn’t grow in the wild. Ornamental trees will grow to 15 meters to 20 meters in height by 8 meters to 10 meters in diameter when grown in the open. The trees will need to be tip pruned above head height to encourage lateral growth. Many trees will still try to grow as a single trunk or multi trunk tree so some perseverance may be needed especially if the trees are planted in any type of shade or if competition is nearby. Due to the large leaves Diploglottis bernieana should be planted in a protected area in the garden away from winds which will tear the leaves making them look tatty.
If Diploglottis bernieana are given adequate moisture, plenty of mulch for moisture retention and an even soil temperature, applying native fertilizers on a regular basis the plants will respond with good flowering over a long period and will yield copious quantities of good fruit with maximum size. I have always been amazed that Diploglottis bernieana is still not being farmed commercially probably due to the harvesting problems of mature trees. They make an excellent substitute for lemonade, topping for ice cream, used in fruit salads or made into sweet sources for pork, lamb dishes, chicken, duck or turkey. We have also made a wine from the fruits which were something to behold. Like over the kitchen sink but that could have been the wine makers fault not the fault of the fruit. Trees often flower from the sixth to ninth year.
Propagation:
Seeds: Diploglottis bernieana‘s seeds do not require treatment before sowing apart from cleaning and removal of the aril. Try using the aril first in the kitchen and the seeds as the bi product. Sow freshly cleaned seeds directly into a seed raising mix and cover with 5mm of the mix. Place in a warm position where they can receive some sunlight daily. Also protect the seed trays from mice and rats. When the seedlings are 25mm to 50mm tall, prick them out and plant them into 50mm native tubes using a seed raising mix.
Once the seedlings reach 150mm to 200mm in height plant them out into their permanent position. Mass plantings can be achieved by planting them at 8 meter to 10 meter centers when used in a rainforest or 15 meters as specimen trees and I would try 8 meters as an orchard tree. Trees in an orchard would need to be tip pruned regularly to encourage a smaller tree with multiple branches for fruiting.
Fertilize using seaweed, fish emulsion or organic chicken pellets soaked in water on an alternate basis. Fertilize every two months until the plants are established then annually in early September to October to maintain health, vitality and better flowering.
Further Comments from Readers:
Hi reader, it seems you use The Bible of Botany a lot. That’s great as we have great pleasure in bringing it to you! It’s a little awkward for us to ask, but our first aim is to purchase land approximately 1,600 hectares to link several parcels of N.P. into one at The Pinnacles NSW Australia, but we need your help. We’re not salespeople. We’re amateur botanists who have dedicated over 30 years to saving the environment in a practical way. We depend on donations to reach our goal. If you donate just $5, the price of your coffee this Sunday, We can help to keep the planet alive in a real way and continue to bring you regular updates and features on Australian plants all in one Botanical Bible. Any support is greatly appreciated. Thank you.
In the spirit of reconciliation we acknowledge the Bundjalung, Gumbaynggirr and Yaegl and all aboriginal nations throughout Australia and their connections to land, sea and community. We pay our respect to their Elders past, present and future for the pleasures we have gained.
NCBG Coffs Harbour NSW
NCBG Coffs Harbour NSW

NCBG Coffs Harbour NSW
NCBG Coffs Harbour NSW
NCBG Coffs Harbour NSW
NCBG Coffs Harbour NSW
NCBG Coffs Harbour NSW
NCBG Coffs Harbour NSW
NCBG Coffs Harbour NSW
Diploglottis campbellii
Classification
Unranked: Eudicots
Unranked: Roside
Order: Sapindales
Family: Sapindacea
Genus: From Diploos, which is Ancient Greek for to double or doubled and Glottis, which is Ancient Greek for a tongue or throat. It refers to petals, which have two glands at their base.
Species: Is named in honour of R.W Campbell who discovered the species.
Common Name: Blunt Leaf Tamarind.
Distribution:
Diploglottis campbellii is found south from Border Ranges National Park in coastal southern Queensland to Lismore in far north eastern New South Wales. It is located on and east of The Great Dividing Range.
There is a disjunct population in far north eastern Queensland at Bahrs Scrub west of Cairns and Rockingham Bay.
https://avh.ala.org.au/occurrences/search?taxa=Diploglottis+campbellii#tab_mapView
Habitat Aspect Climate:
Diploglottis campbellii prefers full sun to dappled shade. It grows in warm riverine and riparian rainforests. The altitude ranges from 40 meters ASL to 600 meters ASL.
The temperatures range from 6 degrees in August to 34 degrees in January.
The rainfall ranges from lows of 1200mm to 1700mm average per annum.
Soil Requirements:
Diploglottis campbellii prefers better quality sandy loams to medium clays. The soils are derived from decomposed black basalts or alluvial deposits. The soils pH ranges from 6pH to 7pH are preferred. It does not tolerate waterlogged soils. Non saline soils to moderately saline soils are tolerated.
Height & Spread:
Wild Plants: 15m to 20m by 5m to 8m.
Characteristics:
Diploglottis campbellii is a fast growing tree usually with a single straight bole for 2/3 of its height. The bole is cylindrical and flanged near the base. The pale grey-brown bark is often difficult to see as it is heavily encrusted in lichens and mosses even from an early age. The new growth of Diploglottis campbellii is moderately covered in soft, white, caduceus hairs.
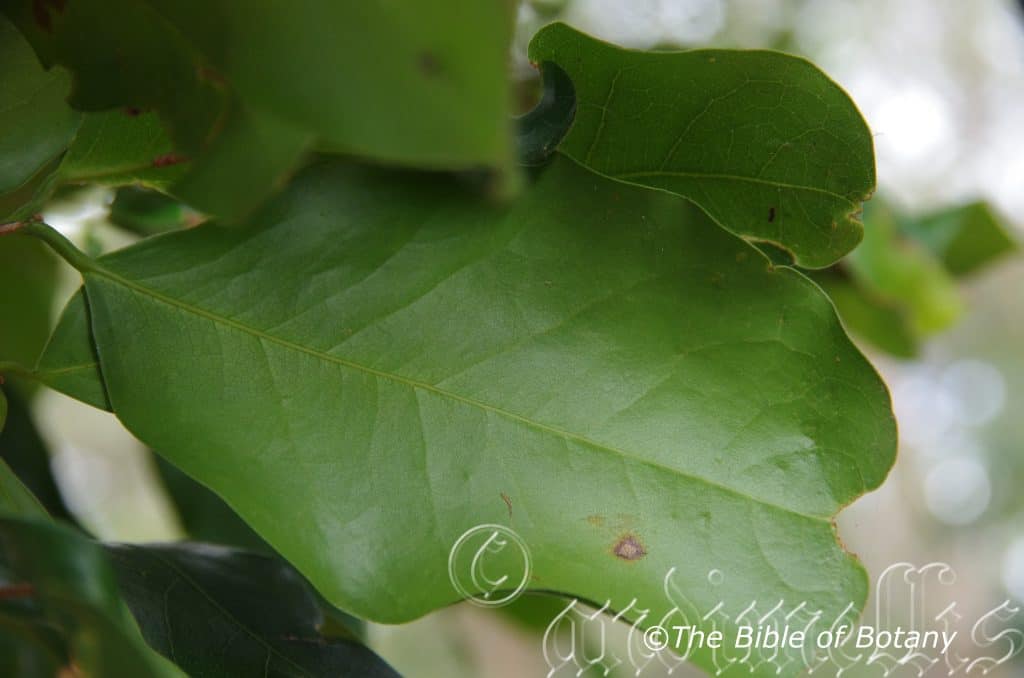
The alternate leaves measure 100mm to 350mm in length while the elliptic-oblong to ovate leaflets usually number 4 to 8 and measure 50mm to 100mm in length by 20mm t045mm in width. The bases are slightly asymmetric to oblique, while the apexes are acute or shortly acuminate. The discolourous laminas are glabrous and semi glossy to glossy on the upper lamina, while the lower lamina is paler and duller. The petiole measures 300mm to 600m in length, while the petiolules measure 2mm to 5mm in length.
The panicles are sparsely to moderately covered in white, caduceus, hirsute hairs and measure 100mm to 150mm in length. The pale greenish-red calyxes have acute lobes and measure 1mm to 2mm in length. The pale creamy-green to pale creamy-ochre petals measure 2mm to 4mm in length, while the stamens measure 4mm to 25mm in length and the reddish, orbicular anthers are basifixed. The flowers appear in October to November.
The 1 to 3 obtuse lobed, somewhat depressed, globose capsules are pale creamy-green to pale creamy-ochre and measure 35mm to 50mm in diameter. The scarlet red aril is succulent. The fruit ripens between February and April.
Wildlife:
Diploglottis campbellii was a staple part of the Australian Aborigines diet. The trees support a wide variety of animals including Possums, Brown Cuckoo, Crimson Rosella, King Parrot, Fig Bird, Regent Bower Bird, Satin Bowerbird, Rose Crowned Pigeon, Top Knot pigeon, Wompoo Pigeon and Currawongs. When the fruits fall to the ground it is eagerly sought after by Native Bush Rats and native mice as well as the Brush Turkey and as they start to ferment myriads of weevils and vinegar flies will join in on the feast.
The fruit has a distinctive lychee crossed tamarind flavour. It is sweet yet has a twist of unripe lemon added.
Cultivation:
Diploglottis campbellii is a beautiful tree that deserves more recognition than it receives. It is fast growing and given room can be coaxed into forming a larger canopy than that it would have in the wild. Ornamental trees will grow to 12 meters to 15 meters tall by 8 meters in diameter. The trees will need to be tip pruned above head height to encourage lateral growth. Many trees will still try to grow as a single trunk or multi trunk tree so some perseverance may be needed especially if the trees are planted in any type of shade or if competition is nearby. Due to the large leaves Diploglottis campbellii should be planted in a protected area in the garden away from strong winds which will tear the leaves making them look ugly and tatty.
If Diploglottis campbellii is given adequate moisture, plenty of mulch for moisture retention and an even soil temperature, applying native fertilizers on a regular basis the plants will respond with good flowering over a longer period and will yield copious quantities of good fruit with maximum size. I have always been amazed that Diploglottis campbellii is still not being farmed professionally despite the harvesting problems of mature trees. It makes an excellent substitute for lemonade, it can be used as a topping for ice cream, in fruit salads or made into sweet sources for pork dishes, chicken, duck or turkey and jams. We have also made a wine from the fruits which were something to behold. Like over the kitchen sink but that could have been the wine makers fault not that of the fruit.
It often reaches its full potential in just 12 years and flower from the sixth or seventh year.
Propagation:
Seeds: Diploglottis campbellii seeds do not require treatment before sowing apart from cleaning and removal of the aril. Try using the aril first in the kitchen and the seeds as the bi product. Sow freshly cleaned seeds directly into a seed raising mix and cover with 5mm of the mix. Place in a warm position where they can receive some sunlight daily. Also protect the seed trays from mice and rats. When the seedlings are 25mm to 50mm tall, prick them out and plant them into 50mm native tubes using a seed raising mix.
Once the seedlings reach 150mm to 200mm in height plant them out into their permanent position. Mass plantings can be achieved by planting them at 8 meter to 10 meter centers when used as a rain trees or plant them at 15 meters as specimen trees and I would try 10 meters as an orchard tree. Trees in an orchard would need to be tip pruned regularly to encourage a smaller tree with more lateral branches for fruiting.
Fertilize using seaweed, fish emulsion or organic chicken pellets soaked in water on an alternate basis. Fertilize every two months until the plants are established then annually in early September to October to maintain health, vitality and better flowering.
Further Comments from Readers:
Hi reader, it seems you use The Bible of Botany a lot. That’s great as we have great pleasure in bringing it to you! It’s a little awkward for us to ask, but our first aim is to purchase land approximately 1,600 hectares to link several parcels of N.P. into one at The Pinnacles NSW Australia, but we need your help. We’re not salespeople. We’re amateur botanists who have dedicated over 30 years to saving the environment in a practical way. We depend on donations to reach our goal. If you donate just $5, the price of your coffee this Sunday, We can help to keep the planet alive in a real way and continue to bring you regular updates and features on Australian plants all in one Botanical Bible. Any support is greatly appreciated. Thank you.
In the spirit of reconciliation we acknowledge the Bundjalung, Gumbaynggirr and Yaegl and all aboriginal nations throughout Australia and their connections to land, sea and community. We pay our respect to their Elders past, present and future for the pleasures we have gained.
Mount Cootha Botanic Gardens Qld.
Mount Cootha Botanic Gardens Qld.
Mount Cootha Botanic Gardens Qld.
Mount Cootha Botanic Gardens Qld.
Mount Cootha Botanic Gardens Qld.
Mount Cootha Botanic Gardens Qld.
Mount Cootha Botanic Gardens Qld.
Diploglottis obovata
Classification
Unranked: Eudicots
Unranked: Roside
Order: Sapindales
Family: Sapindacea
Genus: From Diploos, which is Ancient Greek for to double or doubled and Glottis, which is Ancient Greek for a tongue or throat. It refers to petals, which have two glands at their base.
Species: From Ob, which is Latin for orbital and Ovatus which is Latin for an egg shape. It refers to organs, which are somewhat variable but usually takes the shape or form of an egg.
Common Name: Blunt Leaf Tamarind.
Distribution:
Diploglottis obovata is found south from Bowen to Eungella National Park and Cape Palmerston National Park in coastal Queensland. It is located on and east of The Great Dividing Range.
https://avh.ala.org.au/occurrences/search?taxa=Diploglottis+obovata#tab_mapView
Habitat Aspect Climate:
Diploglottis obovata prefers full sun to dappled shade. It grows in warm well developed subtropical rainforests close to the coast. The altitude ranges from 40 meters ASL to 600 meters ASL.
The temperatures range from 6 degrees in August to 34 degrees in January.
The rainfall ranges from lows of 1200mm to 1700mm average per annum.
Soil Requirements:
Diploglottis obovata prefers better quality sandy loams to medium clays. The soils are derived from decomposed black basalts. The soils pH ranges from 5pH to 6pH are preferred. It does not tolerate waterlogged soils. Non saline soils to moderately saline soils are tolerated.
Height & Spread:
Wild Plants: 20m to 30m by 5m to 8m.
Characteristics:
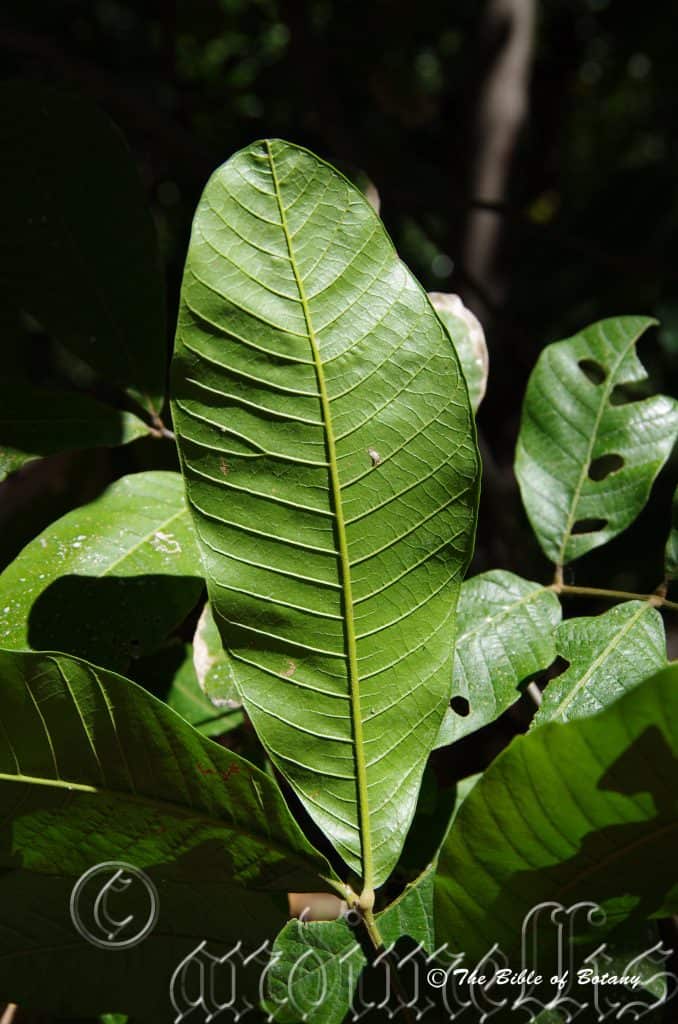
Diploglottis obovata is a fast growing tree usually with a single straight bole for 2/3 of its height. It is cylindrical and flanged near the base. The pale grey-brown bark is often difficult to see as it is heavily encrusted in lichens and mosses even from an early age. The 700mm diameter trunks have horizontal raised sections irregularly spaced along its length. The branchlets have a square cross section and covered in small raised lenticels that measure 1.6mm to 2mm in length by 0.8mm to 1mm in height. It is strongly ribbed on the new juvenile growth. The new growth is densely covered in short rusty to golden brown tomentose hairs.
The alternate leaves of Diploglottis obovata are even pinnate and measure 170mm to 200mm in length. Juvenile trees have 3 to 5 leaflets increasing to 6 to 8 leaflets on mature trees. The sub opposite leaflets on mature trees are oblong and measure 50mm to 90mm in length by 30mm to 80mm in width. The petioles measure 30mm to 50mm in length while the rachis measures 20mm to 35mm in length and the petiolules measure 2mm to 5mm in length. The bases are symmetrical on the lateral leaflets and slightly asymmetrical on the terminal leaflets which are longer than the base leaflets. The bases are broad cuneate to broad cuneate-rounded while the apexes are obtuse. The concolourous laminas are mid grass-green and glabrous. The laminas are flat to slightly undulating and decurve slightly near the apex. The leaf margins are entire. The mid vein and lateral veins are strongly prominent on the lower lamina and are distinctly visible on the upper lamina being paler with the midvein being strongly prominent. The petioles, petiolules are longitudinally grooved while the rachis has 2 longitudinal grooves. The petiolules are swollen at the junction with the rachis. It is densely covered in golden brown hirsute hairs.
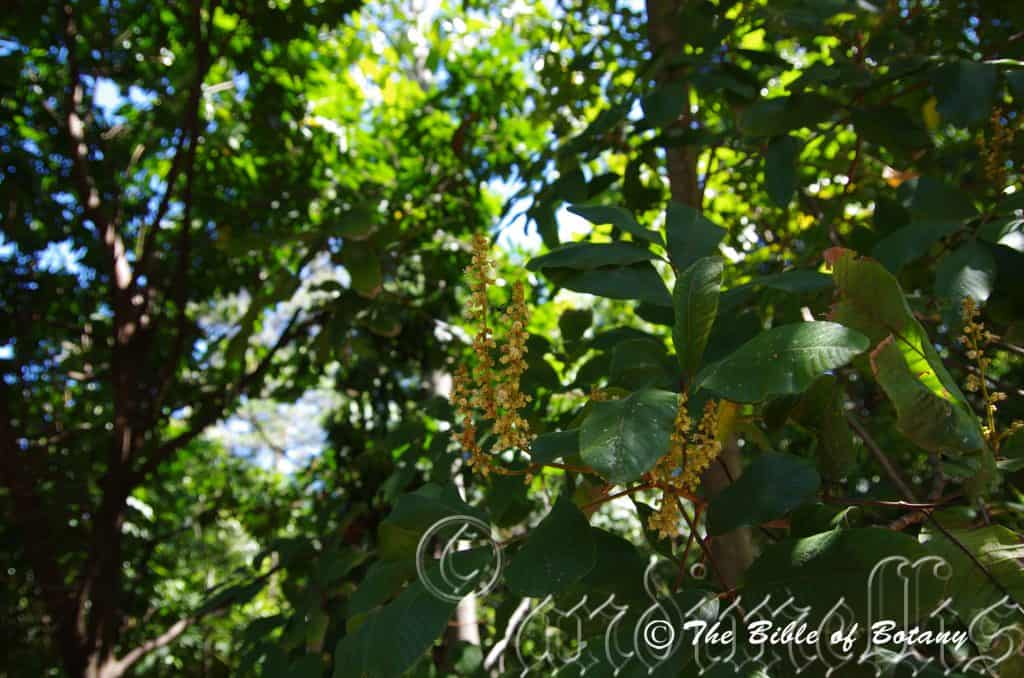
The inflorescences of Diploglottis obovata are born as panicles from the leaf axis. The panicles are covered in rusty to golden-brown to rusty brown tomentose hairs and measure 30mm to 130mm in length. The ovate, golden-yellow bracts are covered in short golden hirsute hairs externally and measure 3mm to 7mm in length by 1mm to 3mm in width. The individual flowers measure 4mm to 5mm overall while the 5, white, obcordate petals measure 4mm to 8mm in length by 3mm to 5mm in width near the apexes. The cupular calyx has 5 ovate, sub-equal flat lobes. The Fifth petal is usually shorter than the others. The “C” shaped disk is yellow-orange.
The 8, white filaments measure 8mm to 12mm in length while the pale yellow to mid yellow basifixed anthers measure 1mm to 1.2mm in length by 0.8mm to 1mm in width.
Diploglottis obovata flowers appear from late September through to early November.
The trees are prolific producers of flattened globose capsules. Each capsule has three lobes with one seed in each lobe. They measure 10mm to 18mm in length by 15mm to 28mm in diameter. The golden fawn capsules are finely rugose and sparsely covered in rusty to short, fine, golden fawn tomentose hairs externally and are glabrous internally. The green capsules turn yellow when ripe and dehisce before dropping to the ground. The capsules ripen from late November to early January. The fruits are look similar to the Chinese Logon fruit in appearance except the aril surrounding the seed is a bright yellow-brown instead of white.
Wildlife:
Diploglottis obovata was a staple part of the Australian Aborigines diet. The trees support a wide variety of animals including Possums, Brown Cuckoo, Crimson Rosella, King Parrott, Fig Bird, Regent Bower Bird, Satin Bower Bird, Rose Crowned Pigeon, Top Knot pigeon, Wompoo Pigeon and Currawongs. When the fruits fall to the ground it is eagerly sought after by Native Bush Rats and native mice as well as Bush Turkeys and as they start to ferment myriads of weevils and vinegar flies will join in on the feast.
The fruits have a distinctive lychee crossed tamarind flavour. It is sweet yet have a twist of unripe Valencia orange to them.
Cultivation:
Diploglottis obovata is a beautiful tall tree that should be included in every rainforest garden. It is very fast growing and given room can be coaxed into forming a larger canopy than that it wouldn’t grow in the wild. Ornamental trees will grow to 12 meters to 15 meters tall by 10 meters in diameter. The trees will need to be tip pruned above head height to encourage lateral growth. Many trees will still try to grow as a single trunk or multi trunk tree so some perseverance may be needed especially if the trees are planted in any type of shade or if competition is nearby. Due to the large leaves Diploglottis obovata should be planted in a protected area in the garden away from winds which will tear the leaves making them look ugly and tatty.
If Diploglottis ovata is given an adequate moisture, plenty of mulch for moisture retention and an even soil temperature, applying native fertilizers on a regular basis the plants will respond with good flowering over a long period and will yield copious quantities of good fruit with maximum size. I have always been amazed that Diploglottis cunninghamii is still not being farmed professionally despite the harvesting problems of mature trees. They make an excellent substitute for lemonade or they can be used as a topping for ice cream, in fruit salads or made into sweet sources for pork dishes, chicken, duck or turkey. We have also made a wine from the fruits which were something to behold. Like over the kitchen sink but that could have been the wine makers fault not that of the fruit.
It will often reaches its full potential in just 12 years and flower from the sixth or seventh year.
Propagation:
Seeds: Diploglottis obovata‘s seeds do not require treatment before sowing apart from cleaning and removal of the aril. Try using the aril first in the kitchen and the seeds as the bi product. Sow freshly cleaned seeds directly into a seed raising mix and cover with 5mm of the mix. Place in a warm position where they can receive some sunlight daily. Also protect the seed trays from mice and rats. When the seedlings are 25mm to 50mm tall, prick them out and plant them into 50mm native tubes using a seed raising mix.
Once the seedlings reach 150mm to 200mm in height plant them out into their permanent position. Mass plantings can be achieved by planting them at 8 meter to 10 meter centers when used as a rain trees or plant them at 15 meters as specimen trees and I would try 10 meters as an orchard tree. Trees in an orchard would need to be tip pruned regularly to encourage a smaller tree with more lateral branches for fruiting.
Fertilize using seaweed, fish emulsion or organic chicken pellets soaked in water on an alternate basis. Fertilize every two months until the plants are established then annually in early September to October to maintain health, vitality and better flowering.
Further Comments from Readers:
Hi reader, it seems you use The Bible of Botany a lot. That’s great as we have great pleasure in bringing it to you! It’s a little awkward for us to ask, but our first aim is to purchase land approximately 1,600 hectares to link several parcels of N.P. into one at The Pinnacles NSW Australia, but we need your help. We’re not salespeople. We’re amateur botanists who have dedicated over 30 years to saving the environment in a practical way. We depend on donations to reach our goal. If you donate just $5, the price of your coffee this Sunday, We can help to keep the planet alive in a real way and continue to bring you regular updates and features on Australian plants all in one Botanical Bible. Any support is greatly appreciated. Thank you.
In the spirit of reconciliation we acknowledge the Bundjalung, Gumbaynggirr and Yaegl and all aboriginal nations throughout Australia and their connections to land, sea and community. We pay our respect to their Elders past, present and future for the pleasures we have gained.
Diplolaena grandiflora
Classification
Unranked: Eudicots
Unranked: Asterids
Class: Magnoliopsida
Order: Sapindales
Family: Rutaceae
Genus: From Diploos, which is Ancient Greek for to double or be doubled and Laina, which is Ancient Greek for a cloak. It refers to flowers, which have a double row of bract like calyxes around the flower.
Species: From Grandis which is Latin for large and Floris, which is Latin for a flower or Flo‘s, which is the Roman goddess of spring and flowers.
Common Name: Wild Rose or Native Rose.
Distribution:
Diplolaena grandiflora is found south from Sedimentary Deposits Conservation Reserve to Geraldton in central coastal Western Australia. There is also an outlying population further north in Cape Range National Park near Exmouth.
https://avh.ala.org.au/occurrences/search?taxa=Diplolaena+grandiflora#tab_mapView
Habitat:
Diplolaena grandiflora prefers partial shade to dappled sunlight. It grows in open woodlands, savannah woodlands on dry plains. The altitude ranges from 15 meters ASL to 320 meters ASL.
The temperatures range from 9 degrees in July to 42 degrees in January.
The rainfall ranges from lows of 200mm to an average of 500mm annually.
Soil Requirements:
Diplolaena grandiflora prefers white skeletal sands, limestone outcrops, skeletal soils on rocky ridges, on drier alluvial flats and plains. The soils pH ranges from 5.5pH to 8pH are preferred. It does not tolerate of waterlogged soils. Non saline soils to moderately saline soils are tolerated.
Height & Spread:
Wild Plants: 0.5m to 3m by 0.6m to 2.5m.
Characteristics:
Diplolaena grandiflora‘s stems are pale grey. The branchlets and young shoots are brown to olive brown while the buds and small branchlets near the apex are dull grey-green and densely covered in pale grey to off white pubescent or sericeous hairs.
Diplolaena grandiflora’s simple subopposite leaves is clustered along the ends of the branches. The broad elliptical leaves measure 30mm to 50mm in length by 15mm to 25mm in width. The petioles measure 3mm to 4mm in length. The bases are rounded cuneate while the apexes are obtuse. The discolourous laminas are pale grey-green to pale grey to mid grey and densely covered in pale grey pulverulent hairs on the upper lamina while the lower lamina is a paler grey and densely covered in white or off white pubescent hairs. The green leaf forms are usually densely covered in pale rusty brown pubescent hairs. The laminas recurve upwards from the mid vein to the margins. The margins are entire. The mid vein and lateral veins are prominent on the lower lamina for the entire length of the lamina and maybe slightly prominent on the upper lamina for part of the length of the lamina. The petioles measure 3mm to 4mm in length.
The inflorescences of Diplolaena grandiflora are born from the leaf axils. The elliptical 5 outer bracts and elliptical 5 inner bracts have obtuse to rounded acute apexes The outer bracts measure 12mm to 16mm in length by 8mm to 10mm in width while the inner bracts measure 15mm to 22mm in length by 6mm to 8mm in width. The bracts are covered in white, off white or pale rusty pubescent hairs and sericeous hairs near the margins. The 50 to 60 red, crimson or deep orange-red stamens measure 16mm to 26mm in length. They have cream to white anthers. The pedicels are covered in off white to pale rusty brown pubescent to hirtellous hairs and measure 4mm to 6mm in length. Flowering occurs from May to October.
Diplolaena grandiflora fruits are globular to ovoidal indehiscent berry. The berries measure 4mm to 5mm in length by 5mm to 6mm in diameter. The glabrous, green fruits turn grey when ripe. The creamy grey seeds measure 1.8mm to 2mm in length by 1.3mm to 1.5mm in diameter.
Wildlife:
Diplolaena grandiflora are attractive to small nectar eating honey eaters.
Cultivation:
Diplolaena grandiflora is a very beautiful small shrub for almost every situation where bright dappled sunlight prevails with good drainage. It is a particularly good plant in semi-arid areas in Western Australia or central and southern Australia as well as closer to the coast as far north as Sydney. It would be worthwhile trying as far north as Roma on very well drained sites. Because of the thick covering of pulverulent hairs they would most likely succumb or at the best look terrible in humid areas.
Around swimming pools and courtyards where their soft pubescent foliage would break up hard lines and would contrast well with the green foliage forms. If it is kept trimmed to around a meter, then they become bushier and will produce more flowers in the following season. It can be used as a small hedge or screen between fences or borders between beds. In cultivation it will grow 1 meter to 2 meters in height by 1 meter to 2 meters in diameter when grown in the open.
It looks great in medium size rockeries or scattered amongst boulders or on dry raised beds particularly if contrasting foliage are used or a blending of grey and green foliage are mixed together. Diplolaena grandiflora has the advantage in that it offers a choice of various foliage so bed could be mostly devoted to them without boredom setting in if a few well-placed pale fine green foliage plants were to be incorporated into the bed. Its main requirement is to have a sandy loam for a base and to dry out between watering especially towards the end of the dry season.
When you design a medium to large miniature desert garden; use low meandering contours to display the plants to their best. Plant annuals or prostrate plants sparingly throughout the bed. Scatter a few Diplolaena grandiflora throughout the scene. This will give a broad open effect. Large rocks or even an old rusty vehicle could be used to increase the remoteness of the scene.
Another method would be to cover the mounds in the distance with annuals that have soft grey foliage. The use of Diplolaena grandiflora’s green leaf forms in the foreground will give a greater illusion of depth. This again would effectively represent the haze experienced in real life. It would have to be much shorter than those planted in valleys or on plains to give depth and height. Don’t make the ridge straight curve it winds around. Use very small tussock grasses or Lomandra species adjacent to shrubs so not to unbalance the scene. Prune plants up the valleys and background so they remain shorter than those in the foreground to give greater depth.
Propagation:
Seeds: Diplolaena grandiflora’s seeds are not easy to collect nor are they easy to grow from seed. Seeds are very variable in fertility and germination. Sow the seeds into a seed raising mix. Cover with 1mm of a fine mix and place the trays in a warm place to germinate. Keep moist not wet. When the seedlings are 25 to 50 mm tall, prick them out and plant them into 50mm native tubes using a seed raising mix.
Once the seedlings reach 200mm to 250mm in height plant them out into their permanent position. For mass plantings plant them at 2 meter to 2.5 meter centers in rockeries or 1.5 meter centers for small hedges and borders.
Fertilize using seaweed, fish emulsion or organic chicken pellets soaked in water on an alternate basis. Fertilize every two months until the plants are established then annually in early September to October to maintain health, vitality and better flowering.
Further Comments from Readers:
Hi reader, it seems you use The Bible of Botany a lot. That’s great as we have great pleasure in bringing it to you! It’s a little awkward for us to ask, but our first aim is to purchase land approximately 1,600 hectares to link several parcels of N.P. into one at The Pinnacles NSW Australia, but we need your help. We’re not salespeople. We’re amateur botanists who have dedicated over 30 years to saving the environment in a practical way. We depend on donations to reach our goal. If you donate just $5, the price of your coffee this Sunday, We can help to keep the planet alive in a real way and continue to bring you regular updates and features on Australian plants all in one Botanical Bible. Any support is greatly appreciated. Thank you.
In the spirit of reconciliation we acknowledge the Bundjalung, Gumbaynggirr and Yaegl and all aboriginal nations throughout Australia and their connections to land, sea and community. We pay our respect to their Elders past, present and future for the pleasures we have gained.
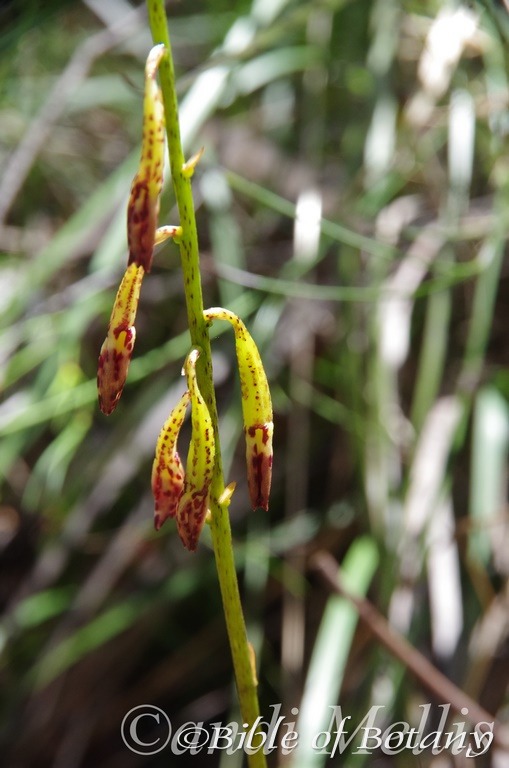
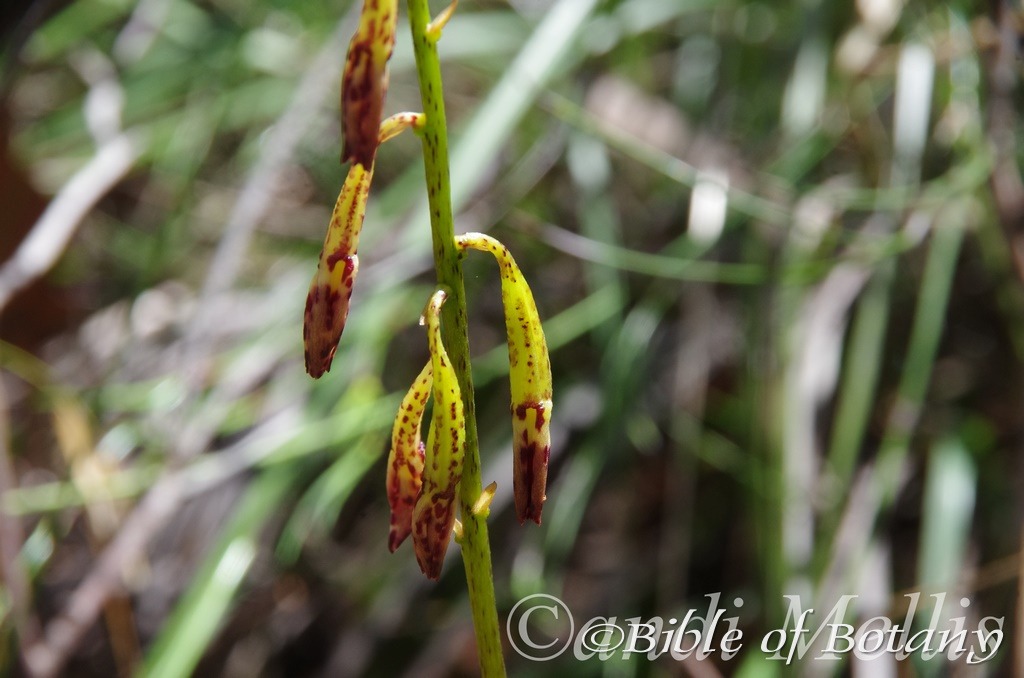
Dipodium atropurpureum
Classification
Unranked: Monocots
Order: Asparagales
Family: Orcidaceae
Subfamily: Epidendroideae
Tribe: Cymbidieae
Subtribe: Cryptopodiinae
Genus: From Dis, which is Ancient Greek, for 2 and Podion, which is Ancient Greek for a base. It refer to plants, which two stipes supporting the pollinia.
Species: From Atro, which is Ancient Greek for very dark or deep in colour and Purpurea, which is Latin for purple. It refers to flowers, which have a very deep maroon colour.
Common Name:
Distribution:
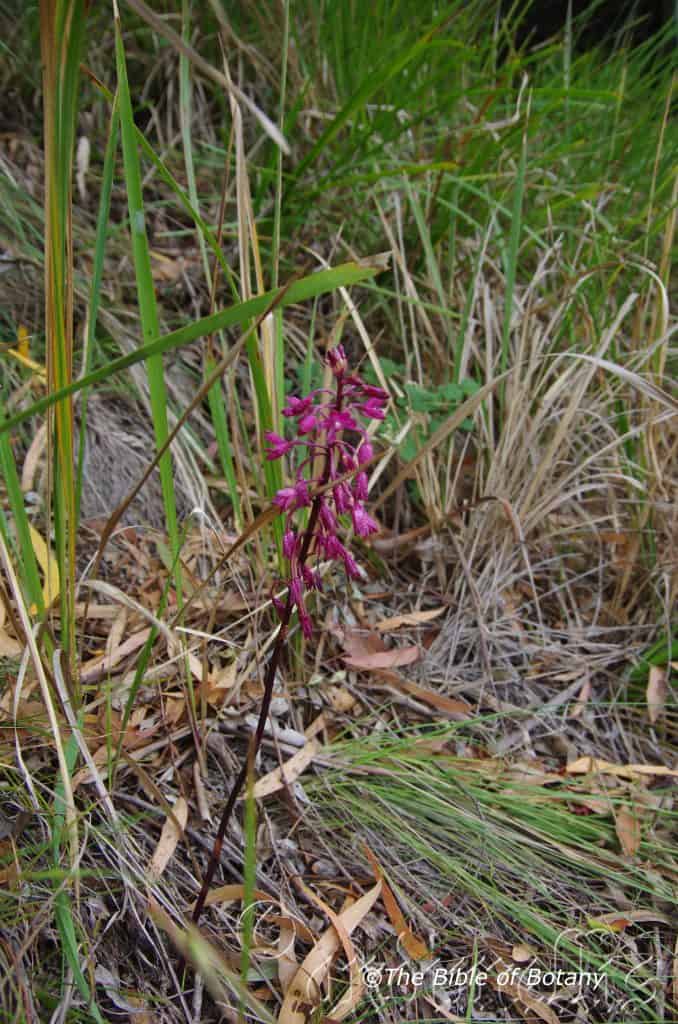
Dipodium atropurpureum is restricted to a small area between the New South Wales, Queensland border and the Hastings River catchment zone in northern New South Wales.
https://avh.ala.org.au/occurrences/search?taxa=Dipodium+atropurpureum#tab_mapView
Habitat:
Dipodium atropurpureum prefers protected areas with dappled sunlight. It grows in moist positions in open woodlands and open schlerophyll forests. The altitude ranges from 5 meters ASL to 600 meters ASL.
The temperatures range from minus 4 degrees in August to 36 degrees in January.
The rainfall ranges from lows of 650mm to an average of 1800mm annually.
Soil Requirements:
Dipodium atropurpureum prefers growing on soils associated with plenty of forest litter. It is a saprophytic orchid meaning that feeds off decaying plants or animals. In this case the orchid gains all its nutrients from freshly decomposing leaf litter and probably has a symbiotic relationship with one or more fungi. The soils need only be shallow and comprise of good quality loams to medium clays. The soils are usually derived from granite or basalts. The soils PH’s would be difficult to access as this could be a very narrow section of the ground based on the litter and other microorganisms. An assumption could be made that it is in a very narrow band of between probably 6.5pH and 7pH. It does not tolerate waterlogged soils. Non saline soils to moderately saline soils are not tolerated.
Height & Spread:
Wild Plants: 0.4m to 0.75m by 0.1m to 0.2m.
Characteristics:
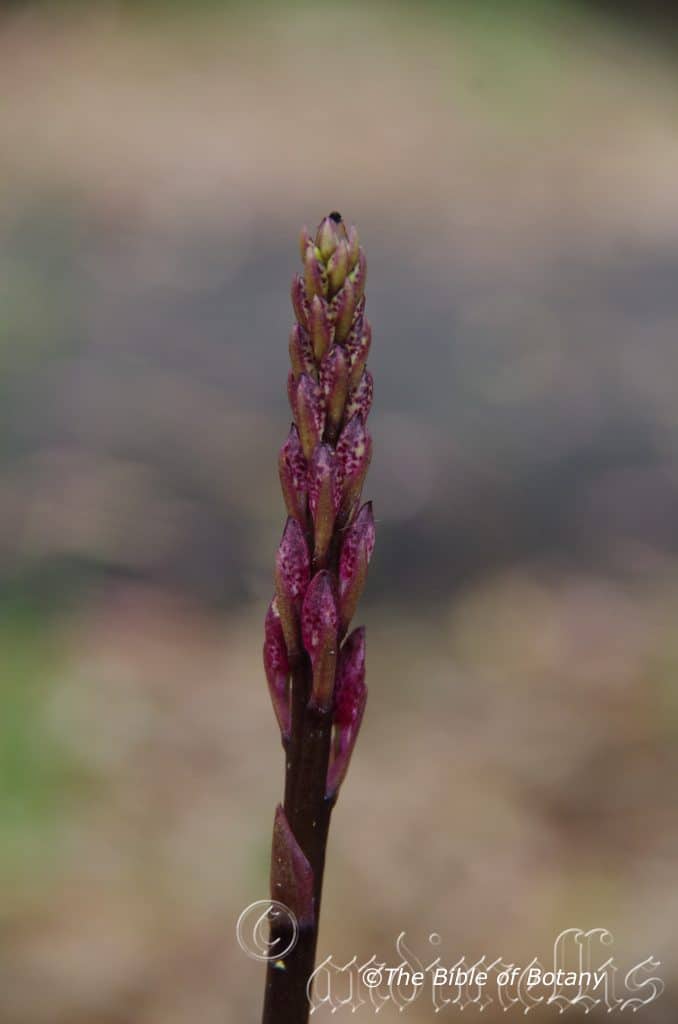
Dipodium atropurpureum’s simple alternate ovate to broad ovate leaves are subtended on the florescence. The leaves measure 7mm to 20mm in length by 6mm to 15mm in width. The bases are clasping while the apexes are tapering. The margins are entire.
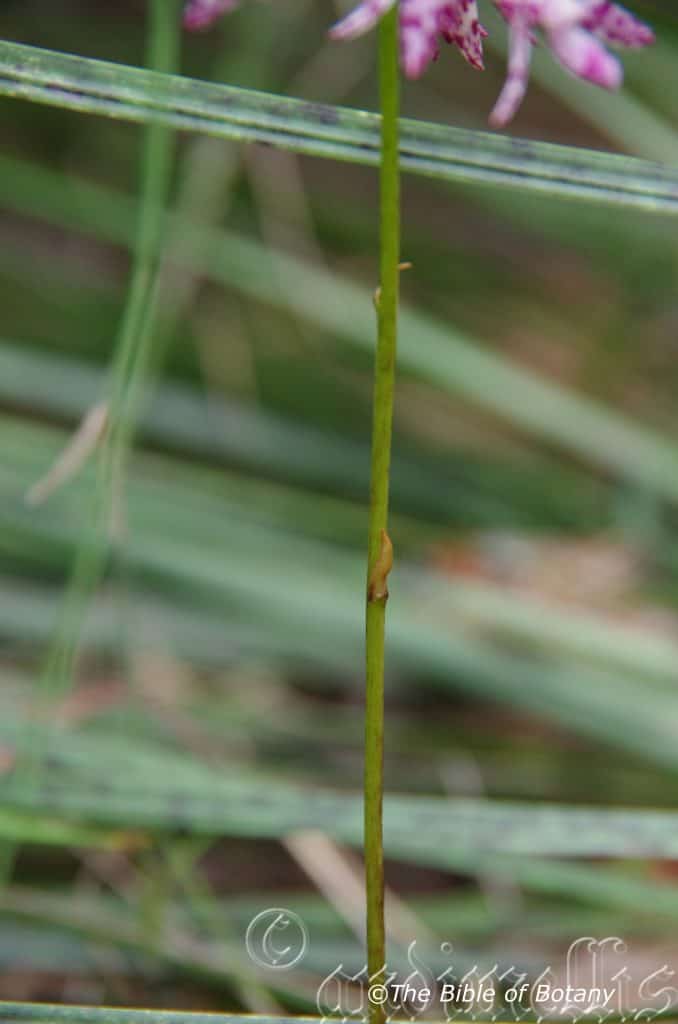
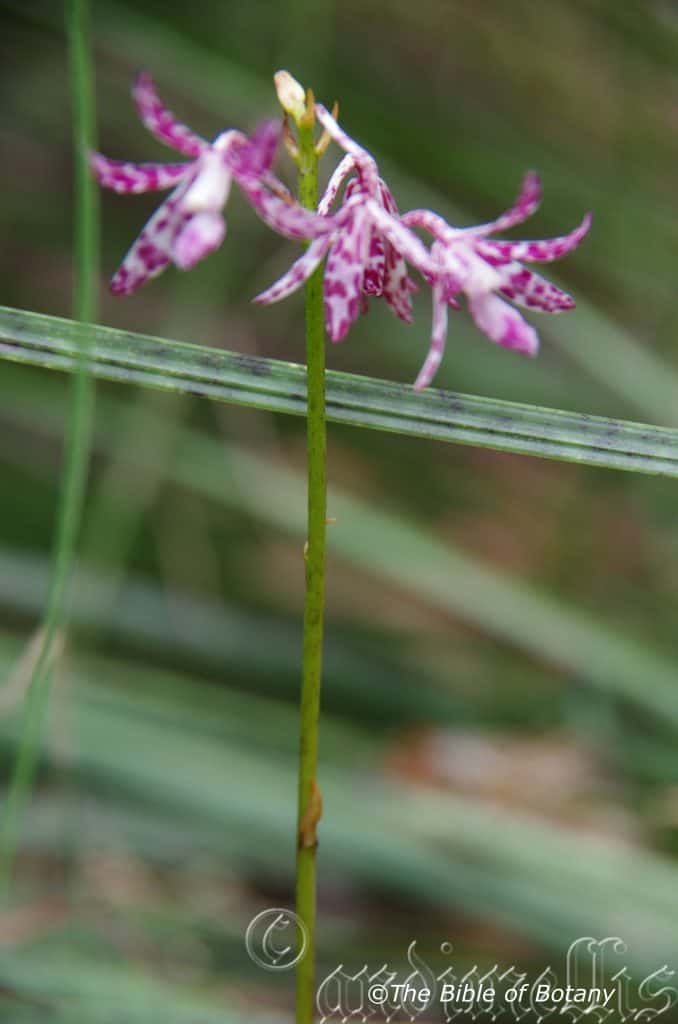
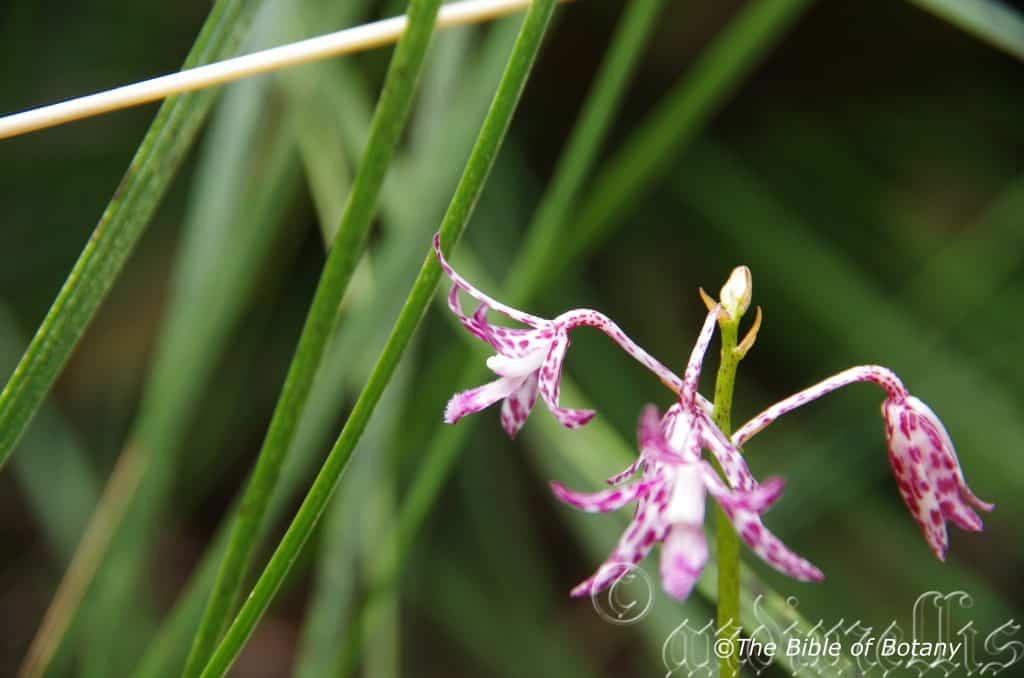
The inflorescences of Dipodium atropurpureum are long, slightly furrowed perpendicular spike. There are 15 to 40 individual flowers on a spike. The sturdy spike is deep red-brown or deep brown semi glossy and glabrous. The spikes measure 400mm to 600mm in length while the pedicels measure 17mm to 22mm including the long narrow ovary which looks like a swelling on the pedicel.
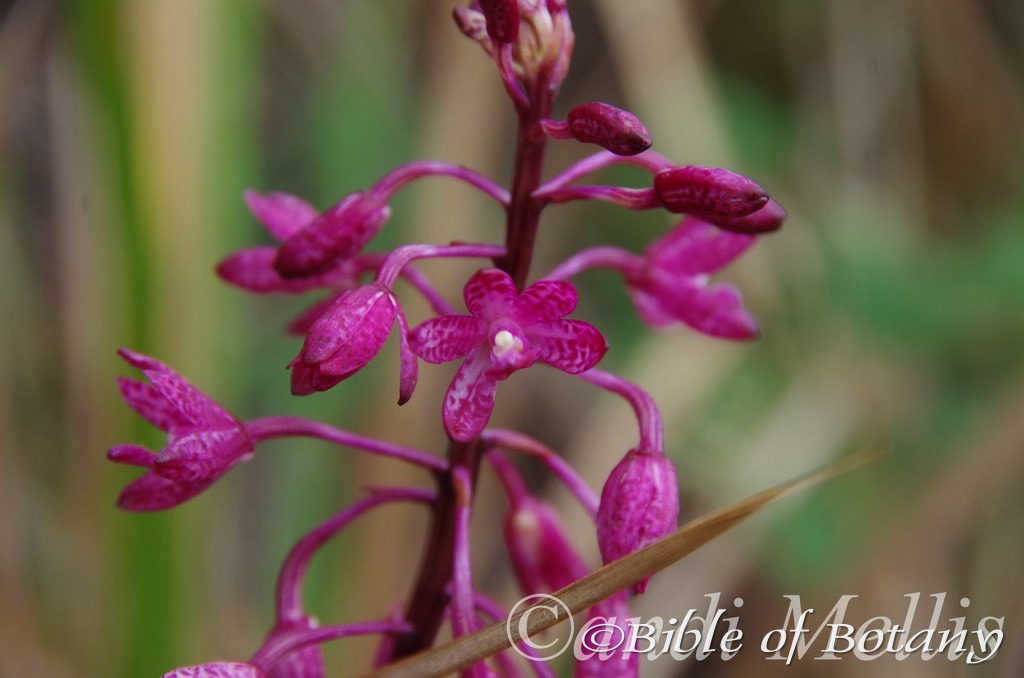
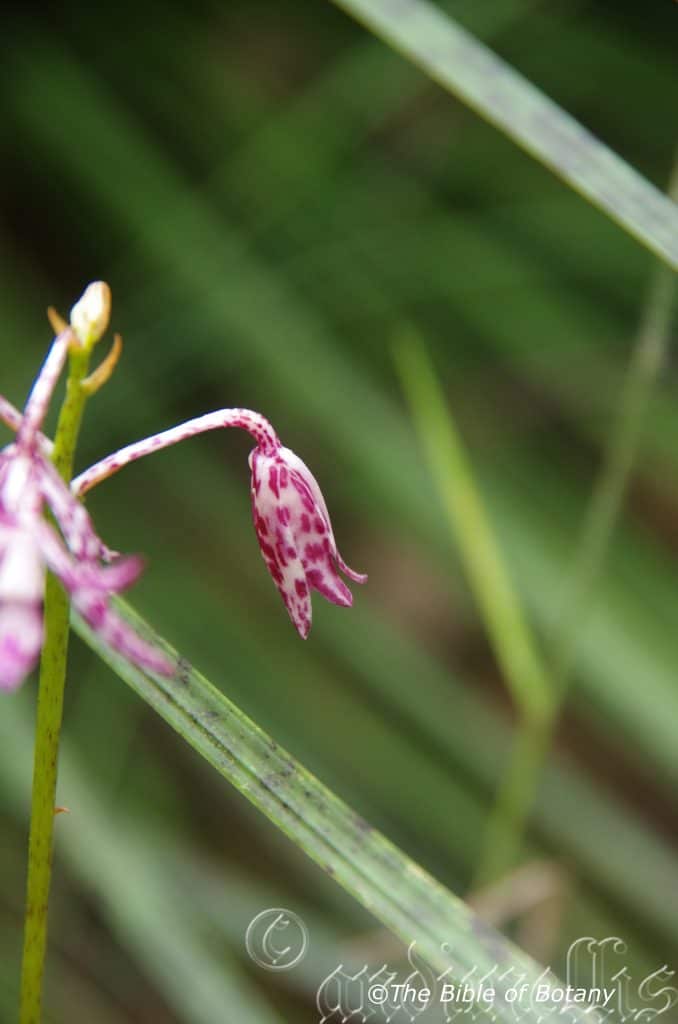
The 3 divaricate sepals and the 2 lateral petals are oblong to narrow elliptical and strongly decurve backwards close to their apexes. They measure 15mm to 19mm in length by 4mm to 5.5mm in width. The petals and sepals are deep purple, heavily blotched with deeper purple and deeper carmine-purple or maroons.
The deep purple labellum measures 12mm to 14mm in length by 3mm to 5mm in width. The callus keels are parallel. The central band of mauve hairs are narrow basally but widening to cover most of the apical half of the mid lobe. The mid lobe is about twice as long as it is broad. The flowers appear from November to December.
Dipodium atropurpureum seed pods swell to 30mm to 40mm in length by 12mm to 16mm in diameter and are a glossy olive green with raised longitudinal ridges in a deep red-brown similar to the spike. They dry to a light semi glossy olive-brown with deeper reddish-brown longitudinal stripes. The seeds are released on fine flagella thread.
Wildlife:
Dipodium atropurpureum‘s wildlife is unknown to the author
Cultivation:
Dipodium atropurpureum is a very attractive orchid that would be very difficult to grow in the nursery because of its saprophytic habit may be impossible to duplicate. If you are fortunate enough to have Dipodium punctatum growing on your property then design the garden around them. It is long lived and all that is needed is to supply a good layer of mulch around them on an annual rotation. Ensure the mulch is similar to the type that already exists as any change may disrupt the growth of microorganisms and lead to the plants death. The mulch should be the same as what is lying on the surface naturally. Mark the spot as they will die down after flowering. Many ground orchids have a symbiotic relationship with specific fungi and need that fungus to survive.
Mark the spot as it flowers, because when it die down after flowering you will forget and have the real chance of killing them. I learnt this lesson early where I once had thousands of Spiranthes australis on the block within several years they had vanished gone for ever. I have regretted my early regeneration projects of slash and replant ever since. I have marked all my ground orchids and lilies ever since with survey pegs while it is in flower so I remember exactly where it is. The pegs are always 150mm to the east of the plant; which is far enough away, as not to cause damage to the roots. Some orchids do not grow and flower every year so the pegs are vital indicators.
Fertilize using seaweed, fish emulsion or organic chicken pellets soaked in water on an alternate basis. Fertilize every two months until the plants are established then annually in early September to October to maintain health, vitality and better flowering.
Further Comments from Readers:
Hi reader, it seems you use The Bible of Botany a lot. That’s great as we have great pleasure in bringing it to you! It’s a little awkward for us to ask, but our first aim is to purchase land approximately 1,600 hectares to link several parcels of N.P. into one at The Pinnacles NSW Australia, but we need your help. We’re not salespeople. We’re amateur botanists who have dedicated over 30 years to saving the environment in a practical way. We depend on donations to reach our goal. If you donate just $5, the price of your coffee this Sunday, We can help to keep the planet alive in a real way and continue to bring you regular updates and features on Australian plants all in one Botanical Bible. Any support is greatly appreciated. Thank you.
In the spirit of reconciliation we acknowledge the Bundjalung, Gumbaynggirr and Yaegl and all aboriginal nations throughout Australia and their connections to land, sea and community. We pay our respect to their Elders past, present and future for the pleasures we have gained.
Armidale NSW
Armidale NSW
Armidale NSW
Armidale NSW
Armidale NSW
Armidale NSW
Armidale NSW
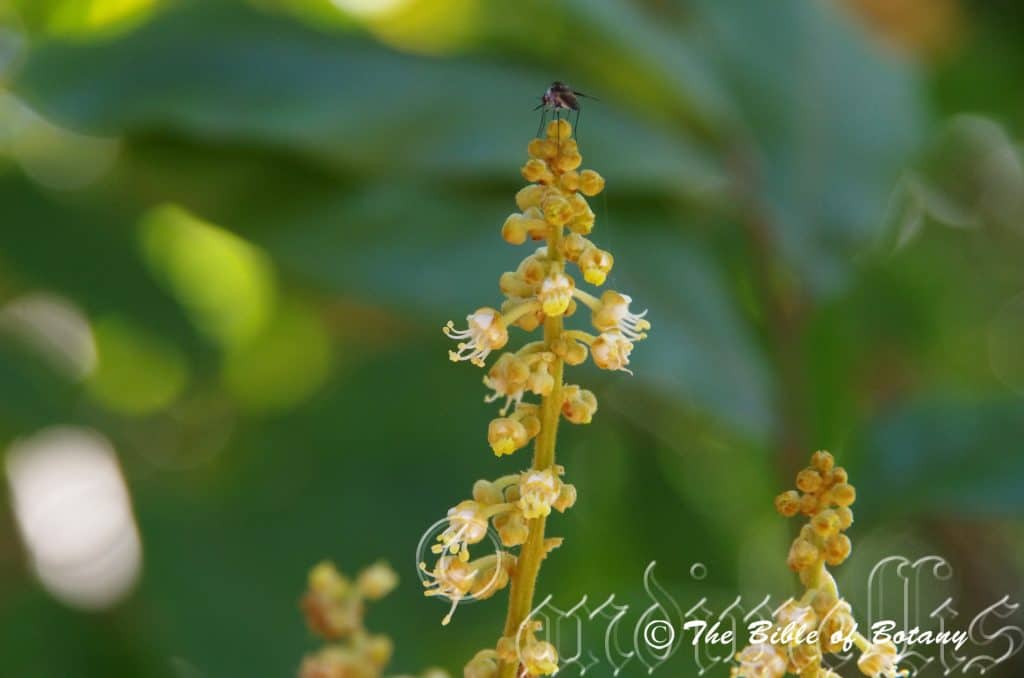
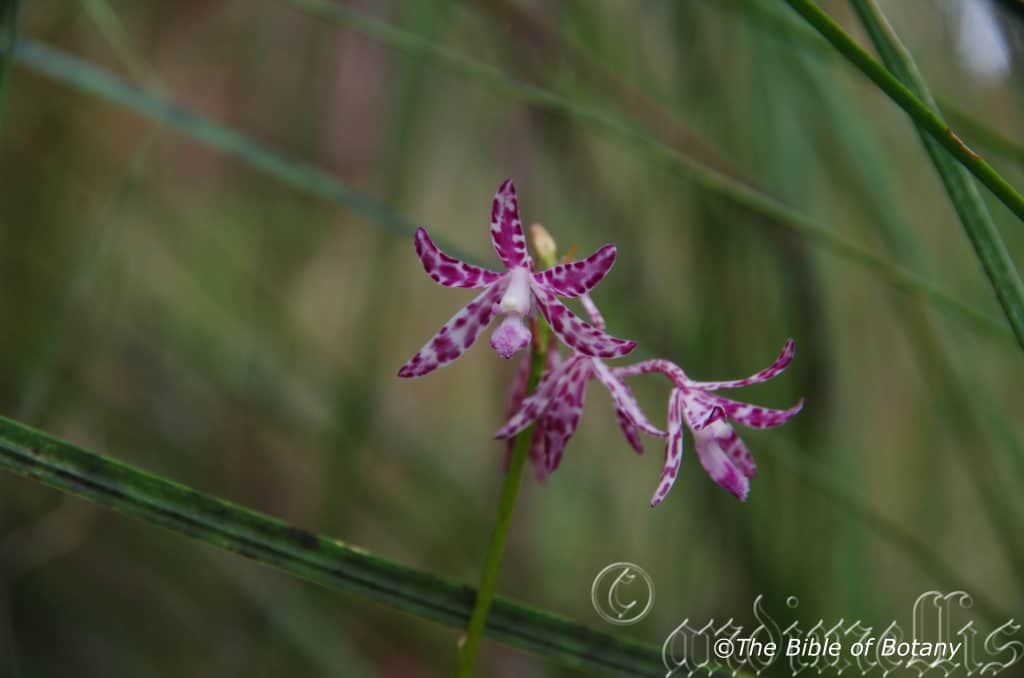
Dipodium punctatum
Classification
Unranked: Monocots
Order: Asparagales
Family: Orcidaceae
Subfamily: Epidendroideae
Tribe: Cymbidieae
Alliance: Cryptopodiinae
Genus: From Dis, which is Ancient Greek, for 2 and Podion, which is Ancient Greek for a base. It refer to plants, which two stipes supporting the pollinia.
Species: From Punctatus, which is Latin for very tiny dots or very tiny depressions. It refers to surfaces or organs, which have minute dots or minute depressions.
Common Name: Hyacinth Orchid or Christmas orchid.
Distribution:
Dipodium punctatum is found from Fraser Island, west to the Carnarvon Gorge then south to Wilsons Promontory then west to Mount Gambier and the Narracoorte Coastal plains in south eastern South Australia.
It is also found near Adelaide and on the south coast border region around Mount Gambier in South Australia and the lower Grampians in Victorian.
There is an outlying population south of Hobart in Tasmania.
https://avh.ala.org.au/occurrences/search?taxa=Dipodium+punctatum#tab_mapView
Habitat Aspect Climate:
Dipodium punctatum prefers protected areas with dappled sunlight. It grows in moist open woodlands, moist schlerophyll forests and adjacent to well developed, riverine and littoral rainforests. The altitude ranges from 15 meters ASL to 850 meters ASL.
The temperatures range from minus 5 degrees in August to 36 degrees in January.
The rainfall ranges from lows of 550mm to an average of 2000mm annually.
Soil Requirements:
Dipodium punctatum prefers growing on soils associated with plenty of forest litter. It is a saprophytic orchid meaning that feeds off decaying plants or animals. In this case the orchid gains all its nutrients from freshly decomposing leaf litter and probably has a symbiotic relationship with one or more fungi. The soils need only be shallow and comprise of good quality loams to medium clays. The soils are usually derived from granite or basalts. The soils PH’s would be difficult to access as this could be a very narrow section of the ground based on the litter and other microorganisms. An assumption could be made that it is in a very narrow band of between probably 6.5pH and 7pH. It does not tolerate waterlogged soils. Non saline soils to moderately saline soils are not tolerated.
Height & Spread:
Wild Plants: 0.4m to 0.75m by 0.1m to 0.2m.
Characteristics:
Dipodium punctatum‘s simple alternate ovate to broad ovate leaves are subtended on the florescence. They measure 7mm to 30mm in length by 4mm to 20mm in width. The bases are clasping while the apexes are tapering. The margin is entire.
The inflorescence of Dipodium punctatum is a long, slightly furrowed perpendicular spike. There are 14 to 60 individual flowers on a spike. The spike is sturdy, deep red-brown or deep brown semi glossy and glabrous. The spikes measure 400mm to 1000mm in length while the pedicels measure 13mm to 30mm including the long narrow ovary which looks like a swelling on the pedicel.
The 3 divaricate sepals and the 2 lateral petals are oblong to narrow elliptical and decurve backwards close to their apexes. They measure 10mm to 19mm in length by 2.5mm to 4.5mm in width. The petals and sepals are pale to deep pink and are heavily spotted and blotched with deep purple, deep carmine-red or maroons.
The pale pink to deep pink labellum measure 9mm to 15mm in length by 3.5mm to 5.5mm in width. The callus keels are parallel. The central band of mauve hairs are narrow basally but widening to cover most of the apical half of the mid lobe. The mid lobe is about twice as long as it is broad. The flowers appear from November to December.
Dipodium punctatum’s elliptical seed pods swell to 30mm to 40mm in length by 12mm to 16mm in diameter. It is glossy olive green with raised longitudinal ridges in a deep red-brown similar to the spike. They dry to a light semi glossy olive-brown with deeper reddish-brown longitudinal stripes. The seeds are released on fine flagella thread.
Wildlife:
Dipodium punctatum‘s wildlife is unknown to the author.
Cultivation:
Dipodium punctatum is a very attractive ground orchid that would be very difficult to grow in the nursery because of its saprophytic habit may be impossible to duplicate. If you are fortunate enough to have punctatum growing on your property then design the garden around them. It is long lived and all that is needed is to supply a good layer of mulch around them on an annual rotation. Ensure the mulch is similar to the type that already exists as any change may disrupt the growth of microorganisms and lead to the plants death. The mulch should be the same as what is lying on the surface naturally. Mark the spot as they will die down after flowering. Many ground orchids have a symbiotic relationship with specific fungi and need that fungus to survive.
Mark the spot as they flower because when they die down after flowering you will forget and have the real chance of killing them. I learnt this lesson early where I once had thousands of Spiranthes australis on the block within several years they had vanished gone for ever. I have regretted my early regeneration projects of slash and replant ever since. I have marked all my ground orchids and lilies ever since with survey pegs while it is in flower so I remember exactly where it is. The pegs are always 150mm to the east of the plant; which is far enough away, as not to cause damage to the roots. Some orchids do not grow and flower every year so the pegs are vital indicators.
Fertilize using seaweed, fish emulsion or organic chicken pellets soaked in water on an alternate basis. Fertilize every two months until the plants are established then annually in early September to October to maintain health, vitality and better flowering.
Further Comments from Readers:
Hi reader, it seems you use The Bible of Botany a lot. That’s great as we have great pleasure in bringing it to you! It’s a little awkward for us to ask, but our first aim is to purchase land approximately 1,600 hectares to link several parcels of N.P. into one at The Pinnacles NSW Australia, but we need your help. We’re not salespeople. We’re amateur botanists who have dedicated over 30 years to saving the environment in a practical way. We depend on donations to reach our goal. If you donate just $5, the price of your coffee this Sunday, We can help to keep the planet alive in a real way and continue to bring you regular updates and features on Australian plants all in one Botanical Bible. Any support is greatly appreciated. Thank you.
In the spirit of reconciliation we acknowledge the Bundjalung, Gumbaynggirr and Yaegl and all aboriginal nations throughout Australia and their connections to land, sea and community. We pay our respect to their Elders past, present and future for the pleasures we have gained.

Author’s Garden The Pinnacles NSW
Author’s Garden The Pinnacles NSW
Author’s Garden The Pinnacles NSW
Author’s Garden The Pinnacles NSW
Author’s Garden The Pinnacles NSW
Author’s Garden The Pinnacles NSW
Clarence Valley NSW
Clarence Valley NSW
Clarence Valley NSW
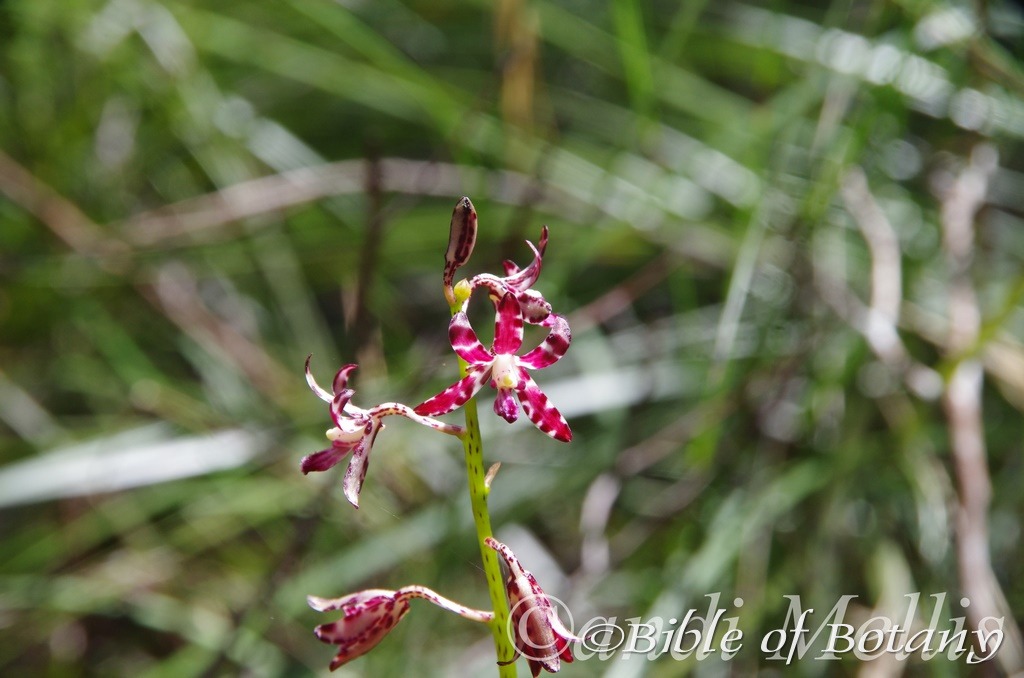
Dipodium variegatum
Classification
Unranked: Monocots
Order: Asparagales
Family: Orcidaceae
Subfamily: Epidendroideae
Tribe: Cymbidieae
Alliance: Cryptopodiinae
Genus: From D’s, which is Ancient Greek, for 2 and Podion, which is Ancient Greek for a base. It refer to plants, which two stipes supporting the pollinia.
Species: From Variegatum, which is Latin for to make varied in appearance by adding different colours. It refers to leaves, which have two or more distinct colours patterns. In Australia it usually refers to plants, which are bred for the variation in colour as a hybrid or varietal form.
Common Name: Hyacinth Orchid or Christmas orchid.
Distribution:
Dipodium variegatum is found south from the tip of Cape York Peninsula in far north Queensland to east Gippsland in eastern Victoria. It is mainly found on the Western Slopes, on and east of the Great Dividing Range to the coast.
https://avh.ala.org.au/occurrences/search?taxa=Dipodium+variegatum#tab_mapView
Habitat:
Dipodium variegatum prefers dappled sunlight to light filtered shade. It grows in moist open woodlands, moist schlerophyll forests and moist heath lands. The altitude ranges from 5 meters ASL to 1050 meters ASL.
The temperatures range from minus 2 degrees in August to 38 degrees in January.
The rainfall ranges from lows of 500mm to an average of 2000mm annually.
Soil Requirements:
Dipodium variegatum prefers growing on soils associated with plenty of forest litter. It is a saprophytic orchid meaning that feeds off decaying plants or animals. In this case the orchid gains all its nutrients from freshly decomposing leaf litter and probably has a symbiotic relationship with one or more fungi. The soils need only be shallow and comprise of good quality loams to medium clays. The soils are usually derived from granite or basalts. The soils PH’s would be difficult to access as this could be a very narrow section of the ground based on the litter and other microorganisms. An assumption could be made that it is in a very narrow band of between probably 6.5pH and 7pH. It does not tolerate waterlogged soils. Non saline soils to moderately saline soils are not tolerated.
Height & Spread:
Wild Plants: 0.4m to 0.75m by 0.1m to 0.2m.
Characteristics:
Dipodium variegatum’s simple alternate ovate to narrow ovate leaves are subtended on the florescence. They measure 7mm to 60mm in length by 4mm to 23mm in width. The bases are clasping while the apexes are tapering. The margins are entire and become attenuate on the petioles.
The inflorescence of Dipodium variegatum is a long, slightly furrowed perpendicular spike. There are 2 to 50 individual flowers on a spike. The spike is sturdy, cream to pale green and spotted with maroon semi glossy and glabrous. The spikes measure 240mm to 800mm in length while the pedicels measure 12mm to 25mm including the long narrow ovary which looks like a swelling on the pedicel.
The 3 divaricate sepals and the 2 lateral petals are oblong to narrow elliptical and decurve slightly backwards close to their apexes. They measure 7mm to 19mm in length by 2mm to 5mm in width. The petals and sepals are creamy-pink to pale pink and are heavily spotted and blotched with deeper pink and maroons.
The cream, mauve or pale pink labellum has purple markings on the apex. The labellum measures 7mm to 15mm in length by 3.5mm to 5.5mm in width. The callus keels are divergent. The central band of mauve hairs are narrow basally but widening to cover most of the apical half of the mid lobe. The mid lobe is about twice as long as it is broad. The flowers appear from November to December.
Dipodium variegatum elliptical seed pods swell to 30mm to 40mm in length by 12mm to 16mm in diameter. It is glossy olive green with raised longitudinal ridges in a deep red-brown similar to the spike. They dry to a light semi glossy olive-brown with deeper reddish-brown longitudinal stripes. The seeds are released on fine flagella thread.
Wildlife:
Dipodium variegatum’s wildlife is unknown to the author
Cultivation:
Dipodium variegatum is a very attractive orchid that would be very difficult to grow in the nursery because of its saprophytic habit may be impossible to duplicate. If you are fortunate enough to have Dipodium variegatum growing on your property then design the garden around them. It is long lived and all that is needed is to supply a good layer of mulch around them on an annual rotation. Ensure the mulch is similar to the type that already exists as any change may disrupt the growth of microorganisms and lead to the plants death. The mulch should be the same as what is lying on the surface naturally. Mark the spot as they will die down after flowering. Many ground orchids have a symbiotic relationship with specific fungi and need that fungus to survive.
Mark the spot as they flower because when they die down after flowering you will forget and have the real chance of killing them. I learnt this lesson early where I once had thousands of Spiranthes australis on the block within several years they had vanished gone for ever. I have regretted my early regeneration projects of slash and replant ever since. I have marked all my ground orchids and lilies ever since with survey pegs while it is in flower so I remember exactly where it is. The pegs are always 150mm to the east of the plant; which is far enough away, as not to cause damage to the roots. Some orchids do not grow and flower every year so the pegs are vital indicators.
Fertilize using seaweed, fish emulsion or organic chicken pellets soaked in water on an alternate basis. Fertilize every two months until the plants are established then annually in early September to October to maintain health, vitality and better flowering.
Further Comments from Readers:
Hi reader, it seems you use The Bible of Botany a lot. That’s great as we have great pleasure in bringing it to you! It’s a little awkward for us to ask, but our first aim is to purchase land approximately 1,600 hectares to link several parcels of N.P. into one at The Pinnacles NSW Australia, but we need your help. We’re not salespeople. We’re amateur botanists who have dedicated over 30 years to saving the environment in a practical way. We depend on donations to reach our goal. If you donate just $5, the price of your coffee this Sunday, We can help to keep the planet alive in a real way and continue to bring you regular updates and features on Australian plants all in one Botanical Bible. Any support is greatly appreciated. Thank you.
In the spirit of reconciliation we acknowledge the Bundjalung, Gumbaynggirr and Yaegl and all aboriginal nations throughout Australia and their connections to land, sea and community. We pay our respect to their Elders past, present and future for the pleasures we have gained.
Dischidia nummularia
Classification
Unranked: Eudicots
Unranked: Asterids
Order: Gentianales
Family: Apocynaceae
Subfamily: Asclepiadoideae
Genus: From D’s, which is Ancient Greek, for 2 and Schidius, which is Latin for a cleft or split. It may refer to the leaves, which appear to be split into two halves in many species.
Species: From Nummuli, which is Latin for peticash or a coin. It refers to leaves, which resemble silver coins in shape and colour.
Common Name:
Distribution:
Dischidia nummularia is found south from the tip of Cape York Peninsula to near Townsville in far north east Queensland.
It is also found in India, China, Indonesia, Laos, Thailand, Vietnam, Myanmar, Malaysia, Indonesia and New Guinee.
https://avh.ala.org.au/occurrences/search?taxa=Dischidia+nummularia#tab_mapView
Habitat Aspect Climate:
Dischidia nummularia prefers dappled shade to filtered sunlight. It grows on various Melaleuca species which are typically found in Melaleuca swamps. The altitude ranges from 5 meters ASL to 250 meters ASL.
The temperatures range from 8 degrees in July to 37 degrees in January.
The rainfall ranges from lows of 1200mm to an average of 3250mm annually.
Soil Requirements:
The soils are not important to Dischidia nummularia as it is an epiphyte growing on the trunks and in the forks of most tropical paper barks mainly Melaleuca viridiflora, Melaleuca quinquenervia and Melaleuca leucadendra. These Melaleuca specie grow in coastal swamps usually on accumulated beach sands, decomposed silty sandstones or alluvial deposits.
Height & Spread:
Wild Plants: 5mm to 12mm by 0.3m to 1.5m.
Characteristics:
Dischidia nummularia‘s prostrate stems are pale grey to a creamy white or creamy-glaucous. The roots are long, wiry, white and appear from the leaf nodes on the stems.
Dischidia nummularia‘s leaf blades are oval, very fleshy and thick. They measure 8mm to 16mm in length by 4mm to 13mm across and 3mm to 5mm thick. The base is rounded or rounded-truncate while the apex is round. The margin is entire. The lamina is a concolourous being creamy white, pale creamy blue-green or glaucous on both laminas however the lower lamina is sparsely covered in white peltate scales. The mid vein is not evident on either lamina. The petioles measure 0.5mm to 2mm long. The leaves and petioles produce milky latex when damaged.
The inflorescence of Dischidia nummularia are born on a short simple cyme. The white or cream sepals measure 0.5mm in length. The swollen corolla measures 2mm to 2.5mm in length by 2.5mm to 3mm in diameter. The 5 linear lobes measure 1.5mm in length with an acute apex. Stamens do not protrude beyond the corolla tube. The style is shorter than the stamens. The peduncle measures 7mm to 8.5mm in length while the pedicels measure 2mm to 2.5mm in length. Peak flowering occurs in the summer however flowers can be seen throughout the year in warmer areas
Dischidia nummularia fruits are long narrow recurved narrow lanceolate follicles. That is the widest section is near the base and they taper strongly towards the apex. The follicles measure 32mm to 35mm in length by 6mm to 8mm in width at the widest point. The follicles turn a paper brown when ripe.
The oblong to broadly elliptical seeds measure 2.5mm to 3mm in length by 0.5mm to 0.6mm in diameter. It is dark brown with a cream funicle.
The seeds are distributed by the wind and are attached to a long cream 25mm plume.
Wildlife:
Dischidia nummularia‘s wildlife is unknown to the author.
Cultivation:
Dischidia nummularia is a very beautiful small unusual plant which should be more widely grown in tropical and sub-tropical gardens. Unfortunately most owners hide their Dischidia‘s out the back in a bush house where it goes unseen for most of the year. It is easy to grow outdoors at least as far south as Brisbane in the warmer suburbs where frosts are not a problem. All that is needed is a good size paper bark tree preferably one of those from tropical Queensland that have a thick papery bark. Melaleuca Viridiflora, Melaleuca quinquenervia, Melaleuca argentea or Melaleuca leucadendra all come to mind as excellent host trees. Tightly secure the plants onto the trunk near a fork and they will do the rest. It will need additional watering however a quick squirt with the hose a couple of times a week will produce an appreciable size plant very quickly.
Propagation:
Seeds: Dischidia nummularia is surprisingly easy to propagate from seed. What is needed is a slab of tee tree bark. – Melaleuca paper barks are best. Sprinkle the seeds on a sheet that has been previously soaked in clean water. Now lay a very fine sheet of the bark that has also been previously soaked in clean water over the top. Hang the bark vertically so that the bottoms are sitting in a saucer of water or place them in a position where they will get spray drift from sprinklers every day. In about two weeks there will be hundreds of the little plants scrambling for your attention. As they develop separate them by cutting the bark into small squares and attaching them to larger pieces of bark. Once the plantlets reach 50mm to 75mm in length then they can be attach directly to a tree in their permanent position. Remember that at this stage they still need a very humid environment with daily watering. Once they have established themselves with mature leaves and the rhizomes and roots are well established the nursery care can be put on the back burner.
Fertilize using seaweed, fish emulsion or organic chicken pellets soaked in water on an alternate basis. Fertilize every two months until the plants are established then twice annually in early September or March to maintain health, vitality and better flowering.
Division:
When the plants are bigger enough they can be didided up.
Take a section that is around 100mm by 100mm and cut around it being careful not to tear the fragile stems. Once the cut has been made cut int the bark of the paperbark a little. Place the fingers below the bark and lift the new plant away from the parent.
Reattach the new plant to its new position and water with our recommended native organic fertiliser fortnightly until established.
Fertilize using seaweed, fish emulsion or organic chicken pellets soaked in water on an alternate basis. Fertilize every two months until the plants are established then annually in early September to October to maintain health, vitality and better flowering.
Further Comments from Readers:
Hi reader, it seems you use The Bible of Botany a lot. That’s great as we have great pleasure in bringing it to you! It’s a little awkward for us to ask, but our first aim is to purchase land approximately 1,600 hectares to link several parcels of N.P. into one at The Pinnacles NSW Australia, but we need your help. We’re not salespeople. We’re amateur botanists who have dedicated over 30 years to saving the environment in a practical way. We depend on donations to reach our goal. If you donate just $5, the price of your coffee this Sunday, We can help to keep the planet alive in a real way and continue to bring you regular updates and features on Australian plants all in one Botanical Bible. Any support is greatly appreciated. Thank you.
In the spirit of reconciliation we acknowledge the Bundjalung, Gumbaynggirr and Yaegl and all aboriginal nations throughout Australia and their connections to land, sea and community. We pay our respect to their Elders past, present and future for the pleasures we have gained.
NCBG Coffs Harbour NSW
NCBG Coffs Harbour NSW
NCBG Coffs Harbour NSW
Dissiliaria baloghioides
Classification
Clade: Angiosperms
Clade: Eudicots
Clade: Rosids
Order: Malpighiales
Family: Picrodendraceae
Tribe: Caletieae
Subtribe: Dissiliariinae
Genus: From Dissilio, which is Latin for to leap, burst asunder or to fly apart. It usually refers to capsules, which burst open when mature.
Species: Is named in honour of Joseph Balogh, a 19th cent Hungarian botanist and Oides, which is Ancient Greek for like or similar to. It refers to plants, which appear similar to the Baloghia genus.
Common Name: Lancewood
The local aborigines know it as Currumgui or Hauer.
Distribution:
Dissiliaria baloghioides is found in several disjunct populations south from Mout Dryander to the Gold Coast Hinterland in southern coastal Queensland.
There is also areport of it from the Richmond River in far north eastern New South Wales.
https://avh.ala.org.au/occurrences/search?taxa=Dissiliaria+baloghioides#tab_mapView
Habitat Aspect Climate:
Dissiliaria baloghioides prefers dappled shade to filtered sunlight as a juvenile tree. The altitude ranges from 180 meters ASL to 700 meters ASL.
The temperatures range from 6 degrees in July to 37 degrees in January.
The rainfall ranges from lows of 800mm to an average of 1250mm annually.
Soil Requirements:
Dissiliaria baloghioides grows in a variety of soils. The soils are derived from decomposed black basalt, brown basalt and shale.
Height & Spread:
Wild Plants: 20mm to 30mm by 5m to 10m.
Characteristics:
The pale grey to mid brown bark is flaky.
Dissiliaria baloghioides’ juvenile foliage is pinkish-red. The ovate stipules measure 1mm to 4mm in length. The opposite or whirled, elliptic to broad-elliptic, ovate or obovate, coriaceous leaves measure 60mm to 125mm in length by 20mm to 70mm in width. The terete petioles have a channel on the upper surface, bend at the base and measure 4mm to 10mm in length. The base is broad cuneate, rounded or truncate, while the apex is broadly acute, broad accuminate or obtuse. The undulating margins are entire. The discolourous laminas are deep green, glabrous and semi glossy on the upper lamina, while the lower lamina is paler and semi glossy to dull. The mid vein is prominent on both laminas and is yellow-green on the upper lamina, as are the 16 to 22 lateral veins. The reticulate veins prominent on the lower lamina.
The inflorescence are unisexual and plants dioecious, clusters or fascicles from the axillary in distal axils.
The male inflorescences are on short, glabrous peduncles, which measure 1mm to 2mm in length, while the pedicels measure 4mm to 12mm in length. The individual flowers measure 5mm to 8mm in diameter. The 3 inner and 3 outer, elliptic, imbricate tepals measure 2mm to 4.5mm in length by 1mm to 2mm in width. The 15 to 20 stamens are reddish.
The female inflorescence are sessile clusters. The terete pedicels measure 3mm to 9mm in length. The 3 inner and 3 or at times 4 outer imbricate tepals are elliptic to ovate and measure 3mm to 4mm in length by 1.8mm to 2.2mm in width. The Ovary is moderately to densely covered in short, fine rusty-golden hirtellus hairs. The trilobed, shortly connate and recurved styles measure 2.6mm to 3.5mm in length.
The fruits are weakly tri lobed, globose capsules that measure 12mm to 22mm in length by 15mm to 22mm in diameter at the widest point. The green capsules turn rusty-brown before exploding. The smooth, glabrous, glossy brown seeds measure 8mm to 10mm in length.
Wildlife:
Dissiliaria baloghioides wildlife is unknown to the author.
Cultivation:
It is a large unusual tree which is suitable for small to large acreage gardens in tropical and subtropical areas. It is slow growing in the early stages and requires better quality soils do well.
Propagation:
Seeds:
The seeds generally have a high fertility and germinate easily without any special treatment before sowing. Sow fresh seeds directly into a seed raising mix and cover with 5mm of the mix. Place in a warm position where they can receive some sunlight daily. Also protect the seed trays from mice and rats. When the seedlings are 25mm to 50mm tall, prick them out and plant them into 50mm native tubes using a seed raising mix.
Once the seedlings reach 150mm to 200mm in height plant them out into their permanent position. Mass plantings can be achieved by planting them at 8 meter to 10 meter centers when used as a rain trees or plant them at 15 meters as specimen trees and I would try 10 meters as an orchard tree. Trees in an orchard would need to be tip pruned regularly to encourage a smaller tree with more lateral branches for fruiting.
Fertilize using seaweed, fish emulsion or organic chicken pellets soaked in water on an alternate basis. Fertilize every two months until the plants are established then annually in early September to October to maintain health, vitality and better flowering.
Further Comments from Readers:
Hi reader, it seems you use The Bible of Botany a lot. That’s great as we have great pleasure in bringing it to you! It’s a little awkward for us to ask, but our first aim is to purchase land approximately 1,600 hectares to link several parcels of N.P. into one at The Pinnacles NSW Australia, but we need your help. We’re not salespeople. We’re amateur botanists who have dedicated over 30 years to saving the environment in a practical way. We depend on donations to reach our goal. If you donate just $5, the price of your coffee this Sunday, We can help to keep the planet alive in a real way and continue to bring you regular updates and features on Australian plants all in one Botanical Bible. Any support is greatly appreciated. Thank you.
In the spirit of reconciliation we acknowledge the Bundjalung, Gumbaynggirr and Yaegl and all aboriginal nations throughout Australia and their connections to land, sea and community. We pay our respect to their Elders past, present and future for the pleasures we have gained.
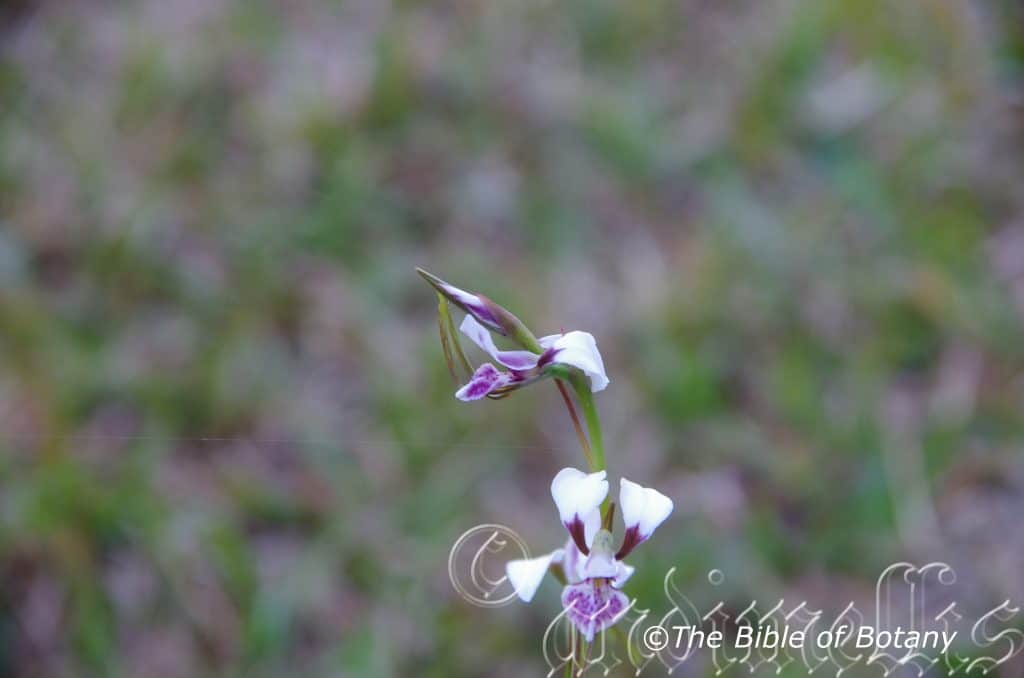
Clarence Valley NSW
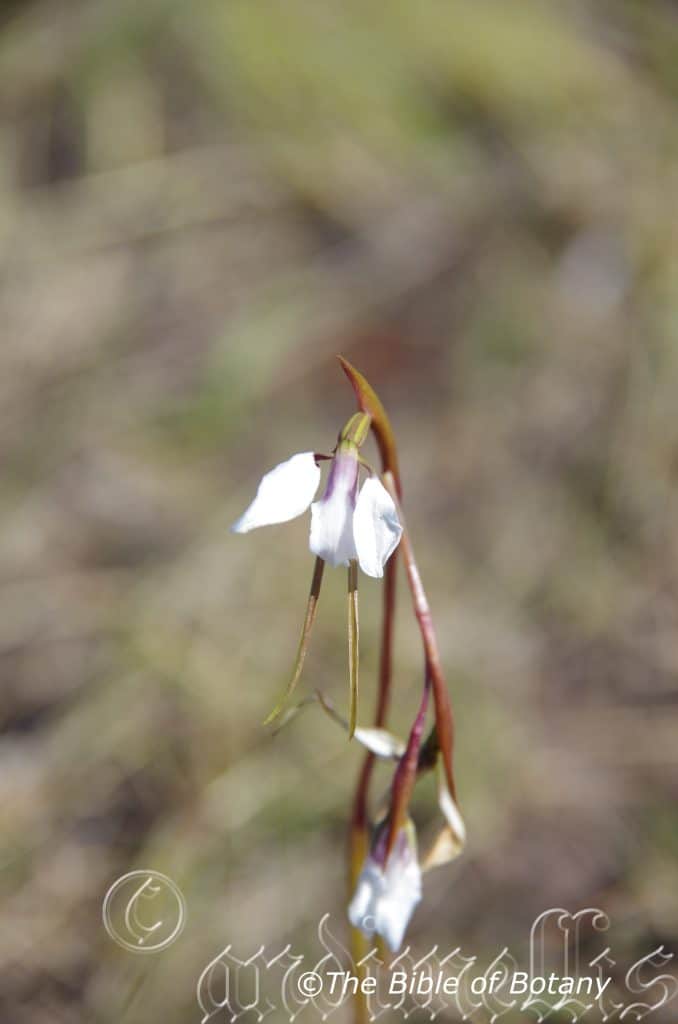
Clarence Valley NSW
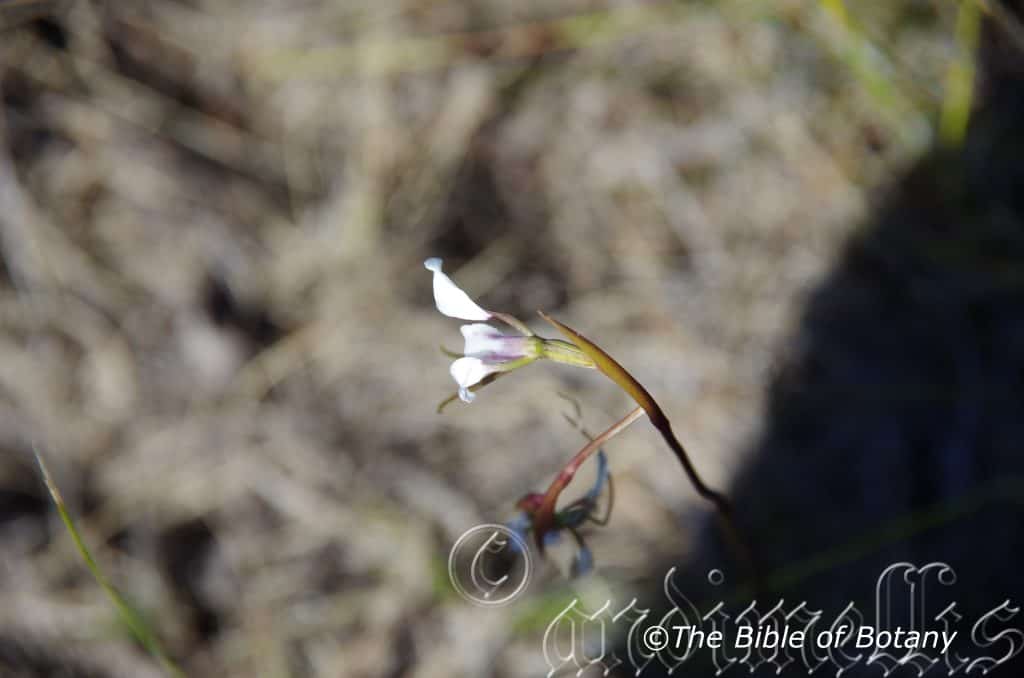
Clarence Valley NSW
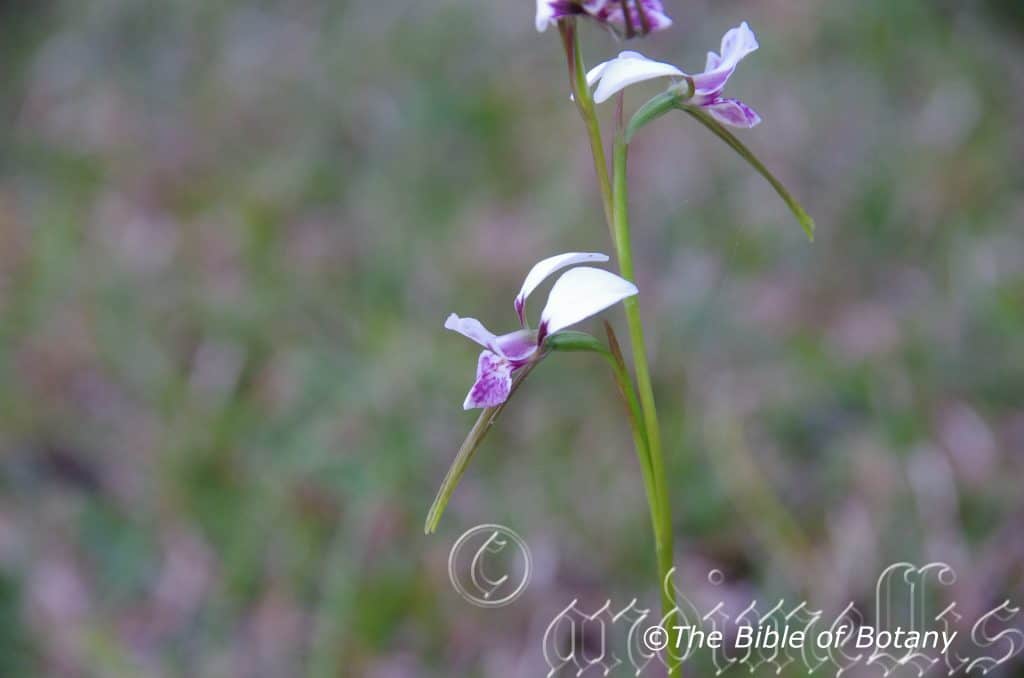
Clarence Valley NSW
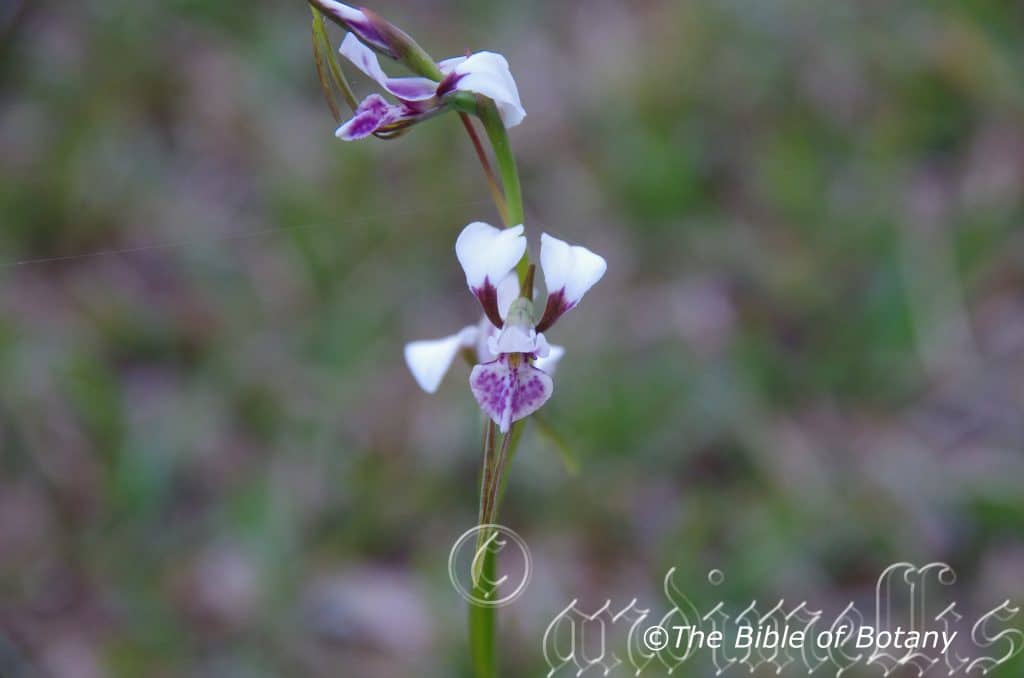
Clarence Valley NSW
Diuris alba
Classification
Unranked: Monocots
Order: Asparagales
Family: Orcidaceae
Subfamily: Orchidoideae
Tribe: Diurideae
Sub tribe: Diuridinae
Genus: From Diploos, which is Ancient Greek for to have two parts or two forms and Oura, which is Ancient Greek for a tail. It refers to organs, which have two distinct types of appendages that resemble a tail or have two organs, which are more prominently displayed like two erect tails.
Species: From Alph’s, which is Ancient Greek or Albus which is Latin for whiteness. It refers to plants usually the flowers, which are stark white.
Common Name:
Distribution:
Diuris alba is found south from North Kennedy in coastal central Queensland to Singleton in central coastal New South Wales. It is mainly found on and east of the Great Dividing Range to the coast.
https://avh.ala.org.au/occurrences/search?taxa=Diuris+alba#tab_mapView
Habitat Aspect Climate:
Diuris alba prefers dappled sunlight to light filtered shade. It grows in moist open schlerophyll forests particularly on grasslands. The altitude ranges from 15 meters ASL to 1000 meters ASL.
The temperatures range from minus 7 degrees in August to 42 degrees in January.
The rainfall ranges from lows of 450mm to an average of 2000mm annually.
Soil Requirements:
Diuris alba prefers sandy loams to light sandy clays with thick layers of forest litter. The soils are derived from decomposed sandstone, granite or accumulated sands behind the back dunes. The soils pH ranges from 5pH to 7pH are preferred. It does not tolerate waterlogged soils though most soils have good moisture retention through capillary action. Non saline soils to lightly saline soils are tolerated.
Height & Spread:
Wild Plants: 0.15m to 0.3m by 0.05m to 0.1m.
Characteristics:
Diuris alba’s 1 or 3 simple, conduplicate, linear leaves measure 100mm to 300mm in length by 2mm to 3mm in width. The bases are clasping while the apexes are tapering. The margins are entire.
The inflorescence of Diuris alba is a long, slightly furrowed perpendicular raceme, with 2 to 7 individual flowers and measure 150mm to 400mm in height. The white flowers are marked with lilac or purple markings on the labellum and base of dorsal sepal and measure 18mm to 23mm in width. The dorsal sepal is narrow to broad ovate and measures 8mm to 17mm in length by 5mm to 9mm in width. The erect dorsal sepal bends outwards and has recurved margins.
The deflexed, lateral sepals are usually parallel or at times crossed, linear or lanceolate and measure 20mm to 40mm in length by 2mm to 3mm in width.
The obliquely, erect to recurved petals, laminas are narrow elliptic to narrow obovate and measure 10mm to 22mm in length by 4mm to 9mm in width. The greenish-purple claw 4mm to 6mm in length.
The labellum measures 10mm to 14mm in length, while the lateral lobes are linear to oblanceolate and measure 3mm to 4 mm in length by 1mm to 2mm in width. The mid lobe is broad ovate to almost circular when flattened and measures 7mm to 1mm in width. There is a ridged along midline. The callus has 2 broad ridges that measure 5mm to 6mm in length. The flowers appear from August to November.
Diuris alba elliptical seed pods swell to 20mm to 30mm in length by 12mm to 18mm in diameter. It is semi glossy, olive green with 5 raised obtuse to flat longitudinal ridges and turn deeper reddish-brown when ripe. The seeds are released on a fine flagella thread.
Wildlife:
Diuris alba’s wildlife is unknown to the author.
Cultivation:
Diuris alba is a very attractive orchid that would be very difficult to grow in the bush house. If you are fortunate enough to have Diuris alba growing on your property then design the garden around them. It is long lived and all that is needed is to supply a good layer of mulch around them on an annual rotation. Ensure the mulch is similar to the type that already exists as any change may disrupt the growth of microorganisms and lead to the plants death. The mulch should be the same as what is lying on the surface naturally. Many ground orchids have a symbiotic relationship with specific fungi and need that fungus to survive.
Mark the spot as they flower because when they die down after flowering you will forget and have the real chance of killing them. I learnt this lesson early where I once had thousands of Spiranthes australis on the block within several years it had vanished gone for ever. I have regretted my early regeneration projects of slash and replant ever since. I have marked all my ground orchids and lilies ever since with survey pegs while it is in flower so I remember exactly where it is. The pegs are always 150mm to the east of the plant; which is far enough away, as not to cause damage to the roots. Some orchids do not grow and flower every year so the pegs are vital indicators.
Fertilize using seaweed, fish emulsion or organic chicken pellets soaked in water on an alternate basis when the first leaves appear. Fertilize annually in early June or July to maintain health, vitality and better flowering.
Propagation:
All orchids that are declared rare, vulnerable or endangered are protected by Federal and State Laws and must not be removed from the wild unless you are a land developer, mining company or main Roads department etc. This includes bulbs, roots, leaves and flowers. No part of any plant can be removed from Federal, State or Local Government land without the prior permission of the authority and this includes the spore.
1. Obtain relevant materials
The first step in growing orchid from seed will be sourcing and having at the ready all materials that will be required in the propagation process.
This includes all of the following:
Unripe orchid seed capsule. If there are 2 capsules secure the second capsule immediately after the first capsule splits or if only one capsule as soon as it changes colour.
Orchid gelling medium with agar which can be purchased from an orchid society or a specialist nursery.
Distilled water
Cooking pot
Spoon
Oven-safe glass or polypropylene containers with lids
Sealable bags
Clean, sterilized cutting board
Rubber gloves
Paper towels
Tweezers or forceps
70 percent ethanol
Bleach
Scalpel or sharp knife
Planting pot
Orchid compost
Length of wire metal
Plastic spray bottle.
deep petri dishes or sterile jars.
2. Prepare agar medium
The agar medium is a special orchid gelling mixture that distilled water will be added to distilled water.
To prepare the medium, mix equal parts of orchid gelling medium with distilled water in a cooking pot.
Place the pot on a stove and bring the mixture to boil for while stirring continuously for two minutes.
Pour the mixture into the petri dishes glass or propylene containers while ensuring not to fill the containers above 20 percent of their volume.
Loosely replace the lids to the containers. Sterilize the containers by heating them up in a microwave oven for between 2 to 3 minutes.
Spray 70 percent ethanol into a sealable bag to create a sterile environment. Transfer the heated containers into the sealable bag.
Allow the containers to cool a bit before tightening their lids and then sealing the bag. Leave the containers to stand for a few days until the mixture solidifies.
3. Prepare seed capsule and work surface
Place an open pot of water on a stove and bring to boil. Place the cutting board in the oven and sterilize.
Put on rubber gloves and sterilize the forceps, and scalpel with 70 percent ethanol.
Insert the seed capsule into a bowel filled with bleach for about fifteen minutes.
Sterilize seed capsule again with 70 percent ethanol and place on grill.
Using the sterilized scalpel, cut open the seed capsule to reveal the seeds. Using a scalpel or sharp knife, scrape out the seeds from the capsule unto an ethanol soaked paper towel.
4. Flasking of the seed
Take out the petri dishes or glass jars containers holding the agar medium. Over the steam, open up the containers and transfer seeds from the ethanol soaked paper towel into the individual containers using the sterilized forceps.
The amount of seeds will determine the number of containers required. Replace the lid of the containers and place them on a window sill that receives indirect sunlight.
5. Wait and exercise patience
All that can be done at this point is to wait until the seeds germinate. The amount of time that this might take varies and is dependent on the particular species.
Generally, the time can range from a few months to a few years. During this period of waiting, ensure the containers are free from contamination to ensure that germination is not disrupted.
6. Emergence of protocorms
Protocorms are tuber-shaped bodies with rhizoids that are produced by the young seedlings of various orchids. Protocorms represent the embryonic form of the orchid plant.
Their emergence after the period of waiting at an affirmation that everything in the propagation process is on track.
7. Transflask orchid seedlings is done after they have developed roots
Upon the emergence of the protocorms, consistently observe the growth of the seedlings. At the point when the seedlings appear to overcrowd the flask, transflasking should be carried out, typically within 30 and 60 days.
* This is done by removing individual seedlings using sterilized tweezers from the original containers and placing them in new containers also filled, in a proportion similar to the original, with agar medium. 6 to 8 in a standard petri dish or 1or 2 to a test tube
8. Transplant seedlings into planting pots
On the presumption that there are no disruptions to the plant growth, the seedlings will eventually outgrow the containers.
At this point, it is to be transplanted into planting pots. A good rule of thumb to determine when it is ready to be transplanted is when the seedlings have developed roots that have grown up to the length of one-quarter of an inch.
To transplant, prepare a planting pot or other container for receiving the seedling by majorly filling it up with coarse fir bark and possibly some slightly moist orchid compost mixture containing perlite, fine charcoal, redwood bark shavings, etc.
To extract the seedlings, submerge the containers in warm water to help loosen the agar gel.
Once the agar medium is softened, twist a piece of metal to form a loop and in turn, use it to carefully pull out the seedlings from the container. It is best done if the agar and seedling can be removed together.
The seedlings can be further rinsed in lukewarm water to remove any excess agar mixture still stuck to them.
Following this, the seedlings can now be planted into the prepared pot with at least 50mm of space between each individual seedling.
9. Positioning the orchid
The seedling once fully transplanted should be placed in a location that is warm with good indirect sun light.
Slowly position the pots into an area that closely assimilates the conditions it will be growing under.
The choice as to whether the plant should be exposed to full sun or in direct sunlight will be dependent on the particular orchid specie.
10. Subsequent care of the plant
After the first week, the seedling can be misted several times a day and watered just once a week.
A guide in watering the plant will be using the dryness of the fir back that is, water the plant until the fir back is completely moistened and wait till it has completely dried out before watering again.
Fertilize using seaweed, fish emulsion or organic chicken pellets soaked in water on an alternate basis. Fertilize every two months until the plants are established then annually in early September to October to maintain health, vitality and better flowering.
Further Comments from Readers:
Hi reader, it seems you use The Bible of Botany a lot. That’s great as we have great pleasure in bringing it to you! It’s a little awkward for us to ask, but our first aim is to purchase land approximately 1,600 hectares to link several parcels of N.P. into one at The Pinnacles NSW Australia, but we need your help. We’re not salespeople. We’re amateur botanists who have dedicated over 30 years to saving the environment in a practical way. We depend on donations to reach our goal. If you donate just $5, the price of your coffee this Sunday, We can help to keep the planet alive in a real way and continue to bring you regular updates and features on Australian plants all in one Botanical Bible. Any support is greatly appreciated. Thank you.
In the spirit of reconciliation we acknowledge the Bundjalung, Gumbaynggirr and Yaegl and all aboriginal nations throughout Australia and their connections to land, sea and community. We pay our respect to their Elders past, present and future for the pleasures we have gained.
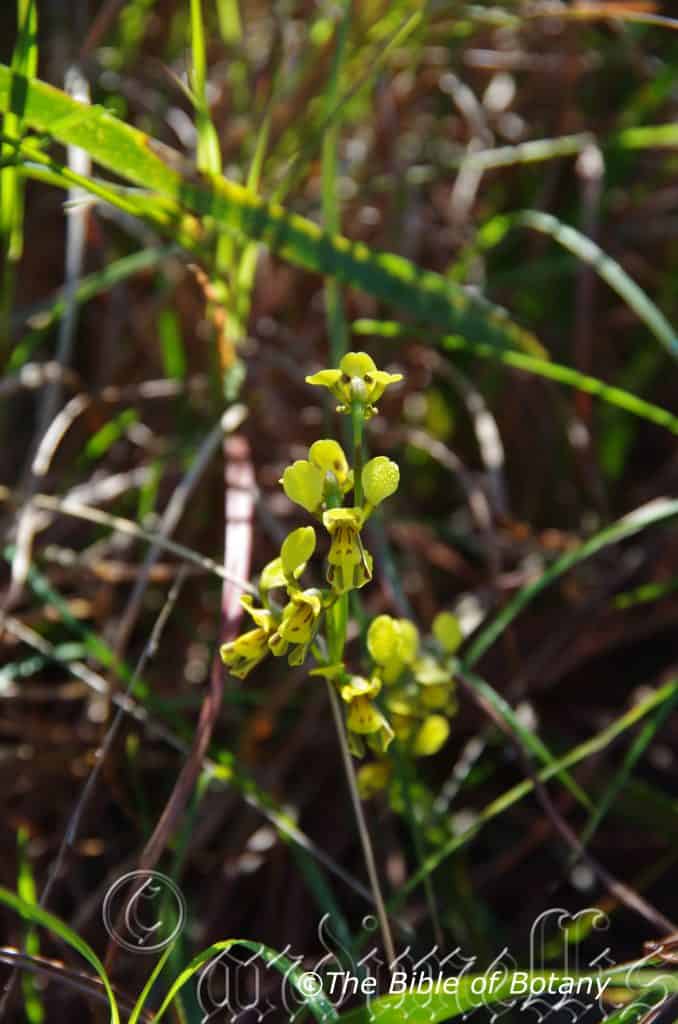
Clarence Valley NSW
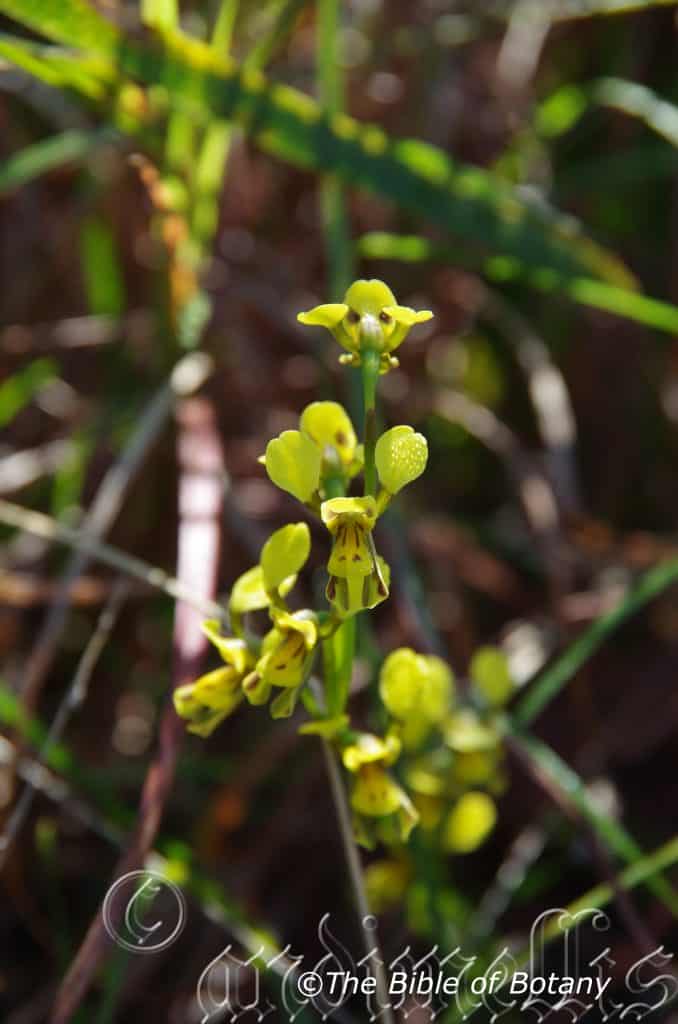
Clarence Valley NSW
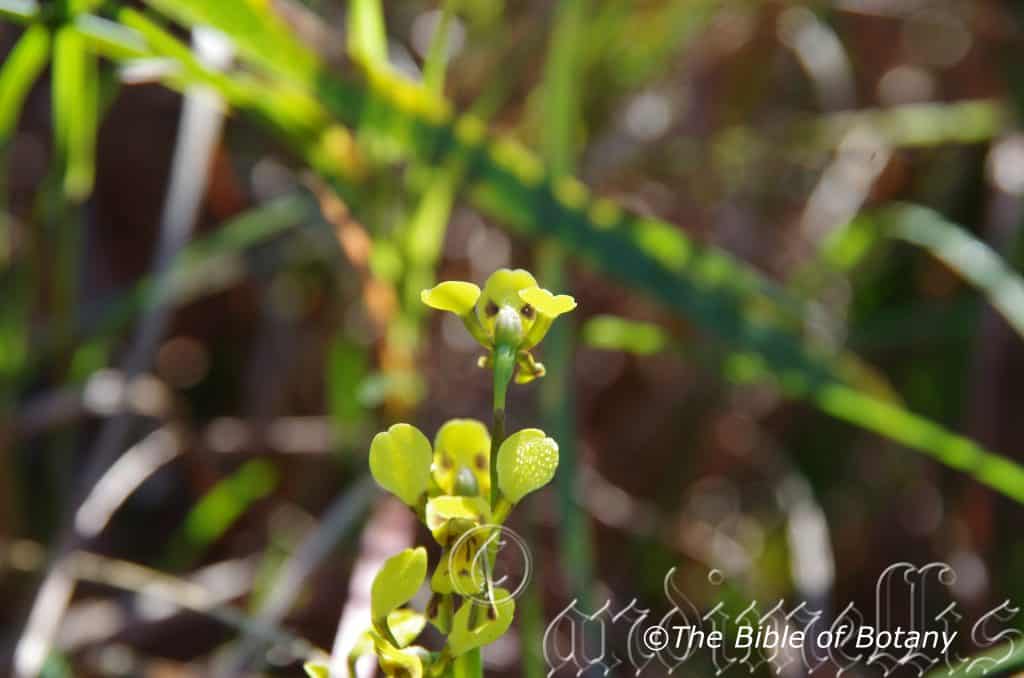
Clarence Valley NSW
Diuris chrysantha
Classification
Unranked: Monocots
Order: Asparagales
Family: Orcidaceae
Subfamily: Orchidoideae
Tribe: Diurideae
Sub tribe: Diuridinae
Genus: From Diploos, which is Ancient Greek for to have two parts or two forms and Oura, which is Ancient Greek for a tail. It refers to organs, which have two distinct types of appendages that resemble a tail or have two organs, which are more prominently displayed like two erect tails.
Species: From Khryseos, which is Ancient Greek or Chriseum, which is Latin for a golden colour and Antha/Anthos, which are Ancient Greek for the male reproductive organ in a flower or the flower. It refers to flowers, which are either pastel or rich golden yellow.
Common Name:
Distribution:
Diuris chrysantha is found south from Byfield National Park in Queensland to Taree in central coastal New South Wales. It is mainly found on the Western Slopes, on and east of the Great Dividing Range to the coast
https://avh.ala.org.au/occurrences/search?taxa=Diuris+chrysantha#tab_mapView
Habitat Aspect Climate:
Diuris chrysantha prefers dappled sunlight to light filtered shade. It grows in moist open sclerophyll forests particularly on grasslands. The altitude ranges from 15 meters ASL to 1050 meters ASL.
The temperatures range from minus 4 degrees in August to 38 degrees in January.
The rainfall ranges from lows of 500mm to an average of 2000mm annually.
Soil Requirements:
Diuris chrysantha prefers sandy loams to light sandy clays with thick layers of forest litter. The soils are derived from decomposed sandstone or granite. The soils pH ranges from 5pH to 6pH are preferred. It does not tolerate waterlogged soils. Non saline soils to moderately saline soils are tolerated.
Height & Spread:
Wild Plants: 0.15m to 0.3m by 0.05m to 0.1m.
Characteristics:
Diuris chrysantha’s 1 or 2 simple, conduplicate, linear leaves measure 120mm to 360mm in length by 4mm to 8mm in width. The bases are clasping while the apexes are tapering. The margins are entire and become attenuate on the petioles.
The inflorescence of Diuris chrysantha is a long, slightly furrowed perpendicular raceme. There are 2 to 7 individual flowers on a raceme. The flowers measure 18mm to 25mm in width. The flowers are golden yellow to orange with brown markings on the dorsal sepal and labellum.
The erect, ovate dorsal sepal measures 7mm to 9mm in length by 6mm to 7mm in width. The deflexed, parallel or curved linear to spathulate lateral sepals are often twisted. The lateral sepals measure 12mm to 18mm in length by 2mm to 4mm in width.
The divergent, recurved, orbicular lateral petals measure 6mm to 8mm in length by 6mm to 8mm in width. The deep brown claw measures 4mm to 7mm in length.
The labellum measures 7mm to 9mm in length. The narrow-ovate to obovate lateral lobes on the labellum measures 2.5mm to 4 mm in length by 2.5mm to 3mm in width at the apex. The margins are entire or crenulate while the conduplicate mid lobe is cordate to broad-cuneate when flattened. The thick callus has divergent ridges and measures 3mm in length. The flowers appear from August to November.
Diuris chrysantha‘s elliptical seed pods swell to 20mm to 30mm in length by 12mm to 18mm in diameter. It is glossy olive green with raised longitudinal ridges in a deep red-brown similar to the spike. They dry to a light semi glossy olive-brown with deeper reddish-brown longitudinal stripes. The seeds are released on fine flagella thread.
Wildlife:
Diuris chrysantha‘s wildlife is unknown to the author.
Propagation:
All orchids that are declared rare, vulnerable or endangered are protected by Federal and State Laws and must not be removed from the wild unless you are a land developer, mining company or main Roads department etc. This includes bulbs, roots, leaves and flowers. No part of any plant can be removed from Federal, State or Local Government land without the prior permission of the authority and this includes the spore.
1. Obtain relevant materials
The first step in growing orchid from seed will be sourcing and having at the ready all materials that will be required in the propagation process.
This includes all of the following:
Unripe orchid seed capsule. If there are 2 capsules secure the second capsule immediately after the first capsule splits or if only one capsule as soon as it changes colour.
Orchid gelling medium with agar which can be purchased from an orchid society or a specialist nursery.
Distilled water
Cooking pot
Spoon
Oven-safe glass or polypropylene containers with lids
Sealable bags
Clean, sterilized cutting board
Rubber gloves
Paper towels
Tweezers or forceps
70 percent ethanol
Bleach
Scalpel or sharp knife
Planting pot
Orchid compost
Length of wire metal
Plastic spray bottle.
deep petri dishes or sterile jars.
2. Prepare agar medium
The agar medium is a special orchid gelling mixture that distilled water will be added to distilled water.
To prepare the medium, mix equal parts of orchid gelling medium with distilled water in a cooking pot.
Place the pot on a stove and bring the mixture to boil for while stirring continuously for two minutes.
Pour the mixture into the petri dishes glass or propylene containers while ensuring not to fill the containers above 20 percent of their volume.
Loosely replace the lids to the containers. Sterilize the containers by heating them up in a microwave oven for between 2 to 3 minutes.
Spray 70 percent ethanol into a sealable bag to create a sterile environment. Transfer the heated containers into the sealable bag.
Allow the containers to cool a bit before tightening their lids and then sealing the bag. Leave the containers to stand for a few days until the mixture solidifies.
3. Prepare seed capsule and work surface
Place an open pot of water on a stove and bring to boil. Place the cutting board in the oven and sterilize.
Put on rubber gloves and sterilize the forceps, and scalpel with 70 percent ethanol.
Insert the seed capsule into a bowel filled with bleach for about fifteen minutes.
Sterilize seed capsule again with 70 percent ethanol and place on grill.
Using the sterilized scalpel, cut open the seed capsule to reveal the seeds. Using a scalpel or sharp knife, scrape out the seeds from the capsule unto an ethanol soaked paper towel.
4. Flasking of the seed
Take out the petri dishes or glass jars containers holding the agar medium. Over the steam, open up the containers and transfer seeds from the ethanol soaked paper towel into the individual containers using the sterilized forceps.
The amount of seeds will determine the number of containers required. Replace the lid of the containers and place them on a window sill that receives indirect sunlight.
5. Wait and exercise patience
All that can be done at this point is to wait until the seeds germinate. The amount of time that this might take varies and is dependent on the particular species.
Generally, the time can range from a few months to a few years. During this period of waiting, ensure the containers are free from contamination to ensure that germination is not disrupted.
6. Emergence of protocorms
Protocorms are tuber-shaped bodies with rhizoids that are produced by the young seedlings of various orchids. Protocorms represent the embryonic form of the orchid plant.
Their emergence after the period of waiting at an affirmation that everything in the propagation process is on track.
7. Transflask orchid seedlings is done after they have developed roots
Upon the emergence of the protocorms, consistently observe the growth of the seedlings. At the point when the seedlings appear to overcrowd the flask, transflasking should be carried out, typically within 30 and 60 days.
* This is done by removing individual seedlings using sterilized tweezers from the original containers and placing them in new containers also filled, in a proportion similar to the original, with agar medium. 6 to 8 in a standard petri dish or 1or 2 to a test tube
8. Transplant seedlings into planting pots
On the presumption that there are no disruptions to the plant growth, the seedlings will eventually outgrow the containers.
At this point, it is to be transplanted into planting pots. A good rule of thumb to determine when it is ready to be transplanted is when the seedlings have developed roots that have grown up to the length of one-quarter of an inch.
To transplant, prepare a planting pot or other container for receiving the seedling by majorly filling it up with coarse fir bark and possibly some slightly moist orchid compost mixture containing perlite, fine charcoal, redwood bark shavings, etc.
To extract the seedlings, submerge the containers in warm water to help loosen the agar gel.
Once the agar medium is softened, twist a piece of metal to form a loop and in turn, use it to carefully pull out the seedlings from the container. It is best done if the agar and seedling can be removed together.
The seedlings can be further rinsed in lukewarm water to remove any excess agar mixture still stuck to them.
Following this, the seedlings can now be planted into the prepared pot with at least 50mm of space between each individual seedling.
9. Positioning the orchid
The seedling once fully transplanted should be placed in a location that is warm with good indirect sun light.
Slowly position the pots into an area that closely assimilates the conditions it will be growing under.
The choice as to whether the plant should be exposed to full sun or in direct sunlight will be dependent on the particular orchid specie.
10. Subsequent care of the plant
After the first week, the seedling can be misted several times a day and watered just once a week.
A guide in watering the plant will be using the dryness of the fir back that is, water the plant until the fir back is completely moistened and wait till it has completely dried out before watering again.
Fertilize using seaweed, fish emulsion or organic chicken pellets soaked in water on an alternate basis. Fertilize every two months until the plants are established then annually in early September to October to maintain health, vitality and better flowering.
Further Comments from Readers:
Hi reader, it seems you use The Bible of Botany a lot. That’s great as we have great pleasure in bringing it to you! It’s a little awkward for us to ask, but our first aim is to purchase land approximately 1,600 hectares to link several parcels of N.P. into one at The Pinnacles NSW Australia, but we need your help. We’re not salespeople. We’re amateur botanists who have dedicated over 30 years to saving the environment in a practical way. We depend on donations to reach our goal. If you donate just $5, the price of your coffee this Sunday, We can help to keep the planet alive in a real way and continue to bring you regular updates and features on Australian plants all in one Botanical Bible. Any support is greatly appreciated. Thank you.
In the spirit of reconciliation we acknowledge the Bundjalung, Gumbaynggirr and Yaegl and all aboriginal nations throughout Australia and their connections to land, sea and community. We pay our respect to their Elders past, present and future for the pleasures we have gained.
Clarence Valley NSW
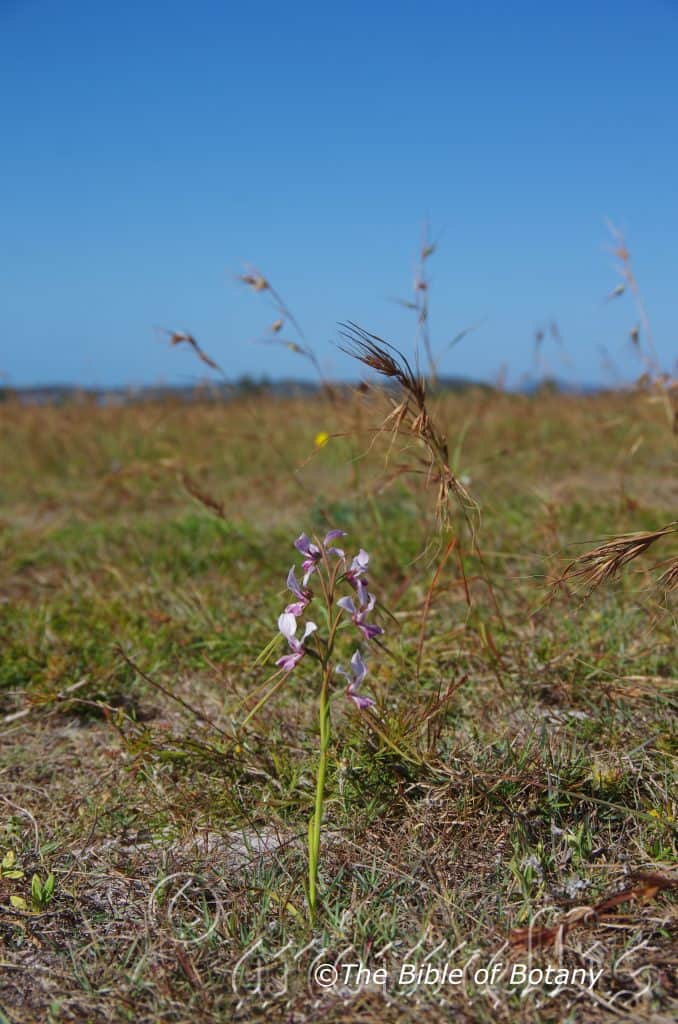
Clarence Valley NSW
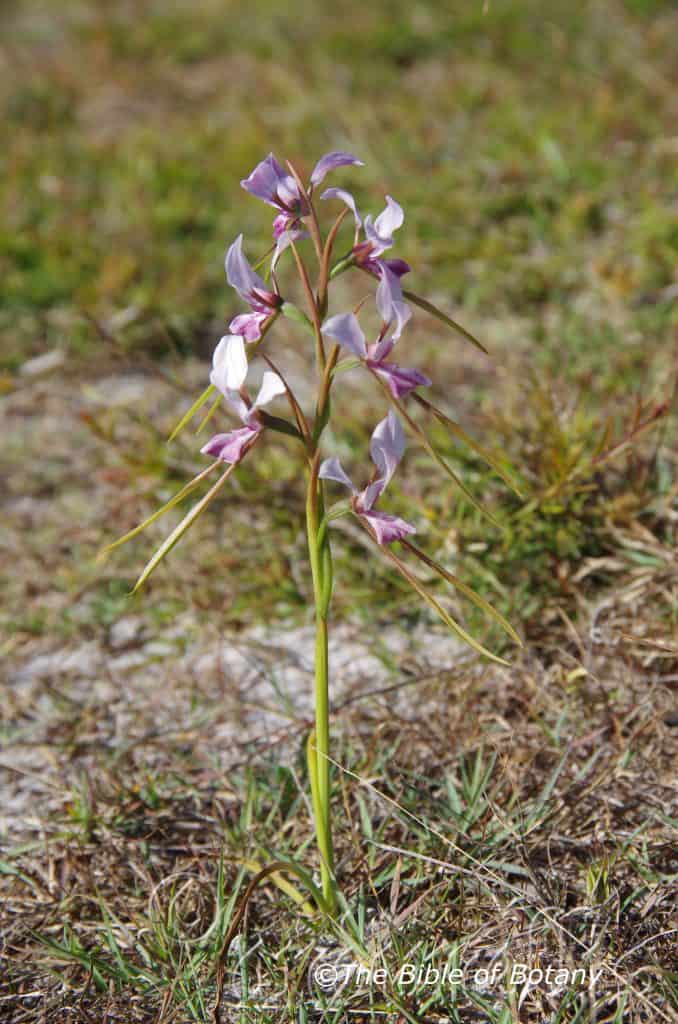
Clarence Valley NSW
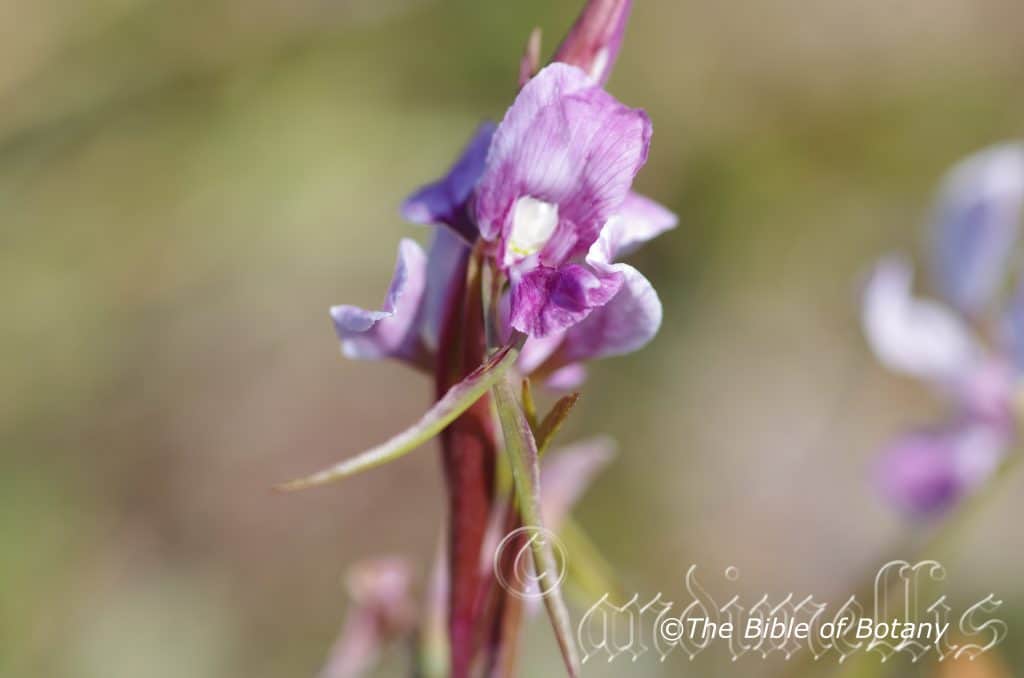
Clarence Valley NSW
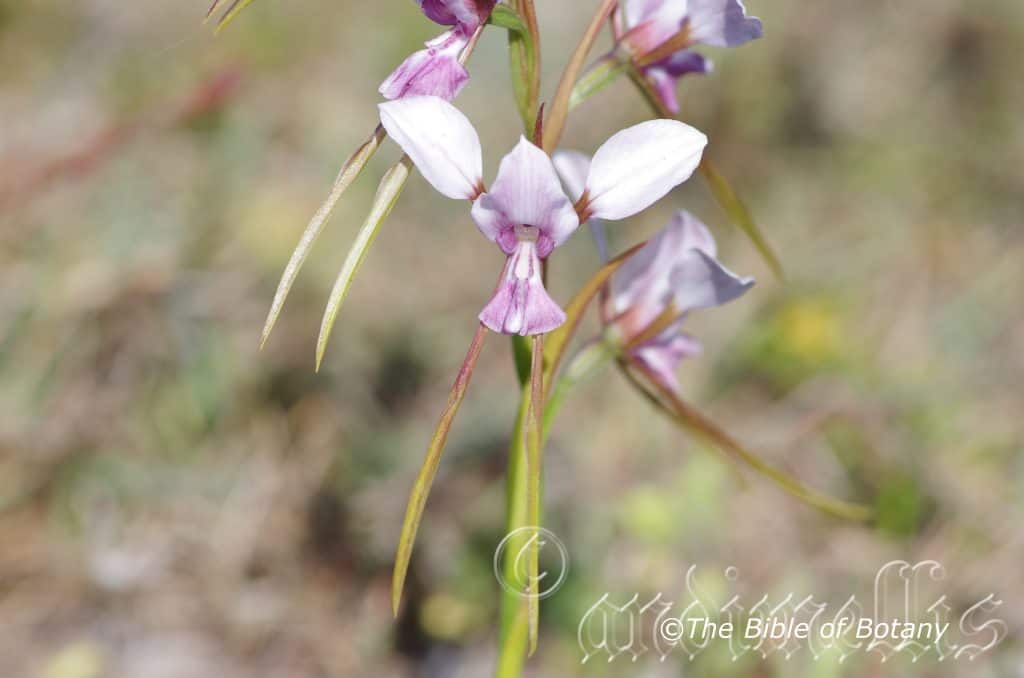
Clarence Valley NSW
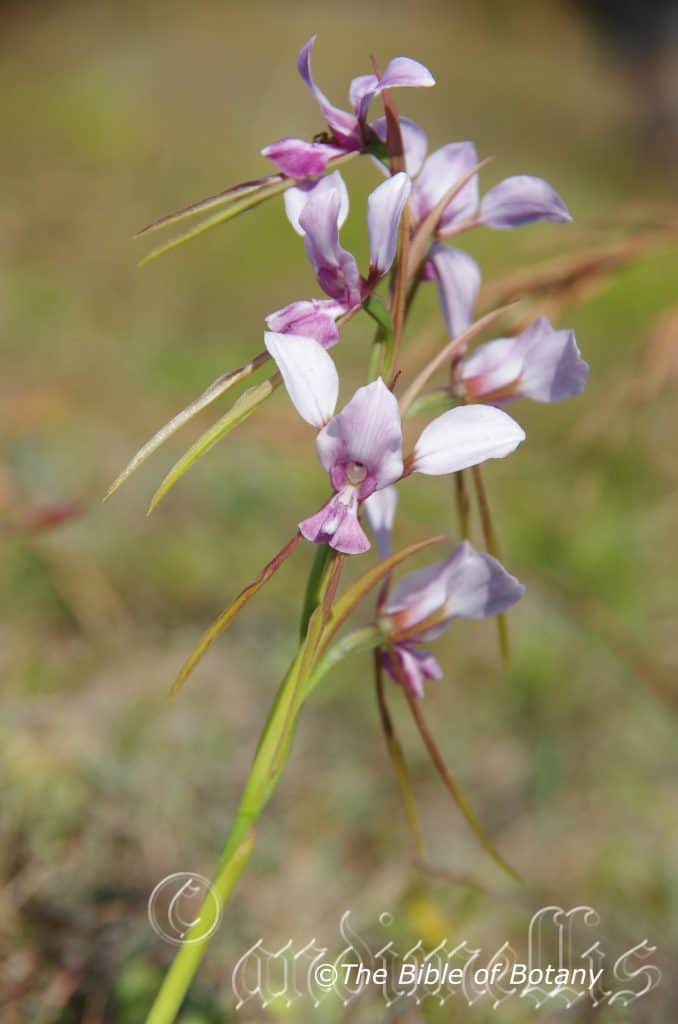
Clarence Valley NSW
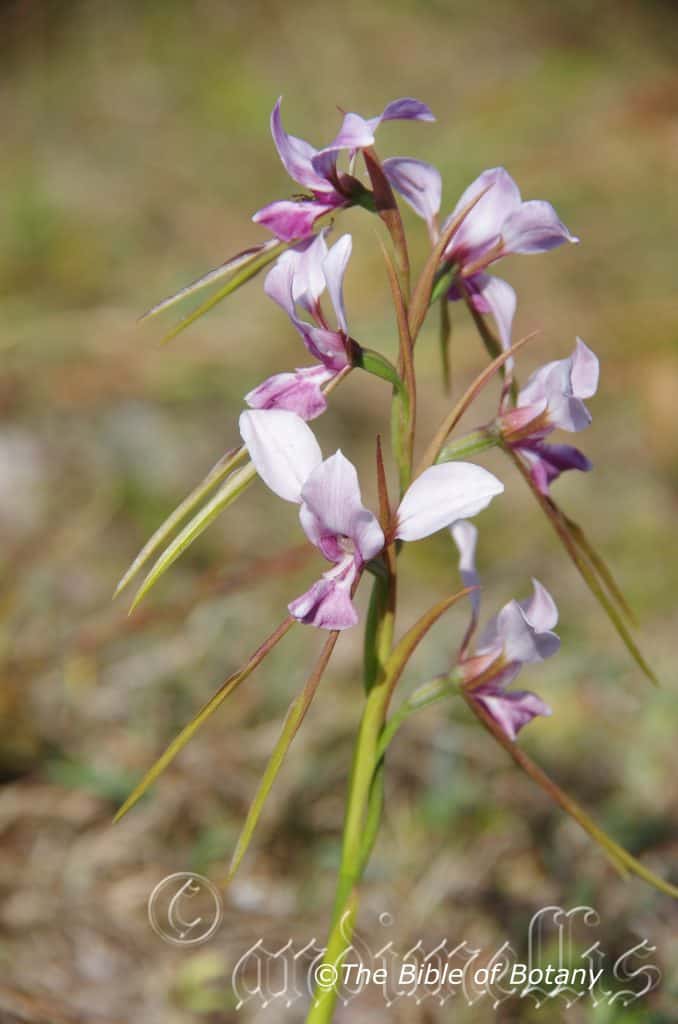
Clarence Valley NSW
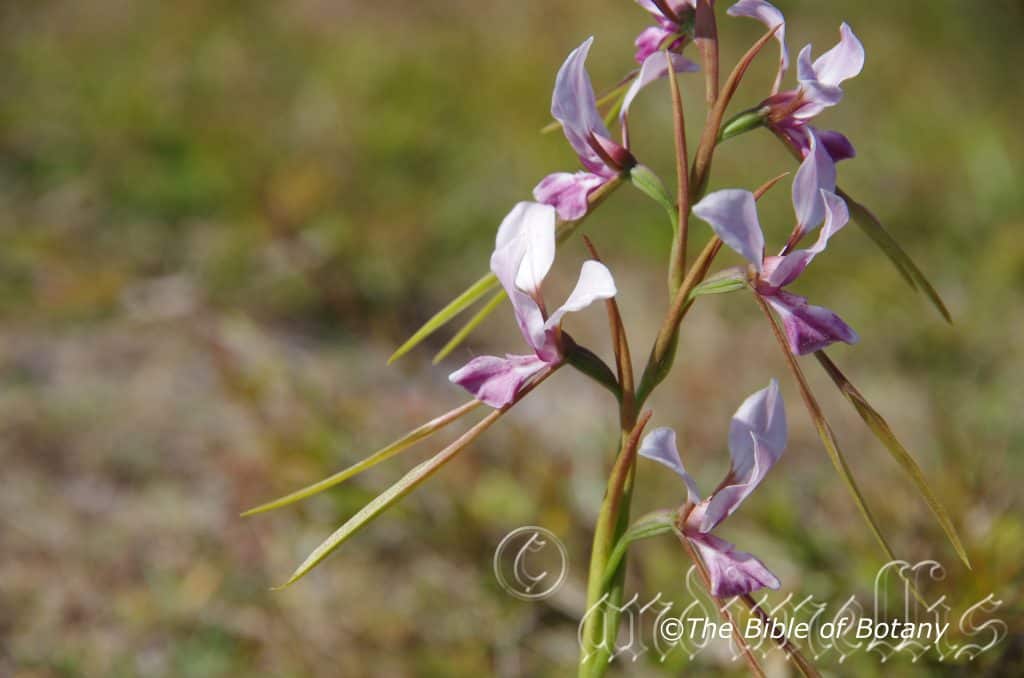
Clarence Valley NSW
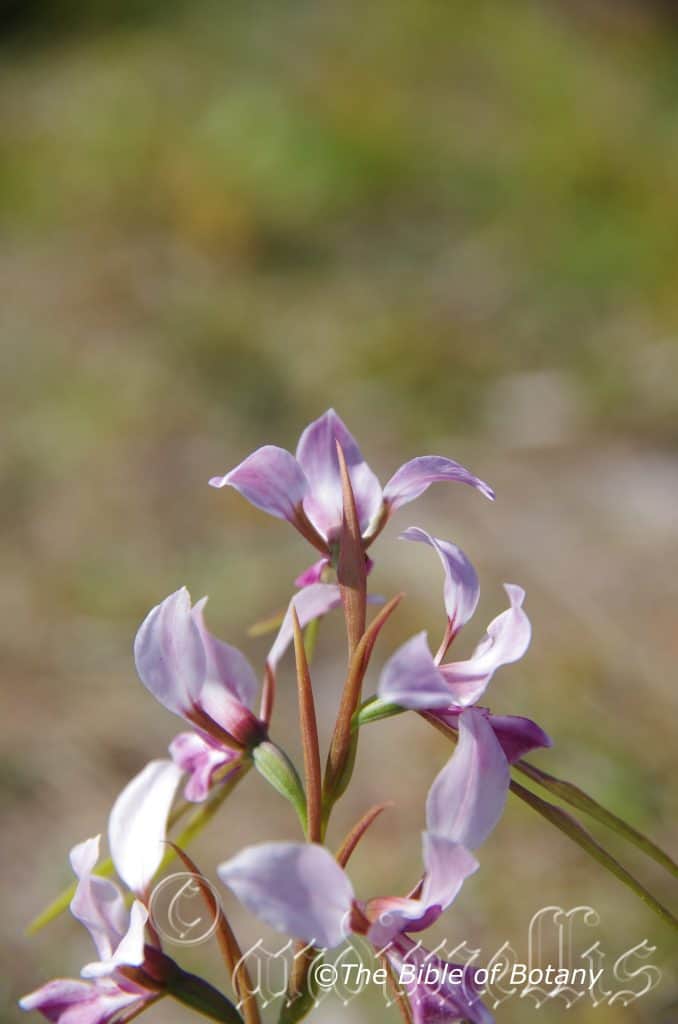
Clarence Valley NSW
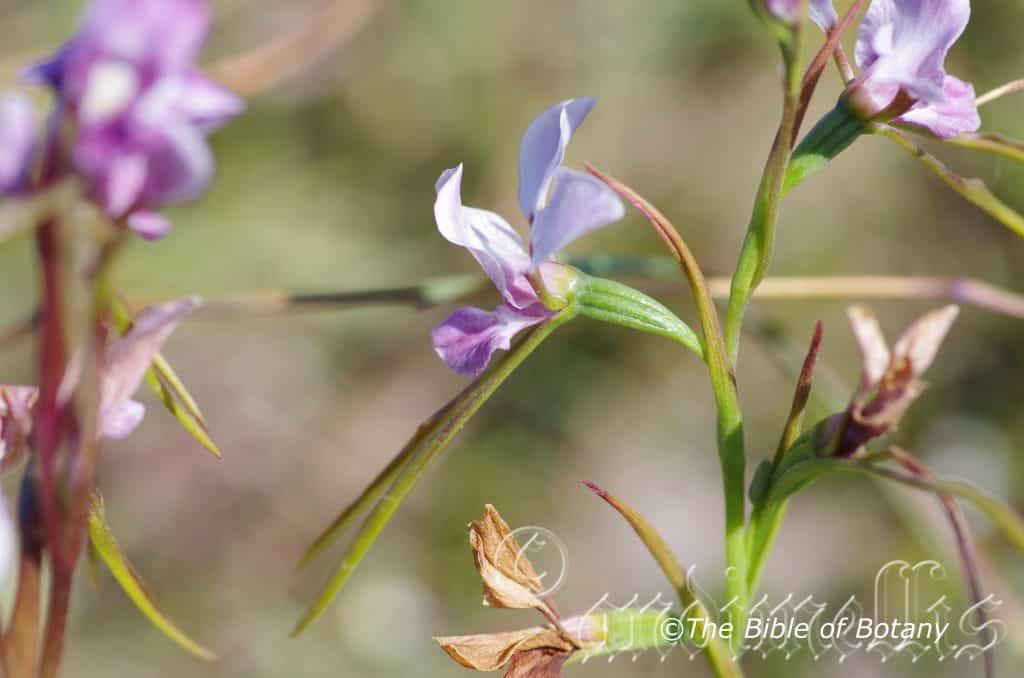
Clarence Valley NSW
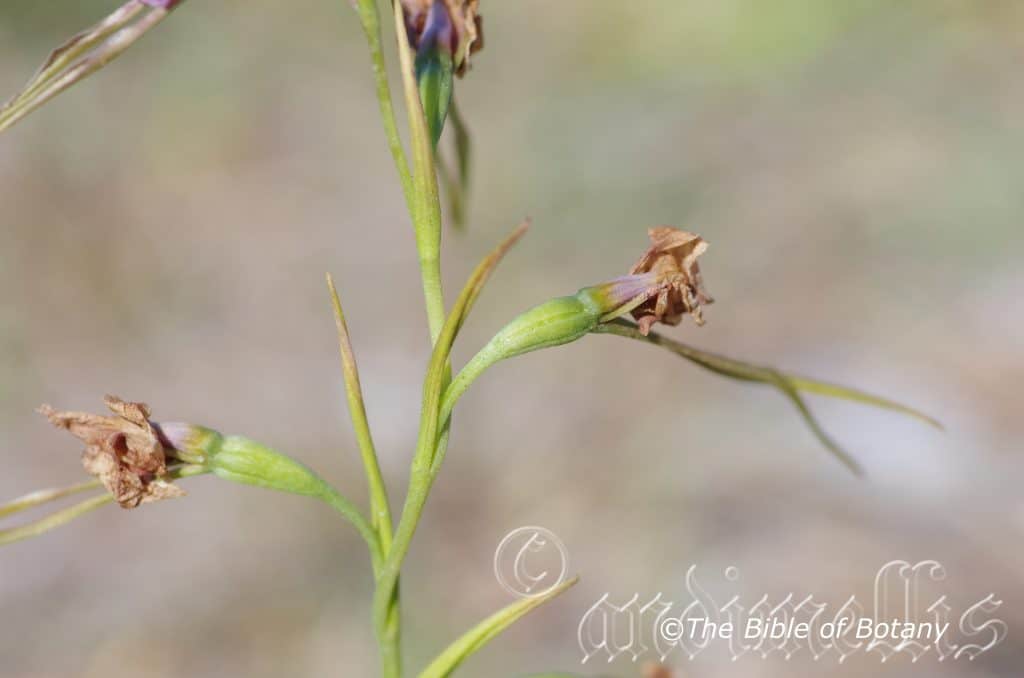
Clarence Valley NSW
xxxxxxxxxxxxxxxxxxxxxxxxxxxxxxxxxxxxxxxxxxxxxxxxxxDiuris punctata
Classification
Unranked: Monocots
Order: Asparagales
Family: Orcidaceae
Subfamily: Orchidoideae
Tribe: Diurideae
Sub tribe: Diuridinae
Genus: From Diploos, which is Ancient Greek for to have two parts or two forms and Oura, which is Ancient Greek for a tail. It refers to organs, which have two distinct types of appendages that resemble a tail or have two organs, which are more prominently displayed like two erect tails.
Species: From Punctatus, which is Latin for very tiny dots or very tiny depressions. It refers to surfaces or organs, which have minute dots or minute depressions.
Varieties: Diuris punctata var. punctata. From Punctatus, which is Latin for very tiny dots or very tiny depressions. It refers to surfaces or organs, which have minute dots or minute depressions.
Varieties: Diuris punctata var. sulfurea. From Sulphur, which is Latin for sulphate yellow. It refers to the colour of flowers, which are bright sulphur yellow.
Common Name: Purple Donkey Orchid.
Distribution: Diuris punctata var. punctata is found south from near Cairns in far north Queensland to the Grampians in south western Victoria. It is mainly found on the Western Slopes, on and east of the Great Dividing Range to the coast. It is also found in several isolated populations further west which may indicate that it may be more widespread than has been reported.
Diuris subsp. punctata var. sulfurea is restricted to a small area near Guyra. Despite living in the area for many years I have never had the good fortune of seeing this sub species.
https://avh.ala.org.au/occurrences/search?taxa=Diuris+punctata#tab_mapView
Habitat Aspect Climate:
Diuris punctata prefers dappled sunlight to light filtered shade. It grows in moist open schlerophyll forests and moist heath lands. The altitude ranges from 50 meters ASL to 700 meters ASL.
The temperatures range from minus 2 degrees in August to 38 degrees in January.
The rainfall ranges from lows of 200mm to an average of 2600mm annually.
Soil Requirements:
Diuris punctata prefers sandy loams to light sandy clays. The soils are derived from decomposed brown basalt, black basalt, metamorphic rocks and with a greater preference for sandstone or granite. The soils are associated with plenty of forest and grass litter. The soils pH ranges from 5pH to 6.5pH are preferred. It does not tolerate waterlogged soils. Non saline soils to moderately saline soils are tolerated.
Height & Spread:
Wild Plants: 0.4m to 0.75m by 0.1m to 0.2m.
Characteristics:
Diuris punctata’s simple conduplicate, linear leaves measure 15mm to 30mm in length by 3mm to 4mm in width. The bases are clasping while the apexes are tapering. The margins are entire and become attenuate on the petioles.
The inflorescence of Diuris punctata is a long, perpendicular raceme. There are 1 to 10 individual flowers on a raceme. The raceme measures 300mm to 600mm in length. The flowers measure 50mm to 60mm in width. The flowers are golden yellow to orange with brown markings on the dorsal sepal and labellum.
The erect, broadly ovate to elliptical dorsal sepal is oblique with backward decurve margins are deep pink to purple-pink. The dorsal sepal measures 10mm to 18mm in length by 8mm to 14mm in width. The long, linear to narrow lanceolate, deflexed lateral sepals are twisted, grass-green externally and maroon internally. The lateral sepals measure 30mm to 40mm in length by 2mm to 5mm in width.
The erect, divergent, ovate to orbicular lateral petals measure 7mm to 17mm in length by 7mm to 15mm in width. The deep maroon to deep maroon-purple or deep burgundy claw measures 2mm to 6mm in length.
The labellum measures 9mm to 15mm in length. The linear to cuneate lateral lobes on the labellum measure 3.5mm to 4mm in length by 1.5mm to 4mm in width at the apex. The margins are entire or irregularly shallowly sinuate while the mid lobe is cordate to broad ovate to reniform when flattened and measures 10mm to 15mm in length by 10mm to 15mm in width. The thick callus has linear-triangular divergent ridges and measures 5mm in length. The area between the calluses are pale yellow to deep yellow. The flowers appear from September to December.
Sub Specie Differences:
Diuris punctata var. punctata‘s flowers are deep maroon to deep maroon-purple or deep burgundy.
Diuris punctata var. sulfurea‘s flowers are sulphur yellow with deep orange to deep orange-brown markings.
Wildlife:
Diuris punctata’s wildlife is unknown to the author
Cultivation:
Diuris punctata is a very attractive orchid that would be very difficult to grow in the nursery. If you are fortunate enough to have Diuris punctata growing on your property then design the garden around them. It is long lived and all that is needed is to supply a good layer of mulch around them on an annual rotation. Ensure the mulch is similar to the type that already exists as any change may disrupt the growth of microorganisms and lead to the plants death. The mulch should be the same as what is lying on the surface naturally. Many ground orchids have a symbiotic relationship with specific fungi and need that fungus to survive.
Mark the spot as they flower because when they die down after flowering you will forget and have the real chance of killing them. I learnt this lesson early where I once had thousands of Spiranthes australis on the block within several years they had vanished gone for ever. I have regretted my early regeneration projects of slash and replant ever since. I have marked all my ground orchids and lilies ever since with survey pegs while it is in flower so I remember exactly where it is. The pegs are always 150mm to the east of the plant; which is far enough away, as not to cause damage to the roots. Some orchids do not grow and flower every year.
1. Obtain relevant materials
The first step in growing orchid from seed will be sourcing and having at the ready all materials that will be required in the propagation process.
This includes all of the following:
Unripe orchid seed capsule. If there are 2 capsules secure the second capsule immediately after the first capsule splits or if only one capsule as soon as it changes colour.
Orchid gelling medium with agar which can be purchased from an orchid society or a specialist nursery.
Distilled water
Cooking pot
Spoon
Oven-safe glass or polypropylene containers with lids
Sealable bags
Clean, sterilized cutting board
Rubber gloves
Paper towels
Tweezers or forceps
70 percent ethanol
Bleach
Scalpel or sharp knife
Planting pot
Orchid compost
Length of wire metal
Plastic spray bottle.
deep petri dishes or sterile jars.
2. Prepare agar medium
The agar medium is a special orchid gelling mixture that distilled water will be added to distilled water.
To prepare the medium, mix equal parts of orchid gelling medium with distilled water in a cooking pot.
Place the pot on a stove and bring the mixture to boil for while stirring continuously for two minutes.
Pour the mixture into the petri dishes glass or propylene containers while ensuring not to fill the containers above 20 percent of their volume.
Loosely replace the lids to the containers. Sterilize the containers by heating them up in a microwave oven for between 2 to 3 minutes.
Spray 70 percent ethanol into a sealable bag to create a sterile environment. Transfer the heated containers into the sealable bag.
Allow the containers to cool a bit before tightening their lids and then sealing the bag. Leave the containers to stand for a few days until the mixture solidifies.
3. Prepare seed capsule and work surface
Place an open pot of water on a stove and bring to boil. Place the cutting board in the oven and sterilize.
Put on rubber gloves and sterilize the forceps, and scalpel with 70 percent ethanol.
Insert the seed capsule into a bowel filled with bleach for about fifteen minutes.
Sterilize seed capsule again with 70 percent ethanol and place on grill.
Using the sterilized scalpel, cut open the seed capsule to reveal the seeds. Using a scalpel or sharp knife, scrape out the seeds from the capsule unto an ethanol soaked paper towel.
4. Flasking of the seed
Take out the petri dishes or glass jars containers holding the agar medium. Over the steam, open up the containers and transfer seeds from the ethanol soaked paper towel into the individual containers using the sterilized forceps.
The amount of seeds will determine the number of containers required. Replace the lid of the containers and place them on a window sill that receives indirect sunlight.
5. Wait and exercise patience
All that can be done at this point is to wait until the seeds germinate. The amount of time that this might take varies and is dependent on the particular species.
Generally, the time can range from a few months to a few years. During this period of waiting, ensure the containers are free from contamination to ensure that germination is not disrupted.
6. Emergence of protocorms
Protocorms are tuber-shaped bodies with rhizoids that are produced by the young seedlings of various orchids. Protocorms represent the embryonic form of the orchid plant.
Their emergence after the period of waiting at an affirmation that everything in the propagation process is on track.
7. Transflask orchid seedlings is done after they have developed roots
Upon the emergence of the protocorms, consistently observe the growth of the seedlings. At the point when the seedlings appear to overcrowd the flask, transflasking should be carried out, typically within 30 and 60 days.
* This is done by removing individual seedlings using sterilized tweezers from the original containers and placing them in new containers also filled, in a proportion similar to the original, with agar medium. 6 to 8 in a standard petri dish or 1or 2 to a test tube
8. Transplant seedlings into planting pots
On the presumption that there are no disruptions to the plant growth, the seedlings will eventually outgrow the containers.
At this point, it is to be transplanted into planting pots. A good rule of thumb to determine when it is ready to be transplanted is when the seedlings have developed roots that have grown up to the length of one-quarter of an inch.
To transplant, prepare a planting pot or other container for receiving the seedling by majorly filling it up with coarse fir bark and possibly some slightly moist orchid compost mixture containing perlite, fine charcoal, redwood bark shavings, etc.
To extract the seedlings, submerge the containers in warm water to help loosen the agar gel.
Once the agar medium is softened, twist a piece of metal to form a loop and in turn, use it to carefully pull out the seedlings from the container. It is best done if the agar and seedling can be removed together.
The seedlings can be further rinsed in lukewarm water to remove any excess agar mixture still stuck to them.
Following this, the seedlings can now be planted into the prepared pot with at least 50mm of space between each individual seedling.
9. Positioning the orchid
The seedling once fully transplanted should be placed in a location that is warm with good indirect sun light.
Slowly position the pots into an area that closely assimilates the conditions it will be growing under.
The choice as to whether the plant should be exposed to full sun or in direct sunlight will be dependent on the particular orchid specie.
10. Subsequent care of the plant
After the first week, the seedling can be misted several times a day and watered just once a week.
A guide in watering the plant will be using the dryness of the fir back that is, water the plant until the fir back is completely moistened and wait till it has completely dried out before watering again.
Fertilize using seaweed, fish emulsion or organic chicken pellets soaked in water on an alternate basis. Fertilize every two months until the plants are established then annually in early September to October to maintain health, vitality and better flowering.
Further Comments from Readers:
Hi reader, it seems you use The Bible of Botany a lot. That’s great as we have great pleasure in bringing it to you! It’s a little awkward for us to ask, but our first aim is to purchase land approximately 1,600 hectares to link several parcels of N.P. into one at The Pinnacles NSW Australia, but we need your help. We’re not salespeople. We’re amateur botanists who have dedicated over 30 years to saving the environment in a practical way. We depend on donations to reach our goal. If you donate just $5, the price of your coffee this Sunday, We can help to keep the planet alive in a real way and continue to bring you regular updates and features on Australian plants all in one Botanical Bible. Any support is greatly appreciated. Thank you.
In the spirit of reconciliation we acknowledge the Bundjalung, Gumbaynggirr and Yaegl and all aboriginal nations throughout Australia and their connections to land, sea and community. We pay our respect to their Elders past, present and future for the pleasures we have gained.
Diuris sulphurea
Classification
Unranked: Monocots
Order: Asparagales
Family: Orcidaceae
Subfamily: Orchidoideae
Tribe: Diurideae
Sub tribe: Diuridinae
Genus: From Diploos, which is Ancient Greek for to have two parts or two forms and Oura, which is Ancient Greek for a tail. It refers to organs, which have two distinct types of appendages that resemble a tail or have two organs, which are more prominently displayed like two erect tails.
Species: From Sulphur, which is Latin for sulphate yellow. It refers to flowers, which are bright yellow.
Common Name: Tiger Orchid or Hornet Orchid.
Distribution:
Diuris sulphurea is a common wide spread species found south from the upper reaches of the Burnette River and Kilkivin in southern coastal Queensland to the Narracorte Coastal Plains Conservation Park and Padthaway Conservation Park in south eastern South Australia. It is mainly found on the Western Slopes on and east of the Great Dividing Range to the coast in the east and on the southern half of Victoria.
https://avh.ala.org.au/occurrences/search?taxa=Diuris+sulphurea#tab_mapView
Habitat Aspect Climate:
Diuris sulphurea prefers dappled sunlight to light filtered shade. It grows in moist open woodland heaths, moist schlerophyll forest grasslands and moist heath lands. The altitude ranges from 10 meters ASL to 600 meters ASL.
The temperatures range from minus 2 degrees in August to 38 degrees in January.
The rainfall ranges from lows of 450mm to an average of 2000mm annually.
Soil Requirements:
Diuris sulphurea prefers sandy loams to light sandy clays with a thick layer of forest litter or grass litter. The soils are derived from decomposed brown basalt, black basalt, shale, metamorphic rocks, sandstone, granite or alluviums. The soils pH ranges from 5pH to 7pH are preferred. It does not tolerate waterlogged soils. Non saline soils to moderately saline soils are tolerated.
Height & Spread:
Wild Plants: 0.15m to 0.35m by 0.75m to 0.1m.
Characteristics:
Diuris sulphurea‘s 1 to 3 simple, conduplicate, linear leaves are measure 20mm to 50mm in length by 3mm to 4mm in width. The bases are clasping while the apexes are tapering. The margins are entire and become attenuate on the petioles.
The inflorescence of Diuris sulphurea is a long, sturdy, perpendicular raceme. There are 2 to 7 individual flowers on a raceme. The racemes measure 150mm to 320mm in length. The flowers measure 18mm to 23mm in width. The flowers are golden yellow to orange with brown markings on the dorsal sepal and labellum.
The erect, oblique ovate dorsal sepals measure 9mm to 21mm in length by 8mm to 16mm in width.
The deflexed, parallel or crossed over conduplicate, linear to lanceolate lateral sepals are often slightly twisted. The strongly conduplicate section opens and spreads near the apex or spathulate section. The sepals are lime-green and deep purple. The lateral sepals measure 12mm to 25mm in length by 1.5mm to 5mm in width.
The divergent, recurved, ovate to orbicular lateral petals measure 6mm to 18mm in length by 6mm to 12mm in width. The apex is obtuse or mucronate. The deep brown on the claws extends part way up the base of the petals. The conduplicate claws measure 3.5mm to 10mm in length.
The labellum measures 7mm to 15mm in length. The narrow-triangular to cuneate lateral lobes on the labellum measure 3.6mm to 6mm in length by 3mm to 4.5mm in width near the apex. The margins are usually crenulate or at times entire. The thick callus has divergent ridges and measures 3mm to 5mm in length. The flowers appear from September to December.
Diuris sulphurea elliptical seed pods swell to 20mm to 30mm long by 12mm to 18mm. It is glossy olive green with raised longitudinal ridges in a deep red-brown similar to the spike. They dry to a light semi glossy olive-brown with deeper reddish-brown longitudinal stripes. The seeds are released on fine flagella thread.
Wildlife:
Diuris sulphurea‘s wildlife is unknown to the author
Cultivation:
Diuris sulphurea is a very attractive orchid that would be very difficult to grow in the nursery. If you are fortunate enough to have Diuris sulphurea growing on your property then design the garden around them. It is long lived and all that is needed is to supply a good layer of mulch around them on an annual rotation. Ensure the mulch is similar to the type that already exists as any change may disrupt the growth of microorganisms and lead to the plants death. The mulch should be the same as what is lying on the surface naturally. Many ground orchids have a symbiotic relationship with specific fungi and need that fungus to survive.
Mark the spot as they flower because when they die down after flowering you will forget and have the real chance of killing them. I learnt this lesson early where I once had thousands of Spiranthes australis on the block within several years they had vanished gone for ever. I have regretted my early regeneration projects of slash and replant ever since. I have marked all my ground orchids and lilies ever since with survey pegs while it is in flower so I remember exactly where it is. The pegs are always 150mm to the east of the plant; which is far enough away, as not to cause damage to the roots. Some orchids do not grow and flower every year so the pegs are vital indicators.
Propagation:
All ferns and orchids that are declared rare, vulnerable or endangered are protected by Federal and State Laws and must not be removed from the wild unless you are a land developer, mining company or main Roads department etc. This includes bulbs, roots, leaves and flowers. No part of any plant can be removed from Federal, State or Local Government land without the prior permission of the authority and this includes the spore.
If it is totally unavoidable and relocation is the only alternative then Diuris sulphurea can be relocated easily within the same locality with a lot of preparation. First prepare the area of ground where the new clod will appear. Water both areas thoroughly a few days before. If the weather is still cool then make 4 deep cuts with the spade vertically down one either side of the orchid and out about 150mm from the plant. Dig down one side so a fifth cut can be made at about 250mm below the orchid. Remove clod being careful not to break the clod. If you are in sandy soil it will pay to first wrap the clod in hessian or paper to prevent the clod disintegrating. Place the clod in its new home leaving it wrapped in the paper or hessian. Replace any soil around the clod and water in thoroughly. Mark with a peg. It maybe 12 months before any new shoot appear. I have used this method following flowering on a friend‘s property when only the seed pods were distinguishable on the orchids. We covered the area with leaf litter from the original site prior to watering in. Following the initial watering and one, a week later the area was left to nature. We had a 100mm success rate and he has a nice collection of Diuris sulphurea in a concentrated area within his garden. Better to have taken the chance than having them covered in concrete from the house foundation.
Fertilize using seaweed, fish emulsion or organic chicken pellets soaked in water on an alternate basis. Fertilize annually in early July to August to maintain health, vitality and better flowering.
1. Obtain relevant materials
The first step in growing orchid from seed will be sourcing and having at the ready all materials that will be required in the propagation process.
This includes all of the following:
Unripe orchid seed capsule. If there are 2 capsules secure the second capsule immediately after the first capsule splits or if only one capsule as soon as it changes colour.
Orchid gelling medium with agar which can be purchased from an orchid society or a specialist nursery.
Distilled water
Cooking pot
Spoon
Oven-safe glass or polypropylene containers with lids
Sealable bags
Clean, sterilized cutting board
Rubber gloves
Paper towels
Tweezers or forceps
70 percent ethanol
Bleach
Scalpel or sharp knife
Planting pot
Orchid compost
Length of wire metal
Plastic spray bottle.
deep petri dishes or sterile jars.
2. Prepare agar medium
The agar medium is a special orchid gelling mixture that distilled water will be added to distilled water.
To prepare the medium, mix equal parts of orchid gelling medium with distilled water in a cooking pot.
Place the pot on a stove and bring the mixture to boil for while stirring continuously for two minutes.
Pour the mixture into the petri dishes glass or propylene containers while ensuring not to fill the containers above 20 percent of their volume.
Loosely replace the lids to the containers. Sterilize the containers by heating them up in a microwave oven for between 2 to 3 minutes.
Spray 70 percent ethanol into a sealable bag to create a sterile environment. Transfer the heated containers into the sealable bag.
Allow the containers to cool a bit before tightening their lids and then sealing the bag. Leave the containers to stand for a few days until the mixture solidifies.
3. Prepare seed capsule and work surface
Place an open pot of water on a stove and bring to boil. Place the cutting board in the oven and sterilize.
Put on rubber gloves and sterilize the forceps, and scalpel with 70 percent ethanol.
Insert the seed capsule into a bowel filled with bleach for about fifteen minutes.
Sterilize seed capsule again with 70 percent ethanol and place on grill.
Using the sterilized scalpel, cut open the seed capsule to reveal the seeds. Using a scalpel or sharp knife, scrape out the seeds from the capsule unto an ethanol soaked paper towel.
4. Flasking of the seed
Take out the petri dishes or glass jars containers holding the agar medium. Over the steam, open up the containers and transfer seeds from the ethanol soaked paper towel into the individual containers using the sterilized forceps.
The amount of seeds will determine the number of containers required. Replace the lid of the containers and place them on a window sill that receives indirect sunlight.
5. Wait and exercise patience
All that can be done at this point is to wait until the seeds germinate. The amount of time that this might take varies and is dependent on the particular species.
Generally, the time can range from a few months to a few years. During this period of waiting, ensure the containers are free from contamination to ensure that germination is not disrupted.
6. Emergence of protocorms
Protocorms are tuber-shaped bodies with rhizoids that are produced by the young seedlings of various orchids. Protocorms represent the embryonic form of the orchid plant.
Their emergence after the period of waiting at an affirmation that everything in the propagation process is on track.
7. Trans flask orchid seedlings is done after they have developed roots
Upon the emergence of the protocorms, consistently observe the growth of the seedlings. At the point when the seedlings appear to overcrowd the flask, trans flasking should be carried out, typically within 30 and 60 days.
* This is done by removing individual seedlings using sterilized tweezers from the original containers and placing them in new containers also filled, in a proportion similar to the original, with agar medium. 6 to 8 in a standard petri dish or 1or 2 to a test tube
8. Transplant seedlings into planting pots
On the presumption that there are no disruptions to the plant growth, the seedlings will eventually outgrow the containers.
At this point, it is to be transplanted into planting pots. A good rule of thumb to determine when it is ready to be transplanted is when the seedlings have developed roots that have grown up to the length of one-quarter of an inch.
To transplant, prepare a planting pot or other container for receiving the seedling by majorly filling it up with coarse fir bark and possibly some slightly moist orchid compost mixture containing perlite, fine charcoal, redwood bark shavings, etc.
To extract the seedlings, submerge the containers in warm water to help loosen the agar gel.
Once the agar medium is softened, twist a piece of metal to form a loop and in turn, use it to carefully pull out the seedlings from the container. It is best done if the agar and seedling can be removed together.
The seedlings can be further rinsed in lukewarm water to remove any excess agar mixture still stuck to them.
Following this, the seedlings can now be planted into the prepared pot with at least 50mm of space between each individual seedling.
9. Positioning the orchid
The seedling once fully transplanted should be placed in a location that is warm with good indirect sun light.
Slowly position the pots into an area that closely assimilates the conditions it will be growing under.
The choice as to whether the plant should be exposed to full sun or in direct sunlight will be dependent on the particular orchid specie.
10. Subsequent care of the plant
After the first week, the seedling can be misted several times a day and watered just once a week.
A guide in watering the plant will be using the dryness of the fir back that is, water the plant until the fir back is completely moistened and wait till it has completely dried out before watering again.
Fertilize using seaweed, fish emulsion or organic chicken pellets soaked in water on an alternate basis. Fertilize every two months until the plants are established then annually in early September to October to maintain health, vitality and better flowering.
Further Comments from Readers:
Hi reader, it seems you use The Bible of Botany a lot. That’s great as we have great pleasure in bringing it to you! It’s a little awkward for us to ask, but our first aim is to purchase land approximately 1,600 hectares to link several parcels of N.P. into one at The Pinnacles NSW Australia, but we need your help. We’re not salespeople. We’re amateur botanists who have dedicated over 30 years to saving the environment in a practical way. We depend on donations to reach our goal. If you donate just $5, the price of your coffee this Sunday, We can help to keep the planet alive in a real way and continue to bring you regular updates and features on Australian plants all in one Botanical Bible. Any support is greatly appreciated. Thank you.
In the spirit of reconciliation we acknowledge the Bundjalung, Gumbaynggirr and Yaegl and all aboriginal nations throughout Australia and their connections to land, sea and community. We pay our respect to their Elders past, present and future for the pleasures we have gained.
Dodonaea boroniifolia
Classification
Unranked: Eudicots
Unranked: Rosids
Family: Sapindales
Subfamily: Dodonaeoideae
Genus: Is named in honour of Rembert Dodoens; 1517-1585, who was a Flemish botanist and professor.
Species: Is named in honour of Francesco Borone; 1769-1794, who was an Italian botanical enthusiast and Folium, which is Latin for foliage. It refers to foliages, which resemble many of the foliages in the Boronia genus.
Common Name: Fern Leaf Hop Bush.
Distribution:
Dodonaea boroniifolia is found south from Chillagoe to Wratham Park in northern Queensland to the Grampians in south western Victoria. It is mainly found on the western side of the Great Dividing Range to the western slopes. There are several isolated populations further west including Settlement Creek near Burke and The Diamantina National Park.
There are several sightings accredited to Western Australia however the state Herbarium of Western Australia doesn’t recognize the species in that state. They included along the Eyre Highway near Balladonia, south of Coolgardie and Dandaragan.
https://avh.ala.org.au/occurrences/search?taxa=Dodonaea+boroniifolia#tab_mapView
Habitat Aspect Climate:
Dodonaea boroniifolia prefers full sun to light shade. It grows among medium trees, or low trees in dry open woodlands, moist open woodlands, open Eucalyptus forests, scrubs, dry heaths or open plains. The altitude ranges from 100 meters ASL to 400 meters ASL.
The temperatures range from minus 4 degrees in August to 44 degrees in January.
The rainfall ranges from lows of 300mm to 1600mm average per annum.
Soil Requirements:
Dodonaea boroniifolia prefers to grow on deep, poor to medium quality sandy silts to sandy loams. The soils are mainly derived from decomposed sandstone and alluvial silts. The pH ranges from 5.5pH to 7pH. It is not tolerant of waterlogged soils. Non saline soils to moderately saline soils are tolerated.
Height & Spread:
Wild Plants: 1.2m to 2m by 1.2m to 2m
Characteristics:
Dodonaea boroniifolia is usually an erect small shrub or at times spreading shrub. The stems are brown or grey and semi glossy. The branchlets are thin reddish-brown glabrous and semi glossy to glossy. The new growth and juvenile growth is grey green to blue-green and glabrous or covered in off white puberulent hairs.
Dodonaea boroniifolia‘s alternate oblong odd pinnate leaves measure 10mm to 35mm in length by 6mm to 14mm in width. The 7 to 15, angular obovate to obovate leaflets measure 3mm to 8mm in length by 1.5mm to 4.5mm in width. The petioles measure 1mm to 8mm in length. The bases are broad cuneate while the apexes are truncate with 3 to 6 teeth or minutely lobed. The concolourous laminas are deep green and usually glabrous or at times covered in off white puberulent hairs while the lower laminas are glabrous and sparsely covered in small white glands. The leaf margins are entire and revolute or recurved.
The dioecious or rarely polygamous dioecious inflorescences of Dodonaea boroniifolia are born small clusters of 3 or 4, from the axils. The pedicels measure 4mm to 8mm in length. The 4, discolourous sepals are deep green externally and paler to yellow green internally are caduceous and glabrous or covered in off white puberulent hairs. The oblong sepals have an acute apex and measure 2.8mm to 4.8mm in length.
The 8 filaments on the male flowers are minute while the anthers are usually glabrous or at times sparsely covered in white pilose hairs on the apex. The anthers are longitudinally ribbed and measure 3mm to 5mm in length.
The ovaries are densely covered in off white pilose hairs. The styles measure 4mm to 6mm in length and have a 4 lobed stigma. The flowers appear from late August to late November.
Dodonaea boroniifolia‘s fruits are a 4 winged capsule. The capsules measure 10mm to 20mm in length by 12mm to 18mm in width. The membranous wings are glabrous or rarely covered in white puberulent hairs. The wings measure 3mm to 5mm in width. The lime green capsules turn bright pink, bright red or bright orange-red then to a pale chartaceous fawn when ripe. The septi fraga dehiscencing capsules hang on the plant for extended periods up to 2 months. The spherical, black, glossy seeds measure 1mm to 1.5mm in diameter.
Wildlife:
Dodonaea boroniifolia‘s capsules and seeds are often eaten by several species of moths or weevils which are unknown to the author.
Cultivation:
Dodonaea boroniifolia is a magnificent small shrub which is well suited to drier, coastal areas, semi-arid zones from the tropic in the north to temperate zones in the south. It thrives on poor sandy loams. In cultivation they will grow 1.5 meters to 2 meters in height by 1.5 meters to 2 meters in diameter when grown in the open.
It can survive temperatures as low as minus 5 degrees and up to 44 degrees. It is drought resistant once established and can cope with the occasional immersion where periodic down pours may flood the land. It is ideal around large sunny swimming pools and courtyards.
The fruiting capsules are the real treat and vary from deeper pink to brilliant scarlet reds and are quite spectacular hanging on the plants for several months, giving colour throughout autumn and winter making a fresh clean tropical look.
Dodonaea boroniifolia also look really good in mass plantings, using one of the smaller, broader leaf forms of Dodonaea boroniifolia with red or orange capsules or burgundy leaves for a strong contrast. The contrasts in colour and leaf forms are very pleasing and natural to the eye. When using this type of planting in a mixed garden of Dodonaea use the broader leaf forms with pink flowers in the center or towards the back and have the smaller leaf forms which also must be shorter towards the front and sides. Try using them as borders, screens and or hedges, again mixing them with some of the other Dodonaea specie for colour, form and height. They look particularly good when inter planted with Dodonaea boroniifolia variety burgundy leaf.
The brightly coloured capsules can be used for indoor arrangements and last for a month or more before fading as long as the water is changed frequently. To ensure good flowering, it is important to prune the plants back to two thirds immediately after the capsule change colour. This will force more growth to the top and give larger and better capsules with long stems. Allow the plants a dormant period in winter. Commence fertilizing on father‘s day and fertilize with our recommended organic native fertilizer every month. This will ensure long stems or great little bushy plants. I find the smaller leaf varieties display the colours better and are usually smaller growing plants at the same time.
Dodonaea boroniifolia is quick growing with a variety to suit every position. They often reach their full potential in just 3 years and flower from the second year. Dodonaea boroniifolia has great prospects as a cut flower in the future and has surprised me that no entrepreneurial young flower farmer has already taken advantage of it because of its ease in growing versatility in climate and soil and the longevity of the colourful capsules. Though not as spectacular Dodonaea viscose red forms, it can be used successfully as a back drop without being overpowering and lasts well indoors.
Propagation:
Seeds: Dodonaea boroniifolia‘s seeds require treatment before sowing. Pre-treat by placing the seeds into a glass of boiling water. Allow the water to cool and leave to soak for 12 to 16 hours. Add a pinch of bicarb in the water for the first 5 to 6 hours before changing the water. Rinse well before sowing.
Sow the treated seeds directly into a seed raising mix and cover with 2mm of the mix. Place the tray in a sunny position. When the seedlings are 25mm to 40mm tall, prick them out and plant them into 50mm native tubes using a seed raising mix. Germination will usually commence after 3 weeks and be completed in 12 weeks from sowing.
Fertilize using Seaweed, fish emulsion or organic chicken pellets soaked in water on an alternate basis. Fertilize every month until established or continue until winter where cut flowers are required.
Once the seedlings reach 150mm to 200mm in height plant them out into their permanent position.
Cuttings: Cuttings should be used if cut flowers are required as the plants are unisexual and only the female plants will deliver the capsules. Remember some male plants will be required in the garden to ensure fertilization. I have seen no research done on the ratio of male plants compared to female plants. A field trip near Coonabarabran in 2002 we counted 1 male plant to 8 to 10 female plants with Dodonaea viscose subsp. cuneata.
1 Prepare the cutting mix by adding one third sharp clean river sand, one third peat and one third perlite. These ingredients are sterilize,
2 Select good material from non diseased plants,
3 Select semi green stems for cuttings. Look for a stem with two or three nodes,
4 Place the cutting on a flat, hard surface, and make a clean down one side of the cutting for 10mm to 15mm with a sharp sterile knife or razor blade. – This scarification of the node will increase the chances of roots emerging from this spot. Now remove all but one or two the leaves, leaving the apex leaves in tact. If the leaves are very large in proportion to the stem, cut off the apical halves.
5 Fill a saucer with water, and place a little mild to medium rooting hormone into another container like a milk bottle top. Dip the node end of the cutting into the water and then into the rooting hormone. Tap off any excess hormone,
6 Use a small dipple stick or old pencil to poke a hole into the soilless potting mix. Ensure the hole is slightly larger than the stem diameter and be careful not to wipe the rooting hormone off the cuttings base, place the cuttings in a pattern ensuring the cuttings are not touching each other,
7 I like to place the pots in Plastic bags to help maintain temperature and moisture. Place in a semi shaded place like under 50mm shade cloth.
8 When the cuttings have struck, open the bag to allow air circulation for a few days to a week,
9 Once hardened off remove the cuttings from the bag and allow to further hardening for a few more days,
10 Transplant into a good potting mix to grow on.
Fertilize using seaweed, fish emulsion or organic chicken pellets soaked in water on an alternate basis. Fertilize every two months until the plants are established then annually in early September to October to maintain health, vitality and better flowering.
Further Comments from Readers:
Hi reader, it seems you use The Bible of Botany a lot. That’s great as we have great pleasure in bringing it to you! It’s a little awkward for us to ask, but our first aim is to purchase land approximately 1,600 hectares to link several parcels of N.P. into one at The Pinnacles NSW Australia, but we need your help. We’re not salespeople. We’re amateur botanists who have dedicated over 30 years to saving the environment in a practical way. We depend on donations to reach our goal. If you donate just $5, the price of your coffee this Sunday, We can help to keep the planet alive in a real way and continue to bring you regular updates and features on Australian plants all in one Botanical Bible. Any support is greatly appreciated. Thank you.
In the spirit of reconciliation we acknowledge the Bundjalung, Gumbaynggirr and Yaegl and all aboriginal nations throughout Australia and their connections to land, sea and community. We pay our respect to their Elders past, present and future for the pleasures we have gained.
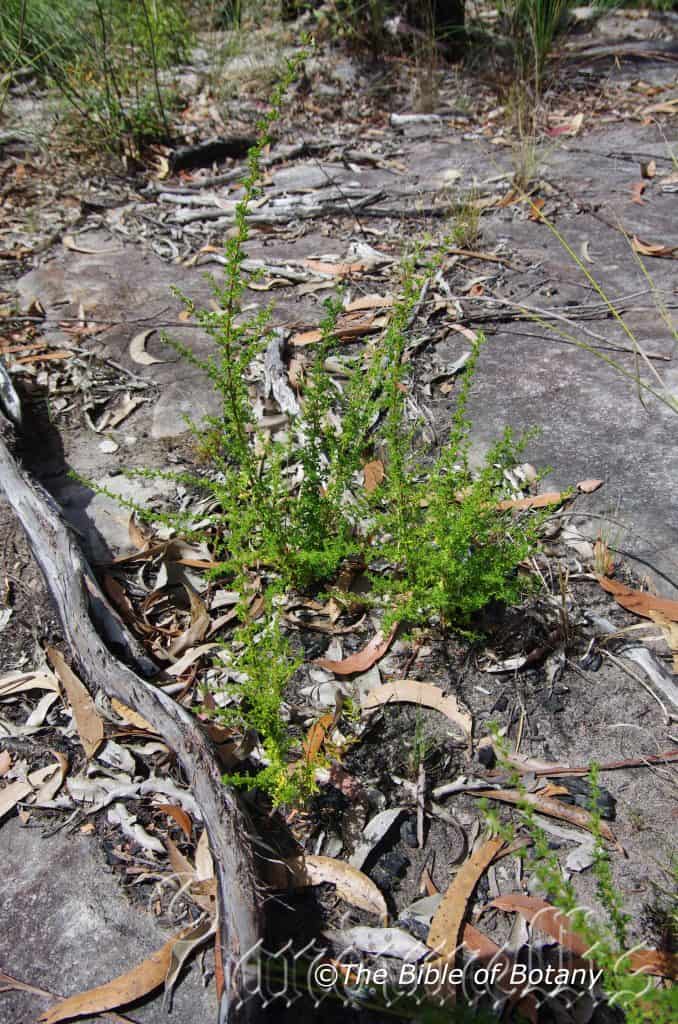
The Pinnacles NSW
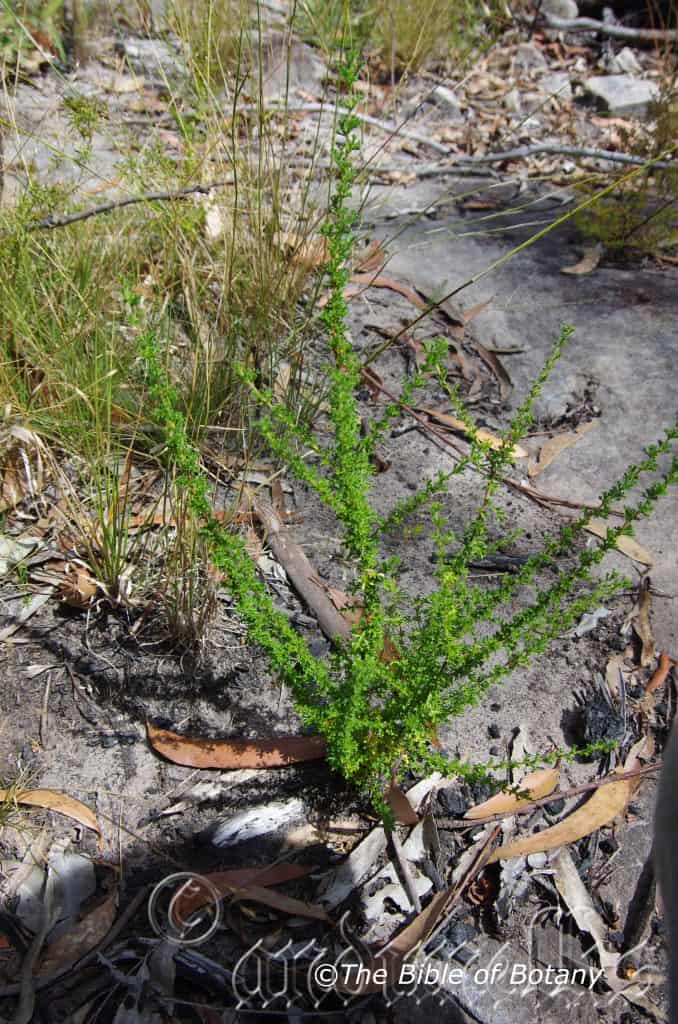
The Pinnacles NSW
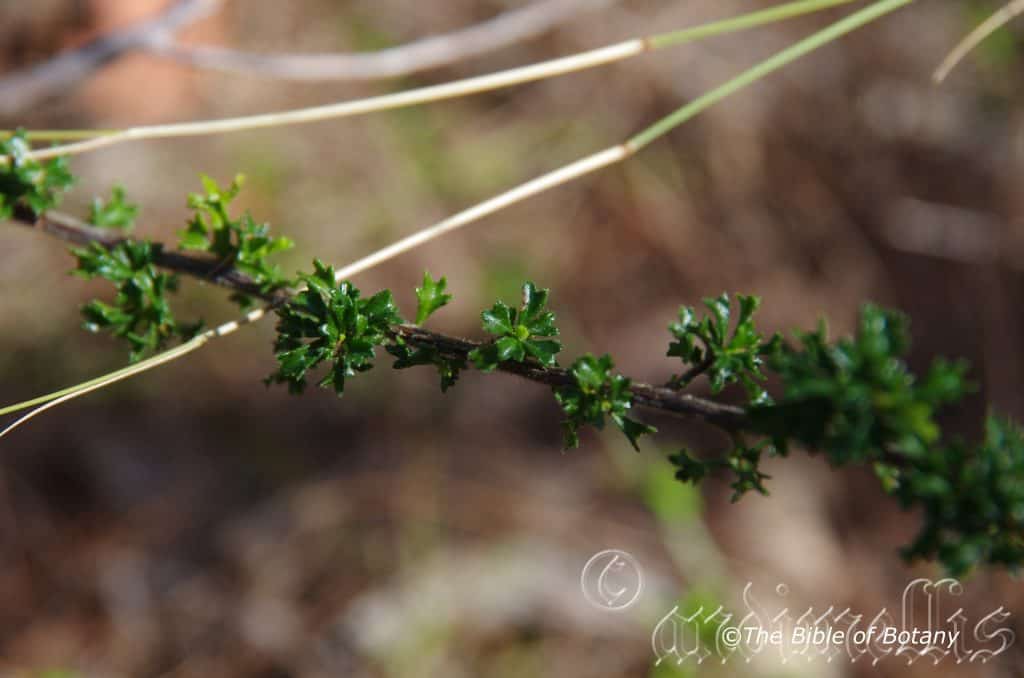
The Pinnacles NSW
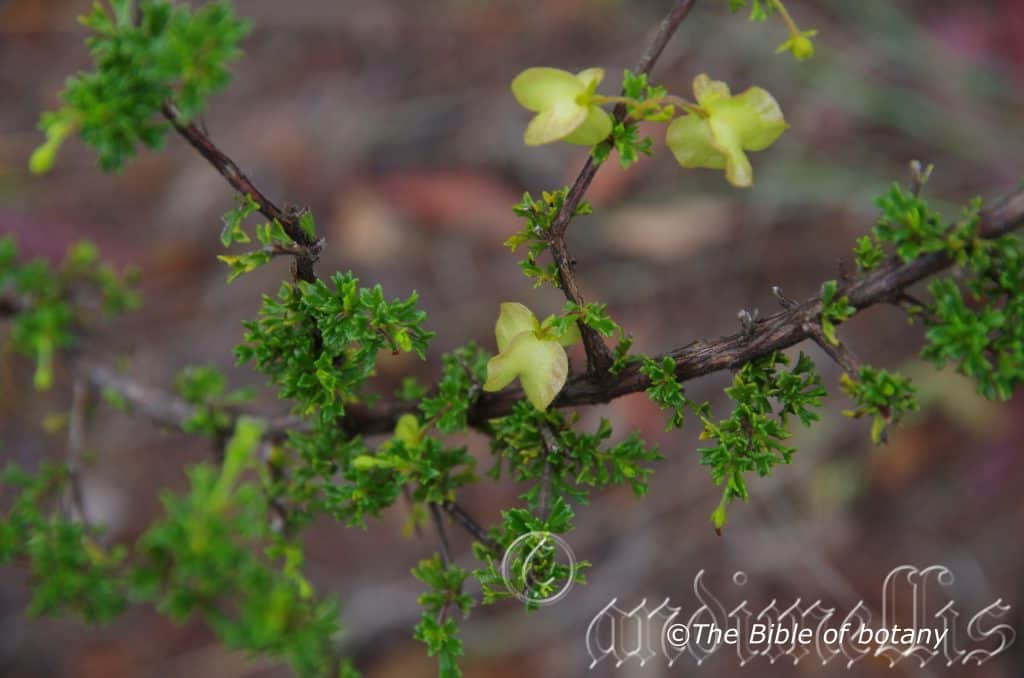
The Pinnacles NSW
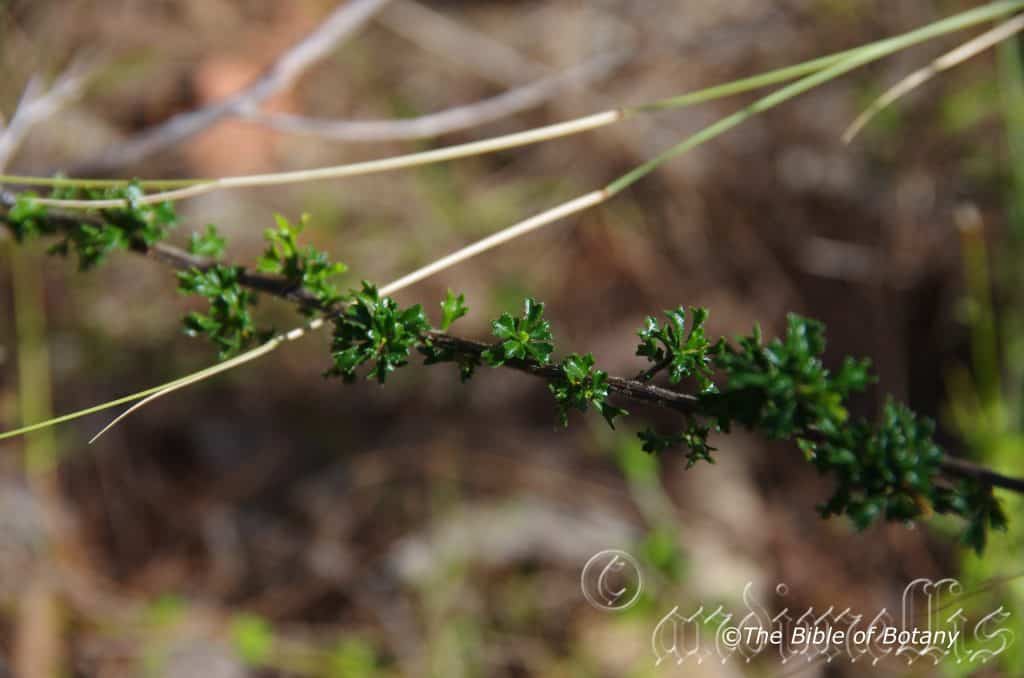
The Pinnacles NSW
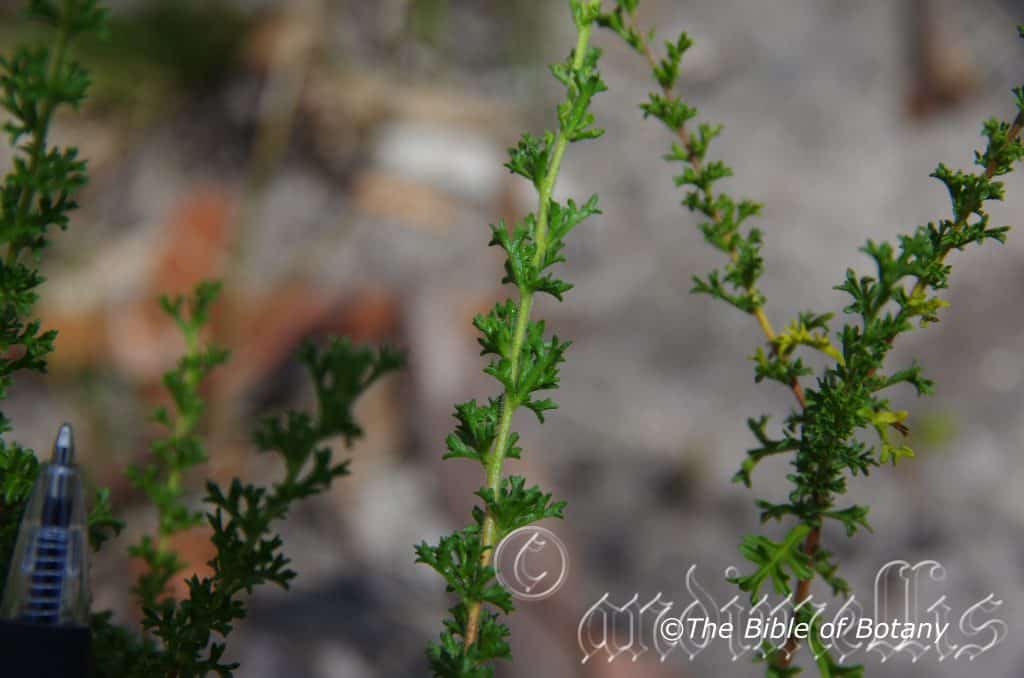
The Pinnacles NSW
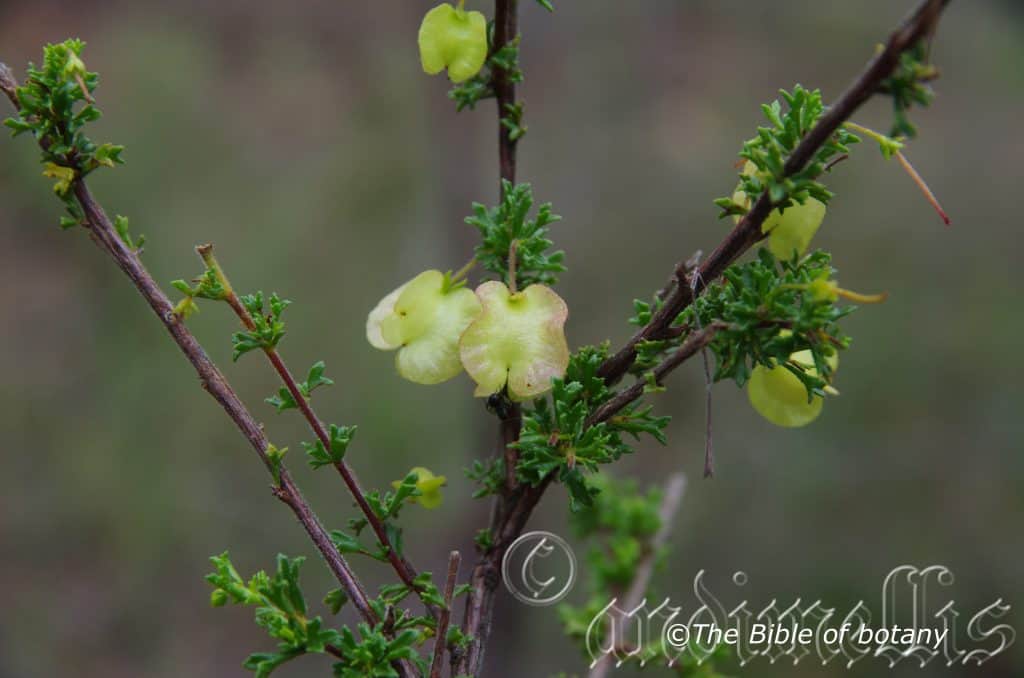
The Pinnacles NSW
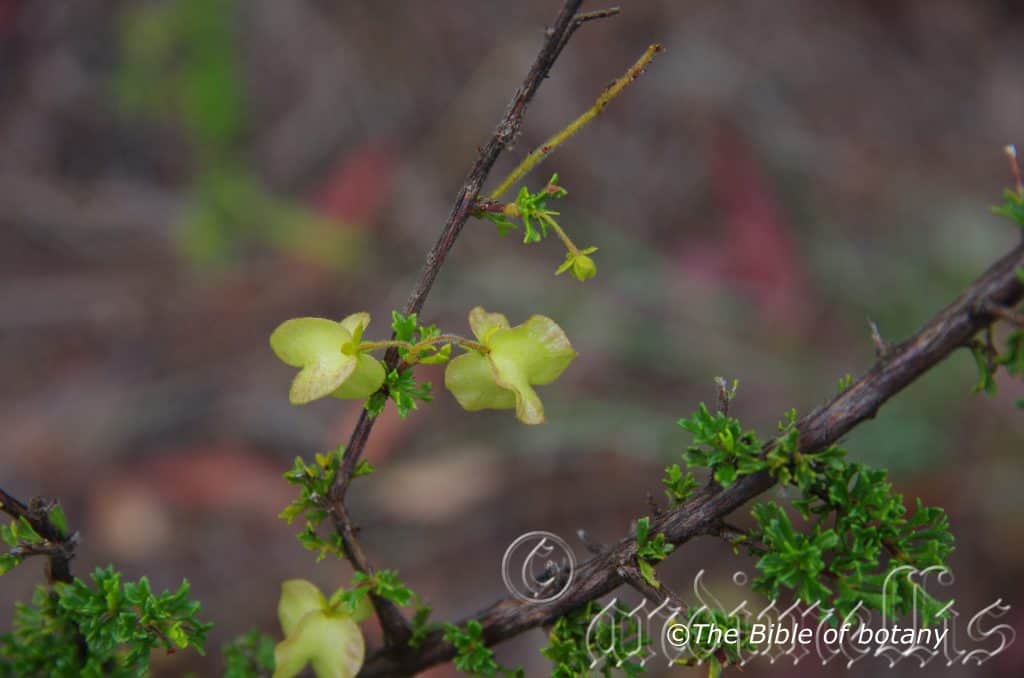
The Pinnacles NSW

Morgan’s Camp Trail Fortis Creek National Park NSW

Morgan’s Camp Trail Fortis Creek National Park NSW
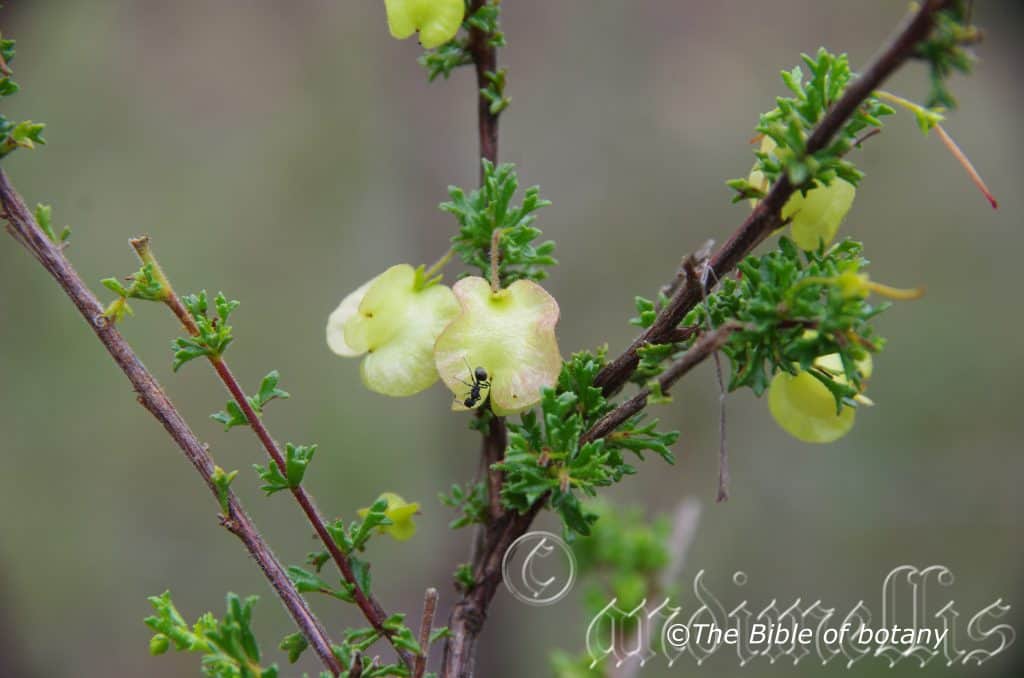
The Pinnacles NSW
Dodonaea crucifolia
Classification
Unranked: Eudicots
Unranked: Rosids
Family: Sapindales
Subfamily: Dodonaeoideae
Genus: Is named in honour of Rembert Dodoens; 1517-1585, who was a Flemish botanist and professor.
Species: From Crux or later Crucis, which are Latin for a cross. It refers to organs or structures, which have the shape of a cross.
Common Name:
Distribution:
Dodonaea crucifolia is restricted to a small area around Grafton, with a second population between The Pinnacles and Banyabba National Park.
https://avh.ala.org.au/occurrences/search?taxa=Dodonaea+crucifolia#tab_mapView
Habitat Aspect Climate:
Dodonaea crucifolia prefers full sun to light shade. It grows in dry open woodlands on escarpments. The altitude ranges from 160 meters ASL to 230 meters ASL.
The temperatures range from 1 degree in August to 44 degrees in January.
The rainfall ranges from lows of 800mm to 1000mm average per annum.
Soil Requirements:
Dodonaea crucifolia prefers to grow on shallow to deep sands derived from decomposed sandstone. The pH ranges from 5.5pH to 6pH. It is not tolerant of waterlogged soils. Non saline soils to slightly saline soils are tolerated.
Height & Spread:
Wild Plants: 1.2m to 2m by 1.2m to 2m.
Characteristics:
Dodonaea crucifolia is usually a small erect shrub with purplish-red stems that are moderately to densely covered in persistent, white hirsute hairs. The new growth is a bright, pale grass-green and is moderately to densely covered in persistent, white hirsute hairs.
Dodonaea crucifolia spiralling usually trifoliate leaves measure 12mm to 18mm in length by 12mm to 18mm in width overall. The three deep lobes are further divided into lobes which usually have 3 smaller lobes. The central lobe measures 12mm to 18mm in length by 7mm to 10mm width while the 2 main lateral lobes measure 7mm to 9mm in length by 6mm to 8mm in width. The discolourous leaves are deep glossy, grass-green and sparsely covered in small pappilate lumps on the upper lamina, while the lower lamina is slightly paler and sparsely to moderately covered in white hirsute hairs. The subsessile, terete petioles are pale grass-green and moderately covered in white hirsute hairs. The bases taper slightly while the lobes apexes are broad acute to acute-obtuse. The margins are entire and recurve upwards strongly near the margins.
The inflorescences of Dodonaea are dioecious. The male flowers pedicels are moderately covered in persistent, white hirsute hairs and measure 1.4mm to 4.5mm in length. The 4 ovate to acute sepals measure 2mm to 2.2mm in length. The 8 stamens are reddish-fawn.
The female flowers pedicels are moderately covered in persistent, white hirsute hairs and measure 9mm to 15mm in length. The 4 lanceolate sepals measure 2.5mm to 3.5mm in length. The bilobed style measures 8mm to 9mm in length.
Dodonaea crucifolia fruits are 4 winged capsules that measure 12mm to 15mm in length by 14mm to 15mm in width. The membranous wings are glabrous and very sparsely covered in very fine papillate lumps and are moderately covered in soft, white ciliate hairs on the wings. The soft pale lemon capsules turn bright pinkish-red starting from the outside when ripe. The septi fraga dehiscing capsules hang on the plant for extended periods. The compressed, elliptical are deep brown to reddish-brown, semi-glossy seeds measure 2.5mm to 3mm in length by 2mm in width.
Wildlife:
Dodonaea crucifolia‘s is unknown to the author.
Cultivation:
Dodonaea crucifolia is a magnificent small shrub which is well suited to drier, coastal areas, semi-arid zones from the tropics in the north to temperate zones in the south. It thrives on poor sandy loams. In cultivation it will grow 1.2 meters to 1.5 meters in height by 1.5 meters to 2 meters in diameter when grown in the open.
The fruiting capsules are the real treat and vary from deeper pink to brilliant scarlet reds and are quite spectacular hanging on the plants for several months, giving colour throughout summer making a fresh clean tropical look.
Dodonaea boroniifolia also looks really good in mass plantings, using one of the smaller, broader leaf forms of Dodonaea boroniifolia with red or orange capsules or burgundy leaves for a strong contrast. The contrasts in colour and leaf forms are very pleasing and natural to the eye. When using this type of planting in a mixed garden of Dodonaea use the broader leaf forms with pink flowers in the center or towards the back and have the smaller leaf forms which also must be shorter towards the front and sides. Try using it as borders, screens and or hedges, again mixing them with some of the other Dodonaea specie for colour, form and height. It looks particularly good when inter planted with Dodonaea crucifolia variety burgundy leaf.
The brightly coloured capsules can be used for indoor arrangements and last for a month or more before fading as long as the water is changed frequently. To ensure good flowering, it is important to prune the plants back to two thirds immediately after the capsule change colour. This will force more growth to the top and give larger and better capsules with long stems. Allow the plants a dormant period in winter. Commence fertilizing on father‘s day and fertilize with our recommended organic native fertilizer every month. This will ensure long stems or great little bushy plants. I find the smaller leaf varieties display the colours better and are usually smaller growing plants at the same time.
Dodonaea crucifolia is quick growing with a variety to suit every position. The biggest problem is to fine seeds or cutting material for propagation.
Propagation:
Seeds: Dodonaea crucifolia‘s seeds require treatment before sowing. Pre-treat by placing the seeds into a glass of very hot not boiling water. Allow the water to cool and leave to soak for 2 to 6 hours.
Sow the treated seeds directly into a seed raising mix and cover with 2mm of the mix with 30mm perlite added. Place the tray in a sunny position. When the seedlings are 25mm to 40mm tall, prick them out and plant them into 50mm native tubes using a seed raising mix. Germination will usually commence after 3 weeks and be completed in 12 weeks from sowing.
Fertilize using Seaweed, fish emulsion or organic chicken pellets soaked in water on an alternate basis. Fertilize every month until established or continue until winter where cut flowers are required.
Once the seedlings reach 150mm to 200mm in height plant them out into their permanent position.
Cuttings: Cuttings should be used if cut flowers are required as the plants are unisexual and only the female plants will deliver the capsules. Remember some male plants will be required in the garden to ensure fertilization. I have seen no research done on the ratio of male plants compared to female plants. A field trip near Coonabarabran in 2002 we counted 1 male plant to 8 to 10 female plants with Dodonaea viscose subsp. cuneata.
1 Prepare the cutting mix by adding one third sharp clean river sand, one third peat and one third perlite. These ingredients are sterilize,
2 Select good material from non diseased plants,
3 Select semi green stems for cuttings. Look for a stem with two or three nodes,
4 Place the cutting on a flat, hard surface, and make a clean down one side of the cutting for 10mm to 15mm with a sharp sterile knife or razor blade. – This scarification of the node will increase the chances of roots emerging from this spot. Now remove all but one or two the leaves, leaving the apex leaves in tact. If the leaves are very large in proportion to the stem, cut off the apical halves.
5 Fill a saucer with water, and place a little mild to medium rooting hormone into another container like a milk bottle top. Dip the node end of the cutting into the water and then into the rooting hormone. Tap off any excess hormone,
6 Use a small dipple stick or old pencil to poke a hole into the soilless potting mix. Ensure the hole is slightly larger than the stem diameter and be careful not to wipe the rooting hormone off the cuttings base, place the cuttings in a pattern ensuring the cuttings are not touching each other,
7 I like to place the pots in Plastic bags to help maintain temperature and moisture. Place in a semi shaded place like under 50mm shade cloth.
8 When the cuttings have struck, open the bag to allow air circulation for a few days to a week,
9 Once hardened off remove the cuttings from the bag and allow to further hardening for a few more days,
10 Transplant into a good potting mix to grow on.
Fertilize using seaweed, fish emulsion or organic chicken pellets soaked in water on an alternate basis. Fertilize every two months until the plants are established then annually in early September to October to maintain health, vitality and better flowering.
Further Comments from Readers:
Hi reader, it seems you use The Bible of Botany a lot. That’s great as we have great pleasure in bringing it to you! It’s a little awkward for us to ask, but our first aim is to purchase land approximately 1,600 hectares to link several parcels of N.P. into one at The Pinnacles NSW Australia, but we need your help. We’re not salespeople. We’re amateur botanists who have dedicated over 30 years to saving the environment in a practical way. We depend on donations to reach our goal. If you donate just $5, the price of your coffee this Sunday, We can help to keep the planet alive in a real way and continue to bring you regular updates and features on Australian plants all in one Botanical Bible. Any support is greatly appreciated. Thank you.
In the spirit of reconciliation we acknowledge the Bundjalung, Gumbaynggirr and Yaegl and all aboriginal nations throughout Australia and their connections to land, sea and community. We pay our respect to their Elders past, present and future for the pleasures we have gained.
Dodonaea hirsuta
Classification
Unranked: Eudicots
Unranked: Rosids
Family: Sapindales
Subfamily: Dodonaeoideae
Genus: Is named in honour of Rembert Dodoens; 1517-1585, who was a Flemish botanist and professor.
Species: From Hirsutus, which is Latin for a hairy and shaggy. It refers to plants which have long, shaggy often rough hairs.
Common Name:
Distribution:
Dodonaea hirsuta is found in 2 disjunct populations and 2 isolated populations. The 2 disjunct populations are from north of Stanthorpe in far southern Queensland south to the Torrington forestry reserve and west to Fraser‘s Creek north of Inverell. The second is near Coutts Crossing south of Grafton and Fortis Creek to Copmanhurst along the northern side of the Clarence River. The isolated populations are found on the Cobar Plain north of Cobar and Nandewar east of Tamworth in New South Wales.
https://avh.ala.org.au/occurrences/search?taxa=Dodonaea+hirsuta#tab_mapView
Habitat Aspect Climate:
Dodonaea hirsuta prefers full sun to light shade. It grows among medium trees, or low trees in open, dry Eucalyptus forests, moist Eucalyptus forests, scrubs and heaths. The altitude ranges from 100 meters ASL to 300 meters ASL or 800 meters ASL to 1100 meters ASL.
The temperatures range from minus 4 degrees in July to 38 degrees in January.
The rainfall ranges from lows of 400mm to 1450mm average per annum.
Soil Requirements:
Dodonaea hirsuta prefers skeletal to deep, poor to good quality sandy soils. The soils are derived from decomposed sandstone and granites. The soils are close to the parent rock and contain rocks boulders or outcrops of the parent rock. The plants growing at lower attitude levels grow on sandstone derived sands while those that grow at the higher altitude levels grow on Granite derived sands. The soils pH ranges from 5.5pH to 6pH. It does not tolerate waterlogged soils. Non saline soils to moderately saline soils are tolerated.
Height & Spread:
Wild Plants: 1m to 1.8m by 1m to 1.5m
Characteristics:
Dodonaea hirsuta is usually an erect small shrub. The stems are brown or grey and semi glossy. The branchlets are thin reddish-brown glabrous and semi glossy to glossy and covered in white hirsute hairs. The new growth and juvenile growth is mid grass-green and densely covered in white hirsute hairs.
Dodonaea hirsuta‘s are clustered in groups of 3.The narrow trapezium leaves measure 4mm to 7mm in length by 3mm to 5mm in width. The 7 to 15, angular obovate to obovate leaflets measure 3mm to 8mm in length by 1.5mm to 4.5mm in width. The petioles measure 1mm to 3mm in length. The bases are usually cuneate or rarely attenuate while the apexes are truncate with 3 to 5 teeth. The concolourous laminas are mid grass-green and usually sparsely to moderately covered in white hirsute hairs or rarely glabrous while the lower laminas sparsely covered in white hirsute hairs. The leaf margins are entire and revolute.
The dioecious inflorescences of Dodonaea hirsuta are born small singularly from the axils. The pedicels measure 4.5mm to 7mm in length. The 4, discolourous sepals are mid grass-green externally and paler to yellow-green internally. The persistent sepals are glabrous or sparsely covered in white hirsute hairs. The lanceolate sepals have an acute apex and measure 1.5mm to 2.6mm in length.
The 6 filaments on the male flowers are minute while the anthers are glabrous. The anthers are longitudinally ribbed and measure 2mm to 3mm in length.
The ovaries are densely covered in off white pulverulent hairs. The styles measure 4mm to 6mm in length and usually have a 3 lobed stigma or rarely 4 lobed. The flowers appear in September.
Dodonaea hirsuta‘s fruits are usually 3 winged or rarely very 4 winged capsules. The capsules measure 11mm to 16mm in length by 12mm to 17mm in width. The membranous wings are glabrous and covered in white villous hairs. The wings measure 2.5mm to 4.5mm in width. The lime green capsules turn bright pink, bright red or bright orange-red then to a pale chartaceous fawn when fully ripe. The septi fraga dehiscing capsules hang on the plant for extended periods up to 2 months. The spherical, black, glossy seeds measure 1mm to 1.5mm in diameter.
Wildlife:
Dodonaea hirsuta‘s capsules and seeds are often eaten by several species of moths or weevils which are unknown to the author.
Cultivation:
Dodonaea hirsuta is a magnificent small shrub which is well suited to drier, coastal areas on pure sand or sandy loams. In cultivation they will usually grow 1.2 meters to 1.6 meters in height by 1.2 meters to 1.6 meters in diameter when grown in the open.
Dodonaea hirsuta has been extensively poached in the wild for its colourful capsules for floral displays in the home and has led to its decline in natural numbers in the wild. Fortunately the plants are now recovering but will take years to fully recover.
It can survive temperatures as low as minus 5 degrees and up to 44 degrees. It is drought resistant once established and can cope with the occasional immersion where periodic down pours may flood the land. It is ideal around large sunny swimming pools and courtyards where their small bright grass-green leaves give a cooling effect. It is neat, tidy, compact and bushy especially if light tip pruning is maintained in the early stages of development.
The fruiting capsules of the deeper orange-red varieties are quite spectacular hanging on the plants for several months. This can give the gardener colour throughout autumn and winter making a fresh clean tropical look.
Dodonaea hirsuta also look really good in mass plantings, using one of the larger leaf forms of Dodonaea viscosa with red or orange capsules or burgundy leaves for a strong contrast. The contrasts in colour and leaf forms are very pleasing and natural to the eye. When using this type of planting in a mixed garden of Dodonaea use the broader leaf forms with pink flowers in the center or towards the back and have the smaller leaf forms which also must be shorter towards the front and sides. Try using it as borders, screens and or hedges, again mixing it with some of the other Dodonaea specie for colour, form and height. It would look particularly good when inter planted with Dodonaea viscosa sub sp. viscose variety burgundy leaf.
The capsules can be used for indoor arrangements and last for a month or more before fading as long as the water is changed frequently. To ensure good flowering, it is important to prune the plants back to two thirds immediately after the capsule change colour. This will force more growth to the top and give larger and better capsules with long stems. This will force more growth to the top and give larger and better capsules on long stems. Allow the plants a dormant period in winter. Fertilizing during the growing season every month and especially prior to the first spring rains come will ensure long stems or great little bushy plants. I find the smaller leaf varieties display the colours better and are usually smaller growing plants at the same time.
Dodonaea are quick growing with a variety to suit every position. It often reaches its full potential in just 3 years and flower from the second year. This Dodonaea has great prospects as a cut flower in the future and has surprised me that no entrepreneurial young flower farmer hasn’t already taken advantage of it because of its ease in growing versatility in climate and soil and the longevity of the colourful capsules. Though not as spectacular Dodonaea viscosa’s red forms, it can be used successfully as a backdrop without being overpowering and lasts well indoors.
Propagation:
Seeds: Dodonaea hirsuta‘s seeds require treatment before sowing. Pre treat by placing the seeds into a glass of off the boil water. Allow the water to cool and leave to soak for 12 to 16 hours. Add a pinch of bicarb in the water for the first 5 to 6 hours before changing the water. Rinse well before sowing.
Sow the treated seeds directly into a seed raising mix and cover with 2mm of the mix. Place the tray in a sunny position. When the seedlings are 25mm to 40mm tall, prick them out and plant them into 50mm native tubes using a seed raising mix. Germination will usually commence after 3 weeks and be completed in 12 weeks from sowing.
Fertilize using Seaweed, fish emulsion or organic chicken pellets soaked in water on an alternate basis. Fertilize every month until established or continue until winter where cut flowers are required.
Once the seedlings reach 150mm to 200mm in height plant them out into their permanent position.
Cuttings: Cuttings should be used if cut flowers are required as the plants are unisexual and only the female plants will deliver the capsules. Remember some male plants will be required in the garden to ensure fertilization. I have seen no research done on the ratio of male plants compared to female plants. A field trip near Coonabarabran in 2002 we counted 1 male plant to 10 female plants with Dodonaea viscose subsp. cuneata.
Cuttings should be used if cut flowers are required as the plants are unisexual and only the female plants will deliver the capsules. Remember some male plants will be required in the garden to ensure fertilization. I have seen no research done on the ratio of male plants compared to female plants. A field trip near Coonabarabran in 2002 we counted 1 male plant to 8 to 10 female plants with Dodonaea viscose subsp. cuneata.
1 Prepare the cutting mix by adding one third sharp clean river sand, one third peat and one third perlite. These ingredients are sterilize,
2 Select good material from non diseased plants,
3 Select semi green stems for cuttings. Look for a stem with two or three nodes,
4 Place the cutting on a flat, hard surface, and make a clean down one side of the cutting for 10mm to 15mm with a sharp sterile knife or razor blade. – This scarification of the node will increase the chances of roots emerging from this spot. Now remove all but one or two the leaves, leaving the apex leaves in tact. If the leaves are very large in proportion to the stem, cut off the apical halves.
5 Fill a saucer with water, and place a little mild to medium rooting hormone into another container like a milk bottle top. Dip the node end of the cutting into the water and then into the rooting hormone. Tap off any excess hormone,
6 Use a small dipple stick or old pencil to poke a hole into the soilless potting mix. Ensure the hole is slightly larger than the stem diameter and be careful not to wipe the rooting hormone off the cuttings base, place the cuttings in a pattern ensuring the cuttings are not touching each other,
7 I like to place the pots in Plastic bags to help maintain temperature and moisture. Place in a semi shaded place like under 50mm shade cloth.
8 When the cuttings have struck, open the bag to allow air circulation for a few days to a week,
9 Once hardened off remove the cuttings from the bag and allow to further hardening for a few more days,
10 Transplant into a good potting mix to grow on.
Fertilize using seaweed, fish emulsion or organic chicken pellets soaked in water on an alternate basis. Fertilize every two months until the plants are established then annually in early September to October to maintain health, vitality and better flowering.
Further Comments from Readers:
Hi reader, it seems you use The Bible of Botany a lot. That’s great as we have great pleasure in bringing it to you! It’s a little awkward for us to ask, but our first aim is to purchase land approximately 1,600 hectares to link several parcels of N.P. into one at The Pinnacles NSW Australia, but we need your help. We’re not salespeople. We’re amateur botanists who have dedicated over 30 years to saving the environment in a practical way. We depend on donations to reach our goal. If you donate just $5, the price of your coffee this Sunday, We can help to keep the planet alive in a real way and continue to bring you regular updates and features on Australian plants all in one Botanical Bible. Any support is greatly appreciated. Thank you.
In the spirit of reconciliation we acknowledge the Bundjalung, Gumbaynggirr and Yaegl and all aboriginal nations throughout Australia and their connections to land, sea and community. We pay our respect to their Elders past, present and future for the pleasures we have gained.
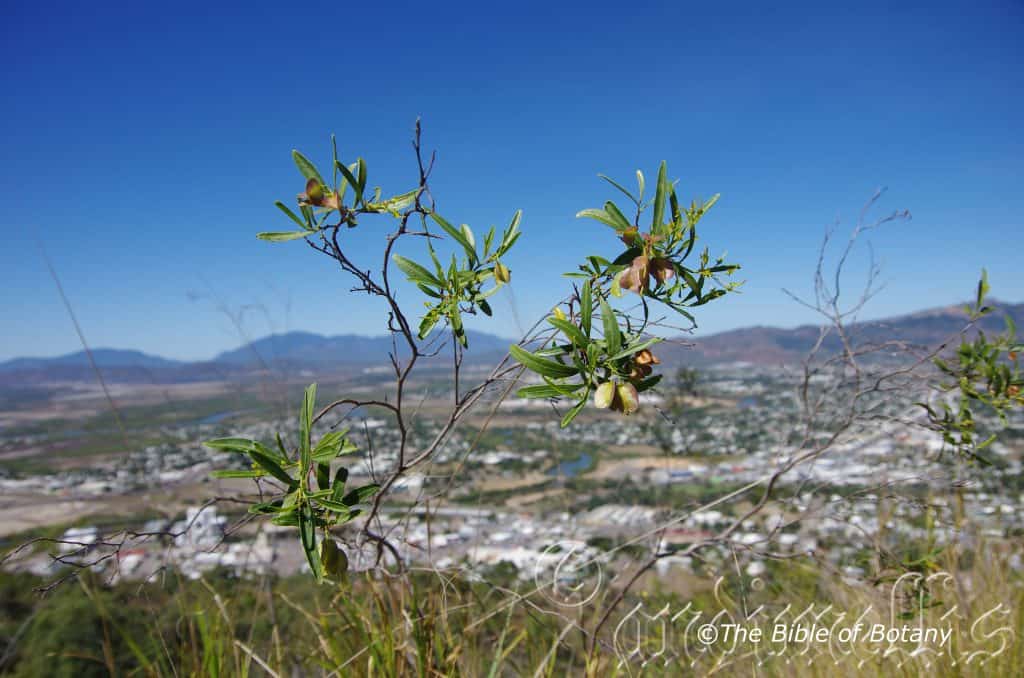
Castle Hill Townsville Qld.
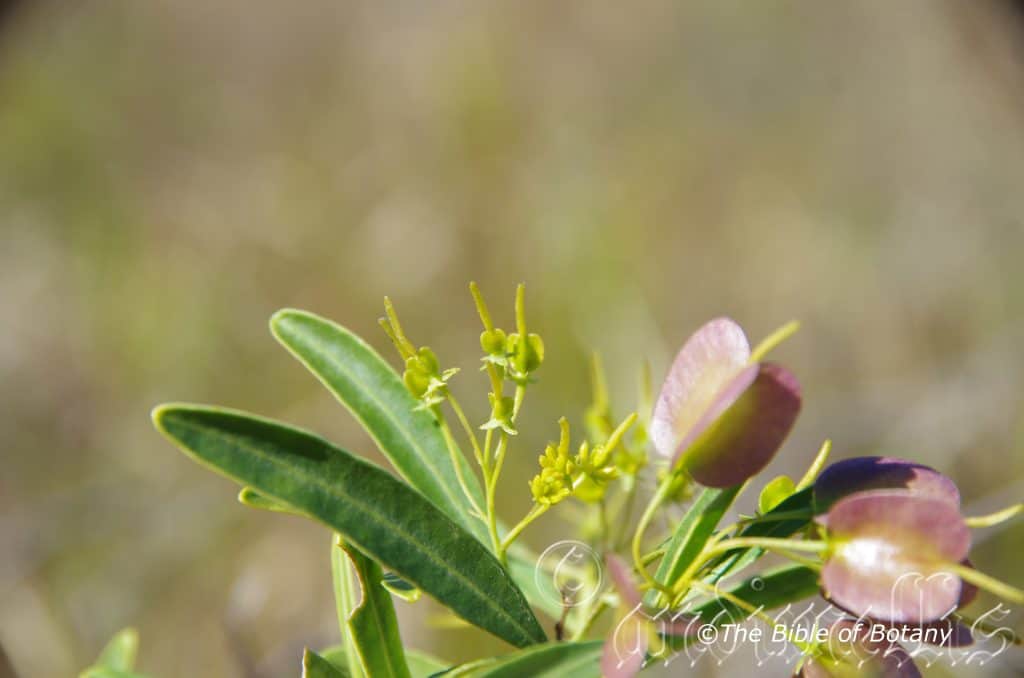
Castle Hill Townsville Qld.
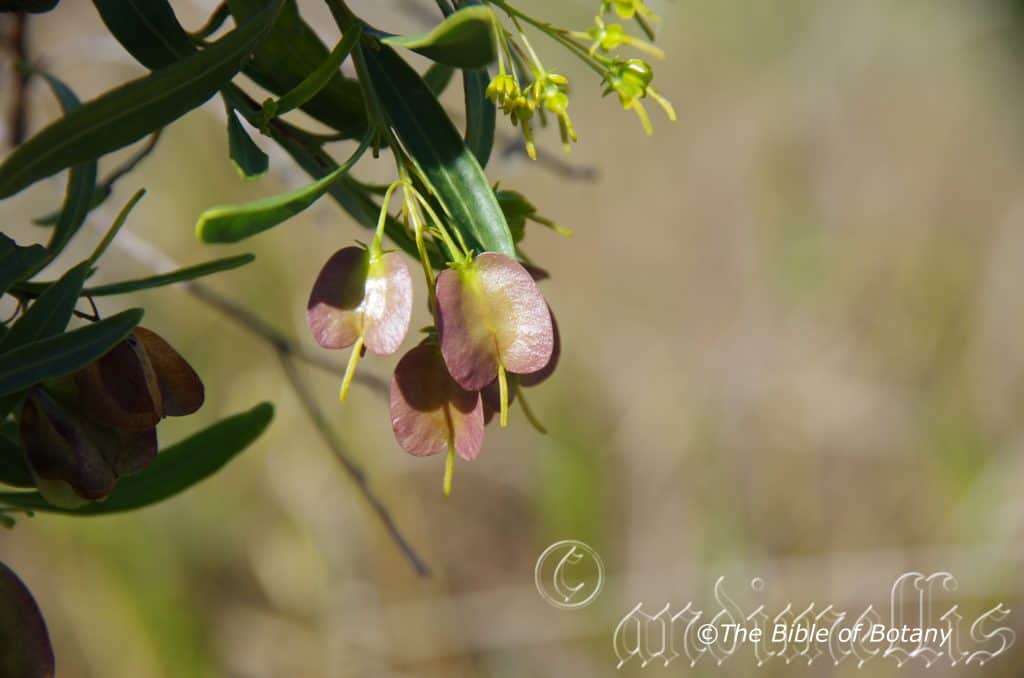
Castle Hill Townsville Qld.
Dodonaea lanceolata
Classification
Unranked: Eudicots
Unranked: Rosids
Family: Sapindales
Subfamily: Dodonaeoideae
Genus: Is named in honour of Rembert Dodoens; 1517-1585, who was a Flemish botanist and professor.
Species: From Lanceolata, which is Latin for a lance or lance shaped. It refers to the leaves, which have a lance shape.
Common Name:
Distribution:
Dodonaea lanceolata is found across the northern half of the Australian mainland and many of the off shore Islands.
https://avh.ala.org.au/occurrences/search?taxa=Dodonaea+lanceolata#tab_mapView
Habitat Aspect Climate:
Dodonaea lanceolata prefers full sun to light shade. It grows of open woodlands, open eucalyptus forests and grasslands particularly in dry inland riparian zones, ridges and escarpments. The altitude ranges from 5 meters ASL to 1000 meters ASL.
The temperatures range from minus 3 degrees in July to 46 degrees in January.
The rainfall ranges from lows of 400mm to 3200mm average per annum.
Soil Requirements:
Dodonaea lanceolata prefers skeletal to deep, poor to better quality coarse sands, fine sands, sandy loams or serpentine clays. The soils are mainly derived from decomposed sandstone or alluvial deposits near creeks and streams. The soils are close to the parent rock and contain rocks boulders or outcrops of the parent rock. The pH ranges from 5.5pH to 7pH. It does not tolerate waterlogged soils. Non saline soils to moderately saline soils are tolerated.
Height & Spread:
Wild Plants: 1m to 3m by 1m to 3m
Characteristics:
Dodonaea lanceolata is an erect open to bushy shrub. The stems are grey-brown sparsely covered in course hirsute hairs. The branchlets are yellow-green and glabrous.
Dodonaea lanceolata‘s alternate, coriaceous, oblong, oblanceolate to lanceolate leaves measure 35mm to 65mm in length by 8mm to 15mm in width. The glabrous, subsessile petioles measure 1mm to 2mm in length. The bases are cuneate while the apexes are usually broad acute to obtuse. The concolourous laminas are deep green to while the margins are entire. Lateral veins scarcely visible on both laminas.
The inflorescences of Dodonaea lanceolata are born on short terminal panicles. The shrubs are monecious. The pedicels measure 5mm to 8mm in length. The persistent, pale yellow-green sepals measure 2mm to 2.5 mm in length.
The usually 8 or at times 7 to 10 pale yellow-green stamens measure 4mm to 5mm in length.
The ovaries are sparsely covered in white pulverulent hairs. The styles measure 6mm to 10mm in length and usually have a 3 or rarely 4 lobed stigma. The flowers appear from late September.
The three styles are fused together and are persistaent until just after the fruits turn purple and measure 12mm to 15mm in length.
Dodonaea lanceolata‘s fruits are usually 3 winged or rarely 4 winged glabrous, capsules, which measure 16mm to 20mm in length by 14mm to 20mm in width. The pale yellow-green capsules turn deep purple to burgundy on ripening and may hang on the plant for extended periods up to 3 months. The membranous wings measure 4.5mm to 5.5mm in width. The compressed, ovate, black, glossy seeds measure 1.5mm to 2mm in diameter.
Wildlife:
Dodonaea lanceolata‘s capsules and seeds are often eaten by several species of moths or weevils which are unknown to the author.
Cultivation:
Dodonaea lanceolata is a beautiful small shrub which is well suited to drier, coastal areas on poor sandy loams. In cultivation it will grow from 1 meter to 1.5 meters in height by 1 meter to 1.5 meters in diameter when grown in the open.
It can survive temperatures as low as 3 degrees and up to 44 degrees. It is particularly good in arid areas where a little extra moisture can be provided and can cope with the occasional immersion where periodic down pours may flood the land. It is ideal around courtyards where their deep green leaves give a cooling effect. It is neat and tidy, compact and bushy especially if light tip pruning is maintained.
The fruiting bright purple capsules are quite spectacular hanging on the plants for several months gives colour throughout summer giving off splashes of colour in the bush.
Dodonaea lanceolata also looks really good in mass plantings, using one of the smaller, finer leaf or larger leaf forms of Dodonaea with red or orange capsules or burgundy leaves for a strong contrast. The contrasts in colour and leaf forms are very pleasing and natural to the eye. When using this type of planting in a mixed garden of Dodonaea use the broader leaf forms with pink flowers in the center or towards the back and have the smaller leaf forms which also must be shorter towards the front and sides. Try using them as borders, screens and or hedges, again mixing them with some of the other Dodonaea species for colour, form and height.
The capsules can be used for indoor arrangements and last for a month or more before fading as long as the water is changed frequently. To ensure good flowering, it is important to prune the plants back to two thirds immediately after the capsule change colour. This will force more growth to the top and give larger and better capsules with long stems. This will force more growth to the top and give larger and better capsules on long stems. Allow the plants a dormant period in winter. Fertilizing during the growing season every month and especially prior to the first spring rains come will ensure long stems or great little bushy plants. I find the smaller leaf varieties display the colours better and are usually smaller growing plants at the same time.
Dodonaea lanceolata is quick growing with a variety to suit every position. It often reaches its full potential in just 3 years and flowers from the second year. This Dodonaea also has great prospects as a cut flower in the future and has surprised me that no entrepreneurial young flower farmer has already taken advantage of it because of its ease in growing versatility in climate and soil and the longevity of the colourful capsules. Though not as spectacular Dodonaea viscosa red forms, it can be used successfully as a back drop without being overpowering and lasts well indoors.
Propagation:
Seeds: Dodonaea lanceolata seeds require treatment before sowing. Pre-treat by placing the seeds into a glass of very hot not boiling water. Allow the water to cool and leave to soak for 12 to 16 hours. Add a pinch of bicarb in the water for the first 5 to 6 hours before changing the water.
Sow the treated seeds directly into a seed raising mix and cover with 2mm of the mix. Place the tray in a sunny position. When the seedlings are 25mm to 40mm tall, prick them out and plant them into 50mm native tubes using a seed raising mix. Germination will usually commence after 3 weeks and be completed in 12 weeks from sowing.
Fertilize using Seaweed, fish emulsion or organic chicken pellets soaked in water on an alternate basis. Fertilize every month until established or continue until winter where cut flowers are required.
Once the seedlings reach 150mm to 200mm in height plant them out into their permanent position.
Cuttings: Cuttings should be used if cut flowers are required as the plants are unisexual and only the female plants will deliver the capsules. Remember some male plants will be required in the garden to ensure fertilization. I have seen no research done on the ratio of male plants compared to female plants. A field trip near Coonabarabran in 2002 we counted 1 male plant to 10 female plants with Dodonaea viscose subsp. cuneata.
Cuttings should be used if cut flowers are required as the plants are unisexual and only the female plants will deliver the capsules. Remember some male plants will be required in the garden to ensure fertilization. I have seen no research done on the ratio of male plants compared to female plants. A field trip near Coonabarabran in 2002 we counted 1 male plant to 8 to 10 female plants with Dodonaea viscose subsp. cuneata.
1 Prepare the cutting mix by adding one third sharp clean river sand, one third peat and one third perlite. These ingredients are sterilize,
2 Select good material from non diseased plants,
3 Select semi green stems for cuttings. Look for a stem with two or three nodes,
4 Place the cutting on a flat, hard surface, and make a clean down one side of the cutting for 10mm to 15mm with a sharp sterile knife or razor blade. – This scarification of the node will increase the chances of roots emerging from this spot. Now remove all but one or two the leaves, leaving the apex leaves in tact. If the leaves are very large in proportion to the stem, cut off the apical halves.
5 Fill a saucer with water, and place a little mild to medium rooting hormone into another container like a milk bottle top. Dip the node end of the cutting into the water and then into the rooting hormone. Tap off any excess hormone,
6 Use a small dipple stick or old pencil to poke a hole into the soilless potting mix. Ensure the hole is slightly larger than the stem diameter and be careful not to wipe the rooting hormone off the cuttings base, place the cuttings in a pattern ensuring the cuttings are not touching each other,
7 I like to place the pots in Plastic bags to help maintain temperature and moisture. Place in a semi shaded place like under 50mm shade cloth.
8 When the cuttings have struck, open the bag to allow air circulation for a few days to a week,
9 Once hardened off remove the cuttings from the bag and allow to further hardening for a few more days,
10 Transplant into a good potting mix to grow on.
Fertilize using seaweed, fish emulsion or organic chicken pellets soaked in water on an alternate basis. Fertilize every two months until the plants are established then annually in early September to October to maintain health, vitality and better flowering.
Further Comments from Readers:
Hi reader, it seems you use The Bible of Botany a lot. That’s great as we have great pleasure in bringing it to you! It’s a little awkward for us to ask, but our first aim is to purchase land approximately 1,600 hectares to link several parcels of N.P. into one at The Pinnacles NSW Australia, but we need your help. We’re not salespeople. We’re amateur botanists who have dedicated over 30 years to saving the environment in a practical way. We depend on donations to reach our goal. If you donate just $5, the price of your coffee this Sunday, We can help to keep the planet alive in a real way and continue to bring you regular updates and features on Australian plants all in one Botanical Bible. Any support is greatly appreciated. Thank you.
In the spirit of reconciliation we acknowledge the Bundjalung, Gumbaynggirr and Yaegl and all aboriginal nations throughout Australia and their connections to land, sea and community. We pay our respect to their Elders past, present and future for the pleasures we have gained.
Dodonaea megazyga
Classification
Unranked: Eudicots
Unranked: Rosids
Family: Sapindales
Subfamily: Dodonaeoideae
Genus: Is named in honour of Rembert Dodoens; 1517-1585, who was a Flemish botanist and professor.
Species: From Mega, which is Ancient Greek for large and Zugat‘s, which is Ancient Greek for a yoke or a fertilized egg. It refers to plants, which have very large ovum.
Common Name:
Distribution:
Dodonaea megazyga is found south from Nambour in southern Queensland to the Blue Mountains in central eastern New South Wales. It is found on and east of the Great Dividing Range.
https://avh.ala.org.au/occurrences/search?taxa=Dodonaea+megazyga#tab_mapView
Habitat Aspect Climate:
Dodonaea megazyga prefers full sun to light shade. It grows among medium trees, or low trees in dry schlerophyll forests and adjacent to rainforests. The altitude ranges from 5 meters ASL to 700 meters ASL.
The temperatures range from minus 4 degrees in July to 40 degrees in January.
The rainfall ranges from lows of 900mm to 1500mm average per annum.
Soil Requirements:
Dodonaea megazyga prefers skeletal to deep, poor to better quality coarse sands, fine sands or sandy loams. The soils are mainly derived from decomposed sandstone. The pH ranges from 5.5pH to 6pH. It does not tolerate waterlogged soils. Non saline soils to moderately saline soils are tolerated.
Height & Spread:
Wild Plants: 2m to 5m by 1m to 1.3m
Characteristics:
Dodonaea megazyga is an upright spindly shrub in closed woodlands to a bushy robust shrub or small tree where it is found in the open. The stems are pale grey-brown and somewhat fibrous. The branchlets are reddish-brown turning olive-green and are sparsely covered in sessile glandular hairs.
Dodonaea megazyga‘s alternate usually imparipinnate or rarely para pinnate leaves measure 72mm to 145mm in length while the lanceolate leaflets measure 17mm to 25mm in length by 4mm to 7.5mm in width. The bases are obliquely cuneate while the apexes are acute. The discolourous laminas are deep green, glossy and scabrous while the lower laminas are glabrous and slightly paler. The leaf margins are entire or have a few very shallow blunt teeth.
The inflorescences of Dodonaea megazyga are many-flowered axillary cymes. The peduncles measure 2mm to 5mm in length. The pedicels measure 2mm to 7mm in length and lengthen as the fruits ripen. The 3 or 4 lanceolate to broad-ovate or broad-oblong, caduceus sepals measure 1.8mm to 2.7mm length.
The 8 stamens measure 3.5mm to 4.5mm in length.
The ovaries are sparsely covered in white pubescent hairs. The flowers appear from July to August.
Dodonaea megazyga‘s fruits are 3 winged glabrous capsules that measure 7mm to 11mm in length by 13mm to 23mm in width. The wings or lobes measure 4.5mm to 8mm in width. The lime green coriaceous capsules turn bright red then to a pale fawn on ripening and may hang on the plant for extended periods up to 4 months. The ovate, black, glossy seeds measure 1mm to 1.5mm in diameter.
Wildlife:
Dodonaea megazyga‘s capsules and seeds are often eaten by several species of moths or weevils which are unknown to the author.
Cultivation:
Dodonaea megazyga is a beautiful small shrub which is well suited to drier, coastal areas on coarse sands to poor sandy loams. In cultivation it will grow from 1 meter to 1.5 meters in height by 1 meter to 1.5 meters in diameter when grown in the open.
It can survive temperatures as low as minus 3 degrees and up to 44 degrees. It is drought resistant once established and can cope with the occasional immersion where periodic down pours may flood the land. It is ideal around large sunny swimming pools and court yards where their deep grass-green leaves give a cooling effect. It is neat and tidy, compact and bushy especially if light tip pruning is maintained.
The fruiting bright red capsules are quite spectacular hanging on the plants for several months gives colour throughout summer giving off splashes of colour in the bush.
Dodonaea megazyga also look really good in mass plantings, using one of the smaller, finer leaf or larger leaf forms of Dodonaea with red or orange capsules or burgundy leaves for a strong contrast. The contrasts in colour and leaf forms are very pleasing and natural to the eye. When using this type of planting in a mixed garden of Dodonaea use the broader leaf forms with pink flowers in the center or towards the back and have the smaller leaf forms which also must be shorter towards the front and sides. Try using them as borders, screens and or hedges, again mixing them with some of the other Dodonaea specie for colour, form and height. They look particularly good when inter planted with Dodonaea Viscosa sub sp. viscosa variety burgundy leaf.
The capsules can be used for indoor arrangements and last for a month or more before fading as long as the water is changed frequently. To ensure good flowering, it is important to prune the plants back to two thirds immediately after the capsule change colour. This will force more growth to the top and give larger and better capsules with longer stems. This will force more growth to the top and give larger and better capsules on long stems. Allow the plants a dormant period in winter. Fertilizing during the growing season every month and especially prior to the first spring rains come will ensure long stems or great little bushy plants. I find the smaller leaf varieties display the colours better and are usually smaller growing plants at the same time.
Dodonaea megazyga is quick growing with a variety to suit every position. It often reaches its full potential in just 3 years and flower from the second year. This Dodonaea has great prospects as a cut flower in the future and has surprised me that no entrepreneurial young flower farmer has already taken advantage of it because of its ease in growing versatility in climate and soil and the longevity of the colourful capsules. Though not as spectacular Dodonaea viscose red forms, it can be used successfully as a back drop without being overpowering and lasts well indoors.
Propagation:
Seeds: Dodonaea megazyga seeds require treatment before sowing. Pre-treat by placing the seeds into a glass of very hot not boiling water. Allow the water to cool and leave to soak for 12 to 16 hours. Add a pinch of bicarb in the water for the first 5 to 6 hours before changing the water where I add half a teaspoon of vinegar for the remaining hours. Rinse well before sowing.
Sow the treated seeds directly into a seed raising mix and cover with 2mm of the mix. Place the tray in a sunny position. When the seedlings are 25mm to 40mm tall, prick them out and plant them into 50mm native tubes using a seed raising mix. Germination will usually commence after 3 weeks and be completed in 12 weeks from sowing.
Fertilize using Seaweed, fish emulsion or organic chicken pellets soaked in water on an alternate basis. Fertilize every month until established or continue until winter where cut flowers are required.
Once the seedlings reach 150mm to 200mm in height plant them out into their permanent position.
Cuttings: Cuttings should be used if cut flowers are required as the plants are unisexual and only the female plants will deliver the capsules. Remember some male plants will be required in the garden to ensure fertilization. I have seen no research done on the ratio of male plants compared to female plants. A field trip near Coonabarabran in 2002 we counted 1 male plant to 10 female plants with Dodonaea viscose subsp. cuneata.
Cuttings should be used if cut flowers are required as the plants are unisexual and only the female plants will deliver the capsules. Remember some male plants will be required in the garden to ensure fertilization. I have seen no research done on the ratio of male plants compared to female plants. A field trip near Coonabarabran in 2002 we counted 1 male plant to 10 female plants with Dodonaea viscose subsp. cuneata.
Cuttings should be used if cut flowers are required as the plants are unisexual and only the female plants will deliver the capsules. Remember some male plants will be required in the garden to ensure fertilization. I have seen no research done on the ratio of male plants compared to female plants. A field trip near Coonabarabran in 2002 we counted 1 male plant to 8 to 10 female plants with Dodonaea viscose subsp. cuneata.
1 Prepare the cutting mix by adding one third sharp clean river sand, one third peat and one third perlite. These ingredients are sterilize,
2 Select good material from non diseased plants,
3 Select semi green stems for cuttings. Look for a stem with two or three nodes,
4 Place the cutting on a flat, hard surface, and make a clean down one side of the cutting for 10mm to 15mm with a sharp sterile knife or razor blade. – This scarification of the node will increase the chances of roots emerging from this spot. Now remove all but one or two the leaves, leaving the apex leaves in tact. If the leaves are very large in proportion to the stem, cut off the apical halves.
5 Fill a saucer with water, and place a little mild to medium rooting hormone into another container like a milk bottle top. Dip the node end of the cutting into the water and then into the rooting hormone. Tap off any excess hormone,
6 Use a small dipple stick or old pencil to poke a hole into the soilless potting mix. Ensure the hole is slightly larger than the stem diameter and be careful not to wipe the rooting hormone off the cuttings base, place the cuttings in a pattern ensuring the cuttings are not touching each other,
7 I like to place the pots in Plastic bags to help maintain temperature and moisture. Place in a semi shaded place like under 50mm shade cloth.
8 When the cuttings have struck, open the bag to allow air circulation for a few days to a week,
9 Once hardened off remove the cuttings from the bag and allow to further hardening for a few more days,
10 Transplant into a good potting mix to grow on.
Fertilize using seaweed, fish emulsion or organic chicken pellets soaked in water on an alternate basis. Fertilize every two months until the plants are established then annually in early September to October to maintain health, vitality and better flowering.
Further Comments from Readers:
Hi reader, it seems you use The Bible of Botany a lot. That’s great as we have great pleasure in bringing it to you! It’s a little awkward for us to ask, but our first aim is to purchase land approximately 1,600 hectares to link several parcels of N.P. into one at The Pinnacles NSW Australia, but we need your help. We’re not salespeople. We’re amateur botanists who have dedicated over 30 years to saving the environment in a practical way. We depend on donations to reach our goal. If you donate just $5, the price of your coffee this Sunday, We can help to keep the planet alive in a real way and continue to bring you regular updates and features on Australian plants all in one Botanical Bible. Any support is greatly appreciated. Thank you.
In the spirit of reconciliation we acknowledge the Bundjalung, Gumbaynggirr and Yaegl and all aboriginal nations throughout Australia and their connections to land, sea and community. We pay our respect to their Elders past, present and future for the pleasures we have gained.
Dodonaea multijuga
Classification
Unranked: Eudicots
Unranked: Rosids
Family: Sapindales
Subfamily: Dodonaeoideae
Genus: Is named in honour of Rembert Dodoens; 1517-1585, who was a Flemish botanist and professor.
Species: From Multus, which is Latin for many and Jugatum which is Latin for a pair. It refers to structures usually the leaves, which are produced in many pairs as opposed to the norm in the species of having single leaves.
Common Name:
Distribution:
Dodonaea multijuga are found in several disjunct populations south from Beerburrum, west to Alton National Park in southern Queensland to the Blue Mountains in central eastern New South Wales. From the Blue Mountains it is found south to the South East Forest National Park in southern New South Wales on the eastern side of the Great Dividing Range.
https://avh.ala.org.au/occurrences/search?taxa=Dodonaea+multijuga#tab_mapView
Habitat Aspect Climate:
Dodonaea multijuga prefers full sun to light shade. It grows among medium trees, or low trees in dry Eucalyptus forests, moist Eucalyptus forests, scrubs, adjacent to creeks and streams. The altitude ranges from 5 meters ASL to 500 meters ASL.
The temperatures range from minus 4 degrees in July to 44 degrees in January.
The rainfall ranges from lows of 900mm to 1600mm average per annum.
Soil Requirements:
Dodonaea multijuga prefers skeletal to deep, poor to better quality coarse sands, fine sands or sandy loams. The soils are mainly derived from decomposed sandstone or alluvial deposits near creeks and streams. The soils are close to the parent rock and contain rocks boulders or outcrops of the parent rock. The pH ranges from 5.5pH to 6pH. It does not tolerate waterlogged soils. Non saline soils to moderately saline soils are tolerated.
Height & Spread:
Wild Plants: 1m to 1.5m by 1m to 1.3m
Characteristics:
Dodonaea multijuga is an upright spindly shrub in closed woodlands to a bushy robust shrub where it is found in the open. The stems are grey-brown sparsely covered in course hirsute hairs. The branchlets are reddish-brown turning olive-green and are covered in white puberulent hairs.
Dodonaea multijuga‘s alternate usually imparipinnate or rarely paripinnate leaves measure 25mm to 60mm in length by 10mm to 18mm in width. The 16 to 28 leaflets are oblong or obovate and measure 4mm to 7mm in length by 1mm to 4mm in width. The terminal leaflet is usually lanceolate and measures 5mm to 8mm in length. The petioles rachis and petiolules are covered in white puberulent hairs. The petioles measure 6mm to 12mm in length while the rachis measures 20mm to 52mm in length and the petiolules measure 0mm to 0.5mm in length. The bases are obliquely cuneate while the apexes are usually broad acute to obtuse or at times with 2 or 3 minute teeth. The concolourous laminas are grass-green to deep grass-green and scabrous while the lower laminas are glabrous or sparsely covered in white puberulent hairs. The leaf margins are entire and revolute.
The inflorescences of Dodonaea multijuga are born on short panicles from the leaf axils. The shrubs are dioecious. The peduncles measure 2mm to 5mm in length. The pedicels measure 7mm to 14mm in length. The 4 or rarely 5 discolourous sepals are mid grass-green externally and paler internally and are caduceus. The lanceolate sepals measure 3mm to 4mm in length.
The usually 8 or rarely 9 or 10 stamens measure 3.5mm to 4.5mm in length.
The ovaries are densely covered in white pulverulent hairs. The styles measure 6mm to 10mm in length and usually have a 3 or rarely 4 lobed stigma. The flowers appear from late September.
Dodonaea multijuga‘s fruits are usually 3 winged or at times 4 winged capsules. The capsules measure 13mm to 16.5mm in length by 15mm to 20mm in width. It is sparsely covered in white puberulent hairs. The wings or lobes measure 3mm to 4.5mm in width. The lime green coriaceous capsules turn bright red then to a pale fawn on ripening and may hang on the plant for extended periods up to 4 months. The ovate, black, glossy seeds measure 1mm to 1.5mm in diameter.
Wildlife:
Dodonaea multijuga‘s capsules and seeds are often eaten by several species of moths or weevils which are unknown to the author.
Cultivation:
Dodonaea multijuga is a beautiful small shrub which is well suited to drier, coastal areas on poor sandy loams. In cultivation it will grow from 1 meter to 1.5 meters in height by 1 meter to 1.5 meters in diameter when grown in the open.
It can survive temperatures as low as minus 3 degrees and up to 44 degrees. It is drought resistant once established and can cope with the occasional immersion where periodic down pours may flood the land. It is ideal around large sunny swimming pools and courtyards where their deep grass-green leaves give a cooling effect. It is neat and tidy, compact and bushy especially if light tip pruning is maintained.
The fruiting bright red capsules are quite spectacular hanging on the plants for several months gives colour throughout summer giving off splashes of colour in the bush.
Dodonaea multijuga also look really good in mass plantings, using one of the smaller, finer leaf or larger leaf forms of Dodonaea with red or orange capsules or burgundy leaves for a strong contrast. The contrasts in colour and leaf forms are very pleasing and natural to the eye. When using this type of planting in a mixed garden of Dodonaea use the broader leaf forms with pink flowers in the center or towards the back and have the smaller leaf forms which also must be shorter towards the front and sides. Try using them as borders, screens and or hedges, again mixing them with some of the other Dodonaea specie for colour, form and height. They look particularly good when inter planted with Dodonaea Viscosa sub sp. viscosa variety burgundy leaf.
The capsules can be used for indoor arrangements and last for a month or more before fading as long as the water is changed frequently. To ensure good flowering, it is important to prune the plants back to two thirds immediately after the capsule change colour. This will force more growth to the top and give larger and better capsules with long stems in the following season. Smaller leaf varieties display the colours better and are usually smaller growing plants at the same time.
Dodonaea multijuga is quick growing with a variety to suit every position. They often reach their full potential in just 3 years and flower from the second year. This Dodonaea has great prospects as a cut flower in the future and has surprised me that no entrepreneurial young flower farmer has already taken advantage of it because of its ease in growing versatility in climate and soil and the longevity of the colourful capsules. Though not as spectacular Dodonaea viscose red forms, it can be used successfully as a backdrop without being overpowering and lasts well indoors.
Propagation:
Seeds: Dodonaea multijuga seeds require treatment before sowing. Pre-treat by placing the seeds into a glass of very hot not boiling water. Allow the water to cool and leave to soak for 12 to 16 hours. Add a pinch of bicarb in the water for the first 5 to 6 hours before changing the water where I add half a teaspoon of vinegar for the remaining hours. Rinse well before sowing.
Sow the treated seeds directly into a seed raising mix and cover with 2mm of the mix. Place the tray in a sunny position. When the seedlings are 25mm to 40mm tall, prick them out and plant them into 50mm native tubes using a seed raising mix. Germination will usually commence after 3 weeks and be completed in 12 weeks from sowing.
Fertilize using Seaweed, fish emulsion or organic chicken pellets soaked in water on an alternate basis. Fertilize every month until established or continue until winter where cut flowers are required.
Once the seedlings reach 150mm to 200mm in height plant them out into their permanent position.
Cuttings: Cuttings should be used if cut flowers are required as the plants are unisexual and only the female plants will deliver the capsules. Remember some male plants will be required in the garden to ensure fertilization. I have seen no research done on the ratio of male plants compared to female plants. A field trip near Coonabarabran in 2002 we counted 1 male plant to 10 female plants with Dodonaea viscose subsp. cuneata.
Cuttings will guarantee the colour size and consistency required in the flowers. Use 70mm to 100mm long semi hardwood cuttings prepared from partially mature wood of the current season‘s growth, just after a flush of growth. Take the cuttings from January to early April or later if you are in a frost free area. Take the cuttings when wood is reasonably firm and the leaves of mature size. Remove half the leaves from the bottom two thirds being careful not to tear the bark. Take a 10mm scraping off the bark from the bottom of the cutting on one side. Use a medium rooting hormone, dip the cutting in and place the cutting in a moist sterile seed raising mix using a dipple stick. Place the trays under 30mm shade in a warm position. Bottom heat will increase strike rates and this can be achieved successfully by a 60 watt electric lamp in a water proof container below the trays or running small heating cables on the beds and covering them with 20mm of course sand. When the cuttings have obviously struck and have developed good roots treat them as for seedlings.
Fertilize using seaweed, fish emulsion or organic chicken pellets soaked in water on an alternate basis. Fertilize every two months until the plants are established then annually in early September to October to maintain health, vitality and better flowering.
Further Comments from Readers:
Hi reader, it seems you use The Bible of Botany a lot. That’s great as we have great pleasure in bringing it to you! It’s a little awkward for us to ask, but our first aim is to purchase land approximately 1,600 hectares to link several parcels of N.P. into one at The Pinnacles NSW Australia, but we need your help. We’re not salespeople. We’re amateur botanists who have dedicated over 30 years to saving the environment in a practical way. We depend on donations to reach our goal. If you donate just $5, the price of your coffee this Sunday, We can help to keep the planet alive in a real way and continue to bring you regular updates and features on Australian plants all in one Botanical Bible. Any support is greatly appreciated. Thank you.
In the spirit of reconciliation we acknowledge the Bundjalung, Gumbaynggirr and Yaegl and all aboriginal nations throughout Australia and their connections to land, sea and community. We pay our respect to their Elders past, present and future for the pleasures we have gained.
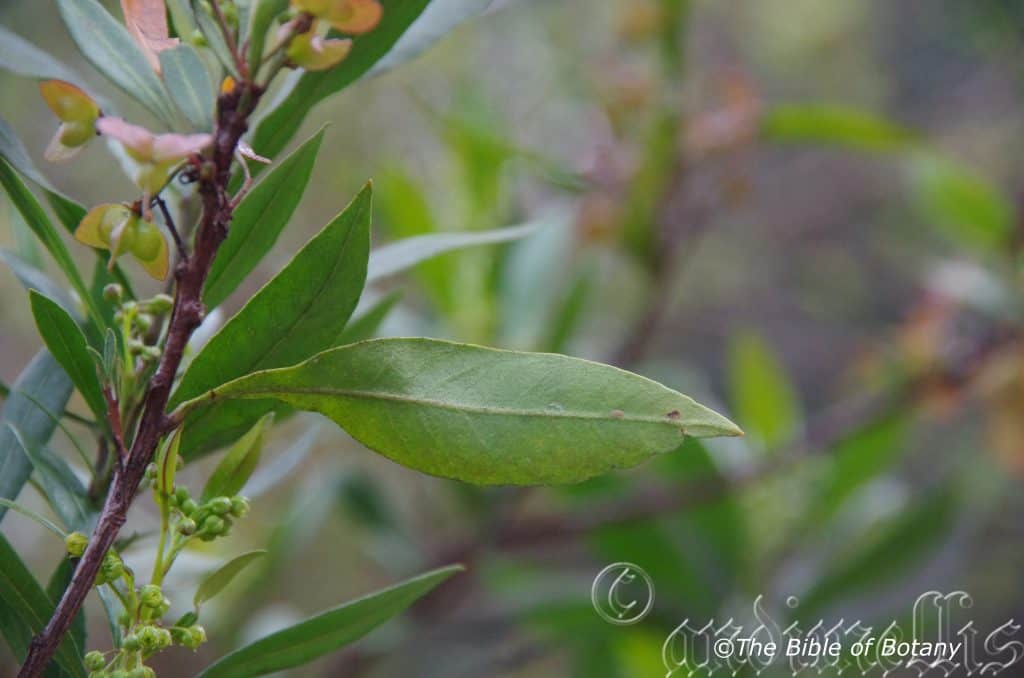
National Botanic Gardens ACT
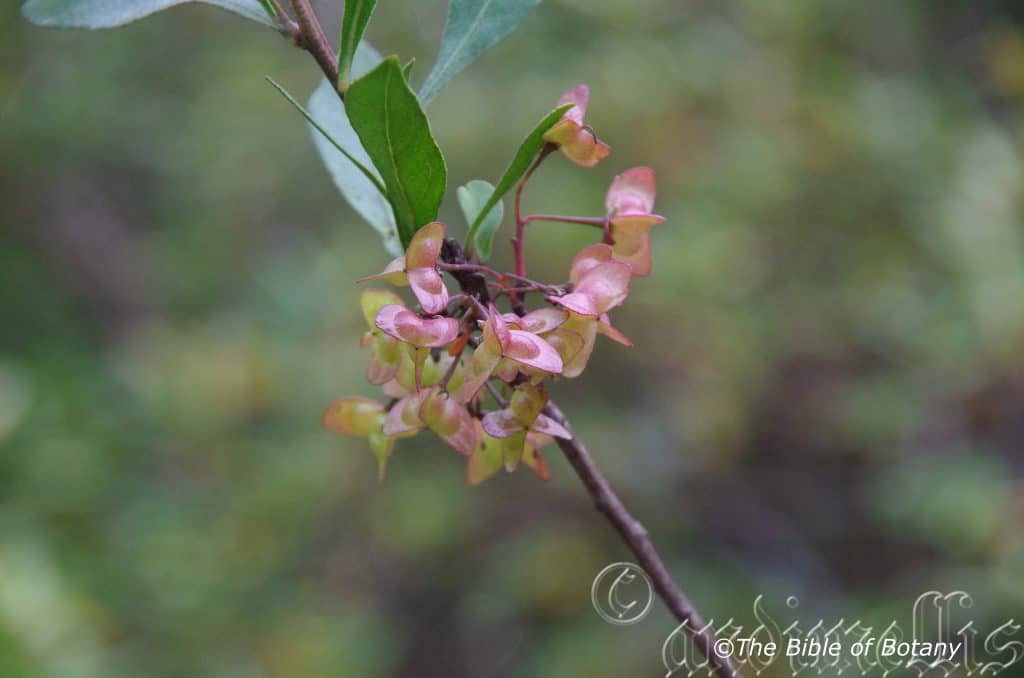
National Botanic Gardens ACT
Dodonaea rhombifolia
Classification
Unranked: Eudicots
Unranked: Rosids
Family: Sapindales
Subfamily: Dodonaeoideae
Genus: Is named in honour of Rembert Dodoens; 1517-1585, who was a Flemish botanist and professor.
Species: From Rhombos, which is Ancient Greek for to spin around or diamond shape and Folium which is Latin for foliage. It refers to leaves or phyllodes, which have a diamond shape.
Common Name: Broad Leaf Hop Bush.
Distribution:
Dodonaea rhombifolia is found in 5 disjunct populations. The northern population is found from Kyogle south to north of Musslebrook along the Great Dividing Range in northern New South Wales. In Victoria and southern New South Wales it is found from the Ottway ranges parallel to the coast to east of Canberra and south west of Canberra south to the Murray River. The other northern population is found on the rivers surrounding Collarenebri, Walgett and Wee Wato.
https://avh.ala.org.au/occurrences/search?taxa=Dodonaea+rhombifolia#tab_mapView
Habitat Aspect Climate:
Dodonaea rhombifolia prefers full sun to light dappled shade. It grows among medium trees, or low trees in dry Eucalyptus forests, moist Eucalyptus forests, scrubs and adjacent to rainforests. The altitude ranges from 10 meters ASL to 750 meters ASL.
The temperatures range from minus 4 degrees in July to 44 degrees in January.
The rainfall ranges from lows of 350mm to 1400mm average per annum.
Soil Requirements:
Dodonaea rhombifolia prefers skeletal to deep, poor to medium quality coarse sands, fine sands or sandy loams. The soils are mainly derived from partially decomposed to decomposed sandstones or granites. The soils are close to the parent rock and contain rocks boulders or outcrops of the parent rock. The pH ranges from 5.5pH to 7pH. It is not tolerant of waterlogged soils. Non saline soils to moderately saline soils are tolerated.
Height & Spread:
Wild Plants: 2m to 2.5m by 2m to 2.5m
Characteristics:
Dodonaea rhombifolia is an upright spindly shrub in closed woodlands or near rainforests to a bushy robust shrub where it is found in the open on the coast. The stems are grey-brown with shallow longitudinal furrows on older plants. Branchlets are thin reddish-brown and glabrous to glossy grass green with new juvenile growth.
Dodonaea rhombifolia‘s alternate simple, rhomboidal, elliptical or rarely obovate leaves measure 50mm to 90mm in length by 15mm to 28mm in width. The petioles measure 5mm to 11mm in length. The bases are attenuate while the apexes are acute. The concolourous laminas are pale grass-green to grass-green, glabrous while the lower laminas are glabrous or sparsely covered in a few small white glands. The leaf margins are entire and slightly revolute.
The inflorescences of Dodonaea rhombifolia are born on short cymes from the axils. The shrubs are monoecious. The peduncles measure 2mm to 5mm in length while the pedicels measure 3.5mm to 8.5mm in length. The 4 pale green sepals turn pink and are caduceous. The sepals are lanceolate to obovate with an acute apex and measure 2mm to 3.5mm in length.
There are 8 greenish-yellow tinged pink stamens that measure 2.8mm to 4.8mm in length.
The ovaries are glabrous. The styles measure 8mm to 15mm in length and have a 4 lobed stigma. The flowers appear from late August to late September.
Dodonaea rhombifolia‘s fruits are a 4 winged capsule. The capsules measure 10mm to 13mm in length by 13mm to 25mm in width. It is glabrous with the wings or lobes measuring 6mm to 9mm in width. The lime green capsules turn pink to bright rose pink then to a pale fawn on ripening and may hang on the plant for extended periods up to 4 months. The ovate, black, glossy seeds measure 1mm to 1.5mm in diameter.
Wildlife:
Dodonaea rhombifolia‘s fruit and seeds are often eaten by several species of moths which are unknown to the author.
The hops like capsules were used as a substitute for hops in the early days of settlement to make beer.
Cultivation:
Dodonaea rhombifolia is a beautiful small shrub which is well suited to drier, coastal areas on poor sandy loams. In cultivation it will grow 1.5 meters to 2 meters in height by 1.5 meters to 2 meters in diameter when grown in the open.
It can survive temperatures as low as minus 3 degrees and up to 44 degrees and is drought resistant once established and can cope with the occasional immersion where periodic down pours may flood the land. It is ideal around large sunny swimming pools and courtyards where their large fresh grass green leaves can give a cooling or tropical affect. It is a neat, tidy and compact bushy especially if light tip pruning is maintained.
The fruiting capsules of the deeper pink varieties are quite spectacular hanging on the plants for several months gives colour throughout autumn and winter making a fresh clean tropical look.
Dodonaea rhombifolia also looks really good in mass plantings, using one of the smaller, finer leaf forms of Dodonaea viscosa with red or orange capsules or burgundy leaves for a strong contrast. The contrasts in colour and leaf forms are very pleasing and natural to the eye. When using this type of planting in a mixed garden of Dodonaea species use the broader leaf forms with pink flowers in the center or towards the back and have the smaller leaf forms which also must be shorter towards the front and sides. Try using it as a border, screen or hedges, again mixing it with some of the other Dodonaea species or small Grevillea species for colour, form and height. It looks particularly good when inter planted with Acacia peragusta.
The capsules can be used for indoor arrangements and last for a month or more before fading as long as the water is changed frequently. To ensure good flowering, it is important to prune the plants back to two thirds immediately after the capsule change colour. This will force more growth to the top and give larger and better capsules with long stems. Allow the plants a dormant period in winter. Fertilizing during the growing season every month and especially prior to the first spring rains come will ensure long stems or great little bushy plants. I find the smaller leaf varieties display the colours better and are usually smaller growing plants at the same time.
Dodonaea rhombifolia is quick growing with a variety to suit every position. It often reaches its full potential in just 3 years and flower from the second year.
Propagation:
Seeds: Dodonaea rhombifolia seeds require treatment before sowing. Pre-treat by placing the seeds into a glass of very hot not boiling water.
Sow the treated seeds directly into a seed raising mix and cover with 2mm of the mix. Place the tray in a sunny position. When the seedlings are 25mm to 40mm tall, prick them out and plant them into 50mm native tubes using a seed raising mix. Germination will usually commence after 3 weeks and be completed in 12 weeks from sowing.
Fertilize using Seaweed, fish emulsion or organic chicken pellets soaked in water on an alternate basis. Fertilize every month until established or continue until winter where cut flowers are required.
Once the seedlings reach 150mm to 200mm in height plant them out into their permanent position.
Cuttings:
1 Prepare the cutting mix by adding one third sharp clean river sand, one third peat and one third perlite. These ingredients are sterilize,
2 Select good material from non diseased plants,
3 Select semi green stems for cuttings. Look for a stem with two or three nodes,
4 Place the cutting on a flat, hard surface, and make a clean down one side of the cutting for 10mm to 15mm with a sharp sterile knife or razor blade. – This scarification of the node will increase the chances of roots emerging from this spot. Now remove all but one or two the leaves, leaving the apex leaves in tact. If the leaves are very large in proportion to the stem, cut off the apical halves.
5 Fill a saucer with water, and place a little mild to medium rooting hormone into another container like a milk bottle top. Dip the node end of the cutting into the water and then into the rooting hormone. Tap off any excess hormone,
6 Use a small dipple stick or old pencil to poke a hole into the soilless potting mix. Ensure the hole is slightly larger than the stem diameter and be careful not to wipe the rooting hormone off the cuttings base, place the cuttings in a pattern ensuring the cuttings are not touching each other,
7 I like to place the pots in Plastic bags to help maintain temperature and moisture. Place in a semi shaded place like under 50mm shade cloth.
8 When the cuttings have struck, open the bag to allow air circulation for a few days to a week,
9 Once hardened off remove the cuttings from the bag and allow to further hardening for a few more days,
10 Transplant into a good potting mix to grow on.
Fertilize using seaweed, fish emulsion or organic chicken pellets soaked in water on an alternate basis. Fertilize every two months until the plants are established then annually in early September to October to maintain health, vitality and better flowering.
Further Comments from Readers:
Hi reader, it seems you use The Bible of Botany a lot. That’s great as we have great pleasure in bringing it to you! It’s a little awkward for us to ask, but our first aim is to purchase land approximately 1,600 hectares to link several parcels of N.P. into one at The Pinnacles NSW Australia, but we need your help. We’re not salespeople. We’re amateur botanists who have dedicated over 30 years to saving the environment in a practical way. We depend on donations to reach our goal. If you donate just $5, the price of your coffee this Sunday, We can help to keep the planet alive in a real way and continue to bring you regular updates and features on Australian plants all in one Botanical Bible. Any support is greatly appreciated. Thank you.
In the spirit of reconciliation we acknowledge the Bundjalung, Gumbaynggirr and Yaegl and all aboriginal nations throughout Australia and their connections to land, sea and community. We pay our respect to their Elders past, present and future for the pleasures we have gained.
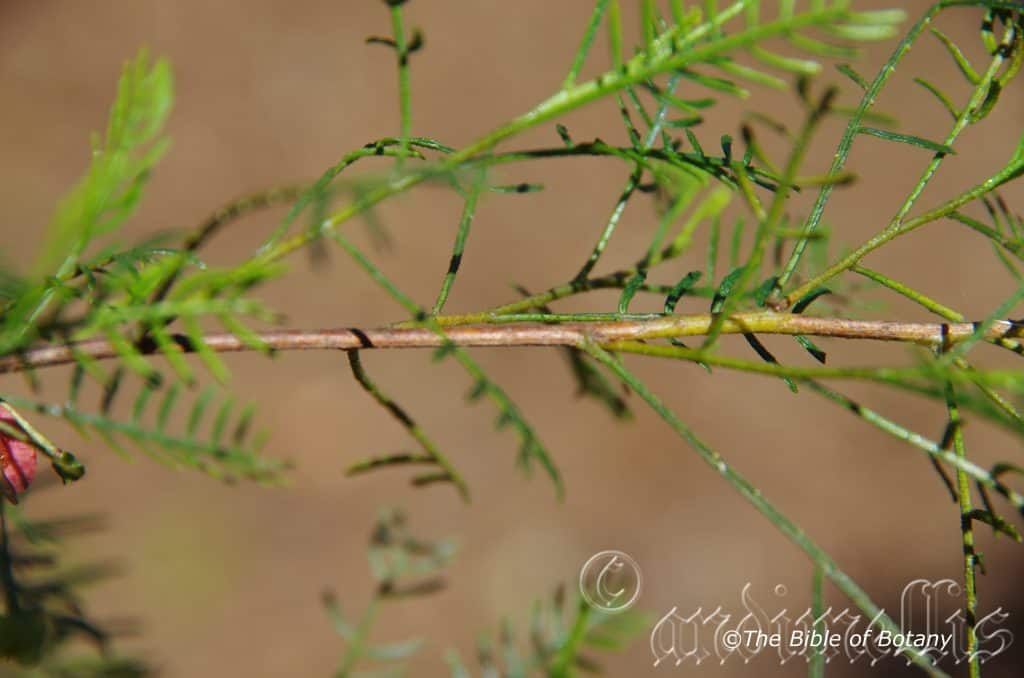
Rosser Gardens Benowa Qld.
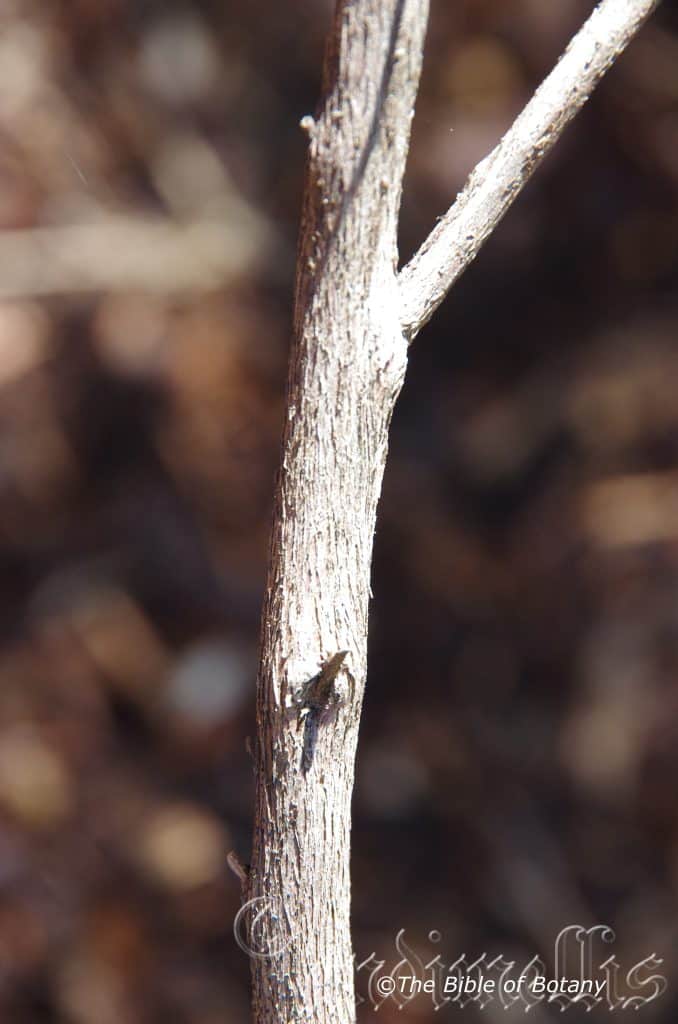
Rosser Gardens Benowa Qld.
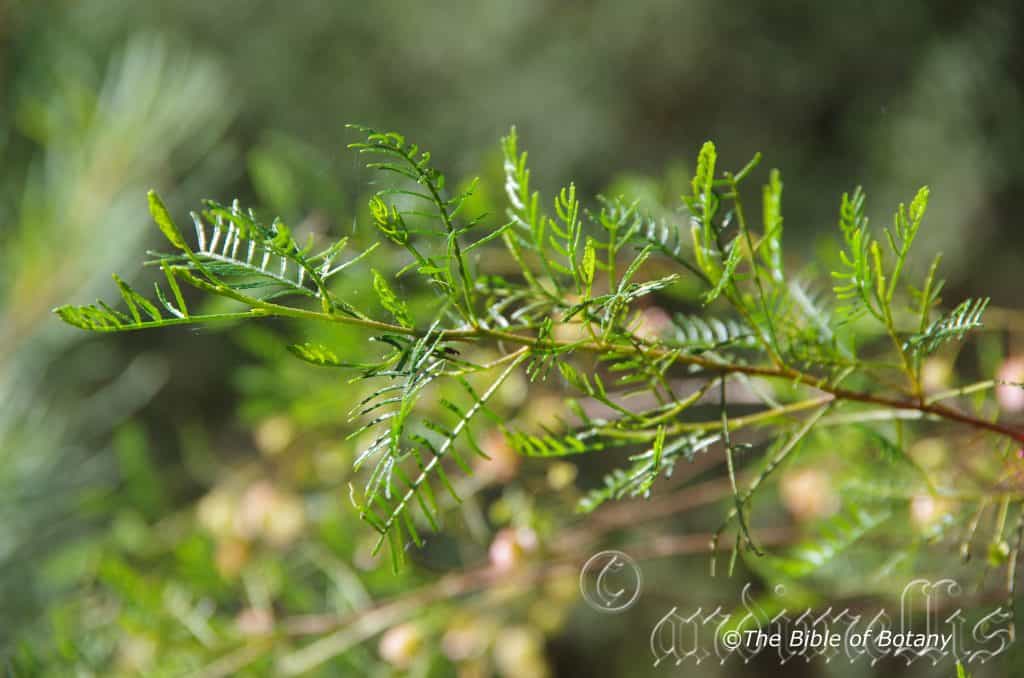
Rosser Gardens Benowa Qld.

Rosser Gardens Benowa Qld.
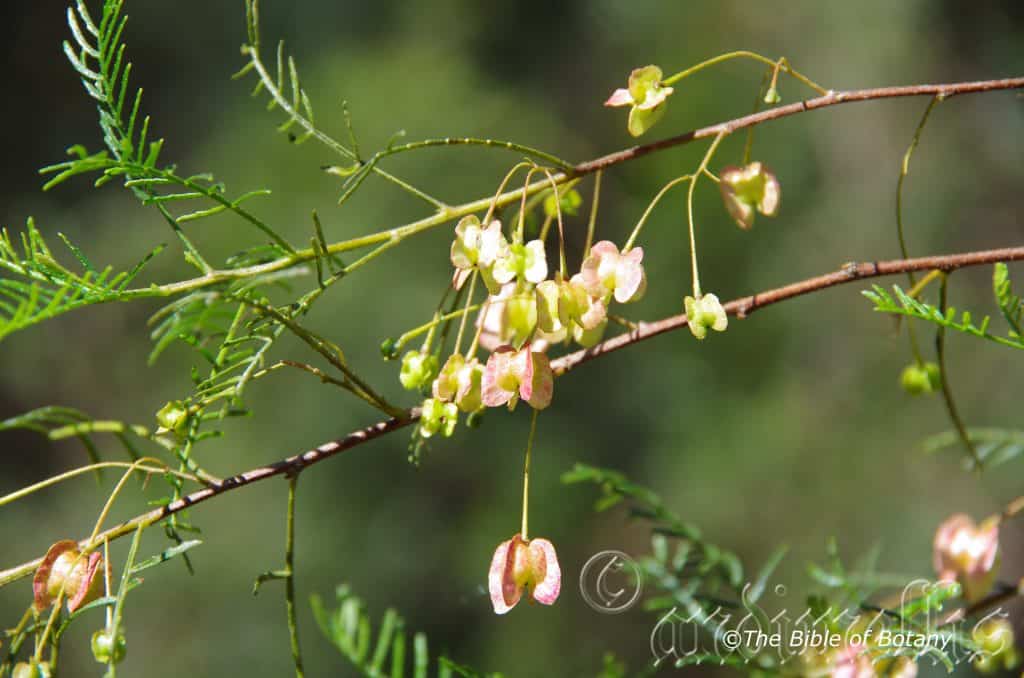
Rosser Gardens Benowa Qld.

Rosser Gardens Benowa Qld.
Dodonaea sinuolata
Classification
Unranked: Eudicots
Unranked: Rosids
Family: Sapindales
Subfamily: Dodonaeoideae
Genus: Is named in honour of Rembert Dodoens; 1517-1585, who was a Flemish botanist and professor.
Species: From Sinuosum, which is winding and Atus, which is Latin for possessive or to have possession of. It refers to an organ or structure usually the leaves’ margins, which wavy or winding – that is sinuate.
Subspecies: Dodonaea sinuolata subsp. sinuolata. From Sinuosum, which is winding and Atus, which is Latin for possessive or to have possession of. It refers to an organ or structure usually the leaves’ margins, which wavy or winding – that is sinuate.
Subspecies: Dodonaea sinuolata subsp. acrodentata. From Akron, which is Ancient Greek or Acro, which is Latin for the extremity or a stem and Odontus, which is Ancient Greek or Dent, which is Latin for a tooth or teeth. It probably refers to the rachis ending in a distinct but small tooth.
Common Name:
Distribution:
Dodonaea sinuolata subsp. sinuolata is found in an area bounded by Quilpie, to Bell and Rosewood in southern Queensland to Castlereagh in central eastern New South Wales.It is mainly found on the western slopes and on the Great Dividing Range.
Dodonaea sinuolata subsp. subsp. acrodentata is found further west and south from the Langlo River in central western Queensland to Ivanhoe in south western New South Wales.
https://avh.ala.org.au/occurrences/search?taxa=Dodonaea+sinuolata#tab_mapView
Habitat Aspect Climate:
Dodonaea sinuolata prefers full sun to light shade. It grows in open woodlands.
It can be found from sea level to high in the mountains. The altitude ranges from 200 meters ASL to 800 meters ASL.
The temperatures range from minus 2 degrees in July to 42 degrees in January.
The rainfall ranges from 400mm to 900mm average annually.
Soil Requirements:
Dodonaea sinuolata prefers to grow on deeper soils of poor to good quality which are derived from partially decomposed sandstones and serpentine soils which are high in iron and magnesium. The PH ranges from 4.5 to 6.5. It does not tolerate waterlogged soils. Non saline soils to moderately saline soils are tolerated.
Height & Spread:
Wild Plants: 2m to 3m by 2m to 3m
Characteristics:
Dodonaea sinuolata is an upright shrub. The bark on the branches is pale grey-brown and slightly furrowed on older plants. Branchlets are thin reddish brown and glabrous to the glossy grass-green found on the new juvenile growth.
The imparipinnate leaves measure 20mm to 40mm in length, while the 6 to 14 linear leaflets measure 5mm to 16mm in length by 1mm to 2mm in width. The bases are attenuate, while the apexes are broad acute to obtuse. The margins are irregularly and finely sinuate or at times entire. The terminal leaflet is shorter and more lobe like. The petiole measures 6mm to 13mm in length.
The inflorescences of Dodonaea sinuolata are born on short axillary cymes with 3 to 6 individual flowers. The shrubs are dioecious. The pedicels measure 5mm to 10mm in length. The 4 caduceous sepal lobes are two ovate and two elliptical measure 3mm to 4mm in length.
The 8 or rarely 10 divaricate yellow-red stamens measure 5mm to 6mm in length.
The flowers appear from late June to late July.
Dodonaea sinuolata‘s fruits are a 3 winged capsule. The capsules measure 10mm to 13mm in length by 10mm to 15mm in width. The glabrous capsule‘s lobes measure 3mm to 5mm in width. The pale grass-green capsules turn lemon-green or lime-green then to a vivid scarlet redand coriaceous when ripe. They hang on the plant for extended periods up to 2 months. The ovate, black, glossy seeds measure 1mm to 1.5mm in diameter.
Wildlife:
Dodonaea sinuolata‘s wildlife is unknown to the author.
Cultivation:
Dodonaea sinuolata is a beautiful small shrub which is well suited to drier, coastal areas on poor sandy loams. In cultivation they will grow 2.5 meters to 3.5 meters tall by 2 meters to 3 meters in diameter.
It can cope with temperatures as low as minus 2 degrees for short periods and up to 44 degrees. It is drought resistant once established and can cope with the occasional immersion where periodic down pours may flood the land. It is ideal around swimming pools as a backdrop. The plants are neat and tidy, compact and bushy especially if light tip pruning is maintained or the capsules are snipped for indoor decorations and in floral arrangements.
Dodonaea sinuolata also looks really good in mass plantings, using one of the other finer leaf forms of Dodonaea viscosa with burgundy or yellow capsules. The contrasts in colour and leaf forms are very pleasing and natural to the eye. When using this type of planting use the broader leaf triquetra in the center or towards the back and have the smaller leaf forms which also must be shorter towards the front and sides. Try using them as borders, screens and or hedges, again mixing them with some of the other Dodonaea specie for colour, form and height.
Dodonaea sinuolata is quick growing with a variety to suit every position. It often reaches its full potential in just 2 years and flower from the second year. Dodonaea species have great prospects as a cut flower in the future and has surprised me that no entrepreneurial young flower farmer has already taken advantage of it because of its ease in growing versatility in climate and soil and the longevity of the capsules. Though not a spectacular red it can be used successfully as a back drop without being overpowering and lasts well indoors.
Propagation:
Seeds: Dodonaea sinuolata seeds require treatment before sowing. Pre-treat by placing the seeds into a glass of very hot not boiling water. Allow the water to cool and leave to soak for 4 to 6 hours.
Sow the treated seeds directly into a seed raising mix and cover with 2mm of the mix. Place the tray in a sunny position. When the seedlings are 25mm to 40mm tall, prick them out and plant them into 50mm native tubes using a seed raising mix. Germination will usually commence after 3 weeks and be completed in 12 weeks from sowing.
Once the seedlings reach 150mm to 200mm in height plant them out into their permanent position.
Cuttings: Cuttings should be used if cut flowers are required as the plants are unisexual and only the female plants will deliver the capsules. Remember some male plants will be required in the garden to ensure fertilization. I have seen no research done on the ratio of male plants compared to female plants. A field trip near Coonabarabran in 2002 we counted 1 male plant to 10 female plants with Dodonaea viscose subsp. cuneata.
Cuttings should be used if cut flowers are required as the plants are unisexual and only the female plants will deliver the capsules. Remember some male plants will be required in the garden to ensure fertilization. I have seen no research done on the ratio of male plants compared to female plants. A field trip near Coonabarabran in 2002 we counted 1 male plant to 10 female plants with Dodonaea viscose subsp. cuneata.
Cuttings should be used if cut flowers are required as the plants are unisexual and only the female plants will deliver the capsules. Remember some male plants will be required in the garden to ensure fertilization. I have seen no research done on the ratio of male plants compared to female plants. A field trip near Coonabarabran in 2002 we counted 1 male plant to 8 to 10 female plants with Dodonaea viscose subsp. cuneata.
1 Prepare the cutting mix by adding one third sharp clean river sand, one third peat and one third perlite. These ingredients are sterilize,
2 Select good material from non diseased plants,
3 Select semi green stems for cuttings. Look for a stem with two or three nodes,
4 Place the cutting on a flat, hard surface, and make a clean down one side of the cutting for 10mm to 15mm with a sharp sterile knife or razor blade. – This scarification of the node will increase the chances of roots emerging from this spot. Now remove all but one or two the leaves, leaving the apex leaves in tact. If the leaves are very large in proportion to the stem, cut off the apical halves.
5 Fill a saucer with water, and place a little mild to medium rooting hormone into another container like a milk bottle top. Dip the node end of the cutting into the water and then into the rooting hormone. Tap off any excess hormone,
6 Use a small dipple stick or old pencil to poke a hole into the soilless potting mix. Ensure the hole is slightly larger than the stem diameter and be careful not to wipe the rooting hormone off the cuttings base, place the cuttings in a pattern ensuring the cuttings are not touching each other,
7 I like to place the pots in Plastic bags to help maintain temperature and moisture. Place in a semi shaded place like under 50mm shade cloth.
8 When the cuttings have struck, open the bag to allow air circulation for a few days to a week,
9 Once hardened off remove the cuttings from the bag and allow to further hardening for a few more days,
10 Transplant into a good potting mix to grow on.
Fertilize using seaweed, fish emulsion or organic chicken pellets soaked in water on an alternate basis. Fertilize every two months until the plants are established then annually in early September to October to maintain health, vitality and better flowering.
Further Comments from Readers:
Hi reader, it seems you use The Bible of Botany a lot. That’s great as we have great pleasure in bringing it to you! It’s a little awkward for us to ask, but our first aim is to purchase land approximately 1,600 hectares to link several parcels of N.P. into one at The Pinnacles NSW Australia, but we need your help. We’re not salespeople. We’re amateur botanists who have dedicated over 30 years to saving the environment in a practical way. We depend on donations to reach our goal. If you donate just $5, the price of your coffee this Sunday, We can help to keep the planet alive in a real way and continue to bring you regular updates and features on Australian plants all in one Botanical Bible. Any support is greatly appreciated. Thank you.
In the spirit of reconciliation we acknowledge the Bundjalung, Gumbaynggirr and Yaegl and all aboriginal nations throughout Australia and their connections to land, sea and community. We pay our respect to their Elders past, present and future for the pleasures we have gained.
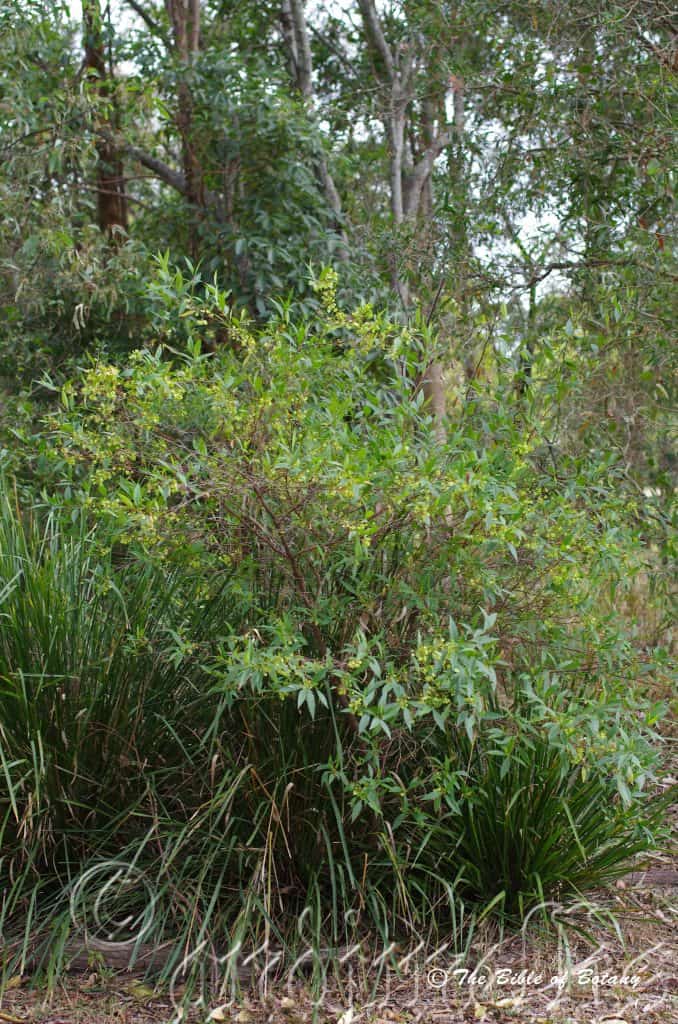
Kedron Brook Qld.

The Pinnacles NSW
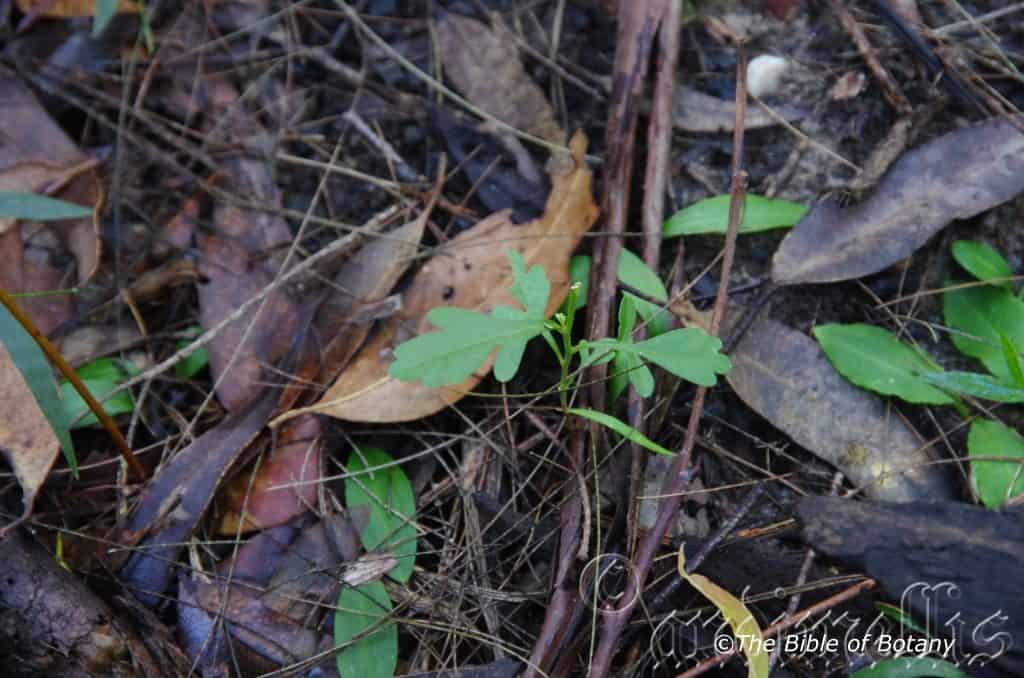
The Pinnacles NSW
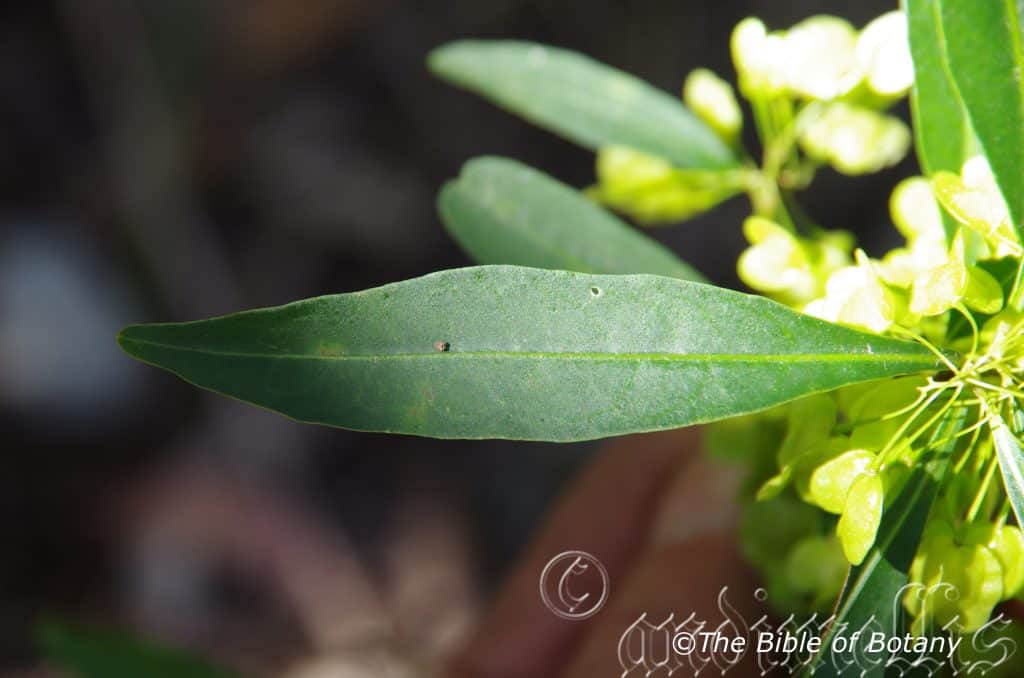
Fortis Creek National Park NSW
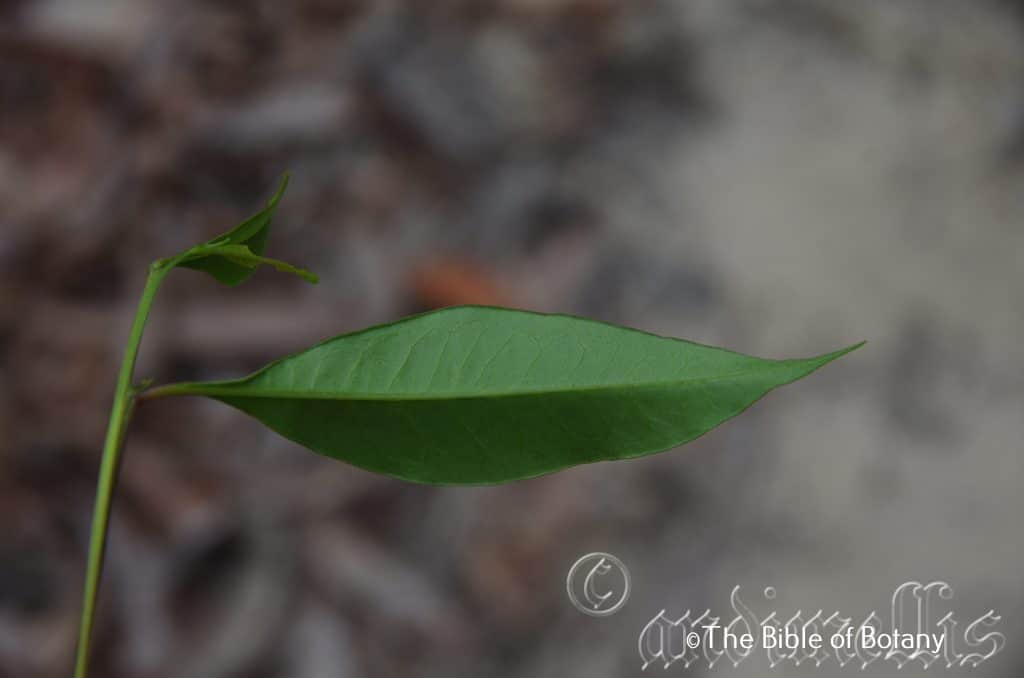
The Pinnacles NSW
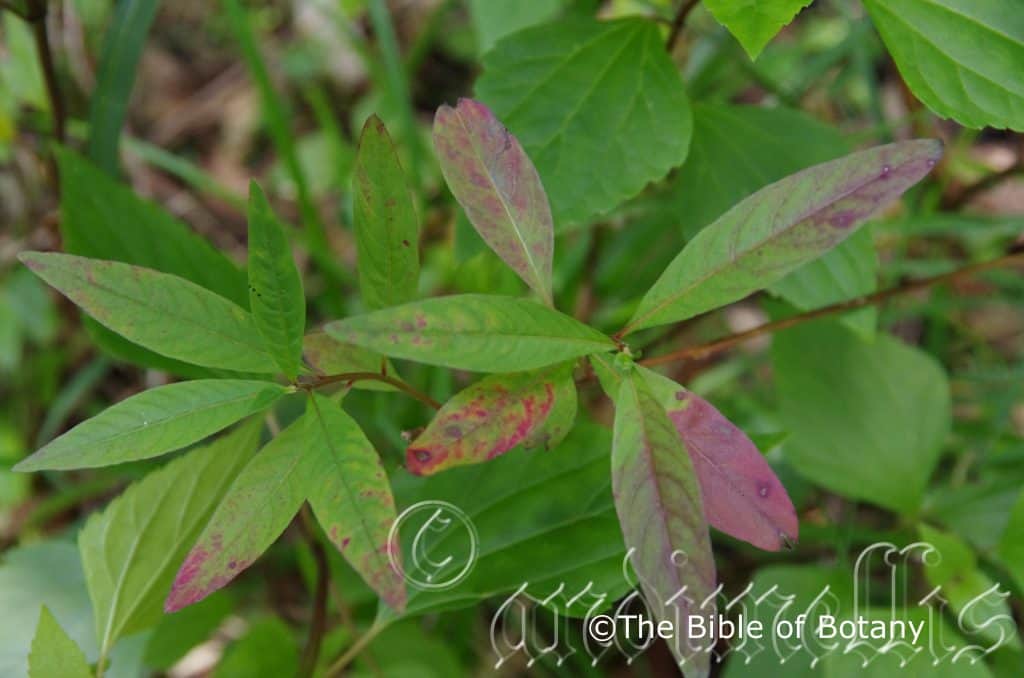
The Pinnacles NSW
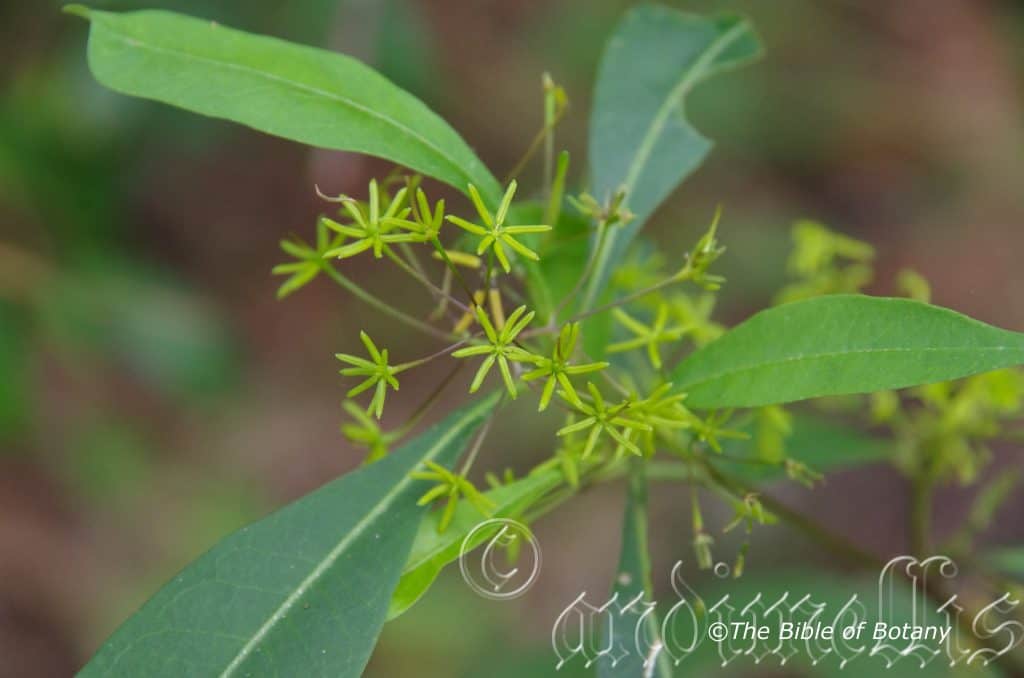
Pillar Valley NSW
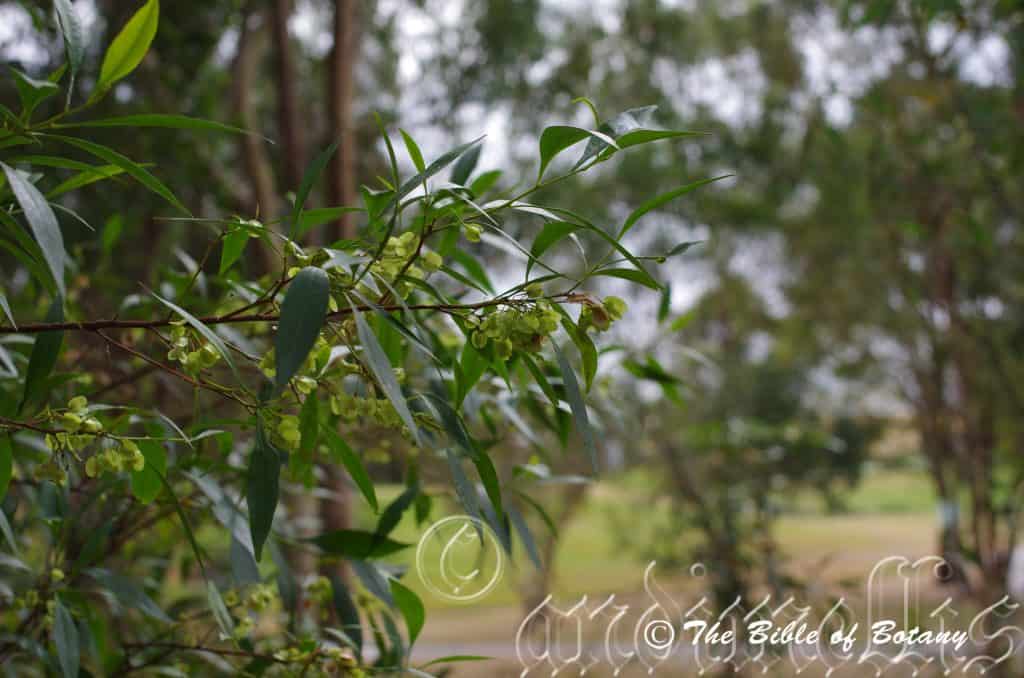
Pillar Valley NSW
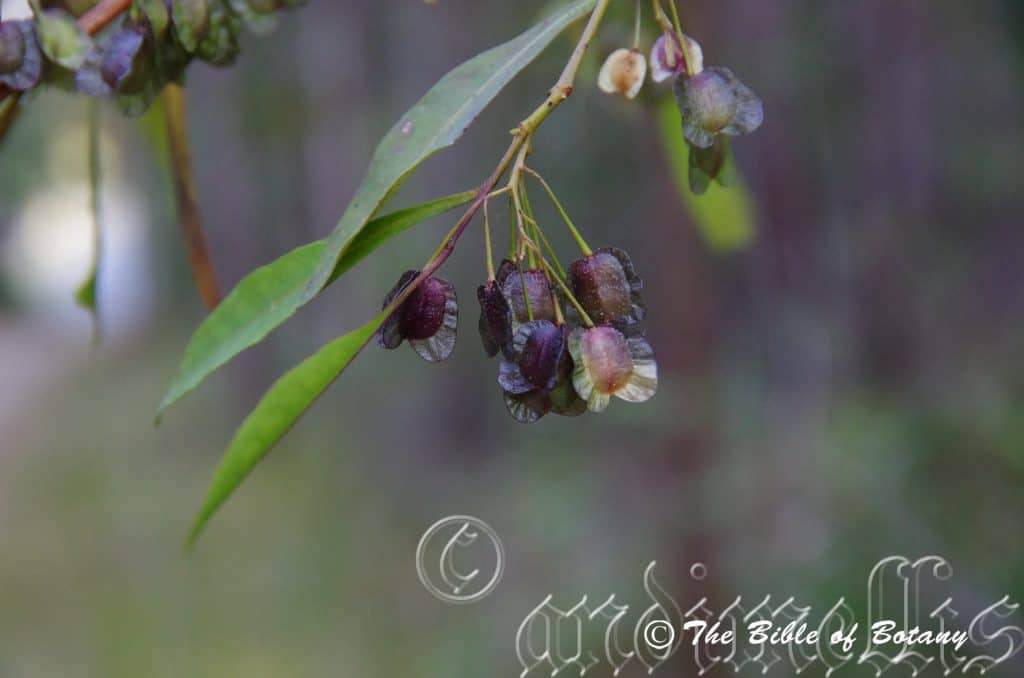
Mitchelton Qld.
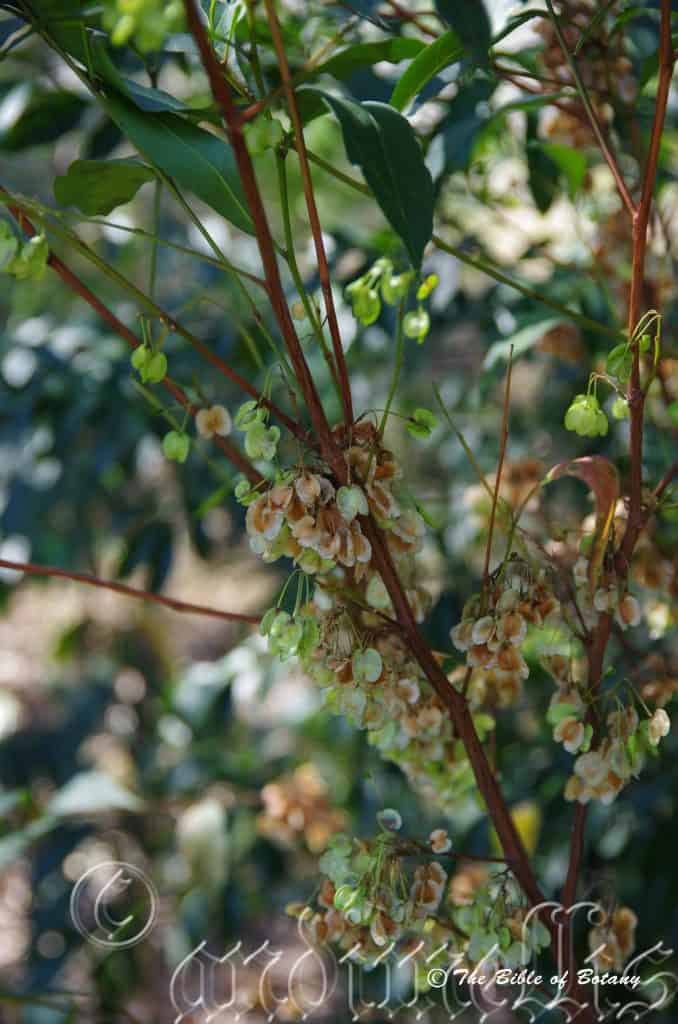
Mitchelton Qld.
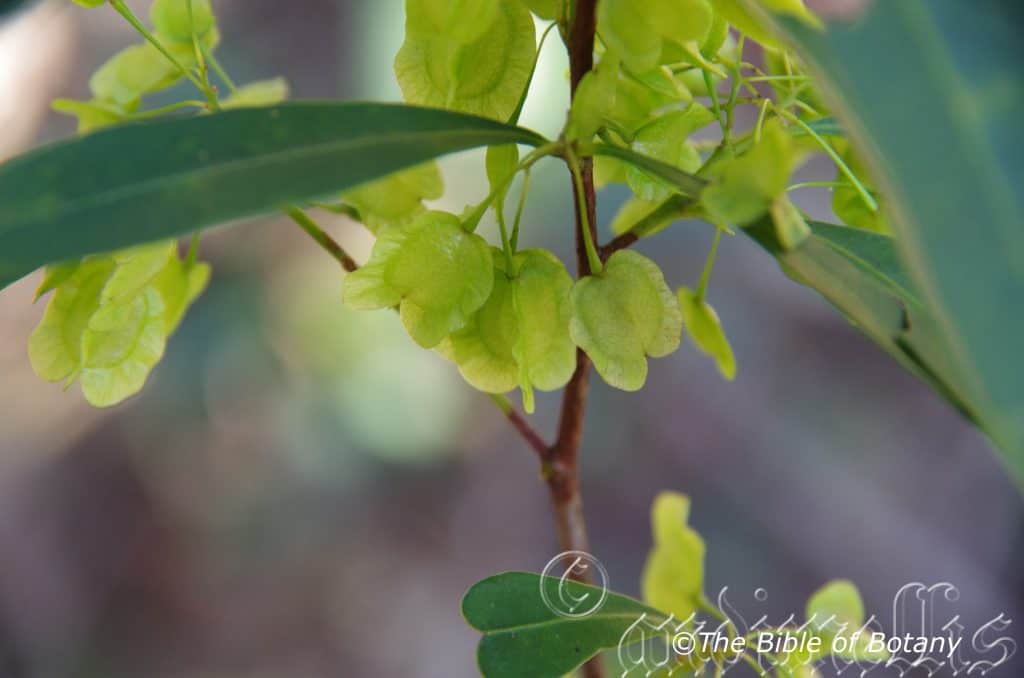
Fortis Creek National Park NSW
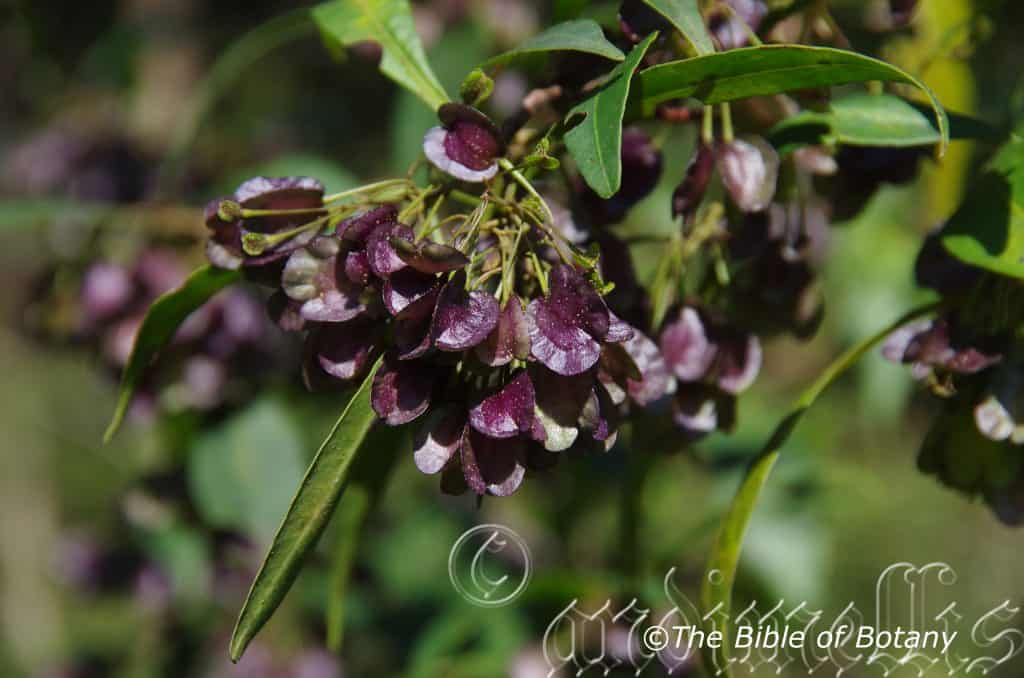
Yuraygir National Park NSW
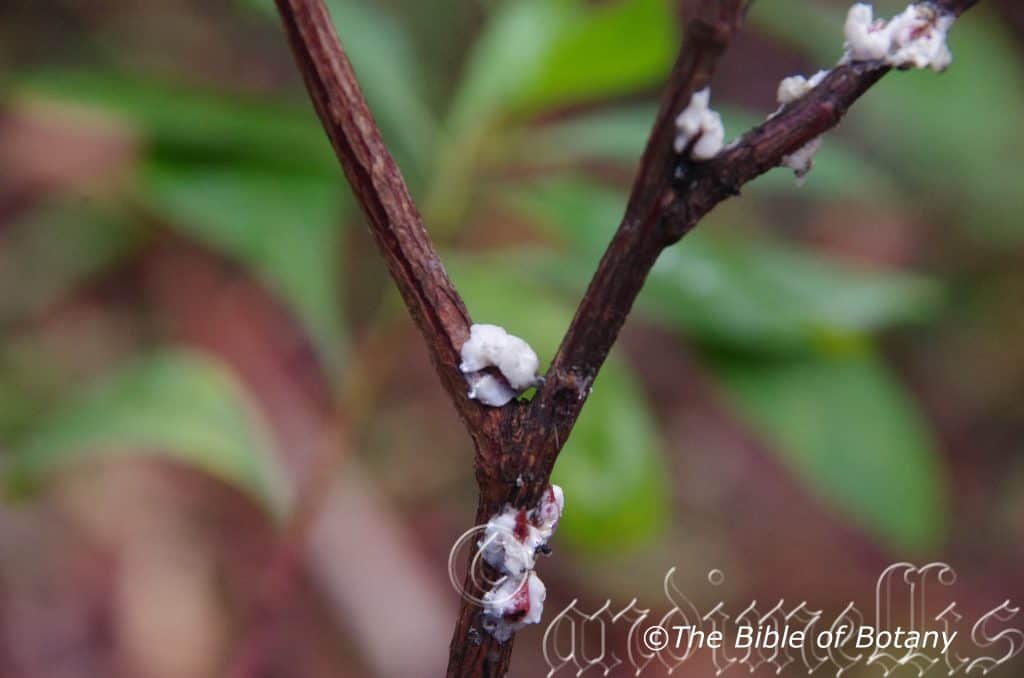
Limeburner Creeek National Park NSW
Dodonaea triquetra
Classification
Unranked: Eudicots
Unranked: Rosids
Family: Sapindales
Subfamily: Dodonaeoideae
Genus: Is named in honour of Rembert Dodoens; 1517-1585, who was a Flemish botanist and professor.
Species: From Treis/Tria, which are Ancient Greek or Tri, which is Latin for three and Kwetra, which is Ancient Greek for an angle. It refers to fruits, which three distinct angles.
Common Name: Large Leaf Hop Bush.
Distribution:
Dodonaea triquetra is found south from Cairns in Northern Queensland to near Orbost in north eastern coastal Victoria. There is a small outlying population on the Leichardt River south of Mount Isa and south of Cloncurry on the Cloncurry River. It is mainly found on and east of the Great Dividing Range to the coast.
There is an isolated population in the Northern Territory on the Yambarran range.
https://avh.ala.org.au/occurrences/search?taxa=Dodonaea+triquetra#tab_mapView
Habitat Aspect Climate:
Dodonaea triquetra prefers full sun to light shade. It grows among medium trees, or low trees in dry Eucalyptus forests or moist Eucalyptus forests, open woodlands, adjacent to dry rainforests or dry gallery forests. It can be found from sea level to high in the mountains. The altitude ranges from 5 meters ASL to 1010 meters ASL.
The temperatures range from minus 4 degrees in July to 44 degrees in January.
The rainfall ranges from 400mm to 2600mm average annually.
Soil Requirements:
Dodonaea triquetra prefers to grow on deeper soils of poor to good quality which are derived from decomposed sandstones, shales and serpentine soils which are high in iron and magnesium. The PH ranges from 6 to 7.5.It does not tolerate waterlogged soils. Non saline soils to moderately saline soils are tolerated.
Height & Spread:
Wild Plants: 2m to 3m by 2m to 3m
Characteristics:
Dodonaea triquetra is an upright spindly to bushy shrub found in closed woodlands or near rainforests or a bushy robust shrub where it is found in the open on the coast. The bark on the trunk is grey brown and slightly furrowed on older plants. Branchlets are thin reddish brown and glabrous to the glossy grass green new juvenile growth.
Dodonaea triquetra alternate, elliptical to lanceolate or ovate leaves measure 50mm to 120mm in length by 12mm to 47mm wide. The bases are cuneate at times are attenuate while the apexes are acuminate to broad acute. The concolourous laminas are grass-green and glabrous. The laminas are flat. The mid vein is slightly prominent on both laminas. The margins are entire. The petioles measure 2mm to 8mm in length.
The inflorescences of Dodonaea triquetra are born on short panicles from the terminals. The shrubs are dioecious. The peduncles measure 2mm to 5mm in length while the pedicels measure 5mm to 10mm in length. The usually 4 or at times 5 pale grass-green sepals are caduceous. The broad triangular sepals measure 0.6mm to 1mm in length.
The 8 or rarely 10 divaricate yellow-green stamens measure 4mm to 5.5mm in length.
The glabrous ovaries are pale grass-green. The burgundy styles measure 18mm to 22mm in length and have a trilobed stigma. The flowers appear from late August to late September.
Dodonaea triquetra‘s fruits are a 3 winged capsule. The capsules measure 10mm to 16mm in length by 10mm to 15mm in width. The glabrous capsule‘s lobes measure 2.5mm to 5mm in width. The pale grass-green capsules turn lemon-green or lime-green then to a pale fawn and coriaceous when ripe and hang on the plant for extended periods up to 2 months. The ovate, black, glossy seeds measure 1mm to 1.5mm in diameter.
Wildlife:
Dodonaea triquetra‘s fruit and seeds are often eaten by several species of moths which are unknown to the author.
The hops like capsules were used as a substitute for hops in the early days of settlement to make beer.
Cultivation:
Dodonaea triquetra is a beautiful small shrub which is well suited to drier, coastal areas on poor sandy loams. In cultivation they will grow 2.5 meters to 3.5 meters tall by 2 meters to 3 meters in diameter.
It can cope with temperatures as low as minus 5 degrees and up to 44 degrees. It is drought resistant once established and can cope with the occasional immersion where periodic down pours may flood the land. It is ideal around swimming pools where their large fresh grass green leaves give a cooling or tropical affect. It is neat and tidy, compact and bushy especially if light tip pruning is maintained.
The fruiting capsules are not as spectacular as the other Dodonaea but again the bright lime or lemon green coloured capsules hang on the plants for several months gives colour throughout autumn and winter making a fresh clean tropical look.
Dodonaea triquetra also looks really good when mixed with Acacia acinaceae or Acacia myrtifolia. The contrasts in colour and leaf forms are very pleasing and natural to the eye. When using this type of planting use the broader leaf triquetra in the center or towards the back and have the smaller leaf forms which also must be shorter towards the front and sides. Try using them as borders, screens and or hedges, again mixing them with some of the other Dodonaea specie for colour, form and height.
The capsules can be used for indoor arrangements and last for a month or more before fading as long as the water is changed frequently. To ensure good flowering, it is important to prune the plants back to two thirds immediately after the capsule change colour. This will force more growth to the top and give larger and better capsules with long stems. This will force more growth to the top and give larger and better capsules with longer stems. Allow the plants a dominant period in winter. Fertilizing during the growing season every month and especially when the first spring rains come will ensure long stems or great little bushy plants. I find the smaller leaf varieties display the colours better and are usually smaller growing plants at the same time.
Dodonaea triquetra is quick growing with a variety to suit most position. It often reaches its full potential in just 3 years and flower from the second year. Dodonaea has great prospects as a cut flower in the future and has surprised me that no entrepreneurial young flower farmer has already taken advantage of it because of its ease in growing versatility in climate and soil and the longevity of the capsules. Though not a spectacular red it can be used successfully as a back drop without being overpowering and lasts well indoors.
Propagation:
Seeds: Dodonaea triquetra seeds require treatment before sowing. Pre-treat by placing the seeds into a glass of very hot not boiling water. Allow the water to cool and leave to soak for 12 to 16 hours. Add a pinch of bicarb in the water for the first 5 to 6 hours before changing the water, where I add half a teaspoon of vinegar for the remaining hours. Rinse well before sowing.
Sow the treated seeds directly into a seed raising mix and cover with 2mm of the mix. Place the tray in a sunny position. When the seedlings are 25mm to 40mm tall, prick them out and plant them into 50mm native tubes using a seed raising mix. Germination will usually commence after 3 weeks and be completed in 12 weeks from sowing.
Once the seedlings reach 150mm to 200mm in height plant them out into their permanent position.
Cuttings: Cuttings should be used if cut flowers are required as the plants are unisexual and only the female plants will deliver the capsules. Remember some male plants will be required in the garden to ensure fertilization. I have seen no research done on the ratio of male plants compared to female plants. A field trip near Coonabarabran in 2002 we counted 1 male plant to 10 female plants with Dodonaea viscose subsp. cuneata.
Cuttings should be used if cut flowers are required as the plants are unisexual and only the female plants will deliver the capsules. Remember some male plants will be required in the garden to ensure fertilization. I have seen no research done on the ratio of male plants compared to female plants. A field trip near Coonabarabran in 2002 we counted 1 male plant to 10 female plants with Dodonaea viscose subsp. cuneata.
Cuttings should be used if cut flowers are required as the plants are unisexual and only the female plants will deliver the capsules. Remember some male plants will be required in the garden to ensure fertilization. I have seen no research done on the ratio of male plants compared to female plants. A field trip near Coonabarabran in 2002 we counted 1 male plant to 8 to 10 female plants with Dodonaea viscose subsp. cuneata.
1 Prepare the cutting mix by adding one third sharp clean river sand, one third peat and one third perlite. These ingredients are sterilize,
2 Select good material from non diseased plants,
3 Select semi green stems for cuttings. Look for a stem with two or three nodes,
4 Place the cutting on a flat, hard surface, and make a clean down one side of the cutting for 10mm to 15mm with a sharp sterile knife or razor blade. – This scarification of the node will increase the chances of roots emerging from this spot. Now remove all but one or two the leaves, leaving the apex leaves in tact. If the leaves are very large in proportion to the stem, cut off the apical halves.
5 Fill a saucer with water, and place a little mild to medium rooting hormone into another container like a milk bottle top. Dip the node end of the cutting into the water and then into the rooting hormone. Tap off any excess hormone,
6 Use a small dipple stick or old pencil to poke a hole into the soilless potting mix. Ensure the hole is slightly larger than the stem diameter and be careful not to wipe the rooting hormone off the cuttings base, place the cuttings in a pattern ensuring the cuttings are not touching each other,
7 I like to place the pots in Plastic bags to help maintain temperature and moisture. Place in a semi shaded place like under 50mm shade cloth.
8 When the cuttings have struck, open the bag to allow air circulation for a few days to a week,
9 Once hardened off remove the cuttings from the bag and allow to further hardening for a few more days,
10 Transplant into a good potting mix to grow on.
Fertilize using seaweed, fish emulsion or organic chicken pellets soaked in water on an alternate basis. Fertilize every two months until the plants are established then annually in early September to October to maintain health, vitality and better flowering.
Further Comments from Readers:
Hi reader, it seems you use The Bible of Botany a lot. That’s great as we have great pleasure in bringing it to you! It’s a little awkward for us to ask, but our first aim is to purchase land approximately 1,600 hectares to link several parcels of N.P. into one at The Pinnacles NSW Australia, but we need your help. We’re not salespeople. We’re amateur botanists who have dedicated over 30 years to saving the environment in a practical way. We depend on donations to reach our goal. If you donate just $5, the price of your coffee this Sunday, We can help to keep the planet alive in a real way and continue to bring you regular updates and features on Australian plants all in one Botanical Bible. Any support is greatly appreciated. Thank you.
In the spirit of reconciliation we acknowledge the Bundjalung, Gumbaynggirr and Yaegl and all aboriginal nations throughout Australia and their connections to land, sea and community. We pay our respect to their Elders past, present and future for the pleasures we have gained.
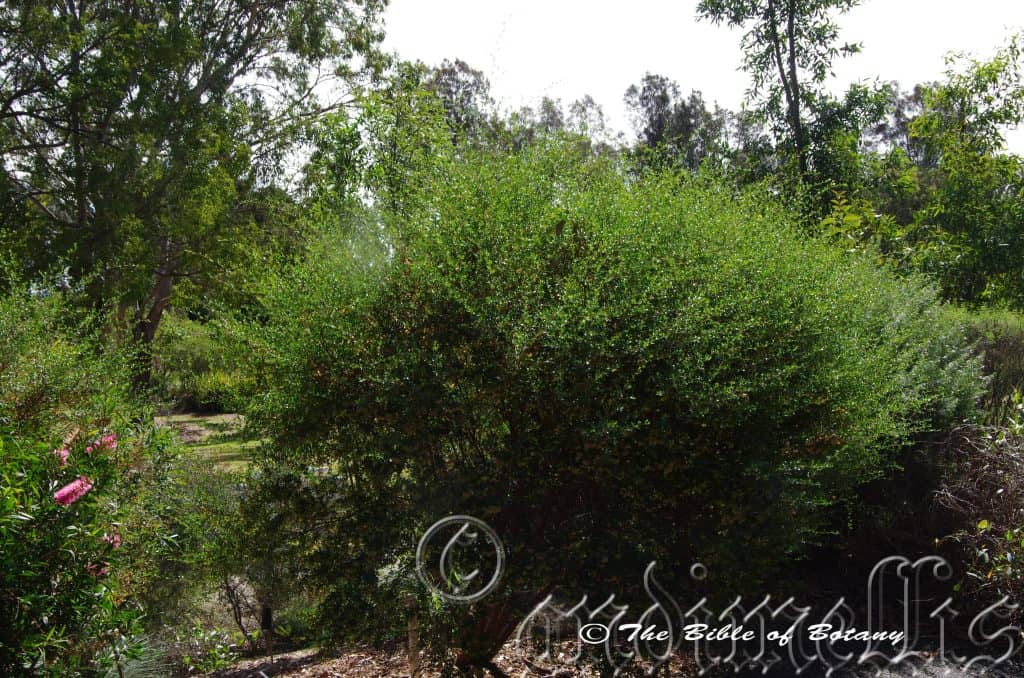
Rosser Gardens Benowa Qld.
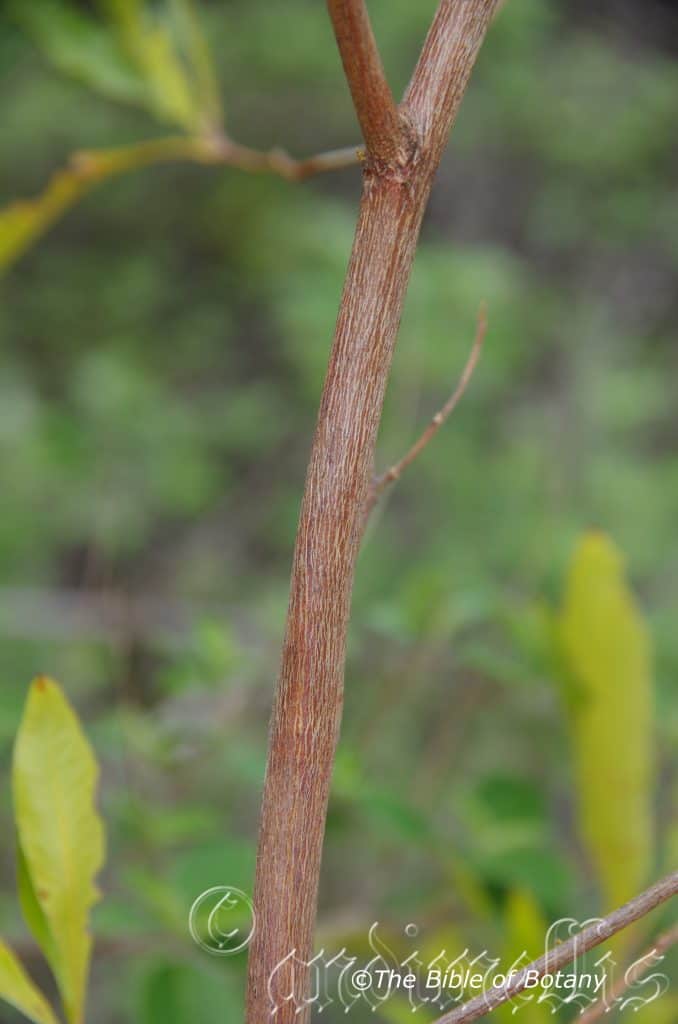
Dodonaea viscosa sub specie burmanniana Magnetic Island Qld.
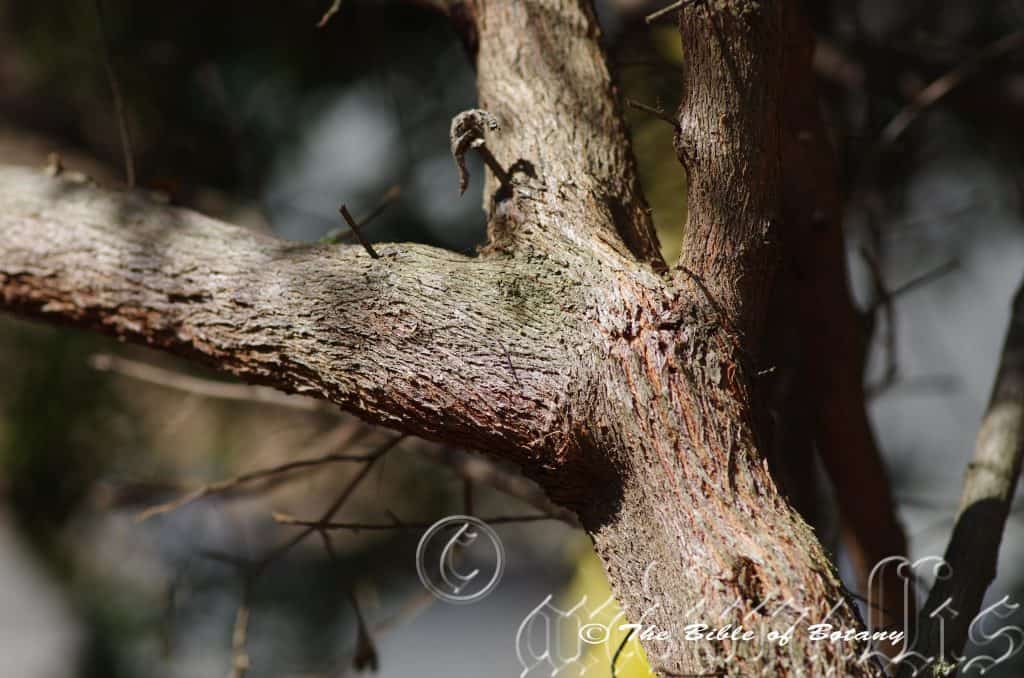
Ross River Condon Qld.
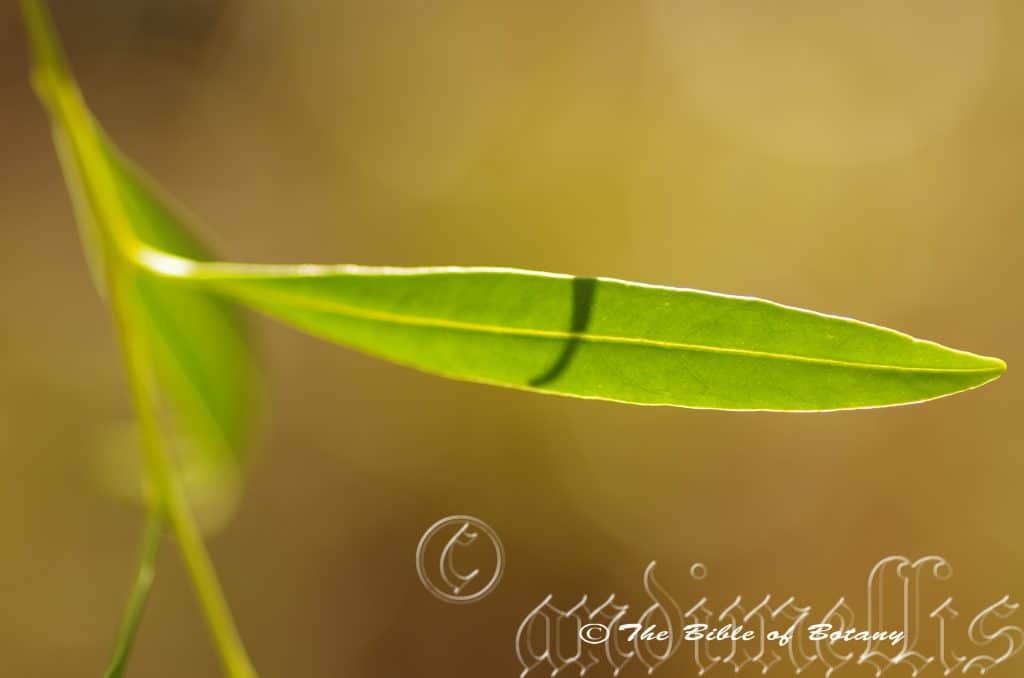
Dodonaea viscosa sub specie angustifolia Castle hill Townsville Qld.

Dodonaea viscosa sub specie angustifolia Castle hill Townsville Qld.
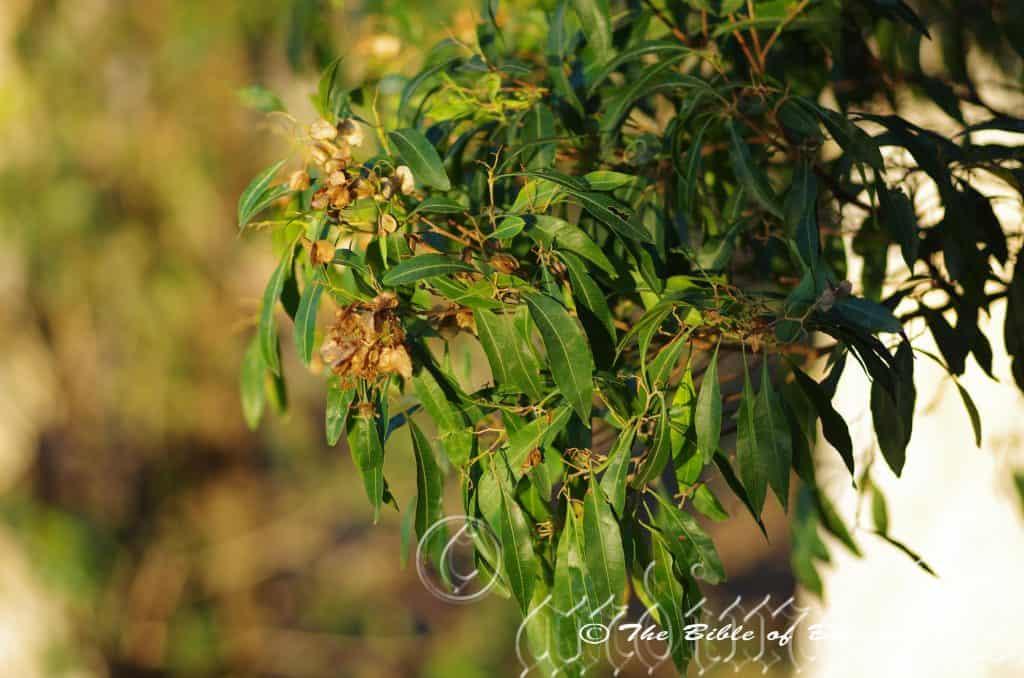
Dodonaea viscosa sub specie burmanniana Ross River Condon Qld.
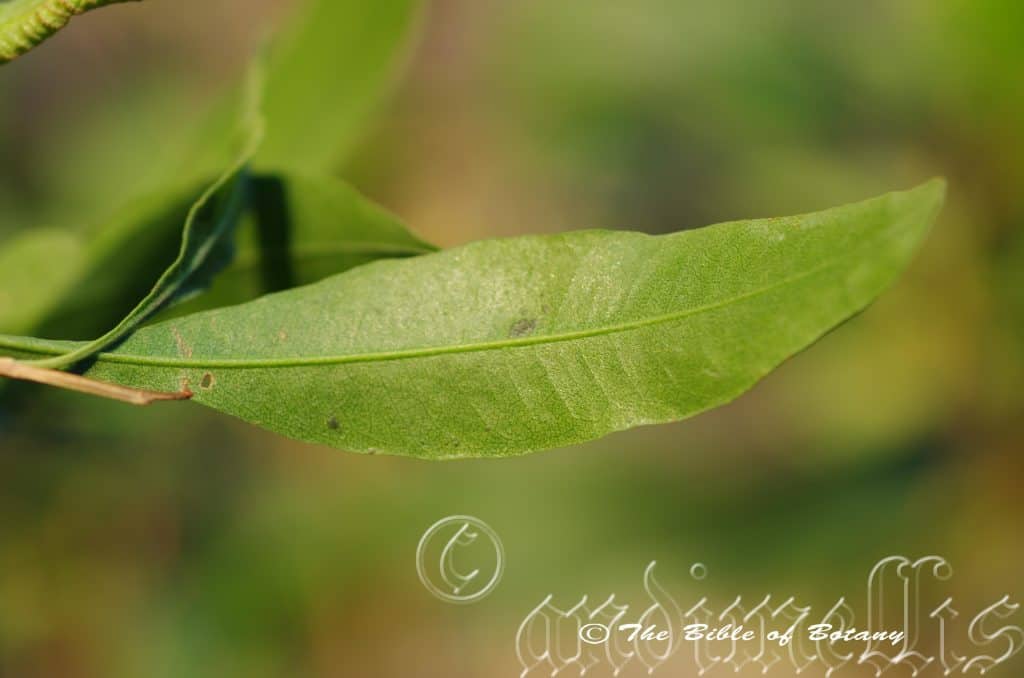
Dodonaea viscosa sub specie burmanniana Ross River Condon Qld.
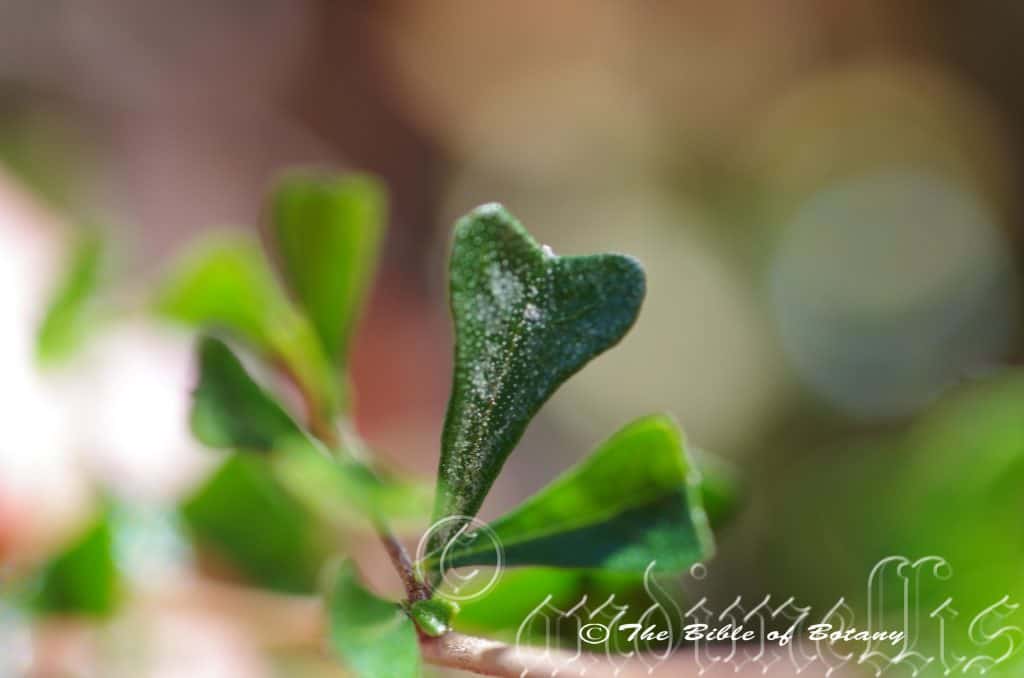
Dodonaea viscosa sub specie cuneata Casina NSW
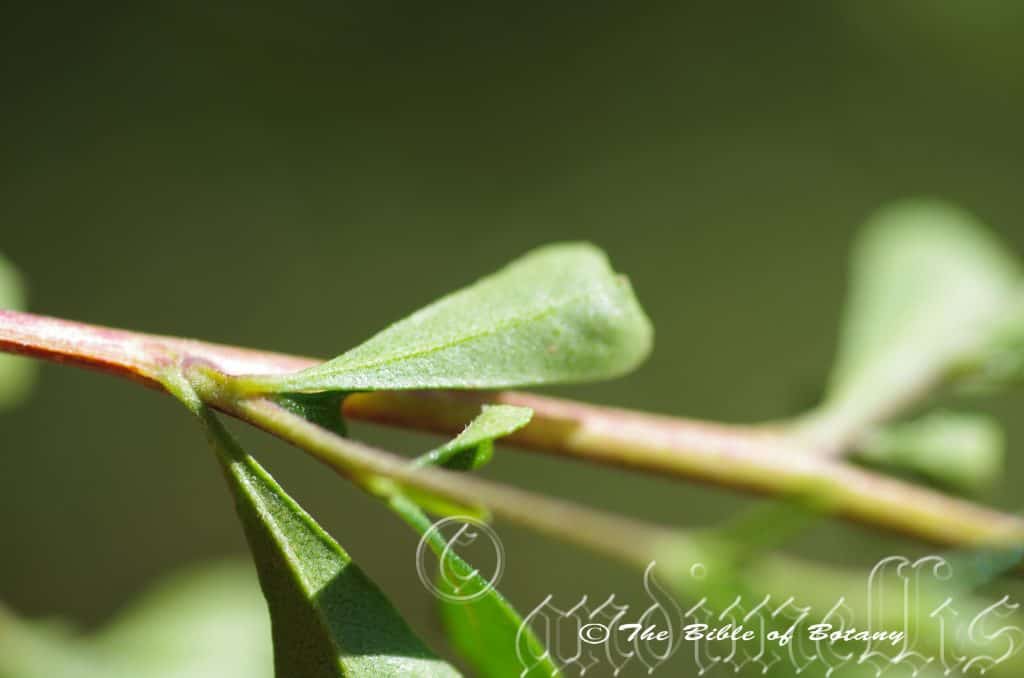
Dodonaea viscosa sub specie cuneata Casina NSW
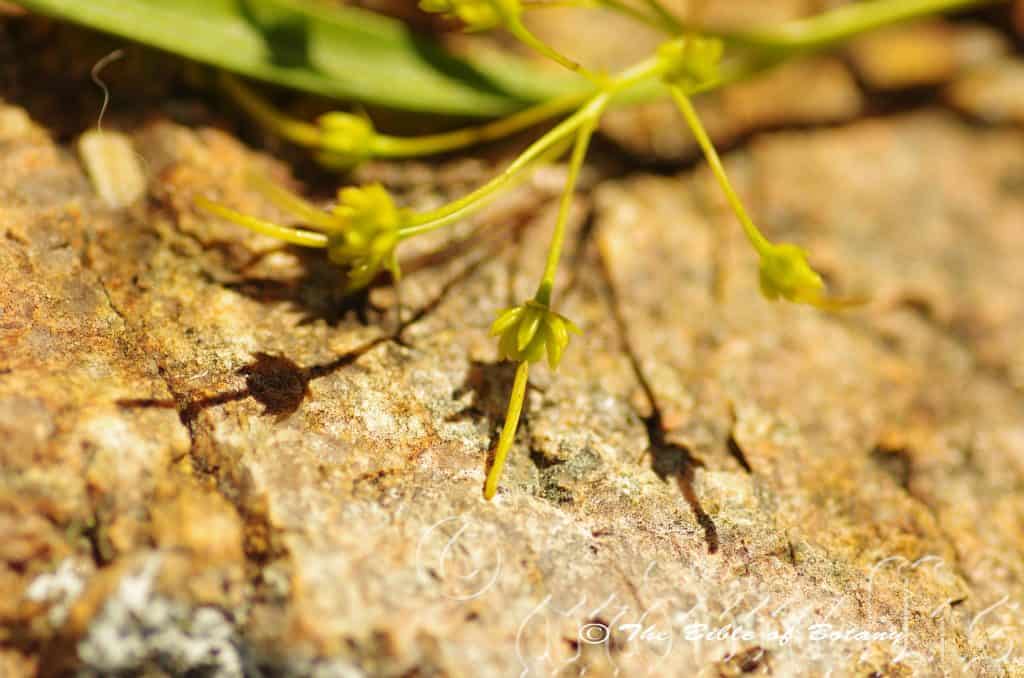
Dodonaea viscosa sub specie angustifolia Castle hill Townsville Qld.
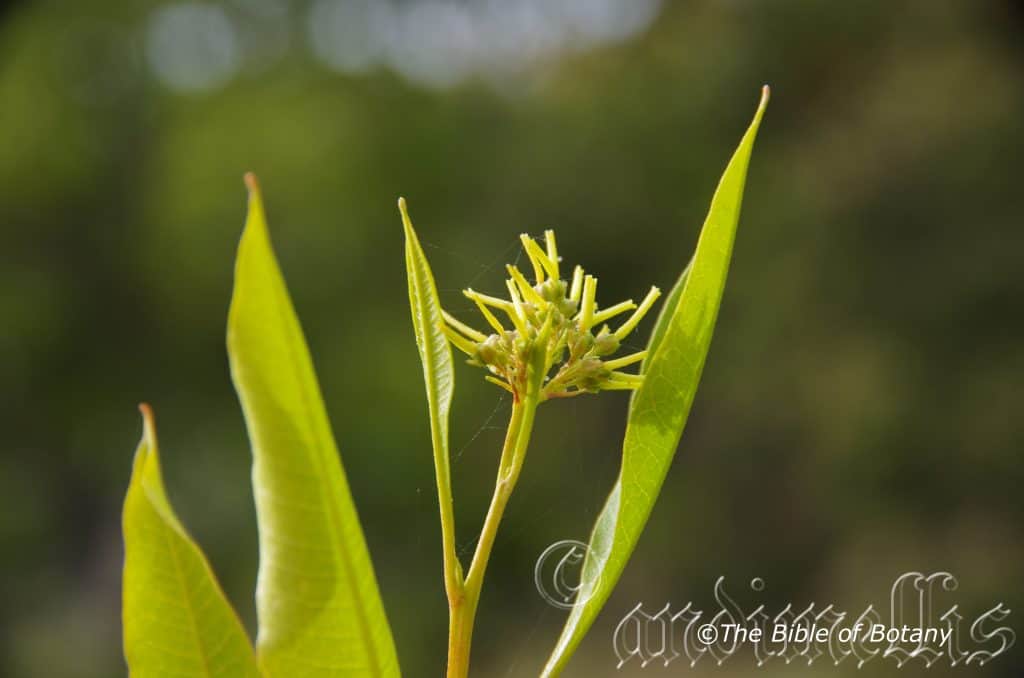
Dodonaea viscosa sub specie burmanniana Magnetic Island Qld.
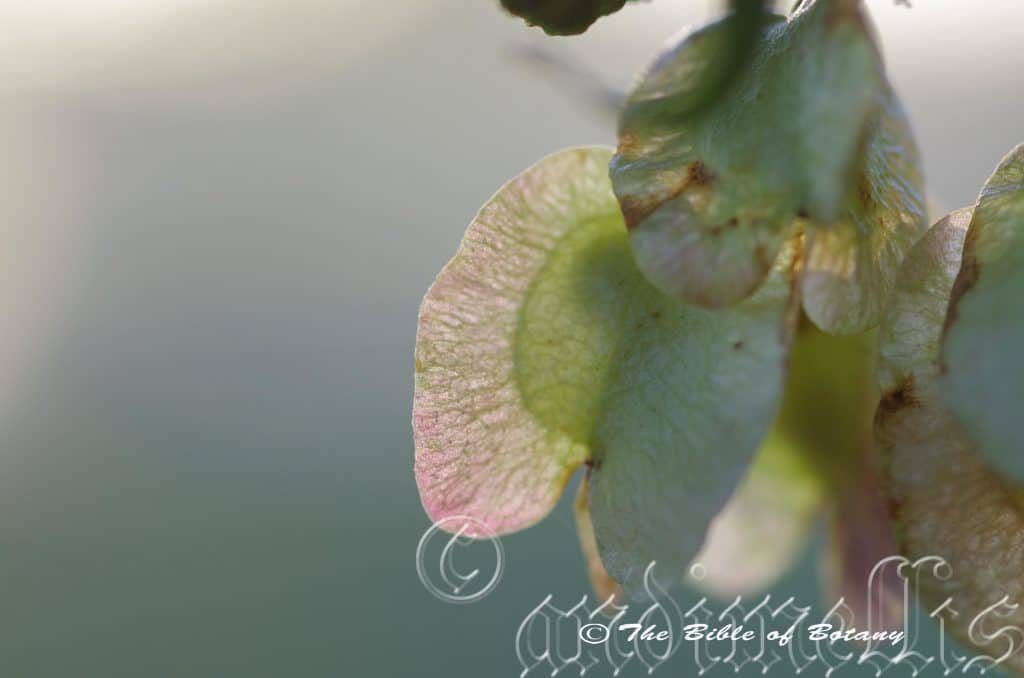
Dodonaea viscosa sub specie burmanniana Ross River Condon Qld.

Dodonaea viscosa sub specie angustifolia Castle hill Townsville Qld.
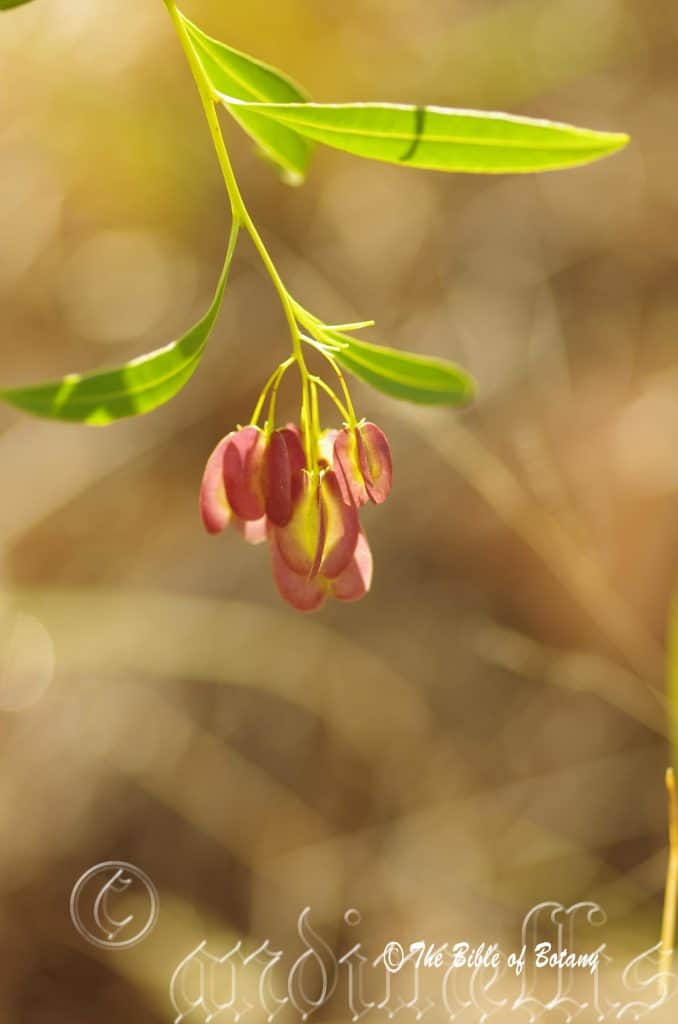
Dodonaea viscosa sub specie angustifolia Castle hill Townsville Qld.
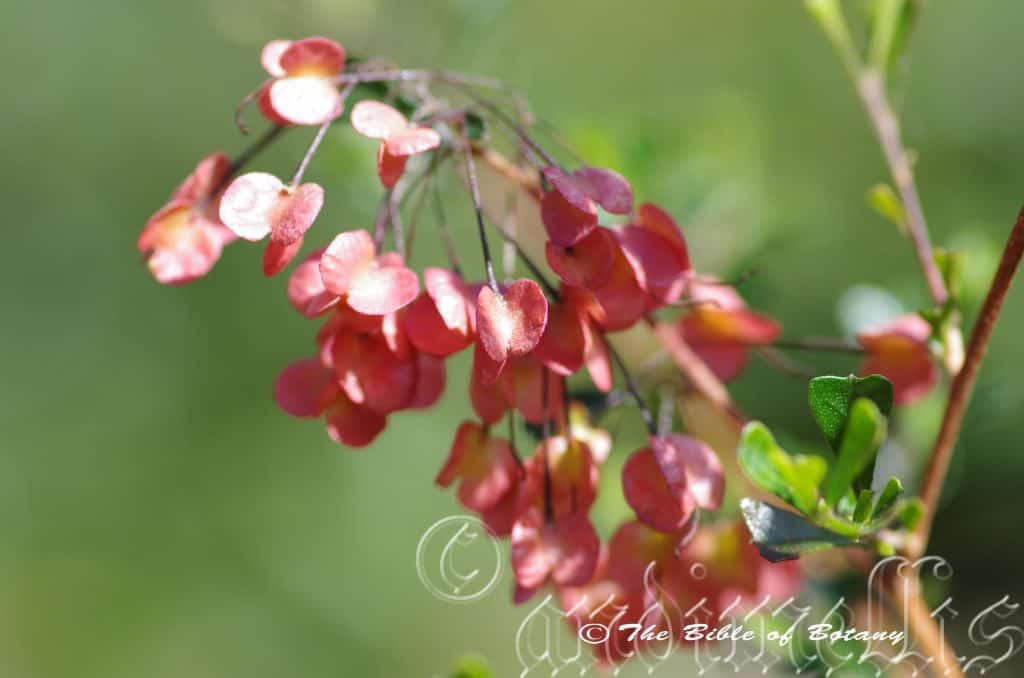
Dodonaea viscosa sub specie cuneata Casina NSW
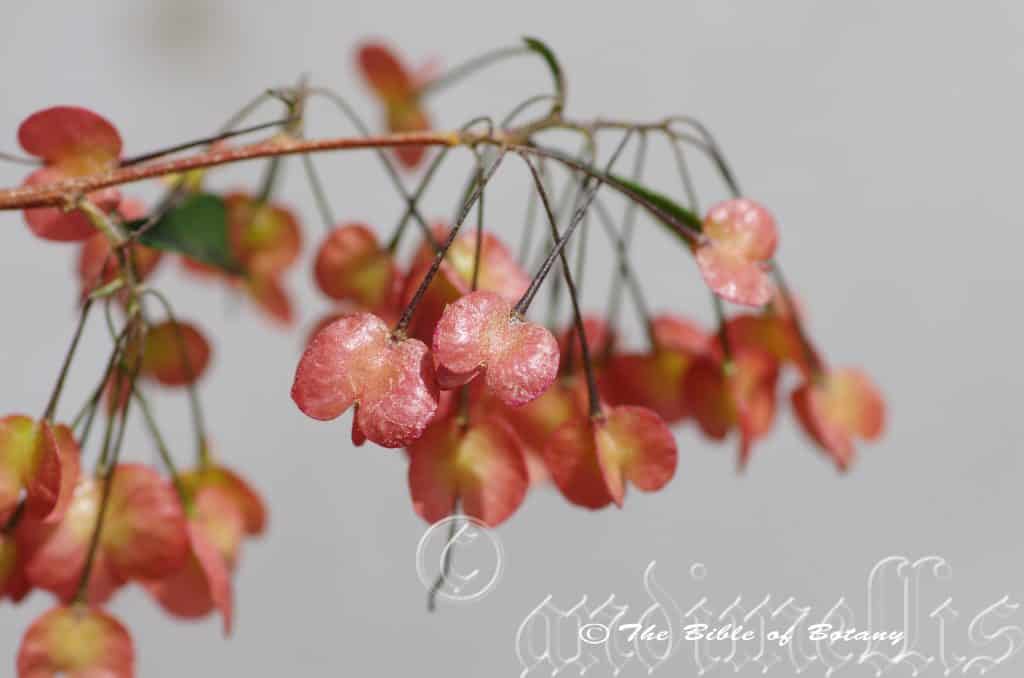
Dodonaea viscosa sub specie cuneata Casina NSW

Dodonaea viscosa sub specie cuneata Casina NSW
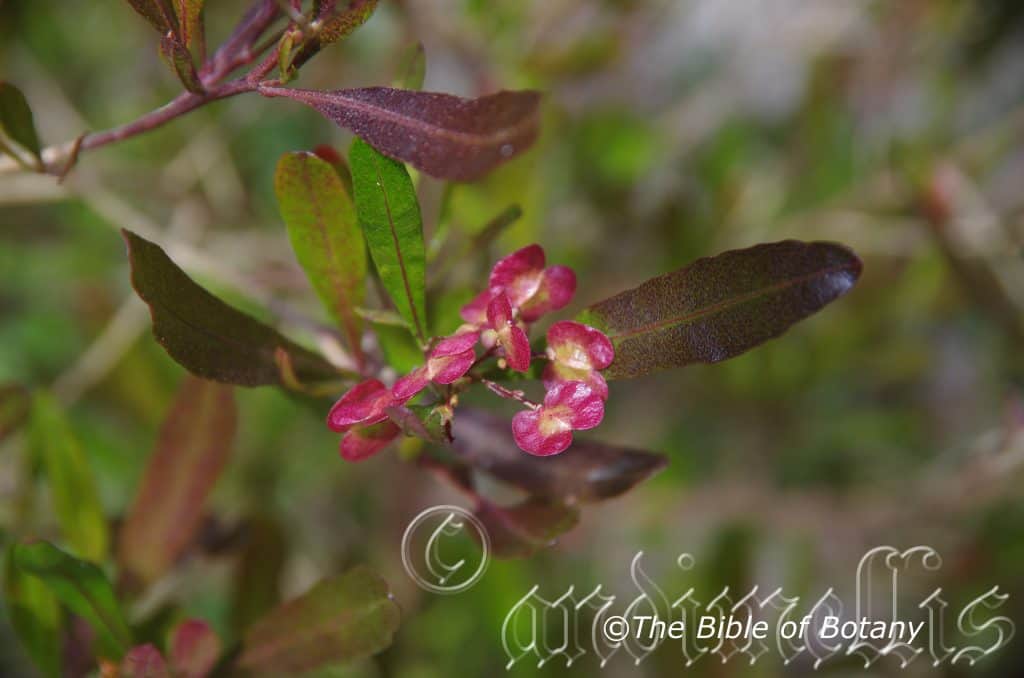
Dodonaea viscosa sub specie viscosa Author’s Garden The Pinnacles NSW
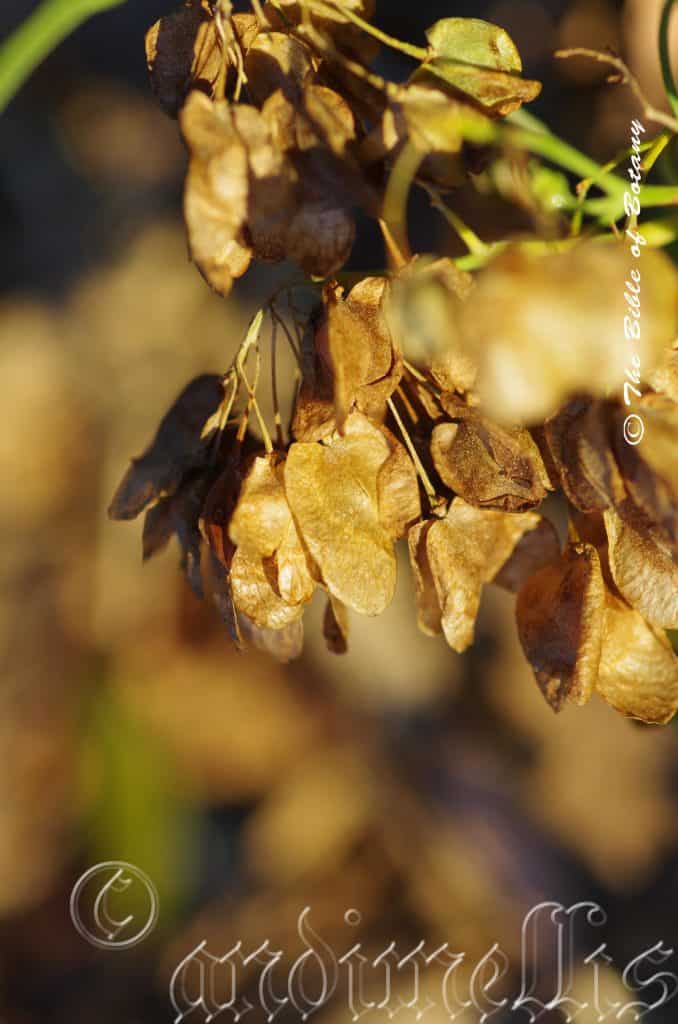
Dodonaea viscosa sub specie burmanniana Ross River Condon Qld.
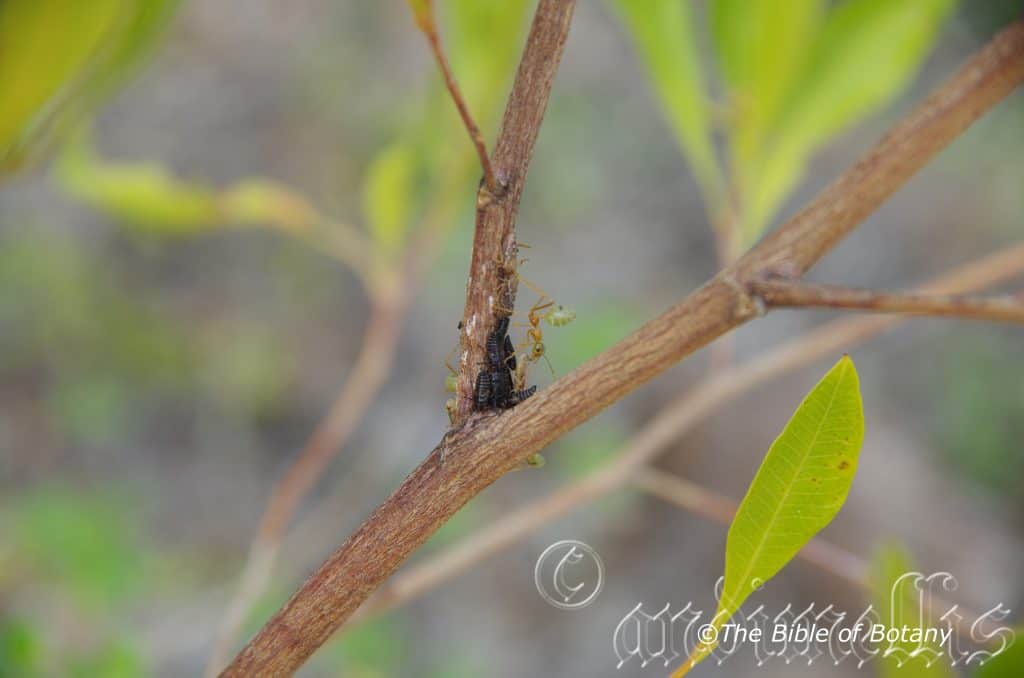
Dodonaea viscosa sub specie burmanniana Ross River Condon Qld.
Dodonaea viscosa
Classification
Unranked: Eudicots
Unranked: Rosids
Family: Sapindales
Subfamily: Dodonaeoideae
Genus: Is named in honour of Rembert Dodoens; 1517-1585, who was a Flemish botanist and professor.
Species: From Visc/Viskus, which is Latin for birdlime made from viscin, which is from the fruits of the Mistletoe. It refers to organs usually the fruits or stems, which have a rather thick glutinous covering similar to thick adhesive glues.
Subspecies: Dodonaea viscosa subsp. angustifolia. From Angusta, which is Latin for narrow, and Folium, which is Latin for foliage. It usually refers to leaves, which are narrower but not quite linear.
Subspecies: Dodonaea viscosa subsp. angustissima. From Angusta, which is Latin for narrow, and Issima, which is Latin for the superlative. It refers to species or subspecies, which have the narrowest leaves in the genus.
Subspecies: Dodonaea viscosa subsp. burmanniana. Is named in honour of Johannes Burman; 1706-1789, who was a Dutch Botanist and friend of Karl Linnaeus.
Subspecies: Dodonaea viscosa subsp. cuneata. From Cuneate, which is Latin for a wedge shape. It refers to the description of the shape of a structure or an organ, usually the leaves, which typically have wedge shaped.
Subspecies: Dodonaea viscosa subsp. mucronata. From Mucronata, which is Latin for a short sharp tip. It refers to the apexes of a leaf, petal, sepal or bracts, which have a short sharp point at the apex.
Subspecies: Dodonaea viscosa subsp. spatulata. From Spatula, which is Latin for to have the shape of a spoon. It refers to leaves or phyllodes, which are shaped like a spoon.
Subspecies: Dodonaea viscosa subsp. Viscosa. From Visc/Viskus, which is Latin for birdlime made from viscin, which is from the fruits of the Mistletoe. It refers to organs usually the fruits or stems, which have a rather thick glutinous covering similar to thick adhesive glues.
Common Name: Sticky Hop Bush.
Distribution:
Dodonaea viscosa is found over most of Australia except on the western half of Tasmania. It is less common on the northern quarter of the continent.
https://avh.ala.org.au/occurrences/search?taxa=Dodonaea+viscosa#tab_mapView
Habitat Aspect Climate:
Dodonaea viscosa prefers full sun to light shade. It grows among medium trees, or low trees, in moist open Eucalyptus forests, adjacent to moist rainforests, dry open Eucalyptus forests, open woodlands, savannah woodlands, and savannah grasslands, seasonal riparian zones, on flats, slopes, mountain ridges or gullies to arid areas bordering deserts. The altitude ranges from 10 meters ASL to 1000 meters ASL.
The temperatures range from minus 4 degrees in July to 44 degrees in January.
The rainfall ranges from a low of 150mm to an average of 2400mm annually.
Soil Requirements:
Dodonaea viscosa prefers skeletal to deep fine sands, sandy loams, light clays, medium clays, heavy clays, stony soils to rocky ground. The soils are derived from most types of parent rock. The pH ranges from 5pH to 7.5pH. It does not tolerate waterlogged soils. None saline to very saline soils are tolerated.
Height & Spread:
Wild Plants: 2m to 8m by 2m to 3m
Characteristics:
Dodonaea viscosa is an extremely variable plant in appearance in every aspect from the trunk, leaves, flowers and the seed capsules. This variation is highlighted in the number of sub specie officially named and confusion even exists between some of the sub species.
It grows as an upright spindly shrub in closed woodlands or adjacent to rainforests to a bushy robust shrub where it is in full sun. The bark on the trunk is grey and slightly furrowed on older plants. Branchlets are thin reddish brown, pale green or deep green and glabrous with new growth being pale green often tinged with pink or purple.
Dodonaea viscosa sub specie angustifolia grows mainly on rocky sites in dry sclerophyll forests. It is compact shrubs measuring 3 meters to 5 meters tall by 3 meters in diameter. The linear to lanceolate leaves measure 60mm to 130mm in length by 5mm to 10mm in width. The base is narrowing attenuate while the apex is narrow acute to narrow acuminate. The margins are entire. The concolourous laminas are deep sea green and glabrous. The petiole measures 6.5mm to 18mm in length.
Dodonaea viscosa sub specie angustissima grows mainly on plains in semi-arid and arid areas. It is compact shrubs measuring 2 meter to 4 meters tall by 2 meter to 3 meters in diameter. The linear to narrow oblong, rarely oblanceolate leaves measure 7.5mm to 45mm in length by 1mm to 6mm in width in a ratio of 7.5 to 1.The base is tapering while the apex is acute to obtuse. The margins are irregularly sinuate or toothed. The concolourous laminas are deep sea green, semi glossy and glabrous. The leaves are sessile.
Dodonaea viscosa sub specie burmanniana grows mainly on rocky slopes or flats in dry sclerophyll forests from Wooli and Grafton north. It is compact shrubs measuring 3 meters to 6 meters tall by 3 meters to 4 meters in diameter. The lanceolate to narrow elliptical leaves measure 70mm to 120mm in length by 10mm to 23mm in width. The base is narrow attenuate while the apex is narrow acute. The margins are entire. The concolourous laminas are pale to mid green and glabrous green. The petiole measures 6mm to 18mm in length.
Dodonaea viscosa sub specie cuneata grows mainly on sandy flats and gentle slopes in dry mallee country and the Pilga scrubs. It is narrow compact shrubs measuring 1 meter to 2.5 meters tall by 1 meter to 2 meters in diameter. The obovate to spathulate or wedge shaped leaves measure 10mm to 32mm in length by 4mm to 9mm in width. The base is cuneate while the apex is truncate to flat obtuse. The margins are entire have 2 or 3 teeth and at times an emarginated tip. The concolourous laminas are deep sea green and rough to farinaceous. The petiole is sessile to 1.5mm in length.
Dodonaea viscosa sub specie mucronata grows mainly on rocky ridges on the ranges or dry creek beds in arid and semi-arid areas. It is erect to spreading shrubs measuring 2 meters to 4 meters tall by 1 meter to 3 meters in diameter. The obovate to spathulate or angular obovate leaves measure 23mm to 70mm in length by 10mm to 25mm in width. The base is broad attenuate while the apex is broad acute to obtuse. The concolourous laminas are deep sea green and glabrous. The margins are entire or irregularly and shallowly sinuate. The petiole measures 3.5mm to 20mm in length.
Dodonaea viscosa sub specie spathulata grows mainly on sandy to medium clays in higher rainfall areas in mallee forests. It is erect shrubs measuring 1 meter to 3 meters tall by 1 meter to 2 meters in diameter. The linear, linear-oblanceolate to narrow oblong-spathulate or spathulate leaves measure 29mm to 75mm in length by 6mm to 16mm in width. The base is tapering attenuate while the apex is acute, mucronate-apiculate. The margins are entire. The concolourous laminas are deep sea green and rough to farinaceous. The petiole is sessile to 10mm in length.
Dodonaea viscosa sub specie viscosa grows mainly on skeletal sands behind beach dunes or on sandy heath lands in dry schlerophyll forests. It is compact shrubs measuring 1.5 meters to 2 meters tall by 1.5 meters to 2.5 meters in diameter. The elliptical to rarely obovate leaves measure 70mm to 130mm in length by 20mm to 40mm in width. The base is broad acute to obtuse while the apex is acute or broad acute to obtuse. The margins are entire. The concolourous laminas are pale grass green and glabrous. The petiole is 2.5mm to 6mm in length.
The inflorescences of Dodonaea viscosa sub specie angustifolia, Dodonaea viscosa sub specie angustissima, Dodonaea viscosa sub specie cuneata; Dodonaea viscosa sub specie mucronata and Dodonaea viscosa sub specie spathulata are born on short panicles from the terminals. The shrubs are dioecious. The peduncles measure 2mm to 5mm in length while the pedicels measure 3mm to 10mm in length. The 3, 4 or 5 glabrous lime-green sepals are caduceous or persistent. The lanceolate sepals measure 1.3mm to 3mm in length.
There are usually 8 or rarely 6, 7, 9 or 10 yellow-green, red, orange, or yellow stamens measure 2mm to 3mm in length.
The glabrous or sparsely puberulent ovaries are pale grass-green. The burgundy styles measure 18mm to 22mm in length and have a trilobed stigma. The flowers appear from late August to late September.
Dodonaea viscosa fruits are a 3 winged or 4 winged capsule. The capsules measure 8.5mm to 28mm in length by 11mm to 28mm in width. The glabrous capsule‘s lobes measure 3mm to 8mm in width. The pale grass-green capsules turn lemon-green, lime-green yellow, orange, pink, red, purple then to a pale fawn and coriaceous when ripe and hang on the plant for extended periods up to 2 months. The ovate, black, glossy seeds measure 1mm to 1.5mm in diameter.
Dodonaea viscosa sub specie viscosa‘s is a flat orbicular usually 2 winged or occasionally 3 winged capsule. The green capsules turn deep red to blood-red when ripe and measure 15mm to 23mm in length by 20mm to 25mm in width. The wings or lobes measure 4mm to 4.5mm in width.
Wildlife:
Dodonaea viscosa‘s leaves, capsules and seeds are occasionally eaten several species of moths and weevils which are unknown to the author. The plants are also vulnerable to stem borers.
Cultivation:
Dodonaea viscosa are very hardy, beautiful small shrub which are well suited to dry inland areas, coastal areas on very sandy soils or sandy loams.
Their versatility doesn’t stop with accepting all types of soils but it can cope with temperatures as low as minus 5 degrees and up to 44 degrees depending upon the subspecies. It is drought resistant once established and can cope with the occasional immersion where periodic down pours may flood the land.
The fruiting capsules are the most spectacular part of the plant and with the bright coloured capsules hanging on the plants for several months this gives colour throughout autumn and winter.
The capsules can be used for indoor arrangements and last for a month or more before fading as long as the water is changed frequently. To ensure good flowering, it is important to tip pruning to help promote bushiness or to prune the plants back to a third of their height and to nip side shoots on the lower stems to promote long stems for cut flowers. This will force more growth to the top and give larger and better capsules and long stems. Allow the plants a dormant period in winter. Fertilizing during the growing season every month and especially when the first spring rains come will ensure long stems or great little bushy plants. I find the smaller leaf varieties display the colours better and are usually smaller growing plants at the same time.
Dodonaea viscosa is quick growing with a variety to suit most position. It often reaches its full potential in just 3 years and flower from the second year. Dodonaea viscosa has one of the best prospects as a cut flower in the fresh flower market. It has surprised me that no entrepreneurial young flower farmer; from semi-arid areas has not already taken advantage of the great potential that exists in farming them and working with the various colours and shapes and sizes on offer. There ease in growing in a wide climate zone and soil types and the longevity of the capsules as a cut flower offer a great marketing opportunity.
People often ask me in different situations what is my favourite native shrub and while that may differ as the years pass I always seem to say Dodonaea viscose sub sp. cuneata and Dodonaea subsp. spathulata for shrubs will probably always hold a very special place in my garden. The small leaf forms with the brilliant variation in capsule colours, means you can dedicate complete garden beds to them. The foliages, plant sizes, and shape being erect compact or spreading offer endless contrasts which means unimaginable layout versatility. The capsule colours which take ages to fade give colour over a long period of time as do the unusual flowers.
Mixed with other natives they can give height and blend inconspicuously while dormant allowing plants like Grevillea to be king during the winter months when in flower yet Dodonaea steal the complete attention when the capsules begin changing colour in late spring and summer.
I have farmed it on a small scale at Nana Glen and found it to positively the easiest crop to grow requiring little attention, a regular native fertilizing regime and some additional watering to gather the most awesome displays. My wife refused to give any permission to have them picked and sent to market such was their subtle beauty over the landscape. It is our intention to set aside an area; at The Pinnacles when we return home, and have the main trees matured, strictly dedicated to this truly beautiful little native.
Propagation:
Seeds: Dodonaea viscosa‘s seeds require treatment before sowing. Pre-treat by placing the seeds into a glass of very hot not boiling water. Allow the water to cool and leave to soak for 4 to 6 hours.
Sow the treated seeds directly into a seed raising mix and cover with 2mm of the mix. Place the tray in a sunny position. When the seedlings are 25mm to 40mm tall, prick them out and plant them into 50mm native tubes using a seed raising mix. Germination will usually commence after 3 weeks and be completed in 12 weeks from sowing.
Once the seedlings reach 150mm to 200mm in height plant them out into their permanent position.
Cuttings: Cuttings should be used if cut flowers are required as the plants are unisexual and only the female plants will deliver the capsules. Remember some male plants will be required in the garden to ensure fertilization. I have seen no research done on the ratio of male plants compared to female plants. A field trip near Coonabarabran in 2002 we counted 1 male plant to 10 female plants with Dodonaea viscose subsp. cuneata.
Cuttings should be used if cut flowers are required as the plants are unisexual and only the female plants will deliver the capsules. Remember some male plants will be required in the garden to ensure fertilization. I have seen no research done on the ratio of male plants compared to female plants. A field trip near Coonabarabran in 2002 we counted 1 male plant to 10 female plants with Dodonaea viscose subsp. cuneata.
Cuttings should be used if cut flowers are required as the plants are unisexual and only the female plants will deliver the capsules. Remember some male plants will be required in the garden to ensure fertilization. I have seen no research done on the ratio of male plants compared to female plants. A field trip near Coonabarabran in 2002 we counted 1 male plant to 8 to 10 female plants with Dodonaea viscose subsp. cuneata.
1 Prepare the cutting mix by adding one third sharp clean river sand, one third peat and one third perlite. These ingredients are sterilize,
2 Select good material from non diseased plants,
3 Select semi green stems for cuttings. Look for a stem with two or three nodes,
4 Place the cutting on a flat, hard surface, and make a clean down one side of the cutting for 10mm to 15mm with a sharp sterile knife or razor blade. – This scarification of the node will increase the chances of roots emerging from this spot. Now remove all but one or two the leaves, leaving the apex leaves in tact. If the leaves are very large in proportion to the stem, cut off the apical halves.
5 Fill a saucer with water, and place a little mild to medium rooting hormone into another container like a milk bottle top. Dip the node end of the cutting into the water and then into the rooting hormone. Tap off any excess hormone,
6 Use a small dipple stick or old pencil to poke a hole into the soilless potting mix. Ensure the hole is slightly larger than the stem diameter and be careful not to wipe the rooting hormone off the cuttings base, place the cuttings in a pattern ensuring the cuttings are not touching each other,
7 I like to place the pots in Plastic bags to help maintain temperature and moisture. Place in a semi shaded place like under 50mm shade cloth.
8 When the cuttings have struck, open the bag to allow air circulation for a few days to a week,
9 Once hardened off remove the cuttings from the bag and allow to further hardening for a few more days,
10 Transplant into a good potting mix to grow on.
Fertilize using seaweed, fish emulsion or organic chicken pellets soaked in water on an alternate basis. Fertilize every two months until the plants are established then annually in early September to October to maintain health, vitality and better flowering.
Further Comments from Readers:
Hi reader, it seems you use The Bible of Botany a lot. That’s great as we have great pleasure in bringing it to you! It’s a little awkward for us to ask, but our first aim is to purchase land approximately 1,600 hectares to link several parcels of N.P. into one at The Pinnacles NSW Australia, but we need your help. We’re not salespeople. We’re amateur botanists who have dedicated over 30 years to saving the environment in a practical way. We depend on donations to reach our goal. If you donate just $5, the price of your coffee this Sunday, We can help to keep the planet alive in a real way and continue to bring you regular updates and features on Australian plants all in one Botanical Bible. Any support is greatly appreciated. Thank you.
In the spirit of reconciliation we acknowledge the Bundjalung, Gumbaynggirr and Yaegl and all aboriginal nations throughout Australia and their connections to land, sea and community. We pay our respect to their Elders past, present and future for the pleasures we have gained.
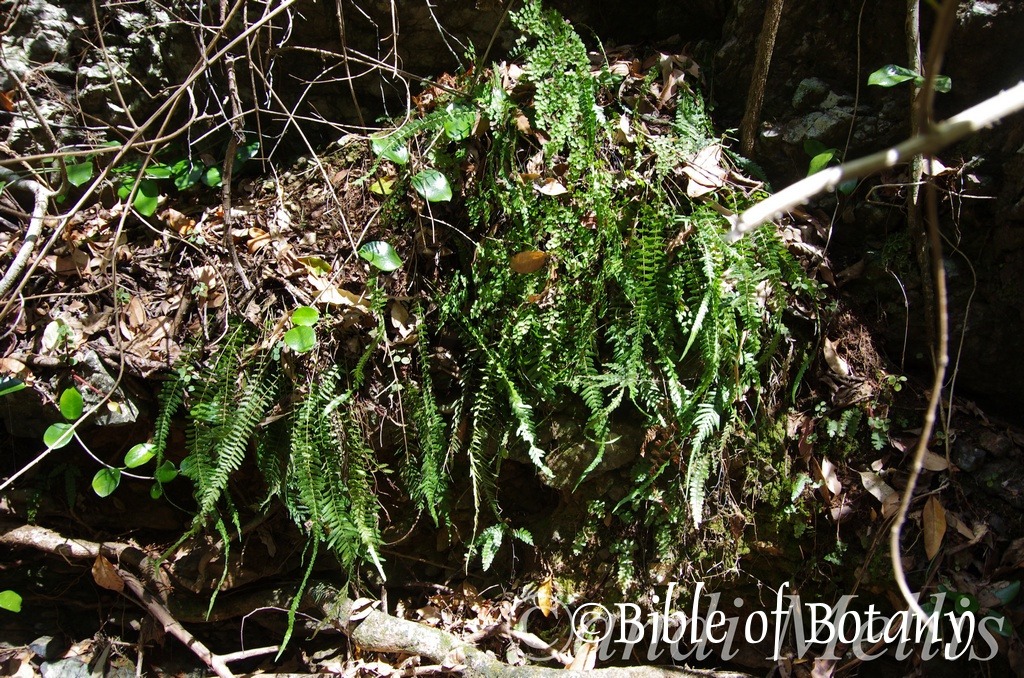
Ramourni National Park NSW
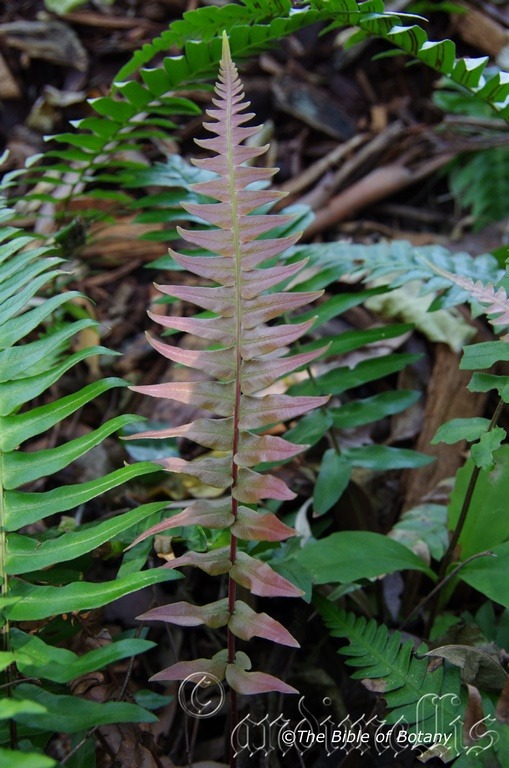
North Coast Botanic Gardens Coffs Harbour NSW
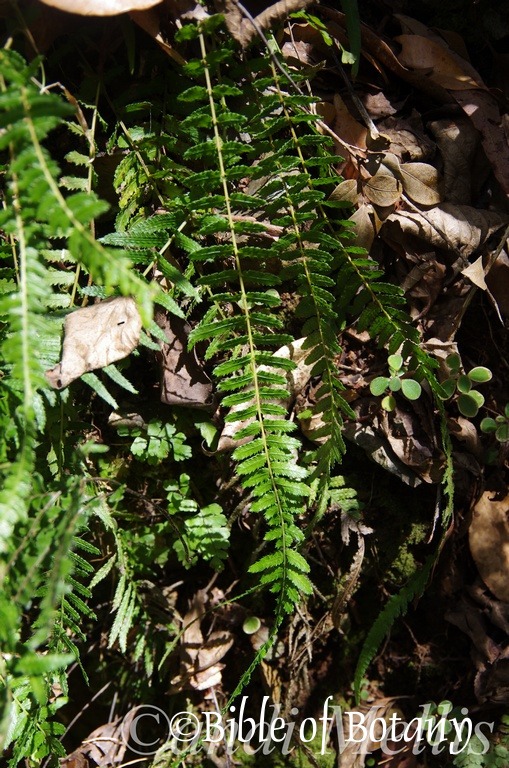
Ramourni National Park NSW
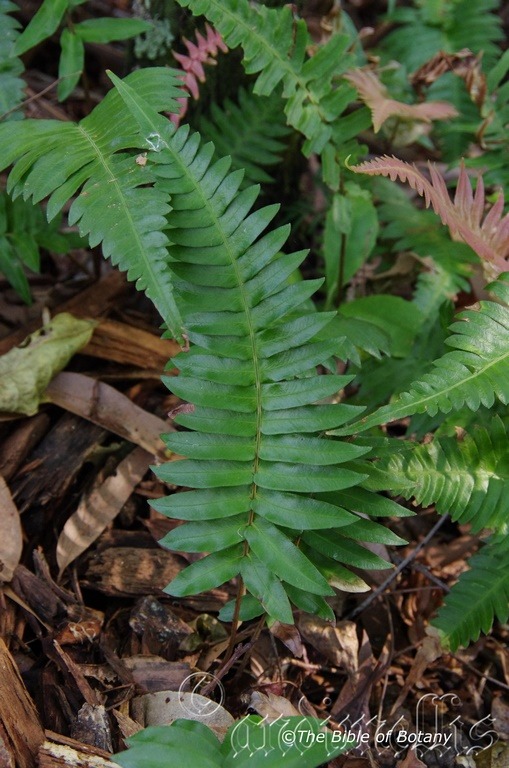
North Coast Botanic Gardens Coffs Harbour NSW
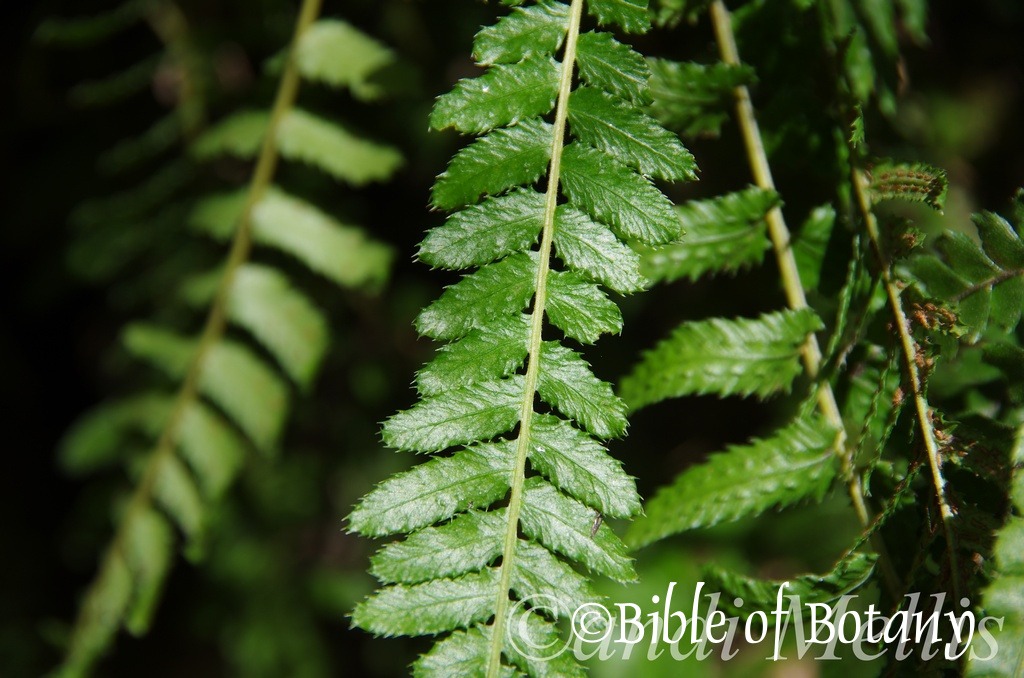
Ramourni National Park NSW
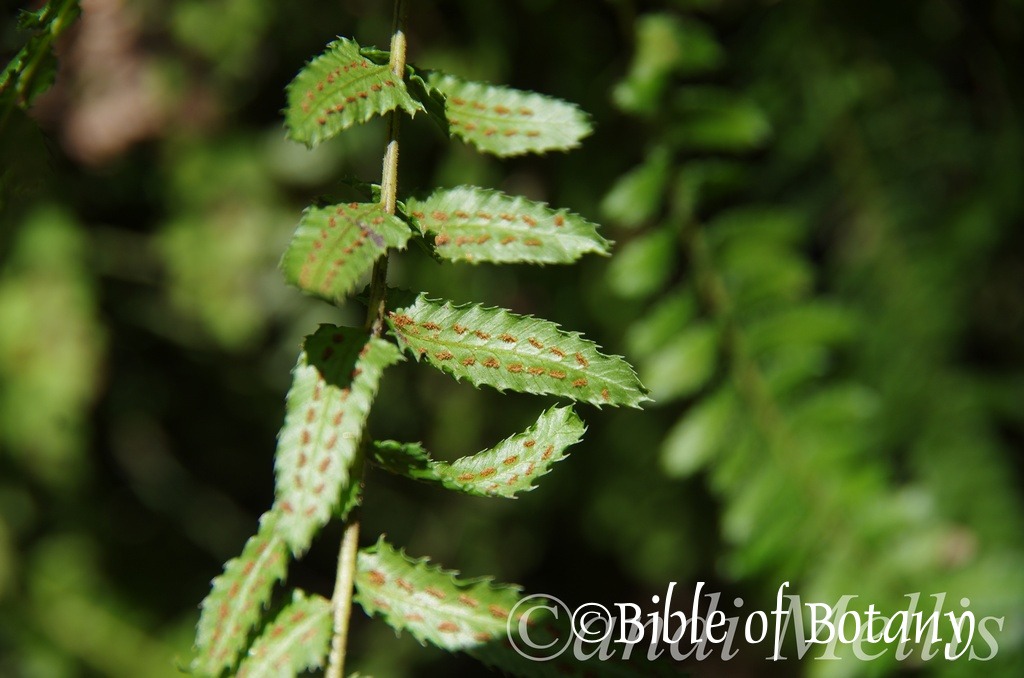
Ramourni National Park NSW
xxxxxxxxxxxxxxxxxxxxxxxxxxxxxxxxxxxxxxxxxxxxxxxx Doodia australis
Classification
Class: Pteridospida
Order: Blechnales
Family: Blechnaceae
Genus: Is named in honour of Samuel Doody; 1656-1706, who was a British botanist and pharmacist and later curator of the Chelsea Physic Gardens.
Specie: From Australe, which is Ancient Greek for the south land. It refers to plants which are usually endemic to Australia.
Sub specie:
Common Name: Rasp Fern.
Distribution:
Doodia australis is found in several disjunct populations in north Queensland south from the Iron Range to Jolly’s Lookout, then continuously on both sides of the Great Dividing Range through New South Wales to southern Victoria and across to eastern South Australia in Mount Clay gullies.
It is also found in north eastern Tasmania along 4 mile stream near Falmouth and on Flinders Island.
It is also found on the north island of New Zealand and several Pacifis Islands.
https://avh.ala.org.au/occurrences/search?taxa=doodia+australis#tab_mapView
Habitat Aspect Climate:
Doodia australis prefers dense shade, light shade to dappled sunlight. It grows in moist montane rainforests, and rain forests. The altitude ranges from 50 meters ASL to 1000 meters ASL.
The temperatures range from minus 4 degrees in August to 36 degrees in January.
The rainfall ranges from lows of 900mm to 2000mm average per annum.
Soil Requirements:
Doodia australis prefers light clays to medium clays close to the parent rocks especially along creek banks. The soils are derived from black basalts or better quality granites. The soils pH ranges from 5.5pH to 6.5pH. It does not tolerate water logged soils. Non saline soils to slightly saline soils are tolerated.
Height & Spread:
Wild Plants:200mm to 450mm by 250mm to several hundred square meters.
Characteristics:
Doodia australis has a short slim to long slim creeping rhizome covered in large narrow black scales.
Doodia australis single pinnatisect to single pinnate, mature fronds are dark green somewhat leathery. The basal 1 to 3 pairs of pinnae are simple with short stalks, becoming sessile towards the middle of the lamina. The short, black stipe is tuberculate. The margins are finely toothed. The 36 to 52 pinnules are deep sea green and semi glossy. The petioles measure 0.5mm to 1mm in length. The bases are hastate.
The fertile and sterile fronds are slightly dimorphic. The oblong sporangia measure 0.7mm to 2mm in length by 0.5mm to 1mm in width. There are 1 or 2 rows on each side of pinna midvein, outer nearer margin, becoming confluent with age.
Wildlife:
Doodia australis’s wildlife is unknown to the author.
Cultivation:
Doodia australis is a beautiful medium fern for courtyards, around swimming pools or in the garden where moist dark to lighter conditions prevail. Doodia australis is excellent for around swimming pools where it can grow to its full potential. If used correctly it can make medium and small areas look larger. Some cleaning of spent fronds on an annual base is necessary and moisture is required to keep it at its best. It is best mass planted in order to appreciate the carpet of red or pink when the flushes of new growth emerge.
It is great beneath a rainforest setting where it can dominate what is usually barren ground. It can be used to great affect where a dry creek bed is the theme by using them to mark out the banks. It is ideal to stabilize moist, shady banks along creeks and streams or to help soak up water in wet areas below septic trenches.
Doodia australis has proven itself reliable as an indoor plant especially in the bathroom where the humidity is higher or around fish tanks and indoor fish ponds. Here its smaller size and robust growth adds interest and colour several times a year.
It is drought tolerant once established so the occasional lapse in watering won’t affect it. If it does happen to look dead after a long holiday during a drought prune all the fronds off to a few centimetres of the rhizome and give them a good soaking. Apply a double strength dose of our recommended fertilizer two days later and again give a good soaking and within two weeks they will be back to their former glory. This drought tolerance makes them ideal for regeneration projects along creeks and gullies.
It often reaches its full potential of 200mm to 300mm in just over 1 year with a spreading habit in full progress.
Propagation:
All ferns that are declared rare, vulnerable or endangered are protected by Federal and State Laws and must not be removed from the wild unless you are a land developer, mining company or main Roads department etc. This includes bulbs, roots, leaves and flowers. No part of any plant can be removed from Federal, State or Local Government land without the prior permission of the authority and this includes the spore.
Most people are put off at the thought of growing ferns from spore. Like all plants that produce their offspring from seed or spore the methods are basically the same. Remember nature has been doing this for millions of years and has been very successful. I have had excellent results growing over 200 different species of Australian ferns so don’t be afraid. Give it a go.
Step 1. Select spore from the fern fronds. Wait until the fern is just starting to release its spore. Rinse the fronds under clean running water and dry. This is to wash off any other spores from rogue ferns that may have settled onto the fronds. (There is nothing worse than having common brake or common soft bracken contaminating a prized tree fern or epiphyte.)
Step 2. Place the dry fronds in a clean brown paper bag and keep them in a cool dark place like the linen closet for about a week to ten days before you are ready to sow the spore. The exception to this rule applies to ferns, which produce green spores. These must be sown immediately that they are released. Todea Barbara is a good example of a fern, which produces green spore.
Step 3. Take a large ice cream container, a small ice cream container and a clean clear plastic bag large enough to seal the large ice cream container and three or four milk bottle tops.
Step 4. Punch or drill 6 to 10 5mm holes in the bottom of the small ice cream container.
Step 5. Wash both containers, tops and plastic bag so that they are very clean and sterile.
Step 6. Use a clean fine seed raising mi. We used 30% fine sand, 30% peat and 30% perlite and 10% vermiculite. We used crushed basalt, crusher dust and peat in a 50:50 ratio for epiphytes. Moisten the mix enough that water does not run out when the mix is squeezed between the fingers.
Step 7. Place the moisten mix (Enough to half fill the small ice cream container) in the microwave oven with a large glass of water for 7 or 8 minutes, until the water is boiling. Allow them to cool in the oven. You will need the water later so do not tip it out.
Step 8. Take the brown paper bag out of the linen closet. Shake the bag and remove the fronds. You should have a yellow, brown, black or rarely greenish brown or ochre powder or very fine, small round pin head size spore depending on the specie involved.
Step 9. Remove the mixture from the oven once it has cooled and place it in the small ice cream container and level.
Step 10. Sprinkle the spore sparsely over the mixture in the small ice cream container.
Step 11. Place the milk bottle tops in the large ice cream container with the flat surface facing down. Place the small ice cream container in the large ice cream container so that it is sitting on the milk bottle tops.
Step 12. Remove the water from the microwave and pour it into the larger ice cream container so there is 25mm to 30mm of water in the bottom.
Step 13. Place the ice cream containers in the plastic bag and seal.
Step 14. Place the contents and bag in a warm shady place preferably 50% to 70% shade depending on the specie. Shade houses and some window sills are ideal.
Step 15. The surface should turn green within a week to two weeks. The prothallus will then develop. From the prthalus the first true fronds will appear. Wait until the ferns are 20mm to 35mm in height before you attempt to transplant them. Once they are ready open the bag up slightly and allow the air to flow around the little ferns. Every 3 to 5 days open the bag a little further so the ferns get use to their new environment. Allow them a week to two weeks to harden off before you transplant them following the removal of the plastic bag. Carefully prick them out into 50mm standard squat tubes as you would any seedling.
Do not try to transplant them as single plants as they are still a little delicate still.
Ground ferns like rasp ferns can be left in clumps.
Platycerium and Asplenium will have to be divided into single plants at a later stage. Once the first divisions have hardened off and the plants reach 50mm to 70mm in height. Be careful, as they are still fragile at this stage. Replace them close to their original position and water. After a few weeks, the ferns will power away without any setbacks. Here they can be further divided where necessary removing the smaller ferns leaving the largest one in place.
Once the smaller ones again reach 50mm to 70mm you may wish to divide the stronger and hardier individual plants into smaller clumps in 100mm squat pots.
Step 16. We fertilized with seaweed, fish emulsion or organic chicken pellets soaked in water on an alternate basis until established.
Fertilize every two months for one year even when in the ground.
Fertilize using seaweed, fish emulsion or organic chicken pellets soaked in water on an alternate basis. Fertilize every two months until the plants are established then annually in early September to October to maintain health, vitality and better flowering.
Further Comments from Readers:
Hi reader, it seems you use The Bible of Botany a lot. That’s great as we have great pleasure in bringing it to you! It’s a little awkward for us to ask, but our first aim is to purchase land approximately 1,600 hectares to link several parcels of N.P. into one at The Pinnacles NSW Australia, but we need your help. We’re not salespeople. We’re amateur botanists who have dedicated over 30 years to saving the environment in a practical way. We depend on donations to reach our goal. If you donate just $5, the price of your coffee this Sunday, We can help to keep the planet alive in a real way and continue to bring you regular updates and features on Australian plants all in one Botanical Bible. Any support is greatly appreciated. Thank you.
In the spirit of reconciliation we acknowledge the Bundjalung, Gumbaynggirr and Yaegl and all aboriginal nations throughout Australia and their connections to land, sea and community. We pay our respect to their Elders past, present and future for the pleasures we have gained.

Kungala NSW
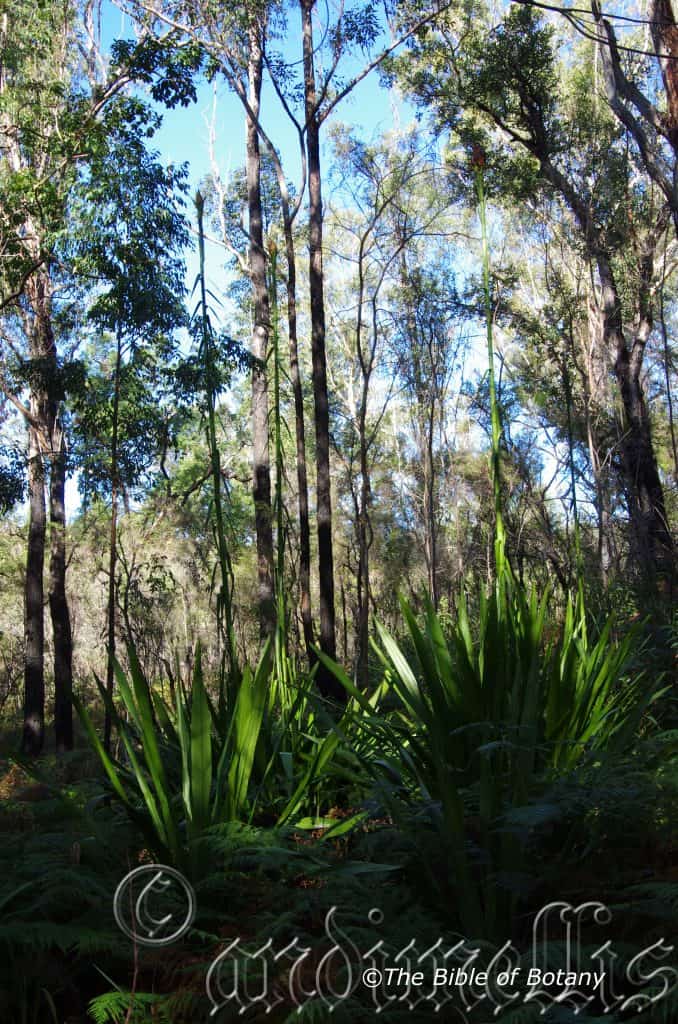
Kungala NSW
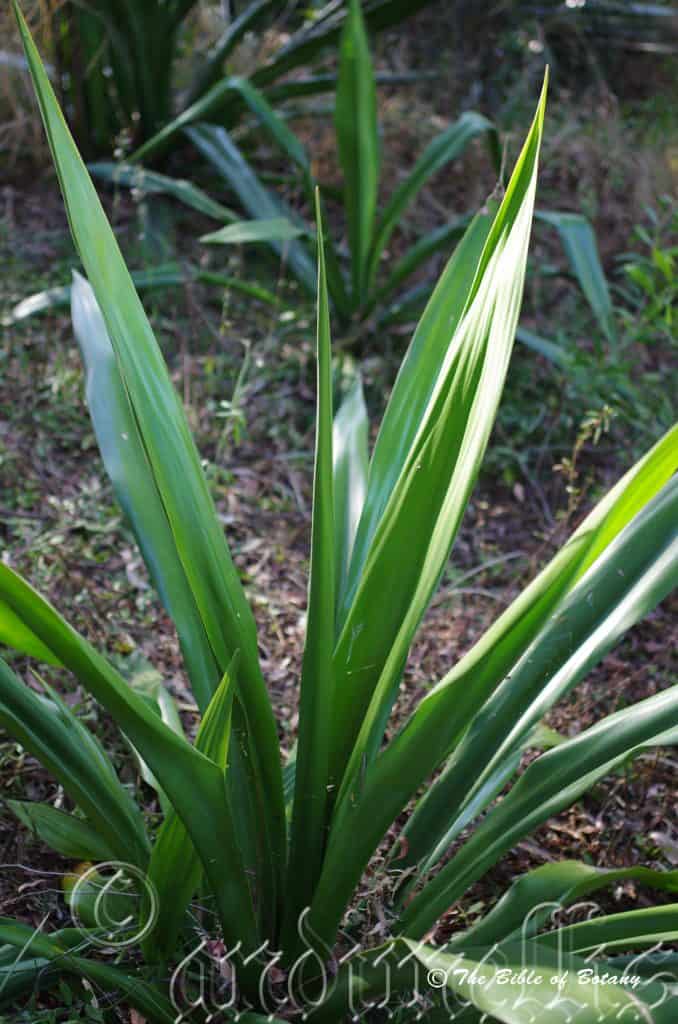
Grange Qld.

Grange Qld.
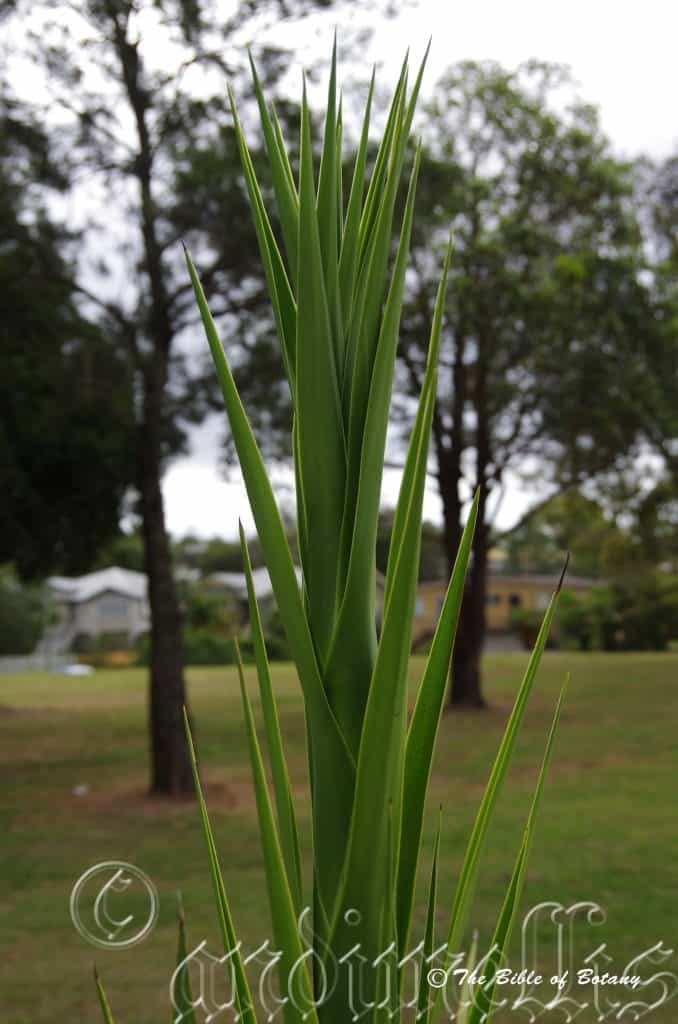
Norman Park Qld.
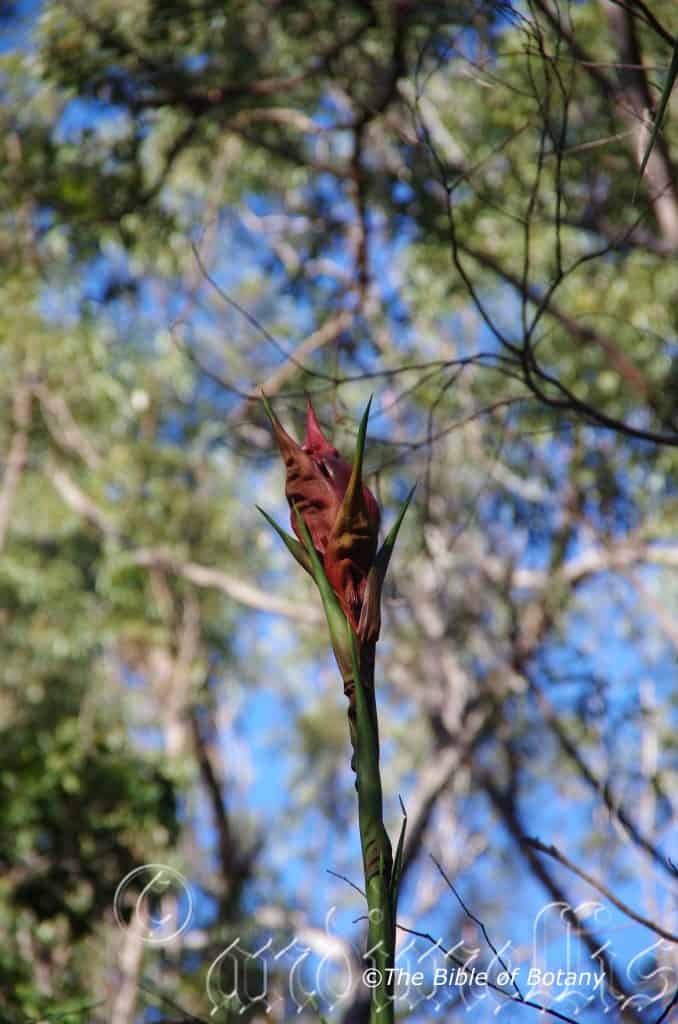
Kungala NSW
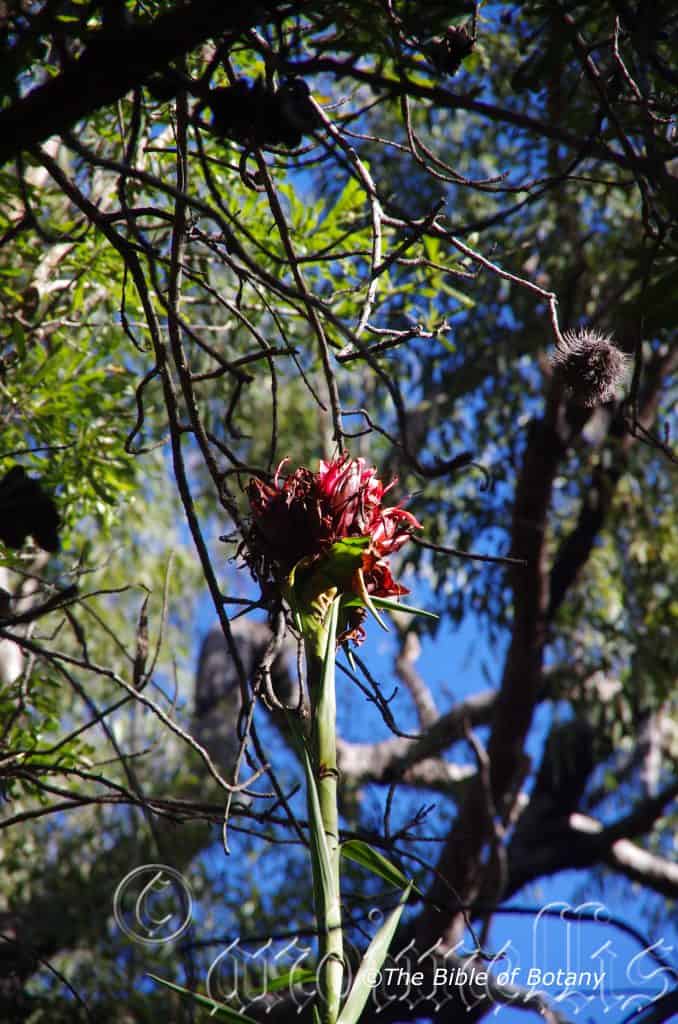
Kungala NSW
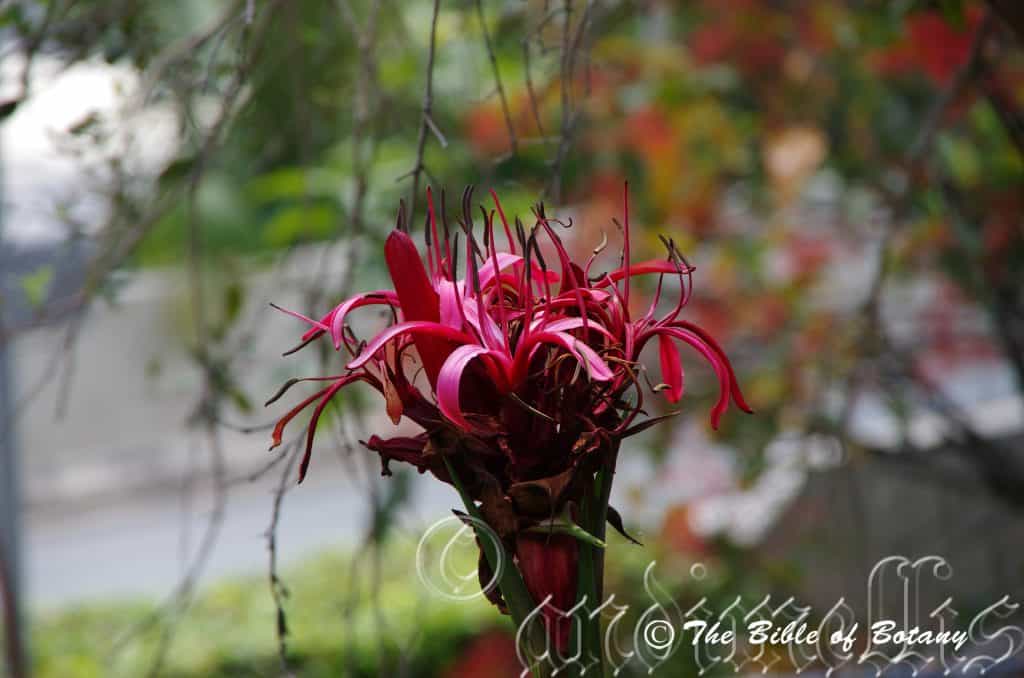
Roma Street Floral gardens Qld.
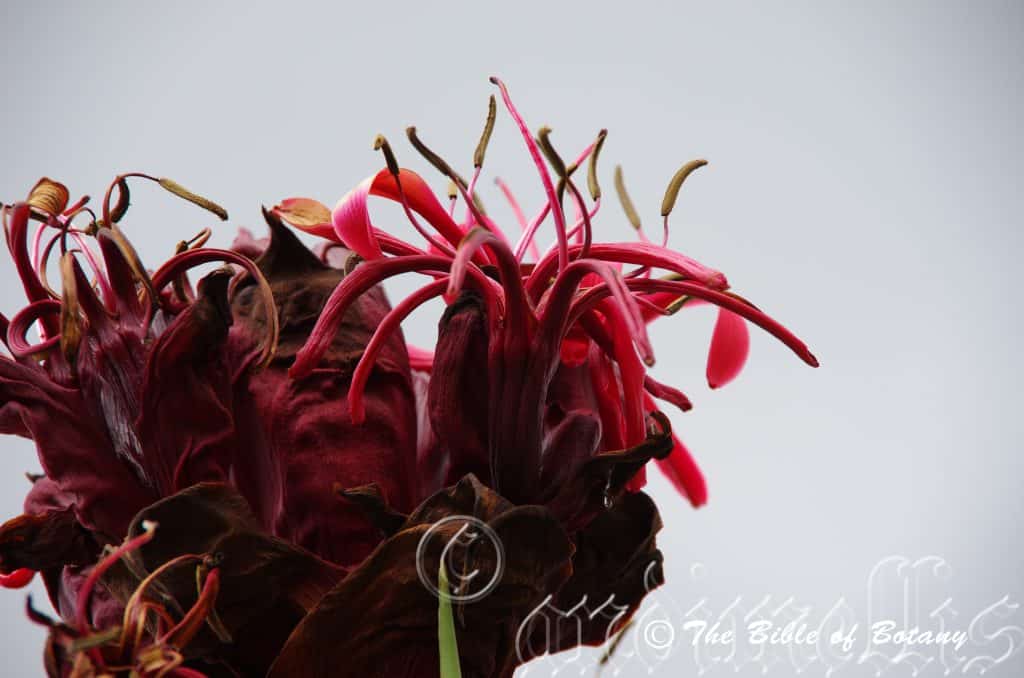
Norman Park Qld.
Doryanthes excelsa
Classification
Unranked: Monocots
Order: Asparagales
Family: Doryanthaceae
Genus: From Dory, which is Ancient Greek for a spear and Antha/Anthos, which are Ancient Greek for the male reproductive organs on a flower or the flower. It refers to flower spikes, which resemble a long spear.
Species: From Ex, which is Ancient Greek for out of the ordinary, outside or external and Celsa, which is Latin for high. It refers to plants, which are taller than other species in the genus.
Common Name: Gmymea Lily or Giant Spear Lily.
Distribution:
Doryanthes excelsa is found south from Bulli Pass to Shoalhaven in central New South Wales with a disjunct population further north on the Glenreagh Cliffs between Grafton and Coffs Harbour.
https://avh.ala.org.au/occurrences/search?taxa=Doryanthes+excelsa#tab_mapView
Habitat:
Aspect / Climate:
Doryanthes excelsa prefers full sun to dappled shade. It grows along the sandstone cliffs above or below open woodlands or in dry Eucalyptus forests. The altitude ranges from 60 meters ASL to 600 meters ASL.
The temperatures range from minus 4 degrees in August to 37 degrees in January.
The rainfall ranges from lows of 750mm to 1400mm average per annum.
Soil Requirements:
Doryanthes excelsa prefers fine reddish sands. The soils are derived from partially decomposed to decomposed reddish or reddish-brown sandstones. The soil‘s pH ranges from 7.5pH. It does not tolerate waterlogged soils. Non saline soils to very saline soils are tolerated to at least 1200 parts per million soluble. (Readings taken Glenreagh cliffs on rocks with seepage.)
Height & Spread:
Wild Plants: 0 5m to 6m by 4m x 5m when in flower.
Characteristics:
Doryanthes excelsa grows as a large strong clumping rosette lily.
The erect to semi pendulant, broad linear to broadly linear basal leaves measure 2000mm to 2500mm in length by 90mm to 110mm in width. The scape leaves are linear to broadly linear and measure 200mm to 300mm long by 50mm to 70mm in width. The bases are sessile and clasping while the apexes are acute. The concolourous rosette and scape laminas are mid grass green and glabrous. The laminas are convex on the upper surface and decurve near the margins. The midvein is broad rounded and prominent on the lower lamina. The leaf margins are entire.
The inflorescences of Doryanthes excelsa are born on a single long scape. The flowers are bright deep pink, scarlet red to carmine red with a paler center or rarely white atop of the 3m to 5m scape. The inflorescence is a globose mass and measure 360mm to 600mm in diameter with 20 to 40 individual flowers in a head. The large triangular bracts are reddish-brown and measure 100mm to 160mm in length by 40mm to 60mm wide at the base and have a long apicular apex. The 6 linear tepals are all of equal in length with narrow acute apex and measure 60mm to 120mm in length. Tepals are oblong to linear curving inwards from the center line and decurve at the apex becoming flattened and reflex as they age.
The stamen‘s filaments are red to pink and measure 54mm to 80mm in length. The cream to pale grey anther measures 27mm to 38mm in length.
The ovary is glabrous. The red to pink style which has an erect to semi oblique pastel grey stigma measures 82mm to 120mm in length. Doryanthes excelsa flowers appear from late September to late October in the north and up to a month later in the south. The plants take 7 to 10 years to flower from seed and die as the seeds ripen. As the main rosette dies smaller dormant rosettes from the base may also begin to grow.
The fruit of Doryanthes excelsa are ellipsoid to ovoidal capsules. The capsules measure 70mm to 100mm in length by 45mm to 65mm in diameter. The green capsules turn reddish-brown at maturity. The deep reddish-brown, flattened, orbicular seeds measure 15mm to 23mm in length.
Wildlife:
Doryanthes excelsa is host to many different medium to large honey eaters.
Cultivation:
Doryanthes excelsa is a striking large lily that does best on sandy soils derived from sandstone or even beach sands. It is excellent subjects for sea side gardens. It is ideal in large rockeries or arid landscapes and look at home amongst boulders and large rocks on banks, cliff faces and formal plantings.
When you design a desert garden, use gentle contours to display the plants to their best. Doryanthes excelsa can be the foundation for a great cactus type garden on harsh sandstone cliffs seaside gardens or arid gardens. It is best in medium to larger gardens where its massive size will not look out of place. Scatter plant a few but make sure there are large void areas between the plants where annuals can be planted for seasonal colour. Planted sparsely they will give the feeling of open space, plains and expansiveness set amongst a harsh environment. Use plants with soft grey foliage that grow no more than 500mm in height to add to the desolation. Grevillea centristigma would be ideal sparsely scattered between the Doryanthes excelsa. Any of the native annuals would suffice for colour and enhance the Doryanthes excelsa when 8it is not in flower.
If rocks or old logs and stumps are used then it is going to have to be very large to keep the balance. Even an old rusty or derelict car frame could really make the scene come to life sitting in the mid ground to back ground.
It often reaches its full potential in just 5 or 6 years and flower in their eighth season from seed in cultivation. The plant with the flowering scape will die however surrounding suckers or seedlings will quickly grow and take its place.
Propagation:
Seeds: Fresh Doryanthes excelsa seeds do not require treatment before sowing.
Fire: This is the most frequently used treatment for seeds in the wild as thousands of seeds have their dormancy broken when cold fires pass through their environments. The plants are usually associated with bushfires and in particular heath fires. It is unknown whether it is the heat or more likely the smoke that induces the seeds to germinate.
Sow a seed directly into 75mm native tubes and cover the seed with a seed raising mix to 10mm. Place them in a warm place and keep moist not wet.
Once the seedlings reach 50mm to 75mm in height or the roots appear at the bottom of the tubes plant them out into their permanent position. Mass plantings can be achieved by planting them at 3 meter to 5 meter centers.
Fertilize using Seaweed, fish emulsion or organic chicken pellets soaked in water on an alternate basis once the seedlings have been planted out until after they have established themselves.
Division: The best time to take divisions is immediately after the seed has being dispersed.When growing from divisions dig around one side of the clump. Take a sharp knife and sever the stem linking the sucker to the parent plant. Remove the plant from the soil, removing unwanted dead leaves and any old smaller clumps that look weak and replant them at the same time. Replant ensuring the soil is at the same level as before. Water and fertilize. New shoots will appear within two to four weeks.
Fertilize using seaweed, fish emulsion or organic chicken pellets soaked in water on an alternate basis. Fertilize every two months until the plants are established then annually in early September to October to maintain health, vitality and better flowering.
Further Comments from Readers:
Hi reader, it seems you use The Bible of Botany a lot. That’s great as we have great pleasure in bringing it to you! It’s a little awkward for us to ask, but our first aim is to purchase land approximately 1,600 hectares to link several parcels of N.P. into one at The Pinnacles NSW Australia, but we need your help. We’re not salespeople. We’re amateur botanists who have dedicated over 30 years to saving the environment in a practical way. We depend on donations to reach our goal. If you donate just $5, the price of your coffee this Sunday, We can help to keep the planet alive in a real way and continue to bring you regular updates and features on Australian plants all in one Botanical Bible. Any support is greatly appreciated. Thank you.
In the spirit of reconciliation we acknowledge the Bundjalung, Gumbaynggirr and Yaegl and all aboriginal nations throughout Australia and their connections to land, sea and community. We pay our respect to their Elders past, present and future for the pleasures we have gained.
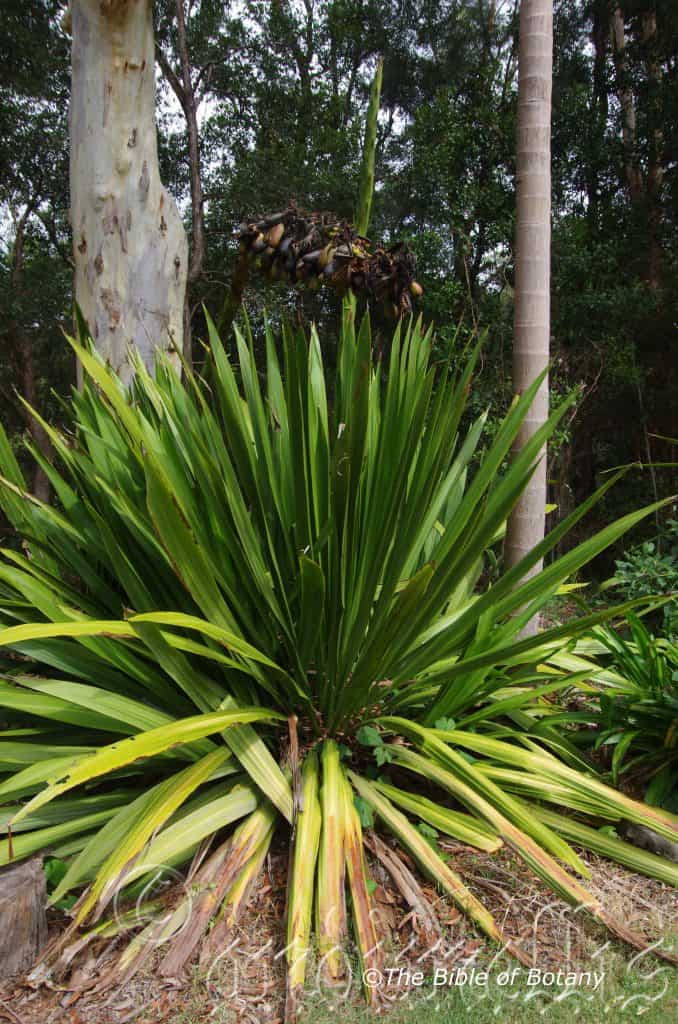
NCBG Coffs Harbour NSW
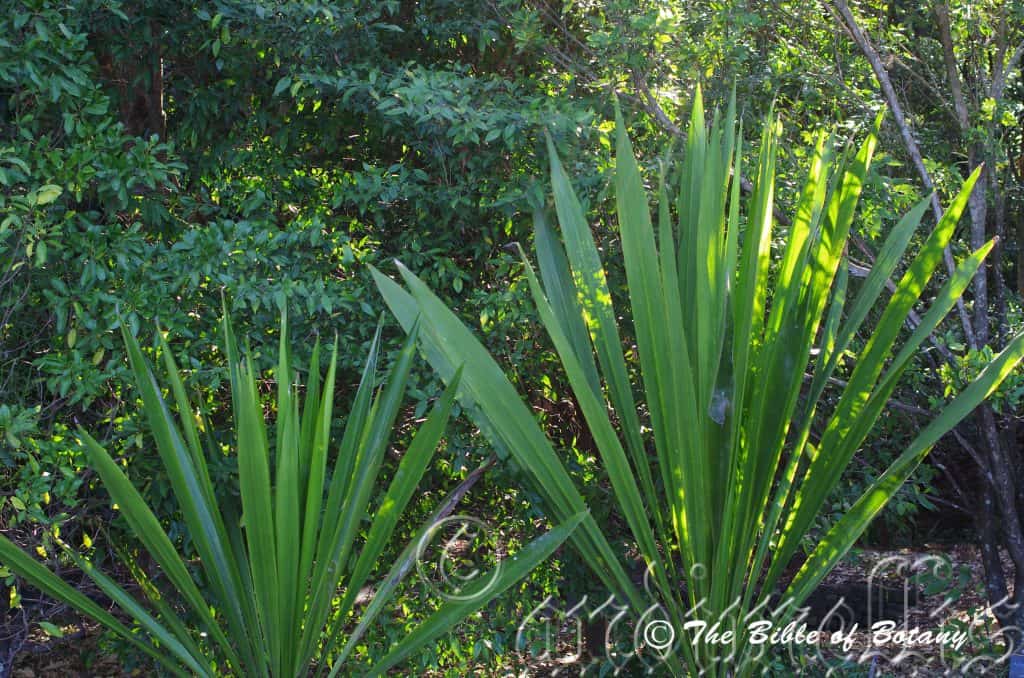
Mount Cootha Botanic gardens Qld.
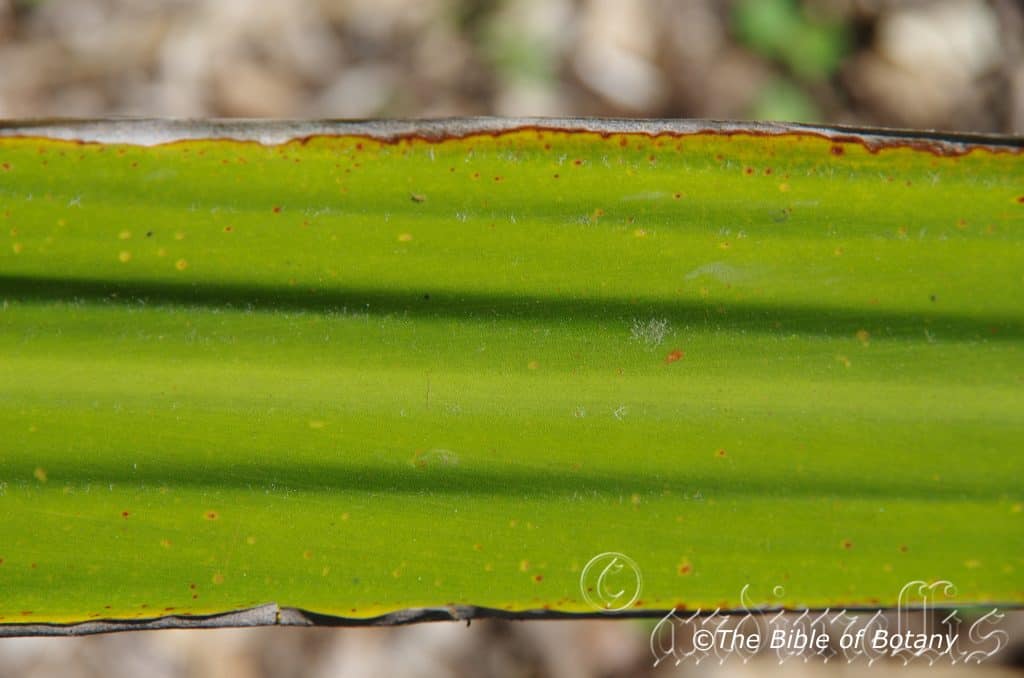
Rosser Gardens Benowa Qld.
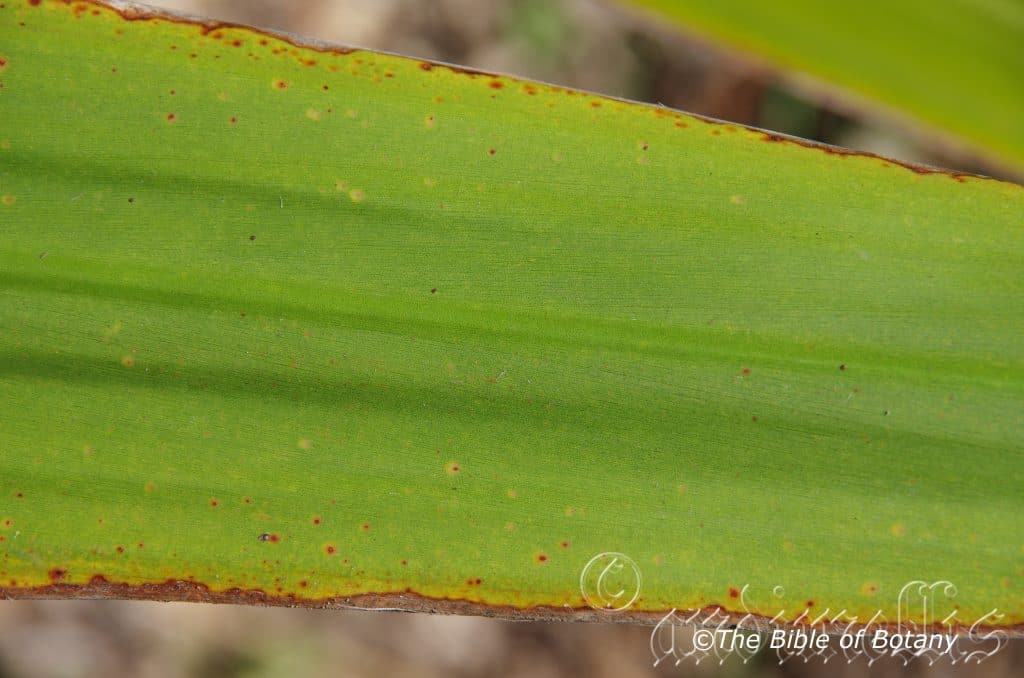
Rosser Gardens Benowa Qld.
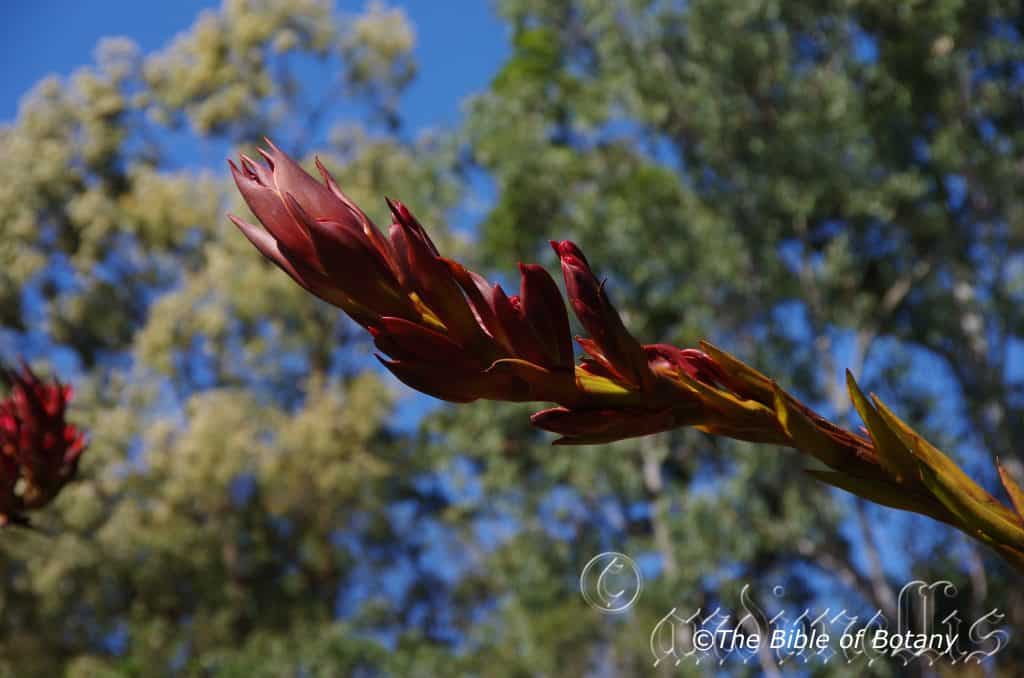
Rosser Gardens Benowa Qld.
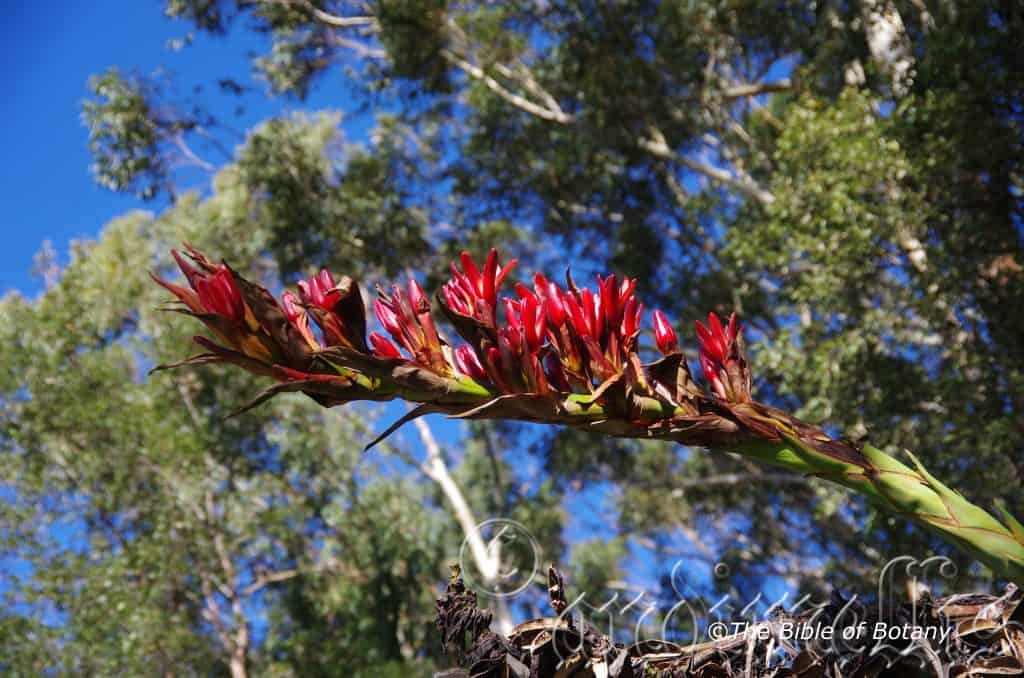
NCBG Coffs Harbour NSW
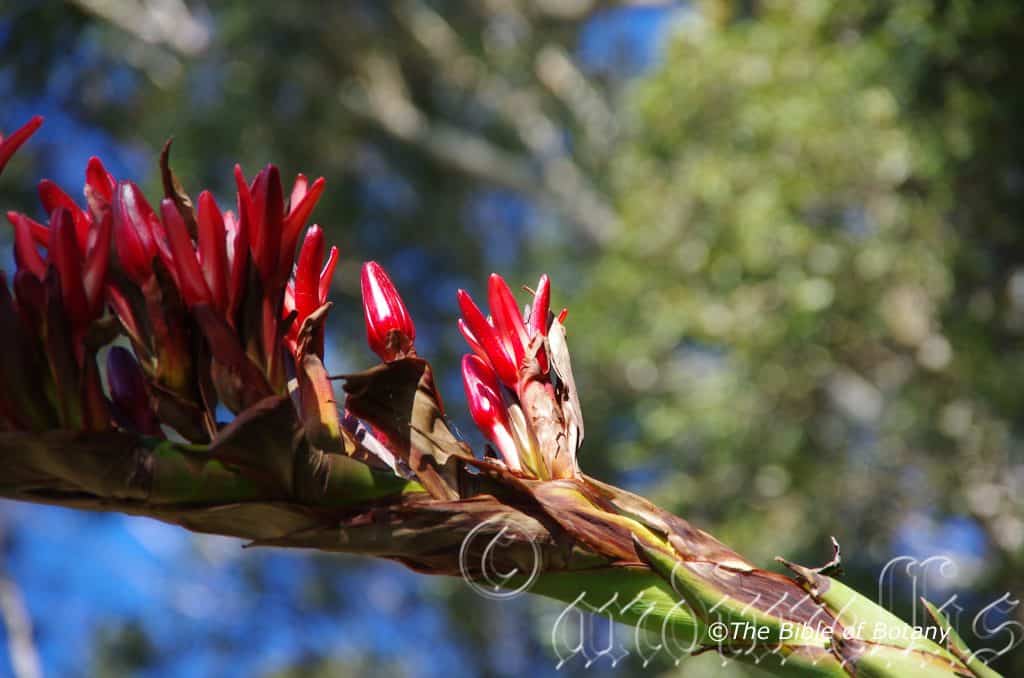
NCBG Coffs Harbour NSW
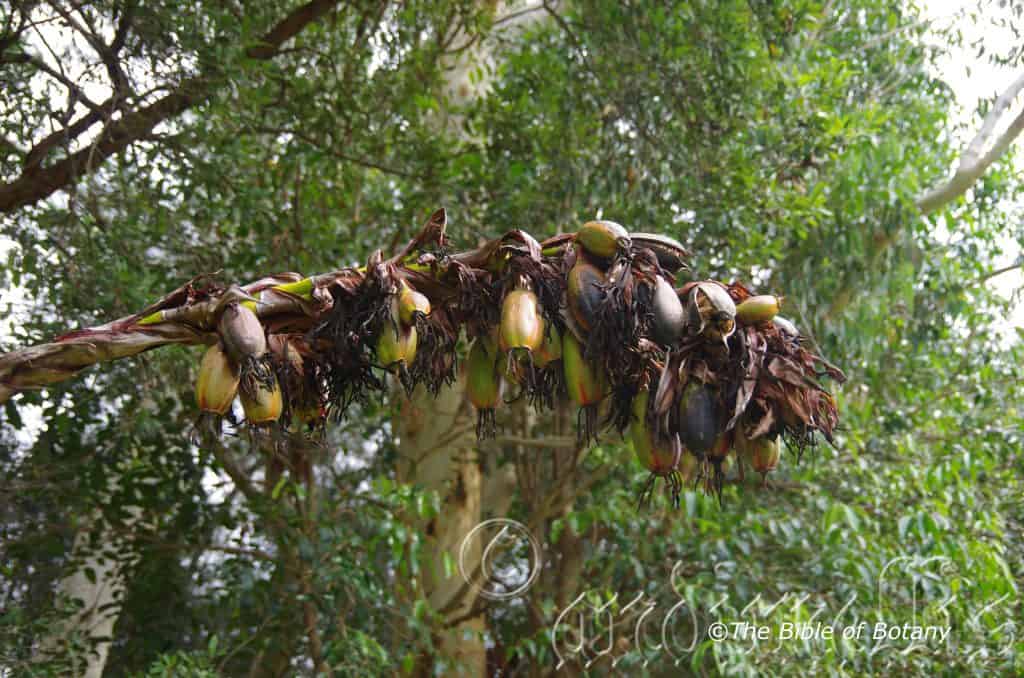
NCBG Coffs Harbour NSW
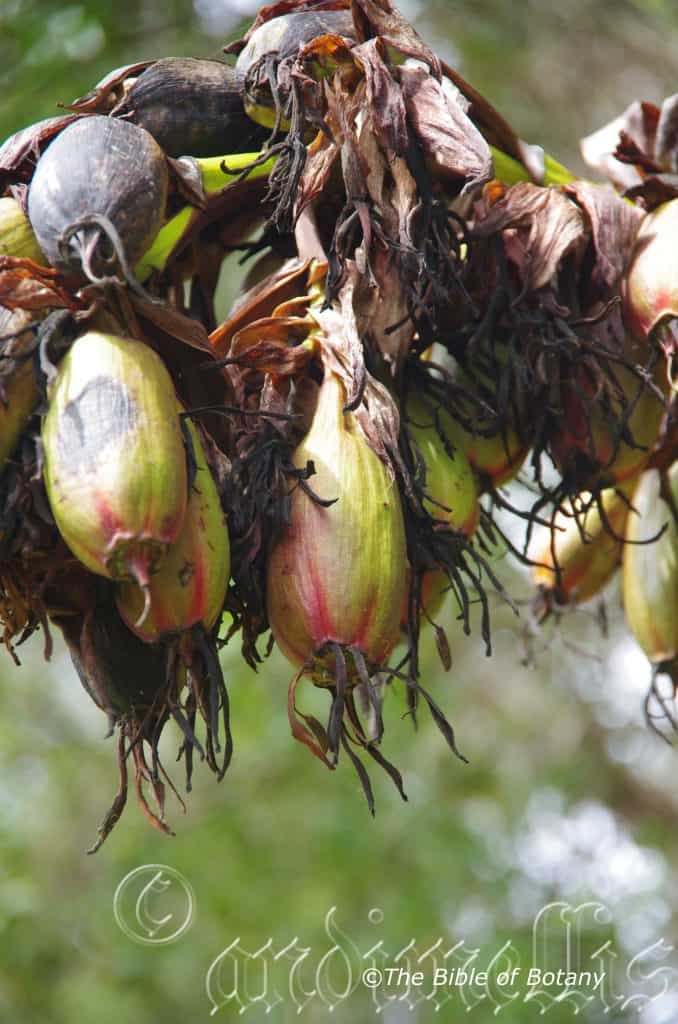
NCBG Coffs Harbour NSW
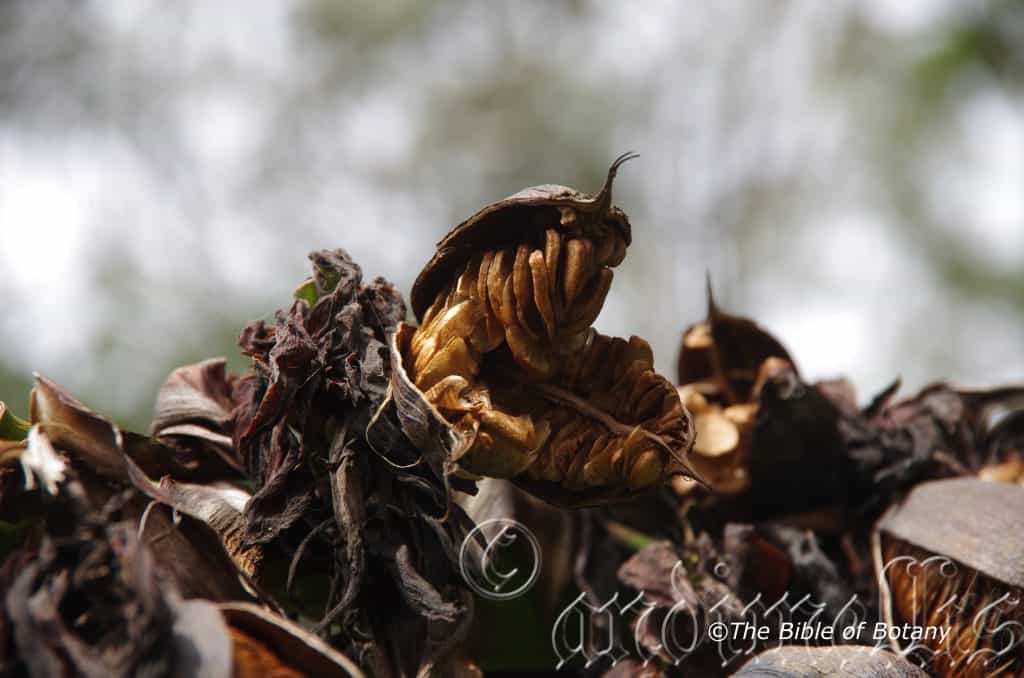
NCBG Coffs Harbour NSW
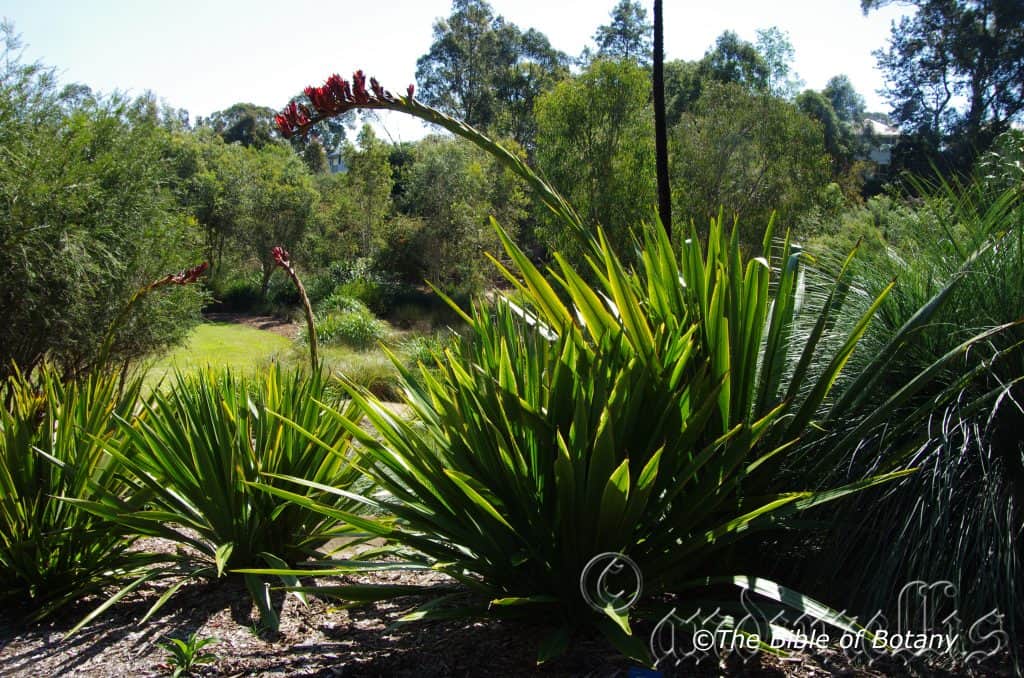
Rosser Gardens Benowa Qld.

Rosser Gardens Benowa Qld.
Doryanthes palmeri
Classification
Unranked: Monocots
Order: Asparagales
Family: Doryanthaceae
Genus: From Dory, which is Ancient Greek for a spear and Antha/Anthos, which are Ancient Greek for the male reproductive organs on a flower or the flower. It refers to flower spikes, which resemble a long spear.
Species: Is named in honour of Sir James Palmer; 1803-1871, who was a physician, pastoralist and politician in Victoria.
Common Name: Gmymea Lily or Spear Lily.
Distribution:
Doryanthes palmeri is restricted to 2 disjunct populations in southern Queensland near Clifton and near Kilcoy to Mount Warning Caldera. The other smaller population in far north eastern Queensland on the Atherton Tableland near Bellenden Kerr Ranges and Yungaburra Road.
https://avh.ala.org.au/occurrences/search?taxa=Doryanthes+palmeri#tab_mapView
Habitat:
Aspect / Climate:
Doryanthes palmeri prefers full sun to dappled shade. It grows on exposed rocky outcrops in wet schlerophyll forest. The altitude ranges from 100 meters ASL to 600 meters ASL.
The temperatures range from minus 3 degrees in August to 37 degrees in January.
The rainfall ranges from lows of 750mm to 1800mm average per annum.
Soil Requirements:
Doryanthes palmeri prefers skeletal light sandy clays to medium clays with stone or rocks. The soils are derived from partially decomposed black basalts. The soils pH ranges from 5.5pH to 6pH. It does not tolerate of waterlogged soils. Non saline soils to moderately saline soils are tolerated.
Height & Spread:
Wild Plants: 0.5m to 6m by 4m x 5m when in flower.
Characteristics:
Doryanthes palmeri grows as a large strong clumping rosette lily.
The erect to semi erect leaves of Doryanthes palmeri are linear to broadly linear. The basal leaves measure 2000mm to 3000mm in length by 90mm to 200mm in width. The scape leaves are linear to broadly linear and measure 200mm to 300mm long by 50mm to 70mm in width. The bases are long attenuate, sessile and clasping while the apexes are acute. The concolourous rosette and scape laminas are mid grass green and glabrous. The laminas recurve upwards from the midvein to the margins. The midvein is broad rounded and prominent on the lower lamina forming the petiole. The leaf margins are entire.
The inflorescences of Doryanthes palmeri are born on a raceme at the apex of a long scape. The flowers are bright deep pink, scarlet red to carmine red with a paler center or rarely reddish-brown atop of the 3m to 5m scape. The inflorescences measure 800mm to 1200mm in length by 70mm to 140mm in diameter with 40 to 80 individual flowers in a head. The large triangular bracts are reddish-brown and measure 100mm to 160mm in length by 40mm to 60mm wide at the base and have a long narrow acute apex. The 6 linear tepals are all of equal in length with an acute apex and measure 60mm to 120mm in length. The erect tepals are oblong to linear recurve inwards from the midrib to the margins and decurve at the apex becoming flattened and reflex as they age.
The stamen‘s filaments are pinkish-red to deep pink or reddish-brown and measure 22mm to 40mm in length. The yellow to lime-yellow anthers measure 12mm to 18mm in length.
The ovary is glabrous. The red to pink style which has an erect to semi oblique yellow-green stigma measures 82mm to 120mm in length. Doryanthes palmeri flowers appear from early September to late October in the north and up to a month later in the south. The plants take 9 to 14 years to flower from seed and die as the seeds ripen. As the main rosette dies smaller dormant rosettes from the base will start to grow.
The fruit of Doryanthes palmeri are ellipsoid to ovoidal capsules. The capsules measure 80mm to 90mm in length by 40mm to 60mm in diameter. The green capsules turn reddish-brown at maturity. The deep reddish-brown, flattened, orbicular seeds measure 17mm to 22mm in length.
Wildlife:
Doryanthes palmeri is host to many different medium to large honeyeaters including the Red Cheeked Wattle Bird, Anthochaera carunculata.
Cultivation:
Doryanthes palmeri is a striking large lily that does best on humus rich light clays to medium clays. It is excellent subjects for gardens in mountainous areas. It is ideal in large rockeries or dry rainforests landscapes and look at home amongst boulders and large rocks on banks, cliff faces and formal in plantings.
Doryanthes palmeri can be the foundation for a great cliff type garden on harsh basaltic or even granitic cliffs near the seaside or arid gardens in semi shade where some moisture is available. It is best in medium to larger gardens where its massive size will not look out of place. Scatter plant a few but make sure there are large void areas between the plants where annuals can be planted for seasonal colour. Planted sparsely with other small shrubs they will give the feeling of containment where the environment is being restricted by the cliffs or steep gullies. Use plants with soft grey foliage that grow no more than 1 meter in height to add to the confinement. Grevillea centristigma, Grevillea rosmarinifolia dwarf forms, Grevillea lanigera or Grevillea laurifolia as a ground cover would be ideal scattered between Doryanthes palmeri to achieve the desired effect of confinement but at the same time the Doryanthes would open up areas between the plants to form small corridors. Any of the shade loving native annuals would suffice for colour and enhance the Doryanthes palmeri when it is not in flower. Here plants like Ozomanthus diosmifolia (Would need pruning), Olearia nernstii or Olearia canescens are firm favourites and would suffice beautifully.
If rocks or old logs and stumps are used then it is going to have to be very large to keep the balance and allowed to be on display. Even an old rusty or derelict car frame could really make the scene come to life sitting in the mid ground to back ground.
It will attain an attractive features in just 3 years and flower in its fifth to 12th season from seed in cultivation. The plant with the flowering scape will die however the suckers or seedlings will quickly grow and take its place.
Propagation:
Seeds: Fresh Doryanthes palmeri seeds do not require treatment before sowing.
Fire: This is the most frequently used treatment for seeds in the wild as thousands of seeds have their dormancy broken when cold fires pass through their environments. The plants are usually associated with bushfires and in particular heath fires. It is unknown whether it is the heat or more likely the smoke that induces the seeds to germinate.
Sow a seed directly into 75mm native tubes and cover the seed with a seed raising mix to 10mm. Place them in a warm place and keep moist not wet.
Once the seedlings reach 50mm to 75mm in height or the roots appear at the bottom of the tubes plant them out into their permanent position. Mass plantings can be achieved by planting them at 3 meter to 5 meter centers.
Fertilize using Seaweed, fish emulsion or organic chicken pellets soaked in water on an alternate basis once the seedlings have been planted out until after they have established themselves.
Division: The best time to take divisions is immediately after the seed has being dispersed.When growing from divisions dig around one side of the clump. Take a sharp knife and sever the stem linking the sucker to the parent plant. Remove the plant from the soil, removing unwanted dead leaves and any old smaller clumps that look weak and replant them at the same time. Replant ensuring the soil is at the same level as before. Water and fertilize. New shoots will appear within two to four weeks.
Fertilize using seaweed, fish emulsion or organic chicken pellets soaked in water on an alternate basis. Fertilize every two months until the plants are established then annually in early September to October to maintain health, vitality and better flowering.
Further Comments from Readers:
Hi reader, it seems you use The Bible of Botany a lot. That’s great as we have great pleasure in bringing it to you! It’s a little awkward for us to ask, but our first aim is to purchase land approximately 1,600 hectares to link several parcels of N.P. into one at The Pinnacles NSW Australia, but we need your help. We’re not salespeople. We’re amateur botanists who have dedicated over 30 years to saving the environment in a practical way. We depend on donations to reach our goal. If you donate just $5, the price of your coffee this Sunday, We can help to keep the planet alive in a real way and continue to bring you regular updates and features on Australian plants all in one Botanical Bible. Any support is greatly appreciated. Thank you.
In the spirit of reconciliation we acknowledge the Bundjalung, Gumbaynggirr and Yaegl and all aboriginal nations throughout Australia and their connections to land, sea and community. We pay our respect to their Elders past, present and future for the pleasures we have gained.
Doryphora sassafras
Classification
Unranked: Magnoliids
Order: Laurales
Family: Atherospermataceae
Genus: From Dory, which is Ancient Greek for a spear and Pherein, which is a Greek suffix for to carry. It usually refers to plants, which bear long spear structures that includes the long, straight trunks.
Species: From Sassafras, which is Latinized from the vernacular of the local Spanish word for a similar plant known as Sassafras. It refers to the fragrance being very similar to the North American Sassafras genus.
Common Name:
Distribution:
Doryphora sassafras is found in several disjunct populations south from the Nambour and Conondale National Park in southern Queensland to Mimosa Rocks National Park in southern New South Wales. It is found on and east of the Great Dividing Range to the coast.
https://avh.ala.org.au/occurrences/search?taxa=Doryphora+sassafras#tab_mapView
Habitat Aspect Climate:
Doryphora sassafras prefers full sun to dappled light. It grows in well-developed rainforests on coastal flats, slopes or gallery forests. The altitude ranges from 10 meters ASL to 700 meters ASL.
The temperatures range from minus 3 degrees in August to 38 degrees in January.
The rainfall ranges from lows of 900mm to an average of 1900mm annually.
Soil Requirements:
Doryphora sassafras prefers better quality light clays to medium clays. The soils are derived from decomposed brown basalt or black basalt at higher altitudes and sedimentary soils at lower elevations. The soils pH ranges from 5pH to 6.5pH where the water can drain freely. It does not tolerate waterlogged soils despite the soils being continually moist to wet. Non saline soils to moderately saline soils are tolerated.
Height & Spread:
Wild Plants: 20m to 50m by 6m to 15m.
Characteristics:
Doryphora sassafras‘s bole is straight with a small crown while the trunk is mid grey-brown to pinkish grey-brown. The branches are pinkish grey-brown with and glabrous. The new growth is olive green and covered in soft, white, caduceus pulverulent hairs.
Doryphora sassafras‘s simple opposite leaves are elliptical to lanceolate or ovate-elliptical and measure 70mm to 100mm in length by 20mm to 40mm in width. The petioles measure 5mm to 15mm in length. The bases are cuneate to shortly attenuate while the apexes are bluntly acute to bluntly acuminate. The discolourous laminas are olive-green to pale sea-green and glabrous and glossy on the upper laminas while the lower laminas are paler. The laminas are flat and recurve slightly upwards from the mid vein to the margins. The margins are shallowly toothed to serrate. The midvein is slightly prominent on the lower lamina and is visible on the upper lamina. The lateral veins curve well inside the margins and are very fine.
The inflorescence of Doryphora sassafras are born in small clusters of 3 from the leaf axils. The pedicels measure 5mm to 12mm in length. The trimerous flowers are white to pastel cream. The oblong-elliptical brown bracts are caduceus as the buds break through. The bracts measure 6mm to 16mm in length by 2mm to 6mm in width. The 6 tepals are oblong with an acute to obtuse-acute apex and measure 6mm to 13mm rarely to 18mm in length by 2mm to 4mm or rarely 7mm in width near the base.
The androecium is complex, with usually 4 or rarely 3 whorls. The outer whorl consists of 6 stamens with the middle-outer whorl consisting of 6 stamen-like staminodes. The inner 1 or 2 whorls consist of 8 to 12 usually 9 style like staminodes. The white stamens measure 2.6mm to 6mm in length. The anthers are white.
The ovary consists of 8 to 12 usually 9 or 12 carpels. Fruiting hypanthium is prominently ribbed with 6 longitudinal ribs which extend onto or over the hypanthium base. The hypanthium is pastel, glossy lime green. The white style measures 3mm to 7mm in length. The flowers appear from May to July.
Doryphora sassafras fruits are pyriform nuts. The nuts measure 10mm to 20mm in length by 6mm to 10mm in diameter at the basal end. The style extends up to 13mm in length and is persistent until the green fruits begin to turn brown and ripen, where the styles shrivel. The achenes measure 3.5mm to 5mm in length by 2mm to 3mm in diameter. The deep brown achenes are plumose with 12mm to 20mm long plumes.
Wildlife:
Doryphora sassafras is the host tree for the Macleay‘s Swallow Tail Butterfly larvae Graphium macleayanus, while the butterflies also feed on nectar from the flowers.
Cultivation:
Doryphora sassafras is a beautiful tree for the large gardens as a feature plant or in the center of a rainforest garden. Trees grow much smaller in cultivation when grown in the open. Trees in Melbourne and Adelaide rarely grow more than 10 meters in height with a 6 meter diameter spread. In the tropics it will grow from 15 meters to 20 meters in height by 6 meters to 9 meters in diameter.
The tree is an excellent park specimen and is relatively fast in growth especially in the early years even on heavier soils especially where soil moisture is consistent and an organic native fertilizer regime is in place.
These tree is excellent for epiphytic orchids and ferns.
Be careful not to plant Doryphora sassafras within 8 meters of drains, sewers or water pipes. Like all water loving plants its roots are vigorous and will seek out and take advantage of any small leak or crack to enter the pipe. It is however an excellent subject to plant below septic trenches where it will absorb a lot of the water and nutrients.
Doryphora sassafras is a great plant for indoor use in its early stages. Use a good potting mix, place 3 to 5 of the seedlings in a large container, spacing them evenly around the pot. (300mm diameter pot is ideal) Treat as below for seedlings and fertilize every month with one of the organic fertilizers suggested on a rotating basis. Trees will grow to 2 meters to 3 meters. Indoors the plants should be rotated on at least a twice a month basis. (That is turning the pot around so that the same side of the tree is not always facing the corner or wall.)
Doryphora sassafras makes a very good accent tree in front of low set or 2 story homes, commercial, industrial sheds or school class rooms where they will break up hard rigid architectural lines and give warmth and breadth to a building.
Propagation:
Seeds: Sow the seeds of Doryphora sassafras directly into a seed raising mix and cover with about 1mm of fine sand. Place the trays in a warm sunny position and make sure the mix never dries out. When the seedlings are 20mm to 30mm tall, prick them out and plant them into 50mm native tubes using a seed raising mix and keep them moist.
Fertilize using Seaweed, fish emulsion or organic chicken pellets soaked in water on an alternate basis. Fertilize every two months until it is well established.
Once the seedlings reach 150mm to 200mm in height plant them out into their permanent position. For mass plantings plant them at 800mm to 1000mm centers.
Fertilize using seaweed, fish emulsion or organic chicken pellets soaked in water on an alternate basis. Fertilize every two months until the plants are established then annually in early September to October to maintain health, vitality and better flowering.
Further Comments from Readers:
Hi reader, it seems you use The Bible of Botany a lot. That’s great as we have great pleasure in bringing it to you! It’s a little awkward for us to ask, but our first aim is to purchase land approximately 1,600 hectares to link several parcels of N.P. into one at The Pinnacles NSW Australia, but we need your help. We’re not salespeople. We’re amateur botanists who have dedicated over 30 years to saving the environment in a practical way. We depend on donations to reach our goal. If you donate just $5, the price of your coffee this Sunday, We can help to keep the planet alive in a real way and continue to bring you regular updates and features on Australian plants all in one Botanical Bible. Any support is greatly appreciated. Thank you.
In the spirit of reconciliation we acknowledge the Bundjalung, Gumbaynggirr and Yaegl and all aboriginal nations throughout Australia and their connections to land, sea and community. We pay our respect to their Elders past, present and future for the pleasures we have gained.
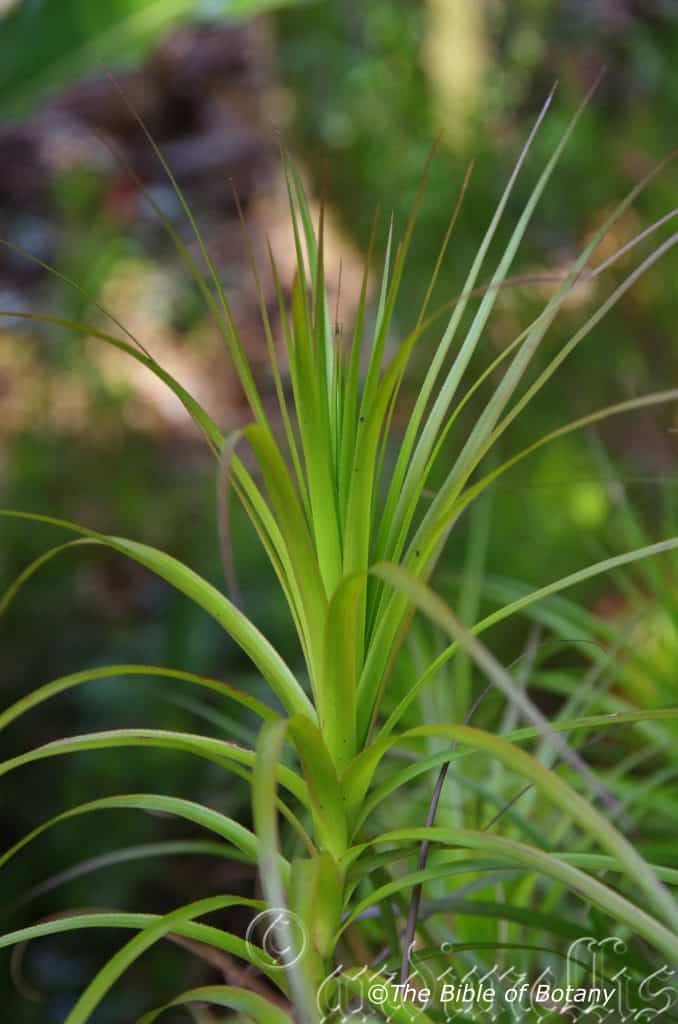
National Botanic Gardens ACT

National Botanic Gardens ACT
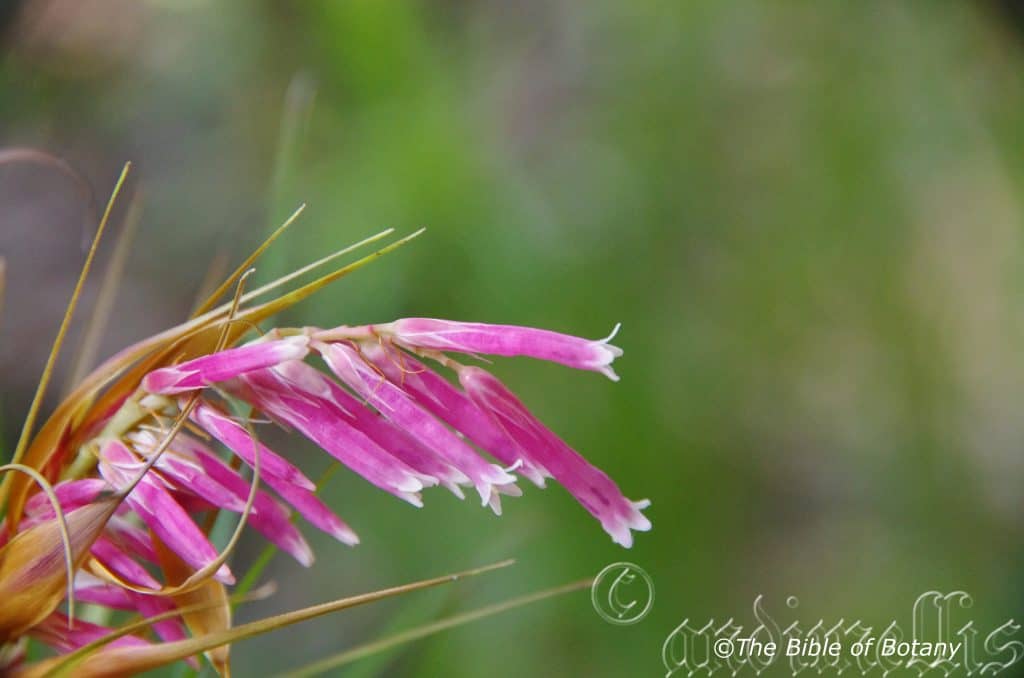
National Botanic Gardens ACT
Dracophyllum macranthum
Classification
Unranked: Eudicots
Unranked: Asterids
Order: Ericales
Family: Ericaceae
Genus: From Dracaena, which is Ancient Greek for a female dragon or is named in honour of Sir Francis Drake who was known as El Draco the Dragon and Phullon/Phyllon, which is Ancient Greek for a leaf. It refers to the shape of the leaves looking similar to the Dracaena genus.
Species: From Makros, which is Ancient Greek for large and Antha/Anthos, which are Ancient Greek for the male reproductive organ of the flower or the flower. It refers to anthers, which are much longer than other species in the genus.
Common Name:
Distribution:
Dracophyllum macranthum is restricted to a very small area in New South Wales from Coorabakh National Park, near Kendall and the northern sections of the Comboyne Plateau south west of Kendall.
https://avh.ala.org.au/occurrences/search?taxa=Dracophyllum+macranthum#tab_mapView
Habitat Aspect Climate:
Dracophyllum macranthum prefers sheltered positions with dappled light. It grows on rocky outcrops along streams, gullies and damp culverts, usually in open areas within the forest. The altitude ranges from 450 meters ASL to 700 meters ASL.
The temperatures range from 1 degree in August to 36 degrees in January.
The rainfall ranges from lows of 850mm to an average of 1600mm annually.
Soil Requirements:
Dracophyllum macranthum prefers better quality skeletal sandy loams to medium clays. The soils are usually derived from decomposed basalts deposited in crevices and pockets within the basalt or in similar positions amongst conglomerate rocks where moisture is captured and retained. Soils with a 6pH through to a 7pH are preferred where the water can drain freely. It does not tolerate waterlogged soils despite the soils being continually moist to wet. Non saline soils to the low side of moderately saline soils are tolerated.
Height & Spread:
Wild Plants: 0.6m to 2.5m by 0.4m to 3m.
Characteristics:
Dracophyllum macranthum‘s stems are fawnish near the base and lime-green are glabrous as they proceed up towards the apex. The erect to spreading stems frequently become more pendent as they lengthen. It often becomes sparsely branched from about 100mm above base.
Dracophyllum macranthum‘s simple clustered, somewhat spreading to pendant towards the apex. The narrow lanceolate to linear leaves, measure 90mm to 200mm in length by 6mm to 10mm in width. The basal leaves are somewhat caduceus from the 200mm to 300mm below the apex. The base is broadly sheathing around the short thin stem while the reddish-brown apex is long acuminate to tapering. The pale brown membranous sheath measures 8mm in length by 1omm to 12mm in width. The discolourous, coriaceous lamina is mid green to deep lime-green and glabrous on the upper lamina while the lower lamina is paler. The laminas are flat or more often recurve upwards from themed vein to the margins. The margins are very finely serrate. The parallel veins are barely visible from either lamina.
The inflorescence of Dracophyllum macranthum are erect second spike born from the terminal. The spikes in which the flowers mature basipetally measure 50mm to 150mm in length with 20 to 120 individual flowers. Each node has a caduceus leaf like bract, usually with 2 or 3 flowers per node basally and 1 or occasionally 2 flowers per node distally. At times the flowers may appear to be secund. The flowers corollas are deflexed to spreading, become erect after the corolla has been discarded. The triangular, brown bracts measure 45mm to 55mm in length by 10mm to 12mm in width. The bracteoles are similar to the bracts and measure 7mm to 9mm in length by 0.5mm to 1mm in width.
The usually deep rose coloured to mid pink calyx has triangular lobes which measure 8mm to 11mm in length by 2mm to 2.5mm in width while the calyx measures 4mm to 6mm in length by 2mm to 2.5mm in width. The margins are covered in white ciliolate hairs especially on the apical half. The corolla is deep pink becoming deep reddish-pink to deep carmine with age and has white lobes. The cylindrical corolla tube measures 16mm to 25mm in length by 3mm to 4mm in width. The divaricate lobes are ovate and measure 2.5mm to 4mm in length by 1.5mm to 3mm in width. The corolla and lobes surfaces are rugose to verrucata
The white, inserted stamens measure 14mm to 20mm in length.
The pistil is usually slightly longer than corolla tube and measures 14mm to 22mm in length. The pistil is sparsely to moderately covered in minute, white papillose hairs distally while the white stigma is indistinctly 5 lobed. The flowers appear from August to October but it has been known to flower as late as December under favourable conditions.
Dracophyllum macranthum‘s fruits are globule capsules. The capsules are shorter than the calyxes. The calyxes are persistent on the ripe fruits while the style is usually persistent.
Wildlife:
When Dracophyllum macranthum are in flower it attracts many butterflies and native insects especially the native bees Tetragonula carbonaria, Tetragonula hockingsi, and Austroplebeia australis.
Cultivation:
Dracophyllum macranthum is one of those plants that always looks as though it needs to be trimmed or have something done to it to tidy it up in cultivation. That is precisely why it should be more widely cultivated around fish ponds or other protected moist areas in in dappled sunshine because it offers the gardener something that is totally natural and different. The stems are long and erect giving the shrubs that straggly dense but natural look. Garden subjects rarely grow more than 2 meter tall by 0.4 meters in diameter.
It would make an excellent talking point, with a strong statement whether it is potted in a sunny fish pond in a courtyard or around a sheltered swimming pool with just a few large rocks or old tree stumps. Placed beside a fish pond with procumbent plants, it would give height and character to the free line pond. Here its flowers can be observed and the reflection on the water adding to the exotic tropical scene.
Where there is a formal pool Dracophyllum macranthum‘s unusual shape, leaves and flowers would break the hard lines yet can still look very formal as a standalone plant.
Dracophyllum macranthum can be used in formal Japanese or Chinese courtyards with great effect against large stones and white or grey pebbles because the strong form and contrasting lines. The scene would be organized with lines of round, square and rectangle but tastefully broken with the strap like leaves. The flowers in such a garden would be noticed, reaching out wanting to be the center of attention but unable to convince the viewer to be transfixed on any section for long enough.
The main problem is securing seed for propagating from legally reliable sources.
Propagation:
Seeds: Sow the seeds of Dracophyllum macranthum directly into a seed raising mix and cover with about 1mm of fine sand. Place the trays in a warm sunny position and make sure the mix never dries out. When the seedlings are 20mm to 30mm tall, prick them out and plant them into 50mm native tubes using a seed raising mix and keep them moist.
Once the seedlings reach 150mm to 200mm in height plant them out into their permanent position. For mass plantings plant them at 800mm to 1000mm centers.
Fertilize using seaweed, fish emulsion or organic chicken pellets soaked in water on an alternate basis. Fertilize every two months until the plants are established then annually in early September to October to maintain health, vitality and better flowering.
Further Comments from Readers:
Hi reader, it seems you use The Bible of Botany a lot. That’s great as we have great pleasure in bringing it to you! It’s a little awkward for us to ask, but our first aim is to purchase land approximately 1,600 hectares to link several parcels of N.P. into one at The Pinnacles NSW Australia, but we need your help. We’re not salespeople. We’re amateur botanists who have dedicated over 30 years to saving the environment in a practical way. We depend on donations to reach our goal. If you donate just $5, the price of your coffee this Sunday, We can help to keep the planet alive in a real way and continue to bring you regular updates and features on Australian plants all in one Botanical Bible. Any support is greatly appreciated. Thank you.
In the spirit of reconciliation we acknowledge the Bundjalung, Gumbaynggirr and Yaegl and all aboriginal nations throughout Australia and their connections to land, sea and community. We pay our respect to their Elders past, present and future for the pleasures we have gained.
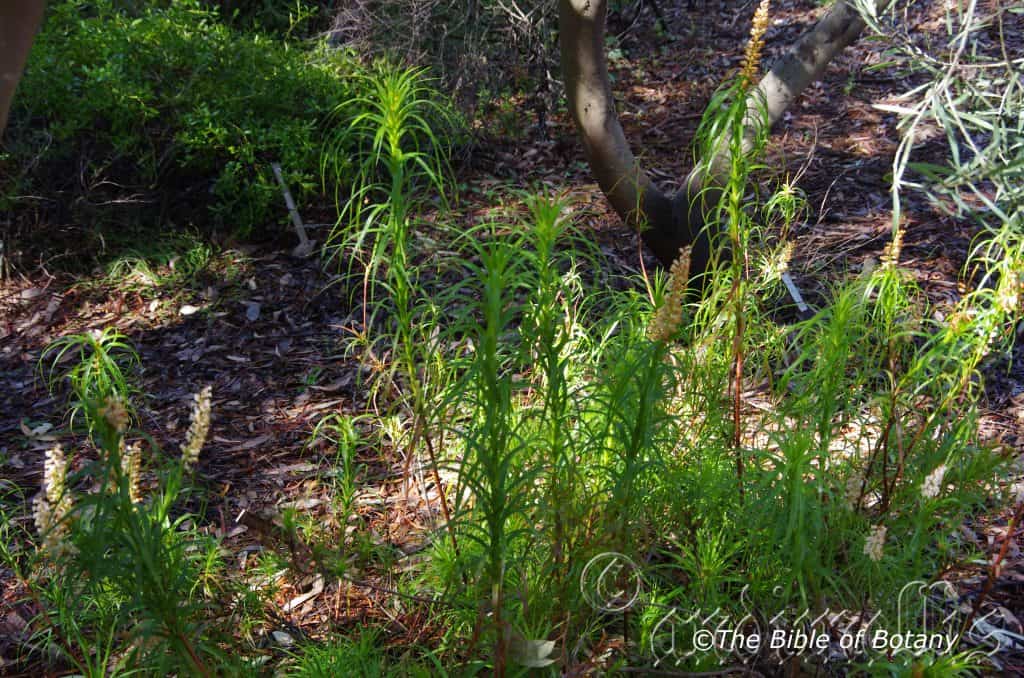
National Botanic Gardens ACT
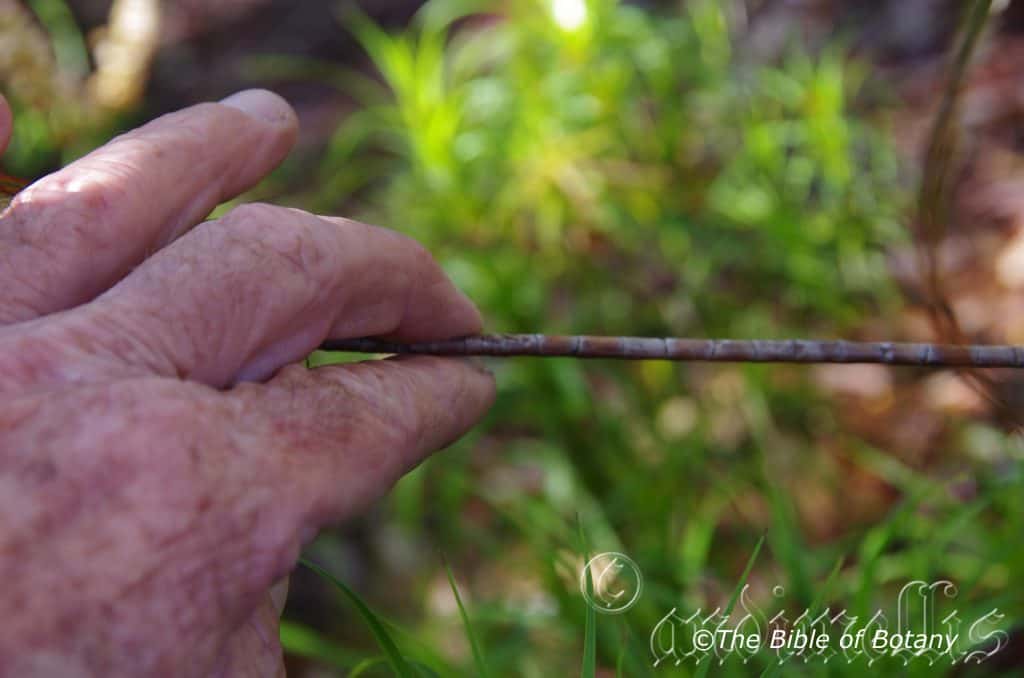
National Botanic Gardens ACT

National Botanic Gardens ACT
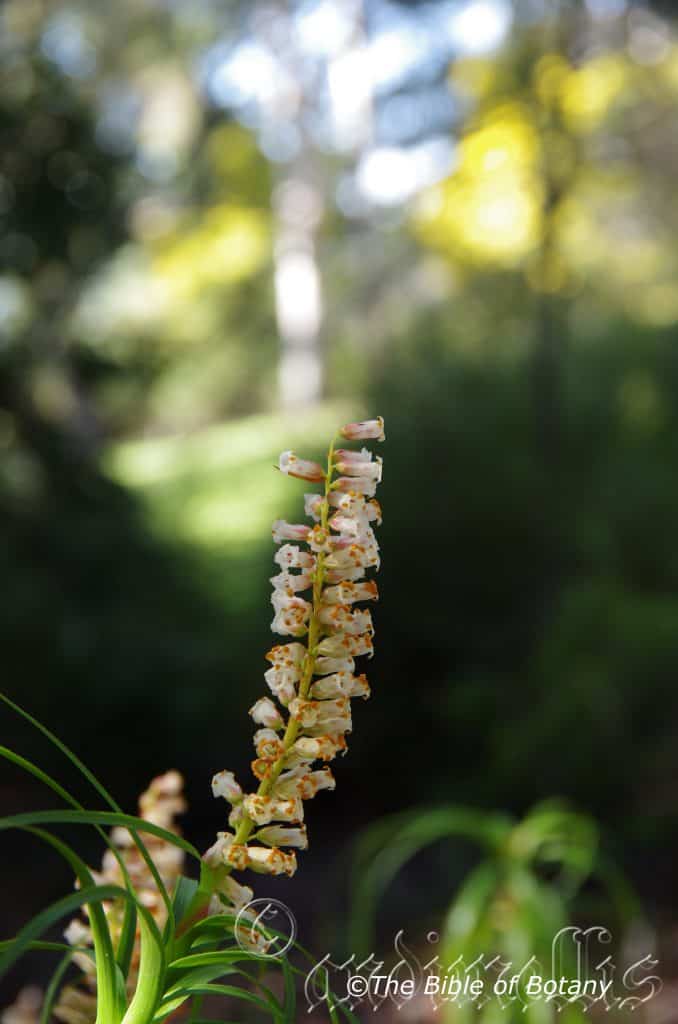
National Botanic Gardens ACT
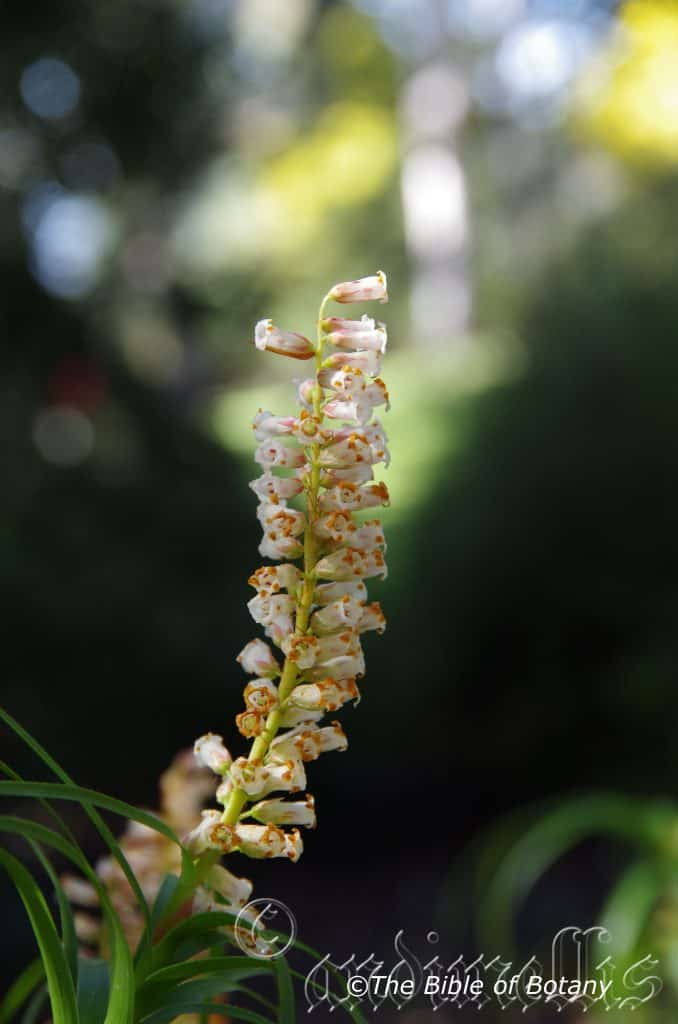
National Botanic Gardens ACT
Dracophyllum secundum
Classification
Unranked: Eudicots
Unranked: Asterids
Order: Ericales
Family: Ericaceae
Genus: From Dracaena, which is Ancient Greek for a female dragon or is named in honour of Sir Francis Drake who was known as El Draco the Dragon and Phullon/Phyllon, which is Ancient Greek for a leaf. It refers to the shape of the leaves looking similar to the Dracaena genus.
Species: From Secundus, which is Latin for to appear on one side only, to be unilateral. It refers to flowers, which appear along one side of the axis or flower spike.
Common Name:
Distribution:
Dracophyllum secundum is found south from Newcastle to Pigeon Hole Creek in southern coastal New South Wales. There are two outlying populations to the north one at Kendall and the second at Glenreagh.
https://avh.ala.org.au/occurrences/search?taxa=Dracophyllum+secundum#tab_mapView
Habitat Aspect Climate:
Dracophyllum secundum prefers full sun to dappled light. It grows below medium size trees, low trees, adjacent to rainforests or in low dry scrub lands in the open on cliff faces. It is most common around waterfalls and seepage areas. The altitude ranges from 100 meters ASL to 500 meters ASL.
The temperatures range from 1 degree in August to 40 degrees in January.
The rainfall ranges from lows of 750mm to an average of 1600mm annually.
Soil Requirements:
Dracophyllum secundum prefers skeletal fine sands to sandy loams. The soils are derived from decomposed sandstone or in sandstone crevices and pockets within the sandstone where moisture is captured. Soils with a 6pH through to a 7pH are preferred where the water can drain freely. It does not tolerate waterlogged soils despite the soils being continually moist to wet. Non saline soils to the low side of moderately saline soils are tolerated.
Height & Spread:
Wild Plants: 0.5m to 1m by 0.4m to 0.8m.
Characteristics:
Dracophyllum secundum’s stems are red-brown. It has a straggly appearance. The narrow stems are grey. The leaf scars are present from the old discarded leaves.
Dracophyllum secundum’s simple clustered spreading narrow lanceolate to lanceolate leaves, measure 50mm to 140mm in length by 5mm to 14mm in width. The base is broad sheathing around the short thick stem while the apex is long acuminate. The margin is entire or very finely toothed. The concolourous laminas are bright grass-green deep grass-green. The parallel veins are slightly prominent on the lower lamina and are not visible except the central vein from the upper lamina.
The inflorescence of Dracophyllum secundum are erect second spike born from the terminal. The spikes measure 50mm to 150mm in length with 20 to 120 individual flowers. The long lanceolate brown bracts are discarded as the buds emerge. They measure 20mm to 25mm in length by 4mm to 5mm in width. The sepals are long tapering and measure 3mm to 5mm in length by 2mm in width near the base. The white, pale pink to deep pink corollas measure 6mm to 9mm in length by 4mm in diameter. The narrow acuminate lobes are erect to spreading and measure 1.5mm to 2mm in length. The corolla is sessile on the deep pink to almost red spike. The inserted stamens are united at the base with the upper 1 mm being free. They measure 1.5mm to 2mm in length. The nectaries are relatively large and measure 2mm in length. The flowers appear from August to December.
Dracophyllum secundum’s fruits are globule capsules. The capsules measure 5mm to 6mm in length by 5mm in diameter. The sepals are persistent at the base.
Wildlife:
When Dracophyllum secundum is in flower it attracts many butterflies and native insects including the native bee, Tetragonula carbonaria, and the Blue banded bee Amegilla cingulata.
Cultivation:
Dracophyllum secundum is one of those plants that always look as though it is in need to be trimmed or have something done to it to tidy it up. That is precisely why it should be more widely cultivated around fish ponds or other wet areas in full sun to light dappled shade because it offers the gardener something that is totally natural and different. The stems are long, erect and leafy and that is what gives it appeal. Garden subjects rarely grow more than 0.7 meters tall by 0.5 meters in diameter.
Mass planted it would look awesome in a sunny courtyard or around a swimming pool with just a few large rocks or an old tree stump or just the walls as the backdrop. Placed beside a fish pond with low growing plants like Hibbertia linearis or Hibbertia obtusifolia if yellow is your thing, Scaevola aemula or Dampiera diversifolia for those who prefer purple, Dampiera coronata, or for something a little taller Celosia argentia for pink or to behold and a red look with Chorizema cordatum or Lechenaultia formosa. Here its flowers can be observed and the reflection on the water adding to that wow look but do not use various colours as the whole effect can be lost instantly.
Where there is a formal pool Dracophyllum secundum’s can easily be planted in rigid straight rows to continue with the formality.
Visualize Dracophyllum secundum being used in formal Japanese or Chinese courtyards with great effect against large stones and white or grey pebbles because the strong form and contrasting lines. The scene would be organized with lines of round, square and rectangle but tastefully broken with the strap like leaves. The flowers in such a garden would go unnoticed however they would be reaching out wanting to be the center of attention but unable to convince the viewer to be transfixed on any section for long enough.
The main problem is securing seed for propagating.
Propagation:
Seeds: Sow the seeds of Dracophyllum secundum into a seed raising mix and cover with about 1mm of fine sand. Place the trays in a warm sunny position and make sure the mix never dries out. When the seedlings are 20mm to 30mm tall, prick them out and plant them into 50mm native tubes using a seed raising mix and keep them moist.
Once the seedlings reach 150mm to 200mm in height plant them out into their permanent position. For mass plantings plant them at 800mm to 1000mm centers.
Fertilize using seaweed, fish emulsion or organic chicken pellets soaked in water on an alternate basis. Fertilize every two months until the plants are established then annually in early September to October to maintain health, vitality and better flowering.
Further Comments from Readers:
Hi reader, it seems you use The Bible of Botany a lot. That’s great as we have great pleasure in bringing it to you! It’s a little awkward for us to ask, but our first aim is to purchase land approximately 1,600 hectares to link several parcels of N.P. into one at The Pinnacles NSW Australia, but we need your help. We’re not salespeople. We’re amateur botanists who have dedicated over 30 years to saving the environment in a practical way. We depend on donations to reach our goal. If you donate just $5, the price of your coffee this Sunday, We can help to keep the planet alive in a real way and continue to bring you regular updates and features on Australian plants all in one Botanical Bible. Any support is greatly appreciated. Thank you.
In the spirit of reconciliation we acknowledge the Bundjalung, Gumbaynggirr and Yaegl and all aboriginal nations throughout Australia and their connections to land, sea and community. We pay our respect to their Elders past, present and future for the pleasures we have gained.

National Botanic Gardens ACT
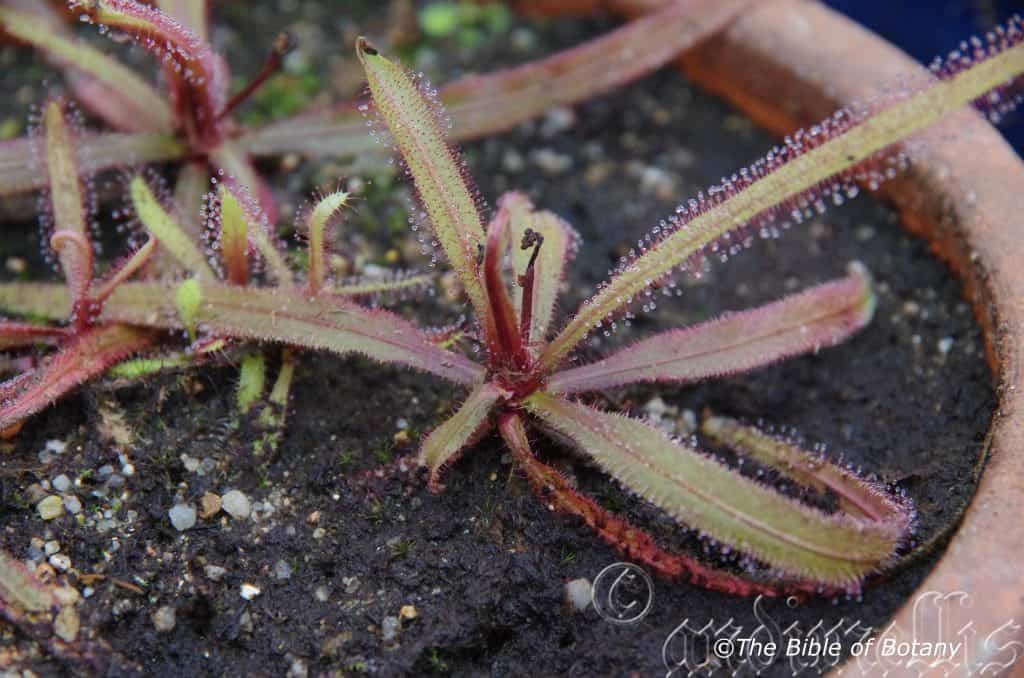
National Botanic Gardens ACT
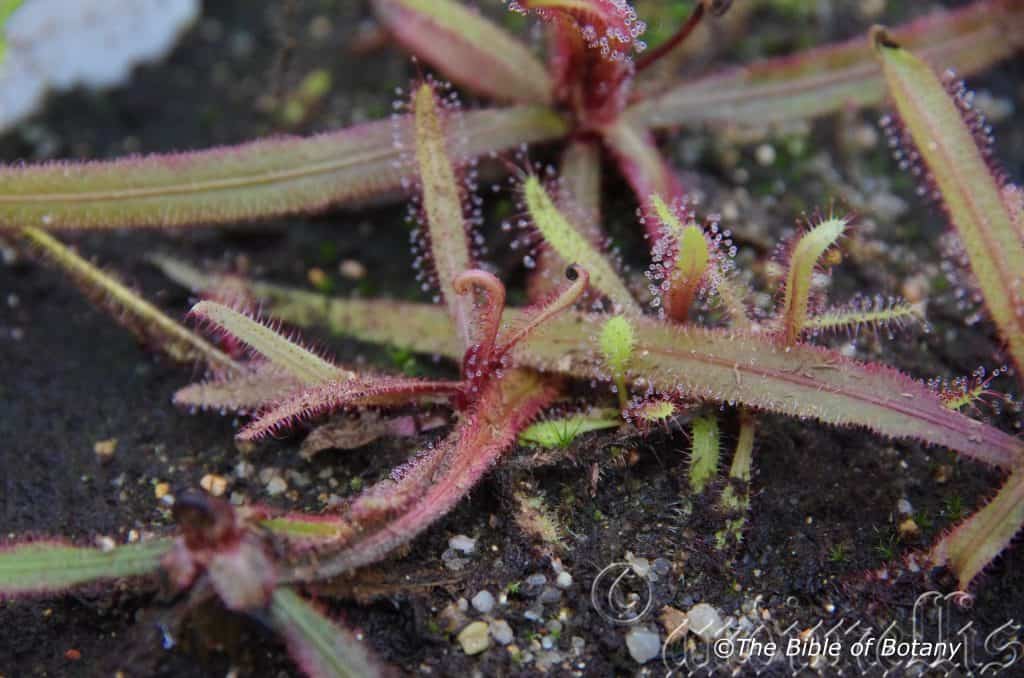
National Botanic Gardens ACT
Drosera adelae
Classification
Unranked: Eudicots
Unranked: CoreEudicots
Order: Caryophyllales
Family: Droceraceae
Genus: From Droseros, which is Ancient Greek for dewy. It refers to the glandular leaf hairs exuding a sticky glistening liquid, which looks like dew.
Sub Genus: Phycopsis
Species: From Adele, which is Latinized from the German for noble. It refers to plants, which have a more regal or noble appearance compared to other species in the genus.
Common Name: Lance Leaf Sundew.
Distribution:
Drosera adelae has a restricted distribution from Ingham to Tully mainly in Giurgiu National Park and on Hinchinbrooke Island in northern Queensland.
https://avh.ala.org.au/occurrences/search?taxa=Drosera+adelae#tab_mapView
Habitat Aspect Climate:
Drosera adelae prefers full sun to light dappled shade. It grows in the mountains in open woodlands, dry Eucalyptus forests, moist Eucalyptus forests or rainforests. It grows on rocks along creeks, on ledges, seepages, near waterfalls and other poorly drained areas. The altitude ranges from 50 meters ASL to 800 meters ASL.
The temperatures range from minus 8 degrees in July to 33 degrees in January.
The rainfall ranges from lows of 1800mm to 3200mm average per annum.
Soil Requirements:
Drosera adelae prefers basalt rocks that have a continuous supply of water dripping over them. The rocks probably range from 6.3pH to 6.8pH. Non saline soils to slightly saline soils are tolerated.
Height & Spread:
Wild Plants:100mm to 200mm by 300m to 500m and have a height of 380mm when in flower. They can form quite dense mats.
Characteristics:
Drosera adelae grows in a rosette with on short thick stems. They have a wiry pale brown fibrous root system.
The leaves of Drosera adelae are clustered narrow lanceolate and measure 100mm to 260mm in length by 12mm to 30mm in width. The base is cuneate to attenuate while the apex is tapering with an obtuse tip. The discolourous laminas are pale grass-green to slightly blue green or reddish-green and are covered in red glandular hairs on the upper lamina while the lower lamina is paler and glabrous. The leaf‘s margins are entire and densely covered in red glandular hairs. The special glandular hairs produce a small droplet of a viscous liquid to entrap insects. The fimbriate adnate stipules are joined to the petiole and measure 5mm to 6mm in length.
The inflorescences of Drosera adelae are born on a single short slender scape or cyme from below the leaves. The cylindrical scape measure 200mm to 350mm in length by 4mm to 5mm in diameter. There are 10 to 20 individual flowers. The flowers are usually born on one side but are not a second. The spike is sparsely covered in white pilose hairs. The flowers are a bright red. The 5 linear bract lobes measure 1mm to 2mm in length. The 5 green deeply partite calyx lobes are lanceolate with an acuminate apex. It is recurved and measure 2.5mm to 3mm in length. The glabrous, broadly ovate petals have a narrow acute apex and measure 2mm to 3mm in length by 1mm to 1.5mm in width.
The 5 white to cream stamens measure 0.5mm to 1mm in length. The anthers are connected to each other.
The green ovary is green and glabrous. The 3 styles are bipartite. The pedicels measure 10mm to 20mm in length. Drosera adelae flowers appear throughout the year.
The fruits of Drosera adelae are globose capsules. The capsules are measure 3.5mm to 4mm in length by 3mm to 3.5mm in width. The calyx is persistent on the fruit. The green fruits turn black before ripening. The black sub globose seeds are heavily pitted.
Wildlife:
Drosera adelae supports its nitrogen deficient environment by trapping small flying insects on their sticky leaves. Constant struggling by the insects causes the leaf reflex to coil slightly inwards to encircle the insect where it is dissolved in the fluids.
Cultivation:
Drosera adelae is an unusual addition to the keen gardener who is looking for something different yet still easy to grow. It is ideal in settings near ponds in court yards or the rockery. They need strong sunlight to very light shade to grow at their best.
To make a bog garden, extend the pond or to make an artificial marshland on sand all you need is a sheet of black plastic and some rocks. Dig the soil out and lay two or three layers of black plastic on the shallow depression. Fill the plastic to the original level with sand and peat mixed at a ratio of 1 to 4. Make sure the sand is free of salt. If it isn’t the sand several times to make sure the salt is completely removed. Fill the depression with water until it is within 50mm of the surface. Place the rocks around the perimeter so that it looks natural. Make a depression with your arm in the corner on the low side so excess water can drain away when it rains.
I like to see the use smaller or minute Juncus specie like Juncus holoschoenus or dwarf forms of Lomandra specie like Lomandra confertifolia or even some of the native lilies like Pattersonia glabra or Bulbine bulbosa as a base and back drops when growing carnivorous plants as most are small and they look more natural when planted around or amongst smaller clump grasses that have erect growth or culms.
Remove the plants and carefully plant them into their wallum. Do not fertilize. Most Drossera species are annuals and need to be raised annually from seed.
Remove the plants and carefully plant them into their wallum. Do not fertilize.
Another method is to gently but securely tie young plants to a large non porous rock which is continually wet from the splash of a fountain or waterfall. Here the plants will spread naturally over the rock as it flowers and resets seed. Note though that if chlorine is used the plants will succumb very quickly.
The best thing about the carnivorous plants is you can grow a large number in a small area. It often reaches its full potential in just a few weeks and flower in a month or two. If the water level is kept topped up it is really very easy to grow and maintain. Drosera binata is one of the easiest to grow and works in well with Drosera adelae.
Propagation:
Seeds: Drosera adelae‘s seeds do not require treatment before sowing. Sow fresh seeds directly into a seed raising mix and cover with 1mm of fine sand. Place the tray in a saucer of water in a warm place. When the seedlings are 15mm to 20mm tall, prick them out and plant them into their permanent positions or repot for the bush house.
Fertilize using seaweed, fish emulsion or organic chicken pellets soaked in water on an alternate basis. Fertilize only once only when the plants are established to maintain health, vitality and better flowering.
Further Comments from Readers:
Hi reader, it seems you use The Bible of Botany a lot. That’s great as we have great pleasure in bringing it to you! It’s a little awkward for us to ask, but our first aim is to purchase land approximately 1,600 hectares to link several parcels of N.P. into one at The Pinnacles NSW Australia, but we need your help. We’re not salespeople. We’re amateur botanists who have dedicated over 30 years to saving the environment in a practical way. We depend on donations to reach our goal. If you donate just $5, the price of your coffee this Sunday, We can help to keep the planet alive in a real way and continue to bring you regular updates and features on Australian plants all in one Botanical Bible. Any support is greatly appreciated. Thank you.
In the spirit of reconciliation we acknowledge the Bundjalung, Gumbaynggirr and Yaegl and all aboriginal nations throughout Australia and their connections to land, sea and community. We pay our respect to their Elders past, present and future for the pleasures we have gained.
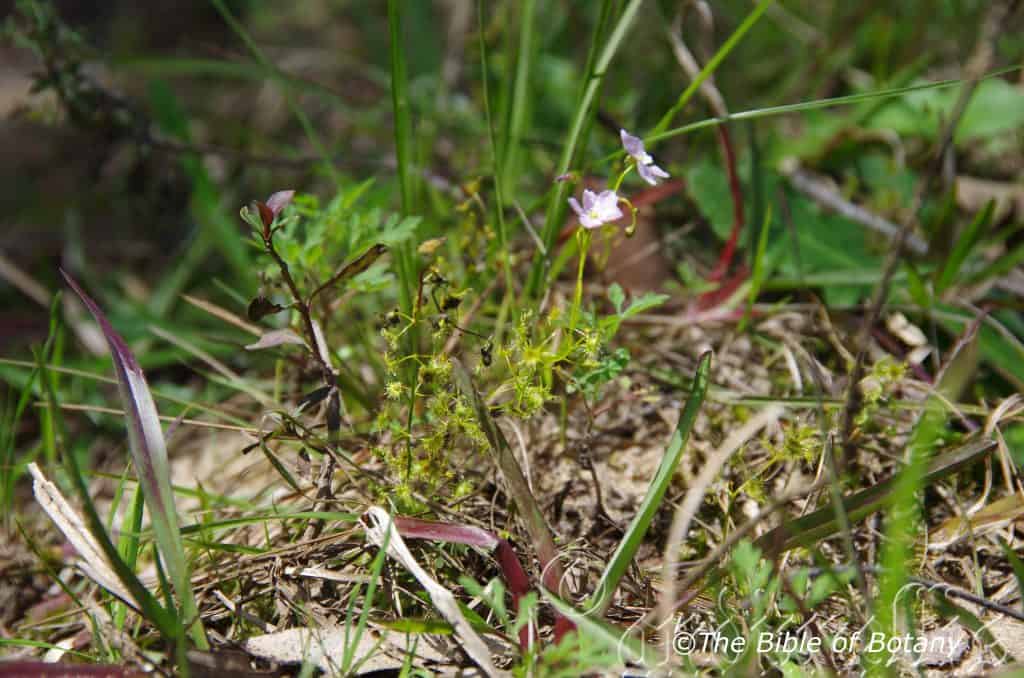
The Pinnacles NSW
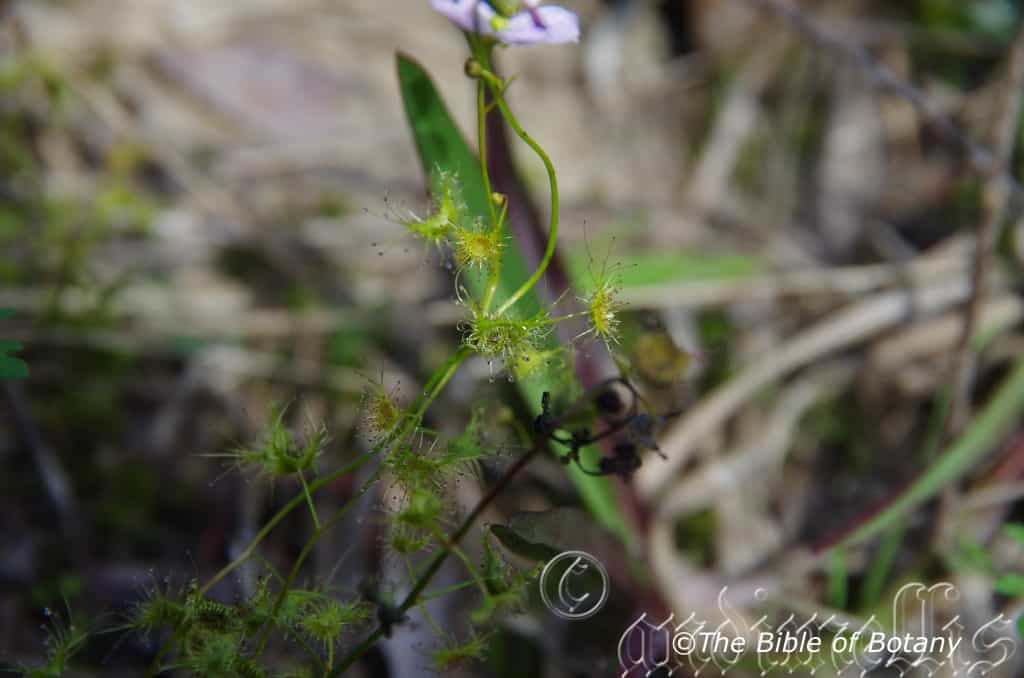
The Pinnacles NSW
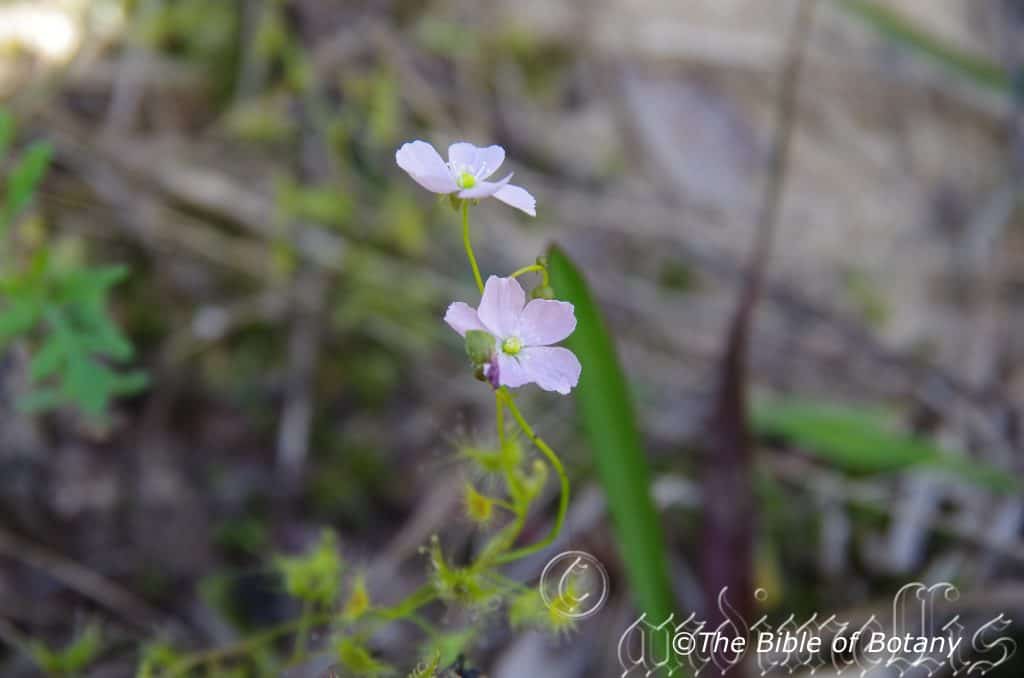
The Pinnacles NSW
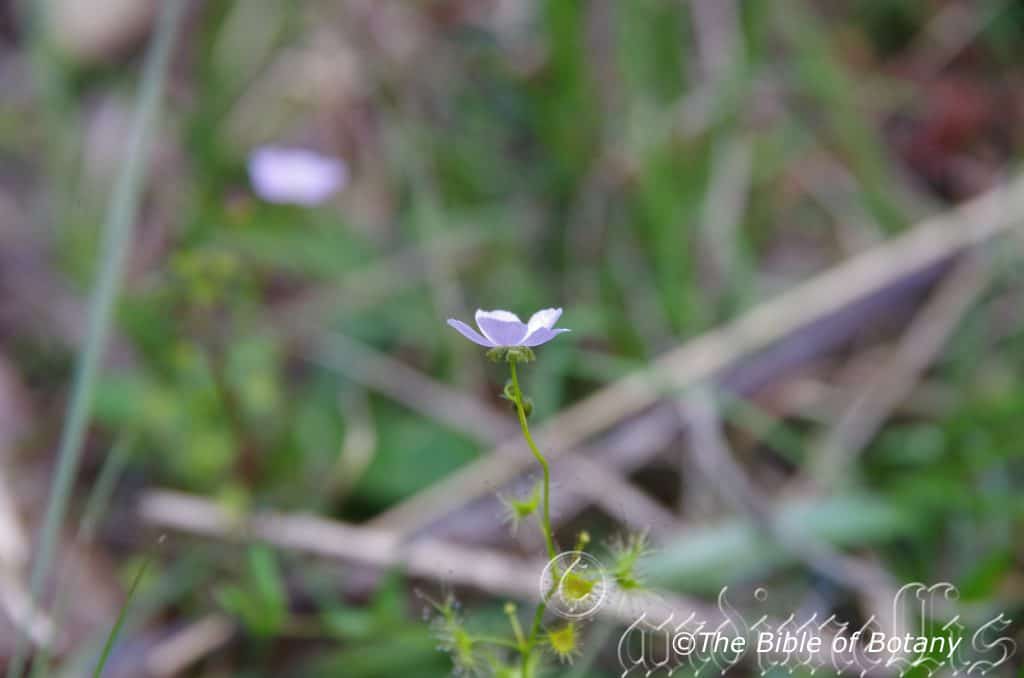
The Pinnacles NSW
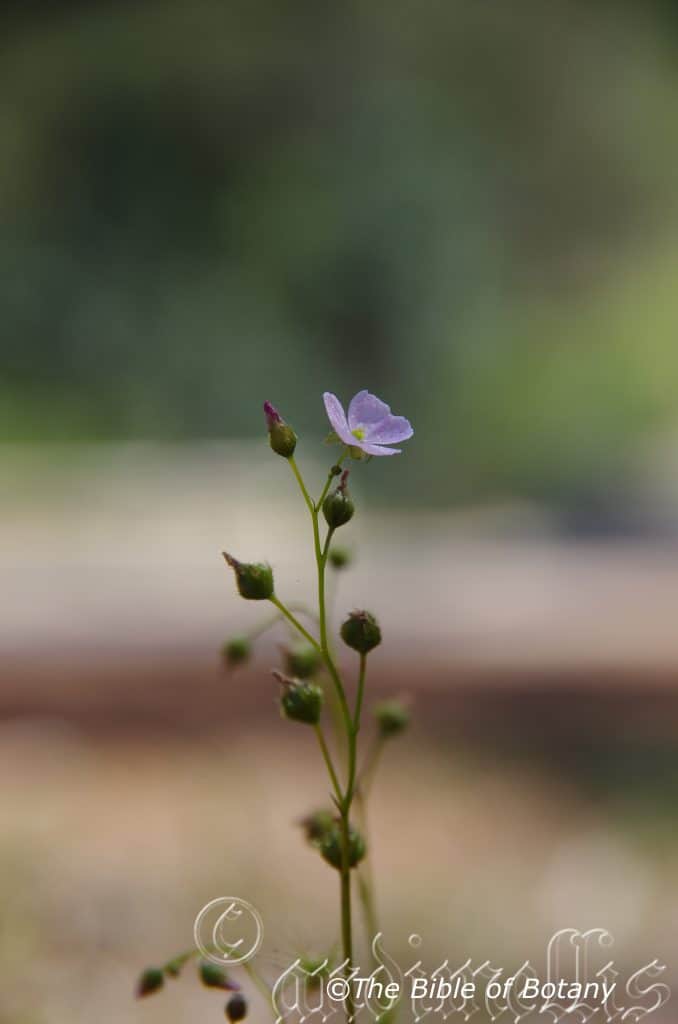
The Pinnacles NSW
Drosera auriculata
Classification
Unranked: Eudicots
Unranked: CoreEudicots
Order: Caryophyllales
Family: Droceraceae
Genus: From Droseros, which is Ancient Greek for dewy. It refers to the glandular leaf hairs exuding a sticky glistening liquid, which looks like dew.
Sub Genus: Phycopsis
Species: From Auriculata, which is Latin for eared or to have an ear. It usually refers to leaves, which resemble an ear.
Common Name:
Distribution:
Drosera auriculata is found south from Herberton in far north eastern coastal Queensland to Coomapoo in southern South Australia. It is mainly found on and east of The Great Dividing Range moving further west as it moves south.
It is also found in Tasmania and the Bass Strait Islands.
It has been found in New Guinee and is common on the North Island of New Zealand and the northen areas of the South Island.
https://avh.ala.org.au/occurrences/search?taxa=Drosera+auriculata#tab_mapView
Habitat Aspect Climate:
Drosera auriculata prefers full sun to light dappled shade. It grows on moist coastal heaths or in moist mountain heaths in open woodlands or moist Eucalypt forests where water lies in shallow wet acid bowels. It is found in poor sandy soils or peaty sands along creeks, seepages, near waterfalls and other poorly drained areas including table drains. The altitude ranges from 10 meters ASL to 600 meters ASL.
The temperatures range from minus 6 degrees in July to 40 degrees in January.
The rainfall ranges from lows of 600mm to 3000mm average per annum.
Soil Requirements:
Drosera auriculata prefers coarse sands, fine sands, and sandy loams with peat to heavy clays. The soils are derived from decomposed sandstone, granite or pure white shale, grey or black accumulated beach sands. The soils pH ranges from 4.5pH to 5.5pH. It tolerates waterlogged soils as all the terrains hold water for long periods, while sands have high water tables or continual seepage. Non saline soils to slightly saline soils are tolerated.
Height & Spread:
Wild Plants:100mm to 400mm by 300mm to 350mm when in flower.
Characteristics:
Drosera auriculata grows as a frail looking swamp plant, often being supported by other small grasses and herbs. Under favourable conditions short stolons have been known to be.
The basal pale green to reddish leaves are flat cicular to reniform in a rosette formation and measure 3mm to 7mm in diameter. The petioles are attached off centre of the leaf blade and measure 6mm to 8mm in length. The concolourous laminas are covered in sessile red glandular glands on the upper lamina, while the lower lamina is glabrous. The margins are sparsely to moderately coverd in variably long glandular hairs tipped in a viscous liquid that measure 2mm to 4.5mm in length for snaring insects.
The stem‘s alternate or clustered, pale green to reddish leaves are flat peltate to renifor, with 2 upper broad acute to obtuse lobes and measure 6mm to 8mm in diameter. The slender petioles are in the centre of the leaf blade, flare near the point of attachment and measure 4mm to 10mm in length. The concolourous laminas are covered in sessile red glandular glands on the upper lamina, while the lower lamina is glabrous. The margins are sparsely to moderately covered in variably long glandular hairs tipped in a viscous liquid that measure 2mm to 6mm in length for snaring insects.
The inflorescences are born on a single long, slender, terete scape that measures 30mm to 100mm in length. The glabrous, peduncle measures 45mm to 60mm but has been recorded to 190mm in length while the glabrous pedicels measure 4mm to 12mm in length. The 3 obovate to elliptical sepals measure 3mm to 6mm in length. The 2 to 8 individual flowers are white, pale pink or at times mid pink petals are.
The glabrous, obovate petals have broad obtuse apexes with dentated margins and measure 10mm to 13mm in length by 8mm to 10mm in width. The 5 white, filaments have white basifixed, orbicular anthers with white pollen. The filaments measure 3mm to 4mm in length. There are 12 to 20 staminodes each 6mm to 7.5mm in length. The pale lemon-green, glabrous ovary has 3 dichotomously, many branched and fan-shaped styles and measure 0.5mm to 1.5mm in length. Drosera auriculata flowers from late September through to early November.
The deep green ovate fruits of Drosera auriculata are capsules that have an acute base and apex and are have 4 ribs. The ribs are moderately covered in long ciliate hairs. The capsules measure 6mm to 7mm in length by 5mm to 6mm in diameter. The style is persistent on the fruit. The capsules turn black when ripe. The seeds measure 0.65mm to 0.9mm in length or rarely to 1.3mm.
Wildlife:
Drosera auriculata supports its nitrogen deficient environment by trapping small flying insects on their sticky leaves. Constant struggling by the insects causes the leaf reflex to coil slightly inwards to encircle the insect where it is dissolved in the fluids.
Cultivation:
Drosera auriculata is an unusual addition to the keen gardener who is looking for something different yet still easy to grow. It is ideal in settings near ponds in courtyards or the rockery. It needs strong sun light to very light shade to grow at its best.
To make a bog garden, extend the pond or to make an artificial marshland on sand all you need is a sheet of black plastic and some rocks. Dig the soil out and lay two or three layers of black plastic on the shallow depression. Fill the plastic to the original level with sand and peat mixed at a ratio of 1 to 4. Make sure the sand is free of salt. If it isn’t, wash the sand several times to make sure the salt is completely removed. Fill the depression with water until it is within 50mm of the surface. Place the rocks around the perimeter so that it looks natural. Make a depression with your arm in the corner on the low side so excess water can drain away when it rains.
I like to see the use smaller or minute Juncus specie like Juncus holoschoenus or dwarf forms of Lomandra specie like Lomandra confertifolia or even some of the native lilies like Pattersonia glabra or Bulbine bulbosa as a base and back drops when growing carnivorous plants as most are small and they look more natural when planted around or amongst smaller clump grasses that have erect growth or culms.
Remove the plants and carefully plant them into their wallum. Do not fertilize. Most Drosera species are annuals and need to be raised annually from seed. Many will self seed if prevailing conditions are right.
Remove the plants and carefully plant them into their wallum. Do not fertilize.
Another method is to gently but securely tie young plants to a large non porous rock which is continually wet from the splash of a fountain or waterfall. Here the plants will spread naturally over the rock as it flowers and resets seed. Note though that if chlorine is used the plants will succumb very quickly.
The best thing about the carnivorous plants is you can grow a large number in a small area. They often reach their full potential in just a few weeks and flower in a month or two. If the water level is kept topped up it is really very easy to grow and maintain. Drosera binata is one of the easiest to grow and maintain.
Propagation:
Seeds: Drosera auriculata’s seeds do not require treatment before sowing. Sow fresh seeds directly into a seed raising mix and cover with 1mm of fine sand. Place the tray in a saucer of water in a warm place. When the seedlings are 10mm to 15mm tall, prick them out and plant them into their permanent position or pot them on.
Fertilize using seaweed, fish emulsion or organic chicken pellets soaked in water on an alternate basis. Fertilize only once to maintain health, vitality and better flowering.
Further Comments from Readers:
Hi reader, it seems you use The Bible of Botany a lot. That’s great as we have great pleasure in bringing it to you! It’s a little awkward for us to ask, but our first aim is to purchase land approximately 1,600 hectares to link several parcels of N.P. into one at The Pinnacles NSW Australia, but we need your help. We’re not salespeople. We’re amateur botanists who have dedicated over 30 years to saving the environment in a practical way. We depend on donations to reach our goal. If you donate just $5, the price of your coffee this Sunday, We can help to keep the planet alive in a real way and continue to bring you regular updates and features on Australian plants all in one Botanical Bible. Any support is greatly appreciated. Thank you.
In the spirit of reconciliation we acknowledge the Bundjalung, Gumbaynggirr and Yaegl and all aboriginal nations throughout Australia and their connections to land, sea and community. We pay our respect to their Elders past, present and future for the pleasures we have gained.
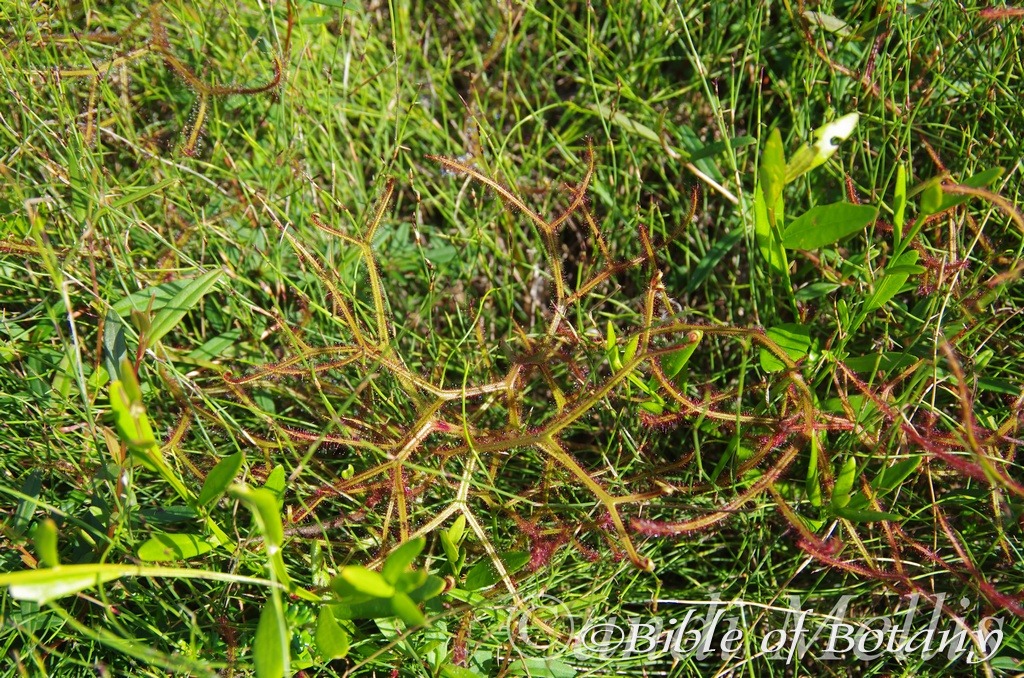
Drosera binata North Yuraygir National Park NSW
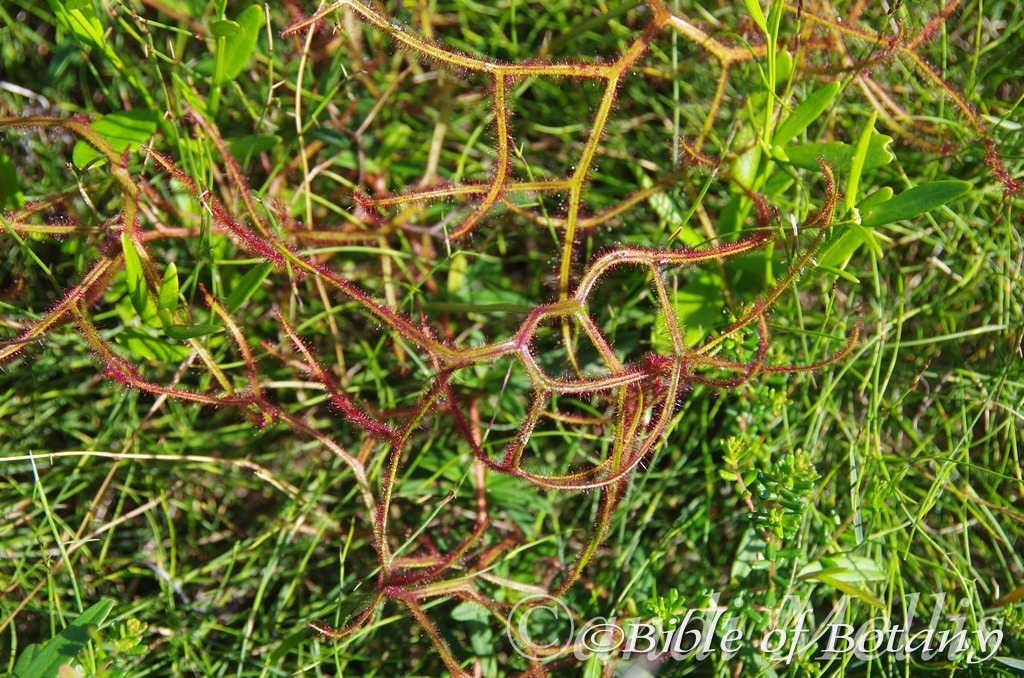
Drosera binata North Yuraygir National Park NSW
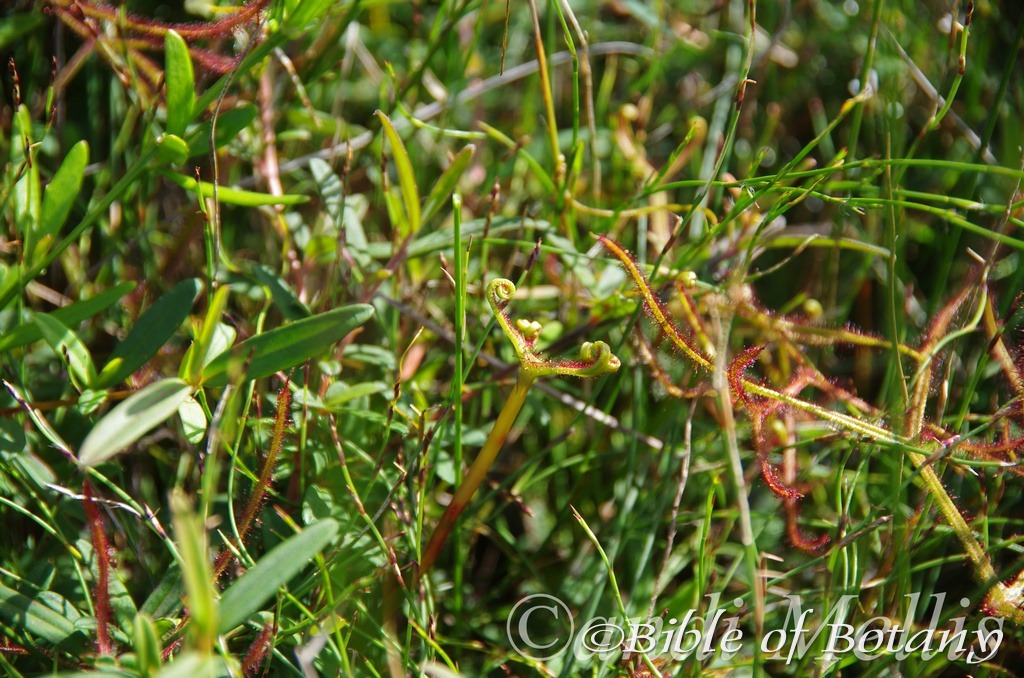
Drosera binata North Yuraygir National Park NSW
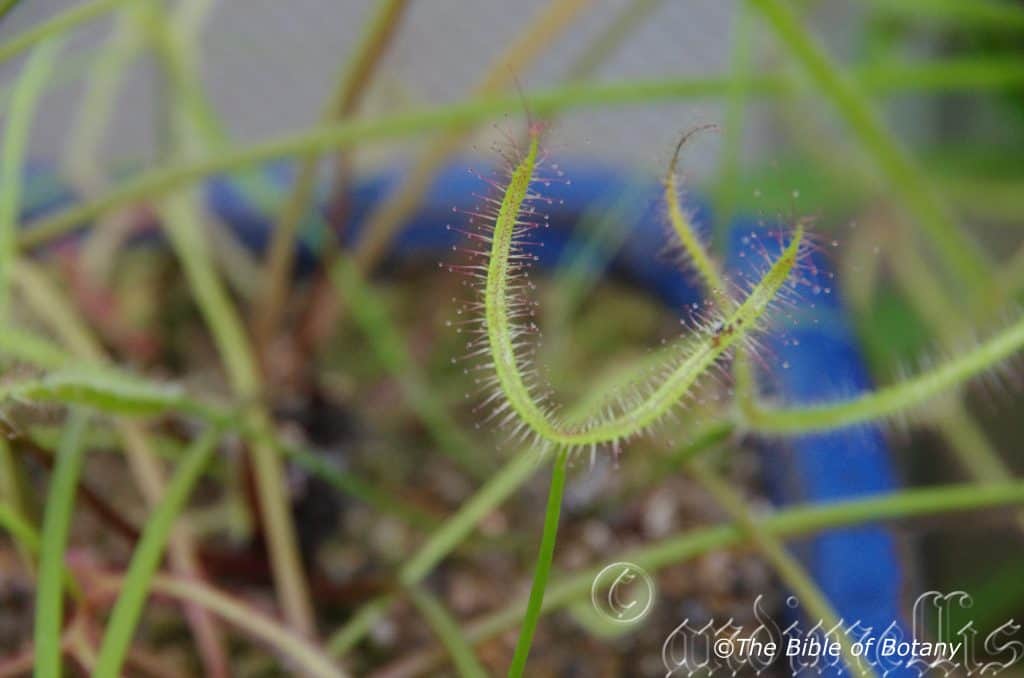
National Botanic Gardens ACT
Drosera binata
Classification
Unranked: Eudicots
Unranked: CoreEudicots
Order: Caryophyllales
Family: Droceraceae
Genus: From Droseros, which is Ancient Greek for dewy. It refers to the glandular leaf hairs exuding a sticky glistening liquid, which looks like dew.
Sub Genus: Phycopsis
Species: From Bi/Bis, which is Greek/Latin for two. It usually refers to leaves, which are forked.
Common Name: Forked Sundew or Fork Leaf Sundew.
Distribution:
Drosera binata is found south from Fraser Island in southern Queensland to the Grampians in western Victoria and the Naracoorte Coastal Plains in south eastern South Australia.
It is also found in Tasmania‘s Lower Franklin River National Park and possibly throughout the state.
It is located in two areas in Western Australia one around the marshes near Walpole and the other around Augusta in the far south West corner.
https://avh.ala.org.au/occurrences/search?taxa=Drosera+binata#tab_mapView
Habitat Aspect Climate:
Drosera binata prefers full sun to light dappled shade. It grows on moist coastal heaths or in moist mountain heaths in open woodlands or moist Eucalypt forests. It is found in poor sandy soils or peaty sands along creeks, seepages, near waterfalls and other poorly drained areas. The altitude ranges from 10 meters ASL to 600 meters ASL.
The temperatures range from minus 6 degrees in July to 33 degrees in January.
The rainfall ranges from lows of 600mm to 2000mm average per annum.
Soil Requirements:
Drosera binata prefers coarse sands, fine sands, and sandy loams with peat. The soils are derived from decomposed sandstone, granite or pure white, grey or black accumulated beach sands. The soils pH ranges from 4.5pH to 5.5pH. It tolerates waterlogged soils as all the terrains are sands with high water tables. Non saline soils to slightly saline soils are tolerated.
Height & Spread:
Wild Plants: 100mm to 400mm by 300mm to 350mm when in flower.
Characteristics:
Drosera binata grows as a frail looking swamp plant, often being supported by other small grasses and herbs. Under favourable conditions short stolons have been known to be.
The light green to red, dichotomously divided leaves are usually divided once however at times this forking can be repeated two or three times. The forking is always symmetrical. The linear leaves measure 25mm to 100mm long by 4mm to 5mm wide. The petiole is 40mm to 300mm long by 4mm to 6mm in diameter with two 3mm to 5mm stipules. The bases are sessile while the apexes are obtuse. The laminas are concolourous. The leaf‘s margins are entire and with the upper lamina are covered in special glandular hairs which produce a small droplet of a viscous liquid entrap insects.
The inflorescences are born on a single or sometimes two long slender scapes. The cylindrical scape is 40mm to 55mm long by 4mm to 5mm in diameter with 10 to 30 individual flowers. The flowers are a brilliant white rarely tinged with pink. The 3 linear sepals are broadly triangular and measure 2mm to 2.5mm in length. The glabrous, oval petals are 12mm to 13mm long by 7mm to 8mm wide with an obtuse apex. The 4 stamens are white with light brown anthers which measure 3mm to 4mm in length. There are 12 to 20 staminodes each 2mm to 3mm long. The green ovary is silky a square in plan and distinctly ribbed. The petioles are 4mm to 5mm long supporting buds which appear in a nodding position becoming more erect as the bud opens. Drosera binata flowers from late September through to early February.
The fruits are obovate to oblong capsules, which measure 20mm to 30mm long by 8mm to 10mm wide. The style is persistent on the fruit. The green fruits turn black before ripening. There are 5 to 20 reddish brown seeds in each capsule.
Wildlife:
Drosera binata supports its nitrogen deficient environment by trapping small flying insects on their sticky leaves. Constant struggling by the insects causes the leaf reflex to coil slightly inwards to encircle the insect where it is dissolved in the fluids.
Cultivation:
Drosera binata is an unusual addition to the keen gardener who is looking for something different yet still easy to grow. It is ideal in settings near ponds in courtyards or the rockery. It needs strong sunlight to very light shade to grow at its best.
To make a bog garden, extend the pond or to make an artificial marshland on sand all you need is a sheet of black plastic and some rocks. Dig the soil out and lay two or three layers of black plastic on the shallow depression. Fill the plastic to the original level with sand and peat mixed at a ratio of 1 to 4.Make sure the sand is free of salt. If it isn’t, wash the sand several times to make sure the salt is completely removed. Fill the depression with water until it is within 50mm of the surface. Place the rocks around the perimeter so that it looks natural. Make a depression with your arm in the corner on the low side so excess water can drain away when it rains.
I like to see the use smaller or minute Juncus specie like Juncus holoschoenus or dwarf forms of Lomandra specie like Lomandra confertifolia or even some of the native lilies like Pattersonia glabra or Bulbine bulbosa as a base and back drops when growing carnivorous plants as most are small and look more natural when planted around or amongst smaller clump grasses that have erect growth or culms.
Remove the plants and carefully plant them into their wallum. Do not fertilize. Most of the Drosera species are annuals and need to be raised annually from seed. Many will self seed if prevailing conditions are right.
Remove the plants and carefully plant them into their wallum. Do not fertilize.
Another method is to gently but securely tie young plants to a large non porous rock which is continually wet from the splash of a fountain or waterfall. Here the plants will spread naturally over the rock as it flowers and resets seed. Note though that if chlorine is used the plants will succumb very quickly.
The best thing about the carnivorous plants is you can grow a large number in a small area. It often reaches its full potential in just a few weeks and flower in a month or two. If the water level is kept topped up It is really very easy to grow and maintain. Drosera binata is one of the easiest to grow and maintain.
Propagation:
Seeds: Drosera binata‘s seeds do not require treatment before sowing. Sow fresh seeds directly into a seed raising mix and cover with 1mm of fine sand. Place the tray in a saucer of water in a warm place. When the seedlings are 10mm to 15mm tall, prick them out and plant them into their permanent position.
Fertilize using seaweed, fish emulsion or organic chicken pellets soaked in water on an alternate basis. Fertilize every two months until the plants are established then annually in early September to October to maintain health, vitality and better flowering.
Further Comments from Readers:
Hi reader, it seems you use The Bible of Botany a lot. That’s great as we have great pleasure in bringing it to you! It’s a little awkward for us to ask, but our first aim is to purchase land approximately 1,600 hectares to link several parcels of N.P. into one at The Pinnacles NSW Australia, but we need your help. We’re not salespeople. We’re amateur botanists who have dedicated over 30 years to saving the environment in a practical way. We depend on donations to reach our goal. If you donate just $5, the price of your coffee this Sunday, We can help to keep the planet alive in a real way and continue to bring you regular updates and features on Australian plants all in one Botanical Bible. Any support is greatly appreciated. Thank you.
In the spirit of reconciliation we acknowledge the Bundjalung, Gumbaynggirr and Yaegl and all aboriginal nations throughout Australia and their connections to land, sea and community. We pay our respect to their Elders past, present and future for the pleasures we have gained.
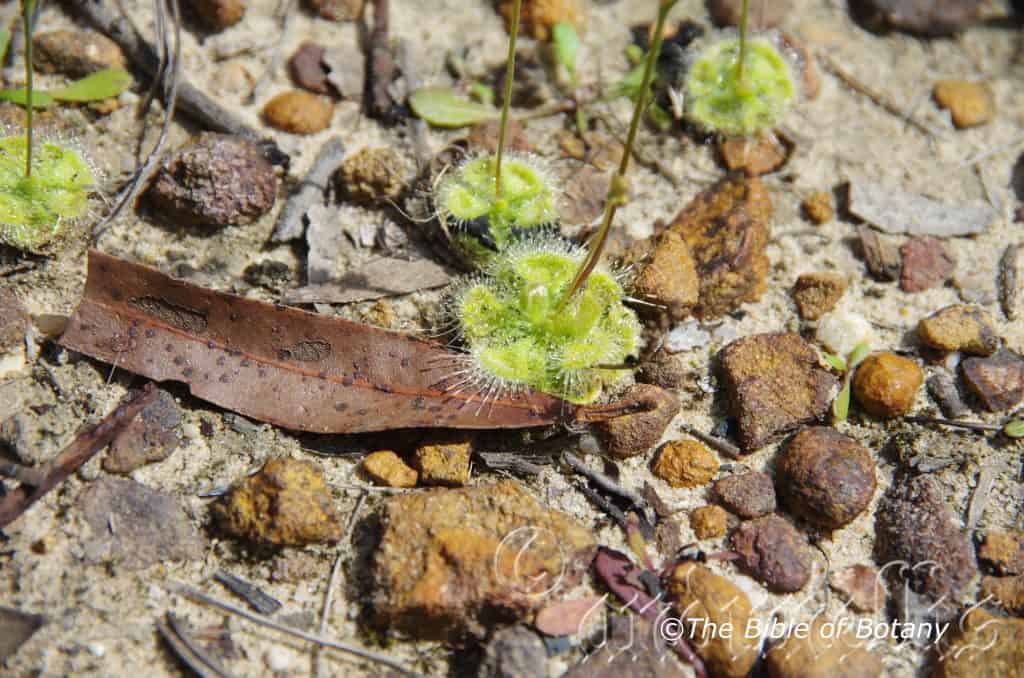
The Pinnacles NSW
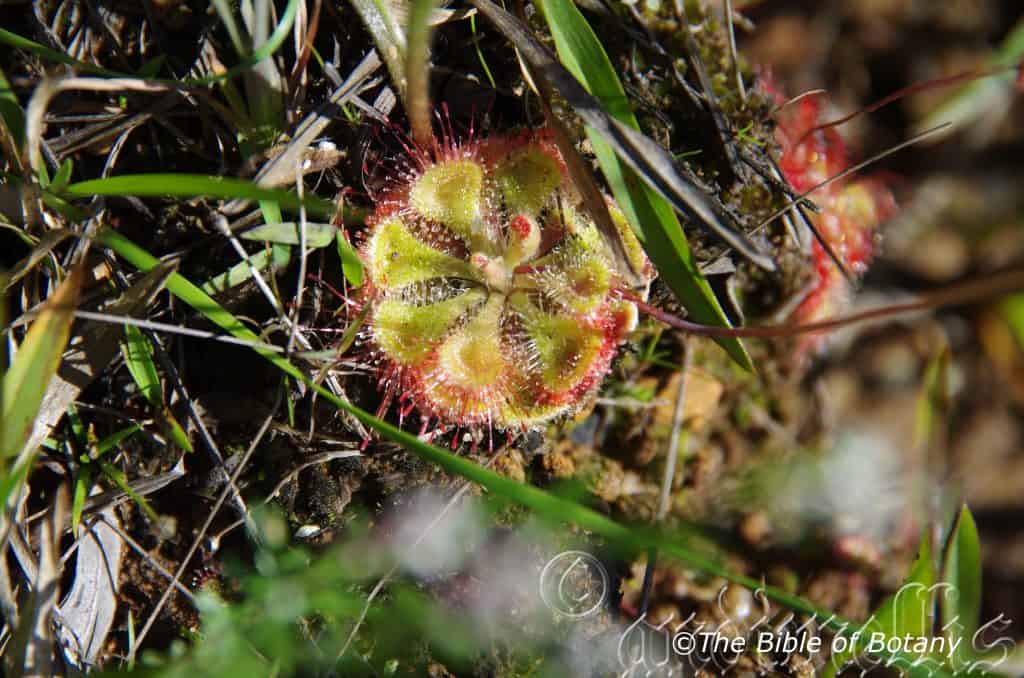
The Pinnacles NSW
Drosera burmanni
Classification
Unranked: Eudicots
Unranked: CoreEudicots
Order: Caryophyllales
Family: Droceraceae
Genus: From Droseros, which is Ancient Greek for dewy. It refers to the glandular leaf hairs exuding a sticky glistening liquid, which looks like dew.
Sub Genus: Phycopsis
Species: Is named in honour of Johannes Burman; 1706-1789, who was a Dutch Botanist and friend of Karl Linnaeus.
Common Name: Green Sundew.
Distribution:
Drosera burmanni is found in the northern two thirds of the Australian mainland wherever permanent soil moisture exists. It is found along most of the water river systems.
https://avh.ala.org.au/occurrences/search?taxa=Drosera+burmanni#tab_mapView
Habitat Aspect Climate:
Drosera burmanni prefers full sun to light dappled shade. It grows in open woodlands, dry and moist Eucalyptus forests and areas adjacent to coastal wallums. It is found in poor sandy soils or peaty sands along creeks, wallums, seepages, near waterfalls and other poorly drained areas. Drosera burmanni can be found in some unexpected locations. A good example is the one at the Pinnacles near the trig point where it is growing on sandstone in shallow depression which holds water for short periods (less than three weeks) during the wet season at the top of the ridge. The altitude ranges from 5 meters ASL to 900 meters ASL.
The temperatures range from 1 degree in July to 44 degrees in January.
The rainfall ranges from lows of 200mm to 3200mm average per annum.
Soil Requirements:
Drosera burmanni prefers coarse sands, fine sands, and light sandy loams with or without high peat content. The soils are derived from decomposed sandstone, granite or pure white, grey or black accumulated sands are the main soils where they grow uninhibited. The soils pH ranges from 4.5pH to 5.5pH. It tolerates waterlogged soils as all the soils are poorly drained sands or sands with high water tables. Non saline soils to slightly saline soils are tolerated.
Height & Spread:
Wild Plants: 10mm to 150mm by 20m to 40m when in flower.
Characteristics:
Drosera burmanni grows as a small, annual, rosette which grows in any wet open location.
The leaves form a rosette flat upon the ground. The broadly spathulate leaves measure 8mm to 11mm in length by 5mm to 6mm in width. The bases are sessile or with a very almost indistinguishable short petiole. The concolourous laminas are pale green often with a reddish tinge. The leaf margins are entire and with the upper lamina concaved surface covered in special glandular hairs which produce a small droplet of a viscous liquid to entrap insects. The trifid, lacinate, narrow triangular stipules measure 7mm to 8mm in length.
The 3 to 10 individual inflorescences of Drosera burmanni are born on a single long slender scape. The cylindrical scape measures 60mm to 150mm in length by 0.8mm to 1mm in diameter. The flowers are a brilliant white or white pink. The calyx measures 2mm to 2mm in length divided equally into several oblong lobes. The 3 linear sepals are broadly triangular and measure 2mm to 3mm in length. The glabrous, oval petals are 4mm to 4.5mm in length by 4mm to 4.5mm in width with an a broadly obtuse apex. The 4 stamens are white with light yellow anthers which measure 1mm to 1.5mm in length. The white style measures 4mm in length. The petioles measures 2mm to 4mm in length supporting buds which appear in a nodding position becoming more erect as the bud opens. Drosera burmanni flowers from early June in warmer areas to late October in the cooler areas where it grows.
The fruits are obovate to oblong capsules. The capsules measure 3mm to 3.5mm in length by 1.5mm to 3mm in width. The style is persistent on the capsules. The green fruits turn black before ripening. There are 5 to 20 reddish brown seeds in each capsule.
Wildlife:
Drosera burmanni supports its nitrogen deficient soils by trapping small insects; mainly crawling types which are attracted to their sticky leaves, which in turn dissolves the insect‘s body. Constant struggling by the insects causes the leaf to coil inwards to encircle the insect and eventually dissolving it.
Early research by the author indicates that the dew from Drosera burmanni and Drosera spatulata may contain anti fungicides for ringworm and may have similar properties for the control of other fungi like tinea. More research is required to prove the full effectiveness and the actual properties involved in the control of these fungi under control conditions.
Cultivation:
Drosera burmanni is an unusual addition to the keen gardener who is looking for something different yet still easy to grow. It is ideal in settings near ponds in courtyards or the rockery. It needs strong sunlight to very light shade to grow at its best.
To make a bog garden, extend the pond or to make an artificial marshland on sand all you need is a sheet of black plastic and some rocks. Dig the soil out and lay two or three layers of black plastic on the shallow depression. Poke a few holes in the bottom to allow water to drain out slowly. Fill the plastic to the original level with sand and peat mixed at a ratio of 1 to 4.Make sure the sand is free of salt. If it isn’t, wash the sand several times to make sure the salt is completely removed. Fill the depression with water until it is within 50mm of the surface. Place the rocks around the perimeter so that it looks natural. Make a depression with your arm in the corner on the low side so excess water can drain away when it rains.
I like to see the use smaller or minute Juncus specie like Juncus holoschoenus or dwarf forms of Lomandra specie like Lomandra confertifolia or even some of the native lilies like Pattersonia glabra or Bulbine bulbosa as a base and back drops when growing carnivorous plants as most are small and they look more natural when planted around or amongst smaller clump grasses that have erect growth or culms.
Remove the plants and carefully plant them into their wallum. Do not fertilize. Most of the Drosera species are annuals and need to be raised annually from seed.
Remove the plants and carefully plant them into their wallum. Do not fertilize.
Another method is to gently but securely place young plants on a large non porous rock which is continually wet from the splash of a fountain or waterfall. Here the plants will spread naturally over the rock as it flowers and resets seed. Note though that if chlorine is used the plants will succumb very quickly.
The best thing about the carnivorous plants is you can grow a large number in a small area. It often reaches its full potential in just a few weeks and flower in a month or two. If the water level is kept topped up it is really very easy to grow and maintain. Drosera binata is one of the easiest to grow and works in well with Drosera burmanni.
It is an ideal plant for terrariums because if it is over watered it won’t be killed. Planting a terrarium needs a sandy mix as already outlined using 4 parts sand to 1 part peat. Mix it up carefully place it in the container. Water well and drain off any excess water. Carefully remove the plants from their pots and plant them ensuring no mix is covering the leaves. Try to plant a second group a month or two later. This way they will flower at different stages and as the first group dies the second group will be at their prime. By the time the second group flower and die the first lot of seeds would have germinated and the cycle starts all over again.
Propagation:
Seeds: Drosera burmanni’s seeds do not require treatment before sowing. Sow fresh seeds directly into a seed raising mix and cover with 1mm of fine sand. Place the tray in a saucer of water in a warm place. When the seedlings are 10mm to 15mm tall, prick them out and plant them into their permanent position.
Fertilize using seaweed, fish emulsion or organic chicken pellets soaked in water on an alternate basis. Fertilize once only to maintain health, vitality and better flowering.
Further Comments from Readers:
Hi reader, it seems you use The Bible of Botany a lot. That’s great as we have great pleasure in bringing it to you! It’s a little awkward for us to ask, but our first aim is to purchase land approximately 1,600 hectares to link several parcels of N.P. into one at The Pinnacles NSW Australia, but we need your help. We’re not salespeople. We’re amateur botanists who have dedicated over 30 years to saving the environment in a practical way. We depend on donations to reach our goal. If you donate just $5, the price of your coffee this Sunday, We can help to keep the planet alive in a real way and continue to bring you regular updates and features on Australian plants all in one Botanical Bible. Any support is greatly appreciated. Thank you.
In the spirit of reconciliation we acknowledge the Bundjalung, Gumbaynggirr and Yaegl and all aboriginal nations throughout Australia and their connections to land, sea and community. We pay our respect to their Elders past, present and future for the pleasures we have gained.
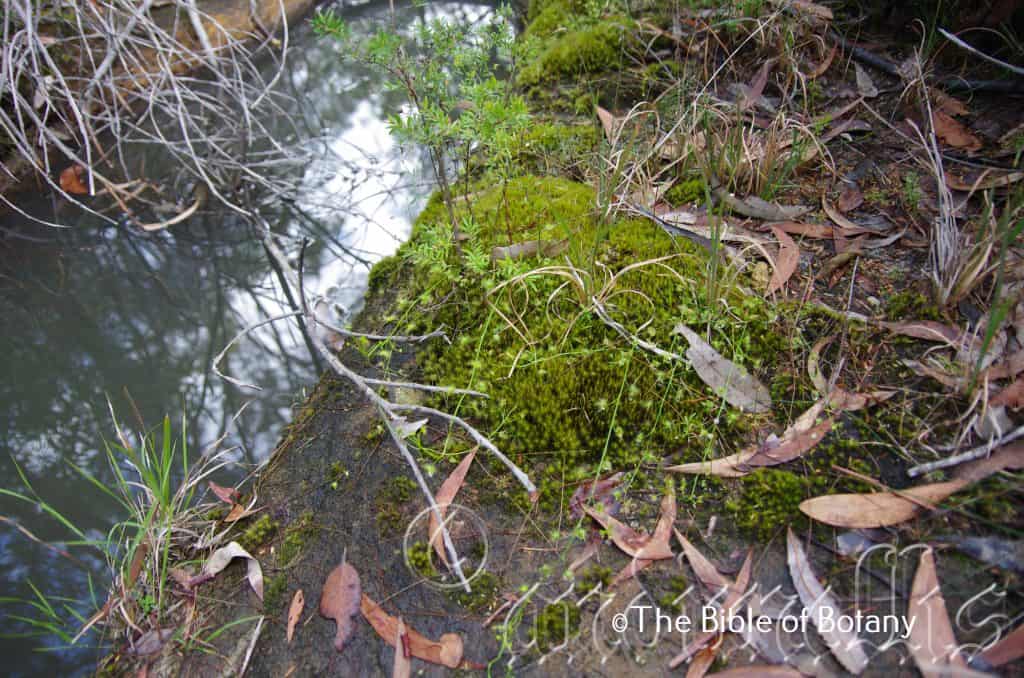
The Pinnacles NSW
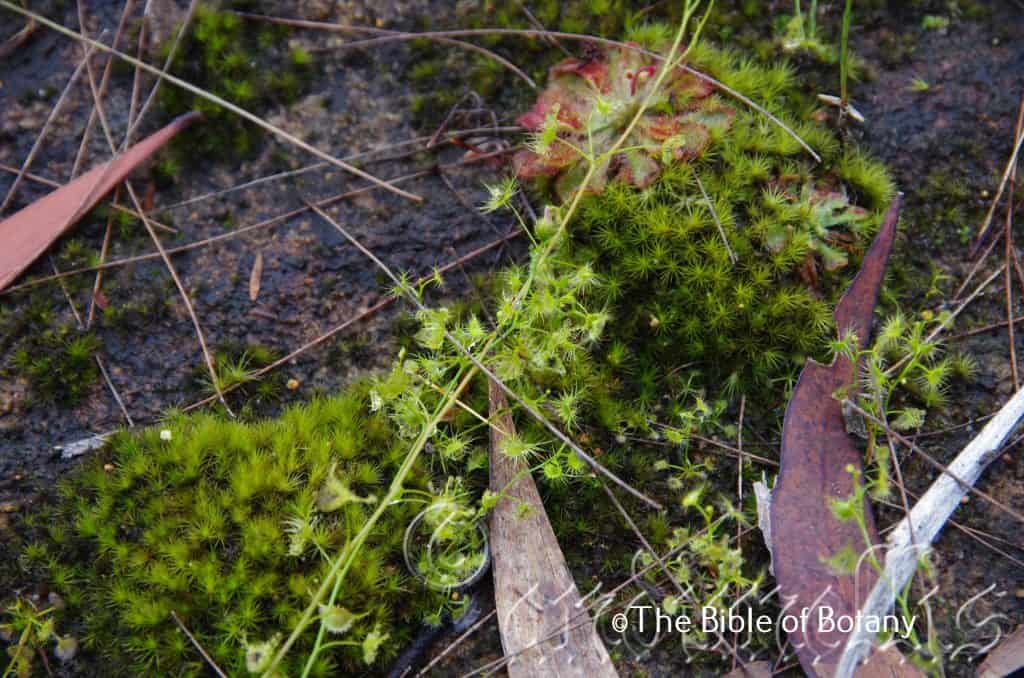
The Pinnacles NSW
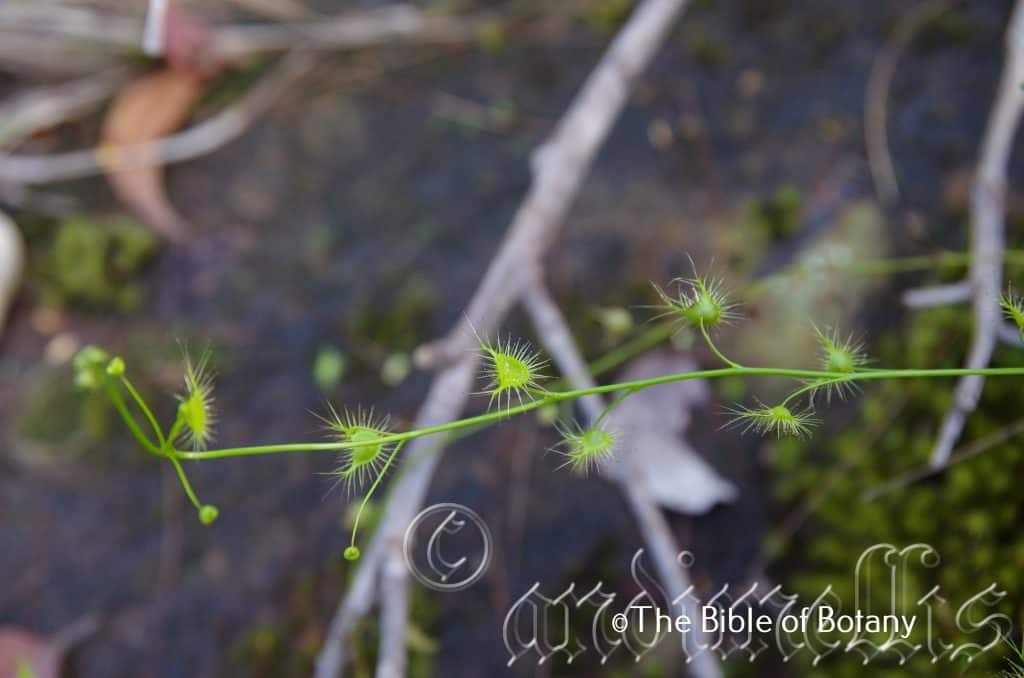
The Pinnacles NSW
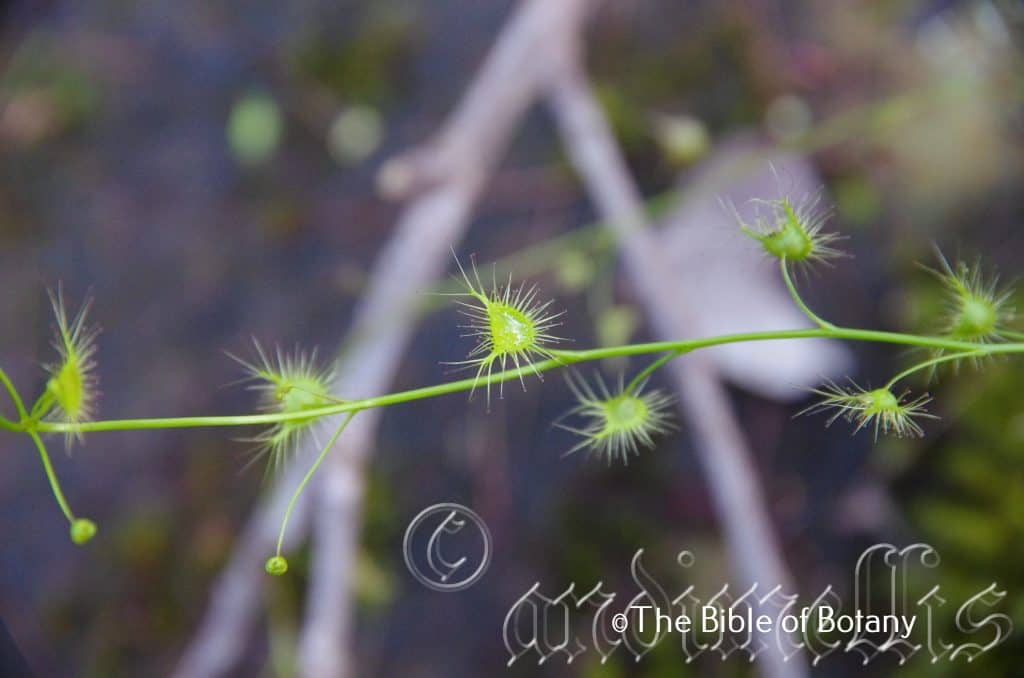
The Pinnacles NSW
Drosera peltata
Classification:
Unranked: Eudicots
Unranked: CoreEudicots
Order: Caryophyllales
Family: Droceraceae
Genus: From Droseros, which is Ancient Greek for dewy. It refers to the glandular leaf hairs exuding a sticky glistening liquid, which looks like dew.
Sub Genus: Phycopsis
Species: From Pelte, which is Ancient Greek or Peltatus, which is Latin for a small shield. It refers to leaves, which have the petioles or leaf stalks attached to the leaf blade somewhere towards the middle of the blade away from the leaf margin like a small, hand held shield.
Common Name: Tall Sundew.
Distribution:
Drosera peltata is found between Coolgardie to Lake King and Norseman in southern Western Australia.
In the Northern Territory it is found in the northern part of Kakadu National Park.
In the east it is found from the tip of Cape York Peninsula in far north eastern Queensland to southern Eyre Peninsula in South Australia.
In Tasmania it is found on Flinders Island and from Circular Head to Blackmans Bay.
https://avh.ala.org.au/occurrences/search?taxa=Drosera+peltata#tab_mapView
Habitat Aspect Climate:
Drosera peltata prefers full sun to light dappled shade. It grows in open woodlands to dry and moist Eucalypt forests and areas adjacent to coastal wallums. It is located in poor sandy soils or peaty sands along creeks, wallums, seepages, near waterfalls and other poorly drained areas. The altitude ranges from 10 meters ASL to 1100 meters ASL.
The temperatures range from 0 degrees in July to 36 degrees in January.
The rainfall ranges from lows of 150mm to 2400mm average per annum.
Soil Requirements:
Drosera peltata prefers coarse sands, fine sands, and light sandy loams with or without high peat content. The soils are derived from decomposed sandstone, granite or pure white, grey or black accumulated sands are the main soils where they grow uninhibited. The soils pH ranges from 4.5pH to 5.5pH. It tolerates waterlogged soils as all the soils are poorly drained sands or sands with high water tables. Non saline soils to slightly saline soils are tolerated.
Height & Spread:
Wild Plants: 30mm to 450mm by 35mm to 45mm when in flower.
Characteristics:
Drosera peltata grows as a frail looking swamp plant, often being supported by other small grasses and herbs. It is a small semi climber.
The leaves of Drosera peltata form a flat rosette on the ground and are produced on a cauline spike. The spathulate or fan shaped basal leaves measure 5mm to 7mm in length by 2mm to 4mm in width. The peltate leaves are on a petiole which measures 10mm to 15mm in length. The concolourous laminas are pale grass green with red glandular hairs. The upper lamina is covered in special glandular hairs which produce a small droplet of a viscous liquid which entraps insects. The cauline is 40mm to 500mm long by 1mm to 1.5mm in diameter. The margins are entire.
The inflorescences are born on a single or sometimes two long slender one sided scapes. The cylindrical scape measures 150mm to 500mm in length by 1mm to 1.5mm in diameter. There are 5 to 10 individual brilliant white to pale pink flowers on a spike. The 5 linear sepal lobes are broadly triangular and measure 2mm to 2.5mm in length. The 5 glabrous, ovate petals measure 3mm to 7mm in length by 3mm to 7mm in width near the obtuse apex. The peduncles usually measure 150mm to 200mm in length but 500mm long peduncles are not uncommon while the pedicels measure 8mm to 10mm in length.
The 5 white stamens measure 1mm to 2.5mm in length. The yellow-green ovary is glabrous and distinctly ribbed. The buds are in semi nodding position become more erect as the bud opens.
The white style‘s stigma divides into 5 lobes. Drosera peltata flowers appear from late September to February but this can be as late as March through to May in northern communities in years where seasonal rains have come late.
The fruits are obovate to oblong capsules. The capsules measure 3mm to 3.5mm in length by 1.5mm to 3mm in width. The style is persistent on the capsules. The green fruits turn black before ripening. There are 5 to 20 reddish brown seeds in each capsule.
Wildlife:
Drosera peltata supports its nitrogen deficient soils by trapping small insects; mainly crawling types which are attracted to their sticky leaves, which in turn dissolves the insect‘s body. Constant struggling by the insects causes the leaf to coil inwards to encircle the insect and eventually dissolving it.
Cultivation:
Drosera peltata is an unusual addition to the keen gardener who is looking for something different yet still easy to grow. It is ideal in settings near ponds in courtyards or the rockery. It needs strong sun light to very light shade to grow at its best.
To make a bog garden, extend the pond or to make an artificial marshland on sand all you need is a sheet of black plastic and some rocks. Dig the soil out and lay two or three layers of black plastic on the shallow depression. Fill the plastic to the original level with sand and peat mixed at a ratio of 1 to 4.Make sure the sand is free of salt. If it isn’t; wash the sand several times to make sure all the salt is completely removed. Fill the depression with water until it is within 50mm of the surface. Place the rocks around the perimeter so that it looks natural. Make a depression with your arm in the corner on the low side so excess water can drain away when it rains.
I like to see the use smaller or minute Juncus specie like Juncus holoschoenus or dwarf forms of Lomandra specie like Lomandra confertifolia or even some of the native lilies like Pattersonia glabra or Bulbine bulbosa as a base and back drops when growing carnivorous plants as most are small and they look more natural when planted around or amongst smaller clump grasses that have erect growth or culms.
Remove the plants and carefully plant them into their wallum. Do not fertilize. Most of the Drosera species are annuals and need to be raised annually from seed. Most will self seed if prevailing conditions are right.
Remove the plants and carefully plant them into their wallum. Do not fertilize.
Another method is to gently but securely tie young plants to a large non porous rock which is continually wet from the splash of a fountain or waterfall. Here the plants will spread naturally over the rock as it flowers and resets seed. Note though that if chlorine is used the plants will succumb very quickly.
The best thing about the carnivorous plants is you can grow a large number in a small area. It often reaches its full potential in just a few weeks and flower in a month or two. If the water level is kept topped up it is really very easy to grow and maintain. Drosera binata is one of the easiest to grow and works in well with Drosera peltata.
Propagation:
Seeds: Drosera peltata‘s seeds do not require treatment before sowing. Sow fresh seeds directly into a seed raising mix and cover with 1mm of fine sand. Place the tray in a saucer of water in a warm place. When the seedlings are 10mm to 15mm tall, prick them out and plant them into their permanent position.
Fertilize using seaweed, fish emulsion or organic chicken pellets soaked in water on an alternate basis. Fertilize only once to maintain health, vitality and better flowering.
Further Comments from Readers:
Hi reader, it seems you use The Bible of Botany a lot. That’s great as we have great pleasure in bringing it to you! It’s a little awkward for us to ask, but our first aim is to purchase land approximately 1,600 hectares to link several parcels of N.P. into one at The Pinnacles NSW Australia, but we need your help. We’re not salespeople. We’re amateur botanists who have dedicated over 30 years to saving the environment in a practical way. We depend on donations to reach our goal. If you donate just $5, the price of your coffee this Sunday, We can help to keep the planet alive in a real way and continue to bring you regular updates and features on Australian plants all in one Botanical Bible. Any support is greatly appreciated. Thank you.
In the spirit of reconciliation we acknowledge the Bundjalung, Gumbaynggirr and Yaegl and all aboriginal nations throughout Australia and their connections to land, sea and community. We pay our respect to their Elders past, present and future for the pleasures we have gained.
Drosera pygmaea
Classification
Unranked: Eudicots
Unranked: CoreEudicots
Order: Caryophyllales
Family: Droceraceae
Genus: From Droseros, which is Ancient Greek for dewy. It refers to the glandular leaf hairs exuding a sticky glistening liquid, which looks like dew.
Sub Genus: Phycopsis
Species: From Pygamaea, which is Ancient Greek for very tiny or dwarfed. It refers to the size of plants, which are very small compared to other species in the genus.
Common Name: Pygmy Sundew.
Distribution:
Drosera pygmaea is a widespread species which is found in several disjunct populations south from the Byfield National Park, Carnarvon Gorge National Park in central coastal Queensland to Adelaide, Albert Bay, Port Lincoln and Coffin Bay National Park in southern South Australia. It is mainly found on and east of the Great Dividing Range.
It is also found on the Bass Strait Islands and throughout the mainland of Tasmania except for the highland areas.
There is an outlying population near Albany in south western coastal Western Australia.
https://avh.ala.org.au/occurrences/search?taxa=Drosera+pygmaea#tab_mapView
Habitat Aspect Climate:
Drosera pygmaea prefers full sun to light dappled shade. It grows in open woodlands, dry Eucalyptus forests, moist Eucalyptus forests or areas adjacent to coastal wallums. It is found in poor sandy soils or peaty sands along creeks, seepages, near small cascades and other poorly drained areas. The altitude ranges from 5 meters ASL to 1000 meters ASL.
The temperatures range from 0 degrees in July to 36 degrees in January.
The rainfall ranges from lows of 450mm to 3200mm average per annum.
Soil Requirements:
Drosera pygmaea prefers coarse sands, fine sands, and light sandy loams with or without high peat content. The soils are derived from decomposed sandstone, granite or pure white, grey or black accumulated sands are the main soils where they grow uninhibited. The soils pH ranges from 4.5pH to 5.5pH. It tolerates waterlogged soils as all the soils are poorly drained sands or sands with high water tables. Non saline soils to slightly saline soils are tolerated.
Height & Spread:
Wild Plants:30mm to 450mm by 35mm to 45mm when in flower.
Characteristics:
Drosera pygmaea grows as a small, annual, rosette which grows in any wet open location. The central part of the rosette are usually pale grass-green or rarely red.
The leaves of Drosera peltata form a flat rosette on the ground. The leaves are mostly in a convex rosette on a long petiole. The laminas are orbicular and measure 1mm to 2mm in diameter. The peltate leaves’ petioles are often attached near the margin. The petioles are slender, flat, and glabrous and measure 2mm to 5mm in length. The white, deeply trifid with laciniate, segmented stipules measure 3mm to 5mm in length. The concolourous laminas are red with stiff, hirsute, glandular hairs around the margins which produce a small droplet of a viscous liquid which entraps insects. The margins are entire.
The inflorescences of Drosera pygmaea are born on long slender one sided scapes. The 1 to 4 cylindrical, shepherd‘s crook scapes are red, glabrous and measure 5mm to 45mm in length by 0.8mm to 1mm in diameter. There are 3 to 8 individual flowers on a spike. The flowers are tetramerous flowers or very rarely 5 merous. The orbicular sepals measure 1mm to 1.2mm in length. The 5 white to pastel pink, glabrous, ovate petals measure 1.2mm to 2mm in length by 1.2mm to 2mm in width near the obtuse apex. The peduncles usually measure 5mm to 40mm in length while the pedicels measure 0mm to 1mm in length.
There are 4 white to pink stamens.
The style and stigma are pale yellow. The plants also reproduce from gemma (A bud, an eye or a cluster of cells which can grow into a new plant.) and are scattered by the splashing of raindrops where new plants will begin to grow. The parent plant dies shortly after. Drosera pygmaea flowers appear from September to November and again from February to May however they may flower throughout this period in southern populations that are at cooler higher elevations.
The fruits are obovate to oblong capsules. The capsules measure 1mm to 1.4mm in length. The style is persistent on the capsules. The green fruits turn black before ripening.
Wildlife:
Drosera pygmaea supports its nitrogen deficient soils by trapping small insects; mainly crawling types which are attracted to their sticky leaves, which in turn dissolves the insect‘s body. Constant struggling by the insects causes the leaf to coil inwards to encircle the insect and eventually dissolving it.
Cultivation:
Drosera pygmaea is an unusual addition to the keen gardener who is looking for something different yet still easy to grow. It is ideal in settings near ponds in courtyards or the rockery. It needs strong sunlight to very light shade to grow at its best.
To make a bog garden, extend the pond or to make an artificial marshland on sand all you need is a sheet of black plastic and some rocks. Dig the soil out and lay two or three layers of black plastic on the shallow depression. Fill the plastic to the original level with sand and peat mixed at a ratio of 1 to 4. Make sure the sand is free of salt. If it isn’t wash the sand several times to make sure the salt is completely removed. Fill the depression with water until it is within 50mm of the surface. Place the rocks around the perimeter so that it looks natural. Make a depression with your arm in the corner on the low side so excess water can drain away when it rains.
I like to see the use smaller or minute Juncus specie like Juncus holoschoenus or dwarf forms of Lomandra specie like Lomandra confertifolia or even some of the native lilies like Pattersonia glabra or Bulbine bulbosa as a base and back drops when growing carnivorous plants as most are small and they look more natural when planted around or amongst smaller clump grasses that have erect growth or culms.
Remove the plants and carefully plant them into their wallum. Do not fertilize. Most of the Drosera species are annuals and need to be raised annually from seed. Most will self seed if prevailing conditions are right.
Remove the plants and carefully plant them into their wallum. Do not fertilize.
Another method is to gently but securely place young plants to a large non porous rock which is continually wet from the splash of a fountain or waterfall. Here the plants will spread naturally over the rock as it flowers and resets seed. Note though that if chlorine is used the plants will succumb very quickly.
The best thing about the carnivorous plants is you can grow a large number in a small area. It often reaches its full potential in just a few weeks and flower in a month or two. If the water level is kept topped up it is really very easy to grow and maintain. Drosera binata is one of the easiest to grow and works in well with some of the other rosette Drosera species, as Drosera pygmaea size can be further enhanced.
Propagation:
Seeds: Drosera pygmaea’s seeds do not require treatment before sowing. Sow fresh seeds directly into a seed raising mix and cover with 1mm of fine sand. Place the tray in a saucer of water in a warm place. When the seedlings are 10mm to 15mm tall, prick them out and plant them into their permanent position.
Fertilize using seaweed, fish emulsion or organic chicken pellets soaked in water on an alternate basis. Fertilize once only to maintain health, vitality and better flowering.
Further Comments from Readers:
Hi reader, it seems you use The Bible of Botany a lot. That’s great as we have great pleasure in bringing it to you! It’s a little awkward for us to ask, but our first aim is to purchase land approximately 1,600 hectares to link several parcels of N.P. into one at The Pinnacles NSW Australia, but we need your help. We’re not salespeople. We’re amateur botanists who have dedicated over 30 years to saving the environment in a practical way. We depend on donations to reach our goal. If you donate just $5, the price of your coffee this Sunday, We can help to keep the planet alive in a real way and continue to bring you regular updates and features on Australian plants all in one Botanical Bible. Any support is greatly appreciated. Thank you.
In the spirit of reconciliation we acknowledge the Bundjalung, Gumbaynggirr and Yaegl and all aboriginal nations throughout Australia and their connections to land, sea and community. We pay our respect to their Elders past, present and future for the pleasures we have gained.
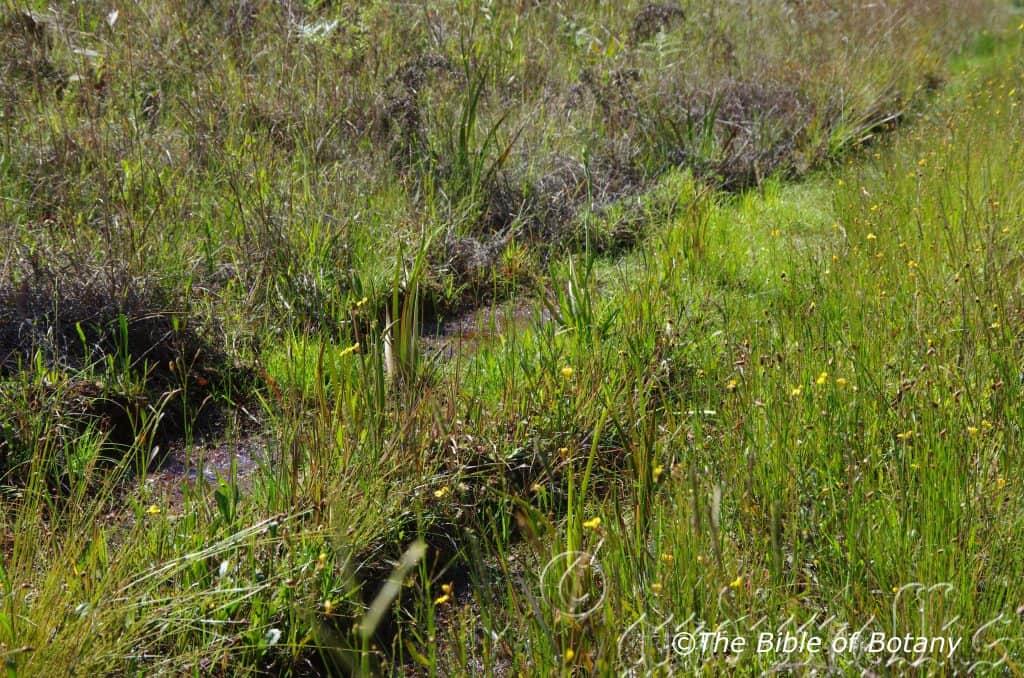
The Pinnacles NSW
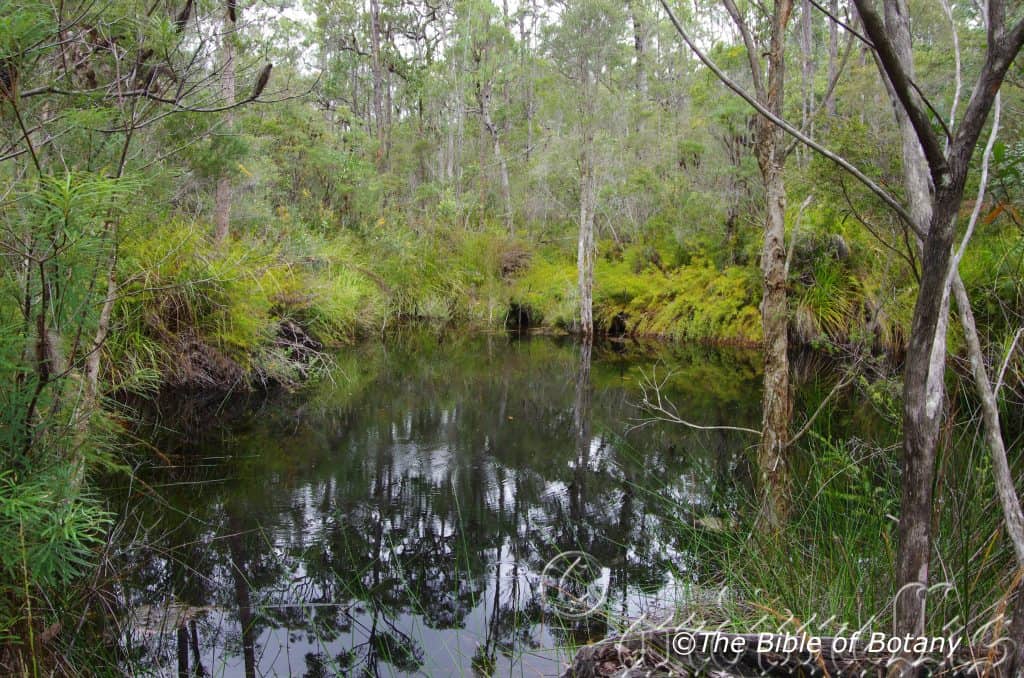
The Pinnacles NSW
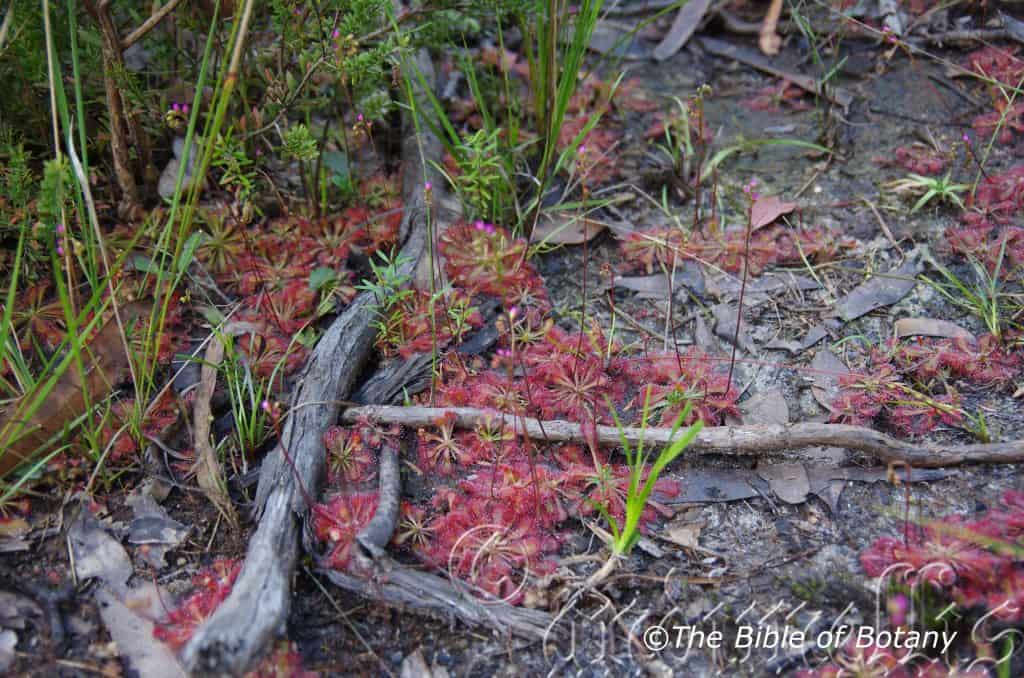
The Pinnacles NSW
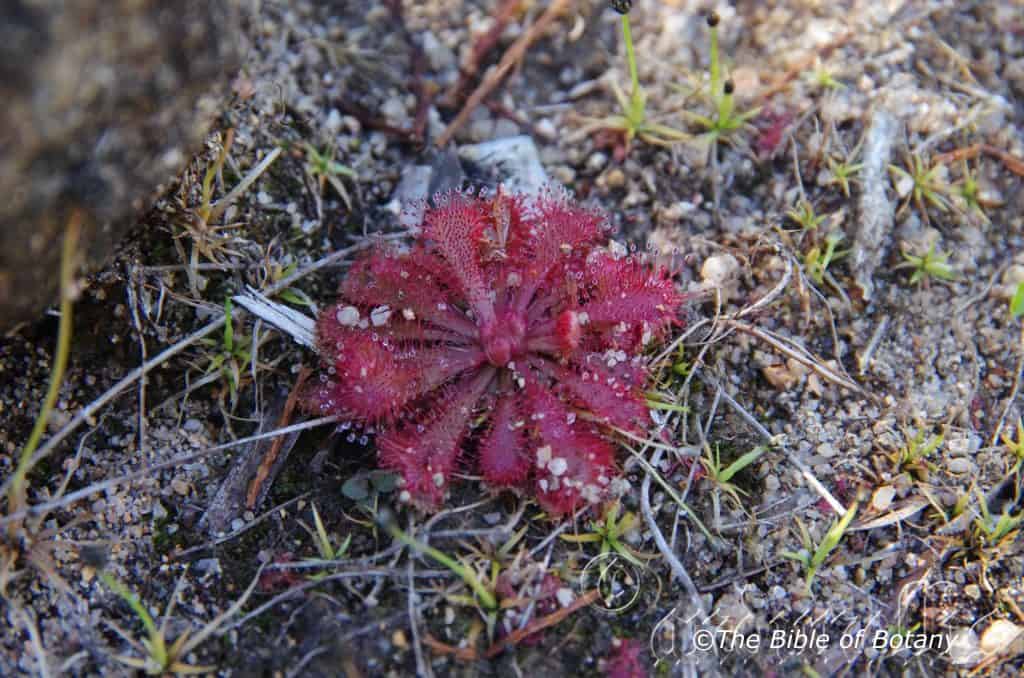
Hidden Valley Paluma Range Qld.
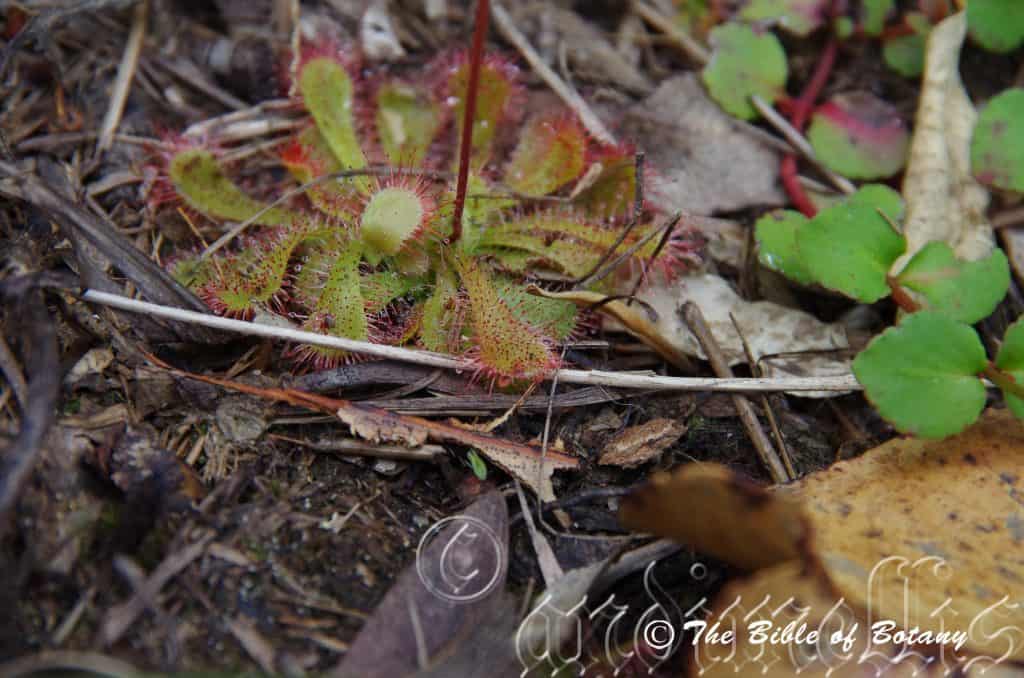
Innes Lake National Park NSW
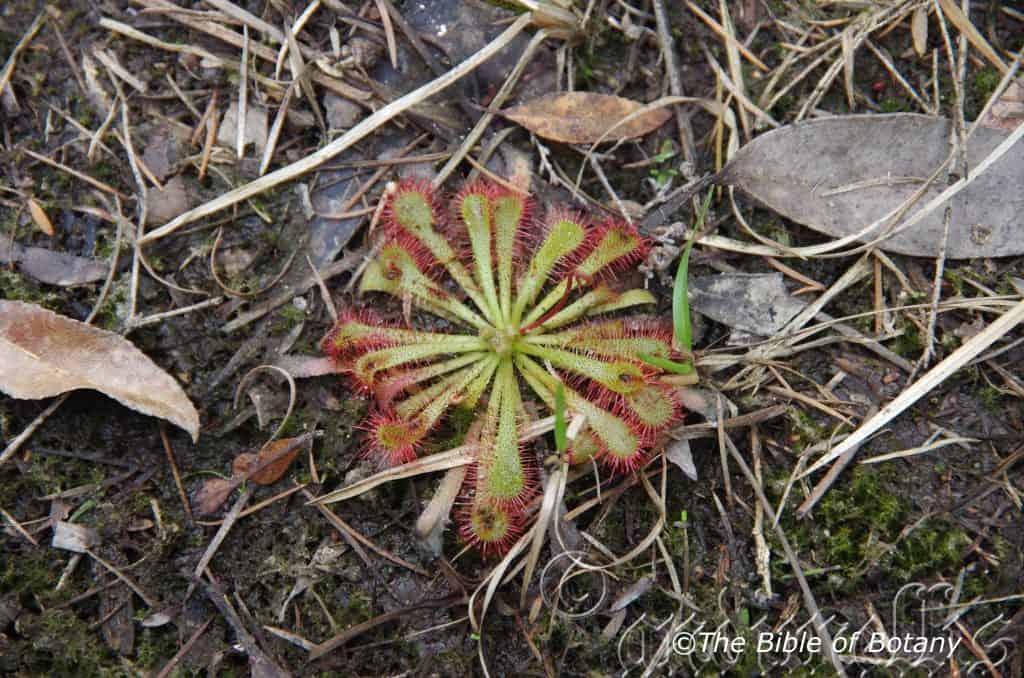
The Pinnacles NSW
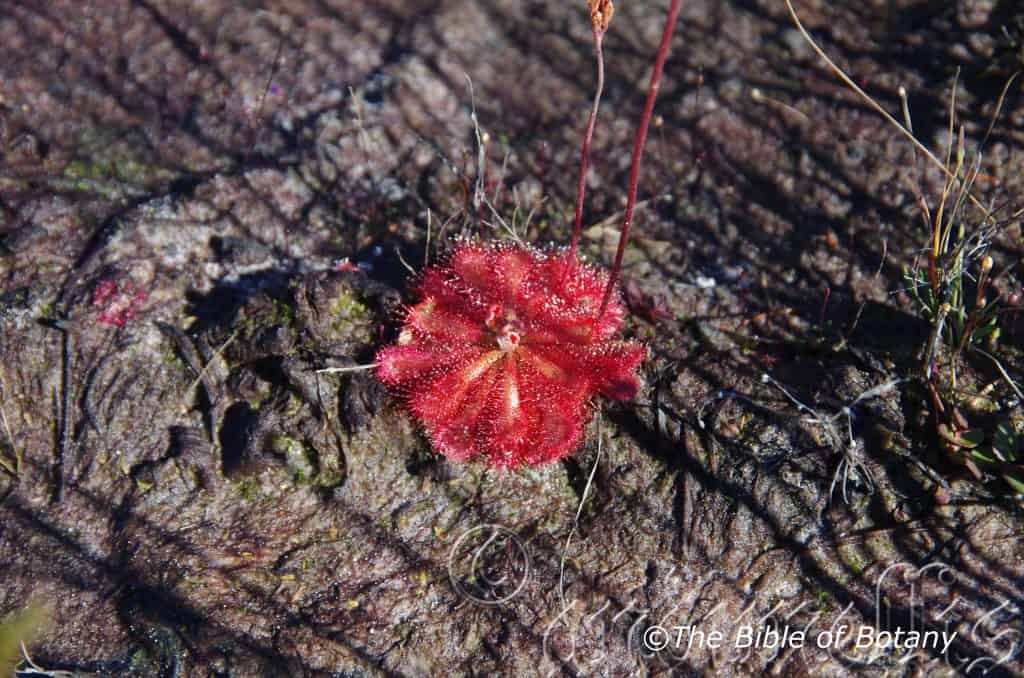
Yuraygir National Park NSW
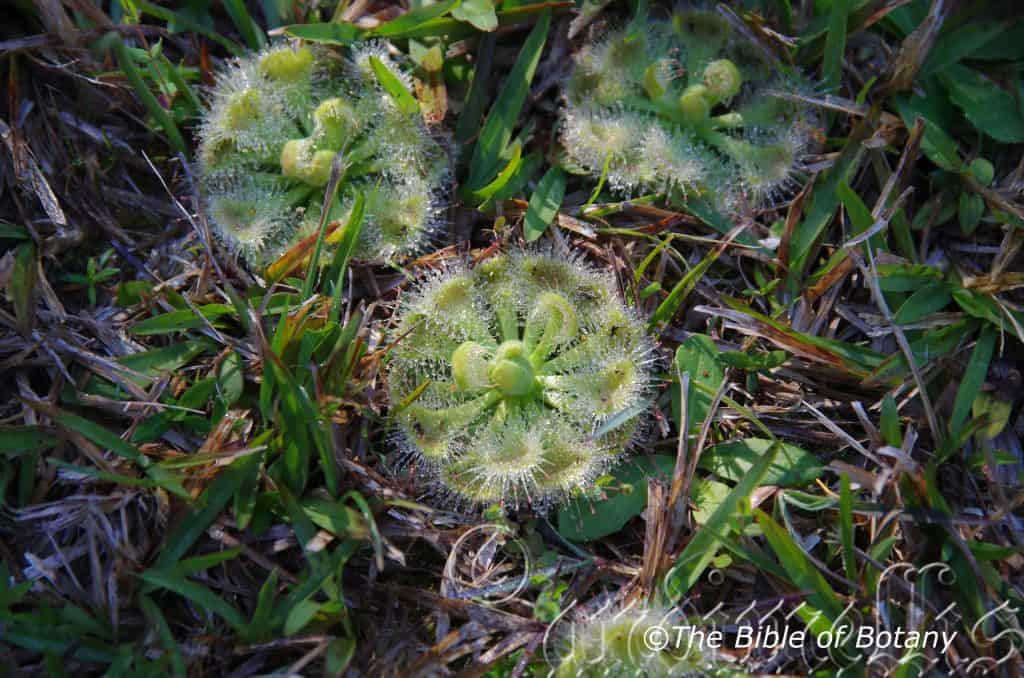
Yuraygir National Park NSW

The Pinnacles NSW
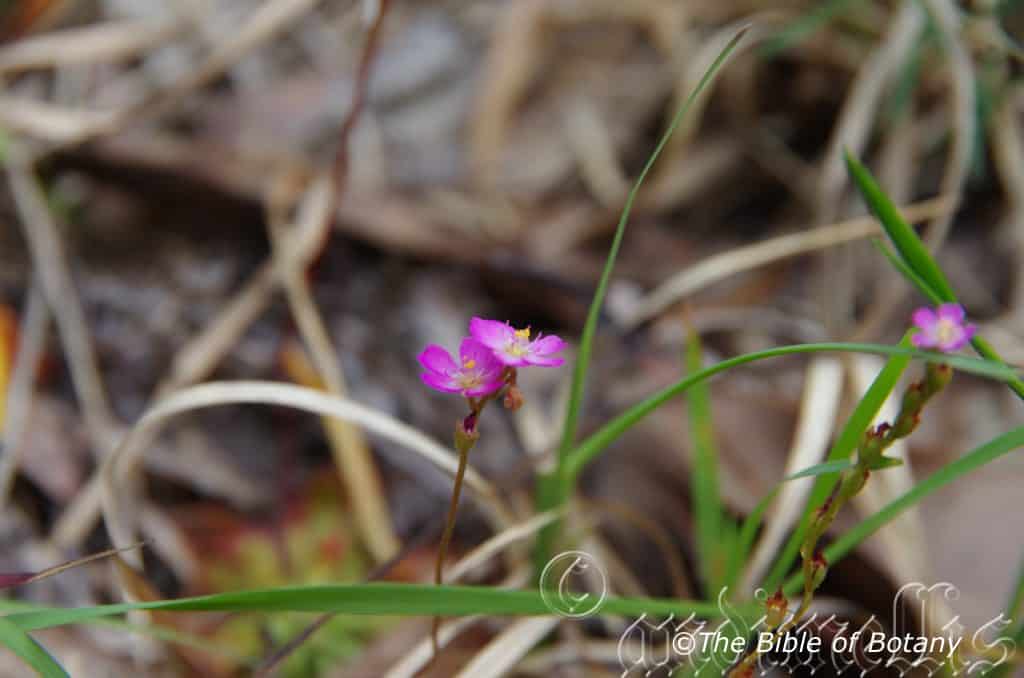
The Pinnacles NSW

The Pinnacles NSW
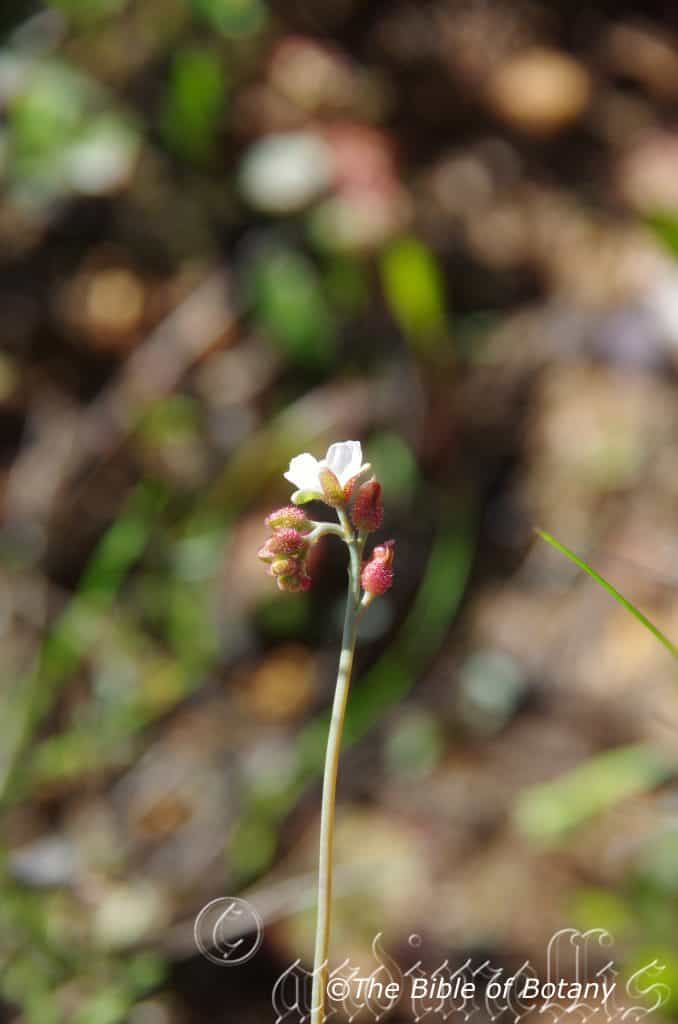
The Pinnacles NSW
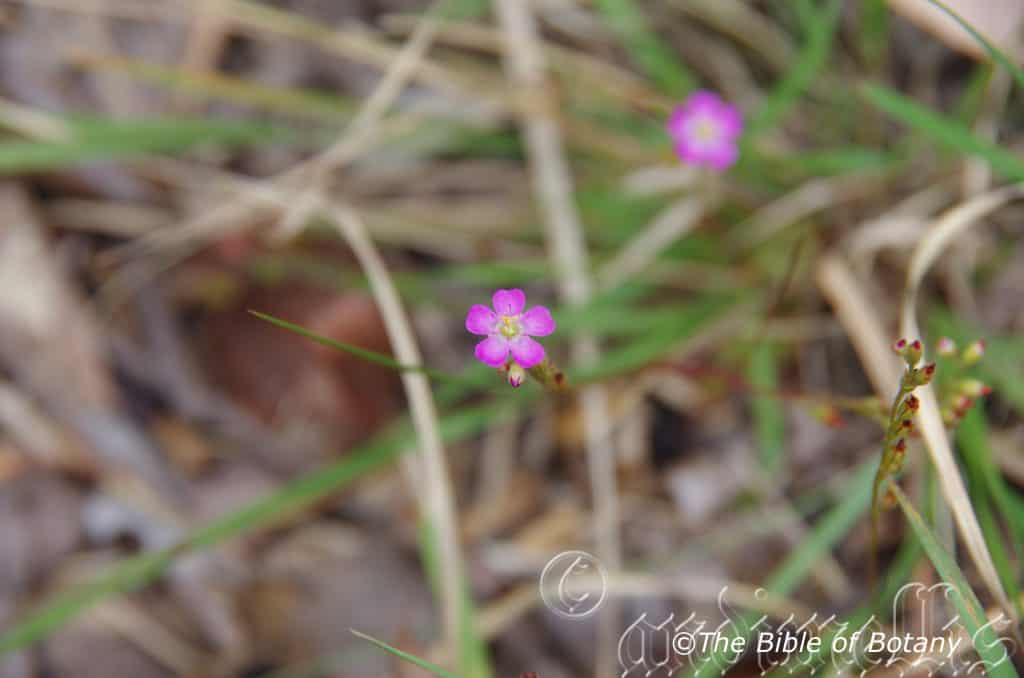
The Pinnacles NSW

The Pinnacles NSW
Drosera spatulata
Classification
Unranked: Eudicots
Unranked: CoreEudicots
Order: Caryophyllales
Family: Droceraceae
Subfamily:
Genus: From Droseros, which is Ancient Greek for dewy. It refers to the glandular leaf hairs exuding a sticky glistening liquid, which looks like dew.
Sub Genus: Phycopsis
Species: From Spatula, which is Latin for to have the shape of a spoon. It refers to leaves or phyllodes including the petiole, which are shaped like a spoon.
Common Name: Red Sundew.
Distribution:
Drosera spatulata is found in several disjunct populations south from the tip of Cape York Peninsula in far north eastern Queensland to Grampians in south western Victoria.
It mainly circumnavigates Tasmania and is found on Flinders Island in Bass Strait.
https://avh.ala.org.au/occurrences/search?taxa=Drosera+spatulata#tab_mapView
Habitat Aspect Climate:
Drosera spatulata prefers full sun to light dappled shade. It grows in open woodlands to dry and moist Eucalypt forests and areas adjacent to coastal wallums. It is found on poor sandy soils or peaty sands along creeks, wallums, seepages, near waterfalls and other poorly drained areas. The altitude ranges from 5 meters ASL to 850 meters ASL.
The temperatures range from minus 4 degrees in July to 36 degrees in January.
The rainfall ranges from lows of 500mm to 3000mm average per annum.
Soil Requirements:
Drosera spatulata prefers coarse sands, fine sands, and light sandy loams with or without high peat content. The soils are derived from decomposed sandstone, granite or pure white, grey or black accumulated sands are the main soils where they grow uninhibited. The soils pH ranges from 4.5pH to 5.5pH. It tolerates waterlogged soils as all the soils are poorly drained sands or sands with high water tables. Non saline soils to slightly saline soils are tolerated.
Height & Spread:
Wild Plants: 20mm to 40mm by 25mm to 150mm when in flower.
Characteristics:
Drosera spatulata grows as a rosette swamp plant hugging the ground.
The leaves form a rosette flat on the ground. The spathulate leaves measure 10mm to 20mm in length including the broad flat 5mm to 10mm petiole. They measure 4mm to 8mm in width near the apex. The concolourous laminas are pale green to grass green or green tinged red with red glandular hairs on the upper lamina while the lower lamina is glabrous. The margins are entire. The upper lamina‘s glandular hairs produce a small droplet of a viscous liquid which entraps insects. Leaves can be crowded or evenly spaced so plant it so that it is just touching each other. The lacinate stipules measure 5mm to 7mm in length.
The inflorescences of Drosera spatulata are born on 1 to 5, usually 2 or 3 long slender scapes. The cylindrical scape measures 80mm to 90mm in length by 1mm to 1.5mm in diameter. There are 5 to 15 individual flowers on a spike. The calyx is deeply divided to form narrow oblong lobes which have an acute apex. They measure 2mm to 5mm in length. The 5 glabrous, orbicular, bright pink to pale pink or rarely white petals measure 4mm to 7mm in length by 4mm to 7mm in width. The obtuse apex is curved upwards. The 5 stamens are white with pale yellow anthers which measure 1mm to 2mm in length. The green ovary is glabrous and distinctly ribbed. The pedicels are 0.5mm to 3mm in length supporting buds in a nodding position which becoming more erect as the bud opens. Drosera spatulata flowers from late September through to January.
The fruits of Drosera spatulata are obovate to oblong capsules. The capsules measure 3mm to 3.5mm in length by 1.5mm to 3mm in width. The style is persistent on the capsules. The green fruits turn black before ripening. There are 5 to 20 reddish brown seeds in each capsule.
Wildlife:
Drosera spatulata supports its nitrogen deficient soils by trapping small insects; mainly crawling types which are attracted to their sticky leaves, which in turn dissolves the insect‘s body. Constant struggling by the insects causes the leaf to coil inwards to encircle the insect and eventually dissolving it.
Early research by the author indicates that the dew from Drosera burmanni and Drosera spatulata may contain anti fungicides for ringworm and may have similar properties for the control of other fungi like Tinea. More research is required to prove the full effectiveness and the actual properties involved in the control of these fungi.
Cultivation:
Drosera spatulata is an unusual addition to the keen gardener who is looking for something different yet still easy to grow. It is ideal in settings near ponds in court yards or the rockery. They need strong sun light to very light shade to grow at their best.
To make a bog garden, extend the pond or to make an artificial marshland on sand all you need is a sheet of black plastic and some rocks. Dig the soil out and lay two or three layers of black plastic on the shallow depression. Fill the plastic to the original level with sand and peat mixed at a ratio of 4 to 1.Make sure the sand is free of salt. If it isn’t wash the sand several times to make sure all the salt is completely removed. Fill the depression with water until it is within 50mm of the surface. Place the rocks around the perimeter so that it looks natural. Make a depression with your arm in the corner on the low side so excess water can drain away when it rains.
I like to see the use smaller or minute Juncus specie like Juncus holoschoenus or dwarf forms of Lomandra specie like Lomandra confertifolia or even some of the native lilies like Pattersonia glabra or Bulbine bulbosa as a base and back drops when growing carnivorous plants as most are small and they look more natural when planted around or amongst smaller clump grasses that have erect growth or culms.
Remove the plants and carefully plant them into their wallum. Do not fertilize. Most of the Drosera species are annuals and need to be raised annually from seed. Most will self seed if prevailing conditions are right.
Remove the plants and carefully plant them into their wallum. Do not fertilize.
Another method is to gently but securely place young plants to a large non porous rock which is continually wet from the splash of a fountain or waterfall. Here the plants will spread naturally over the rock as it flowers and resets seed. Note though that if chlorine is used the plants will succumb very quickly.
The best thing about the carnivorous plants is you can grow a large number in a small area. It often reaches its full potential in just a few weeks and flower in a month or two. If the water level is kept topped up it is really very easy to grow and maintain. Drosera binata is one of the easiest to grow and works in well with Drosera spatulata. The interesting thing here is Drosera spatulata foliage comes in all shades of red and green while the flowers are white to every shade of pink to almost red.
It is an ideal plant for terrariums because if it is over watered it won’t kill them. Planting a terrarium needs a sandy mix as already outlined using 4 parts sand to 1 part peat. Mix it up carefully place it in the container. Water well and drain off any excess water. Carefully remove the plants from their pots and plant them ensuring no mix is covering the leaves. Try to plant a second group a month or two later. This way they will flower at different stages and as the first group dies the second group will be at their prime. By the time the second group flower and die the first lot of seeds would have germinated and the cycle starts all over again.
Propagation:
Seeds: Drosera spatulata‘s seeds do not require treatment before sowing. Sow fresh seeds directly into a seed raising mix and cover with 1mm of fine sand. Place the tray in a saucer of water in a warm place. When the seedlings are 10mm to 15mm tall, prick them out and plant them into their permanent position.
Fertilize using seaweed, fish emulsion or organic chicken pellets soaked in water on an alternate basis. Fertilize once only to maintain health, vitality and better flowering.
Further Comments from Readers:
Hi reader, it seems you use The Bible of Botany a lot. That’s great as we have great pleasure in bringing it to you! It’s a little awkward for us to ask, but our first aim is to purchase land approximately 1,600 hectares to link several parcels of N.P. into one at The Pinnacles NSW Australia, but we need your help. We’re not salespeople. We’re amateur botanists who have dedicated over 30 years to saving the environment in a practical way. We depend on donations to reach our goal. If you donate just $5, the price of your coffee this Sunday, We can help to keep the planet alive in a real way and continue to bring you regular updates and features on Australian plants all in one Botanical Bible. Any support is greatly appreciated. Thank you.
In the spirit of reconciliation we acknowledge the Bundjalung, Gumbaynggirr and Yaegl and all aboriginal nations throughout Australia and their connections to land, sea and community. We pay our respect to their Elders past, present and future for the pleasures we have gained.
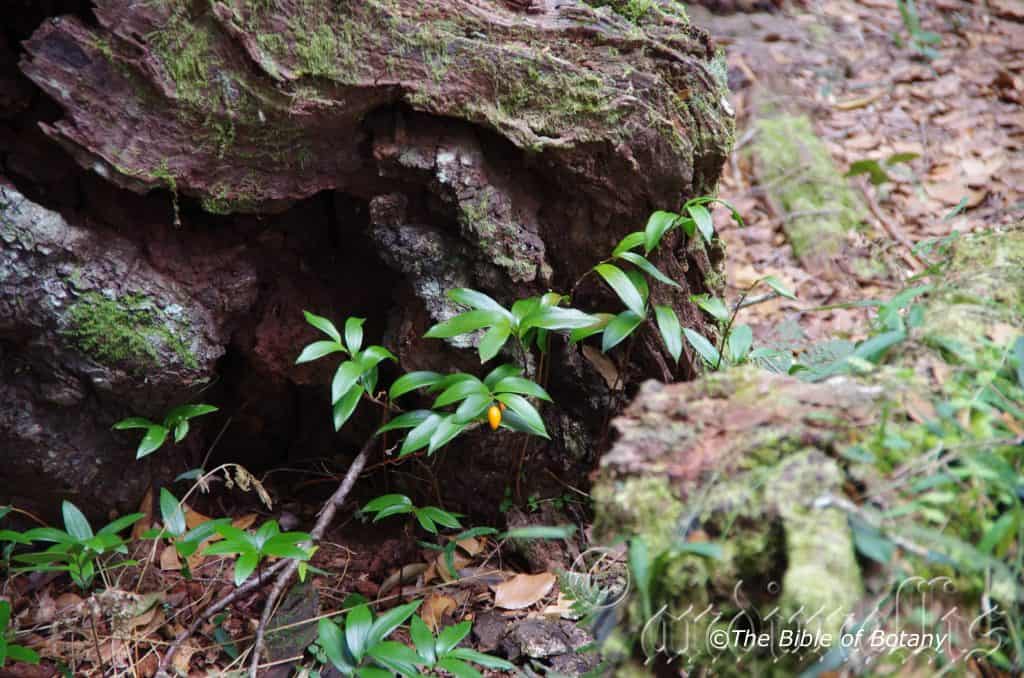
Dangar Falls Dorrigo NSW
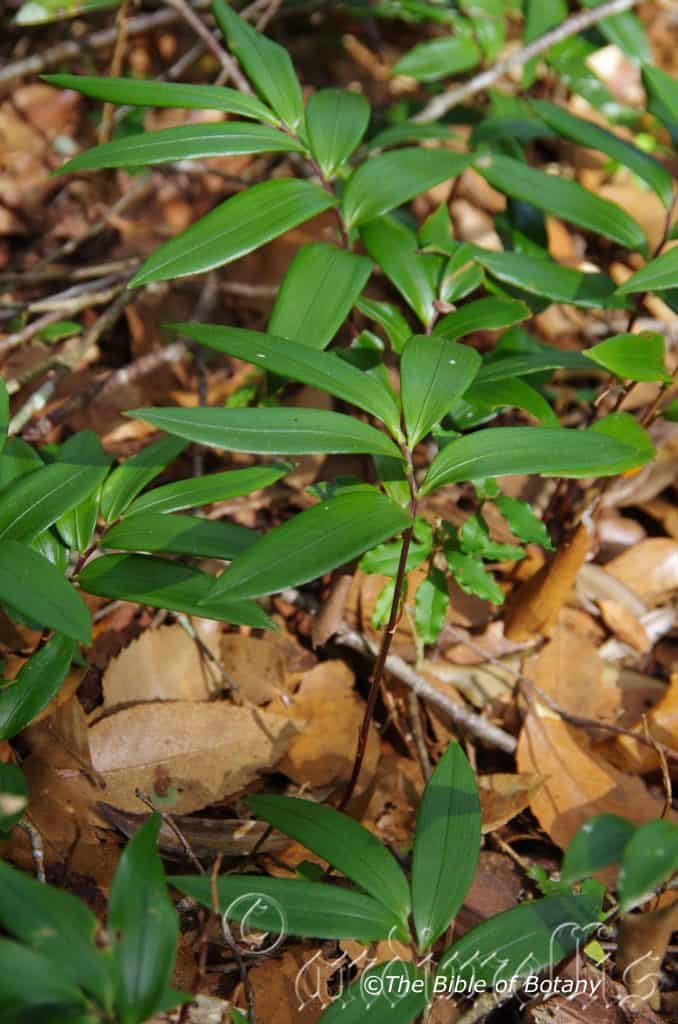
Dangar Falls Dorrigo NSW
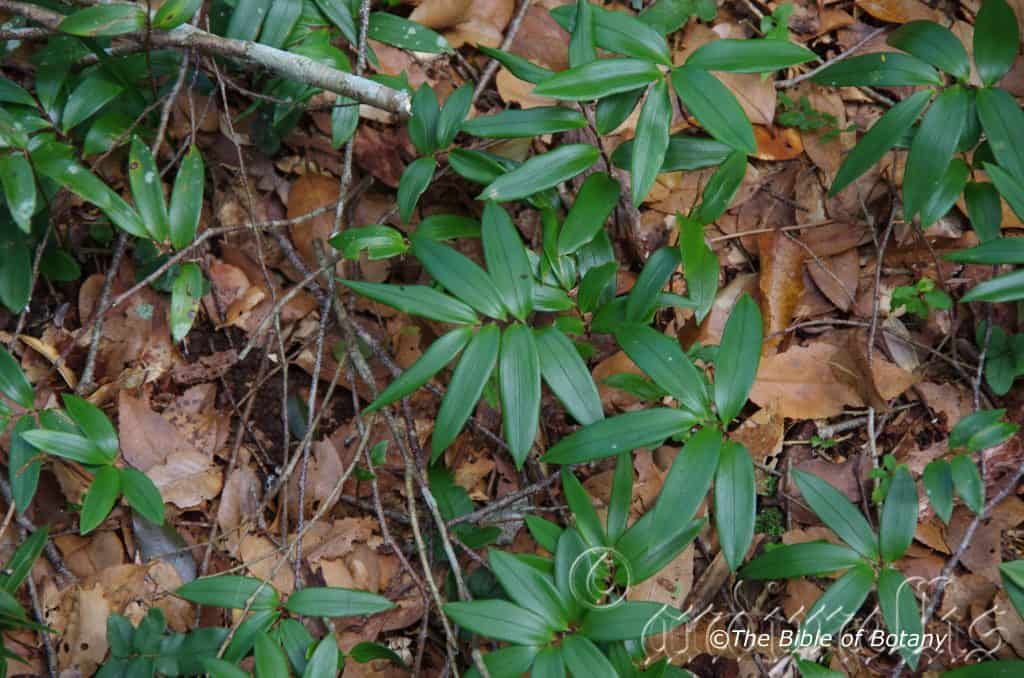
Dangar Falls Dorrigo NSW
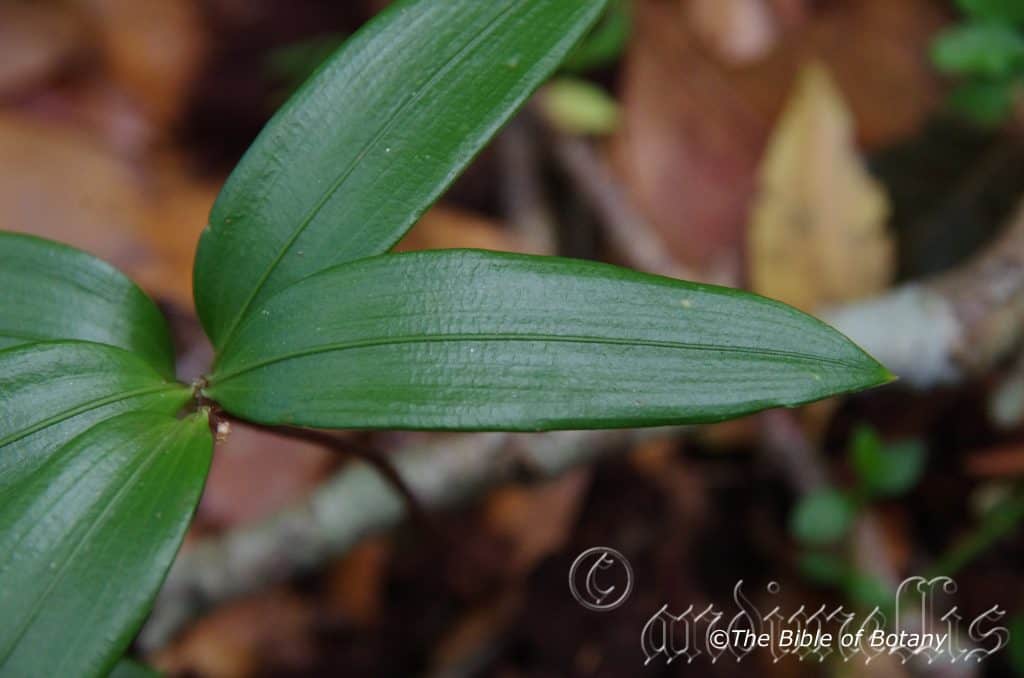
Dangar Falls Dorrigo NSW
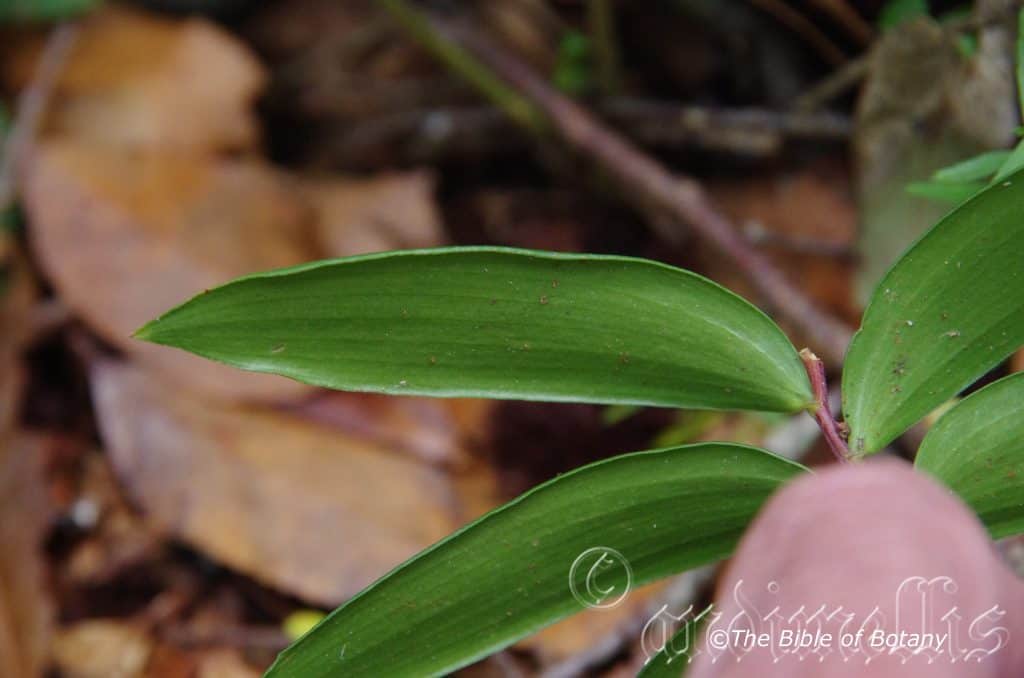
Dangar Falls Dorrigo NSW
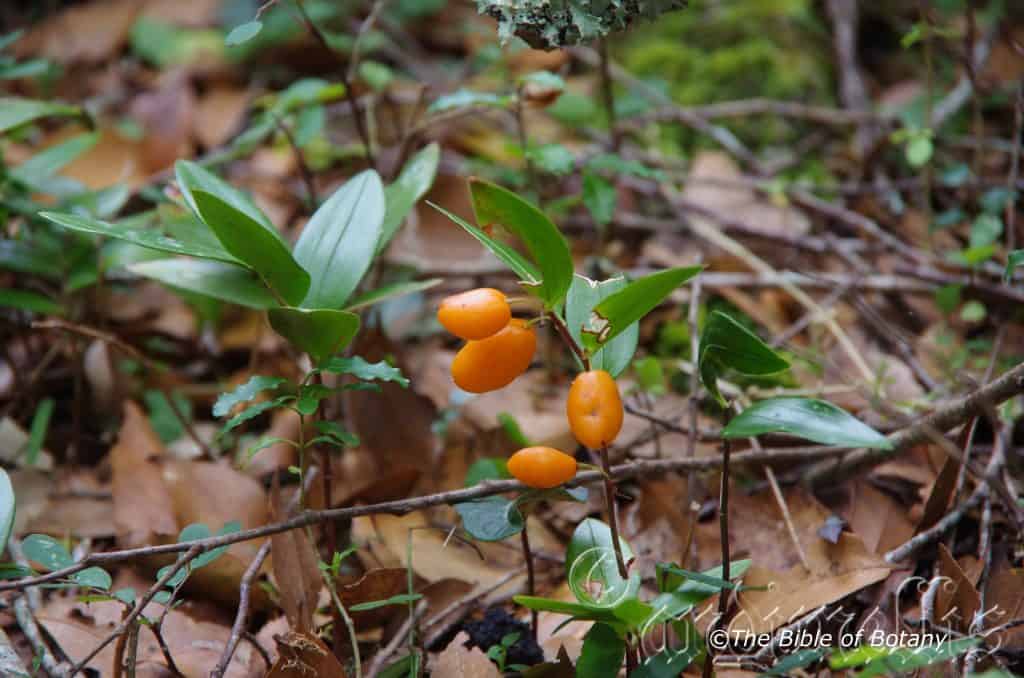
Dangar Falls Dorrigo NSW
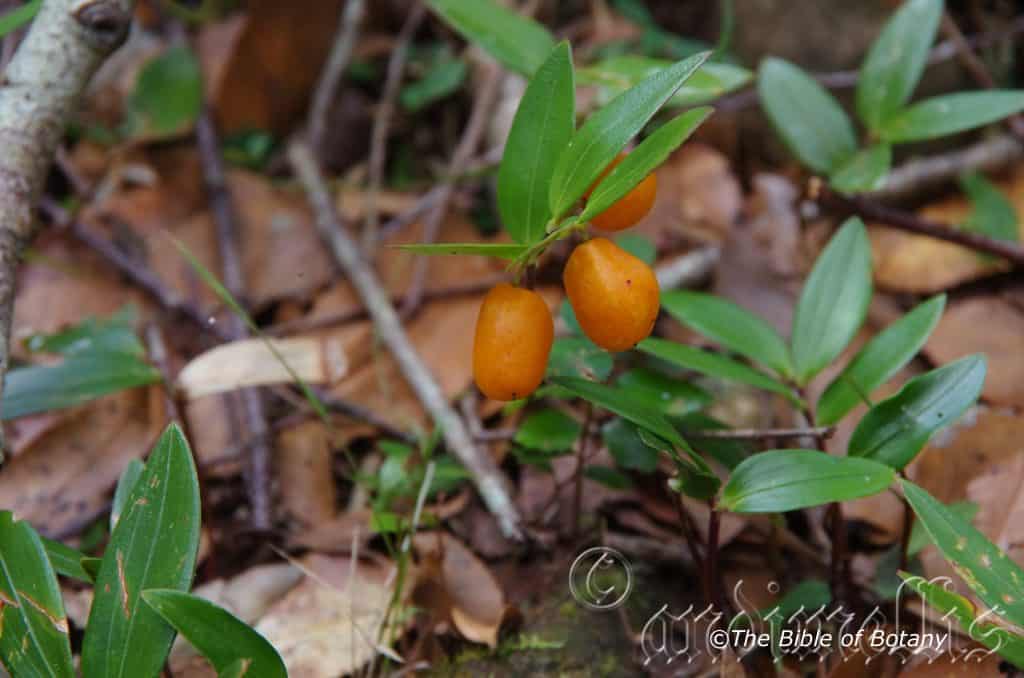
Dangar Falls Dorrigo NSW
Drymophila moorei
Classification
Unranked: Monocots
Class: Equisetopsida
Order: Liliales
Family: Alstroemeriaceae or Luzuriagaceae (In dispute at the present time)
Genus: From Drymos, which is Ancient Greek for copse or a thicket and Philos, which is Ancient Greek for loving or to be loved. It refers to plants which prefer to grow beneath a group of trees in dense shade.
Species: Is named in honour of Moore but which Moore cannot be substantiated.
Common Name:
Distribution:
Drymophila moorei is south from Conondale National Park Kilcoy in south east Queensland to Bulga Plateau in central eastern New South Wales. It is mainly found on the Great Dividing Range.
https://avh.ala.org.au/occurrences/search?taxa=Drymophila+moorei#tab_mapView
Habitat Aspect Climate:
Drymophila moorei prefers full shade to light dappled shade. It grows beneath the trees of moist rainforests and moist gallery forests. The altitude ranges from 650 meters ASL to 900 meters ASL.
The temperatures range from minus 3 degrees in July to 35 degrees in January.
The rainfall ranges from lows of 1200mm to 1800mm average per annum.
Soil Requirements:
Drymophila moorei prefers better quality loams to medium clays. The soils are derived from decomposed brown basalt and black basalt. The soils pH ranges from 6pH to 7.5pH. It does not tolerate waterlogged soils though annual inundations are frequent where it grows in riparian gullies. Non saline soils to slightly saline soils are tolerated.
Height & Spread:
Wild Plants: 100mm to 300mm by 100mm to 200mm
Characteristics:
Drymophila moorei grows as small herb with unbranched aerial stems. The glossy deep maroon stems form a zigzag pattern. The white to off white rhizomes are as thick as the stems and measure 1mm to 2mm in diameter.
The elliptic to broad lanceolate leaves measure 30mm to 60mm in length by 10mm to 20mm in width. The bases are rounded oblique while the apex taper to a sharp short spine. The discolourous laminas are deep sea-green, glabrous and glossy on the upper laminas while the lower laminas are glabrous, slightly paler and dull. The laminas are flat and strongly decurve near the margins. The leaf margins are entire. The mid vein is strongly prominent on the upper lamina while the 8 or 10 parallel veins are barely visible on both laminas. The petioles measure 0.5mm to 1.5mm in length.
The white or pastel pink inflorescences of Drymophila moorei are born singularly from the leaf axils and measure 10mm to 15mm in diameter. The slender, glabrous pedicels measure 8mm to 12mm in length. The 3 oblong-linear to narrow elliptical sepals measure 6.5mm to 8mm in length by 1.8mm to 2.2mm in width while the 3 petals measure 7mm to 8.5mm in length by 1.8mm to 2.2mm in width.
The 3 white filaments measure 2mm to 3mm in length. The white oblong, abaxial anthers measure 1.8mm to 2.2mm in length.
The 3 or 4 locular, white ovary is glabrous and measures 2mm in length. The white pistil splits into 2 tapering styles, which measure 2mm in length. The pistil measures 2mm to 5mm in length. Drymophila moorei flowers from September to early November but can flower sporadically through to January.
The fruits of Drymophila moorei are indehiscent ovoidal deep yellow-orange to deep orange berries. The berries measure 10mm to 15mm in length by 6mm to 9mm in diameter. The few ovoidal seeds in each fruit measure 4mm to 6.5mm in length by 2.5mm to 4mm in diameter. Fruits ripen from March through to August.
Wildlife:
Drymophila moorei‘s wildlife is unknown to the author.
Cultivation:
Drymophila moorei maybe difficult to grow without dense shade. This is one of the best sub shrubs for native rainforest gardens and should be tried more frequently where dense shaded can be guaranteed or on the southern side of homes or amongst small ferns in a fernery.
Propagation:
Seeds: Drymophila moorei‘s seeds do not require treatment before sowing. Sow fresh seeds directly into a seed raising mix and cover with 2mm to 3mm of the mix. When the seedlings are 25mm to 50mm tall, prick them out and plant them into 100mm squat pots using a seed raising mix.
Once the seedlings reach 100mm to 150mm in height of stems are near the edge of the pots plant them out into their permanent position. Mass plantings can be achieved by planting them at 0.5 meter centers for a quick dense coverage or to 1.5 meter centers for a more open coverage.
Fertilize using seaweed, fish emulsion or organic chicken pellets soaked in water on an alternate basis. Fertilize every two months until the plants are established then annually in early September to October to maintain health, vitality and better flowering.
Further Comments from Readers:
Hi reader, it seems you use The Bible of Botany a lot. That’s great as we have great pleasure in bringing it to you! It’s a little awkward for us to ask, but our first aim is to purchase land approximately 1,600 hectares to link several parcels of N.P. into one at The Pinnacles NSW Australia, but we need your help. We’re not salespeople. We’re amateur botanists who have dedicated over 30 years to saving the environment in a practical way. We depend on donations to reach our goal. If you donate just $5, the price of your coffee this Sunday, We can help to keep the planet alive in a real way and continue to bring you regular updates and features on Australian plants all in one Botanical Bible. Any support is greatly appreciated. Thank you.
In the spirit of reconciliation we acknowledge the Bundjalung, Gumbaynggirr and Yaegl and all aboriginal nations throughout Australia and their connections to land, sea and community. We pay our respect to their Elders past, present and future for the pleasures we have gained.
Drynaria quercifolia
Classification
Class: Pteridospida
Order: Polypodiales
Family: Polypodiaceae
Subfamily: Drynarioideae
Tribe: Sedeae
Sub Tribe: Sedinae
Genus: From Dryas, which is Ancient Greek for the nymph of the Oak trees in a forest in Greek mythology. It refers to fronds, which resemble the leaves on the European Oak tree or the Drys genus.
Species: From Quercus, which is Latin for an oak tree and Folium which is Latin for foliage. It refers leaves, which resemble the European oak tree.
Common Name: NorthernBasket Fern.
Distribution:
Drynaria quercifolia is widespread in several disjunct populations east from the Kimberley‘s in the North West of Western Australia, across the Top End of the Northern Territory to near Bowen in far north Queensland. It is also found on the Islands in the Gulf of Carpentaria and the Torres Strait.
https://avh.ala.org.au/occurrences/search?taxa=Drynaria+quercifolia#tab_mapView
Habitat Aspect Climate:
Drynaria quercifolia prefers light shade, dappled light to full sun. It mainly grows in protected areas in monsoonal forests, well developed rain forests and wet Eucalyptus forests. The altitude ranges from 10 meters ASL to 900 meters ASL.
The temperature ranges from 10 degrees in August to 38 degrees in January.
The rainfall ranges from lows of 1000mm to 3200mm average per annum.
Soil Requirements:
Drynaria quercifolia prefers coarse sands to light sandy loams when growing as a terrestrial fern with a thick covering of forest litter when it is grows as a lithophyte on rocks or in the crevices between boulders. It can also be seen growing as an epiphyte in the northern parts of its range in higher rainfall areas. The soils pH ranges from 6pH to 7pH. It does not tolerate waterlogged soils. Non saline soils to slightly saline soils are tolerated.
Height & Spread:
Wild Plants:100mm to 500mm by 500mm to hundreds of square meters. Such large clumps are probably more than one plant growing together.
Characteristics:
Drynaria quercifolia rhizomes are densely covered in ginger to golden-brown, persistent floccose hairs and scales and measure 2mm to 25mm in diameter. The scales measure 20mm to 25mm in length by 0.7mm to 2.5mm in width near the base. The soft, ginger coloured to deep brown scales taper gradually from the base to the narrow acute apex. The scale‘s margins are paler and finely lacinate.
Drynaria quercifolia fronds are dimorphic. The nest fronds are ovate to oblong-orbicular and glabrous. The nest fronds measure 55mm to 400mm in length by 9mm to 255mm width. The bases are truncate to broadly round while the apexes are obtuse apexes. The concolourous nest fronds are pale grass-green to pale blue-green. The laminas are flat to slightly recurve from the midvein to the margins. The midvein and lateral veins are prominent on the lower laminas and are distinctly visible on the upper laminas. The margins are regularly shallowly to deeply lobed.
The fertile fronds are deeply pinnatifid, erect to semi pendulant and measure 280mm to 1100mm in length by 60mm to 300mm in width. The deep brown rachises are attenuate and glabrous. The opposite to alternate pinnules are deeply divided but not to the rachis. The apexes are acute. The pinnae are linear and measure 15mm to 300mm in length by 11mm to 50mm in width. The concolourous laminas are grass-green, glabrous and coriaceous. The midvein is prominent on the lower laminas and is distinctly visible on the upper laminas. The pinnae are flat while the margins are entire.
Drynaria quercifolia‘s reddish brown sori are round and measure 1mm to 2mm in diameter. It is usually in 2 regular rows between adjacent main lateral veins and are usually slightly impressed into the laminas surface or flat.
Confusing Specie:
Drynaria quercifolia‘s scales are soft and are narrowed gradually from base to apex and measure 20mm in length. The scales are finely lancinate near the base and entire for the remainder. The plants are large and rigid. The sori are in 2 regular rows between adjacent main veins. It is the only species found west of the Great Dividing Range in northern Queensland and the Northern Territory and Western Australia.
Drynaria rigida’s fronds are pinnatifid with few broadly adnate lobes. The scales have ciliate hairs along the margins. The sori are superficially scattered or in 2 regular rows between each pair of main veins. It grows further south and in cooler areas where the species overlaps with Drynaria quercifolia.
Drynaria sparsisora’s scales are stiff, narrowed abruptly above the basal third with the apical section being caduceus. The margins are slightly winged and finely lacinate for the entire length. The plants are shorter and smaller overall. The sori are in 2 irregular rows between the adjacent main veins with others being sparsely interspersed.
Wildlife:
Drynaria quercifolia‘s wildlife is unknown to the author.
Cultivation:
Only use Drynaria quercifolia in hot, high rainfall areas as it is cold sensitive. Good specimens can be found as far south as Rockhampton though hot houses would be needed to grow good plants further south. Further south than Rockhampton on the east coast, I would strongly recommend the growing of Drynaria rigidula or Drynaria sparsisora. Drynaria quercifolia is a beautiful large fern for courtyards, around swimming pools or in the garden where moist brighter conditions prevail. Drynaria quercifolia is excellent for around larger fish and frog ponds where it can grow to its full potential. It breaks up hard fences and walls giving a pleasant vertical look. If used correctly it can make medium size areas look larger. Some cleaning of spent fronds on a biannual base is necessary and moisture is not required to keep it at its best. It is drought tolerant so the occasional lapse in watering won’t affect them. Too promote a good flush of growth all that is needed is to give them a good soaking with our fertilizer. Apply a normal strength dose of our recommended fertilizer a week later and within two weeks they will be produce a good flush.
It often reaches its full potential of 1500mm in around 5 years to 7 years in tropical areas. Do not plant it in the soil but on rocks and between boulders. In the tropics it can be used as an epiphyte where natural rainfall and fogs can supplement its water requirements.
Plants need to be carefully placed and maintained for at least 12 months from planting out on rocks, logs or bricks so that they can attach themselves and secure a good root run. Watering weekly after placement; if it doesn’t rain, and fertilize every month will ensure strong growth. I use porous rocks as stabilizers when planting on the ground.
It is one of the best and properly positioned there is no better fern than the Drynaria species for appearance and beauty in the garden particularly when mixed with Platycerium species, Asplenium Nidus, Asplenium australe or Davallia pyxidata beneath your favourite trees absolutely amazing results can be achieved in a few short years.
Other large ferns for strength and character are Acrostichum species, in a wet boggy area and for a hanging fern few anywhere in the world will beat Schellolepis subauriculata, Schellolepis subauriculata var. knightae is particularly striking as is Schellolepis verrucosum. These hanging forms should be planted away from the Drynaria species so that they can be viewed as separate identities displaying its unique beauty.
All the above ferns can have fronds which measure over two meters in length when grown in favourable conditions. Yes you guessed it I am rather partial to ferns.
Outdoors it is best positioned in a low fork of larger trees or tied securely to the upper side of a horizontal branch where their fronds can cascade down in full view. When tying them to a branch I like to place a small amount peat between the branch and the rhizomes to help preserve moisture until it is well established. It is rather slow at establishing themselves so patience is required.
Propagation:
Spores: All ferns that are declared rare, vulnerable or endangered are protected by Federal and State Laws and must not be removed from the wild unless you are a land developer, mining company or main Roads department etc. This includes bulbs, roots, leaves and flowers. No part of any plant can be removed from Federal, State or Local Government land without the prior permission of the authority and this includes the spore.
Most people are put off at the thought of growing ferns from spore. Like all plants that produce their offspring from seed or spore the methods are basically the same. Remember nature has been doing this for millions of years and has been very successful. I have had excellent results growing over 200 different species of Australian ferns so don’t be afraid. Give it a go.
Step 1. Select spore from the fern fronds. Wait until the fern is just starting to release its spore. Rinse the fronds under clean running water and dry. This is to wash off any other spores from rogue ferns that may have settled onto the fronds. (There is nothing worse than having common brake or common soft bracken contaminating a prized tree fern or epiphyte.)
Step 2. Place the dry fronds in a clean brown paper bag and keep them in a cool dark place like the linen closet for about a week to ten days before you are ready to sow the spore. The exception to this rule applies to ferns, which produce green spores. These must be sown immediately that it is released. Todea Barbara is a good example of a fern, which produces green spore.
Step 3. Take a large ice cream container, a small ice cream container and a clean clear plastic bag large enough to seal the large ice cream container and three or four milk bottle tops.
Step 4. Punch or drill 6 to 10 5mm holes in the bottom of the small ice cream container.
Step 5. Wash both containers, tops and plastic bag so that it is very clean and sterile.
Step 6. Use a clean fine seed raising mi. We used 30mm fine sand, 30mm peat and 30mm perlite and 10mm vermiculite. We used crushed basalt, crusher dust and peat in a 50:50 ratio for epiphytes. Moisten the mix enough that water does not run out when the mix is squeezed between the fingers.
Step 7. Place the moisten mix (Enough to half fill the small ice cream container) in the microwave oven with a large glass of water for 7 or 8 minutes, until the water is boiling. Allow them to cool in the oven. You will need the water later so do not tip it out.
Step 8. Take the brown paper bag out of the linen closet. Shake the bag and remove the fronds. You should have a yellow, brown, black or rarely greenish brown or ochre powder or very fine, small round pin head size spore depending on the specie involved.
Step 9. Remove the mixture from the oven once it has cooled and place it in the small ice cream container and level.
Step 10. Sprinkle the spore sparsely over the mixture in the small ice cream container.
Step 11. Place the milk bottle tops in the large ice cream container with the flat surface facing down. Place the small ice cream container in the large ice cream container so that it is sitting on the milk bottle tops.
Step 12. Remove the water from the microwave and pour it into the larger ice cream container so there is 25mm to 30mm of water in the bottom.
Step 13. Place the ice cream containers in the plastic bag and seal.
Step 14. Place the contents and bag in a warm shady place preferably 50mm to 70mm shade depending on the specie. Shade houses and some window sills are ideal.
Step 15. The surface should turn green within a week to two weeks. The prothallus will then develop. From the prthalus the first true fronds will appear. Wait until the ferns are 20mm to 35mm in height before you attempt to transplant them. Once they are ready open the bag up slightly and allow the air to flow around the little ferns. Every 3 to 5 days open the bag a little further so the ferns get use to their new environment. Allow them a week to two weeks to harden off before you transplant them following the removal of the plastic bag. Carefully prick them out into 50mm standard squat tubes as you would any seedling.
Do not try to transplant them as single plants as they are still a little delicate still.
Once the smaller ones again reach 50mm to 70mm you may wish to divide the stronger and hardier individual plants into smaller clumps in 100mm squat pots.
Fertilize using seaweed, fish emulsion or organic chicken pellets soaked in water on an alternate basis. Fertilize every two months until the plants are established then annually in early September to October to maintain health, vitality and better flowering.
Further Comments from Readers:
Hi reader, it seems you use The Bible of Botany a lot. That’s great as we have great pleasure in bringing it to you! It’s a little awkward for us to ask, but our first aim is to purchase land approximately 1,600 hectares to link several parcels of N.P. into one at The Pinnacles NSW Australia, but we need your help. We’re not salespeople. We’re amateur botanists who have dedicated over 30 years to saving the environment in a practical way. We depend on donations to reach our goal. If you donate just $5, the price of your coffee this Sunday, We can help to keep the planet alive in a real way and continue to bring you regular updates and features on Australian plants all in one Botanical Bible. Any support is greatly appreciated. Thank you.
In the spirit of reconciliation we acknowledge the Bundjalung, Gumbaynggirr and Yaegl and all aboriginal nations throughout Australia and their connections to land, sea and community. We pay our respect to their Elders past, present and future for the pleasures we have gained.
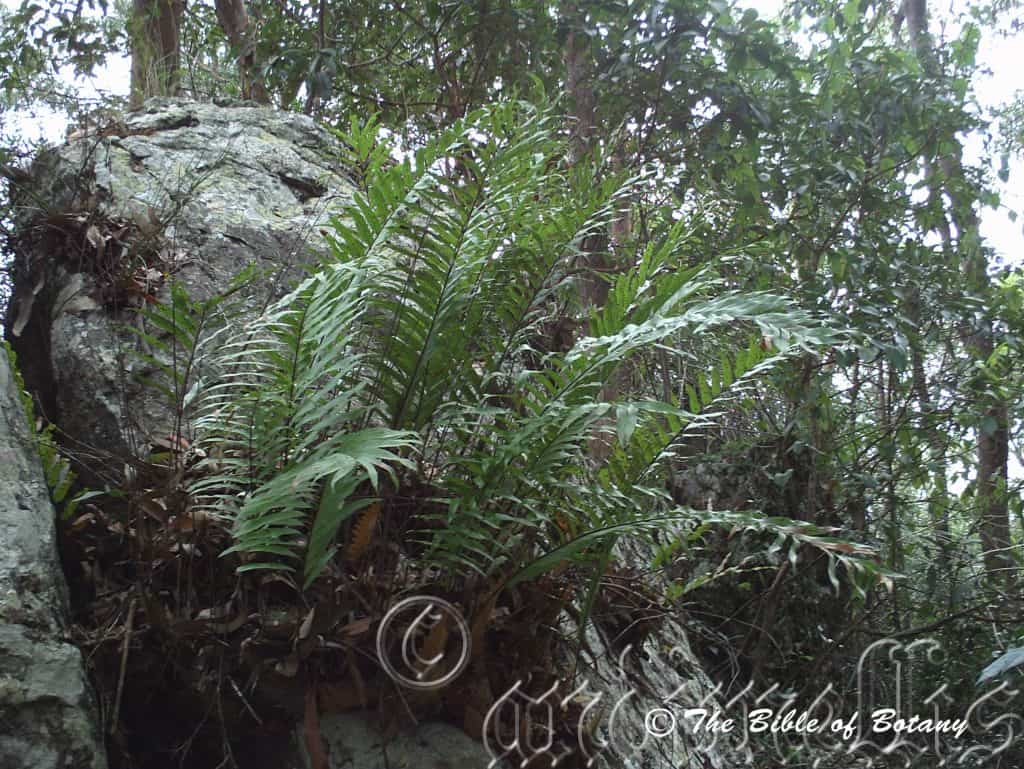
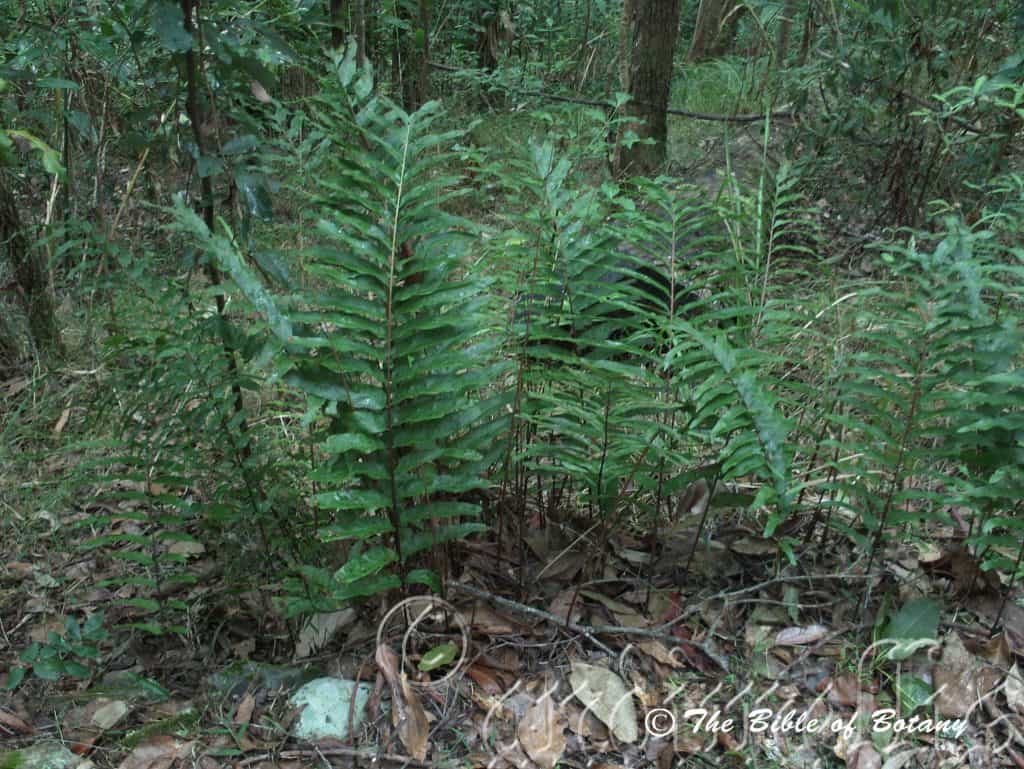

Crystal Creek Paluma Range National Park Qld.
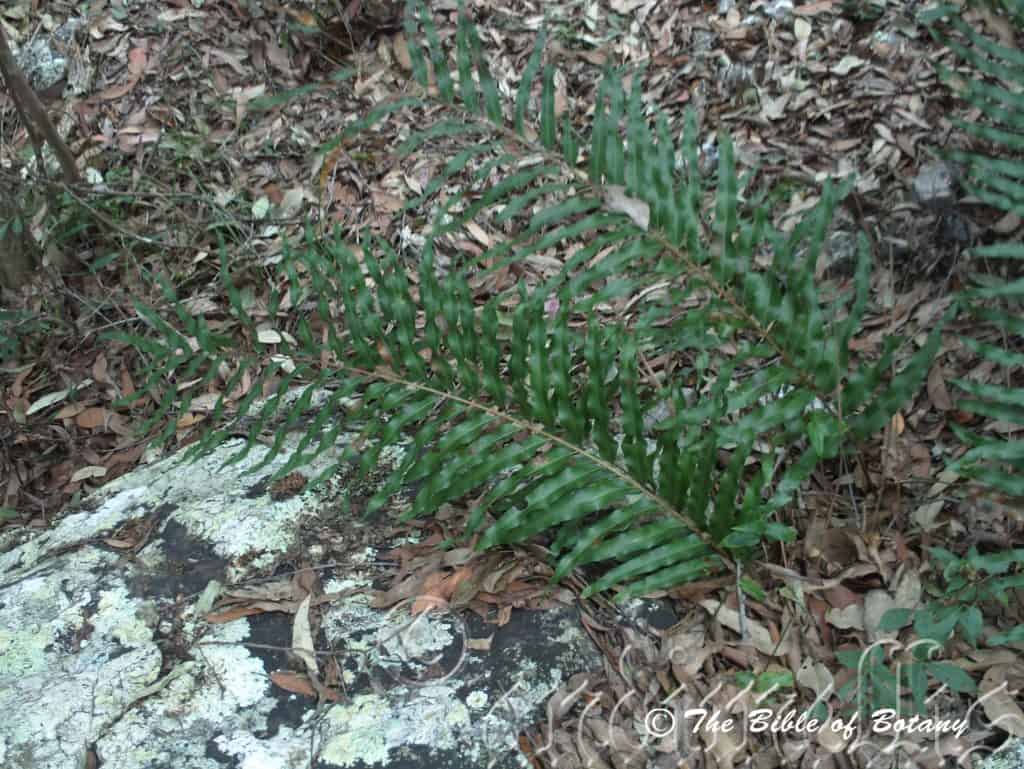
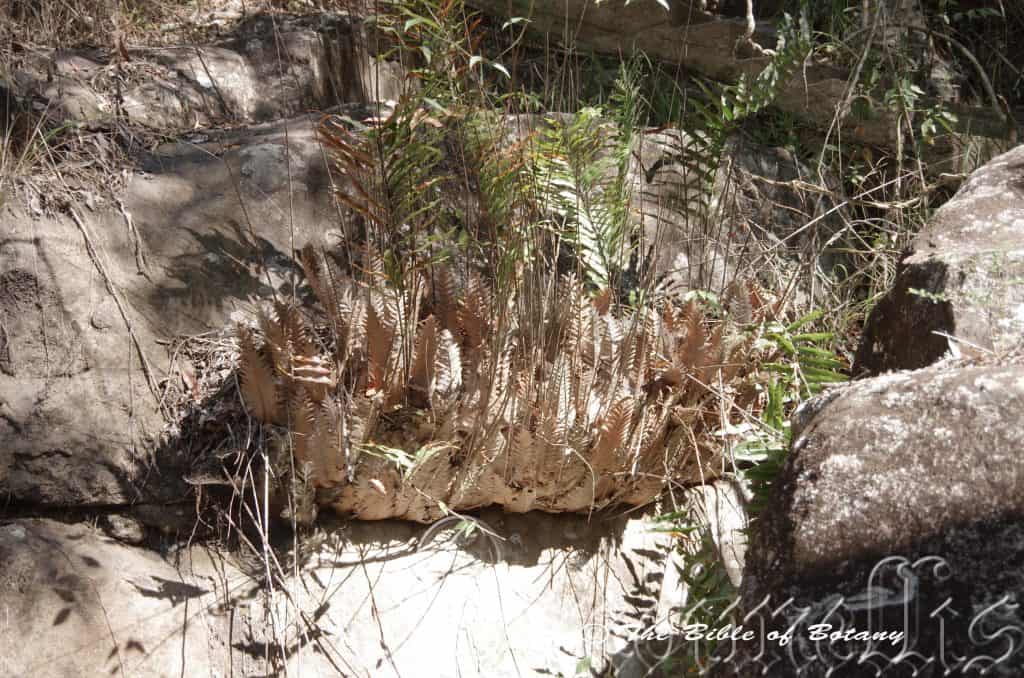
Crystal Creek Paluma Range National Park Qld.
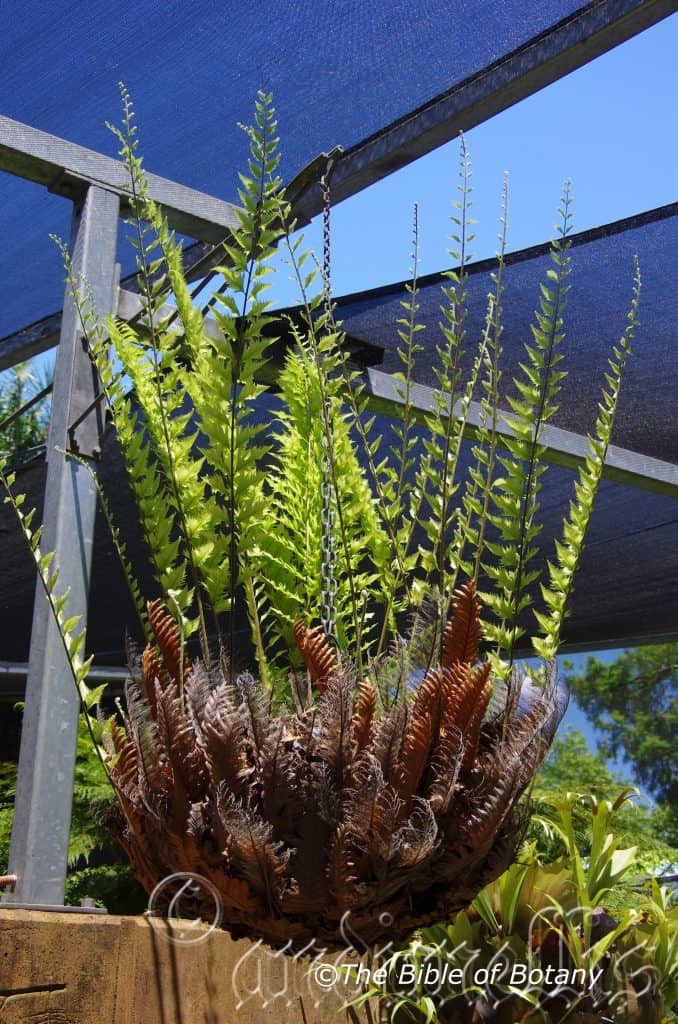
Mount Cootha Botanic Gardens Qld.
Drynaria rigidula
Classification
Class: Pteridospida
Order: Polypodiales
Family: Polypodiaceae
Subfamily: Drynarioideae
Tribe: Sedeae
Sub Tribe: Sedinae
Genus: From Dryas, which is Ancient Greek for the nymph of the Oak trees in a forest in Greek mythology. It refers to fronds, which resemble the leaves on the European Oak tree or the Drys genus.
Species: From Rigins, which is Latin for stiff or unbending. It refers to structures or organs, which are stiff and rigid.
Subspecies: Drynaria rigidula subsp. rigidula. From Rigins, which is Latin for stiff or unbending. It refers to structures or organs, which are stiff and rigid.
Subspecies: Drynaria rigidula subsp. whitei. Is probably named in honour of Cyril Tennison White; 1890-1950, who was a Queensland botanist for 35 years.
Common Name: Basket Fern.
Distribution:
Drynaria rigidula is found south from Cape Tribulation and many Islands off the East Coast including the Moreton Bay Islands of Stradbroke Island and Peel Island in Queensland to the Border Ranges National Park in far north eastern New South Wales. There are a few isolated populations north of the Clarence River and one at Nana Glen. It is found on and east of the Great Dividing Range to the coast.
https://avh.ala.org.au/occurrences/search?taxa=Drynaria+rigidula#tab_mapView
Habitat Aspect Climate:
Drynaria rigidula prefers in light shade, dappled light to full sun. It grows mainly in semi protected areas close to rain forests and wet Eucalyptus forests. The altitude ranges from 10 meters ASL to 1000 meters ASL.
The temperature ranges from minus 2 degrees in August to 38 degrees in January.
The rainfall ranges from lows of 900mm to 3000mm average per annum.
Soil Requirements:
Drynaria rigidula prefers coarse sands to light sandy loams when growing as a terrestrial fern with a thick covering of forest litter when it is grows as a lithophyte on rocks or in the crevices between boulders. It can also be seen growing as an epiphyte in the northern parts of its range in higher rainfall areas. The soils pH ranges from 6pH to 7pH. It does not tolerate waterlogged soils. Non saline soils to slightly saline soils are tolerated.
Height & Spread:
Wild Plants:100mm to 1500mm by 1500mm to hundreds of square meters. Such large clumps are probably more than one plant growing together.
Characteristics:
Drynaria rigidula rhizomes are densely covered in ginger to golden-brown, persistent floccose hairs and scales and measure 20mm to 25mm in diameter. The scales measure 20mm to 25mm in length by 0.7mm to 2.5mm in width near the base. The soft, ginger coloured to deep brown scales taper gradually from the base to the narrow acute apex. The scale‘s margins are paler and finely lacinate.
Drynaria rigidula‘s fronds are dimorphic. The nest fronds are lanceolate to oblong-lanceolate and glabrous. The nest fronds measure 120mm to 360mm in length by 60mm to 80mm width. The bases are truncate to broadly round while the apexes are obtuse apexes. The concolourous nest fronds are pale grass-green. The laminas are flat to slightly recurve from the midvein to the margins. The midvein and lateral veins are prominent on the lower laminas and are distinctly visible on the upper laminas. The margins are regularly shallowly to deeply lobed. Both kinds of fronds are sparsely covered with narrow ciliate scales and stellate hairs.
The deep brown to deep brown-black rachises is glabrous. The opposite to alternate pinnules are deeply divided but not to the rachis. The lower section of the base is truncate to the lower lobes base while the apexes are acute. The pinnae are linear and measure 100mm to 150mm in length by 11mm to 25mm in width. The concolourous laminas are grass-green and coriaceous. The midvein is prominent on the lower laminas and is distinctly visible on the upper laminas. The pinnae are flat. The margins are entire, usually with a costular nectary in the basiscopic pinna axil.
Drynaria rigidula‘s reddish brown sori are round and measure 1mm to 1.8mm in diameter. It is in 2 regular rows between adjacent main lateral veins but closer to the lower vein. It is slightly impressed into the laminas surface.
Confusing Specie:
Drynaria rigida’s fronds are pinnatifid with few broadly adnate lobes. The scales have ciliate hairs along the margins. The sori are superficially scattered or in 2 regular rows between each pair of main veins. It grows further south and in cooler areas where the species overlaps with Drynaria quercifolia.
Drynaria quercifolia‘s scales are soft and are narrowed gradually from base to apex and measure 20mm in length. The scales are finely laciniate near the base and entire for the remainder. The plants are large and rigid. The sori are in 2 regular rows between adjacent main veins. It is the only species found west of the Great Dividing Range in northern Queensland and the Northern Territory and Western Australia.
Drynaria sparsisora’s scales are stiff, narrowed abruptly above the basal third with the apical section being caduceus. The margins are slightly winged and finely lacinate for the entire length. The plants are shorter and smaller overall. The sori are in 2 irregular rows between the adjacent main veins with others being sparsely interspersed.
Subspecie Differences:
Drynaria rigidula subsp. rigidula fertile fronds are deeply pinnatifid and erect to erect and semi pendulant. The fronds are not fimbriate.
Drynaria rigidula subsp. whitei fertile fronds are deeply pinnatifid and semi erect pendulant. The fronds are not fimbriate. The fronds measure 280mm to 1500mm in length including the stipe which measures 60mm to 300mm in length. It is restricted to the Kimberley district of Western Australia.
Wildlife:
Drynaria rigidula‘s wildlife is unknown to the author.
Cultivation:
Drynaria rigidula is a beautiful large fern for courtyards, around swimming pools or in the garden where moist lighter conditions prevail. Drynaria rigidula is excellent for around fish and frog ponds where it can grow to its full potential. It breaks up hard fences and walls giving a pleasant vertical look. If used correctly it can make medium size areas look larger. Some cleaning of spent fronds on a biannual base is necessary and moisture is not required to keep it at its best. It is drought tolerant so the occasional lapse in watering won’t affect them. Too promote a good flush of growth all that is needed is to give them a good soaking with our fertilizer. Apply a normal strength dose of our recommended fertilizer a week later and within two weeks they will be produce a good flush.
It often reaches its full potential of 1500mm in around 5 years year. Do not plant it in the soil but on rocks and between boulders. In the tropics it can be used as an epiphyte where natural rainfall and fogs can supplement their water requirements.
Plants need to be carefully placed and maintained for at least 9 months from planting out on rocks, logs or bricks so that they can attach themselves and secure a good root run. Watering weekly after placement if it doesn’t rain and fertilize every month will ensure strong growth.
It is one of the best and properly positioned there is no better fern than the Drynaria species for appearance and beauty in the garden particularly when mixed with Platycerium species, Asplenium Nidus, Asplenium australe or Davallia pyxidata beneath your favourite trees absolutely amazing results can be achieved in a few short years.
Other large ferns for strength and character are Acrostichum species, in a wet boggy area and for a hanging fern few anywhere in the world will beat Schellolepis subauriculata, Schellolepis subauriculata var. knightae is particularly striking as is Schellolepis verrucosum. These hanging forms should be planted away from the Drynaria species so that they can be viewed as separate identities displaying their unique beauty.
All the above ferns can have fronds which measure over two meters in length when grown in favourable conditions. Yes you guessed it I am rather partial to ferns.
Drynaria rigidula subsp. whitei is particularly striking grown in a hanging basket.
It is best positioned in a fork of a large tree or tied securely to the upper side of a horizontal branch where their fronds can cascade down in full view. When tying them to a branch I like to place a small amount peat between the branch and the rhizomes to help preserve moisture until It is well established. It is rather slow at establishing themselves so patience is required.
Propagation:
Spores: All ferns that are declared rare, vulnerable or endangered are protected by Federal and State Laws and must not be removed from the wild unless you are a land developer, mining company or main Roads department etc. This includes bulbs, roots, leaves and flowers. No part of any plant can be removed from Federal, State or Local Government land without the prior permission of the authority and this includes the spore.
Most people are put off at the thought of growing ferns from spore. Like all plants that produce their offspring from seed or spore the methods are basically the same. Remember nature has been doing this for millions of years and has been very successful. I have had excellent results growing over 200 different species of Australian ferns so don’t be afraid. Give it a go.
Step 1. Select spore from the fern fronds. Wait until the fern is just starting to release its spore. Rinse the fronds under clean running water and dry. This is to wash off any other spores from rogue ferns that may have settled onto the fronds. (There is nothing worse than having common brake or common soft bracken contaminating a prized tree fern or epiphyte.)
Step 2. Place the dry fronds in a clean brown paper bag and keep them in a cool dark place like the linen closet for about a week to ten days before you are ready to sow the spore. The exception to this rule applies to ferns, which produce green spores. These must be sown immediately they are released. Todea Barbara is a good example of a fern, which produces green spore.
Step 3. Take a large ice cream container, a small ice cream container and a clean clear plastic bag large enough to seal the large ice cream container and three or four milk bottle tops.
Step 4. Punch or drill 6 to 10 5mm holes in the bottom of the small ice cream container.
Step 5. Wash both containers, tops and plastic bag so that they are very clean and sterile.
Step 6. Use a clean fine seed raising mi. We used 30mm fine sand, 30mm peat and 30mm perlite and 10mm vermiculite. We used crushed basalt, crusher dust and peat in a 50:50 ratio for epiphytes. Moisten the mix enough that water does not run out when the mix is squeezed between the fingers.
Step 7. Place the moisten mix (Enough to half fill the small ice cream container) in the microwave oven with a large glass of water for 7 or 8 minutes, until the water is boiling. Allow them to cool in the oven. You will need the water later so do not tip it out.
Step 8. Take the brown paper bag out of the linen closet. Shake the bag and remove the fronds. You should have a yellow, brown, black or rarely greenish brown or ochre powder or very fine, small round pin head size spore depending on the specie involved.
Step 9. Remove the mixture from the oven once it has cooled and place it in the small ice cream container and level.
Step 10. Sprinkle the spore sparsely over the mixture in the small ice cream container.
Step 11. Place the milk bottle tops in the large ice cream container with the flat surface facing down. Place the small ice cream container in the large ice cream container so that it is sitting on the milk bottle tops.
Step 12. Remove the water from the microwave and pour it into the larger ice cream container so there is 25mm to 30mm of water in the bottom.
Step 13. Place the ice cream containers in the plastic bag and seal.
Step 14. Place the contents and bag in a warm shady place preferably 50mm to 70mm shade depending on the specie. Shade houses and some window sills are ideal.
Step 15. The surface should turn green within a week to two weeks. The prothallus will then develop. From the prothallus the first true fronds will appear. Wait until the ferns are 20mm to 35mm in height before you attempt to transplant them. Once they are ready open the bag up slightly and allow the air to flow around the little ferns. Every 3 to 5 days open the bag a little further so the ferns get use to their new environment. Allow them a week to two weeks to harden off before you transplant them following the removal of the plastic bag. Carefully prick them out into 50mm standard squat tubes as you would any seedling.
Do not try to transplant them as single plants as they are still a little delicate still.
Once the smaller ones again reach 50mm to 70mm you may wish to divide the stronger and hardier individual plants into smaller clumps in 100mm squat pots.
Fertilize using seaweed, fish emulsion or organic chicken pellets soaked in water on an alternate basis. Fertilize every two months until the plants are established then annually in early September to October to maintain health, vitality and better flowering.
Further Comments from Readers:
Hi reader, it seems you use The Bible of Botany a lot. That’s great as we have great pleasure in bringing it to you! It’s a little awkward for us to ask, but our first aim is to purchase land approximately 1,600 hectares to link several parcels of N.P. into one at The Pinnacles NSW Australia, but we need your help. We’re not salespeople. We’re amateur botanists who have dedicated over 30 years to saving the environment in a practical way. We depend on donations to reach our goal. If you donate just $5, the price of your coffee this Sunday, We can help to keep the planet alive in a real way and continue to bring you regular updates and features on Australian plants all in one Botanical Bible. Any support is greatly appreciated. Thank you.
In the spirit of reconciliation we acknowledge the Bundjalung, Gumbaynggirr and Yaegl and all aboriginal nations throughout Australia and their connections to land, sea and community. We pay our respect to their Elders past, present and future for the pleasures we have gained.
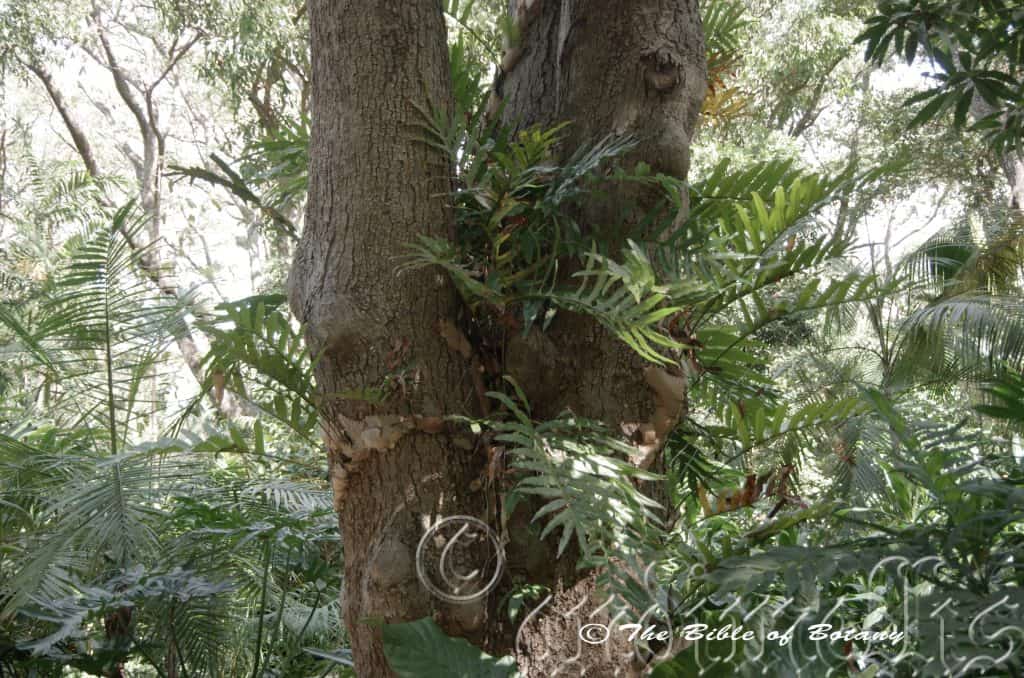
Paluma Range National Park Qld.
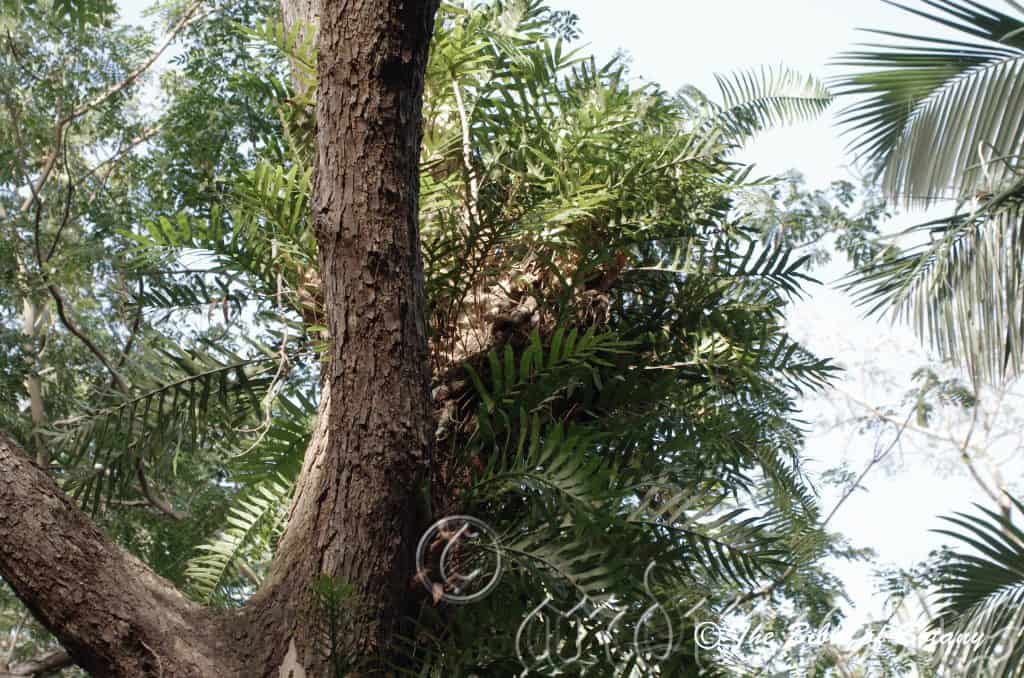
Paluma Range National Park Qld.
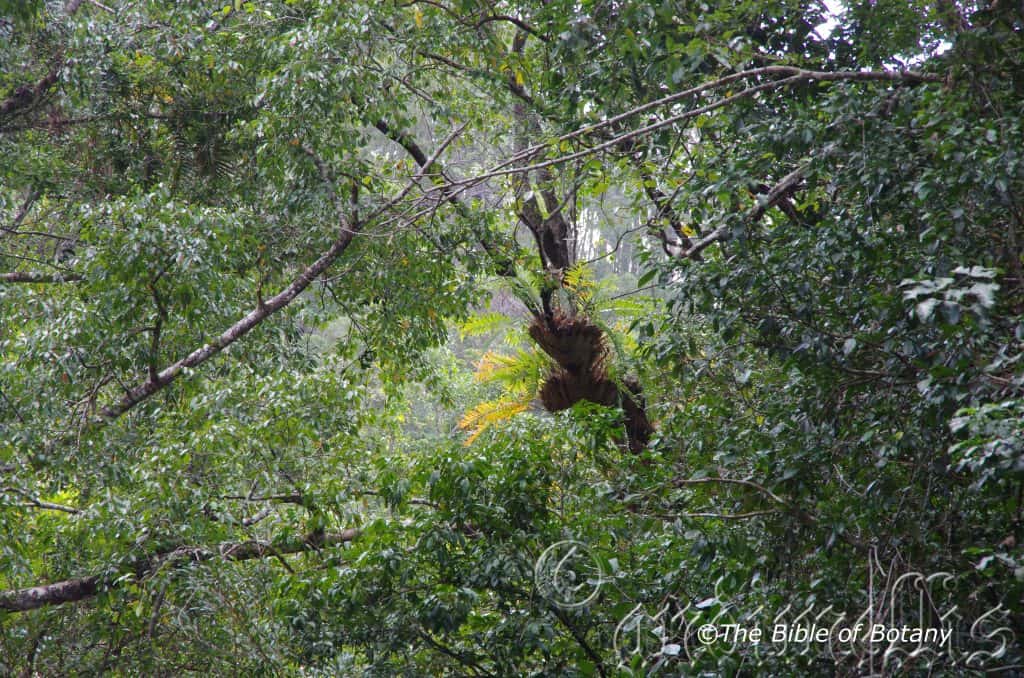
Paluma Range National Park Qld.

Paluma Range National Park Qld.
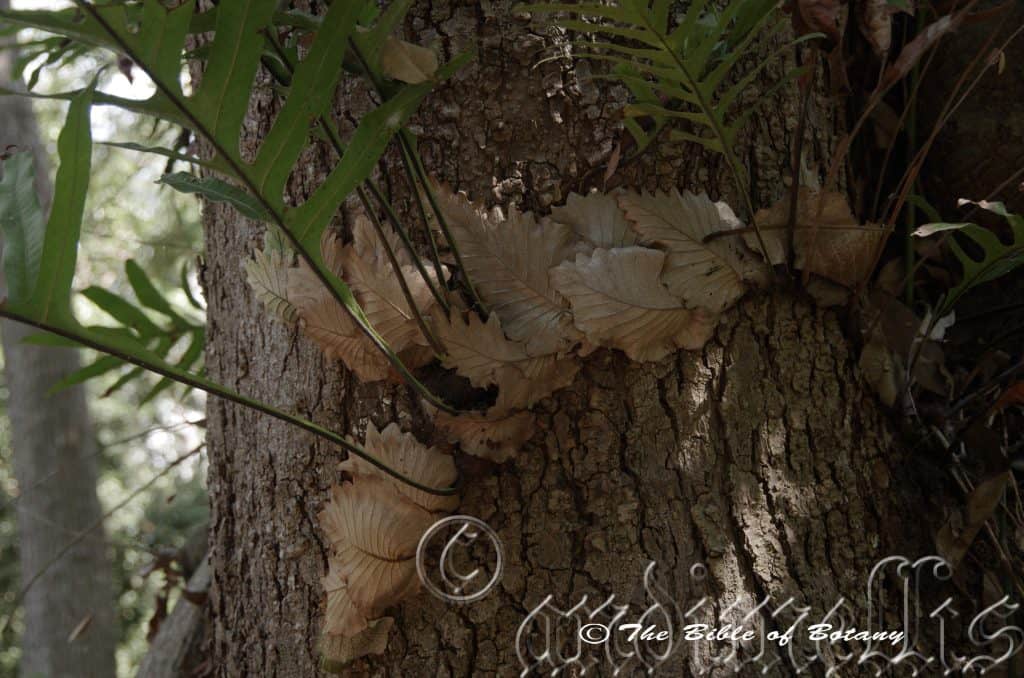
Paluma Range National Park Qld.
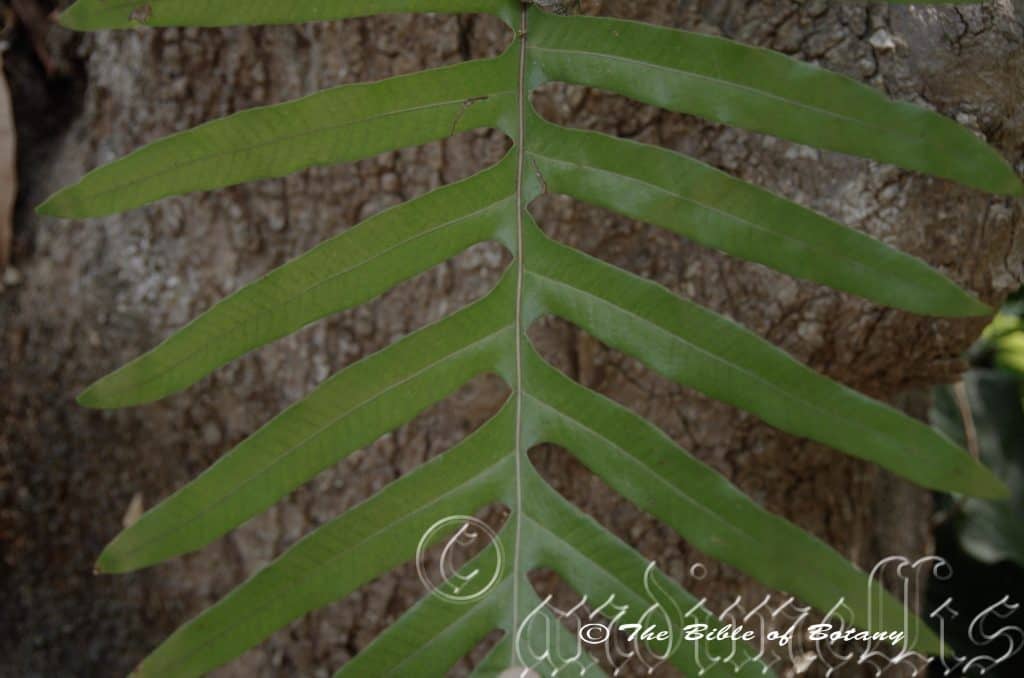
Paluma Range National Park Qld.
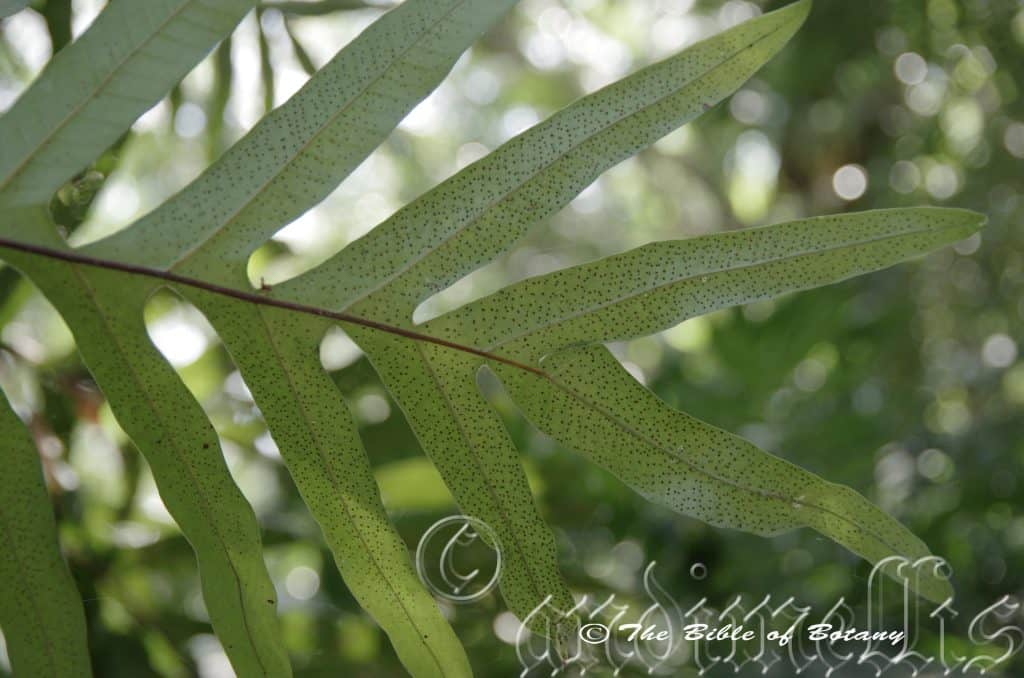
Paluma Range National Park Qld.
Drynaria sparsisora
Classification
Class: Pteridospida
Order: Polypodiales
Family: Polypodiaceae
Subfamily: Drynarioideae
Tribe: Sedeae
Sub Tribe: Sedinae
Genus: From Dryas, which is Ancient Greek for the nymph of the Oak trees in a forest in Greek mythology. It refers to fronds, which resemble the leaves on the European Oak tree or the Drys genus.
Species: From Sparsum, which is Latin for a few or thinly distributed and Sorus, which is Ancient Greek or later Sirus, which is Latin for a heap or cluster of sporangia. It refers to ferns, which produce fewer or far fewer sporangia than other species in the genus.
Common Name: SmallBasket Fern.
Distribution:
Drynaria sparsisora is found south from the Torres Strait Islands in far north Queensland to Fraser Island in central coastal Queensland. It
is mainly found from the coast and on the coastal ranges.
https://avh.ala.org.au/occurrences/search?taxa=Drynaria+sparsisora#tab_mapView
Habitat Aspect Climate:
Drynaria sparsisora prefers light shade, dappled light to full sun. It grows mainly in semi protected areas close to rain forests and wet Eucalyptus forests. The altitude ranges from 10 meters ASL to 800 meters ASL.
The temperature ranges from minus 4 degrees in August to 38 degrees in January.
The rainfall ranges from lows of 900mm to 2800mm average per annum.
Soil Requirements:
Drynaria sparsisora prefers coarse sands to light sandy loams when growing as a terrestrial fern with a thick covering of forest litter when it is grows as a lithophyte on rocks or in the crevices between boulders. It can also be seen growing as an epiphyte in the northern parts of its range in higher rainfall areas. The soils pH ranges from 6pH to 7pH. It does not tolerate waterlogged soils. Non saline soils to slightly saline soils are tolerated.
Height & Spread:
Wild Plants:1000mm to 500mm by 1500mm to hundreds of square meters. Such large clumps are probably more than one plant growing together.
Characteristics:
Drynaria sparsisora has a very short thick creeping rhizome densely covered in long reddish-brown caduceus scales. The rhizome measures 20mm to 50mm in diameter. The scales are narrowing triangular and measure 3mm to 6mm in length by 1.5mm to 2mm in width at the base. The stiff, brown to very dark brown scales have bases that are rounded and appressed, overlapping the next scale. The apexes are abruptly tapering to a narrow acute tip while the margins are paler and are very fine ciliate or lacinate.
Drynaria sparsisora‘s fronds are dimorphic. The nest fronds are short and narrow ovate to orbicular. They measure 110mm to 360mm in length by 110mm to 320mm in width. The slightly lobed to moderately lobed laminas are pale green quickly turning papery brown. The lobe apexes are obtuse.
The fertile fronds are pinnate, erect with pendant apexes and measure 700mm to 1000mm in length by 500mm to 600mm in width including the 300mm to 450mm attenuate rachis. The linear pinnules measure 700mm to 950mm in length by 140mm to 600mm in width. The lobes bases narrow slightly at the base while the apexes are usually acute or acuminate. The concolourous pinnae are grass-green and coriaceous. The oblong lobes are slightly decurrent to within 0.5mm to1mm from the midrib. The pinnae measure 70mm to 330mm in length by 9mm to 60mm in width. The margins are entire usually with a costular nectary in the apex side of the acroscopic pinnae axil.
Drynaria sparsisora‘s reddish brown sori are placed evenly either side of the mid vein.
Confusing Specie:
Drynaria sparsisora’s scales are stiff, narrowed abruptly above the basal third with the apical section being caduceus. The margins are slightly winged and finely lacinate for the entire length. The plants are shorter and smaller overall. The sori are in 2 irregular rows between the adjacent main veins with others being sparsely interspersed.
Drynaria rigida’s fronds are pinnatifid with few broadly adnate lobes. The scales have ciliate hairs along the margins. The sori are superficially scattered or in 2 regular rows between each pair of main veins. It grows further south and in cooler areas where the species overlaps with Drynaria quercifolia.
Drynaria quercifolia‘s scales are soft and are narrowed gradually from base to apex and measure 20mm in length. The scales are finely lacinate near the base and entire for the remainder. The plants are large and rigid. The sori are in 2 regular rows between adjacent main veins. It is the only species found west of the Great Dividing Range in northern Queensland and the Northern Territory and Western Australia.
Wildlife:
Drynaria sparsisora‘s wildlife is unknown to the author.
Cultivation:
Drynaria sparsisora is a beautiful large fern for courtyards, around swimming pools or in the garden where moist lighter conditions prevail. Drynaria sparsisora is excellent for around fish and frog ponds where it can grow to its full potential. It breaks up hard fences and walls giving a pleasant vertical look. If used correctly it can make medium size areas look larger. Some cleaning of spent fronds on a biannual base is necessary and moisture is not required to keep it at its best. It is drought tolerant so the occasional lapse in watering won’t affect them. Too promote a good flush of growth all that is needed is to give them a good soaking with our fertilizer. Apply a normal strength dose of our recommended fertilizer a week later and within two weeks they will be produce a good flush.
It often reaches its full potential of 1500mm in around 5 years year. Do not plant it in the soil but on rocks and between boulders. In the tropics it can be used as an epiphyte where natural rainfall and fogs can supplement its water requirements.
Plants need to be carefully placed and maintained for at least 9 months from planting out on rocks, logs or bricks so that it can attach itself and secure a good root run. Watering weekly after placement if it doesn’t rain and fertilize every month will ensure strong growth.
It is one of the best and properly positioned there is no better fern than the Drynaria species for appearance and beauty in the garden particularly when mixed with Platycerium species, Asplenium Nidus, Asplenium australe or Davallia pyxidata beneath your favourite trees absolutely amazing results can be achieved in a few short years.
Other large ferns that come to mind for strength and character are Acrostichum species, in a wet boggy area and for a hanging fern few anywhere in the world will beat Schellolepis subauriculata, Schellolepis subauriculata var. knightae is particularly striking as is Schellolepis verrucosum. These hanging forms should be planted away from the Drynaria species so that they can be viewed as separate identities displaying their unique beauty.
All the above ferns can have fronds which measure over two meters in length when grown in favourable conditions. Yes you guessed it I am rather partial to ferns.
It is best positioned in a low fork of a larger tree or tied securely to the upper side of a horizontal branch where their fronds can cascade down in full view. When tying them to a branch I like to place a small amount peat between the branch and the rhizomes to help preserve moisture until it is well established. It is rather slow at establishing themselves so patience is required.
Propagation:
Spores: All ferns that are declared rare, vulnerable or endangered are protected by Federal and State Laws and must not be removed from the wild unless you are a land developer, mining company or main Roads department etc. This includes bulbs, roots, leaves and flowers. No part of any plant can be removed from Federal, State or Local Government land without the prior permission of the authority and this includes the spore.
Most people are put off at the thought of growing ferns from spore. Like all plants that produce their offspring from seed or spore the methods are basically the same. Remember nature has been doing this for millions of years and has been very successful. I have had excellent results growing over 200 different species of Australian ferns so don’t be afraid. Give it a go.
Step 1. Select spore from the fern fronds. Wait until the fern is just starting to release its spore. Rinse the fronds under clean running water and dry. This is to wash off any other spores from rogue ferns that may have settled onto the fronds. (There is nothing worse than having common brake or common soft bracken contaminating a prized tree fern or epiphyte.)
Step 2. Place the dry fronds in a clean brown paper bag and keep them in a cool dark place like the linen closet for about a week to ten days before you are ready to sow the spore. The exception to this rule applies to ferns, which produce green spores. These must be sown immediately they are released. Todea Barbara is a good example of a fern, which produces green spore.
Step 3. Take a large ice cream container, a small ice cream container and a clean clear plastic bag large enough to seal the large ice cream container and three or four milk bottle tops.
Step 4. Punch or drill 6 to 10 5mm holes in the bottom of the small ice cream container.
Step 5. Wash both containers, tops and plastic bag so that they are very clean and sterile.
Step 6. Use a clean fine seed raising mi. We used 30mm fine sand, 30mm peat and 30mm perlite and 10mm vermiculite. We used crushed basalt, crusher dust and peat in a 50:50 ratio for epiphytes. Moisten the mix enough that water does not run out when the mix is squeezed between the fingers.
Step 7. Place the moisten mix (Enough to half fill the small ice cream container) in the microwave oven with a large glass of water for 7 or 8 minutes, until the water is boiling. Allow them to cool in the oven. You will need the water later so do not tip it out.
Step 8. Take the brown paper bag out of the linen closet. Shake the bag and remove the fronds. You should have a yellow, brown, black or rarely greenish brown or ochre powder or very fine, small round pin head size spore depending on the specie involved.
Step 9. Remove the mixture from the oven once it has cooled and place it in the small ice cream container and level.
Step 10. Sprinkle the spore sparsely over the mixture in the small ice cream container.
Step 11. Place the milk bottle tops in the large ice cream container with the flat surface facing down. Place the small ice cream container in the large ice cream container so that it is sitting on the milk bottle tops.
Step 12. Remove the water from the microwave and pour it into the larger ice cream container so there is 25mm to 30mm of water in the bottom.
Step 13. Place the ice cream containers in the plastic bag and seal.
Step 14. Place the contents and bag in a warm shady place preferably 50mm to 70mm shade depending on the specie. Shade houses and some window sills are ideal.
Step 15. The surface should turn green within a week to two weeks. The prothallus will then develop. From the prthalus the first true fronds will appear. Wait until the ferns are 20mm to 35mm in height before you attempt to transplant them. Once they are ready open the bag up slightly and allow the air to flow around the little ferns. Every 3 to 5 days open the bag a little further so the ferns get use to their new environment. Allow them a week to two weeks to harden off before you transplant them following the removal of the plastic bag. Carefully prick them out into 50mm standard squat tubes as you would any seedling.
Do not try to transplant them as single plants as they are still a little delicate still.
Once the smaller ones again reach 50mm to 70mm you may wish to divide the stronger and hardier individual plants into smaller clumps in 100mm squat pots.
Fertilize using seaweed, fish emulsion or organic chicken pellets soaked in water on an alternate basis. Fertilize every two months until the plants are established then annually in early September to October to maintain health, vitality and better flowering.
Further Comments from Readers:
Hi reader, it seems you use The Bible of Botany a lot. That’s great as we have great pleasure in bringing it to you! It’s a little awkward for us to ask, but our first aim is to purchase land approximately 1,600 hectares to link several parcels of N.P. into one at The Pinnacles NSW Australia, but we need your help. We’re not salespeople. We’re amateur botanists who have dedicated over 30 years to saving the environment in a practical way. We depend on donations to reach our goal. If you donate just $5, the price of your coffee this Sunday, We can help to keep the planet alive in a real way and continue to bring you regular updates and features on Australian plants all in one Botanical Bible. Any support is greatly appreciated. Thank you.
In the spirit of reconciliation we acknowledge the Bundjalung, Gumbaynggirr and Yaegl and all aboriginal nations throughout Australia and their connections to land, sea and community. We pay our respect to their Elders past, present and future for the pleasures we have gained.
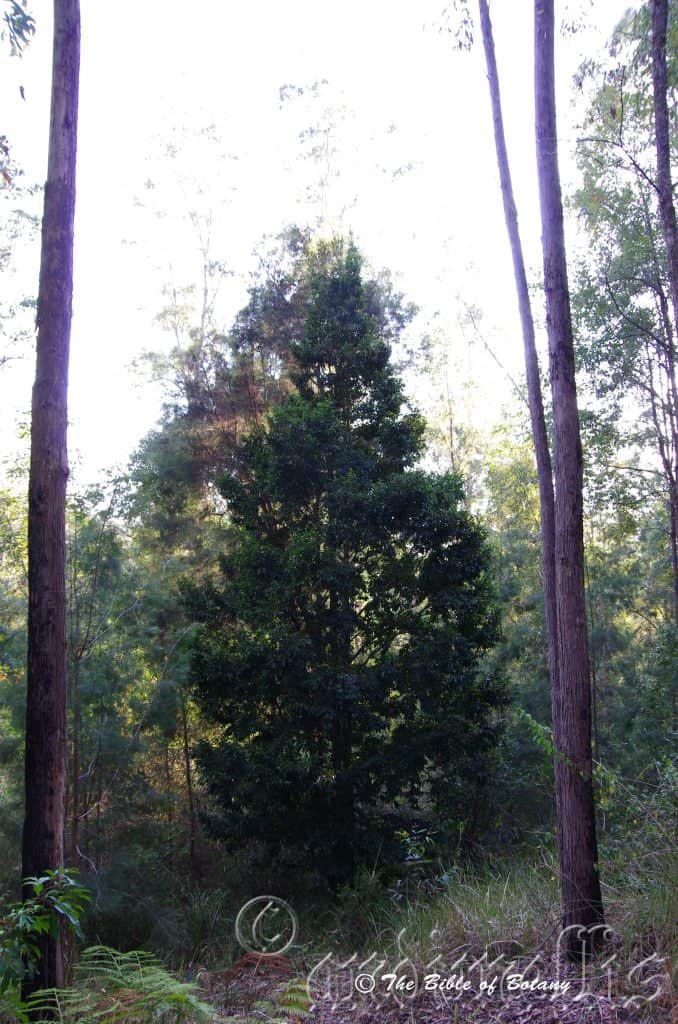
Kendall NSW
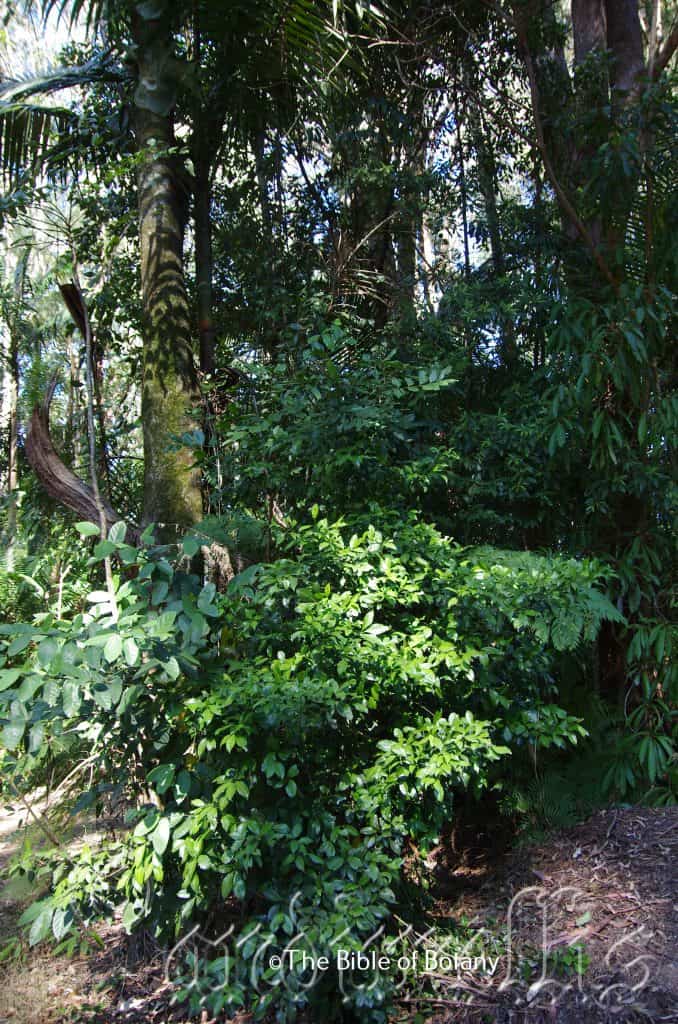
Washpool National Park NSW

Washpool National Park NSW
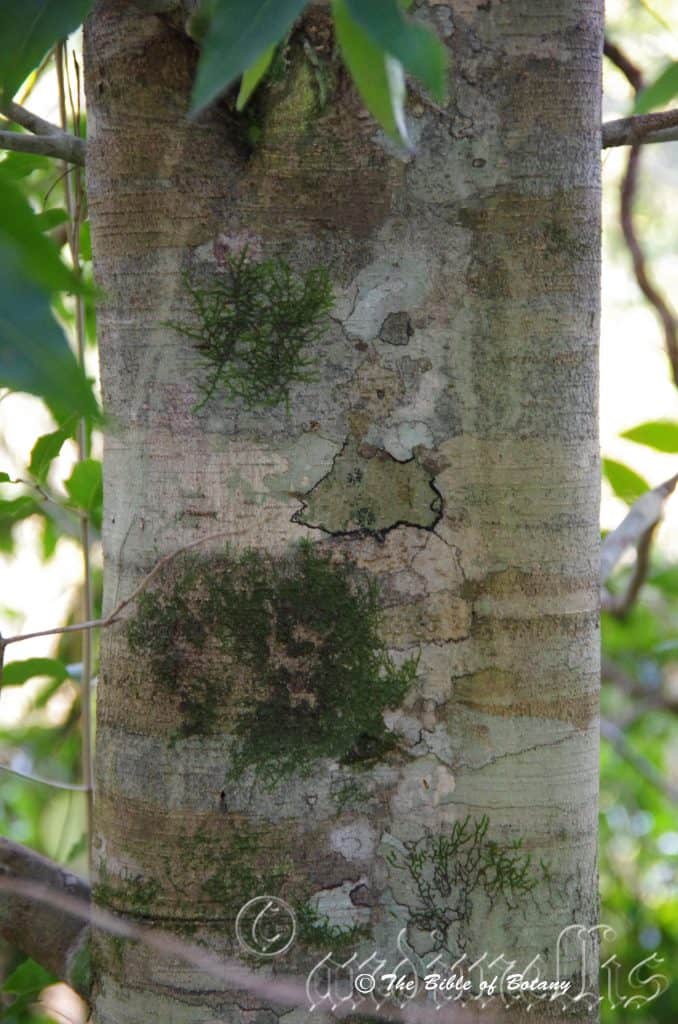
Kendall NSW
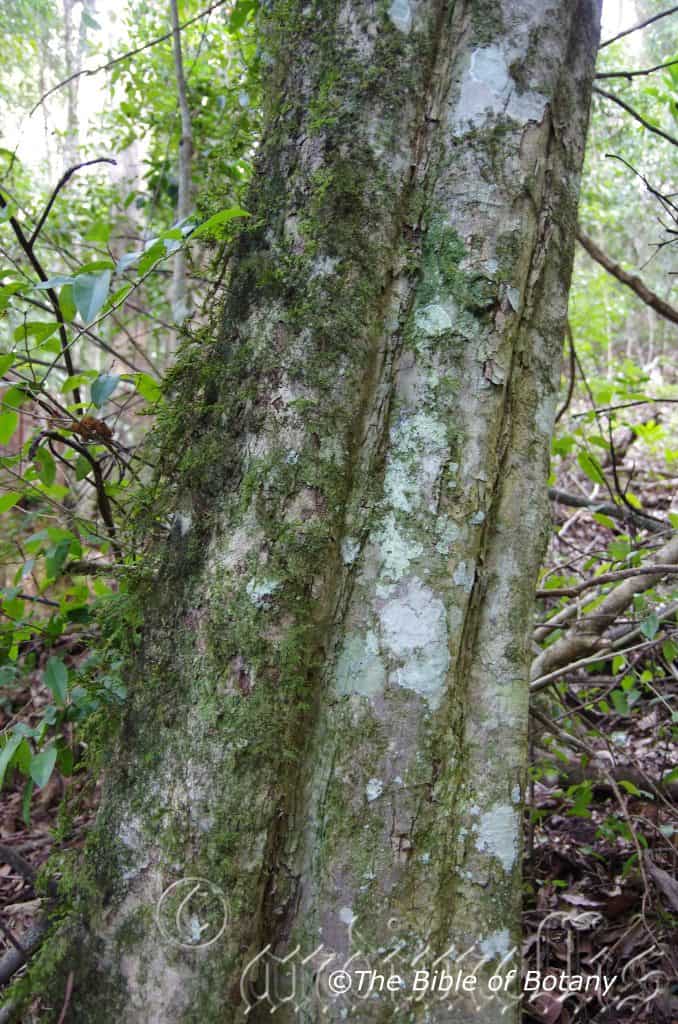
Border Ranges National Park NSW
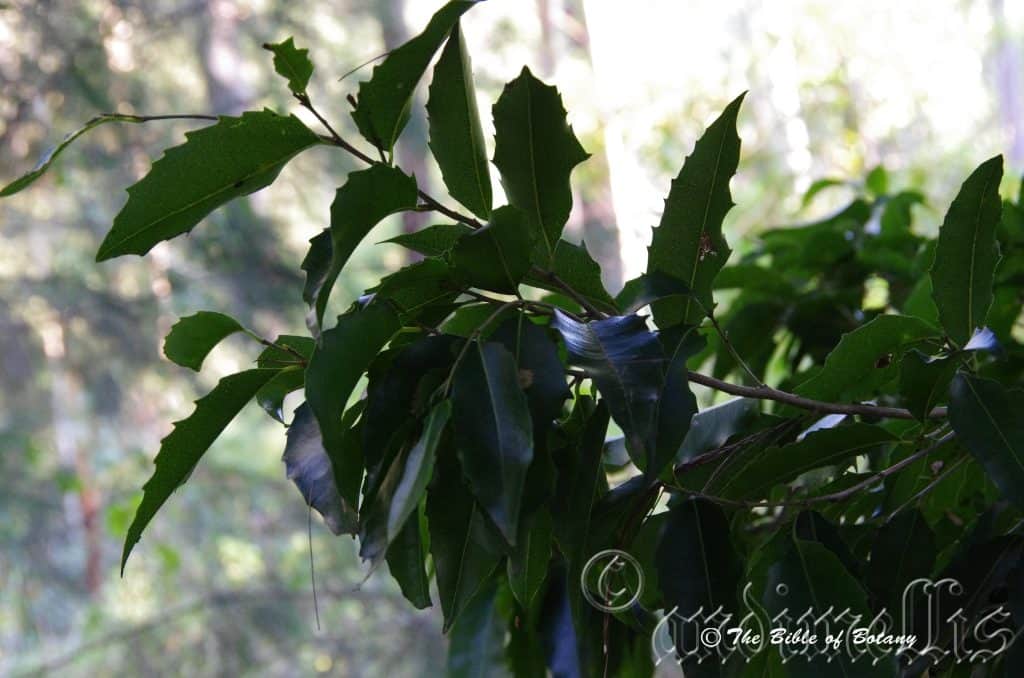
Kendall NSW
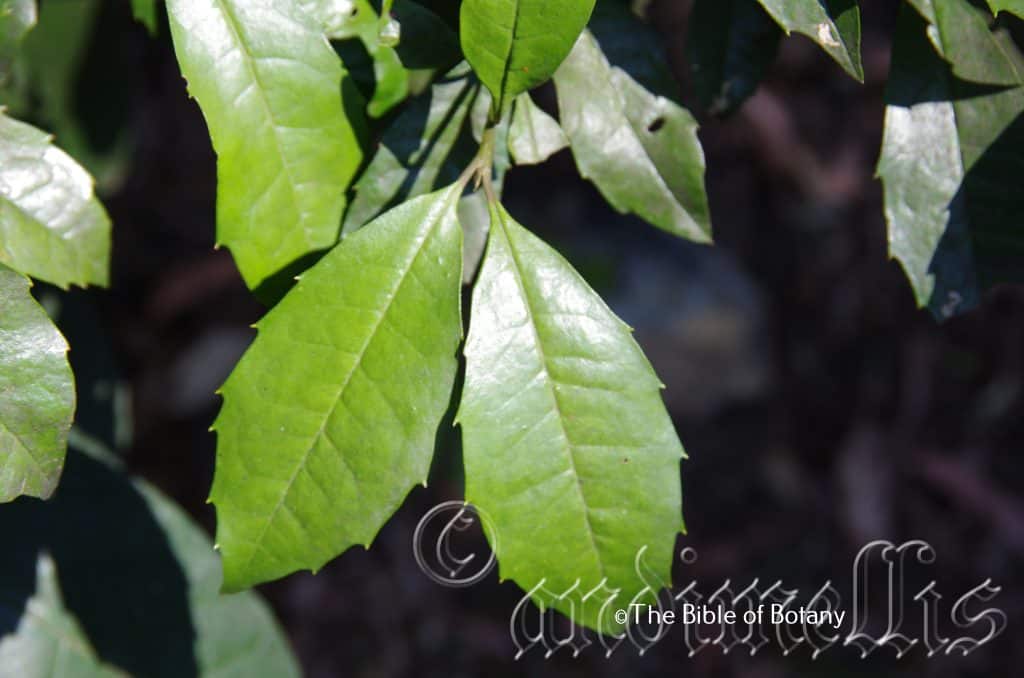
Washpool National Park NSW
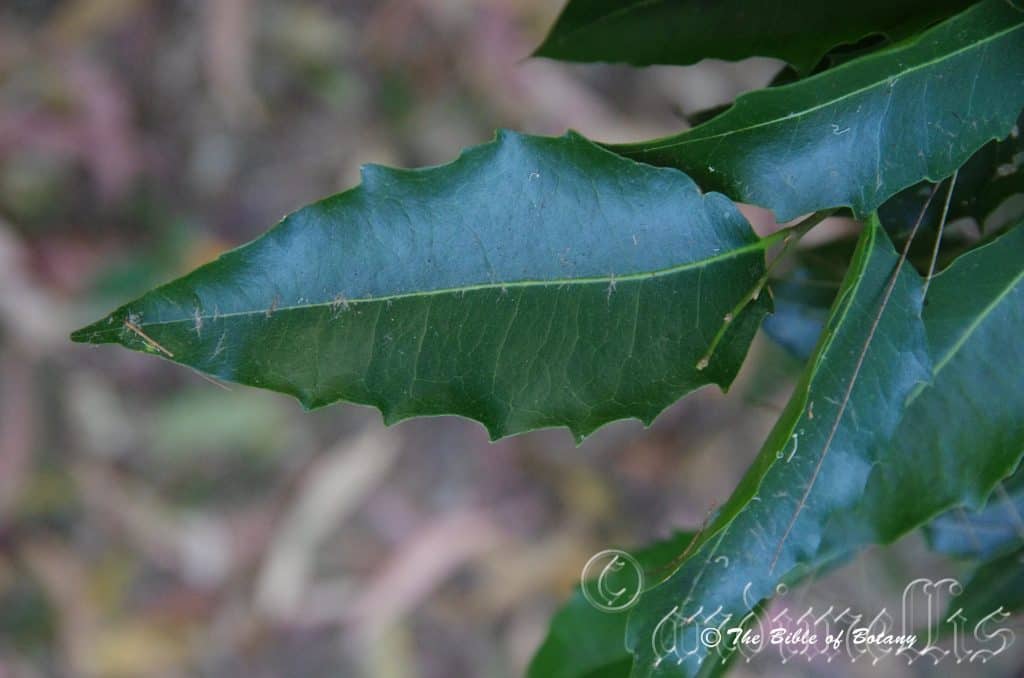
Kendall NSW

Washpool National Park NSW
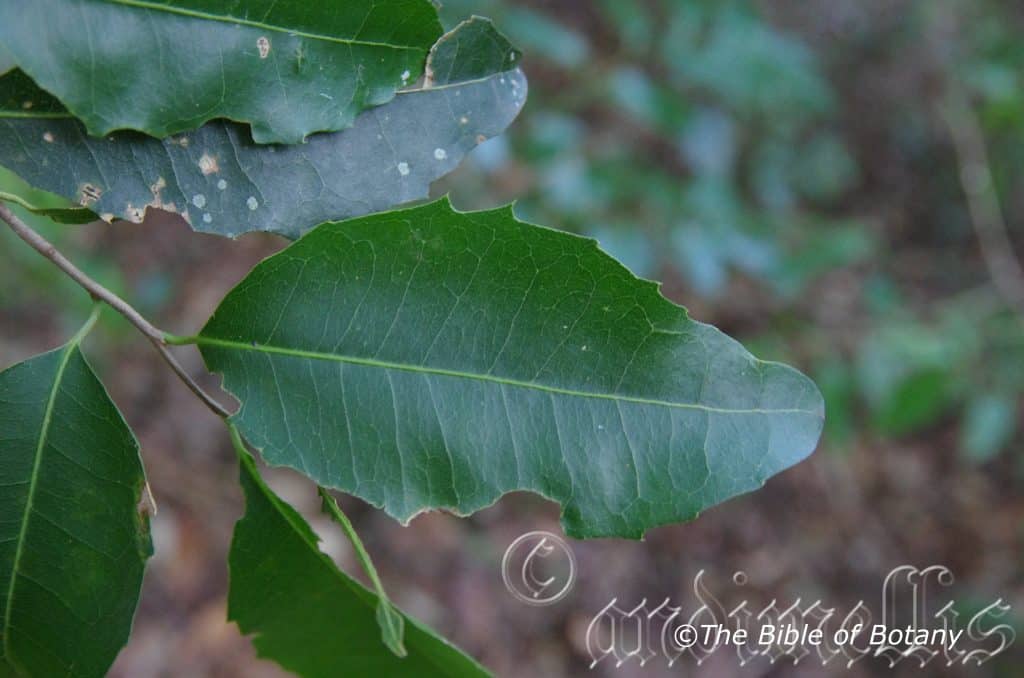
Border Ranges National Park NSW
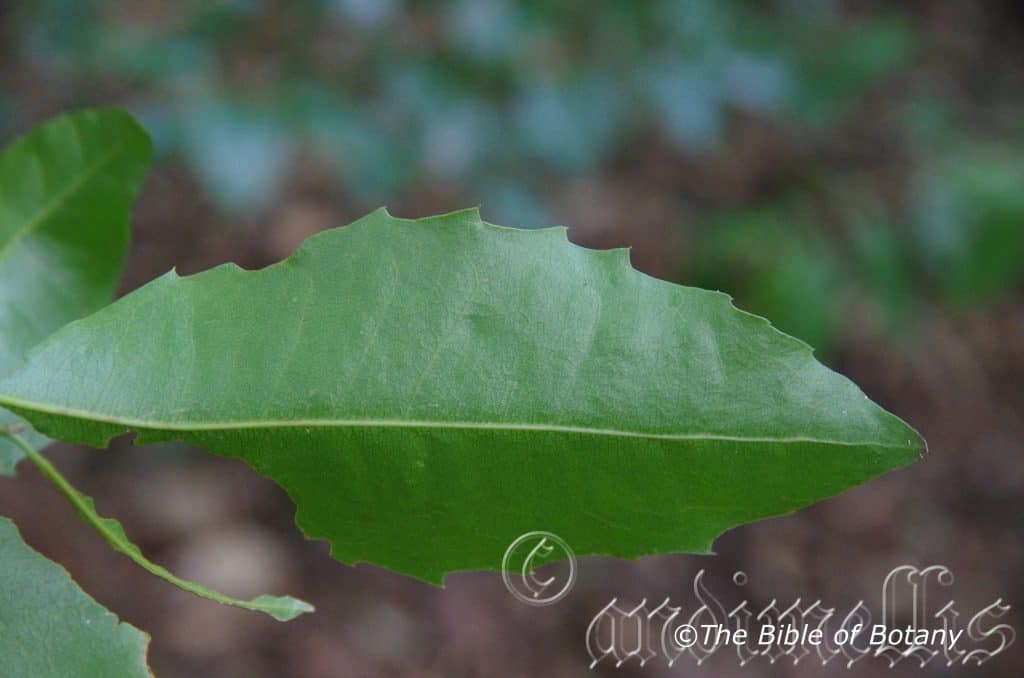
Border Ranges National Park NSW
Drypetes deplanchei
Classification
Unranked: Eudicots
Unranked: Rosids
Order: Malpighiales
Family: Putranjivaceae
Genus: From Dryas, which is Ancient Greek for the nymph of the Oak trees in a forest in Greek mythology and Agapetes, which is Ancient Greek for beloved or admired. It refers to the general beauty of the trees, appearing like an Oak tree and that they deserve more admiration.
Species: Is named in honour of Emile Deplanche; 1824-1874, who was a French naval surgeon, botanist and entomologist.
Common Name: Yellow Tulipwood or Grey Bark or White Myrtle.
Distribution:
Drypetes deplanchei is found east from the Kimberley coast Islands and the Kimberley Ranges in north west, Western Australia through the top end of the Northern Territory to the Calvert River in the east of the Northern Territory.
It is found south from Torres Strait Islands in far north Queensland to Dungog on the Hunter River in central coastal New South Wales. It is also found on Lord Howe Island.
https://avh.ala.org.au/occurrences/search?taxa=Drypetes+deplanchei#tab_mapView
Habitat Aspect Climate:
Drypetes deplanchei prefers full sun to dappled shade. It grows in littoral rainforest, drier rainforest adjacent to well-developed rainforests, riparian rainforests and monsoonal rainforests in the far north and west of the country. The altitude ranges from 10 meters ASL to 400 meters ASL.
The temperatures range from minus 2 degrees in July to 42 degrees in January.
The rainfall ranges from lows of 750mm to 3200mm average per annum.
Soil Requirements:
Drypetes deplanchei prefers better quality soils from sandy loams to medium gravelly clays. The soils are derived from decomposed sandstones, brown basalts, metamorphic rocks, shales or sedimentary deposits. The soils pH ranges from 5pH to 7pH. It does not tolerate waterlogged soils though annual inundations are frequent where they grow on alluvial flats or riparian gullies. Non saline soils to very saline soils are tolerated.
Height & Spread:
Wild Plants: 10m to 25m by 6m to 16m
Characteristics:
Drypetes deplanchei grows as large bushy shrub or a small tree. The pale grey bark is deeply furrowed and corky to the main branches. The trunk is often shallowly fluted at the base on young trees and up to half the length of the bole on older trees. The bark is pale grey, pustular and scaly to flaky on older trees. The bark is decorticating on mature trees in irregular patches leaving depressions and protuberance which gives the trunk a mottled appearance. The stems are thick, green rapidly turning pale grey, glabrous and sparsely covered in paler lenticels.
The elliptical to obovate leaves of Drypetes deplanchei measure 50mm to 150mm in length by 10mm to 55mm in width. The minute triangular stipules measure 1mm in length. The petioles measure 2mm to 10mm in length. The bases are cuneate while the apexes are obtuse-acute. The discolourous laminas are sea-green, coriaceous and glabrous on the upper laminas while the lower laminas are slightly paler. The laminas are slightly convex or recurve slightly upwards from the mid vein to the margins and decurve slightly from midway to the apex. The mid vein is prominent on the lower lamina and is distinctly visible on the upper lamina. The lateral veins are slightly prominent on the lower lamina forming loops well inside the margin and are not visible on the upper lamina. The leaf margins are entire.
The juvenile and coppice leaf margins are prominently toothed.
The male inflorescences of Drypetes deplanchei are born on short racemes from the leaf axils. The racemes on the male flowers measure 10mm to 15mm in length. The pale lime-green flowers measure 4mm to 6mm in diameter. The pedicels measure 5mm to 8mm in length. The 4 pale green petals measure 2mm to 3.5mm in length by 2mm to 3.5mm in width.
The 5 or 11 pastel green filaments are positioned around the cupuliform disc. The filaments measure 0.4mm to 0.8mm in length while the creamy yellow anthers measure 0.8mm to 1.5mm in length by 0.5mm to 1mm in width.
The female inflorescences of Drypetes deplanchei are born in small clusters of 3 or 4 from the leaf axils. The pale lime-green to pale yellow-green flowers measure 3mm to 4mm in length by 4mm to 6mm in diameter. The pedicels measure 3mm to 10mm in length. The 4 pale lime-green petals measure 2.2mm to 3.6mm in length by 2mm to 3mm in width. The pastel green style is reduced to a stump while the bilobed stigma is appressed on the apex of the cupuliform ovary. The stigmas measure 1mm to 1.5mm in length. Drypetes deplanchei flowers from late September to late November.
The fruits of Drypetes deplanchei are indehiscent globular to ellipsoidal drupes. The glabrous drupes measure 10mm to 18mm in length by 9mm to 11mm in diameter. The green, fleshy fruits turn orange to orange-red or red when ripe. The creamy coloured seeds measure 8mm to 12mm in length by 7mm in diameter. The berries ripen from February to April.
Wildlife:
Drypetes deplanchei fruits are eaten by the Fig Bird, Green cat bird, Lewin Honeyeater and Top Knot pigeon so are probably consumed by most fruit eating birds.
The edible fruits have a small amount of flesh which is rather bland.
Cultivation:
Drypetes deplanchei is a great plant for the bush garden, dry rainforest garden or a specimen tree in a park like scenario. It is relatively fast growing and hardy on most soils in cultivation. It can cope with temperatures as low as 2 degrees and up to 42 degrees once established. It is drought resistant and can cope with the occasional immersion where periodic down pours may flood the land.
Add to the above, if it is given adequate moisture, plenty of mulch for moisture retention and an even soil temperature, applying native fertilizers on a regular basis the plants will respond with good flowering and fruiting over a longer period. Care must be given when fertilizing as strong nitrogen fertilizers will lead to too rapid a growth and the trees become top heavy and are prone to wind damage and uprooting.
Its deep green foliage and dense canopy is a distinctive feature along with the furrowed bark on mature trees. Cultivated trees are very dense and hold their leaves for a longer period making them more attractive than its wild parents. It will grow from 10 meters to 15 meters in height by 8 meters to 13 meters in diameter. Plantings of 3 to 7 trees mixed with other small rainforest trees like Cupaniopsis anachariodes, Hymenosporum flavum and Harpullia pendula or Harpullia arborea in close proximity contrast beautifully because of the bark and foliage being so different in colour and textures.
The trees would make very good accent trees in front of low set or 2 story commercial buildings, industrial sheds or school buildings and school yards where they will break up hard rigid architectural lines and give warmth and breadth to the building.
Try using it in large courtyards, where the only other feature is a large rock, stump or formal or informal frog or fish pond. Next to such features their large deep green leaves and colourful fruits are never overpowering but certainly noticed. It would be ideal in commercial entrances and foyers to break the ice and give a feeling of business as usual but somehow make the business more relaxing.
Propagation:
Seeds: Drypetes deplanchei‘s seeds do not require treatment before sowing. Sow fresh seeds directly into a seed raising mix and cover with 5mm of the mix. When the seedlings are 25mm to 50mm tall, prick them out and plant them into 50mm native tubes using a seed raising mix.
Once the seedlings reach 150mm to 200mm in height plant them out into their permanent position. Mass plantings can be achieved by planting them at 4 meter to 6 meter centers.
Fertilize using seaweed, fish emulsion or organic chicken pellets soaked in water on an alternate basis. Fertilize every two months until the plants are established then annually in early September to October to maintain health, vitality and better flowering.
Further Comments from Readers:
Hi reader, it seems you use The Bible of Botany a lot. That’s great as we have great pleasure in bringing it to you! It’s a little awkward for us to ask, but our first aim is to purchase land approximately 1,600 hectares to link several parcels of N.P. into one at The Pinnacles NSW Australia, but we need your help. We’re not salespeople. We’re amateur botanists who have dedicated over 30 years to saving the environment in a practical way. We depend on donations to reach our goal. If you donate just $5, the price of your coffee this Sunday, We can help to keep the planet alive in a real way and continue to bring you regular updates and features on Australian plants all in one Botanical Bible. Any support is greatly appreciated. Thank you.
In the spirit of reconciliation we acknowledge the Bundjalung, Gumbaynggirr and Yaegl and all aboriginal nations throughout Australia and their connections to land, sea and community. We pay our respect to their Elders past, present and future for the pleasures we have gained.
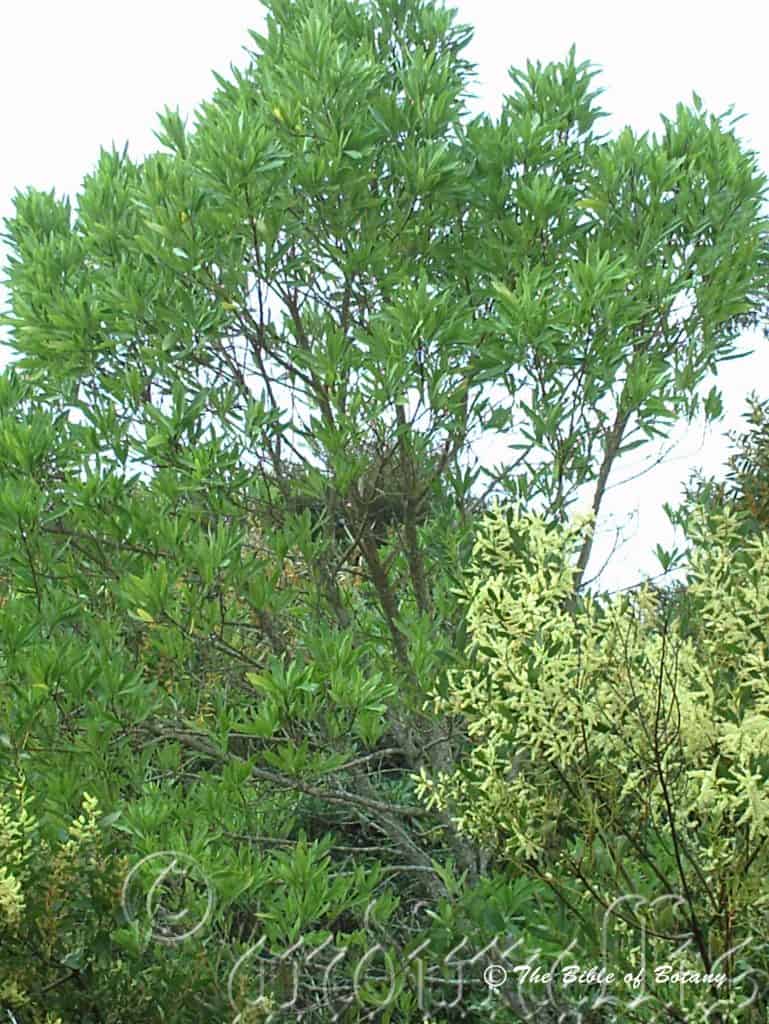
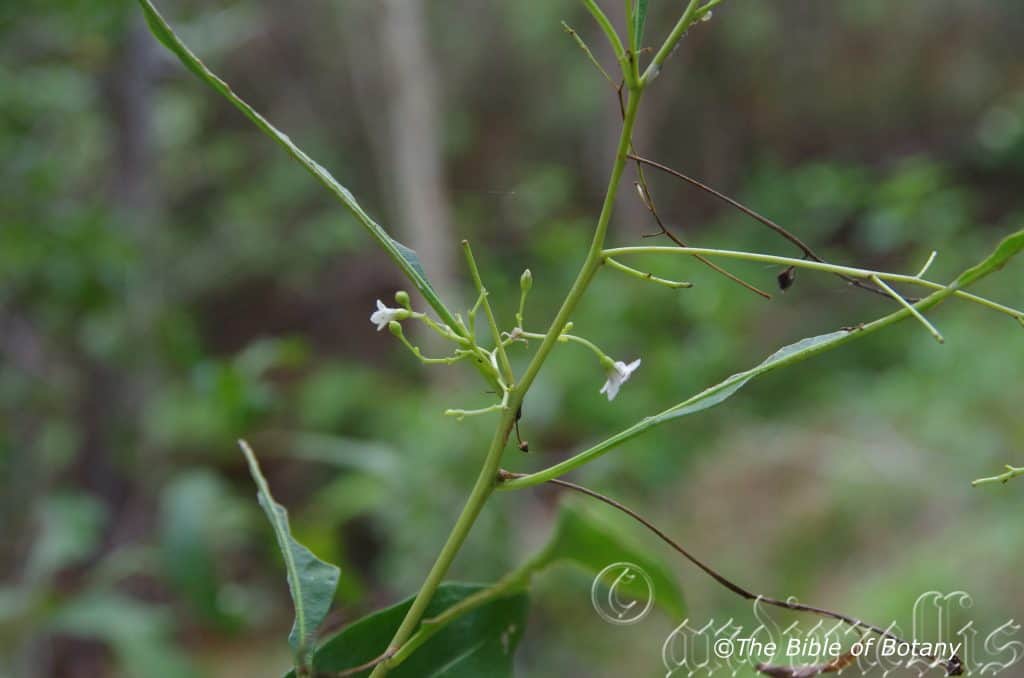
The Pinnacles NSW
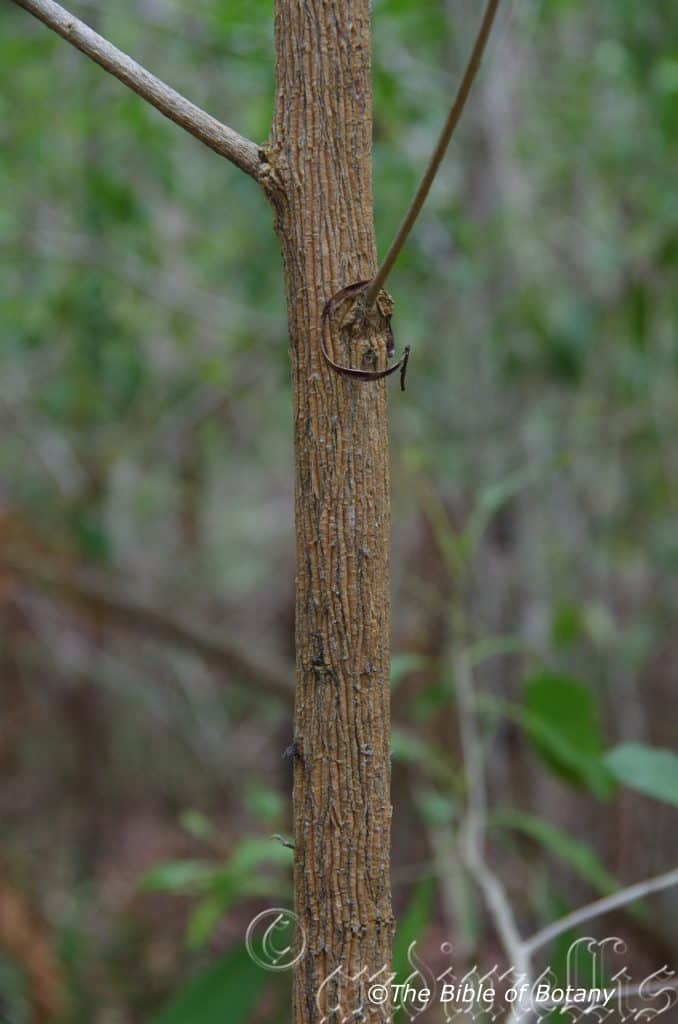
The Pinnacles NSW
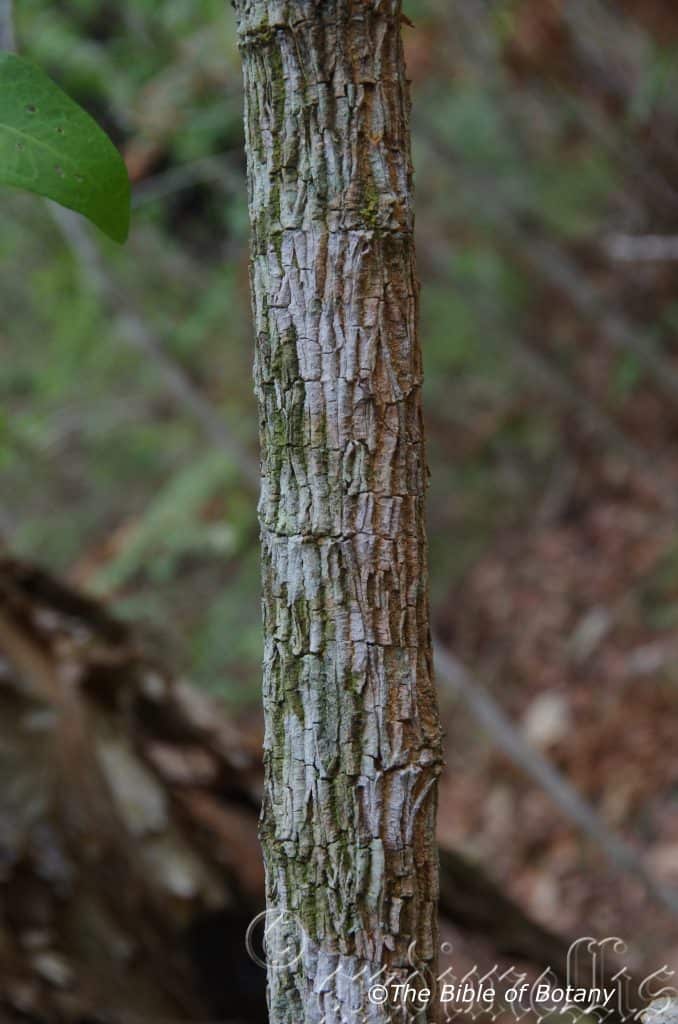
The Pinnacles NSW
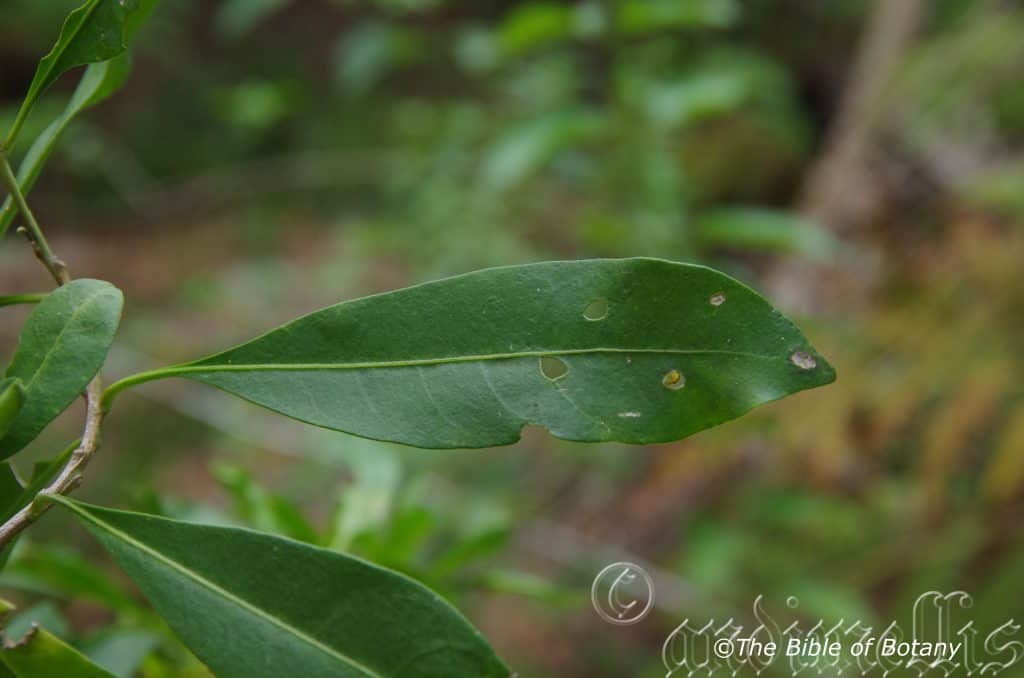
The Pinnacles NSW
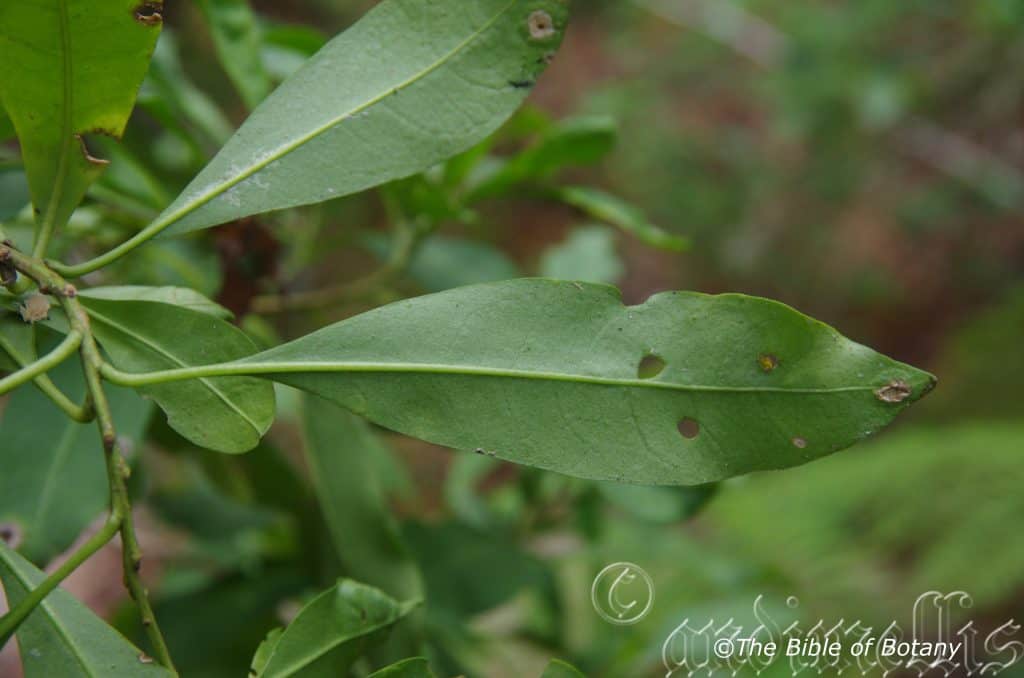
The Pinnacles NSW
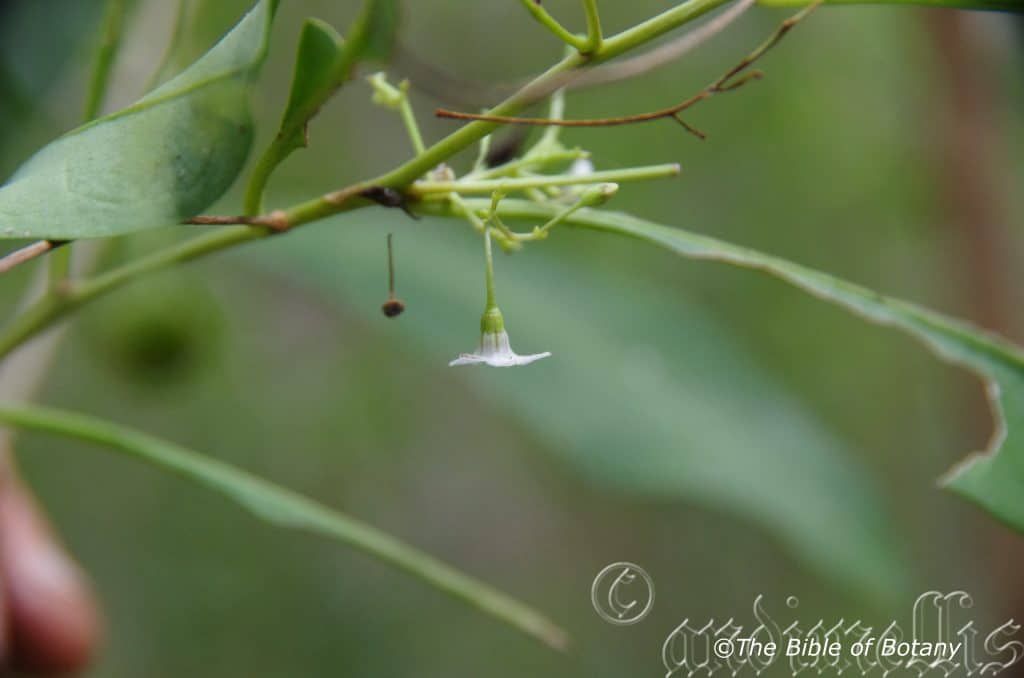
The Pinnacles NSW
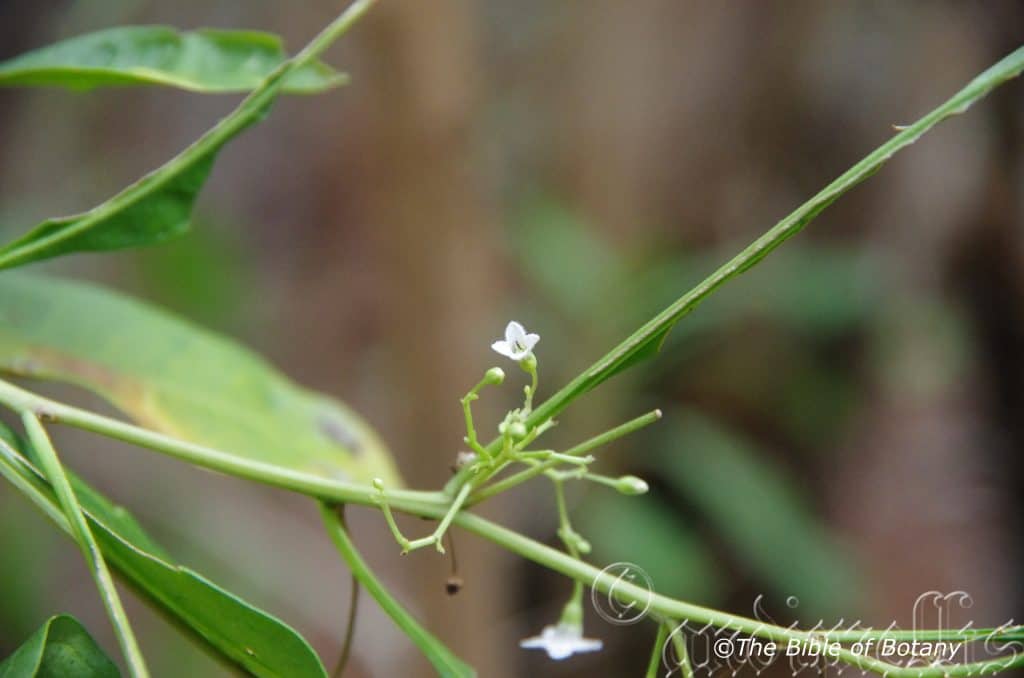
The Pinnacles NSW
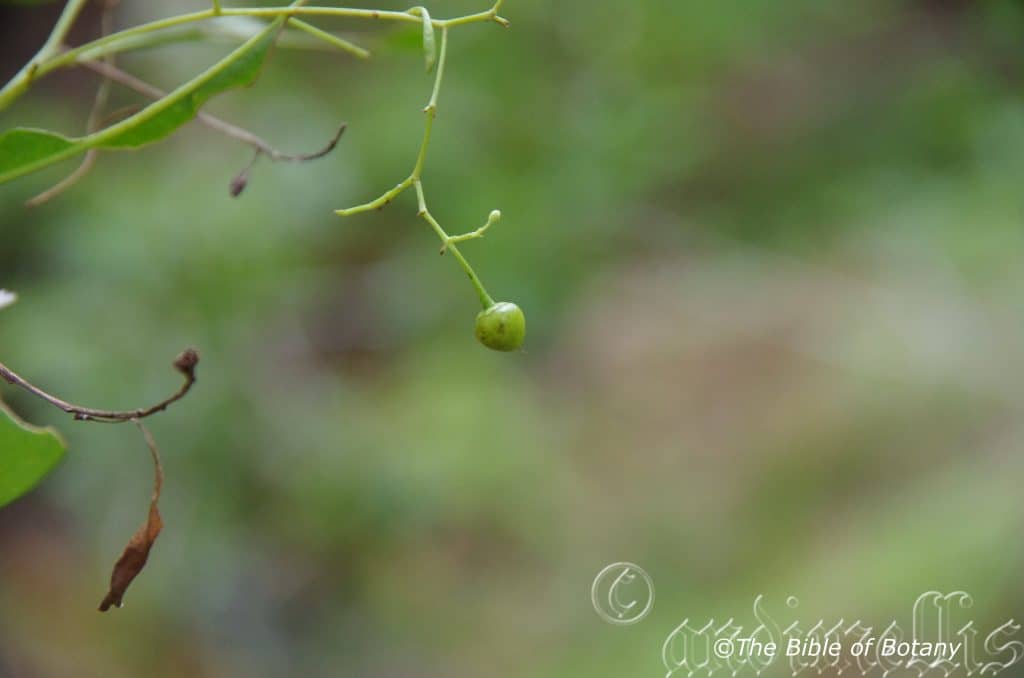
The Pinnacles NSW
Duboisia myoporoides
Classification
Unranked: Eudicots
Unranked: Asterids
Order: Solanales
Family: Solanaceae
Genus: Is named in honour of Charles Du Bois; 1656-1740, who was a British merchant and patron of botany.
Species: From Myo, which is Ancient Greek for to close or be closed, Poros, which is Ancient Greek for a pore or vacuole and Eidos/Oides, which is Ancient Greek for alike or similar to. It refers to plants, especially the leaves which resemble those of the Myoporum genus.
Common Name: Corkwood.
Distribution:
Duboisia myoporoides is found south from near Cooktown in north, Queensland to Batemans Bay in the south of New South Wales.
https://avh.ala.org.au/occurrences/search?taxa=Duboisia+myoporoides#tab_mapView
Habitat Aspect Climate:
Duboisia myoporoides prefers full sun to dappled shade. It grows in moist Eucalypt forests and areas adjacent to all types of rainforests. The altitude ranges from 8 meters ASL to 960 meters ASL.
The temperatures range from minus 2 degrees in July to 36 degrees in January.
The rainfall ranges from lows of 900mm to 3200mm average per annum.
Soil Requirements:
Duboisia myoporoides prefers better quality sandy loams to medium gravelly clays. The soils are derived from decomposed sandstones, basalts or shales. The soils pH ranges from 5pH to 6.5pH. It does not tolerate waterlogged soils though some seasonal short term inundations are tolerated on alluvial flats or riparian gullies. None saline to moderately saline soils are tolerated.
Height & Spread:
Wild Plants: 10m to 20m by 6m to 8m
Characteristics:
Duboisia myoporoides grows as large bushy shrub or a small tree. The creamy pale grey bark is deeply furrowed and corky to the main branches. The bark on older trees has a mosaic patch work of lichens and in higher rainfall areas may have mosses growing on them. Stems are thin, off white to pale fawn and glabrous while the branchlets are pale green to mid grass-green with purple markings.
The elliptical to obovate leaves of Duboisia myoporoides measure 40mm to 150mm in length by 12mm to 40mm in width. The leaves are sessile or on a short petiole to 3mm in length. The bases are cuneate to slightly oblique while the apexes are acuminate to broad acuminate. The discolourous laminas are pale to mid grass-green and glabrous on the upper lamina while the lower lamina is slightly paler. The laminas are flat or curve slightly upwards from the mid vein. The mid vein is prominent on the lower lamina and is distinctly visible on the upper lamina. The leaf margins are entire.
Inflorescences of Duboisia myoporoides are broad pyramidal panicles born terminally or from the final leaf axils. The flowers are white with purple markings inside the corolla. The petiole measures 3mm to 4mm in length. The green calyx measures 1mm to 3mm in length with the lobes measuring 0.5 to 1mm in length. The corolla measures 4mm to 7mm in length by 2mm to 4mm in diameter at the apex. The white corollas are finely streaked purple on the inner surface. The lobes measure 2mm to 4mm in length. It is oblong with a broadly acute apex.
The 4 or at times 5 white stamens measure 2mm to 3mm in length. The ovary is sparsely covered in short white sericeous hairs. The style which has a distinctly bumpy stigma measures 1.5mm to 2mm in length. Duboisia myoporoides flowers from late July through to early September.
The fruits are indehiscent globose berries. The berries measure 4.5mm to 8mm in length by 4mm to 7mm wide. The green sterile fruits turn yellow before dropping while fertile fruits turn a purple-black. The reddish brown seeds in each fruit. The pedicel lengthens to 6mm to 12mm in length by the time the berries ripen.
Wildlife:
Duboisia myoporoides leaves are eaten by several butterfly specie despite being toxic to warm blooded animals. This includes Coenotes eremophylae. The Figbird Sphecotheres vieilloti, Green Catbird Ailuroedus crassirostris, Lewin Honeyeater Meliphaga lewinii, and Top Knot pigeon Lopholaimus antarcticus, have been seen eating the fruits of Duboisia myoporoides despite being toxic to domestic fowls and other birds.
Cultivation:
Duboisia myoporoides is a plant for the bush garden as it is fast growing and hardy on most soils in cultivation. It can cope with temperatures as low as minus 5 degrees and up to 42 degrees once established. It is drought resistant and can cope with the occasional immersion where periodic down pours may flood the land.
Add to the above, if it is given adequate moisture, plenty of mulch for moisture retention and an even soil temperature, applying native fertilizers on a regular basis the plants will respond with good flowering over a longer period. Care must be given when fertilizing as strong nitrogen fertilizers will lead to too rapid a growth and the trees become top heavy and are prone to wind damage and uprooting.
It often reaches its full potential in just 3 years and flower from the third year. Its pale green foliage is a distinctive feature along with the deeply furrowed corky bark. Cultivated trees are very dense and hold their leaves for a longer period making them more attractive than their wild parents. The tree develops a denser canopy and are smaller growing to around 8 meters to 12 meters by 6 meters in diameter for a tree or can be pruned early to develop a large shrub some 4 meters in height by 5 meters in diameter. Plantings of three or four trees in close proximity contrast beautifully because of the bark and foliage being so different in colour and texture.
The leaves and fruits are toxic to humans and produce the alkaloid tropane which is used commercially to produce scopolamine. Scopolamine is used in the manufacturing of motion sickness, some ulcer treatments and morning sickness tablets. Because of the toxicity care should be taken when planting where children can eat the berries. No deaths have been reported as the leaves and fruits are too bitter to consume however young children may swallow the fruits. Poisoning is similar to atropine poisoning with muscle convulsions, diarrhoea fast or erratic heart beat and eye dilation and fixed pupil positions. If suspected poisoning occurs seek medical advice immediately.
This is one of the best small trees for small epiphytic orchid and fern enthusiasts. The bark is excellent for small epiphytic orchids that require a little more moisture or have very fine roots. The deeply furrowed corky bark offers a large surface area and channels water down to the orchids even in light showers.
Propagation:
Seeds: Duboisia myoporoides‘ seeds do not require treatment before sowing. Sow fresh seeds directly into a seed raising mix and cover with 5mm of the mix. When the seedlings are 25mm to 50mm tall, prick them out and plant them into 50mm native tubes using a seed raising mix.
Fertilize using seaweed, fish emulsion or organic chicken pellets soaked in water on an alternate basis. Fertilize every two months until the plants are established then annually in early September to October to maintain health, vitality and better flowering.
Further Comments from Readers:
Hi reader, it seems you use The Bible of Botany a lot. That’s great as we have great pleasure in bringing it to you! It’s a little awkward for us to ask, but our first aim is to purchase land approximately 1,600 hectares to link several parcels of N.P. into one at The Pinnacles NSW Australia, but we need your help. We’re not salespeople. We’re amateur botanists who have dedicated over 30 years to saving the environment in a practical way. We depend on donations to reach our goal. If you donate just $5, the price of your coffee this Sunday, We can help to keep the planet alive in a real way and continue to bring you regular updates and features on Australian plants all in one Botanical Bible. Any support is greatly appreciated. Thank you.
In the spirit of reconciliation we acknowledge the Bundjalung, Gumbaynggirr and Yaegl and all aboriginal nations throughout Australia and their connections to land, sea and community. We pay our respect to their Elders past, present and future for the pleasures we have gained.

South West Townsville Qld.

South West Townsville Qld.

South West Townsville Qld.

South West Townsville Qld.
South West Townsville Qld.
Dubouzetia saxatilis
Classification
Clade: Tracheophytes
Clade: Angiosperms
Clade: Eudicots
Order: Rosids
Family: Elaeocarpaceae
Genus: Dubouzetia is unknown to the author.
Species: From Saxum, which is Latin for a rock or rocky. It refers to the plant‘s habitat being very rocky.
Common Name:
Distribution:
Dubouzetia saxatilis is restricted to a small area south west of Townsville in far north eastern Queensland.
https://avh.ala.org.au/occurrences/search?taxa=Dubouzetia+saxitilis#tab_mapView
Habitat Aspect Climate:
Dubouzetia saxatilis prefers full sun to dappled shade. It grows on steep rhyolitic cliff faces. The altitude ranges from 320 meters ASL to 360 meters ASL.
The temperatures range from 8 degrees in July to 40 degrees in January.
The rainfall ranges from lows of 900mm to 1145mm average per annum.
Soil Requirements:
Dubouzetia saxatilis prefers to grow on steep rhyolitic cliffs. The soils pH ranges from 5pH to 6pH. It does not tolerate waterlogged soils. Only none saline soils are tolerated.
Height & Spread:
Wild Plants: 0.5m to 1m by 1m to 2m
Characteristics:
Dubouzetia saxatilis grows as small open shrub. The terete stems are pale yellowish-green and moderately to densely covered in short, soft, white pubescent hairs.
The spirally placed broad elliptical to obovate leaves of Dubouzetia saxatilis measure 30mm to 70mm in length by 15mm to 30mm in width. The terete thick petioles are glabrous to sparsely covered in short, soft, white pubescent hairs and measure 5mm to 8mm in length. The petioles bend 90 degrees at the base of the leaf. The bases are broad ovate almost truncate, while the apexes are broad acute. The concolourous laminas are deep green, glossy and glabrous on the upper lamina while the lower lamina is dull to semi glossy and sparsely covered in short, soft, white pubescent hairs. The laminas are flat from the mid vein. The yellowish mid vein is distinctly visible on the upper lamina, while the mid vein and the 7 to 9 pairs of lateral veins are prominent on the lower lamina and sparsely covered in short, soft, white pubescent hairs. The lateral veins loop inside the margin. The leaf margins are irregularly crenate and at times are undulating. The old leaves turn red before falling.
Inflorescences of Dubouzetia saxatilis are generally 1 or 2 small cymes of 3 individual flowers along the stems The terete pale yellow-green petioles measures 15mm to 20mm in length. The 5 white elliptical calyxes measures 4mm to 6mm in length by 3 to 5mm in width. The 5 white, bell-shaped petals measure 8mm to 12mm in length by 5mm to 7.5mm in width.
The 5 white stamens have a brownish anther and measure 9mm to 11mm in length. The white style has a linear stigma and measures 10mm to 14mm in length. Dubouzetia saxatilis apparently flowers several times a year. My photos were taken in August.
The fruit is a thin walled capsule. The capsules measure 9mm to 11mm in length and have 3 or 4 lobes.
Wildlife:
Dubouzetia saxatilis‘s wildlife is unknown to the author.
Cultivation:
Very little is known of how it handles cultivation yet reports indicate it maybe problemsome under garden conditions with many dying suddenly.
Propagation:
Seeds: Dubouzetia saxatilis‘s propagation is not known.
Fertilize using seaweed, fish emulsion or organic chicken pellets soaked in water on an alternate basis. Fertilize every two months until the plants are established then annually in early September to October to maintain health, vitality and better flowering.
Further Comments from Readers:
Hi reader, it seems you use The Bible of Botany a lot. That’s great as we have great pleasure in bringing it to you! It’s a little awkward for us to ask, but our first aim is to purchase land approximately 1,600 hectares to link several parcels of N.P. into one at The Pinnacles NSW Australia, but we need your help. We’re not salespeople. We’re amateur botanists who have dedicated over 30 years to saving the environment in a practical way. We depend on donations to reach our goal. If you donate just $5, the price of your coffee this Sunday, We can help to keep the planet alive in a real way and continue to bring you regular updates and features on Australian plants all in one Botanical Bible. Any support is greatly appreciated. Thank you.
In the spirit of reconciliation we acknowledge the Bundjalung, Gumbaynggirr and Yaegl and all aboriginal nations throughout Australia and their connections to land, sea and community. We pay our respect to their Elders past, present and future for the pleasures we have gained.
Durabaculum undulatum
Classification
Class: Eenzaadlobbigen
Order: Asparagales
Family: Orcidaceae
Subfamily: Epidendroideae
Tribe: Dendrobieae
Sub Tribe: Grastidiinae
Genus: From Durum, which is Latin for tough, hardy vigorous or unyielding and Baculum which is Latin for a cane. It refers to orchids, which have hard canes.
Species: From Undulatum, which is Latin for wavy. It refers to structures or organs, which have margins or surfaces which are very wavy or undulating.
Common Name: Golden Antler Orchid.
Distribution:
Durabaculum undulatum is found south from the tip of Cape York Peninsula in far north Queensland in 4 disjunct populations to Rockhampton. It is also found on some of the Torres Strait Islands and Islands off the East coast. It is now very rare due to prolonged poaching.
https://avh.ala.org.au/occurrences/search?taxa=Durabaculum+undulatum#tab_mapView
Habitat Aspect Climate:
Durabaculum undulatum prefers dappled shade. It grows in coastal, littoral and lowland rainforests, adjacent to wet open Eucalyptus forests, open woodlands or coastal woodland heaths, mangrove forests or on the rocky coastal headlands. The altitude ranges from 2 meters ASL to 460 meters ASL.
The temperatures range from 6 degrees in July to 39 degrees in January.
The rainfall ranges from lows of 900mm to 3000mm average per annum. The rainfall is seasonal mainly in the summer and autumn with dry winters and springs and humid to dry atmospheric conditions between these periods.
Soil Requirements:
Durabaculum undulatums prefers to grow as an epiphyte on various trees within its range or as a lithophyte on rocks. The soils are derived from Granites, basalts, Sandstones, pumice stone, accumulated beach sands or accumulated coral sands. The soils pH ranges from 4.5pH to 8pH. It does not tolerate waterlogged soils. None saline to very saline soils are tolerated.
Height & Spread:
Wild Plants: 0.3m to 0.6m by 0.6m to 1m.
Characteristics:
Durabaculum undulatum grows in a monopodial on medium stems as an epiphyte or lithophyte. The canes are erect, golden yellow, cylindrical and thicker towards the center of the canes. It is covered in a white papery bract when first emerging. They measure 200mm to 1500mm long by 40mm to 60mm in diameter. Roots are thick, glabrous white and radiate out from the base of the cane.
Durabaculum undulatum‘s long channelled, ovate; leaves number 10 to 35 and appear on the upper two thirds of the cane. It is sessile with the base sheathing the cane while the apex is emarginated. It is erect to spreading, glabrous and measure 80mm to 160mm in length by 35mm to 50mm in width. The leaf margins are entire and curve upwards and maybe almost conduplicate. The coriaceous concolourous laminas are deep green.
The inflorescences of Durabaculum undulatum are a long raceme with 10 to 40 flowers. It is born in the leaf axils produced from present year‘s canes or old canes. The erect to semi pendulant rachis vary from 200mm to 600mm in length while the pedicels measure 30mm to 40mm in length including the 2mm to 3mm ovary which appears to be part of the pedicel but is slightly swollen. The nodding flowers open sequentially along the raceme and measure 40mm to 80mm in length by 40mm to 80mm in width. It is a light golden brown though dark brown forms are known as are golden yellow and lemon yellows. The labellum can be marked with brown, purple, lilac or maroon.
The 3 sepals are narrow-oblong, wide spreading, strongly twisted with strongly undulating margins. The sepals are strongly recurved while the dorsal sepal recurve the most. They measure 25mm to 35mm in length by 5mm to 7mm in width. The base is fused to the column foot while the apex is mucronate.
The oblique erect petals are narrow oblong, strongly twisted with strongly undulating margins and measure 37mm to 45mm in length by 7mm to 8mm in width. The base is fused in front of the sepals while the apex is mucronate to acuminate.
The labellum measures 17mm to 24mm in length by 11mm to 15mm in width with 3 lobes. The two large ovate lateral lobes curve outwards and have a rounded apex. They measure 8mm to 10mm long by 8mm to 10mm wide. The decurve mid lobe is narrow oblong with undulating margins. They measure 12mm to 16mm in length by 7mm to 8mm in width. The column foot measures 5mm to 12mm in length. Flowering occurs from August to November.
Wildlife:
Durabaculum undulatum is the host to numerous small native bees when in flower and also hosts the Dendrobium beetle.
Cultivation:
To start this section please only buy plants that have been seed grown or propagated by tissue culture as poaching is leading to the demise and probable extinction of this magnificent orchid. I request that you DOB known poachers into the police for our environments sake.
Durabaculum undulatum is a beautiful orchid which is rather hardy and easy to grow and to propagate at least as far south as sale in Victoria along the coast. It does very well either in the bush house in a course Cymbidium mix or attached to most trees that do not shed their bark. Do not attach them to Eucalyptus trees as the barks contain resins which Durabaculum undulatum detest. The exception being Dendrobium aemulum which has been found growing on sevearal different iron barks
Trees with mass plantings of mixed orchids look really spectacular and those that have a lot of Durabaculum undulatum add interest and curiosity over a long period especially when in flower. Ficus specie, Ceropetalum specie and Elaeocarpus specie s are good host trees as is a natural host for this orchid in the wild as are Cupaniopsis specie. Select trees which allow more light to penetrate the canopy as It is not a rainforest or closed forest orchid.
Be ever so vigilant for Stethopachys formosa the Thelychiton enthusiast‘s nightmare. This beetle can inflict a lot of damage in just one season. Plants attached to trees are less likely to be phased by Dendrobium beetle because of natural predators like birds, bats and frogs.
Control of the beetle is simple just squash it. It is a slow mover and though like all beetles can fly try to use hiding as a means of escape. The pupae are just as easy to eliminate. Check the base of all your orchids on a regular basis and again destroy any pupae. These look like small patches of white toothpaste squeezed from the tube. The larvae are the most difficult and will usually need a systemic spray or great concentration to find the small holes on the canes as they bore their way through from the inside. Eggs are yellowish and measure about 1.5mm in length.
The beetle eats buds, flowers, new shoots and developing seed pods. Larvae consume the canes.
Propagation:
Seeds: Durabaculum undulatum‘s seeds require treatment before sowing. Really Orchid seeds are meant for professionals with time, equipment and space. However if you wish to persevere then here are the basics and you are learning from an amateur.
1. Obtain relevant materials
The first step in growing orchid from seed will be sourcing and having at the ready all materials that will be required in the propagation process.
This includes all of the following:
Unripe orchid seed capsule. If there are 2 capsules secure the second capsule immediately after the first capsule splits or if only one capsule as soon as it changes colour.
Orchid gelling medium with agar which can be purchased from an orchid society or a specialist nursery.
Distilled water
Cooking pot
Spoon
Oven-safe glass or polypropylene containers with lids
Sealable bags
Clean, sterilized cutting board
Rubber gloves
Paper towels
Tweezers or forceps
70 percent ethanol
Bleach
Scalpel or sharp knife
Planting pot
Orchid compost
Length of wire metal
Plastic spray bottle.
deep petri dishes or sterile jars.
2. Prepare agar medium
The agar medium is a special orchid gelling mixture that distilled water will be added to distilled water.
To prepare the medium, mix equal parts of orchid gelling medium with distilled water in a cooking pot.
Place the pot on a stove and bring the mixture to boil for while stirring continuously for two minutes.
Pour the mixture into the petri dishes glass or propylene containers while ensuring not to fill the containers above 20 percent of their volume.
Loosely replace the lids to the containers. Sterilize the containers by heating them up in a microwave oven for between 2 to 3 minutes.
Spray 70 percent ethanol into a sealable bag to create a sterile environment. Transfer the heated containers into the sealable bag.
Allow the containers to cool a bit before tightening their lids and then sealing the bag. Leave the containers to stand for a few days until the mixture solidifies.
3. Prepare seed capsule and work surface
Place an open pot of water on a stove and bring to boil. Place the cutting board in the oven and sterilize.
Put on rubber gloves and sterilize the forceps, and scalpel with 70 percent ethanol.
Insert the seed capsule into a bowel filled with bleach for about fifteen minutes.
Sterilize seed capsule again with 70 percent ethanol and place on grill.
Using the sterilized scalpel, cut open the seed capsule to reveal the seeds. Using a scalpel or sharp knife, scrape out the seeds from the capsule unto an ethanol soaked paper towel.
4. Flasking of the seed
Take out the petri dishes or glass jars containers holding the agar medium. Over the steam, open up the containers and transfer seeds from the ethanol soaked paper towel into the individual containers using the sterilized forceps.
The amount of seeds will determine the number of containers required. Replace the lid of the containers and place them on a window sill that receives indirect sunlight.
5. Wait and exercise patience
All that can be done at this point is to wait until the seeds germinate. The amount of time that this might take varies and is dependent on the particular species.
Generally, the time can range from a few months to a few years. During this period of waiting, ensure the containers are free from contamination to ensure that germination is not disrupted.
6. Emergence of protocorms
Protocorms are tuber-shaped bodies with rhizoids that are produced by the young seedlings of various orchids. Protocorms represent the embryonic form of the orchid plant.
Their emergence after the period of waiting at an affirmation that everything in the propagation process is on track.
7. Trans flask orchid seedlings is done after they have developed roots
Upon the emergence of the protocorms, consistently observe the growth of the seedlings. At the point when the seedlings appear to overcrowd the flask, transflasking should be carried out, typically within 30 and 60 days.
* This is done by removing individual seedlings using sterilized tweezers from the original containers and placing them in new containers also filled, in a proportion similar to the original, with agar medium. 6 to 8 in a standard petri dish or 1or 2 to a test tube
8. Transplant seedlings into planting pots
On the presumption that there are no disruptions to the plant growth, the seedlings will eventually outgrow the containers.
At this point, it is to be transplanted into planting pots. A good rule of thumb to determine when they are ready to be transplanted is when the seedlings have developed roots that have grown up to the length of one-quarter of an inch.
To transplant, prepare a planting pot or other container for receiving the seedling by majorly filling it up with coarse fir bark and possibly some slightly moist orchid compost mixture containing perlite, fine charcoal, redwood bark shavings, etc.
To extract the seedlings, submerge the containers in warm water to help loosen the agar gel.
Once the agar medium is softened, twist a piece of metal to form a loop and in turn, use it to carefully pull out the seedlings from the container. It is best done if the agar and seedling can be removed together.
The seedlings can be further rinsed in lukewarm water to remove any excess agar mixture still stuck to them.
Following this, the seedlings can now be planted into the prepared pot with at least 50mm of space between each individual seedling.
9. Positioning the orchid
The seedling once fully transplanted should be placed in a location that is warm with good indirect sun light.
Slowly position the pots into an area that closely assimilates the conditions it will be growing under.
The choice as to whether the plant should be exposed to full sun or in direct sunlight will be dependent on the particular orchid specie.
10. Subsequent care of the plant
After the first week, the seedling can be misted several times a day and watered just once a week.
A guide in watering the plant will be using the dryness of the fir back that is, water the plant until the fir back is completely moistened and wait till it has completely dried out before watering again.
Do not fertilize until the seedlings have fully established themselves.
Division of Canes: Canes from old plants can be divided provided as long as there are 2 or 3 old canes from the previous seasons. With a sterile knife cut the canes through the base caring not to damage the eyes from which the new canes will appear. Place in a pot using a Cymbidium mix. Trim the roots and use 2 or 3 stakes to firmly secure the plant in the pot. To attach the orchids to a tree use a strong calico or hemp string and secure the base of the canes firmly against the trunk. If it is possible secure one of the canes against the branch to prevent any unnecessary movement until well established. Fertilize with seaweed solution.
Fertilize using seaweed, fish emulsion or organic chicken pellets soaked in water on an alternate basis. Fertilize every two months until the plants are established then annually in early September to October to maintain health, vitality and better flowering.
Further Comments from Readers:
Hi reader, it seems you use The Bible of Botany a lot. That’s great as we have great pleasure in bringing it to you! It’s a little awkward for us to ask, but our first aim is to purchase land approximately 1,600 hectares to link several parcels of N.P. into one at The Pinnacles NSW Australia, but we need your help. We’re not salespeople. We’re amateur botanists who have dedicated over 30 years to saving the environment in a practical way. We depend on donations to reach our goal. If you donate just $5, the price of your coffee this Sunday, We can help to keep the planet alive in a real way and continue to bring you regular updates and features on Australian plants all in one Botanical Bible. Any support is greatly appreciated. Thank you.
In the spirit of reconciliation we acknowledge the Bundjalung, Gumbaynggirr and Yaegl and all aboriginal nations throughout Australia and their connections to land, sea and community. We pay our respect to their Elders past, present and future for the pleasures we have gained.
Durringtonia paludosa
Classification
Unranked: Magnoliopsida
Order: Gentiales
Family: Rubiaceae
Genus: Is named in honour of Lorraine Rosebeth Durrington; 1948-20.., who was an Australian medical practitioner, botanist and ecologist.
Species: From Paludosa which is Greek or Palus/ Palidosum, which is Latin for wallums, swamps or marshes. It refers to the habitats, which are very wet as in wallums marshes or swamplands.
Common Name:
Distribution:
Durringtonia paludosa is restricted to several disjunct populations south from including Cooloola National Park in coastal eastern Queensland to Smiths Lake and Wyrrabalong National Park in central coastal New South Wales.
https://avh.ala.org.au/occurrences/search?taxa=Durringtonia+paludosa#tab_mapView
Habitat Aspect Climate:
Durringtonia paludosa prefers full sun to dappled shade. It grows in moist coastal wallums with its strong holds being on Moreton Island and Stradbroke Island. The altitude ranges from 5 meters ASL to 15 meters ASL.
The temperatures range from minus 2 degrees in August to 38 degrees in January.
The rainfall ranges from lows of 1000mm to 2200mm average per annum.
Soil Requirements:
Durringtonia paludosa prefers sandy loams or peaty sandy loams. The soils are usually derived from accumulated peaty beach sands. The soils pH ranges 4.5pH to 6.5pH. It tolerates waterlogged soils with high water tables where capillary action maintains even soil moisture. Non saline soils to moderately saline soils are tolerated as are salt laden winds.
Height & Spread:
Wild Plants: 0.5m to 1m by 0.2m to 0.8m
Characteristics:
Durringtonia paludosa grows as a weak perennial herb which is usually supported by the surrounding vegetation or as a small decumbent herb. The stems are decussately branched, green and glabrous. The plants dry black. The juvenile stems are grass-green and glabrous.
The ovate to narrow-elliptical or linear-subulate leaves of Durringtonia paludosa measure 8mm to 15mm in length by 2mm to 2.5mm in width. The petioles measures 1mm to 8mm in length. The bases are cuneate to truncate while the apexes are acute, acuminate to blunt acuminate or obtuse. The concolourous laminas are mid grass green and glabrous. The laminas are flat or slightly upwards from the mid vein and down at the apex. The mid vein is slightly prominent on the lower lamina and is distinctly visible on the upper lamina. The leaf margins are entire with or without a slight undulation.
The inflorescences of Durringtonia paludosa are decussately branched cymes reduced to a single pendent flower.
The male flowers calyxes measure 0.4mm to 0.7mm in length including the triangular lobes. The cream to pale red-brown corolla lobes is oblong and measure 2mm to 2.5mm in length.
The female flowers are smaller with the stigma being fusiform and papillose. The flowers appear from late September to late December.
The fruits of Durringtonia paludosa are laterally compressed ellipsoidal berries. The berries measure 5mm to 7mm in length. The green fruits turn yellow to orange-yellow when ripe. The ovoidal seeds measure 3mm to 3.5mm in length.
Wildlife:
Durringtonia paludosa‘s wildlife is unknown to the author.
Cultivation:
Durringtonia paludosa is a plant for small wetland areas. Cultivated plants usually grow 200mm to 800mm in height by 200mm to 800mm in diameter when grown in the open and allowed to spread out in a decumbent habit. Tip pruning may be advisable if 1 or 2 leading shoots do not branch.
To make a bog garden, extend the pond or to make an artificial marshland on sand all you need are sheets of black plastic and some rocks. Dig the soil out and lay two or three layers of black plastic over the shallow depression (200mm in depth). Now perforate the plastic to allow water to drain slowly away in the dry season. Backfill over the plastic to the original level with sharp course sand and peat mixed at a ratio of 4 to 1.Make sure the sand is free of salt. If it isn’t, wash the sand several times to make sure the salt is completely removed. Fill the depression with water until it is within 150mm of the surface. Place the rocks around the perimeter so that it looks natural. Make a depression with your arm in the corner on the low side so excess water can drain away when it rains. Too ensure adequate moisture flow and water retention is continued throughout the year direct some of the house‘s storm water into the bog garden. Another method is to allow some of the storm water to flow into a fish or frog pond and allow the overflow to flow into the bog garden. This will also help clean the fish or frog pond and the nutrient rich water will feed your plants before itself being filtered and flows back into the environment.
When you design a short heath garden which Durringtonia paludosa is well suited to don’t use contours to display the plants as heath lands are almost always flat or have a slight rise. Taller heaths are better placed on the downhill side of a path so that you can still look over the tallest plants. Scatter Durringtonia paludosa back from the path as it is rather brittle and will be easily broken or passer-byes who will continually just want to feel them. Make the heath garden path narrow so it gives an extra dimension which many people forget about when designing heath gardens. Plants must be planted close together and be shorter than 200mm with the exception of one or two plants at the most. These will be feature plants. The idea is to achieve a feeling of expansive flatness. This can be achieved with using the Durringtonia paludosa‘s yellow-orange fruits mixed with smaller carnivorous plants like Drosera adelae, Drosera binata, Drosera burmanni, Drosera peltata, Drosera pygmaea, Drosera spatulata, Cephalotus follicularis or some of the smaller Nepenthes like Nepenthes tenax. Chloanthes parviflora is another small colourful plant with pale blue flowers that could be incorporated very successfully without overpowering Durringtonia paludosa but plant it in a drier position near the edge or on a slight rise.
Propagation:
Seeds: Durringtonia paludosa‘s seeds do not require treatment before sowing though seeds may be difficult to collect initially. Sow fresh seeds directly into a seed raising mix. Place the trays in a larger tray which has water in it and place them under 30mm shade in a warm position. When the seedlings are 20mm to 40mm tall, prick them out and plant them into 50mm native tubes using a seed raising mix.
Once the seedlings reach 100mm to 150mm in height plant them out into their permanent position. Mass plantings can be achieved by planting them at 0.5 meter to 1 meter centers.
Fertilize using seaweed, fish emulsion or organic chicken pellets soaked in water on an alternate basis. Fertilize every two months until the plants are established then annually in early September to October to maintain health, vitality and better flowering.
Further Comments from Readers:
Hi reader, it seems you use The Bible of Botany a lot. That’s great as we have great pleasure in bringing it to you! It’s a little awkward for us to ask, but our first aim is to purchase land approximately 1,600 hectares to link several parcels of N.P. into one at The Pinnacles NSW Australia, but we need your help. We’re not salespeople. We’re amateur botanists who have dedicated over 30 years to saving the environment in a practical way. We depend on donations to reach our goal. If you donate just $5, the price of your coffee this Sunday, We can help to keep the planet alive in a real way and continue to bring you regular updates and features on Australian plants all in one Botanical Bible. Any support is greatly appreciated. Thank you.
In the spirit of reconciliation we acknowledge the Bundjalung, Gumbaynggirr and Yaegl and all aboriginal nations throughout Australia and their connections to land, sea and community. We pay our respect to their Elders past, present and future for the pleasures we have gained.

Clarence River NSW
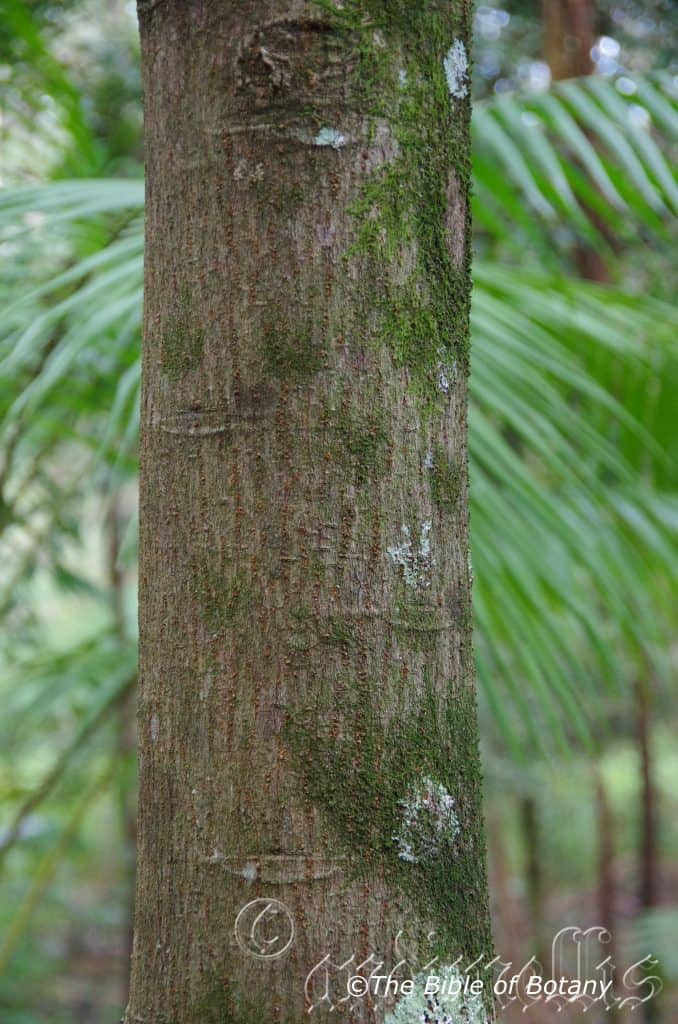
NCBG Coffs Harbour NSW
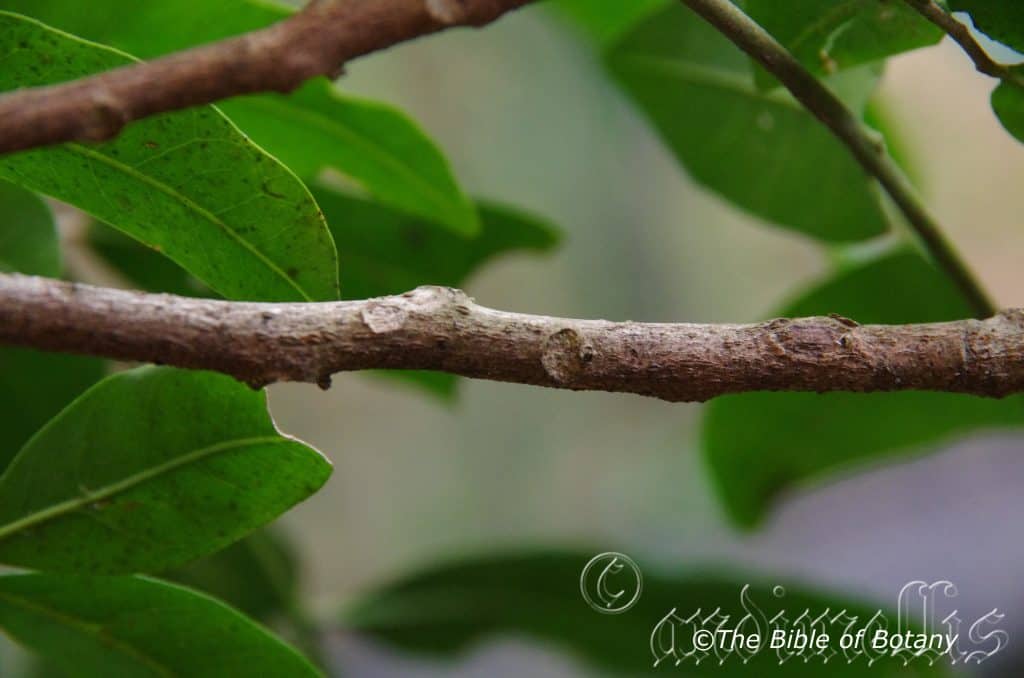
NCBG Coffs Harbour NSW

NCBG Coffs Harbour NSW
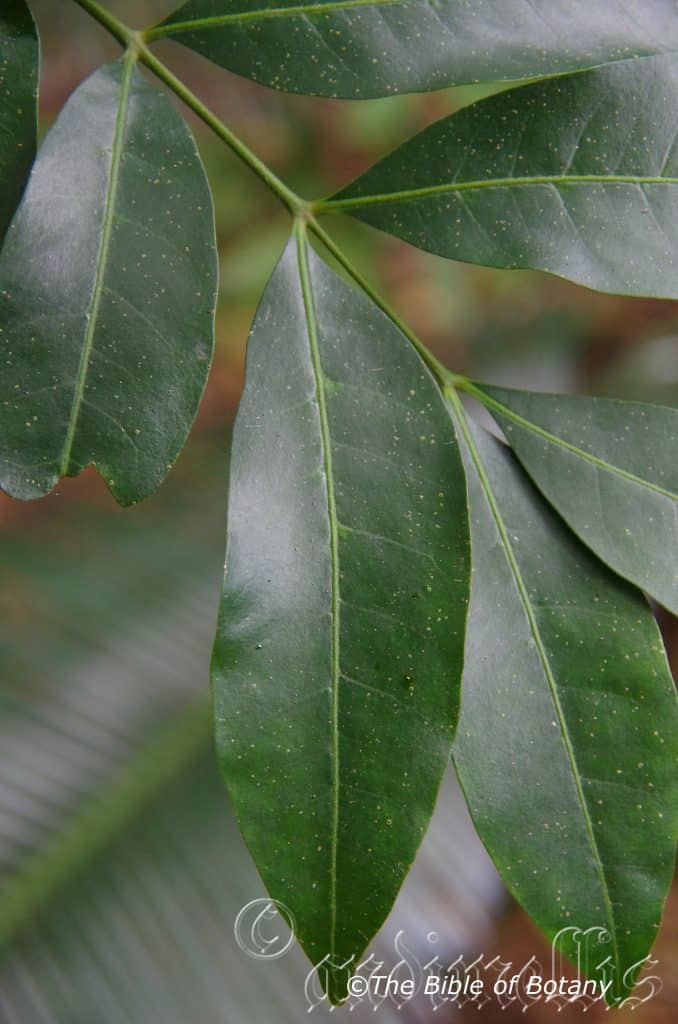
NCBG Coffs Harbour NSW
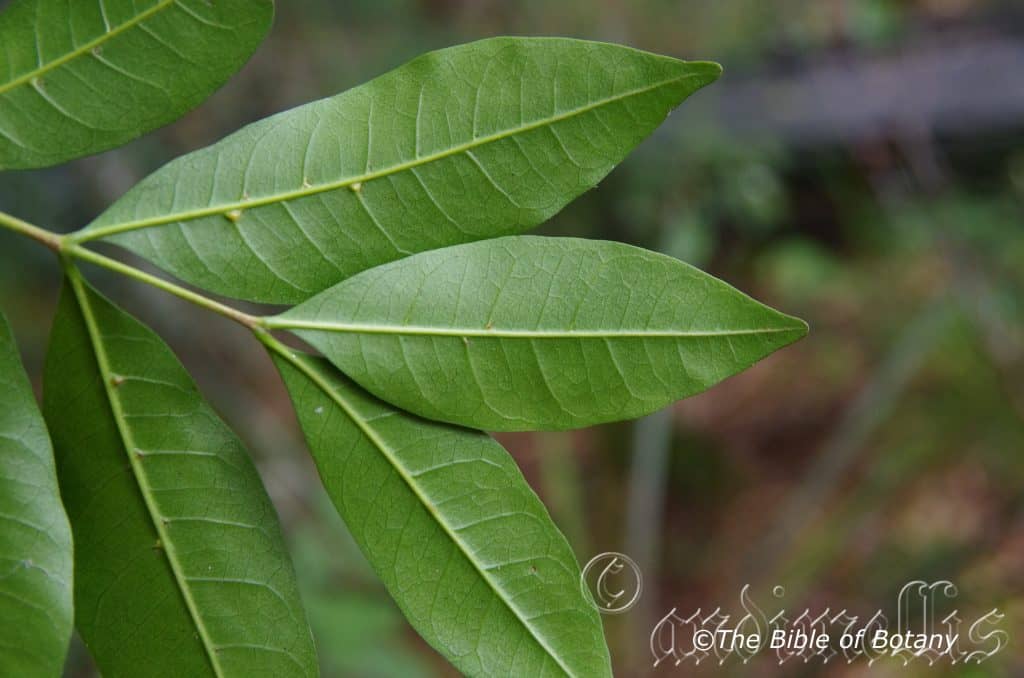
NCBG Coffs Harbour NSW

Clarence River NSW
Dysoxylum fraserianum
Classification
Unranked: Eudicots
Unranked: Rosids
Class: Equisetopsida
Order: Sapindales
Family: Meliaceae
Genus: From Dus-, which is Ancient Greek for to convey the idea of something that is being difficult, impaired, abnormal, or bad and Oxylon which is Ancient Greek for wood. It refers to the odour of the freshly cut wood which is somewhat offensive.
Species: Is named in honour of Charles Fraser; 1788-1831, who was a Scottish born Australian and was the first superintendent of the National (New South Wales Botanic Gardens) and plant collector.
Common Name: Rose wood or Rose Mahogany.
Distribution:
Dysoxylum fraserianum is found south from west of Bundaberg to Wyong in the central of New South Wales. It is usually found on and east of the Great Dividing Range.
https://avh.ala.org.au/occurrences/search?taxa=Dysoxylum+fraserianum#tab_mapView
Habitat Aspect Climate:
Dysoxylum fraserianum prefers full sun to full shade. It grows on coastal lowland mountains in well-developed rainforests. The altitude ranges from 40 meters ASL to 1300 meters ASL.
The temperatures range from minus 2 degrees in July to 36 degrees in January.
The rainfall ranges from lows of 900mm to 2000mm average per annum.
Soil Requirements:
Dysoxylum fraserianum prefers better quality sandy loams to medium gravelly clays. The soils are usually derived from decomposed brown basalt, black basalt, metamorphic rocks, granites, shales or at times accumulated peaty beach sands. The soils pH ranges 5.5pH to 6.5pH. It does not tolerate waterlogged soils though seasonal inundations for short periods are tolerated where it grows on alluvial flats or riparian gullies. Non saline soils to moderately slightly saline soils are tolerated.
Height & Spread:
Wild Plants: 50m to 60m by 8m to 12m
Characteristics:
Dysoxylum fraserianum grows as tree. The red-brown to red-grey or at times yellow-grey bark is scaly and flaky to the main branches. The bark on older trees has a mosaic patch work of the above colours. Old mature trees will form large buttresses. These buttresses are brown and glabrous. Branches are grey to grey-brown and striated or with small longitudinal furrows. The juvenile stems are deep green and covered in fawn to rusty tomentose hairs.
The elliptical to obovate paripinnate leaves of Dysoxylum fraserianum measure 65mm to 250mm in length. The elliptical to obovate leaflets measure 40mm to 110mm in length by 15mm to 40mm in width. The petioles measures 1mm to 8mm in length. The asymmetrical bases are cuneate while the apexes are acuminate to blunt acuminate. Leaves on juvenile plants are lobed with an obtuse apex. The discolourous laminas are mid grass green, glabrous and glossy on the upper lamina while the lower lamina is slightly paler and semi glossy. The laminas are flat or slightly upwards from the mid vein and down at the apex. The mid vein is prominent on the lower lamina and is distinctly visible on the upper lamina. The leaf margins are entire with or without a slight undulation. The 1 to 5 domatia are prominently swollen along the mid vein axils.
Inflorescences of Dysoxylum fraserianum are panicles born terminally and in the leaf axils. The panicles measure 60 to 120mm in length. The pedicel measures 3mm to 4mm in length. The green calyx measures 3mm to 3.5mm in length by 4.5mm to 5mm in width. The cream corolla lobes are oblong with an acute apex. The corolla measures 4mm to 4.5mm in length while the lobes measure 5mm to 7mm in length. The stocky pedicel measures 5mm to 7mm in length by 2mm to 2.5mm in diameter.
The 9 to 10 white stamens are united to form a tube and measure 4mm to 4.5mm in length. The ovary is sparsely covered in short white sericeous hairs. The style is slightly exserted above the stamens and measures 4mm to 4.6mm in length. The fragrant flowers appear from late April to June.
The fruits of Dysoxylum fraserianum are indehiscent ovoid berries. The berries measure 15mm to 25mm in length by 10mm to 20mm in diameter. The green fruits turn yellow before turning yellow-fawn or khaki tinged pink. There are 3 or 4 glossy brown seeds in each fruit. The seeds are surrounded by a white pulp and are attached to the ovary by a white basal aril. The seeds measure 7mm to 10mm in length by 5mm to 7mm in width. The cotyledons are green within the seeds.
Wildlife:
Dysoxylum fraserianum‘s wildlife is unknown to the author.
Cultivation:
Dysoxylum fraserianum is a plant for the large rainforest tree large garden park scenarios or a specimen shade tree.
If it is given adequate moisture, plenty of mulch for moisture retention and an even soil temperature, applying native fertilizers on a regular basis the plants will still be slow and take many years to establish themselves.
Their glossy green foliage is a distinctive feature along with the red flaky bark. Cultivated trees are very dense and hold their leaves for a longer period making them more attractive than their wild parents. Trees develop a denser canopy and are smaller growing to around 30 meters to 40 meters by 10 meters to 15 meters in diameter. Plantings of three or four different tree species in close proximity contrast beautifully because of the bark and foliage being so different in colour and texture. This can be achieved with using small dry rainforest trees like Cupaniopsis anacharioides, Harpullia pendula, Hymenosporum flavum, Dysoxylum mollissimum, Dysoxylum rufum, or any other.
This is good tree for epiphytic orchid and fern enthusiasts. The bark is excellent for small epiphytic orchids however a long wait will be necessary to see the trees come to fruition.
Propagation:
Seeds: Dysoxylum fraserianum‘s seeds do not require treatment before sowing. Sow fresh seeds directly into a seed raising mix and cover with 5mm of the mix. Place the seeds in a shady warm position and keep moist not wet. When the seedlings are 25mm to 50mm tall, prick them out and plant them into 50mm native tubes using a seed raising mix.
Once the seedlings reach 150mm to 200mm in height plant them out into their permanent position. Mass plantings can be achieved by planting them at 6 meter to 12 meter centers.
Fertilize using seaweed, fish emulsion or organic chicken pellets soaked in water on an alternate basis. Fertilize every two months until the plants are established then annually in early September to October to maintain health, vitality and better flowering.
Further Comments from Readers:
Hi reader, it seems you use The Bible of Botany a lot. That’s great as we have great pleasure in bringing it to you! It’s a little awkward for us to ask, but our first aim is to purchase land approximately 1,600 hectares to link several parcels of N.P. into one at The Pinnacles NSW Australia, but we need your help. We’re not salespeople. We’re amateur botanists who have dedicated over 30 years to saving the environment in a practical way. We depend on donations to reach our goal. If you donate just $5, the price of your coffee this Sunday, We can help to keep the planet alive in a real way and continue to bring you regular updates and features on Australian plants all in one Botanical Bible. Any support is greatly appreciated. Thank you.
In the spirit of reconciliation we acknowledge the Bundjalung, Gumbaynggirr and Yaegl and all aboriginal nations throughout Australia and their connections to land, sea and community. We pay our respect to their Elders past, present and future for the pleasures we have gained.
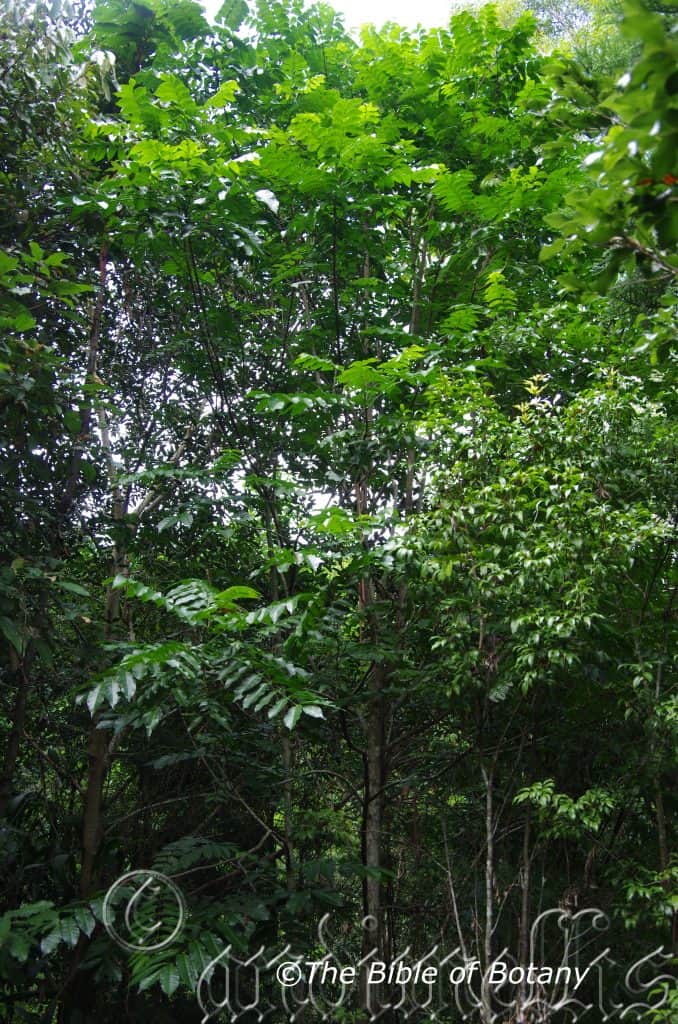
LBG Lismore NSW
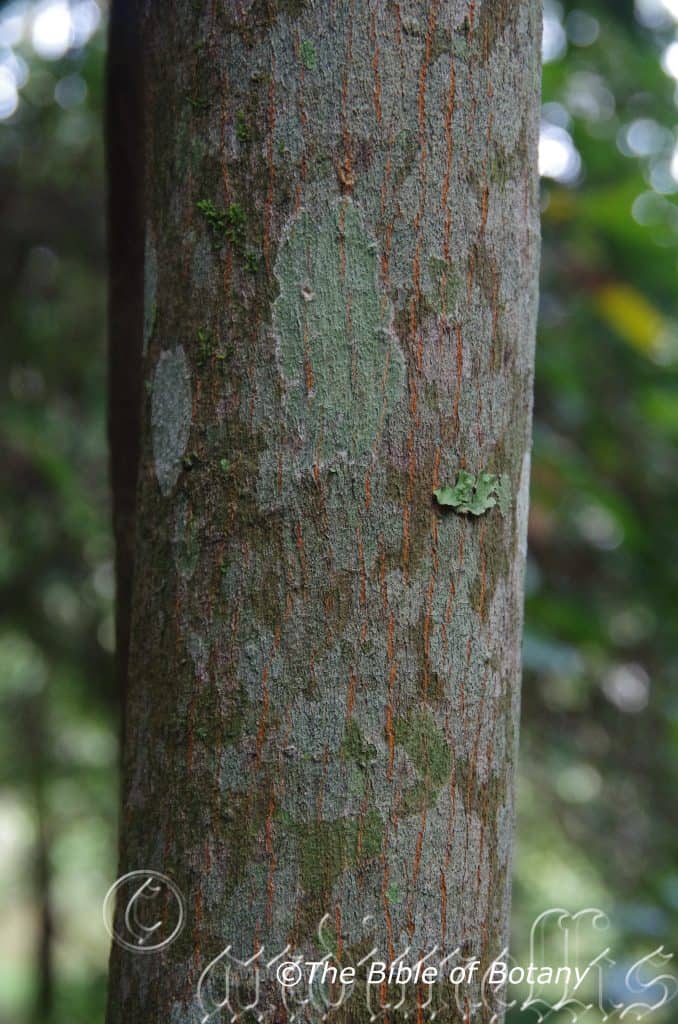
LBG Lismore NSW
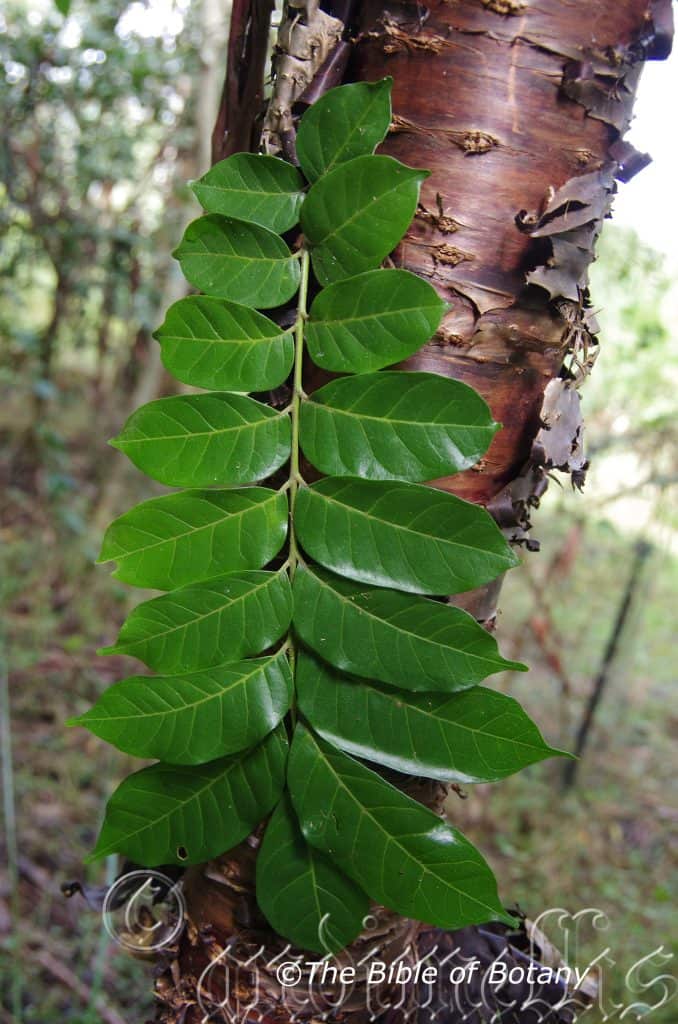
LBG Lismore NSW
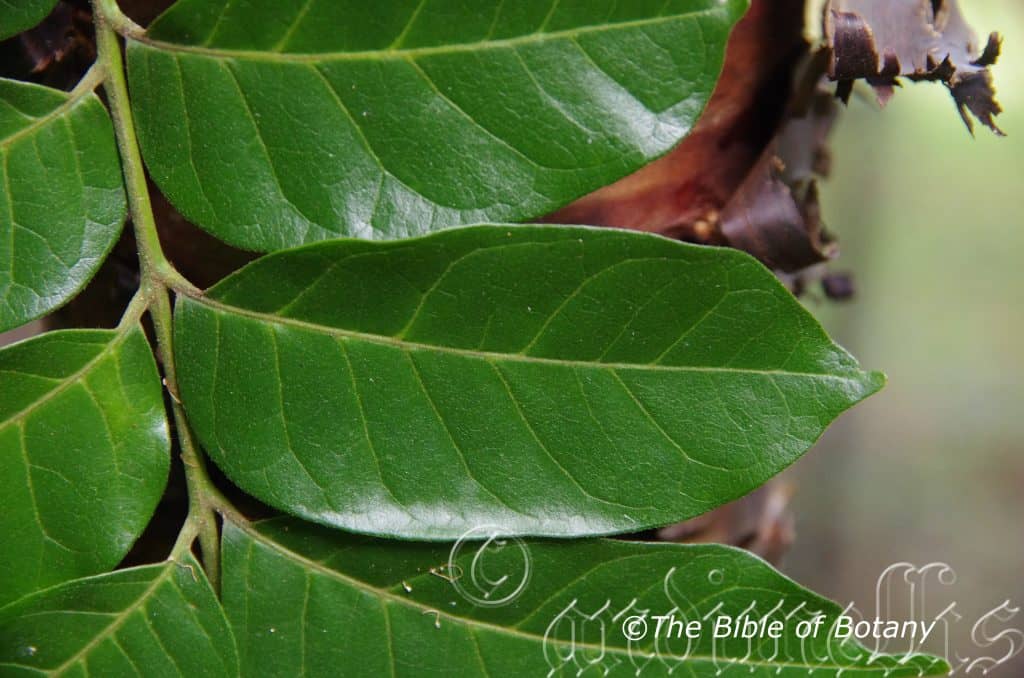
LBG Lismore NSW
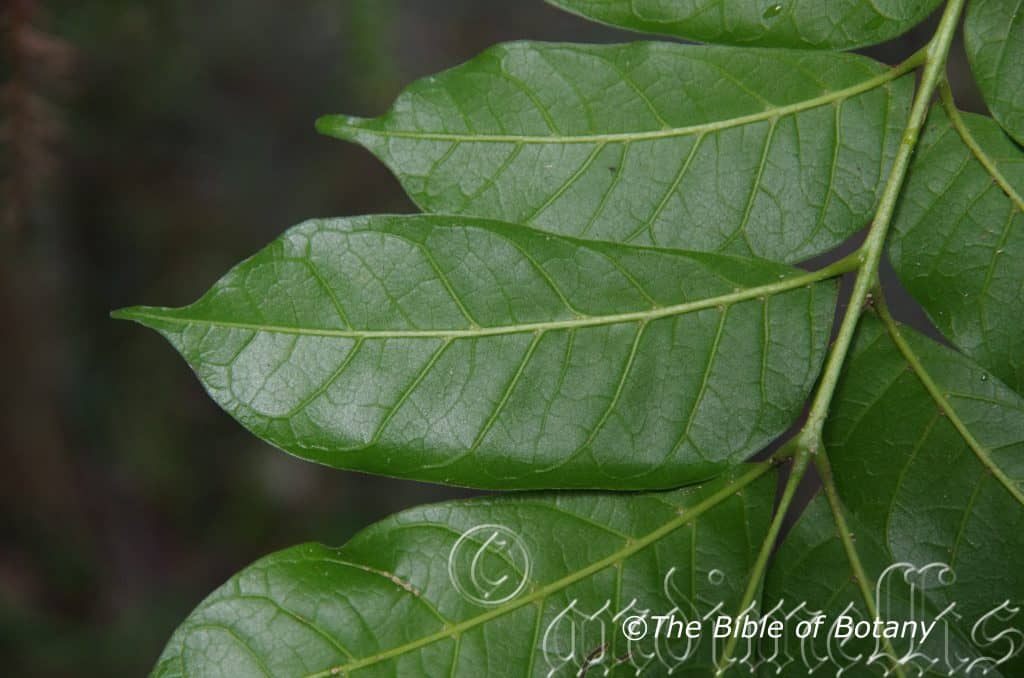
LBG Lismore NSW
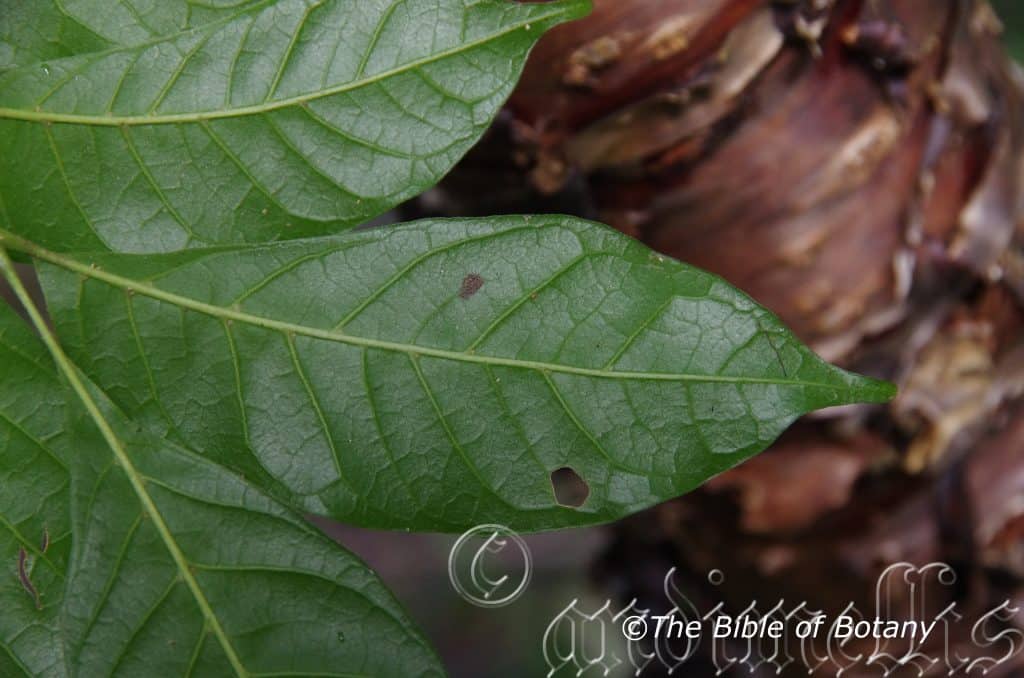
LBG Lismore NSW
Dysoxylum mollissimum
Classification
Unranked: Eudicots
Unranked: Rosids
Class: Equisetopsida
Order: Sapindales
Family: Meliaceae
Genus: From Dus, which is Ancient Greek for to convey the idea of something that is being difficult, impaired, abnormal, or bad and Oxylon which is Ancient Greek for wood. It refers to the odour of the freshly cut wood which is somewhat offensive.
Species: From Mollis, which is Latin for softly hairy and supple to touch and -Issima, which is Latin for the superlative or most. It usually refers to leaves, phyllodes at times other organs, which have the softest white hairs on very supple stems and laminas.
Subspecies: Dysoxylum mollissimum subsp. molle. From Mollis, which is Latin for softly hairy and supple to touch. It refers to structures or organs, which have short, soft white hairs. It is the only subspecies found in Australia.
Common Name: Red Bean Tree.
Distribution:
Dysoxylum mollissimum is found south from the McIlvor River near Cooktown in far north eastern Queensland to Limeburners Creek National Park in the central coastal New South Wales. It is usually found on and east of the Great Dividing Range.
https://avh.ala.org.au/occurrences/search?taxa=Dysoxylum+mollissimum#tab_mapView
Habitat Aspect Climate:
Dysoxylum mollissimum prefers full sun to full shade. It grows in well-developed rain forest on a variety of sites but is more common in warm lowland rainforests in the southern populations and at higher elevations in the north where it is found in cooler rainforests. It is associated with well-developed rainforests and well developed littoral rainforests. The altitude ranges from 5 meters ASL to 800 meters ASL.
The temperatures range from 2 degrees in July to 36 degrees in January.
The rainfall ranges from lows of 1000mm to 3200mm average per annum.
Soil Requirements:
Dysoxylum mollissimum prefers better quality light clays to medium clays. The soils are usually derived from decomposed brown basalt, black basalt, shales or sandstones, granites, alluvial deposits or at times accumulated beach sands. The soils pH ranges 5.5pH to 6.5pH. It does not tolerate waterlogged soils. Non saline soils to moderately slightly saline soils are tolerated.
Height & Spread:
Wild Plants: 35m to 40m by 5m to 8m
Characteristics:
Dysoxylum mollissimum grows as a tall straight tree in its natural habitat. The bole is usually buttressed or flanged at the base. The grey to brown usually grey-brown bark is thickly scaly, rough and flaky. Freshly cut bark has a typical onion scent. The branchlets are pale grey-brown and carry the scars of old leaves. The juvenile stems are deep green and densely covered in soft rusty-red to rusty-brown villous hairs.
The elliptical to obovate imparipinnate leaves of Dysoxylum mollissimum measure 150mm to 450mm in length by 65mm to 320mm in width. The 11 to 23 oblong-elliptical to oblong leaflets measure 30mm to 150mm in length by 20mm to 50mm in width. The petioles are noticeably swollen where they join the branchlets and measure 50mm to 120mm in length while the petiolules measure 1mm to 10mm in length. The strongly asymmetrical bases are cuneate on one side and rounded on the other side while the apexes are acuminate. The concolourous laminas are mid grass-green, semi glossy and covered in soft, fine, rusty-brown puberulent hairs. The laminas are flat or recurve slightly upwards from the mid vein and decurve downwards at the apex. The mid vein and lateral veins are prominent on the lower lamina and are distinctly visible on the upper lamina. The lateral veins form incomplete loops well inside the margins. The leaf margins are entire with or without a slight undulation. The domatia are faveolus with tufts of rusty-brown tufts of hair surrounding the orifices.
Inflorescences of Dysoxylum mollissimum are panicles born terminally and from the upper leaf axils. The panicles measure 50mm to 350mm in length. The stocky pedicel measures 1.5mm to 2mm in length. The green cupular calyxes measure 0.8mm to 1.2mm in length including the obtuse lobes. The cream corolla lobes are oblong with an acute apex. The corolla and lobes are glabrous or covered in fine soft white puberulent hairs externally and are glabrous internally. The corolla measures 4mm to 6mm in length while the lobes measure 4mm to 6mm in length.
The 6 or 8 cream filaments are united to form a staminal tube and measure 5mm to 10mm in length. The cream, oblong anthers are free and measure 0.8mm to 1mm in length.
The ovary is sparsely covered in soft, white puberulent hairs. The style is equal to the filaments and measures 5mm to 10mm in length. The flowers appear from late January to early July.
The fruits of Dysoxylum mollissimum are indehiscent ovoidal to globose berries. The berries measure 16mm to 28mm in length by 14mm to 26mm in diameter. The green fruits turn pale creamy-yellow to pale creamy-fawn tinged pink when ripe and have a scurfy surface. There are 3 or 4 glossy red-brown seeds in each berry. The seeds are surrounded by a dry, white pulp. The flattened trigonous seeds measure 7mm to 10mm in length by 5mm to 7mm in width. The cotyledons are green within the seeds.
Wildlife:
Dysoxylum mollissimum‘s wildlife is unknown to the author.
Cultivation:
Dysoxylum mollissimum is a plant for the large rainforest garden, a park tree or a specimen shade tree.
With adequate moisture, plenty of mulch for moisture retention and an even soil temperature, applying native fertilizers on a regular basis the plants will still be slow and take many years to establish themselves as a small shade tree.
Its glossy green foliage is a distinctive feature along with the pale grey-brown flaky bark. Cultivated trees are very dense and hold their leaves for a longer period making them more attractive than their wild parents. Trees develop a denser canopy and are smaller growing to around 15 meters to 25 meters in height by 10 meters to 14 meters in diameter. Plantings of three or four different tree species in close proximity contrast beautifully because of the bark and foliage being so different in colour and texture. This can be achieved with using small dry rainforest trees like Cupaniopsis anacharioides, Harpullia pendula, Hymenosporum flavum, Dysoxylum mollissimum, Dysoxylum rufum, or any other.
Dysoxylum mollissimum would make very good accent trees in front of low set or 2 story commercial buildings, industrial sheds or school buildings where it will break up hard rigid architectural lines and give warmth and breadth to a building. They also offer good shade due to their dense canopies.
Propagation:
Seeds: Dysoxylum mollissimum‘s seeds do not require treatment before sowing. Sow fresh seeds directly into a seed raising mix and cover with 5mm of the mix. Place the seeds in a shady warm position and keep moist not wet. When the seedlings are 25mm to 50mm tall, prick them out and plant them into 50mm native tubes using a seed raising mix.
Once the seedlings reach 150mm to 200mm in height plant them out into their permanent position. Mass plantings can be achieved by planting them at 6 meter to 12 meter centers.
Fertilize using seaweed, fish emulsion or organic chicken pellets soaked in water on an alternate basis. Fertilize every two months until the plants are established then annually in early September to October to maintain health, vitality and better flowering.
Further Comments from Readers:
Hi reader, it seems you use The Bible of Botany a lot. That’s great as we have great pleasure in bringing it to you! It’s a little awkward for us to ask, but our first aim is to purchase land approximately 1,600 hectares to link several parcels of N.P. into one at The Pinnacles NSW Australia, but we need your help. We’re not salespeople. We’re amateur botanists who have dedicated over 30 years to saving the environment in a practical way. We depend on donations to reach our goal. If you donate just $5, the price of your coffee this Sunday, We can help to keep the planet alive in a real way and continue to bring you regular updates and features on Australian plants all in one Botanical Bible. Any support is greatly appreciated. Thank you.
In the spirit of reconciliation we acknowledge the Bundjalung, Gumbaynggirr and Yaegl and all aboriginal nations throughout Australia and their connections to land, sea and community. We pay our respect to their Elders past, present and future for the pleasures we have gained.
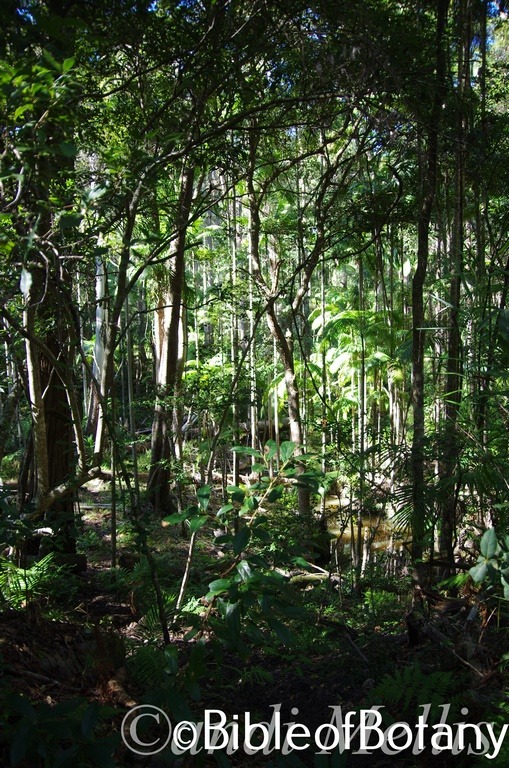
Yuryaigir National Park NSW

Yuryaigir National Park NSW

Yuryaigir National Park NSW
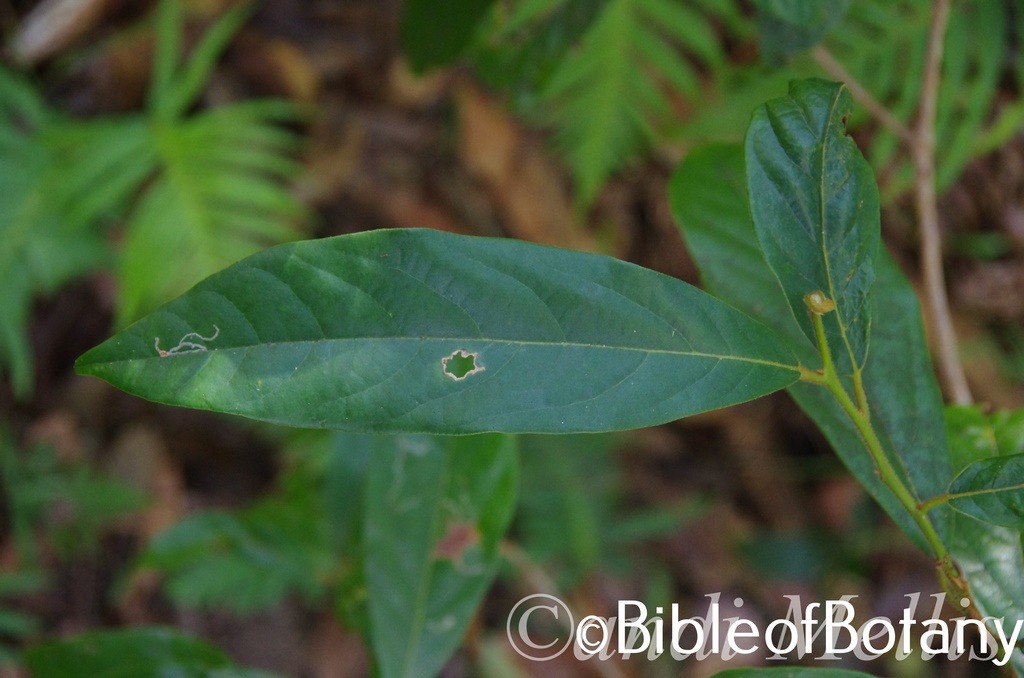
Yuryaigir National Park NSW
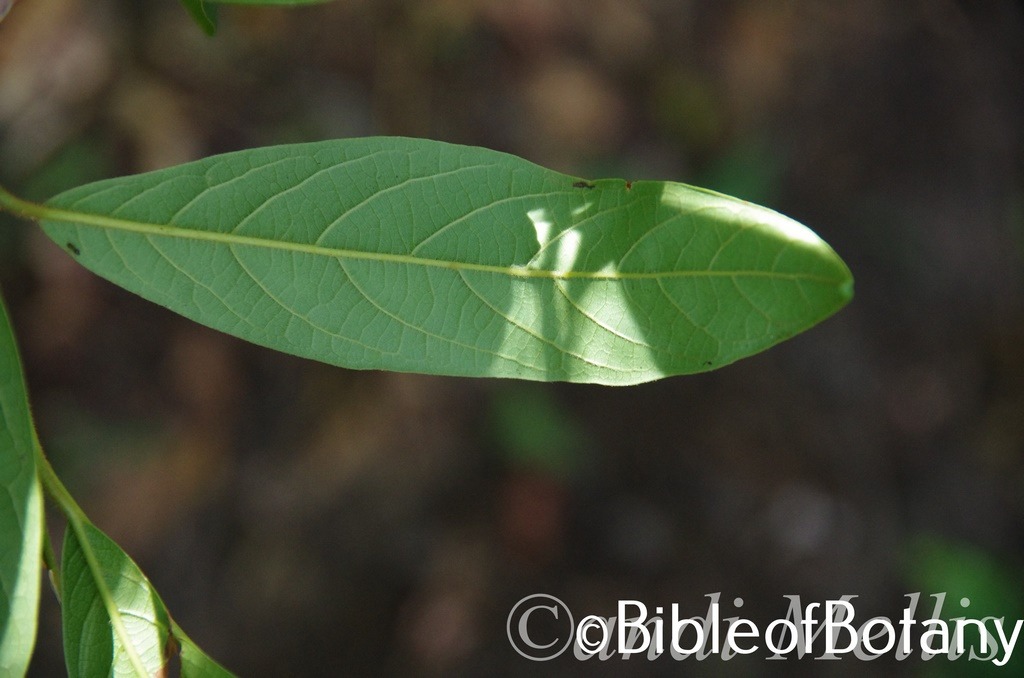
Yuryaigir National Park NSW
Dysoxylum rufum
Classification
Unranked: Eudicots
Unranked: Rosids
Class: Equisetopsida
Order: Sapindales
Family: Meliaceae
Genus: From Dus-, which is Ancient Greek for to convey the idea of something that is being difficult, impaired, abnormal, or bad and Oxylon which is Ancient Greek for wood. It refers to the odour of the freshly cut wood which is somewhat offensive.
Species: From Rufescere, which is Latin for deep rusty-red to tawny-red. It refers to leaves and/or stems, which are covered in deep rusty-red hairs.
Common Name: Hairy Rosewood.
Distribution:
Dysoxylum rufum is found south from the Bloomfield River to Mackay in far north eastern Queensland. It is then found south from Fraser Island in central Queensland to Booral in central coastal New South Wales. It is usually found on and east of the Great Dividing Range. There is disjunct population on Gracemere Station along the Fitzroy River.
https://avh.ala.org.au/occurrences/search?taxa=Dysoxylum+rufum#tab_mapView
Habitat Aspect Climate:
Dysoxylum rufum prefers full sun to full shade. It grows in well-developed sub-tropical rainforests or well-developed littoral rainforests. The altitude ranges from 5 meters ASL to 1150 meters ASL.
The temperatures range from minus 2 degrees in July to 36 degrees in January.
The rainfall ranges from lows of 900mm to 2000mm average per annum.
Soil Requirements:
Dysoxylum rufum prefers better quality sandy loams to medium clays. The soils are usually derived from decomposed brown basalt, black basalt, metamorphic rocks, shales or at times granites. The soils pH ranges 5pH to 6.5pH. It does not tolerate waterlogged soils though annual inundations are frequent where they grow on alluvial flats or riparian gullies. Non saline soils to moderately slightly saline soils are tolerated.
Height & Spread:
Wild Plants: 15m to 35m by 8m to 12m
Characteristics:
Dysoxylum rufum grows as a small tree. The grey bark is marked with horizontal wrinkle to the main branches. The bark on older trees will have a mosaic patch work of lichens and mosses to add colour to the trunks. The boles on old mature trees will form small flutes. The branchlets are pale to mid grey-brown tinged pinkish-red and are covered in fawn to rusty villous hairs. The branchlets are pale grey-brown and carry the scars of old leaves. The new growth stems are deep green and covered in fawn to rusty villous hairs.
The elliptical to obovate imparipinnate leaves of Dysoxylum rufum measure 200mm to 600mm in length by 62mm to 345mm in width. The 11 to 21 oblong-ovate to oblong-elliptical leaflets measure 50mm to 220mm in length by 18mm to 50mm in width. The petioles are noticeably swollen where they join onto the branchlets. The petioles and petiolules are densely covered in soft, fawn or golden brown villous hairs. The petioles measure 30mm to 80mm in length while the petiolules measure 2mm to 4mm in length.
The bases are asymmetrical broad cuneate on one side and rounded-cuneate on the other side while the apexes are narrowing acuminate to narrow acuminate. The discolourous laminas are mid grass green to sea-green, semi glossy and covered in soft, fawn or golden brown villous hairs on the upper lamina while the lower laminas are slightly paler and dull. The laminas are flat or decurve slightly downwards or recurve slightly upwards near the margins. The mid vein is prominent on the upper lamina and is distinctly visible on the lower lamina. The leaf margins are entire with or without a slight undulation. The domatia are faveolus with tufts of rusty-brown tufts of hair surrounding the orifices.
Inflorescences of Dysoxylum rufum are panicles born terminally and in the leaf axils. The panicles measure 150m to 250mm in length. The yellow-green calyxes measure 1.5mm to 2mm in length including the obtuse lobes. The white corolla lobes are oblong with an acute apex. The corolla and lobes are densely covered in soft, white, villous hairs. The corolla measures 6mm to 7mm in length while the lobes measure 6mm to 7mm in length by 1.5mm to 2mm in width. The stocky pedicel measures 1.5mm to 2mm in length.
The 10 white petiolate filaments are united to form a tube and measure 6mm to 7mm in length. The cream anthers are held just below the apex of the filaments.
The ovary is sparsely covered in short, soft, white villous hairs. The style is slightly exserted above the stamens and measures 6.5mm to 7.5mm in length. The flowers appear from December to February.
The fruits of Dysoxylum rufum are indehiscent globular berries. The berries measure 26mm to 36mm in length by 30mm to 40mm in diameter. The northern fruits are larger than the fruits from southern trees. The green fruits turn golden-yellow to yellow-fawn or golden-khaki when ripe. There are 4 or 5 glossy reddish-brown to reddish-orange seeds in each fruit. The seeds are surrounded by a creamy-white pulp. The rounded trigonous seeds measure 8mm to 12mm in length by 6mm to10mm in width. The cotyledons are green within the seeds.
Wildlife:
Dysoxylum rufum‘s wildlife is unknown to the author.
Cultivation:
Dysoxylum rufum is a plant for the large rainforest garden, park tree or a specimen shade tree.
If it is given adequate moisture, plenty of mulch for moisture retention and an even soil temperature, applying native fertilizers on a regular basis the plants will still be slow and take many years to establish themselves.
Its glossy green foliage is a distinctive feature along with the pale grey-brown flaky bark. Cultivated trees are very dense and hold their leaves for a longer period making them more attractive than their wild parents. Trees develop a denser canopy and are smaller growing to around 10 meters to 15 meters in height by 10 meters to 15 meters in diameter. Plantings of three or four different tree species in close proximity contrast beautifully because of the bark and foliage being so different in colour and texture. This can be achieved with using small dry rainforest trees like Cupaniopsis anacharioides, Harpullia pendula, Hymenosporum flavum, Dysoxylum mollissimum, Brachychiton discolor, or any other.
Dysoxylum rufum would make very good accent trees in front of low set or 2 story commercial buildings, industrial sheds or school buildings where they will break up hard rigid architectural lines and give warmth and breadth to a building. They also offer good shade due to their dense canopies.
Propagation:
Seeds: Dysoxylum rufum‘s seeds do not require treatment before sowing. Sow fresh seeds directly into a seed raising mix and cover with 5mm of the mix. Place the seeds in a shady warm position and keep moist not wet. When the seedlings are 25mm to 50mm tall, prick them out and plant them into 50mm native tubes using a seed raising mix.
Once the seedlings reach 150mm to 200mm in height plant them out into their permanent position. Mass plantings can be achieved by planting them at 6 meter to 12 meter centers.
Fertilize using seaweed, fish emulsion or organic chicken pellets soaked in water on an alternate basis. Fertilize every two months until the plants are established then annually in early September to October to maintain health, vitality and better flowering.
Further Comments from Readers:
Hi reader, it seems you use The Bible of Botany a lot. That’s great as we have great pleasure in bringing it to you! It’s a little awkward for us to ask, but our first aim is to purchase land approximately 1,600 hectares to link several parcels of N.P. into one at The Pinnacles NSW Australia, but we need your help. We’re not salespeople. We’re amateur botanists who have dedicated over 30 years to saving the environment in a practical way. We depend on donations to reach our goal. If you donate just $5, the price of your coffee this Sunday, We can help to keep the planet alive in a real way and continue to bring you regular updates and features on Australian plants all in one Botanical Bible. Any support is greatly appreciated. Thank you.
In the spirit of reconciliation we acknowledge the Bundjalung, Gumbaynggirr and Yaegl and all aboriginal nations throughout Australia and their connections to land, sea and community. We pay our respect to their Elders past, present and future for the pleasures we have gained.
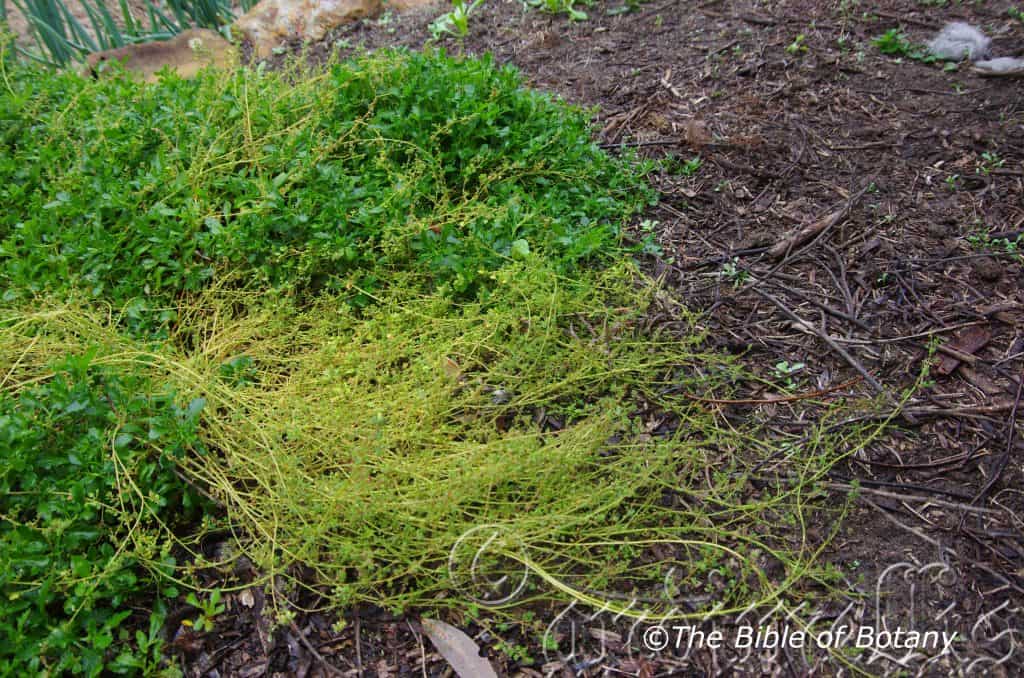
Author’s Garden The Pinnacles NSW
Author’s Garden The Pinnacles NSW
Author’s Garden The Pinnacles NSW
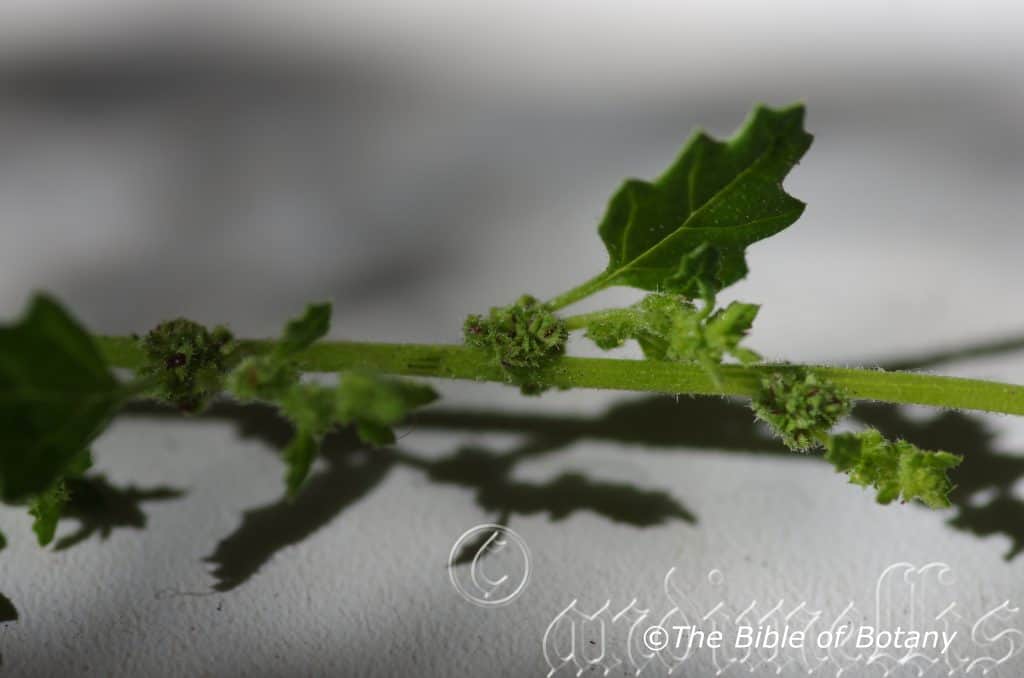
Author’s Garden The Pinnacles NSW
Dysphania pumilio
Classification
Unranked: Eudicots
Order: Caryophyllales
Family: Amaranthaceae
Subfamily: Chenopodioideae
Tribe:
Genus: From Dys, which is Ancient Greek for to convey the idea of something that is foul, bad or having an ill odour and Phania which is Ancient Greek for insignificant. It probably refers to structures, like the leaves or flowers, which have an insignificantly bad odour.
Species: From Pugmaloi, which is Ancient Greek for a pygmie or Pugmi, which is Ancient Greek problem child or Pumilio, which is Latin for a dwarf. It refers to organs or structures, which are much smaller than other species in the genus.
Common Name:
Distribution:
Dysphania pumilio is found in a line south from De Grey and Coongan Rivers to 7klm north of Overlander Roadhouse, north west coastal Highway then south east to Eyre Botanical District. Near Israelite Bay in Western Australia.
In the east it is found from from near the tip of Cape York Peninsula in far north Queensland to Uluru in southern Northern Territory and south to Kangaroo Island in South Australia.
It is also found on the eastern half of Tasmania and New Zealand.
https://avh.ala.org.au/occurrences/search?taxa=Dysphania+pumilio#tab_mapView
Habitat Aspect Climate:
Dysphania pumilio prefers full sun, light dappled shade to part shade. It grows in open woodlands and open heaths from gentle slopes to flats. The altitude ranges from 5 meters ASL to 1000 meters ASL.
The temperatures range from minus 3 degrees in July to 44 degrees in January.
The rainfall ranges from lows of 150mm to 3000mm average per annum.
Soil Requirements:
Dysphania pumilio prefers variable quality sands to sandy loams. The soils are usually derived from decomposed sandstone or at times granites. It is also found on accumulated sands in semi arid areas. The soils pH ranges 5pH to 6.5pH. It does not tolerate waterlogged soils. Non saline soils to moderately slightly saline soils are tolerated.
Height & Spread:
Wild Plants: 50mm to 75mm by 500mm to 800mm.
Characteristics:
Dysphania pumilio grows as a small prostrate ground cover or is seen scrambling over low obstacles. The stems are grass green and are moderately to densely covered in glandular and hirsute hairs.
The elliptical to ovate, succulent leaves of Dysphania pumilio measure 5mm to 20mm in length by 5mm to 20mm in width. The terete petioles are moderately to densely covered in glandular and hirsute hairs and measure 2mm to 10mm in length.
The bases are cuneate often extending down the petiole, while the apexes are acute. The discolourous laminas are mid grass green and sparsely covered in hirsute hairs with a few glandular hairs on the upper lamina while the lower lamina is slightly paler. The laminas are flat or recurve slightly upwards towards the margins. The margins are sinuate to entire or at times have 3 or 4 lobes. The mid vein is slightly prominent on the lower lamina and is distinctly visible on the upper lamina.
Inflorescences of Dysphania pumilio are few to many-flowered axillary glomerulus with reduced leaf like bracts. The inflorescences are bisexual or female and measure 0.55mm to 1mm across. The 5 green perianth segments are free to base, spathulate or obtuse and are usually sparsely covered hirsute and glandular hairs more prominent at the apex. There is a single stamen in the bisexual flowers
The erect deep brown to black seed measures 0.4mm to 0.5mm in diameter.
Wildlife:
Dysphania pumilio‘s wildlife is unknown to the author.
Cultivation:
Dysphania pumilio is an easy to grow native which is most suitable for flat areas in full sun light that has very good drainage. It should be treated as an annual. Most areas where it is growing will self seed in small numbers once establish.
Dysphania pumilio looks good planted amongst other small ground covers with contrasting foliages like Scaevola aemula or Goodenia grandiflora. Be careful even as an Dysphania pumilio can over run other ground covers.
Annuals like the paper daisy Xerochrysum bracteatum, Brachyscome multifida and Rhodanthe chlorocephala subsp. rosea are three beautiful contrasting annuals with height that will help give depth and good contrasts in foliage and flower colour.
Propagation:
Seeds: Dysphania pumilio’s seeds do not require treatment before sowing. Sow fresh seeds directly into a seed raising mix and cover with 5mm of the mix. Place the seeds in a shady warm position and keep moist not wet. When the seedlings are 25mm to 50mm tall, prick them out and plant them into 50mm native tubes using a seed raising mix.
Once the seedlings reach 150mm to 200mm in height plant them out into their permanent position. Mass plantings can be achieved by planting them at 6 meter to 12 meter centers.
Alternatively the seeds can be broadcast at the rate of 1 gram per square meter for a dense covering or gently rake the ground where the plants were from the previous season.
Fertilize using seaweed, fish emulsion or organic chicken pellets soaked in water on an alternate basis. Fertilize every two months until the plants are established then annually in early September to October to maintain health, vitality and better flowering.
Further Comments from Readers:
Hi reader, it seems you use The Bible of Botany a lot. That’s great as we have great pleasure in bringing it to you! It’s a little awkward for us to ask, but our first aim is to purchase land approximately 1,600 hectares to link several parcels of N.P. into one at The Pinnacles NSW Australia, but we need your help. We’re not salespeople. We’re amateur botanists who have dedicated over 30 years to saving the environment in a practical way. We depend on donations to reach our goal. If you donate just $5, the price of your coffee this Sunday, We can help to keep the planet alive in a real way and continue to bring you regular updates and features on Australian plants all in one Botanical Bible. Any support is greatly appreciated. Thank you.
In the spirit of reconciliation we acknowledge the Bundjalung, Gumbaynggirr and Yaegl and all aboriginal nations throughout Australia and their connections to land, sea and community. We pay our respect to their Elders past, present and future for the pleasures we have gained.
All information is included in good faith and has been thoroughly researched prior to printing. The website or the author does not warrant or guarantee the accuracy of any information on these pages, nor does the website or the author accept any responsibility for any loss arising from the use of the information found within. The views and opinions are strictly those of the author or those members who chose to actively participate in the contents herein.