Plant Descriptions – Boronia chartacea – Bothriochloa australe
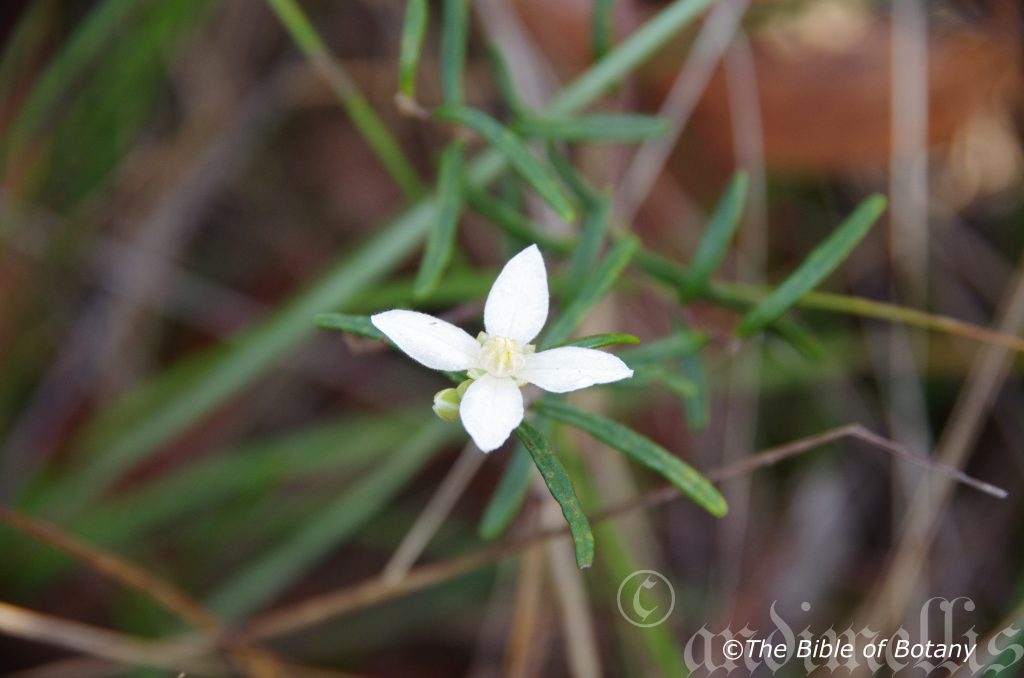
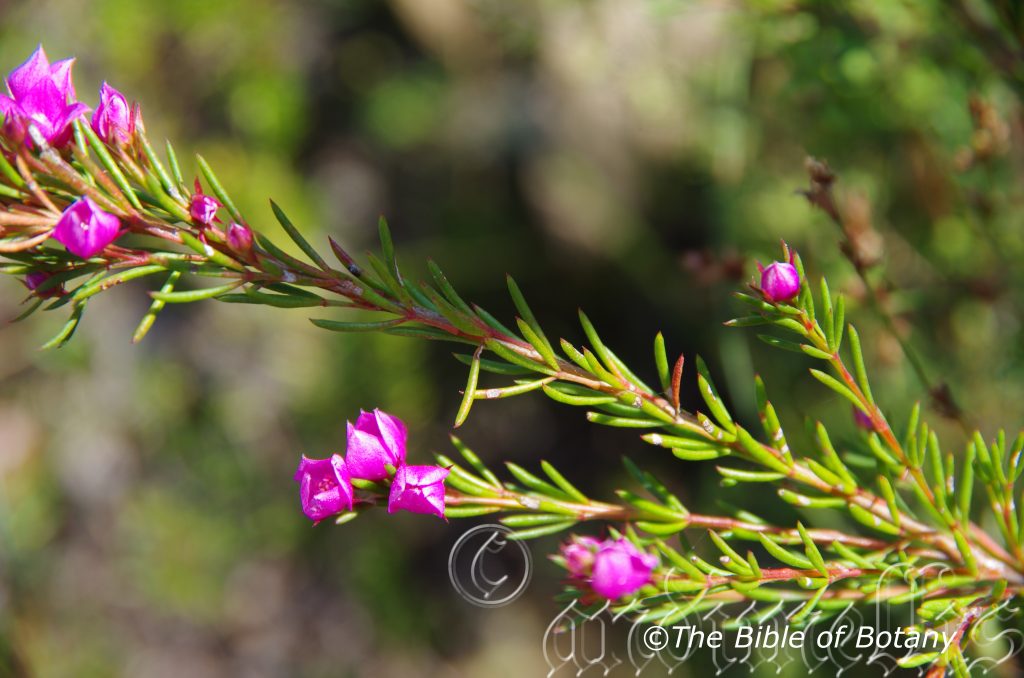
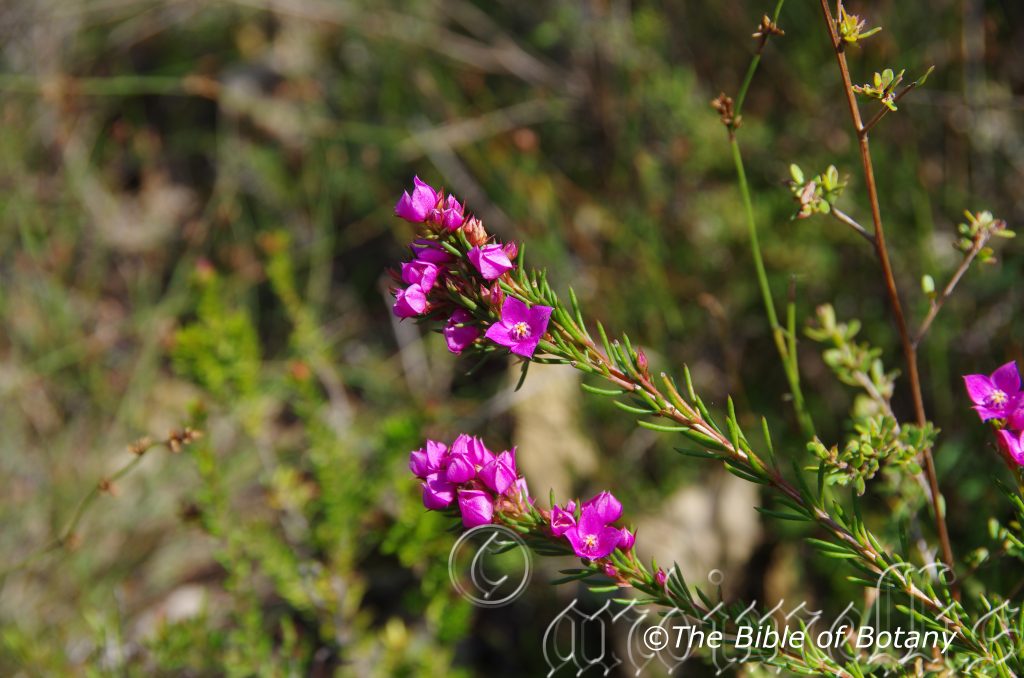
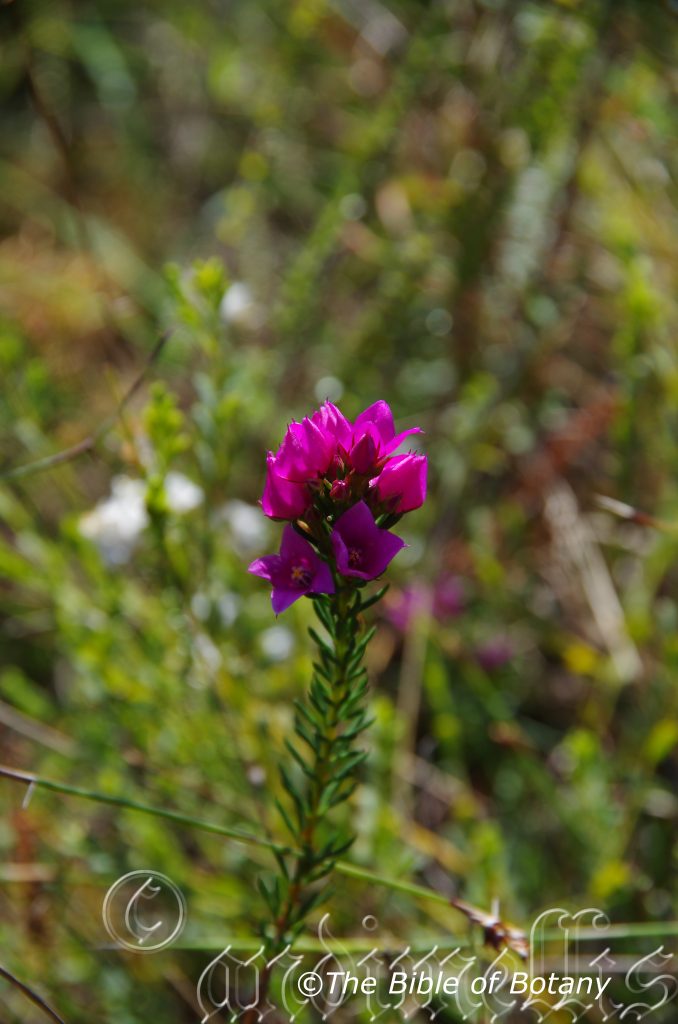
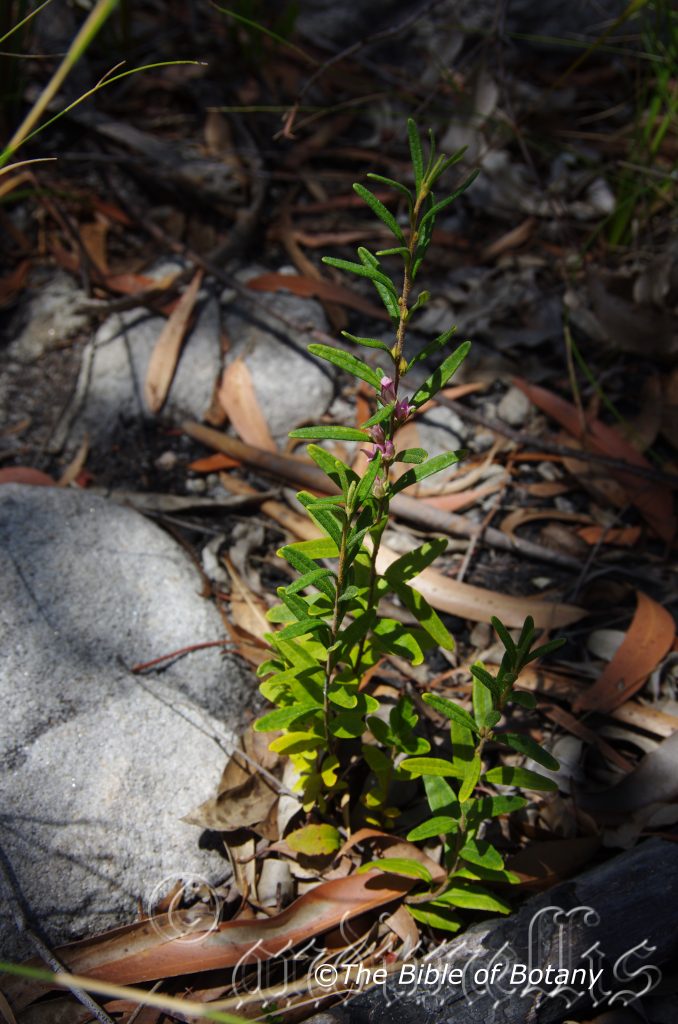
Boronia chartacea
Boronia clavata
Boronia denticulata
Boronia falcifolia
Boronia hapalophylla
Boronia heterophylla
Boronia ledifolia
Boronia parviflora
Boronia pinnata
Boronia polygalifolia
Boronia rosmarinifolia
Boronia safrolifera
Boronia umbellata
Bosistoa floydii
Bosistoa pentacocca
Bossiaea ensata
Bossiaea heterophylla
Bossiaea rhombifolia
Bothriochloa decipiens subsp. decipiens
Botrychium australe
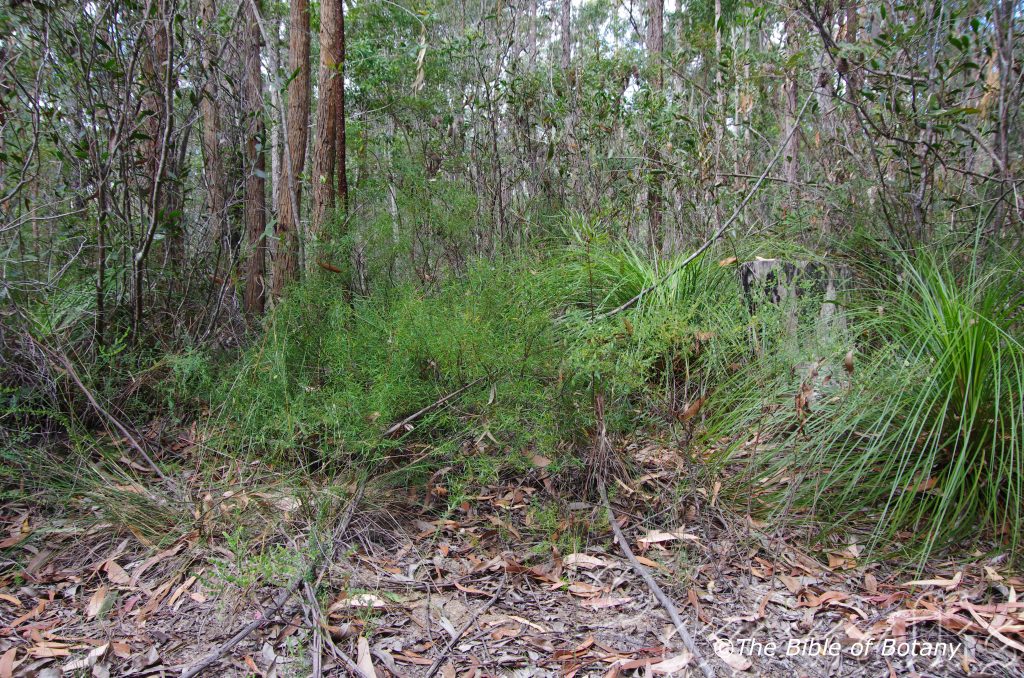
The Pinnacles NSW
The Pinnacles NSW
The Pinnacles NSW
The Pinnacles NSW
The Pinnacles NSW
The Pinnacles NSW
The Pinnacles NSW
The Pinnacles NSW

The Pinnacles NSW
The Pinnacles NSW
The Pinnacles NSW
The Pinnacles NSW
Boronia chartacea
Classification:
Class: Rosids
Order: Sapindales
Family: Rutaceae
Genus: Is named in honour of Francesco Borone; 1769-1794, who was an Italian botanical enthusiast.
Species: From Chartacea, which is Latin for papery. It refers to an organ or structure, which has a papery appearance and or touch.
Common Name:
Distribution:
Boronia chartacea is endemic to New South Wales and is found south from Fortis Creek Nature Reserve and Copmanhurst to Wauchope.
Habitat Aspect Climate:
Boronia chartacea grows in full sun to dappled shade on ridges and slopes in open Eucalyptus forests or open Eucalyptus woodlands. The altitude ranges from 25 meters ASL to 183 meters ASL.
The temperatures range from minus 1 degree in August to 37 degrees in January.
The rainfalls range from lows of 800mm to 1500mm average per annum.
https://avh.ala.org.au/occurrences/search?taxa=Boronia+chartacea#tab_mapView
Soil Requirements:
Boronia chartacea prefers deep, fine sands, sandy loams to light fatty clays. The soils are usually derived from decomposed reddish sandstones or lateritic sandstones. The soil’s pH ranges from 4.5pH to 5.5pH. It does not tolerate waterlogged soils. None saline soils to moderately saline soils are tolerated.
Height & Spread:
Wild Plants: 0.5m to 2.5m by 0.75m to 1.5m
Characteristics:
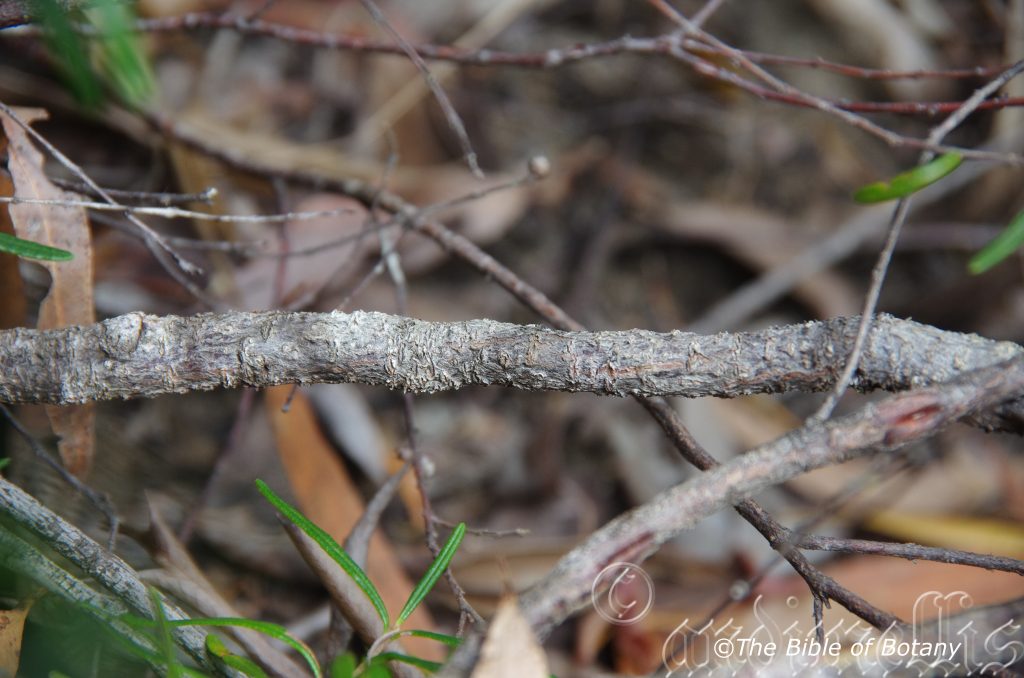
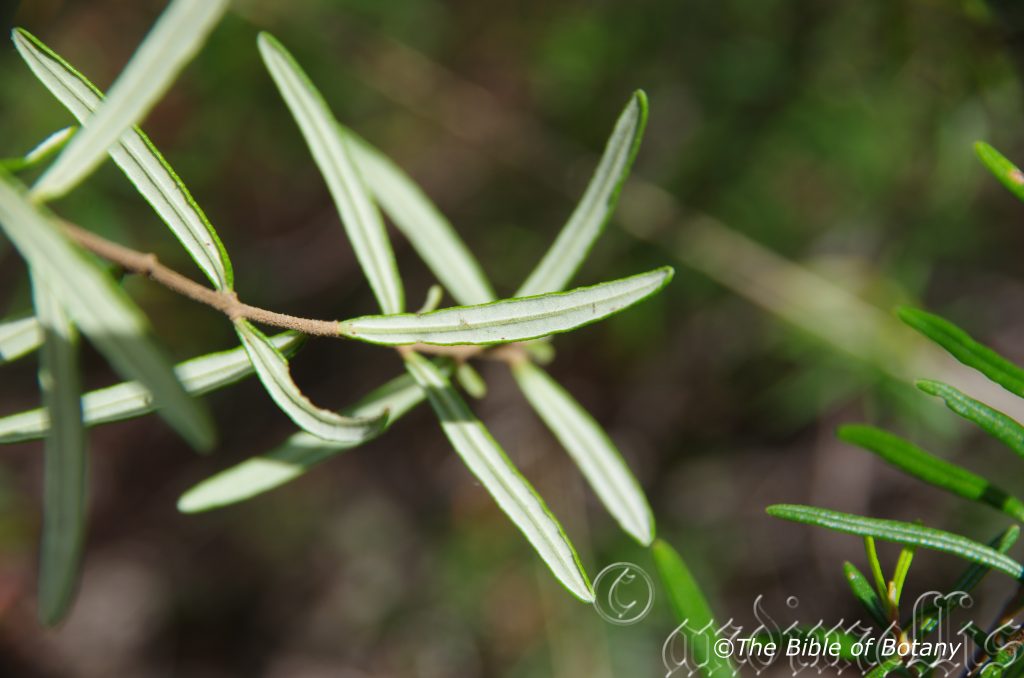
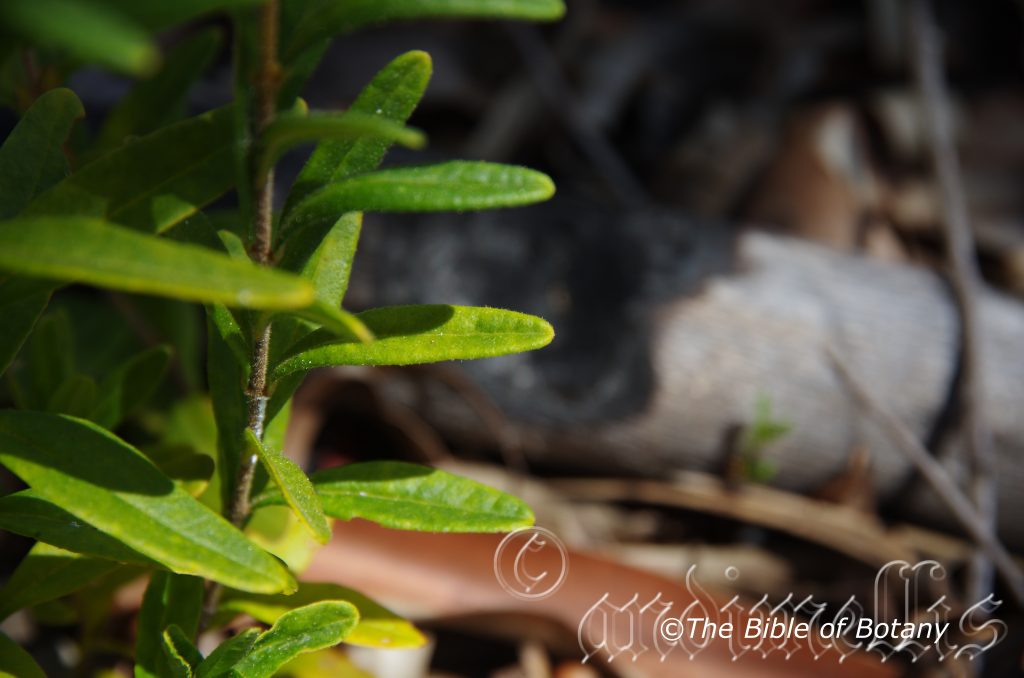
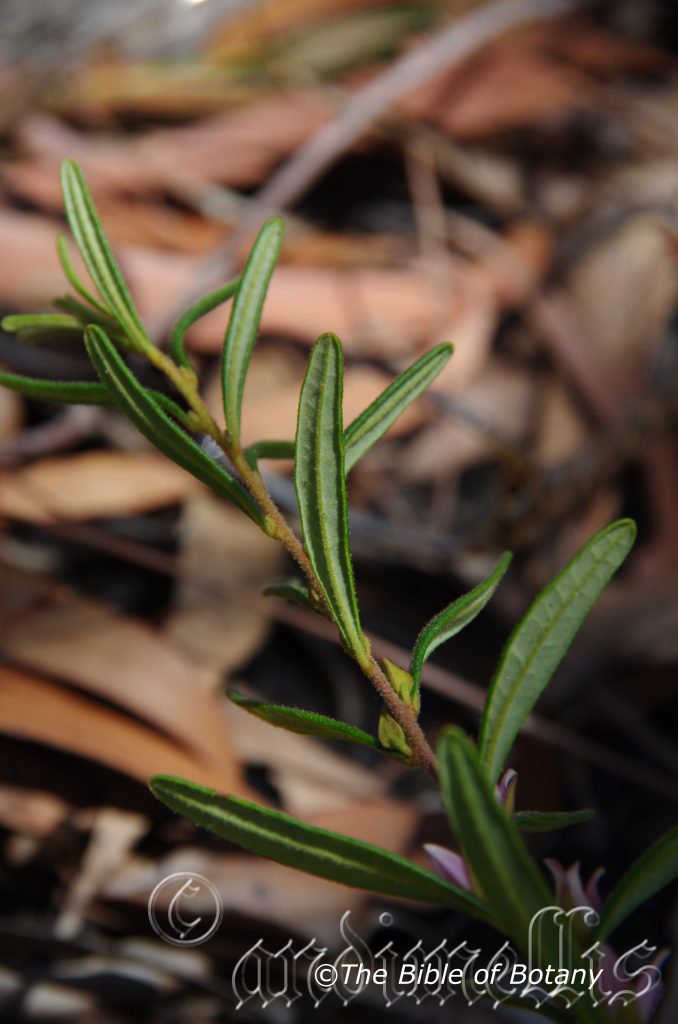
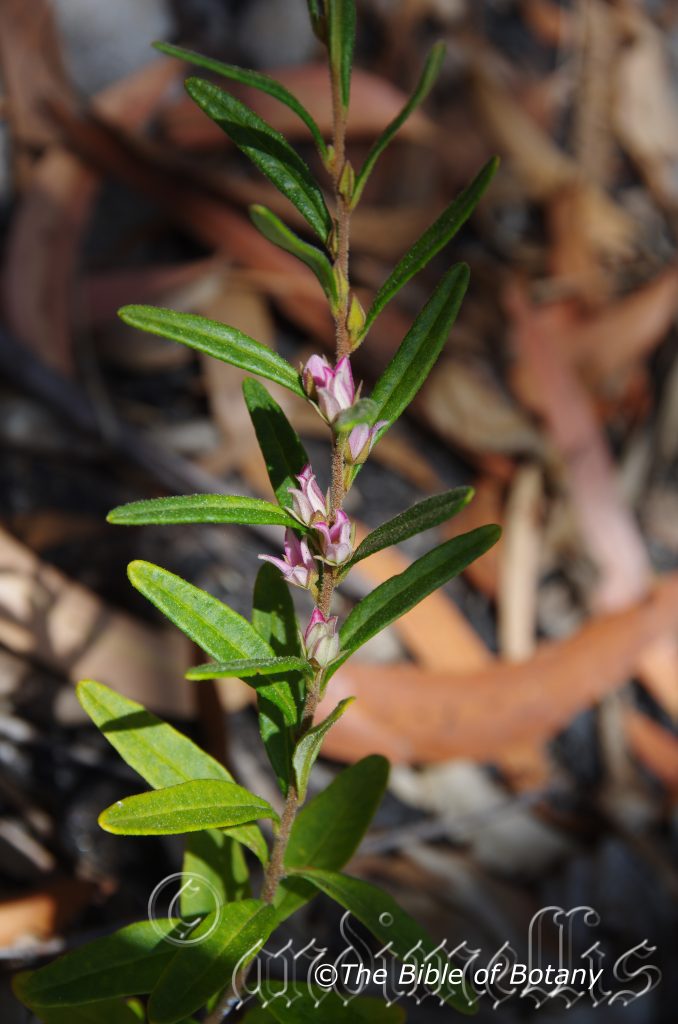
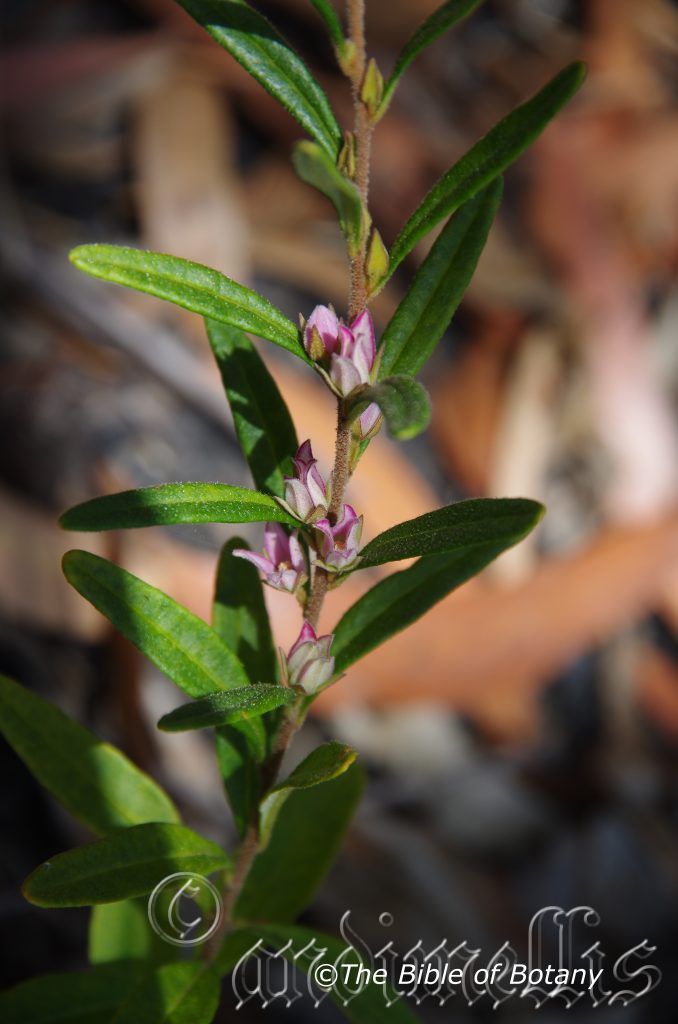
Boronia chartacea stems are slender, semi weeping and brown to deep burgundy-brown and glabrous. Young and juvenile branchlets are deep burgundy-brown and covered in fawn stellate-puberulent hairs.
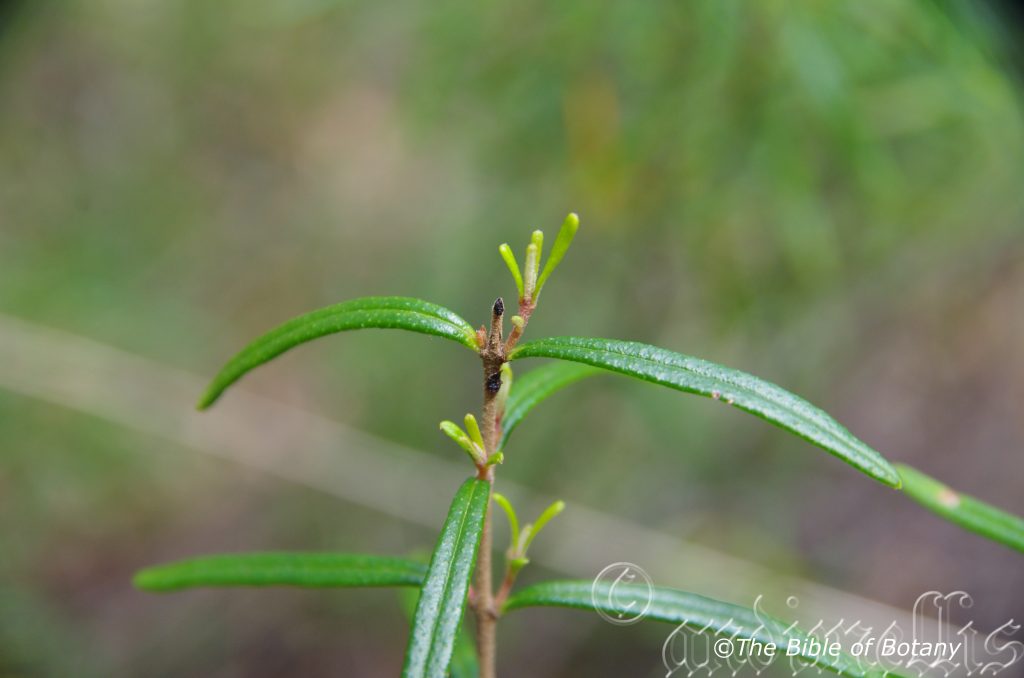
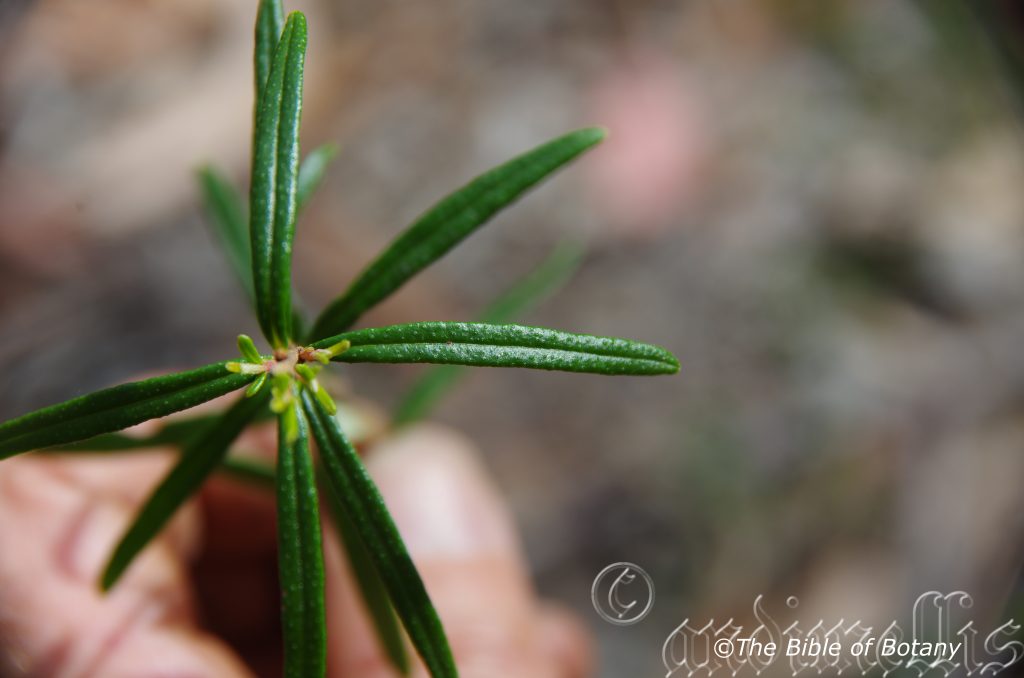
Boronia chartacea’s opposite leaves are broad linear, narrow elliptical or narrow oblong and measure 20mm to 50mm in length by 2mm to 4mm in width. The bases are tapering while the apexes are obtuse. The concolourous laminas are papillate, deep grass-green to sea-green, glabrous and dull on the upper laminas while the lowers laminas are covered in fawn tomentose hairs. The mid vein is prominent on the lower lamina and is clearly visible on the upper lamina. The leaf margins are uneven as a result of the papillation of the upper lamina and are recurved to strongly revolute. The petioles are deep burgundy-red and measure 1mm to 2mm in length. Juvenile shoots are a paler green and glabrous. The leaves are strongly aromatic when crushed.
The inflorescences of Boronia chartacea are born singly from the leaf axils. The red-brown pedicels measure 2mm to 8mm in length. The 4 pinkish grey-green, ovate calyxes have acute apexes and are covered in tomentose hairs externally. The sepals measure 1.6mm to 2mm in length. The 4 divaricate, bright pink or rarely white, valvate petals are covered in pink stellate to puberulent hairs externally and have a strongly prominent midrib on the lower surface. The petals measure 7mm to 9mm in length by 3.6mm to 4.5mm in width.
The 8 stout, slightly recurved filaments are deep pink and measure 1.5mm to 2mm in length by 0.5mm in width. The trilobed anthers are cream to pale yellow.
The short, stout pistil measures less than 1mm in length. The sweetly scented flowers are produced in profusion from July to September.
The fruits Boronia chartacea is a swollen cocci surrounded by the dried pale dull faded pink petals. The cocci are glabrous.
Wildlife:
Boronia chartacea’s wildlife is unknown to the author.
Cultivation:
Boronia chartacea will grow from 1.5 meters to 2 meters in height by 1 meter to 1.8 meters in diameter in the garden when grown in an open situation. It will need a good friable sandy loam with excellent drainage, good moisture and a covering of good organic mulch. It would be ideal around swimming pools, sunny court yards along driveways or placed in sunny rockeries. I would be prepared to try this species on the south of Sydney and in the south east corner of Western Australia in areas where only mild frosts are experienced.
It makes beautiful garden subjects and this one is no exception. It is hardier than most, responds to watering and tip pruning. Boronia chartacea is easy to grow from seed so a good supply can be maintained with plants always looking at their best. Seed grown plants give far better flowering displays and grow stronger than cutting grown plants.
It is a great feature plant amongst rockeries, beneath trees, on banks and in particular, when planted in mass displays for their flowers.
Boronia chartacea is best grown in small clumps of 2 to 3 plants or planted close enough with other small plants between to give a mass affect when in flower. Surround it with other pink or white flowering, small prostrate Grevillea species with deep red flowers for something tantalizingly superb for late winter colour. The deep red flowers will not be in conflict if the plants are grown as ground covers. If the Grevillea species were of equal in size or slightly smaller they would be too overpowering so keep this in mind. It can be frequently tip pruned to increase bushiness and more flowers in the next season. The open appearance lends beautifully for rockeries where the accent is on the boulders. The open habit also ensures the flowers are on good display all the time from all angles. A crowded garden bed will kill the effect of the leaves, stems and flowers so do not crowd them. These are the features so use them as highlights in the garden.
Boronias in general are difficult to grow under cultivated conditions but fortunately this one is an exception and has proven itself in the southern states.
Select the place you want the plants to grow in and pre-prepare it. Buy a few small plants in native tubes and plant them close enough to give a display but far enough apart to be observed when half grown.
Beware of what you buy at a nursery. You are better buying small seed grown plants that have never flowered before. Why? Because, when Boronia are cutting grown they have a weaker root system. The roots may look big and strong however they rarely develop good adventitious roots. Adventitious roots are the small hair like roots that absorb water and nutrient. It is the lack of these roots that will eventually lead to the decline or health of the plant over successive seasons.
If seed plants are unobtainable or a specific colour or leaf form is required then cutting grown plants must be used to ensure the type wanted.
Select the place you want the plants to grow in and pre-prepare it. Buy a few small plants and plant them close enough to give a display but far enough apart to be observed when half grown.
Boronia chartacea like all Boronia are not easy to grow from seed so a good supply can be difficult to maintain in the garden from seedlings.
Seed grown plants give far better flowering displays and grow stronger than cutting grown plants once established.
Misting the plants on a regular basis will imitate the orographic precipitation found in the wild.
It is best to select a Boronia that grows in your district as these ultimately will have the best chance of surviving and giving great displays.
Propagation:
Seeds: The seeds of Boronia chartacea may be difficult to come by as the plant is endangered and seed collection is strictly controlled. Seeds can be removed easily from the plants as they dry. Once Boronia chartacea has finished flowering and the fruits have swollen place an old sheet below the plants and keep a close eye on it. Peg it down so it doesn’t blow around. When the seeds start to disperse, it can be all over in one day with the seeds being scattered on the ground. Clean the rubbish off and sieve the material for the seeds or place a smooth mat on the ground below the seed bearing branches.
Seeds need to be treated by rubbing gently on fine sandpaper. Another method is to drop them into hot water and allow it to cool. I have also laid the rubbish out at the time of collecting the seeds and burnt it with the seeds still amongst the trash. No one method has proven better than the other with all producing erratic results. Scarifying the seeds by placing them in the refrigerator for two or three weeks may help germination.
Sow freshly treated seeds directly into a seed raising mix, keeping them moist not wet and place the tray in a warm place with no more than 50mm shade. When the seedlings are 20mm to 25mm in height, prick them out and plant them into 50mm native tubes using a good organic mix.
As the seedlings roots reach the bottom of the tubes plant them out into their permanent position. Do not delay.
For mass plantings, space the seedlings at 1.5 meters to 2 meter centers.
Cuttings: While I am not a big supporter of taking cuttings from Boronia, at times we have no choice when seed is not available. Use 60mm to100mm long semi hardwood material, which is taken in late winter to mid spring immediately after flowering has finished and the last of the blooms have faded. The type of material is not important as they all strike relatively easily though side shoots with the heels removed are excellent. It is usually prepared from partially mature wood of the current season’s growth, just after a flush of growth.
1 Prepare the cutting mix by adding one third sharp clean river sand, one third peat and one third perlite. These ingredients are sterile,
2 Select good material from non diseased plants,
3 Select semi green stems for cuttings. Look for a stem with two or three nodes,
4 Place the cutting on a flat, hard surface, and make a clean slice through the middle of the lower node on an angle towards the base, with a sterilized sharp knife or razor blade. – This scarification of the node will increase the chances of roots emerging from this spot. Now remove all but one or two the leaves, leaving the apex leaves in tact. If the leaves are very large in proportion to the stem, cut off the apical halves.
5 Some plants root easily, but a rooting hormone can help others by stimulating the cutting into sending out new roots. Fill a saucer with water, and place some rooting hormone into another container like a bottle top. Dip the node end of the cutting into the water and then into the rooting hormone. Tap off any excess hormone,
6 Use a small dipple stick or old pencil to poke a hole into the soilless potting mix. Ensure the hole is slightly larger than the stem diameter and be careful not to wipe the rooting hormone off the cuttings base, place the cuttings in a pattern ensuring the cuttings are not touching each other,
7 I like to place the pots in Plastic bags to help maintain temperature and moisture. Place in a semi shaded place like under 50mm shade cloth.
8 When the cuttings have struck, open the bag to allow air circulation for a few days to a week,
9 Once hardened off remove the cuttings from the bag and allow to further hardening for a few more days,
10 Transplant into a good potting mix to grow on.
Fertilize using Seaweed, fish emulsion or organic chicken pellets soaked in water on an alternate basis. Fertilize every two months until the plants are established then annually in early September to October to maintain health, vitality and better flowering.
Further Comments from Readers:
Hi reader, it seems you use The Bible of Botany a lot. That’s great as we have great pleasure in bringing it to you! It’s a little awkward for us to ask, but our first aim is to purchase land approximately 1,600 hectares to link several parcels of N.P. into one at The Pinnacles NSW Australia, but we need your help. We’re not salespeople. We’re amateur botanists who have dedicated over 30 years to saving the environment in a practical way. We depend on donations to reach our goal. If you donate just $5, the price of your coffee this Sunday, We can help to keep the planet alive in a real way and continue to bring you regular updates and features on Australian plants all in one Botanical Bible. Any support is greatly appreciated. Thank you.
In the spirit of reconciliation we acknowledge the Bundjalung, Gumbaynggirr and Yaegl and all aboriginal nations throughout Australia and their connections to land, sea and community. We pay our respect to their Elders past, present and future for the pleasures we have gained.
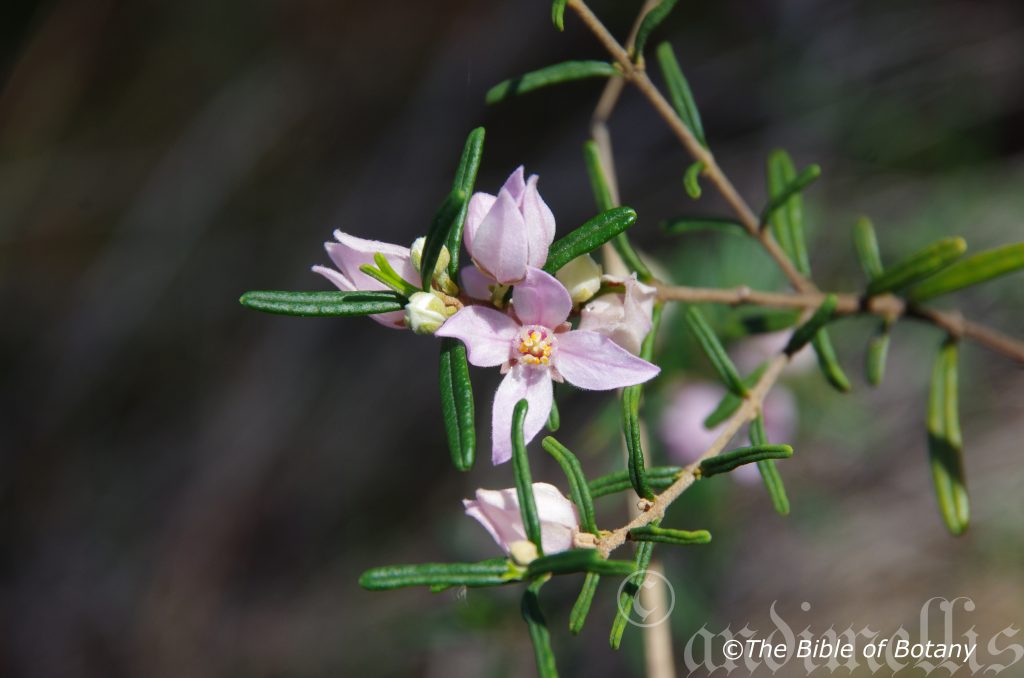
Boronia clavata
Classification:
Class: Rosids
Order: Sapindales
Family: Rutaceae
Genus: Is named in honour of Francesco Borone; 1769-1794, who was an Italian botanical enthusiast.
Species: From Clavatum, which is Latin for a club. It refers to organs, which are shaped like a club.
Common Name: Bremer River Boronia.
Distribution:
Boronia clavata is endemic to south west Western Australia around Bremer Bay and the Fitzgerald National Park.
https://avh.ala.org.au/occurrences/search?taxa=Boronia+clavata#tab_mapView
Habitat Aspect Climate:
Boronia clavata prefers full sun to partial shade. It grows in open woodlands and shrubby heaths on plains or alluvial flats. The altitude ranges from 5 meters ASL to 250 meters ASL
The temperatures range from 3 degrees in August to 37 degrees in January.
The rainfall ranges from lows of 400mm to an average of 820mm annually.
Soil Requirements:
Boronia clavata prefers deep, coarse sands, fine sands, sandy loams, light fatty clays or light silts to heavy silts. The soils are usually derived from decomposed sandstones, granites, alluvial deposits or ancient accumulated beach sands. The soil’s pH ranges from 5pH to 6.5pH. It does not tolerate waterlogged soils. None saline soils to moderately saline soils are tolerated.
Height & Spread:
Wild Plants: 0.5m to 2m by 0.5m to 1.5m
Characteristics:
Boronia clavata has a pale grey to grey-brown glabrous bark. Young juvenile branchlets are pink-brown to deep pink-brown and glabrous.
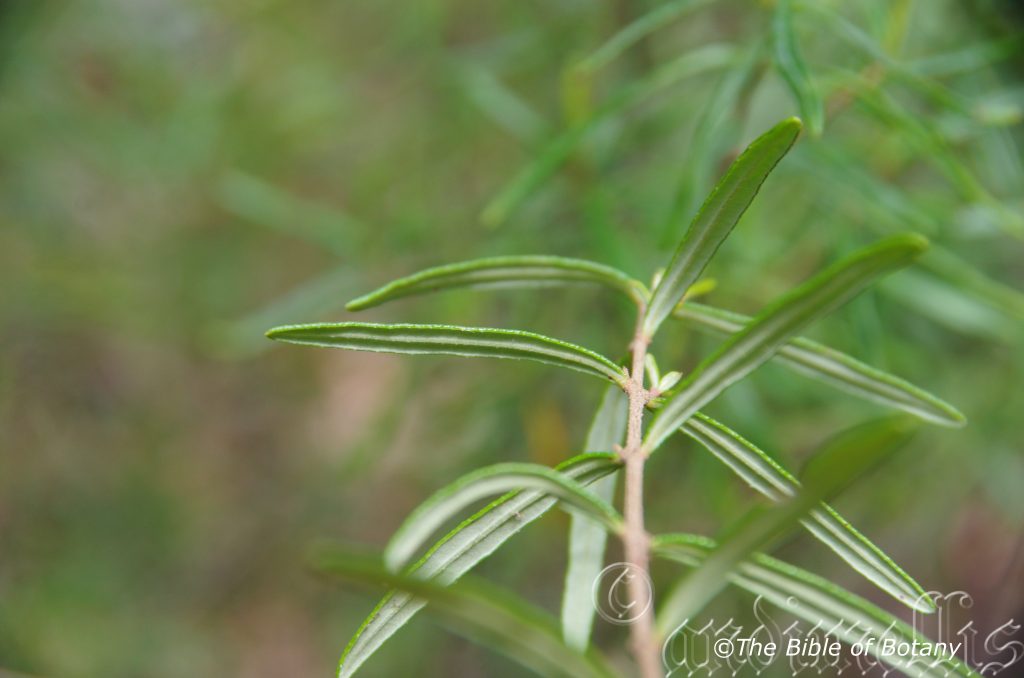
Boronia clavata’s leaves are opposite and often divided on a short peduncle. The simple, linear, leaves are once divided or trifoliate and measure 10mm to 20mm in length by 1.5mm to 2.5mm in width. The concolourous laminas are a dull pale grass-green to mid green. The mid vein is slightly prominent on the lower lamina and not visible from above. The leaf margins are entire. The leaves are sessile while the peduncles measures 0.5mm to 1.5mm in length. Juvenile shoots are a paler green and glabrous. The leaves are aromatic when crushed.
The inflorescences of Boronia clavata are born singly from the leaf axis. The pedicels range from 2mm to 3mm in length. The 4 linear calyxes are glabrous and measure 0.5mm to 0.8mm in length. The 4 pale green to mid green sepals have broad acute apexes. The calyx lobes measure 1.5mm to 2mm in length. The 4 bright pale lemon-yellow to bright lemon-lime petals are elliptical, concave on the inner surface and measure 7mm to 8mm in length by 3.5mm to 4mm in width.
The 8 bright lime green stamens measure 1mm to 1.5mm in length.
The bright lime green clavate style measures 4mm to 5mm in length. The 4 lobed stigmas are usually a deeper green than the style. The sweetly scented flowers are produced in profusion from August to October.
The fruits Boronia clavata is a swollen cocci surrounded by the dried pale dull faded yellow petals. The cocci are glabrous.
Wildlife:
Boronia clavata‘s wildlife is unknown to the author.
Cultivation:
Boronia clavata will grow from 1.5 meters to 1.8 meters in height by 1 meter to 1.8 meters in diameter in the garden. It will need a good friable sandy loam with excellent drainage and moisture. It would be ideal along fence lines, driveways or placed in sunny rockeries.
It makes a beautiful garden subject as it is hardier than most, responds to watering and tip pruning. Boronia clavata is easy to grow from seed so a good supply can be maintained with plants always looking at their best. Seed grown plants give far better flowering displays and grow stronger than cutting grown plants.
It is a great feature plant amongst rockeries, beneath trees, on banks and in particular, when planted in mass displays for their flowers.
Boronia clavata is best grown in small clumps of 6 to 8 plants or planted close enough with other small plants between to give a mass affect when in flower. Surround it with other pink or white flowering Boronia or small prostrate Grevillea species with deep red flowers for something tantalizingly superb for late winter colour. The deep red flowers will not be in conflict if the plants are grown as ground covers. If the Grevillea species were of equal size or slightly smaller they would be too overpowering so keep this in mind. It can be frequently tip pruned to increase bushiness and more flowers in the next season. The open appearance lends beautifully for rockeries where the accent is on the boulders. The open habit also ensures the flowers are on good display all the time from all angles. A crowded garden bed will kill the effect of the leaves, stems and flowers so do not crowd them. These are the features so use them as highlights in the garden.
Boronias in general are difficult to grow under cultivated conditions. It is difficult enough to maintain when growing naturally on your block. Some useful hints are.
Beware of what you buy at a nursery. You are better buying small seed grown plants that have never flowered before. Why? Because, when Boronia are cutting grown they have a weaker root system. The roots may look big and strong however they rarely develop good adventitious roots. Adventitious roots are the small hair like roots that absorb water and nutrient. It is these roots that will eventually lead to the decline or health of the plant over successive seasons.
If seed plants are unobtainable or a specific colour or leaf form is required then cutting grown plants must be used to ensure the type wanted.
Select the place you want the plants to grow in and pre-prepare it. Buy a few small plants and plant them close enough to give a display but far enough apart to be observed when half grown.
Boronia clavata like all Boronias are not easy to grow from seed so a good supply can be difficult to maintain in the garden from seedlings.
Seed grown plants give far better flowering displays and grow stronger than cutting grown plants once established.
Misting the plants on a regular basis will imitate the orographic precipitation found in the wild.
Select the Boronia that grow in your district as these will do best.
Propagation:
Seeds: The seeds of Boronia clavata may be difficult to come by as the plant is endangered and seed collection is strictly controlled. Seeds can be removed easily from the plants as they dry. Once Boronia clavata has finished flowering and the fruits have swollen place an old sheet below the plants and keep a close eye on it. Peg it down so it doesn’t blow around. When the seeds start to disperse, it can be all over in one day with the seeds being scattered on the ground. Clean the rubbish off and sieve the material for the seeds or place a smooth mat on the ground below the seed bearing branches.
Seeds need to be treated by rubbing between fine sandpaper. Another method is to drop them into hot water and allow it to cool. I have also laid the rubbish out at the time of collecting the seeds and burnt it with the seeds still amongst the rubbish. No one method has proven better than the other with all producing erratic results.
Sow freshly treated seeds directly into a seed raising mix, cover with mm to 3mm of mix with 30mm perlite and water. Keep them moist not wet. When the seedlings are 20mm to 25mm in height, prick them out and plant them into 50mm native tubes using a good organic mix.
As the seedlings roots reach the bottom of the tubes plant them out into their permanent position. Nip the growing shoots to help promote bushiness. Do not delay.
For mass plantings, space the seedlings at 1.5 meters to 2 meter centers.
Cuttings: While I am not a big supporter of taking cuttings from Boronia at times we have no choice when seed is not available. Use 60mm to 100mm long semi hardwood material, which is taken in late winter to mid spring immediately after flowering has finished and the last of the blooms have faded. The type of material is not important as they all strike fairly easily though side shoots with the heels removed are excellent. They are usually prepared taken from late September to late October.
1 Prepare the cutting mix by adding one third sharp clean river sand, one third peat and one third perlite. These ingredients are sterile,
2 Select good material from non diseased plants,
3 Select semi green stems for cuttings. Look for a stem with two or three nodes,
4 Place the cutting on a flat, hard surface, and make a clean slice through the middle of the lower node on an angle towards the base, with a sterilized sharp knife or razor blade. – This scarification of the node will increase the chances of roots emerging from this spot. Now remove all but one or two the leaves, leaving the apex leaves in tact. If the leaves are very large in proportion to the stem, cut off the apical halves.
5 Some plants root easily, but a rooting hormone can help others by stimulating the cutting into sending out new roots. Fill a saucer with water, and place some rooting hormone into another container like a bottle top. Dip the node end of the cutting into the water and then into the rooting hormone. Tap off any excess hormone,
6 Use a small dipple stick or old pencil to poke a hole into the soilless potting mix. Ensure the hole is slightly larger than the stem diameter and be careful not to wipe the rooting hormone off the cuttings base, place the cuttings in a pattern ensuring the cuttings are not touching each other,
7 I like to place the pots in Plastic bags to help maintain temperature and moisture. Place in a semi shaded place like under 50mm shade cloth.
8 When the cuttings have struck, open the bag to allow air circulation for a few days to a week,
9 Once hardened off remove the cuttings from the bag and allow to further hardening for a few more days,
10 Transplant into a good potting mix to grow on.
Fertilize using Seaweed, fish emulsion or organic chicken pellets soaked in water on an alternate basis. Fertilize every two months until the plants are established then annually in early September to October to maintain health, vitality and better flowering.
Further Comments from Readers:
Hi reader, it seems you use The Bible of Botany a lot. That’s great as we have great pleasure in bringing it to you! It’s a little awkward for us to ask, but our first aim is to purchase land approximately 1,600 hectares to link several parcels of N.P. into one at The Pinnacles NSW Australia, but we need your help. We’re not salespeople. We’re amateur botanists who have dedicated over 30 years to saving the environment in a practical way. We depend on donations to reach our goal. If you donate just $5, the price of your coffee this Sunday, We can help to keep the planet alive in a real way and continue to bring you regular updates and features on Australian plants all in one Botanical Bible. Any support is greatly appreciated. Thank you.
In the spirit of reconciliation we acknowledge the Bundjalung, Gumbaynggirr and Yaegl and all aboriginal nations throughout Australia and their connections to land, sea and community. We pay our respect to their Elders past, present and future for the pleasures we have gained.
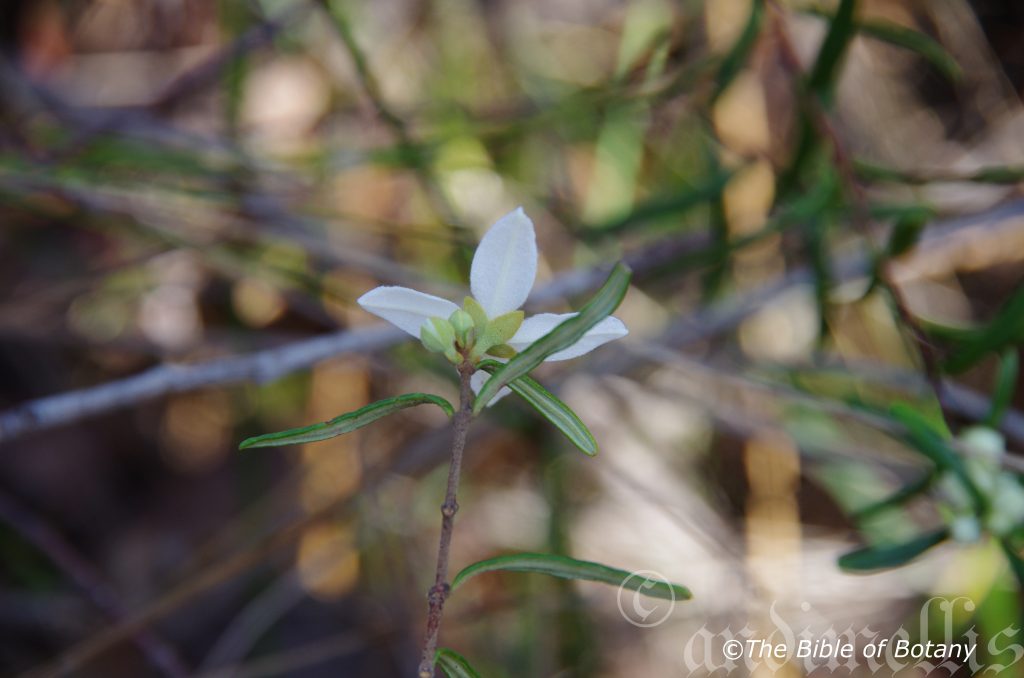
Boronia denticulata
Classification:
Class: Rosids
Order: Sapindales
Family: Rutaceae
Genus: Is named in honour of Francesco Borone; 1769-1794, who was an Italian botanical enthusiast.
Species: From Odoos/Odonta, which are Ancient Greek or later Dons, which is Latin for a tooth or teeth and Ocalatum which is Latin for with an eye. It refers to leaf margins which have very fine teeth that need a keen eye to see them.
Common Name:
Distribution:
Boronia denticulata is endemic to south west Western Australia south from the Swan River Plains then east from Augusta and the Margaret River to the Esperance Plains.
https://avh.ala.org.au/occurrences/search?taxa=Boronia+denticulata#tab_mapView
Habitat Aspect Climate:
Boronia denticulata prefers full sun to partial shade. It grows in open Eucalyptus forests, open woodlands or shrubby heaths on flood plains or alluvial flats. The altitude ranges from 5 meters ASL to 300 meters ASL
The temperatures range from lows of 3 degrees in August to 36 degrees in January.
The rainfalls range from lows of 400mm to an average of 1150mm.
Soil Requirements:
Boronia denticulata prefers deep, fine sands, sandy loams to light fatty clays with gravel. The soils are usually derived from decomposed sandstones, granites or alluvial deposits mixed with lateritic gravels. The soil’s pH ranges from 4.5pH to 6.5pH. It does not tolerate waterlogged soils. None saline soils to moderately saline soils are tolerated.
Height & Spread:
Wild Plants: 0.5m to 1.8m by 0.5m to 1.8m
Characteristics:
Boronia denticulata stems are grey-pale green. The stems for most of their length are pale grass green to mid green and glabrous even on the juvenile branchlets.
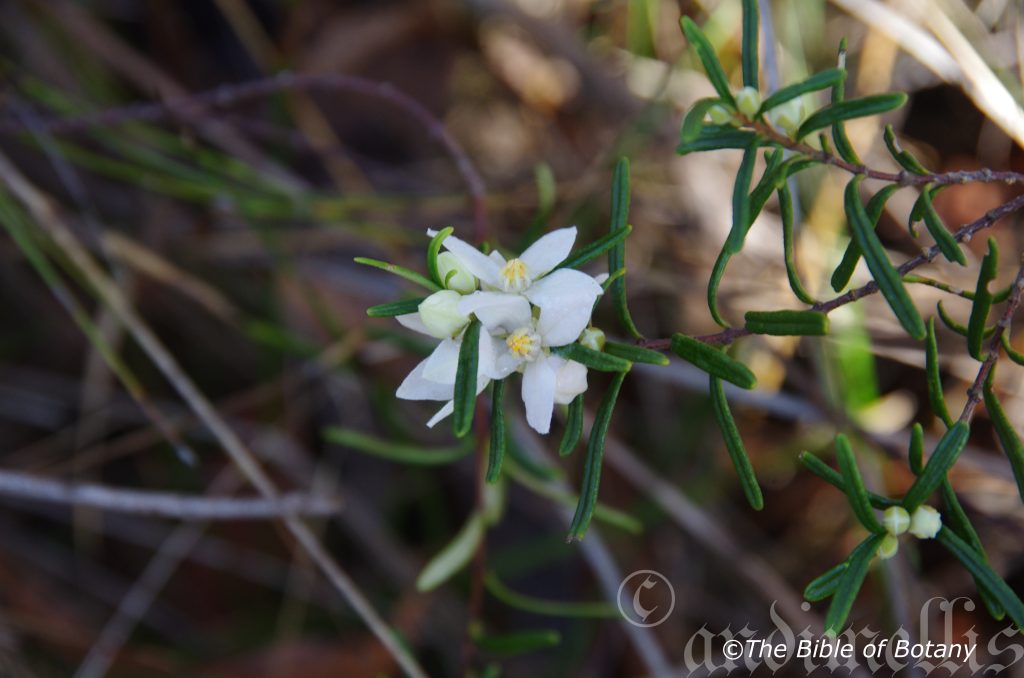
Boronia denticulata has linear, narrow oblanceolate or narrow elliptical leaves that measure 20mm to 30mm in length by 2mm to 6mm in width. The base is cuneate while the apex is acute. The concolourous laminas are flat, dull and mid grey-green. The mid vein is slightly prominent on the lower lamina and is faintly visible from the upper lamina. The leaf margins are finely toothed. The petioles are sessile to 0.5mm in length. The leaves are strongly aromatic when crushed.
The inflorescences of Boronia denticulata is a small cyme of 3 to 5 individual flowers. The peduncles and pedicels are pale green and glabrous. The peduncles measure 10mm to 15mm in length while the pedicels measure 5mm to 8mm in length. The green cupular calyxes are glabrous and measure 1mm in length. The 4 pale pink to bright deep pink petals measure 5mm to 10mm in length by 4.5mm to 9mm in width.
The 8 pink to deep pink filaments measure 1.5mm to 2mm in length. The anthers are bright yellow.
The 4 chamber ovary is green while the yellow style measures 0.6mm to 1mm in length. The sweetly scented flowers are produced profusely in July to December or as late as January to February in good seasons.
The fruits Boronia denticulata are swollen cocci surrounded by the dried pale dull faded pink petals. The cocci are glabrous.
Wildlife:
Boronia denticulata’s wildlife is unknown to the author.
Cultivation:
Boronia denticulata will grow from 1 meter to 1.5 meters in height by 1 meter to 1.5 meters in diameter in the garden. It will need a good friable sandy loam with excellent drainage and moisture. It would be ideal around swimming pools, sunny court yards along driveways or placed in sunny rockeries, bushy gardens and heaths.
It makes a beautiful garden subject and is hardier than most, responds to watering and tip pruning. Boronia denticulata is easy to grow on most sandy loams to fertile medium clays provided the drainage is good.
Boronia denticulata make outstanding contribution to a moist heath garden and are frost resistant to at least minus 3 degrees. It can be used as the taller growing plant scattered throughout the heath scene. When you design a flat heath garden which Boronia denticulate is well suited don’t use contours to display the plants as heath lands are almost always flat or have a slight rise. Plants must be planted close together and be short so you can see over the tallest ones with the exception of one or two plants at the most. These will be feature plants. The idea is to achieve a feeling of expansive flatness. This can be achieved with using the Boronia denticulata’s green linear leaves and having them contrasting with finer pale green or soft grey to glaucous coloured foliage. Use a lot of procumbent plants like Carpobrotus edulis, Hibbertia species or other Boronia species. Mix them with other smaller shrubs so none of them dominate the scene but blend in to give a mosaic of foliage colours that you oversee. Here I immediately think of Actinotis helianthi or Grevillea thelemanniana for two great contrasting foliage.
Seed grown plants give far better flowering displays and grow stronger than cutting grown plants.
It is a great feature plant amongst rockeries, beneath trees, on banks and in particular, when planted in mass displays for their flowers.
Boronia denticulata is best grown in small clumps of 2 to 4 plants or planted close enough with other small plants between to give a mass affect when in flower. Surround them with other pink or white flowering Boronia or small prostrate Grevillea species with deep red flowers for something tantalizingly superb for late winter colour. The deep red flowers will not be in conflict if the plants are grown as ground covers. If the Grevillea were of equal size or slightly smaller they would be too overpowering so keep this in mind. It can be frequently tip pruned to increase bushiness and more flowers in the next season. The open appearance lends beautifully for rockeries where the accent is on the boulders. The open habit also ensures the flowers are on good display all the time from all angles. A crowded garden bed will kill the effect of the leaves, stems and flowers so do not crowd them. These are the features so use them as highlights in the garden.
Boronia species in general are difficult to grow under cultivated conditions. It is difficult enough to maintain when growing naturally on your block. Some useful hints are.
Beware of what you buy at a nursery. You are better buying small seed grown plants that have never flowered before. Why? Because, when Boronia are cutting grown they have a weaker root system. The roots may look big and strong however they rarely develop good adventitious roots. Adventitious roots are the small hair like roots that absorb water and nutrient. It is these roots that will eventually lead to the decline or health of the plant over successive seasons.
If seed plants are unobtainable or a specific colour or leaf form is required then cutting grown plants must be used to ensure the type wanted.
Select the place you want the plants to grow in and pre-prepare it. Buy a few small plants and plant them close enough to give a display but far enough apart to be observed when half grown.
Boronia denticulata like all Boronias are not easy to grow from seed so a good supply can be difficult to maintain in the garden from seedlings.
Seed grown plants give far better flowering displays and grow stronger than cutting grown plants once established.
Misting the plants on a regular basis will imitate the orographic precipitation found in the wild.
Select the Boronia that grow in your district as these will do best.
Propagation:
Seeds: The seeds of Boronia denticulata may be difficult to come by as the plant is endangered and seed collection is strictly controlled. Seeds can be removed easily from the plants as they dry. Once Boronia denticulata has finished flowering and the fruits have swollen place an old sheet below the plants and keep a close eye on it. Peg it down so it doesn’t blow around. When the seeds start to disperse, it can be all over in one day with the seeds being scattered on the ground. Clean the rubbish off and sieve the material for the seeds or place a smooth mat below the seed bearing branches.
Seeds need to be treated by rubbing between fine sandpaper. Another method is to drop them into hot water and allow it to cool. I have also laid the rubbish out at the time of collecting the seeds and burnt it with the seeds still amongst the rubbish. No one method has proven better than the other with all producing erratic results.
Sow freshly treated seeds directly into a seed raising mix, keeping them moist not wet. When the seedlings are 20mm to 25mm in height, prick them out and plant them into 50mm native tubes using a good organic mix.
As the seedlings roots reach the bottom of the tubes plant them out into their permanent position. Nip the growing shoots to help promote bushiness. Do not delay.
For mass plantings, space the seedlings at 1.5 meters to 2 meter centers.
Cuttings: While I am not a big supporter of taking cuttings from Boronia at times we have no choice when seed is not available. Use 60mm to 100mm long semi hardwood material, which is taken in late winter to mid spring immediately after flowering has finished and the last of the blooms have faded. The type of material is not important as they all strike fairly easily though side shoots with the heels removed are excellent. They are usually prepared from partially mature wood of the current season’s growth, just after a flush of growth. For Boronia denticulata the cutting normally made from late September to late October.
While I am not a big supporter of taking cuttings from Boronia at times we have no choice when seed is not available. Use 60mm to100mm long semi hardwood material, which is taken in late winter to mid spring immediately after flowering has finished and the last of the blooms have faded. The type of material is not important as they all strike fairly easily though side shoots with the heels removed are excellent. They are usually prepared taken from late September to late October.
1 Prepare the cutting mix by adding one third sharp clean river sand, one third peat and one third perlite. These ingredients are sterile,
2 Select good material from non diseased plants,
3 Select semi green stems for cuttings. Look for a stem with two or three nodes,
4 Place the cutting on a flat, hard surface, and make a clean slice through the middle of the lower node on an angle towards the base, with a sterilized sharp knife or razor blade. – This scarification of the node will increase the chances of roots emerging from this spot. Now remove all but one or two the leaves, leaving the apex leaves in tact. If the leaves are very large in proportion to the stem, cut off the apical halves.
5 Some plants root easily, but a rooting hormone can help others by stimulating the cutting into sending out new roots. Fill a saucer with water, and place some rooting hormone into another container like a bottle top. Dip the node end of the cutting into the water and then into the rooting hormone. Tap off any excess hormone,
6 Use a small dipple stick or old pencil to poke a hole into the soilless potting mix. Ensure the hole is slightly larger than the stem diameter and be careful not to wipe the rooting hormone off the cuttings base, place the cuttings in a pattern ensuring the cuttings are not touching each other,
7 I like to place the pots in Plastic bags to help maintain temperature and moisture. Place in a semi shaded place like under 50mm shade cloth.
8 When the cuttings have struck, open the bag to allow air circulation for a few days to a week,
9 Once hardened off remove the cuttings from the bag and allow to further hardening for a few more days,
10 Transplant into a good potting mix to grow on.
Fertilize using Seaweed, fish emulsion or organic chicken pellets soaked in water on an alternate basis. Fertilize every two months until the plants are established then annually in early September to October to maintain health, vitality and better flowering.
Further Comments from Readers:
Hi reader, it seems you use The Bible of Botany a lot. That’s great as we have great pleasure in bringing it to you! It’s a little awkward for us to ask, but our first aim is to purchase land approximately 1,600 hectares to link several parcels of N.P. into one at The Pinnacles NSW Australia, but we need your help. We’re not salespeople. We’re amateur botanists who have dedicated over 30 years to saving the environment in a practical way. We depend on donations to reach our goal. If you donate just $5, the price of your coffee this Sunday, We can help to keep the planet alive in a real way and continue to bring you regular updates and features on Australian plants all in one Botanical Bible. Any support is greatly appreciated. Thank you.
In the spirit of reconciliation we acknowledge the Bundjalung, Gumbaynggirr and Yaegl and all aboriginal nations throughout Australia and their connections to land, sea and community. We pay our respect to their Elders past, present and future for the pleasures we have gained.
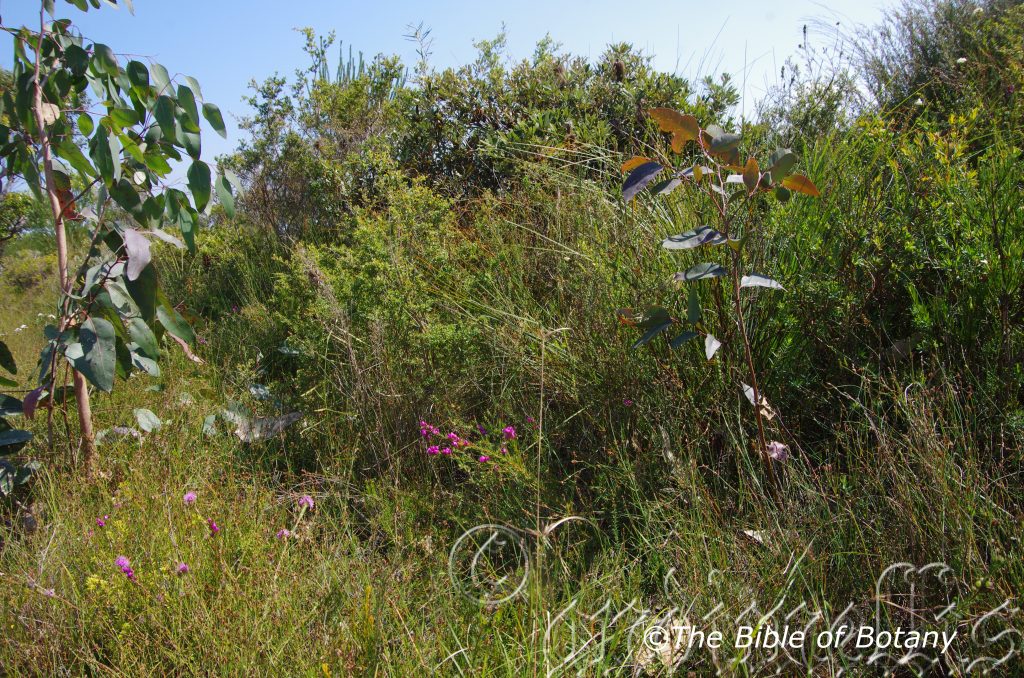
Yuraygir National Park Back Dunes NSW
Yuraygir National Park Back Dunes NSW
Yuraygir National Park Back Dunes NSW
Yuraygir National Park Back Dunes NSW
Boronia falcifolia
Classification:
Class: Rosids
Order: Sapindales
Family: Rutaceae
Genus: Is named in honour of Francesco Borone; 1769-1794, who was an Italian botanical enthusiast.
Species: From Falcata, which is Latin for a sythe or sickle shape and Folium, which is Latin for foliage. It refers to a leaves, which have a falcate shape.
Common Name: Wallum Boronia.
Distribution:
Boronia falcifolia is found south from Lake Manduran in southern coastal Queensland to Bulladelah and the Myall Lakes district in central coastal New South Wales.
https://avh.ala.org.au/occurrences/search?taxa=Boronia+falcifolia#tab_mapView
Habitat Aspect Climate:
Boronia falcifolia prefers full sun to partial shade. It grows in open Eucalyptus forests, open woodlands or shrubby heaths, Melaleuca forests on coastal wallums. The altitude ranges from 5 meters ASL to 350 meters ASL.
The temperatures range from lows of minus 3 degree and summer highs of 37 degrees.
The rainfall varies from a low of 400mm with an average of 2100mm annually.
Soil Requirements:
Boronia falcifolia prefers deep, coarse sands, fine sands to sandy loams. The soils are usually derived from decomposed sandstones or accumulated peaty beach sands or at times granites. The soil’s pH ranges from 4.5pH to 6.5pH. It does not tolerate waterlogged soils. None saline soils to moderately saline soils are tolerated.
Height & Spread:
Wild Plants: 0.5m to 1m by 0.5m to 1m
Characteristics:
Boronia falcifolia has few stems that are pale grey to grey-brown and glabrous. Young and juvenile branchlets are pink to deep pink-green, angled and glabrous.
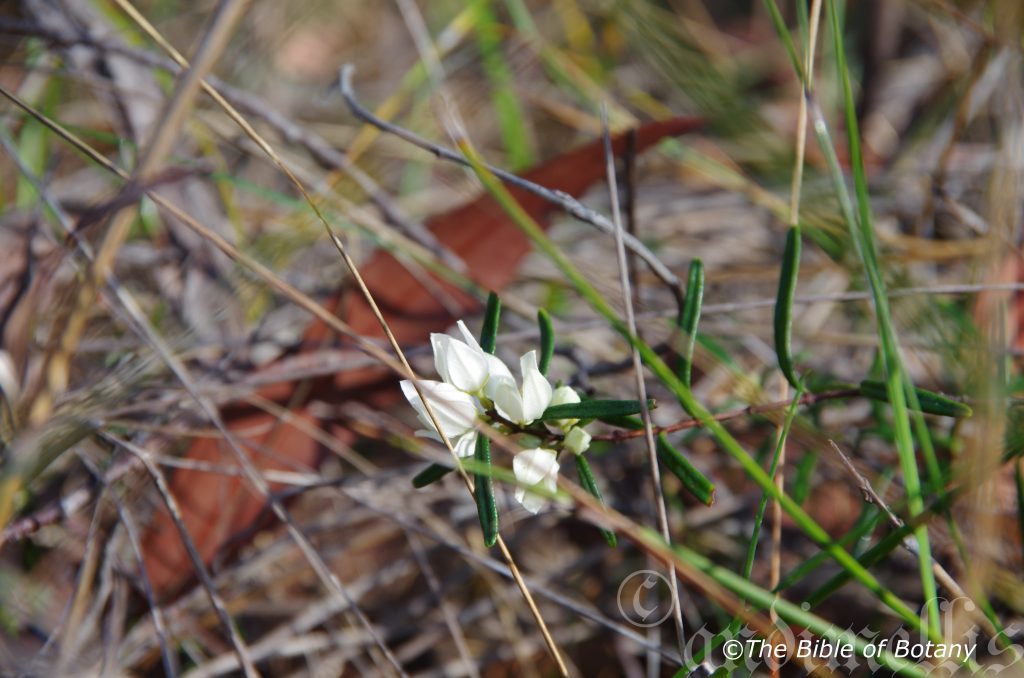
Boronia falcifolia‘s adjacent leaves are single or in whorls of 3.The linear to terete leaves are falcate to straight and measure 5mm to 25mm in length by 1mm to 2mm in width. The bases are tapered while the apexes are narrowing acuminate to aristate. The concolourous laminas are a dull deep green to sea-green and resinous and glabrous. The mid vein is slightly prominent below and it is not visible from above. The leaf margins are entire. The petioles measure unto 3mm to 5 mm in length. Young and juvenile shoots are a pale green and glabrous. The leaves are not strongly aromatic when crushed.
The inflorescences of Boronia falcifolia are born 1 to 3 from the upper leaf axils. The pedicels measure 4mm to 7mm in length. The 4 rose pink to deep pink, linear sepals taper to the apexes are glabrous and measure 2.5mm to 4mm in length by 0.5mm to 1.2mm in width. The 4 rose pink to deep pink petals are ovate to broad elliptical and decurve slightly at anthesis. The imbricate petals measure 5mm to 8mm in length by 3.5mm to 7mm in width.
The 8 deep pink stamens are covered in pale pink to deep pink puberulent and ciliate hairs and measure 2mm to 2.8mm in length. The adnately fixed anthers are yellow.
The 4 chamber ovary is maroon-red while the pink pistil measures 1.8mm to 2.3mm in length. The flowers appear throughout the year with a peak flowering from August to October.
The fruits Boronia falcifolia is a swollen cocci surrounded by the dried pale dull faded pink petals. The cocci are glabrous.
Wildlife:
Boronia falcifolia‘s wildlife is unknown to the author.
Cultivation:
Boronia falcifolia will grow from 0.4 meters to 0.8 meters in height by 0.4 meters to 0.8 meters in diameter in the garden when grown in the open. It will need a good friable sandy loam with excellent drainage and moisture. They would be ideal around swimming pools, sunny court yards along driveways or placed in sunny rockeries and heaths.
It makes beautiful garden subjects and this one is no exception however it will need regular pruning to keep it bushy and prevent 1 or 2 leading stems becoming longer and spindly. It is hardier than most, responds to watering and native fertilizer regimes. Boronia falcifolia is easy to grow on most sandy loams to fertile medium clays provided the drainage is good.
Boronia falcifolia makes an outstanding contribution to a moist heath garden and are frost resistant to at least minus 3 degrees. Here it can be used as the taller growing plant scattered throughout the heath scene. When you design a flat heath garden which Boronia falcifolia is well suited don’t use contours to display the plants as heath lands are almost always flat or have a slight rise. Plants must be planted close together and be short so you can see over the tallest ones with the exception of one or two plants at the most. These will be feature plants. The idea is to achieve a feeling of expansive flatness. This can be achieved with using the Boronia falcifolia‘s long flowering season to give patches of colour throughout the heath and having the pink contrasting with finer pale green or soft grey to glaucous coloured foliage. Use a lot of procumbent plants like Carpobrotus edulis, Hibbertia species or other Boronia species. Mix them with other smaller shrubs so none of them dominate the scene but blend in to give a mosaic of foliage colours that you oversee. Here I immediately think of Actinotis helianthi or Grevillea thelemanniana for two great contrasting foliage.
Boronia falcifolia is best grown in small clumps of 3 or 4 plants then pruning will not be as constant and they will look naturally dense. Surround them with other pink or white flowering Boronia or small prostrate Grevillea species with deep red flowers for something tantalizingly superb for late winter colour. The deep red flowers will not be in conflict if the plants are grown as ground covers. If the Grevillea species were of equal size or slightly smaller they would be too overpowering so keep this in mind. It can be frequently tip pruned to increase bushiness and more flowers in the next season. The open appearance lends beautifully for rockeries where its accent is more pronounced. The open habit also ensures the flowers are on good display all the time from all angles. A crowded garden bed is the way to go.
Seed grown plants give far better flowering displays and grow stronger than cutting grown plants.
Boronia species in general are difficult to grow under cultivated conditions. It is difficult enough to maintain when growing naturally on your block. Some useful hints are.
Beware of what you buy at a nursery. You are better buying small seed grown plants that have never flowered before. Why? Because, when Boronia are cutting grown they have a weaker root system. The roots may look big and strong however it rarely develops a good adventitious roots. Adventitious roots are the small hair like roots that absorb water and nutrient. It is these roots that will eventually lead to the decline or health of the plant over successive seasons.
If seed plants are unobtainable or a specific colour or leaf form is required then cutting grown plants must be used to ensure the type wanted.
Select the place you want the plants to grow in and pre-prepare it. Buy a few small plants and plant them close enough to give a display but far enough apart to be observed when half grown.
Boronia falcifolia like all Boronia are not easy to grow from seed so a good supply can be difficult to maintain in the garden from seedlings.
Seed grown plants give far better flowering displays and grow stronger than cutting grown plants once established.
Misting the plants on a regular basis will imitate the orographic precipitation found in the wild.
Select Boronia species that grow in your district as they will do better.
Propagation:
Seeds: The seeds of Boronia falcifolia may be difficult to come by as the plant is endangered and seed collection is strictly controlled. Seeds can be removed easily from the plants as they dry. Once Boronia falcifolia has finished flowering and the fruits have swollen place an old sheet below the plants and keep a close eye on it. Peg it down so it doesn’t blow around. When the seeds start to disperse, it can be all over in one day with the seeds being scattered on the ground. Clean the rubbish off and sieve the material for the seeds or place a smooth mat below the seed producing branches.
Seeds need to be treated by rubbing between fine sandpaper. Another method is to drop them into hot water and allow it to cool. I have also laid the rubbish out at the time of collecting the seeds and burnt it with the seeds still amongst the rubbish. No one method has proven better than the other with all producing erratic results.
Sow freshly treated seeds directly into a seed raising mix, keeping them moist not wet. When the seedlings are 20mm to 25mm in height, prick them out and plant them into 50mm native tubes using a good organic mix.
As the seedlings roots reach the bottom of the tubes plant them out into their permanent position. Nip the growing shoots to help promote bushiness. Do not delay.
For mass plantings, space the seedlings at 1.5 meters to 2 meter centers.
Cuttings: While I am not a big supporter of taking cuttings from Boronia at times we have no choice when seed is not available. Use 60mm to 100mm long semi hardwood material, which is taken in late winter to mid spring immediately after flowering has finished and the last of the blooms have faded. The type of material is not important as they all strike fairly easily though side shoots with the heels removed are excellent. They are usually prepared from partially mature wood of the current season’s growth, just after a flush of growth. Boronia falcifolia cuttings are normally made from late September to late October.
While I am not a big supporter of taking cuttings from Boronia at times we have no choice when seed is not available. Use 60mm to 100mm long semi hardwood material, which is taken in late winter to mid spring immediately after flowering has finished and the last of the blooms have faded. The type of material is not important as they all strike fairly easily though side shoots with the heels removed are excellent. They are usually prepared from partially mature wood of the current season’s growth, just after a flush of growth. For Boronia falcifolia the cuttings are normally made from late September to late October.
While I am not a big supporter of taking cuttings from Boronia at times we have no choice when seed is not available. Use 60mm to100mm long semi hardwood material, which is taken in late winter to mid spring immediately after flowering has finished and the last of the blooms have faded. The type of material is not important as they all strike fairly easily though side shoots with the heels removed are excellent. They are usually prepared taken from late September to late October.
1 Prepare the cutting mix by adding one third sharp clean river sand, one third peat and one third perlite. These ingredients are sterile,
2 Select good material from non diseased plants,
3 Select semi green stems for cuttings. Look for a stem with two or three nodes,
4 Place the cutting on a flat, hard surface, and make a clean slice through the middle of the lower node on an angle towards the base, with a sterilized sharp knife or razor blade. – This scarification of the node will increase the chances of roots emerging from this spot. Now remove all but one or two the leaves, leaving the apex leaves in tact. If the leaves are very large in proportion to the stem, cut off the apical halves.
5 Some plants root easily, but a rooting hormone can help others by stimulating the cutting into sending out new roots. Fill a saucer with water, and place some rooting hormone into another container like a bottle top. Dip the node end of the cutting into the water and then into the rooting hormone. Tap off any excess hormone,
6 Use a small dipple stick or old pencil to poke a hole into the soilless potting mix. Ensure the hole is slightly larger than the stem diameter and be careful not to wipe the rooting hormone off the cuttings base, place the cuttings in a pattern ensuring the cuttings are not touching each other,
7 I like to place the pots in Plastic bags to help maintain temperature and moisture. Place in a semi shaded place like under 50mm shade cloth.
8 When the cuttings have struck, open the bag to allow air circulation for a few days to a week,
9 Once hardened off remove the cuttings from the bag and allow to further hardening for a few more days,
10 Transplant into a good potting mix to grow on.
Fertilize using Seaweed, fish emulsion or organic chicken pellets soaked in water on an alternate basis. Fertilize every two months until the plants are established then annually in early September to October to maintain health, vitality and better flowering.
Further Comments from Readers:
Hi reader, it seems you use The Bible of Botany a lot. That’s great as we have great pleasure in bringing it to you! It’s a little awkward for us to ask, but our first aim is to purchase land approximately 1,600 hectares to link several parcels of N.P. into one at The Pinnacles NSW Australia, but we need your help. We’re not salespeople. We’re amateur botanists who have dedicated over 30 years to saving the environment in a practical way. We depend on donations to reach our goal. If you donate just $5, the price of your coffee this Sunday, We can help to keep the planet alive in a real way and continue to bring you regular updates and features on Australian plants all in one Botanical Bible. Any support is greatly appreciated. Thank you.
In the spirit of reconciliation we acknowledge the Bundjalung, Gumbaynggirr and Yaegl and all aboriginal nations throughout Australia and their connections to land, sea and community. We pay our respect to their Elders past, present and future for the pleasures we have gained.
Kremnos NSW
Kremnos NSW
Kremnos NSW
Kremnos NSW
Kremnos NSW
Kremnos NSW
Boronia hapalophylla
Classification:
Class: Rosids
Order: Sapindales
Family: Rutaceae
Genus: Is named in honour of Francesco Borone; 1769-1794, who was an Italian botanical enthusiast.
Species: From Haplos, which is Ancient Greek for once, single or simple and Phullon/Phyllon, which is Ancient Greek for a leaf. It refers to leaves, which are simple compared to other species in the genus which are generally toothed or pinnate leaflets.
Common Name: Wallum Boronia.
Distribution:
Boronia hapalophylla is restricted to a small area south west of Grafton near Coutts Crossing in New South Wales.
https://avh.ala.org.au/occurrences/search?taxa=Boronia+hapalophylla#tab_mapView
Habitat Aspect Climate:
Boronia hapalophylla prefers full sun to dappled shade. It grows in open woodland or open Eucalypts forests. The altitude ranges from 45 meters ASL to 80 meters ASL.
The temperatures range from lows of minus 2 degree in August to 37 degrees in January.
The rainfalls range from lows of 950mm with an average of 1400mm.
Soil Requirements:
Boronia hapalophylla prefers sandy loams or podzolic soils. The soils are derived from decomposed sandstone or alluvial deposits. The soils pH ranges from 5.5pH to 6pH. It does not tolerate waterlogged soils. Non saline soils to moderately saline soils are tolerated.
Height & Spread:
Wild Plants: 1m to 2m by 1m to 2m
Characteristics:
Boronia hapalophylla has few stems that are pale grey to tan and are densely, covered in tomentose hairs. Young and juvenile branchlets are tan to pale olive-green or pale grass-green.
The sub opposite leaves are paired or in sub opposite whorls of 3.The narrow elliptical, elliptical to lanceolate leaves measure 13mm to 70mm in length by 2mm to 12mm in width. The bases are tapered while the apexes are acute. The concolourous laminas are a dull deep grey-green to sea-green and sparsely to densely covered in fawn to pale grey stellate hairs, especially along midvein on the upper laminas while lower laminas paler are covered in a dense heterogeneous indumentums comprising a layer of multi angular hairs over a layer of peltate hairs. The mid vein is prominent on the lower lamina and is distinctly visible from the upper lamina. The leaf margins are entire and slightly recurve to revolute. The petioles measure 0.5mm to 1.5mm in length. The leaves are not strongly aromatic when crushed.
The inflorescences are born singularly or in small clusters to 5 from the upper leaf axils. The pedicels are densely covered in fawn to pale grey tomentose hairs measure 2mm to 6.5mm in length. The 4 pinkish-red to orange-green or orange and green, elliptical to lanceolate sepals have a narrowly acute apex and are densely covered in fawn to pale grey tomentose hairs externally and glabrous internally. The sepals measure 4mm to 7mm in length by 3mm to 4.5mm in width. The 4 rose pink to deep pink petals are elliptical, divaricate at anthesis and are densely covered in fawn tomentose hairs externally and glabrous internally. The valvate petals measure 8mm to 10mm in length by 3.5mm to 7mm in width.
The 8 stamens are dimorphic with the 4 longer stamens being adjacent to the petals while the 4 shorter stamens are opposite the petals. The stamens are densely covered in white tomentose hairs. The stamens measure 1.8mm to 2mm in length. The anthers are white.
The 4 chamber ovary is glabrous, deep pink-red to red while the orange-red pistil and measures 1.8mm to 2.1mm in length. The flowers appear throughout the year with a peak flowering from September to early November.
The fruits of Boronia hapalophylla are swollen cocci surrounded by the dried pale dull faded pink sepals and petals. The sepals enlarge to 10mm in length by 7mm in width while the petals enlarge to 15mm in length by 10mm in width. The cocci are glabrous.
Wildlife:
Boronia hapalophylla’s wildlife is unknown to the author.
Cultivation:
It would make an good fire retardant small tree.
* Fire retardant plants act as radiant heat screens and absorb more heat from an approaching fire without burning.
* Fire retardant trees are able reduce wind speed near a house or out buildings.
* Fire retardant also trap embers and sparks carried by the wind.
* Fire retardant ground covers are able to catch burning embers without catching fire themselves, and also slow the travel of a fire through debris and litter on the ground.
It will grow from 1 meter to 1.6 meters in height by 1 meter to 1.6 meters in diameter in the garden when grown in the open. It will need a good friable sandy to fatty loam with excellent drainage and moisture. It would be ideal around swimming pools, sunny court yards along driveways or placed in sunny rockeries, bush gardens or heaths.
It makes a beautiful garden subject but it will need some, annual pruning to keep it bushy and prevent 1 or 2 leading stems becoming longer and spindlier.
Boronia hapalophylla would make an outstanding contribution to a moist heath garden and are frost resistant to at least minus 3 degrees. Here they can be used as the taller growing plant scattered throughout the heath scene. When you design a flat heath garden which Boronia hapalophylla is well suited don’t use contours to display the plants as heath lands are almost always flat or have a slight rise. Plants must be planted close together and be short so you can see over the tallest ones with the exception of one or two plants at the most. These will be feature plants. The idea is to achieve a feeling of expansive flatness. This can be achieved with using the Boronia hapalophylla’s long flowering season to give patches of colour throughout the heath and having the pink contrasting with finer pale green or soft grey to glaucous coloured foliage. Use a lot of procumbent plants like Hibbertia aspera or Hibbertia obtusifolia or Acacia brownii. Mix it with other smaller shrubs so none of them dominate the scene but blend in to give a mosaic of foliage colours that you oversee. Here I immediately think of Actinotis helianthi or Grevillea thelemanniana for two great contrasting foliage.
Seed grown plants give far better flowering displays and grow stronger than cutting grown plants.
Boronia in general are difficult to grow under cultivated conditions. It is difficult enough to maintain when growing naturally on your block. Some useful hints are.
Beware of what you buy at a nursery. You are better buying small seed grown plants that have never flowered before. Why? Because, when Boronia are cutting grown they have a weaker root system. The roots may look big and strong however they rarely develop good adventitious roots. Adventitious roots are the small hair like roots that absorb water and nutrient. It is these roots that will eventually lead to the decline or health of the plant over successive seasons.
If seed plants are unobtainable or a specific colour or leaf form is required then cutting grown plants must be used to ensure the type wanted.
Select the place you want the plants to grow in and pre-prepare it. Buy a few small plants and plant them close enough to give a display but far enough apart to be observed when half grown.
Boronia hapalophylla like all Boronia are not easy to grow from seed so a good supply can be difficult to maintain in the garden from seedlings.
Seed grown plants give far better flowering displays and grow stronger than cutting grown plants once established.
Misting the plants on a regular basis will imitate the orographic precipitation found in the wild.
Select the Boronia that grow in your district as these will do best.
Propagation:
Seeds: The seeds of Boronia hapalophylla may be difficult to come by as the plant is endangered and seed collection is strictly controlled. Seeds can be removed easily from the plants as they dry. Once Boronia hapalophylla has finished flowering and the fruits have swollen place an old sheet below the plants and keep a close eye on it. Peg it down so it doesn’t blow around. Alternately place brown paper bags over the cocci as they begin to ripen. When the seeds start to disperse, it can be all over in one day with the seeds being scattered on the ground. Clean the rubbish off and sieve the material for the seeds or place a smooth mat below the seed producing branches.
The following methods are based on other Boronia specie as I have not been in a position to grow Boronia hapalophylla from either seed or cutting.
Seeds need to be treated by rubbing between fine sandpaper. Another method is to drop them into hot water and allow it to cool. I have also laid the rubbish out at the time of collecting the seeds and burnt it with the seeds still amongst the rubbish. No one method has proven better than the other with all producing erratic results.
Sow freshly treated seeds directly into a seed raising mix, keeping them moist not wet. When the seedlings are 20mm to 25mm in height, prick them out and plant them into 50mm native tubes using a good organic mix.
As the seedlings roots reach the bottom of the tubes plant them out into their permanent position. Nip the growing shoots to help promote bushiness. Do not delay.
For mass plantings, space the seedlings at 1.5 meters to 2 meter centres.
Cuttings: While I am not a big supporter of taking cuttings from Boronia at times we have no choice when seed is not available. Use 60mm to 100mm long semi hardwood material, which is taken in late winter to mid spring immediately after flowering has finished and the last of the blooms have faded. The type of material is not important as they all strike fairly easily though side shoots with the heels removed are excellent. It is usually prepared from partially mature wood of the current season’s growth, just after a flush of growth. Boronia hapalophylla cuttings are normally made from late September to late October.
While I am not a big supporter of taking cuttings from Boronia at times we have no choice when seed is not available. Use 60mm to 100mm long semi hardwood material, which is taken in late winter to mid spring immediately after flowering has finished and the last of the blooms have faded. The type of material is not important as they all strike fairly easily though side shoots with the heels removed are excellent. They are usually prepared from partially mature wood of the current season’s growth, just after a flush of growth. For Boronia hapalophylla the cutting normally made from late September to late October.
While I am not a big supporter of taking cuttings from Boronia at times we have no choice when seed is not available. Use 60mm to100mm long semi hardwood material, which is taken in late winter to mid spring immediately after flowering has finished and the last of the blooms have faded. The type of material is not important as they all strike fairly easily though side shoots with the heels removed are excellent. They are usually prepared taken from late September to late October.
1 Prepare the cutting mix by adding one third sharp clean river sand, one third peat and one third perlite. These ingredients are sterile,
2 Select good material from non diseased plants,
3 Select semi green stems for cuttings. Look for a stem with two or three nodes,
4 Place the cutting on a flat, hard surface, and make a clean slice through the middle of the lower node on an angle towards the base, with a sterilized sharp knife or razor blade. – This scarification of the node will increase the chances of roots emerging from this spot. Now remove all but one or two the leaves, leaving the apex leaves in tact. If the leaves are very large in proportion to the stem, cut off the apical halves.
5 Some plants root easily, but a rooting hormone can help others by stimulating the cutting into sending out new roots. Fill a saucer with water, and place some rooting hormone into another container like a bottle top. Dip the node end of the cutting into the water and then into the rooting hormone. Tap off any excess hormone,
6 Use a small dipple stick or old pencil to poke a hole into the soilless potting mix. Ensure the hole is slightly larger than the stem diameter and be careful not to wipe the rooting hormone off the cuttings base, place the cuttings in a pattern ensuring the cuttings are not touching each other,
7 I like to place the pots in Plastic bags to help maintain temperature and moisture. Place in a semi shaded place like under 50mm shade cloth.
8 When the cuttings have struck, open the bag to allow air circulation for a few days to a week,
9 Once hardened off remove the cuttings from the bag and allow to further hardening for a few more days,
10 Transplant into a good potting mix to grow on.
Fertilize using Seaweed, fish emulsion or organic chicken pellets soaked in water on an alternate basis. Fertilize every two months until the plants are established then annually in early September to October to maintain health, vitality and better flowering.
Further Comments from Readers:
Hi reader, it seems you use The Bible of Botany a lot. That’s great as we have great pleasure in bringing it to you! It’s a little awkward for us to ask, but our first aim is to purchase land approximately 1,600 hectares to link several parcels of N.P. into one at The Pinnacles NSW Australia, but we need your help. We’re not salespeople. We’re amateur botanists who have dedicated over 30 years to saving the environment in a practical way. We depend on donations to reach our goal. If you donate just $5, the price of your coffee this Sunday, We can help to keep the planet alive in a real way and continue to bring you regular updates and features on Australian plants all in one Botanical Bible. Any support is greatly appreciated. Thank you.
In the spirit of reconciliation we acknowledge the Bundjalung, Gumbaynggirr and Yaegl and all aboriginal nations throughout Australia and their connections to land, sea and community. We pay our respect to their Elders past, present and future for the pleasures we have gained.
Boronia heterophylla
Classification:
Unranked: Eudicots
Unranked: Rosids
Order: Sapindales
Family: Rutaceae
Genus: Is named in honour of Francesco Borone; 1769-1794, who was an Italian botanical enthusiast.
Species: From Heteros, which is Ancient Greek for other or different and Pholis, which is Ancient Greek for a horny scale. It refers to structures or organs, which have a prominent horny like scale.
Common Name: Red Boronia.
Distribution:
Boronia heterophylla is endemic to south west corner of Western Australia from Bunbury on the coast in the north west to Albany in the south east.
https://avh.ala.org.au/occurrences/search?taxa=Boronia+heterophylla#tab_mapView
Habitat Aspect Climate:
Boronia heterophylla prefers full sun. It grows in open woodlands, open Eucalyptus forests and shrubby heaths on flood plains, alluvial flats and river banks or adjacent to sandy wallums. The altitude ranges from 5 meters ASL to 300 meters ASL.
The temperatures range from lows of 3 degrees in August to 37 degrees in January.
The rainfall varies from a low of 550mm with an average of 1150mm.
Soil Requirements:
Boronia heterophylla prefers sandy loams or podsolic soils. The soils are derived from decomposed sandstone or alluvial deposits. The soils pH ranges from 5.5pH to 6pH. It does not tolerate water logged soils. Non saline soils to moderately saline soils are tolerated.
Height & Spread:
Wild Plants: 1m to 3m by 1m to 2.5m
Characteristics:
Boronia heterophylla has a deep rusty brown glabrous bark on the main stems. Young branchlets and juvenile branchlets are pale grass green and glabrous.
The alternate leaves of Boronia heterophylla are odd pinnate dividing into two or three or sometimes even four times. The individual leaflets are linear to narrow oblong. The leaflets measure 15mm to 25mm in length by 1mm to 2.5mm in width. The bases are tapering while the apexes are also tapering. The concolourous laminas are dull pale green to grass-green. The mid vein is slightly prominent below and it is not visible from above. The leaf margins are entire. The petioles, rachises and petiolules are glabrous. The petioles measures 12mm to 16mm in length while the rachises measures 8 to 20mm in length and the petiolules measure 4mm to 8mm in length. The new shoots are a paler green and glabrous. The leaves are aromatic when crushed.
The inflorescences of Boronia heterophylla are born singularly or more often 2 or 3 from the leaf axils. The pendulant, contorted and urceolate flowers are deep pink to magenta or rarely white. There are 2 glabrous stipules which measure 2.5mm to 3mm in length by 1mm to 1.5mm in width. The 4 greenish-red sepals are ovate-triangular with an acute apex and an apiculate tip. The 4 petals are oblong-ovate with an obtuse apex and a mucronate tip. The petals measure 10mm to 12mm in length by 7.5mm to 9mm in width. The pedicels measure 4mm to 6mm in length.
The 8 deep pink stamens are inserted and measure 3mm in length while the anthers are yellow.
The deep pink to magenta style measures 4mm in length. The flowers appear profusely from mid-September to late November.
The fruits Boronia heterophylla are swollen cocci which are surrounded by the dried, pale, dull, faded, pink petals. The cocci are glabrous.
Wildlife:
Boronia heterophylla’s wildlife is unknown to the author.
Cultivation:
This Boronia is much sought after because of the magnificent typical Boronia scent. The scent while mild will linger throughout the day and evening when the air is still.
Boronia heterophylla makes a truly lovely garden subject. It is probably the hardiest Boronia species for garden cultivation. It responds to watering and tip pruning. Boronia heterophylla will grow from 1.5 meter to 2 meters tall by 1.5 meter to 2 meters in diameter in the garden but must be lightly tipped pruned to maintain a neat bushy plant. Bushier plants produce more spectacular flowering displays. It has proven itself as a reliable plant on the east coast at least in temperate zones and semi-arid zones at least as far north as Dalby.
It is a great feature plant on dry banks, beneath Eucalyptus trees where open canopies exist. When planted in mass its flowers come to the fore. This is one of the best because of its size and proliferation of flowers.
It is best used adjacent to small areas of bush close to paths, along fence lines or the house so its deep pink flowers can be viewed regularly. If it is surrounded by shorter plants with larger foliage and white flowers it will dominate at the center giving an expansive look to the bed especially when in flower. For heath plantings use plants which have predominantly fine leaves of various shades of green. Its smaller size enables this to be achieved even in small and medium size gardens. It can be more regularly tip pruned if smaller plants are required in the foreground. It respond well to pruning recovering quickly and often increasing the number of flowers in the following season.
Ensure that the whole plant or at least most of it is on display from most sections of the garden as the flowers are a real bonus.
Seed grown plants give far better flowering displays and grow stronger than cutting grown plants.
Boronias in general are difficult to grow under cultivated conditions. It is difficult enough to maintain when growing naturally on your block. Some useful hints are.
Beware of what you buy at a nursery. You are better buying small seed grown plants that have never flowered before. Why? Because, when Boronia are cutting grown as they have a weaker root system. The roots may look big and strong however they rarely develop good adventitious roots. Adventitious roots are the small hair like roots that absorb water and nutrient. It is these roots that will eventually lead to the decline or health of the plant over successive seasons.
If seed plants are unobtainable or a specific colour or leaf form is required then cutting grown plants must be used to ensure the type wanted.
Select the place you want the plants to grow in and pre-prepare it. Buy a few small plants and plant them close enough to give a display but far enough apart to be observed when half grown.
Boronia heterophylla like all Boronia are not easy to grow from seed so a good supply can be difficult to maintain in the garden from seedlings.
Seed grown plants give far better flowering displays and grow stronger than cutting grown plants once established.
Misting the plants on a regular basis will imitate the orographic precipitation found in the wild.
Select the Boronia that grow in your district as these will do far better.
Propagation:
Seeds: Boronia heterophylla‘s seed may be difficult to come by as the plant is endangered and seed collection is strictly controlled. Seeds can be removed easily from the plants as they dry. Once Boronia heterophylla has finished flowering and the fruits have swollen place an old sheet below the plants and keep a close eye on it. Peg it down so it doesn’t blow around. Alternately place brown paper bags over the cocci as they begin to ripen. When the seeds start to disperse, it can be all over in one day with the seeds being scattered on the ground. Clean the rubbish off and sieve the material for the seeds or place a smooth mat below the seed producing branches.
The following methods are based on other Boronia specie as I have not been in a position to grow Boronia heterophylla from either seed or cutting.
Seeds need to be treated by rubbing between fine sandpaper. Another method is to drop them into hot water and allow it to cool. I have also laid the rubbish out at the time of collecting the seeds and burnt it with the seeds still amongst the rubbish. No one method has proven better than the other with all producing erratic results.
Sow freshly treated seeds directly into a seed raising mix, keeping them moist not wet. When the seedlings are 20mm to 25mm in height, prick them out and plant them into 50mm native tubes using a good organic mix.
As the seedlings roots reach the bottom of the tubes plant them out into their permanent position. Nip the growing shoots to help promote bushiness. Do not delay.
For mass plantings, space the seedlings at 1.5 meters to 2 meter centres.
Cuttings: While I am not a big supporter of taking cuttings from Boronia at times we have no choice when seed is not available. Use 60mm to 100mm long semi hardwood material, which is taken in late winter to mid spring immediately after flowering has finished and the last of the blooms have faded. The type of material is not important as they all strike fairly easily though side shoots with the heels removed are excellent. They are usually prepared from partially mature wood of the current season’s growth, just after a flush of growth. Boronia heterophylla cuttings are normally made from late September to late October.
While I am not a big supporter of taking cuttings from Boronia at times we have no choice when seed is not available. Use 60mm to 100mm long semi hardwood material, which is taken in late winter to mid spring immediately after flowering has finished and the last of the blooms have faded. The type of material is not important as they all strike fairly easily though side shoots with the heels removed are excellent. They are usually prepared from partially mature wood of the current season’s growth, just after a flush of growth. The cuttings are normally made from late September to late October.
While I am not a big supporter of taking cuttings from Boronia at times we have no choice when seed is not available. Use 60mm to100mm long semi hardwood material, which is taken in late winter to mid spring immediately after flowering has finished and the last of the blooms have faded. The type of material is not important as they all strike fairly easily though side shoots with the heels removed are excellent. They are usually prepared taken from late September to late October.
1 Prepare the cutting mix by adding one third sharp clean river sand, one third peat and one third perlite. These ingredients are sterile,
2 Select good material from non diseased plants,
3 Select semi green stems for cuttings. Look for a stem with two or three nodes,
4 Place the cutting on a flat, hard surface, and make a clean slice through the middle of the lower node on an angle towards the base, with a sterilized sharp knife or razor blade. – This scarification of the node will increase the chances of roots emerging from this spot. Now remove all but one or two the leaves, leaving the apex leaves in tact. If the leaves are very large in proportion to the stem, cut off the apical halves.
5 Some plants root easily, but a rooting hormone can help others by stimulating the cutting into sending out new roots. Fill a saucer with water, and place some rooting hormone into another container like a bottle top. Dip the node end of the cutting into the water and then into the rooting hormone. Tap off any excess hormone,
6 Use a small dipple stick or old pencil to poke a hole into the soilless potting mix. Ensure the hole is slightly larger than the stem diameter and be careful not to wipe the rooting hormone off the cuttings base, place the cuttings in a pattern ensuring the cuttings are not touching each other,
7 I like to place the pots in Plastic bags to help maintain temperature and moisture. Place in a semi shaded place like under 50mm shade cloth.
8 When the cuttings have struck, open the bag to allow air circulation for a few days to a week,
9 Once hardened off remove the cuttings from the bag and allow to further hardening for a few more days,
10 Transplant into a good potting mix to grow on.
Fertilize using Seaweed, fish emulsion or organic chicken pellets soaked in water on an alternate basis. Fertilize every two months until the plants are established then annually in early September to October to maintain health, vitality and better flowering.
Further Comments from Readers:
Hi reader, it seems you use The Bible of Botany a lot. That’s great as we have great pleasure in bringing it to you! It’s a little awkward for us to ask, but our first aim is to purchase land approximately 1,600 hectares to link several parcels of N.P. into one at The Pinnacles NSW Australia, but we need your help. We’re not salespeople. We’re amateur botanists who have dedicated over 30 years to saving the environment in a practical way. We depend on donations to reach our goal. If you donate just $5, the price of your coffee this Sunday, We can help to keep the planet alive in a real way and continue to bring you regular updates and features on Australian plants all in one Botanical Bible. Any support is greatly appreciated. Thank you.
In the spirit of reconciliation we acknowledge the Bundjalung, Gumbaynggirr and Yaegl and all aboriginal nations throughout Australia and their connections to land, sea and community. We pay our respect to their Elders past, present and future for the pleasures we have gained.
Boronia ledifolia
Classification:
Class: Rosids
Order: Sapindales
Family: Rutaceae
Genus: Is named in honour of Francesco Borone; 1769-1794, who was an Italian botanical enthusiast.
Species: From Ledon, which is Ancient Greek for the ancient group of rosemary like plants and Folium, which is Latin for foliage. It refers to leaves, which very closely resemble the Ledum genus.
Common Name: Showy Boronia or Ledum Boronia or Sydney Boronia.
Distribution:
Boronia ledifolia is found near Tenterfield on the Northern Tablelands, Casino, in central and southern New South Wales on coastal sandstone. It is rare in Victoria being found on Mount Elizabeth and in the Snowy River Gorge.
https://avh.ala.org.au/occurrences/search?taxa=Boronia+ledifolia#tab_mapView
Habitat Aspect Climate:
Boronia ledifolia prefers full sun to light dappled shade. It usually grows in open Eucalyptus forests, dry woodlands or shrubby heaths. The altitude ranges from 5 meters ASL to 600 meters ASL.
The temperatures range from minus 4 degrees in July to 35 degrees in January.
The rainfall ranges from lows of 450mm to 1100mm average per annum.
Soil Requirements:
Boronia ledifolia prefers fine sands to sandy loams. The soils are derived from decomposed sandstones or granites. The soils pH ranges from 5pH to 6.5pH. It does not tolerate water logged soils. None saline soils to moderately saline soils are tolerated.
Height & Spread:
Wild Plants: 0.5m to 1.5m by 0.5m to 1.5m
Characteristics:
Boronia ledifolia grows as a small dense shrub with pale brown branches while the young and juvenile stems are pale green-brown and densely covered in short fawn stellate and tomentose hairs and fawn to pale green-brown farinaceous warts.
The leaves of Boronia ledifolia are single or are pinnate with 3 to 7 leaflets. The middle leaflet is the longest. The linear-elliptical to narrow elliptical or narrow oblong leaves measure 4mm to 34mm in length by 1mm to 5mm in width. The lamina margins are entire and are revolute to recurve. The leaf base is round cuneate while the apex is broad acute to obtuse. The discolourous upper laminas are deep sea green, glabrous, glossy and sparsely covered in stellate fawn hairs on the upper laminas while the lower laminas are paler and densely covered in fawn tomentose hairs. The winged rachis and petioles are densely covered in fawn stellate and tomentose hairs. The rachises measures 2mm to 8mm in length while the individual petioles measure 2mm to 4mm in length.
The inflorescence is single flowered or rarely 2 to 3 flowers on a short cyme from the leaf axis. The 4 triangular sepals are pinkish-red and measure 2.5mm to 3.3mm in length. They are sparsely covered in fawn tomentose hairs externally and white tomentose hairs internally. The 4 pale pink to bright, deep pink or rarely white petals are valvate and elliptical. The petals are strongly ridged on the lower surface and furrowed on the upper surface. They measure 5mm to 10mm in length by 3.5mm to 6mm in width. The pedicels measure 7mm to 12mm in length.
The 8 pink stamens are covered in white tomentose hairs and measure 1.8mm to 2mm in length while the white or yellow anthers measure 0.6mm in diameter. Flowers appear from July through to late September.
The red-maroon ovary is glabrous. The pink style and stigma measure 0.8mm to 1.2mm in length. The flowers occur from July to October.
The fruit of Boronia ledifolia are swollen cocci surrounded by the dried pale dull faded valvate petals. The cocci are glabrous.
Wildlife:
Boronia ledifolia’s wildlife is unknown to the author.
Cultivation:
Boronia ledifolia make magnificent small garden subjects and it is hardier than most, responds to watering and tip pruning. Boronia ledifolia will grow from 1 meter to 1.2 meters tall by 1 meter to 1.2 meters in diameter in the garden when grown in the open. Tip pruning ensures bushier plants which produce more spectacular flowering displays. This is another beautiful Boronia which is best grown and transplanted from tubes rather than advanced plants in larger pots.
Boronia ledifolia is much sought after because of the magnificent typical Boronia flowers in late winter to mid spring , which make ideal cut flowers.
It is a great feature plant beneath tall open canopy trees like Eucalyptus nicholii, Eucalyptus flicifolia or Corymbia curtisii. It does well on banks and in particular, when planted in mass displays for their flowers throughout the bush where they flourish in dappled light.
It can be regularly tip pruned if a smaller plant is required in the foreground. It respond well to pruning recovering quickly and often increasing the number of flowers in the following season. Ensure that the whole plant or at least most of it is on display from most sections of the garden as the flowers are a real bonus.
When it is in flower Boronia ledifolia will catch your attention and the viewer will be transfixed on the display rather than watching the path. Plant it at 1.2 meter to 1.5 meter centres for a mass display or 1 meter to 1.2 meters for scattered plantings in a heath garden.
Seed grown plants give far better flowering displays and grow stronger than cutting grown plants. Boronias in general are difficult to grow under cultivated conditions.
Some useful hints are.
Beware of what you buy at a nursery. You are better buying small seed grown plants that have never flowered before. Why? Because, when Boronia are cutting grown they have a weaker root system. The roots may look big and strong however they rarely develop good adventitious roots. Adventitious roots are the small hair like roots that absorb water and nutrient. It is these roots that will eventually lead to the decline or health of the plant over successive seasons.
If seed plants are unobtainable or a specific colour or leaf form is required then cutting grown plants must be used to ensure the type wanted.
Select the place you want the plants to grow in and pre-prepare it. Buy a few small plants and plant them close enough to give a display but far enough apart to be observed when half grown.
Boronia ledifolia like all Boronia are not easy to grow from seed so a good supply can be difficult to maintain in the garden from seedlings.
Seed grown plants give far better flowering displays and grow stronger than cutting grown plants once established.
Misting the plants on a regular basis will imitate the orographic precipitation found in the wild.
Select the Boronia that grow in your district as these will do best.
Propagation:
Seeds: Boronia ledifolia‘s seed may be difficult to come by as the plant is endangered and seed collection is strictly controlled. Seeds can be removed easily from the plants as they dry. OnceBoronia ledifolia has finished flowering and the fruits have swollen place an old sheet below the plants and keep a close eye on it. Peg it down so it doesn’t blow around. Alternately place brown paper bags over the cocci as they begin to ripen. When the seeds start to disperse, it can be all over in one day with the seeds being scattered on the ground. Clean the rubbish off and sieve the material for the seeds or place a smooth mat below the seed producing branches.
The following methods are based on other Boronia specie, as I have not been in a position to grow Boronia ledifolia from either seed or cutting.
Seeds need to be treated by rubbing between fine sandpaper. Another method is to drop them into hot water and allow it to cool. I have also laid the rubbish out at the time of collecting the seeds and burnt it with the seeds still amongst the rubbish. No one method has proven better than the other with all producing erratic results.
Sow freshly treated seeds directly into a seed raising mix, keeping them moist not wet. When the seedlings are 20mm to 25mm in height, prick them out and plant them into 50mm native tubes using a good organic mix.
As the seedlings roots reach the bottom of the tubes plant them out into their permanent position. Nip the growing shoots to help promote bushiness. Do not delay.
For mass plantings, space the seedlings at 1.5 meters to 2 meter centres.
Cuttings: While I am not a big supporter of taking cuttings from Boronia at times we have no choice when seed is not available. Use 60mm to100mm long semi hardwood material, which is taken in late winter to mid spring immediately after flowering has finished and the last of the blooms have faded. The type of material is not important as they all strike fairly easily though side shoots with the heels removed are excellent. They are usually prepared from partially mature wood of the current season’s growth, just after a flush of growth. Boronia ledifolia cuttings are normally taken from late late August to October following flowering.
1 Prepare the cutting mix by adding one third sharp clean river sand, one third peat and one third perlite. These ingredients are sterile,
2 Select good material from non diseased plants,
3 Select semi green stems for cuttings. Look for a stem with two or three nodes,
4 Place the cutting on a flat, hard surface, and make a clean slice through the middle of the lower node on an angle towards the base, with a sterilized sharp knife or razor blade. – This scarification of the node will increase the chances of roots emerging from this spot. Now remove all but one or two the leaves, leaving the apex leaves in tact. If the leaves are very large in proportion to the stem, cut off the apical halves.
5 Some plants root easily, but a rooting hormone can help others by stimulating the cutting into sending out new roots. Fill a saucer with water, and place some rooting hormone into another container like a bottle top. Dip the node end of the cutting into the water and then into the rooting hormone. Tap off any excess hormone,
6 Use a small dipple stick or old pencil to poke a hole into the soilless potting mix. Ensure the hole is slightly larger than the stem diameter and be careful not to wipe the rooting hormone off the cuttings base, place the cuttings in a pattern ensuring the cuttings are not touching each other,
7 I like to place the pots in Plastic bags to help maintain temperature and moisture. Place in a semi shaded place like under 50mm shade cloth.
8 When the cuttings have struck, open the bag to allow air circulation for a few days to a week,
9 Once hardened off remove the cuttings from the bag and allow to further hardening for a few more days,
10 Transplant into a good potting mix to grow on.
Fertilize using Seaweed, fish emulsion or organic chicken pellets soaked in water on an alternate basis. Fertilize every two months until the plants are established then annually in early September to October to maintain health, vitality and better flowering.
Further Comments from Readers:
Hi reader, it seems you use The Bible of Botany a lot. That’s great as we have great pleasure in bringing it to you! It’s a little awkward for us to ask, but our first aim is to purchase land approximately 1,600 hectares to link several parcels of N.P. into one at The Pinnacles NSW Australia, but we need your help. We’re not salespeople. We’re amateur botanists who have dedicated over 30 years to saving the environment in a practical way. We depend on donations to reach our goal. If you donate just $5, the price of your coffee this Sunday, We can help to keep the planet alive in a real way and continue to bring you regular updates and features on Australian plants all in one Botanical Bible. Any support is greatly appreciated. Thank you.
In the spirit of reconciliation we acknowledge the Bundjalung, Gumbaynggirr and Yaegl and all aboriginal nations throughout Australia and their connections to land, sea and community. We pay our respect to their Elders past, present and future for the pleasures we have gained.
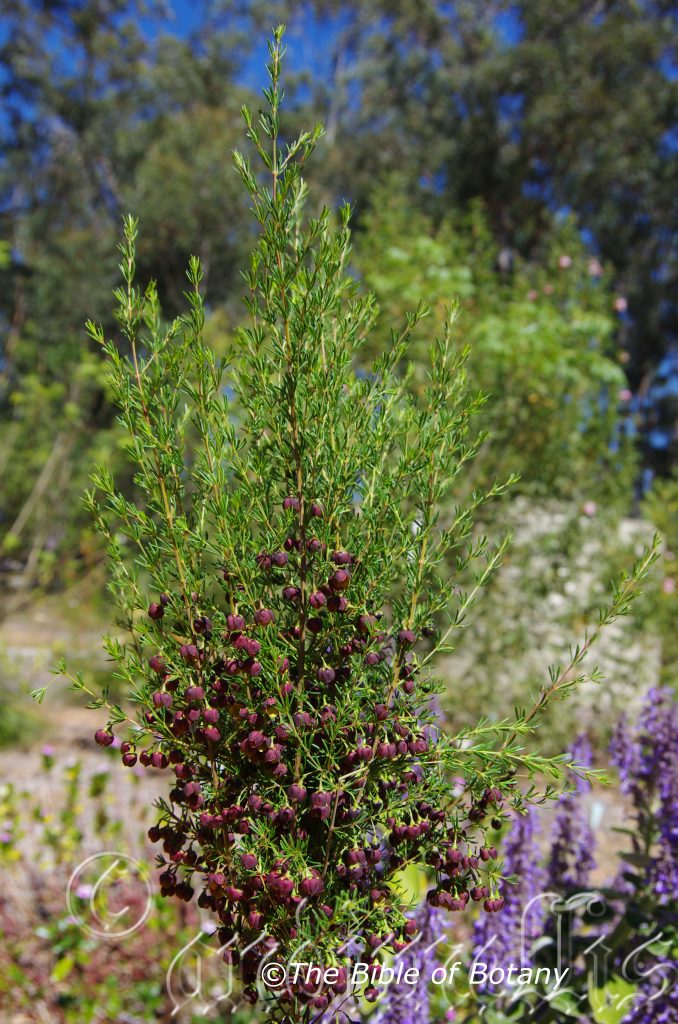
Author’s Garden The Pinnacles NSW
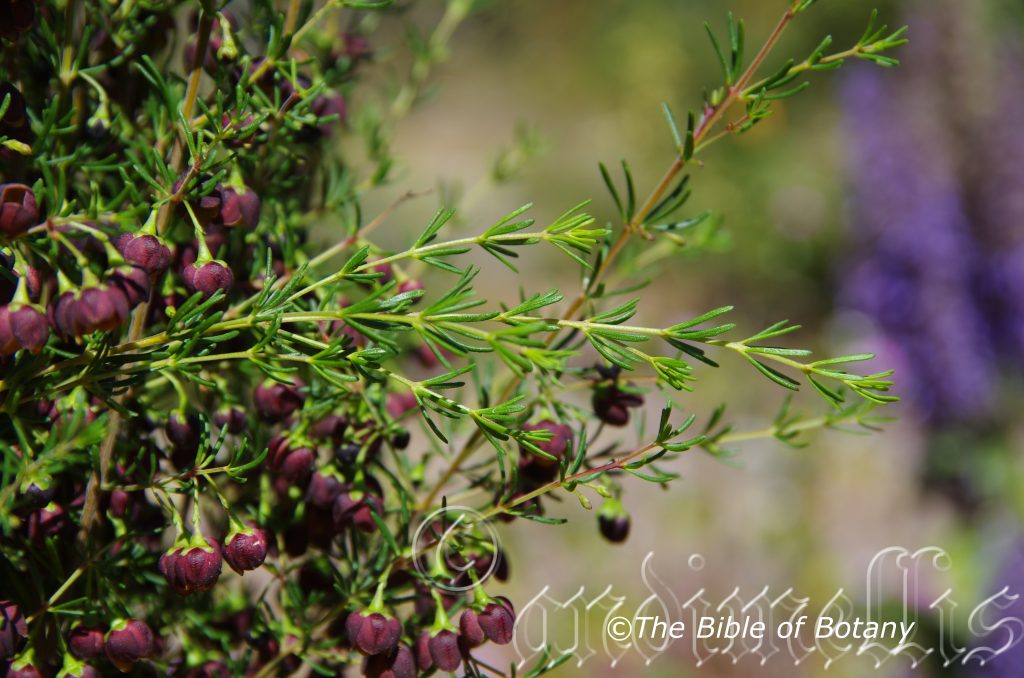
Author’s Garden The Pinnacles NSW
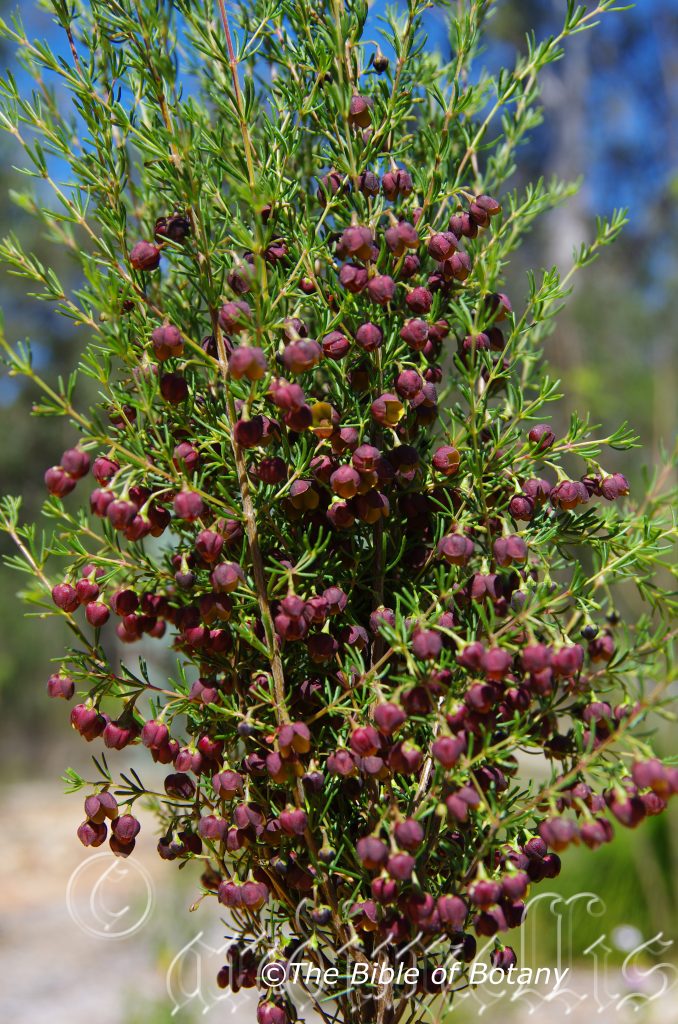
Author’s Garden The Pinnacles NSW
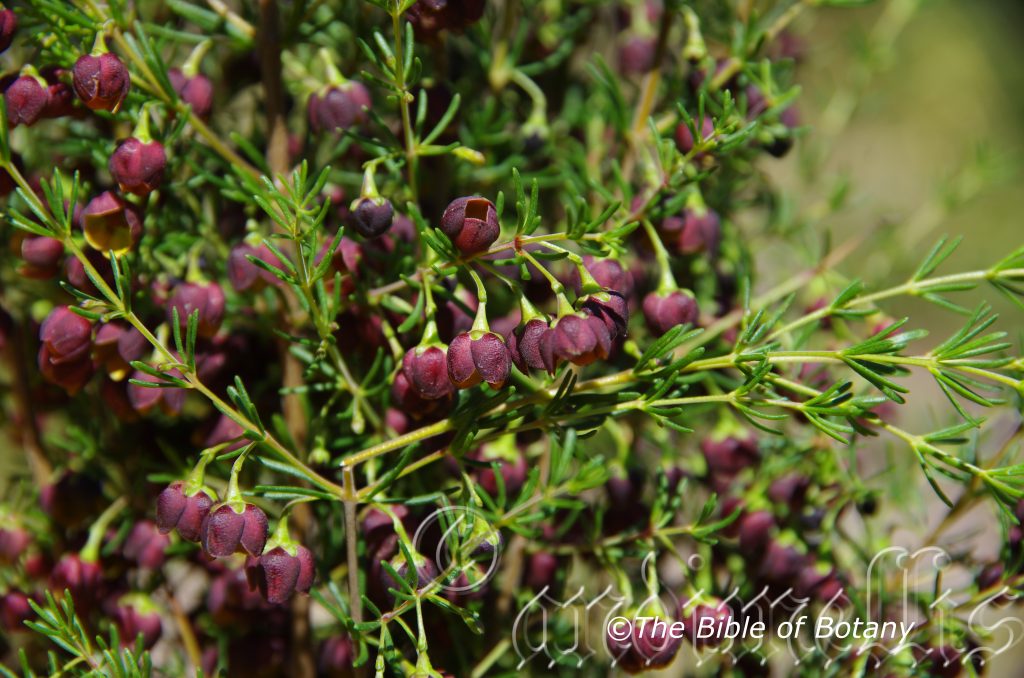
Author’s Garden The Pinnacles NSW
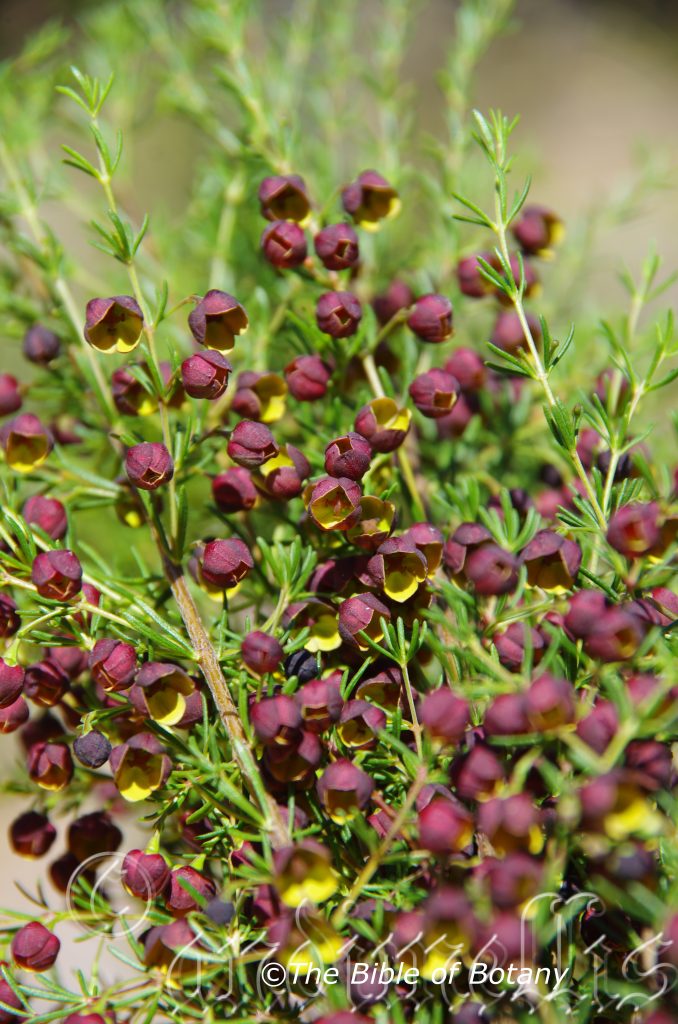
Author’s Garden The Pinnacles NSW
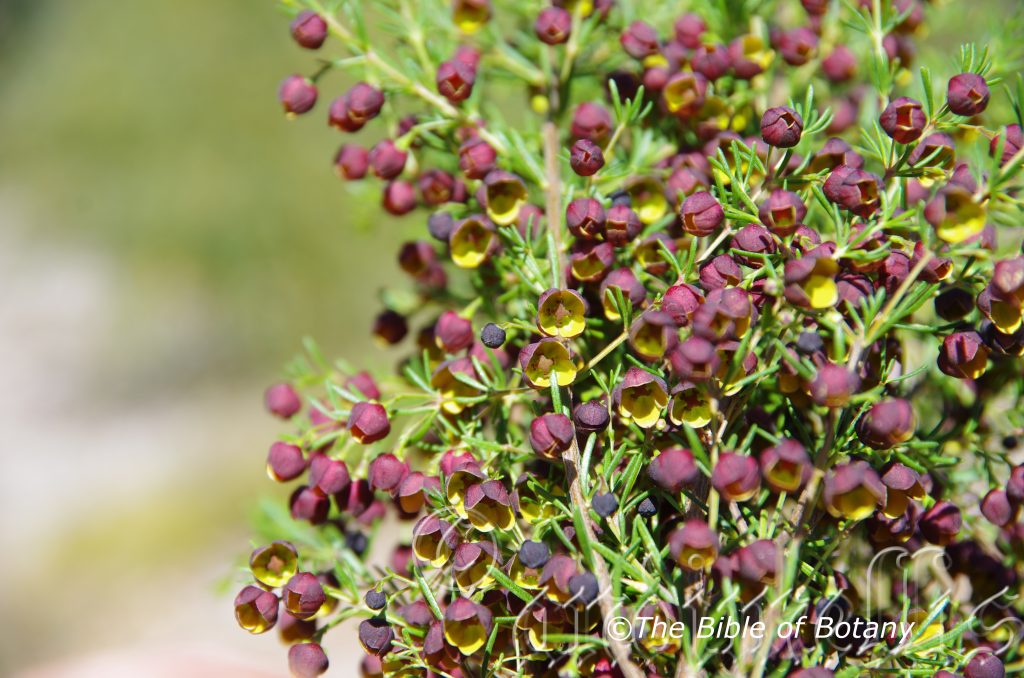
Author’s Garden The Pinnacles NSW
Boronia megastigma
Classification:
Class: Rosids
Order: Sapindales
Family: Rutaceae
Subfamily:
Genus: Is named in honour of Francesco Borone; 1769-1794, who was an Italian botanical enthusiast.
Species: From Megas, which is Ancient Greek for great, large or mighty and Stigma which is Ancient Greek or Stigma, which is Latin for to brand, a burned mark, especially on a slaves to show ownership. It refers to the usually papillate or glandular part of the style which receives the pollen that resembled a branding iron in form.
Common Name: Brown Boronia, Sweet-scented Boronia or Scented Boronia.
Distribution:
Boronia megastigma is found south and west of a line from Perth in the north-west to the Bremmer River in the south-east in south west Western Australia.
https://avh.ala.org.au/occurrences/search?taxa=Boronia+megastigma#tab_mapView
Habitat Aspect Climate:
Boronia megastigma prefers full sun to light dappled shade. It usually grows grows in winter-wet swamps and wet woodlands, mainly in the karri forests and the southern edges of the jarrah forests. The altitude ranges from 5 meters ASL to 550 meters ASL.
The temperatures range from minus 3 degrees in July to 38 degrees in January.
The rainfall ranges from lows of 500mm to 1550mm average per annum.
Soil Requirements:
Boronia megastigma prefers fine to coarse sands to sandy loams. The soils are derived from decomposed sandstones or at times accumulated beach sands. The soils pH ranges from 5pH to 6.5pH. It does not tolerate water logged soils. None saline soils to moderately saline soils are tolerated.
Height & Spread:
Wild Plants: 1m to 2m by 1m to 1.6m
Characteristics:
Boronia megastigma is a small open shrub that typically grows to a height of 1 meter to 2 meters in the garden with slender branches, which are covered in soft white pubescent hairs. The strongly aromatic, sessile leaves have three or five thick, slender, linear leaflets that measure 10mm to 20mm in length by 1.5mm to 3mm in width.
The pedicel measures 8mm to 12mm in length. The aromatic, cupular flowers are borne singly in leaf the axils and are nodding. The four broadly, ovate, glabrous sepals measure 1.5mm to 2.5mm in length, while the ovate petals measure 6mm to 7mm in length by 6mm to 7mm in width. They are semi glossy, deep reddish brown to deep brown, purplish-black or rarely yellow externally and bright yellow internally. There are 8 sterile stamens nearest the sepals which have ovate, deep purple anthers that measure 1mm in length. The fertile stamens nearest the petals have ovate, yellow anthers that measure also 1mm in length. The large, deep purple to black stigma has 4 lobes.
The fruit of Boronia megastigma are swollen cocci surrounded by the dried pale dull faded sepals. The cocci are glabrous.
Wildlife:
Boronia megastigma’s wildlife is unknown to the author.
Cultivation:
Boronia megastigma is quite a striking addition for the garden. Despite preferring moister conditions it is only a short lived plant and should be treated as a 2 or 3 year perennial on the east coast or 4 to 5 years on the west coast. At the Pinnacles in northern New South Wales we had 2 successful years from the plants, which appears to be the norm this far north and east. The deep maroon-brown to deep reddish-brown, semi glossy flowers are bright yellow inside are definitely different and coupled with its fragrance is worthwhile, the extra time taken to replant it every few years. The flowers have a magical look and fragrance and is used in the production of essential oils.
Boronia megastigma is often difficult to attain especially on the east coast.
It is a great feature shrub producing a wealth of beauty when in flower. Plant it where it will receive strong dappled sunlight. Plant it near the house so it can be viewed regularly. It does particularly well in small, moist, sandy rockeries as a fill in plant or where imitating its natural habitat is conjured up. Either way it can be planted in small groups of 2 or 3 or as stand alone plants scattered plantings throughout the garden to create a natural heath setting. If it is surrounded by shorter plants with larger foliage and red or white flowers it will blend into the landscape so ensure smaller plants are used. The flower colour is particularly unusual and allpale coloured flowers will contrast with its deep purple-brown and deep yellow flowers. For heath plantings use plants which have predominantly fine pale green foliage or broad leaves in deep greens or grey. A mixture of Flannel flower, Actinotus helianthi with Hibbertia vestita and Scaevola aemula would look grandiose to say the least.
It can be regularly tip pruned if bushier plants are required in the fore ground. It responds well to pruning recovering quickly and often increasing the number of flowers in the following season.
Six or more Boronia megastigma planted back from a bend in the garden will become a very strong focal point when in flower, gain a lot of attention whether you are coming or going because of the fresh clean look of the foliage even in the driest of times. Place it in the mid ground with other large leaf ground covers and very small shrubs. To the rear, use large leaf taller plants. Plants with white, pink or pale purple flowers can be used in both the midground and background. This will draw gardners attention to the colourful display.
Ensure that the whole plant or at least most of it is on display from most sections of the garden as the flowers are a treamendous bonus.
Seed grown plants grow stronger than cutting grown plants.
Boronias in general are difficult to grow under cultivated conditions.
Beware of what you buy at a nursery. You are better buying small seed grown plants that have never flowered before. Why? Because, when many Boronia are grown from cuttings they have a weaker root system. The roots may look big and strong however they rarely develop good adventitious roots. Adventitious roots are the small hair like roots that absorb water and nutrient. It is these roots that will eventually lead to the decline or health of the plant over successive seasons.
If seed plants are unobtainable it would be a good idea to collect seeds and try sowing from the first season then cull seeds from longer lived plants or ones with the desired qualities in the future.
Select the place you want the plants to grow in and pre-prepare it. Buy a few small plants and plant them close enough to give a display but far enough apart to be observed when half grown.
Boronia megastigma like all Boronia are not easy to grow from seed so a good supply can be difficult to maintain in the garden from seedlings.
Select the Boronia that grow in your district as these will do better.
Propagation:
Seeds: Boronia megastigma‘s seed may be difficult to come by as the plant is endangered and seed collection is strictly controlled. Seeds can be removed easily from the plants as they dry. Once Boronia megastigma has finished flowering and the fruits have swollen place an old sheet below the plants and keep a close eye on it. Peg it down so it doesn’t blow around. Alternately place brown paper bags over the cocci as they begin to ripen. When the seeds start to disperse, it can be all over in one day with the seeds being scattered on the ground. Clean the rubbish off and sieve the material for the seeds or place a smooth mat below the seed producing branches.
The following methods are based on other Boronia specie as I have not been in a position to grow Boronia pinnata from either seed or cutting.
Seeds need to be treated by rubbing between fine sandpaper. Another method is to drop them into hot water and allow it to cool. I have also laid the rubbish out at the time of collecting the seeds and burnt it with the seeds still amongst the rubbish. No one method has proven better than the other with all producing erratic results.
Sow freshly treated seeds directly into a seed raising mix, keeping them moist not wet. When the seedlings are 20mm to 25mm in height, prick them out and plant them into 50mm native tubes using a good organic mix.
As the seedlings roots reach the bottom of the tubes plant them out into their permanent position. Nip the growing shoots to help promote bushiness. Do not delay.
For mass plantings, space the seedlings at 1.5 meters to 2 meter centres.
Cuttings: While I am not a big supporter of taking cuttings from Boronia at times we have no choice when seed is not available. Use 60mm to100mm long semi hardwood material, which is taken in late winter to mid spring immediately after flowering has finished and the last of the blooms have faded. The type of material is not important as they all strike fairly easily though side shoots with the heels removed are excellent. They are usually prepared from partially mature wood of the current season’s growth, just after a flush of growth. Boronia megastigma cuttings are normally made from late November to February following flowering.
1 Prepare the cutting mix by adding one third sharp clean river sand, one third peat and one third perlite. These ingredients are sterile,
2 Select good material from non diseased plants,
3 Select semi green stems for cuttings. Look for a stem with two or three nodes,
4 Place the cutting on a flat, hard surface, and make a clean slice through the middle of the lower node on an angle towards the base, with a sterilized sharp knife or razor blade. – This scarification of the node will increase the chances of roots emerging from this spot. Now remove all but one or two the leaves, leaving the apex leaves in tact. If the leaves are very large in proportion to the stem, cut off the apical halves.
5 Some plants root easily, but a rooting hormone can help others by stimulating the cutting into sending out new roots. Fill a saucer with water, and place some rooting hormone into another container like a bottle top. Dip the node end of the cutting into the water and then into the rooting hormone. Tap off any excess hormone,
6 Use a small dipple stick or old pencil to poke a hole into the soilless potting mix. Ensure the hole is slightly larger than the stem diameter and be careful not to wipe the rooting hormone off the cuttings base, place the cuttings in a pattern ensuring the cuttings are not touching each other,
7 I like to place the pots in Plastic bags to help maintain temperature and moisture. Place in a semi shaded place like under 50mm shade cloth.
8 When the cuttings have struck, open the bag to allow air circulation for a few days to a week,
9 Once hardened off remove the cuttings from the bag and allow to further hardening for a few more days,
10 Transplant into a good potting mix to grow on.
Fertilize using Seaweed, fish emulsion or organic chicken pellets soaked in water on an alternate basis. Fertilize every two months until the plants are established then annually in early September to October to maintain health, vitality and better flowering.
Further Comments from Readers:
Hi reader, it seems you use The Bible of Botany a lot. That’s great as we have great pleasure in bringing it to you! It’s a little awkward for us to ask, but our first aim is to purchase land approximately 1,600 hectares to link several parcels of N.P. into one at The Pinnacles NSW Australia, but we need your help. We’re not salespeople. We’re amateur botanists who have dedicated over 30 years to saving the environment in a practical way. We depend on donations to reach our goal. If you donate just $5, the price of your coffee this Sunday, We can help to keep the planet alive in a real way and continue to bring you regular updates and features on Australian plants all in one Botanical Bible. Any support is greatly appreciated. Thank you.
In the spirit of reconciliation we acknowledge the Bundjalung, Gumbaynggirr and Yaegl and all aboriginal nations throughout Australia and their connections to land, sea and community. We pay our respect to their Elders past, present and future for the pleasures we have gained.
Boronia parviflora
Classification:
Class: Rosids
Order: Sapindales
Family: Rutaceae
Genus: Is named in honour of Francesco Borone; 1769-1794, who was an Italian botanical enthusiast.
Species: From Paros, which is Ancient Greek or Parvum which is Latin for small and Floris which is Latin for a flower or Flos from the Roman goddess of spring and flowers. It refers to flowers, which are smaller than other species in the genus.
Common Name: Swamp Boronia.
Distribution:
Boronia parviflora is found in several disjunct populations south from Agnes Waters in southern coastal Queensland to Mount Gambier in south eastern South Australia. It is mainly found on and east of the Great Dividing Range. The major exceptions are at Boonoo Boonoo State Forest, Shepparton Tatura and the Grampians.
It is also circumnavigates Tasmania especially on the eastern side however it is probably found throughout the state and the Bass Strait Islands.
https://avh.ala.org.au/occurrences/search?taxa=Boronia+parviflora#tab_mapView
Habitat Aspect Climate:
Boronia parviflora prefers full sun to light dappled shade. It usually grows in open Eucalyptus marshy heaths and wallums. The altitude ranges from 5 meters ASL to 900 meters ASL.
The temperatures range from minus 4 degrees in July to 35 degrees in January.
The rainfalls range from lows of 650mm to 2500mm average per annum. Rainfall is not as important as the habitatswhich are in depressions where water vaccumulates.
Soil Requirements:
Boronia parviflora prefers coarse sands, fine sands to sandy loams. The soils are derived from decomposed sandstones or granites or accumulated peaty beach sands. The soils pH ranges from 4.5pH to 6pH. It does not tolerate water logged soils. None saline soils to moderately saline soils are tolerated.
Height & Spread:
Wild Plants: 0.1m to 1m by 0.5m to 1.5m
Characteristics:
Boronia parviflora grows as a small dense shrub or procumbent shrub with pale olive-green stems to pale olive-green stems with reddish markings or tinged red. The stems are densely matted on the procumbent plants. The young and juvenile stems are pale green-brown. All stems are glabrous.
The opposite leaves of Boronia parviflora are linear-elliptical to narrow elliptical or linear-obovate and measure 7mm to 25mm in length by 1.5mm to 8mm in width. The leaf bases are round-cuneate to cuneate while the apexes are acute often with a mucronate tip. The discolourous laminas are mid green to sea green, glabrous, glossy and glabrous on the upper laminas while the lower laminas are more likely to have a reddish tinge. The leaves are fleshy to succulent. The margins are entire finely toothed or finely crenate. The olive-green petioles are glabrous and measure 0mm to 1.5mm in length.
The inflorescences of Boronia parviflora are usually solitary but flowers in small clusters of 2 to 3 born from the terminals are not uncommon. The 2 linear bracts are caduceus The 4 ovate to oblong-ovate sepals are mid green to olive-green and are glabrous with an acute apex. The sepals measure 2mm to 4mm in length. The 4 valvate, pale pink to bright, deep pink or white petals are elliptical, oblong-elliptical to ovate have an acute apex with a mucronate tip. The petals are weakly ridged on the lower surface and faintly furrowed on the upper surface. They measure 3mm to 6mm in length by 3mm to 5.5mm in width. The glabrous pedicels measure 2mm to 10mm in length.
The 8 white or pale pink stamens are glabrous and measure 0.3mm to 0.5mm in length while the anthers are white or yellow.
The pale lemon-green or pale pink ovary is glabrous and has 4 chambers. The pale lemon green or pale pink style and stigma measure 0.4mm to 0.6mm in length. The flowers occur throughout the year but are more frequently occur from late August to early March.
The fruit of Boronia parviflora are swollen cocci surrounded by the dried pale dull green sepals. The cocci are glabrous.
Wildlife:
Boronia parvifoli’s wildlife is unknown to the author.
Cultivation:
Boronia parviflora would make an interesting garden subject and is worthwhile persevering with, in trying to obtain one or a couple. It responds to watering and tip pruning and must be kept moist all year. Boronia parviflora will grow from 0.3 meter to 0.8 meters tall by 1 meter to 1.2 meters in diameter in the garden when grown in the open. Tip pruning ensures bushier plants which produce better flowering displays. This is a beautiful Boronia which is best grown and transplant from tubes rather than advanced plants in larger pots. Boronia parviflora should be much sought after because of its more procumbent growth habit.
Plant it near the house so its white or pink flowers can be viewed regularly. It is great near paths where a small plant is required as a fill in plant. It can be planted in small clusters of 2 or 3 or as standalone plants scattered throughout the garden to create a natural undulating affect. If it is surrounded by taller plants with larger foliage and red or white flowers it will dominate at the front making the bed look larger. For heath plantings use plants which have predominantly fine leaves of various colours. This is one plant that benefits highly from being mass planted or planted in small scattered clumps. Its small size enables this to be achieved even in small and medium size gardens. It respond well to pruning recovering quickly and often increasing the number of flowers in the following season.
Ensure that the whole plant or at least most of it is on display from most sections of the garden and do not over crowd them as they will succumb to heavy shade and competition.
Because it flowers all year it will catch your attention drawing people to the plants especially when few other plants are in flower. Plant it at 1.2 meter to 1.5 meter centers for a mass display.
Seed grown plants give far better flowering displays and grow stronger than cutting grown plants.
Boronia species in general are difficult to grow under cultivated conditions. It is difficult enough to maintain when growing naturally on your block. Some useful hints are.
Beware of what you buy at a nursery. You are better buying small seed grown plants that have never flowered before. Why? Because, when Boronia are cutting grown they have a weaker root system. The roots may look big and strong however they rarely develop good adventitious roots. Adventitious roots are the small hair like roots that absorb water and nutrient. It is the lack of these roots that will eventually lead to the decline or health of the plant over successive seasons.
If seed plants are unobtainable or a specific colour or leaf form is required then cutting grown plants must be used to ensure the type wanted.
Select the place you want the plants to grow in and pre-prepare it. Buy a few small plants and plant them close enough to give a display but far enough apart to be observed when half grown.
Boronia parvifolia like all Boronia species are not easy to grow from seed so a good supply can be difficult to maintain in the garden from seedlings.
Seed grown plants give far better flowering displays and grow stronger than cutting grown plants once established.
Misting the plants on a regular basis will imitate the orographic precipitation found in the wild.
Select the Boronia that grow in your district as these will do best.
Propagation:
Seeds: Boronia parviflora‘s seed may be difficult to come by as the plant is endangered and seed collection is strictly controlled. Seeds can be removed easily from the plants as they dry. Once Boronia parviflora has finished flowering and the fruits have swollen place an old sheet below the plants and keep a close eye on it. Peg it down so it doesn’t blow around. Alternately place brown paper bags over the cocci as they begin to ripen. When the seeds start to disperse, it can be all over in one day with the seeds being scattered on the ground. Clean the rubbish off and sieve the material for the seeds or place a smooth mat below the seed producing branches.
The following methods are based on other Boronia specie as I have not been in a position to grow Boronia parviflora from either seed or cutting.
Seeds need to be treated by rubbing between fine sandpaper. Another method is to drop them into hot water and allow it to cool. I have also laid the rubbish out at the time of collecting the seeds and burnt it with the seeds still amongst the rubbish. No one method has proven better than the other with all producing erratic results.
Sow freshly treated seeds directly into a seed raising mix, keeping them moist not wet. When the seedlings are 20mm to 25mm in height, prick them out and plant them into 50mm native tubes using a good organic mix.
As the seedlings roots reach the bottom of the tubes plant them out into their permanent position. Nip the growing shoots to help promote bushiness. Do not delay.
For mass plantings, space the seedlings at 1.5 meters to 2 meter centers.
Cuttings: While I am not a big supporter of taking cuttings from Boronia at times we have no choice when seed is not available. Use 60mm to100mm long semi hardwood material, which is taken in late winter to mid spring immediately after flowering has finished and the last of the blooms have faded. The type of material is not important as they all strike fairly easily though side shoots with the heels removed are excellent. They are usually prepared from partially mature wood of the current season’s growth, just after a flush of growth. Boronia parviflora cuttings are normally made from late September to late October.
Remove half the leaves from the bottom section being careful not to tear the bark. Take a 10mm slice off the bark from the bottom of the cutting on one side. Using a weak rooting hormone, dip the cutting in and place it in a moist sterile seed raising mix. When the cuttings have obviously struck and have developed good roots treat them as for seedlings.
Fertilize using Seaweed, fish emulsion or organic chicken pellets soaked in water on an alternate basis. Fertilize every two months until the plants are established then annually in early September to October to maintain health, vitality and better flowering.
Further Comments from Readers:
Hi reader, it seems you use The Bible of Botany a lot. That’s great as we have great pleasure in bringing it to you! It’s a little awkward for us to ask, but our first aim is to purchase land approximately 1,600 hectares to link several parcels of N.P. into one at The Pinnacles NSW Australia, but we need your help. We’re not salespeople. We’re amateur botanists who have dedicated over 30 years to saving the environment in a practical way. We depend on donations to reach our goal. If you donate just $5, the price of your coffee this Sunday, We can help to keep the planet alive in a real way and continue to bring you regular updates and features on Australian plants all in one Botanical Bible. Any support is greatly appreciated. Thank you.
In the spirit of reconciliation we acknowledge the Bundjalung, Gumbaynggirr and Yaegl and all aboriginal nations throughout Australia and their connections to land, sea and community. We pay our respect to their Elders past, present and future for the pleasures we have gained.
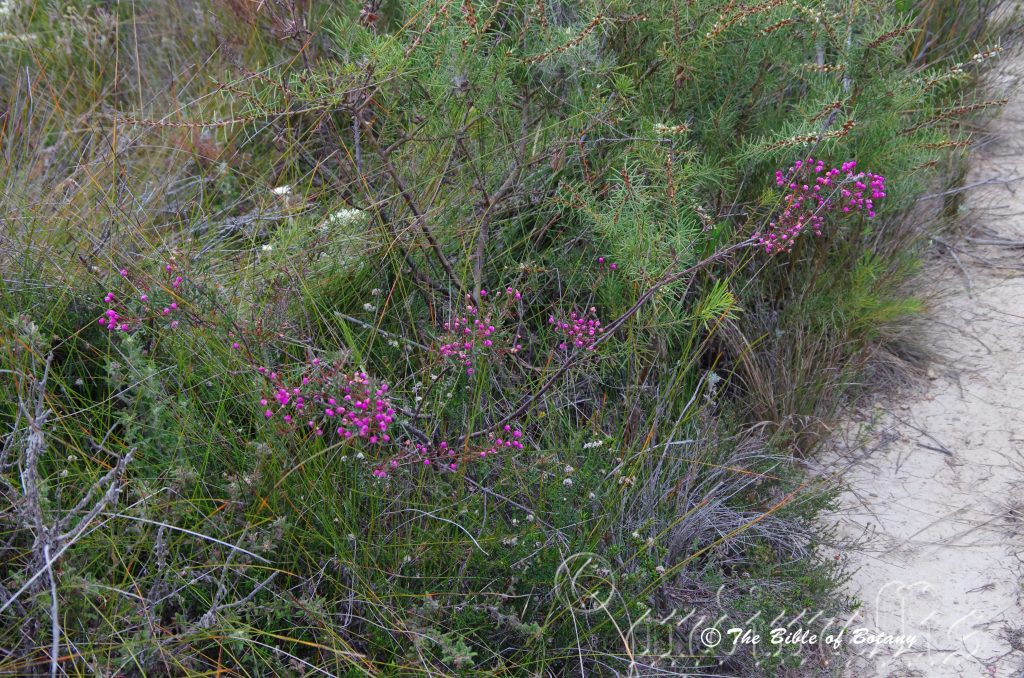
Crowdy Bay National Park Back Dunes NSW
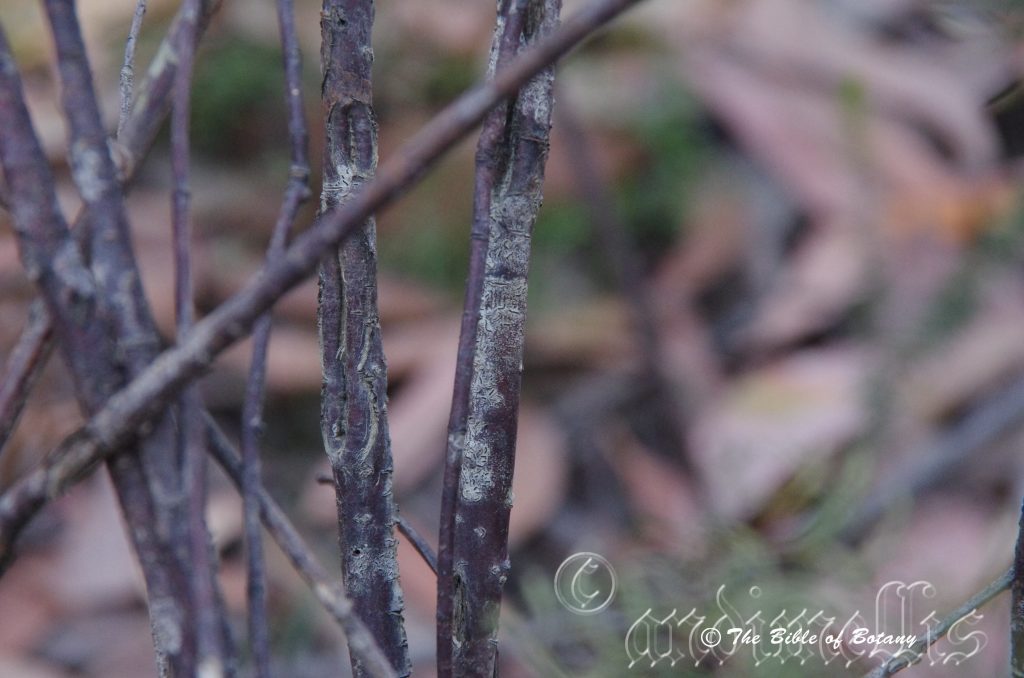
Crowdy Bay National Park Back Dunes NSW
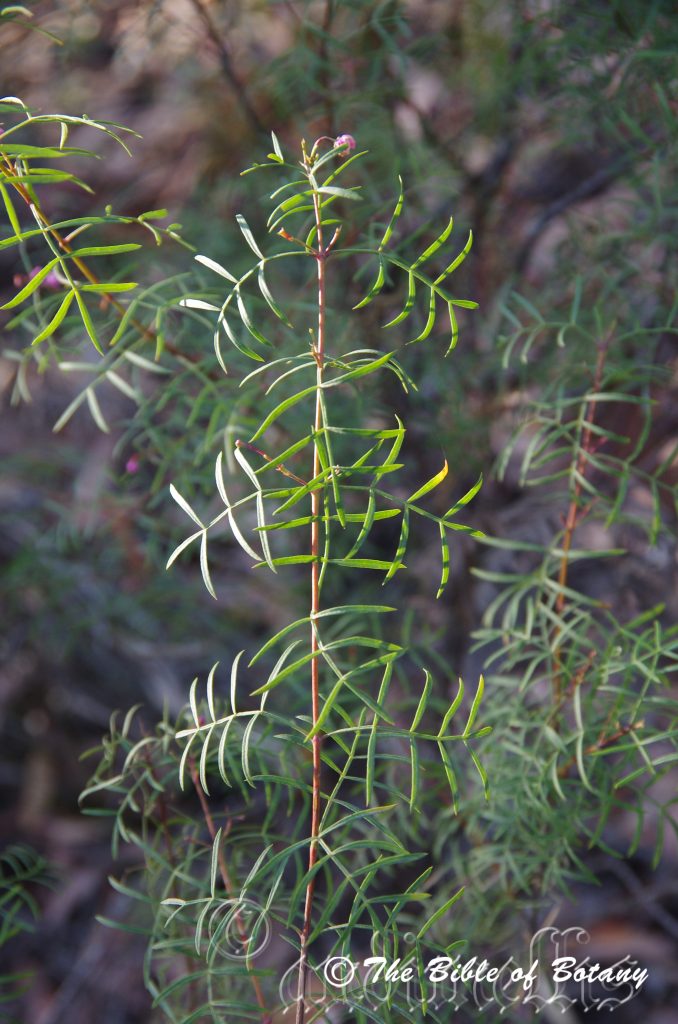
Crowdy Bay National Park Back Dunes NSW
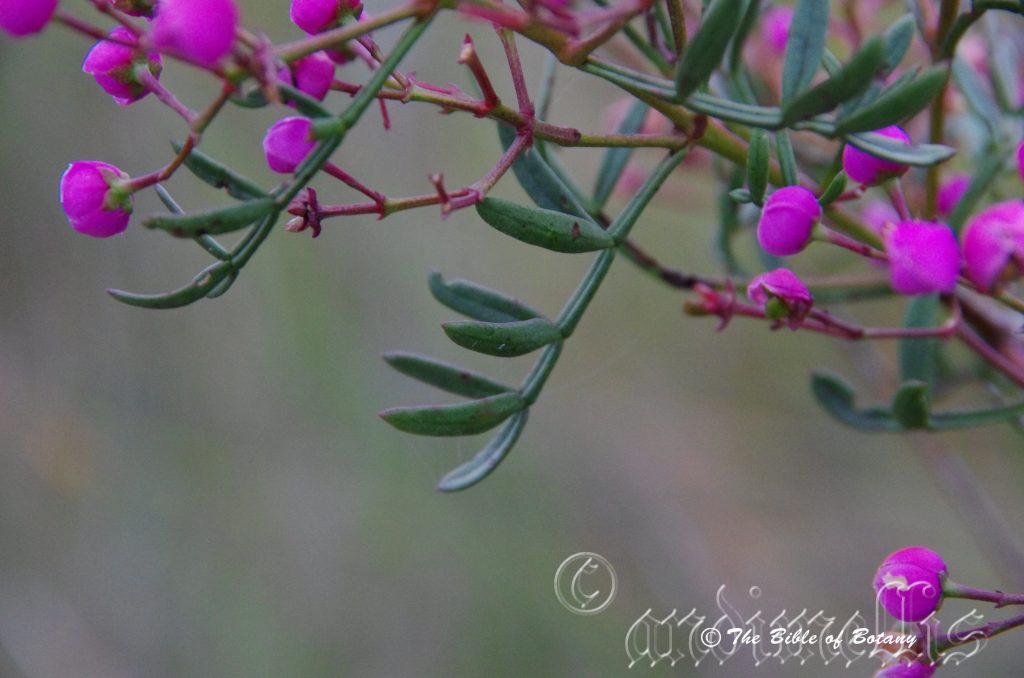
Crowdy Bay National Park Back Dunes NSW
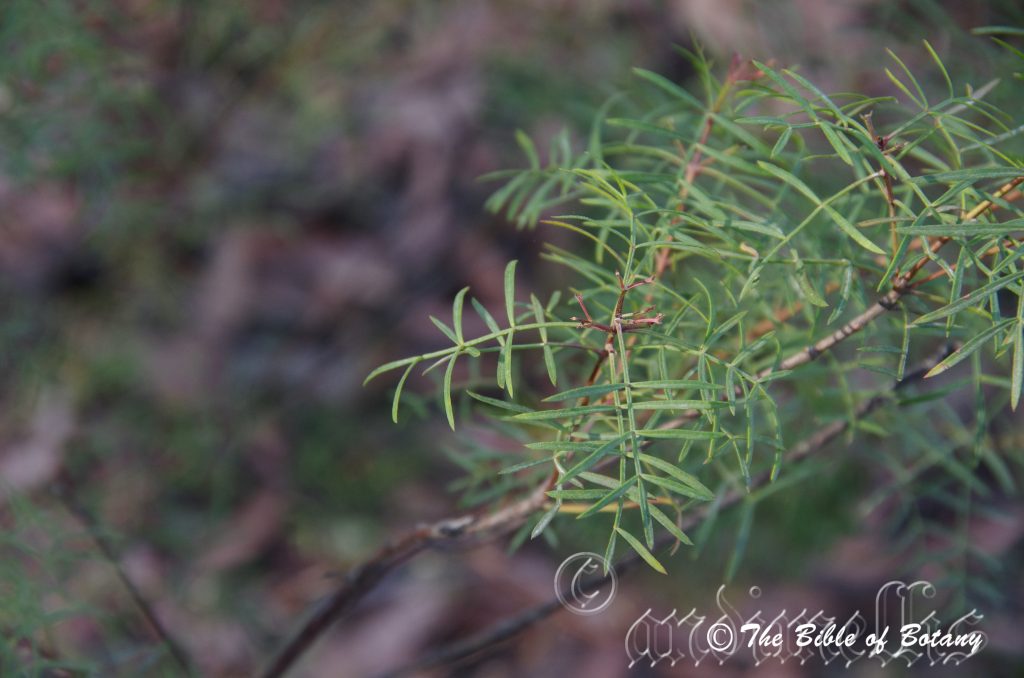
Crowdy Bay National Park Back Dunes NSW
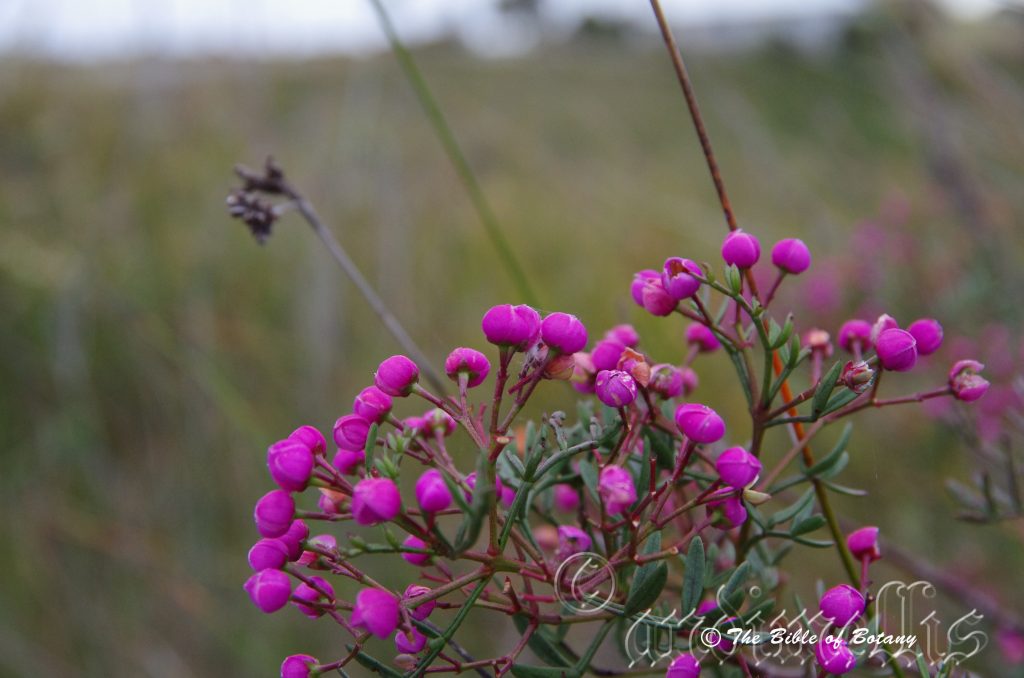
Crowdy Bay National Park Back Dunes NSW
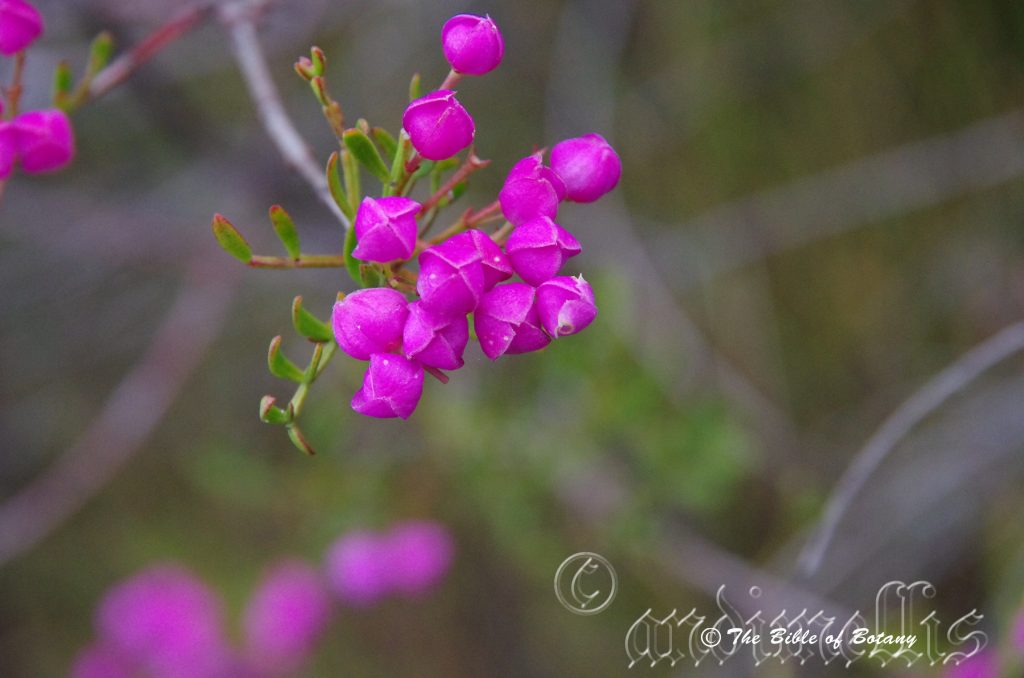
Crowdy Bay National Park Back Dunes NSW
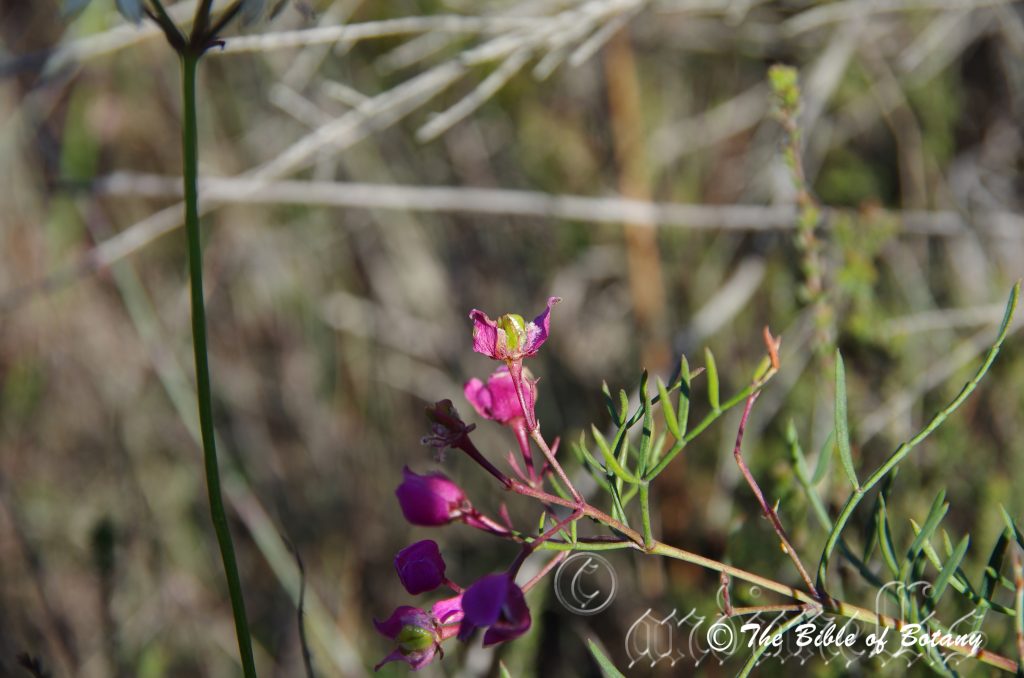
Crowdy Bay National Park Back Dunes NSW
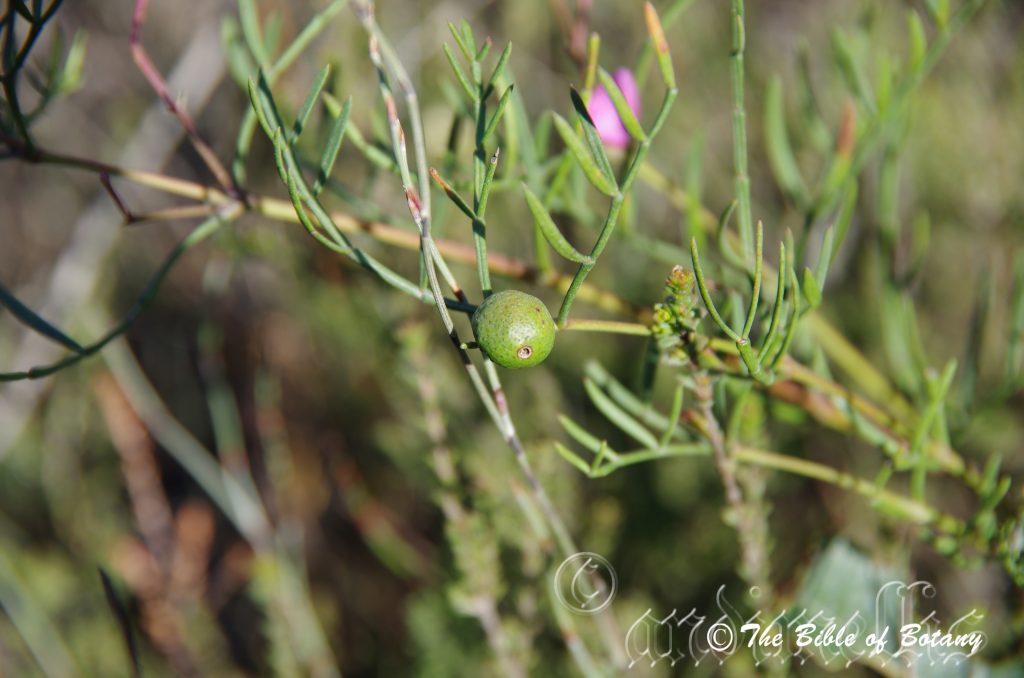
Crowdy Bay National Park Back Dunes NSW
Boronia pinnata
Classification:
Class: Rosids
Order: Sapindales
Family: Rutaceae
Subfamily:
Genus: Is named in honour of Francesco Borone; 1769-1794, who was an Italian botanical enthusiast.
Species: From Pinula, which is Latin for a pinna. It refers to one leaflet of a pinnate leaf.
Common Name:
Distribution:
Boronia pinnata is found south from the Sunshine coast in southern Queensland to of Nowra in southern coastal New South Wales. There is a disjunct population found in the Nadgee Nature Reserve.
https://avh.ala.org.au/occurrences/search?taxa=Boronia+pinnata#tab_mapView
Habitat Aspect Climate:
Boronia pinnata prefers full sun to light dappled shade. It usually grows in open Eucalyptus forests, dry woodlands or shrubby heaths. The altitude ranges from 5 meters ASL to 550 meters ASL.
The temperatures range from minus 3 degrees in July to 38 degrees in January.
The rainfall ranges from lows of 450mm to 1800mm average per annum.
Soil Requirements:
Boronia pinnata prefers fine to coarse sands to sandy loams. The soils are derived from decomposed sandstones or at times accumulated beach sands. The soils pH ranges from 5pH to 6.5pH. It does not tolerate water logged soils. None saline soils to moderately saline soils are tolerated.
Height & Spread:
Wild Plants: 0.5m to 1.5m by 0.5m to 1.5m
Characteristics:
Boronia pinnata grows as a small open or dense shrub with grey-brown and glabrous stems. The young and juvenile stems are pale greenish-brown, glabrous and slightly angled to strongly angled stems. The stems are strongly aromatic.
The leaves of Boronia pinnata are pinnate with 5 to 11 leaflets. The terminal leaflet is the shortest. The narrow elliptical to narrow oblong leaves measure 5mm to 25mm in length by 1mm to 3mm in width. The leaf bases are cuneate to cuneate-truncate while the apexes are acute. The concolourous upper laminas are mid blue-green, glabrous and dull. The lamina margins are entire, flat to slightly recurved and thick chartaceous or thinly coriaceous. The winged petioles and rachises are glabrous with a furrow on the upper surface. The leaves are strongly aromatic. The petioles measure 6mm to 14mm in length while the individual rachises measure 6mm to 20mm in length. Individual leaflets are sessile.
The inflorescence of Boronia pinnata short simple cymes or corymbosa born from the terminals and upper leaf axils. There are 3 to 8 individual flowers. The 4 narrow triangular sepals are glabrous, pale pink to deep pink and measure 1mm to 2.2mm in length. The 4 pale pink to bright, deep pink or purplish-pink petals are imbricate, broadly elliptical to ovate and are covered in white ciliate hairs and some white puberulent hairs close to the apexes. The petals measure 5mm to 10mm in length by 3mm to 6mm in width. The slender pedicels measure 6mm to 30mm in length.
The 8 white to pink stamens are covered in white puberulent hairs and measure 1mm to 1.5mm in length while the white to pastel yellow anthers measure 0.5mm to 0.6mm in diameter.
The maroon ovary is densely covered in white pulverulent hairs. The pastel yellow style has a white stigma and measure 0.2mm to 0.4mm in length. The flowers occur from June to February.
The fruit of Boronia pinnata are swollen cocci surrounded by the dried pale dull faded sepals. The cocci are glabrous.
Wildlife:
Boronia pinnata’s wildlife is unknown to the author.
Cultivation:
Boronia pinnata make magnificent garden subjects and this one is one of the easier ones to grow. It is hardier than most, responds to watering, mulching and tip pruning. Boronia pinnata will grow from 1 meter to 1.2 meters tall by 1 meter to 1.2 meters in diameter in the garden when grown in the open. Tip pruning ensures bushier plants which produce more spectacular flowering displays. This is a beautiful Boronia which is best grown and transplanted from tubes rather than advanced plants in larger pots.
Boronia pinnata is a much sought after species, because of the magnificent typical Boronia flowers over a long period in mid winter to mid summer.
Plant it near the house so its deep pink flowers can be viewed regularly. It is great in a small garden bed as a fill in plant. It looks good when planted in small clusters of 2 or 3 plants or scattered throughout the garden to create an open natural feel. If it is surrounded by shorter plants with larger foliage and white, cream or yellow flowers it will dominate the bed when it is in flower. For heath plantings use plants which have predominantly fine pale green leaves or broad leaves in deep greens or grey. Its small size enables it to achieve a stunning look when surrounded by small prostrate plants. It can be more regularly tip pruned if smaller plants is required in the foreground. It responds well to pruning recovering quickly and often increasing the number of flowers in the following season.
Six or more Boronia pinnata planted back from a bend in the garden will become a very strong focal point when in flower gain a lot of attention whether you are coming or going because of the fresh clean look of the foliage even in the driest of times. Place them in the mid ground with other large leaf ground covers and very small shrubs. To the rear, use large leaf taller plants. Plants with white, deep red or deep purple flowers can be used in both the mid ground and background. This will lead the viewer’s eyes directly to the pink flowers for a longer period.
Ensure that the whole plant or at least most of it is on display from most sections of the garden as the flowers are a real bonus.
When it is in flower this Boronia will catch your attention and the viewer will be transfixed on the display rather than watching the path. Plant it at 1.2 meter to 1.5 meter centres for a mass display where the blooms are required as cut flowers. Pick the sprays when about 30mm of the blooms have opened.
Seed grown plants give far better flowering displays and grow stronger than cutting grown plants.
Boronias in general are difficult to grow under cultivated conditions. Boronia pinnata maybe one of the easier ones to try in the garden and has proven itself now for several decades as being reliable.
Beware of what you buy at a nursery. You are better buying small seed grown plants that have never flowered before. Why? Because, when many Boronia are grown from cuttings they have a weaker root system. The roots may look big and strong however they rarely develop good adventitious roots. Adventitious roots are the small hair like roots that absorb water and nutrient. It is these roots that will eventually lead to the decline or health of the plant over successive seasons.
If seed plants are unobtainable or a specific colour or leaf form is required then cutting grown plants must be used to ensure the type wanted.
Select the place you want the plants to grow in and pre-prepare it. Buy a few small plants and plant them close enough to give a display but far enough apart to be observed when half grown.
Boronia pinnata like all Boronia are not easy to grow from seed so a good supply can be difficult to maintain in the garden from seedlings.
Seed grown plants give far better flowering displays and grow stronger than cutting grown plants once established.
Select the Boronia that grow in your district as these will do best.
Propagation:
Seeds: Boronia pinnata’s seed may be difficult to come by as the plant is endangered and seed collection is strictly controlled. Seeds can be removed easily from the plants as they dry. Once Boronia pinnata has finished flowering and the fruits have swollen place an old sheet below the plants and keep a close eye on it. Peg it down so it doesn’t blow around. Alternately place brown paper bags over the cocci as they begin to ripen. When the seeds start to disperse, it can be all over in one day with the seeds being scattered on the ground. Clean the rubbish off and sieve the material for the seeds or place a smooth mat below the seed producing branches.
The following methods are based on other Boronia specie as I have not been in a position to grow Boronia pinnata from either seed or cutting.
Seeds need to be treated by rubbing between fine sandpaper. Another method is to drop them into hot water and allow it to cool. I have also laid the rubbish out at the time of collecting the seeds and burnt it with the seeds still amongst the rubbish. No one method has proven better than the other with all producing erratic results.
Sow freshly treated seeds directly into a seed raising mix, keeping them moist not wet. When the seedlings are 20mm to 25mm in height, prick them out and plant them into 50mm native tubes using a good organic mix.
As the seedlings roots reach the bottom of the tubes plant them out into their permanent position. Nip the growing shoots to help promote bushiness. Do not delay.
For mass plantings, space the seedlings at 1.5 meters to 2 meter centres.
Cuttings: While I am not a big supporter of taking cuttings from Boronia at times we have no choice when seed is not available. Use 60mm to100mm long semi hardwood material, which is taken in late winter to mid spring immediately after flowering has finished and the last of the blooms have faded. The type of material is not important as they all strike fairly easily though side shoots with the heels removed are excellent. They are usually prepared from partially mature wood of the current season’s growth, just after a flush of growth. Boronia pinnata cuttings are normally made from late November to February following flowering.
1 Prepare the cutting mix by adding one third sharp clean river sand, one third peat and one third perlite. These ingredients are sterile,
2 Select good material from non diseased plants,
3 Select semi green stems for cuttings. Look for a stem with two or three nodes,
4 Place the cutting on a flat, hard surface, and make a clean slice through the middle of the lower node on an angle towards the base, with a sterilized sharp knife or razor blade. – This scarification of the node will increase the chances of roots emerging from this spot. Now remove all but one or two the leaves, leaving the apex leaves in tact. If the leaves are very large in proportion to the stem, cut off the apical halves.
5 Some plants root easily, but a rooting hormone can help others by stimulating the cutting into sending out new roots. Fill a saucer with water, and place some rooting hormone into another container like a bottle top. Dip the node end of the cutting into the water and then into the rooting hormone. Tap off any excess hormone,
6 Use a small dipple stick or old pencil to poke a hole into the soilless potting mix. Ensure the hole is slightly larger than the stem diameter and be careful not to wipe the rooting hormone off the cuttings base, place the cuttings in a pattern ensuring the cuttings are not touching each other,
7 I like to place the pots in Plastic bags to help maintain temperature and moisture. Place in a semi shaded place like under 50mm shade cloth.
8 When the cuttings have struck, open the bag to allow air circulation for a few days to a week,
9 Once hardened off remove the cuttings from the bag and allow to further hardening for a few more days,
10 Transplant into a good potting mix to grow on.
Fertilize using Seaweed, fish emulsion or organic chicken pellets soaked in water on an alternate basis. Fertilize every two months until the plants are established then annually in early September to October to maintain health, vitality and better flowering.
Further Comments from Readers:
Hi reader, it seems you use The Bible of Botany a lot. That’s great as we have great pleasure in bringing it to you! It’s a little awkward for us to ask, but our first aim is to purchase land approximately 1,600 hectares to link several parcels of N.P. into one at The Pinnacles NSW Australia, but we need your help. We’re not salespeople. We’re amateur botanists who have dedicated over 30 years to saving the environment in a practical way. We depend on donations to reach our goal. If you donate just $5, the price of your coffee this Sunday, We can help to keep the planet alive in a real way and continue to bring you regular updates and features on Australian plants all in one Botanical Bible. Any support is greatly appreciated. Thank you.
In the spirit of reconciliation we acknowledge the Bundjalung, Gumbaynggirr and Yaegl and all aboriginal nations throughout Australia and their connections to land, sea and community. We pay our respect to their Elders past, present and future for the pleasures we have gained.
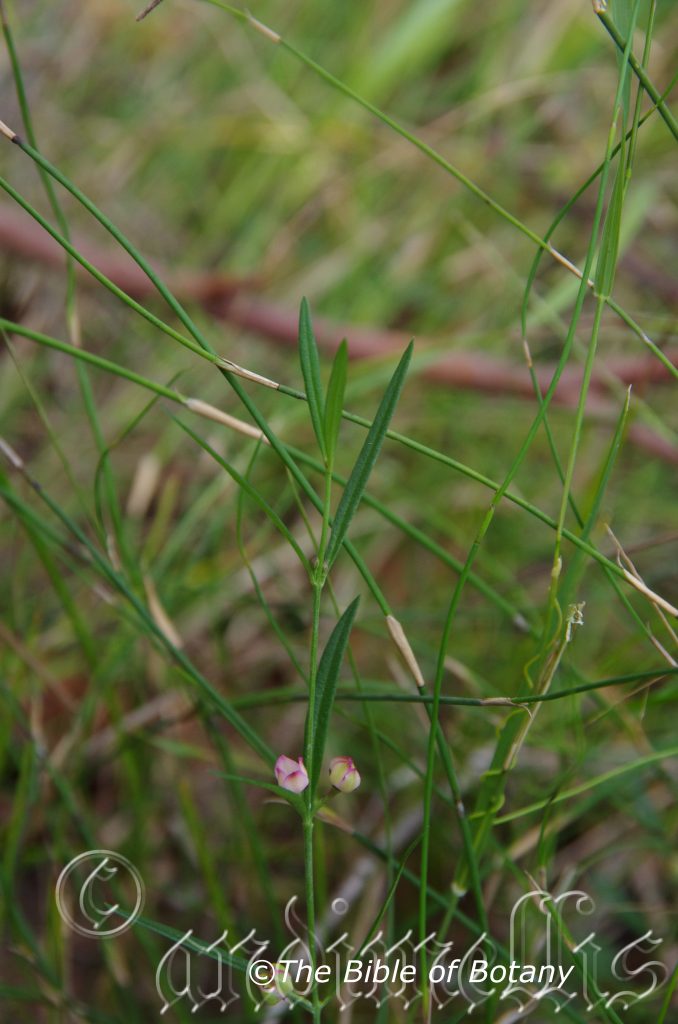
The Pinnacles NSW
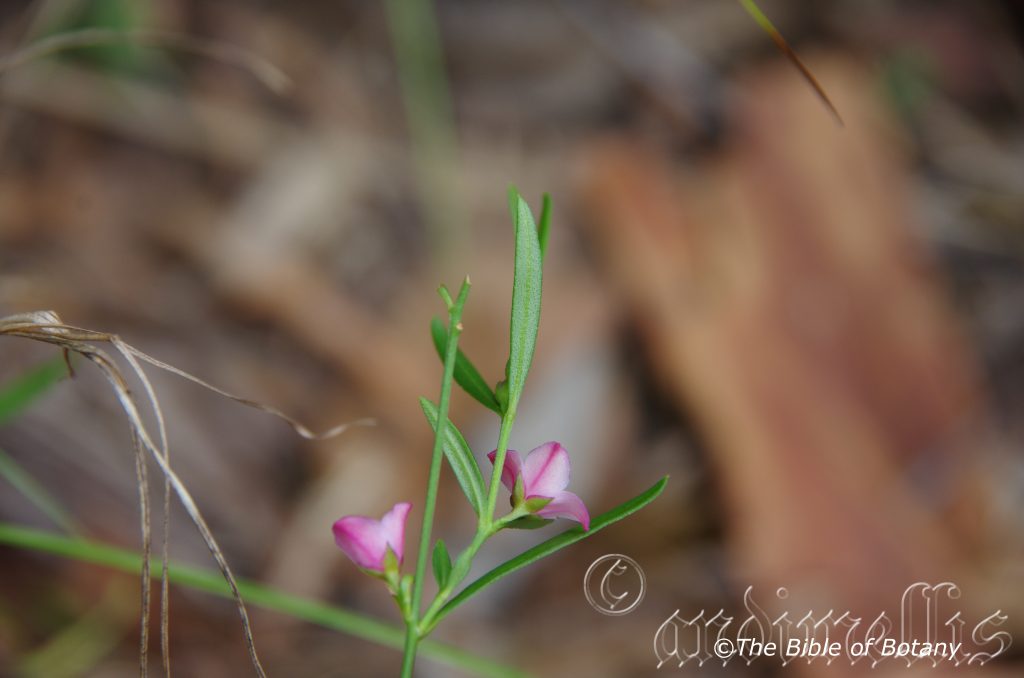
The Pinnacles NSW
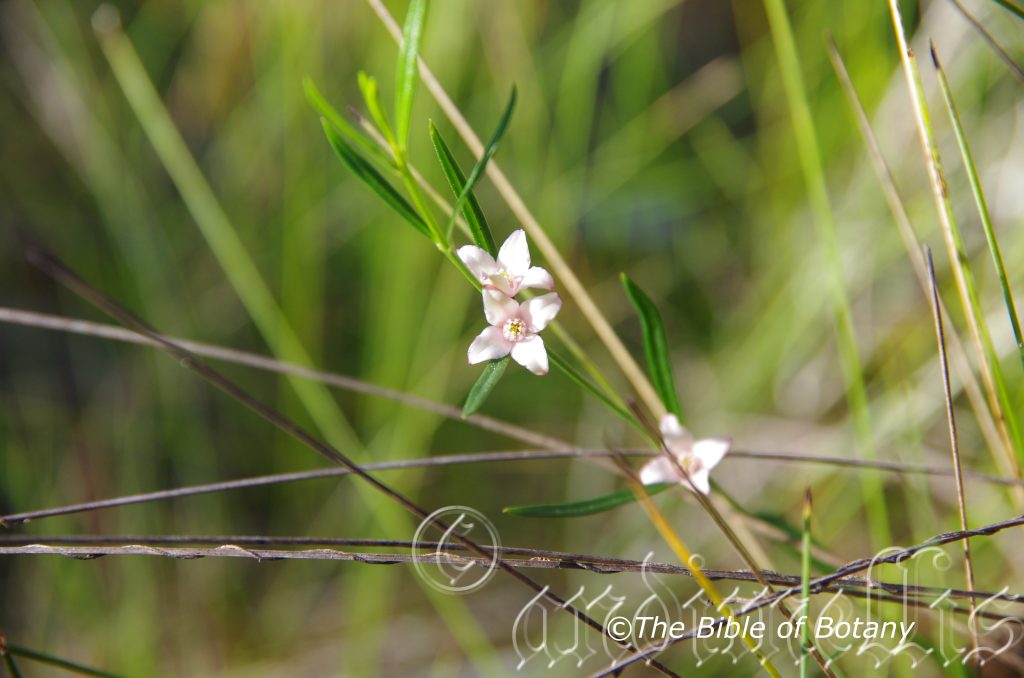
The Pinnacles NSW
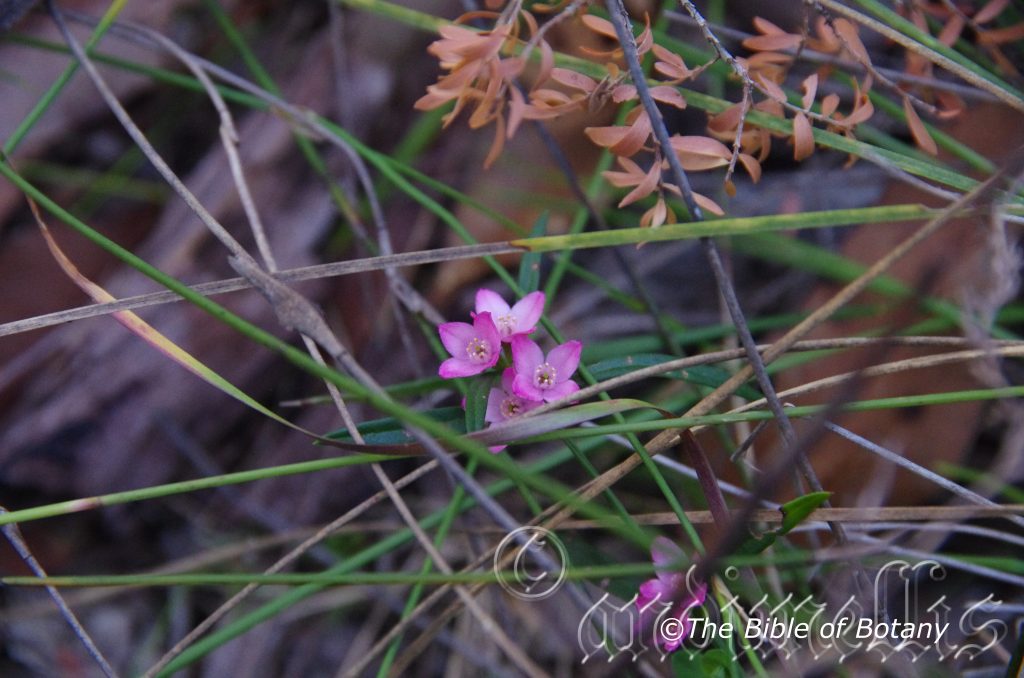
The Pinnacles NSW
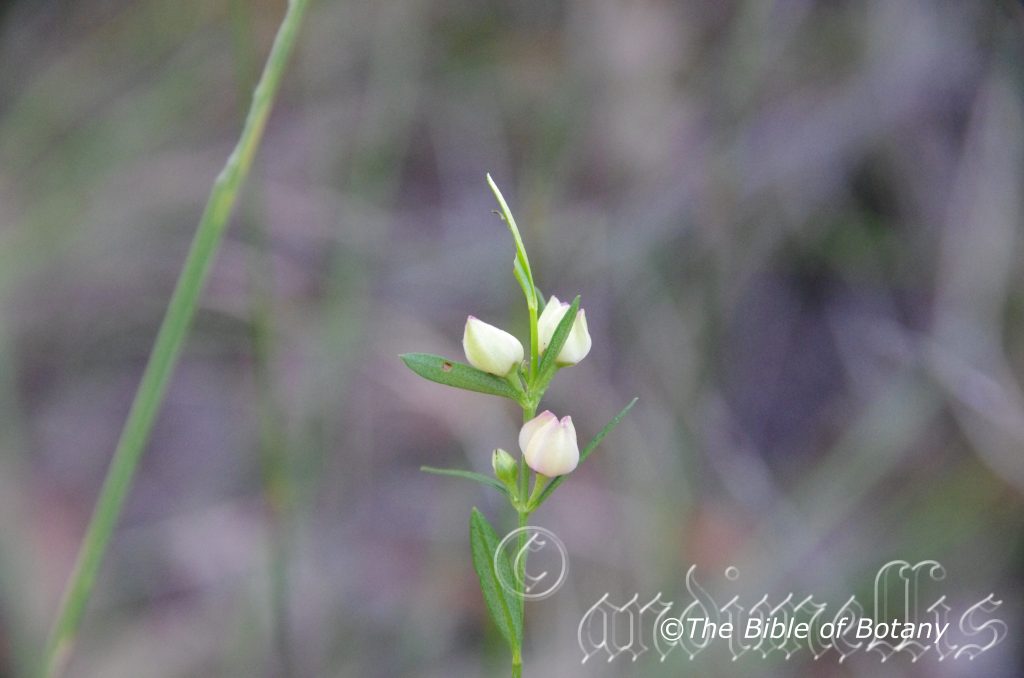
The Pinnacles NSW
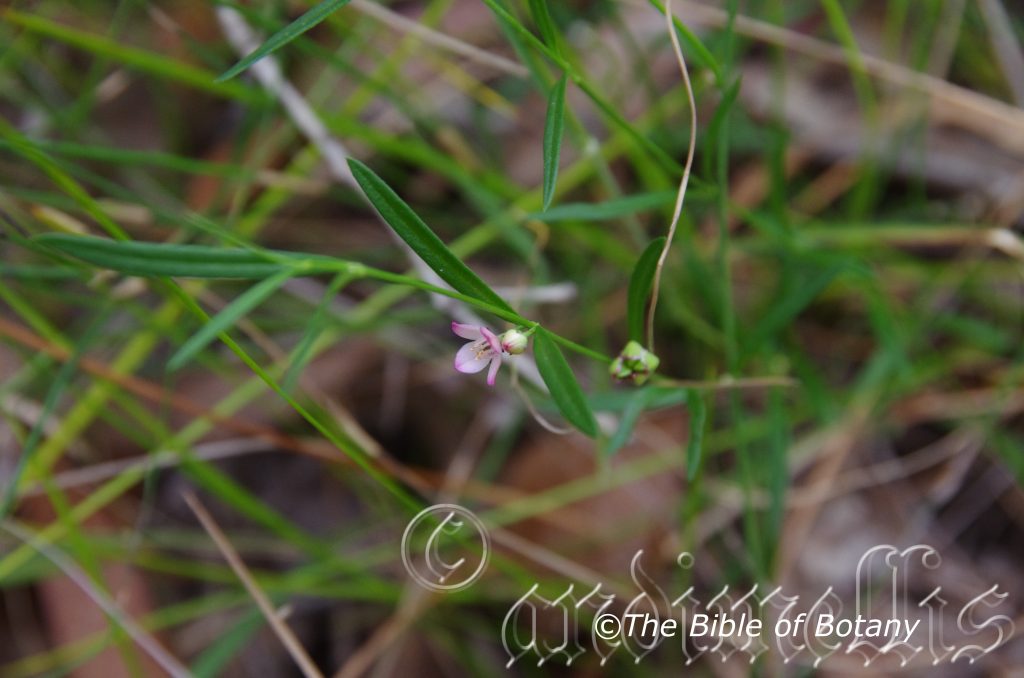
The Pinnacles NSW
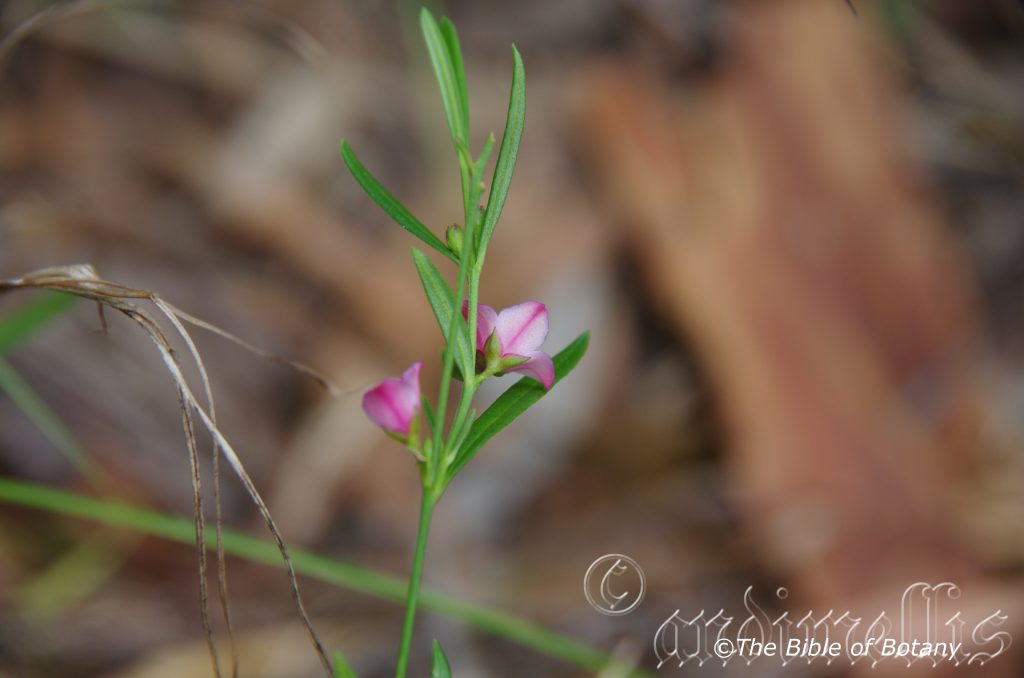
The Pinnacles NSW
Boronia polygalifolia
Classification:
Class: Rosids
Order: Sapindales
Family: Rutaceae
Genus: Is named in honour of Francesco Borone; 1769-1794, who was an Italian botanical enthusiast.
Species: From Poly, which is Greek many or much, Galon/Gala, which are Greek for milk and Folium, which is Latin for foliage. It refers to foliage plants, which are typical or similar to those of the milkworts in the Polygala genus that were thought to increase milk supply in cows and goats.
Common Name: Dwarf Boronia.
Distribution:
Boronia polygalifolia is found south from the Sunshine Coast in southern coastal Queensland to Mouyra and Geehi in southern New South Wales. It is found on and east of the Great Dividing Range and on the western slopes at higher altitudes.
https://avh.ala.org.au/occurrences/search?taxa=Boronia+polygalifolia#tab_mapView
Habitat Aspect Climate:
Boronia polygalifolia prefers prefers full sun to light dappled shade. It usually grows in open Eucalyptus forests, dry woodlands or shrubby heaths on rocky out crops in exposed positions. The altitude ranges from 5 meters ASL to 1200 meters ASL.
The temperatures range from minus 8 degrees in July to 35 degrees in January.
The rainfall ranges from lows of 600mm to 2000mm average per annum.
Soil Requirements:
Boronia polygalifolia prefers coarse sands, fine sands to sandy loams. The soils are derived from decomposed sandstones, granites or accumulated beach sands. The soils pH ranges from 5pH to 6.5pH. It does not tolerate water logged soils. None saline soils to moderately saline soils are tolerated.
Height & Spread:
Wild Plants: 0.08m to 0.6m by 0.5m to 1m.
Characteristics:
Boronia polygalifolia grows as a small straggly open shrub with grass-green, glabrous stems with 2 distinct longitudinal grooves between the leaf nodes. The young and juvenile stems are similar to the mature stems.
The leaves of Boronia polygalifolia are linear-elliptical to narrow elliptical and measure 6mm to 30mm in length by 1mm to 6mm in width. The leaf bases are cuneate and decurrent while the apexes are acute. The discolourous upper laminas are mid grass-green to sea green, glabrous, glossy on the upper laminas while the lower laminas are paler and dull. The lamina margins are entire and are revolute to recurve. The glabrous petioles are sessile 1mm in length.
The inflorescences of Boronia polygalifolia are single flowered from the leaf axils. The 4 triangular glabrous sepals are grass-green often with a red to maroon margin and measure 1.3mm to 2mm in length. The 4 pale pink to bright to deep pink petals are often more deeply coloured as they approach the apexes. The imbricate or valvate petals are ovate and measure 4mm to 6mm in length by 3.5mm to 5mm width. The pedicels measure 2mm to 6mm in length.
The 8 pastel pink stamens are glabrous and measure 1mm to 1.5mm in length while the yellow anthers are adnately fixed to the filaments.
The green ovary is glabrous. The pink style and stigma measure 0.4mm to 0.6mm in length. The flowers occur throughout the year with a peak from late September to early January.
The fruit of Boronia polygalifolia are swollen cocci surrounded by the dried pale dull faded imbricate petals. The cocci are glabrous.
Wildlife:
Boronia polygalifolia’s wildlife is unknown to the author.
Cultivation:
Boronia polygalifolia is a straggly dwarf shrub that needs to be planted in small groups to make it look bushier in the garden. Cultivated subjects respond to a little watering, native fertilizers and tip pruning. Boronia polygalifolia will grow from 0.4 meters to 0.6 meters in height by 0.5 meter to 0.8 meters in diameter in the garden when grown in the open. This is a beautiful Boronia which is best grown and transplant from tubes rather than advanced plants in larger pots.
Boronia polygalifolia could be more widely grown in temperate climate and Alpine districts along the east coast to high in the mountains where it is very frost tolerant and drought tolerant once established.
For heath plantings use plants which have predominantly fine leaves of different colours to help high light Boronia polygalifolia.
Its small size enables it to be poked into small areas or between boulders, logs or other features without dominating the feature yet give a soft display. It responds to pruning recovering quickly and often increasing the number of flowers in the following season but will never become dense.
Seed grown plants give far better flowering displays and grow stronger than cutting grown plants.
Boronia species in general are difficult to grow under cultivated conditions. It is difficult enough to maintain when growing naturally on your block. Some useful hints are.
Beware of what you buy at a nursery. You are better buying small seed grown plants that have never flowered before. Why? Because, when Boronia are cutting grown it have a weaker root system. The roots may look big and strong however it rarely develops a good adventitious roots system. Adventitious roots are the small hair like roots that absorb water and nutrient. It is the lack of these roots that will eventually lead to the decline or health of the plant over successive seasons. Boronia polygalifolia seems to be an exception to the rule that cutting grown plants have weak root system but this maybe because some wholesale nurseries have a new technique.
If seed plants are unobtainable or a specific colour or leaf form is required then cutting grown plants must be used to ensure the type wanted.
Select the place you want the plants to grow in and pre-prepare it. Buy a few small plants and plant them close enough to give a display but far enough apart to be observed when half grown.
Boronia polygalifolia like all Boronias are not easy to grow from seed so a good supply can be difficult to maintain in the garden from seedlings.
Seed grown plants give far better flowering displays and grow stronger than cutting grown plants once established.
It is best to select Boronias that grow in your district as these will do best. Despite growing around the Pinnacles our cultivated plants only lived for two flowering seasons.
Propagation:
Seeds: Boronia polygalifolia‘s seed may be difficult to come by as the plant is endangered and seed collection is strictly controlled. Seeds can be removed easily from the plants as they dry. Once Boronia polygalifolia has finished flowering and the fruits have swollen place an old sheet below the plants and keep a close eye on it. Peg it down so it doesn’t blow around. Alternately place brown paper bags over the cocci as they begin to ripen. When the seeds start to disperse, it can be all over in one day with the seeds being scattered on the ground. Clean the rubbish off and sieve the material for the seeds or place a smooth mat below the seed producing branches.
The following methods are based on other Boronia specie as I have not been in a position to grow Boronia heterophylla from either seed or cutting.
Seeds need to be treated by rubbing between fine sandpaper. Another method is to drop them into hot water and allow it to cool. I have also laid the rubbish out at the time of collecting the seeds and burnt it with the seeds still amongst the rubbish. No one method has proven better than the other with all producing erratic results.
Sow freshly treated seeds directly into a seed raising mix, keeping them moist not wet. When the seedlings are 20mm to 25mm in height, prick them out and plant them into 50mm native tubes using a good organic mix.
As the seedlings roots reach the bottom of the tubes plant them out into their permanent position. Nip the growing shoots to help promote bushiness. Do not delay.
Cuttings: While I am not a big supporter of taking cuttings from Boronia at times we have no choice when seed is not available. Use 60mm to100mm long semi hardwood material, which is taken in late winter to mid spring immediately after flowering has finished and the last of the blooms have faded. The type of material is not important as they all strike fairly easily though side shoots with the heels removed are excellent. They are usually prepared from partially mature wood of the current season’s growth, just after a flush of growth. Boronia polygalifolia cuttings are normally made from late late August to October following flowering.
1 Prepare the cutting mix by adding one third sharp clean river sand, one third peat and one third perlite. These ingredients are sterile,
2 Select good material from non diseased plants,
3 Select semi green stems for cuttings. Look for a stem with two or three nodes,
4 Place the cutting on a flat, hard surface, and make a clean slice through the middle of the lower node on an angle towards the base, with a sterilized sharp knife or razor blade. – This scarification of the node will increase the chances of roots emerging from this spot. Now remove all but one or two the leaves, leaving the apex leaves in tact. If the leaves are very large in proportion to the stem, cut off the apical halves.
5 Some plants root easily, but a rooting hormone can help others by stimulating the cutting into sending out new roots. Fill a saucer with water, and place some rooting hormone into another container like a bottle top. Dip the node end of the cutting into the water and then into the rooting hormone. Tap off any excess hormone,
6 Use a small dipple stick or old pencil to poke a hole into the soilless potting mix. Ensure the hole is slightly larger than the stem diameter and be careful not to wipe the rooting hormone off the cuttings base, place the cuttings in a pattern ensuring the cuttings are not touching each other,
7 I like to place the pots in Plastic bags to help maintain temperature and moisture. Place in a semi shaded place like under 50mm shade cloth.
8 When the cuttings have struck, open the bag to allow air circulation for a few days to a week,
9 Once hardened off remove the cuttings from the bag and allow to further hardening for a few more days,
10 Transplant into a good potting mix to grow on.
Fertilize using Seaweed, fish emulsion or organic chicken pellets soaked in water on an alternate basis. Fertilize every two months until the plants are established then annually in early September to October to maintain health, vitality and better flowering.
Further Comments from Readers:
Hi reader, it seems you use The Bible of Botany a lot. That’s great as we have great pleasure in bringing it to you! It’s a little awkward for us to ask, but our first aim is to purchase land approximately 1,600 hectares to link several parcels of N.P. into one at The Pinnacles NSW Australia, but we need your help. We’re not salespeople. We’re amateur botanists who have dedicated over 30 years to saving the environment in a practical way. We depend on donations to reach our goal. If you donate just $5, the price of your coffee this Sunday, We can help to keep the planet alive in a real way and continue to bring you regular updates and features on Australian plants all in one Botanical Bible. Any support is greatly appreciated. Thank you.
In the spirit of reconciliation we acknowledge the Bundjalung, Gumbaynggirr and Yaegl and all aboriginal nations throughout Australia and their connections to land, sea and community. We pay our respect to their Elders past, present and future for the pleasures we have gained.
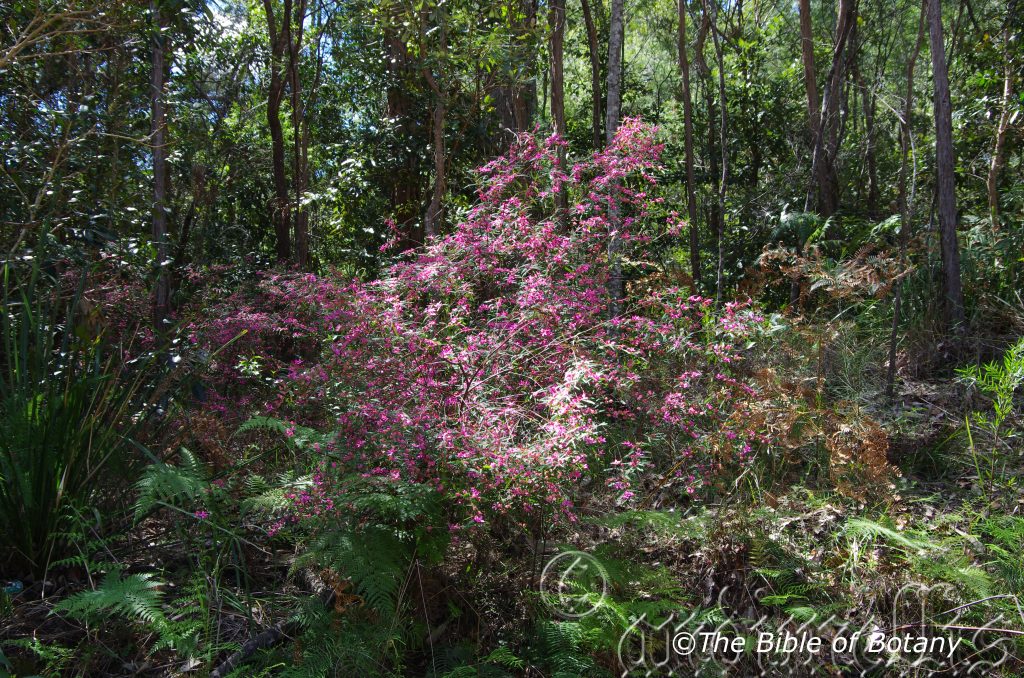
Fortis Creek National Park NSW
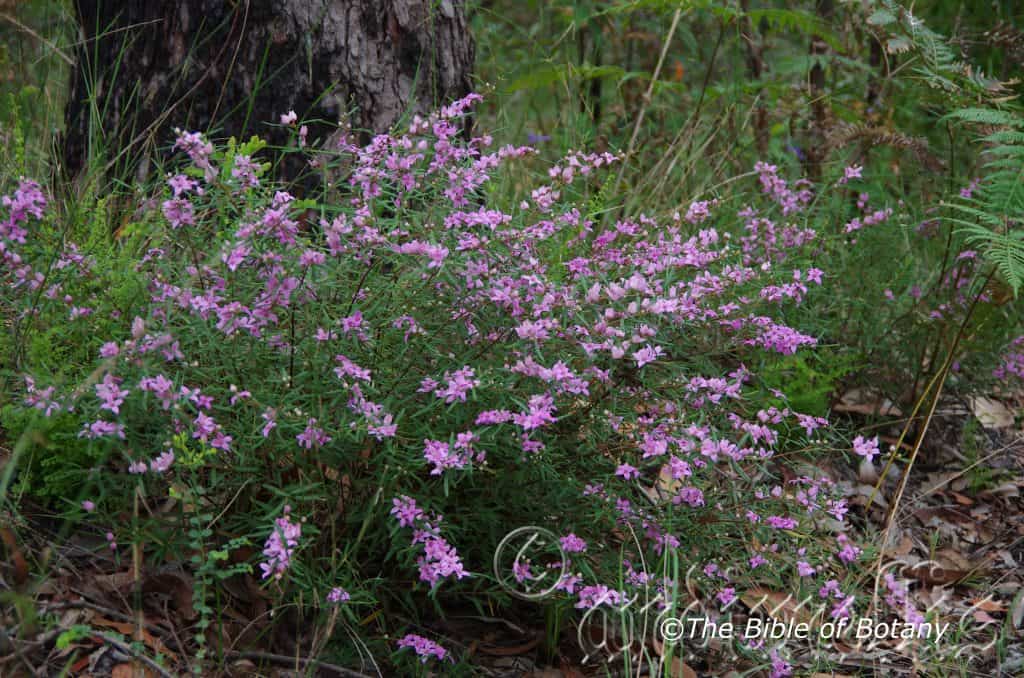
Fortis Creek National Park NSW
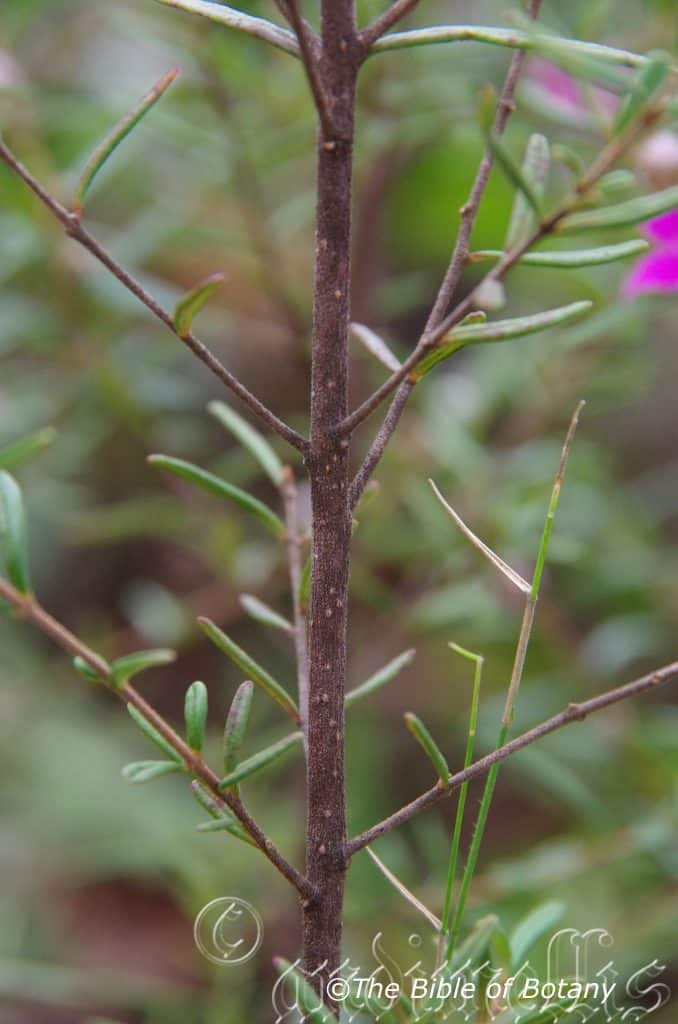
Author’s Garden The Pinnacles NSW

Author’s Garden The Pinnacles NSW

Author’s Garden The Pinnacles NSW
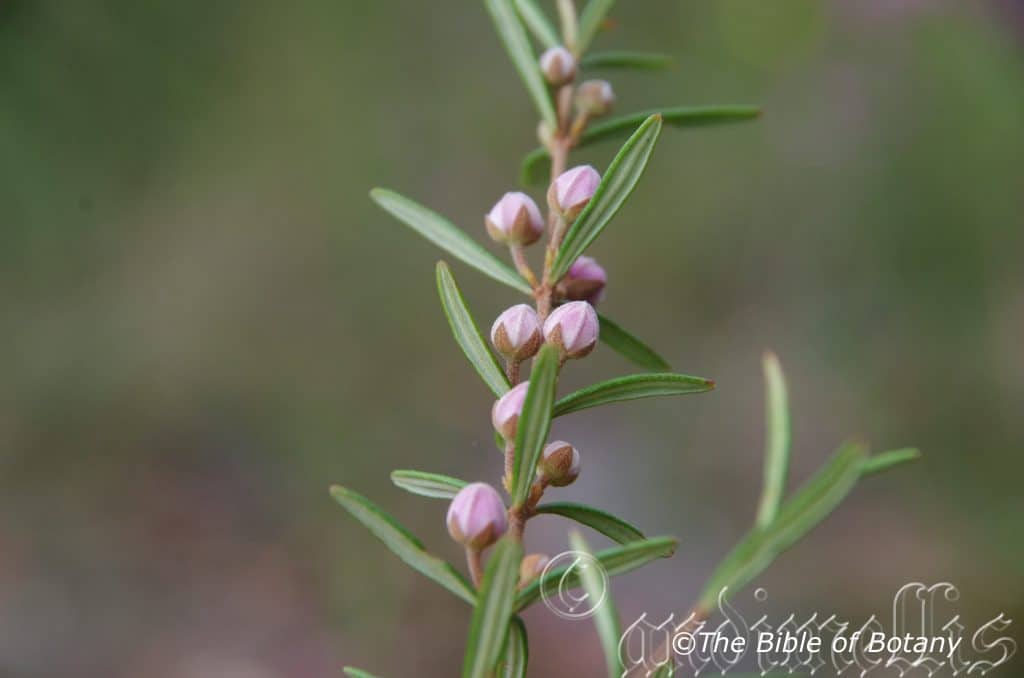
The Pinnacles NSW
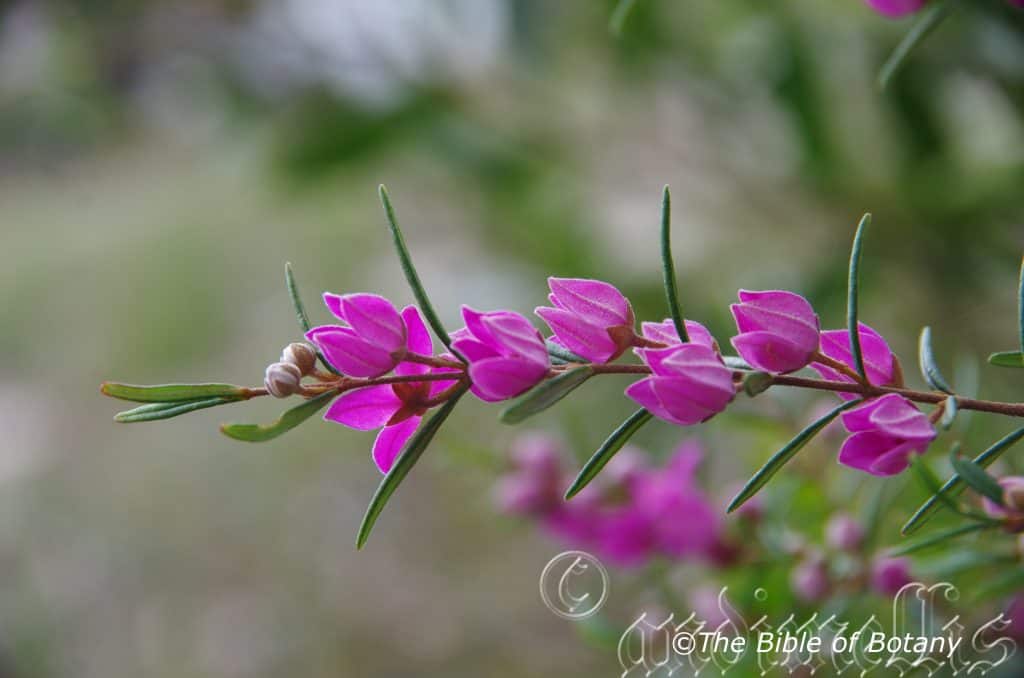
The Pinnacles NSW
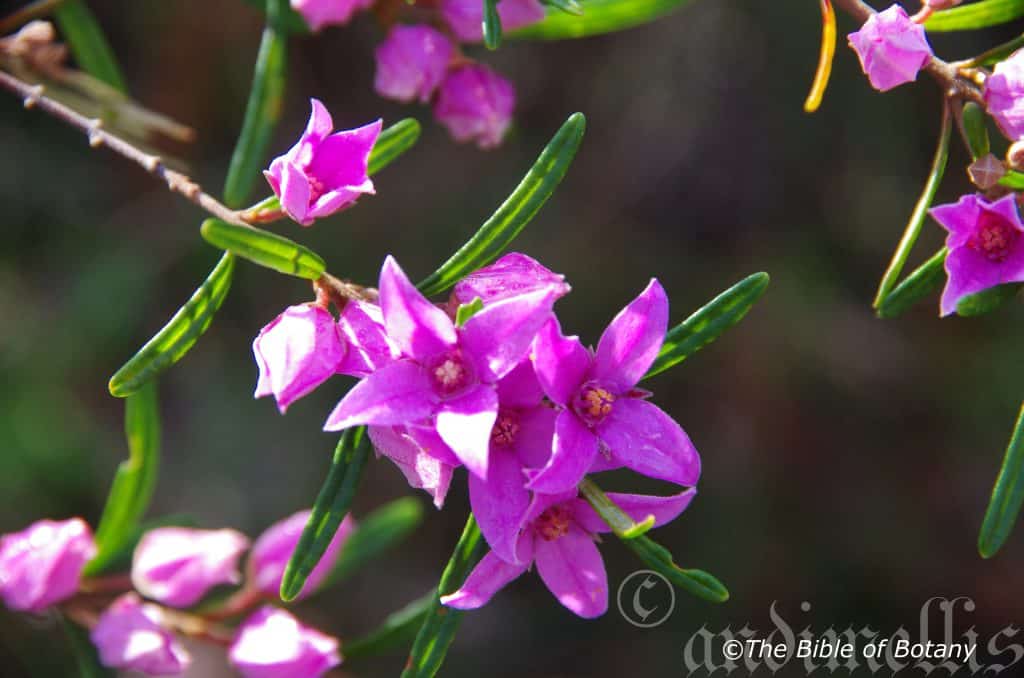
The Pinnacles NSW
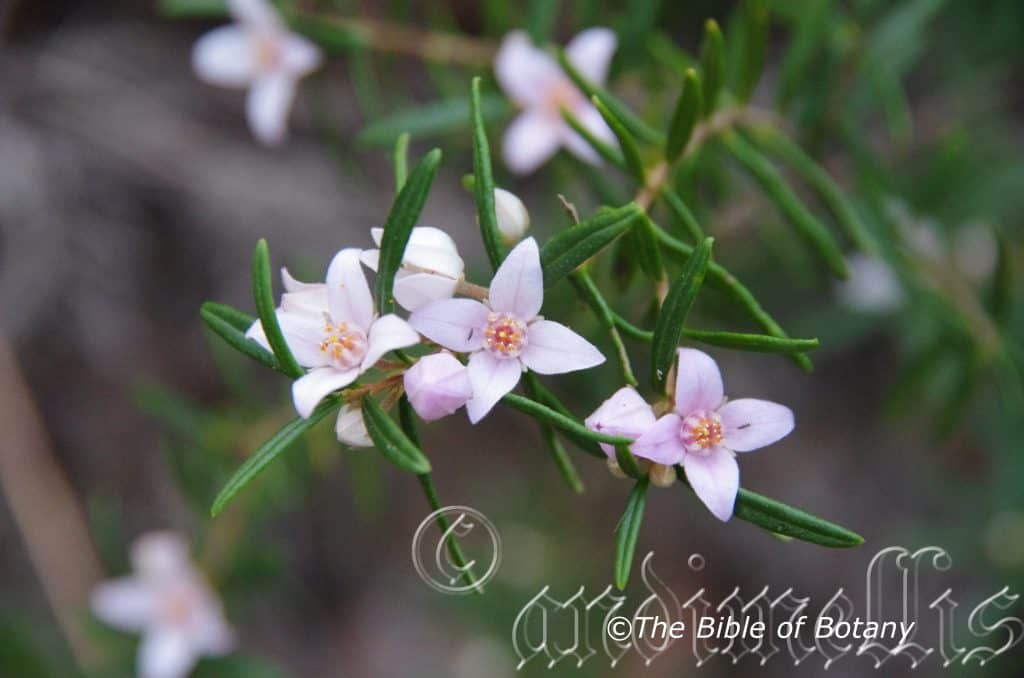
The Pinnacles NSW
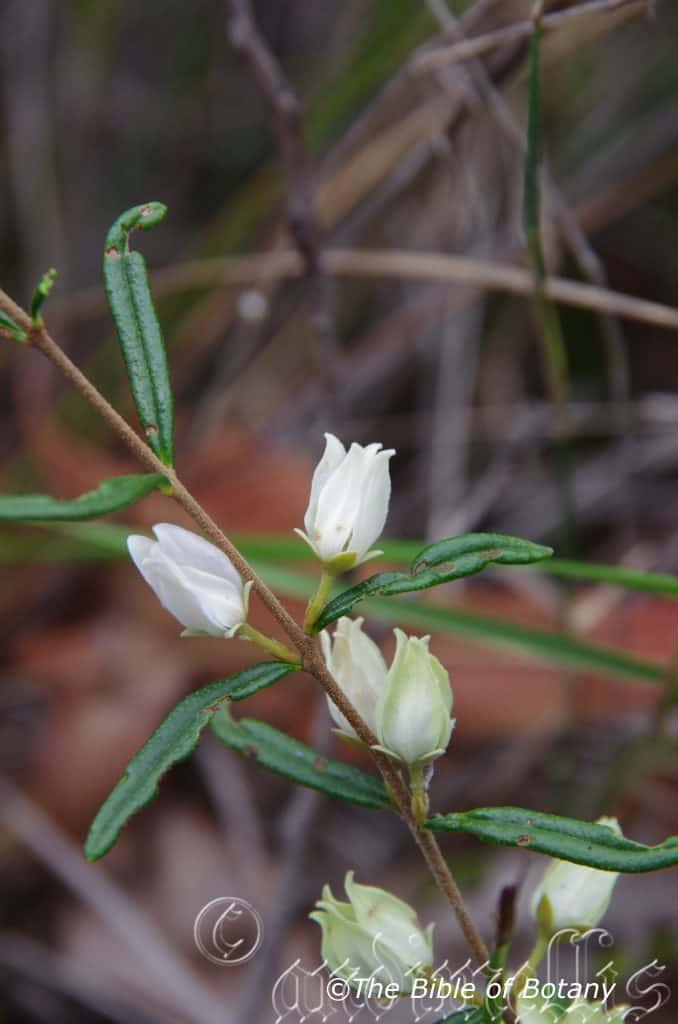
The Pinnacles NSW

Fortis Creek National Park NSW

Fortis Creek National Park NSW

Fortis Creek National Park NSW
Boronia rosmarinifolia
Classification:
Class: Rosids
Order: Sapindales
Family: Rutaceae
Genus: Is named in honour of Francesco Borone; 1769-1794, who was an Italian botanical enthusiast.
Species: From Roscida, which is Latin for to have a dewy or wet appearance, Marinus, which Latin for the sea and Folium, which is Latin for foliage. It refers to shrubs or leaves, which resembles the Mediterranean Rosemary bush which was known as the dew of the sea.
Common Name: Rosemary Boronia.
Distribution:
Boronia rosmarinifolia is found south from Fraser Island and Carnarvon Gorge in southern Queensland to Red Rock in northern coastal New South Wales.
https://avh.ala.org.au/occurrences/search?taxa=Boronia+rosmarinifolia#tab_mapView
Habitat Aspect Climate:
Boronia rosmarinifolia prefers full sun to light dappled shade. It usually grows in open Eucalyptus forests, dry woodlands or shrubby heaths or coastal wallum heaths. The altitude ranges from 5 meters ASL to 500 meters ASL.
The temperatures range from minus 2 degree in early August to 37 degrees in January.
The rainfall ranges from a low of 550mm to an average of 1600mm annually.
Soil Requirements:
Boronia rosmarinifolia prefers sandy soils to sandy loams. The soils are usually are derived from decomposed sandstone, or accumulated sands behind the frontal dunes. The pH ranges from 4.5pH to 7pH. It does not tolerate water logged soils. Non saline soils to moderately saline soils are tolerated.
Height & Spread:
Wild Plants: 0.5m to 1m by 0.5m to 1m.
Characteristics:
Boronia rosmarinifolia is a striking small shrub with rusty brown semi glossy, resinous stems. The young and juvenile stems are rusty brown semi glossy, farinaceous and covered in rusty tomentose hairs.
The simple, opposite, linear-oblong to narrow oblong leaves measure 6mm to 40mm in length by 2mm to 3mm in width. The base is cuneate while the apex is obtuse. The discolourous laminas are grass-green to mid green and are sparsely covered in rusty stellate hairs on the upper laminas, especially along the mid vein while the lower laminas are paler and covered in rusty tomentose hairs. The margins are entire and revolute to recurve. The mid vein is prominent on the lower lamina and is distinctly visible as a longitudinal groove along the upper lamina. The leaves are sessile.
The inflorescence is single flowered born from the leaf axils. The pedicels are covered in rusty stellate and tomentose hairs and measure 2mm to 7mm in length. The 4 broadly triangular sepals are covered in rusty tomentose hairs externally and measure 1.5mm to 2mm in length. The 4 pale pink to bright pink elliptical petals are valvate and covered in white ciliate and pulverulent hairs. (The photos of the white form taken at The Pinnacles are the first taken and recorded of the pure white flowering form. The petals measure 7mm to 10mm in length and 5.5mm to 6.5mm wide and fade with age.
The 8 pink stamens are densely covered in long white ciliate hairs near the base and sparsely covered in short white ciliate hairs near the anthers. The filaments measure 1.2mm to 1.6mm in length while the orange anthers measure 0.4mm in diameter.
The deep pink-red ovaries are glabrous. The deep pink-red pistil is conical and measures 1.6mm to 2mm in length. The flowers occur from July to October.
Boronia rosmarinifolia are swollen cocci surrounded by the dried pale dull faded imbricate petals. The cocci are glabrous.
Wildlife:
Boronia rosmarinifolia’s flowers attract several species of honey bees and pollen flies. The golden honey bee or pollen flies are in the Geron genus.
Cultivation:
Boronia rosmarinifolia is a magnificent medium garden subject and is one of the easier ones to grow. It is hardier than most, responds to a little extra water, mulch, fertilizer and tip pruning. Boronia rosmarinifolia will grow from 1 meter to 1.2 meters tall by 1 meter to 1.2 meters in diameter in the garden when grown in the open. Tip pruning ensures bushier plants which produce more spectacular flowering displays in the following season. This is a beautiful Boronia which is best grown when transplanted from tubes rather than advanced plants in larger pots.
Boronia rosmarinifolia is much sought after because of the magnificent displays of pink Boronia flowers in late winter to mid spring which are ideal for cut flowers.
It is a great feature plant amongst rockeries, beneath trees, on banks and in particular, when planted in mass displays for its flowers throughout the bush where it flourish in dappled light. This is one of the best because of its size, proliferation of flowers and hardiness.
Plant it near the house so its deep pink flowers can be viewed regularly. It is great in small garden beds as a fill in plant. It can be planted in small clusters of 2 or 3 or as standalone plants scattered throughout the garden to create a natural heath setting. If it is surrounded by shorter plants with larger foliage and red or white flowers it will dominate at the center giving an expansive look to the bed especially when it is in flower.
For heath plantings use plants which have predominantly fine leaves of various colours. It can be regularly tip pruned if smaller plants are required in the foreground. It responds well to pruning recovering quickly and often increasing the number of flowers in the following season.
Mass planting of Boronia rosmarinifolia back from a bend will become a very strong focal point especially when in flower especially if it is surrounded by shorter white or yellow flowering plants like Hibbertia diffusa or Actinotus helianthi. Place it in the background with the smaller shrubs in the foreground. Hibbertia diffusa as a ground cover with its striking yellow flowers will take over as Boronia rosmarinifolia‘s flowers subside.
Plant it at 1 meter to 1.2 meter centers for a mass display or 1 meter to 1.2 meters for scattered plantings in a heath garden.
Boronia species in general are difficult to grow under cultivated conditions, however this one is a little easier and plants protected on our block have lived and flowered well for over four seasons.
Beware of what you buy at a nursery. You are better buying small seed grown plants that have never flowered before. Why? Because, when Boronia are cutting grown they have a weaker root system. The roots may look big and strong however they rarely develop good adventitious roots. Adventitious roots are the small hair like roots that absorb water and nutrient. It is these roots that will eventually lead to the decline or health of the plant over successive seasons.
If seed plants are unobtainable or a specific colour form is required then cutting grown plants must be used to ensure the type wanted.
Select the place you want the plants to grow in and pre-prepare it. Buy a few small plants and plant them close enough to give a display but far enough apart to be observed when half grown.
Boronia rosmarinifolia like all Boronia are not easy to grow from seed so a good supply can be difficult to maintain in the garden from seedlings.
Seed grown plants give far better flowering displays and grow stronger than cutting grown plants once established.
Select the Boronia that grow in your district as these will do best.
Propagation:
Seeds: Boronia rosmarinifolia seed may be difficult to come by as the plant is endangered and seed collection is strictly controlled. Seeds can be removed easily from the plants as they dry. Once Boronia rosmarinifolia has finished flowering and the fruits have swollen place an old sheet below the plants and keep a close eye on it. Peg it down so it doesn’t blow around. Alternately place brown paper bags over the cocci as they begin to ripen. When the seeds start to disperse, it can be all over in one day with the seeds being scattered on the ground. Clean the rubbish off and sieve the material for the seeds or place a smooth mat below the seed producing branches.
The following methods are based on other Boronia specie as I have not been in a position to grow Boronia rosmarinifolia from either seed or cutting.
Seeds need to be treated by rubbing between fine sandpaper. Another method is to drop them into hot water and allow it to cool. I have also laid the rubbish out at the time of collecting the seeds and burnt it with the seeds still amongst the rubbish. No one method has proven better than the other with all producing erratic results.
Sow freshly treated seeds directly into a seed raising mix and cover with 3mm of mix with 30mm perlite added. Water keep moist not wet and place in a semi shaded area. When the seedlings are 20mm to 25mm in height, prick them out and plant them into 50mm native tubes using a good organic mix.
As the seedlings roots reach the bottom of the tubes plant them out into their permanent position. Nip the growing shoots to help promote bushiness. Do not delay.
For mass plantings, space the seedlings at 1.5 meters to 2 meter centers.
Cuttings: While I am not a big supporter of taking cuttings from Boronia at times we have no choice when seed is not available. At least this Boronia is easier and responds better than most. Use 60mm to100mm long semi hardwood material, which is taken in late winter to mid spring immediately after flowering has finished and the last of the blooms have faded. The type of material is not important as they all strike fairly easily though side shoots with the heels removed are excellent. They are usually prepared from partially mature wood of the current season’s growth, just after a flush of growth. Boronia rosmarinifolia cuttings are normally made from late October or early November.
1 Prepare the cutting mix by adding one third sharp clean river sand, one third peat and one third perlite. These ingredients are sterile,
2 Select good material from non diseased plants,
3 Select semi green stems for cuttings. Look for a stem with two or three nodes,
4 Place the cutting on a flat, hard surface, and make a clean slice through the middle of the lower node on an angle towards the base, with a sterilized sharp knife or razor blade. – This scarification of the node will increase the chances of roots emerging from this spot. Now remove all but one or two the leaves, leaving the apex leaves in tact. If the leaves are very large in proportion to the stem, cut off the apical halves.
5 Some plants root easily, but a rooting hormone can help others by stimulating the cutting into sending out new roots. Fill a saucer with water, and place some rooting hormone into another container like a bottle top. Dip the node end of the cutting into the water and then into the rooting hormone. Tap off any excess hormone,
6 Use a small dipple stick or old pencil to poke a hole into the soilless potting mix. Ensure the hole is slightly larger than the stem diameter and be careful not to wipe the rooting hormone off the cuttings base, place the cuttings in a pattern ensuring the cuttings are not touching each other,
7 I like to place the pots in Plastic bags to help maintain temperature and moisture. Place in a semi shaded place like under 50mm shade cloth.
8 When the cuttings have struck, open the bag to allow air circulation for a few days to a week,
9 Once hardened off remove the cuttings from the bag and allow to further hardening for a few more days,
10 Transplant into a good potting mix to grow on.
Fertilize using Seaweed, fish emulsion or organic chicken pellets soaked in water on an alternate basis. Fertilize every two months until the plants are established then annually in early September to October to maintain health, vitality and better flowering.
Further Comments from Readers:
Hi reader, it seems you use The Bible of Botany a lot. That’s great as we have great pleasure in bringing it to you! It’s a little awkward for us to ask, but our first aim is to purchase land approximately 1,600 hectares to link several parcels of N.P. into one at The Pinnacles NSW Australia, but we need your help. We’re not salespeople. We’re amateur botanists who have dedicated over 30 years to saving the environment in a practical way. We depend on donations to reach our goal. If you donate just $5, the price of your coffee this Sunday, We can help to keep the planet alive in a real way and continue to bring you regular updates and features on Australian plants all in one Botanical Bible. Any support is greatly appreciated. Thank you.
In the spirit of reconciliation we acknowledge the Bundjalung, Gumbaynggirr and Yaegl and all aboriginal nations throughout Australia and their connections to land, sea and community. We pay our respect to their Elders past, present and future for the pleasures we have gained.
Crowdy Bay National Park Back Dunes NSW

Crowdy Bay National Park Back Dunes NSW
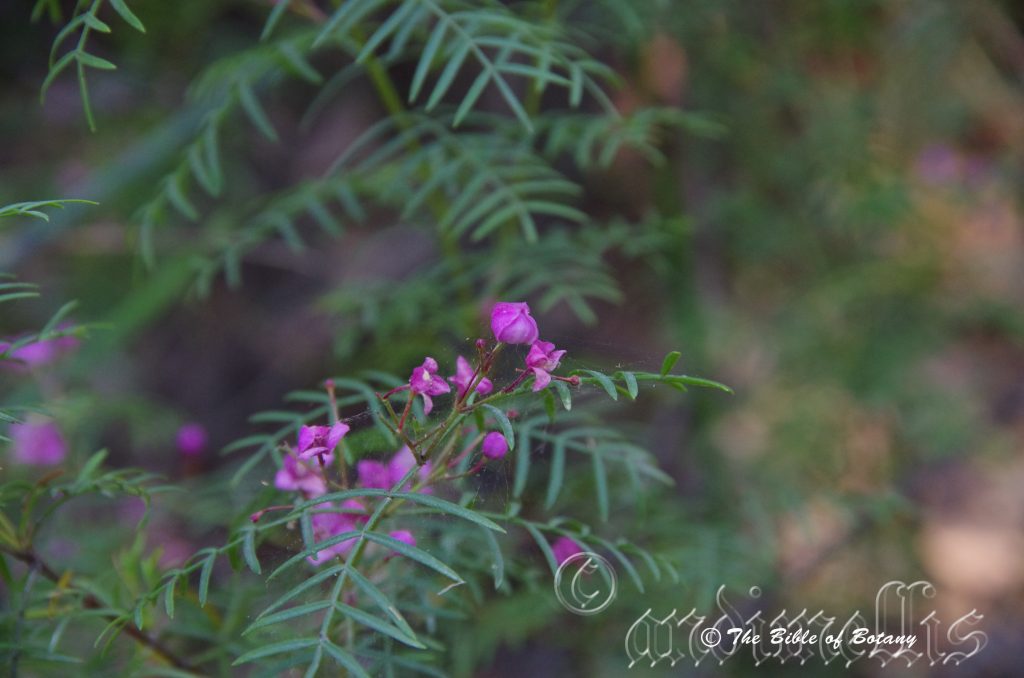
Crowdy Bay National Park Back Dunes NSW

Crowdy Bay National Park Back Dunes NSW
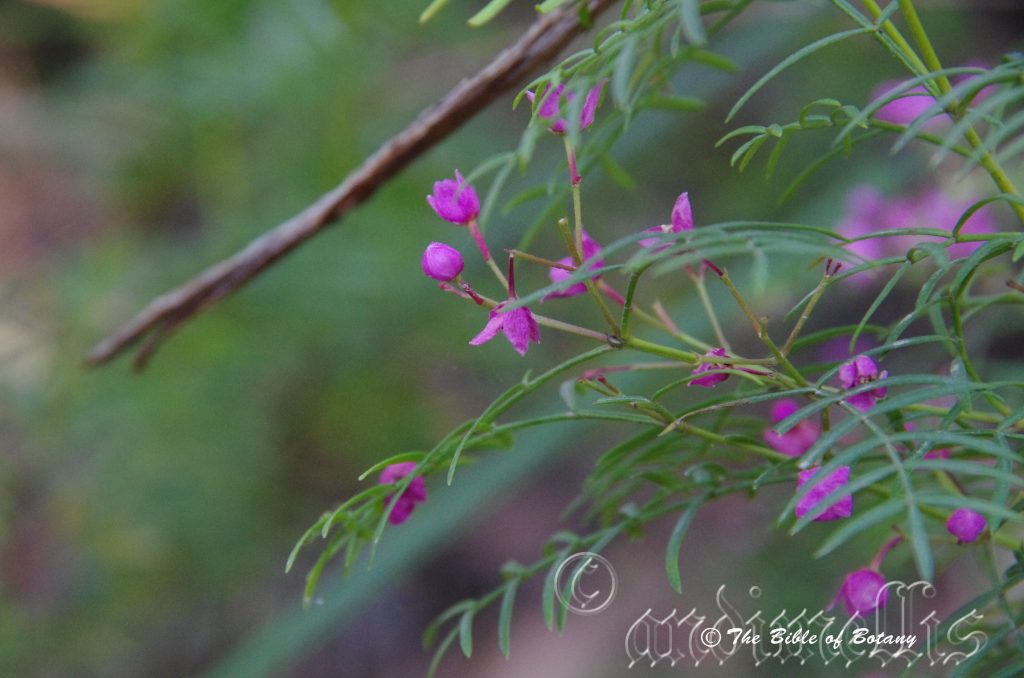
Crowdy Bay National Park Back Dunes NSW
Boronia safrolifera
Classification:
Class: Rosids
Order: Sapindales
Family: Rutaceae
Genus: Is named in honour of Francesco Borone; 1769-1794, who was an Italian botanical enthusiast.
Species: From Saffranum, which is Latin for a vegetable gold and Ferae/Fererum, which is Latin for to bear or bearing. It refers to flowers, which are brilliant purple with a tinge of gold or the juice of flowers which is golden-yellow in colour.
Common Name: Swamp Boronia.
Distribution:
Boronia safrolifera is found south from Caboolture in southern Queensland to Myall Lakes National Park in New South Wales. It is found on the coastal plains behind the frontal dunes.
https://avh.ala.org.au/occurrences/search?taxa=Boronia+safrolifera#tab_mapView
Habitat Aspect Climate:
Boronia safrolifera prefers full sun to light dappled shade. It usually grows in dry open woodlands, shrubby heaths or wallum heaths. The altitude ranges from 5 meters ASL to 600 meters ASL.
The temperatures range from minus 2 degrees in July to 37 degrees in January.
The rainfall ranges from lows of 800mm to 1900mm average per annum.
Soil Requirements:
Boronia safrolifera prefers fine sands, sandy loams to light fatty clays. The soils are derived from decomposed sandstones or accumulated sands. The soils pH ranges from 4.5pH to 6pH. It tolerates short seasonal water logged soils and short seasonal high water tables. None saline soils to moderately saline soils are tolerated.
Height & Spread:
Wild Plants: 0.5m to 2m by 0.8m to 2m
Characteristics:
Boronia safrolifera grows as a small dense shrub with pale brown to reddish-brown stems. The stems are glabrous to sparsely covered in rusty hirtellous hairs. The young and juvenile stems are pale green-brown to grass-green and sparsely to moderately covered in hirtellous hairs and fawn to pale green-brown farinaceous warts.
The leaves of Boronia safrolifera are odd pinnate with 7 to 19 leaflets. The terminal leaflet is the shortest. The narrow elliptical to elliptical or narrow oblong leaflets measure 3mm to 15mm in length by 1mm to 3mm in width. The leaf bases are cuneate while the apexes are broad acute to obtuse with a mucronate tip. The discolourous upper laminas are mid blue-green to deep green, glossy and glabrous to sparsely covered in pale grey hirtellous hairs on the upper laminas while the lower laminas are paler. The lamina margins are entire or sparsely covered in very fine teeth. They are flat to recurve. The winged petioles and rachises are glabrous. The midvein is slightly prominent on the lower lamina and is faintly visible from the upper lamina. The petioles measures 3mm to 10mm in length while the rachises measure 9mm to 30mm in length. The individual leaflets are sessile.
The inflorescences of Boronia safrolifera are small clusters born from the leaf axils or terminals. There are 3 to 6 individual flowers in a cluster. The 4 triangular sepals are grass-green, glabrous and measure 1.6mm to 2mm in length. The 4 deep bright, deep pink or rarely pale pink, orbicular petals are imbricate and glabrous while the margins are covered in white ciliate hairs. The petals measure 5mm to 7mm in diameter. The pedicels measure 4mm to 12mm in length.
The 8 purple-pink filaments at times turn pale green near the anthers are covered in long white tomentose hairs near the base and sparsely covered in long white tomentose hairs near the anthers. The slightly recurved filaments measure 1.8mm to 2mm in length while the pale yellow to deep yellow or orange anthers measure 0.6mm in diameter.
The deep maroon-red, glossy ovary is glabrous. The maroon-red style and stigma measure 1.8mm to 2mm in length. The flowers occur from August to November.
The fruit of Boronia safrolifera are swollen cocci surrounded by the dried pale dull faded sepals. The cocci are glabrous.
Wildlife:
Boronia safrolifera’s wildlife is unknown to the author.
Cultivation:
Boronia safrolifera make magnificent garden subjects. Boronia safrolifera will grow from 1 meter to 1.5 meters tall by 1 meter to 2 meters in diameter in the garden when grown in the open. Tip pruning ensures bushier plants which produce more spectacular flowering displays. This is a beautiful Boronia which is best grown and transplanted from tubes rather than advanced plants in larger pots.
It is much sought after because of the magnificent flowers in late winter to mid spring.
It is a great feature plant amongst rockeries, beneath trees, on banks and in particular, when planted in mass displays for their flowers throughout the bush where they flourish in dappled light.
Boronia safrolifera would make a good contribution to a wet heath garden on sandy soils. It can be used as the taller growing plant scattered throughout the heath scene. Use a lot of procumbent plants like Carpobrotus edulis, Hibbertia vestita or Hibbertia accuminata. Mix it with other smaller shrubs so none of them dominate the scene but blend in to give a mosaic of foliage colours that you oversee. Actinotis helianthi or Grevillea thelemanniana are two more natives with great contrasting foliage.
Ensure that the whole plant or at least most of it is on display from most sections of the garden as the flowers are a real bonus.
When it is in flower this plant will catch your attention and the viewer will be transfixed on the display rather than watching the path. Plant it at 1.2 meter to 1.5 meter centres for a mass display or 1 meter to 1.2 meters for scattered plantings in a heath garden.
Boronia species in general are difficult to grow under cultivated conditions. It is difficult enough to maintain when growing naturally on your block. Some useful hints are.
Beware of what you buy at a nursery. You are better buying small seed grown plants that have never flowered before. Why? Because, when Boronia are cutting grown they have a weaker root system. The roots may look big and strong however they rarely develop good adventitious roots. Adventitious roots are the small hair like roots that absorb water and nutrient. It is these roots that will eventually lead to the decline or health of the plant over successive seasons.
If seed plants are unobtainable or a specific colour or leaf form is required then cutting grown plants must be used to ensure the type wanted.
Select the place you want the plants to grow in and pre-prepare it. Buy a few small plants and plant them close enough to give a display but far enough apart to be observed when half grown.
Boronia safrolifera like all Boronia are not easy to grow from seed so a good supply can be difficult to maintain in the garden from seedlings.
Seed grown plants give far better flowering displays and grow stronger than cutting grown plants once established.
Select the Boronia that grow in your district as these will do best.
Propagation:
Seeds: Boronia safrolifera’s seed may be difficult to come by as the plant is endangered and seed collection is strictly controlled. Seeds can be removed easily from the plants as they dry. Once Boronia safrolifera has finished flowering and the fruits have swollen place an old sheet below the plants and keep a close eye on it. Peg it down so it doesn’t blow around. Alternately place brown paper bags over the cocci as they begin to ripen. When the seeds start to disperse, it can be all over in one day with the seeds being scattered on the ground. Clean the rubbish off and sieve the material for the seeds or place a smooth mat below the seed producing branches.
The following methods are based on other Boronia specie as I have not been in a position to grow Boronia safrolifera from either seed or cutting.
Seeds need to be treated by rubbing between fine sandpaper. Another method is to drop them into hot water and allow it to cool. I have also laid the rubbish out at the time of collecting the seeds and burnt it with the seeds still amongst the rubbish. No one method has proven better than the other with all producing erratic results.
Sow freshly treated seeds directly into a seed raising mix, keeping them moist not wet. When the seedlings are 20mm to 25mm in height, prick them out and plant them into 50mm native tubes using a good organic mix.
As the seedlings roots reach the bottom of the tubes plant them out into their permanent position. Nip the growing shoots to help promote bushiness. Do not delay.
For mass plantings, space the seedlings at 1.5 meters to 2 meter centres.
Cuttings: While I am not a big supporter of taking cuttings from Boronia at times we have no choice when seed is not available. Use 60mm to 100mm long semi hardwood material, which is taken in late winter to mid spring immediately after flowering has finished and the last of the blooms have faded. The type of material is not important as they all strike fairly easily though side shoots with the heels removed are excellent. They are usually prepared from partially mature wood of the current season’s growth, just after a flush of growth. Boronia safrolifera cuttings are normally made from late September to late October.
1 Prepare the cutting mix by adding one third sharp clean river sand, one third peat and one third perlite. These ingredients are sterile,
2 Select good material from non diseased plants,
3 Select semi green stems for cuttings. Look for a stem with two or three nodes,
4 Place the cutting on a flat, hard surface, and make a clean slice through the middle of the lower node on an angle towards the base, with a sterilized sharp knife or razor blade or take a 10mm slice off one side at the base. – This scarification of the node will increase the chances of roots emerging from this spot. Now remove all but one or two the leaves, leaving the apex leaves in tact. If the leaves are very large in proportion to the stem, cut off the apical halves.
5 Some plants root easily, but a rooting hormone can help others by stimulating the cutting into sending out new roots. Fill a saucer with water, and place some rooting hormone into another container like a bottle top. Dip the node end of the cutting into the water and then into the rooting hormone. Tap off any excess hormone,
6 Use a small dipple stick or old pencil to poke a hole into the soilless potting mix. Ensure the hole is slightly larger than the stem diameter and be careful not to wipe the rooting hormone off the cuttings base, place the cuttings in a pattern ensuring the cuttings are not touching each other,
7 I like to place the pots in Plastic bags to help maintain temperature and moisture. Place in a semi shaded place like under 50mm shade cloth.
8 When the cuttings have struck, open the bag to allow air circulation for a few days to a week,
9 Once hardened off remove the cuttings from the bag and allow to further hardening for a few more days,
10 Transplant into a good potting mix to grow on.
Fertilize using Seaweed, fish emulsion or organic chicken pellets soaked in water on an alternate basis. Fertilize every two months until the plants are established then annually in early September to October to maintain health, vitality and better flowering.
Further Comments from Readers:
Hi reader, it seems you use The Bible of Botany a lot. That’s great as we have great pleasure in bringing it to you! It’s a little awkward for us to ask, but our first aim is to purchase land approximately 1,600 hectares to link several parcels of N.P. into one at The Pinnacles NSW Australia, but we need your help. We’re not salespeople. We’re amateur botanists who have dedicated over 30 years to saving the environment in a practical way. We depend on donations to reach our goal. If you donate just $5, the price of your coffee this Sunday, We can help to keep the planet alive in a real way and continue to bring you regular updates and features on Australian plants all in one Botanical Bible. Any support is greatly appreciated. Thank you.
In the spirit of reconciliation we acknowledge the Bundjalung, Gumbaynggirr and Yaegl and all aboriginal nations throughout Australia and their connections to land, sea and community. We pay our respect to their Elders past, present and future for the pleasures we have gained.

Coffs Harbour NSW
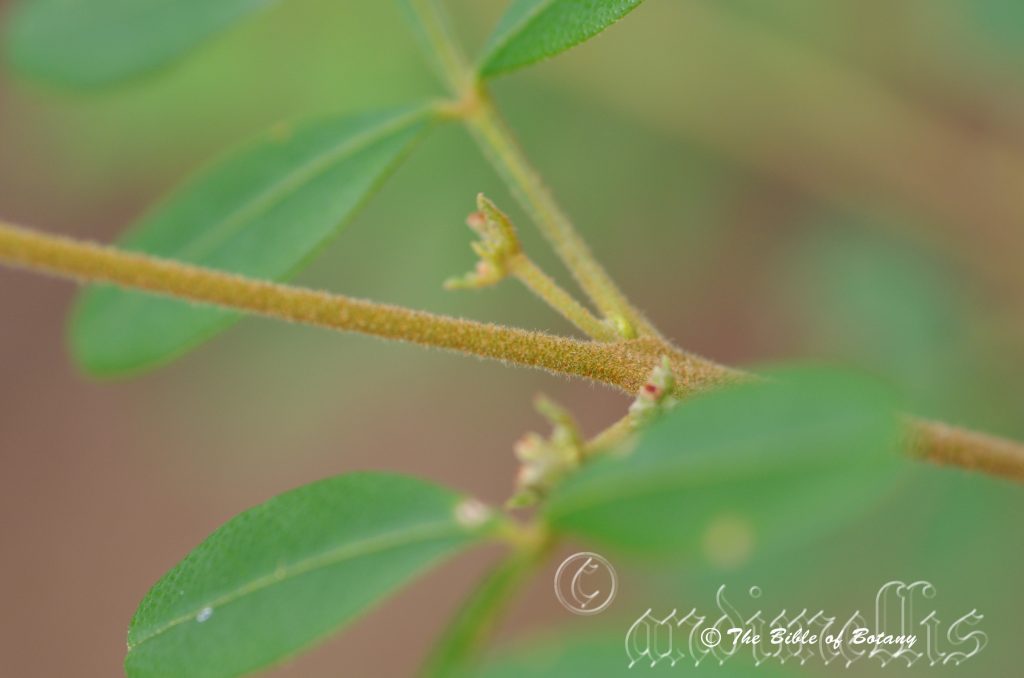
Nana Glen NSW

Nana Glen NSW
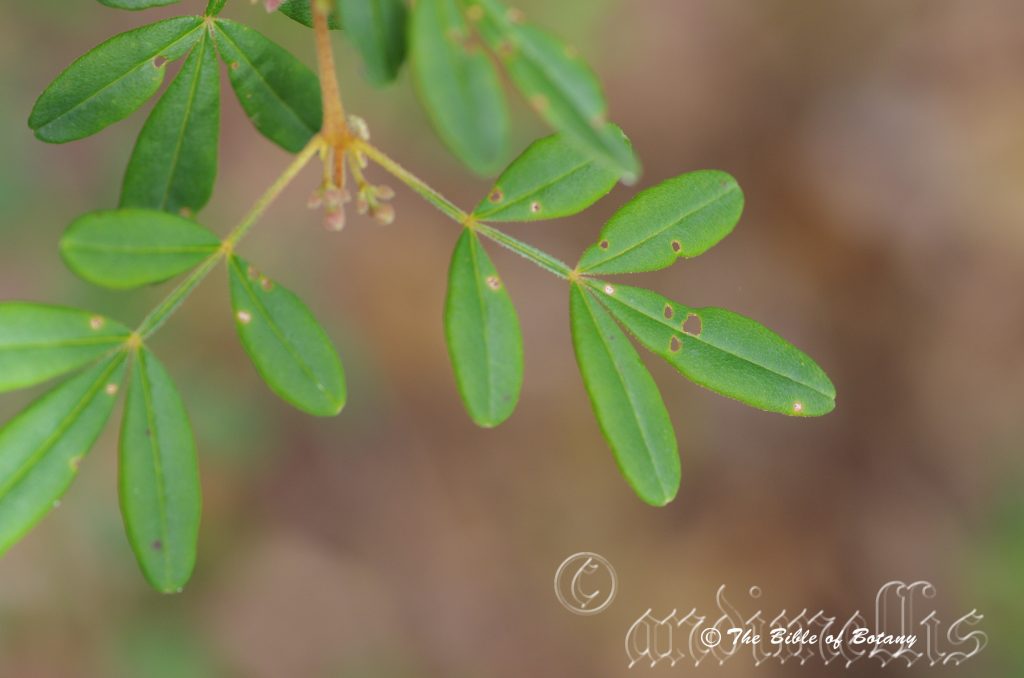
Nana Glen NSW
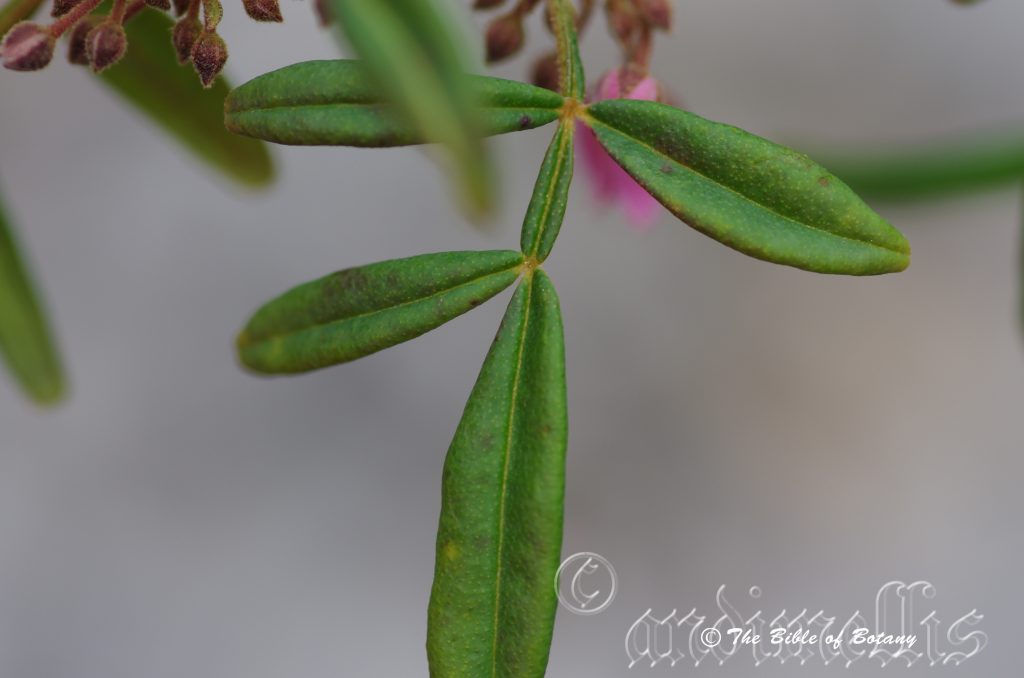
Nana Glen NSW

Nana Glen NSW

Coramba NSW
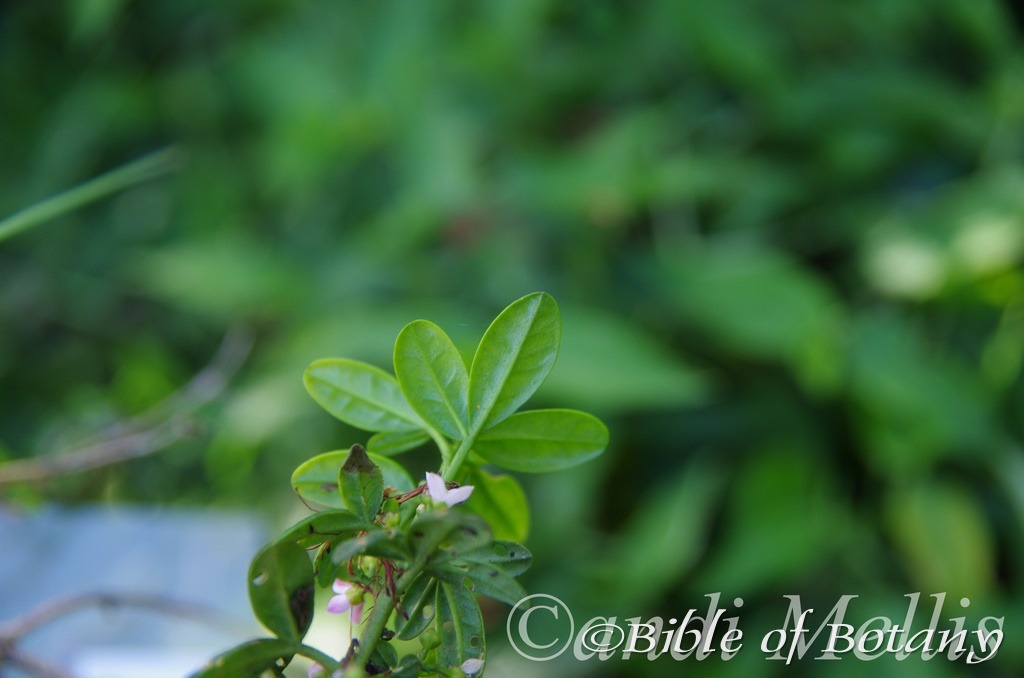
Coramba NSW

Nana Glen NSW

Nana Glen NSW

Nana Glen NSW

Nana Glen NSW
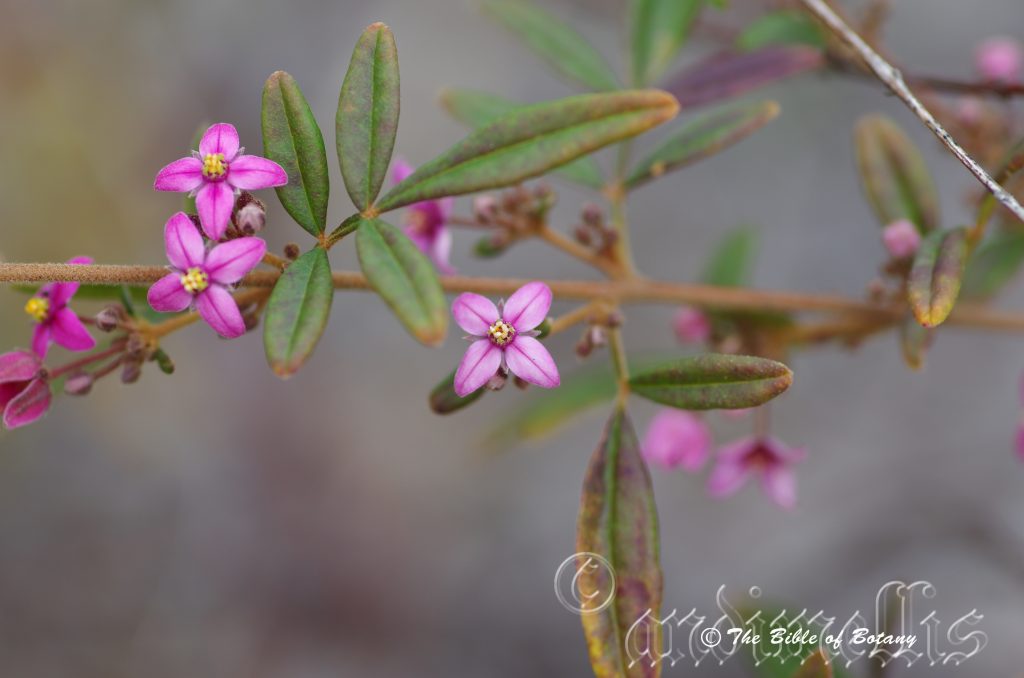
Nana Glen NSW
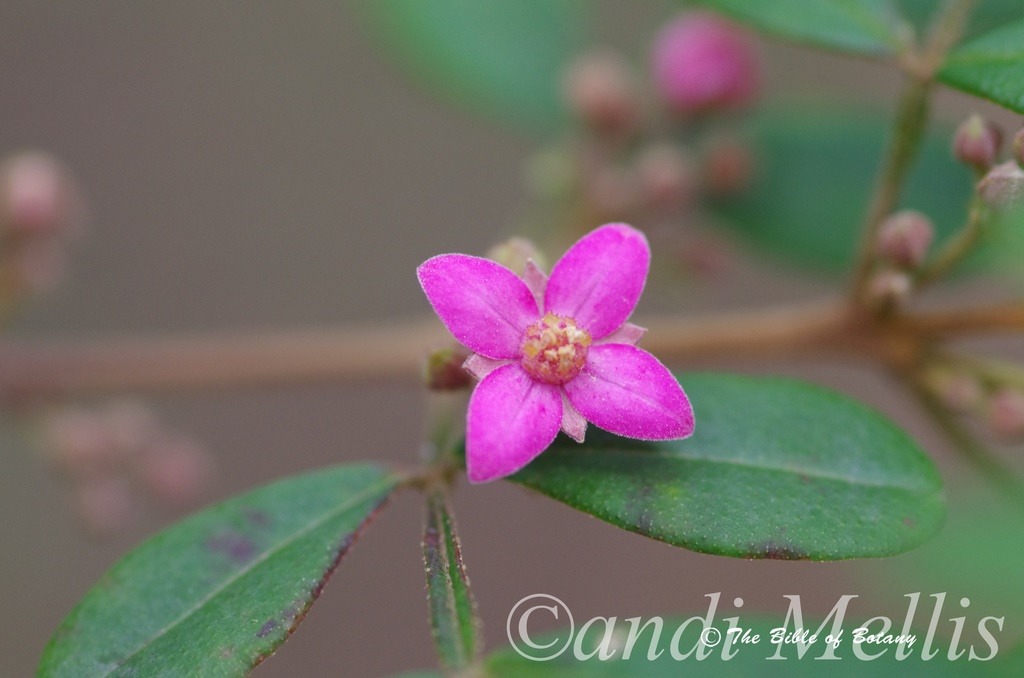
Nana Glen NSW
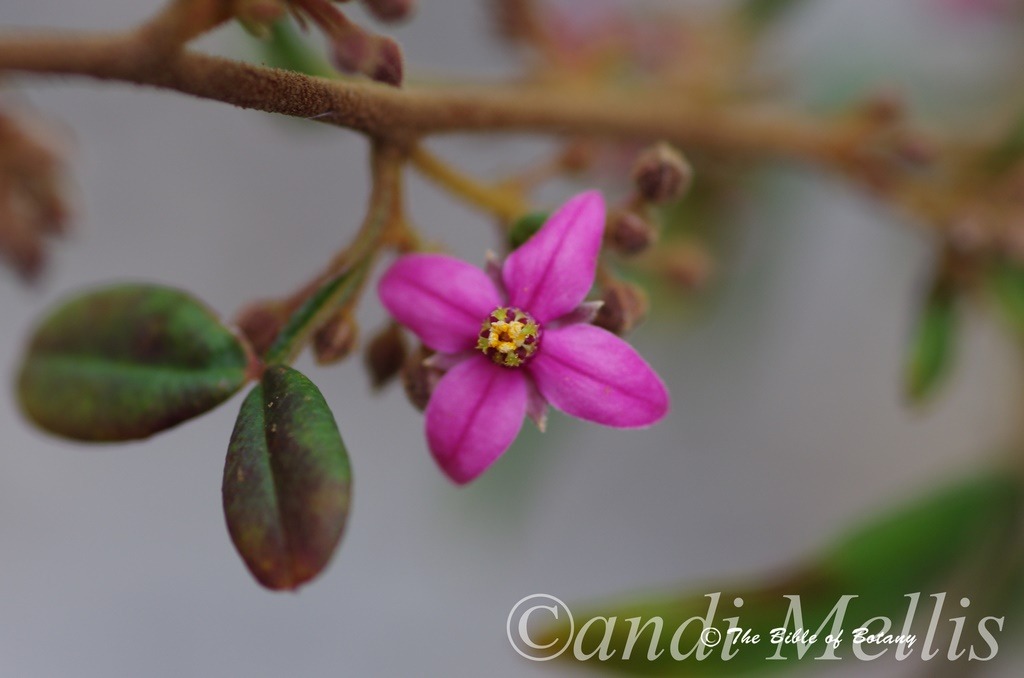
Nana Glen NSW

Nana Glen NSW
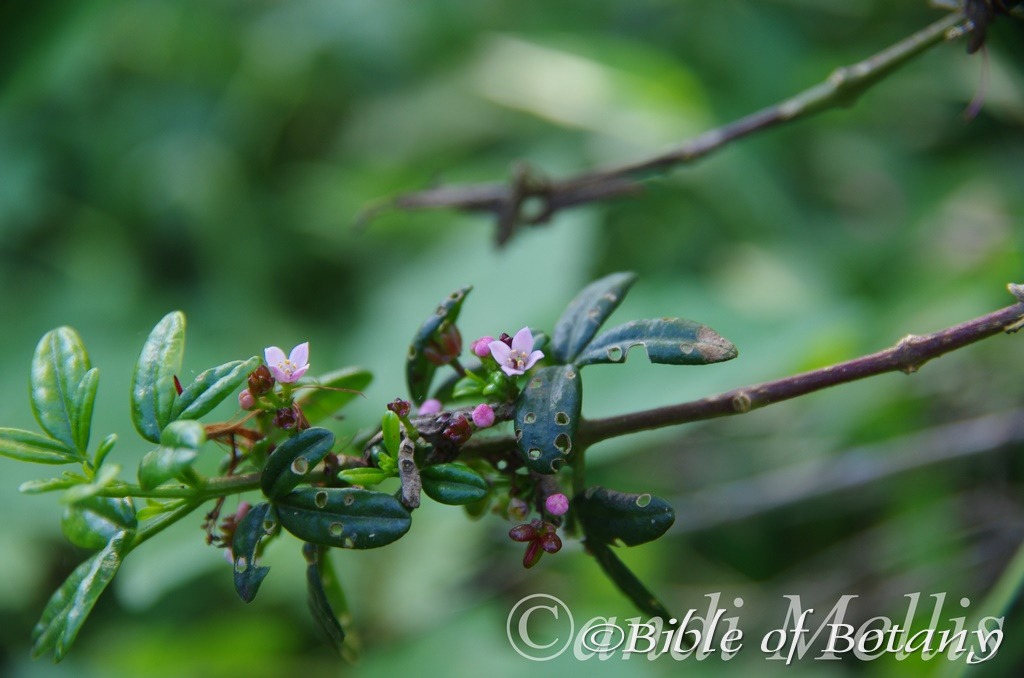
Coramba NSW
Boronia umbellata
Classification:
Class: Rosids
Order: Sapindales
Family: Rutaceae
Genus: Is named in honour of Francesco Borone; 1769-1794, who was an Italian botanical enthusiast.
Species: From Umbella/Umbra, which is Latin for a parasol or umbrella. It refers to floral clusters of flowers, in which all the petioles branch from the same level on the stalk axis and terminate at the same level in loose umbels.
Common Name: Andi’s Boronia or Orara Boronia.
Distribution:
Boronia umbellata is restricted to a small area west of Coffs Harbour in Nana Glen on the Orara River with a second larger population on private property near Bucca Bucca Creek. This Boronia grew naturally on our block at Nana Glen and we were ecstatic to see it multiply from just 27 plants in 1990 to over 140 individual plants when we sold the property in 2007. I am pleased to say the present owners understand just how rare Boronia umbellata is and are carrying on the job of protecting and nurturing the area it is growing in. There are estimated to be around 300 plants in the wild.
https://avh.ala.org.au/occurrences/search?taxa=Boronia+umbellata#tab_mapView
Habitat Aspect Climate:
Boronia umbellata grows in dappled light as an understory plant in moist open Eucalyptus forests. The altitude ranges from 70 meters ASL to 130 meters ASL.
The temperatures range from minus 4 degrees in early August to 32 degrees in January. The plants are frost tolerant and had no noticeable burning when temperatures had reached minus 8 in the open adjacent to where the plants grew naturally.
The rainfall ranges from a low of 880mm to an average of 1350mm annually.
Soil Requirements:
Boronia umbellata prefers better quality sandy loams to gritty medium clays or lighter alluvials. The soils are derived from decomposed brown basalt mixed with decomposed sandy shale and sandstone. The pH. of the soils range from 5pH to 5.5pH with a sub soil as low as 4pH due to high aluminium levels. The forest floor is covered in Eucalyptus leaf litter with sparse native grasses present mainly Themeda triandra. It does not tolerate water logged soils however some plants experienced flooding during the wet season as the unnamed creek floods the surrounding flats where they grow for short periods in very wet seasons. Very few deaths occurred as a result of the worst floods where plants were inundated for a short period. The few plants that succumbed to the flood were all young plants less than a few years old. Non saline soils to slightly or may be to moderately saline soils are tolerated.
Our property experiences patches of high boron and salt which caused difficulties in growing organic mandarins and lemons in the early years before the problems improved with organic growing practices. The areas involved had salt ranging from 200 parts to 800 parts per million. Citrus on the available root stocks in Australia normally find reduced growth levels when the salt rises above 400 parts per million (Slight). It must be noted that the high salt, high boron soils were detected outside the forested area on the flats. The area within the forest was never tested for salt or boron at depths.
Height & Spread:
Wild Plants:1m to 3m by 1m to 2.5m.
Characteristics:
Boronia umbellata grows as a strikingly beautiful medium shrub with grey-brown, dull, glabrous stems. The young and juvenile stems are pale soft grey-green and densely covered in white, pale grey and or rusty-brown stellate and short white tomentose hairs.
The opposite, odd pinnate leaflets of Boronia umbellata are elliptical to broad oblong. There are 3 or 5 leaflets with the terminal leaflet being the longest. The leaflets measure 17mm to 44mm in length and 8mm to 13mm in width. The pale grey-green petioles and rachises are densely covered in short, white, pale grey and or rusty-brown stellate and tomentose hairs. The petioles measure 8mm to 20mm in length while the rachises measure 10mm to 20mm in length. The petioles and rachises have a 1mm to 2mm flat wing extension along either side. The bases are cuneate while the apexes are obtuse to broadly acute. The discolourous laminas are pale grey-green to a soft pale green, dull, sparsely covered in short, white, pale grey and or rusty-brown stellate hairs on the upper laminas while the lower laminas are paler and very densely covered in pale grey tomentose hairs. The laminas decurve downwards close to the margins, while the margins are entire. The mid vein is prominent on the lower lamina and is distinctly visible from the upper lamina. The lateral veins are not visible on either lamina.
The inflorescence of Boronia umbellata is a loose auxiliary umbel of 2 to 6 individual flowers. The pedicels measure 6mm to 20mm in length. The 4 elliptical, pale grey-green sepals have an acute apex and are densely covered in short white, pale grey and or rusty-brown tomentose hairs externally and are glabrous internally. The sepals measure 2.1mm to 3.5mm in length by 0.6mm to 1.2mm in width. The 4 elliptical to ovate-elliptical, pale pink to deep, bright pink petals fade as they age. They have a longitudinal ridge on the lower surface and a furrow on the upper surface and are recurved at the apex. The valvate petals are sparsely covered in short white tomentose hairs externally and are glabrous internally. The petals measure 7mm to 10mm in length by 4mm to 5.5mm in width.
The 8 deep pink, sterile stamens nearest the sepals have pale green anthers with white uncinate hairs and alternate one large and one small. The fertile anthers measure 2mm to 2.5mm in length. The anthers are bright yellow and measure 0.7 to 0.8 in length by 0.9mm to 1.2mm in width.
The 4 chamber ovary is deep pink to carmine-pink and glabrous. The deep pink to carmine-pink pistil measures 2.4mm to 2.8mm in length. The flowers appear from late August to early November.
Boronia umbellata’s fruits are a swollen cocci surrounded by the faded pale pink dried petals. The seeds are deep brown to black and glabrous.
Wildlife:
Boronia umbellata is a host for the citrus swallowtail butterfly, Papilio aegeus, though very little damage is done. In later years the plants never hosted the butterfly which may indicate that the butterfly preferred citrus trees or the larger number of plants spread the butterflies more thinly and we did not notice its presence. No detailed surveys were carried out.
Cultivation:
Boronia umbellata makes a good garden subject if it can be obtained. Boronia umbellata will grow from 1.5 meters to 2.5 meters tall by 1 meter to 2 meters in diameter in the garden but must be lightly tipped pruned to maintain a bushier plant. Bushier plants produce more spectacular flowering displays. This beautiful Boronia was easier to grow and maintain than most Boronia species. It is more reliable when grown on as advanced plants in the garden.
It is a great feature plant amongst larger bushland rockeries, beneath tall open Eucalyptus forests. On banks and in particular, when planted in mass displays for its flowers on very flat terrain. This Boronia species, because of its size, proliferation of flowers could probably be grown in subtropical zones as far north as Rockhampton to cool temperate zones as far south as Hobart. It is frost tolerant inside the forest area, where temperatures were down to minus 6 degrees in the open and is relatively drought resistant.
It would be at its best when used adjacent to small areas of bush close to paths or the house so its mid to deep pink flowers can be viewed regularly. It is great on very flat heavier alluvial soils. It can be planted in small groups of 2 or 3 or as a standalone plant scattered throughout the garden to create a natural bush setting. If it is surrounded by shorter plants with larger foliage and deep red or white flowers it will dominate at the center giving an expansive look to the bed especially when it is in flower.
This is one Boronia species that benefits highly from being mass planted or planted in scattered clumps. Its medium size enables this to be achieved even in small and medium size gardens. It can be regularly tipped pruned if smaller plants are required in the foreground. It responds well to pruning recovering quickly and often increasing the number of flowers in the following season.
Six or more planted back from a bend will become a very strong focal point when in flower, gain a lot of attention whether you are coming or going because of the fresh clean look of the foliage even in the driest of times. Place it in the mid ground with other large leaf ground covers or very small shrubs. To the rear, use large leaf taller plants. Plants with white, or pale purple flowers can be used in both the midground and background. This will lead the viewer’s eyes directly to the pink flowers for a longer period.
Ensure that the most of the plant is on display from most sections of the garden as the flowers are a real bonus.
When it is in flower this plant will catch your attention and the viewer will be transfixed on the display rather than watching the path. Plant it at 1 meter to 2 meter centers for a mass display or 1.5 meter to 2 meters for scattered plantings beneath Eucalyptus trees like Eucalyptus carnea, Eucalyptus pilularis, Eucalyptus propinqua, Eucalyptus pyrocarpa or Eucalyptus resinifera forest garden. Thess Eucalyptus species are all part of the habitat where Boronia umbellata grows.
Boronia species in general are difficult to grow under cultivated conditions. Boronia umbellata is an exception to the rule. Because of its rarity, I undertook a programme of reestablishing the few plants on our block at Nana Glen to a well established area. I was able to transplant hundreds of plants from existing wild plants and redistribute them around the block where clumps grew close together. Seed was also easier to collect and more reliable than any other Boronia I have dealt with and we had fewer casualties on transplanting seedlings into tubes and on the block.
Boronia umbellata is at further risk from poaching road widening and maintenance of roads, timber harvesting activities and inappropriate fire regimes.
Some useful hints are.
Beware of what you buy at a nursery. You are better buying small seed grown plants that have never flowered before. Why? Because, when Boronia are cutting grown they have a weaker root system. The roots may look big and strong however they rarely develop good adventitious roots. Adventitious roots are the small hair like roots that absorb water and nutrient. It is these roots that will eventually lead to the decline or health of the plant over successive seasons.
If seed plants are unobtainable or a specific colour or leaf form is required then cutting grown plants must be used to ensure the type wanted.
Select the place you want the plants to grow in and pre-prepare it. Buy a few small plants and plant them close enough to give a display but far enough apart to be observed when half grown.
Boronia umbellata is probably the easiest of all the Boronia to grow from seed but a good supply can be difficult to maintain even in garden plants growing within their natural habitat.
Seed grown plants give far better flowering displays and grow stronger than cutting grown plants once established.
Select the Boronia that grow in your district as these will do best.
Propagation:
Seeds: The seeds of Boronia umbellata can be removed easily from the plants as they dry. Once Boronia umbellata has finished flowering and the fruits have swollen place an old sheet below the plants and keep a close eye on it. Peg it down so it doesn’t blow around. Once the seeds start to disperse, it can be all over in one day. Clean the rubbish off and sieve the material for the seeds.
Seeds need to be treated by rubbing between fine sandpaper. Another method is to drop them into hot water and allow it to cool. I have also laid the rubbish out at the time of collecting and burnt it with the seeds still amongst the rubbish. No one method has proven better than the other.
Sow treated seeds directly into a seed raising mix, keeping them moist not wet. When the seedlings are 20mm to 25mm tall, prick them out and plant them into 50mm native tubes using a good organic mix.
As the seedlings roots reach the bottom of the tubes plant them out into their permanent position. Do not delay.
For mass plantings space the seedlings at 1.5 meters to 2 meter centers.
Fertilize using Seaweed, fish emulsion or organic chicken pellets soaked in water on an alternate basis. Fertilize every two months until the plants are established then annually in early September to October to maintain health, vitality and better flowering.
Further Comments from Readers:
Hi reader, it seems you use The Bible of Botany a lot. That’s great as we have great pleasure in bringing it to you! It’s a little awkward for us to ask, but our first aim is to purchase land approximately 1,600 hectares to link several parcels of N.P. into one at The Pinnacles NSW Australia, but we need your help. We’re not salespeople. We’re amateur botanists who have dedicated over 30 years to saving the environment in a practical way. We depend on donations to reach our goal. If you donate just $5, the price of your coffee this Sunday, We can help to keep the planet alive in a real way and continue to bring you regular updates and features on Australian plants all in one Botanical Bible. Any support is greatly appreciated. Thank you.
In the spirit of reconciliation we acknowledge the Bundjalung, Gumbaynggirr and Yaegl and all aboriginal nations throughout Australia and their connections to land, sea and community. We pay our respect to their Elders past, present and future for the pleasures we have gained.
Coffs Harbour Botanic Gardens NSW
Coffs Harbour Botanic Gardens NSW
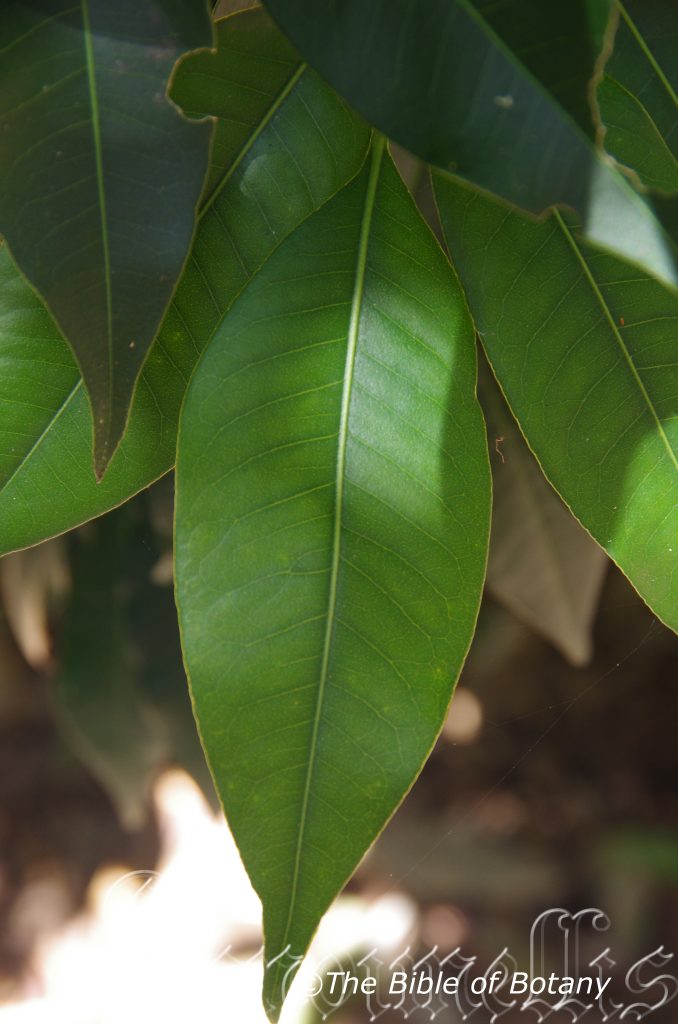
Coffs Harbour Botanic Gardens NSW
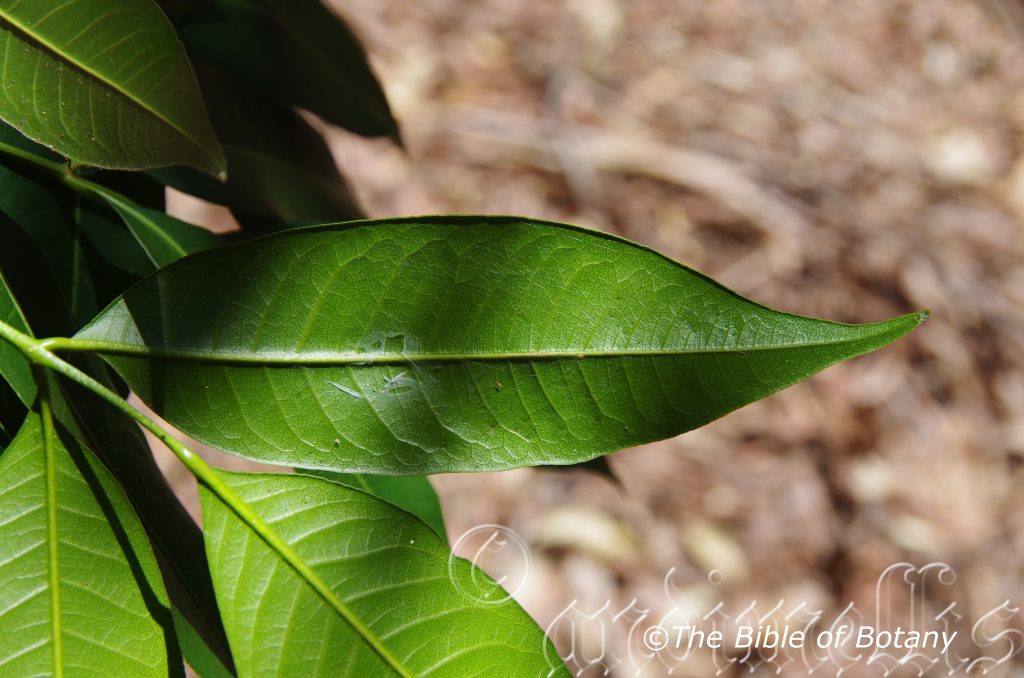
Coffs Harbour Botanic Gardens NSW
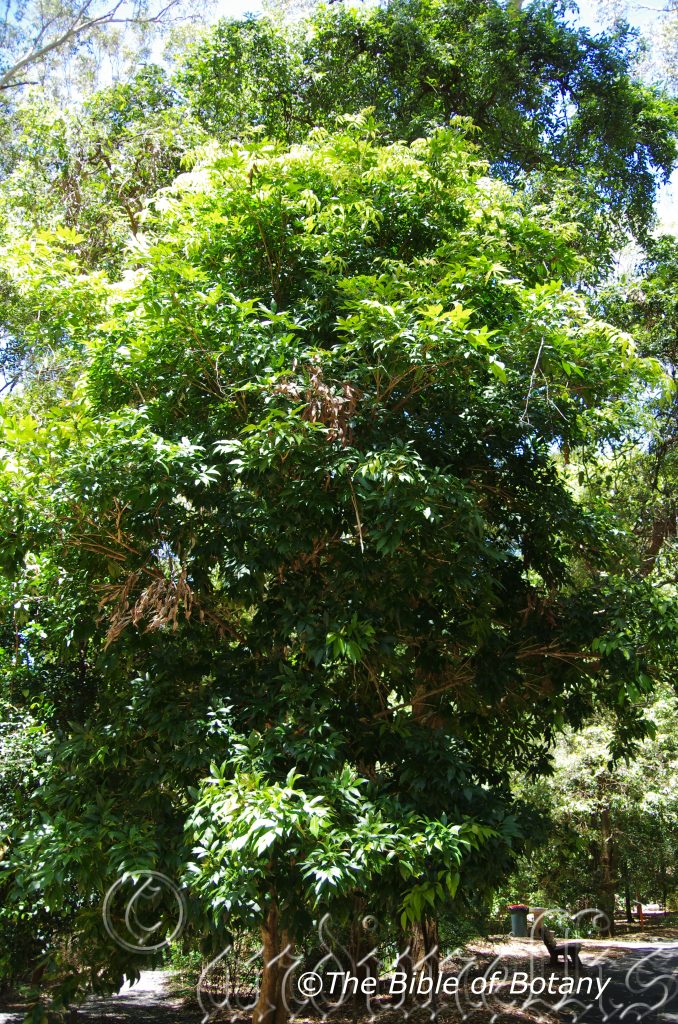
Coffs Harbour Botanic Gardens NSW
Bosistoa floydii
Classification:
Class: Rosids
Order: Sapindales
Family: Rutaceae
Genus: Bosistoa is named in honour of Bosistoa Joseph Bosisto; 1824-1898, who was a British born Australian pharmacists and pioneer in Australian essential oils.
Species: Is named in honour of a good friend of mine and everyone at the Friends of the North Coast Botanic Gardens, Alexander Geoffrey Floyd; April 1 1926 to December 2022, who was an exceptionally talented man on rainforest species of Australia and who gave his time freely to help all budding volunteers and young aspiring botanists. He has been recognized with two genre named after him along with six species.
Common Name: Fine Leaf Bosistoa.
Distribution:
Bosistoa floydii is restricted to the Bellinger River and the Orara River riparian zones.
https://avh.ala.org.au/occurrences/search?taxa=Bosistoa+floydii#tab_mapView
Habitat Aspect Climate:
Bosistoa floydii grows in dappled light as a small rain forest tree in riparian zones. The altitude ranges from 20 meters ASL to 200 meters ASL
The temperatures range from minus 2 degrees in early August to 32 degrees in January.
The rainfall ranges from a low of 780mm to an average of 1300mm annually.
Soil Requirements:
Bosistoa floydii prefers better quality alluvial deposits. The soils are derived from decomposed brown basalts. The soils pH. ranges from 5pH to 5.5pH. It does not tolerate water logged soils however some plants experience annual flooding during the wet season. Non saline soils to moderately saline soils are tolerated.
Height & Spread:
Wild Plants: 10m to 15m by 8m to 12m.
Characteristics:
Bosistoa floydii prefers to grow as a small tree with finely, longitudinally, furrowed, grey bark. The trunk is fluted to buttress in older trees. The young and juvenile stems are thick pale grass-green and glabrous or covered in cream lenticels.
The opposite, odd pinnate leaves of Bosistoa floydii have 3 to 7 leaflets and are arrow in outline. The petioles, rachises and petiolules are grass-green and glabrous. The petioles are channelled on the upper surface and round on the lower surface and measure 10mm to 18mm in length. The rachises measure 10mm to 22mm in length. The lateral petiolules measure 5mm to 10mm while the terminal petiolules measure 10mm to 25mm in length. The petioles and rachises have a 1mm to 2mm flat wing extension along either side. The leaflets are narrow-elliptic to oblong-elliptic and measure 65mm to 160mm in length by 15mm to 35mm in width. The asymmetrical bases are attenuate while the apexes are acuminate. The discolourous laminas are deep green to sea-green, semi glossy and glabrous on the upper laminas while the lower laminas are paler and dull. The laminas are flat and decurve slightly near the apexes and sparsely covered in prominent oil glands. The margins are entire. The mid vein and lateral veins are strongly prominent on the lower lamina and are distinctly visible from the upper lamina.
The inflorescences of Bosistoa floydii are loose panicles born from the terminals. The rachises, peduncles and pedicles are glabrous or sparsely covered in white hirsute hairs. The rachises measure 150mm to 200mm in length overall. The 5 white to cream sepals are glabrous with white ciliate hairs and measure 0.8mm to 1mm in length. The 5 white to cream, ovate petals measure 4mm to 5mm in length. The ovary is sparsely covered in white hirtellous hair.
The 4 elliptical to ovate-elliptical, deep, bright pink petals fade as they age. They have a longitudinal ridge on the lower surface and a furrow on the upper surface and are recurved at the apex. The valvate petals are sparsely covered in short white tomentose hairs on the outer surface, are glabrous on the inner surface and measure 7mm to 10mm in length by 4mm to 5.5mm in width.
The 8 white to cream stamens measure 1mm to 1.6mm in length. The anthers are bright yellow and measure 0.4mm in diameter.
The ovary is sparsely covered in white hirtellous hair. The flowers occur from October to November.
The fruits of Bosistoa floydii are oblique-ovoidal to elliptical cocci. The 2 green cocci per flower turn yellow-brown to tan and are transversely ribbed when ripe. The cocci measure 8mm to 11mmin width. The seeds are deep brown to black and glabrous.
Wildlife:
Bosistoa floydii’s wildlife is unknown to the author.
Cultivation:
It would make an excellent good fire retardant small tree.
* Fire retardant plants act as radiant heat screens and absorb more heat from an approaching fire without burning.
* Fire retardant trees are able reduce wind speed near a house or out buildings.
* Fire retardant also trap embers and sparks carried by the wind.
* Fire retardant ground covers are able to catch burning embers without catching fire themselves, and also slow the travel of a fire through debris and litter on the ground.
Bosistoa floydii would make a beautiful garden subject. It is a hardy small tree that can be grown as a single trunk tree in a small rainforest or a shrubby multi trunk tree or a wider spreading small park tree in parks and garden. Bosistoa floydii will grow from 10 meters to 12 meters tall by 3 meter to 6 meters in diameter in a rainforest garden or 8 meters to 10 meters in height by 6 meters to 8 meters in diameter when grown in the open.
It would be suitable for small to large gardens.
This tree would make a very good accent tree in front of low set homes commercial buildings, industrial sheds or school buildings where it will break up hard rigid architectural lines and give warmth and breadth to a building. It can be used as standalone tree or used in formal garden beds with annuals. Planted in a formal line out from buildings it can offer shade in the warm summer months and allow northerly sun rays to fall below the canopy in the winter when pruned to head height.
Try using it over a B-B-Q area for summer shade.
The tree is an excellent tree for hosting small to large epiphytic ferns and orchids.
Propagation:
Seeds: The seeds of Bosistoa floydii can be removed easily from the plants as they dry. Once Bosistoa floydii has finished flowering and the fruits have swollen usually in early to mid-February place an old sheet below the plants and keep a close eye on it. Peg it down so it doesn’t blow around. Clean the rubbish off and pick the seeds out.
Seeds do not need to be treated. Sow the seeds directly into a seed raising mix, keeping them moist not wet. Place the seed trays in a warm place with 30mm to 70mm shade. In frosty areas seed should be sown in the following spring. When the seedlings are 20mm to 25mm tall, prick them out and plant them into 50mm native tubes using a good organic mix.
As the seedlings roots reach the bottom of the tubes plant them out into their permanent position. Do not delay.
For mass plantings space the seedlings out at 5 meters to 7 meter centers.
Fertilize using Seaweed, fish emulsion or organic chicken pellets soaked in water on an alternate basis. Fertilize every two months until the plants are established then annually in early September to October to maintain health, vitality and better flowering.
Further Comments from Readers:
Hi reader, it seems you use The Bible of Botany a lot. That’s great as we have great pleasure in bringing it to you! It’s a little awkward for us to ask, but our first aim is to purchase land approximately 1,600 hectares to link several parcels of N.P. into one at The Pinnacles NSW Australia, but we need your help. We’re not salespeople. We’re amateur botanists who have dedicated over 30 years to saving the environment in a practical way. We depend on donations to reach our goal. If you donate just $5, the price of your coffee this Sunday, We can help to keep the planet alive in a real way and continue to bring you regular updates and features on Australian plants all in one Botanical Bible. Any support is greatly appreciated. Thank you.
In the spirit of reconciliation we acknowledge the Bundjalung, Gumbaynggirr and Yaegl and all aboriginal nations throughout Australia and their connections to land, sea and community. We pay our respect to their Elders past, present and future for the pleasures we have gained.
Bosistoa pentacocca
Classification:
Class: Rosids
Order: Sapindales
Family: Rutaceae
Genus: Is named in honour of Joseph Bostisto; 1827-1898, who was a British born Australian pharmaceutical manufacturer of essential oils and early colonial politician in Victoria. It refers to the Eucalyptus oil industry coming from Joseph Bosisto.
Species: From Penta, which is Ancient Greek for five and kokkos, which is Ancient Greek for a dry berry. It refers to fruits, which have compartments.
Common Name: Native Almond.
Distribution:
Bosistoa pentacocca is found south from Bowen in northern coastal Queensland to the Clarence River in northern New South Wales in several disjunct populations.
https://avh.ala.org.au/occurrences/search?taxa=Bosistoa+pentacocca#tab_mapView
Habitat Aspect Climate:
Bosistoa pentacocca grows in full sun to dappled light as a small tree in riparian zones of streams and creeks in well-developed rain tropical forests, subtropical rainforests and gallery forests associated with rain forest species.
The altitude ranges from 15 meters ASL to 650 meters ASL.
The temperatures range from minus 2 degrees in early August to 36 degrees in January.
The rainfalls range from lows of 800mm to an average of 1600mm annually.
Soil Requirements:
Bosistoa pentacocca prefers better quality light clay soils to medium gritty clay soils. The soils are derived from decomposed brown basalt or black basalts. The soils have a pH which ranges from 5.5pH to 6.5pH. The forest floor is covered in leaf litter. It does not tolerate water logged soils however it may experience some short term inundation during the wet season. Non saline soils to moderately saline soils are tolerated.
Height & Spread:
Wild Plants:10m to 18m by 6m to 10m.
Characteristics:
Bosistoa pentacocca grows as a small tree with deep grey to deep grey-brown bark. The larger branches are grey-brown to brown, dull and glabrous. The young and juvenile stems are olive-green to mid green and glabrous.
The opposite leaves of Bosistoa pentacocca are odd pinnate with 5 to 13 leaflets and measure 140mm to 450mm in length. The petiole, rachises and petiolules are glabrous. The petioles measure 30mm to 80mm in length while the rachises measure 100mm to 300mm in length. The lateral petioles measure 1mm to 8mm in length while the terminal petiolules measure 5mm to 25mm in length. The leaflets are elliptical-oblong to oblanceolate and measure 90mm to 270mm in length and 15mm to 70mm in width. The base is cuneate to round while the apex is acuminate. The discolourous laminas are deep grass-green to sea-green and glabrous on the upper laminas while the lower laminas are much paler. The laminas are flat or recurve slightly upwards from the mid vein to the margins and are undulating near the margins. The margins are bluntly toothed. The mid vein and lateral veins are prominent on both laminas but more pronounced on the lower laminas. Oil glands are very distinct on the laminas. The new growth is pale tan to deep tan and glossy.
The inflorescences of Bosistoa pentacocca are panicles of 200 or more individual flowers. The terminal panicles measure 150mm to 200mm in length. The rachises, peduncles and pedicels are densely covered in white pulverulent hairs. The 5 elliptical, white sepals are glabrous and measure 1mm to 1.2mm in length by 0.6mm to 1.2mm in width. The 5 elliptical to ovate-elliptical white petals measure 4mm to 4.8mm in length by 2.4mm to 3.2mm in width. The valvate petals are glabrous, divaricate and become strongly decurve after anthesis.
The 10 white filaments measure 4mm to 4.8mm in length by 0.9mm to 1.1mm in width at the base and taper to the apex. The dorsifixed anthers are pastel khaki to pale khaki and measure 1mm to 1.4mm in length by 0.8mm to 1mm in width.
The dome shaped ovary is pascal green with a reddish ring around the base is densely covered in white canescent hairs. The pascal green pistil measures 1.2mm to 1.6mm in length. The flowers occur from mid-January to late February.
The fruits of Bosistoa pentacocca are 5 lobed globose cocci. The faintly transversely ribbed cocci are densely covered in fine white canescent hairs and measure 15mm to 25mm in diameter.
Wildlife:
Bosistoa pentacocca common name is a real misconception as the fruits while they may look similar to the exotic almond are poisonous.
Cultivation:
It would make an excellent good fire retardant medium tree.
* Fire retardant plants act as radiant heat screens and absorb more heat from an approaching fire without burning.
* Fire retardant trees are able reduce wind speed near a house or out buildings.
* Fire retardant also trap embers and sparks carried by the wind.
* Fire retardant ground covers are able to catch burning embers without catching fire themselves, and also slow the travel of a fire through debris and litter on the ground.
Bosistoa pentacocca makes a beautiful garden subject for small to large gardens. It will grow from 10 meters to 15 meters in height by 6 meters to 8 meters in diameter in the garden when grown in the open. This is a beautiful upright small tree.
This tree would make a very good accent trees in front of low set homes, commercial buildings, industrial sheds or school buildings where they will break up hard rigid architectural lines and give warmth and breadth to a building. It can be used as standalone plants or used in formal garden beds with annuals. Planted in a formal line out from buildings it can offer shade in the warm summer months and allow northerly sun rays to fall below the canopy in the winter when pruned to head height.
Try using it over a B-B-Q area for summer shade. For multi trunk trees prick the tip out of the seedlings as they are planted out. For park like scenarios plant them at 12 meter to 18 meter centres or at 6 meter centres for a small rainforest garden.
The tree is excellent for hosting small to large epiphytic ferns and orchids.
Propagation:
Seeds: The seeds of Bosistoa pentacocca can be removed easily from the cocci as they dry. The seeds do not need to be treated so they can be sown directly into a seed raising mix, keeping them moist not wet. Place the trays in a warm place under 30mm to 50mm shade cloth. When the seedlings are 50mm to 75mm tall, prick them out and plant them into 50mm native tubes using a good organic mix.
As the seedlings’ roots reach the bottom of the tubes plant them out into their permanent position.
Fertilize using Seaweed, fish emulsion or organic chicken pellets soaked in water on an alternate basis. Fertilize every two months until the plants are established then annually in early September to October to maintain health, vitality and better flowering.
Further Comments from Readers:
Hi reader, it seems you use The Bible of Botany a lot. That’s great as we have great pleasure in bringing it to you! It’s a little awkward for us to ask, but our first aim is to purchase land approximately 1,600 hectares to link several parcels of N.P. into one at The Pinnacles NSW Australia, but we need your help. We’re not salespeople. We’re amateur botanists who have dedicated over 30 years to saving the environment in a practical way. We depend on donations to reach our goal. If you donate just $5, the price of your coffee this Sunday, We can help to keep the planet alive in a real way and continue to bring you regular updates and features on Australian plants all in one Botanical Bible. Any support is greatly appreciated. Thank you.
In the spirit of reconciliation we acknowledge the Bundjalung, Gumbaynggirr and Yaegl and all aboriginal nations throughout Australia and their connections to land, sea and community. We pay our respect to their Elders past, present and future for the pleasures we have gained.
Coffs Harbour Botanic Gardens NSW
Coffs Harbour Botanic Gardens NSW
Coffs Harbour Botanic Gardens NSW
Coffs Harbour Botanic Gardens NSW
Coffs Harbour Botanic Gardens NSW
Coffs Harbour Botanic Gardens NSW
Bosistoa transversa
Classification:
Class: Rosids
Order: Sapindales
Family: Rutaceae
Genus: Is named in honour of Joseph Bostisto; 1827-1898, who was a British born Australian pharmaceutical manufacturer of essential oils and early colonial politician in Victoria. It refers to the Eucalyptus oil industry coming from Joseph Bosisto.
Species: From Trans, which is Latin for to move across and Versa, which is Latin for to lie down or to lie flat. It may refer to the leaves, which often lie across each other.
Common Name: yellow Satin Heart or Three Leaved Bosistoa.
Distribution:
Bosistoa transversa is found south from Gladstone in southern coastal Queensland to the lower Tweed River in far north eastern New South Wales.
There are two isolated populations further north in North eastern coastal Queensland near Mackay and Cairns
https://avh.ala.org.au/occurrences/search?taxa=Bosistoa+transversa#tab_mapView
Habitat Aspect Climate:
Bosistoa transversa grows in full sun to dappled light as a small tree in riparian zones of streams and creeks in well-developed rain tropical forests, subtropical rainforests and gallery forests associated with rain forest species.
The altitude ranges from 5 meters ASL to 150 meters ASL.
The temperatures range from 2 degrees in early August to 36 degrees in January.
The rainfalls range from lows of 800mm to an average of 2800mm annually.
Soil Requirements:
Bosistoa transversa prefers better quality light clay soils to medium gritty clay soils. The soils are derived from decomposed brown basalt or black basalts. The soils have a pH which ranges from 5.5pH to 6.5pH. The forest floor is covered in leaf litter. It does not tolerate water logged soils however it may experience some short term inundation during the wet season. Non saline soils to moderately saline soils are tolerated.
Height & Spread:
Wild Plants:10m to 15m by 3.5m to 5m.
Characteristics:
Bosistoa transversa grows as a small tree with deep brown bark covered in rather fine lenticinel lumps. The branches are mid brown semi glossy, glabrous with a few isolated lenticinel lumps. The juvenile stems are pale olive-green and glabrous.
The opposite leaves of Bosistoa transversa are found in 1 to 3 leaflets. The petiole, rachises and petiolules are glabrous. The somewhat flattened petioles measure 5mm to 30mm in length while the lateral petiolules measure 5mm to 10mm in length and the terminal petiolule measures 5mm to 25mm in length.
The leaves measure 85mm to 160mm in length, while the individual elliptic-oblong to broad-elliptic leaflets measure 40mm to 125mm in length by 110mm to 60mm in width. The discolourous laminas are deep green and glabrous on the upper laminas while the lower laminas are much paler. The laminas are flat or recurve slightly upwards close to the margins and are slightly undulating. The base is cuneate to rounded, while the apex is strongly acuminate. The margins are entire. The mid vein, lateral veinsand reticulated veins are prominent on both laminas but more pronounced on the lower lamina. Oil glands are distinct on the laminas. The new growth is deep pink.
The inflorescences of Bosistoa transversa are terminal or terminal and upper axillary panicles with 200 or more individual flowers. The panicles measure 70mm to 160mm in length. The rachises, peduncles and pedicels are pale creamy-green, glabrous to sparsely covered in fine, white pubescent hairs. The 5 elliptical, pale creamy-green sepals are , glabrous to sparsely covered in fine, white pubescent hairs and measure 1mm to 1.2mm in length. The 5 elliptical to broad elliptical white petals measure 3mm to 5mm in length by 1.5mm to 2.5mm in width.
The 10 white filaments are united in pairs at the base and are free on the apical two thirds and measure 2mm to 3.5mm. The dorsifixed anthers are deep yellow and measure 0.8mm to 1mm in diameter.
The stout style is white and measures 1.5mm to 2mm in length. The dome shaped ovary is pascal green and densely covered in off white canescent hairs. The flowers occur from mid November to late February.
The fruits of Bosistoa transversa are 5 lobed ovoidal cocci. The transversely ribbed cocci are densely covered in off white canescent hairs and measure 10mm to 13mm in diameter.
Wildlife:
Bosistoa transversa‘s wildlife is unknown to the author.
Cultivation:
It would make an excellent good fire retardant medium tree.
* Fire retardant plants act as radiant heat screens and absorb more heat from an approaching fire without burning.
* Fire retardant trees are able reduce wind speed near a house or out buildings.
* Fire retardant also trap embers and sparks carried by the wind.
* Fire retardant ground covers are able to catch burning embers without catching fire themselves, and also slow the travel of a fire through debris and litter on the ground.
Bosistoa transversa makes a lovely, upright small garden tree, suitable for small to large gardens. It will grow from 8 meters to 12 meters in height by 3 meters to 6 meters in diameter when grown in an open position.
It would make a good accent trees in front of low set homes, commercial buildings, industrial sheds or school buildings where it will break up hard rigid architectural lines and give warmth and breadth to a building. It can be used as standalone plant or used in formal garden beds with annuals. Planted in a formal line out from buildings it can offer shade in the warm summer months and allow northerly sun rays to fall below the canopy in the winter when pruned to head height.
Try using it over a B-B-Q area for summer shade. For multi trunk trees prick the tip out of the seedlings as they are planted out. For park like scenarios plant them at 12 meter to 18 meter centers or at 8 meter centers for a small rainforest garden.
The trees are excellent for hosting small to large epiphytic ferns and orchids.
Propagation:
Seeds: The seeds of can be removed easily from the cocci as they dry. The seeds do not need to be treated so they can be sown directly into a seed raising mix, keeping them moist not wet. Place the trays in a warm place under 30mm to 50mm shade cloth. When the seedlings are 50mm to 75mm tall, prick them out and plant them into 50mm native tubes using a good organic mix.
As the seedlings roots reach the bottom of the tubes plant them out into their permanent position.
Fertilize using Seaweed, fish emulsion or organic chicken pellets soaked in water on an alternate basis. Fertilize every two months until the plants are established then annually in early September to October to maintain health, vitality and better flowering.
Further Comments from Readers:
Hi reader, it seems you use The Bible of Botany a lot. That’s great as we have great pleasure in bringing it to you! It’s a little awkward for us to ask, but our first aim is to purchase land approximately 1,600 hectares to link several parcels of N.P. into one at The Pinnacles NSW Australia, but we need your help. We’re not salespeople. We’re amateur botanists who have dedicated over 30 years to saving the environment in a practical way. We depend on donations to reach our goal. If you donate just $5, the price of your coffee this Sunday, We can help to keep the planet alive in a real way and continue to bring you regular updates and features on Australian plants all in one Botanical Bible. Any support is greatly appreciated. Thank you.
In the spirit of reconciliation we acknowledge the Bundjalung, Gumbaynggirr and Yaegl and all aboriginal nations throughout Australia and their connections to land, sea and community. We pay our respect to their Elders past, present and future for the pleasures we have gained.
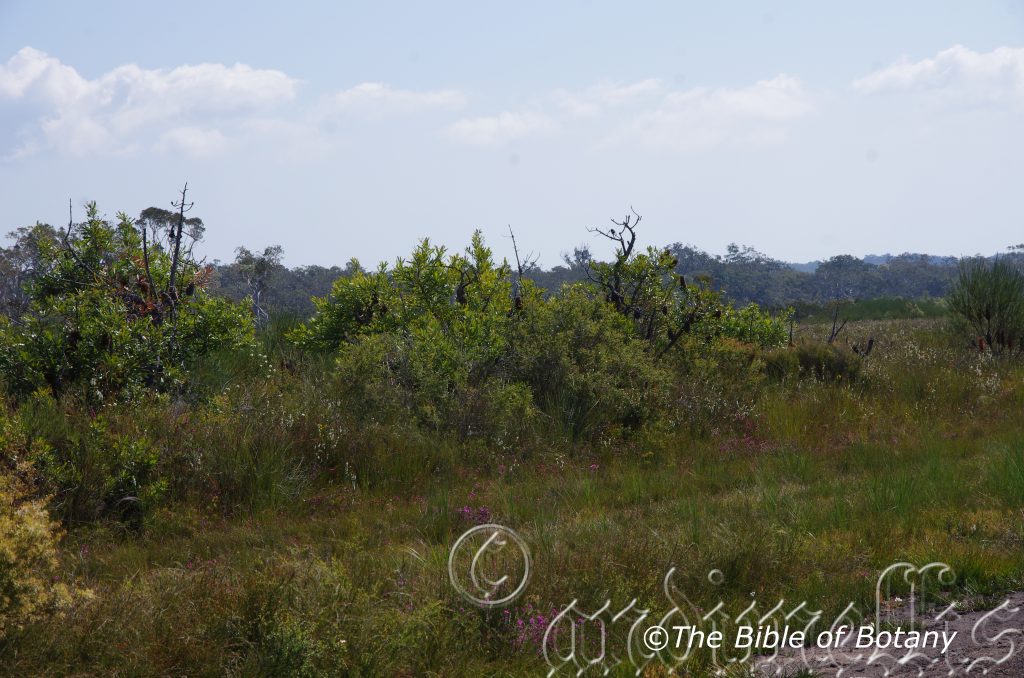
Yuraygir National Park NSW
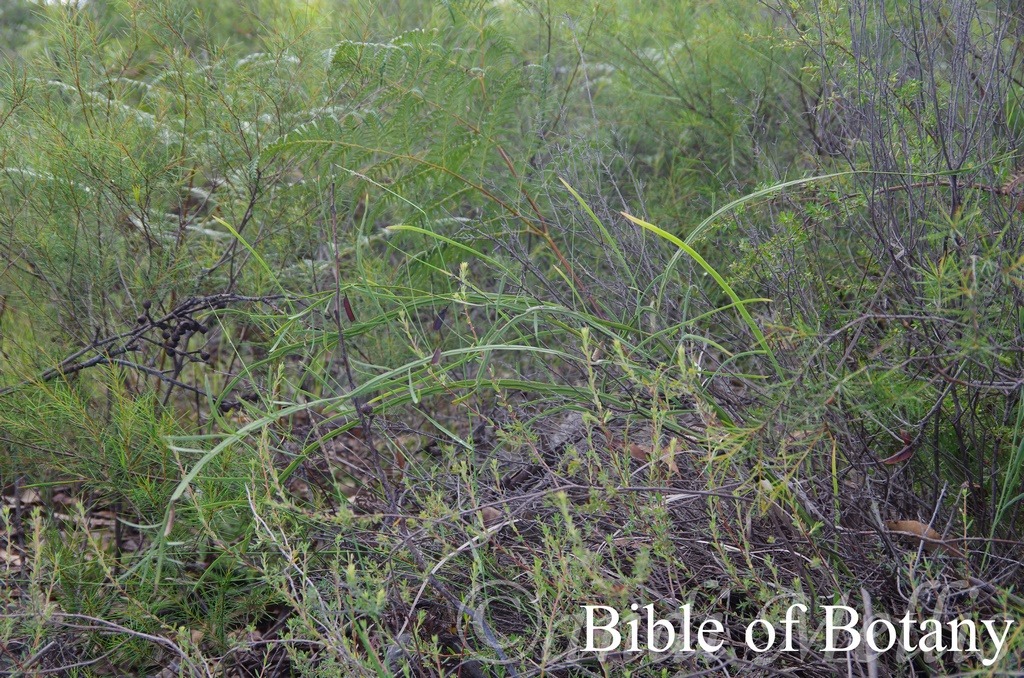
Sherwood Forest Nature Reserve NSW
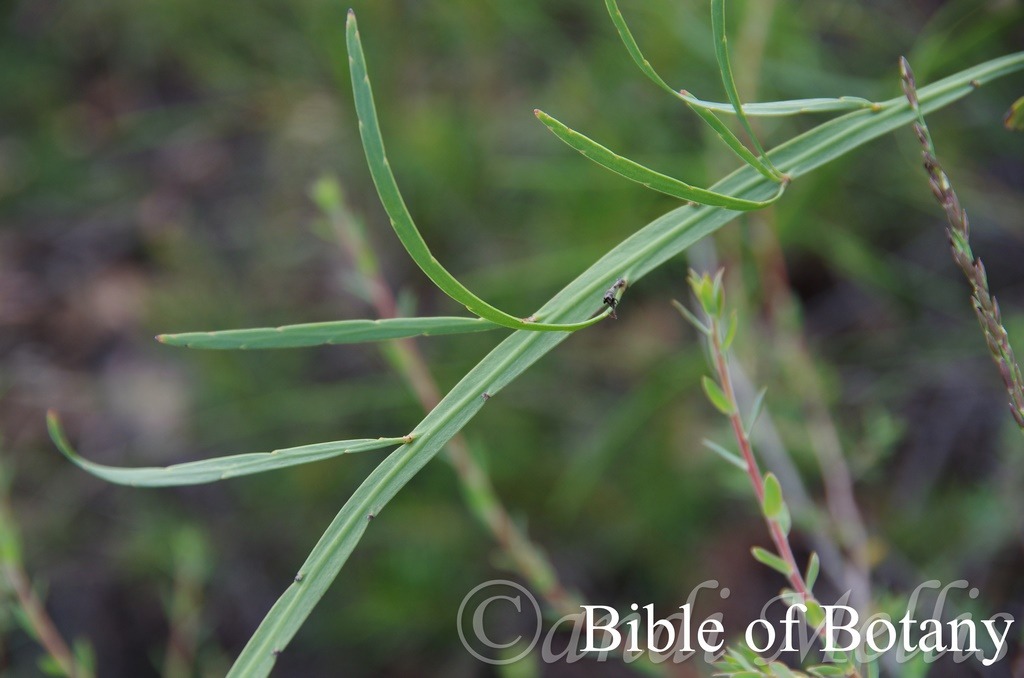
Sherwood Forest Nature Reserve NSW

Yuraygir National Park NSW
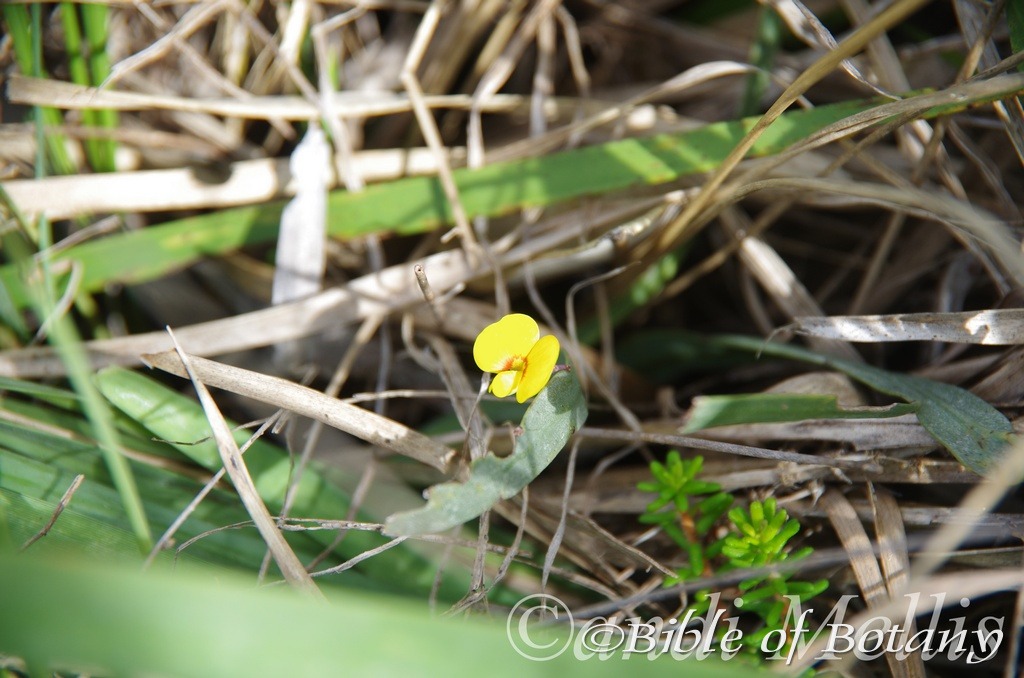
North Yuraygir National Park NSW
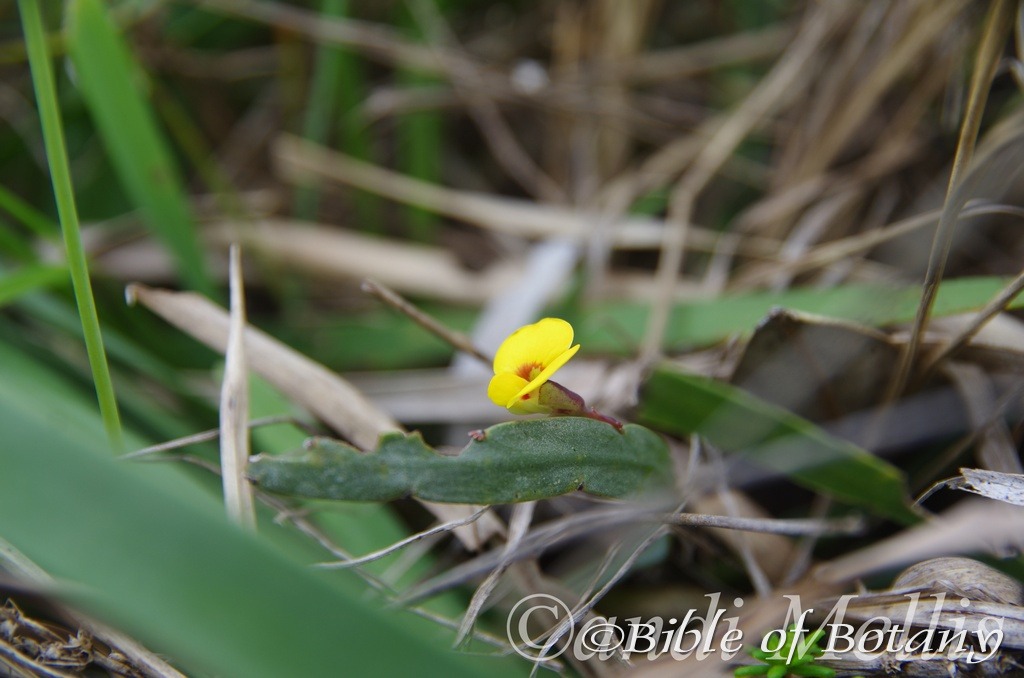
North Yuraygir National Park NSW
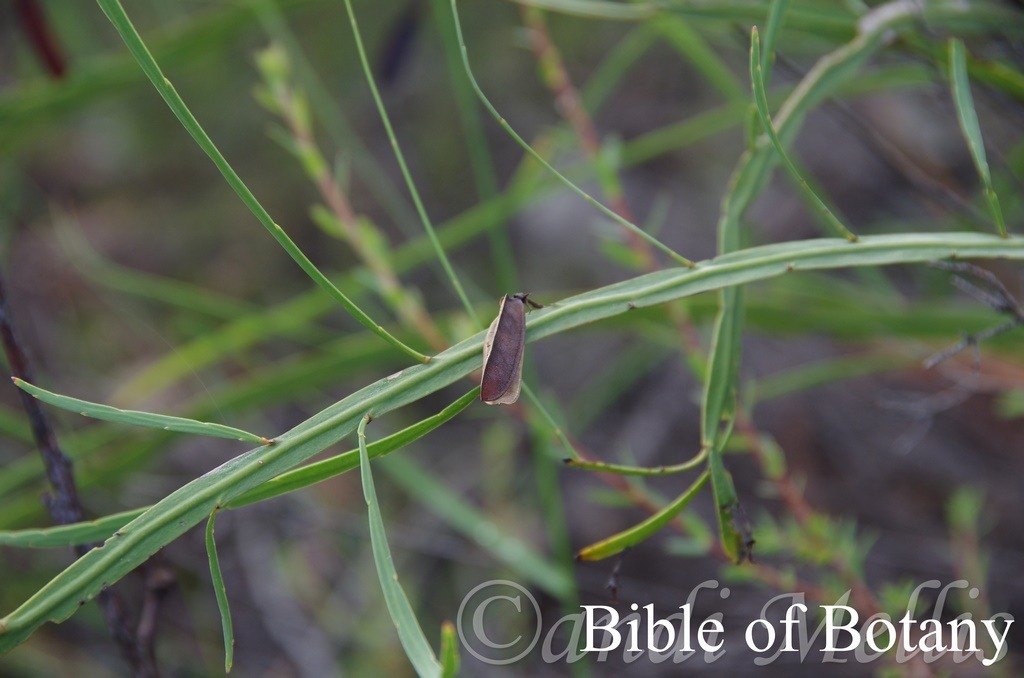
Sherwood Forest Nature Reserve NSW
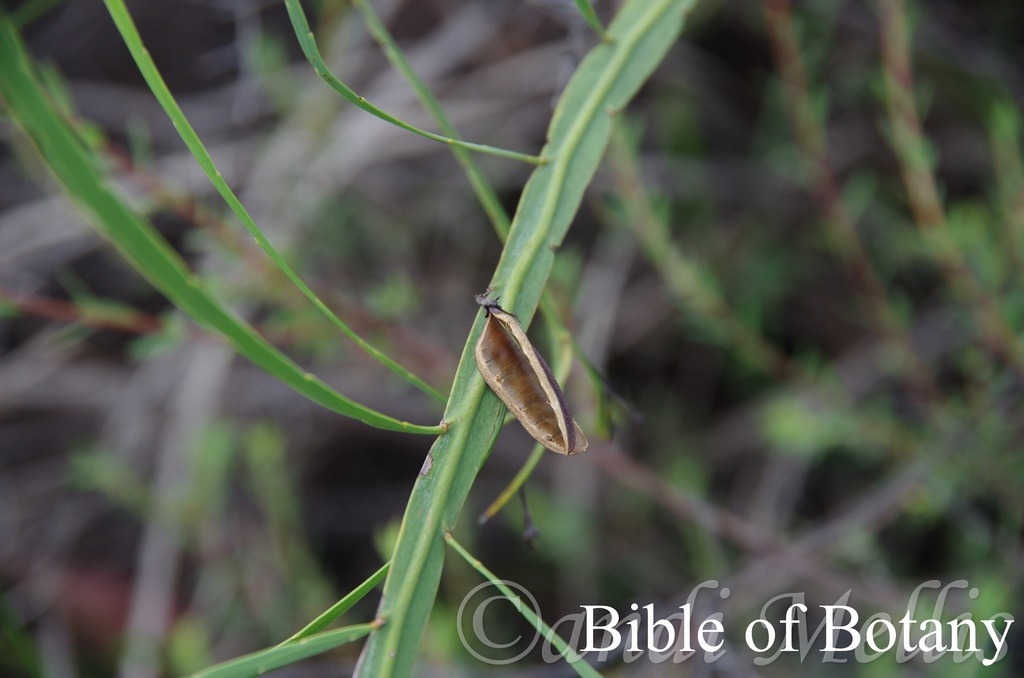
Sherwood Forest Nature Reserve NSW
Bossiaea ensata
Classification:
Class: Equisetopsida
Subclass: Magnoliidae
Superorder: Rosids
Order: Fabales
Family: Fabaceae
Subfamily: Faboideae
Tribe: Bossiaeeae
Genus: Is named in honour of Bossieu de la Martinierra; 1…-1788, who was a botanist on the ill fated Le Perouse Expedition.
Species: From Ensata, which is Latin for having a scimitar sword shape. It refers to stems which have the shape of a flattened scimitar or being somewhat falcate.
Common Name: Sword Bossiaea.
Distribution:
Bossiaea ensata is found south from the Sunshine Coast in southern coastal Queensland south to Orbost in north eastern Victoria. There is a disjunct population in Bascombe Well Conservation Park in South Australia. Two further disjunct populations are to be found in Queensland on Fraser Island and the other south of Lake Awoonga near Gladstone.
https://avh.ala.org.au/occurrences/search?taxa=Bossiaea+ensata#tab_mapView
Habitat Aspect Climate:
Bossiaea ensata prefers full sun to dappled light. It is found in coastal heaths, on plain heaths and in open woodland forests. The altitude ranges from 5 meters ASL to 480 meters ASL.
The temperatures range from minus 3 degrees in early August to 36 degrees in January.
The rainfalls range from lows of 350mm to an average of 2000mm annually.
Soil Requirements:
Bossiaea ensata prefers skeletal to deep sandy loams, fatty sands and light gravelly clays. The soils are derived from decomposed sandstone or accumulated sands. The soils have a pH which ranges from 5.5pH to 6.5pH. It does not tolerate water logged soils. Non saline soils to very saline soils are tolerated.
Height & Spread:
Wild Plants: 0.5m to 1.5m by 0.8m to 1.6m.
Characteristics:
Bossiaea ensata grows as a small erect shrub, procumbent shrub or decumbent shrub. The flat stems are winged, mid green to grass-green, dull and glabrous. They measure 4mm to 10mm in width. The young and juvenile stems are similar to the adult stems but semi glossy.
The alternate leaves of Bossiaea ensata are reduced to scales. The true ovate leaves are only found on juvenile growth and regrowth and measure 1mm to 2mm in length by 1mm to 2mm in width.
The inflorescences of Bossiaea ensata are born singularly from the leaf scale axils. The pedicels are glabrous and measure 2mm to 4mm in length. The green bracts measure 1mm to 2mm in length. The bracteoles are placed half way along the pedicels and measure 1mm to 1.5mm in length. The reddish-green calyxes measure 3mm to 4mm in length while the lobes measure 0.7mm to 0.9mm in length.
The flowers measure 6mm to 10mm in length overall with the standards being of unequal length. The 2 ovate to ovate-reniform standards are reddish-orange externally and yellow internally with red markings near the base. The standards measure 6.5mm to 11mm in length by 5mm to 6.5mm in width. The 2 oblong wing petals are yellow to orange-red and spread near the apex. The apexes are obtuse. The wings measure 6mm to 8mm in length by 2mm to 3mm in width. The red, oblong keel has an obtuse apex and measures 5.5mm to 7.5mm in length by 2mm to 3mm in width.
The 6 to 8 locule ovary is shortly stipitate and glabrous. The flowers appear from August to November.
The fruits of Bossiaea ensata are oblong pods. The glabrous pods measure 2.5mm to 4mm in length. The swollen stipes measures 3.5mm to 4.5mm in length
Wildlife:
Bossiaea ensata wildlife is unknown to the author.
Cultivation:
Bossiaea ensata makes an interesting and very unusual addition to any garden for someone who likes the unusual garden subjects. It is ideal for small to large gardens. It will grow from 1 meter to 1.5 meters in height by 1 meter to 1.5 meters in diameter in the garden when grown in the open. This is a little beauty that deserves higher recognition by the nursery trade and gardeners alike for its unusual stems and flowers.
This shrub makes a sensational accent plants for garden beds of all sizes. It can be incorporated into a miniature desert garden very easily. The use of contours to display the plant to its best advantage is essential along with sparse plantings. Use small, fine leaf tussock grasses or Lilies like Patersonia sericea or Lomandra filiformis adjacent to Bossiaea ensata to place a stronger emphasis on the stems.
Place it near old stumps and roots to make the stumps or roots look larger and harsher. Remember this plant has unusual stems that need focusing on so be sparing with the other plants when planting. A billabong affect would be the go, not a waterfall or cascade.
Try using it in a small bed adjacent to a B-B-Q area, where it can be pruned and planted in groups of 3 at 0.8 meter centres to give a totally different picture while having guests look and talk about the stems. The shrubs respond to light pruning to produce slightly foliaged plant. Either side Bossiaea ensata you need plants that grow no more than 0.4 meters in height. These shrubs or ground covers should have fine pale green leaves with small, lilac or mauve flowers to enhance the strong statement in the centre. If deeper, strong coloured flowers are wanted then ensure that they flower at different times of the year.
Bossiaea ensata is not often grown which means seeds or cutting material may have to be collected from wild plants. It is a hardy species for sunny or semi-shaded sites beneath Eucalyptus forests and need well drained soils to flourish. It tolerates moderate frost and temperatures down to minus 3 degrees once established.
Propagation:
Seeds: The seeds of Bossaea ensata can be removed easily from the pods as they dry. The seeds need to be treated by placing them in a glass of water off the boil and allowing it to cool and soak the seeds for several hours or until the seeds swell. Do not soak the seeds for more than 8 hours. Sow the swollen seeds directly into a seed raising mix, keeping them moist not wet. Place the trays in a warm place under 30mm shade cloth. When the seedlings are 30mm to 60mm tall, prick them out and plant them into 50mm native tubes using a good organic mix.
Fertilize using Seaweed, fish emulsion or organic chicken pellets soaked in water on an alternate basis. Fertilize every two months until the plants are established then annually in early September or March to maintain health, vitality and better flowering.
As the seedlings roots reach the bottom of the tubes plant them out into their permanent position.
Cuttings: Use 80mm to 120mm long material from semi hardwood to on the current season’s growth that is just after a flush of growth has hardened. This type of cutting normally is made from the middle of September to early March. The wood is reasonably firm and not soft. Ensure the material has at least 2 nodes to work with. The bottom node is where the roots will grow while the upper node will supply the new shoots.
1 Prepare the cutting mix by adding one third sharp clean river sand, one third peat and one third perlite. These ingredients are sterile,
2 Select good material from non diseased plants,
3 Select semi green stems for cuttings. Look for a stem with two or three nodes,
4 Place the cutting on a flat, hard surface, and make a clean slice through the middle of the lower node on an angle towards the base, with a sterilized sharp knife or razor blade. – This scarification of the node will increase the chances of roots emerging from this spot. Now remove all but one or two the leaves, leaving the apex leaves in tact. If the leaves are very large in proportion to the stem, cut off the apical halves.
5 Some plants root easily, but a rooting hormone can help others by stimulating the cutting into sending out new roots. Fill a saucer with water, and place some rooting hormone into another container like a bottle top. Dip the node end of the cutting into the water and then into the rooting hormone. Tap off any excess hormone,
6 Use a small dipple stick or old pencil to poke a hole into the soilless potting mix. Ensure the hole is slightly larger than the stem diameter and be careful not to wipe the rooting hormone off the cuttings base, place the cuttings in a pattern ensuring the cuttings are not touching each other,
7 I like to place the pots in Plastic bags to help maintain temperature and moisture. Place in a semi shaded place like under 50mm shade cloth.
8 When the cuttings have struck, open the bag to allow air circulation for a few days to a week,
9 Once hardened off remove the cuttings from the bag and allow to further hardening for a few more days,
10 Transplant into a good potting mix to grow on.
Fertilize using Seaweed, fish emulsion or organic chicken pellets soaked in water on an alternate basis. Fertilize every two months until the plants are established then annually in early September to October to maintain health, vitality and better flowering.
Further Comments from Readers:
Hi reader, it seems you use The Bible of Botany a lot. That’s great as we have great pleasure in bringing it to you! It’s a little awkward for us to ask, but our first aim is to purchase land approximately 1,600 hectares to link several parcels of N.P. into one at The Pinnacles NSW Australia, but we need your help. We’re not salespeople. We’re amateur botanists who have dedicated over 30 years to saving the environment in a practical way. We depend on donations to reach our goal. If you donate just $5, the price of your coffee this Sunday, We can help to keep the planet alive in a real way and continue to bring you regular updates and features on Australian plants all in one Botanical Bible. Any support is greatly appreciated. Thank you.
In the spirit of reconciliation we acknowledge the Bundjalung, Gumbaynggirr and Yaegl and all aboriginal nations throughout Australia and their connections to land, sea and community. We pay our respect to their Elders past, present and future for the pleasures we have gained.
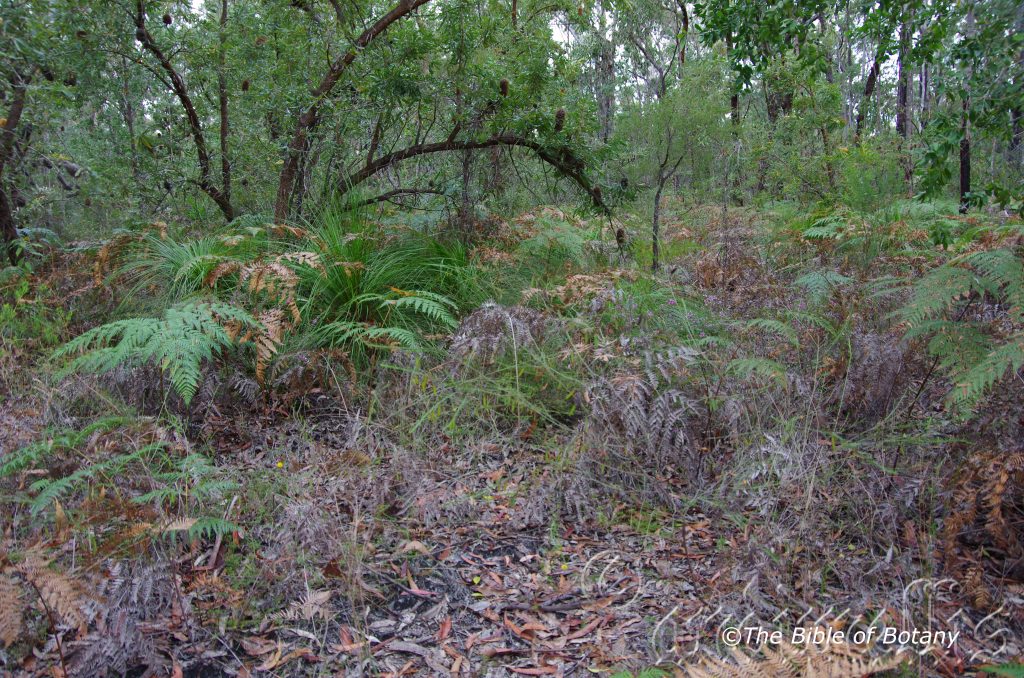
The Pinnacles NSW
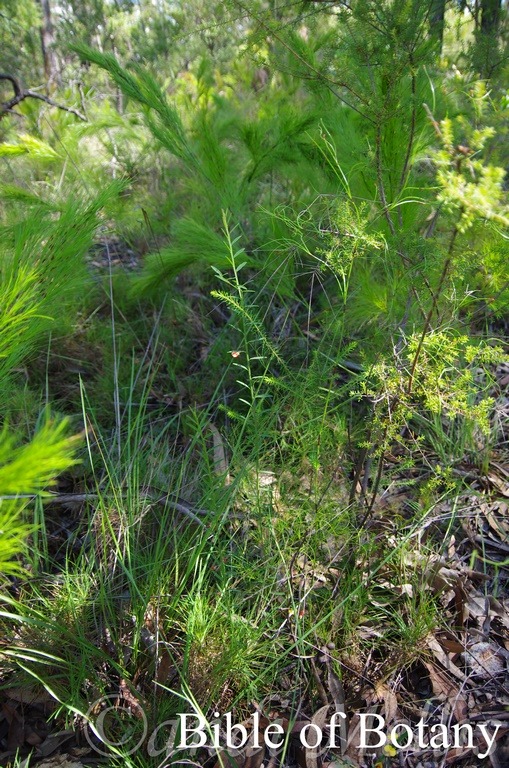
Sherwood Nature Reserve North NSW

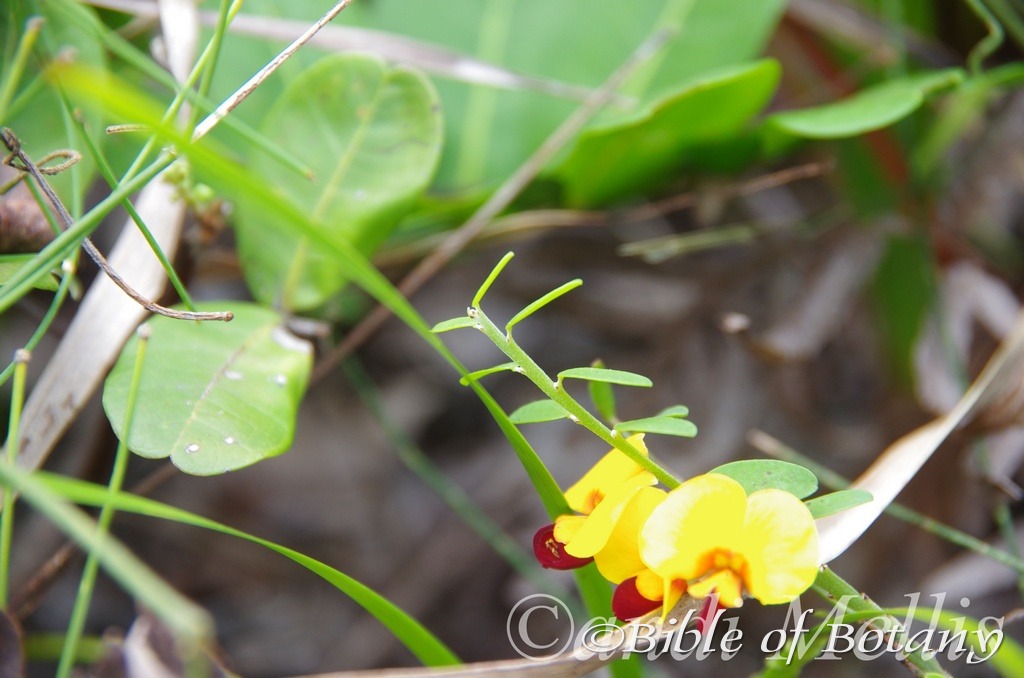
North Yuraygir National Park NSW

The Pinnacles NSW
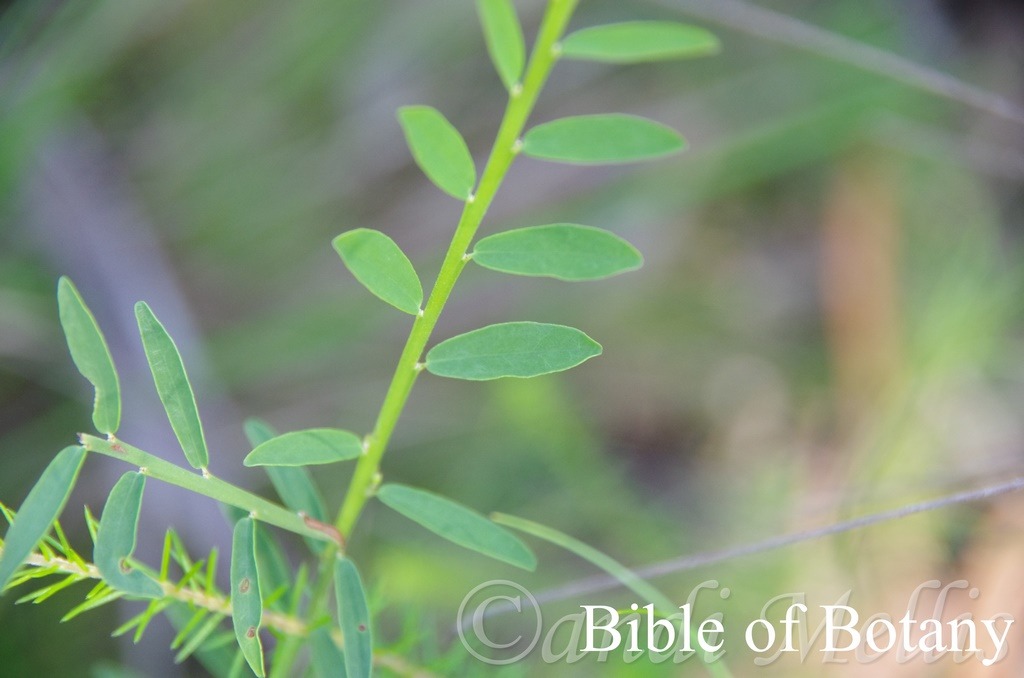
Sherwood Nature Reserve North NSW
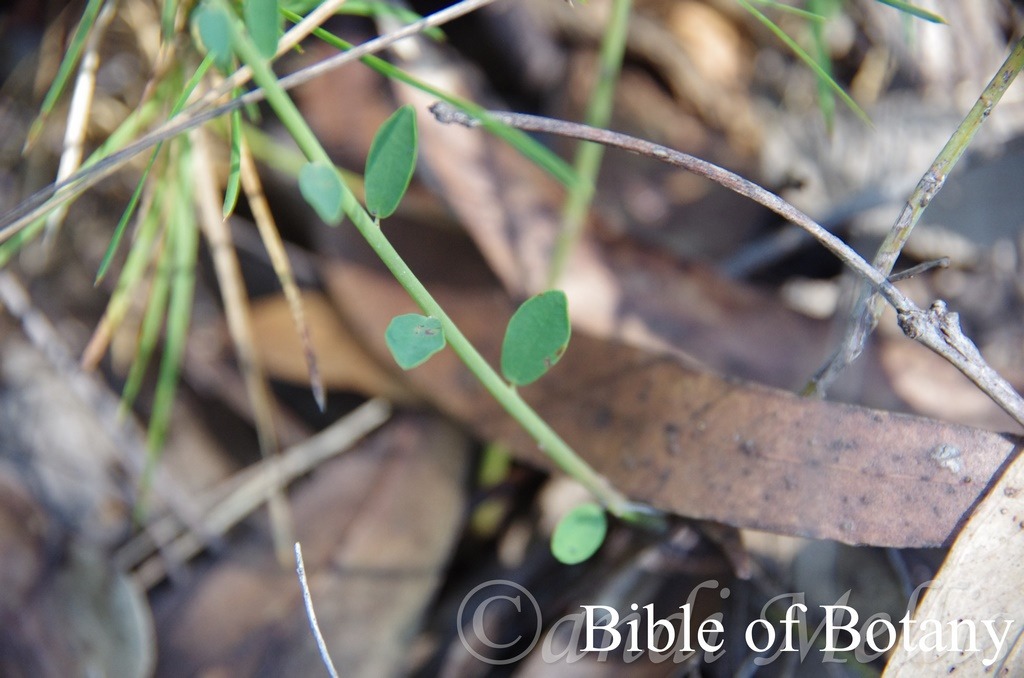
Sherwood Nature Reserve North NSW
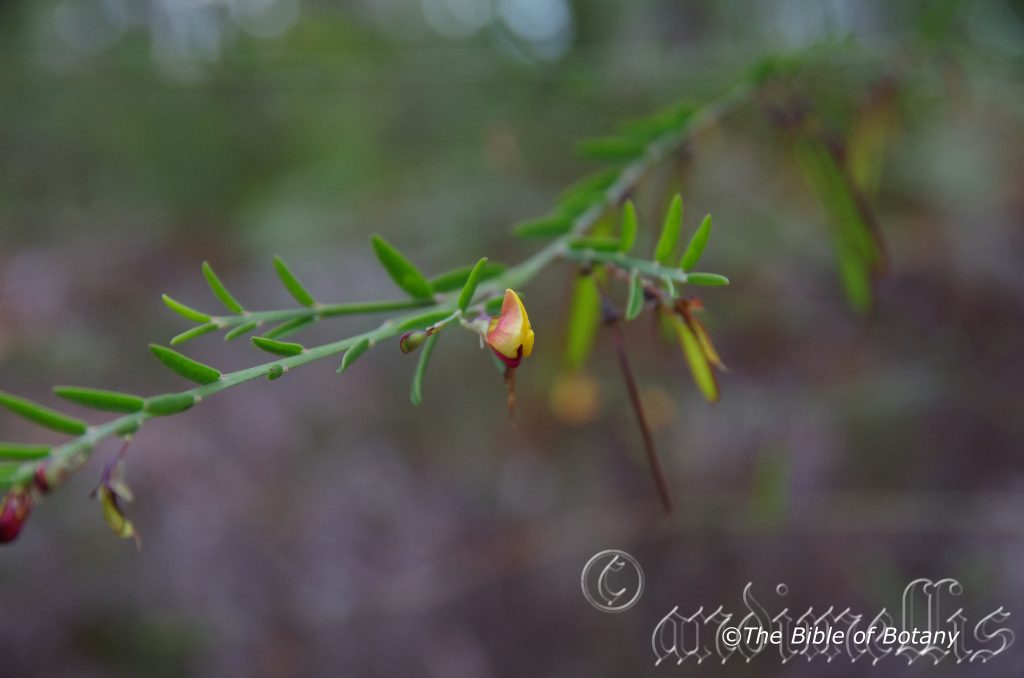
The Pinnacles NSW
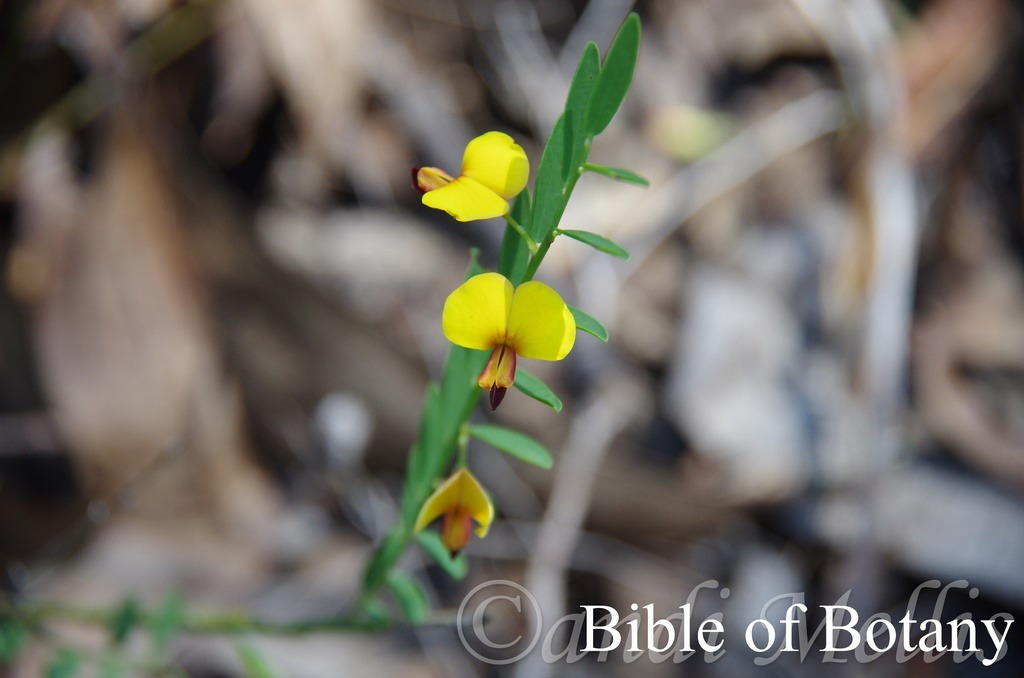
Sherwood Nature Reserve North NSW
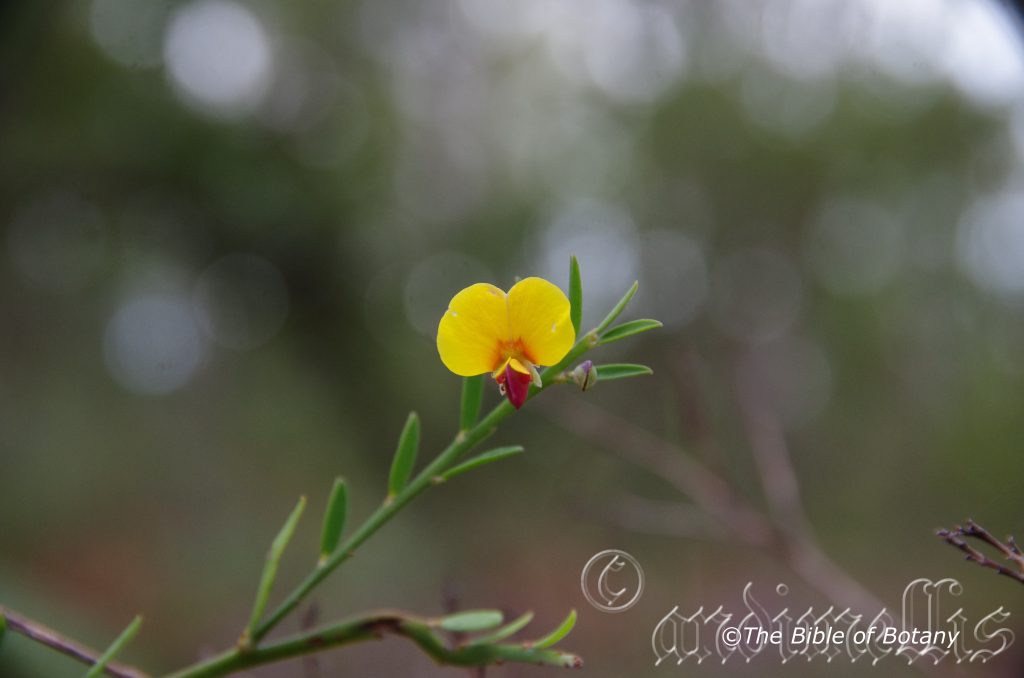
The Pinnacles NSW
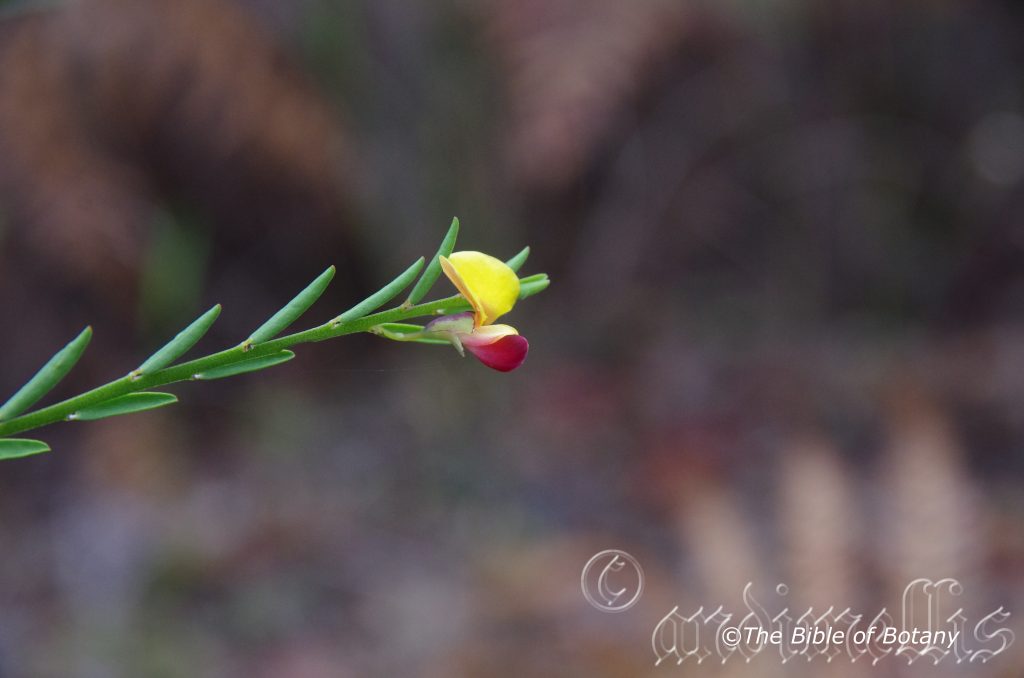
Sherwood Nature Reserve North NSW
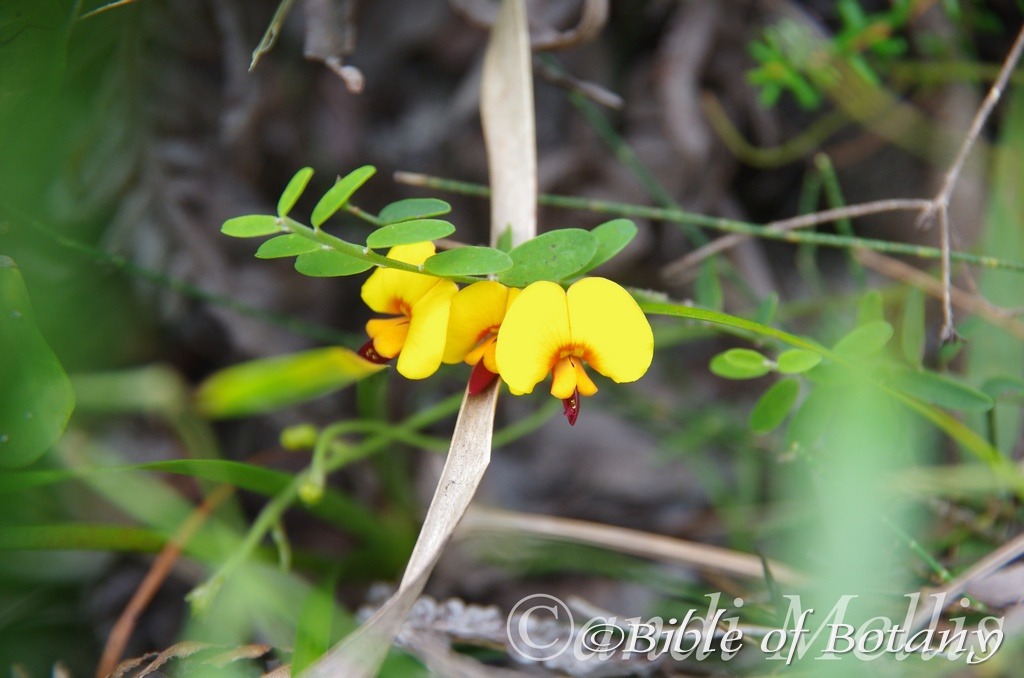
North Yuraygir National Park NSW
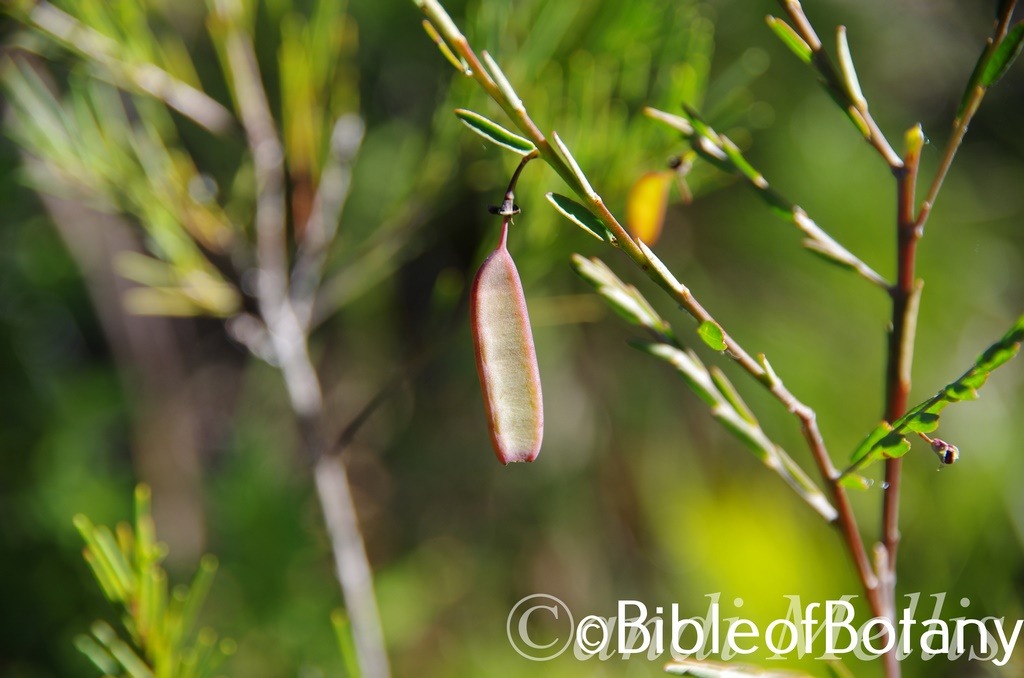
Author’s Garden The Pinnacles NSW
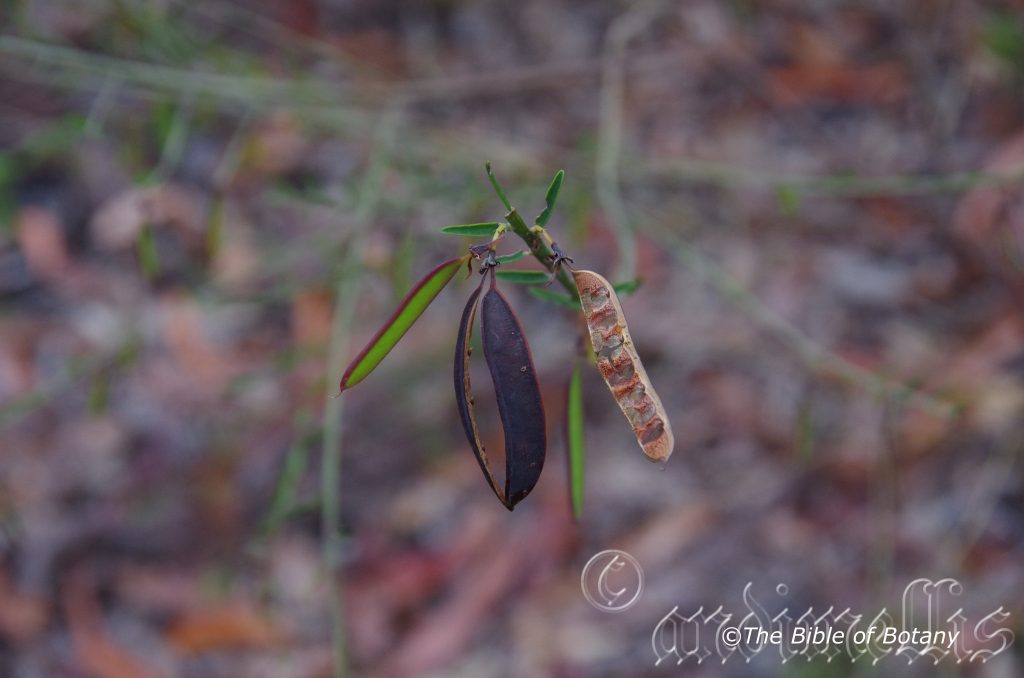
The Pinnacles NSW
Bossiaea heterophylla
Classification:
Unranked: Rosids
Order: Fabales
Family: Fabaceae
Subfamily: Faboideae
Tribe: Bossiaeeae
Genus: Is named in honour of Bossieu de la Martinierra; 1758-1788, who was a French botanist on the ill-fated Le Perouse Expedition.
Species: From Heteros, which is Ancient Greek for other or different and Phullon/Phyllon, which are Ancient Greek for a a leaf or a flat surface. It refers to leaves often on the same plant which are flat but of different forms.
Common Name: Variable Bossiaea.
Distribution:
Bossiaea heterophylla is found south from the Kolan River Conservation Park in central coastal Queensland south to the Mitchell River National Park in north western Victoria.
https://avh.ala.org.au/occurrences/search?taxa=Bossiaea+heterophylla#tab_mapView
Habitat Aspect Climate:
Bossiaea heterophylla prefers full sun to dappled light. It is found in coastal heaths and on mountain heaths in open woodland forests especially behind the frontal and back dunes.
The temperatures range from minus 3 degrees in early August to 38 degrees in January.
The rainfalls range from lows of 600mm to an average of 1800mm annually.
Soil Requirements:
Bossiaea heterophylla prefers skeletal to deep sandy loams to light fatty clays. The soils are derived from decomposed sandstone or accumulated beach sands. The soils pH ranges from 5.5pH to 6.5pH. It does not tolerate water logged soils. Non saline soils to very saline soils are tolerated as are salt laden winds.
Height & Spread:
Wild Plants: 0.5m to 1m by 0.8m to 1m.
Characteristics:
Bossiaea heterophylla is a striking small erect shrub, procumbent shrub or decumbent shrub. The flat stems mid green, deep grass-green or glabrous, dull and glabrous. They measure 4mm to 10mm in width. The young and juvenile stems are similar to the adult stems but semi glossy.
The alternate leaves of Bossiaea heterophylla are distichous. The ovate to linear leaves often appear on the same stem. The leaves measure 10mm to 30mm in length by 2mm to 15mm in width. The leaves are usually broader lower down on the stems. The bases are rounded while the apexes are obtuse to acute. The concolourous or discolourous laminas are dull, pale green, blue-green, grey green or grass-green while the lower laminas maybe paler. The midvein is slightly prominent on the lower lamina and is not visible on the upper laminas. The laminas are flat to strongly recurve upwards. The margins are entire. The 2 linear stipules measure 0.6mm to 1.2mm in length. The petioles measure 1.5mm to 2.2mm in length.
The inflorescences of Bossiaea heterophylla are born singularly from the leaf scale axils. The pedicels are glabrous and measure 4mm to 5mm in length. The pastel, translucent green bracts measure 1mm to 2mm in length. The bracteoles are placed on the lower half of the pedicels and measure 1mm to 2mm in length. The pastel translucent reddish-green calyxes measure 3.5mm to 6.5mm in length while the 5 lobes measure 1mm to 1.2mm in length.
The flowers measure 7mm to 15mm in length overall. The 2 ovate to standards are yellow externally and yellow internally with faint red markings near the base. The standards measure 7mm to 12mm in height by 4.5mm to 7mm in width. The 2 oblong wing petals are yellow and spread near the apex. The apexes are obtuse. The wings measure 5mm to 7mm in length by 2mm to 3mm in width. The maroon-red, oblong keel has an obtuse apex and measures 6.5mm to 11mm in length by 3mm to 5mm in width.
The 8 locule ovary is stipitate and glabrous. The flowers appear from April to May.
The fruits of Bossiaea heterophylla are flattened, oblong pods. The glabrous pods measure 2.5mm to 4mm in length. The bracteoles are persistent at the base of the pods.
Wildlife:
Bossiaea heterophylla wildlife is unknown to the author.
Cultivation:
Bossiaea heterophylla grows as a small straggly but interesting, unusual addition to any garden for someone who likes the unusual garden subjects. It is ideal for small to large gardens. It will grow from 0.5 meters to 1 meter in height by 0.6 meters to 1 meter in diameter in the garden when grown in the open. This is a little beauty that deserves higher recognition by the nursery trade and gardeners alike.
It can be incorporated into a miniature arid garden very easily, where the use of contours to display the plant to its best is essential along with sparse plantings. Use small, fine leaf tussock grasses, Lilies like Patersonia sericea or Lomandra filicifolia adjacent to Bossiaea heterophylla to give a stronger emphasis on the Boronia.
Try using it in a a small bed adjacent to a B-B-Q area. It can be lightly pruned and planted in clusters of 3 at 0.8 meter centres to give a totally different picture with lushness and prosperity being the theme. The shrubs respond well to pruning and produce a more densely foliaged plant with better flowering the following season. Either side Bossiaea heterophylla you need plants that grow no more than 0.4 meters in height. These plants should have fine pale green leaves with small, lilac or mauve flowers to enhance the strong statement in the centre. If deeper, strong coloured flowers are wanted then ensure that they flower at different times of the year.
Bossiaea heterophylla are not often grown which means seeds or cutting material may have to be collected from wild plants. It is a hardy species for semi-shaded sites beneath Eucalyptus forests and need well drained soils to flourish. It tolerates moderate frost and temperatures down to minus 3 degrees once established.
Propagation:
Seeds: The seeds of Bossiaea heterophylla can be removed easily from the pods as they dry. The seeds need to be treated by placing them in a glass of water off the boil and allowing it to cool and soak for several hours until the seeds swell. Do not soak the seeds for more than 8 hours. Sow the swollen seeds directly into a seed raising mix, keeping them moist not wet. Place the trays in a warm place under 30mm shade cloth. When the seedlings are 30mm to 60mm tall, prick them out and plant them into 50mm native tubes using a good organic mix.
As the seedlings roots reach the bottom of the tubes plant them out into their permanent position.
Cuttings: Use 80mm to 120mm long material from semi hardwood to on the current season’s growth that is just after a flush of growth has hardened. This type of cutting normally is made from the middle of September to October after the spring flush has just hardened off. The wood is reasonably firm and not soft. Ensure the material has at least 2 nodes to work with. The bottom node is where the roots will grow while the upper node will supply the new shoots.
1 Prepare the cutting mix by adding one third sharp clean river sand, one third peat and one third perlite. These ingredients are sterile,
2 Select good material from non diseased plants,
3 Select semi green stems for cuttings. Look for a stem with two or three nodes,
4 Place the cutting on a flat, hard surface, and make a clean slice through the middle of the lower node on an angle towards the base, with a sterilized sharp knife or razor blade. – This scarification of the node will increase the chances of roots emerging from this spot. Now remove all but one or two the leaves, leaving the apex leaves in tact. If the leaves are very large in proportion to the stem, cut off the apical halves.
5 Some plants root easily, but a rooting hormone can help others by stimulating the cutting into sending out new roots. Fill a saucer with water, and place some rooting hormone into another container like a bottle top. Dip the node end of the cutting into the water and then into the rooting hormone. Tap off any excess hormone,
6 Use a small dipple stick or old pencil to poke a hole into the soilless potting mix. Ensure the hole is slightly larger than the stem diameter and be careful not to wipe the rooting hormone off the cuttings base, place the cuttings in a pattern ensuring the cuttings are not touching each other,
7 I like to place the pots in Plastic bags to help maintain temperature and moisture. Place in a semi shaded place like under 50mm shade cloth.
8 When the cuttings have struck, open the bag to allow air circulation for a few days to a week,
9 Once hardened off remove the cuttings from the bag and allow to further hardening for a few more days,
10 Transplant into a good potting mix to grow on.
Fertilize using Seaweed, fish emulsion or organic chicken pellets soaked in water on an alternate basis. Fertilize every two months until the plants are established then annually in early September to October to maintain health, vitality and better flowering.
Further Comments from Readers:
Hi reader, it seems you use The Bible of Botany a lot. That’s great as we have great pleasure in bringing it to you! It’s a little awkward for us to ask, but our first aim is to purchase land approximately 1,600 hectares to link several parcels of N.P. into one at The Pinnacles NSW Australia, but we need your help. We’re not salespeople. We’re amateur botanists who have dedicated over 30 years to saving the environment in a practical way. We depend on donations to reach our goal. If you donate just $5, the price of your coffee this Sunday, We can help to keep the planet alive in a real way and continue to bring you regular updates and features on Australian plants all in one Botanical Bible. Any support is greatly appreciated. Thank you.
In the spirit of reconciliation we acknowledge the Bundjalung, Gumbaynggirr and Yaegl and all aboriginal nations throughout Australia and their connections to land, sea and community. We pay our respect to their Elders past, present and future for the pleasures we have gained.
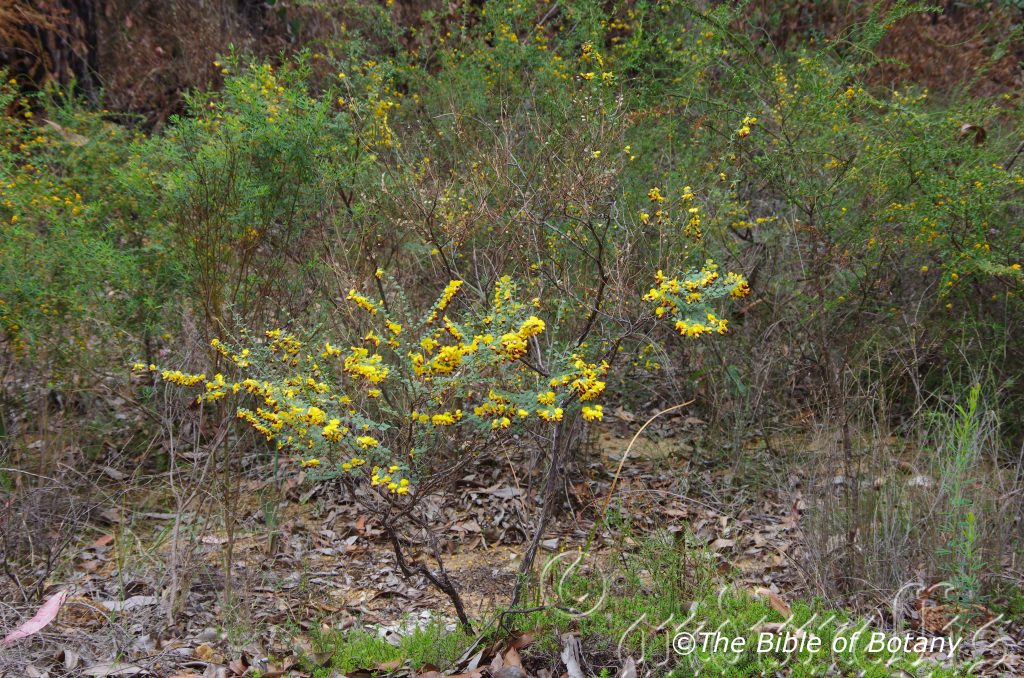
Author’s Garden The Pinnacles NSW
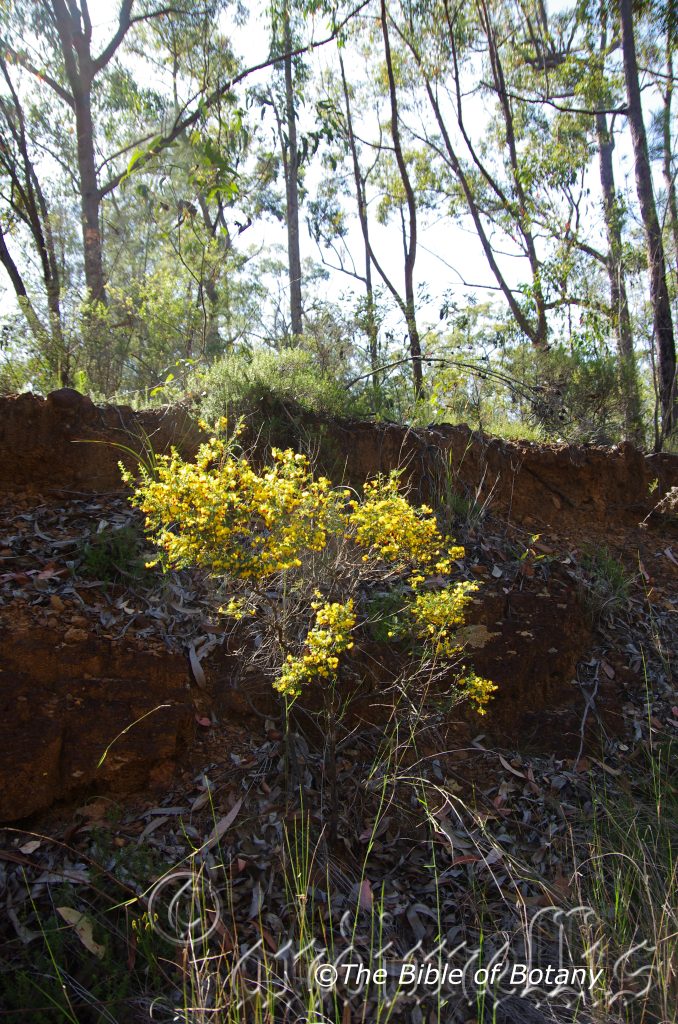
Fortis Creek National Park NSW

The Pinnacles NSW
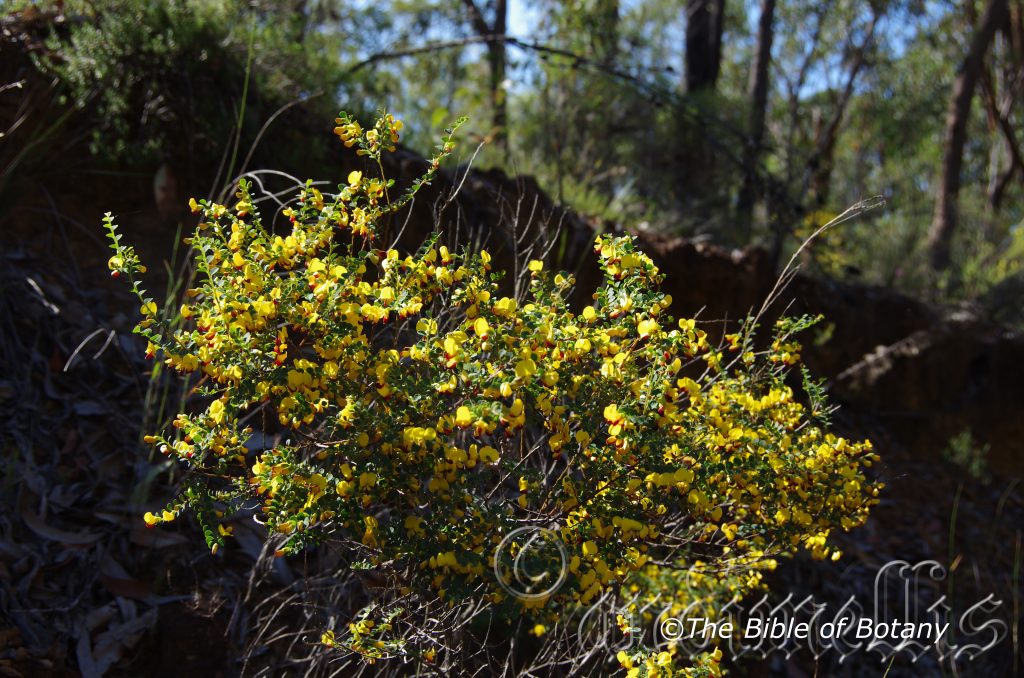
Fortis Creek National Park NSW

Author’s Garden The Pinnacles
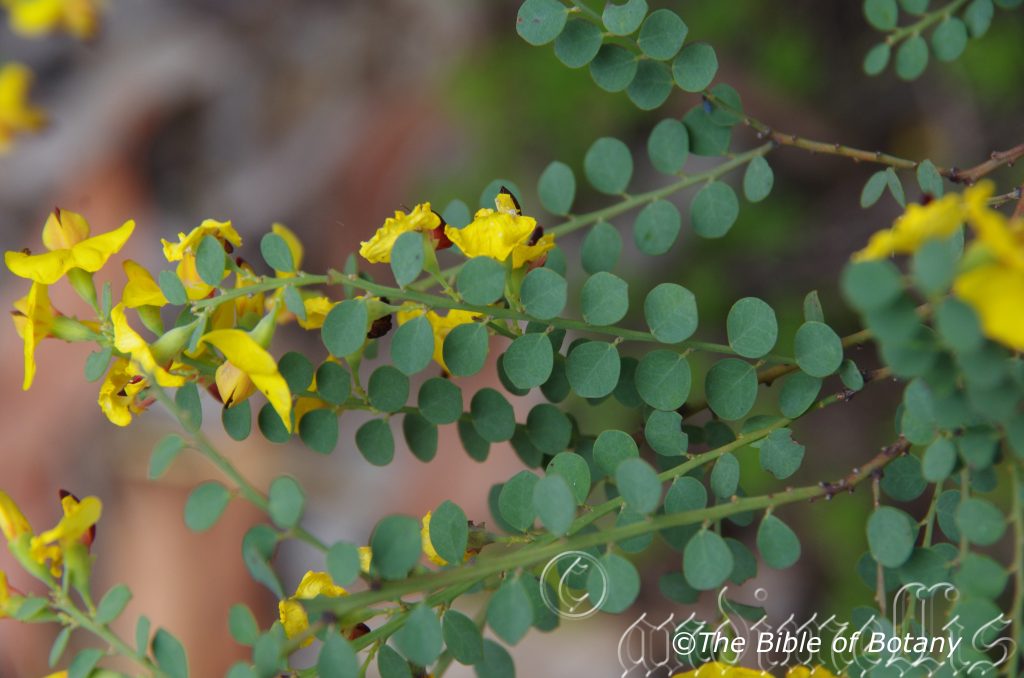
Author’s Garden The Pinnacles

Author’s Garden The Pinnacles

Author’s Garden The Pinnacles
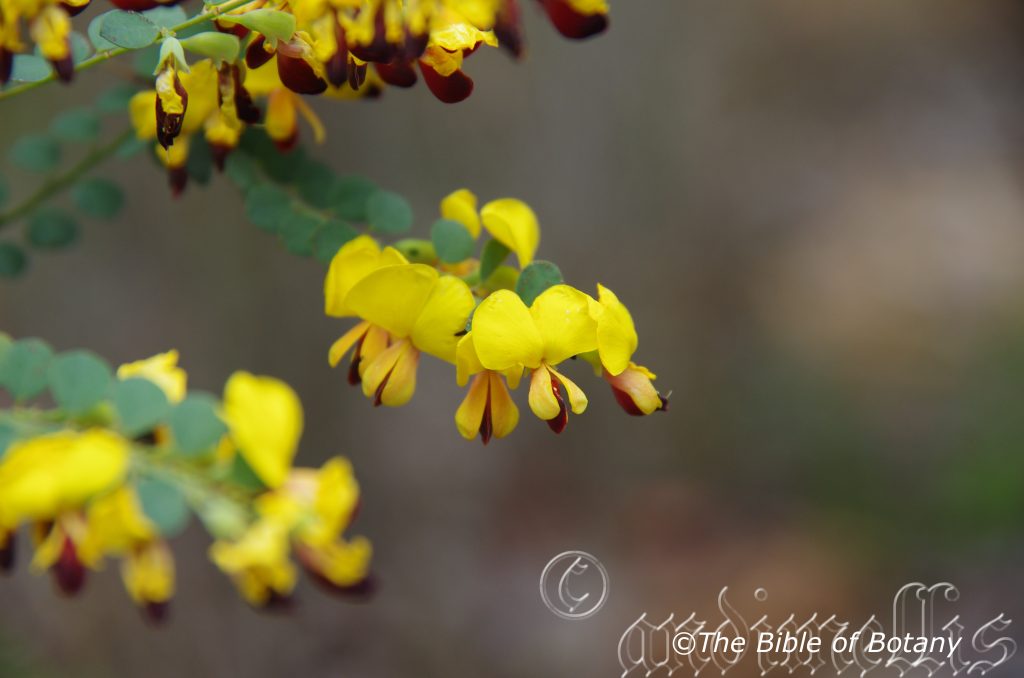
Author’s Garden The Pinnacles
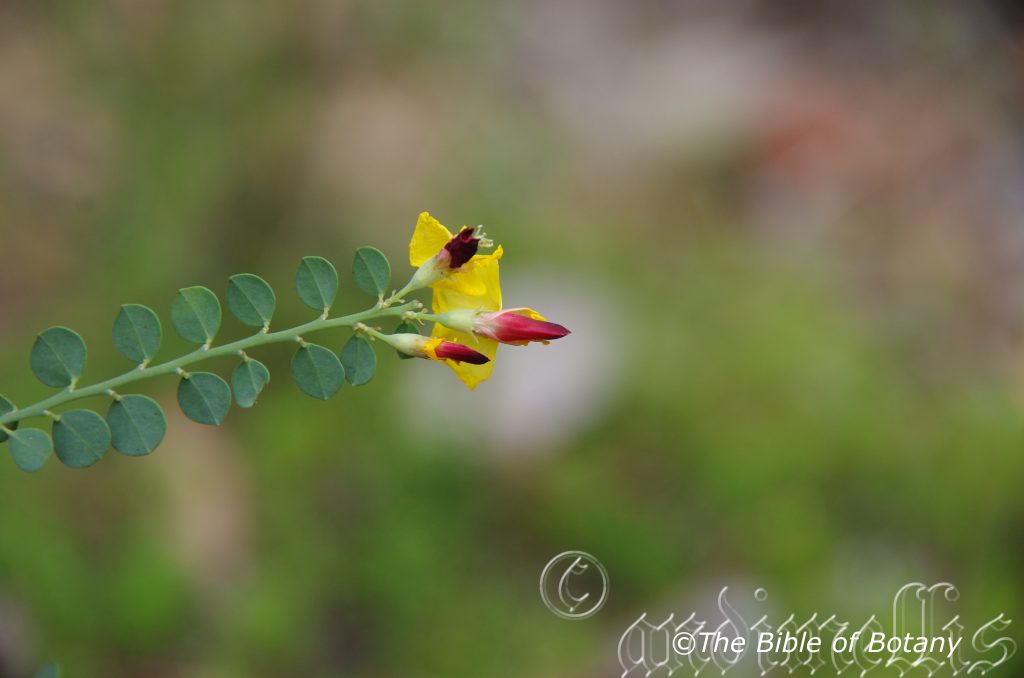
Author’s Garden The Pinnacles NSW
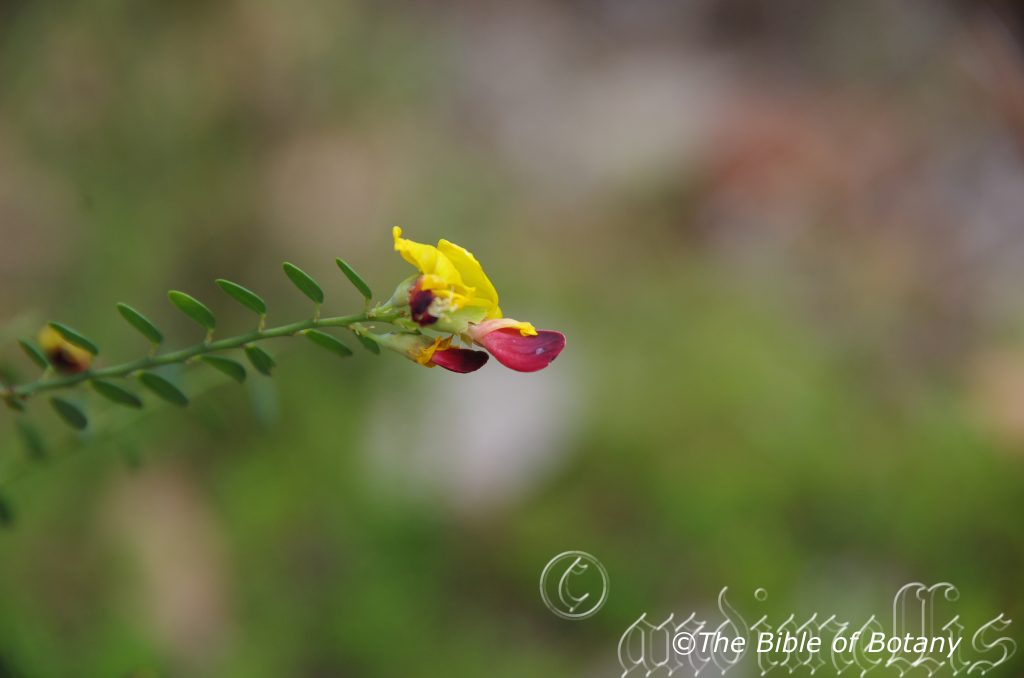
Author’s Garden The Pinnacles NSW
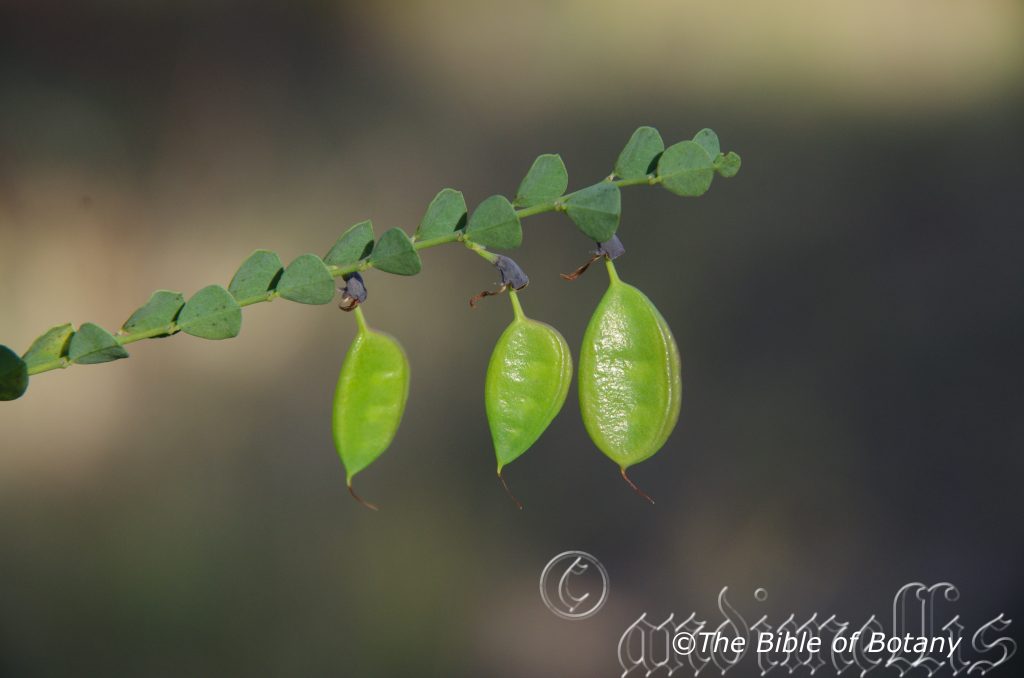
Author’s Garden The Pinnacles NSW

Author’s Garden The Pinnacles NSW

Fortis Creek National Park NSW

Tetragonula carbonaria Native Bee The Pinnacles NSW
Bossiaea rhombifolia
Classification:
Unranked: Rosids
Order: Fabales
Family: Fabaceae
Subfamily: Faboideae
Tribe: Bossiaeeae
Genus: Is named in honour of Bossieu de la Martinierra; 1758-1788, who was a botanist on the ill-fated Le Perouse Expedition.
Species: From Rhombos, which is Ancient Greek for to spin around or diamond shape and Folium which is Latin for foliage. It refers to leaves or phyllodes, which have a diamond shape.
Subspecies: Bossiaea rhombifolia subsp. concolor. From Con, which is Latin for to come together and Colour, which is Latin for a hue or colour. It refers to a structure or organ usually the leaves, which have the same colour on both surfaces.
Subspecies: Bossiaea rhombifolia subsp. rhombifolia. From Rhombos, which is Ancient Greek for to spin around or diamond shape and Folium which is Latin for foliage. It refers to leaves or phyllodes, which have a diamond shape.
Common Name:
Distribution:
Bossiaea rhombifolia is found south from St. George in southern Queensland to Wadbilliga Mountain in southern New South Wales. Bossiaea rhombifolia subsp. concolor is common in the Pilga scrub and along the western part of the range. There is a disjunct population near Gayndah in southern Queensland.
Bossiaea rhombifolia subsp. rhombifolia. is found south from St. George in southern Queensland to Wadbilliga Mountain in southern New South Wales.
https://avh.ala.org.au/occurrences/search?taxa=Bossiaea+rhombifolia#tab_mapView
Habitat Aspect Climate:
Bossiaea rhombifolia prefers full sun to light dappled shade. It is found in dry coastal heaths, on plain heaths and in open woodland and dry sclerophyll forests especially on the western plains. The altitude ranges from 5 meters ASL to 600 meters ASL.
The temperatures range from minus 3 degrees in early August to 40 degrees in January.
The rainfalls range from lows of 600mm to an average of 1600mm annually.
Soil Requirements:
Bossiaea rhombifolia prefers sandy loams, light fatty clays or gravelly medium clays. The soils are derived from decomposed sandstone or accumulated sands behind the frontal dunes on the coast. Sandstone soils may be skeletal or deep sands. The soils have a pH which ranges from 5.5pH to 6.5pH. It does not tolerate water logged soils. Non saline soils to very saline soils are tolerated.
Height & Spread:
Wild Plants: 0.3m to 2m by 0.8m to 1.6m.
Characteristics:
Bossiaea rhombifolia grows as a small erect shrub with pale blue-green to pale blue-grey stems. The flat, dull, glabrous stems become more rounded as the plants mature. The young and juvenile stems are similar to the adult stems.
The alternate leaves of Bossiaea rhombifolia subspecies rhombifolia are rhombic, broad ovate to angular-obovate and measure 4mm to 10mm in length by 4mm to 9mm in width. The bases are rounded to broadly cuneate while the apexes are obtuse-acute with a mucronate tip. The concolourous laminas are pale blue green to pale grey-green. The laminas are flat to recurving upwards from the midvein to the margins. The margins are entire. The mid vein is slightly prominent on the lower lamina and is faintly visible from the upper lamina. The triangular stipules measure 1mm to 1.5mm in length. The petioles measure 1mm to 1.5mm in length.
The alternate leaves of Bossiaea rhombifolia subspecies concolor are rhombic to elliptical-rhombic and measure 3mm to 9mm in length by 2.5mm to 6mm in width. The bases are rounded to broadly cuneate while the apexes are obtuse-acute, truncate or retuse. The concolourous laminas are pale blue-green to mid grey-green. The laminas are flat to recurving upwards from the midvein to the margins. The margins are entire. The mid vein is slightly prominent on the lower lamina and is faintly visible from the upper lamina. The petioles measure 1mm to 1.5mm in length.
The inflorescences of Bossiaea rhombifolia subspecies rhombifolia are born singularly from the leaf scale axils. The pedicels are glabrous and measure 2mm to 4.5mm in length. The green bracts measure 0.6mm to 1mm in length. The bracteoles are positioned near the junction of the pedicel and leaf axils. The bracteoles measure 0.6mm to 1mm in length. The blue-green calyxes often have a purple to burgundy tinge whether this is from natural colouring or phosphate deficiencies is difficult to tell. The calyxes measure 3.5mm to 5mm in length while the lobes measure 0.6mm to 0.9mm in length.
The flowers measure 7mm to 12mm in length overall. The 2 ovate to broad ovate-reniform standards are mid yellow to bright yellow externally and yellow internally with red markings near the base. The standards measure 4mm to 5mm in length by 3.5mm to 4mm in width. The 2 oblong wing petals are deep maroon-red to burgundy-red with obtuse apexes. The wings measure 3.5mm to 4.5mm in length by 2mm to 3mm in width. The deep maroon-red to deep burgundy-red, oblong keel has an obtuse apex and measures 4.5mm to 5mm in length by 2mm to 3mm in width.
The 4 locule ovary is long-stipitate and glabrous. The flowers appear from July to October.
The inflorescences of Bossiaea rhombifolia subsp. concolor are similar to the type subsp. but measures 7mm to 8mm overall meaning that all dimensions are slightly smaller. The flowers sometimes lack the red markings on the standard petals. Flowers appear from August to early November.
The fruits of Bossiaea rhombifolia are flattened obovate to oblong pods. The glabrous pods measure 10mm to 25mm in length by 7mm to 12mm in width and 3mm to 4.5mm in thickness. The bracteoles are persistent at the base while the style is persistent at the apex of the pods.
Wildlife:
Bossiaea rhombifolia’s wildlife is unknown to the author.
Cultivation:
Bossiaea rhombifolia makes a beautiful and interesting addition to most gardens. It is ideal for small to large gardens. It will grow from 0.5 meters to 1.2 meters in height by 0.8 meters to 1.2 meters in diameter in the garden when grown in the open.
The shrub makes a sensational accent plant for rockeries of all sizes or on harsh barren sites and has the advantage like all legumes it replaces nitrogen back into the soil. It can be incorporated into a miniature forest gardens very easily. The use of contours to display the plant to its best is essential along with sparse plantings. Use small, fine leaf tussock grasses, Lilies like Patersonia glabrata or Lomandra filicifolia adjacent to Bossiaea rhombifolia to give a stronger feeling of beauty when it is in flower.
Place it near old stumps and roots to make the stumps or roots look larger and harsher. Remember this plant is rather small so be sparing with the other plants when planting and use short plants.
Try using it in a rockery with small leaf succulents like Disphyma crassifolium, Haloscaria bulbosa or Sarcocornia blackiana for something truly different. Here it can be lightly pruned and planted in groups of 3 at 1 meter centers to give a totally lush theme especially when it is in flower. The shrubs respond to pruning to produce a more densely foliaged plant.
Either side Bossiaea rhombifolia you could use plants that grow no more than 0.4 meters in height. These plants should have fine pale green leaves with small, lilac or mauve flowers to enhance the pale bluish leaves.
Bossiaea rhombifolia is not often grown which means seeds or cutting material may have to be; initially, collected from wild plants. It is a hardy species for sunny or semi-shaded sites below open Eucalyptus trees like Eucalyptus resinifera, Eucalyptus pilularis or Eucalyptus planchoniana. Bossiaea rhombifolia grows in the more open canopy areas, along walkways or where an old tree has fallen allowing more light to reach the ground.
The soils need to be well drained but moist for it to flourish. It tolerates moderate frost and temperatures down to minus 2 degrees once established without any burning of the foliage.
Bossiaea rhombifolia would make a good contribution to a moist sandy or rocky terrain rock garden whether it is flat or on a slope. Here it can be used as fill in plants, scattered throughout the boulders. When you use it in an area that is strewn with large boulders do not over crowd the scene as the boulders are a formidable part of the scene. Bossiaea rhombifolia is well suited to such conditions so use contours to display the plants. Plants must be planted sparingly with short annuals between to display Bossiaea rhombifolia’s vibrant yellow flowers. This can be achieved with using Bossiaea rhombifolia’s beautiful pale blue-green rhomboidal leaves contrasting with finer pale green or soft grey to glaucous coloured foliage. If large deep green leaf plants are wanted try using them as prostrate plants or in the background. Use a lot of procumbent plants like Hibbertia obtusifolia, Lechenaultia formosum, Xerochrysum bracteatum, Xerochrysum viscosum to make Bossiaea rhombifolia look larger more spectacular. Mix it with other smaller shrubs so none of them dominate the scene but blend in to give a mosaic of foliage colours that you oversee.
Tip pruning of the stems on an annual basis after flowering has ceased will ensure bushier, smaller plants that will have better and larger flowers in the future. An annual application of organic native fertilizers will also increase the vigour of the plants. Unfortunately the plants are rather short lived probably around 4 or 5 years, but are easy to reproduce and often set fertile seed giving a continuous cycle of seedlings to mature plants.
Propagation:
Seeds: The seeds of Bossiaea rhombifolia can be removed easily from the pods as they dry. The seeds need to be treated by placing them in a glass of water off the boil and allowing it to cool. Sow the swollen seeds directly into a seed raising mix, keeping them moist not wet. Place the trays in a warm place under 30mm shade cloth. When the seedlings are 30mm to 60mm tall, prick them out and plant them into 50mm native tubes using a good organic mix.
As the seedlings roots reach the bottom of the tubes plant them out into their permanent position.
Cuttings: Try using 80mm to 120mm long material from semi hardwood to on the current season’s growth that is just after a flush of growth has hardened. This type of cutting normally is made from the middle of September to early March. The wood is reasonably firm and not soft. Ensure the material has at least 2 nodes to work with. The bottom node is where the roots will grow while the upper node will supply the new shoots.
Using an appropriate rooting hormone, dip the cutting in and place it in a moist sterile seed raising mix. When the cuttings have obviously struck and have developed good roots treat them as for seedlings.
Fertilize using Seaweed, fish emulsion or organic chicken pellets soaked in water on an alternate basis. Fertilize every two months until the plants are established then annually in early September to October to maintain health, vitality and better flowering.
Further Comments from Readers:
Hi reader, it seems you use The Bible of Botany a lot. That’s great as we have great pleasure in bringing it to you! It’s a little awkward for us to ask, but our first aim is to purchase land approximately 1,600 hectares to link several parcels of N.P. into one at The Pinnacles NSW Australia, but we need your help. We’re not salespeople. We’re amateur botanists who have dedicated over 30 years to saving the environment in a practical way. We depend on donations to reach our goal. If you donate just $5, the price of your coffee this Sunday, We can help to keep the planet alive in a real way and continue to bring you regular updates and features on Australian plants all in one Botanical Bible. Any support is greatly appreciated. Thank you.
In the spirit of reconciliation we acknowledge the Bundjalung, Gumbaynggirr and Yaegl and all aboriginal nations throughout Australia and their connections to land, sea and community. We pay our respect to their Elders past, present and future for the pleasures we have gained.
Bothriochloa decipiens
Classification:
Unranked: Monocots
Unranked: Commelinids
Order: Poales
Family: Poaceae
Subfamily: Panicoidaea
Tribe: Andropogonaea
Genus: From Bothrion/Brothos, which is Ancient Greek for a little pit and Chloe, which is Ancient Greek for a grass. It refers to organs usually the glumes, which have small pits.
Species: From Decipiens, which is Latin for to deceive, deceitful or false. It refers to plants, which appear to have a structure or organ of another plant so that it at times looks superficially similar to another plant species.
Common Name: Red Leg Grass or Blue Pitted Grass.
Distribution:
Bothriochloa decipiens is a wide spread species found south and east of a line from the Gulf of Carpentaria on the Queensland, Northern Territory border south to Nash Lake then in a south easterly line to Adavale then south line to Cobar and Henty near the Victorian border.
There is a disjunct population near Shepparton in Victoria and 3 isolated disjunct populations in Western Australia on the Hamersley Range, Tom Price and Murchison.
https://avh.ala.org.au/occurrences/search?taxa=Bothriochloa+decipiens#tab_mapView
Habitat Aspect Climate:
Bothriochloa decipiens prefers light dappled shade full sun. It is usually found on dry open flat plains or gentle slopes. The altitude ranges from near 5 meters ASL to 450 meters ASL.
The temperatures range from minus 3 degrees in August to 44 degrees in January.
The rainfall ranges from lows of 250mm to 3000mm average per annum.
Soil Requirements:
Bothriochloa decipiens usually prefers sandy loams to medium clays or at times heavy clays. The soils can be fertile or poor, skeletal or deep and porous or cloggy. The soils are usually derived from decomposed brown basalt, black basalt, sandstones, shales, metashales and granites usually deposited as alluviums. The soils pH ranges from 4.5pH to 6.5pH. It tolerates water logged soils for short periods. Non saline soils to moderately saline soils are tolerated.
Height & Spread:
Wild Plants: 0.6m to 1m by 0.5m to 0.8m.
Characteristics:
Bothriochloa decipiens is an erect densely tufted caespitose perennial grass. The fawn to rusty-brown rhizomes are very short and sparsely branched.
The 5 to 9 culms are erect or geniculate ascending, terete and measure 300mm to 1600mm in height or rarely to 2000mm in height by 0.8mm to 1.6mm diameter. The mid culm nodes are glabrous while the lateral branches simple or sparsely branched.
Leaves are mostly basal. The leaf sheaths of Bothriochloa decipiens are dull and glabrous or sparsely covered in white puberulent hairs. The ligules have a fringed membrane with a truncate apex and measure 0.75mm to 1.5mm in length. The leaves measure 60mm to 260mm in length by 2mm to 6mm in width. The long linear laminas are glabrous or sparsely covered in white puberulent hairs and have a truncate or obtuse apex. The concolourous laminas are grass-green. The margins are entire.
The inflorescences of Bothriochloa decipiens are subdigitata with 3 to 5 appressed racemes. The racemes measure 40mm to 70mm in length. The racemes are fragile at the nodes and are covered in 4mm to 5mm long white hirsute or pilose hairs in the axils pedicels and joints.
The sessile sterile spikelets are 1 in the cluster with companion spikelets pedicelled. The fertile spikelets are 2 flowered, the lower floret barren or rarely male while the upper fertile flower comprises of a single basal sterile floret without a Rachilla extension. The spikelets are lanceolate, dorsally compressed and measure 4.75mm to 5.25mm in length.
The single glumes are similar, acute and measure 2.5mm to 3.8mm in length. The elliptical lower glumes’ surfaces are covered in long 3mm to 10mm white puberulent hairs. The lower glume is without a keel with 7 to 9 nerves. The lanceolate, upper glume has a single keel with 3 nerves while the surface is asperulus.
The basal single sterile florets are barren without a significant palea. The fertile lemma measures 1.75mm to 2mm in length. The lemma’s apex is entire with a single awn which measures 15mm to 24mm in length overall with a twisted column. The column measures 6mm to 10mm in length. The palea is absent.
The inflorescences have a single anther. The anthers measure 3mm to 3.5mm in length overall including the 0.4mm to 0.6mm appendages. The flowers appear from late September to late February under ideal conditions.
The fruits of Bothriochloa decipiens are white grains. The grains are covered in white pilose hairs or white papillose hairs. The grains measure 1.9mm to 2.5mm in length.
Wildlife:
Bothriochloa decipiens’s do not appear to have any predators though the leaf blades are eaten by kangaroos, wallabies and stock when other food is not available.
The seeds are edible and the plants have intermediate nutritional value for stock that usually prefer sweeter more palatable species to this one.
Cultivation:
Bothriochloa decipiens is a perennial tufted grass for larger gardens and pastures on farms. In cultivation it will grow from 1.3 meter to 1.5 meters in height by 0.6 meter to 0.8 meters in diameter when grown in the open.
It grows exceptionally well on most soil types except for pure sand. 1 or 2 deep waterings during the growing season is far more beneficial than regular small amounts. It can cope with temperatures as low as minus 4 degrees and up to 40 degrees. It is drought tolerant once established while at the same time can cope with periodic flooding and wet feet.
It is an excellent plant for mulching the ground especially when grown on better quality soils where it will produce copious quantities of good quality trash and can be harvested several times in a growing season.
Propagation:
Seeds: Seeds of Bothriochloa decipiens can be collected from the panicles as the majority of the seeds ripen. Once the flowers have died and the first seeds have appeared remove the panicle and place it in a brown paper bag. Seeds will remain viable for several years if kept cool and dry.
Sow the seeds directly into a seed raising mix, keeping them moist. When the seedlings are 40mm to 50mm tall, prick them out and plant them into 50mm native tubes using a good organic mix.
As the seedlings roots reach the bottom of the tubes plant them out into their permanent position. Do not delay as they will develop a large root system quickly and will be difficult to remove without some set back to the vigour or health of the plants.
Division: Bothriochloa decipiens can also be divided, although getting large numbers is more successful from seed. Bothriochloa decipiens can be divided by digging up a clump and cutting the fibrous root clumps into two to four equal parts with a spade. Cut all the leaves and stems back to within 50mm to 70mm of the ground level and replant them in a reprepared hole. I usually do this by making sure the old ground level is 10mm to 20mm below that of the new ground level where you want them to be at the same level when everything settles down or plant them at the same level if a small depression is required. Water in thoroughly with a weak solution of one of our fertilizer recommendations.
Fertilize using Seaweed, fish emulsion or organic chicken pellets soaked in water on an alternate basis. Fertilize every two months until the plants are established then annually in early September to October to maintain health, vitality and better flowering.
Further Comments from Readers:
Hi reader, it seems you use The Bible of Botany a lot. That’s great as we have great pleasure in bringing it to you! It’s a little awkward for us to ask, but our first aim is to purchase land approximately 1,600 hectares to link several parcels of N.P. into one at The Pinnacles NSW Australia, but we need your help. We’re not salespeople. We’re amateur botanists who have dedicated over 30 years to saving the environment in a practical way. We depend on donations to reach our goal. If you donate just $5, the price of your coffee this Sunday, We can help to keep the planet alive in a real way and continue to bring you regular updates and features on Australian plants all in one Botanical Bible. Any support is greatly appreciated. Thank you.
In the spirit of reconciliation we acknowledge the Bundjalung, Gumbaynggirr and Yaegl and all aboriginal nations throughout Australia and their connections to land, sea and community. We pay our respect to their Elders past, present and future for the pleasures we have gained.
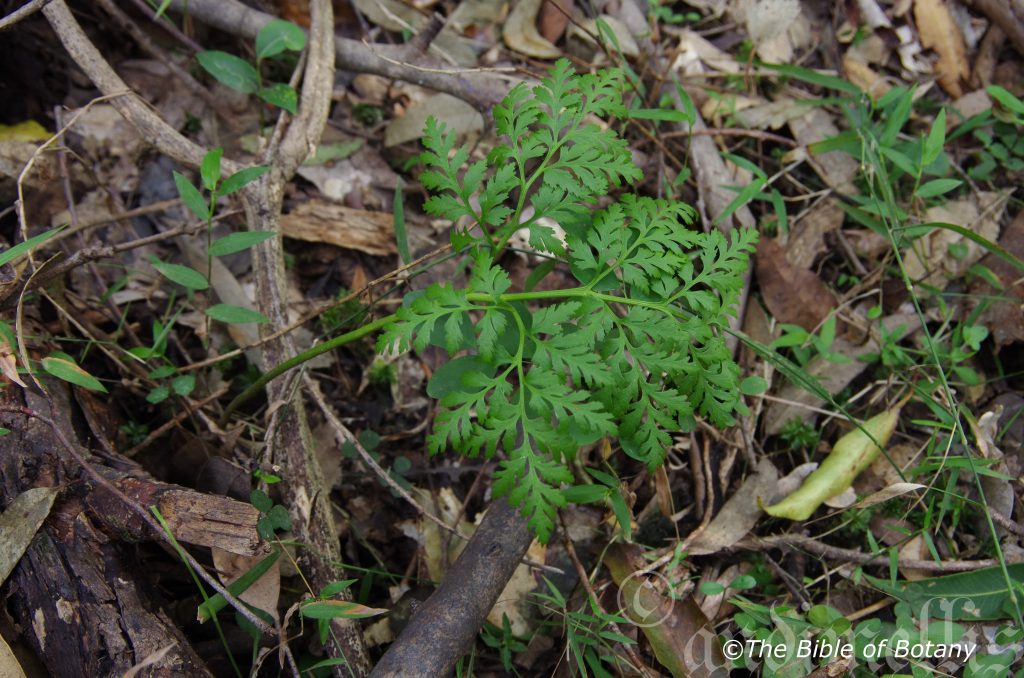
Pillar Valley NSW
Botrychium australe
Classification:
Class: Pteridospida
Order: Ophioglossales
Family: Ophioglossaceae
Genus: From Botrys, which is Ancient Greek for a bunch of grapes and Chium, which is Ancient Greek for a wine district in Ancient Greece. It refers to sporangia or fruits which somewhat resemble a bunch of grapes.
Species: From Terra Australis, which is Latin for land of the south. It refers to plants, which were first discovered from the land down under.
Common Name: Austral Moonwort, Parsley Fern, Austral Moorwort or Parsley Fern.
Distribution:
Botrychium australe is found south from Tiaro in southern coastal Queensland to Melbourne in Victoria. There are several disjunct populations from Mareeba in far north Queensland south to Kroombit State Forest in Queensland. There is also a population on Lord Howe Island.
It is found on King Island in Bass Strait and with 2 populations in Tasmania near Richmond and in the central highlands of Marlborough.
In South Australia it is found south of Adelaide to Clarendon district. The South Australian and Tasmanian plants are now believed to be extinct as the plants have not been sighted since to 1950.
https://avh.ala.org.au/occurrences/search?taxa=Botrychium+australe#tab_mapView
Habitat Aspect Climate:
Bothriochloa australe grows in dense shade, light shade or dappled sunlight. It is found on moist land in open forests and grasslands. The altitude ranges from 5 meters ASL to 980 meters ASL
The temperature ranges from minus 4 degrees in August to 38 degrees in January.
The rainfall ranges from lows of 450mm to 3000mm average per annum.
Soil Requirements:
Bothriochloa australe prefers fine sands, light fatty clays to medium clays with copious quantities of forest litter. The soils are usually derived from decomposed brown basalt, black basalt, granites, shale and metashales. The soils pH ranges from 5.5pH to 7pH. It does not tolerate water logged soils however prefers even moisture throughout the year. Non saline soils to moderately saline soils are tolerated.
Height & Spread:
Wild Plants:150mm to 450mm by 200mm to 100mm.
Characteristics:
Bothriochloa australe is a small tufted fern which is presently under further investigation. The reddish to reddish-brown rhizomes are usually glabrous. The plants are unusual in that it may spend a part of their time growing beneath the ground similar to fungi on decomposing vegetable or animal matter.
The thick, fleshy root is distinctly ridged and contracted.
Bothriochloa australe’s single or at times two, sterile fronds are usually 2 to 4 pinnate. The sterile laminae rachis is broadly ovate or 5-angled. The pinnae measure 70mm to 400mm in height by 100mm to 350mm in width. The glossy, glabrous, fleshy stipes are deep parsley green and glabrous and measure 40mm to 150mm in length. The broad ovate to orbicular fronds are deeply dissected similar to a parsley leaf. The concolourous pinnae’s laminas are deep green and semi glossy on the upper lamina while the lower laminas are dull. The plants produce a single frond a year which may be sterile, fertile or both.
The dimorphic single or at times two fertile fronds are born on the same fleshy stipese as the sterile frond. The triangular 2 to 3 pinnate fronds are narrower much branched and born on a long stalk. The pinnae with the sporangia are arranged in 2 crowded rows along the final lateral branches.
Wildlife:
Bothriochloa australe’s wildlife is unknown to the author.
Cultivation:
Bothriochloa australe is a beautiful ground fern that is worthwhile protecting and nurturing if you are lucky enough to have some growing on your property. While it is widespread it is not common and cultivation, animal husbandry and poor land use practices is forcing it closer to the point of being declared uncommon or rare. If a plant is found ensure there is a continuous supply of local, natural organic leaf litter available to cover the area. Do not use mulch from outside the area or non-native mulches. Keep the area moist not wet and avoid walking on the land as soil compaction and digging will only assist in their demise. Even if it appears to disappear remember like a fungus it can survive beneath the surface.
Propagation:
Spores: Nothing is known of its reproduction and it is likely that Bothriochloa australe could have a symbiotic relationship with certain mycorrhizal fungi and these will be needed if you are to be successful. Many species studied overseas have been known to exist beneath the ground similar to fungi with their only need to send a frond up is to reproduce. Further studies are required for the Australian specie.
All ferns that are declared rare, vulnerable or endangered are protected by Federal and State Laws and must not be removed from the wild unless you are a land developer, mining company or main Roads department etc. This includes bulbs, roots, leaves and flowers. No part of any plant can be removed from Federal, State or Local Government land without the prior permission of the authority and this includes the spore.
Most people are put off at the thought of growing ferns from spore. Like all plants that produce their offspring from seed or spore the methods are basically the same. Remember nature has been doing this for millions of years and has been very successful. I have had excellent results growing over 200 different species of Australian ferns so don’t be afraid. Give it a go.
Step 1. Select spore from the fern fronds. Wait until the fern is just starting to release its spore. Rinse the fronds under clean running water and dry. This is to wash off any other spores from rogue ferns that may have settled onto the fronds. (There is nothing worse than having common brake or common soft bracken contaminating a prized tree fern or epiphyte.)
Step 2. Place the dry fronds in a clean brown paper bag and keep them in a cool dark place like the linen closet for about a week to ten days before you are ready to sow the spore. The exception to this rule applies to ferns, which produce green spores. These must be sown immediately that they are released. Todea Barbara is a good example of a fern, which produces green spore.
Step 3. Take a large ice cream container, a small ice cream container and a clean clear plastic bag large enough to seal the large ice cream container and three or four milk bottle tops.
Step 4. Punch or drill 6 to 10 5mm holes in the bottom of the small ice cream container.
Step 5. Wash both containers, tops and plastic bag so that they are very clean and sterile.
Step 6. Use a clean fine seed raising mi. We used 30mm fine sand, 30mm peat and 30mm perlite and 10mm vermiculite. We used crushed basalt, crusher dust and peat in a 50:50 ratio for epiphytes. Moisten the mix enough that water does not run out when the mix is squeezed between the fingers.
Step 7. Place the moisten mix (Enough to half fill the small ice cream container) in the microwave oven with a large glass of water for 7 or 8 minutes, until the water is boiling. Allow them to cool in the oven. You will need the water later so do not tip it out.
Step 8. Take the brown paper bag out of the linen closet. Shake the bag and remove the fronds. You should have a yellow, brown, black or rarely greenish brown or ochre powder or very fine, small round pin head size spore depending on the specie involved.
Step 9. Remove the mixture from the oven once it has cooled and place it in the small ice cream container and level.
Step 10. Sprinkle the spore sparsely over the mixture in the small ice cream container.
Step 11. Place the milk bottle tops in the large ice cream container with the flat surface facing down. Place the small ice cream container in the large ice cream container so that it is sitting on the milk bottle tops.
Step 12. Remove the water from the microwave and pour it into the larger ice cream container so there is 25mm to 30mm of water in the bottom.
Step 13. Place the ice cream containers in the plastic bag and seal.
Step 14. Place the contents and bag in a warm shady place preferably 50mm to 70mm shade depending on the specie. Shade houses and some window sills are ideal.
Step 15. The surface should turn green within a week to two weeks. The prothallus will then develop. From the prthalus the first true fronds will appear. Wait until the ferns are 20mm to 35mm in height before you attempt to transplant them. Once they are ready open the bag up slightly and allow the air to flow around the little ferns. Every 3 to 5 days open the bag a little further so the ferns get use to their new environment. Allow them a week to two weeks to harden off before you transplant them following the removal of the plastic bag. Carefully prick them out into 50mm standard squat tubes as you would any seedling.
Do not try to transplant them as single plants as they are still a little delicate still.
Once the smaller ones again reach 50mm to 70mm you may wish to divide the stronger and hardier individual plants into smaller clumps in 100mm squat pots.
Fertilize using Seaweed, fish emulsion or organic chicken pellets soaked in water on an alternate basis. Fertilize every two months until the plants are established then annually in early September to October to maintain health, vitality and better flowering.
Further Comments from Readers:
Hi reader, it seems you use The Bible of Botany a lot. That’s great as we have great pleasure in bringing it to you! It’s a little awkward for us to ask, but our first aim is to purchase land approximately 1,600 hectares to link several parcels of N.P. into one at The Pinnacles NSW Australia, but we need your help. We’re not salespeople. We’re amateur botanists who have dedicated over 30 years to saving the environment in a practical way. We depend on donations to reach our goal. If you donate just $5, the price of your coffee this Sunday, We can help to keep the planet alive in a real way and continue to bring you regular updates and features on Australian plants all in one Botanical Bible. Any support is greatly appreciated. Thank you.
In the spirit of reconciliation we acknowledge the Bundjalung, Gumbaynggirr and Yaegl and all aboriginal nations throughout Australia and their connections to land, sea and community. We pay our respect to their Elders past, present and future for the pleasures we have gained.
All information is included in good faith and has been thoroughly researched prior to printing. The website or the author does not warrant or guarantee the accuracy of any information on these pages, nor does the website or the author accept any responsibility for any loss arising from the use of the information found within. The views and opinions are strictly those of the author or those members who chose to actively participate in the contents herein.