While photographing plants is a great hobby collecting the real thing and growing it on is better but not everyone can afford a camera nor do they own a large block of land to grow and watch there collection develop. This has led many people doing the next best thing in joining a “Friends of the Botanic Garden society.”
Here people can work in the gardens at their own pace and feel really proud of what they and the other members have created under the auspices of a professional botanist. Even Botanists flock to “Friends” when they retire because they cannot get enough of that greenery into their lives.
Collecting botanical specimens is not as simple as hacking off the flower and a couple of leaves, shoving them between pages in the telephone directory and waiting for them to dry and flatten out.
People considering herbarium samples as an adjunct to their pastime of gardening are best to do it through an approved Herbarium. The botanists are well trained, knowledgeable in the field of plants, can instruct in the best methods and friendly without placing further stress on plants in their natural environment.
There are 6 steps in preserving plant specimens. Collect, Label, Dry, Press, Mount and Label.
Collecting Plants in the Field
The best advice I can give here is to join a group of like minds at your local Herbarium or Botanic Gardens. If the local Botanic Gardens does not have a Herbarium then see if you can start one from scratch.
Different groups of plants require different methods. That is Woody trees and shrubs need different methods of collecting and pressing to ferns, fungi, herbaceous perennials, grasses or aquatic plants.
Label
Once a plant has been decided upon to be collected field notes need to be gathered
I fully recommend carrying a waterproof list of what information is required. How often in the excitement of finding a specimen to photograph I have forgotten to photograph the underside of the leaf.
The list is invaluable.
A typical Card for a herbarium would look similar to this.
Be responsible and think of the environment and government Laws.
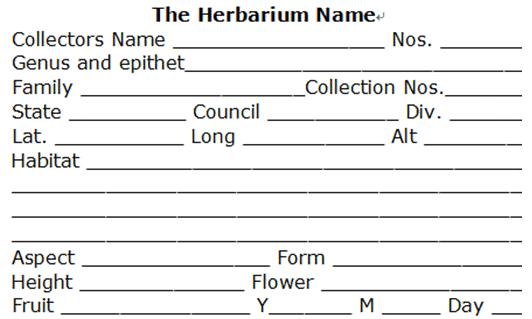
1. The collector’s name and collector number must be assigned to each specimen.
2. The genus and specie name should be filled out if known.
3. The family name should be filled out if known.
4. If samples are taken from different plants even in the same area on the same day they must be given a different collection number and treated as 2 separate samples. The rule of thumb with small plants is if several are collected together in close proximity, are of the same population and are able to fit onto a single pressing sheet then they can be classified as one collection, however if there is a difference between the specimens being collected they must be treated as separate specimens.
5. The location of the plants is best done by GPS giving latitude and longitude with minutes if possible. If this is not possible then the State, Council area and closest identification landmarks are to be used. (Street names creeks with distances. The odometer on a car is usually in 100 meter increments.)
6. The habitat includes the type of soil, associated plant communities, moisture of soil and terrain.
7. Aspect includes cliff face northerly, southerly sunny shaded etc.
8. The form is whether the plant is a tree, shrub, ground cover, creeper, liana annual, perennial etc.
9. Colour and stage of flowers and fruits if present.
10. The time of year month and day are important but can also include the time if flowering is affected by sunlight or darkness.
Drying Plants
Plants must be protected from fungal growth until the drying process is over. If the air temperature is too high or the relative humidity is too high, to dry the specimens adequately then place the plant press in a position where it will receive some additional ventilation out of direct sunlight. A fan at low speed will suffice perfectly.
You will need to tighten the press straps daily as they will become loose as the plants inside dry and shrink.
A simple dryer consists of an open-ended plywood box; with or without a bottom, measuring 46mm long, 350mm to 60mm wide and at least 30 cm high. To allow for proper air circulation, the dryer should have a small air vent cut near the base or should be raised slightly off the ground, if the bottom of the dryer is absent. A 100 watt bulb is placed in the bottom of the dryer; on a metal tray or fire or fire proof container. The press is placed; on a brick on each corner, on edge, length wise, above the dryer’s open top, with cardboard placed alongside to block air spaces and to assist in creating the draft. This creates warm air at the base of the dryer which will rise through the press assisting in the drying process. Depending on the moisture in the plant samples, the collection sheets will dry in 24 to 48 hours
Pressing Plants the Procedure
The specimen must be completely dry before mounting. Brushing them with alcohol will be beneficial on some plants susceptible to fungi attack.
Place each plant between one sheet of folded newspaper. Only use one specimen per newspaper sheet.
Label each sheet in the bottom right hand corner to identify it with the specimen with your field notes. Collection Number and name will suffice.
Keep the size of a herbarium sheet in mind (290mm by 430mm). If the specimen is small, several may be needed to fill the sheet.
Make sure all the specimen fits between the sheets.
If necessary, the plant should be folded neatly in an “N” or inverted “V” so it will fit inside the specimen sheets for pressing. Place some leaves and flowers up and some down so both sides can be viewed at the same time when mounted.
Load the plant press. No more than 3 newspapers between blotter sheets. No more than 3 blotter sheets between cardboard dividers.
Tighten the press and do not disturb for 7 to 12 days!
Mounting Plants
Herbarium sheets measure 290mm by 430mm.
Glue a Herbarium card to the lower, right-hand corner of a herbarium sheet.
Decide how you will position your plant on the herbarium sheet.
Completely cover a tray or glass plate with a layer of “thinned” Elmer’s white glue.
Carefully lay your specimen in the glue on the tray. Do Not push the specimen down into the glue.
Lift the specimen from the glue and place it on the herbarium sheet, pressing the plant gently against the sheet.
For specimens with thick stems or fruit, run a bead of “Archers herbarium cement.”
Place the finished sheet flat on a lab table to dry.
Alternatively lay the specimen in position on the Herbarium sheet and use the appropriate herbarium tape to stick the specimen to the sheet. Herbarium tape is the easy modern method to secure your valuable specimen to the sheet.
Herbarium Cards
Much of the formal information needed for the herbarium card is available from the collector’s field notebook.
Correct identification of the specimen is extremely important at this point. Care must be take to insure the plant is labeled with the correct identification. The plants name collector number and location. Any additional information can be kept on the computer.
Storing Mounted Plants
In a professional herbarium, mounted plants are stored in humidity and temperature controlled rooms that are protected from insect infestation.
Personal mounts can be kept in boxes with mothballs, and stored in a dark cool cabinet. This must be done or collections will be attacked by silver fish or worse still termites sooner or later
Remember
1. The three educational goals of plant collecting are: To increase awareness of and study our natural environment, to Learn to manage and preserve our natural resources and to Learn to identify local flora by sight.
2. A complete specimen when collected should show the roots, stems, flowers and fruits.
3. When pressing plants, use one specimen per newspaper sheet.
4. Place no more than three newspapers between blotter sheets in a plant press.
5. The size of a herbarium sheet is 290mm by 430mm.
6. A herbarium card goes in the lower right hand corner of each herbarium sheet.
7. When storing dried plants, protect them from insect infestation and extremes in humidity and temperature.
8. A plant press is used to press and dry plants.
9. In the field, keep plants in a sealed plastic bag and out of sun.
10. List the basic information that should be kept in a collectors notebook about each plant. The collector’s name and collector number, The genus and specie of the plant if known, The collection number, The location preferably with a GPS system, The habitat, soil type, associated plant communities & terrain, The form of the plant, The colour and stage of flowers and fruits if present & the date.
11. There are 6 steps in preserving a plant – Collect, Label, Dry, Press, Mount and Label.
Further Comments from Members:
All information is included in good faith and has been thoroughly researched prior to printing. The website or the author does not warrant or guarantee the accuracy of any information on these pages, nor does the website or the author accept any responsibility for any loss arising from the use of the information found within. The views and opinions are strictly those of the author or those members who chose to actively, participate in the contents herein.
“Hi reader, it seems you use The Bible of Botany a lot. That’s great as we have great pleasure in bringing it to you! It’s a little awkward for us to ask, but our first aim is to purchase land approximately 1,600 hectares to link several parcels of N.P. into one at The Pinnacles NSW Australia, but we need your help. We’re not salespeople. We’re amateur botanists who have dedicated over 30 years to saving the environment in a practical way. We depend on donations to reach our goal. If you donate just $5, the price of your coffee this Sunday, We can help to keep the planet alive in a real way and continue to bring you regular updates and features on Australian plants all in one Botanical Bible. Any support is greatly appreciated. Thank you.”
In the spirit of reconciliation we acknowledge the Bundjalung, Gumbaynggirr and Yaegl and all aboriginal nations throughout Australia and their connections to land, sea and community. We pay our respect to their Elders past, present and future for the pleasures we have gained.