Hibiscus diversifolia
Hibiscus geranioides
Hibiscus heterophyllus
Hibiscus insularis
Hibiscus macilwraithensis
Hibiscus panduriformis
Hibiscus phyllochlaenus
Hibiscus sp. barambah creek
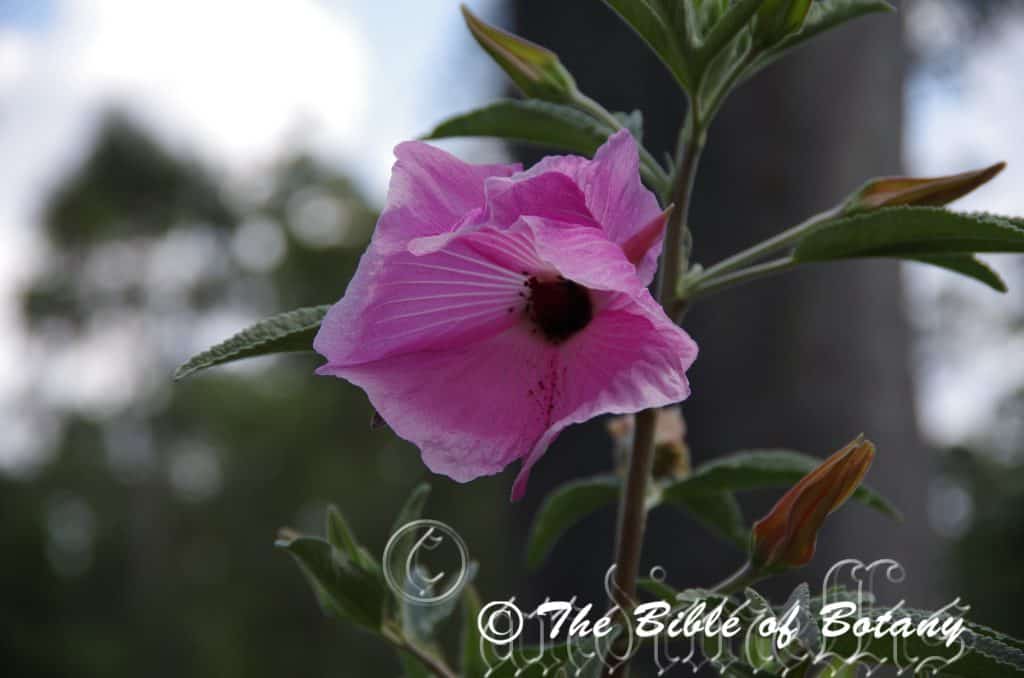
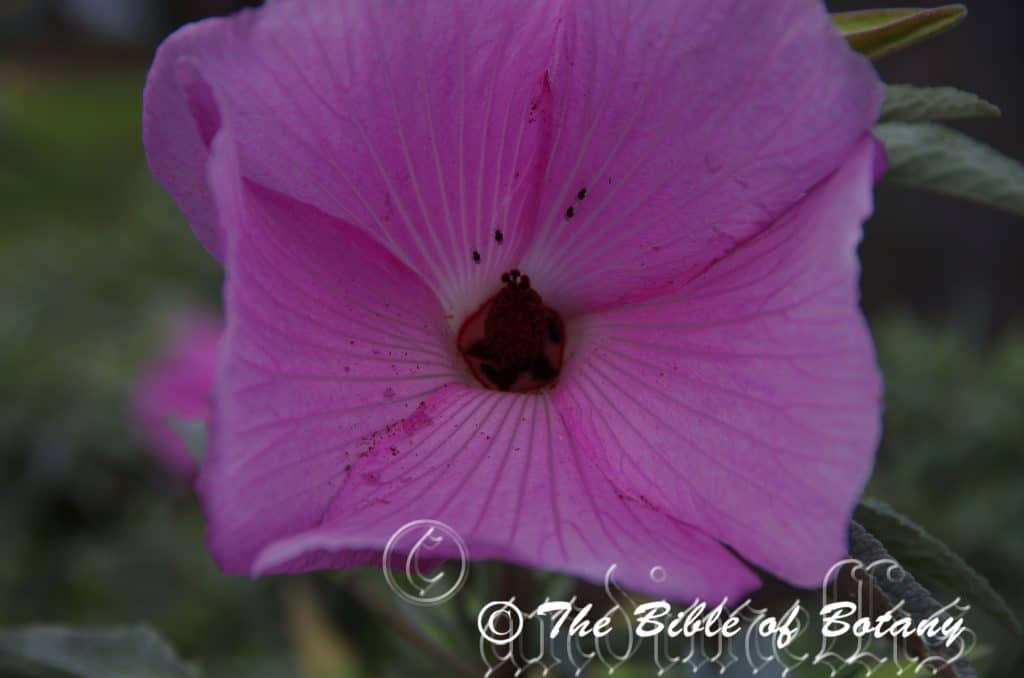
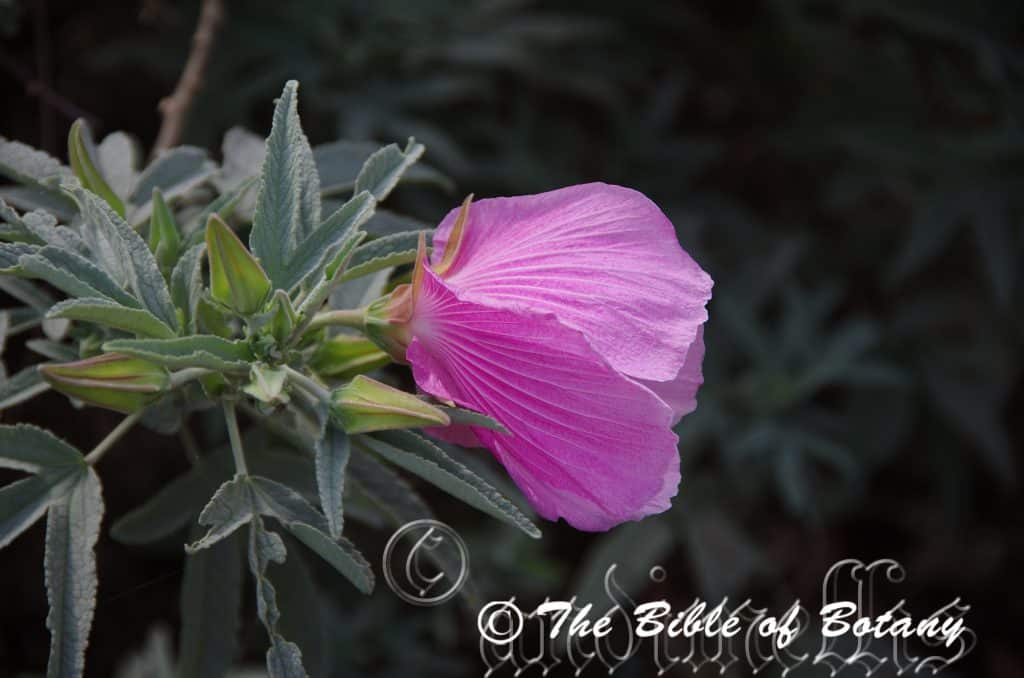
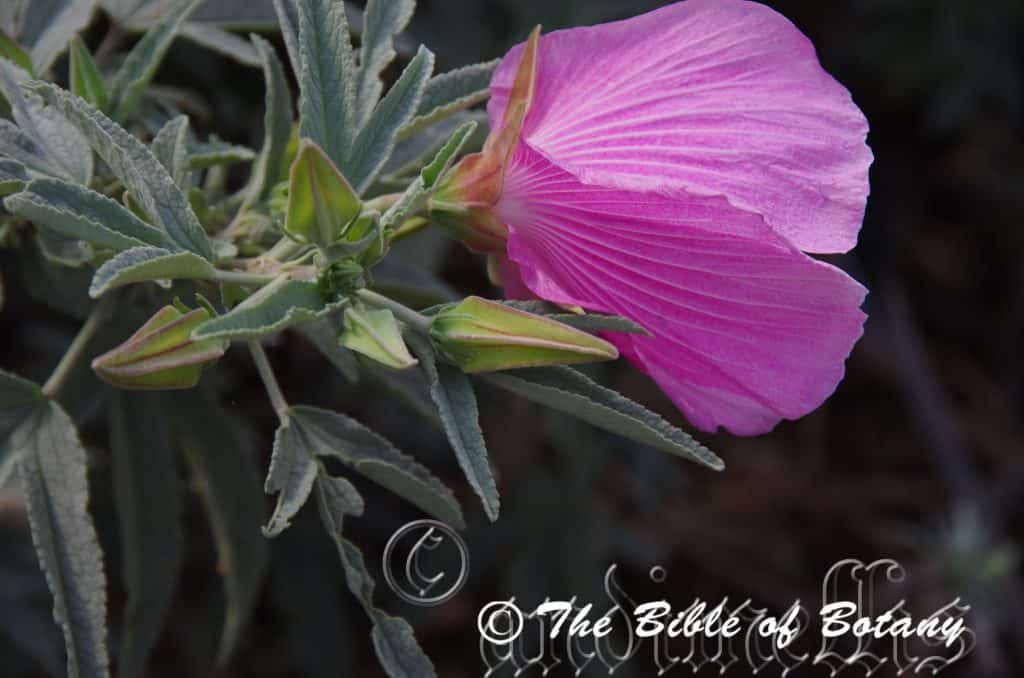
Hibiscus splendens
Hibiscus sturtii
Hibiscus tiliaceus
Hibiscus tozerensis
Hibiscus trionum
Hicksbeachia pinnatifolia
Hippocratea barbata
Histiopteris incisa
Hodgkinsonia ovatiflora
Homalanthus novoguineensis
Homalanthus populifolius
Homoranthus flavescens
Homoranthus virgatus
Hovea acutifolia
Hovea densivellosa
Hovea graniticola
Hovea heterophylla
Hovea longifolia
Hovea ramulosa
Hovea similis
Howea forsteriana
Howittia trilocularis
Hoya australis
Hoya macgillivrayi
Hoya oligotricha
Huperzia carinata
Huperzia phlegmaria
Huperzia phlegmarioides
Huperzia squarrosa
Hybanthus monopetalus
Hybanthus stellarioides
Hybanthus vernonii
Hydriastele wendlandiana
Hydrilla verticillata
Hydrocharis dubia
Hydrocotyle acutiloba
Hydrocotyle geraniifolia
Hydrocotyle pedicellosa
Hydrocotyle peduncularis
Hydrocotyle tripartita
Hydrocotyle verticillata
Hymenophyllum australe
Hymenophyllum bivalve
Hymenophyllum cupressiforme
Hymenophyllum flabellatum
Hymenosporum flavum
Hyparrhenia filipendula
Hypericum gramineum
Hypericum japonicum
Hypoestes floribunda
Hypolaena fastigiata
Hypolepis glandulifera
Hypolepis muelleri
Hypoxis pratensis
Diamond Head Beach NSW
Diamond Head Beach NSW
Diamond Head Beach NSW
Diamond Head Beach NSW
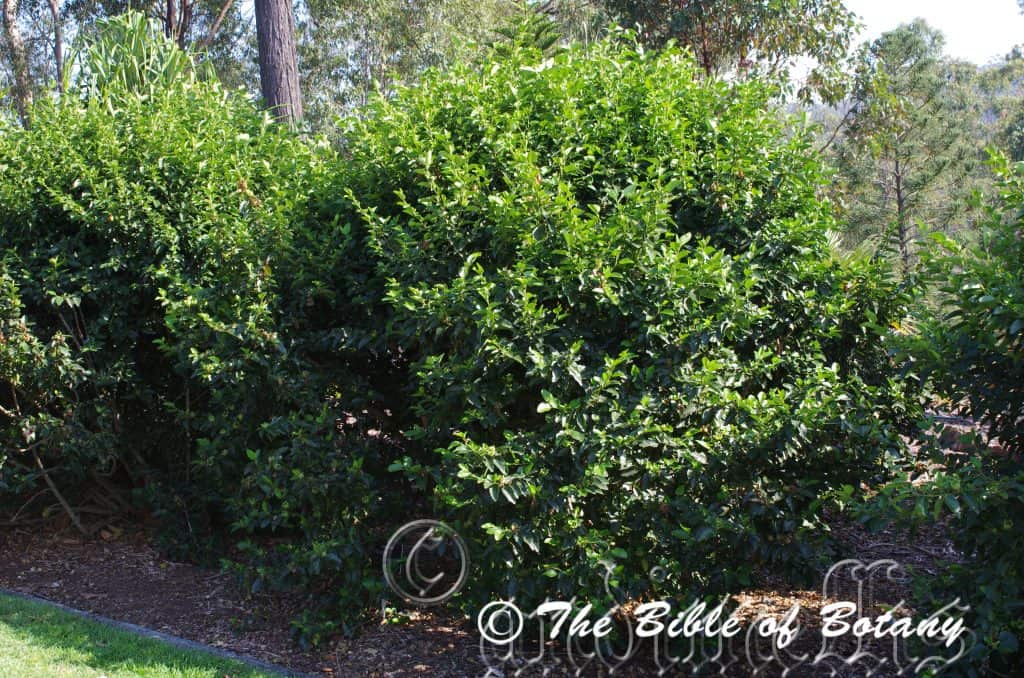
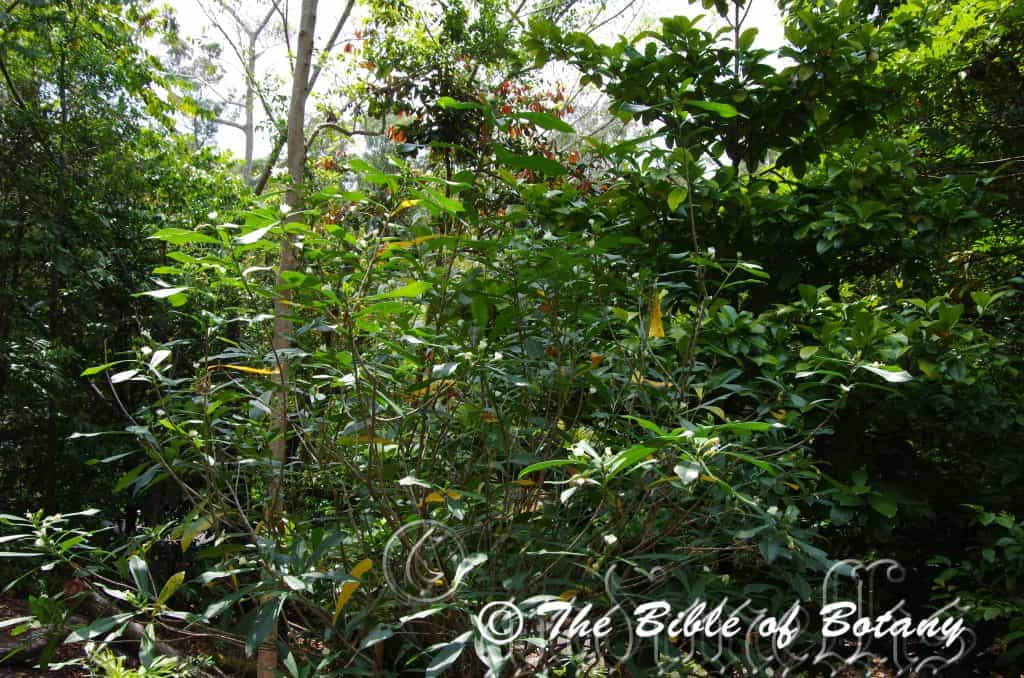
Author’s Garden The Pinnacles NSW
Diamond Head Beach NSW
Diamond Head Beach NSW
Diamond Head Beach NSW
Diamond Head Beach NSW
Author’s Garden The Pinnacles NSW
Hibiscus diversifolia
Classification:
Unranked: Eudicots
Order: Malvales
Family: Malvaceae
Subfamily: Malvoideae
Tribe: Hibisceae
Genus: From Ibískos, which is Greek or later Hibiscum, which is Latin for a marsh mallo. It refers to a plant in ancient Egypt that grew in marshes and was used to make mallow for soothing the throat. Today it refers to plants, which have flowers that resemble the marsh mallow plant.
Species: From Dīversum, which is Latin for more than one form and Folium, which is Latin for foliage. It refers to where the leaves are very variable in shape and size.
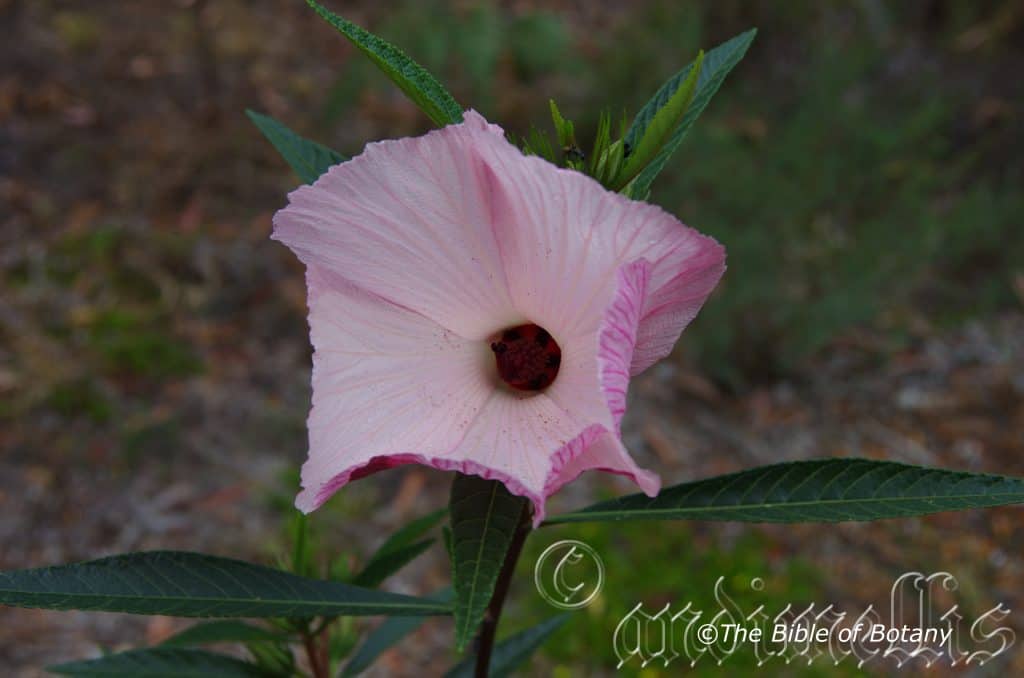
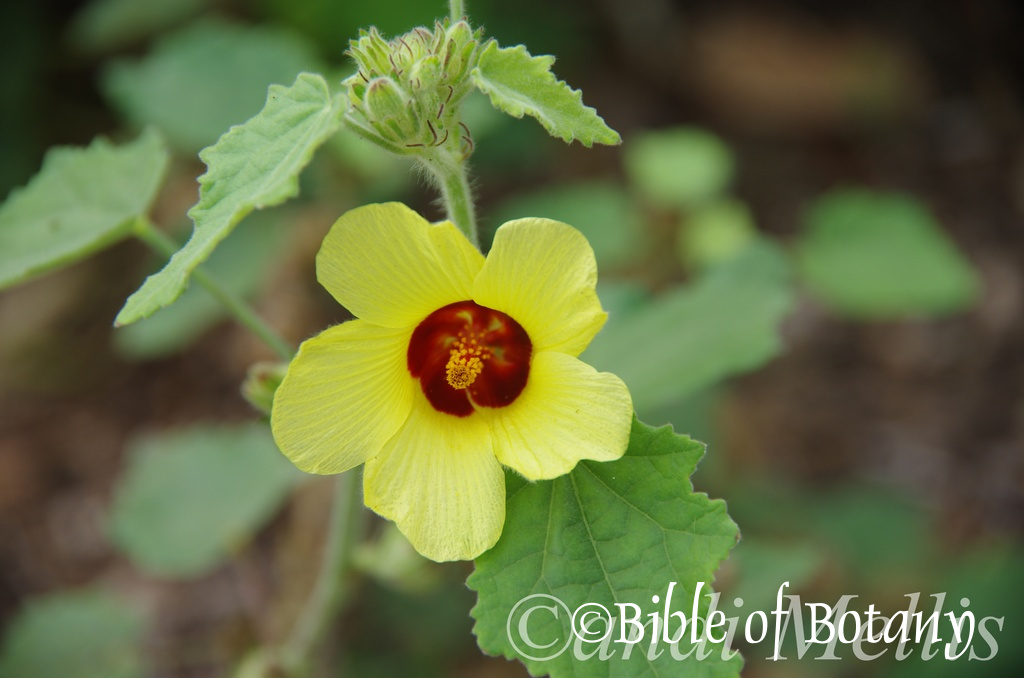
Common Name: Native Rosella.
In the Aboriginal language it is known as Wyrrung.
Distribution:
Hibiscus diversifolia is found south from Cairns in Queensland to Jervis Bay in central coastal New South Wales. It is found along the coastal strip.
https://avh.ala.org.au/occurrences/search?taxa=Hibiscus+diversifolia#tab_mapView
Habitat Aspects Climate:
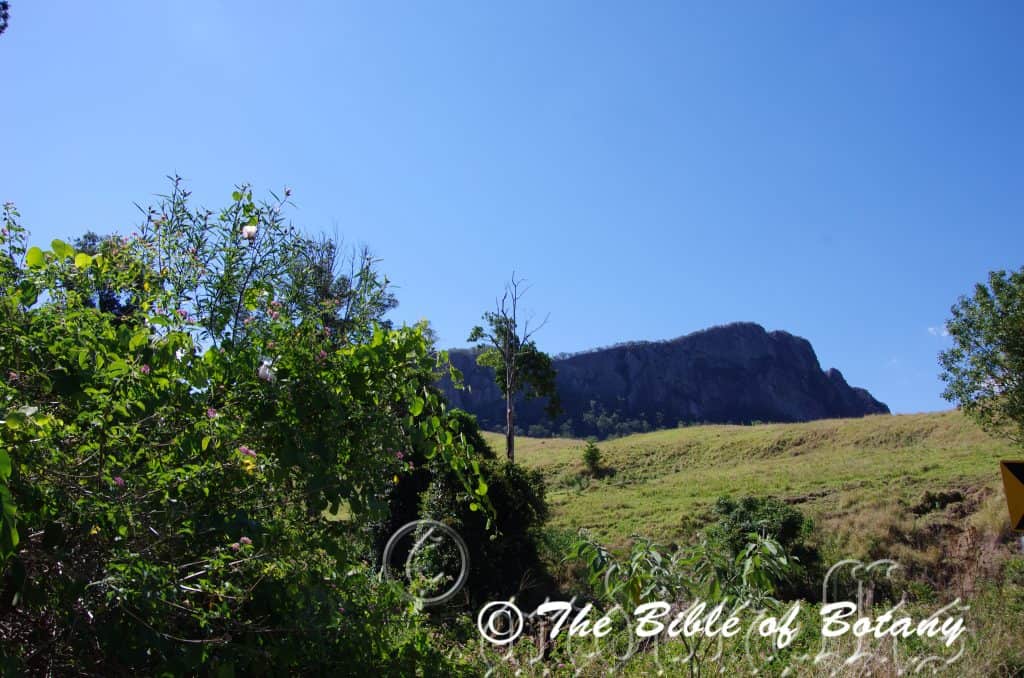
Hibiscus diversifolia prefers full sun to light dappled shade. It grows in more open woodland swamps, woodland wallum heaths or open heaths. The altitude ranges from 10 meters ASL to 350 meters ASL.
The temperatures range from 2 degree in July to 38 degrees in January.
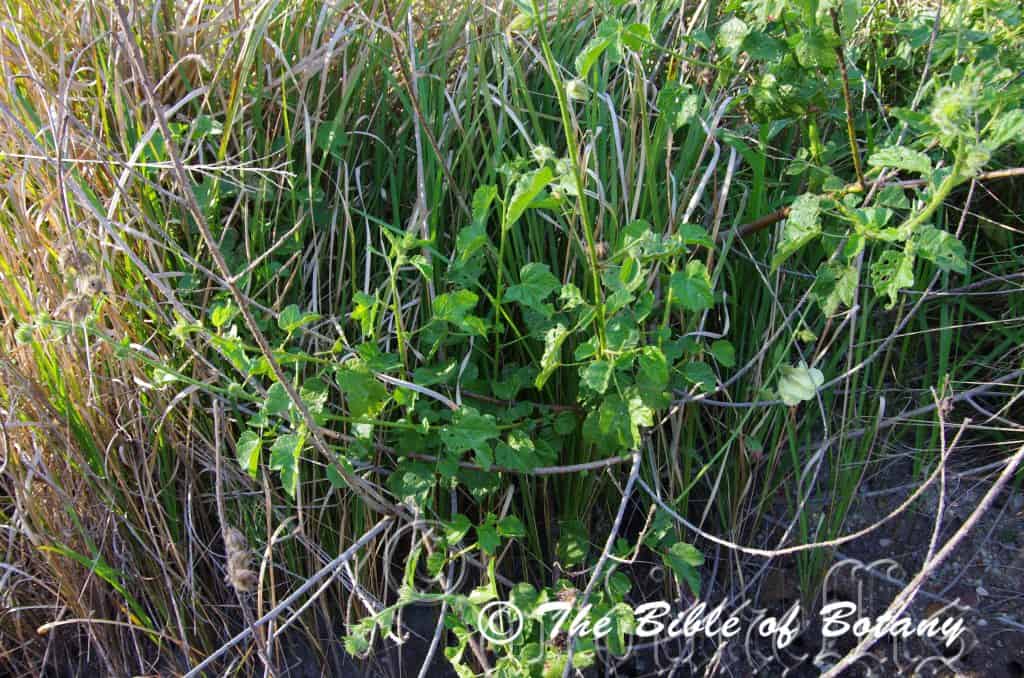
The rainfall ranges from lows of 750mm to an average of 2400mm annually. This is of little consequence as the plants grow where there is continuous ground moisture, even to the extent of becoming semi aquatic with branches extending out over the surface of the water.
Soil Requirements:
Hibiscus diversifolia prefers sandy loams, fatty sands, gritty light clays, medium clays or podsolics. The soils are derived from decomposed brown basalt, black basalt, metamorphic rocks sandstones or accumulated peaty beach sands. The soils pH varies from 5pH through to a 6pH. It tolerates waterlogged soils seasonal inundations and high water tables. Non saline soils to moderately saline soils are tolerated.
Height & Spread:
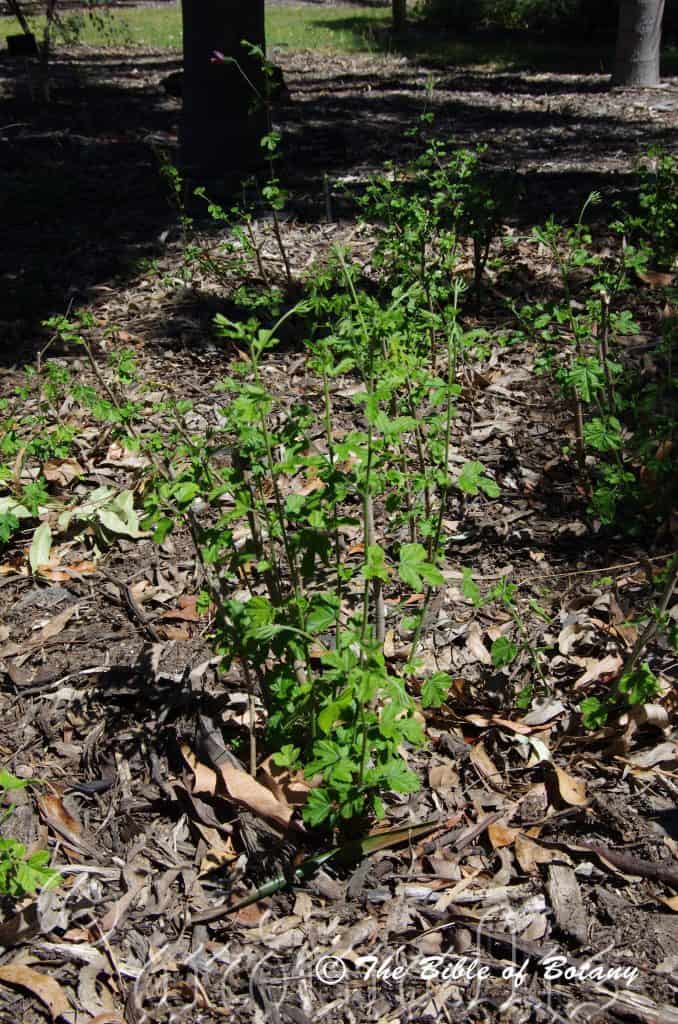
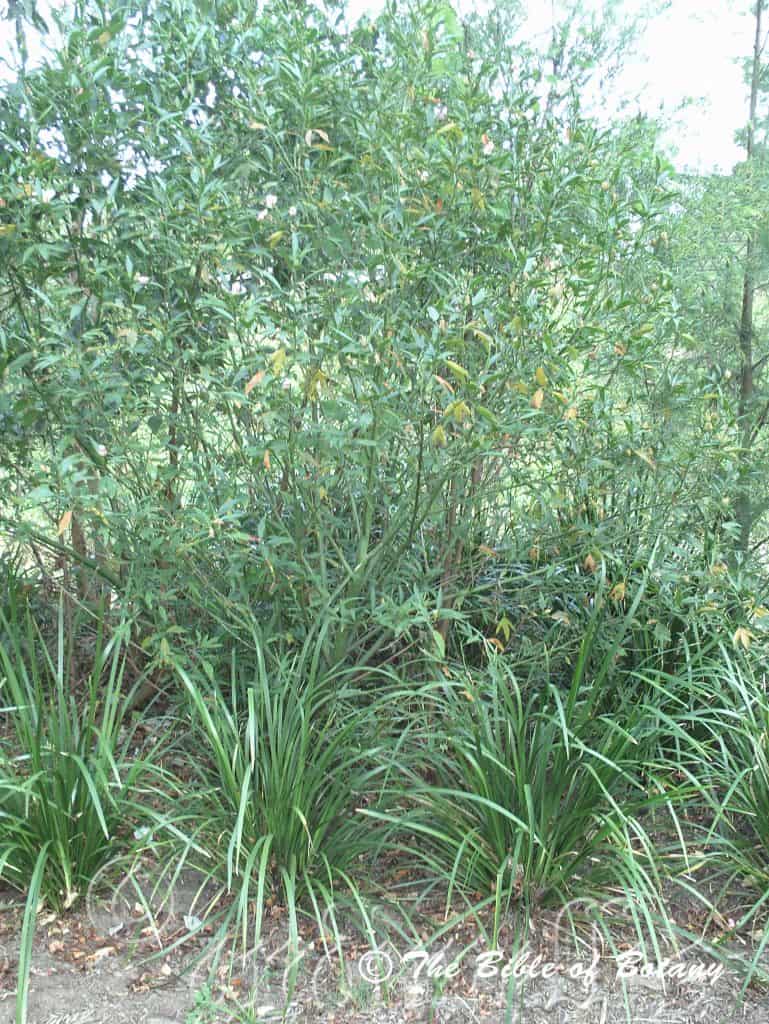
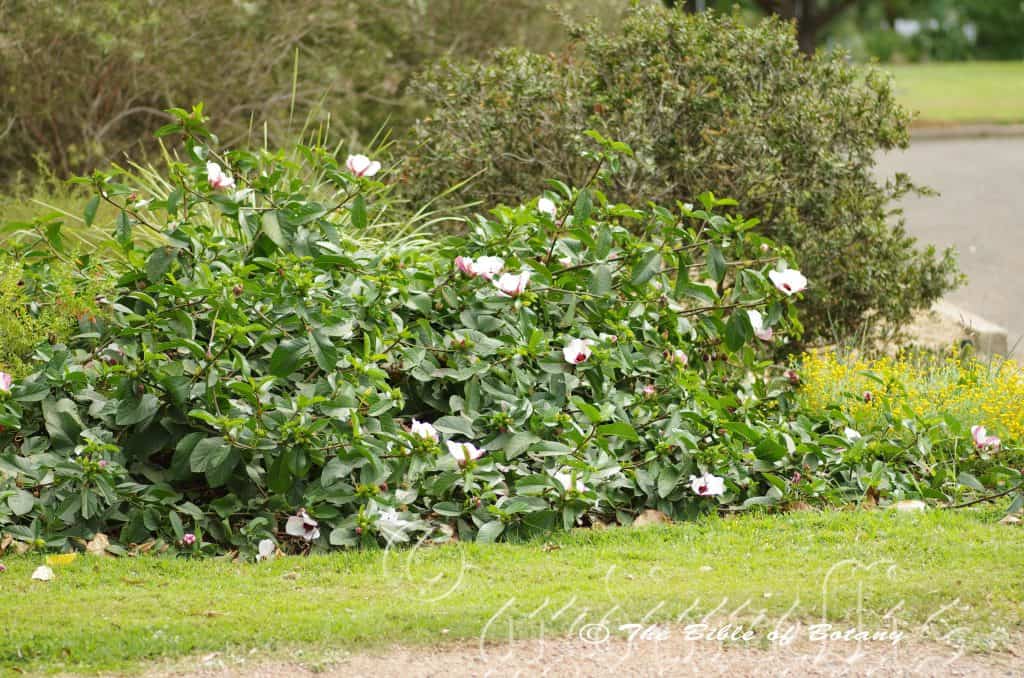
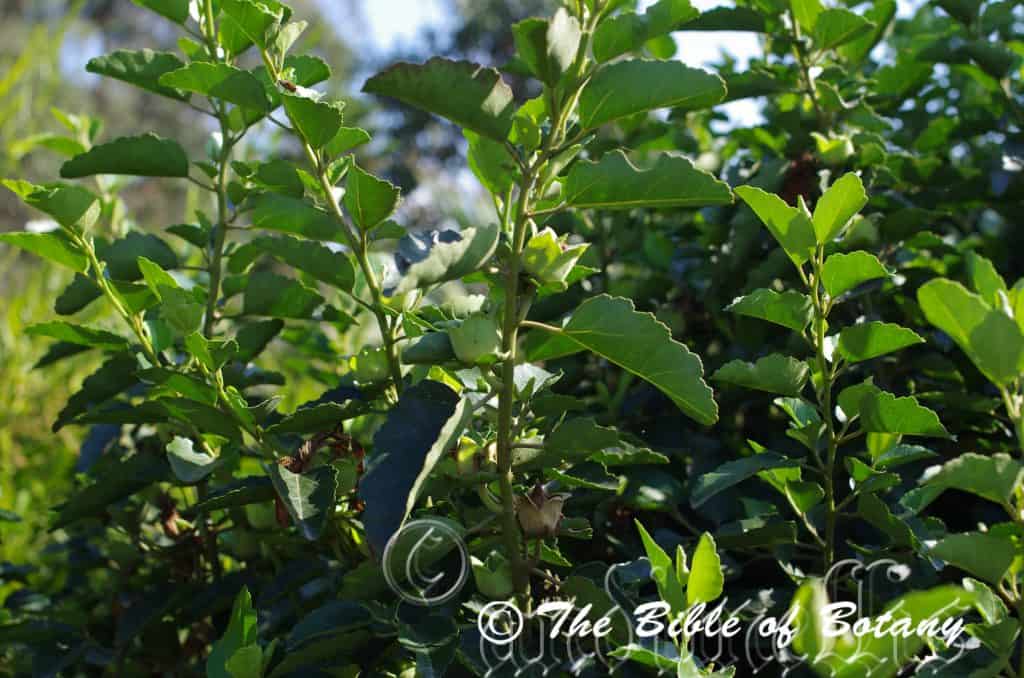
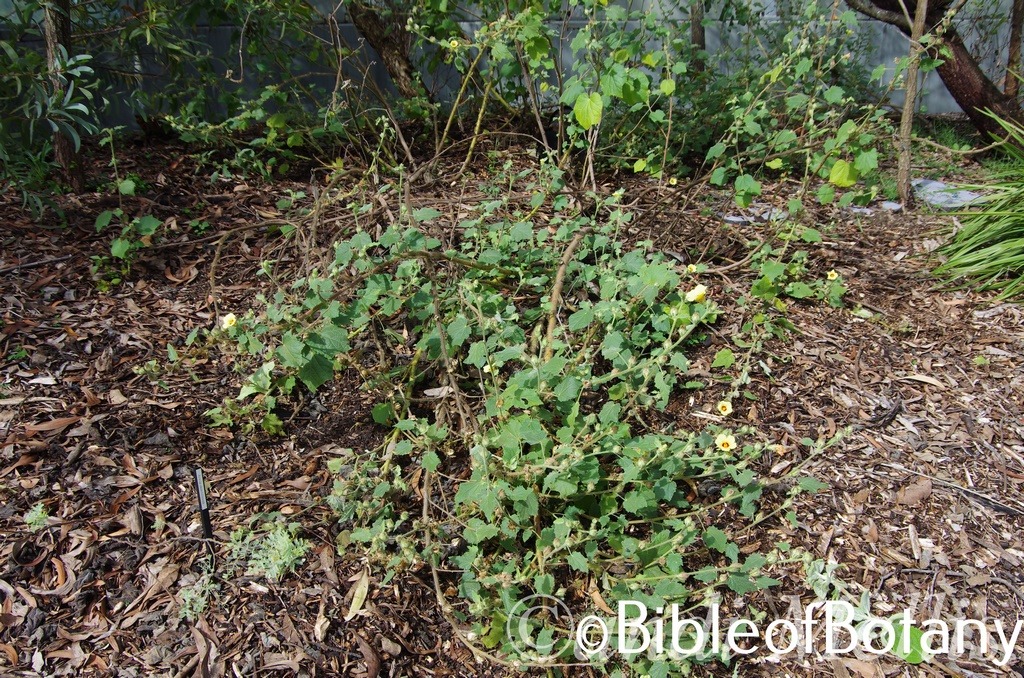
Wild Plants: 1m to 2m by 2m to 2.5m. This is a small straggly shrub that spreads thinly over other shrubs, grasses or the surface water.
Characteristics:
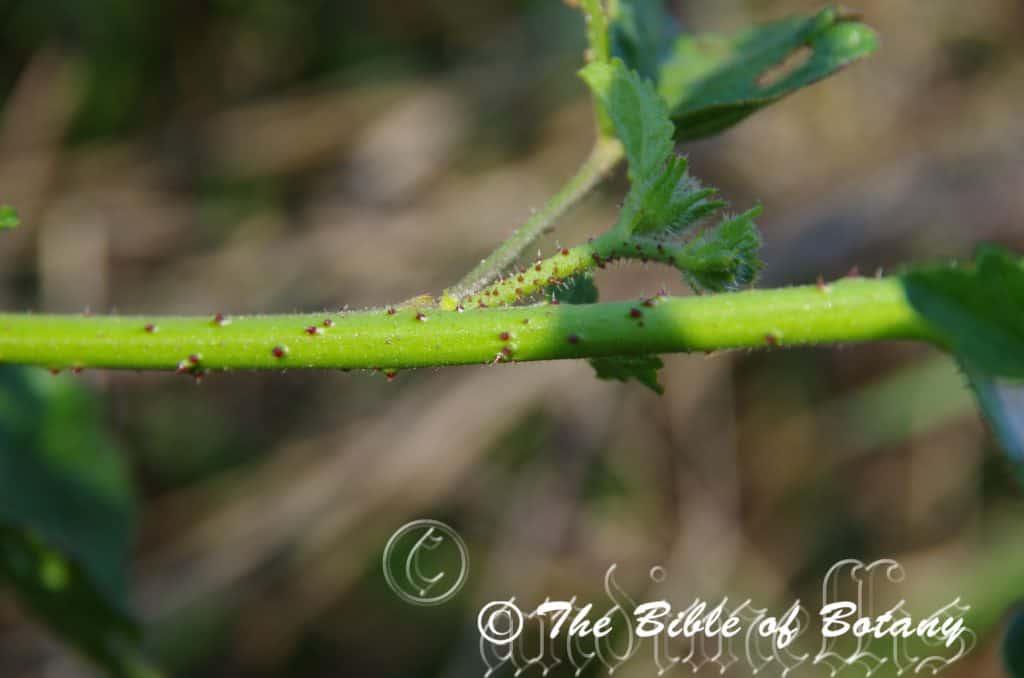
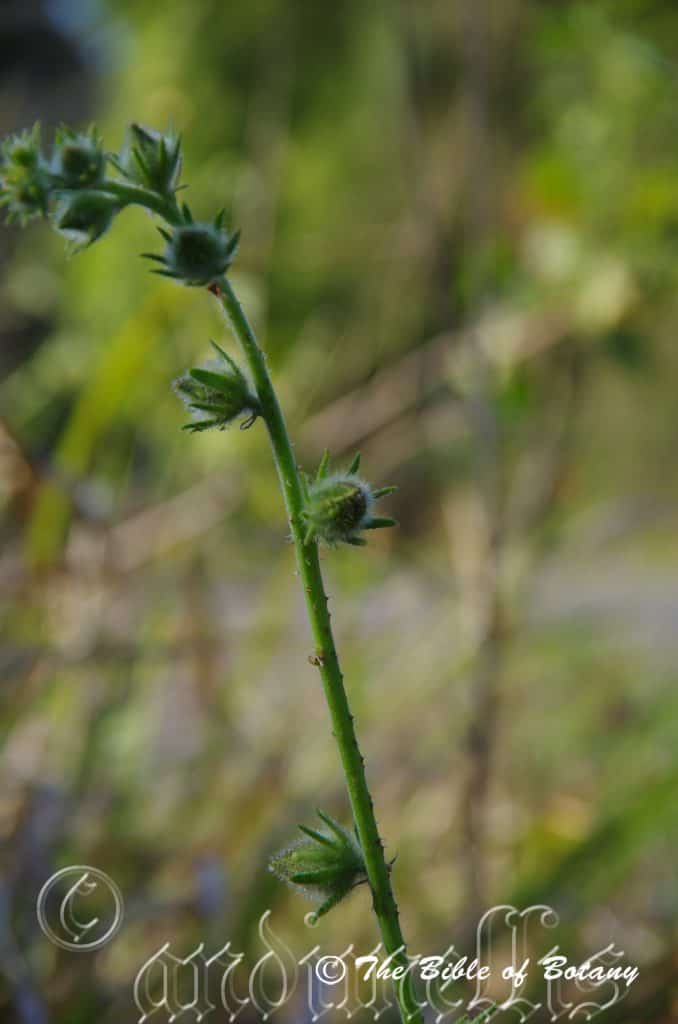
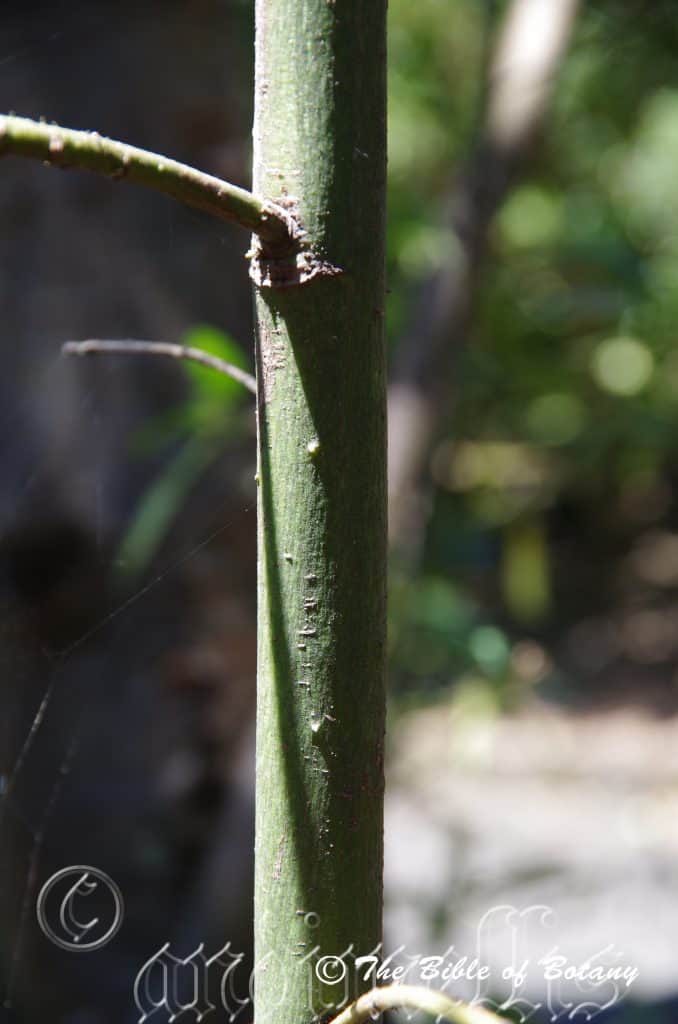
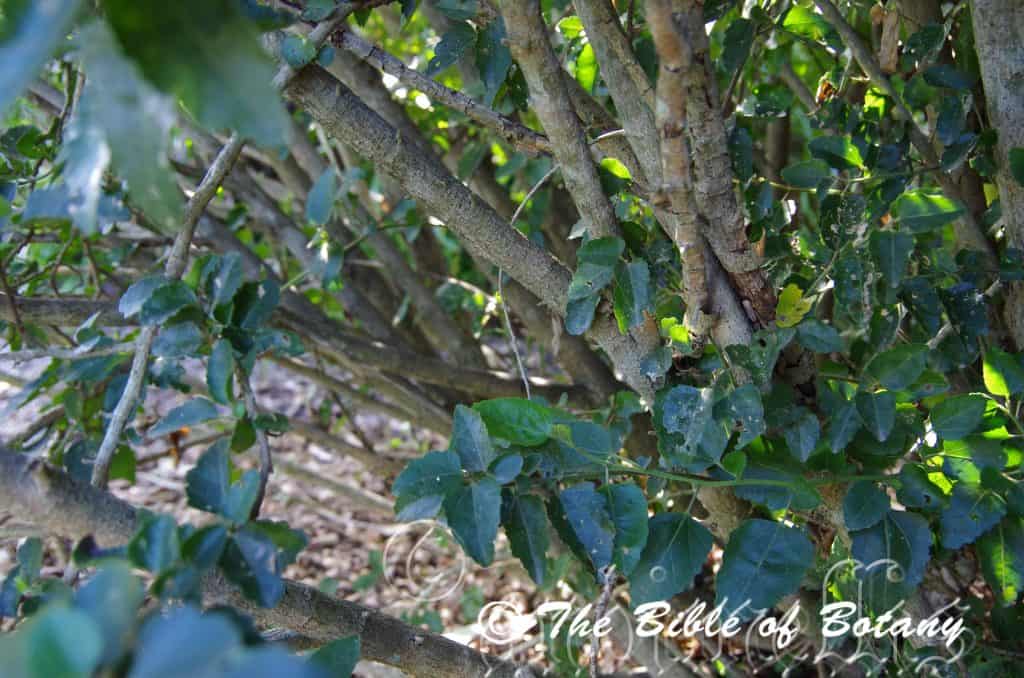
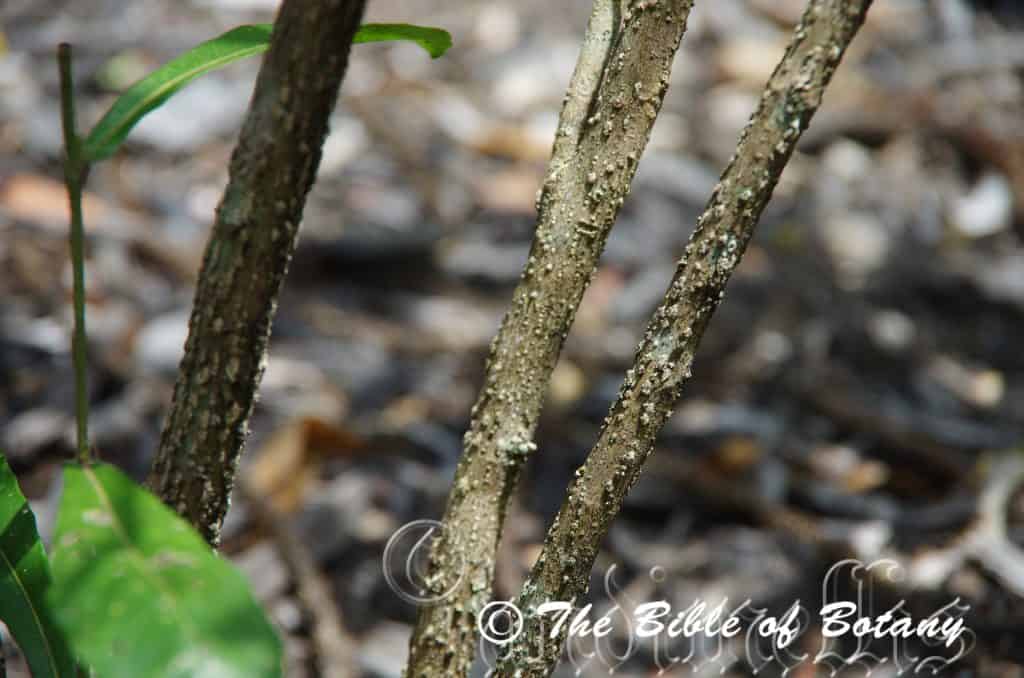
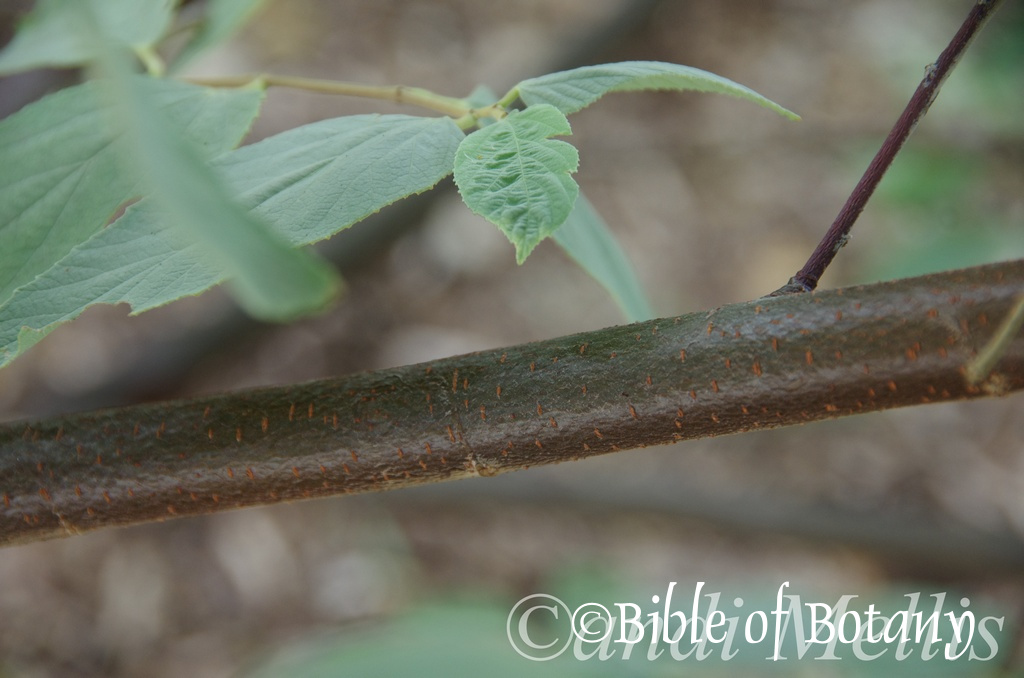
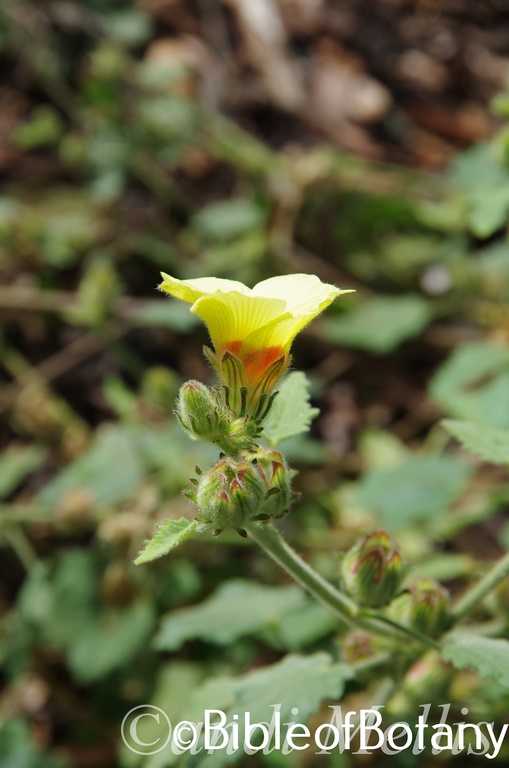
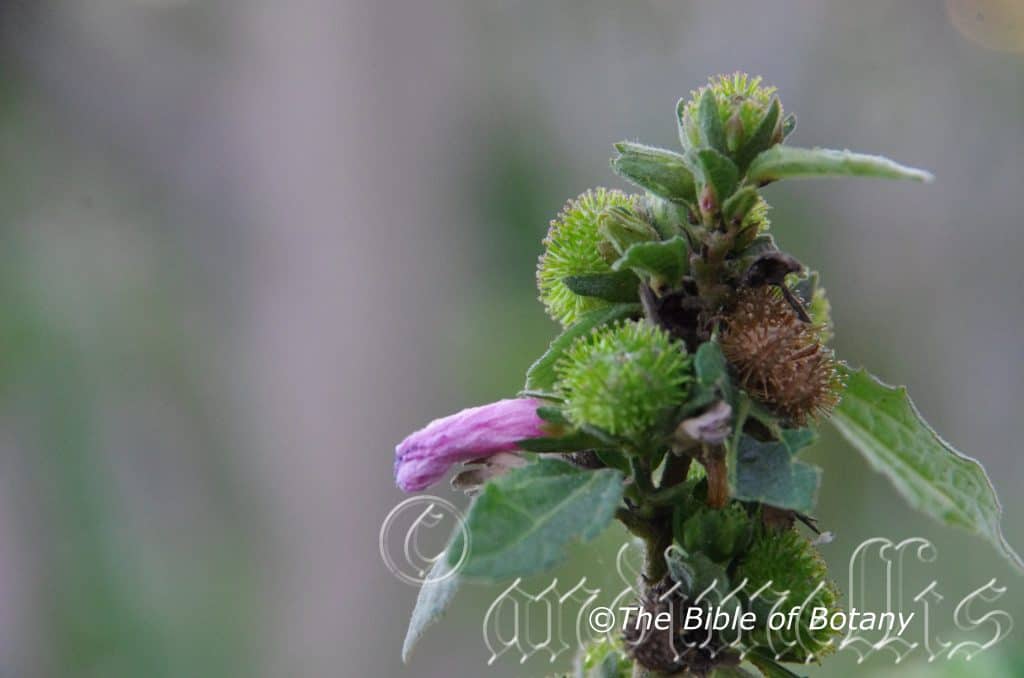
Hibiscus diversifolia’s stems are grey-brown to pale creamy-brown with a few short sharp persistent prickles. The branchlets rely on other shrubs for support or float across water often forming watery roots along the stems. The branchlets are pale green and are densely covered in course white pubescent and setose hairs. There are two types of branches short leafed non flowering stems and longer sparsely leafed flowering stems.
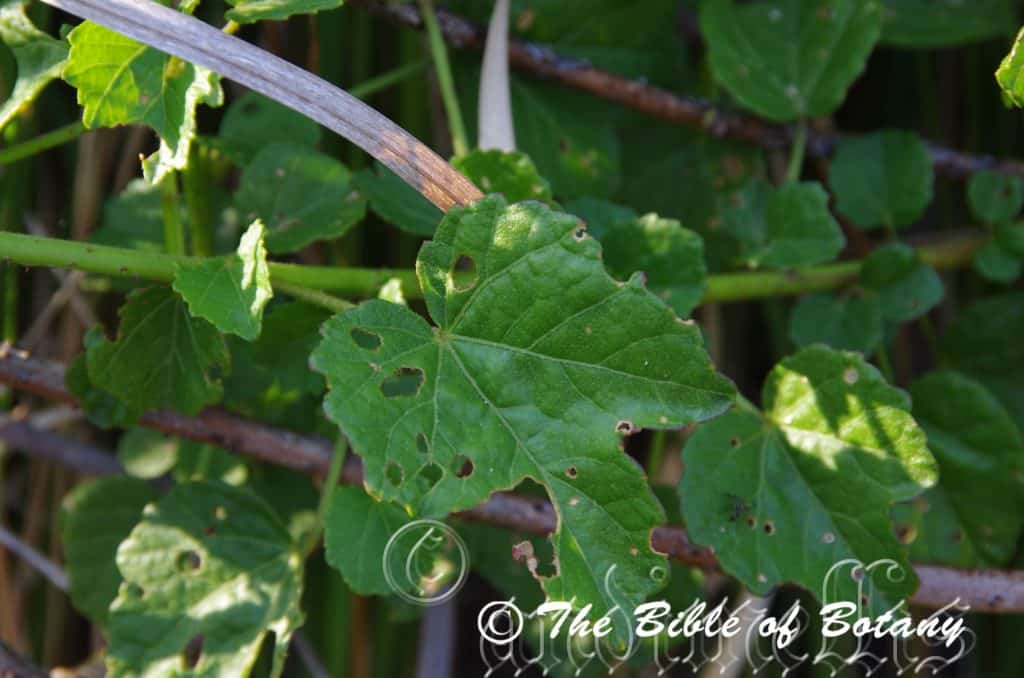
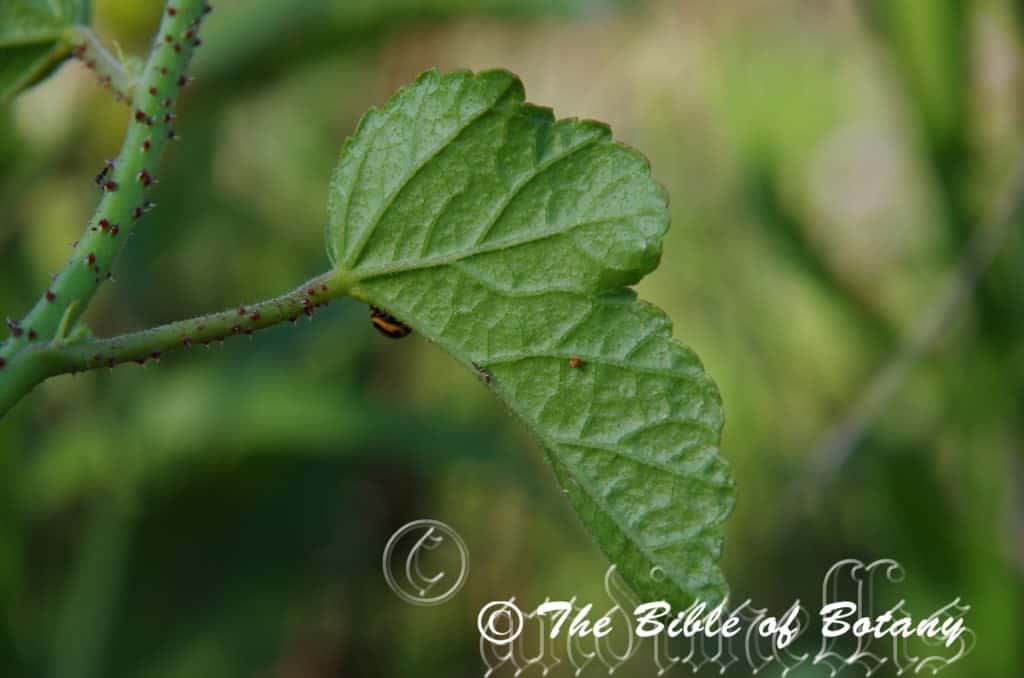
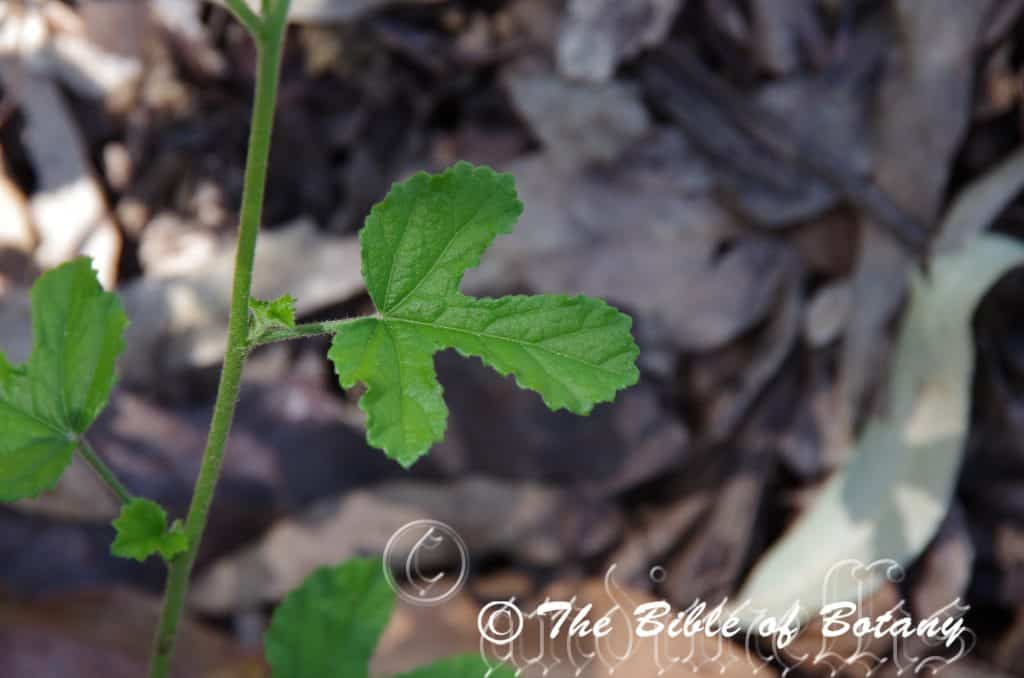
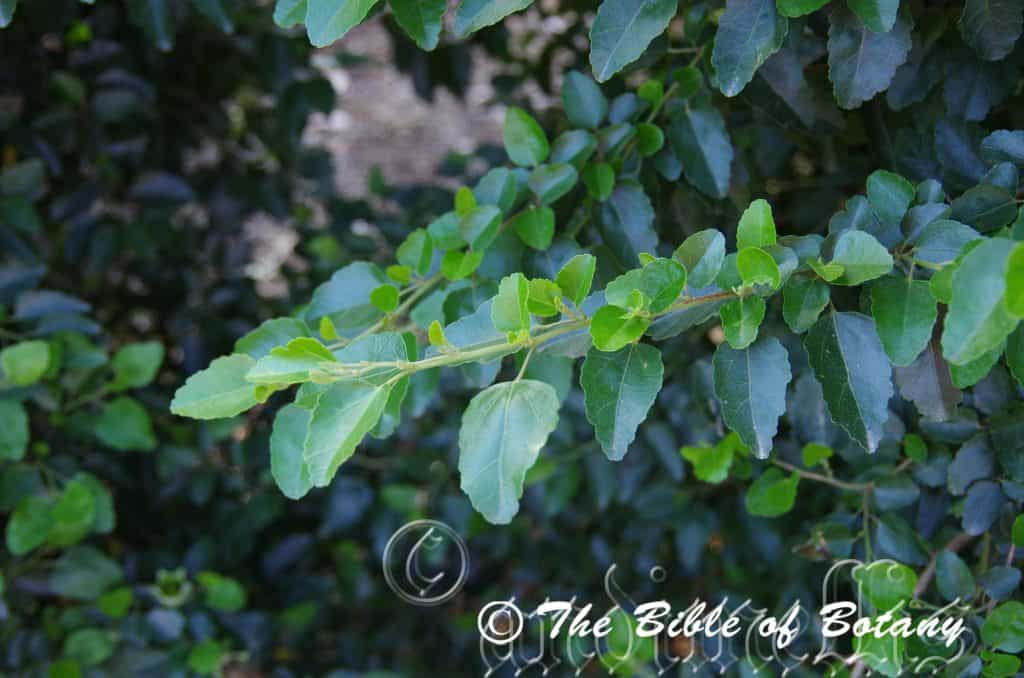
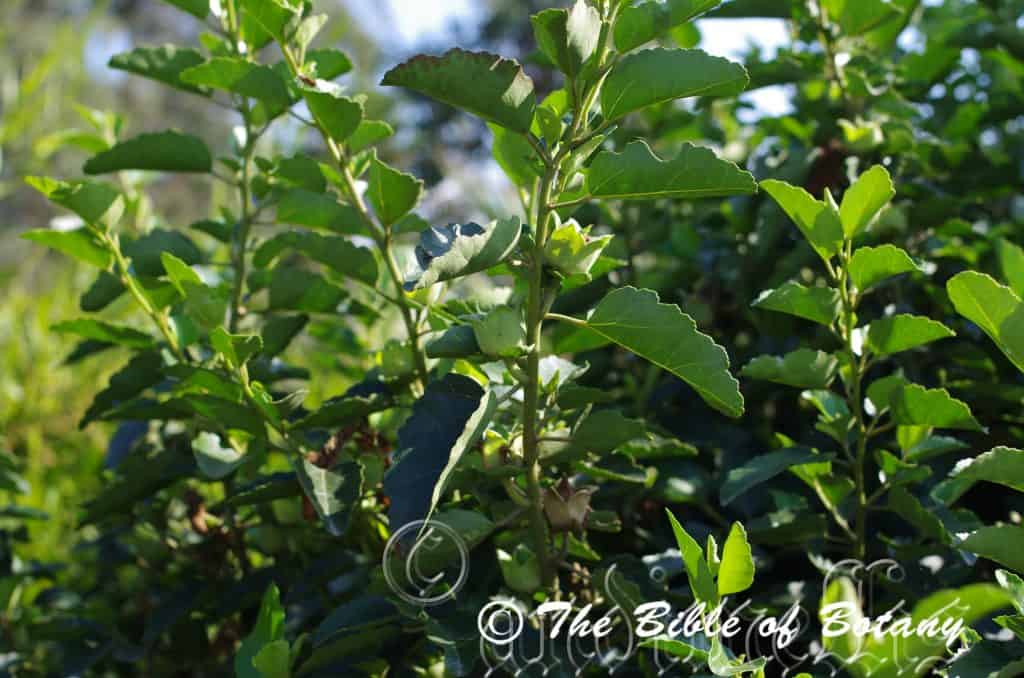
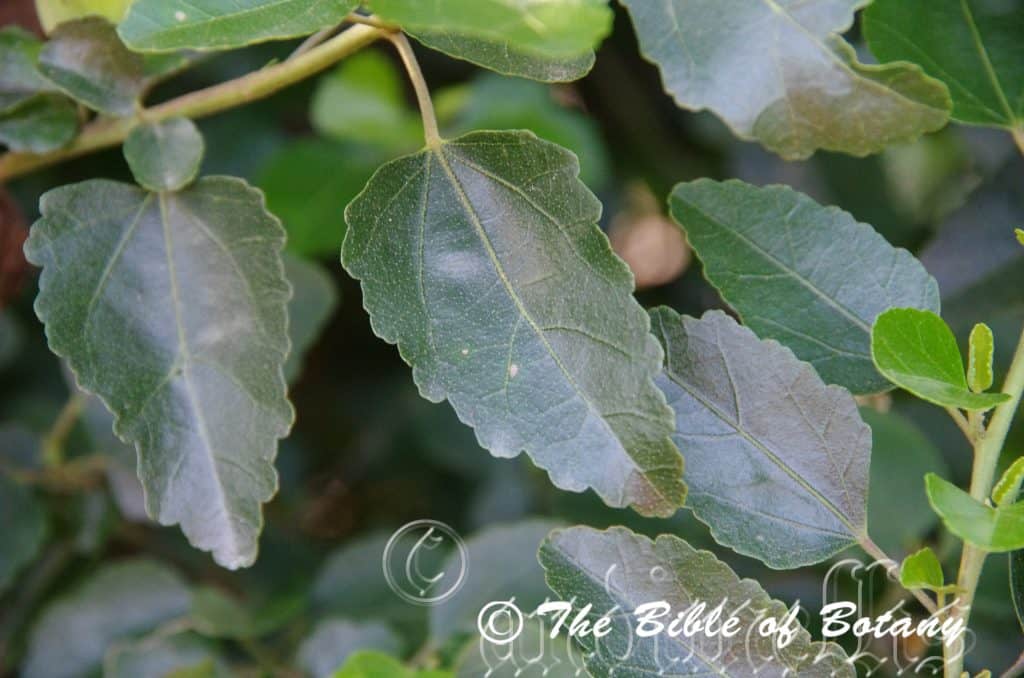
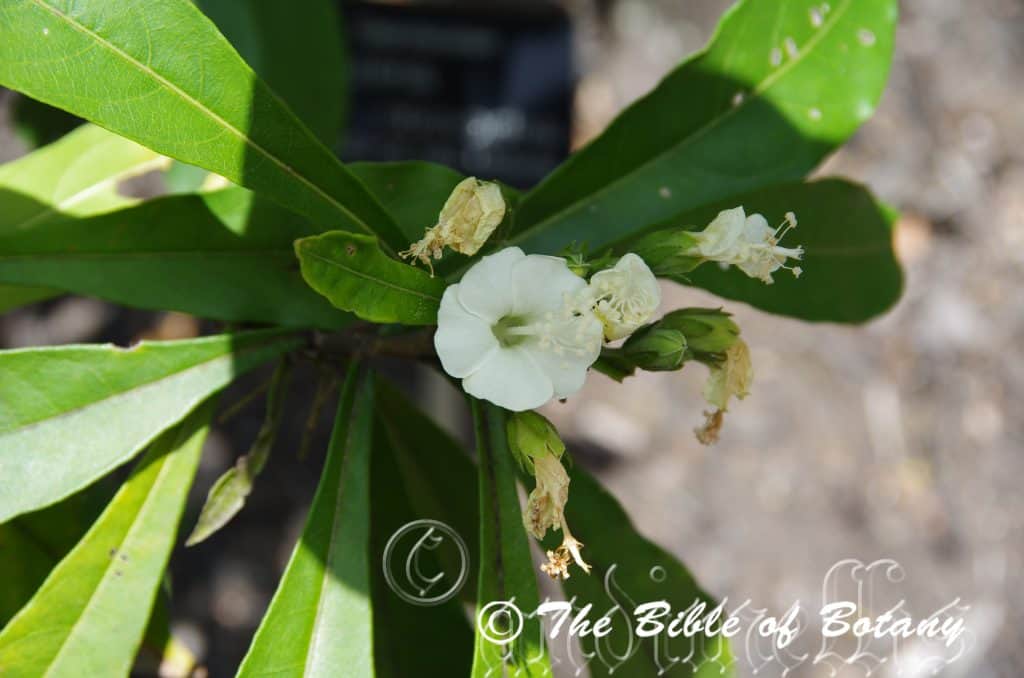
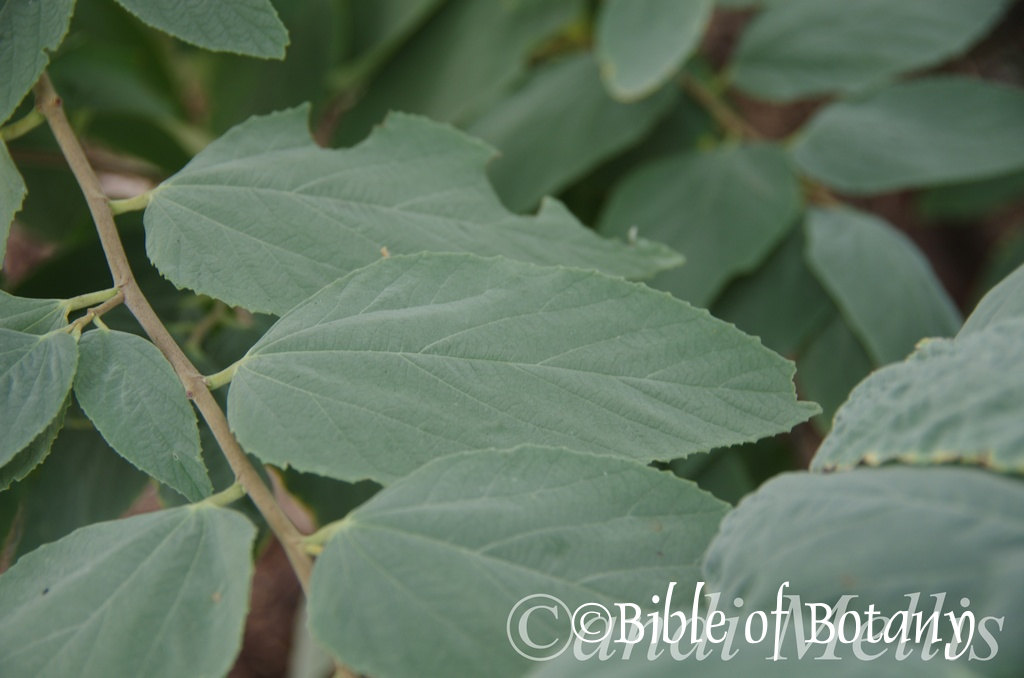
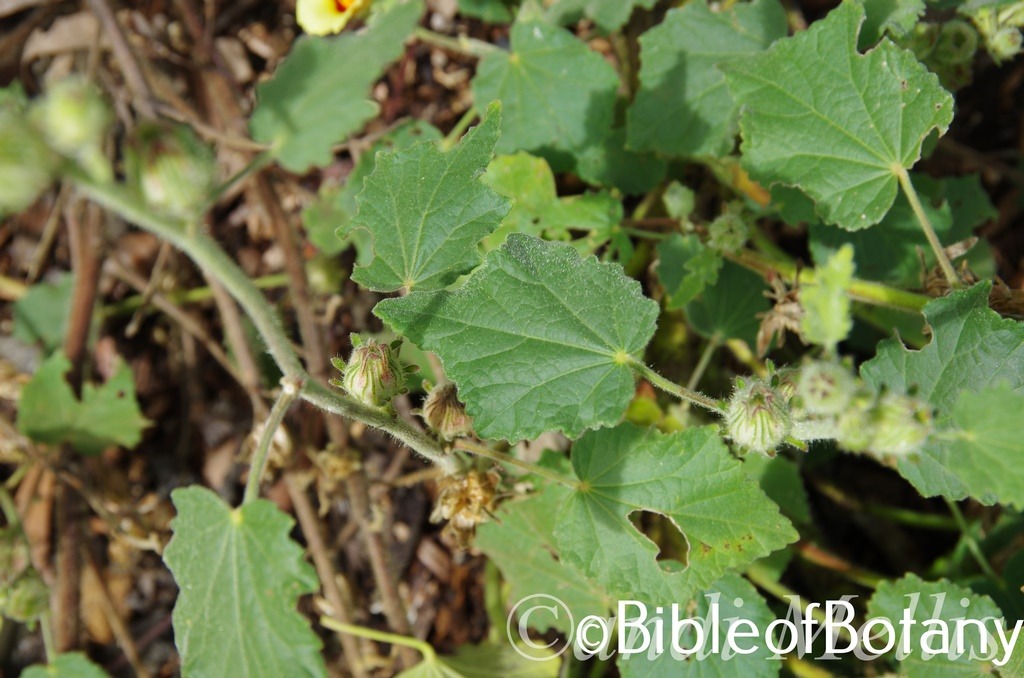
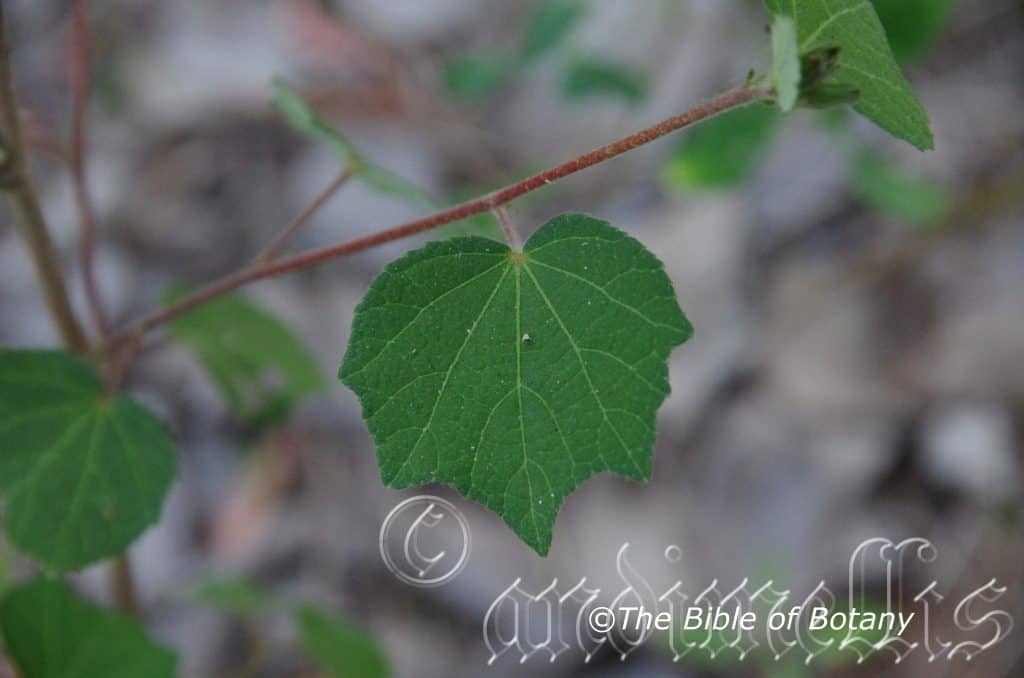
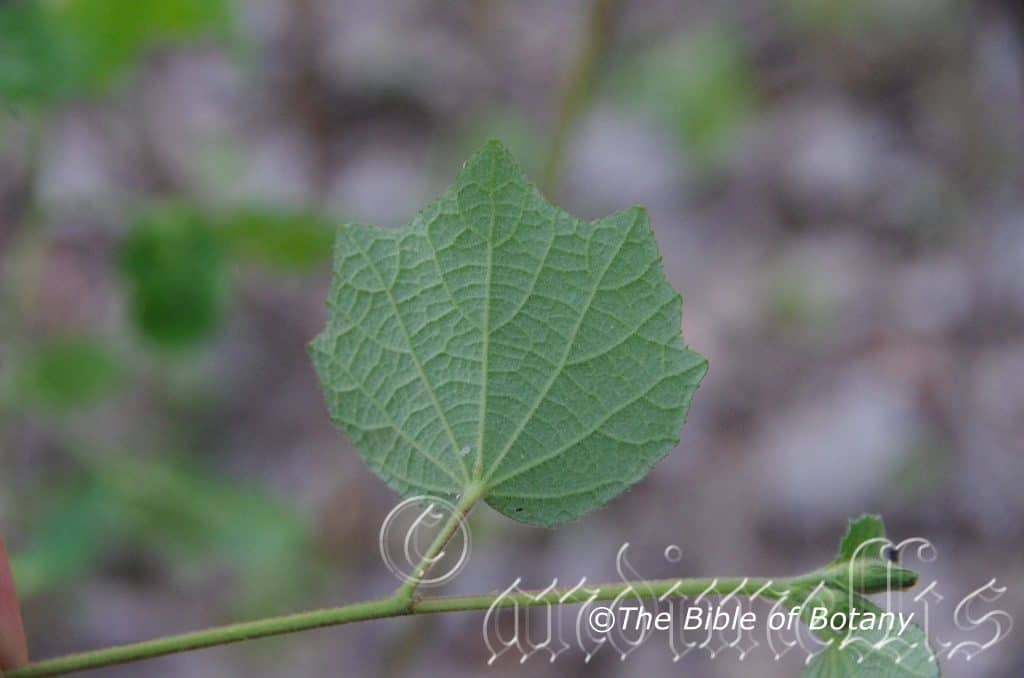
Hibiscus diversifolia’s alternate, ovate to cordate or 3 to 5 shallowly lobed leaves measure 40mm to 80mm in length by 40mm to 80mm in width. The lobes are oblong or broadly ovate and measure 5mm to 20mm in length. The leaves are reduced along the flowering stems to usually being elliptical to lanceolate and measure 30mm to 60mm in length by 20mm to 30mm in width. The base is extremely variable from cuneate, truncate, rounded, cordate or even slightly hastate while the apexes are acuminate or narrow acute to broadly acute. The concolourous laminas are pale grass-green to pale blue-green. The laminas are densely covered in white pubescent and setose hairs. The margins are entire or more often are crenulate to sinuate. It is flat or curve slightly upwards from the mid vein. The mid vein and main lateral veins are prominent on the lower lamina and are slightly visible from above. The mid vein and lateral veins have a row of short sharp prickles. The petioles measure 7mm to 80mm in length.
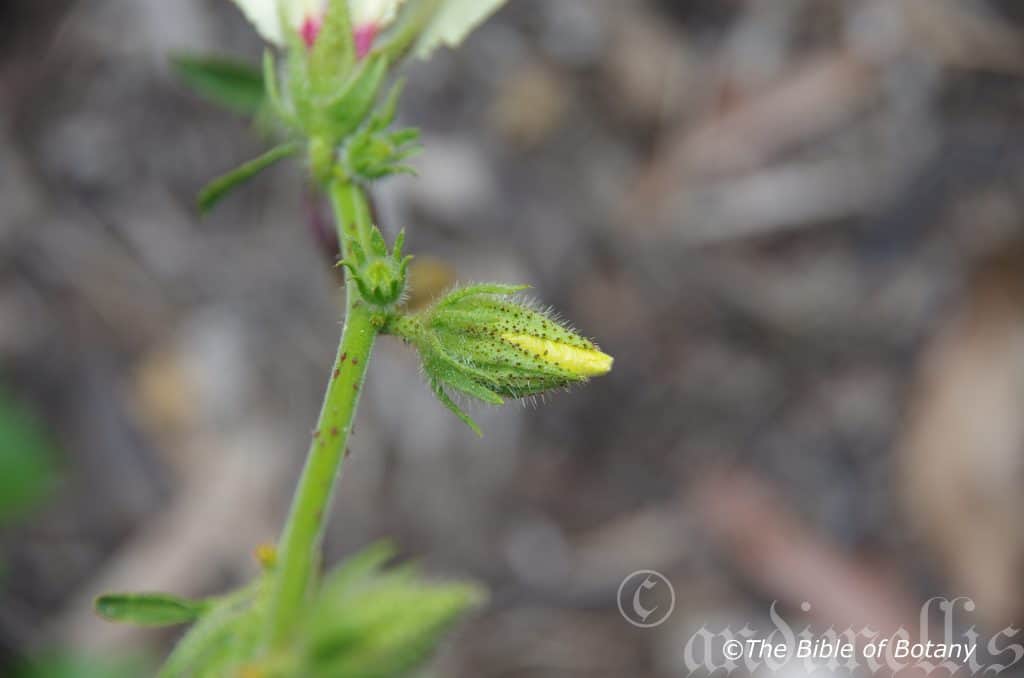
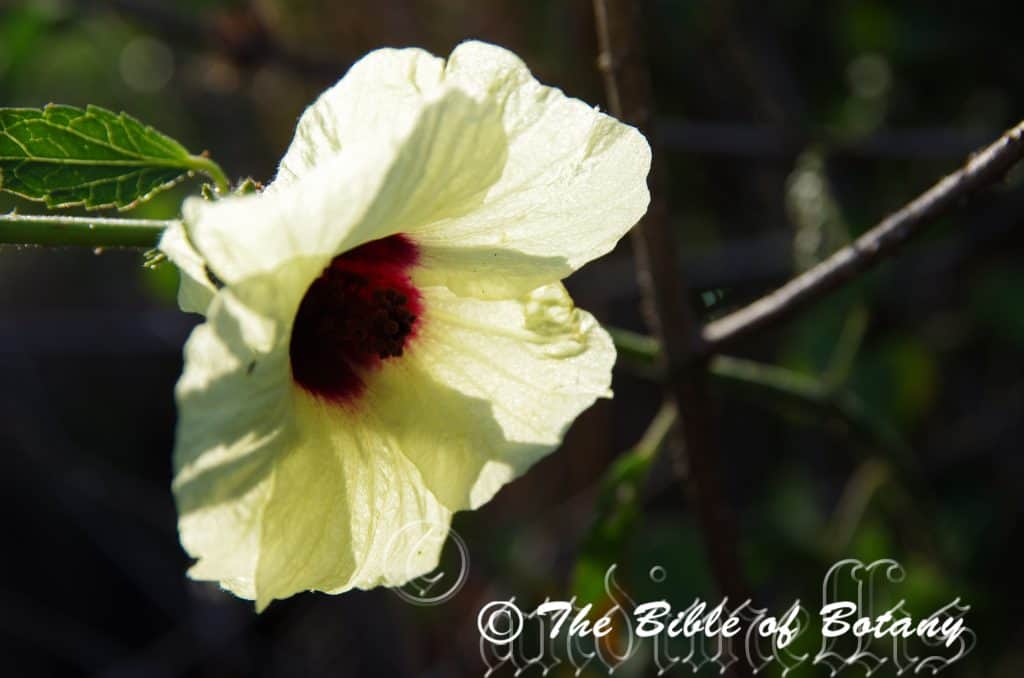
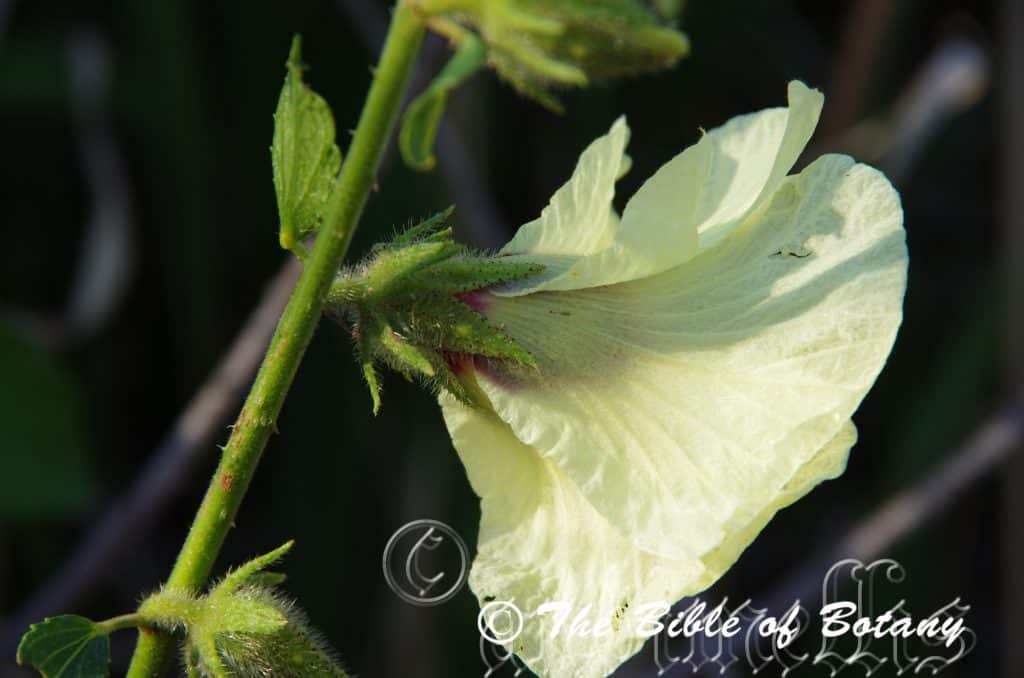
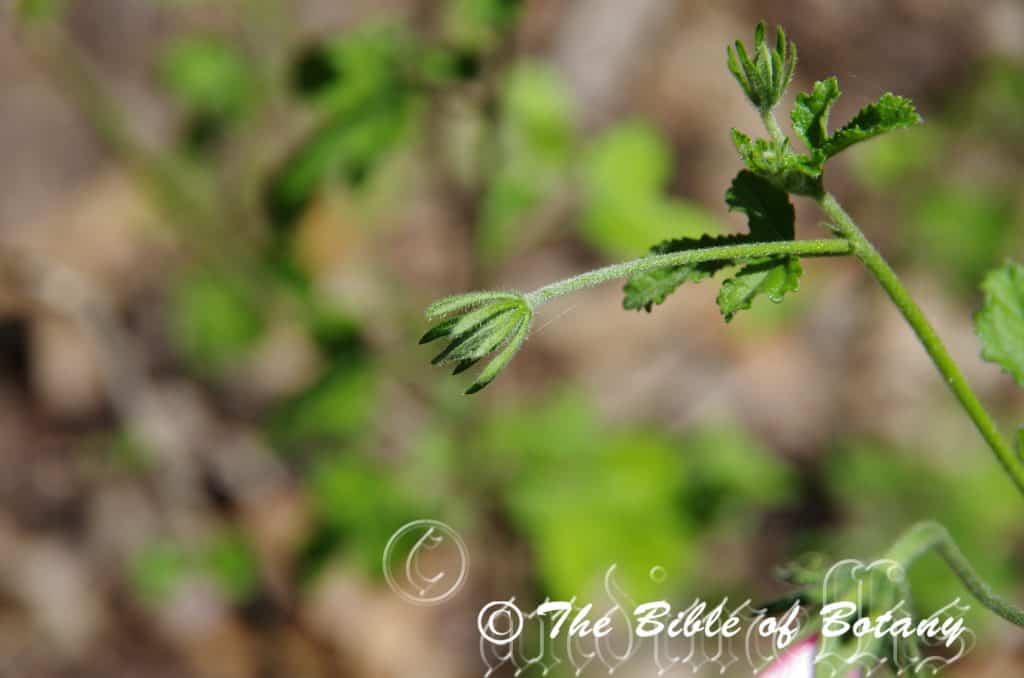
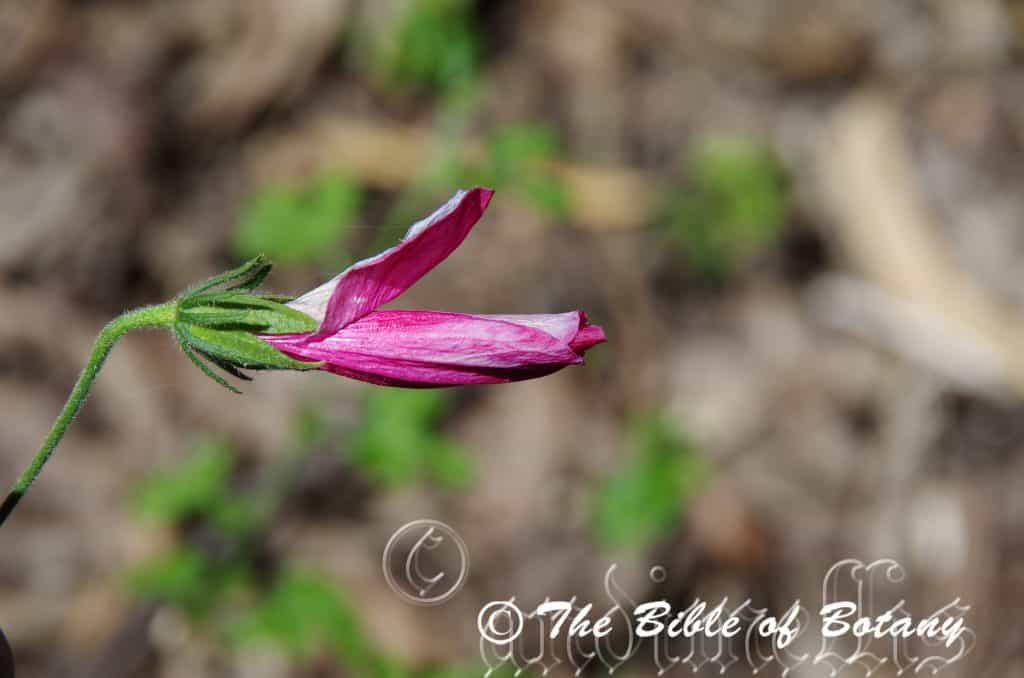
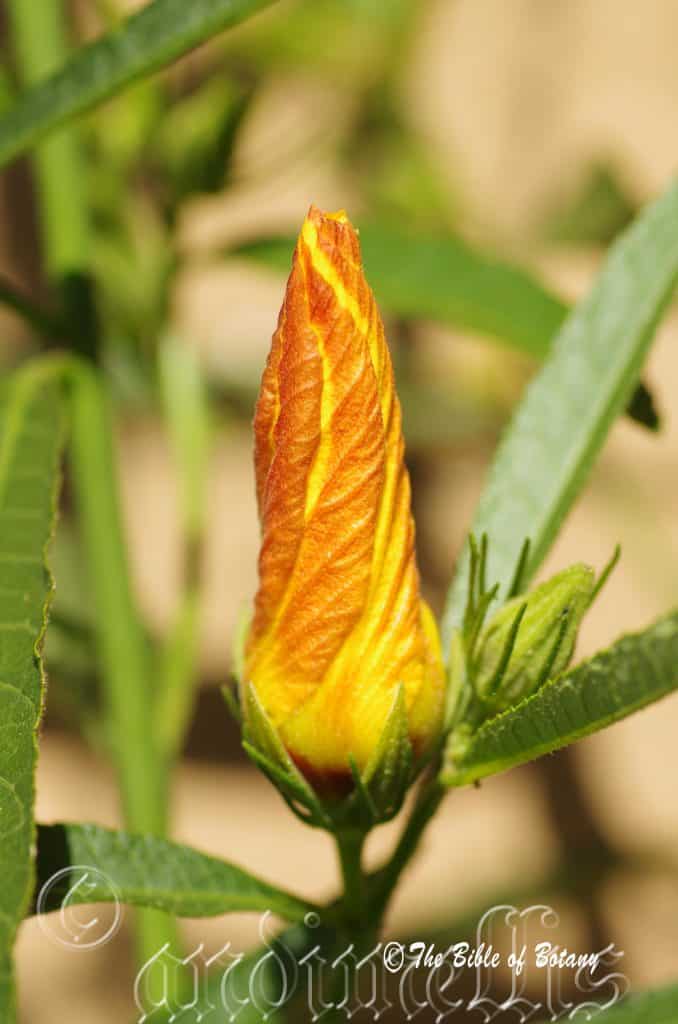
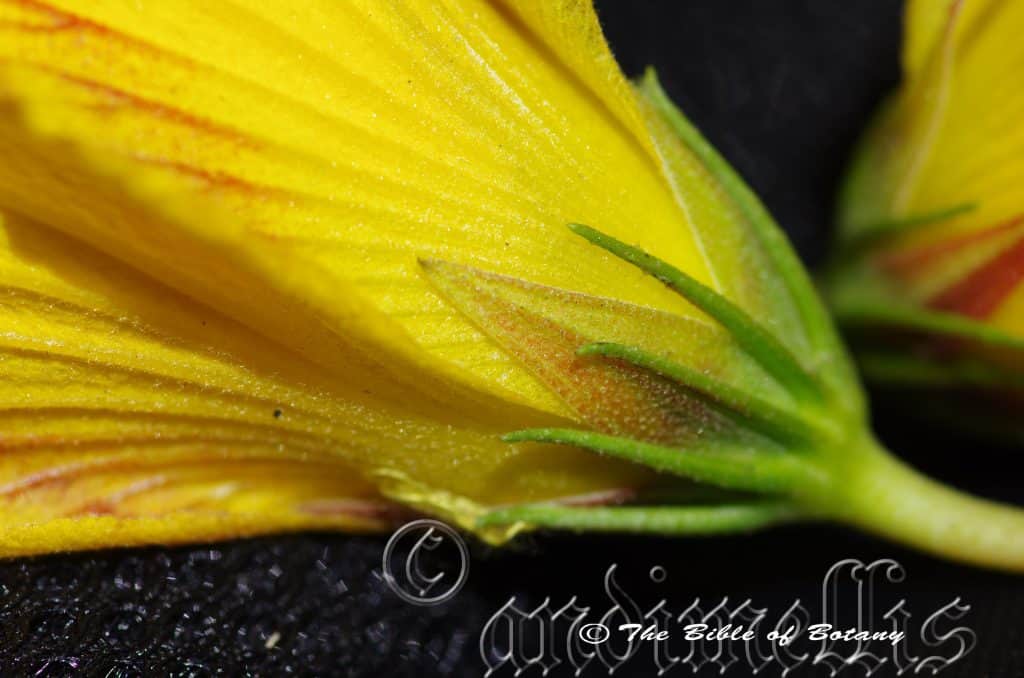
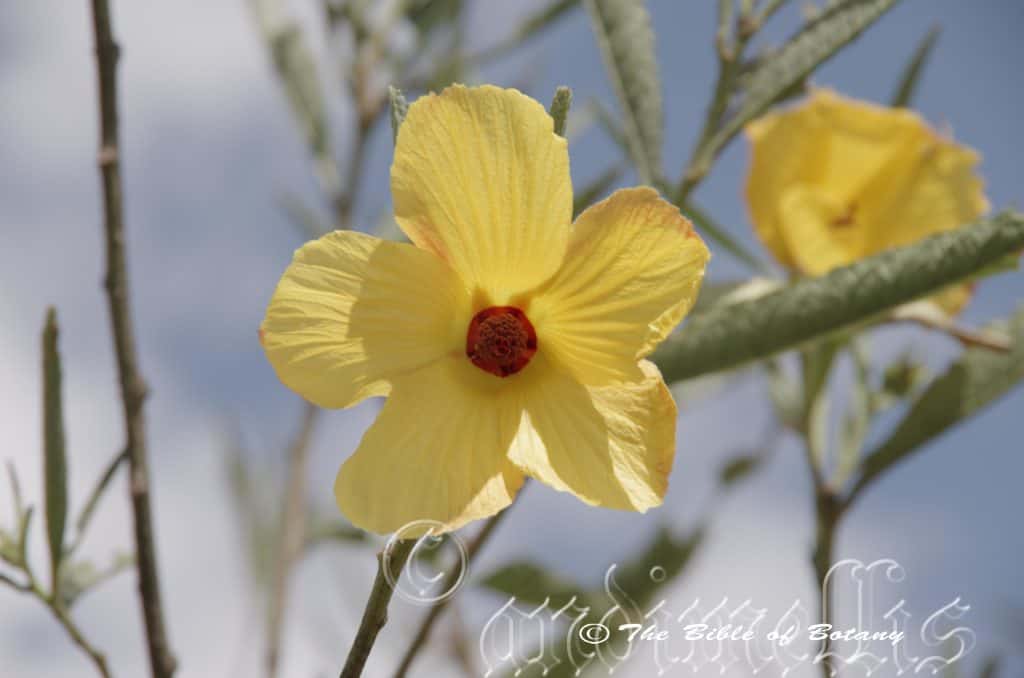
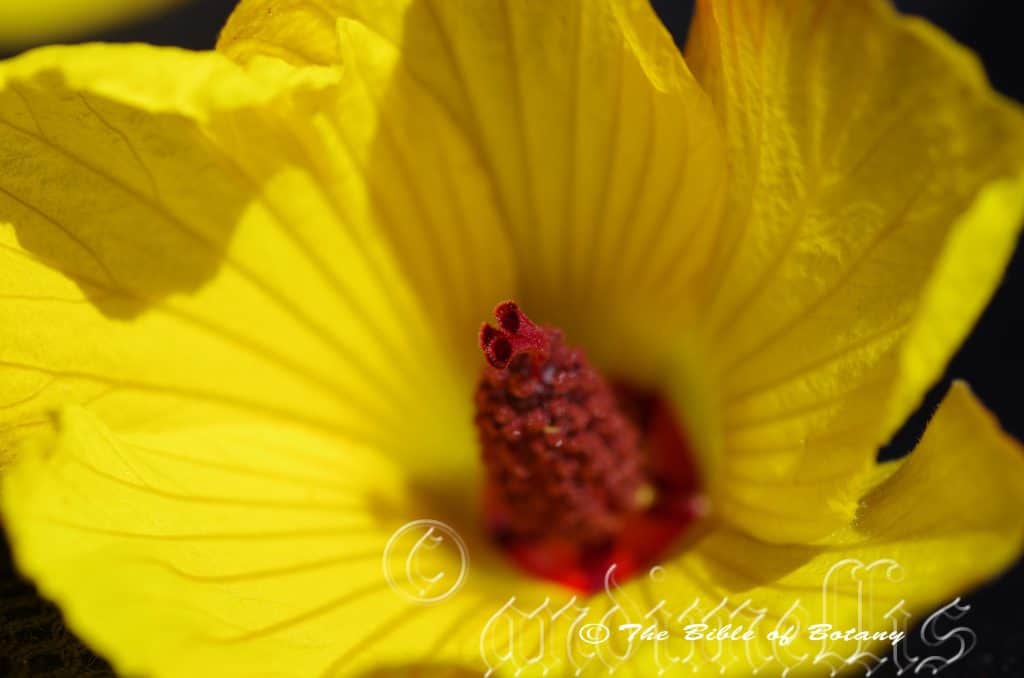
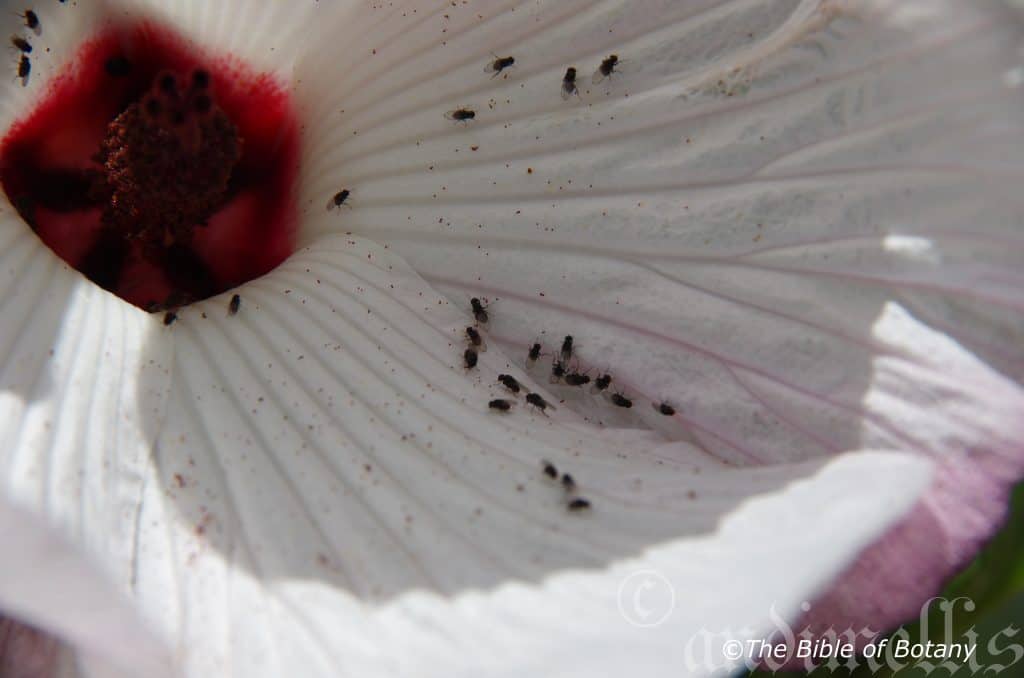
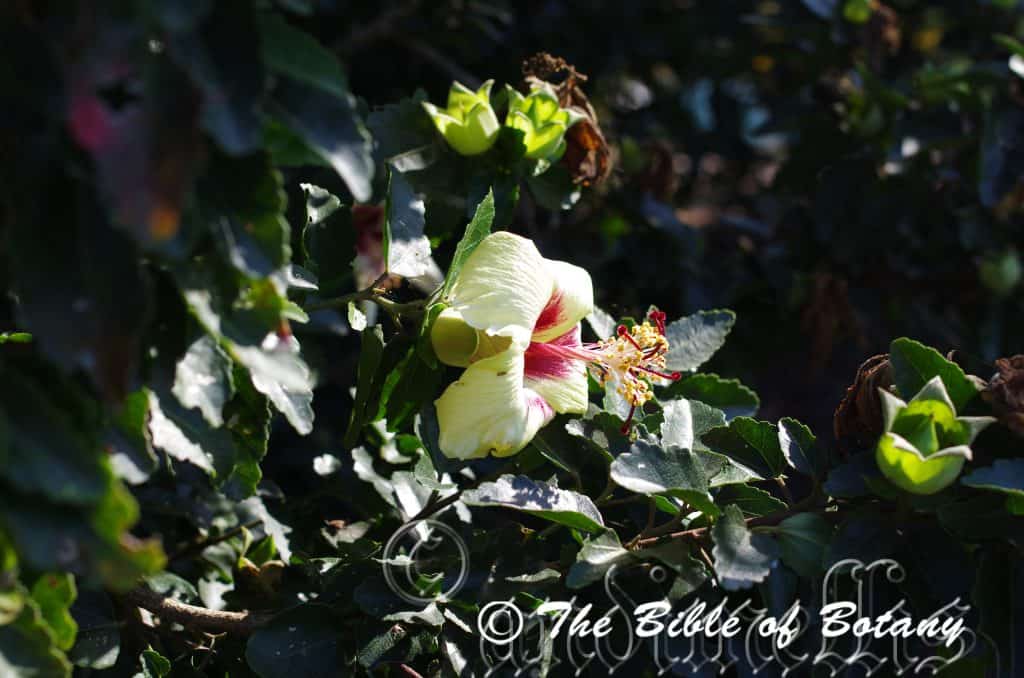
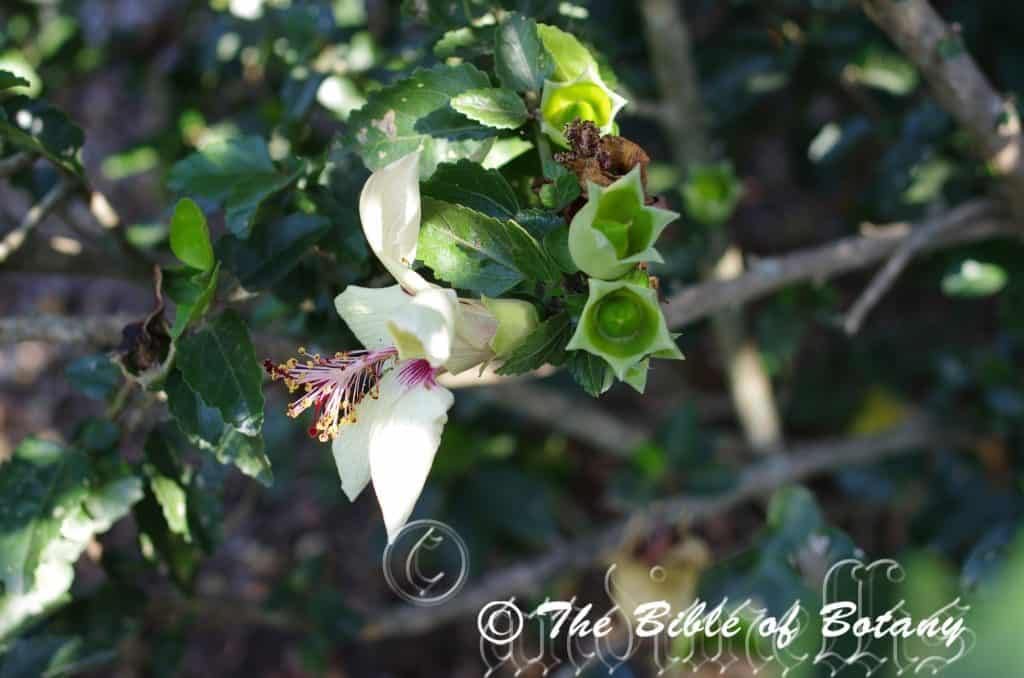
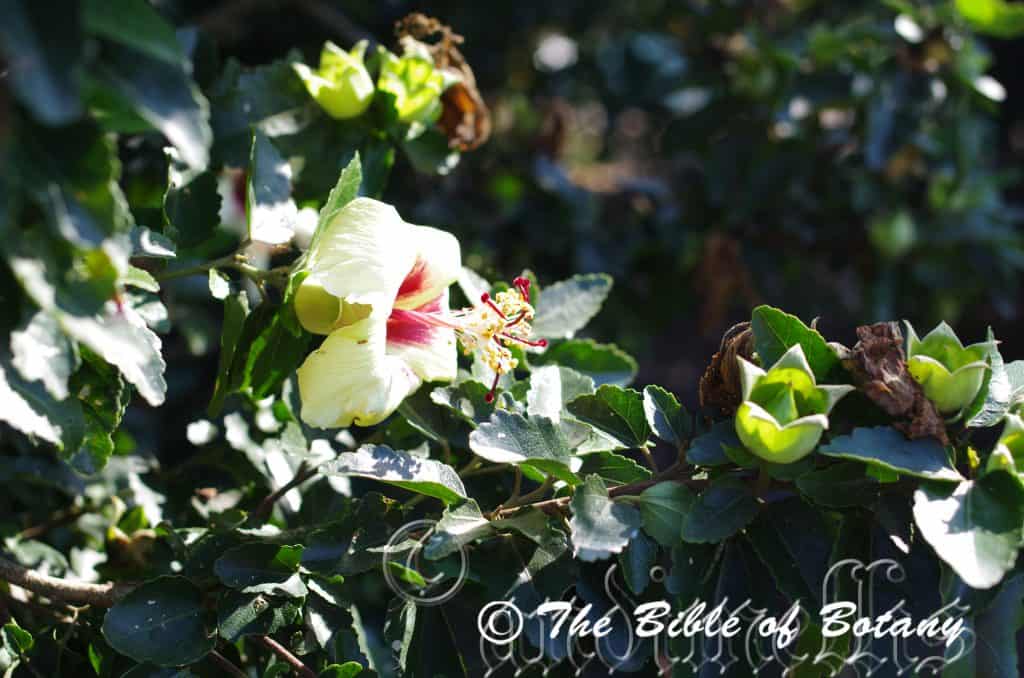
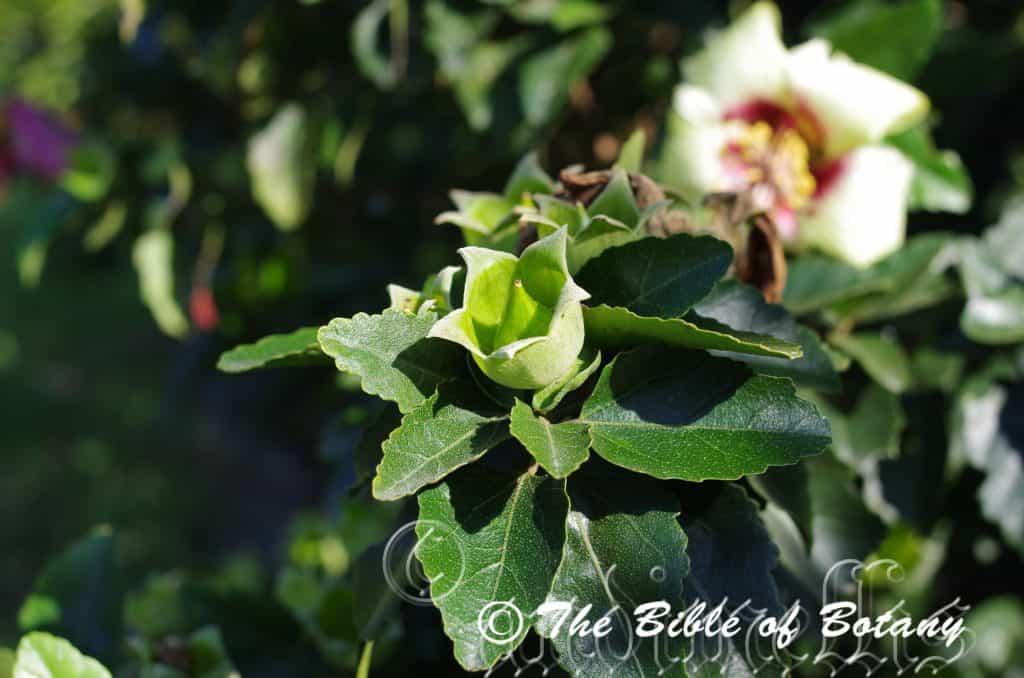
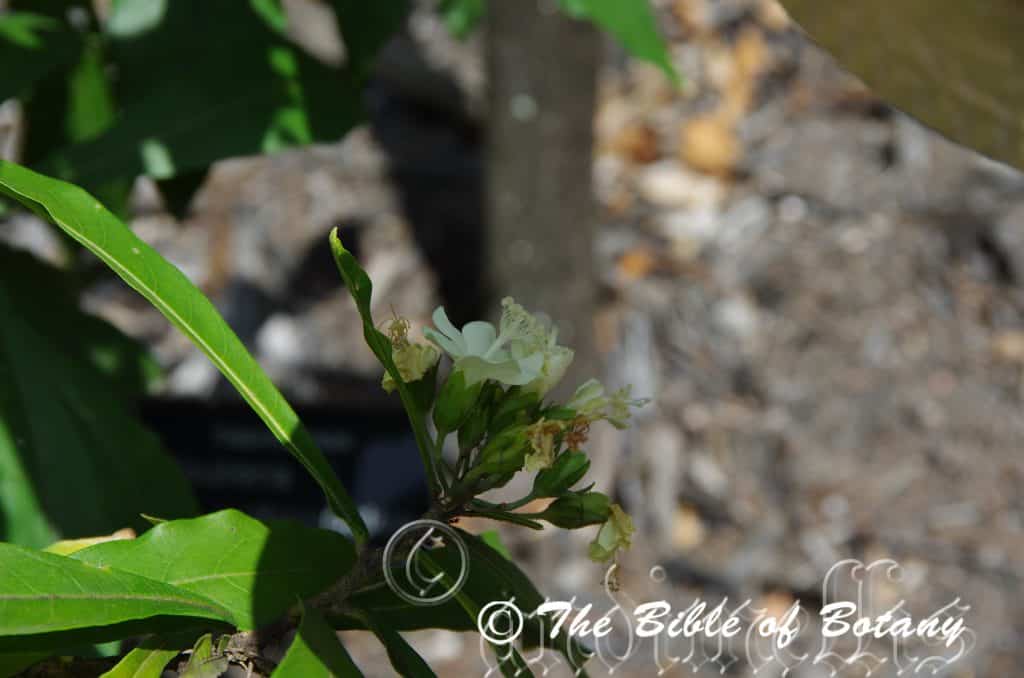
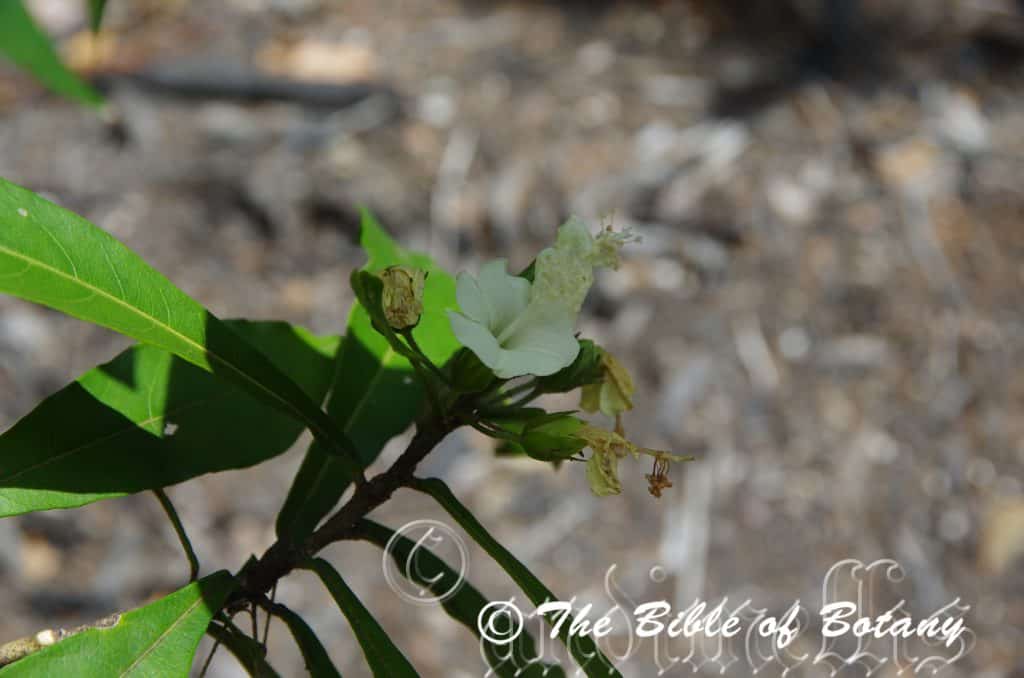
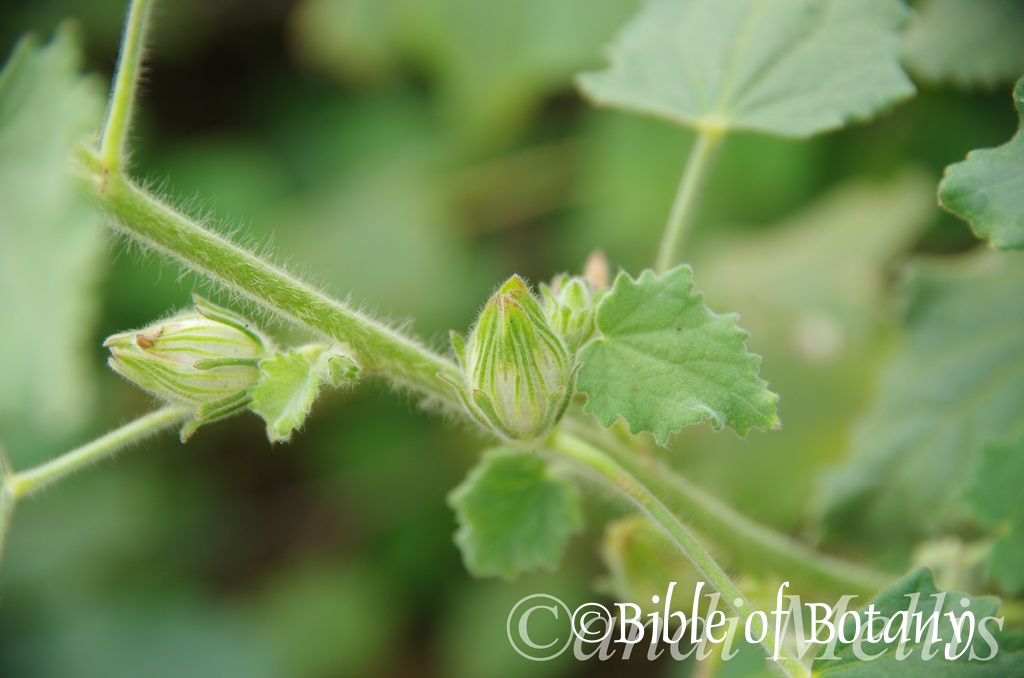
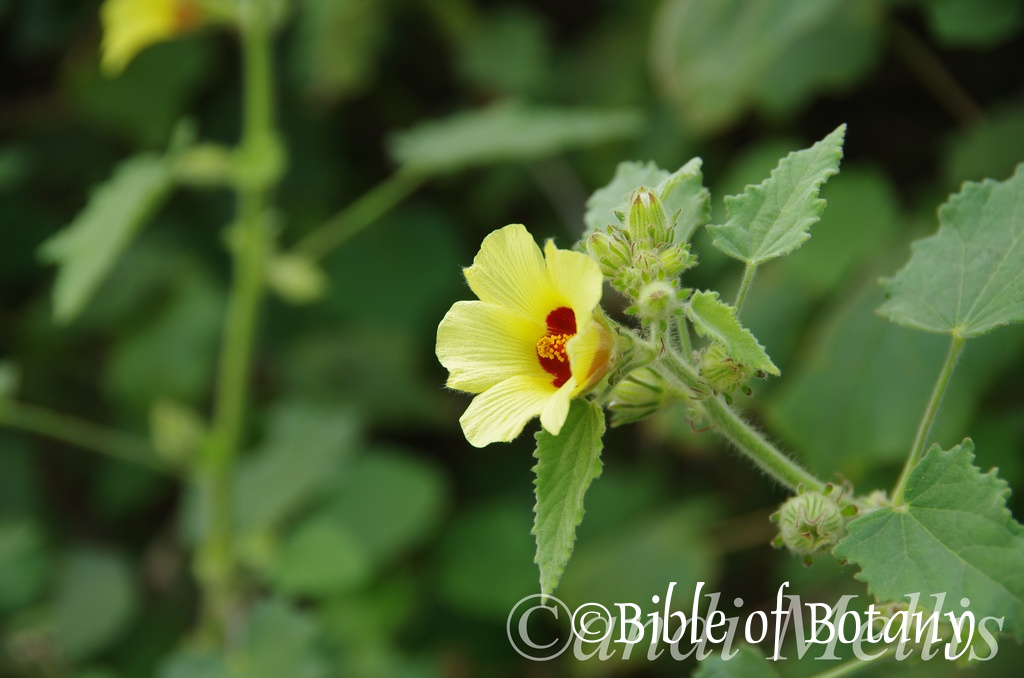
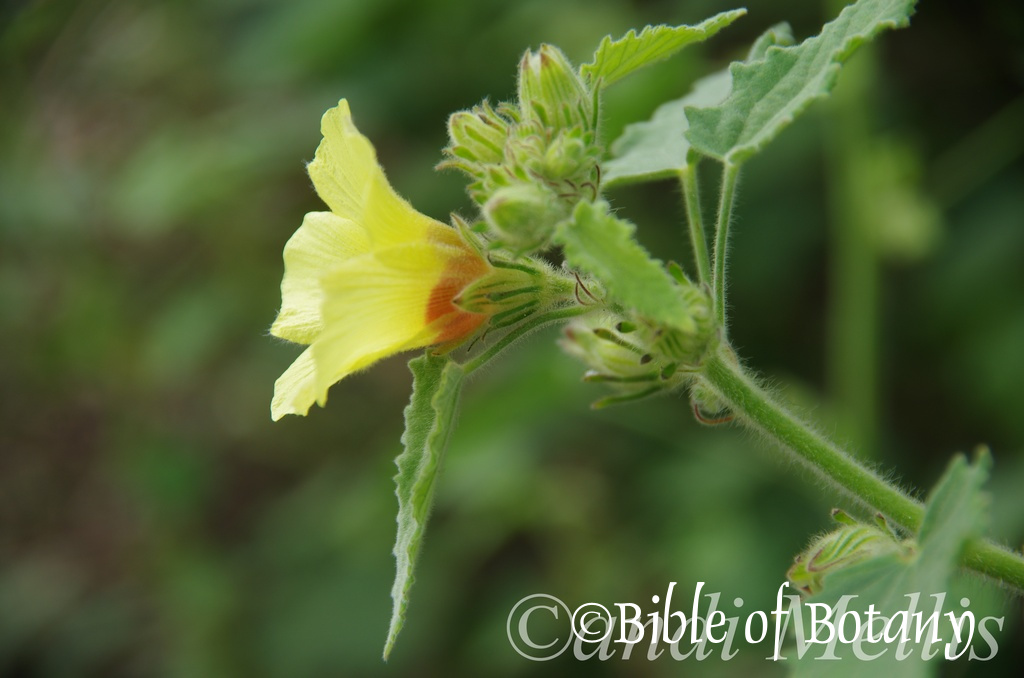
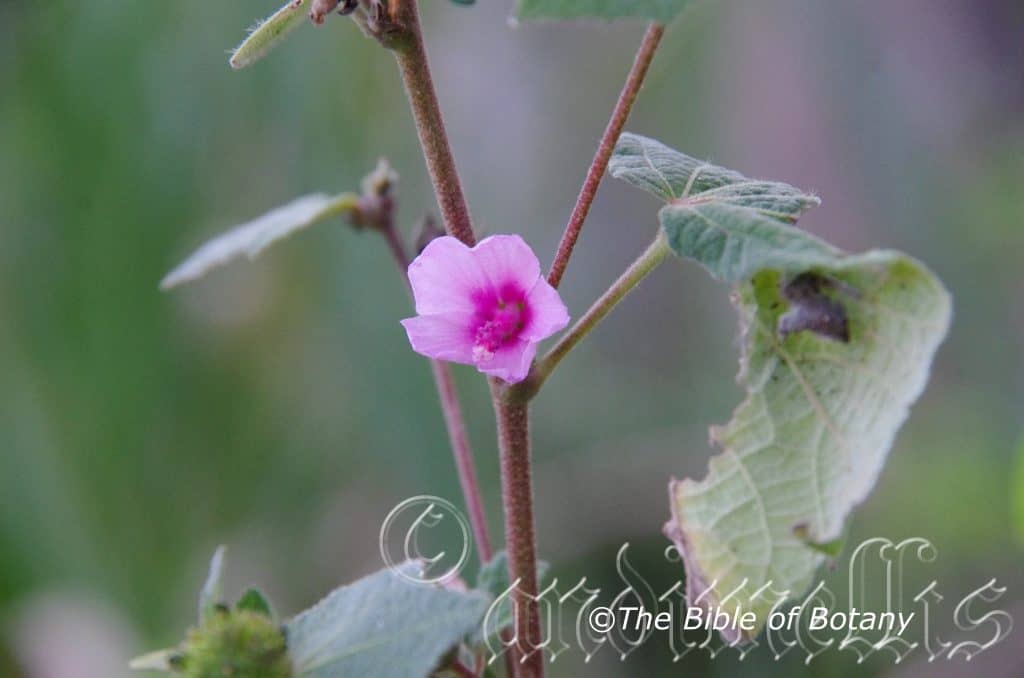
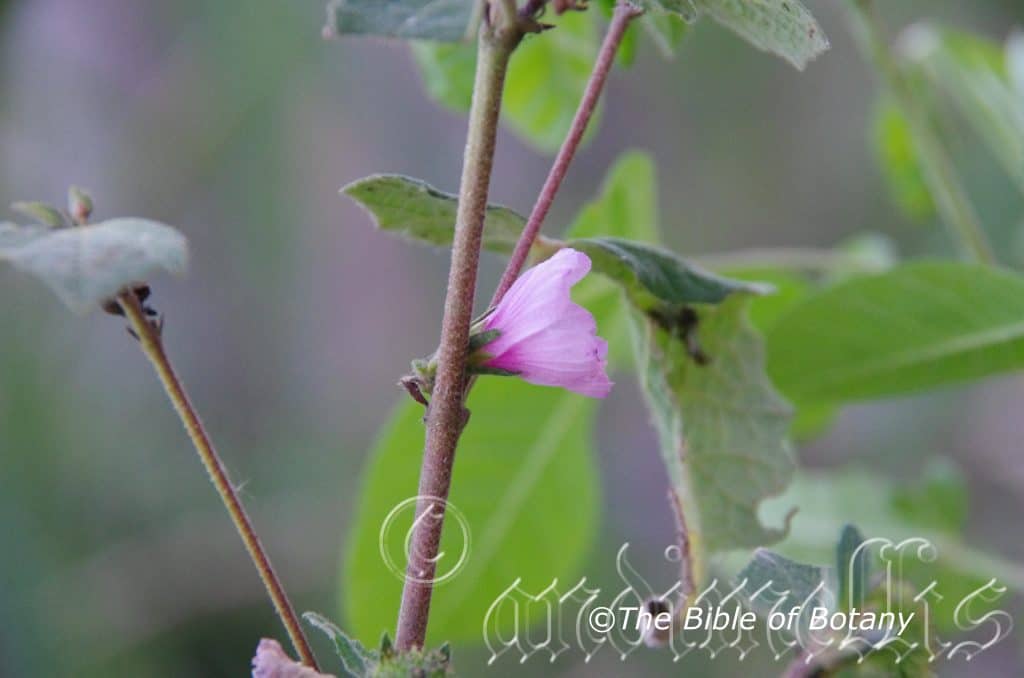
The inflorescences of Hibiscus diversifolia are born on a terminal raceme or singularly from the leaf axis and measure 70mm to 100mm in diameter when spread out. The pedicels, buds and sepals are all densely covered in white appressed puberulent and setose hairs. The pedicels measure 0.5mm to 5mm in length. The 8 to 10 linear epicalyxes segments are pale green and measure 10mm to 12mm in length. The 5 pale creamy green subulate calyx lobes measure 12mm to 20mm long. The 5 pale yellow petals only partially open forming a funnel. It is ovate to orbicular or broadly spathulate tapering at the base and are strongly contorted while the apex is broadly obtuse. The pale yellow corolla has a deep red to burgundy base. They measure 30mm to 50mm in length by 30mm to 50mm across at the widest point.
The deep red to burgundy style measures 25 to 45mm in length and divides into 5 stigmas very close to the apex. The 50 to 60 deep red or burgundy stamens are fused to the upper portion of the style. Flowers appear from August to May in cooler climate while flowers will appear throughout the year in frost free warm areas with full sun.
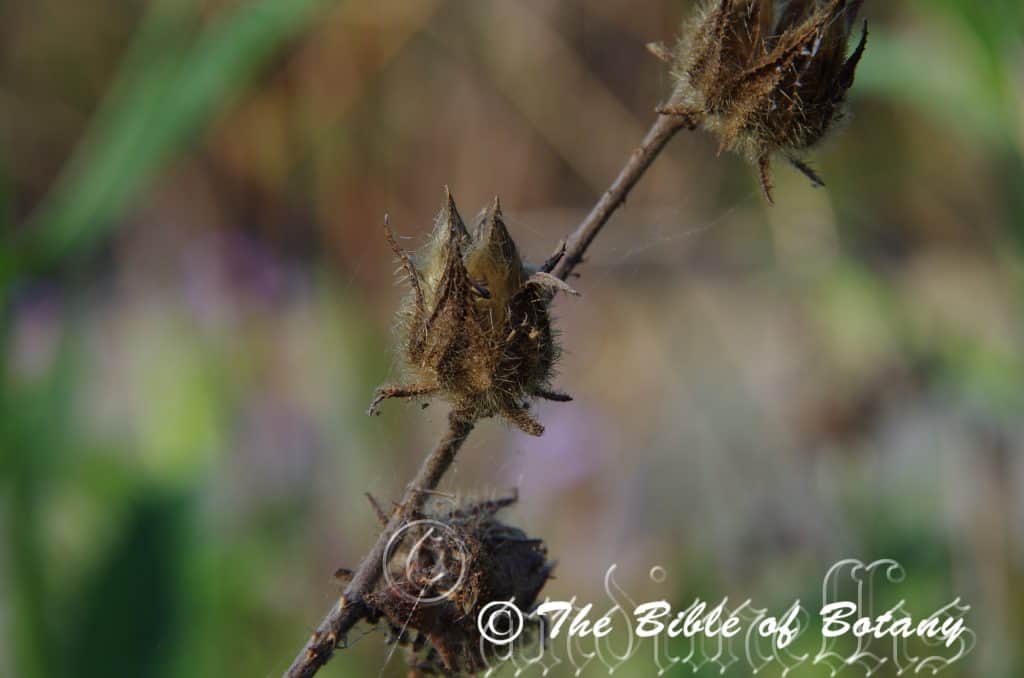
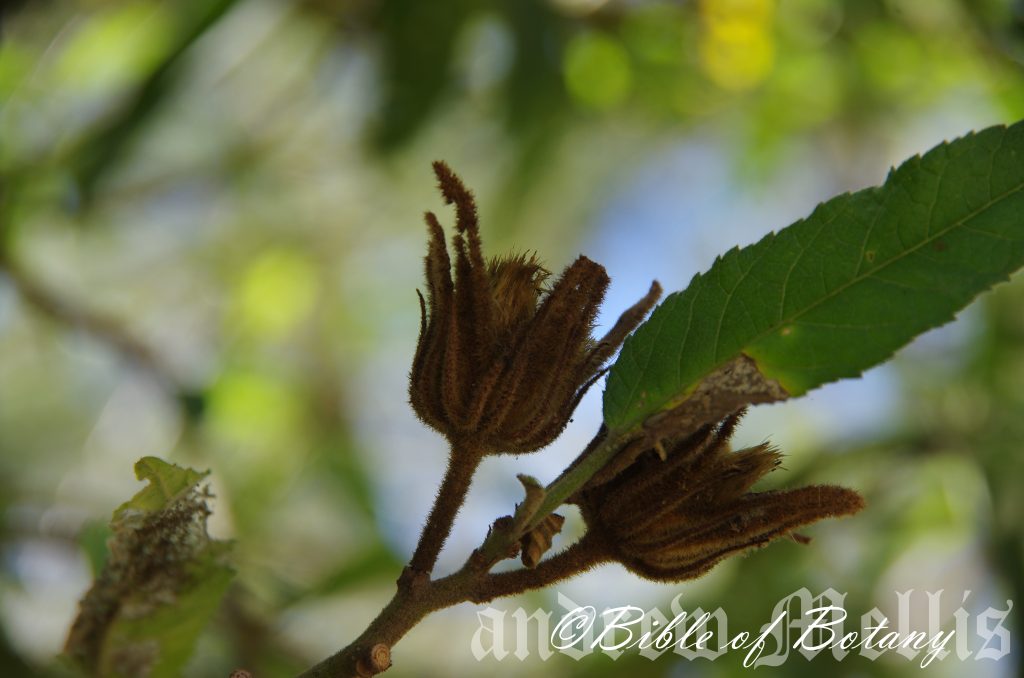
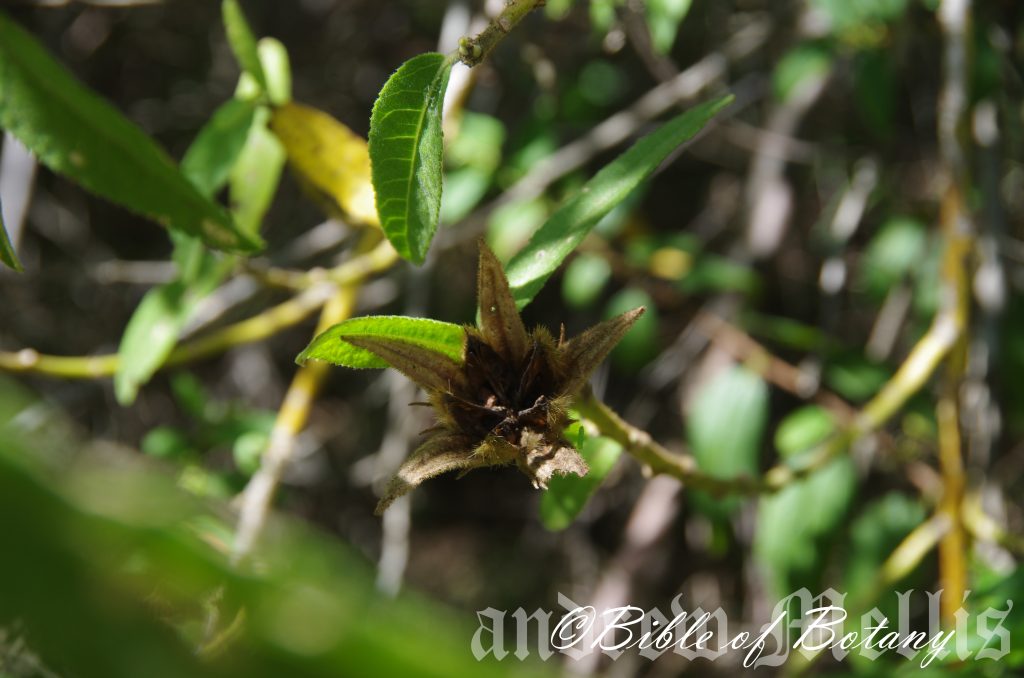
Hibiscus diversifolia’s fruit is a globose to conical capsule. The capsules measure 18mm to 22mm in length by 18mm to 20mm in diameter. It is densely covered in stiff fawn to pale brown hirtellous and setose hairs. The green capsules turn brown on ripening. The pale dull, deep brown glabrous seeds measure 3mm to 4mm in diameter.
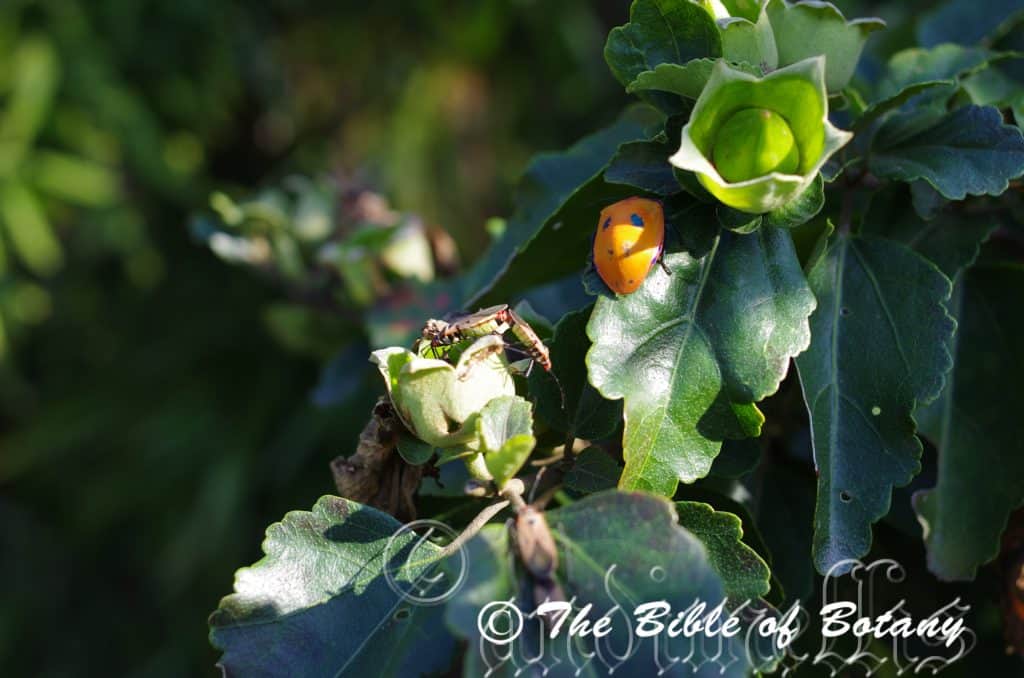
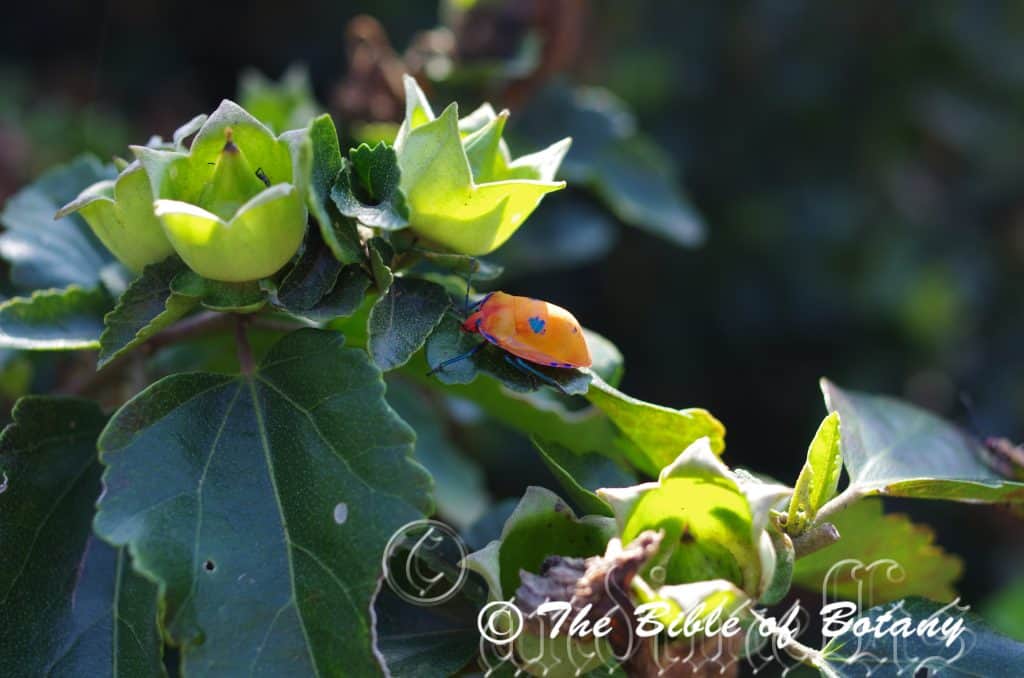
Wildlife:
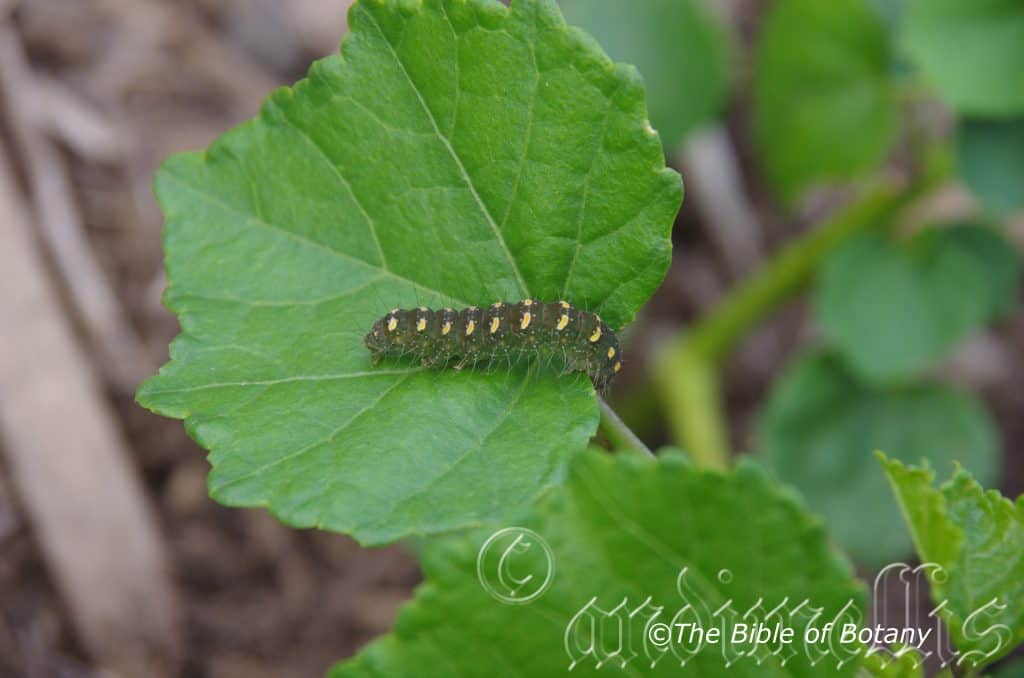
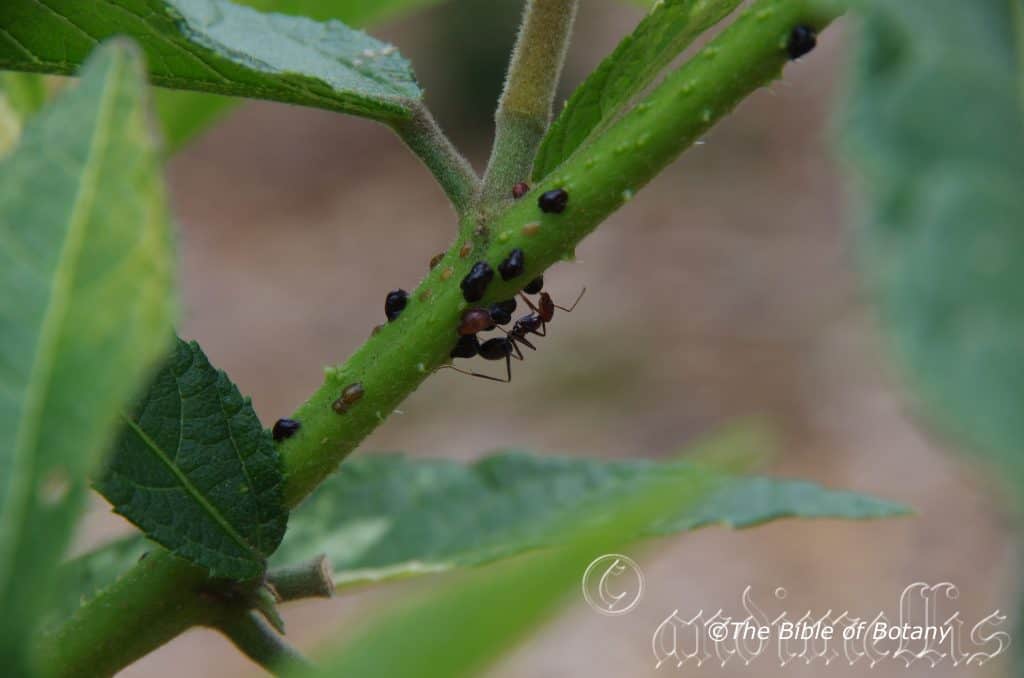
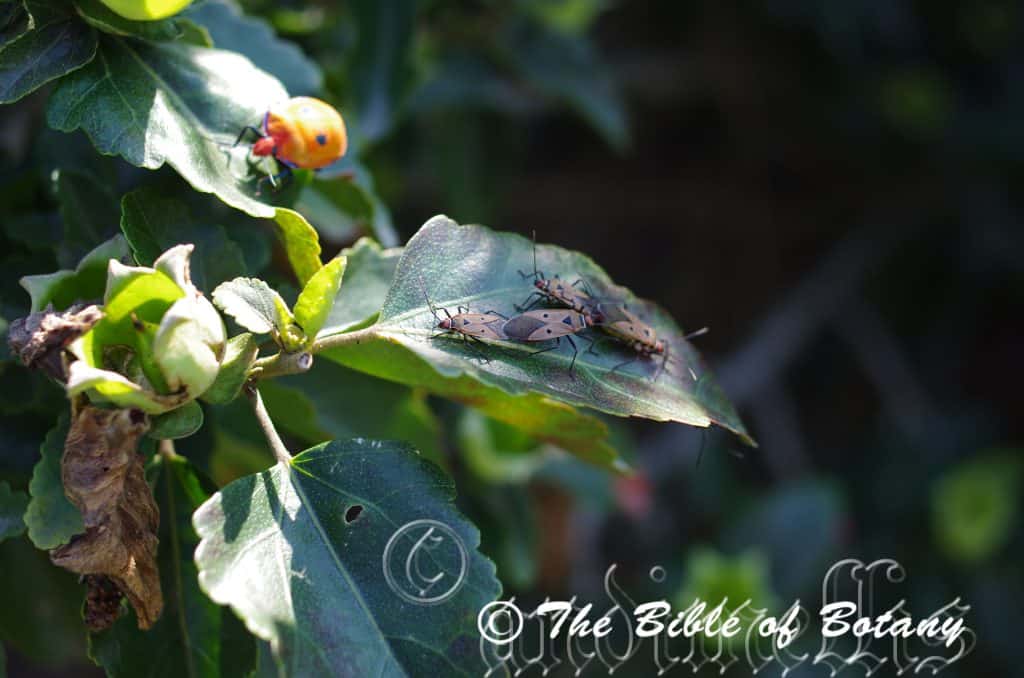
The flowers are visited by a number of small honeyeaters along with the native Hibiscus beetles from the Nitidulidae family. The leaves and flowers are eaten by the harlequin bugs. Harlequin bugs are those beautifully coloured beetles called Tectocoris diopthalmus.
Cultivation:
Hibiscus diversifolia is a very beautiful small native shrub which is suitable for small gardens to the largest gardens in wet areas. It is an excellent colourful addition for tropical, subtropical or temperate zones. As a garden subject it will grow to 1.5 meter to 2 meters high by 2 meters to 3 meters wide. It is fast growing and are cold tolerant to temperatures at least as low as minus 6 degrees. Frosts will kill young unprotected plants. Older plants will be killed off down to ground level will grow out immediately on warmer weather.
It is best suited to areas that are waterlogged or have poor drainage like in depressions and around sullage trenches. Place them at the bottom of slopes or retaining walls where moisture lies or seeps out. It must be pruned to maintain a bushy appearance and for the plants to send up more flowering stems. I have found by pruning the flowering stems back just prior to the last few flowers buds opening the plants will send up new flowering stems very quickly. I also pruned them during the coldest month of the year to help stimulate more growth. Not a pleasant job with the prickles but worthwhile once the flowers start to appear.
Propagation:
Seeds: Hibiscus diversifolia seeds can be sown directly into a seed raising mix. Cover them with 5mm of fine sand and keep moist not wet. Place the tray in a warm sunny position. When the seedlings are 20mm to 30mm tall, prick them out and plant them into 50mm native tubes using a good organic mix.
Once the seedlings reach 150mm to 200mm in height they can be planted out into their permanent position.
Cuttings: Try using 100mm to 150mm long ripened material when growing from Cuttings. Take them in mid spring or autumn. Remove a 10mm slice from the bark in a downward stroke from one side. Using a rooting hormone is not required. Now and place it into a sterile mix of peat, sand and perlite.
Place the trays under 30mm to 50mm shade and keep the trays warm. Bottom heat is beneficial when striking the cuttings. Ideally temperatures should be maintained at between 22 to 24 degrees.
When the cuttings have obviously struck and have developed good roots treat them as for seedlings.
Alternatively take a 150mm to 200mm non flowering stem which is 10mm to 20mm thick. Remove the top 200mm and place it in a 50mm native tube with a porous mix without organic matter. Ensure that the bottom of the cutting is about 20mm from the base of the tube. Now lay the tubes out at 45 degrees so that the bottom half of the tube is in water. When the roots appear at the bottom of the tubes harden the off a little and plant them out into their permanent positions.
Fertilize using Seaweed, fish emulsion or organic chicken pellets soaked in water and apply the liquid on an alternate basis. Fertilize every 2 months until the plants are well established then on an annual basis in September to October to maintain good health, vigour and better flowering.
Further Comments from Readers:
Hi reader, it seems you use The Bible of Botany a lot. That’s great as we have great pleasure in bringing it to you! It’s a little awkward for us to ask, but our first aim is to purchase land approximately 1,600 hectares to link several parcels of N.P. into one at The Pinnacles NSW Australia, but we need your help. We’re not salespeople. We’re amateur botanists who have dedicated over 30 years to saving the environment in a practical way. We depend on donations to reach our goal. If you donate just $5, the price of your coffee this Sunday, We can help to keep the planet alive in a real way and continue to bring you regular updates and features on Australian plants all in one Botanical Bible. Any support is greatly appreciated. Thank you.
In the spirit of reconciliation we acknowledge the Bundjalung, Gumbaynggirr and Yaegl and all aboriginal nations throughout Australia and their connections to land, sea and community. We pay our respect to their Elders past, present and future for the pleasures we have gained.
Mount Cootha Botanical Gardens Qld.
Mount Cootha Botanical Gardens Qld.
Mount Cootha Botanical Gardens Qld.

Mount Cootha Botanical Gardens Qld.
Mount Cootha Botanical Gardens Qld.
Hibiscus geranioides
Classification:
Unranked: Eudicots
Order: Malvales
Family: Malvaceae
Subfamily: Malvoideae
Tribe: Hibisceae
Genus: From Ibískos, which is Greek or later Hibiscum, which is Latin for a marsh mallo and Folium, which is Latin for foliage. It refers to a plant in ancient Egypt that grew in marshes and was used to make mallow for soothing the throat. Today it refers to plants, which have flowers that resemble the marsh mellow plant.
Species: From Geraniol, which is Ancient Greek for a crane’s bill and Eîdos/Oides, which is Ancient Greek for alike or similar to. It refers to the plants which resemble those of the exotic Geranium genus.
Common Name: Geranium Leaf Hibiscus.
Distribution:
Hibiscus geranioides is found across the top end of Australia east from the Kimberley Range in the north western, Western Australia to Cape York Peninsula in far north eastern Queensland.
https://avh.ala.org.au/occurrences/search?taxa=Hibiscus+geranioides#tab_mapView
Habitat Aspects Climate:
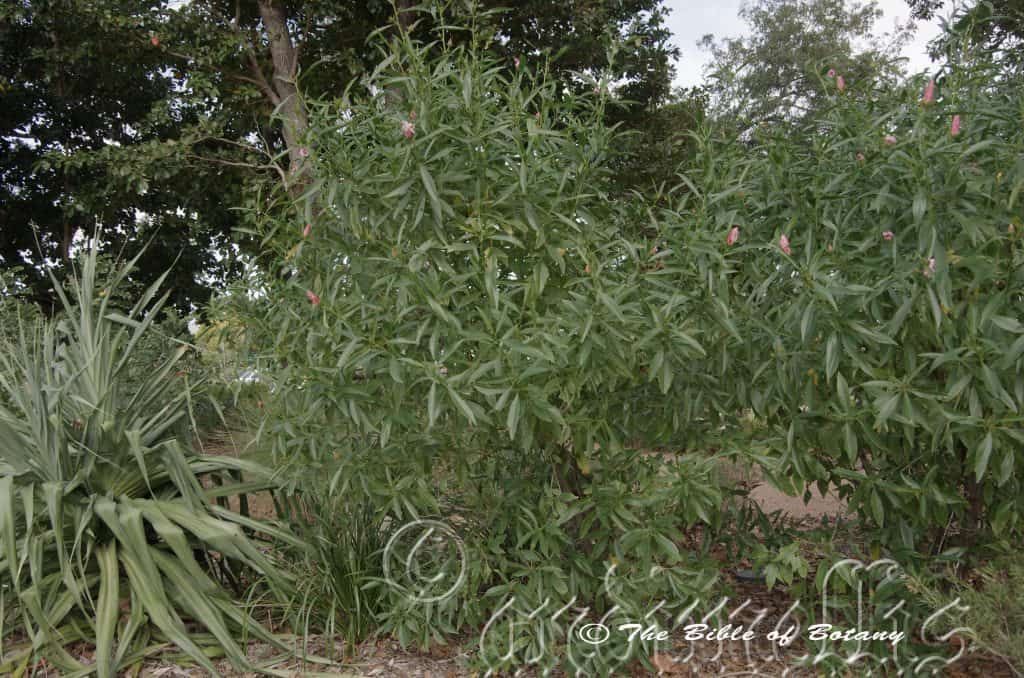
Hibiscus geranioides prefers full sun to dappled shade. It grows in riparian zones, open woodlands, adjacent to dry and well developed monsoonal and in littoral rainforests. This is a small perennial shrub that has large showy pink flowers. The altitude ranges from 5 meters ASL to 600 meters ASL.
The temperatures range from 8 degree in July to 42 degrees in January.
The rainfall ranges from lows of 550mm to an average of 3000mm annually. In lower rainfall areas it is associated with soils that have a stronger capillary action along riparian zones.
Soil Requirements:
Hibiscus geranioides prefer sandy loams, fatty sands to light clays. The soils are usually derived from decomposed brown basalt, and sandstone. The soils pH varies from 5pH through to a 6pH. It does not tolerate waterlogged soils however annual inundations or periodic rises in water tables for short periods are tolerated. Non saline soils to moderately saline soils are tolerated.
Height & Spread:
Wild Plants: 0.5m to 0.7m by 0.5m to 0.8m.
Characteristics:
Hibiscus geranioides’s stem is blue-green and glabrous. The branchlets are pale blue-green and are covered in fawn to pale brown stellate or stiff trifid hairs.
Hibiscus geranioides’s ovate or 3 lobed leaves and measure 30mm to 70mm in length by 20mm to 60mm in width. The lobes are oblong or broadly ovate and measure 25mm to 40mm in length. The bases are hastate to rounded while the apexes are obtuse. The concolourous laminas are blue-green and are sparsely covered in white hirsute hairs or very rarely glabrous. The margins are serrate and flat. The mid vein and main lateral veins are prominent on the lower lamina and are slightly visible from above. The mid vein and lateral veins have a row of setose hairs. The petioles are covered in fawn to pale brown stellate hairs and measure 20mm to 25mm in length
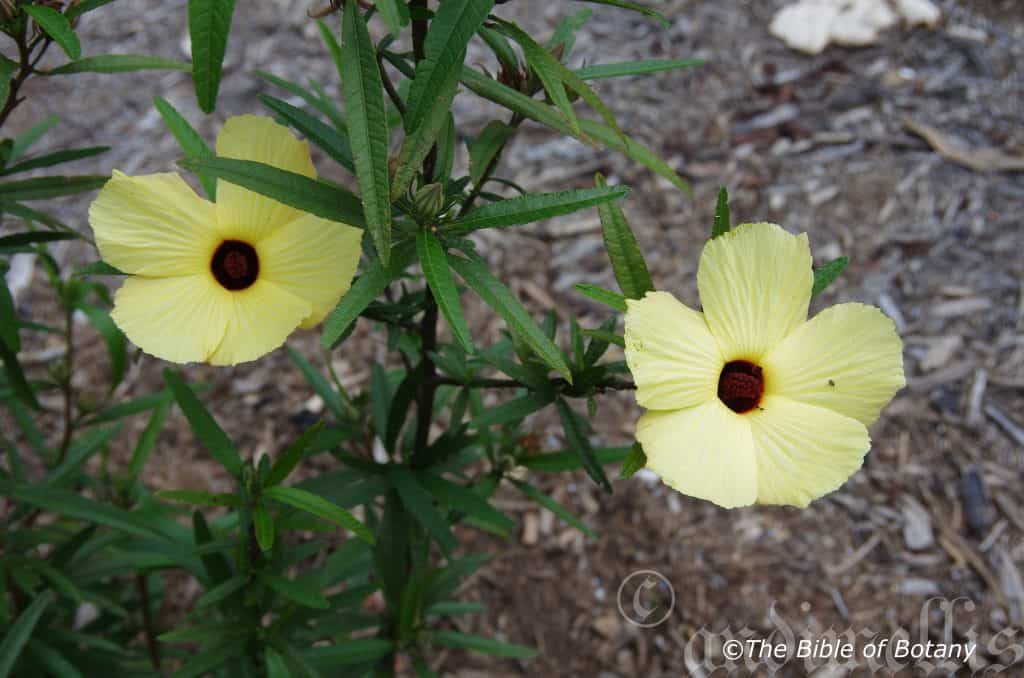
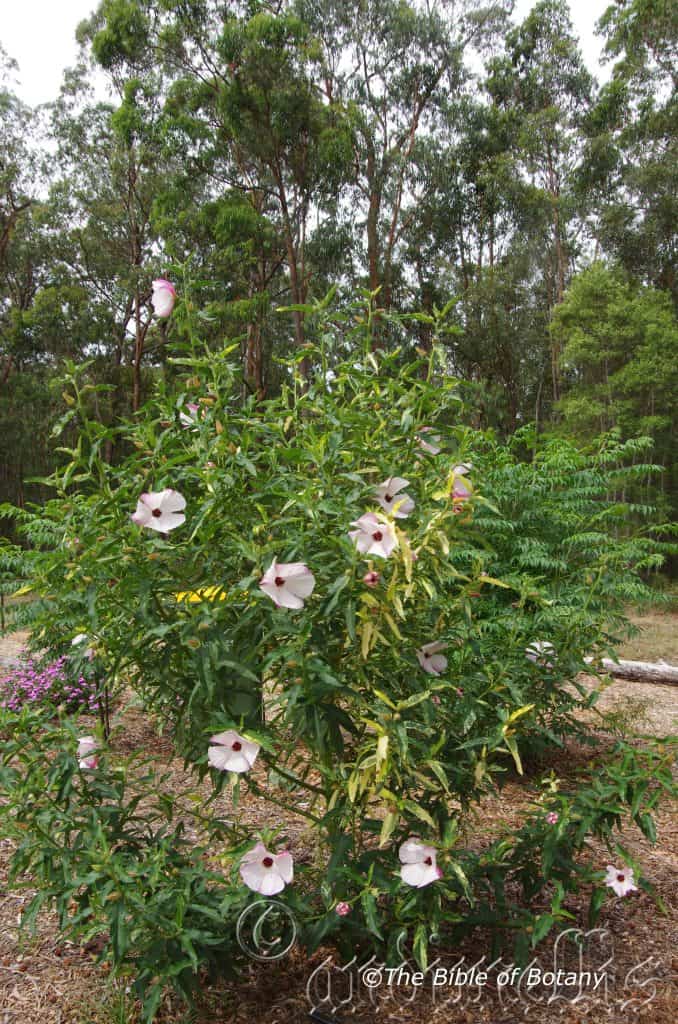
The inflorescences of Hibiscus geranioides are born singularly from the leaf axis and measure 120mm to 150mm in diameter when spread out. The pedicels, buds and sepals are all densely covered in white stellate hairs. The pedicel measures 15mm to 25mm in length. The 7 to 10 linear epicalyxes lobes are green and measure 3mm to 7mm in length. The 5 calyx lobes are deep green, lanceolate, and are covered in white stellate hairs externally and glabrous internally. They measure 4mm to 6mm in length. The 5 pale pink rarely white to deep pink petals are oblong to elliptical. The petals are tapering at the base and are contorted while the apex is broadly obtuse. The petals measure 10mm to 20mm in length by 8mm to 10mm across at the widest point. The corolla is purple-red at the base.
The pink stamens are fused to the upper segment of the style and have yellow anthers. The pale pink to deep pink styles measure 8 to 18mm in length. The 5 lobed pink stigmas are linear. The flowers appear throughout the year under favourable conditions.
Hibiscus geranioides’s fruit is a globose to conical capsule. The capsules measure 8mm to 12mm in length by 7mm to 9mm in diameter. It is densely covered in stiff fawn to khaki hirsute hairs. The green capsules turn brown on ripening. The pale dull grey-brown seeds measure 3mm to 4mm in diameter and are covered in long pale brown hirsute hairs.
Confusing Species:
This species is often confused with Hibiscus pedunculata which originates from Africa and is incorrectly sold under the label of Hibiscus geranioides.
Hibiscus geranioides has pedicel which measure 15mm to 25mm in length, petals, measure 10mm to 20mm in length, calyx measure 10mm to 15mm in length and epicalyx measure 7mm to 15mm in length which are longer.
Hibiscus pedunculata has pedicel which measure 4mm to 12mm in length, petals, measure 30mm to 40mm in length sepals and epicalyx are all shorter.
Wildlife:
The flowers are visited by a number of small native Hibiscus beetles from the Nitidulidae family. The leaves and flowers are eaten by the harlequin bugs. Harlequin bugs are those beautifully coloured beetles called Tectocoris diopthalmus.
Cultivation:
Hibiscus geranioides is a very beautiful small native shrub which is suitable for small gardens to the largest gardens in moist to wet areas. It is an excellent colourful addition for tropical, subtropical or warm temperate frost free areas in the garden. As garden subjects it will grow to 0.5 meters to 1 meter in height by 0.6 meters to 1 meter in diameter. They must be lightly pruned regularly to enhance bushiness and better flowering. It is fast growing and are cold tolerant to temperatures at least as low as minus 1 degree. They should be treated as an annual and are easy to propagate from seed.
It is best suited to areas that have consistent ground moisture but not waterlogged. It makes excellent colourful additions where a fast growing annual or perennial is wanted. Plants we had growing at Nana Glen in a warm northerly position lived for 5 years and flowered from early September until cut back by frosts in late June or early July. The central stem that survived the frosts would immediately commence growing and flowering as soon as the last frosts were over for the year. Seedlings naturally sown beneath the mother plant would commence flowering in late November.
Propagation:
Seeds: Hibiscus geranioides seeds can be sown directly into a seed raising mix. Cover them with 5mm of fine sand and keep moist not wet. Place the tray in a warm sunny position.
When the seedlings are 20mm to 30mm tall, prick them out and plant them into 50mm native tubes using a good organic mix.
Once the seedlings reach 150mm to 200mm in height they can be planted out into their permanent position.
Cuttings: Try using 100mm to 150mm long ripened material when growing from Cuttings. Take them in mid spring or autumn. Remove a 10mm slice from the bark in a downward stroke from one side. Rooting hormone is not required. Place the cutting into a sterile mix of peat, sand and perlite. The weak hormone is mainly used for sterility.
Place the trays under 30mm to 50mm shade and keep the trays warm. Bottom heat is beneficial when striking the cuttings. Ideally temperatures should be maintained at between 22 to 24 degrees.
When the cuttings have obviously struck and have developed good roots treat them as for seedlings.
Fertilize using Seaweed, fish emulsion or organic chicken pellets soaked in water and apply the liquid on an alternate basis. Fertilize every 2 months until the plants are well established then on an annual basis in September to October to maintain good health, vigour and better flowering.
Further Comments from Readers:
Hi reader, it seems you use The Bible of Botany a lot. That’s great as we have great pleasure in bringing it to you! It’s a little awkward for us to ask, but our first aim is to purchase land approximately 1,600 hectares to link several parcels of N.P. into one at The Pinnacles NSW Australia, but we need your help. We’re not salespeople. We’re amateur botanists who have dedicated over 30 years to saving the environment in a practical way. We depend on donations to reach our goal. If you donate just $5, the price of your coffee this Sunday, We can help to keep the planet alive in a real way and continue to bring you regular updates and features on Australian plants all in one Botanical Bible. Any support is greatly appreciated. Thank you.
In the spirit of reconciliation we acknowledge the Bundjalung, Gumbaynggirr and Yaegl and all aboriginal nations throughout Australia and their connections to land, sea and community. We pay our respect to their Elders past, present and future for the pleasures we have gained.
Grevillea NSW
Mount Cootha Botanic Gardens Qld.
Brookside Qld.

Grange Qld.
Miriam Vale Qld.
Miriam Vale Qld.
Miriam Vale Qld.
Author’s Garden The Pinnacles NSW
Miriam Vale Qld.
Miriam Vale Qld.
Miriam Vale Qld.
Author’s Garden The Pinnacles NSW
Miriam Vale Qld.
Miriam Vale Qld.
Miriam Vale Qld.
Author’s Garden The Pinnacles NSW

Author’s Garden The Pinnacles NSW
Author’s Garden The Pinnacles NSW
Author’s Garden The Pinnacles NSW
Author’s Garden The Pinnacles NSW
Author’s Garden The Pinnacles NSW
Author’s Garden The Pinnacles NSW
Author’s Garden The Pinnacles NSW
Author’s Garden The Pinnacles NSW
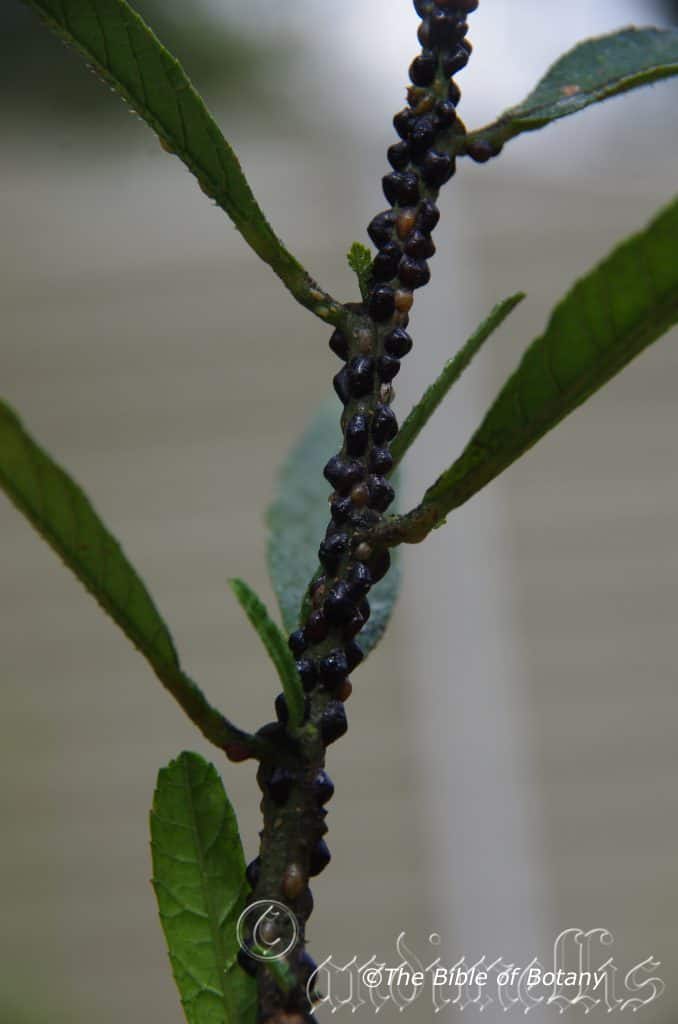
Parasaissetia nigra Author’s Garden The Pinnacles NSW

Author’s Garden The Pinnacles NSW
Author’s Garden The Pinnacles NSW
Anderson Gardens Townsville Qld.
Anderson Gardens Townsville Qld.
Hibiscus heterophyllus
Classification:
Unranked: Eudicots
Order: Malvales
Family: Malvaceae
Subfamily: Malvoideae
Tribe: Hibisceae
Genus: From Ibískos, which is Greek or later Hibiscum, which is Latin for a marsh mallo and Folium, which is Latin for foliage. It refers to a plant in ancient Egypt that grew in marshes and was used to make mallow for soothing the throat. Today it refers to plants, which have flowers that resemble the marsh mellow plant.
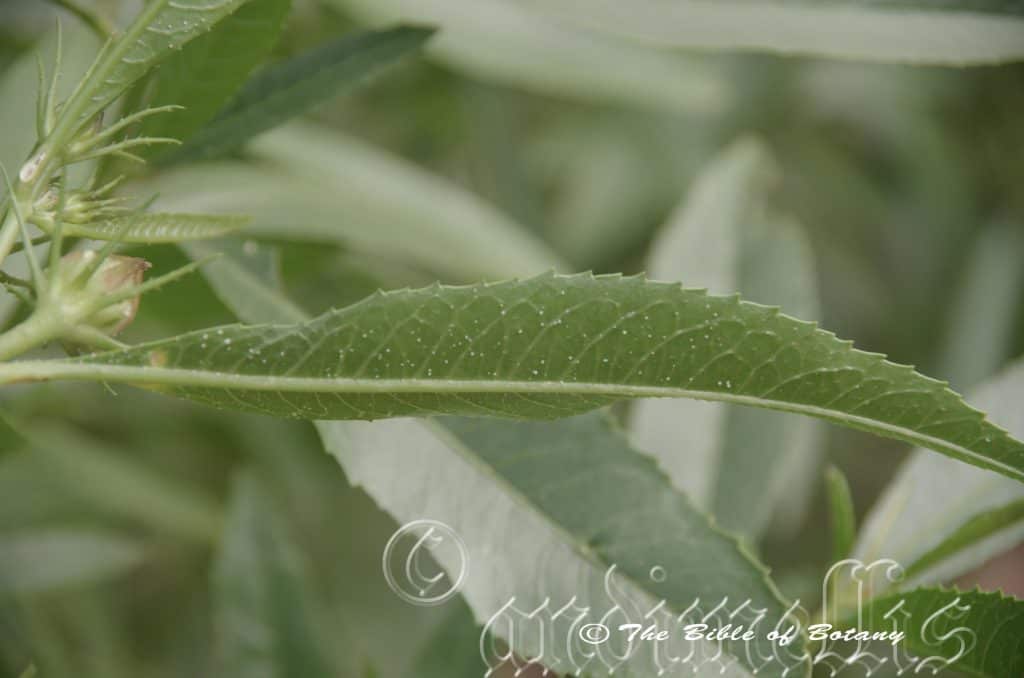
Species: From Heteros, which is Ancient Greek for other or different and Phullon/Phýllon, which is Ancient Greek for a leaf. It refers to leaves, which are of different sizes and shapes on the same plant.
Common Name: Native Rosella.
Distribution:
Hibiscus heterophyllus is found south from Ingham in far north Queensland to Wollongong in New South Wales through. There is an outlying colony on the Lockhart River on Cape York Peninsula. It is found on and east the Great Dividing Range to the coast.
https://avh.ala.org.au/occurrences/search?taxa=Hibiscus+heterophyllus#tab_mapView
Habitat Aspects Climate:
Hibiscus heterophyllus prefers full sun to dappled shade. It grows in riparian zones, open woodlands, adjacent to dry rainforests, well developed rainforests or in littoral rainforests. The altitude ranges from 5 meters ASL to 850 meters ASL.
The temperatures range from 2 degree in July to 36 degrees in January.
The rainfall ranges from lows of 750mm to an average of 3000mm annually.
Soil Requirements:
Hibiscus heterophyllus prefers sandy loams, fatty sands, gritty light clays, medium clays or podzolics. The soils are derived from decomposed shale, brown basalt, black basalt, metamorphic rocks and sandstones. The soils pH varies from 5pH through to a 7pH. It does not tolerate waterlogged soils however annual inundations or periodic rises in water tables are normal. Non saline soils to moderately saline soils are tolerated.
Height & Spread:
Wild Plants: 4m to 6m by 2m to 4m.
Characteristics:
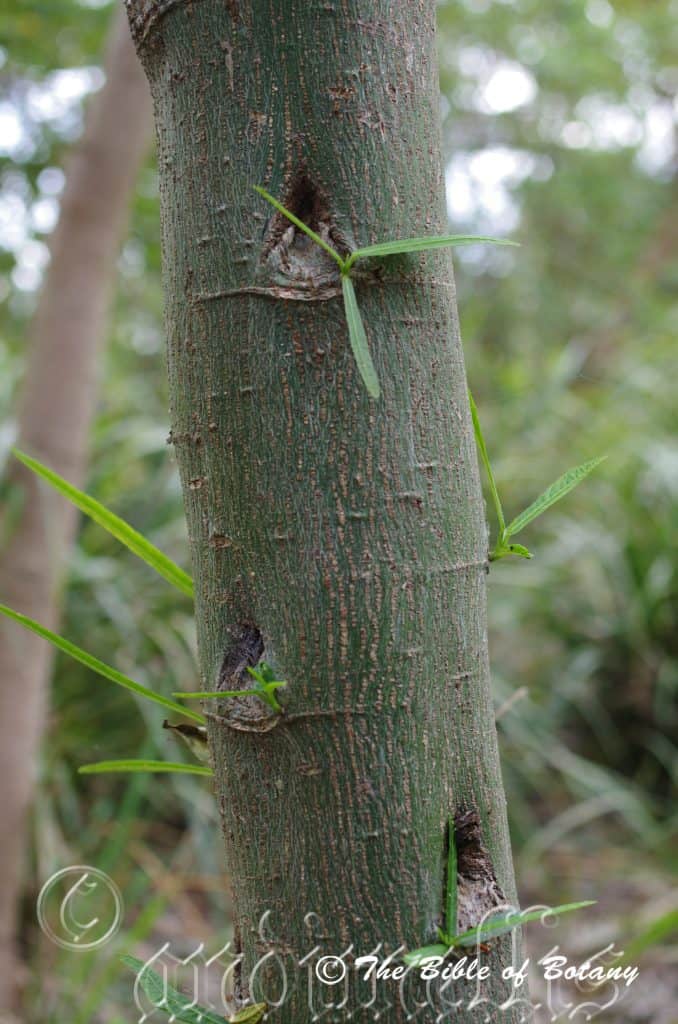
Hibiscus heterophyllus’s bark is green to deep green and glabrous. The branches and branchlets are green, densely covered in fawn to rusty hirtellous and stellate hairs with a few setose hairs.
Hibiscus heterophyllus’s ovate or 3 to 5 lobed lower leaves measure 50mm to 120mm in length by 50mm to 130mm in width. The upper leaves are narrow ovate to lanceolate and measure 90mm to 180mm in length by 25mm to 60mm in width. The lobes are oblong or broadly ovate and measure 25mm to 60mm in length. The base is cuneate to rounded while the apex is acuminate or narrow acute. The concolourous laminas are deep sea green and are sparsely covered in rusty tomentose with a few setose hairs or very rarely glabrous. The margins are entire and flat. The mid vein and main lateral veins are prominent on the lower lamina and are slightly visible from above. The mid vein and lateral veins have a row of setose hairs. The petioles measure 20mm to 30mm in length and are covered in white setose hairs.
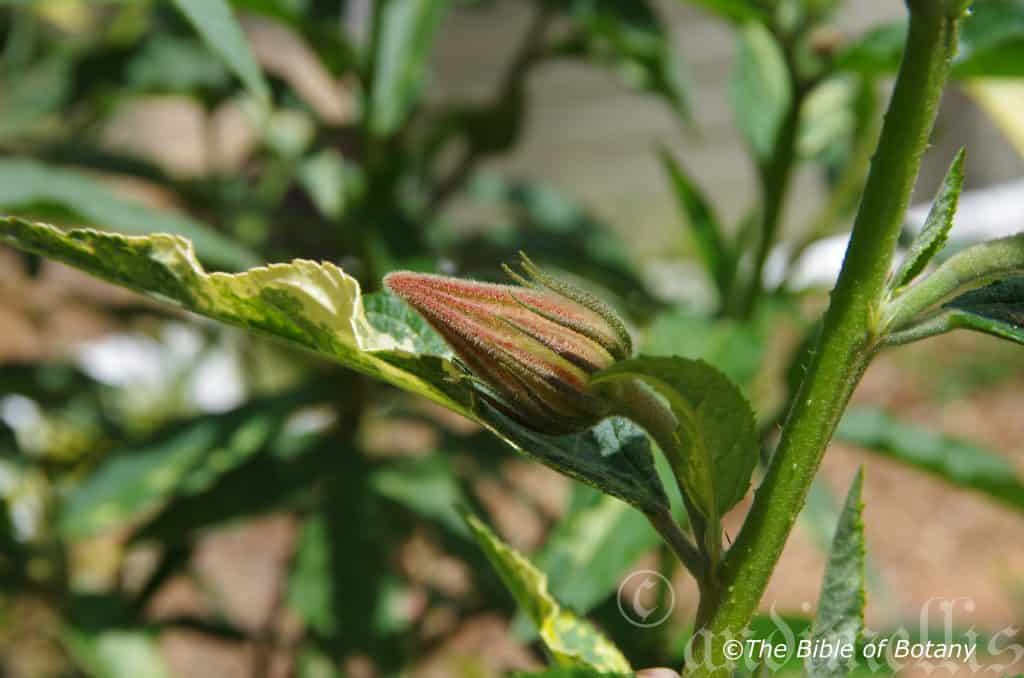
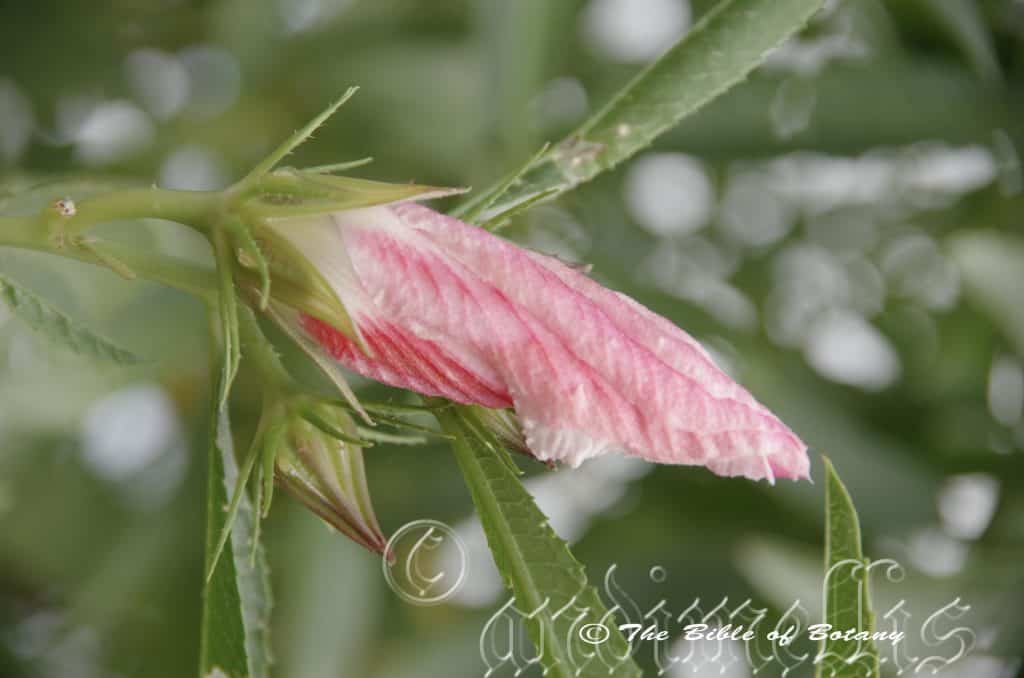
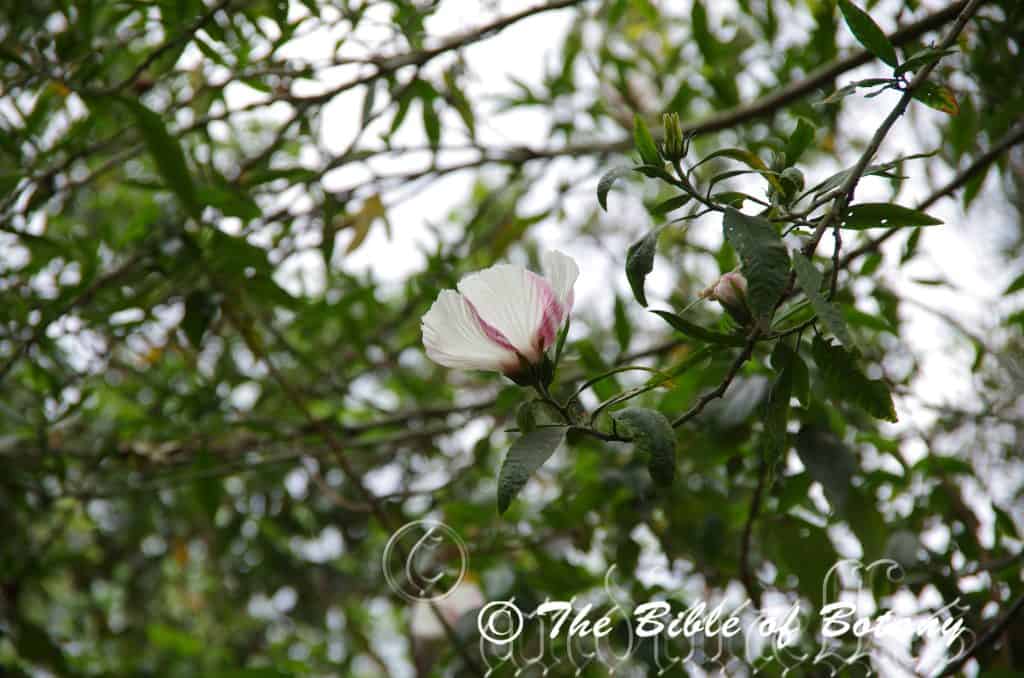
The inflorescences of Hibiscus heterophyllus are born singularly from the leaf axis and measure 120mm to 150mm in diameter when spread out. The pedicels, buds and sepals are all densely covered in rusty stellate and tomentose hairs with a few setose hairs. The pedicel measures 18mm to 25mm in length. The epicalyxes number 10 to 12 and are pale green linear and measure 15mm to 20mm in length. The 5 calyx lobes are deep green, lanceolate, and are covered in rusty tomentose hairs and measure 20mm to 35mm long. The 5 white or bright yellow petals have a wide pink longitudinal line down the edge. The petals are ovate to broadly spathulate tapering at the base and are contorted while the apex is broadly obtuse. The corolla has a deep red to burgundy base and measure 50mm to 70mm in length by 40mm to 60mm across at the widest point. The deep red to burgundy style measures 25 to 30mm in length and divides into 5 stigmas very close to the apex. The 10 to 20 deep red or burgundy stamens are fused to the style for much of its length. Flowers appear from September to May.
Hibiscus heterophyllus’s fruits are globose to conical capsule. The capsules measure 18mm to 22mm in length by 18mm to 20mm in diameter. It is densely covered in stiff fawn to khaki puberulent and setose hairs. The green capsules turn brown on ripening. The pale dull grey-brown glabrous seeds measure 3mm to 4mm in diameter.
Wildlife:
The flowers are visited by a number of small honeyeaters along with the native Hibiscus beetles from the Nitidulidae family. The leaves and flowers are eaten by the harlequin bugs. Harlequin bugs are those beautifully coloured beetles called Tectocoris diopthalmus. The flowers and especially the seeds are much sought after by the Australian king parrot, Alisterus scapularis.
Cultivation:
Hibiscus heterophyllus is a very beautiful small native tree or large shrub, which is suitable for small gardens to the largest gardens in moist situations. It is an excellent colourful addition for tropical, subtropical or warm temperate zones. As a garden subject it will grow to 4 meter to 6 meters in height by 4 meters to 6 meters in diameter. It must be lightly pruned regularly to enhance bushiness and better flowering. It is fast growing and are cold tolerant to temperatures at least as low as minus 2 degrees. Frosts will kill young unprotected plants. Older plants will be killed off down to the hard wood however recover immediately the weather warms up again.
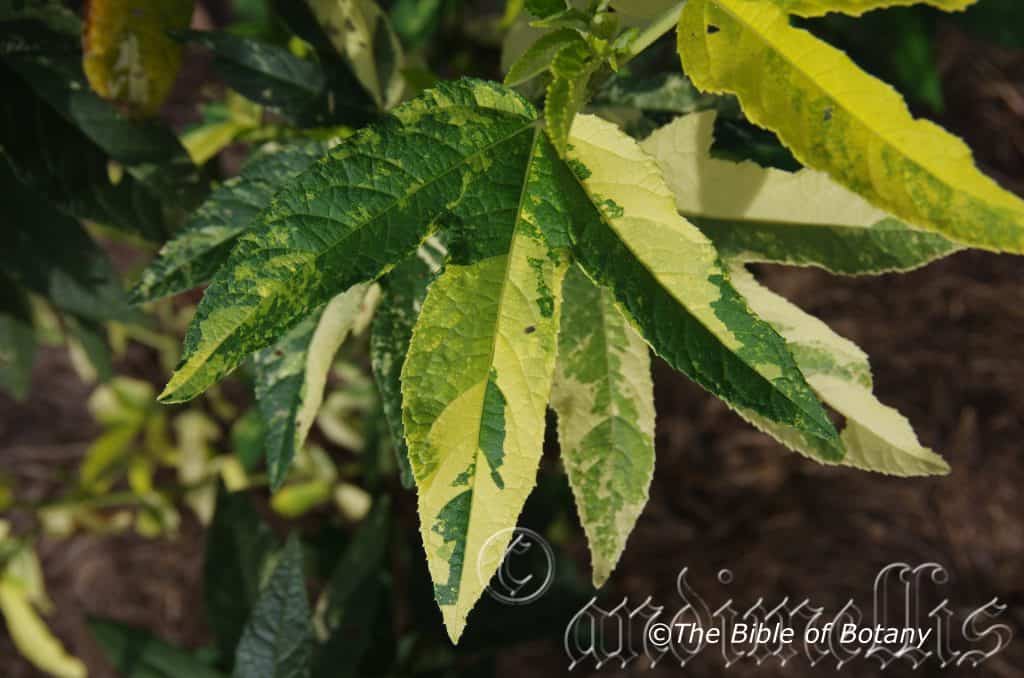
It is best suited to areas that have consistent ground moisture but not waterlogged. It makes a good small specimen tree during the establishment of a rainforest, being fast growing and usually flower in the second year from seed. The green trunk is an attractive feature as are the flowers with pink buds opening to white or yellow. We have measured the flowers; from a variegated white flowering specimen, we have growing in our Malvaceae garden and they average 190mm in diameter. The largest of the Australian Hibiscus we have seen to date.
Propagation:
Seeds: Hibiscus heterophyllus seeds can be sown directly into a seed raising mix. Cover them with 5mm of fine sand and keep moist not wet. Place the tray in a warm sunny position. When the seedlings are 20mm to 30mm tall, prick them out and plant them into 50mm native tubes using a good organic mix.
Once the seedlings reach 150mm to 200mm in height they can be planted out into their permanent position.
Cuttings: It is very easy to propagate from cuttings. Try using 100mm to 150mm long ripened material when growing from Cuttings. Take them in mid spring or autumn. Remove a 10mm slice from the bark in a downward stroke from one side at the base. Using a weak rooting hormone, dip the cutting in and place it into a sterile mix of peat, sand and perlite. The weak hormone is mainly used for sterility. I have used vitamin B liquid formulas as an alternative to the use of hormones
Place the trays under 30mm to 50mm shade and keep the trays warm. Bottom heat is beneficial when striking the cuttings. Ideally temperatures should be maintained at between 22 to 24 degrees.
When the cuttings have obviously struck and have developed good roots treat them as for seedlings.
Fertilize using Seaweed, fish emulsion or organic chicken pellets soaked in water and apply the liquid on an alternate basis. Fertilize every 2 months until the plants are well established then on an annual basis in September to October to maintain good health, vigour and better flowering.
Further Comments from Readers:
Hi reader, it seems you use The Bible of Botany a lot. That’s great as we have great pleasure in bringing it to you! It’s a little awkward for us to ask, but our first aim is to purchase land approximately 1,600 hectares to link several parcels of N.P. into one at The Pinnacles NSW Australia, but we need your help. We’re not salespeople. We’re amateur botanists who have dedicated over 30 years to saving the environment in a practical way. We depend on donations to reach our goal. If you donate just $5, the price of your coffee this Sunday, We can help to keep the planet alive in a real way and continue to bring you regular updates and features on Australian plants all in one Botanical Bible. Any support is greatly appreciated. Thank you.
In the spirit of reconciliation we acknowledge the Bundjalung, Gumbaynggirr and Yaegl and all aboriginal nations throughout Australia and their connections to land, sea and community. We pay our respect to their Elders past, present and future for the pleasures we have gained.
Mount Cootha Botanical Gardens Qld.
Mount Cootha Botanical Gardens Qld.
Mount Cootha Botanical Gardens Qld.
Mount Cootha Botanical Gardens Qld.
Mount Cootha Botanical Gardens Qld.
Mount Cootha Botanical Gardens Qld.
Mount Cootha Botanical Gardens Qld.
Mount Cootha Botanical Gardens Qld.
Mount Cootha Botanical Gardens Qld.
Mount Cootha Botanical Gardens Qld.
Hibiscus insularis
Classification:
Unranked: Eudicots
Order: Malvales
Family: Malvaceae
Subfamily: Malvoideae
Tribe: Hibisceae
Genus: From Ibískos, which is Greek or later Hibiscum, which is Latin for a marsh mallo and Folium, which is Latin for foliage. It refers to a plant in ancient Egypt that grew in marshes and was used to make mallow for soothing the throat. Today it refers to plants, which have flowers that resemble the marsh mellow plant.
Species: From īnsulānus which is Latin for relating to an Island or Islands. It refers to plants, which grow on islands or at times narrow necked peninsula.
Common Name: Phillip Island Hibiscus.
Distribution:
Hibiscus insularis is endemic to Phillip Island which is part of the Norfolk Island group.
https://avh.ala.org.au/occurrences/search?taxa=Hibiscus+insularis#tab_mapView
Habitat Aspects Climate:
Hibiscus insularis prefers full sun to light dappled shade. It grows in open plains and headlands. The altitude ranges from 60 meters ASL to 250 meters ASL.
The temperatures range from 15 degree in July to 28 degrees in January.
The rainfall ranges from lows of 1000mm to an average of 1328mm annually.
Soil Requirements:
Hibiscus insularis prefers red, gritty, porous light clays to medium well drained red clays. The soils are derived from decomposed black basalt. The soils pH varies from 5.5pH through to a 6pH. It does not tolerate waterlogged soils. Non saline soils to moderately saline soils are tolerated as are salt laden winds.
Note that our measurements have been obtained from garden grown specimens at the Mount Cootha Botanical gardens as have all the our photographs. Plants had been regularly fertilized and this could distort measurements compared to the wild ancestors. The plants were probably from a single genetic pool which would limit the range and size of the measurements provided below. It is not known whether the specimens grown are representative of the species or type specimen.
Height & Spread:
Wild Plants: 2m to 2.5m by 2m to 2.5m.
Characteristics:
Hibiscus insularis’s main stems are pale grey, mid grey-brown to pale creamy-brown. The main stems are rough and somewhat scabrous. The smaller stems are pale green and are moderately covered in course white puberulent and sessile stellate hairs.
Hibiscus insularis’s alternate, oval to ovate leaves measure 30mm to 60mm in length by 20mm to 45mm in width. The bases are truncate while the apexes are tapering obtuse with a broad, shallow emarginate to retuse tip. The discolourous laminas are deep green to sea-green and sparsely covered in tufts of spreading, fawn sessile stellate hairs on the upper laminas while the lower laminas are much paler and slightly scabrous. The laminas recurve upwards from the mid vein to the margins while the margins are irregularly sinuate with or without a few shallow lobes. The mid vein is prominent on both laminas but more prominent on the lower lamina while the main lateral veins are prominent on the upper lamina and are clearly visible from the lower laminas being yellowish-green. The mid vein and lateral veins have a row of short sharp prickles. The petioles measure 7mm to 15mm in length.
The inflorescences of Hibiscus insularis are born singularly from the leaf axis and measure 60mm to 80mm in diameter when spread out. The pedicels are densely covered in fine white pulverulent and floccose hairs. The stout pedicels measure 7mm to 9mm in length. The 5 elliptical bracts are densely covered in short white pulverulent and tufted floccose hairs externally and measure 5mm to 6mm in length by 4mm to 4.5mm in width. The pale creamy yellow-green calyxes have 5 broad triangular lobes and are densely covered in short white pulverulent and tufted floccose hairs externally. The calyxes are glabrous internally while the lobes are covered in short white pulverulent and tufted floccose hairs. The calyxes measure 6mm to 7.5mm in length by 10mm to 12mm in diameter while the lobes measure 3mm to 3.5mm in length. The 5 strongly contorted petals are oblong and twist to form a long funnel form tube. The pale yellow corolla is heavily streaked in purplish-red to deep purplish-pink from the base and extends to the opening of the funnel internally and can be seen from the outside through the petals. The petals measure 40mm to 55mm in length by 20mm to 25mm across at the widest point.
The gynoecium is purplish-red to deep purplish-pink near the base and extends to the mouth of the funnel where it turns pastel yellow rotating around the style similar to a barbers pole to where the styles divides. The gynoecium measure 42mm to 46mm in length. The 70 to 80 white filaments are often streaked in purplish-red to deep purplish-pink. The stamens are fused to the upper portion of the style and measure 6mm to 9mm in length. The white, purplish-red to deep purplish-pink anthers produce a pale yellow pollen and measure 0.5mm to 2mm in diameter after anthesis including the pollen. The purplish-red, deep purplish-pink or magenta styles are 5 fid and measure 8mm to 10mm from where they divide to the stigmas that measure 1.5mm to 2mm in length. The flowers appear throughout the year.
Hibiscus insularis’s fruits are broad conical capsules. The capsules measure 14mm to 15mm in length by 9mm to 10mm in diameter. The green capsules turn deep brown to chocolate brown and rugulose when ripe. The epicalyx and sepals are persistent on the ripe capsules. The pale dull, deep brown rugulose seeds measure 3mm to 4mm in diameter.
Wildlife:
The flowers on Hibiscus insularis are visited by a number of native Hibiscus beetles from the Nitidulidae family. The leaves and flowers are eaten by the harlequin bugs. Harlequin bugs are those beautifully coloured beetles called Tectocoris diopthalmus.
Cultivation:
Hibiscus insularis is a beautiful small native shrub which is suitable for small gardens to the largest gardens in wet areas. It is an excellent colourful addition for tropical, subtropical or temperate zones. As a garden subject it will grow to 1.5 meter to 2 meters high by 2 meters to 3 meters wide. It is fast growing and are cold tolerant to temperatures as low as minus 2 degrees if protected during the early stages of growth. Frosts will kill young unprotected plants.
If mild native fertilizers are used they will develop deep sea-green leaves.
It would make an excellent hedge, screen and wildlife corridors because of their upright bushy growth habit and their abundance of flowers. It should be noted however that it is susceptible to the Hibiscus Harlequin beetle and these may form plagues under a monoculture situation. Another drawback is that if used on farms it is highly palatable to stock so must be fenced off.
It would look particularly attractive at the edge of a bush garden. Plants can be placed near a bend in the garden or set back in the mid ground. It will gain a lot of attention and highlight other finer bright green leafy shrubs. Mass plant it (4 to 8) in the midground with deep red flowering plants in the foreground while large flowering specie can be placed in the background. It would be a very good choice if planted on a tight bend or “U” bends. Planted on the inside of the bend, whether it is in flower or not these plants will break your concentration and the viewer will be transfixed on the display of flowers or foliage rather than watching the path. Here the choice of companion plants to use on the outside of the bend is limited only by your imagination. Small Acacias to 1 meter diameter with cream or white flowers can also be used to great effect as their flowering will compliment it as would many of the red flowering Grevillea. When mass planting use 2.5 meter to 2.5 meter centers.
Propagation:
Seeds: Hibiscus insularis seeds can be sown directly into a seed raising mix. Cover them with 5mm of fine sand and keep moist not wet. Place the tray in a warm sunny position. When the seedlings are 20mm to 30mm tall, prick them out and plant them into 50mm native tubes using a good organic mix.
Once the seedlings reach 150mm to 200mm in height they can be planted out into their permanent position.
Cuttings: Use 75mm to 100mm long ripened material when growing from Cuttings. Take them in mid spring or autumn. Remove a 10mm slice from the bark in a downward stroke from one side. Rooting hormone is not required. Place it into a sterile mix of peat, sand and perlite.
Place the trays under 30mm to 50mm shade and keep the trays warm. Bottom heat is beneficial when striking the cuttings. Ideally temperatures should be maintained at between 22 to 24 degrees.
When the cuttings have obviously struck and have developed good roots treat them as for seedlings.
Alternatively take a 150mm to 200 non flowering stem which is 10mm to 20mm thick. Remove the top 200mm and place it in a 50mm native tube with a porous mix without organic matter. Ensure that the bottom of the cutting is about 20mm from the base of the tube. Now lay the tubes out at 45 degrees so that the bottom half of the tube is in water. When the roots appear at the bottom of the tubes harden the off a little and plant them out into their permanent positions.
Fertilize using Seaweed, fish emulsion or organic chicken pellets soaked in water and apply the liquid on an alternate basis. Fertilize every 2 months until the plants are well established then on an annual basis in September to October to maintain good health, vigour and better flowering.
Further Comments from Readers:
Hi reader, it seems you use The Bible of Botany a lot. That’s great as we have great pleasure in bringing it to you! It’s a little awkward for us to ask, but our first aim is to purchase land approximately 1,600 hectares to link several parcels of N.P. into one at The Pinnacles NSW Australia, but we need your help. We’re not salespeople. We’re amateur botanists who have dedicated over 30 years to saving the environment in a practical way. We depend on donations to reach our goal. If you donate just $5, the price of your coffee this Sunday, We can help to keep the planet alive in a real way and continue to bring you regular updates and features on Australian plants all in one Botanical Bible. Any support is greatly appreciated. Thank you.
In the spirit of reconciliation we acknowledge the Bundjalung, Gumbaynggirr and Yaegl and all aboriginal nations throughout Australia and their connections to land, sea and community. We pay our respect to their Elders past, present and future for the pleasures we have gained.
Mount Cootha Botanical Gardens Qld.
Mount Cootha Botanical Gardens Qld.
Mount Cootha Botanical Gardens Qld.
Mount Cootha Botanical Gardens Qld.
Mount Cootha Botanical Gardens Qld.
Mount Cootha Botanical Gardens Qld.
Mount Cootha Botanical Gardens Qld.
Mount Cootha Botanical Gardens Qld.
Mount Cootha Botanical Gardens Qld.

Mount Cootha Botanical Gardens Qld.
Hibiscus macilwraithensis
Classification:
Unranked: Eudicots
Order: Malvales
Family: Malvaceae
Subfamily: Malvoideae
Tribe: Hibisceae
Genus: From Ibískos, which is Greek or later Hibiscum, which is Latin for a marsh mallo and Folium, which is Latin for foliage. It refers to a plant in ancient Egypt that grew in marshes and was used to make mallow for soothing the throat. Today it refers to plants, which have flowers that resemble the marsh mellow plant.
Species: Is named in honour of Thomas MacIlwraith; 1835–1900, who was a Queensland politician and pastoralist and Anum/Ensis, which is Latin for originating from. It refers to the type species coming from the Macilwraithe Range in far north eastern Queensland.
Common Name:
Distribution:
Hibiscus macilwraithensis is found south from Bolt Head to Macillwraith Range on Cape York Peninsula with a disjunct population further south near Tolga on the Atherton Tableland in far north eastern coastal Queensland.
https://avh.ala.org.au/occurrences/search?taxa=Hibiscus+macilwraithensis#tab_mapView
Habitat Aspects Climate:
Hibiscus macIlwraithensis prefers medium shade to light dappled shade. It grows adjacent to or in tropical rainforests and monsoonal rainforests. The altitude ranges from 50 meters ASL to 400 meters ASL.
The temperatures range from 12 degree in July to 36 degrees in January.
The rainfall ranges from lows of 1850mm to an average of 3000mm annually.
Soil Requirements:
Hibiscus macilwraithensis prefers loams to medium clays. The soils are usually derived from decomposed brown basalt, black basalt or sandstones. The soils pH varies from 5pH through to a 6pH. It does not tolerate waterlogged soils. Non saline soils to moderately saline soils are tolerated.
Height & Spread:
Wild Plants: 1m to 4m by 2m to 3m.
Characteristics:
Hibiscus macilwraithensis’s stems are grey-brown to pale fawnish-brown and are covered in papillate and farinaceous lumps. The grey-brown branchlets are covered in papillate and farinaceous lumps while the stems are pale green and are usually moderately covered in course fawn to pale brown stellate hairs or at times sparsely covered.
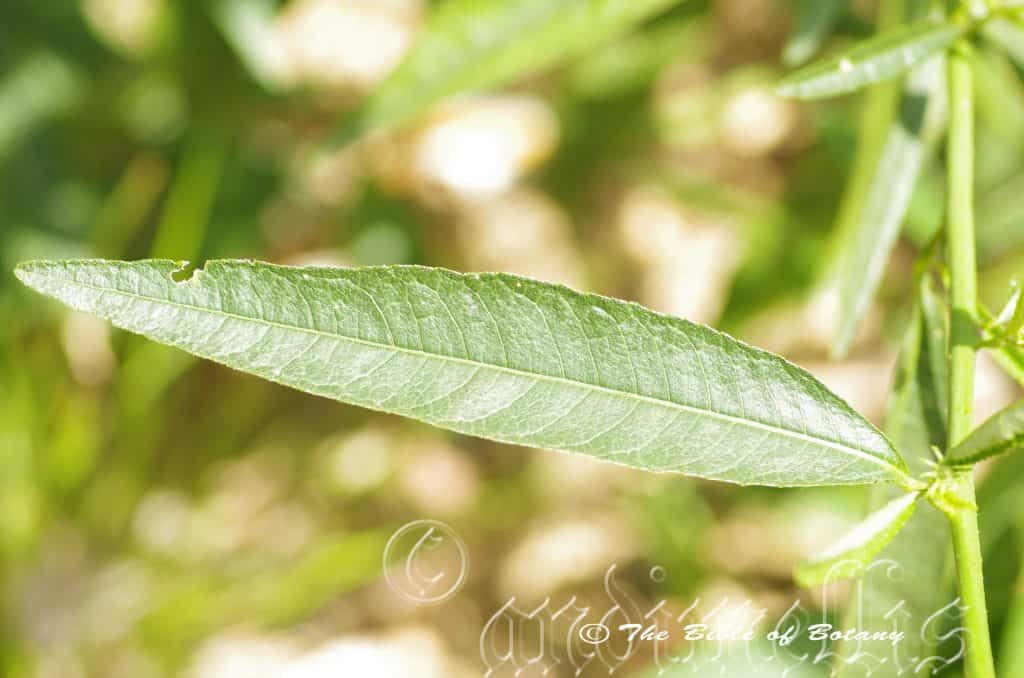
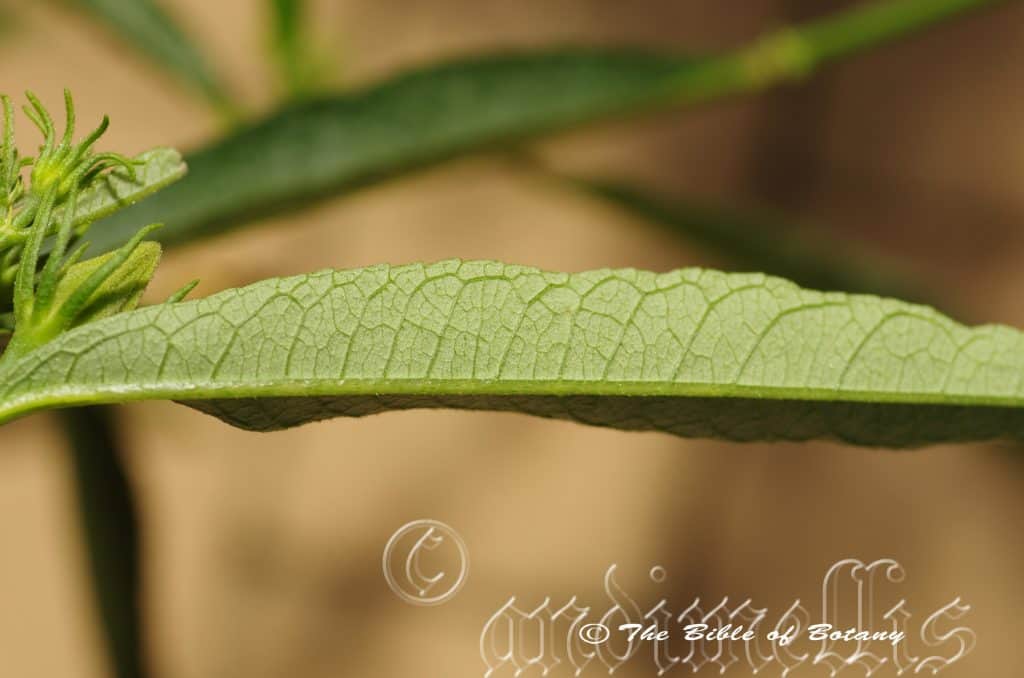
Hibiscus macilwraithensis’s alternate, oblanceolate leaves measure 125mm to 170mm in length by 40mm to 50mm in width at the widest point. The linear stipules are filiform and measure 4mm to10mm in length. The bases are long tapering and are rounded where they join onto the petioles while the apexes are acuminate or narrowly acute. The discolourous laminas are mid grass-green to mid green, somewhat scabrous and are usually moderately covered in course fawn to pale brown stellate hairs or at times sparsely covered on the upper laminas and are paler on the lower laminas. The laminas are flat and straight while the margins are entire and slightly undulating. The mid vein is strongly prominent on the lower lamina and is prominent on the upper lamina while the lateral veins are strongly prominent on the lower lamina and slightly prominent on the upper lamina. The lateral veins loop close to the margins. The stout petioles measure 2mm to 3mm in length.
The inflorescences of Hibiscus macilwraithensis are born on a terminal raceme or singularly from the leaf axis and measure 70mm to 100mm in diameter when spread out. The pedicels are densely covered in fawn to pale brown stellate hairs and measure 10mm to 50mm in length. The 6 or 7 linear epicalyxes segments are free for most their length, are deep green and are sparsely covered in fawn to pale brown stellate hairs. The epicalyxes measure 8.2mm to 12.5mm in length by 2mm to 3.5mm in width. The calyxes and 5 elliptical lobes are covered in fawn to pale brown stellate hairs and scales externally and are glabrous internally. The calyxes and lobes measure 10mm to 15mm in length by 3.5mm to 5mm in width. The 5 broad oval petals are strongly contorted while the apex is broadly truncate with a mucronate tip. The corolla and petals are usually creamy-white or at times white from the base to the apex and are covered in white sessile stellate hairs externally especially near the margins. They measure 20mm to 28mm in length by 15mm to 20mm across at the widest point.
The white gynoecium measures 22 to 33mm in length including the stamens. The 18 to 22 white filaments measure are fused to the upper 3mm to 5mm below the stigma. The filiform filaments measure 3mm to 4.5mm in length while the cream strongly reniform anthers dehisce on the outer edge and measure 0.8mm to 1mm in diameter.
The 5 fid, white stigma splits very close to the apex. The flowers appear from August to October.
Hibiscus macilwraithensis’s fruits are subglobose capsules. The capsules measure 10mm to 16mm in length by 12mm to 14mm in diameter. The green capsules are moderately to densely covered in stiff fawn to pale brown stellate hairs and turn brown on ripening. The epicalyxes and sepals are persistent on the ripe capsules.
The pale dull, grey obloidal, glabrous seeds are covered in white hirsute hairs and measure 4.5mm to 5mm in length by 2.8mm to 3mm in diameter.
Wildlife:
The flowers on Hibiscus maciIlwraithensis are visited by a number of native Hibiscus beetles from the Nitidulidae family. The leaves and flowers are eaten by the harlequin bugs. Harlequin bugs are those beautifully coloured beetles called Tectocoris diopthalmus.
Cultivation:
Hibiscus macilwraithensis is a very beautiful small native shrub which is suitable for small gardens to the largest gardens in moist areas. It is an excellent addition for tropical, subtropical or warm, frost free, temperate gardens. As a garden subject it will grow to 4 meter to 5 meters in height by 3 meters to 4 meters in diameter. It is fast growing and drought tolerant once established
If mild native fertilizers are used they will develop deep sea-green tropical look in the leaves.
It makes an excellent large hedges, screens and wildlife corridors because of their upright bushy growth habit and their abundance of flowers. It should be noted however that it may be susceptible to the Hibiscus Harlequin beetle and these may form plagues under a monoculture situation. Another drawback could be that if used on farms maybe highly palatable to stock so may need fencing off.
It looks particularly attractive at the edge of a bush gardens or used as a rainforest understory plant or for the starting of a small rainforests on a suburban block.
Propagation:
Seeds: Hibiscus macilwraithensis seeds can be sown directly into a seed raising mix. Cover them with 5mm of fine sand and keep moist not wet. Place the tray in a warm sunny position. When the seedlings are 20mm to 30mm tall, prick them out and plant them into 50mm native tubes using a good organic mix.
Once the seedlings reach 150mm to 200mm in height they can be planted out into their permanent position.
Cuttings: Try using 75mm to 100mm long ripened material when growing from Cuttings. Take them in mid spring or autumn. Remove a 10mm slice from the bark in a downward stroke from one side at the base. Using an appropriate rooting hormone, dip the cutting in and place it into a sterile mix of peat, sand and perlite.
Place the trays under 30mm to 50mm shade and keep the trays warm. Bottom heat is beneficial when striking the cuttings. Ideally temperatures should be maintained at between 22 to 24 degrees.
When the cuttings have obviously struck and have developed good roots treat them as for seedlings.
Alternatively take a 150mm to 200 non flowering stem which is 10mm to 20mm thick. Remove the top 200mm and place it in a 50mm native tube with a porous mix without organic matter. Ensure that the bottom of the cutting is about 20mm from the base of the tube. Now lay the tubes out at 45 degrees so that the bottom half of the tube is in water. When the roots appear at the bottom of the tubes harden the off a little and plant them out into their permanent positions.
Fertilize using Seaweed, fish emulsion or organic chicken pellets soaked in water and apply the liquid on an alternate basis. Fertilize every 2 months until the plants are well established then on an annual basis in September to October to maintain good health, vigour and better flowering.
Further Comments from Readers:
Hi reader, it seems you use The Bible of Botany a lot. That’s great as we have great pleasure in bringing it to you! It’s a little awkward for us to ask, but our first aim is to purchase land approximately 1,600 hectares to link several parcels of N.P. into one at The Pinnacles NSW Australia, but we need your help. We’re not salespeople. We’re amateur botanists who have dedicated over 30 years to saving the environment in a practical way. We depend on donations to reach our goal. If you donate just $5, the price of your coffee this Sunday, We can help to keep the planet alive in a real way and continue to bring you regular updates and features on Australian plants all in one Botanical Bible. Any support is greatly appreciated. Thank you.
In the spirit of reconciliation we acknowledge the Bundjalung, Gumbaynggirr and Yaegl and all aboriginal nations throughout Australia and their connections to land, sea and community. We pay our respect to their Elders past, present and future for the pleasures we have gained.
Mount Cootha Botanic Gardens Qld.

Mount Cootha Botanic Gardens Qld.
Mount Cootha Botanic Gardens Qld.
Mount Cootha Botanic Gardens Qld.
Mount Cootha Botanic Gardens Qld.
Mount Cootha Botanic Gardens Qld.
Mount Cootha Botanic Gardens Qld.
Mount Cootha Botanic Gardens Qld.
Mount Cootha Botanic Gardens Qld.
Mount Cootha Botanic Gardens Qld.

Mount Cootha Botanic Gardens Qld.
Hibiscus panduriformis
Classification:
Unranked: Eudicots
Order: Malvales
Family: Malvaceae
Subfamily: Malvoideae
Tribe: Hibisceae
Genus: From Ibískos, which is Greek or later Hibiscum, which is Latin for a marsh mallo and Folium, which is Latin for foliage. It refers to a plant in ancient Egypt that grew in marshes and was used to make a mallow for soothing the throat. Today it refers to plants, which have flowers that resemble the marsh mellow plant.
Species: From Pandura, which is Latin for a type of musical instrument and Forme, which is Latin for a shape or form. It refers to organs, usually the leaves, which are roughly fiddle shaped.
Common Name:
Distribution:
Hibiscus panduriformis is found north of a line extending from Karratha in north western, Western Australia, through to Hookers Creek in the Northern Territory then south east to west Rockhampton in central eastern Queensland.
It is also Widespread in tropical Africa, Madagascar, tropical Asia to New Guinea.
https://avh.ala.org.au/occurrences/search?taxa=Hibiscus+panduriformis#tab_mapView
Habitat Aspects Climate:
Hibiscus panduriformis prefers full sun to very light dappled shade. It grows in open sparse woodlands in semi arid areas. The altitude ranges from 5 meters ASL to 400 meters ASL.
The temperatures range from 6 degree in July to 42 degrees in January.
The rainfall ranges from lows of 500mm to an average of 2500mm annually.
Soil Requirements:
Hibiscus panduriformis prefers fine sands to course sands and alluvial gravelly clay flats often colonising previously cleared land or disturbed land. The soils are usually derived from decomposed sandstones or sandy to sandy clay alluvials. The soils pH varies from 5pH through to a 6pH. It does not tolerate waterlogged soils. Non saline soils to moderately saline soils are tolerated.
Height & Spread:
Wild Plants: 1.5m to 3m by 2m to 3m.
Characteristics:
Hibiscus panduriformis’s usually grows as a shrub like perennial herb, with woody base. The trunk and fawnish-yellow stems are moderately covered in long, brownish, stellate hairs.
Hibiscus panduriformis’s alternate, almost obtuse to oblong or oblong-elliptical leaves measure 40mm to 95mm in length by 30mm to 75mm in width at the widest point. The bases are truncate, rounded or slightly cordate, while the apexes are broad acute. The concolourous to slightly discolourous laminas are mid pale green to mid green, and are slightly to moderately covered in course, fawn, stellate hairs on the upper laminas, while the lower laminas are moderately covered in course, fawn, stellate hairs. The laminas are flat and straight while the margins have 3 to 5 shallow lobes and are irregularly crenate or toothed. The mid vein and lateral veins are strongly prominent on the lower and clearly visible on the upper lamina. The terete petioles are moderately covered in course, fawn, stellate hairs and measure 20mm to 50mm in length.
The inflorescences of Hibiscus panduriformis are yellow, dark centred, turning apricot-orange with age and are born singularly from the leaf axis. The epicalyx comprises of 8 to 10 linear to spathulate bracts, which are joined near the base. The calyx has 5 triangular lobes, which are moderately covered in white tomentose hairs and measure 10mm to 16mm in length. The petals are sparsely covered in soft, white, pubescent hairs externally and measure 70mm to 100mm in diameter when spread out. The pedicels are densely covered in fawn to pale brown stellate hairs and measure 6mm to 10mm in length. The pedicels are covered in fawn to pale brown stellate hairs and measure 6mm to 10mm in length.
Ovary hairs or scales present, simple hairs present, stellate hairs absent, gland-tipped hairs absent; style 1, 15 mm long, with five style terminal awns or spines absent; calyx persistent to mature fruit; seeds per loculus 2-4.
The green, 5 locular ovary is covered in short, soft, white hirsute hairs measures 7mm to 9mm in diameter. The flowers appear from March to July.
The filiform filaments are united at the base and form a staminal tube around the base of the style and are covered in white, pubulent hairs. The filaments measure 0.5mm to 0.6mm in length while the anthers are glabrous.
Hibiscus panduriformis’s fruits are sub sperical capsules measure 12mm to 16mm in diameter. The green capsules are moderately to densely covered soft white to fawn pubescent hairs and turn brown on ripening. The epicalyxes and sepals are persistent on the ripe capsules.
The glabrous, reniform or subglobose seeds are horizontally ribbed are glabrous to densely covered in short fawn to brownish hirsute hairs and measure 2mm to 2.5mm in diameter.
Wildlife:
The flowers on Hibiscus panduriformis are visited by a number of native Hibiscus beetles from the Nitidulidae family. The leaves and flowers are eaten by the harlequin bugs. Harlequin bugs are those beautifully coloured beetles known as Tectocoris diopthalmus.
Cultivation:
Hibiscus panduriformis is a beautiful small native shrub which is suitable for small gardens to the largest gardens which have moisture retentive loamy soils. It is an excellent addition for tropical, subtropical or warm frost free temperate gardens. As a garden subject it will grow to 4 meters to 5 meters in height by 3 meters to 4 meters in diameter. It is fast growing and drought tolerant once established
If mild native fertilizers are used it will develop deep sea-green tropical look in the leaves.
Propagation:
Seeds: Hibiscus panduriformis seeds can be sown directly into a seed raising mix. Cover them with 5mm of fine sand and keep moist not wet. Place the tray in a warm sunny position. When the seedlings are 20mm to 30mm tall, prick them out and plant them into 50mm native tubes using a good organic mix.
Once the seedlings reach 150mm to 200mm in height they can be planted out into their permanent position.
Cuttings: Try using 75mm to 100mm long ripened material when growing from Cuttings. Take them in mid spring or autumn. Remove a 10mm slice from the bark in a downward stroke from one side at the base. Using an appropriate rooting hormone, dip the cutting in and place it into a sterile mix of peat, sand and perlite.
Place the trays under 30% to 50% shade and keep the trays warm. Bottom heat is beneficial when striking the cuttings. Ideally temperatures should be maintained at between 22 to 24 degrees.
When the cuttings have obviously struck and have developed good roots treat them as for seedlings.
Alternatively take a 150mm to 200 non flowering stem which is 10mm to 20mm thick. Remove the top 200mm and place it in a 50mm native tube with a porous mix without organic matter. Ensure that the bottom of the cutting is about 20mm from the base of the tube. Now lay the tubes out at 45 degrees so that the bottom half of the tube is in water. When the roots appear at the bottom of the tubes harden the off a little and plant them out into their permanent positions.
Fertilize using Seaweed, fish emulsion or organic chicken pellets soaked in water and apply the liquid on an alternate basis. Fertilize every 2 months until the plants are well established then on an annual basis in September to October to maintain good health, vigour and better flowering.
Further Comments from Readers:
Hi reader, it seems you use The Bible of Botany a lot. That’s great as we have great pleasure in bringing it to you! It’s a little awkward for us to ask, but our first aim is to purchase land approximately 1,600 hectares to link several parcels of N.P. into one at The Pinnacles NSW Australia, but we need your help. We’re not salespeople. We’re amateur botanists who have dedicated over 30 years to saving the environment in a practical way. We depend on donations to reach our goal. If you donate just $5, the price of your coffee this Sunday, We can help to keep the planet alive in a real way and continue to bring you regular updates and features on Australian plants all in one Botanical Bible. Any support is greatly appreciated. Thank you.
In the spirit of reconciliation we acknowledge the Bundjalung, Gumbaynggirr and Yaegl and all aboriginal nations throughout Australia and their connections to land, sea and community. We pay our respect to their Elders past, present and future for the pleasures we have gained.
Mount Stuart Qld.
Mount Stuart Qld.
Mount Stuart Qld.
Mount Stuart Qld.
Mount Stuart Qld.

Mount Stuart Qld.
Hibiscus phyllochlaenus
Classification:
Unranked: Eudicots
Order: Malvales
Family: Malvaceae
Subfamily: Malvoideae
Tribe: Hibisceae
Genus: From Ibískos, which is Greek or later Hibiscum, which is Latin for a marsh mallo and Folium, which is Latin for foliage. It refers to a plant in ancient Egypt that grew in marshes and was used to make mallow for soothing the throat. Today it refers to plants, which have flowers that resemble the marshmallow plant.
Species: From Phýllo which is Ancient Greek for a leaf and chlaenus which is Latin for a plant family found in Madagasca. It refers to plants, which have leaves that resemble the Madagascan family of plants.
Common Name:
Distribution:
Hibiscus phyllochlaenus is restricted to a small area south from Charters Towers and the Paluma Range National Park to Banana and Gladstone in northern to central eastern Queensland.
Habitat Aspects Climate:
Hibiscus phyllochlaenus prefers full sun to light dappled shade. It grows in more open woodlands verging on open grass plains. The altitude ranges from 85 meters ASL to 350 meters ASL.
The temperatures range from 2 degree in July to 40 degrees in January.
The rainfall ranges from lows of 500mm to an average of 1200mm annually.
Soil Requirements:
Hibiscus phyllochlaenus prefers medium clays or sandy clays on rocky terrains. The soils are usually derived from better quality decomposed shale, brown basalt, black basalt, metamorphic rocks or sandstone or granite. The soils pH varies from 5pH through to a 6pH. It does not tolerate waterlogged soils however annual inundations or periodic rises in water tables are normal. Non saline soils to moderately saline soils are tolerated.
Height & Spread:
Wild Plants: 1m to 2m by 1m to 2m.
Characteristics:
Our measurements are taken from a single plant on Mount Stuart near Townsville and may not be typical of the type specimen.
Hibiscus phyllochlaenus has reddish-brown stems that are sporadically blotched in matted, white hairs. The juvenile stems are moderately to densely covered in a mixture of short and long, soft, white somewhat tardy caduceous hirsute hairs.
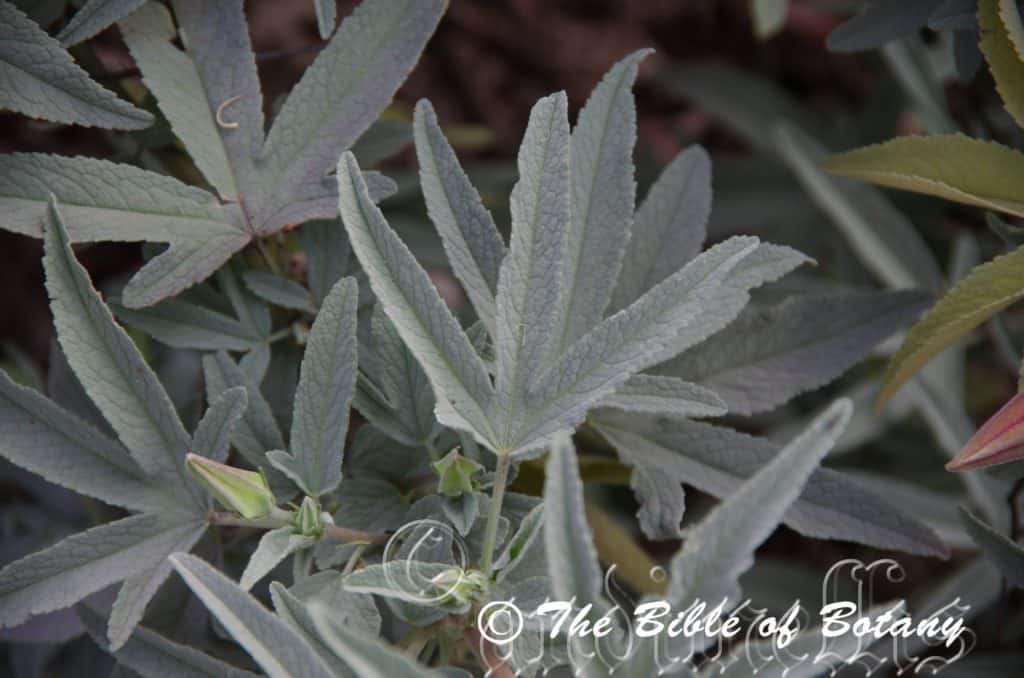
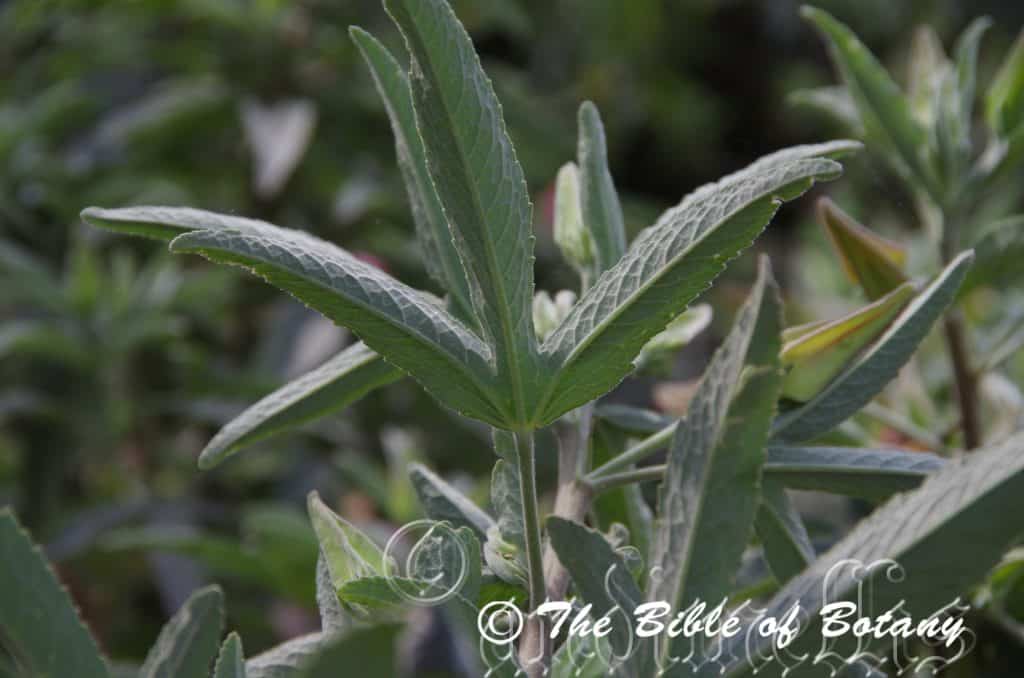
The petioles are moderately to densely covered in a mixture of short and long, soft, white hirsute hairs and measure 18mm to 22mm in length. The palmate leaves have shallow, obtuse and acute lobes and measure 60mm to 90mm in length by 60mm to 80mm in width. The bases are cordate. The discolourous laminas are velvety to touch and are sparsely covered in long, soft, white hirsute hairs on the upper lamina, while the lower lamina is pale to almost whitish and moderately covered in long, soft, white hirsute hairs especially along the veins. The margins are serrate and flat. The main palmate veins and main lateral veins are prominent on the both laminas, but more so on the lower lamina.
The pedicels, buds and sepals are moderately to densely covered in a mixture of short and long, soft, white hirsute hairs. The pedicel measures 5mm to 8mm in length. The 5 linear epicalyxes lobes are dull green, moderately to densely covered in a mixture of short and long, soft, white hirsute hairs externally and glabrous internally and measure 3mm to 7mm in length. The 5 calyx lobes are dull green, linear, moderately to densely covered in a mixture of short and long, soft, white hirsute hairs externally and glabrous internally. They measure 4mm to 6mm in length. The 5 usually bright pink or rarely white petals are oblong. The petals are tapering at the base and are contorted while the apex is broadly obtuse. The petals measure 10mm to 20mm in length by 10mm to 12mm across at the widest point. The corolla is purple-red at the base.
The 5 brownish stamens are set at the base of the pistil, while the staminodes are fused to the upper segment of the style. The deep pink style measures 8 to 12mm in length. The tri lobed white stigmas are orbicular. The flowers appear throughout the year under favourable conditions.
Hibiscus geranioides’s fruit is a globose to conical capsule. The capsules are densely covered in long, soft, echinate spikes that have stellate apexes and measure 9mm to 12mm in length by 9mm to 12mm in diameter not including the echinate spikes, which measure 3mm to 5mm in length. It is densely covered in stiff fawn to khaki hirsute hairs. The green capsules turn brown on ripening.
Wildlife:
The flowers on Hibiscus phyllochlaenus are visited by a number of small honeyeaters along with the native Hibiscus beetles from the Nitidulidae family. The leaves and flowers are eaten by the harlequin bugs. (Harlequin bugs are those beautifully coloured beetles called Tectocoris diopthalmus.)
Cultivation:
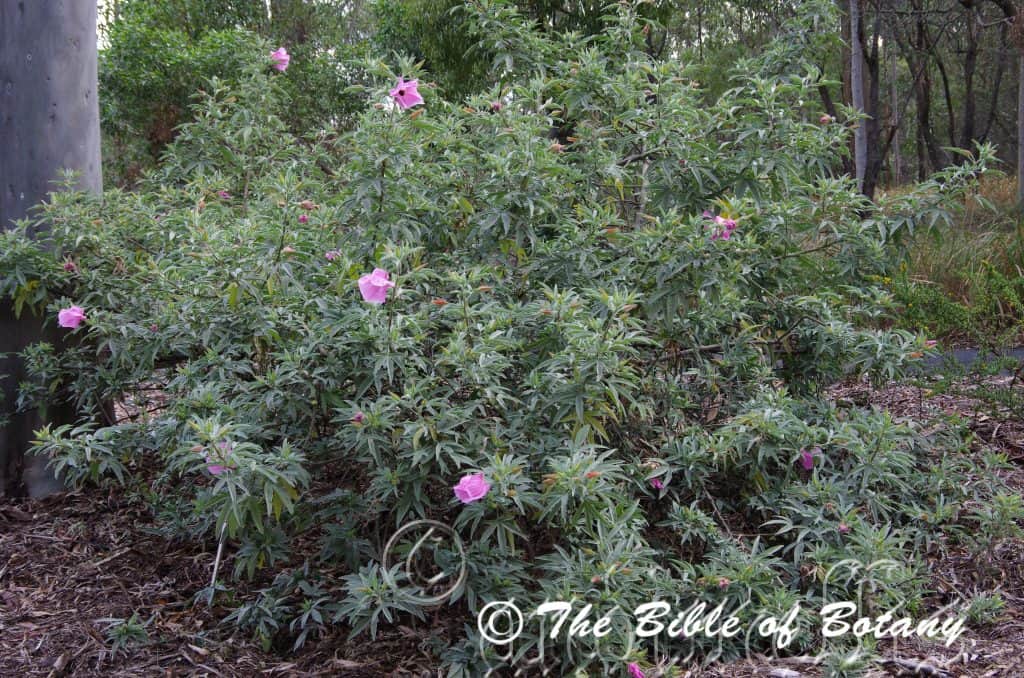
Hibiscus phyllochlaenus is a very beautiful small native shrub, which is suitable for small gardens to the largest gardens on heavier or rocky soils. It is an excellent colourful spring addition for tropical, subtropical or warm temperate frost free gardens. The large soft grey velvet leaves make an attractive feature for the period that this shrub is not in flower.
As a garden subject it will grow to 2 meter to 3 meters high by 2 meters to 3.5 meters in diameter when grown in the open. It must be pruned regularly to enhance bushiness or to train them as a smaller shrub.
As a shrub the more lateral branches created, the more abundant the flowers will be in the following spring. Hard pruning can be done once the plants are established but some set back will occur in flowering so it is better to trim the plants on a regular or annual basis. It is fast growing and are cold tolerant to temperatures at least as low as minus 3 degrees. Frosts will kill young unprotected plants. Older plants will be killed off down to the hard wood but they will grow out immediately on warmer weather. They need a protected area away from strong winds as the branches are quite brittle and snap easily.
Placed in front of a bush garden or at the edge of a forest garden their striking display of flowers and leaves will draw your attention so that you will want to investigate further. A bend in a path can be broken up by placing them at the back of the bend.
Place it in the background with medium and smaller plants with finer pale green leaves in front will draw the attention of people passing by. Plants with either red, white or yellow flowers can be used in the mid ground while the prostrate or smaller shrubs are best with red or white flowers in the front. This will lead the viewer’s eyes down to the foreground and over to the back ground. Whether it is in flower or not these trees will catch your attention because of the large, beautiful flowers and unusual foliage. The viewer will be transfixed on the display of flowers or shape rather than watching the path. The large blue green leaves will offset the pale yellow or cream flowers of any prostrate Acacias planted in the foreground. In fact they would be a very strong but softening complementary contrast if the prostrate or smaller Acacia specie were to flower at the same time. In a bush scene it is best scattered through the bush to give patches of colour to attract the viewers’ attention and draw them even further in rather than having a mass planting. If it is to be planted within a forest ensure there is adequate light available or the plants will tend to grow very spindly.
Propagation:
Seeds: Hibiscus phyllochlaenus seeds can be sown directly into a seed raising mix. Cover them with 5mm of fine sand and keep moist not wet. Place the tray in a warm sunny position. When the seedlings are 20mm to 30mm tall, prick them out and plant them into 50mm native tubes using a good organic mix.
Once the seedlings reach 150mm to 200mm in height they can be planted out into their permanent position.
Cuttings: Use 75mm to 100mm long ripened material when growing from Cuttings. Take them in mid spring or autumn. Remove a 10mm slice from the bark in a downward stroke from one side at the base. A rooting hormone is not required. Place it into a sterile mix of peat, sand and perlite.
Place the trays under 30mm to 50mm shade and keep the trays warm. Bottom heat is beneficial when striking the cuttings. Ideally temperatures should be maintained at between 22 to 24 degrees.
When the cuttings have obviously struck and have developed good roots treat them as for seedlings.
Alternatively take a 150mm to 200 non flowering stem which is 10mm to 20mm thick. Remove the top 200mm and place it in a 50mm native tube with a porous mix without organic matter. Ensure that the bottom of the cutting is about 20mm from the base of the tube. Now lay the tubes out at 45 degrees so that the bottom half of the tube is in water. When the roots appear at the bottom of the tubes harden the off a little and plant them out into their permanent positions.
Fertilize using Seaweed, fish emulsion or organic chicken pellets soaked in water and apply the liquid on an alternate basis. Fertilize every 2 months until the plants are well established then on an annual basis in September to October to maintain good health, vigour and better flowering.
Further Comments from Readers:
Hi reader, it seems you use The Bible of Botany a lot. That’s great as we have great pleasure in bringing it to you! It’s a little awkward for us to ask, but our first aim is to purchase land approximately 1,600 hectares to link several parcels of N.P. into one at The Pinnacles NSW Australia, but we need your help. We’re not salespeople. We’re amateur botanists who have dedicated over 30 years to saving the environment in a practical way. We depend on donations to reach our goal. If you donate just $5, the price of your coffee this Sunday, We can help to keep the planet alive in a real way and continue to bring you regular updates and features on Australian plants all in one Botanical Bible. Any support is greatly appreciated. Thank you.
In the spirit of reconciliation we acknowledge the Bundjalung, Gumbaynggirr and Yaegl and all aboriginal nations throughout Australia and their connections to land, sea and community. We pay our respect to their Elders past, present and future for the pleasures we have gained.
Mount Cootha Botanical Gardens Qld.
Mount Cootha Botanical Gardens Qld.
Mount Cootha Botanical Gardens Qld.
Mount Cootha Botanical Gardens Qld.
Mount Cootha Botanical Gardens Qld.
Mount Cootha Botanical Gardens Qld.
Mount Cootha Botanical Gardens Qld.
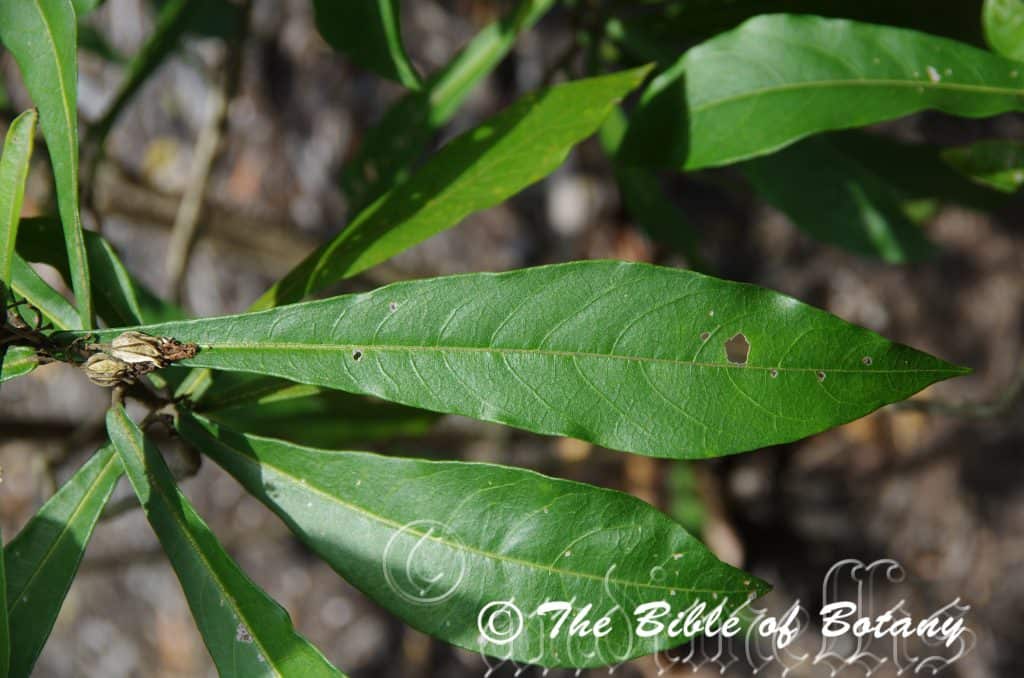
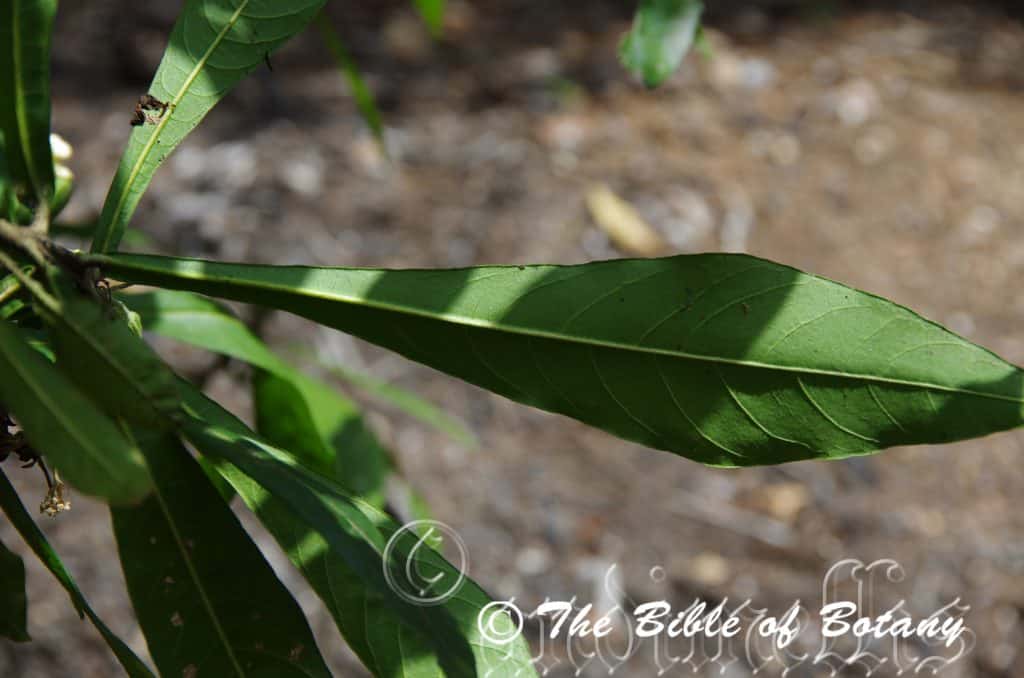
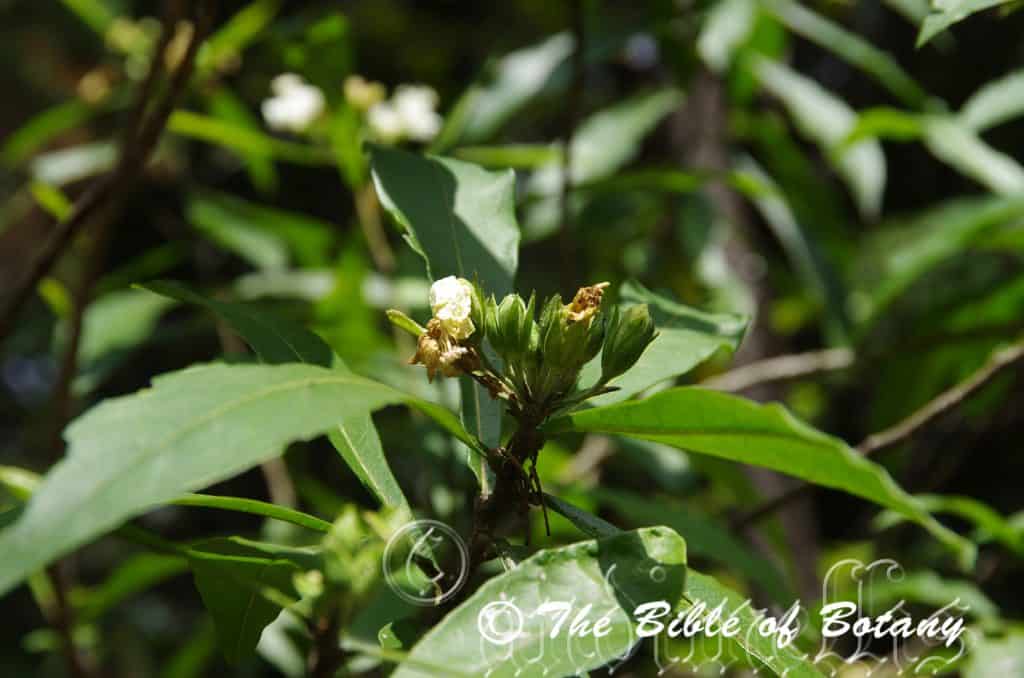
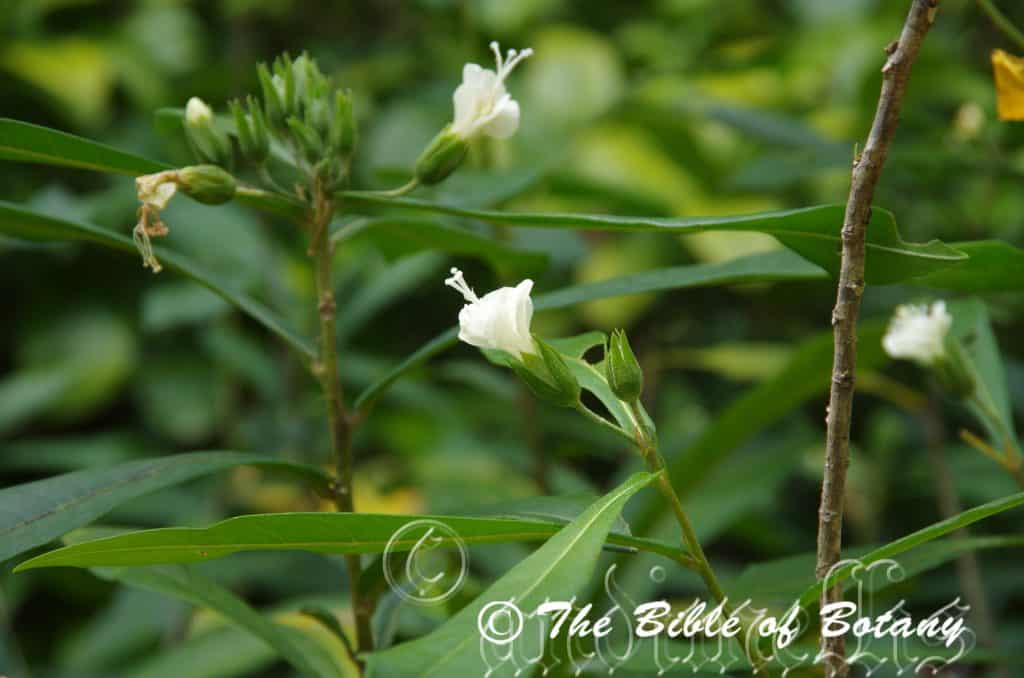
Hibiscus sp. barambah creek
Classification:
Unranked: Eudicots
Order: Malvales
Family: Malvaceae
Subfamily: Malvoideae
Tribe: Hibisceae
Genus: From Ibískos, which is Greek or later Hibiscum, which is Latin for a marsh mallo and Folium, which is Latin for foliage. It refers to a plant in ancient Egypt that grew in marshes and was used to make mallow for soothing the throat. Today it refers to plants, which have flowers that resemble the marsh mellow plant.
Species: From Baramba Creek, which is Latin for a creek between Kingaroy and Nanango. It refers to plants, which were first discovered along the Creek in south eastern Queensland.
Common Name:
Distribution:
Hibiscus sp. barambah creek is endemic to the middle and lower reaches of Barambah Creek from east of Kingaroy to Gayndah in southern Queensland.
Habitat Aspects Climate:
Hibiscus sp. barambah creeks prefers full sun to light dappled shade. It grows in more open riparian zones, in swamps marshlands and wallums. The altitude ranges from 85 meters ASL to 350 meters ASL.
The temperatures range from 2 degree in July to 38 degrees in January.
The rainfall ranges from lows of 500mm to an average of 800mm annually.
Soil Requirements:
Hibiscus sp. Barambah creek prefers medium clays or sandy clays on rocky terrains. The soils are usually derived from better quality decomposed shale, brown basalt, black basalt, metamorphic rocks or sandstone. The soils pH varies from 5pH through to a 6pH. It does not tolerate waterlogged soils however annual inundations or periodic rises in water tables are normal. Non saline soils to moderately saline soils are tolerated.
Height & Spread:
Wild Plants: 1m to 2.5m by 2m to 3m.
Characteristics:
Hibiscus sp. barambah creek’s trunk is blue-green with a few short sharp persistent prickles. The branches and branchlets are pale blue to blue-green and densely covered in glistening white pulverulent and hispid and setose hairs.
Hibiscus sp. barambah creek’s alternate leaves are palmate with 3 to 5 deeply divided lobes and measure 60mm to 150mm in length by 60mm to 150mm in width. The lobes are narrow oblong and measure 10mm to 100mm in length. The petioles are densely covered in off white silky pulverulent hairs and measure 50mm to 80mm in length.The bases are truncate, rounded or cordate while the apexes are broad acuminate, broad acute or narrow acute. The concolourous laminas are pale grey-green and densely covered in off white silky pulverulent hairs. The margins are entire or more often are finely crenate. It is flat or curve slightly upwards from the mid vein though this becomes stronger in hot dry weather. The midvein vein and main lateral veins are prominent on the lower lamina and are slightly visible from above. The mid vein and lateral veins have a few short sharp spines.
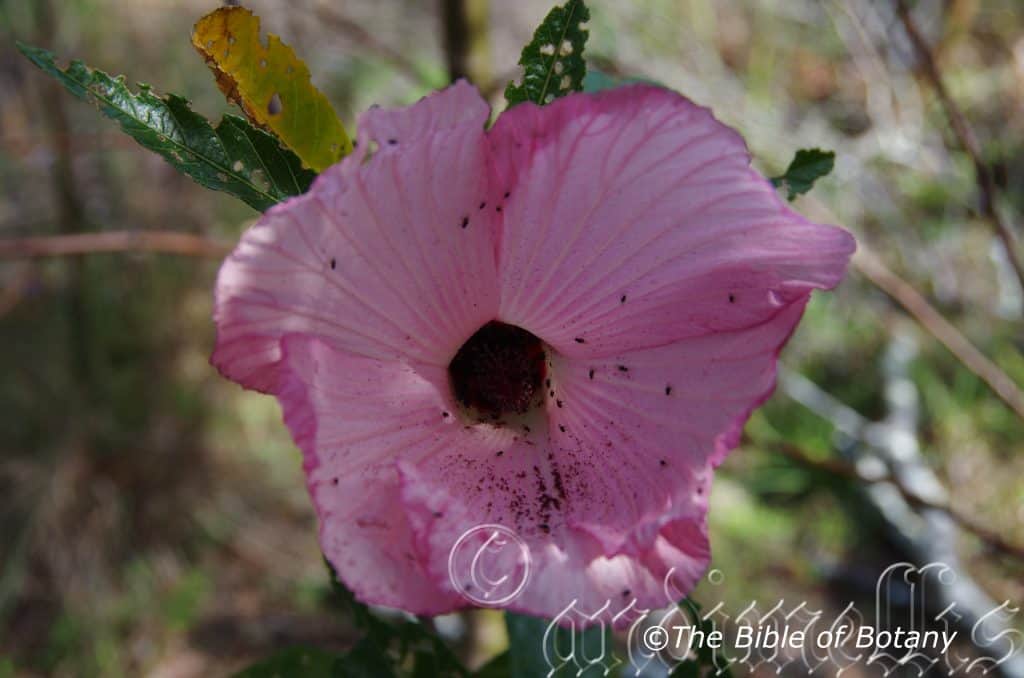
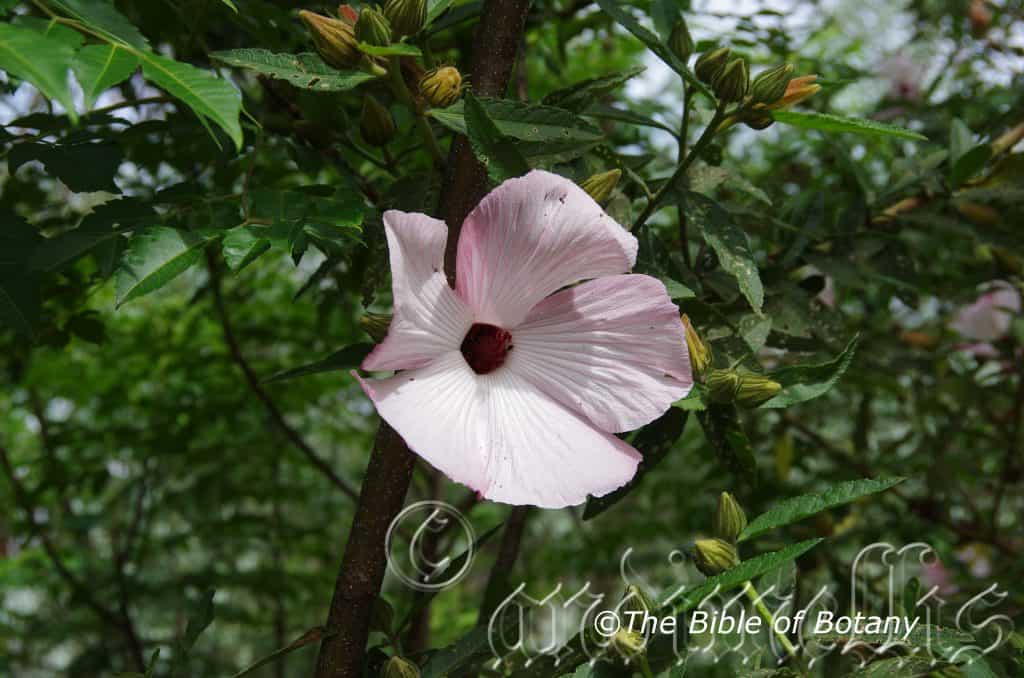
The inflorescences of Hibiscus sp. barambah creek are born singularly from the leaf axis and measure150mm to 170mm in diameter when spread out. The pedicels are densely covered in off white silky pulverulent hairs. The pedicel measures 18mm to 26mm in length. The 10 to 12 linear epicalyxes are blue-green linear and are densely covered in off white silky pulverulent hairs and measure 18mm to 25mm in length. The lanceolate calyxes and 5 lobes are pale blue-green with an acuminate apex. The calyxes are densely covered in off white silky pulverulent hairs and measure 30mm to 40mm long. The 5 pale pink to deep pink petals have a wide deeper pink to purple broad longitudinal line down the edge. The petals are broadly triangular with an obtuse apex and contorted base. The corolla has a red and deep burgundy base and measure 50mm to 80mm in length by 50mm to 80mm across at the widest point.
The 46 to 60 deep maroon-red sometimes burgundy-red stamens are fused to the basal two thirds of the style. The filaments measure 5mm to 6mm in length while the anthers measure 2mm to 2.5mm in diameter. The deep maroon-red sometimes burgundy-red pistils are sparsely covered in soft, maroon-red or burgundy-red pulverulent hairs and measure 22mm to 36mm in length. The 5 fid burgundy stigma is free and covered in soft deep maroon-red sometimes burgundy-red hairs while the branches measures 2mm to 3mm in length and the stigmas measure 1.5mm to 1.8mm in diameter. The flowers appear from September to October.
Hibiscus sp. barambah creek’s fruits are globose to broad conical capsules. The capsules measure 26mm to 32mm in length by 24mm to 30mm in diameter. It is covered in off white pulverulent hairs. The grey-green capsules turn brown on ripening. The pale dull grey-brown glabrous seeds measure 3mm to 4mm in diameter.
Confusing Species:
Hibiscus sp. barambah creek has deep incised lobes on the foliage on mature trees that are blue-grey and are densely covered in velutinous hairs. The flowers are more intense in colour with the petals being only partially open at anthesis. The calyxes are linear with strong prominent ribs.
Hibiscus splendens has broad shallow lobes on the foliage or simple ovate leaves on mature trees that are blue-green and are densely covered in glistening white pubescent, hispid and setose hairs. The flowers are less intense in colour with the petals being more open at anthesis. The calyxes are more rounded with less prominent ribbing.
Wildlife:
The flowers on Hibiscus sp. barambah creek are visited by a number of small honeyeaters along with the native Hibiscus beetles from the Nitidulidae family being less prominent than on other Hibiscus species. The leaves and flowers are eaten by the harlequin bugs. Harlequin bugs are those beautifully coloured beetles called Tectocoris diopthalmus.
Cultivation:
Hibiscus sp. barambah creek is a very beautiful large native shrub for semi arid or dry locations. It is suitable for small gardens to the largest gardens on heavier or rocky soils. It is an excellent colourful spring addition for tropical, subtropical or warm temperate frost free gardens. The large soft grey velvet leaves make an attractive feature for the period that this shrub is not in flower.
As a garden subject it will grow to 3 meter to 4 meters high by 2 meters to 4 meters in diameter when grown in the open. It needs to be pruned regularly to enhance bushiness. As a shrub the more lateral branches created the more abundant the flowering will be in the following spring. Hard pruning is not advisable. It is fast growing and are cold tolerant to temperatures at least as low as minus 3 degrees. Frosts will kill young unprotected plants. Older plants will be killed off down to the hard wood but it will grow out immediately on warmer weather. It needs a protected area away from strong winds as the branches are quite brittle and snap easily.
Placed at the rear of a bush garden or at the edge of a forest garden its striking display of flowers and leaves will draw your attention so that you will want to investigate further. Place it in the background with medium and smaller plants with finer pale green leaves in front will draw the attention of people passing by. Plants with either red, white or yellow flowers can be used in the midground while the prostrate or smaller shrubs are best with red or white flowers in the front.
It can be a very strong but softening complementary contrast if prostrate or smaller Acacia specie were to flower at the same time. In a bush scene it is best scattered through the bush to give patches of colour to attract the viewers’ attention and draw them even further in rather than having a mass planting. If it is to be planted within a forest ensure there is adequate light available or the plants will tend to grow very spindly.
Propagation:
Seeds: Hibiscus sp. barambah creek seeds can be sown directly into a seed raising mix. Cover them with 5mm of fine sand and keep moist not wet. Place the tray in a warm sunny position. When the seedlings are 20mm to 30mm tall, prick them out and plant them into 50mm native tubes using a good organic mix.
Once the seedlings reach 150mm to 200mm in height they can be planted out into their permanent position.
Cuttings: Use 80mm to 120mm long ripened material when growing from Cuttings. Take them in the warmer months. Remove a 10mm slice from the bark in a downward stroke from one side at the base. A rooting hormone is not required. Place it into a sterile mix of peat, sand and perlite.
Place the trays under 30mm to 50mm shade and keep the trays warm. Bottom heat is beneficial when striking the cuttings. Ideally temperatures should be maintained at between 22 to 24 degrees.
When the cuttings have obviously struck and have developed good roots treat them as for seedlings.
Alternatively take a 150mm to 200 non flowering stem which is 10mm to 20mm thick. Remove the top 200mm and place it in a 50mm native tube with a porous mix without organic matter. Ensure that the bottom of the cutting is about 20mm from the base of the tube. Now lay the tubes out at 45 degrees so that the bottom half of the tube is in water. When the roots appear at the bottom of the tubes harden the off a little and plant them out into their permanent positions.
Fertilize using Seaweed, fish emulsion or organic chicken pellets soaked in water and apply the liquid on an alternate basis. Fertilize every 2 months until the plants are well established then on an annual basis in September to October to maintain good health, vigour and better flowering.
Further Comments from Readers:
Hi reader, it seems you use The Bible of Botany a lot. That’s great as we have great pleasure in bringing it to you! It’s a little awkward for us to ask, but our first aim is to purchase land approximately 1,600 hectares to link several parcels of N.P. into one at The Pinnacles NSW Australia, but we need your help. We’re not salespeople. We’re amateur botanists who have dedicated over 30 years to saving the environment in a practical way. We depend on donations to reach our goal. If you donate just $5, the price of your coffee this Sunday, We can help to keep the planet alive in a real way and continue to bring you regular updates and features on Australian plants all in one Botanical Bible. Any support is greatly appreciated. Thank you.
In the spirit of reconciliation we acknowledge the Bundjalung, Gumbaynggirr and Yaegl and all aboriginal nations throughout Australia and their connections to land, sea and community. We pay our respect to their Elders past, present and future for the pleasures we have gained.
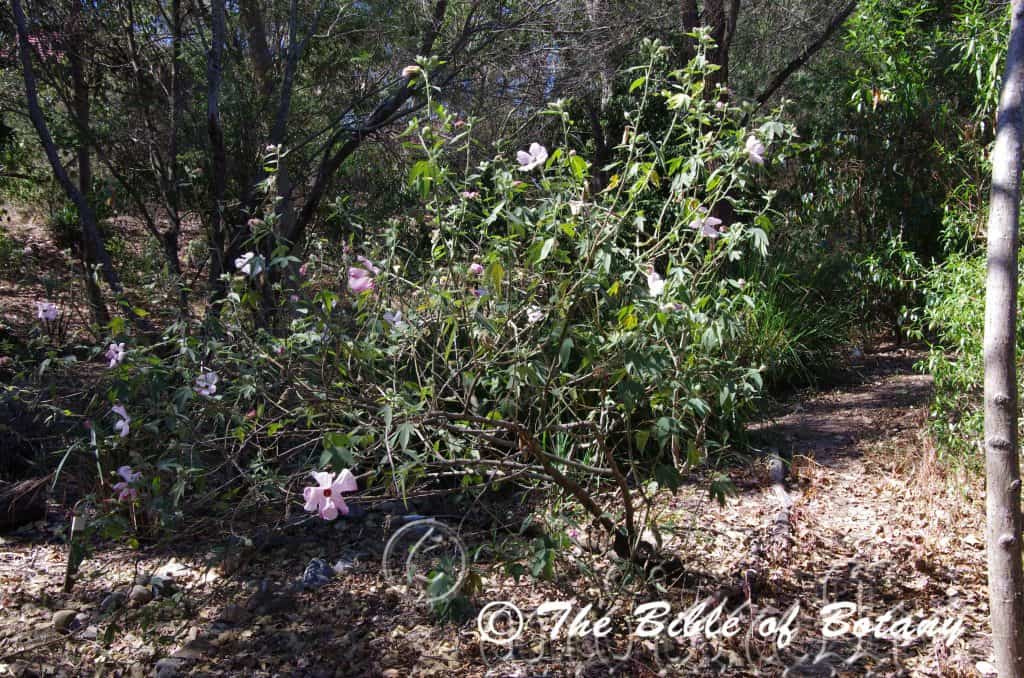
Greening Australia Norman Park Qld.
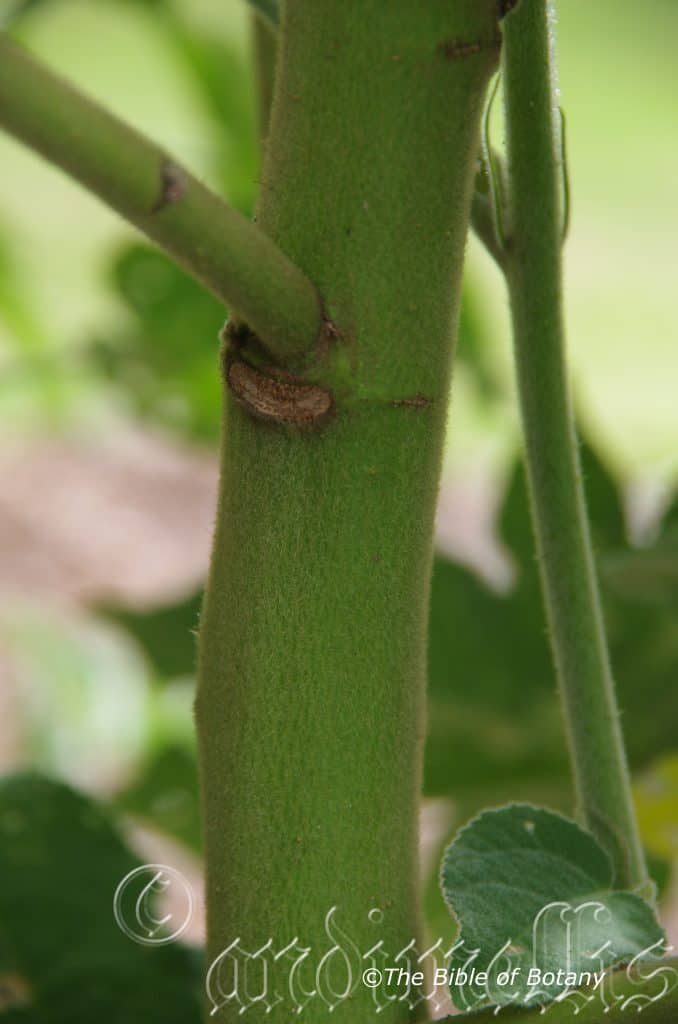
NCBG Coffs Harbour NSW
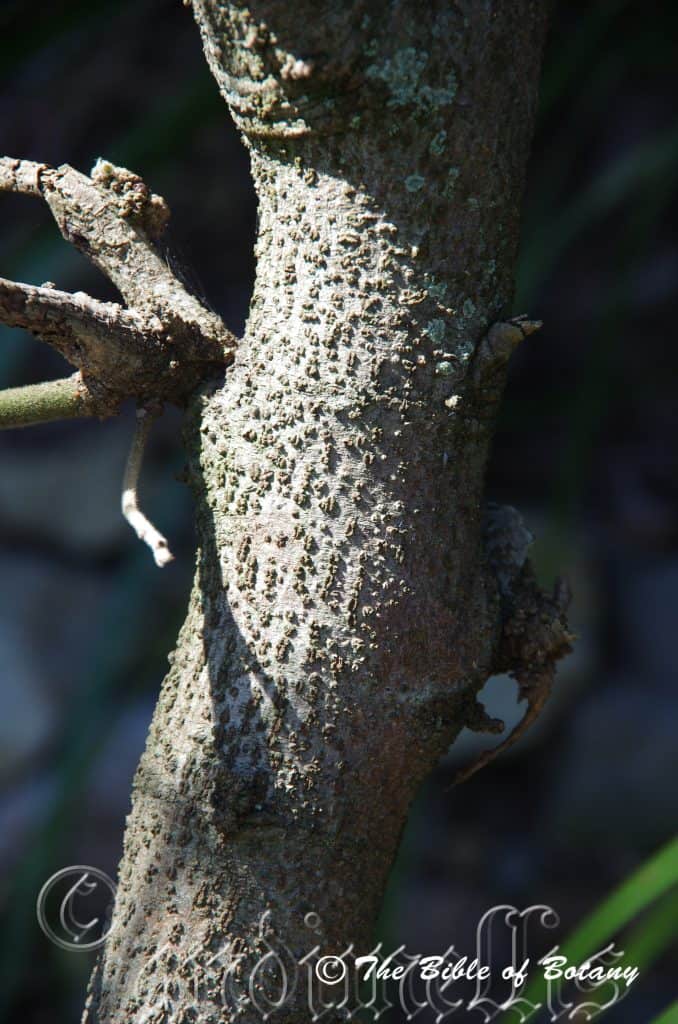
Greening Australia Norman Park Qld.
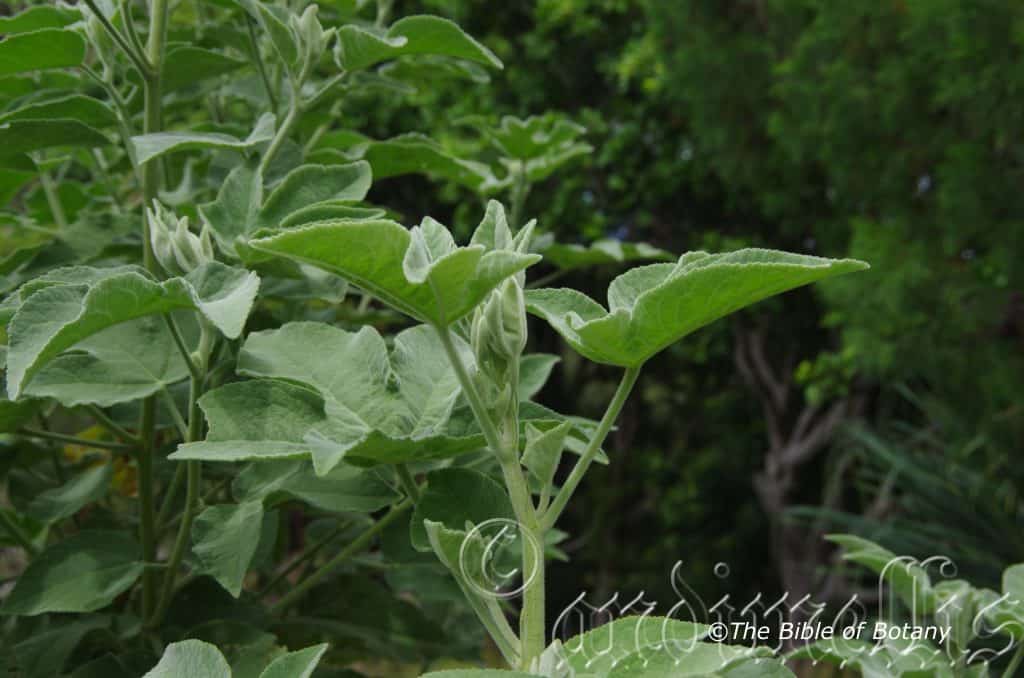
NCBG Coffs Harbour NSW
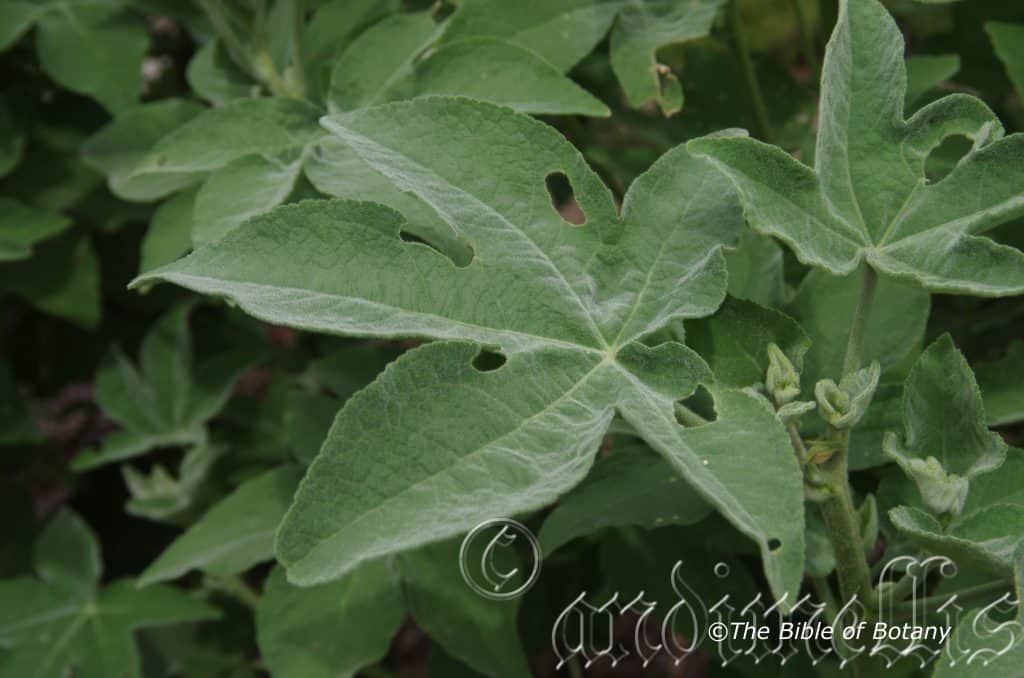
NCBG Coffs Harbour NSW
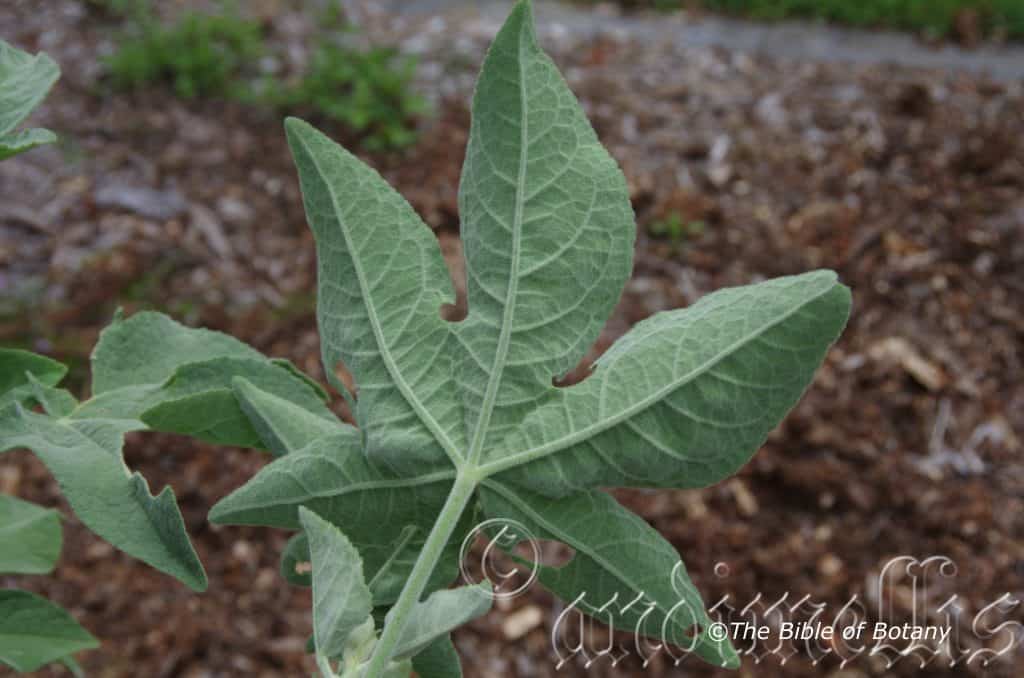
NCBG Coffs Harbour NSW
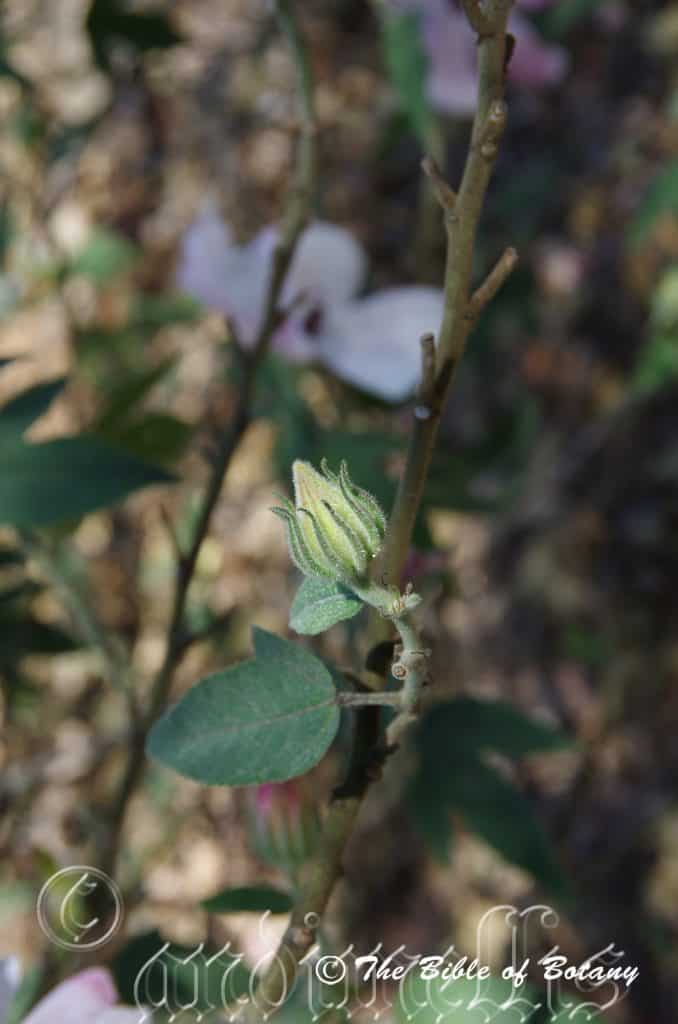
NCBG Coffs Harbour NSW
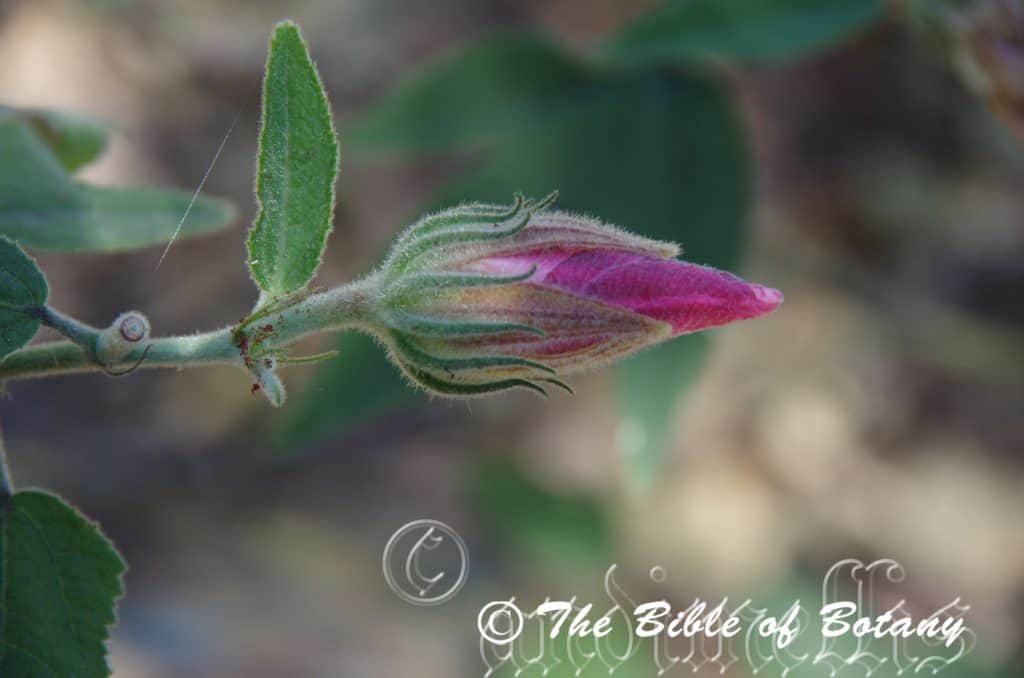
Greening Australia Norman Park Qld
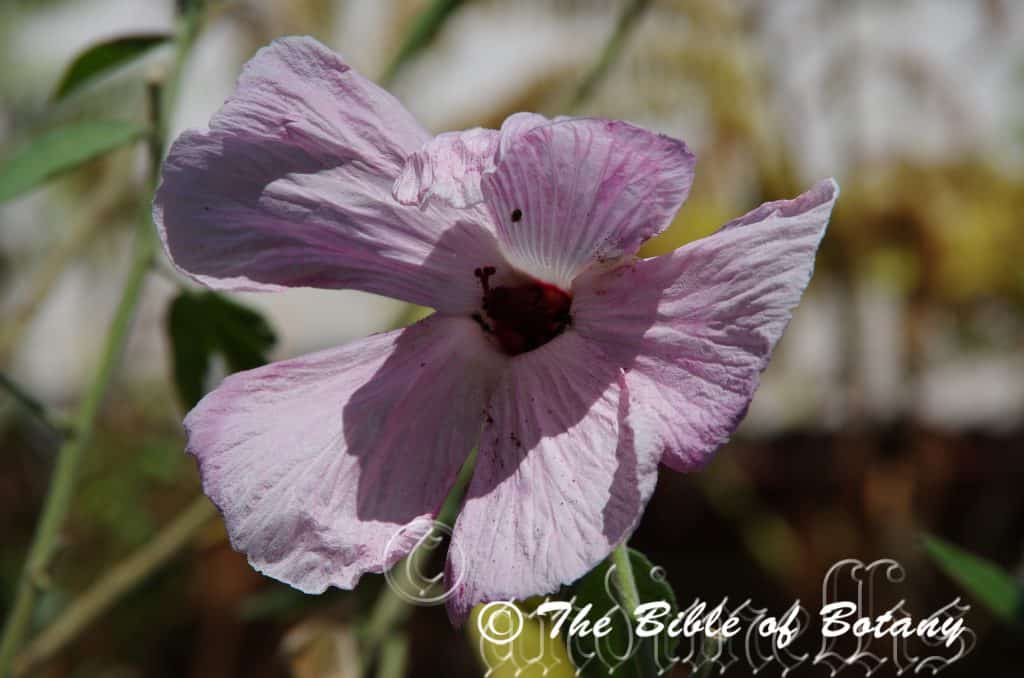
Greening Australia Norman Park Qld
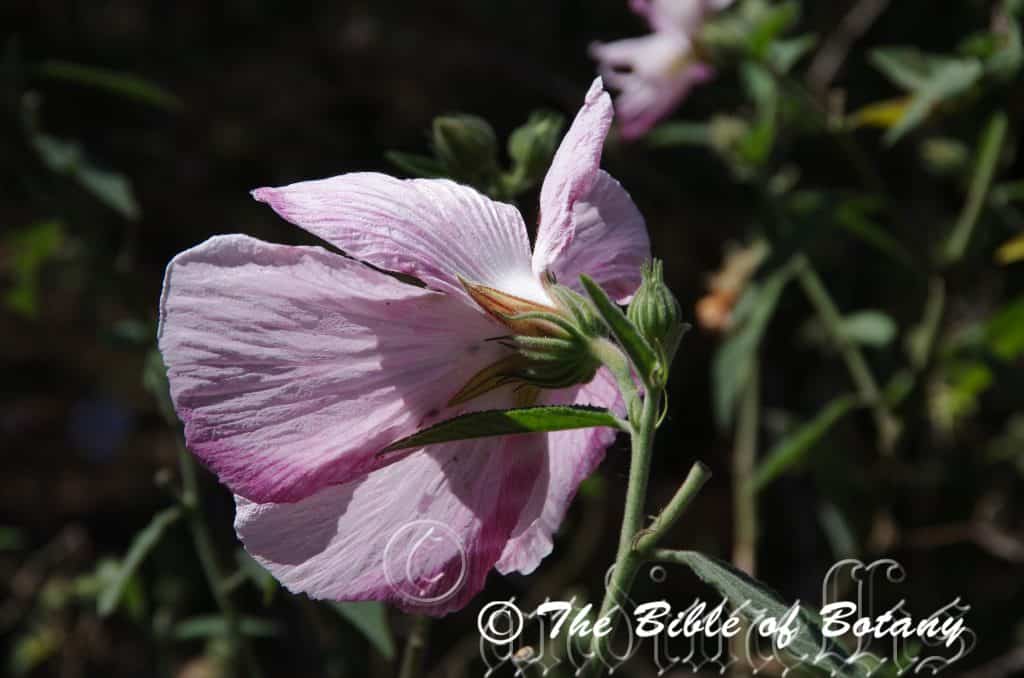
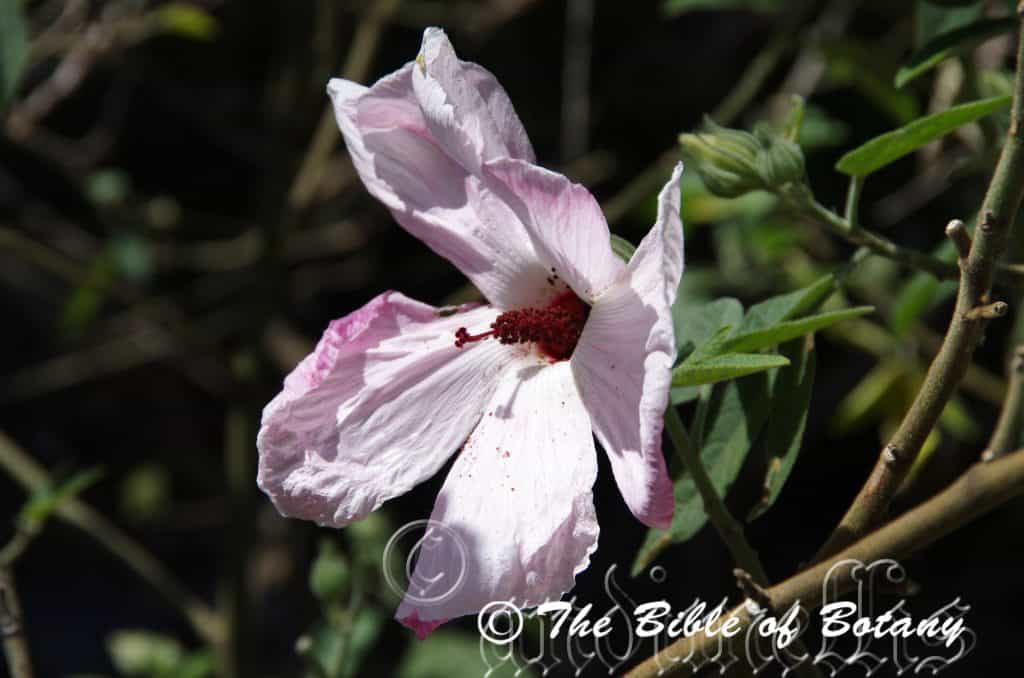
Greening Australia Norman Park Qld
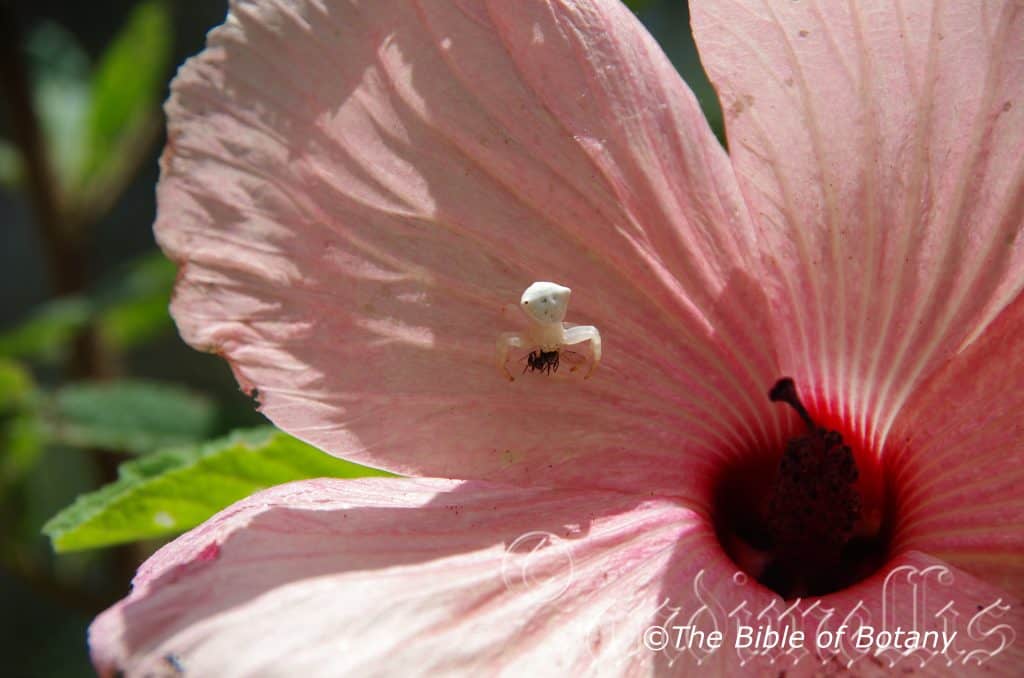
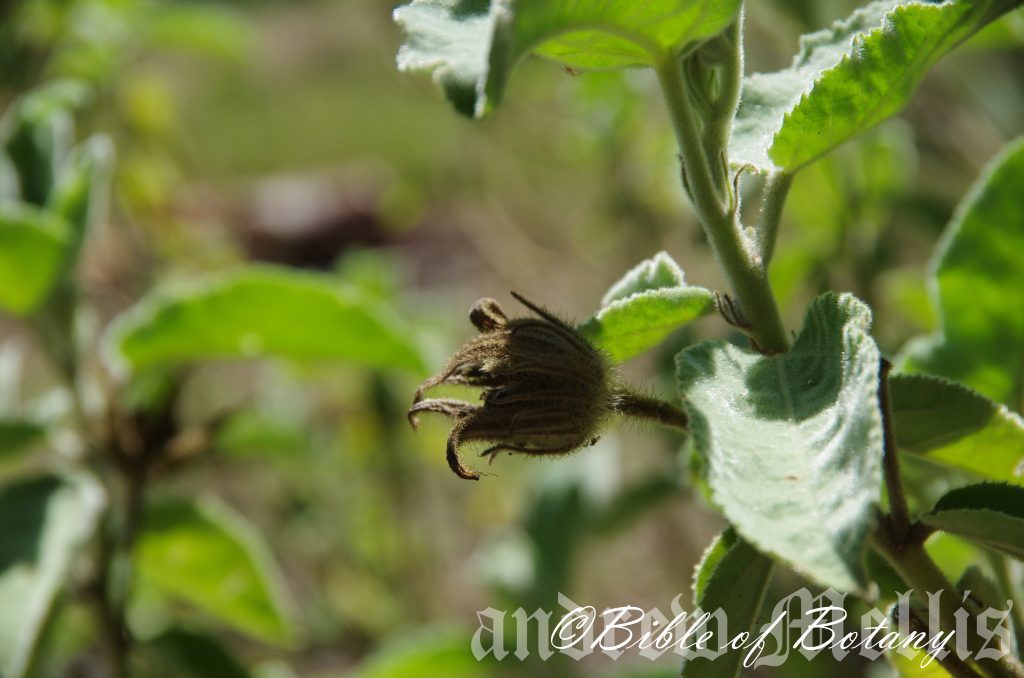
Author’s Garden The Pinnacles NSW
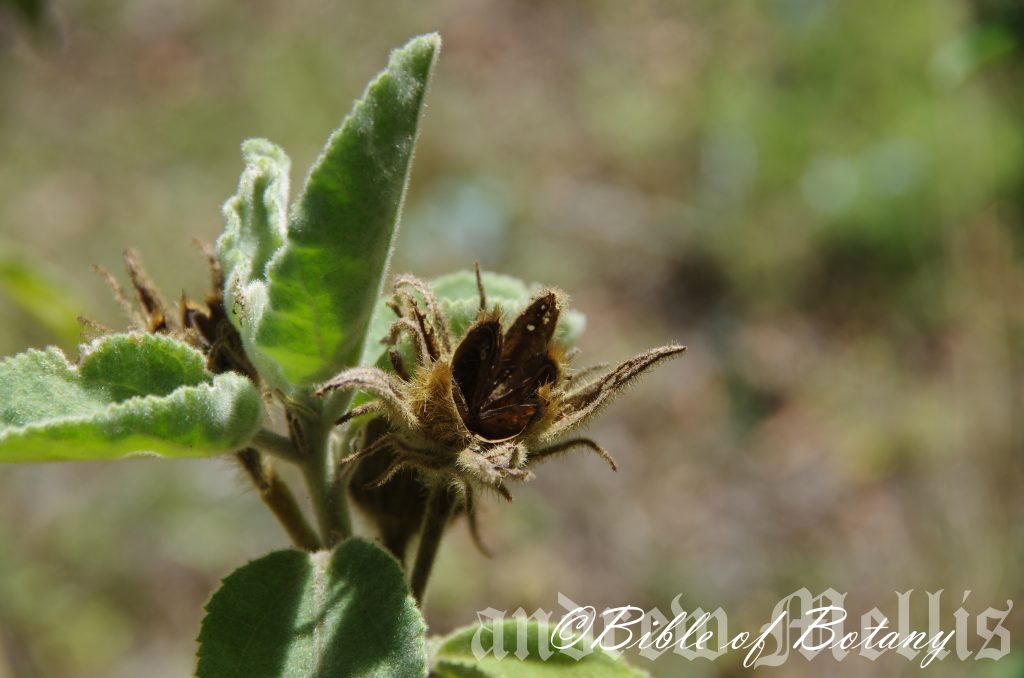
Author’s Garden The Pinnacles NSW
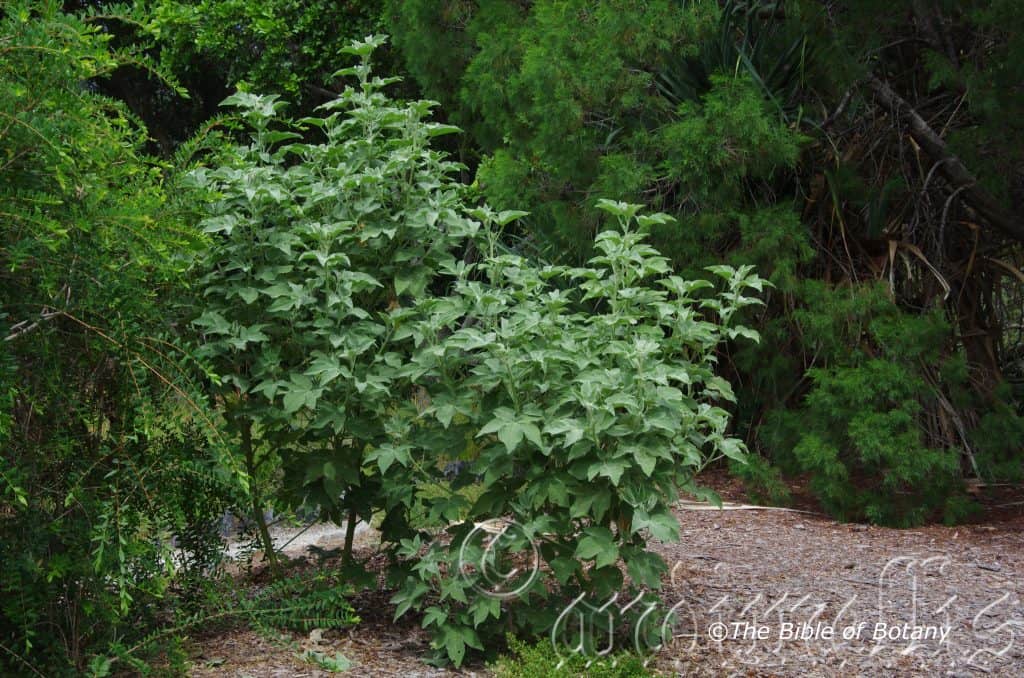
NCBG Coffs Harbour NSW
Hibiscus splendens
Classification:
Unranked: Eudicots
Order: Malvales
Family: Malvaceae
Subfamily: Malvoideae
Tribe: Hibisceae
Genus: From Ibískos, which is Greek or later Hibiscum, which is Latin for a marsh mallo and Folium, which is Latin for foliage. It refers to a plant in ancient Egypt that grew in marshes and was used to make mallow for soothing the throat. Today it refers to plants, which have flowers that resemble the marsh mellow plant.
Species: From Splendēns, which is Latin for to glisten or shine. It refers to plants, which have a real shine about them or have an organ or structure that glistens in the sunlight.
Common Name: Pink Hibiscus or Native Hollyhock.
Distribution:
Hibiscus splendens is found south from Camilla and Cairns in central eastern Queensland to Wollongong in central coastal New South Wales. It is mainly found on the Western slopes, on and east of the Great Dividing Range to the coast.
https://avh.ala.org.au/occurrences/search?taxa=Hibiscus+splendens#tab_mapView
Habitat Aspects Climate:
Hibiscus splendens prefers full sun to light dappled shade. It grows in more open country on slopes and hills in transitional forests usually between rainforests and Eucalyptus forests or gallery forests. The altitude ranges from 5 meters ASL to 750 meters ASL.
The temperatures range from 2 degree in July to 36 degrees in January.
The rainfall ranges from lows of 550mm to an average of 2800mm annually.
Soil Requirements:
Hibiscus splendens prefers growing on light sandy clays to medium clays, rocky terrains or at times on podzolic soils. The soils are usually derived from better quality decomposed shale, brown basalt, black basalt, metamorphic rocks, sandstones or at times granites. The soils pH varies from 5pH through to a 6pH. It does not tolerate waterlogged soils however annual inundations or periodic rises in water tables are normal. Non saline soils to moderately saline soils are tolerated.
Height & Spread:
Wild Plants: 2m to 5m by 2m to 4m.
Characteristics:
Hibiscus splendens’s juvenile trunk is blue-green with a few short sharp persistent prickles before maturing to a pale grey covered in vertical rows of tubercular nodes. The branches and branchlets are pale blue to blue-green and densely covered in glistening white pulverulent and hispid and setose hairs.
Hibiscus splendens’s alternate palmate leaves have 3 to 5 lobed lobes and measure 60mm to 150mm in length by 60mm to 150mm in width. The lobes are oblong or broadly ovate and measure 10mm to 50mm long. The leaves on mature trees and shrubs are lanceolate to ovate and measure 30mm to 80mm in length by 12mm to 30mm in width. The bases are truncate, rounded or cordate while the apexes are broad acuminate, broad acute or narrow acute. The concolourous laminas are pale blue-green and densely covered in glistening white pulverulent and hispid and setose hairs. The margins are entire or more often are finely crenate. It is flat or curve slightly upwards from the mid vein though this becomes stronger in hot dry weather. The midvein vein and main lateral veins are prominent on the lower lamina and are slightly visible from above. The mid vein and lateral veins have a few short sharp spines. The petioles are covered in white pulverulent hairs and glistening hispid and setose hairs and measure 50mm to 80mm in length.
The inflorescences of Hibiscus splendens are born singularly from the leaf axis and measure150mm to 170mm in diameter when spread out. The pedicels are densely covered in covered in white pulverulent hairs and glistening hispid hairs. The pedicel measures 18mm to 26mm in length. The 10 to 12 linear epicalyxes are blue-green linear and are densely covered in white pulverulent hairs and glistening hispid and setose hairs. The epicalyxes measure 18mm to 25mm in length. The lanceolate calyxes and 5 lobes are pale blue-green with an acuminate apex. The calyxes are covered in white pulverulent hairs and glistening hispid hairs and measure 30mm to 40mm long. The 5 pale pink to deep pink petals have a wide deeper pink to purple broad longitudinal line down the edge. The petals are broadly triangular with an obtuse apex and contorted base. The corolla has a red and deep burgundy base and measure 50mm to 80mm in length by 50mm to 80mm across at the widest point.
The 46 to 60 deep maroon-red sometimes burgundy-red stamens are fused to the basal two thirds of the style. The filaments measure 5mm to 6mm in length while the anthers measure 2mm to 2.5mm in diameter. The deep maroon-red sometimes burgundy-red pistils are sparsely covered in soft, maroon-red or burgundy-red pulverulent hairs and measure 22mm to 36mm in length. The 5 fid burgundy stigma is free and covered in soft deep maroon-red sometimes burgundy-red hairs while the branches measures 2mm to 3mm in length and the stigmas measure 1.5mm to 1.8mm in diameter. The flowers appear from September to October.
Hibiscus splendens’s fruits are globose to broad conical capsules. The capsules measure 26mm to 32mm in length by 24mm to 30mm in diameter. It is covered in white pulverulent hairs and glistening hispid and setose hairs. The blue-green capsules turn grey-brown on ripening. The pale dull grey-brown glabrous seeds measure 3mm to 4mm in diameter.
Confusing Species:
Hibiscus splendens has broad shallow lobes on the foliage or simple ovate leaves on mature trees that are blue-green and are densely covered in glistening white pubescent, hispid and setose hairs. The flowers are less intense in colour with the petals being more open at anthesis. The calyxes are more rounded with less prominent ribbing.
Hibiscus sp. barambah creek has deep incised lobes on the foliage on mature trees that are blue-grey and are densely covered in velutinous hairs. The flowers are more intense in colour with the petals being only partially open at anthesis. The calyxes are linear with strong prominent ribs.
Wildlife:
The flowers are visited by a number of small native Hibiscus beetles from the Nitidulidae family. The leaves and flowers are eaten by the harlequin bugs but not as frequent as other Hibiscus species. Harlequin bugs are those beautifully coloured beetles called Tectocoris diopthalmus. The flowers and especially the seeds are much sought after by the Australian king parrot, Alisterus scapularis.
Cultivation:
Hibiscus splendens is a very beautiful large native shrub or small tree which is suitable for small gardens to the largest gardens on heavier or rocky soils. It is an excellent colourful spring addition for tropical, subtropical or warm temperate frost free gardens. The large soft grey velvet leaves make an attractive feature for the period that this shrub is not in flower.
As a garden subjects it will grow to 3 meter to 4 meters high by 2 meters to 4 meters in diameter when grown in the open. It needs to be pruned regularly to enhance bushiness. As a shrub the more lateral branches created the more abundant the flowering will be in the following spring. Hard pruning is not advisable. It is fast growing and is cold tolerant to temperatures at least as low as minus 3 degrees. Frosts will kill young unprotected plants. Older plants will be killed off down to the hard wood but will grow out immediately on warmer weather. It needs a protected area away from strong winds as the branches are quite brittle and snap easily.
Placed at the rear of a bush garden or at the edge of a forest garden their striking display of flowers and leaves will draw your attention so that you will want to investigate further. Place it in the background with medium and smaller plants with finer pale green leaves in front will draw the attention of people passing by. Plants with either red, white or yellow flowers can be used in the midground while the prostrate or smaller shrubs are best with red or white flowers in the front.
It can be a very strong but softening complementary contrast if prostrate or smaller Acacia specie were to flower at the same time. In a bush scene it is best scattered through the bush to give patches of colour to attract the viewers’ attention and draw them even further in rather than having a mass planting. If it is to be planted within a forest ensure there is adequate light available or the plants will tend to grow very spindly.
I have cursed myself a thousand times for not taking cuttings off the hybrid (orange flower in photograph) between Hibiscus splendens X Hibiscus heterophyllus yellow.
Propagation:
Seeds: Hibiscus splendens seeds can be sown directly into a seed raising mix. Cover them with 5mm of fine sand and keep moist not wet. Place the tray in a warm sunny position.
When the seedlings are 20mm to 30mm tall, prick them out and plant them into 50mm native tubes using a good organic mix.
Once the seedlings reach 150mm to 200mm in height they can be planted out into their permanent position.
Cuttings: Use 80mm to 120mm long ripened material when growing from Cuttings. Take them in the warmer months. Remove a 10mm slice from the bark in a downward stroke from one side at the base. A rooting hormone is not required. Place it into a sterile mix of peat, sand and perlite.
Place the trays under 30mm to 50mm shade and keep the trays warm. Bottom heat is beneficial when striking the cuttings. Ideally temperatures should be maintained at between 22 to 24 degrees.
When the cuttings have obviously struck and have developed good roots treat them as for seedlings.
Alternatively take a 150mm to 200 non flowering stem which is 10mm to 20mm thick. Remove the top 200mm and place it in a 50mm native tube with a porous mix without organic matter. Ensure that the bottom of the cutting is about 20mm from the base of the tube. Now lay the tubes out at 45 degrees so that the bottom half of the tube is in water. When the roots appear at the bottom of the tubes harden the off a little and plant them out into their permanent positions.
Fertilize using Seaweed, fish emulsion or organic chicken pellets soaked in water and apply the liquid on an alternate basis. Fertilize every 2 months until the plants are well established then on an annual basis in September to October to maintain good health, vigour and better flowering.
Further Comments from Readers:
Hi reader, it seems you use The Bible of Botany a lot. That’s great as we have great pleasure in bringing it to you! It’s a little awkward for us to ask, but our first aim is to purchase land approximately 1,600 hectares to link several parcels of N.P. into one at The Pinnacles NSW Australia, but we need your help. We’re not salespeople. We’re amateur botanists who have dedicated over 30 years to saving the environment in a practical way. We depend on donations to reach our goal. If you donate just $5, the price of your coffee this Sunday, We can help to keep the planet alive in a real way and continue to bring you regular updates and features on Australian plants all in one Botanical Bible. Any support is greatly appreciated. Thank you.
In the spirit of reconciliation we acknowledge the Bundjalung, Gumbaynggirr and Yaegl and all aboriginal nations throughout Australia and their connections to land, sea and community. We pay our respect to their Elders past, present and future for the pleasures we have gained.
Hibiscus sturtii
Classification:
Unranked: Eudicots
Order: Malvales
Family: Malvaceae
Subfamily: Malvoideae
Tribe: Hibisceae
Genus: From Ibískos, which is Greek or later Hibiscum, which is Latin for a marsh mallo and Folium, which is Latin for foliage. It refers to a plant in ancient Egypt that grew in marshes and was used to make mallow for soothing the throat. Today it refers to plants, which have flowers that resemble the marsh mellow plant.
Species: Is named in honour of Captain Charles Napier Sturt; 1795–1869, who was a British born explorer in the interior of Australia and Anum/Ensis which is Latin for to originate from. It refers to plants which were first discovered in the Sturt desert region.
Subspecies: Hibiscus sturtii var. campylochlamys. From Kampylos, which is Ancient Greek for bent, curved, or crooked and Chlamys, which is Ancient Greek for a cloak, mantle, or covering. It refers to the structure of the involucre and calyx, which are “more or less deeply” bent or curved.
Subspecies: Hibiscus sturtii var. fosteri. Is named in honour of Cyril W. Foster; 18..-1933, who was a British botanist who collected in Africa.
Subspecies: Hibiscus sturtii var. glandulosa. From Gland/Glāns, which is Latin for a gland. It refers to a group of cells, which make an organ that produce a secretion and bearing numerous glands.
Subspecies: Hibiscus sturtii var. muelleri. Is named in honour of Ferdinand Von Mueller; 1825-1896, who was a German born Australian Botanist who named over 2000 new species and was director of the Melbourne Botanic Gardens.
Subspecies: Hibiscus sturtii var. platychlamys. From Platy, which is Ancient Greek for flat and broad and Chlamys, which is Ancient Greek for a cloak. It refers to seeds and/or pappus which are flattish and have bristles.
Subspecies: Hibiscus sturtii var. truncatus. From Truncātus, which is Latin for to maim as in to have the limbs cut off. It refers to structures or organs that have no appendages or a square apex.
Subspecies: Hibiscus sturtii var. sturtii. Is named in honour of Captain Charles Napier Sturt; 1795–1869, who was a British born explorer in the interior of Australia and Anum/Ensis which is Latin for to originate from. It refers to plants which were first discovered in the Sturt desert region.
Subspecies: Hibiscus sturtii var. typicus. From Typikós, which is Ancient Greek, Typicālis, which is Ancient Latin or later Typicus, which is Modern Latin for typical or normal. It refer to characteristics of species, which are very typical of the genus or a subspecies or variety that is typical of the species.
Common Name: Sturt’s desert Rose.
Distribution:
Hibiscus sturtii subsp. campylochlamys is widespread in the central half of Western Australia from the coast to the lower half of the Northern Territory and the western two thirds of Queensland.
Hibiscus sturtii var. glandulosa is limited to two disjunct populations, two in the northern portion of Western Australia and two in the central east of the Northern Territory.
Hibiscus sturtii subsp. muelleri is widespread but not common in any portion of its distribution. It is found in the south eastern portion of the Northern Territory, central South Australia, central western Queensland and north western New South Wales.
Hibiscus sturtii subsp. platychlamys is widespread in the central half of Western Australia from the coast to the lower half of the Northern Territory and fare western central Queensland.
Hibiscus sturtii subsp. truncatus is widespread in the central half of Western Australia from the coast down to Shark Bay to the lower half of the Northern Territory.
Hibiscus sturtii subsp. sturtii is limited to a few scattered populations in Western Australia and the lower third of the Northern Territory, then it becomes widespread throughout Queensland and New South Wales west of the Great Dividing Range.
Hibiscus sturtii var. typicus is found in scattered populations in the central half of Western Australia from the coast to the lower third of the Northern Territory, then it becomes widespread throughout Queensland and New South Wales west of the Great Dividing Range.
https://avh.ala.org.au/occurrences/search?taxa=Hibiscus+sturtii#tab_mapView
Habitat Aspect Climate:
Hibiscus sturtii prefers full sun to light dappled shade. It grows in more open riparian zones, depressions and drainage lines in arid zones in central Australia. It is a straggly shrub with large pale yellow flowers. The altitude ranges from 20 meters ASL to 1000 meters ASL.
The temperatures range from minus 2 degree in July to 42 degrees in January.
The rainfall ranges from lows of 150mm to an average of 1600mm annually.
Soil Requirements:
Hibiscus sturtii prefers sandy loams, fatty sands, gritty light clays, medium clays or podzolics. The soils are usually derived from decomposed sandstones or granite. The soils pH varies from 5pH through to a 6pH. It does not tolerate waterlogged soils. Non saline soils to moderately saline soils are tolerated.
Height & Spread:
Wild Plants: 0.3m to 0.7m by 0.5m to 0.8m.
Characteristics:
Hibiscus sturtii’s is usually a sub shrub or at times a semi prostrate ground cover. The stems are bluish-green and densely covered in rusty-brown or rusty-red stellate hairs.
Hibiscus sturtii’s ovate to cordate or 3 to 5 lobed leaves measure 20mm to 55mm in length by 12mm to 25mm in width. The bases are broadly rounded, truncate or broad cuneate while the apexes are obtuse to tapering obtuse. The discolourous laminas are pale blue-green to pale blue-green and densely covered in rusty-brown or rusty-red stellate hairs. The laminas recurve upwards from the mid vein to the margins while the margins are serrate, toothed to shallowly lobed. The laminas are flat or convex between the main vein and the lateral veins on the upper laminas. The mid vein and main lateral veins are prominent on the lower lamina and are not visible or clearly visible from above. The petioles measure 5mm to 8mm in length.
The inflorescences of Hibiscus sturtii are born singularly from the leaf axis and measure 150mm to 170mm in diameter when spread out. The pedicels are densely covered in rusty-brown or rusty-red stellate hairs and measures 18mm to 50mm in length. The 7 to 8 linear, narrow triangular or ovate epicalyxes and lobes are pale blue-green and densely covered in rusty-brown or rusty-red stellate hairs. The cupuliform epicalyxes measure 7mm to 10mm in length while the lobes measure 6mm to 8mm in length by 4mm to 6mm in width. The 5 broad triangular to broad lanceolate calyxes lobes are pale blue-green and are in rusty-brown or rusty-red stellate hairs and measure 8mm to 13mm long.
The 5 pale pink to deep pink petals have a wide deeper pink to purple broad longitudinal line down the edge. The contorted petals are broad oblong to oval with a broad obtuse or truncate apex. The pale pink to deep pink, pale purple, white, or yellow petals are white at the base and sparsely covered in white stellate hairs. The petals measure 15mm to 26mm in length by 12mm to 26mm in width.
The 12 to 20 white pistils is fused to the apical third of the style or yellow with Hibiscus stuartii subsp. fosterii’s which are fused to the apical half of the style. The white, filiform filaments measure 3mm to 4mm in length while the white orbicular anthers measure 0.5mm to 1mm in diameter.
The white or yellow pistils are glabrous and measure 10mm to 15mm in length. The 5 fid white or yellow stigmas are glabrous while the branches measures 2mm to 3mm in length and the stigmas measure 1.5mm to 1.8mm in diameter. The flowers appear throughout the year under favourable conditions with a peak from September to October.
Hibiscus sturtii’s fruits are globose capsules. The capsules measure 9mm to 12mm in length by 9mm to 12mm in diameter. It is densely covered in long, white appressed hirsute hairs. The green capsules turn brown on ripening. The pale dull, deep brown glabrous seeds measure 3mm to 4mm in diameter.
Confusing Subspecies Varieties:
Hibiscus sturtii vsubsps.. campylochlamys
Hibiscus stuartii subsps. fosterii’s flowers are yellow and it grows on granitic soils. The leaves are densely covered in white pulverulent hairs.
Hibiscus stuartii subsps.. glandulosa
Hibiscus stuartii subsp. muelleri’s epicalyxes are narrow triangular to linear and are slightly to much shorter than the true calyxes.
Hibiscus stuartii subsp. platychlamys
Hibiscus stuartii subsp. truncatus has leaf bases, which are are truncate.
Hibiscus stuartii subsps. stuartii’s epicalyxes’ segments are dilated, obtuse-triangular and are equal to or slightly shorter than the true calyxes. The epicalyxes and calyxes are often reflexed in fruit
Hibiscus sturtii var. typicus
Wildlife:
The flowers on Hibiscus sturtii are visited by a number of native Hibiscus beetles from the Nitidulidae family. The leaves and flowers are eaten by the harlequin bugs. Harlequin bugs are those beautifully coloured beetles called Tectocoris diopthalmus.
Cultivation:
Hibiscus sturtii is a very beautiful small native shrub which is suitable for small gardens to the largest gardens in drier semi-arid, arid or subtropical areas where the humidity is on the low side. As a garden subject it will grow from 0.4 meter to 0.5 meters in height by 0.5 meters to 1 meter in width. It must be pruned regularly to enhance bushiness and better flowering otherwise a straggly less productive flowering plant will eventuate. Hard pruning can be done once the plants are established but some set back will occur in flowering so it is better to trim the plants on a regular or biannual basis. It is fast growing and are cold tolerant to temperatures at least as low as minus 1 degrees. Frosts will kill young unprotected plants. Older plants may be killed off down to ground level but will grow out immediately on warmer weather returning.
It is best suited to areas that are well drained. Place them at the top of slopes or retaining walls where moisture drains rapidly. When you design a miniature desert garden; which Hibiscus sturtii is highly suitable, use contours to display the plants to their best. Use one or two taller shrubs like Grevillea bipinnatifida to give a stronger more vertical break to the sides which will help frame the center or a squat rounded shrub like Grevillea thyrsoides to compliment the rolling plains. Small Grevillea like Grevillea centristigma or Grevillea masonii or use annuals to help contrast the foliages and flowers
Place them near old stumps and roots to make the stumps or roots look larger. Select an area of ground and let your hair down and be imaginative and this is the plant that may just change your life. Remember to plant sparingly leaving large gaps between the plants to allow the mulch to be seen. Mulches should consist of fine pebbles to give a more expansive barren look. A billabong affect is the go, not a waterfall or cascades and keep it in harmony with the scene by not making it too large or placing it in the center unless a totally formal look is required.
Propagation:
Seeds: Hibiscus sturtii seeds can be sown directly into a seed raising mix. Cover them with 5mm of fine sand and keep moist not wet. Place the tray in a warm sunny position. When the seedlings are 20mm to 30mm tall, prick them out and plant them into 50mm native tubes using a good organic mix.
Once the seedlings reach 150mm to 200mm in height they can be planted out into their permanent position.
Cuttings: Use 80mm to 120mm long ripened material when growing from Cuttings. Take them in the warmer months. Remove a 10mm slice from the bark in a downward stroke from one side at the base. A rooting hormone is not required. Place it into a sterile mix of peat, sand and perlite.
Place the trays under 30mm to 50mm shade and keep the trays warm. Bottom heat is beneficial when striking the cuttings. Ideally temperatures should be maintained at between 22 to 24 degrees.
When the cuttings have obviously struck and have developed good roots treat them as for seedlings.
Alternatively take a 150mm to 200 non flowering stem which is 10mm to 20mm thick. Remove the top 200mm and place it in a 50mm native tube with a porous mix without organic matter. Ensure that the bottom of the cutting is about 20mm from the base of the tube. Now lay the tubes out at 45 degrees so that the bottom half of the tube is in water. When the roots appear at the bottom of the tubes harden the off a little and plant them out into their permanent positions.
Fertilize using Seaweed, fish emulsion or organic chicken pellets soaked in water and apply the liquid on an alternate basis. Fertilize every 2 months until the plants are well established then on an annual basis in September to October to maintain good health, vigour and better flowering.
Further Comments from Readers:
Hi reader, it seems you use The Bible of Botany a lot. That’s great as we have great pleasure in bringing it to you! It’s a little awkward for us to ask, but our first aim is to purchase land approximately 1,600 hectares to link several parcels of N.P. into one at The Pinnacles NSW Australia, but we need your help. We’re not salespeople. We’re amateur botanists who have dedicated over 30 years to saving the environment in a practical way. We depend on donations to reach our goal. If you donate just $5, the price of your coffee this Sunday, We can help to keep the planet alive in a real way and continue to bring you regular updates and features on Australian plants all in one Botanical Bible. Any support is greatly appreciated. Thank you.
In the spirit of reconciliation we acknowledge the Bundjalung, Gumbaynggirr and Yaegl and all aboriginal nations throughout Australia and their connections to land, sea and community. We pay our respect to their Elders past, present and future for the pleasures we have gained.
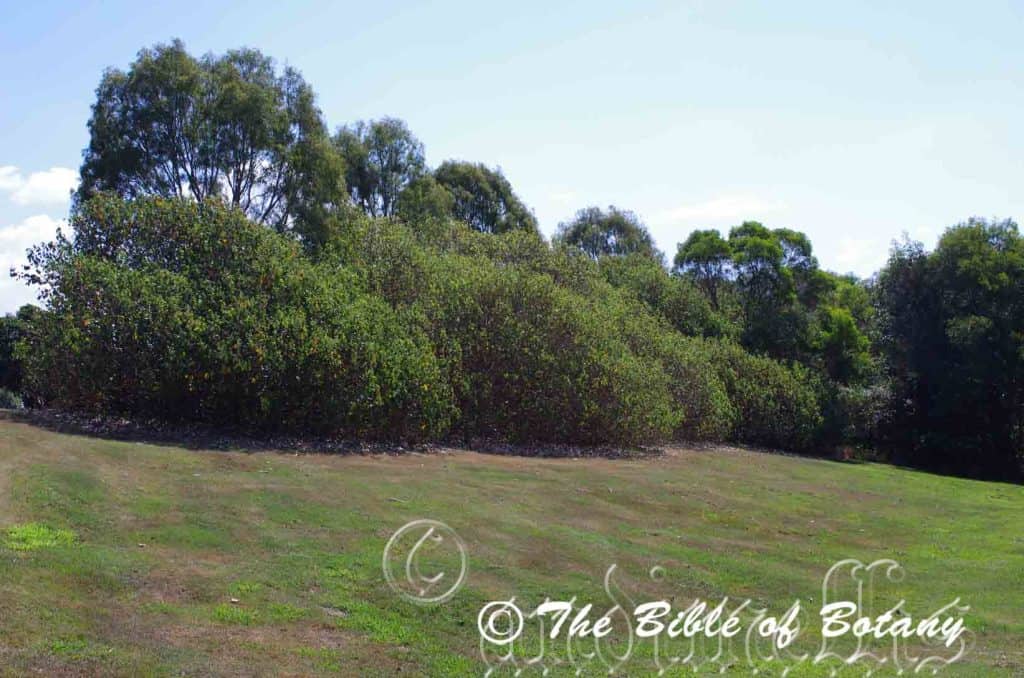
Wynnum North Foreshore Qld.
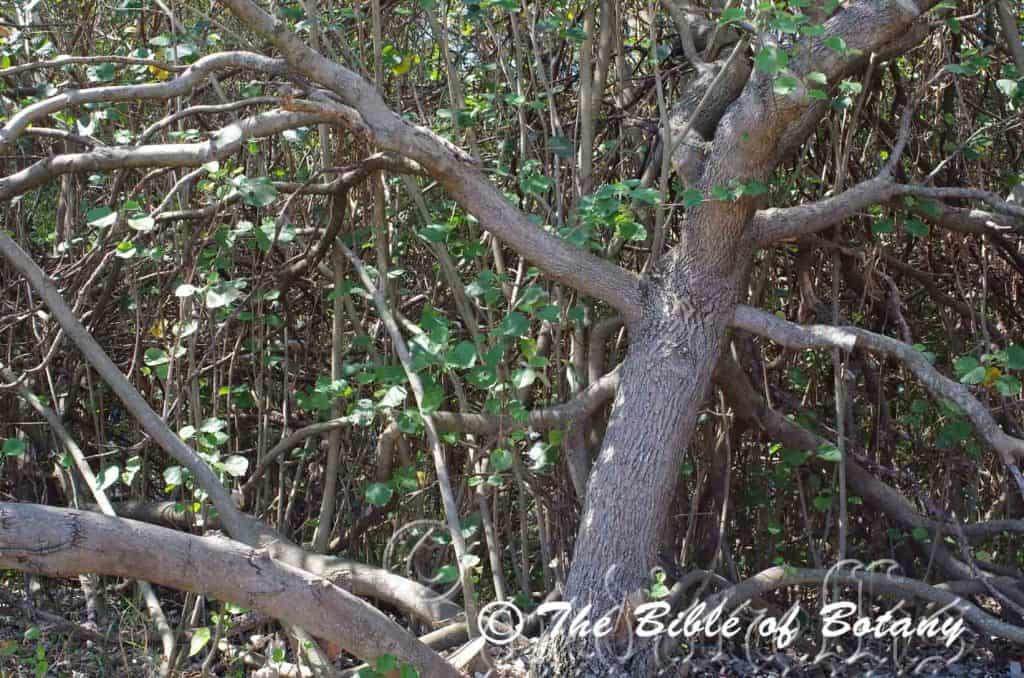
Wynnum North Foreshore Qld.
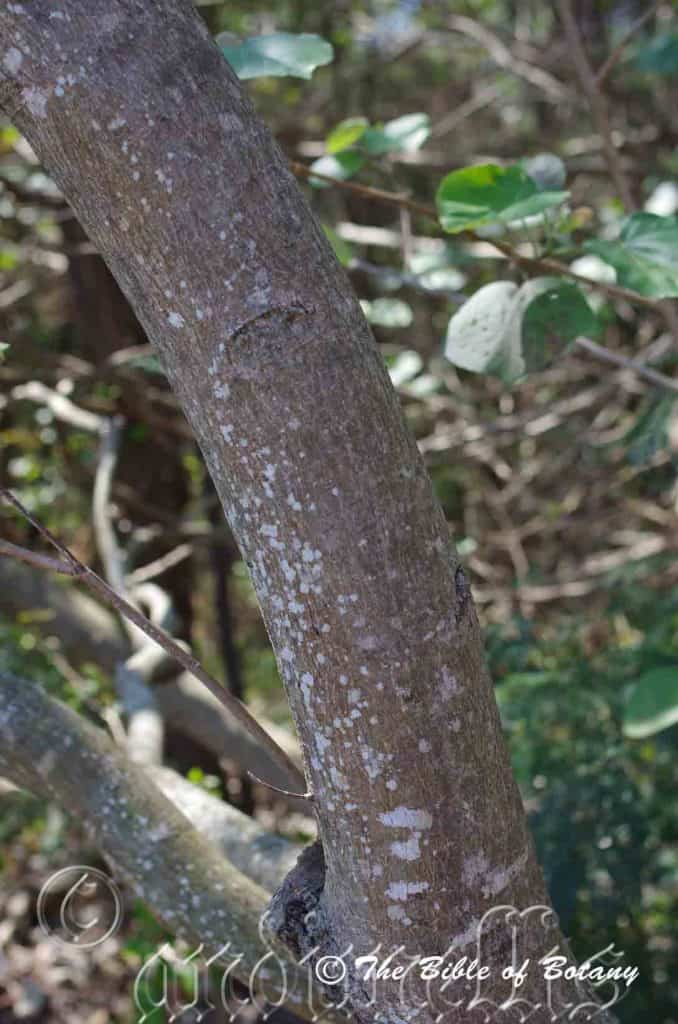
Wynnum North Foreshore Qld.
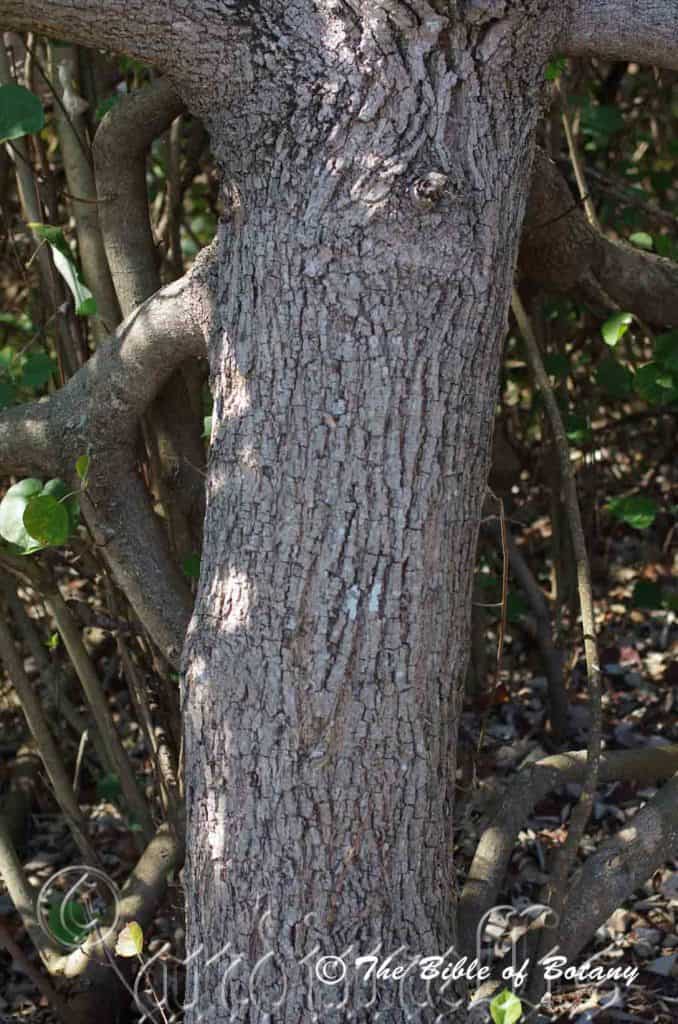
Wynnum North Foreshore Qld.
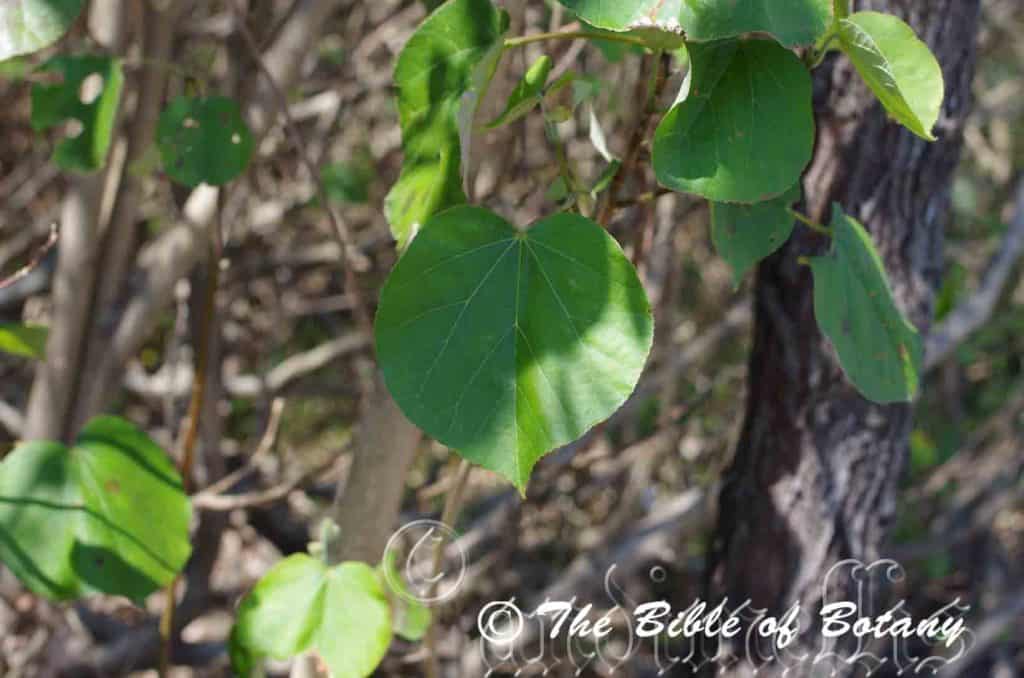
Wynnum North Foreshore Qld.
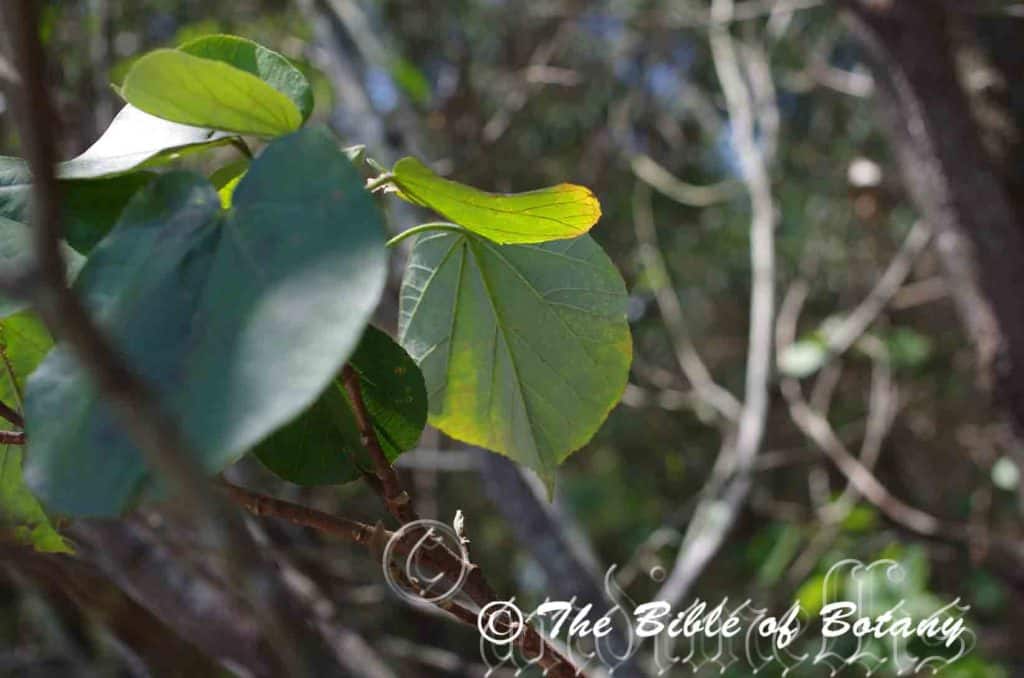
Wynnum North Foreshore Qld.
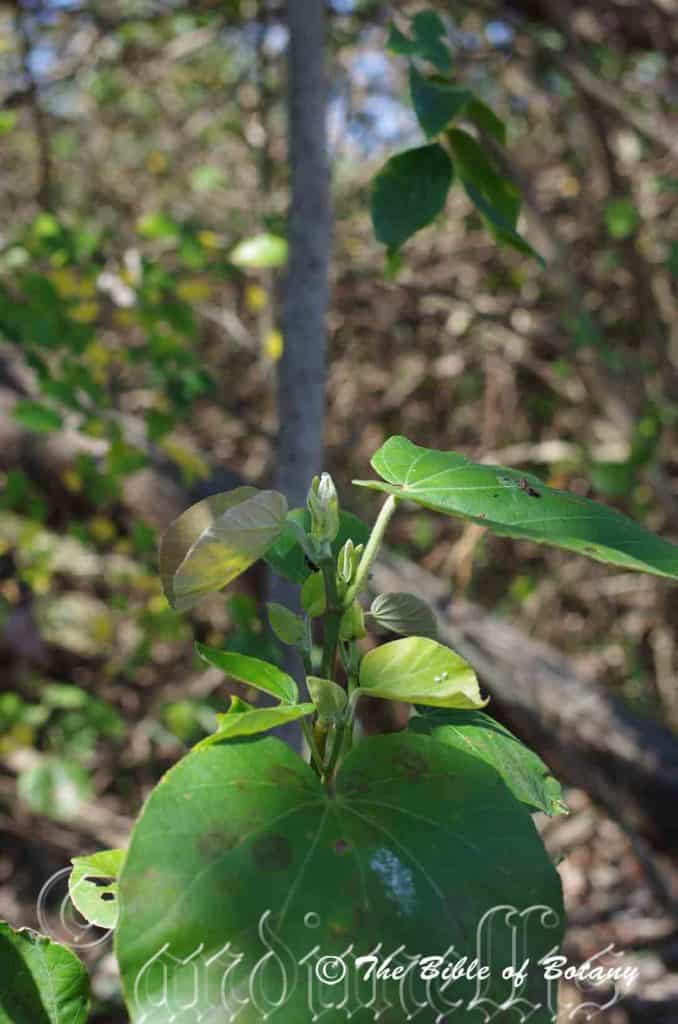
Wynnum North Foreshore Qld.
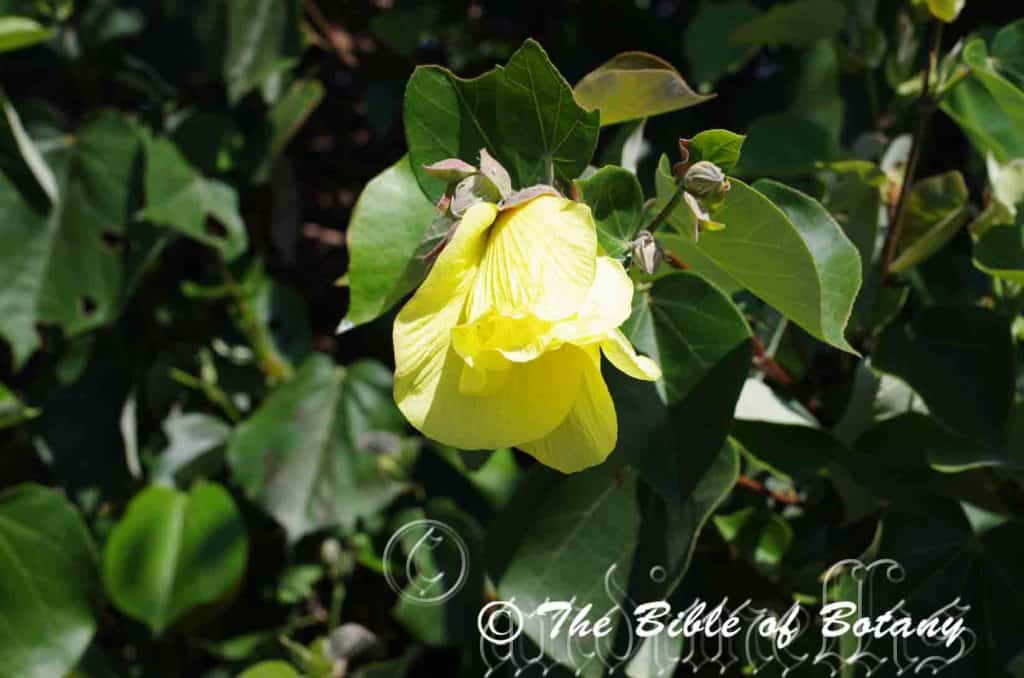
Wynnum North Foreshore Qld.
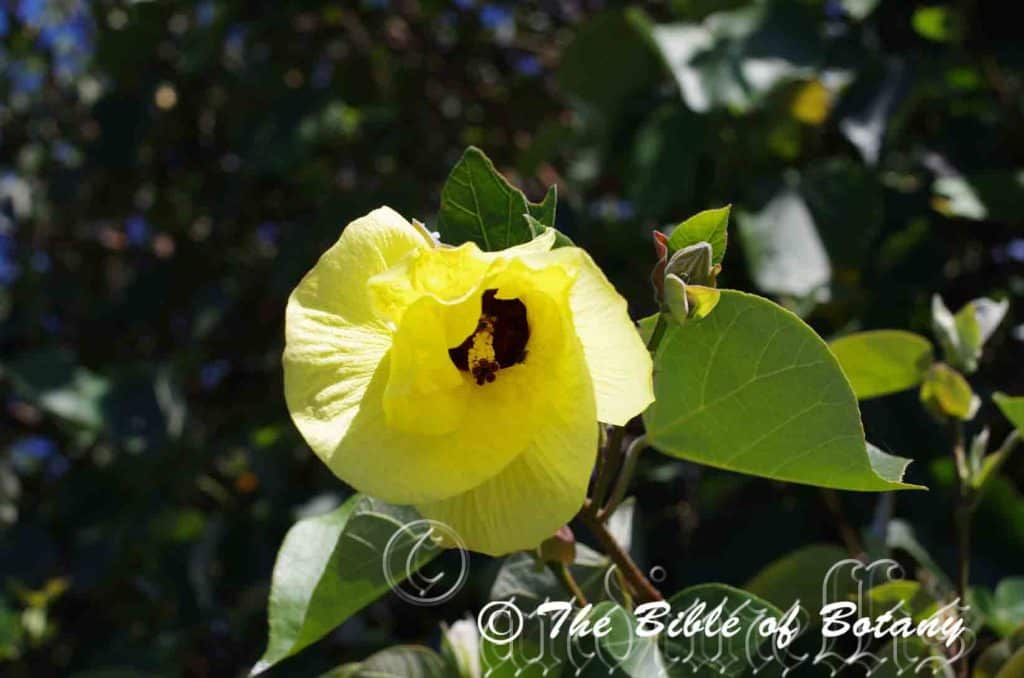
Wynnum North Foreshore Qld.
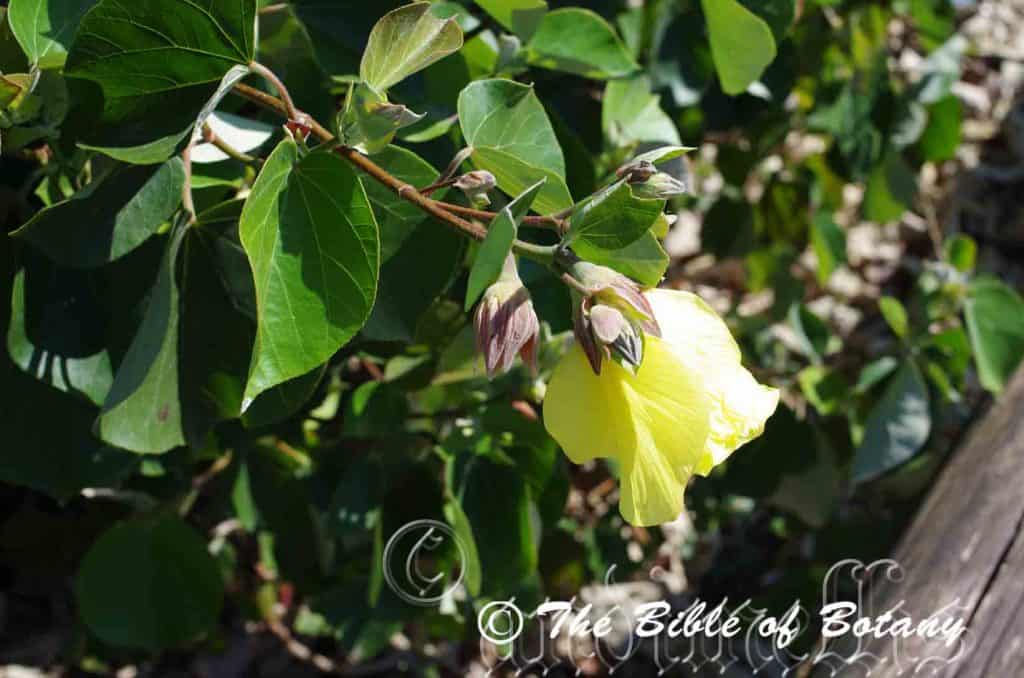
Wynnum North Foreshore Qld.
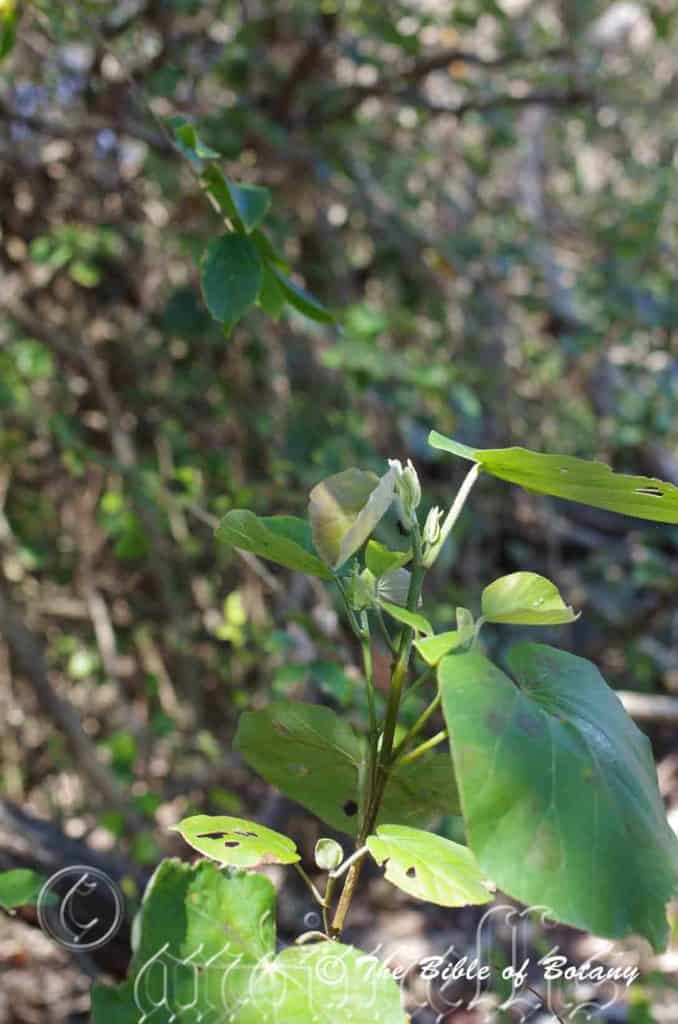
Wynnum North Foreshore Qld.
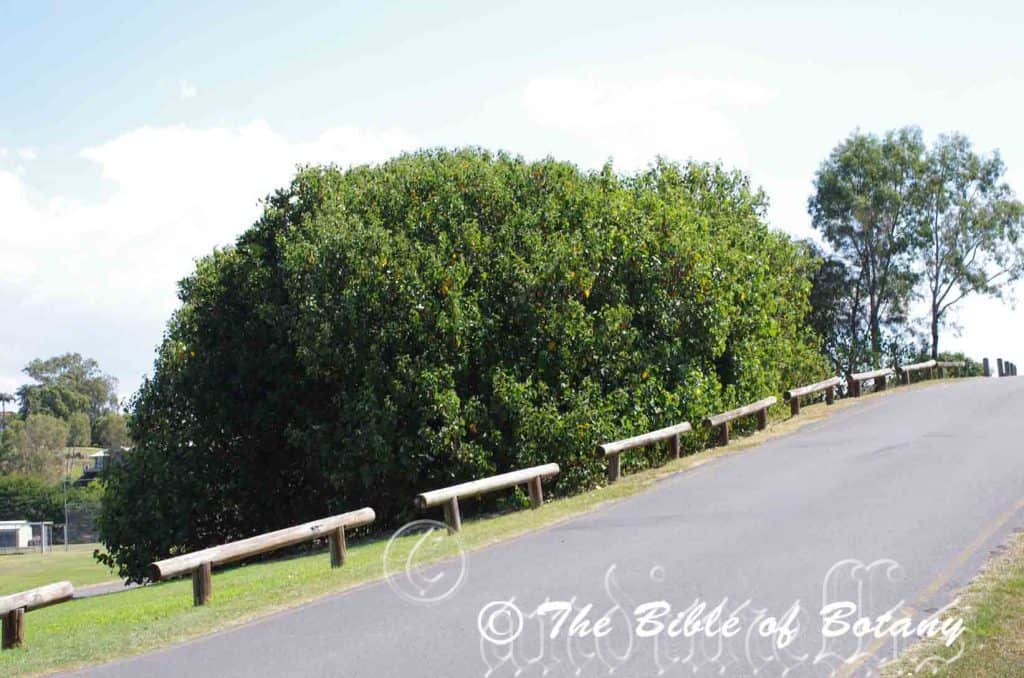
Wynnum North Foreshore Qld.
Hibiscus tiliaceus
Classification:
Unranked: Eudicots
Order: Malvales
Family: Malvaceae
Subfamily: Malvoideae
Tribe: Hibisceae
Genus: From Ibískos, which is Greek or later Hibiscum, which is Latin for a marsh mallo and Folium, which is Latin for foliage. It refers to a plant in ancient Egypt that grew in marshes and was used to make mallow for soothing the throat. Today it refers to plants, which have flowers that resemble the marsh mellow plant.
Species: From Tilia, which is Latin for the European Linden tree Tilia europeae. It refers to leaves which have a very similar appearance to the European Tillia genus.
Common Name: The flower of an hour.
Distribution:
Hibiscus tiliaceus is found north and east from the Ord River in Western Australia along the coast to Port Macquarie in coastal New South Wales.
https://avh.ala.org.au/occurrences/search?taxa=Hibiscus+tiliaceus#tab_mapView
Habitat Aspect Climate:
Hibiscus tiliaceus prefers full sun to light dappled shade. It grows in exposed and semi sheltered positions along the foreshore and river and creek estuaries. The altitude ranges from 1 meters ASL to 25 meters ASL.
The temperatures range from 3 degrees in July to 44 degrees in January.
The rainfall ranges from lows of 1000mm to an average of 3200mm annually.
Soil Requirements:
Hibiscus tiliaceus prefers coarse and fine sands, sandy loams, fatty sands, and coral sands. The soils are usually derived from alluvial deposits or accumulated beach sands. The soils pH varies from 6pH through to an 8pH. It does not tolerate waterlogged soils though seasonal high water tables are frequently encountered. Non saline soils to extremely saline soils are tolerated as are salt laden winds.
Height & Spread:
Wild Plants: 7m to 9m by 8m to 10m.
Characteristics:
Hibiscus tiliaceus is a medium tree often with a poorly formed trunk and horizontal branches often touching the ground.
Hibiscus tiliaceus’s alternate orbicular or cordate leaves measure 50mm to 180mm in diameter. The cleft lobes are oblong to lanceolate in outline and measure 15mm to 70mm in length by 10mm to 45mm in width. The petioles measure 10mm to 30mm in length. The petioles measure 100mm to 300mm in length. The bases are rounded or cordate while the apexes are broad acuminate. The discolourous laminas are deep green to sea-green and glabrous on the upper laminas while the lower laminas are silvery to off white and sparsely covered in white or pale grey stellate hairs. The laminas are flat and recurve strongly upwards from the main mid vein. The mid vein and 6 or 8 lateral veins are prominent on the lower lamina and are clearly visible from upper lamina.
The inflorescences of Hibiscus tiliaceus are born on a short raceme from the terminals. The peduncles are articulate at the base. The 8 to 13 epicalyx segments are triangular and measure 7mm to 11mm in length. The lanceolate calyx lobes are moderately to densely covered in pale rusty–brown stellate hairs externally and are glabrous internally and measure 20mm to 28mm in length. The corolla is pale yellow to bright yellow with a large basal red to maroon or at times burgundy blotch. The corolla measures 50mm to 80mm in length. The mid green cupuliform calyx and 5 elliptical-lanceolate calyx lobes measure 10mm to 18mm in length. The flowers appear throughout the warmer months in the south and from early spring to late autumn in the north with the odd flower all year.
The bright yellow stamens and style are fused while the stigma is deep red to maroon-red. The corolla turns a drab reddish yellow shortly after anthesis then falls a way.
Hibiscus tiliaceus’s fruit is a globose capsule. The capsules measure 22mm to 26mm in length by 14mm to 20mm in diameter. The green capsules turn fawnish brown to greyish brown when ripe and are moderately to densely covered in pale greyish brown to yellowish brown pubescent to hirtellous hairs externally and are glabrous internally. The fawnish-brown reniform seeds are covered in distinct rows of tuberculate lines.
Wildlife:
The flowers on Hibiscus tiliaceus are visited by a number of native Hibiscus beetles from the Nitidulidae family. The leaves and flowers are eaten by the harlequin bugs. Harlequin bugs are those beautifully coloured beetles called Tectocoris diopthalmus. The flowers, especially the seeds are much sought after by the Australian king parrot, Alisterus scapularis.
Cultivation:
Hibiscus tiliaceus is a beautiful medium size tree which is suitable for medium gardens to the largest gardens in exposed situations. It would make an excellent colourful addition for semi-arid, arid, tropical, subtropical or warm frost free temperate gardens. As a garden subject it will grow from 6 meters to 12 meters in height by 8 meters to 12 meters in diameter. It is fast growing, drought resistant but is frost sensitive in the early stages. Severe frosts will kill young trees.
Hibiscus tiliaceus offer dense shade and are good for mounting coastal type orchids like Dendrobium speciosum and ferns like Asplenium australis. This Hibiscus performs admirably when used between other arid plants on deep, dry sandy flats and gentle embankments.
Propagation:
Seeds: Hibiscus tiliaceus seeds can be sown directly into a seed raising mix. Sow the seeds as soon as the last frosts are over for the year. Cover them with 5mm of fine sand and keep moist not wet. Place the tray in a warm sunny position.
When the seedlings are 40mm to 50mm tall, prick them out and plant them into 50mm native tubes using a good organic mix.
Once the seedlings reach 150mm to 200mm in height they can be planted out into their permanent position. Don’t delay as it usually forms a thick aggressive root in the initial stages. Over fertilizing this tree could cause brittleness in the branches so moderation should be the key.
Cuttings: Seed is produced in good quantities and is easy to harvest and germinate so there is little need to propagate plants from cuttings unless a specific colour or leaf form is required.
Use 100mm long half ripened material when growing from cuttings from the present season’s growth. Take them in mid-autumn or early spring. Remove half the leaves from the bottom section being careful not to tear the bark. Take a 10mm slice off the bark from the bottom of the cutting on one side.
1 Prepare the cutting mix by adding one third sharp clean river sand, one third peat and one third perlite. These ingredients are sterilize,
2 Select good material from non diseased plants,
3 Select semi green stems for cuttings. Look for a stem with two or three nodes,
4 Place the cutting on a flat, hard surface, and make a clean cut down one side of the cutting at the base for 10mm with a sharp sterile knife or razor blade. – This scarification of the node will increase the chances of roots emerging from this spot. Now remove all but one or two the leaves, leaving the apex leaves in tact. If the leaves are very large in proportion to the stem, cut off the apical halves.
5 Fill a saucer with water, and place a little medium strength rooting hormone into another container like a milk bottle top. Dip the node end of the cutting into the water and then into the rooting hormone. Tap off any excess hormone,
6 Use a small dipple stick or old pencil to poke a hole into the soilless potting mix. Ensure the hole is slightly larger than the stem diameter and be careful not to wipe the rooting hormone off the cuttings base, place the cuttings in a pattern ensuring the cuttings are not touching each other,
7 I like to place the pots in Plastic bags to help maintain temperature and moisture. Place in a semi shaded place like under 50mm shade cloth.
8 When the cuttings have struck, open the bag to allow air circulation for a few days to a week,
9 Once hardened off remove the cuttings from the bag and allow to further hardening for a few more days,
10 Transplant into a good potting mix to grow on.
Fertilize using Seaweed, fish emulsion or organic chicken pellets soaked in water and apply the liquid on an alternate basis. Fertilize every 2 months until the plants are well established then on an annual basis in September to October to maintain good health, vigour and better flowering.
Further Comments from Readers:
Hi reader, it seems you use The Bible of Botany a lot. That’s great as we have great pleasure in bringing it to you! It’s a little awkward for us to ask, but our first aim is to purchase land approximately 1,600 hectares to link several parcels of N.P. into one at The Pinnacles NSW Australia, but we need your help. We’re not salespeople. We’re amateur botanists who have dedicated over 30 years to saving the environment in a practical way. We depend on donations to reach our goal. If you donate just $5, the price of your coffee this Sunday, We can help to keep the planet alive in a real way and continue to bring you regular updates and features on Australian plants all in one Botanical Bible. Any support is greatly appreciated. Thank you.
In the spirit of reconciliation we acknowledge the Bundjalung, Gumbaynggirr and Yaegl and all aboriginal nations throughout Australia and their connections to land, sea and community. We pay our respect to their Elders past, present and future for the pleasures we have gained.
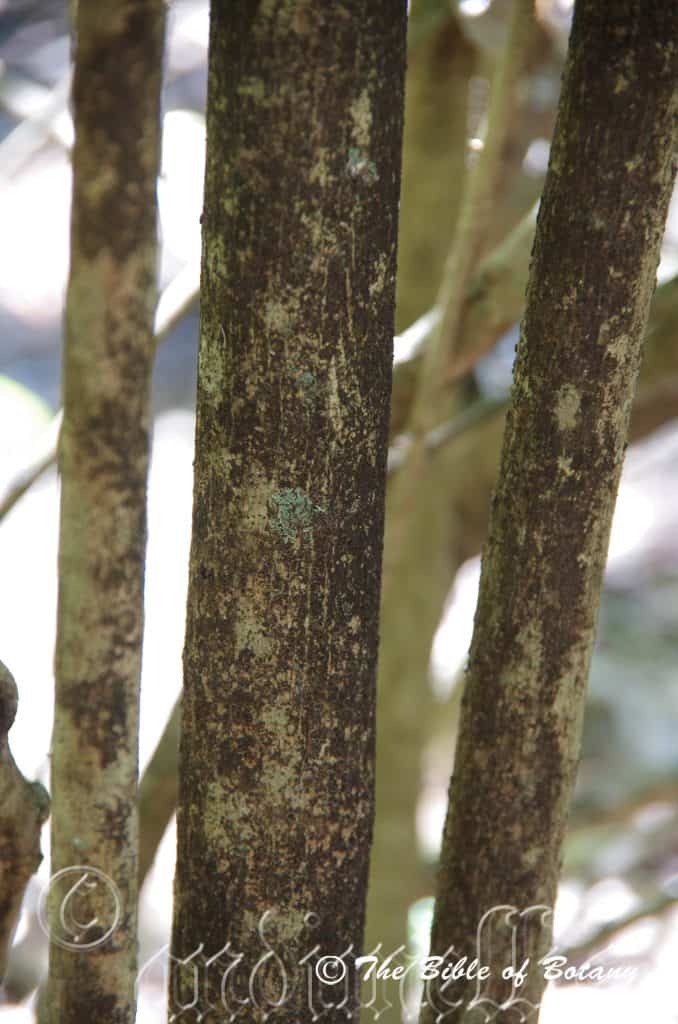
Mount Cootha Botanical Gardens Qld.
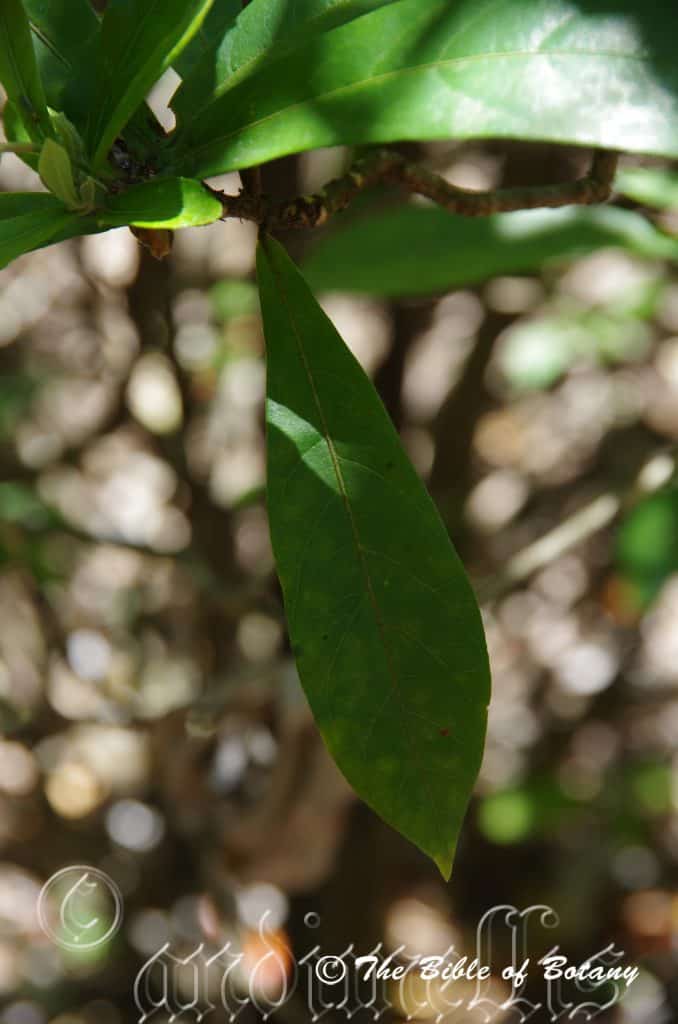
Mount Cootha Botanical Gardens Qld.
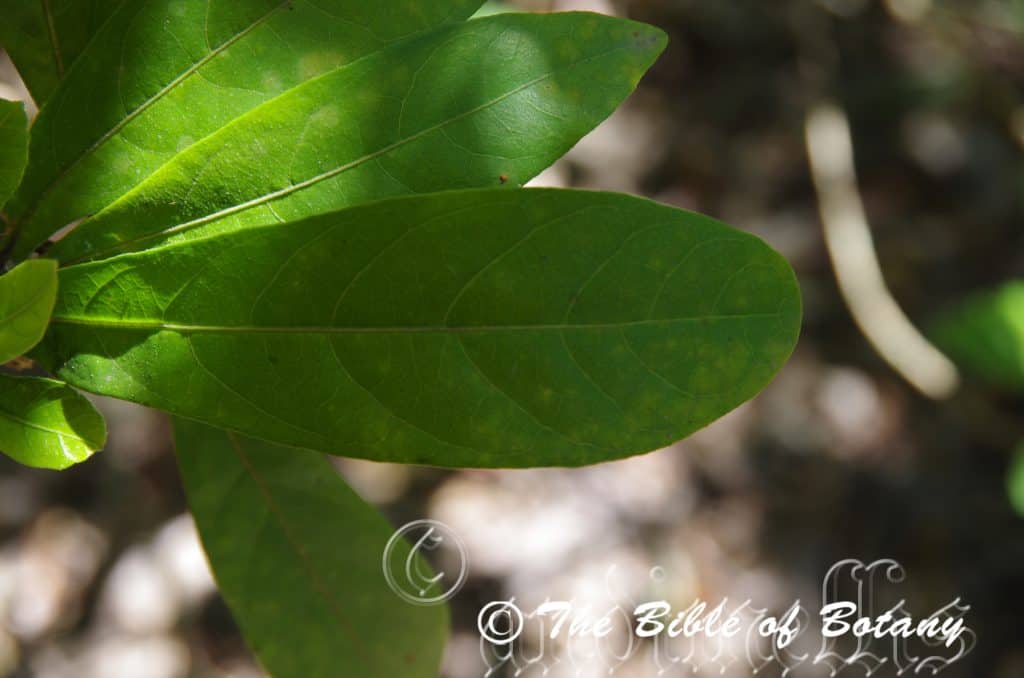
Mount Cootha Botanical Gardens Qld.
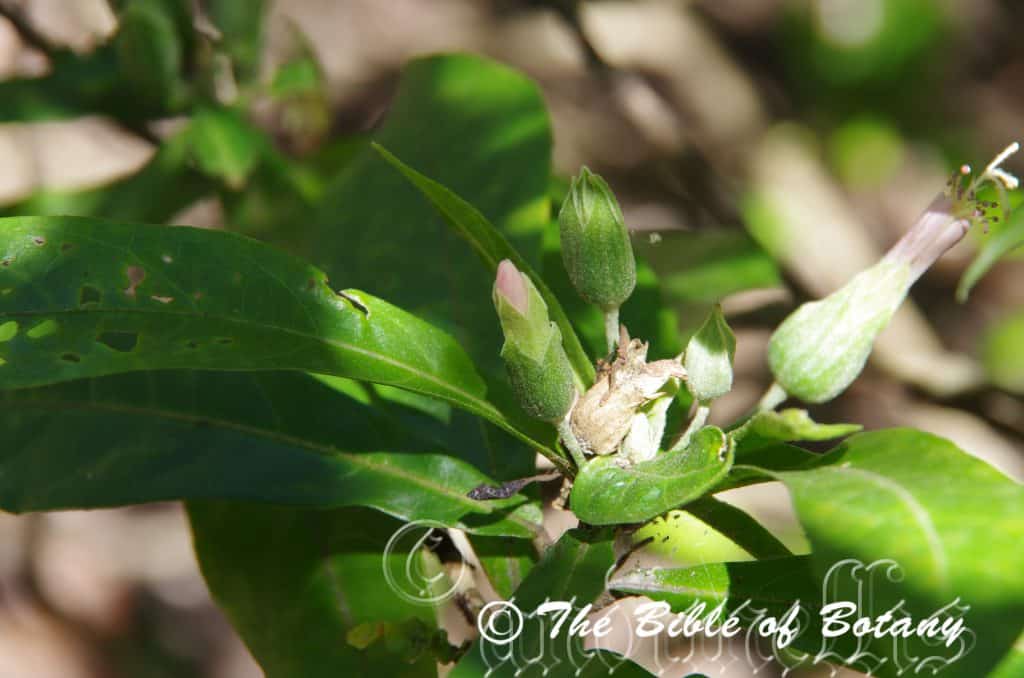
Mount Cootha Botanical Gardens Qld.
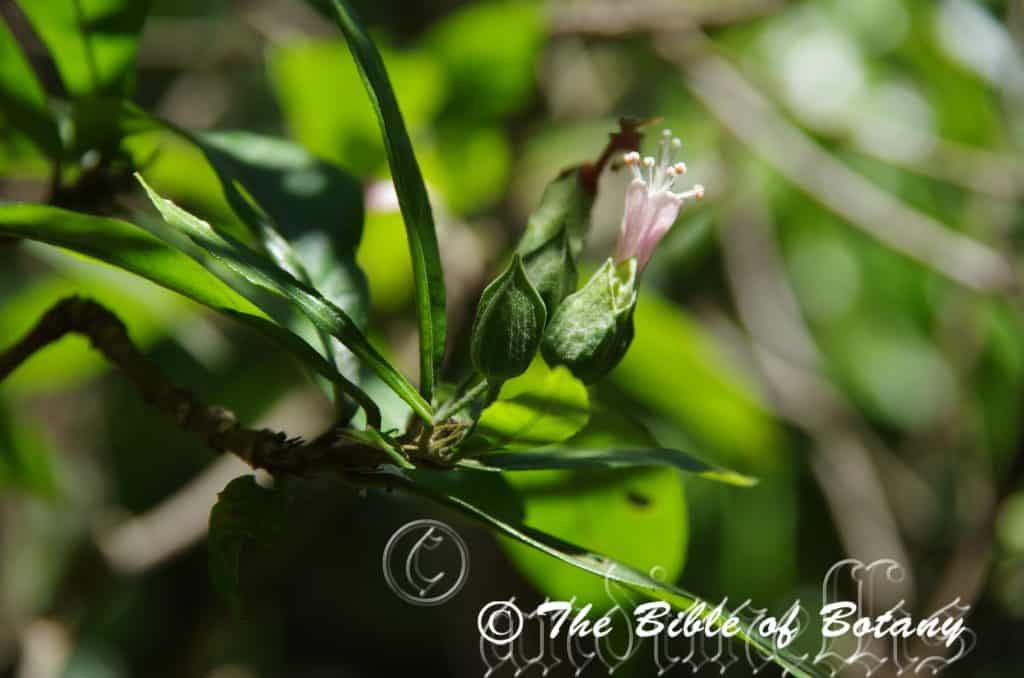
Mount Cootha Botanical Gardens Qld.
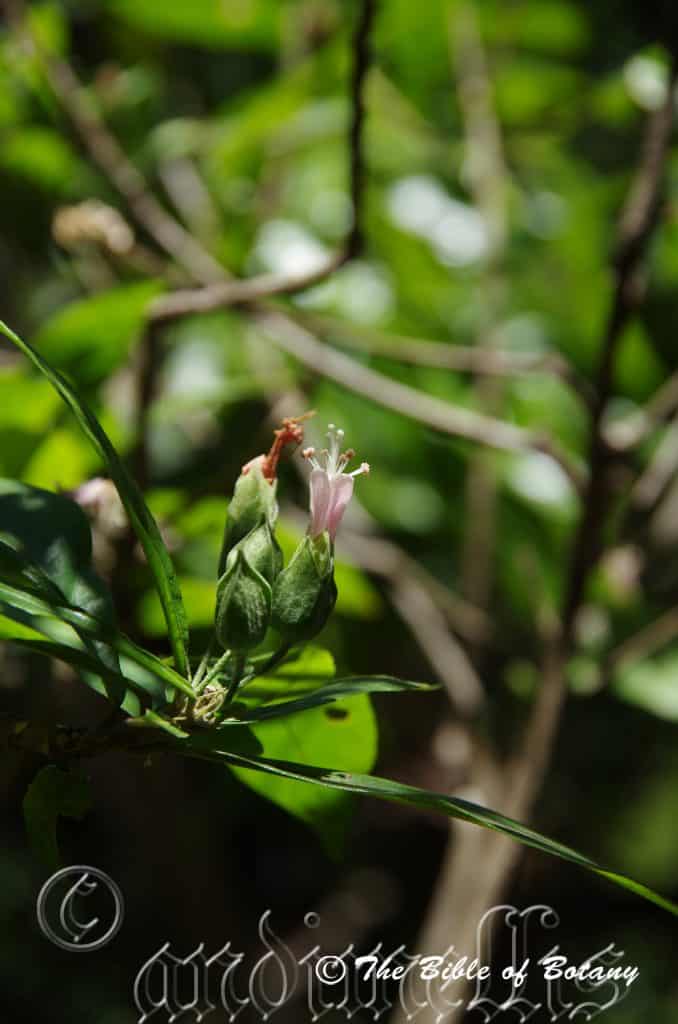
Mount Cootha Botanical Gardens Qld.
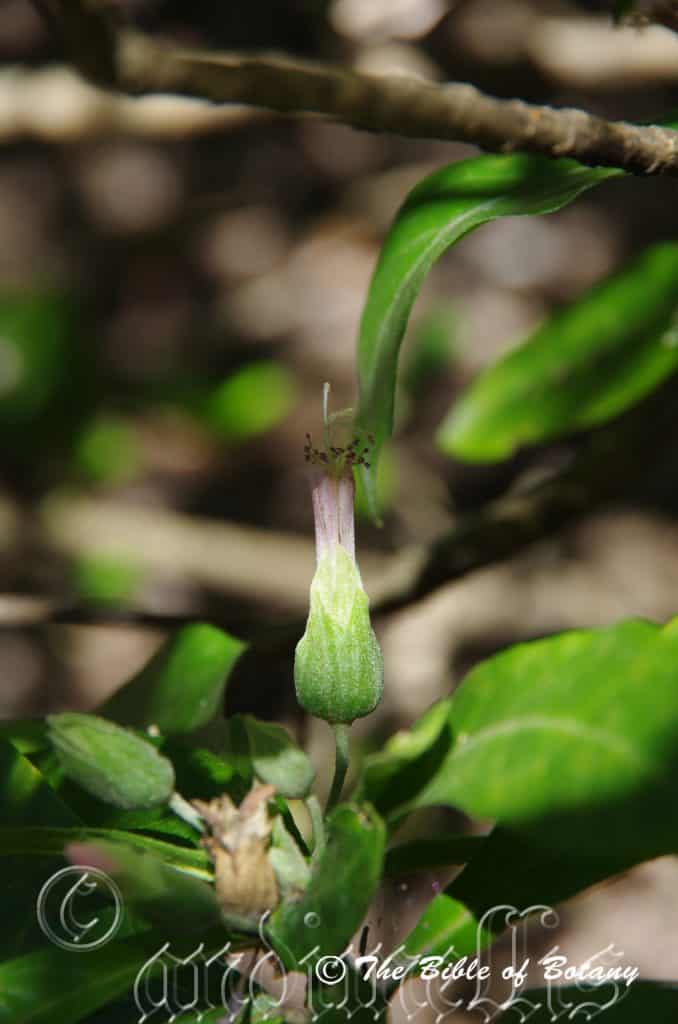
Mount Cootha Botanical Gardens Qld.
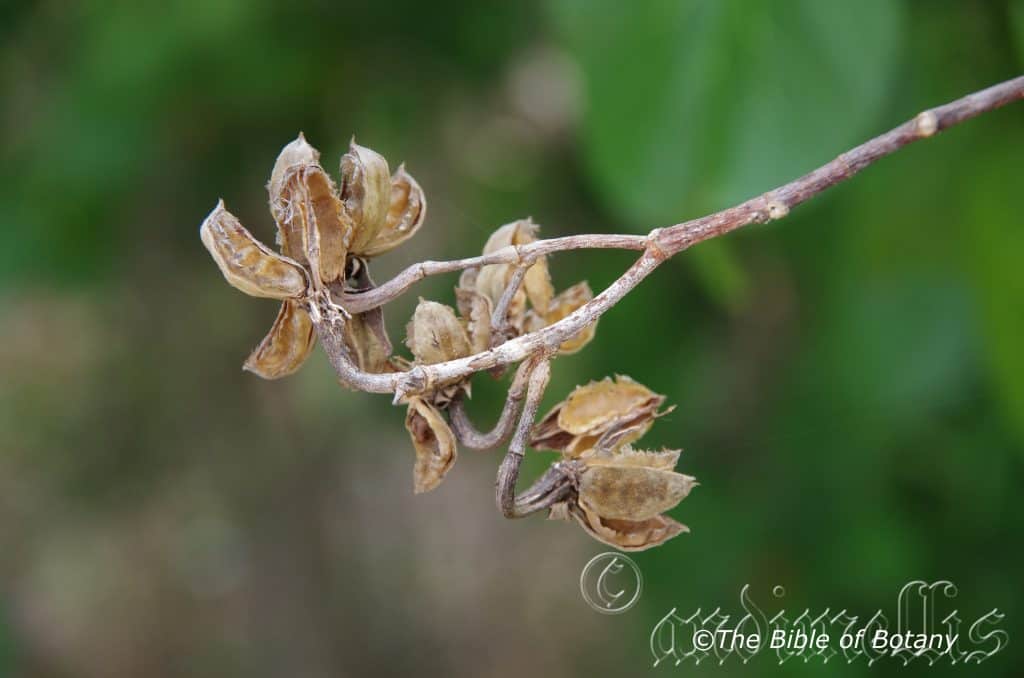
Crystal Creek Estuary East of Moongubulla Qld.
Hibiscus tozerensis
Classification:
Unranked: Eudicots
Order: Malvales
Family: Malvaceae
Subfamily: Malvoideae
Tribe: Hibisceae
Genus: From Ibískos, which is Greek or later Hibiscum, which is Latin for a marsh mallo and Folium, which is Latin for foliage. It refers to a plant in ancient Egypt that grew in marshes and was used to make mallow for soothing the throat. Today it refers to plants, which have flowers that resemble the marshmallow plant.
Species: From Tozer, which is Latinized for the Mount Tozer district on Cape York Peninsula and Anum/Ensis which is Latin for to originate from. It refers to plants, which were first discovered around Mount Tozer on Cape York Peninsula in far north eastern Queensland.
Common Name: Iron Range Hibiscus.
Distribution:
Hibiscus tozerensis is restricted to 2 small disjunct populations south from Kennedy Hill to Tozer’s gap and Brown’s Creek and near Tolga on the Atherton Tableland in far north Queensland on Cape York Peninsula.
https://avh.ala.org.au/occurrences/search?taxa=Hibiscus+tozerensis#tab_mapView
Habitat Aspect Climate:
Hibiscus tozerensis prefers full sun to light dappled shade. It grows on the margins of tropical rainforests. The altitude ranges from 100 meters ASL to 400 meters ASL.
The temperatures range from 8 degree in July to 36 degrees in January.
The rainfall ranges from lows of 1350mm to an average of 2000mm annually.
Soil Requirements:
Hibiscus tozerensis prefers sandy loams, fatty sands, gritty light clays, medium clays or podsolics. The soils are usually derived from decomposed brown basalt, metasediments and granitic sands. The soils pH varies from 5pH through to a 6pH. It does not tolerate waterlogged soils however annual inundations or periodic rises in water tables are normal. Non saline soils to moderately saline soils are tolerated.
Height & Spread:
Wild Plants: 2m to 4m by 2m to 3m.
Characteristics:
Hibiscus tozerensis’s main stems are pale brown, grey-brown to pale creamy-brown and are often covered in lichens. The branchlets are grass-green and are covered in white and fawn stellate hairs.
Hibiscus tozerensis’s alternate oblanceolate leaves measure 125mm to 175mm in length by 40mm to 45mm in width. The filiform, linear stipules are densely covered in brown stellate hairs and measure 4mm to 10mm in length. The bases are cuneate while the apexes are narrow acuminate, broad accuminata or obtuse even on the same tree and same twigs. The concolourous laminas are grass-green and usually sparsely to moderately covered in white or at times pale brown stellate hairs. The laminas are slightly rough but not scabrous. The laminas are usually flat or at times recurve slightly upwards from the mid vein to the margins and at times are slightly convex between the main vein and the main lateral veins. The margins are entire or slightly undulate.
The mid vein is strongly prominent on both laminas while the main lateral veins are prominent on both laminas especially near the mid vein. The lateral veins form loops close to the margins. The mid vein and lateral veins close to the mid vein are moderately to densely covered in brown stellate hairs. The petioles are densely covered in brown stellate hairs and measure 3.5mm to 6mm in length.
The inflorescences of Hibiscus tozerensis are born in clusters from the terminals and measure 40mm to 50mm in diameter when spread out. The pedicels are all densely covered in white stellate and measure 10mm to 50mm in length. The 3 to 5 broad oval epicalyxes lobes have an acuminate apex and are grass-green. The cupuliform tube measures 5mm to 7.5mm in length by 4mm to 5mm in width while the lobes measure 7.5mm to 10mm in length. The 5 pale grass-green, translucent calyx lobes are oval with an acuminate apex. The calyxes and lobes are moderately covered in white stellate hairs externally, are glabrous internally and measure 12mm to 15mm in length. The 5 pastel creamy pink to pale creamy pink petals only partially open to form a funnel. It is oblong and strongly contorted while the apex is broadly obtuse-truncate. The petals measure 18mm to 22mm in length by 3.5mm to 4.5mm across at the widest point.
The white style measures 26mm to 31.5mm in length and divides into 5 orbicular to broad conical stigmas. There are 2 or 3 white, linear bracts between the filaments and the stigma branches that are moderately covered in white stellate hairs and measure 2.5mm to 5mm in length.
The 10, 15 or 20 white filaments are fused to the middle section of the style and are moderately covered in long, white stellate and hirsute hairs. The filaments measure 3mm to 5mm in length. The basifixed anthers are strongly reniform and are dehiscence on the outer periphery. The style and stigma branches are moderately covered in long, white stellate and hirsute hairs while the branches measure 3mm to 6mm in length while the stigmas measure 0.8mm in diameter. The flowers appear from September to November.
Hibiscus tozerensis’s fruits are sub globose capsules. The capsules measure 10mm to 15mm in length by 12mm to 14mm in diameter. It is covered in white stellate hairs. The green capsules turn brown on ripening. The calyxes, epicalyx and lobes are persistent at the base of the ripe capsules. The 12 to 15 seeds measure 5mm in length by 4.5mm in diameter and are covered in long, white hirsute hairs.
Wildlife:
The flowers on Hibiscus tozerensis are visited by numerous native Hibiscus beetles from the Nitidulidae family. The leaves and flowers are eaten by the harlequin bugs. Harlequin bugs are those beautifully coloured beetles called Tectocoris diopthalmus.
Cultivation:
Hibiscus tozerensis is a beautiful medium to large native shrub or small tree, which is suitable for small gardens to the largest gardens in moist areas. It is an excellent colourful addition for tropical, subtropical or temperate zone gardens where a lush rainforest look is required. As a garden subject it will grow to 4 meter to 5 meters in height by 2 meters to 3 meters in width. It is fast growing and are drought tolerant once established. Frosts will kill young unprotected trees. Older plants will be killed off down to ground level but will grow out immediately on warmer weather.
It can be used in raised garden beds or turning circles as the main feature surrounded by small shrubs and ground covers or annuals. Fine, pale green leaves would make a wonderful contrast especially if the flowers appeared at a different time of the year as the pale creamy pink flowers would be lost amongst strong reds and purples while lilacs, pinks and whites would blend leaving a feeling that something is missing.
The trees would make very good accent trees in front of low set commercial, industrial sheds or school class rooms or between shade trees in front of low multistorey buildings where they will break up hard rigid architectural lines and give warmth and breadth to the building.
This Hibiscus species would make a good Bonsai specimen as the branches are easy to work..
Propagation:
Seeds: Hibiscus tozerensis seeds can be sown directly into a seed raising mix. Cover them with 5mm of fine sand and keep moist not wet. Place the tray in a warm sunny position. When the seedlings are 20mm to 30mm tall, prick them out and plant them into 50mm native tubes using a good organic mix.
Once the seedlings reach 150mm to 200mm in height they can be planted out into their permanent position.
Cuttings: Seed is produced in good quantities and is easy to harvest and germinate so there is little need to propagate plants from cuttings unless a specific colour or leaf form is required.
Use 80mm to 100mm long half ripened material when growing from cuttings from the present season’s growth. Take them in mid-autumn or early spring. Remove half the leaves from the bottom section being careful not to tear the bark. Take a 10mm slice off the bark from the bottom of the cutting on one side.
1 Prepare the cutting mix by adding one third sharp clean river sand, one third peat and one third perlite. These ingredients are sterilize,
2 Select good material from non diseased plants,
3 Select semi green stems for cuttings. Look for a stem with two or three nodes,
4 Place the cutting on a flat, hard surface, and make a clean cut down one side of the cutting at the base for 10mm with a sharp sterile knife or razor blade. – This scarification of the node will increase the chances of roots emerging from this spot. Now remove all but one or two the leaves, leaving the apex leaves in tact. If the leaves are very large in proportion to the stem, cut off the apical halves.
5 Fill a saucer with water, and place a little medium strength rooting hormone into another container like a milk bottle top. Dip the node end of the cutting into the water and then into the rooting hormone. Tap off any excess hormone,
6 Use a small dipple stick or old pencil to poke a hole into the soilless potting mix. Ensure the hole is slightly larger than the stem diameter and be careful not to wipe the rooting hormone off the cuttings base, place the cuttings in a pattern ensuring the cuttings are not touching each other,
7 I like to place the pots in Plastic bags to help maintain temperature and moisture. Place in a semi shaded place like under 50mm shade cloth.
8 When the cuttings have struck, open the bag to allow air circulation for a few days to a week,
9 Once hardened off remove the cuttings from the bag and allow to further hardening for a few more days,
10 Transplant into a good potting mix to grow on.
Fertilize using Seaweed, fish emulsion or organic chicken pellets soaked in water and apply the liquid on an alternate basis. Fertilize every 2 months until the plants are well established then on an annual basis in September to October to maintain good health, vigour and better flowering.
Further Comments from Readers:
Hi reader, it seems you use The Bible of Botany a lot. That’s great as we have great pleasure in bringing it to you! It’s a little awkward for us to ask, but our first aim is to purchase land approximately 1,600 hectares to link several parcels of N.P. into one at The Pinnacles NSW Australia, but we need your help. We’re not salespeople. We’re amateur botanists who have dedicated over 30 years to saving the environment in a practical way. We depend on donations to reach our goal. If you donate just $5, the price of your coffee this Sunday, We can help to keep the planet alive in a real way and continue to bring you regular updates and features on Australian plants all in one Botanical Bible. Any support is greatly appreciated. Thank you.
In the spirit of reconciliation we acknowledge the Bundjalung, Gumbaynggirr and Yaegl and all aboriginal nations throughout Australia and their connections to land, sea and community. We pay our respect to their Elders past, present and future for the pleasures we have gained.
Hibiscus trionum
Classification:
Unranked: Eudicots
Order: Malvales
Family: Malvaceae
Subfamily: Malvoideae
Tribe: Hibisceae
Genus: From Ibískos, which is Greek or later Hibiscum, which is Latin for a marsh mallo and Folium, which is Latin for foliage. It refers to a plant in ancient Egypt that grew in marshes and was used to make mallow for soothing the throat. Today it refers to plants, which have flowers that resemble the marsh mellow plant.
Species: From Treîs/Tría, which are Ancient Greek or Tri, which is Latin for three. It refers to a species, which have flowers that appear naturally in three different colours.
Common Name:
Distribution:
Hibiscus trionum is found south and east of a line from Mount McMinn in the eastern Northern Territory to Camballin in the north west of Western Australia to Boulia in north western Queensland to north of Alice Springs and south to Tumbly Bay on Eyre Peninsula in southern South Australia. There are 2 isolated populations in Western Australia from Millstream to Mount Tom Price in the Pilbra and Moora north of Perth south to Donnybrook and then east to Ongerup. In Tasmania it is found in 2 disjunct populations from west Tamara to Entally and from Hobart to Kingborough on the southern coast.
https://avh.ala.org.au/occurrences/search?taxa=Hibiscus+trionum#tab_mapView
Habitat Aspect Climate:
Hibiscus trionum prefers full sun to light dappled shade. It grows in more open woodlands, open forests and plains and slopes. It is a straggly shrub with large pale yellow flowers. The altitude ranges from 10 meters ASL to 850 meters ASL.
The temperatures range from minus 3degrees in July to 38 degrees in January.
The rainfall ranges from lows of 150mm to an average of 2000mm annually.
Soil Requirements:
Hibiscus trionum prefers sandy loams, fatty sands, gritty light clays, medium clays or podsolics. The soils are usually derived from decomposed granites or sandstones. The soils pH varies from 5pH through to a 6pH. It does not tolerate waterlogged soils. Non saline soils to moderately saline soils are tolerated.
Height & Spread:
Wild Plants: 0.5m to 0.6m by 0.5m to 1m.
Characteristics:
Hibiscus trionum is an annual or short lived perennial with grass-green stems. The terete or angular stems are sparsely covered in course, long, white hirsute hairs.
Hibiscus trionum’s alternate lower leaves are orbicular and measure 15mm to 30mm in diameter while the upper leaves are deeply divided with 3 to 5 lobes from near the base. The cleft lobes are oblong to lanceolate in outline and measure 15mm to 70mm in length by 10mm to 45mm in width. The petioles measure 10mm to 30mm in length. The bases of the lobes are tapering to the petiole while the apexes are obtuse. The concolourous laminas are mid blue-green to mid green and are often variable, glabrous and semi glossy. The laminas are flat or recurve slightly upwards from the mid vein to the margins while the lobes margins are cleft. The mid vein and main lateral veins are prominent on the lower lamina and are visible from upper laminas.
The inflorescences of Hibiscus trionum are born from the leaf axils and measure 35mm to 65mm in diameter when spread out. The pedicels are sparsely covered in long white hirsute hairs. The pedicels measure 15mm to 22mm in length. The 10 to 14 linear epicalyxes are mid blue-green to mid green and measure 8mm to 10mm in length by 2mm to 2.5mm in width. The lime-green cupuliform calyx and 5 triangular calyx lobes are translucent with 4 to 5 raised burgundy veins. The calyxes measure 12mm to 20mm long.
The 5 pale yellow, cream or at times white petals only partially open to form a funnel. The oval, orbicular or broadly oblong have deep burgundy-red bases and often have a pastel purple band along one margin. The petals measure 15mm to 30mm in length by 12mm to 30mm across at the widest point.
The deep burgundy-red or white style measures 9mm to 15mm in length. The 20 to 60 deep burgundy-red or white filiform filaments are fused to the apical half of the style. The 5 deep burgundy-red or white branches holding the stigmas measure 3mm to 5mm in length while the stigmas measure 1.5mm to 2mm in diameter. The flowers appear throughout the year under favourable weather conditions and where warmth is maintained all year. There is a peak from October to May in cooler climate.
Hibiscus trionum’s fruit is a globose to conical capsule. The capsules measure 15mm to 22mm in length by 14mm to 20mm in diameter. The translucent lime-green capsules are covered in faint reticulate veins and have 20 to 25 longitudinal veins. There are 3 or 4 smaller veins between each of the 5 main raised veins. The 5 larger veins expand on the apical half to 3.5mm in height while the basal half and the reaming smaller wings measure 0.8mm to 1.2mm in height. The wings ridges are burgundy and covered in small papillate lumps with long white hirsute hairs growing from each. The green capsules turn papery-brown when ripe. The pale dull, deep brown glabrous seeds measure 3mm to 4mm in diameter. The deep grey to almost black, orbicular, rugulose seeds measure 3mm to 3.5mm in diameter.
Wildlife:
The flowers on Hibiscus trionum are visited by a number of native Hibiscus beetles from the Nitidulidae family. The leaves and flowers are eaten by the harlequin bugs. Harlequin bugs are those beautifully coloured beetles called Tectocoris diopthalmus.
Cultivation:
Hibiscus trionum is a very beautiful small native shrub which is suitable for small gardens to the largest gardens in wet areas. It is an excellent colourful addition for semi-arid, arid, tropical, subtropical or warm frost free temperate gardens. As a garden subject it will grow to 0.3 meter to 0.5 meters in height by 0.5 meters to 0.8 meters in diameter. It must be pruned regularly to enhance bushiness and better flowering. It is fast growing, drought resistant but is frost sensitive. Frosts will kill unprotected plants.
This is the perfect little filler in permanent garden beds where a fill in plant is required following the death of an older plant or where it can be used as an annual or perennial. This seldom grown, but easy-to-grow Hibiscus performs admirably when used between other arid plants on dry embankments and on rock walls. It forms a beautiful compact, densely branched mound of deeply lobed, deep grey-green leaves which add a texture not often seen in the garden. Planted in the foreground of a taller shrubbery the leaves have a strong character that will bring the background forward. Planted in the background in a small garden the interesting texture of the leaves and the cream Hibiscus flowers with the purples hues on under sides, and deep burgundy centers are very eye catching especially if it is surrounded by deep reds and oranges or with deep reds and deep blues and violets in front. Each flower typical of the Malvaceae may only last a day but the plant blooms profusely once it starts in the garden and produces interestingly wonderful inflated seed pods.
Propagation:
Seeds: Hibiscus trionum seeds can be sown directly into a seed raising mix. Sow the seeds as soon as the last frosts are over for the year. Cover them with 5mm of fine sand and keep moist not wet. Place the tray in a warm sunny position. When the seedlings are 20mm to 30mm tall, prick them out and plant them into 50mm native tubes using a good organic mix.
Once the seedlings reach 150mm to 200mm in height they can be planted out into their permanent position.
Cuttings: Seed is produced in good quantities and is easy to harvest and germinate so there is little need to propagate plants from cuttings unless a specific colour or leaf form is required.
Use 75mm to 100mm long ripened material when growing from cuttings from the desired parent material. Take them in mid spring or autumn or immediately after the specific flower colour is noted. Remove a 10mm slice from the bark in a downward stroke from one side. Using an appropriate rooting hormone, dip the cutting in and place it into a sterile mix of peat, sand and perlite.
Place the trays under 30mm to 50mm shade and keep the trays warm. Bottom heat is beneficial when striking the cuttings. Ideally temperatures should be maintained at between 22 to 24 degrees.
When the cuttings have obviously struck and have developed good roots treat them as for seedlings.
Alternatively take a 150mm to 200 non flowering stem which is 10mm to 20mm thick. Remove the top 200mm and place it in a 50mm native tube with a porous mix without organic matter. Ensure that the bottom of the cutting is about 20mm from the base of the tube. Now lay the tubes out at 45 degrees so that the bottom half of the tube is in water. When the roots appear at the bottom of the tubes harden the off a little and plant them out into their permanent positions.
Fertilize using Seaweed, fish emulsion or organic chicken pellets soaked in water and apply the liquid on an alternate basis. Fertilize every 2 months until the plants are well established then on an annual basis in September to October to maintain good health, vigour and better flowering.
Further Comments from Readers:
Hi reader, it seems you use The Bible of Botany a lot. That’s great as we have great pleasure in bringing it to you! It’s a little awkward for us to ask, but our first aim is to purchase land approximately 1,600 hectares to link several parcels of N.P. into one at The Pinnacles NSW Australia, but we need your help. We’re not salespeople. We’re amateur botanists who have dedicated over 30 years to saving the environment in a practical way. We depend on donations to reach our goal. If you donate just $5, the price of your coffee this Sunday, We can help to keep the planet alive in a real way and continue to bring you regular updates and features on Australian plants all in one Botanical Bible. Any support is greatly appreciated. Thank you.
In the spirit of reconciliation we acknowledge the Bundjalung, Gumbaynggirr and Yaegl and all aboriginal nations throughout Australia and their connections to land, sea and community. We pay our respect to their Elders past, present and future for the pleasures we have gained.
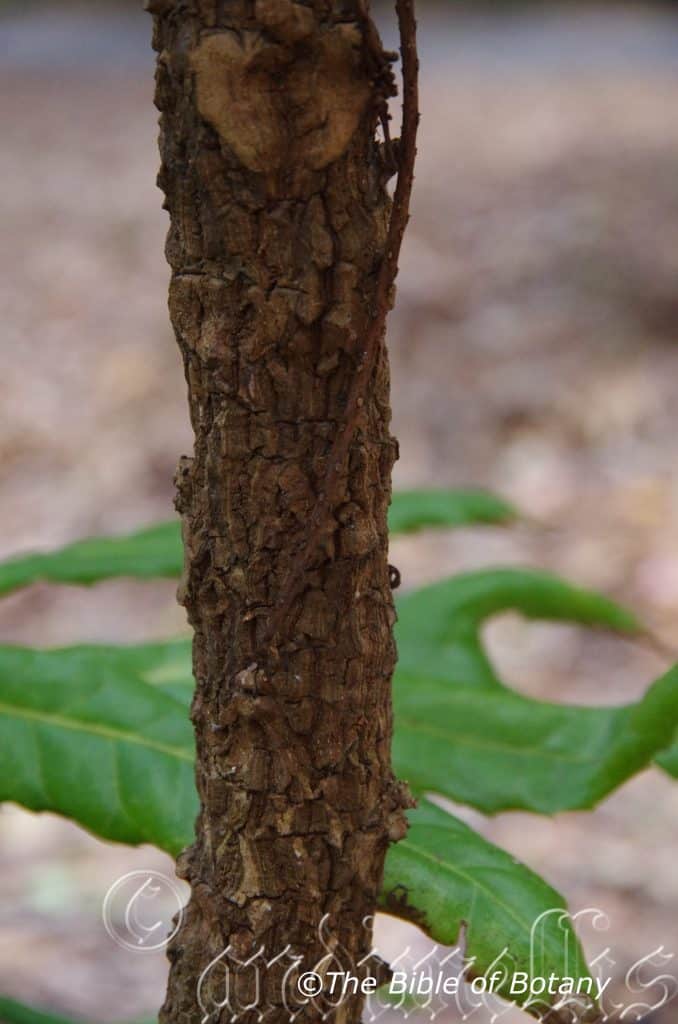
NCBG Coffs Harbour NSW
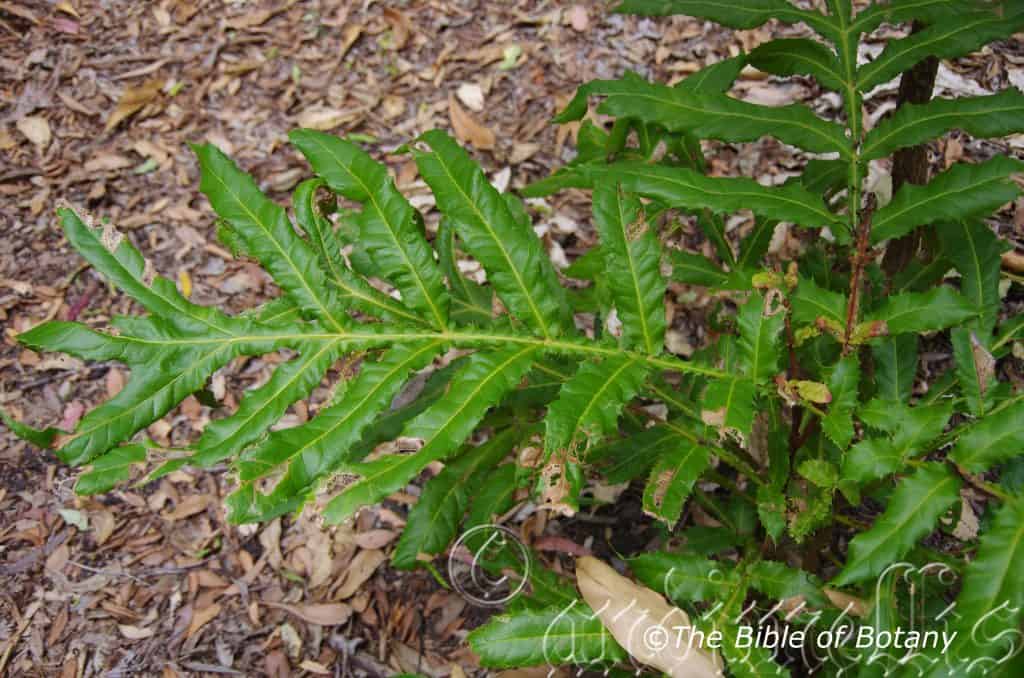
NCBG Coffs Harbour NSW
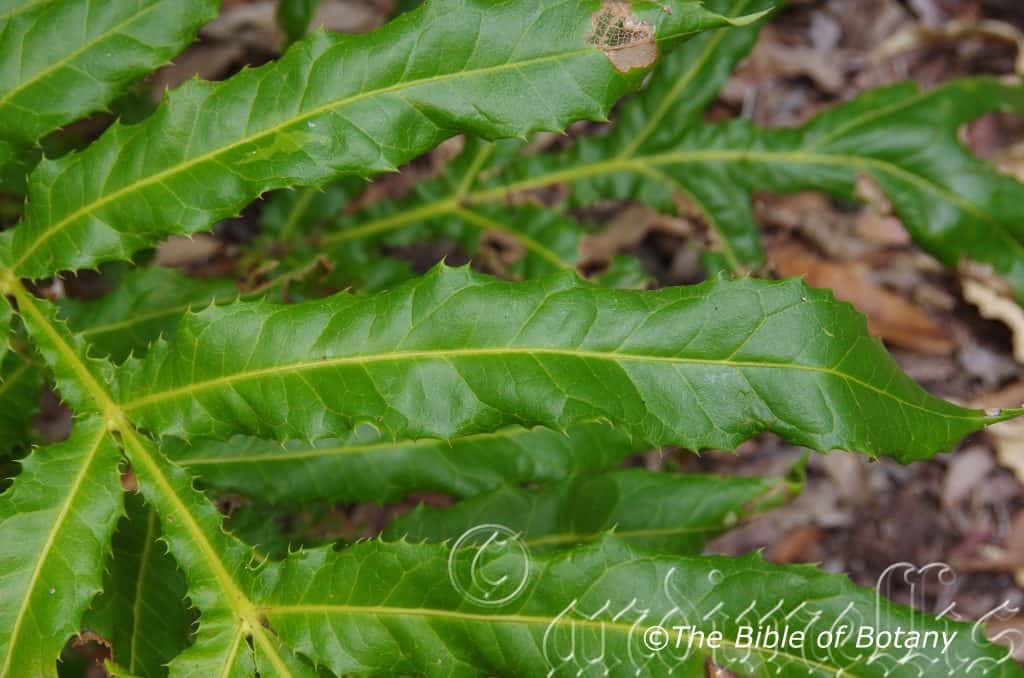
NCBG Coffs Harbour NSW
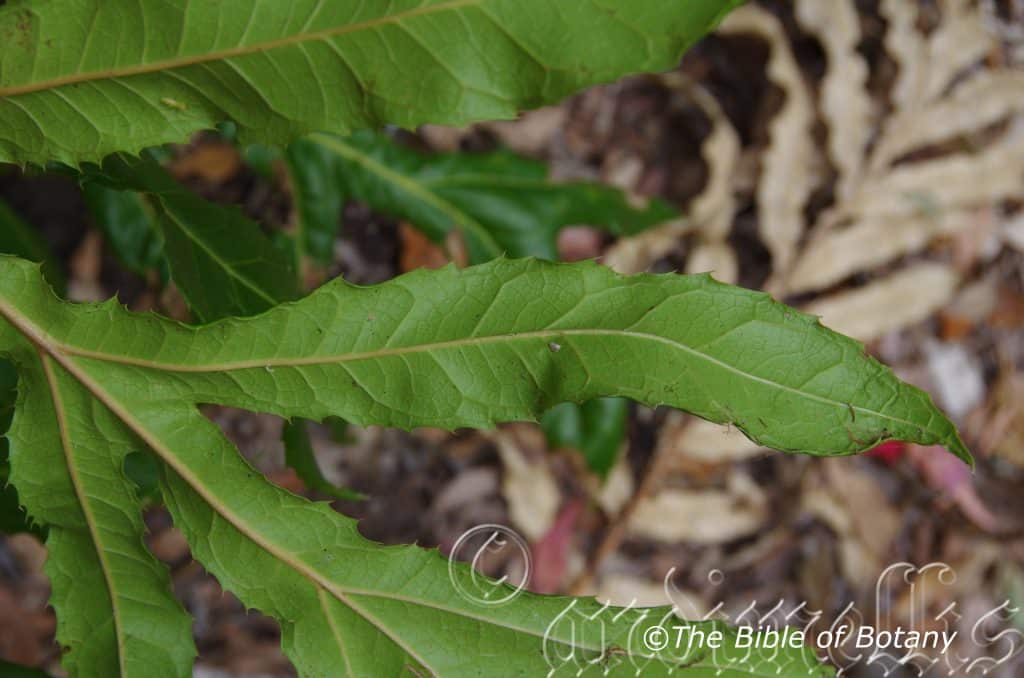
NCBG Coffs Harbour NSW

Crabbes Creek NSW
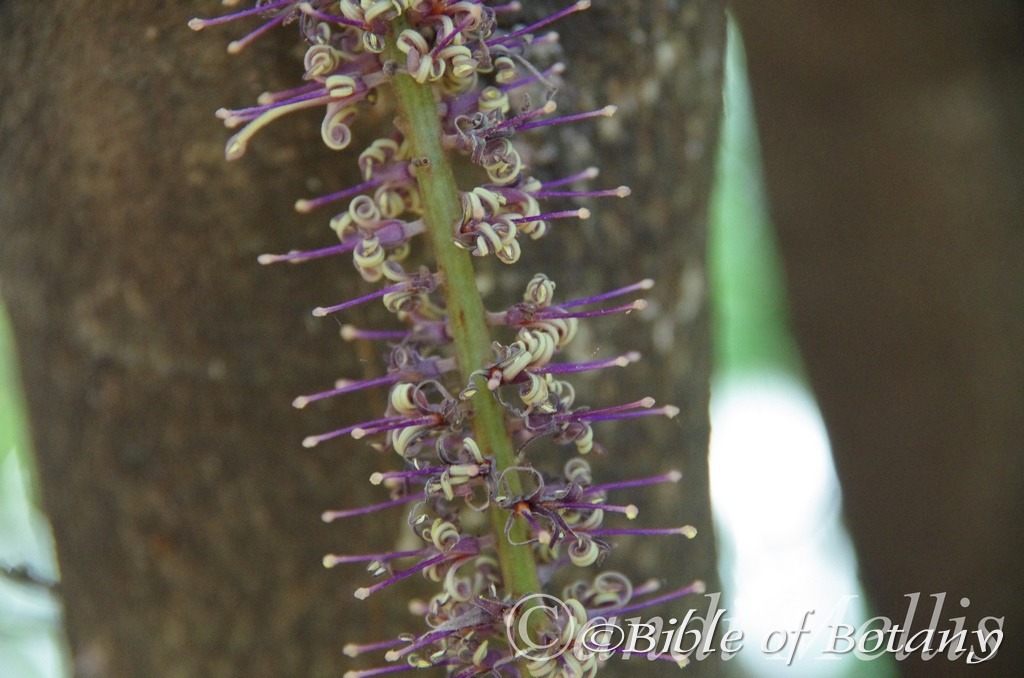
Crabbes Creek NSW
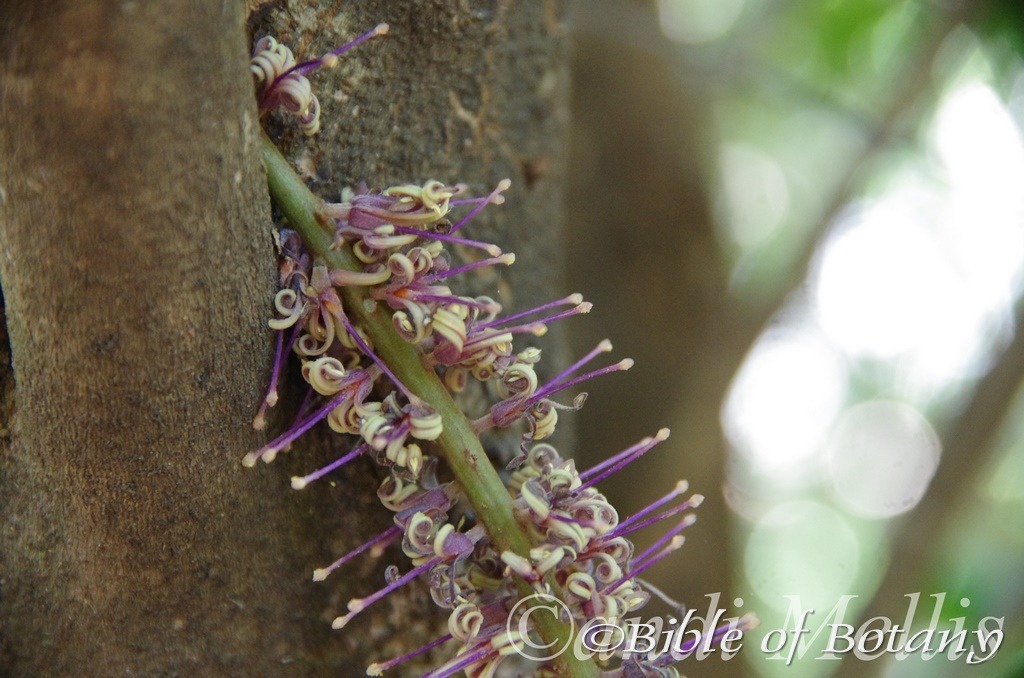
Crabbes Creek NSW

Crabbes Creek NSW
Hicksbeachia pinnatifolia
Classification:
Unranked: Eudicots
Order: Proteales
Family: Proteaceae
Genus: Is named in honour of Sir Manual Hicks-Beach; 1837-1916, who was a British colonial secretary.
Species: From Pinna which is Latin for a pinna and Folium, which is Latin for foliage. It refers to divided leaf sections, where the clefts do not reach the main vein and are usually greater than 50mm of their length.
Common Name: Red Bopple Nut, Bopple Nut, Beef Nut or Rose Nut.
Distribution:
Hicksbeachia pinnatifolia is found in 2 disjunct populations south from Crystal Creek in far south eastern coastal Queensland to Murwillumbah and Alstonville and from Thora to Kennaicle Creek near Nambucca.
https://avh.ala.org.au/occurrences/search?taxa=Hicksbeachia+pinnatifolia#tab_mapView
Habitat Aspect Climate:
Hicksbeachia pinnatifolia prefers full sun to light dappled shade. It grows in and on the margins of subtropical rainforest. The altitude ranges from 80 meters ASL to 160 meters ASL.
The temperatures range from minus 2 degrees in August to 38 degrees in January.
The rainfall ranges from lows of 1050mm to an average of 1900mm annually.
Soil Requirements:
Hicksbeachia pinnatifolia prefers better quality loams to gritty light clays to medium clays. The soils are usually derived from decomposed black basalt. The soils pH varies from 5.5pH through to a 6pH. It does not tolerate waterlogged soils however the soils remain moist throughout the year. Non saline soils to moderately saline soils are tolerated.
Height & Spread:
Wild Plants: 8m to 10m by 5m to 7m.
Characteristics:
Hicksbeachia pinnatifolia’s stems are mid brown and scabrous. The branchlets are pale green or reddish-maroon when young and are densely covered in long, course, rusty-red or rusty-brown pulverulent or hirsute hairs. The trees often form several thin trunks and sucker readily from the ground or lower section of the trunk if damaged.
Hicksbeachia pinnatifolia’s alternate, oblong odd pinnate leaves measure 340mm to 1000mm in length by 30mm to 85mm in width. There are 7 to 35 usually 15 to 25 narrow oblong pinnae that measure 60mm to 250mm in length by 20mm to 70mm in width. The northern population’s leaves are longer and broader than the southern forms. The longest leaves are usually 2 to 4 pairs back from the apex. The winged petioles measure 7mm to 80mm in length. The bases are rounded and often attenuate on the northern forms and attenuate sessile on the southern forms while the apexes are acuminate, obtuse or truncate on the northern forms and acute on the southern forms.
The discolourous coriaceous laminas are deep grass-green to sea-green, glabrous on the upper laminas while the lower laminas are much paler and rusty-green to greenish-brown. The laminas recurve slightly to moderately from the mid vein to the margins and decurve moderately to strongly from the base to the apex or only on the apical third. The margins are covered in irregular small, pungent teeth. The mid vein and main lateral veins are prominent on both laminas. The venation forms loops well inside the margin. The peduncle and rachis are prominently winged while the peduncles reniform base is swollen where it connects to the branch. The peduncle measures 34mm to 60mm in length while the rachis measures 400mm to 800mm in length.
The conflorescences of Hicksbeachia pinnatifolia are born cauliforously on racemes. The racemes measure 140mm to 450mm in length. There is a pair of flowers in each pair of bracts that measure 0.3mm to 1mm in length. The northern form’s peduncle rachis and pedicels are covered in rusty-brown puberulent hairs while the southern forms are glabrous. The peduncles measure 0.5mm to 3mm in length while the individual pedicels measure 0mm to 1.5mm in length. The tepals are purple-maroon to purple-burgundy externally and pinkish-purple to creamy purple internally and measure 10mm to 15mm in length.
The purple-maroon to purple-burgundy pistils are covered in rusty-red to rusty-brown pulverulent hairs and measure 14mm to 19mm in length. The ovary is densely covered in rusty-red to rusty-brown pulverulent hairs. The strong but sweetly scented flowers appear from early June to early September but may produce the odd flower throughout the year under favourable conditions.
Hicksbeachia pinnatifolia’s fruits are globose nuts. The nuts measure 25mm to 35mm in length by 20mm to 30mm in diameter. The green nuts turn orange–red when ripe. The fleshy, coriaceous rind dehisces to reveal the brown nut.
Wildlife:
The flowers on Hicksbeachia pinnatifolia are visited by thousands of native pollen flies, native bees and butterflies.
While the nuts have been eaten they contain variable amounts of CHN (Cyanide) and should be treated as poisonous. The CSIRO is presently attempting to develop new strains for cultivation that are Cyanide free. When this is achieved the trees will have great potential in the nut industry.
Cultivation:
Hicksbeachia pinnatifolia makes an excellent medium size tree for a park like scene or specimen tree in the garden. It always looks green and fresh especially where adequate ground moisture is retained whether it is grown in light shade or full sun. It is very suitable on sandy clay soils. It is most suitable for small, medium and large gardens close to the coast in warm temperate, subtropical or tropical gardens. As agarden subject it will grow from 6m to 8m in height by 5m to 7m in diameter. It is cold tolerant to temperatures at least as low as minus 2 degrees once established. It should be protected until they reach at least 2.5 meters in height.
It is best used adjacent to small areas of bush close to paths or the house so their perfumed scented flowers can be appreciated regularly. It can be planted in small groups of 1, 2 or 3 for a formal garden look or as a standalone plant to create a dense shade for other shade loving plants.
It can be used as shade trees in semi protected areas. It is an excellent tree for starting a dry rainforest garden. When planting the trees in a rainforest try to place them near the edge so the scent from the proliferation of flowers can be fully enjoyed and their natural bushy shape is not interfered with.
If mild native fertilizers are used it will develop deep sea green leaves.
In Native gardens it can be used for attracting smaller honeyeaters and less aggressive nectar feeding birds. Smaller birds like silver eyes which will seek the protection offered by the dense canopy and use the plants as a regular feed source. Butterflies, native bees, native flies or native beetles will also be attracted during flowering and are necessary for fertilization of the flowers.
It is useful as a backdrop small tree contrasting with smaller finer leaf shrubs that are planted in the foreground. This gives the impression that they like being the center of attention which they deserve.
Looking ahead for mass plantings in an orchard space the CNH free trees at 8 meter centers or if you are using them as a park trees plant them using 10 meter centers. Rainforest trees where the nuts are not important plant them at 6 meter centers.
Note the fruit may contain CHN see wildlife.
Propagation:
Seeds: Hicksbeachia pinnatifolia seeds can be sown directly into 50mm native tubes using a good organic mix after treatment. The seeds need to be filed down on one side to remove the thick woody shell being careful not to cut into the testa. Place the tubes beneath 30mm shade and keep moist not wet.
Once the seedlings reach 150mm to 200mm in height they can be planted out into their permanent position or potted on.
Cuttings: Try using 75mm to 100mm long ripened material when growing from Cuttings. Take them in mid spring or autumn. Use 100mm long half ripened material when growing from cuttings from the present season’s growth. Take them in mid-autumn or early spring. Remove half the leaves from the bottom section being careful not to tear the bark. Take a 10mm slice off the bark from the bottom of the cutting on one side.
1 Prepare the cutting mix by adding one third sharp clean river sand, one third peat and one third perlite. These ingredients are sterilize,
2 Select good material from non diseased plants,
3 Select semi green stems for cuttings. Look for a stem with two or three nodes,
4 Place the cutting on a flat, hard surface, and make a clean cut down one side of the cutting at the base for 10mm with a sharp sterile knife or razor blade. – This scarification of the node will increase the chances of roots emerging from this spot. Now remove all but one or two the leaves, leaving the apex leaves in tact. If the leaves are very large in proportion to the stem, cut off the apical halves.
5 Fill a saucer with water, and place a little medium strength rooting hormone into another container like a milk bottle top. Dip the node end of the cutting into the water and then into the rooting hormone. Tap off any excess hormone,
6 Use a small dipple stick or old pencil to poke a hole into the soilless potting mix. Ensure the hole is slightly larger than the stem diameter and be careful not to wipe the rooting hormone off the cuttings base, place the cuttings in a pattern ensuring the cuttings are not touching each other,
7 I like to place the pots in Plastic bags to help maintain temperature and moisture. Place in a semi shaded place like under 50mm shade cloth.
8 When the cuttings have struck, open the bag to allow air circulation for a few days to a week,
9 Once hardened off remove the cuttings from the bag and allow to further hardening for a few more days,
10 Transplant into a good potting mix to grow on.
Fertilize using Seaweed, fish emulsion or organic chicken pellets soaked in water and apply the liquid on an alternate basis. Fertilize every 2 months until the plants are well established then on an annual basis in September to October to maintain good health, vigour and better flowering.
Further Comments from Readers:
Hi reader, it seems you use The Bible of Botany a lot. That’s great as we have great pleasure in bringing it to you! It’s a little awkward for us to ask, but our first aim is to purchase land approximately 1,600 hectares to link several parcels of N.P. into one at The Pinnacles NSW Australia, but we need your help. We’re not salespeople. We’re amateur botanists who have dedicated over 30 years to saving the environment in a practical way. We depend on donations to reach our goal. If you donate just $5, the price of your coffee this Sunday, We can help to keep the planet alive in a real way and continue to bring you regular updates and features on Australian plants all in one Botanical Bible. Any support is greatly appreciated. Thank you.
In the spirit of reconciliation we acknowledge the Bundjalung, Gumbaynggirr and Yaegl and all aboriginal nations throughout Australia and their connections to land, sea and community. We pay our respect to their Elders past, present and future for the pleasures we have gained.
Hippocratea barbata
Classification:
Unranked: Magnoliophyta
Class: Magnoliopsida
Class: Rosidae
Order: Celastrales
Family: Celastraceae
Subfamily: Hippocrateoideae
Genus: Is named in honour of Hippocrates; 460-370, who was an ancient Greek physician and the father of modern medicine practices.
Species: From Barbātum, which is Latin for a beard or a barbed hair. It refers to tufts of hairs, which are barbed.
Common Name: Knot Vine.
Distribution:
Hippocratea barbata is found in 2 disjunct populations on the coastal ranges of the Great Dividing Range to the coast. It is found south from the Torres Strait Island and the northern half of Cape York Peninsula then down the eastern side to Mount Norman south of Townsville and from Gracemere near Rockhampton in Queensland to the Clarence Valley in far north eastern coastal New South Wales.
https://avh.ala.org.au/occurrences/search?taxa=Hippocratea+barbata#tab_mapView
Habitat Aspect Climate:
Hippocratea barbata prefers full sun to light dappled shade. It grows in more open riparian zones, in swamps marshlands and wallums. It is a straggly shrub with large pale yellow flowers. The altitude ranges from 2 meters ASL to 1000 meters ASL.
The temperatures range from minus 2 degrees in August to 38 degrees in January.
The rainfall ranges from lows of 900mm to an average of 3200mm annually.
Soil Requirements:
Hippocratea barbata prefers sandy loams, fatty sands, gritty light clays, medium clays or podzolics and silts. The soils are usually derived from decomposed shale, brown basalt, black basalt, metamorphic rocks, granite, and sandstone alluvial and accumulated sands including corals sands. The soils pH varies from 4.5pH through to a 7pH. It does not tolerate waterlogged soils however annual inundations or periodic rises in water tables are normal. Non saline soils to moderately saline soils are tolerated.
Height & Spread:
Wild Plants: 10m to 20m by 12m to 25m.
Characteristics:
The branches are grey-brown, while the small stems are pale rusty-brown and covered in rough horizontal lenticels. The smallest stems are twining often coiling completely around the host forming knots, grass-green and scabrous.
The opposite leaves are usually ovate to lanceolate or at times are obovate and measure 30mm to 90mm in length by 12mm to 35mm in width. The bases are tapering, cuneate or rounded and symmetrical or slightly asymmetrical while the apexes are obtuse to broad acuminate or cuspidate. The discolourous laminas are mid green to sea-green glabrous and dull to semi glossy on the upper laminas while the lower laminas are much paler. The laminas are flat, recurve slightly upwards from the mid vein to the margins or are convex on the upper laminas and are straight or decurve downwards near the apex. The laminas are flat between the mid vein and the main lateral veins or are convex between the mid vein and the main lateral veins. The margins are entire or crenate. The mid vein and main lateral veins are prominent on the lower lamina and are visible from the upper lamina or are prominent on both laminas. The narrow triangular stipules measure 0.7mm to 1mm in length. The petioles measure 5mm to 8mm in length.
The inflorescences are born on 2 to 4 branched cymes from the leaf axils. The cymes measure 35mm to 50mm in length by 35mm to 50mm in diameter. The peduncles, rachis and pedicels are covered in white puberulent hairs. The pedicels measure 0.5mm to 5mm in length. The deep green calyx and 5 minute calyx lobes measure 1mm to 1.2mm in length. The 5 divaricate petals are greenish-yellow externally and honey-yellow internally. It is elliptical while the apex are acute and cupuliform. They petals are very sparsely covered in long white pilose hairs internally near the apex and are smothered in a gluttonous honey like substance. The petals measure 4mm to 5mm in length by 1.5mm to 2.4mm in width.
The glabrous green ovary is covered in a gluttonous honey like substance and measures 1.5mm to 1.8mm in length by 2mm to 2.2mm in diameter. The ovaries have 8 to 10 locules. The 3 triangular stamens have broad deep brownish filaments and tan to mid brown anthers. The stamens measure 1.2mm to 1.5mm in length. The pale green pistil is domed shaped and tapers to the stigma. The sweetly scented flowers appear from November to December.
The fruits are globose, glabrous capsules. The capsule lobes measure 30mm to 50mm in length by 15mm to 20mm in width. The yellowish-green, coriaceous capsules turn brown when. The pale dull, brown glabrous seeds measure 25mm to 30mm in length by 10mm to 12mm in width including the wing.
Wildlife:
Hippocratea barbata’s wildlife is unknown to the author.
Cultivation:
There is no finer sight than a house wall, fence or veranda covered by the leaves of a creeper or enveloped in a mass of green foliage, unless it is a balcony adorned with a colourful, scented cloud of flowers or a patio that is reminiscent of orange blossom.
It may be every gardener’s dream but it is an ambition that is easier to turn into reality than you might believe. Hippocratea barbata’s lush foliage and sweetly scented flowers can be the start of that dream. Fast easy, hardy and reliable once established to withstand frosts, drought and hard wear on north facing walls south facing walls or somewhere in between.
It grows well on sturdy fences, along walls or on large embankments as a ground cover. The widespread use of climbers as ground covers is just beginning and it can play an intrical part in improving the general atmosphere of an area and will provide both a habitat and food for many small native animals.
Without the need for a great deal of equipment and little knowledge a trellis or lean to can be constructed to help you disguise an ugly corner or adorn a bland looking shed wall or an ugly neighbours pool fence with an ever greenery of ivies and climbers covering every surface.
The success of your ‘green’ exterior will largely depend on your imagination and the selection of the right plants in the right location.
With only a little effort, and in a very short time, some climbers will completely cover ugly facades or large expanses of unsightly wall. Such plants are also suitable for providing greenery on a balcony, on fences and in the garden. It can be mixed with Pandorea pandorana or Pandorea jasminoides to extend the flowering period or bouquet.
This is a particularly good plant for espaliering as it is fast growing and dense in habit. I would even be tempted to grow it as a bonsai plant where it would be easy to work and develop a thick trunk within a few years. I have used a related specie here in China as a bonsai where the trunk grew to 300mm in height by 60mm in diameter and the branches extended to 500mm in just 5 years. Nothing beats imagination and it is rife in China where small gardens are the only option for most people.
Propagation:
Seeds: Hippocratea barbata seeds can be sown directly into a seed raising mix. Cover them with 5mm of fine sand and keep moist not wet. Place the tray in a warm sunny position. When the seedlings are 20mm to 30mm tall, prick them out and plant them into 50mm native tubes using a good organic mix.
Once the seedlings reach 150mm to 200mm in height they can be planted out into their permanent position.
Cuttings: Try using 75mm to 100mm long ripened material when growing from Cuttings that have at least 2 pairs of nodes.
Use 100mm long half ripened material when growing from cuttings from the present season’s growth. Take them in mid-autumn or early spring. Remove half the leaves from the bottom section being careful not to tear the bark. Take a 10mm slice off the bark from the bottom of the cutting on one side.
1 Prepare the cutting mix by adding one third sharp clean river sand, one third peat and one third perlite. These ingredients are sterilize,
2 Select good material from non diseased plants,
3 Select semi green stems for cuttings. Look for a stem with two or three nodes,
4 Place the cutting on a flat, hard surface, and make a clean cut down one side of the cutting at the base for 10mm with a sharp sterile knife or razor blade. – This scarification of the node will increase the chances of roots emerging from this spot. Now remove all but one or two the leaves, leaving the apex leaves in tact. If the leaves are very large in proportion to the stem, cut off the apical halves.
5 Fill a saucer with water, and place a little medium strength rooting hormone into another container like a milk bottle top. Dip the node end of the cutting into the water and then into the rooting hormone. Tap off any excess hormone,
6 Use a small dipple stick or old pencil to poke a hole into the soilless potting mix. Ensure the hole is slightly larger than the stem diameter and be careful not to wipe the rooting hormone off the cuttings base, place the cuttings in a pattern ensuring the cuttings are not touching each other,
7 I like to place the pots in Plastic bags to help maintain temperature and moisture. Place in a semi shaded place like under 50mm shade cloth.
8 When the cuttings have struck, open the bag to allow air circulation for a few days to a week,
9 Once hardened off remove the cuttings from the bag and allow to further hardening for a few more days,
10 Transplant into a good potting mix to grow on.
Fertilize using Seaweed, fish emulsion or organic chicken pellets soaked in water and apply the liquid on an alternate basis. Fertilize every 2 months until the plants are well established then on an annual basis in September to October to maintain good health, vigour and better flowering.
Further Comments from Readers:
Hi reader, it seems you use The Bible of Botany a lot. That’s great as we have great pleasure in bringing it to you! It’s a little awkward for us to ask, but our first aim is to purchase land approximately 1,600 hectares to link several parcels of N.P. into one at The Pinnacles NSW Australia, but we need your help. We’re not salespeople. We’re amateur botanists who have dedicated over 30 years to saving the environment in a practical way. We depend on donations to reach our goal. If you donate just $5, the price of your coffee this Sunday, We can help to keep the planet alive in a real way and continue to bring you regular updates and features on Australian plants all in one Botanical Bible. Any support is greatly appreciated. Thank you.
In the spirit of reconciliation we acknowledge the Bundjalung, Gumbaynggirr and Yaegl and all aboriginal nations throughout Australia and their connections to land, sea and community. We pay our respect to their Elders past, present and future for the pleasures we have gained.
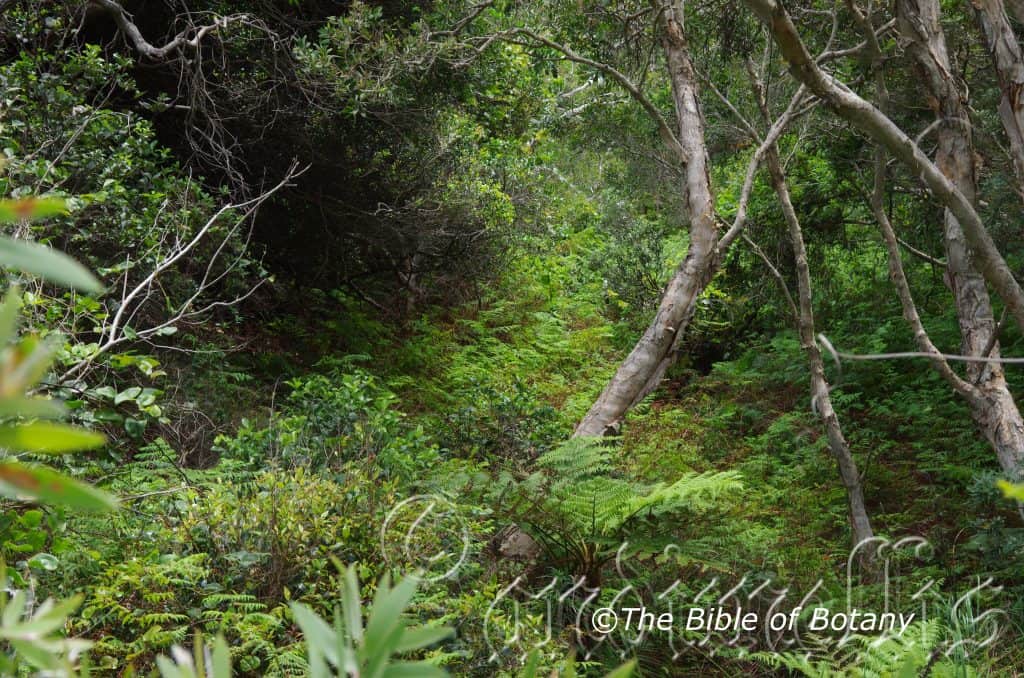
Boorkoom Yuraigir National Park NSW
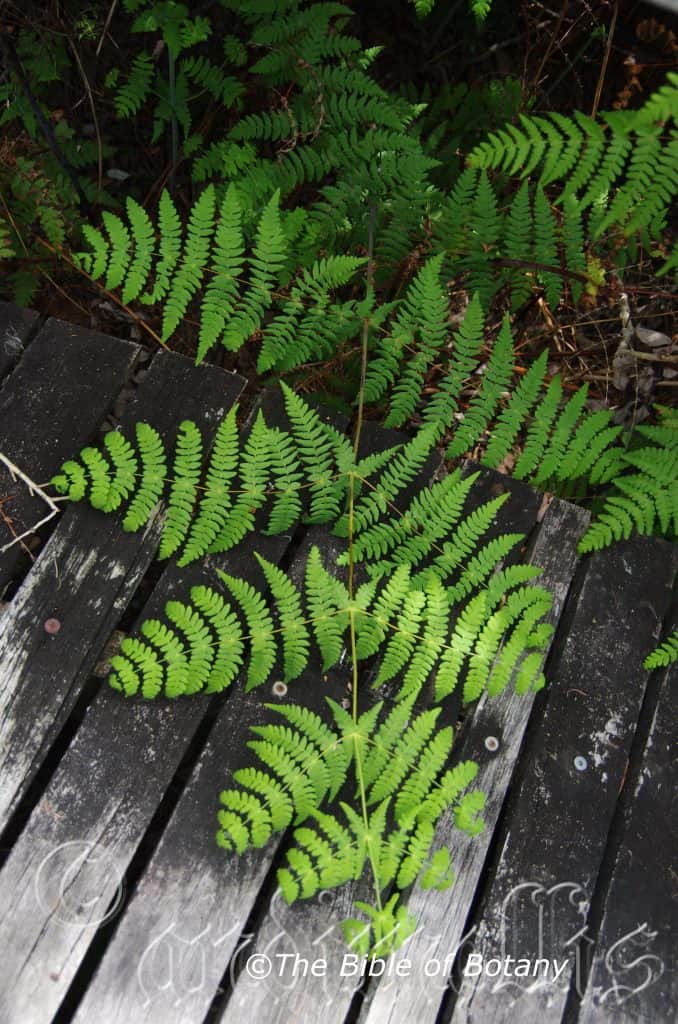
Boorkoom Yuraigir National Park NSW
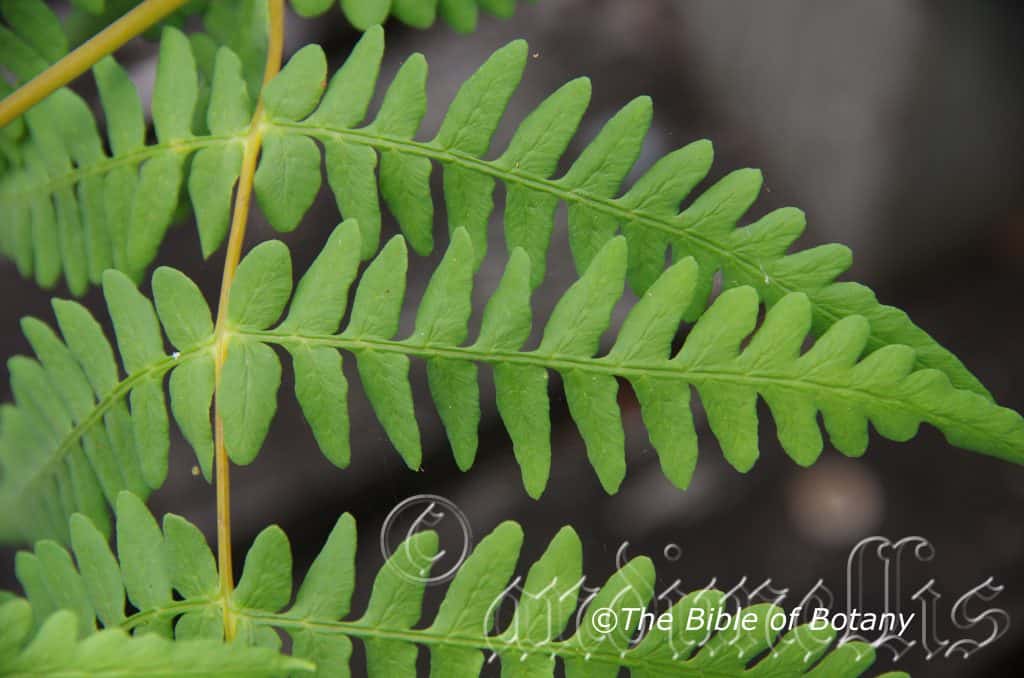
Boorkoom Yuraigir National Park NSW
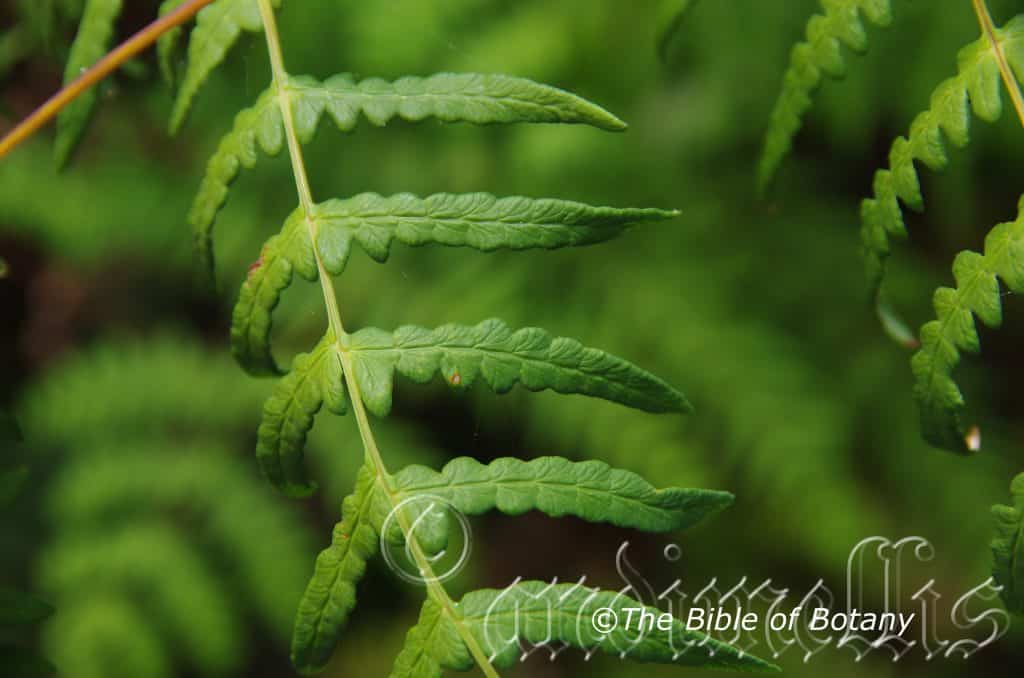
Boorkoom Yuraigir National Park NSW
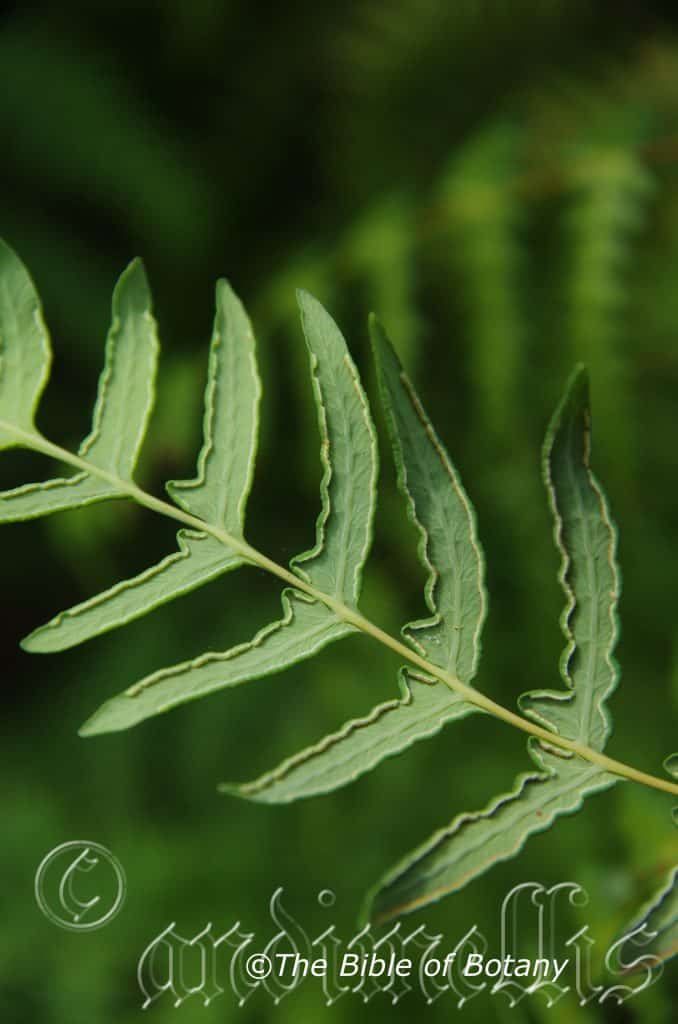
Boorkoom Yuraigir National Park NSW
Histiopteris incisa
Classification:
Division: Tracheophyta
Subdivision: Euphyllophytina
Class: Polypodiopsida
Order: Polypodiales
Family: Dennstaediaceae
Genus: From Hiistion, which is Ancient Greek for a web and Pteris, which is Ancient Greek for a fern. It refers to fronds which have a dense web like venation on the fronds.
Species: From Incisus, which is Latin for to be deeply cut. It refers to leaf margins, which are deeply cut or torn in appearance.
Common Name: Bat’s Wing Fern or Oak Leaf Fern.
Distribution:
Histiopteris incisa is found on the Ord River and south from Yal Yal Springs to the Esperance Plains within 70 kilometers on the coast in southern Western Australia.
In the east it is found south from the Mossman River in far north Queensland to the Huon Valley in far southern coast of Tasmania including the Bass Strait Islands. It is mainly found on and east of the Great Dividing Range but extends westwards to Mount Gambier in South Australia where it is also found on Kangaroo Island and from the Adelaide Hills to Lake Alexandrina. In the Northern territory it is found in southern Kakadu National Park, and bounded within the Macdonald Ranges, the Finke River and Alice Springs.
https://avh.ala.org.au/occurrences/search?taxa=Histiopteris+incisa#tab_mapView
Habitat Aspect Climate:
Histiopteris incisa prefers full shade, partial shade, dappled light and a little overhead sunlight in moist sheltered sites. It grows in moist, sheltered situations in riparian zones along creek banks, streams and drainage lines, where it often forms extensive colonies.
The temperatures range from 4 degrees in July to 42 degrees in January.
The rainfalls range from lows of 600mm to an average of 3200mm annually. This is not as important as where the ferns grow is usually always associated with water, seepages or soil moisture.
Soil Requirements:
Histiopteris incisa prefers sandy loams, fatty sands, gritty light clays, medium clays, podsolics or medium to heavy silts. The soils are derived from decomposed shale, brown basalt, black basalt, metamorphic rocks, granites, sandstones or alluvial or accumulated sands including corals sands. The soils pH varies from 5.5pH through to a 6.5pH. It does not tolerate waterlogged soils however annual inundations or periodic rises in water tables are tolerated. Non saline soils to moderately saline soils are tolerated.
Height & Spread:
Wild plants grow from 1m to 2m by 2m to hundreds of square meters.
Characteristics:
Histiopteris incisa is one of the few ferns that form large clumps. The rhizomes are thick and covered in linear to narrow lanceolate, reddish to golden-brown scales which measure 4mm to 6mm in length by 1.5mm to 2mm in width. The margins of the scales are entire. The rhizomes measure 3mm to 7mm in diameter.
The large triangular fronds are held horizontal on stout, blue-green to aqua stipe. The stipes are glabrous except for a few deep brown scattered scales near the base and a few pale yellow or white hair like scales to the rachis. The stipes measure 1500mm to 2100mm in length. The soft pale blue-green laminas are 2 to 3 pinnate. The discolourous laminas are with a delicate, soft pale blue-green and glabrous on the upper laminas while the lower laminas are glaucous. The pinnae have a pair of clasping stipule like leaflets at the base. The ultimate segments are asymmetrical.
The fertile fronds of Histiopteris incisa are similar however look finer. The margins have 1mm decurved membranous flaps that partially surround the continuous marginal sori on the lower laminas.
Wildlife:
Wherever Histiopteris incisa grows the fronds are always attacked at some stage during the year from caterpillars.
Cultivation:
Histiopteris incisa is a very hardy fern in cultivation particularly near the coast where temperatures are more even. It can tolerate bright conditions and even thrive in very light shade though they will lose that beautiful pale blue on the fronds. It is an ideal ferns for around pool scapes and against walls where the soil is continuously moist. As long as they do not dry out and plentiful water is guaranteed healthy growth is assured.
This fern looks particularly at home in large dark court yards where the 1.6 meter long fronds contrast beautifully against brick work, logs, stumps or other very hard line features.
It looks great in a rainforest garden setting where it breaks up vertical lines of the trunks from palms and Cordyline specie. Some cleaning of spent fronds on annual bases maybe necessary particularly after they have been foraged over by unknown moth larvae. It is not drought tolerant so the occasional lapse in watering will see the fronds look worse for wear and the new fronds much reduced in size. If it does happen to look dead after a long holiday or during a drought prune all the fronds off to a few centimeters of the rhizome and give them a good soaking. I follow this procedure with my plants after it is defoliated every year in early summer. Cut all the foliage or remaining foliage back to just above the rhizome. Apply a generous watering then after two days give them a double strength of our recommended fertilizer and within two weeks the new fronds will totally rejuvenate the floor of the forest.
Propagation:
Spores: All ferns that are declared rare, vulnerable or endangered are protected by Federal and State Laws and must not be removed from the wild unless you are a land developer, mining company or main Roads department etc. This includes bulbs, roots, leaves and flowers. No part of any plant can be removed from Federal, State or Local Government land without the prior permission of the authority and this includes the spore.
Most people are put off at the thought of growing ferns from spore. Like all plants that produce their offspring from seed or spore the methods are basically the same. Remember nature has been doing this for millions of years and has been very successful. I have had excellent results growing over 200 different species of Australian ferns so don’t be afraid. Give it a go.
Step 1. Select spore from the fern fronds. Wait until the fern is just starting to release its spore. Rinse the fronds under clean running water and dry. This is to wash off any other spores from rogue ferns that may have settled onto the fronds. (There is nothing worse than having common brake or common soft bracken contaminating a prized tree fern or epiphyte.)
Step 2. Place the dry fronds in a clean brown paper bag and keep them in a cool dark place like the linen closet for about a week to ten days before you are ready to sow the spore. The exception to this rule applies to ferns, which produce green spores. These must be sown immediately that they are released. Todea Barbara is a good example of a fern, which produces green spore.
Step 3. Take a large ice cream container, a small ice cream container and a clean clear plastic bag large enough to seal the large ice cream container and three or four milk bottle tops.
Step 4. Punch or drill 6 to 10 5mm holes in the bottom of the small ice cream container.
Step 5. Wash both containers, tops and plastic bag so that they are very clean and sterile.
Step 6. Use a clean fine seed raising mi. We used 30mm fine sand, 30mm peat and 30mm perlite and 10mm vermiculite. We used crushed basalt, crusher dust and peat in a 50:50 ratio for epiphytes. Moisten the mix enough that water does not run out when the mix is squeezed between the fingers.
Step 7. Place the moisten mix (Enough to half fill the small ice cream container) in the microwave oven with a large glass of water for 7 or 8 minutes, until the water is boiling. Allow them to cool in the oven. You will need the water later so do not tip it out.
Step 8. Take the brown paper bag out of the linen closet. Shake the bag and remove the fronds. You should have a yellow, brown, black or rarely greenish brown or ochre powder or very fine, small round pin head size spore depending on the specie involved.
Step 9. Remove the mixture from the oven once it has cooled and place it in the small ice cream container and level.
Step 10. Sprinkle the spore sparsely over the mixture in the small ice cream container.
Step 11. Place the milk bottle tops in the large ice cream container with the flat surface facing down. Place the small ice cream container in the large ice cream container so that it is sitting on the milk bottle tops.
Step 12. Remove the water from the microwave and pour it into the larger ice cream container so there is 25mm to 30mm of water in the bottom.
Step 13. Place the ice cream containers in the plastic bag and seal. Step 14. Place the contents and bag in a warm shady place preferably 50mm to 70mm shade depending on the specie. Shade houses and some window sills are ideal.
Step 15. The surface should turn green within a week to two weeks. The prothallus will then develop. From the prthalus the first true fronds will appear. Wait until the ferns are 20mm to 35mm in height before you attempt to transplant them. Once they are ready open the bag up slightly and allow the air to flow around the little ferns. Every 3 to 5 days open the bag a little further so the ferns get use to their new environment. Allow them a week to two weeks to harden off before you transplant them following the removal of the plastic bag. Carefully prick them out into 50mm standard squat tubes as you would any seedling.
Do not try to transplant them as single plants as they are still a little delicate still.
Once the smaller ones again reach 50mm to 70mm you may wish to divide the stronger and hardier individual plants into smaller clumps in 100mm squat pots.
Step 16. We fertilized with seaweed, fish emulsion or organic chicken pellets soaked in water on an alternate basis until established. Fertilize every two months for one year even when in the ground.
INDOORS OR POTTED ON:
Plants that are being used as patio or for indoors should have a good quality indoor mix.
Sawdust or sand mixes are too well draining unless the sawdust has completely composted down where it exhibits a texture like plasticine to the touch. Moisture can be squeezed out between the fingers yet it remains moist. I find this a great basis to start with.
Mix equal parts of the well decomposed saw dust with the above feel with perlite and vermiculite. To this add two part sharp clean sand, one part compost and one part good crusher dust from basalt rock quarries. Preferably black basalt but both are good. Make sure the sand comes from a source that does not have salt.
Fertilize using Seaweed, fish emulsion or organic chicken pellets soaked in water and apply the liquid on an alternate basis. Fertilize every 2 months until the plants are well established then on an annual basis in September to October to maintain good health, vigour and better flowering.
Further Comments from Readers:
Hi reader, it seems you use The Bible of Botany a lot. That’s great as we have great pleasure in bringing it to you! It’s a little awkward for us to ask, but our first aim is to purchase land approximately 1,600 hectares to link several parcels of N.P. into one at The Pinnacles NSW Australia, but we need your help. We’re not salespeople. We’re amateur botanists who have dedicated over 30 years to saving the environment in a practical way. We depend on donations to reach our goal. If you donate just $5, the price of your coffee this Sunday, We can help to keep the planet alive in a real way and continue to bring you regular updates and features on Australian plants all in one Botanical Bible. Any support is greatly appreciated. Thank you.
In the spirit of reconciliation we acknowledge the Bundjalung, Gumbaynggirr and Yaegl and all aboriginal nations throughout Australia and their connections to land, sea and community. We pay our respect to their Elders past, present and future for the pleasures we have gained.
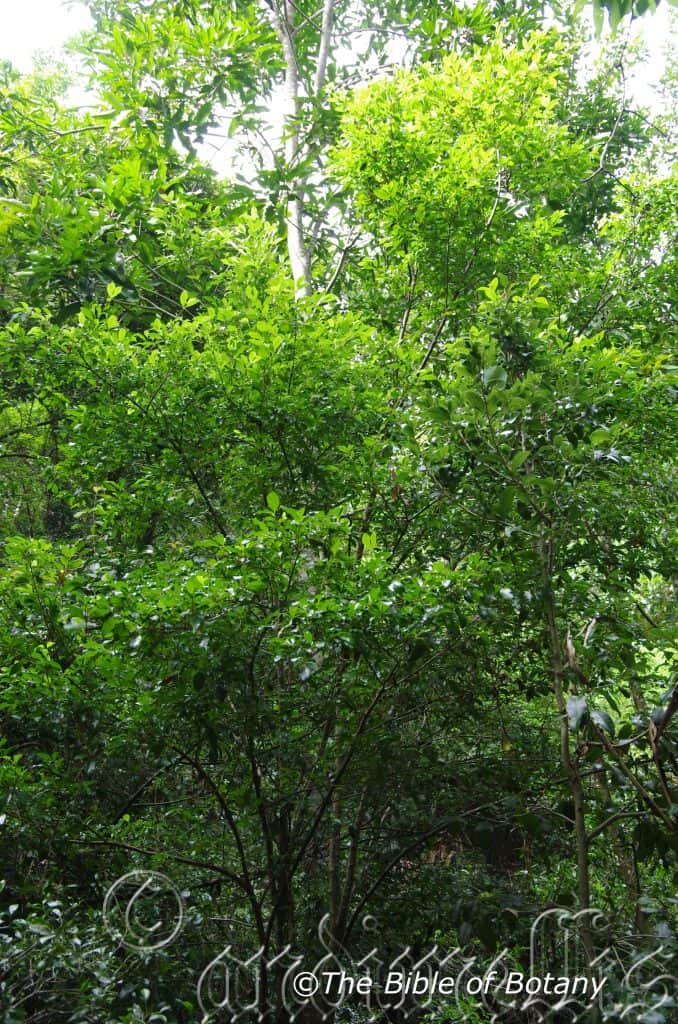
LBG Lismore NSW
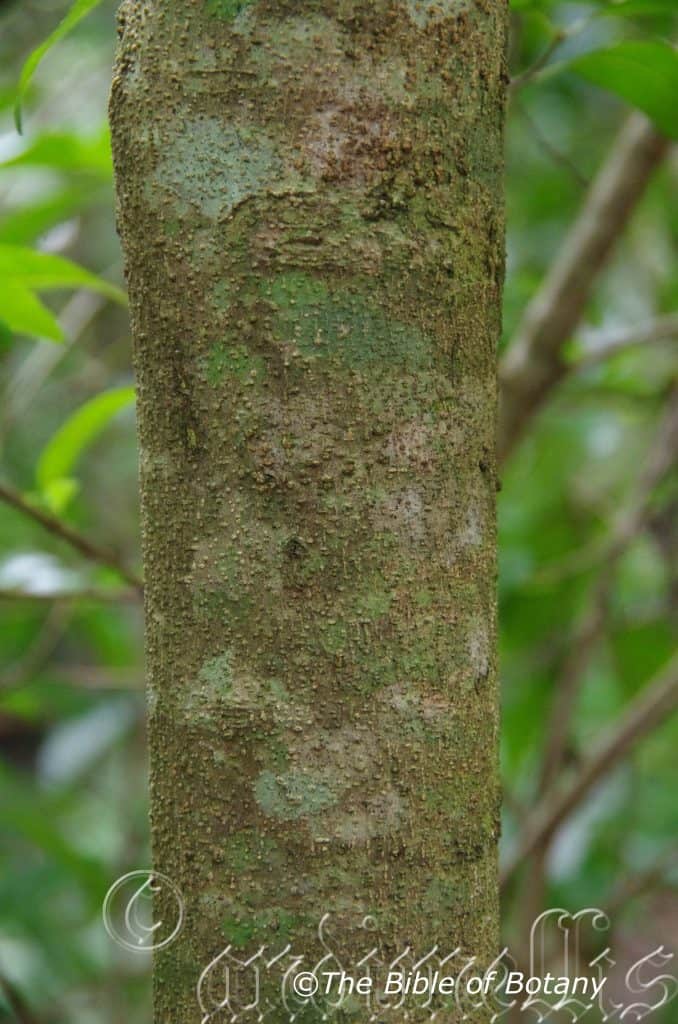
LBG Lismore NSW
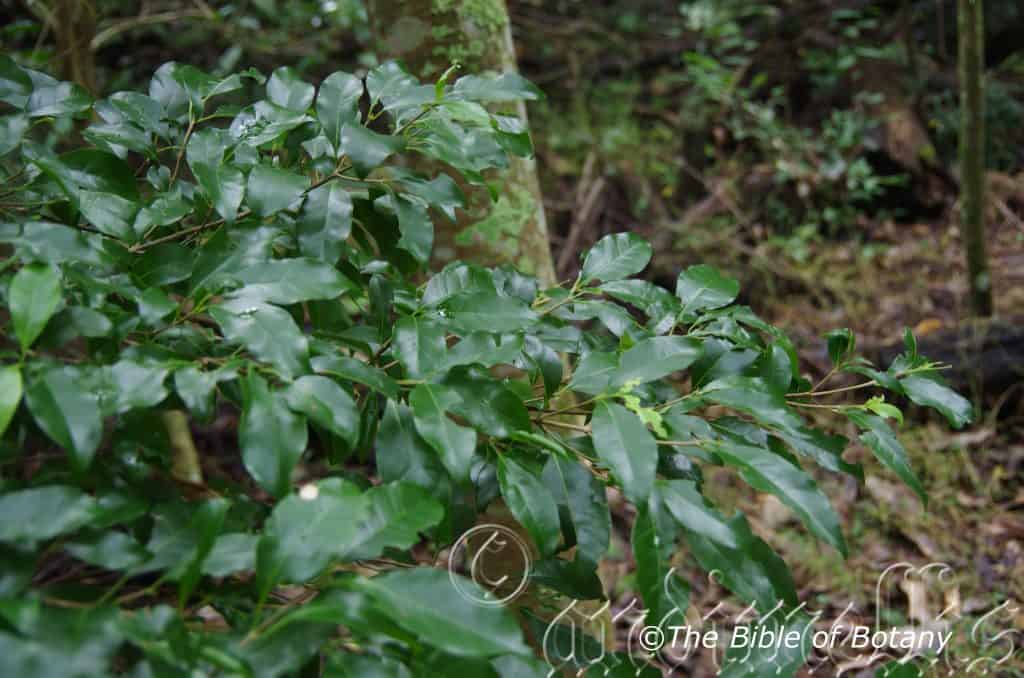
LBG Lismore NSW
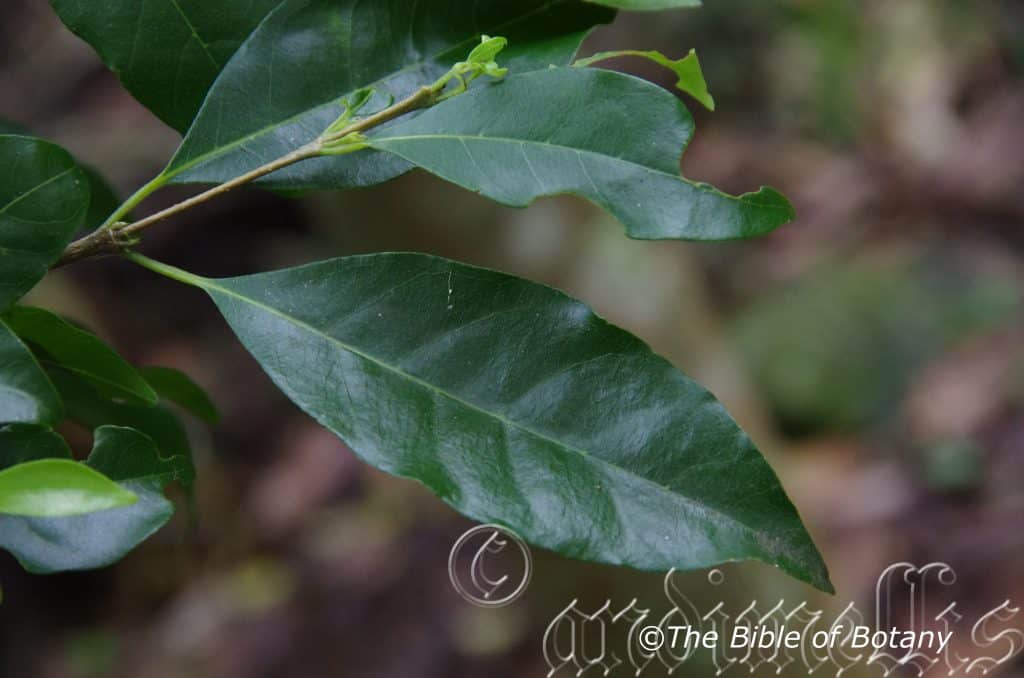
LBG Lismore NSW
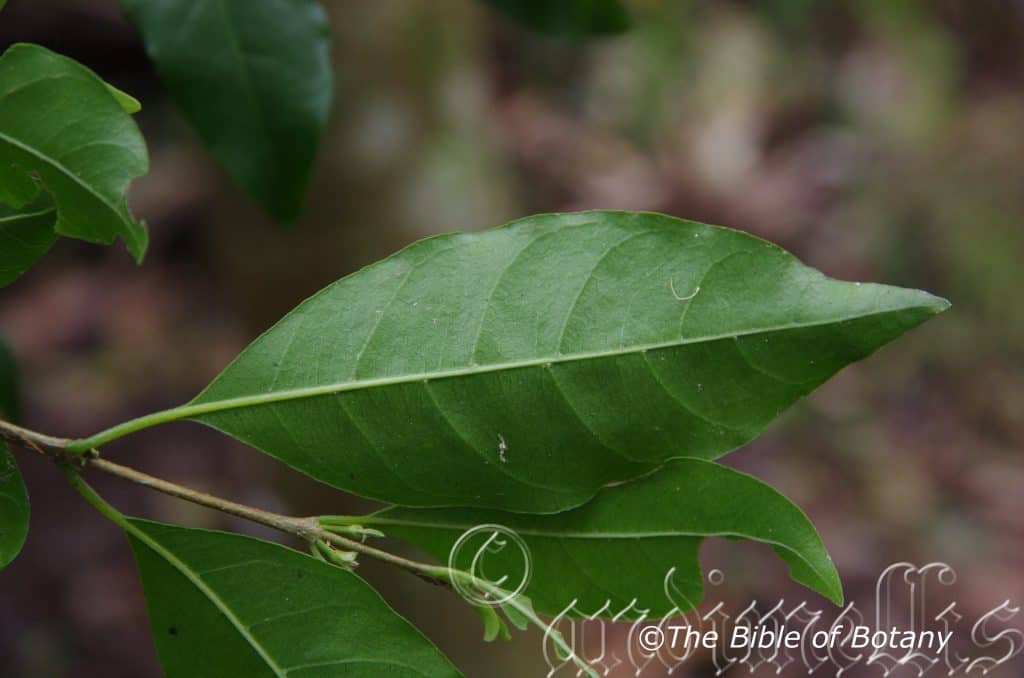
NCBG Coffs Harbour NSW
Hodgkinsonia ovatiflora
Classification:
Unranked: Eudicots
Superorder: Asterids
Order: Gentianales
Family: Rubiaceae
Subfamily: Malvoideae
Genus: Is named in honour of Miss Mary Hodgkinson; 1824-1889, who was an English born Australian who was an avid collector of plants in northern New South Wales.
Species: From Ovatis, which is Latin for almost an egg shape and Flōris, which is Latin for a flower or Flōs, which is the Roman goddess for spring and flowers. It refers to flowers, which have the outline of an egg.
Common Name:
Distribution:
Hodgkisonia ovatiflora is found south from the Broken River in central coastal Queensland to the Hastings River in northern central New South Wales.
https://avh.ala.org.au/occurrences/search?taxa=Hodgkinsonia+ovatiflora#tab_mapView
Habitat Aspect Climate:
Hodgkinsonia ovatiflora prefers full sun to light dappled shade. It grows in dry warm subtropical rainforests and cool dry tropical rainforests. The altitude ranges from 30 meters ASL to 980 meters ASL.
The temperatures range from minus 2 degree in July to 38 degrees in January.
The rainfall ranges from lows of 800mm to an average of 2000mm annually.
Soil Requirements:
Hodgkinsonia ovatiflora prefers light gritty clays to medium clays or podzolics. The soils are derived from decomposed metashales, brown basalt, black basalt and metamorphic rocks. The soils pH varies from 4.5pH through to a 6pH. It does not tolerate waterlogged soils. Non saline soils to moderately saline soils are tolerated.
Height & Spread:
Wild Plants: 18m to 25m by 10m to 12m.
Characteristics:
The trunk is grey-brown, while the branchlets are grey-brown and densely covered in oblong raised lenticels. The new growth is mid green, glabrous and sparsely covered in white lenticels.
The opposite, elliptical to narrow ovate leaves measure 40mm to 85mm in length by 10mm to 40mm in width. The bases are cuneate while the apexes are acute to bluntly acuminate. The glossy discolourous laminas are deep grass-green to deep green and glabrous while the lower laminas are grass green to pale olive-green. The laminas recurve upwards from the mid vein to the margins and decurve near the apex while the margins are entire. The mid vein and main lateral veins are prominent on the lower laminas and is slightly prominent on the upper laminas. The reticulate veins are finely prominent on the lower lamina while the mid vein may have some tufts of fine fawn, hirsute hairs at the axils with the lateral veins on the lower surface. The minute stipules are triangular. The petioles measure 4mm to 10mm in length.
The inflorescences are umbels or umbellatas born from the leaf axis. The pedicels and peduncles and peduncules are glabrous. The pedicels measure 20mm to 30mm in length while the peduncles measure 20mm to 30mm in length and the peduncules measure 0.5mm to 1mm in length.
There are 10 to 20 male flowers on an umbel. The pale green calyxes measure 1mm to 1.2mm in length. The pastel green to white, urceolate, corolla tubes measure 4mm to 4.5mm in length. The 5 minute lobes are obtuse. The 5 pastel green to white stamens and anthers are inserted.
There are 2 to 6 female flowers on an umbel. The pale green calyxes measure 2mm to 2.5mm in length. The pastel green to white, globose, corolla tubes measure 2mm to 2.5mm in length while the 5 minute lobes are truncate. The pastel green to white pistil are equal to or slightly longer than the corolla and lobes. The 5 staminodes are inserted. The flowers appear from November to January.
The fruits are ovoidal drupes. The drupes measure 6mm to 10mm in length by 5mm to 8mm in diameter. The green drupes turn red to orange-red when ripe and dry to black with longitudinal ribs. The pale dull, deep brown glabrous seeds measure 3mm to 4mm in diameter.
Wildlife:
Hodgkinsonia ovatiflora’s wildlife is unknown to the author.
Cultivation:
Hodgkinsonia ovatiflora is a very beautiful small to medium native tree which is suitable for small gardens to the largest gardens in moist to dry areas especially on slopes. It is an excellent colourful addition for tropical, subtropical or warm temperate zones. As a garden subject it will grow to 6 meter to 8 meters high by 5 meters to 7 meters in diameter when grown in the open or taller and narrower if confined to a rainforest garden. It is relatively fast growing and are cold tolerant to temperatures at least as low as minus 3 degrees. Frosts will kill young unprotected plants so will need some protection in inclement weather in the first few years.
The trees would make an excellent street tree on nature strips or along bicycle ways meandering through the streets or especially in meandering avenues. As accent trees in front of low set or 2 story commercial buildings, industrial sheds or school classrooms they would be ideal. Here they would break up hard rigid architectural lines and give warmth and breadth to the structures.
The root system is usually not invasive or large meaning it is a better choice planted near amenities and underground services.
Propagation:
Seeds: The seeds are best sown directly into 50mm native tubes and covered with 10mm of a good quality seed raising mix. Place the tubes in a warm sunny position or beneath 30 shade cloth.
When the seedlings reach 150mm to 200mm in height they can be planted out into their permanent position or repot into larger containers.
Fertilize using Seaweed, fish emulsion or organic chicken pellets soaked in water and apply the liquid on an alternate basis. Fertilize every 2 months until the plants are well established then on an annual basis in September to October to maintain good health, vigour and better flowering.
Further Comments from Readers:
Hi reader, it seems you use The Bible of Botany a lot. That’s great as we have great pleasure in bringing it to you! It’s a little awkward for us to ask, but our first aim is to purchase land approximately 1,600 hectares to link several parcels of N.P. into one at The Pinnacles NSW Australia, but we need your help. We’re not salespeople. We’re amateur botanists who have dedicated over 30 years to saving the environment in a practical way. We depend on donations to reach our goal. If you donate just $5, the price of your coffee this Sunday, We can help to keep the planet alive in a real way and continue to bring you regular updates and features on Australian plants all in one Botanical Bible. Any support is greatly appreciated. Thank you.
In the spirit of reconciliation we acknowledge the Bundjalung, Gumbaynggirr and Yaegl and all aboriginal nations throughout Australia and their connections to land, sea and community. We pay our respect to their Elders past, present and future for the pleasures we have gained.
Homalanthus novoguineensis
Classification:
Unranked: Manoliophyta
Class: Magnoliopsida
Order: Malpighiales
Family: Euphorbiaceae
Genus: From Homalos, which is Ancient Greek for flat and equal and ántha/ánthos, which are Ancient Greek for the male reproductive organs on a flower or the flower. It refers to leaves, which are flat and smooth while resembling brightly coloured flowers.
Species: From Novae/Novus, which is Latin for new, Guinee which is Latin for Papuana and eastern Irian Jahya and Anum/Ensis, which is Latin for to originate from. It refers to plants, which were first discovered from New Guinee.
Common Name: Bleeding Heart.
Distribution:
Homalanthus novoguineensis is found in three disjunct populations. It is found east from the southern Kimberley Plateau in north western, Western Australia to the Ord River in the Northern Territory.
The Queensland populations are found south from the Iron Range National Park to Townsville. It is found on and east of the Great Dividing Range to the coast.
https://avh.ala.org.au/occurrences/search?taxa=Homalanthus+novo-guineensis#tab_mapView
Habitat Aspect Climate:
Homalanthus novoguineensis prefers full sun to light dappled shade. It grows in more open riparian zones, adjacent to all types of rainforests and wet Eucalyptus forests. The altitude ranges from 10 meters ASL to 350 meters ASL.
The temperatures range from 2 degree in July to 36 degrees in January.
The rainfall ranges from lows of 750mm to an average of 2600mm annually.
Soil Requirements:
Homalanthus novoguineensis prefers better quality sandy loams, alluvial flats to light and medium clays. The soils are derived from decomposed brown basalt, black basalt, and metamorphic rocks. The soils pH varies from 5.5pH through to a 6.8pH. It does not tolerate waterlogged soils however soils are generally moist throughout the year. Non saline soils to moderately saline soils are tolerated.
Height & Spread:
Wild Plants: 2m to 12m by 3m to 8m.
Characteristics:
Homalanthus novoguineensis’s stems are grey, grey-brown or brown, glabrous and often sparsely covered in lichens. The branchlets are pale green and glabrous. The trunk, branches, branchlets and petioles all exude white latex when damaged.
Homalanthus novoguineensis’s alternate oval to cordate leaves measure 50mm to 80mm in length by 35mm to 65mm in width. The bases are cordate while the apexes are obtuse with an apiculate tip to long acute. The discolourous laminas are a mid blue-green and glabrous on the upper lamina while the lower lamina is paler. The leaves turn a brilliant scarlet red prior to dropping to the ground. The margins are entire and flat. The mid vein and main lateral veins are prominent on the lower lamina and are visible from above. The petioles are very long, slender, deep red and measure 20mm to 35mm in length. There are two oblong stipules which measure 10mm to 12mm in length.
The inflorescences of Homalanthus novoguineensis are born on an erect terminal raceme; similar to a catkin and measure 150mm to 240mm in length. The flowers number about 100 to 360 per raceme. The bracts subtend the female flowers or clusters of male flowers. The male and female flowers are found along the common rachis. The creamy-green to creamy-yellow flowers measure 1.5mm to 2mm in length by 1mm to 1.5mm in diameter. The corolla tube is white while the fimbriate lobes are yellow. The lime green pedicel measures 0.6mm to 1mm in length. Flowers appear from May to June.
Homalanthus novoguineensis’s fruit is a globose to ovoid capsule. The stigma is persistent on the capsules while the pedicels lengthen to 15mm to 20mm. The capsules measure 8mm to 9mm in length by 8mm to 9mm in diameter. The glaucous-green, glabrous capsules turn brown on ripening before dehiscing. The 4 to 6 dull black glabrous seeds measure 2.5mm to 3mm in diameter.
Wildlife:
The fruits are eaten by the Brown Cuckoo Dove Macropygia phasianella, White Headed Pigeon Columba leucomela, and Emerald dove Chalcophaps indica, and probably other rainforest pigeons and doves. The trees are the host to Australia’s largest moth the Hercules Moth, Coscinocera Hercules.
Cultivation:
Homalanthus novoguineensis is a very beautiful small native shrub which is suitable for small gardens to the largest gardens. It is an excellent colourful addition for tropical, subtropical or warm temperate zones. As a garden subject it will grow to 6 meter to 8 meters in height by 4 meters to 6 meters in diameter when grown in the open. As rainforest subjects they will grow from 10 meters to 12 meters in height by 3 meters to 4 meters in diameter.
It can be pruned regularly to enhance bushiness and better flowering though the flowers are insignificant. However the fruits are very attractive to a number of different birds so this is a good reason for growing them for the fruits. Hard pruning is not recommended as the plants do not respond quickly to the damage so it is better to trim the plants on a regular or annual basis. It is fast growing and are cold tolerant to temperatures at least as low as 0 degrees. Frosts will kill young unprotected plants.
Homalanthus novoguineensis is best suited for rainforest situations and does best in partial shade or dappled light on moist soils. It is almost a must for starting a rainforest as it responds to disturbed ground and native fertilizers. Plants can achieve 6 meters in a couple of years especially when mass planted at 3 meter centers. The trunks are a feature not to be overlooked as on older trees it is slightly furrowed and are a deep brown to black.
Plants respond well to regular watering and fertilizing. Fertilizers should be applied at half recommended rates as the trees can become top heavy and subject to wind damage when grown in the open.
Propagation:
Seeds: Homalanthus novoguineensis seeds can be sown directly into a seed raising mix. Cover them with 5mm of fine sand and keep moist not wet. Place the tray in a warm sunny position.
When the seedlings are 20mm to 30mm tall, prick them out and plant them into 50mm native tubes using a good organic mix.
Once the seedlings reach 150mm to 200mm in height they can be planted out into their permanent position.
Cuttings: Try using 75mm to 100mm long ripened material when growing from Cuttings. Take them in mid spring or autumn. Remove a 10mm slice from the bark in a downward stroke from one side. Using an appropriate rooting hormone, dip the cutting in and place it into a sterile mix of peat, sand and perlite.
Place the trays under 30mm to 50mm shade and keep the trays warm. Bottom heat is beneficial when striking the cuttings. Ideally temperatures should be maintained at between 22 to 24 degrees.
When the cuttings have obviously struck and have developed good roots treat them as for seedlings.
Fertilize using Seaweed, fish emulsion or organic chicken pellets soaked in water and apply the liquid on an alternate basis. Fertilize every 2 months until the plants are well established then on an annual basis in September to October to maintain good health, vigour and better flowering.
Further Comments from Readers:
Hi reader, it seems you use The Bible of Botany a lot. That’s great as we have great pleasure in bringing it to you! It’s a little awkward for us to ask, but our first aim is to purchase land approximately 1,600 hectares to link several parcels of N.P. into one at The Pinnacles NSW Australia, but we need your help. We’re not salespeople. We’re amateur botanists who have dedicated over 30 years to saving the environment in a practical way. We depend on donations to reach our goal. If you donate just $5, the price of your coffee this Sunday, We can help to keep the planet alive in a real way and continue to bring you regular updates and features on Australian plants all in one Botanical Bible. Any support is greatly appreciated. Thank you.
In the spirit of reconciliation we acknowledge the Bundjalung, Gumbaynggirr and Yaegl and all aboriginal nations throughout Australia and their connections to land, sea and community. We pay our respect to their Elders past, present and future for the pleasures we have gained.
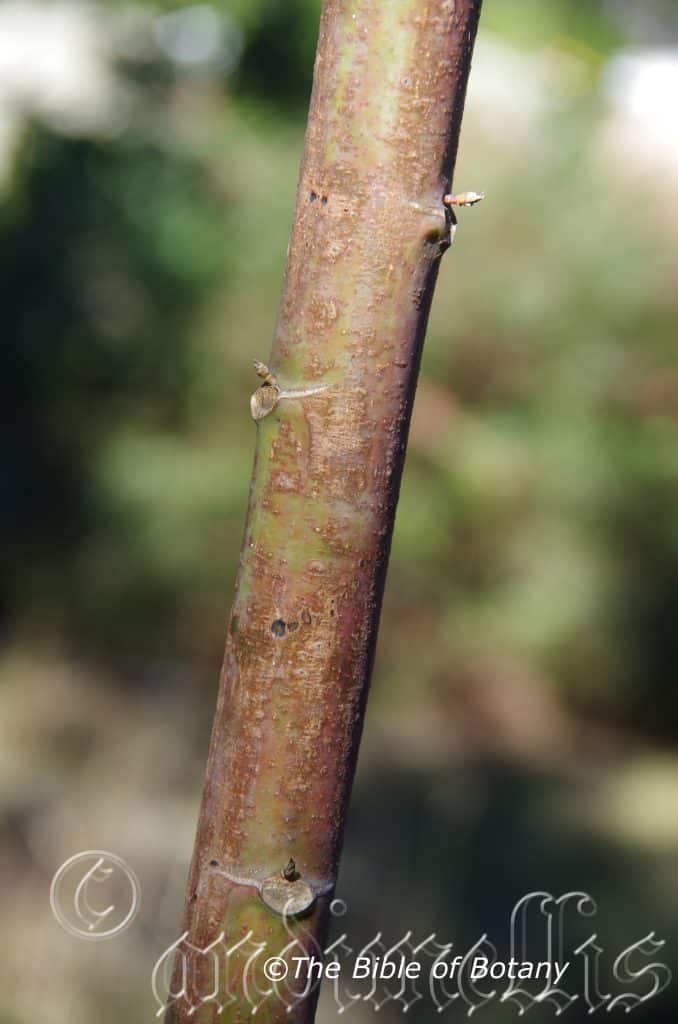
Author’s Garden The Pinnacles NSW
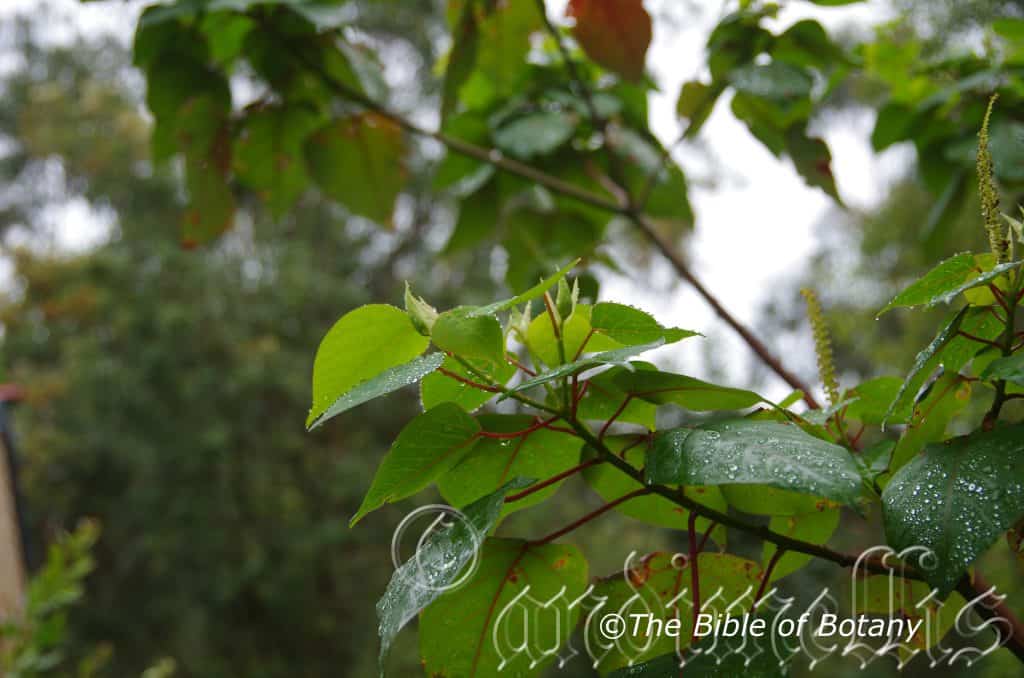
Author’s Garden The Pinnacles NSW
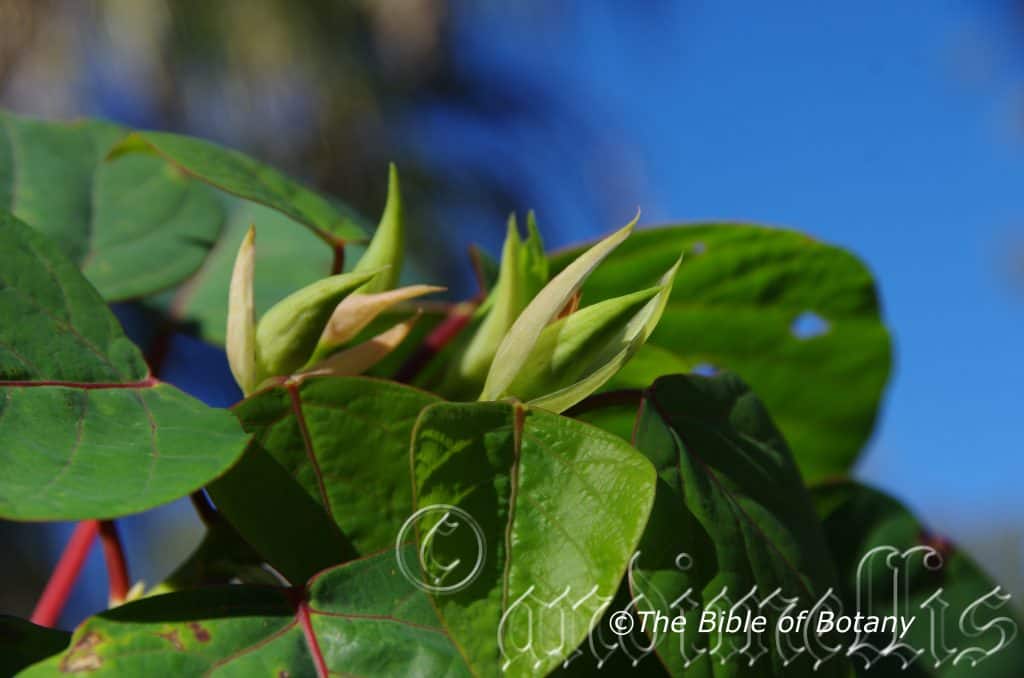
Author’s Garden The Pinnacles NSW
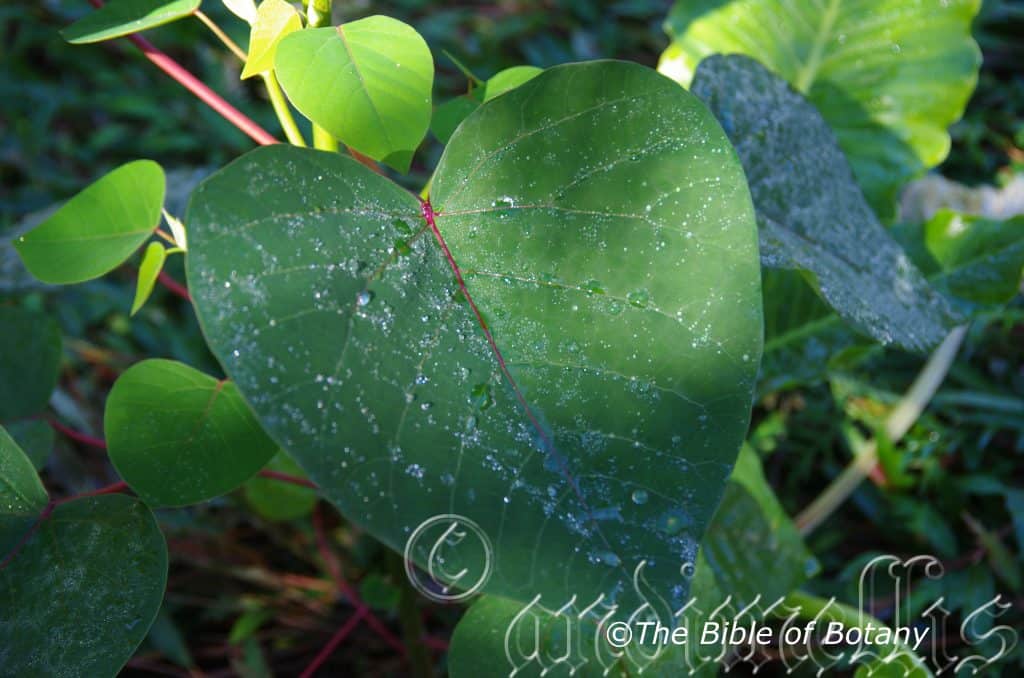
Author’s Garden The Pinnacles NSW
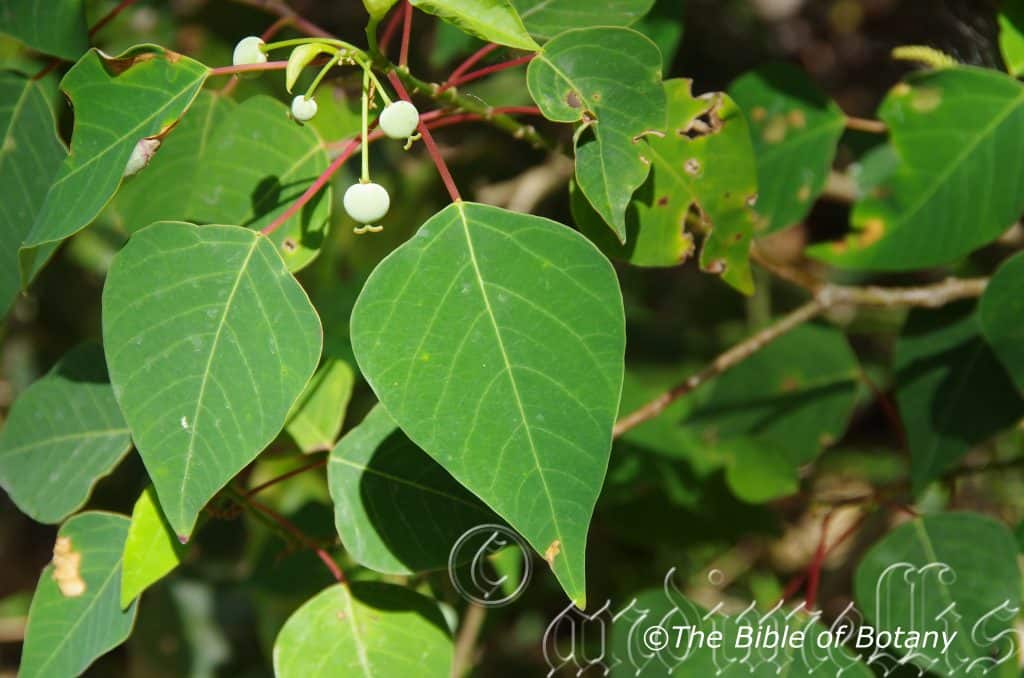
NCBG Coffs Harbour NSW
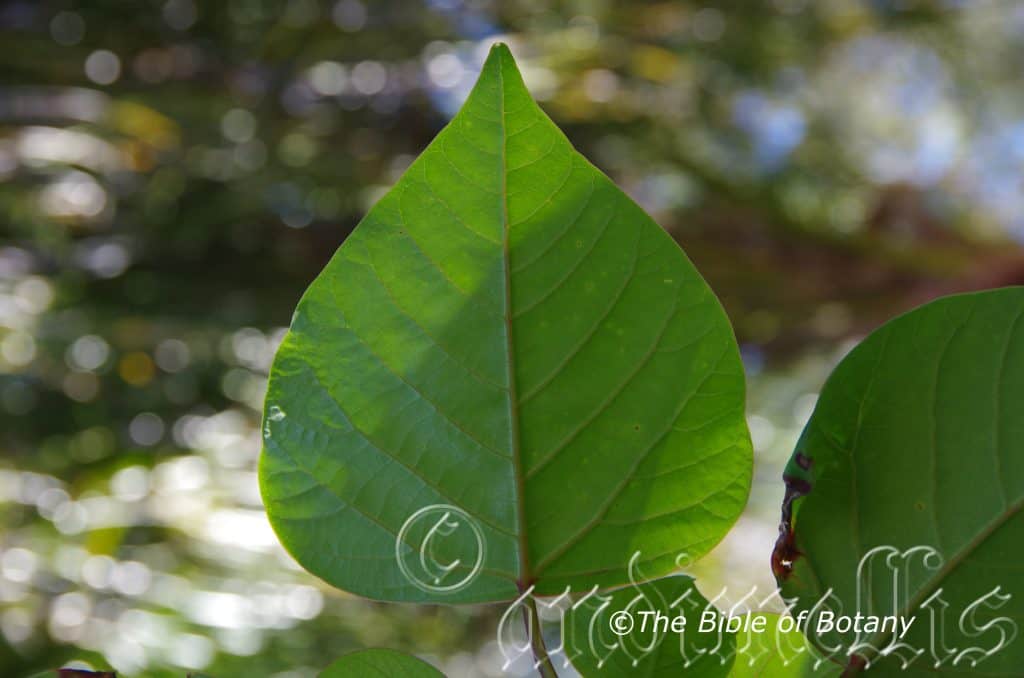
Author’s Garden The Pinnacles NSW
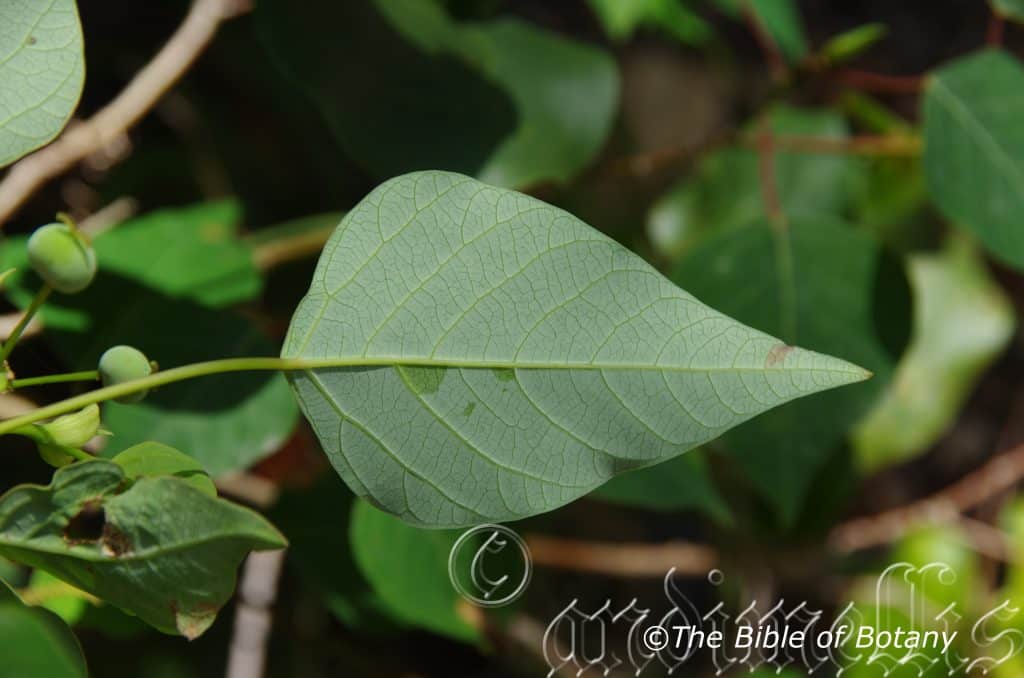
NCBG Coffs Harbour NSW
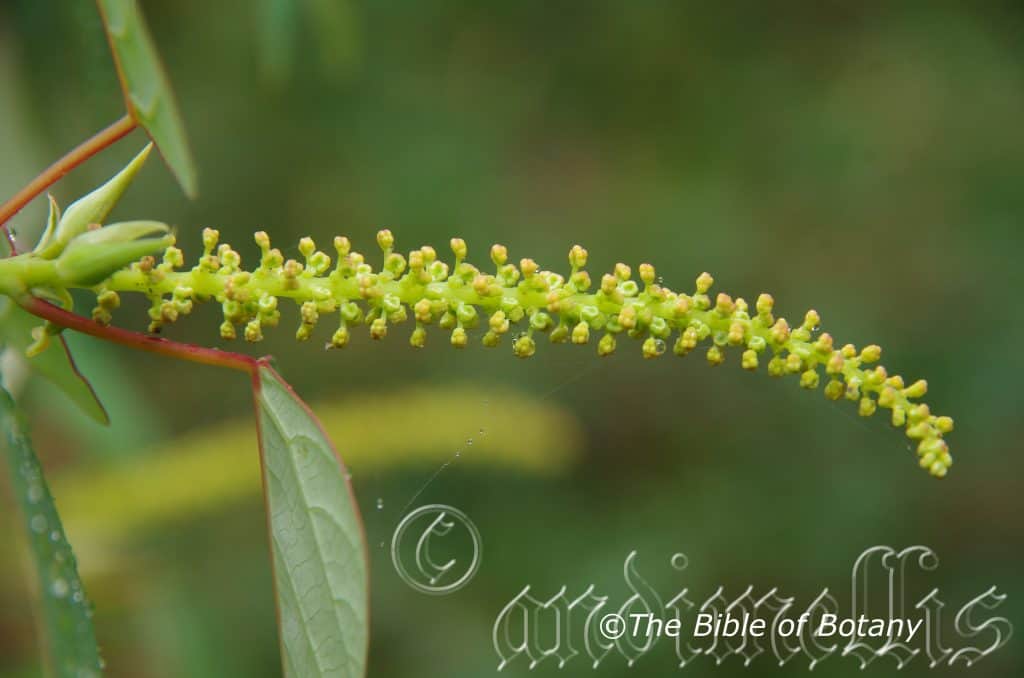
Author’s Garden The Pinnacles NSW
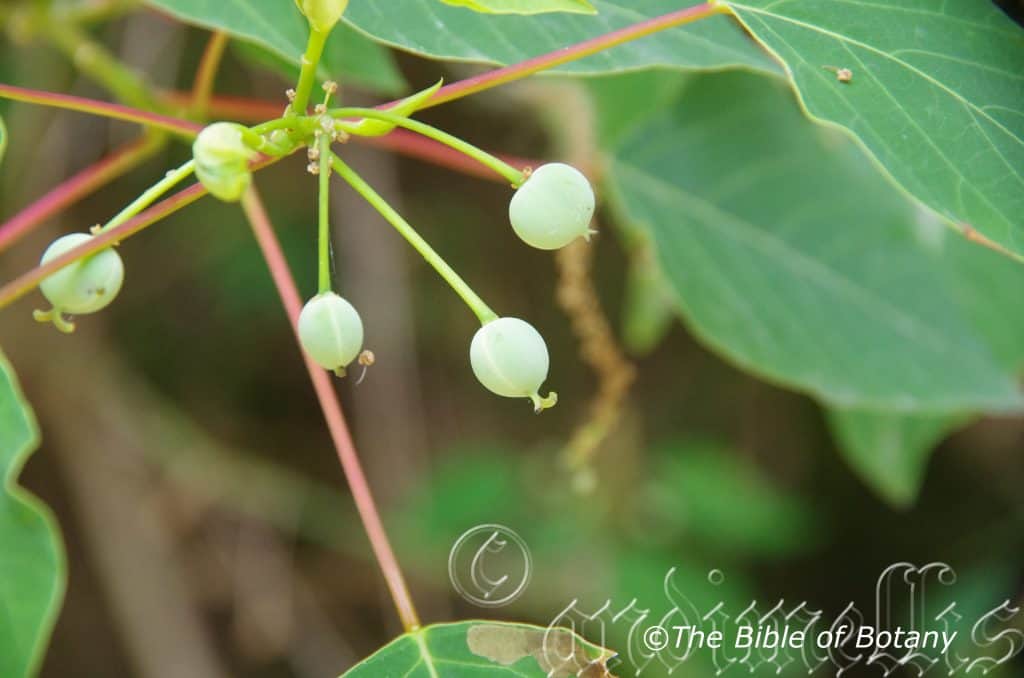
NCBG Coffs Harbour NSW
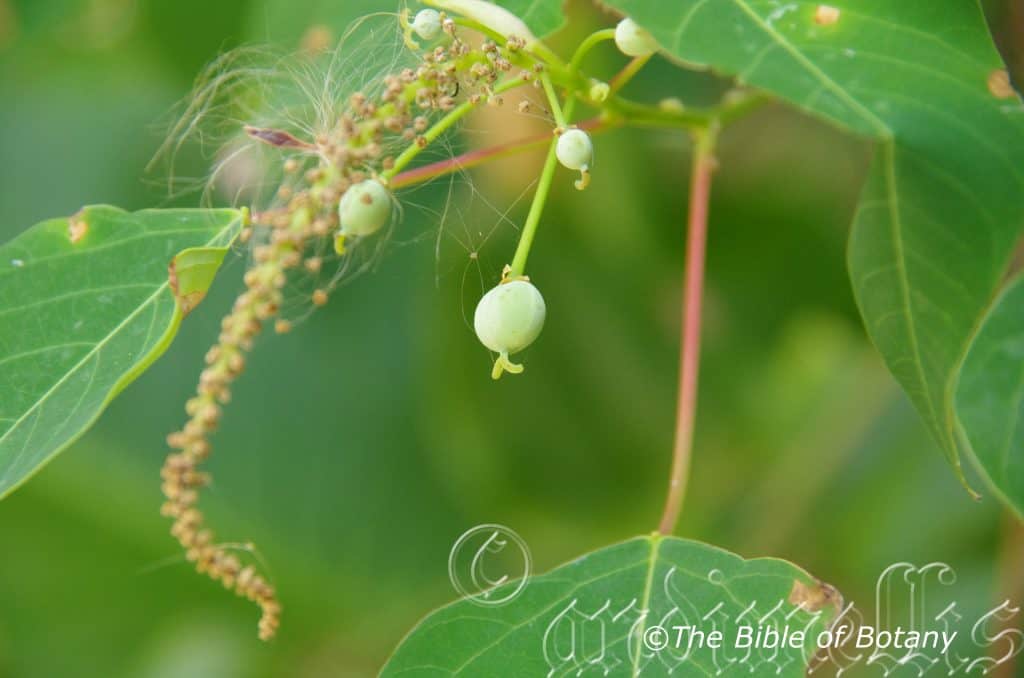
NCBG Coffs Harbour NSW
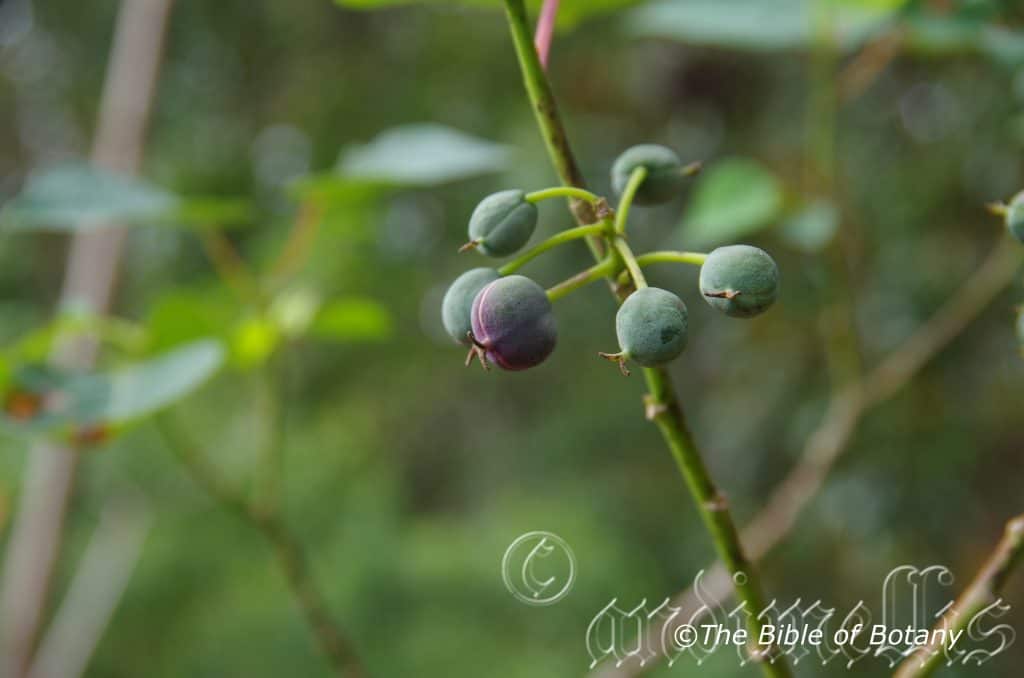
Author’s Garden The Pinnacles NSW
Homalanthus populifolius
Classification:
Unranked: Magnoliophyta
Class: Magnoliopsida
Order: Malpighiales
Family: Euphorbiaceae
Genus: From Homalos, which is Ancient Greek for flat and equal and ántha/ánthos, which are Ancient Greek for the male reproductive organs on a flower or the flower. It refers to leaves, which are flat and smooth while resembling brightly coloured flowers.
Species: From Popler, which is old English for the Poplar tree and Folium, which is Latin for foliage. It refers to leaves, which resemble the European Populus genus.
Common Name: Bleeding Heart.
Distribution:
Homalanthus populifolius is found south from Cooktown in north eastern Queensland to the Victorian New South Wales border. There is an outlying population north east of Melbourne. It is mainly found on and east of the Great Dividing Range.
https://avh.ala.org.au/occurrences/search?taxa=Homalanthus+populifolius#tab_mapView
Habitat Aspect Climate:
Homalanthus populifolius prefers full sun to light dappled shade. It grows in more open riparian zones, adjacent to all types of rainforests and wet Eucalyptus forests including littoral rainforests. The altitude ranges from 5 meters ASL to 650 meters ASL.
The temperatures range from 2 degree in July to 36 degrees in January.
The rainfall ranges from lows of 750mm to an average of 2600mm annually.
Soil Requirements:
Homalanthus populifolius prefers sandy loams, fatty sands, gritty light clays, medium clays or podsolics. The soils are derived from decomposed shale, brown basalt, black basalt, metamorphic rocks, granites, sandstones or accumulated peaty beach sands. The soils pH ranges from 5pH through to a 7pH. It does not tolerate waterlogged soils however the soils are moist throughout the year. Non saline soils to moderately saline soils are tolerated.
Height & Spread:
Wild Plants: 4m to 6m by 3m to 6m.
Characteristics:
Homalanthus populifolius’s stems are grey, grey-brown or brown, glabrous and often sparsely covered in lichens. The branchlets are pale green and glabrous. The trunk, branches, branchlets and petioles all exude white latex when damaged. This is a small dense canopy small tree or large shrub with colourful leaves when it is about to drop.
Homalanthus populifolius’s oval to cordate leaves measure 30mm to 150mm in length by 30mm to 120mm in width. The base is cordate while the apex is broadly acute. The discolourous laminas are deep green and glabrous on the upper lamina while the lower lamina is pale grey-green. The leaves turn a brilliant scarlet red prior to dropping to the ground. The margins are entire and flat. The mid vein and main lateral veins are prominent on the lower lamina and are visible from above. The petioles are very long, slender, deep red and measure 40mm to 120mm in length. The two clasping oblong stipules measure 10mm to 12mm in length.
The inflorescences of Homalanthus populifolius are born on a terminal raceme; similar to a catkin and measure 70mm to 180mm in length. The flowers number about 100 to 240 per raceme. The bracts subtend the female flowers or it is in small clusters of male flowers. The creamy green to creamy yellow flowers measure 1.5mm to 2mm in length by 1mm to 1.5mm in diameter. Flowers appear from October to early December.
Homalanthus popalanifolius’s fruit is a globose to ovoid capsule. The capsules measure 8mm to 10mm in length by 8mm to 10mm in diameter. The glaucous-green, glabrous capsules turn brown on ripening. The dull black glabrous seeds measure 2mm to 3mm in diameter.
Wildlife:
The fruits are eaten by most doves and pigeons including the Brown Cuckoo Dove and white headed pigeon. These trees are good creek restoration trees developing a good root system in all types of soil.
Cultivation:
Homalanthus populifolius is a very beautiful small native shrub which is suitable for small gardens to the largest gardens. It is an excellent colourful addition for tropical, subtropical or warm temperate zones. As a garden subject it will grow to 6 meter to 8 meters in height by 4 meters to 6 meters in diameter when grown in the open. As rainforest subjects they will grow from 10 meters to 12 meters in height by 3 meters to 4 meters in diameter.
It can be pruned regularly to enhance bushiness and better flowering though the flowers are insignificant. However the fruits are very attractive to a number of different birds so this is a good reason for growing them for the fruits. Hard pruning is not recommended as the plants do not respond quickly to the damage so it is better to trim the plants on a regular or annual basis. It is fast growing and are cold tolerant to temperatures at least as low as 0 degrees. Frosts will kill young unprotected plants.
Homalanthus novoguineensis is best suited for rainforest situations and does best in partial shade or dappled light on moist soils. It is almost a must for starting a rainforest as it respond to disturbed ground and native fertilizers. Plants can achieve 6 meters in a couple of years especially when mass planted at 3 meter centers. The trunks are a feature not to be overlooked as on older trees it is slightly furrowed and are a deep brown to black.
It responds well to regular watering and fertilizing. Fertilizers should be applied at half recommended rates as the trees can become top heavy and subject to wind damage when grown in the open. It is an ideal plant for breaking up heavy clay soils and increasing soil fertility by producing large quantities of leaf litter.
Propagation:
Seeds: Homalanthus populifolius seeds can be sown directly into a seed raising mix. Cover them with 5mm of fine sand and keep moist not wet. Place the tray in a warm sunny position.
When the seedlings are 20mm to 30mm tall, prick them out and plant them into 50mm native tubes using a good organic mix.
Once the seedlings reach 150mm to 200mm in height they can be planted out into their permanent position.
Cuttings: Use 100mm to 150mm long ripened material when growing from cuttings from the present season’s growth. Take them in mid-autumn or early spring. Remove half the leaves from the bottom section being careful not to tear the bark. Take a 10mm slice off the bark from the bottom of the cutting on one side.
1 Prepare the cutting mix by adding one third sharp clean river sand, one third peat and one third perlite. These ingredients are sterilize,
2 Select good material from non diseased plants,
3 Select semi green stems for cuttings. Look for a stem with two or three nodes,
4 Place the cutting on a flat, hard surface, and make a clean cut down one side of the cutting at the base for 10mm with a sharp sterile knife or razor blade. – This scarification of the node will increase the chances of roots emerging from this spot. Now remove all but one or two the leaves, leaving the apex leaves in tact. If the leaves are very large in proportion to the stem, cut off the apical halves.
5 Fill a saucer with water, and place a little weak strength rooting hormone into another container like a milk bottle top. Dip the node end of the cutting into the water and then into the rooting hormone. Tap off any excess hormone,
6 Use a small dipple stick or old pencil to poke a hole into the soilless potting mix. Ensure the hole is slightly larger than the stem diameter and be careful not to wipe the rooting hormone off the cuttings base, place the cuttings in a pattern ensuring the cuttings are not touching each other,
7 I like to place the pots in Plastic bags to help maintain temperature and moisture. Place in a semi shaded place like under 50mm shade cloth.
8 When the cuttings have struck, open the bag to allow air circulation for a few days to a week,
9 Once hardened off remove the cuttings from the bag and allow to further hardening for a few more days,
10 Transplant into a good potting mix to grow on.
Fertilize using Seaweed, fish emulsion or organic chicken pellets soaked in water and apply the liquid on an alternate basis. Fertilize every 2 months until the plants are well established then on an annual basis in September to October to maintain good health, vigour and better flowering.
Further Comments from Readers:
Hi reader, it seems you use The Bible of Botany a lot. That’s great as we have great pleasure in bringing it to you! It’s a little awkward for us to ask, but our first aim is to purchase land approximately 1,600 hectares to link several parcels of N.P. into one at The Pinnacles NSW Australia, but we need your help. We’re not salespeople. We’re amateur botanists who have dedicated over 30 years to saving the environment in a practical way. We depend on donations to reach our goal. If you donate just $5, the price of your coffee this Sunday, We can help to keep the planet alive in a real way and continue to bring you regular updates and features on Australian plants all in one Botanical Bible. Any support is greatly appreciated. Thank you.
In the spirit of reconciliation we acknowledge the Bundjalung, Gumbaynggirr and Yaegl and all aboriginal nations throughout Australia and their connections to land, sea and community. We pay our respect to their Elders past, present and future for the pleasures we have gained.
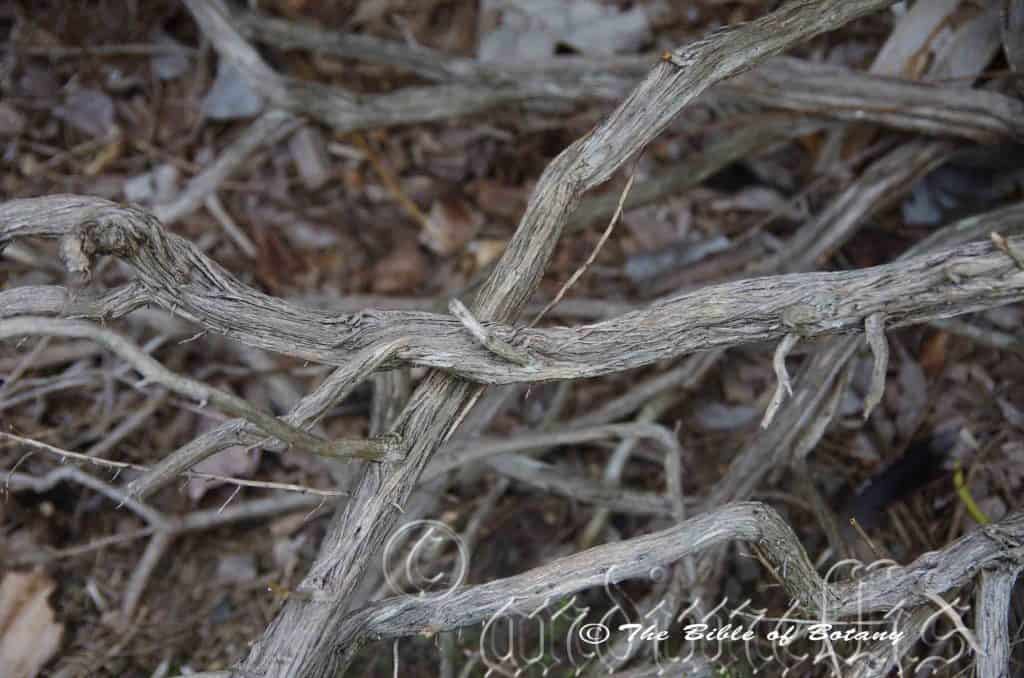
NCBG Coffs Harbour NSW
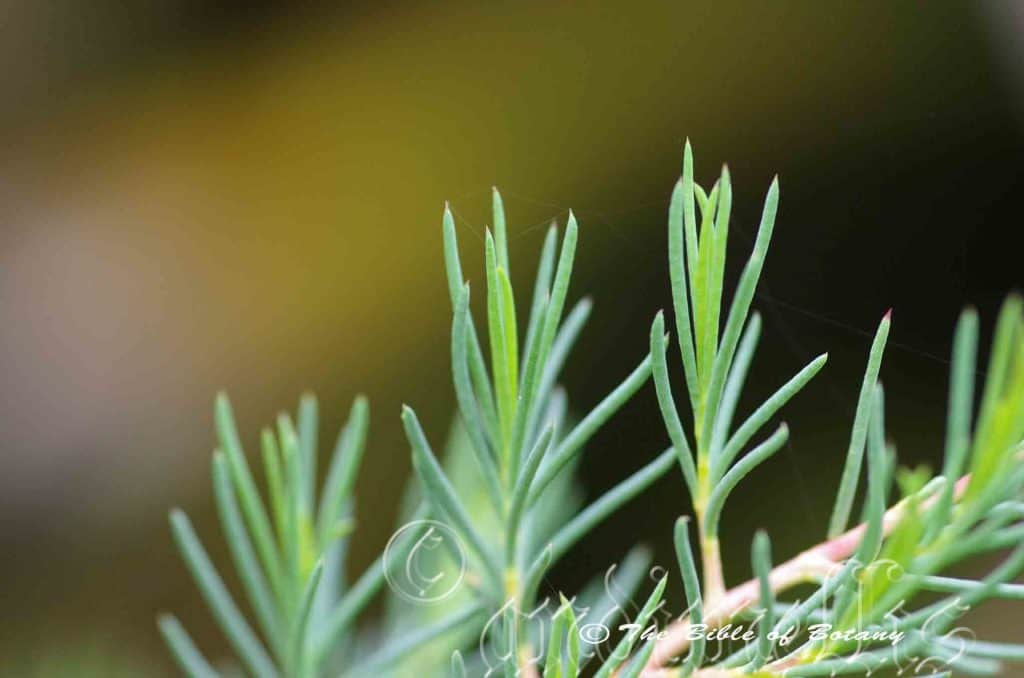
NCBG Coffs Harbour NSW

NCBG Coffs Harbour NSW
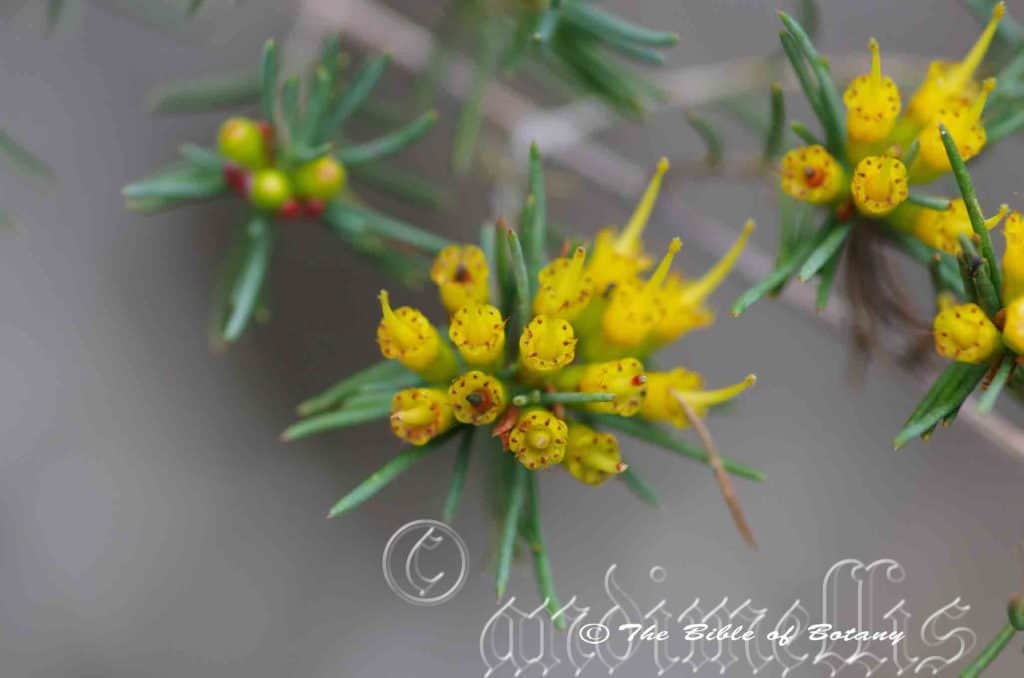
NCBG Coffs Harbour NSW
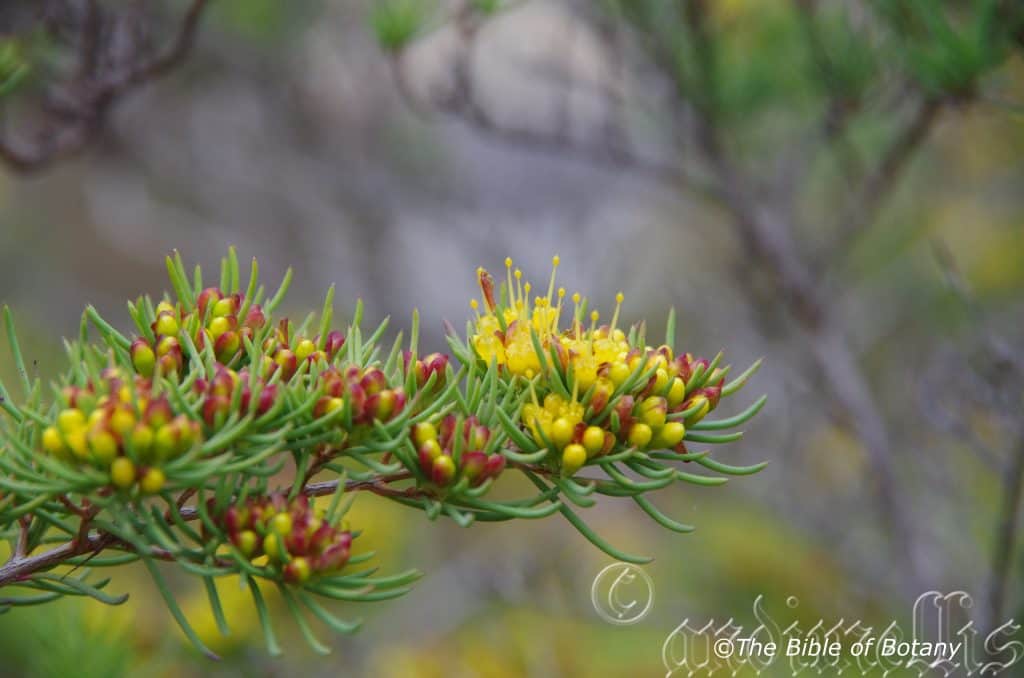
NCBG Coffs Harbour NSW
Homoranthus flavescens
Classification:
Unranked: Eudicots
Class: Rosids
Order: Myrtales
Family: Myrtaceae
Genus: From Hómoios, which is Ancient Greek for similar, unvarying or uniformly and ántha/ánthos, which are Ancient Greek for the male reproductive organs in a flower or the flower. It refers to all anthers and or flowers which are rather uniform throughout the genus.
Species: From Flavum, which is Latin for turning or becoming yellow. It refers to the colour of the stems, leaves or more often the flowers, which turn yellowish or yellow-ochre following anthesis.
Common Name:
Distribution:
Homoranthus flavescens is found south from between Caloundra and Roma in southern Queensland to the Dubbo Plains in central eastern New South Wales. There is an outlying population north east of Melbourne. It is mainly found on and east of the Great Dividing Range.
https://avh.ala.org.au/occurrences/search?taxa=Homoranthus+flavescens#tab_mapView
Habitat Aspect Climate:
Homoranthus flavescens prefers full sun to light dappled shade. It grows in more open Eucalyptus forests and sclerophyll forests. The altitude ranges from 250 meters ASL to 750 meters ASL.
The temperatures range from 2 degree in July to 36 degrees in January.
The rainfall ranges from lows of 450mm to an average of 1100mm annually.
Soil Requirements:
Homoranthus flavescens prefers skeletal sandy loams, fatty sands or gritty light clays. The soils are derived from decomposed granites, sandstones or accumulated alluvial silts sands. The soils pH ranges from 5pH through to a 7pH. It does not tolerate waterlogged soils. Non saline soils to moderately saline soils are tolerated.
Height & Spread:
Wild Plants: 0.4m to 1m by 1m to 2m.
Characteristics:
Homoranthus flavescens’s stems are covered in a hard, thick grey striated bark. The branchlets near the growing tips are smooth creamy yellow to creamy red or orange, glabrous and often glaucous.
Homoranthus flavescens’s ovate to terete, fleshy leaves are clustered near the terminal branchlets and measure 6mm to 12mm in length by 1mm to 1.5mm in width. The short petioles are difficult to distinguish from the leaves except that it is yellowish. They measure 0.5mm to 1mm in length. The apexes are broadly acute ending in a soft point. The concolourous laminas are a mid bluish-green and glabrous. The leaves turn a yellow or brilliant scarlet-orange prior to dropping to the ground. The mid vein and lateral veins are not visible.
The inflorescences of Homoranthus flavescens are born solitary from the leaf axils. The pedicels measure 1mm to 3mm in length. The deep yellowish flowers bracteoles shed before anthesis. The hypanthium is narrow-obconical with 5 prominent longitudinal ribs. It is usually glabrous or at times glandular between the ribs. The corolla tube measures 3.5mm to 5 mm in length. The sepals measure 1.5mm to 2.5mm length while the petals measure 0.8mm to 1.1mm in length. The style measures 5mm to 9mm in length. The flowers appear from September to early March.
Homoranthus flavescens’s fruit is a cylindrical capsule. The capsules measure 3mm to 4mm in length by 1.5mm to 2mm in diameter. The glaucous-yellowish, glabrous capsules turn reddish-brown on ripening. The seeds are black and glabrous.
Wildlife:
Homoranthus flavescens is attractive to native bees like Tetragonula carbonaria and the Blue banded bee Amegilla cingulata when in flower.
Cultivation:
Homoranthus flavescens is a very beautiful small native shrub which is suitable for small gardens to the largest gardens. It is an excellent colourful addition for dry heath gardens in warm temperate zones to cool subtropical areas. As a garden subject it prefers to grow in light shade or dappled sunlight. It grows to 0.6 meter to 0.8 meters in height by 1.2 meters to 2.2 meters in diameter when grown in the open.
It is better not to prune the plants as this reduces flowering and the plants display considerable set back even under ideal conditions. It is not fast growing and may take some time to adapt to local conditions especially if planted in full sun. It is cold tolerant to temperatures at least as low as minus 5 degrees which makes them ideal for mountain scapes on sites that suffer severe frosts.
Homoranthus flavescens is best suited for growing in areas that have large boulders or rockeries, dry heaths, sandy slopes or dry forest gardens.
It responds well to a little extra water and fertilizing when grown on sand. Fertilizers should be applied regularly at half strengths.
Not only is its beautiful blue foliage an attractant with its creamy yellow flowers but when the air is still the fragrance of honey drifts across the garden especially when mass planted.
Looking at the photo of the stems and the fact that it has longevity, it would probably make a good bonsai specimen.
Propagation:
Seeds: Homoranthus flavescens seeds can be sown directly into a seed raising mix. Cover them with 5mm of fine sand and keep moist not wet. Place the tray in a warm sunny position.
When the seedlings are 20mm to 30mm tall, prick them out and plant them into 50mm native tubes using a good organic mix.
Once the seedlings reach 150mm to 200mm in height they can be planted out into their permanent position.
Cuttings: Use 100mm long ripe material when growing from cuttings from the present season’s growth. Take them in the warmer months of the year. Remove half the leaves from the bottom section being careful not to tear the bark. Take a 10mm slice off the bark from the bottom of the cutting on one side.
1 Prepare the cutting mix by adding one third sharp clean river sand, one third peat and one third perlite. These ingredients are sterilize,
2 Select good material from non diseased plants,
3 Select semi green stems for cuttings. Look for a stem with two or three nodes,
4 Place the cutting on a flat, hard surface, and make a clean cut down one side of the cutting at the base for 10mm with a sharp sterile knife or razor blade. – This scarification of the node will increase the chances of roots emerging from this spot. Now remove all but one or two the leaves, leaving the apex leaves in tact. If the leaves are very large in proportion to the stem, cut off the apical halves.
5 Fill a saucer with water, and place a little medium strength rooting hormone into another container like a milk bottle top. Dip the node end of the cutting into the water and then into the rooting hormone. Tap off any excess hormone,
6 Use a small dipple stick or old pencil to poke a hole into the soilless potting mix. Ensure the hole is slightly larger than the stem diameter and be careful not to wipe the rooting hormone off the cuttings base, place the cuttings in a pattern ensuring the cuttings are not touching each other,
7 I like to place the pots in Plastic bags to help maintain temperature and moisture. Place in a semi shaded place like under 50mm shade cloth.
8 When the cuttings have struck, open the bag to allow air circulation for a few days to a week,
9 Once hardened off remove the cuttings from the bag and allow to further hardening for a few more days,
10 Transplant into a good potting mix to grow on.
Fertilize using Seaweed, fish emulsion or organic chicken pellets soaked in water and apply the liquid on an alternate basis. Fertilize every 2 months until the plants are well established then on an annual basis in September to October to maintain good health, vigour and better flowering.
Further Comments from Readers:
Hi reader, it seems you use The Bible of Botany a lot. That’s great as we have great pleasure in bringing it to you! It’s a little awkward for us to ask, but our first aim is to purchase land approximately 1,600 hectares to link several parcels of N.P. into one at The Pinnacles NSW Australia, but we need your help. We’re not salespeople. We’re amateur botanists who have dedicated over 30 years to saving the environment in a practical way. We depend on donations to reach our goal. If you donate just $5, the price of your coffee this Sunday, We can help to keep the planet alive in a real way and continue to bring you regular updates and features on Australian plants all in one Botanical Bible. Any support is greatly appreciated. Thank you.
In the spirit of reconciliation we acknowledge the Bundjalung, Gumbaynggirr and Yaegl and all aboriginal nations throughout Australia and their connections to land, sea and community. We pay our respect to their Elders past, present and future for the pleasures we have gained.
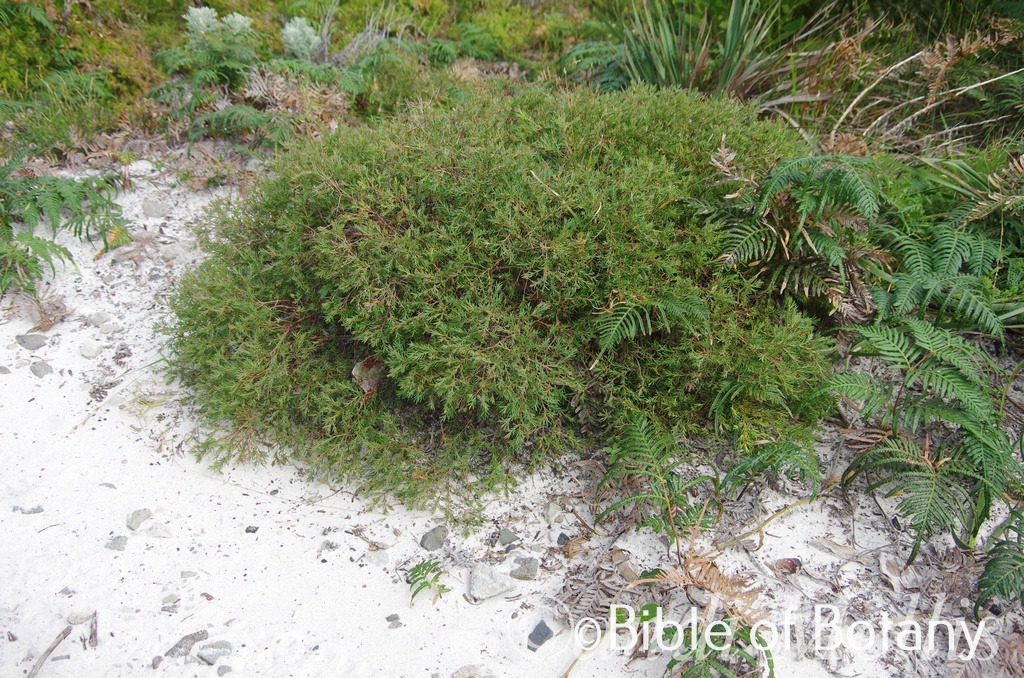
Yuraygir National Park NSW
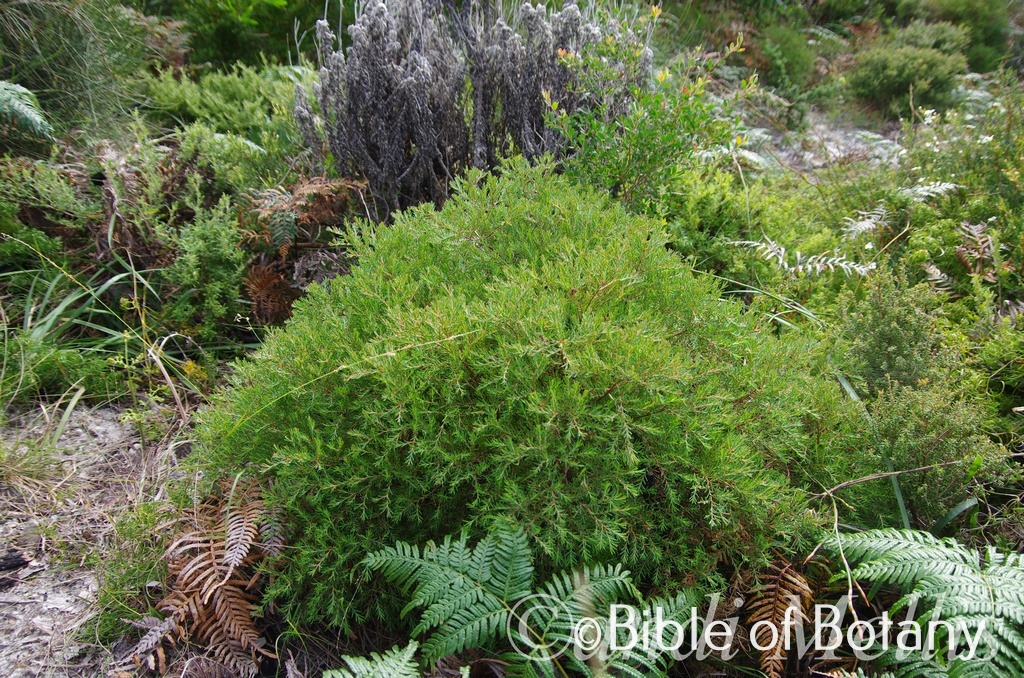
Yuraygir National Park NSW
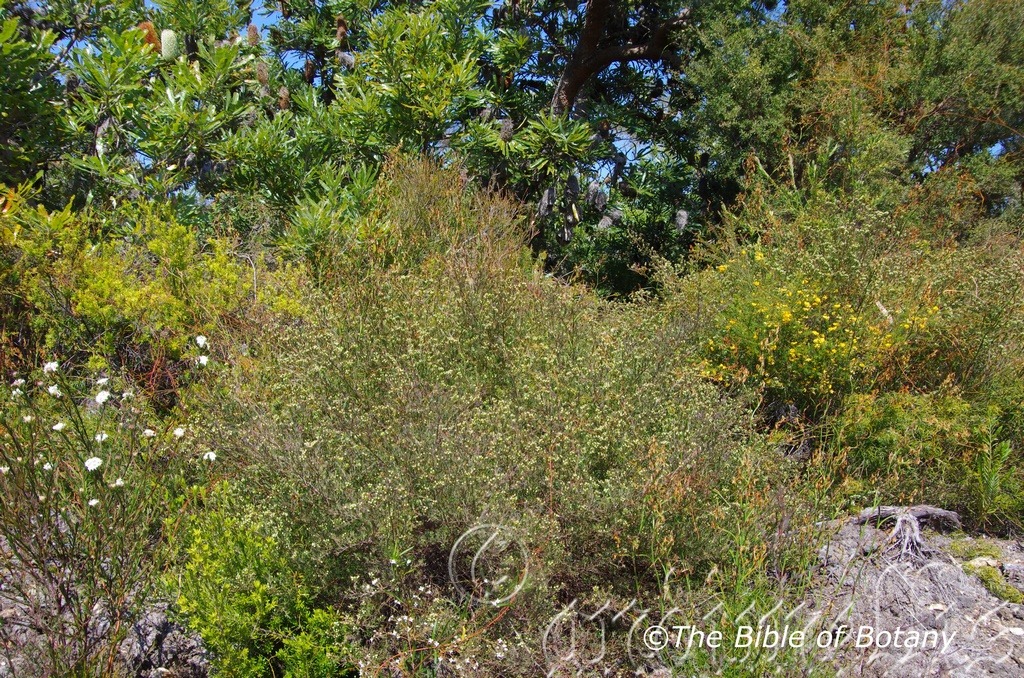
NCBG Coffs Harbour NSW
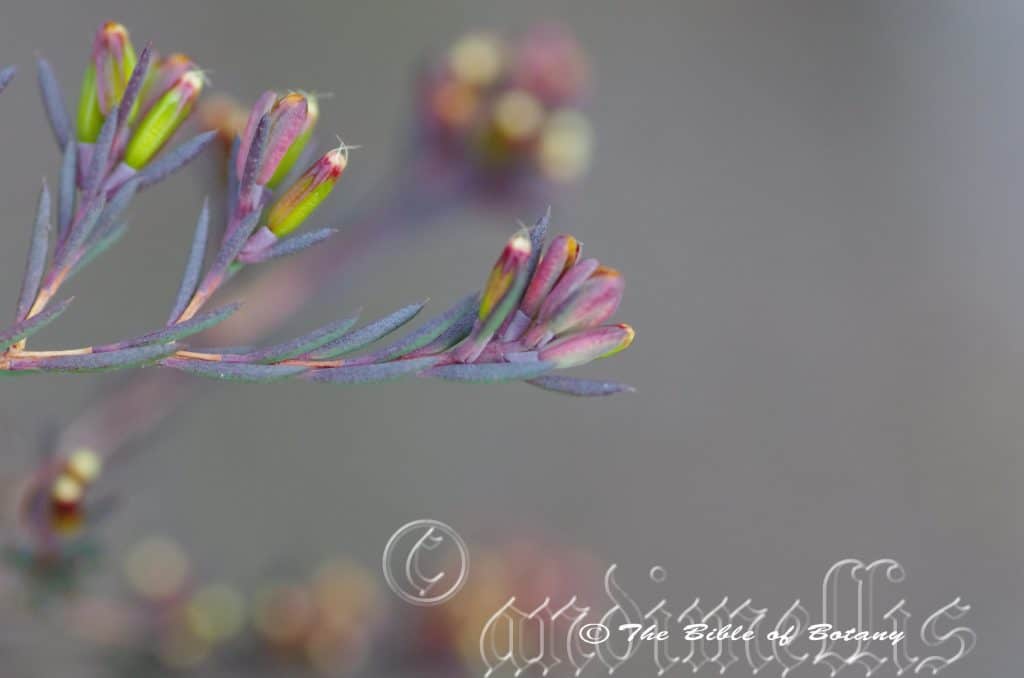
NCBG Coffs Harbour NSW
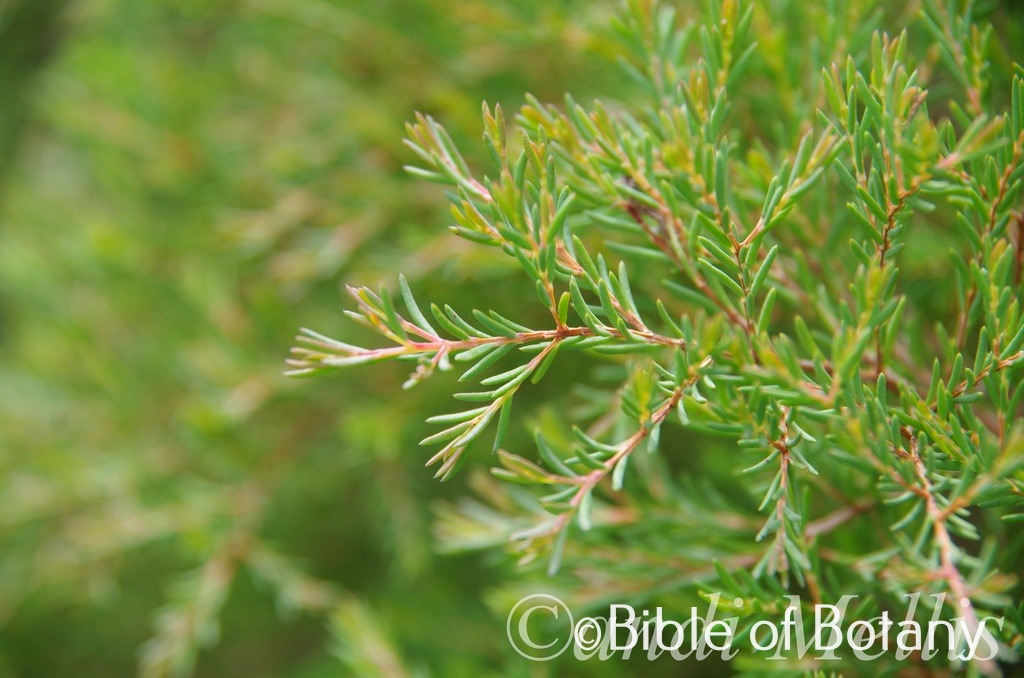
Yuraygir National Park NSW
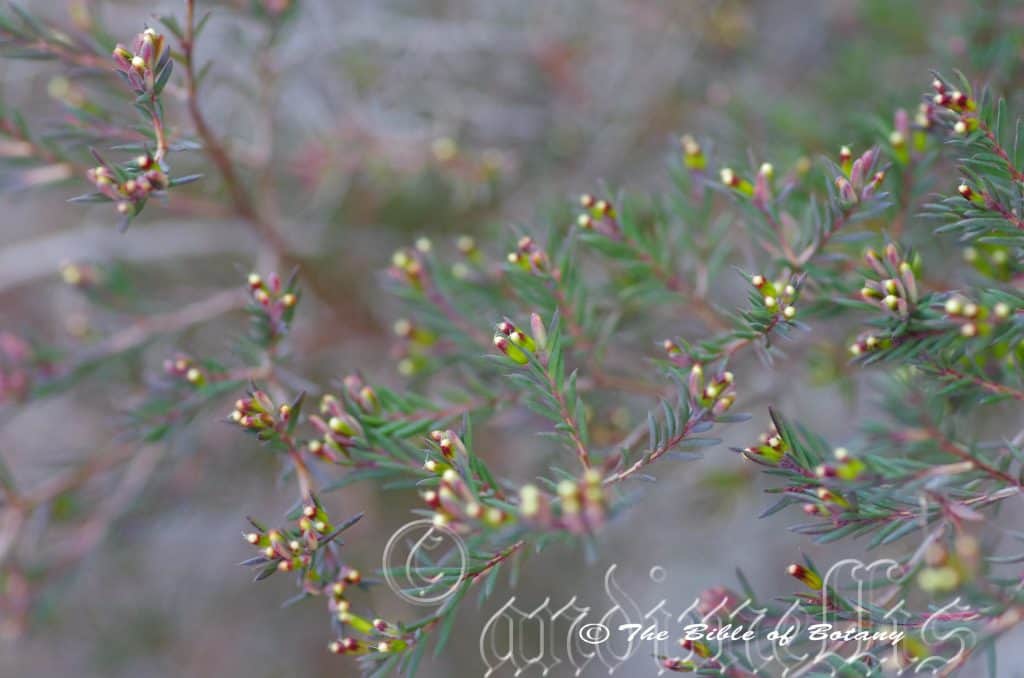
NCBG Coffs Harbour NSW
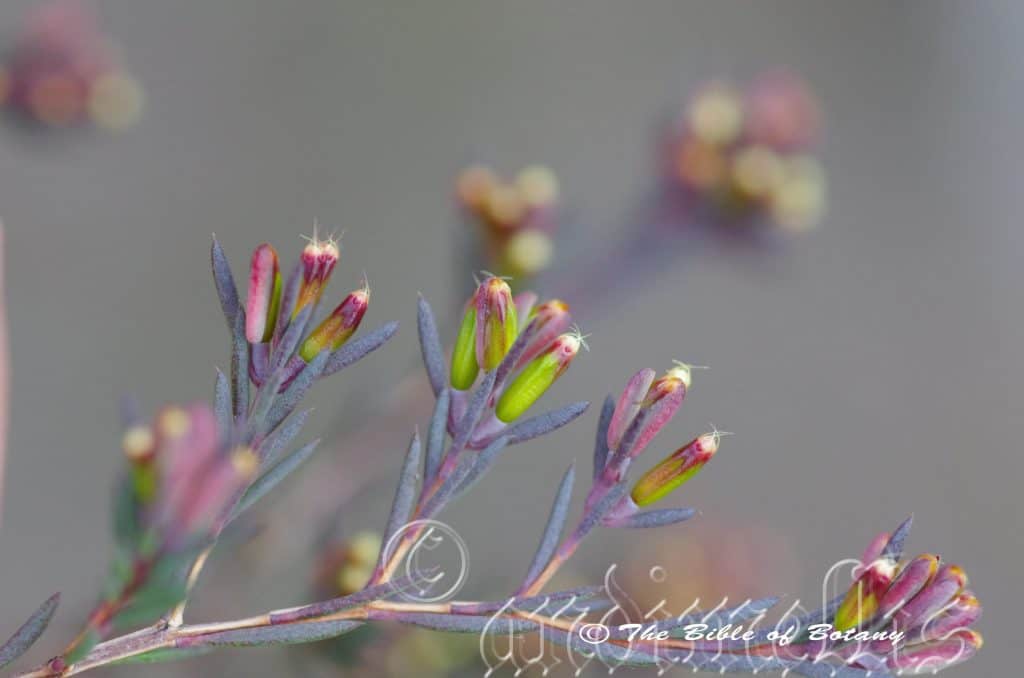
NCBG Coffs Harbour NSW
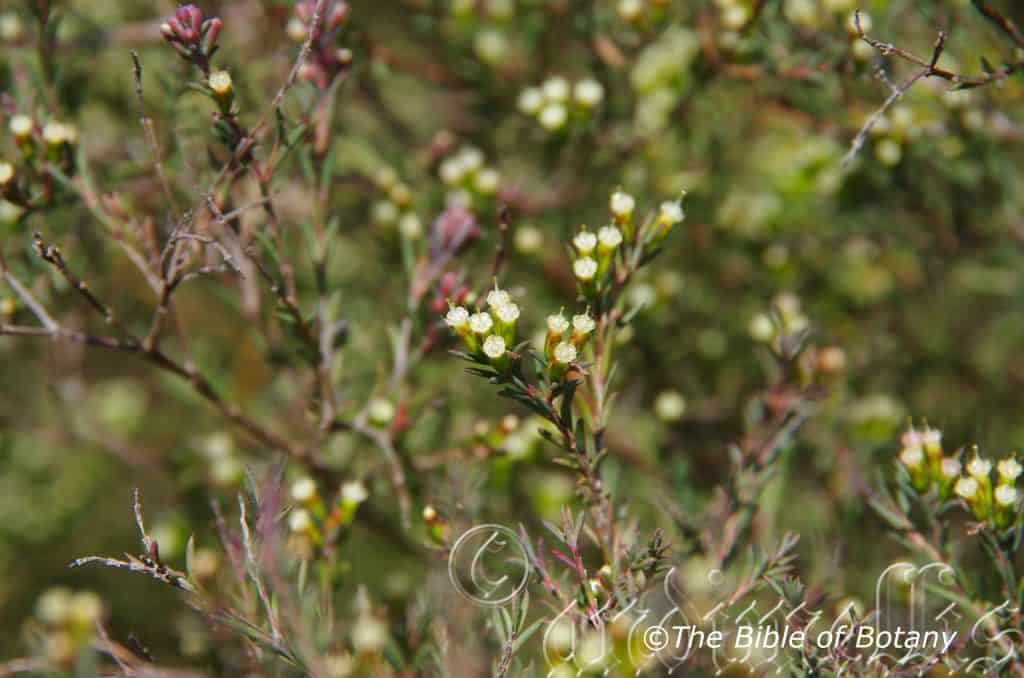
NCBG Coffs Harbour NSW
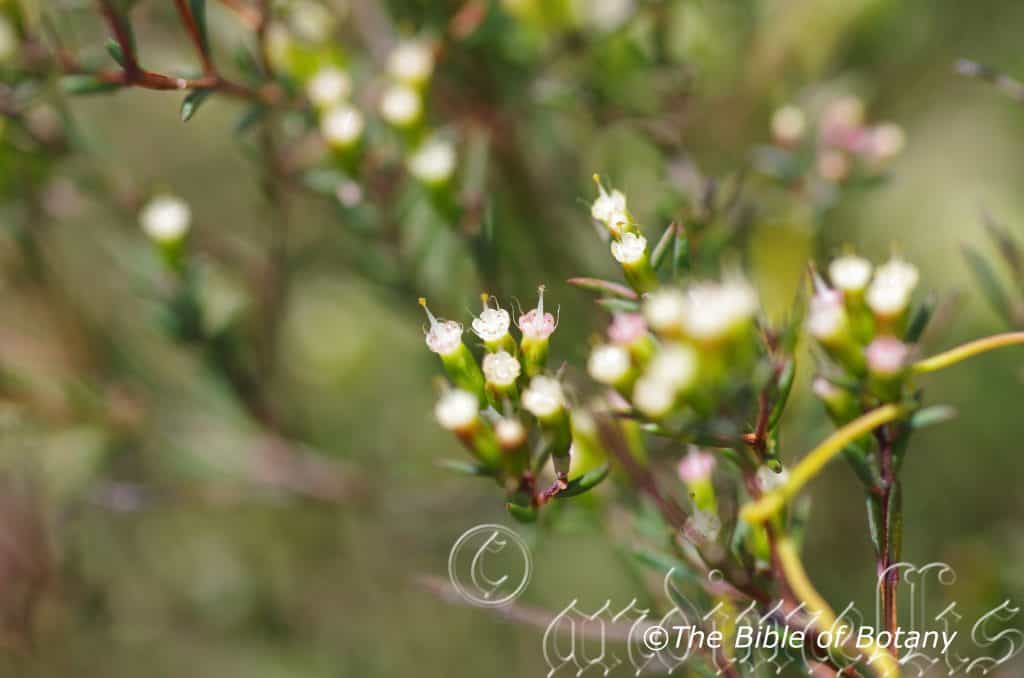
NCBG Coffs Harbour NSW
Homoranthus virgatus
Classification:
Unranked: Eudicots
Class: Rosids
Order: Myrtales
Family: Myrtaceae
Genus: From Hómoios, which is Ancient Greek for similar, unvarying or uniformly and ántha/ánthos, which are Ancient Greek for the male reproductive organs in a flower or the flower. It refers to all anthers and or flowers which are rather uniform throughout the genus.
Species: From Virgātus, which is Latin for a wand. It refers to stems, which are straight and thin like a wand or stick.
Common Name:
Distribution:
Homoranthus virgatus is found south from Shoalhaven north of Rockhampton in central coastal Queensland to Taree in central coastal New South Wale.
https://avh.ala.org.au/occurrences/search?taxa=Homoranthus+virgatus#tab_mapView
Habitat Aspect Climate:
Homoranthus virgatus prefers full sun to light dappled shade. It grows in less exposed coastal fore shores in open Eucalyptus forests and heaths including littoral rainforests. The altitude ranges from 5 meters ASL to 60 meters ASL.
The temperatures range from 2 degree in July to 37 degrees in January.
The rainfall ranges from lows of 950mm to an average of 2600mm annually.
Soil Requirements:
Homoranthus virgatus prefers skeletal to deep sands, sandy loams or light fatty clays. The soils are usually derived from accumulated beach sands. The soils pH ranges from 5pH through to a 7pH. It does not tolerate waterlogged soils. Non saline soils to very saline soils are tolerated as are salt laden winds.
Height & Spread:
Wild Plants: 0.5m to 1.5m by 0.6m to 1m.
Characteristics:
Homoranthus virgatus’s stems are covered in a hard, thick grey striated bark. The branchlets near the growing tips are smooth creamy yellow to fawn and glabrous.
Homoranthus virgatus’s ovate to terete, fleshy leaves are clustered on the terminal branchlets and measure 6mm to 11mm in length by 0.9mm to 1.2mm in width. The short petioles are difficult to distinguish from the actual leaves except that it is purplish-pink. They measure 1mm to 1.4mm in length. The apexes are broadly acute ending in a soft point. The concolourous laminas are a mid bluish-grey often with a purplish tinge and glabrous. The mid vein and lateral veins are not visible.
The inflorescences of Homoranthus virgatus are born solitary from the leaf axils. The pedicels measure 1mm to 1.5mm in length. The pale yellow flower’s bracteoles shed before anthesis. The hypanthium is narrow-obconical with 5 prominent longitudinal ribs. It is usually glandular between the ribs. The corolla tube measures 4.5mm to 5.5mm in length. The sepals measure 1.5mm to 2.2mm length while the petals measure 0.8mm to 1.2mm in length. The style measures 4mm to 5mm in length. The flowers appear from September to early March.
Homoranthus virgatus’s fruit is a cylindrical capsule. The capsules measure 4mm to 5mm in length by 1.5mm to 2mm in diameter. The glaucous-yellowish, glabrous capsules turn reddish-brown on ripening. The seeds are black and glabrous.
Wildlife:
Homoranthus virgatus is attractive to native bees like Tetragonula carbonaria and the Blue banded bee Amegilla cingulata when in flower.
Cultivation:
Homoranthus virgatus is a very beautiful small native shrub which is suitable for small gardens to the largest gardens. It is an excellent colourful addition for heath gardens in warm temperate zones to cool sub tropical areas. As a garden subject it prefers to grow in light shade or dappled sunlight. It grows from 1 meter to 1.6 meters in height by 1 meter to 1.4 meters in diameter when grown in the open.
It is better not to prune the plants as this reduces flowering and the plants display considerable set back even under ideal conditions. It is not fast growing and may take some time to adapt to local conditions especially if planted in full sun. It is cold tolerant to temperatures at least as low as minus 5 degrees which makes them ideal for mountain scapes on sites that suffer severe frosts.
Homoranthus virgatus is best suited for growing in dry rockeries, sandy slopes, and dry forest gardens and is especially well suited to dry heath settings.
It responds well to a little extra water when grown on sand and fertilizing. Fertilizers should be applied regularly at half strengths. Because of the twisted stems and longevity Homoranthus virgatus may make very good bonsai specimen.
Not only is its beautiful blue foliage an attractant with its creamy yellow flowers but when the air is still the fragrance of honey drifts across the garden especially when mass planted.
Propagation:
Seeds: Homoranthus virgatus seeds can be sown directly into a seed raising mix. Cover them with 5mm of fine sand and keep moist not wet. Place the tray in a warm sunny position.
When the seedlings are 20mm to 30mm tall, prick them out and plant them into 50mm native tubes using a good organic mix.
Once the seedlings reach 150mm to 200mm in height they can be planted out into their permanent position.
Cuttings: Use 70mm to 80mm long ripe material when growing from cuttings from the present season’s growth. Take them in the warmer months of the year. Remove half the leaves from the bottom section being careful not to tear the bark. Take a 10mm slice off the bark from the bottom of the cutting on one side.
1 Prepare the cutting mix by adding one third sharp clean river sand, one third peat and one third perlite. These ingredients are sterilize,
2 Select good material from non-diseased plants,
3 Select semi green stems for cuttings. Look for a stem with two or three nodes,
4 Place the cutting on a flat, hard surface, and make a clean cut down one side of the cutting at the base for 10mm with a sharp sterile knife or razor blade. – This scarification of the node will increase the chances of roots emerging from this spot. Now remove all but one or two the leaves, leaving the apex leaves in tact. If the leaves are very large in proportion to the stem, cut off the apical halves.
5 Fill a saucer with water, and place a little medium strength rooting hormone into another container like a milk bottle top. Dip the node end of the cutting into the water and then into the rooting hormone. Tap off any excess hormone,
6 Use a small dipple stick or old pencil to poke a hole into the soilless potting mix. Ensure the hole is slightly larger than the stem diameter and be careful not to wipe the rooting hormone off the cuttings base, place the cuttings in a pattern ensuring the cuttings are not touching each other,
7 I like to place the pots in Plastic bags to help maintain temperature and moisture. Place in a semi shaded place like under 50mm shade cloth.
8 When the cuttings have struck, open the bag to allow air circulation for a few days to a week,
9 Once hardened off remove the cuttings from the bag and allow to further hardening for a few more days,
10 Transplant into a good potting mix to grow on.
Fertilize using Seaweed, fish emulsion or organic chicken pellets soaked in water and apply the liquid on an alternate basis. Fertilize every 2 months until the plants are well established then on an annual basis in September to October to maintain good health, vigour and better flowering.
Further Comments from Readers:
Hi reader, it seems you use The Bible of Botany a lot. That’s great as we have great pleasure in bringing it to you! It’s a little awkward for us to ask, but our first aim is to purchase land approximately 1,600 hectares to link several parcels of N.P. into one at The Pinnacles NSW Australia, but we need your help. We’re not salespeople. We’re amateur botanists who have dedicated over 30 years to saving the environment in a practical way. We depend on donations to reach our goal. If you donate just $5, the price of your coffee this Sunday, We can help to keep the planet alive in a real way and continue to bring you regular updates and features on Australian plants all in one Botanical Bible. Any support is greatly appreciated. Thank you.
In the spirit of reconciliation we acknowledge the Bundjalung, Gumbaynggirr and Yaegl and all aboriginal nations throughout Australia and their connections to land, sea and community. We pay our respect to their Elders past, present and future for the pleasures we have gained.
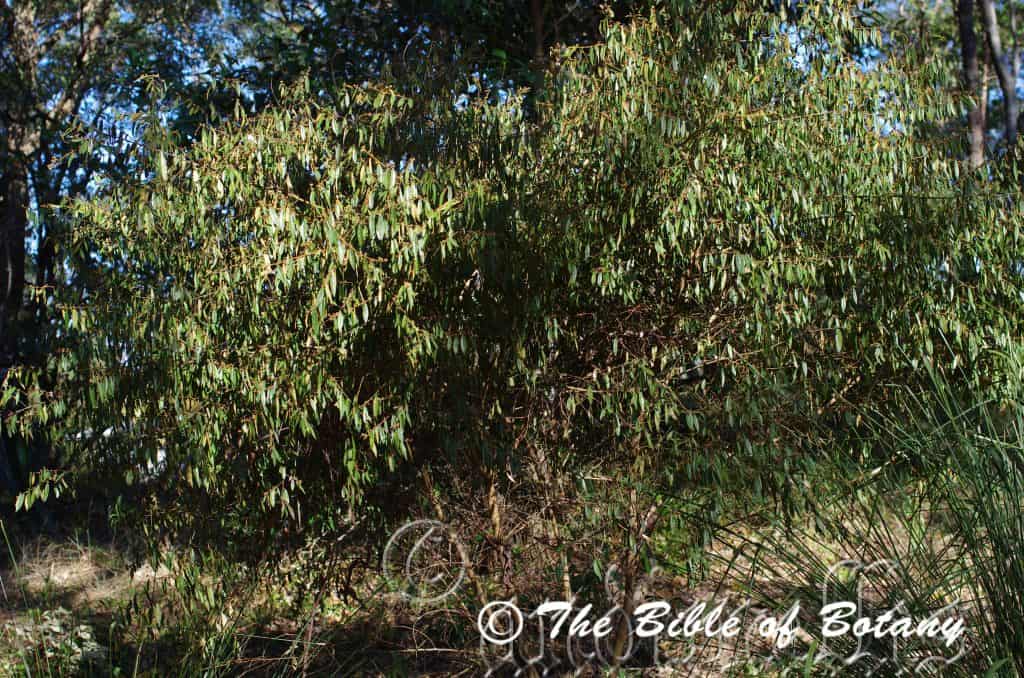
Grange Restoration Qld.
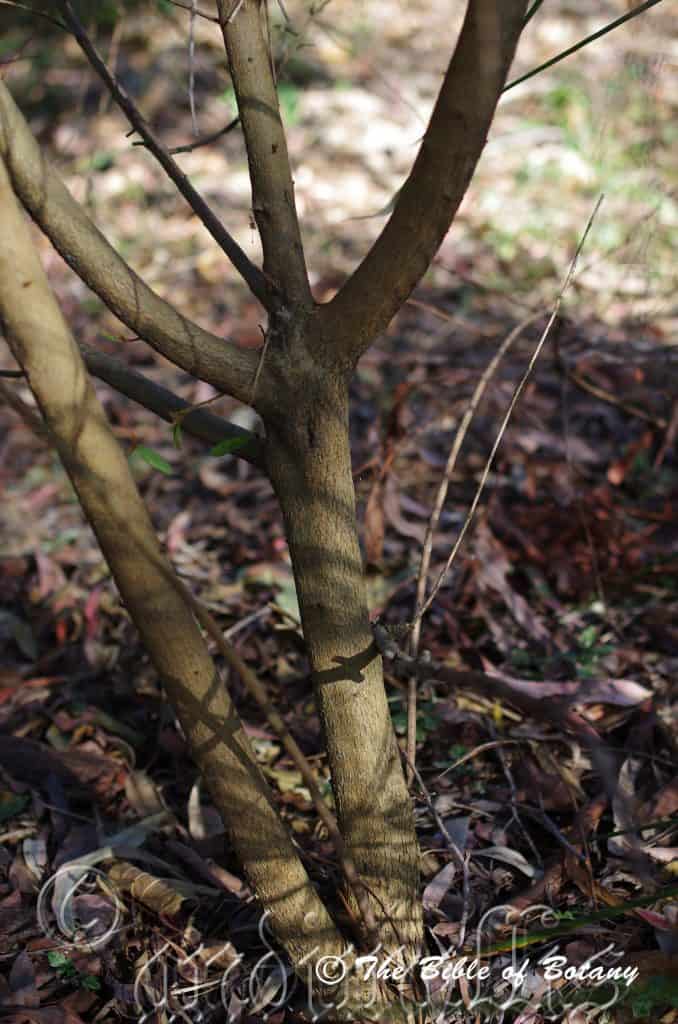
Grange Restoration Qld.
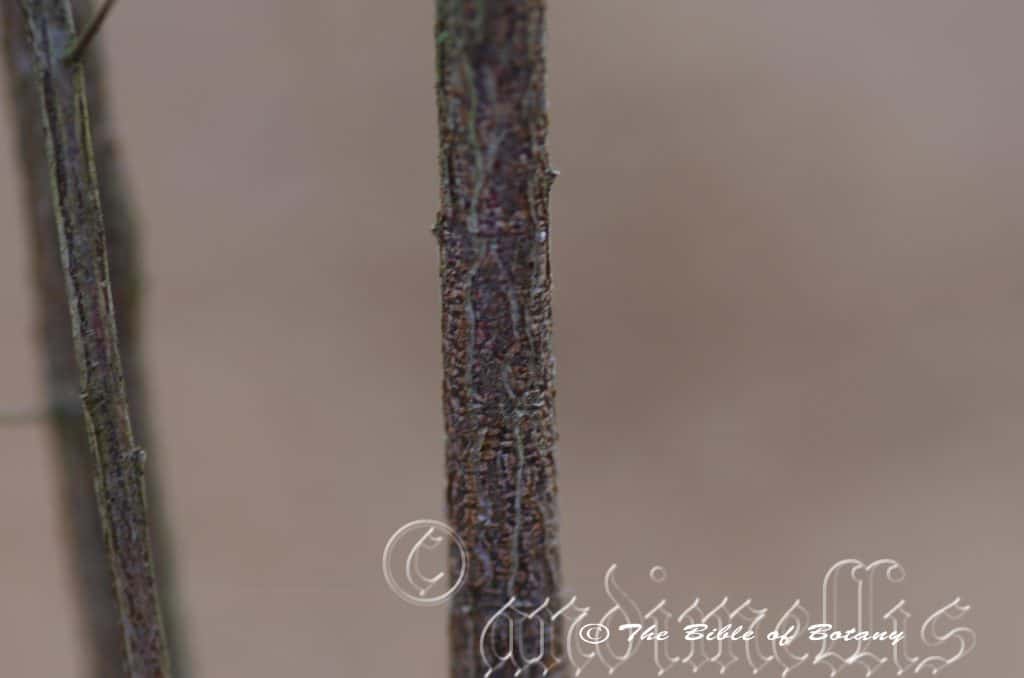
Nambour Qld.
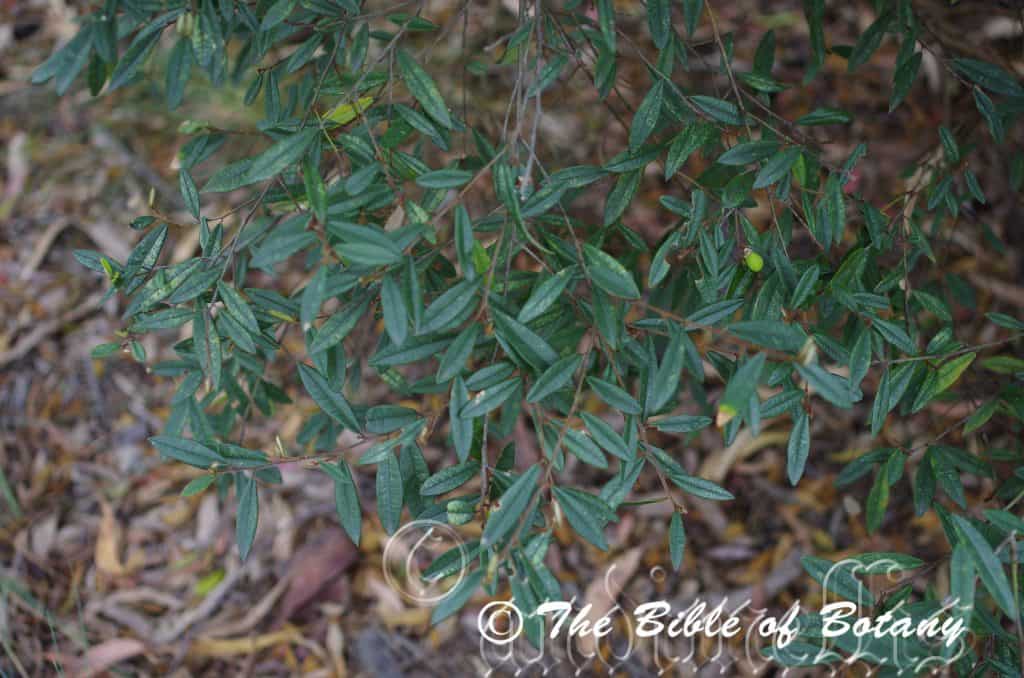
Mount Cootha Botanical Gardens Qld.
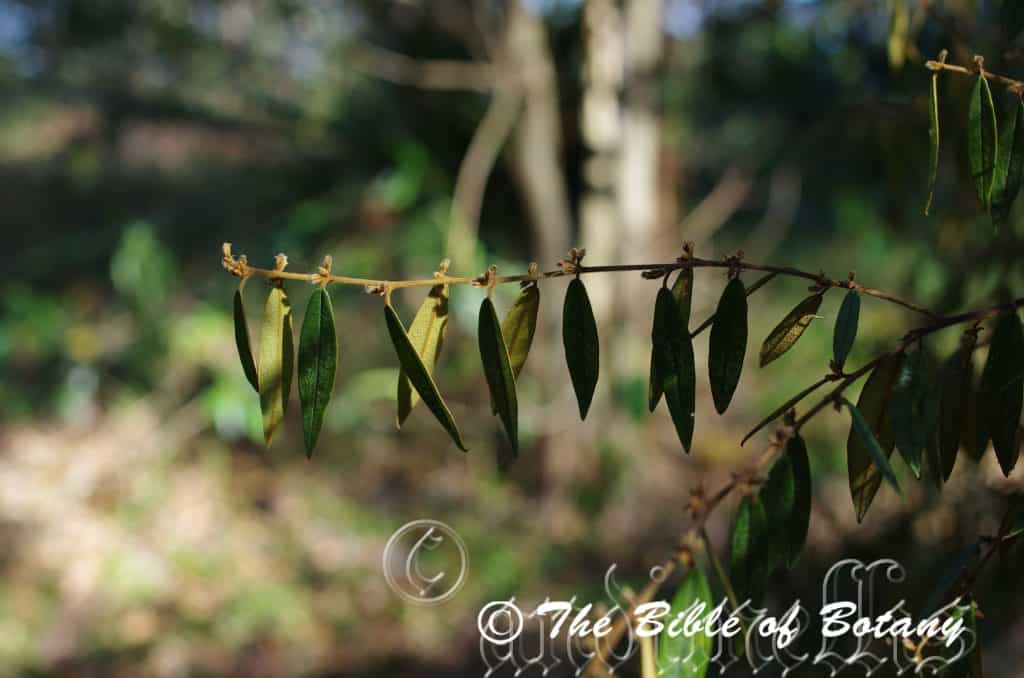
Grange Restoration Qld.
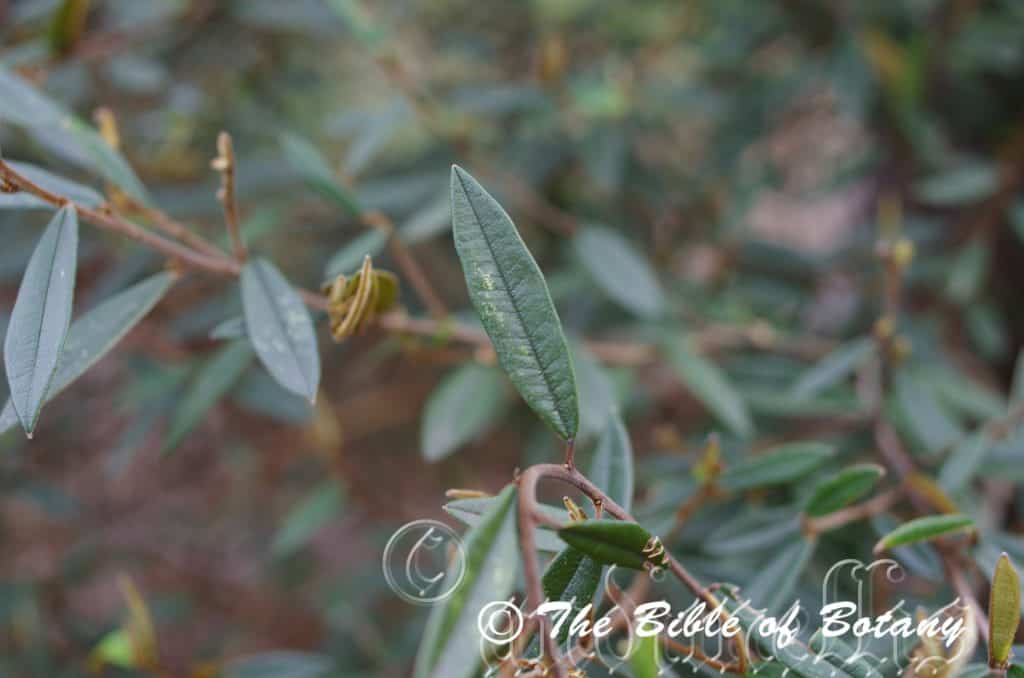
Mount Cootha Botanical Gardens Qld.
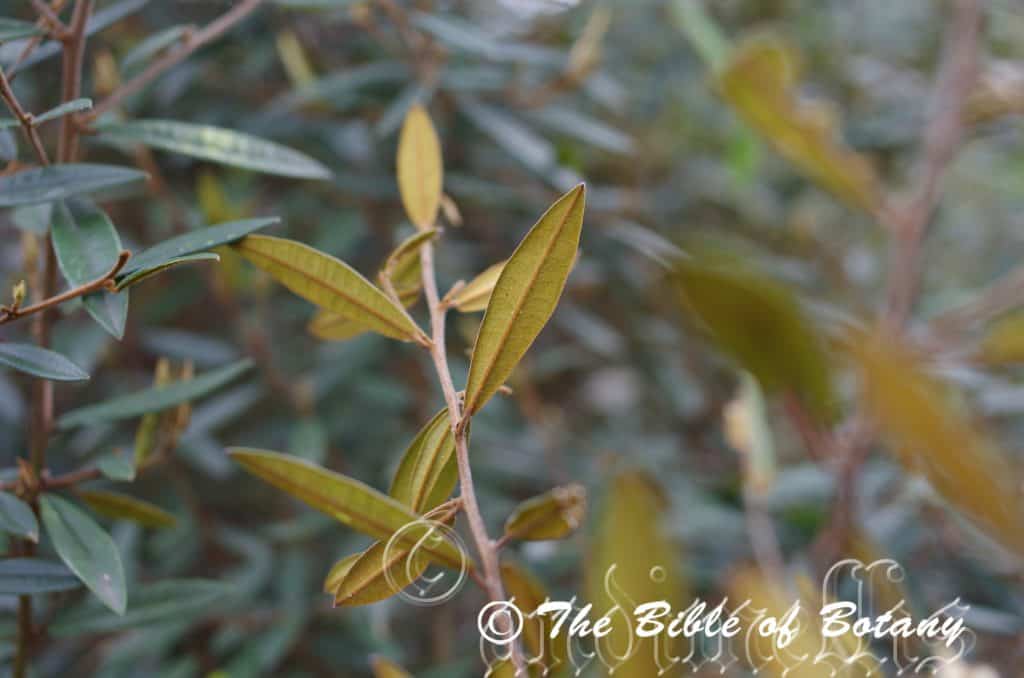
Mount Cootha Botanical Gardens Qld.
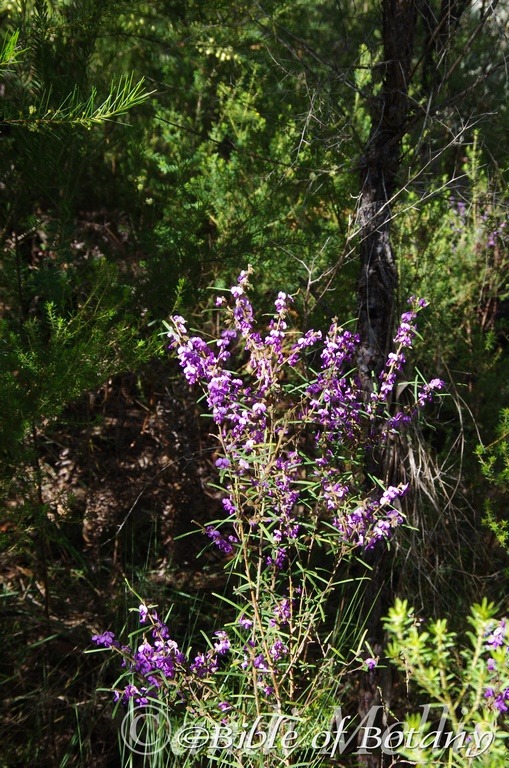
Banyabba National Park NSW
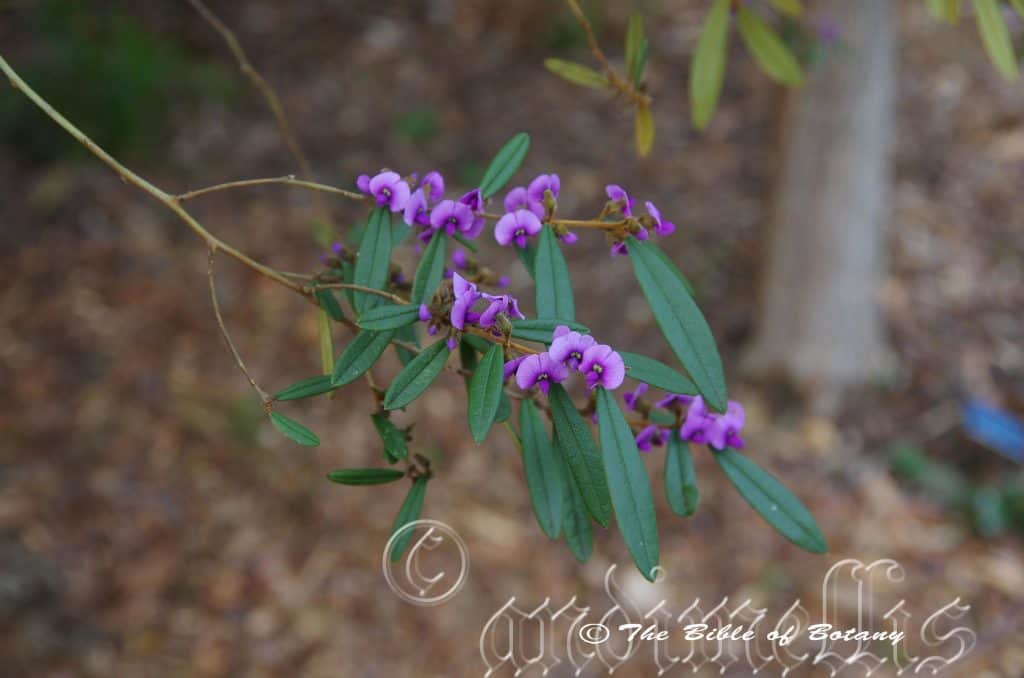
Banyabba National Park NSW
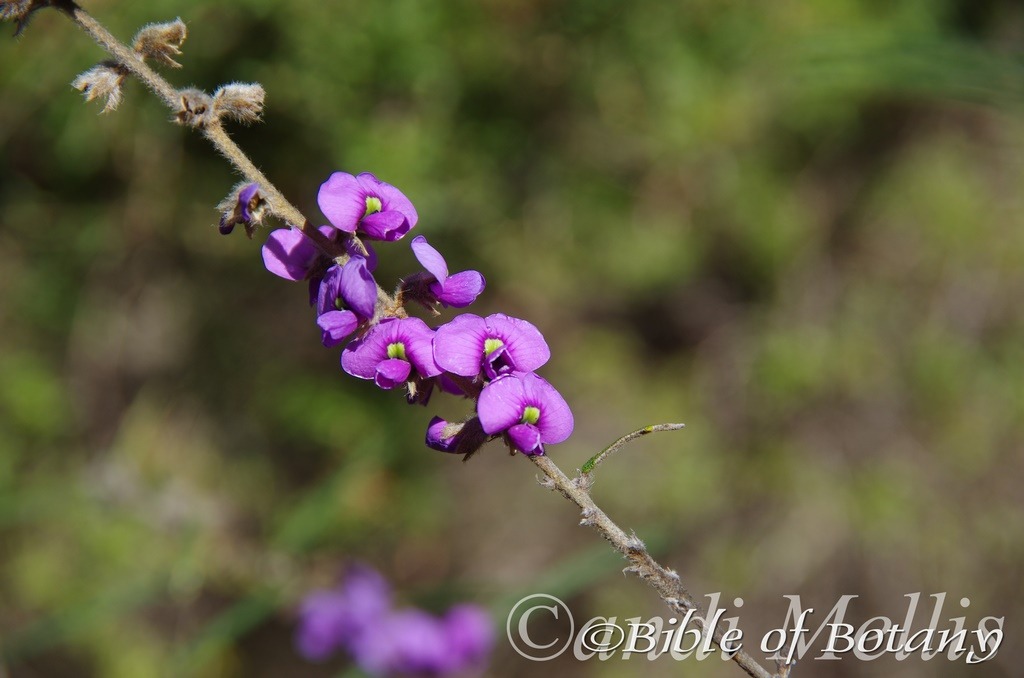
Banyabba National Park NSW
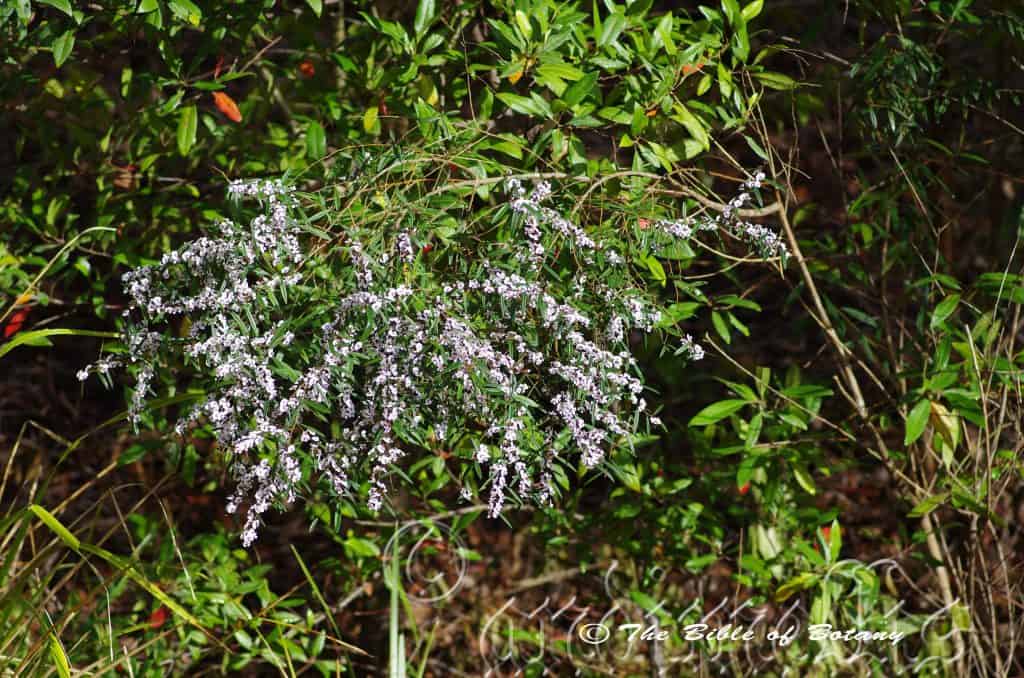
Nambour Qld.
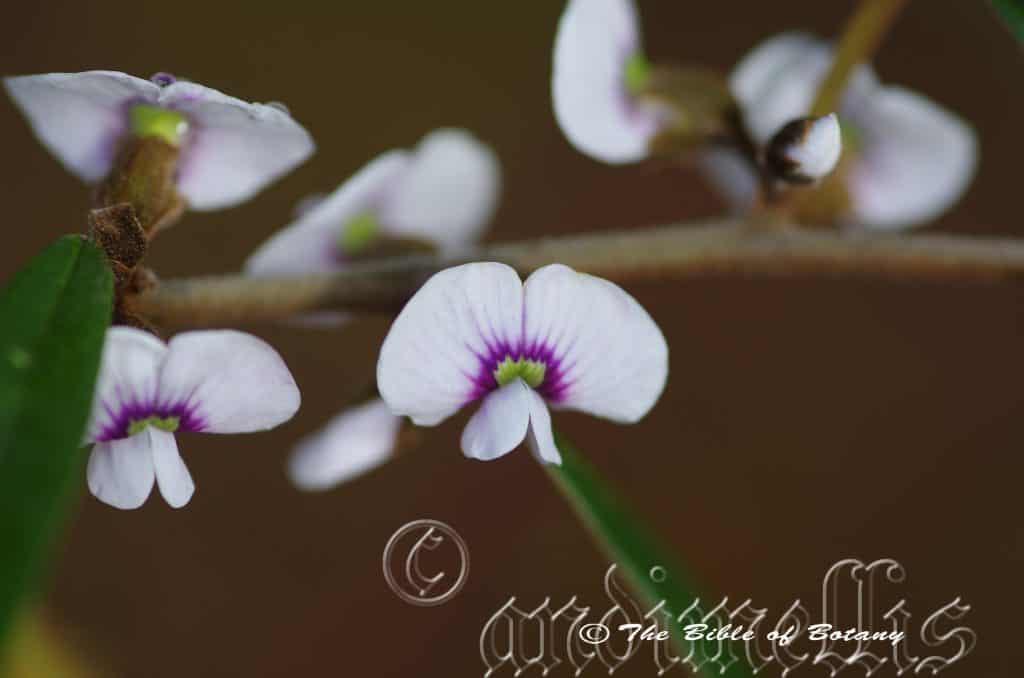
Nambour Qld.
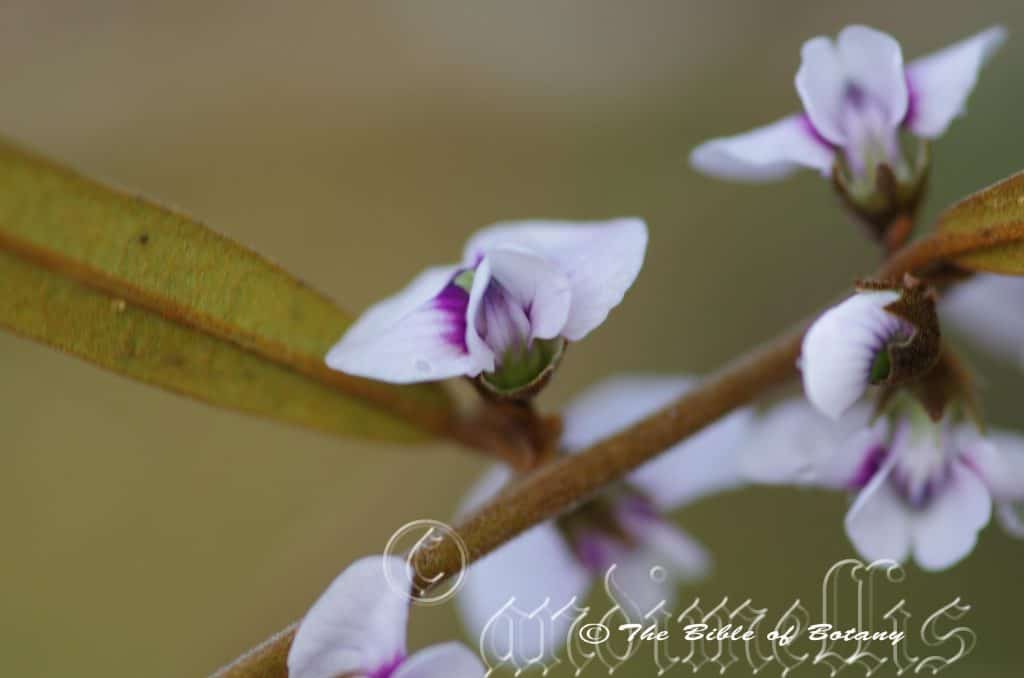
Nambour Qld.
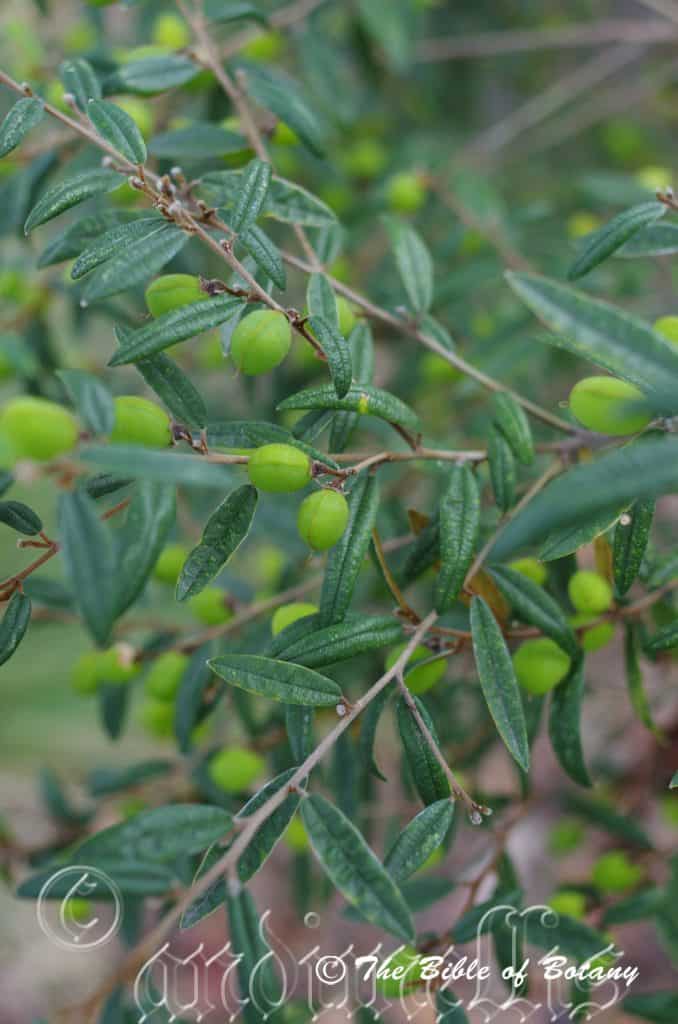
NCBG Coffs Harbour NSW
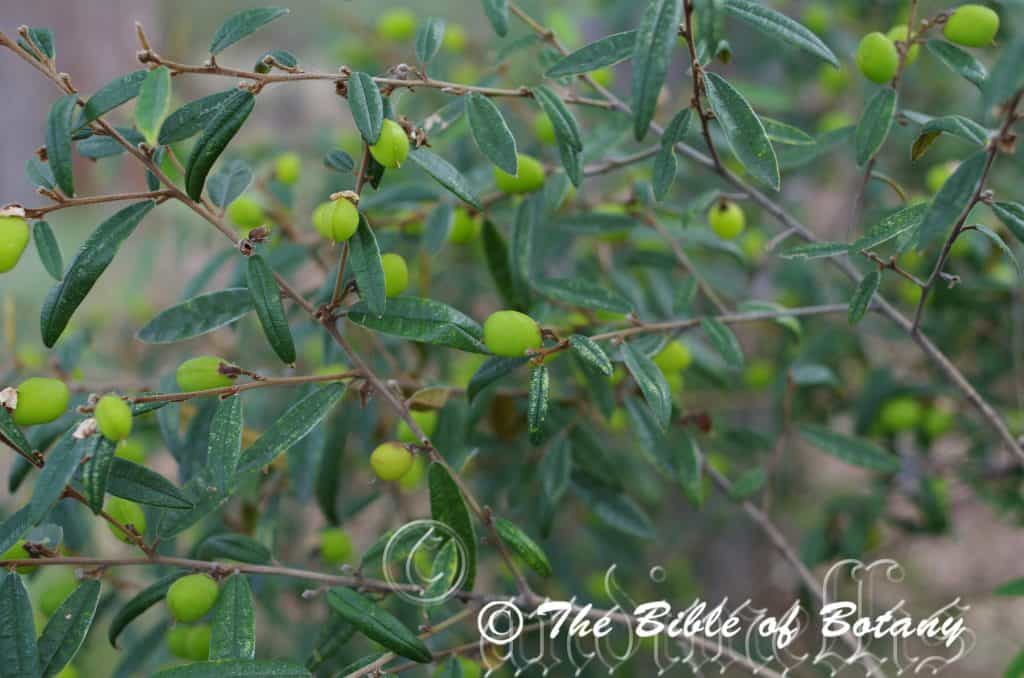
NCBG Coffs Harbour NSW
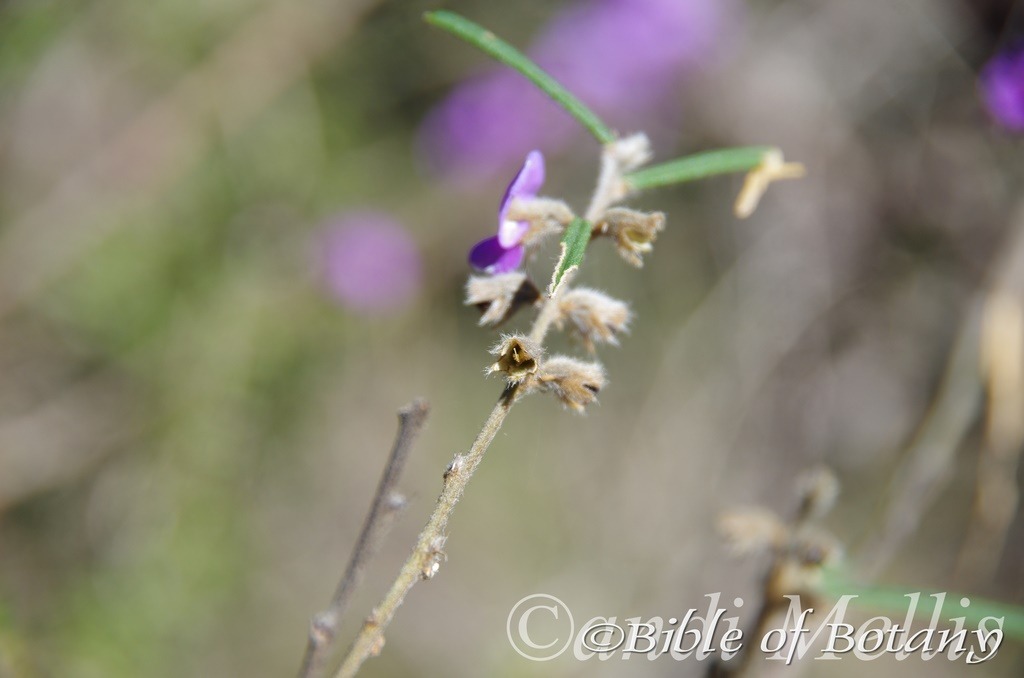
Banyabba National Park NSW
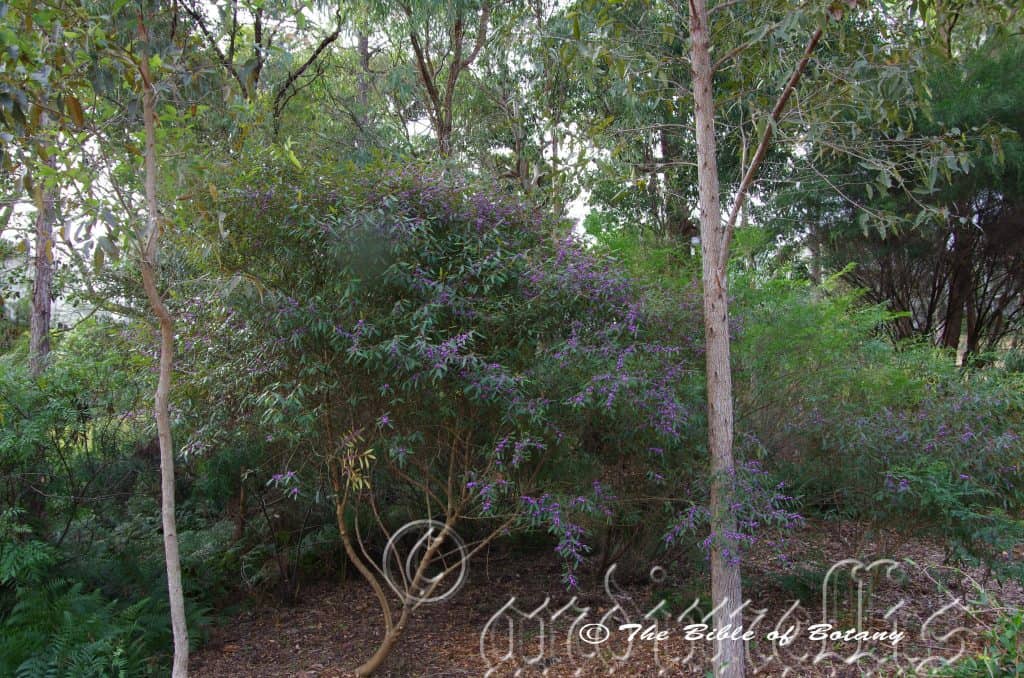
The Pinnacles NSW
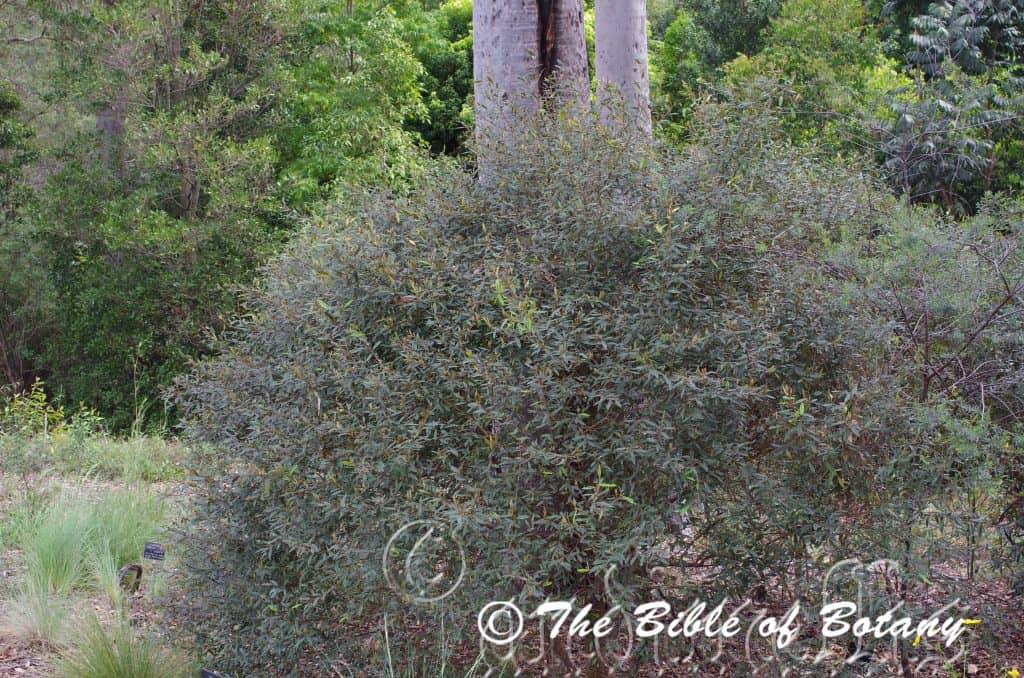
NCBG Coffs Harbour NSW
Hovea acutifolia
Classification:
Unranked: Eudicots
Unranked Rosids
Order: Fabales
Family: Fabaceae
Subfamily: Fabiodeae
Tribe: Brongniartieae
Genus: Is named in honour of Anton P. Hove; 1773-1798, who was a Polish botanist who collected plants for Sir Joseph Banks in West Africa, India and Crimea.
Species: From Acutatum, which is Latin for sharpened or to sharpen and Folium, which is Latin for foliage. It refers to leaves, which evenly, taper or gradually taper towards their apex.
Common Name: Purple Pea.
Distribution:
Hovea acutifolia is found south from Bundaberg in south eastern Queensland to west of Sydney in New South Wales. It is found on and east of the Great Dividing Range to the coast.
https://avh.ala.org.au/occurrences/search?taxa=Hovea+acutifolia#tab_mapView
Habitat Aspect Climate:
Hovea acutifolia prefer full sun to light dappled shade. It grows in more open riparian zones, adjacent to all types of rainforests and wet Eucalyptus forests. The altitude ranges from 2 meters ASL to 650 meters ASL.
The temperatures range from 2 degree in July to 36 degrees in January.
The rainfall ranges from lows of 500mm to an average of 1600mm annually.
Soil Requirements:
Hovea acutifolia prefers sandy loams, fatty sands, and gritty light clays to medium clays. The soils are derived from decomposed shale, brown basalt, black basalt, metamorphic rocks, granites or sandstones. The soils pH varies from 5.5pH through to a 6.5pH. It does not tolerate waterlogged soils however annual inundations or periodic rises in water tables are normal. Non saline soils to moderately saline soils are tolerated.
Height & Spread:
Wild Plants: 2m to 4m by 1m to 2.5m.
Characteristics:
Hovea acutifolia’s main stems are grey and densely covered in grey to pale rusty brown villous hairs. The branchlets are grey and densely covered in grey to pale rusty brown hirsute and villous hairs.
Hovea acutifolia’s alternate narrow elliptical leaves measure 30mm to 70mm in length by 3mm to 12mm in width. The bases are cuneate while the apexes are tapering acute. The discolourous laminas are deep sea-green and glabrous on the upper lamina while the lower lamina is paler and are moderately covered in pale rusty-brown pubescent hairs. The laminas curve upwards from the mid vein which forms a distinct channel. The mid vein is strongly prominent on the lower lamina. There is a reticulate venation of veins which are visible from the upper lamina. The laminas recurve slightly upwards from the mid vein to the margins while the margins are entire. The midvein is strongly prominent on the lower lamina and is visible from above. The petioles measure 2mm to 3mm in length and are covered in rusty villous hairs.
The inflorescences of Hovea acutifolia are born in clusters from the leaf axils. The flowers number about 1 to 4 per leaf axil. The calyx lobes measure 4mm to 5mm in length and are sparsely covered in rusty pannate hairs. The pale purple to deep purple standards have deeper purple veins spreading out from the base. The standards measure 9mm to 10mm in height by 6mm to 7mm in width. The wings measure 6mm to 7mm in length by 3.5mm to 4.5mm in height. The keel is only exposed along the bottom edge and measures 4mm to 5mm in length by 4mm to 5mm in depth. The pedicel measures 2mm to 3mm in length. Flowers appear from August to October.
Hovea acutifolia’s fruit is an oblong pod. The pods are 12mm to 16mm long by 10mm to 13mm in diameter. The styles are persistent on the pods. It is sparsely covered in white pannate and hirsute hairs. The green pods turn deep grey brown to black on ripening. The 2 dull black glabrous seeds measure 2mm to 3mm in length.
Wildlife:
Hovea acutifolia’s wildlife is unknown to the author however the seeds are frequently eaten by unknown weevil larvae.
Cultivation:
Hovea acutifolia is a very beautiful small slender shrub which is suitable for small gardens to the largest gardens. It is an excellent colourful addition for subtropical or warm temperate zone gardens. As a garden subject itwill grow to 2.5 meter to 3 meters in height by 1.5 meters to 2 meters in diameter when grown in the open.
It should be tipped pruned regularly as a juvenile plants to enhance bushiness and better flowering. Hovea respond well to tip pruning, additional native fertilizers and heavy mulching. Being a legume high nitrogenous fertilizers should be avoided. Hard pruning is not recommended as the plants do not respond quickly to the damage so it is better to trim the plants on a regular basis. It is fast growing and are cold tolerant to temperatures at least as low as minus 4 degrees. Heavy frosts will kill young unprotected plants.
It is most suitable for use around swimming pools, sunny courtyards, besides pathways, rockeries, along sandy clay banks or along driveways, screens, windbreaks or shelter belts for small native animals. If it is placed around a pool or sunny courtyard try to plant 2 or 3 in a straight row for a very formal look or use curves for the natural look. The choice of companion plants with bright yellow to cream flowers will contrast the deep purples beautifully. It would not matter whether fine or large leaf plants are used provided it is a pale green or lime green for an all year contrast. Hibbertia would look terrific as the ground and contrast brilliantly with the deep yellow flowers and give the Hovea with its deep violet flowers extra height and greater depth to the garden. The slender growth habit would make small areas look larger and walls look longer.
When mass or group planting Hovea acutifolia, use curves and irregular patterns so they can be viewed from different angles around the garden. Use them at the edge of a forest scene or close to several large trees with smaller Acacias in the foreground or larger Acacia species in the background. The contrast in foliages and flowers makes a very powerful display of colour for 2 months of the year.
Propagation:
Seeds: Hovea acutifolia seeds need to be treated before sowing. Pre-treat the seeds by light abrasion. This can be done by placing the seeds in an old sock, with coarse sand and placing them in the weekly wash, or scarifying by pouring boiling water over the seeds and allowing them to soak for several hours. Place the treated seeds into a seed raising mix. Cover them with 5mm of fine sand and keep moist not wet. Place the tray in a warm sunny position.
When the seedlings are 20mm to 30mm tall, prick them out and plant them into 50mm native tubes using a good organic mix.
Once the seedlings reach 150mm to 200mm in height they can be planted out into their permanent position.
Cuttings: Use 80mm to 100mm long half ripened material when growing from cuttings from the present season’s growth. Take them in mid-autumn or early spring. Remove half the leaves from the bottom section being careful not to tear the bark. Take a 10mm slice off the bark from the bottom of the cutting on one side.
1 Prepare the cutting mix by adding one third sharp clean river sand, one third peat and one third perlite. These ingredients are sterilize,
2 Select good material from non diseased plants,
3 Select semi green stems for cuttings. Look for a stem with two or three nodes,
4 Place the cutting on a flat, hard surface, and make a clean cut down one side of the cutting at the base for 10mm with a sharp sterile knife or razor blade. – This scarification of the node will increase the chances of roots emerging from this spot. Now remove all but one or two the leaves, leaving the apex leaves in tact. If the leaves are very large in proportion to the stem, cut off the apical halves.
5 Fill a saucer with water, and place a little medium strength rooting hormone into another container like a milk bottle top. Dip the node end of the cutting into the water and then into the rooting hormone. Tap off any excess hormone,
6 Use a small dipple stick or old pencil to poke a hole into the soilless potting mix. Ensure the hole is slightly larger than the stem diameter and be careful not to wipe the rooting hormone off the cuttings base, place the cuttings in a pattern ensuring the cuttings are not touching each other,
7 I like to place the pots in Plastic bags to help maintain temperature and moisture. Place in a semi shaded place like under 50mm shade cloth.
8 When the cuttings have struck, open the bag to allow air circulation for a few days to a week,
9 Once hardened off remove the cuttings from the bag and allow to further hardening for a few more days,
10 Transplant into a good potting mix to grow on.
Fertilize using Seaweed, fish emulsion or organic chicken pellets soaked in water and apply the liquid on an alternate basis. Fertilize every 2 months until the plants are well established then on an annual basis in September to October to maintain good health, vigour and better flowering.
Further Comments from Readers:
Hi reader, it seems you use The Bible of Botany a lot. That’s great as we have great pleasure in bringing it to you! It’s a little awkward for us to ask, but our first aim is to purchase land approximately 1,600 hectares to link several parcels of N.P. into one at The Pinnacles NSW Australia, but we need your help. We’re not salespeople. We’re amateur botanists who have dedicated over 30 years to saving the environment in a practical way. We depend on donations to reach our goal. If you donate just $5, the price of your coffee this Sunday, We can help to keep the planet alive in a real way and continue to bring you regular updates and features on Australian plants all in one Botanical Bible. Any support is greatly appreciated. Thank you.
In the spirit of reconciliation we acknowledge the Bundjalung, Gumbaynggirr and Yaegl and all aboriginal nations throughout Australia and their connections to land, sea and community. We pay our respect to their Elders past, present and future for the pleasures we have gained.
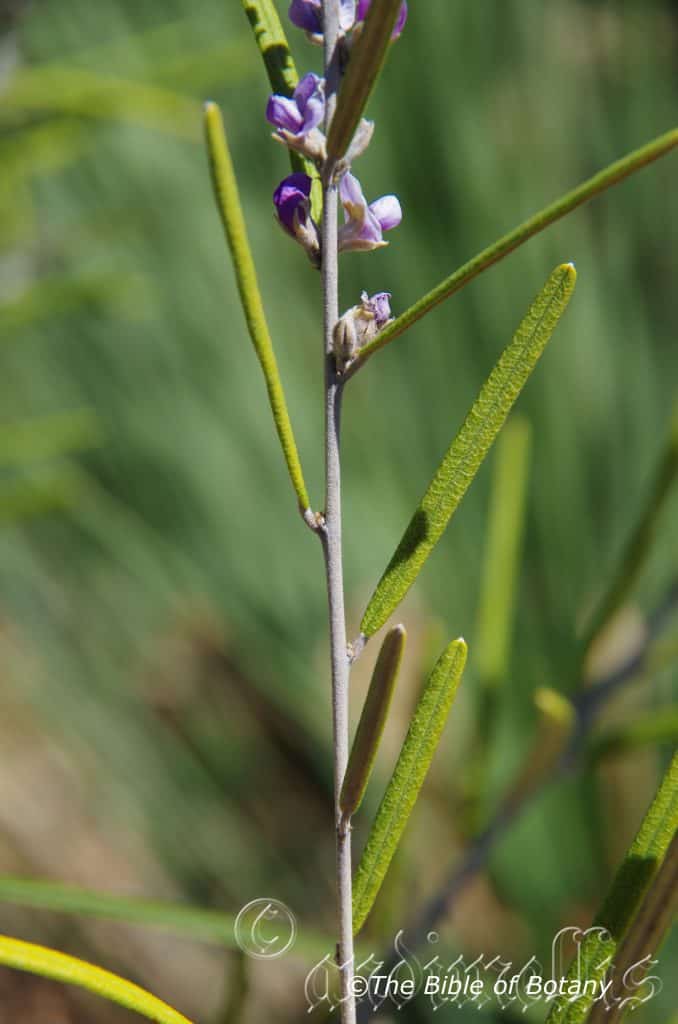
Townsville Qld.
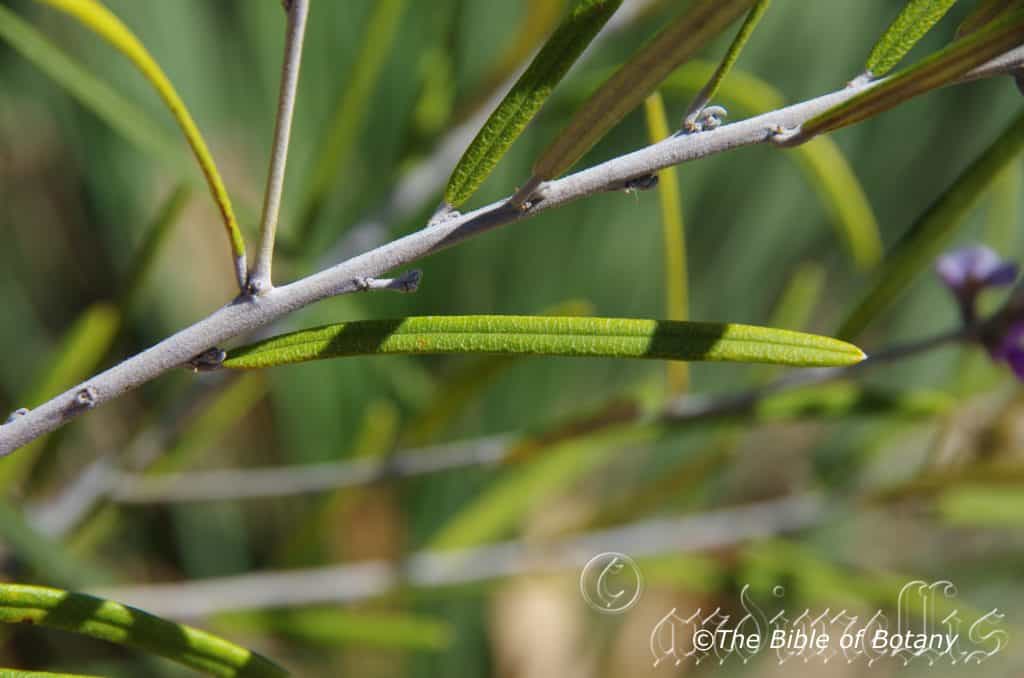
Townsville Qld.
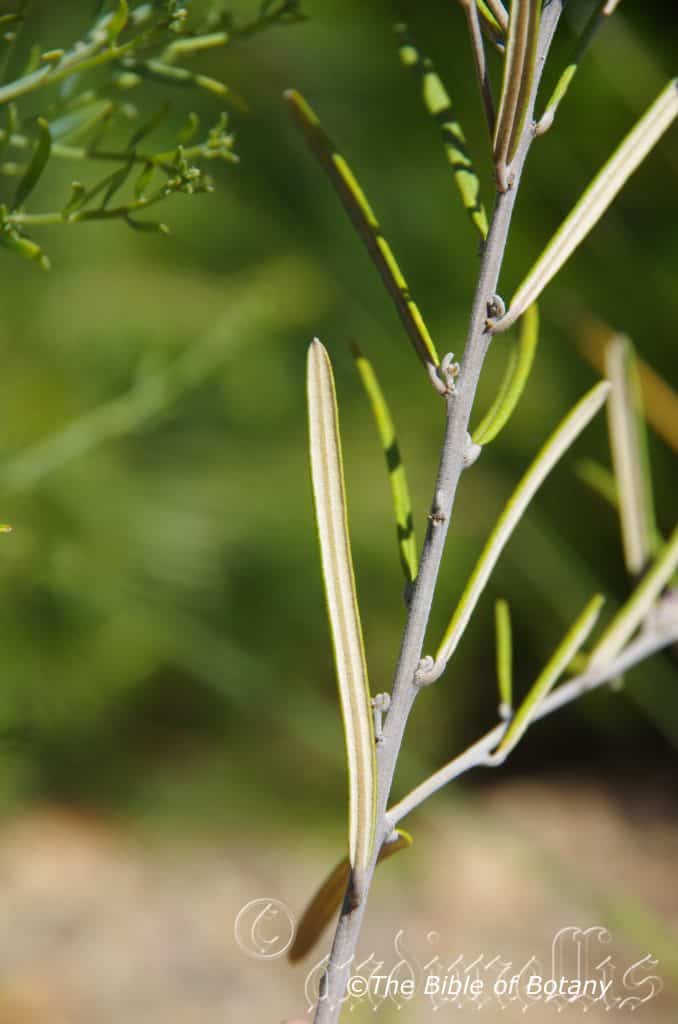
Townsville Qld.
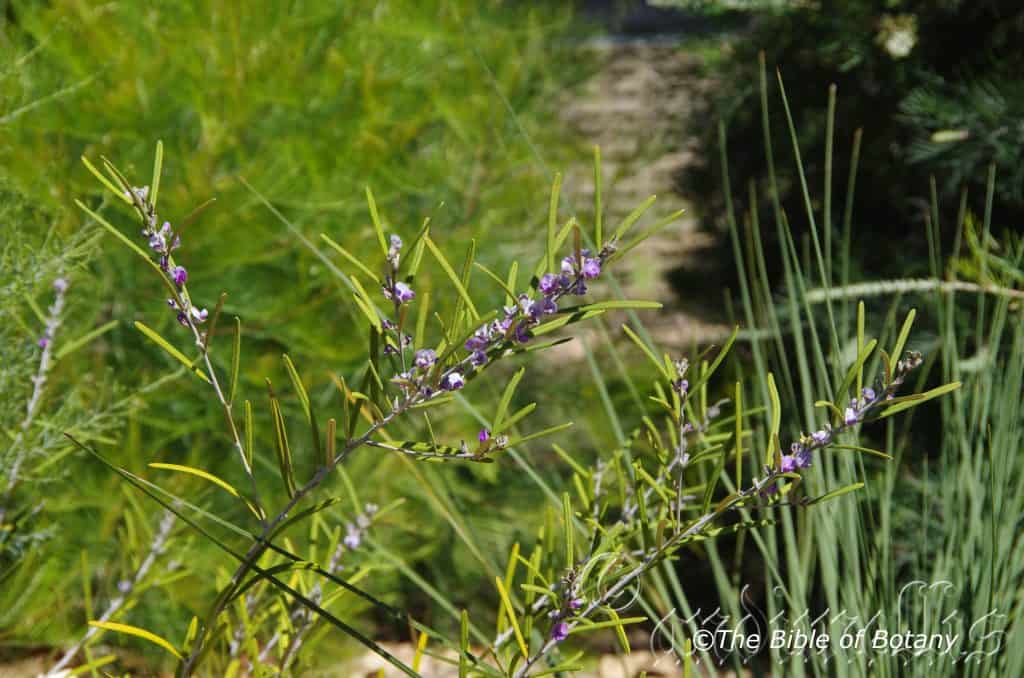
Townsville Qld.
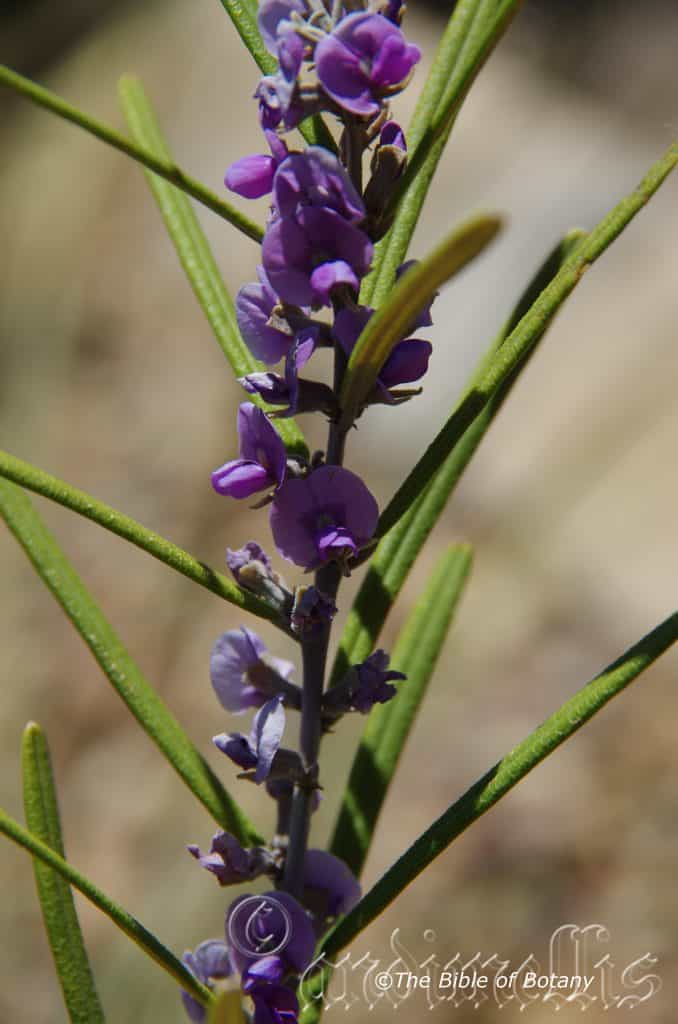
Townsville Qld.
Hovea densivellosa
Classification:
Unranked: Eudicots
Unranked Rosids
Order: Fabales
Family: Fabaceae
Subfamily: Fabiodeae
Tribe: Brongniartieae
Genus: Is named in honour of Anton P. Hove; 1773-1798, who was a Polish botanist who collected plants for Sir Joseph Banks in West Africa, India and Crimea.
Species: From Dasús which is Ancient Greek or later Densus, which is Latin for hairy, shaggy or dense and Villōsa, which is Latin for a fleece. It refers to organs or structures, which are densely covered in long hairy, shaggy wool like hairs.
Common Name: Purple Pea.
Distribution:
Hovea densivellosa is found in several disjunct populations south from the Windsor Tablelands to Many Peaks range near Miriam Vale in eastern. It is mainly found on and east of the Great Dividing Range to the coast.
https://avh.ala.org.au/occurrences/search?taxa=Hovea+densivellosa#tab_mapView
Habitat Aspect Climate:
Hovea densivellosa prefer full sun to light dappled shade. It grows on gentle to steep slopes, ridges and crests in more open Eucalyptus forests and open woodlands. The altitude ranges from 20 meters ASL to 1100 meters ASL.
The temperatures range from 4 degree in July to 40 degrees in January.
The rainfall ranges from lows of 800mm to an average of 3000mm annually.
Soil Requirements:
Hovea densivellosa prefers sandy loams, fatty sands, and gritty light clays to medium clays. The soils are derived from decomposed brown rhyolitic basalts, granites or at times sandstones. The soils pH varies from 4.5pH through to a 6pH. It does not tolerate waterlogged soils. Non saline soils to moderately saline soils are tolerated.
Height & Spread:
Wild Plants: 2m to 2m by 1m to 1.5m.
Characteristics:
All measurements have been taken from a single plant and community growing on the Paluma Range National Park.
The main stems of Hovea densivellosa are grey and densely covered in pale grey to pale rusty brown villous hairs. The juvenile stems are grey-green and densely covered in grey to pale rusty brown hirsute and villous hairs.
Hovea densivellosa has alternate narrow linear leaves measure 60mm to 80mm in length by 5mm to 6.5mm in width. The petioles measure 1.5mm to 2mm in length and are covered in rusty villous hairs. The bases are rounded while the apexes are obtuse with a short, broad apiculate tip. The discolourous laminas are grass-green and rugose on the upper lamina while the lower lamina is paler and are densely covered in pale rusty-brown villose hairs. The laminas are convex from mid vein to the margins and are revolute. The margins are entire. The mid vein is strongly prominent on the lower lamina and is depressed on the upper lamina.
The sessile or subsessile inflorescences of Hovea densivellosa are born in pairs or at times singularly or in small clusters of three from the leaf axils. The calyx measures 3mm to 4mm in length, while the lobes measure 2.5mm to 4mm in length and are sparsely covered in rusty pannate hairs. The upper lobe is broadly truncate while the lower lobes are narrow acute and are densely covered in pale rusty-brown villose hairs. The pale purplish-pink to deep purplish-pink standards have a small emarginate apex and measure 8mm to 9mm in height by 9mm to 10mm in width. The purplish-pink wings measure 6mm to 7mm in length by 3mm to 3.5mm in width. The purplish-pink keel petals measure 4mm to 5mm in length by 2mm to 2.5mm in width. Flowers appear in July.
Hovea denivellosa’s fruit is an oblong pod.
Wildlife:
Hovea densevillosa’s wildlife is unknown to the author.
Cultivation:
Hovea densivellosa is a slender, small open shrub which is suitable for small gardens to the largest gardens. It is an excellent colourful addition for subtropical or warm temperate zone gardens. As a garden subject it will grow to 1 meter to 2 meters in height by 1.5 meters to 2 meters in diameter when grown in the open.
It should be tipped pruned regularly as a juvenile plants to enhance bushiness and better flowering. Hovea species respond very well to tip pruning, additional native fertilizers and heavy mulching. Being a legume high nitrogenous fertilizers should be avoided. Hard pruning is not recommended as the plants do not respond quickly to the damage so it is better to trim the plants on a regular basis. It is fast growing and are cold tolerant to temperatures at least as low as minus 4 degrees. Heavy frosts will kill young unprotected plants.
It is most suitable for use on steeper dry, rockeries, along sandy clay banks or along driveways. The choice of companion plants with bright yellow to cream flowers will contrast the deep purples beautifully. It would not matter whether fine or large leaf plants are used provided it is a pale green or lime green for an all year contrast. Mixed Hibbertia species like Hibbertia diffusa and Hibbertia pedunculata would look terrific as the ground cover and contrast brilliantly with the deep yellow flowers and give the Hovea densivellosa with its deep violet flowers, giving extra height and greater depth to the garden. The slender growth habit would make small areas look larger and walls look longer.
When mass or group planting Hovea densivellosa, use curves and irregular patterns so they can be viewed from different angles around the garden. Use it at the edge of a forest scene or close to several large trees with smaller Acacias species like Acacia filicifolia or Acacia suaveolens in the foreground or larger Acacias like Acacia fimbriata or Acacia floribunda in the background. The contrast in foliages and flowers makes a very powerful display of colour for 2 months of the year.
Propagation:
Seeds: Hovea densivellosa seeds need to be treated before sowing. Pre-treat the seeds by light abrasion. This can be done by placing the seeds in an old sock, with coarse sand and placing them in the weekly wash, or scarifying by pouring boiling water over the seeds and allowing them to soak for several hours. Place the treated seeds into a seed raising mix. Cover them with 5mm of fine sand and keep moist not wet. Place the tray in a warm sunny position.
When the seedlings are 20mm to 30mm tall, prick them out and plant them into 50mm native tubes using a good organic mix.
Once the seedlings reach 150mm to 200mm in height they can be planted out into their permanent position.
Cuttings: Use 80mm to 100mm long half ripened material when growing from cuttings from the present season’s growth. Take them in mid-autumn or early spring. Remove half the leaves from the bottom section being careful not to tear the bark. Take a 10mm slice off the bark from the bottom of the cutting on one side.
1 Prepare the cutting mix by adding one third sharp clean river sand, one third peat and one third perlite. These ingredients are sterilize,
2 Select good material from non diseased plants,
3 Select semi green stems for cuttings. Look for a stem with two or three nodes,
4 Place the cutting on a flat, hard surface, and make a clean cut down one side of the cutting at the base for 10mm with a sharp sterile knife or razor blade. – This scarification of the node will increase the chances of roots emerging from this spot. Now remove all but one or two the leaves, leaving the apex leaves in tact. If the leaves are very large in proportion to the stem, cut off the apical halves.
5 Fill a saucer with water, and place a little medium strength rooting hormone into another container like a milk bottle top. Dip the node end of the cutting into the water and then into the rooting hormone. Tap off any excess hormone,
6 Use a small dipple stick or old pencil to poke a hole into the soilless potting mix. Ensure the hole is slightly larger than the stem diameter and be careful not to wipe the rooting hormone off the cuttings base, place the cuttings in a pattern ensuring the cuttings are not touching each other,
7 I like to place the pots in Plastic bags to help maintain temperature and moisture. Place in a semi shaded place like under 50mm shade cloth.
8 When the cuttings have struck, open the bag to allow air circulation for a few days to a week,
9 Once hardened off remove the cuttings from the bag and allow to further hardening for a few more days,
10 Transplant into a good potting mix to grow on.
Fertilize using Seaweed, fish emulsion or organic chicken pellets soaked in water and apply the liquid on an alternate basis. Fertilize every 2 months until the plants are well established then on an annual basis in September to October to maintain good health, vigour and better flowering.
Further Comments from Readers:
Hi reader, it seems you use The Bible of Botany a lot. That’s great as we have great pleasure in bringing it to you! It’s a little awkward for us to ask, but our first aim is to purchase land approximately 1,600 hectares to link several parcels of N.P. into one at The Pinnacles NSW Australia, but we need your help. We’re not salespeople. We’re amateur botanists who have dedicated over 30 years to saving the environment in a practical way. We depend on donations to reach our goal. If you donate just $5, the price of your coffee this Sunday, We can help to keep the planet alive in a real way and continue to bring you regular updates and features on Australian plants all in one Botanical Bible. Any support is greatly appreciated. Thank you.
In the spirit of reconciliation we acknowledge the Bundjalung, Gumbaynggirr and Yaegl and all aboriginal nations throughout Australia and their connections to land, sea and community. We pay our respect to their Elders past, present and future for the pleasures we have gained.
Hovea graniticola
Classification:
Hovea graniticola
Unranked Rosids
Order: Fabales
Family: Fabaceae
Subfamily: Fabiodeae
Tribe: Brongniartieae
Genus: Is named in honour of Anton P. Hove; 1773-1798, who was a Polish botanist who collected plants for Sir Joseph Banks in West Africa, India and Crimea.
Species: From Granitica which is Latin for a type of intrusive based rocks that decompose down to rather course silica sands. It refers to plants, which prefer to grow on granitic sands or between Granit boulders.
Common Name: GranitePurple Pea.
Distribution:
Hovea graniticola is found south from Eummundi in south eastern Queensland to Orange in far north eastern New South Wales on the Granite Belt. It is mainly found on the western side of the Great Dividing Range on the Range with a few populations near the coast.
https://avh.ala.org.au/occurrences/search?taxa=Hovea+granitica#tab_mapView
Habitat Aspect Climate:
Hovea graniticola prefers full sun to light dappled shade. It grows in more open riparian zones, moist Eucalyptus forests Eucalyptus woodlands or sclerophyll woodland heaths. The altitude ranges from 450 meters ASL to 1050 meters ASL.
The temperatures range from minus 4 degrees in July to 30 degrees in January.
The rainfall ranges from lows of 600mm to an average of 1000mm annually.
Soil Requirements:
Hovea graniticola prefers better quality soils from sandy loams, alluvial flats to light clays. The soils are usually derived from partially decomposed granites. The soils pH varies from 5pH through to a 6pH. It does not tolerate waterlogged soils however annual inundations or periodic rises in water tables are normal. Non saline soils to moderately saline soils are tolerated.
Height & Spread:
Wild Plants: 1.2m to 2.5m by 1m to 2m.
Characteristics:
Hovea graniticola’s main stems are grey to deep grey and densely covered in brown or grey-brown pannate and hirtellous hairs. The branchlets are grey to deep grey and densely covered in brown or grey-brown villous and hirtellous hairs.
Hovea graniticola’s alternate, narrow oblong to linear leaves measure 25mm to 50mm in length by 3mm to 6mm in width. The bases are rounded while the apexes are acute or obtuse with a mucronate tip to 1.5mm in length. The discolourous laminas are deep green and glabrous while the lower lamina is densely covered in rusty-orange villous and hirsute hairs. The laminas are strongly arched from the mid vein. The margins are entire and slightly recurved at the edge. The midvein is strongly prominent on the lower lamina and is visible from the upper lamina with a visible reticulated venation. The petioles measure 2mm to 3.5mm in length and are covered in rusty pubescent hairs. The stipules measure 2mm to 5mm and are densely covered in rusty-orange villous and hirsute hairs.
The inflorescences of Hovea graniticola are born in pairs from the leaf axils. The calyx lobes measure 4.5mm to 6mm in length and are sparsely covered in rusty-orange hirtellous hairs. The pale to deep purple standards have deeper purple veins spreading out from the base. The standards measure 9mm to 10mm high by 6mm to 7mm wide while the wings measure 6mm to 7mm in length by 3.5mm to 4.5mm in height. The keel is totally enclosed. The pedicel measures 0.5mm to 3mm in length. Flowers appear from August to October.
Hovea graniticola’s fruit is a flattened oblong pod. The styles are persistent on the pods. The pods measure 10mm to 13mm in length by 8mm to 10mm in height by 3mm to 4mm in width. It is sparsely covered in rusty hirtellous hairs. The green pods turn deep grey brown to black on ripening. The dull black glabrous seeds measure 2mm to 3mm in length.
Wildlife:
Hovea graniticola’s wildlife is unknown to the author.
Cultivation:
Hovea graniticola is a very beautiful small slender shrub which is suitable for small gardens to the largest gardens. It is an excellent colourful addition for sub tropical or warm temperate zone gardens. As a garden subject it will grow to 2 meter to 2.5 meters in height by 1.5 meters to 2 meters in diameter when grown in the open.
It can be tipped pruned regularly to enhance bushiness and better flowering. Hovea graniticola responds well to tip pruning, additional native fertilizers and heavy mulching. Being legume high nitrogenous fertilizers should be avoided. Hard pruning is not recommended as it does not respond quickly to the damage so it is better to trim the plants on a regular basis. It is fast growing and are cold tolerant to temperatures at least as low as minus 6 degrees. Heavy frosts will kill young unprotected plants in their first year.
It is most suitable for use around swimming pools, sunny courtyards, besides pathways, rockeries, along sandy clay banks or along driveways, screens, windbreaks or shelter belts for small native animals. If it is placed around a pool or sunny courtyard try to plant 2 or 3 in a straight row for a very formal look or use curves for the natural look. The choice of companion plants with bright yellow to cream flowers will contrast the deep purples beautifully. It would not matter whether fine or large leaf plants are used provided it is a pale green or lime green for an all year contrast. Hibbertia diffusa would look terrific as the ground cover and contrast brilliantly with the deep yellow flowers and give the Hovea graniticola with its deep violet flowers extra height and greater depth to the garden. The slender growth habit would make small areas look larger and walls look longer.
When mass or cluster planting Hovea graniticola, use curves and irregular patterns so they can be viewed from different angles around the garden. Use it at the edge of a forest scene or close to several large trees with smaller Acacias species like Acacia filicifolia or Acacia suaveolens in the foreground or larger Acacias like Acacia fimbriata or Acacia floribunda in the background. will give great colour contrast for several months of the year.
Propagation:
Seeds: Hovea graniticola seeds need to be treated before sowing. Pre-treat the seeds by light abrasion. This can be done by placing the seeds in an old sock, with coarse sand and placing them in the weekly wash, or scarifying by pouring boiling water over the seeds and allowing them to soak for several hours. Place the treated seeds into a seed raising mix. Cover them with 5mm of fine sand and keep moist not wet. Place the tray in a warm sunny position.
When the seedlings are 20mm to 30mm tall, prick them out and plant them into 50mm native tubes using a good organic mix.
Once the seedlings reach 150mm to 200mm in height they can be planted out into their permanent position.
Cuttings: Use 70mm to 100mm long half ripened material when growing from cuttings from the present season’s growth. Take them in mid-autumn or early spring. Remove half the leaves from the bottom section being careful not to tear the bark. Take a 10mm slice off the bark from the bottom of the cutting on one side.
1 Prepare the cutting mix by adding one third sharp clean river sand, one third peat and one third perlite. These ingredients are sterilize,
2 Select good material from non diseased plants,
3 Select semi green stems for cuttings. Look for a stem with two or three nodes,
4 Place the cutting on a flat, hard surface, and make a clean cut down one side of the cutting at the base for 10mm with a sharp sterile knife or razor blade. – This scarification of the node will increase the chances of roots emerging from this spot. Now remove all but one or two the leaves, leaving the apex leaves in tact. If the leaves are very large in proportion to the stem, cut off the apical halves.
5 Fill a saucer with water, and place a little medium strength rooting hormone into another container like a milk bottle top. Dip the node end of the cutting into the water and then into the rooting hormone. Tap off any excess hormone,
6 Use a small dipple stick or old pencil to poke a hole into the soilless potting mix. Ensure the hole is slightly larger than the stem diameter and be careful not to wipe the rooting hormone off the cuttings base, place the cuttings in a pattern ensuring the cuttings are not touching each other,
7 I like to place the pots in Plastic bags to help maintain temperature and moisture. Place in a semi shaded place like under 50mm shade cloth.
8 When the cuttings have struck, open the bag to allow air circulation for a few days to a week,
9 Once hardened off remove the cuttings from the bag and allow to further hardening for a few more days,
10 Transplant into a good potting mix to grow on.
Fertilize using Seaweed, fish emulsion or organic chicken pellets soaked in water and apply the liquid on an alternate basis. Fertilize every 2 months until the plants are well established then on an annual basis in September to October to maintain good health, vigour and better flowering.
Further Comments from Readers:
Hi reader, it seems you use The Bible of Botany a lot. That’s great as we have great pleasure in bringing it to you! It’s a little awkward for us to ask, but our first aim is to purchase land approximately 1,600 hectares to link several parcels of N.P. into one at The Pinnacles NSW Australia, but we need your help. We’re not salespeople. We’re amateur botanists who have dedicated over 30 years to saving the environment in a practical way. We depend on donations to reach our goal. If you donate just $5, the price of your coffee this Sunday, We can help to keep the planet alive in a real way and continue to bring you regular updates and features on Australian plants all in one Botanical Bible. Any support is greatly appreciated. Thank you.
In the spirit of reconciliation we acknowledge the Bundjalung, Gumbaynggirr and Yaegl and all aboriginal nations throughout Australia and their connections to land, sea and community. We pay our respect to their Elders past, present and future for the pleasures we have gained.

Banyabba National Park NSW
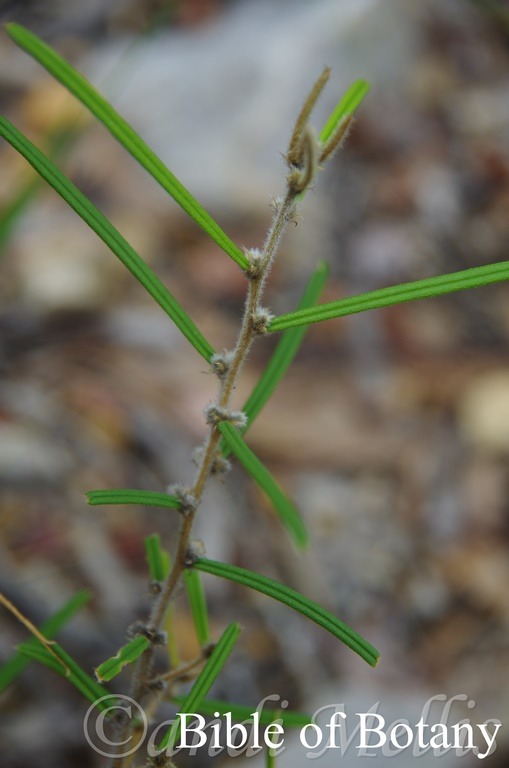
Banyabba National Park NSW

Banyabba National Park NSW

Banyabba National Park NSW
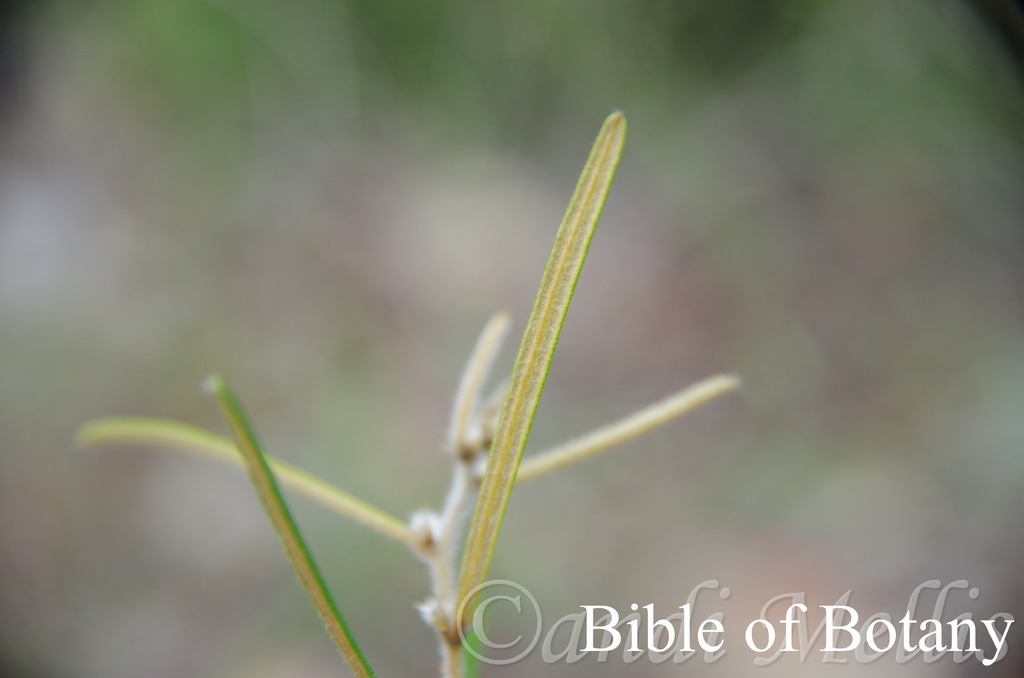
Banyabba National Park NSW

Author’s Garden The Pinnacles NSW

Author’s Garden The Pinnacles NSW
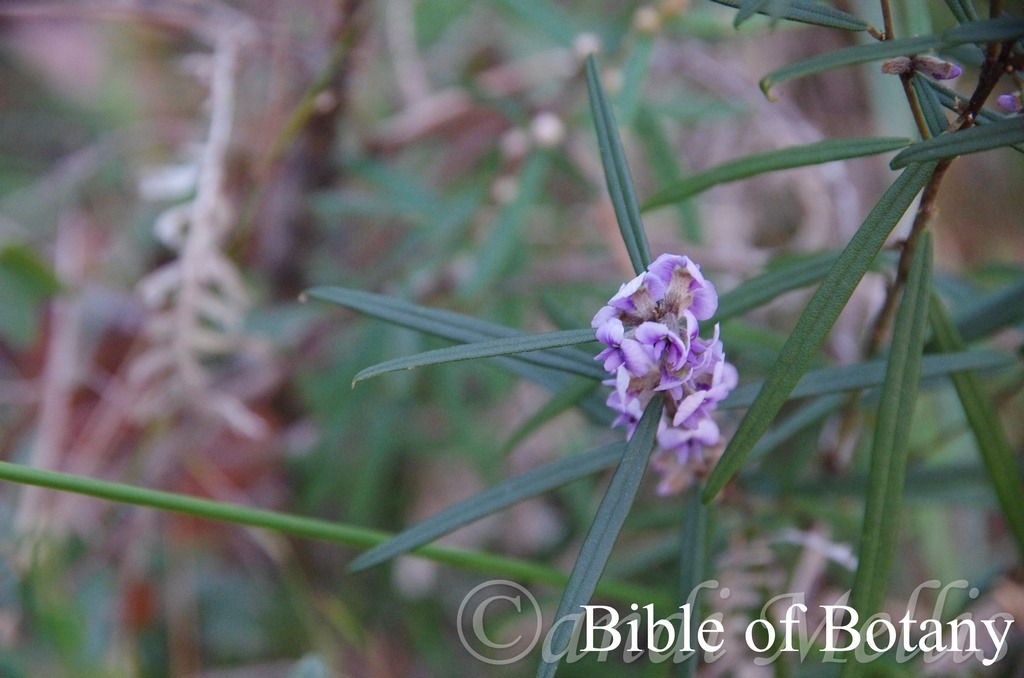
Author’s Garden The Pinnacles NSW
Hovea heterophylla
Classification:
Unranked: Eudicots
Unranked Rosids
Order: Fabales
Family: Fabaceae
Subfamily: Fabiodeae
Tribe: Brongniartieae
Genus: Is named in honour of Anton P. Hove; 1773-1798, who was a Polish botanist who collected plants for Sir Joseph Banks in West Africa, India and Crimea.
Species: From Heteros, which is Ancient Greek for other or different and Phullon/Phýllon, which is Ancient Greek for a leaf. It refers to leaves, which are of different sizes and or shapes often on the same plant or in the same population.
Common Name:
Distribution:
Hovea heterophylla is widespread south and east of a line from Rainbow Beach in southern coastal Queensland to Angelsea and Urquhats Bluff in coastal southern Victoria. It is also found south from Bendigo to the South Australian border.
In Tasmania it is found east of a line from East Sassafras near Latrobe in the north to Derwent Bridge and Kingborough in the south.
https://avh.ala.org.au/occurrences/search?taxa=Hovea+heterophylla#tab_mapView
Habitat Aspect Climate:
Hovea heterophylla prefers full sun to light dappled shade. It grows in dry open sclerophyll forests, woodlands and adjacent to coastal heaths. The altitude ranges from 2meters ASL to 1250 meters ASL.
The temperatures range from minus 4 degree in August to 39 degrees in January.
The rainfall ranges from lows of 350mm to an average of 1800mm annually.
Soil Requirements:
Hovea heterophylla prefers sandy loams, fatty sands, gritty light clays, medium clays or podzolics. The soils are usually derived from decomposed shale, brown basalt, black basalt, metamorphic rocks, granite and sandstone. The soils pH varies from 5.5pH through to a 6.5pH. It does not tolerate waterlogged soils however annual inundations or periodic rises in water tables are normal. Non saline soils to moderately saline soils are tolerated.
Height & Spread:
Wild Plants: 0.3m to 0.5m by 0.5m to 1m.
Characteristics:
Hovea heterophylla’s main stems are pale brown and densely covered in pale grey, silvery-fawn to fawn hirsute appressed and antrorse hairs. The stems are brown and densely covered in pale grey, silvery-fawn to fawn hirsute appressed hairs.
Hovea heterophylla’s alternate narrow alternate, dimorphic leaves are elliptical to orbicular on the older and lower stems while the upper stems are linear, lanceolate or very narrow elliptical. The leaves measure 6mm to 65mm in length by 1.5mm to 17mm in width. The stipules and petioles are densely covered in pale grey, silvery-fawn to fawn tomentose hairs. The narrow ovate to lanceolate stipules measure 1mm to 2mm in length while the petioles measure 1.5mm to 3mm in length.The bases are rounded while the apexes are acute and strongly hooked downwards.
The discolourous laminas are sea-green and glabrous with small 0.1mm to 0.3mm areoles on the upper lamina while the lower laminas are paler and sparsely to densely covered in covered in pale grey, silvery-fawn to fawn hirsute appressed and antrorse hairs. The laminas recurve lightly upwards from the mid vein to the margins while the margins are entire. The mid vein is strongly prominent on the lower lamina and is clearly visible from the upper lamina. The lateral and secondary veins are finely reticulate.
The inflorescences of Hovea heterophylla are born in small clusters of 1 to 3 usually 2 individual flowers from the leaf axils. The calyx lobes measure 4mm to 5mm in length and are sparsely covered in rusty pannate hairs. The pale purple to deep purple standards have deeper purple veins spreading out from the base. The standards measure 9mm to 10mm in height by 6mm to 7mm in width. The wings measure 6mm to 7mm in length by 3.5mm to 4.5mm in height. The keel is only exposed along the bottom edge and measures 4mm to 5mm in length by 4mm to 5mm in depth. The pedicel measures 1.5mm to 3mm in length.
The narrow ovate to lanceolate bracts measure 1.5mm to 2.5mm in length and are usually recurved and contorted. The bracteoles are usually covered in pale grey, silvery-fawn to fawn hirsute appressed hairs or at times are glabrous and are inserted at base of calyxes. The lanceolate bracteoles are usually covered in pale grey, silvery-fawn to fawn hirsute appressed hairs or at times glabrous and measure 1.5mm to 2.5mm in length. The calyxes are covered in pale grey, silvery-fawn to fawn hirsute appressed hairs or at times glabrous externally and are glabrous internally and measure 3.5mm to 5mm in length. The upper calyxes’ lobe measures 0.2mm to 0.4mm in length by 2.5mm to 3mm in width. The lateral calyx lobes measure 1.5mm to 2.5mm in length while the lower lobes measure 2mm to 3mm in length.
The purple standard is greenish-yellow at the base and is surrounded by a deep purple halo. The standards measures 7mm to 10mm in height by 7mm to 10mm in width. The claw measures 2mm to 2.5mm in length.
The purple wings measure 6mm to 7.5mm in length.
The purple keel measures 4.5mm to 5mm in length by 2mm to 2.5mm in width while its claw measures 2mm in length.
Hovea heterophylla’s fruits are orbicular pods. The glabrous pods measure 7mm to 10mm in length by 7mm to 10mm in diameter. The styles are persistent on the pods. The green pods turn deep grey to black when ripe.
The dull, deep brown, glabrous ellipsoidal seeds measure 3.5mm to 4mm in length by 3mm to 3.2mm in diameter. The aril is oblong to elliptic and extending from 50 to 75mm of the curved length of seed. The arils measure 3mm to 3.5mm in length by 1.5mm in width.
Wildlife:
Hovea heterophylla’s wildlife is unknown to the author however the seeds are frequently eaten by unknown weevil larvae.
Cultivation:
Hovea heterophylla is a very beautiful small slender shrub which is suitable for small gardens to the largest gardens. It is an excellent colourful addition for sub tropical or warm temperate zone gardens. As a garden subject it will grow to 0.5 meter to 0.6 meters in height by 0.8 meters to 1 meter in diameter when grown in the open.
It can be tipped pruned regularly to enhance bushiness and better flowering. It responds very well to tip pruning, additional native fertilizers and heavy mulching. Being legume high nitrogenous fertilizers should be avoided. Hard pruning is not recommended as the plants do not respond quickly to the damage so it is better to trim the plants on a regular basis. It is fast growing and are cold tolerant to temperatures at least as low as minus 4 degrees. Heavy frosts will kill young unprotected plants.
When planted adjacent to bush or in shrubberies try to plant them in small groups of 2 to 4 in a straight row for a very formal look or scatter plant them for the natural look.
The choice of companion plants with bright yellow to cream flowers will contrast the deep purples beautifully. It would not matter whether fine or large leaf plants are used provided it is a pale green or lime green for an all year contrast. Hibbertia would look terrific as the ground and contrast brilliantly with the deep yellow flowers and give the Hovea with its deep violet flowers extra height and greater depth to the garden. The slender growth habit would make small areas look larger and walls look longer.
When mass or group planting Hovea acutifolia, use curves and irregular patterns so they can be viewed from different angles around the garden. Use them at the edge of a forest scene or close to several large trees with smaller Acacia species in the foreground or taller Acacia species in the background. The contrast in foliages and flowers makes a very powerful display of colour for 2 months of the year.
Propagation:
Seeds: Hovea heterophylla seeds can be sown directly into a seed raising mix. Cover them with 5mm of fine sand and keep moist not wet. Place the tray in a warm sunny position.
When the seedlings are 20mm to 30mm tall, prick them out and plant them into 50mm native tubes using a good organic mix.
Once the seedlings reach 150mm to 200mm in height they can be planted out into their permanent position.
Cuttings: Use 80mm to 100mm long half ripened material when growing from cuttings from the present season’s growth. Take them in mid-autumn or early spring. Remove half the leaves from the bottom section being careful not to tear the bark. Take a 10mm slice off the bark from the bottom of the cutting on one side.
1 Prepare the cutting mix by adding one third sharp clean river sand, one third peat and one third perlite. These ingredients are sterilize,
2 Select good material from non diseased plants,
3 Select semi green stems for cuttings. Look for a stem with two or three nodes,
4 Place the cutting on a flat, hard surface, and make a clean cut down one side of the cutting at the base for 10mm with a sharp sterile knife or razor blade. – This scarification of the node will increase the chances of roots emerging from this spot. Now remove all but one or two the leaves, leaving the apex leaves in tact. If the leaves are very large in proportion to the stem, cut off the apical halves.
5 Fill a saucer with water, and place a little medium strength rooting hormone into another container like a milk bottle top. Dip the node end of the cutting into the water and then into the rooting hormone. Tap off any excess hormone,
6 Use a small dipple stick or old pencil to poke a hole into the soilless potting mix. Ensure the hole is slightly larger than the stem diameter and be careful not to wipe the rooting hormone off the cuttings base, place the cuttings in a pattern ensuring the cuttings are not touching each other,
7 I like to place the pots in Plastic bags to help maintain temperature and moisture. Place in a semi shaded place like under 50mm shade cloth.
8 When the cuttings have struck, open the bag to allow air circulation for a few days to a week,
9 Once hardened off remove the cuttings from the bag and allow to further hardening for a few more days,
10 Transplant into a good potting mix to grow on.
Fertilize using Seaweed, fish emulsion or organic chicken pellets soaked in water and apply the liquid on an alternate basis. Fertilize every 2 months until the plants are well established then on an annual basis in September to October to maintain good health, vigour and better flowering.
Further Comments from Readers:
Hi reader, it seems you use The Bible of Botany a lot. That’s great as we have great pleasure in bringing it to you! It’s a little awkward for us to ask, but our first aim is to purchase land approximately 1,600 hectares to link several parcels of N.P. into one at The Pinnacles NSW Australia, but we need your help. We’re not salespeople. We’re amateur botanists who have dedicated over 30 years to saving the environment in a practical way. We depend on donations to reach our goal. If you donate just $5, the price of your coffee this Sunday, We can help to keep the planet alive in a real way and continue to bring you regular updates and features on Australian plants all in one Botanical Bible. Any support is greatly appreciated. Thank you.
In the spirit of reconciliation we acknowledge the Bundjalung, Gumbaynggirr and Yaegl and all aboriginal nations throughout Australia and their connections to land, sea and community. We pay our respect to their Elders past, present and future for the pleasures we have gained.
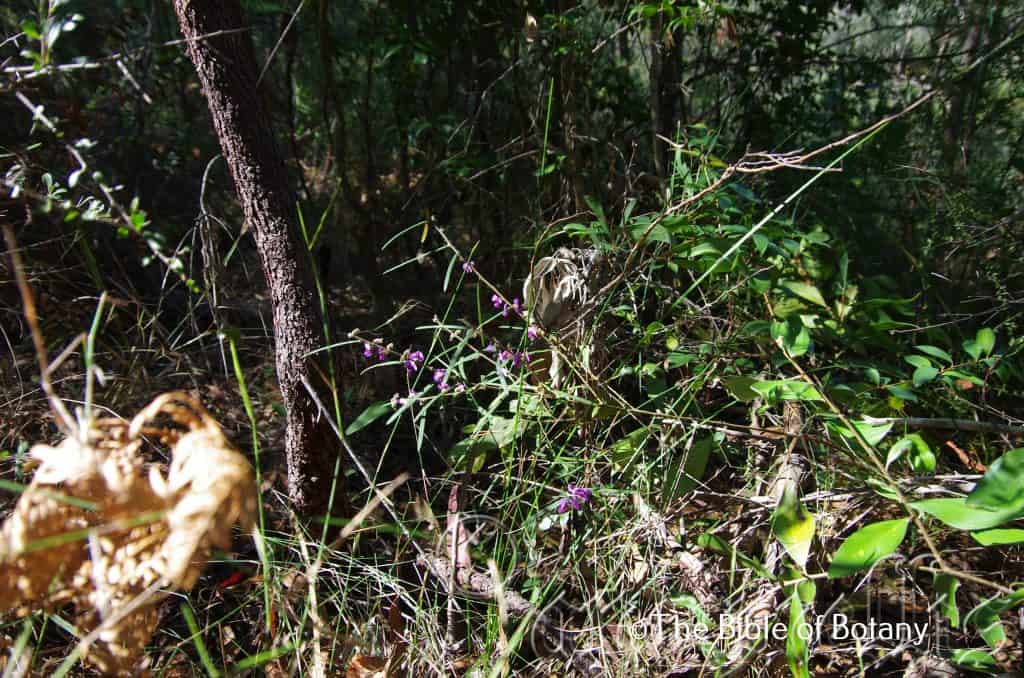
The Pinnacles NSW
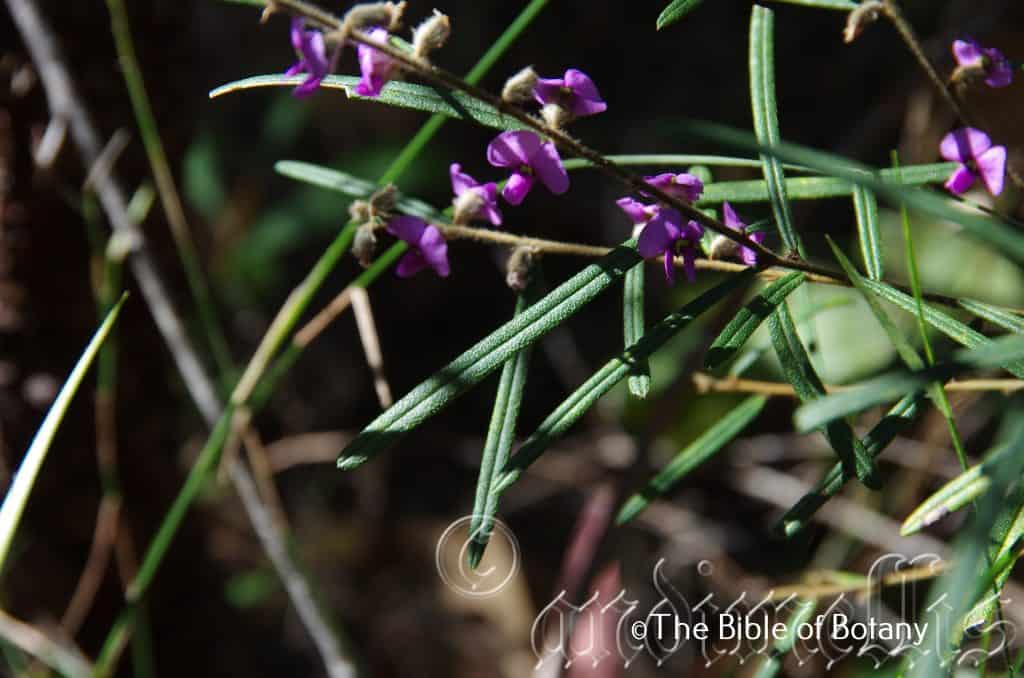
The Pinnacles NSW
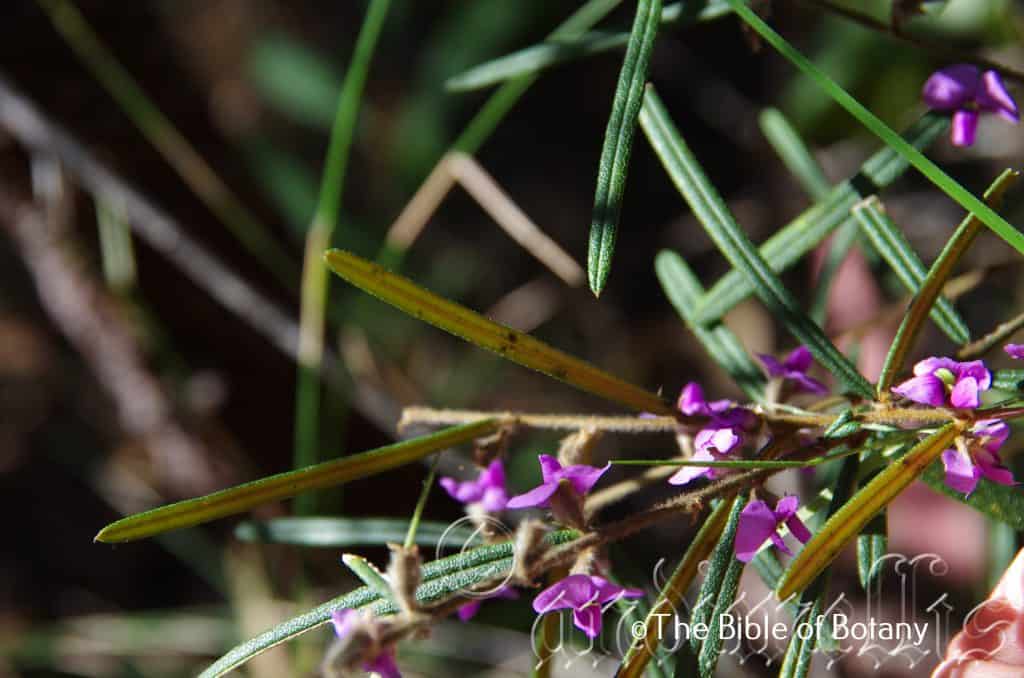
The Pinnacles NSW
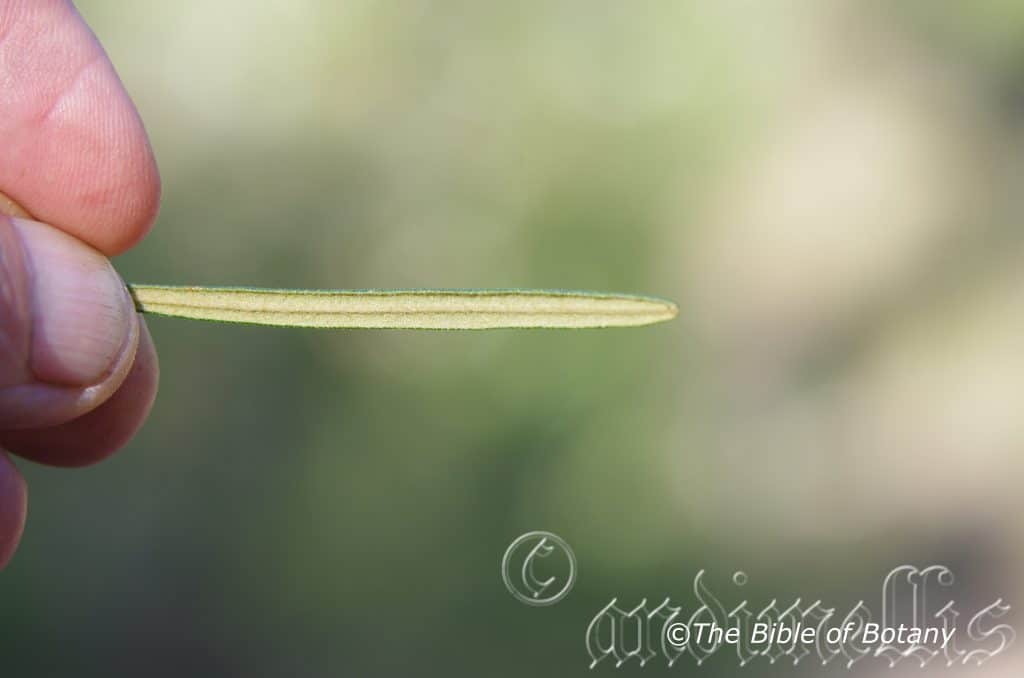
Banyabba National Park NSW
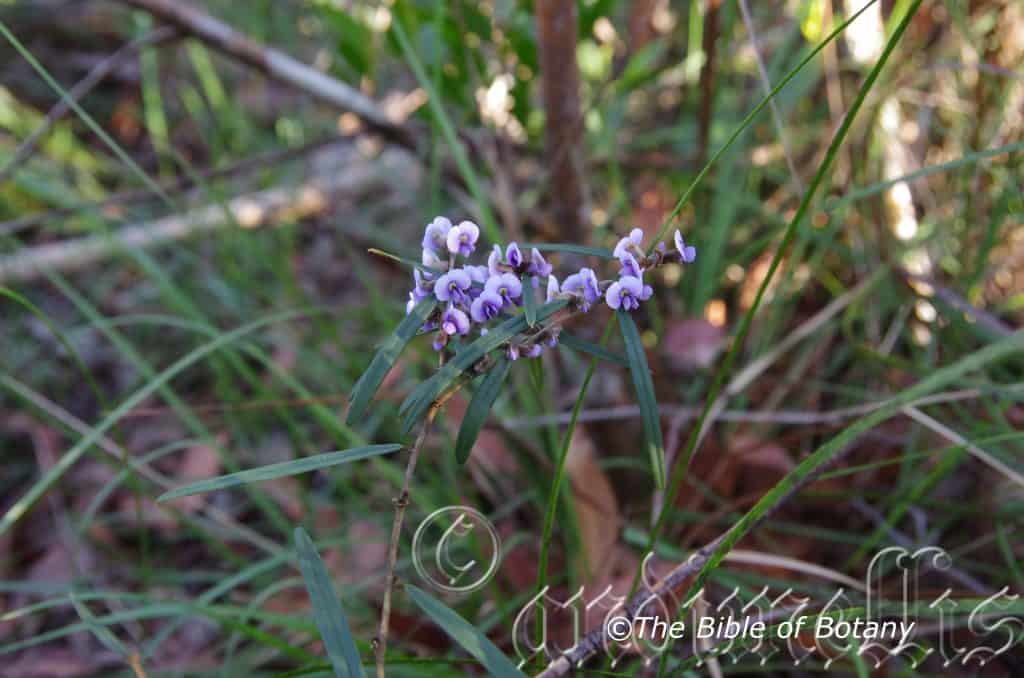
Author’s Garden The Pinnacles NSW
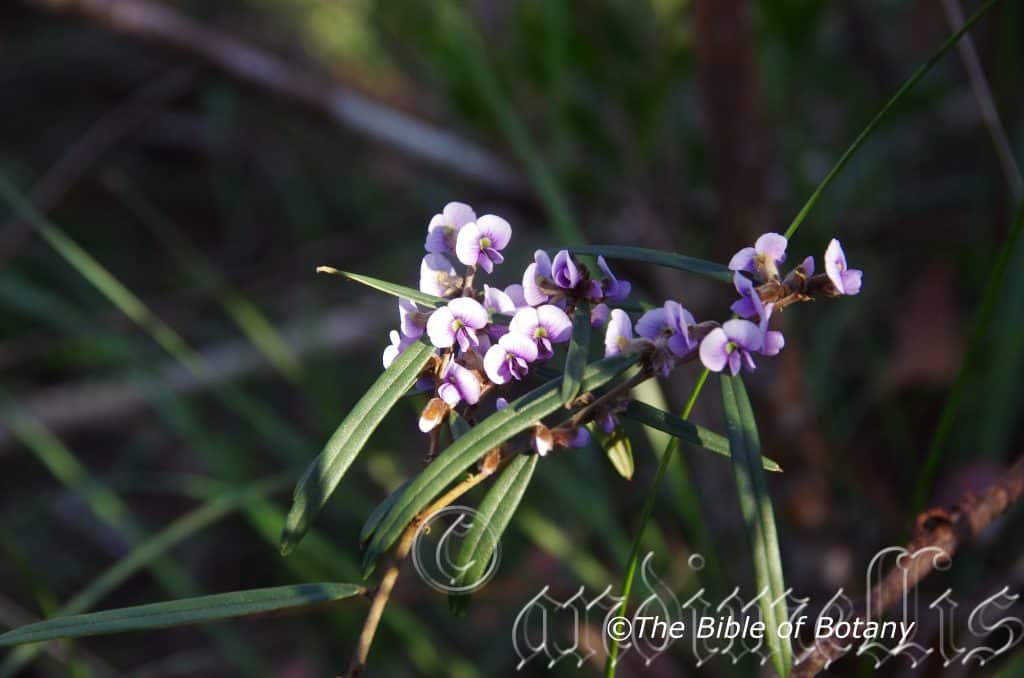
Author’s Garden The Pinnacles NSW
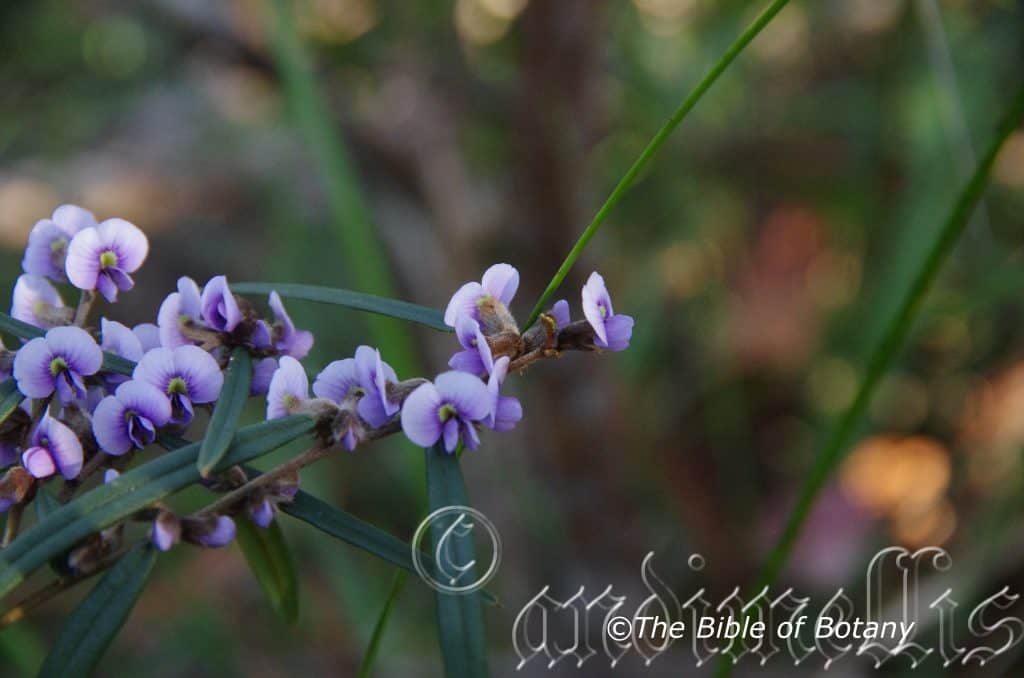
Author’s Garden The Pinnacles NSW
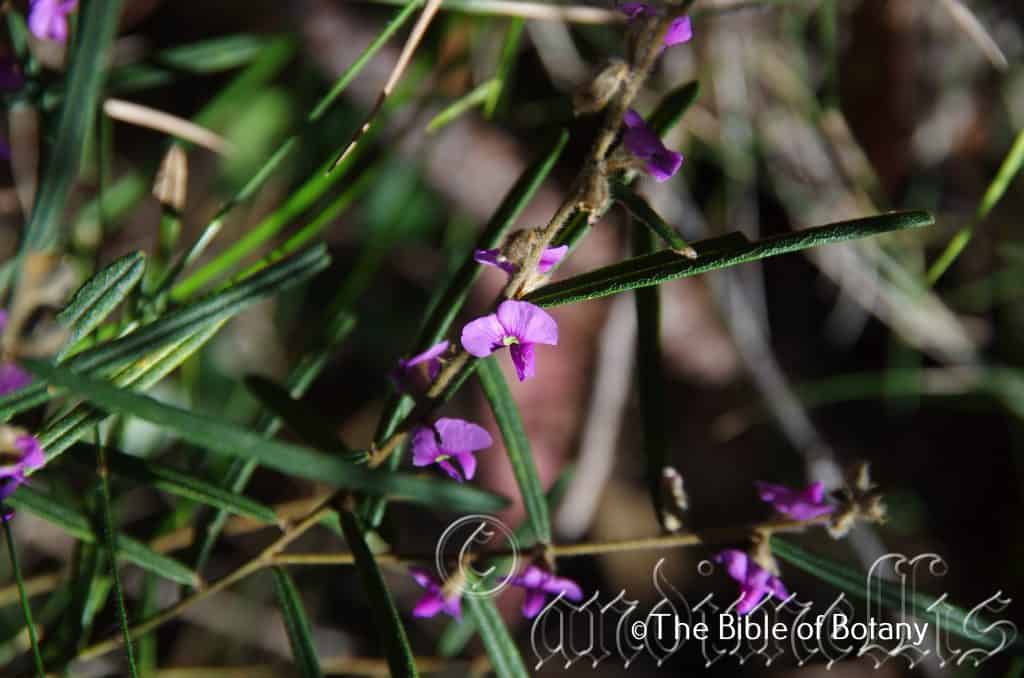
The Pinnacles NSW
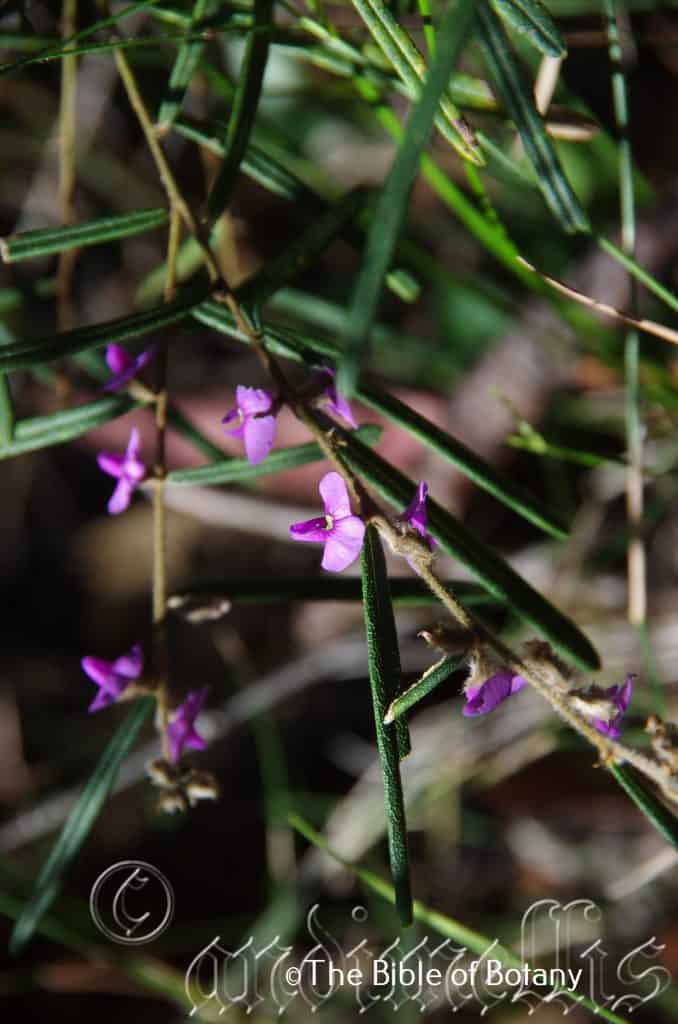
The Pinnacles NSW
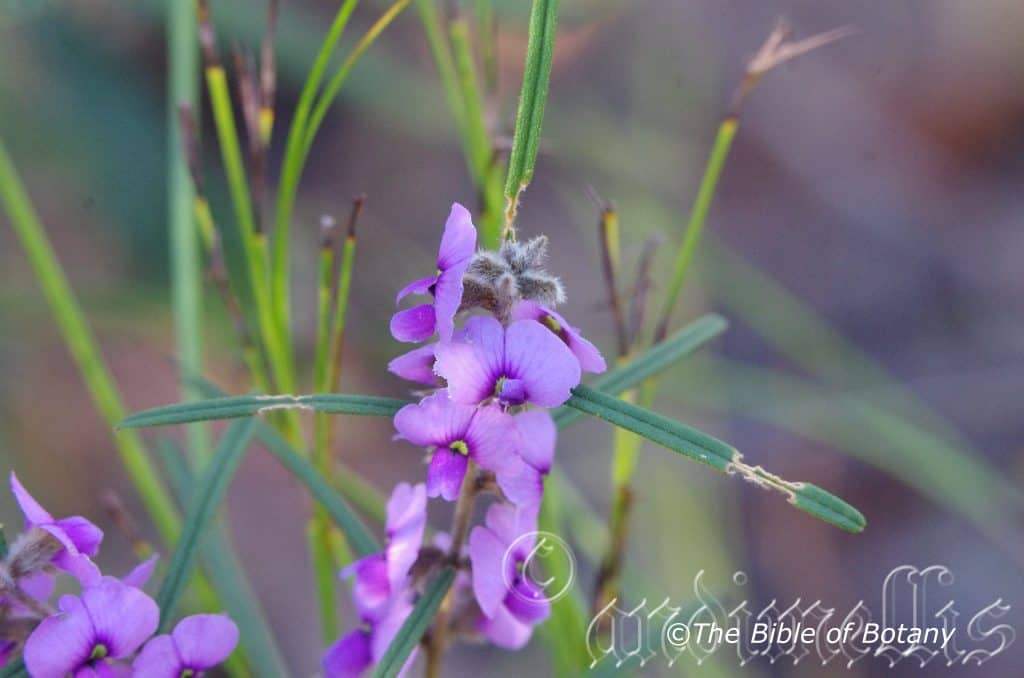
Banyabba National Park NSW
Hovea ramulosa
Classification:
Unranked: Eudicots
Unranked Rosids
Order: Fabales
Family: Fabaceae
Subfamily: Fabiodeae
Tribe: Brongniartieae
Genus: Is named in honour of Anton P. Hove; 1773-1798, who was a Polish botanist who collected plants for Sir Joseph Banks in West Africa, India and Crimea.
Species: From Rāmulus/Rāmulī, which is Latin for a twig or small stem. It refers to plants, which have many small branchlets or where flowers appear on the naked stems behind the leaves.
Common Name:
Distribution:
Hovea ramulosa is found south from Esk in far south eastern Queensland to Purgatory Creek west of Grafton in far north eastern New South Wales.
https://avh.ala.org.au/occurrences/search?taxa=Hovea+ramulosa#tab_mapView
Habitat Aspect Climate:
Hovea ramulosa prefer full sun to light dappled shade. It grows in open dry sclerophyll forests or dry eucalyptus woodlands. The altitude ranges from 50 meters ASL to 250 meters ASL.
The temperatures range from minus 2 degree in August to 38 degrees in January.
The rainfall ranges from lows of 800mm to an average of 1300mm annually.
Soil Requirements:
Hovea ramulosa prefers sandy loams to fatty sandy loams or medium to heavy silts. The soils are usually derived from partially decomposed to decomposed sandstones, granites or at times alluvial deposits. The soils pH varies from 5.5pH through to a 6.5pH. It does not tolerate waterlogged soils however annual inundations or periodic rises in water tables are normal. Non saline soils to moderately saline soils are tolerated.
Height & Spread:
Wild Plants: 1.6m to 2.2m by 1.8m to 2.2m.
Characteristics:
Hovea ramulosa’s main stems are mid reddish-brown and densely covered in long, grey, grey-brown, deep grey, spreading villous hairs. The smaller stems are grey and are densely covered in long, grey, grey-brown, deep grey, spreading and matted villous hairs.
Hovea ramulosa’s juvenile leaves are lorate to very narrow elliptic or oblanceolate and measre35mm to 90mm in length by 2.5mm to 8mm in width.
The alternate narrow linear to linear adult leaves measure 35mm to 90mm in length by 2.5mm to 5mm in width. The bases are rounded while the apexes are obtuse to obtuse-acute with a dense tuft of long, grey, grey-brown, deep grey, hirsute hairs. The discolourous laminas are sea-green, dull and glabrous on the upper lamina while the lower lamina is densely covered in tan, orange-brown deep orange-brown villous hairs that are partly obscured by long pale grey to off white hairs that are mainly spreading laterally from midrib to the leaf margins. The upper laminas are straight and strongly convex from the mid vein to the margins while the margins are entire and revolute. The mid vein is strongly prominent on the lower lamina and is clearly visible as a groove on the upper laminas while the upper laminas reticulated venations are strongly raised with short projections at vein junctions. The lanceolate to subulate stipules measure 2mm to 4mm in length. The petioles are densely covered in long, grey, grey-brown, deep grey, spreading and matted villous hairs and measure 2mm to 2.5mm in length and are covered in rusty villous hairs.
The inflorescences of Hovea ramulosa narrow ovate to lanceolate bracts are distally located 1.5mm to 2.3mm from the base of the petioles measure 1.5mm to 3mm in length. The bracteoles are usually inserted at the base of the calyx and are densely covered in long, grey, grey-brown, deep grey, spreading and matted villous hairs. The lanceolate bracteoles measure 1.5mm to 3mm in length. The calyxes are covered in long, grey, grey-brown, deep grey, spreading and matted villous hairs externally and are glabrous internally. The calyxes’ tubes measure 2.5mm to 3.2mm in length. The upper calyx’s lobe measures 1.2mm to 1.5mm in length by 2.5mm to 3.2mm in width. The lateral calyx lobes measure 1.8mm to 2mm in length while the lower lobe measures 2.2mm to 2.5mm in length by 4mm to 4.5mm in width. The flowers are sessile.
The deep mauve to purple standard is greenish-yellow at the base and is surrounded by a deep purple halo. The standards measures 9mm to 12mm in height by 10mm to 12mm in width. The claw measures 2mm to 2.5mm in length.
The deep mauve to purple wings measure 7mm to 8mm in length by 3.5mm to 4mm in width while the claw measures 2mm in length.
The deep mauve to purple keel measures 4.5mm to 5mm in length by 2mm to 2.2mm in width while its claw measures 2mm in length. Flowers appear from July to August.
Hovea ramulosa’s fruits are orbicular pods. The pods are moderately covered in long, pale grey to pale grey-brown, spreading and matted tomentose hairs. The pods measure 9mm to 11mm in length by 9mm to 11mm in diameter. The styles are persistent on the pods. The green pods turn deep grey to black when ripe.
The dull, deep motley brown, glabrous, ellipsoidal seeds measure 4.5mm to 5mm in length by 3mm to 3.2mm in diameter. The oblong aril extends from 70 to 80mm of the curved length of seed. The arils measure 4.4mm to 4.8mm in length by 1.2mm in width.
Wildlife:
Hovea ramulosa’s wildlife is unknown to the author however the seeds are frequently eaten by unknown weevil larvae.
Cultivation:
Hovea ramulosa is a very beautiful small slender shrub which is suitable for small gardens to the largest gardens. It is an excellent colourful addition for sub tropical or warm temperate zone gardens. As a garden subject it will grow to 1 meter to 1.5 meters in height by 1 meter to 1.5 meters in diameter when grown in the open.
It can be tipped pruned regularly to enhance bushiness and better flowering. Hovea respond very well to tip pruning, additional native fertilizers and heavy mulching. Being legume high nitrogenous fertilizers should be avoided. Hard pruning is not recommended as the plants do not respond quickly to the damage so it is better to trim the plants on a regular basis. It is fast growing and are cold tolerant to temperatures at least as low as minus 4 degrees. Heavy frosts will kill young unprotected plants.
It is most suitable for use around swimming pools, sunny courtyards, besides pathways, rockeries, along sandy clay banks, along drive ways, low hedges screens, front line in wind breaks, adjacent to bush gardens or shelter belts for small native animals.
When planted adjacent to bush or in shrubberies try to plant them in small groups of 2 to 4 in a straight row for a very formal look or scatter plant them for the natural look. The choice of companion plants with bright yellow to cream flowers will contrast the deep purples beautifully. It would not matter whether fine or large leaf plants are used provided it is a pale green or lime green for an all year contrast. Hibbertia would look terrific as the ground and contrast brilliantly with the deep yellow flowers and give the Hovea with its deep violet flowers extra height and greater depth to the garden. The slender growth habit would make small areas look larger and walls look longer.
When mass or cluster planting Hovea ramulosa, use curves and irregular patterns so they can be viewed from different angles around the garden. Use them at the edge of a forest scene or close to several large trees with smaller Acacia species in the foreground or larger Acacia species in the background. The contrast in foliages and flowers makes a very powerful display of colour for 2 months of the year.
Propagation:
Seeds: Hovea ramulosa seeds need to be treated before sowing. Pre-treat the seeds by light abrasion. This can be done by placing the seeds in an old sock, with coarse sand and placing them in the weekly wash, or scarifying by pouring boiling water over the seeds and allowing them to soak for several hours. Place the treated seeds into a seed raising mix. Cover them with 5mm of fine sand and keep moist not wet. Place the tray in a warm sunny position.
When the seedlings are 20mm to 30mm tall, prick them out and plant them into 50mm native tubes using a good organic mix.
Once the seedlings reach 150mm to 200mm in height they can be planted out into their permanent position.
Cuttings: Use 70mm to 100mm long half ripened material when growing from cuttings from the present season’s growth. Take them in mid-autumn or early spring. Remove half the leaves from the bottom section being careful not to tear the bark. Take a 10mm slice off the bark from the bottom of the cutting on one side.
1 Prepare the cutting mix by adding one third sharp clean river sand, one third peat and one third perlite. These ingredients are sterilize,
2 Select good material from non diseased plants,
3 Select semi green stems for cuttings. Look for a stem with two or three nodes,
4 Place the cutting on a flat, hard surface, and make a clean cut down one side of the cutting at the base for 10mm with a sharp sterile knife or razor blade. – This scarification of the node will increase the chances of roots emerging from this spot. Now remove all but one or two the leaves, leaving the apex leaves in tact. If the leaves are very large in proportion to the stem, cut off the apical halves.
5 Fill a saucer with water, and place a little medium strength rooting hormone into another container like a milk bottle top. Dip the node end of the cutting into the water and then into the rooting hormone. Tap off any excess hormone,
6 Use a small dipple stick or old pencil to poke a hole into the soilless potting mix. Ensure the hole is slightly larger than the stem diameter and be careful not to wipe the rooting hormone off the cuttings base, place the cuttings in a pattern ensuring the cuttings are not touching each other,
7 I like to place the pots in Plastic bags to help maintain temperature and moisture. Place in a semi shaded place like under 50mm shade cloth.
8 When the cuttings have struck, open the bag to allow air circulation for a few days to a week,
9 Once hardened off remove the cuttings from the bag and allow to further hardening for a few more days,
10 Transplant into a good potting mix to grow on.
Fertilize using Seaweed, fish emulsion or organic chicken pellets soaked in water and apply the liquid on an alternate basis. Fertilize every 2 months until the plants are well established then on an annual basis in September to October to maintain good health, vigour and better flowering.
Further Comments from Readers:
Hi reader, it seems you use The Bible of Botany a lot. That’s great as we have great pleasure in bringing it to you! It’s a little awkward for us to ask, but our first aim is to purchase land approximately 1,600 hectares to link several parcels of N.P. into one at The Pinnacles NSW Australia, but we need your help. We’re not salespeople. We’re amateur botanists who have dedicated over 30 years to saving the environment in a practical way. We depend on donations to reach our goal. If you donate just $5, the price of your coffee this Sunday, We can help to keep the planet alive in a real way and continue to bring you regular updates and features on Australian plants all in one Botanical Bible. Any support is greatly appreciated. Thank you.
In the spirit of reconciliation we acknowledge the Bundjalung, Gumbaynggirr and Yaegl and all aboriginal nations throughout Australia and their connections to land, sea and community. We pay our respect to their Elders past, present and future for the pleasures we have gained.
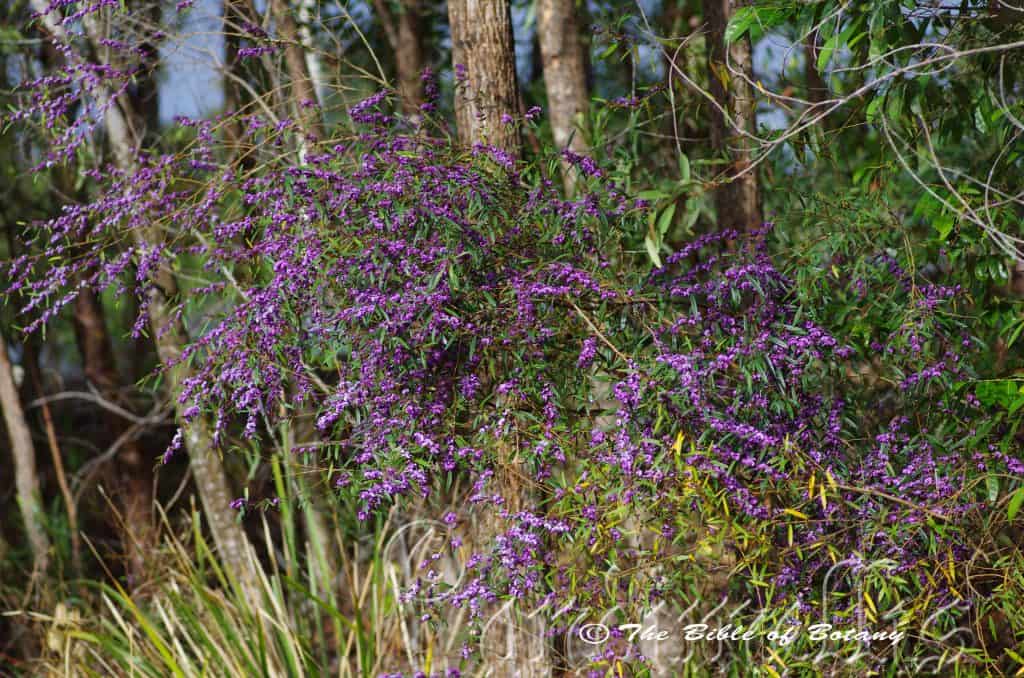
Yandina Qld.
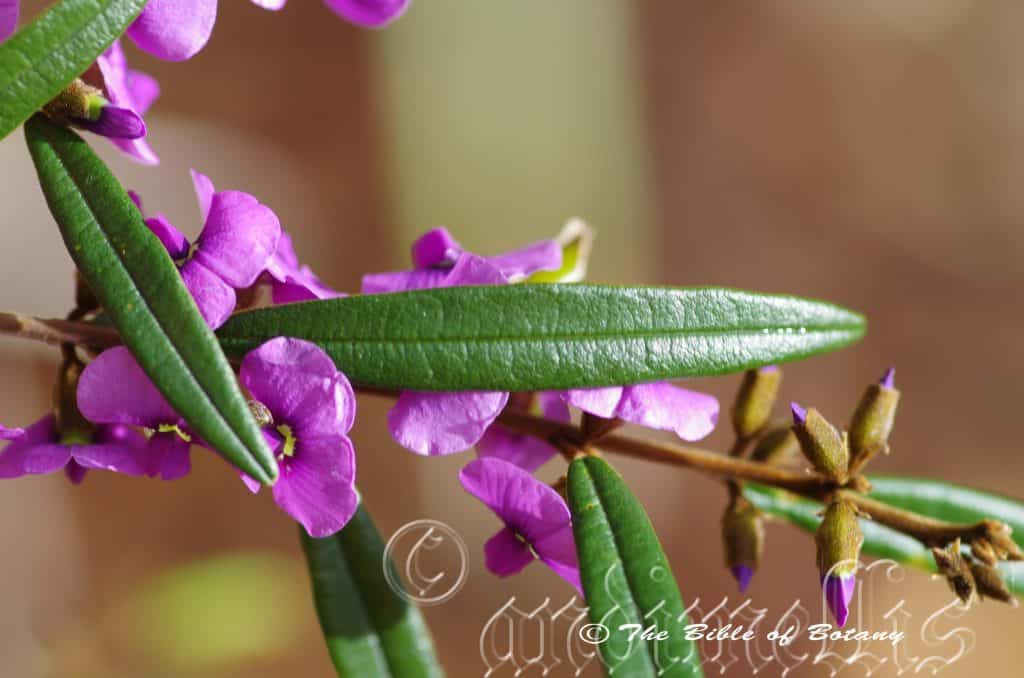
Yandina Qld.
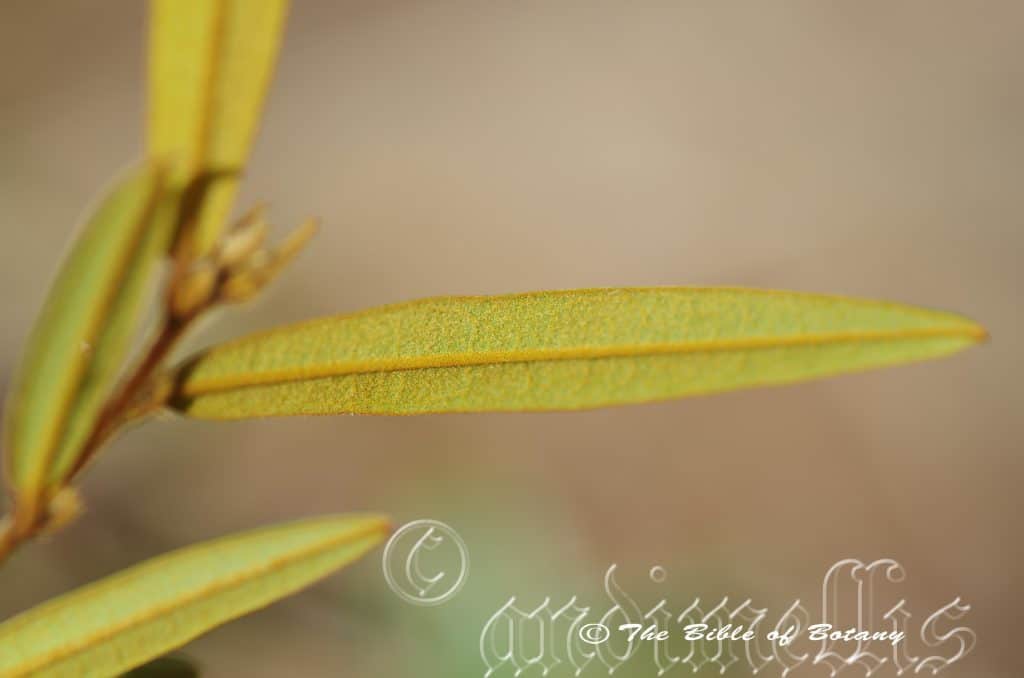
Yandina Qld.
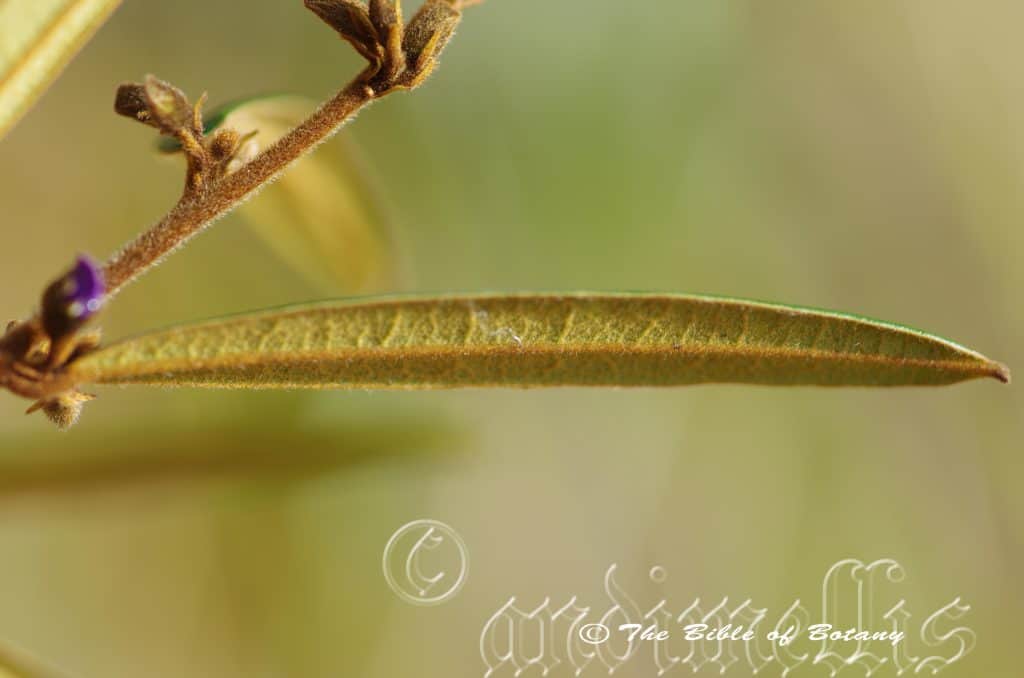
Yandina Qld.
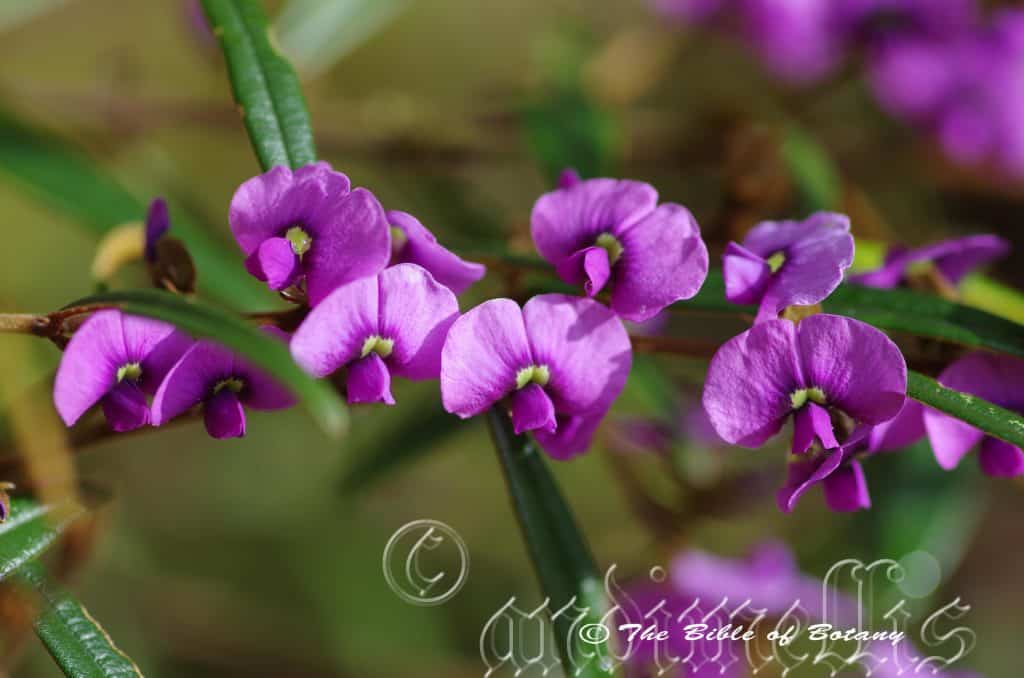
Yandina Qld.
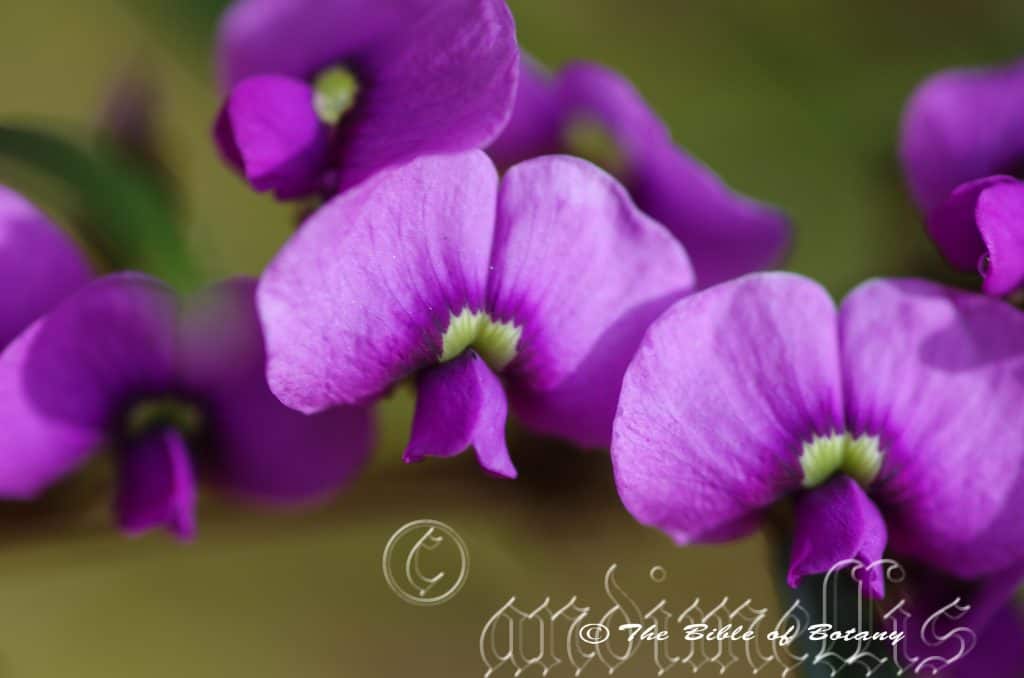
Yandina Qld.
Hovea similis
Classification:
Unranked: Eudicots
Unranked Rosids
Order: Fabales
Family: Fabaceae
Subfamily: Fabiodeae
Tribe: Brongniartieae
Genus: Is named in honour of Anton P. Hove; 1773-1798, who was a Polish botanist who collected plants for Sir Joseph Banks in West Africa, India and Crimea.
Species: From Simili, which is Ancient Greek for alike or similar to. It refers to structures or organs, which have the appearance that is similar or very typical of another species or genus.
Common Name: Purple Pea.
Distribution:
Hovea similis is found south from Maryborough in south eastern Queensland to the Manning River in New South Wales. It is found on and east of the Great Dividing Range to the coast.
https://avh.ala.org.au/occurrences/search?taxa=Hovea+similis#tab_mapView
Habitat Aspect Climate:
Hovea similis prefers full sun to light dappled shade. It grows in more open riparian zones, moist Eucalyptus forests or dry open Eucalyptus forests. This is a small densely foliaged shrub with colourful deep purple pea flowers. The altitude ranges from 10 meters ASL to 1050 meters ASL.
The temperatures range from minus 3 degree in August to 38 degrees in January.
The rainfall ranges from lows of 700mm to an average of 1420mm annually.
Soil Requirements:
Hovea similis prefers growing on better quality sandy loams to light clays with iron stone gravels. The soils are usually derived from decomposed granites, basaltic rhyolites or at times sandstone. The soils pH varies from 5.5pH through to a 6.2pH. It does not tolerate waterlogged soils however annual inundations or periodic rises in water tables are normal. Non saline soils to moderately saline soils are tolerated.
Height & Spread:
Wild Plants: 3m to 5m by 2m to 3m.
Characteristics:
Hovea similis’s main stems are grey to deep grey and are densely covered in silver-grey, pale brown or pale silver-brown pannate hairs which bend towards the apex of the stems. The branchlets are grey to deep grey and are densely covered in silver-grey, pale brown or pale silver-brown pannate and villous hairs which bend towards the apex of the stems.
Hovea similis’s alternate, narrow elliptical to linear leaves measure 25mm to 80mm in length by 4mm to 9mm in width. The bases are rounded to broadly cuneate while the apexes are acute to obtuse with a mucronate tip. The discolourous laminas are deep sea-green, glabrous and semi glossy on the upper lamina while the lower lamina is paler and covered in rusty-orange villous and hirsute hairs. The lamina is weakly arched either side of the mid vein. The reticulated pattern of veins on the upper lamina is faintly visible. The margins are entire. The mid vein is strongly prominent on the lower lamina and is visible from above. The petioles measure 1mm to 2mm in length and are covered in rusty-orange pannate hairs. The lanceolate stipules measure 1.3mm to 1.8mm in length.
The inflorescences of Hovea similis are born in pairs or threes from the leaf axils. The narrow ovate to lanceolate bracts measure 1.2mm to 2.5mm in length. The bracteoles measure 1.2mm to 3mm in length. The calyx lobes measure 4mm to 5mm in length total length while the acute lobes measure 1.5 to 2.5mm in length. The lobes are covered in pale yellow brown pannate hairs. The deep purple standards have deeper purple almost navy blue spot at the base. The standards measure 7mm to 8mm in height by 8mm to 11mm in width while the wings measure 5mm to 7.5mm in length by 2mm to 3.5mm in height. The keel is protrudes below the wings and measure 4mm by 5mm in length by 1.8mm to 2.2mm in height. The pedicel measures 0.2mm to 4mm in length. Flowers appear from mid-March to September.
Hovea similis’s fruit is an irregularly shaped orbicular pod. The style is persistent on the pods. The pods measure 10mm to 15mm in length by 10mm to 15mm in height by 3mm to 5mm in width. It is glabrous both externally and internally. The green pods turn deep grey brown on ripening. The dull black glabrous seeds measure 2mm to 2.5mm in length.
Wildlife:
Hovea similis’s wildlife is unknown to the author, however the seeds are frequently eaten by unknown weevil larvae.
Cultivation:
Hovea similis is a very beautiful small slender shrub which is suitable for small gardens to the largest gardens. It is an excellent colourful addition for sub tropical or warm temperate zone gardens having deep purple blue flowers. As a garden subject it will grow to 2.5 meter to 3 meters high by 2 meters to 2.5 meters wide.
It can be tipped pruned regularly to enhance bushiness and better flowering. Hovea similes respond very well to tip pruning, additional native fertilizers and heavy mulching. Being legume high nitrogenous fertilizers should be avoided. Hard pruning is not recommended as the plants do not respond quickly to the damage so it is better to trim the plants on a regular basis. (When hit with the tractor slasher the plants succumb very quickly) It is fast growing and are cold tolerant to temperatures at least as low as minus 4 degrees in Nana Glen where severe frosts will reach 8 meters.
It is most suitable for use around swimming pools, sunny courtyards, besides pathways, rockeries, along sandy clay banks or along driveways, screens, windbreaks or shelter belts for small native animals. If it is placed around a pool or sunny courtyard try to plant 2 or 3 in a straight row for a very formal look or use curves for the natural look. The choice of companion plants with bright yellow to cream flowers will contrast the deep purples beautifully. It would not matter whether fine or large leaf plants are used provided it is a pale green or lime green for an all year contrast. Hibbertia would look great on the ground and give the Hovea extra height. The slender growth habit would make small areas look larger and walls look longer.
When mass or group planting Hovea similis, use curves and irregular patterns so they can be viewed from different angles around the garden.
Use them at the edge of a forest scene or close to several large trees with slightly smaller Acacia specie or larger Acacia specie will give a very powerful display of colour for 2 months of the year in July and August. They look fantastic when mixed with Acacias.
Propagation:
Seeds: Hovea similis seeds need to be treated before sowing. Pre-treat the seeds by light abrasion. This can be done by placing the seeds in an old sock, with coarse sand and placing them in the weekly wash, or scarifying by pouring boiling water over the seeds and allowing them to soak for several hours. Place the treated seeds into a seed raising mix. Cover them with 5mm of fine sand and keep moist not wet. Place the tray in a warm sunny position.
When the seedlings are 20mm to 30mm tall, prick them out and plant them into 50mm native tubes using a good organic mix.
Once the seedlings reach 150mm to 200mm in height they can be planted out into their permanent position.
Cuttings: Use 70mm to 100mm long half ripened material when growing from cuttings from the present season’s growth. Take them in mid-autumn or early spring. Remove half the leaves from the bottom section being careful not to tear the bark. Take a 10mm slice off the bark from the bottom of the cutting on one side.
1 Prepare the cutting mix by adding one third sharp clean river sand, one third peat and one third perlite. These ingredients are sterilize,
2 Select good material from non diseased plants,
3 Select semi green stems for cuttings. Look for a stem with two or three nodes,
4 Place the cutting on a flat, hard surface, and make a clean cut down one side of the cutting at the base for 10mm with a sharp sterile knife or razor blade. – This scarification of the node will increase the chances of roots emerging from this spot. Now remove all but one or two the leaves, leaving the apex leaves in tact. If the leaves are very large in proportion to the stem, cut off the apical halves.
5 Fill a saucer with water, and place a little medium strength rooting hormone into another container like a milk bottle top. Dip the node end of the cutting into the water and then into the rooting hormone. Tap off any excess hormone,
6 Use a small dipple stick or old pencil to poke a hole into the soilless potting mix. Ensure the hole is slightly larger than the stem diameter and be careful not to wipe the rooting hormone off the cuttings base, place the cuttings in a pattern ensuring the cuttings are not touching each other,
7 I like to place the pots in Plastic bags to help maintain temperature and moisture. Place in a semi shaded place like under 50mm shade cloth.
8 When the cuttings have struck, open the bag to allow air circulation for a few days to a week,
9 Once hardened off remove the cuttings from the bag and allow to further hardening for a few more days,
10 Transplant into a good potting mix to grow on.
Fertilize using Seaweed, fish emulsion or organic chicken pellets soaked in water and apply the liquid on an alternate basis. Fertilize every 2 months until the plants are well established then on an annual basis in September to October to maintain good health, vigour and better flowering.
Further Comments from Readers:
Hi reader, it seems you use The Bible of Botany a lot. That’s great as we have great pleasure in bringing it to you! It’s a little awkward for us to ask, but our first aim is to purchase land approximately 1,600 hectares to link several parcels of N.P. into one at The Pinnacles NSW Australia, but we need your help. We’re not salespeople. We’re amateur botanists who have dedicated over 30 years to saving the environment in a practical way. We depend on donations to reach our goal. If you donate just $5, the price of your coffee this Sunday, We can help to keep the planet alive in a real way and continue to bring you regular updates and features on Australian plants all in one Botanical Bible. Any support is greatly appreciated. Thank you.
In the spirit of reconciliation we acknowledge the Bundjalung, Gumbaynggirr and Yaegl and all aboriginal nations throughout Australia and their connections to land, sea and community. We pay our respect to their Elders past, present and future for the pleasures we have gained.
Howea forsteriana
Classification:
Unranked: Monocots
Unranked: Commelinids
Order: Arecales
Family: Arecacae
Subfamily: Arecaoideae
Tribe: Areceae
Sub Tribe: Linospadicinae
Genus: From Howe which is Latinized for Lord Howe Island. (Richard Howe, 1st Earl Howe) It refers to plants which were first discovered on Lord Howe Island or are restricted to the Islands.
Species: Is named in honour of Cyril W. Foster; 18..-1933, who was a British botanist who collected in Africa.
Common Name: Lord Howe Palm.
Distribution:
Howea forsteriana distribution is restricted to the Lord Howe Island group of islands east of Australia’s mainland.
https://avh.ala.org.au/occurrences/search?taxa=Howea+forsteriana#tab_mapView
Habitat Aspect Climate:
Howea forsteriana prefers dense shade to a dappled filtered light. It is found in coastal rain forests, riverine rainforests or littoral rainforests. The altitude ranges from 10 meters ASL to 250 meters ASL.
The temperatures range from 8 degrees in August to 31 degrees in January.
The rainfalls range from lows of 950mm to an average of 1600mm annually.
Soil Requirements:
Howea forsteriana grows on sandy loams to light red clays. The soils are usually derived from decomposed basalt. The soils are close to neutral ranging from a PH of 5.5 to 6.5.It does not tolerate waterlogged soils however annual inundations or periodic rises in water tables are normal. Non saline soils to moderately saline soils are tolerated as are salt laden winds.
Height & Spread:
Wild Plants:12m to 18m by 3m to 4m in diameter with a trunk 300mm to 350mm in diameter.
Characteristics:
Howea forsteriana has a beautiful slender grey trunk. The 300mm to 350mm diameter trunks retains the leaf scars from past leaves. The upper sections of the trunk are deep green.
Howea forsteriana leaves measure 3000mm to 4500mm in length by 1000mm to 1500mm across. It is known as a feather palm due to the leaves looking like the feather of a bird’s wing. It is a self-cleaning palm shedding old leaves soon after they die. The 12 to 16 leaves clasp the trunk in a crown shaft for the upper 1000mm to 1300mm. The leaves have a pronounced lateral twist with 60 to 80 pairs of pinnae. The pinnae measure 600mm to 750mm in length by 30mm to 50mm in width. The petiole measures 320mm to 380mm and is concave above and convex below. The leaves are discolourous with the upper lamina being deep sea green and the lower lamina being a silvery grey. The pinnae base is truncate while the apex is irregularly torn. The margins are entire while the midrib is prominent on both laminas.
Howea forsteriana’s inflorescence is born in large pendant panicles from below the bottom of the crown shaft. They measure 500mm to 950mm in length by 400mm to 500mm in width. The palms are monoecious.
The 3 sepals measure 1.6mm to 2mm in length. There are 3 white to cream male flowers in a cluster which have lanceolate petals. The petals measure 6mm to 7mm in length by 2mm to 3mm in width. The 9 stamens measure 2.5mm in length with 2mm anthers. The male flowers outnumber the female flowers by 3 to 1.
The female flowers sepals measure 2mm in length. The 3 petals are tightly packed around the style never fully opening and measure 3mm to 4mm in length. Only the trilobed stigma is exserted beyond the petals.
Howea forsteriana’s fruit is an ovoid to globose nut. The nuts measure 8mm to 14mm in length by 6mm to 10mm in diameter. The green nuts turn deep red to deep orange-red when ripe. The Calyx and stigma are persistent on the fruits. The epicarp sheds to reveal the fawn-brown coconut fibres that surround the nut.
Confusing Species:
Howea belmoreana’s inflorescence are single spike. The rachis of the leaves are arcuate.
Howea forsteriana’s inflorescences usually have 3 to 5 branches are at times up to 8 branches from a single broad base. The rachis of central and lower leaves horizontal and drooping
Wildlife:
Howea forsteriana’s wildlife is unknown to the Author.
Cultivation:
Howea forsteriana is a beautiful palm that deserves a place in every tropical or sub tropical garden. It may reach 16 meters by 5 meters in cultivation but don’t hold your breath waiting as it is rather slow in forming a trunk of any size.
The trunk is suitable for stags and other epiphytes. Howea forsteriana will grow on most soils especially those that are not pure sand as long as an adequate supply of water is given. It is a good feature plant around pools and ponds as it is self-cleaning and take years to flower and fruit. Roots do not give any problems when in confined places like court yards and near pools. They make great accent plant against hard surfaces like brick walls or where a slow maturing plant is required.
Kentia palms also make good indoor subjects or tub plants for patios.
Due to the slow growth of kentia the plants are ideal for confined spaces and may be moved at a later stage without much set back.
INDOORS OR POTTED ON:
Howea forsteriana sawdust or sand mixes are too well draining unless the sawdust has completely composted down where it exhibits a texture like plasticine to the touch. Moisture can be squeezed out between the fingers yet it remains moist. I find this a great basis to start with.
Mix equal parts of the well decomposed saw dust with the above feel with perlite and vermiculite. To this add two part sharp clean sand and one part compost. Make sure the sand comes from a source that does not have salt.
The Saw dust in this condition creates the moisture retention and holds nutrient in. The perlite and vermiculite make the mix neutral and both have great water holing capacity without shrinkage with age. The sand creates good drainage and is good for good healthy root development.
Indoor plants need good light and ventilation without drying breezes or wind. Bangalow palms will tolerate darker positions in the home than Alexandra palms. Again fertilize the plants on a monthly basis with the above formula on a rotation basis.
Propagation:
Seeds: Sow Howea forsteriana into a seed raising mix. Seed can be slow to germinate and is often erratic in germination.
When the seedlings are at the two to three leaf stages, prick them out and plant them into 75mm native tubes using a good organic mix.
Once the seedlings reach 250mm to 300mm in height plant them out into their permanent position.
Where mass plantings of Howea fosteriana are required, as a feature plant them at 3 meters to 4 meters centers. Plantings along a drive way should be planted at 4 meter centers.
Fertilize using Seaweed, fish emulsion or organic chicken pellets soaked in water and apply the liquid on an alternate basis. Fertilize every 2 months until the plants are well established then on an annual basis in September to October to maintain good health, vigour and better flowering.
Further Comments from Readers:
Hi reader, it seems you use The Bible of Botany a lot. That’s great as we have great pleasure in bringing it to you! It’s a little awkward for us to ask, but our first aim is to purchase land approximately 1,600 hectares to link several parcels of N.P. into one at The Pinnacles NSW Australia, but we need your help. We’re not salespeople. We’re amateur botanists who have dedicated over 30 years to saving the environment in a practical way. We depend on donations to reach our goal. If you donate just $5, the price of your coffee this Sunday, We can help to keep the planet alive in a real way and continue to bring you regular updates and features on Australian plants all in one Botanical Bible. Any support is greatly appreciated. Thank you.
In the spirit of reconciliation we acknowledge the Bundjalung, Gumbaynggirr and Yaegl and all aboriginal nations throughout Australia and their connections to land, sea and community. We pay our respect to their Elders past, present and future for the pleasures we have gained.
Howittia trilocularis
Classification
Unranked: Eudicots
Unranked: Rosids
Order: Malvales
Family: Malvaceae
Genus: Is probably named in honour of Dr. Godfrey Howitt; 1800-1873, who was an English born Australian physician, botanist and entomologist in Melbourne.
Species: From Treîs/Tría, which are Ancient Greek or Tri, which is Latin for three and Loculus, which is Latin for a case or box. It refers plants which have three locules or ovaries.
Common Name:
Distribution:
Howittia trilocularis is found south from Diandarah Falls in northern New South Wales to near Orbost in Victoria with an outlying population in the Grampians. It is mainly found on and east of the Great Dividing Range to the coast.
https://avh.ala.org.au/occurrences/search?taxa=Howittia+trilocularis#tab_mapView
Habitat Aspect Climate:
Howittia trilocularis prefers dappled shade to full sun. It grows in moist closed Eucalyptus forests to dry open Eucalyptus forests. The altitude ranges from 10 meters ASL to 550 meters ASL.
The temperatures range from minus 3 degrees in July to 36 degrees in January.
The rainfall ranges from lows of 300mm to an average of 1200mm annually.
Soil Requirements:
Howittia trilocularis prefers light clays to medium clays. The soils are usually derived from decomposed shale, or mudstones or at times sandstones, basalts or granites. The soils pH varies from 5pH through to a 6pH. It tolerates seasonal wet soils and seasonal high water tables for short periods. Non saline soils to moderately saline soils are tolerated.
Height & Spread:
Wild Plants: 1m to 3m by 1m to 3m.
Characteristics:
Howittia trilocularis’s main stems are fawn and densely covered in fawn pannate hairs. The branchlets are pale green and covered in fawn to pale yellow pilose to villous hairs.
Howittia trilocularis’s broad lanceolate to ovate leaves measure 20mm to 90mm in length by 10mm to 50mm in width. The base is broadly rounded or at times cordate while the apex is broad acute. The discolourous laminas are grass-green or olive green and covered in golden yellow-brown pilose to villous hairs on the upper lamina while the lower lamina is a paler olive green or yellow-green and covered in golden yellow-brown pilose and villous hairs. The margins are entire, serrated or widely toothed. They arch upwards either side of the mid vein. The midvein and lateral veins are prominent on the lower lamina and are visible from above. The petioles measure 15mm to 20mm in length and are covered in golden yellow-brown pilose and villous hairs.
The inflorescences of Howittia trilocularis are born singularly from the leaf axis and measure 25mm to 30mm when spread out. The 5 grass-green triangular calyx lobes measure 4mm to 5mm in length and are covered in golden yellow-brown pilose and villous hairs externally and internally. The purple, lilac or pink corolla measures 10mm to 14mm in length. The white style measures 7mm to 10mm in length and divides into 3 stigmas at the apex. The style measures 7mm to 10mm in length. The white stamens are fused to the lower two thirds of the style. The stamens measure 1mm to 2.5mm in length. The pedicels are longer than the leaves and measure 35mm to 120mm in length. Flowers appear from September to February however some flowers appear throughout the year in warmer areas.
Howittia trilocularis’s fruit is a globose capsule. The capsules measure 7mm to 8mm in diameter. It is covered in golden yellow-brown pilose and villous hairs. The green pods turn deep grey brown on ripening. The dull grey glabrous oblong, seeds have a round triangular cross section and measure 2mm to 3mm in length.
Wildlife:
Howittia trilocularis’s is unknown to the author.
Cultivation:
Howittia trilocularis is a very beautiful small shrub which is suitable for small lightly shaded spots in the garden. As garden subjects they will grow to 1.5 meters to 2 meters in height by 1.5 meters to 2 meters in diameter when grown in the open. Southern grown plants tend to grow larger than plants from northern New South Wales.
It should be tip pruned regularly to enhance bushiness and better flowering. Howittia trilocularis respond very well to tip pruning, additional native fertilizers and heavy mulching. Hard pruning is not recommended. It is fast growing and are cold tolerant to temperatures at least as low as minus 4 degrees but will grow better if in a frost free area which doesn’t fall below zero.
It is most suitable for use around swimming pools, bright courtyards, besides pathways, rockeries, along sandy clay banks or along drive ways and larger fish or frog ponds. Around frog ponds the semi arching stems will offer protection for these amphibians venturing to and from the water. Two, three or four planted back from a bend will become a very strong focal point when in flower gain a lot of attention whether you are coming or going because of the fresh clean look of the foliage even in the driest of times. Place them in the mid ground with large deep green glabrous foliages to the rear and fine leaf ground covers and very small shrubs in front that have deep green glabrous foliages. Plants with cream or pale yellow flowers can be used in both the foreground and background for the best contrasting colours. Plants with finer foliages in pale green will also compliment the scene during periods when there are few flowers in the garden.
Small prostrate Acacia species with cream, white or yellow flowers can also be used to great effect as their flowering will compliment those from Howittia trilocularis.
Propagation:
Seeds: Howittia trilocularis seeds can be sown directly into a seed raising mix. Cover them with 5mm of fine sand and keep moist not wet. Place the tray in a warm sunny position.
When the seedlings are 20mm to 30mm tall, prick them out and plant them into 50mm native tubes using a good organic mix.
Once the seedlings reach 150mm to 200mm in height they can be planted out into their permanent position.
Cuttings: Try using 50mm to 80mm long ripened material when growing from Cuttings. Take them in mid spring through to autumn. Remove a 10mm slice from the bark in a downward stroke from one side at the base. The use of a rooting hormone is not required. Place it into a sterile mix of peat, sand and perlite.
Place the trays under 30mm to 50mm shade and keep the trays warm. Bottom heat is beneficial when striking the cuttings. Ideally temperatures should be maintained at between 22 to 24 degrees.
When the cuttings have obviously struck and have developed good roots treat them as for seedlings.
Fertilize using Seaweed, fish emulsion or organic chicken pellets soaked in water and apply the liquid on an alternate basis. Fertilize every 2 months until the plants are well established then on an annual basis in September to October to maintain good health, vigour and better flowering.
Further Comments from Readers:
Hi reader, it seems you use The Bible of Botany a lot. That’s great as we have great pleasure in bringing it to you! It’s a little awkward for us to ask, but our first aim is to purchase land approximately 1,600 hectares to link several parcels of N.P. into one at The Pinnacles NSW Australia, but we need your help. We’re not salespeople. We’re amateur botanists who have dedicated over 30 years to saving the environment in a practical way. We depend on donations to reach our goal. If you donate just $5, the price of your coffee this Sunday, We can help to keep the planet alive in a real way and continue to bring you regular updates and features on Australian plants all in one Botanical Bible. Any support is greatly appreciated. Thank you.
In the spirit of reconciliation we acknowledge the Bundjalung, Gumbaynggirr and Yaegl and all aboriginal nations throughout Australia and their connections to land, sea and community. We pay our respect to their Elders past, present and future for the pleasures we have gained.
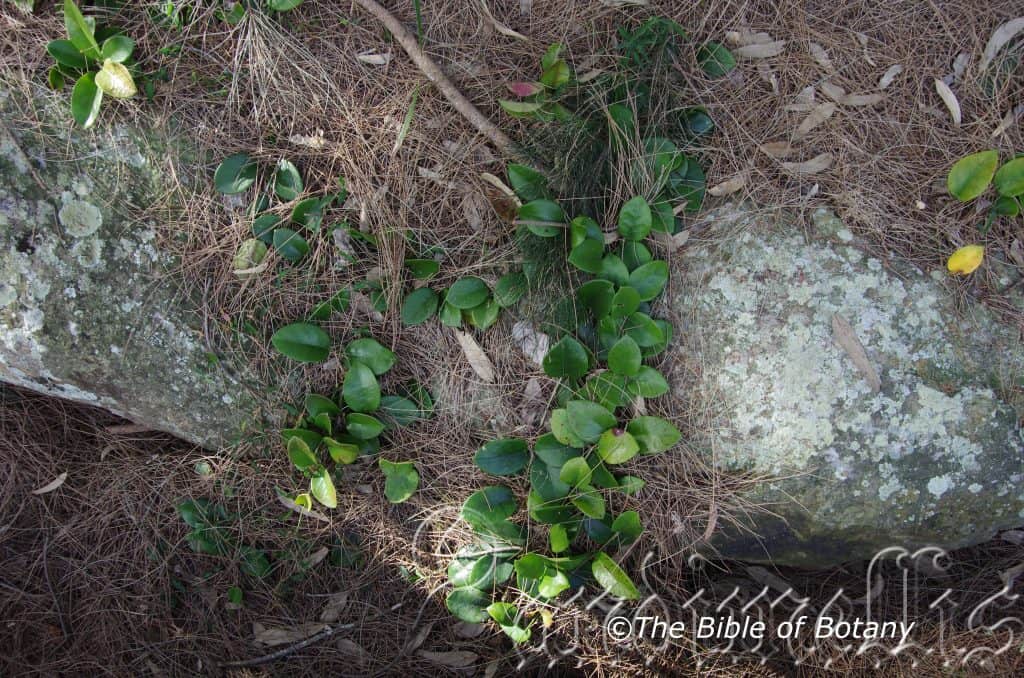
Paluma Range National Park Qld.
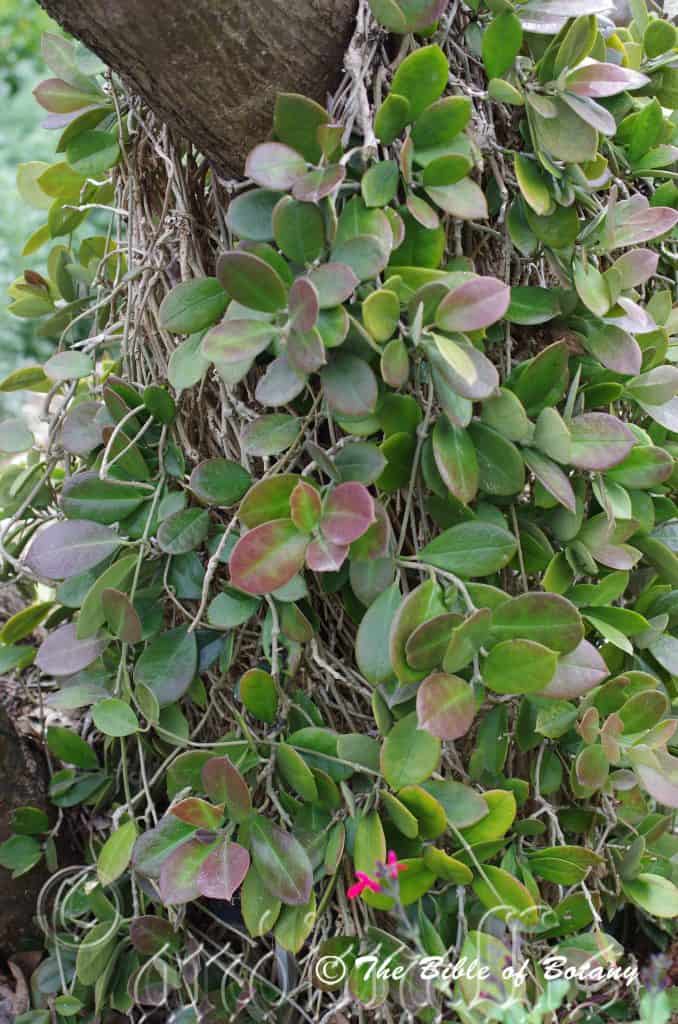
Crystal Creek Paluma Range National Park Qld.
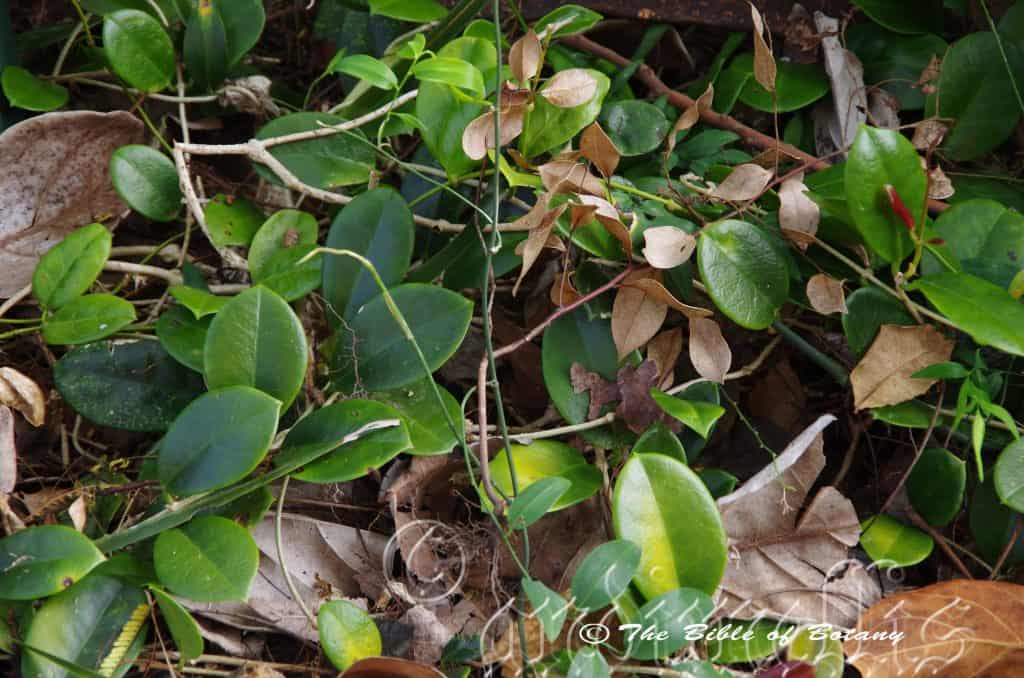
Mount Cootha Botanic Gardens Qld.
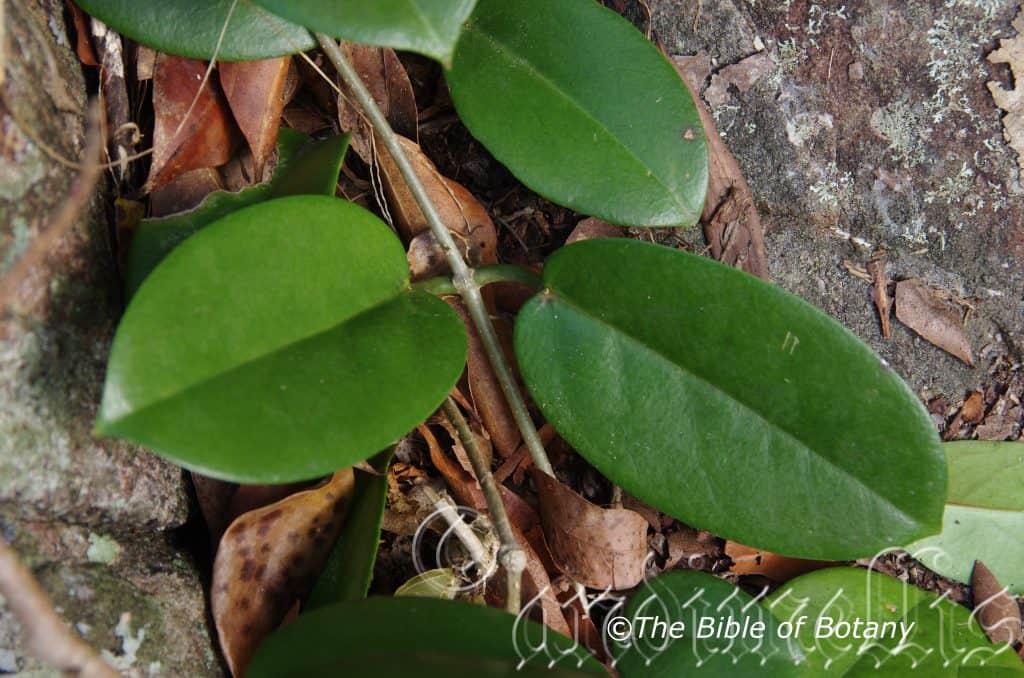
Paluma Range National Park Qld.
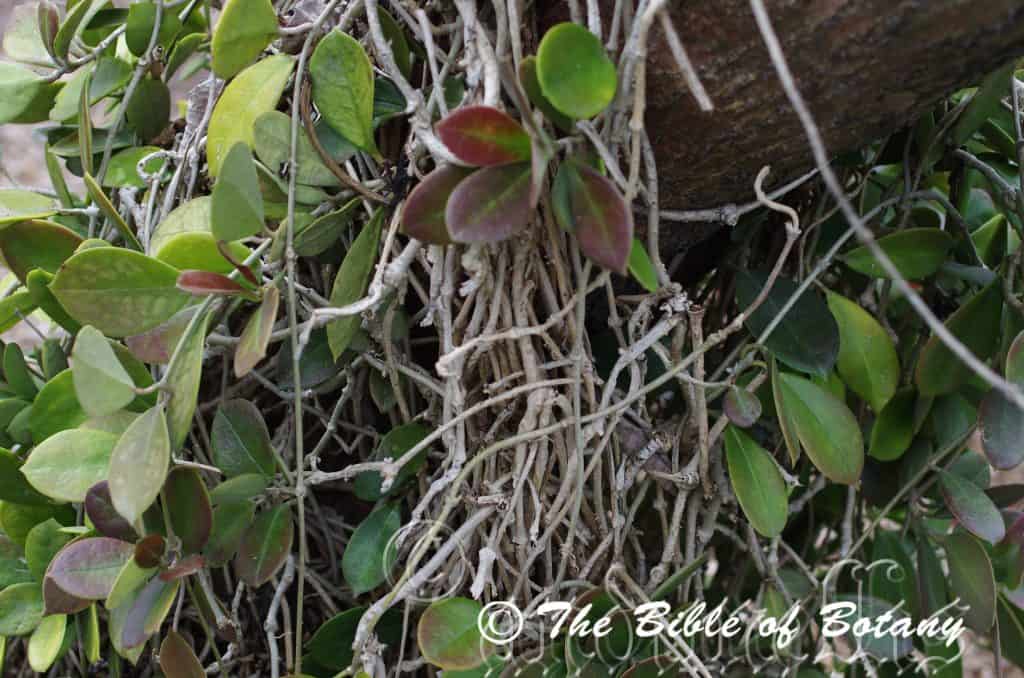
Mount Cootha Botanic Gardens Qld.
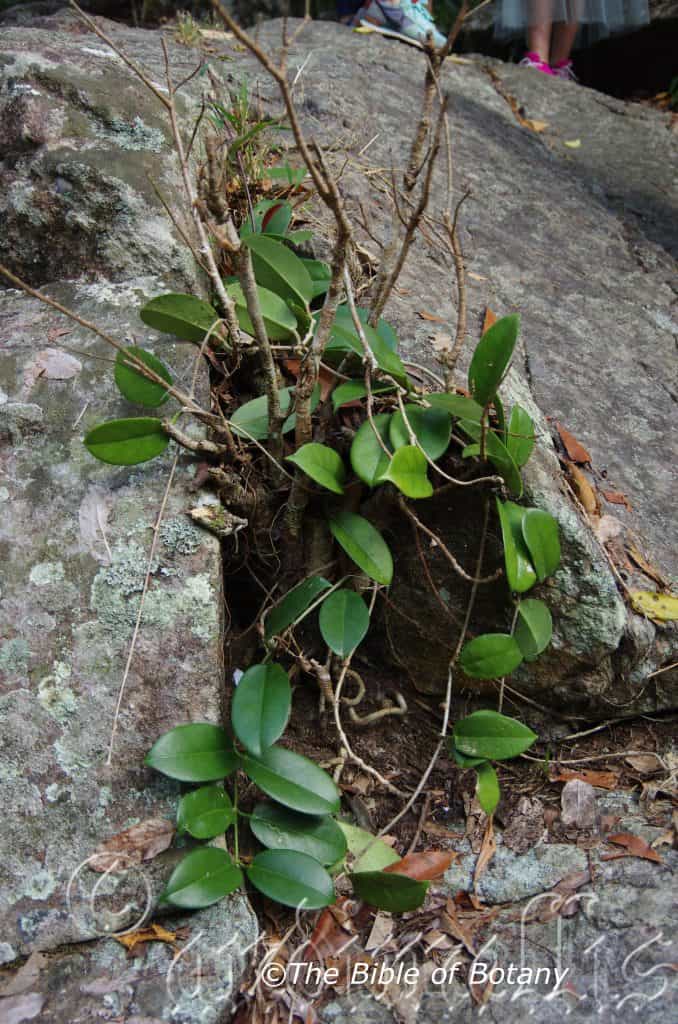
Paluma Range National Park Qld.
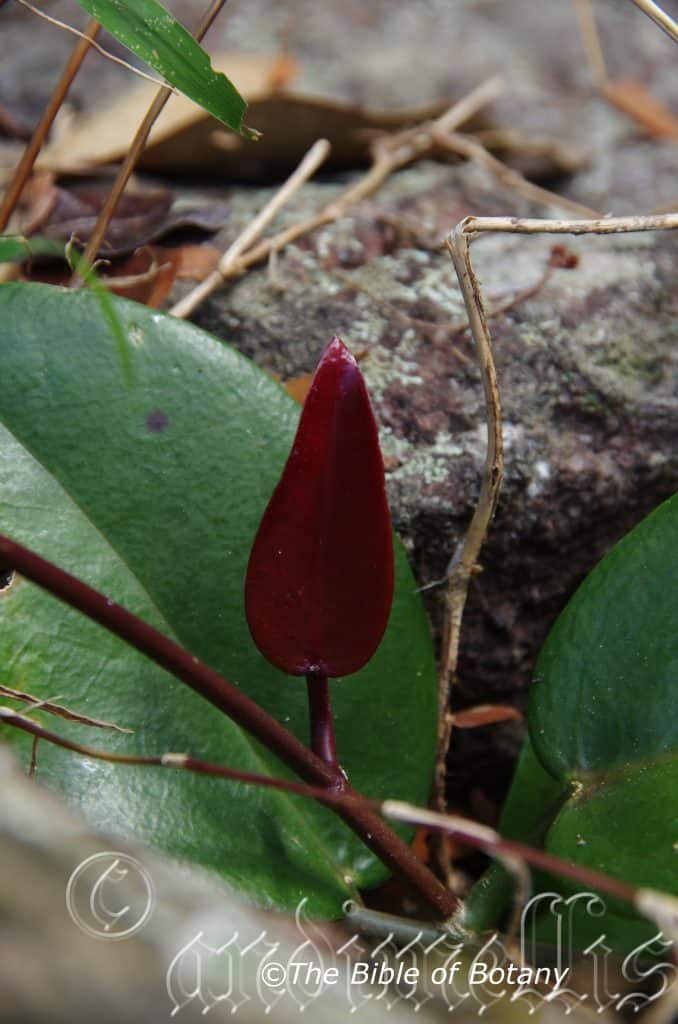
Paluma Range National Park Qld.
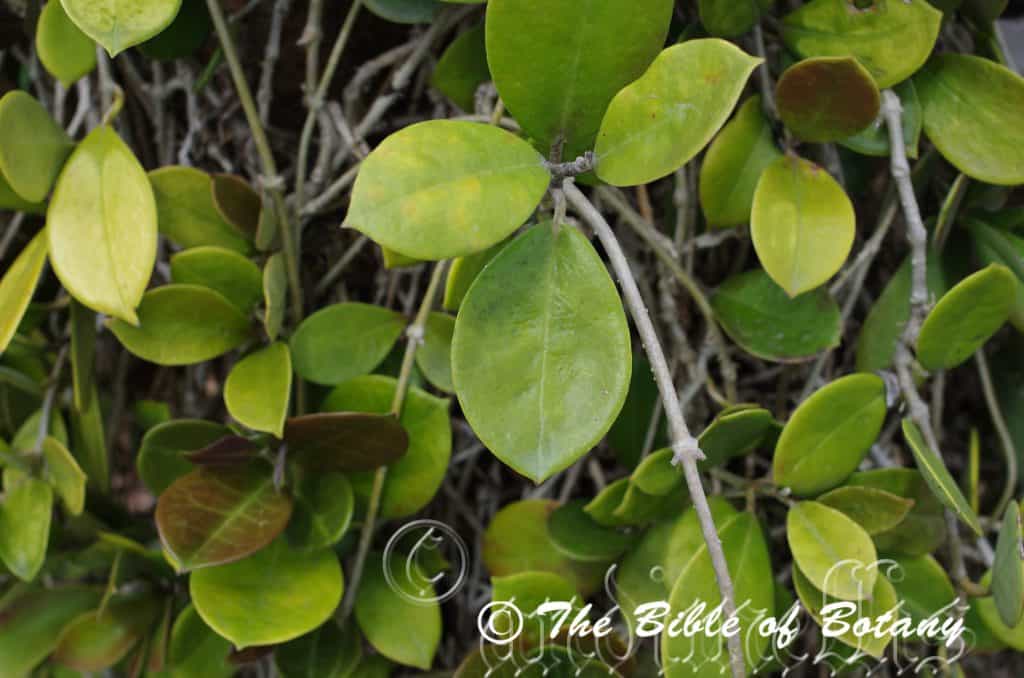
Mount Cootha Botanic Gardens Qld.
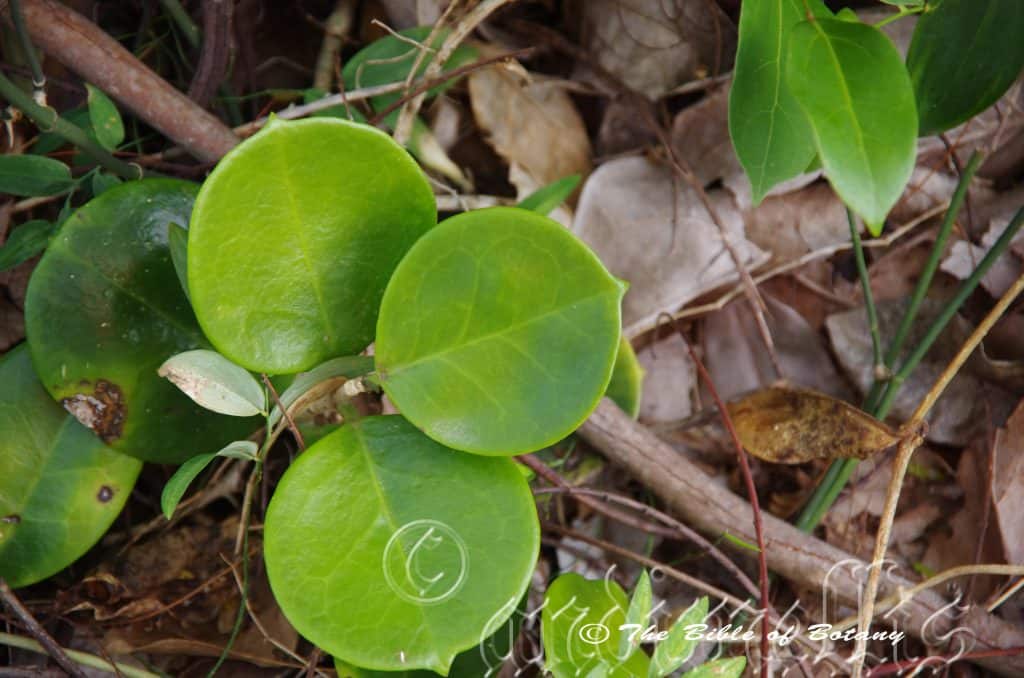
Crystal Creek Paluma Range National Park Qld.
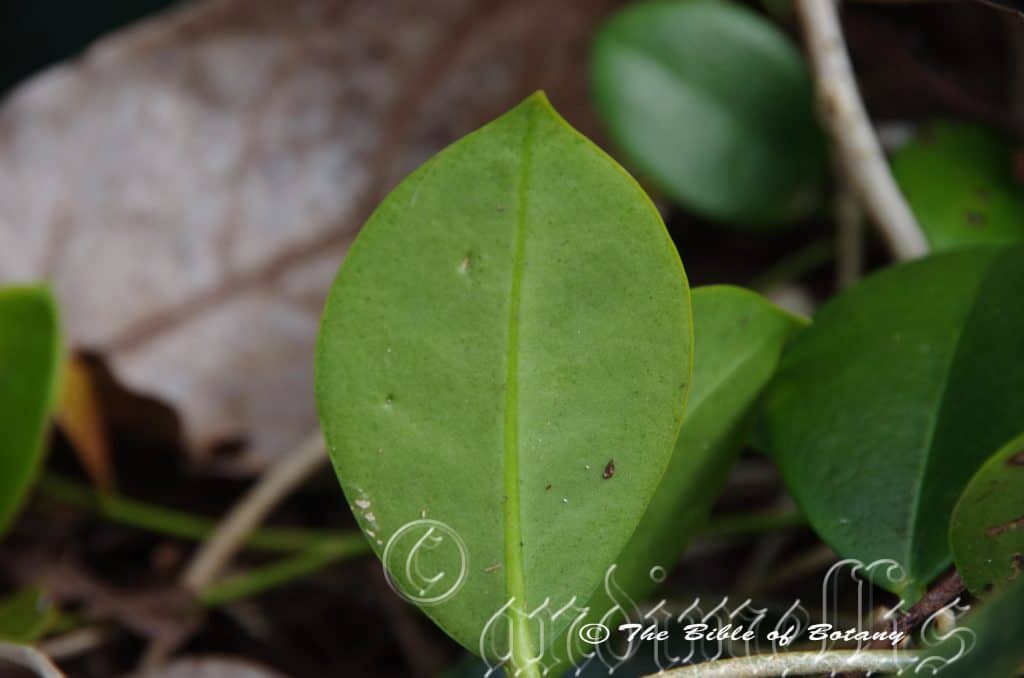
Crystal Creek Paluma Range National Park Qld.
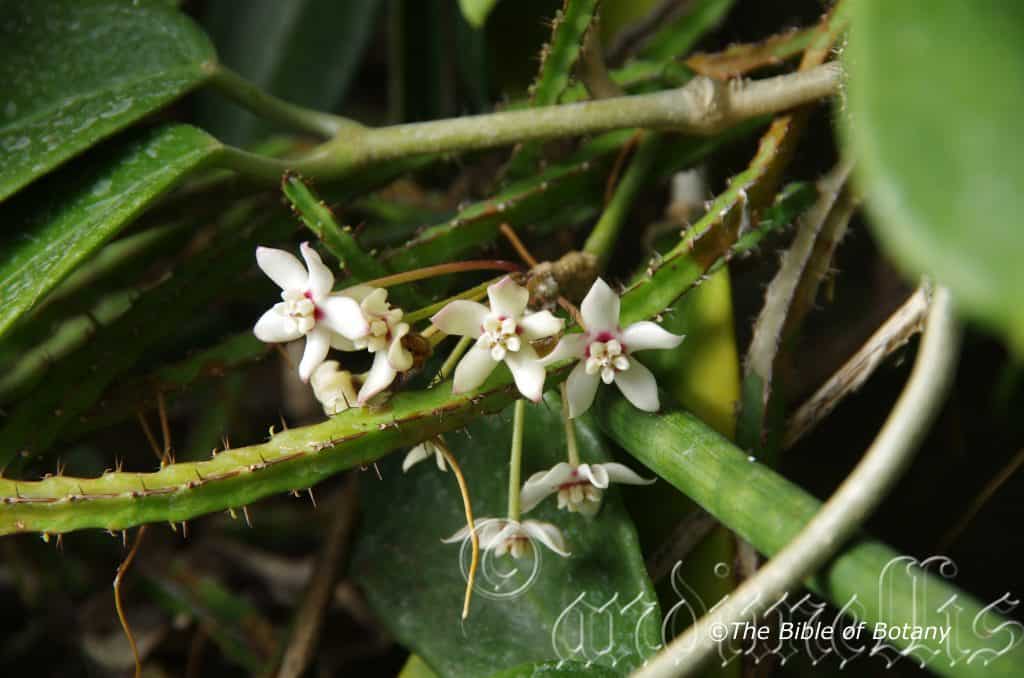
NCBG Coffs Harbour NSW
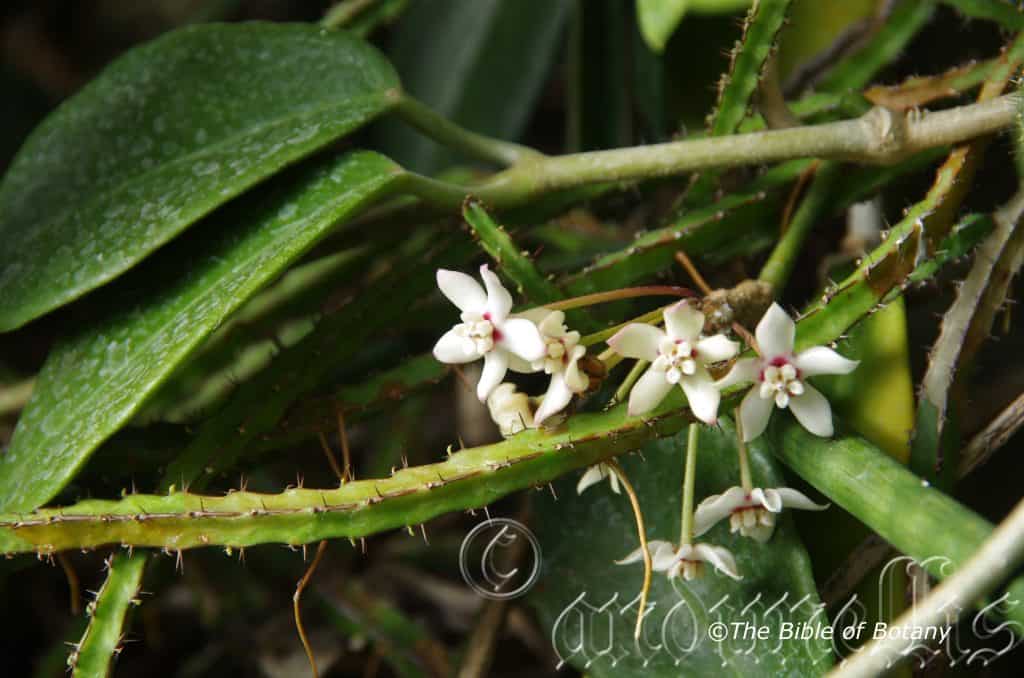
NCBG Coffs Harbour NSW
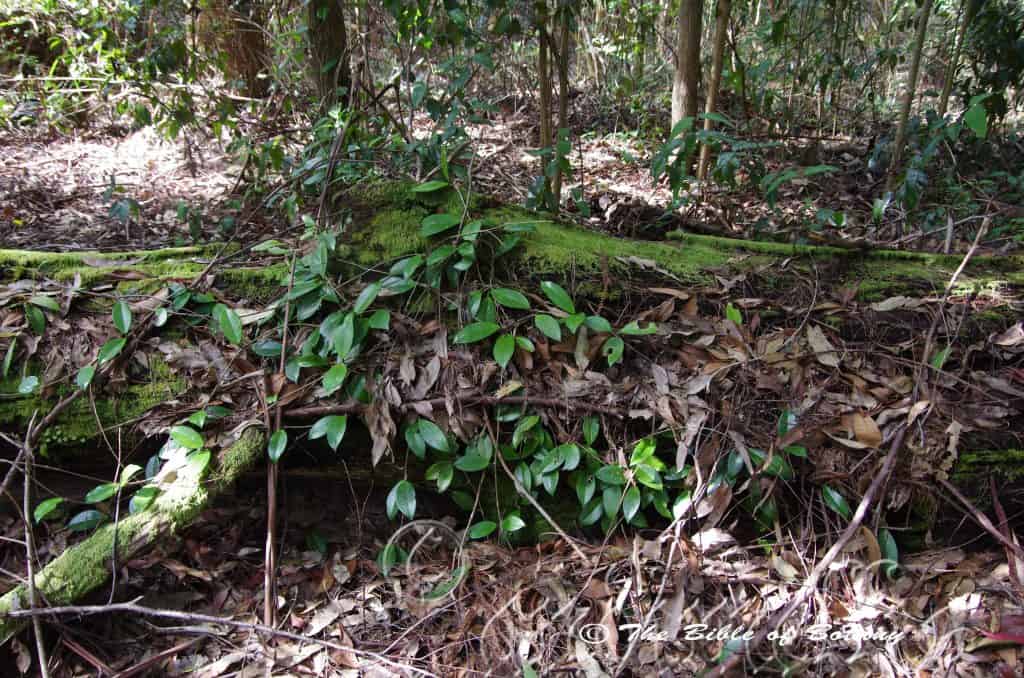
Nana Glen NSW
Hoya australis
Classification:
Unranked: Eudicots
Unranked: Asterids
Order: Gentianales
Family: Apocynaceae
Subfamily: Asclepiadoideae
Genus: Is named in honour of Thomas Hoy; 1750-1822, who was an English born gardener and botanist in Syon House in Middlesex England.
Species: From Terra Australis, which is Latin for land of the south. It refers to plants, which were first discovered from the land down under.
Subspecies: Hoya australis subsp. australis. From Terra Australis, which is Latin for land of the south. It refers to plants, which were first discovered from the land down under.
Subspecies: Hoya australis subsp. oramicola. From Ará, which is Ancient Greek or ōrātum, Latin for to pray or to orate. It usually refers flowers, which hang down.
Subspecies: Hoya australis subsp. rupicola. From Rupes, which is Latin for a cliff or crag, Kola, which is Ancient Greek or Cola, which is Latin for to dwell or reside. It refers to plants, which prefer to grow on rocky cliffs, tors and crags.
Subspecies: Hoya australis subsp. sana. From Sôs, which is Ancient Greek or later Sānum which is Latin for sane, of sound mind or a kiss. It refers to the extraordinary beauty of the flowers which overpowers the mind.
Subspecies: Hoya australis subsp. tenuipes. From Tanu, which is Ancient Greek or later Tenue, which is Latin for slender and fine and Pous, which is Ancient Greek or Pedi, which is Latin for a foot or feet. It refers to pedicels or petioles, which are rather slender.
Common Name: Native Wax Flower or Australian Wax Flower.
Distribution:
Hoya australis is mainly found on the coastal side and on the Great Dividing Range south from Cooktown in far north Queensland to Dorrigo in northern New South Wales. It is mainly found on and east of the Great Dividing Range to the coast.
Hoya australis subsp. rupicola is found in Western Australia from the Ord River across to the Kimberley Range and is now considered to be a distinct species – Hoya rupicola.
Hoya australis subsp. australis is found from the tip of Cape York Peninsula in Queensland south to the mouth of the Macleay River in New South Wales.
Hoya australis subsp. oramicola is found from Melville Islands and around Darwin in the Northern Territory.
Hoya australis subsp. rupicola is found from the Kimberley district in far north west Western Australia east to East
Arnhem.
Hoya australis subsp. sana is found on the norther half of Cape York Peninsula.
Hoya australis subsp. tenuipes is found in New Guinee, the lower half of Cape York Peninsula and south to Innisfail.
https://avh.ala.org.au/occurrences/search?taxa=Hoya+australis#tab_mapView
Habitat Aspect Climate:
Hoya australis prefers dappled full sun to shade. It grows in moist Eucalyptus forests, dry rainforests and on the back dunes associated with moist littoral rainforests. The altitude ranges from 10 meters ASL to 850 meters ASL.
The temperatures range from 4 degree in August to 36 degrees in January.
The rainfall ranges from lows of 750mm to an average of 3200mm annually.
Soil Requirements:
Hoya australis prefers growing on sandy soils to light clays. It also grows in the nests and back material of Asplenium and Platycerium specie. The soils are usually derived from decomposed sandstones, accumulated sands or at times shale, brown basalt, black basalt, metamorphic rocks, granite and sandstone. The soils pH varies from 5pH through to a 6pH. It does not tolerate waterlogged soils. Non saline soils to moderately saline soils are tolerated as are salt laden winds.
Height & Spread:
Wild Plants: 1m to 6m by 0.1m to 6m.
Characteristics:
Hoya australis is a small twinning climber with large white or pale pink wax flowers. The main stems are brown and densely covered in pale grey pubescent hairs especially towards the apex. All parts of the plants exude white latex when damaged.
Hoya australis’s broad elliptical, ovate, oval or orbicular leaves are thick and coriaceous. They measure 30mm to 60mm in length by 20mm to 50mm in width. The base is rounded while the apex is obtuse with a short apiculate point. The concolourous laminas are olive-green, grey-green or deep sea green and glabrous or sparsely covered in white or pale grey pubescent hairs on the upper lamina while the lower lamina is densely covered in white or pale grey pulverulent and pannate hairs. The margins are entire and are flat or curve slightly upwards from the mid vein. The mid vein and lateral veins are prominent on the lower lamina and are visible from above. The petioles measure 10mm to 35mm in length and are covered in white or pale grey pulverulent hairs.
The inflorescences of Hoya australis are born in umbels from the leaf axis and measure 60mm to 75mm in diameter. There are 12 to 30 flowers per umbel. The yellow green sepals measure 2mm to 3mm in length. The pure white or rarely pale pink corolla has a red to burgundy center and measures 7mm to 8mm in length while the 5 oblong lobes spread widely and have an acute apex. They measure 7mm to 12mm in width and are sparsely covered in very short white hairs. The corona is white. The large, oval, pure white, spreading stamens are fused together at the base to form a short tube. They eventually spread out opposite the petals. The pale yellow green peduncle measures 5mm to 25mm in length while the pale yellow green pedicels measure 15mm to 25mm in length. The fragrant flowers appear from March to August however the odd flower may appear throughout the year in warmer areas.
Hoya australis’s fruit is a linear terete follicle. The follicles measure 70mm to 180mm in length by 5mm to 7mm in diameter. The green pods turn deep grey-brown on ripening. Seeds are cream to fawn, and measure 3mm to 4mm in length with long 15mm to 25mm white plume extending out from out from the apex.
Wildlife:
Hoya australis is the food source for two Australian butterflies, the Australian Crow butterfly and Eichorn’s Crow butterfly.
Cultivation:
Hoya australis are very beautiful small climbers which are suitable for small shaded spots in the garden. It is an excellent colourful addition for subtropical or warm temperate zone gardens. As a garden subject it will grow to 2 meter to 3 meters in height by 2 meters to 2.5 meters wide when grown in the open.
It should be tip pruned regularly to enhance bushiness and better flowering. Hoya australis respond very well to tip pruning, additional native fertilizers and heavy mulching. Hard pruning is not necessary. It is fast growing and are cold tolerant to temperatures as low as 0 degrees. It is frost sensitive so frosts should be avoided. In Nana Glen I have grown this plant where temperatures reach minus 3 however the plants were not subjected to frosts. It displayed browning and purpling of the leaves but recovered slowly during the summer months.
It is most suitable for use around swimming pools, bright courtyards, and smaller fish or frog ponds where they can scramble over logs, rocks or stumps. It is better used to scramble over logs and around rocks than on a fence or pergola.
It looks spectacular when grown in, indoor miniature gardens, formal gardens or around fish or frog ponds.
In the formal or Japanese Gardens they can be used as the center of attention or as the main plant beside the water feature. Imagine a small pond with fish swimming, beside it is a lonely Hoya australis scrambling over a stump a log or cascading down beside the waterfall. This is very powerful. It is balanced, formal yet very relaxing. It does not require much maintenance and if you go on holidays they will survive with a monthly watering.
In court yards, around bush house or swimming pools they can be used on small trellis or in hanging baskets. Hoya australis make very good indoor plants where central heating is not an issue. When growing them in pots use a good indoor mix.
It makes wonderful topiary work and hanging basket specimens.
INDOORS OR POTTED ON:
Sawdust or sand mixes are too well draining unless the sawdust has completely composted down where it exhibits a texture like plasticine to the touch. Moisture can be squeezed out between the fingers yet it remains moist. I find this a great basis to start with.
Mix equal parts of the well decomposed saw dust with the above feel with perlite and vermiculite. To this add two part sharp clean sand, one part compost and one part good crusher dust from a basalt rock quarries. Preferably black basalt but both are good. Make sure the sand comes from a source that does not have salt.
The decomposed Sawdust in this condition creates the moisture retention and holds nutrient in. The perlite and vermiculite make the mix neutral and both have great water holing capacity without shrinkage with age. The sand creates good drainage and is good for good healthy root development. The crusher dust adds vital minerals which the plants need.
Indoor plants need good light and ventilation without drying breezes or wind. Fertilize the plants on a monthly basis during the growing season with the formula mentioned under propagation at half strength on a rotation basis.
Propagation:
Seeds: Hoya australis seeds can be sown directly into a seed raising mix. Cover them with 5mm of fine sand and keep moist not wet. Place the tray in a warm sunny position.
When the seedlings are 20mm to 30mm tall, prick them out and plant them into 50mm native tubes using a good organic mix.
Once the seedlings reach 150mm to 200mm in height they can be planted out into their permanent position.
Cuttings: Use 50mm to 80mm long ripened material when growing from cuttings that have at least one pair of leaves. Take them in warmer months of the year. Place them into a sterile mix of peat, sand and perlite with the pair of leaves just touching the surface of the mix.
Place the trays under 30mm to 50mm shade and keep the trays warm. Bottom heat is beneficial to hasten rooting of the cuttings. Ideally temperatures should be maintained at between 22 to 24 degrees. Keep the trays moist not wet and allow them to almost dry out between watering.
When the cuttings have obviously struck and have developed good roots treat them as for seedlings.
Another method is to layer the cutting. This involves nicking a section from an internodes and pinning the runner horizontally to the surface of in an adjacent pot so that it can’t move. This method is 100mm reliable and plants usually form roots very quickly within the month. Once good roots have formed sever the new plant from its parent and nip the apex to promote more lateral runners.
Fertilize using Seaweed, fish emulsion or organic chicken pellets soaked in water and apply the liquid on an alternate basis. Fertilize every 2 months until the plants are well established then on an annual basis in September to October to maintain good health, vigour and better flowering.
Further Comments from Readers:
Hi reader, it seems you use The Bible of Botany a lot. That’s great as we have great pleasure in bringing it to you! It’s a little awkward for us to ask, but our first aim is to purchase land approximately 1,600 hectares to link several parcels of N.P. into one at The Pinnacles NSW Australia, but we need your help. We’re not salespeople. We’re amateur botanists who have dedicated over 30 years to saving the environment in a practical way. We depend on donations to reach our goal. If you donate just $5, the price of your coffee this Sunday, We can help to keep the planet alive in a real way and continue to bring you regular updates and features on Australian plants all in one Botanical Bible. Any support is greatly appreciated. Thank you.
In the spirit of reconciliation we acknowledge the Bundjalung, Gumbaynggirr and Yaegl and all aboriginal nations throughout Australia and their connections to land, sea and community. We pay our respect to their Elders past, present and future for the pleasures we have gained.
Hoya macgillivrayi
Classification:
Unranked: Eudicots
Unranked: Asterids
Order: Gentianales
Family: Apocynaceae
Subfamily: Asclepiadoideae
Genus: Is named in honour of Thomas Hoy; 1750-1822, who was an English born gardener and botanist in Syon House in Middlesex England.
Species: Is named in honour of Thomas Hoy; 1750-1822, who was an English born gardener and botanist in Syon House in Middlesex England.
Common Name: Coastal Wax Flower.
Distribution:
Hoya macgillivrayi is found on the eastern coastal side of Cape York Peninsula in far north Queensland.
https://avh.ala.org.au/occurrences/search?taxa=Hoya+macgillivrayi#tab_mapView
Habitat Aspect Climate:
Hoya macgillivrayi prefers dappled shade. It grows on coastal headlands or in the littoral rainforests behind the coastal frontal dunes. The altitude ranges from 10 meters ASL to 100 meters ASL.
Temperatures range from 10 degree in August to 38 degrees in January.
The rainfall ranges from lows of 900mm to an average of 3000mm annually.
Soil Requirements:
Hoya macgillivrayi prefers growing on sandy soils. It also grows in the nests and back material of Asplenium species and Platycerium specie. It grows as an epiphyte or lithophyte on rocks. The soils are usually derived from decomposed sandstone or accumulated sands or granite. The soils pH varies from 5pH through to a 6pH. It does not tolerate waterlogged soils. Non saline soils to moderately saline soils are tolerated as are salt laden winds.
Height & Spread:
Wild Plants: 0.1m to 6m by 0.1m to 6m.
Characteristics:
Hoya macgillivrayi’s main stems are grey and glabrous. All parts of the plants exude copious quantities of white milky latex when damaged.
Hoya macgillivrayi’s broad elliptical leaves are thick and coriaceous. They measure 90mm to 175mm in length by 40mm to 70mm in width. The base is hastate while the apex is narrowly acuminate. The concolourous laminas are green to deep sea-green and glabrous. The margins are entire and flat or curve very slightly upwards from the mid vein. The midvein vein is prominent on the lower lamina and is visible from above. The petioles measure 15mm to 20mm in length and are glabrous.
The inflorescences of Hoya macgillivrayi are born in umbiliform from the leaf axils and measure 50mm to 60mm in diameter. There are 6 to 18 flowers per umbel which measures 120mm to 200mm in diameter. The cream calyxes measure 30mm to 56mm in length. The deep burgundy to deep maroon corolla measures 22mm to 23mm in length while the 5 broad triangular divaricate lobes measure 20mm to 22mm in length. The large, oval, maroon stamens, spreading stamens are fused together at the base to form a short tube. The peduncle measures 10 to 70mm in length while the pedicels measure 70mm to 80mm in length.
The anthers measure 2.5mm to 2.7mm in length. The flowers appear from March to August however the odd flower may appear throughout the year in warmer areas.
Hoya macgillivrayi’s fruit is a long linear acicular capsule. The capsules measure 160mm to 210mm in length by 10mm to 16mm in diameter. The green pods turn deep grey brown on ripening. Seeds are cream to fawn, oblong and measure 6.5mm to 7mm in length with long 40mm to 45mm white plume extending out from the apex.
Wildlife:
Hoya macgillivrayi’s wildlife is unknown to the author.
Cultivation:
Hoya macgillivrayi is a beautiful small climber, which is suitable for small shaded spots in the garden. It is an excellent colourful addition for subtropical or warm temperate zone gardens. As a garden subject it will grow to 2 meter to 2.5 meters in height by 1.5 meters to 2 meters in width.
It should be tip pruned regularly to enhance bushiness and better flowering. Hoya macgillivrayi responds very well to tip pruning, additional native fertilizers and heavy mulching. Hard pruning is not necessary. It is fast growing and are cold tolerant to temperatures as low as 0 degrees. It is frost sensitive so frosts should be avoided.
It is most suitable for use around swimming pools, bright courtyards, and smaller fish or frog ponds where it can scramble over logs, rocks or stumps.
It looks spectacular when grown in indoor miniature gardens, formal gardens or around fish or frog ponds.
In the formal or Japanese Gardens they can be used as the center of attention or as the main plant beside the water feature. Imagine a small pond with fish swimming. As a single plant, Hoya macgillivrayi scrambling over a stump a log or cascading down beside the waterfall is worthwhile seeing when in flower. This is very powerful, balanced, formal yet very relaxing. It does not require much maintenance and if you go on holidays they will survive with a fortnightly watering.
In court yards, around bush house or swimming pools they can be used on small trellis or in hanging baskets. Hoya australis make very good indoor plants where central heating is not an issue. When growing them in pots use a good indoor mix.
It would make a wonderful small topiary work and hanging basket specimens.
INDOORS OR POTTED ON:
Sawdust or sand mixes are too well draining unless the sawdust has completely composted down where it exhibits a texture like plastacine to the touch. Moisture can be squeezed out between the fingers yet it remains moist. I find this a great basis to start with.
Mix equal parts of the well decomposed saw dust with the above feel with perlite and vermiculite. To this add two part sharp clean sand, one part compost and one part good crusher dust from a basalt rock quarries. Preferably black basalt but both are good. Make sure the sand comes from a source that does not have salt.
The decomposed Sawdust in this condition creates the moisture retention and holds nutrient in. The perlite and vermiculite make the mix neutral and both have great water holing capacity without shrinkage with age. The sand creates good drainage and is good for good healthy root development. The crusher dust adds vital minerals which the plants need.
Indoor plants need good light and ventilation without drying breezes or wind. Fertilize the plants on a monthly basis during the growing season with the formula mentioned under propagation at half strength on a rotation basis.
Propagation:
Seeds: Hoya macgillivrayi seeds can be sown directly into a seed raising mix. Cover them with 5mm of fine sand and keep moist not wet. Place the tray in a warm sunny position.
When the seedlings are 20mm to 30mm tall, prick them out and plant them into 50mm native tubes using a good organic mix.
Once the seedlings reach 150mm to 200mm in height they can be planted out into their permanent position.
Cuttings: Use 50mm to 80mm long ripened material with at least 2 pairs of nodes when growing from cuttings that have at least one pair of leaves. Take them in the warmer months of the year. Place the cuttings into a sterile mix of peat, sand and perlite with the pair of leaves just touching the surface of the mix.
Place the trays under 30mm to 50mm shade and keep the trays warm. Bottom heat is beneficial when striking the cuttings. Ideally temperatures should be maintained at between 22 to 24 degrees. Keep the trays moist not wet and allow them to almost dry out between watering.
When the cuttings have obviously struck and have developed good roots treat them as for seedlings.
Another method is to layer the cutting. This involves nicking a section from an internodes and pinning the runner horizontally to the surface of in an adjacent pot so that it can’t move. This method is 100mm reliable and plants usually form roots very quickly within the month. Once good roots have formed sever the new plant from its parent and nip the apex to promote more lateral runners.
Fertilize using Seaweed, fish emulsion or organic chicken pellets soaked in water and apply the liquid on an alternate basis. Fertilize every 2 months until the plants are well established then on an annual basis in September to October to maintain good health, vigour and better flowering.
Further Comments from Readers:
Hi reader, it seems you use The Bible of Botany a lot. That’s great as we have great pleasure in bringing it to you! It’s a little awkward for us to ask, but our first aim is to purchase land approximately 1,600 hectares to link several parcels of N.P. into one at The Pinnacles NSW Australia, but we need your help. We’re not salespeople. We’re amateur botanists who have dedicated over 30 years to saving the environment in a practical way. We depend on donations to reach our goal. If you donate just $5, the price of your coffee this Sunday, We can help to keep the planet alive in a real way and continue to bring you regular updates and features on Australian plants all in one Botanical Bible. Any support is greatly appreciated. Thank you.
In the spirit of reconciliation we acknowledge the Bundjalung, Gumbaynggirr and Yaegl and all aboriginal nations throughout Australia and their connections to land, sea and community. We pay our respect to their Elders past, present and future for the pleasures we have gained.
Hoya oligotricha
Classification:
Unranked: Eudicots
Unranked: Asterids
Order: Gentianales
Family: Apocynaceae
Subfamily: Asclepiadoideae
Genus: Is named in honour of Thomas Hoy; 1750-1822, who was an English born gardener and botanist in Syon House in Middlesex England.
Species: Is named in honour of John Macgillivray; 1822–1867, who was a Scottish botanist and author who studied the plants from the Northern Territory.
Common Name: Coastal Wax Flower.
Distribution:
Hoya oligotricha is found on the coastal side and on the Great Dividing Range on the coastal strip from Cape Grafton in far north Queensland to Kempsey in northern New South Wales.
https://avh.ala.org.au/occurrences/search?taxa=Hoya+oligotricha#tab_mapView
Habitat Aspect Climate:
Hoya oligotricha prefers dappled shade to full sunlight. It grows on coastal headlands and in the littoral rainforests behind the coastal frontal dunes. The altitude ranges from 5 meters ASL to 30 meters ASL.
The temperatures range from 3 degree in August to 40 degrees in January.
The rainfall ranges from lows of 900mm to an average of 3000mm annually.
Soil Requirements:
Hoya oligotricha prefers growing on shallow sandy soils. It also grows in the nests and back material of Asplenium species and Platycerium specie growing close to the coast. The soils are usually derived from decomposed sandstone or accumulated sands. The soils pH varies from 6pH through to a 6.8pH. It does not tolerate water gged soils. Non saline soils to moderately saline soils are tolerated as are salt laden winds.
Height & Spread:
Wild Plants: 0.1m to 6m by 0.1m to 6m.
Characteristics:
Hoya oligotricha’s main stems are brown and sparsely covered in pale grey pubescent hairs especially towards the apex. All parts of the plants exude copious quantities of white latex when damaged.
Hoya oligotricha’s broad elliptical, ovate, oval or orbicular leaves are thick and coriaceous. They measure 40mm to 120mm in length by 30mm to 80mm in width. The petioles measure 10mm to 35mm in length and are glabrous or covered in pale grey pulverulent hairs. The bases are rounded while the apexes are obtuse with or without a short apiculate point. The concolourous laminas are deep green to deep sea-green and are glabrous or sparsely covered in pale grey pubescent hairs. The margins are entire and are flat or curve slightly upwards from the mid vein. The midvein and lateral veins are prominent on the lower lamina and are visible from above.
The inflorescences of Hoya oligotricha are born in umbels from the leaf axils and measure 50mm to 70mm in diameter. There are 12 to 30 flowers per umbel which measure 15mm to 25mm each. The yellow green sepals measure 2mm to 4mm in length. The cream or pale creamy pink corolla has a red to pink center and measures 7mm to 8mm in length and is sparsely covered in minute pubescent hairs. The 5 oblong lobes spread widely and have an acute to obtuse apex. They measure 7mm to 12mm in width and are sparsely covered in very short white hairs. The corona is white. The large, oval, pure white, spreading stamens are fused together at the base to form a short tube. The pale yellow green peduncle measures 5mm to 25mm in length while the pale yellow green pedicels measure 15mm to 30mm in length. The fragrant flowers appear from March to August however the odd flower may appear throughout the year in warmer areas.
Hoya oligotricha’s fruit is a linear, terete capsule. The capsules measure 100mm to 150mm long by 10mm to 15mm in width. The green pods turn deep grey brown on ripening. Seeds are cream to fawn, oblong and measure 3.5mm to 4.5mm in length with long 15mm to 25mm white plume out from the from the apex.
Wildlife:
Hoya oligotricha’s wildlife is unknown to the author.
Cultivation:
Hoya oligotricha are very beautiful small climbers which are suitable for small shaded spots in the garden. It is an excellent colourful addition for subtropical or warm temperate zone gardens. As a garden subject it will grow to 2 meter to 5 meters high by 2 meters to 2.5 meters wide. It should be tip pruned regularly to enhance bushiness and better flowering. Hoya oligotricha respond very well to tip pruning, additional native fertilizers and heavy mulching. Hard pruning is not necessary. It is fast growing and are cold tolerant to temperatures as low as 0 degrees. It is frost sensitive so frosts should be avoided.
It is most suitable for use around swimming pools, bright courtyards, and smaller fish or frog ponds where it can scramble over logs, rocks or stumps.
It looks spectacular when grown in indoor miniature gardens, formal gardens or around fish or frog ponds.
In the formal or Japanese Gardens they can be used as the center of attention or as the main plant beside the water feature. Imagine a small pond with fish swimming. As a single plant scrambling over a stump a log or cascading down beside the waterfall it is very powerful, balanced, formal yet very relaxing. It does not require much maintenance and if you go on holidays they will survive with a fortnightly watering.
In court yards, around bush house or swimming pools it can be used on small trellis or in hanging baskets. Hoya oligotricha make very good indoor plants where central heating is not an issue. When growing them in pots use a good indoor mix.
INDOORS OR POTTED ON:
Sawdust or sand mixes are too well draining unless the sawdust has completely composted down where it exhibits a texture like plastacine to the touch. Moisture can be squeezed out between the fingers yet it remains moist. I find this a great basis to start with.
Mix equal parts of the well decomposed saw dust with the above feel with perlite and vermiculite. To this add two part sharp clean sand, one part compost and one part good crusher dust from a basalt rock quarries. Preferably black basalt but both are good. Make sure the sand comes from a source that does not have salt.
The decomposed Sawdust in this condition creates the moisture retention and holds nutrient in. The perlite and vermiculite make the mix neutral and both have great water holing capacity without shrinkage with age. The sand creates good drainage and is good for good healthy root development. The crusher dust adds vital minerals which the plants need.
Indoor plants need good light and ventilation without drying breezes or wind. Fertilize the plants on a monthly basis during the growing season with the formula mentioned under propagation at half strength on a rotation basis.
Propagation:
Seeds: Hoya oligotricha seeds can be sown directly into a seed raising mix. Cover them with 5mm of fine sand and keep moist not wet. Place the tray in a warm sunny position.
When the seedlings are 20mm to 30mm tall, prick them out and plant them into 50mm native tubes using a good organic mix.
Once the seedlings reach 150mm to 200mm in height they can be planted out into their permanent position.
Cuttings: Use 50mm to 80mm long ripened material when growing from Cuttings. Take them in the warmer months of the year. Remove a 10mm slice from the bark in a downward stroke from one side. Using an appropriate rooting hormone, dip the cutting in and place it into a sterile mix of peat, sand and perlite.
Place the trays under 30mm to 50mm shade and keep the trays warm. Bottom heat is beneficial when striking the cuttings. Ideally temperatures should be maintained at between 22 to 24 degrees.
When the cuttings have obviously struck and have developed good roots treat them as for seedlings.
Another method is to layer the cutting. This involves nicking a section from an internodes and pinning the runner horizontally to the surface of in an adjacent pot so that it can’t move. This method is 100mm reliable and plants usually form roots very quickly within the month. Once good roots have formed sever the new plant from its parent and nip the apex to promote more lateral runners.
Fertilize using Seaweed, fish emulsion or organic chicken pellets soaked in water and apply the liquid on an alternate basis. Fertilize every 2 months until the plants are well established then on an annual basis in September to October to maintain good health, vigour and better flowering.
Further Comments from Readers:
Hi reader, it seems you use The Bible of Botany a lot. That’s great as we have great pleasure in bringing it to you! It’s a little awkward for us to ask, but our first aim is to purchase land approximately 1,600 hectares to link several parcels of N.P. into one at The Pinnacles NSW Australia, but we need your help. We’re not salespeople. We’re amateur botanists who have dedicated over 30 years to saving the environment in a practical way. We depend on donations to reach our goal. If you donate just $5, the price of your coffee this Sunday, We can help to keep the planet alive in a real way and continue to bring you regular updates and features on Australian plants all in one Botanical Bible. Any support is greatly appreciated. Thank you.
In the spirit of reconciliation we acknowledge the Bundjalung, Gumbaynggirr and Yaegl and all aboriginal nations throughout Australia and their connections to land, sea and community. We pay our respect to their Elders past, present and future for the pleasures we have gained.
Anderson Botanic Gardens Townsville Qld.
Anderson Botanic Gardens Townsville Qld.
Anderson Botanic Gardens Townsville Qld.
Anderson Botanic Gardens Townsville Qld.
Anderson Botanic Gardens Townsville Qld.
Anderson Botanic Gardens Townsville Qld.
Huperzia carinata
Classification:
Division: Lycopodiophyta
Class: Lycopodiopsida
Order: Lycopodiales
Family: Huperziaceae
Genus: Is named in honour of Johann Peter Huperz; 1771-1816, who was a German botanist who specialized in ferns.
Species: From Carinatus, which is Latin for to have a keel like ridge. It refers to an organ, which has a longitudinally raised ridge.
Common Name: Queensland Tassel or Tasselled Club Moss.
Distribution:
Huperzia carinata is found on the eastern side of Cape York Peninsula in the north, south from the Iron Range National Park to north of Cape Grafton in far north Queensland.
https://avh.ala.org.au/occurrences/search?taxa=Huperzia+carinata#tab_mapView
Habitat Aspect Climate:
Huperzia carinata prefers dense shade to heavy filtered light. It grows in coastal rainforests, mountain rainforests, high on the trunks or branches of suitable trees. It grows as an epiphyte, lithophyte or on rare occasions in the soil. The altitude ranges from 50 meters ASL to 1250 meters ASL.
The temperatures range from 6 degrees in August to 28 degrees in January.
The rainfalls range from lows of 1600mm to 3200mm average per annum.
Soil Requirements:
Huperzia carinata grows as an epiphyte on trees or as a lithophyte on rocks. Occasionally it can be seen growing on the rainforest floors among the leaf litter. The soils are usually derived from decomposed brown basalt, black basalt sandstones or granites. The soils and composts pH varies from 5pH through to a 6pH. It does not tolerate waterlogged soils. Non saline soils to slightly saline soils are tolerated.
Height & Spread:
Wild Plants: 100mm to 1200mm by 500mm to 800mm.
Characteristics:
Huperzia carinata has short, tufted, stout stem stems in their initial stages of growth which eventually become pendulous as they lengthen in size. The longer stems will become dimorphically branched and measure 400mm to 900mm in length by 12mm to 15mm in diameter. The last 20mm to 60mm contain the fertile sporangia. The stems are black at the base becoming glossy green as they approach the pendulous section.
Huperzia carinata leaves are densely arranged in 4 spiralling rows along the stems. The leaves are at 30 degree angles to the central axis. The coriaceous, attenuate lanceolate, linear-lanceolate to almost acicular leaves are prominently keeled on the lower surface of the lamina. The leaves are not twisted on this specie and measure 10mm to 13mm in length by 1mm to 2mm in width near the base. The concolourous laminas are lime-green to pale yellowish-green and glabrous. The laminas recurve slightly upwards from the mid vein to the margins. The margins are entire.
The transitional zone from the sterile leaves to the fertile sporangia zone is gradual and is located at the apexes of the pendulous branches. The sporangia zone is usually unbranched or at times branched once or rarely twice. The fertile sporangia are held in the upper half to upper eighth of the sporophylls length. The sporophylls measure 4mm to 8mm in length by 1mm to 2.5mm in width. The ovate-cuspidate to lanceolate sporophylls bases are truncate to rounded while the apexes are acute. The lime –green to yellowish-green sporophylls are glabrous. It is cuspidate with a prominent longitudinal keel on the lower surface. The sporangia are about half the size of the sporophylls.
Wildlife:
Huperzia carinata’s wildlife is unknown to the author in the wild.
Cultivation:
Huperzia carinata is a magnificent large club moss that is very easy to grow however it is slow to establish especially in cooler climates. It is suitable for bright courtyards or in the garden where moist bright conditions prevail. Huperzia carinata is an excellent basket plant when planted on the sides of the basket. Do not use metal or plastic baskets as it is iron sensitive and resents roots sweating in the plastic baskets.
Huperzia carinata will establish itself from small plants and will reach its full potential in around 4 to 8 years. Its only requirement is semi-shade warm temperatures above 6 degrees centigrade and a humid microclimate.
When the sterile and fertile fronds are on display together the rich lime-green colour of the strobilus and leaves are refreshing to look at. The areas for cultivation should mimic their natural surroundings as close as possible to ensure successful happy plants. It makes an ideal plant for a bush house in sub tropical and cool tropical gardens.
Propagation:
Spores: Huperzia carinata is not easy to grow so expect many failures but once the area and success has been made the rewards are great in admiration and the plants will self-propagate without any further to do without becoming rampant.
All ferns and clubmosses that are declared rare, vulnerable or endangered are protected by Federal and State Laws and must not be removed from the wild unless you are a land developer, mining company or main Roads department etc. This includes bulbs, roots, leaves and flowers. No part of any plant can be removed from Federal, State or Local Government land without the prior permission of the authority and this includes the spore.
Most people are put off at the thought of growing ferns from spore. Like all plants that produce their offspring from seed or spore the methods are basically the same. Remember nature has been doing this for millions of years and has been very successful. I have had excellent results growing over 200 different species of Australian ferns so don’t be afraid. Give it a go.
Step 1. Select spore from the fern fronds. Wait until the fern is just starting to release its spore. Rinse the fronds under clean running water and dry. This is to wash off any other spores from rogue ferns that may have settled onto the fronds. (There is nothing worse than having common brake or common soft bracken contaminating a prized tree fern or epiphyte.)
Step 2. Place the dry fronds in a clean brown paper bag and keep them in a cool dark place like the linen closet for about a week to ten days before you are ready to sow the spore. The exception to this rule applies to ferns, which produce green spores. These must be sown immediately that they are released. Todea Barbara is a good example of a fern, which produces green spore.
Step 3. Take a large ice cream container, a small ice cream container and a clean clear plastic bag large enough to seal the large ice cream container and three or four milk bottle tops.
Step 4. Punch or drill 6 to 10 5mm holes in the bottom of the small ice cream container.
Step 5. Wash both containers, tops and plastic bag so that they are very clean and sterile.
Step 6. Use a clean fine seed raising mi. We used 30mm fine sand, 30mm peat and 30mm perlite and 10mm vermiculite. We used crushed basalt, crusher dust and peat in a 50:50 ratio for epiphytes. Moisten the mix enough that water does not run out when the mix is squeezed between the fingers.
Step 7. Place the moisten mix (Enough to half fill the small ice cream container) in the microwave oven with a large glass of water for 7 or 8 minutes, until the water is boiling. Allow them to cool in the oven. You will need the water later so do not tip it out.
Step 8. Take the brown paper bag out of the linen closet. Shake the bag and remove the fronds. You should have a yellow, brown, black or rarely greenish brown or ochre powder or very fine, small round pin head size spore depending on the specie involved.
Step 9. Remove the mixture from the oven once it has cooled and place it in the small ice cream container and level.
Step 10. Sprinkle the spore sparsely over the mixture in the small ice cream container.
Step 11. Place the milk bottle tops in the large ice cream container with the flat surface facing down. Place the small ice cream container in the large ice cream container so that it is sitting on the milk bottle tops.
Step 12. Remove the water from the microwave and pour it into the larger ice cream container so there is 25mm to 30mm of water in the bottom.
Step 13. Place the ice cream containers in the plastic bag and seal.
Step 14. Place the contents and bag in a warm shady place preferably 50mm to 70mm shade depending on the specie. Shade houses and some window sills are ideal.
Step 15. The surface should turn green within a week to two weeks. The prothallus will then develop. From the prthalus the first true fronds will appear. Wait until the ferns are 20mm to 35mm in height before you attempt to transplant them. Once they are ready open the bag up slightly and allow the air to flow around the little ferns. Every 3 to 5 days open the bag a little further so the ferns get use to their new environment. Allow them a week to two weeks to harden off before you transplant them following the removal of the plastic bag. Carefully prick them out into 50mm standard squat tubes as you would any seedling.
Do not try to transplant them as single plants as they are still a little delicate still.
Once the smaller ones again reach 50mm to 70mm you may wish to divide the stronger and hardier individual plants into smaller clumps in 100mm squat pots.
Alternative remove the tips of the plants where the strobilus are and place them in an open sterile mix of equal parts of peat moss perlite and vermiculite and course washed sand.
For more detailed work on propagating tassel ferns check out:
Once they reach 50mm to 60mm you may start to separate the strongest ones and again do not move them far from their original position. After a few weeks the ferns will grow stronger. Once the fronds reach 80mm plant them into their permanent positions. If mass planting space the ferns at 400mm centers.
Fertilize using seaweed, fish emulsion or organic chicken pellets soaked in water on an alternate basis. Fertilize the plants on a monthly basis during the growing season with the formula mentioned at half strength on a rotation basis.
Further Comments from Readers:
Hi reader, it seems you use The Bible of Botany a lot. That’s great as we have great pleasure in bringing it to you! It’s a little awkward for us to ask, but our first aim is to purchase land approximately 1,600 hectares to link several parcels of N.P. into one at The Pinnacles NSW Australia, but we need your help. We’re not salespeople. We’re amateur botanists who have dedicated over 30 years to saving the environment in a practical way. We depend on donations to reach our goal. If you donate just $5, the price of your coffee this Sunday, We can help to keep the planet alive in a real way and continue to bring you regular updates and features on Australian plants all in one Botanical Bible. Any support is greatly appreciated. Thank you.
In the spirit of reconciliation we acknowledge the Bundjalung, Gumbaynggirr and Yaegl and all aboriginal nations throughout Australia and their connections to land, sea and community. We pay our respect to their Elders past, present and future for the pleasures we have gained.
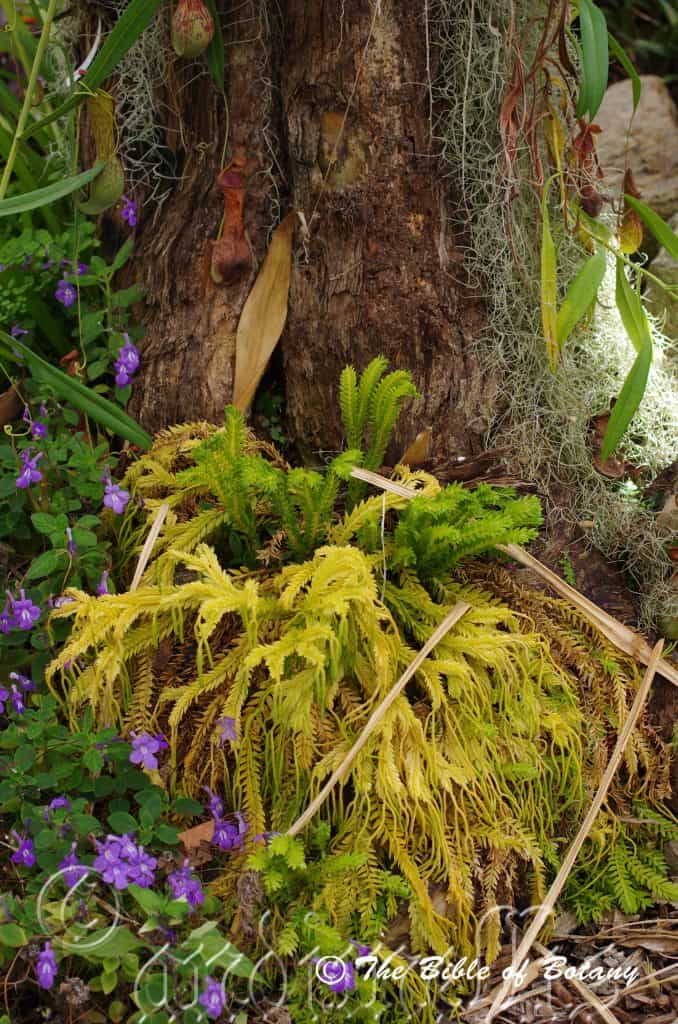
Mount Cootha Botanic Gardens Qld.
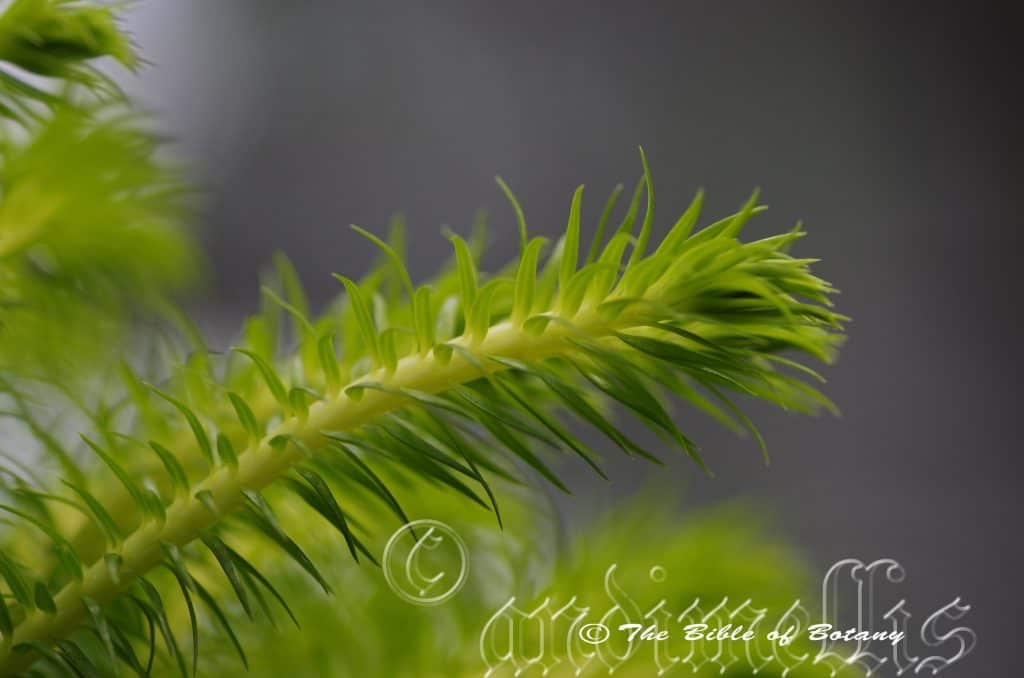
Mount Cootha Botanic Gardens Qld.
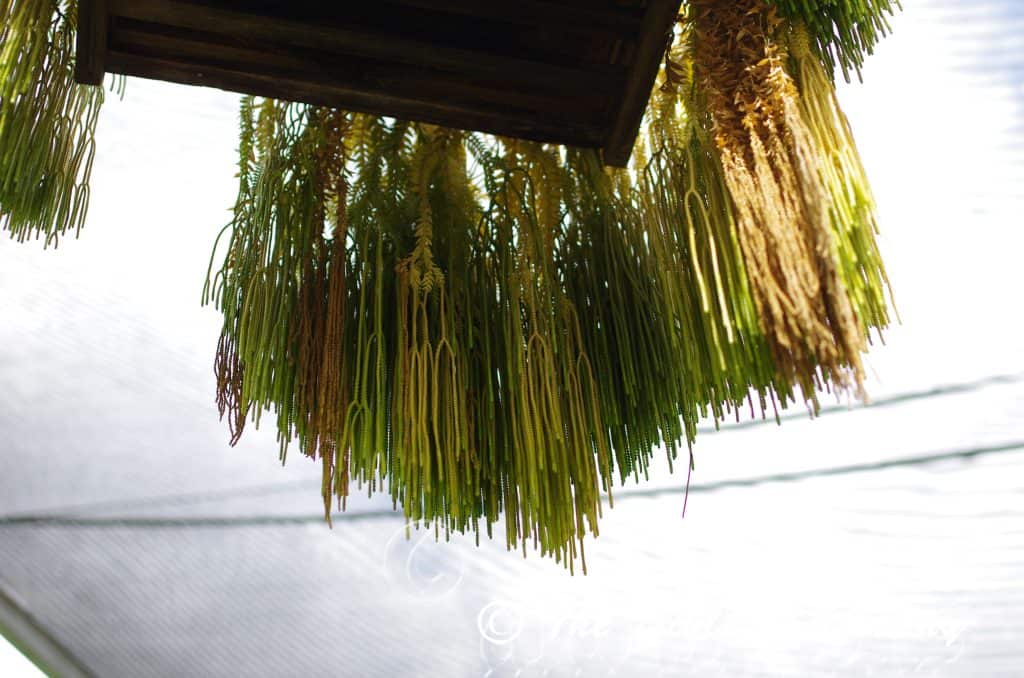
Mount Cootha Botanic Gardens Qld.
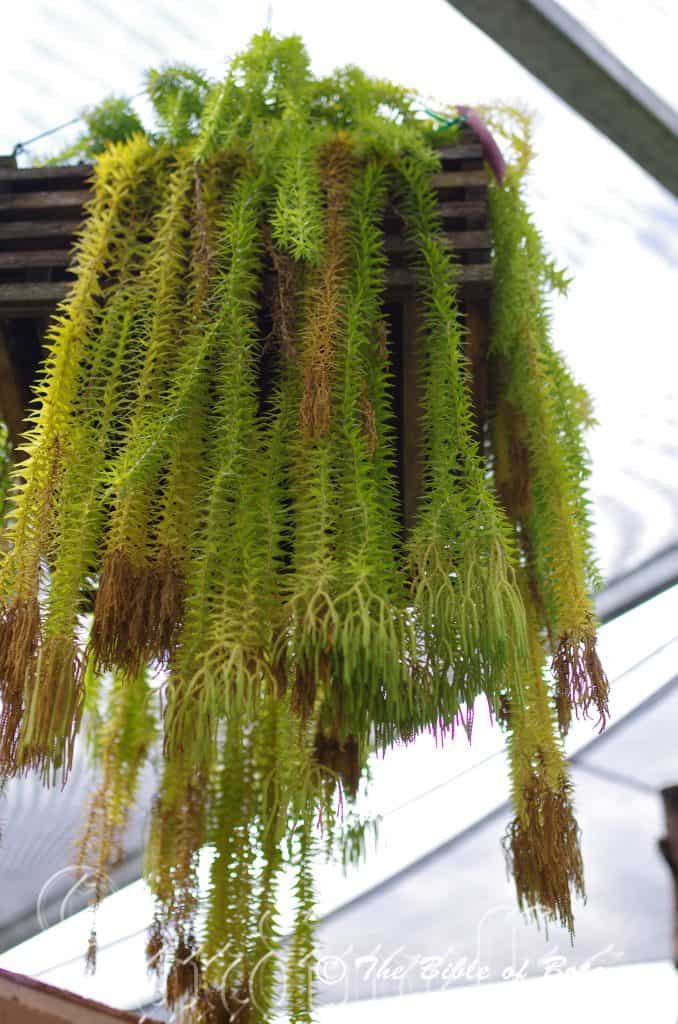
Mount Cootha Botanic Gardens Qld.
xxxxxxxxxxxxxxxxxxxxxxxxxxxxxxxxxxxxxxxxxxxHuperzia phlegmaria
Classification:
Division: Lycopodiophyta
Class: Lycopodiopsida
Order: Lycopodiales
Family: Huperziaceae
Genus: Is named in honour of Johann Peter Huperz; 1771-1816, who was a German botanist who specialized in ferns.
Species: From Phlégma, which is Ancient Greek for a flame as to rise up suddenly or to flare up and Maria, which is Latin for a lunar plain. The reference is obscure unless it refers to the exquisite beauty that erupts emotions in one’s heart.
Common Name: Queensland Tassel or Tasseled Club Moss.
Distribution:
Huperzia phlegmaria is found on the eastern side of Cape York Peninsula in the north, south from the Iron range National Park to Innisfail in far north Queensland.
https://avh.ala.org.au/occurrences/search?taxa=Huperzia+phlegmaria#tab_mapView
Habitat Aspect Climate:
Huperzia phlegmaria prefers dense shade to heavy filtered light. It grows in coastal rainforests, mountain rainforests, and high on the trunks or branches of suitable trees. It grows as an epiphyte, lithophyte or on rare occasions in the soil. The altitude ranges from 50 meters ASL to 1250 meters ASL.
The temperatures range from 10 degrees in August to 28 degrees in January.
The rainfalls range from lows of 1600mm to 3200mm average per annum.
Soil Requirements:
Huperzia phlegmaria grows as an epiphyte on trees or as a lithophyte on rocks. Occasionally it can be seen growing on the rainforest floors among the leaf litter. The soils are usually derived from decomposed brown basalt, black basalt sandstones or granites. The soils and composts pH varies from 5pH through to a 6pH. It does not tolerate waterlogged soils. Non saline soils to slightly saline soils are tolerated.
Height & Spread:
Wild Plants: 100mm to 1200mm by 500mm to 800mm.
Characteristics:
Huperzia phlegmaria has short, tufted, stout stem stems in their initial stages of growth which eventually become pendulous as they lengthen in size. Longer stems will become dimorphically branched. They measure 500mm to 1000mm in length by 20mm to 25mm in diameter. The last 20mm to 60mm contain the fertile sporangia. The stems are black at the base becoming glossy green as they approach the pendulous section.
Huperzia phlegmaria leaves are densely arranged spirally along the stems. The coriaceous, attenuate lanceolate leaves are angled at 50 to 70 degrees along the stems. It is twisted near the base and measure 7mm to 20mm in length by 2.5mm to 6mm in width at the base. The concolourous laminas are lime-green. The margins are entire.
The sessile strobilus carrying the spore is located at the apexes of the pendulous branches and is numerous. The strobili are abruptly formed on special terminal dimorphic branches. It is oblong and measure 20mm to 60mm in length by 1mm to 3mm in diameter. The sporophylls are ovate with a rounded base and an acute apex. It is decussate, appressed, keeled and measure 1mm to 1.25mm in length by 1mm to 1.15mm in width. The sporangia are about half the size of the sporophylls.
Wildlife:
I have never seen anything attack Huperzia phlegmaria in the wild.
Cultivation:
Huperzia phlegmaria is a magnificent large club moss that is very easy to grow however it is slow to establish especially in cooler climates. It is suitable for bright courtyards or in the garden where moist bright conditions prevail. Huperzia phlegmaria is an excellent basket plant when planted on the sides of the basket. Do not use metal or plastic baskets as it is iron sensitive and resents roots sweating in the plastic baskets.
Huperzia phlegmaria will establish themselves from small plants and will reach its full potential in around 8 to 10 years. There only requirement is semi-shade and a humid microclimate.
When the sterile and fertile fronds are on display together the rich lime-green colour of the strobilus and leaves are refreshing to look at. The areas for cultivation should mimic its natural surroundings as close as possible to ensure successful happy plants. It would make an ideal plant in small raised garden around semi shaded pools in warm temperate, subtropical and cool tropical gardens.
Fertilize the plants on a monthly basis during the growing season with the formula mentioned under propagation at half strength on a rotation basis.
Propagation:
Spores: Huperzia phlegmaria is not easy to grow so expect many failures but once the area and success has been made the rewards are great in admiration and the plants will self-propagate without any further to do without becoming rampant.
All ferns and clubmosses that are declared rare, vulnerable or endangered are protected by Federal and State Laws and must not be removed from the wild unless you are a land developer, mining company or main Roads department etc. This includes bulbs, roots, leaves and flowers. No part of any plant can be removed from Federal, State or Local Government land without the prior permission of the authority and this includes the spore.
Most people are put off at the thought of growing ferns from spore. Like all plants that produce their offspring from seed or spore the methods are basically the same. Remember nature has been doing this for millions of years and has been very successful. I have had excellent results growing over 200 different species of Australian ferns so don’t be afraid. Give it a go.
Step 1. Select spore from the fern fronds. Wait until the fern is just starting to release its spore. Rinse the fronds under clean running water and dry. This is to wash off any other spores from rogue ferns that may have settled onto the fronds. (There is nothing worse than having common brake or common soft bracken contaminating a prized tree fern or epiphyte.)
Step 2. Place the dry fronds in a clean brown paper bag and keep them in a cool dark place like the linen closet for about a week to ten days before you are ready to sow the spore. The exception to this rule applies to ferns, which produce green spores. These must be sown immediately that they are released. Todea Barbara is a good example of a fern, which produces green spore.
Step 3. Take a large ice cream container, a small ice cream container and a clean clear plastic bag large enough to seal the large ice cream container and three or four milk bottle tops.
Step 4. Punch or drill 6 to 10 5mm holes in the bottom of the small ice cream container.
Step 5. Wash both containers, tops and plastic bag so that they are very clean and sterile.
Step 6. Use a clean fine seed raising mi. We used 30mm fine sand, 30mm peat and 30mm perlite and 10mm vermiculite. We used crushed basalt, crusher dust and peat in a 50:50 ratio for epiphytes. Moisten the mix enough that water does not run out when the mix is squeezed between the fingers.
Step 7. Place the moisten mix (Enough to half fill the small ice cream container) in the microwave oven with a large glass of water for 7 or 8 minutes, until the water is boiling. Allow them to cool in the oven. You will need the water later so do not tip it out.
Step 8. Take the brown paper bag out of the linen closet. Shake the bag and remove the fronds. You should have a yellow, brown, black or rarely greenish brown or ochre powder or very fine, small round pin head size spore depending on the specie involved.
Step 9. Remove the mixture from the oven once it has cooled and place it in the small ice cream container and level.
Step 10. Sprinkle the spore sparsely over the mixture in the small ice cream container.
Step 11. Place the milk bottle tops in the large ice cream container with the flat surface facing down. Place the small ice cream container in the large ice cream container so that it is sitting on the milk bottle tops.
Step 12. Remove the water from the microwave and pour it into the larger ice cream container so there is 25mm to 30mm of water in the bottom.
Step 13. Place the ice cream containers in the plastic bag and seal.
Step 14. Place the contents and bag in a warm shady place preferably 50mm to 70mm shade depending on the specie. Shade houses and some window sills are ideal.
Step 15. The surface should turn green within a week to two weeks. The prothallus will then develop. From the prthalus the first true fronds will appear. Wait until the ferns are 20mm to 35mm in height before you attempt to transplant them. Once they are ready open the bag up slightly and allow the air to flow around the little ferns. Every 3 to 5 days open the bag a little further so the ferns get use to their new environment. Allow them a week to two weeks to harden off before you transplant them following the removal of the plastic bag. Carefully prick them out into 50mm standard squat tubes as you would any seedling.
Do not try to transplant them as single plants as they are still a little delicate still.
Once the smaller ones again reach 50mm to 70mm you may wish to divide the stronger and hardier individual plants into smaller clumps in 100mm squat pots.
Alternative remove the tips of the plants where the strobilus are and place them in an open sterile mix of equal parts of peat moss perlite and vermiculite and course washed sand.
Once they reach 50mm to 60mm you may start to separate the strongest ones and again do not move them far from their original position. After a few weeks the ferns will grow stronger. Once the fronds reach 80mm plant them into their permanent positions. If mass planting space the ferns at 400mm centers.
For more detailed work on propagating tassel ferns check out:
Fertilize using seaweed, fish emulsion or organic chicken pellets soaked in water on an alternate basis. Fertilize the plants on a monthly basis during the growing season with the formula mentioned at half strength on a rotation basis.
Further Comments from Readers:
Hi reader, it seems you use The Bible of Botany a lot. That’s great as we have great pleasure in bringing it to you! It’s a little awkward for us to ask, but our first aim is to purchase land approximately 1,600 hectares to link several parcels of N.P. into one at The Pinnacles NSW Australia, but we need your help. We’re not salespeople. We’re amateur botanists who have dedicated over 30 years to saving the environment in a practical way. We depend on donations to reach our goal. If you donate just $5, the price of your coffee this Sunday, We can help to keep the planet alive in a real way and continue to bring you regular updates and features on Australian plants all in one Botanical Bible. Any support is greatly appreciated. Thank you.
In the spirit of reconciliation we acknowledge the Bundjalung, Gumbaynggirr and Yaegl and all aboriginal nations throughout Australia and their connections to land, sea and community. We pay our respect to their Elders past, present and future for the pleasures we have gained.
Anderson Botanic Gardens Townsville Qld.
Anderson Botanic Gardens Townsville Qld.

Anderson Botanic Gardens Townsville Qld.
Huperzia phlegmarioides
Classification:
Division: Lycopodiophyta
Class: Lycopodiopsida
Order: Lycopodiales
Family: Huperziaceae
Genus: Is named in honour of Johann Peter Huperz; 1771-1816, who was a German botanist who specialized in ferns.
Species: From Phlégma, which is Ancient Greek for a flame as to rise up suddenly or to flare up, Maria, which is Latin for a lunar plain and Eîdos/Oides, which is Ancient Greek for alike or similar to. It refers to plants, which have a close resemblance to the Phlegmaria genus in that its exquisite beauty can erupt emotions in one’s heart.
Common Name: Tassel Fern or Square Tassel Fern.
Distribution:
Huperzia phlegmarioides is found on the eastern side of Cape York Peninsula in 2 disjunct populations. The northern population is found south from the Iron Range National park to east of the Mungkan Kandu National Park and south from Cedar Bay National Park to the Paluma National Park.
https://avh.ala.org.au/occurrences/search?taxa=Huperzia+phlegmarioides#tab_mapView
Habitat Aspect Climate:
Huperzia phlegmarioides grows in dense shade to heavy filtered light. It grows in coastal rainforests or mountain rainforests, high on the trunks or branches of suitable trees as an epiphyte, lithophyte on rocks or on rare occasions in the soil. The altitude ranges from 20 meters ASL to 350 meters ASL.
The temperatures range from 10 degrees in August to 28 degrees in January.
The rainfalls range from lows of 1600mm to 3200mm average per annum.
Soil Requirements:
Huperzia phlegmarioides grows as an epiphyte on trees or as a lithophyte on rocks. Occasionally it can be seen growing on the rainforest floors among the leaf litter.
Height & Spread:
Wild Plants: 100mm to 1200mm by 500mm to 800mm.
Characteristics:
Huperzia phlegmarioides has short, tufted, stout stem stems in their initial stages of growth which eventually become pendulous as they lengthen in size. Longer stems will become dimorphically branched. They measure 600mm to 1200mm in length by 25mm to 30mm in diameter. The last 30mm to 90mm contain the fertile sporangia. The stems are black at the base becoming glossy green as they approach the pendulous section.
Huperzia phlegmarioides leaves are densely arranged spirally along the stems. The coriaceous, attenuate, triangular to broad lanceolate leaves are angled at 70 to 85 degrees along the stems. It is slightly twisted near the base and measure 7mm to 20mm in length by 5mm to 8mm in width at the base. The concolourous laminas are lime-green with the margins being entire.
The sessile strobilus carrying the spore is located at the apexes of the pendulous branches and is numerous. The strobili are abruptly formed on special terminal dimorphic branches. It is oblong and measure 30mm to 70mm in length by 1.5mm to 3mm in diameter. The sporophylls are ovate with a rounded base and an acute apex. It is decussate, appressed, keeled and measure 1mm to 1.25mm in length by 1mm to 1.15mm in width. The sporangia are about half the size of the sporophylls.
Wildlife:
The wildlife associated with Huperzia phlegmarioides is unknown to the author.
Cultivation:
Huperzia phlegmarioides is a magnificent large club moss that is very easy to grow however it is slower than Huperzia phlegmarioides to establish especially in cooler climates. It is suitable for bright courtyards or in the garden where moist bright conditions prevail. Huperzia phlegmarioides is an excellent basket plant when planted on the sides of the basket. Do not use metal or plastic baskets as it is iron sensitive and resents roots sweating in the plastic baskets.
Huperzia phlegmarioides will establish themselves from small plants and will reach their full potential in around 8 to 10 years. There only requirement is shade and a humid microclimate.
When the sterile and fertile fronds are on display together the rich lime-green colour of the strobilus and leaves are refreshing to look at. The areas for cultivation should mimic their natural surroundings as close as possible to ensure successful happy plants. It would make an ideal plant in small raised gardens around sunny pools in warm temperate, sub tropical and cool tropical gardens.
Fertilize the plants on a monthly basis during the growing season with the formula mentioned under propagation at half strength on a rotation basis.
Propagation:
Spores: Huperzia phlegmarioides is not easy to grow so expect many failures but once the area and success has been made the rewards are great in admiration and the plants will self-propagate without any further to do without becoming rampant.
All ferns and clubmosses that are declared rare, vulnerable or endangered are protected by Federal and State Laws and must not be removed from the wild unless you are a land developer, mining company or main Roads department etc. This includes bulbs, roots, leaves and flowers. No part of any plant can be removed from Federal, State or Local Government land without the prior permission of the authority and this includes the spore.
Most people are put off at the thought of growing ferns from spore. Like all plants that produce their offspring from seed or spore the methods are basically the same. Remember nature has been doing this for millions of years and has been very successful. I have had excellent results growing over 200 different species of Australian ferns so don’t be afraid. Give it a go.
Step 1. Select spore from the fern fronds. Wait until the fern is just starting to release its spore. Rinse the fronds under clean running water and dry. This is to wash off any other spores from rogue ferns that may have settled onto the fronds. (There is nothing worse than having common brake or common soft bracken contaminating a prized tree fern or epiphyte.)
Step 2. Place the dry fronds in a clean brown paper bag and keep them in a cool dark place like the linen closet for about a week to ten days before you are ready to sow the spore. The exception to this rule applies to ferns, which produce green spores. These must be sown immediately that they are released. Todea Barbara is a good example of a fern, which produces green spore.
Step 3. Take a large ice cream container, a small ice cream container and a clean clear plastic bag large enough to seal the large ice cream container and three or four milk bottle tops.
Step 4. Punch or drill 6 to 10 5mm holes in the bottom of the small ice cream container.
Step 5. Wash both containers, tops and plastic bag so that they are very clean and sterile.
Step 6. Use a clean fine seed raising mi. We used 30mm fine sand, 30mm peat and 30mm perlite and 10mm vermiculite. We used crushed basalt, crusher dust and peat in a 50:50 ratio for epiphytes. Moisten the mix enough that water does not run out when the mix is squeezed between the fingers.
Step 7. Place the moisten mix (Enough to half fill the small ice cream container) in the microwave oven with a large glass of water for 7 or 8 minutes, until the water is boiling. Allow them to cool in the oven. You will need the water later so do not tip it out.
Step 8. Take the brown paper bag out of the linen closet. Shake the bag and remove the fronds. You should have a yellow, brown, black or rarely greenish brown or ochre powder or very fine, small round pin head size spore depending on the specie involved.
Step 9. Remove the mixture from the oven once it has cooled and place it in the small ice cream container and level.
Step 10. Sprinkle the spore sparsely over the mixture in the small ice cream container.
Step 11. Place the milk bottle tops in the large ice cream container with the flat surface facing down. Place the small ice cream container in the large ice cream container so that it is sitting on the milk bottle tops.
Step 12. Remove the water from the microwave and pour it into the larger ice cream container so there is 25mm to 30mm of water in the bottom.
Step 13. Place the ice cream containers in the plastic bag and seal.
Step 14. Place the contents and bag in a warm shady place preferably 50mm to 70mm shade depending on the specie. Shade houses and some window sills are ideal.
Step 15. The surface should turn green within a week to two weeks. The prothallus will then develop. From the prthalus the first true fronds will appear. Wait until the ferns are 20mm to 35mm in height before you attempt to transplant them. Once they are ready open the bag up slightly and allow the air to flow around the little ferns. Every 3 to 5 days open the bag a little further so the ferns get use to their new environment. Allow them a week to two weeks to harden off before you transplant them following the removal of the plastic bag. Carefully prick them out into 50mm standard squat tubes as you would any seedling.
Do not try to transplant them as single plants as they are still a little delicate still.
Once the smaller ones again reach 50mm to 70mm you may wish to divide the stronger and hardier individual plants into smaller clumps in 100mm squat pots.
Alternative remove the tips of the plants where the strobilus are and place them in an open sterile mix of equal parts of peat moss perlite and vermiculite and course washed sand.
Once they reach 50mm to 60mm you may start to separate the strongest ones and again do not move them far from their original position. After a few weeks the ferns will grow stronger. Once the fronds reach 80mm plant them into their permanent positions. If mass planting space the ferns at 400mm centers.
For more detailed work on propagating tassel ferns check out:
Fertilize using seaweed, fish emulsion or organic chicken pellets soaked in water on an alternate basis. Fertilize the plants on a monthly basis during the growing season with the formula mentioned at half strength on a rotation basis.
Further Comments from Readers:
Hi reader, it seems you use The Bible of Botany a lot. That’s great as we have great pleasure in bringing it to you! It’s a little awkward for us to ask, but our first aim is to purchase land approximately 1,600 hectares to link several parcels of N.P. into one at The Pinnacles NSW Australia, but we need your help. We’re not salespeople. We’re amateur botanists who have dedicated over 30 years to saving the environment in a practical way. We depend on donations to reach our goal. If you donate just $5, the price of your coffee this Sunday, We can help to keep the planet alive in a real way and continue to bring you regular updates and features on Australian plants all in one Botanical Bible. Any support is greatly appreciated. Thank you.
In the spirit of reconciliation we acknowledge the Bundjalung, Gumbaynggirr and Yaegl and all aboriginal nations throughout Australia and their connections to land, sea and community. We pay our respect to their Elders past, present and future for the pleasures we have gained.
Anderson Botanic Gardens Townsville Qld.
Anderson Botanic Gardens Townsville Qld.
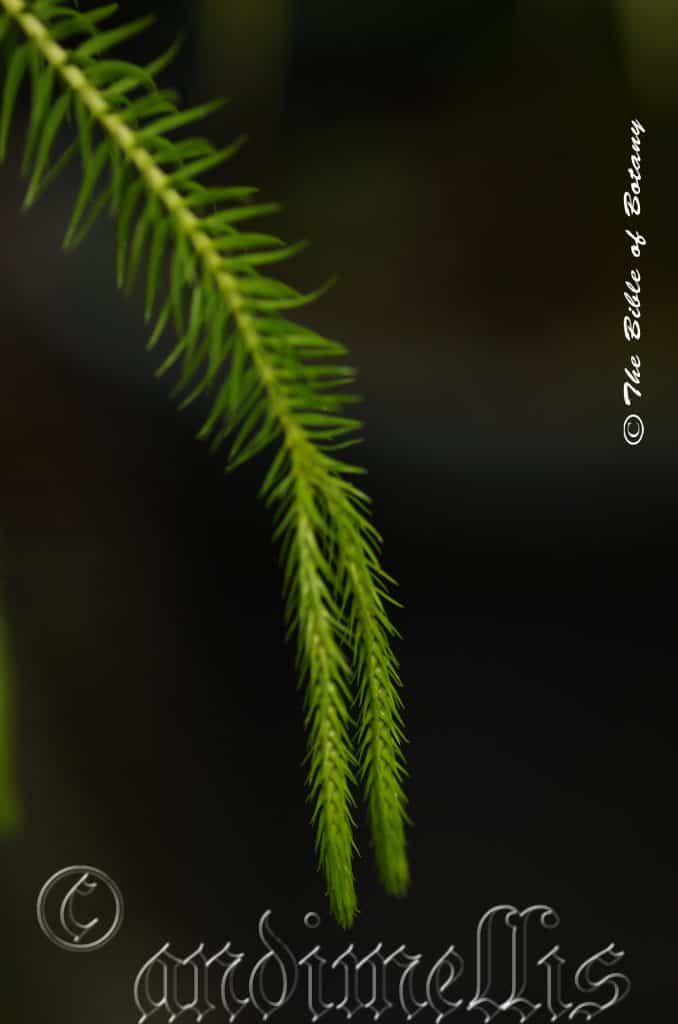
Anderson Botanic Gardens Townsville Qld.
Huperzia squarrosa
Classification:
Division: Lycopodiophyta
Class: Lycopodiopsida
Order: Lycopodiales
Family: Huperziaceae
Genus: Is named in honour of Johann Peter Huperz; 1771-1816, who was a German botanist who specialized in ferns.
Species: From Squarrōsa, which is Latin for scurfy, scabby. It refers to organs or structures, which are rather scabby compared to other species in the genus.
Common Name: Tassel Fern or Scurfy Tassel Fern.
Distribution:
Huperzia squarrosa is restricted to a small area north to south of Cairns in far north eastern coastal Queensland.
https://avh.ala.org.au/occurrences/search?taxa=Huperzia+squarrosa#tab_mapView
Habitat Aspect Climate:
Huperzia squarrosa grows in dense shade to heavy filtered light. It grows in coastal rainforests or mountain rainforests, high on the trunks or branches of suitable trees as an epiphyte, lithophyte on rocks or on rare occasions in the soil. The altitude ranges from 10 meters ASL to 350 meters ASL.
The temperatures range from 10 degrees in August to 32 degrees in January.
The rainfalls range from lows of 1600mm to 3200mm average per annum.
Soil Requirements:
Huperzia squarrosa grows as an epiphyte on trees or as a lithophyte on rocks. Occasionally it can be seen growing on the rainforest floors among the leaf litter.
Height & Spread:
Wild Plants: 100mm to 1000mm by 500mm to 600mm.
Characteristics:
Huperzia squarrosa has short, tufted, stout, erect stems in their initial stages of growth which eventually become pendulous as they lengthen in size. Longer stems will become dimorphically branched. They measure 600mm to 1000mm in length by 25mm to 30mm in diameter. The last 30mm to 90mm contain the fertile sporangia. The stems are black at the base becoming glossy green as they approach the pendulous section.
Huperzia squarrosa leaves are densely arranged spirally along the stems. The coriaceous, attenuate, triangular to broad lanceolate leaves are angled at 60 to 65 degrees along the stems. It is slightly twisted near the base and measure 7mm to 20mm in length by 5mm to 8mm in width at the base. The concolourous laminas are lime-green with the margins being entire.
The sessile strobilus carrying the spore is located at the apexes of the pendulous branches and is numerous. The strobili are abruptly formed on special terminal dimorphic branches. They are linear and measure 30mm to 70mm in length by 1.5mm to 3mm in diameter. The sporophylls are ovate with a rounded base with a acute apex. It is decussate, appressed, keeled and measure 1mm to 1.25mm in length by 1mm to 1.15mm in width. The sporangia are about half the size of the sporophylls.
Wildlife:
The wildlife associated with Huperzia squarrosa is unknown to the author.
Cultivation:
Huperzia squarrosa is a magnificent fine club moss that is very easy to grow however it is slower than Huperzia squarrosa to establish especially in cooler climates. It is suitable for bright courtyards or in the garden where moist bright conditions prevail. Huperzia squarrosa is an excellent basket plant when planted on the sides of the basket. Do not use metal or plastic baskets as it is iron sensitive and resents roots sweating in the plastic baskets.
Huperzia squarrosa will establish itself from small plants and will reach its full potential in around 8 to 10 years. There only requirement is shade and a humid microclimate.
When the sterile and fertile fronds are on display together the rich lime-green colour of the strobilus and leaves are refreshing to look at. The areas for cultivation should mimic their natural surroundings as close as possible to ensure successful happy plants. It would make ideal plants in small gardens around sunny pools in warm temperate, subtropical and cool tropical gardens.
Fertilize the plants on a monthly basis during the growing season with the formula mentioned under propagation at half strength on a rotation basis.
Propagation:
Spores: Huperzia squarrosa is not easy to grow so expect many failures but once the area and success has been made the rewards are great in admiration and the plants will self-propagate without any further to do without becoming rampant.
All ferns and clubmosses that are declared rare, vulnerable or endangered are protected by Federal and State Laws and must not be removed from the wild unless you are a land developer, mining company or main Roads department etc. This includes bulbs, roots, leaves and flowers. No part of any plant can be removed from Federal, State or Local Government land without the prior permission of the authority and this includes the spore.
Most people are put off at the thought of growing ferns from spore. Like all plants that produce their offspring from seed or spore the methods are basically the same. Remember nature has been doing this for millions of years and has been very successful. I have had excellent results growing over 200 different species of Australian ferns so don’t be afraid. Give it a go.
Step 1. Select spore from the fern fronds. Wait until the fern is just starting to release its spore. Rinse the fronds under clean running water and dry. This is to wash off any other spores from rogue ferns that may have settled onto the fronds. (There is nothing worse than having common brake or common soft bracken contaminating a prized tree fern or epiphyte.)
Step 2. Place the dry fronds in a clean brown paper bag and keep them in a cool dark place like the linen closet for about a week to ten days before you are ready to sow the spore. The exception to this rule applies to ferns, which produce green spores. These must be sown immediately that they are released. Todea Barbara is a good example of a fern, which produces green spore.
Step 3. Take a large ice cream container, a small ice cream container and a clean clear plastic bag large enough to seal the large ice cream container and three or four milk bottle tops.
Step 4. Punch or drill 6 to 10 5mm holes in the bottom of the small ice cream container.
Step 5. Wash both containers, tops and plastic bag so that they are very clean and sterile.
Step 6. Use a clean fine seed raising mi. We used 30mm fine sand, 30mm peat and 30mm perlite and 10mm vermiculite. We used crushed basalt, crusher dust and peat in a 50:50 ratio for epiphytes. Moisten the mix enough that water does not run out when the mix is squeezed between the fingers.
Step 7. Place the moisten mix (Enough to half fill the small ice cream container) in the microwave oven with a large glass of water for 7 or 8 minutes, until the water is boiling. Allow them to cool in the oven. You will need the water later so do not tip it out.
Step 8. Take the brown paper bag out of the linen closet. Shake the bag and remove the fronds. You should have a yellow, brown, black or rarely greenish brown or ochre powder or very fine, small round pin head size spore depending on the specie involved.
Step 9. Remove the mixture from the oven once it has cooled and place it in the small ice cream container and level.
Step 10. Sprinkle the spore sparsely over the mixture in the small ice cream container.
Step 11. Place the milk bottle tops in the large ice cream container with the flat surface facing down. Place the small ice cream container in the large ice cream container so that it is sitting on the milk bottle tops.
Step 12. Remove the water from the microwave and pour it into the larger ice cream container so there is 25mm to 30mm of water in the bottom.
Step 13. Place the ice cream containers in the plastic bag and seal. Step 14. Place the contents and bag in a warm shady place preferably 50mm to 70mm shade depending on the specie. Shade houses and some window sills are ideal.
Step 15. The surface should turn green within a week to two weeks. The prothallus will then develop. From the prthalus the first true fronds will appear. Wait until the ferns are 20mm to 35mm in height before you attempt to transplant them. Once they are ready open the bag up slightly and allow the air to flow around the little ferns. Every 3 to 5 days open the bag a little further so the ferns get use to their new environment. Allow them a week to two weeks to harden off before you transplant them following the removal of the plastic bag. Carefully prick them out into 50mm standard squat tubes as you would any seedling.
Do not try to transplant them as single plants as they are still a little delicate still.
Once the smaller ones again reach 50mm to 70mm you may wish to divide the stronger and hardier individual plants into smaller clumps in 100mm squat pots.
Alternative remove the tips of the plants where the strobilus are and place them in an open sterile mix of equal parts of peat moss perlite and vermiculite and course washed sand.
Once they reach 50mm to 60mm you may start to separate the strongest ones and again do not move them far from their original position. After a few weeks the ferns will grow stronger. Once the fronds reach 80mm plant them into their permanent positions. If mass planting space the ferns at 400mm centers.
For more detailed work on propagating tassel ferns check out:
Fertilize using seaweed, fish emulsion or organic chicken pellets soaked in water on an alternate basis. Fertilize the plants on a monthly basis during the growing season with the formula mentioned at half strength on a rotation basis.
Further Comments from Readers:
Hi reader, it seems you use The Bible of Botany a lot. That’s great as we have great pleasure in bringing it to you! It’s a little awkward for us to ask, but our first aim is to purchase land approximately 1,600 hectares to link several parcels of N.P. into one at The Pinnacles NSW Australia, but we need your help. We’re not salespeople. We’re amateur botanists who have dedicated over 30 years to saving the environment in a practical way. We depend on donations to reach our goal. If you donate just $5, the price of your coffee this Sunday, We can help to keep the planet alive in a real way and continue to bring you regular updates and features on Australian plants all in one Botanical Bible. Any support is greatly appreciated. Thank you.
In the spirit of reconciliation we acknowledge the Bundjalung, Gumbaynggirr and Yaegl and all aboriginal nations throughout Australia and their connections to land, sea and community. We pay our respect to their Elders past, present and future for the pleasures we have gained.

The Pinnacles NSW

The Pinnacles NSW

The Pinnacles NSW
Hybanthus monopetalus
Classification:
Class: Equistopsida
Subclass: Magnoliidae
Superorder: Rosanae
Order: Malpighiales
Family: Violaceae
Genus: From Hybos, which is Ancient Greek for a hump and ántha/ánthos, which are Ancient Greek for the male reproductive organ of a flower or the flower. It refers to the anthers forming a hump or ridge along the largest petal.
Species: From Monos, which is Ancient Greek for one or singular and Petalon, which is Ancient Greek for a petal. It refers to plants, that have a single large petal and may have two or more, much smaller petals.
Common Name: Purple spade flower
Distribution:
Hybanthus monopetalus is found south from near Cape Grafton and Cape Melville in far north eastern Queensland to Orbost in north eastern Victoria.
It is also found west to Mount Finke in South Australia.
https://avh.ala.org.au/occurrences/search?taxa=Hybanthus+monopetalus#tab_mapView
Habitat Aspect Climate:
Hybanthus monopetalus prefers light dappled shade within dry sclerophyll forests, open woodlands and dry heath lands. The altitude ranges from 10 meters ASL to 900 meters ASL.
The temperatures range from 2 degree in August to 40 degrees in January.
The rainfalls range from lows of 150mm to an average of 1600mm annually. In low rainfall areas it is confined to areas of high capillary action near permanent water.
Soil Requirements:
Hybanthus monopetalus prefers growing on skeletal sandy loams to medium clays. The soils are derived from decomposed sandstones or granites. The soils pH varies from 5.5pH to 6.5pH. It does not tolerate waterlogged soils however soils usually have a dense mat of leaf litter. Non saline soils to moderately saline soils are tolerated.
Height & Spread:
Wild Plants: 0.4m to 0.6m by 0.4m to 0.6m.
Characteristics:
This is a small perennial herb with unusual flowers. Hybanthus monopetalus’s main stems are green and glabrous.
Hybanthus monopetalus’s linear, oblong or narrow elliptical leaves measure 6mm to 9mm in length by 2mm to 4mm in width. The base is cuneate while the apex is acute. The concolourous laminas are deep green to grass green and glabrous. The margins are entire and slightly recurved. The midvein is prominent on the lower lamina and is visible from above. The stipules are linear to triangular and measure 1mm to 1.5mm in length. The petioles are sessile or are unto 0.5mm in length.
The inflorescences of Hybanthus monopetalus’s are born terminally or from the leaf axils. The 5 deep green sepals measure 2mm to 3mm in length and are glabrous. The upper 2 petals are lanceolate and measure 2mm to 3mm in length while the 2 lateral petal is broad falcate and measure 2mm to 3mm in length. The single lower petal is broadly spathulate and is pale blue purple to lilac with several deeper coloured veins radiating outwards from a large deeper coloured blotch near the base. It measures 17mm to 20mm in length by 16mm to 18mm in width.
The anthers have a swollen triangular appendage attached near the base. The flowers appear from late November through to late February.
Hybanthus monopetalus’s fruit is an oblong capsule. The capsules measure 3mm to 6mm in length. It is glabrous. The green pods turn brown on ripening. The 3 to 6 round pitted seeds measure 0.8 in diameter.
Confusing species:
Hybanthus monopetalus: Stipules linear to deltoid and measure 1.5mm. broad falcate. Capsule measure 3mm in diameter.
Hybanthus vernonii: Stipules linear and measure 0.5mm. Leaves linear and measure 5mm to 45mm in length. Lateral petals are narrow oblong. Capsule measure 3mm to 6mm in diameter.
Wildlife:
Hybanthus monopetalus’s wildlife is unknown to the author.
Cultivation:
Hybanthus monopetalus is a very beautiful small lily, which is suitable for small sunny or lightly shaded spots in the garden. It is an excellent colourful addition for sub tropical, warm temperate or semi-arid zone gardens. As a garden subject it will grow to 0.4 meter to 0.5 meters in height by 0.5 meters to 0.6 meters wide. It should be treated as an annual.
It responds very well to tip pruning, additional native fertilizers and heavy mulching. It is fast growing and is cold tolerant to temperatures as low as 0 degrees.
It is most suitable for use around swimming pools, bright courtyards, rockeries, smaller fish or frog ponds or miniature gardens.
In the informal, formal or Japanese Gardens it can be used as the fill in plants or as the main plant beside the water feature. Imagine a small pond with fish swimming. Planting of Hybanthus monopetalus below a small waterfall or near a pond and above tit is water cascading down over small rocks will give a very powerful yet relaxing scene. It can partially surround such a scene and still look effective. Use it in small clusters with larger rocks or in front of a large log. The large log gives a strong horizontal affect with depth if placed on an angle. Right along the front in a straight line of the Hybanthus for a statement of man’s power over nature or use 2 to 3 lines of subtle curves to depict nature reviving itself after a fire. The rest of the scene would comprise of maybe one two or three rocks the ground would be sand. It can be a mixture of the purple flowered Hybanthus monopetalus with the yellow or orange flowering Hybanthus stellarioides . The vertical stems and linear leaves will create a longer looking log that has a greater diameter. The plants will be dainty yet display a very relaxing and thought provoking scene.
It is best to mass plant them for really good colourful displays. Plant them at 0.2 meter to 0.3 centres.
Hybanthus monopetalus would make excellent potted plants and benefit from being fertilized on a monthly basis during the growing season with the formula mentioned under propagation at half strength on a rotation basis.
Propagation:
Seeds: Hybanthus monopetalus are very easy to grow from seeds. Sow the seeds directly into a seed raising mix. Cover them with 2mm of fine sand and keep moist not wet. Place the tray in a warm sunny position. When the seedlings are 20mm to 30mm tall, prick them out and plant them into 50mm native tubes using a good organic mix.
Once the seedlings reach 150mm to 200mm in height they can be planted out into their permanent position.
Fertilize using Seaweed, fish emulsion or organic chicken pellets soaked in water and apply the liquid on an alternate basis. Fertilize every 2 months until the plants are well established then on an annual basis in September to October to maintain good health, vigour and better flowering.
Further Comments from Readers:
Hi reader, it seems you use The Bible of Botany a lot. That’s great as we have great pleasure in bringing it to you! It’s a little awkward for us to ask, but our first aim is to purchase land approximately 1,600 hectares to link several parcels of N.P. into one at The Pinnacles NSW Australia, but we need your help. We’re not salespeople. We’re amateur botanists who have dedicated over 30 years to saving the environment in a practical way. We depend on donations to reach our goal. If you donate just $5, the price of your coffee this Sunday, We can help to keep the planet alive in a real way and continue to bring you regular updates and features on Australian plants all in one Botanical Bible. Any support is greatly appreciated. Thank you.
In the spirit of reconciliation we acknowledge the Bundjalung, Gumbaynggirr and Yaegl and all aboriginal nations throughout Australia and their connections to land, sea and community. We pay our respect to their Elders past, present and future for the pleasures we have gained.
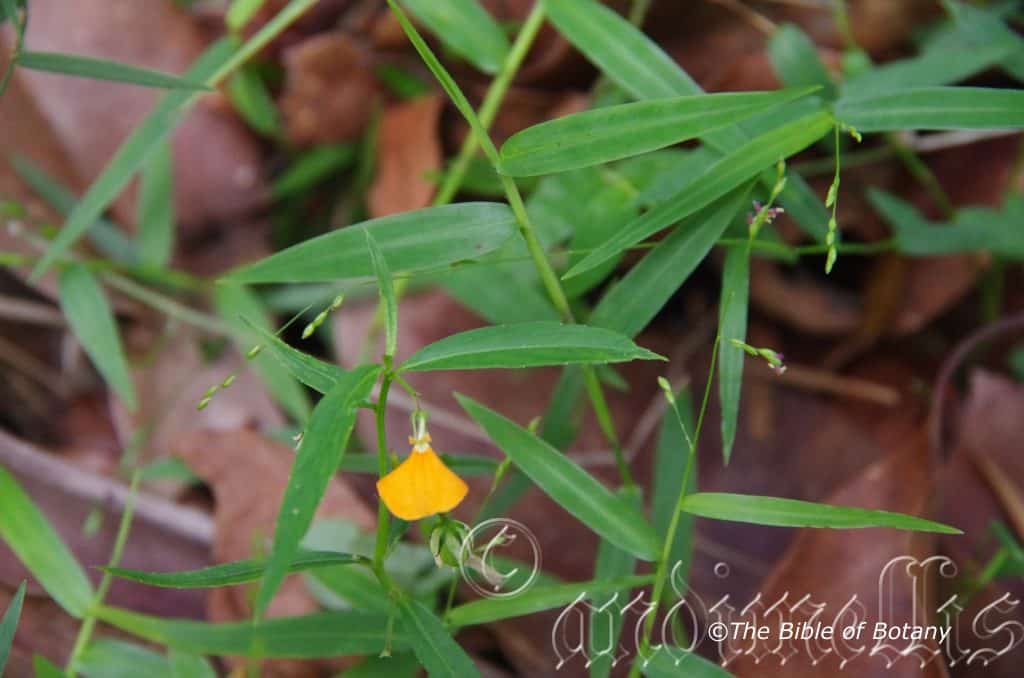
Pillar Valley NSW
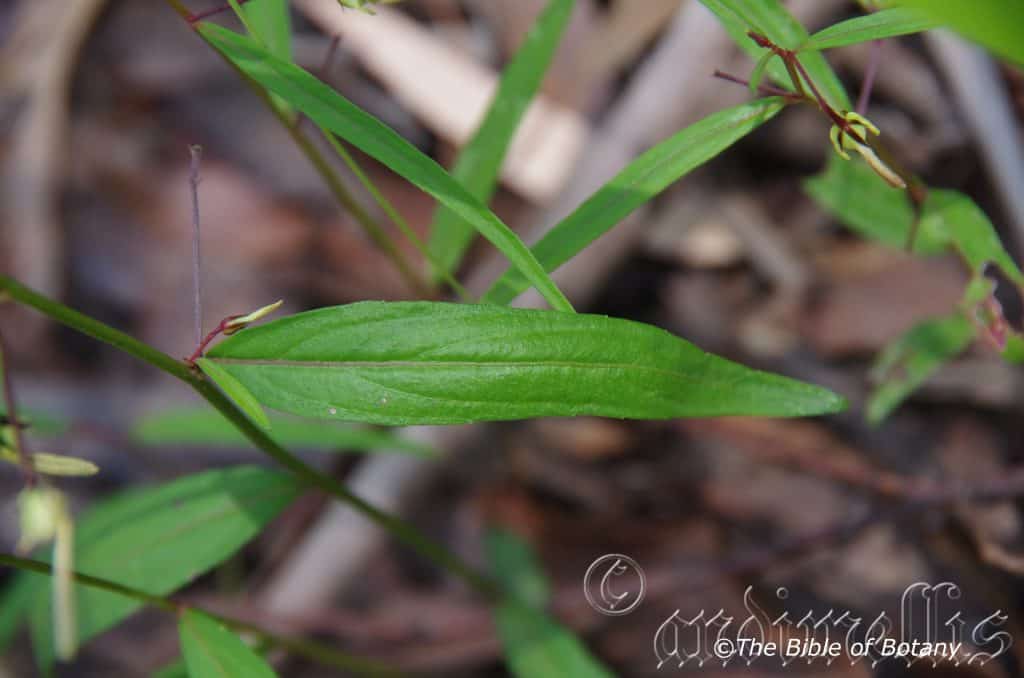
The Pinnacles NSW
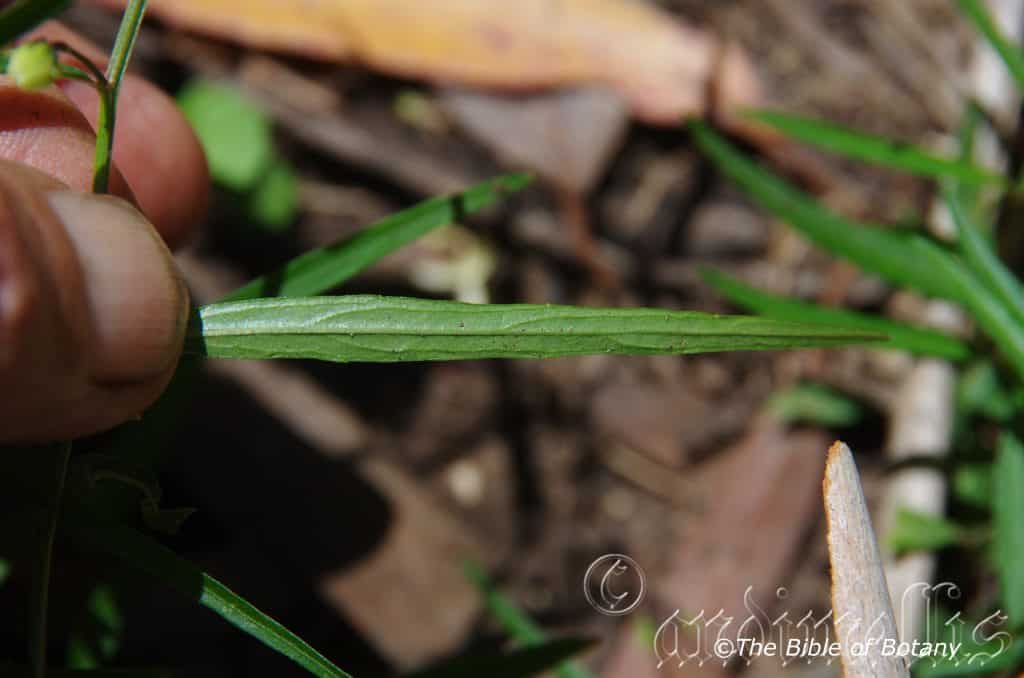
Pillar Valley NSW
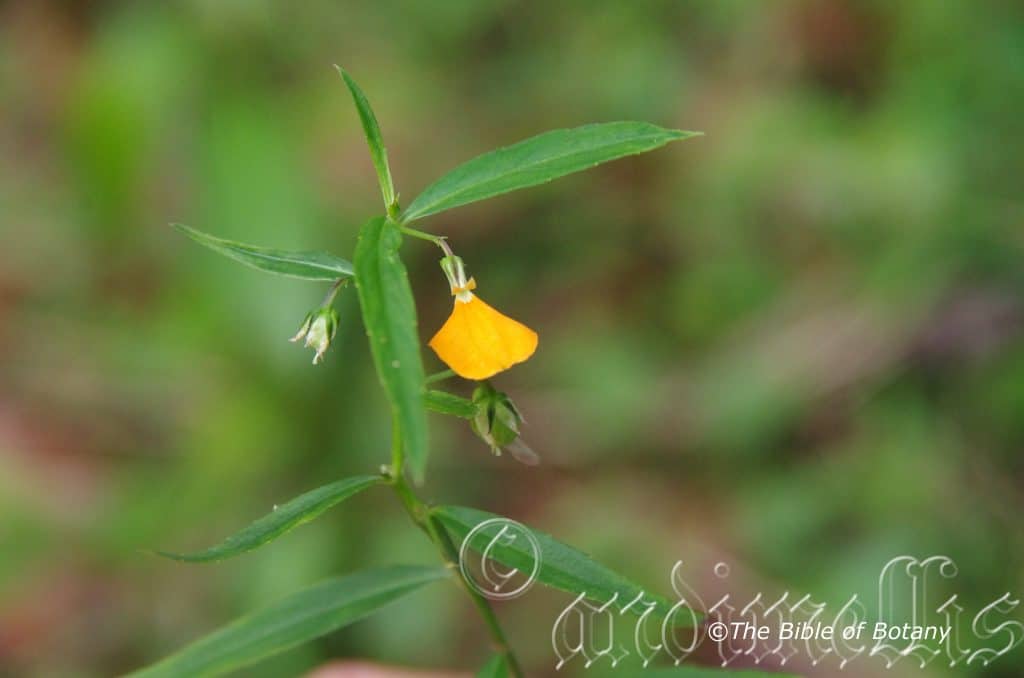
Pillar Valley NSW
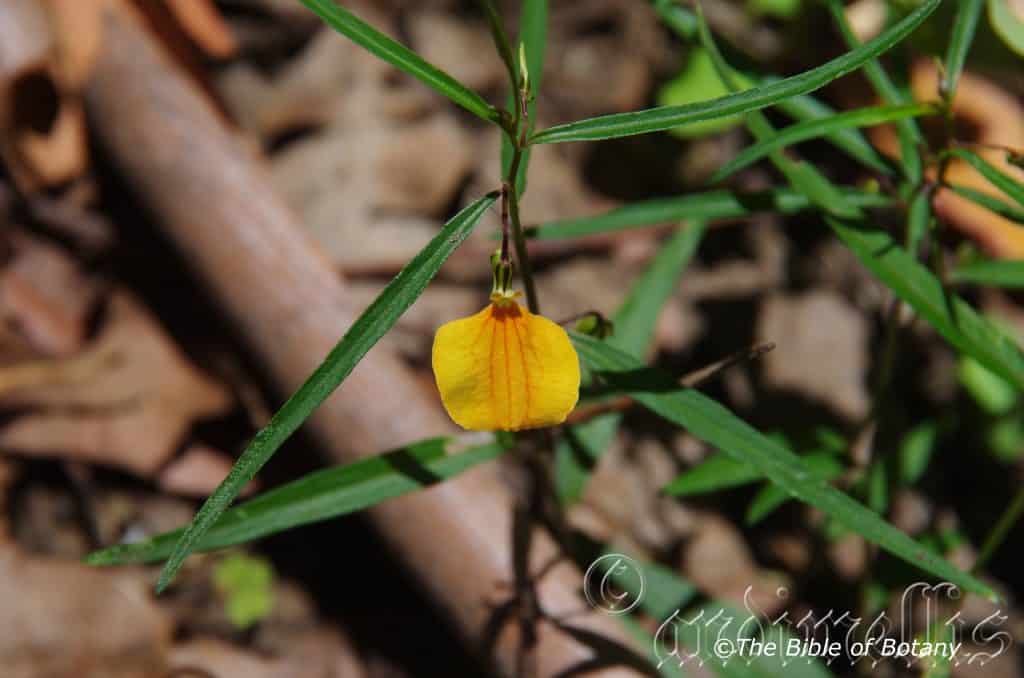
The Pinnacles NSW
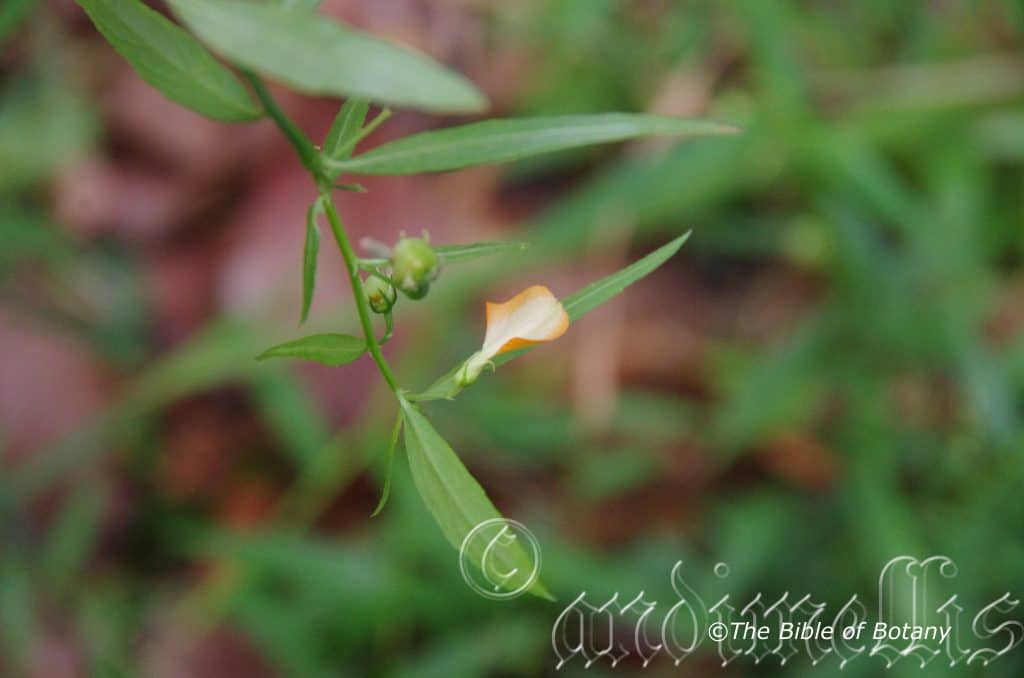
The Pinnacles NSW
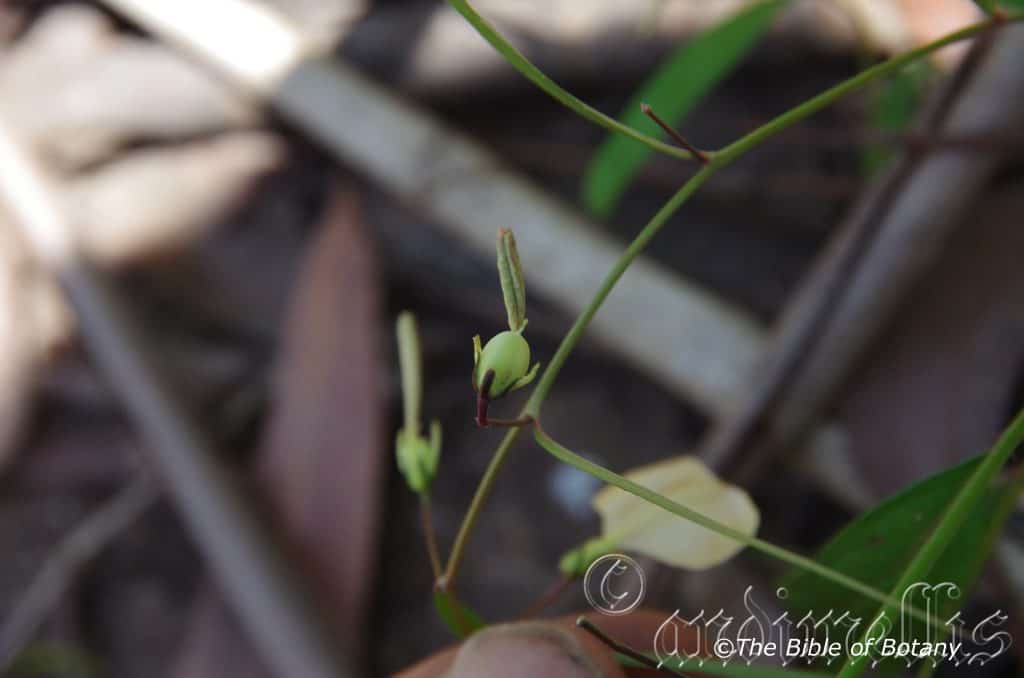
Pillar Valley NSW
Hybanthus stellarioides
Classification:
Class: Equisetopsida
Subclass: Magnoliidae
Superorder: Rosanae
Order: Malpighiales
Family: Violaceae
Genus: From Hybos, which is Ancient Greek for a hump and ántha/ánthos, which are Ancient Greek for the male reproductive organ of a flower or the flower. It refers to the anthers forming a hump or ridge along the largest petal.
Species: From Astḗr, which is Ancient Greek or Stellāris/Stellātus, which is Latin for a star or star shape and Eîdos/Oides, which is Ancient Greek for alike or similar to. It refers to plants, which resemble the Stellaria genus.
Common Name:
Distribution:
Hybanthus stellarioides is found south and east of a line from the Iron Range National Park to Mornington Island and Wesseley Island in the Gulf of Carpentaria, Inverliegh Homestead to Clermont in far north Queensland then south to Mount Playfair then on and east of the Great Dividing Range from Dyngie to Prospect in central coastal New South Wales.
https://avh.ala.org.au/occurrences/search?taxa=Hybanthus+stellariodes#tab_mapView
Habitat Aspect Climate:
Hybanthus stellarioides prefers full sun to dappled shade. It grows in dry schlerophyll forests, open woodlands and dry coastal heaths. The altitude ranges from 5 meters ASL to 1050 meters ASL.
The temperatures range from minus 3 degrees in August to 42 degrees in January.
The rainfalls range from lows of 600mm to an average of 2800mm annually. In low rainfall areas it is confined to areas of high capillary action near permanent water.
Soil Requirements:
Hybanthus stellarioides prefer growing on skeletal sands to sandy loams. The soils are usually derived from decomposed sandstones, granites, shales, metamorphic rocks, brown basalts and black basalts. The soils pH varies from 5.5pH to 6.5pH. It does not tolerate waterlogged soils however annual inundations or periodic rises in water tables for short periods are tolerated. Non saline soils to moderately saline soils are tolerated.
Height & Spread:
Wild Plants: 0.2m to 0.3m by 0.2m to 0.3m.
Characteristics:
This is a small annual herb with unusual orange flowers. Hybanthus stellarioides’s main stems are green or deep burgundy-maroon and sparsely to moderately covered in white antrorse and spreading hirsute hairs.
Hybanthus stellarioides’s linear, narrow lanceolate to narrow elliptical or ovate leaves measure 10mm to 80mm in length by 2mm to 8mm in width. The bases are cuneate to rounded while the apexes are tapering, acute or obtuse. The discolourous laminas are mid green to grass-green and glabrous on the upper laminas while the lower laminas are sparsely to moderately covered in white hirsute spreading hairs. The laminas are flat to recurve slightly upwards from the mid vein to the margins and decurve downwards slightly on the apical half while the margins are entire or very finely, sparsely toothed and recurved. The margins are sparsely covered in long, white ciliate hairs. The midvein is prominent on the lower lamina and is visible from the upper lamina. The linear stipules are measure 0.8mm to 1mm in length. The petioles are sessile or are unto 0.5mm in length.
The inflorescences of Hybanthus stellarioides’s are born solitary from the leaf axils. The 5 grass-green tipped deep burgundy-maroon linear sepals measure 2.5mm to 4.5mm in length by 1.8mm to 2.2mm in width and are glabrous. The 2 linear to narrow oblong upper petals are yellow to deep orange and measure 3mm to 4.2mm in length by 1.3mm to 1.5mm in width while the 2 broad linear to oblong lateral petals are yellow to deep orange and measure 4mm to 5mm in length by 1.5mm to 1.8mm in width.
The single lower petal is broadly spathulate with the spathulate section being oval to square and is yellow to deep orange. The lower petal measures 10mm to 15mm in length by 10mm to 17mm in width overall.
The 5 dimorphic stamens are inserted, with 3 being posterior and 2 being anterior. The pastel green style measures 1.5mm to 2mm in length. The flowers appear from late November through to late February.
Hybanthus stellarioides’s fruits are obloidal capsules. The glabrous capsules measure 5.5mm to 7.5mm in length by 3.5mm to 6mm in diameter. The green pods turn pale grey when ripe.
The 5 to 10 ovoidal to ellipsoidal seeds are longitudinally ribbed and pitted between the seeds. The seeds measure 1.8 to 2.2mm in length by 1.2mm to 1.4mm in diameter.
Wildlife:
Hybanthus stellarioides’s wildlife is unknown to the author.
Cultivation:
Hybanthus stellarioides is a very beautiful small lily which is suitable for small sunny or lightly shaded spots in the garden. It is an excellent colourful addition for sub tropical, warm temperate or semi-arid zone gardens. As a garden subject it will grow to 0.2 meter to 0.4 meters in height by 0.2 meters to 0.5 meters in diameter.
It is fast growing and are cold tolerant to temperatures as low as 0 degrees.
It is most suitable for use around swimming pools, bright courtyards, rockeries, smaller fish or frog ponds or miniature gardens.
In the informal or formal Gardens they can be used as the fill in plants or as the main plant beside the water feature. Imagine a small pond with fish swimming. Planting Hybanthus stellarioides, near a pond with water cascading down over small rocks is a very powerful yet formal and relaxing scene. It can partially surround such a scene and still look effective. Use it in small clusters with larger rocks or in front of a large log. The large log gives a strong horizontal affect with depth if placed on an angle. Right along the front in a straight line of the Hybanthus stellarioides for a statement of man’s power over nature or use 2 to 3 lines of subtle curves to depict nature reviving itself after a fire. The rest of the scene would comprise of maybe one two or three rocks the ground would be sand. It can be a mixture of the purple flowered Hybanthus monopetalus the yellow or orange flowering Hybanthus stellarioides. The horizontal stems and linear leaves will create a longer looking log that has a greater diameter. The plants will be dainty yet display a very relaxing and thought provoking scene.
It is best to mass plant them for really good colourful displays. Plant them at 0.2 meter to 0.3 centres.
Hybanthus make good potted plants and benefit from being fertilized on a monthly basis during the growing season with the formula mentioned under propagation at half strength on a rotation basis.
Propagation:
Seeds: Hybanthus stellarioides are very easy to grow from seed. Sow the seeds directly into a seed raising mix. Cover them with 1mm of fine sand and keep moist not wet. Place the tray in a warm sunny position. When the seedlings are 20mm to 30mm tall, prick them out and plant them into 50mm native tubes using a good organic mix.
Once the seedlings reach 150mm to 200mm in height they can be planted out into their permanent position.
Fertilize using Seaweed, fish emulsion or organic chicken pellets soaked in water and apply the liquid on an alternate basis. Fertilize every 2 months until the plants are well established then on an annual basis in September to October to maintain good health, vigour and better flowering.
Further Comments from Readers:
Hi reader, it seems you use The Bible of Botany a lot. That’s great as we have great pleasure in bringing it to you! It’s a little awkward for us to ask, but our first aim is to purchase land approximately 1,600 hectares to link several parcels of N.P. into one at The Pinnacles NSW Australia, but we need your help. We’re not salespeople. We’re amateur botanists who have dedicated over 30 years to saving the environment in a practical way. We depend on donations to reach our goal. If you donate just $5, the price of your coffee this Sunday, We can help to keep the planet alive in a real way and continue to bring you regular updates and features on Australian plants all in one Botanical Bible. Any support is greatly appreciated. Thank you.
In the spirit of reconciliation we acknowledge the Bundjalung, Gumbaynggirr and Yaegl and all aboriginal nations throughout Australia and their connections to land, sea and community. We pay our respect to their Elders past, present and future for the pleasures we have gained.
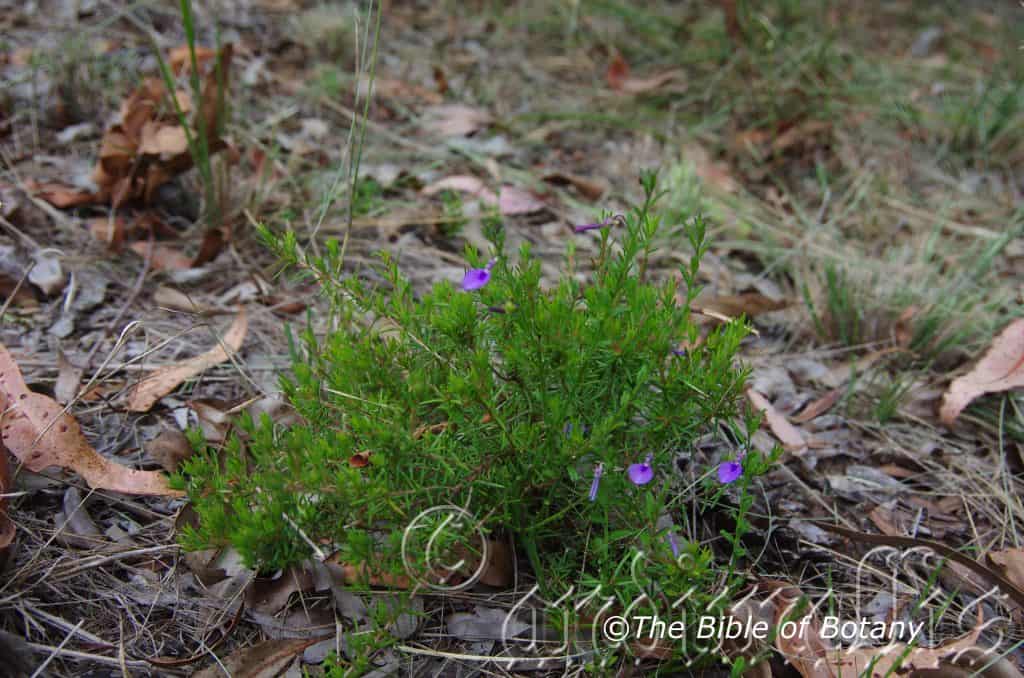
Author’s Garden The Pinnacles NSW
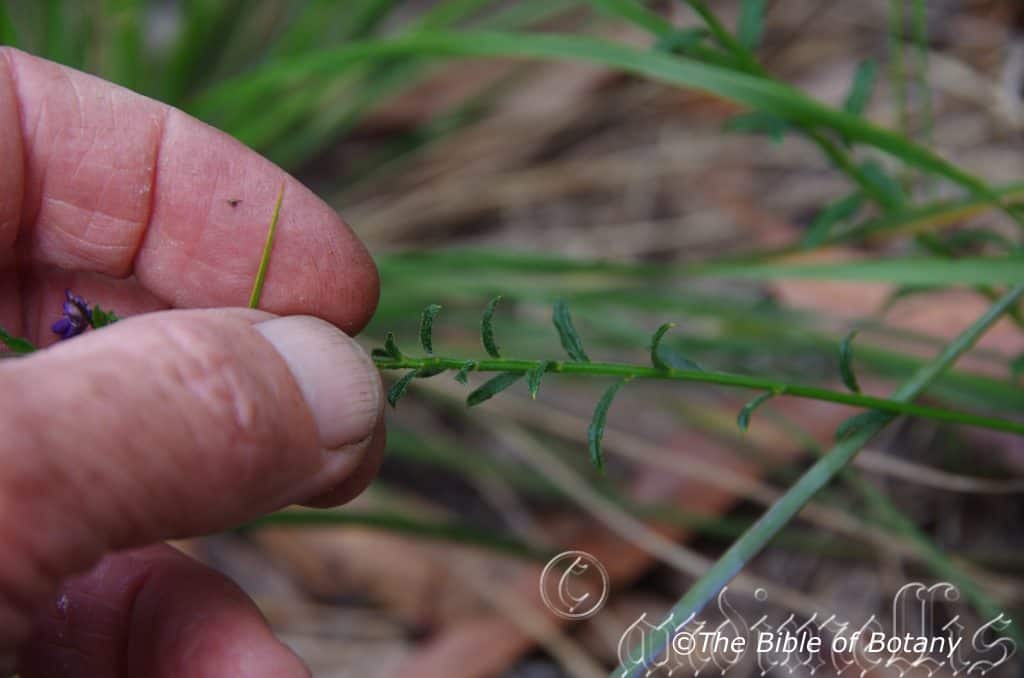
The Pinnacles NSW
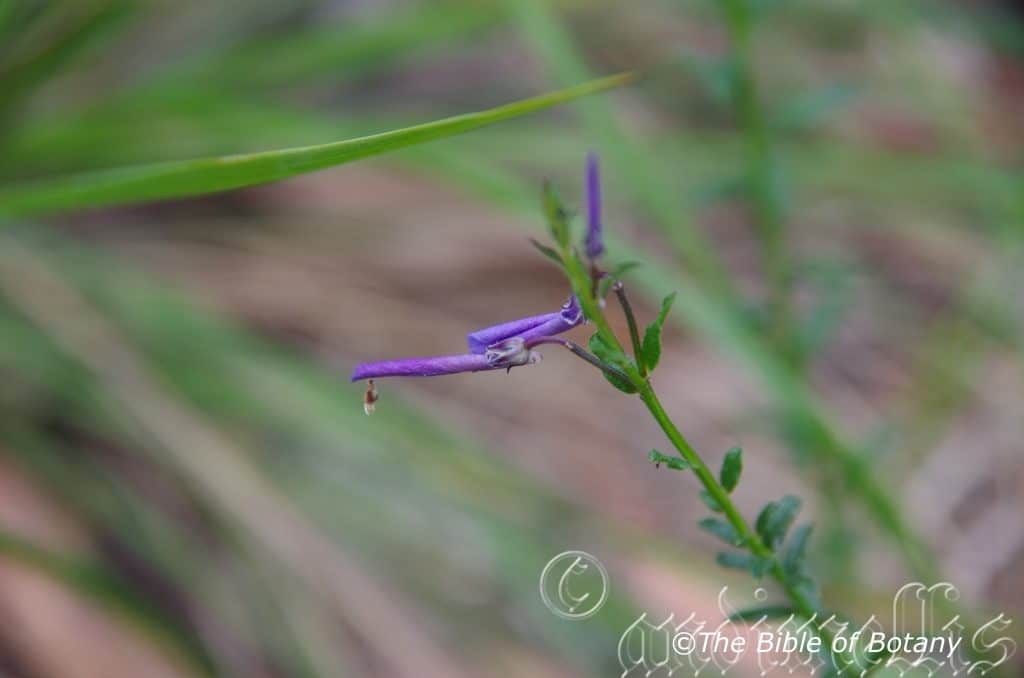
Author’s Garden The Pinnacles NSW
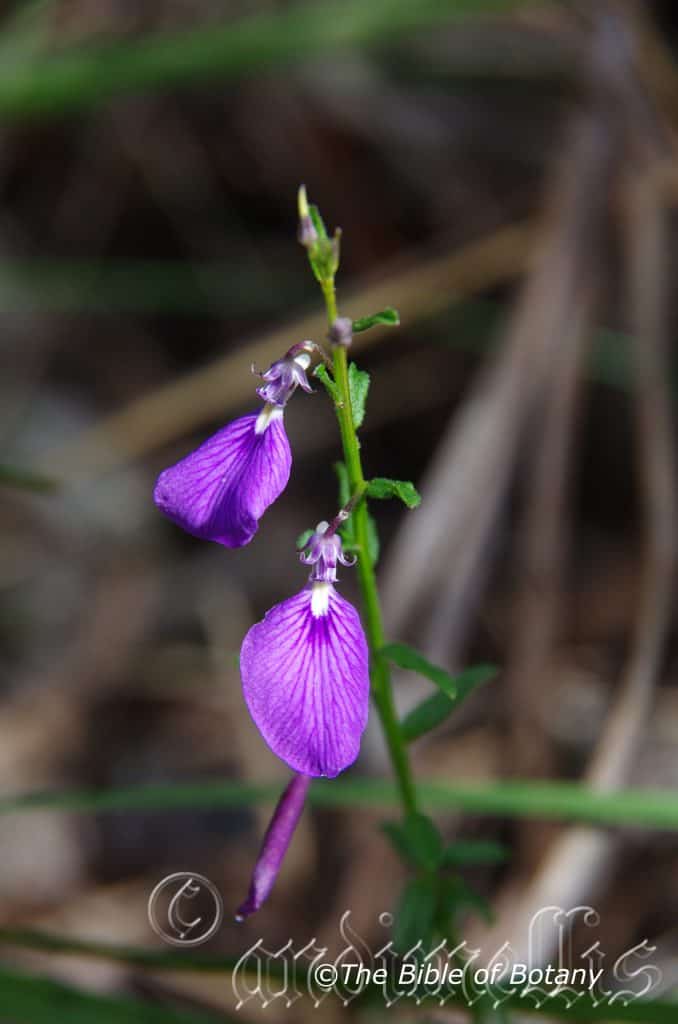
Author’s Garden The Pinnacles NSW
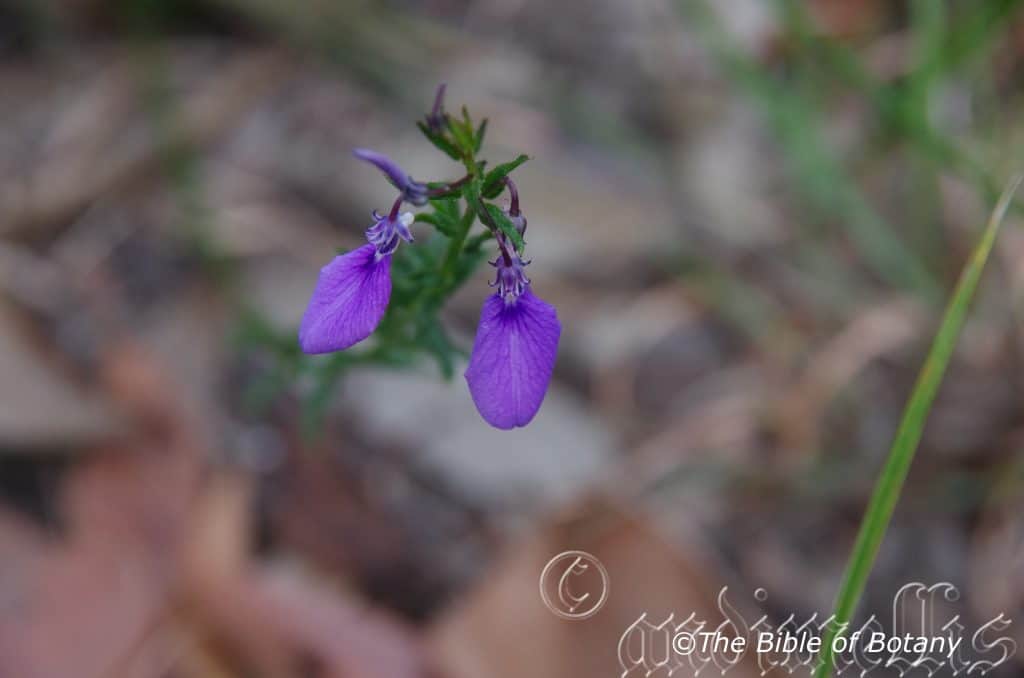
Author’s Garden The Pinnacles NSW
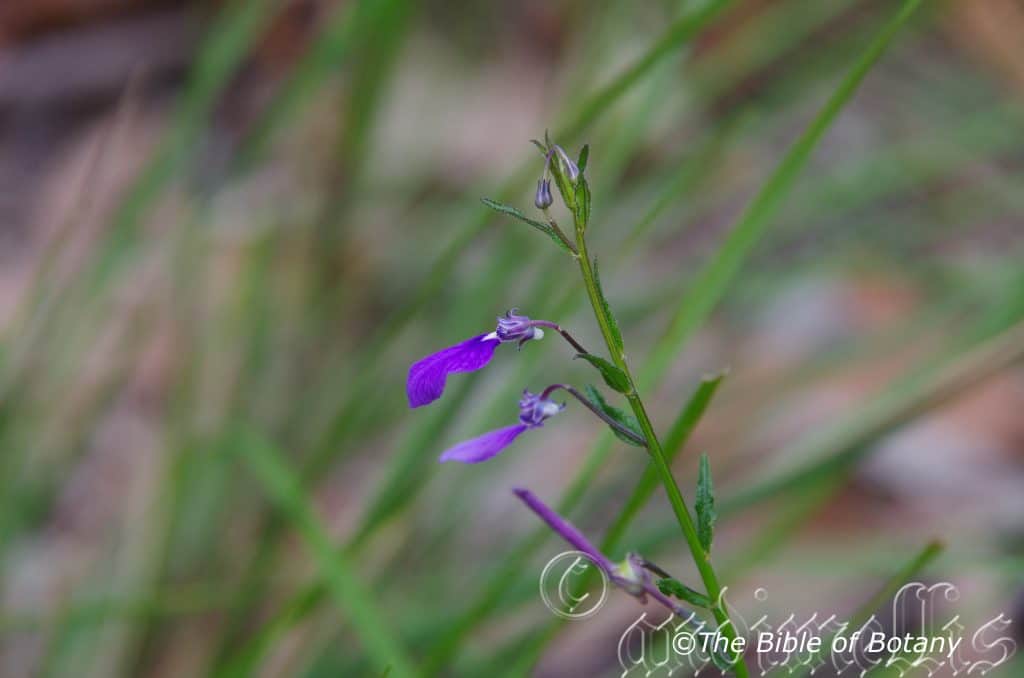
Author’s Garden The Pinnacles NSW
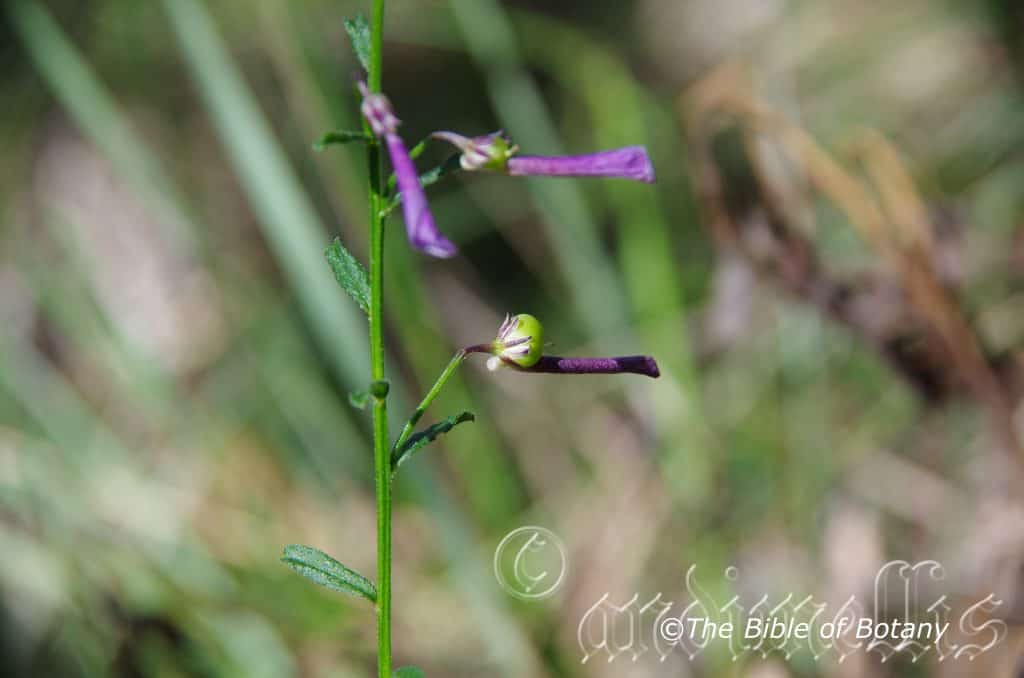
Author’s Garden The Pinnacles NSW
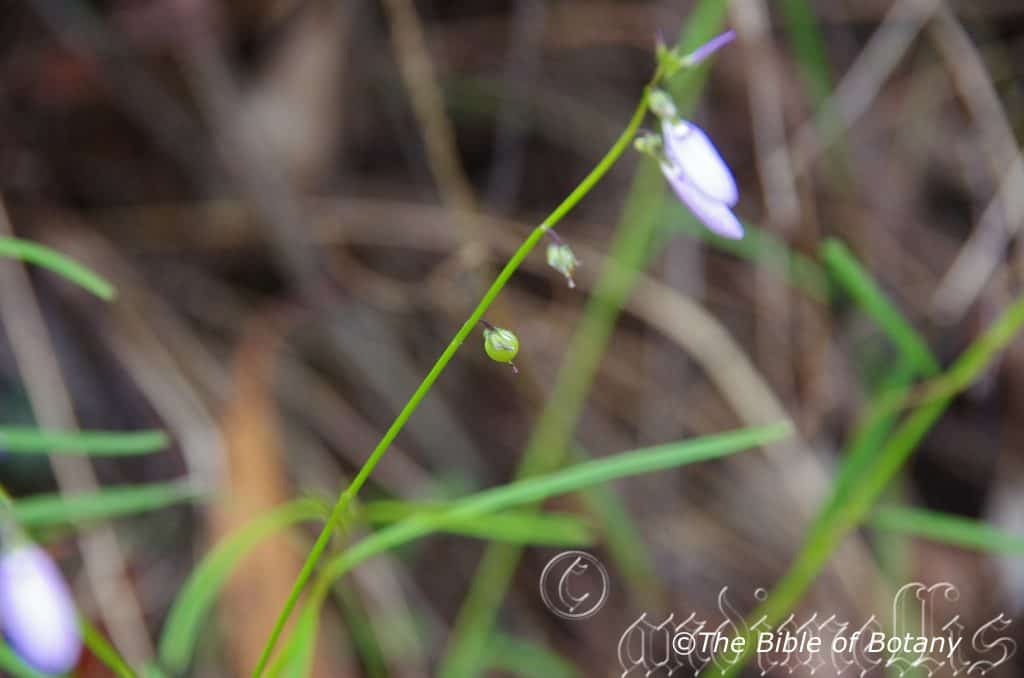
The Pinnacles NSW
Hybanthus vernonii
Classification:
Class: Equisetopsida
Subclass: Magnoliidae
Superorder: Rosanae
Order: Malpighiales
Family: Violaceae
Genus: From Hybos, which is Ancient Greek for a hump and ántha/ánthos, which are Ancient Greek for the male reproductive organ of a flower or the flower. It refers to the anthers forming a hump or ridge along the largest petal.
Species: Is named in honour of William Veron; 1688-1711, who was a bryologist. (A person who studies Mosses, Liverworts and Horsetails).
Subspecies: Hybanthus vernonii subsp. scaber. From Scab, which is Latin for rough. It refers to structures or organs, which has a rough surface.
Subspecies: Hybanthus vernonii subsp. vernonii. From Laevis, which is Latin for polished smooth. It refers to structures or an organs, which are very smooth.
Common Name:
Distribution:
Hybanthus vernonii subsp. scaber is found in three disjunct populations east of the Great Dividing Range in New South Wales. The northern population is between Lismore and south of Grafton, Wollongong south to north of Nelligen and between Eden and the border.
Hybanthus vernonii subsp. verdonii is found south from Koonyum Range in north eastern coastal New South Wales to Orbost in north eastern Victoria with a disjunct population further south on the Dandenong Ranges. There are 3 populations west of the Great Dividing Range on the Liverpol Plains, near Bathurst and Braidwood near Tumit.
https://avh.ala.org.au/occurrences/search?taxa=Hybanthus+vernonii#tab_mapView
Habitat Aspect Climate:
Hybanthus vernonii prefers full sun to dappled shade. It grows in dry schlerophyll forests, open woodlands and dry heaths. The altitude ranges from 10 meters ASL to 300 meters ASL.
The temperatures range from minus 5 degree in August to 38 degrees in January.
The rainfalls range from lows of 700mm to an average of 2000mm annually.
Soil Requirements:
Hybanthus vernonii prefers skeletal sands, sandy loams to light clays. The soils are usually derived from decomposed or partially decomposed sandstones, alluvial deposits or accumulated peaty beach sands. The soils pH varies from 5.5pH to 6.5pH. It does not tolerate waterlogged soils however annual seasonal inundations or high water tables for short periods are tolerated. Non saline soils to moderately saline soils are tolerated.
Height & Spread:
Wild Plants: 0.4m to 1m by 0.4m to 1m. This is a small perennial herb with unusual flowers.
Characteristics:
Hybanthus vernonii’s main stems are deep green and glabrous or scabrous while the four ribs are sparsely covered in stiff white hirsute hairs.
Hybanthus vernonii’s linear to narrow lanceolate leaves measure 6mm to 45mm in length by 1mm to 5.5mm in width. The bases are cuneate or taper slightly to the short petiole while the tapers to a short mucronate tip. The concolourous laminas are grass-green and glabrous or scabrous. The laminas decurve slightly downwards near the margins and decurve slightly on the apical half. The midvein is prominent on the lower lamina and is visible from above. The linear stipules measure 0.4mm to 0.5mm in length. The petioles measure 0mm to 0.5mm in length.
The inflorescences of Hybanthus vernonii’s are born solitary from the leaf axils. The 5 deep mid green, purple or purple and white sepals are glabrous and measure 1.5mm to 5mm in length.
The 2 purple upper petals are narrow oblong with a single vein and measure 1.5mm to 3mm in length while the 2 purple, lateral petals are narrow oblong and measure 1.5mm to 3mm in length. The single lower petal is broadly ovate-spathulate and is deep purple to lilac with several deeper coloured veins radiating outwards. The base is white with a deep purple halo. The lower petal measures 9mm to 13mm in length by 7mm to 12mm in width.
The anthers have a swollen triangular appendage attached near the base and are covered in white hirsute hairs. The flowers appear from late August to late February.
Hybanthus vernonii’s fruits are oblong capsules. The capsules measure 6mm to 8mm in length by 4mm to 7mm in diameter. It is glabrous. The green pods turn brown on ripening. The 3 to 6 seeds are orbicular and glabrous.
Confusing Subspecies Varieties:
Hybanthus vernonii sub sps. vernonii’s stems and leaves are glabrous. The upper leaves laminas are linear while the lower laminas are usually lanceolate and measure 5mm to 45mm in length by 1mm to 4mm in width.
Hybanthus vernonii sub sps. scaber’s stems and leaves are scabrous. The laminas are narrow lanceolate to narrow oblanceolate and measure 5mm to 15mm in length by 0.3mm to 5.5mm in width. The acute apexes at times have 3 sharp mucronate tips.
Wildlife:
Hybanthus vernonii’s wildlife is unknown to the author.
Cultivation:
Hybanthus vernonii is very beautiful small lily which is suitable for small sunny or lightly shaded spots in the garden. It is an excellent colourful addition for sub tropical, warm temperate or semi-arid gardens. As a garden subject it will grow to 0.4 meter to 0.5 meters in height by 0.5 meters to 0.6 meters wide. They should be treated as an annual.
It is fast growing and are cold tolerant to temperatures as low as minus 2 degrees.
It is most suitable for use around swimming pools, bright courtyards, rockeries, smaller fish or frog ponds or miniature gardens.
In the informal or formal Gardens they can be used as the fill in plants or as the main plant beside the water feature. Imagine a small pond with fish swimming. Planting clusters of Hybanthus vernonii adjacent to a small pond or below water cascading down over small rocks is very powerful yet formal and relaxing scene. It can be partially surrounded by such a scene and still look effective. Use it in small clusterss with larger rocks or in front of a large log. The large log gives a strong horizontal affect with depth if placed on an angle. Right along the front in a straight line of the Hybanthus vernonii for a statement of man’s power over nature or use 2 to 3 lines of subtle curves to depict nature reviving itself after a fire. The rest of the scene would comprise of maybe one two or three rocks the ground would be sand. It can be a mixture of the purple flowered Hybanthus vernonii and the yellow or orange flowering Hybanthus stellarioides. The horizontal stems and linear leaves will create a longer looking log that has a greater diameter. The plants will be dainty yet display a very relaxing and thought provoking scene.
It is best to mass plant them for really good colourful displays. Plant them at 0.2 meter to 0.3 centres.
Hybanthus make excellent potted plants and benefit from being fertilized on a monthly basis during the growing season with the formula mentioned under propagation at half strength on a rotation basis.
Propagation:
Seeds: Hybanthus vernonii are very easy to grow from seeds. Sow the seeds directly into a seed raising mix. Cover them with 2mm of fine sand and keep moist not wet. Place the tray in a warm sunny position. When the seedlings are 20mm to 30mm tall, prick them out and plant them into 50mm native tubes using a good organic mix.
Once the seedlings reach 150mm to 200mm in height they can be planted out into their permanent position.
Fertilize using Seaweed, fish emulsion or organic chicken pellets soaked in water and apply the liquid on an alternate basis. Fertilize every 2 months until the plants are well established then on an annual basis in September to October to maintain good health, vigour and better flowering.
Further Comments from Readers:
Hi reader, it seems you use The Bible of Botany a lot. That’s great as we have great pleasure in bringing it to you! It’s a little awkward for us to ask, but our first aim is to purchase land approximately 1,600 hectares to link several parcels of N.P. into one at The Pinnacles NSW Australia, but we need your help. We’re not salespeople. We’re amateur botanists who have dedicated over 30 years to saving the environment in a practical way. We depend on donations to reach our goal. If you donate just $5, the price of your coffee this Sunday, We can help to keep the planet alive in a real way and continue to bring you regular updates and features on Australian plants all in one Botanical Bible. Any support is greatly appreciated. Thank you.
In the spirit of reconciliation we acknowledge the Bundjalung, Gumbaynggirr and Yaegl and all aboriginal nations throughout Australia and their connections to land, sea and community. We pay our respect to their Elders past, present and future for the pleasures we have gained.
Hydriastele wendlandiana
Classification:
Unranked: Monocots
Unranked: Commelinids
Order: Aracales
Family: Arecaleae
Subfamily: Arecoideae
Genus: From Hydro, which is Ancient Greek for water and Stelos, which is Ancient Greek for a column (water). It refers to the pale silvery, long, straight trunk appearing like a column of water especially at night, and association with a watery habitat.
Species: Is named in honour of Johann Christopher Wendland; 1775-1828, who was a distinguished German botanical artist and illustrator.
Common Name: Wendal’s Palm or Water Palm.
Distribution:
Hydriastele wendlandiana is found east from Darwin to Groote Eylandt in the Northern Territory.
In the east it is found south from the tip of Cape York Peninsula to Ingham.
https://avh.ala.org.au/occurrences/search?taxa=Hydriastele+wendlandiana#tab_mapView
Habitat Aspect Climate:
Hydriastele wendlandiana prefers full sun to partial shade. It grows in littoral rainforests, low lying rainforests and swampy Melaleuca forests on flood plains or in shallow depressions. The altitude ranges from 10 meters ASL to 300 meters ASL.
The temperatures range from 10 degree in August to 34 degrees in January.
The rainfall ranges from lows of 1000mm to an average of 3200mm annually.
Soil Requirements:
Hydriastele wendlandiana prefers growing on better quality soils which range from light sandy clays to medium clays. The soils are derived from decomposed basalts and sandstones laid down as alluviums. The soils are usually derived from decomposed sandstone or accumulated sands or at times shale, brown basalt, black basalt, metamorphic rocks, granite and sandstone. The soils pH varies from 4.5pH through to a 7pH. It tolerates waterlogged soils, annual inundations for long periods or where the water tables surface’s for long periods. Non saline soils to moderately saline soils are tolerated as are salt laden winds.
Height & Spread:
Wild Plants: 6m to 7m by 2.5m to 4m. This is a small feather leaf palm with one to three trunks.
Characteristics:
Hydriastele wendlandiana’s trunk is silvery grey and glabrous. The leaf scars are prominent on the trunk. It is a clumping palm however often only one or two stems will become dominant.
Hydriastele wendlandiana’s leaves measure 2000mm to 3000mm in length by 600mm to 1050mm in width while the rachis measures 400mm to 500mm in length. The rachis is triangular in cross section with an angle as the upper surface. The rachis is pale green and covered in white or brown or white and brown scales. The 1000mm collar or leaf sheath is pale green and covered in white and pale brown scales. The 30 to 40 leaflets are oblong and measure 250mm to 550mm long by 15mm to 60mm wide. The apical leaflets are fused together to form a narrow triangular fan. The base is sessile while the apex is praemorse. The concolourous laminas are deep green to grass-green and glabrous. The margins are entire and convex on the upper lamina. The mid vein is prominent on the lower lamina and is not visible from above. The base is sessile while the apex is praemorse. The rachis is triangular in cross section and angular on the upper surface. The petiole measures 200mm to 280mm in length.
The inflorescences of Hydriastele wendlandiana are spikes born from below the bottom leaf sheath and measure 200mm to 250mm in length. There are 10 to 20 spikes on each short peduncle with each spike having 90 to 120 flowers. The flowers are born in triads with one female flower between two male flowers. The yellow green calyxes measure 0.8 to 1mm in length. There are 6 stamens with 3 on the tepals and 3 are free. The anthers are white with white pollen. The elliptical tepals are pale fawn to cream. The yellow tepals of the female flowers are shorter and wrap around the ovary. The stigma is the only section of the pistil exposed to the environment.
Hydriastele wendlandiana’s fruit is a globular drupe. The drupes measure 6.5mm to 8mm in diameter. It is glabrous. The green drupes turn bright scarlet red on ripening. The calyx is persistent on the ripe fruit and remains yellow green. The hard testa is surrounded by coi fibres. (Coi is better known as coco nut fibre.) The seeds measure 4mm in diameter.
Wildlife:
Hydriastele wendlandiana’s wildlife is unknown to the author.
Cultivation:
Hydriastele wendlandiana is very beautiful, small, slender palm which is suitable for small sunny or shaded wet spots in the garden. It is an excellent addition for subtropical or tropical zone gardens. As agarden subject it will grow to 7 meter to 7.5 meters high by 2.5 meter to 4 meters in diameter at the crown. Plants will form clumps to 3 meters in diameter in which only one two or three trunks will develop to a full size. It responds very well to additional native fertilizers and heavy mulching. It has a medium rate of growth and are cold tolerant to temperatures as low as 3 degrees. I know of plants which are doing well as far south as Coffs Harbour in frost free zones.
It is most suitable for use around swimming pools, bright courtyards, besides pathways, rockeries, along sandy banks or along drive ways provided drainage is poor and permanent water is available.
Hydriastele wendlandiana makes a very good indoor, patio, swimming pool or courtyard plants in tubs. Select large bushy plants and repot them into large tubs using a good organic potting mix.
INDOORS OR POTTED ON:
Sawdust or sand mixes are too well draining unless the sawdust has completely composted down where it exhibits a texture like plasticine to the touch. Moisture can be squeezed out between the fingers yet it remains moist. I find this a great basis to start with.
Mix equal parts of the well decomposed saw dust with the above feel with perlite and vermiculite. To this add two part sharp clean sand, one part compost and one part good crusher dust from a basalt rock quarry. Preferably black basalt but both are good. Make sure the sand comes from a source that does not have salt.
The decomposed Sawdust in this condition creates the moisture retention and holds nutrient in. The perlite and vermiculite make the mix neutral and both have great water holing capacity without shrinkage with age. The sand creates good drainage and is good for good healthy root development. The crusher dust adds vital minerals which the plants need.
Indoor plants need good light and ventilation without drying breezes or wind. Fertilize the plants on a monthly basis during the growing season with the formula mentioned under propagation at half strength on a rotational basis during the growing season.
Propagation:
Seeds: Hydriastele wendlandiana seeds can be sown directly into a deep tray with a good seed raising mix. Cover them with 15mm to 20mm of fine weed free mulch and keep moist. Alternatively the seeds can be placed directly into 50mm native tubes. Place the tray or tubes in a warm sunny position.
When the seedlings are 20mm to 30mm tall, prick them out and plant them into 50mm native tubes using a good organic mix.
Once the seedlings reach 150mm to 200mm in height they can be planted out into their permanent position.
Fertilize using Seaweed, fish emulsion or organic chicken pellets soaked in water and apply the liquid on an alternate basis. Fertilize every 2 months until the plants are well established then on an annual basis in September to October to maintain good health, vigour and better flowering.
Further Comments from Readers:
Hi reader, it seems you use The Bible of Botany a lot. That’s great as we have great pleasure in bringing it to you! It’s a little awkward for us to ask, but our first aim is to purchase land approximately 1,600 hectares to link several parcels of N.P. into one at The Pinnacles NSW Australia, but we need your help. We’re not salespeople. We’re amateur botanists who have dedicated over 30 years to saving the environment in a practical way. We depend on donations to reach our goal. If you donate just $5, the price of your coffee this Sunday, We can help to keep the planet alive in a real way and continue to bring you regular updates and features on Australian plants all in one Botanical Bible. Any support is greatly appreciated. Thank you.
In the spirit of reconciliation we acknowledge the Bundjalung, Gumbaynggirr and Yaegl and all aboriginal nations throughout Australia and their connections to land, sea and community. We pay our respect to their Elders past, present and future for the pleasures we have gained.
Hydrilla verticillata
Classification:
Unranked: Monocots
Order: Alismatales
Family: Hydrochartaceae
Genus: From Hydra, which is Latin for water. It refers to an old order of plants that grow fully submerged in fresh water.
Species: From Verticillus which is Latin for a whorl and Cilliatus which is Latin for short marginal hairs. It refers to hairy margined leaves, which form stars at the nodes.
Common Name: Hydrilla or Water Thyme.
Distribution:
Hydrilla verticillata is found in most of the fresh water ways from near Broome in central coastal Western Australia to the Arafura Swamp in the north east of the Northern Territory. In the south west of Western Australia it is found on the Swan River Plain.
In Queensland it is found south from the Leichardt River and the Gilbert River flowing into the Gulf of Carpentaria and most of the fresh water creeks, streams and rivers flowing east from north of Cooktown to Campbelltown in central coastal New South Wales.
It is also found along the Murray River, Wilson’s Promontory and the Yarra River in Victoria.
https://avh.ala.org.au/occurrences/search?taxa=Hydrilla+verticillata#tab_mapView
Habitat Aspect Climate:
Hydrilla verticillata prefers full sun to very light shade. It grows in clean still or fresh slow running water, billabongs and lakes. The altitude ranges from 10 meters ASL to 915 meters ASL.
The water temperatures range from 2 degrees in August to 32 degrees in January but its optimum growth is when the temperatures are fairly static at around 16 to 20 degrees.
The rainfall ranges from lows of 100mm to an average of 3200mm annually. This is of little consequence as it relies on flows in the river system.
Soil Requirements:
Hydrilla verticillata soils with a pH that varies from 6.5pH to 7pH. Non saline water to water that contains 0.7mm salt are tolerated.
Height & Spread:
Wild Plants: 1.5m to 8m by 1m to 2m.
Characteristics:
The stems are strongly branched water plants that form a dense canopy just below the water’s surface.The pale green to pale grey-green stems usually measure 1.5 meters to 3 meters in length but can grow to 8 meters in very slow moving water. The internodes are usually 25mm to 35mm apart but vary from 10mm near the apexes at the water surface to 50mm in deeper water.
The elliptical leaves are in whirls of 3 to 8 and measure 20mm to 40mm in length by 4mm to 5mm in width. The bases are sessile while the apex is acute. The concolourous laminas are grass-green and glabrous. The laminas are flat and decurve on the apical half while the margins are sparsely covered in very fine teeth. The mid vein is prominent on the lower lamina and is visible from the upper lamina. The mid vein has a row of fine teeth on the lower surface.
The inflorescences are dioecious. The perianth segments measure 1mm to 3mm in length.
There is a single male flower to a spathe which is without a hypanthium. The pedicels measure 1.5mm to 3mm in length.
The female flowers mostly are usually singular or at times 2 to a spathe and have a slender hypanthium. The filiform hypanthium looks like a pedicel and measures 15mm to 100mm in length.
The fruits are globular capsules. The capsules measure 5mm to 10mm in length by 1.2mm to 1.6mm in diameter. It is glabrous. The green drupes turn grey when ripe. The grey seeds measure 2mm to 3mm in length.
Confusing Specie:
Hydrilla verticillata are course to touch. The narrow elliptical leaves are in whirls of 3 to 8.The plants are dioecious with male flowers measuring 6mm to 7mm in diameter while the female measure 6mm to 7mm in diameter.
Egeria densa’s leaves occur in whorls of 3 to 6 and have very fine serrations that need a magnifying glass to be seen. Smooth to touch. The linear spiralling leaves in whirls of 3 to 4. The plants are dioecious with male flowers measuring 12.5mm to 19mm in diameter while the female measure 4mm to 6mm in diameter.
Elodea canadens’s leaves have very fine serrations that need a magnifying glass to be seen. Smooth to touch. The linear spiralling leaves in whirls of 3.The plants are dioecious with male flowers measuring 7mm to 9mm in diameter while the female measure 4mm to 6mm in diameter.
Wildlife:
Hydrilla verticillata is considered a pest in many countries especially America. It is a very important plant in the Australian river system, where it is the food source for several beetles including the Bagous genus including Hydrilla weevil Bagous hydrillae, and Bagous hydrillae. It is also the food source for Hydrilla leafminor Hydrellia balciunasi, which in turn is preyed upon by small hungry fish. Hydrilla verticillata also feeds freshwater tortoises including the common long neck tortoise (Chelodina longicollis). It is also a useful refuge for frogs, small freshwater fish and is used by many small fish to lay their eggs on. As can be seen this is a vitally important plant in the Australian web of life.
Cultivation:
Hydrilla verticillata is a beautiful slender plant for the indoor plant aquarium and outdoor fish pond and frog pond.
Propagation:
Seeds: The seeds can be sown directly into a seed raising mix. Cover them with 15mm to 20mm of fine weed free mulch and place the pots in a basin of water. Place the tray in a warm position beneath 30mm shade cloth. When the seedlings are 20mm to 30mm tall, prick them out and plant them into 50mm native tubes using a good organic mix.
Once the seedlings reach 150mm to 200mm in height they can be planted out into their permanent position.
Plants are best produced by removing it from the water. Cutting them into 200mm to 300mm lengths and placing the basal section into the ground or pot the resubmerging the pots in water.
Further Comments from Readers:
Hi reader, it seems you use The Bible of Botany a lot. That’s great as we have great pleasure in bringing it to you! It’s a little awkward for us to ask, but our first aim is to purchase land approximately 1,600 hectares to link several parcels of N.P. into one at The Pinnacles NSW Australia, but we need your help. We’re not salespeople. We’re amateur botanists who have dedicated over 30 years to saving the environment in a practical way. We depend on donations to reach our goal. If you donate just $5, the price of your coffee this Sunday, We can help to keep the planet alive in a real way and continue to bring you regular updates and features on Australian plants all in one Botanical Bible. Any support is greatly appreciated. Thank you.
In the spirit of reconciliation we acknowledge the Bundjalung, Gumbaynggirr and Yaegl and all aboriginal nations throughout Australia and their connections to land, sea and community. We pay our respect to their Elders past, present and future for the pleasures we have gained.
Hydrocharis dubia
Classification:
Unranked: Monocots
Order: Alismatales
Family: Hydrocharitaceae
Genus: From Hydro, which is Ancient Greek for water and Kharis, which is Ancient Greek for a grace. It refers to the small graceful flowers of this waterlily compared to its giant cousins.
Species: From Dubious, which is Latin for some uncertainty, uncharacteristic or doubtful. It refers to the plants being similar to but displaying characteristics not usual of the family or genus to which it has been allocated.
Common Name: Frogbit.
Distribution:
Hydrocharis dubia is found in 2 distinct disjunct populations in Australia on and east of the Great Dividing Range. In the north it is found south from Charters Towers to Healey’s Lagoon. In the south it is found south from Rosewood in southern Queensland to Doubtful Creek a tributary of the Richmond River, the Clarence River floodplains and the Frederickton floodplains and freshwater swamps.
https://avh.ala.org.au/occurrences/search?taxa=Hydrocharis+dubia#tab_mapView
Habitat Aspect Climate:
Hydrocharis dubia prefers full sun to very light shade. It grows in clean fresh slow running water, billabongs, lakes and swamps. The altitude usually ranges from 5 meters ASL to 60 meters ASL but the Charters Towers population is at is 309 meters ASL.
The temperatures range from 1 degree in August to 38 degrees in January.
The rainfall ranges from lows of 1400mm to an average of 2000mm annually except for the Charters Towers population which is as low as 600mm per annum.
Soil Requirements:
Hydrocharis dubia prefers growing on better quality light silty soils to heavy silty soils. The soils are derived from various types of alluvial deposits. The soils pH varies from 4.5pH to 5.5pH. It tolerates waterlogged soils and prefers annual inundations, periods where the water rises in high water tables and surface water lies. Non saline soils to moderately saline soils are tolerated as are salt laden winds.
Height & Spread:
Wild Plants: 0.1m to 0.15m by 0.2m to 0.3m.
Characteristics:
Hydrocharis dubia is an aquatic perennial with stolons rooting firmly into the silts in shallow water. The stolons produce clusters of leaves, the peduncles and roots from their nodes.
The leaves are both emergent and floating leaves. The floating leaves are broad ovate, cordate, reniform or orbicular and measure 30mm to 70mm in length by 30mm to 70mm in width. The bases are cordate, reniform or truncate. The discolourous laminas are grass-green, deep green or deep green with a purple tinge, semi glossy and glabrous on the upper laminas while the lower laminas are paler and dull. The petioles measure 20mm to 120mm in length.
The emergent leaves are similar but often have a more robust petiole.
The inflorescences are long emergent spikes born from below the water at a node. The flowers measure 20mm to 30mm in diameter.
The spathes measure 10mm to 25m in length. The 3 sepals are oblong with an obtuse cupuliform apex and are glabrous and are white and glabrous externally internally. The sepals measure 4mm to 5mm in length by 2mm to 3mm in width. The 3 translucent white petals have a yellow base and are oval with a broad obtuse to truncate apex. The petals measure 10mm to 15mm in length by 10mm to 15mm in width.
The male flowers are born in small clusters of 1 to 4 on short pedicels from a peduncle spathe. The green, glabrous pedicels measure 15mm to 25mm in length. The 6 bright yellow filaments measures 0.5mm in length while the bright yellow, oblong anthers measure 1.5mm to 2mm in length.
The female flowers are born singularly on a 10mm to 80mm long pedicel from a sessile spathe. The bright yellow style divides into 6 bright yellow, linear stigmas. There are 0 or 6 bright yellow staminodes. The flowers appear from November to February.
The fruits are ellipsoidal to ovoidal capsules. The capsules measure 5mm to 10mm in length by 4mm to 8mm in diameter. It is glabrous. The green capsules turn bright deep brown-grey when ripe. The seeds testa is covered in tuberculate lumps and measure 1mm to 1.5mm in diameter.
Wildlife:
Hydrocharis dubia’s wildlife is unknown to the author.
Cultivation:
Hydrocharis dubia is a very beautiful dwarf flowering water lily for the outdoor frog or fish ponds in a sunny or partly shaded position. It is an excellent addition for subtropical or tropical zone gardens. As a garden subject it will form small clumps on the water’s surface.
It is most suitable for use in wet bog gardens, areas with drainage problems or permanent water is available. It would make a good plant for shallow outdoor fish or frog ponds.
Propagation:
Seeds: Hydrocharis dubia seeds can be sown directly into a seed raising mix. Cover them with 15mm to 20mm of fine weed free mulch and place the pots in a basin of water and keep wet. Place the tray in a warm sunny position.
When the seedlings are 20mm to 30mm tall, prick them out and plant them into 50mm native tubes using a good organic mix.
Once the seedlings reach 150mm to 200mm in height they can be planted out into their permanent position.
Further Comments from Readers:
Hi reader, it seems you use The Bible of Botany a lot. That’s great as we have great pleasure in bringing it to you! It’s a little awkward for us to ask, but our first aim is to purchase land approximately 1,600 hectares to link several parcels of N.P. into one at The Pinnacles NSW Australia, but we need your help. We’re not salespeople. We’re amateur botanists who have dedicated over 30 years to saving the environment in a practical way. We depend on donations to reach our goal. If you donate just $5, the price of your coffee this Sunday, We can help to keep the planet alive in a real way and continue to bring you regular updates and features on Australian plants all in one Botanical Bible. Any support is greatly appreciated. Thank you.
In the spirit of reconciliation we acknowledge the Bundjalung, Gumbaynggirr and Yaegl and all aboriginal nations throughout Australia and their connections to land, sea and community. We pay our respect to their Elders past, present and future for the pleasures we have gained.
Hydrocotyle acutiloba
Classification:
Unranked: Eudicots
Superorder: Asterids
Order: Apiales
Family: Araliaceae
Genus: From Hydro, which is Ancient Greek for water and Kotyle, which is Ancient Greek for a cup or plate. It refers to the small hollow in the middle of the leaves.
Species: From Acutatum, which is Latin for sharpened or to sharpen and Lobos, which is Ancient Greek or Lobus which is Latin for a round appendage on an organ. It refers to appendages, which resemble ear lobes that taper gradually towards their apexes.
Common Name:
Distribution:
Hydrocotyle acutiloba is found south from the Windsor Tableland in far north Queensland to Iguana Creek in south west Gippsland in Victoria with an isolated population near Frankston on Mornington Peninsula.
https://avh.ala.org.au/occurrences/search?taxa=Hydrocotyle+acutiloba#tab_mapView
Habitat Aspect Climate:
Hydrocotyle acutiloba prefers full shade to very light shade. It grows in moist shallow depressions, drainage lines and near seepages in moist Eucalyptus forests, adjacent to Rainforests and wet heaths and adjacent to and on the margins of swamps in the shallow water. The altitude ranges from 10 meters ASL to 990 meters ASL.
The temperatures range from minus 2 degree in August to 38 degrees in January.
The rainfall ranges from lows of 450mm to an average of 3000mm annually.
Soil Requirements:
Hydrocotyle acutiloba prefer growing on better quality wet sands to moist heavy clays. The soils are derived from decomposed brown basalt, black basalt, sandstones, granite, shale and metamorphic rocks, alluviums and accumulated sands including coral sands. The soils pH varies from 4.5pH through to 8pH. It tolerates waterlogged soils and prefers annual inundations with periods where the water rises in high water tables and surface water lies. Non saline soils to moderately saline soils are tolerated.
Height & Spread:
Wild Plants: 0.1m to 0.3m by 0.5m to several square meters.
Characteristics:
Hydrocotyle acutiloba is a small creeping semi succulent herb that roots readily from the nodes where it touches the ground. The stems often grow below the mulch. The pastel green almost white, pale green stems often have a pale pink tinge and are covered in ascending white hirsute hairs.
The alternate leaves are orbicular, cordate or reniform and measure 6mm to 60mm in diameter. The bases are cordate while the apexes are broad acute to broad obtuse. The discolourous laminas are mid green to blue-green and are covered in white hirsute hairs on the upper laminas while the lower laminas are paler and are moderately covered in white hispid hairs. The laminas are flat while the margins have 3 to 7 shallow to deep lobes. The lobes’ margins are usually entire or at times have small disjunct, irregular teeth and are at times covered in white ciliate hairs. The lobe apexes are broad acute to acute-obtuse. The main veins and primary secondary veins are prominent on the lower laminas and are visible from the upper laminas. The mid vein and main lateral veins are moderately covered in long, white hirsute hairs on the lower laminas and are denser near the base. The orbicular, contorted stipules are covered in white hirsute hairs and measure 1.5mm to 1.8mm in diameter and become chartaceous with age. The grass-green petioles are densely covered in white hirsute hairs often and measure 40mm to 35mm in length. The petioles are glabrous except for a small area near the base of the leaves which are moderately covered in long white hispid hairs. The petioles measure 10mm to 30mm in length.
The inflorescences are monoecious, globose umbels born from the leaf axils or leaf opposed from the nodes on the rhizomes. They usually consist of 3 to 20 individual flowers that have 2 or 3 flowers open at a time. The umbels measure 3mm to 7mm in diameter while the individual flowers measure 2mm to 3mm in diameter. The peduncles and pedicels are grass-green to blue-green and glabrous. The peduncles measure 7mm to 30mm in length while the pedicels measure 0.5mm to 1.5mm in length. The 5 ovate to triangular, translucent petals are pastel yellow at the base and blend through to a beautiful delicate mid greenish-purple at the apexes at anthesis. The petals are cupuliform at the apex and measure 0.6mm to 1mm in length by 0.4mm to 0.6mm in width.
The 5 filiform, translucent white filaments are born opposite the petals at the base of the lime-green ovary. The filaments measure 0.5mm to 0.8mm in length while the slightly oblong almost orbicular cream or pink, anthers are basifixed and measure 0.5mm to 0.6mm in length. The anthers dehisce transversely from the apex to release the pale yellow pollen. The ovary is laterally compressed, is verging on being bilobed and measures 0.5mm to 0.8mm in length. The 2 styles curve inwards and measure 0.25mm to 0.35mm in length. The flowers appear from September to February.
The fruits are laterally compressed mericarps. The bilobed mericarps are covered in white hirtellous hairs. The mericarps measure 1.5mm to 2mm in length by 1.8mm to 2.2mm in width and 0.8mm to 1mm in thickness. The olive-green capsules turn brownish-grey when ripe. The styles or remnants of the styles are persistent on the ripe fruits.
Confusing Species:
Hydrocotyle acutiloba alternate leaves are orbicular, cordate or reniform and measure 6mm to 60mm in diameter and are moderately covered in white hispid hairs..
Hydrocotyle verticillata is either a floating or terrestrial plant. Its orbicular leaves usually measure 20mm to 50mm in diameter and are peltate. These leaves have crenate margins. The flowers are arranged in simple clusters along an unbranched stalk or are arranged in compound umbels with several branches with 2 to 5 individual flowers in each cluster.
Hydrocotyle peduncularis is by the larger leaves and the glabrous petioles except for a small section immediately below the leaves on the petioles and the more obtuse lobes.
Wildlife:
Hydrocotyle acutiloba’s wildlife is unknown to the author.
The young leaves when harvested and eaten have a mild parsley taste and can easily be substituted for parsley. It is sweeter and softer on the palate. It is also being investigated as a good anti-cancer vegetable similar to broccoli. The leaves can be added to deserts, salads, fruit salad or juiced and mixed with fruits for a pleasant drink.
Cultivation:
Hydrocotyle acutiloba is a very beautiful shade loving ground covers that have escaped the imagination of Australian gardeners. Imagine a path winding its way through a shaded glade or corner of the yard and on the ground it blankets the area between shrubs, or contrasts with Cordyline terminalis with their bright pink, red and yellow foliages breaking the horizontal greenery. Next is a seat surrounded by palms and again the ground is a lush green of Hydrocotyle acutiloba leaves. Feeling peckish then all one has to do is lean over and plucks a few leaves, the sweet taste reminds of days gone by when our forefathers once used the leaves in an Aussie salad.
It has a place in most rainforest gardens where the soil never dries out. Best yet you can do away with the lawn mower.
Propagation:
Seeds: The seeds can be sown directly into a seed raising mix. Cover them with 15mm to 20mm of fine weed free mulch and keep moist. Place the tray in a warm sunny position. When the seedlings are 20mm to 30mm tall, prick them out and plant them into 50mm native tubes using a good organic mix.
Once the seedlings reach 150mm to 200mm in height they can be planted out into their permanent position.
Runners: Use 50mm to 70mm long herbaceous runners taken from October to early April or later if you are in a frost free area with at least 2 nodes. Select vigorously growing plants of the form you desire should be used when growing from runners. Remove half the leaves from teach individual plantlet. It is preferable to use plantlets that already have a few established roots for quick growth. Place the plantlets into tubes and place them in a cool semi shaded position preferably under 50mm shade cloth and keep moist.
Fertilize using seaweed, fish emulsion or organic chicken pellets soaked in water on an alternate basis. Fertilize every two months until the plants are established then annually in early September to October to maintain health vitality and better flowering.
Further Comments from Readers:
Hi reader, it seems you use The Bible of Botany a lot. That’s great as we have great pleasure in bringing it to you! It’s a little awkward for us to ask, but our first aim is to purchase land approximately 1,600 hectares to link several parcels of N.P. into one at The Pinnacles NSW Australia, but we need your help. We’re not salespeople. We’re amateur botanists who have dedicated over 30 years to saving the environment in a practical way. We depend on donations to reach our goal. If you donate just $5, the price of your coffee this Sunday, We can help to keep the planet alive in a real way and continue to bring you regular updates and features on Australian plants all in one Botanical Bible. Any support is greatly appreciated. Thank you.
In the spirit of reconciliation we acknowledge the Bundjalung, Gumbaynggirr and Yaegl and all aboriginal nations throughout Australia and their connections to land, sea and community. We pay our respect to their Elders past, present and future for the pleasures we have gained.
Hydrocotyle geraniifolia
Classification:
Unranked: Eudicots
Superorder: Asterids
Order: Apiales
Family: Araliaceae
Genus: From Hydro, which is Ancient Greek for water and Kotyle, which is Ancient Greek for a cup or plate. It refers to the small hollow in the middle of the leaves.
Species: From Geranion, which is Ancient Greek for a crane’s bill and Folium, which is Latin for foliage. It refers to the leaves, which resemble those of the exotic Geranium genus.
Common Name: Forest Pennywort.
Distribution:
Hydrocotyle geraniifolia is found south from Mount Maroon in far south east Queensland to the Dandenong Ranges east of Melbourne in south eastern Victoria. There are several disjunct populations including mount Abbott west of Bowen and Mount David in the Eungella National Park in central coastal Queensland and Colac in southern Victoria.
https://avh.ala.org.au/occurrences/search?taxa=Hydrocotyle+geraniifolia#tab_mapView
Habitat Aspect Climate:
Hydrocotyle geraniifolia prefers dense shade to very light shade. It grows in moist shallow depressions, drainage lines and near seepages in moist eucalyptus forests. The altitude ranges from 5 meters ASL to 900 meters ASL.
The temperatures range from minus 4 degree in August to 36 degrees in January.
The rainfall ranges from lows of 750mm to an average of 2000mm annually.
Soil Requirements:
Hydrocotyle geraniifolia prefers better quality sandy loams to medium clays. The soils are usually derived from decomposed brown basalt, black basalt, sandstones, granite, shale and metamorphic rocks or alluvial deposits. The soils pH varies from 4.5pH through to a 7pH. It tolerates waterlogged soils. Non saline soils to moderately saline soils are tolerated.
Height & Spread:
Wild Plants: 0.1m to 0.2m by 0.5m to 2m.
Characteristics:
Hydrocotyle geraniifolia is a small creeping or weak climbing herb with lax stems that will root at the nodes where they touch the ground.
The alternate leaves are deeply palmatisect and measure 40mm to 85mm in length by 50mm to 80mm in width. There are 3 or 5 lobes of which the middle lobe is the longest. The lanceolate to narrow lanceolate lobes measure 40mm to 50mm in length by 7mm to 18mm in width. The bases are tapering while the apexes are tapering to a narrow obtuse tip. The concolourous laminas are mid green to grass-green or blue-green and glabrous or very sparsely covered in long, white, hirsute hairs. The laminas are flat while the margins are coarsely toothed with the teeth being acute, obtuse and often covered in white hirtellous hairs on the margins. The midvein and primary lateral veins are prominent on the lower laminas and are visible from the upper laminas. The mid vein and main lateral veins are covered in short, white hispid hairs on the upper surface. The membranous stipules are covered in white ciliate hairs. The scabrous petioles measure 10mm to 20mm in length.
The inflorescences are leaf opposed simple umbels. They usually consist of 15 to 20 individual flowers and measure 4mm to 8mm in diameter. The peduncles are grass-green, to blue-green and glabrous while the pedicels are white and glabrous. The peduncles measure 25mm to 50mm in length while the pedicels measure 2mm to 3mm in length. The white petals are elliptical and measure 2mm to 4mm in length by 2mm to 2.5mm in width.
The 5 filiform, white stamens are opposite the petals and measure 3mm to 4mm in length while the conical anthers are cream.
The stout conical stigma is pastel green to pale green. The flowers appear from November to February.
The fruits are dorsally ribbed mericarps which extend into a short wing. The mericarps measure 2mm to 2.5mm in length by 3.5mm to 3.8mm in width. The pale green mericarps turn grey when ripe. The style is persistent on the ripe fruits.
Wildlife:
Hydrocotyle geraniifolia’s wildlife is unknown to the author.
The young leaves when harvested and eaten have a mild parsley taste and can easily be substituted for parsley. It is sweeter and softer on the palate. It is also being investigated as a good anti-cancer vegetable similar to broccoli. The leaves can be added to deserts, salads, fruit salad or juiced and mixed with fruits for a pleasant drink.
Cultivation:
Hydrocotyle geraniifolia is a beautiful shade loving ground cover that has escaped the imagination of Australian gardeners. Imagine a path winding its way through a shaded glade or corner of the yard and on the ground is Hydrocotyle geraniifolia blanketing the area between shrubs, Cordyline terminalis with their bright pink, red and yellow foliages breaking the horizontal greenery of Hydrocotyle geraniifolia. Next is a seat surrounded by palms and again the ground is a lush green leaves. Feeling peckish then all one has to do is lean over and plucks a few leaves, the sweet taste reminds of days gone by when our forefathers once used the leaves in an Aussie salad.
It has a place in most rainforest gardens where the soil never dries out. And you can forget mowing as it maintains a low but lush growth all year round.
Propagation:
Seeds: The seeds can be sown directly into a seed raising mix. Cover them with 15mm to 20mm of fine weed free mulch and keep moist. Place the tray in a warm sunny position. When the seedlings are 20mm to 30mm tall, prick them out and plant them into 50mm native tubes using a good organic mix.
Once the seedlings reach 150 to 200mm in height they can be planted out into their permanent position.
Runners: Use 50mm to 70mm long herbaceous runners taken from October to early April or later if you are in a frost free area with at least 2 nodes. Select vigorously growing plants of the form you desire should be used when growing from runners. Remove half the leaves from teach individual plantlet. It is preferable to use plantlets that already have a few established roots for quick growth. Place the plantlets into tubes and place them in a cool semi shaded position preferably under 50mm shade cloth and keep moist.
Fertilize using seaweed, fish emulsion or organic chicken pellets soaked in water on an alternate basis. Fertilize every two months until the plants are established then annually in early September to October to maintain health vitality and better flowering.
Further Comments from Readers:
Hi reader, it seems you use The Bible of Botany a lot. That’s great as we have great pleasure in bringing it to you! It’s a little awkward for us to ask, but our first aim is to purchase land approximately 1,600 hectares to link several parcels of N.P. into one at The Pinnacles NSW Australia, but we need your help. We’re not salespeople. We’re amateur botanists who have dedicated over 30 years to saving the environment in a practical way. We depend on donations to reach our goal. If you donate just $5, the price of your coffee this Sunday, We can help to keep the planet alive in a real way and continue to bring you regular updates and features on Australian plants all in one Botanical Bible. Any support is greatly appreciated. Thank you.
In the spirit of reconciliation we acknowledge the Bundjalung, Gumbaynggirr and Yaegl and all aboriginal nations throughout Australia and their connections to land, sea and community. We pay our respect to their Elders past, present and future for the pleasures we have gained.
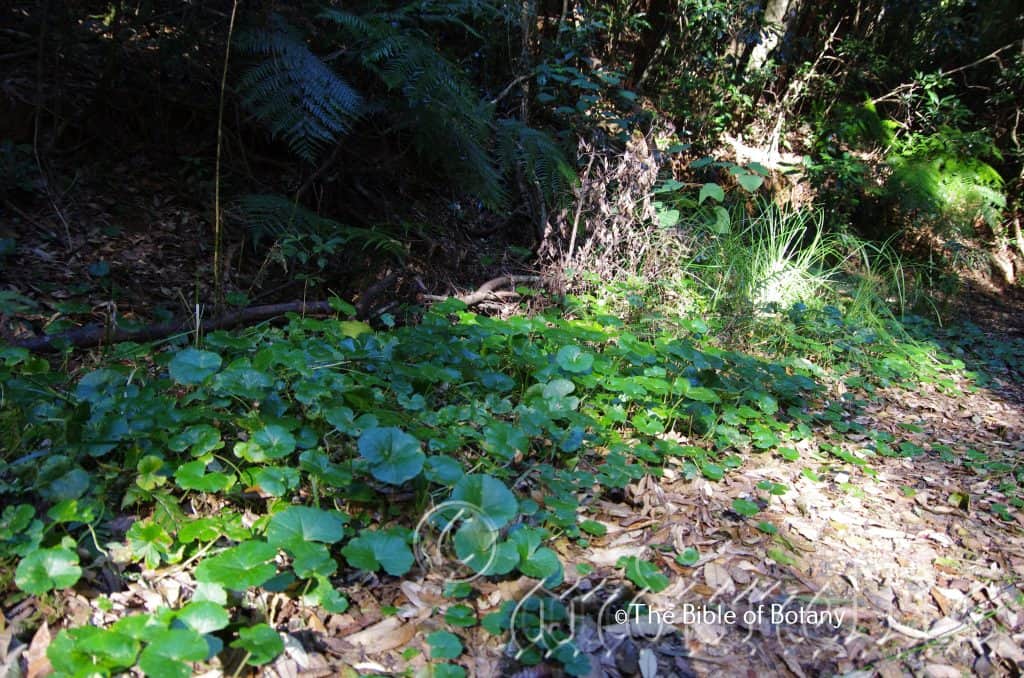
Washpool National Park NSW
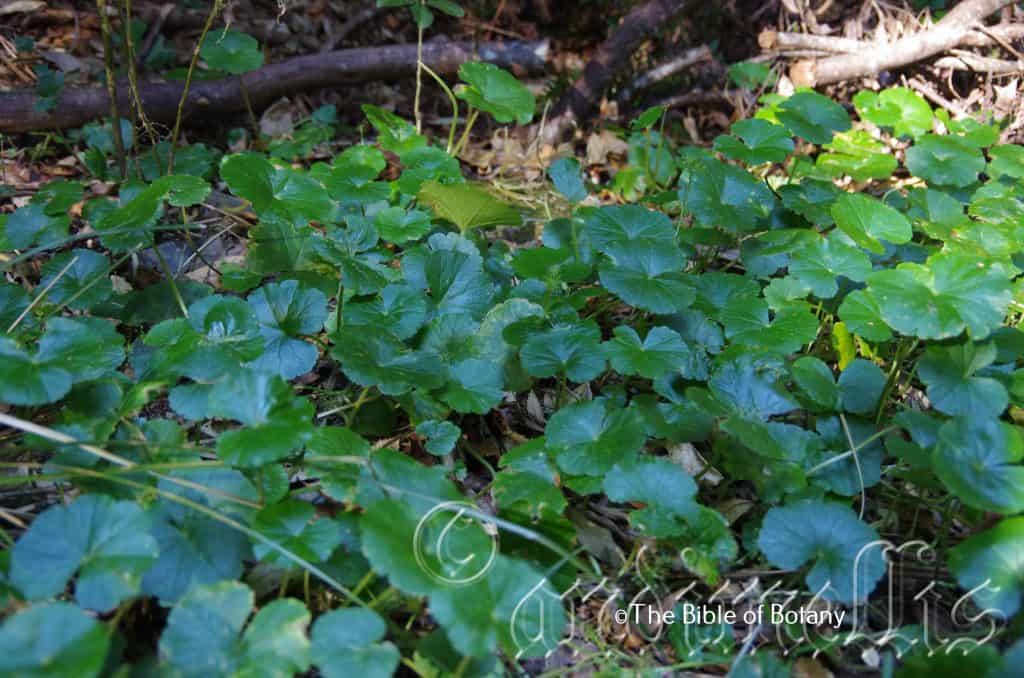
Washpool National Park NSW
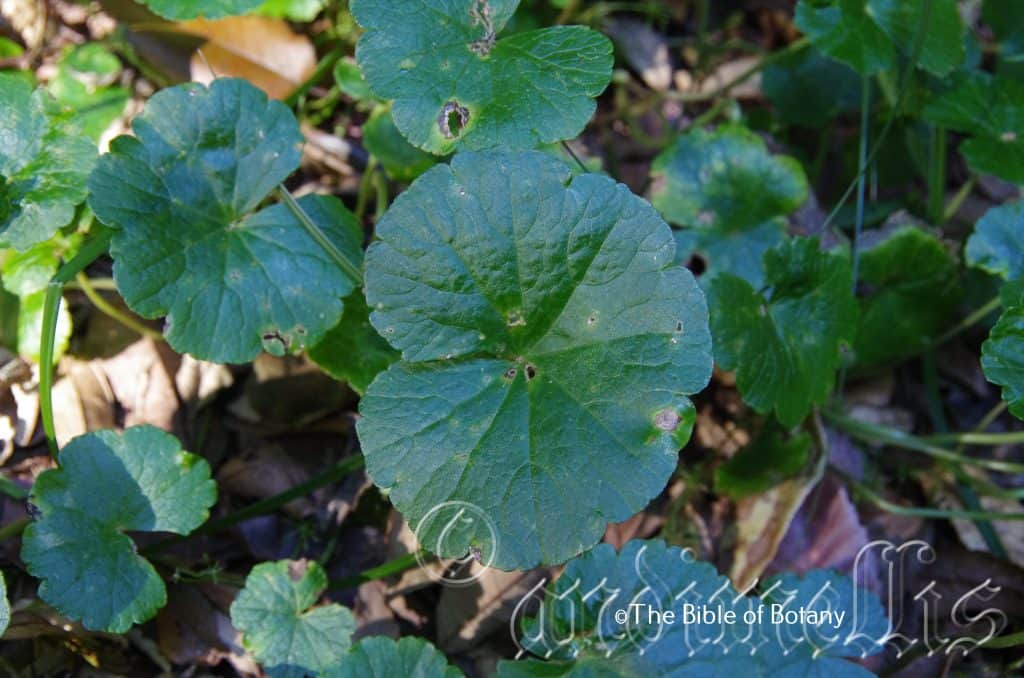
Washpool National Park NSW
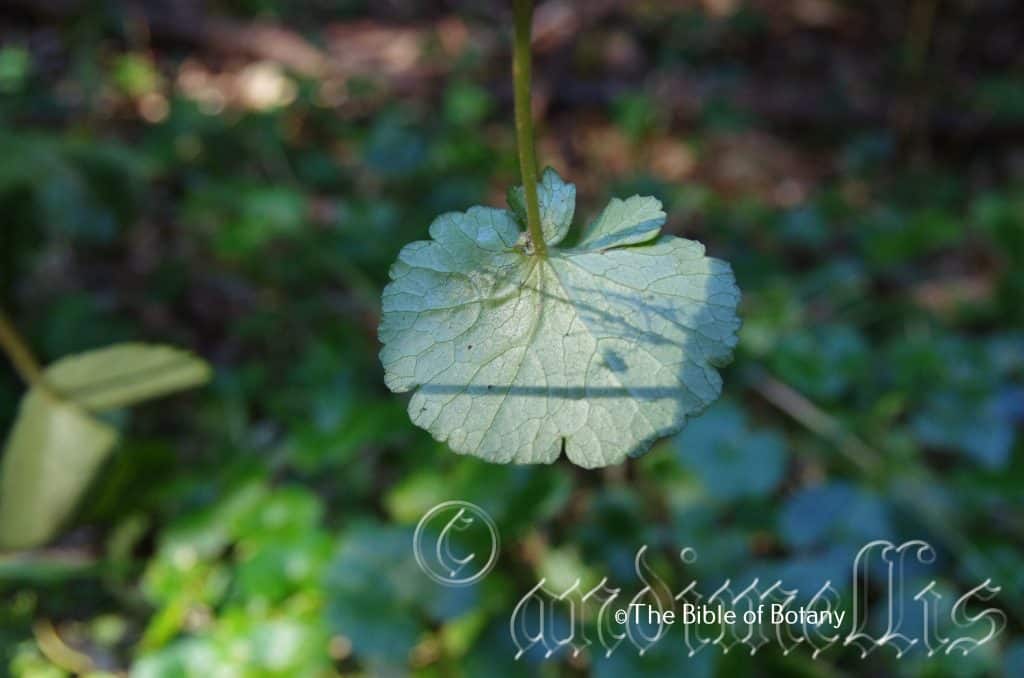
Washpool National Park NSW
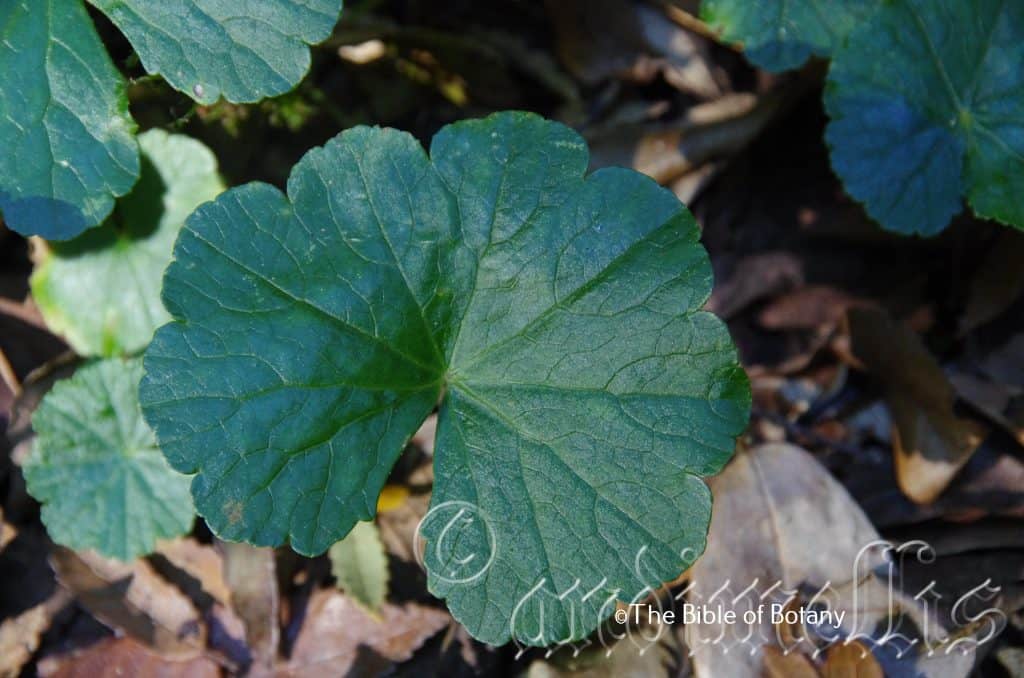
Washpool National Park NSW
Hydrocotyle pedicellosa
Classification:
Unranked: Eudicots
Superorder: Asterids
Order: Apiales
Family: Araliaceae
Genus: From Hydro, which is Ancient Greek for water and Kotyle, which is Ancient Greek for a cup or plate. It refers to the small hollow in the middle of the leaves.
Species: From Pous, which is Ancient Greek or Pes/Pedi, which is Latin for a little foot or feet. It refers to flowers, which have very distinct pedicel.
Common Name: Pennywort.
Distribution:
Hydrocotyle pedicellosa is found in 2 disjunct populations on and east of the Great Dividing Range. The northern population is found south from Port Douglas to Ravenshoe in far north Queensland. The southern population is found south from Caloundra in south east Queensland to Kendall with an outlying sighting at Maitland and Tabulum in New South Wales and Sherbrooke Forest in the Dandenong Ranges.
https://avh.ala.org.au/occurrences/search?taxa=Hydrocotyle+pedicellosa#tab_mapView
Habitat Aspect Climate:
Hydrocotyle pedicellosa prefers medium shade to very light shade. It grows in moist shallow depressions, drainage lines and near seepages in moist eucalyptus forests. The altitude ranges from 15 meters ASL to 900 meters ASL.
The temperatures range from minus 4 degree in August to 36 degrees in January.
The rainfall ranges from lows of 500mm to an average of 3000mm annually.
Soil Requirements:
Hydrocotyle pedicellosa prefer growing on better quality sandy loams to medium clays. The soils are derived from decomposed brown basalt, black basalt, sandstones, granite, shale and metamorphic rocks and alluviums. The soils pH varies from 4.5pH through to a 7pH. It tolerates waterlogged soils and prefers annual inundations, periods where the water rises in high water tables and surface water lies. Non saline soils to moderately saline soils are tolerated.
Height & Spread:
Wild Plants: 0.05m to 0.08m by 0.5m to several square meters.
Characteristics:
Hydrocotyle pedicellosa is a small creeping succulent herb that roots readily from the nodes where they touch the ground. The green rhizomes often turn reddish when exposed to full sun and are glabrous or very sparsely covered in white puberulent hairs.
The alternate leaves are orbicular, cordate or reniform and measure 30mm to 120mm in diameter. The bases are cordate while the apexes are broad obtuse. The discolourous laminas are mid green to deep grass-green and glabrous on the upper laminas while the lower laminas are paler, glossy and scabrous and sparsely covered in white puberulent hairs. The laminas are flat while the margins are shallowly crenate. The midvein and primary lateral veins are slightly prominent on the lower laminas and are visible from the upper laminas. The mid vein and main lateral veins are covered in white pulverulent hairs on the lower laminas especially near the base. The stipules encircle the petiole and are undulating and scarious. The grass-green petioles are densely covered in white hispid hairs often with a few longer hirsute hairs near the base and measure 40mm to 35mm in length.
The inflorescences are dioecious umbels or small clusters of umbels born from the nodes on the rhizomes. They usually consist of 30 to 50 individual flowers and measure 12mm to 20mm in diameter. The peduncles and pedicels are grass-green and glabrous. The peduncles measure 15m to 60mm in length while the pedicels measure 4mm to 10mm in length. The elliptical petals are cupuliform at the apex and are pastel green at the base and blend through to a beautiful delicate mid purple at the apex. The petals measure 0.5mm to 0.7mm in length by 0.2mm to 0.25mm in width.
The 5 filiform, translucent white filaments are born opposite the petals at the base of the lime-green ovary. The filaments measure 0.5mm to 0.6mm in length while the oblong almost orbicular burgundy-maroon, basifixed anthers measure 0.08mm to 0.09mm in diameter prior to dehiscing where they swell to 0.14mm to 0.16mm in diameter including the pollen. The anthers dehisce transversely from the apex to release the pale yellow pollen. The pollen grains measure about 0.05mm in diameter.
The stout conical stigma is translucent and measures 1mm in length while the pale green, glistening disc on the hypanthium measures 1.8mm to 2mm in length by 0.8mm to 1mm in width. The flowers appear from November to February.
The fruits are convex mericarps with curved lateral ribs. The mericarps surfaces are scabrous between the ribs. The mericarps measure 1mm to 1.2mm in length by 1mm to 1.5mm in width. The pale green capsules turn grey when ripe. The style is persistent on the ripe fruits.
Wildlife:
Hydrocotyle pedicellosa’s wildlife is unknown to the author.
The young leaves when harvested and eaten have a mild parsley taste and can easily be substituted for parsley. It is sweeter and softer on the palate. It is also being investigated as a good anti-cancer vegetable similar to broccoli. The leaves can be added to deserts, vegetable salads, fruit salad or juiced and mixed with fruits for a pleasant drink.
Cultivation:
Hydrocotyle pedicellosa is a beautiful shade or dappled light loving ground covers that have escaped the imagination of Australian gardeners. Imagine a path winding its way through a shaded glade or corner of the yard and on the ground Hydrocotyle pedicellosa blankets the area between shrubs, Cordyline terminalis with their bright pink, red and yellow foliages breaking the horizontal greenery. Next is a seat surrounded by palms and again the ground is a lush green of Hydrocotyle pedicellosa leaves. Feeling peckish one leans over and plucks a few leaves, the sweet taste reminds of days gone by when our forefathers once used the leaves in an Aussie salad.
And you can forget mowing as it maintains a low but lush growth all year round.
It has a place in most rainforest gardens where the soil never dries out.
Propagation:
Seeds: The seeds can be sown directly into a seed raising mix. Cover them with 15mm to 20mm of fine weed free mulch and keep moist. Place the tray in a warm sunny position. When the seedlings are 20mm to 30mm tall, prick them out and plant them into 50mm native tubes using a good organic mix.
Once the seedlings reach 150 to 200mm in height they can be planted out into their permanent position.
Runners: Use 50mm to 70mm long herbaceous runners taken from October to early April or later if you are in a frost free area with at least 2 nodes. Select vigorously growing plants of the form you desire should be used when growing from runners. Remove half the leaves from teach individual plantlet. It is preferable to use plantlets that already have a few established roots for quick growth. Place the plantlets into tubes and place them in a cool semi shaded position preferably under 50mm shade cloth and keep moist.
Fertilize using seaweed, fish emulsion or organic chicken pellets soaked in water on an alternate basis. Fertilize every two months until the plants are established then annually in early September to October to maintain health vitality and better flowering.
Further Comments from Readers:
Hi reader, it seems you use The Bible of Botany a lot. That’s great as we have great pleasure in bringing it to you! It’s a little awkward for us to ask, but our first aim is to purchase land approximately 1,600 hectares to link several parcels of N.P. into one at The Pinnacles NSW Australia, but we need your help. We’re not salespeople. We’re amateur botanists who have dedicated over 30 years to saving the environment in a practical way. We depend on donations to reach our goal. If you donate just $5, the price of your coffee this Sunday, We can help to keep the planet alive in a real way and continue to bring you regular updates and features on Australian plants all in one Botanical Bible. Any support is greatly appreciated. Thank you.
In the spirit of reconciliation we acknowledge the Bundjalung, Gumbaynggirr and Yaegl and all aboriginal nations throughout Australia and their connections to land, sea and community. We pay our respect to their Elders past, present and future for the pleasures we have gained.
Hydrocotyle peduncularis
Classification
Unranked: Eudicots
Superorder: Asterids
Order: Apiales
Family: Araliaceae
Genus: From Hydro, which is Ancient Greek for water and Kotyle, which is Ancient Greek for a cup or plate. It refers to the small hollow in the middle of the leaves.
Species: From Pous, which is Ancient Greek or Pes/Pedi, which is Latin for a foot or feet. It refers to flowers, which have a relatively longer peduncle or pedicel than other flowers in the genus. The primary or main stalk which all the pedicels are derived.
Common Name:
Distribution:
Hydrocotyle peduncularis is found south from Port Douglas in far north Queensland to Wilson’s Promontory in Victoria.
In Tasmania it is found on the eastern half of the state including Flinders Island group.
https://avh.ala.org.au/occurrences/search?taxa=Hydrocotyle+peduncularis#tab_mapView
Habitat Aspect Climate:
Hydrocotyle peduncularis prefers full shade to very light shade. It grows in moist shallow depressions, drainage lines and near seepages in moist Eucalyptus forests, adjacent to Rainforests and wet heaths. The altitude ranges from 40 meters ASL to 1150 meters ASL.
The temperatures range from minus 4 degree in August to 38 degrees in January.
The rainfall ranges from lows of 500mm to an average of 3000mm annually.
Soil Requirements:
Hydrocotyle peduncularis prefers growing on better quality wet sands to moist heavy clays. The soils are derived from decomposed brown basalt, black basalt, sandstones, granite, shale, metamorphic rocks or alluvial deposits. The soils pH varies from 4.5pH through to a 7pH. It tolerates waterlogged soils and prefers annual inundations, periods where the water rises in high water tables and surface water lies. Non saline soils to moderately saline soils are tolerated.
Height & Spread:
Wild Plants: 0.05m to 0.08m by 0.5m to several square meters.
Characteristics:
Hydrocotyle peduncularis is a small creeping semi succulent herb that roots readily from the nodes where they touch the ground. The stems often grow below the mulch. The pastel green almost white, pale green stems often have a pale pink tinge and are glabrous.
The alternate leaves are orbicular, cordate or reniform and measure 50mm to 120mm in diameter. The bases are cordate while the apexes are broad obtuse. The discolourous laminas are mid green to deep grass-green and covered in white hispid hairs on the upper laminas while the lower laminas are paler covered in white hispid hairs. The laminas are flat while the margins are shallowly lobed or at times deeply lobed while the lobes margins are usually entire or at times crenate. The lobe apexes are obtuse to truncate. The main veins and primary secondary veins are prominent on the lower laminas and are visible from the upper laminas. The mid vein and main lateral veins are moderately covered in long, white hispid hairs on the lower laminas especially near the base. The broad oblong-ovate, contorted stipules are scarious with crenate margins and are covered in white hispid hairs often with a few longer hirsute hairs. The grass-green petioles are densely covered in white hispid hairs often with a few longer hirsute hairs near the base and measure 40mm to 35mm in length. The petioles are glabrous except for a small area near the base of the leaves which are moderately covered in long white hispid hairs. The petioles measure 100mm to 300mm in length.
The inflorescences are monoecious umbels or small clusters of 2 or 3 umbels born from the nodes on the rhizomes. They usually consist of 8 to 12 individual flowers that measure 10mm to 13mm in diameter. The peduncles and pedicels are grass-green to blue-green often tinged pink and are covered in white hispid hairs often with a few longer hirsute hairs. The peduncles measure 10m to 50mm in length while the pedicels measure 0mm to 0.5mm in length. The oblong-elliptical translucent petals are pastel green or white at the base and blend through to a beautiful delicate mid pink at the apexes. The petals are cupuliform at the apex and measure 1.5mm to 2mm in length by 1.2mm to 1.8mm in width.
The 5 filiform, translucent white filaments are born opposite the petals at the base of the lime-green ovary. The filaments measure 1.5mm to 2mm in length while the oblong almost orbicular cream or pink, anthers are basifixed. The anthers dehisce transversely from the apex to release the pale yellow pollen.
The stout conical stigma is translucent and measures 1.5mm to 2mm in length while the pale green, glistening disc on the hypanthium measures 1.6mm to 2mm in length by 1.6mm to 2mm in width. The flowers appear from September to February.
Hydrocotyle peduncularis’s fruits are convex mericarps with prominent, curved dorsal ribs. The mericarps surfaces are covered in fine tuberculate lumps between the ribs. The mericarps measure 1.2mm to 1.5mm in length by 1.2mm to 1.6mm in width and 0.4mm to 0.5mm in thickness. The pale green capsules turn grey when ripe. The style is persistent on the ripe fruits.
Confusing Species:
Hydrocotyle acutiloba’s leaves are smaller and covered in white hispid to hirsute hairs extend down the petioles to the stems and the acute lobes.
Hydrocotyle verticillata is either a floating or terrestrial plant. Its orbicular leaves usually measure 20mm to 50mm in diameter and are peltate. The leaves have crenate margins. The flowers are arranged in simple clusters along an unbranched stalk or are arranged in compound umbels with several branches with 2 to 5 individual flowers in each cluster
Wildlife:
Hydrocotyle peduncularis’s wildlife is unknown to the author.
The young leaves when harvested and eaten have a mild parsley taste and can easily be substituted for parsley. It is sweeter and softer on the palate. It is also being investigated as a good anti-cancer vegetable similar to broccoli. The leaves can be added to deserts, salads, fruit salad or juiced and mixed with fruits for a pleasant drink.
Cultivation:
It is a very beautiful shade loving ground covers that have escaped the imagination of Australian gardeners. Imagine a path winding its way through a shaded glade or corner of the yard and on the ground Hydrocotyle pedicellosa blankets the area between shrubs, Cordyline terminalis with their bright pink, red and yellow foliages would break the horizontal greenery. Next is a seat surrounded by palms and again the ground is a lush green of leaves. Feeling peckish then all one has to do is lean over and plucks a few leaves, the sweet taste reminds of days gone by when our forefathers once used the leaves in an Aussie salad.
It has a place in most rainforest gardens where the soil never dries out. And you can put the lawn mower away as it never needs mowing yet stays green and lush all year.
Propagation:
Seeds: Hydrocotyle peduncularis seeds can be sown directly into a seed raising mix. Cover them with 15mm to 20mm of fine weed free mulch and keep moist. Place the tray in a warm sunny position. When the seedlings are 20mm to 30mm tall, prick them out and plant them into 50mm native tubes using a good organic mix.
Once the seedlings reach 150 to 200mm in height they can be planted out into their permanent position.
Runners: Use 50mm to 70mm long herbaceous runners taken from October to early April or later if you are in a frost free area with at least 2 nodes. Select vigorously growing plants of the form you desire should be used when growing from runners. Remove half the leaves from teach individual plantlet. It is preferable to use plantlets that already have a few established roots for quick growth. Place the plantlets into tubes and place them in a cool semi shaded position preferably under 50mm shade cloth and keep moist.
Fertilize using seaweed, fish emulsion or organic chicken pellets soaked in water on an alternate basis. Fertilize every two months until the plants are established then annually in early September to October to maintain health vitality and better flowering.
Further Comments from Readers:
Hi reader, it seems you use The Bible of Botany a lot. That’s great as we have great pleasure in bringing it to you! It’s a little awkward for us to ask, but our first aim is to purchase land approximately 1,600 hectares to link several parcels of N.P. into one at The Pinnacles NSW Australia, but we need your help. We’re not salespeople. We’re amateur botanists who have dedicated over 30 years to saving the environment in a practical way. We depend on donations to reach our goal. If you donate just $5, the price of your coffee this Sunday, We can help to keep the planet alive in a real way and continue to bring you regular updates and features on Australian plants all in one Botanical Bible. Any support is greatly appreciated. Thank you.
In the spirit of reconciliation we acknowledge the Bundjalung, Gumbaynggirr and Yaegl and all aboriginal nations throughout Australia and their connections to land, sea and community. We pay our respect to their Elders past, present and future for the pleasures we have gained.
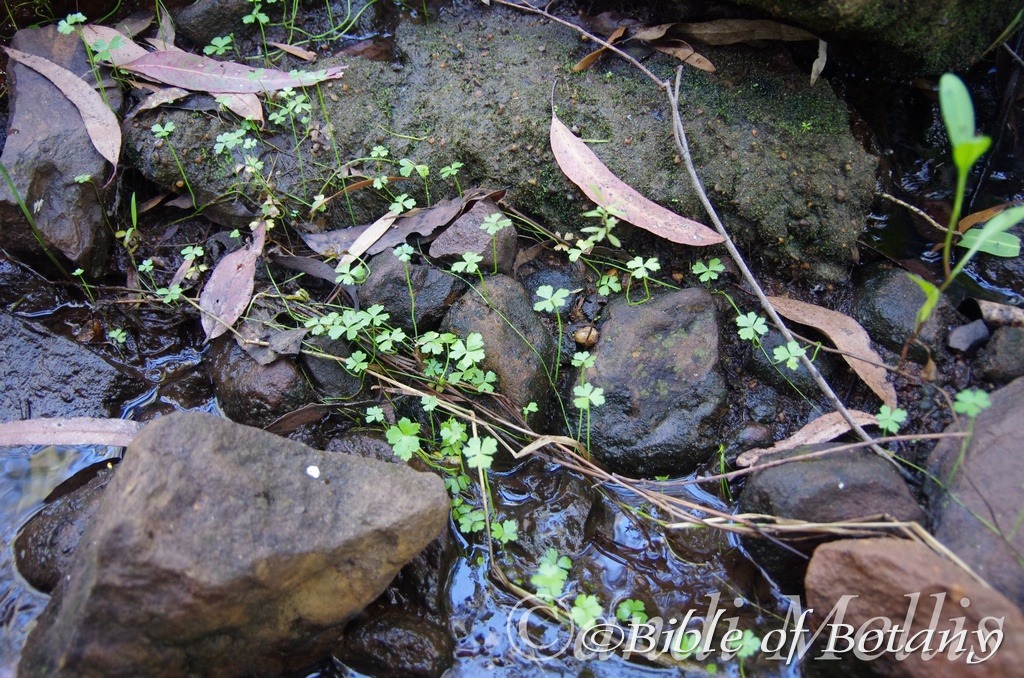
Mill Creek Fortis Creek National Park NSW
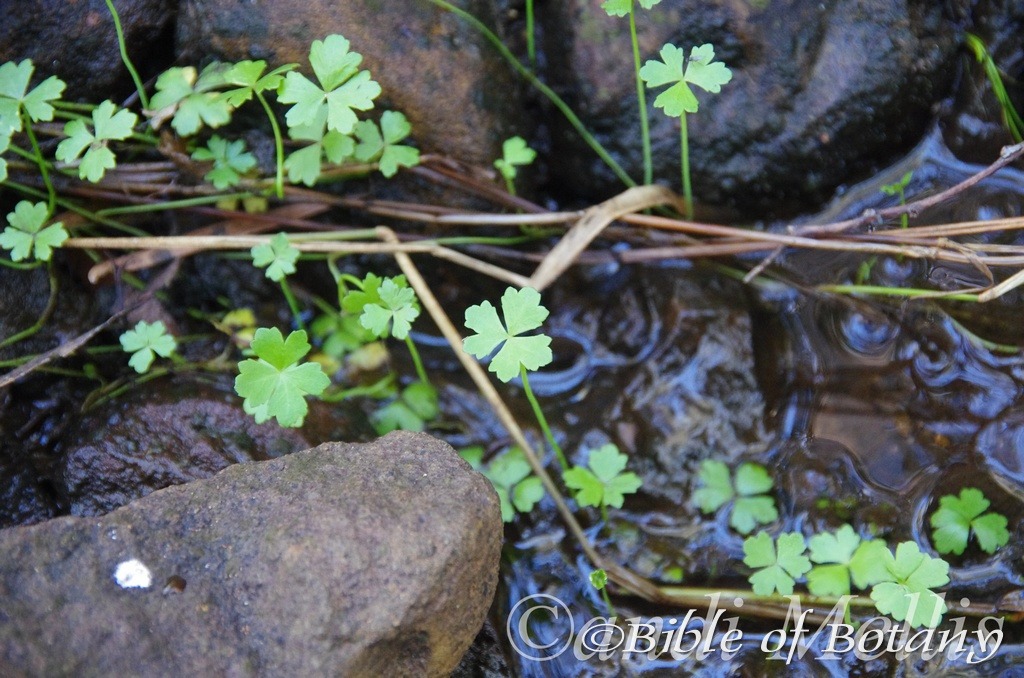
Mill Creek Fortis Creek National Park NSW
Hydrocotyle tripartita
Classification:
Unranked: Eudicots
Superorder: Asterids
Order: Apiales
Family: Araliaceae
Genus: From Hydro, which is Ancient Greek for water and Kotyle, which is Ancient Greek for a cup or plate. It refers to the small hollow in the middle of the leaves.
Species: From Treîs/Tría, which are Ancient Greek or Tri, which is Latin for three and Partitas, which is Latin for partition or to divide. It refers to organs, which divide into three parts not necessarily equal parts.
Common Name: Pennywort.
Distribution:
Hydrocotyle tripartita is found in a line east and south of Yabba Creek Jimna in southern Queensland to Werribee in southern Victoria with a small population near Hawkesdale. In South Australia it is found on Kangaroo Island and east from Naracoort to Wattle Range. It has been found in 4 locations in Tasmania including Vale of Belvoir, Pine Lake, Macquarie River and the Huon valley.
There are several widely disjunct populations in northern Queensland from the Dainties River to the Kombi Tops south west of Gladstone.
https://avh.ala.org.au/occurrences/search?taxa=Hydrocotyle+tripartita#tab_mapView
Habitat Aspect Climate:
Hydrocotyle tripartita prefer full shade to very light shade. It grows in moist shallow depressions, drainage lines, near seepages along creeks and streams in moist eucalyptus forests and adjacent to rainforests. The altitude ranges from 5 meters ASL to 1250 meters ASL.
The temperatures range from minus 4 degree in August to 40 degrees in January.
The rainfall ranges from lows of 400mm to an average of 3000mm annually.
Soil Requirements:
Hydrocotyle tripartita prefer growing on better quality sandy loams to medium clays. The soils are derived from decomposed brown basalt, black basalt, sandstones, granite, shale and metamorphic rocks and alluviums. The soils pH varies from 4.5pH through to a 7pH. It tolerates waterlogged soils and prefers sites that are inundated on annual bases or periods where the water rises in high water tables and surface water lies. Non saline soils to moderately saline soils are tolerated.
Height & Spread:
Wild Plants: 0.05m to 0.1m by 0.5m to several square meters.
Characteristics:
Hydrocotyle tripartita is a small procumbent herb that roots readily from the nodes where they touch the ground. The green rhizomes often turn reddish when exposed to full sun and are glabrous to moderately covered in white puberulent hairs.
The alternate or clustered leaves are orbicular and measure 4mm to 20mm in diameter. The 3 to 5 contorted lobes are deeply divided often to the petiole and often shallowly divided again at the apexes. The bases are peltate and almost divided to the petiole while the lobe apexes are acute. The concolourous laminas are mid grass-green, semi glossy and glabrous to sparsely covered in white to fawn strigose hairs. The laminas are flat while the margins are toothed. The midvein and primary lateral veins are slightly prominent on the lower laminas and are visible from the upper laminas. The mid vein and main lateral veins are sparsely covered in white to fawn erect to semi erect strigose hairs on the lower lamina veins especially on the basal two thirds. The ovate to rhomboidal stipules are membranous. The grass-green petioles are mainly glabrous and are covered in long, white to fawn reflexed hirsute hairs below the base of the lamina and may become very dense just below the base and on the base of the lamina. The petioles measure 40mm to 50mm in length.
The inflorescences are dioecious umbels born from the nodes on the rhizomes. They usually consist of 6 to 10 individual flowers and measure 12mm to 20mm in diameter. The peduncles are grass-green and glabrous. The peduncles measure 5m to 12mm in length. The elliptical petals are cupuliform at the apex and are pastel greenish-yellow to pastel purple-green with purplish spots.
The 5 filiform, translucent white filaments are born opposite the petals at the base of the lime-green ovary. The petals measure 0.35mm to 0.4mm in length by 0.2mm to 0.25mm in width.
The stout conical stigma is translucent and measures 1mm in length while the pale green, glistening disc on the hypanthium measures 1.8mm to 2mm in length by 0.8mm to 1mm in width. The petals measure 0.45mm to 0.5mm in length by 0.2mm to 0.25mm in width. The flowers appear from November to March.
The fruits are compressed laterally mericarps with strongly acute dorsal and intermediate ribs. The mericarps surfaces are glabrous between the ribs and on the ribs. The mericarps measure 1mm to 1.2mm in length by 1mm to 1.5mm in width. The pale green capsules turn grey when ripe. The style is persistent on the ripe fruits. The black, orbicular seeds measure 0.5mm in diameter.
Wildlife:
Hydrocotyle tripartita’s wildlife is unknown to the author.
The young leaves when harvested and eaten have a mild parsley taste and can easily be substituted for parsley. It is sweeter and softer on the palate. It is also being investigated as a good anti-cancer vegetable similar to broccoli. The leaves can be added to deserts, salads, fruit salad or juiced and mixed with fruits for a pleasant drink.
Cultivation:
Hydrocotyle tripartita is a beautiful shade loving ground covers in very wet areas or bog gardens that have escaped the imagination of Australian gardeners. Imagine a path winding its way through a shaded wet glade or corner of the yard that is continually wet or along a stream or creek and on the ground it blankets the area between shrubs, Cordyline terminalis or Cordyline petiolaris with their bright pink, red and yellow foliages breaking the horizontal greenery of Hydrocotyle tripartita. Next is a seat surrounded by palms and again the ground is a lush green of Hydrocotyle tripartita leaves. Feeling peckish one leans over and plucks a few leaves, the sweet taste reminds of days gone by when our forefathers once used the leaves in an Aussie salad.
It has a place in most rainforest gardens where the soil never dries out. And you can put the lawn mower away as it never needs mowing yet stays green and lush all year.
Hydrocotyle tripartita has been very successfully grown and used in aquariums as a low growing, mat forming prostrate plant on the bottom of tanks. It has a low to medium light requirement at 0.5 watts per litter of water. Optimum growth is maintained with 6mg to 14mg of CO2 per litre of water. It is fish friendly and takes up large amounts of nutrient. It can be harvested and fed to many species of fish as a green food or discarded so the new growth can continually remove the ammonium from the water.
Propagation:
Seeds: The seeds can be sown directly into a moisture retentive seed raising mix. Cover them with 15mm to 20mm of fine weed free mulch and keep moist to wet. Place the tray in a warm sunny position.
When the seedlings are 20mm to 30mm tall, prick them out and plant them into 50mm native tubes using a good organic mix.
Once the seedlings reach 150mm to 200mm in height they can be planted out into their permanent position.
Runners: Use 50mm to 70mm long herbaceous runners taken from October to early April or later if you are in a frost free area with at least 2 nodes. Select vigorously growing plants of the form you desire should be used when growing from runners. Remove half the leaves from teach individual plantlet. It is preferable to use plantlets that already have a few established roots for quick growth. Place the plantlets into tubes and place them in a cool semi shaded position preferably under 50mm shade cloth and keep moist.
Fertilize using seaweed, fish emulsion or organic chicken pellets soaked in water on an alternate basis. Fertilize every two months until the plants are established then annually in early September to October to maintain health vitality and better flowering.
Further Comments from Readers:
Hi reader, it seems you use The Bible of Botany a lot. That’s great as we have great pleasure in bringing it to you! It’s a little awkward for us to ask, but our first aim is to purchase land approximately 1,600 hectares to link several parcels of N.P. into one at The Pinnacles NSW Australia, but we need your help. We’re not salespeople. We’re amateur botanists who have dedicated over 30 years to saving the environment in a practical way. We depend on donations to reach our goal. If you donate just $5, the price of your coffee this Sunday, We can help to keep the planet alive in a real way and continue to bring you regular updates and features on Australian plants all in one Botanical Bible. Any support is greatly appreciated. Thank you.
In the spirit of reconciliation we acknowledge the Bundjalung, Gumbaynggirr and Yaegl and all aboriginal nations throughout Australia and their connections to land, sea and community. We pay our respect to their Elders past, present and future for the pleasures we have gained.
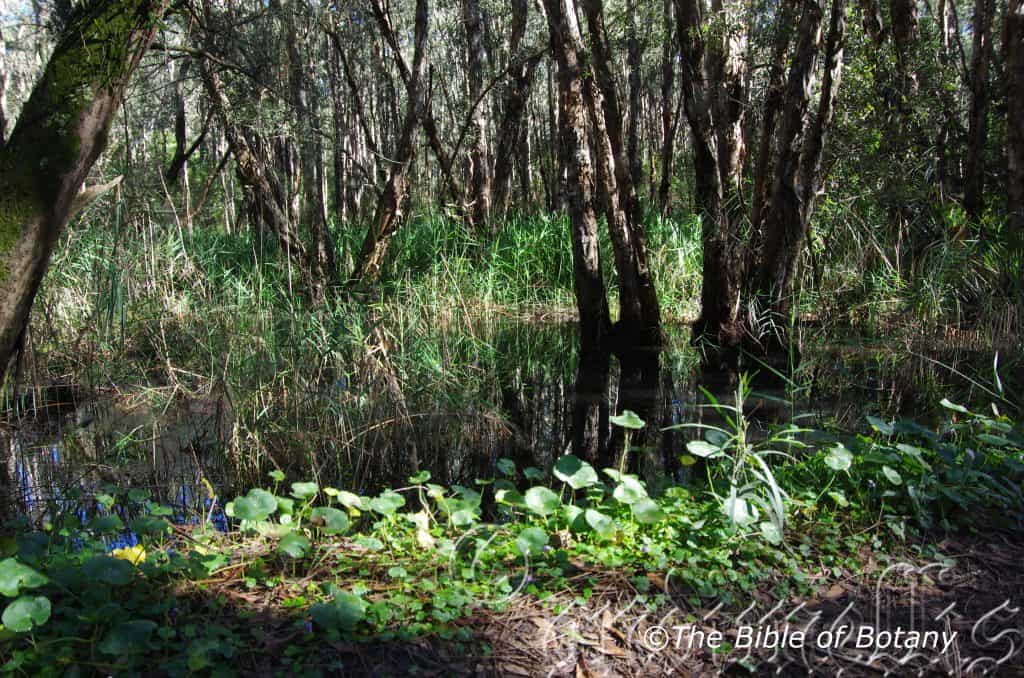
Goolawar National Park NSW
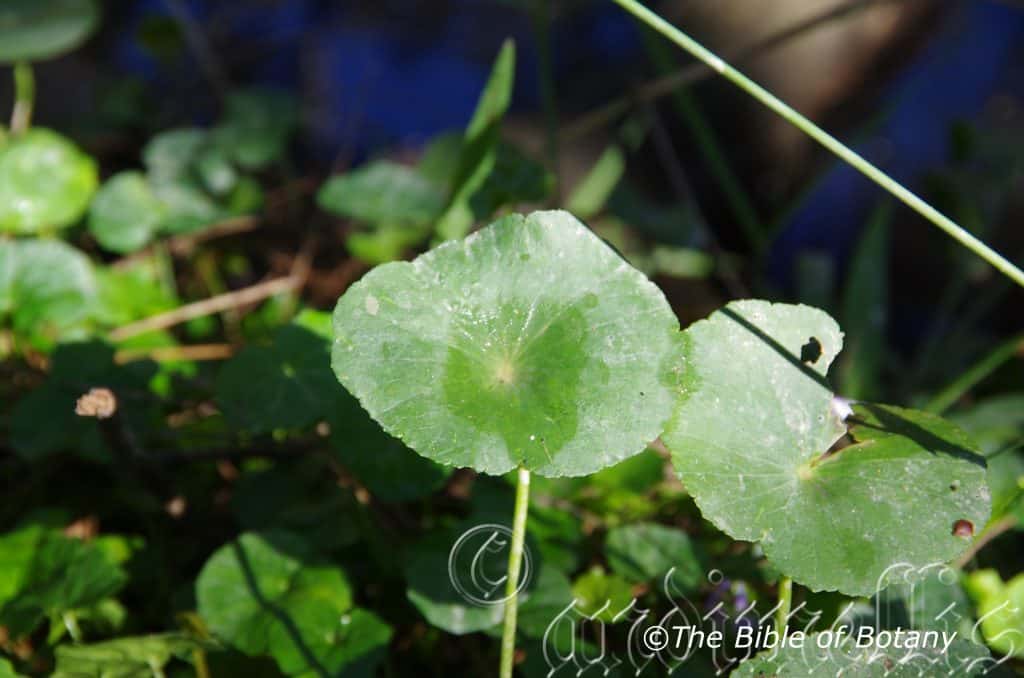
Goolawar National Park NSW
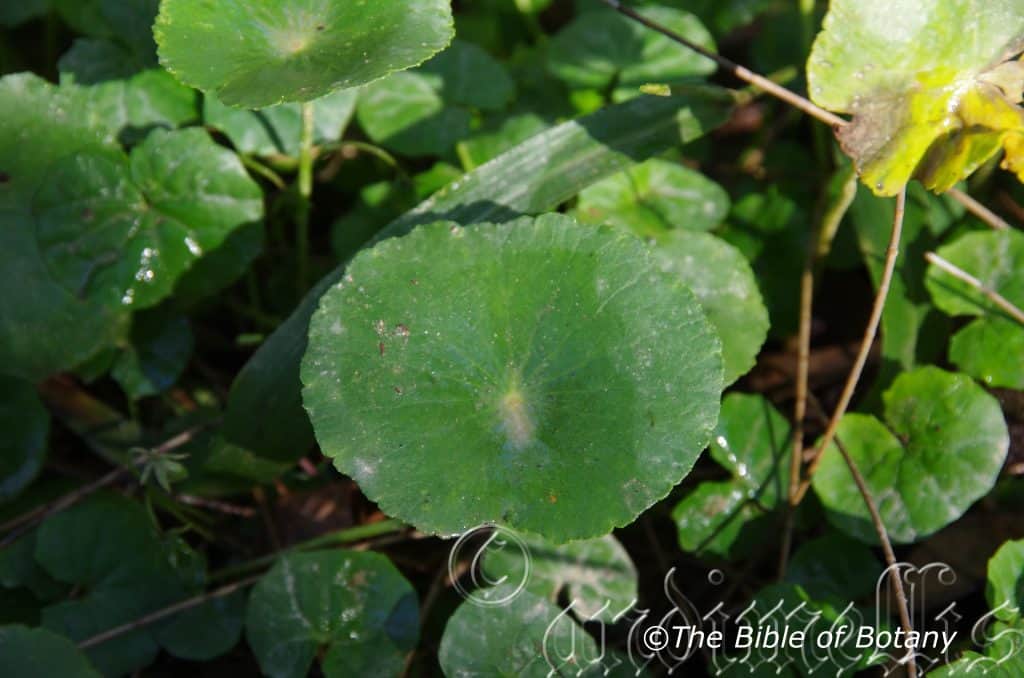
Goolawar National Park NSW
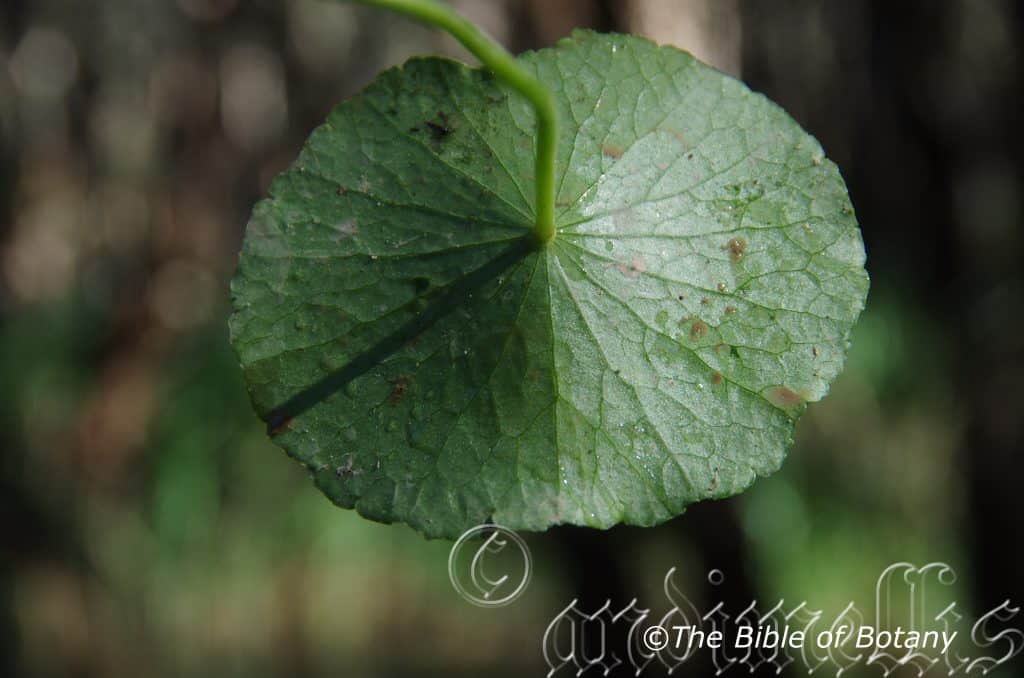
Goolawar National Park NSW
Hydrocotyle verticillata
Classification:
Unranked: Eudicots
Superorder: Asterids
Order: Apiales
Family: Araliaceae
Genus: From Hydro, which is Ancient Greek for water and Kotyle, which is Ancient Greek for a cup or plate. It refers to the small hollow in the middle of the leaves.
Species: From Verticillus which is Latin for a whorl and Cilliatus which is Latin for short marginal hairs. It refers to hairy margined leaves, which form stars at the nodes.
Common Name: Shield Pennywort.
Distribution:
Hydrocotyle verticillata is found on the Swan River and near Lowden in Western Australia. In South Australia it is found near Oodnadatta, Wilpina, from Tanunda to Lake Alexandra Callawonga Creek near Victor Harbour and from Narracoorte Plain south to Mount Gambier. On the east coast it is found in several disjunct populations south Hughendon Springs to Wilson’s Promontory and from Warnambool to Lake Parrumbeti in southern Victoria.
https://avh.ala.org.au/occurrences/search?taxa=Hydrocotyle+verticillata#tab_mapView
Habitat Aspect Climate:
Hydrocotyle verticillata prefer full shade to very light shade. It grows in freshwater swamps, drainage lines, around dams, lagoons and along creeks, streams and rivers, sometimes partially submerged and floodplains. The altitude ranges from 15 meters ASL to 740 meters ASL.
The temperatures range from minus 4 degree in August to 36 degrees in January.
The rainfall ranges from lows of 350mm to an average of 3000mm annually.
Soil Requirements:
Hydrocotyle verticillata prefer growing on better quality sandy loams to medium clays. The soils are usually derived from decomposed sandstones, granite, shale and metamorphic rocks, alluviums and accumulated sands. The soils pH varies from 4.5pH through to a 7pH. It tolerates waterlogged soils and prefers sites where it grows in water for several months of the year. Non saline soils to moderately saline soils are tolerated.
Height & Spread:
Wild Plants: 0.05m to 0.08m by 0.5m to several square meters.
Characteristics:
Hydrocotyle verticillata is a small perennial prostrate herb that roots readily from the nodes where they touch the ground. The green rhizomes are glabrous.
The sub alternate or clustered in groups of 3 to 4 leaves are orbicular, broadly reniform and measure 20mm to 40mm in diameter. The bases are peltate while the apexes are broad truncated with shallowly divided lobes. The discolourous laminas are mid grass-green and glabrous on the upper laminas while the lower laminas are paler to glaucous-green. The laminas are flat while the margins are shallowly crenate. The midvein and primary lateral veins are slightly prominent on the lower laminas and are deep grass-green and visible from the upper laminas. The pale grass-green petioles are often deep pinkish-green beneath the laminas and are glabrous. The petioles measure 15mm to 25mm in length.
The inflorescences are dioecious simple umbels, compound umbels or simple umbels that are interrupted with 3 to 7 individual flowers in whirls on the peduncle. It is born from the nodes on the rhizomes. They usually consist of 3 to 15 individual flowers and measure 8mm to 10mm in diameter. The peduncles and pedicels are grass-green and glabrous. The peduncles measure 60m to 120mm in length while the pedicels measure 0mm to 0.5mm in length. The elliptical petals are slightly cupuliform and bend sharply upwards at the apex. The pastel green to white or pastel creamy-yellow petals measure 3mm to 4mm in length by 2mm to 2.5mm in width.
The 5 filiform, translucent white, filiform filaments are born opposite the petals at the base of the pastel to pale lime-green ovary. The filaments measure 2.5mm to 3.5mm in length while the oblong almost orbicular creamy-yellow, basifixed anthers measure 0.08mm to 1mm in diameter prior to dehiscing. The anthers dehisce transversely from the apex to release the pale yellow pollen.
The stout, conical stigma is translucent, creamy-green and measures 1mm in length while the pale green, glistening disc on the hypanthium measures 1.8mm to 2mm in length by 0.8mm to 1mm in width. The flowers appear from November to April.
The fruits are broad ellipsoidal, strongly compressed laterally mericarps with curved lateral ribs. The mericarps surfaces are glabrous on and between the dorsal and intermediate filiform ribs. The mericarps measure 2mm to 2.2mm in length by 2.5mm to 3mm in width and 1.6mm to 1.8mm in thickness. The pale lime-green capsules turn grey when ripe. The style is persistent on the ripe fruits.
Confusing Species:
Hydrocotyle verticillata is either a floating or terrestrial plant. Its orbicular leaves usually measure 20mm to 50mm in diameter and are peltate. The leaves have crenate margins. The flowers are arranged in simple clusters along an unbranched stalk or are arranged in compound umbels with several branches with 2 to 5 individual flowers in each cluster.
Hydrocotyle acutiloba’s leaves are smaller and covered in white hispid to hirsute hairs extend down the petioles to the stems and the acute lobes.
Hydrocotyle peduncularis is a terrestrial plant growing on dry land or in swampy areas. Its smaller leaves measure 5mm to 12mm in diameter. The leaves are orbicular or reniform while the margins are entire or are crenate. The flowers are arranged in small dense umbels containing several small sessile or shortly pedicillate.
Wildlife:
Hydrocotyle verticillata’s wildlife is unknown to the author.
The young leaves when harvested and eaten have a mild parsley taste and can easily be substituted for parsley. It is sweeter and softer on the palate. It is also being investigated as a good anti-cancer vegetable similar to broccoli. The leaves can be added to deserts, salads, fruit salad or juiced and mixed with fruits for a pleasant drink.
Cultivation:
Hydrocotyle verticillata are very beautiful shade loving ground covers that have escaped the imagination of Australian gardeners. Imagine a path winding its way through a shaded glade or corner of the yard and on the ground it blankets the area between shrubs, Cordyline terminalis or Cordyline petiolaris with their bright pink, red and yellow foliages breaking the horizontal greenery of Hydrocotyle verticillata. Next is a seat surrounded by palms and again the ground is a lush green leaves. Feeling peckish one leans over and plucks a few leaves, the sweet taste reminds of days gone by when our forefathers once used the leaves in an Aussie salad.
It has a place in most rainforest gardens where the soil never dries out. And you can put the lawn mower away as it never needs mowing yet stays green and lush all year.
Hydrocotyle verticillata has been very successfully grown and used in aquariums as a low growing, mat forming prostrate plant on the bottom of tanks. It has a low to medium light requirement at 0.5 watts per litre of water. Optimum growth is maintained with 8mg to 16mg of CO2 per litre of water. It is fish friendly and takes up large amounts of nutrient. It can be harvested and fed to many species of fish as a green food or discarded so the new growth can continually remove the ammonium from the water.
Propagation:
Seeds: Hydrocotyle verticillata seeds can be sown directly into a seed raising mix. Cover them with 15mm to 20mm of fine weed free mulch and keep moist. Place the tray in a warm sunny position. When the seedlings are 20mm to 30mm tall, prick them out and plant them into 50mm native tubes using a good organic mix.
Once the seedlings reach 150mm to 200mm in height they can be planted out into their permanent position.
Runners: Use 50mm to 70mm long herbaceous runners taken from October to early April or later if you are in a frost free area with at least 2 nodes. Select vigorously growing plants of the form you desire should be used when growing from runners. Remove half the leaves from teach individual plantlet. It is preferable to use plantlets that already have a few established roots for quick growth. Place the plantlets into tubes and place them in a cool semi shaded position preferably under 50mm shade cloth and keep moist.
Fertilize using seaweed, fish emulsion or organic chicken pellets soaked in water on an alternate basis. Fertilize every two months until the plants are established then annually in early September to October to maintain health vitality and better flowering.
Further Comments from Readers:
Hi reader, it seems you use The Bible of Botany a lot. That’s great as we have great pleasure in bringing it to you! It’s a little awkward for us to ask, but our first aim is to purchase land approximately 1,600 hectares to link several parcels of N.P. into one at The Pinnacles NSW Australia, but we need your help. We’re not salespeople. We’re amateur botanists who have dedicated over 30 years to saving the environment in a practical way. We depend on donations to reach our goal. If you donate just $5, the price of your coffee this Sunday, We can help to keep the planet alive in a real way and continue to bring you regular updates and features on Australian plants all in one Botanical Bible. Any support is greatly appreciated. Thank you.
In the spirit of reconciliation we acknowledge the Bundjalung, Gumbaynggirr and Yaegl and all aboriginal nations throughout Australia and their connections to land, sea and community. We pay our respect to their Elders past, present and future for the pleasures we have gained.
Hymenophyllum australe
Classification:
Phylum: Pteridopphyta
Class: Polypodiopsida
Order: Hymenophyllales
Family: Hymenophyllaceae
Genus: From Hymen/Humen, which is Ancient Greek for a membrane and Phullon/Phýllon, which is Ancient Greek for a leaf. It refers to the fronds, which have thin membranous covering.
Specie: From Terra Australis, which is Latin for land of the south. It refers to plants, which were first discovered from the land down under.
Common Name:
Distribution:
Hymenophyllum australe is found in several widely disjunct populations south from Mareeba to Eachum in far north coastal Queensland and from Lamington National Park in southern coastal Queensland to the Otway ranges in coastal southern Victoria. It mainly grows on and east of the Great Dividing Range.
It is also found on Flinders Island and most of mainland Tasmania except for the central east to the coast.
https://avh.ala.org.au/occurrences/search?taxa=Hymenophyllum+australe#tab_mapView
Habitat Aspect Climate:
Hymenophyllum australe prefers full shade, partial shade, dappled light and even a little full sun. It grows as an epiphytic or lithophyte on rocks in rainforest or in moist open forest, often along creeks, streams and rivers in wet Eucalyptus forests, in moist subtropical forests and moist temperate forests. The altitude ranges from 50 meters ASL to 950 meters ASL.
Temperatures range from minus 4 degrees in July to 34 degrees in January.
Rainfalls range from lows of 750mm to an average of 3000mm annually. The areas receive additional moisture from orographic precipitation.
Soil Requirements:
Hymenophyllum australe grows on better quality rocks. The soils are usually derived from partially decomposed granite, shale metamorphic rocks, brown basalt and black basalt. The soils and mulches pH varies from 5pH through to a 6pH. It does not tolerate waterlogged soils however often grows where the soils are permanently moist or are covered in sprays from waterfalls. Non saline soils to moderately saline soils are tolerated.
Height & Spread:
Wild plants grow from 0.1m to 0.2m by 0.2m x 1m.
Characteristics:
The slender rhizomes are sparsely covered in large broad reddish-brown hairs.
The pinnate to tripinnate fronds are pendant and measure 40mm to 200mm length by 10mm to 50mm in width overall. The laminas measure 30mm to 45mm in length by 10mm to 50mm in width. The reddish-brown stipe is glabrous and measures 60mm to 100mm in length. The rachis and pinnae’s wings are flat or slightly crisped. The wings measure 1mm to 3mm in width while the margins are entire. The bases are attenuate while the apexes are obtuse. The concolourous laminas are grass-green to glaucous-green, glabrous and semi glossy. The mid vein is slightly prominent on the lower lamina and is clearly visible from the upper lamina. The petioles measure 4mm to 6mm in length.
Fertile fronds are similar to the fertile fronds. The numerous marginal involucre are obovate with raised receptacles that have obtuse, emarginate or retuse apexes. The receptacle is club-shaped and inserted while the spore is tan.
Wildlife:
Hymenophyllum australe’s wildlife is unknown to the author.
Cultivation:
Hymenophyllum australe is a very difficult fern to procure and to succeed with in cultivation. Propagated plants may prove to be more successful. Shade would be of paramount importance for any type of success which would include the correct microclimate.
This fern would look particularly at home in rainforests boulder or on the trunks or rainforest trees with small orchids rowing out in between.
Propagation:
Spores: All ferns that are declared rare, vulnerable or endangered are protected by Federal and State Laws and must not be removed from the wild unless you are a land developer, mining company or main Roads department etc. This includes bulbs, roots, leaves and flowers. No part of any plant can be removed from Federal, State or Local Government land without the prior permission of the authority and this includes the spore.
This is a very difficult fern to attempt to propagate in cultivation. Procuring spore and setting the spore is easy and the spore germinates readily. The problems arise on transplanting the prothallus and young ferns are sensitive to disturbance. There is also the problem of the very specific microclimate required to keep the ferns thriving.
Most people are put off at the thought of growing ferns from spore. Like all plants that produce their offspring from seed or spore the methods are basically the same. Remember nature has been doing this for millions of years and has been very successful. I have had excellent results growing over 200 different species of Australian ferns so don’t be afraid. Give it a go.
Step 1. Select spore from the fern fronds. Wait until the fern is just starting to release its spore. Rinse the fronds under clean running water and dry. This is to wash off any other spores from rogue ferns that may have settled onto the fronds. (There is nothing worse than having common brake or common soft bracken contaminating a prized tree fern or epiphyte.)
Step 2. Place the dry fronds in a clean brown paper bag and keep them in a cool dark place like the linen closet for about a week to ten days before you are ready to sow the spore. The exception to this rule applies to ferns, which produce green spores. These must be sown immediately that they are released. Todea Barbara is a good example of a fern, which produces green spore.
Step 3. Take a large ice cream container, a small ice cream container and a clean clear plastic bag large enough to seal the large ice cream container and three or four milk bottle tops.
Step 4. Punch or drill 6 to 10 5mm holes in the bottom of the small ice cream container.
Step 5. Wash both containers, tops and plastic bag so that they are very clean and sterile.
Step 6. Use a clean fine seed raising mi. We used 30mm fine sand, 30mm peat and 30mm perlite and 10mm vermiculite. We used crushed basalt, crusher dust and peat in a 50:50 ratio for epiphytes. Moisten the mix enough that water does not run out when the mix is squeezed between the fingers.
Step 7. Place the moisten mix (Enough to half fill the small ice cream container) in the microwave oven with a large glass of water for 7 or 8 minutes, until the water is boiling. Allow them to cool in the oven. You will need the water later so do not tip it out.
Step 8. Take the brown paper bag out of the linen closet. Shake the bag and remove the fronds. You should have a yellow, brown, black or rarely greenish brown or ochre powder or very fine, small round pin head size spore depending on the specie involved.
Step 9. Remove the mixture from the oven once it has cooled and place it in the small ice cream container and level.
Step 10. Sprinkle the spore sparsely over the mixture in the small ice cream container.
Step 11. Place the milk bottle tops in the large ice cream container with the flat surface facing down. Place the small ice cream container in the large ice cream container so that it is sitting on the milk bottle tops.
Step 12. Remove the water from the microwave and pour it into the larger ice cream container so there is 25mm to 30mm of water in the bottom.
Step 13. Place the ice cream containers in the plastic bag and seal.
Step 14. Place the contents and bag in a warm shady place preferably 50mm to 70mm shade depending on the specie. Shade houses and some window sills are ideal.
Step 15. The surface should turn green within a week to two weeks. The prothallus will then develop. From the prthalus the first true fronds will appear. Wait until the ferns are 20mm to 35mm in height before you attempt to transplant them. Once they are ready open the bag up slightly and allow the air to flow around the little ferns. Every 3 to 5 days open the bag a little further so the ferns get use to their new environment. Allow them a week to two weeks to harden off before you transplant them following the removal of the plastic bag. Carefully prick them out into 50mm standard squat tubes as you would any seedling.
Do not try to transplant them as single plants as they are still too delicate still.
Once the smaller ones again reach 50mm to 70mm you may wish to divide the stronger and hardier individual plants into smaller clumps in 100mm squat pots.
Fertilize using seaweed, fish emulsion or organic chicken pellets soaked in water on an alternate basis. Fertilize every two months until the plants are established then annually in early September to October to maintain health vitality and better flowering.
Further Comments from Readers:
Hi reader, it seems you use The Bible of Botany a lot. That’s great as we have great pleasure in bringing it to you! It’s a little awkward for us to ask, but our first aim is to purchase land approximately 1,600 hectares to link several parcels of N.P. into one at The Pinnacles NSW Australia, but we need your help. We’re not salespeople. We’re amateur botanists who have dedicated over 30 years to saving the environment in a practical way. We depend on donations to reach our goal. If you donate just $5, the price of your coffee this Sunday, We can help to keep the planet alive in a real way and continue to bring you regular updates and features on Australian plants all in one Botanical Bible. Any support is greatly appreciated. Thank you.
In the spirit of reconciliation we acknowledge the Bundjalung, Gumbaynggirr and Yaegl and all aboriginal nations throughout Australia and their connections to land, sea and community. We pay our respect to their Elders past, present and future for the pleasures we have gained.
Hymenophyllum bivalve
Classification:
Phylum: Pteridopphyta
Class: Polypodiopsida
Order: Hymenophyllales
Family: Hymenophyllaceae
Genus: From Hymen/Humen, which is Ancient Greek for a membrane and Phullon/Phýllon, which is Ancient Greek for a leaf. It refers to the fronds, which have thin membranous covering.
Species: From Bi/Bis, which is Greek/Latin for two and Valvae, which is Latin for a door leaf. It usually refers to fruits or at times sporangium, which divide into two separate chambers when ripe.
Common Name:
Distribution:
Hymenophyllum bivalve is restricted to a few high altitude regions from Mount Merino on Queensland, the New South Wales Border Ranges National Parks, Five Mile Creek headwaters west of Kempsey, Gloucester to the Patterson River headwaters and Mittagong to Shoalhaven Heads.
https://avh.ala.org.au/occurrences/search?taxa=Hymenophyllum+bivalve#tab_mapView
Habitat Aspect Climate:
Hymenophyllum bivalve prefers full shade, partial shade and dappled light. It grows as an epiphytic or lithophyte on rocks in rainforest or in moist open forest, often along creeks, streams and rivers in subtropical forests and temperate forests. The altitude ranges from 270 meters ASL to 1140 meters ASL.
Temperatures range from minus 3 degrees in July to 32 degrees in January.
Rainfalls range from lows of 600mm to an average of 3200mm annually. The ferns receive additional moisture throughout the year from orographic precipitation.
Soil Requirements:
Hymenophyllum bivalve prefers better quality rocks. The soils are usually derived from partially decomposed granite, shale metamorphic rocks, brown basalt and black basalt. The soils and mulches pH varies from 5pH through to a 6pH. It does not tolerate waterlogged soils but prefers that remain moist throughout the year. Non saline soils to moderately saline soils are tolerated.
Height & Spread:
Wild plants grow from 0.2m to 0.4m by 1m x 2m across.
Characteristics:
Its long creeping rhizomes are wiry and sparsely covered in deep brown appressed hairs.
The pinnate to bipinnate fronds are pendant with pinnatifid ultimate segments. The fronds measure 100mm to 300mm in length by 50mm to 70mm in width overall. The laminas measure 50mm to 200mm in length by 25mm to 70mm in width. The deep reddish-brown stipe is glabrous and measures 60mm to 110mm in length. The pinnae’s wings are flat and narrow. The wings measure 1mm to 2mm in width while the margins are finely toothed. The bases are attenuate while the apexes are obtuse. The concolourous laminas are grass-green, glabrous and semi glossy to glossy. The mid vein is slightly prominent on the lower lamina and is clearly visible from the upper lamina.
Fertile fronds are similar to the fertile fronds. The marginal involucre are green with club-shaped receptacles that are inserted at the base and slightly exserted at the apex. The clavate recepticles have deep brown spore.
Wildlife:
Hymenophyllum bivalve’s wildlife is unknown to the author.
Cultivation:
Hymenophyllum bivalve is a very difficult fern to procure and to succeed with in cultivation. Propagated plants may prove to be more successful. Shade would be of paramount importance for any type of success which would include the correct microclimate.
This fern would look particularly at home in rainforests on boulders or on the trunks or rainforest trees with small orchids rowing out in between.
Propagation:
Spores: All ferns that are declared rare, vulnerable or endangered are protected by Federal and State Laws and must not be removed from the wild unless you are a land developer, mining company or main Roads department etc. This includes bulbs, roots, leaves and flowers. No part of any plant can be removed from Federal, State or Local Government land without the prior permission of the authority and this includes the spore.
This is a very difficult fern to attempt to propagate in cultivation. Procuring spore and setting the spore is easy and the spore germinates readily. The problems arise on transplanting the prothallus and young ferns are sensitive to disturbance. There is also the problem of the very specific microclimate required to keep the ferns thriving.
Most people are put off at the thought of growing ferns from spore. Like all plants that produce their offspring from seed or spore the methods are basically the same. Remember nature has been doing this for millions of years and has been very successful. I have had excellent results growing over 200 different species of Australian ferns so don’t be afraid. Give it a go.
Step 1. Select spore from the fern fronds. Wait until the fern is just starting to release its spore. Rinse the fronds under clean running water and dry. This is to wash off any other spores from rogue ferns that may have settled onto the fronds. (There is nothing worse than having common brake or common soft bracken contaminating a prized tree fern or epiphyte.)
Step 2. Place the dry fronds in a clean brown paper bag and keep them in a cool dark place like the linen closet for about a week to ten days before you are ready to sow the spore. The exception to this rule applies to ferns, which produce green spores. These must be sown immediately that they are released. Todea Barbara is a good example of a fern, which produces green spore.
Step 3. Take a large ice cream container, a small ice cream container and a clean clear plastic bag large enough to seal the large ice cream container and three or four milk bottle tops.
Step 4. Punch or drill 6 to 10 5mm holes in the bottom of the small ice cream container.
Step 5. Wash both containers, tops and plastic bag so that they are very clean and sterile.
Step 6. Use a clean fine seed raising mi. We used 30mm fine sand, 30mm peat and 30mm perlite and 10mm vermiculite. We used crushed basalt, crusher dust and peat in a 50:50 ratio for epiphytes. Moisten the mix enough that water does not run out when the mix is squeezed between the fingers.
Step 7. Place the moisten mix (Enough to half fill the small ice cream container) in the microwave oven with a large glass of water for 7 or 8 minutes, until the water is boiling. Allow them to cool in the oven. You will need the water later so do not tip it out.
Step 8. Take the brown paper bag out of the linen closet. Shake the bag and remove the fronds. You should have a yellow, brown, black or rarely greenish brown or ochre powder or very fine, small round pin head size spore depending on the specie involved.
Step 9. Remove the mixture from the oven once it has cooled and place it in the small ice cream container and level.
Step 10. Sprinkle the spore sparsely over the mixture in the small ice cream container.
Step 11. Place the milk bottle tops in the large ice cream container with the flat surface facing down. Place the small ice cream container in the large ice cream container so that it is sitting on the milk bottle tops.
Step 12. Remove the water from the microwave and pour it into the larger ice cream container so there is 25mm to 30mm of water in the bottom.
Step 13. Place the ice cream containers in the plastic bag and seal.
Step 14. Place the contents and bag in a warm shady place preferably 50mm to 70mm shade depending on the specie. Shade houses and some window sills are ideal.
Step 15. The surface should turn green within a week to two weeks. The prothallus will then develop. From the prthalus the first true fronds will appear. Wait until the ferns are 20mm to 35mm in height before you attempt to transplant them. Once they are ready open the bag up slightly and allow the air to flow around the little ferns. Every 3 to 5 days open the bag a little further so the ferns get use to their new environment. Allow them a week to two weeks to harden off before you transplant them following the removal of the plastic bag. Carefully prick them out into 50mm standard squat tubes as you would any seedling.
Do not try to transplant them as single plants as they are still too delicate still.
Once the smaller ones again reach 50mm to 70mm you may wish to divide the stronger and hardier individual plants into smaller clumps in 100mm squat pots.
Fertilize using seaweed, fish emulsion or organic chicken pellets soaked in water on an alternate basis. Fertilize every two months until the plants are established then annually in early September to October to maintain health vitality and better flowering.
Further Comments from Readers:
Hi reader, it seems you use The Bible of Botany a lot. That’s great as we have great pleasure in bringing it to you! It’s a little awkward for us to ask, but our first aim is to purchase land approximately 1,600 hectares to link several parcels of N.P. into one at The Pinnacles NSW Australia, but we need your help. We’re not salespeople. We’re amateur botanists who have dedicated over 30 years to saving the environment in a practical way. We depend on donations to reach our goal. If you donate just $5, the price of your coffee this Sunday, We can help to keep the planet alive in a real way and continue to bring you regular updates and features on Australian plants all in one Botanical Bible. Any support is greatly appreciated. Thank you.
In the spirit of reconciliation we acknowledge the Bundjalung, Gumbaynggirr and Yaegl and all aboriginal nations throughout Australia and their connections to land, sea and community. We pay our respect to their Elders past, present and future for the pleasures we have gained.
Hymenophyllum cupressiforme
Classification:
Phylum: Pteridopphyta
Class: Polypodiopsida
Order: Hymenophyllales
Family: Hymenophyllaceae
Genus: From Hymen/Humen, which is Ancient Greek for a membrane and Phullon/Phýllon, which is Ancient Greek for a leaf. It refers to the fronds, which have thin membranous covering.
Species: From Cupressus, which is Latin for Cypress trees and Forme which is Latin for to take the form of. It refers to ferns, which resemble miniature Cypress pines.
Common Name: Common Filmy Fern.
Distribution:
Hymenophyllum cupressiforme is found south of Mount Tamborine in far south eastern Queensland to the southern tip of Tasmania including Flinders Island. There is a disjunct population further north in Queensland on the Kroombit Tops and Eungella National Park.
In Victoria it is found as far west as Dimboola in the Murray depression and to the Glenelg River.
It is also found on Lord Howe Island.
https://avh.ala.org.au/occurrences/search?taxa=Hymenophyllum+cupressiforme#tab_mapView
Habitat Aspect Climate:
Hymenophyllum cupressiforme prefers full shade, partial shade and dappled light. It grows as an epiphytic or lithophyte on rocks in rainforest or in moist open forest, often along creeks, streams and rivers in subtropical forests and temperate forests. The altitude ranges from 50 meters ASL to 1170 meters ASL.
Temperatures range from 4 degrees in July to 42 degrees in January.
Rainfalls range from lows of 600mm to an average of 3200mm annually.The areas receive additional moisture from orographic precipitation.
Soil Requirements:
Hymenophyllum cupressiforme grows on better quality rocks. The soils are usually derived from partially decomposed granite, shale metamorphic rocks, brown basalt and black basalt. The soils and mulches pH varies from 5pH through to a 6pH. It tolerates waterlogged soils and prefers sites where it grows in water for several months of the year. Non saline soils to moderately saline soils are tolerated.
Height & Spread:
Wild plants grow from 0.02m to 0.1m by 0.2m x 2m across.
Characteristics:
The slender, long creeping rhizomes are much branched. The new shoots are sparsely covered in reddish-brown hairs.
The fronds are pinnate, bipinnate or tripinnate and are pendant with primary segments pinnatifid. The fronds measure 20mm to 90mm in length by 15mm to 30mm in width overall. The laminas measure 50mm to 200mm in length by 25mm to 70mm in width. The deep reddish-brown stipe is glabrous and measures 5mm to 35mm in length. The rachises’ wings are flat, and narrow. The wings measure 1mm to 1.5mm in width while the margins are finely toothed. The bases are attenuate while the apexes are obtuse. The concolourous laminas are grass-green, glabrous and semi glossy to glossy. The pinnae margins are finely toothed. The mid vein is slightly prominent on the lower lamina and is clearly visible from the upper lamina.
Fertile fronds are similar to the fertile fronds. The sori are born on the upper side of the pinnae axils on short lateral extensions of the lamina. The involucre is green while the black, orbicular receptacles are entirely inserted or are inserted at the base and exserted at the apex.
Wildlife:
Hymenophyllum cupressiforme’s wildlife is unknown to the author.
Cultivation:
It is a very difficult fern to procure and to succeed with in cultivation. Propagated plants may prove to be more successful. Shade would be of paramount importance for any type of success which would include the correct microclimate.
This fern would look particularly at home in rainforests on boulders or on the trunks or rainforest trees with small orchids rowing out in between where a specific moist, humid microclimate can be maintained.
Propagation:
Spores: All ferns that are declared rare, vulnerable or endangered are protected by Federal and State Laws and must not be removed from the wild unless you are a land developer, mining company or main Roads department etc. This includes bulbs, roots, leaves and flowers. No part of any plant can be removed from Federal, State or Local Government land without the prior permission of the authority and this includes the spore.
This is a very difficult fern to attempt to propagate in cultivation. Procuring spore and setting the spore is easy and the spore germinates readily. The problems arise on transplanting the prothallus and young ferns are sensitive to disturbance. There is also the problem of the very specific microclimate required to keep the ferns thriving.
Most people are put off at the thought of growing ferns from spore. Like all plants that produce their offspring from seed or spore the methods are basically the same. Remember nature has been doing this for millions of years and has been very successful. I have had excellent results growing over 200 different species of Australian ferns so don’t be afraid. Give it a go.
Step 1. Select spore from the fern fronds. Wait until the fern is just starting to release its spore. Rinse the fronds under clean running water and dry. This is to wash off any other spores from rogue ferns that may have settled onto the fronds. (There is nothing worse than having common brake or common soft bracken contaminating a prized tree fern or epiphyte.)
Step 2. Place the dry fronds in a clean brown paper bag and keep them in a cool dark place like the linen closet for about a week to ten days before you are ready to sow the spore. The exception to this rule applies to ferns, which produce green spores. These must be sown immediately that they are released. Todea Barbara is a good example of a fern, which produces green spore.
Step 3. Take a large ice cream container, a small ice cream container and a clean clear plastic bag large enough to seal the large ice cream container and three or four milk bottle tops.
Step 4. Punch or drill 6 to 10 5mm holes in the bottom of the small ice cream container.
Step 5. Wash both containers, tops and plastic bag so that they are very clean and sterile.
Step 6. Use a clean fine seed raising mi. We used 30mm fine sand, 30mm peat and 30mm perlite and 10mm vermiculite. We used crushed basalt, crusher dust and peat in a 50:50 ratio for epiphytes. Moisten the mix enough that water does not run out when the mix is squeezed between the fingers.
Step 7. Place the moisten mix (Enough to half fill the small ice cream container) in the microwave oven with a large glass of water for 7 or 8 minutes, until the water is boiling. Allow them to cool in the oven. You will need the water later so do not tip it out.
Step 8. Take the brown paper bag out of the linen closet. Shake the bag and remove the fronds. You should have a yellow, brown, black or rarely greenish brown or ochre powder or very fine, small round pin head size spore depending on the specie involved.
Step 9. Remove the mixture from the oven once it has cooled and place it in the small ice cream container and level.
Step 10. Sprinkle the spore sparsely over the mixture in the small ice cream container.
Step 11. Place the milk bottle tops in the large ice cream container with the flat surface facing down. Place the small ice cream container in the large ice cream container so that it is sitting on the milk bottle tops.
Step 12. Remove the water from the microwave and pour it into the larger ice cream container so there is 25mm to 30mm of water in the bottom.
Step 13. Place the ice cream containers in the plastic bag and seal.
Step 14. Place the contents and bag in a warm shady place preferably 50mm to 70mm shade depending on the specie. Shade houses and some window sills are ideal.
Step 15. The surface should turn green within a week to two weeks. The prothallus will then develop. From the prthalus the first true fronds will appear. Wait until the ferns are 20mm to 35mm in height before you attempt to transplant them. Once they are ready open the bag up slightly and allow the air to flow around the little ferns. Every 3 to 5 days open the bag a little further so the ferns get use to their new environment. Allow them a week to two weeks to harden off before you transplant them following the removal of the plastic bag. Carefully prick them out into 50mm standard squat tubes as you would any seedling.
Do not try to transplant them as single plants as they are still too delicate still.
Once the smaller ones again reach 50mm to 70mm you may wish to divide the stronger and hardier individual plants into smaller clumps in 100mm squat pots.
Fertilize using seaweed, fish emulsion or organic chicken pellets soaked in water on an alternate basis. Fertilize every two months until the plants are established then annually in early September to October to maintain health vitality and better flowering.
Further Comments from Readers:
Hi reader, it seems you use The Bible of Botany a lot. That’s great as we have great pleasure in bringing it to you! It’s a little awkward for us to ask, but our first aim is to purchase land approximately 1,600 hectares to link several parcels of N.P. into one at The Pinnacles NSW Australia, but we need your help. We’re not salespeople. We’re amateur botanists who have dedicated over 30 years to saving the environment in a practical way. We depend on donations to reach our goal. If you donate just $5, the price of your coffee this Sunday, We can help to keep the planet alive in a real way and continue to bring you regular updates and features on Australian plants all in one Botanical Bible. Any support is greatly appreciated. Thank you.
In the spirit of reconciliation we acknowledge the Bundjalung, Gumbaynggirr and Yaegl and all aboriginal nations throughout Australia and their connections to land, sea and community. We pay our respect to their Elders past, present and future for the pleasures we have gained.
Hymenophyllum flabellatum
Classification:
Phylum: Pteridopphyta
Class: Polypodiopsida
Order: Hymenophyllales
Family: Hymenophyllaceae
Genus: From Hymen/Humen, which is Ancient Greek for a membrane and Phullon/Phýllon, which is Ancient Greek for a leaf. It refers to the fronds, which have thin membranous covering.
Species: From Flabellum, which is Latin for a fan shape. It refers to delicate fronds, which resemble a fan in form.
Common Name: Shiny Filmy Fern.
Distribution:
Hymenophyllum flabellatum is found in several disjunct populations south from Mount Tamborine in south eastern Queensland to Cape Otway in southern Victoria and the Grampians National Park to the west. There is an isolated population in the north of Queensland between Mareeba and Cardwell.
In Tasmania it is found on Flinders Island and most the Mainland except for the Central Highlands.
https://avh.ala.org.au/occurrences/search?taxa=Hymenophyllum+flabellatum#tab_mapView
Habitat Aspect Climate:
Hymenophyllum flabellatum prefers full shade. It grows as an epiphyte and lithophyte on rocks often forming large mats in subtropical rainforests and temperate rainforests where humid moist microclimates exist. The altitude ranges from 200 meters ASL to 740 meters ASL.
Temperatures range from minus 2 degrees in July to 42 degrees in January.
Rainfalls range from lows of 700mm to an average of 3200mm annually. The lower rainfall areas receive additional moisture from orographic precipitation.
Soil Requirements:
Hymenophyllum flabellatum prefers on better quality rocks. The soils are usually derived from partially decomposed granite, shale metamorphic rocks, brown basalt and black basalt. The soils and mulches pH varies from 5pH through to a 6pH. It tolerates waterlogged soils and prefers sites where it grows in water for several months of the year. Non saline soils to moderately saline soils are tolerated.
Height & Spread:
Wild plants grow from 0.15m to 0.25m by 0.5m x 2m across.
Characteristics:
The long, slender creeping rhizomes are much branched. The new shoots and nodes are pale reddish-brown and are densely covered in soft, reddish-brown woolly hairs.
The fronds are bipinnate and are pendant with primary segments pinnatifid. The fronds measure 50mm to 250mm in length by 35mm to 150mm in width overall. The laminas measure 40mm to 200mm in length by 15mm to 55mm in width. The deep reddish-brown stipe is glabrous and measures 50mm to 150mm in length. The rachises are winged near the apexes and are very sparsely covered in long, brown hairs. The wings measure 1mm to 1.5mm in width while the margins are entire. The bases are attenuate while the apexes are obtuse or retuse. The linear ultimate segments are concolourous, grass-green, glabrous and semi glossy to glossy. The pinnae margins are entire and finely toothed. The mid vein is slightly prominent on the lower lamina and is clearly visible from the upper lamina.
Fertile fronds are similar to the fertile fronds. The numerous sori are born on the upper side of the terminal lobes or on short lateral extensions of the lamina between the lobes. The involucre are green, orbicular receptacles while the pale brown to pale purple-brown, ripe clavate sori are slightly inserted at the base and the apexes are obtuse and exserted.
Wildlife:
Hymenophyllum flabellatum’s wildlife is unknown to the author.
Cultivation:
Hymenophyllum flabellatum is another very difficult fern to procure and to succeed with in cultivation. Propagated plants may prove to be more successful. Shade would be of paramount importance for any type of success which would include the correct microclimate.
This fern would look particularly at home in rainforests on boulders or on the trunks or rainforest trees with small orchids rowing out in between where a specific moist, humid microclimate can be maintained.
Propagation:
Spores: All ferns that are declared rare, vulnerable or endangered are protected by Federal and State Laws and must not be removed from the wild unless you are a land developer, mining company or main Roads department etc. This includes bulbs, roots, leaves and flowers. No part of any plant can be removed from Federal, State or Local Government land without the prior permission of the authority and this includes the spore.
This is a very difficult fern to attempt to propagate in cultivation. Procuring spore and setting the spore is easy and the spore germinates readily. The problems arise on transplanting the prothallus and young ferns are sensitive to disturbance. There is also the problem of the very specific microclimate required to keep the ferns thriving.
Most people are put off at the thought of growing ferns from spore. Like all plants that produce their offspring from seed or spore the methods are basically the same. Remember nature has been doing this for millions of years and has been very successful. I have had excellent results growing over 200 different species of Australian ferns so don’t be afraid. Give it a go.
Step 1. Select spore from the fern fronds. Wait until the fern is just starting to release its spore. Rinse the fronds under clean running water and dry. This is to wash off any other spores from rogue ferns that may have settled onto the fronds. (There is nothing worse than having common brake or common soft bracken contaminating a prized tree fern or epiphyte.)
Step 2. Place the dry fronds in a clean brown paper bag and keep them in a cool dark place like the linen closet for about a week to ten days before you are ready to sow the spore. The exception to this rule applies to ferns, which produce green spores. These must be sown immediately that they are released. Todea Barbara is a good example of a fern, which produces green spore.
Step 3. Take a large ice cream container, a small ice cream container and a clean clear plastic bag large enough to seal the large ice cream container and three or four milk bottle tops.
Step 4. Punch or drill 6 to 10 5mm holes in the bottom of the small ice cream container.
Step 5. Wash both containers, tops and plastic bag so that they are very clean and sterile.
Step 6. Use a clean fine seed raising mi. We used 30mm fine sand, 30mm peat and 30mm perlite and 10mm vermiculite. We used crushed basalt, crusher dust and peat in a 50:50 ratio for epiphytes. Moisten the mix enough that water does not run out when the mix is squeezed between the fingers.
Step 7. Place the moisten mix (Enough to half fill the small ice cream container) in the microwave oven with a large glass of water for 7 or 8 minutes, until the water is boiling. Allow them to cool in the oven. You will need the water later so do not tip it out.
Step 8. Take the brown paper bag out of the linen closet. Shake the bag and remove the fronds. You should have a yellow, brown, black or rarely greenish brown or ochre powder or very fine, small round pin head size spore depending on the specie involved.
Step 9. Remove the mixture from the oven once it has cooled and place it in the small ice cream container and level.
Step 10. Sprinkle the spore sparsely over the mixture in the small ice cream container.
Step 11. Place the milk bottle tops in the large ice cream container with the flat surface facing down. Place the small ice cream container in the large ice cream container so that it is sitting on the milk bottle tops.
Step 12. Remove the water from the microwave and pour it into the larger ice cream container so there is 25mm to 30mm of water in the bottom.
Step 13. Place the ice cream containers in the plastic bag and seal.
Step 14. Place the contents and bag in a warm shady place preferably 50mm to 70mm shade depending on the specie. Shade houses and some window sills are ideal.
Step 15. The surface should turn green within a week to two weeks. The prothallus will then develop. From the prthalus the first true fronds will appear. Wait until the ferns are 20mm to 35mm in height before you attempt to transplant them. Once they are ready open the bag up slightly and allow the air to flow around the little ferns. Every 3 to 5 days open the bag a little further so the ferns get use to their new environment. Allow them a week to two weeks to harden off before you transplant them following the removal of the plastic bag. Carefully prick them out into 50mm standard squat tubes as you would any seedling.
Do not try to transplant them as single plants as they are still too delicate still.
Once the smaller ones again reach 50mm to 70mm you may wish to divide the stronger and hardier individual plants into smaller clumps in 100mm squat pots.
Fertilize using seaweed, fish emulsion or organic chicken pellets soaked in water on an alternate basis. Fertilize every two months until the plants are established then annually in early September to October to maintain health vitality and better flowering.
Further Comments from Readers:
Hi reader, it seems you use The Bible of Botany a lot. That’s great as we have great pleasure in bringing it to you! It’s a little awkward for us to ask, but our first aim is to purchase land approximately 1,600 hectares to link several parcels of N.P. into one at The Pinnacles NSW Australia, but we need your help. We’re not salespeople. We’re amateur botanists who have dedicated over 30 years to saving the environment in a practical way. We depend on donations to reach our goal. If you donate just $5, the price of your coffee this Sunday, We can help to keep the planet alive in a real way and continue to bring you regular updates and features on Australian plants all in one Botanical Bible. Any support is greatly appreciated. Thank you.
In the spirit of reconciliation we acknowledge the Bundjalung, Gumbaynggirr and Yaegl and all aboriginal nations throughout Australia and their connections to land, sea and community. We pay our respect to their Elders past, present and future for the pleasures we have gained.
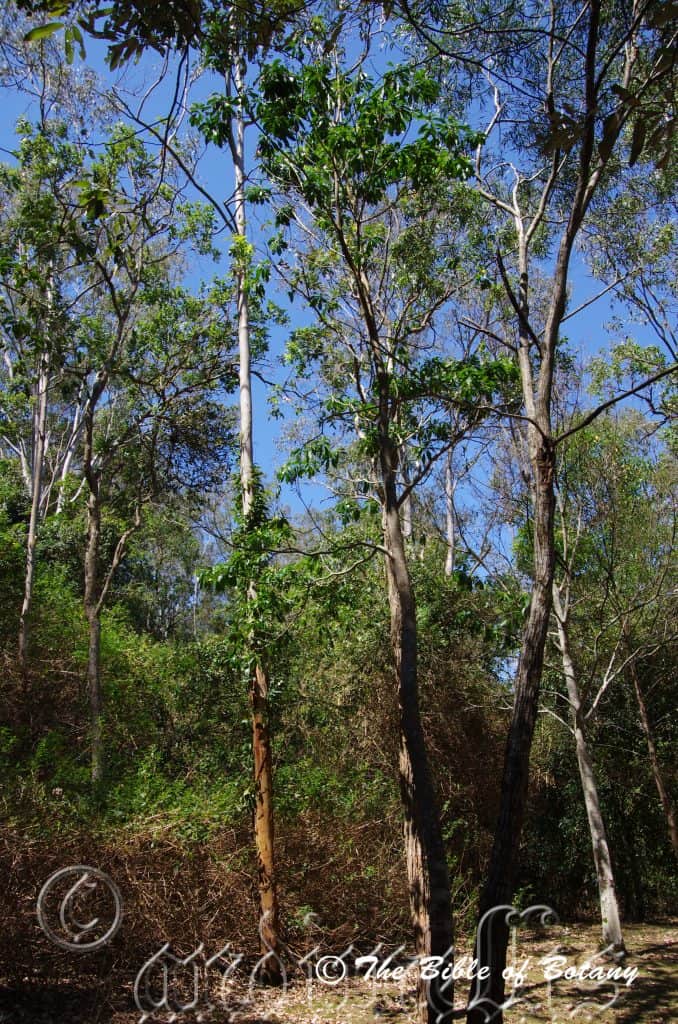
Author’s Garden The Pinnacles NSW
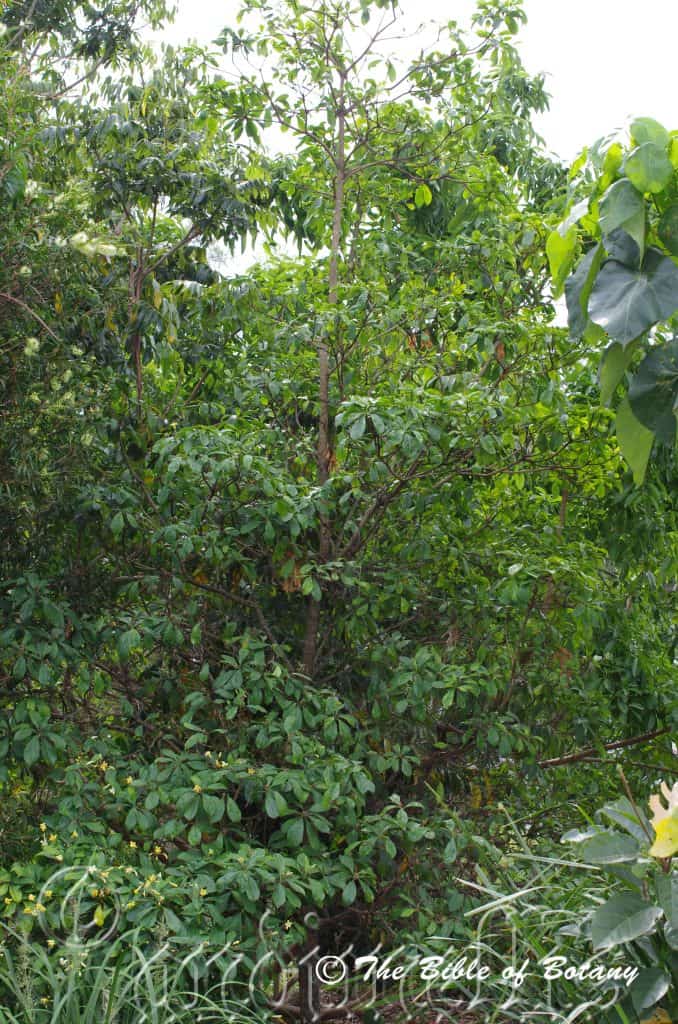
Author’s Garden The Pinnacles NSW
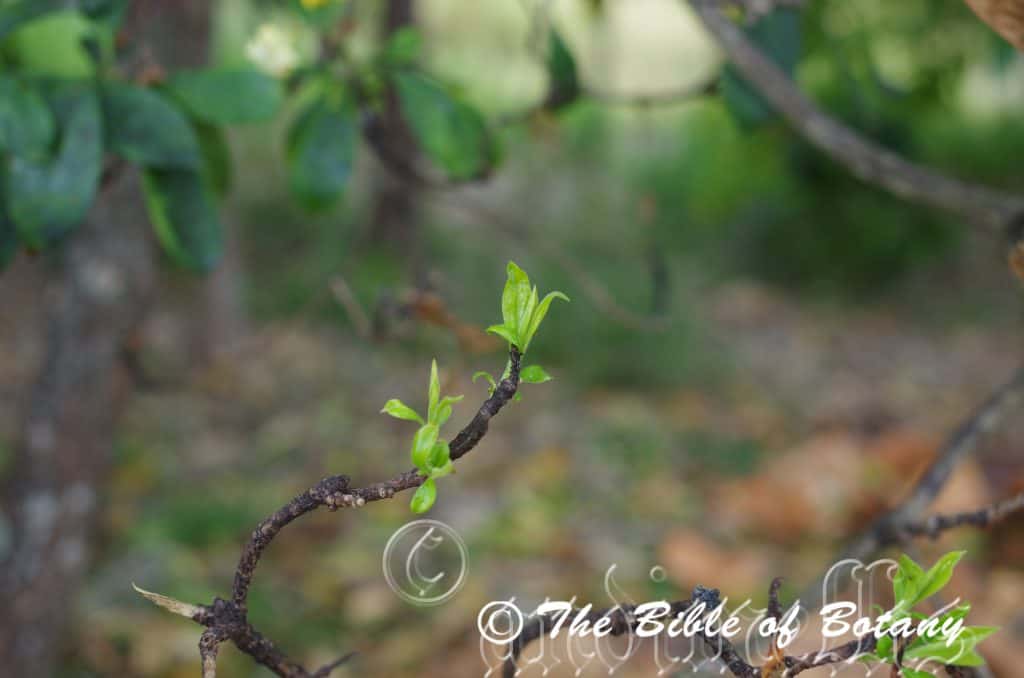
Author’s Garden The Pinnacles NSW
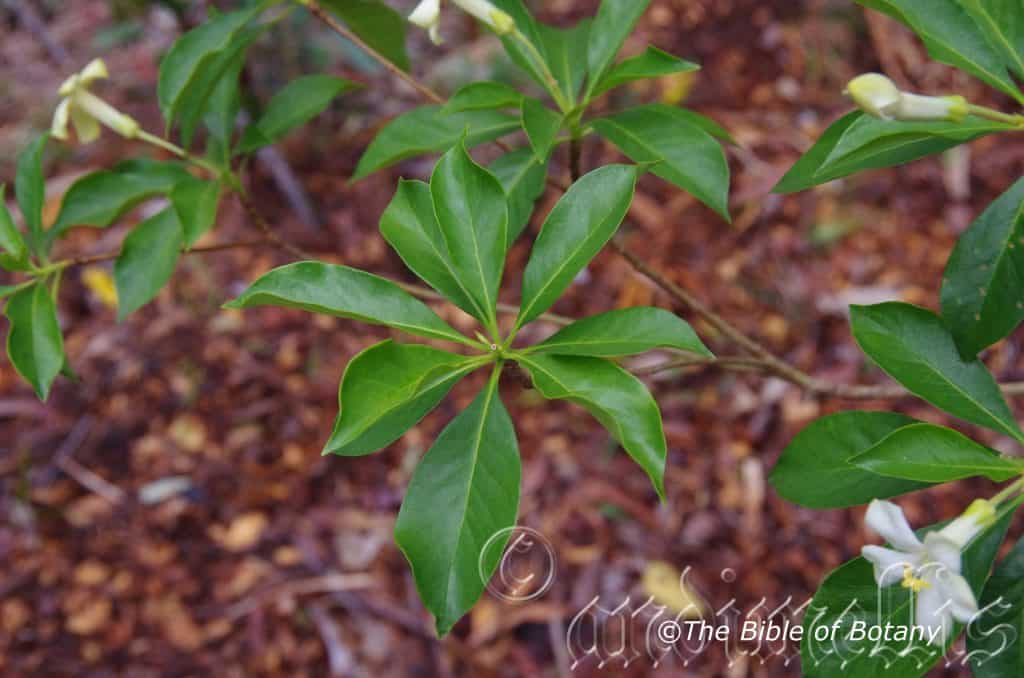
Author’s Garden The Pinnacles NSW
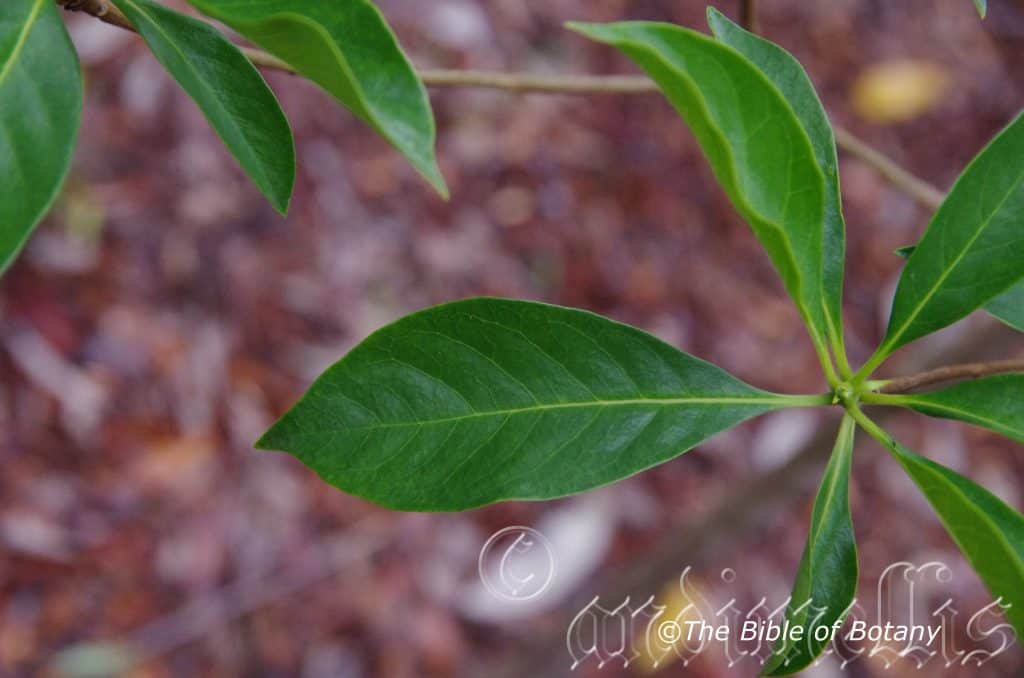
Author’s Garden The Pinnacles NSW
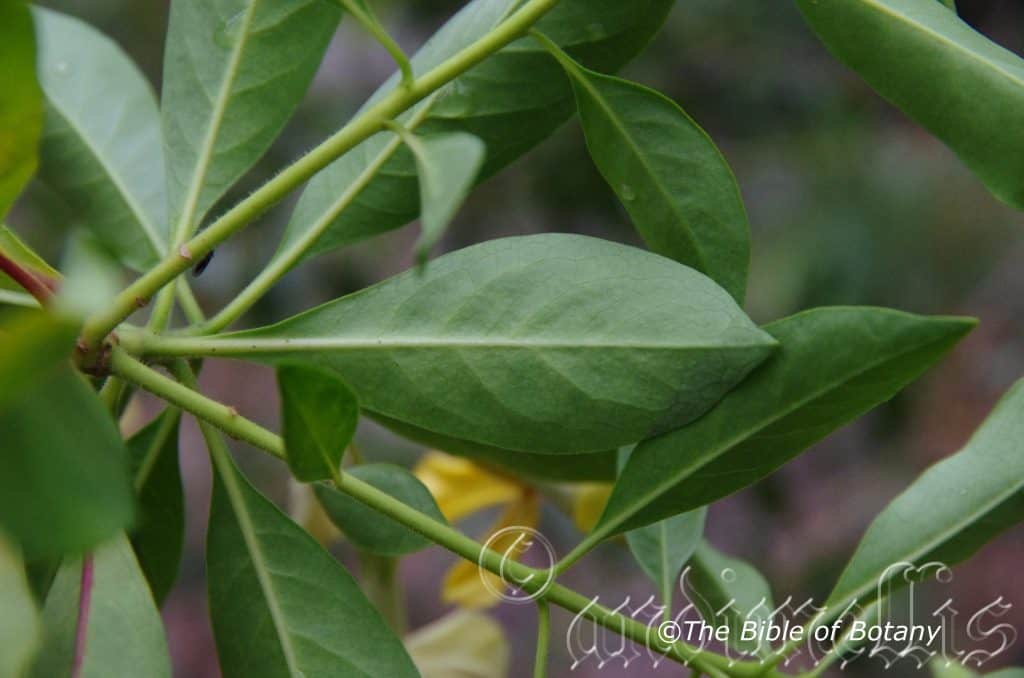
Author’s Garden The Pinnacles NSW
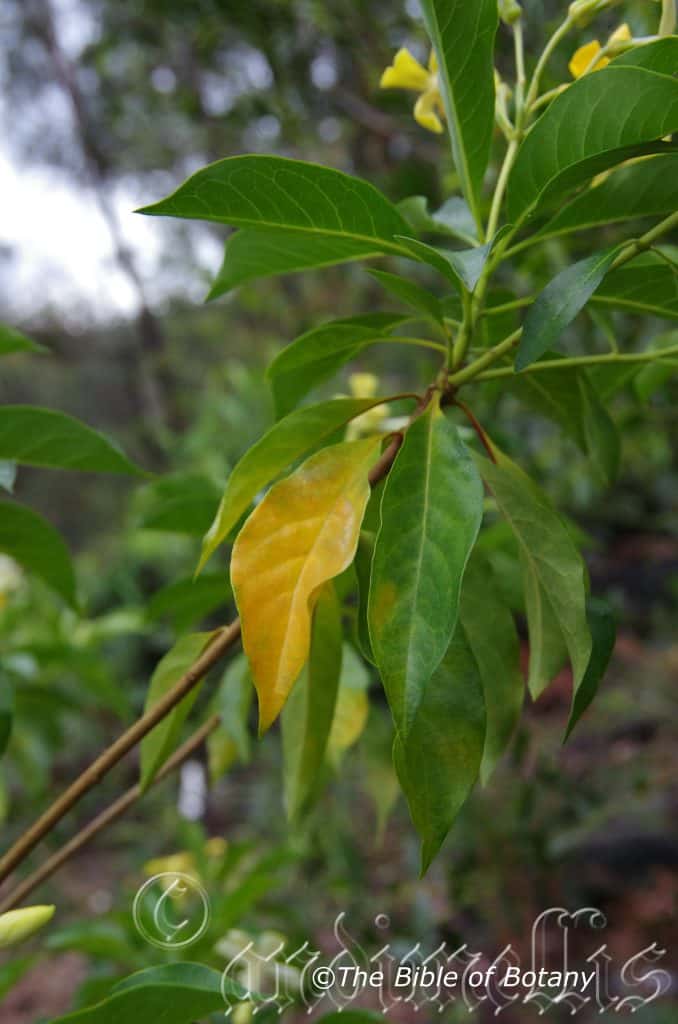
Author’s Garden The Pinnacles NSW
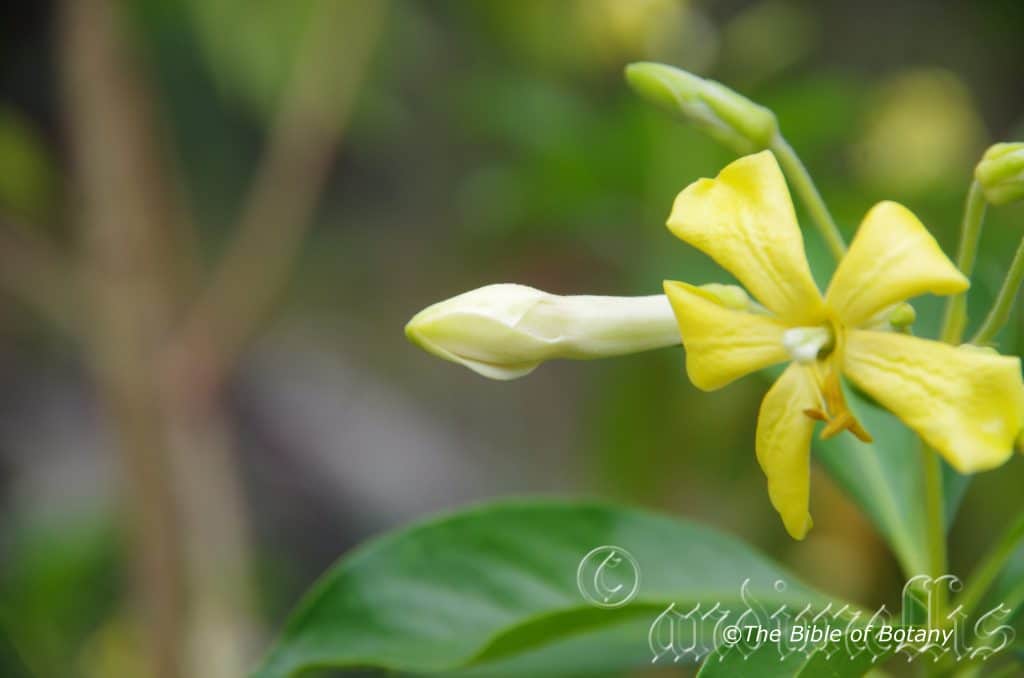
Author’s Garden The Pinnacles NSW
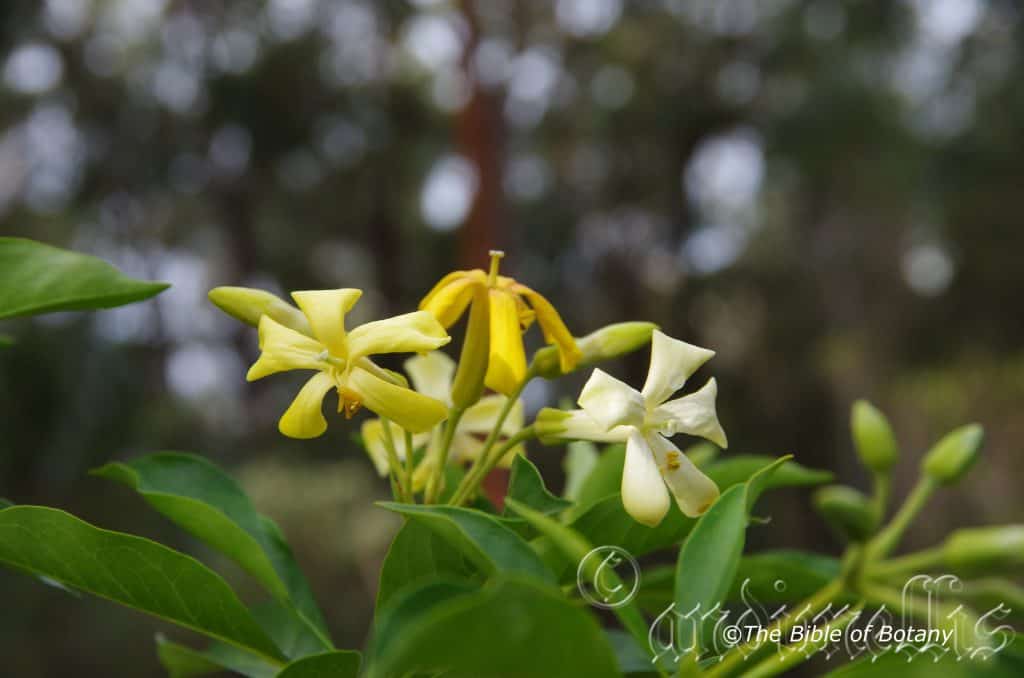
Author’s Garden The Pinnacles NSW
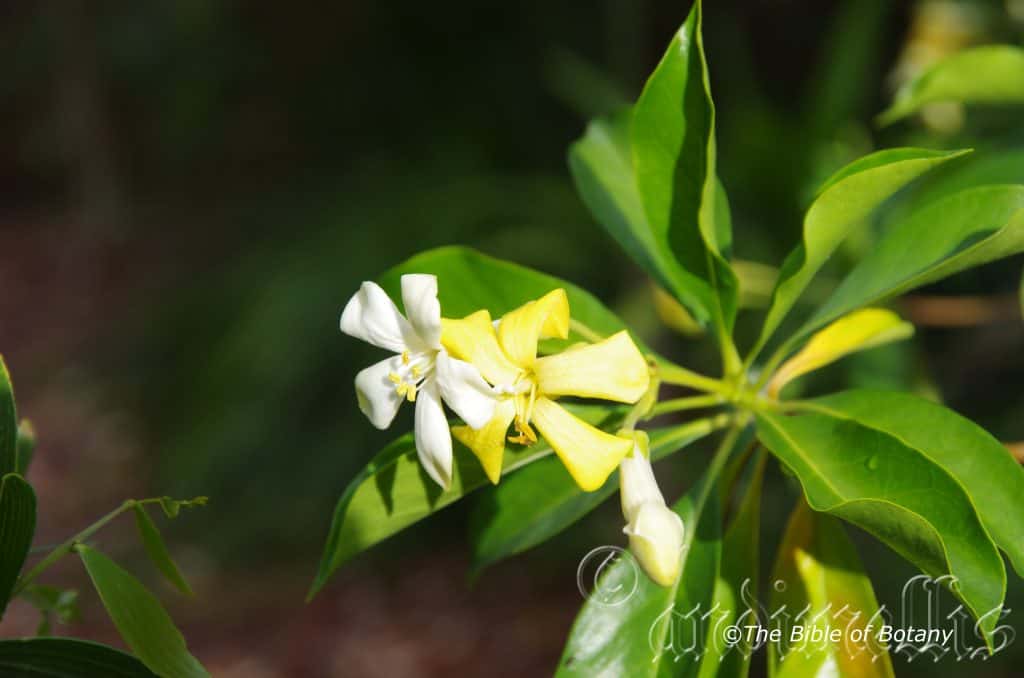
Author’s Garden The Pinnacles NSW
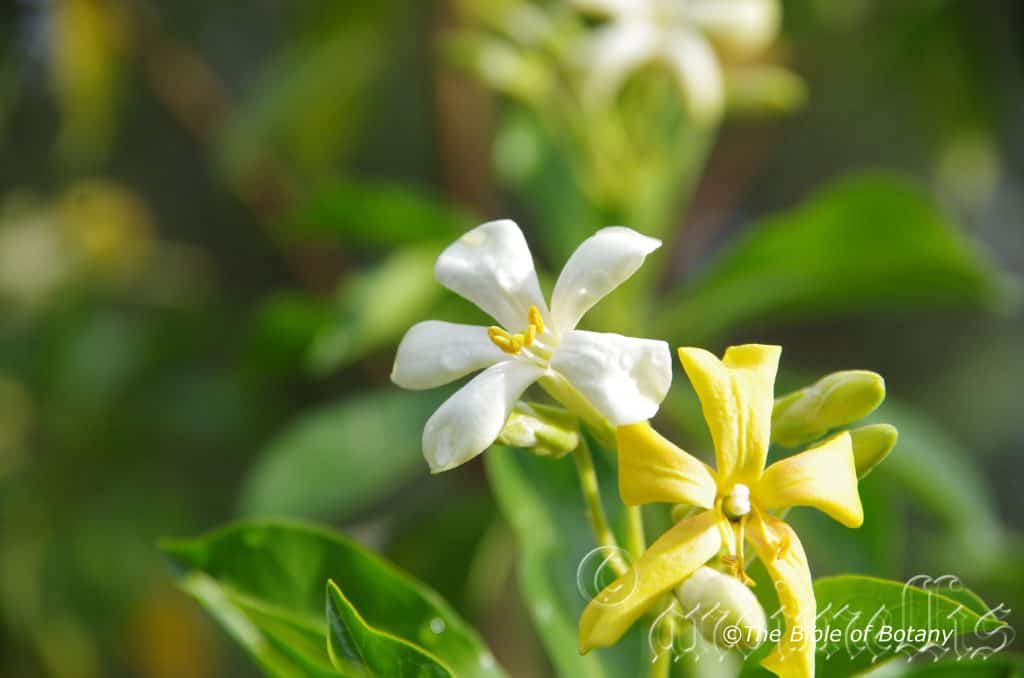
Author’s Garden The Pinnacles NSW
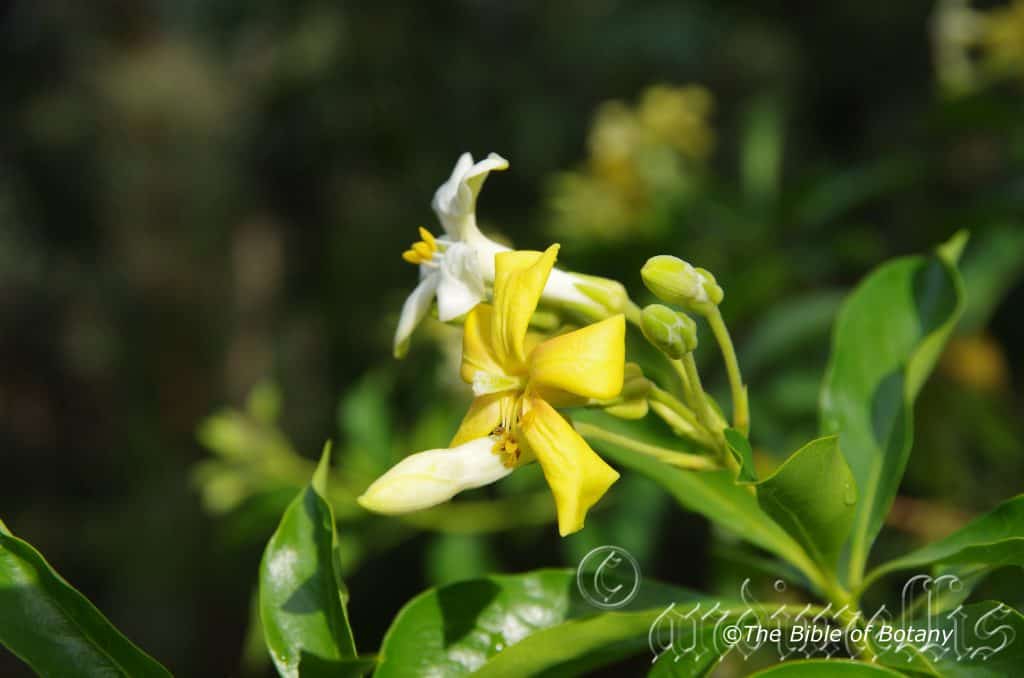
Author’s Garden The Pinnacles NSW
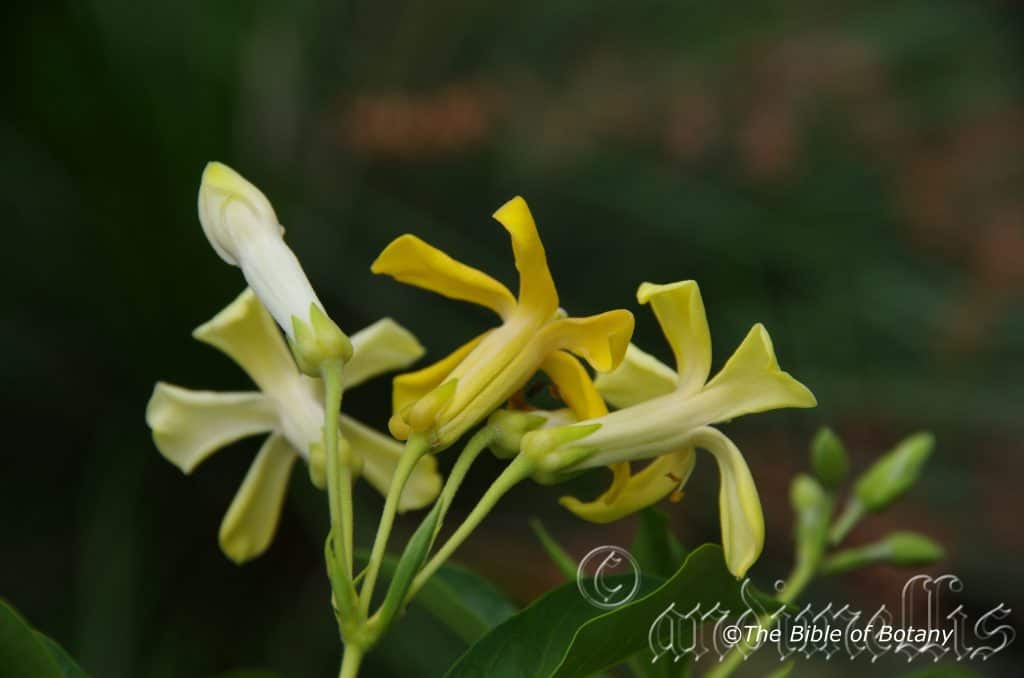
Author’s Garden The Pinnacles NSW
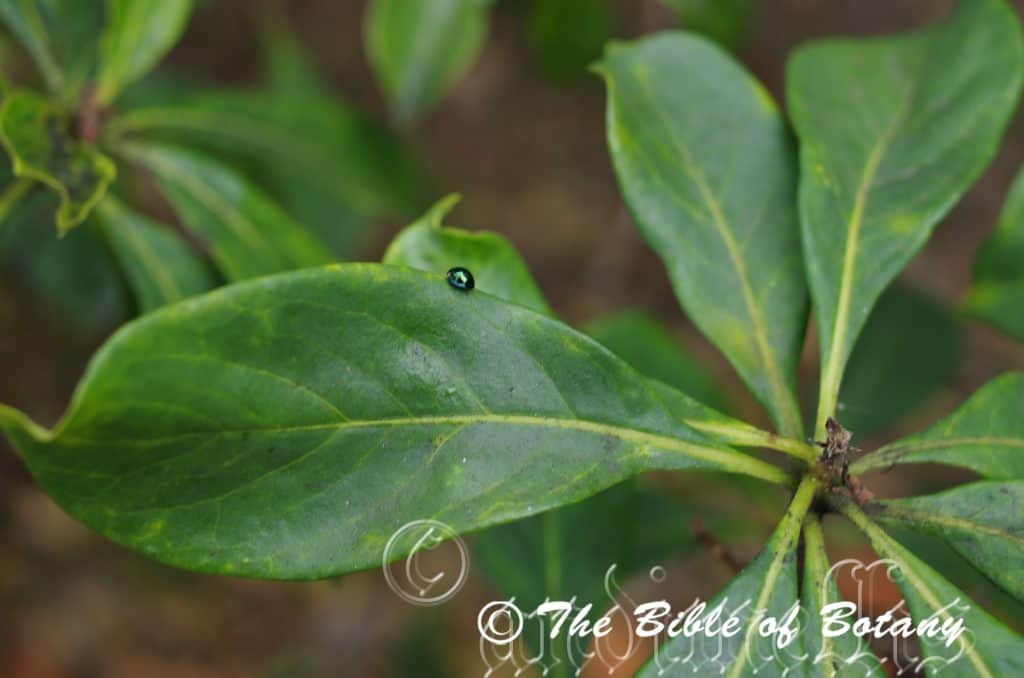
Brookside Qld.
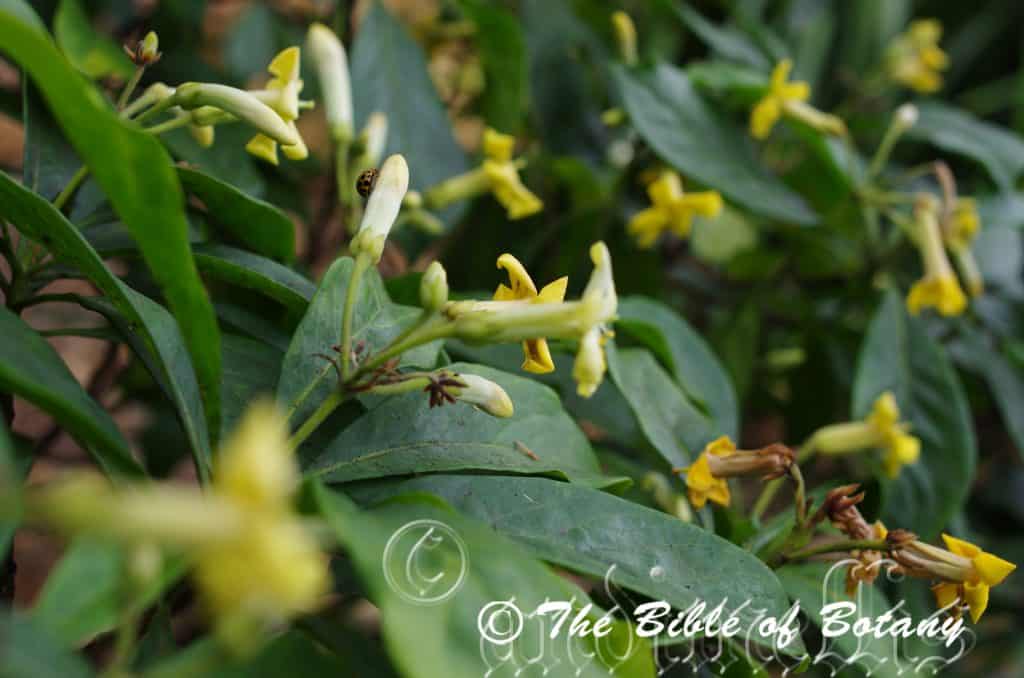
28 spotted Ladybird Epilachna vigintioctopunctata Brookside Qld.
Hymenosporum flavum
Classification:
Unranked: Eudicots
Unranked: Asterids
Order: Apiales
Family: Pittosporaceae
Genus: From Hymen/Humen, which is Ancient Greek for a membrane and Sporá, which is Ancient Greek for a seed or sowing of seeds. It refers to seeds, which have a very delicate, filmy membranous wing around the seed.
Species: From Flabellum, which is Latin for a fan shape. It refers to delicate fronds, which are fan shaped.
Common Name: Sweet Hymenosporum.
Distribution:
Hymenosporum flavum is found south from Cape York Peninsula in Queensland to the Hunter River in central coastal New South Wales. It is found mainly on and east of the Great Dividing Range to the coast.
https://avh.ala.org.au/occurrences/search?taxa=Hymenosporum+flavum#tab_mapView
Habitat Aspect Climate:
Hymenosporum flavum prefer full sun to medium shade. It grows in littoral rainforests, low lying rainforests and swampy rain forests. The altitude ranges from 10 meters ASL to 700 meters ASL.
The temperatures range from 10 degree in August to 34 degrees in January.
The rainfall ranges from lows of 900mm to an average of 3000mm annually.
Soil Requirements:
Hymenosporum flavum prefers better quality soils which range from light sandy clays to medium clays. The soils are usually derived from decomposed brown basalt, black basalt, fatty sandstones and alluviums and contain a high percentage of organic matter. The soils pH varies from 5pH through to a 6.5pH. It does not tolerate waterlogged soils however the soils are usually moisture retentive throughout the year. Non saline soils to moderately saline soils are tolerated.
Height & Spread:
Wild Plants: 15m to 20m by 7m to 12m.
Characteristics:
Hymenosporum flavum’s trunk is pale grey-fawn and glabrous. The branchlets remain pale grey-fawn and glabrous to where the leaves are still present where they turn a pale green and are glabrous or very sparsely covered in soft white pannate or tomentose hairs. This is a medium, narrow growing tree with beautiful sweetly scented white cream and yellow flowers.
Hymenosporum flavum’s alternate or sometimes whirled leaves are oblong-obovate or ovate to oblanceolate. They measure 80mm to 160mm in length by 30mm to 45mm in width. The base is cuneate while the apex is acuminate to apiculate. The discolourous laminas are pale green to pale grass-green and glabrous on the upper lamina while the lower lamina is slightly paler and sparsely covered in soft white pannate or tomentose hairs. The margins are entire and curve upwards from the mid vein. The midvein is prominent on the lower lamina and is visible from above. The petiole measures 18mm to 32mm in length.
The inflorescences of Hymenosporum flavum are born terminally on a rachis that measures 40mm to 50mm in length. The individual pedicels measure 30mm to 40mm in length and are covered in soft white pannate or tomentose hairs. The flowers number 5 to 10 per rachis. The yellow green oblong sepals have an acute apex and measure 6mm to 8mm in length. The white corolla turns cream and progressively deepens to a bright creamy yellow after anthesis. While most plants have a yellow corolla some plants are heavily streaked in red to red-brown. The corolla measures 15mm to 20mm in length while the 5 oblong to ovate divaricate lobes have an obtuse apex. The lobes measure 15mm to 20mm in length by 8mm to 15mm in width. The corollas are covered in soft white tomentose hairs externally and internally. The green linear ovary is covered in soft white pannate or tomentose hairs. The very fragrant flowers appear earlier in the north than southern plants. The flowers appear from early August to early December.
Hymenosporum flavum’s fruit is an ovoid, pear shaped follicle. The follicles are 20mm to 35mm in length by 7mm to 10mm wide at the widest point. It is sparsely covered in soft white pannate to tomentose hairs or rarely glabrous. The green drupes turn black on ripening. The flat, ovoid, black seeds measure 5mm to 7mm in length and are surrounded by pale yellow sulphur like powder and a 2mm reniform wing.
Wildlife:
The flowers are attractive to nectar eating birds, native bees and many species of butterflies. The seeds are frequently eaten by an unknown larvae prior to ripening.
Cultivation:
Hymenosporum flavum is an attractive slender, open canopy tree, which is suitable for small sunny or semi shaded gardens. It is an excellent addition in warm temperate, subtropical or tropical gardens. As a garden subject it will grow to 8 meter to 9 meters in height by 4 meter to 5 meters in diameter when grown in the open.
It respond very well to additional native fertilizers and heavy mulching. It is fast growing and are cold tolerant to temperatures as low as minus 1 degree. Young plants need to be protected from frosts while trees over 2 meters can take temperatures down to minus 4 without any stress.
Hymenosporum flavum is a beautiful tree, as a standalone specimen tree, as it has a tall narrow appearance giving light shade that will not restrict lawn growth. It has a non-invasive root system so are safe around sewer pipes, other amenities and paths.
The tree is a good foundation plant for starting a dwarf rainforest garden. Mass plantings can be achieved with spacing of 5 meter to 6 meter centers. It is very good plants at hosting small epiphytic ferns and orchids, which prefer brighter conditions.
Placed at the rear of a bush garden their striking display of flowers will draw your attention so that you will want to investigate further. A bend in a path can be broken up by placing them at the back of the bend. Place them in the background with medium and smaller plants with finer pale green leaves in front. Plants with either small white pink or red flowers can be used in the mid ground while the prostrate or smaller shrubs are best with red or white flowers in the front. This will lead the viewer’s eyes down and over to the back ground. When it is in flower, these trees will catch your attention because of the proliferation of sweetly scented white, cream and yellow flowers. The viewer will be transfixed on the display of flowers or shape rather than watching the path. Avoid using yellow cream or white flowering plants adjacent to them especially if there is any chance that the flower periods will overlap as this will relegate and blend Hymenosporum flavum’s flowers into just another pool of cream flowers.
In full sun given plenty of mulch and a regular supply of native fertilizers will flower from the third year from seed. Good reliable flowering can be enjoyed after 5 years. Tip pruning will help to maintain bushiness however good soil maintenance will be a better long term strategy for good flowering.
Propagation:
Seeds: Hymenosporum flavum seeds can be sown directly into a seed raising mix. Cover them with 5mm to 6mm of fine weed free mulch and keep moist. Place the tray in a warm sunny position. When the seedlings are 20mm to 30mm tall, prick them out and plant them into 50mm native tubes using a good organic mix.
Once the seedlings reach 150mm to 200mm in height they can be planted out into their permanent position.
Fertilize using seaweed, fish emulsion or organic chicken pellets soaked in water on an alternate basis. Fertilize every two months until the plants are established then annually in early September to October to maintain health vitality and better flowering.
Further Comments from Readers:
Hi reader, it seems you use The Bible of Botany a lot. That’s great as we have great pleasure in bringing it to you! It’s a little awkward for us to ask, but our first aim is to purchase land approximately 1,600 hectares to link several parcels of N.P. into one at The Pinnacles NSW Australia, but we need your help. We’re not salespeople. We’re amateur botanists who have dedicated over 30 years to saving the environment in a practical way. We depend on donations to reach our goal. If you donate just $5, the price of your coffee this Sunday, We can help to keep the planet alive in a real way and continue to bring you regular updates and features on Australian plants all in one Botanical Bible. Any support is greatly appreciated. Thank you.
In the spirit of reconciliation we acknowledge the Bundjalung, Gumbaynggirr and Yaegl and all aboriginal nations throughout Australia and their connections to land, sea and community. We pay our respect to their Elders past, present and future for the pleasures we have gained.
Hyparrhenia filipendula
Classification:
Unranked: Monocots
Unranked: Commelinids
Superorder: Lilanae
Order: Poales
Family: Poaceae
Genus: From Hypos, which is Ancient Greek for under and Arren/Andros, which is Ancient Greek for a man or masculine. It refers to the male spikelets, which are situated at the base of the spikes or below the ovary.
Species: From Filum, which is Latin for a thread or a thin cord and Pendulous, which is Greek for to hang down. It refers to the long thin awns which hang downwards.
Common Name: Tambookie Grass.
Distribution:
Hyparrhenia filipendula is found south from Mareeba in far north Queensland to Dungog in central coastal New South Wales. It is mainly found on and east of the Great Dividing Range with 3 isolated populations on the western side of the range at Eianasleigh Uplands, along the Merivale River and Tamworth.
https://avh.ala.org.au/occurrences/search?taxa=Hyparrhenia+filipendula#tab_mapView
Habitat Aspect Climate:
Hyparrhenia filipendula prefers full sun to light dappled shade. It mainly grows adjacent to swamps, marshes and wallums or near moist depressions and drainage lines in open forests or open woodlands. The altitude ranges from 384 meters ASL to 570 meters ASL.
The temperatures range from minus 4 degrees in August to 40 degrees in January.
The rainfall ranges from lows of 200mm to 2200mm average per annum.
Soil Requirements:
Hyparrhenia filipendula prefer light gritty clays to medium clays and podsolic soils. The soils are usually derived from decomposed sandstone, metamorphic rocks lateritic clays or accumulated sands along the coast. The soils pH ranges from 5pH to 7pH. It tolerates waterlogged soils with plants often standing in shallow water for short periods following rain. Non saline soils to moderately saline soils are tolerated.
Height & Spread:
Wild Plants: 1m to 1.5m by 0.5m to 0.7m.
Characteristics:
It grows as a loose tufted perennial grass with erect culms. The culms are pale blue-green to mid blue-green and glabrous. The terete culms usually measure 600mm to 1500mm in height but have been recorded at 2000mm in height by 0.5mm to 1mm in diameter. The rhizome very short. The lateral branches are simple or at times branched.
The cauline leaves are pendulant on the apical half and measure 150mm to 200mm in length by 2mm to 3mm in width. The sheath margins are entire. The ligules are ciliate membranes that measure 0.5mm to 1mm.
The inflorescences are compound panicles. The elliptical spikes measure 150mm to 900mm in length. The rachises are fragile at the nodes
The spikelets are very tight packed on the spike. There is 1 fertile sessile spikelet in the cluster with 1 fertile companion pedicelled spikelet. The 2 basal sterile spikelets are well developed on lower raceme while the lower companion spikelets empty lemmas or male. The sterile or male spikelets measure 5mm to 7mm in length. The linear to elliptical or at times oblong fertile florets are without a rachilla extension are dorsally compressed and measure 5.5mm to 8mm in length.
The upper and lower glumes are dissimilar and firmer than the fertile lemmas. The glumes are straw-yellow, glumes are chartaceous or coriaceous. The lanceolate lower glumes are without keels and have 9 to 11 nerves. The lower glumes are glabrous or sparsely covered in white puberulent hairs. The upper linear glumes are without keels and nerves.
There are 3 pale yellow anthers. The flowers appear from November to February.
The fertile lemma are without a keel and are single nerved. The apex is dentate while the single awn has a twisted column and usually measures 40mm to 50mm in length but can be as short as 30mm and as long as 55mm in length.
Confusing Species:
Hyparrhenia filipendula is a native grass that grows 1000mm to 1500mm meters in height. Its racemes are paired and measure 15mm to 25mm in length with 1 to 3 pairs of spikelets. The seeds’ relatively long awns measure 40mm to 50mm in length.
Hyparrhenia hirta is an introduced specie that grows from 600mm to 1500mm in height. Its racemes are paired and measure 15mm to 50mm in length with 4 to 8 pairs of spikelets. The seeds have relatively short awns that measure 10mm to 35mm in length.
Hyparrhenia rufa or thatch grass is an introduced specie that grows much taller from 1.8 meters to 2.5 meters in height. Its racemes are paired clusters and measure 15mm to 50mm in length and each pair has 4 to 10 pairs of spikelets. The seeds’ awns measure 20mm to 30mm in length.
Wildlife:
Hyparrhenia filipendula leaves are eaten most of Australia’s herbaceous animals including the Grey Kangaroo Macropus giganteus, The Pretty Face Wallaby Macropus parryi, and Swamp Wallaby Wallabia bicolor.
Cultivation:
It is considered to be a good fodder crop. The leaves and stems are eaten along with other pasture crops when growing in the pasture to the extent it will soon be eliminated from the pastures. It has a rapid growth rate from mid spring after the spring rains to late autumn. It does not recover well from overgrazing and is best managed by allowing a free period between grazing and because of its palatability Hyparrhenia filipendula will often be overtaken in an area especially by the introduced species which are far less palatable to stock.
Hyparrhenia filipendula is classified as a weed by gardeners because of its open habit of growth and being a rush. Its potential in large rockeries or an introduction to a bush garden is very limited.
In cultivation it can be grown on most types of soil even heavy podzolic soils, better quality clay but does not perform well on sandy loams. It requires full sun for best results but copes quite well in light dappled shade. With a little added moisture, mulch or native fertilizer added at the time when it is planted out will maximum colour and vigour.
In cultivation the plants usually grow from 1000mm to 1600mm in height by 400mm to 500mm in diameter.
Propagation:
Seeds: The seeds can be sown directly into a seed raising mix. Cover the seeds with 2mm of the mix. Place the trays in a warm position under 20mm or 30mm shade. When the seedlings reach 20mm to 40mm tall, prick them out and plant them into 50mm native tubes using a seed raising mix. Place the 50mm native tubes into a tray of water and return them to the bush house.
Once the seedlings reach 150mm to 200mm in height plant them out into their permanent position. Mass plantings can be achieved by planting them at a minimum of 0.4 meters to 0.5 meter centers.
Fertilize using seaweed, fish emulsion or organic chicken pellets soaked in water on an alternate basis. Fertilize every two months until the plants are established then annually in early September to October to maintain health vitality and better flowering.
Further Comments from Readers:
Hi reader, it seems you use The Bible of Botany a lot. That’s great as we have great pleasure in bringing it to you! It’s a little awkward for us to ask, but our first aim is to purchase land approximately 1,600 hectares to link several parcels of N.P. into one at The Pinnacles NSW Australia, but we need your help. We’re not salespeople. We’re amateur botanists who have dedicated over 30 years to saving the environment in a practical way. We depend on donations to reach our goal. If you donate just $5, the price of your coffee this Sunday, We can help to keep the planet alive in a real way and continue to bring you regular updates and features on Australian plants all in one Botanical Bible. Any support is greatly appreciated. Thank you.
In the spirit of reconciliation we acknowledge the Bundjalung, Gumbaynggirr and Yaegl and all aboriginal nations throughout Australia and their connections to land, sea and community. We pay our respect to their Elders past, present and future for the pleasures we have gained.
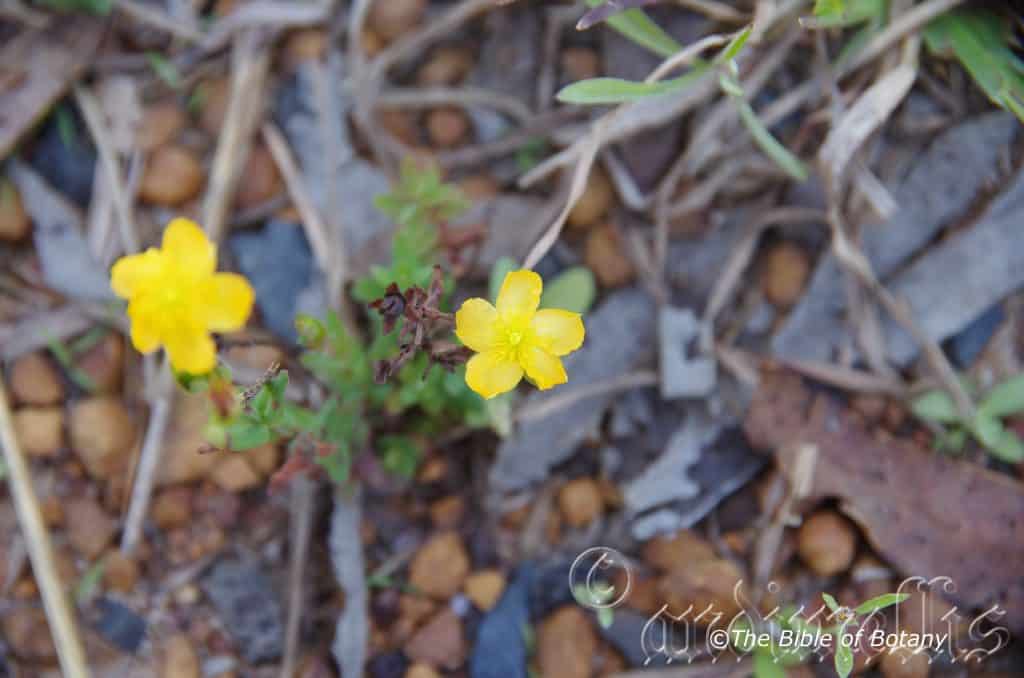
The Pinnacles NSW
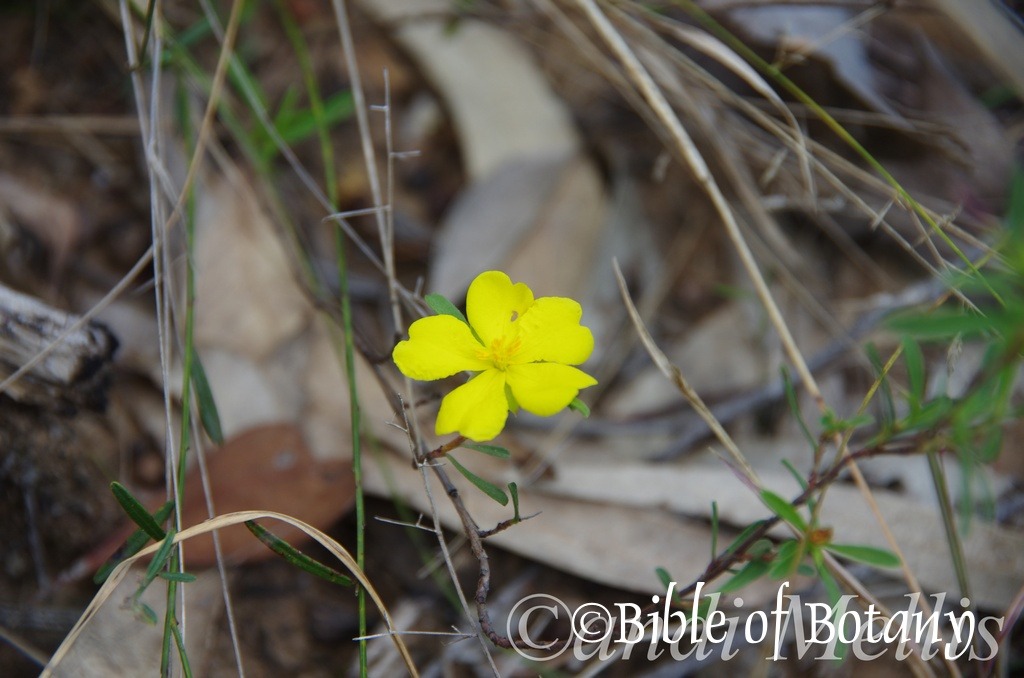
Stockyard Creek Coaldale NSW
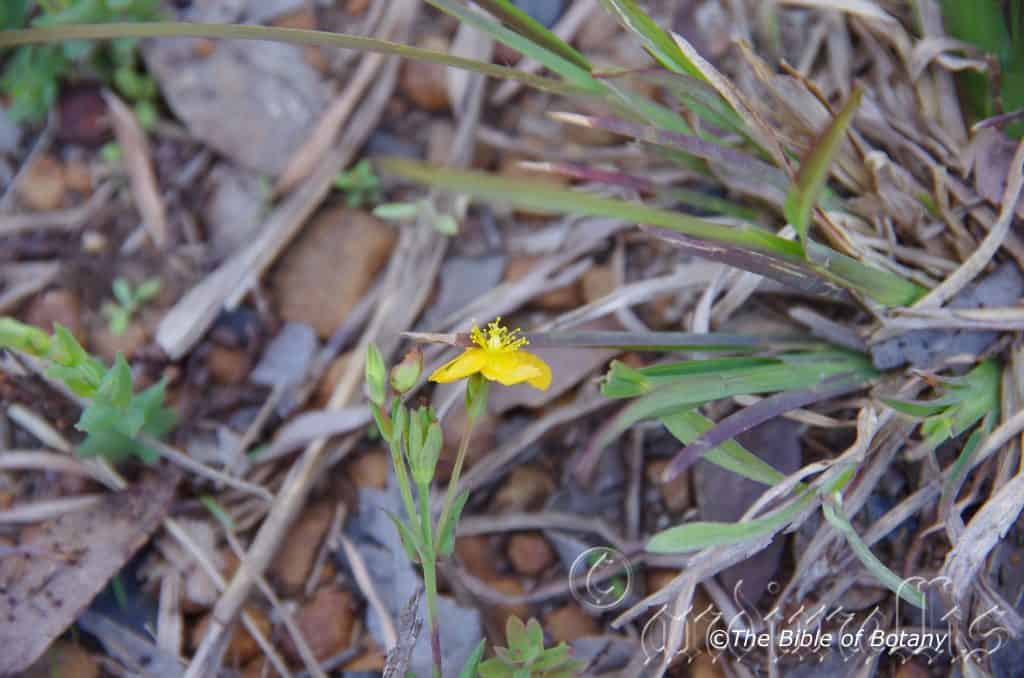
The Pinnacles NSW

The Pinnacles NSW
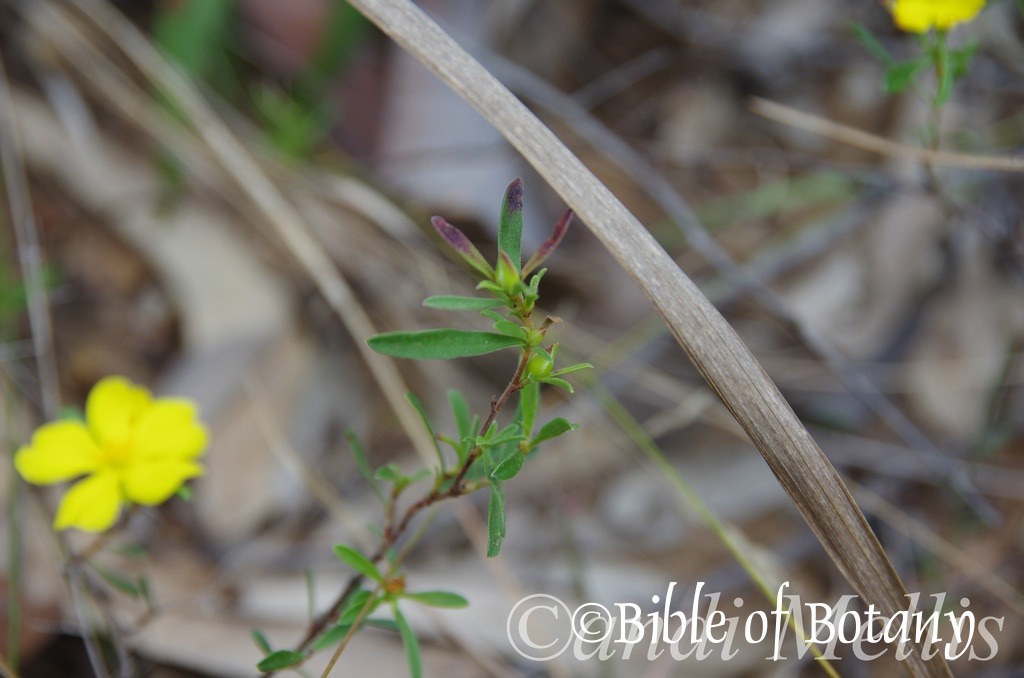
Stockyard Creek Coaldale NSW
Hypericum gramineum
Classification:
Unranked: Eudicots
Unranked: Rosids
Order: Malpighiales
Family: Hypericaceae
Subfamily: Hypericoideae
Genus: From Hyper, which is Ancient Greek for above and Eikon, which is Ancient Greek for a picture. It refers to plants, which were hung above pictures to help fend off or ward off evil spirits.
Species: From Gramine, which is Latin for a grass like. It refers to plants, which produce grains resembling some cereals and/or the leaves resembling some grasses.
Common Name: Small Saint John’s Wort.
Distribution:
Hypericum gramineum is widespread throughout Australia except for the true deserts and from Broome to Geraldton along the west coast extending inland to the deserts.
It is also absent from the western third of Tasmania.
https://avh.ala.org.au/occurrences/search?q=taxamm3Amm22Hypericum+gramineummm22#tab_mapView
Habitat Aspect Climate:
Hypericum gramineum prefers dappled shade to full sun. It grows on coastal headlands, plateaus, on the ranges in dry sclerophyll forests, open Eucalyptus woodlands, open heaths, riparian zones, littoral rainforests, or the margins and openings of temperate rainforests to tropical rainforests. The altitude ranges from 3 meters ASL to 1010 meters ASL.
The temperatures range from minus 5 degrees in July to 42 degrees in January.
The rainfalls range from lows of 200mm to an average of 3200mm annually.
Soil Requirements:
Hypericum gramineum prefers to grow on well drained moist skeletal to deep fatty sands, light gritty clays to medium clays or podzolic soils. The soils are usually derived from decomposed sandstones, granites, brown basalts, black, basalts, shale, metamorphic rocks, lateritic soils or limestones. The soils pH varies from 5.5pH through to a 6pH. It does not tolerate waterlogged soils. Non saline soils to moderately saline soils are tolerated as are salt laden winds.
Height & Spread:
Wild Plants: 0.1m to 0.4m by 0.3m to 0.8m.
Characteristics:
The glabrous stems are caespitose often with narrow chartaceous wings.
The opposite, disjunct, ovate to lanceolate leaves are divaricate while the leaves on the floral stems are more appressed to clasping. The leaves measure 5mm to 17mm in length by 3mm to 7mm in width. The bases are clasping while the apexes are tapering acute. The discolourous laminas are mid grass-green and glabrous on the upper laminas while the lower laminas are paler. The margins are entire and are decurve to revolute. The mid vein is prominent on the lower lamina and distinctly visible from the upper lamina.
The inflorescences are born on small terminal cymes of 3 to 9 individual flowers. The flowers measure 5mm to 12mm in diameter. The brown narrow triangular to broad lanceolate to narrow lanceolate bracts and bracteoles are chartaceous. The 5 pale brown chartaceous, lanceolate to narrow elliptical sepals have acute apexes and 3 to 5 conspicuous veins. The unequal sepals usually measure 3mm to 5mm in length but can grow to 9mm in length by 1mm to 2mm in width. The 5 bright yellow to bright yellow-orange contorted petals are obovate to oblanceolate with truncate to broad obtuse apexes and crisped margins. The petals measure 5mm to 10mm in length by 3mm to 6mm in width. The erect pedicels measure 5mm to 15mm in length.
There are 20 to 50 bright yellow free, stamens surround the carpels. The stamens measure 4mm to 6.5mm in length. The narrow ovoidal to ovoid-conical ovary are glabrous and measure 0.7mm to 1.8mm in length. The 3 spreading styles measure 0.7mm to 1.8mmin length.
The flowers appear from September to late December or early January in favourable seasons.
The fruits are ovoidal to ovoidal-conical capsules. The sepals, are persistent at the base while the stamens and styles are persistent on the apexes of the capsules. The 3 chamber carpels are glabrous and measure 2.5mm to 8mm in length by 1.5mm to 3mm in width. The green fruits turn reddish-brown when ripe. The deep brown orbicular seeds are finely ribbed transversally and measures 0.5mm to 0.6mm in diameter.
Wildlife:
Hypericum gramineum wildlife is unknown to the author however small black beetles have been observed on the flowers.
Cultivation:
It is a very beautiful small native herb for small gardens. It is an excellent colourful addition for subtropical to cool temperate gardens. As a garden subject it will grow to 0.3 meter to 0.5 meters in height by 0.5 meters to 0.8 meters in diameter.
It is fast growing, drought tolerant once established and are cold tolerant to temperatures at least as low as minus 6 degrees without any burning.
It is most suitable for use around swimming pools, sunny courtyards, besides pathways or in rockeries.
If it is placed around a pool then it could be placed in the center not at the ends and plant 2 or 3 in a straight row for a very formal look or use curves for the natural look. Here the choice of companion plants to use either side is limited only by size of the area to be landscaped. Leaf size or flower colour is limited by your imagination. The only limitation would be not to use other yellow flowering plants.
It is great adjacent to small areas of bush close to paths or the house so their deep yellow flowers can be viewed regularly. It is also suited for planting in small sunny rockeries as a fill in plant. Here it could be planted in small clusters of 6 to 9 to create a denser looking plant or 3 to 6 plants for a more barren look with other arid or alpine plants. If it is surrounded by slightly taller plants with larger leaves and red, deep blue or purple flowers they will create a very strong scene with depth and breadth especially when it is in flower.
Again 2 to 9 planted back from a bend or corner will become a very strong focal point when in flower, gain a lot of attention whether you are coming or going because of the fresh clean look of the foliage even in the driest of times. It can be tip pruned to make it bushier. Hard pruning can be done once the plants are established but some set back may occur so it is better to trim the plants on a regular or annual basis. It responds well to pruning recovering quickly and often increasing the number of flowers on the new growth.
Ensure that the whole plant is on display from most sections of the garden as the flowers are a real bonus.
Whether it is in flower or not these plants will catch your attention. Mass plantings are best achieved by planting them at 0.3 meters to 0.5 meter centers.
Propagation:
Seeds: The seeds can be sown directly onto a seed raising mix. Cover them with 1mm of fine sand and keep moist not wet. Place the tray in a warm sunny position or beneath 30mm shade cloth.
When the seedlings are 20mm to 30mm tall, prick them out and plant them into 50mm native tubes using a good organic mix.
Once the seedlings reach 150mm to 200mm in height they can be planted out into their permanent position. Nip the growing tips out, plant and fertilize.
Cuttings: Use 60mm to 80mm long half ripened or fully ripened material when growing from cuttings from the present season’s and growth that has 2 nodes. Take them in the warmer months of the year. Remove half the leaves from the bottom section being careful not to tear the bark. Take a 10mm slice off the bark from the bottom of the cutting on one side. A rooting hormone is not required. Place the cutting in a moist, sterile seed raising mix with the upper node on or just below the surface.
Place the trays beneath 30mm shade and keep the trays warm. Bottom heat maybe beneficial in cooler climates when striking the cuttings. Ideally temperatures should be maintained at between 20 to 24 degrees.
When the cuttings have obviously struck and have developed good roots treat them as for seedlings.
Fertilize using seaweed, fish emulsion or organic chicken pellets soaked in water on an alternate basis. Fertilize every two months until the plants are established then annually in early September to October to maintain health vitality and better flowering.
Further Comments from Readers:
Hi reader, it seems you use The Bible of Botany a lot. That’s great as we have great pleasure in bringing it to you! It’s a little awkward for us to ask, but our first aim is to purchase land approximately 1,600 hectares to link several parcels of N.P. into one at The Pinnacles NSW Australia, but we need your help. We’re not salespeople. We’re amateur botanists who have dedicated over 30 years to saving the environment in a practical way. We depend on donations to reach our goal. If you donate just $5, the price of your coffee this Sunday, We can help to keep the planet alive in a real way and continue to bring you regular updates and features on Australian plants all in one Botanical Bible. Any support is greatly appreciated. Thank you.
In the spirit of reconciliation we acknowledge the Bundjalung, Gumbaynggirr and Yaegl and all aboriginal nations throughout Australia and their connections to land, sea and community. We pay our respect to their Elders past, present and future for the pleasures we have gained.

The Pinnacles NSW
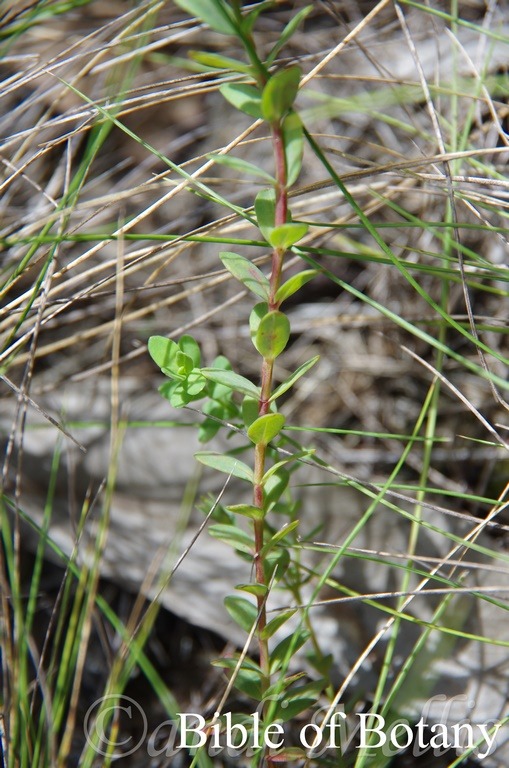
The Pinnacles NSW
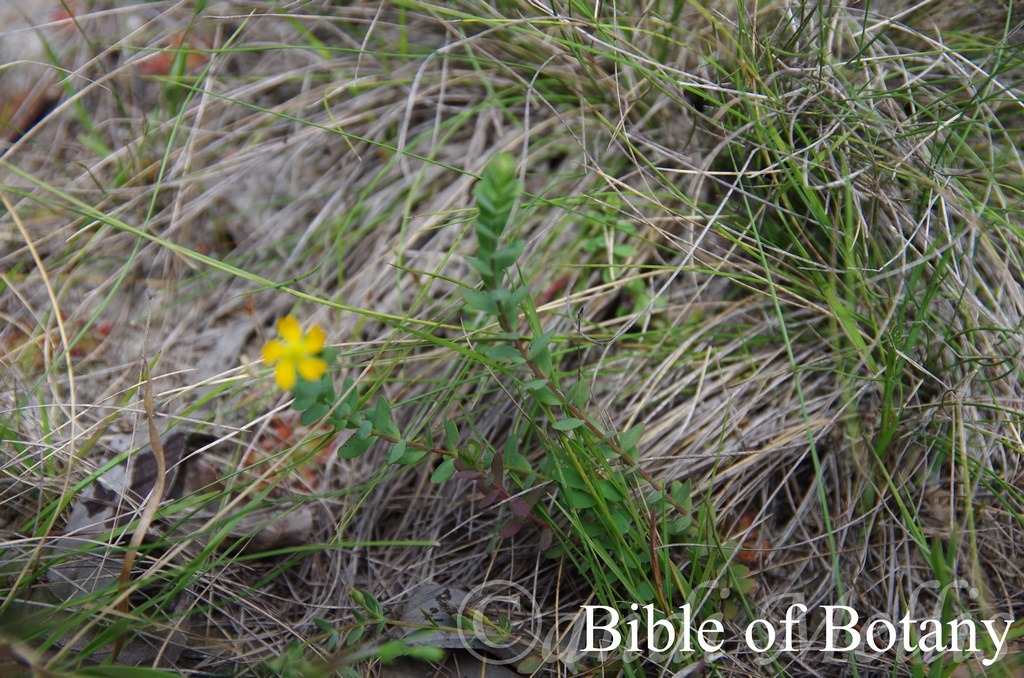
The Pinnacles NSW

The Pinnacles NSW
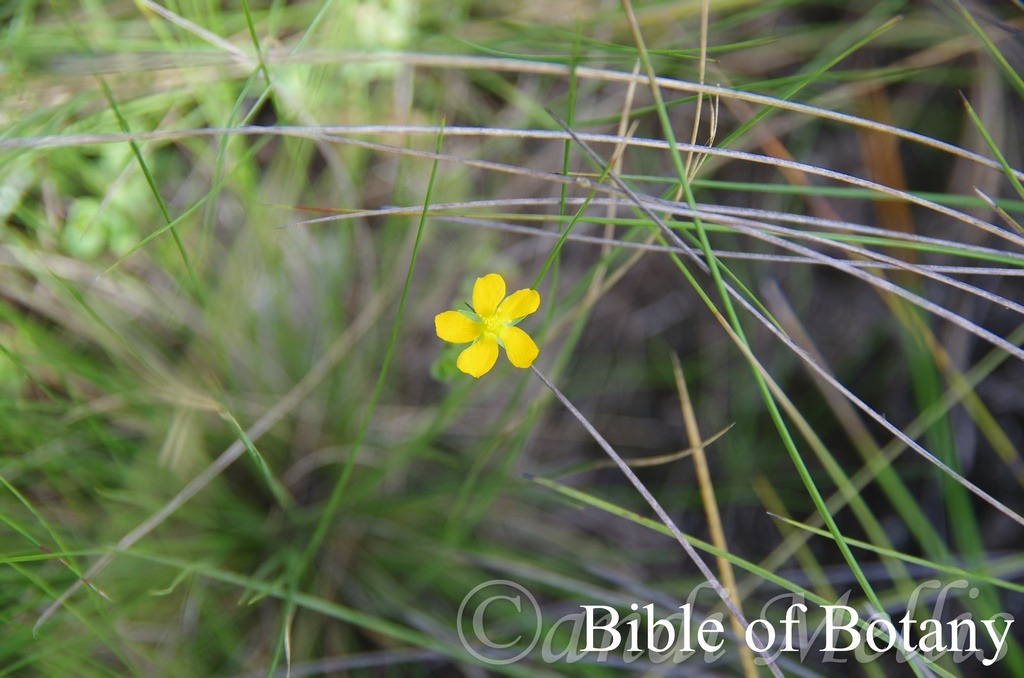
The Pinnacles NSW

The Pinnacles NSW
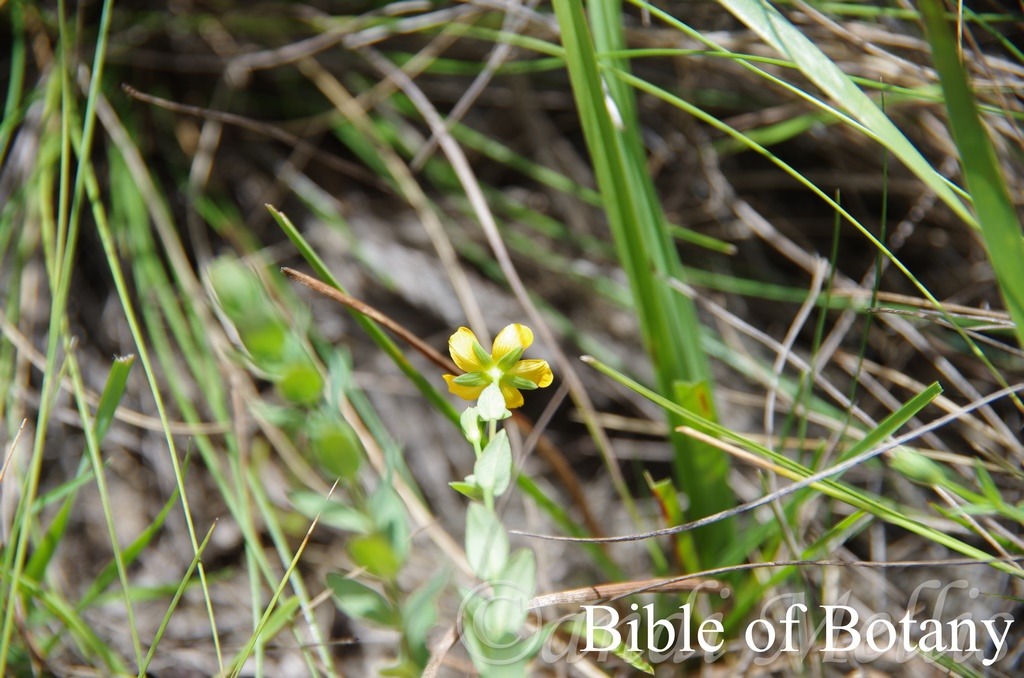
The Pinnacles NSW
Hypericum japonicum
Classification:
Unranked: Eudicots
Unranked: Rosids
Order: Malpighiales
Family: Hypericaceae
Subfamily: Hypericoideae
Genus: From Hyper, which is Ancient Greek for above and Eikon, which is Ancient Greek for a picture. It refers to plants, which were hung above pictures to help fend off or ward off evil spirits.
Species: From Japanese, which is Latinized for Japan. It refers to plants, which were first discovered in Japan.
Common Name: Saint John’s Wort.
Distribution:
Hypericum japonicum is widespread throughout Australia except for the true deserts. It is found south of Herberton in far north eastern Queensland to southern Victoria, the Bass Strait Islands and Tasmania. It is found west to Deep Creek National Park and Kangaroo Island in South Australia. In Western Australia it is found in the southern half of the state.
It is also found south from Japan, China, Malaysia, Indonesia and New Guinea.
https://avh.ala.org.au/occurrences/search?q=taxa%3A%22Hypericum+japonicum%22#tab_mapView
Habitat Aspect Climate:
Hypericum japonicum prefers dappled shade to full sun. It grows on coastal headlands, plateaus, on the ranges in dry sclerophyll forests, open Eucalyptus woodlands, open heaths, riparian zones, littoral rainforests, or the margins and openings of temperate rainforests to tropical rainforests. It grows in damp places, including swamps, drains and shallow depressions. The altitude ranges from 3 meters ASL to 1200 meters ASL.
The temperatures range from minus 5 degrees in July to 42 degrees in January.
The rainfalls range from lows of 200mm to an average of 2200mm annually.
Soil Requirements:
Hypericum japonicum prefers to grow on not so well drained, moist skeletal to deep fatty sands, light gritty clays to medium clays or podzolic soils. The soils are usually derived from decomposed sandstones, granites, brown basalts, black, basalts, shale, metamorphic rocks, lateritic soils or limestones. The soils pH varies from 4.5pH through to a 7.5pH. It tolerates waterlogged soils. Non saline soils to moderately saline soils are tolerated as are salt laden winds.
Height & Spread:
Wild Plants: 0.1m to 0.2m by 0.1m to 0.3m.
Characteristics:
Hypericum japonicum grows as a prostrate or decumbent herb with glabrous stems are caespitose often with narrow chartaceous wings on the lower sections.
The opposite, decussate, elliptical leaves measure 3mm to 10mm in length by 1.5mm to 5mm in width. The bases are clasping while the apexes are obtuse. The discolourous laminas are pale blue-green dull and glabrous on the upper laminas while the lower laminas are dull and slightly paler. The margins are entire and decurve slightly from the mid vein to the margins. The leaves decurve from the base to the apex. The mid vein is prominent on the lower lamina and faintly visible from the upper lamina.
The inflorescences are born on small terminal cymes of usually 1 to 3 individual flowers or at times more. The 5 pale greenish-blue elliptical sepals have narrow acute apexes. The sepals measure 3mm to 5mm in length but can grow to 9mm in length by 1.5mm to 2.5mm in width. The 5 bright yellow to bright yellow to yellow-orange contorted petals are obovate to oblanceolate with truncate to broad obtuse apexes and crisped margins. The petals measure 3mm to 8mm in length by 3mm to 5mm in width. The erect pedicels measure 4mm to 5mm in length.
There are 20 to 30 bright yellow free, stamens surround the carpels. The stamens measure 1mm to 2mm in length. The narrow ovoidal ovary is glabrous and measure 0.7mm to 1.8mm in length. The 3 spreading styles measure 0.7mm to 1.8mmin length.
The flowers appear from September to late March in favourable seasons.
The fruits are ovoidal to ovoidal-conical capsules. The sepals, are persistent and surround the green capsules, while the stamens and styles are persistent on the apexes. The 3 chamber carpels are glabrous and measure 5mm to 7mm in length. The green fruits turn brown when ripe.
Wildlife:
Hypericum japonicum wildlife is unknown to the author.
Cultivation:
Hypericum japonicum is an attractive small native herb for small garden beds. It is an excellent colourful addition for subtropical to cool temperate gardens. As a garden subject it will grow to 0.2 meter to 0.3 meters in height by 0.2 meters to 0.3 meters in diameter.
It is most suitable for use around swimming pools, sunny courtyards, besides pathways or in rockeries.
If it is placed around a pool then I would place them into the center not at the ends and plant 8 or more in a straight row for a very formal look or use curves for the natural look. Here the choice of companion plants to use either side is limited only by size of the area to be landscaped. Leaf size or flower colour is limited by your imagination. The only limitation would be not to use other yellow flowering plants.
It is good adjacent to small areas of bush close to paths or the house so that its deep yellow flowers can be viewed regularly. It is also suited for planting in small sunny rockeries as a fill in plant. Here it could be planted in small groups of 6 to 9 to create a denser looking plant or 3 to 6 plants for a more barren look with other arid or alpine plants. If it is surrounded by slightly taller plants with larger leaves and red, deep blue or purple flowers as they will create a very strong scene with depth and breadth especially when it is in flower. Try using Lechenaultia formosa for a deep red contrast or Lechenaultia biloba for a blue contrast.
When in flower the plants will catch your attention. Mass plantings are best achieved by planting them at 0.3 meters centers.
Propagation:
Seeds: The seeds can be sown directly onto a seed raising mix. Cover them with 1mm of fine sand and keep moist not wet. Place the tray in a warm sunny position or beneath 30% shade cloth.
When the seedlings are 20mm to 30mm tall, prick them out and plant them into 50mm native tubes using a good organic mix.
Once the seedlings reach 150mm to 200mm in height they can be planted out into their permanent position. Nip the growing tips out, plant and fertilize.
Cuttings: Use 60mm to 80mm long half ripened or fully ripened material when growing from cuttings from the present season’s and growth that has 2 nodes. Take them in the warmer months of the year. Remove half the leaves from the bottom section being careful not to tear the bark. Take a 10mm slice off the bark from the bottom of the cutting on one side. A rooting hormone is not required. Place the cutting in a moist, sterile seed raising mix with the upper node on or just below the surface.
Place the trays beneath 30% shade and keep the trays warm. Bottom heat maybe beneficial in cooler climates when striking the cuttings. Ideally temperatures should be maintained at between 20 to 24 degrees.
When the cuttings have obviously struck and have developed good roots treat them as for seedlings.
Fertilize using seaweed, fish emulsion or organic chicken pellets soaked in water on an alternate basis. Fertilize every two months until the plants are established then annually in early September to October to maintain health vitality and better flowering.
Further Comments from Readers:
Hi reader, it seems you use The Bible of Botany a lot. That’s great as we have great pleasure in bringing it to you! It’s a little awkward for us to ask, but our first aim is to purchase land approximately 1,600 hectares to link several parcels of N.P. into one at The Pinnacles NSW Australia, but we need your help. We’re not salespeople. We’re amateur botanists who have dedicated over 30 years to saving the environment in a practical way. We depend on donations to reach our goal. If you donate just $5, the price of your coffee this Sunday, We can help to keep the planet alive in a real way and continue to bring you regular updates and features on Australian plants all in one Botanical Bible. Any support is greatly appreciated. Thank you.
In the spirit of reconciliation we acknowledge the Bundjalung, Gumbaynggirr and Yaegl and all aboriginal nations throughout Australia and their connections to land, sea and community. We pay our respect to their Elders past, present and future for the pleasures we have gained.
Hypoestes floribunda
Classification:
Unranked: Eudicots
Unranked: Asterids
Order: Lamales
Family: Acanthaceae
Subfamily: Acanthoides
Tribe: Ruellieae
Subtribe: Justiciina
Genus: From Hypo, which is Ancient Greek for under and Estia which is Ancient Greek for a house. It refers to calyxes which are beneath the bracts similar to being under or covered by a roof.
Species: From Flōris, which is Latin for a flower or Flōs, which is Roman for the Goddess of spring and flowers and Bundus, which is Latin for abundant or plenty. It refers to plants, which have flowers born in prolific numbers.
Subspecies: Hypoestes floribunda subsp. floribunda. From Flōris, which is Latin for a flower or Flōs, which is Roman for the Goddess of spring and flowers and Bundus, which is Latin for abundant or plenty. It refers to flowers, which are born in prolific numbers when in flower.
Subspecies: Hypoestes floribunda subsp. angustifolia. From Angusta, which is Latin for narrow and Folium, which is Latin for foliage. It usually refers to leaves, which are narrower than other species in the genus.
Subspecies: Hypoestes floribunda var. cinerea. From Cinereous, which is Latin for ash coloured. It usually refers to the leaves which are greyish to blueish-grey with or without a coppery tinge.
Subspecies: Hypoestes floribunda var. distans. From Distans, which is Latin for separating from. It refers to any organ, which is situated a distance from the next.
Subspecies: Hypoestes floribunda var. paniculata. From Panos, which is Ancient Greek or Pānicula, which is Latin for a flower head. It refers to flowers, which are arranged in a head.
Subspecies: Hypoestes floribunda var. pubescens. From Pūbēscēns, which is Latin for short, very soft hairs. It refers to structures or organs, which are covered in soft, white or pale grey hairs.
Subspecies: Hypoestes floribunda var. suaveolens.From Suavis, which is Latin/French for sweet. It refers to flowers, or at times the fruits which are sweetly scented.
Subspecies: Hypoestes floribunda var. varia.From Varius, which is Latin for different. It refers to the leaves which have great variation in size shape and colour.
Subspecies:Hypoestes floribunda var. velutina. From Velutinus, which is Latin for to be densely covered in short soft hairs. It refers to structures or organs, which form dense soft velvet like mats.
Common Name:
Distribution:
Hypoestes floribunda var. floribunda is widespread throughout northern Australia and is found in 2 distinct populations. The first is in a line north from Eighty Mile Beach between Broome and Port Headland in central coastal Western Australia to Cooee Hill in north eastern Northern Territory, Mount Isa in far north western Queensland and north to the Crook River estuary in the Northern Territory.
The second population is found south and east from the Torres Strait Islands to the Archer River estuary, the Etherridge River catchment to Mullumbimbi and the Clarence River catchment in far north eastern New South Wales. There are also a few odd populations to the west of this line near Riversleigh Station and from Wondoan to Glen Morgan.
Hypoestes floribunda subsp. angustifolia is widespread throughout northern Australia from the Kimberley Ranges east into the western side of the Northern Territory.
Hypoestes floribunda var. canescens is scattered in several disjunct populations from Cape York Peninsula south to Townsville.
Hypoestes floribunda var. cinerea is found north of a line from Kakadu National Park in the west to near Townsville in the east.
Hypoestes floribunda var. distans is found north of a line from Kakadu National Park in the east to the southern Kymberley Ranges in the west.
Hypoestes floribunda var. paniculata is scattered in several disjunct populations from Anna Plains on the West Coast of Western Australia to Groote Eyelandt in the Northern Territory.
Hypoestes floribunda var. pubescens is found south from Melville National Park in far north eastern Queensland to Grafton in North eastern New South Wales on and east of the Great Dividing Range.
Hypoestes floribunda var. suaveolens is found on the Kimberley Ranges in West Coast of Western Australia.
Hypoestes floribunda var. varia is found south from Melville National Park in far north eastern Queensland to Grafton in North eastern New South Wales on and east of the Great Dividing Range.
Hypoestes floribunda var. velutina is found in several disjunct populations south from Mount Mulligan to Rockhampton.
https://avh.ala.org.au/occurrences/search?taxa=Hypoestes+floribunda#tab_mapView
Habitat Aspect Climate:
Hypoestes floribunda prefer full sun to dappled shade. It grows in most types of forest from brigalow scrub, open woodlands, open Eucalyptus forests, frontal dunes, back dunes dry dunal heaths dry rainforest margins and openings, monsoonal forests and vine thickets. The altitude ranges from 3 meters ASL to 1000 meters ASL.
The temperatures range from minus 1 degree in August to 44 degrees in January.
The rainfalls range from lows of 320mm to an average of 3200mm annually.
Soil Requirements:
Hypoestes floribunda prefer to grow on well drained moist skeletal soils, fatty sands, and light gritty clays to medium clays and podzolic soils. The soils are usually derived from decomposed sandstone, granite, brown basalt, black, basalt, shale, metamorphic rocks, lateritic soils, limestones accumulated sands including coral sands and alluviums. The soils pH varies from 5.5pH through to a 7.5pH. It does not tolerate waterlogged soils. Non saline soils to very saline soils are tolerated as are salt laden winds.
Height & Spread:
Wild Plants: 0.5m to 1m by 0.5m to 0.8m.
Characteristics:
The glabrous stems are usually covered in white pulverulent to pannate hairs or rarely glabrous and longitudinally ridged on the new growth.
The opposite, ovate to lanceolate leaves are divaricate and often decussate. The leaves measure 10mm to 90mm in length by 4mm to 25mm in width. The bases are broad cuneate to rounded while the apexes are acuminate. The discolourous laminas are mid blue-green to mid green and sparsely to moderately covered in white pubescent hairs with some longer hirsute hairs on the upper laminas while the lower laminas are paler. The laminas are flat to recurve slightly from the mid vein to the margins while the margins are entire. The mid vein is strongly prominent on the lower lamina while the lateral veins are prominent. The mid vein and lateral veins are distinctly visible from the upper lamina. The mid blue-green petiole is moderately covered in white pulverulent hairs with a few longer hirsute hairs and measure 5mm to 15mm in length.
The inflorescences are born on small terminal cymes of 6 to 18 individual flowers. The usually 1 or 2 or at times clustered involucre bracts are dull, pale olive-green to mid green and are elliptical to lanceolate. The involucre bracts measure 5mm to 9mm in length. The calyx is mid green to grass-green and measures 3mm to 4mm in length while the 4 linear lobes measure 2mm to 2.5mm in length. The usually white or pastel pink or at times pale pink to deep pink corolla tube and measures 5mm to 8mm in length. The corolla and lobes are sparsely to moderately covered in white pulverulent hairs.
The upper erect oblong middle lobe is pastel pink, pale pink to deep pink and are often marked with white or deeper pink patterns near the base. The apex is obtuse. The middle lobe measures 7mm to 15mm in length by 2mm to 4.5mm in width. The 2 oblanceolate-falcate lateral erect lobes are pastel pink, pale pink to deep pink and measure 6mm to 14mm in length by 1mm to 2.2mm in width. The lateral lobes are fused to the middle petal for most of their length and have acute apexes. The lower lobe is linear and decurve downwards on the apical half and measures 5mm to 14mm in length by 1mm to 2.2mm in width. The apex is acute.
There are 2 pastel pink, pale pink to deep pink filaments are covered in white puberulent hairs especially on the basal half. The filaments measure 4mm to 12mm in length. The white to creamy white anthers are adnately fixed and dehiscence longitudinally to release the white pollen. The base of the ovary is surrounded by a large linear, glabrous gland. The filiform, white style measures 7mm to 13mm in length. The flowers appear from May to August.
The fruits are narrow oblong to clavate capsules. The calyx and involucre bracts are persistent at the base of the capsules. The capsules measure 9mm to 12.5mm in length by 1.5mm to 3mm in width. The green fruits turn grey when ripe. The deep brown compressed patelliform seeds are rugose and develop on the basal half of the capsules.
Confusing Subspecies Varieties:
Hypoestes floribunda subsp. floribunda’s involucres are in long panicles and not clustered in the axils, with short dense, glandular or non-glandular hairs and longer glandular hairs. The branches and stems are covered in hairs on the ridges and in the valleys.
Hypoestes floribunda subsp. pubescens’s involucres are clustered in axils. commonly glabrous or with a few non-glandular hairs, rarely with long glandular hairs. The branches and stems are covered in hairs only on the ridges.
Wildlife:
Hypoestes floribunda’s wildlife is unknown to the author.
Cultivation:
Hypoestes floribunda is a beautiful small native herb for small gardens. It is an excellent colourful addition for subtropical to cool temperate gardens. As a garden subject it will grow from 0.6 meter to 1 meter in height by 0.6 meters to 0.8 meters in diameter when grown in the open.
It is fast growing perennials that are drought tolerant once established and are cold tolerant to temperatures at least as low as 6 degrees without any burning.
It is most suitable for use besides pathways, in rockeries or adjacent to bush garden scapes.
It is great adjacent to small areas of bush close to the house so their variable pink flowers can be viewed regularly. It is also suited for planting in medium sunny rockeries as a fill in plant. Here they should be planted in small groups of 2 or 3 to create a denser looking plant. If it is surrounded by slightly taller plants with larger leaves and yellow or orange flowers it will create a very strong scene with depth and breadth especially when it is in flower.
Again 2 to 9 planted back from a bend or corner will become a very strong focal point when in flower, gain a lot of attention whether you are coming or going because of the fresh clean look of the foliage even in the driest of times. It can be tip pruned to make them bushier. Hard pruning can be done once the plants are established but some set back may occur so it is better to trim the plants on a regular or annual basis. It responds well to pruning recovering quickly and often increasing the number of flowers on the new growth.
Ensure that the whole plant is on display from most sections of the garden as the flowers are a real bonus.
Mass plantings are best achieved by planting them at 0.3 meters to 0.6 meter centers.
Propagation:
Seeds: The seeds can be sown directly onto a seed raising mix after they have been treated. Treat the seeds by nicking the hard outer testa and soaking in water for 10 to 12 hours. Cover them with a minimum of 1mm of fine sand and keep moist not wet. Place the tray in a warm sunny position or beneath 30mm shade cloth. When the seedlings are 20mm to 30mm tall, prick them out and plant them into 50mm native tubes using a good organic mix and nip the lead shoot out.
Once the seedlings reach 150mm to 200mm in height they can be planted out into their permanent position. Nip the growing tips out, plant and fertilize.
Cuttings: Use 80mm to 100mm long half ripened material when growing from cuttings from the present season’s growth. Take them in mid-autumn or early spring. Remove half the leaves from the bottom section being careful not to tear the bark. Take a 10mm slice off the bark from the bottom of the cutting on one side.
1 Prepare the cutting mix by adding one third sharp clean river sand, one third peat and one third perlite. These ingredients are sterilize,
2 Select good material from non diseased plants,
3 Select semi green stems for cuttings. Look for a stem with two or three nodes,
4 Place the cutting on a flat, hard surface, and make a clean cut down one side of the cutting at the base for 10mm with a sharp sterile knife or razor blade. – This scarification of the node will increase the chances of roots emerging from this spot. Now remove all but one or two the leaves, leaving the apex leaves in tact. If the leaves are very large in proportion to the stem, cut off the apical halves.
5 A rooting hormone is not required,
6 Use a small dipple stick or old pencil to poke a hole into the soilless potting mix. Ensure the hole is slightly larger than the stem diameter and be careful not to wipe the rooting hormone off the cuttings base, place the cuttings in a pattern ensuring the cuttings are not touching each other,
7 I like to place the pots in Plastic bags to help maintain temperature and moisture. Place in a semi shaded place like under 50mm shade cloth.
8 When the cuttings have struck, open the bag to allow air circulation for a few days to a week,
9 Once hardened off remove the cuttings from the bag and allow to further hardening for a few more days,
10 Transplant into a good potting mix to grow on.
Fertilize using seaweed, fish emulsion or organic chicken pellets soaked in water on an alternate basis. Fertilize every two months until the plants are established then annually in early September to October to maintain health vitality and better flowering.
Further Comments from Readers:
Hi reader, it seems you use The Bible of Botany a lot. That’s great as we have great pleasure in bringing it to you! It’s a little awkward for us to ask, but our first aim is to purchase land approximately 1,600 hectares to link several parcels of N.P. into one at The Pinnacles NSW Australia, but we need your help. We’re not salespeople. We’re amateur botanists who have dedicated over 30 years to saving the environment in a practical way. We depend on donations to reach our goal. If you donate just $5, the price of your coffee this Sunday, We can help to keep the planet alive in a real way and continue to bring you regular updates and features on Australian plants all in one Botanical Bible. Any support is greatly appreciated. Thank you.
In the spirit of reconciliation we acknowledge the Bundjalung, Gumbaynggirr and Yaegl and all aboriginal nations throughout Australia and their connections to land, sea and community. We pay our respect to their Elders past, present and future for the pleasures we have gained.
Hypolaena fastigiata
Classification:
Unranked: Monocots
Unranked: Commelinids
Order: Poales
Family: Restionaceae
Genus: From Hypo, which is Ancient Greek for under and Khlaena, which is Ancient Greek for a cloak. It refers to bracts which are tightly pressed against the culms like a tight fitting cloak.
Species: From Fasiculus, which is Latin for a small, close cluster or to be bundled together. It refers to organs, which are closely imbricated together.
Common Name:
Distribution:
Hypolaena fastigiata is found south from the Swan River Plain to the Esperance Coastal Plain along the coast and along the river systems close to the coast in Western Australia.
On the east coast it is found south from Littabella National Park, north west of Bundaberg in central coastal Queensland to Mount Crawford Forest on the Murray River in South Australia. It is found along the coast and along the river systems close to the coast. It is also found on Kangaroo Island, southern Eyre Peninsula to Flinders’ Island near Venus Bay.
In Tasmania it is found on King Island and Flinders Island group of Islands in Bass Strait and along the north and east coast of the main Island.
https://avh.ala.org.au/occurrences/search?taxa=Hypolaena+fastigiata#tab_mapView
Habitat Aspect Climate:
Hypolaena fastigiata prefers full sun to light dappled shade. It mainly grows moist heaths to dry heaths close to the coast. The altitude ranges from 2 meters ASL to 570 meters ASL.
The temperatures range from minus 3 degrees in August to 40 degrees in January.
The rainfall ranges from lows of 300mm to 2000mm average per annum.
Soil Requirements:
Hypolaena fastigiata prefers white or grey peaty sands to sandy loams. The soils are usually derived from decomposed sandstones, granites or accumulated peaty beach sands. The soils pH ranges from 4.5pH to 6.5pH. It tolerates seasonal wet soils and seasonal high water tables while soil moisture is maintain on the surface through capillary action of the soil. Non saline soils to moderately saline soils are tolerated as are salt laden winds.
Height & Spread:
Wild Plants: 0.4m to 0.65m by 0.2m to 0.3m.
Characteristics:
It grows as a loose tufted perennial rush with erect to ascending culms that are densely branched. The sea-green culms are straight to slightly flexuous, striated and measure 200mm to 650mm in height by 1mm to 1.5mm in diameter. The young and juvenile culms are covered in off white to pale grey minute caduceus, tomentose hairs. The rhizome are creeping to erect or ascending and are sparsely covered in white floccose hairs with glabrous sheathing scales. The rhizomes measure 3mm to 4mm in diameter.
The deep red-brown sheaths are striate and are closely appressed on the culms. The sheaths measure 12mm to 15mm in length and usually have acute or at times caudate apexes.
The leaves are reduced to narrow acute apexes that measure 1mm to 3mm in length.
The inflorescences are compound panicles. The elliptical spikes measure 150mm to 900mm in length. The rachises are fragile at the nodes.
The male flowers are usually nodding or at times are erect panicles. The deep red-brown spikes are few to many at the end of flowering branches. The spikelets are compressed, oblanceolate to elliptic and measure 5mm to 7mm in length by 2.0mm to 2.5mm in diameter. The individual florets measure 1.2mm to 1.6mm in length. The filaments are short while the dorsifixed anthers are attached near the base.
The erect female spikelets are elliptic to oblong and strongly spread out at apexes. The deep reddish-brown flowers measure 6mm to 12mm in length. The individual florets measure 1.2mm to 1.3mm in length. The flowers appear from September to December.
The fruits of are ovoidal nuts. The pale brown to mid brown nuts measure 4mm in length by 3mm in diameter.
Wildlife:
Hypolaena fastigiata wildlife are unknown to the author.
Cultivation:
Hypolaena fastigiata is not a good fodder crop. It is an unusual rush for the fastidious gardener. It is difficult to locate in nurseries and if required will probably mean the gardener will have to secure seed to grow it themselves. Its potential in medium rockeries is huge as would be its potential in the coastal heath garden.
In cultivation it needs moist to dry sandy loams or peaty sands to succeed. In cultivation the plants would probably grow similar to their wild cousins where it grows from 500mm to 700mm in height by 200mm to 500mm in diameter.
Hypolaena fastigiata is well suited to a heath type garden provided it can have a little room to expand so don’t crowd it in. Don’t use contours to display the plants as heath lands are almost always flat or have a slight rise. Make the heath garden path narrow so you have to feel the plants as you walk through the garden bed. This gives an extra dimension which many people forget about when designing heath gardens. Plants must be planted close together and be short so you can see over the tallest ones with the exception of one or two plants at the most in the mid ground or in the background. These will be feature plants. The idea is to achieve a feeling of expansive flatness. This can be achieved with using the Hypolaena fastigiata’s open habit lack of leaves and erect culms to give a vertical look. Mix them with other smaller shrubs so none of them dominate the scene but blend in to give a mosaic of foliage colours that you oversee. Here I immediately think of Actinotis helianthi, Melaleuca pearsonii or other subshrubs like Cloanthes parviflora or Pelargonium australe, Pelargonium inodorum. Even Hibiscus diversifolia could be pruned and used in the background or allowed to straggled between clumps Comesperma defoliatum in the foreground. Glycyrrhiza acanthocarpa would be something entirely different next to a path where you can walk by and pick a leaf to crush and enjoy the aroma of liquorice.
Propagation:
Seeds: The seeds can be sown directly onto a seed raising mix after they have been treated. Treat the seeds by nicking the hard outer testa and soaking in water for 10 to 12 hours. Cover them with a minimum of 1mm of fine sand and keep moist not wet. Place the tray in a warm sunny position or beneath 30mm shade cloth. When the seedlings are 20mm to 30mm tall, prick them out and plant them into 50mm native tubes using a good organic mix and nip the lead shoot out.
Once the seedlings reach 150mm to 200mm in height they can be planted out into their permanent position. Nip the growing tips out, plant and fertilize.
Fertilize using seaweed, fish emulsion or organic chicken pellets soaked in water on an alternate basis. Fertilize every two months until the plants are established then annually in early September to October to maintain health vitality and better flowering.
Further Comments from Readers:
Hi reader, it seems you use The Bible of Botany a lot. That’s great as we have great pleasure in bringing it to you! It’s a little awkward for us to ask, but our first aim is to purchase land approximately 1,600 hectares to link several parcels of N.P. into one at The Pinnacles NSW Australia, but we need your help. We’re not salespeople. We’re amateur botanists who have dedicated over 30 years to saving the environment in a practical way. We depend on donations to reach our goal. If you donate just $5, the price of your coffee this Sunday, We can help to keep the planet alive in a real way and continue to bring you regular updates and features on Australian plants all in one Botanical Bible. Any support is greatly appreciated. Thank you.
In the spirit of reconciliation we acknowledge the Bundjalung, Gumbaynggirr and Yaegl and all aboriginal nations throughout Australia and their connections to land, sea and community. We pay our respect to their Elders past, present and future for the pleasures we have gained.
Hypolepis glandulifera
Classification:
Unranked: Polypodiophyta
Class: Polypodiidae
Order: Polypodiales
Family: Dennstaedtiaceae
Genus: From Hypo, which is Ancient Greek for under and Lepis, which is Ancient Greek for a scale. It refers to the position of the indusium, which is positioned over the sori and resemble a scale.
Species: From Gland/Glāns, which is Latin for a gland and Ferra, which is Latin for to bear or bearing. It refers to plants, which have numerous glands.
Common Name: Downy Ground Fern.
Distribution:
Hypolepis glandulifera is found from the Big Tableland to Hinchinbrook, in the Carnarvon Gorge and from the Kroombit Tableland to Builyan Plateau in far north and central Queensland. It is also found south from the Bunya Mountains in southern Queensland to the Glenelg Plain in south western Victoria.
In Tasmania it is found on Flinders Island and along the north coast east from the Forth River to the east coast and south to the Tasman Peninsula.
https://avh.ala.org.au/occurrences/search?taxa=Hypolepis+glandulifera#tab_mapView
Habitat Aspect Climate:
Hypolepis glandulifera prefers partial shade to light dappled sunlight. It grows in moist open rainforests, adjacent to rainforests often forming large colonies. The altitude ranges from 30 meters ASL to 1240 meters ASL.
The temperatures range from 4 degrees in July to 42 degrees in January.
The rainfalls range from lows of 400mm to an average of 3200mm annually. The lower rainfall areas are associated with high off season orographic precipitation.
Soil Requirements:
Hypolepis glandulifera prefers better quality loams to medium clays. The soils are usually derived from partially decomposed granite, shale metamorphic rocks, sandstones, brown basalt and black basalt. The soils and mulches pH varies from 5pH through to a 6pH. It does not tolerate waterlogged soils however the soils remain moist for extended periods after rain. Non saline soils to moderately saline soils are tolerated.
Height & Spread:
Wild plants grow from 1m to 1.5m by 2m x 10m across.
Characteristics:
It is one of the few ferns that form large clumps. The green rhizomes are thick and sparsely covered in reddish-brown linear hairs. The rhizomes measure 3mm in length by 8mm in diameter.
The erect triangular fronds are usually tripinnate near the base and bipinnate on the apical half. The fronds measure 600mm to 1500mm in length. The stipes are brown to orange-brown at base becoming paler above and covered in white silky sericeous hairs. The main rachis is light brown to yellowish-brown or reddish–brown and is covered in glandular hairs and scattered small, brown to orange tuberculate lumps. The secondary rachises are covered in conspicuous, crisped hairs, some with glandular apices. The concolourous laminas are dull pale grass-green and sparsely to moderately covered in white semi caduceus, glandular hairs. The ultimate segments are shallowly lobed and toothed. The mid vein is prominent on the lower lamina and is clearly visible from the upper lamina.
The fertile fronds are similar to the sterile fronds. The sori are positioned well inside the margins and are unprotected or are covered by a false indusium.
Wildlife:
Hypolepis glandulifera’s wildlife is unknown to the author.
Cultivation:
It is a very hardy fern in cultivation particularly near the coast where temperatures and rainfall are more even. It can tolerate bright conditions and even thrive in very light shade provided moisture is maintained throughout the year. Hypolepis glandulifera are ideal ferns for around pool scapes and against walls where the fronds are forced upwards. It makes an excellent tub plant or subject in restricted areas like courtyards where a taller hardier fern is required provided the mix is continuously moist to wet. As long as they do not dry out and plentiful water is guaranteed healthy growth is assured.
This fern looks particularly at home in large bright court yards where the 1.4 meter long fronds contrast beautifully against brick work, logs, stumps or other very hard line features.
It looks great in a rainforest garden setting where it breaks up vertical lines of the trunks from palms and Cordyline specie. Some cleaning of spent fronds on annual bases maybe necessary particularly after they have been foraged over by unknown moth larvae. It is not drought tolerant so the occasional lapse in watering will see the fronds look worse for wear and the new fronds much reduced in size. If they do happen to look dead after a long holiday or during a drought prune all the fronds off to a few centimetres of the rhizome and give them a good soaking. I follow this procedure with my plants after it is defoliated every year in early summer. Cut all the foliage or remaining foliage back to just above the rhizome. Apply a generous watering then after two days give them a double strength of our recommended fertilizer and within two weeks the new fronds will totally rejuvenate the floor of the forest.
Propagation:
Spores: All ferns that are declared rare, vulnerable or endangered are protected by Federal and State Laws and must not be removed from the wild unless you are a land developer, mining company or main Roads department etc. This includes bulbs, roots, leaves and flowers. No part of any plant can be removed from Federal, State or Local Government land without the prior permission of the authority and this includes the spore.
Most people are put off at the thought of growing ferns from spore. Like all plants that produce their offspring from seed or spore the methods are basically the same. Remember nature has been doing this for millions of years and has been very successful. I have had excellent results growing over 200 different species of Australian ferns so don’t be afraid. Give it a go.
Step 1. Select spore from the fern fronds. Wait until the fern is just starting to release its spore. Rinse the fronds under clean running water and dry. This is to wash off any other spores from rogue ferns that may have settled onto the fronds. (There is nothing worse than having common brake or common soft bracken contaminating a prized tree fern or epiphyte.)
Step 2. Place the dry fronds in a clean brown paper bag and keep them in a cool dark place like the linen closet for about a week to ten days before you are ready to sow the spore. The exception to this rule applies to ferns, which produce green spores. These must be sown immediately that they are released. Todea Barbara is a good example of a fern, which produces green spore.
Step 3. Take a large ice cream container, a small ice cream container and a clean clear plastic bag large enough to seal the large ice cream container and three or four milk bottle tops.
Step 4. Punch or drill 6 to 10 5mm holes in the bottom of the small ice cream container.
Step 5. Wash both containers, tops and plastic bag so that they are very clean and sterile.
Step 6. Use a clean fine seed raising mi. We used 30mm fine sand, 30mm peat and 30mm perlite and 10mm vermiculite. We used crushed basalt, crusher dust and peat in a 50:50 ratio for epiphytes. Moisten the mix enough that water does not run out when the mix is squeezed between the fingers.
Step 7. Place the moisten mix (Enough to half fill the small ice cream container) in the microwave oven with a large glass of water for 7 or 8 minutes, until the water is boiling. Allow them to cool in the oven. You will need the water later so do not tip it out.
Step 8. Take the brown paper bag out of the linen closet. Shake the bag and remove the fronds. You should have a yellow, brown, black or rarely greenish brown or ochre powder or very fine, small round pin head size spore depending on the specie involved.
Step 9. Remove the mixture from the oven once it has cooled and place it in the small ice cream container and level.
Step 10. Sprinkle the spore sparsely over the mixture in the small ice cream container.
Step 11. Place the milk bottle tops in the large ice cream container with the flat surface facing down. Place the small ice cream container in the large ice cream container so that it is sitting on the milk bottle tops.
Step 12. Remove the water from the microwave and pour it into the larger ice cream container so there is 25mm to 30mm of water in the bottom.
Step 13. Place the ice cream containers in the plastic bag and seal.
Step 14. Place the contents and bag in a warm shady place preferably 50mm to 70mm shade depending on the specie. Shade houses and some window sills are ideal.
Step 15. The surface should turn green within a week to two weeks. The prothallus will then develop. From the prthalus the first true fronds will appear. Wait until the ferns are 20mm to 35mm in height before you attempt to transplant them. Once they are ready open the bag up slightly and allow the air to flow around the little ferns. Every 3 to 5 days open the bag a little further so the ferns get use to their new environment. Allow them a week to two weeks to harden off before you transplant them following the removal of the plastic bag. Carefully prick them out into 50mm standard squat tubes as you would any seedling.
Do not try to transplant them as single plants as they are still a little delicate still.
Once the smaller ones again reach 50mm to 70mm you may wish to divide the stronger and hardier individual plants into smaller clumps in 100mm squat pots.
Fertilize using seaweed, fish emulsion or organic chicken pellets soaked in water on an alternate basis. Fertilize every two months until the plants are established then annually in early September to October to maintain health vitality and better flowering.
Further Comments from Readers:
Hi reader, it seems you use The Bible of Botany a lot. That’s great as we have great pleasure in bringing it to you! It’s a little awkward for us to ask, but our first aim is to purchase land approximately 1,600 hectares to link several parcels of N.P. into one at The Pinnacles NSW Australia, but we need your help. We’re not salespeople. We’re amateur botanists who have dedicated over 30 years to saving the environment in a practical way. We depend on donations to reach our goal. If you donate just $5, the price of your coffee this Sunday, We can help to keep the planet alive in a real way and continue to bring you regular updates and features on Australian plants all in one Botanical Bible. Any support is greatly appreciated. Thank you.
In the spirit of reconciliation we acknowledge the Bundjalung, Gumbaynggirr and Yaegl and all aboriginal nations throughout Australia and their connections to land, sea and community. We pay our respect to their Elders past, present and future for the pleasures we have gained.
Hypolepis muelleri
Classification:
Class: Polypodiidae
Order: Polypodiales
Family: Dennstaedtiaceae
Genus: From Hypo, which is Ancient Greek for under and Lepis, which is Ancient Greek for a scale. It refers to the position of the indusium, which is positioned over the sori and resemble a scale.
Species: Is named in honour of Ferdinand Von Mueller; 1825-1896, who was a German born Australian Botanist who named over 2000 new species and was director of the Melbourne Botanic Gardens.
Common Name: Harsh Ground Fern.
Distribution:
Hypolepis muelleri is found in a line south and east from Stony Creek near Bundaberg in central coastal Queensland to Warnambool in southern coastal Victoria with a disjunct population further west on the Glenelg plain. It is also found in 3 isolated populations to the north near Cardwell, Eungella National Park and Taroom.
In Tasmania it is found on King Island and Flinders Island and across the top end close to the coast from east to west.
https://avh.ala.org.au/occurrences/search?taxa=Hypolepis+muelleri#tab_mapView
Habitat Aspect Climate:
Hypolepis muelleri prefers full shade, partial shade to dappled sunlight. It grows in moist semi open Eucalyptus to moist open Eucalyptus forests coastal woodlands along creeks, streams and rivers around swamps and wet wallum heaths. The altitude ranges from 10 meters ASL to 950 meters ASL.
The temperatures range from 4 degrees in July to 42 degrees in January.
The rainfalls range from lows of 600mm to an average of 3200mm annually. Additional moisture is supplemented in drier inland areas by orographic precipitation.
Soil Requirements:
Hypolepis muelleri prefers better quality moist sands to moist medium clays with a thick layer of forest litter. The soils are usually derived from partially decomposed granites, shale metamorphic rocks, brown basalt or black basalt. The soils and mulches pH varies from 5.5pH through to a 7pH. It tolerates waterlogged soils and is often standing in water for several weeks every year. Non saline soils to moderately saline soils are tolerated.
Height & Spread:
Wild plants grow from 0.7m to 01m by 1m x 2m across.
Characteristics:
Hypolepis muelleri is one of the few ferns that form large clumps. The green rhizomes are thick and moderately to densely covered in deep brown linear hispid hairs. The rhizomes measure 1.5mm in length by 3mm in diameter.
The erect triangular fronds are usually tripinnate near the base and bipinnate on the apical half. The fronds measure 500mm to 1000mm in length. The stipes are reddish-brown at base becoming straw-yellow above. The stipe and main rachis are smooth, glabrous to covered in brown to orange–brown hirtellous hairs on small tuberculate lumps. The secondary rachises are covered in brown septate hairs that are usually curved towards the tip of the rachis. The deep green, triangular lamina is tri pinnate at the base and pinnate on the apical half. The concolourous laminas are dull grass-green and sparsely to moderately covered in white hirtellous and hirsute hairs. The ultimate segments are simple oblong lobes. The mid vein is prominent on the lower lamina and is clearly visible from the upper lamina.
The fertile fronds are similar to the sterile fronds. The sori is positioned well inside the margins, are unprotected and mixed with short brown hirtellous hairs.
Wildlife:
Hypolepis muelleri’s wildlife is unknown to the author.
Cultivation:
Hypolepis muelleri is a very hardy fern in cultivation particularly near the coast where temperatures and rainfall are more even. They can tolerate bright conditions and even thrive in very light shade provided moisture is maintained throughout the year. Hypolepis muelleri is an ideal fern for around pool scapes and against walls where the fronds are forced upwards. They make excellent tub plants or subjects in restricted areas like court yards where a taller hardier fern is required provided the mix is continuously wet. As long as they do not dry out and plentiful water is guaranteed healthy growth is assured.
This fern looks particularly at home in large bright court yards where the 1.4 meter long fronds contrast beautifully against brick work, logs, stumps or other very hard line features.
Hypolepis muelleri look great in a rainforest garden setting where it breaks up vertical lines of the trunks from palms and Cordyline. Some cleaning of spent fronds on annual bases maybe necessary particularly after they have been foraged over by unknown moth larvae. It is not drought tolerant so the occasional lapse in watering will see the fronds look worse for wear and the new fronds much reduced in size. If they do happen to look dead after a long holiday or during a drought prune all the fronds off to a few centimetres of the rhizome and give them a good soaking. I follow this procedure with my plants after it is defoliated every year in early summer. Cut all the foliage or remaining foliage back to just above the rhizome. Apply a generous watering then after two days give them a double strength of our recommended fertilizer and within two weeks the new fronds will totally rejuvenate the floor of the forest.
Propagation:
Spores: Most people are put off at the thought of growing ferns from spore. Like all plants that produce their offspring from seed or spore the methods are basically the same. Remember nature has been doing this for millions of years and has been very successful. I have had excellent results growing over 200 different species of Australian ferns so don’t be afraid. Give it a go.
Step 1. Select spore from the fern fronds. Wait until the fern is just starting to release its spore. Rinse the fronds under clean running water and dry. This is to wash off any other spores from rogue ferns that may have settled onto the fronds. (There is nothing worse than having common brake or common soft bracken contaminating a prized tree fern or epiphyte.)
Step 2. Place the dry fronds in a clean brown paper bag and keep them in a cool dark place like the linen closet for about a week to ten days before you are ready to sow the spore. The exception to this rule applies to ferns, which produce green spores. These must be sown immediately that they are released. Todea Barbara is a good example of a fern, which produces green spore.
Step 3. Take a large ice cream container, a small ice cream container and a clean clear plastic bag large enough to seal the large ice cream container and three or four milk bottle tops.
Step 4. Punch or drill 6 to 10 5mm holes in the bottom of the small ice cream container.
Step 5. Wash both containers, tops and plastic bag so that they are very clean and sterile.
Step 6. Use a clean fine seed raising mi. We used 30mm fine sand, 30mm peat and 30mm perlite and 10mm vermiculite. We used crushed basalt, crusher dust and peat in a 50:50 ratio for epiphytes. Moisten the mix enough that water does not run out when the mix is squeezed between the fingers.
Step 7. Place the moisten mix (Enough to half fill the small ice cream container) in the microwave oven with a large glass of water for 7 or 8 minutes, until the water is boiling. Allow them to cool in the oven. You will need the water later so do not tip it out.
Step 8. Take the brown paper bag out of the linen closet. Shake the bag and remove the fronds. You should have a yellow, brown, black or rarely greenish brown or ochre powder or very fine, small round pin head size spore depending on the specie involved.
Step 9. Remove the mixture from the oven once it has cooled and place it in the small ice cream container and level.
Step 10. Sprinkle the spore sparsely over the mixture in the small ice cream container.
Step 11. Place the milk bottle tops in the large ice cream container with the flat surface facing down. Place the small ice cream container in the large ice cream container so that it is sitting on the milk bottle tops.
Step 12. Remove the water from the microwave and pour it into the larger ice cream container so there is 25mm to 30mm of water in the bottom.
Step 13. Place the ice cream containers in the plastic bag and seal.
Step 14. Place the contents and bag in a warm shady place preferably 50mm to 70mm shade depending on the specie. Shade houses and some window sills are ideal.
Step 15. The surface should turn green within a week to two weeks. The prothallus will then develop. From the prothalus the first true fronds will appear. Wait until the ferns are 20mm to 35mm in height before you attempt to transplant them. Once they are ready open the bag up slightly and allow the air to flow around the little ferns. Every 3 to 5 days open the bag a little further so the ferns get use to their new environment. Allow them a week to two weeks to harden off before you transplant them following the removal of the plastic bag. Carefully prick them out into 50mm standard squat tubes as you would any seedling.
Do not try to transplant them as single plants as they are still a little delicate still.
Once the smaller ones again reach 50mm to 70mm you may wish to divide the stronger and hardier individual plants into smaller clumps in 100mm squat pots.
Fertilize using seaweed, fish emulsion or organic chicken pellets soaked in water on an alternate basis. Fertilize every two months until the plants are established then annually in early September to October to maintain health vitality and better flowering.
Further Comments from Readers:
Hi reader, it seems you use The Bible of Botany a lot. That’s great as we have great pleasure in bringing it to you! It’s a little awkward for us to ask, but our first aim is to purchase land approximately 1,600 hectares to link several parcels of N.P. into one at The Pinnacles NSW Australia, but we need your help. We’re not salespeople. We’re amateur botanists who have dedicated over 30 years to saving the environment in a practical way. We depend on donations to reach our goal. If you donate just $5, the price of your coffee this Sunday, We can help to keep the planet alive in a real way and continue to bring you regular updates and features on Australian plants all in one Botanical Bible. Any support is greatly appreciated. Thank you.
In the spirit of reconciliation we acknowledge the Bundjalung, Gumbaynggirr and Yaegl and all aboriginal nations throughout Australia and their connections to land, sea and community. We pay our respect to their Elders past, present and future for the pleasures we have gained.
Hypoxis pratensis
Classification:
Unranked:
Unranked: Monocots
Class: Lilianae
Order: Asparagales
Family: Hypoxidaceae
Genus: From Hypo, which is Ancient Greek for under and Oxys, which is Ancient Greek for sharp. It refers to a sharp point on the seeds of many species.
Species: From Pratens, which is Latin for a meadow and Anum/Ensis, which is Latin for originating from. It refers to plant habitats, which are meadow like.
Variety: Hypoxis pratensis var. pratensis. From Pratens, which is Latin for a meadow and Anum/Ensis, which is Latin for originating from. It refers to plant habitats, which are meadow like.
Variety: Hypoxis pratensis var. tuberculata. From Tūberōsum, which is Latin for a tuber or lumps and bumps. It refers to structures or organs, which has a tuberculate lumps or bumps.
Common Name: Golden Weather Grass.
Distribution:
Hypoxis pratensis var. pratensis is found from Batavia Downs on Cape York Peninsula to the Richmond Valley in far north eastern New South Wales and from Taree to Jervis Bay in central coastal New South Wales.
Hypoxis pratensis var. tuberculata is found from Boyne Island in central coastal Queensland to the Clarence Valley in far north eastern New South Wales.
https://avh.ala.org.au/occurrences/search?taxa=Hypoxis+pratensis#tab_mapView
Habitat Aspect Climate:
Hypoxis pratensis prefer dappled shade to full sun. It grows on coastal headlands, plateaus, on the ranges in dry sclerophyll forests, open woodlands and heaths, riparian zones, littoral rainforests, or on the margins and in openings of temperate rainforests to tropical rainforests. This is a small rounded shrub with deep yellow flowers. The altitude ranges from 3 meters ASL to 1010 meters ASL.
The temperatures range from minus 2 degrees in July to 38 degrees in January.
The rainfalls range from lows of 550mm to an average of 2500mm annually.
Soil Requirements:
Hypoxis pratensis prefers well drained moist skeletal soils, fatty sands, light gritty clays to medium clays and podzolic soils. The soils are usually derived from decomposed sandstones, granites, brown basalt, black, basalt, shale, metamorphic rocks, lateritic soils and limestones. The soils pH varies from 5.5pH through to a 6pH. It does not tolerate waterlogged soils. Non saline soils to moderately saline soils are tolerated as are salt laden winds.
Height & Spread:
Wild Plants: 0.1m to 0.4m by 0.3m to 0.6m.
Characteristics:
It is a perennial herb with a condensed corm. , The corms measure 12mm to 15mm in length by 12mm to 15mm in diameter. The corm sheaths are chartaceous to fibrous. The roots are tuberous or fleshy and fibrous. The corms develop from 5mm to 70mm below the surface of the ground.
The erect to pendulant, linear leaves are slightly subulate and complicated. The leaves measure 35mm to 400mm in length by 1.5mm to 5.5mm in width. The bases are clasping around the corm while the apexes are tapering acute. The concolourous laminas are mid grass-green and glabrous or sparsely covered in white hirtellous to puberulent hairs. The laminas are flat to recurve upwards from the midvein to the margins while the margins are entire. The mid vein is strongly prominent on the lower lamina and distinctly visible from the upper lamina.
The inflorescences are usually simple cymes born at the end of a spike. There are usually 2 to 8 spikes with 3 to 9 individual flowers on each spike. The peduncle and pedicels are grass-green to sea-green and glabrous. The peduncles measure 30mm to 350mm in length while the pedicels measure 7mm to 30mm in length. The axils are sparsely to moderately covered in white pulverulent hairs. The brown narrow triangular-lanceolate to linear bracts and bracteoles are chartaceous.
The single grass-green, linear to narrow lanceolate bracteole measures 2mm to 8mm in length. The 6 bright yellow narrow lanceolate to oblong tepals measure 7mm to 12mm in length by 2.8mm to 6mm in width. The tepals are sparsely to moderately covered in white villous hairs externally and are glabrous internally.
The bright yellow filaments are opposite the tepals and measure 1.8mm to 3mm in length while the bright yellow, obloidal anthers measure 1.5mm to 2.5mm in length by 0.5mm to 0.6mm in diameter. The 3 locular, bright yellow ovary is sparsely to moderately covered in white villous hairs and measures 1.3mm to 2.5mm in length. The bright yellow pistil measures 2mm to 3mm in length.
The fruits are globose to narrow turbinate capsules. The capsules are deep chocolate-brown, glabrous and measure 3.5mm to 7mm in length by 2mm to 3mm in width. The deep brown globular seeds measures 0.8mm to 1.3mm in diameter.
Confusing Subspecies Varieties:
Hypoxis pratensis subsp. pratensis’s anthers measure 1.5mm to 2mm in length while the seeds are colliculate.
Hypoxis pratensis subsp. tuberculata’s anthers measure 2.2mm to 2.5mm in length while the seeds are conspicuously tuberculate.
Wildlife:
Hypoxis pratensis wildlife is unknown to the author.
Cultivation:
Hypoxis pratensis is a beautiful small native herb for small gardens. It is an excellent colourful addition for sub tropical to cool temperate gardens. As a garden subject it will grow to 0.3 meter to 0.4 meters in height by 0.4 meters to 0.6 meters in diameter.
It is fast growing, drought tolerant once established and are cold tolerant to temperatures at least as low as 6 degrees without any burning.
It is most suitable for use around swimming pools, sunny courtyards, besides pathways or in rockeries.
If it is placed around a pool then place it in the center for a formal look or towards the ends for a more informal look. Clusters of 6 to 10 in a straight row for a very formal look or use curves for a more informal look or scatter plant them in small groups of 2 to 4 for the natural look. Here the choice of companion plants to use either side is limited only by size of the area to be landscaped. Leaf size or flower colour is limited by your imagination. The only limitation would be not to use other yellow flowering plants.
It is great adjacent to small areas of bush close to paths or the house so their deep yellow flowers can be viewed regularly. It is also suited for planting in small sunny rockeries as a fill in plant. Here it could be planted in small groups of 6 to 9 to create a denser looking plant or 3 to 6 plants for a more barren look with other arid or alpine plants. If it is surrounded by slightly taller plants with larger leaves and red, deep blue or purple flowers it will create a very strong scene with depth and breadth especially when it is in flower.
Again 2 to 9 planted back from a bend or corner will become a very strong focal point when in flower, gain a lot of attention whether you are coming or going because of the fresh clean look of the foliage even in the driest of times. It can be tip pruned to make them bushier. Hard pruning can be done once the plants are established but some set back may occur so it is better to trim the plants on a regular or annual basis. It responds well to tip pruning recovering quickly and often increasing the number of flowers on the new growth.
Ensure that the whole plant is on display from most sections of the garden as the flowers are a real bonus.
Whether it is in flower or not these plants will catch your attention. Mass plantings are best achieved by planting them at 0.3 meters to 0.5 meter centers.
Propagation:
Seeds: The seeds can be sown directly onto a seed raising mix. Cover them with 1mm of fine sand and keep moist not wet. Place the tray in a warm sunny position or beneath 30mm shade cloth. When the seedlings are 20mm to 30mm tall, prick them out and plant them into 50mm native tubes using a good organic mix.
Once the seedlings reach 150mm to 200mm in height they can be planted out into their permanent position. Nip the growing tips out, plant and fertilize.
Fertilize using Seaweed, fish emulsion or a half strength solution of organic chicken pellets soaked in water on an alternate basis. Fertilize every 3 months until the plants are well established then annually in early September to assist in prolific blooming and good health.
Corms: The use of bulbs or corms is unusual amongst Australian natives. Cut spent flowers off immediately after the have died. The corms should be dug up and roughly cleaned allow all the leaves to completely die off before removing the plants from the soil.
Do not store flower bulbs with fresh fruit like apples, pears, bananas etc. prior to planting. Most fruits produce ethylene (C2H4) which can cause flowers to abort, misshaped flowers or stunted flower in the following season.
Do not stack the corms, rhizomes, bulbs as this creates heat and can set off decay.
Store them in a cool place away from sunlight and below 12 degrees centigrade and above 6 degrees centigrade.
Place the corms, rhizomes, bulbs on a layer of peat which has been soaked and squeeze dried.
Storage temperatures and moisture conditions are very specific for each individual species. Very little work has been done on Australian native annuals and perennials which develop corms, rhizomes, bulbs so the information here is a guide only.
Most corms, rhizomes, bulbs and the like are best stored at a few degrees above their mean winter temperatures or a few degrees below their dry season temperatures. Those plants that have wet soils during their dormant period should be kept moist while those that are dormant during the dry season should be stored in a dry condition but not that dry that the plants shrivel up and die.
Fertilize using seaweed, fish emulsion or organic chicken pellets soaked in water on an alternate basis. Fertilize every two months until the plants are established then annually in early September to October to maintain health vitality and better flowering.
Further Comments from Readers:
Hi reader, it seems you use The Bible of Botany a lot. That’s great as we have great pleasure in bringing it to you! It’s a little awkward for us to ask, but our first aim is to purchase land approximately 1,600 hectares to link several parcels of N.P. into one at The Pinnacles NSW Australia, but we need your help. We’re not salespeople. We’re amateur botanists who have dedicated over 30 years to saving the environment in a practical way. We depend on donations to reach our goal. If you donate just $5, the price of your coffee this Sunday, We can help to keep the planet alive in a real way and continue to bring you regular updates and features on Australian plants all in one Botanical Bible. Any support is greatly appreciated. Thank you.
In the spirit of reconciliation we acknowledge the Bundjalung, Gumbaynggirr and Yaegl and all aboriginal nations throughout Australia and their connections to land, sea and community. We pay our respect to their Elders past, present and future for the pleasures we have gained.
All information is included in good faith and has been thoroughly researched prior to printing. The website or the author does not warrant or guarantee the accuracy of any information on these pages, nor does the website or the author accept any responsibility for any loss arising from the use of the information found within. The views and opinions are strictly those of the author or those members who chose to actively participate in the contents herein.