Ptilothrix deusta
Ptilotus exaltatus
Ptilotus macrocephalus
Ptilotus manglesii
Ptilotus obovatus
Ptychosperma elegans
Ptychosperma macarthurii
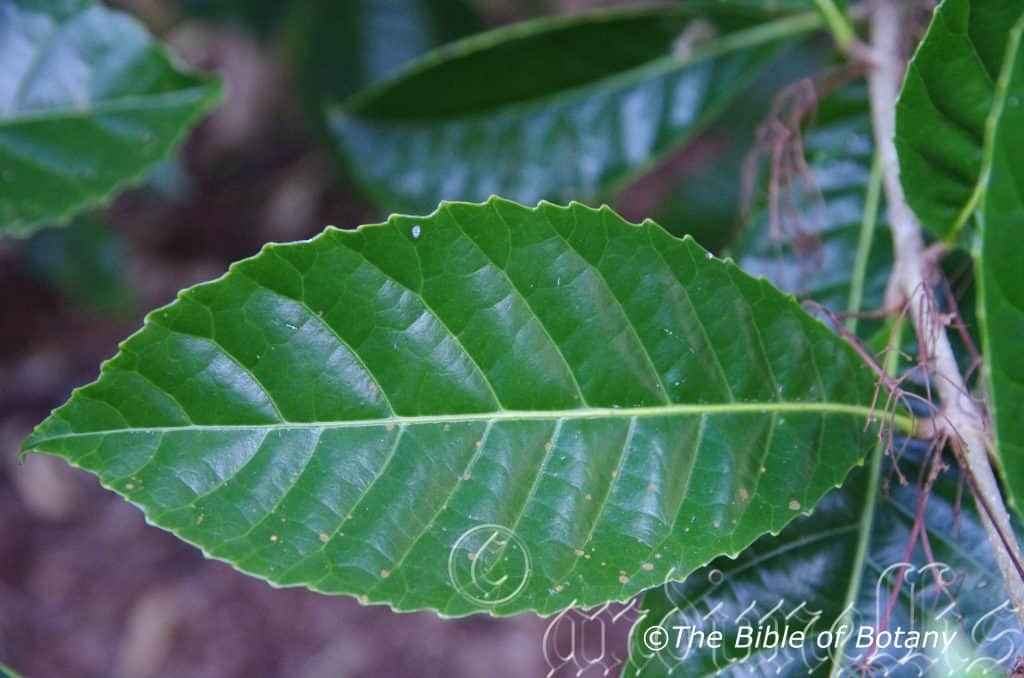
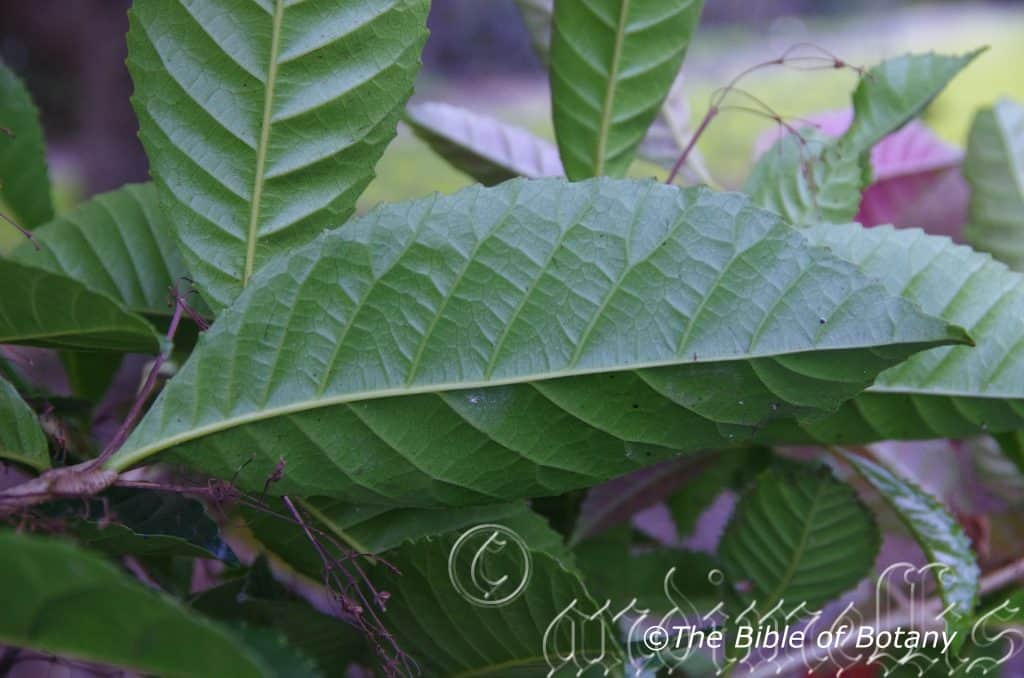
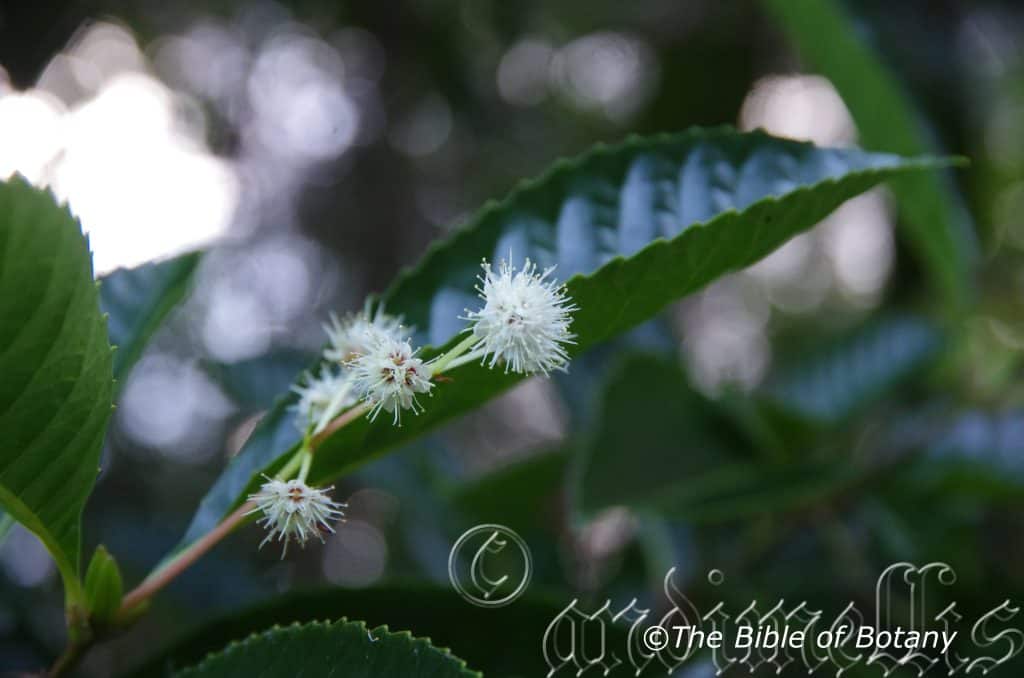
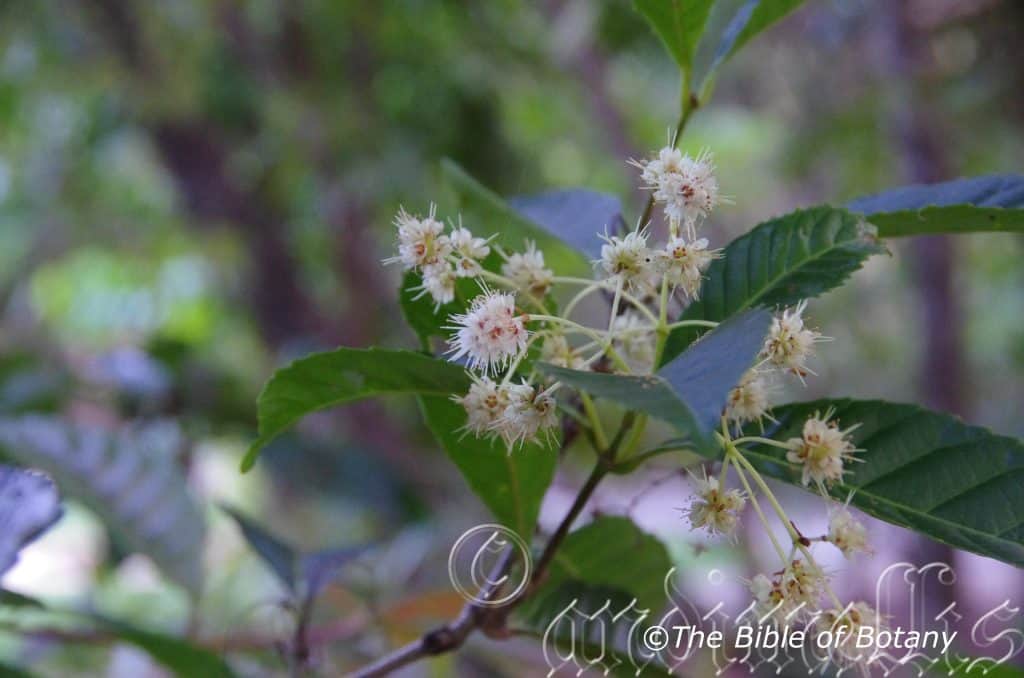
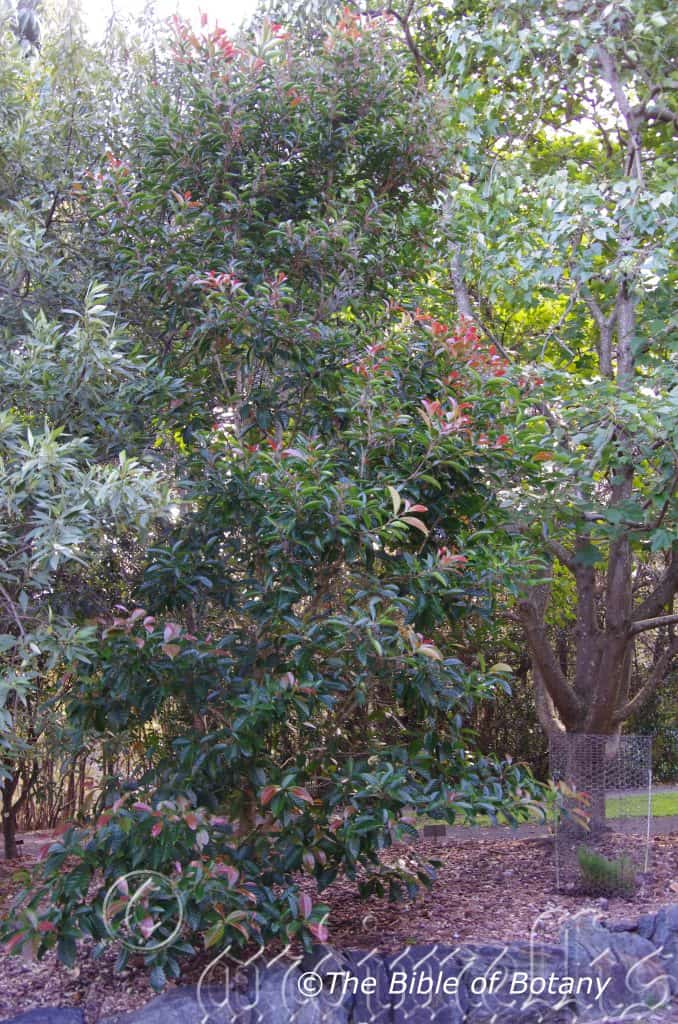
Pullea stutzeri
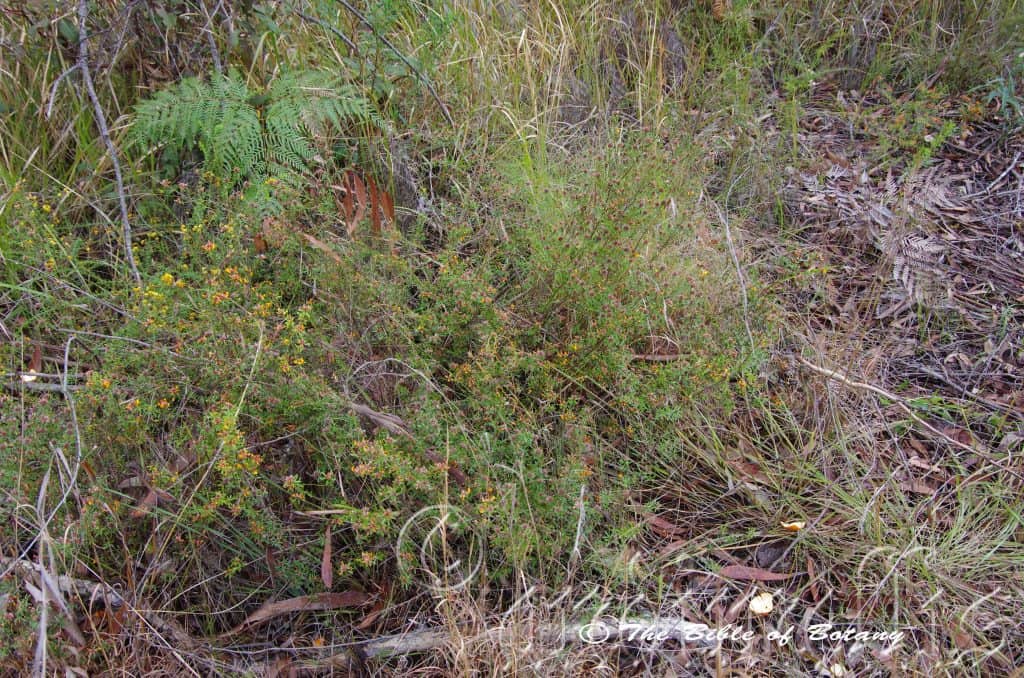
Pullenia gunnii
Pultenaea alea
Pultenaea daphnoides
Pultenaea dentata
Pultenaea euchila
Pultenaea flexilis
Pultenaea maritima
Pultenaea myrtoides
Pultenaea petiolaris
Pultenaea pycnocephala
Pultenaea retusa
Pultenaea robusta
Pultenaea rostrata
Pultenaea setulosa
Pultenaea spinosa
Pultenaea villosa
Pyrrosia confluens
Pyrrosia lanceolata
Pyrrosia longifolia
Pyrrosia rupestris
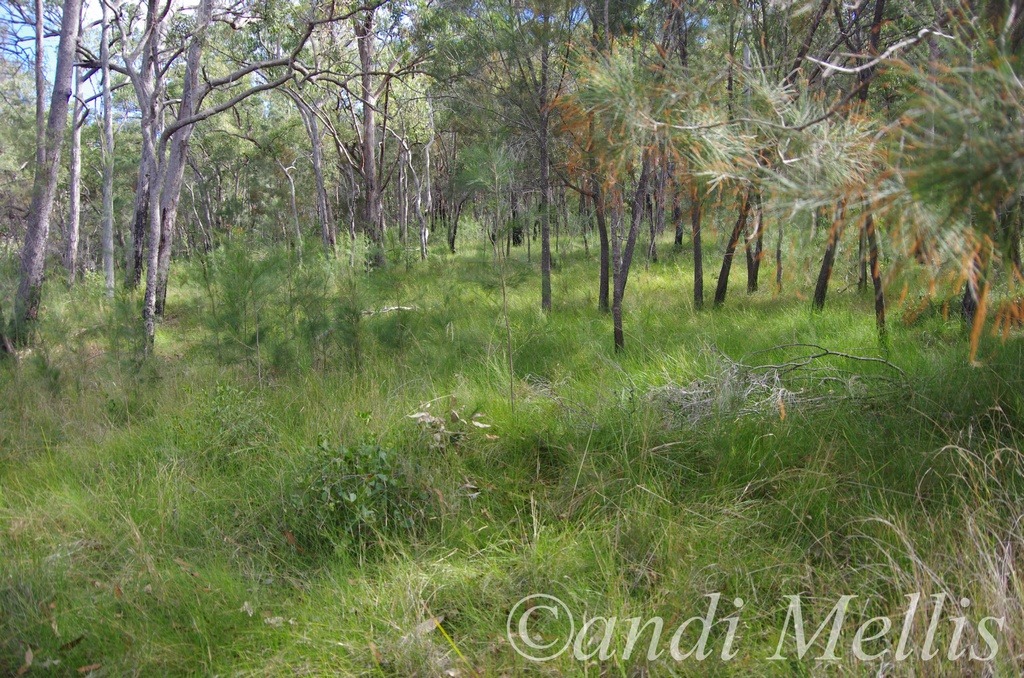
Wombat Creek Conservation Area NSW
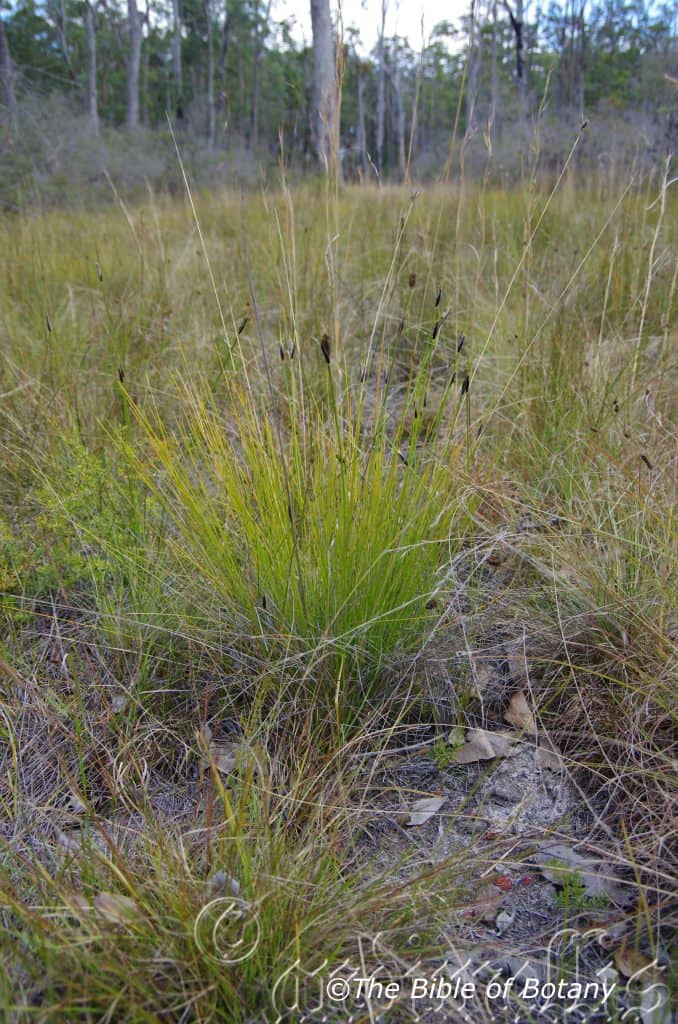
The Pinnacles NSW
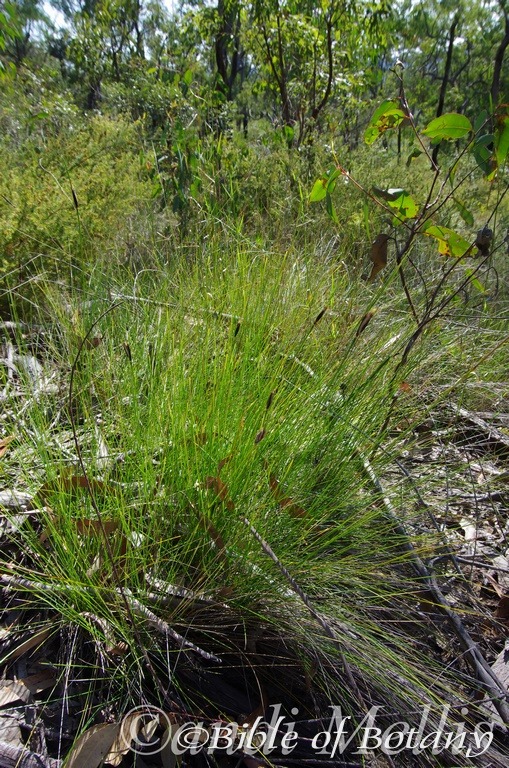
Morgan’s Camp Trail Fortis Creek National Park NSW
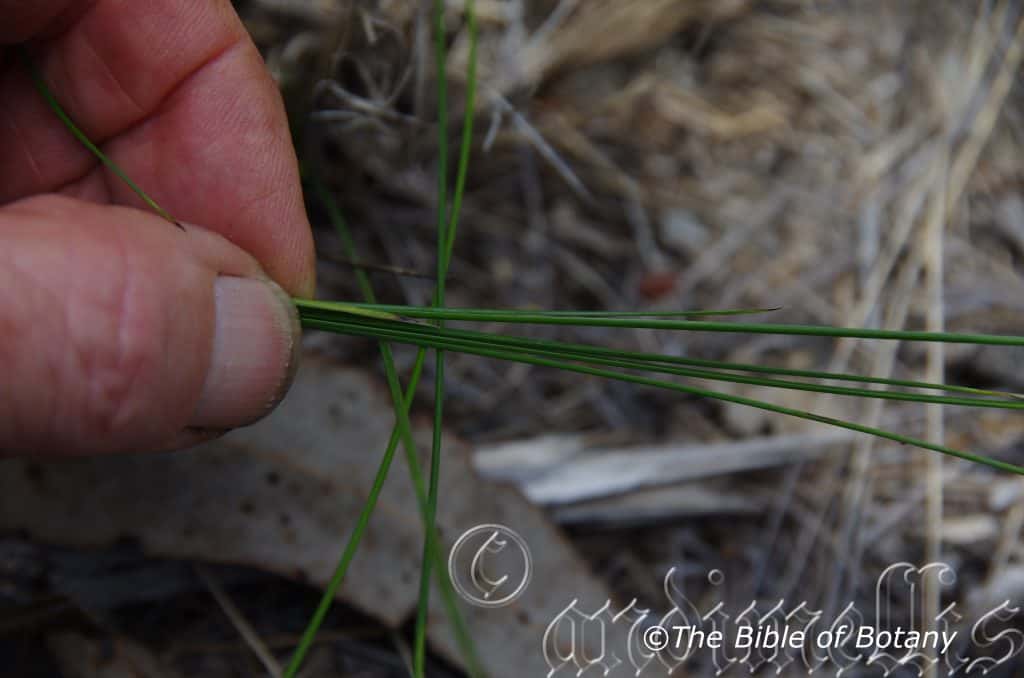
The Pinnacles NSW
Camp Trail Fortis Creek National Park NSW
The Pinnacles NSW
Camp Trail Fortis Creek National Park NSW
Camp Trail Fortis Creek National Park NSW
The Pinnacles NSW
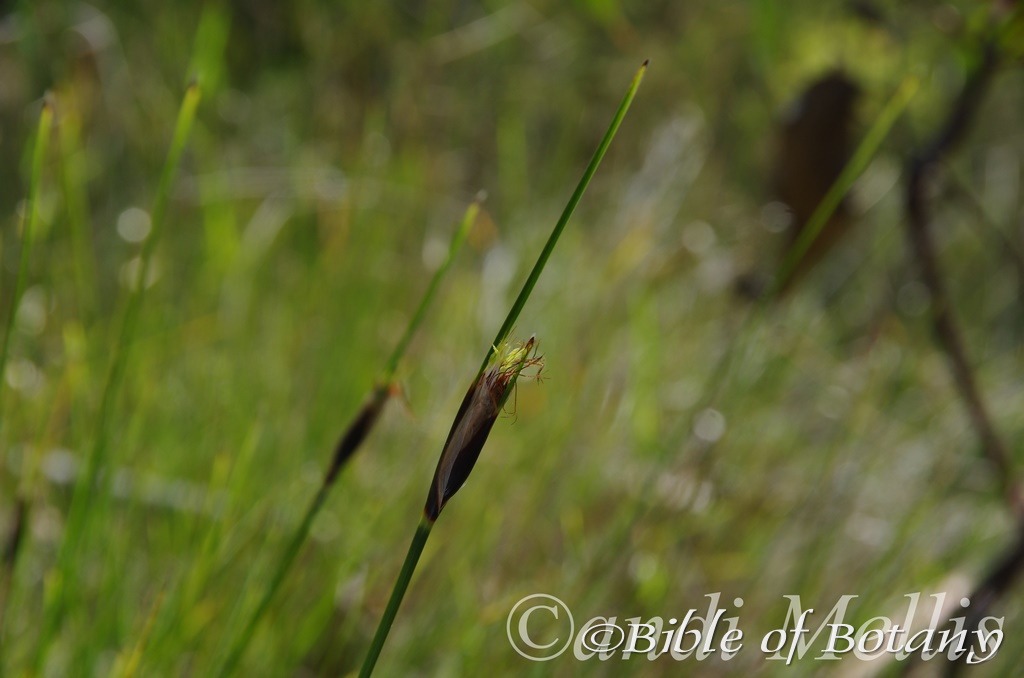
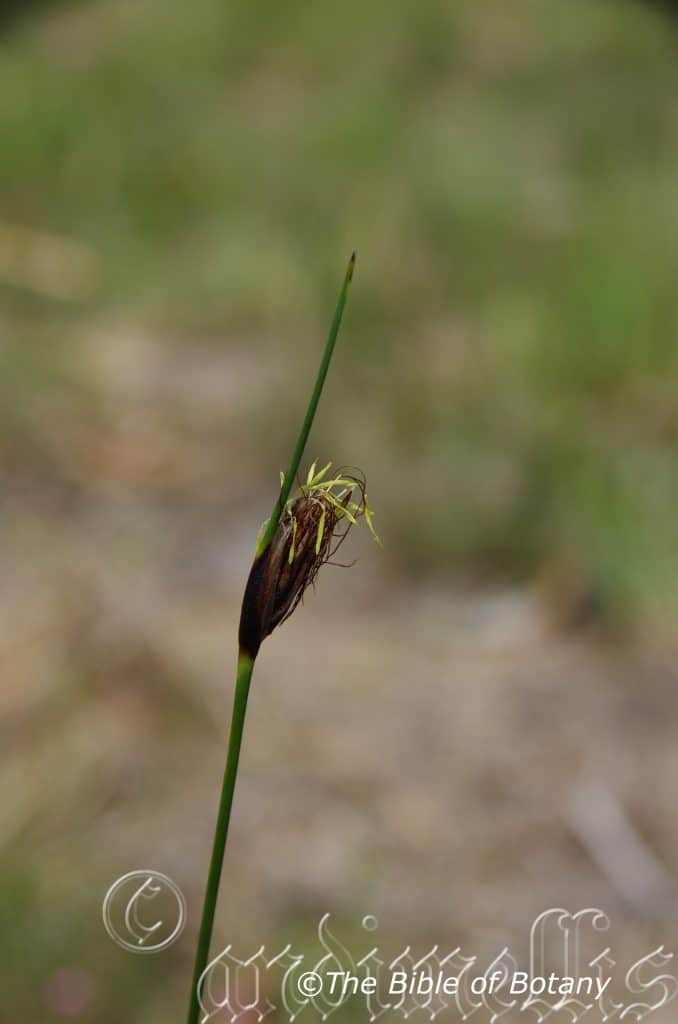
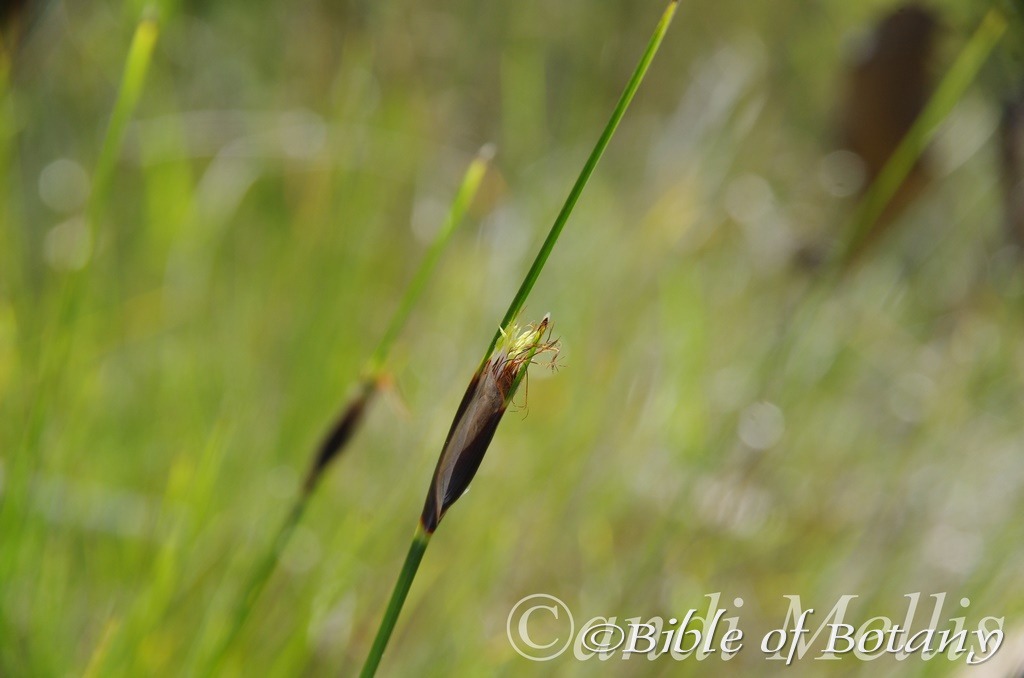
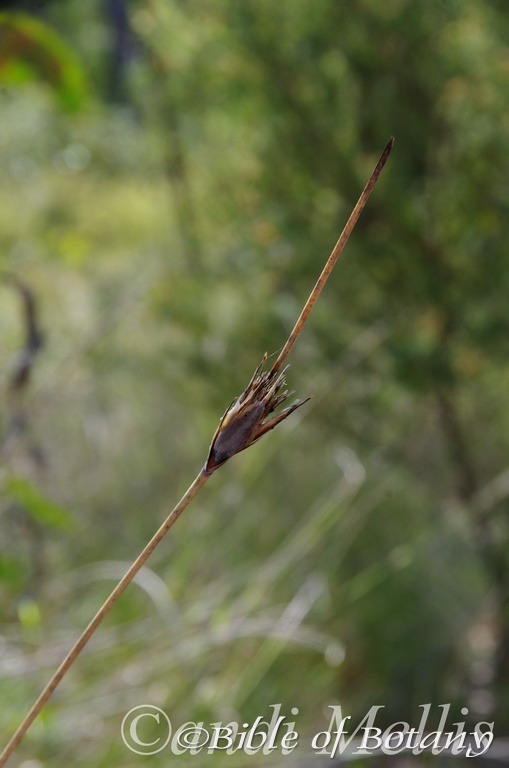
Ptilothrix deusta
Classification:
Class: Equisetopsida
Superorder: Magnoliidae
Order: Lillianaeales
Family: Cyperaceae
Genus: From Ptílon, which is Ancient Greek for downy as in a duck’s downy feathers and Thrix, which is Ancient Greek for a long hair. It refers to hairs, which emerge through a mass of downy hairs or resemble a duck’s downy feathers.
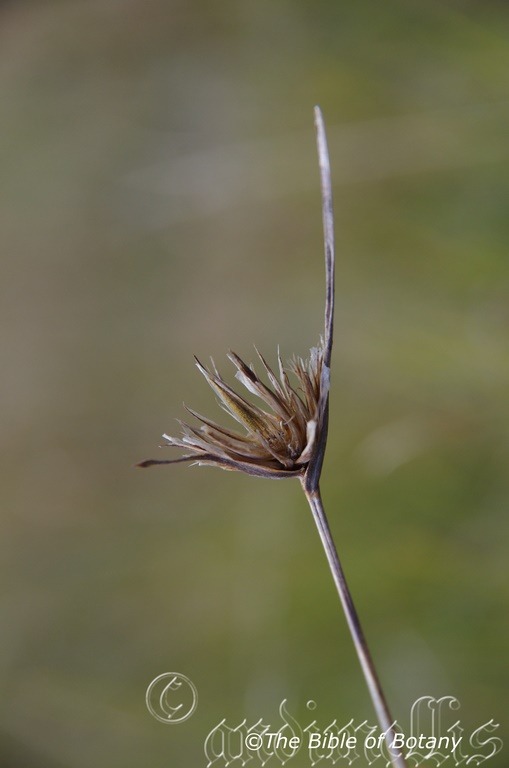
Species: From Deusta, which is Latin for to be burned. It refers to the burnt sienna colour on flower heads, which are contrast the grass-green spikes.
Common Name:
Distribution:
Ptilothrix deusta is found south from Bundaberg in southern coastal Queensland to Middle Creek near Shoalhaven in central coastal New South Wales. It is found on and east of the Great Dividing Range to the coast.
https://avh.ala.org.au/occurrences/search?taxa=Ptilothrix+deusta#tab_mapView
Habitat Aspect Climate:
Ptilothrix deusta prefers dappled shade to full sun. It grows in open woodlands, open dry sclerophyll forests, montane heaths or coastal heaths. The altitude ranges from 2 meters BSL to 1336 meters ASL.
The temperatures range from minus 4 degrees in July to 40 degrees in January.
The rainfall ranges from lows of 160mm to 850mm average per annum.
Soil Requirements:
Ptilothrix deusta prefers coarse sands, fine sands light fatty clays to light gritty clays with a high proportion of gravel and leaf litter usually as a layer of peat over the surface. The soils are usually derived from decomposed granites or at times sandstones. The soils pH ranges from 4.8pH to 6.2pH. It tolerates seasonal waterlogged soils where the soils are moist for the remainder of the year. Non saline soils to very saline soils are tolerated.
Height & Spread:
Wild Plants: 0.3m to 0.8m by 0.5m to 1m.
Characteristics:
Ptilothrix deusta grows as a slender erect dense perennial with terete, often grooved culms. The stems are straight to slightly divergent, smooth, glabrous and mid green to deep green. The culms measure 300mm to 550mm or rarely to 800mm in length by 1.1mm to 1.7mm in diameter. The new shoots are glossy.
The alternate linear leaves usually measure 80mm to 300mm in length by 0.5mm to 1.3mm in width. The base sheaths are very pale yellow to grey-brown while the apexes are acute. The thick concolourous laminas are deep green and glabrous. The laminas are flat while the margins are entire. The mid vein is slightly prominent on the lower lamina and is visible on the upper lamina.
The inflorescences are obconical to turbinate born on terminal heads. The simple terminal heads measure 15mm to 25mm in length by 4mm to 7mm in diameter. The 2 involucral bracts exceed the inflorescence. The blades measure 50mm to 70mm in length.
The spikelets measure 8mm to 17mm in length. The off white rachilla is elongated at maturity.
The similar glumes are very narrow elliptical to linear, hyaline and glabrous. The midrib is deep brown with narrow yellow band either side and is moderately covered in off white to pale yellowish-ochre hispid hairs. The upper glumes have acute apexes while the lower glumes have mucronate apexes and measure 12mm to 14mm in length. The hypogynous hispid hairs are white to yellowish-ochre and are about as long as the slightly rostrate beak.
The 2 or 3 anthers measure 6mm to 7mm including the 1.3mm to 1.5mm appendages.
The ovaries are on short pedicels and are covered in white pilose hairs. The flowers appear from September to November.
The fruits are narrow ovoidal nuts. The nuts are glabrous. The deep green nuts turn deep brown to blackish, minutely reticulate and glossy. The nuts measure 5mm to 6mm in length by 0.7mm to 1mm in diameter. The spherical seeds are glossy black and measure 1mm in diameter.
Wildlife:
Ptilothrix deusta’s wildlife is unknown to the author.
Cultivation:
Ptilothrix deusta is a beautiful, small, perennial reed for gardens with seasonal wet sandy soils. It is ideal at the edge of open forests or as the main strap leaf reed in a coastal heath or mountain heath garden. It also makes a great rockery display in hot open spaces or confined sunny positions. In cultivation it will grow from 0.5 meters to 0.6 meters in height by 0.4 meters to 0.5 meters in diameter when grown in the open.
It grows exceptionally well on lighter soils and thrives on sandier pindan soils provided water is found at lower levels. It can cope with temperatures as low as minus 4 degrees and up to 40 degrees. It is drought resistant once established which makes it ideal for the forgetful or busy gardener.
Add to the above, if it is given a little native fertilizer on being planted out as a seedling until it is established will respond with good flowering and good fruit set over a long period.
The flower stems are excellent for indoor use maintaining its colour and freshness for many weeks.
Mass plantings or scattered through the bush add colour throughout the year. It can be rotated or used in heath settings where splashes of deep green are required. Mass plantings are best achieved by planting it at 0.5 meters to 1 meter centers.
Propagation:
Seeds: The seeds can be removed easily from the heads that have begun to dehisce. Once the flowers have died and the first seeds have appear from the heads remove the heads and keep them in a warm dry place. The seeds will remain viable for several decades under ideal conditions in the fridge.
Sow seeds that have been resting in the vegetable crisper directly into a seed raising mix, keeping them moist. When the seedlings are 20mm to 25mm tall, prick them out and plant them into 50mm native tubes using a good organic mix.
As the seedlings roots reach the bottom of the tubes plant them out into their permanent position. Do not delay as they will develop a large root system quickly as do most desert plants.
Fertilize using seaweed, fish emulsion or organic chicken pellets soaked in water on an alternate basis. Fertilize every two months until the plants are established then annually in early September to October to maintain better colour, health and vitality.
Further Comments from Readers:
“Hi reader, it seems you use The Bible of Botany a lot. That’s great as we have great pleasure in bringing it to you! It’s a little awkward for us to ask, but our first aim is to purchase land approximately 1,600 hectares to link several parcels of N.P. into one at The Pinnacles NSW Australia, but we need your help. We’re not salespeople. We’re amateur botanists who have dedicated over 30 years to saving the environment in a practical way. We depend on donations to reach our goal. If you donate just $5, the price of your coffee this Sunday, We can help to keep the planet alive in a real way and continue to bring you regular updates and features on Australian plants all in one Botanical Bible. Any support is greatly appreciated. Thank you.”
In the spirit of reconciliation we acknowledge the Bundjalung, Gumbaynggirr and Yaegl and all aboriginal nations throughout Australia and their connections to land, sea and community. We pay our respect to their Elders past, present and future for the pleasures we have gained.
Mount Cootha Botanic Gardens Qld.
Mount Cootha Botanic Gardens Qld.
Mount Cootha Botanic Gardens Qld.
Mount Cootha Botanic Gardens Qld.
Ptilotus exaltatus
Classification:
Unranked: Eudicots
Unranked: Core Eudicots
Order: Caryophyllales
Family: Amaranthaceae
Genus: From Ptílon, which is Ancient Greek for downy as in a duck’s downy feathers and Lōtus, which is Latin for lavish, elegant and luxurious. It refers to flowers, which resemble the Lotus flowers of the east in colour and have petals cloaked in the luxury of down.
Species: From Ex, which is Ancient Greek for out of the ordinary or outside or external and Alatus, which is Latin for lofty or tall. It refers to shrubs which are much taller than all the other species in the genus.
Common Name: Tall Mulla Mulla or Tall Hairy Tails.
Distribution:
Ptilotus exaltatus is a very widespread species in central arid and semi-arid areas of Australia. It is not found in any of the true deserts.
https://avh.ala.org.au/occurrences/search?taxa=Ptilotus+exaltatus#tab_mapView
Habitat Aspect Climate:
Ptilotus exaltatus prefers dappled shade to full sun. It grows in open woodlands open forests, grasslands, heaths or warm mallee scrubs from below sea level in central South Australia. The altitude ranges from 5 meters BSL to 650 meters ASL.
The temperatures range from minus 4 degrees in July to 40 degrees in January.
The rainfall ranges from lows of 160mm to 850mm average per annum.
Soil Requirements:
Ptilotus exaltatus prefers light sandy clays to medium clays with a high proportion of gravel. The soils are usually derived from decomposed brown basalt, black basalts or sandstones. The soils pH ranges from 5.5pH to 7pH. It does not tolerate waterlogged soils. Non saline soils to very saline soils are tolerated.
Height & Spread:
Wild Plants: 0.5m to 1.5m by 0.6m to 1m.
Characteristics:
Ptilotus exaltatus grows as a small spreading dense perennial. The stems are tall, straight, pale grey-green, blue green, yellow or red, scabrous with few branches from near the base. The stems are glabrous to sparsely covered in white hirsute hairs especially in the leaf axils. New shoots are covered in white hirsute hairs
The alternate leaves are obovate to oblong-lanceolate or spathulate. Ptilotus exaltatus leaves measure 80mm to 200mm in length by 30mm to 50mm in width. The bases are rounded to broadly cuneate while the apexes are obtuse to obtuse-acuminate with or without a mucronate tip. The thick concolourous laminas are mid blue green and glabrous to sparsely covered in white caduceus hirsute hairs. The leaf margins are entire, flat and curve slightly upwards from the mid vein. The mid vein is prominent on the lower lamina and is distinctly visible on the upper lamina. The petiole is sessile to 2mm in length.
Inflorescences of Ptilotus exaltatus are born on terminal conical heads lengthening to cylindrical as the individual flowers mature. The simple terminal cymes measure 30mm to 180mm in length by 30mm to 40mm in diameter. The pale grey to pale fawn bracts are ovate to elliptical with a cuspidate apex. It is covered in long white hirsute hairs with the midrib being densely covered in the long white hirsute hairs. The deep carmine to purple perianths measure 16mm to 21mm in length by 1.5mm to 2.5mm in width. The lower two thirds closest to the base is covered in long white pilose hairs and longer hirsute hairs externally and is glabrous internally as is the third closest to the apex. The apexes are minutely toothed.
The 2 or 3 stamens and 2 or 3 staminodes are all inserted.
The ovaries are on short pedicels and are covered in white pilose hairs. Ptilotus exaltatus’s flowers appear throughout the year after good rains.
Ptilotus exaltatus’s fruits are small ovate capsules. The capsules are glabrous. The greenish capsules turn pale fawn when ripe. The spherical seeds are glossy black and measure 1mm in diameter.
Wildlife:
Ptilotus exaltatus’s does not appear to have any predators though the flowers are visited by hundreds of small native nectar eating butterflies, native bees, wasps and native flies.
The seeds are edible and contain a high quality protein which can be made into flour. Plants can be grown commercially for the seed and I have recommended it as a commercial crop in the past. Commercially the seed is known as amaranth to which it is closely related. The leaves can be boiled or steamed as a vegetable substitute for cabbage.
Cultivation:
Ptilotus exaltatus is a magnificent perennial that should be more widely grown in subtropical temperate, semi-arid and arid gardens. It is ideal at the edge of a forest or as the pioneer herbs in open country to help bind the soil and add potash and colour to the scene. It also make great rockery displays in hot open spaces or confined sunny positions. In cultivation it will grow from 0.5 meters to 1.2 meters in height by 0.6 meters to 1.2 meters in diameter when grown in the open.
It can be pruned to keep them short and to help increase the number of blooms on the plants.
It grows well on lighter soils but not on pure sand and thrive on pindan soils given just 1 or 2 watering. Itcan cope with temperatures as low as minus 4 degrees and up to 45 degrees. It is drought resistant once established and in fact detest too much water.
Add to the above, if it is given a little native fertilizer on being planted out as a seedling will respond with good flowering and good fruit set over a long period.
The flowers are excellent for indoor use maintaining their colour and freshness for many months.
Mass plantings or scattered through the bush add colour throughout the year. It can be rotated or used in a heath setting where splashes of colour are required. Plant it out about 8 to 10 weeks before the flowers are required or withhold watering for several months and give them a good soaking about 4 weeks prior to when the flowers are required.
Spent flowers should be removed to promote longer flowering and better quality flowers.
Propagation:
Seeds: The seeds of Ptilotus exaltatus can be removed easily from the capsules that have fallen to the ground. Once the flowers have died and the first seeds have appear from the capsules remove the flowers and keep them in a cool dry place. Seeds will remain viable for several decades under ideal conditions.
Sow freshly treated seeds directly into a seed raising mix, keeping them moist not wet. When the seedlings are 20mm to 25mm tall, prick them out and plant them into 50mm native tubes using a good organic mix.
As the seedlings roots reach the bottom of the tubes plant them out into their permanent position. Do not delay as they will develop a large root system quickly as do most desert plants.
Fertilize using seaweed, fish emulsion or organic chicken pellets soaked in water on an alternate basis. Fertilize every two months until the plants are established then annually in early September to October to maintain better colour, health, vitality and flowering.
Further Comments from Readers:
“Hi reader, it seems you use The Bible of Botany a lot. That’s great as we have great pleasure in bringing it to you! It’s a little awkward for us to ask, but our first aim is to purchase land approximately 1,600 hectares to link several parcels of N.P. into one at The Pinnacles NSW Australia, but we need your help. We’re not salespeople. We’re amateur botanists who have dedicated over 30 years to saving the environment in a practical way. We depend on donations to reach our goal. If you donate just $5, the price of your coffee this Sunday, We can help to keep the planet alive in a real way and continue to bring you regular updates and features on Australian plants all in one Botanical Bible. Any support is greatly appreciated. Thank you.”
In the spirit of reconciliation we acknowledge the Bundjalung, Gumbaynggirr and Yaegl and all aboriginal nations throughout Australia and their connections to land, sea and community. We pay our respect to their Elders past, present and future for the pleasures we have gained.
Ptilotus macrocephalus
Classification:
Unranked: Eudicots
Unranked: Core Eudicots
Order: Caryophyllales
Family: Amaranthaceae
Genus: From Ptílon, which is Ancient Greek for downy as in a duck’s downy feathers and Lōtus, which is Latin for lavish, elegant and luxurious. It refers to flowers, which resemble the Lotus flowers of the east in colour and have petals cloaked in the luxury of down.
Species: From Makros, which is Ancient Greek for large, Kephalḗ, which is Ancient Greek for a head and Um, which is Greek/Latin for a degree. It refers to flower heads which are much larger than other species in the genus.
Common Name: Green Pussy tails or Green Feather heads.
Distribution:
Ptilotus macrocephalus is a very widespread species in central arid and semi-arid areas of Australia. It is not found in any of the true deserts.
https://avh.ala.org.au/occurrences/search?taxa=Ptilotus+macrocephalus#tab_mapView
Habitat Aspect Climate:
Ptilotus macrocephalus prefers dappled shade to full sun. It grows in open forests, open woodlands grasslands or scrubby heaths. The altitude ranges from 5 meters ASL to 650 meters ASL.
The temperatures range from minus 4 degrees in July to 40 degrees in January.
The rainfall ranges from lows of 160mm to 850mm average per annum.
Soil Requirements:
Ptilotus macrocephalus prefers to grow on light sandy clays to medium clays with a high proportion of gravel. The soils are usually derived from decomposed brown basalt, black basalts or sandstones. The soils pH ranges from 5.5pH to 7pH. It does not tolerate waterlogged soils. Non saline soils to very saline soils are tolerated.
Height & Spread:
Wild Plants: 0.4m to 0.5m by 0.4m to 0.6m.
Characteristics:
Ptilotus macrocephalus grows as a small spreading dense perennial. The stems are divaricate from a central woody root tuber. It is pale grey-green, blue green, smooth with few branches from near the base. The stems are glabrous to sparsely covered in white hirsute hairs. New shoots are covered in white hirsute hairs.
The alternate linear to narrow lanceolate leaves of Ptilotus microcephalus’s measure 40mm to 55mm in length by 3mm to 5mm in width. The bases are rounded to broadly cuneate while the apexes are mucronate tip. The thick concolourous laminas are mid blue green and glabrous. The leaf margins are entire, flat and undulating. The mid vein is prominent on the lower lamina and is distinctly visible on the upper lamina. The leaves are sessile.
Inflorescences of Ptilotus macrocephalus are born on terminal conical heads lengthening to cylindrical as the individual flowers mature. The simple terminal cymes measure 50mm to 120mm in length by 25mm to 30mm in diameter. The pale grey-green to pale fawn-green bracts are elliptical with an acute to acuminate or mucronate or entire apex. It is glabrous. The 4 soft lemon yellow, erect perianth lobes measure 25mm to 30mm in length by 2.5mm to 3.5mm in diameter. The lower two thirds closest to the base is covered in long soft white hirsute hairs externally and is glabrous internally as is the third closest to the apex. The apexes are minutely toothed.
The 4 stamens and 1 staminode are all inserted.
The ovaries are covered in white puberulent hairs. The style is sparsely covered in long white hirsute hairs along one side for 50mm to 60mm of its length. Ptilotus microcephalus’s flowers appear throughout the year after good rains.
Ptilotus macrocephalus’s fruits are small ovate capsules. The capsules are glabrous. The greenish capsules turn pale fawn when ripe. The spherical seeds are glossy black and measure 1mm in diameter.
Wildlife:
Ptilotus macrocephalus does not appear to have any predators though the flowers are visited by hundreds of small native nectar eating butterflies, native bees, wasps and native flies.
The seeds are edible and contain a high quality protein which can be made into flour. Plants can be grown commercially for the seed and I have recommended it as a commercial crop in the past. Commercially the seed is known as amaranth to which it is closely related. The leaves most likely can be boiled or steamed as a vegetable substitute for cabbage.
Cultivation:
Ptilotus macrocephalus is a magnificent perennial that should be more widely grown in subtropical temperate, semi-arid and arid gardens. It is ideal at the edge of a forest or as the pioneer herbs in open country to help bind the soil and add potash and colour to the scene. It also makes a great rockery displays in hot open spaces or confined sunny positions. In cultivation it will grow from 0.5 meters to 0.6 meters in height by 0.5 meters to 0.6 meters in diameter when grown in the open.
It grows exceptionally well on lighter soils but not on pure sand and thrive on pindan soils given just 1 or 2 watering. It can cope with temperatures as low as minus 4 degrees and up to 45 degrees. It is drought resistant once established and in fact detest too much water.
Add to the above, if it is given a little native fertilizer on being planted out as a seedling will respond with good flowering and good fruit set over a long period.
The flowers are excellent for indoor floral arrangements, maintaining its colour and freshness for many months.
Mass plantings or scattered through the bush add colour throughout the year. It can be rotated or used in a heath setting where colour is required. Plant them out about 8 to 10 weeks before the flowers are required or withhold watering for several months and give them a good soaking about 4 weeks prior to when the flowers are required.
Spent flowers should be removed to promote longer flowering and better quality flowers.
Propagation:
Seeds: The seeds of Ptilotus macrocephalus can be removed easily from the capsules that have fallen to the ground. Once the flowers have died and the first seeds have appear from the capsules remove the flowers and keep them in a cool dry place. Seeds will remain viable for several decades under ideal conditions.
Sow freshly treated seeds directly into a seed raising mix, keeping them moist not wet. When the seedlings are 20mm to 25mm tall, prick them out and plant them into 50mm native tubes using a good organic mix.
As the seedlings roots reach the bottom of the tubes plant them out into their permanent position. Do not delay as they will develop a large root system quickly as do most desert plants.
Fertilize using seaweed, fish emulsion or organic chicken pellets soaked in water on an alternate basis. Fertilize every two months until the plants are established then annually in early September to October to maintain better colour, health, vitality and flowering.
Further Comments from Readers:
“Hi reader, it seems you use The Bible of Botany a lot. That’s great as we have great pleasure in bringing it to you! It’s a little awkward for us to ask, but our first aim is to purchase land approximately 1,600 hectares to link several parcels of N.P. into one at The Pinnacles NSW Australia, but we need your help. We’re not salespeople. We’re amateur botanists who have dedicated over 30 years to saving the environment in a practical way. We depend on donations to reach our goal. If you donate just $5, the price of your coffee this Sunday, We can help to keep the planet alive in a real way and continue to bring you regular updates and features on Australian plants all in one Botanical Bible. Any support is greatly appreciated. Thank you.”
In the spirit of reconciliation we acknowledge the Bundjalung, Gumbaynggirr and Yaegl and all aboriginal nations throughout Australia and their connections to land, sea and community. We pay our respect to their Elders past, present and future for the pleasures we have gained.
Ptilotus manglesii
Classification:
Unranked: Eudicots
Unranked: Core Eudicots
Order: Caryophyllales
Family: Amaranthaceae
Genus: From Ptílon, which is Ancient Greek for downy as in a duck’s downy feathers and Lōtus, which is Latin for lavish, elegant and luxurious. It refers to flowers, which resemble the Lotus flowers of the east in colour and have petals cloaked in the luxury of down.
Species: Is named in honour of James Mangles; 1786-1767, who was an early Western Australian botanist.
Subspecies: Ptilotus manglesii subsp. angustifolia. From Angusta, which is Latin for narrow and Folium, which is Latin for foliage. It usually refers to leaves or at times the calyx lobes or petals, which are narrower than other species in the genus.
Subspecies: Ptilotus manglesii subsp. manglesii’s. Is named in honour of James Mangles; 1786-1767, who was an early Western Australian botanist.
Common Name: Little Pom Poms.
Distribution:
Ptilotus manglesii is a widespread species in south western coastal Western Australia south from the Wandana Nature Reserve north near Geraldton to the Fitzgerald National Park with a disjunct population further east near Kalgoorlie.
https://avh.ala.org.au/occurrences/search?taxa=Ptilotus+manglesii#tab_mapView
Habitat Aspect Climate:
Ptilotus manglesii prefers dappled shade to full sun. It grows on open flat woodlands or scrubby woodland heaths. The altitude ranges from 5 meters ASL to 450 meters ASL.
The temperatures range from minus 1 degree in July to37 degrees in January.
The rainfall ranges from lows of 300mm to 1600mm average per annum.
Soil Requirements:
Ptilotus manglesii prefers to grow on light sandy clays to medium clays. The soils are usually derived from decomposed sandstones or granite. The soils pH ranges from 5.5pH to 6.5pH. It does not tolerate waterlogged soils. Non saline soils to moderately saline soils are tolerated.
Height & Spread:
Wild Plants: 0.05m to 0.3m by 0.2m to 0.5m.
Characteristics:
Ptilotus manglesii grows as a small spreading dense perennial. The stems are divaricate from a central tap root. The stems are reddish-green, smooth with few branches from near the base. The stems are glabrous.
The alternate rosette leaves are narrow spathulate to narrow lanceolate. Ptilotus manglesii’s leaves measure 40mm to 90mm in length by 8mm to 28mm in width. The reddish-green petioles measure 13mm to 30mm in length. The bases are long tapering and attenuate while the apexes are obtuse. The thick chartaceous laminas are mid grey-green to deep olive-green and glabrous. The laminas recurve upwards from the mid vein to the margins and recurve upwards on the apical quarter. The margins are shallowly, broadly and irregularly toothed to shallowly crenate. The mid vein is paler than the lamina, is prominent on the lower lamina and is distinctly visible on the upper lamina.
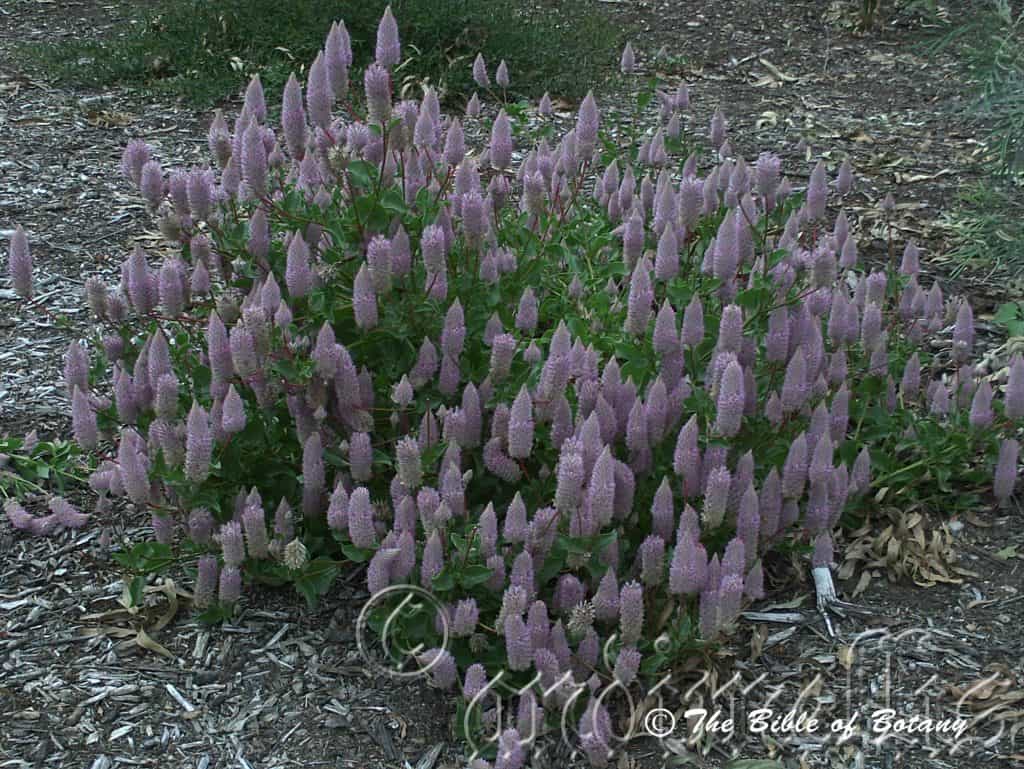
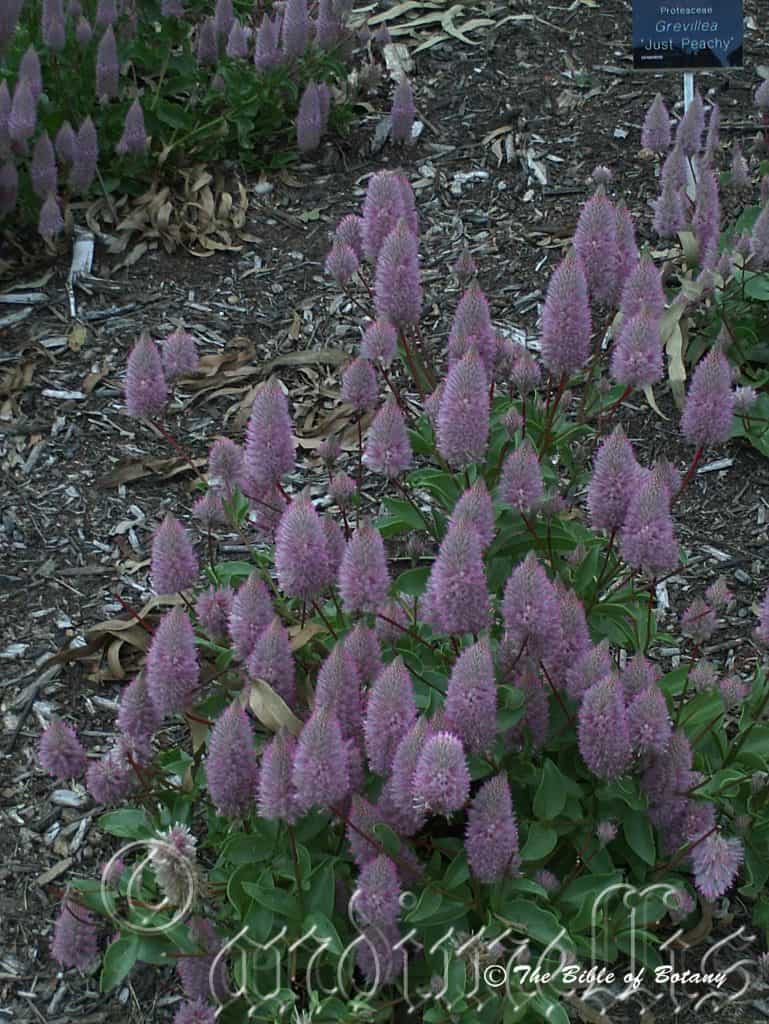
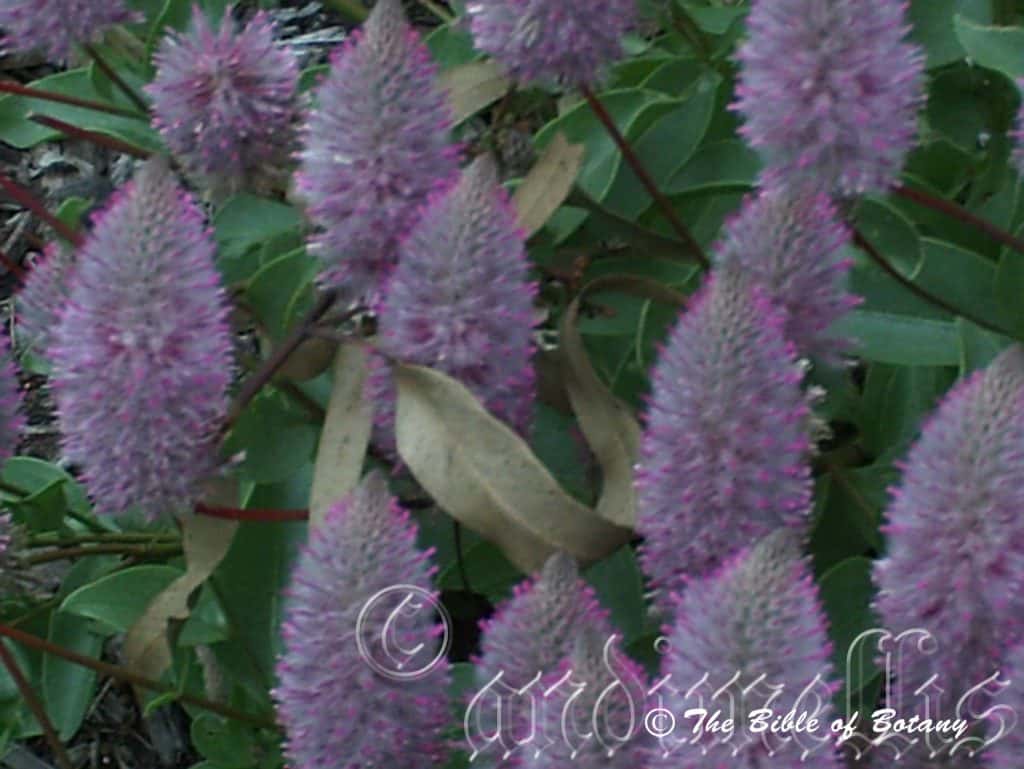
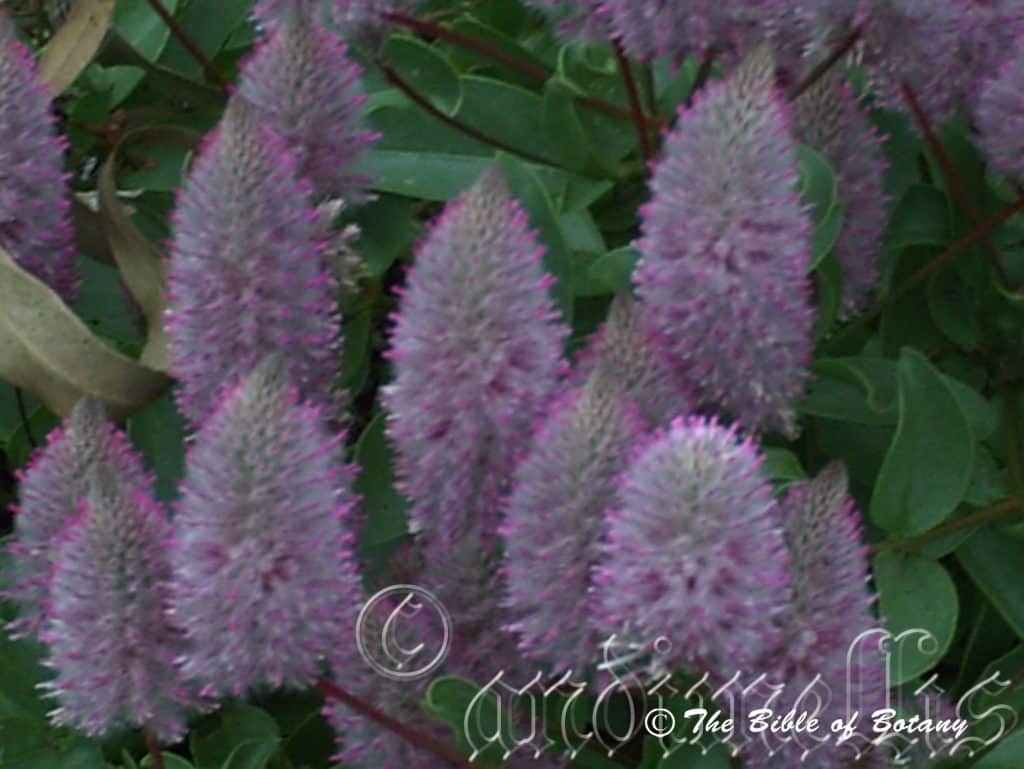
Inflorescences of Ptilotus manglesii are born on terminal lanceolate heads lengthening to cylindrical as the individual flowers mature. The rachis measures 100mm to 450mm in height and has a few disjunct lanceolate leaves along its length usually on the basal half. The simple terminal raceme measures 20mm to 40mm in length by 25mm to 30mm in diameter. The deep reddish–brown bracts are covered in long white filiform hirsute hairs. The 4 petals are carmine-pink to deep hot pink externally and white internally. It is erect and measure 10mm to 14mm in length by 1mm to 1.8mm in diameter.
The 4 white filaments measure 1mm to 1.5mm in length while the oblong, dorsifixed, hot pink anthers measure 0.8mm to 1mm in length. The white style measures 1.5mm to 2.5mm in length and has an orbicular hot pink stigma.
The ovaries are covered in white puberulent hairs. The style is sparsely covered in long white hirsute hairs along one side for 50mm to 60mm of its length. Ptilotus manglesii’s flowers appear from September to December and sometimes as late as January.
The fruits of Ptilotus manglesii are small ovate capsules. The capsules are glabrous. The purple- red capsules turn pale pinkish-fawn when ripe. The spherical seeds are glossy black and measure 1mm in diameter.
Confusing Subspecie:
Ptilotus manglesii subsp. angustifolia’s leaves are narrow elliptical to linear.
Ptilotus manglesii subsp. manglesii’s leaves are narrow spathulate to narrow lanceolate.
Wildlife:
Ptilotus manglesii’s does not appear to have any predators though the flowers are visited by hundreds of small native nectar eating butterflies, native bees, wasps and native flies.
Cultivation:
Ptilotus manglesii is a magnificent perennial that is better grown and treated as an annual that should be more widely grown in warm temperate, semi-arid and arid gardens. It is ideal when mass planted at the edge of dry heaths or as a border plant to add a subtle movement to more vibrant bold colours to the rear colour to the scene. It also makes a good rockery display in hot open spaces or confined sunny positions when massed planted. In cultivation it will grow from 0.1 meter to 0.3 meters in height by 0.5 meters to 0.6 meters in diameter when grown in the open.
It grows exceptionally well on lighter gravelly or rocky sandy loams but not on pure sand and thrive on pindan soils given just 1 or 2 good soakings during the growing period prior to flowering. It can cope with temperatures as low as minus 2 degrees and up to 40 degrees. It is drought resistant once established and in fact detest too much water.
Add to the above, if it is given a little native fertilizer on being planted out as a seedling will respond with good flowering and good fruit set ensuring a good supply of seed for the following season.
Mass plantings or scattered through the bush add colour throughout the year. It can be rotated or used in low heath gardens where splashes of colour are required from September to January.
Spent flowers should be removed to promote longer flowering and better quality flowers.
Propagation:
Seeds: The seeds of Ptilotus manglesii can be removed easily from the capsules that have fallen to the ground. Once the flowers have died and the first seeds have appear from the capsules remove the flowers and keep them in a cool dry place. Seeds will remain viable for several decades under ideal conditions.
Sow freshly treated seeds directly into a seed raising mix, keeping them moist not wet. When the seedlings are 20 to 25 mm tall, prick them out and plant them into 50mm native tubes using a good organic mix.
As the seedlings roots reach the bottom of the tubes plant them out into their permanent position. Do not delay as they will develop a large root system quickly as do most desert plants.
Fertilize using seaweed, fish emulsion or organic chicken pellets soaked in water on an alternate basis. Fertilize every two months until the plants are established then annually in early September to October to maintain better colour, health, vitality and flowering.
Further Comments from Readers:
“Hi reader, it seems you use The Bible of Botany a lot. That’s great as we have great pleasure in bringing it to you! It’s a little awkward for us to ask, but our first aim is to purchase land approximately 1,600 hectares to link several parcels of N.P. into one at The Pinnacles NSW Australia, but we need your help. We’re not salespeople. We’re amateur botanists who have dedicated over 30 years to saving the environment in a practical way. We depend on donations to reach our goal. If you donate just $5, the price of your coffee this Sunday, We can help to keep the planet alive in a real way and continue to bring you regular updates and features on Australian plants all in one Botanical Bible. Any support is greatly appreciated. Thank you.”
In the spirit of reconciliation we acknowledge the Bundjalung, Gumbaynggirr and Yaegl and all aboriginal nations throughout Australia and their connections to land, sea and community. We pay our respect to their Elders past, present and future for the pleasures we have gained.
National Botanic Gardens ACT
National Botanic Gardens ACT
Ptilotus obovatus
Classification:
Unranked: Eudicots
Unranked: Core Eudicots
Order: Caryophyllales
Family: Amaranthaceae
Genus: From Ptílon, which is Ancient Greek for downy as in a duck’s downy feathers and Lōtus, which is Latin for lavish, elegant and luxurious. It refers to flowers, which resemble the Lotus flowers of the east in colour and have petals cloaked in the luxury of down.
Species: From Ob, which is Latin for orbital and Ovatus which is Latin for an egg shape. It refers to leaves, which are somewhat variable but usually obovate.
Variety: Ptilotus obovatus var. grandiflorus. From Grandis, which is Latin for large and Flōris, which is Latin for a flower or Flōs, which is the Roman goddess of spring and flowers. It refers to plants, which produce larger flowers than most other species in the genus.
Variety: Ptilotus obovatus var. griseus. From Griseus/Grizeus which is Latin for a pale blueish or pale pearly-grey. It refers to structures or organs, which are pale blueish-grey or pale pearly-grey in colour.
Variety: Ptilotus obovatus var. lancifolius. From Lancea which is Latin for a lance and Folium, which is Latin for foliage. It refers to leaves, which are several times longer than it is wide and tapering after the broadest point in the middle to a sharp point similar to a sword.
Variety: Ptilotus obovatus var. parviflorus. From Paûros, which is Ancient Greek or Parvum which is Latin for small and Flōris which is Latin for a flower or Flōs from the Roman goddess of spring and flowers. It refers to flowers, which are somewhat smaller when compared to other species in the genus.
Variety: Ptilotus obovatus var. obovatus. From Ob, which is Latin for orbital and Ovatus which is Latin for an egg shape. It refers to leaves, which are somewhat variable but usually obovate.
Common Name: Silver Mulla Mulla.
Distribution:
Ptilotus obovatus var. grandiflorus is a very widespread species in central arid and semi-arid areas of Australia. It is not found in any of the true deserts or in coastal regions.
Ptilotus obovatus var. griseus is a very widespread species in the central upper third of central Australia in the semi-arid areas of. It is not found in any of the true deserts.
Ptilotus obovatus var. lancifolius is a very widespread species in Western Australia, the Northern territory, South Australia and the western half of Queensland and New South wales. It is found in the far north west of Victoria.
Ptilotus obovatus var. parviflorus is a very widespread species in Western Australia, the Northern Territory, South Australia and the western half of Queensland and New South wales. It is found in the far north west of Victoria.
Ptilotus obovatus var. obovatus is a very widespread species in Western Australia, the Northern Territory, South Australia and the western half of Queensland and New South wales. It is found in the far north west of Victoria. It is not found in any of the true deserts but edges into them.
https://avh.ala.org.au/occurrences/search?taxa=Ptilotus+obovatus#tab_mapView
Habitat Aspect Climate:
Ptilotus obovatus prefers dappled shade to full sun. It grows in open dry woodland heaths, savannah woodlands or hummock grasslands. The altitude ranges from 20 meters ASL to 650 meters ASL.
The temperatures range from minus 4 degrees in July to 40 degrees in January.
The rainfall ranges from lows of 140mm to 500mm average per annum.
Soil Requirements:
Ptilotus obovatus prefers light sandy clays to medium clays often with a high proportion of gravel. The soils are usually derived from decomposed brown basalt, black basalts, sandstones, granite, shale or metamorphic rocks. The soils pH ranges from 5pH to 7pH. It does not tolerate waterlogged soils. Non saline soils to very saline soils are tolerated.
Height & Spread:
Wild Plants: 0.6m to 1m by 0.6m to 1m.
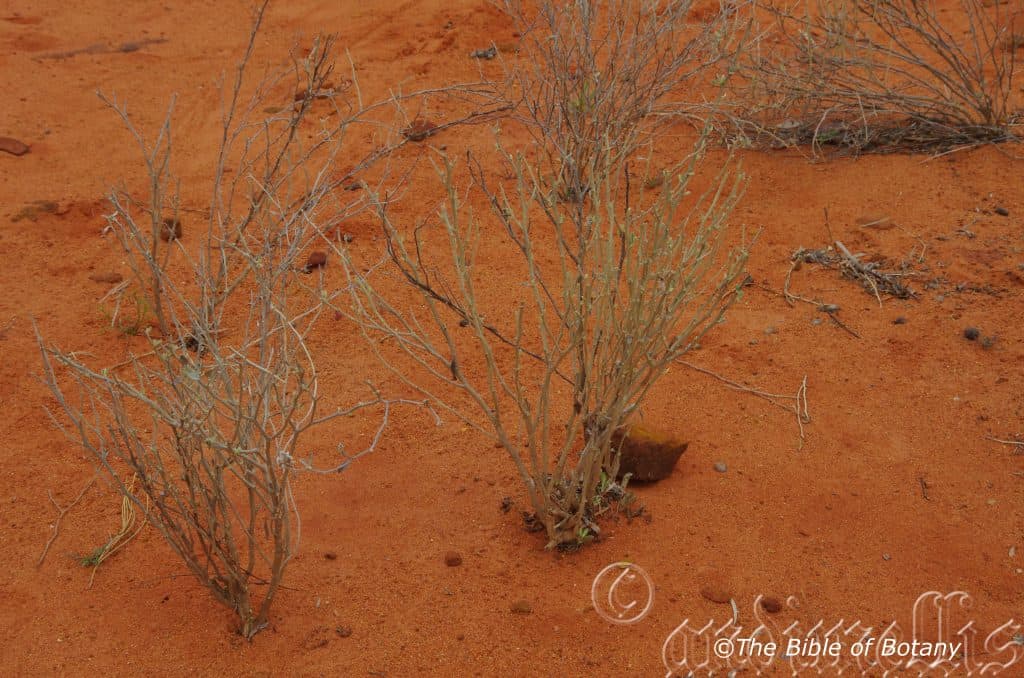
Characteristics:
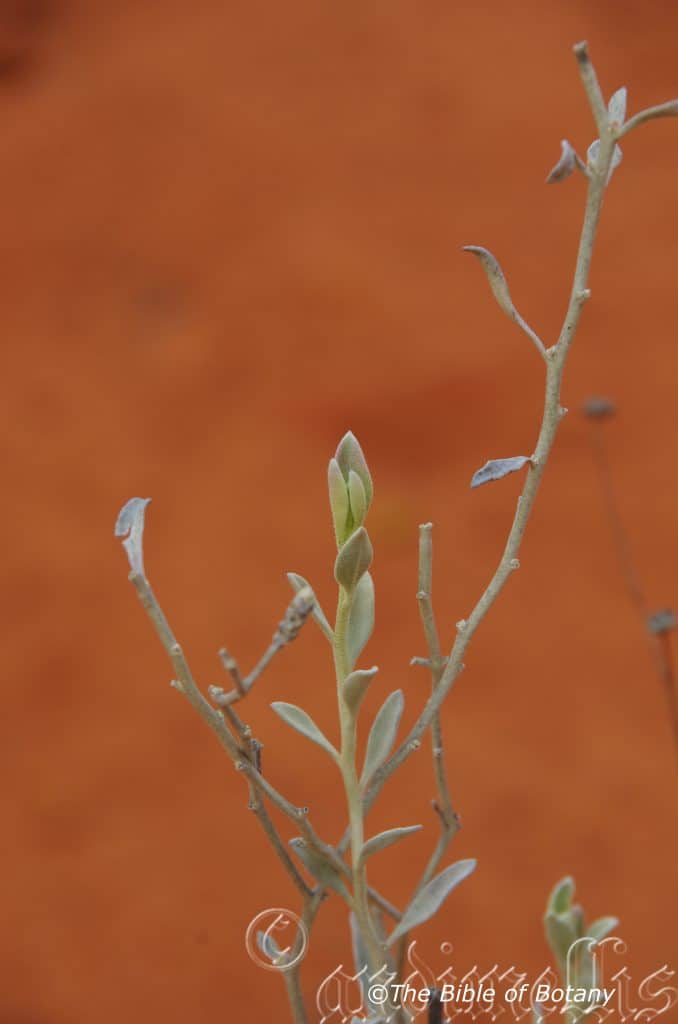
Ptilotus obovatus grows as a small spreading dense perennial. The stems are divaricate from a central woody root tuber. The stems are pale grey-green, blue-green, smooth with few branches from near the base. The stems are densely covered in white hirsute, tomentose and stellate hairs as are the new shoots.
The alternate leaves of Ptilotus obovatus are obovate or lanceolate to elliptical. The leaves measure 10mm to 40mm in length by 5mm to 30mm in width. The bases are cuneate while the apexes are obtuse to emarginated. The very thick concolourous laminas are pale grey-blue to pale grey-green and glabrous. The leaf margins are entire, flat and undulating. The mid vein is not prominent on either lamina and is not visible on the lower lamina and is barely visible on the upper lamina. The petioles measure 2mm to 115mm in length.
Inflorescences of Ptilotus obovatus are born on terminal globose heads lengthening to short cylindrical heads as the individual flowers mature. The simple terminal cymes measure 10mm to 33mm in length by 10mm to 16mm in diameter. The glossy black bracts are ovate with a narrowly acute to mucronate apex. The bases of the bracts are sparsely to densely cover in white hirsute hairs. The 5 perianth tubes are very short with the lobes spreading. The linear lobes are green with deep pink margins. The perianth and lobes measure 7mm to 10mm in length by 1.5mm to 2mm in diameter. The apexes are narrowly acute.
The perianths of Ptilotus obovatus var. obovatus are pale pink to mid pink. The lower 75mm to 80mm of the perianths closest to the base are densely covered in long, soft, white hirsute and pilose hairs externally and is glabrous internally as is the 25mm to 20mm closest to the apex.
The perianths of Ptilotus obovatus var. parvifolius are pale grey to silvery-grey. The lower 65mm to 70mm of the perianths closest to the base are sparsely covered in long, soft, white hirsute and pilose hairs externally and is glabrous internally as is the 35mm to 30mm closest to the apex.
The 3 or 4 stamens and 1 or 2 staminodes are all inserted. The anthers are yellow.
The ovaries are sparsely covered in white hirsute hairs near the apex. The style is glabrous. Ptilotus obovatus’s flowers appear throughout the year especially after good rains.
The fruits are small ovate capsules. The capsules are glabrous. The greenish capsules turn pale fawn when ripe. The spherical seeds are glossy black and measure 1mm in diameter.
Wildlife:
Ptilotus obovatus does not appear to have any predators though the flowers are visited by hundreds of small native nectar eating butterflies, native bees, wasps and native flies.
The seeds are edible and contain a high quality protein which can be made into flour. Plants can be grown commercially for the seed and I have recommended it as a commercial crop in the past. Commercially the seed is known as amaranth to which it is closely related. The leaves most likely can be boiled or steamed as a vegetable substitute for cabbage.
Cultivation:
Ptilotus obovatus is a magnificent annual that should be more widely grown in temperate, semi-arid and arid gardens. It is ideal at the edge of a forest or as the pioneer herbs in open country to help bind the soil and add potash and colour to the scene. It also makes a good rockery displays as the main feature in hot open spaces or confined sunny positions. In cultivation they will grow from 0.7 meters to 1.2 meters in height by 0.7 meters to 1.2 meters in diameter when grown in the open.
It grows well on lighter soils but not on pure sand and thrives on pindan soils given just 1 or 2 deep watering during the growing season. It can cope with temperatures as low as minus 4 degrees and up to 40 degrees. It is drought resistant once established and in fact detest too much water.
Add to the above, if it is given a little native fertilizer on being planted out as a seedling will respond with good flowering and good fruit set over a long period.
Mass plantings or scattered through the bush add colour throughout the year. It can be rotated or used in a heath setting where colour is required. It can be used in a desert scene or a heath scene equally well however if it is used in a heath scene be mindful that other dry desert plants should be the companion plants. It should also have a clear area surrounding each plant to allow for good air flow otherwise fungal problems would be a real concern.
When you design a miniature desert garden, use contours to display the plants to their best. Plant a row of small shrubs on the top to represent the hills or a ridge or use it on the plains to give a feeling of expansive flatness with the hills in the distance. Another method would be to cover the hills in the distance with annuals that have soft grey foliages. This again would effectively represent the haze experienced in real life. It would have to be taller than those planted in valleys or on plains to give depth and height. Don’t make the ridge straight curve it around. Use small tussock grasses or Lomandra species adjacent to Ptilotus obovatus to give it height. Prune plants up the valleys and background so they remain shorter than those in the foreground to give greater depth.
Place it near old stumps and roots to make the stumps or roots look larger. Select an area of ground and let your hair down and be imaginative and this is the plant that may just change your life. Remember this plant is rather large for this type of garden so be sparingly with the other plants when planting and remember that deserts are rolling flat plains not steep hills so it is best to use a gentle slope or a basin with a small pool at the bottom. A billabong affect is the go, not a waterfall or cascades.
Ptilotus obovatus would make an outstanding contribution to a dry heath garden. Here it can be used as the taller growing plant scattered throughout the heath scene. When you design a flat dryer heath garden which this Ptilotus obovatus is well suited don’t use contours to display the plants as heath lands are almost always flat or have a slight rise. Plants must be planted close together and be short so you can see over the tallest ones with the exception of one or two plants at the most. These will be feature plants. The idea is to achieve a feeling of expansive flatness. This can be achieved with using the Ptilotus obovatus’s soft grey ovate to obovate leaves and having them contrasting with finer pale green or fine grey to glaucous coloured foliages. Use a lot of procumbent plants like Grevillea masonii, Grevillea thelemanniana or any of the Hibbertia obtusifolia. Mix it with other smaller shrubs so none of them dominate the scene but blend in to give a mosaic of foliage colours that you oversee.
Spent flowers should be removed to promote longer flowering and better quality flowers.
Propagation:
Seeds: The seeds of Ptilotus obovatus can be removed easily from the capsules that have fallen to the ground. Once the flowers have died and the first seeds have appear from the capsules remove the flowers and keep them in a cool dry place. Seeds will remain viable for several decades under ideal conditions.
Sow freshly treated seeds directly into a seed raising mix, keeping them moist not wet. When the seedlings are 20mm to 25mm tall, prick them out and plant them into 50mm native tubes using a good organic mix.
As the seedlings roots reach the bottom of the tubes plant them out into their permanent position. Do not delay as they will develop a large root system quickly as do most desert plants.
Fertilize using seaweed, fish emulsion or organic chicken pellets soaked in water on an alternate basis. Fertilize every two months until the plants are established then annually in early September to October to maintain better colour, health, vitality and flowering.
Further Comments from Readers:
“Hi reader, it seems you use The Bible of Botany a lot. That’s great as we have great pleasure in bringing it to you! It’s a little awkward for us to ask, but our first aim is to purchase land approximately 1,600 hectares to link several parcels of N.P. into one at The Pinnacles NSW Australia, but we need your help. We’re not salespeople. We’re amateur botanists who have dedicated over 30 years to saving the environment in a practical way. We depend on donations to reach our goal. If you donate just $5, the price of your coffee this Sunday, We can help to keep the planet alive in a real way and continue to bring you regular updates and features on Australian plants all in one Botanical Bible. Any support is greatly appreciated. Thank you.”
In the spirit of reconciliation we acknowledge the Bundjalung, Gumbaynggirr and Yaegl and all aboriginal nations throughout Australia and their connections to land, sea and community. We pay our respect to their Elders past, present and future for the pleasures we have gained.
Mount Cootha Botanic Gardens Qld.
Mount Cootha Botanic Gardens Qld.
Condon Qld.
Mount Cootha Botanic Gardens Qld.
Mount Cootha Botanic Gardens Qld.
Mount Cootha Botanic Gardens Qld.
Mount Cootha Botanic Gardens Qld.
Mount Cootha Botanic Gardens Qld.

Condon Qld.
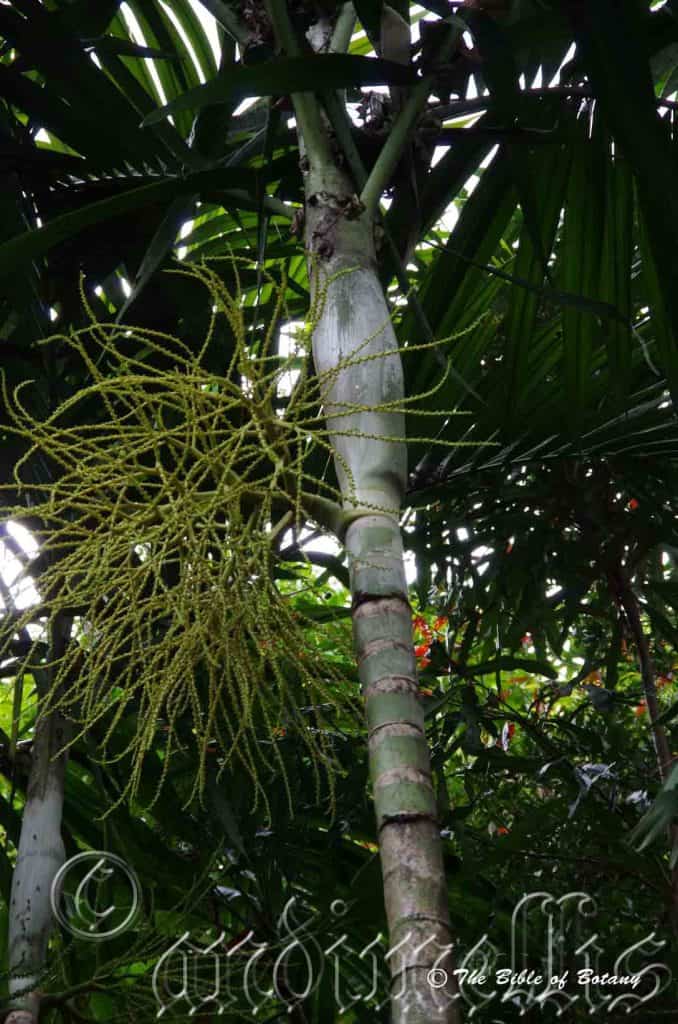
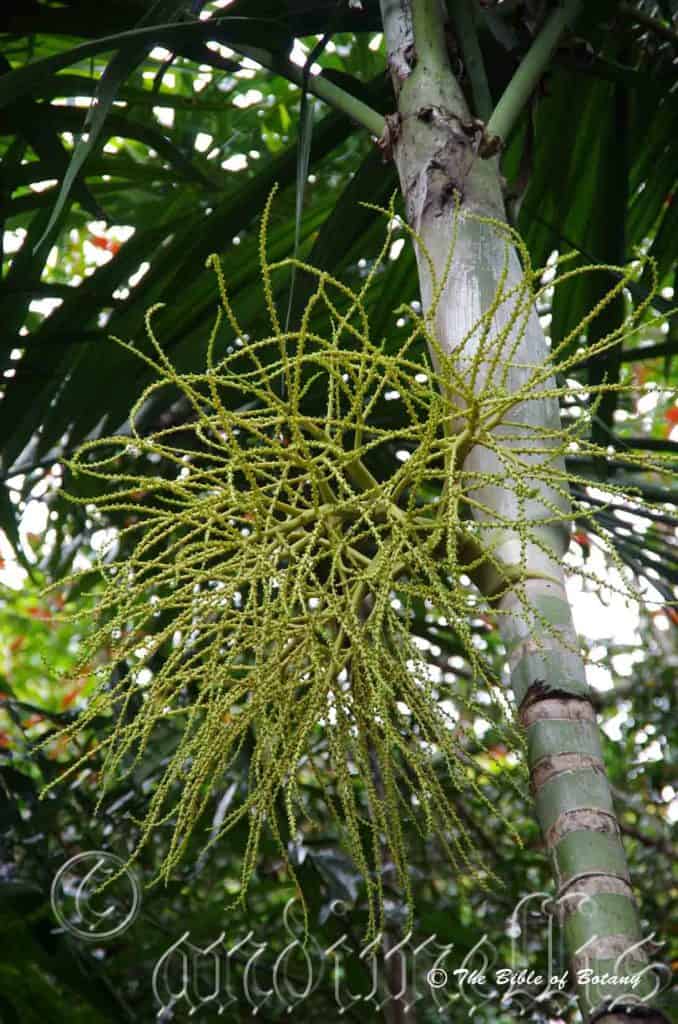
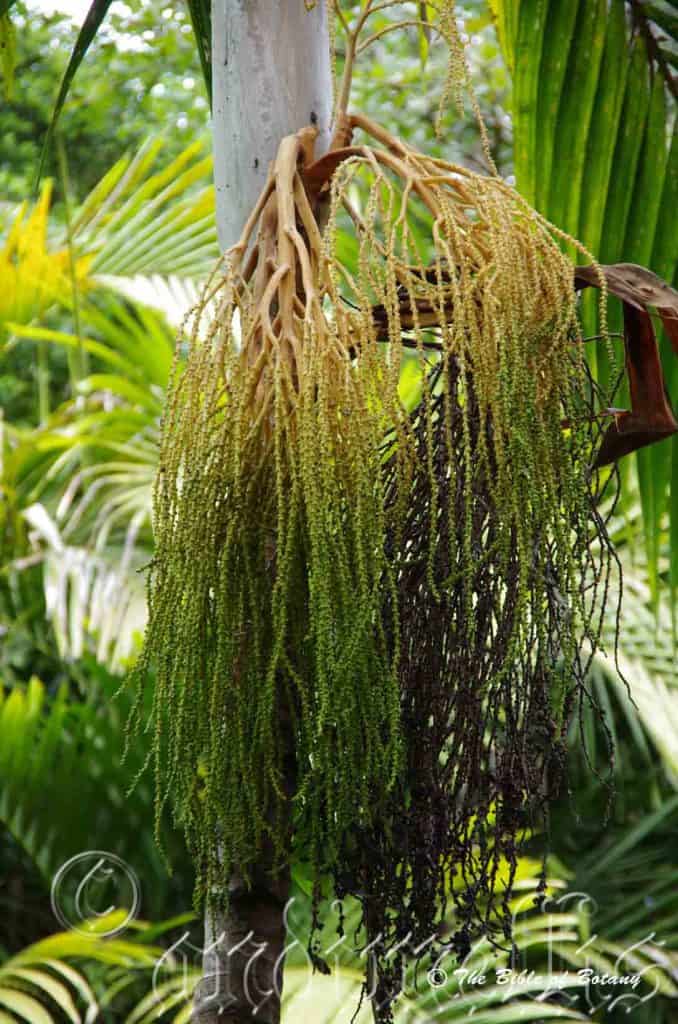
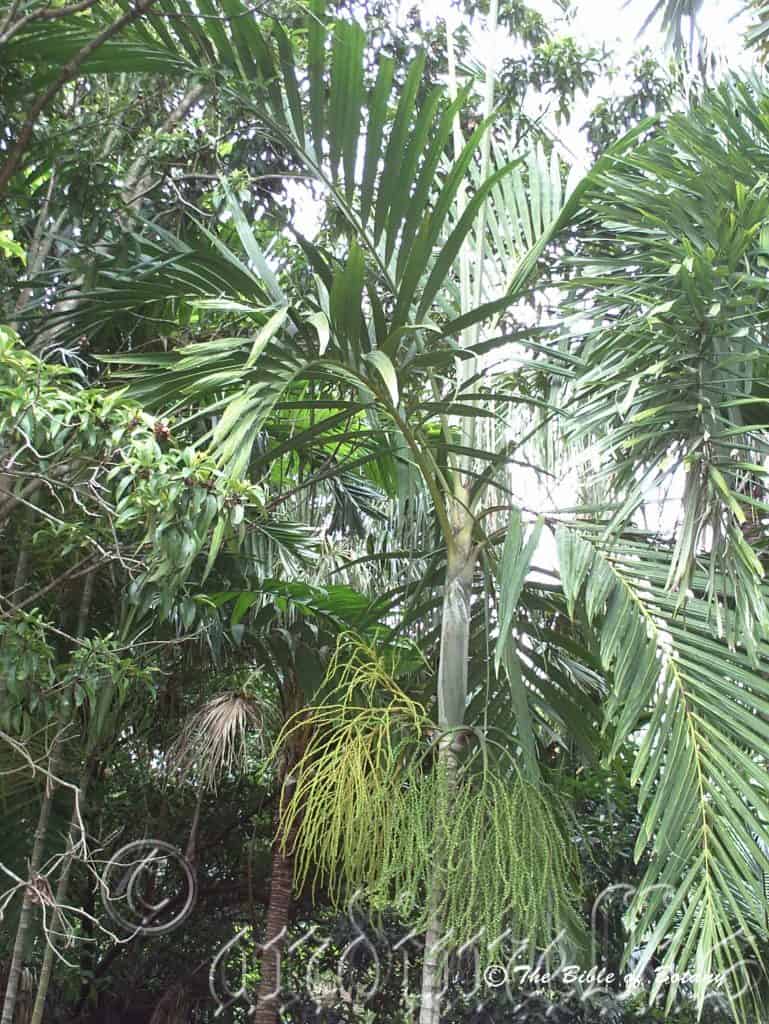
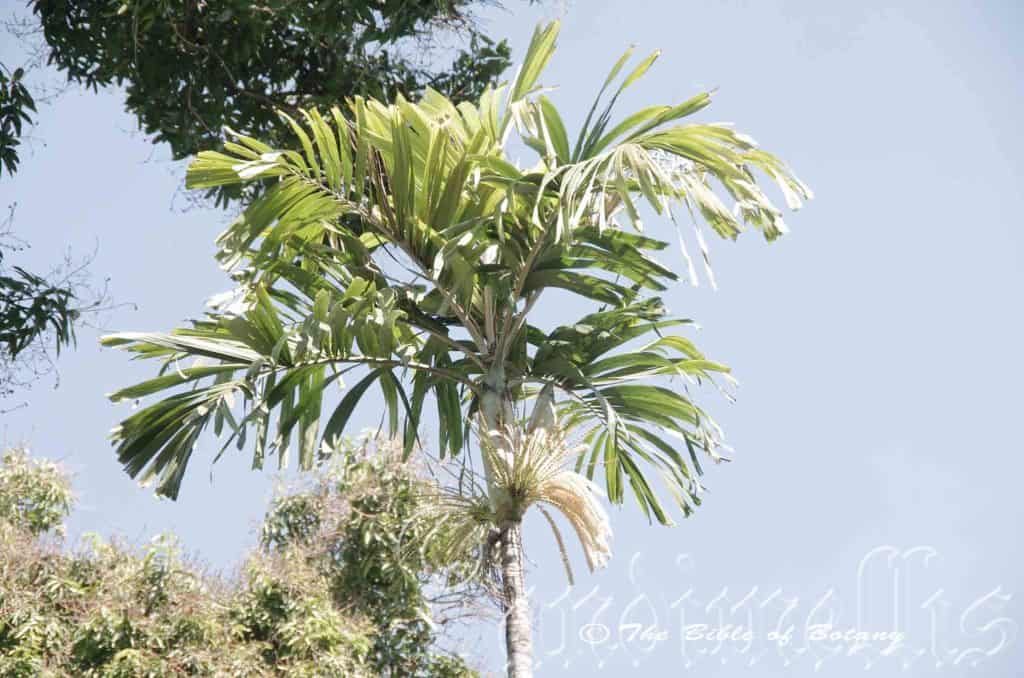
Ptychosperma elegans
Classification:
Class: Monocots
Order: Commelinids
Family: Arecales
Subfamily: Arecaceae
Genus: From Ptycho, which is Ancient Greek for a fold or crease and Spérma, which is Ancient Greek for a seed. It refers to seeds, which have a distinct longitudinal fold or crease.
Species: From ēlegāns, which is Latin for fine, elegant, handsome and tasteful. It refers to the overall appearance of plants, which are neat and good looking.
Common Name: Solitaire Palm.
Distribution:
Ptychospermum elegans is found from the Torres Strait Islands and southern New Guinea then south from Cape York Peninsula to the Fitzroy River near Rockhampton. It is also found around Nhulunbuy and Groote Eyelandt in the north east of the Northern Territory.
https://avh.ala.org.au/occurrences/search?taxa=Ptychosperma+elegans#tab_mapView
Habitat Aspect Climate:
Ptychospermum elegans prefers shade to lightly filtered light. It grows in coastal well developed rain forests, monsoonal rainforests or littoral rainforests. The altitude ranges from 5 meters ASL to 900 meters ASL.
The temperatures range from 6 degrees in August to 37 degrees in January.
The rainfalls range from lows of 900mm to an average of 3200mm annually.
Soil Requirements:
Ptychospermum elegans prefers to grow on light sandy clays to medium clays often with copious quantities of leaf litter. The soils are usually derived from decomposed brown basalt, black basalts, sandstones, granites, shale or metamorphic rocks. The soils pH ranges from 5pH to 7pH. It tolerates waterlogged soils especially those where seasonal water tables rise close to the surface. Non saline soils to moderately saline soils are tolerated.
Height & Spread:
Wild Plants: 9m to 12m by 3m to 4.5m.
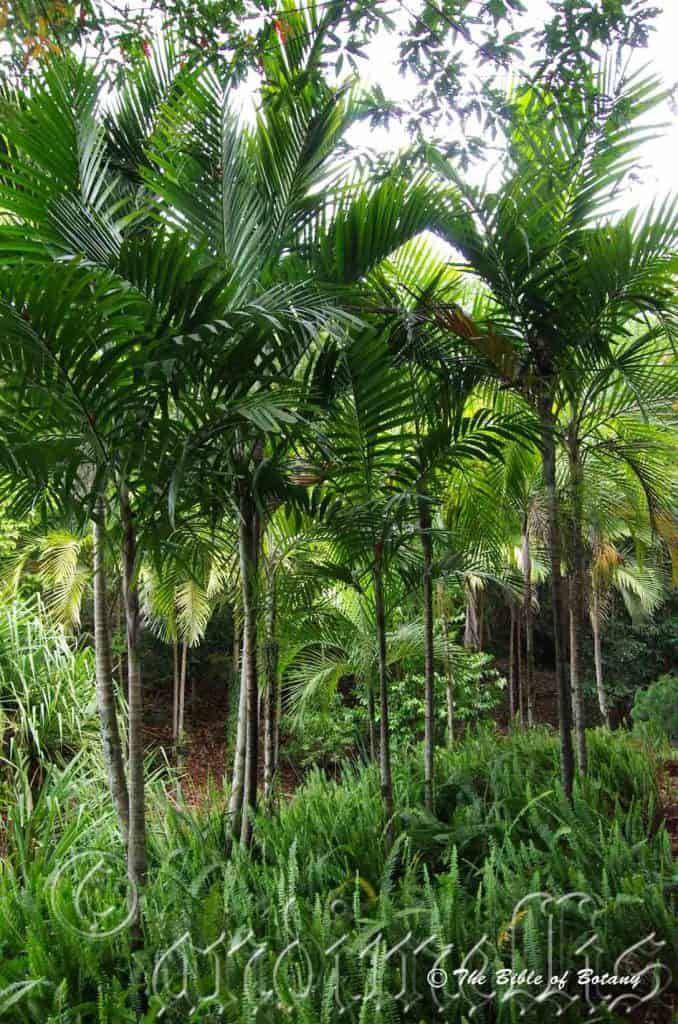
Characteristics:
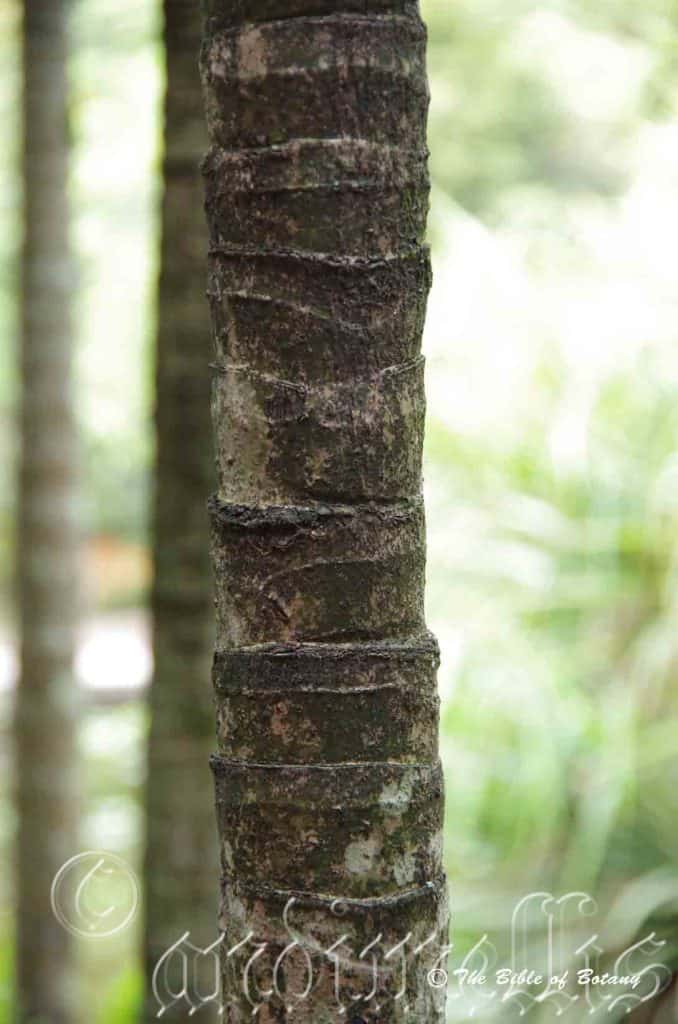
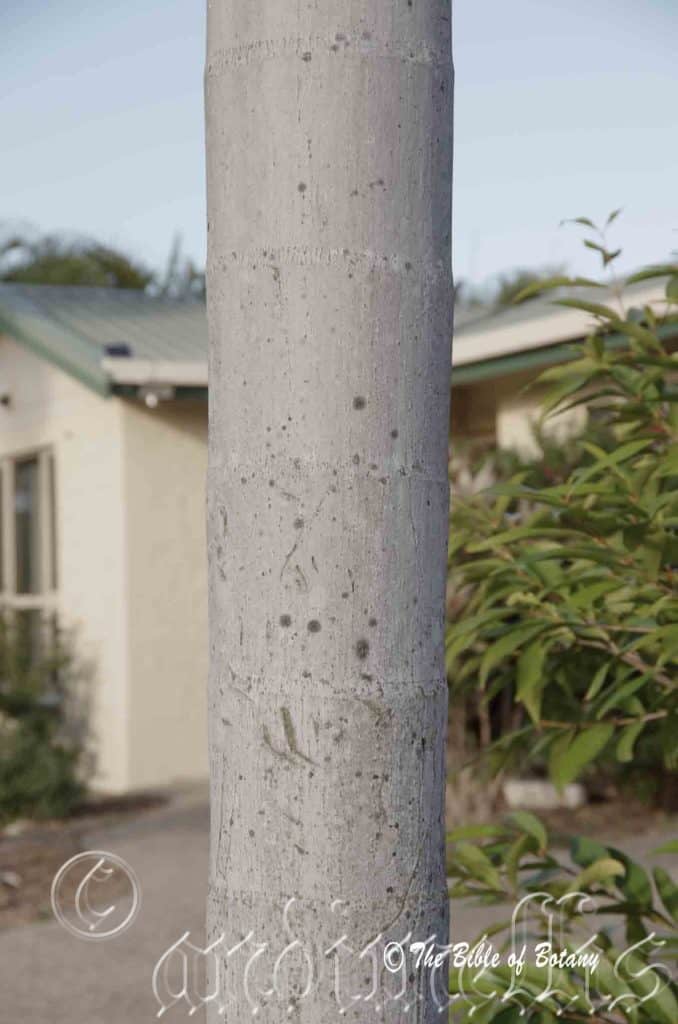
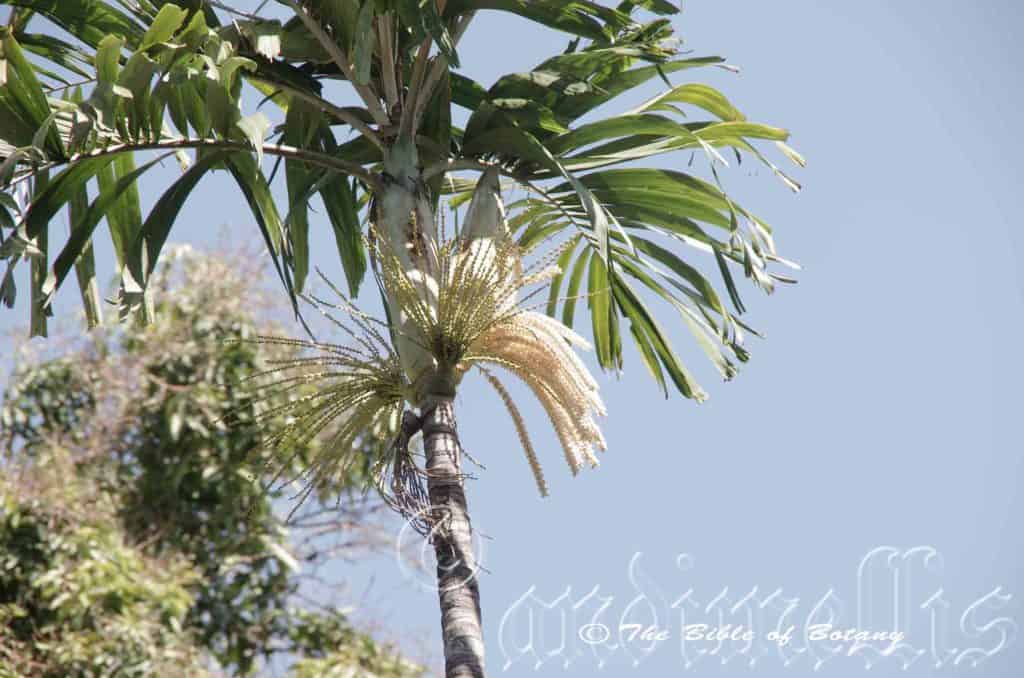
Ptychospermum elegans has a single slender grey trunk to 12 meters in height by 100mm to 150mm in diameter. The trunk is pale grey and retains the leaf scars of discarded leaves.
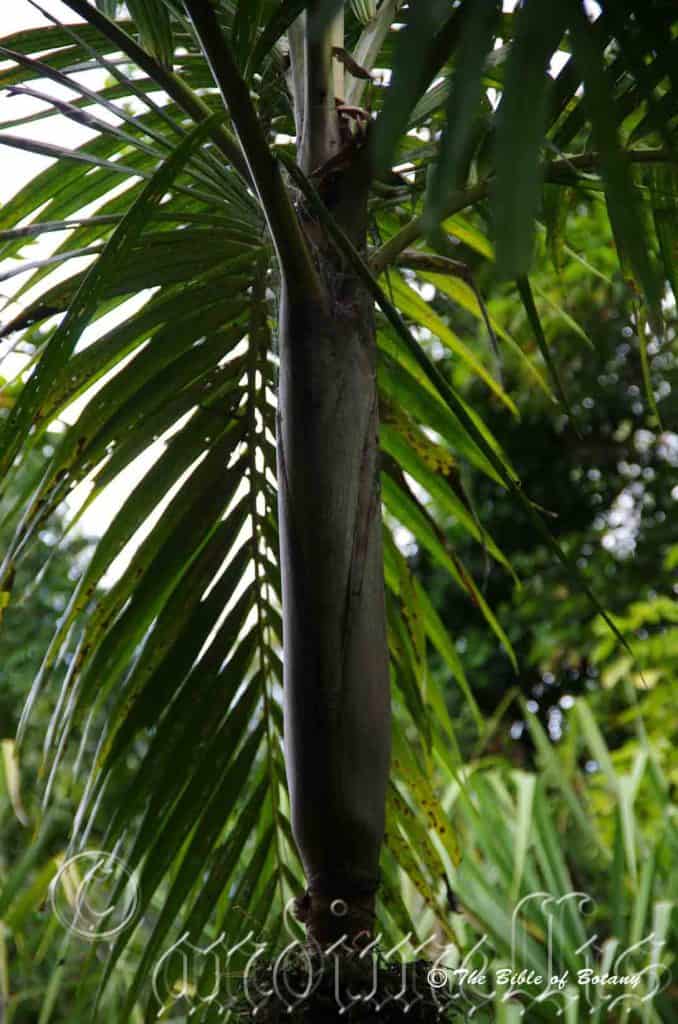
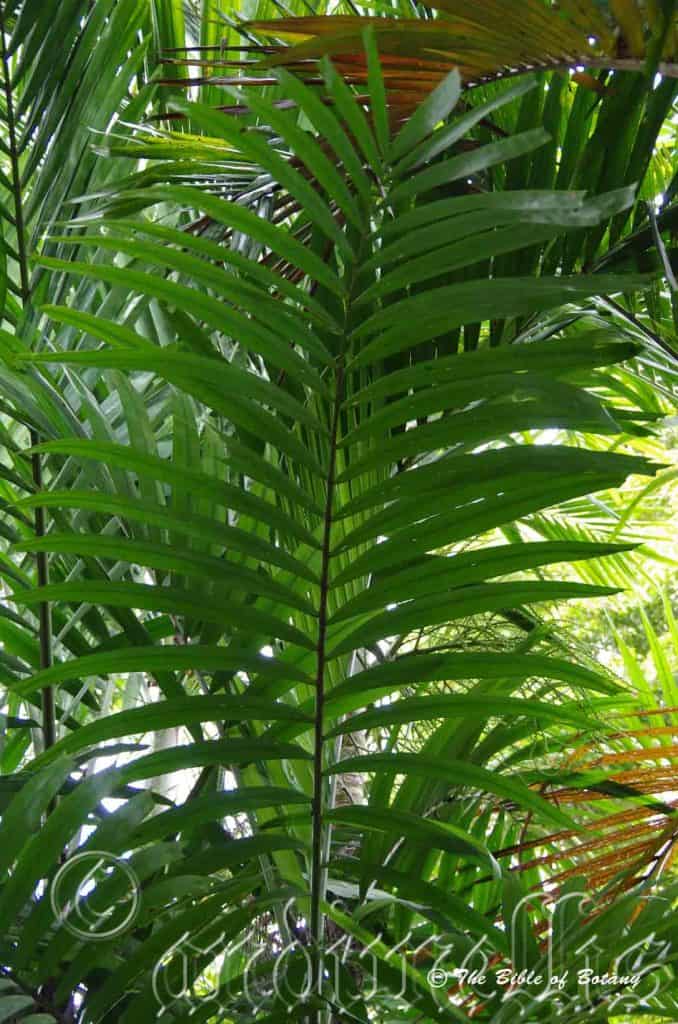
Ptychospermum elegans leaves measure 3000mm to 3300mm in length by 1000mm to 1600mm across. It is known as a feather palm due to the leaves looking like the feather of a bird’s wing. It is a self-cleaning palm shedding old leaves soon after they die. The 6 to 8 leaves clasp the trunk in a crown shaft for the upper 1000mm to 1200mm of the trunk. The petiole to the first pinnae measures 320mm to 380mm and is concave on the upper surface while the lower surface is convex. The leaves have a very slight lateral twist with 30 to 60 pairs of pinnae. The pinnae measure 800mm to 840mm in length by 40mm to 50mm in width. The discolourous laminas are mid green to deep sea-green and glabrous on the upper laminas while the lower laminas are paler. The almost opposite pinnae base is recurved while the apex is praemorse. The margins are entire while the midrib is prominent on the upper lamina and is visible on the lower lamina.
The inflorescences of Ptychospermum elegans are born in large pendant panicles from below the bottom of the crown shaft. They measure 650mm to 700mm in length by 650mm to 700mm in width. The plants produce their flowers in groups of 3 with 2 male flowers to 1 female flower.
The 3 pale green sepals measure 1.5mm to 2mm in length. The 3 pale creamy green petals measure 5.5mm to 6.5mm in length by 2mm to 3mm in width. The 12 to 22 stamens measure 2.5mm in length with pale yellow anthers. The style and stigma are well developed in the male flowers however the ovaries are absent.
The female flowers 3 green sepals measure 2.5mm in length by 2.5mm in width. The 3 green petals are tightly packed around the style never fully opening and measure 4mm to 5mm in length by 2.5mm in diameter. The 6 staminodes surround the recurved stigma which measures 1mm in length.
Ptychospermum elegans’s fruit is a globose to ellipsoidal nut. The nuts measure 9mm to 15mm in length by 8mm to 10mm in diameter. The green nuts turn scarlet red on ripening. The fawn calyx and stigma are persistent on the fruits. The red epicarp sheds to reveal the fawn-brown coconut fibres that surround the nuts which measure 7mm to 11mm in length by 5mm to 8mm in diameter. Nuts have 2 to 5 longitudinal furrows.
Wildlife:
Birds have a liking for the fruit especially Pigeons and Bower birds. Possums and gliders enjoy eating the flowers. It is the host plant for the Yellow Palm Dart butterfly Cephrenes trichopepla, and the Orange Palm Dart butterfly Cephrenes augiades subsp. aperthias.
Cultivation:
Ptychospermum elegans is a beautiful palm from the northern rainforests of Australia and deserves a place in every tropical and sub-tropical garden. It may reach 12 meters by 5 meters in cultivation but don’t hold your breath. The trunk is suitable for stags and other epiphytes especially if the trunks are protected from winds and are shaded during the heat of the day.
Ptychospermum elegans will grow on most soils especially those that are not pure sand as long as an adequate supply of water and fertilizer program is in place. It grows in very wet soils even where the water is stagnant.
It is a good feature plant around pools and ponds as it is self-cleaning and take years to flower and fruit. Roots do not give any problems when in confined places like court yards and near pools. This is a great accent plant against hard surfaces like brick walls or where a slow maturing plant is required.
It is a fast growing palm that make very good indoor subjects or tub plants for patios for many years. It can grow to 1.5 meters in 2 years from seed under ideal conditions.
Group plantings of three or four palms spaced at 4 meters will look thick and bushy in about four years. Scattered plantings throughout a rain forest garden look much more natural and pleasant to the eye than dense plantings.
Indoor or Potted On:
Sawdust or sand mixes are too well draining unless the sawdust has completely composted down where it exhibits a texture like plasticine to the touch. Moisture can be squeezed out between the fingers yet it remains moist. I find this a great basis to start with.
Mix equal parts of the well decomposed saw dust with the above feel with perlite and vermiculite. To this add two part sharp clean sand and one part compost. Make sure the sand comes from a source that does not have salt.
The Saw dust in this condition creates the moisture retention and holds nutrient in. The perlite and vermiculite make the mix neutral and both have great water holding capacity without shrinkage with age. The sand creates good drainage and is good for good healthy root development.
Indoor plants need good light and ventilation without drying breezes or wind. Again fertilize the plants on a monthly basis with the above formula on a rotation basis.
Propagation:
Seeds: Sow the seeds into a seed raising mix in deep trays and cover with 10mm of mix. Seeds are often quick to germinate with germination completed within 4 months. When the seedlings are at the two to three leaf stages, prick them out and plant them into 75mm native tubes using a good organic mix.
Fertilize using Seaweed, fish emulsion or organic chook pellets soaked in water and apply the liquid on an alternate basis. Fertilize every month. Once the seedlings reach 250mm to 300mm in height plant them out into their permanent position.
Where mass plantings of Ptychospermum elegans are required, as a feature; plant them at 3 meters to 4 meters centers. Plantings along a drive way should be planted at 4 meter centers.
Fertilize using seaweed, fish emulsion or organic chicken pellets soaked in water on an alternate basis. Fertilize every two months until the plants are established then annually in early September to October to maintain better colour, health, vitality and flowering.
Further Comments from Readers:
“Hi reader, it seems you use The Bible of Botany a lot. That’s great as we have great pleasure in bringing it to you! It’s a little awkward for us to ask, but our first aim is to purchase land approximately 1,600 hectares to link several parcels of N.P. into one at The Pinnacles NSW Australia, but we need your help. We’re not salespeople. We’re amateur botanists who have dedicated over 30 years to saving the environment in a practical way. We depend on donations to reach our goal. If you donate just $5, the price of your coffee this Sunday, We can help to keep the planet alive in a real way and continue to bring you regular updates and features on Australian plants all in one Botanical Bible. Any support is greatly appreciated. Thank you.”
In the spirit of reconciliation we acknowledge the Bundjalung, Gumbaynggirr and Yaegl and all aboriginal nations throughout Australia and their connections to land, sea and community. We pay our respect to their Elders past, present and future for the pleasures we have gained.
Mount Cootha Botanic Gardens Qld.
Mount Cootha Botanic Gardens Qld.
Mount Cootha Botanic Gardens Qld.
Mount Cootha Botanic Gardens Qld.
Condon Qld.
Condon Qld.
Mount Cootha Botanic Gardens Qld.
Mount Cootha Botanic Gardens Qld.
Condon Qld.
Palmatum Gardens Townsville Qld.
Condon Qld.
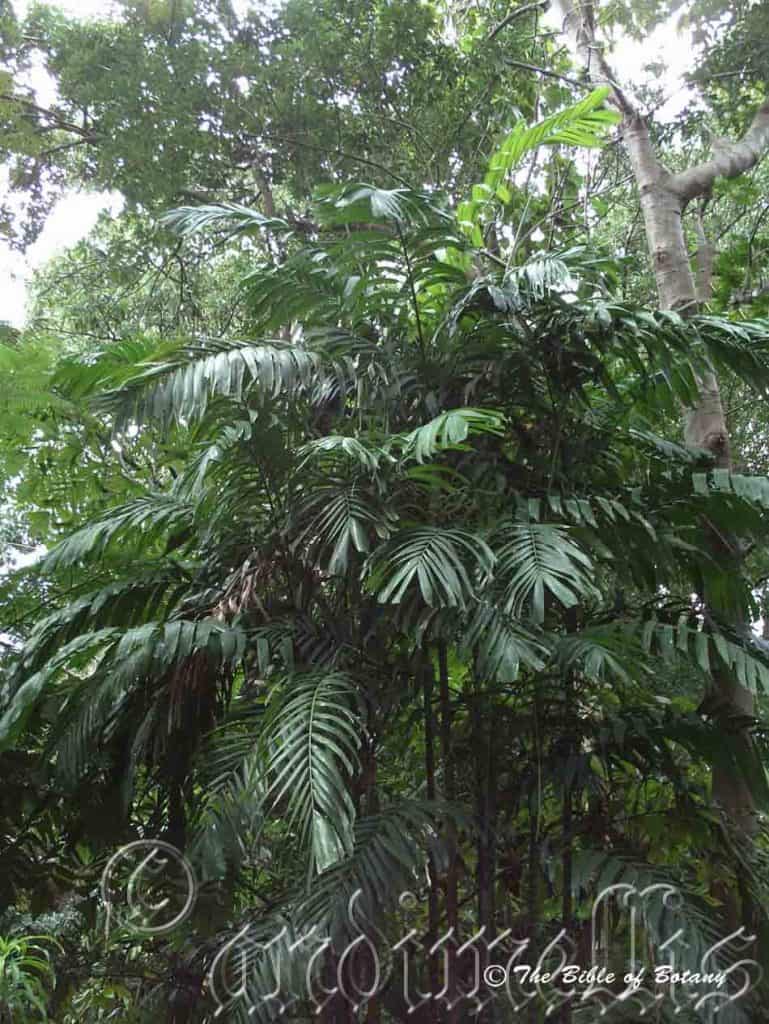
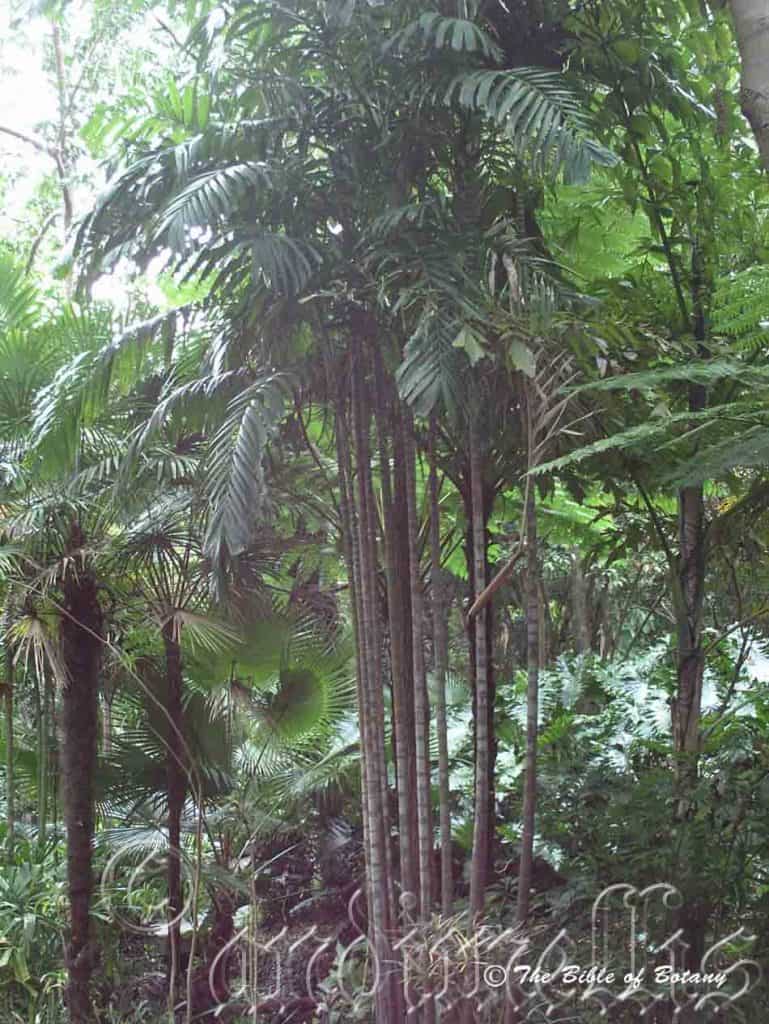
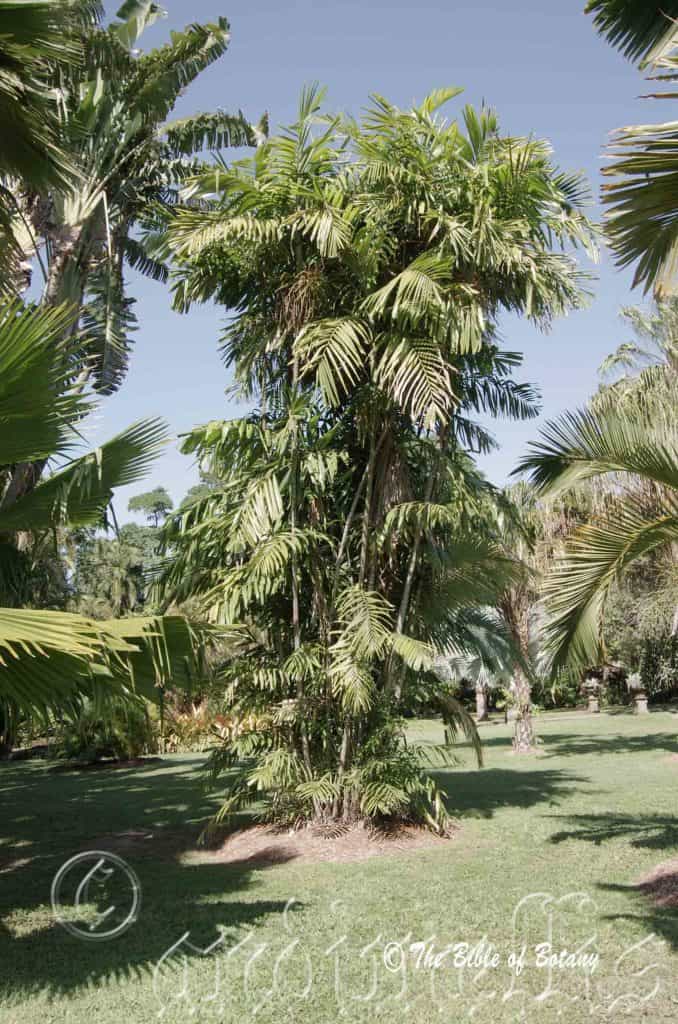
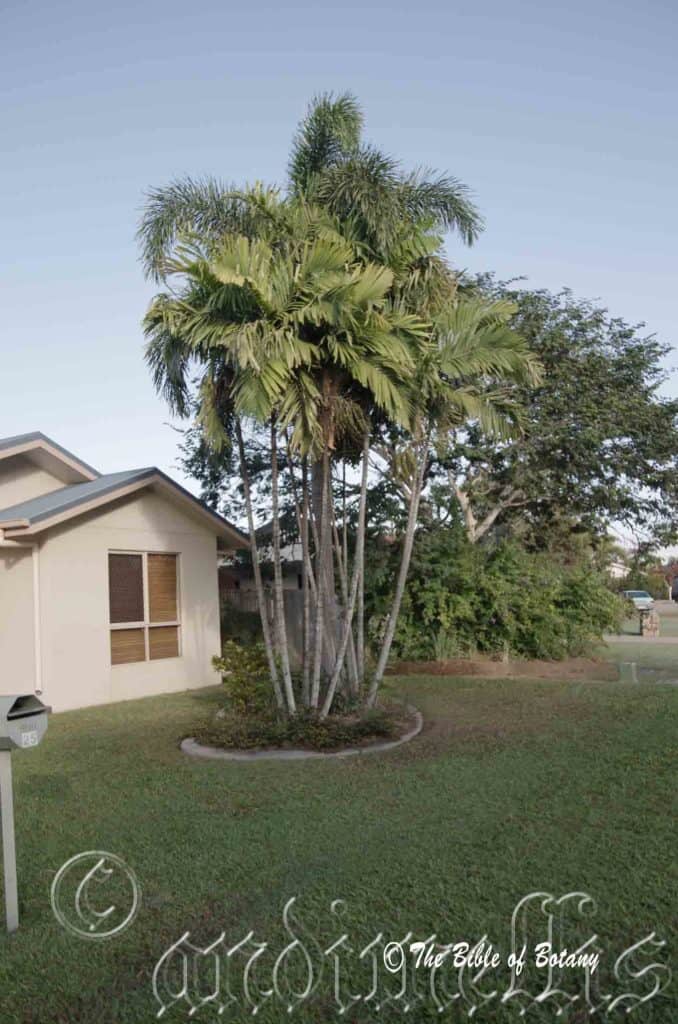
Ptychosperma macarthurii
Classification:
Class: Monocots
Order: Commelinids
Family: Arecales
Subfamily: Arecaceae
Genus: From Ptycho, which is Ancient Greek for a fold or crease and Spérma, which is Ancient Greek for a seed. It refers to seeds, which have a distinct longitudinal fold or crease.
Species: Is named in honour of William Macarthur; 1800-1882, who was an Australian botanist, horticulturalist and agriculturalist.
Common Name: Australian Cluster Palm.
Distribution:
Ptychospermum macarthurii is found in 3 distinctly disjunct populations. It is found around Darwin and is most likely incorrectly called Ptychosperma bleeseri.
The eastern population is on the eastern side and northern tip of Cape York Peninsula to Cape to Mapoon while the southern population is found south from the Iron Range National Park to east of Coen.
https://avh.ala.org.au/occurrences/search?taxa=Ptychosperma+macarthurii#tab_mapView
Habitat Aspect Climate:
Ptychospermum macarthurii prefers shade to lightly filtered light. It grows in coastal, lowland well developed rain forests, monsoonal rainforests, littoral rainforests and brackish water on alluvial flats or riparian zones. The altitude ranges from 10 meters ASL to 400 meters ASL.
The temperatures range from 10 degrees in August to 37 degrees in January.
The rainfalls range from lows of 1550mm to an average of 3200mm annually.
Soil Requirements:
Ptychospermum macarthurii prefers to grow on light sandy clays to medium clays with a high proportion of forest litter. The soils are usually derived from decomposed brown basalt, black basalts, podsolic soils or sandstones. The soils pH ranges from 5.5pH to 8pH. It does not tolerate waterlogged soils. Non saline soils to extremely saline soils are tolerated.
Height & Spread:
Wild Plants: 7m to 15m by 5m to 8m. The trunk measures 100mm to 150mm in diameter.
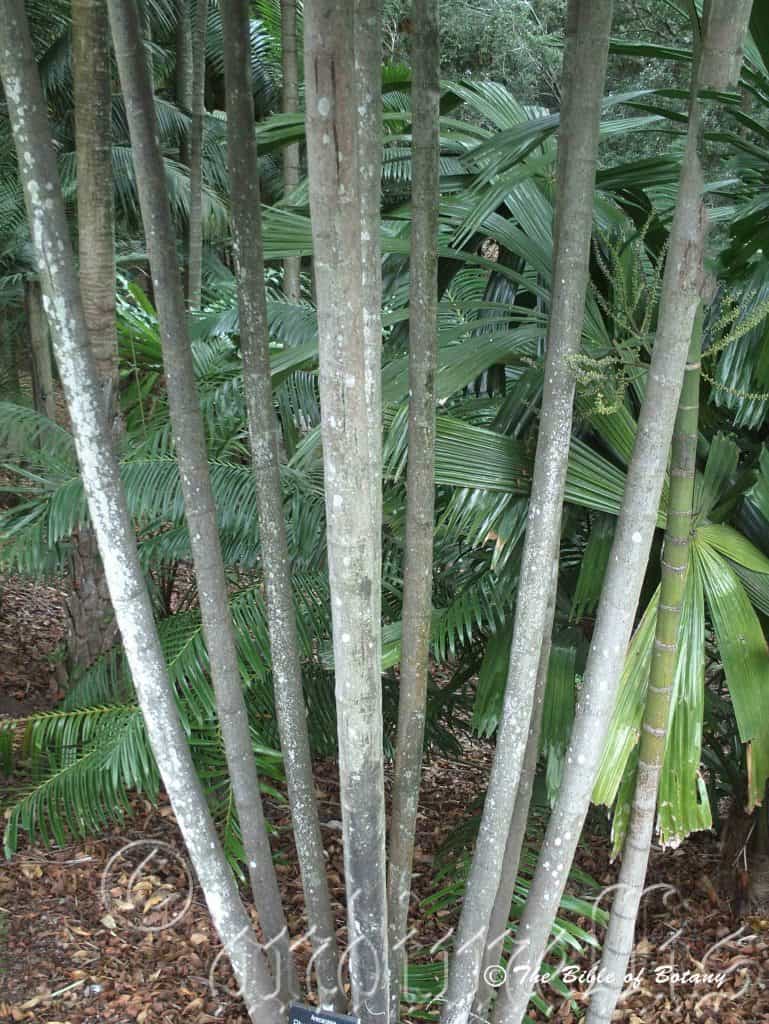
Characteristics:
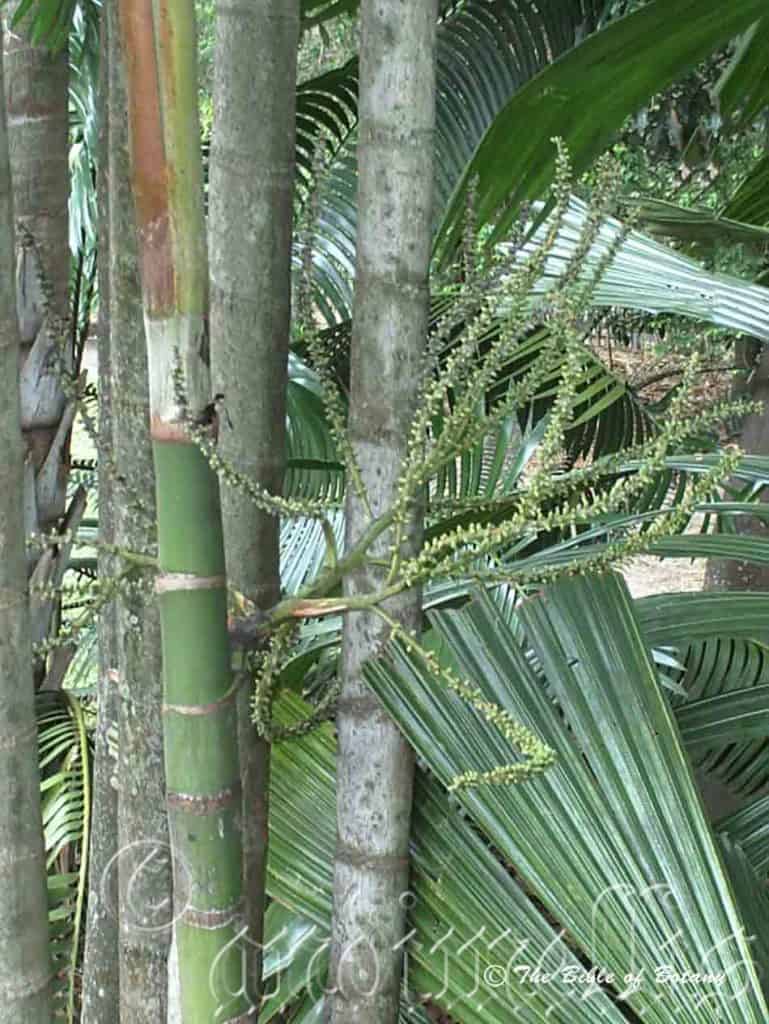
Ptychospermum macarthurii is a multi-trunked palm with slender grey shafts to 15 meters in height. There are usually 2 or 3 main shafts surrounded by many suckers up to a meter in height when growing in dense shade. Plants growing in full sun will see more of the suckers developing to maturity. The trunk is pale grey and retains the leaf scars of discarded leaves.
Ptychospermum macarthurii leaves measure 2600mm to 3000mm in length by 900mm to 1150mm across. It is known as a feather palm due to the leaves looking like the feather of a bird’s wing. It is a self-cleaning palm shedding old leaves soon after they die.
The 6 to 9 leaves clasp the trunk in a crown shaft for the upper 900mm to 1000mm of the trunk. The leaves have a lateral twist to 90 degrees with 15 to 40 pairs of pinnae. The opposite or sub opposite pinnae measure 500mm to 560mm in length by 30mm to 80mm in width. The petiole to the first pinnae measures 420mm to 500mm and is concave and glabrous on the upper surface while the lower surface is convex and glabrous. The concolourous leaves are mid sea-green to deep sea-green. The pinnae bases taper to a short petiole while the apexes are praemorse. The margins are entire while the midrib is prominent on both laminas.
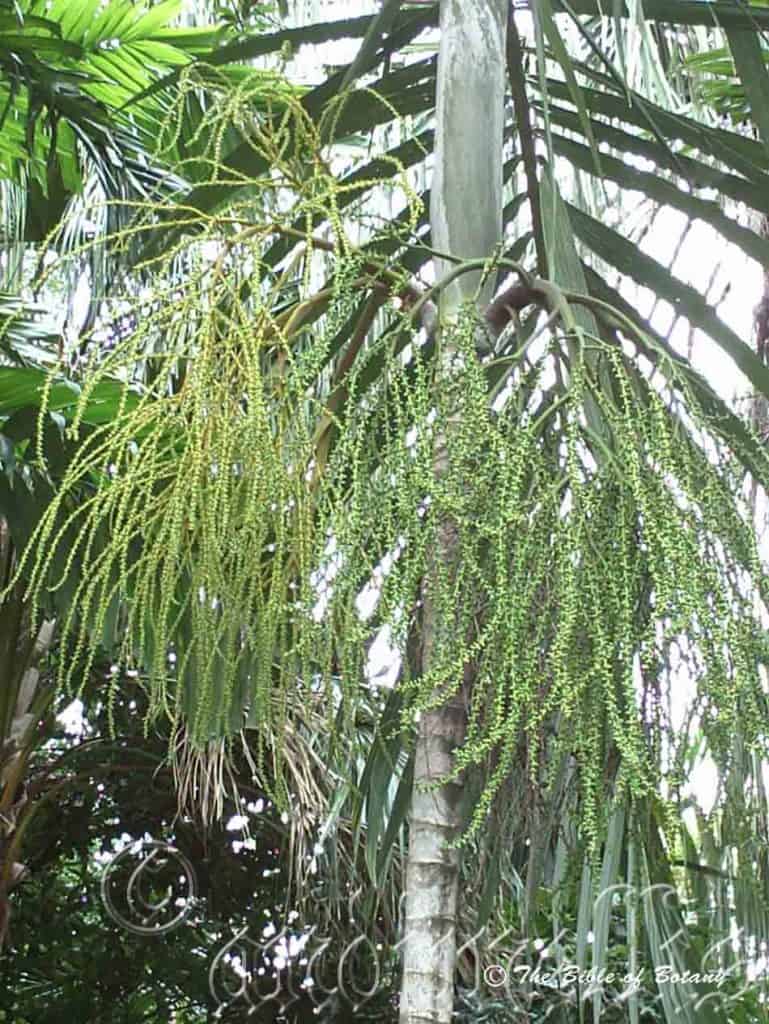
Ptychospermum macarthurii’s inflorescence is born in large pendant panicles from below the bottom of the crown shaft. They measure 240mm to 450mm in length by 360mm to 600mm in width. The palms are monoecious producing 2 male flowers to 1 female flower.
The 3 pale green sepals measure 1.5mm to 2.5mm in length. The 3 pale yellow-green to pale green petals measure 6mm to 7.2mm in length by 2mm to 3mm in width. The 23 to 40 stamens measure 3.5mm in length with pale yellow anthers. The style and stigma are well developed in the male flowers however the ovaries are absent.
The female flowers 3 creamy green sepals measure 2mm in length by 3mm in width. The 3 creamy green petals are tightly packed around the style never fully opening and measure 3mm to 4mm in length by 2mm to 3.5mm in diameter. The 3 to 6 staminodes surround the recurved stigma which measures 0.5mm in length.
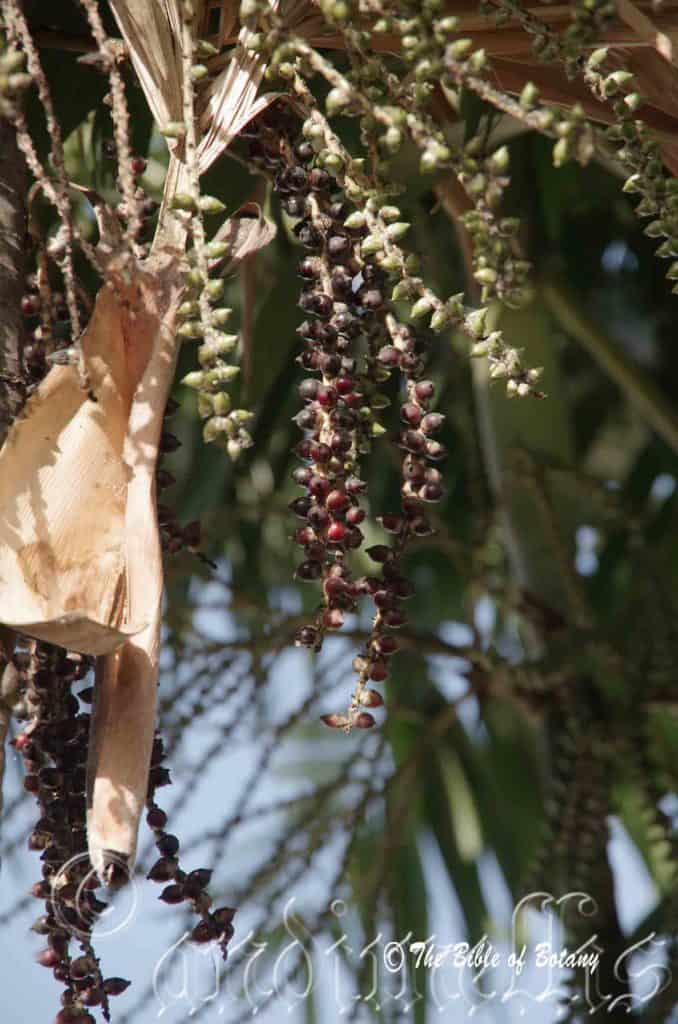
Ptychospermum macarthurii’s fruit are ovoidal nuts. The nuts measure 12mm to 18mm in length by 8mm to 12mm in diameter. The green nuts turn scarlet red on ripening. The fawn calyx and stigma are persistent on the fruits. The red epicarp sheds to reveal the fawn-brown coconut fibres that surround the ellipsoidal nuts which measure 9mm to 12mm in length by 5mm to 8mm in diameter. Nuts have 4 or 5 longitudinal furrows.
Wildlife:
Birds have a liking for the fruit especially Pigeons and Bower birds. Possums and gliders enjoy eating the flowers. It is the host plant for the Yellow Palm Dart butterfly Cephrenes trichopepla, and the Orange Palm Dart butterfly Cephrenes augiades subsp. aperthias.
Cultivation:
Ptychospermum macarthurii is a beautiful palm from the East coast rainforest gardens of Australia and deserves a place in every tropical and sub-tropical garden. It may reach 6 meters by 8 meters in height by 6 meters to 8 meters in diameter in cultivation but don’t hold your breath. The ultimate height of the palms depends on the availability of light. The darker the conditions the more compact are the growth while bright conditions will create a more robust plant to 12 meters or more in height.
Ptychospermum macarthurii will grow on most soils especially those that are not pure sand as long as an adequate supply of water is given. They grow in very wet soils even where the water is stagnant or brackish.
It is a good feature plant around pools and ponds as it is self-cleaning and take years to flower and fruit. Roots do not give any problems when in confined places like courtyards and near pools. This is a great accent plant against hard surfaces like brick walls or where a slow maturing plant is required.
Due to their slow growth Ptychospermum macarthurii makes very good indoor subject or tub plants for patios for many years.
Group plantings of three or four palms spaced at 4 meters will look thick and bushy in about eight years. Scattered plantings throughout a rain forest garden look much more natural and pleasant to the eye than dense plantings.
Indoors or Potted On:
Sawdust or sand mixes are too well draining unless the sawdust has completely composted down where it exhibits a texture like plastacine to the touch. Moisture can be squeezed out between the fingers yet it remains moist. I find this a great basis to start with.
Mix equal parts of the well decomposed saw dust with the above feel with perlite and vermiculite. To this add two part sharp clean sand and one part compost. Make sure the sand comes from a source that does not have salt.
The Saw dust in this condition creates the moisture retention and holds nutrient in. The perlite and vermiculite make the mix neutral and both have great water holing capacity without shrinkage with age. The sand creates good drainage and is good for good healthy root development.
Indoor plants need good light and ventilation without drying breezes or wind. Again fertilize the plants on a monthly basis with the above formula on a rotation basis.
Propagation:
Seeds: Sow the seeds directly into a seed raising mix in deep trays and cover with 10mm of mix. Seeds are often quick to germinate with germination completed within 4 months. When the seedlings are at the two to three leaf stages, prick them out and plant them into 75mm native tubes using a good organic mix.
As the roots developed and begin to grow out of the tubes repot the plants into 200mm buckets.
Fertilize using Seaweed, fish emulsion or organic chook pellets soaked in water and apply the liquid on an alternate basis. Fertilize every month. Once the seedlings reach 400mm to 600mm in height plant them out into their permanent position or repot them on into large tubs for indoor or patio use.
Where mass plantings of Ptychospermum macarthurii are required, as a feature; plant them at 6 meter to 8 meter centers.
Fertilize using seaweed, fish emulsion or organic chicken pellets soaked in water on an alternate basis. Fertilize every two months until the plants are established then annually in early September to October to maintain better colour, health, vitality and flowering.
Further Comments from Readers:
“Hi reader, it seems you use The Bible of Botany a lot. That’s great as we have great pleasure in bringing it to you! It’s a little awkward for us to ask, but our first aim is to purchase land approximately 1,600 hectares to link several parcels of N.P. into one at The Pinnacles NSW Australia, but we need your help. We’re not salespeople. We’re amateur botanists who have dedicated over 30 years to saving the environment in a practical way. We depend on donations to reach our goal. If you donate just $5, the price of your coffee this Sunday, We can help to keep the planet alive in a real way and continue to bring you regular updates and features on Australian plants all in one Botanical Bible. Any support is greatly appreciated. Thank you.”
In the spirit of reconciliation we acknowledge the Bundjalung, Gumbaynggirr and Yaegl and all aboriginal nations throughout Australia and their connections to land, sea and community. We pay our respect to their Elders past, present and future for the pleasures we have gained.
NCBG Coffs Harbour NSW
NCBG Coffs Harbour NSW
NCBG Coffs Harbour NSW
NCBG Coffs Harbour NSW
NCBG Coffs Harbour NSW
NCBG Coffs Harbour NSW
NCBG Coffs Harbour NSW
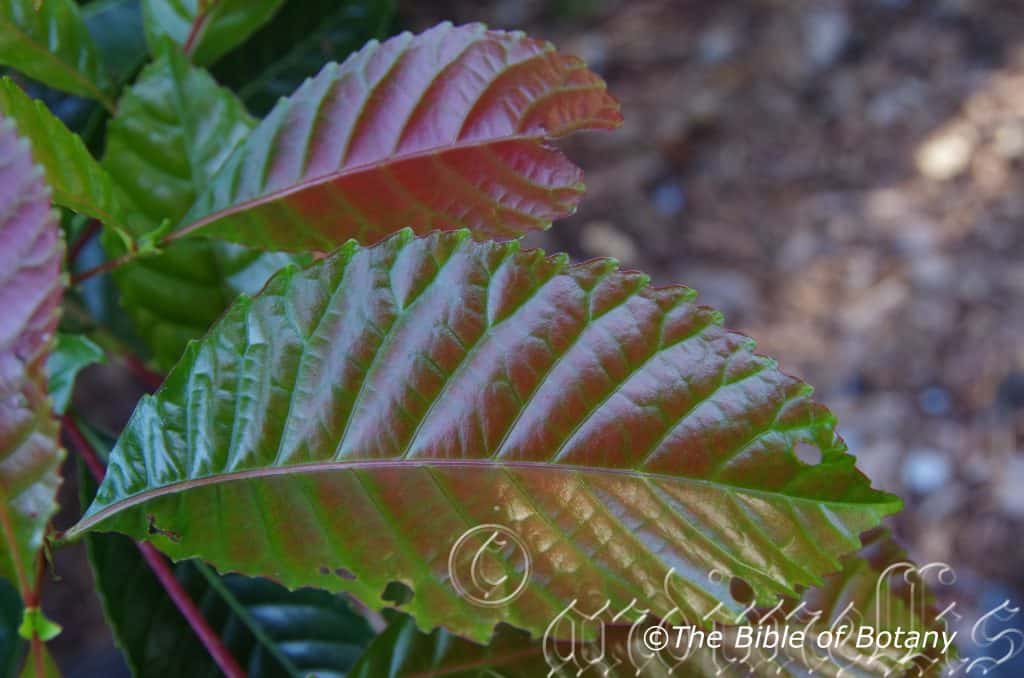
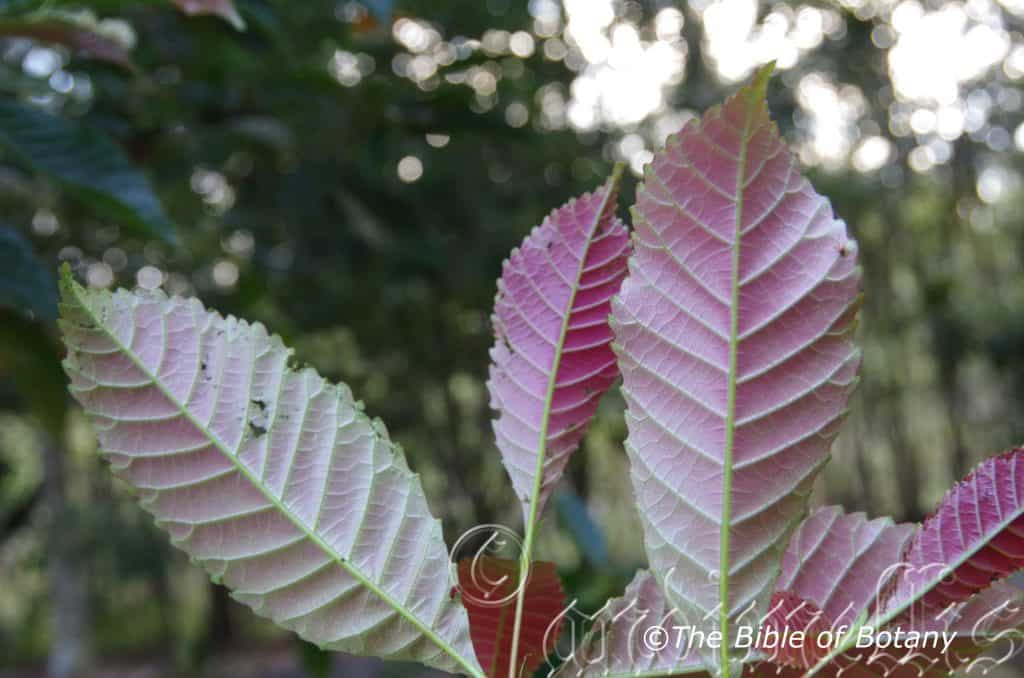
Pullea stutzeri
Classification:
Unranked: Eudicots
Unranked: Rosids
Order: Oxalidales
Family: Cunoniaceae
Genus: Is named in honour of August Adriaan Pulle; 1878–1955, who was a distinguished Dutch professor, botanist and geobotanist.
Species: Is probably named in honour of Professor Olga Stutzer, from Brasil, who collected and studied Bromilliads in detail.
Common Name: Hard Alder.
Distribution:
Pullea stutzeri is restricted to an area south from Mount Cook to Paluma Range National Park in far north eastern Queensland. It is found on and east of the Great Dividing Range.
https://avh.ala.org.au/occurrences/search?taxa=Pullea+stutzeri#tab_mapView
Habitat Aspect Climate:
Pullea stutzeri prefers dappled shade to full sun. It grows in well developed rain forest, riparian rainforests and littoral rainforests. The altitude ranges from 10 meters ASL to 1500 meters ASL.
The temperatures range from 3 degree in July to 40 degrees in January.
The rainfall ranges from lows of 1900mm to 3250mm average per annum.
Soil Requirements:
Pullea stutzeri prefers light sandy clays to medium clays with a high proportion of gravel and forest litter. The soils are usually derived from decomposed granite or black basalt. The soils pH ranges from 4.5pH to 6pH. It does not tolerate waterlogged soils however it favours seasonal moist sites. Non saline soils to moderately saline soils are tolerated.
Height & Spread:
Wild Plants: 2.5m to 8m by 3m to 4m.
Characteristics:
Wildlife:
Pullea stutzeri’s wildlife is unknown to the author.
Cultivation:
Pullea stutzeri is a medium bushy shrub to a more open spreading or erect tree for subtropical and tropical gardens. It is ideal at the edge of a rainforest or as the pioneer shrubs before establishing a garden proper. In cultivation it will grow from 3 meters to 8 meters in height by 3 meters to 6 meters in diameter when grown in the open.
It grows well on light fatty clays to medium clay soils. It can cope with temperatures as low as 3 degrees and up to 40 degrees. It is somewhat drought resistant once established but looks its best when consistent moisture is supplied.
Add to the above, if it is given a little extra organic native fertilizer on being planted out and on an annual basis will respond with excellent flowering, brilliant foliage flushes and retain a bushier crown.
Pullea stutzeri would make a good contribution to most ordinary small city gardens because of its brilliant red new growth. Use a lot of procumbent plants like Carpobrotus edulis, Dampiera purpurea, Pattersonia sericea or any of the Hibbertia dentata. Mix it with other smaller shrubs like dwarf red flowering Grevillea specie, Bauera rubioides or Austromyrtus dulcis so none of them dominate the scene but blend in to give a mosaic of different foliage colours that you can enjoy all year.
Propagation:
Seeds: The seeds of Pullea stutzeri can be removed easily from the fruits that have already turned brown and begun to open. Sow freshly treated seeds directly into a seed raising mix after scarifying the seeds on a fine piece of emery paper. Cover the seeds with 5mm to 6mm of potting mix and keep them moist not wet.
When the seedlings are 20mm to 25mm tall, prick them out and plant them into 50mm native tubes using a good organic mix.
As the seedlings roots reach the bottom of the tubes, nip the growing tips out and plant them out into their permanent position.
Fertilize using seaweed, fish emulsion or organic chicken pellets soaked in water on an alternate basis. Fertilize every two months until the plants are established then annually in early September to October to maintain health, vitality and better flowering.
Further Comments from Readers:
“Hi reader, it seems you use The Bible of Botany a lot. That’s great as we have great pleasure in bringing it to you! It’s a little awkward for us to ask, but our first aim is to purchase land approximately 1,600 hectares to link several parcels of N.P. into one at The Pinnacles NSW Australia, but we need your help. We’re not salespeople. We’re amateur botanists who have dedicated over 30 years to saving the environment in a practical way. We depend on donations to reach our goal. If you donate just $5, the price of your coffee this Sunday, We can help to keep the planet alive in a real way and continue to bring you regular updates and features on Australian plants all in one Botanical Bible. Any support is greatly appreciated. Thank you.”
In the spirit of reconciliation we acknowledge the Bundjalung, Gumbaynggirr and Yaegl and all aboriginal nations throughout Australia and their connections to land, sea and community. We pay our respect to their Elders past, present and future for the pleasures we have gained.
Pullenia gunnii
Classification
Unranked: Eudicots
Unranked: Rosids
Order: Fabales
Family: Fabaceae
Subfamily: Faboideae
Genus: Pullenia is named in honour of Roy “Royal” Pullen; 1925-2009, who was an Australian botanist and plant collector, who collected extensively in Papua New Guinea between 1957 and 1972. A good example is Pullenia gunnii.
Specie:s Gunnii is named in honour of Ronald Campbell Gunn; 1808-1881, who was a South African born Tasmanian collector of plants and botanist.
Common Name: Slender Tick Trefoil.
Distribution:
Pullenia gunnii is found south from the Daintree River National Park to the Victoria Volcanic Plain in south western Victoria. It is mainly found on and east of the Great Dividing Range along the east coast and south of the Range in southern Victoria.
It is also found along the northern and eastern coastal areas in Tasmania.
https://avh.ala.org.au/occurrences/search?taxa=Desmodium+gunnii#tab_mapView
Habitat Aspect Climate:
Pullenia gunnii prefers medium shade, dappled shade to full sunlight. It grows in dry sclerophyll forests open woodlands, adjacent to rainforests and woodlands verging on grasslands. The altitude ranges from 5 meters ASL to 1050 meters ASL.
The temperatures range from minus 4 degrees in August to 36 degrees in January.
The rainfall ranges from lows of 500mm to 3000mm average per annum.
Soil Requirements:
Pullenia gunnii prefers sandy loams to medium clays. The soils are derived from decomposed brown basalt, black basalt, metamorphic rocks, granite, sandstone and metashales. The soils pH ranges from 5pH to 5.5pH. It does not tolerate waterlogged soils. Non saline soils to moderately saline soils are tolerated.
Height & Spread:
Wild Plants: 30mm to 400mm by 900mm to 1200mm
Characteristics:
Pullenia gunnii is a fast growing small creeper. The wiry stems are mid green, glabrous or covered in short, white, appressed, hirsute hairs.
The alternate leaves of Pullenia gunnii are trifoliate. The leaflets are obcordate, ovate to rhomboidal. The lateral leaflets measure 10mm to 17mm in length by 10mm to 17mm in width while the terminal leaflet measures 12mm to 20mm in length by 12mm to 20mm in width. The bases are broadly cuneate, rounded or truncate while the apexes are obtuse, truncate with an emarginate tip or emarginate. The discolourous laminas are deep green, glabrous and dull on the upper laminas while the lower laminas are pale grey-green to glaucous. The midvein is prominent on the lower lamina and is visible from the upper lamina. The laminas margins are entire. The petioles and petiolules are glabrous to sparsely covered in white uncinated hairs. The stipules measure 4mm to 8mm in length. The petiole and petiolules are grass-green to deep green and glabrous or sparsely covered in white appressed hairs. The 2 olive-brown to deep green stipules measure 2mm to 4mm in length. The petioles measure 10mm to 30mm in length while the petiolules measure 0.6mm to 1mm in length.
The inflorescences of Pullenia gunnii are born on long slender racemes with 3 to 5 individual flowers. The rachises and pedicels are mid green and glabrous to sparsely covered in white hirsute hairs. The rachises measure 90mm to 160mm in length while the pedicels measure 1.5mm to 7mm in length.
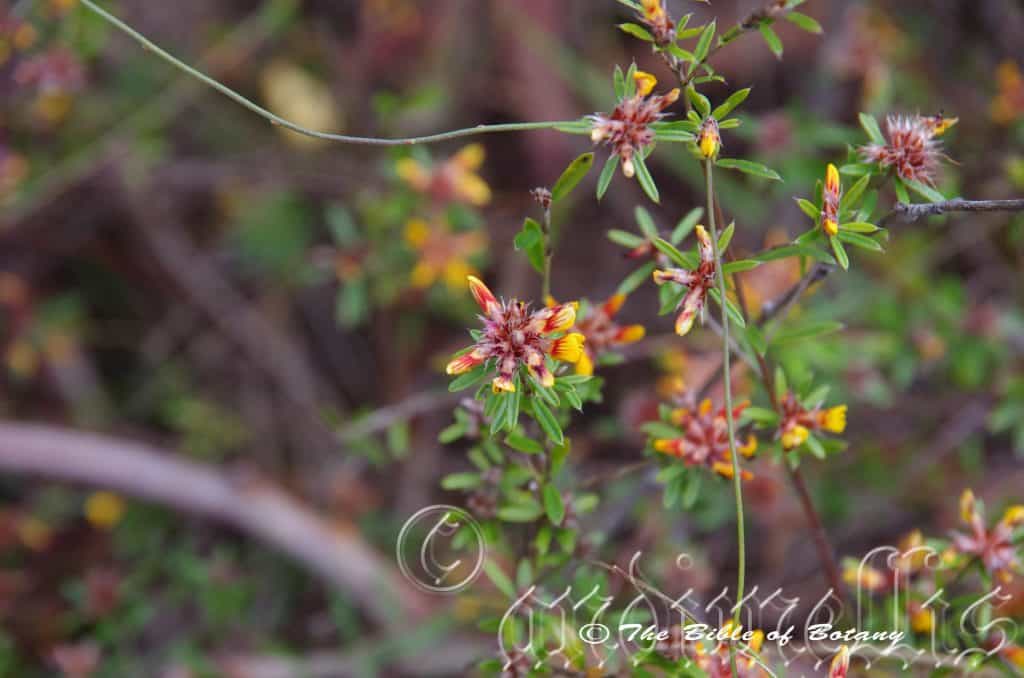
The individual flowers are very regular, typical legume and measure 10mm to 12mm in length. The green tinged red to pale reddish-brown calyxes are glabrous to moderately covered in white hirsute hairs and measure 3.5mm to 4mm in length not including the lanceolate lobes which measure 0.3mm to 0.4mm in length.
The united, obtuse, erect standard petal is pale pink to lilac with an emarginate apex and measures 6mm to 7mm in height by 10mm to 11mm in width. The pale pink to lilac, oblong to oblong-elliptical wing petals run parallel to the keel and are strongly convex around the keel. The wing petals measure 8mm to 9mm in length by 6mm to 7mm in height. The pink to lilac keel petal measures 7mm to 8mm in length by 3.5mm to 4mm in height.
9 of the 10 creamy fawn, dimorphic; alternately 1 long and 1 shorter, filaments are united to form a staminal tube which is open on one side. The filaments are united for 2mm to 2.5mm of their length and are free for 2mm to 2.5mm in length. The upper free stamen measures 8mm to 9mm in length. The oblong, cream to pale yellow anthers measure 0.5mm in length.
The white pistil measures 7mm to 8mm in length. The flowers appear from February to April.
Pullenia gunnii fruits are long flattened pods. The pods contain 3 to 6 seeds usually 3 or 4.The pods are strongly constricted between the seeds and measure 13mm to 30mm in length by 2mm to 2.5mm in width with of the each article measuring 3.5mm to 5mm in length. The green pods turn black when ripe and are covered in short white uncinated hairs. The calyxes are persistent at the base of the pods. The deep brown to almost black, reniform seeds measure 2.6mm to 3mm in length.
Wildlife:
Pullenia gunnii flowers are visited by almost every small butterfly in the district. The seeds are often eaten by an unknown weevil as the fruits ripen, gaining access when the fruits are at the immature stage.
The fruit segments are easily broken and are dispersed by adhesion to animals and humans by the short uncinated hairs. The seeds are not released spontaneously from fruit with both methods ensuring wide distribution of the seeds.
Cultivation:
Pullenia gunnii is a beautiful sub shrub that is ignored because of its size and unspectacular flowers.
It has a tendency to look as though it is always about to start growing but never does. Its appeal comes when it can be incorporated into the garden in mass plantings close paths so that it can be looked at and not being crowded. It responds to pruning to ensure a bushier plant with many terminal shoots. Another upside is the foliage lying rather prostrate while the racemes are held above the foliage. This means it is best planted just beyond the shorter border plants or between small shrubs with different foliage but don’t crowd it. Use plants with deep red or orange flowers to the rear and in the midground. This will ensure that the whole plant blends into the foreground when not in flower and contrasts nicely when in flower. Mass plantings are best achieved by planting them at 200mm to 300mm centers. Light tip pruning may also be advantageous.
Once established it is drought tolerant and tolerant to light frosts. The plants will die back to an underground tuber under severe drought conditions and are best pruned heavily every 2 or 3 years to maintain good vigour and health.
Propagation:
Seeds: Pullenia gunnii‘s seeds require scarification prior to sowing. The abrasion method has proven very successful for us. This involves rubbing the seeds gently between two sheets of very fine sandpaper to reduce the thickness of the seed coat. What we did if there are large numbers of seeds to do is a glue sheet of medium corundum to the inside surfaces of a small disposable plastic container. Place the seeds into the container and shake the container vigorously for several minutes. Check to see if the coating has been partially removed.
Alternatively the seeds can be placed in a cup of hot water and let stand for 4 or 5 hours.
Sow freshly treated seeds directly into a seed raising mix and cover with 5mm of the mix. When the seedlings are 25mm to 50mm tall, prick them out and plant them into 50mm native tubes using a seed raising mix. Alternately place one or two seeds directly into the 50mm tubes
Once the seedlings reach 150mm to 200mm in height plant them out into their permanent position. If the plants are to be used for ground covers nip the tips out prior to sowing.
Plants can be grown by digging up patches and just cutting into 4 sections. Replant into a shallow saucer made in the ground, cover with 5mm to 10mm of sand and water every second day until the new shoots appear.
Fertilize using seaweed, fish emulsion or organic chicken pellets soaked in water on an alternate basis. Fertilize every two months until the plants are established then annually in early September to October to maintain health, vitality and better flowering.
Further Comments from Readers:
Hi reader, it seems you use The Bible of Botany a lot. That’s great as we have great pleasure in bringing it to you! It’s a little awkward for us to ask, but our first aim is to purchase land approximately 1,600 hectares to link several parcels of N.P. into one at The Pinnacles NSW Australia, but we need your help. We’re not salespeople. We’re amateur botanists who have dedicated over 30 years to saving the environment in a practical way. We depend on donations to reach our goal. If you donate just $5, the price of your coffee this Sunday, We can help to keep the planet alive in a real way and continue to bring you regular updates and features on Australian plants all in one Botanical Bible. Any support is greatly appreciated. Thank you.
In the spirit of reconciliation we acknowledge the Bundjalung, Gumbaynggirr and Yaegl and all aboriginal nations throughout Australia and their connections to land, sea and community. We pay our respect to their Elders past, present and future for the pleasures we have gained.
Woolli-Grafton road NSW
Woolli-Grafton road NSW
Pultenaea alea
Classification:
Unranked: Eudicots
Unranked: Rosids
Order: Fabales
Family: Fabaceae
Subfamily: Faboideae
Genus: Is named in honour of Richard Pulteney; 1730-1801, who was an English surgeon and botanist who studied the plants of Lecestershire.
Species: From Alea, which is Latin for taking a risk or uncertainty. It refers to habitats, which are on the edge or in harsh transitional zones.
Common Name: Orange Pultenaea.
Distribution:
Pultenaea alea is restricted to a small area between the old Banyabba railway Station and Half Way Creek south of Grafton in far north eastern New South Wales. It is found east of the Great Dividing Range.
https://avh.ala.org.au/occurrences/search?taxa=Pultenaea+elea#tab_mapView
Habitat Aspect Climate:
Pultenaea aleaprefers dappled shade to full sun. It grows in dry, open sclerophyll forests on flats or gentle slopes. The altitude ranges from 10 meters ASL to 80 meters ASL.
The temperatures range from minus 1 degree in July to 38 degrees in January.
The rainfall ranges from lows of 900mm to 1650mm average per annum.
Soil Requirements:
Pultenaea alea prefers light sandy clays to medium clays with or without a high proportion of gravel and forest litter. The soils are usually derived from decomposed sandstones, shale or alluvial podzolic soils. The soils pH ranges from 4.5pH to 5.5pH. It does not tolerate waterlogged soils however it favours seasonal wet sites. Non saline soils to moderately saline soils are tolerated.
Height & Spread:
Wild Plants: 0.5m to 1.5m by 1m to 2.5m.
Characteristics:
Pultenaea alea grows as an erect or wide spreading densely foliaged small shrub. The stems are straight or divergent pale grey to pinkish-grey, scabrous. The new growth is deep sea-green and usually sparsely covered in off white puberulent hairs.
The alternate, linear to narrow oblong leaves measure 4.5mm to 10mm in length by 1mm to 1.8mm in width. The stipules measure 0.5mm to 2mm in length. The petioles measure 0.2mm to 0.5mm in length. The bases taper to the petioles while the apexes are broad acute to mucronate broad. The discolourous or concolourous laminas are mid grey-green, dull and glabrous on the upper laminas while the lower laminas are similar or slightly paler. The laminas are flat and decurve downwards slightly at the apex. The margins are entire. The mid vein is faintly or not prominent on the lower lamina and is not distinctly visible from the upper lamina.
The inflorescences are small racemes of 2 to 4 flowers born from leafy, sub terminal or apparently terminal racemes. The individual flowers are typical legume and measure 7.5mm to 15mm in length by 6mm to 13mm in height. The pedicels measure 5mm to 10mm in length. The linear to linear to ovate bracteoles are attached to the base of calyx tube and are acute and glabrous. The acute bracteoles measure 1mm to 1.5mm in length. The pedicels measure 2mm to 4mm in length.
The calyx tube and 5 lobes are glabrous to sparsely covered in off white puberulent hairs. The 2 upper lobes are obtuse while the 2 lateral lobes are acute to acuminate and longer than the lower lobe. The calyx tube measures 3mm to 4.5mm in length while the lobes measure 2mm to 4.5mm in length.
The broad ovate, erect standard petal is deep yellow with a deep red splash near the base and a deep red aura further out near the base. The standard measures 7mm to 12mm in height by 9mm to 16mm in width.
The bright yellow, oblong wing petals run parallel to the keel and measure 7mm to 12mm in length by 2.5mm to 4mm in height.
The bright yellow spathulate keel petals are almost surrounded by the wing petals and measure 8mm to 14mm in length by 4mm to 5mm in height. The ovary is glabrous. The flowers appear from August to March.
Pultenaea alea’s turgid fruits are turgid pods. The pods are glabrous and measure 8mm to 9mm in length by 5.5mm to 6mm in width. The green pods turn deep turn reddish-brown externally and creamy-brown internally. The style is persistent and extends from 8mm to 9mm in length. The seeds are semi glossy, deep brown to black.
Wildlife:
Pultenaea alea’s flowers may look insignificant in the bush but as a genus it is in fact a very important source of nectar and pollen for native bees, wasps and pollen flies. These in return attract small insect eating birds.
Cultivation:
Pultenaea alea is a small open shrub that should be more widely grown in temperate or subtropical gardens. It is ideal at the edge of a rain forest or as the pioneer shrubs before establishing a garden proper. It also makes a great rockery display in hot open spaces or confined sunny positions. In cultivation it will grow from 1.5 meter to 2.2 meters in height by 1.5 meters to 2 meters in diameter when grown in the open.
It grows rapidly on light fatty clays to medium clay soils. It can cope with temperatures as low as minus 2 degrees and up to 40 degrees. It is drought resistant once established and in fact detest too much water.
Add to the above, if it is given a little extra moisture and native fertilizer on being planted out as a seedling until it is established will respond with excellent flowering and good fruit set in the following season.
Pultenaea alea would make a good contribution to a dry or moist heath garden. Here it can be used as the main feature plant in the background or give a horizon affect to the heath garden. If scattered throughout the heath scene as the taller feature plant in a small garden it will contrast beautifully with larger leaf plants. When you design a flat heath garden which Pultenaea alpea is well suited don’t use contours to display the plants as heath lands are almost always flat or have a slight rise. Plants must be planted close together and be short so you can see over the tallest ones with the exception of one or two plants at the most. The idea is to achieve a feeling of expansive flatness. This can be achieved with using the Pultenaea alea’s pale blue green oblong leaves contrasting with finer or larger pale green or soft grey to glaucous coloured foliages. Use a lot of procumbent plants like Carpobrotus edulis, Dampiera purpurea, Pattersonia specie or any of the Hibbertia obtusifolia. Mix them with other smaller shrubs like small red flowering Grevillea specie, Bauera rubioides or Austromyrtus dulcis so none of them dominate the scene but blend in to give a mosaic of different foliage colours that you can enjoy all year.
Propagation:
Seeds: The seeds of Pultenaea alea can be removed easily from the fruits that have already turned brown and begin to open.
Sow freshly treated seeds directly into a seed raising mix after scarifying the seeds on a fine piece of emery paper. Cover the seeds with 5mm to 6mm of potting mix and keep them moist not wet. When the seedlings are 20mm to 25mm tall, prick them out and plant them into 50mm native tubes using a good organic mix.
As the seedlings roots reach the bottom of the tubes, nip the growing tips out and plant them out into their permanent position. Do not delay.
Cuttings: Fortunately Pultenaea alea cuttings are relatively easy to strike. Use 100mm to 200mm long tip cuttings or lateral shoots from the present season’s growth. Take them in warmer months of the year. Remove half the leaves from the bottom section being careful not to tear the bark.
1 Prepare the cutting mix by adding two thirds sharp clean river sand, one third peat or one third perlite. These ingredients must be sterilized,
2 Select good material from non diseased plants,
3 Select semi green stems for cuttings. Look for a stem with two or three nodes,
4 Place the cutting on a flat, hard surface, and make a clean cut down one side of the cutting at the base for 10mm with a sharp sterile knife or razor blade. – This scarification of the node will increase the chances of roots emerging from this spot. Now remove all but one or two the leaves, leaving the apex leaves in tact. If the leaves are very large in proportion to the stem, cut off the apical halves.
5 Fill a saucer with water, and place a little medium strength rooting hormone into another container like a milk bottle top. Dip the node end of the cutting into the water and then into the rooting hormone. Tap off any excess hormone,
6 Use a small dipple stick or old pencil to poke a hole into the soilless potting mix. Ensure the hole is slightly larger than the stem diameter and be careful not to wipe the rooting hormone off the cuttings base. Place 2 to 4 cuttings in each of the 50mm native tubes,
7 I like to place the tubes in bucket with holes drilled in the bottom to allow excess water to drain out. A plastic bag that fits over the bucket is ideal to help maintain temperature and moisture. Place in a semi shaded, warm position like under 50mm shade cloth.
8 When the cuttings have struck, open the bag to allow air circulation for a few days to a week,
9 Once hardened off remove the cuttings from the bag and allow to further hardening for a few more days to a week,
10 Transplant into a good potting mix to grow on.
Fertilize using seaweed, fish emulsion or organic chicken pellets soaked in water on an alternate basis. Fertilize every two months until the plants are established then annually in early September to October to maintain health, vitality and better flowering.
Further Comments from Readers:
“Hi reader, it seems you use The Bible of Botany a lot. That’s great as we have great pleasure in bringing it to you! It’s a little awkward for us to ask, but our first aim is to purchase land approximately 1,600 hectares to link several parcels of N.P. into one at The Pinnacles NSW Australia, but we need your help. We’re not salespeople. We’re amateur botanists who have dedicated over 30 years to saving the environment in a practical way. We depend on donations to reach our goal. If you donate just $5, the price of your coffee this Sunday, We can help to keep the planet alive in a real way and continue to bring you regular updates and features on Australian plants all in one Botanical Bible. Any support is greatly appreciated. Thank you.”
In the spirit of reconciliation we acknowledge the Bundjalung, Gumbaynggirr and Yaegl and all aboriginal nations throughout Australia and their connections to land, sea and community. We pay our respect to their Elders past, present and future for the pleasures we have gained.
Pultenaea daphnoides
Classification:
Unranked: Eudicots
Unranked: Rosids
Order: Fabales
Family: Fabaceae
Subfamily: Faboideae
Genus: Is named in honour of Richard Pulteney; 1730-1801, who was an English surgeon and botanist who studied the plants of Lecestershire.
Species: From Dáphnē, which is Ancient Greek for the name of the nymph who was changed into a Laurel to escape Apollo and Eîdos/Oides, which is Ancient Greek for alike or similar to. It refers to plants, which resemble the exotic Daphne.
Common Name: Large Leaf Pea Bush.
Distribution:
Pultenaea daphnoides is found south from Caboolture in south eastern Queensland to Glenelg Heywood in south western Victoria. It extends northwards in central Victoria to the Murray River and further west in South Australia from Mount Prospect to the western tip of Kangaroo Island with an isolated population at Le Cape Grande National Park in southern Western Australia. There is an isolated population in far north Queensland at the Ravenshoe Cemetery. It is mainly found on and east of the Great Dividing Range to the coast.
It is found on the eastern Bass Strait Islands and circumnavigates Tasmania.
https://avh.ala.org.au/occurrences/search?taxa=Pultenaea+daphnoides#tab_mapView
Habitat Aspect Climate:
Pultenaea daphnoides prefer dappled shade to full sun. It grows in heaths within moist sclerophyll forests and wet sclerophyll forests. The altitude ranges from 2 meters ASL to 980 meters ASL.
The temperatures range from minus 3 degrees in July to 40 degrees in January.
The rainfall ranges from lows of 300mm to 2200mm average per annum.
Soil Requirements:
Pultenaea daphnoides prefer to grow on white sands, reddish or grey light sandy clays, fatty clays to medium gritty clays with or without a high proportion of gravel and forest litter. The soils are usually derived from decomposed sandstones, sharp shales, sandy podzolic soils and accumulated peaty beach sands. The soils pH ranges from 4.5pH to 6.6pH. It does not tolerate waterlogged soils. Non saline soils to moderately saline soils are tolerated as are salt laden winds.
Height & Spread:
Wild Plants: 1m to 1.5m by 1m to 1.6m.
Characteristics:
Pultenaea daphnoides grows as an erect open foliaged small turbinate shrub. The stems are straight, pale grey and scabrous. The juvenile stems and new growth are moderately covered in off white pubescent hairs.
The alternate leaves of Pultenaea daphnoides are clustered near the ends of the stems. It is oblong to obovate and measure 5mm to 40mm in length by 2mm to 11mm in width. The stipules measure 1mm to 2mm in length. The petioles are paler than the laminas measure 1mm to 4mm in length. The bases taper to the petioles while the apexes are usually obtuse to truncate or rarely retuse or aristate. The discolourous laminas are mid blue-green and glabrous on the upper laminas while the lower laminas are paler. The laminas are flat to recurve upwards from the mid vein to the margins and are straight to decurve downwards close to the apex. The margins are entire. The mid vein is paler than the laminas and is prominent on the lower lamina and distinctly visible from the upper lamina.
Inflorescences of Pultenaea daphnoides are small densely clustered racemes of 7 to 15 flowers born from terminal. The individual flowers are typical legume and measure 7mm to 15mm in length by 5mm to 12mm in height. The imbricate bracts are caducous and measure 2mm to 4mm in length. The narrow oblong to narrow ovate bracteoles are attached to the upper section of the calyx tube. The apexes are ovate or entire with 2 or 3 lobes. The lobes are glabrous to moderately covered in white pulverulent hairs. The pedicels measure 2mm to 4mm in length.
The pinkish-red calyx tube and 5 lobes are densely covered in soft, white antrorse or sericeous hairs. The lobes are similar with acute apexes often with whitish margins. The calyx tube measures 4mm to 6mm in length while the lobes measure 2mm to 3mm in length.
The broad ovate, erect standard petal is deep yellow with a deep red aura near the base. The divergent, forward leaning standard measures 6mm to 12mm in height by 9mm to 16mm in width.
The bright yellow, oblong wing petals run parallel to the keel and have an obtuse apex. The wings measure 6mm to 10mm in length by 3.5mm to 4.5mm in height.
The spathulate keels are bright yellow at the base, turn deep maroon at the apex and are almost surrounded by the wing petals. The keels measure 5mm to 9mm in length by 4.5mm to 6mm in height.
The ovary is moderately to densely covered in soft, white sericeous hairs. The flowers appear from August to November.
Pultenaea daphnoides’s fruits are somewhat compressed pods. The pods are moderately to densely covered in soft, white sericeous hairs and measure 5mm to 7mm in length by 3mm to 4mm in width. The green capsules turn deep reddish-brown externally and mid reddish-brown internally with pale lips. The 3 to 5 laterally compressed, ellipsoidal seeds are glossy brown. The style and calyx are persistent on the ripe pods.
Wildlife:
Pultenaea daphnoides’s flowers may look insignificant in the bush but as a genus it is in fact a very important source of nectar and pollen for native bees, wasps and pollen flies. These in return attract small insect eating birds.
Cultivation:
Pultenaea daphnoides is a small open erect turbinate shrub that could be more widely grown in cool temperate to cool subtropical gardens. It is ideal at the edge of a rainforest or as the pioneer shrubs before establishing a garden proper. It also makes a great rockery display in hot open sunny positions. In cultivation it will grow from 1.2 meter to 1.6 meters in height by 0.8 meters to 1.2 meters in diameter when grown in the open.
It grows well on light fatty clays to medium clay soils. It can cope with temperatures as low as minus 3 degrees and up to 40 degrees. It is drought resistant once established and in fact detest too much water.
Add to the above, if it is given a little extra moisture and native fertilizer on being planted out as a seedling until it is established will respond with excellent flowering and good fruit set in the following season.
Pultenaea daphnoides would make a good contribution to a dry or moist heath garden. Here it can be used as the main feature plant in the background or give a horizon affect to a small bush garden. If scattered throughout the bush scene as the taller feature plant in a small bush garden it will contrast beautifully with larger leaf plants or finer green leaf foliages. When you design a bush garden which Pultenaea daphnoides is well suited don’t use contours to display the plants as bush lands are almost always on flats or have a slight rises with no formal patterns. Plants must be planted sparsely and are best if you can see over the tallest ones with the exception of one or two plants at the most. The idea is to achieve a feeling of expansiveness even if in a small area. This can be achieved by using Pultenaea daphnoides’s mid blue-green leaves procumbent plants like Carpobrotus edulis or any of the Hibbertia diffusa, Scaevola aemula or small tuft grasses or reeds like Ptilothrix deusta or lilies like any of the Dianella caerulea and dwarf Lomandra conferta. Mix them with other smaller prostrate shrubs so none of them dominate the scene but blend in to give a mosaic of foliage colours that you oversee. Here it can reach out over plants like Actinotis helianthi, Grevillea thelemanniana or Grevillea masonii without limiting there outline.
Propagation:
Seeds: The seeds of Pultenaea daphnoides can be removed easily from the fruits that have already turned brown and begun to open.
Sow freshly treated seeds directly into a seed raising mix after scarifying the seeds on a fine piece of emery paper. Cover the seeds with 5mm to 6mm of potting mix and keep them moist not wet. When the seedlings are 20mm to 25mm tall, prick them out and plant them into 50mm native tubes using a good organic mix.
As the seedlings roots reach the bottom of the tubes, nip the growing tips out and plant them out into their permanent position. Do not delay.
Cuttings: Fortunately Pultenaea daphnoides cuttings are relatively easy to strike. Use 100mm to 200mm long tip cuttings or lateral shoots from the present season’s growth. Take them in warmer months of the year. Remove half the leaves from the bottom section being careful not to tear the bark.
1 Prepare the cutting mix by adding two thirds sharp clean river sand, one third peat or one third perlite. These ingredients must be sterilized,
2 Select good material from non diseased plants,
3 Select semi green stems for cuttings. Look for a stem with two or three nodes,
4 Place the cutting on a flat, hard surface, and make a clean cut down one side of the cutting at the base for 10mm with a sharp sterile knife or razor blade. – This scarification of the node will increase the chances of roots emerging from this spot. Now remove all but one or two the leaves, leaving the apex leaves in tact. If the leaves are very large in proportion to the stem, cut off the apical halves.
5 Fill a saucer with water, and place a little medium strength rooting hormone into another container like a milk bottle top. Dip the node end of the cutting into the water and then into the rooting hormone. Tap off any excess hormone,
6 Use a small dipple stick or old pencil to poke a hole into the soilless potting mix. Ensure the hole is slightly larger than the stem diameter and be careful not to wipe the rooting hormone off the cuttings base. Place 2 to 4 cuttings in each of the 50mm native tubes,
7 I like to place the tubes in bucket with holes drilled in the bottom to allow excess water to drain out. A plastic bag that fits over the bucket is ideal to help maintain temperature and moisture. Place in a semi shaded, warm position like under 50mm shade cloth.
8 When the cuttings have struck, open the bag to allow air circulation for a few days to a week,
9 Once hardened off remove the cuttings from the bag and allow to further hardening for a few more days to a week,
10 Transplant into a good potting mix to grow on.
Fertilize using seaweed, fish emulsion or organic chicken pellets soaked in water on an alternate basis. Fertilize every two months until the plants are established then annually in early September to October to maintain health, vitality and better flowering.
Further Comments from Readers:
“Hi reader, it seems you use The Bible of Botany a lot. That’s great as we have great pleasure in bringing it to you! It’s a little awkward for us to ask, but our first aim is to purchase land approximately 1,600 hectares to link several parcels of N.P. into one at The Pinnacles NSW Australia, but we need your help. We’re not salespeople. We’re amateur botanists who have dedicated over 30 years to saving the environment in a practical way. We depend on donations to reach our goal. If you donate just $5, the price of your coffee this Sunday, We can help to keep the planet alive in a real way and continue to bring you regular updates and features on Australian plants all in one Botanical Bible. Any support is greatly appreciated. Thank you.”
In the spirit of reconciliation we acknowledge the Bundjalung, Gumbaynggirr and Yaegl and all aboriginal nations throughout Australia and their connections to land, sea and community. We pay our respect to their Elders past, present and future for the pleasures we have gained.
Pultenaea dentata
Classification:
Unranked: Eudicots
Unranked: Rosids
Order: Fabales
Family: Fabaceae
Subfamily: Faboideae
Genus: Is named in honour of Richard Pulteney; 1730-1801, who was an English surgeon and botanist who studied the plants of Lecestershire.
Species: From Odoús/Odonta, which are Ancient Greek or Dēns, which is Latin for a tooth or teeth. It refers to the margins of the leaves or at times the calyx lobes, which are toothed.
Common Name: Cluster Pea Bush.
Distribution:
Pultenaea dentata is found in several disjunct populations south from Stanthorpe in far south east Queensland to Tarpeena on the southern Narracoorte Coastal Plains. It is found on and east of the Great Dividing Range and extends northwards in Victoria to the northern sections of the Grampians. It is also found further west from Nangkita Swamp to Mount Compass with a single population in the central part of Kangaroo Island.
It is also found on King Island and the Flinders Island group and most of Tasmania except for the centre.
https://avh.ala.org.au/occurrences/search?taxa=Pultenaea+dentata#tab_mapView
Habitat Aspect Climate:
Pultenaea dentata prefers dappled shade to full sun. It grows in moist to wet swampy heaths and moist to wet open woodlands adjacent to heaths. The altitude ranges from 20 meters ASL to 950 meters ASL.
The temperatures range from minus 4 degrees in July to 38 degrees in January.
The rainfall ranges from lows of 500mm to 2400mm average per annum.
Soil Requirements:
Pultenaea dentata prefers to grow on coarse, white sands, fine white sands, white and yellow light fatty clays to medium clays with a high proportion of gravel and a peaty surface layer. The soils are usually derived from decomposed granites or at times sandstones. The soils pH ranges from 5pH to 6.5pH. It tolerates seasonal waterlogged soils. Non saline soils to moderately saline soils are tolerated.
Height & Spread:
Wild Plants: 0.5m to 0.8m by 1m to 1.6m.
Characteristics:
Pultenaea dentata usually grows as a procumbent shrub or at times an erect shrub with divaricate stems. The grey stems are thin while the juvenile and new growth are olive-green to reddish-green and sparsely to densely covered in long, soft, off white, appressed pubescent or sericeous hairs.
The alternate or occasionally opposite leaves of Pultenaea dentata are linear, narrow elliptic to narrow obovate and measure 5mm to 11mm in length by 1mm to 2mm in width. The stipules measure 1mm to 2mm in length. The petioles are olive-green to reddish-green and sparsely to densely covered in long, soft, off white, appressed pubescent or sericeous hairs and measure 1mm to 2mm in length. The bases taper to the petioles while the apexes are usually acute or at times obtuse. The discolourous laminas are mid blue-green to mid green, dull and glabrous on the upper lamina while the lower laminas are paler. The laminas are strongly concave on the upper surfaces and bend downwards at the base on the petiole. The margins are entire and thickened and are revolute. The mid vein is slightly prominent on the lower lamina and is not visible from the upper lamina.
The inflorescences of Pultenaea dentata are small densely clustered racemes of 7 to 15 flowers born from terminals on short lateral shoots. The individual flowers are typical legume and measure 6mm to 10mm in length by 4mm to 6.5mm in height. The persistent, imbricate bracts measure 2mm to 4mm in length. The narrow oblong to narrow ovate bracteoles are attached to the stipules. The bracteoles are obovate to circular with apexes that are usually trilobed. The lobes are sparsely to moderately covered in long, soft, white hirsute hairs. The subulate stipules are usually covered in long, white hirsute hairs. The bracteole stipules are covered in long soft, white hirsute hairs, have an acute apex and are attached to the base of the calyx tube. The pedicels measure 0.5mm to 1mm in length.
The reddish-brown calyx tube and 5 lobes are moderately covered in long, soft, white hirsute hairs. The lobes are similar with acute to acuminate apexes. The calyx tube measures 2mm to 3mm in length while the lobes measure 1.5mm to 2mm in length.
The broad ovate, erect standard petal is deep orange-red to red with yellow margins. The divergent, forward leaning standard petals surround the wing petals and measure 6mm to 10mm in height by 10mm to 16mm in width.
The bright yellow, oblong wing petals run parallel to the keel and have an obtuse apex. The wings measure 6mm to 8mm in length by 3.5mm to 4.5mm in height.
The spathulate keels are bright yellow at the base, turn deep maroon at the apex and are surrounded by the wing petals. The keels measure 5mm to 7mm in length by 3mm to 4mm in height.
The ovary is moderately to densely covered in soft, white hirsute hairs. The flowers appear from September to December.
Pultenaea dentata’s fruits are somewhat compressed pods. The pods are moderately to densely covered in soft, white sericeous hairs and measure 5mm to 6mm in length by 3mm to 4mm in width. The green capsules turn deep reddish-brown externally and mid reddish-brown internally with pale lips. The 3 to 5 laterally compressed, ellipsoidal seeds are glossy brown. The style and calyx are persistent on the ripe pods.
Wildlife:
Pultenaea dentata’s flowers may look insignificant in the bush but as a genus it is in fact a very important source of nectar and pollen for native bees, wasps and pollen flies. These in return attract small insect eating birds.
Cultivation:
Pultenaea dentata is a small open shrub that should be more widely grown in temperate or subtropical gardens. It is ideal at the edge of a rainforest or as the pioneer shrubs before establishing a garden proper. It also makes a great rockery displays in hot open spaces or confined sunny positions. In cultivation it will grow from 0.6 meter to 0.8 meters in height by 1 meter to 1.3 meters in diameter when grown in the open.
It grows well on sandy loams to light fatty clays. It can cope with temperatures as low as minus 1 degree and up to 40 degrees.
Add to the above, if it is given a little extra moisture and native fertilizer on being planted out as a seedling until it is established will respond with excellent flowering and good fruit set in the following season.
Pultenaea dentata would make a good contribution to a moist heath garden. Here it can be used as the main feature plant in the background or give a horizon affect to a small heath garden. If scattered throughout the bush scene as the taller feature plant in a small bush garden it will contrast beautifully with larger leaf plants or finer green leaf foliages. When you design a bush garden which this Pultenaea is well suited don’t use contours to display the plants as bush lands are almost always on flats or have a slight rises with no formal patterns. Plants must be planted close together and are best if you can see over the tallest ones with the exception of one or two plants at the most. The idea is to achieve a feeling of expansiveness even if it is in a small area. This can be achieved by using Pultenaea dentata’s mid blue-green leaves with other procumbent plants like Carpobrotus edulis or Hibertia obtusifolia, Scaevola aemula or small tuft grasses or reeds like Ptilothrix deusta or lilies like Dianella caerulea and dwarf Lomandra conferta. Mix them with other smaller prostrate shrubs so none of them dominate the scene but blend in to give a mosaic of foliage colours that you oversee. Here I immediately think of Actinotis helianthi, Grevillea thelemanniana or Grevillea masonii for 3 great contrasting foliages.
Propagation:
Seeds: The seeds of Pultenaea daphnoides can be removed easily from the fruits that have already turned brown and begin to open.
Sow freshly treated seeds directly into a seed raising mix after scarifying the seeds on a fine piece of emery paper. Cover the seeds with 5mm to 6mm of potting mix and keep them moist not wet. When the seedlings are 20mm to 25mm tall, prick them out and plant them into 50mm native tubes using a good organic mix.
As the seedlings roots reach the bottom of the tubes, nip the growing tips out and plant them out into their permanent position. Do not delay.
Cuttings: Fortunately Pultenaea daphnoides cuttings strike easy. Use 100mm to 200mm long tip cuttings or lateral shoots from the present season’s growth. Take them in warmer months of the year. Remove half the leaves from the bottom section being careful not to tear the bark.
1 Prepare the cutting mix by adding two thirds sharp clean river sand, one third peat or one third perlite. These ingredients must be sterilized,
2 Select good material from non diseased plants,
3 Select semi green stems for cuttings. Look for a stem with two or three nodes,
4 Place the cutting on a flat, hard surface, and make a clean cut down one side of the cutting at the base for 10mm with a sharp sterile knife or razor blade. – This scarification of the node will increase the chances of roots emerging from this spot. Now remove all but one or two the leaves, leaving the apex leaves in tact. If the leaves are very large in proportion to the stem, cut off the apical halves.
5 Fill a saucer with water, and place a little medium strength rooting hormone into another container like a milk bottle top. Dip the node end of the cutting into the water and then into the rooting hormone. Tap off any excess hormone,
6 Use a small dipple stick or old pencil to poke a hole into the soilless potting mix. Ensure the hole is slightly larger than the stem diameter and be careful not to wipe the rooting hormone off the cuttings base. Place 2 to 4 cuttings in each of the 50mm native tubes,
7 I like to place the tubes in bucket with holes drilled in the bottom to allow excess water to drain out. A plastic bag that fits over the bucket is ideal to help maintain temperature and moisture. Place in a semi shaded, warm position like under 50mm shade cloth.
8 When the cuttings have struck, open the bag to allow air circulation for a few days to a week,
9 Once hardened off remove the cuttings from the bag and allow to further hardening for a few more days to a week,
10 Transplant into a good potting mix to grow on.
Fertilize using seaweed, fish emulsion or organic chicken pellets soaked in water on an alternate basis. Fertilize every two months until the plants are established then annually in early September to October to maintain health, vitality and better flowering.
Further Comments from Readers:
“Hi reader, it seems you use The Bible of Botany a lot. That’s great as we have great pleasure in bringing it to you! It’s a little awkward for us to ask, but our first aim is to purchase land approximately 1,600 hectares to link several parcels of N.P. into one at The Pinnacles NSW Australia, but we need your help. We’re not salespeople. We’re amateur botanists who have dedicated over 30 years to saving the environment in a practical way. We depend on donations to reach our goal. If you donate just $5, the price of your coffee this Sunday, We can help to keep the planet alive in a real way and continue to bring you regular updates and features on Australian plants all in one Botanical Bible. Any support is greatly appreciated. Thank you.”
In the spirit of reconciliation we acknowledge the Bundjalung, Gumbaynggirr and Yaegl and all aboriginal nations throughout Australia and their connections to land, sea and community. We pay our respect to their Elders past, present and future for the pleasures we have gained.
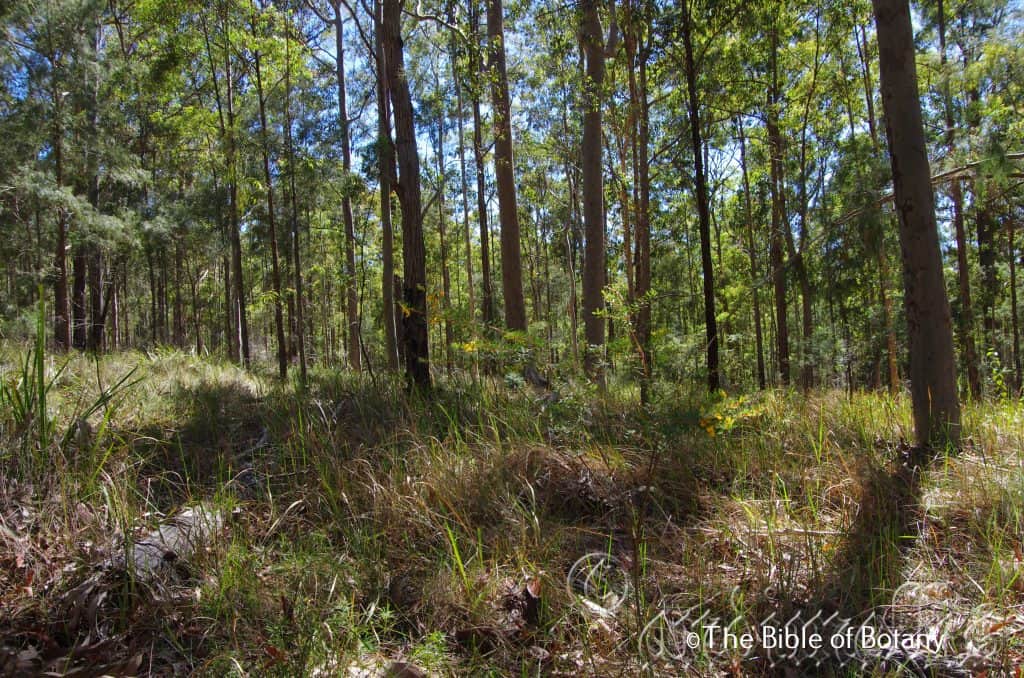
Pillar Valley NSW

Coaldale South NSW
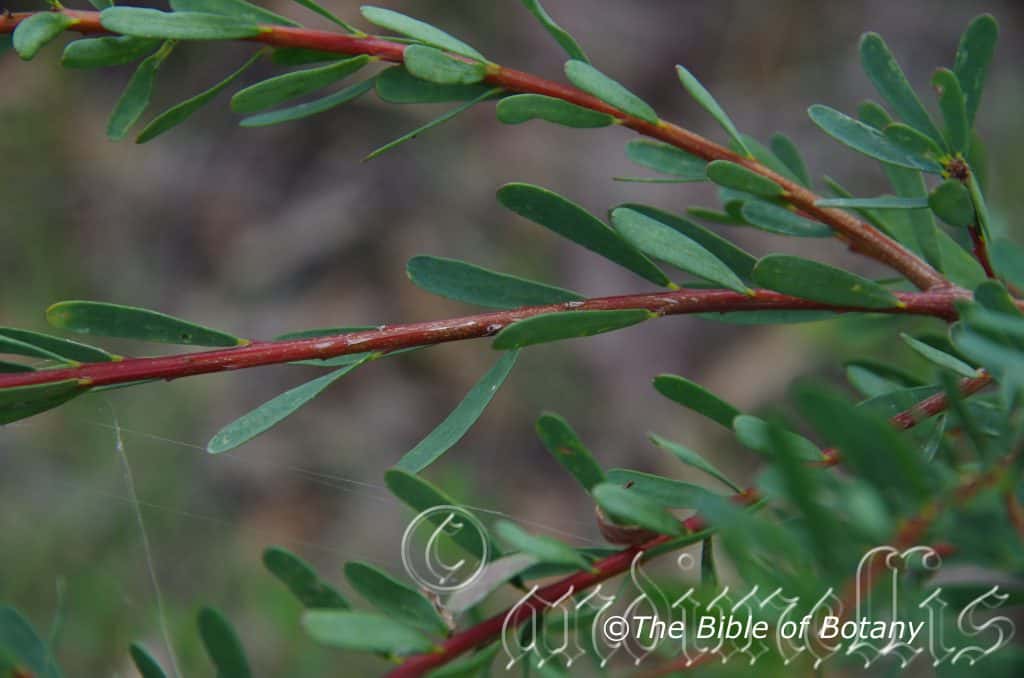
Coaldale South NSW
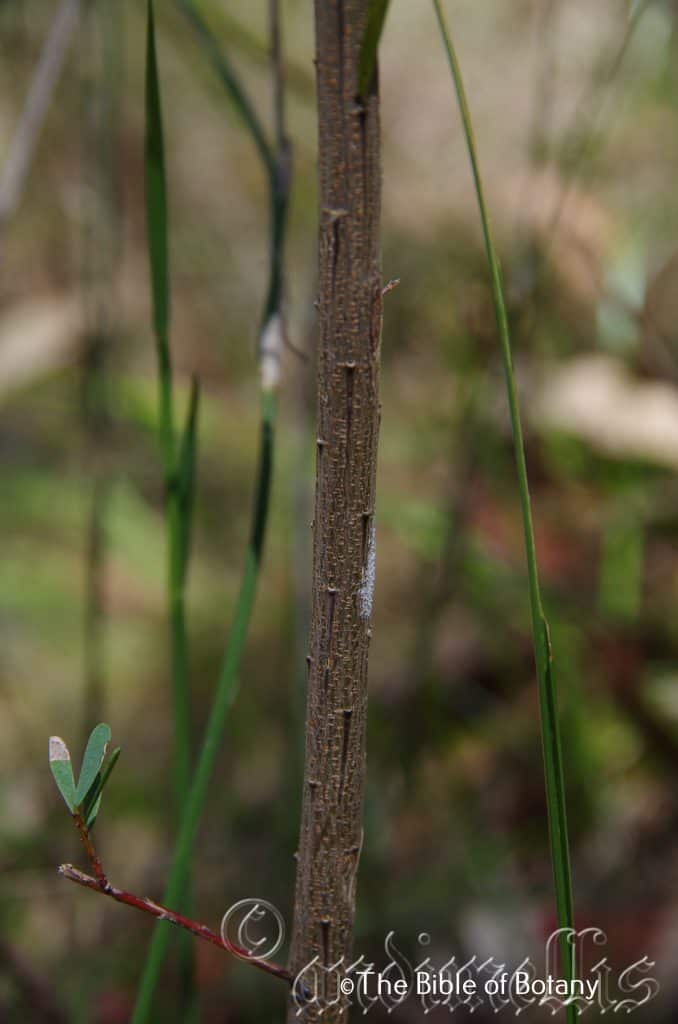
Pillar Valley NSW
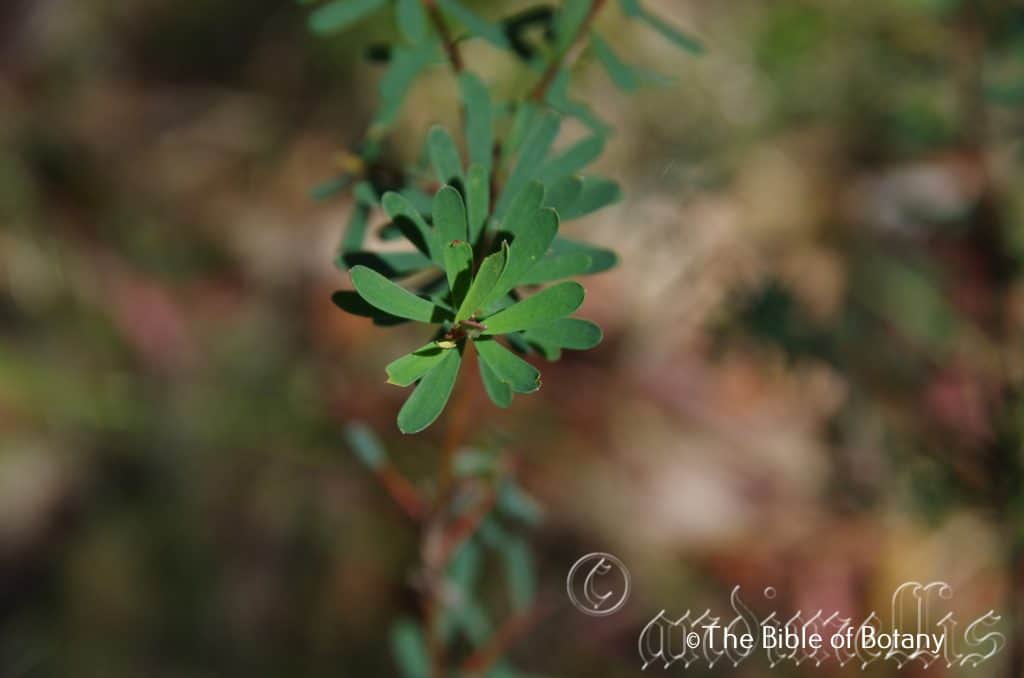
Pillar Valley NSW
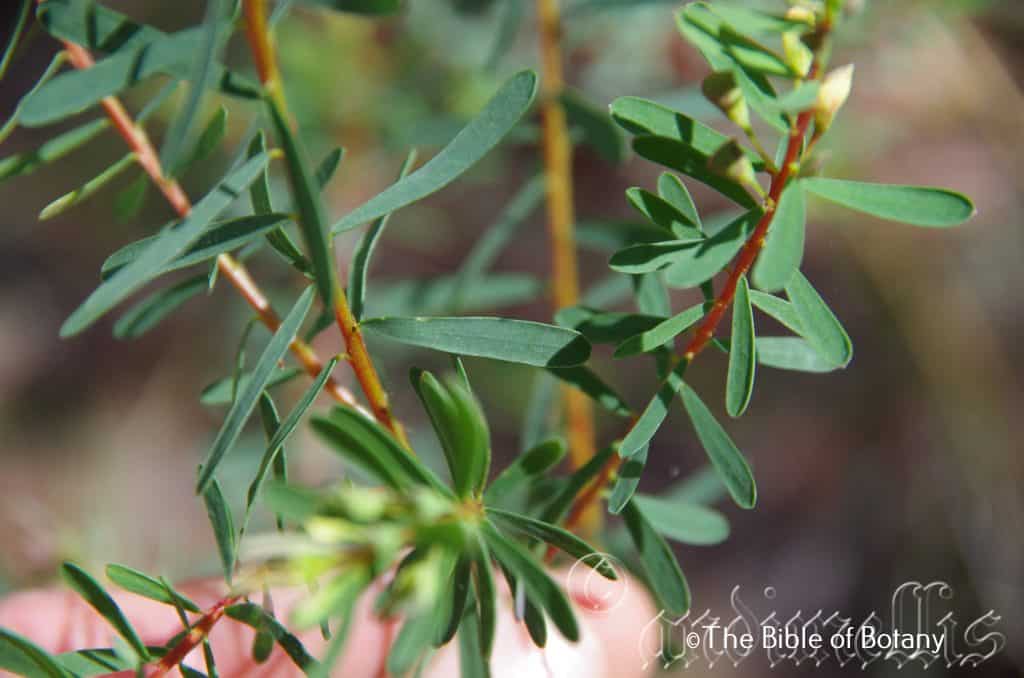
Pillar Valley NSW
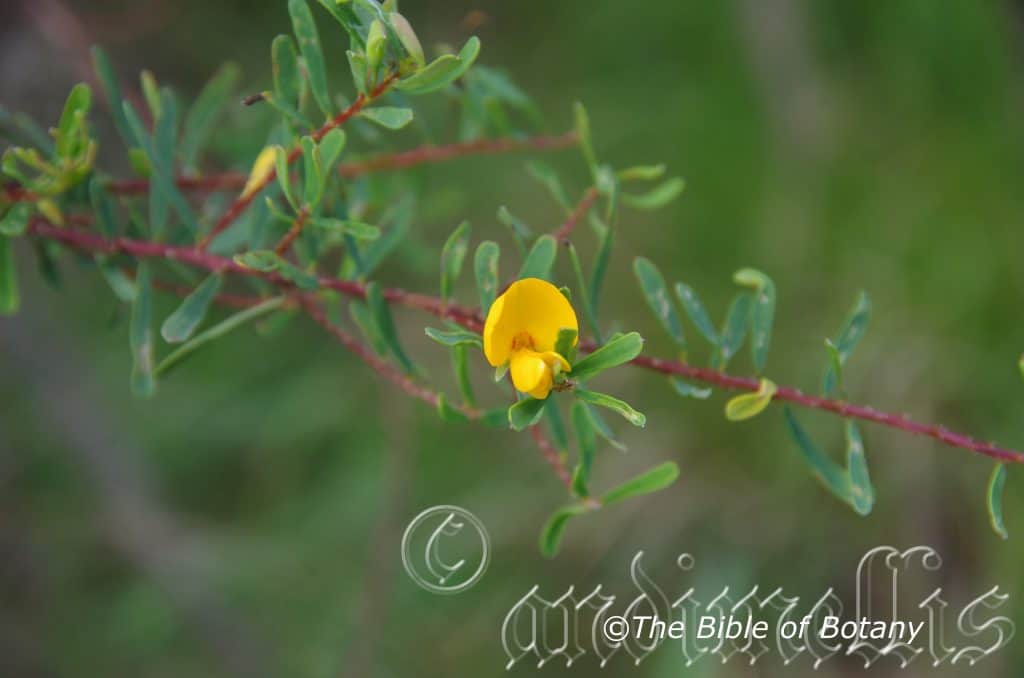
Coaldale South NSW
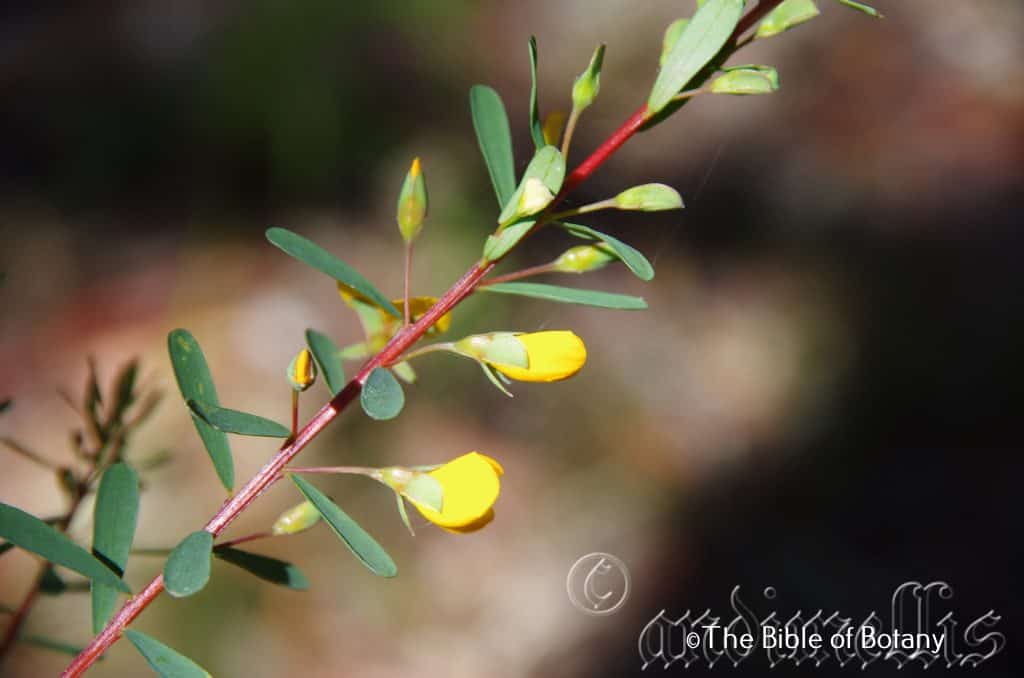
Pillar Valley NSW
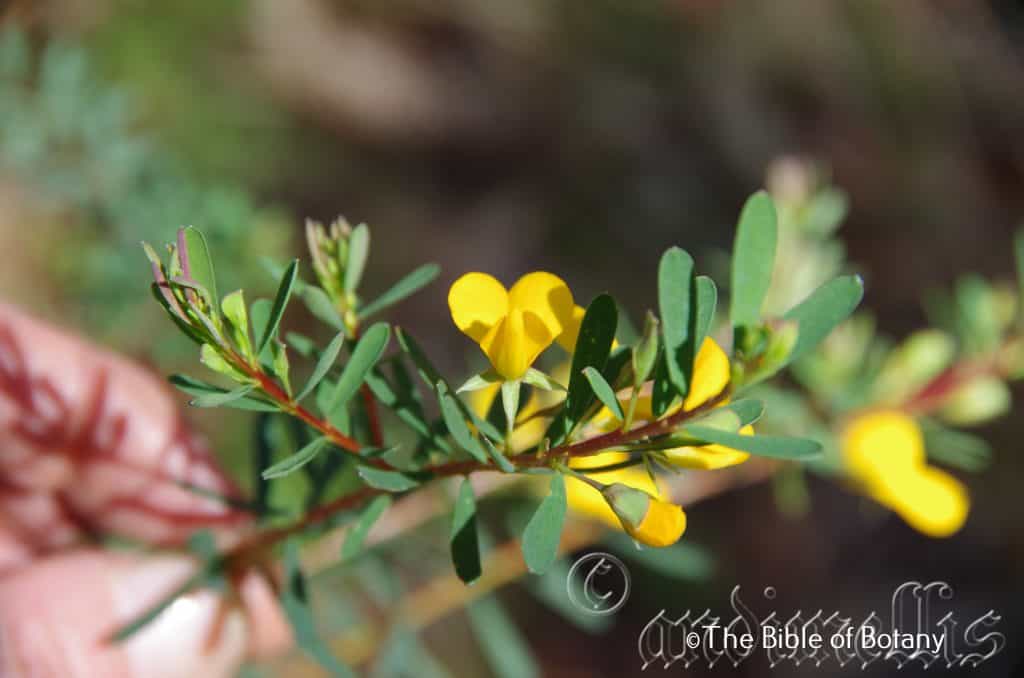
Pillar Valley NSW
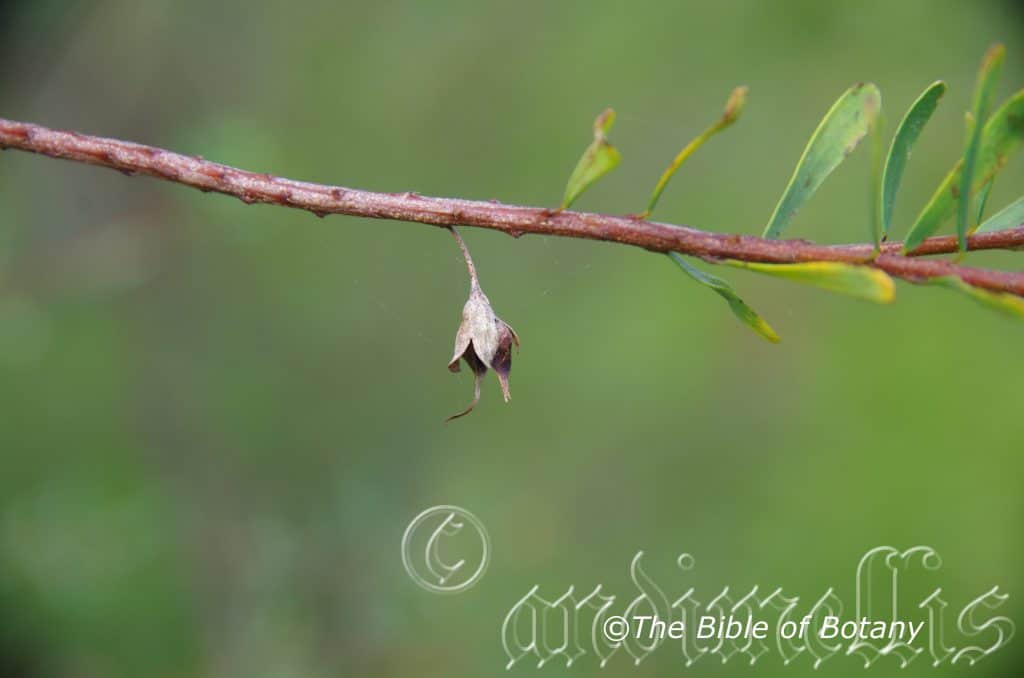
Coaldale South NSW
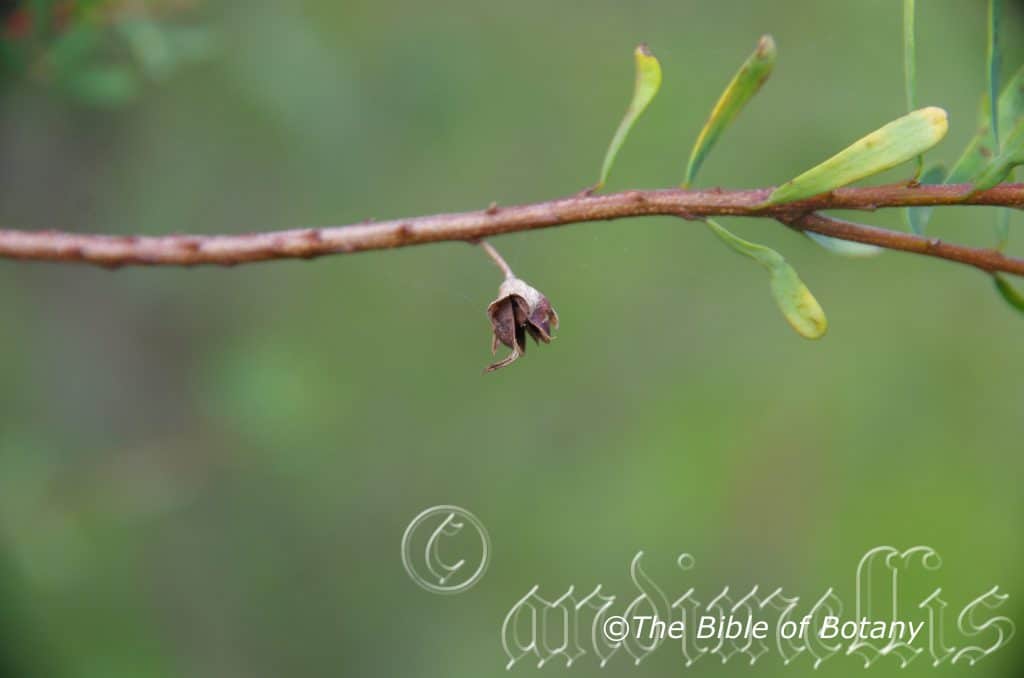
Coaldale South NSW
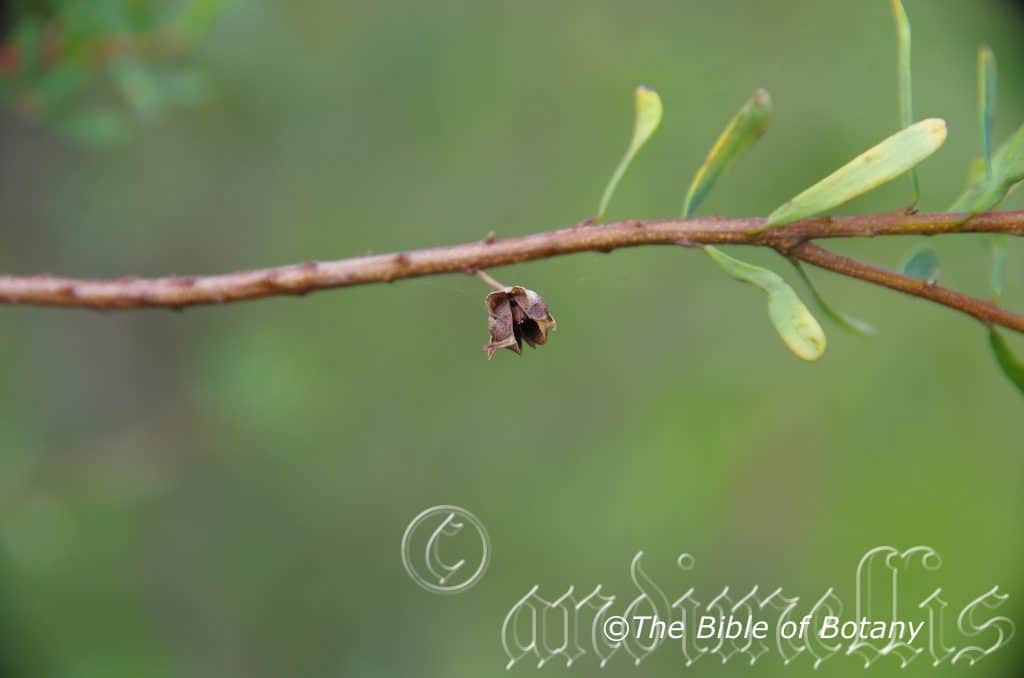
Coaldale South NSW
Pultenaea euchila
Classification:
Unranked: Eudicots
Unranked: Rosids
Order: Fabales
Family: Fabaceae
Subfamily: Faboideae
Genus: Is named in honour of Richard Pulteney; 1730-1801, who was an English surgeon and botanist who studied the plants of Lecestershire.
Species: From Eu, which is Greek for wrapped up or well covered and Kheilos, which is Ancient Greek for a lip. It refers to the wing petals, which entirely cover the keel petals.
Common Name: Orange Pultenaea.
Distribution:
Pultenaea euchila is found south from near Miriam Vale in Queensland to north of Port Macquarrie in New South Wales. It is found on and east of the Great Dividing Range. It is also found around the Newcastle Hawksbury river area.
https://avh.ala.org.au/occurrences/search?taxa=Pultenaea+euchila#tab_mapView
Habitat Aspect Climate:
Pultenaea euchila prefers dappled shade to full sun. It grows in dry sclerophyll forests and open woodlands. The altitude ranges from 2 meters ASL to 800 meters ASL.
The temperatures range from minus 4 degrees in July to 36 degrees in January.
The rainfall ranges from lows of 850mm to 1600mm average per annum.
Soil Requirements:
Pultenaea euchila prefers light sandy clays to medium clays with a high proportion of gravel. The soils are usually derived from decomposed sandstones, shale, calciferous sands or accumulated beach sands. The soils pH ranges from 5.5pH to 8pH. It does not tolerate waterlogged soils. Non saline soils to moderately saline soils are tolerated.
Height & Spread:
Wild Plants: 1m to 1.5m by 1m to 1.6m.
Characteristics:
Pultenaea euchila grows as a wide spreading densely foliaged small tree. The trunk is tall, straight, pale grey, scabrous and usually covered in green lichens and especially mosses in cooler moist terrains. The stems are thin deep brown and becoming green-brown only near the apex with newer leaf growth. These stems are sparsely covered in lighter coloured lenticels. The new growth is deep sea-green and sparsely covered in white lenticels and fine white hirsute hairs.
The alternate to almost opposite leaves of Pultenaea euchila are clustered near the ends of the stems. It is narrowly obovate and measure 10mm to 20mm in length by 3mm to 5mm in width. The bases are tapering to cuneate while the apexes are obtuse, often with a small mucronate tip. The discolourous laminas are mid blue-green and glabrous on the upper lamina and slightly deeper in colour on the lower lamina. The leaf margins are entire, flat and curve slightly upwards from the mid vein and are incurved. The mid vein is prominent on the lower lamina and not distinctly visible from the upper lamina. The stipules measure 1mm to 2mm in length while the petioles are sessile to 0.5mm in length.
The inflorescences of Pultenaea euchila are small racemes of 2 to 6 flowers born in the leaf axils near the terminal shoots. The individual flowers are typical legume measuring 10mm to 15mm in length by 11mm to 15mm in width. The pendant flowers pale blue green calyxes are glabrous. They measure 6mm to 8mm in length including the 4 acuminate 2.6mm to 3.2mm lobes.
The broad ovate divaricate standard petal recurves towards the front and is yellow with a deep emarginated apex and has small faint red markings near the base. They measures 9mm to 11mm in height by 15mm to 17mm in width.
The ovate wing petals run parallel to the keel and measure 9mm to 11mm in length by 7mm to 9mm in height.
The keel petals are surrounded or covered by the lateral wing petals and measure 7mm to 9mm in length by 4mm to 5mm in height. The keel is yellow to orange. The pedicels measure 7mm to 10mm long.
The ovary is glabrous. Pultenaea euchila flowers from late August through to October.
Pultenaea euchila’s fruits are turgid, somewhat compressed pods. The pods are glabrous and measure 8mm to 9mm in length by 5.5mm to 6mm in width and 4mm to 5mm in depth. The green capsules turn deep brown externally and red brown internally with pale lips. The 3 to 5 laterally compressed, ellipsoidal seeds are glossy brown. The style is persistent and extends from 8mm to 9mm in length.
Wildlife:
Pultenaea euchila’s flowers may look insignificant in the bush but as a genus it is in fact a very important source of nectar and pollen for native bees, wasps and pollen flies. These in return attract small insect eating birds.
Cultivation:
Pultenaea euchila is a small open shrub that should be more widely grown in temperate or subtropical gardens. It is ideal at the edge of a rainforest or as the pioneer shrubs before establishing a garden proper. It also makes a great rockery displays in hot open spaces or confined sunny positions. In cultivation it will grow from 1 meter to 1.5 meters in height by 1 meter to 1.5 meters in diameter when grown in the open.
It grows rapidly on light clays to medium clay soils. It can cope with temperatures as low as minus 2 degrees and up to 40 degrees. It is drought resistant once established and in fact detest too much water.
Add to the above, if it is given a little extra moisture and native fertilizer on being planted out as a seedling it will respond with good flowering and good fruit set in the following season.
Pultenaea euchila would make good contribution to a dry or moist heath garden. Here it can be used as fill in plant, scattered throughout the heath scene or as the taller feature plant in a small garden. When you design a flat heath garden which Pultenaea euchila is well suited don’t use contours to display the plants as heath lands are almost always flat or have a slight rise. Plants must be planted close together and be short so you can see over the tallest ones with the exception of one or two plants at the most. The idea is to achieve a feeling of expansive flatness. This can be achieved with using the Pultenaea euchila’s pale blue green oblong leaves contrasting with finer or larger pale green or soft grey to glaucous coloured foliages.
Use a lot of procumbent plants like Carpobrotus edulis, Dampiera purpurea, Pattersonia sericea or Hibbertia stellaris. Mix them with other smaller shrubs like small red flowering Bauera rubioides or Austromyrtus dulcis so none of them dominate the scene but blend in to give a mosaic of different foliage colours that you can enjoy all year.
Propagation:
Seeds: The seeds of Pultenaea euchila can be removed easily from the fruits that have already turned brown and begun to open.
Sow freshly treated seeds directly into a seed raising mix, keeping them moist not wet. When the seedlings are 20mm to 25mm tall, prick them out and plant them into 50mm native tubes using a good organic mix.
As the seedlings roots reach the bottom of the tubes plant them out into their permanent position. Do not delay.
Cuttings: Fortunately Pultenaea euchila cuttings are relatively easy to strike. Use 100mm to 200mm long tip cuttings or lateral shoots from the present season’s growth. Take them in warmer months of the year. Remove half the leaves from the bottom section being careful not to tear the bark.
1 Prepare the cutting mix by adding two thirds sharp clean river sand, one third peat or one third perlite. These ingredients must be sterilized,
2 Select good material from non diseased plants,
3 Select semi green stems for cuttings. Look for a stem with two or three nodes,
4 Place the cutting on a flat, hard surface, and make a clean cut down one side of the cutting at the base for 10mm with a sharp sterile knife or razor blade. – This scarification of the node will increase the chances of roots emerging from this spot. Now remove all but one or two the leaves, leaving the apex leaves in tact. If the leaves are very large in proportion to the stem, cut off the apical halves.
5 Fill a saucer with water, and place a little medium strength rooting hormone into another container like a milk bottle top. Dip the node end of the cutting into the water and then into the rooting hormone. Tap off any excess hormone,
6 Use a small dipple stick or old pencil to poke a hole into the soilless potting mix. Ensure the hole is slightly larger than the stem diameter and be careful not to wipe the rooting hormone off the cuttings base. Place 2 to 4 cuttings in each of the 50mm native tubes,
7 I like to place the tubes in bucket with holes drilled in the bottom to allow excess water to drain out. A plastic bag that fits over the bucket is ideal to help maintain temperature and moisture. Place in a semi shaded, warm position like under 50mm shade cloth.
8 When the cuttings have struck, open the bag to allow air circulation for a few days to a week,
9 Once hardened off remove the cuttings from the bag and allow to further hardening for a few more days to a week,
10 Transplant into a good potting mix to grow on.
Fertilize using seaweed, fish emulsion or organic chicken pellets soaked in water on an alternate basis. Fertilize every two months until the plants are established then annually in early September to October to maintain health, vitality and better flowering.
Further Comments from Readers:
“Hi reader, it seems you use The Bible of Botany a lot. That’s great as we have great pleasure in bringing it to you! It’s a little awkward for us to ask, but our first aim is to purchase land approximately 1,600 hectares to link several parcels of N.P. into one at The Pinnacles NSW Australia, but we need your help. We’re not salespeople. We’re amateur botanists who have dedicated over 30 years to saving the environment in a practical way. We depend on donations to reach our goal. If you donate just $5, the price of your coffee this Sunday, We can help to keep the planet alive in a real way and continue to bring you regular updates and features on Australian plants all in one Botanical Bible. Any support is greatly appreciated. Thank you.”
In the spirit of reconciliation we acknowledge the Bundjalung, Gumbaynggirr and Yaegl and all aboriginal nations throughout Australia and their connections to land, sea and community. We pay our respect to their Elders past, present and future for the pleasures we have gained.
Pultenaea flexilis
Classification:
Unranked: Eudicots
Unranked: Rosids
Order: Fabales
Family: Fabaceae
Subfamily: Faboideae
Genus: Is named in honour of Richard Pulteney; 1730-1801, who was an English surgeon and botanist who studied the plants of Lecestershire.
Species: From Flexus, which is Latin for bent, torturous, winding. It refers to stems, which are very flexible.
Common Name: Graceful Bush Pea.
Distribution:
Pultenaea flexilis is found south from Goodger near Kingaroy and Mapleton in south east Queensland to Deua National Park in southern coastal New South Wales. It is found on the western side, on and east of the Great Dividing Range to the coast except for an isolated population on Tindar Creek on the Cobar Peneplains.
https://avh.ala.org.au/occurrences/search?taxa=Pultenaea+flexilis#tab_mapView
Habitat Aspect Climate:
Pultenaea flexilis prefers dappled shade to full sun. It grows in dry sclerophyll forests or open woodlands on well drained sites. The altitude ranges from 5 meters ASL to 1000 meters ASL.
The temperatures range from minus 3 degrees in July to 37 degrees in January.
The rainfall ranges from lows of 500mm to 2000mm average per annum.
Soil Requirements:
Pultenaea flexilis prefers to grow on coarse, white sands, fine white sands, white and yellow light fatty clays to medium clays with a high proportion of gravel and a peaty surface layer made from eucalyptus leaves and Casuarinaceae foliage. The soils are usually derived from decomposed iron or manganese stained granites, high lateritic sandstones or rarely brown basalts or black basalts or are associated with podzolic soils with lateritic or aluminium gravels in the sub surfaces. The soils pH ranges from 4.2pH to 5pH. It does not tolerate waterlogged soils. Non saline soils to moderately saline soils are tolerated.
Height & Spread:
Wild Plants: 1.5m to 4m by 1m to 3m.
Characteristics:
Pultenaea flexilis usually grows as an erect open to bushy shrub or at times a spreading shrub with divaricate stems. The grey stems are thin while the juvenile and new growth are olive-green to brownish-red and are glabrous to sparsely covered in soft, off white sericeous hairs.
The alternate leaves of Pultenaea flexilis are linear, obovate to narrow obovate and measure 8mm to 20mm in length by 2mm to 4mm in width. The stipules measure 2mm to 4mm in length. The petioles are olive-green to reddish-green and are glabrous to sparsely covered in soft, off white, sericeous hairs and measure 1mm to 2mm in length. The bases taper to the petioles while the apexes are usually acuminate or at times mucronate. The discolourous laminas are mid green to deep green, dull and glabrous on the upper laminas while the lower laminas are darker. The laminas are flat to slightly recurve upwards from the mid vein to the margins and decurve at the apex. The margins are entire and thickened or revolute. The mid vein is paler than the lamina and is prominent on the lower lamina and is clearly visible from the upper lamina.
The inflorescences of Pultenaea flexilis are small densely clustered racemes of 7 to 15 flowers born from the terminals or sub terminals from the upper leaf axils. The individual flowers are typical legume and measure 8mm to 10mm in length by 4mm to 6.5mm in height. The persistent, imbricate bracts measure 2mm to 4mm in length. The linear, narrow ovate to ovate bracteoles are glabrous or glabrescent with acuminate to acute apexes. The pale yellow-green bracteoles are attached at base or lower part of calyx tube. The bracteoles measure 1mm to 3mm in length. The pedicels measure 2mm to 5mm in length.
The yellow-green calyx tube and 5 pale lemon–green lobes are glabrous to sparsely covered in long, soft, white hirsute hairs. The lobes are similar with acute to acuminate apexes. The calyx tube measures 2.5mm to 3.5mm in length while the lobes measure 2mm to 3mm in length.
The broad ovate, erect standard petal is bright yellow with a splashed reddish halo near the base. The erect divaricate standard petals measure 8.5mm to 11mm in height by 13mm to 16mm in width.
The bright yellow, oblong divergent wing petals run parallel to the keel and have an obtuse apex. The wing petals partially cover the keel and measure 7mm to 9mm in length by 4mm to 5mm in height.
The bright yellow, oblong to slightly spathulate keel petals measure 6mm to 8mm in length by 4mm to 5mm in height.
The ovary is glabrous to sparsely covered in long, soft, white hirsute hairs near the apex. The flowers appear from August to October.
Pultenaea flexilis’s fruits are turgid pods. The pods are glabrous to sparsely covered in soft, white sericeous hairs and measure 6mm to 9mm in length by 5mm to 6mm in width. The green capsules turn deep reddish-brown externally and mid reddish-brown internally with paler lips. The laterally compressed, ellipsoidal seeds are glossy brown. The style and calyx are persistent on the ripe pods.
Wildlife:
Pultenaea flexilis’s flowers may look insignificant in the bush but as a genus it is in fact a very important source of nectar and pollen for native bees, wasps and pollen flies. These in return attract small insect eating birds.
Cultivation:
Pultenaea flexilis is a small open shrub that should be more widely grown in temperate or subtropical gardens. It is ideal at the edge of a rainforest or as the pioneer shrubs before establishing a garden proper. It also makes a great rockery displays in hot open spaces or confined sunny positions. In cultivation it will grow from 2.5 meter to 3.5 meters in height by 2 meters to 2.5 meters in diameter when grown in the open.
It grows well on sandy loams to light fatty clays. It can cope with temperatures as low as minus 3 degrees and up to 40 degrees once established.
Add to the above, if it is given a little extra moisture and native fertilizer on being planted out as a seedling until it is established will respond with excellent flowering and good fruit set in the following season.
Pultenaea flexilis would make a good contribution to a moist heath garden. Here it can be used as the main feature plant in the background or give a horizon affect to a small heath garden. If scattered throughout the bush scene as the taller feature plant in a small bush garden it will contrast beautifully with larger leaf plants or finer green leaf foliages. When you design a bush garden which it is well suited don’t use contours to display the plants as bush lands are almost always on flats or have a slight rises with no formal patterns. Plants must be planted close together and are best if you can see over the tallest ones with the exception of one or two plants at the most. The idea is to achieve a feeling of expansiveness even if it is in a small area. This can be achieved by using Pultenaea flexilis’s mid blue-green leaves with other procumbent plants like Hibbertia dentata, Scaevola aemula, Goodenia rotundifolia or small tuft grasses or reeds like Ptilthrix deusta or lilies like Dianella caerulea and dwarf Lomandra conferta. Mix them with other smaller prostrate shrubs so none of them dominate the scene but blend in to give a mosaic of foliage colours that you oversee.
Propagation:
Seeds: The seeds of Pultenaea flexilis can be removed easily from the pods that have already turned brown and begun to open.
Sow freshly treated seeds directly into a seed raising mix after scarifying the seeds on a fine piece of emery paper. Cover the seeds with 5mm to 6mm of potting mix and keep them moist not wet. When the seedlings are 20mm to 25mm tall, prick them out and plant them into 50mm native tubes using a good organic mix.
As the seedlings roots reach the bottom of the tubes, nip the growing tips out and plant them out into their permanent position. Do not delay.
Cuttings: Fortunately Pultenaea flexilis are relatively easy to strike from cuttings. Use 100mm to 150mm long tip cuttings or lateral shoots from the present season’s growth. Take them in warmer months of the year. Remove half the leaves from the bottom section being careful not to tear the bark.
1 Prepare the cutting mix by adding two thirds sharp clean river sand, one third peat or one third perlite. These ingredients must be sterilized,
2 Select good material from non diseased plants,
3 Select semi green stems for cuttings. Look for a stem with two or three nodes,
4 Place the cutting on a flat, hard surface, and make a clean cut down one side of the cutting at the base for 10mm with a sharp sterile knife or razor blade. – This scarification of the node will increase the chances of roots emerging from this spot. Now remove all but one or two the leaves, leaving the apex leaves in tact. If the leaves are very large in proportion to the stem, cut off the apical halves.
5 Fill a saucer with water, and place a little medium strength rooting hormone into another container like a milk bottle top. Dip the node end of the cutting into the water and then into the rooting hormone. Tap off any excess hormone,
6 Use a small dipple stick or old pencil to poke a hole into the soilless potting mix. Ensure the hole is slightly larger than the stem diameter and be careful not to wipe the rooting hormone off the cuttings base. Place 2 to 4 cuttings in each of the 50mm native tubes,
7 I like to place the tubes in bucket with holes drilled in the bottom to allow excess water to drain out. A plastic bag that fits over the bucket is ideal to help maintain temperature and moisture. Place in a semi shaded, warm position like under 50mm shade cloth.
8 When the cuttings have struck, open the bag to allow air circulation for a few days to a week,
9 Once hardened off remove the cuttings from the bag and allow to further hardening for a few more days to a week,
10 Transplant into a good potting mix to grow on.
Fertilize using seaweed, fish emulsion or organic chicken pellets soaked in water on an alternate basis. Fertilize every two months until the plants are established then annually in early September to October to maintain health, vitality and better flowering.
Further Comments from Readers:
“Hi reader, it seems you use The Bible of Botany a lot. That’s great as we have great pleasure in bringing it to you! It’s a little awkward for us to ask, but our first aim is to purchase land approximately 1,600 hectares to link several parcels of N.P. into one at The Pinnacles NSW Australia, but we need your help. We’re not salespeople. We’re amateur botanists who have dedicated over 30 years to saving the environment in a practical way. We depend on donations to reach our goal. If you donate just $5, the price of your coffee this Sunday, We can help to keep the planet alive in a real way and continue to bring you regular updates and features on Australian plants all in one Botanical Bible. Any support is greatly appreciated. Thank you.”
In the spirit of reconciliation we acknowledge the Bundjalung, Gumbaynggirr and Yaegl and all aboriginal nations throughout Australia and their connections to land, sea and community. We pay our respect to their Elders past, present and future for the pleasures we have gained.

Moonee Beach Headland NSW

Moonee Beach Headland NSW

Moonee Beach Headland NSW

Moonee Beach Headland NSW
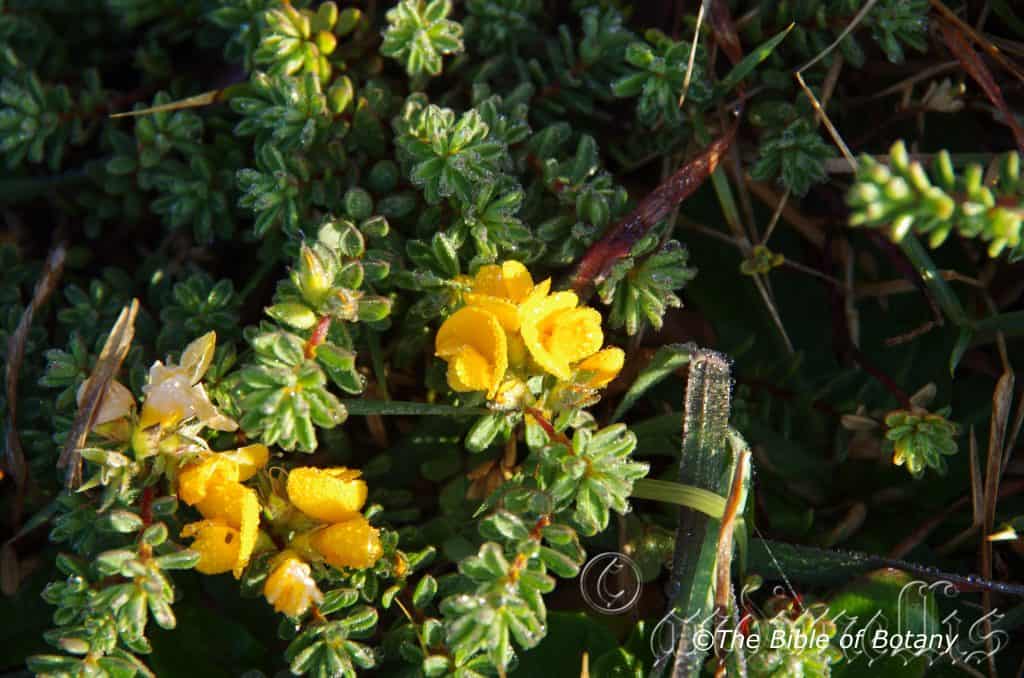
Moonee Beach Headland NSW
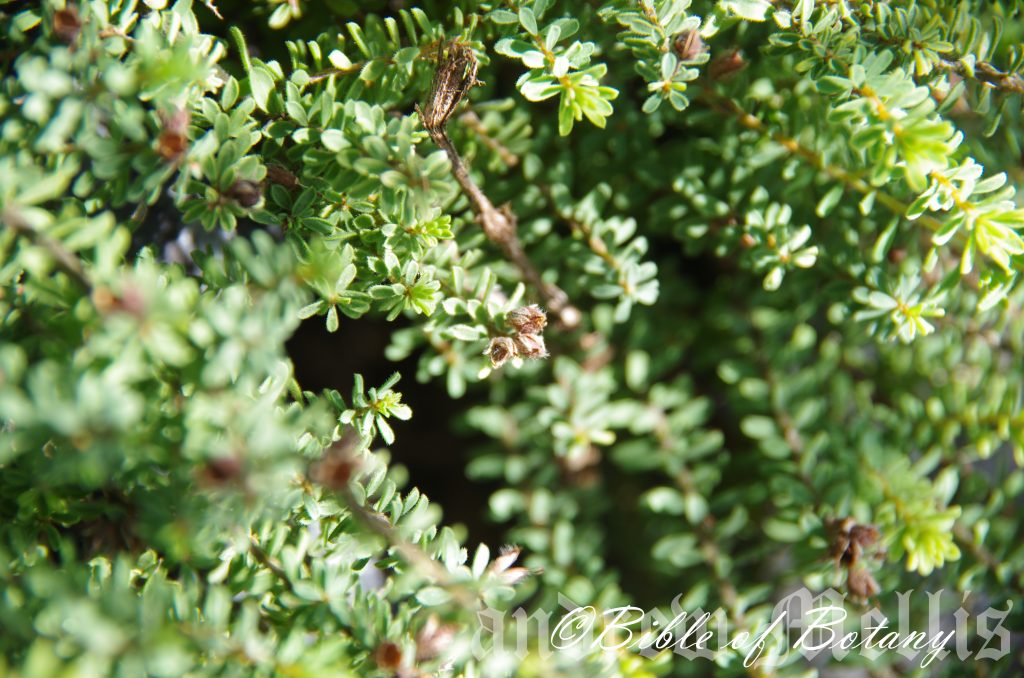
Moonee Beach Headland NSW
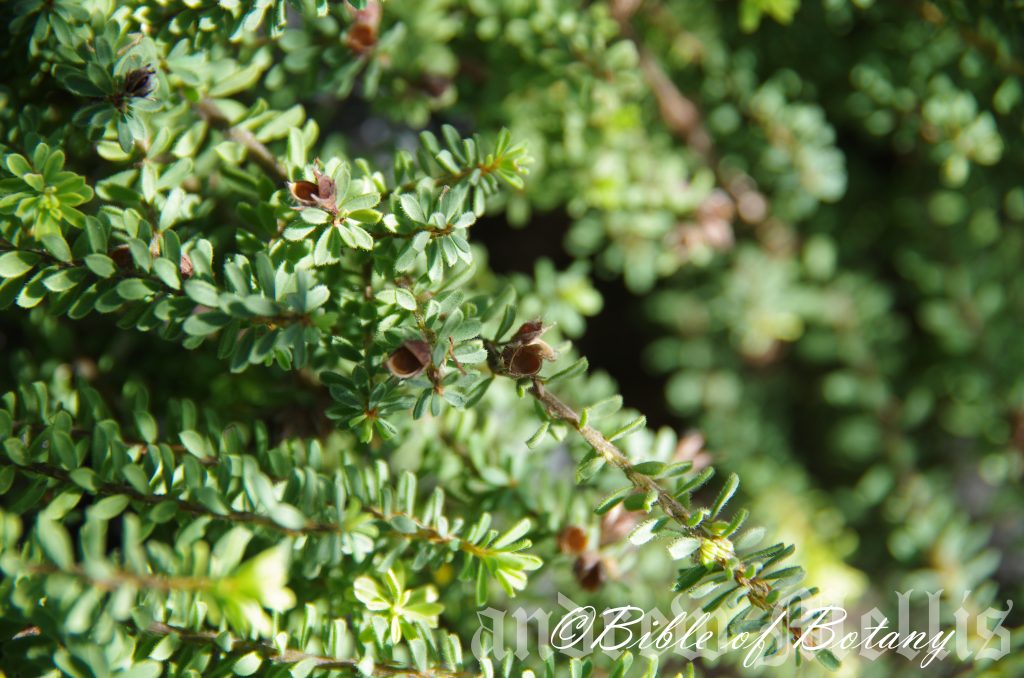
Moonee Beach Headland NSW
Pultenaea maritima
Classification:
Unranked: Eudicots
Unranked: Rosids
Order: Fabales
Family: Fabaceae
Subfamily: Faboideae
Genus: Is named in honour of Richard Pulteney; 1730-1801, who was an English surgeon and botanist who studied the plants of Lecestershire.
Species: From Marīnum, which is Latin for of the sea. It refers to plants, which grow along the coastline or on headlands.
Common Name: Coastal Bush Pea.
Distribution:
Pultenaea maritima is found south from Greta Sandy National Park in southern coastal Queensland to Newcastle beach in central coastal New South Wales. It is found along the coastal strip except for an isolated population on the Gara River near Armidale and Chambigne Nature Reserve near Grafton.
https://avh.ala.org.au/occurrences/search?taxa=Pultenaea+maritima#tab_mapView
Habitat Aspect Climate:
Pultenaea maritima prefers dappled shade to full sun. It usually grows in open exposed situations on coastal headlands or on ridges and shelves in dry sclerophyll forests or open woodlands. The altitude usually ranges from 2 meters ASL to 32 meters ASL except for the population on the Gara River which is at around 900 meters ASL and the Chambigne Nature Reserve which is at around 120 meters ASL.
The temperatures range is usually from 3 degrees in July to 38 degrees in January but drops to minus 4 degrees near Armidale on the Gara River.
The rainfall ranges from lows of 1000mm to 2000mm average per annum except for the Gara River and Chambigne population which receive lows of around 650mm and 1200mm and averages of 850mm and 1750mm annually respectively.
Soil Requirements:
Pultenaea maritima prefers fine white sands, to white or yellowish medium gritty clays with a high proportion of gravel. The soils are usually derived from accumulated beach sands, estuarial deposited silts or at times decomposed granites or gritty shales. The soils pH ranges from 5pH to 7pH. It does not tolerate waterlogged soils. Non saline soils to very saline soils are tolerated as are salt laden winds.
Height & Spread:
Wild Plants: 0.2m to 0.5m by 1m to 2m.
Characteristics:
Pultenaea maritima usually grows as a prostrate shrub forming dense mats. The grey stems are grey and thin. The juvenile and new growth is pinkish-green to greenish-pink and is moderately covered in soft, off white sericeous hairs.
The alternate leaves of Pultenaea maritima are elliptic, oblong to spathulate and measure 3.5mm to 5mm in length by 2mm to 3mm in width. The stipules measure 1.1mm to 2mm in length. The petioles are mid bluish-green, are sparsely covered in soft, white, sericeous hairs and measure 0mm to 0.5mm in length. The bases taper to the petioles while the apexes are acute to emarginate. The concolourous laminas are mid blue-green to mid green and dull. The laminas strongly recurve upwards from the mid vein to the margins while the margins are entire. The mid vein is paler than the lamina and is prominent on the lower lamina and is visible from the upper lamina.
The inflorescences of Pultenaea maritima are born from sub terminal or apparently terminal, dense to somewhat lax, leafy shoots. The individual flowers are typical legume and measure 6.5mm to 10mm in length by 4mm to 6.5mm in height. The bracteoles are fused halfway with the stipules but are longer than the stipules and are attached at the bases of the calyxes. The bracteoles and stipules are covered in white sericeous hairs. The bracteoles measure 3mm to 3.3mm in length. The pedicels measure 0mm to 0.5mm in length.
The mid blue-green to mid green calyx tube and 5 lobes are sparsely to moderately covered in soft, white sericeous hairs. The lobes are similar with acute to acuminate apexes. The calyx tube measures 2mm to 2.6mm in length while the lobes measure 1.8mm to 2.5mm in length.
The broad ovate, erect standard petal is dull to bright yellow with or without a splashed reddish halo near the base. The erect divaricate standard petals measure 6mm to 9mm in height by 9mm to 12mm in width.
The dull to bright yellow, oblong divergent wing petals run parallel to the keel and have an obtuse apex. The wing petals are divergent to loosely cover the keel and measure 6.5mm to 10mm in length by 3.5mm to 4mm in height.
The dull to bright yellow, oblong to slightly spathulate keel petals measure 6mm to 8.5mm in length by 4mm to 4.5mm in height.
The ovary is glabrous at the base and is sparsely covered in long, soft, white sericeous hairs near the apex. The flowers appear from August to October.
Pultenaea maritima’s fruits are turgid pods. The pods are glabrous to sparsely covered in soft, white sericeous hairs and measure 5mm to 6mm in length by 4mm to 5mm in width. The green capsules turn deep reddish-brown externally and mid reddish-brown internally with paler lips. The style and calyx are persistent on the ripe pods.
Wildlife:
Pultenaea maratima’s flowers may look insignificant in the bush but as a genus it is in fact a very important source of nectar and pollen for native bees, wasps and pollen flies. These in return attract small insect eating birds.
Cultivation:
Pultenaea maritima is a small open shrub that should be more widely grown in temperate or subtropical gardens. It is ideal at the edge of a rainforest or as the pioneer shrubs before establishing a garden proper. It also makes great rockery displays in hot open spaces or confined sunny positions. In cultivation it will grow from 0.2 meter to 0.5 meters in height by 1.5 meters to 2.2 meters in diameter when grown in the open on flat ground.
It grows exceptionally well on sandy loams, light fatty clays or skeletal rocky soils in exposed situations. It can cope with temperatures as low as minus 3 degrees and up to 40 degrees once established.
Add to the above, if it is given a little extra moisture and native fertilizer on being planted out as a seedling until it is established will respond with excellent flowering and good fruit set in the following season. It is best pruned lightly on an annual basis to maintain a dense foliage plant otherwise it has a tendency to become bare in the center.
Pultenaea maritima would make a good contribution to a dry or moist sunny rockery. Here it can be used as the main feature plant surrounded by short perennials or annuals. If scattered throughout a bush scene as the procumbent species it will give height to the other plants and contrast beautifully with larger leaf plants or finer foliage plants with bright green foliages. Use a lot of procumbent plants like Carpobrotus edulis, Dampiera purpurea Pattersonia glabra or Hibbertia obtusifolia. Mix it with other smaller shrubs like small red flowering Bauera rubioides or Austromyrtus dulcis so none of them dominate the scene but blend in to give a mosaic of different foliage colours that you can enjoy all year.
Propagation:
Seeds: The seeds of Pultenaea maritima can be removed easily from the fruits that have already turned brown and begun to open.
Sow freshly treated seeds directly into a seed raising mix after scarifying the seeds on a fine piece of emery paper. Cover the seeds with 5mm to 6mm of potting mix and keep them moist not wet. When the seedlings are 20mm to 25mm tall, prick them out and plant them into 50mm native tubes using a good organic mix.
As the seedlings roots reach the bottom of the tubes, nip the growing tips out and plant them out into their permanent position. Do not delay.
Cuttings: Fortunately Pultenaea maritima cuttings are relatively easy to strike. Use 100mm to 200mm long tip cuttings or lateral shoots from the present season’s growth. Take them in warmer months of the year. Remove half the leaves from the bottom section being careful not to tear the bark.
1 Prepare the cutting mix by adding two thirds sharp clean river sand, one third peat or one third perlite. These ingredients must be sterilized,
2 Select good material from non diseased plants,
3 Select semi green stems for cuttings. Look for a stem with two or three nodes,
4 Place the cutting on a flat, hard surface, and make a clean cut down one side of the cutting at the base for 10mm with a sharp sterile knife or razor blade. – This scarification of the node will increase the chances of roots emerging from this spot. Now remove all but one or two the leaves, leaving the apex leaves in tact. If the leaves are very large in proportion to the stem, cut off the apical halves.
5 Fill a saucer with water, and place a little medium strength rooting hormone into another container like a milk bottle top. Dip the node end of the cutting into the water and then into the rooting hormone. Tap off any excess hormone,
6 Use a small dipple stick or old pencil to poke a hole into the soilless potting mix. Ensure the hole is slightly larger than the stem diameter and be careful not to wipe the rooting hormone off the cuttings base. Place 2 to 4 cuttings in each of the 50mm native tubes,
7 I like to place the tubes in bucket with holes drilled in the bottom to allow excess water to drain out. A plastic bag that fits over the bucket is ideal to help maintain temperature and moisture. Place in a semi shaded, warm position like under 50mm shade cloth.
8 When the cuttings have struck, open the bag to allow air circulation for a few days to a week,
9 Once hardened off remove the cuttings from the bag and allow to further hardening for a few more days to a week,
10 Transplant into a good potting mix to grow on.
Fertilize using seaweed, fish emulsion or organic chicken pellets soaked in water on an alternate basis. Fertilize every two months until the plants are established then annually in early September to October to maintain health, vitality and better flowering.
Further Comments from Readers:
“Hi reader, it seems you use The Bible of Botany a lot. That’s great as we have great pleasure in bringing it to you! It’s a little awkward for us to ask, but our first aim is to purchase land approximately 1,600 hectares to link several parcels of N.P. into one at The Pinnacles NSW Australia, but we need your help. We’re not salespeople. We’re amateur botanists who have dedicated over 30 years to saving the environment in a practical way. We depend on donations to reach our goal. If you donate just $5, the price of your coffee this Sunday, We can help to keep the planet alive in a real way and continue to bring you regular updates and features on Australian plants all in one Botanical Bible. Any support is greatly appreciated. Thank you.”
In the spirit of reconciliation we acknowledge the Bundjalung, Gumbaynggirr and Yaegl and all aboriginal nations throughout Australia and their connections to land, sea and community. We pay our respect to their Elders past, present and future for the pleasures we have gained.

Boorkoom Yuraigir National Park NSW
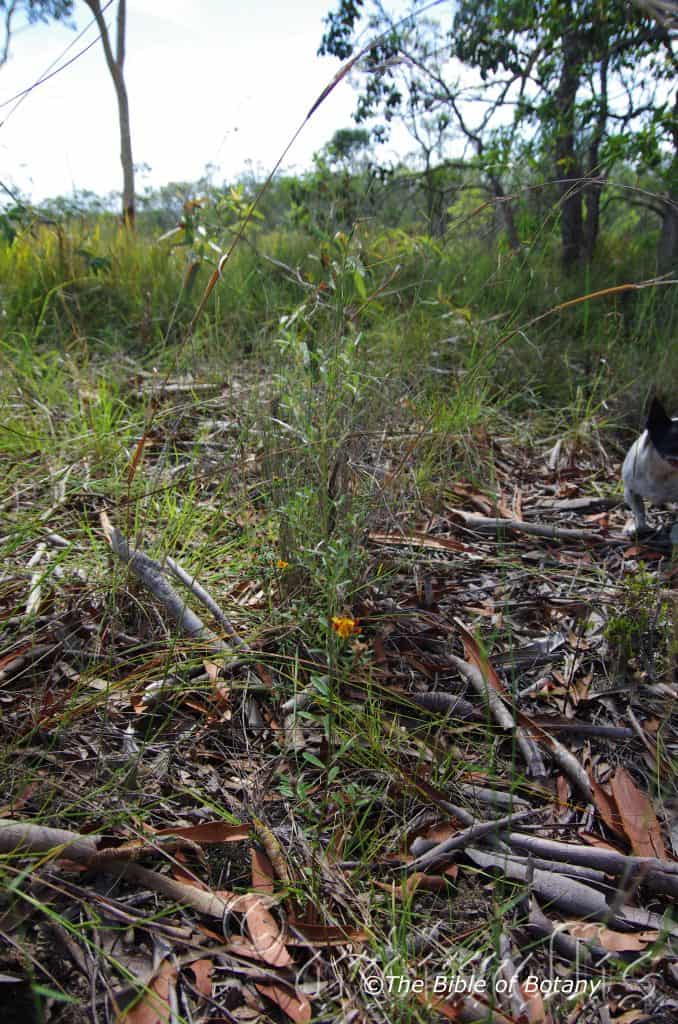
Boorkoom Yuraigir National Park NSW
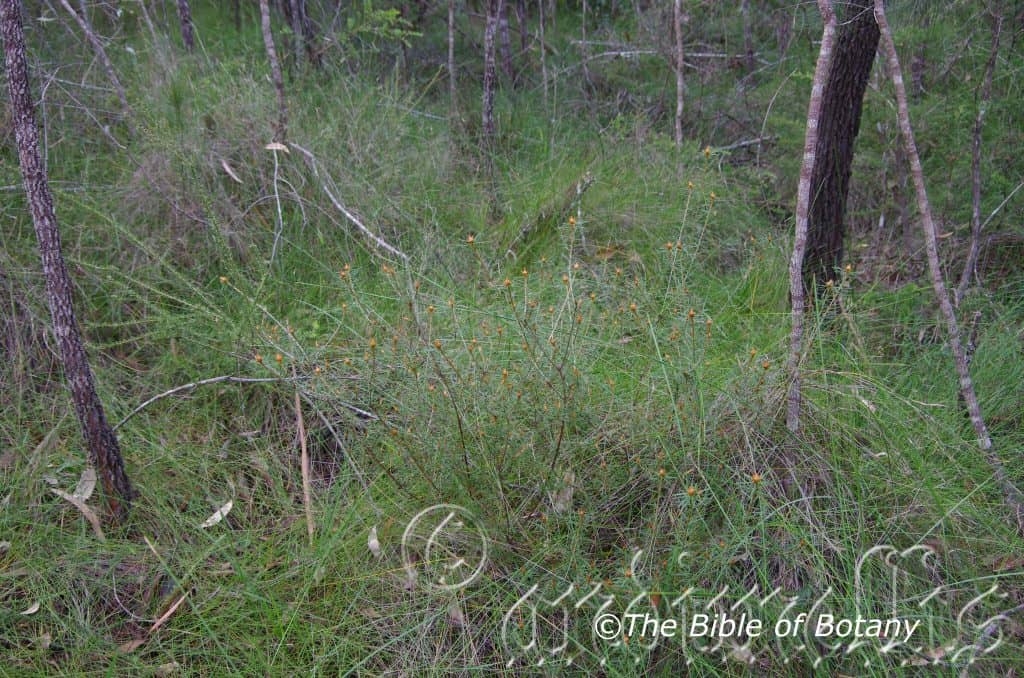
The Pinnacles NSW
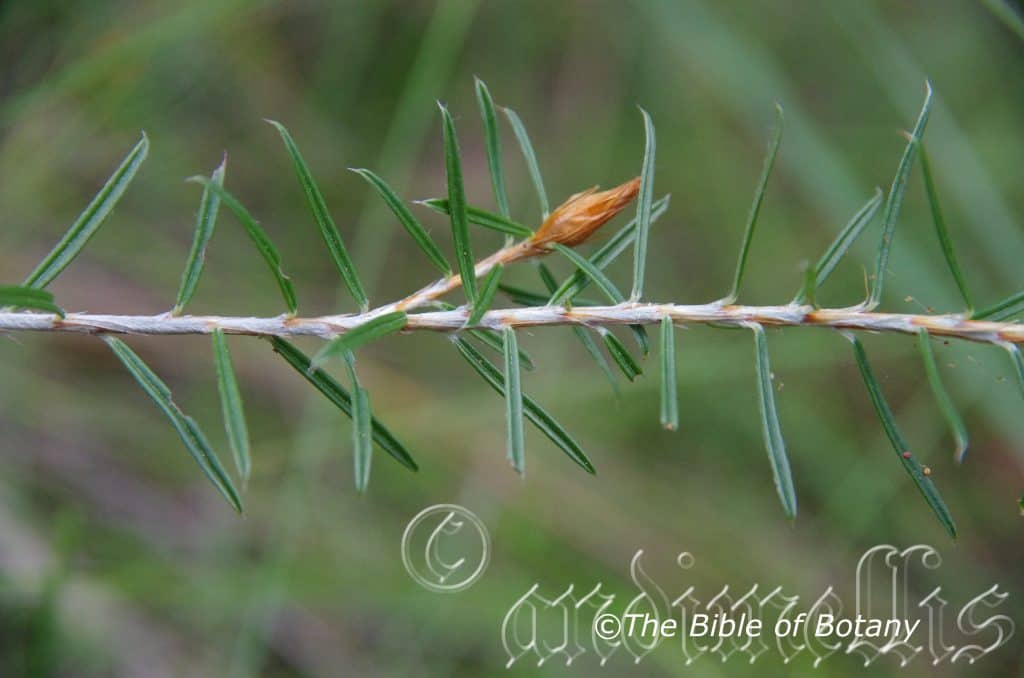
Boorkoom Yuraigir National Park NSW
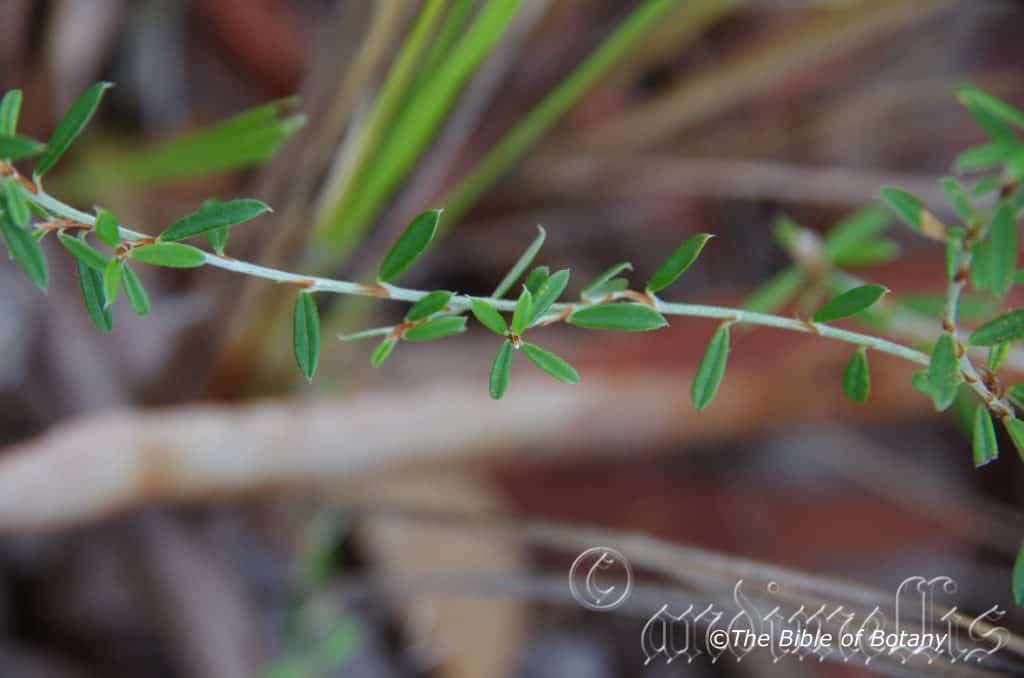
Boorkoom Yuraigir National Park NSW
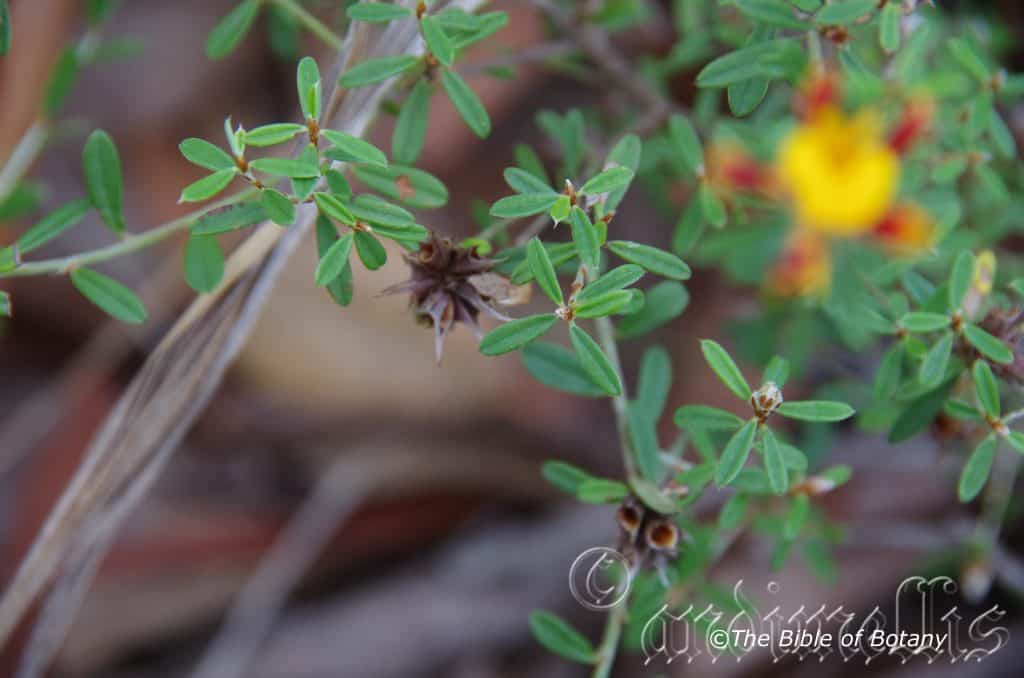
The Pinnacles NSW
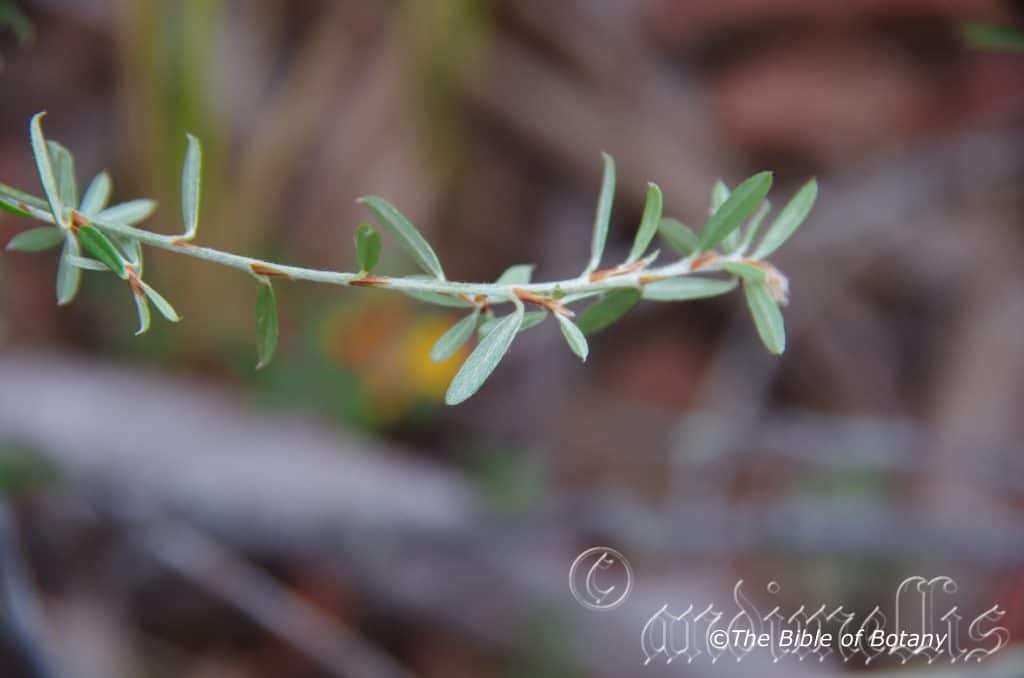
Boorkoom Yuraigir National Park NSW
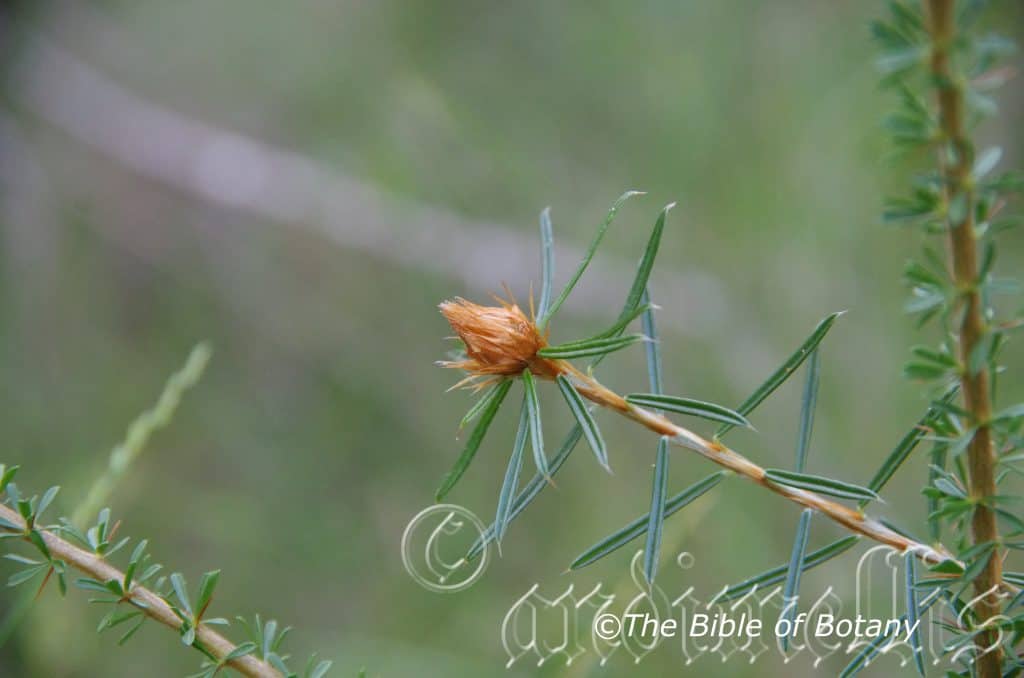
The Pinnacles NSW
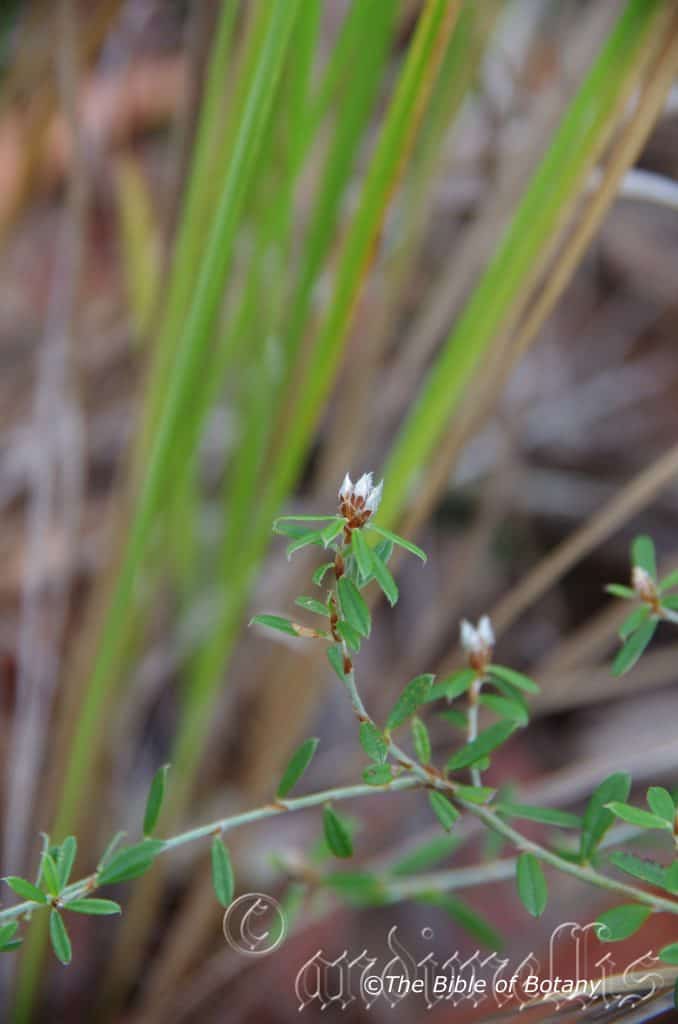
Boorkoom Yuraigir National Park NSW
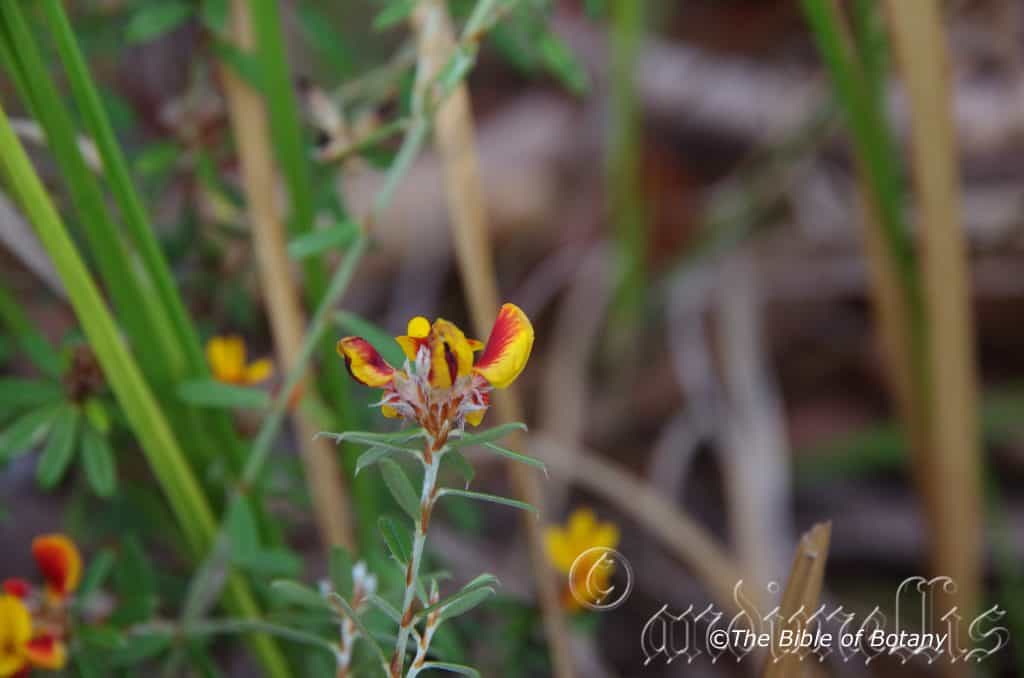
Boorkoom Yuraigir National Park NSW
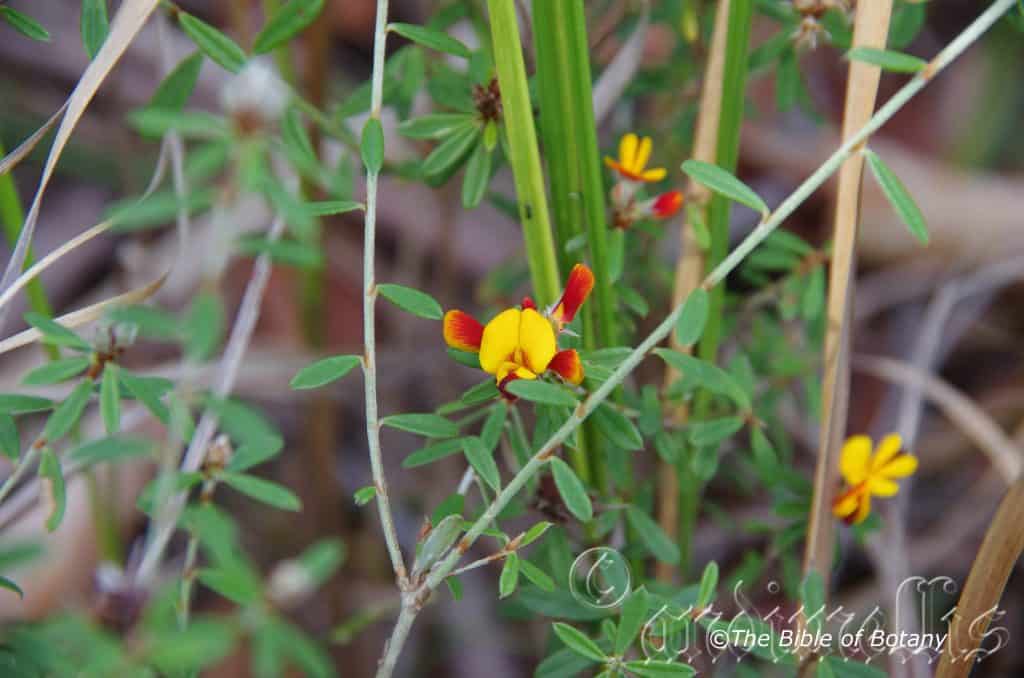
Boorkoom Yuraigir National Park NSW
Pultenaea myrtoides
Classification:
Unranked: Eudicots
Unranked: Rosids
Order: Fabales
Family: Fabaceae
Subfamily: Faboideae
Genus: Is named in honour of Richard Pulteney; 1730-1801, who was an English surgeon and botanist who studied the plants of Lecestershire.
Species: From Múrtos, which is Ancient Greek for bitter or later Myrtus, which is Latin for the European Myrtle genus and Eîdos/Oides, which is Ancient Greek for alike or similar to. It refers to leaves and fruits, which have typical myrtle characteristics.
Common Name: Myrtle Leaf Pultenaea.
Distribution:
Pultenaea myrtoides is found south from Childers in south eastern Queensland to the Hunter River in New South Wales. It is found on and east of the Great Dividing Range to the coast.
https://avh.ala.org.au/occurrences/search?taxa=Pultenaea+myrtoides#tab_mapView
Habitat Aspect Climate:
Pultenaea myrtoides prefers dappled shade to full sun. It grows in dry schlerophyll forests, dry open woodland heaths or moist open woodland wet heaths. The altitude ranges from 5 meters ASL to 875 meters ASL.
The temperatures range from minus 4 degrees in July to 36 degrees in January.
The rainfall ranges from lows of 850mm to 1500mm average per annum.
Soil Requirements:
Pultenaea myrtoides prefers sandy clays to light fatty clays with a high proportion of gravel. The soils are usually derived from decomposed granites or sandstones. The soils pH ranges from 5.5pH to 7pH. It does not tolerate waterlogged soils. Non saline soils to moderately saline soils are tolerated.
Height & Spread:
Wild Plants: 1m to 1.6m by 1m to 1.8m.
Characteristics:
Pultenaea myrtoides grows as a wide spreading densely foliaged shrub. The erect stems are pale grey-brown and glabrous. The new growth is pale olive-brown to olive green, smooth and covered in white pubescent hairs.
The alternate leaves of Pultenaea myrtoides are obovate or rarely linear and measure 5mm to 20mm in length by 2mm to 7mm in width. The caducous stipules measure 3mm to 5mm in length while the petioles are 0.5mm to 1.5mm in length. The bases are tapering-cuneate to cuneate while the apexes are obtuse to acute with a small mucronate tip as well as being decurve. The discolourous laminas are mid blue green to mid grass green and glabrous on the upper lamina while the lower lamina is paler and covered in pale grey pubescent hairs. The leaf margins are entire, flat or curve slightly upwards from the mid vein. The mid vein is prominent on the lower lamina and visible from the upper lamina.
Inflorescences of Pultenaea myrtoides are dense, terminal clusters of 4 to 8 flowers blooming at any one time. The individual flowers are typical legume measuring 7mm to 10mm in length by 7mm to 10mm in height. The erect flower’s imbricate bracts are black and persistent. The centre lobe is ovate to broadly spathulate while the 2 lateral lobes are obtuse. They measure 1.6mm to 2.2mm in length while the lobes measure 1.6mm to 2.2mm in length. The black calyxes are densely covered in white pubescent hairs. The calyx tubes and lobes measure 5mm to 8mm in length including the 4 acuminate 2.6mm to 4.2mm lobes. The pedicels measure 0.8mm to 1.2mm in length.
The narrow broad ovate standard petal strongly recurves towards the front of the flower. It is yellow with a broad acute to obtuse apex and has scarlet red striations radiating out from near the base. They measure 5.5mm to 7mm in height by 5mm to 7mm in width and curve forward over the wing petals. The elliptical wing petals run parallel to the keel and measure 7mm to 10mm in length by 4mm to 5mm in height. The oblong to obovate keel petals are hooded by the lateral wing petals and measure 7mm to 9mm in length by 5mm to 6mm in height. The keel is orange to red with the margins covered in white ciliate hairs.
The ovary is covered in white pulverulent hairs. Pultenaea myrtoides flowers from late August through to October.
Pultenaea myrtoides’s fruits are somewhat compressed pods. The pods are glabrous and measure 5mm to 6.5mm in length by 5mm to 6mm in width and 3mm to 3.5mm in depth. The green capsules turn deep brown externally and red brown internally with pale lips. The style is persistent and extends from 8mm to 9mm in length.
Wildlife:
Pultenaea myrtoides’s flowers are very important source of nectar and pollen for native bees, wasps and pollen flies. These in return attract small insect eating birds.
Cultivation:
Pultenaea myrtoides is a small open shrub that should be more widely grown in temperate or subtropical gardens. It is ideal at the edge of a rainforest or as the pioneer shrubs before establishing a garden proper. It would also make a great rockery displays in hot open spaces or confined sunny positions. In cultivation it will grow from 1 meter to 1.5 meters in height by 1.2 meters to 1.8 meters in diameter when grown in the open.
It grows exceptionally well on light clays to medium clay soils. It can cope with temperatures as low as minus 4 degrees and up to 40 degrees.
Add to the above, if it is given a little extra moisture and native fertilizer on being planted out as a seedling will respond with good flowering and good fruit set in the following season.
Pultenaea myrtoides would make a good contribution to a dry or moist heath garden. It can be used as a fill in plant, scattered throughout the heath scene or planted in small clusters. Use a lot of procumbent plants like Carpobrotus edulis, Dampiera purpurea, Pattersonia glabra or Hibbertia dentata Mix them with other smaller shrubs like small red flowering Bauera rubioides or Austromyrtus dulcis so none of them dominate the scene but blend in to give a mosaic of different foliage colours that you can enjoy all year. Mix it with other smaller shrubs so none of them dominate the scene but blend in to give a mosaic of foliage colours that you oversee.
Propagation:
Seeds: The seeds of Pultenaea myrtoides can be removed easily from the fruits that have already turned brown and begun to open.
Sow freshly treated seeds directly into a seed raising mix, keeping them moist not wet. When the seedlings are 20mm to 25mm tall, prick them out and plant them into 50mm native tubes using a good organic mix.
As the seedlings roots reach the bottom of the tubes plant them out into their permanent position.
Cuttings: Fortunately Pultenaea myrtoides cuttings are relatively easy to strike. Use 80mm to 150mm long tip cuttings or lateral shoots from the present season’s growth. Take them in warmer months of the year. Remove half the leaves from the bottom section being careful not to tear the bark.
1 Prepare the cutting mix by adding two thirds sharp clean river sand, one third peat or one third perlite. These ingredients must be sterilized,
2 Select good material from non diseased plants,
3 Select semi green stems for cuttings. Look for a stem with two or three nodes,
4 Place the cutting on a flat, hard surface, and make a clean cut down one side of the cutting at the base for 10mm with a sharp sterile knife or razor blade. – This scarification of the node will increase the chances of roots emerging from this spot. Now remove all but one or two the leaves, leaving the apex leaves in tact. If the leaves are very large in proportion to the stem, cut off the apical halves.
5 Fill a saucer with water, and place a little medium strength rooting hormone into another container like a milk bottle top. Dip the node end of the cutting into the water and then into the rooting hormone. Tap off any excess hormone,
6 Use a small dipple stick or old pencil to poke a hole into the soilless potting mix. Ensure the hole is slightly larger than the stem diameter and be careful not to wipe the rooting hormone off the cuttings base. Place 2 to 4 cuttings in each of the 50mm native tubes,
7 I like to place the tubes in bucket with holes drilled in the bottom to allow excess water to drain out. A plastic bag that fits over the bucket is ideal to help maintain temperature and moisture. Place in a semi shaded, warm position like under 50mm shade cloth.
8 When the cuttings have struck, open the bag to allow air circulation for a few days to a week,
9 Once hardened off remove the cuttings from the bag and allow to further hardening for a few more days to a week,
10 Transplant into a good potting mix to grow on.
Fertilize using seaweed, fish emulsion or organic chicken pellets soaked in water on an alternate basis. Fertilize every two months until the plants are established then annually in early September to October to maintain health, vitality and better flowering.
Further Comments from Readers:
“Hi reader, it seems you use The Bible of Botany a lot. That’s great as we have great pleasure in bringing it to you! It’s a little awkward for us to ask, but our first aim is to purchase land approximately 1,600 hectares to link several parcels of N.P. into one at The Pinnacles NSW Australia, but we need your help. We’re not salespeople. We’re amateur botanists who have dedicated over 30 years to saving the environment in a practical way. We depend on donations to reach our goal. If you donate just $5, the price of your coffee this Sunday, We can help to keep the planet alive in a real way and continue to bring you regular updates and features on Australian plants all in one Botanical Bible. Any support is greatly appreciated. Thank you.”
In the spirit of reconciliation we acknowledge the Bundjalung, Gumbaynggirr and Yaegl and all aboriginal nations throughout Australia and their connections to land, sea and community. We pay our respect to their Elders past, present and future for the pleasures we have gained.
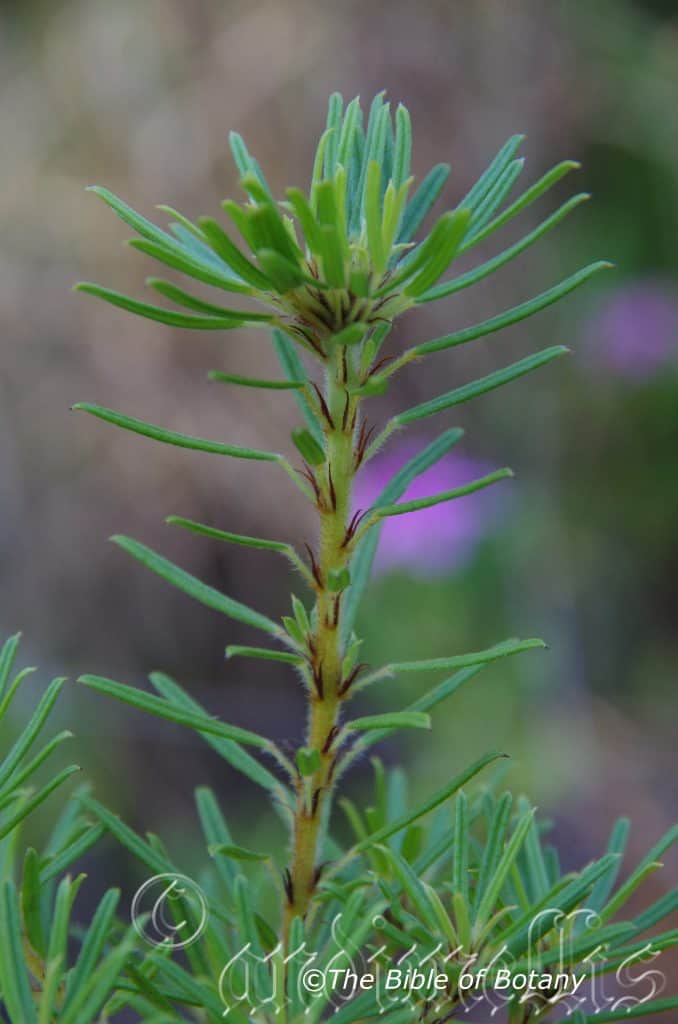
The Pinnacles NSW
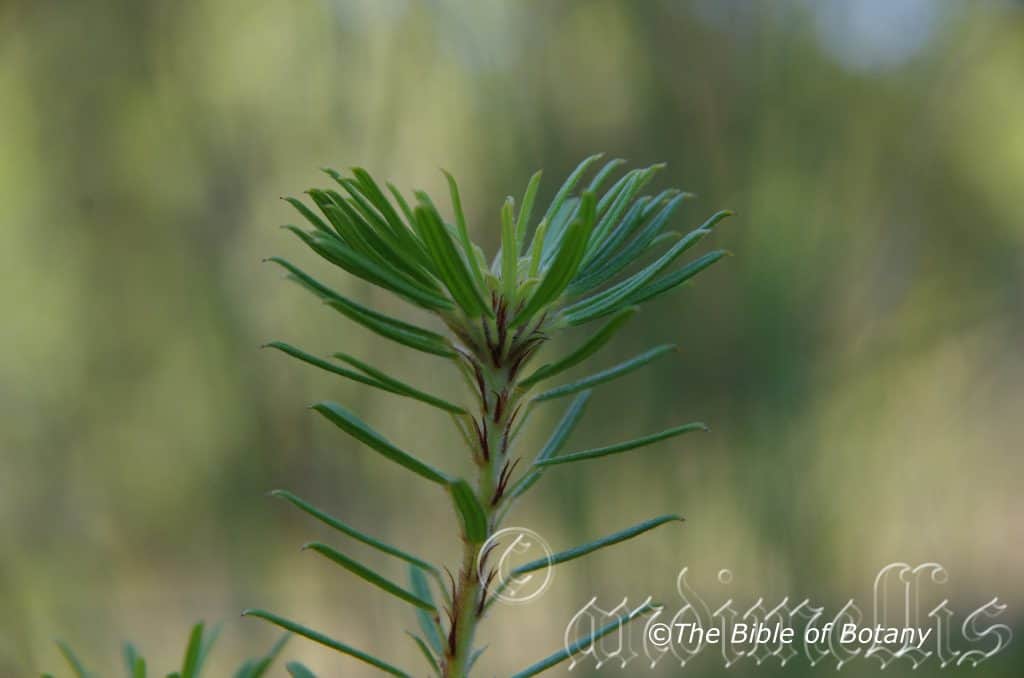
Author’s Garden The Pinnacles NSW

Author’s Garden The Pinnacles NSW
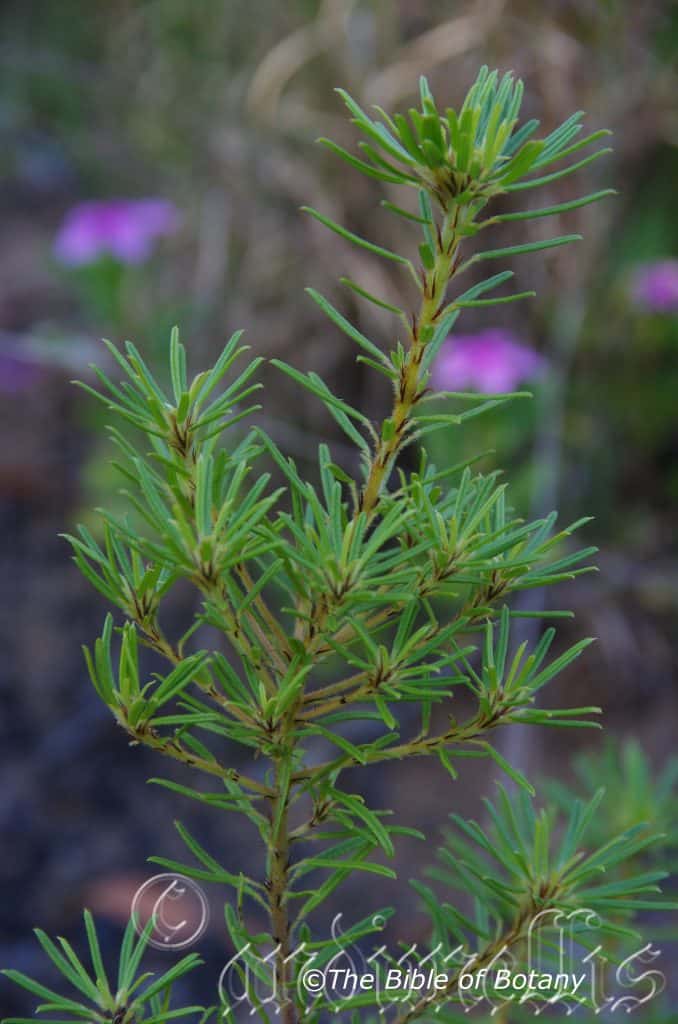
Author’s Garden The Pinnacles NSW
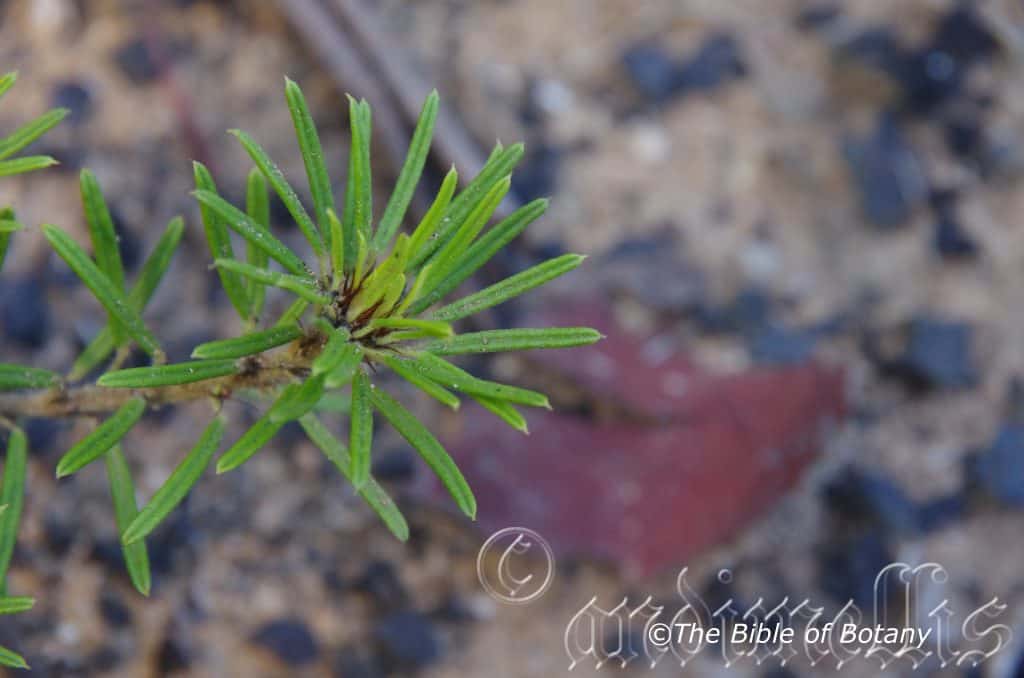
Author’s Garden The Pinnacles NSW
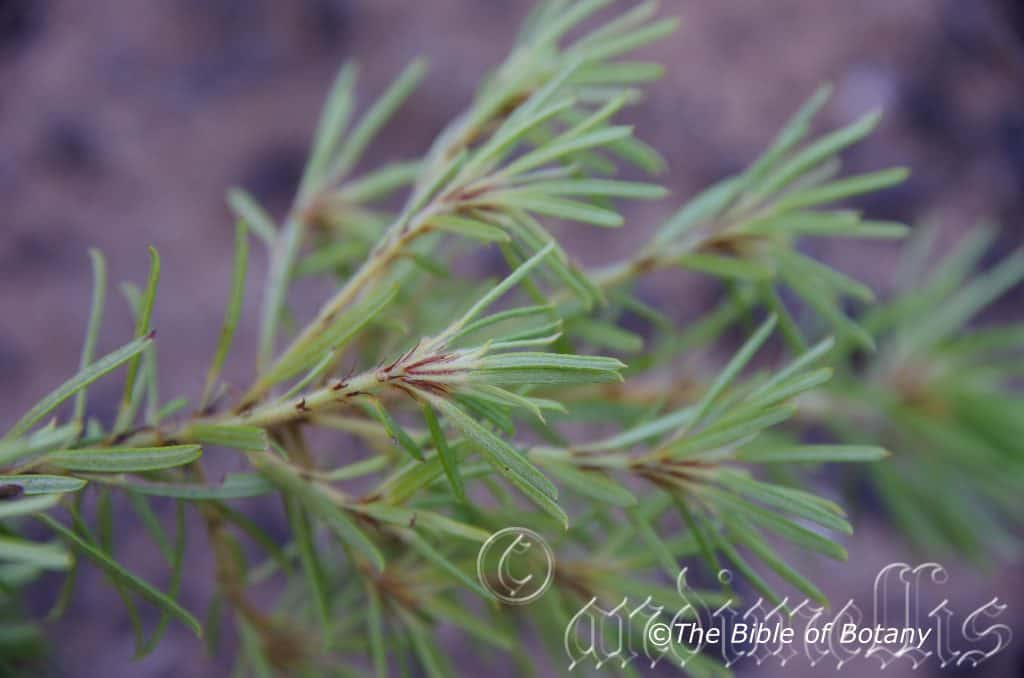
Fortis Creek National Park NSW
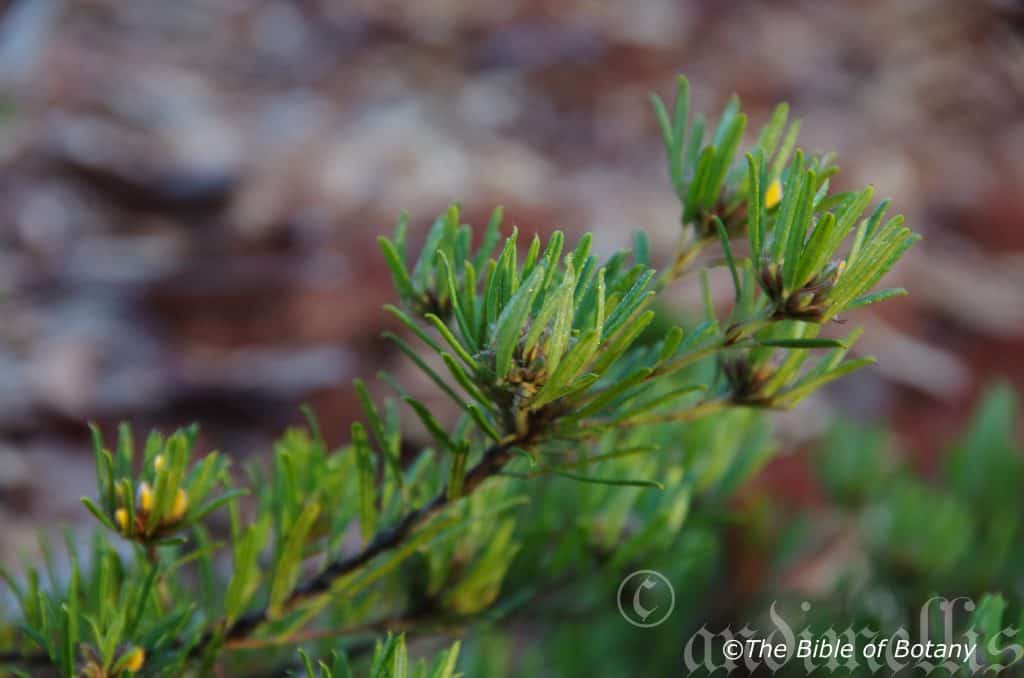
Author’s Garden The Pinnacles NSW
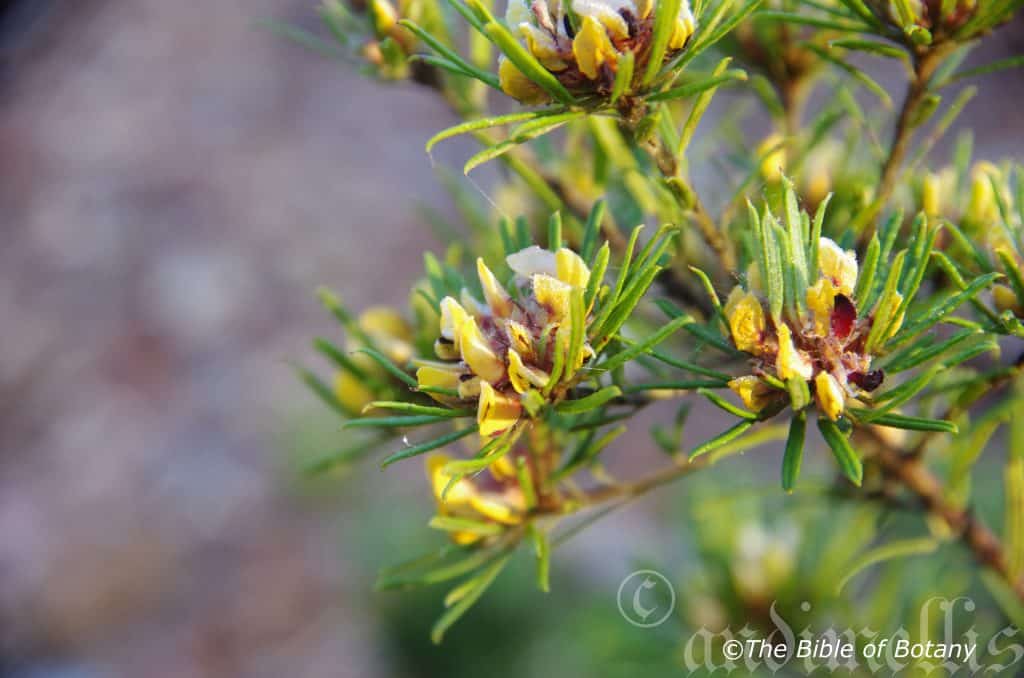
Author’s Garden The Pinnacles NSW
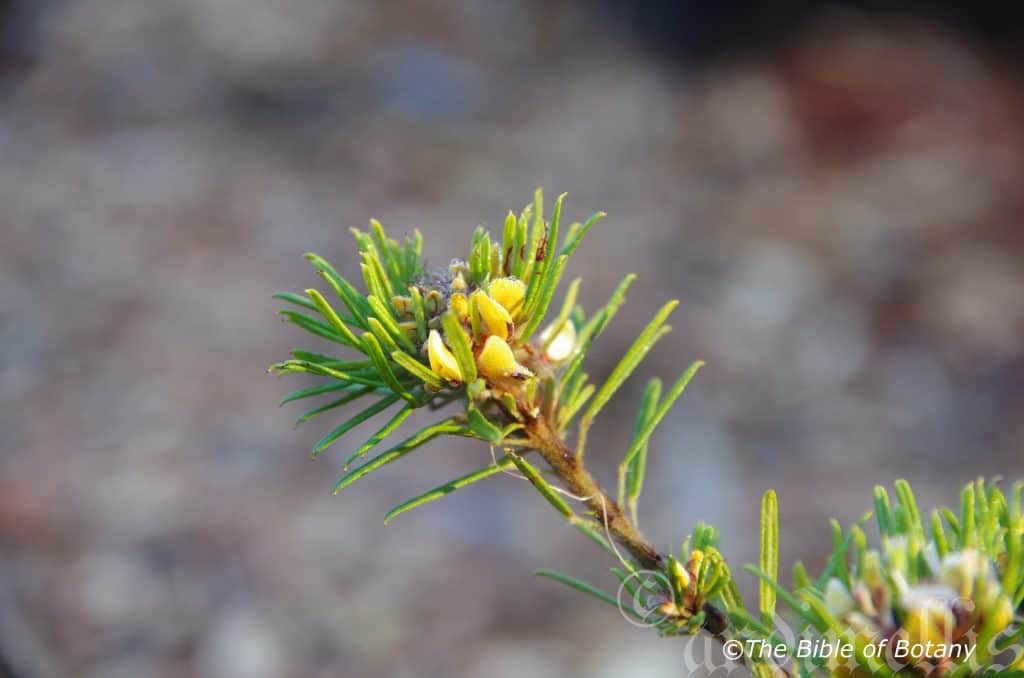
Author’s Garden The Pinnacles NSW
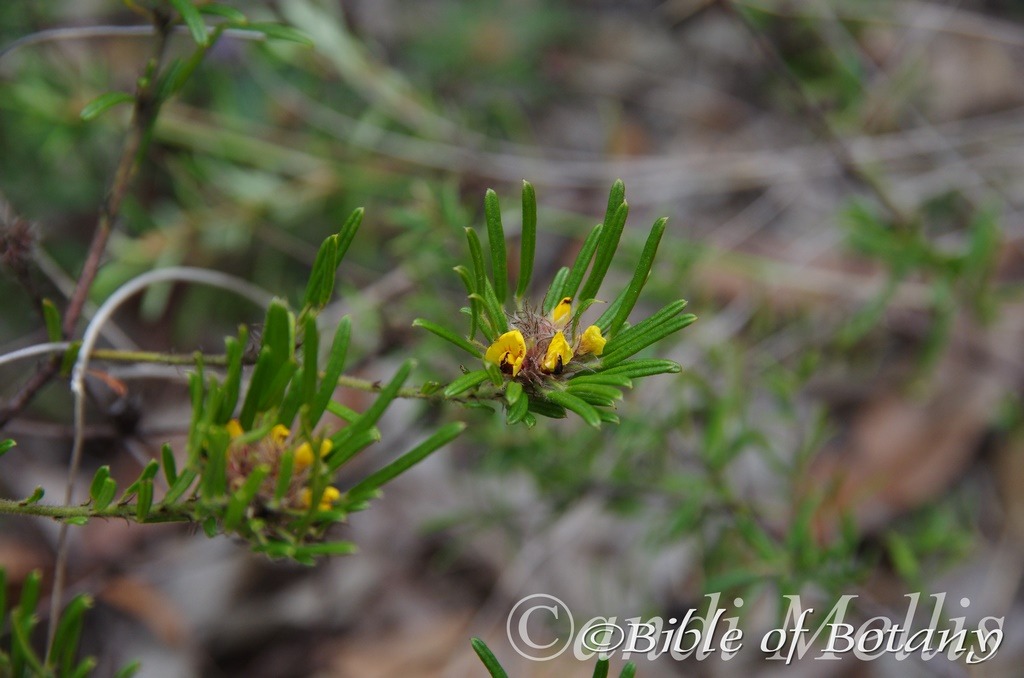
Fortis Creek National Park NSW
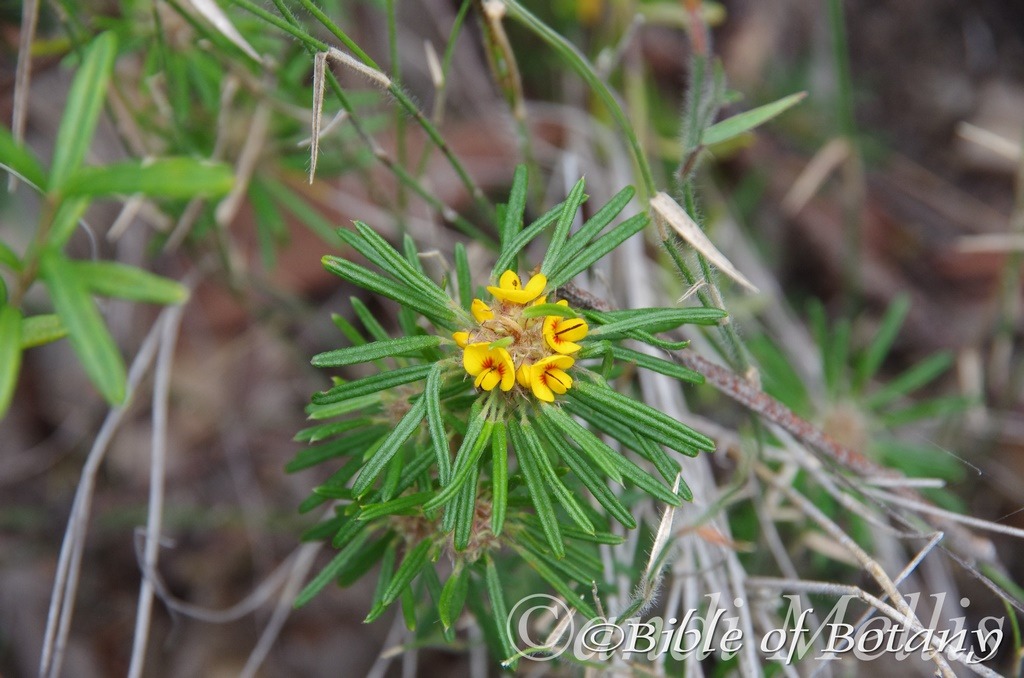
Fortis Creek National Park NSW
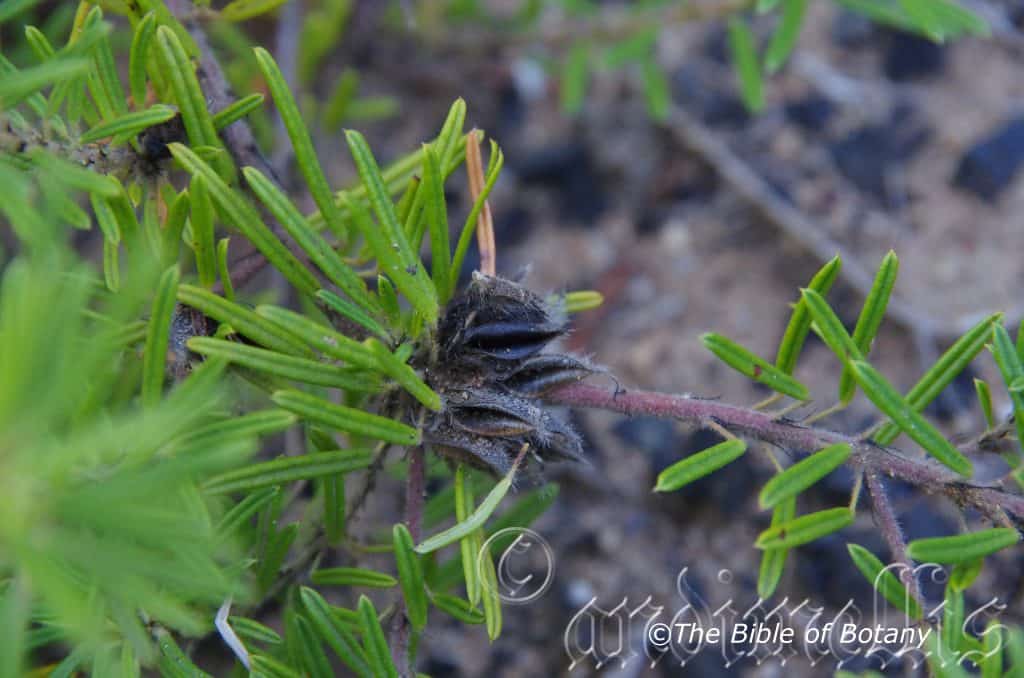
Author’s Garden The Pinnacles NSW

Author’s Garden The Pinnacles NSW
Pultenaea petiolaris
Classification:
Unranked: Eudicots
Unranked: Rosids
Order: Fabales
Family: Fabaceae
Subfamily: Faboideae
Genus: Is named in honour of Richard Pulteney; 1730-1801, who was an English surgeon and botanist who studied the plants of Lecestershire.
Species: From Petiolus, which is Latin for a leaf stalk. It refers to leaf stalks, which are much longer than other species in the genus.
Common Name: Woolly Bush Pea.
Distribution:
Pultenaea petiolaris is found in several disjunct populations bounded by Blenco Creek to Rockingham Bay and Taravale in the north eastern Queensland. In central Queensland it is bounded by Rockhampton, Junee-Dingo and Jericho to Mount Playfair in the Carnarvon Ranges then south-east to Whiporie and south to Half way Creek with a population further south in the Bellangary State Forest near Wauchope and Port Macquarie in northern coastal New South Wales.
https://avh.ala.org.au/occurrences/search?taxa=Pultenaea+petiolaris#tab_mapView
Habitat Aspect Climate:
Pultenaea petiolaris prefers dappled shade to full sun. It grows in dry sclerophyll forest heaths or open Eucalyptus woodlands. The altitude ranges from 2 meters ASL to 550 meters ASL.
The temperatures range from minus 2 degrees in July to 36 degrees in January.
The rainfall ranges from lows of 400mm to 2000mm average per annum.
Soil Requirements:
Pultenaea petiolaris prefers to grow on light sandy clays to medium clays with a high proportion of gravel. The soils are usually derived from decomposed sandstones, gritty shale, gritty brown basalts, gritty black basalts or sandy metamorphic rocks. The soils pH ranges from 5pH to 6pH. It does not tolerate waterlogged soils. Non saline soils to moderately saline soils are tolerated.
Height & Spread:
Wild Plants: 0.2m to 0.3m by 1m to 1.6m.
Characteristics:
Pultenaea petiolaris grows as a procumbent shrub with thin grey stems. The juvenile and new growth is pinkish-green to greenish-pink and is moderately covered in soft, off white tomentose hairs.
The alternate leaves of Pultenaea petiolaris are linear, with central groove and measure 10mm to 25mm in length by 1mm to 2mm in width. The stipules measure 3.5mm to 4mm in length. The petioles are mid bluish-green and are moderately covered in soft, white, tomentose and floccose hairs and measure 3mm to 5mm in length. The bases taper to the petioles while the apexes are acute with a short pungent tip. The discolourous laminas are mid blue-green to mid green, dull, glabrous and moderately covered in white matted tomentose to floccose hairs on the upper laminas while the lower laminas are paler and moderately covered in white matted tomentose to floccose hairs. The upper laminas are convex from the mid vein to the margins while the margins are entire and revolute. The mid vein is prominent on the lower lamina and is visible from the upper lamina as a groove.
The inflorescences of Pultenaea petiolaris are born in dense heads from the terminals with the outer flowers subtended by leaves while the inner flowers subtended by leafless stipules. The individual flowers are typical legume and measure 9mm to 11mm in length by 8mm to 10mm in height. The bracteoles are attached at the midpoint of the calyxes. The bracteoles are covered in long reddish-brown hirsute bristles which are glabrous to densely covered in long white velutinous hairs. The bracteoles measure 5mm to 8mm in length. The pedicels measure 1mm to 1.5mm in length.
The mid blue-green to mid green calyx tube and 5 lobes are moderately to densely covered in soft, white tomentose to velutinous hairs. The lobes are similar with acute to acuminate apexes. The calyx tube measures 3mm to 5mm in length including the lobes which measure 1mm to 1.8mm in length.
The broad ovate, erect, forward leaning divergent standard petal is bright yellow with splash of red radiating out from near the base. The standard petals measure 8mm to 10mm in height by 13mm to 16mm in width.
The dull to bright yellow, oblong wing petals run parallel to the keel petals at the top and are somewhat divergent along the bottom and have an obtuse apex. The wing petals are divergent to loosely cover the keel and measure 9mm to 11mm in length by 4mm to 5mm in height.
The bright deep red semi glossy, oblong to slightly spathulate keel petals measure 8mm to 10.5mm in length by 4mm to 5mm in height.
The ovary is moderately to densely covered in long, soft, white tomentose to velutinous hairs. The flowers appear from August to October.
Pultenaea petiolaris’s fruits are flattened turgid pods. The pods are moderately to densely covered in white covered in soft, white sericeous hairs and measure 6mm to 9mm in length by 4mm to 5mm in width. The green capsules turn deep reddish-brown externally and mid reddish-brown internally with paler lips. The style and calyx are persistent on the ripe pods.
Wildlife:
Pultenaea petiolaris’s flowers may look insignificant in the bush but as a genus it is in fact a very important source of nectar and pollen for native bees, wasps and pollen flies. These in return attract small insect eating birds.
Cultivation:
Pultenaea petiolaris is a small open shrub that should be more widely grown in temperate or subtropical gardens. It is ideal at the edge of a rain forest or as the pioneer shrubs before establishing a garden proper. It also makes a great rockery display in hot open spaces or confined sunny positions. In cultivation it grows from 0.2 meter to 0.3 meters in height by 1.2 meters to 1.5 meters in diameter when grown in the open on flat ground.
It grows exceptionally well on sandy loams, light fatty clays or skeletal rocky soils in exposed situations. It can cope with temperatures as low as minus 2 degrees and up to 40 degrees once established.
Add to the above, if it is given a little extra moisture and native fertilizer on being planted out as a seedling until it is established will respond with excellent flowering and good fruit set in the following season. It is best pruned lightly on an annual basis to maintain a dense foliage plant otherwise it has a habit to become bare in the center.
Pultenaea petiolaris would make a good contribution to a dry or moist heath garden. It can be used as a fill in plant, scattered throughout the heath scene or planted in small clusters. Use a lot of procumbent plants like Carpobrotus edulis, Dampiera purpurea, Pattersonia glabra or Hibbertia dentata Mix them with other smaller shrubs like small red flowering Bauera rubioides or Austromyrtus dulcis so none of them dominate the scene but blend in to give a mosaic of different foliage colours that you can enjoy all year. Mix it with other smaller shrubs so none of them dominate the scene but blend in to give a mosaic of foliage colours that you oversee.
It is also an excellent specimen for retaining walls and embankments where it looks at home cascading over the wall or down slopes.
Propagation:
Seeds: The seeds of Pultenaea petiolaris can be removed easily from the fruits that have already turned brown and begun to open.
Sow freshly treated seeds directly into a seed raising mix after scarifying the seeds on a fine piece of emery paper. Cover the seeds with 5mm to 6mm of potting mix and keep them moist not wet. When the seedlings are 20mm to 25mm tall, prick them out and plant them into 50mm native tubes using a good organic mix.
As the seedlings roots reach the bottom of the tubes, nip the growing tips out and plant them out into their permanent position. Do not delay.
Cuttings: Fortunately Pultenaea petiolaris cuttings are relatively easy to strike. Use 100mm to 200mm long tip cuttings or lateral shoots from the present season’s growth. Take them in warmer months of the year. Remove half the leaves from the bottom section being careful not to tear the bark.
1 Prepare the cutting mix by adding two thirds sharp clean river sand, one third peat or one third perlite. These ingredients must be sterilized,
2 Select good material from non diseased plants,
3 Select semi green stems for cuttings. Look for a stem with two or three nodes,
4 Place the cutting on a flat, hard surface, and make a clean cut down one side of the cutting at the base for 10mm with a sharp sterile knife or razor blade. – This scarification of the node will increase the chances of roots emerging from this spot. Now remove all but one or two the leaves, leaving the apex leaves in tact. If the leaves are very large in proportion to the stem, cut off the apical halves.
5 Fill a saucer with water, and place a little medium strength rooting hormone into another container like a milk bottle top. Dip the node end of the cutting into the water and then into the rooting hormone. Tap off any excess hormone,
6 Use a small dipple stick or old pencil to poke a hole into the soilless potting mix. Ensure the hole is slightly larger than the stem diameter and be careful not to wipe the rooting hormone off the cuttings base. Place 2 to 4 cuttings in each of the 50mm native tubes,
7 I like to place the tubes in bucket with holes drilled in the bottom to allow excess water to drain out. A plastic bag that fits over the bucket is ideal to help maintain temperature and moisture. Place in a semi shaded, warm position like under 50mm shade cloth.
8 When the cuttings have struck, open the bag to allow air circulation for a few days to a week,
9 Once hardened off remove the cuttings from the bag and allow to further hardening for a few more days to a week,
10 Transplant into a good potting mix to grow on.
Fertilize using seaweed, fish emulsion or organic chicken pellets soaked in water on an alternate basis. Fertilize every two months until the plants are established then annually in early September to October to maintain health, vitality and better flowering.
Further Comments from Readers:
“Hi reader, it seems you use The Bible of Botany a lot. That’s great as we have great pleasure in bringing it to you! It’s a little awkward for us to ask, but our first aim is to purchase land approximately 1,600 hectares to link several parcels of N.P. into one at The Pinnacles NSW Australia, but we need your help. We’re not salespeople. We’re amateur botanists who have dedicated over 30 years to saving the environment in a practical way. We depend on donations to reach our goal. If you donate just $5, the price of your coffee this Sunday, We can help to keep the planet alive in a real way and continue to bring you regular updates and features on Australian plants all in one Botanical Bible. Any support is greatly appreciated. Thank you.”
In the spirit of reconciliation we acknowledge the Bundjalung, Gumbaynggirr and Yaegl and all aboriginal nations throughout Australia and their connections to land, sea and community. We pay our respect to their Elders past, present and future for the pleasures we have gained.
Pultenaea pycnocephala
Classification:
Unranked: Eudicots
Unranked: Rosids
Order: Fabales
Family: Fabaceae
Subfamily: Faboideae
Genus: Is named in honour of Richard Pulteney; 1730-1801, who was an English surgeon and botanist who studied the plants of Lecestershire.
Species: From Phychos, which is Ancient Greek for thick, dense and compact and Kephalḗ, which is Ancient Greek for a head. It refers to terminal, flower heads, which are dense.
Common Name:
Distribution:
Pultenaea pycnocephala is restricted to a small area in far south eastern Queensland and northern New South Wales bounded by Lamington National Park, Tenterfield, Glen Innes, Walcha and Bluff Mountain near Whiporie. There are 2 disjunct populations found further south at Mongarlo and Cooma. It is found on of the Great Dividing Range.
https://avh.ala.org.au/occurrences/search?taxa=Pultenaea+pycnocephala#tab_mapView
Habitat Aspect Climate:
Pultenaea pycnocephala prefer dappled shade to full sun. It grows in dry sclerophyll forests or open Eucalyptus woodlands. The altitude ranges from 790 meters ASL to 1360 meters ASL.
The temperatures range from minus 4 degrees in July to 36 degrees in January.
The rainfall ranges from lows of 700mm to 1900mm average per annum.
Soil Requirements:
Pultenaea pycnocephala prefer to grow on white, coarse sands, white, fine sands to yellowish light fatty clays with a high proportion of gravel. The soils are usually derived from decomposed granites or at times sandstones. The soils pH ranges from 5pH to 6pH. It does not tolerate waterlogged soils. Non saline soils to moderately saline soils are tolerated.
Height & Spread:
Wild Plants: 1m to 1.5m by 1m to 1.6m.
Characteristics:
Pultenaea pycnocephala grows as an erect shrub with thin, grey stems. The juvenile and new growth is pinkish-green and densely covered in soft, off white sericeous hairs.
The alternate leaves of Pultenaea pycnocephala are obovate, convex, with deep central groove and measure 5mm to 15mm in length by 2mm to 6mm in width. The stipules measure 2mm to 6mm in length. The petioles are pinkish-green and densely covered in soft, white, sericeous hairs and measure 1mm to 3mm in length. The bases are cuneate while the apexes are retuse or obtuse with a short pungent spine. The discolourous laminas are deep green to sea-green, glossy and glabrous on the upper laminas while the lower laminas are paler and densely covered in short white sericeous hairs. The upper laminas are strongly convex from the mid vein to the margins while the margins decurve downwards. The mid vein is strongly prominent on the lower lamina and is visible from the upper lamina as a groove.
The inflorescences of Pultenaea pycnocephala are dense heads born from terminal. The individual flowers are typical legume and measure 10mm to 12mm in length by 9mm to 10mm in height. The persistent, imbricate bracts measure 3mm to 8mm in length. The bracts are shortly trilobed and are bristly to acuminate or obovate to orbicular. The bracteoles measure 5mm to 7mm in length and lack stipules. The obovate or acuminate bracteoles are densely covered in white sericeous hairs and are attached below the base of the calyx tube. The pedicels measure 0mm to 0.5mm in length.
The blue-green to mid green calyx tube and 5 lobes are moderately to densely covered in soft, white tomentose hairs. The lobes are similar with acute to acuminate apexes. The calyx tube measures 4mm to 4.5mm in length while the lobes measure 3mm to 4mm in length.
The broad ovate, erect standard petal is dull to bright yellow with or without a splash of red radiating out from near the base. The erect divaricate standard petals measure 8mm to 10mm in height by 12mm to 16mm in width.
The dull to bright yellow, oblong divergent wing petals run parallel to the keel and have an obtuse apex. The wing petals are divergent to loosely cover the keel and measure 10mm to 12mm in length by 3.5mm to 4mm in height.
The dull to bright yellow, oblong to slightly spathulate keel petals measure 9mm to 11mm in length by 4mm to 4.5mm in height.
The ovary is covered in off white tomentose hairs. The flowers appear throughout the warmer months of October to April.
Pultenaea pycnocephala’s fruits are flattened turgid pods. The pods are glabrous to sparsely covered in soft, white sericeous hairs and measure 6mm to 7mm in length by 4mm to 5mm in width. The green capsules turn deep reddish-brown externally and mid reddish-brown internally with paler lips. The style and calyx are persistent on the ripe pods. The pale glossy fawnish-brown seeds are ellipsoidal and spotted in black.
Wildlife:
Pultenaea petiolaris’s flowers may look insignificant in the bush but as a genus it is in fact a very important source of nectar and pollen for native bees, wasps and pollen flies. These in return attract small insect eating birds.
Cultivation:
Pultenaea pycnocephala is a small open shrub that should be more widely grown in temperate or subtropical gardens. It is ideal at the edge of a rainforest or as the pioneer shrubs before establishing a garden proper. It would also make a good rockery displays in hot open spaces or confined sunny positions. In cultivation it will grow from 1.5 meter to 1.8 meters in height by 1.5 meters to 1.8 meters in diameter when grown in the open.
It grows exceptionally well on sandy loams, light fatty clays or skeletal rocky soils in exposed situations. It can cope with temperatures as low as minus 3 degrees and up to 40 degrees once established.
Add to the above, if it is given a little extra moisture and native fertilizer on being planted out as a seedling until it is established will respond with excellent flowering and good fruit set in the following season. It is best pruned lightly on an annual basis to maintain a dense foliage plant otherwise it has a habit to become bare in the center.
Pultenaea pycnocephala would make a good contribution to a dry or moist heath garden. It can be used as a fill in plant, scattered throughout the heath scene or planted in small clusters. Use a lot of procumbent plants like Carpobrotus edulis, Dampiera purpurea, Pattersonia glabra or Hibbertia dentata Mix them with other smaller shrubs like small red flowering Bauera rubioides or Austromyrtus dulcis so none of them dominate the scene but blend in to give a mosaic of different foliage colours that you can enjoy all year. Mix it with other smaller shrubs so none of them dominate the scene but blend in to give a mosaic of foliage colours that you oversee.
Propagation:
Seeds: The seeds of Pultenaea pycnocephala can be removed easily from the fruits that have already turned brown and begun to open.
Sow freshly treated seeds directly into a seed raising mix after scarifying the seeds on a fine piece of emery paper. Cover the seeds with 5mm to 6mm of potting mix and keep them moist not wet. When the seedlings are 20mm to 25mm tall, prick them out and plant them into 50mm native tubes using a good organic mix.
As the seedlings roots reach the bottom of the tubes, nip the growing tips out and plant them out into their permanent position. Do not delay.
Cuttings: Fortunately Pultenaea pycnocephala cuttings are relatively easy to strike. Use 80mm to 150mm long tip cuttings or lateral shoots from the present season’s growth. Take them in warmer months of the year. Remove half the leaves from the bottom section being careful not to tear the bark.
1 Prepare the cutting mix by adding two thirds sharp clean river sand, one third peat or one third perlite. These ingredients must be sterilized,
2 Select good material from non diseased plants,
3 Select semi green stems for cuttings. Look for a stem with two or three nodes,
4 Place the cutting on a flat, hard surface, and make a clean cut down one side of the cutting at the base for 10mm with a sharp sterile knife or razor blade. – This scarification of the node will increase the chances of roots emerging from this spot. Now remove all but one or two the leaves, leaving the apex leaves in tact. If the leaves are very large in proportion to the stem, cut off the apical halves.
5 Fill a saucer with water, and place a little medium strength rooting hormone into another container like a milk bottle top. Dip the node end of the cutting into the water and then into the rooting hormone. Tap off any excess hormone,
6 Use a small dipple stick or old pencil to poke a hole into the soilless potting mix. Ensure the hole is slightly larger than the stem diameter and be careful not to wipe the rooting hormone off the cuttings base. Place 2 to 4 cuttings in each of the 50mm native tubes,
7 I like to place the tubes in bucket with holes drilled in the bottom to allow excess water to drain out. A plastic bag that fits over the bucket is ideal to help maintain temperature and moisture. Place in a semi shaded, warm position like under 50mm shade cloth.
8 When the cuttings have struck, open the bag to allow air circulation for a few days to a week,
9 Once hardened off remove the cuttings from the bag and allow to further hardening for a few more days to a week,
10 Transplant into a good potting mix to grow on.
Fertilize using seaweed, fish emulsion or organic chicken pellets soaked in water on an alternate basis. Fertilize every two months until the plants are established then annually in early September to October to maintain health, vitality and better flowering.
Further Comments from Readers:
“Hi reader, it seems you use The Bible of Botany a lot. That’s great as we have great pleasure in bringing it to you! It’s a little awkward for us to ask, but our first aim is to purchase land approximately 1,600 hectares to link several parcels of N.P. into one at The Pinnacles NSW Australia, but we need your help. We’re not salespeople. We’re amateur botanists who have dedicated over 30 years to saving the environment in a practical way. We depend on donations to reach our goal. If you donate just $5, the price of your coffee this Sunday, We can help to keep the planet alive in a real way and continue to bring you regular updates and features on Australian plants all in one Botanical Bible. Any support is greatly appreciated. Thank you.”
In the spirit of reconciliation we acknowledge the Bundjalung, Gumbaynggirr and Yaegl and all aboriginal nations throughout Australia and their connections to land, sea and community. We pay our respect to their Elders past, present and future for the pleasures we have gained.
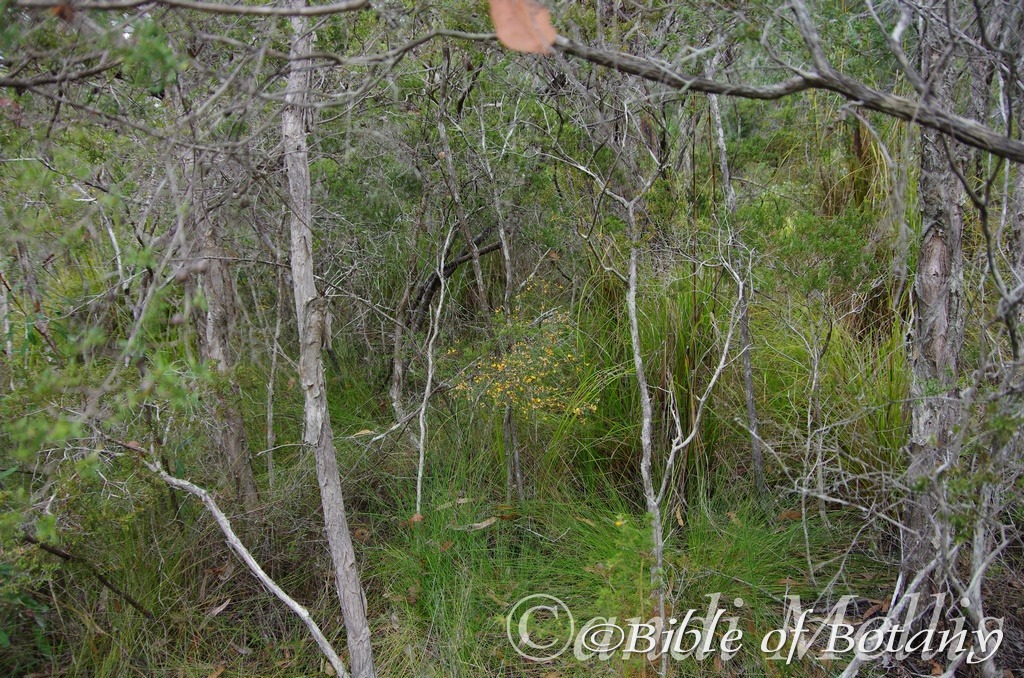
The Pinnacles NSW

Author’s Garden The Pinnacles NSW
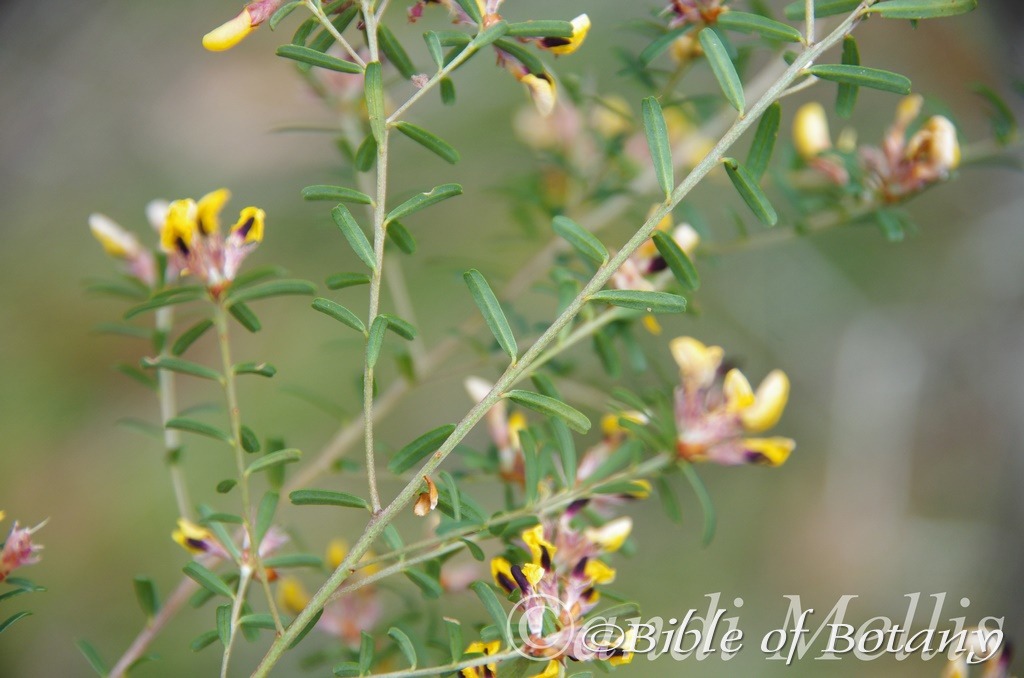
The Pinnacles NSW
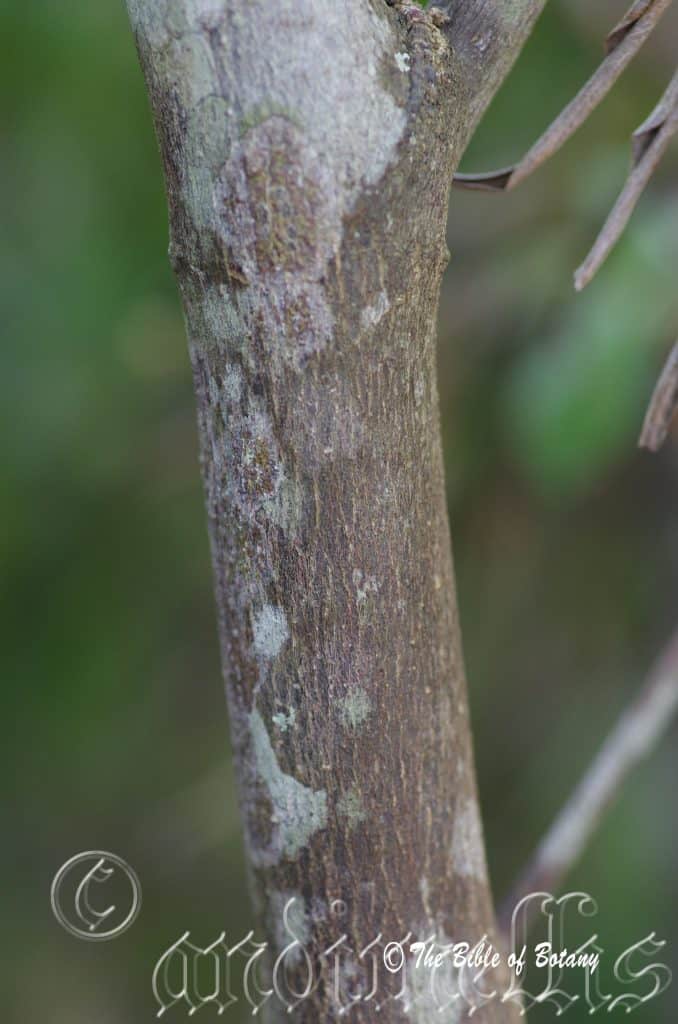
Rosser Gardens Benowa Qld.
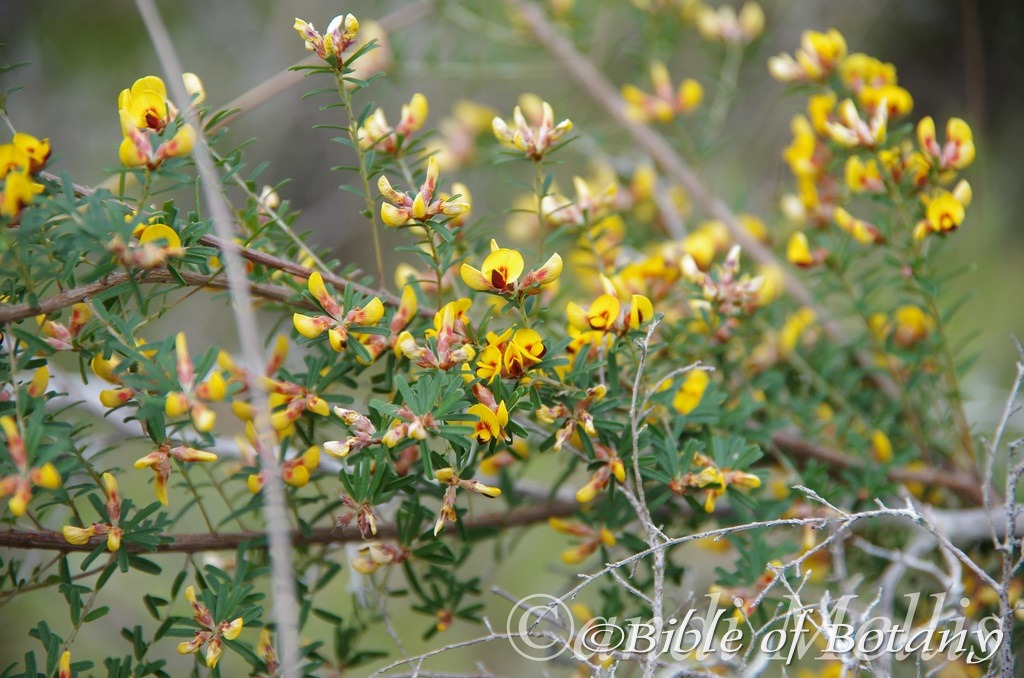
The Pinnacles NSW
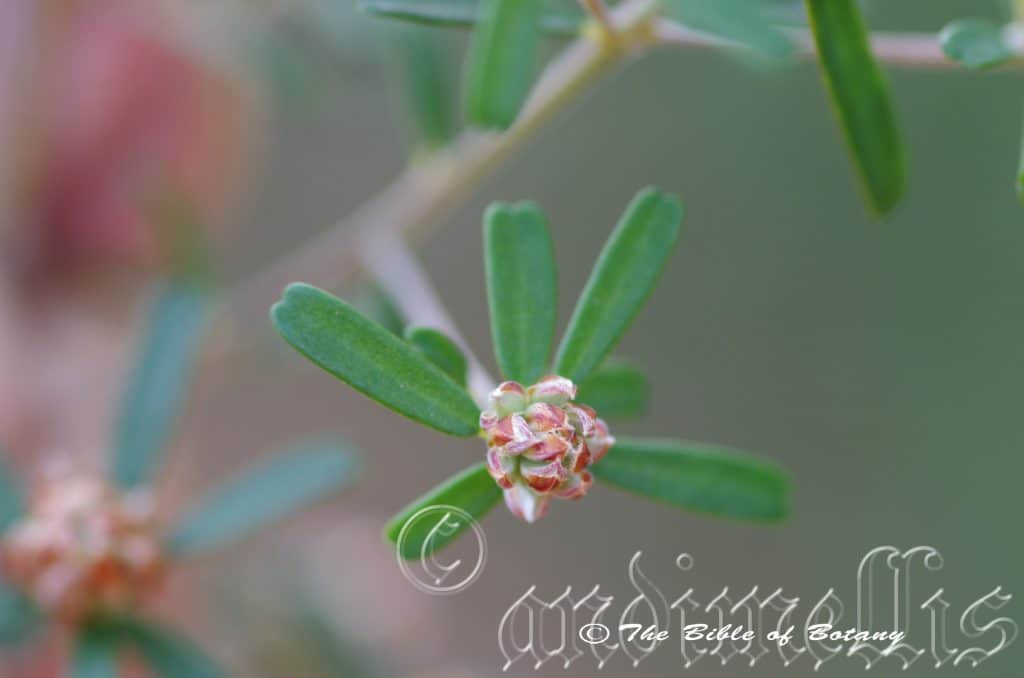
Nambour Qld.
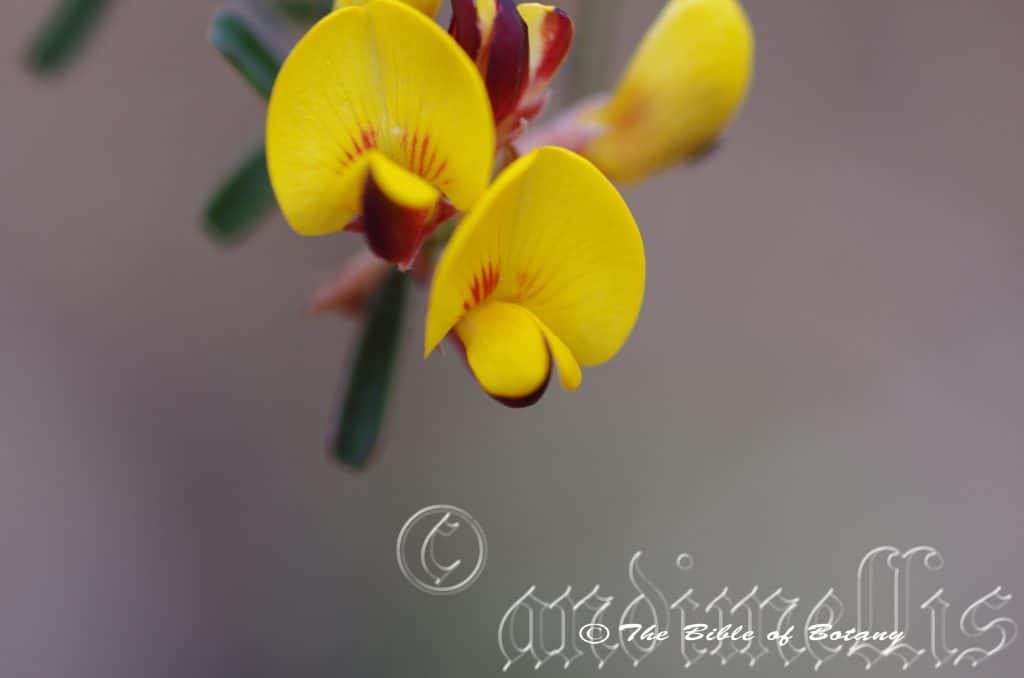
Nambour Qld.
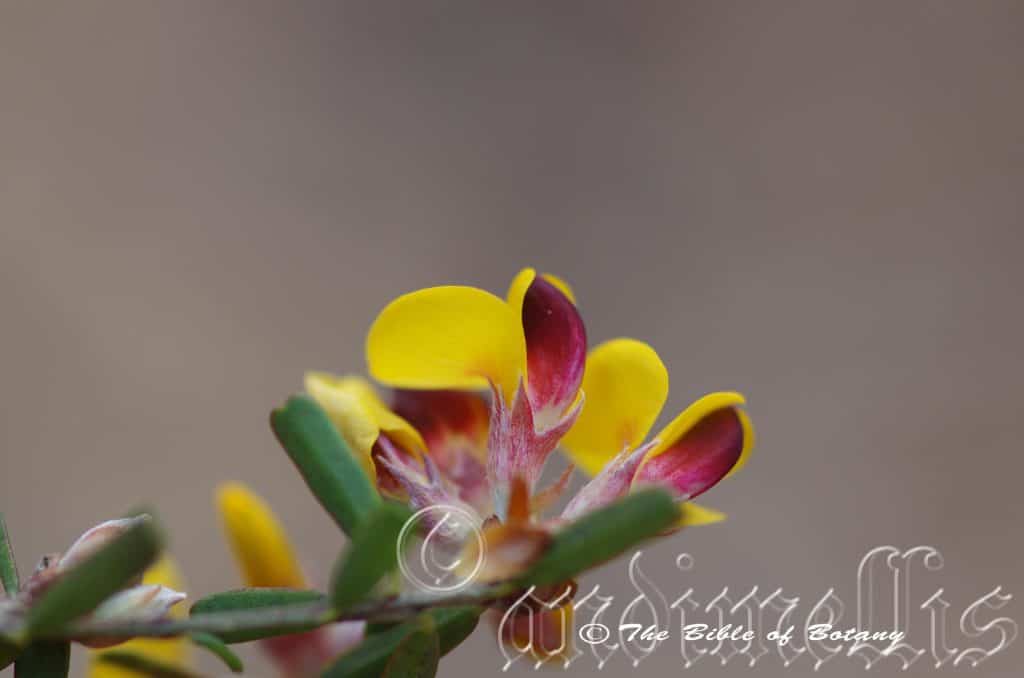
Nambour Qld.
xxxxxxxxxxxxxxxxxxxxxxxxxxxxxxxxxxxxxxxxxxxxxxxxxxxPultenaea retusa
Classification:
Unranked: Eudicots
Unranked: Rosids
Order: Fabales
Family: Fabaceae
Subfamily: Faboideae
Genus: Is named in honour of Richard Pulteney; 1730-1801, who was an English surgeon and botanist who studied the plants of Lecestershire.
Species: From Retūsa, which is Latin for to make blunt. It refers to organs, usually the leaves or petals, which have obtuse apexes with a shallow notch as against emarginate which has a deep notch.
Common Name: Notched Leaf Pultenaea.
Distribution:
Pultenaea retusa is found south from Wangetti north of Cairns to the Mornington Peninsula in south eastern Victoria in several disjunct populations. It is found on and east of the Great Dividing Range to the coast.
Habitat Aspect Climate:
Pultenaea retusa prefers dappled shade to full sun. It grows in wet open sclerophyll forests, open woodlands or swampy heaths. The altitude ranges from 5 meters ASL to 1000 meters ASL.
The temperatures range from minus 4 degrees in July to 36 degrees in January.
The rainfall ranges from lows of 650mm to 3000mm average per annum.
Soil Requirements:
Pultenaea retusa prefers to ghttps://avh.ala.org.au/occurrences/search?taxa=Pultenaea+retusa#tab_mapView
row on grey, orange or red sandy loams to medium clays with or without a high proportion of gravel. The soils are usually derived from decomposed brown basalt, black basalts or sandstones. It tolerates seasonally waterlogged soils and seasonally high water tables. The soils pH ranges from 5pH to 7pH.Non saline soils to moderately saline soils are tolerated.
Height & Spread:
Wild Plants: 1m to 1.5m by 1m to 1.6m.
Characteristics:
Pultenaea retusa grows as a small erect densely foliaged shrub. The erect stems are pale grey-brown and glabrous. The new growth is pale olive-brown to olive green, smooth and moderately covered in white pubescent hairs.
The alternate leaves of Pultenaea retusa are linear to narrowly lanceolate and measure 5mm to 15mm in length by 2mm to 5mm in width. The caducous stipules measure 0.6mm to 1mm in length while the petioles are 0.5mm to 1.5mm in length. The bases are tapering-cuneate to cuneate while the apexes are truncate with a mucronate tip. The discolourous laminas are mid sea-green to mid blue-green and glabrous on the upper lamina while the lower lamina is paler. The leaf margins are entire, flat or recurves. The mid vein is slightly prominent on the lower lamina and faintly visible to distinctly visible from the upper lamina.
Inflorescences of Pultenaea retusa are dense, terminal clusters of 4 to 8 flowers blooming at any one time. The individual flowers are typical legume measuring 5mm to 7mm in length by 5mm to 7mm in height. The erect flower’s caducous, imbricate bracts are black and attached to the upper part of the calyx tube. The bracts are moderately covered in white pubescent hairs, entire or occasionally with 2 or 3 minute ovate lobes. They measure 2mm to 5mm in length and are moderately covered in white pubescent hairs. The calyxes are densely covered in white pubescent hairs as are the acute lobes. The calyx tubes and lobes measure 3mm to 4mm in length including the 4 acuminate 1mm to 1.2mm lobes. The pedicels measure 0.1mm to 0.3mm in length.
The narrow broad ovate standard petal strongly recurves downwards over the lateral wing and keel petals. It is yellow with a shallow emarginated apex and has scarlet red striations radiating out from near the base. They measure 5.5mm to 7mm in height by 5mm to 6mm in width. The margins curve forward to partially surround the wing petals. The obovate wing petals run parallel to the keel partially covering them. They measure 4mm to 5mm in length by 2.5mm to 3mm in height. The oblong to obovate keel petals are hooded by the lateral wing petals and measure 4mm to 5mm in length by 3mm to 4mm in height. The keel is deep maroon burgundy almost black.
The ovary is sparsely covered in white puberulent hairs. The slender style measures 2mm to 3mm in length. Pultenaea retusa flowers from late August through to October.
Pultenaea retusa’s fruits are compressed pods. The pods are glabrous and measure 5mm to 7mm in length by 5mm to 6mm in width and 3mm to 3.5mm in depth. The green capsules turn deep brown externally and red brown internally with pale lips. The style is persistent and extends to 5mm or 6mm in length.
Wildlife:
Pultenaea retusa’s flowers may look insignificant in the bush but as a genus it is in fact a very important source of nectar and pollen for native bees like the little Tetragonula carbonaria bee wasps and pollen flies. These in return attract small insect eating birds.
Cultivation:
Pultenaea retusa is a small open shrub that should be more widely grown in temperate or subtropical gardens. It is ideal at the edge of a rain forest or as the pioneer shrubs before establishing a garden proper. It also make great rockery displays in hot open spaces or confined sunny positions. In cultivation it will grow from 1 meter to 1.5 meters in height by 1.2 meters to 1.8 meters in diameter when grown in the open.
It grows exceptionally well on light clays to medium clay soils. They can cope with temperatures as low as minus 4 degrees and up to 40 degrees.
Add to the above, if it is given a little extra moisture and native fertilizer on being planted out as a seedling will respond with good flowering and good fruit set in the following season.
Pultenaea retusa would make a good contribution to a dry or moist heath garden. It can be used as a fill in plant, scattered throughout the heath scene or planted in small clusters. Use a lot of procumbent plants like Carpobrotus edulis, Dampiera purpurea, Pattersonia glabra or Hibbertia dentata Mix them with other smaller shrubs like small red flowering Bauera rubioides or Austromyrtus dulcis so none of them dominate the scene but blend in to give a mosaic of different foliage colours that you can enjoy all year. Mix it with other smaller shrubs so none of them dominate the scene but blend in to give a mosaic of foliage colours that you oversee.
Propagation:
Seeds: The seeds of Pultenaea retusa can be removed easily from the fruits that have already turned brown and begun to open.
Sow freshly treated seeds directly into a seed raising mix, keeping them moist not wet. When the seedlings are 20mm to 25mm tall, prick them out and plant them into 50mm native tubes using a good organic mix.
As the seedlings roots reach the bottom of the tubes plant them out into their permanent position.
Cuttings: Fortunately Pultenaea retusa cuttings are relatively easy to strike. Use 80mm to 150mm long semi hardwood to hardwood cuttings from the present season’s growth. Take them in warmer months of the year. Remove half the leaves from the bottom section being careful not to tear the bark.
1 Prepare the cutting mix by adding two thirds sharp clean river sand, one third peat or one third perlite. These ingredients must be sterilized,
2 Select good material from non diseased plants,
3 Select semi green stems for cuttings. Look for a stem with two or three nodes,
4 Place the cutting on a flat, hard surface, and make a clean cut down one side of the cutting at the base for 10mm with a sharp sterile knife or razor blade. – This scarification of the node will increase the chances of roots emerging from this spot. Now remove all but one or two the leaves, leaving the apex leaves in tact. If the leaves are very large in proportion to the stem, cut off the apical halves.
5 Fill a saucer with water, and place a little medium strength rooting hormone into another container like a milk bottle top. Dip the node end of the cutting into the water and then into the rooting hormone. Tap off any excess hormone,
6 Use a small dipple stick or old pencil to poke a hole into the soilless potting mix. Ensure the hole is slightly larger than the stem diameter and be careful not to wipe the rooting hormone off the cuttings base. Place 2 to 4 cuttings in each of the 50mm native tubes,
7 I like to place the tubes in bucket with holes drilled in the bottom to allow excess water to drain out. A plastic bag that fits over the bucket is ideal to help maintain temperature and moisture. Place in a semi shaded, warm position like under 50mm shade cloth.
8 When the cuttings have struck, open the bag to allow air circulation for a few days to a week,
9 Once hardened off remove the cuttings from the bag and allow to further hardening for a few more days to a week,
10 Transplant into a good potting mix to grow on.
Fertilize using seaweed, fish emulsion or organic chicken pellets soaked in water on an alternate basis. Fertilize every two months until the plants are established then annually in early September to October to maintain health, vitality and better flowering.
Further Comments from Readers:
“Hi reader, it seems you use The Bible of Botany a lot. That’s great as we have great pleasure in bringing it to you! It’s a little awkward for us to ask, but our first aim is to purchase land approximately 1,600 hectares to link several parcels of N.P. into one at The Pinnacles NSW Australia, but we need your help. We’re not salespeople. We’re amateur botanists who have dedicated over 30 years to saving the environment in a practical way. We depend on donations to reach our goal. If you donate just $5, the price of your coffee this Sunday, We can help to keep the planet alive in a real way and continue to bring you regular updates and features on Australian plants all in one Botanical Bible. Any support is greatly appreciated. Thank you.”
In the spirit of reconciliation we acknowledge the Bundjalung, Gumbaynggirr and Yaegl and all aboriginal nations throughout Australia and their connections to land, sea and community. We pay our respect to their Elders past, present and future for the pleasures we have gained.
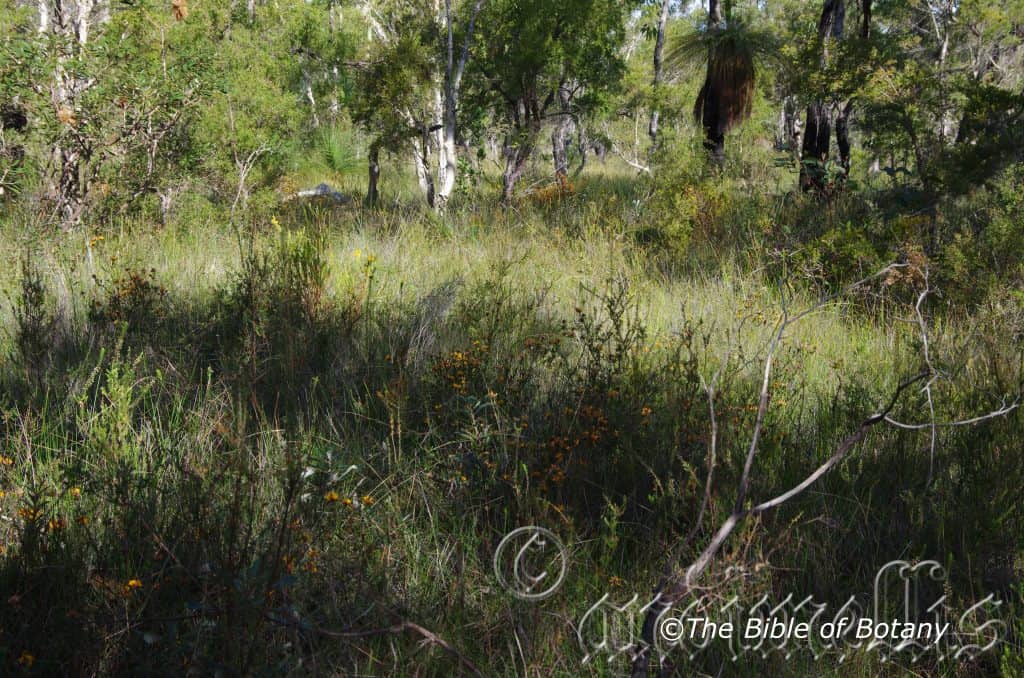
Kremnos NSW
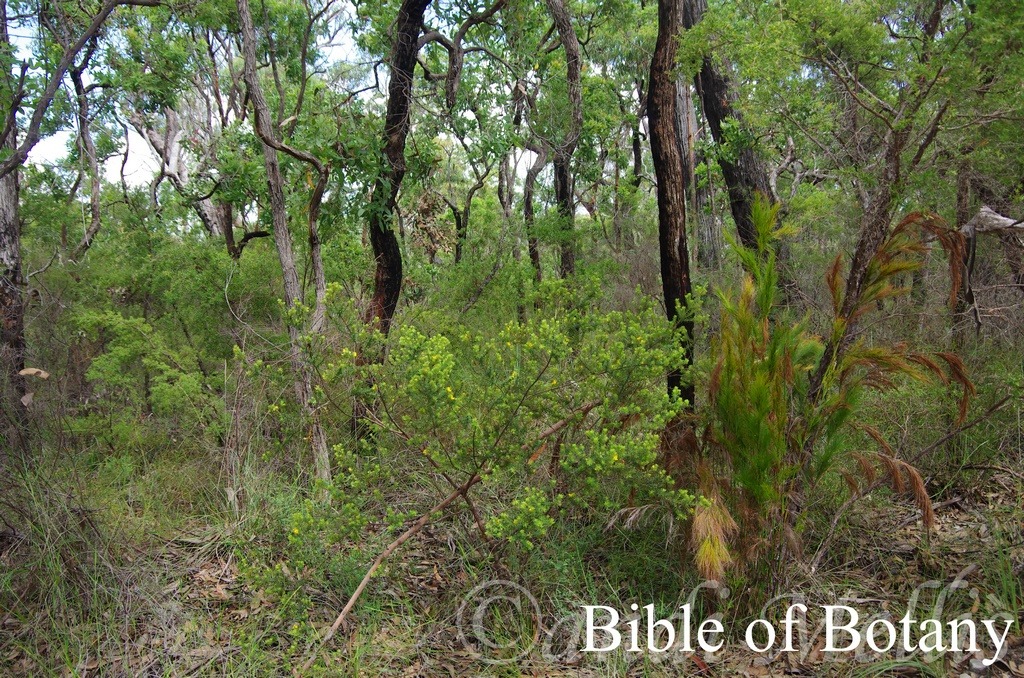
Sherwood Nature Reserve NSW
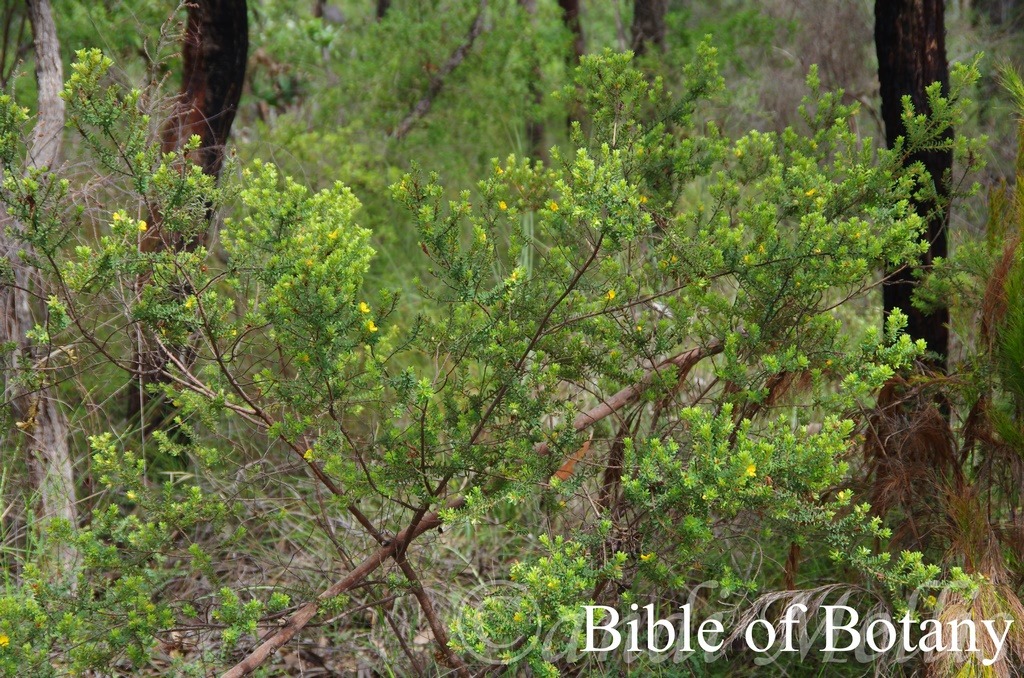
Sherwood Nature Reserve NSW

Sherwood Nature Reserve NSW
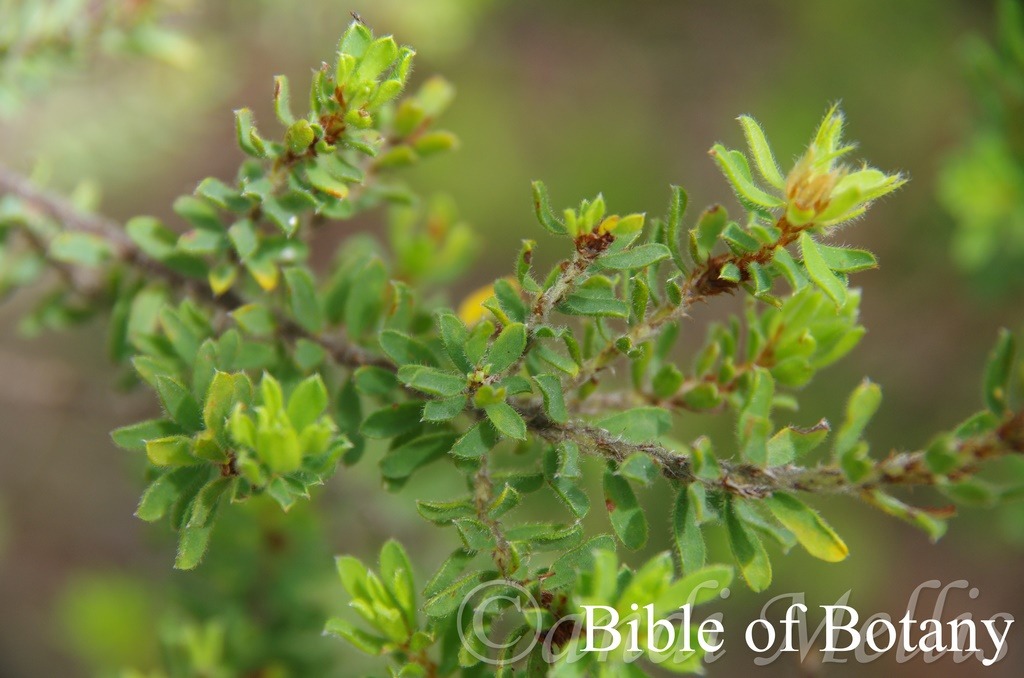
Sherwood Nature Reserve NSW
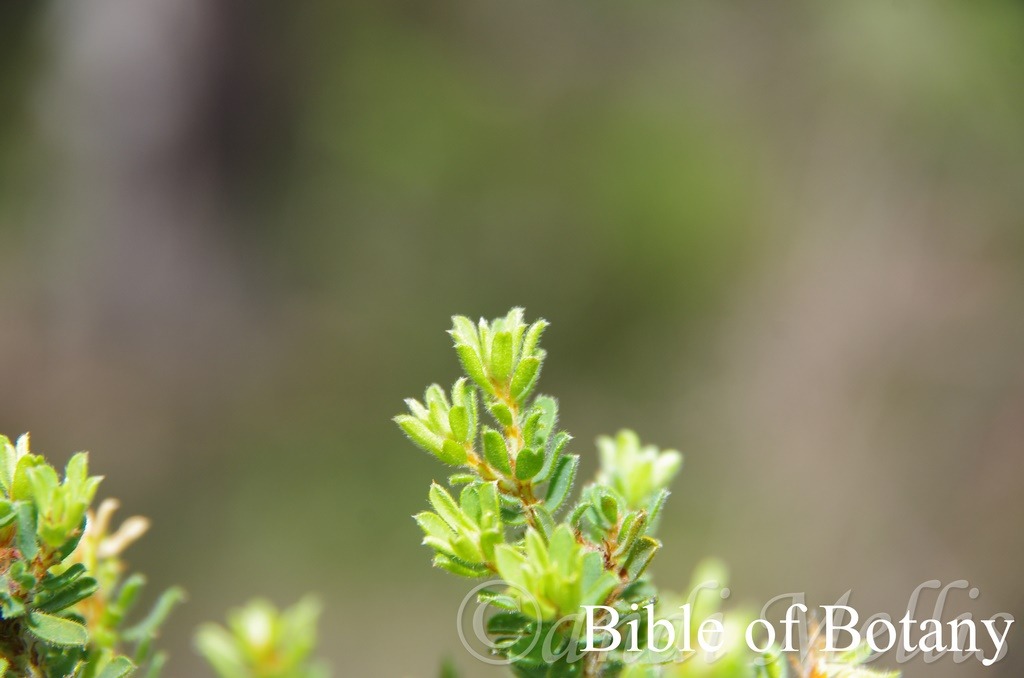
Sherwood Nature Reserve NSW
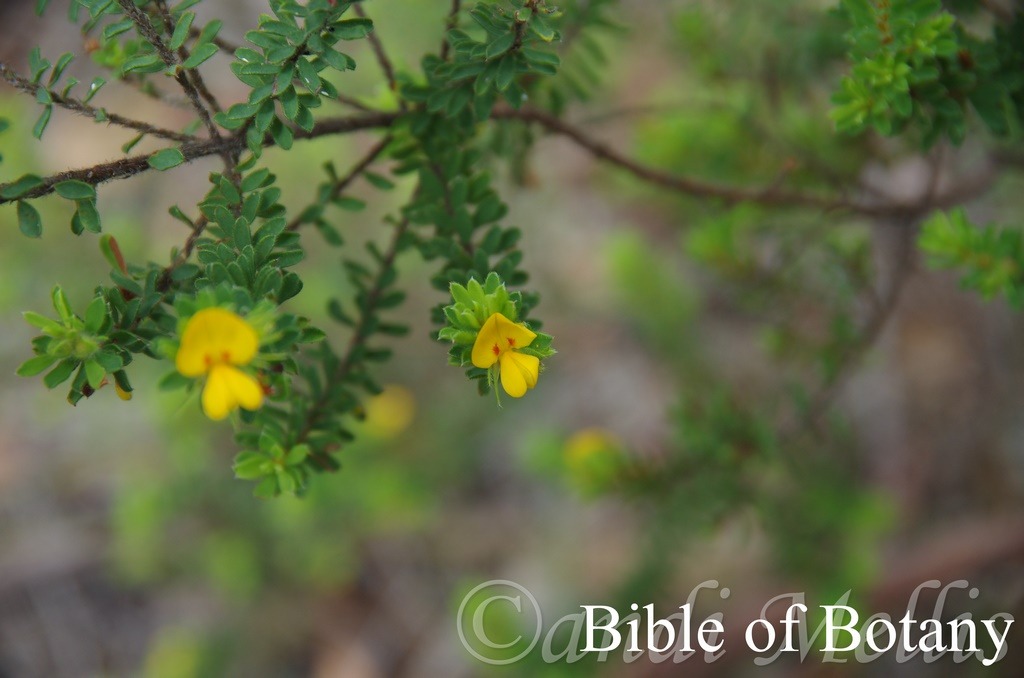
Sherwood Nature Reserve NSW
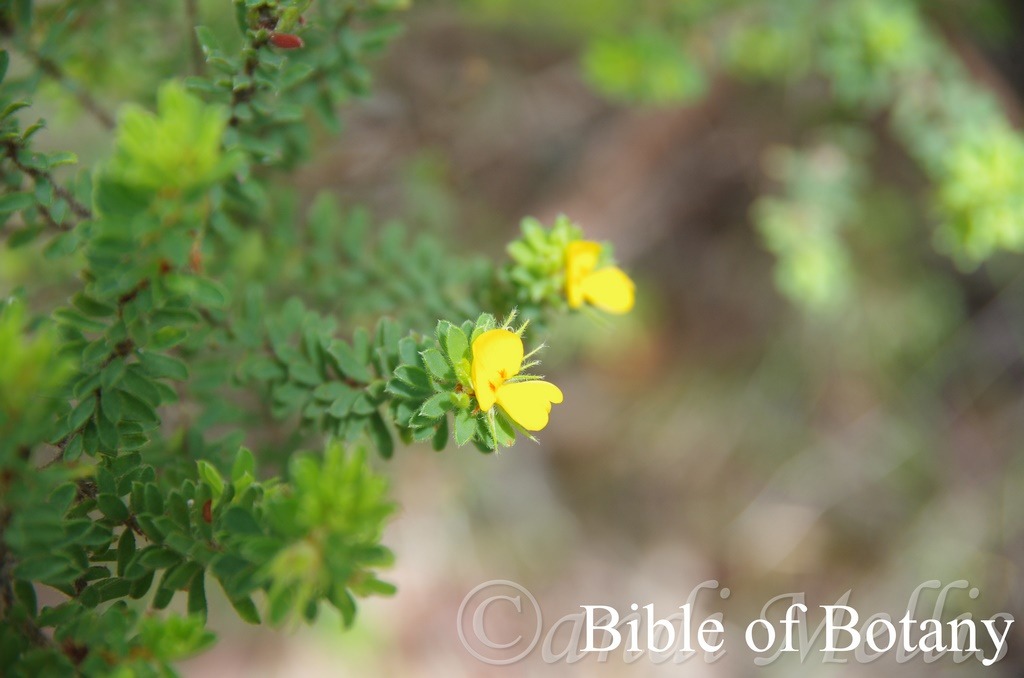
Sherwood Nature Reserve NSW
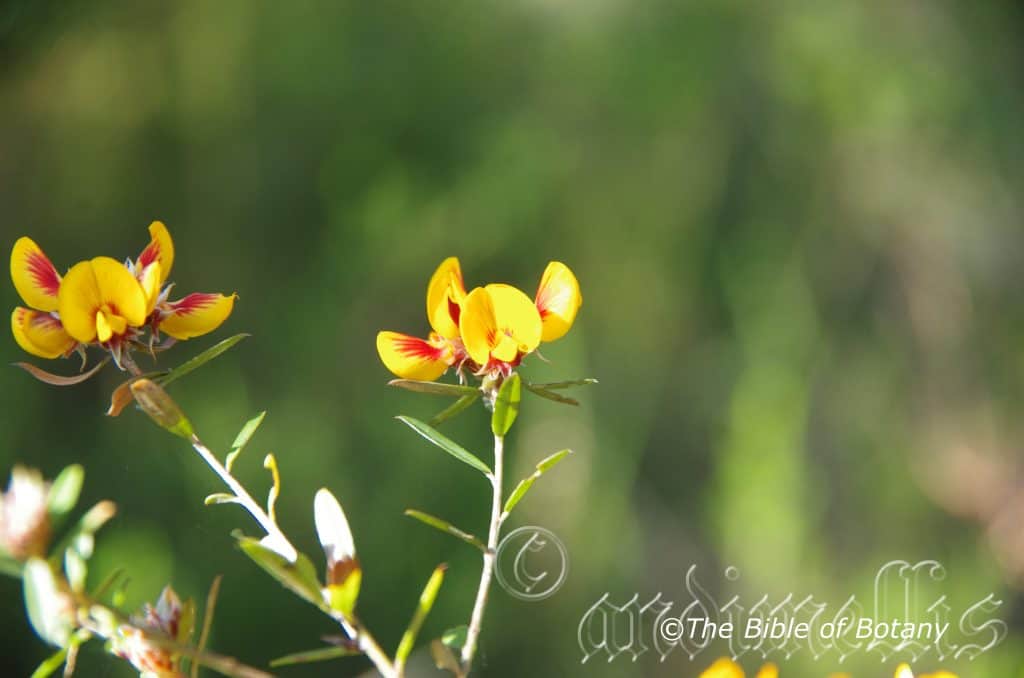
Kremnos NSW
Pultenaea robusta
Classification:
Unranked: Eudicots
Unranked: Rosids
Order: Fabales
Family: Fabaceae
Subfamily: Faboideae
Genus: Is named in honour of Richard Pulteney; 1730-1801, who was an English surgeon and botanist who studied the plants of Lecestershire.
Species: From Rōbustum, which is Latin for strong and hard as in Oak. It refers to timbers, trunks, branches or stems which are hard and strong.
Subspecies: Some states at the time of writing still refer to it as Pultenaea paleacea subsp. robusta.
Common Name: Chaffy Bush Pea.
Distribution:
Pultenaea robusta is found in several disjunct populations south from the Blackdown Tablelands in central Queensland to Bald Knob Fire trial near Yamba in northern New South Wales with a population further north on Mount Bowen on Hinchinbrook Island and further south at Port Jackson.
https://avh.ala.org.au/occurrences/search?taxa=Pultenaea+robusta#tab_mapView
Habitat Aspect Climate:
Pultenaea robusta prefers dappled shade to full sun. It grows in dry open woodland heath or coastal heaths. The altitude ranges from 2 meters ASL to 600 meters ASL.
The temperatures range from 0 degrees in July to 36 degrees in January.
The rainfall ranges from lows of 400mm to 2200mm average per annum.
Soil Requirements:
Pultenaea robusta prefers to grow on white peaty sands, reddish to yellowish-orange light fatty clays with a high proportion of lateritic gravel. The soils are usually derived from decomposed sandstones or accumulated peaty beach sands. The soils pH ranges from 5pH to 6.2pH. It does not tolerate waterlogged soils. Non saline soils to moderately saline soils are tolerated.
Height & Spread:
Wild Plants: 0.3m to 0.5m by 1m to 1.6m.
Characteristics:
Pultenaea robusta grows as a prostrate to spreading open straggly shrub with grey stems. The juvenile and new growth is pale green to olive-green and moderately covered in soft, off white pubescent hairs.
The alternate to almost opposite leaves of Pultenaea robusta are linear and measure 10mm to 19mm in length by 1mm to 2.5mm in width. The stipules measure 3mm to 11mm in length. The petioles are moderately covered in soft, off white pubescent hairs and measure 1mm to 2mm in length. The bases taper to the petioles while the apexes are acute with a sharp, pungent, black spine. The discolourous laminas are mid green to grass-green and glabrous on the upper laminas while the lower laminas are paler. The upper lamina is convex strongly recurve upwards from the mid vein to the margins while the margins are revolute. The mid vein is prominent on the lower lamina and is visible from the upper lamina.
The inflorescences of Pultenaea robusta are dense heads born from terminals. The individual flowers are typical legume and measure 7mm to 11mm in length by 4mm to 6.5mm in height. The bracteoles are attached to the lower parts of the bases of the calyxes. The bracteoles measure 3mm to 5mm in length. The persistent imbricate bracts measure 5mm to 10mm in length. The 2 or 3 lobes are ovate to acute, glabrous or covered in off white pubescent and ciliate hairs. The pedicels measure 0mm to 0.5mm in length.
The tan to pale orange-brown calyx tube and 5 lobes are densely covered in long, soft, white sericeous hairs. The lobes are similar with acute to acuminate apexes. The calyx tube measures 2mm to 4mm in length while the lobes measure 2mm to 3.5mm in length.
The broad ovate, erect standard petal is bright yellow with a splash of red radiating out from near the base on both the externally and internally. The standard petals loosely surround the wing and keel petals and measure 7mm to 11mm in length by 5mm to 7mm in width.
The dull to bright yellow, oblong divergent wing petals run parallel to the keel and have an obtuse apex. The wing petals are divergent to loosely cover the keel and measure 8mm to 9mm in length by 4mm to 5mm in height.
The dull to bright yellow, oblong to slightly spathulate keel petals measure 6mm to 9mm in length by 4mm to 5mm in height.
The ovary is moderately to densely covered in long, soft, white sericeous hairs near the apex. The flowers appear from August to October.
Pultenaea robusta’s fruits are turgid pods. The pods are glabrous to moderately covered in long, soft, white sericeous hairs and measure 5mm to 6mm in length by 4mm to 5mm in width. The green capsules turn deep reddish-brown externally and mid reddish-brown internally with paler lips. The style and calyx are persistent on the ripe pods.
Wildlife:
Pultenaea robusta’s flowers may look insignificant in the bush but as a genus it is in fact a very important source of nectar and pollen for native bees like Tetragonula carbonaria, wasps and pollen flies. These in return attract small insect eating birds.
Cultivation:
Pultenaea robusta is a small open shrub that should be more widely grown in temperate or subtropical gardens. It is ideal at the edge of a rain forest or as the pioneer shrubs before establishing a garden proper. It also makes a great rockery display in hot open spaces or confined sunny positions. In it will grow from 1 meter to 1.5 meters in height by 1.2 meters to 1.8 meters in diameter when grown in the open.
It grows exceptionally well on light clays to medium clay soils. It can cope with temperatures as low as minus 4 degrees and up to 40 degrees.
Add to the above, if it is given a little extra moisture and native fertilizer on being planted out as a seedling will respond with good flowering and good fruit set in the following season.
Pultenaea robusta would make a good contribution to a dry or moist heath garden. It can be used as a fill in plant, scattered throughout the heath scene or planted in small clusters. Use a lot of procumbent plants like Carpobrotus edulis, Dampiera purpurea, Pattersonia glabra or Hibbertia dentata Mix them with other smaller shrubs like small red flowering Bauera rubioides or Austromyrtus dulcis so none of them dominate the scene but blend in to give a mosaic of different foliage colours that you can enjoy all year. Mix it with other smaller shrubs so none of them dominate the scene but blend in to give a mosaic of foliage colours that you oversee.
Propagation:
Seeds: The seeds of Pultenaea robusta can be removed easily from the fruits that have already turned brown and have begun to open.
Sow freshly treated seeds directly into a seed raising mix after scarifying the seeds on a fine piece of emery paper. Cover the seeds with 5mm to 6mm of potting mix and keep them moist not wet. When the seedlings are 20mm to 25mm tall, prick them out and plant them into 50mm native tubes using a good organic mix.
As the seedlings roots reach the bottom of the tubes, nip the growing tips out and plant them out into their permanent position. Do not delay.
Cuttings: Fortunately Pultenaea robusta cuttings are relatively easy to strike. Use 80mm to 120mm long tip cuttings or lateral shoots from the present season’s growth. Take them in warmer months of the year. Remove half the leaves from the bottom section being careful not to tear the bark.
1 Prepare the cutting mix by adding two thirds sharp clean river sand, one third peat or one third perlite. These ingredients must be sterilized,
2 Select good material from non diseased plants,
3 Select semi green stems for cuttings. Look for a stem with two or three nodes,
4 Place the cutting on a flat, hard surface, and make a clean cut down one side of the cutting at the base for 10mm with a sharp sterile knife or razor blade. – This scarification of the node will increase the chances of roots emerging from this spot. Now remove all but one or two the leaves, leaving the apex leaves in tact. If the leaves are very large in proportion to the stem, cut off the apical halves.
5 Fill a saucer with water, and place a little medium strength rooting hormone into another container like a milk bottle top. Dip the node end of the cutting into the water and then into the rooting hormone. Tap off any excess hormone,
6 Use a small dipple stick or old pencil to poke a hole into the soilless potting mix. Ensure the hole is slightly larger than the stem diameter and be careful not to wipe the rooting hormone off the cuttings base. Place 2 to 4 cuttings in each of the 50mm native tubes,
7 I like to place the tubes in bucket with holes drilled in the bottom to allow excess water to drain out. A plastic bag that fits over the bucket is ideal to help maintain temperature and moisture. Place in a semi shaded, warm position like under 50mm shade cloth.
8 When the cuttings have struck, open the bag to allow air circulation for a few days to a week,
9 Once hardened off remove the cuttings from the bag and allow to further hardening for a few more days to a week,
10 Transplant into a good potting mix to grow on.
Fertilize using seaweed, fish emulsion or organic chicken pellets soaked in water on an alternate basis. Fertilize every two months until the plants are established then annually in early September to October to maintain health, vitality and better flowering.
Further Comments from Readers:
“Hi reader, it seems you use The Bible of Botany a lot. That’s great as we have great pleasure in bringing it to you! It’s a little awkward for us to ask, but our first aim is to purchase land approximately 1,600 hectares to link several parcels of N.P. into one at The Pinnacles NSW Australia, but we need your help. We’re not salespeople. We’re amateur botanists who have dedicated over 30 years to saving the environment in a practical way. We depend on donations to reach our goal. If you donate just $5, the price of your coffee this Sunday, We can help to keep the planet alive in a real way and continue to bring you regular updates and features on Australian plants all in one Botanical Bible. Any support is greatly appreciated. Thank you.”
In the spirit of reconciliation we acknowledge the Bundjalung, Gumbaynggirr and Yaegl and all aboriginal nations throughout Australia and their connections to land, sea and community. We pay our respect to their Elders past, present and future for the pleasures we have gained.
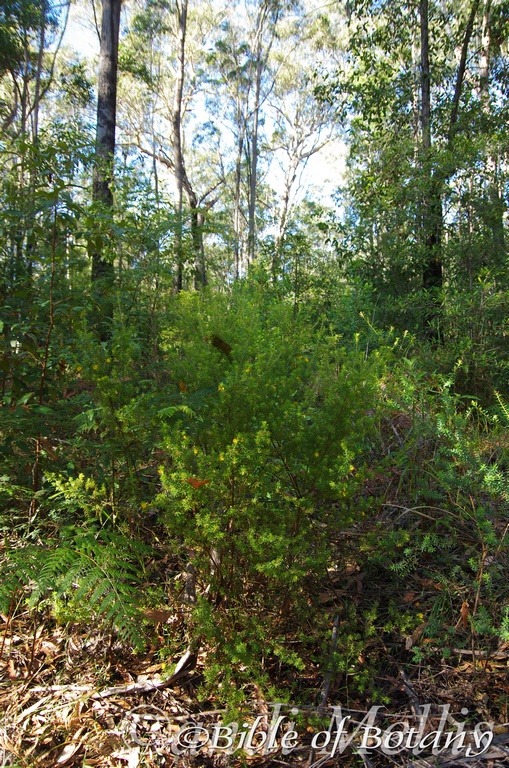
Pigeon Gully National Park NSW
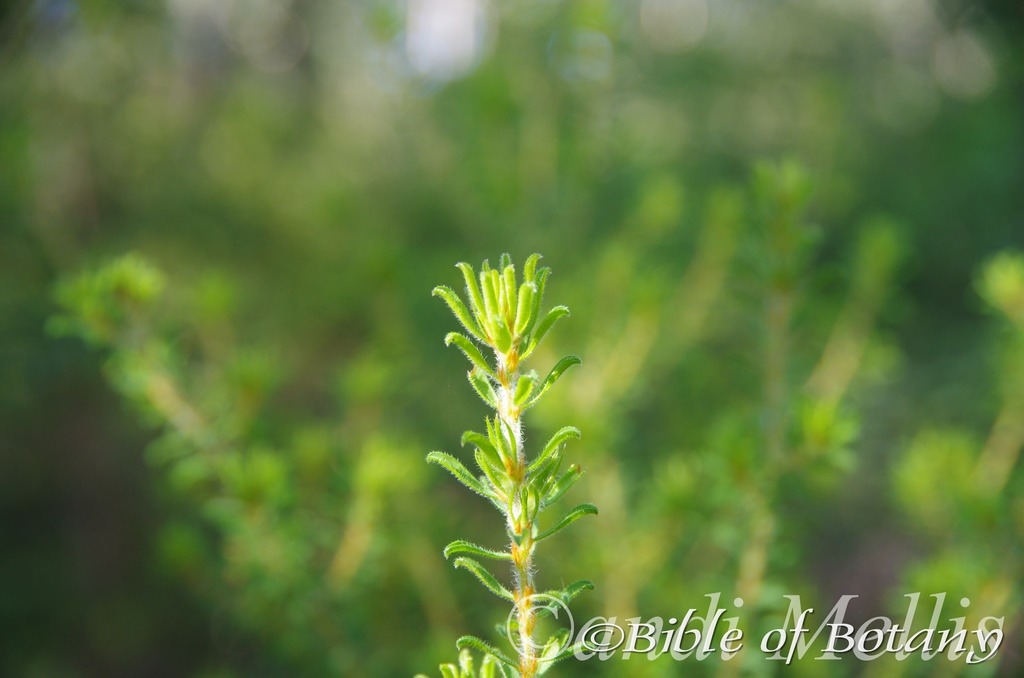
Pigeon Gully National Park NSW

Pigeon Gully National Park NSW
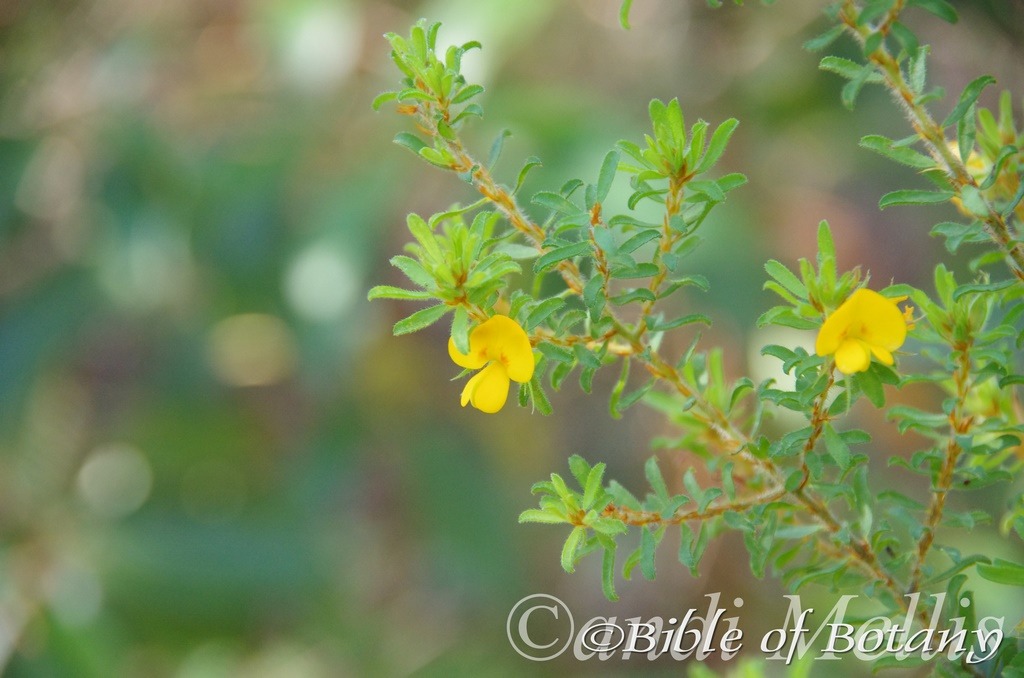
Pigeon Gully National Park NSW
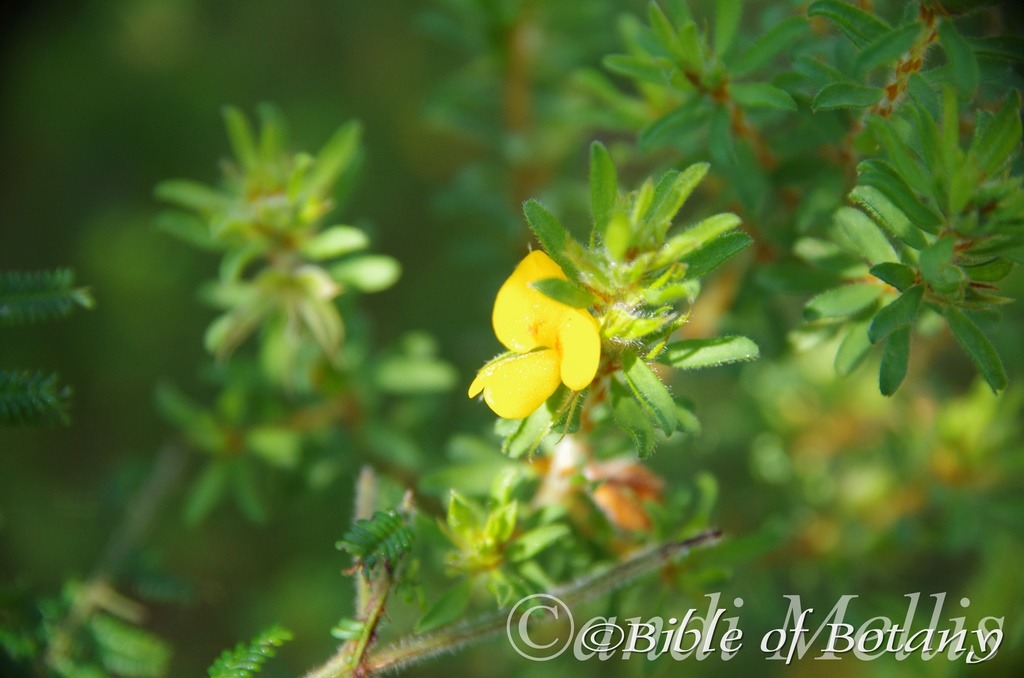
Pigeon Gully National Park NSW
Pultenaea rostrata
Classification:
Unranked: Eudicots
Unranked: Rosids
Order: Fabales
Family: Fabaceae
Subfamily: Faboideae
Genus: Is named in honour of Richard Pulteney; 1730-1801, who was an English surgeon and botanist who studied the plants of Lecestershire.
Species: From Rostellum, which is Latin for a small beak. It refers to fruits, which bear a rostrate beak like appendage at the apex of an organ.
Common Name:
Distribution:
Pultenaea rostrata is restricted to a small area along the coastal strip and along the Clarence River flats to Coaldale in the west to Sawtell. There is a disjunct population to the north in southern coastal Queensland at Caloundra and the Mount Mee Forest Reserve and further south at Hastings Beach and Newcastle beach in New South Wales.
https://avh.ala.org.au/occurrences/search?taxa=Pultenaea+rostrata#tab_mapView
Habitat Aspect Climate:
Pultenaea rostrata prefers dappled shade to full sun. It grows in dry sclerophyll forests, moist sclerophyll forests and open woodland heaths on the coast. The altitude usually ranges from 2 meters ASL to 137 meters ASL with the exception of the population near Cascade which is around 600 meters. (My estimate.)
The temperatures range from minus 2 degrees in July to 38 degrees in January.
The rainfall ranges from lows of 950mm to 2100mm average per annum.
Soil Requirements:
Pultenaea rostrata prefers white peaty sands, yellowish-orange to reddish light fatty clays with a high proportion of lateritic gravel. The soils are usually derived from decomposed sandstones or accumulated peaty beach sands. The soils pH ranges from 5pH to 7pH. It does not tolerate waterlogged soils. Non saline soils to very saline soils are tolerated as are salt laden winds.
Height & Spread:
Wild Plants: 0.3m to 1m by 1m to 1.6m.
Characteristics:
Pultenaea rostrata grows as a procumbent to erect shrub with pale brown stems. The juvenile and new growth is pale green to mid green and is moderately covered in soft, off white sericeous hairs.
The alternate leaves of Pultenaea rostrata are narrow spathulate to oblanceolate to narrow elliptic or narrow oblong and measure 6mm to 12mm in length by 2mm to 4mm in width. The stipules measure 3mm to 5mm in length. The petioles are mid bluish-green and are sparsely covered in soft, white, sericeous hairs. The petioles measure 0mm to 0.5mm in length. The bases are cuneate while the apexes are truncate often with a retuse notch, obtuse or retuse. The discolourous laminas are mid blue-green to mid green, dull and glabrous on the upper laminas while the lower laminas are darker. The laminas recurve upwards from the mid vein to the margins and gently decurve downwards on the apical half. The margins are entire and often recurve downwards. The mid vein is prominent on the lower lamina and is visible from the upper lamina.
The inflorescences of Pultenaea rostrata are dense heads born from sub terminal or apparently terminals that are somewhat lax, leafy shoots. The individual flowers are typical legume and measure 6.5mm to 10mm in length by 4mm to 6.5mm in height. The bracts are absent on this species. The subulate bracteoles are rarely fused to the stipules but are longer than the stipules and are attached below the middle of the calyxes. The bracteoles and stipules are sparsely to moderately covered in white sericeous hairs. The bracteoles measure 4mm to 7mm in length. The pedicels measure 0mm to 2mm in length.
The mid pinkish calyx tube and 5 lobes are sparsely to densely covered in soft, white sericeous hairs. The subulate lobes are similar and have acuminate. The calyx tube measures 4.5mm to 8mm in length while the lobes measure 2.5mm to 3.5mm in length.
The broad ovate, erect standard petal is dull to bright yellow with or without a splashed reddish halo near the base. The erect divaricate standard petals measure 6mm to 9mm in height by 9mm to 12mm in width.
The dull to bright yellow, oblong divergent wing petals run parallel to the keel and have an obtuse apex. The wing petals are divergent to loosely cover the keel and measure 6.5mm to 10mm in length by 3.5mm to 4mm in height.
The dull to bright yellow, oblong to slightly spathulate keel petals measure 6mm to 8.5mm in length by 4mm to 4.5mm in height.
The ovary is glabrous at the base and is sparsely to moderately covered in long, soft, white sericeous hairs near the apex. The flowers appear from August to October.
Pultenaea rostrata’s fruits are turgid pods. The pods are glabrous to sparsely covered in soft, white sericeous hairs and measure 5mm to 6mm in length by 4mm to 5mm in width. The green capsules turn deep reddish-brown externally and mid reddish-brown internally with paler lips. The style and calyx are persistent on the ripe pods.
Wildlife:
Pultenaea rostrata’s flowers are an important source of nectar and pollen for native bees, wasps and pollen flies. These in return attract small insect eating birds.
Cultivation:
Pultenaea rostrata is a small open shrub that should be more widely grown in temperate or subtropical gardens. It is ideal below small Eucalyptus trees. It also makes good display in hot open spaces or confined sunny positions. In cultivation it will grow from 0.3 meter to 1 meter in height by 1.5 meters to 2 meters in diameter when grown in the open on flat ground.
It grows rapidly on light clays to medium clay soils. It can cope with temperatures as low as minus 4 degrees and up to 40 degrees.
Add to the above, if it is given a little extra moisture and native fertilizer on being planted out as a seedling will respond with good flowering and good fruit set in the following season.
Pultenaea rostrata would make a good contribution to a dry or moist heath garden. It can be used as a fill in plant, scattered throughout the heath scene or planted in small clusters. Use a lot of procumbent plants like Carpobrotus edulis, Dampiera purpurea, Pattersonia glabra or Hibbertia dentata Mix them with other smaller shrubs like small red flowering Bauera rubioides or Austromyrtus dulcis so none of them dominate the scene but blend in to give a mosaic of different foliage colours that you can enjoy all year. Mix it with other smaller shrubs so none of them dominate the scene but blend in to give a mosaic of foliage colours would make a good contribution to a dry or moist heath garden. It can be used as a fill in plant, scattered throughout the heath scene or planted in small clusters. Use a lot of procumbent plants like Carpobrotus edulis, Dampiera purpurea, Pattersonia glabra or Hibbertia dentata Mix them with other smaller shrubs like small red flowering Bauera rubioides or Austromyrtus dulcis so none of them dominate the scene but blend in to give a mosaic of different foliage colours that you can enjoy all year. Mix it with other smaller shrubs so none of them dominate the scene but blend in to give a mosaic of foliage colours that you can enjoy all year.
Propagation:
Seeds: The seeds of Pultenaea rostrata can be removed easily from the fruits that have already turned brown and begun to open.
Sow freshly treated seeds directly into a seed raising mix after scarifying the seeds on a fine piece of emery paper. Cover the seeds with 5mm to 6mm of potting mix and keep them moist not wet. When the seedlings are 20mm to 25mm tall, prick them out and plant them into 50mm native tubes using a good organic mix.
As the seedlings roots reach the bottom of the tubes, nip the growing tips out and plant them out into their permanent position. Do not delay.
Cuttings: Fortunately Pultenaea rostrata cuttings are relatively easy to strike. Use 80mm to 120mm long tip cuttings or lateral shoots from the present season’s growth. Take them in warmer months of the year. Remove half the leaves from the bottom section being careful not to tear the bark.
1 Prepare the cutting mix by adding two thirds sharp clean river sand, one third peat or one third perlite. These ingredients must be sterilized,
2 Select good material from non diseased plants,
3 Select semi green stems for cuttings. Look for a stem with two or three nodes,
4 Place the cutting on a flat, hard surface, and make a clean cut down one side of the cutting at the base for 10mm with a sharp sterile knife or razor blade. – This scarification of the node will increase the chances of roots emerging from this spot. Now remove all but one or two the leaves, leaving the apex leaves in tact. If the leaves are very large in proportion to the stem, cut off the apical halves.
5 Fill a saucer with water, and place a little medium strength rooting hormone into another container like a milk bottle top. Dip the node end of the cutting into the water and then into the rooting hormone. Tap off any excess hormone,
6 Use a small dipple stick or old pencil to poke a hole into the soilless potting mix. Ensure the hole is slightly larger than the stem diameter and be careful not to wipe the rooting hormone off the cuttings base. Place 2 to 4 cuttings in each of the 50mm native tubes,
7 I like to place the tubes in bucket with holes drilled in the bottom to allow excess water to drain out. A plastic bag that fits over the bucket is ideal to help maintain temperature and moisture. Place in a semi shaded, warm position like under 50mm shade cloth.
8 When the cuttings have struck, open the bag to allow air circulation for a few days to a week,
9 Once hardened off remove the cuttings from the bag and allow to further hardening for a few more days to a week,
10 Transplant into a good potting mix to grow on.
Fertilize using seaweed, fish emulsion or organic chicken pellets soaked in water on an alternate basis. Fertilize every two months until the plants are established then annually in early September to October to maintain health, vitality and better flowering.
Further Comments from Readers:
“Hi reader, it seems you use The Bible of Botany a lot. That’s great as we have great pleasure in bringing it to you! It’s a little awkward for us to ask, but our first aim is to purchase land approximately 1,600 hectares to link several parcels of N.P. into one at The Pinnacles NSW Australia, but we need your help. We’re not salespeople. We’re amateur botanists who have dedicated over 30 years to saving the environment in a practical way. We depend on donations to reach our goal. If you donate just $5, the price of your coffee this Sunday, We can help to keep the planet alive in a real way and continue to bring you regular updates and features on Australian plants all in one Botanical Bible. Any support is greatly appreciated. Thank you.”
In the spirit of reconciliation we acknowledge the Bundjalung, Gumbaynggirr and Yaegl and all aboriginal nations throughout Australia and their connections to land, sea and community. We pay our respect to their Elders past, present and future for the pleasures we have gained.
Clearview Qld.
Clearview Qld.
Clearview Qld.
Clearview Qld.
Clearview Qld.
Clearview Qld.
Pultenaea setulosa
Classification:
Unranked: Eudicots
Unranked: Rosids
Order: Fabales
Family: Fabaceae
Subfamily: Faboideae
Genus: Is named in honour of Richard Pulteney; 1730-1801, who was an English surgeon and botanist who studied the plants of Lecestershire.
Species: From Seta/Setae, which are Latin for a bristle. It refers to structures or organs, which have very short bristly hairs. It is seen at the node where a leaf is expected or are an extension to the leaf’s apex.
Common Name: Spiny Pultenaea or Prickly Pultenaea.
Distribution:
“As previously treated here, this species is a variable complex of populations distributed from Qld to Vic. In the past, several of these have been recognized as distinct species. One of us (RdK) considers these to be an intergrading series of geographic variants comprising one widespread species. However, the Pultenaea setulosa complex is the subject of ongoing taxonomic research. [Note: Research in 2022 shows that this species should be restricted to Queensland. Specimens from NSW belong to multiple taxa with a revision of species concepts in preparation by R.L.Barrett, J.Clugston and colleagues.” https://plantnet.rbgsyd.nsw.gov.au/cgi-bin/NSWfl.pl page=nswfl&lvl=sp&name=Pultenaea~setulosa
I am only looking at the Queensland populations as per above as my photos were taken at Clearview. I am not 100% confident that the photos and my description are of Pultenaea setulose and will stand corrected. Pultenaea setulosa is found south from Clearview to west of Rockhampton in central coastal Queensland. It is found on the eastern side of the Great Dividing Range.
https://avh.ala.org.au/occurrences/search?taxa=Pultenaea+setulosa#tab_mapView
Habitat Aspect Climate:
Pultenaea setulosa prefers dappled shade to full sun. It grows in dry schlerophyll forests, on the frontal dunes and back dunes. The altitude ranges from 1 meters ASL to 75 meters ASL.
The temperatures range from 6 degrees in July to 36 degrees in January.
The rainfall ranges from lows of 600mm to 900mm average per annum.
Soil Requirements:
Pultenaea setulosa prefers sandy soils derived from decomposed sandstone or accumulated beach sands. The soils pH ranges from 6.5pH to 8pH. It does not tolerate waterlogged soils. Non saline soils to moderately saline soils are tolerated as are salt laden winds.
Height & Spread:
Wild Plants: 1m to 2.5m by 1m to 3m.
Characteristics:
Pultenaea setulosa grows as a small erect to spreading decumbent shrub. The stems are moderately to densely covered in fine, silky, white hairs.
The alternate leaves of Pultenaea setulosa are linear to narrow obovate and measure 3.5mm to 16mm in length by 1mm to 3mm in width. The bases taper to the petiole, while the apexes are obtuse acuminate and are decurved to straight. The upper lamina is distinctly channeled. The margins curve upwards from the mid vein and are involute. The concolorous surfaces are deep green and smooth to tuberculated are moderately covered in long, fine, silky, white hairs. The linear stipules are sparsely covered in long, fine, silky, white hairs and measure 2mm to 4mm in length.
The inflorescences of Pultenaea setulosa are subterminal and are densely surrounded by the leaves. The leaves are shorter and with enlarged stipules. The bracts each have a leafless pair of stipules. The individual flowers measure 8mm to 13mm in length. The pedicels measure 0.5mm to 3 mm in length. The narrow-ovate, acuminate to bristly, bracteoles are glabrous and are attached on or at base of calyx tube and measure 1mm to 8mm in length. The stipules measure 2/3 length of bracteoles. The calyx tubes are glabrous to sparsely covered in fine, silky, white hairs and measures 4mm to 8mm in length. The ovary is glabrous or sparsely covered in a few fine, silky, white hairs at base of style.
The fruits are turgid pods. The pods are glabrous and measure 5mm to 7mm in length.
Wildlife:
Pultenaea setulosa’s flowers may look insignificant in the bush but as a genus it is in fact a very important source of nectar and pollen for native bees like Tetragonula carbonaria,wasps and pollen flies. These in return attract small insect eating birds.
Cultivation:
Pultenaea setulosa is unknown but would treat it the same as other Pultenaea species.
Propagation:
Seeds: The seeds of Pultenaea setulosa can be removed easily from the fruits that have already turned brown and begun to open.
Sow freshly treated seeds directly into a seed raising mix, keeping them moist not wet. When the seedlings are 20mm to 25mm tall, prick them out and plant them into 50mm native tubes using a good organic mix.
As the seedlings roots reach the bottom of the tubes plant them out into their permanent position. Do not delay.
Cuttings: Fortunately Pultenaea setulosa cuttings are probably like other species in the genus are relatively easy to strike. Try using 80mm to 120mm long tip cuttings or lateral shoots from the present season’s growth. Take them in warmer months of the year. Remove half the leaves from the bottom section being careful not to tear the bark.
1 Prepare the cutting mix by adding two thirds sharp clean river sand, one third peat or one third perlite. These ingredients must be sterilized,
2 Select good material from non diseased plants,
3 Select semi green stems for cuttings. Look for a stem with two or three nodes,
4 Place the cutting on a flat, hard surface, and make a clean cut down one side of the cutting at the base for 10mm with a sharp sterile knife or razor blade. This scarification of the node will increase the chances of roots emerging from this spot. Now remove all but one or two the leaves, leaving the apex leaves in tact. If the leaves are very large in proportion to the stem, cut off the apical halves.
5 Fill a saucer with water, and place a little medium strength rooting hormone into another container like a milk bottle top. Dip the node end of the cutting into the water and then into the rooting hormone. Tap off any excess hormone,
6 Use a small dipple stick or old pencil to poke a hole into the soilless potting mix. Ensure the hole is slightly larger than the stem diameter and be careful not to wipe the rooting hormone off the cuttings base. Place 2 to 4 cuttings in each of the 50mm native tubes,
7 I like to place the tubes in bucket with holes drilled in the bottom to allow excess water to drain out. A plastic bag that fits over the bucket is ideal to help maintain temperature and moisture. Place in a semi shaded, warm position like under 50% shade cloth.
8 When the cuttings have struck, open the bag to allow air circulation for a few days to a week,
9 Once hardened off remove the cuttings from the bag and allow to further hardening for a few more days to a week,
10 Transplant into a good potting mix to grow on.
Fertilize using seaweed, fish emulsion or organic chicken pellets soaked in water on an alternate basis. Fertilize every two months until the plants are established then annually in early September to October to maintain health, vitality and better flowering.
Further Comments from Readers:
“Hi reader, it seems you use The Bible of Botany a lot. That’s great as we have great pleasure in bringing it to you! It’s a little awkward for us to ask, but our first aim is to purchase land approximately 1,600 hectares to link several parcels of N.P. into one at The Pinnacles NSW Australia, but we need your help. We’re not salespeople. We’re amateur botanists who have dedicated over 30 years to saving the environment in a practical way. We depend on donations to reach our goal. If you donate just $5, the price of your coffee this Sunday, We can help to keep the planet alive in a real way and continue to bring you regular updates and features on Australian plants all in one Botanical Bible. Any support is greatly appreciated. Thank you.”
In the spirit of reconciliation we acknowledge the Bundjalung, Gumbaynggirr and Yaegl and all aboriginal nations throughout Australia and their connections to land, sea and community. We pay our respect to their Elders past, present and future for the pleasures we have gained.
Pultenaea spinosa
Classification:
Unranked: Eudicots
Unranked: Rosids
Order: Fabales
Family: Fabaceae
Subfamily: Faboideae
Genus: Is named in honour of Richard Pulteney; 1730-1801, who was an English surgeon and botanist who studied the plants of Lecestershire.
Species: From Spīnōsus, which is Latin for a thorn or backbone. It refers to the modified leaves, phyllodes, petioles, midveins or stipules. The leaves have turned into or are reduced to spines. It is seen at the node where a leaf is expected or are an extension to the leaf’s apex.
Common Name: Spiny Pultenaea or Prickly Pultenaea.
Distribution:
Pultenaea spinosa is found south from Innisfail in far north east Queensland to near Ballarat and Shepparton in central Victoria. It is found on the eastern side of the Western Plains, western Slopes, on and east of the Great Dividing Range.
https://avh.ala.org.au/occurrences/search?taxa=Pultenaea+spinosa#tab_mapView
Habitat Aspect Climate:
Pultenaea spinosa prefers dappled shade to full sun. It grows in dry schlerophyll forests to moist Eucalyptus forests. It is found in open woodlands heaths. The altitude ranges from 5 meters ASL to 1000 meters ASL.
The temperatures range from minus 4 degrees in July to 36 degrees in January.
The rainfall ranges from lows of 850mm to 2400mm average per annum.
Soil Requirements:
Pultenaea spinosa prefers soils that are yellow, orange or red sandy loams to medium sandy clays often with a high proportion of lateritic gravels. The soils are usually derived from decomposed brown basalt, black basalts, granites or sandstones. The soils pH ranges from 4.5pH to 6pH. It does not tolerate waterlogged soils. Non saline soils to moderately saline soils are tolerated.
Height & Spread:
Wild Plants: 0.5m to 2.5m by 1m to 3m.
Characteristics:
Pultenaea spinosa grows as a small spreading procumbent shrub or small erect shrub. The erect or divaricate stems are contorted, grey-brown and glabrous. The new growth is olive-brown to olive green, smooth and sparsely covered in white spreading puberulent hairs.
The opposite leaves are often in whirls of Pultenaea spinosa are ovate to obcordate and measure 5mm to 8mm in length by 3mm to 7mm in width. The base is cuneate while the apex is obtuse to acute with a pungent aristate tip. The concolourous laminas are mid olive green to deep olive green and glabrous to sparsely covered in white puberulent hairs near the base. The leaf margins are entire and flat to strongly incurve. The mid vein is slightly prominent on the lower lamina and faintly visible from the upper lamina. The caducous stipules measure 1mm to 2mm in length while the leaves are sessile.
Inflorescences of Pultenaea spinosa are born singularly from the leaf axils. The individual flowers are typical legume measuring 6mm to 9mm in length by 14mm to 17mm in height. The calyxes are glabrous to sparsely covered in white puberulent hairs near the base while the acute lobes are glabrous. The calyx tubes and lobes measure 4mm to 5mm in length including the 4 narrowly acute 2mm to 2.5mm lobes. The linear bracteoles are attached to the lower part of the calyx tube and measure 3mm to 3.5mm in length. The pedicels measure 4.5mm to 7mm in length.
The broad ovate divaricate standard petal is yellow with an emarginated apex and has a clearly defined scarlet red striations radiating out from near the base. They measure 6mm to 9mm in height by 6mm to 9mm in width. The obovate wing petals run parallel to the keel partially covering them. They measure 6mm to 8mm in length by 3mm to 4mm in height. The oblong to obovate keel petals are hooded by the lateral wing petals and measure 6mm to 9mm in length by 4mm to 5mm in height. The keel is scarlet red to carmine.
The ovary is glabrous. The slender style measures 10mm to 12mm in length. Pultenaea spinosa flowers from late August through to October and through to November in good seasons.
The fruits are turgid pods. The pods are glabrous and measure 5mm to 7mm in length by 5mm to 6mm in width and 3mm to 3.5mm in depth. The green capsules turn deep brown externally and red brown internally with pale lips. The 2 to 3 ellipsoidal seeds are glossy deep brown and measure 4.5mm to 5.1mm in length by 3mm to 3.3mm in diameter. The style is persistent on the pods.
Wildlife:
Pultenaea spinosa’s flowers may look insignificant in the bush but as a genus it is in fact a very important source of nectar and pollen for native bees like Tetragonula carbonaria, wasps and pollen flies. These in return attract small insect eating birds.
Cultivation:
Pultenaea spinosa is a small open shrub that should be more widely grown in temperate, subtropical or semi-arid gardens. It is ideal at the edge of a forest garden or as the pioneer shrubs before establishing a garden proper. It also makes a good display confined sunny positions. In cultivation it will grow from 1 meter to 1.5 meters in height by 1.2 meters to 1.8 meters in diameter when grown in the open.
It grows well on light clays to medium clay soils. It can cope with temperatures as low as minus 4 degrees and up to 40 degrees.
It can be lightly tipped pruned to enhance bushiness. If it is given a little extra moisture and native fertilizer at half rate once a year and on being planted out as a seedling it will respond with exceptional flowering and good fruit set in the following season so you will never be without seeds.
Pultenaea spinosa would make a good contribution to a coastal garden on beach sand. It can be used as fill in plants, scattered throughout the scene. Pultenaea spinosa is well suited to such conditions so cluster plant it sparingly with short annuals between to give vibrant colour.
Use a lot of procumbent plants like Scaevola aemula, Xerochrysum bracteatum Pembertonia latisquamea, Brachyscome multifida, Coronidium elatum all add pleasant contrasts with deep purple blue or white flowers. Then there are the small tuft grasses or reeds like Ptilthrix deusta or lilies like Dianella caerulea and dwarf Lomandra confertifolia.
Mix it with other smaller shrubs like small red flowering Bauera rubioides or Austromyrtus dulcis so none of them dominate the scene but blend in to give a mosaic of different foliage colours that you can enjoy all year.
Propagation:
Seeds: The seeds of Pultenaea spinosa can be removed easily from the fruits that have already turned brown and begun to open.
Sow freshly treated seeds directly into a seed raising mix, keeping them moist not wet. When the seedlings are 20mm to 25mm tall, prick them out and plant them into 50mm native tubes using a good organic mix.
As the seedlings roots reach the bottom of the tubes plant them out into their permanent position. Do not delay.
Cuttings: Fortunately Pultenaea spinosa cuttings are relatively easy to strike. Use 80mm to 120mm long tip cuttings or lateral shoots from the present season’s growth. Take them in warmer months of the year. Remove half the leaves from the bottom section being careful not to tear the bark.
1 Prepare the cutting mix by adding two thirds sharp clean river sand, one third peat or one third perlite. These ingredients must be sterilized,
2 Select good material from non diseased plants,
3 Select semi green stems for cuttings. Look for a stem with two or three nodes,
4 Place the cutting on a flat, hard surface, and make a clean cut down one side of the cutting at the base for 10mm with a sharp sterile knife or razor blade. – This scarification of the node will increase the chances of roots emerging from this spot. Now remove all but one or two the leaves, leaving the apex leaves in tact. If the leaves are very large in proportion to the stem, cut off the apical halves.
5 Fill a saucer with water, and place a little medium strength rooting hormone into another container like a milk bottle top. Dip the node end of the cutting into the water and then into the rooting hormone. Tap off any excess hormone,
6 Use a small dipple stick or old pencil to poke a hole into the soilless potting mix. Ensure the hole is slightly larger than the stem diameter and be careful not to wipe the rooting hormone off the cuttings base. Place 2 to 4 cuttings in each of the 50mm native tubes,
7 I like to place the tubes in bucket with holes drilled in the bottom to allow excess water to drain out. A plastic bag that fits over the bucket is ideal to help maintain temperature and moisture. Place in a semi shaded, warm position like under 50mm shade cloth.
8 When the cuttings have struck, open the bag to allow air circulation for a few days to a week,
9 Once hardened off remove the cuttings from the bag and allow to further hardening for a few more days to a week,
10 Transplant into a good potting mix to grow on.
Fertilize using seaweed, fish emulsion or organic chicken pellets soaked in water on an alternate basis. Fertilize every two months until the plants are established then twice annually in early September to October to maintain health, vitality and better flowering.
Further Comments from Readers:
“Hi reader, it seems you use The Bible of Botany a lot. That’s great as we have great pleasure in bringing it to you! It’s a little awkward for us to ask, but our first aim is to purchase land approximately 1,600 hectares to link several parcels of N.P. into one at The Pinnacles NSW Australia, but we need your help. We’re not salespeople. We’re amateur botanists who have dedicated over 30 years to saving the environment in a practical way. We depend on donations to reach our goal. If you donate just $5, the price of your coffee this Sunday, We can help to keep the planet alive in a real way and continue to bring you regular updates and features on Australian plants all in one Botanical Bible. Any support is greatly appreciated. Thank you.”
In the spirit of reconciliation we acknowledge the Bundjalung, Gumbaynggirr and Yaegl and all aboriginal nations throughout Australia and their connections to land, sea and community. We pay our respect to their Elders past, present and future for the pleasures we have gained.
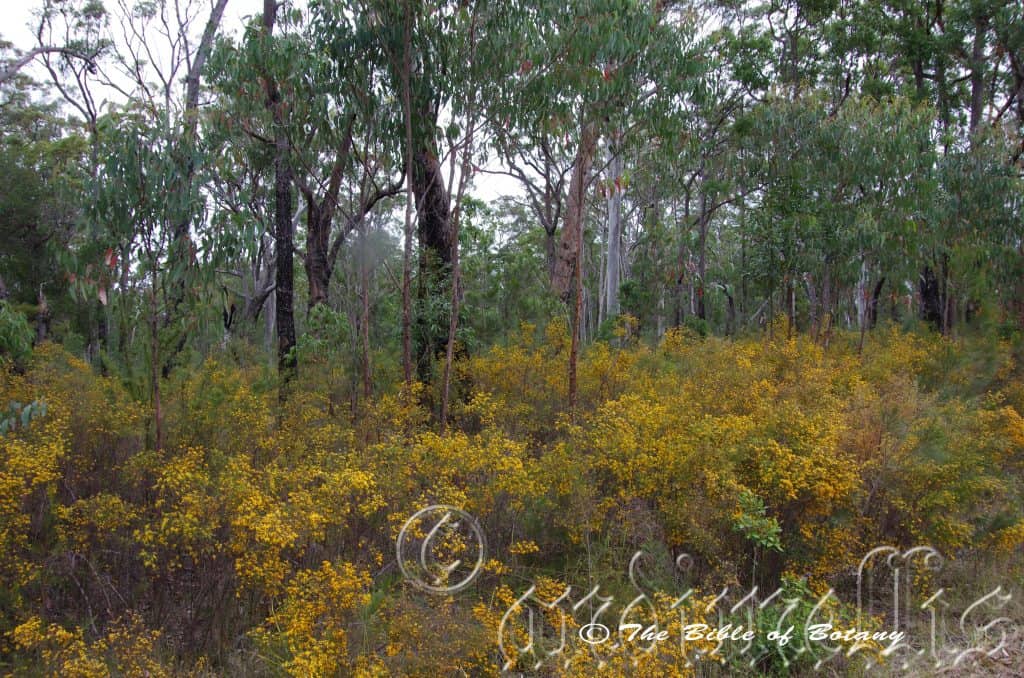
The Pinnacles NSW

Yuraygir National Park NSW
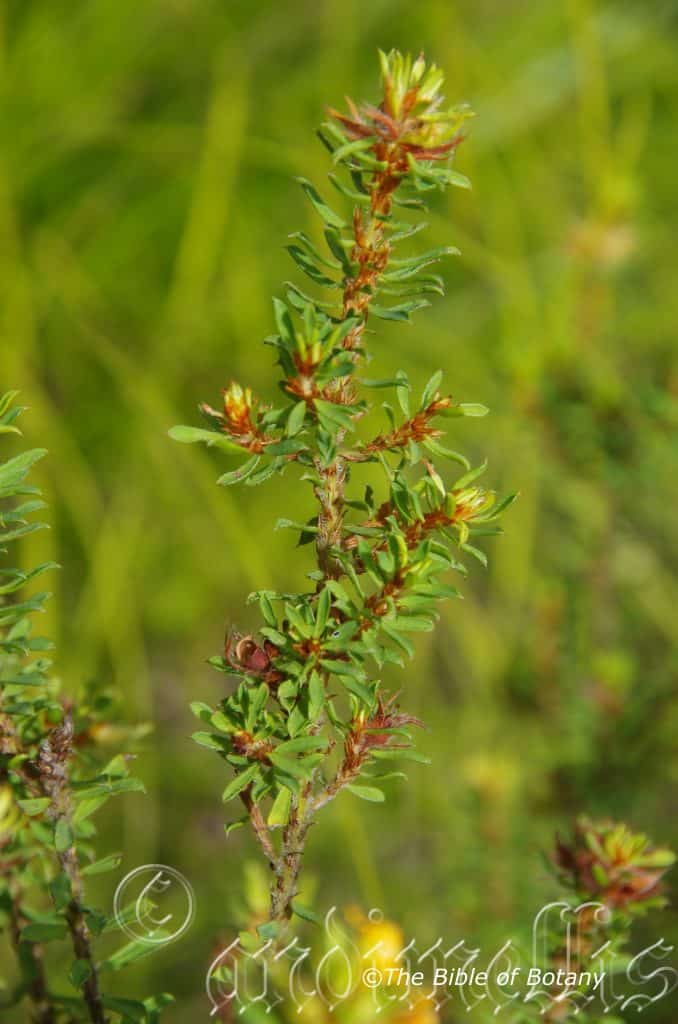
Yuraygir National Park NSW
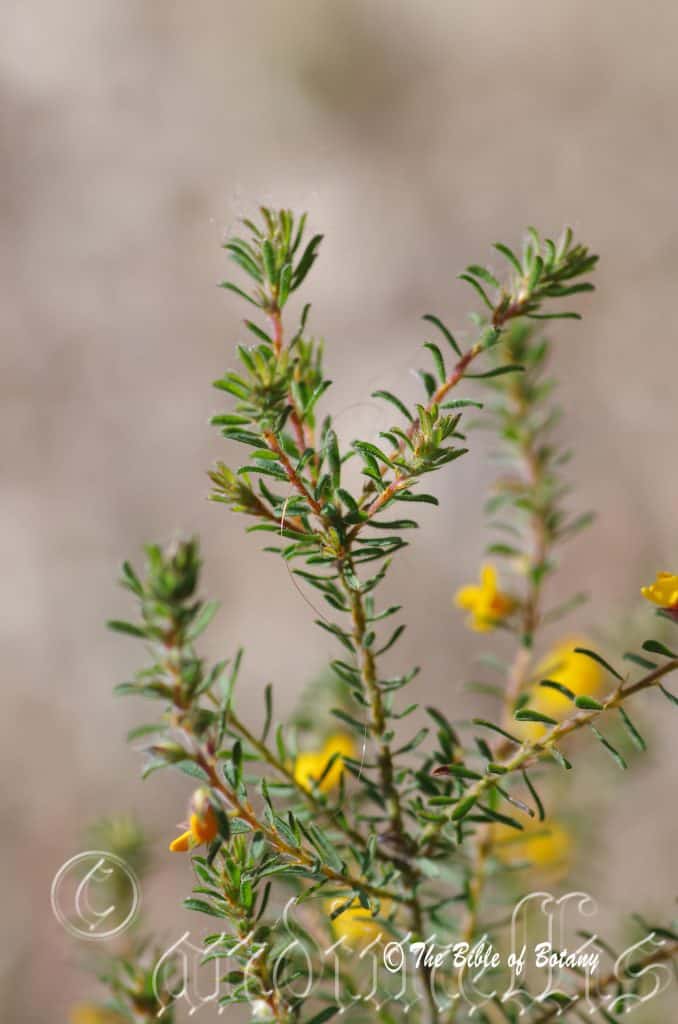
The Pinnacles NSW
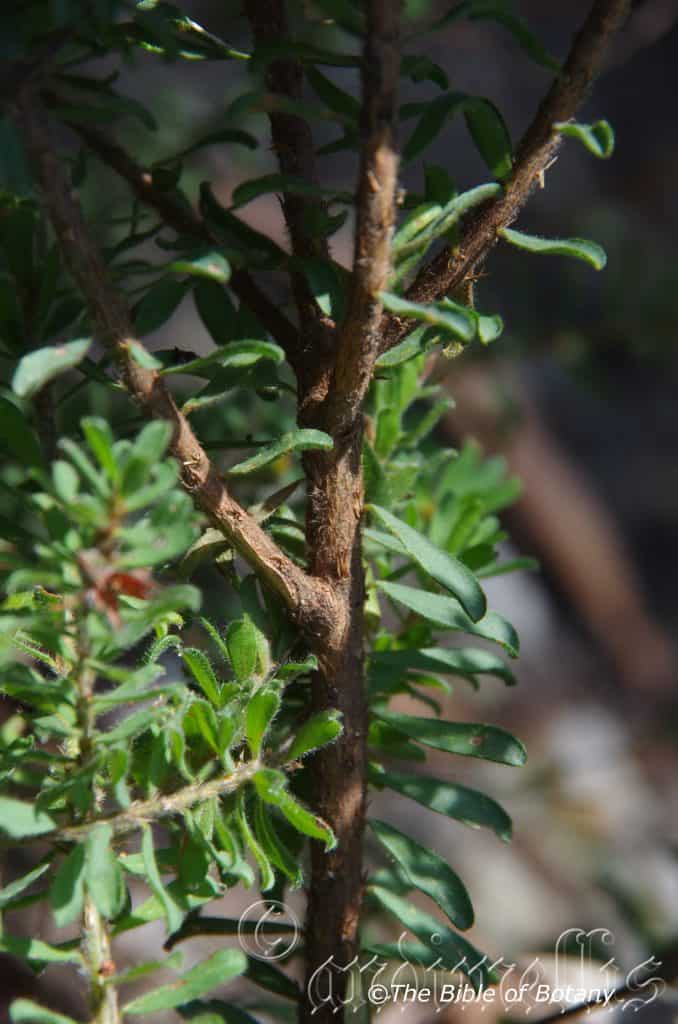
Yuraygir National Park NSW
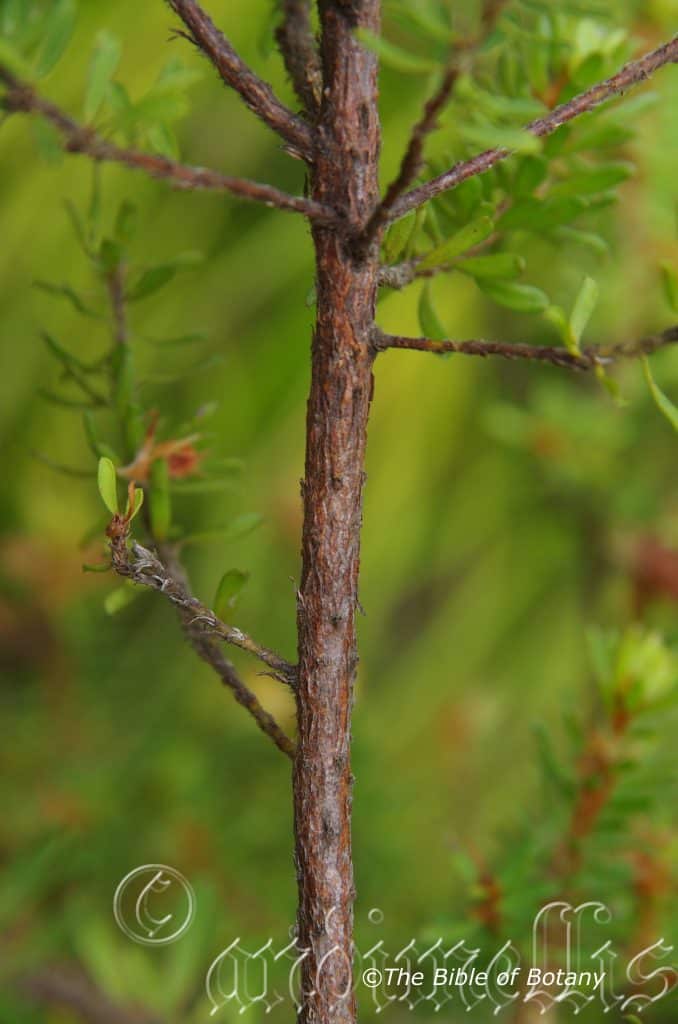
The Pinnacles NSW
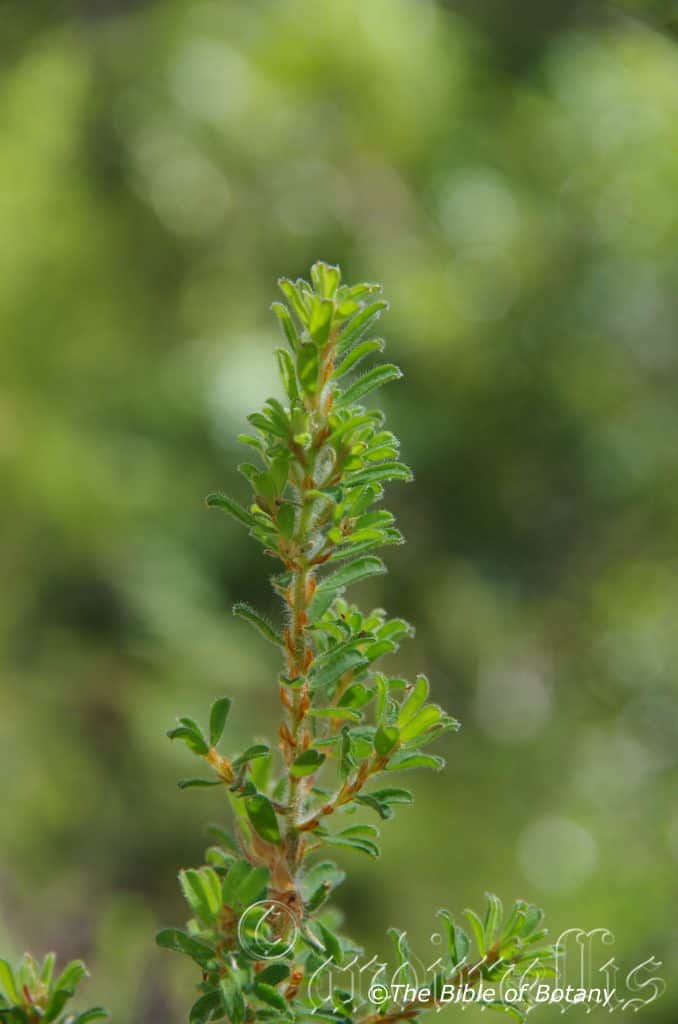
Yuraygir National Park NSW
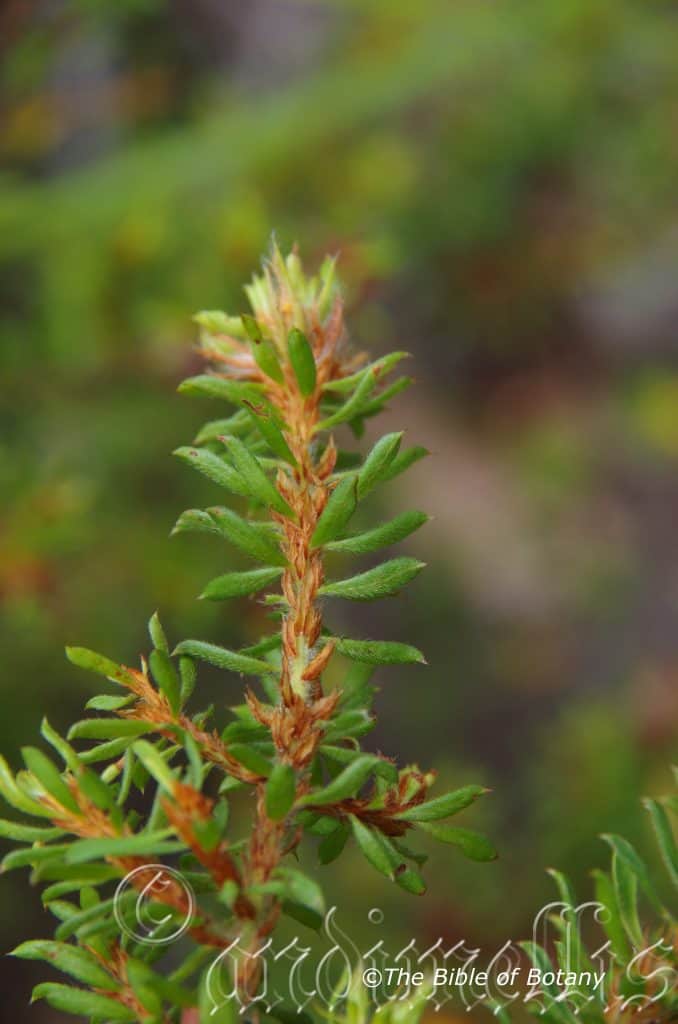
The Pinnacles NSW

The Pinnacles NSW
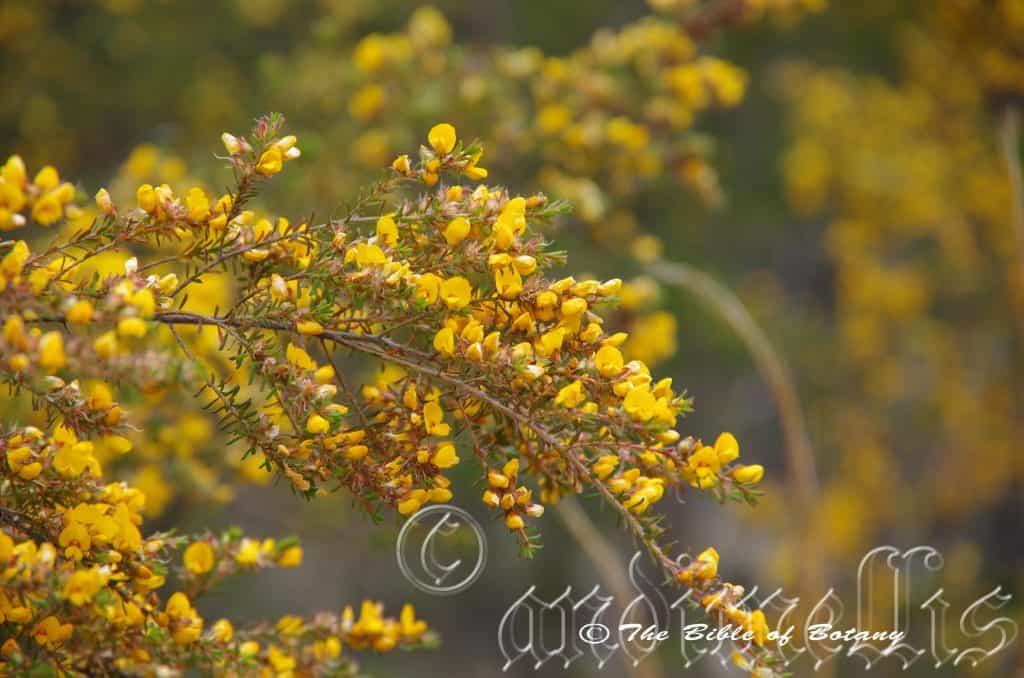
The Pinnacles NSW
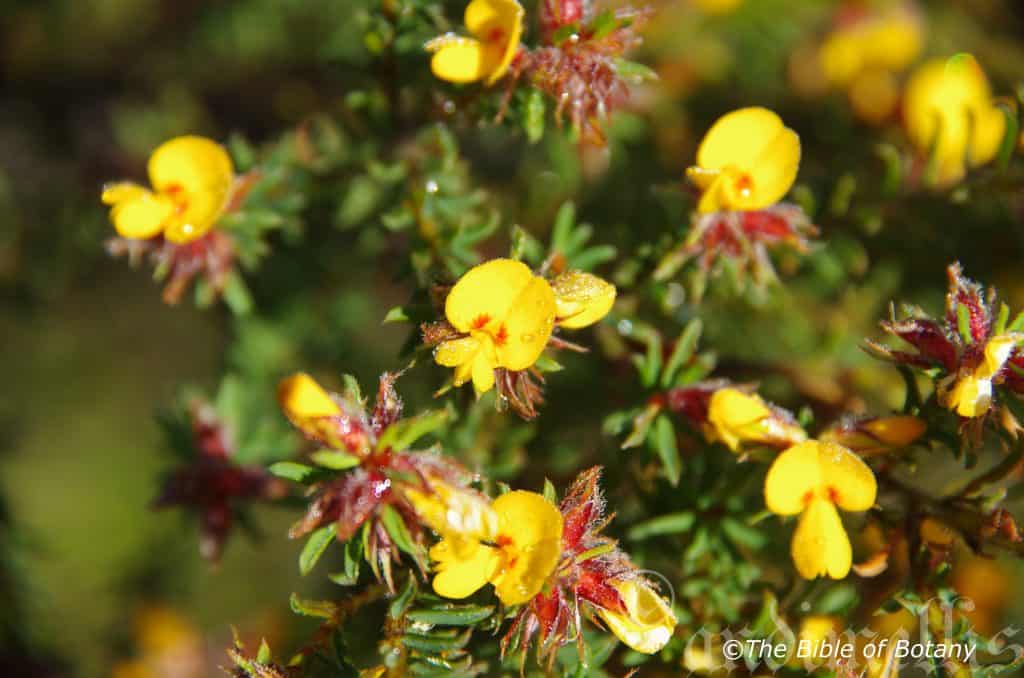
The Pinnacles NSW
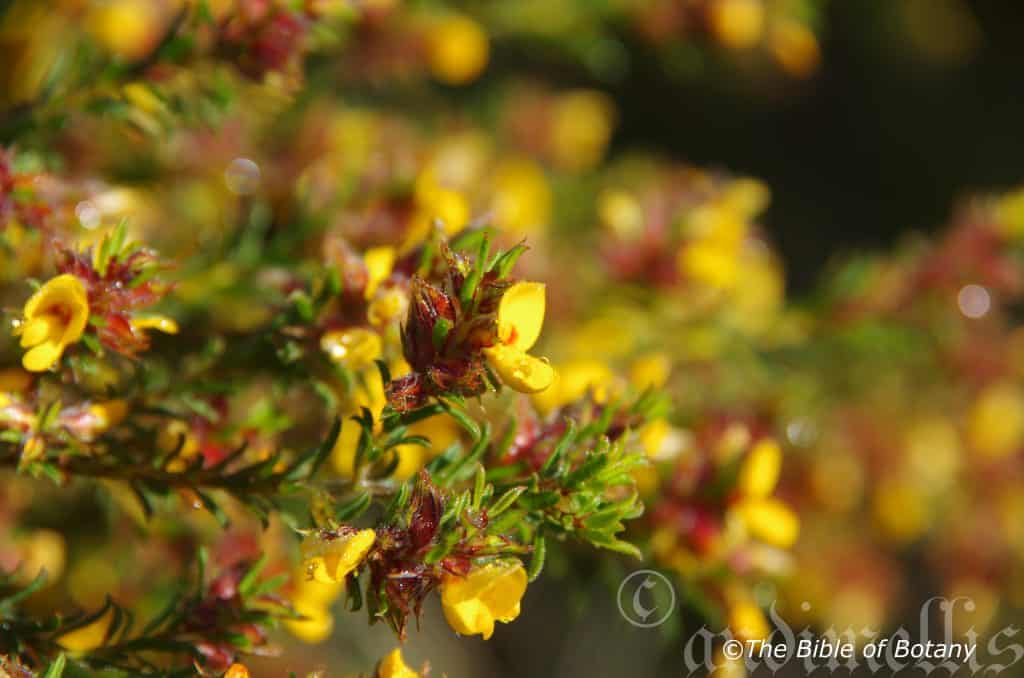
The Pinnacles NSW
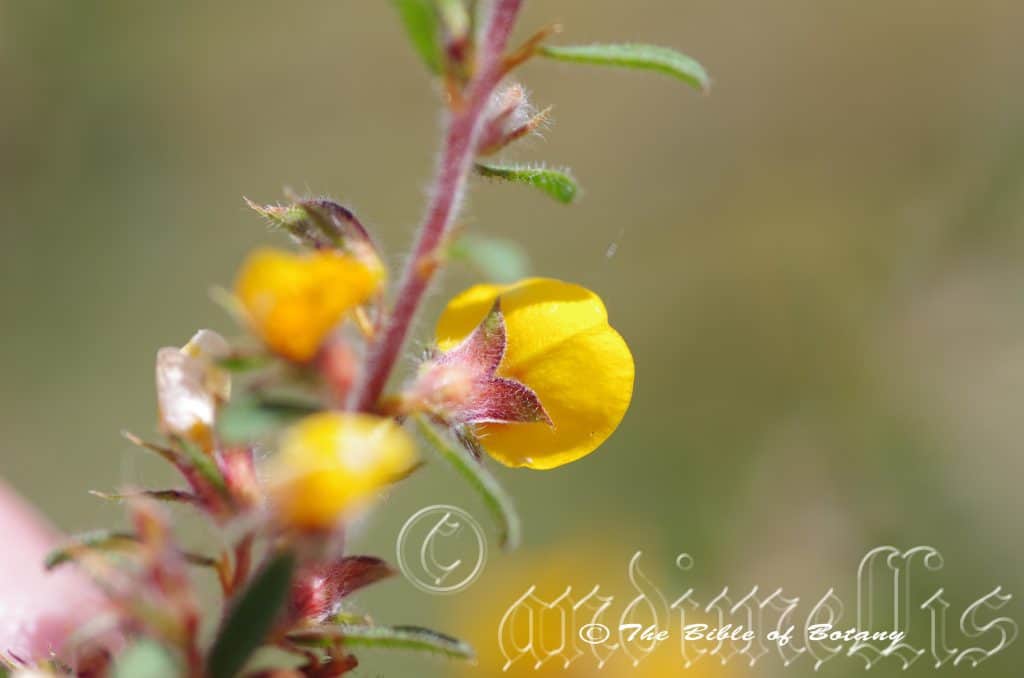
The Pinnacles NSW
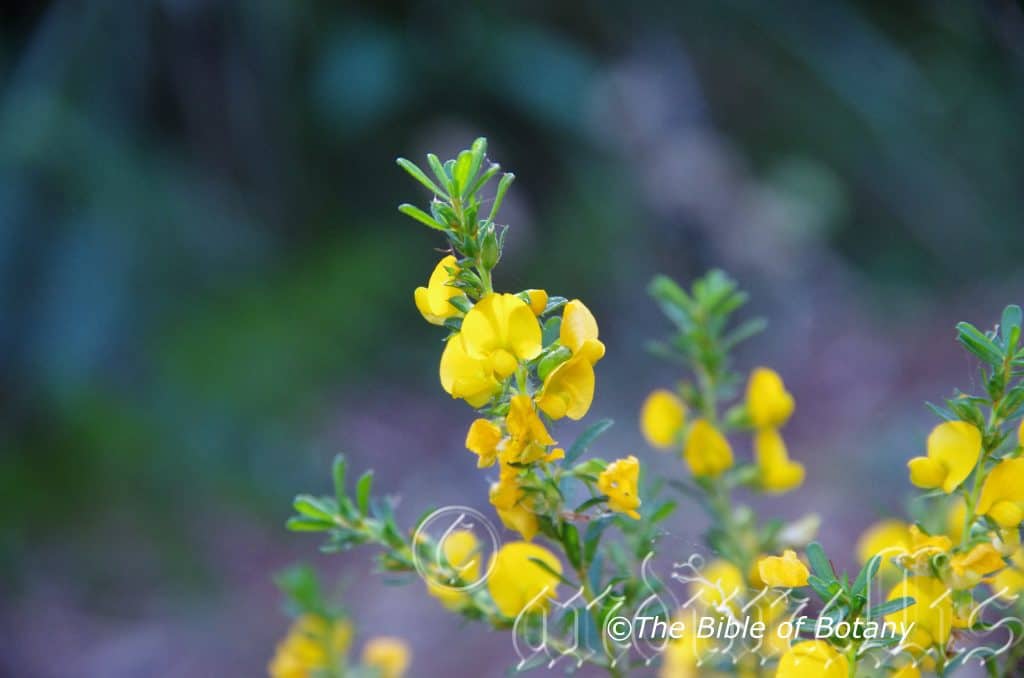
The Pinnacles NSW
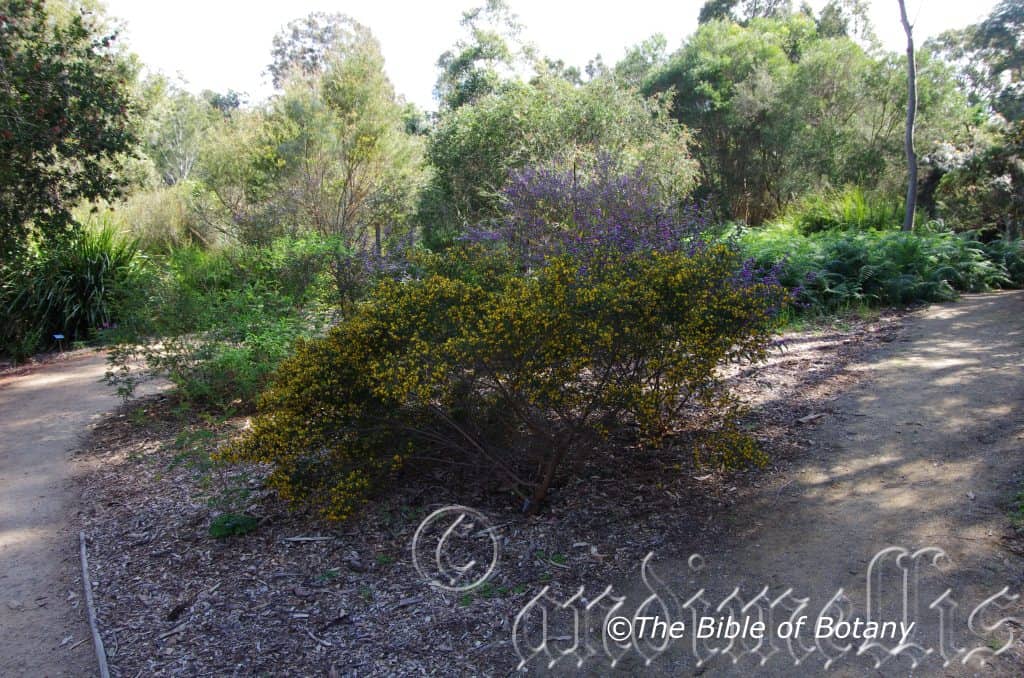
Rosser Gardens Benowa Qld.
Pultenaea villosa
Classification:
Unranked: Eudicots
Unranked: Rosids
Order: Fabales
Family: Fabaceae
Subfamily: Faboideae
Genus: Is named in honour of Richard Pulteney; 1730-1801, who was an English surgeon and botanist who studied the plants of Lecestershire.
Species: From Villōsa, which is Latin for shaggy. It refers to organs or structures, which bear short or long, shaggy or curly, “villose” hairs.
Common Name: Hairy Bush Pea.
Distribution:
Pultenaea villosa is found south from Gladstone in southern Queensland to Eden in southern coastal New South Wales. It is found on the Western slopes, on and east of the Great Dividing Range.
https://avh.ala.org.au/occurrences/search?taxa=Pultenaea+villosa#tab_mapView
Habitat Aspect Climate:
Pultenaea villosa prefers dappled shade to full sun. It grows in dry schlerophyll forests to moist Eucalyptus forests. It is found in open woodlands heaths. The altitude ranges from 5 meters ASL to 1000 meters ASL.
The temperatures range from minus 4 degrees in July to 38 degrees in January.
The rainfall ranges from lows of 750mm to 1800mm average per annum.
Soil Requirements:
Pultenaea villosa prefers to grow on light sandy clays to medium clays with or without a high proportion of gravel. The soils are usually derived from decomposed brown basalt, black basalts, shales, granites or sandstones. The soils pH ranges from 4.5pH to 6.5pH. It does not tolerate waterlogged soils though some plants experience periodic flooding or high water tables close to the coast. Non saline soils to very saline soils are tolerated.
Height & Spread:
Wild Plants: 1m to 2.5m by 1m to 3m.
Characteristics:
Pultenaea villosa grows as a small spreading procumbent shrub or small erect shrub. The erect to divaricate stems are grey-brown and glabrous. The new growth is pale olive-brown to pale olive green, smooth and densely covered in short white spreading villose hairs. New growth is often reddish to reddish green.
The alternate leaves of Pultenaea villosa are narrowly obovate to spathulate and measure 4mm to 10mm in length by 2mm to 3.5mm in width. The base is cuneate while the apex is obtuse or rarely acute. The concolourous or discolourous laminas are pale olive-green to mid olive-green and covered in soft, white often appressed, short villose hairs on the upper lamina while the lower lamina maybe slightly deeper in colour. The leaf margins are entire and flat and incurved to involute. The mid vein is slightly prominent on the lower lamina and not visible from the upper lamina. The caducous stipules measure 1mm to 4mm in length while the leaves are sessile.
Inflorescences of Pultenaea villosa are born singularly from the terminals or on special short side shoots. The individual flowers are lax and typical legume measuring 6mm to 12mm in length by 6mm to 12mm in height and 9mm to 18mm in breadth. The calyxes are sparsely covered in short, white, often appressed villose hairs as are the acute lobes. The calyx tubes and lobes measure 4mm to 11mm in length including the 4 acute to acuminate 1mm to 3mm lobes. Stipules measure 1.5mm to 3mm in length. The linear bracteoles are fused between the base and the centre of the calyx tube and measure 3mm to 7mm in length. The pedicels measure 1mm to 4mm in length.
The broad ovate divaricate standard petal is yellow with an emarginated apex and has a clearly defined scarlet red striations radiating out from near the base. They measure 6mm to 12mm in height by 9mm to 18mm in width. The oblong wing petals run parallel to the keel partially covering them. They measure 5mm to 11mm in length by 3mm to 5mm in height. The oblong keel petals are partially covered by the lateral wing petals and measure 5mm to 11mm in length by 4.5mm to 7.2mm in height. The keel is yellow.
The ovary apex is covered in short white villose hairs. The slender style measures 5mm to 11mm in length. Pultenaea villosa flowers from late August through to late September but may have the odd flower as late as early November.
The fruits are turgid pods. The pods are glabrous and measure 4mm to 6mm in length by 5mm to 6mm in width and 3mm to 3.5mm in depth. The green capsules turn deep brown externally and red brown internally with pale lips. The 2 to 4 laterally compressed, oval seeds are deep glossy brown. The style is persistent on the pods.
Wildlife:
Pultenaea villosa’s seeds are eaten by the Crimson Rosella Platycerus elegans, Cockatiels Nymphicus hollandicus, and possibly the Eastern Rosella Platycerus eximius, as they have been observed on the plants eating several times but not actually plucking the seeds.
The flowers may look insignificant in the bush but as a genus it is in fact a very important source of nectar and pollen for native bees, wasps and pollen flies. These in return attract small insect eating birds.
Cultivation:
Pultenaea villosa is a small dense soft velvety shrub that should be more widely cultivated in temperate, subtropical and semi-arid gardens. It is ideal at the edge of or below a Eucalyptus forest or as the pioneer shrubs before establishing a garden proper. It would also make a good rockery displays in hot open spaces or confined sunny positions. In cultivation they will grow from 1 meter to 1.5 meters in height by 1.2 meters to 1.8 meters in diameter when grown in the open.
It grows particularly well on poorer quality acidic sands to medium clay soils. It can cope with temperatures as low as minus 4 degrees and up to 44 degrees.
It can be lightly tipped pruned to enhance bushiness. If it is given a little extra moisture and native fertilizer at half rate once a year and on being planted out as a seedling it will respond with exceptional flowering, with the flowers generally being the larger size and good fruit set in the following season so you will never be without seeds.
Pultenaea villosa would make a good contribution to a clay rocky terrain rock garden. Here it can be used as fill in plants, scattered throughout the boulders or planted in mass in opens between boulders. When you use it in area that is strewn with large boulders do not over crowd the scene as the boulders are a formidable part of the scene. Pultenaea villosa is well suited to such conditions so use contours to display the plants boulder country are almost always rising and falling in contour and have sharp rises. Plants must be planted sparingly with short annuals with pink or red flowers between to give vibrant contrasting colours. Make the scene so you can see over the tallest ones with the exception of one or two plants at the most. The idea is to achieve a feeling of expansive harshness. This can be achieved with using Pultenaea villosa’s olive-green leaves contrasting with finer pale lime green or soft grey to glaucous coloured foliages. If large deep green leaf plants are wanted try using them as prostrate or background plants.
Use a lot of procumbent plants like Carpobrotus edulis, Dampiera specie, Pattersonia specie with the planting of other procumbent plants like Scaevola specie, Xerochrysum bracteatum Pembertonia latisquamea, Brachyscome multifida, Coronidium elatum all add pleasant contrasts with deep purple blue or white flowers. Then there are the small tuft grasses or reeds like Ptilothrix deusta or lilies like Dianella caerulea and dwarf Lomandra hystrix.
Mix them with other smaller shrubs like small red flowering Grevillea specie, Bauera rubioides or Austromyrtus dulcis so none of them dominate the scene but blend in to give a mosaic of different foliage colours that you can enjoy all year.
Propagation:
Seeds: The seeds of Pultenaea villosa can be removed easily from the fruits that have already turned brown and begun to open. Remove the seeds and place them in hot water not boiling water and leave them to soak overnight. Seeds that have not swollen repeat the exercise.
Sow freshly treated seeds directly into a seed raising mix, keeping them moist not wet. When the seedlings are 20mm to 25mm tall, prick them out and plant them into 50mm native tubes using a good organic mix.
As the seedlings roots reach the bottom of the tubes plant them out into their permanent position.
Cuttings: Fortunately Pultenaea villosa cuttings are relatively easy to strike. Use 80mm to 120mm hardwood cuttings from the present season’s growth. Take them in warmer months of the year. Remove half the leaves from the bottom section being careful not to tear the bark.
1 Prepare the cutting mix by adding two thirds sharp clean river sand, one third peat or one third perlite. These ingredients must be sterilized,
2 Select good material from non diseased plants,
3 Select semi green stems for cuttings. Look for a stem with two or three nodes,
4 Place the cutting on a flat, hard surface, and make a clean cut down one side of the cutting at the base for 10mm with a sharp sterile knife or razor blade. – This scarification of the node will increase the chances of roots emerging from this spot. Now remove all but one or two the leaves, leaving the apex leaves in tact. If the leaves are very large in proportion to the stem, cut off the apical halves.
5 Fill a saucer with water, and place a little medium strength rooting hormone into another container like a milk bottle top. Dip the node end of the cutting into the water and then into the rooting hormone. Tap off any excess hormone,
6 Use a small dipple stick or old pencil to poke a hole into the soilless potting mix. Ensure the hole is slightly larger than the stem diameter and be careful not to wipe the rooting hormone off the cuttings base. Place 2 to 4 cuttings in each of the 50mm native tubes,
7 I like to place the tubes in bucket with holes drilled in the bottom to allow excess water to drain out. A plastic bag that fits over the bucket is ideal to help maintain temperature and moisture. Place in a semi shaded, warm position like under 50mm shade cloth.
8 When the cuttings have struck, open the bag to allow air circulation for a few days to a week,
9 Once hardened off remove the cuttings from the bag and allow to further hardening for a few more days to a week,
10 Transplant into a good potting mix to grow on.
Fertilize using seaweed, fish emulsion or organic chicken pellets soaked in water on an alternate basis. Fertilize every two months until the plants are established then twice annually in early September to October to maintain health, vitality and better flowering.
Further Comments from Readers:
“Hi reader, it seems you use The Bible of Botany a lot. That’s great as we have great pleasure in bringing it to you! It’s a little awkward for us to ask, but our first aim is to purchase land approximately 1,600 hectares to link several parcels of N.P. into one at The Pinnacles NSW Australia, but we need your help. We’re not salespeople. We’re amateur botanists who have dedicated over 30 years to saving the environment in a practical way. We depend on donations to reach our goal. If you donate just $5, the price of your coffee this Sunday, We can help to keep the planet alive in a real way and continue to bring you regular updates and features on Australian plants all in one Botanical Bible. Any support is greatly appreciated. Thank you.”
In the spirit of reconciliation we acknowledge the Bundjalung, Gumbaynggirr and Yaegl and all aboriginal nations throughout Australia and their connections to land, sea and community. We pay our respect to their Elders past, present and future for the pleasures we have gained.
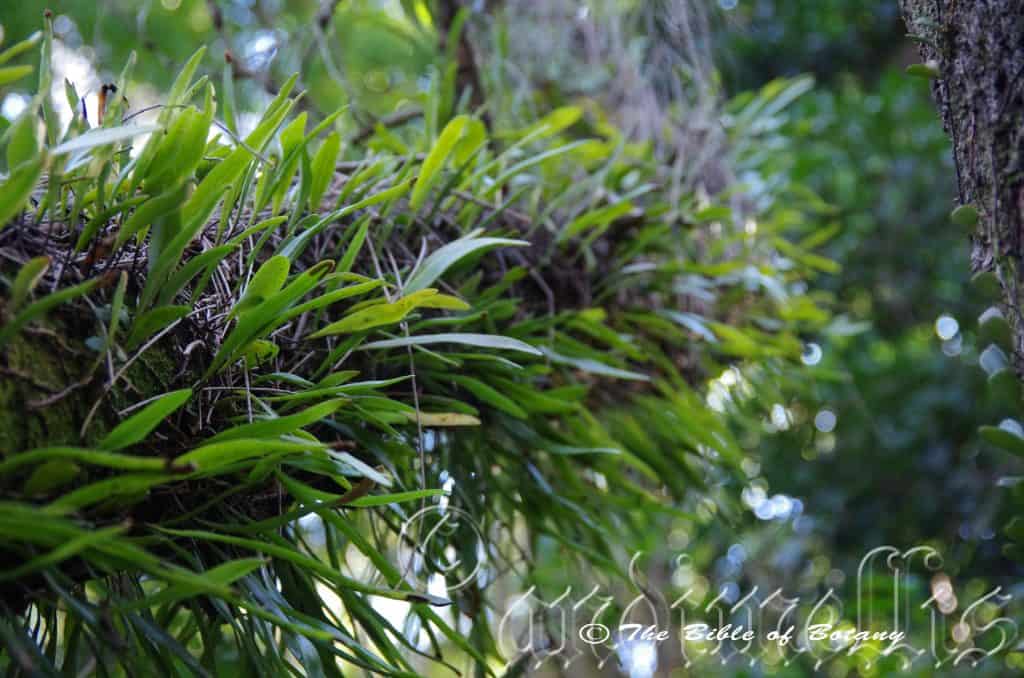
Moonee Beach Headland NSW

Moonee Beach Headland NSW
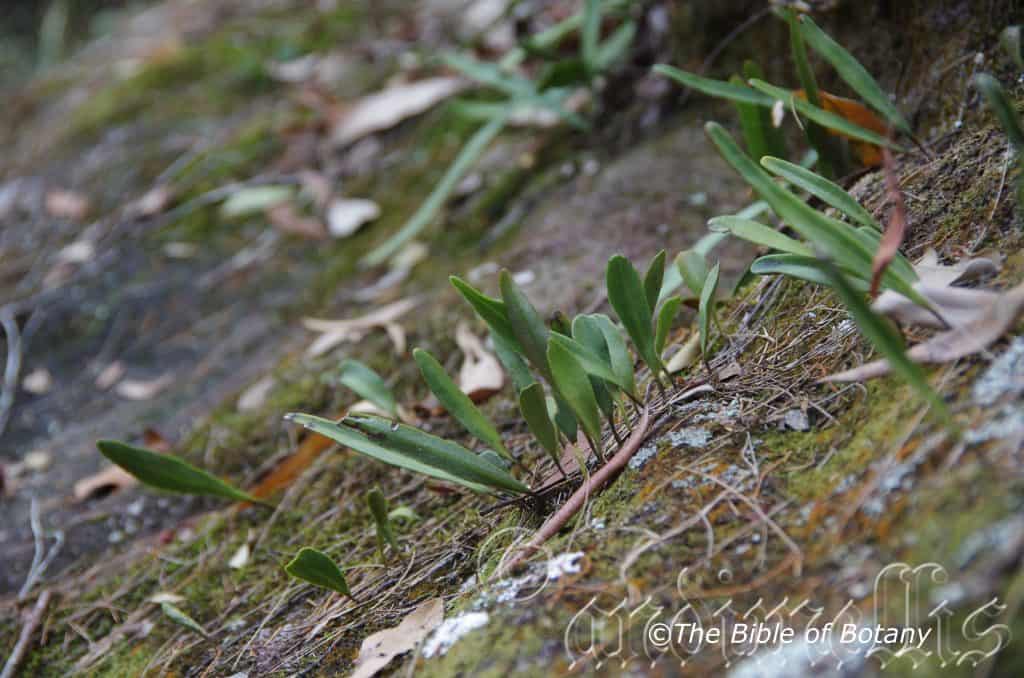
Moonee Beach Headland NSW
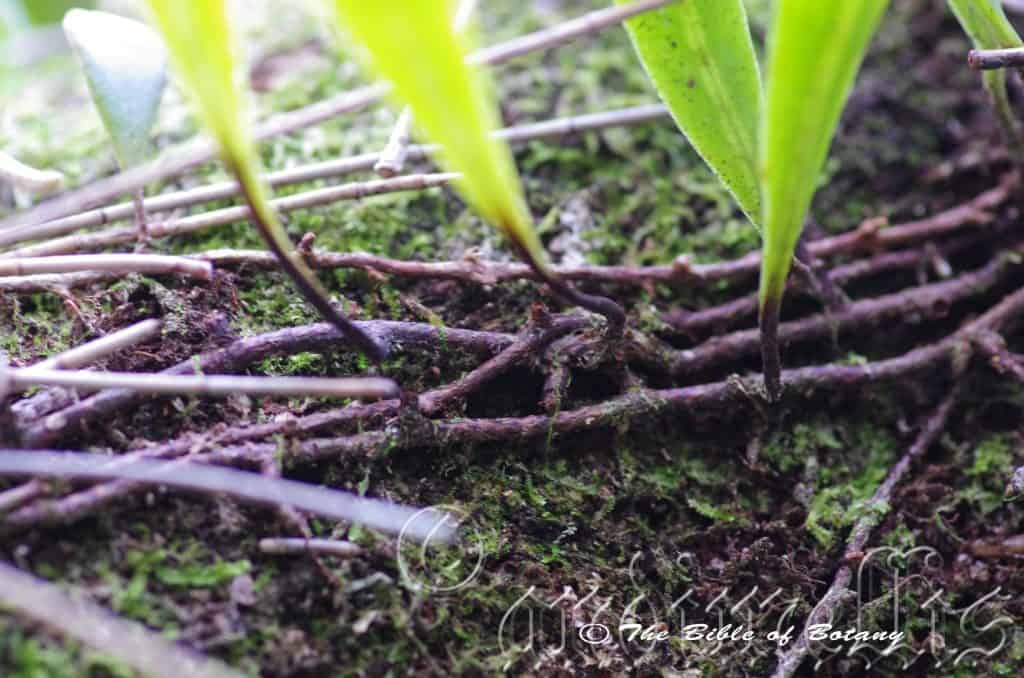
The Pinnacles NSW
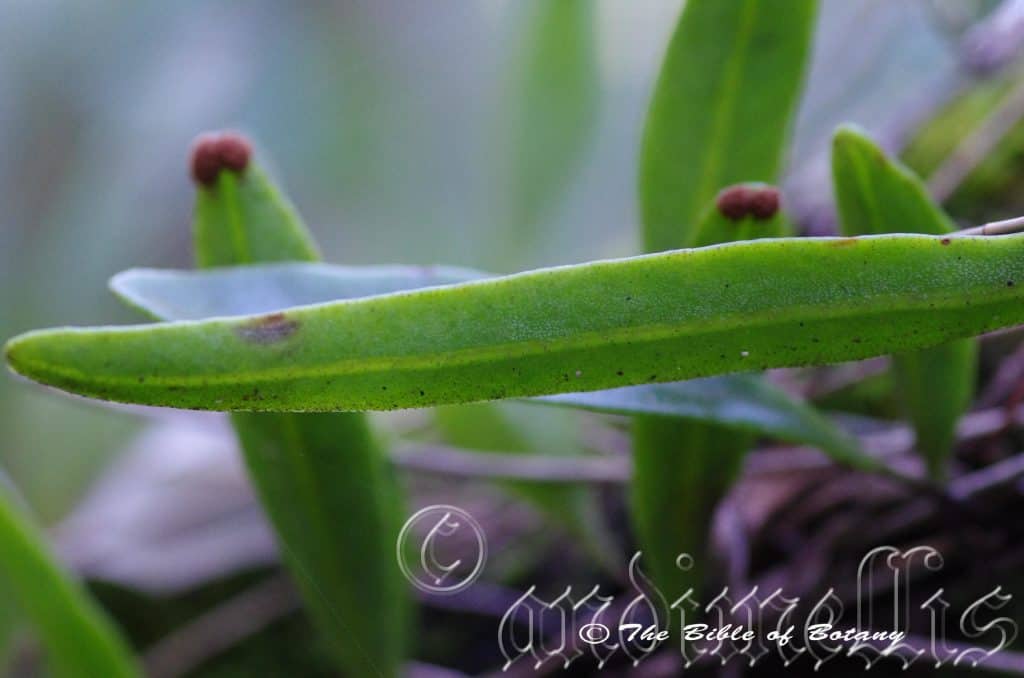
Moonee Beach Headland NSW
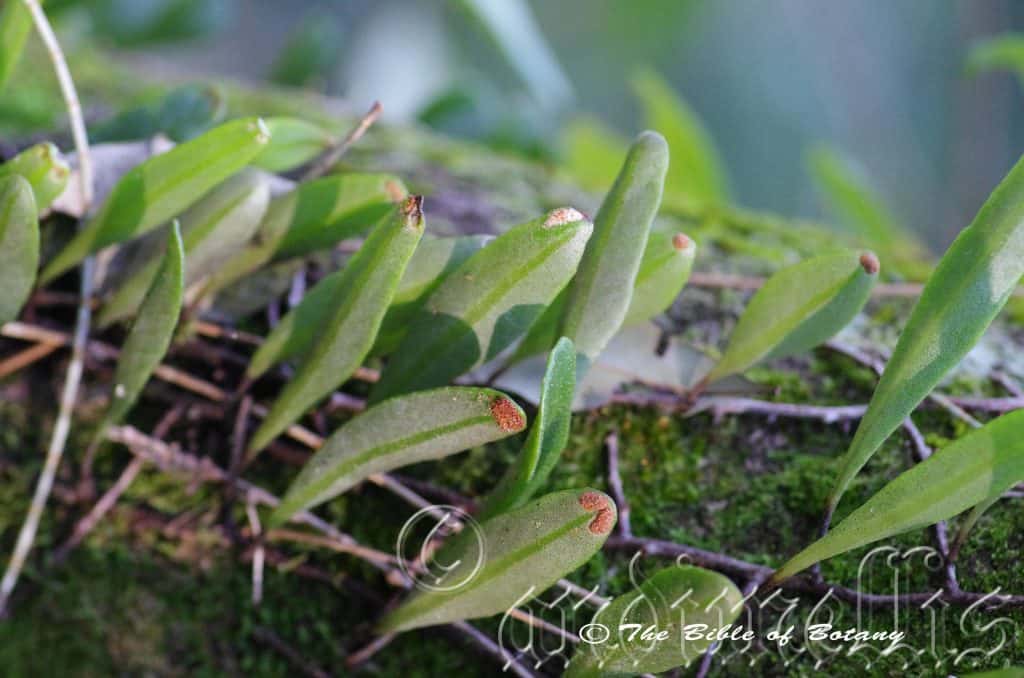
Moonee Beach Headland NSW
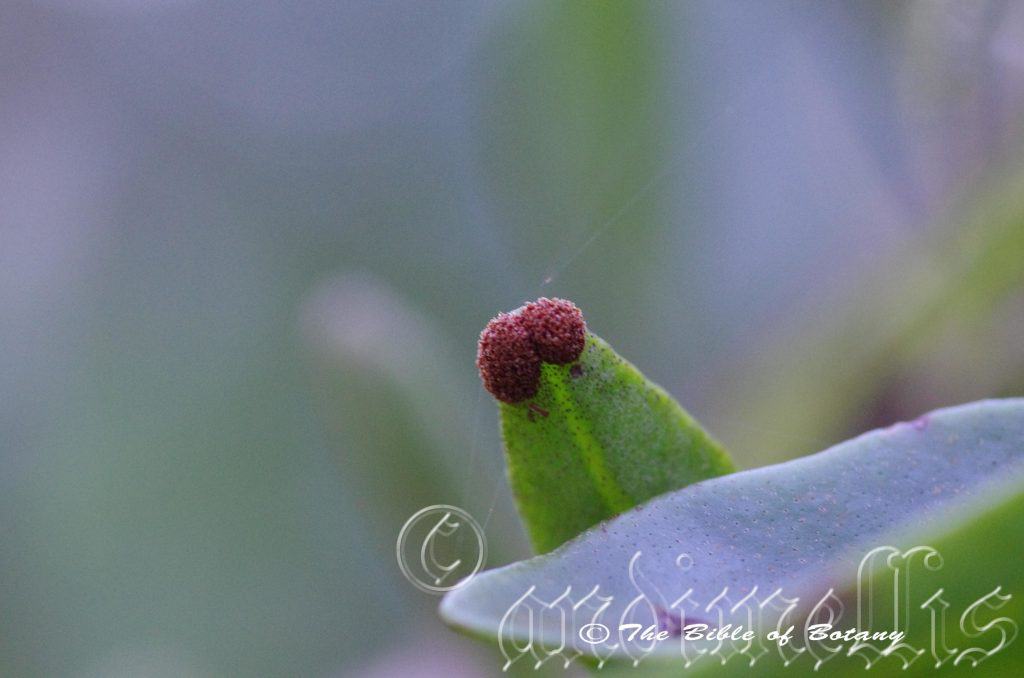
Moonee Beach Headland NSW
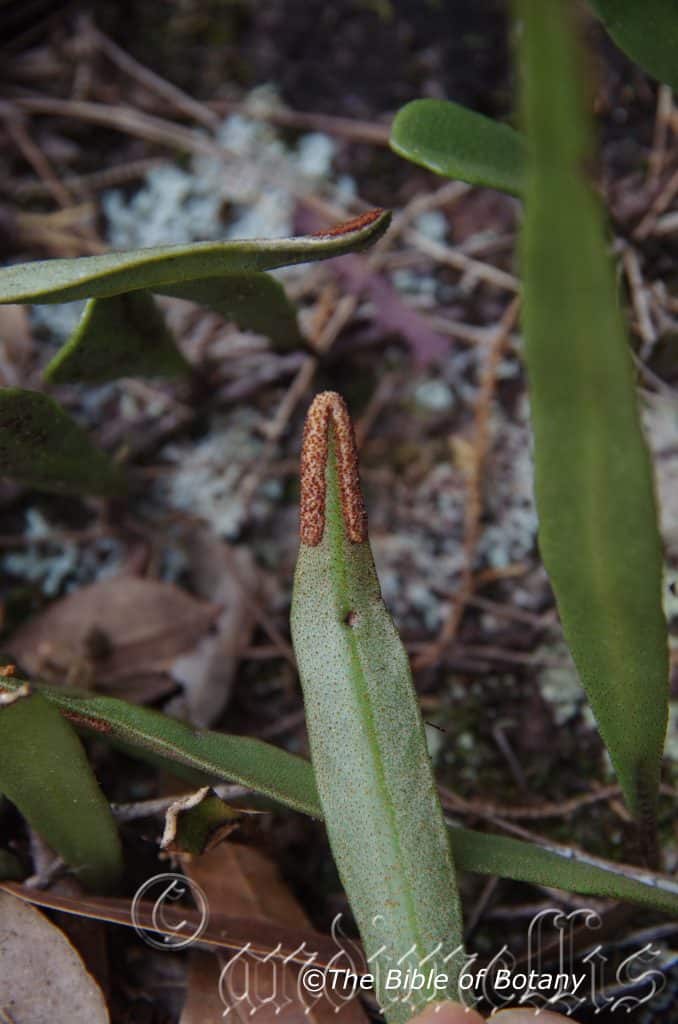
The Pinnacles NSW
Pyrrosia confluens
Classification:
Unranked: Pteridiophyta
Class: Pteridopsida
Order: Polypodiales
Family: Pteridaceae
Genus: From Pyrros, which is Ancient Greek for a flame or flame colour. It refers to the colour of the dead or dying fronds, which often turn yellow or reddish-yellow before dropping.
Species: From Con/Com, which is Greek/Latin for to come together and Fluentum, which is Latin for flowing. It refers to where two waterways like streams come together however in botany It refers to 2 parts of an organ, which come together to form a “V or Y” similar to two rivers meeting. here it refers to the sori on the underside of the fronds coming together like two streams.
Common Name: Felt Fern.
Distribution:
Pyrrosia confluens is found in several disjunct populations south from Innisfail in north eastern Queensland to the northern Illawarra district south of Sydney in central eastern New South Wales. It is found on the Western Slopes on and east of the Great Dividing Range.
https://avh.ala.org.au/occurrences/search?taxa=Pyrrosia+confluens#tab_mapView
Habitat Aspect Climate:
Pyrrosia confluens prefers dappled light to full shade. It grows in well-developed cool and warm well developed rainforests, temperate rainforests, sub-tropical rainforests, littoral rainforests or moist Eucalyptus forests. The altitude ranges from 5 meters ASL to 1050 meters ASL.
The temperatures range from minus 1 degree in July to 34 degrees in January.
The rainfall ranges from lows of 900mm to 2800mm average per annum.
Soil Requirements:
Pyrrosia confluens grows on trees as an epiphyte or on rocks as a lithophyte. The trees grow in soils that are usually derived from decomposed brown basalt, black basalts, granites or sandstones. The soils pH ranges from 5.5pH to 6.7pH. It does not tolerate waterlogged soils. Non saline soils to slightly saline soils are tolerated.
Height & Spread:
Wild Plants: 0.02m to 0.05m by 1m to 5m
Characteristics:
Pyrrosia confluens rhizomes are long, thin and creeping. The rhizomes branch freely and covered are red-brown to brown appressed fimbriate scales
Pteris confluens slender 10mm to 32mm long stipes are deep red-brown to deep brown and are glabrous to sparsely covered in red-brown to brown scales.
The lamina of Pyrrosia confluens are simple, erect, non-divided and non-dimorphic fronds. The laminas are narrowly ovate to oblong and measure 30mm to 70mm in length by 6mm to 15mm in width. The laminas remain erect whether it is growing on the upper side, side or lower side of a branch. It is leathery. The concolourous laminas are deep green to deep sea-green, dull on the upper lamina while the lower laminas are sparsely covered in stellate hairs especially on the area closest to the base. The margins are entire and flat while the apex is long tapering.
The fertile fronds of Pyrrosia confluens’s are similar to the sterile fronds. Pteris confluens’s sori are restricted to the apical half of the frond forming 2 oblong or ovate patches or a single horse shoe shape confluens patch at the apex. The spores are small circular and tan in colour.
Wildlife:
Pyrrosia confluens’s wildlife is unknown to the author.
Cultivation:
Pyrrosia confluens is an excellent ferns for cultivation that look great on slabs of bark, placed on the bark of suitable host trees or grown as a lithophyte on porous rocks.
Pyrrosia confluens is very hardy and is another of those easy to grow ferns that just require a moist garden position where it can get light shade to medium shade and cool air with fairly high level of moisture. It is ideally suited to rainforest garden but will establish themselves in any suitable microclimate.
It always looks green and fresh giving a tropical look in a short time.
Small to medium frog or fish ponds are made even more attractive when surrounded by this fern growing on rocks which will spread over small areas if given the opportunity without becoming problemsome. Its small size makes for a balance setting where medium to large rocks or boulders are used with other small rainforest understory herbs.
If grown as a potted bush house plant, place the pot on a saucer filled with gravel and water to ensure better humidity and mist frequently. Trim or pinch off dried fronds to keep it tidy and at its beautiful best. Fertilize every month during the growing season or during the warmer months with a half strength solution of our recommended organic fertilizer.
Propagation:
Fern Spores:
All ferns that are declared rare, vulnerable or endangered are protected by Federal and State Laws and must not be removed from the wild unless you are a land developer, mining company or main Roads department etc. This includes bulbs, roots, leaves and flowers. No part of any plant can be removed from Federal, State or Local Government land without the prior permission of the authority and this includes the spore.
Most people are put off at the thought of growing ferns from spore. Like all plants that produce their offspring from seed or spore the methods are basically the same. Remember nature has been doing this for millions of years and has been very successful. I have had excellent results growing over 200 different species of Australian ferns so don’t be afraid. Give it a go.
Step 1. Select spore from the fern fronds. Wait until the fern is just starting to release its spore. Rinse the fronds under clean running water and dry. This is to wash off any other spores from rogue ferns that may have settled onto the fronds. (There is nothing worse than having common brake or common soft bracken contaminating a prized tree fern or epiphyte.)
Step 2. Place the dry fronds in a clean brown paper bag and keep them in a cool dark place like the linen closet for about a week to ten days before you are ready to sow the spore. The exception to this rule applies to ferns, which produce green spores. These must be sown immediately that they are released. Todea Barbara is a good example of a fern, which produces green spore.
Step 3. Take a large ice cream container, a small ice cream container and a clean clear plastic bag large enough to seal the large ice cream container and three or four milk bottle tops.
Step 4. Punch or drill 6 to 10 5mm holes in the bottom of the small ice cream container.
Step 5. Wash both containers, tops and plastic bag so that they are very clean and sterile.
Step 6. Use a clean fine seed raising mix. We used 30 parts fine sand, 30 parts peat, 30 parts perlite and 10 parts vermiculite. When we have epiphytes we used crushed basalt, crusher dust and peat in a 50:50 ratio. Moisten the mix enough that water does not run out when the mix is squeezed between the fingers.
Step 7. Place the moisten mix (Enough to half fill the small ice cream container) in the microwave oven with a large glass of water for 7 or 8 minutes, until the water is boiling. Allow them to cool in the oven. You will need the water later so do not tip it out.
Step 8. Take the brown paper bag out of the linen closet. Shake the bag and remove the fronds. You should have a yellow, brown, black or rarely greenish brown or ochre powder or very fine, small round pin head size spore depending on the specie involved.
Step 9. Remove the mixture from the oven once it has cooled and place it in the small ice cream container and level.
Step 10. Sprinkle the spore sparsely over the mixture in the small ice cream container.
Step 11. Place the milk bottle tops in the large ice cream container with the flat surface facing down. Place the small ice cream container in the large ice cream container so that it is sitting on the milk bottle tops.
Step 12. Remove the water from the microwave and pour it into the larger ice cream container so there is 25mm to 30mm of water in the bottom.
Step 13. Place the ice cream containers in the plastic bag and seal. Step 14. Place the contents and bag in a warm shady place preferably 50mm to 70mm shade depending on the specie. Shade houses and some window sills are ideal.
Step 15. The surface should turn green within a week to two weeks. The prothallus will then develop. From the prthalus the first true fronds will appear. Wait until the ferns are 20mm to 35mm in height before you attempt to transplant them. Once they are ready open the bag up slightly and allow the air to flow around the little ferns. Every 3 to 5 days open the bag a little further so the ferns get use to their new environment. Allow them a week to two weeks to harden off before you transplant them following the removal of the plastic bag. Carefully prick them out into 50mm standard squat tubes as you would any seedling.
Do not try to transplant them as single plants as they are still a little delicate still.
Once the smaller ones again reach 50mm to 70mm you may wish to divide the stronger and hardier individual plants into smaller clumps in 100mm squat pots.
Fertilized with seaweed, fish emulsion or organic chicken pellets soaked in water on an alternate basis until established. Fertilize every two months for one year even when placed in tree forks or on rocks and boulders then twice a year in September and again in March.
Division:
Ferns can be increased by dividing older plants into 2 or 3 new plants using a sharp knife and cutting them into 2 or 3 equal sections of around 100square centimetres or larger. Securely the plants tightly to a tree or onto a rock with course hemp string as it takes a lot longer to break down, can be tightened easily and does not constrict the growth of the tree or fern and has no added chemicals.
Further Comments from Readers:
“Hi reader, it seems you use The Bible of Botany a lot. That’s great as we have great pleasure in bringing it to you! It’s a little awkward for us to ask, but our first aim is to purchase land approximately 1,600 hectares to link several parcels of N.P. into one at The Pinnacles NSW Australia, but we need your help. We’re not salespeople. We’re amateur botanists who have dedicated over 30 years to saving the environment in a practical way. We depend on donations to reach our goal. If you donate just $5, the price of your coffee this Sunday, We can help to keep the planet alive in a real way and continue to bring you regular updates and features on Australian plants all in one Botanical Bible. Any support is greatly appreciated. Thank you.”
In the spirit of reconciliation we acknowledge the Bundjalung, Gumbaynggirr and Yaegl and all aboriginal nations throughout Australia and their connections to land, sea and community. We pay our respect to their Elders past, present and future for the pleasures we have gained.
Pyrrosia lanceolata
Classification:
Unranked: Pteridiophyta
Class: Pteridopsida
Order: Polypodiales
Family: Pteridaceae
Genus: From Pyrros, which is Ancient Greek for a flame or flame colour. It refers to the colour of the dead or dying fronds, which often turn yellow or reddish-yellow before dropping.
Species: From Lancea, which is Latin for a small lance. It usually refers to leaves, which are several times longer than it is wide with one side broader than the other and tapering after the broadest point in the middle.
Common Name: Lance Leaf Fern.
Distribution:
Pyrrosia lanceolata is found from the Torres Strait Islands and through to New Guinea and west to Thailand and south to of Coen on Cape York Peninsula.
https://avh.ala.org.au/occurrences/search?taxa=Pyrrosia+lanceolata#tab_mapView
Habitat Aspect Climate:
Pyrrosia lanceolata prefers medium shade to full shade. It grows in well-developed warm well developed rainforests, sub-tropical rainforests, littoral rainforests, wet Eucalyptus forests or monsoonal rainforests. The altitude ranges from 5 meters ASL to 1000 meters ASL.
The temperatures range from minus 10 degrees in July to 38 degrees in September and February.
The rainfall ranges from lows of 1600mm to over 3200mm average per annum.
Soil Requirements:
Pyrrosia lanceolata prefers to grow on trees as an epiphyte or at times on rocks as a lithophyte. The soils are usually derived from decomposed brown basalt, black basalts, granites or sandstones. The soils pH ranges from 5.5pH to 6.7pH. It does not tolerate waterlogged soils. Non saline soils to slightly saline soils are tolerated.
Height & Spread:
Wild Plants: 0.06m to 0.12m by 1m to 5m.
Characteristics:
Pyrrosia lanceolata rhizomes are long, thin, creeping and measure 1.5mm to 3mm in diameter. It is covered in narrow ovate appressed scales which measure 1mm to 2.5mm in length by 0.3mm to 1mm in width with a long flagella apex. It is deep brown while the margins are covered in pale fawn ciliate hairs.
Pyrrosia lanceolata slender 5mm to 40mm long stipes are deep brown and are sparsely covered in brown hirsute hairs.
The laminas of Pyrrosia lanceolata are simple, erect, non-divided and dimorphic fronds. The laminas are narrowly obovate to obovate, spathulate or rarely elliptical and measure 30mm to 125mm in length by 10mm to 28mm in width. It is leathery to fleshy. The concolourous laminas are deep grass-green to deep sea-green, semi glossy to glossy on the upper lamina while the lower laminas are dull. The mature fronds are usually glabrous or at times still sparsely covered in white puberulent hairs. The mid vein is prominent on the lower lamina and is visible from the upper lamina. The margins are entire and flat. The base is cuneate becoming attenuate while the apex is acute to obtuse.
The fertile fronds are narrowly obovate to obovate, spathulate or rarely elliptical and measure 55mm to 170mm in length by 5mm to 20mm in width.
The sori are found on the apex half to two thirds of the lamina extending from almost the mid vein to the margins and becoming confluent near the apex.
There is some dimorphism between plants especially in the arrangement of the spore with some plants having a continuous row of sori (Mentioned above) while others have individual sori scattered in the two sections either side of the midvein. This could lead to the plants being divided into two separate species. The latter plants also have shorter fronds. If this is a new specie the latter will be given the new name. The spores are small circular and brown in colour.
Wildlife:
Pyrrosia lanceolata’s wildlife is unknown to the author.
Cultivation:
Pyrrosia lanceolata is an excellent ferns for cultivation that look great on slabs of bark, placed on the bark of suitable host trees or grown as a lithophyte on porous rocks.
Pyrrosia lanceolata is very hardy and is another of those easy to grow ferns that just require a moist garden position where it can get light shade to medium shade and cool air with fairly high level of moisture. It is ideally suited to rainforest garden but will establish themselves in any suitable microclimate.
It always looks green and fresh giving a tropical look in a short time.
Small to medium frog or fish ponds are made even more attractive when surrounded by this fern growing on rocks which will spread over small areas if given the opportunity without becoming problemsome. Its size makes for a balance setting where medium to large rocks or boulders are used with other small rainforest understory herbs.
If grown as a potted bush house plant, place the pot on a saucer filled with gravel and water to ensure better humidity and mist frequently. Trim or pinch off dried fronds to keep it tidy and at its beautiful best. Fertilize every month during the growing season or during the warmer months with a half strength solution of our recommended organic fertilizer.
Ferns can be increased by dividing older plants into 2 or 3 new plants using a sharp knife and cutting them into 2 or 3 equal sections of around 100square centimetres or more.
To attach the plants to a tree I recommend using course hemp string as it takes a lot longer to break down, can be tightened easily and does not constrict the growth of the tree and has no added chemicals.
Propagation:
Fern Spores:
All ferns that are declared rare, vulnerable or endangered are protected by Federal and State Laws and must not be removed from the wild unless you are a land developer, mining company or main Roads department etc. This includes bulbs, roots, leaves and flowers. No part of any plant can be removed from Federal, State or Local Government land without the prior permission of the authority and this includes the spore.
Most people are put off at the thought of growing ferns from spore. Like all plants that produce their offspring from seed or spore the methods are basically the same. Remember nature has been doing this for millions of years and has been very successful. I have had excellent results growing over 200 different species of Australian ferns so don’t be afraid. Give it a go.
Step 1. Select spore from the fern fronds. Wait until the fern is just starting to release its spore. Rinse the fronds under clean running water and dry. This is to wash off any other spores from rogue ferns that may have settled onto the fronds. (There is nothing worse than having common brake or common soft bracken contaminating a prized tree fern or epiphyte.)
Step 2. Place the dry fronds in a clean brown paper bag and keep them in a cool dark place like the linen closet for about a week to ten days before you are ready to sow the spore. The exception to this rule applies to ferns, which produce green spores. These must be sown immediately that they are released. Todea Barbara is a good example of a fern, which produces green spore.
Step 3. Take a large ice cream container, a small ice cream container and a clean clear plastic bag large enough to seal the large ice cream container and three or four milk bottle tops.
Step 4. Punch or drill 6 to 10 5mm holes in the bottom of the small ice cream container.
Step 5. Wash both containers, tops and plastic bag so that they are very clean and sterile.
Step 6. Use a clean fine seed raising mi. We used 30 parts fine sand, 30 parts peat,30 parts perlite and 10 parts vermiculite. We used crushed basalt, crusher dust and peat in a 50:50 ratio for epiphytes. Moisten the mix enough that water does not run out when the mix is squeezed between the fingers.
Step 7. Place the moisten mix (Enough to half fill the small ice cream container) in the microwave oven with a large glass of water for 7 or 8 minutes, until the water is boiling. Allow them to cool in the oven. You will need the water later so do not tip it out.
Step 8. Take the brown paper bag out of the linen closet. Shake the bag and remove the fronds. You should have a yellow, brown, black or rarely greenish brown or ochre powder or very fine, small round pin head size spore depending on the specie involved.
Step 9. Remove the mixture from the oven once it has cooled and place it in the small ice cream container and level.
Step 10. Sprinkle the spore sparsely over the mixture in the small ice cream container.
Step 11. Place the milk bottle tops in the large ice cream container with the flat surface facing down. Place the small ice cream container in the large ice cream container so that it is sitting on the milk bottle tops.
Step 12. Remove the water from the microwave and pour it into the larger ice cream container so there is 25mm to 30mm of water in the bottom.
Step 13. Place the ice cream containers in the plastic bag and seal. Step 14. Place the contents and bag in a warm shady place preferably 50mm to 70mm shade depending on the specie. Shade houses and some window sills are ideal.
Step 15. The surface should turn green within a week to two weeks. The prothallus will then develop. From the prthalus the first true fronds will appear. Wait until the ferns are 20mm to 35mm in height before you attempt to transplant them. Once they are ready open the bag up slightly and allow the air to flow around the little ferns. Every 3 to 5 days open the bag a little further so the ferns get use to their new environment. Allow them a week to two weeks to harden off before you transplant them following the removal of the plastic bag. Carefully prick them out into 50mm standard squat tubes as you would any seedling.
Do not try to transplant them as single plants as they are still a little delicate still.
Once the smaller ones again reach 50mm to 70mm you may wish to divide the stronger and hardier individual plants into smaller clumps in 100mm squat pots.
Fertilized with seaweed, fish emulsion or organic chicken pellets soaked in water on an alternate basis until established. Fertilize every two months for one year even when placed in tree forks or on rocks and boulders then twice a year in September and again in March.
Further Comments from Readers:
“Hi reader, it seems you use The Bible of Botany a lot. That’s great as we have great pleasure in bringing it to you! It’s a little awkward for us to ask, but our first aim is to purchase land approximately 1,600 hectares to link several parcels of N.P. into one at The Pinnacles NSW Australia, but we need your help. We’re not salespeople. We’re amateur botanists who have dedicated over 30 years to saving the environment in a practical way. We depend on donations to reach our goal. If you donate just $5, the price of your coffee this Sunday, We can help to keep the planet alive in a real way and continue to bring you regular updates and features on Australian plants all in one Botanical Bible. Any support is greatly appreciated. Thank you.”
In the spirit of reconciliation we acknowledge the Bundjalung, Gumbaynggirr and Yaegl and all aboriginal nations throughout Australia and their connections to land, sea and community. We pay our respect to their Elders past, present and future for the pleasures we have gained.
Pyrrosia longifolia
Classification:
Unranked: Pteridiophyta
Class: Pteridopsida
Order: Polypodiales
Family: Pteridaceae
Genus: From Pyrros, which is Ancient Greek for a flame or flame colour. It refers to the colour of the dead or dying fronds, which often turn yellow or reddish-yellow before dropping.
Species: From Longitia/Longus, which is Latin for long in length and Folium, which is Latin for foliage. It refers to leaves, which are long and strap like or are much longer than other species in the genus.
Common Name: Felt Fern.
Distribution:
Pyrrosia longifolia is found south from the Torres Strait Islands and the tip of Cape York Peninsula to Girringun National Park in the south including the off shore Islands in far north Queensland.
https://avh.ala.org.au/occurrences/search?taxa=Pyrrosia+longifolia#tab_mapView
Habitat Aspect Climate:
Pyrrosia longifolia prefers medium shade to full shade. It grows in well-developed warm well developed rainforests, temperate rainforests sub-tropical rainforests, littoral rainforests and wet Eucalyptus forests. The altitude ranges from 15 meters ASL to 1100 meters ASL.
The temperatures range from minus 1 degree in July to 34 degrees in January.
The rainfall ranges from lows of 900mm to 2800mm average per annum.
Soil Requirements:
Pyrrosia longifolia prefers to grow on trees as an epiphyte or on rocks as a lithophyte. The soils are usually derived from decomposed brown basalts, black basalts, granites or sandstones. The soils pH ranges from 5.5pH to 6.7pH. It does not tolerate waterlogged soils. Non saline soils to slightly saline soils are tolerated.
Height & Spread:
Wild Plants: 0.02m to 0.05m by 1m to 5m.
Characteristics:
Pyrrosia longifolia rhizomes are long, thin, creeping with many branches and measure 1.5mm to 4mm in diameter. It is covered in narrow ovate appressed scales which measure 1.5mm to 4mm in length by 0.9mm to 1.5mm in width. The scales are deep brown-black with paler chartaceous, ragged margins.
Pyrrosia longifolia slender 10mm to 100mm long stipes are deep brown to deep brown-black and densely covered in deep brown-black with paler chartaceous, ragged margins.
The laminas of Pyrrosia longifolia are simple, erect, and none divided in the Australian specimens and not dimorphic fronds. The erect or lax laminas are broad linear to narrow oblong and measure 30mm to 660mm in length by 7mm to 40mm in width. The coriaceous to fleshy, discolourous laminas are grass-green to sea-green, semi glossy to glossy on the upper lamina while the lower laminas are silvery-grey, dull and covered in fine, soft, silvery-grey sericeous hairs. The mid vein is prominent on the lower lamina and is visible from the upper lamina. The margins are entire and flat to slightly recurve. The base tapers and is attenuate for over 50mm of the stipe, while the apex is tapering and ends in a nodding, obtuse apex.
The fertile fronds are similar to the sterile fronds. The sori are crowded in 4 to 8 rows on either side of the mid vein. They extend 50mm to 70mm of the way down the frond and converge near the apex. The spores are small irregularly circular and brown in colour.
Wildlife:
Pyrrosia longifolia’s wildlife is unknown to the author.
Cultivation:
Pyrrosia longifolia are excellent ferns for cultivation and make great hanging basket or slab specimens for one or two or three growing seasons when they must be repotted or divided.
Pyrrosia longifolia is an excellent ferns for cultivation that look great on slabs of bark, placed on the bark of suitable host trees or grown as a lithophyte on porous rocks.
Pyrrosia longifolia is very hardy and is another of those easy to grow ferns that just require a moist garden position where it can get light shade to medium shade and cool air with fairly high level of moisture. It is ideally suited to rainforest garden but will establish themselves in any suitable microclimate.
It always look green and fresh giving a tropical look in a short time.
Its size makes for a balance setting where medium to large rocks or boulders are used on a wall so they can hang down.
If grown as a potted bush house plant, place the pot on a saucer filled with gravel and water to ensure better humidity and mist frequently. Trim or pinch off dried fronds to keep it tidy and at its beautiful best. Fertilize every month during the growing season or during the warmer months with a half strength solution of our recommended organic fertilizer.
Ferns can be increased by dividing older plants into 2 or 3 new plants using a sharp knife and cutting them into 2 or 3 equal sections of around 100square centimetres or more.
To attach the plants to a tree I recommend using course hemp string as it takes a lot longer to break down, can be tightened easily and does not constrict the growth of the tree and has no added chemicals.
Propagation:
Fern Spores:
All ferns that are declared rare, vulnerable or endangered are protected by Federal and State Laws and must not be removed from the wild unless you are a land developer, forestry, mining company or main Roads department etc. This includes bulbs, roots, leaves and flowers. No part of any plant can be removed from Federal, State or Local Government land without the prior permission of the authority and this includes the spore.
Most people are put off at the thought of growing ferns from spore. Like all plants that produce their offspring from seed or spore the methods are basically the same. Remember nature has been doing this for millions of years and has been very successful. I have had excellent results growing over 200 different species of Australian ferns so don’t be afraid. Give it a go.
Step 1. Select spore from the fern fronds. Wait until the fern is just starting to release its spore. Rinse the fronds under clean running water and dry. This is to wash off any other spores from rogue ferns that may have settled onto the fronds. (There is nothing worse than having common brake or common soft bracken contaminating a prized tree fern or epiphyte.)
Step 2. Place the dry fronds in a clean brown paper bag and keep them in a cool dark place like the linen closet for about a week to ten days before you are ready to sow the spore. The exception to this rule applies to ferns, which produce green spores. These must be sown immediately that they are released. Todea Barbara is a good example of a fern, which produces green spore.
Step 3. Take a large ice cream container, a small ice cream container and a clean clear plastic bag large enough to seal the large ice cream container and three or four milk bottle tops.
Step 4. Punch or drill 6 to 10 5mm holes in the bottom of the small ice cream container.
Step 5. Wash both containers, tops and plastic bag so that they are very clean and sterile.
Step 6. Use a clean fine seed raising mi. We used 30 parts fine sand, 30 parts peat and 30 parts perlite and 10 parts vermiculite. We used crushed basalt, crusher dust and peat in a 25:25:50 ratio for epiphytes. Moisten the mix enough that water does not run out when the mix is squeezed between the fingers.
Step 7. Place the moisten mix (Enough to half fill the small ice cream container) in the microwave oven with a large glass of water for 7 or 8 minutes, until the water is boiling. Allow them to cool in the oven. You will need the water later so do not tip it out.
Step 8. Take the brown paper bag out of the linen closet. Shake the bag and remove the fronds. You should have a yellow, brown, black or rarely greenish brown or ochre powder or very fine, small round pin head size spore depending on the specie involved.
Step 9. Remove the mixture from the oven once it has cooled and place it in the small ice cream container and level.
Step 10. Sprinkle the spore sparsely over the mixture in the small ice cream container.
Step 11. Place the milk bottle tops in the large ice cream container with the flat surface facing down. Place the small ice cream container in the large ice cream container so that it is sitting on the milk bottle tops.
Step 12. Remove the water from the microwave and pour it into the larger ice cream container so there is 25mm to 30mm of water in the bottom.
Step 13. Place the ice cream containers in the plastic bag and seal. Step 14. Place the contents and bag in a warm shady place preferably 50mm to 70mm shade depending on the specie. Shade houses and some window sills are ideal.
Step 15. The surface should turn green within a week to two weeks. The prothallus will then develop. From the prthalus the first true fronds will appear. Wait until the ferns are 20mm to 35mm in height before you attempt to transplant them. Once they are ready open the bag up slightly and allow the air to flow around the little ferns. Every 3 to 5 days open the bag a little further so the ferns get use to their new environment. Allow them a week to two weeks to harden off before you transplant them following the removal of the plastic bag. Carefully prick them out into 50mm standard squat tubes as you would any seedling.
Do not try to transplant them as single plants as they are still a little delicate still.
Once the smaller ones again reach 50mm to 70mm you may wish to divide the stronger and hardier individual plants into smaller clumps in 100mm squat pots.
Step 16. We fertilized with seaweed, fish emulsion or organic chicken pellets soaked in water on an alternate basis until established. Fertilize every two months for one year even when in the ground.
Further Comments from Readers:
“Hi reader, it seems you use The Bible of Botany a lot. That’s great as we have great pleasure in bringing it to you! It’s a little awkward for us to ask, but our first aim is to purchase land approximately 1,600 hectares to link several parcels of N.P. into one at The Pinnacles NSW Australia, but we need your help. We’re not salespeople. We’re amateur botanists who have dedicated over 30 years to saving the environment in a practical way. We depend on donations to reach our goal. If you donate just $5, the price of your coffee this Sunday, We can help to keep the planet alive in a real way and continue to bring you regular updates and features on Australian plants all in one Botanical Bible. Any support is greatly appreciated. Thank you.”
In the spirit of reconciliation we acknowledge the Bundjalung, Gumbaynggirr and Yaegl and all aboriginal nations throughout Australia and their connections to land, sea and community. We pay our respect to their Elders past, present and future for the pleasures we have gained.
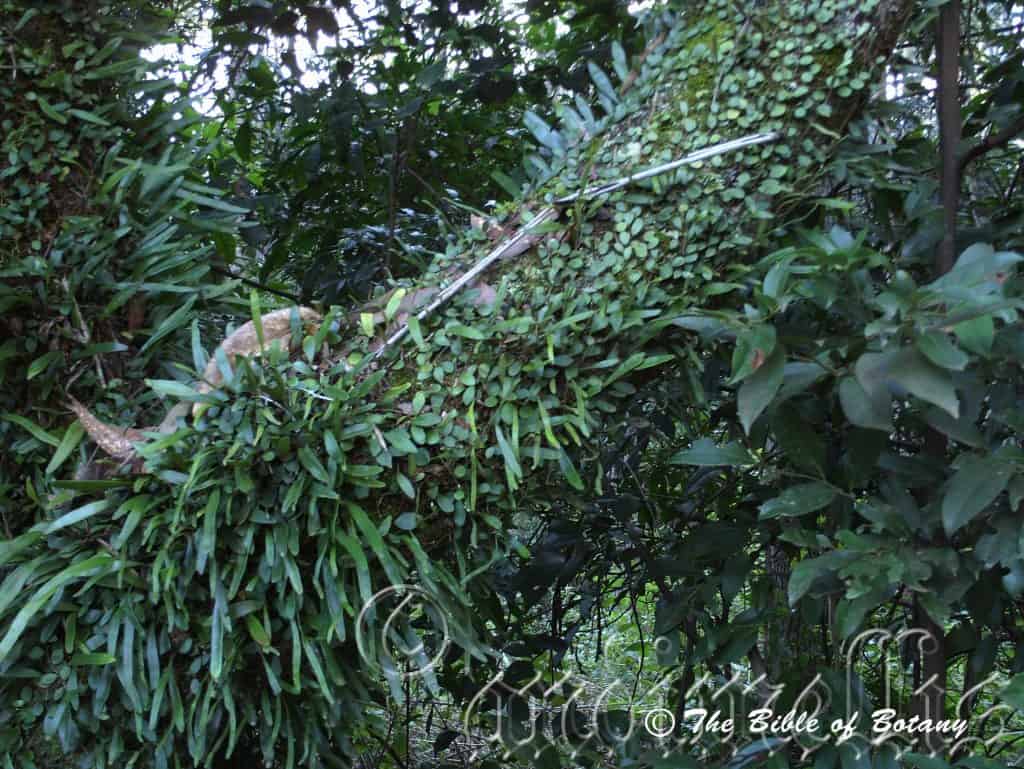
Swan Creek NSW
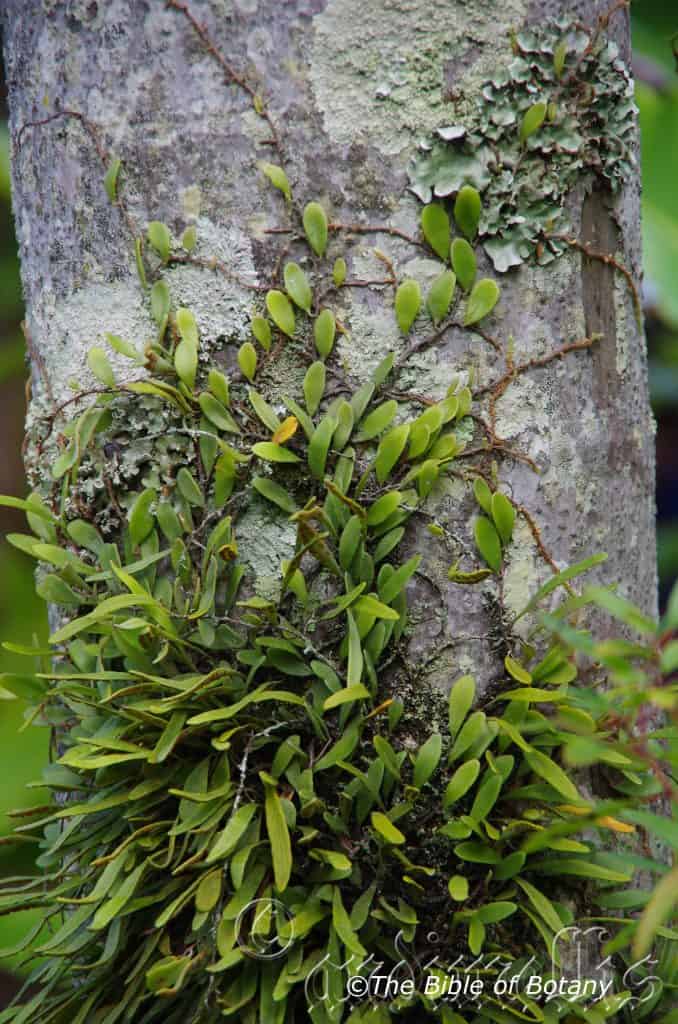
Gympie Qld.
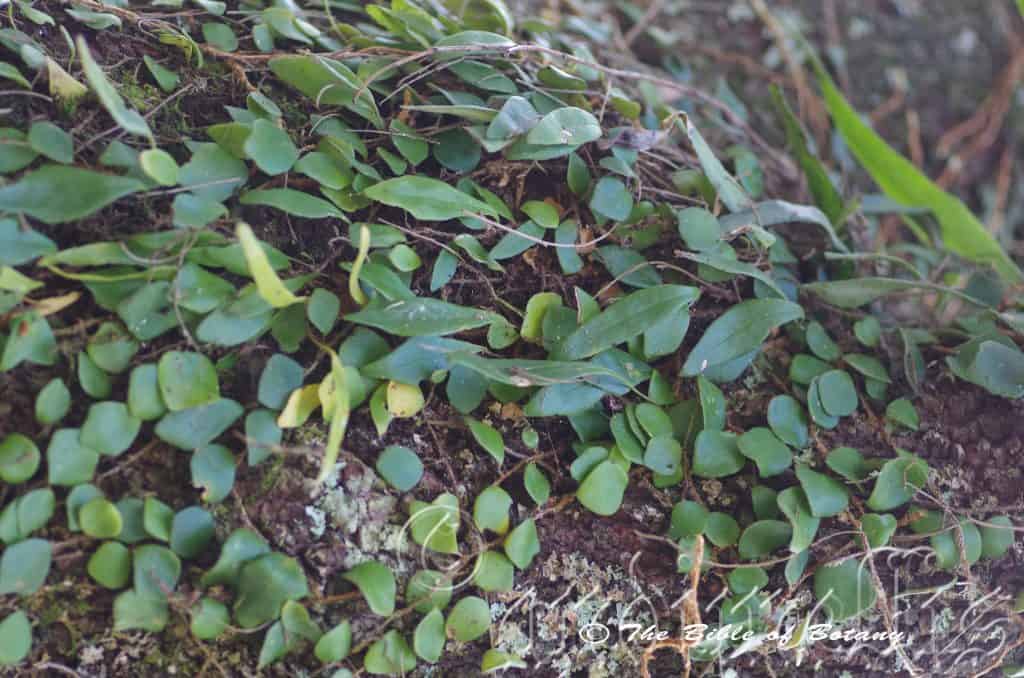
Cathedral Rocks National Park Ebor NSW
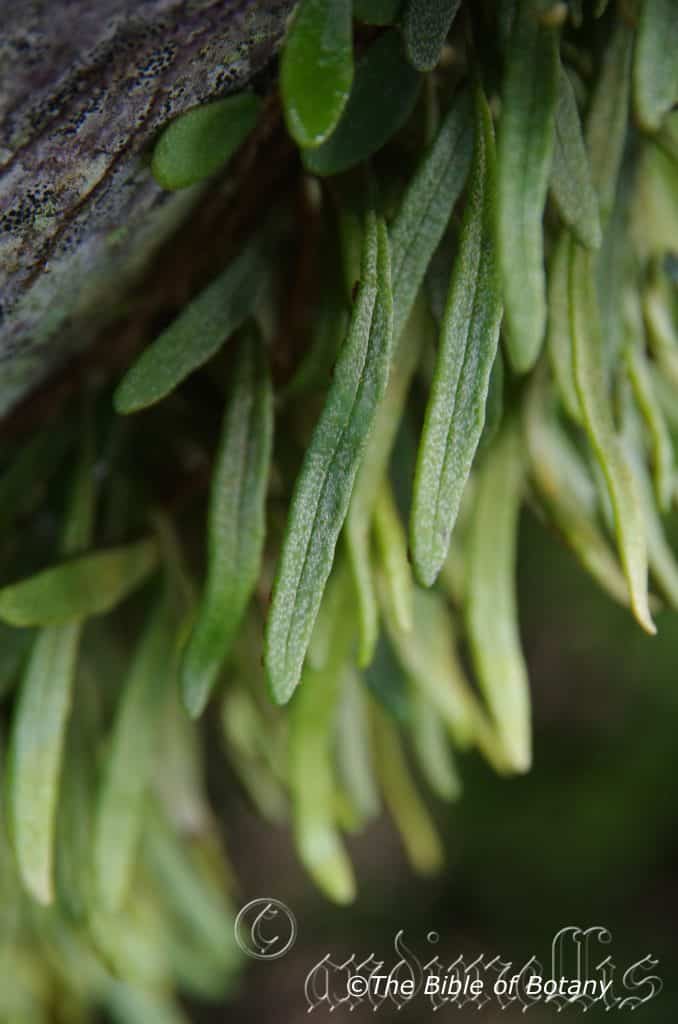
Gympie Qld.
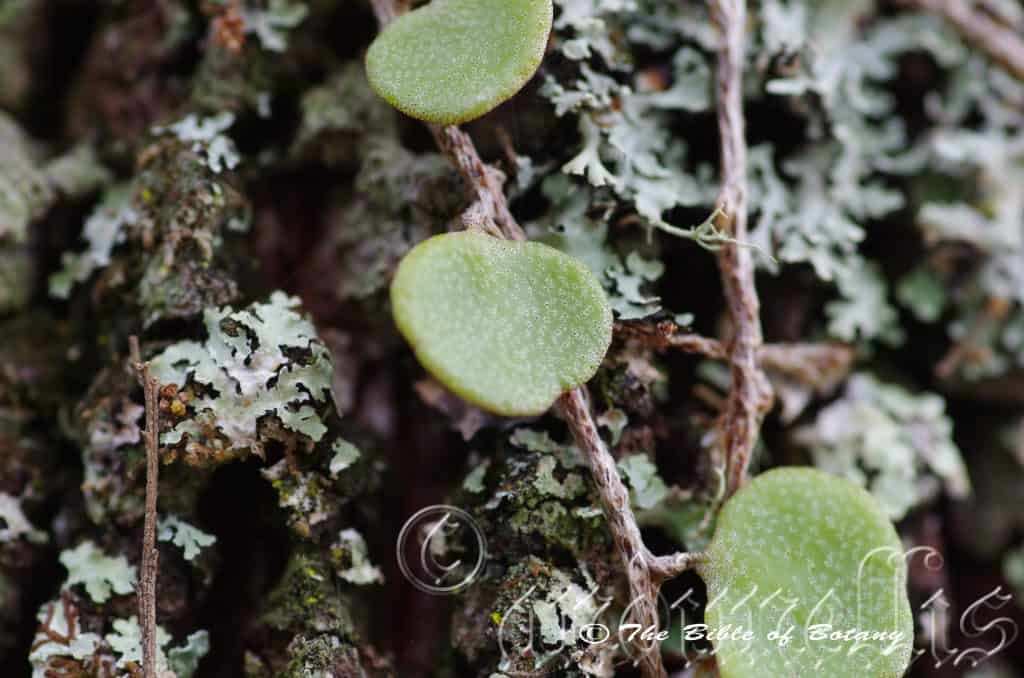
Cathedral Rocks National Park Ebor NSW
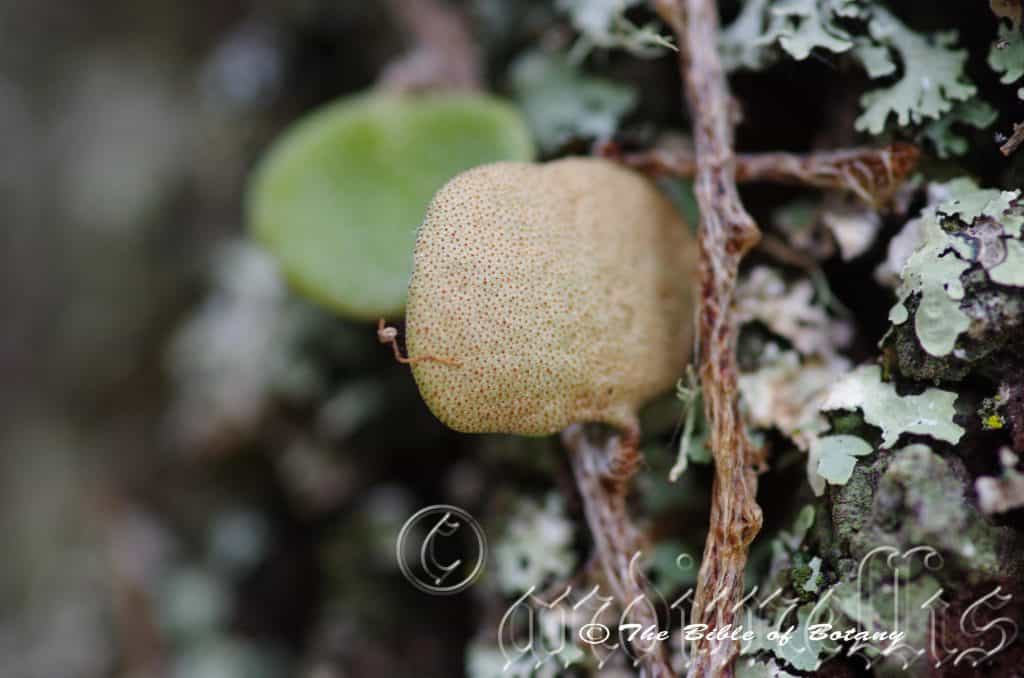
Cathedral Rocks National Park Ebor NSW
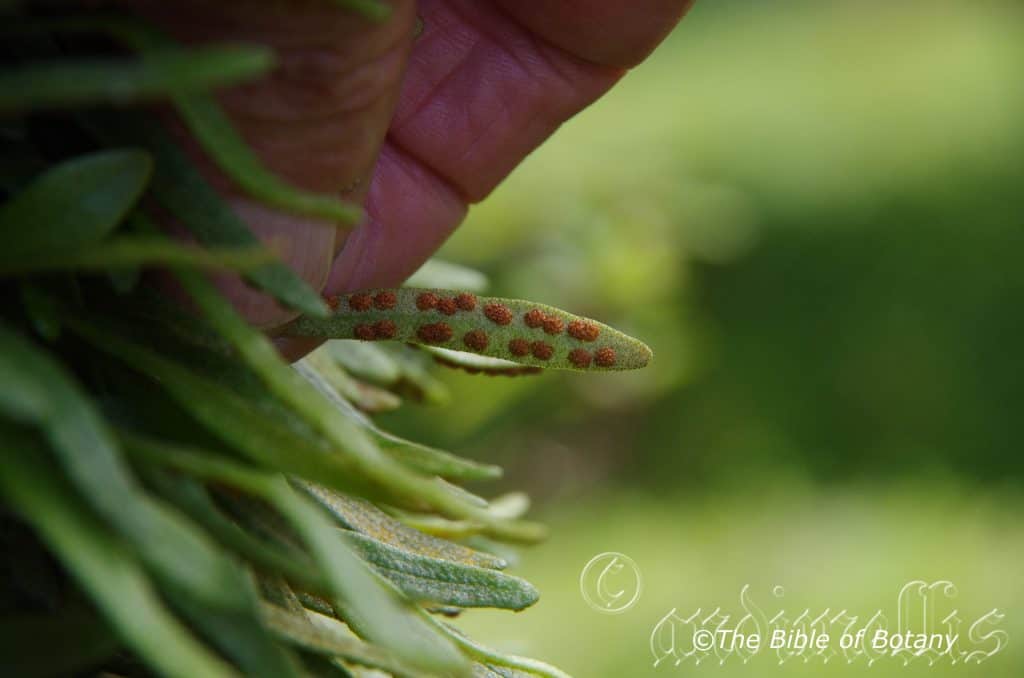
Gympie Qld.
Pyrrosia rupestris
Classification:
Unranked: Pteridiophyta
Class: Pteridopsida
Order: Polypodiales
Family: Pteridaceae
Genus: From Pyrros, which is Ancient Greek for a flame or flame colour. It refers to the colour of the dead or dying fronds, which often turn yellow and or reddish-yellow before dropping.
Species: From Rūpestre, which is Latin for a cliff or craggy outcrop. It refers to plants, which prefer to grow or were thought to only favour rocky crags on cliffs.
Common Name: Rock Felt Fern.
Distribution:
Pyrrosia rupestris is found south from the Daintree Rainforest National Park on Cape York Peninsula in far north eastern Queensland to Sale in central eastern Gippsland. There are 3 isolated populations in Victoria, one near Cape Bridgewater on the border with South Australia, the second near Macedon and the third on the northern section of Wilson Promontory. It is mainly found on the Western Slopes, on and east of the Great Dividing Range to the coast.
https://avh.ala.org.au/occurrences/search?taxa=Pyrrosia+rupestris#tab_mapView
Habitat Aspect Climate:
Pyrrosia rupestris prefers medium shade to full shade. It grows in well-developed warm well developed rainforests, temperate rainforests sub-tropical rainforests, littoral rainforests or moist Eucalyptus forests. The altitude ranges from 5 meters ASL to 1350 meters ASL.
The temperatures range from minus 1 degree in July to 38 degrees in January.
The rainfall ranges from lows of 900mm to 3200mm average per annum.
Soil Requirements:
Pyrrosia rupestris prefers to grow on trees as an epiphyte or on rocks as a lithophyte. The soils are usually derived from decomposed brown basalt, black basalts, granites or sandstones. The soils pH ranges from 5.5pH to 6.7pH. It does not tolerate waterlogged soils. Non saline soils to slightly saline soils are tolerated.
Height & Spread:
Wild Plants: 0.05m to 0.08m by 1m to 3m.
Characteristics:
Pteris rupestris rhizomes are long, thin, creeping, are freely branching and measure 1mm to 2mm in diameter. The scales are narrowly+- ovate and measure 2.5mm to 5mm in length by 0.9mm to 1.5mm in width. It is covered in spreading pale brown, papery scales. It is pale brown, chartaceous tapering to long flagella like apex while the margins are entire or undulating.
Pteris rupestris fertile frond’s stipes are slender and measure 1mm to 10mm long in length while the stipes in the fertile fronds measure 3mm to 45mm in length. The stipes are covered in pale brown, chartaceous tapering to a long flagella like apex while the margins are entire or undulating.
The lamina of Pyrrosia rupestris are simple, erect, non-divided and not dimorphic fronds. The erect laminas on the sterile fronds are obovate to broadly spathulate and measure 4mm to 40mm in length by 33mm to 15mm in width. The coriaceous to fleshy, discolourous laminas are sea-green to deep sea-green, dull to semi glossy and sparsely covered in fine, soft, white to pale red sericeous hairs on the upper lamina while the lower laminas are paler, dull and covered in fine, soft, white to pale red sericeous hairs. The mid vein is prominent on the lower lamina and is faintly visible from the upper lamina. The margins are entire and flat. The base is cuneate to broadly cuneate while the apex is obtuse to acute.
The sori are crowded in 1 to 4 rows on either side of the mid vein. They extend 85mm to 90mm of the way down the frond and are confluent close to the apex. The spores are small circular and yellow-brown in colour.
Wildlife:
Pyrrosia rupestris’s wildlife is unknown to the author.
Cultivation:
Pyrrosia rupestris is an excellent fern for cultivation that looks great on slabs of bark, placed on the bark of a suitable host tree or grown as a lithophyte on porous rocks.
Pyrrosia rupestris is very hardy and is another of those easy to grow ferns that just require a moist garden position where it can get light shade to medium shade and cool air with fairly high level of moisture. It is ideally suited to rainforest garden but will establish itself in any suitable microclimate.
It always looks green and fresh giving a tropical look in a short time.
Small to medium frog or fish ponds are made even more attractive when surrounded by this fern growing on rocks which will spread over small areas if given the opportunity without becoming problemsome. Its small size makes for a balance setting where medium to large rocks or boulders are used with other small rainforest understory herbs.
If grown as a potted bush house plant, place the pot on a saucer filled with gravel and water to ensure better humidity and mist frequently. Trim or pinch off dried fronds to keep it tidy and at its beautiful best. Fertilize every month during the growing season or during the warmer months with a half strength solution of our recommended organic fertilizer.
Ferns can be increased by dividing older plants into 2 or 3 new plants using a sharp knife and cutting them into 2 or 3 equal sections of around 100square centimetres or more.
To attach the plants to a tree I recommend using course hemp string as it takes a lot longer to break down, can be tightened easily and does not constrict the growth of the tree and has no added chemicals.
Propagation:
Fern Spores:
All ferns that are declared rare, vulnerable or endangered are protected by Federal and State Laws and must not be removed from the wild unless you are a land developer, forestry, mining company or main Roads department etc. This includes bulbs, roots, leaves and flowers. No part of any plant can be removed from Federal, State or Local Government land without the prior permission of the authority and this includes the spore.
Most people are put off at the thought of growing ferns from spore. Like all plants that produce their offspring from seed or spore the methods are basically the same. Remember nature has been doing this for millions of years and has been very successful. I have had excellent results growing over 200 different species of Australian ferns so don’t be afraid. Give it a go.
Step 1. Select spore from the fern fronds. Wait until the fern is just starting to release its spore. Rinse the fronds under clean running water and dry. This is to wash off any other spores from rogue ferns that may have settled onto the fronds. (There is nothing worse than having common brake or common soft bracken contaminating a prized tree fern or epiphyte.)
Step 2. Place the dry fronds in a clean brown paper bag and keep them in a cool dark place like the linen closet for about a week to ten days before you are ready to sow the spore. The exception to this rule applies to ferns, which produce green spores. These must be sown immediately that they are released. Todea Barbara is a good example of a fern, which produces green spore.
Step 3. Take a large ice cream container, a small ice cream container and a clean clear plastic bag large enough to seal the large ice cream container and three or four milk bottle tops.
Step 4. Punch or drill 6 to 10 5mm holes in the bottom of the small ice cream container.
Step 5. Wash both containers, tops and plastic bag so that they are very clean and sterile.
Step 6. Use a clean fine seed raising mi. We used 30 parts fine sand, 30 parts peat and 30 parts perlite and 10 parts vermiculite. We used crushed basalt, crusher dust and peat in a 50:50 ratio for epiphytes. Moisten the mix enough that water does not run out when the mix is squeezed between the fingers.
Step 7. Place the moisten mix (Enough to half fill the small ice cream container) in the microwave oven with a large glass of water for 7 or 8 minutes, until the water is boiling. Allow them to cool in the oven. You will need the water later so do not tip it out.
Step 8. Take the brown paper bag out of the linen closet. Shake the bag and remove the fronds. You should have a yellow, brown, black or rarely greenish brown or ochre powder or very fine, small round pin head size spore depending on the specie involved.
Step 9. Remove the mixture from the oven once it has cooled and place it in the small ice cream container and level.
Step 10. Sprinkle the spore sparsely over the mixture in the small ice cream container.
Step 11. Place the milk bottle tops in the large ice cream container with the flat surface facing down. Place the small ice cream container in the large ice cream container so that it is sitting on the milk bottle tops.
Step 12. Remove the water from the microwave and pour it into the larger ice cream container so there is 25mm to 30mm of water in the bottom.
Step 13. Place the ice cream containers in the plastic bag and seal. Step 14. Place the contents and bag in a warm shady place preferably 50mm to 70mm shade depending on the specie. Shade houses and some window sills are ideal.
Step 15. The surface should turn green within a week to two weeks. The prothallus will then develop. From the prthalus the first true fronds will appear. Wait until the ferns are 20mm to 35mm in height before you attempt to transplant them. Once they are ready open the bag up slightly and allow the air to flow around the little ferns. Every 3 to 5 days open the bag a little further so the ferns get use to their new environment. Allow them a week to two weeks to harden off before you transplant them following the removal of the plastic bag.
Carefully prick them out and plant them into 100mm standard squat pots as you would any seedling.
Do not try to transplant them as single plants as they are still a little delicate still.
Once the smaller ones again reach 120mm to 150mm you can transplant them in their final positions.
Step 16. We fertilized with seaweed, fish emulsion or organic chicken pellets soaked in water on an alternate basis until established. Fertilize every two months for one year even when in the ground or on a tree trunk rocks or boulders.
Further Comments from Readers:
“Hi reader, it seems you use The Bible of Botany a lot. That’s great as we have great pleasure in bringing it to you! It’s a little awkward for us to ask, but our first aim is to purchase land approximately 1,600 hectares to link several parcels of N.P. into one at The Pinnacles NSW Australia, but we need your help. We’re not salespeople. We’re amateur botanists who have dedicated over 30 years to saving the environment in a practical way. We depend on donations to reach our goal. If you donate just $5, the price of your coffee this Sunday, We can help to keep the planet alive in a real way and continue to bring you regular updates and features on Australian plants all in one Botanical Bible. Any support is greatly appreciated. Thank you.”
In the spirit of reconciliation we acknowledge the Bundjalung, Gumbaynggirr and Yaegl and all aboriginal nations throughout Australia and their connections to land, sea and community. We pay our respect to their Elders past, present and future for the pleasures we have gained.
All information is included in good faith and has been thoroughly researched prior to printing. The website or the author does not warrant or guarantee the accuracy of any information on these pages, nor does the website or the author accept any responsibility for any loss arising from the use of the information found within. The views and opinions are strictly those of the author or those members who chose to actively participate in the contents herein.