Plant Descriptions – Beaufortia incana – Bombax ceiba
Beaufortia incana
Beilschmiedia elliptica
Beilschmiedia obtusifolia
Belvisia mucronata
Benthamina alyxifolia
Berberidopsis beckleri
Bertya brownii
Bertya sp.chambigne
Bertya sp.Clouds Creek
Beyeria lasiocarpa
Billardiera rubens
Billbardiera heterophylla
Billbardiera scandens
Blandfordia grandiflora
Blandfordia nobilis
Blechnum camfieldii
Blechnum cartilagineum
Bertya cloudscreek
Blechnum lineare
Blechnum minus
Blechnum nudum
Blechnum patersonii
Blechnum wattsii
Blumea mollis
Boehmeria macrophylla
Bolboschoenus fluviatilis
Bombax ceiba
Beaufortia incana
Classification:
Phylum: Eudicots
Class: Rosids
Order: Myrtales
Family: Myrtaceae
Genus: Is named in honour of Mary Somerset, Duchess of Beaufort, Nee Capell; 1630-1715, also known as Mary Seymour, Lady Beauchamp who was an English noblewoman, gardener and botanist.
Species: From In, which is Latin for an intensifier and Canus, which is Latin for to grow grey, white and hairy. It refers to organs usually the leaves or stems, which are covered in soft grey or white canescent or pubescent hairs.
Common Name: Western Bottle Brush.
Distribution:
Beaufortia incana is found from east of Perth on the Swan River in the north south to Kojonup and east to Lake Magenta in south west Western Australia.
https://avh.ala.org.au/occurrences/search?taxa=Beaufortia+incana+#tab_mapView
Habitat Aspect Climate:
Beaufortia incana prefers full sun to dappled shade. It grows on plains and gentle slopes in dry open woodlands to dry open Eucalypt forests. The altitude ranges from 100 meters ASL to 350 meters ASL.
The temperatures range from 3 degrees in July to 36 degrees in January.
The rainfall ranges from lows of 400mm to 1200mm average per annum.
Soil Requirements:
Beaufortia incana prefers deep, gravely loams to light stony fatty clays. The soils are usually derived from decomposed sandstones, granites, accumulated windblown sands or ancient coastal dune sands. The soil’s pH ranges from 5pH to 6pH. It does not tolerate waterlogged soils. None saline soils to moderately saline soils are tolerated.
Height & Spread:
Wild Plants: 0.5m to 2m by 0.5m to 1.5m
Characteristics:
Beaufortia incana grows as a strong upright dense shrub. The main stems are pendulant with a thick spongy, longitudinal flaky bark. The bark is dull pale grey-brown. Juvenile branchlets are pale pink-fawn turning pale green as they approach the apex. They are densely covered in long white villous hairs.
The crowded, oblong leaves of Beaufortia incana measure 5mm to 7mm in length by 0.7mm to 1mm in width. The bases are round to cuneate while the apexes are obtuse to broad acute. The concolourous lamina is soft pale green to pale blue-green and is densely covered in short white villous hairs. The leaf margins are entire. The petioles are sessile to 0.5 mm in length.
The inflorescences of Beaufortia incana are born in globular clusters from along the previous season’s growth or towards the end of the branchlets. There are 28 to 48 individual flowers in a cluster. The flowers measure 20mm to 25mm in diameter. The stamens and pistil are the most prominent part of the flowers.
The 4 or at times 5 stamens orange-red to scarlet red and further divide near the apexes. The filaments measure 6mm to 9mm in length before dividing into three for the final 2mm to 4mm. The anthers are reddish-brown to blood red.
The flowers are born singularly within each bract. The 5 oblong pale green petals measure 1mm to 2mm in length by 0.5mm in width. The long, filiform, orange-red to scarlet red style measures 8mm to 14mm in length. The flowers appear from August to December.
Beaufortia incana’s fruit is a small, glabrous pentagonal shaped woody capsule. The capsules measure 4mm to 5mm in diameter while the orifice measures 2mm to 2.5mm. The 3 to 5 woody, depressed valves.
Wildlife:
Beaufortia incana’s flowers are eaten by possums, native rats and are visited by many small nectar feeding honeyeaters and butterflies.
Cultivation:
Beaufortia incana makes an excellent small bushy shrub for native gardens. it is suitable on all types of sandy loams and are most suitable for small, medium and large gardens close to the coast in temperate, sub-tropical or semi-arid gardens. As a garden subject it will grow from 1 meter to 2.5 meters tall by 0.5 meters to 1.6meters diameter. It is cold tolerant to temperatures to minus 2 degrees once established and is surprisingly drought tolerant. Beaufortia incana has been grown successfully in semi-arid areas in southern Queensland that is worth while trying in other semi-arid and temperate zones on the east coast.
It is very fast growing especially with a good fertilizing program and with a little moisture will grow more than 1 meter a year. Give the plants a double dose of our recommended fertilizer following flowering and a good deep soaking in mid-winter if good winter rains are not forthcoming. With hold summer watering unless temperatures exceed 40 degrees and the soils are becoming parched.
Try using it in an informal or formal manner in front of buildings. This will aid in breaking up rigid lines and soften the structures overall appearance. On taller buildings this can be done by planting it between taller narrow types of trees with finer or broader leaves. Plant it together with unequal gaps and free flowing curves to accentuate height and depth. Use wider spacings where the building in the background is seen as dappled specks will soften it and where it is planted closer together will give a bolder contrast between the two. Some of the small leptospermum or Grevilleas would make ideal companion plants. Try using Leptospermum laevigatum or Leptospermum polygalifolium and Grevillea pteridifolia or even Hibiscus Heterophyllus to add colour and foliage contrasts.
2 or 3 planted with a curve, back from a bend will become a very strong upright focal point whether it is in flower or not. In smaller bush gardens or more in larger gardens will gain a lot of attention forming a barrier for what lies behind them, enticing the walker to look further.
It can be regularly tip pruned if a tall hedge is required. This can be maintained with regular pruning and planting closer together with spacings of 2 meters. It responds very well to tip pruning, recovering quickly and increasing the number of flowers in the following season.
Propagation:
Seeds: Beaufortia incana seeds do not require treatment before sowing. Sow fresh seeds directly into a seed raising mix and cover with 5mm of the mix. When the seedlings are 25mm to 50mm tall, prick them out and plant them into 50mm native tubes using a seed raising mix.
Once the seedlings reach 150mm to 200mm in height plant them out into their permanent position. Mass plantings can be achieved with spacing of 2 meters. When planting for the flowers, plant the seedlings at 3 meter spacings so easy pruning and harvesting can take place.
Cuttings: Use 20mm to 70mm long softwood cuttings are prepared from soft, succulent, new growth of woody plants, just as it begins to harden (mature). Shoots are suitable for making softwood cuttings when they can be snapped easily when bent and when they still have a gradation of leaf size (oldest leaves are mature while the newest leaves are still small). For Beaufortia incana, this stage occurs in May, June, or July in warm frost free areas. The soft shoots are quite tender, and extra care must be taken to keep them from drying out. The extra effort pays off, because they root quickly.
1 prepare the cutting mix by adding one third sharp clean river sand, one third peat and one third perlite. These ingredients are sterile,
2 Select good material from non diseased plants,
3 Select semi green stems for cuttings. Look for a stem with two or three nodes,
4 Place the cutting on a flat, hard surface, and make a clean slice with a sterilized sharp knife or razor blade down one side at the base. – This scarification of the node will increase the chances of roots emerging from this spot. Now remove all but one or two the leaves, leaving the apex leaves in tact. If the leaves are very large in proportion to the stem, cut off the apical halves.
5 Some plants root easily, but a rooting hormone can help others by stimulating the cutting into sending out new roots. Fill a saucer with water, and place some rooting hormone into another container like a bottle top. Dip the node end of the cutting into the water and then into the rooting hormone. Tap off any excess hormone,
6 Use a small dipple stick or old pencil to poke a hole into the soilless potting mix. Ensure the hole is slightly larger than the stem diameter and be careful not to wipe the rooting hormone off the cuttings base, place the cuttings in a pattern ensuring the cuttings are not touching each other,
7 I like to place the pots in Plastic bags to help maintain temperature and moisture. Place in a semi shaded place like under 50mm shade cloth.
8 When the cuttings have struck, open the bag to allow air circulation for a few days to a week,
9 Once hardened off remove the cuttings from the bag and allow to further hardening for a few more days,
10 Transplant into a good potting mix to grow on.
Fertilize using Seaweed, fish emulsion or organic chicken pellets soaked in water on an alternate basis. Fertilize every two months until the plants are established then annually in early September to October to maintain health, vitality and better flowering.
Further Comments from Readers:
Hi reader, it seems you use The Bible of Botany a lot. That’s great as we have great pleasure in bringing it to you! It’s a little awkward for us to ask, but our first aim is to purchase land approximately 1,600 hectares to link several parcels of N.P. into one at The Pinnacles NSW Australia, but we need your help. We’re not salespeople. We’re amateur botanists who have dedicated over 30 years to saving the environment in a practical way. We depend on donations to reach our goal. If you donate just $5, the price of your coffee this Sunday, We can help to keep the planet alive in a real way and continue to bring you regular updates and features on Australian plants all in one Botanical Bible. Any support is greatly appreciated. Thank you.
In the spirit of reconciliation we acknowledge the Bundjalung, Gumbaynggirr and Yaegl and all aboriginal nations throughout Australia and their connections to land, sea and community. We pay our respect to their Elders past, present and future for the pleasures we have gained.
Lismore Botanic Gardens NSW
Lismore Botanic Gardens NSW
Lismore Botanic Gardens NSW
Mount Cootha Botanic Gardens Qld.
Beilschmiedia elliptica
Classification:
Phylum: Equisetopsida
Class: Magnoliids
Order: Laurales
Family: Lauraceae
Genus: Is named in honour of Carl Traugott Beilschmied; 1793-1848, who was a German pharmacist and botanist who did extensive research in phytogeography – Is the branch of botany that deals with the geographical distribution of plants.
Species: From Elleiptikas, which is Ancient Greek for an elliptical or ovate shape. It refers to organs usually the leaves which have an elliptical shape.
Sub specie:
Common Name: Grey Walnut
Distribution:
Beilschmiedia elliptica is found south from near Miriam Vale in south eastern Queensland to Foster in New South Wales.
https://avh.ala.org.au/occurrences/search?taxa=Beilschmiedia+elliptica#tab_mapView
Habitat Aspect Climate:
Beilschmiedia elliptica prefers full sun to dappled shade. It grows in warm temperate rainforest and in warm moist subtropical rainforest on and east of the Great Dividing Range. The altitude ranges from 10 meters ASL to 900 meters ASL.
The temperatures range from minus 3 degrees in July to 36 degrees in January.
The rainfall ranges from lows of 900mm to 2100mm average per annum.
Soil Requirements:
Beilschmiedia elliptica prefers poorer quality deep, gravely loams to light stony fatty clays. The soils are usually derived from decomposed sandstones, granites, brown basalts, black basalts, shales, metamorphic rocks or accumulated peaty beach sands. The soil’s pH ranges from 5pH to 7pH. It does not tolerate waterlogged soils. None saline soils to moderately saline soils are tolerated.
Height & Spread:
Wild Plants: 25m to 32m by 8m to 15m
Characteristics:
Beilschmiedia elliptica grows as a strong upright tree with a buttressed base. The bark is pale grey to pale red-brown with lepidote lumps and often with numerous depressions while the main branches are erect with papillate lumps. The bark is dull pale grey to pale grey-brown and covered in mosses. Young and juvenile branchlets turn pink as they approach the apex. They are densely covered in long white appressed pannate hairs.
The alternate or rarely sub opposite leaves of Beilschmiedia elliptica are narrow elliptical to lanceolate. They measure 60mm to 100mm in length by 20mm to 35mm in width. The base is cuneate while the apex is acute to bluntly acuminate. The discolourous laminas are mid green to mid grey-green, dull and covered in short white, caduceus, appressed pannate hairs while the lower laminas are slightly paler. The laminas recurve slightly upwards from the mid vein to the margins and are slightly undulating along the margins. The mid vein is prominent on both laminas but more is pronounced on the lower lamina. The 6 to 10 alternate pairs of lateral veins are slightly prominent on the lower laminas and are faintly visible on the upper laminas. The leaf margins are entire. The petioles measure 4mm to 8m in length.
The inflorescences of Beilschmiedia elliptica are globular panicles born from the upper leaf axils. The panicles measure 60mm to 90mm in length by 50mm to 80mm in diameter. There are 78 to 108 individual flowers on a panicle which measure 8mm to 10mm in diameter. The 6 ovate tepals are densely covered in white appressed pannate hairs externally. The pascal yellow-green tepals measure 2.1mm to 3.5mm in length by 2.1mm to 3.5mm in width.
The 9 pascal yellow-green stamens are arranged in 2 rows with 6 on the outer row and 3 on the inner row. The 6 outer stamens are opposite the tepals. There are 3 staminodes alternating with the 3 inner stamens. Each stamen is leaf like and pascal yellow-green, with 2 deep yellow-orange anthers. They measure 1mm to 1.6mm in length.
The stout pascal yellow-green has a maroon-red stigma. The flowers appear from August to October.
Beilschmiedia elliptica’s fruit is glabrous ovoidal to globose drupe. The drupes measure 13mm to 18mm in length by 9mm to 12mm in diameter. The green drupes turn black and glaucous when ripe. They ripen from February to April.
Wildlife:
Beilschmiedia elliptica fruits are eaten by possums, native rats and are visited by many fruit eating birds including the Rose-crowned Fruit Dove Ptilinopus regina, Topknot Pigeon Lopholaimus antarcticus, Green Catbird Ailuroedus crassirostris, and the Wompoo Fruit Dove Ptilinopus magnificus. The fruits are also probably eaten by the various flying foxes and Cassowaries Casuarius casuarius.
Fallen fruits are probably eaten by native rats and native mice.
The fruits are edible, however I have not experienced the taste so cannot comment further.
Cultivation:
It would make an good fire retardant medium to tall tree.
* Fire retardant plants act as radiant heat screens and absorb more heat from an approaching fire without burning.
* Fire retardant trees are able reduce wind speed near a house or out buildings.
* Fire retardant also trap embers and sparks carried by the wind.
* Fire retardant ground covers are able to catch burning embers without catching fire themselves, and also slow the travel of a fire through debris and litter on the ground.
Beilschmiedia elliptica makes an excellent bushy tree for medium to large native gardens. It is hardy on most soil types and is most suitable for gardens close to the coast in warm temperate, sub-tropical or semi-arid gardens. As a garden subject it will grow from 15 meter to 20 meters in height by 7 meters to 10 meters diameter when grown in the open on better quality soils. It is cold tolerant to temperatures to minus 2 degrees once established and are surprisingly drought tolerant.
It is fast growing especially with a good organic native fertilizing program and with a little moisture will grow more than 1 meter a year. Give the plants a double dose of our recommended fertilizer following flowering and a good deep soaking in mid-winter if good winter rains are not forthcoming. Withhold summer watering unless temperatures exceed 40 degrees.
Because of Beilschmiedia elliptica’s rather fast, tall upright narrower growth it makes an excellent accent tree in front of low set homes, commercial properties, industrial sheds, school buildings or farm sheds where it will break up hard rigid architectural lines and give warmth and breadth to a building. Heavy shade produced from there dense canopy and the fact that the leaves are carried almost to the ground the ascetic and cooling effects are strong.
A lot more research is needed on Beilschmiedia species to determine the feasibility of oil production from the seeds. Beilschmiedia mannii, Beilschmiedia brenesii and Beilschmiedia ugandiensis which are non-natives are being trialled in South America and Africa for their oil content and flavour.
Propagation:
Seeds: Beilschmiedia elliptica’s seeds are best having the flesh removed prior to sowing. Allow the fruit to start fermenting and wash thoroughly prior to sowing. Sow the fresh seeds directly into a seed raising mix and cover with 5mm of the mix or sow directly into the 50mm native tubes. When the seedlings in the trays are 25mm to 50mm tall, prick them out and plant them into 50mm native tubes using a seed raising mix.
Once the seedlings reach 150mm to 200mm in height plant them out into their permanent position.
Mass plantings can be achieved with spacing of 10 meters for a rainforest or 15 meters for a park like scenario.
When planting for the fruit in an orchard, plant the seedlings at 12 meter spacings so easy pruning and harvesting can take place.
Fertilize using Seaweed, fish emulsion or organic chicken pellets soaked in water on an alternate basis. Fertilize every two months until the plants are established then annually in early September to October to maintain health, vitality and better flowering.
Further Comments from Readers:
Hi reader, it seems you use The Bible of Botany a lot. That’s great as we have great pleasure in bringing it to you! It’s a little awkward for us to ask, but our first aim is to purchase land approximately 1,600 hectares to link several parcels of N.P. into one at The Pinnacles NSW Australia, but we need your help. We’re not salespeople. We’re amateur botanists who have dedicated over 30 years to saving the environment in a practical way. We depend on donations to reach our goal. If you donate just $5, the price of your coffee this Sunday, We can help to keep the planet alive in a real way and continue to bring you regular updates and features on Australian plants all in one Botanical Bible. Any support is greatly appreciated. Thank you.
In the spirit of reconciliation we acknowledge the Bundjalung, Gumbaynggirr and Yaegl and all aboriginal nations throughout Australia and their connections to land, sea and community. We pay our respect to their Elders past, present and future for the pleasures we have gained.
Coffs Harbour Botanic Gardens NSW
Beilschmiedia obtusifolia
Classification:
Phylum: Equisetopsida
Class: Magnoliids
Order: Laurales
Genus: Is named in honour of Carl Traugott Beilschmied; 1793-1848, who was a German pharmacist and botanist who did extensive research in phytogeography – – Is the branch of botany that deals with the geographical distribution of plants. .
Species: From Obtusum, which is Latin for rounded and Folium, which is Latin for foliage. It refers to leaves, which have round or obtuse apexes.
Common Name: Blush Walnut.
Distribution:
Beilschmiedia obtusifolia is found south from the Torres Strait Islands, New Guinee and Cape York Peninsula to Port Macquarrie in northern coastal New South Wales.
https://avh.ala.org.au/occurrences/search?taxa=Beilschmiedia+obtusifolia#tab_mapView
Habitat Aspect Climate:
Beilschmiedia obtusifolia prefers full sun to dappled shade. It grows in warm, well developed sub-tropical rainforests, moist closed Eucalyptus forests, moist open Eucalyptus forests, monsoonal forests and vine forests. The altitude ranges from 5 meters ASL to 820 meters ASL.
The temperatures range from 1 degree in July to 36 degrees in January.
The rainfall ranges from lows of 900mm to 3200mm average per annum.
Soil Requirements: Beilschmiedia obtusifolia prefers better quality rich, deep, fertile, loams, light stony fatty clays to medium clays. The soils are usually derived from decomposed brown basalts, black basalts, shales, metamorphic rocks, or at times heavier accumulated peaty beach sands. The soil’s pH ranges from 5pH to 6pH. It does not tolerate waterlogged soils. None saline soils to moderately saline soils are tolerated.
Height & Spread:
Wild Plants: 25m to 33m by 8m to 15m
Characteristics:
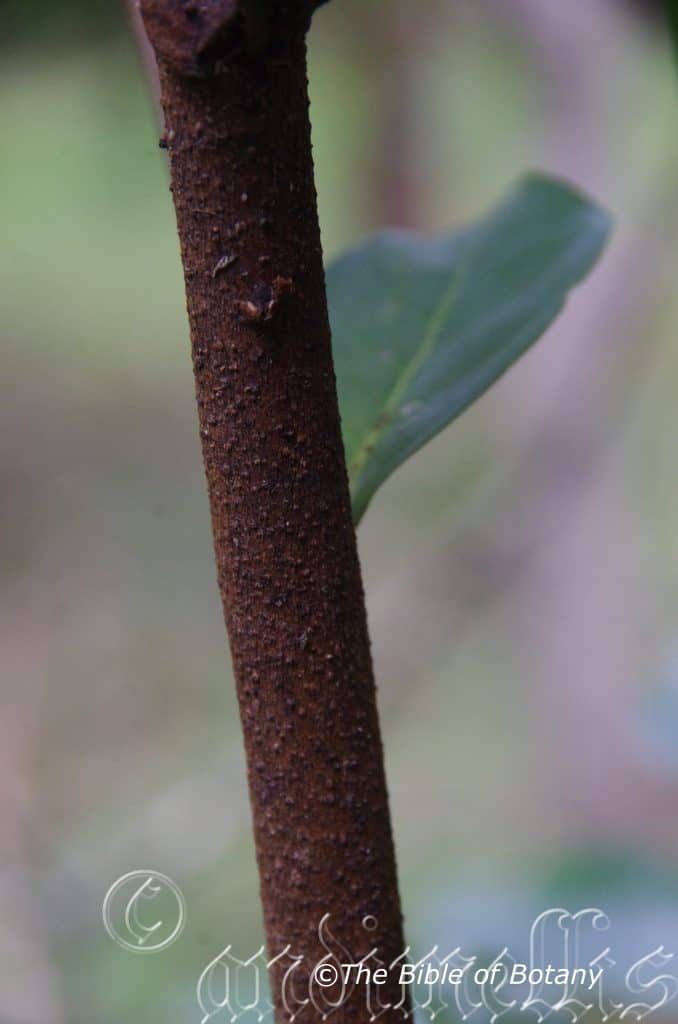
Beilschmiedia obtusifolia grows as a strong upright tree with a straight to flanged base. The bark is pale grey to grey on old trees and pale brown on younger trees. The scurfy bark has longitudinal fissures while the main branches are divaricate, glabrous to scurfy and covered in mosses. The branchlets have numerous pale, circular or elongated lenticels. Young and juvenile branchlets turn pink to rich glossy tan as they approach the apex. They are covered in long white, appressed, caduceus pannate hairs. The trunks often have1 to many lateral shoots close to the base that never fully develop.
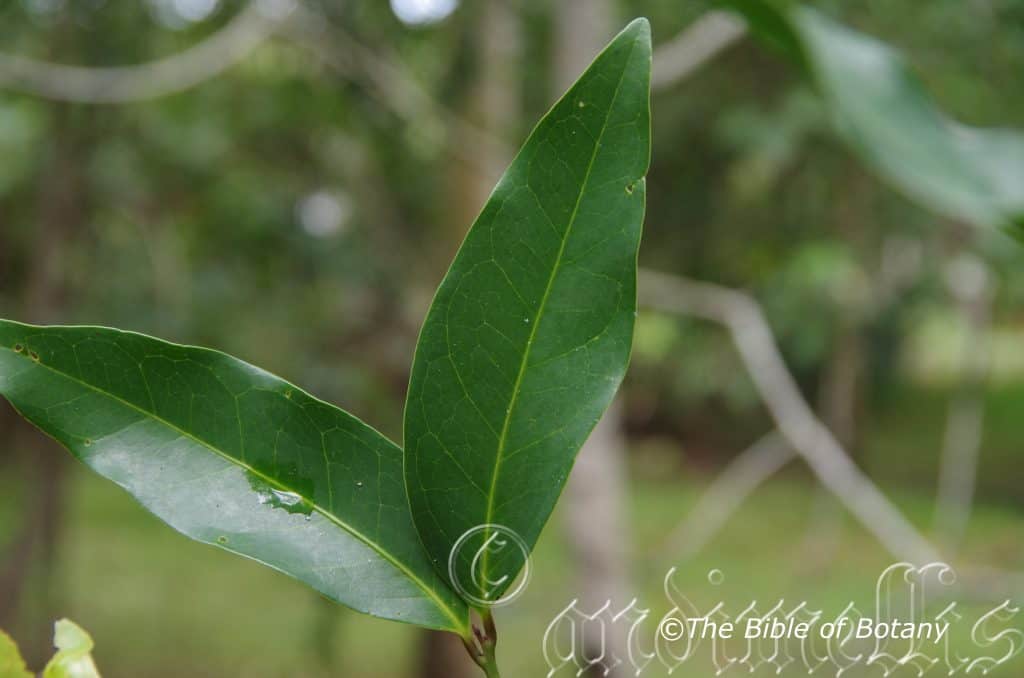
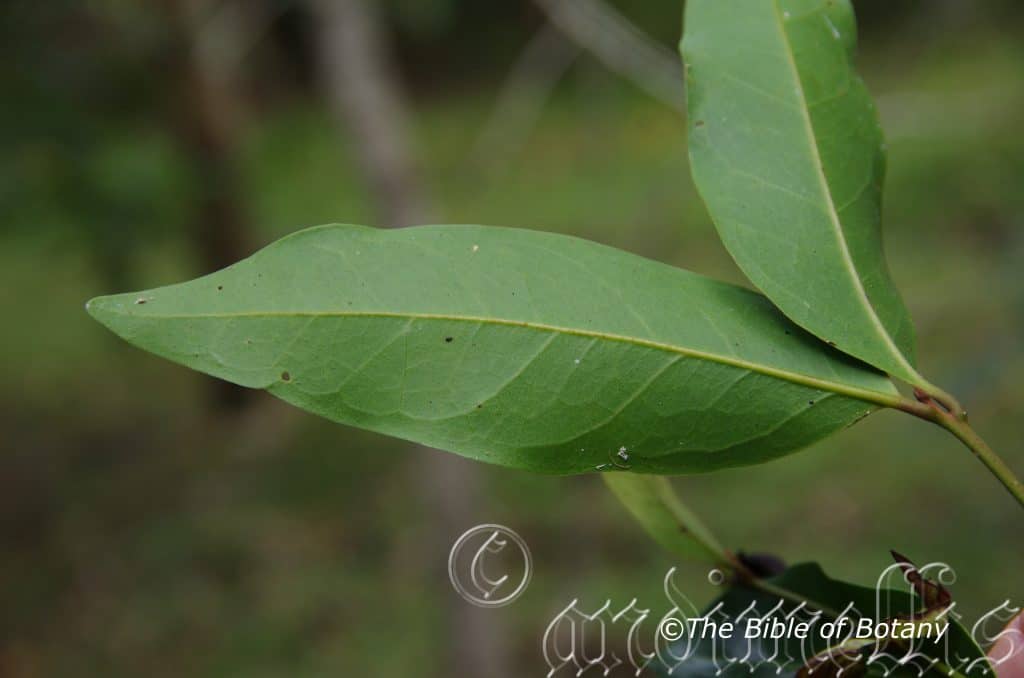
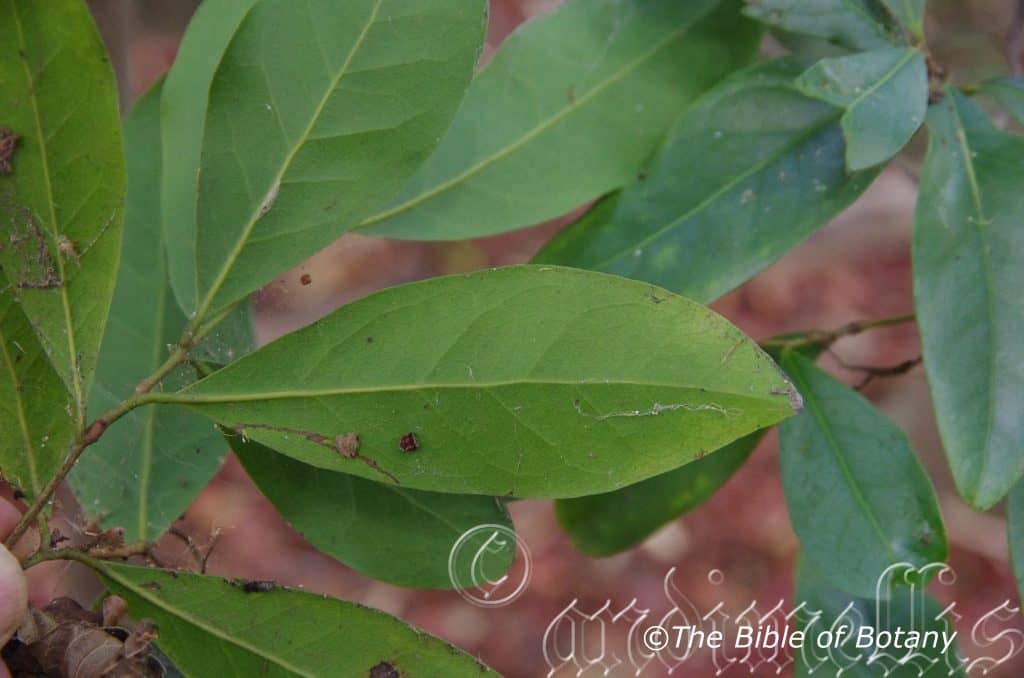
The alternate leaves of Beilschmiedia obtusifolia are oblanceolate and measure 60mm to 160mm in length by 20mm to 55mm in width. The petioles are flat or slightly channelled on the upper surface and measure 5mm to 15m in length. The bases are cuneate and shortly attenuate while the apexes are obtuse to bluntly acuminate. The discolourous laminas are mid green to deep grass-green, glossy and covered in short white, caduceus, appressed pannate hairs while the lower laminas are paler and semi glossy. The laminas are flat and are slightly undulating along the margins. The mid vein is prominent on the lower laminas and is flush or slightly prominent on the upper lamina. The 8 to 13 alternate pairs of lateral veins are slightly prominent on the lower laminas and are faintly visible on the upper laminas. The leaf margins are entire.
The inflorescences of Beilschmiedia obtusifolia are globular panicles born from the upper leaf axils. The panicles measure 100mm to 180mm in length by 60mm to 130mm in diameter. There are 78 to 108 individual flowers on a panicle which measure 5mm to 7mm in diameter. The 6 ovate tepals are densely covered in white appressed pannate hairs externally. The off white tepals measure 2mm to 2.2mm in length by 2.1mm to 3.5mm in width.
The 9 off white stamens are arranged in 2 rows with 6 on the outer row and 3 on the inner row. The 6 outer stamens are opposite the tepals. There are 3 staminodes alternating with the 3 inner stamens. Each stamen is leaf like and off white with 2 deep yellow-orange anthers. They measure 1mm to 1.6mm in length.
The stout off white style and ovary are off white. The flowers appear from October to November.
Beilschmiedia obtusifolia’s fruit are glabrous ovoidal drupes. The drupes measure 18mm to 24mm in length by 12mm to 17mm in diameter. The green drupes turn black and glaucous when ripe. They ripen from January to July.
Wildlife:
Beilschmiedia obtusifolia fruits are eaten by possums, native rats and are visited by many fruit eating birds including the Rose-crowned Fruit Dove, Topknot Pigeon, Green Catbird and the Wompoo Fruit Dove . The fruits are also probably eaten by the various flying foxes and Cassowaries.
Cultivation:
It would make an good fire retardant medium to tall tree.
* Fire retardant plants act as radiant heat screens and absorb more heat from an approaching fire without burning.
* Fire retardant trees are able reduce wind speed near a house or out buildings.
* Fire retardant also trap embers and sparks carried by the wind.
* Fire retardant ground covers are able to catch burning embers without catching fire themselves, and also slow the travel of a fire through debris and litter on the ground.
Beilschmiedia obtusifolia makes a good bushy tree for medium to large native gardens. It is hardy on better quality soils and are most suitable for gardens close to the coast in warm temperate, sub-tropical or semi-arid gardens. As a garden subject it will grow from 15 meter to 20 meters in height by 9 meters to 12 meters diameter when grown in the open on better quality soils. It is cold tolerant to temperatures to minus 2 degrees once established and are surprisingly drought tolerant.
It is fast growing especially with a good organic native fertilizing program and with a little moisture, organic mulch it will grow more than 1 meter a year. Give the plants a double dose of our recommended fertilizer following flowering and a good deep soaking in mid-winter if good winter rains are not forthcoming. Withhold summer watering unless temperatures exceed 40 degrees.
Beilschmiedia obtusifolia is rather fast growing, tall upright narrower growth, which makes it an excellent accent tree in front of low set homes, commercial properties, industrial sheds, school buildings or farm sheds where they will break up hard rigid architectural lines and give warmth and breadth to a building. Heavy shade produced from there dense canopy and the fact that the leaves are carried almost to the ground the ascetic and cooling effects are strong.
A lot more research is needed on Beilschmiedia specie to determine the feasibility of oil production from the seeds. Beilschmiedia mannii, Beilschmiedia brenesii and Beilschmiedia ugandiensis which are non-natives are being trialled in South America and Africa for their oil content and flavour.
Propagation:
Seeds:
Beilschmiedia obtusifolia‘s seeds are best having the flesh removed prior to sowing. Allow the fruit to start fermenting and wash thoroughly prior to sowing. Sow the fresh seeds directly into a seed raising mix and cover with 5mm of the mix or sow directly into the 50mm native tubes. When the seedlings in the trays are 25mm to 50mm tall, prick them out and plant them into 50mm native tubes using a seed raising mix.
Once the seedlings reach 150mm to 200mm in height plant them out into their permanent position.
Mass plantings can be achieved with spacing of 10 meters for a rainforest or 15 meters for a park like scenario.
When planting for the fruit in an orchard, plant the seedlings at 12 meter spacings so easy pruning and harvesting can take place.
Fertilize using Seaweed, fish emulsion or organic chicken pellets soaked in water on an alternate basis. Fertilize every two months until the plants are established then annually in early September to October to maintain health, vitality and better flowering.
Further Comments from Readers:
Hi reader, it seems you use The Bible of Botany a lot. That’s great as we have great pleasure in bringing it to you! It’s a little awkward for us to ask, but our first aim is to purchase land approximately 1,600 hectares to link several parcels of N.P. into one at The Pinnacles NSW Australia, but we need your help. We’re not salespeople. We’re amateur botanists who have dedicated over 30 years to saving the environment in a practical way. We depend on donations to reach our goal. If you donate just $5, the price of your coffee this Sunday, We can help to keep the planet alive in a real way and continue to bring you regular updates and features on Australian plants all in one Botanical Bible. Any support is greatly appreciated. Thank you.
In the spirit of reconciliation we acknowledge the Bundjalung, Gumbaynggirr and Yaegl and all aboriginal nations throughout Australia and their connections to land, sea and community. We pay our respect to their Elders past, present and future for the pleasures we have gained.
Belvisia mucronata
Classification:
Unranked: Pteridophyta
Class: Polypodiopsida
Order: Polypodiales
Family: Polypodacea
Genus: Maybe named in honour of Segundo Ruiz Belvis 1829-1867, who was a Spanish abolitionist, fighting for the freedom of black slaves in Puerto Rico and for Puerto Rico’s right to independence.
Species: From Mucronata, which is Latin for a short sharp tip. It refers to the apexes of a leaf, petal, sepal or bracts, which have a short sharp point at the apex.
Common Name: Whip Tail Fern or Needle Fern.
Distribution:
Belvisia mucronata is found south from the Iron range National Park in far north Queensland in several disjunct populations to Susan Island in northern New South Wales. It is found on and east of the Great Dividing Range. Belvisia mucronata is also found naturally in India, Indonesia, and South East Asia including Taiwan and many of the Pacific Islands. Despite its widespread distribution it is classified a rare and has suffered from severe poaching in the past.
https://avh.ala.org.au/occurrences/search?taxa=Belvisia+mucronata#tab_mapView
Habitat Aspect Climate:
Belvisia mucronata prefers full shade to even dapple light shade. It grows in well-developed rainforests or adjacent to well-developed rainforests in moist Eucalyptus forests. It occasionally is seen growing on the ground. The altitude ranges from 5 meters ASL to 1200 meters ASL but has been recorded as high as 4,000 meters in southern Asia.
The temperatures range from 3 degrees in the cooler months to 37 degrees in the monsoonal and cyclone seasons in the tropics.
The rainfalls range from lows of 1250mm to an average of 3200mm annually.
Soil Requirements:
Belvisia mucronata grows as an epiphyte on trees or as a lithophyte on rocks. Occasionally it can be seen growing on the rainforest floors among the leaf litter.
Height & Spread:
Wild Plants: 0.1 meter to 0.7 meters by 0.3 meters to 4 meters.
Characteristics:
Belvisia mucronata rhizomes are densely covered with clathrate, acuminate scales. The triangular to broadly triangular scales measure 3mm to 7mm in length by 0.6mm to 2mm in width near the base. The deep brown almost black scales have dentate margins. In large specimens they are spongy from the amount of decomposing leaf litter channelled down to the rhizomes by the simple fronds and leached down to the feeder and aerial roots below.
The coriaceous, linear fronds have a deep brown-black stipe which measures 7mm to 75mm in length. Belvisia mucronata have beautiful large simple or at times forked deep green fronds which measure 80mm to 530mm in length by 5mm to 30mm in width. The concolourous laminas are deep green and glabrous. They are flat or undulating. The bases are tapering while the apexes are tapering to constrict at the junction with the mucronate extension. The mid vein is prominent bon the lower laminas and clearly visible from the upper laminas. The lateral veins are reticulate and not clearly visible from either lamina.
The fertile fronds have long mucronate extensions beyond the apexes that measure 20mm to 250mm in length by 3mm to 6mm in width. The spore covers the whole lower surface of the mucronate tip and is golden tan when ripe.
Wildlife:
Is unknown to the author.
Cultivation:
Belvisia mucronata is a beautiful fern from the rainforests of Australia. Growing it is easy and small plants will reach their full potential in around 3 to 4 years and look really good in as little as 2 or 3 years. Belvisia mucronata is not cold tolerant so if there is any doubt with cool nights or cold winds place it in a bush house or wait until a good canopy has developed to protect it from unexpected frosts. If light frosts are a continual problem then I would suggest growing Pyrrosia rupestre as a substitute.
Its only requirement is shade and a warm humid microclimate. Feeding the plants with dilute seaweed extract, diluted fish emulsion or diluted organic chicken pellets soaked in water and sprayed onto the leaves will see Belvisia mucronata thrive. The additional use of cold tea leaves or a hand full of semi decomposed bush litter from time to time will do the plants no harm.
It can be used with great affect around swimming pools and in particular warm bright court yards with a few logs or rocks around are where they excel. The scene can be further enhanced by the addition of Asplenium australisica, Adiantum aethiopicum or small Dendrobium species.
Poked into small corners of rain forest settings or placed into the forks of trees it will give instant age to the project. Small to medium rocks can come to life in the shaded garden or rainforest by securing small plants to them. When this is done regular watering and fertilizing is essential until the plants secure themselves to their new home. This may take several months or even a year or two for them to re-establish a good root system that can adequately look after the foliage.
Feeding the plants with seaweed extract diluted fish emulsion or diluted organic lifter between leaf flushes will see Belvisia mucronata thrive.
Propagation:
Spores: Step 1. Select spore from the fern fronds. Wait until the fern is just starting to release its spore. Rinse the fronds under clean running water and dry. This is to wash off any other spores from rogue ferns that may have settled onto the fronds. (There is nothing worse than having common brake or common soft bracken contaminating a prized tree fern or epiphyte.)
Step 2. Place the dry fronds in a clean brown paper bag and keep them in a cool dark place like the linen closet for about a week to ten days before you are ready to sow the spore. The exception to this rule applies to ferns, which produce green spores. These must be sown immediately that they are released. Todea Barbara is a good example of a fern, which produces green spore.
Step 3. Take a large ice cream container, a small ice cream container and a clean clear plastic bag large enough to seal the large ice cream container and three or four milk bottle tops.
Step 4. Punch or drill 6 to 10 5mm holes in the bottom of the small ice cream container.
Step 5. Wash both containers, tops and plastic bag so that they are very clean and sterile.
Step 6. Use a clean fine seed raising mi. We used 30mm fine sand, 30mm peat and 30mm perlite and 10mm vermiculite. We used crushed basalt, crusher dust and peat in a 50:50 ratio for epiphytes. Moisten the mix enough that water does not run out when the mix is squeezed between the fingers.
Step 7. Place the moisten mix (Enough to half fill the small ice cream container) in the microwave oven with a large glass of water for 7 or 8 minutes, until the water is boiling. Allow them to cool in the oven. You will need the water later so do not tip it out.
Step 8. Take the brown paper bag out of the linen closet. Shake the bag and remove the fronds. You should have a yellow, brown, black or rarely greenish brown or ochre powder or very fine, small round pin head size spore depending on the specie involved.
Step 9. Remove the mixture from the oven once it has cooled and place it in the small ice cream container and level.
Step 10. Sprinkle the spore sparsely over the mixture in the small ice cream container.
Step 11. Place the milk bottle tops in the large ice cream container with the flat surface facing down. Place the small ice cream container in the large ice cream container so that it is sitting on the milk bottle tops.
Step 12. Remove the water from the microwave and pour it into the larger ice cream container so there is 25mm to 30mm of water in the bottom.
Step 13. Place the ice cream containers in the plastic bag and seal.
Step 14. Place the contents and bag in a warm shady place preferably 50mm to 70mm shade depending on the specie. Shade houses and some window sills are ideal.
Step 15. The surface should turn green within a week to two weeks. The prothallus will then develop. From the prthalus the first true fronds will appear. Wait until the ferns are 20mm to 35mm in height before you attempt to transplant them. Once they are ready open the bag up slightly and allow the air to flow around the little ferns. Every 3 to 5 days open the bag a little further so the ferns get use to their new environment. Allow them a week to two weeks to harden off before you transplant them following the removal of the plastic bag. Carefully prick them out into 50mm standard squat tubes as you would any seedling.
Do not try to transplant them as single plants as they are still a little delicate still.
Ground ferns like Belvisia can be left in small clumps. After a few weeks, the ferns will power away without any setbacks. Here they can be further divided where necessary removing the smaller ferns leaving the largest one in place.
Once the smaller ones again reach 50mm to 70mm you may wish to divide the stronger and hardier individual plants into smaller clumps in 100mm squat pots.
Fertilize using Seaweed, fish emulsion or organic chicken pellets soaked in water on an alternate basis. Fertilize every two months until the plants are established then annually in early September to October to maintain health, vitality and better flowering.
Further Comments from Readers:
Hi reader, it seems you use The Bible of Botany a lot. That’s great as we have great pleasure in bringing it to you! It’s a little awkward for us to ask, but our first aim is to purchase land approximately 1,600 hectares to link several parcels of N.P. into one at The Pinnacles NSW Australia, but we need your help. We’re not salespeople. We’re amateur botanists who have dedicated over 30 years to saving the environment in a practical way. We depend on donations to reach our goal. If you donate just $5, the price of your coffee this Sunday, We can help to keep the planet alive in a real way and continue to bring you regular updates and features on Australian plants all in one Botanical Bible. Any support is greatly appreciated. Thank you.
In the spirit of reconciliation we acknowledge the Bundjalung, Gumbaynggirr and Yaegl and all aboriginal nations throughout Australia and their connections to land, sea and community. We pay our respect to their Elders past, present and future for the pleasures we have gained.
The Pinnacles NSW
The Pinnacles NSW
The Pinnacles NSW
The Pinnacles NSW
The Pinnacles NSW
The Pinnacles NSW
Benthamina alyxifolia
Classification:
Unranked: Magnoliophyta
Class: Magnoliopsida
Order: Santalales
Family: Loranthaceae
Genus: Is named in honour of George Bentham; 1800-1884, who was an English botanist who undertook the reclassification: of seed plants into families.
Species: From Alysis, which is Ancient Greek for a chain, and Folium, which is Latin for foliage. It refers to the individual leaflets, which are joined in a chain formation.
Common Name:
Distribution:
Benthaina alyxifolia is found south from Agnes waters in southern coastal Queensland to New Castle in central coastal New South Wales in several disjunct populations. There are two disjunct populations much farther north near Cairns and the western section of Cedar Bay National Park in far north east Queensland.
https://avh.ala.org.au/occurrences/search?taxa=Benthamina+alyxifolia#tab_mapView
Habitat Aspect Climate:
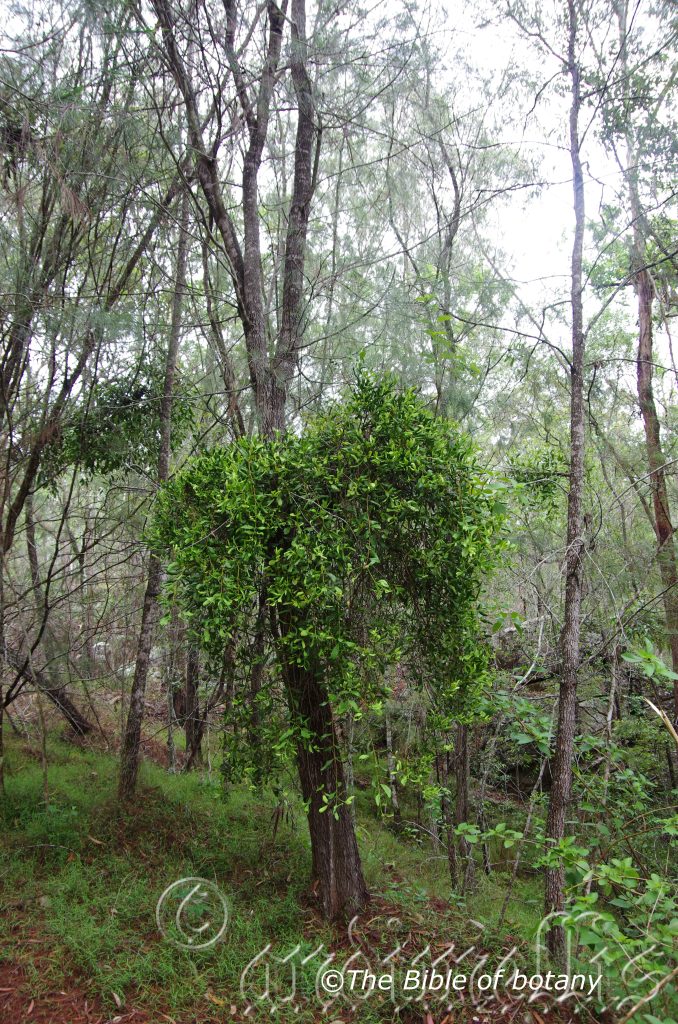
Benthaina alyxifolia prefer full sun to dappled shade. It grows as a parasitic plant on many varieties of rainforest and riparian forest trees. It is most frequently found on Myrtaceae. It is found in tropical rainforests, subtropical rainforests or moist Eucalyptus forests. The altitude ranges from 5 meters ASL to 950 meters ASL.
It has been found growing on the following hosts:
Ehretia acuminata Allocasuarina littoralis, Acacia melanoxylon, Daphnandra micrantha, Melaleuca viminalis, Eugenia smithii, Macadamia sp., Cupaniopsis anacardioides, Guioa semiglauca, Duboisia myoporoides and Aphananthe philippinensis
The temperatures range from 3 degrees in July to 36 degrees in January.
The rainfall ranges from lows of 800mm to 2400mm average per annum.
Soil Requirements:
Benthaina alyxifolia prefer host plants that grow on better quality rainforest soils. It does not tolerate waterlogged.
Height & Spread:
Wild Plants: 0.5m to 2m by 0.5m to 2m
Characteristics:
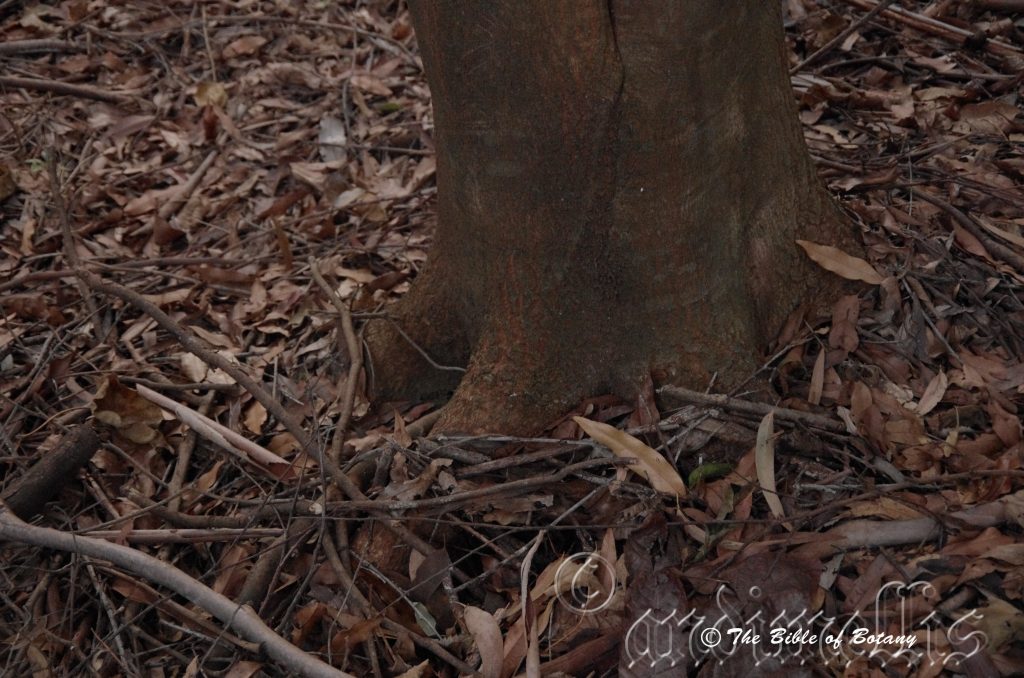
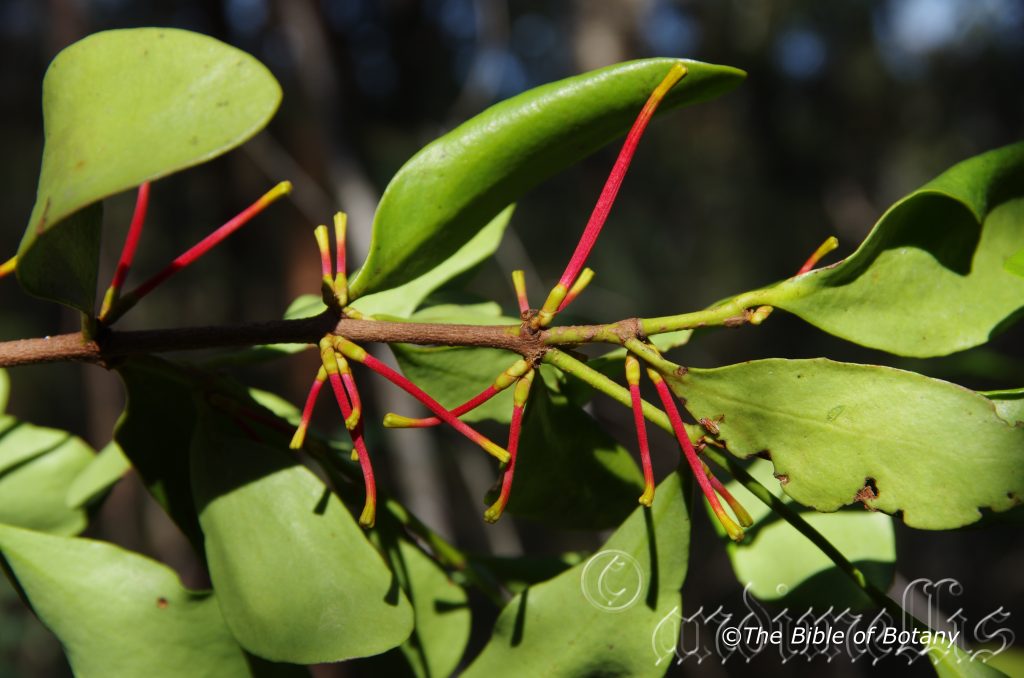
Benthaina alyxifolia grows as a strong erect parasite. The main stems are erect to spreading while the bark is pale fawn to pale fawn-brown with fine fissures while the smaller stems are mid green and covered in brown lenticels. Young and juvenile stems are covered in short brown tomentose hairs. The roots are externally attached.
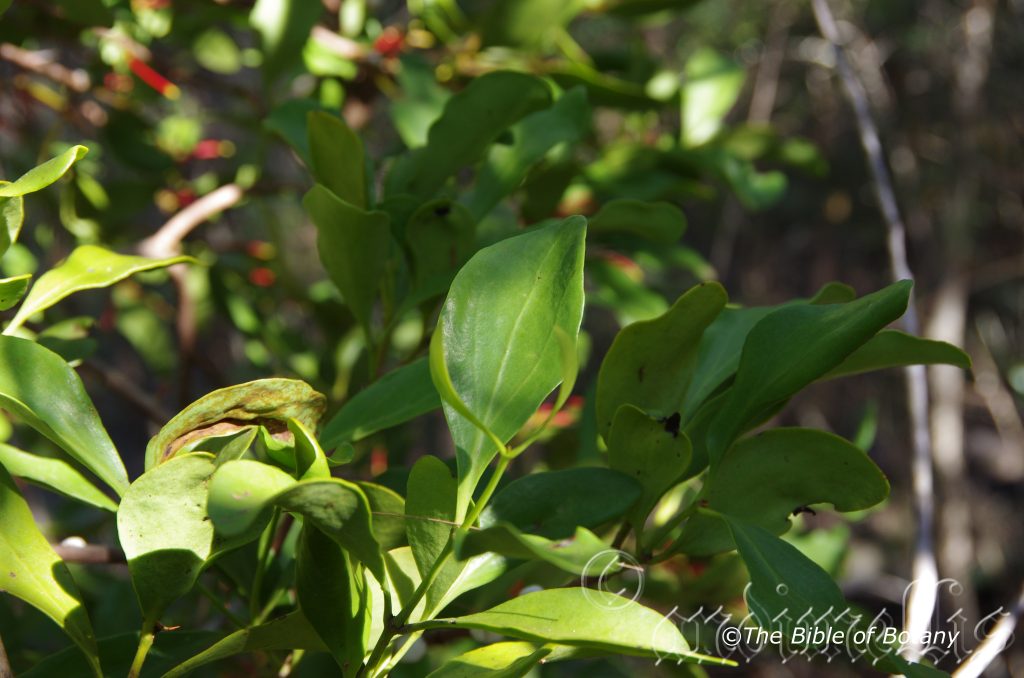
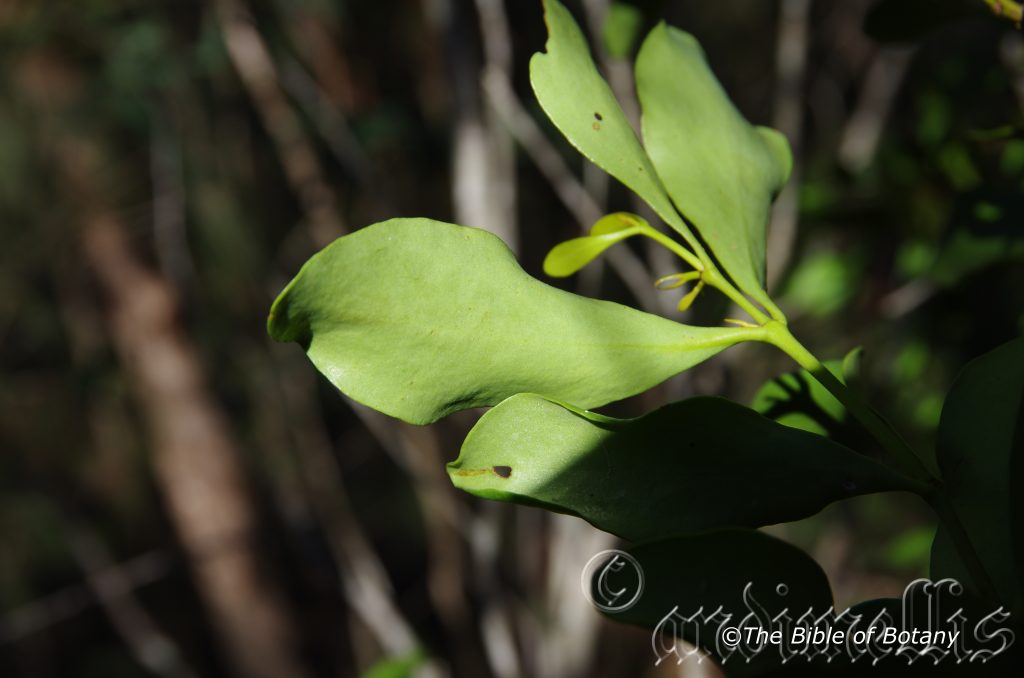
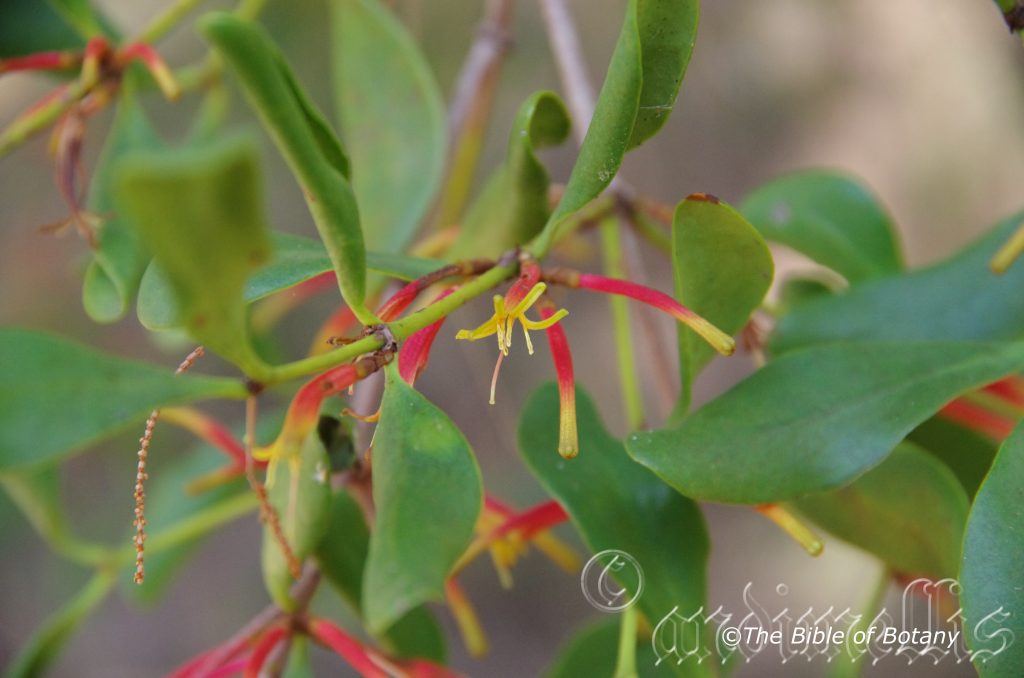
The opposite leaves of Benthaina alyxifolia are broad elliptical to broadly obovate and measure 25mm to 80mm in length by 20mm to 50mm in width. The base is rounded while the apex is obtuse. The discolourous laminas are mid grass-green, glossy and glabrous while the lower laminas are paler and dull. The leaf margins are entire and decurve downwards. The mid vein is obscure but very slightly prominent on the lower lamina and faintly visible from the upper lamina. The petioles measure 2mm to 7mm in length.
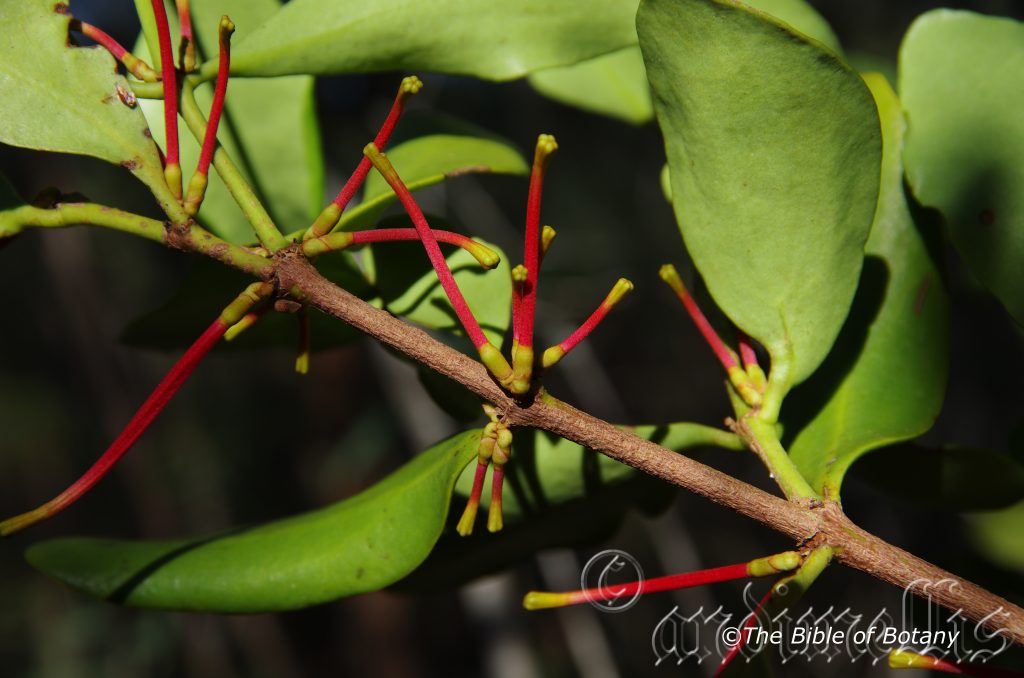
The inflorescences of Benthaina alyxifolia are born in clusters from the leaf nodes and old leaf scars. There are 5 to 12 individual flowers in a cluster. The peduncles and pedicels are covered in reddish-brown tomentose hairs. The peduncles measure 0.5mm to 3mm in length while the pedicels measure 0.5mm to 1mm in length.
The crimson-red to scarlet-red bracts are covered in reddish-brown tomentose hairs and completely encircle the ovaries. The bracts measure 2mm to 3mm in length. The calyxes tubes are covered in reddish-brown tomentose hairs and measure 3mm to 5mm in length. The corollas are crimson-red to scarlet-red externally and yellow internally. The Corolla when mature decurve and measures 32mm to 42mm in length by 3mm in diameter and 3.5mm to 4mm in diameter where the lobes, pistil and stamens are. The 5 linear lobes measure 4mm to 6mm in length.
The 5 crimson-red to scarlet-red exserted filaments measure 26mm to 36mm in length while the oblong anthers are yellow and measure 3.5mm to 4.5mm in length.
The long, slender, crimson-red to scarlet-red exserted style measures 32mm to 42mm in length. The flowers appear throughout the year with a peak from late September to early November.
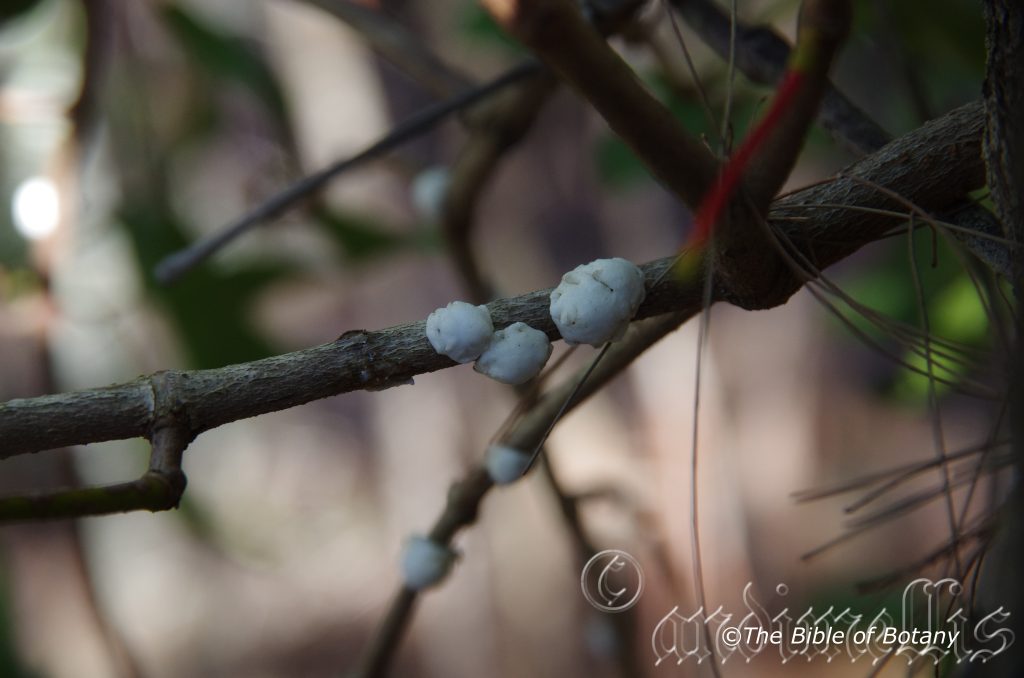
Benthaina alyxifolia’s fruit are fleshy, ellipsoidal berries. The berries measure 8mm to 10mm in length by 4.5mm to 6mm in diameter around the middle. The green fruits turn purple-brown then yellow-orange and soft when ripe. The calyxes are persistent at the apex of the ripe fruits.
Wildlife:
Benthaina alyxifolia‘s flowers are a source of nectar for the Brown honeyeater Lichmera indistincta, and the yellow face honeyeater Lichenostomus chrysops. The fruits are always sought after by the little mistletoe bird Dicaeum hirundinaceum.
Cultivation:
Benthaina alyxifolia is not a favourite of many people with just as many appreciating its real beauty.
However if one commences life on a tree close to the ground where the flowers and fruits can be viewed easily it may be worthwhile leaving it there as a curiosity. The fruits can then be controlled when ripe or they can be left to nature. It makes an interesting addition to the garden. It is a great talking point for children and adults alike.
Propagation:
Seeds:
Benthaina alyxifolia seeds can be removed from the ripe berries by eating them and spitting the seeds out. The seeds can be placed directly onto the branch of most rainforest specie however the Myrtaceae family will give the best results. Ensure the branch of the host tree has plenty of light as heavy shade is not supportive of healthy growth. Use the fruit as the adhesive or flour and water to stick the seed to the branch. Seeds usually germinate in a few days to a week and can be foliar fertilized with a weak solution of seaweed or fish emulsion until they are established.
Fertilize using Seaweed, fish emulsion or organic chicken pellets soaked in water on an alternate basis. Fertilize every two months until the plants are established then annually in early September to October to maintain health, vitality and better flowering.
Further Comments from Readers:
Hi reader, it seems you use The Bible of Botany a lot. That’s great as we have great pleasure in bringing it to you! It’s a little awkward for us to ask, but our first aim is to purchase land approximately 1,600 hectares to link several parcels of N.P. into one at The Pinnacles NSW Australia, but we need your help. We’re not salespeople. We’re amateur botanists who have dedicated over 30 years to saving the environment in a practical way. We depend on donations to reach our goal. If you donate just $5, the price of your coffee this Sunday, We can help to keep the planet alive in a real way and continue to bring you regular updates and features on Australian plants all in one Botanical Bible. Any support is greatly appreciated. Thank you.
In the spirit of reconciliation we acknowledge the Bundjalung, Gumbaynggirr and Yaegl and all aboriginal nations throughout Australia and their connections to land, sea and community. We pay our respect to their Elders past, present and future for the pleasures we have gained.
Berberidopsis beckleri
Classification:
Unranked: Eudicots
Unranked: Core Eudicots
Order: Berberidopsidales
Family: Berberidopsidaceae or Flacourtiaceae
Genus: From Berberis, which is Latinized from the Arabic vernacular for the Barberry fruit and Opsis, which is Ancient Greek for to have the appearance of. It refers to plants, which have fruits, which resemble the exotic Barberry in appearance.
Species: Is probably named in honour of Ludwig Philipp Heinrich Becker; 1808-1861, who was a German botanical artist and explorer who died on the last Burke and Wills expedition near Balloo in Queensland.
Common Name: Montane Tape Vine or Mountain Tape vine.
Distribution:
Berberidopsis beckleri is found south from the Border Ranges National Park and Mount Barney in southern Queensland to the Barrington Tops National Park in New South Wales.
https://avh.ala.org.au/occurrences/search?taxa=Berberidopsis+beckleri#tab_mapView
Habitat Aspect Climate:
Berberidopsis beckleri prefers dappled shade to full shade. It grows in warmer type well developed temperate rainforests or cooler sub-tropical rainforests. The altitude ranges from 60 meters ASL to 1100 meters ASL.
The temperatures range from minus 2 degrees in July to 36 degrees in January.
The rainfall ranges from lows of 800mm to 2000mm average per annum.
Soil Requirements:
Berberidopsis beckleri prefers better quality deep, light clays to medium clays. The soils are usually derived from decomposed brown basalts or black basalts. The soil’s pH ranges from 5.5pH to 6.5pH. It does not tolerate waterlogged soils. None saline soils to moderately saline soils are tolerated.
Height & Spread:
Wild Plants:5m to 15m by 5m to 15m
Characteristics:
Berberidopsis beckleri grows as a strong glabrous climber. The deep brown to reddish-brown or purple-red main stems is erect. The younger and juvenile stems are pale pinkish-green, yellow-green or mid green turning pale blue-green and glaucous as they approach the apex.
The alternate leaves of Berberidopsis beckleri are ovate to broad ovate and measure 30mm to 85mm usually to 65mm in length by 20mm to 50mm in width. The bases are truncate, rounded to broadly cuneate while the apexes are broadly acuminate to tapering acuminate. The discolourous laminas are mid blue-green or at times mid grass-green on the upper laminas while the lower laminas are blue-green with a glaucous coating. The thin soft leaves have 2 domatia between the main vein and the 2 lowest lateral veins. The domatia are covered in pale grey pannate hairs. The palmate veins are prominent on the lower lamina and are distinctly visible from the upper lamina. The leaf margins are entire or with 2 to 4 small lobed teeth. The petioles measure 14mm to 22mm in length.
The inflorescences of Berberidopsis beckleri are born singularly or at times in pairs from the leaf axils. The 15 to 18 ovate to broad elliptical perianth segments have obtuse apexes. The perianth segments are deep rose pink on the outer petals gradually becoming paler and eventually turning white on the inner pair. They measure 2mm to 8.2mm in length by 4mm to 5mm in width. The long thin pedicels measure 14mm to 24mm in length.
The 12 to 13 inserted pascal green stamens measure 3mm to 3.5mm in length.
The inserted pascal green style measures 2mm to 3mm in length. The flowers appear from November to February.
Berberidopsis beckleri’s fruit are glabrous, ovoidal berries. The berries measure 18mm to 23mm in length by 10mm to 18mm in diameter. The green berries turn red then black when ripe. The discs swell and are persistent at the base while the styles are persistent at the apexes.
The creamy white seeds number 100 to 120 per berry.
Wildlife:
Berberidopsis beckleri wildlife is unknown to the author. The fruits were eaten by aborigines.
Cultivation:
Berberidopsis beckleri makes an excellent small bushy shrub for native gardens or a trellis plant. It is suitable on most sandy loams to medium clays. The Australian Botanic Gardens have several plants growing at Mount Tomah botanic Gardens. It would be most suitable for small, medium and large gardens along the Great Dividing Range, on the western slopes and eastern slopes in temperate, sub-tropical gardens. As garden subjects it will grow from 3 meters to 4 meters in height by 3 meters to 6 meters width if grown in the open. This makes them ideal for light framed pergolas fences and screens.
It is cold tolerant to temperatures to minus 4 degrees once established and are surprisingly drought tolerant.
It is very fast growing especially with a good fertilizing program and with a little moisture will cover a pergola in a couple of years. Give the plants a double dose of our recommended fertilizer following flowering and a good deep soaking in mid-winter if good winter rains are not forthcoming.
It can be regularly tip pruned if a tall hedge is required over a fence. This can be maintained with regular pruning and planting closer together with spacings of 2 meters. They respond very well to tip pruning and recover quickly.
Very little is known about its needs however the fruits do have great potential horticulturally particularly if the seeds can be reduced and the pulp increased.
Propagation:
Seeds: Not much is known of its propagation so I have treated it similarly to Billardiera species. Berberidopsis beckleri‘s seeds should be removed from the pulp and washed thoroughly before sowing. Sow fresh seeds directly into a seed raising mix and cover with 5mm of the mix. When the seedlings are 25mm to 50mm tall, prick them out and plant them into 50mm native tubes using a seed raising mix.
Once the seedlings reach 150mm to 200mm in height plant them out into their permanent position. Mass plantings can be achieved with spacing of 2 meters. When planting for the fruit in an orchard, plant the seedlings 5 meters apart on the trellises similar to viticulture.
Cuttings: Use 20mm to 70mm long softwood cuttings are prepared from soft, succulent, new growth of woody plants, just as it begins to harden (mature). Shoots are suitable for making softwood cuttings when they can be snapped easily when bent and when they still have a gradation of leaf size (oldest leaves are mature while the newest leaves are still small). For Beaufortia incana, this stage occurs in May, June, or July in warm frost free areas. The soft shoots are quite tender, and extra care must be taken to keep them from drying out. The extra effort pays off, because they root quickly.
Take them in mid-autumn or late spring. Remove half the leaves from the bottom section being careful not to tear the bark.
1 prepare the cutting mix by adding one third sharp clean river sand, one third peat and one third perlite. These ingredients are sterile,
2 Select good material from non diseased plants,
3 Select semi green stems for cuttings. Look for a stem with two or three nodes,
4 Place the cutting on a flat, hard surface, and make a clean slice with a sterilized sharp knife or razor blade romoving 10mm off one side of the cutting. – This scarification of the node will increase the chances of roots emerging from this spot. Now remove all but one or two the leaves, leaving the apex leaves in tact. If the leaves are very large in proportion to the stem, cut off the apical halves.
5 Some plants root easily, but a rooting hormone can help others by stimulating the cutting into sending out new roots. Fill a saucer with water, and place some rooting hormone into another container like a bottle top. Dip the node end of the cutting into the water and then into the rooting hormone. Tap off any excess hormone,
6 Use a small dipple stick or old pencil to poke a hole into the soilless potting mix. Ensure the hole is slightly larger than the stem diameter and be careful not to wipe the rooting hormone off the cuttings base, place the cuttings in a pattern ensuring the cuttings are not touching each other,
7 I like to place the pots in Plastic bags to help maintain temperature and moisture. Place in a semi shaded place like under 50mm shade cloth.
8 When the cuttings have struck, open the bag to allow air circulation for a few days to a week,
9 Once hardened off remove the cuttings from the bag and allow to further hardening for a few more days,
10 Transplant into a good potting mix to grow on.
Fertilize using Seaweed, fish emulsion or organic chicken pellets soaked in water on an alternate basis. Fertilize every two months until the plants are established then annually in early September to October to maintain health, vitality and better flowering.
Further Comments from Readers:
Hi reader, it seems you use The Bible of Botany a lot. That’s great as we have great pleasure in bringing it to you! It’s a little awkward for us to ask, but our first aim is to purchase land approximately 1,600 hectares to link several parcels of N.P. into one at The Pinnacles NSW Australia, but we need your help. We’re not salespeople. We’re amateur botanists who have dedicated over 30 years to saving the environment in a practical way. We depend on donations to reach our goal. If you donate just $5, the price of your coffee this Sunday, We can help to keep the planet alive in a real way and continue to bring you regular updates and features on Australian plants all in one Botanical Bible. Any support is greatly appreciated. Thank you.
In the spirit of reconciliation we acknowledge the Bundjalung, Gumbaynggirr and Yaegl and all aboriginal nations throughout Australia and their connections to land, sea and community. We pay our respect to their Elders past, present and future for the pleasures we have gained.
Bertya brownii
Classification:
Unranked: Eudicots
Unranked: Rosids
Order: Myrtales
Family: Myrtaceae
Genus: Is named in honour of Count Léonce de Lambertye; 1810-1877, who was a French botanist and horticulturist at Chaltrait.
Species: Is named in honour of Robert Brown; 1773-1858, who was a naturalist who sailed with Mathew Flinders when he circumnavigated Australia and became South Australia’s first botanical collector.
Common Name:
Distribution:
Bertya brownii is found along the Great Dividing Range in several disjunct populations from the Macleay River to Deua National Park in eastern New South Wales. It is found on and east of the Great Dividing Range.
https://avh.ala.org.au/occurrences/search?taxa=Bertya+brownii#tab_mapView
Habitat Aspect Climate:
Bertya brownii prefers dense shade to dappled sun light. It grows in deep gullies within moist Eucalyptus forests and on the verge of moist rainforests. The altitude ranges from 150 meters ASL to 970 meters ASL
The temperatures range from 0 degrees in July to 36 degrees in January.
The rainfall ranges from lows of 700mm to 2000mm average per annum.
Soil Requirements:
Bertya brownii prefers sandy loams to light fatty clays. The soils are usually derived from decomposed red sandstone or granites. The soils range from a pH of 5pH to 6pH. It does not tolerate waterlogged. Non saline soils to moderately saline soils are tolerated.
Height & Spread:
Wild Plants:01m to 3m by 1m to 2m
Characteristics:
Bertya brownii grows as a strong upright dense shrub. The main stems are erect pale brown turning to olive green as they approach the apexes. Young and juvenile branchlets are pale olive-green, pale reddish-brown or pale purple-brown and covered in fawn to rusty course tomentose hairs.
The opposite leaves of Bertya brownii are oblong to oblong-lanceolate and measure 10mm to 55mm in length by 5mm to 15mm in width. The base is rounded while the apex is obtuse to obtuse-acute. The discolourous laminas are deep green to sea-green and are densely covered in short course, fawn to rusty-brown tomentose hairs while the lower laminas are white. The laminas are convex from the midvein to the margins and decurve at the margins but are not revolute. They are soft and brittle. The leaf margins are entire or more often finely sinuate. The mid vein is strongly prominent while the lateral veins are finely prominent on the lower lamina while the mid vein is clearly visible and the lateral veins are faintly visible to obscure. The petioles measure 3.5mm to 6.5mm in length.
The inflorescences of Bertya brownii are monoecious born from the leaf axils. The flowers are born singularly with in each bract. The pedicels are densely covered in fawn to pale rusty-brown tomentose hairs and measure 20mm to 25mm in length. The 4 or 5 bracts are subulate and measure 3mm to 5mm in length. The bracts are olive-yellow and densely covered in course fawn to rusty-brown tomentose hairs externally.
The 5 male petaloids are yellow-green, glabrous with an obtuse mucronate tip at the apex and measure 4mm to 5mm in length. The male rachises measures 8mm to 11mm in length while the perianth segments measure 4mm to 5mm in length.
The female perianth segments are rigid and measure 3mm to 4mm in length. They are slightly swollen beneath and surrounding the ovary. The ovaries are densely covered in course, caduceus rusty-brown tomentose hairs. The white, deeply trifid styles measure 8mm to 10mm in length. The flowers appear from October to February.
Bertya brownii’s fruit are glabrous, cylindrical capsules. The capsules are glabrous except for a few isolated rusty-brown, course, tomentose hairs and measure 9mm to 10mm in length by 6mm to 7mm in diameter. The olive-green capsules turn olive-brown before they explode when ripe.
Wildlife:
Bertya brownii wildlife is unknown to the author.
Cultivation:
Bertya brownii would make a good small bushy shrub for native gardens where it is partially shady and moisture can be assured. It is suitable on most types of sandy loams and is most suitable for small, medium and large gardens high in the mountains in temperate, subtropical or semiarid gardens. As a garden subject it will probably grow from 2.5 meters to 3.5 meters in height by 2 meters to 2.5 meters diameter when grown in the open. It is cold tolerant to temperatures of minus 4 degrees once established and drought tolerant.
It is fast growing especially with a good fertilizing program, with an organic mulch layer and with a little moisture will grow more than 1 meter a year. Give the plants a double dose of our recommended fertilizer following flowering and a good deep soaking in mid-winter if good winter rains are not forthcoming. Withhold summer watering unless temperatures exceed 40 degrees and the soils are becoming parched.
Try using them in an informal or formal manner in front of buildings. This will aid in breaking up rigid lines and soften the structures overall appearance. At the same time it can be used to highlight the contrasts between the two. On taller buildings this can be done by planting it between taller narrow types of trees with finer or broader leaves. Plant them together with unequal gaps and free flowing curves to accentuate height and depth. Use wider spacings where the building in the background is seen as dappled specks will soften it and where it is planted closer together will give a bolder contrast between the two. Some of the small Leptospermum species or Grevillea species would make ideal companion plants. Try using Leptospermum laevigatum or Leptospermum polygalifolium and Grevillea pteridifolia or even Hibiscus Heterophyllus for foliage contrasts.
2 or 3 planted with a curve, back from a bend will become a very strong upright focal point whether it is in flower or not. In smaller bush gardens or more in larger gardens will gain a lot of attention forming a barrier for what lies behind them, enticing the walker to look further.
Because it is brittle and wild plants observed reshoot from below the breaks readily they could be regularly tip pruned or even pruned hard to establish a tall hedge. This can be maintained with regular pruning and planting closer together with spacings of 2 meters.
Propagation:
Seeds: Bertya brownii seeds may be difficult to obtain and need scarifying prior to sowing. This can be done by placing the seeds in a small calico bag. Place the calico bag in a plastic bag then place the bag in the vegetable crisper of the fridge for 6 to 8 weeks prior to sowing. Sow fresh seeds directly into a seed raising mix and cover with 5mm of the mix. When the seedlings are 25 to 50 mm tall, prick them out and plant them into 50mm native tubes using a seed raising mix.
Once the seedlings reach 150 to 200mm in height plant them out into their permanent position.
Cuttings: Use 30mm to 60mm long semi-hardwood cuttings would be my preference prepared from partially mature wood of the current season’s growth. This should be taken just after a flush of growth has hardened off. This type of cutting normally is made from the middle of July in frost free locations to early fall. The wood is reasonably firm and the leaves of mature size.
1 prepare the cutting mix by adding one third sharp clean river sand, one third peat and one third perlite. These ingredients are sterile,
2 Select good material from non diseased plants,
3 Select semi green stems for cuttings. Look for a stem with two or three nodes,
4 Place the cutting on a flat, hard surface, and make a clean slice with a sterilized sharp knife or razor blade 10mm off one side at the base of the cutting. – This scarification of the node will increase the chances of roots emerging from this spot. Now remove all but one or two the leaves, leaving the apex leaves in tact. If the leaves are very large in proportion to the stem, cut off the apical halves.
5 Some plants root easily, but a rooting hormone can help others by stimulating the cutting into sending out new roots. Fill a saucer with water, and place some rooting hormone into another container like a bottle top. Dip the node end of the cutting into the water and then into the rooting hormone. Tap off any excess hormone,
6 Use a small dipple stick or old pencil to poke a hole into the soilless potting mix. Ensure the hole is slightly larger than the stem diameter and be careful not to wipe the rooting hormone off the cuttings base, place the cuttings in a pattern ensuring the cuttings are not touching each other,
7 I like to place the pots in Plastic bags to help maintain temperature and moisture. Place in a semi shaded place like under 50mm shade cloth.
8 When the cuttings have struck, open the bag to allow air circulation for a few days to a week,
9 Once hardened off remove the cuttings from the bag and allow to further hardening for a few more days,
10 Transplant into a good potting mix to grow on.
Fertilize using Seaweed, fish emulsion or organic chicken pellets soaked in water on an alternate basis. Fertilize every two months until the plants are established then annually in early September to October to maintain health, vitality and better flowering.
Further Comments from Readers:
Hi reader, it seems you use The Bible of Botany a lot. That’s great as we have great pleasure in bringing it to you! It’s a little awkward for us to ask, but our first aim is to purchase land approximately 1,600 hectares to link several parcels of N.P. into one at The Pinnacles NSW Australia, but we need your help. We’re not salespeople. We’re amateur botanists who have dedicated over 30 years to saving the environment in a practical way. We depend on donations to reach our goal. If you donate just $5, the price of your coffee this Sunday, We can help to keep the planet alive in a real way and continue to bring you regular updates and features on Australian plants all in one Botanical Bible. Any support is greatly appreciated. Thank you.
In the spirit of reconciliation we acknowledge the Bundjalung, Gumbaynggirr and Yaegl and all aboriginal nations throughout Australia and their connections to land, sea and community. We pay our respect to their Elders past, present and future for the pleasures we have gained.
Bertya sp.chambigne
Classification:
Unranked: Eudicots
Unranked: Rosids
Order: Malpighiales
Family: Euphorbiaceae
Subfamily: Crotonoideae
Tribe: Ricinocarpeae
Subtribe: Bertyinae
Genus: Is named in honour of Count Leonce de Lambertye; 1810-1877, who was a French botanist and horticulturist at Chaltrait.
Species: Is Latinized from the Chambigne Nature Reserve between Grafton and Buccarumbi in northern NSW. It refers to the locality to where the plants are restricted to.
Common Name:
Distribution:
Bertya sp. chambigne is restricted to two or maybe three localities in the Clarence Valley. It has been found in the Chambigne Nature Reserve near Coutts Crossing and Shannon Creek. The Whitemans Creek catchment plants may be extinct as they have not been collected since early 1967.
https://avh.ala.org.au/occurrences/search?taxa=Bertya+sp. +chambigne#tab_mapView
Habitat Aspect Climate:
Bertya sp. chambigne prefer full sun to dappled shade. It is restricted to dry rocky exposed cliff edges and the bases of cliffs in scrubby sclerophyll vegetation adjacent to eucalyptus dominated communities where the dominant species include Eucalyptus planchoniana, Eucalyptus psammitica, Eucalyptus pyrocarpa, and Eucalyptus pilularis. The altitude ranges from 300 meters ASL to 700 meters ASL.
The temperatures range from minus 2 degrees in July to 38 degrees in January.
The rainfall ranges from lows of 800mm to 1500mm average per annum.
Soil Requirements:
Bertya sp. chambigne prefers soils that have a high sand content to light sandy or gritty clays and screes. The soils are derived from decomposed metamorphic rocks, sandstone or brown basalts. (Assumption on some soils is derived from the local Eucalyptus species which are associated with Bertya and the known terrain of the district where it grows. ) The soils pH ranges from 5pH to 6.5pH. It does not tolerate waterlogged soils. Non saline soils to moderately saline soils are tolerated.
Height & Spread:
Wild Plants: 1.5m to 3m by 1m to 1.5m
Characteristics:
Bertya sp. chambigne grows as a strong upright dense shrub. The main stems are erect pale brown turning to olive green as they approach the apexes. Young and juvenile branchlets are terete, pale olive-green or pale reddish-brown and densely covered in white stalked stellate hairs.
The alternate spiralling linear leaves of Bertya sp. chambigne are divaricate. They measure 15mm to 30mm in length by 1mm to 2mm in width. The bases are tapering while the apexes are tapering to a point. The concolourous laminas are deep green, scabrous and very sparsely covered in white stalked stellate hairs while the lower laminas are densely covered in white stalked stellate hairs. The leaf margins are entire and strongly revolute. The petioles are sessile to 0.5 mm in length.
The inflorescences of Bertya sp. chambigne’s are monoecious born from the leaf axils. The flowers are born singularly with in each bract. The pedicels are sessile to 0.5mm in length. The 4 or 5 bracts are subulate and measure 3mm to 5mm in length. The bracts are olive-yellow and densely covered in white stalked stellate hairs externally.
The male petaloids are yellow-green, glabrous with an obtuse mucronate tip at the apex. The flowers are profuse pollen producing a fine cream pollen.
The female petaloids are yellow-green, glabrous with an obtuse mucronate tip at the apex and are revolute. They are slightly swollen beneath and surrounding the ovary. The ovaries are sparsely covered in course, caduceus white stellate hairs. The red style is initially columular splitting into 3 long divaricate lobes. The lobes measure 3mm to 3.5mm in length. The flowers appear in October.
Photo Unknown source.
Bertya sp. chambigne’s fruit are glabrous, cylindrical capsules. The capsules are glabrous except for a few isolated rusty-brown, course, tomentose hairs and measure 7mm to 9mm in length by 4mm to 4.5mm in diameter. The olive-green capsules are sparsely covered in stalked stellate and turn pale grey-brown before they explode when ripe.
The 3 ovoid seeds have a yellow caruncle and measure 7.5mm to 8mm in length by 3.5mm to 4mm in diameter.
Wildlife:
Bertya sp. chambigne wildlife are unknown to the author.
Cultivation:
Bertya sp. chambigne would make a good small bushy shrub for native gardens where it is partially shady and moisture can be assured. It is suitable on most types of sandy loams and is most suitable for small, medium and large gardens high in the mountains in temperate, subtropical or semiarid gardens. As a garden subject it will grow from 1.5 meters to 3.5 meters in height by 1.5 meters to 2.5 meters diameter when grown in the open. It is cold tolerant to temperatures of minus 4 degrees once established. It is not drought tolerant with wild communities suffering badly in prolonged or severe droughts
It is very fast growing especially with a good fertilizing program and with a little moisture will grow nearly a meter a year. Give the plants a double dose of our recommended fertilizer following flowering and a good deep soaking in mid-winter if good winter rains are not forthcoming. Withhold summer watering unless temperatures exceed 40 degrees and the soils are becoming parched.
Use it in an informal or formal manner in front of buildings. This will aid in breaking up rigid lines and soften the structures overall appearance. On taller buildings this can be done by planting it between taller narrower types of trees with finer or broader leaves. Plant it together with unequal gaps and free flowing curves to accentuate height and depth. Use wider spacings where the building in the background is seen as dappled specks will soften it and where it is planted closer together will give a bolder contrast between the two. Some of the small leptospermum or Grevilleas would make ideal companion plants. Leptospermum laevigatum, Leptospermum polygalifolium or Grevillea pteridifolia or even Hibiscus heterophyllus.
2 or 3 planted with a curve, back from a bend will become a very strong upright focal point whether it is in flower or not. In smaller bush gardens or more in larger gardens will gain a lot of attention forming a barrier for what lies behind them, enticing the walker to look further.
Because it is relatively brittle it could be regularly tip pruned or even pruned hard to establish a tall hedge. This can be maintained with regular pruning and planting closer together with spacings of 2 meters.
Propagation:
Seeds: Bertya sp. chambigne seeds may be difficult to obtain and need scarifying prior to sowing. This can be done by placing the seeds in a small calico bag. Place the calico bag in a plastic bag then place the bag in the vegetable crisper of the fridge for 6 to 8 weeks prior to sowing. Sow fresh seeds directly into a seed raising mix and cover with 5mm of the mix. When the seedlings are 25 to 50 mm tall, prick them out and plant them into 50mm native tubes using a seed raising mix.
Once the seedlings reach 150 to 200mm in height plant them out into their permanent position.
Cuttings: Use 30mm to 60mm long semi-hardwood cuttings would be my preference prepared from partially mature wood of the current season’s growth. This should be taken just after a flush of growth has hardened off. This type of cutting normally is made from the middle of July in frost free locations to early fall. The wood is reasonably firm and the leaves of mature size.
1 prepare the cutting mix by adding one third sharp clean river sand, one third peat and one third perlite. These ingredients are sterile,
2 Select good material from non diseased plants,
3 Select semi green stems for cuttings. Look for a stem with two or three nodes,
4 Place the cutting on a flat, hard surface, and make a clean slice through the middle of the lower node on an angle towards the base, with a sterilized sharp knife or razor blade. – This scarification of the node will increase the chances of roots emerging from this spot. Now remove all but one or two the leaves, leaving the apex leaves in tact. If the leaves are very large in proportion to the stem, cut off the apical halves.
5 Some plants root easily, but a rooting hormone can help others by stimulating the cutting into sending out new roots. Fill a saucer with water, and place some rooting hormone into another container like a bottle top. Dip the node end of the cutting into the water and then into the rooting hormone. Tap off any excess hormone,
6 Use a small dipple stick or old pencil to poke a hole into the soilless potting mix. Ensure the hole is slightly larger than the stem diameter and be careful not to wipe the rooting hormone off the cuttings base, place the cuttings in a pattern ensuring the cuttings are not touching each other,
7 I like to place the pots in Plastic bags to help maintain temperature and moisture. Place in a semi shaded place like under 50mm shade cloth.
8 When the cuttings have struck, open the bag to allow air circulation for a few days to a week,
9 Once hardened off remove the cuttings from the bag and allow to further hardening for a few more days,
10 Transplant into a good potting mix to grow on.
Fertilize using Seaweed, fish emulsion or organic chicken pellets soaked in water on an alternate basis. Fertilize every two months until the plants are established then annually in early September to October to maintain health, vitality and better flowering.
Further Comments from Readers:
Hi reader, it seems you use The Bible of Botany a lot. That’s great as we have great pleasure in bringing it to you! It’s a little awkward for us to ask, but our first aim is to purchase land approximately 1,600 hectares to link several parcels of N.P. into one at The Pinnacles NSW Australia, but we need your help. We’re not salespeople. We’re amateur botanists who have dedicated over 30 years to saving the environment in a practical way. We depend on donations to reach our goal. If you donate just $5, the price of your coffee this Sunday, We can help to keep the planet alive in a real way and continue to bring you regular updates and features on Australian plants all in one Botanical Bible. Any support is greatly appreciated. Thank you.
In the spirit of reconciliation we acknowledge the Bundjalung, Gumbaynggirr and Yaegl and all aboriginal nations throughout Australia and their connections to land, sea and community. We pay our respect to their Elders past, present and future for the pleasures we have gained.
Bertya cloudscreek
Classification:
Unranked: Eudicots
Unranked: Rosids
Order: Malpighiales
Family: Euphorbiaceae
Subfamily: Crotonoideae
Tribe: Ricinocarpeae
Subtribe: Bertyinae
Genus: Is named in honour of Count Leonce de Lambertye; 1810-1877, who was a French botanist and horticulturist at Chaltrait.
Species: Is Latinized from the Clouds Creek region south Grafton in northern NSW. It refers to the locality to where the plants are restricted to.
Common Name:
Distribution:
Bertya sp. Clouds Creek is restricted to a small area between Clouds Creek and the Kangaroo River between Grafton and Ebor.
Habitat Aspect Climate:
Bertya sp. cloudscreek is a rare and endangered species which prefer full sun to dappled shade. It grows in inaccessible alluvial heaths in open woodlands to dry and open Eucalypt forests. The altitude ranges from 300 meters ASL to 1000 meters ASL.
Temperatures range from minus 3 degrees in July to 36 degrees in January.
Rainfall ranges from lows of 1000mm to 1600mm average per annum.
Soil Requirements:
Bertya sp. cloudscreek prefers soils are derived from decomposed granites. The soils range from a pH of 4.5pH to 6pH. It does not tolerate waterlogged. Non saline soils to slightly saline soils are tolerated.
Height & Spread:
Wild Plants: 2m to 4m by 2m to 3m.
Characteristics:
Bertya sp. cloudscreek grows as a strong upright dense shrub. The main stems are grey and erect. The young and juvenile branchlets are pale grey-pink turning olive-green as they approach the apex. They are densely covered in pale golden-brown to golden-brown tomentose hairs.
The opposite leaves of Bertya sp. cloudscreek are decussate. The lanceolate leaves measure 50mm to 75mm in length by 9mm to 17mm in width. The bases are cuneate-rounded and decurrent while the apex is acute. The discolourous laminas are deep green, scabrous and sparsely covered in pale golden-brown to golden-brown tomentose hairs on the upper laminas while the lower laminas are white and densely covered in pale golden-brown to golden-brown tomentose hairs especially along the mid vein. The laminas recurve upwards from the mid vein to the margins. The leaf margins are entire and revolute. The mid vein is prominent on the upper lamina while the secondary veins are slightly prominent on the upper lamina. The petioles are densely covered in pale golden-brown to golden-brown tomentose hairs and measure 3mm to 5mm in length. There are 2 stipitate glands are present near the bases. There are 2 opposite, stipitate, stipes that measure 0.4mm to 1mm in length.
This new taxon is distinguished from Bertya opponens by the presence of stipitate glands near the base of the leaves and the golden-brown rather than white tomentose hairs. The leaves are generally longer and narrower than those found on Bertya opponens
The inflorescences of Bertya sp. cloudscreek are born as small cluster of 4 individual flowers from the leaf axils. There is 1 male flower to 3 female flowers in a cluster. The 4 outer linear bracts are thick and densely covered in yellow-brown tomentose hairs. The bracts measure 2.5mm to 5mm in length. The 2 inner linear bracts are obscure and densely covered in viscid hirsute hairs. The 4 or 5 broad ovate perianths are glabrous, viscid and measure 5mm to 6mm in length.
The single male flower is viscid, sessile while bracts are densely covered in yellow-brown pilose hairs.
The female flowers are not viscid. They are sessile while the bracts are densely covered in yellow-brown pilose hairs. The ovary is densely covered in yellow-brown pilose hairs. The 3 or 4 green styles have 4 deeply abaxial, branched lobes and are united near the base. The lobes measure 5mm in length. The ovary is densely covered in yellow-brown villous hairs. The flowers appear from July to August.
Bertya sp. Clouds Creek’s fruit are globose capsules. The capsules measure 10mm to 12mm in length by 8mm to 10mm in diameter. The capsules are densely covered in pale yellow-brown villous hairs. The olive-green capsules are sparsely covered in stalked stellate and turn pale grey-brown before they explode when ripe.
The 3 ovoid seeds measure 6.5mm to 8mm in length by 3.5mm to 4mm in diameter.
Wildlife:
Bertya sp. Clouds Creek’s wildlife is unknown to the author.
Cultivation:
Bertya sp. cloudscreek would make an excellent small bushy shrub for native gardens where it is partially shady and moisture can be assured. It is suitable on all types of sandy loams and are most suitable for small, medium and large gardens high in the mountains in temperate, sub-tropical or semi-arid gardens. As a garden subject it will grow from 2.5 meters to 4 meters in height by 2 meters to 3 meters diameter when grown in the open. it is cold tolerant to temperatures of minus 4 degrees once established. It is not drought tolerant with wild communities suffering badly in prolonged or severe droughts
It is rather fast growing especially with a good fertilizing program, a thick layer of organic mulch and with a little moisture will grow a meter a year. Give the plants a double dose of our recommended fertilizer following flowering and a good deep soaking in mid-winter if good winter rains are not forthcoming. Withhold summer watering in normal years unless temperatures exceed 40 degrees and the soils are becoming parched.
Try using it in an informal or formal manner in front of buildings. This will aid in breaking up rigid lines and soften the structures overall appearance. At the same time it can be used to highlight the contrasts between the two. On taller buildings this can be done by planting it between taller narrow types of trees with finer or broader leaves. Plant them together with unequal gaps and free flowing curves to accentuate height and depth. Use wider spacings where the building in the background is seen as dappled specks will soften it and where it is planted closer together will give a bolder contrast between the two. Some of the smaller Leptospermum species or Grevillea species would make ideal companion plants. Try using Leptospermum laevigatum or Leptospermum polygalifolium and Grevillea pteridifolia or even Hibiscus heterophyllus.
2 or 3 planted with a curve, back from a bend will become a very strong upright focal point whether it is in flower or not. In smaller bush gardens or more in larger gardens will gain a lot of attention forming a barrier for what lies behind them, enticing the walker to look further.
Propagation:
Seeds: Bertya sp. clouds creek seeds may be difficult to obtain and need scarifying prior to sowing. This can be done by placing the seeds in a small calico bag. Place the calico bag in a plastic bag then place the bag in the vegetable crisper of the fridge for 6 to 8 weeks prior to sowing.
Sow fresh seeds directly into a seed raising mix, cover with 5mm of the mix and water.
When the seedlings are 25mm to 50mm tall, prick them out and plant them into 50mm native tubes using a seed raising mix.
Once the seedlings reach 150mm to 200mm in height plant them out into their permanent position.
Cuttings: Use 30mm to 60mm long semi-hardwood cuttings would be my preference prepared from partially mature wood of the current season’s growth. This should be taken just after a flush of growth has hardened off. This type of cutting normally is made from the middle of July in frost free locations to early fall. The wood is reasonably firm and the leaves of mature size.
1 prepare the cutting mix by adding one third sharp clean river sand, one third peat and one third perlite. These ingredients are sterile,
2 Select good material from non diseased plants,
3 Select semi green stems for cuttings. Look for a stem with two or three nodes,
4 Place the cutting on a flat, hard surface, and make a clean slice through the middle of the lower node on an angle towards the base, with a sterilized sharp knife or razor blade. – This scarification of the node will increase the chances of roots emerging from this spot. Now remove all but one or two the leaves, leaving the apex leaves in tact. If the leaves are very large in proportion to the stem, cut off the apical halves.
5 Some plants root easily, but a rooting hormone can help others by stimulating the cutting into sending out new roots. Fill a saucer with water, and place some rooting hormone into another container like a bottle top. Dip the node end of the cutting into the water and then into the rooting hormone. Tap off any excess hormone,
6 Use a small dipple stick or old pencil to poke a hole into the soilless potting mix. Ensure the hole is slightly larger than the stem diameter and be careful not to wipe the rooting hormone off the cuttings base, place the cuttings in a pattern ensuring the cuttings are not touching each other,
7 I like to place the pots in Plastic bags to help maintain temperature and moisture. Place in a semi shaded place like under 50mm shade cloth.
8 When the cuttings have struck, open the bag to allow air circulation for a few days to a week,
9 Once hardened off remove the cuttings from the bag and allow to further hardening for a few more days,
10 Transplant into a good potting mix to grow on.Fertilize using Seaweed, fish emulsion or organic chicken pellets soaked in water on an alternate basis. Fertilize every two months until the plants are established then twice annually in early September or March to maintain better health, vitality and flowering.
Fertilize using Seaweed, fish emulsion or organic chicken pellets soaked in water on an alternate basis. Fertilize every two months until the plants are established then annually in early September to October to maintain health, vitality and better flowering.
Further Comments from Readers:
Hi reader, it seems you use The Bible of Botany a lot. That’s great as we have great pleasure in bringing it to you! It’s a little awkward for us to ask, but our first aim is to purchase land approximately 1,600 hectares to link several parcels of N.P. into one at The Pinnacles NSW Australia, but we need your help. We’re not salespeople. We’re amateur botanists who have dedicated over 30 years to saving the environment in a practical way. We depend on donations to reach our goal. If you donate just $5, the price of your coffee this Sunday, We can help to keep the planet alive in a real way and continue to bring you regular updates and features on Australian plants all in one Botanical Bible. Any support is greatly appreciated. Thank you.
In the spirit of reconciliation we acknowledge the Bundjalung, Gumbaynggirr and Yaegl and all aboriginal nations throughout Australia and their connections to land, sea and community. We pay our respect to their Elders past, present and future for the pleasures we have gained.
Beyeria lasiocarpa
Classification:
Unranked: Eudicots
Unranked: Rosids
Order: Malpighiales
Family: Euphorbiaceae
Subfamily: Crotonoideae
Genus: Is named in honour of George Beyer; l865-1920, who was an Australian who worked at the Sydney Technical Museum.
Species: From Lasios, which is a Greek prefix for woolly, Karpos, which is Ancient Greek for a fruit. It refers to fruits, which are covered in woolly type hairs.
Common Name:
Distribution:
Beyeria lasiocarpa is found south from the Sunshine Coast hinterland in south east Queensland to Yarranderie National Park south west of Sydney in several disjunct populations in the north then continuously south from Nowra in New South Wales to Lake Tyers State Park in Victoria.
https://avh.ala.org.au/occurrences/search?taxa=Beyeria+lasiocarpa#tab_mapView
Habitat Aspect Climate:
Beyeria lasiocarpa prefers full sun to dappled shade and will be found growing wet open sclerophyll Eucalypt forests. It is found along the coast and adjacent ranges. The altitude ranges from 20 meters ASL to 1350 meters ASL
The temperatures range from 2 degrees in July to 36 degrees in January.
The rainfall ranges from lows of 1000mm to 2000mm average per annum.
Soil Requirements:
Beyeria lasiocarpa prefers deep, sandy loams to light gravely clays. The soils are usually derived from decomposed granites, brown basalts or black basalts. The soil’s pH ranges from 5.5pH to 6.5pH. It does not tolerate waterlogged soils. None saline soils to moderately saline soils are tolerated.
Height & Spread:
Wild Plants: 2m to 6m by 2m to 3m
Characteristics:
Beyeria lasiocarpa grows as a strong upright dense shrub. The main stems are pendulant with a thick spongy, longitudinal flaky bark. The bark is dull pale grey-brown. Juvenile branchlets are pale pink-fawn turning pale green as they approach the apex. They are densely covered in long white villous hairs.
The alternate leaves of Beyeria lasiocarpa are ovate to elliptical or oblong and measure 30mm to 80mm in length by 7mm to 20mm in width. The bases are cuneate while the apexes are obtuse or mucronate. The discolourous laminas are deep grass-green to sea-green and glabrous or at times viscid on the upper laminas while the lower laminas are white and densely covered in white tomentose hairs. The leaf margins are entire. The mid vein is strongly prominent on the lower laminas while the lateral veins are faintly prominent. Only the main vein is visible from the upper laminas. The petioles are sessile to 0.5 mm in length.
The inflorescences of Beyeria lasiocarpa are monoecious and born in cluster from the leaf axils. There are 2 to 4 individual flowers in a cluster. The narrow triangular, yellow-green sepals measure 2.5mm to 3.5mm in length. The 4 ovate convex petals are creamy-yellow to pale lime-green externally and pale yellow internally and measure 4mm to 5.5mm in length by 4mm to 5.5mm in width. The peduncles are glabrous and measure 2mm to 4mm in length.
The male flowers are solitary or born on short peduncles in clusters of 2 to 4.The pedicels are glabrous and measure 7mm to 9mm in length. The numerous white filaments measure 1.6mm to 2.5mm in length. The dorsifixed anthers are pale creamy fawn.
The solitary female flowers are born on 6mm to 10mm glabrous pedicels. The stigma is sessile or nearly so. The ovary is glabrous and thickly resinous. The flowers appear from December to July.
Beyeria lasiocarpa’s fruits are ovoidal capsule. The capsules are densely covered in white to translucent hirsute hairs and measure 8mm to 10mm in length by 9mm to 11mm in diameter. The green capsules turn brown and explode when ripe. The stigma is persistent at the apex of the capsules and measures 3mm to 4mm in diameter.
The ovoid to slightly falcate seeds are black and measure 1.5mm to 2mm in length.
Wildlife:
Beyeria lasiocarpa wildlife are unknown to the author.
Cultivation:
Beyeria lasiocarpa is a small bushy shrub for native gardens. It is suitable on all types of sandy loams and is most suitable for small, medium and large gardens close to the coast in temperate, subtropical or semiarid gardens. As a garden subject it will grow from 3 meter to 4 meters in height by 2.5 meters to 3 meters diameter when grown in the open. It is cold tolerant to temperatures to minus 3 degrees once established and are not drought tolerant.
It is very fast growing especially when a good, organic native fertilizing program is included and with a little moisture will grow more than 1 meter a year. Give the plants a double dose of our recommended fertilizer following flowering and a good deep soaking in mid-winter if good winter rains are not forthcoming.
Try using it in an informal or formal manner in front of buildings. This will aid in breaking up rigid lines and soften the structures overall appearance. On taller buildings plant it between taller narrow types of trees with finer or broader leaves. Plant it together with unequal gaps and free flowing curves to accentuate height and depth. Use wider spacings where the building in the background is seen as dappled specks will soften it and where it is planted closer together will give a bolder contrast between the two. Some of the small Leptospermum species or Grevillea species would make ideal companion plants. Try using Leptospermum laevigatum or Leptospermum polygalifolium and Grevillea pteridifolia or even Hibiscus heterophyllus.
It can be regularly tip pruned if a tall hedge is required. This can be maintained with regular pruning and planting closer together with spacings of 2 meters. It responds very well to tip pruning, recovering quickly and increasing the number of flowers in the following season.
Propagation:
Seeds: Beyeria lasiocarpa seeds do not require treatment before sowing, however scarifying the seeds may help uniformity in germination. Place the seeds in a calico bag, then place the calico bag in a plastic bag and put the plastic bag in the vegetable crisper for a few weeks before sowing. Sow seeds directly into a seed raising mix and cover with 5mm of the mix. When the seedlings are 25mm to 50 mm tall, prick them out and plant them into 50mm native tubes using a seed raising mix.
Once the seedlings reach 150 to 200mm in height plant them out into their permanent position. Mass plantings can be achieved with spacing of 2 meters. When planting for the fruit in an orchard, plant the seedlings at 3 meter spacings so easy pruning and harvesting can take place.
Cuttings: Use 50mm to 90mm long semi-hardwood cuttings would be my preference prepared from partially mature wood of the current season’s growth. This should be taken just after a flush of growth has hardened off. This type of cutting normally is made from the middle of July in frost free locations to early autumn where frosts occur. The wood is reasonably firm and the leaves are of mature size.
1 prepare the cutting mix by adding one third sharp clean river sand, one third peat and one third perlite. These ingredients are sterile,
2 Select good material from non diseased plants,
3 Select semi green stems for cuttings. Look for a stem with two or three nodes,
4 Place the cutting on a flat, hard surface, and make a clean slice through the middle of the lower node on an angle towards the base, with a sterilized sharp knife or razor blade. – This scarification of the node will increase the chances of roots emerging from this spot. Now remove all but one or two the leaves, leaving the apex leaves in tact. If the leaves are very large in proportion to the stem, cut off the apical halves.
5 Some plants root easily, but a rooting hormone can help others by stimulating the cutting into sending out new roots. Fill a saucer with water, and place some rooting hormone into another container like a bottle top. Dip the node end of the cutting into the water and then into the rooting hormone. Tap off any excess hormone,
6 Use a small dipple stick or old pencil to poke a hole into the soilless potting mix. Ensure the hole is slightly larger than the stem diameter and be careful not to wipe the rooting hormone off the cuttings base, place the cuttings in a pattern ensuring the cuttings are not touching each other,
7 I like to place the pots in Plastic bags to help maintain temperature and moisture. Place in a semi shaded place like under 50mm shade cloth.
8 When the cuttings have struck, open the bag to allow air circulation for a few days to a week,
9 Once hardened off remove the cuttings from the bag and allow to further hardening for a few more days,
10 Transplant into a good potting mix to grow on.
Fertilize using Seaweed, fish emulsion or organic chicken pellets soaked in water on an alternate basis. Fertilize every two months until the plants are established then annually in early September to October to maintain health, vitality and better flowering.
Further Comments from Readers:
Hi reader, it seems you use The Bible of Botany a lot. That’s great as we have great pleasure in bringing it to you! It’s a little awkward for us to ask, but our first aim is to purchase land approximately 1,600 hectares to link several parcels of N.P. into one at The Pinnacles NSW Australia, but we need your help. We’re not salespeople. We’re amateur botanists who have dedicated over 30 years to saving the environment in a practical way. We depend on donations to reach our goal. If you donate just $5, the price of your coffee this Sunday, We can help to keep the planet alive in a real way and continue to bring you regular updates and features on Australian plants all in one Botanical Bible. Any support is greatly appreciated. Thank you.
In the spirit of reconciliation we acknowledge the Bundjalung, Gumbaynggirr and Yaegl and all aboriginal nations throughout Australia and their connections to land, sea and community. We pay our respect to their Elders past, present and future for the pleasures we have gained.
Billardiera heterophylla
Classification:
Phylum: Eudicots
Class: Asterids
Order: Apiales
Family: Pittosporaceae
Genus: Is named in honour of Billardier; 1755-1834 who travelled with the D’entrecasteaux Expedition to Western Australia and Tasmania where he discovered many new species.
Species: From Heteros, which is Ancient Greek for other or different and Pholis, which is Ancient Greek for a horny scale. It refers to structures or organs, which have a prominent horny like scale.
Common Name: Purple Appleberry or Bluebell Creeper.
In the Aboriginal language it is known as Garawang.
Distribution:
Billardiera heterophylla is found in several disjunct populations south from Watheroo National Park to Mount Frankland National Park and east to Albany. It is also found from Leda Nature reserve east to Esperence in Western Australia.
https://avh.ala.org.au/occurrences/search?taxa=Billardiera+heterophylla#tab_mapView
Habitat Aspect Climate:
Billardiera heterophylla prefer full sun to light dappled shade. It grows and will be found growing in coastal heath lands and around inland salt lakes with coastal heath land type open woodlands.
The temperatures range from 3 degrees in August to 38 degrees in January.
The rainfall ranges from lows of 500mm to 1600mm average per annum.
Soil Requirements:
Billardiera heterophylla prefer pure sand to light fatty loamy soils that are usually derived from accumulated sands. The soils pH ranges from 6pH to 7pH. It is not tolerant of waterlogged soils though capillary action may keep the soils relatively moist deep down. Non saline soils to extremely saline soils are tolerated as are salt laden winds.
Height & Spread:
Wild Plants: 1m to 3m by 1m to 3m.
Characteristics:
Billardiera heterophylla grows as a slender scrambling climber, climbing over other small well rounded shrubs when there is nothing to scramble over. Billardiera heterophylla is a stem contact climber with the young shoots twinning around anything they come in contact with. Stems are thin red-brown, glabrous, glossy and covered in red-brown to white elliptical to elliptical-ovate lenticels. The older stems are angular with a cuticulare ridging. The stems are very tough and were used for lashing by the local Aborigines. Young and juvenile leading shoots are lime-green and densely covered in soft, white sericeous hairs.
Billardiera heterophylla has opposite, sub opposite or alternate leaves. The broad linear, oblong, narrow elliptical or lanceolate, leaves measure 10mm to 48mm in length by 4mm to 15mm in width. The base is cuneate while the apex is obtuse to acute. The leaf margins are entire. The discolourous laminas are bright lime-green to bright grass-green and covered in soft, white, caduceus sericeous hairs on the upper lamina and slightly paler on the lower lamina. The laminas are flat or recurve slightly upwards from the midvein to the margins. They are flat or slightly undulating. The colouration is a deeper green when grown in the shade however leaf drop develops if the shade is too strong. The midvein is slightly prominent on the lower laminas near the bases and very faintly prominent thereafter and is not visible from the upper laminas. The lateral veins are very faintly prominent on the lower laminas and are not visible from the upper laminas. Juvenile leaves are tripartite to trilobed and measure 20mm to 40mm in length. The juvenile petioles measure 15mm to 35mm in length. Adult petioles measure 1mm to 2mm in length.
The inflorescences of Billardiera heterophylla are born on simple cymes from the leaf axils. There are 2 to 4 individual nodding flowers on a cyme. The 4 narrow linear to narrow triangular sepals are green to deep burgundy and densely covered in white sericeous hairs. They measure 2mm to 3mm in length. The 4 obovate petals are sky blue, blue, or rarely lilac or white. The petals are adjacent to the sepals and measure 6mm to 8mm in length. The slender peduncle and pedicels are glabrous, green to red-brown. The peduncles measure 10mm to 18mm in length while the pedicels measure 6mm to 8mm in length.
The stamens initially form a columular tube with the anthers. The white filaments are shorter than the cream anthers which dehisce longitudinally. The stamens measure 3mm to 4.5mm in length.
The obovoid ovary is pink to mauve and ridged. They are densely covered in silky white sericeous hairs particularly along the ridges. The white style is short and thick initially while the stamens form the columular tube then elongating beyond anthers following anthesis. The white stigma is small capitate and obscure. Billardiera heterophylla flowers from January February though flowers will appear as early as early December and mid-March in favourable seasons. Flowering appears to be more prolific following a prolonged cold period or drier conditions followed by a warm moist spring.
The fruits are oblong indehiscent berries. The berries are covered in silky white sericeous hairs and measure 7mm to 10mm in length by 3mm to 4.5mm in diameter. The style is persistent on the fruit. The green fruits turn deep green to purple-green when ripe and drop to the ground. There are 5 to 20 reddish brown seeds in each fruit which measure less than 1mm in diameter.
Wildlife:
Billardiera heterophylla leaves are a favoured food source and habitat for the Pittosporum Bug Pseudopines geminata. The fruits are eaten by possums, native rats and were a staple part of the Australian Aborigines.
Cultivation:
Billardiera heterophylla is a beautiful small creeper that deserves a place in most native or exotic garden. It is ideal in almost every setting near ponds, at the edge of a rainforest in courtyards, around swimming pools or in the orchard.
Its versatility doesn’t stop with accepting most types of soils in cultivation. It can cope with temperatures as low as minus 6 degrees and up to 42 degrees. It is drought resistant and can cope with the occasional immersion where periodic down pours may flood the land. This has led to it becoming an environmental weed in some areas of south-eastern Australia and Tasmania. Care should be exercised before introducing this plant into gardens near natural bush land or at least consume the fruits as soon as they are ripe.
It is best used adjacent in small areas of bush close to paths or the house so their flowers can be viewed regularly and fully appreciated. It looks good in small rockeries as a fill in plant to form perfect round domes. If It is surrounded by shorter plants with fine foliage and red flowers it will still give a pleasant outline and strength to the bed especially when it is in flower.
Billardiera heterophylla will make an excellent topiary plant as it can be trimmed regularly and recovers very quickly. If it is given adequate moisture and there is a fertilizer regime in place it would probably be the quickest topiary plant on the market.
Propagation:
Seeds: Billardiera heterophylla seeds do not require treatment before sowing, however scarifying the seeds may help uniformity in germination. Place the seeds in a calico bag, then place the calico bag in a plastic bag and put the plastic bag in the vegetable crisper for a few weeks before sowing. Sow seeds directly into a seed raising mix and cover with 5mm of the mix. When the seedlings are 25 to 50 mm tall, prick them out and plant them into 50mm native tubes using a seed raising mix.
Once the seedlings reach 150 to 200mm in height plant them out into their permanent position. Mass plantings can be achieved with spacing of 2 meters. When planting for the fruit in an orchard, plant the seedlings at 3 meter distances so easy pruning and harvesting can take place.
Cuttings:
Use 30mm to 60mm long semi-hardwood cuttings would be my preference prepared from partially mature wood of the current season’s growth. This should be taken just after a flush of growth has hardened off. This type of cutting normally is made from the middle of July in frost free locations to early autumn where frosts occur. The wood is reasonably firm and the leaves are of mature size.
Remove most of the leaves leaving the top 2 to 4. Take a 10mm slice off the bark from the bottom of the cutting on one side. Using an average rooting hormone, dip the cutting in and place it in a moist sterile seed raising mix. When the cuttings have obviously struck and have developed good roots treat them as for seedlings.
Fertilize using Seaweed, fish emulsion or organic chicken pellets soaked in water on an alternate basis. Fertilize every two months until the plants are established then annually in early September to October to maintain health, vitality and better flowering.
Further Comments from Readers:
Hi reader, it seems you use The Bible of Botany a lot. That’s great as we have great pleasure in bringing it to you! It’s a little awkward for us to ask, but our first aim is to purchase land approximately 1,600 hectares to link several parcels of N.P. into one at The Pinnacles NSW Australia, but we need your help. We’re not salespeople. We’re amateur botanists who have dedicated over 30 years to saving the environment in a practical way. We depend on donations to reach our goal. If you donate just $5, the price of your coffee this Sunday, We can help to keep the planet alive in a real way and continue to bring you regular updates and features on Australian plants all in one Botanical Bible. Any support is greatly appreciated. Thank you.
In the spirit of reconciliation we acknowledge the Bundjalung, Gumbaynggirr and Yaegl and all aboriginal nations throughout Australia and their connections to land, sea and community. We pay our respect to their Elders past, present and future for the pleasures we have gained.
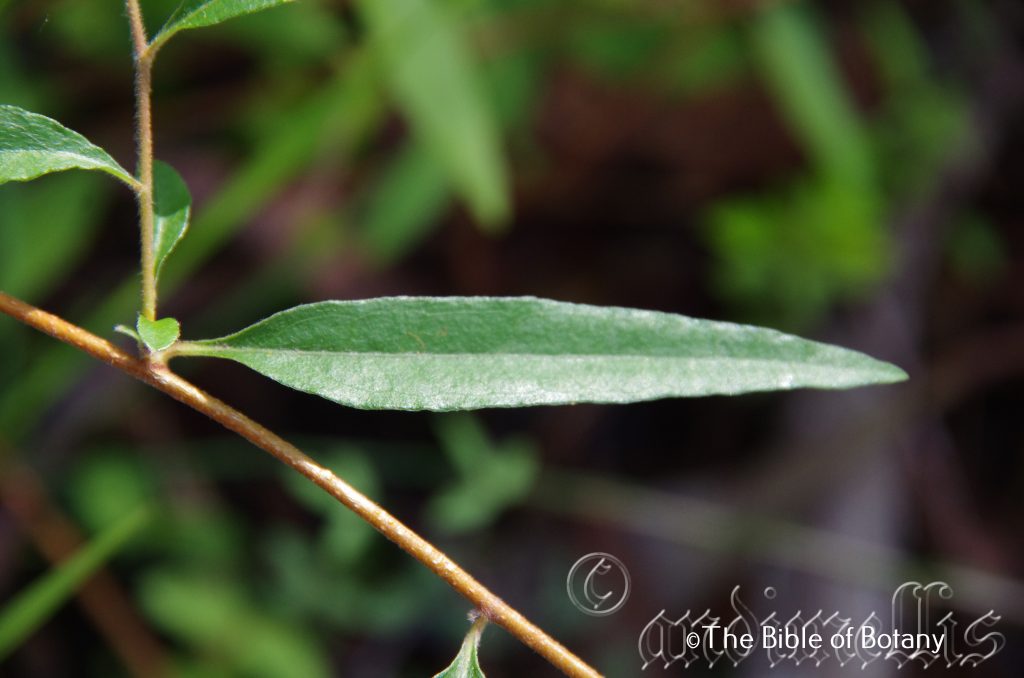
Pillar Valley NSW
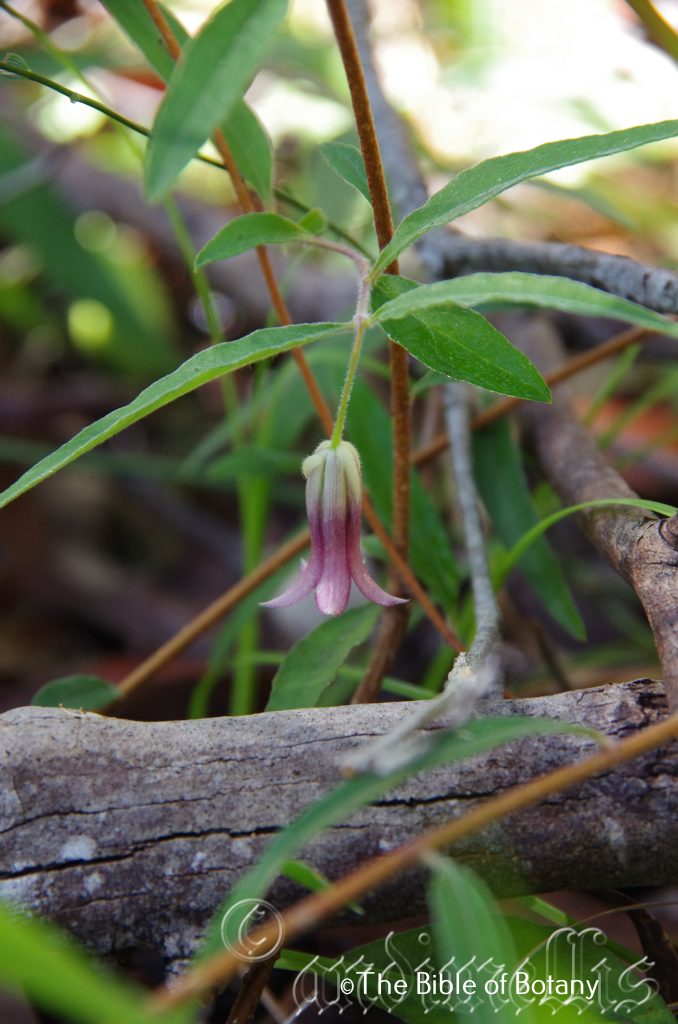
Pillar Valley NSW
Billardiera rubens
Classification:
Unranked: Eudicots
Unranked: Asterids
Order: Apiales
Family: Pittosporacea
Genus: Is named in honour of Jacques Julien Houtou de la Billardier; 1755-1834 who travelled with the D’entrecasteaux Expedition to Western Australia and Tasmania where he discovered many new species.
Species: From Rubēns, which is Latin for reddish. It refers to organs, which are reddish in colour.
Common Name: Hairy Apple Berry.
In the Aboriginal language it is known as Garawang.
Distribution:
Billardiera rubens is found south from the Bunya Mountains National Park in southern Queensland to Woko National park in central New South Wales. It is mainly found on and east of The Great Dividing Range.
https://avh.ala.org.au/occurrences/search?taxa=Billardiera+rubens#tab_mapView
Habitat Aspect Climate:
Billardiera rubens prefers full sun to dappled shade. It grows in the mountains in warm temperate rainforests or cool subtropical rainforests. The altitude ranges from 5 meters ASL to 980 meters ASL.
The temperatures range from 1 degree in August to 36 degrees in January.
The rainfall ranges from lows of 600mm to 2000mm average per annum. Lower rainfall areas receive additional moisture through orographic precipitation.
Soil Requirements:
Billardiera rubens prefers light clays soils to medium clays. The soils are usually derived from decomposed basalts. The soils pH ranges from 5pH to 6.5pH. It does not tolerate waterlogged soils. Non saline soils to moderately saline soils are tolerated.
Height & Spread:
Wild Plants: 1m to 3m by 1m to 3m.
Characteristics:
Billardiera rubens grows as a vigorous scrambling climber, climbing over other small shrubs or as a small shrub when there is nothing to scramble over. Billardiera rubens is a stem contact climber with the young shoots twinning around anything they come in contact with. Stems are thin reddish-brown to red, glabrous or slightly scabrid. The stems are reddish-brown to red and Young and juvenile leading shoots are pale green and glabrous.
Billardiera rubens light green alternate narrow obovate or rarely narrow elliptical are at times slightly falcate leaves measure 35mm to 60mm in length by 5mm to 10mm in width. The base is cuneate while the apex is narrow acute to tapering. The leaf margins are entire. The discolourous laminas are mid green on the upper laminas and are paler on the lower laminas. The laminas are glabrous. The colouration is a deeper green when grown in the shade however leaf drop develops if the shade is too strong. Petioles measure 0.5mm to 2mm to 4mm in length. Juvenile leaves irregularly lobed and dentate
The nodding inflorescences of Billardiera rubens are born singularly or in pairs from the leaf axils. The 5 green, ovate to ovoid sepals are asymmetrical, and measure 3mm to 6mm in length. The margins are covered in white ciliate hairs. The clawed petals are slightly recurved at the tips and are pale yellow with a pink tinged throat and margins which darken with age. The petals measure 13mm to 18mm in length. The pedicels are slender, glabrous and measure 10mm to 20mm in length.
The cream to white stamens has anthers which are sagittate with a distinctly mucronate tip. The stamens measure 6mm to 9mm in length.
The pistil has a glabrous ovary which is glabrous. The cream style is short and stout with a knobby stigma. Billardiera rubens flowers from late August to early November.
The fruits are indehiscent berries. They are obovate to oblong, glabrous and measure 15mm to 20mm in length by 6mm to 8mm in diameter. The berries have a rounded base with a round apex. The style is persistent on the fruit. The green fruits drop before ripening and turn yellow on the ground.
Wildlife:
Billardiera rubens‘s wildlife is unknown to the author.
Cultivation:
Billardiera rubens is a beautiful small creeper that deserves a place in many native or exotic garden. It is ideal in almost every setting near ponds, at the edge of a rainforest in courtyards, around swimming pools, in the orchard or covering a low fence.
Its versatility doesn’t stop with accepting all types of soils but it can cope with temperatures as low as minus 5 degrees and up to 42 degrees. It is drought resistant and can cope with the occasional immersion where periodic down pours may flood the land.
It is best used adjacent to small areas of bush close to paths or the house so their fruits can be harvested as they ripen. Add to the above, if it is given adequate moisture, plenty of mulch for moisture retention and an even soil temperature, applying native fertilizers on a regular basis the plants will respond with good flowering over a long period and will yield good quality fruit with maximum size. The fruits can measure 30mm to 35mm in length by 10mm to 12mm in diameter.
Propagation:
Seeds: Billardiera rubens seeds do not require treatment before sowing, however scarifying the seeds may help uniformity in germination. Place the seeds in a calico bag, then place the calico bag in a plastic bag and put the plastic bag in the vegetable crisper for a few weeks before sowing. Sow seeds directly into a seed raising mix and cover with 5mm of the mix. When the seedlings are 25mm to 50 mm tall, prick them out and plant them into 50mm native tubes using a seed raising mix.
Once the seedlings reach 150mm to 200mm in height plant them out into their permanent position. Mass plantings can be achieved with spacing of 2 meters. When planting for the fruit in an orchard, plant the seedlings at 3 meter distances so easy pruning and harvesting can take place.
Cuttings: Use 30mm to 60mm long semi-hardwood cuttings would be my preference prepared from partially mature wood of the current season’s growth. This should be taken just after a flush of growth has hardened off. This type of cutting normally is made from the middle of July in frost free locations to early autumn where frosts occur. The wood is reasonably firm and the leaves are of mature size.
Remove most of the leaves leaving the top 2 to 4.Take a 10mm slice off the bark from the bottom of the cutting on one side. Using an average rooting hormone, dip the cutting in and place it in a moist sterile seed raising mix. When the cuttings have obviously struck and have developed good roots treat them as for seedlings.
Fertilize using Seaweed, fish emulsion or organic chicken pellets soaked in water on an alternate basis. Fertilize every two months until the plants are established then annually in early September to October to maintain health, vitality and better flowering.
Further Comments from Readers:
Hi reader, it seems you use The Bible of Botany a lot. That’s great as we have great pleasure in bringing it to you! It’s a little awkward for us to ask, but our first aim is to purchase land approximately 1,600 hectares to link several parcels of N.P. into one at The Pinnacles NSW Australia, but we need your help. We’re not salespeople. We’re amateur botanists who have dedicated over 30 years to saving the environment in a practical way. We depend on donations to reach our goal. If you donate just $5, the price of your coffee this Sunday, We can help to keep the planet alive in a real way and continue to bring you regular updates and features on Australian plants all in one Botanical Bible. Any support is greatly appreciated. Thank you.
In the spirit of reconciliation we acknowledge the Bundjalung, Gumbaynggirr and Yaegl and all aboriginal nations throughout Australia and their connections to land, sea and community. We pay our respect to their Elders past, present and future for the pleasures we have gained.
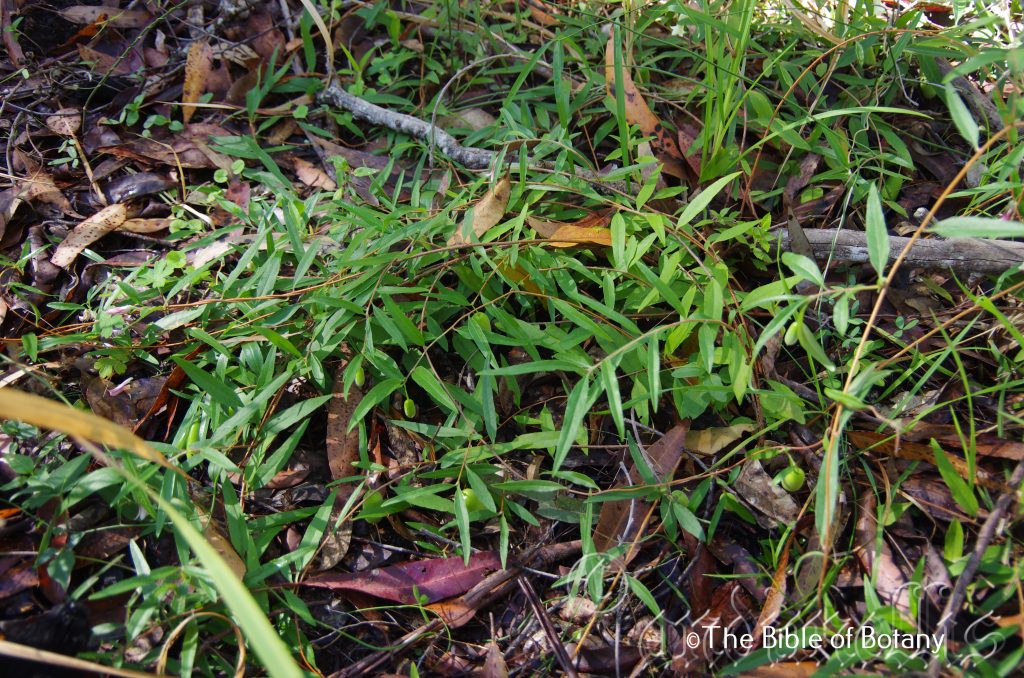
Pillar Valley NSW
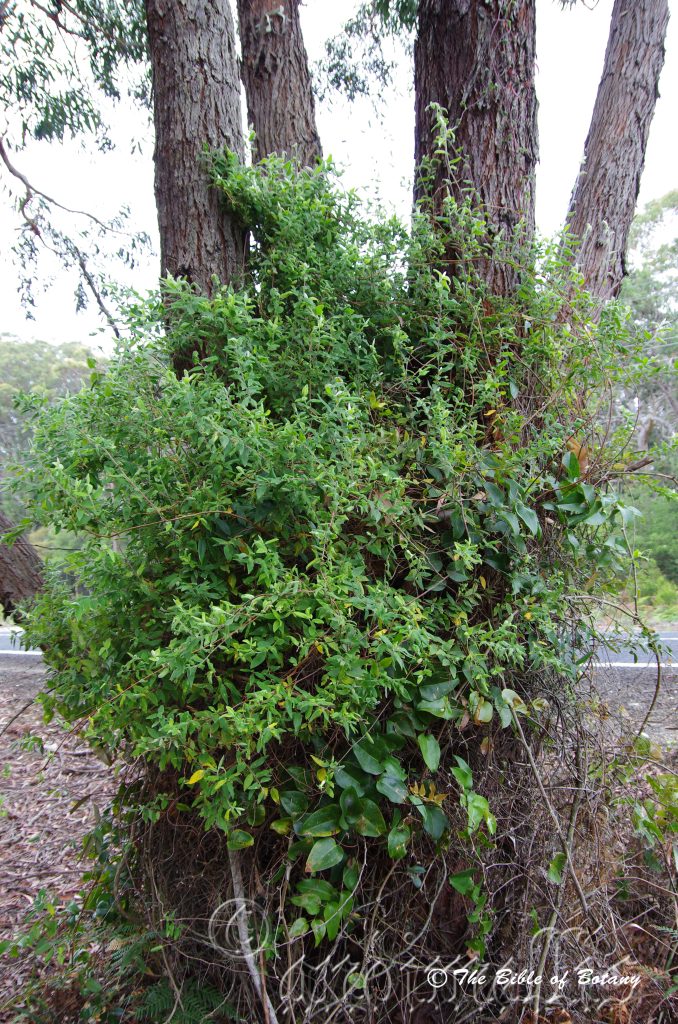
Lake Innes National Park NSW
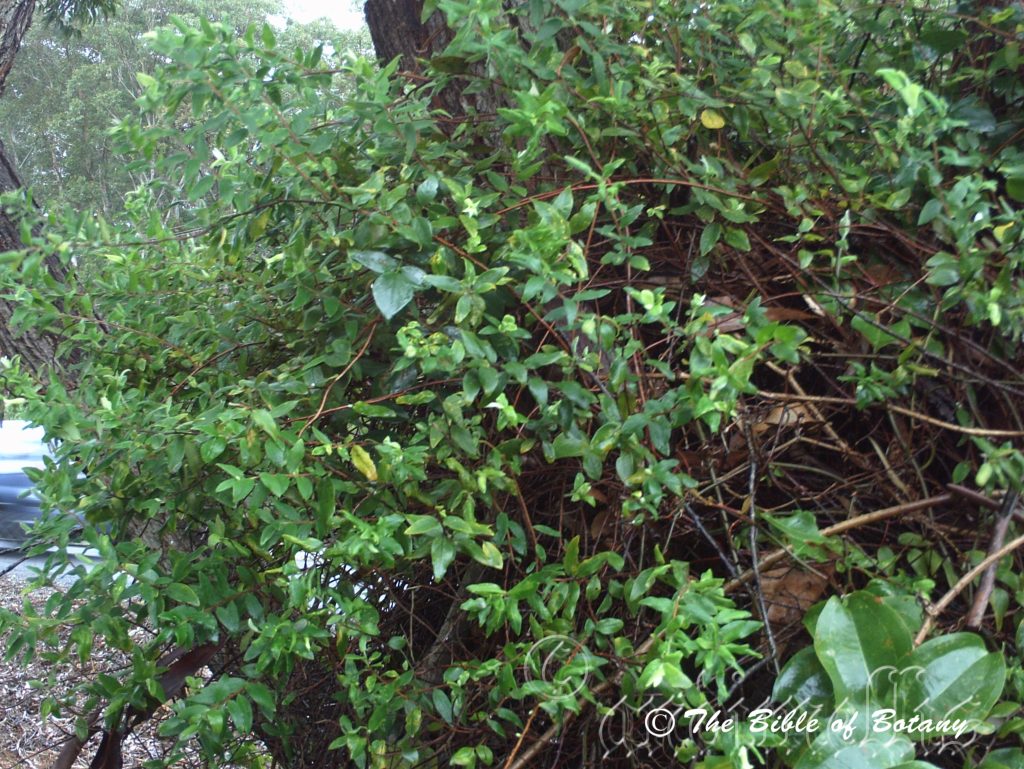
Lake Innes National Park NSW
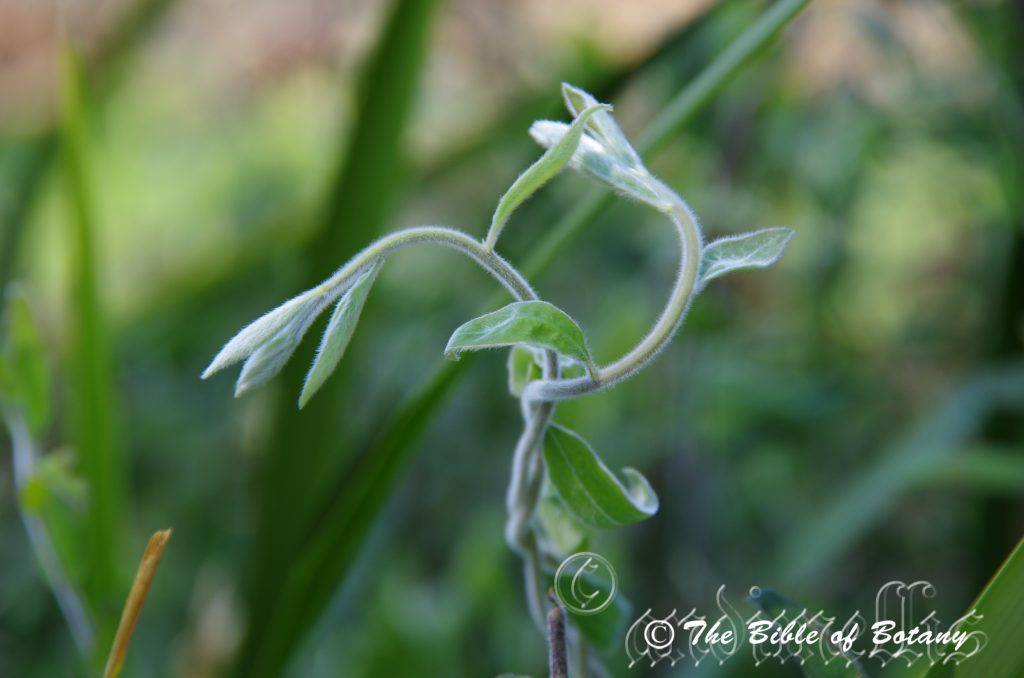
Kendal NSW
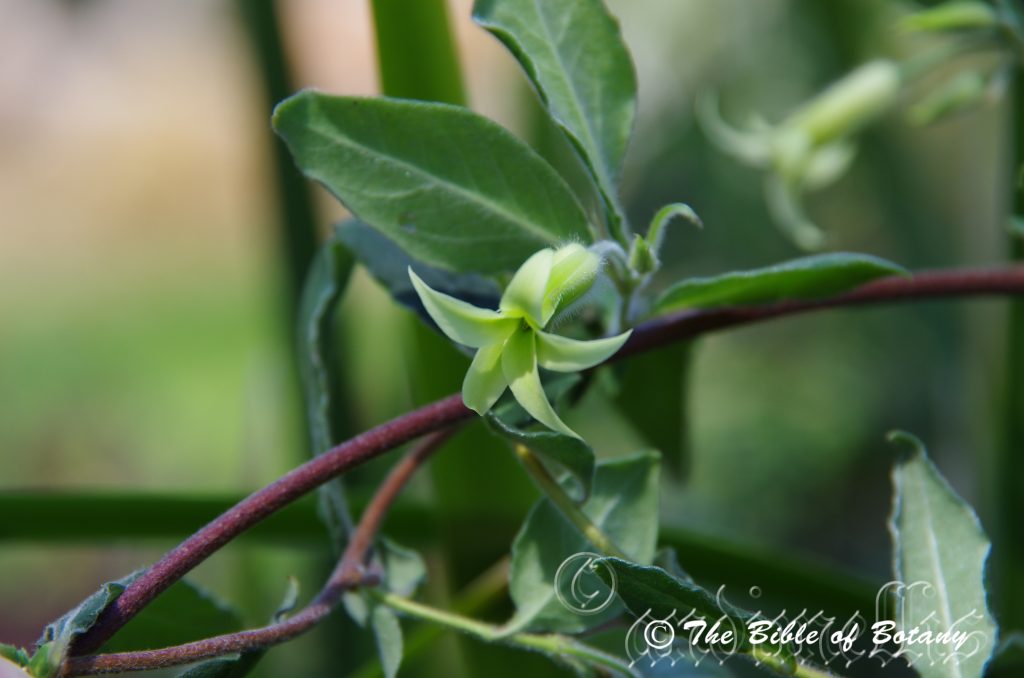
Kendal NSW
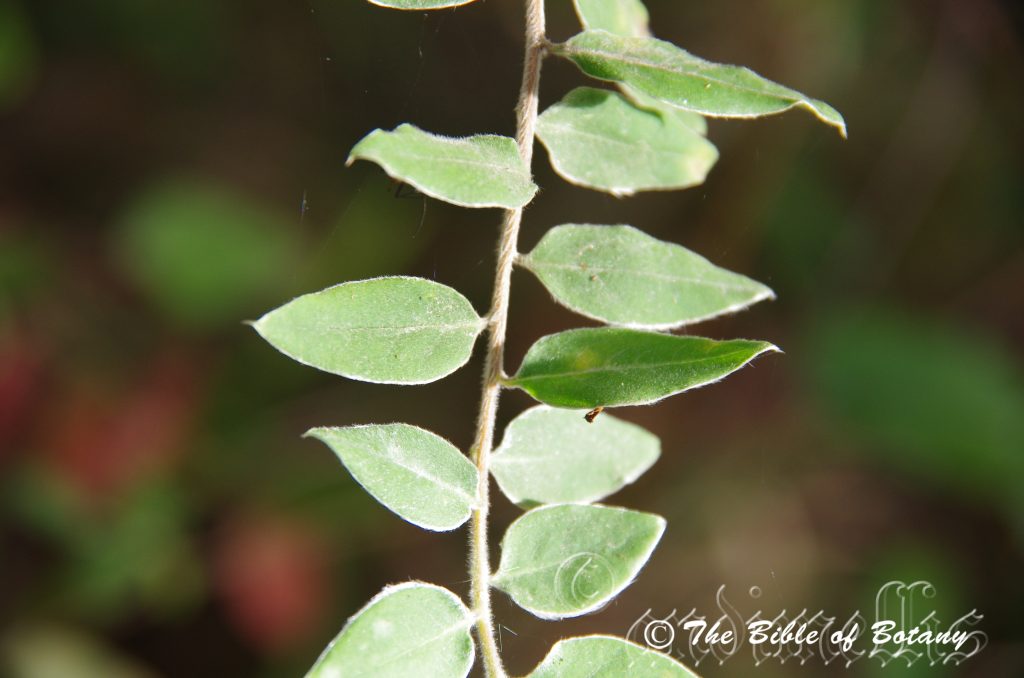
Kendal NSW
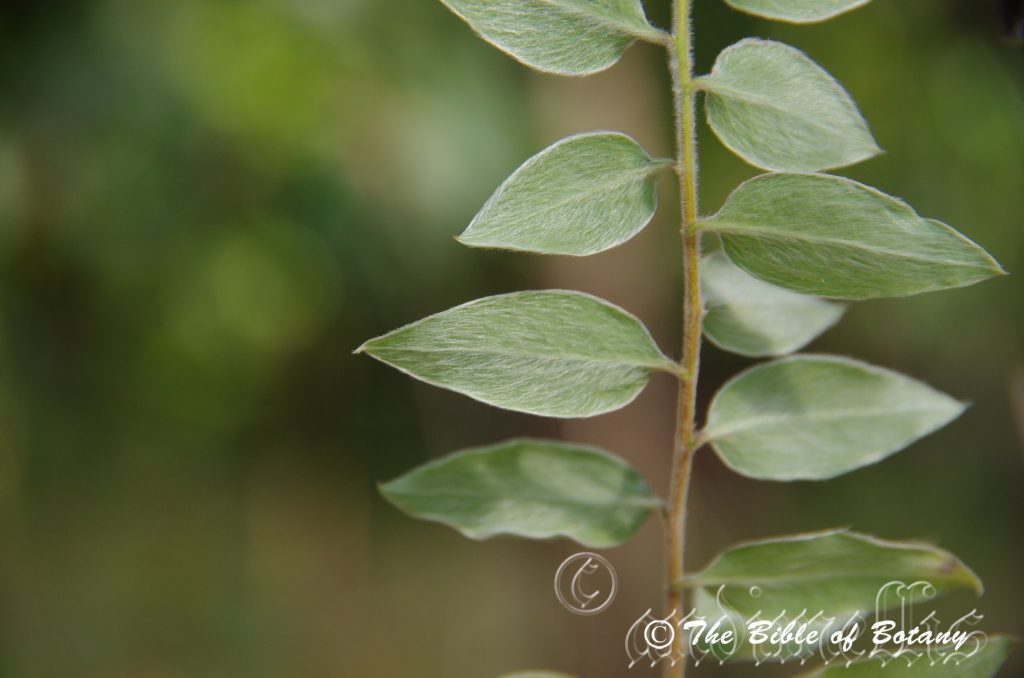
Kendal NSW
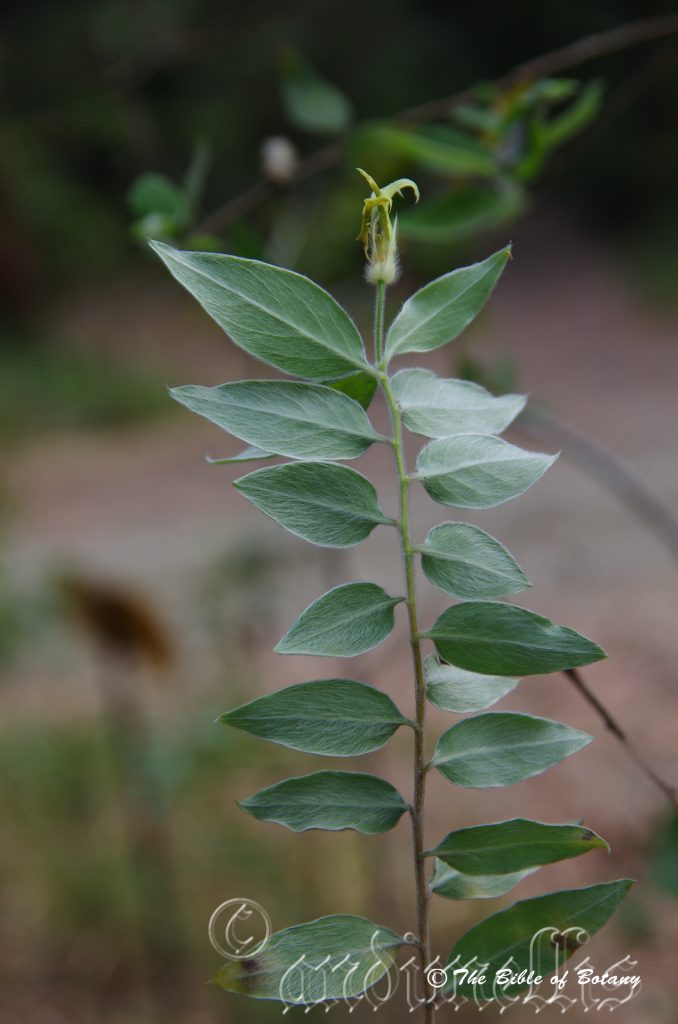
Kendal NSW
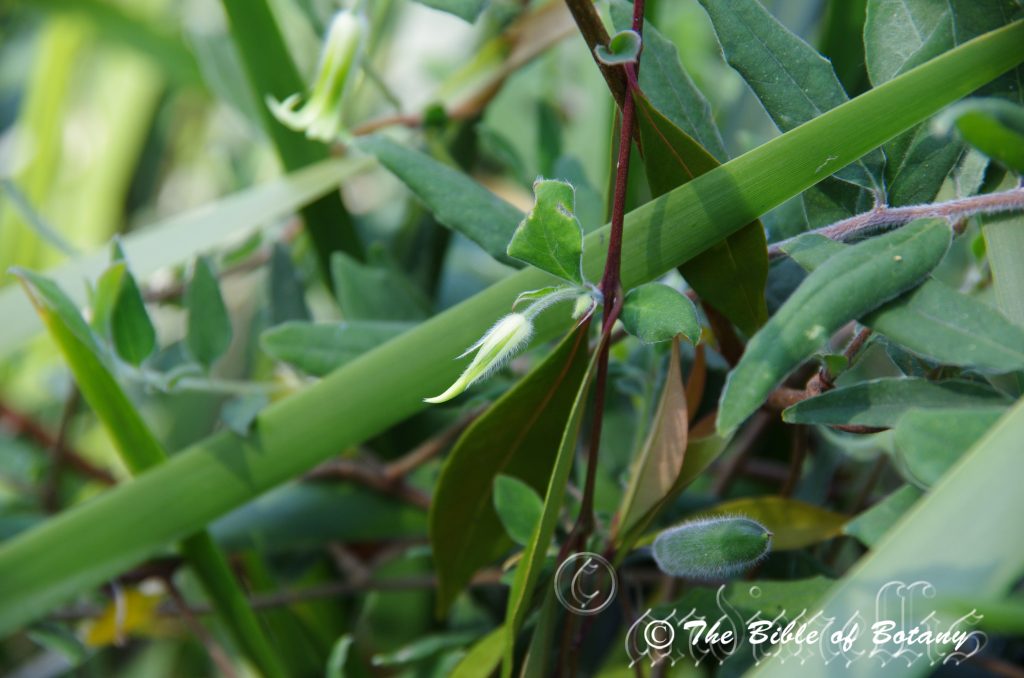
Kendal NSW
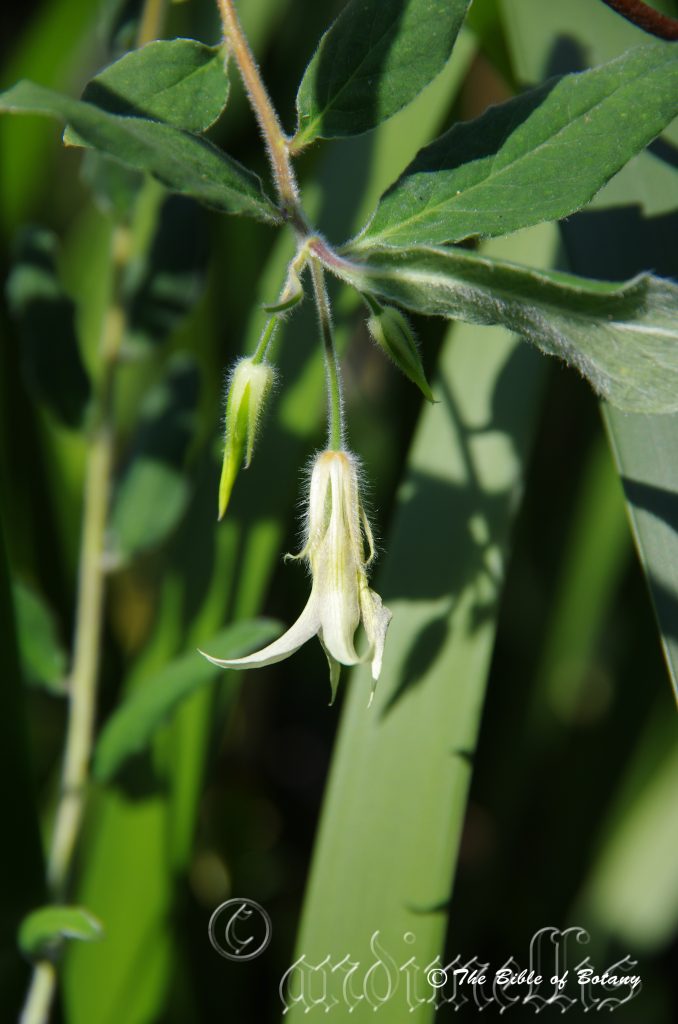
Kendal NSW
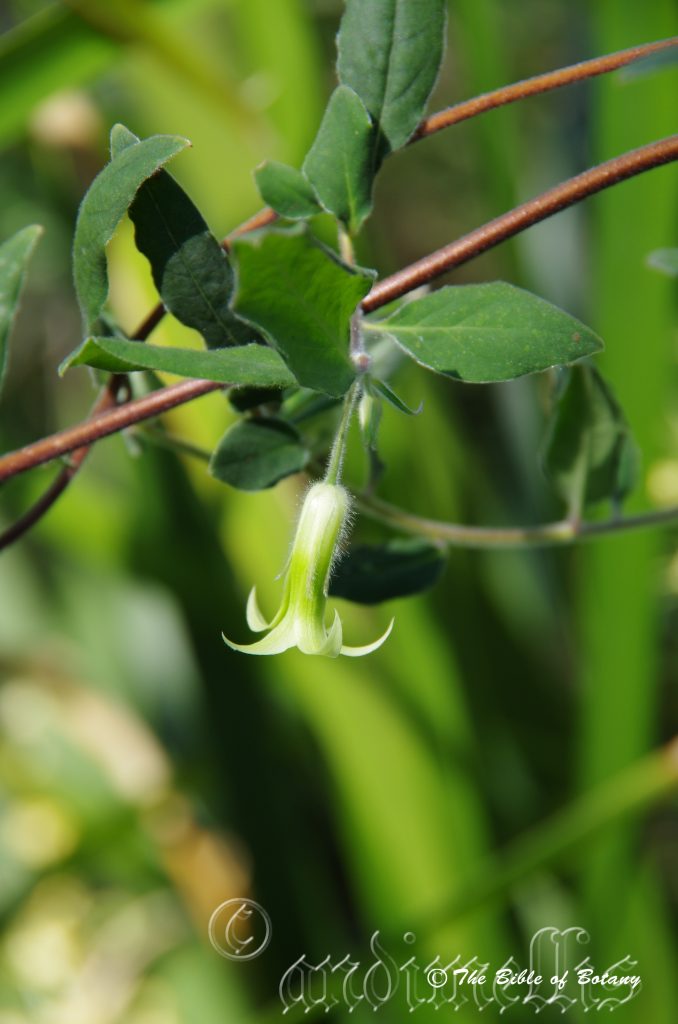
Kendal NSW
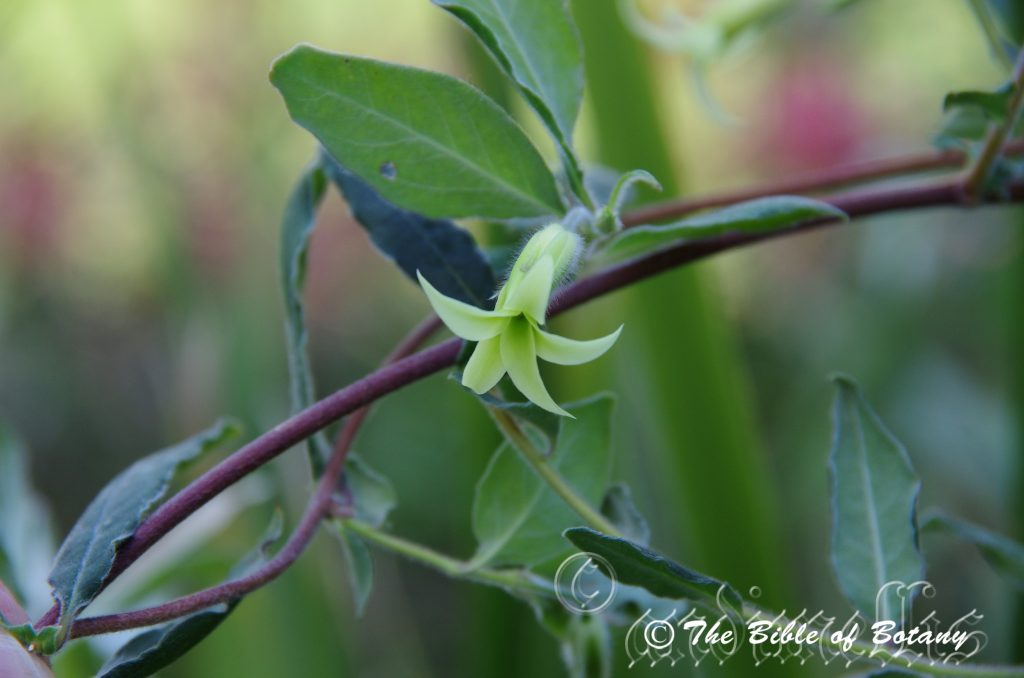
Kendal NSW
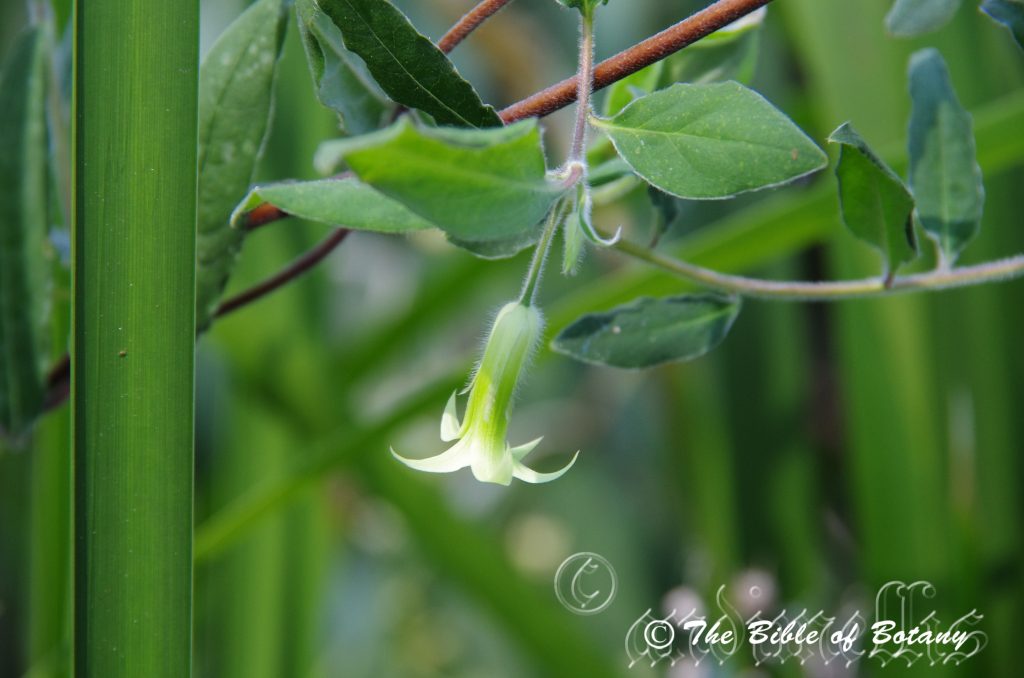
Kendal NSW
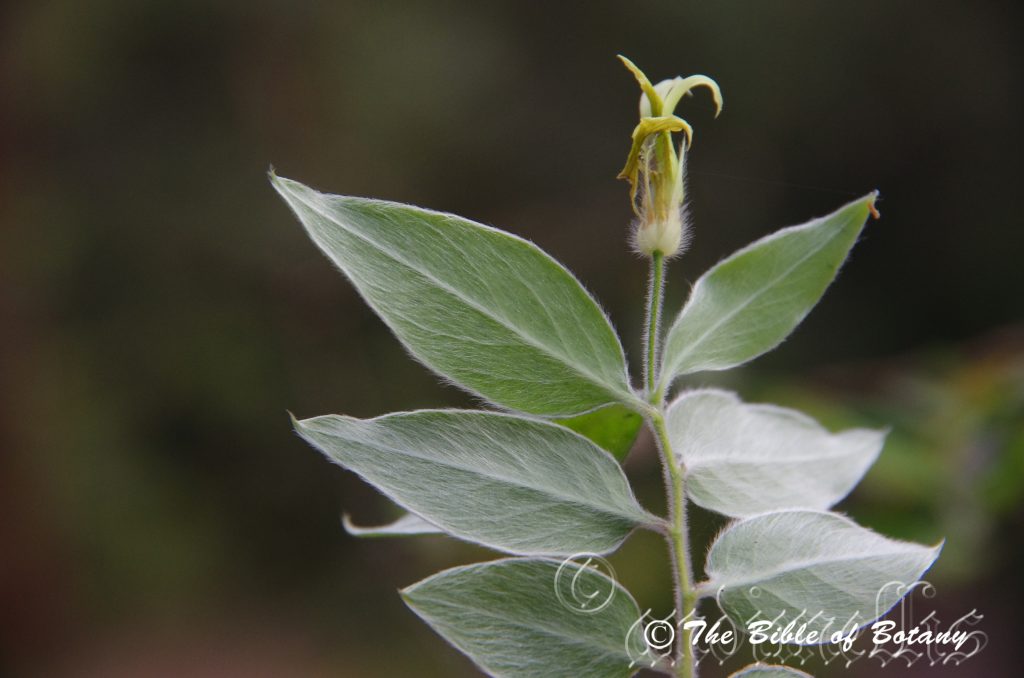
Kendal NSW
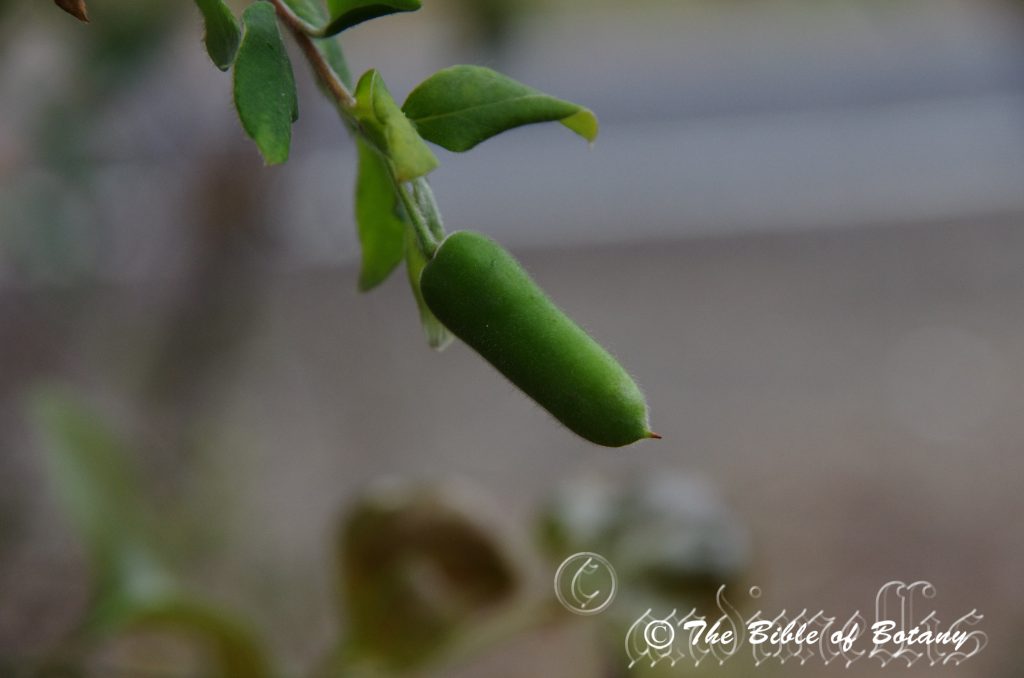
Lake Innes National Park NSW
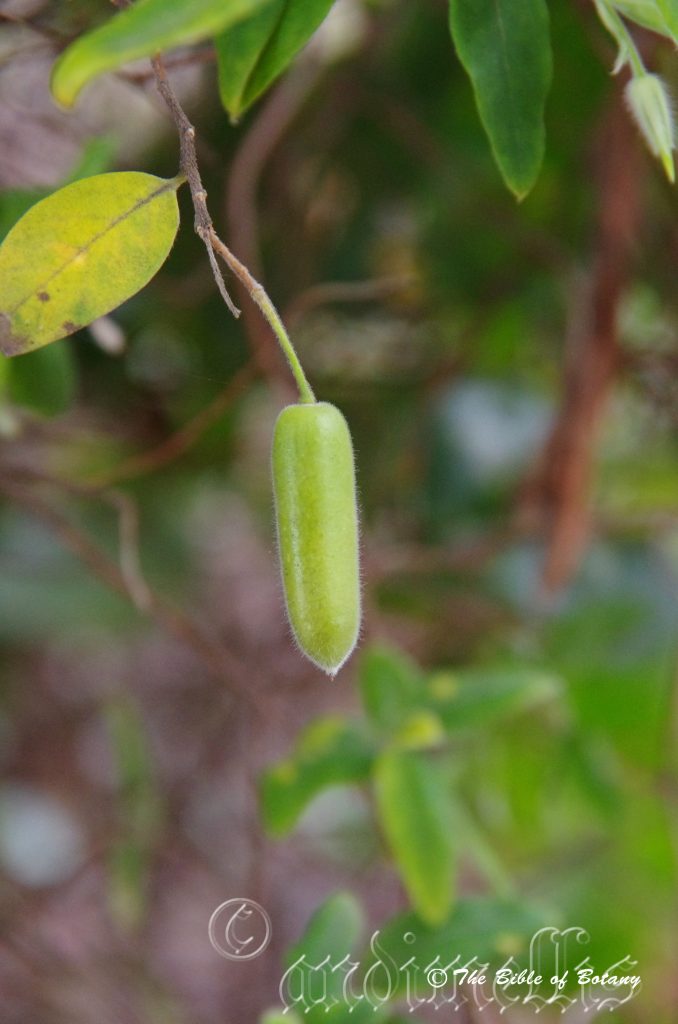
Lake Innes National Park NSW
Billardiera scandens
Classification:
Unranked: Eudicots
Unranked: Asterids
Order: Apiales
Family: Pittosporacea
Genus: Is named in honour of Billardier; 1755-1834 who travelled with the D’entrecasteaux Expedition to Western Australia and Tasmania where he discovered many new species.
Species: From Scandere, which is Latin for the people of Scandere. It refers to people, who are very good climbers in a very mountainous/hilly district.
Common Name: Hairy Apple Berry.
In the Aboriginal language it is known as Garawang.
Distribution:
Billardiera scandens is found south from Rockhampton in Queensland to the Victorian border on and east of the Great Dividing Range to the coast. It is also found west to the South Australian, Victorian border and on Kangaroo Island.
It grows on Flinders Island and the northern and eastern side of Tasmania.
https://avh.ala.org.au/occurrences/search?taxa=Billardiera+scandens#tab_mapView
Habitat Aspect Climate:
Billardiera scandens prefers full sun to dappled shade. It grows in open woodlands, dry rainforests, moist Eucalypt forests and areas adjacent to coastal wallums. The altitude ranges from 3 meters ASL to 1450 meters ASL.
The temperatures range from minus 6 degrees in July to 38 degrees in January.
The rainfall ranges from lows of 400mm to 1600mm average per annum.
Soil Requirements:
Billardiera scandens prefers deep, sandy loams, light fatty clays, medium clays or light silts to heavy silts. The soils are usually derived from decomposed sandstones granites, brown basalts, black basalts, shales, metamorphic rocks, limestones, alluvial deposits or accumulated peaty beach sands. The soil’s pH ranges from 4.5pH to 7.5pH. It does not tolerate waterlogged soils. None saline soils to very saline soils are tolerated as are salt laden winds.
Height & Spread:
Wild Plants: 1m to 3m by 1m to 3m.
Characteristics:
Billardiera scandens grows as a scandent climber, climbing over other small shrubs or as a small shrub when there is nothing to scramble over. Billardiera scandens is a stem contact climber with the young shoots twinning around anything they come in contact with. Stems are thin red-brown, and covered in silky, white pilose hairs. Juvenile leading shoots are pale green and densely covered in silky, white pilose hairs.
Billardiera scandens’ light green alternate narrow ovate leaves measure 35mm to 40mm in length by 12mm to 15mm in width. The base is cuneate while the apex is obtuse with a mucronate tip or acute. The leaf margins are entire. The discolourous laminas are pale blue-green to mid green on the upper laminas and covered in silky, white pilose hairs while the lower laminas are slightly paler on the lower lamina. The laminas are densely covered in appressed, silky, white pannate hairs. The colouration is a deeper green when grown in the shade however leaf drop develops if the shade is too strong. Petioles measure 0mm to 4mm long.
The nodding inflorescences of Billardiera scandens are born singularly or in pairs. The flowers are a pale yellow to pale yellow with a pink tinge. The 5 linear sepals are asymmetrical and covered in white pilose hairs externally and glabrous internally. They measure 6mm to 10mm in length. The clawed petals are slightly recurved at the tips and densely covered in silky white pilose hairs externally and are glabrous internally. The petals measure 16mm to 20mm in length.
Stamens are as long as the united section of the petals and are white while the white anthers are versatile.
The pistil has a long ovary which is densely covered in silky, short, white, pilose hairs. It is longer than the style which has a distinctly knobby stigma. The pedicels are densely covered in silky, long, white pilose hairs and measures 5mm to 12mm in length
Billardiera scandens flowers from late October through to early March. Flowering appears to be more prolific following a prolonged cold period.
The fruits are indehiscent berries. They are obovate to oblong, sparsely covered in silky, white pilose hairs and measure 20mm to 30mm in length by 8mm to 10mm in diameter. The berries have a rounded base with a round apex. The style is persistent on the fruit. The green fruits drop before ripening and turn yellow on the ground. There are 5 to 20 reddish brown seeds in each fruit which measure less than 1mm in diameter.
Wildlife:
Billardiera scandens fruit is eaten by possums, native rats and was a staple part of the Australian Aborigines and first Europeans to settle in Australia.
The fruit has a mild sweet apple taste crossed with a touch of kiwi fruit hence one of its common names.
Cultivation:
Billardiera scandens is a beautiful small creeper that deserves a place in every native or exotic garden. it is ideal in almost every setting near ponds, at the edge of a rainforest in courtyards, around swimming pools, in the orchard or the rockery.
Its versatility doesn’t stop with accepting all types of soils but they can cope with temperatures as low as minus 6 degrees and up to 42 degrees. It is drought resistant and can cope with the occasional immersion where periodic down pours may flood the land.
It is best used adjacent to small areas of bush close to paths or the house so their fruits can be harvested as they ripen. It is ideal in small rockeries as a fill in plant. If it is surrounded by shorter plants with fine foliage and red flowers they will still give a pleasant outline and strength to the bed especially when it is in fruit. Planted with a mass of smaller plants and groundcovers with mixed coloured flowers and foliage will ensure a great display during the winter and spring months and for the rest of the year. Plant it at 3 meter spacings ensuring that other smaller plants are planted so that they do not enter its zone.
Add to the above, if it is given adequate moisture, plenty of mulch for moisture retention and an even soil temperature, applying native fertilizers on a regular basis the plants will respond with good flowering over a long period and will yield good quality fruit with maximum size. The fruits can measure 30mm to 35mm in length by 10mm to 12mm in diameter.
Propagation:
Seeds: Billardiera scandens seeds do not require treatment before sowing, however scarifying the seeds may help uniformity in germination. Place the seeds in a calico bag, then place the calico bag in a plastic bag and put the plastic bag in the vegetable crisper for a few weeks before sowing. Sow seeds directly into a seed raising mix and cover with 5mm of the mix. When the seedlings are 25mm to 50 mm tall, prick them out and plant them into 50mm native tubes using a seed raising mix.
Once the seedlings reach 150mm to 200mm in height plant them out into their permanent position. Mass plantings can be achieved with spacing of 2 meters. When planting for the fruit in an orchard, plant the seedlings at 3 meter spacings so easy pruning and harvesting can take place.
Cuttings:
Use 30mm to 60mm long semi-hardwood cuttings would be my preference prepared from partially mature wood of the current season’s growth. This should be taken just after a flush of growth has hardened off. This type of cutting normally is made from the middle of July in frost free locations to early autumn where frosts occur. The wood is reasonably firm and the leaves are of mature size.
Remove most of the leaves leaving the top 2 to 4. Take a 10mm slice off the bark from the bottom of the cutting on one side. Using an average rooting hormone, dip the cutting in and place it in a moist sterile seed raising mix. When the cuttings have obviously struck and have developed good roots treat them as for seedlings.
Fertilize using Seaweed, fish emulsion or organic chicken pellets soaked in water on an alternate basis. Fertilize every two months until the plants are established then annually in early September to October to maintain health, vitality and better flowering.
Further Comments from Readers:
Hi reader, it seems you use The Bible of Botany a lot. That’s great as we have great pleasure in bringing it to you! It’s a little awkward for us to ask, but our first aim is to purchase land approximately 1,600 hectares to link several parcels of N.P. into one at The Pinnacles NSW Australia, but we need your help. We’re not salespeople. We’re amateur botanists who have dedicated over 30 years to saving the environment in a practical way. We depend on donations to reach our goal. If you donate just $5, the price of your coffee this Sunday, We can help to keep the planet alive in a real way and continue to bring you regular updates and features on Australian plants all in one Botanical Bible. Any support is greatly appreciated. Thank you.
In the spirit of reconciliation we acknowledge the Bundjalung, Gumbaynggirr and Yaegl and all aboriginal nations throughout Australia and their connections to land, sea and community. We pay our respect to their Elders past, present and future for the pleasures we have gained.
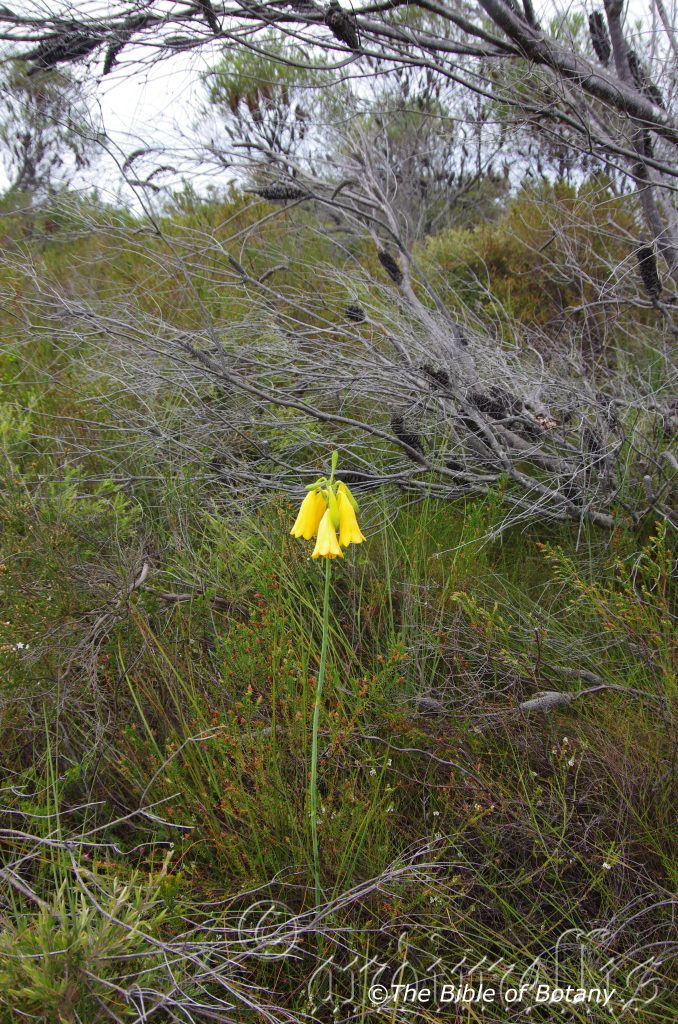
Boorkoom Yuraygir National Park NSW
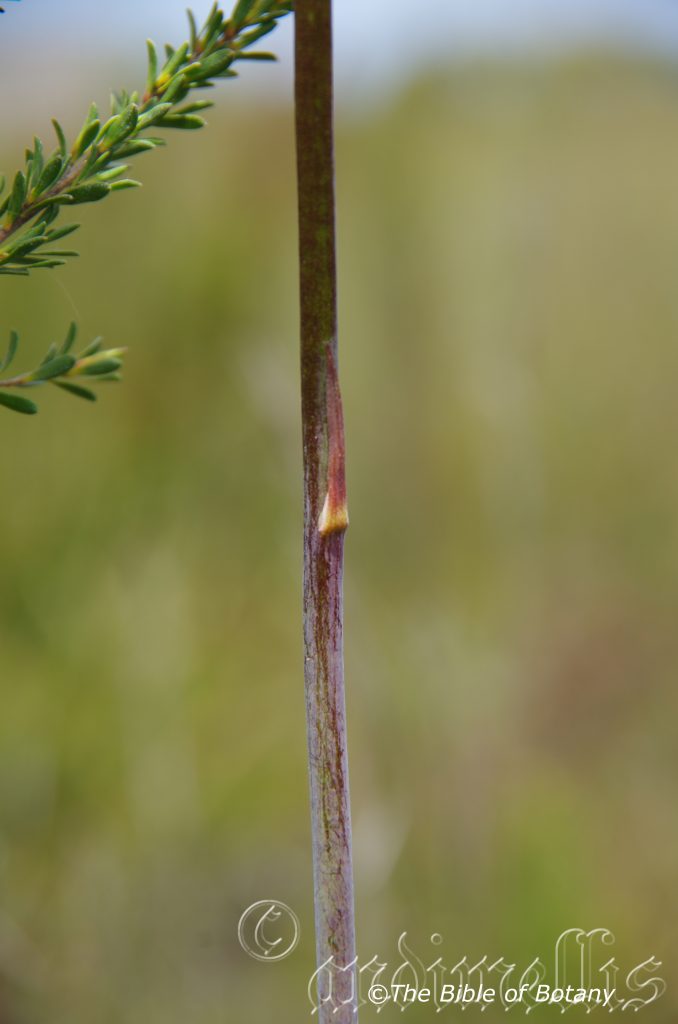
Boorkoom Yuraygir National Park NSW
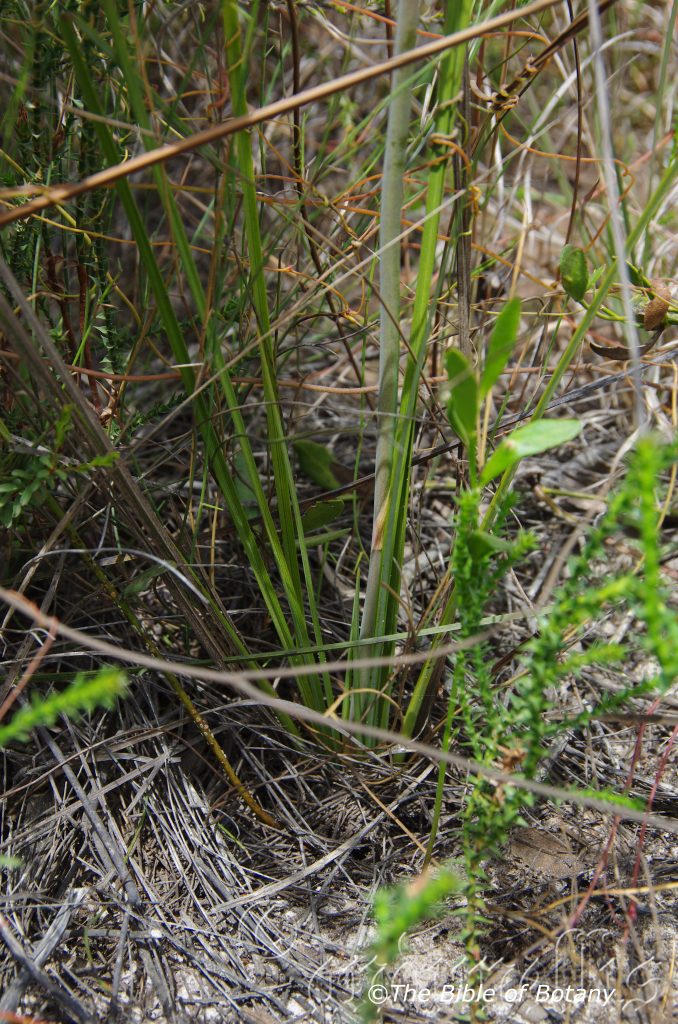
Boorkoom Yuraygir National Park NSW
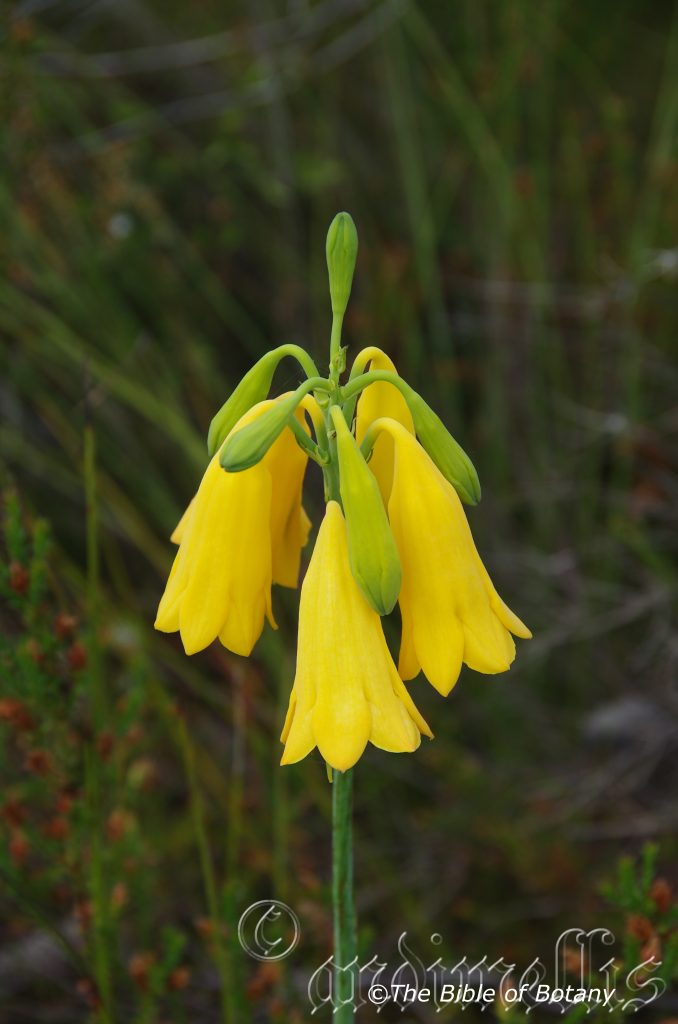
Boorkoom Yuraygir National Park NSW
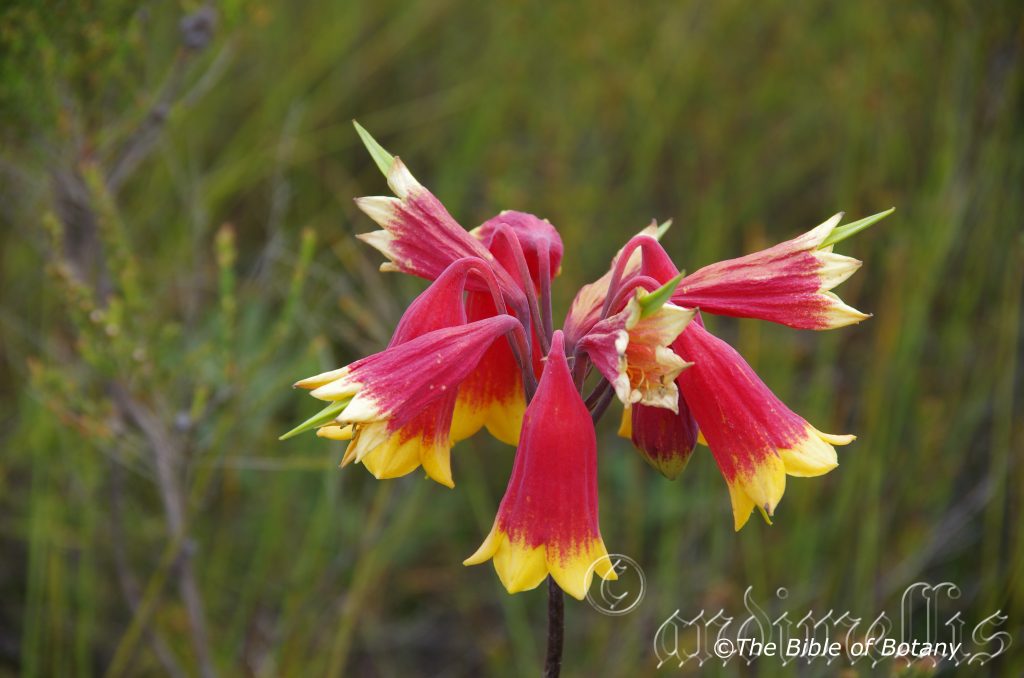
Boorkoom Yuraygir National Park NSW

Boorkoom Yuraygir National Park NSW
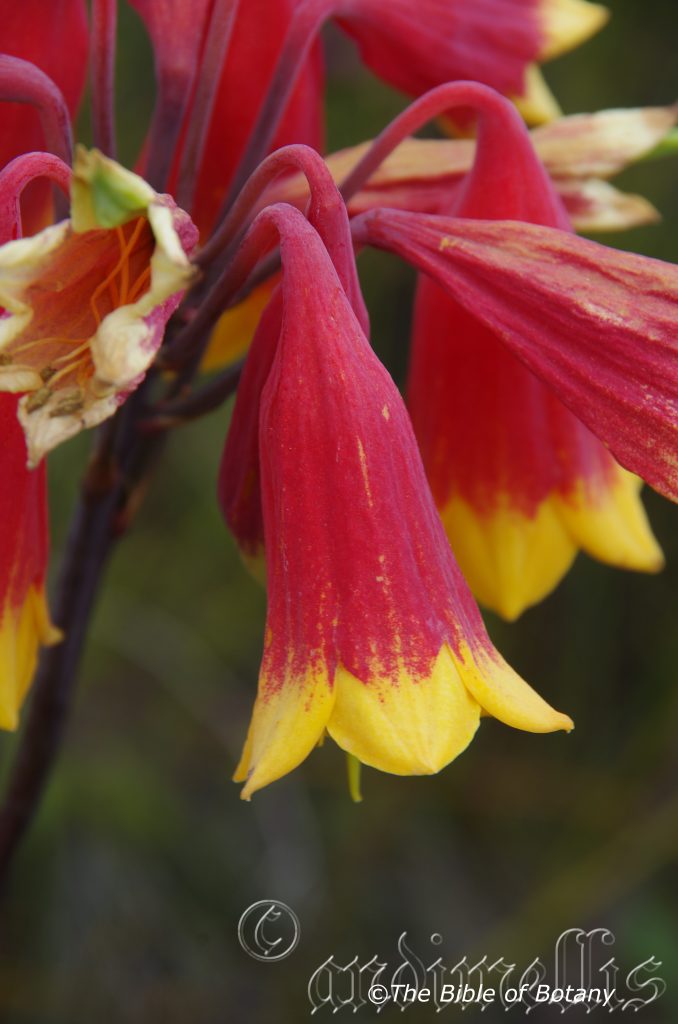
Boorkoom Yuraygir National Park NSW
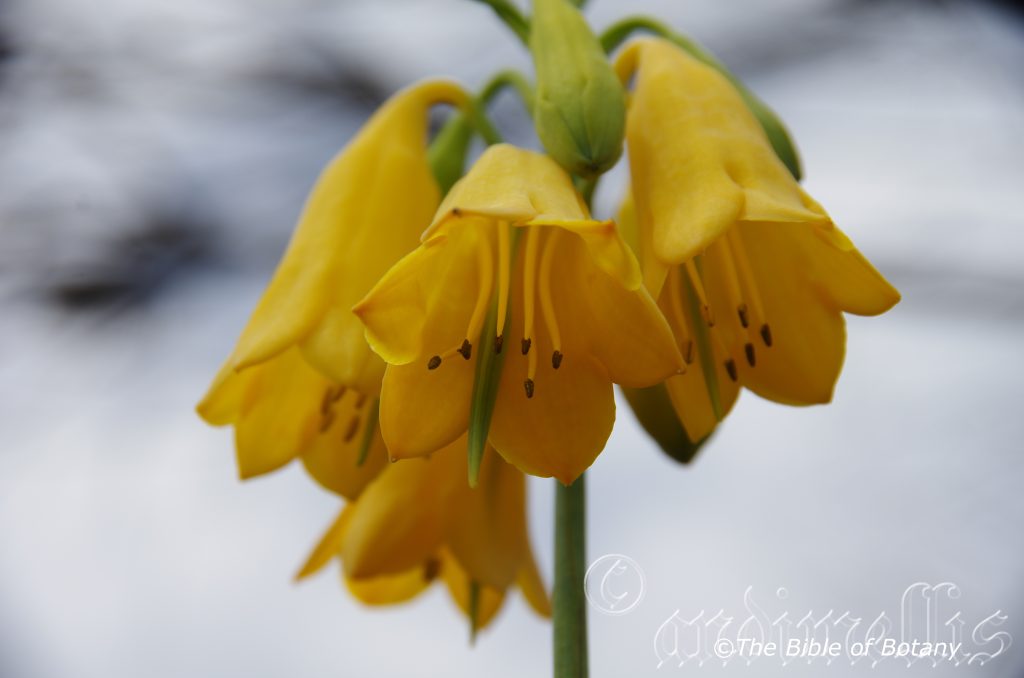
Boorkoom Yuraygir National Park NSW
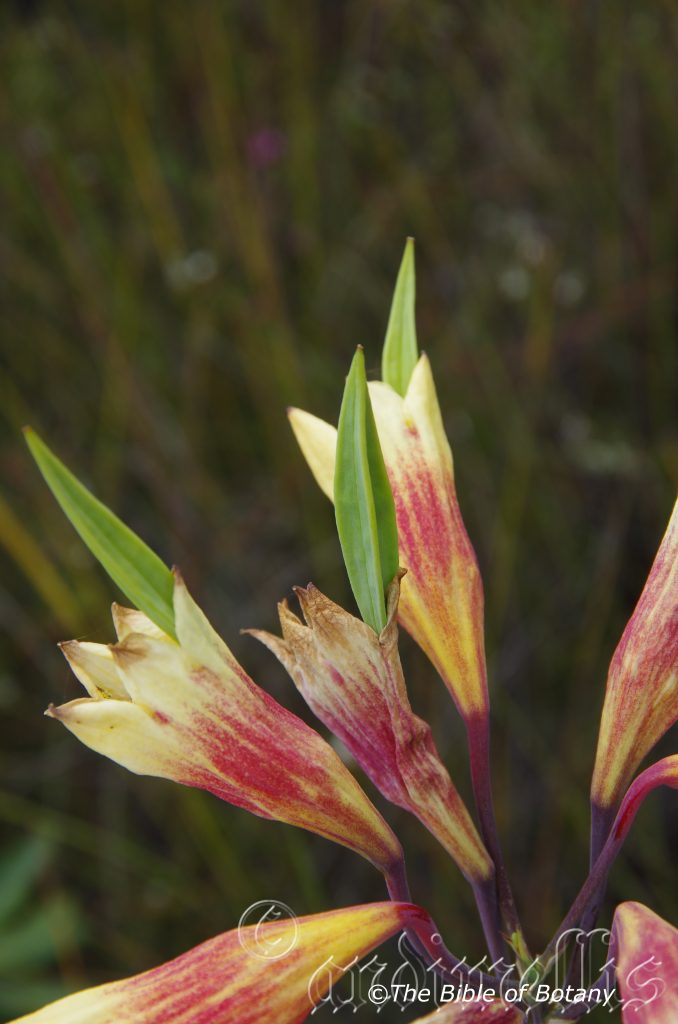
Boorkoom Yuraygir National Park NSW
Blandfordia grandiflora
Classification:
Unranked: Monocots
Order: Asparagales
Family: Blandfordiaceae
Genus: Is named in honour of George Spenser Blandford; 1766-1840, who was the marquis of Blandford.
Species: From Grandis which is Latin for large and Floris, which is Latin for a flower or Flos, which is the Roman goddess of spring and flowers. It refers to plants, which produce larger flowers than most other species in the genus.
Common Name: Christmas Bells.
Distribution:
Blandfordia grandiflora is found in many disjunct populations mainly because of poaching and habitat destruction. It is found south from Fraser Island in southern coastal Queensland to the Hawkesbury River sandstone plateau in central coastal New South Wales. It is mainly found on the eastern side of The Great Dividing Range.
https://avh.ala.org.au/occurrences/search?taxa=Blandfordia+grandiflora+#tab_mapView
Habitat Aspect Climate:
Blandfordia grandiflora prefers full sun to very light shade. It grows in coastal wallums behind the frontal dunes or back dunes or wet tablelands heaths. The altitude ranges from 5 meters ASL to 450 meters ASL
The temperatures range from minus 2 degrees in July to 40 degrees in January.
The rainfall ranges from lows of 400mm to 1800mm average per annum.
Soil Requirements:
Blandfordia grandiflora prefers deep, coarse sands, fine sands to sandy loams. The soils are usually derived from decomposed sandstones, granites or accumulated peaty beach sands. The soil’s pH ranges from 4.5pH to 6pH. It tolerates seasonal waterlogged soils. None saline soils to moderately saline soils are tolerated.
Height & Spread:
Wild Plants: 0.3m to 1m by 0.2m to 0.4m when in flower.
Characteristics:
Blandfordia grandiflora grows as a tufted perennial which resembles the exotic Lilies.
Blandfordia grandifloras’ narrow, strap like, linear leaves measure 500mm to 700 in length by 2.5mm to 5mm in width. The laminas are flat channelled on the upper surface and keeled below. The concolourous laminas are grass-green and slightly scabrous to scabrous. The margins are crenulate, thickened and flat or slightly in rolled.
The nodding inflorescences of Blandfordia grandiflora are born on a long thick scape. The flowers vary greatly in colour from all yellow to all yellow-orange in the yellow forms, the yellow-red forms are red on the basal half and yellow on the apex half, the orange forms are red to orange-red on the basal two thirds and yellow on the apex third while the red forms are red on the corolla tubes with yellow lobes.
The deep olive-green to brownish-green scapes measure 800mm to 1750mm in length by 6mm to 8mm in diameter. The inflorescence form a raceme near the apex and contain 2 to 20 but usually 7 to 12 individual flowers. The pedicels measure 25mm to 45mm in length and are longer than the subtending bract. Subtending bracts measure 10mm to 30mm in length. The campanulate corolla tubes measure 35 to 60mm in length by 18mm to 30mm in diameter at the apex. The lobes are semicircular while the apexes are acute. They measure 8mm to 11mm in length.
The stamens are attached slightly below the middle from the base of the corolla tube. The free section of the filaments measure 20mm to 30mm in length while the oblong anthers measure 3mm to 5mm in length.
The green pistil of Blandfordia grandiflora is tapering. It flowers from late November to early January.
The fruits of Blandfordia grandiflora are long, elliptical capsules. They glabrous and measure 40mm to 60mm in length including the style by 10mm to 14mm in diameter. The capsules are tapered at the bases and apexes. The style is persistent on the capsules. The green fruits fawn and chartaceous when ripe. The numerous small reddish-brown seeds in each capsule which measure less than 0.5mm in diameter.
Wildlife:
Blandfordia grandiflora flowers are very popular feeding stations for most small and medium size honeyeaters like the New Holland Honeyeater Phylidonyris novaehollandiae, and the Scarlet Honeyeater Myzomela sanguinolenta.
Cultivation:
Blandfordia grandiflora is a magnificent additions to sunny moist garden along the coast and adjacent slopes. In cultivation they will grow from 350mm to 750mm in height by 200mm to 400mm in diameter and produce scapes to 1800mm when in flower.
It accepts most types of sandy loams and can cope with temperatures as low as minus 2 degrees and up to 42 degrees. It does however prefer the occasional immersion in water for a few days and to be kept moist at all times. If it dry out even for short periods the number of flowers and the size of the flowers will be greatly affected.
It is best used adjacent in small areas of bush close to paths or the house so its magnificent flowers can be harvested or admired for long periods. It is great in small wet soaks as a fill in plant but does best in bog or wet heath gardens.
Blandfordia grandiflora looks great when mixed with small Lomandra filicifolia, Hibbertia diffusa, Patersonia glabrata or any of the carnivorous plants like Drosera species. The first flowers will appear after 18 months from germination and will take another 2 years to reach its full potential. The earliest blooms are the best in size and number so if latter blooms are required the first flowering scapes should be removed as soon as they emerge. To do this on some plants when it is mass planted will give a longer flowering season with better looking blooms. The spent flowers should be removed as soon as they have passed their best to encourage the latter blooms to develop to their best.
It is proving to be reliable as pot plant when the pots are standing in a saucer of water.
Propagation:
Seeds: Blandfordia grandiflora seeds do not require treatment before sowing. Sow fresh seeds directly into a seed raising mix and cover with 1mm to 2mm of the mix. Place the trays in a warm sheltered place with a maximum of 50mm shade cloth and stand the trays in a saucepan of water or a capillary bench where water trickles through all the time. Prick the seedlings out as they reach 25mm to 40mm tall, and plant them into 50mm native tubes using a seed raising mix. Place the tubes in a permanent supply of water for a week or more before you begin to harden the seedlings off.
Fertilize using Seaweed, fish emulsion or organic chicken pellets soaked in water on an alternate basis. Fertilize every two months until the plants are established then annually in early September or March to maintain health, vitality and better flowering. If the plants are to be planted in an artificial wallum monitor the rate of fertilizer as far less will be required while too much will accumulate at the bottom and will cause problems.
Germination is erratic and can take weeks or several months. Once the seedlings reach 150 to 200mm in height plant them out into their permanent position. Mass plantings can be achieved with spacing of 0.4 meters to 0.7 meter.
Further Comments from Readers:
Hi reader, it seems you use The Bible of Botany a lot. That’s great as we have great pleasure in bringing it to you! It’s a little awkward for us to ask, but our first aim is to purchase land approximately 1,600 hectares to link several parcels of N.P. into one at The Pinnacles NSW Australia, but we need your help. We’re not salespeople. We’re amateur botanists who have dedicated over 30 years to saving the environment in a practical way. We depend on donations to reach our goal. If you donate just $5, the price of your coffee this Sunday, We can help to keep the planet alive in a real way and continue to bring you regular updates and features on Australian plants all in one Botanical Bible. Any support is greatly appreciated. Thank you.
In the spirit of reconciliation we acknowledge the Bundjalung, Gumbaynggirr and Yaegl and all aboriginal nations throughout Australia and their connections to land, sea and community. We pay our respect to their Elders past, present and future for the pleasures we have gained.
Blandfordia nobilis
Classification:
Unranked: Monocots
Order: Asparagales
Family: Blandfordiaceae
Genus: Is named in honour of George Spenser Blandford; 1766-1840, who was the marquis of Blandford.
Species: From Nobile, which is Latin for noticeable, showy or highly ranked. It refers to plants, which are much showier than other species in the genus.
Common Name: Christmas Bells or Lesser Christmas bells.
Distribution:
Bladfordia nobilis is found south from the Blue Mountains National Park and west to Jenolan Caves National Park to Braidwood and Meroo National Park on the coast of New South Wales.
https://avh.ala.org.au/occurrences/search?taxa=Blandfordia+nobilis+#tab_mapView
Habitat Aspect Climate:
Blandfordia nobilis prefers full sun to light shade. It grows in coastal wallums, in open mountain woodland heaths. The altitude ranges from 3 meters ASL to 680 meters ASL
The temperatures range from minus 6 degrees in July to 38 degrees in January.
The rainfall ranges from lows of 800mm to 1200mm average per annum.
Soil Requirements:
Blandfordia nobilis prefers deep, coarse sands, fine sands, and sandy loams to light fatty clays. The soils are usually derived from decomposed sandstones, granites or accumulated peaty beach sands. The soil’s pH ranges from 4.5pH to 6pH. It tolerates seasonal waterlogged soils. None saline soils to moderately saline soils are tolerated.
Height & Spread:
Wild Plants: 0.3m to 1m by 0.2m to 0.4m when in flower.
Characteristics:
Blandfordia nobilis grows as a tufted perennial which resembles the exotic Lilies.
Blandfordia nobilis’s narrow, strap like, linear leaves measure 500mm to 750 in length by 2mm to 5mm in width. The laminas are flat channelled on the upper surface and keeled below. The concolourous laminas are grass-green and slightly scabrous to scabrous. The margins are crenulate, thickened and flat.
The nodding inflorescences of Blandfordia nobilis are born on a long thick scape. The flowers vary greatly in colour from all yellow to all yellow-orange in the yellow forms, the yellow-red forms are red on the basal half and yellow on the apex half, the orange forms are red to orange-red on the basal two thirds and yellow on the apex third while the red forms are red on the corolla tubes with yellow lobes.
The deep olive-green to brown-green scapes measure 500mm to 800mm in length by 6mm to 7mm in diameter. The inflorescence form a loose raceme near the apex and contain 3 to 25 but usually 9 to 15 individual flowers. The pedicels measure 28mm to 35mm in length and are much longer than the subtending bract. The subtending bracts measure 7mm to 10mm in length. The campanulate corolla tubes measure 25 to 40mm in length by 8mm to 11mm in diameter at the apex. The lobes are ovate while the apexes are apiculate. They measure 5mm to 6.5mm in length.
The stamens are attached slightly below the middle from the base of the corolla tube. The free section of the filaments measure 15mm to 20mm in length while the oblong anthers measure 2mm to 2.8mm in length.
The green pistil of Blandfordia nobilis is tapering. The flowers appear from late November to early January.
The fruits of Blandfordia nobilis are long, elliptical capsules. They glabrous and measure 40mm to 60mm in length including the style by 10mm to 14mm in diameter. The capsules are tapered at the bases and apexes. The style is persistent on the capsules while the stipe measures 20mm to 25mm in length. The green fruits fawn and chartaceous when ripe.
The numerous small reddish-brown seeds in each capsule which measure less than 0.5mm in diameter.
Wildlife:
Blandfordia nobilis’s flowers are very popular feeding stations for most small and medium size honeyeaters like the New Holland Honeyeater Phylidonyris novaehollandiae, and the Scarlet Honeyeater Myzomela sanguinolenta.
Cultivation:
Blandfordia nobilis a magnificent additions to sunny moist garden along the coast and adjacent slopes. In cultivation they will grow from 350mm to 750mm in height by 200mm to 400mm in diameter and produce scapes to 1800mm when in flower.
It accepts most types of sandy loams and can cope with temperatures as low as minus 2 degrees and up to 42 degrees. It does however prefer the occasional immersion in water for a few days and to be kept moist at all times. If it dry out even for short periods the number of flowers and the size of the flowers will be greatly affected.
It is best used adjacent in small areas of bush close to paths or the house so its magnificent flowers can be harvested or admired for long periods. It is great in small wet soaks as a fill in plant but does best in bog or wet heath gardens.
Blandfordia nobilis looks great when mixed with small Lomandra filicifolia, Hibbertia diffusa, Patersonia glabrata or any of the carnivorous plants like Drosera species. The first flowers will appear after 18 months from germination and will take another 2 years to reach its full potential. The earliest blooms are the best in size and number so if latter blooms are required the first flowering scapes should be removed as soon as they emerge. To do this on some plants when it is mass planted will give a longer flowering season with better looking blooms. The spent flowers should be removed as soon as they have passed their best to encourage the latter blooms to develop to their best.
It is proving to be reliable as pot plant when the pots are standing in a saucer of water.
Propagation:
Seeds: Blandfordia nobilis seeds do not require treatment before sowing. Sow fresh seeds directly into a seed raising mix and cover with 1mm to 2mm of the mix. Place the trays in a warm sheltered place with a maximum of 50mm shade cloth and stand the trays in a saucepan of water or a capillary bench where water trickles through all the time. Prick the seedlings out as they reach 25mm to 40mm tall, and plant them into 50mm native tubes using a seed raising mix. Place the tubes in a permanent supply of water for a week or more before you begin to harden the seedlings off.
Fertilize using Seaweed, fish emulsion or organic chicken pellets soaked in water on an alternate basis. Fertilize every two months until the plants are established then annually in early September or March to maintain health, vitality and better flowering. If the plants are to be planted in an artificial wallum monitor the rate of fertilizer as far less will be required while too much will accumulate at the bottom and will cause problems.
Germination is erratic and can take weeks or several months. Once the seedlings reach 150 to 200mm in height plant them out into their permanent position. Mass plantings can be achieved with spacing of 0.5 meters to 1 meter.
Further Comments from Readers:
Hi reader, it seems you use The Bible of Botany a lot. That’s great as we have great pleasure in bringing it to you! It’s a little awkward for us to ask, but our first aim is to purchase land approximately 1,600 hectares to link several parcels of N.P. into one at The Pinnacles NSW Australia, but we need your help. We’re not salespeople. We’re amateur botanists who have dedicated over 30 years to saving the environment in a practical way. We depend on donations to reach our goal. If you donate just $5, the price of your coffee this Sunday, We can help to keep the planet alive in a real way and continue to bring you regular updates and features on Australian plants all in one Botanical Bible. Any support is greatly appreciated. Thank you.
In the spirit of reconciliation we acknowledge the Bundjalung, Gumbaynggirr and Yaegl and all aboriginal nations throughout Australia and their connections to land, sea and community. We pay our respect to their Elders past, present and future for the pleasures we have gained.
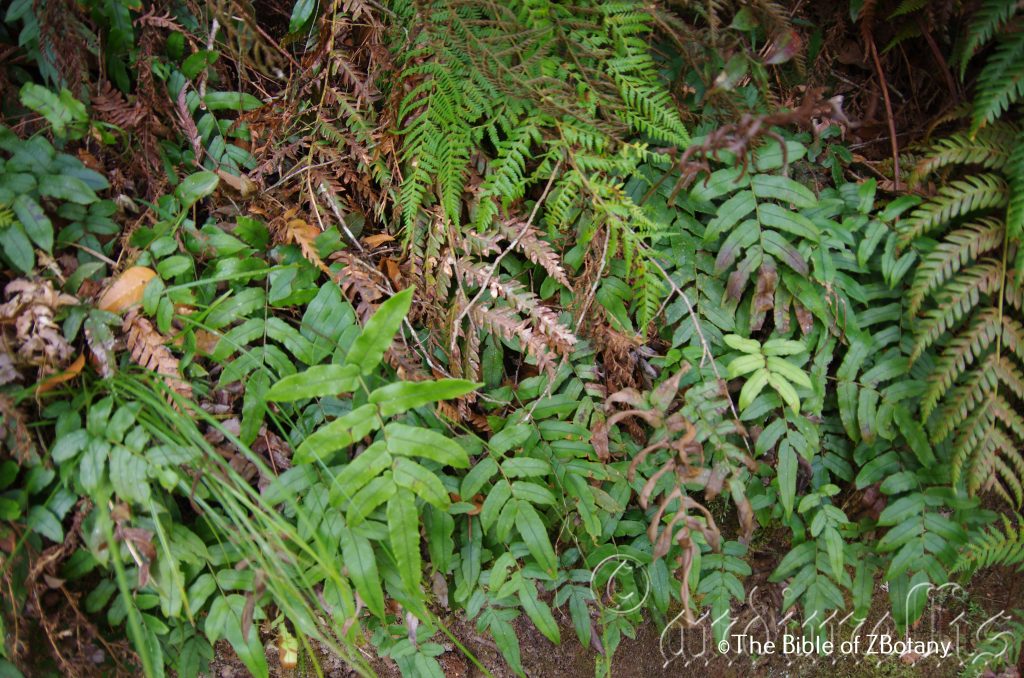
Dangar Falls NSW
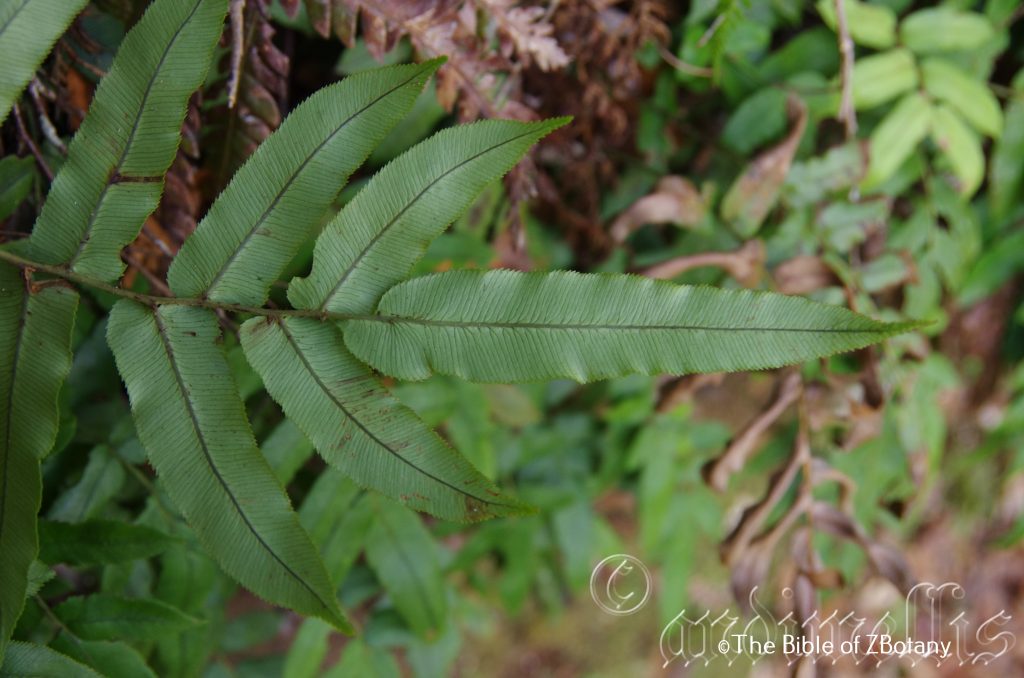
Dangar Falls NSW
Blechnum ambiguum
Classification:
Class: Pteridospida
Order: Athyriales
Family: Blechnaceae
Genus: From Blockhon, which is Ancient Greek for the ancient name given to ferns. It refers to a group of ferns, which have typical fishbone type fronds.
Species: From Ambiguum, which is Latin, for changing, fluctuating or waving. It refers to plants, their organs or structures, which show great variation.
Common Name:
Distribution:
Blechnum ambiguum is found on and east of the Great Dividing Range, south from west of Newcastle to Shoalhaven in New South Wales.
There are several disjunct populations further north to Middle Creek at Glenreagh and one on the Blackdown tablelands in central eastern Queensland and further south on the Genoa River in far north eastern Victoria.
https://avh.ala.org.au/occurrences/search?taxa=Blechnum+ambiguum+#tab_mapView
Habitat Aspect Climate:
Blechnum ambiguum grows in dense shade and dappled sunlight in well developed rainforests. It is found on rock faces along seepage lines or moist riverine gullies. The altitude ranges from 50 meters ASL to 600 meters ASL
The temperature ranges from 2 degrees in August to 36 degrees in January.
The rainfall ranges from lows of 1100mm to 2000mm average per annum.
Soil Requirements:
Blechnum ambiguum prefers soils that have high leaf litter content. The soils are light loams to medium clays associated with sandstone. The soils pH ranges from 5.5pH to 6.5pH. It tolerates waterlogged soils and does best on soils which have seepage problems. Non saline soils to very saline soils are tolerated.
Height & Spread:
Wild Plants: 300mm to 500mm by 100mm to 200mm.
Characteristics:
Blechnum ambiguum has short to medium, slender creeping rhizome with pale brown to red-brown scales. The lanceolate to ovate scales are much longer than broad, lanceolate to ovate.
The fronds are usually pendent, all of similar shape and size. They are mostly pinnate and measure 300mm to 500mm in length by 100mm to 200mm in width. The pale green, dull pinnae becoming more coarsely toothed towards apices.
The distinctly stalked, sterile frond’s pinnae (at least in the lower third of lamina,) measure 60mm to 100mm in length by 15mm to 25mm in width. The stalks measure 1mm to 3mm in length. The bases are rounded to truncate while the apexes are bluntly pointed to tapering. The fertile frond’s pinnae measure 40mm to 90mm in length by 3mm to 10mm in width and are less than half as broad as the sterile pinnae.
Wildlife:
Blechnum ambiguum’s wildlife is unknown to the author.
Cultivation:
Blechnum ambiguum is another beautiful ground fern for courtyards, around semi shady swimming pools or in the garden where moist conditions prevail. Blechnum ambiguum is excellent for around swimming pools where it can grow to its full potential. It is a pleasant fern for established rainforest gardens. If used correctly it can make medium size areas look larger. Some cleaning of spent fronds on a regular is necessary and year round moisture is required to keep it at its best. If it happens to look dead after a long holiday during a drought prune all the fronds off to a few centimetres of the rhizome and give them a good soaking. Apply a double strength dose of our recommended fertilizer two days later and within two weeks it will be back to its former glory.
It often reaches its full potential of 1000mm in just over 1 year.
Propagation:
Spores:
All ferns that are declared rare, vulnerable or endangered are protected by Federal and State Laws and must not be removed from the wild unless you are a land developer, mining company or main Roads department etc. This includes bulbs, roots, leaves and flowers. No part of any plant can be removed from Federal, State or Local Government land without the prior permission of the authority and this includes the spore.
Most people are put off at the thought of growing ferns from spore. Like all plants that produce their offspring from seed or spore the methods are basically the same. Remember nature has been doing this for millions of years and has been very successful. I have had excellent results growing over 200 different species of Australian ferns so don’t be afraid. Give it a go.
Step 1. Select spore from the fern fronds. Wait until the fern is just starting to release its spore. Rinse the fronds under clean running water and dry. This is to wash off any other spores from rogue ferns that may have settled onto the fronds. (There is nothing worse than having common brake or common soft bracken contaminating a prized tree fern or epiphyte.)
 Step 2. Place the dry fronds in a clean brown paper bag and keep them in a cool dark place like the linen closet for about a week to ten days before you are ready to sow the spore. The exception to this rule applies to ferns, which produce green spores. These must be sown immediately that they are released. Todea Barbara is a good example of a fern, which produces green spore.
Step 3. Take a large ice cream container, a small ice cream container and a clean clear plastic bag large enough to seal the large ice cream container and three or four milk bottle tops.
Step 4. Punch or drill 6 to 10 5mm holes in the bottom of the small ice cream container.
Step 5. Wash both containers, tops and plastic bag so that they are very clean and sterile.
Step 6. Use a clean fine seed raising mi. We used 30mm fine sand, 30mm peat and 30mm perlite and 10mm vermiculite. We used crushed basalt, crusher dust and peat in a 50:50 ratio for epiphytes. Moisten the mix enough that water does not run out when the mix is squeezed between the fingers.
Step 7. Place the moisten mix (Enough to half fill the small ice cream container) in the microwave oven with a large glass of water for 7 or 8 minutes, until the water is boiling. Allow them to cool in the oven. You will need the water later so do not tip it out.
Step 8. Take the brown paper bag out of the linen closet. Shake the bag and remove the fronds. You should have a yellow, brown, black or rarely greenish brown or ochre powder or very fine, small round pin head size spore depending on the specie involved.
Step 9. Remove the mixture from the oven once it has cooled and place it in the small ice cream container and level.
Step 10. Sprinkle the spore sparsely over the mixture in the small ice cream container.
Step 11. Place the milk bottle tops in the large ice cream container with the flat surface facing down. Place the small ice cream container in the large ice cream container so that it is sitting on the milk bottle tops.
Step 12. Remove the water from the microwave and pour it into the larger ice cream container so there is 25mm to 30mm of water in the bottom.
Step 13. Place the ice cream containers in the plastic bag and seal.
Step 14. Place the contents and bag in a warm shady place preferably 50mm to 70mm shade depending on the specie. Shade houses and some window sills are ideal.
Step 15. The surface should turn green within a week to two weeks. The prothallus will then develop. From the prthalus the first true fronds will appear. Wait until the ferns are 20mm to 35mm in height before you attempt to transplant them. Once they are ready open the bag up slightly and allow the air to flow around the little ferns. Every 3 to 5 days open the bag a little further so the ferns get use to their new environment. Allow them a week to two weeks to harden off before you transplant them following the removal of the plastic bag. Carefully prick them out into 50mm standard squat tubes as you would any seedling.
Do not try to transplant them as single plants as they are still a little delicate still.
Ground ferns like maiden Hair can be left in clumps.
Platycerium and Asplenium will have to be divided into single plants at a later stage. Once the first divisions have hardened off and the plants reach 50mm to 70mm in height. Be careful, as they are still fragile at this stage. Replace them close to their original position and water. After a few weeks, the ferns will power away without any setbacks. Here they can be further divided where necessary removing the smaller ferns leaving the largest one in place.
Once the smaller ones again reach 50mm to 70mm you may wish to divide the stronger and hardier individual plants into smaller clumps in 100mm squat pots.
Fertilize using Seaweed, fish emulsion or organic chicken pellets soaked in water on an alternate basis. Fertilize every two months until the plants are established then annually in early September to October to maintain health, vitality and better flowering.
Further Comments from Readers:
Hi reader, it seems you use The Bible of Botany a lot. That’s great as we have great pleasure in bringing it to you! It’s a little awkward for us to ask, but our first aim is to purchase land approximately 1,600 hectares to link several parcels of N.P. into one at The Pinnacles NSW Australia, but we need your help. We’re not salespeople. We’re amateur botanists who have dedicated over 30 years to saving the environment in a practical way. We depend on donations to reach our goal. If you donate just $5, the price of your coffee this Sunday, We can help to keep the planet alive in a real way and continue to bring you regular updates and features on Australian plants all in one Botanical Bible. Any support is greatly appreciated. Thank you.
In the spirit of reconciliation we acknowledge the Bundjalung, Gumbaynggirr and Yaegl and all aboriginal nations throughout Australia and their connections to land, sea and community. We pay our respect to their Elders past, present and future for the pleasures we have gained.
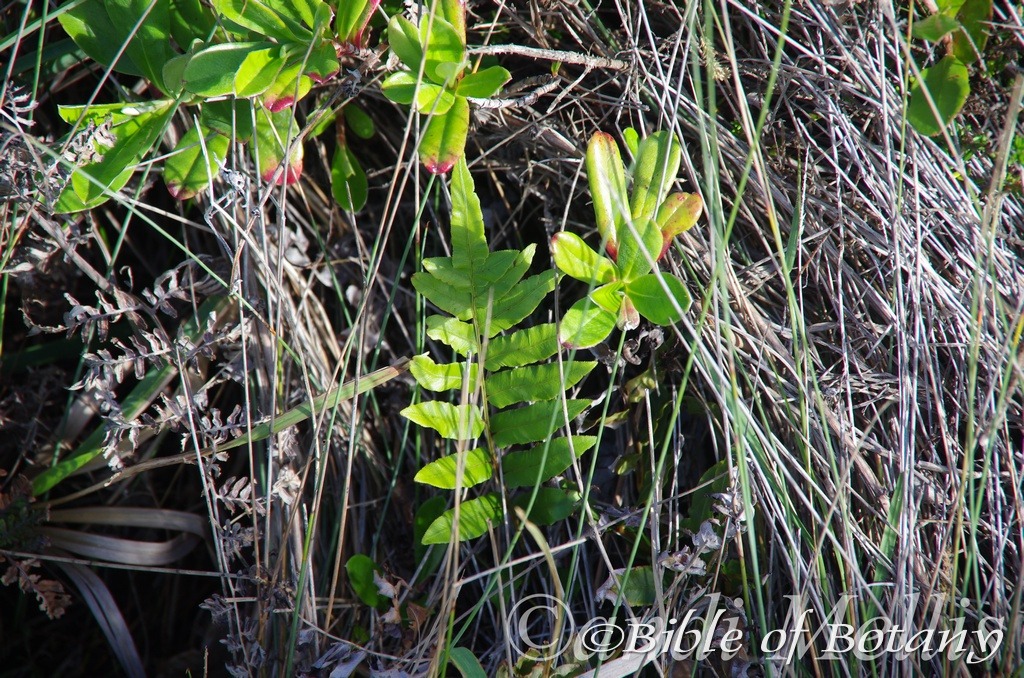
Blechnum camfieldii
Classification:
Class: Pteridospida
Order: Athyriales
Family: Blechnaceae
Genus: From Blockhon, which is Ancient Greek for the ancient name given to ferns. It refers to a group of ferns, which have typical fishbone type fronds.
Species: Is named in honour of Julius Henry Camfield; 1852-1916, who was an English born Australian who was dedicated and loyal overseer of Gardens and parks around Sydney.
Common Name: Eared Swamp Fern or Eared Wallum Fern.
Distribution:
Blechnum camfieldii is found south from Fraser Island in southern coastal Queensland to Clyde Mountain in southern coastal New South Wales. It is restricted to coastal areas east of the Great Dividing Range.
https://avh.ala.org.au/occurrences/search?taxa=Blechnum+camfieldii+#tab_mapView
Habitat Aspect Climate:
Blechnum camfieldii grows in dense shade, light shade and dappled sunlight. It is found in high rainfall areas in coastal wallums, coastal swamps and wet Eucalyptus Melaleuca forests. The altitude ranges from 3 meters ASL to 60 meters ASL
The temperature ranges from 4 degrees in August to 36 degrees in January.
The rainfall ranges from lows of 1100mm to 2000mm average per annum.
Soil Requirements:
Blechnum camfieldii prefers soils that have high leaf litter content beneath an open Eucalyptus or Melaleuca swamps and wallums. The soils are light sandy loams to medium clays. The soils are usually derived from accumulated sands along the coastal fringe. The soils pH ranges from 5.5pH to 7pH. It tolerates waterlogged soils and does best on soils which have high water tables or are continually wet. Non saline soils to very saline soils are tolerated.
Height & Spread:
Wild Plants: 500mm to 1000mm by 800mm to 1000mm.
Characteristics:
Blechnum camfieldii has a very short thick creeping rhizome which often forms a small feeble trunk in older plants. The rhizomes are covered in large, broad scales which have distinctly deeper brown centers and pale translucent margins.
This Blechnum camfieldii’s fronds grow in flushes. The fronds are single pinnate for most of their length. They usually measure 500mm to 1000mm in length by 160mm to 400mm in width. The fronds are clustered at the end of the rhizome. The stipeses are reddish-brown becoming deep chocolate brown towards the base and with age. The long triangular fronds longest pinnae are towards the middle of the frond. The 11 to 25 pinnae are pale green with the new growth varying from mid-pink to deep pink. The pinnae are sub sessile with auriculate bases while the apexes are narrowing acute. The margins are entire.
The fronds are dimorphic with the sterile fronds pinnae being pedicillate. The ovate to lanceolate pinnae measure 80mm to 200mm in length by 10mm to 17mm in width. The lowermost pinnae are much reduced in size while the upper pinnae are hastate or more often auriculate.
The fertile frond’s pinnae measure 80mm to 180mm in length by 3mm to 5mm in width.
Wildlife:
Blechnum camfieldii wildlife is unknown to the author.
Cultivation:
Blechnum camfieldii is a beautiful ground fern for courtyards, around semi shady salt swimming pools or in the garden where moist conditions prevail. Blechnum camfieldii is excellent for around swimming pools where it can grow to its full potential. It breaks up hard fences and walls giving a pleasant vertical tropical look. If used correctly it can make medium size areas look larger. Some cleaning of spent fronds on an annual basis is necessary and moisture is required to keep it at its best. It is drought tolerant so the occasional lapse in watering won’t affect them. If it does happen to look dead after a long holiday during a drought prune all the fronds off to a few centimetres of the rhizome and give them a good soaking. Apply a double strength dose of our recommended fertilizer two days later and within two weeks they will be back to their former glory.
It often reaches its full potential of 1000mm in just over 1 year.
Propagation:
Spores: All ferns that are declared rare, vulnerable or endangered are protected by Federal and State Laws and must not be removed from the wild unless you are a land developer, mining company or main Roads department etc. This includes bulbs, roots, leaves and flowers. No part of any plant can be removed from Federal, State or Local Government land without the prior permission of the authority and this includes the spore.
Most people are put off at the thought of growing ferns from spore. Like all plants that produce their offspring from seed or spore the methods are basically the same. Remember nature has been doing this for millions of years and has been very successful. I have had excellent results growing over 200 different species of Australian ferns so don’t be afraid. Give it a go.
Step 1. Select spore from the fern fronds. Wait until the fern is just starting to release its spore. Rinse the fronds under clean running water and dry. This is to wash off any other spores from rogue ferns that may have settled onto the fronds. (There is nothing worse than having common brake or common soft bracken contaminating a prized tree fern or epiphyte.)
Step 2. Place the dry fronds in a clean brown paper bag and keep them in a cool dark place like the linen closet for about a week to ten days before you are ready to sow the spore. The exception to this rule applies to ferns, which produce green spores. These must be sown immediately that they are released. Todea Barbara is a good example of a fern, which produces green spore.
Step 3. Take a large ice cream container, a small ice cream container and a clean clear plastic bag large enough to seal the large ice cream container and three or four milk bottle tops.
Step 4. Punch or drill 6 to 10 5mm holes in the bottom of the small ice cream container.
Step 5. Wash both containers, tops and plastic bag so that they are very clean and sterile.
Step 6. Use a clean fine seed raising mi. We used 30mm fine sand, 30mm peat and 30mm perlite and 10mm vermiculite. We used crushed basalt, crusher dust and peat in a 50:50 ratio for epiphytes. Moisten the mix enough that water does not run out when the mix is squeezed between the fingers.
Step 7. Place the moisten mix (Enough to half fill the small ice cream container) in the microwave oven with a large glass of water for 7 or 8 minutes, until the water is boiling. Allow them to cool in the oven. You will need the water later so do not tip it out.
Step 8. Take the brown paper bag out of the linen closet. Shake the bag and remove the fronds. You should have a yellow, brown, black or rarely greenish brown or ochre powder or very fine, small round pin head size spore depending on the specie involved.
Step 9. Remove the mixture from the oven once it has cooled and place it in the small ice cream container and level.
Step 10. Sprinkle the spore sparsely over the mixture in the small ice cream container.
Step 11. Place the milk bottle tops in the large ice cream container with the flat surface facing down. Place the small ice cream container in the large ice cream container so that it is sitting on the milk bottle tops.
Step 12. Remove the water from the microwave and pour it into the larger ice cream container so there is 25mm to 30mm of water in the bottom.
Step 13. Place the ice cream containers in the plastic bag and seal.
Step 14. Place the contents and bag in a warm shady place preferably 50mm to 70mm shade depending on the specie. Shade houses and some window sills are ideal.
Step 15. The surface should turn green within a week to two weeks. The prothallus will then develop. From the porthalus the first true fronds will appear. Wait until the ferns are 20mm to 35mm in height before you attempt to transplant them. Once they are ready open the bag up slightly and allow the air to flow around the little ferns. Every 3 to 5 days open the bag a little further so the ferns get use to their new environment. Allow them a week to two weeks to harden off before you transplant them following the removal of the plastic bag. Carefully prick them out into 50mm standard squat tubes as you would any seedling.
Do not try to transplant them as single plants as they are still a little delicate still.
Ground ferns like maiden Hair can be left in clumps.
Platycerium and Asplenium them close to their original position and water. After a few weeks, the ferns will power away without any setbacks. Here they can be further divided where necessary removing the smaller ferns leaving the largest one in place.
Once the smaller ones again reach 50mm to 70mm you may wish to divide the stronger and hardier individual plants into smaller clumps in 100mm squat pots.
Fertilize using Seaweed, fish emulsion or organic chicken pellets soaked in water on an alternate basis. Fertilize every two months until the plants are established then annually in early September to October to maintain health, vitality and better flowering.
Further Comments from Readers:
Hi reader, it seems you use The Bible of Botany a lot. That’s great as we have great pleasure in bringing it to you! It’s a little awkward for us to ask, but our first aim is to purchase land approximately 1,600 hectares to link several parcels of N.P. into one at The Pinnacles NSW Australia, but we need your help. We’re not salespeople. We’re amateur botanists who have dedicated over 30 years to saving the environment in a practical way. We depend on donations to reach our goal. If you donate just $5, the price of your coffee this Sunday, We can help to keep the planet alive in a real way and continue to bring you regular updates and features on Australian plants all in one Botanical Bible. Any support is greatly appreciated. Thank you.
In the spirit of reconciliation we acknowledge the Bundjalung, Gumbaynggirr and Yaegl and all aboriginal nations throughout Australia and their connections to land, sea and community. We pay our respect to their Elders past, present and future for the pleasures we have gained.
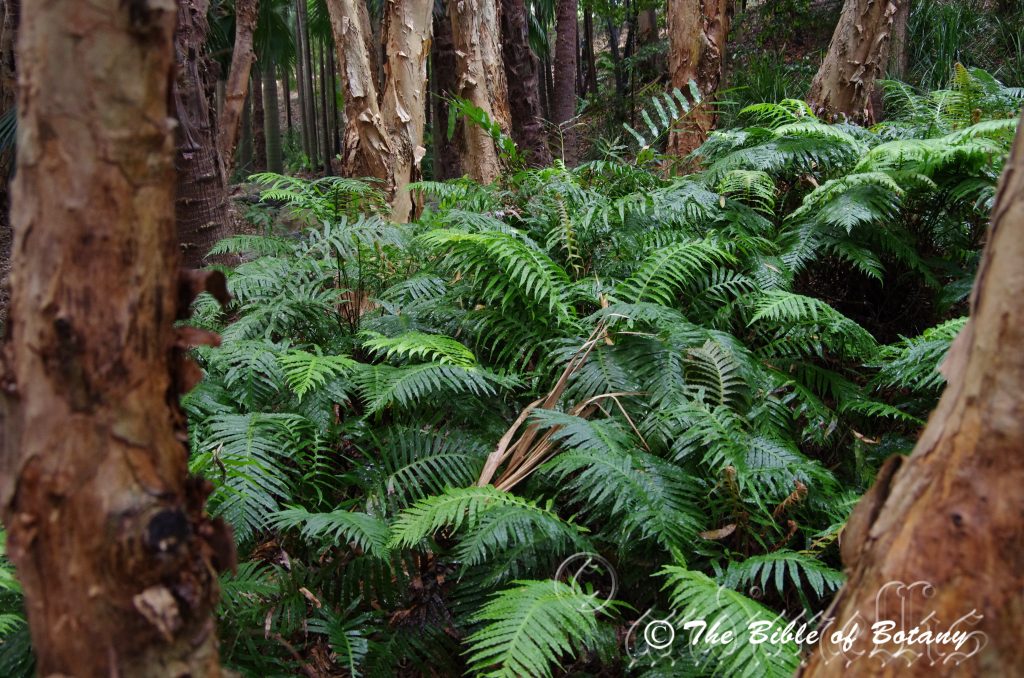
Mount Cootha Botanic gardens Qld.
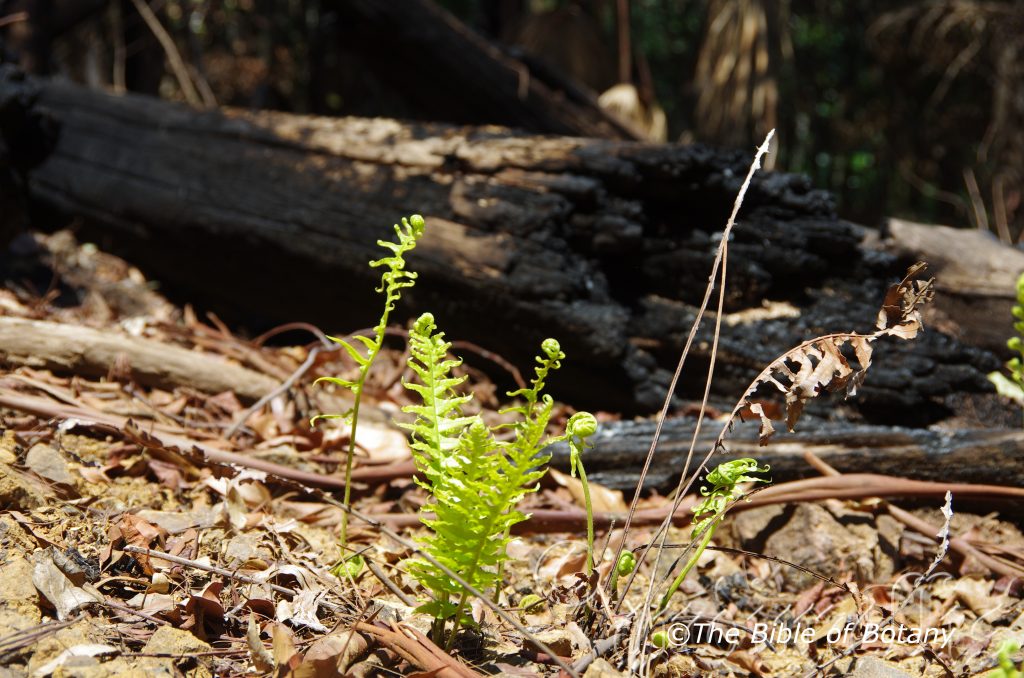
Erwingar State Forest NSW

Erwingar State Forest NSW
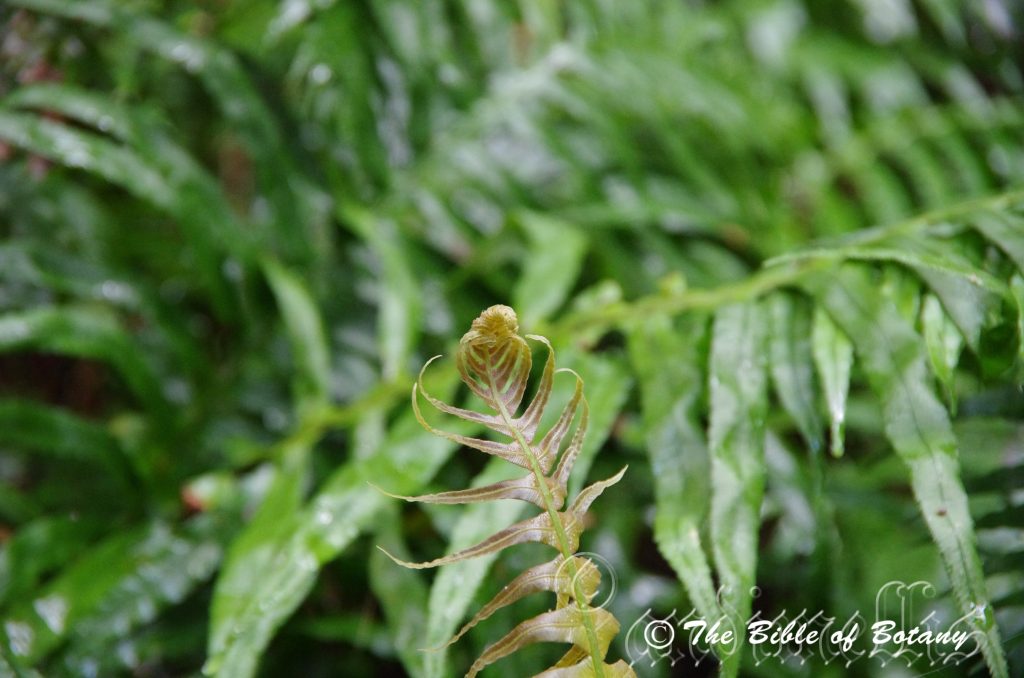
Erwingar State Forest NSW
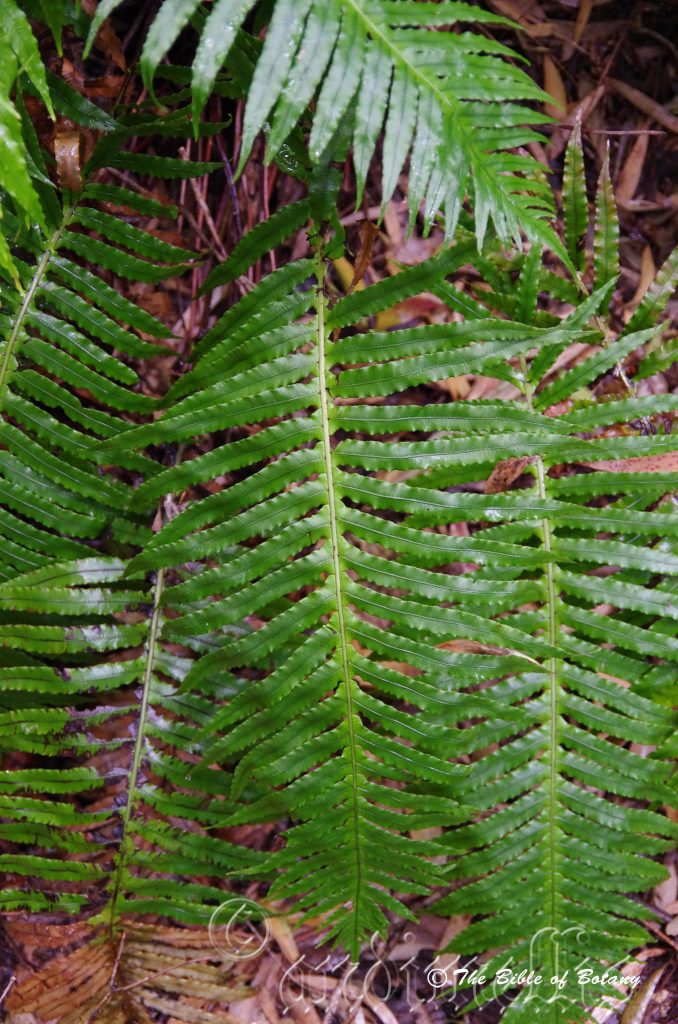
Erwingar State Forest NSW
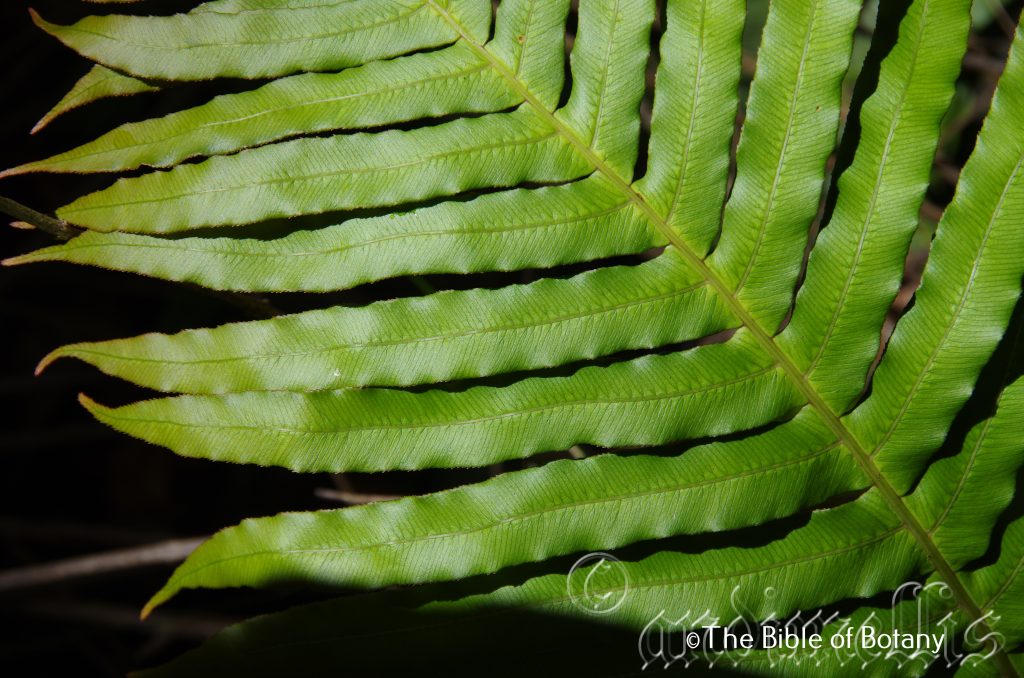
Pillar Valley NSW
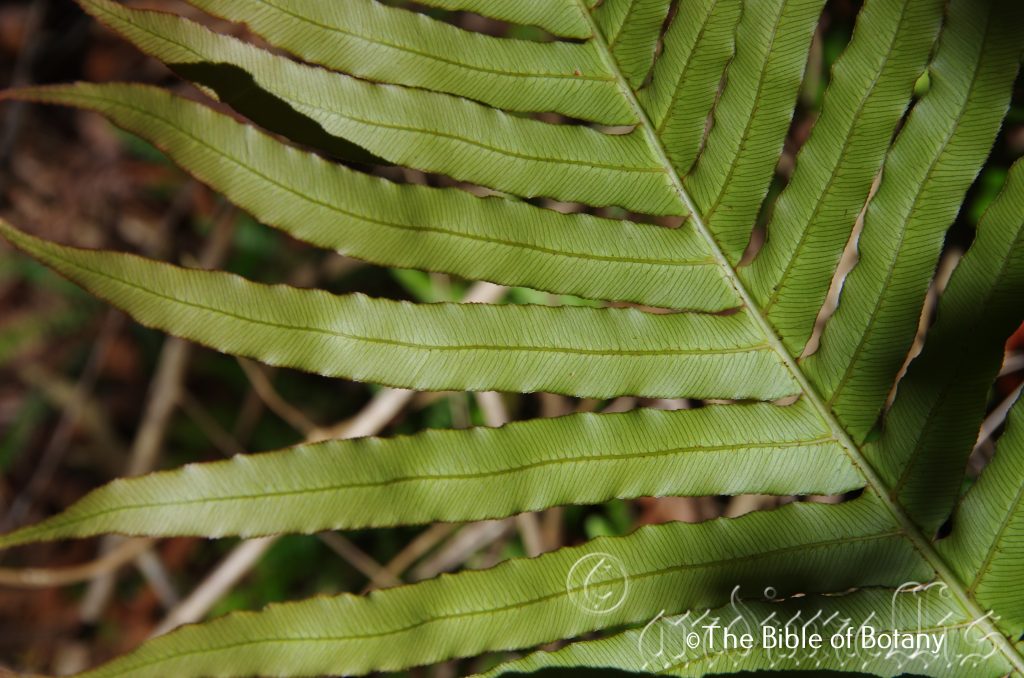
Pillar Valley NSW
Blechnum cartilagineum
Classification:
Class: Pteridospida
Order: Athyriales
Family: Blechnaceae
Genus: From Blockhon, which is Ancient Greek for the ancient name given to ferns. It refers to a group of ferns, which have typical fishbone type fronds.
Species : From Cartilaginosis, which is Latin for a whitish or pale yellowish gristle or Kartos, which is Ancient Greek for strong. It refers to a group of ferns, which have typical fishbone type fronds.
Common Name: Soft Water Fern or Gristle Fern.
Distribution:
Blechnum cartilagineum is found south from Lakefield National Park in far north eastern Queensland to Wilsons Promontory in Victoria
In Tasmania it is found on the eastern side of the north coast and down the eastern side to Tin Creek Marshlands.
https://avh.ala.org.au/occurrences/search?taxa=Blechnum+cartilagineum+#tab_mapView
Habitat Aspect Climate:
Blechnum cartilagineum grows in dense shade, light shade or dappled sunlight. It grows in mountain rainforests, littoral rainforests, wallums, moist Eucalyptus forests or gallery forests. The altitude ranges from 3 meters ASL to 1400 meters ASL
The temperature ranges from minus 4 degrees in August to 36 degrees in February.
The rainfall ranges from lows of 600mm to 2100mm average per annum.
Soil Requirements:
Blechnum cartilagineum prefers deep, sandy loams, light fatty clays to medium clays. The soils are usually derived from decomposed sandstones granites, brown basalts, black basalts, shales, metamorphic rocks or creek meander alluvial deposits. The soil’s pH ranges from 4.5pH to 6.5pH. It does not tolerate waterlogged soils. None saline soils to moderately saline soils are tolerated.
Height & Spread:
Wild Plants: 500mm to 1500mm by many meters in diameter.
Characteristics:
Blechnum cartilagineum has a very short thick creeping rhizome covered in large broad black scales. The scales measure 3mm to 4mm in length by 3mm in width.
This Blechnum cartilagineum’s fronds grow in flushes. They look like small tree ferns with the large fronds that measure 500mm to 1500mm in length by 200mm to 300mm in width. The fronds are clustered at the end of the rhizome. The stripes are grooved black and scaly at the base. The single pinnate frond’s lamina is roughly long triangular with the longest pinnae being a third of the distance from the base with subsequent pinnae becoming smaller towards the apex. The 18 pinnae are pale green with the new growth varying from a paler green through to different shades of pink to red maroons. They measure 30mm to 150mm in length by 15mm to 25mm in width. The alternate linear pinnae are sessile with hastate bases while the apexes are narrowing acute. The margins are entire and undulating.
Wildlife:
Blechnum cartilagineum wildlife is unknown to the author.
Cultivation:
It would make an good fire retardant fern for shady moist areas.
* Fire retardant plants act as radiant heat screens and absorb more heat from an approaching fire without burning.
* Fire retardant trees are able reduce wind speed near a house or out buildings.
* Fire retardant also trap embers and sparks carried by the wind.
* Fire retardant ground covers are able to catch burning embers without catching fire themselves, and also slow the travel of a fire through debris and litter on the ground.
Blechnum cartilagineum is a beautiful large fern for larger courtyards, around shady swimming pools or in the garden where moist conditions prevail. Blechnum cartilagineum is an excellent fern for around swimming pools where it can grow to its full potential. It breaks up hard fences and walls giving a pleasant vertical tropical look. If used correctly it can make medium size areas look larger. Some cleaning of spent fronds on an annual basis is necessary and moisture is required to keep it at its best. It is drought tolerant so the occasional lapse in watering won’t affect them. If it does happen to look dead after a long holiday during a drought prune all the fronds off to a few centimetres of the rhizome and give them a good soaking. Apply a double strength dose of our recommended fertilizer two days later and within two weeks they will be back to their former glory.
They often reach their full potential of 1500mm in just over 1 year.
Propagation:
Spores: All ferns that are declared rare, vulnerable or endangered are protected by Federal and State Laws and must not be removed from the wild unless you are a land developer, mining company or main Roads department etc. This includes bulbs, roots, leaves and flowers. No part of any plant can be removed from Federal, State or Local Government land without the prior permission of the authority and this includes the spore.
Most people are put off at the thought of growing ferns from spore. Like all plants that produce their offspring from seed or spore the methods are basically the same. Remember nature has been doing this for millions of years and has been very successful. I have had excellent results growing over 200 different species of Australian ferns so don’t be afraid. Give it a go.
Step 1. Select spore from the fern fronds. Wait until the fern is just starting to release its spore. Rinse the fronds under clean running water and dry. This is to wash off any other spores from rogue ferns that may have settled onto the fronds. (There is nothing worse than having common brake or common soft bracken contaminating a prized tree fern or epiphyte.)
Step 2. Place the dry fronds in a clean brown paper bag and keep them in a cool dark place like the linen closet for about a week to ten days before you are ready to sow the spore. The exception to this rule applies to ferns, which produce green spores. These must be sown immediately that they are released. Todea Barbara is a good example of a fern, which produces green spore.
Step 3. Take a large ice cream container, a small ice cream container and a clean clear plastic bag large enough to seal the large ice cream container and three or four milk bottle tops.
Step 4. Punch or drill 6 to 10 5mm holes in the bottom of the small ice cream container.
Step 5. Wash both containers, tops and plastic bag so that they are very clean and sterile.
Step 6. Use a clean fine seed raising mi. We used 30mm fine sand, 30mm peat and 30mm perlite and 10mm vermiculite. We used crushed basalt, crusher dust and peat in a 50:50 ratio for epiphytes. Moisten the mix enough that water does not run out when the mix is squeezed between the fingers.
Step 7. Place the moisten mix (Enough to half fill the small ice cream container) in the microwave oven with a large glass of water for 7 or 8 minutes, until the water is boiling. Allow them to cool in the oven. You will need the water later so do not tip it out.
Step 8. Take the brown paper bag out of the linen closet. Shake the bag and remove the fronds. You should have a yellow, brown, black or rarely greenish brown or ochre powder or very fine, small round pin head size spore depending on the specie involved.
Step 9. Remove the mixture from the oven once it has cooled and place it in the small ice cream container and level.
Step 10. Sprinkle the spore sparsely over the mixture in the small ice cream container.
Step 11. Place the milk bottle tops in the large ice cream container with the flat surface facing down. Place the small ice cream container in the large ice cream container so that it is sitting on the milk bottle tops.
Step 12. Remove the water from the microwave and pour it into the larger ice cream container so there is 25mm to 30mm of water in the bottom.
Step 13. Place the ice cream containers in the plastic bag and seal.
Step 14. Place the contents and bag in a warm shady place preferably 50mm to 70mm shade depending on the specie. Shade houses and some window sills are ideal.
Step 15. The surface should turn green within a week to two weeks. The prothallus will then develop. From the prothalus the first true fronds will appear. Wait until the ferns are 20mm to 35mm in height before you attempt to transplant them. Once they are ready open the bag up slightly and allow the air to flow around the little ferns. Every 3 to 5 days open the bag a little further so the ferns get use to their new environment. Allow them a week to two weeks to harden off before you transplant them following the removal of the plastic bag. Carefully prick them out into 50mm standard squat tubes as you would any seedling.
Do not try to transplant them as single plants as they are still a little delicate still.
Ground ferns like maiden Hair can be left in clumps.
Platycerium and Asplenium will have to be divided into single plants at a later stage. Once the first divisions have hardened off and the plants reach 50mm to 70mm in height. Be careful, as they are still fragile at this stage. Replace them close to their original position and water. After a few weeks, the ferns will power away without any setbacks. Here they can be further divided where necessary removing the smaller ferns leaving the largest one in place.
Once the smaller ones again reach 50mm to 70mm you may wish to divide the stronger and hardier individual plants into smaller clumps in 100mm squat pots.
Fertilize using Seaweed, fish emulsion or organic chicken pellets soaked in water on an alternate basis. Fertilize every two months until the plants are established then annually in early September to October to maintain health, vitality and better flowering.
Further Comments from Readers:
Hi reader, it seems you use The Bible of Botany a lot. That’s great as we have great pleasure in bringing it to you! It’s a little awkward for us to ask, but our first aim is to purchase land approximately 1,600 hectares to link several parcels of N.P. into one at The Pinnacles NSW Australia, but we need your help. We’re not salespeople. We’re amateur botanists who have dedicated over 30 years to saving the environment in a practical way. We depend on donations to reach our goal. If you donate just $5, the price of your coffee this Sunday, We can help to keep the planet alive in a real way and continue to bring you regular updates and features on Australian plants all in one Botanical Bible. Any support is greatly appreciated. Thank you.
In the spirit of reconciliation we acknowledge the Bundjalung, Gumbaynggirr and Yaegl and all aboriginal nations throughout Australia and their connections to land, sea and community. We pay our respect to their Elders past, present and future for the pleasures we have gained.
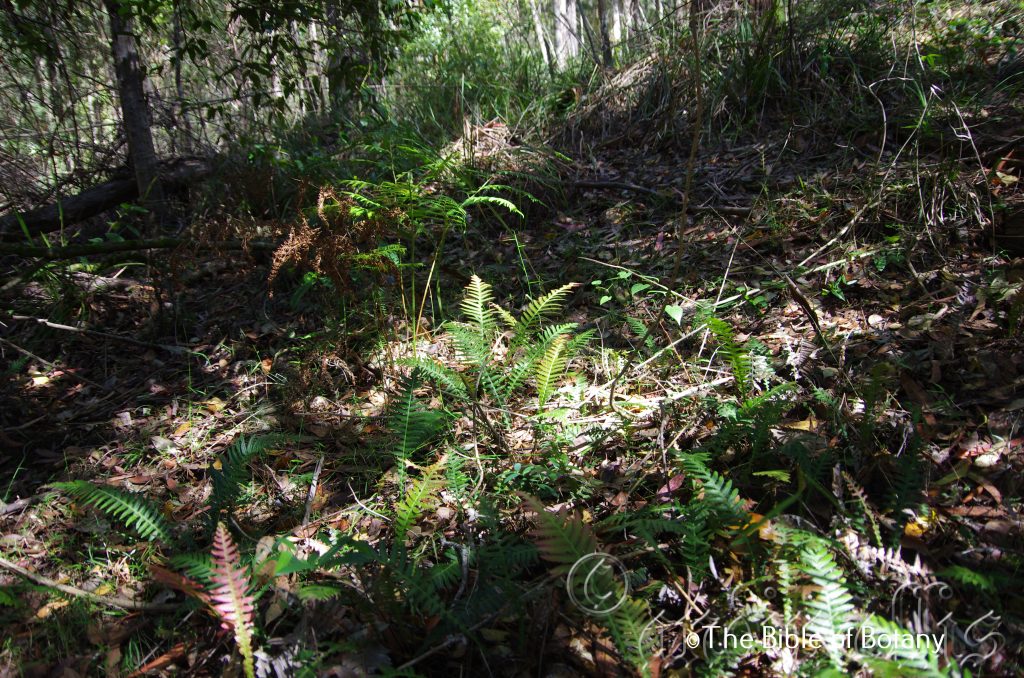
Pillar Valley NSW
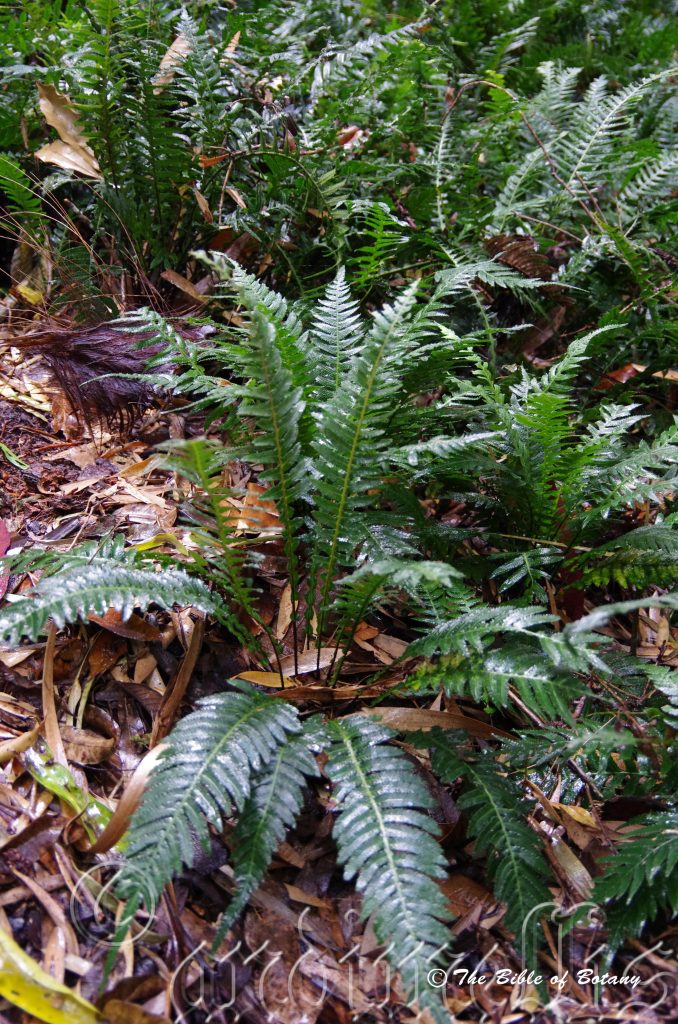
The Pinnacles NSW
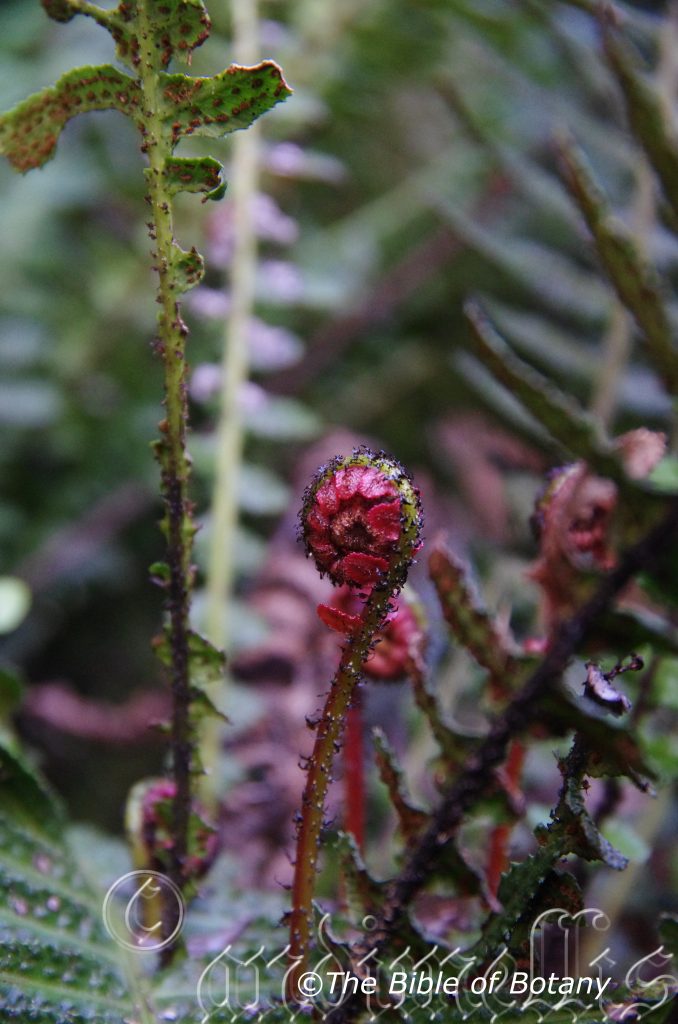
Author’s Garden The Pinnacles NSW
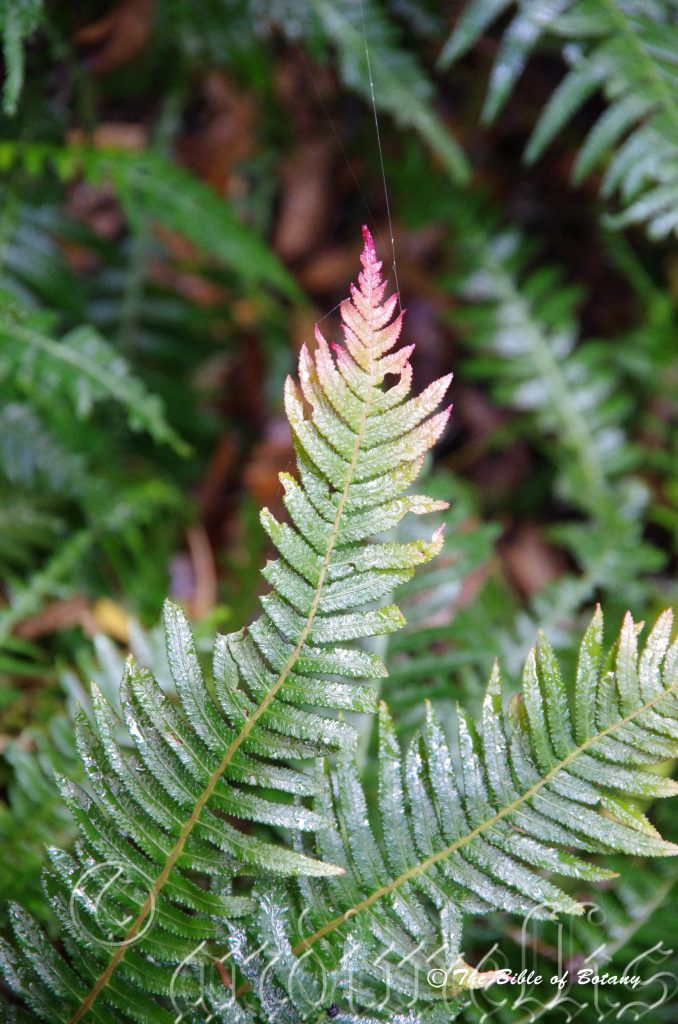
Author’s Garden The Pinnacles NSW
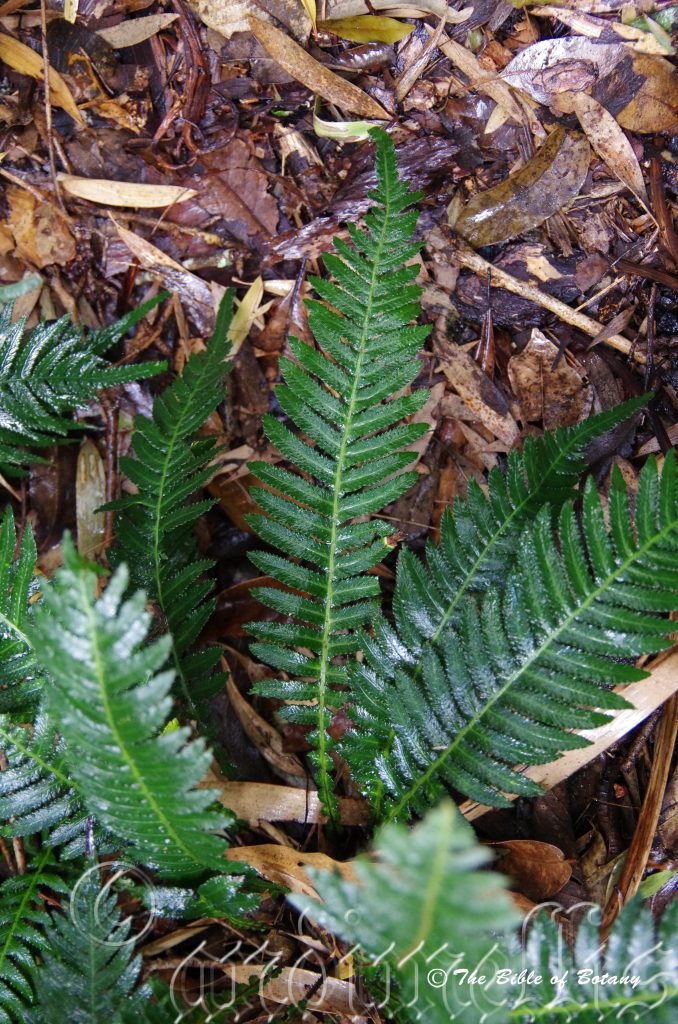
Author’s Garden The Pinnacles NSW
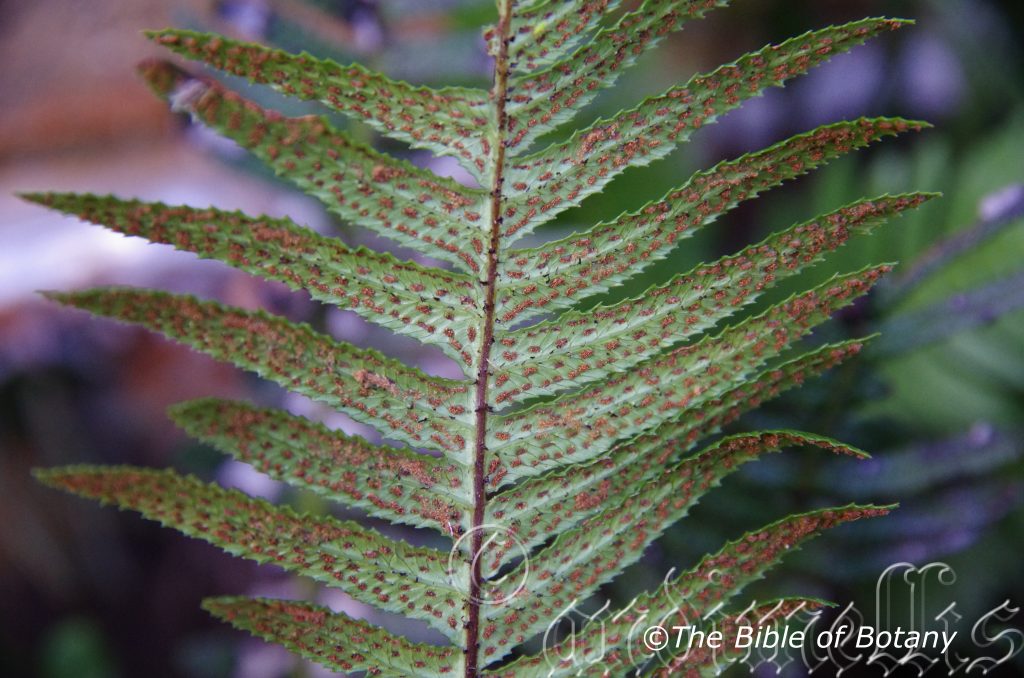
Author’s Garden The Pinnacles NSW
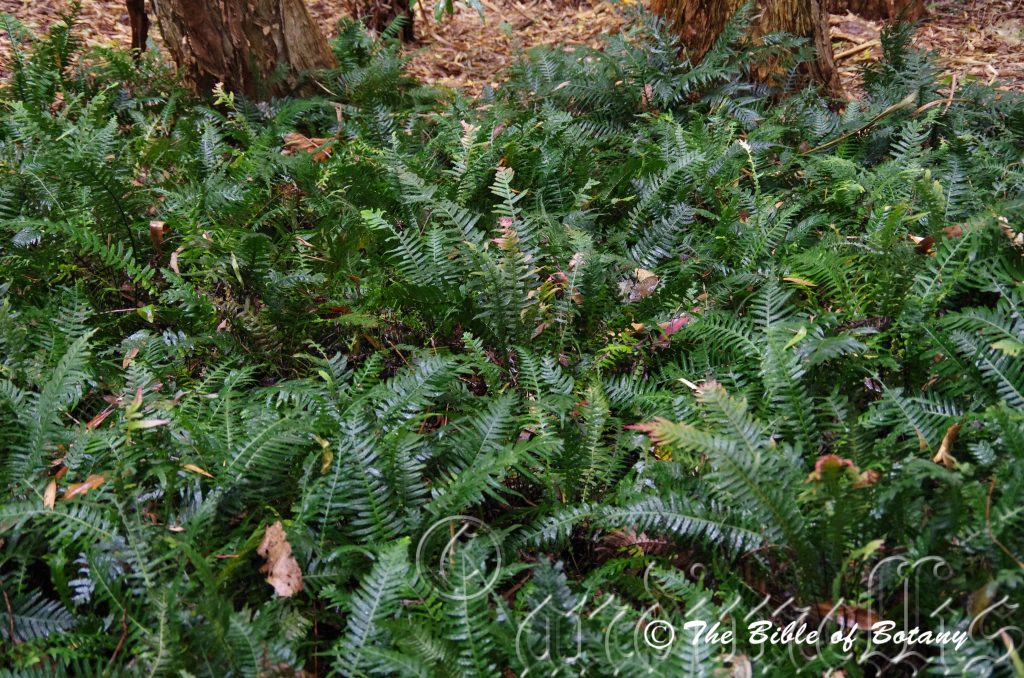
Mount Cootha Botanic Gardens Qld.
Blechnum doodianum
Classification
Class: Pteridospida
Order: Blechnales
Family: Blechnaceae
Genus: From Blockhon, which is Ancient Greek for the name given to ferns. It refers to a group of ferns, which have typical fishbone type fronds.
Species: Is named in honour of Samuel Doody; 1656-1706, who was a British botanist and pharmacist and later curator of the Chelsea Physic Gardens.
Common Name: Small Rasp Fern.
Distribution:
Blechnum doodianum is restricted to a small area from Tewantin State Forest south to the Glass House Mountains National Park in south eastern Queensland.
https://avh.ala.org.au/occurrences/search?taxa=blechnum+doodianum#tab_mapView
Habitat Aspect Climate:
Blechnum doodianum prefers dense shade, light shade to dappled sunlight. It grows in montane rainforests, or moist schlerophyll forests. The altitude ranges from 100 meters ASL to 300 meters ASL.
The temperatures range from minus 4 degrees in August to 36 degrees in January.
The rainfall ranges from lows of 1000mm to 2000mm average per annum.
Soil Requirements:
Blechnum doodianum prefers light clays to medium clays close to the parent rocks. The soils are derived from black basalts. The soils pH ranges from 5.5pH to 6.5pH. It does not tolerate waterlogged soils. Non saline soils to moderately saline soils are tolerated.
Height & Spread:
Wild Plants: 200mm to 450mm by 250mm to several hundred square meters.
Characteristics:
Blechnum doodianum has a short slim to long slim creeping rhizome covered in large narrow black scales. The scales measure 2mm to 4mm in length by 3mm in width.
Blechnum doodianum fronds grow in flushes covering the ground in brilliant pink or red of the new fronds. The new growth varies from rose pink to red and deep maroons. The rigid erect lanceolate fronds measure 125mm to 390mm in length by 7mm to 110mm in width. The stipes are deep brown first emerging deep pink or red similar to the colour of the fronds. The pinnatisect pinnules are deeply divided giving the appearance of being separate pinnules. The fronds are rough with the longest pinnules being half way along the rachis from the base to the apex with subsequent pinnae becoming smaller towards the ends. The alternate linear pinnules measure 4mm to 87mm in length by 1.5mm to 3mm in width. The base of the pinnae extend to the opposite pinnae on the rachis above and below where as they are distinctly free from the opposite pinnae along the rachis on Blechnum doodianum. The margins are finely toothed. The 36 to 52 pinnules are deep sea green. The base of the pinnules is sessile except for the basal 1 to 3 pairs which have short petioles. The petioles measure 0.5mm to 1mm in length. The bases are hastate.
The fertile and sterile fronds are strongly dimorphic. The oblong sporangia measure 0.7mm to 10mm in length by 0.5mm to 0.7mm in width. The 1 row of reniform sori is on each side of the pinna midvein and is closer to the midvein than the margin. The indusium is persistent and dehisces on the edge facing the midvein. The sori become confluent as they mature.
Wildlife:
Blechnum doodianum’s wildlife is unknown to the author.
Cultivation:
It would make an good fire retardant fern for shady moist areas.
* Fire retardant plants act as radiant heat screens and absorb more heat from an approaching fire without burning.
* Fire retardant trees are able reduce wind speed near a house or out buildings.
* Fire retardant also trap embers and sparks carried by the wind.
* Fire retardant ground covers are able to catch burning embers without catching fire themselves, and also slow the travel of a fire through debris and litter on the ground.
Blechnum doodianum is a beautiful medium fern for courtyards, around swimming pools or in the garden where moist dark to lighter conditions prevail. Blechnum doodianum is excellent for around swimming pools where it can grow to its full potential. If used correctly it can make medium and small areas look larger. Some cleaning of spent fronds on a biannual base is necessary and moisture is required to keep it at its best. It is best mass planted in order to appreciate the carpet of red or pink when the flushes of new growth emerge.
It is an ideal fern to grow beneath a rainforest setting where it can dominate what is usually barren ground. It can be used to great affect where a dry creek bed is the theme by using it to mark out the banks. It can be used to stabilize banks along creeks and streams or to help soak up water in wet areas below septic trenches.
Blechnum doodianum has proven itself reliable as an indoor plant especially in the bathroom where the humidity is higher or around fish tanks and indoor fish ponds. Here its small size and robust growth adds interest and colour several times a year.
It is somewhat drought tolerant once established so the occasional lapse in watering won’t affect it. If it does happen to look dead after a long holiday during a drought prune all the fronds off to a few centimetres of the rhizome and give them a good soaking. Apply a double strength dose of our recommended fertilizer two days later and again give a good soaking and within two weeks it will be back to their former glory. This drought tolerance makes it ideal for regeneration projects along creeks and gullies.
It often reaches its full potential of 200mm in just over 1 year with a spreading habit in full progress. We have had very good results with it planted on the southern side of a brick wall in a courtyard where it gets full sun during the summer’s wet season.
Propagation:
All ferns that are declared rare, vulnerable or endangered are protected by Federal and State Laws and must not be removed from the wild unless you are a land developer, mining company or main Roads department etc. This includes bulbs, roots, leaves and flowers. No part of any plant can be removed from Federal, State or Local Government land without the prior permission of the authority and this includes the spore.
Most people are put off at the thought of growing ferns from spore. Like all plants that produce their offspring from seed or spore the methods are basically the same. Remember nature has been doing this for millions of years and has been very successful. I have had excellent results growing over 200 different species of Australian ferns so don’t be afraid. Give it a go.
Step 1. Select spore from the fern fronds. Wait until the fern is just starting to release its spore. Rinse the fronds under clean running water and dry. This is to wash off any other spores from rogue ferns that may have settled onto the fronds. (There is nothing worse than having common brake or common soft bracken contaminating a prized tree fern or epiphyte.)
 Step 2. Place the dry fronds in a clean brown paper bag and keep them in a cool dark place like the linen closet for about a week to ten days before you are ready to sow the spore. The exception to this rule applies to ferns, which produce green spores. These must be sown immediately that they are released. Todea Barbara is a good example of a fern, which produces green spore.
Step 3. Take a large ice cream container, a small ice cream container and a clean clear plastic bag large enough to seal the large ice cream container and three or four milk bottle tops.
Step 4. Punch or drill 6 to 10 5mm holes in the bottom of the small ice cream container.
Step 5. Wash both containers, tops and plastic bag so that they are very clean and sterile.
Step 6. Use a clean fine seed raising mi. We used 30mm fine sand, 30mm peat and 30mm perlite and 10mm vermiculite. We used crushed basalt, crusher dust and peat in a 50:50 ratio for epiphytes. Moisten the mix enough that water does not run out when the mix is squeezed between the fingers.
Step 7. Place the moisten mix (Enough to half fill the small ice cream container) in the microwave oven with a large glass of water for 7 or 8 minutes, until the water is boiling. Allow them to cool in the oven. You will need the water later so do not tip it out.
Step 8. Take the brown paper bag out of the linen closet. Shake the bag and remove the fronds. You should have a yellow, brown, black or rarely greenish brown or ochre powder or very fine, small round pin head size spore depending on the specie involved.
Step 9. Remove the mixture from the oven once it has cooled and place it in the small ice cream container and level.
Step 10. Sprinkle the spore sparsely over the mixture in the small ice cream container.
Step 11. Place the milk bottle tops in the large ice cream container with the flat surface facing down. Place the small ice cream container in the large ice cream container so that it is sitting on the milk bottle tops.
Step 12. Remove the water from the microwave and pour it into the larger ice cream container so there is 25mm to 30mm of water in the bottom.
Step 13. Place the ice cream containers in the plastic bag and seal.
Step 14. Place the contents and bag in a warm shady place preferably 50mm to 70mm shade depending on the specie. Shade houses and some window sills are ideal.
Step 15. The surface should turn green within a week to two weeks. The prothallus will then develop. From the prthalus the first true fronds will appear. Wait until the ferns are 20mm to 35mm in height before you attempt to transplant them. Once they are ready open the bag up slightly and allow the air to flow around the little ferns. Every 3 to 5 days open the bag a little further so the ferns get use to their new environment. Allow them a week to two weeks to harden off before you transplant them following the removal of the plastic bag. Carefully prick them out into 50mm standard squat tubes as you would any seedling.
Do not try to transplant them as single plants as they are still a little delicate still.
Ground ferns like maiden Hair can be left in clumps.
Platycerium and Asplenium will have to be divided into single plants at a later stage. Once the first divisions have hardened off and the plants reach 50mm to 70mm in height. Be careful, as they are still fragile at this stage. Replace them close to their original position and water. After a few weeks, the ferns will power away without any setbacks. Here they can be further divided where necessary removing the smaller ferns leaving the largest one in place.
Once the smaller ones again reach 50mm to 70mm you may wish to divide the stronger and hardier individual plants into smaller clumps in 100mm squat pots.
Fertilize using Seaweed, fish emulsion or organic chicken pellets soaked in water on an alternate basis. Fertilize every two months until the plants are established then annually in early September to October to maintain health, vitality and better flowering.
Further Comments from Readers:
Hi reader, it seems you use The Bible of Botany a lot. That’s great as we have great pleasure in bringing it to you! It’s a little awkward for us to ask, but our first aim is to purchase land approximately 1,600 hectares to link several parcels of N.P. into one at The Pinnacles NSW Australia, but we need your help. We’re not salespeople. We’re amateur botanists who have dedicated over 30 years to saving the environment in a practical way. We depend on donations to reach our goal. If you donate just $5, the price of your coffee this Sunday, We can help to keep the planet alive in a real way and continue to bring you regular updates and features on Australian plants all in one Botanical Bible. Any support is greatly appreciated. Thank you.
In the spirit of reconciliation we acknowledge the Bundjalung, Gumbaynggirr and Yaegl and all aboriginal nations throughout Australia and their connections to land, sea and community. We pay our respect to their Elders past, present and future for the pleasures we have gained.
Blechnum lineare
Classification
Class: Pteridospida
Order: Blechnales
Family: Blechnaceae
Genus: From Blockhon, which is Ancient Greek for the ancient name given to ferns. It refers to a group of ferns, which have typical fishbone type fronds.
Species: From Linearis, which is Latin for straight lines. It refers to leaves, phyllodes or fronds, which are narrow where the veins appear as straight lines or have uniformly coloured lines.
Common Name: Small Rasp Fern.
Distribution:
Blechnum lineare is restricted to several disjunct populations south from Cairns to Ingham, Keppel Bay, Mount Castletower National Park, the Glass House Mountains National Park, the Nunimbah Mount Warning National Parks, the Clarence Valley west of Copmanhurst, Heathcote National Park to the Blue Mountains National Park and Macquarie Pass National Park.
https://avh.ala.org.au/occurrences/search?taxa=Doodia+lineare#tab_mapView
Habitat Aspect Climate:
Blechnum lineare prefers dense shade, light shade and dappled sunlight. It grows on moisture retentive soils in montane rainforests, littoral rainforests and moist Eucalyptus forests especially on steeper creek banks and sheltered ridges where some seepage exists or shallow depressions in dry schlerophyll forests. The altitude ranges from 50 meters ASL to 650 meters ASL.
The temperature ranges from minus 2 degrees in August to 38 degrees in January.
The rainfall ranges from lows of 900mm to 3000mm average per annum. Good moisture retentive soils areas important than the rainfall.
Soil Requirements:
Blechnum lineare prefers sandy loams to medium clays. The soils are derived from brown basalt, black basalt, metamorphic rocks, shale fatty sandstones and fatty granites and heavy silt alluviums. The soils pH ranges from 5.5pH to 7pH. It does not tolerate waterlogged soils and does best on soils which have good moisture retention throughout the year. Doodia linearis is often found just above the high water mark along the creeks it inhabits. Non saline soils to moderately saline soils are tolerated.
Height & Spread:
Wild Plants: 90mm to 450mm by 200mm to 2000mm.
Characteristics:
Blechnum lineare has a very short, slim, creeping rhizome. The rhizomes are covered in large broad black scales measuring 2mm to 3mm in length by 2mm in width.
Blechnum lineare fronds grow in flushes with rainforest plants or those growing in dark places in large colonies covering the ground in brilliant pink or red of the new fronds. The rigid erect to decumbent fronds are narrow lanceolate on fertile fronds and measure 85mm to 450mm in length by 6mm to 18mm in width. The stipes are deep red brown to deep brown-black on mature fronds. The single pinnate fronds are rough with the shortest pinnules being a third of the distance from the apex with the subsequent pinnae becoming smaller towards the apex where they are sessile. The opposite to sub opposite pinnules measure 2mm to 12mm in length by 2mm to 4mm in width. The basal pinnae are orbicular while the middle pinnae are oblong and the terminal pinnae are narrowing lanceolate. The margins are finely toothed to finely crenate. The base of the pinnae extend to the opposite pinnae on the rachis above and below where as they are distinctly free from the opposite pinnae along the rachis on Doodia australis. The margins are finely toothed. The 36 to 52 pinnules are deep sea green. The base of the pinnules is sessile except for the basal 1 to 2 pairs which have short petioles. The petioles measure 0.5mm to 1mm in length. The bases are hastate.
The fertile and sterile fronds are strongly dimorphic. The oblong sporangia measure 0.7mm to 10mm in length by 0.5mm to 1mm in width. The 1or 2 rows of reniform sori are on each side of the pinnae midvein with the inner one being closer to the midvein than the margin while the outer one is closer to the margin. The indusium is persistent and dehisces on the edge facing the midvein. The sori become confluent as they mature.
Wildlife:
Blechnum lineare’s wildlife is unknown to the author.
Cultivation:
It would make an good fire retardant fern for shady moist areas.
* Fire retardant plants act as radiant heat screens and absorb more heat from an approaching fire without burning.
* Fire retardant trees are able reduce wind speed near a house or out buildings.
* Fire retardant also trap embers and sparks carried by the wind.
* Fire retardant ground covers are able to catch burning embers without catching fire themselves, and also slow the travel of a fire through debris and litter on the ground.
Blechnum lineare maybe a difficult species to identify in the wild as it has been known to hybridize with other Blechnum species. It was formerly known as Doodia aspera, Doodia australis, and Doodia caudata and would probably hybridize with Doodia heterophylla if given the chance. It is a beautiful small fern for courtyards, around swimming pools or in the garden where moist dark to lighter conditions prevail. Blechnum lineare is excellent for around swimming pools where it can grow to its full potential. If used correctly it can make medium size areas look larger. Some cleaning of spent fronds on a biannual base is necessary and moisture is required to keep it at its best. It is best mass planted in order to appreciate the carpet of red or pink when the flushes of new growth emerge.
It is also ideal for planting around small fish ponds and frog ponds because of their small size. Leaves will become decumbent thus will bend over rocks and stark lines softening the edges and making the area look more natural particularly when it forms a small trunk. It can also be used very effectively in dwarf gardens or indoor gardens.
Blechnum lineare makes an excellent terrarium plant growing slowly under glass or inside bottles.
It is moderately drought tolerant once established so the occasional lapse in watering won’t affect it. If it does happen to look dead after a long holiday during a drought prune all the fronds off to a few centimetres of the rhizome and give them a good soaking. Apply a double strength dose of our recommended fertilizer two days later and again give a good soaking and within two weeks it will be back to its former glory. This drought tolerance makes it ideal for regeneration projects along creeks and gullies.
It will reach its full potential of 200mm in just over 1 year with a spreading habit in full progress. Blechnum lineare being smaller than the other Blechnum species could make it an ideal terrarium plant.
Propagation:
Spores: All ferns that are declared rare, vulnerable or endangered are protected by Federal and State Laws and must not be removed from the wild unless you are a land developer, mining company or main Roads department etc. This includes bulbs, roots, leaves and flowers. No part of any plant can be removed from Federal, State or Local Government land without the prior permission of the authority and this includes the spore.
Most people are put off at the thought of growing ferns from spore. Like all plants that produce their offspring from seed or spore the methods are basically the same. Remember nature has been doing this for millions of years and has been very successful. I have had excellent results growing over 200 different species of Australian ferns so don’t be afraid. Give it a go.
Step 1. Select spore from the fern fronds. Wait until the fern is just starting to release its spore. Rinse the fronds under clean running water and dry. This is to wash off any other spores from rogue ferns that may have settled onto the fronds. (There is nothing worse than having common brake or common soft bracken contaminating a prized tree fern or epiphyte.)
 Step 2. Place the dry fronds in a clean brown paper bag and keep them in a cool dark place like the linen closet for about a week to ten days before you are ready to sow the spore. The exception to this rule applies to ferns, which produce green spores. These must be sown immediately that they are released. Todea Barbara is a good example of a fern, which produces green spore.
Step 3. Take a large ice cream container, a small ice cream container and a clean clear plastic bag large enough to seal the large ice cream container and three or four milk bottle tops.
Step 4. Punch or drill 6 to 10 5mm holes in the bottom of the small ice cream container.
Step 5. Wash both containers, tops and plastic bag so that they are very clean and sterile.
Step 6. Use a clean fine seed raising mi. We used 30mm fine sand, 30mm peat and 30mm perlite and 10mm vermiculite. We used crushed basalt, crusher dust and peat in a 50:50 ratio for epiphytes. Moisten the mix enough that water does not run out when the mix is squeezed between the fingers.
Step 7. Place the moisten mix (Enough to half fill the small ice cream container) in the microwave oven with a large glass of water for 7 or 8 minutes, until the water is boiling. Allow them to cool in the oven. You will need the water later so do not tip it out.
Step 8. Take the brown paper bag out of the linen closet. Shake the bag and remove the fronds. You should have a yellow, brown, black or rarely greenish brown or ochre powder or very fine, small round pin head size spore depending on the specie involved.
Step 9. Remove the mixture from the oven once it has cooled and place it in the small ice cream container and level.
Step 10. Sprinkle the spore sparsely over the mixture in the small ice cream container.
Step 11. Place the milk bottle tops in the large ice cream container with the flat surface facing down. Place the small ice cream container in the large ice cream container so that it is sitting on the milk bottle tops.
Step 12. Remove the water from the microwave and pour it into the larger ice cream container so there is 25mm to 30mm of water in the bottom.
Step 13. Place the ice cream containers in the plastic bag and seal.
Step 14. Place the contents and bag in a warm shady place preferably 50mm to 70mm shade depending on the specie. Shade houses and some window sills are ideal.
Step 15. The surface should turn green within a week to two weeks. The prothallus will then develop. From the prthalus the first true fronds will appear. Wait until the ferns are 20mm to 35mm in height before you attempt to transplant them. Once they are ready open the bag up slightly and allow the air to flow around the little ferns. Every 3 to 5 days open the bag a little further so the ferns get use to their new environment. Allow them a week to two weeks to harden off before you transplant them following the removal of the plastic bag. Carefully prick them out into 50mm standard squat tubes as you would any seedling.
Do not try to transplant them as single plants as they are still a little delicate still.
Ground ferns like maiden Hair can be left in clumps.
Platycerium species and Asplenium species will have to be divided into single plants at a later stage. Once the first divisions have hardened off and the plants reach 50mm to 70mm in height. Be careful, as they are still fragile at this stage. Replace them close to their original position and water. After a few weeks, the ferns will power away without any setbacks. Here they can be further divided where necessary removing the smaller ferns leaving the largest one in place.
Once the smaller ones again reach 50mm to 70mm you may wish to divide the stronger and hardier individual plants into smaller clumps in 100mm squat pots.
Fertilize using Seaweed, fish emulsion or organic chicken pellets soaked in water on an alternate basis. Fertilize every two months until the plants are established then annually in early September to October to maintain health, vitality and better flowering.
Further Comments from Readers:
Hi reader, it seems you use The Bible of Botany a lot. That’s great as we have great pleasure in bringing it to you! It’s a little awkward for us to ask, but our first aim is to purchase land approximately 1,600 hectares to link several parcels of N.P. into one at The Pinnacles NSW Australia, but we need your help. We’re not salespeople. We’re amateur botanists who have dedicated over 30 years to saving the environment in a practical way. We depend on donations to reach our goal. If you donate just $5, the price of your coffee this Sunday, We can help to keep the planet alive in a real way and continue to bring you regular updates and features on Australian plants all in one Botanical Bible. Any support is greatly appreciated. Thank you.
In the spirit of reconciliation we acknowledge the Bundjalung, Gumbaynggirr and Yaegl and all aboriginal nations throughout Australia and their connections to land, sea and community. We pay our respect to their Elders past, present and future for the pleasures we have gained.
Blechnum minus
Classification:
Class: Pteridospida
Order: Athyriales
Family: Blechnaceae
Genus: From Blockhon, which is Ancient Greek for the ancient name given to ferns. It refers to a group of ferns, which have typical fishbone type fronds.
Species: From Minuta, which is Latin for substantially smaller. It refers to plants, which are much smaller compared to other species in the genus.
Common Name: Soft Water Fern.
Distribution:
Blechnum minus is found south from the Bunya Bunya Mountains in southern Queensland to north west of Mount Gambier on the Wattle range in southern South Australia. It is found on and east of the Great Dividing Range to the coast and the southern half of Victoria. It is also found south from Kaisersfuhi Conservation Park to Deep Creek Conservation Park in South Australia. There are two isolated populations near Rockingham Bay in far north Queensland and Coonamble in central New South Wales.
It is found over most of Tasmania except for the central and south eastern Highlands.
https://avh.ala.org.au/occurrences/search?taxa=Blechnum+minus+#tab_mapView
Habitat Aspect Climate:
Blechnum minus grows in light shade and dappled sunlight. It is found in high rainfall areas in coastal wallums and mountainous marshes, wet open Eucalyptus forests along creeks and streams. The altitude ranges from 5 meters ASL to 850 meters ASL
The temperature ranges from minus 4 degrees in August to 38 degrees in January.
The rainfall ranges from lows of 500mm to 2400mm average per annum.
Soil Requirements:
Blechnum minus prefers deep, sandy loams, light fatty clays to medium clays. The soils are usually derived from decomposed granites, brown basalts, black basalts, shales, metashales or alluvial deposits. The soil’s pH ranges from 5pH to 6.5pH. It tolerates seasonal waterlogged soils or seasonal high water tables. None saline soils to moderately saline soils are tolerated.
Height & Spread:
Wild Plants: 500mm to 700mm by 800mm to 1000mm.
Characteristics:
Blechnum minus has a very short thick creeping rhizome which may form a small feeble trunk in older plants. The rhizomes are covered in large scales which are brown and semi translucent.
This Blechnum minus’s fronds grow in flushes. The fronds are single pinnate for most of their length. They usually measure 250mm to 700mm in length by 150mm to 240mm in width. The fronds are clustered at the end of the rhizome. The glossy, glabrous stipes are pale brown becoming chocolate brown towards the base and with age. The long triangular fronds longest pinnae are towards the middle of the frond. The 11 to 35 concolourous pinnae’s laminas are bright lime-green and glossy on the upper lamina while the lower laminas are dull. The young growth is bright pink. The margins are entire.
The fronds are dimorphic with the sterile fronds pinnae being pedicillate. The oblong pinnae measure 80mm to 120mm in length by 8mm to 10mm in width. The lower most pinnae are much reduced in size, are more widely spaced and measure 5mm to 15mm in length. The lower pinnae bases are rounded and the upper pinnae are slightly hastate.
The fertile fronds’ pinnae measure 80mm to 140mm in length by 2mm to 3mm in width.
Wildlife:
Blechnum minus’s wildlife is unknown to the author.
Cultivation:
Blechnum minus is a beautiful ground fern for courtyards, around semi shady salt swimming pools or in the garden where moist conditions prevail. Blechnum minus is excellent for around swimming pools where it can grow to its full potential. It breaks up hard fences and walls giving a pleasant vertical tropical look. If used correctly it can make medium size areas look larger. Gardens subjects grown in partial shade with adequate water supple usually grow 500mm to 600mm in height by about 1 square meter in diameter.
Some cleaning of spent fronds on an annual basis is necessary and moisture is required to keep it at its best.
It is moderately drought tolerant so the occasional lapse in watering won’t affect them. If it happens to look dead after a long holiday or during a drought prune all the fronds off to a few centimetres of the rhizome and give it a good soaking. Apply a double strength dose of our recommended fertilizer two days later and within two weeks it will be back to their former glory.
It often reaches its their potential of 1000mm in just over 1 year.
Propagation:
Spores: All ferns that are declared rare, vulnerable or endangered are protected by Federal and State Laws and must not be removed from the wild unless you are a land developer, mining company or main Roads department etc. This includes bulbs, roots, leaves and flowers. No part of any plant can be removed from Federal, State or Local Government land without the prior permission of the authority and this includes the spore.
Most people are put off at the thought of growing ferns from spore. Like all plants that produce their offspring from seed or spore the methods are basically the same. Remember nature has been doing this for millions of years and has been very successful. I have had excellent results growing over 200 different species of Australian ferns so don’t be afraid. Give it a go.
Step 1. Select spore from the fern fronds. Wait until the fern is just starting to release its spore. Rinse the fronds under clean running water and dry. This is to wash off any other spores from rogue ferns that may have settled onto the fronds. (There is nothing worse than having common brake or common soft bracken contaminating a prized tree fern or epiphyte.)
 Step 2. Place the dry fronds in a clean brown paper bag and keep them in a cool dark place like the linen closet for about a week to ten days before you are ready to sow the spore. The exception to this rule applies to ferns, which produce green spores. These must be sown immediately that they are released. Todea Barbara is a good example of a fern, which produces green spore.
Step 3. Take a large ice cream container, a small ice cream container and a clean clear plastic bag large enough to seal the large ice cream container and three or four milk bottle tops.
Step 4. Punch or drill 6 to 10 5mm holes in the bottom of the small ice cream container.
Step 5. Wash both containers, tops and plastic bag so that they are very clean and sterile.
Step 6. Use a clean fine seed raising mi. We used 30mm fine sand, 30mm peat and 30mm perlite and 10mm vermiculite. We used crushed basalt, crusher dust and peat in a 50:50 ratio for epiphytes. Moisten the mix enough that water does not run out when the mix is squeezed between the fingers.
Step 7. Place the moisten mix (Enough to half fill the small ice cream container) in the microwave oven with a large glass of water for 7 or 8 minutes, until the water is boiling. Allow them to cool in the oven. You will need the water later so do not tip it out.
Step 8. Take the brown paper bag out of the linen closet. Shake the bag and remove the fronds. You should have a yellow, brown, black or rarely greenish brown or ochre powder or very fine, small round pin head size spore depending on the specie involved.
Step 9. Remove the mixture from the oven once it has cooled and place it in the small ice cream container and level.
Step 10. Sprinkle the spore sparsely over the mixture in the small ice cream container.
Step 11. Place the milk bottle tops in the large ice cream container with the flat surface facing down. Place the small ice cream container in the large ice cream container so that it is sitting on the milk bottle tops.
Step 12. Remove the water from the microwave and pour it into the larger ice cream container so there is 25mm to 30mm of water in the bottom.
Step 13. Place the ice cream containers in the plastic bag and seal.
Step 14. Place the contents and bag in a warm shady place preferably 50mm to 70mm shade depending on the specie. Shade houses and some window sills are ideal.
Step 15. The surface should turn green within a week to two weeks. The prothallus will then develop. From the prthalus the first true fronds will appear. Wait until the ferns are 20mm to 35mm in height before you attempt to transplant them. Once they are ready open the bag up slightly and allow the air to flow around the little ferns. Every 3 to 5 days open the bag a little further so the ferns get use to their new environment. Allow them a week to two weeks to harden off before you transplant them following the removal of the plastic bag. Carefully prick them out into 50mm standard squat tubes as you would any seedling.
Do not try to transplant them as single plants as they are still a little delicate still.
Ground ferns like maiden Hair can be left in clumps.
Platycerium species and Asplenium species will have to be divided into single plants at a later stage. Once the first divisions have hardened off and the plants reach 50mm to 70mm in height. Be careful, as they are still fragile at this stage. Replace them close to their original position and water. After a few weeks, the ferns will power away without any setbacks. Here they can be further divided where necessary removing the smaller ferns leaving the largest one in place.
Once the smaller ones again reach 50mm to 70mm you may wish to divide the stronger and hardier individual plants into smaller clumps in 100mm squat pots.
Fertilize using Seaweed, fish emulsion or organic chicken pellets soaked in water on an alternate basis. Fertilize every two months until the plants are established then annually in early September to October to maintain health, vitality and better flowering.
Further Comments from Readers:
Hi reader, it seems you use The Bible of Botany a lot. That’s great as we have great pleasure in bringing it to you! It’s a little awkward for us to ask, but our first aim is to purchase land approximately 1,600 hectares to link several parcels of N.P. into one at The Pinnacles NSW Australia, but we need your help. We’re not salespeople. We’re amateur botanists who have dedicated over 30 years to saving the environment in a practical way. We depend on donations to reach our goal. If you donate just $5, the price of your coffee this Sunday, We can help to keep the planet alive in a real way and continue to bring you regular updates and features on Australian plants all in one Botanical Bible. Any support is greatly appreciated. Thank you.
In the spirit of reconciliation we acknowledge the Bundjalung, Gumbaynggirr and Yaegl and all aboriginal nations throughout Australia and their connections to land, sea and community. We pay our respect to their Elders past, present and future for the pleasures we have gained.
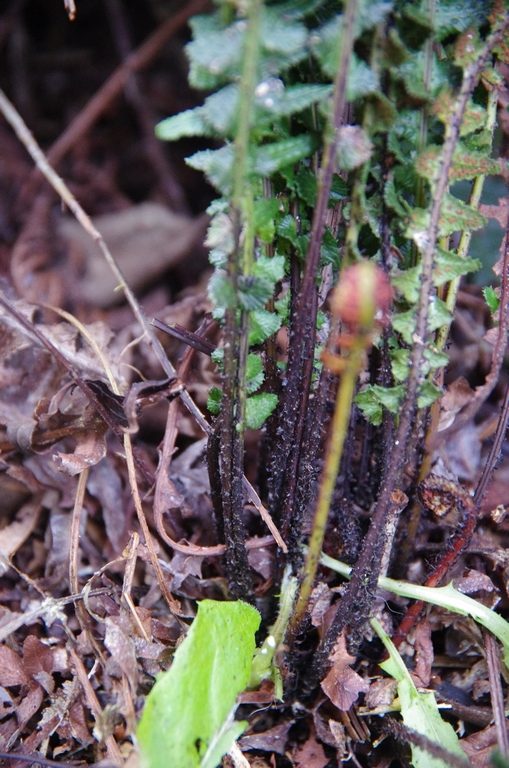
Author’s Garden The Pinnacles NSW

Author’s Garden The Pinnacles NSW
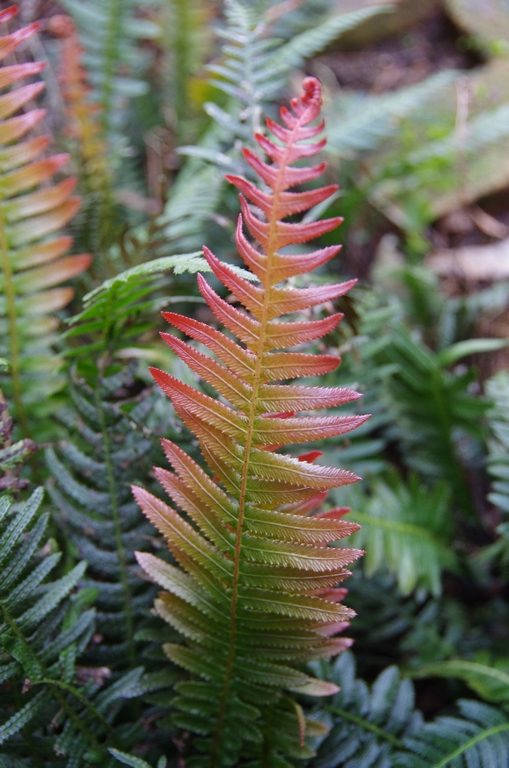
Author’s Garden The Pinnacles NSW
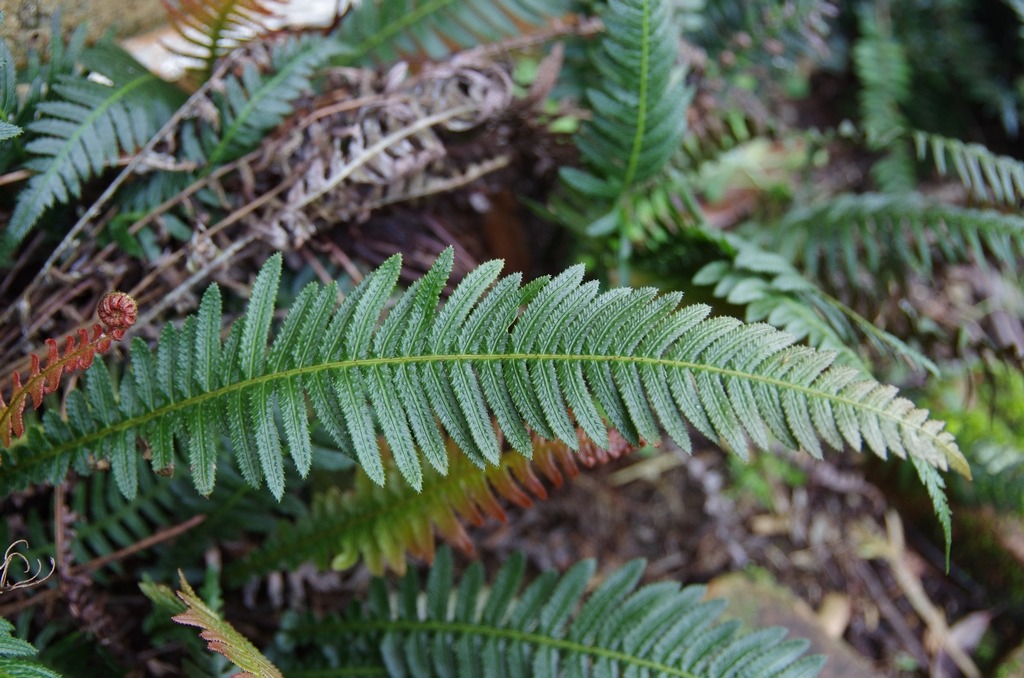
Author’s Garden The Pinnacles NSW
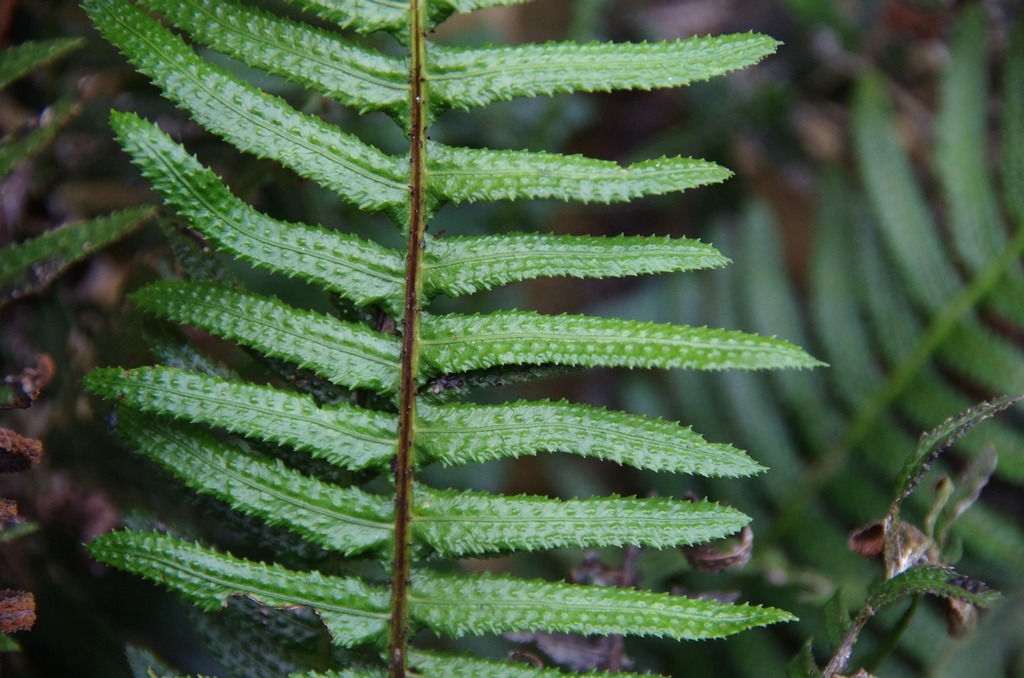
Author’s Garden The Pinnacles NSW
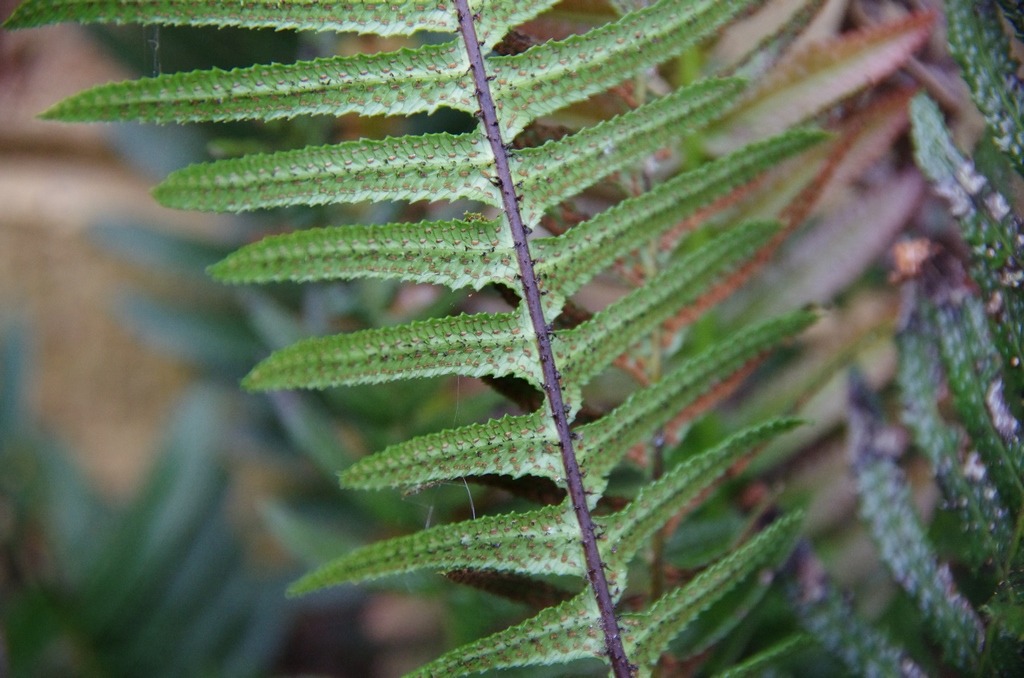
Author’s Garden The Pinnacles NSW
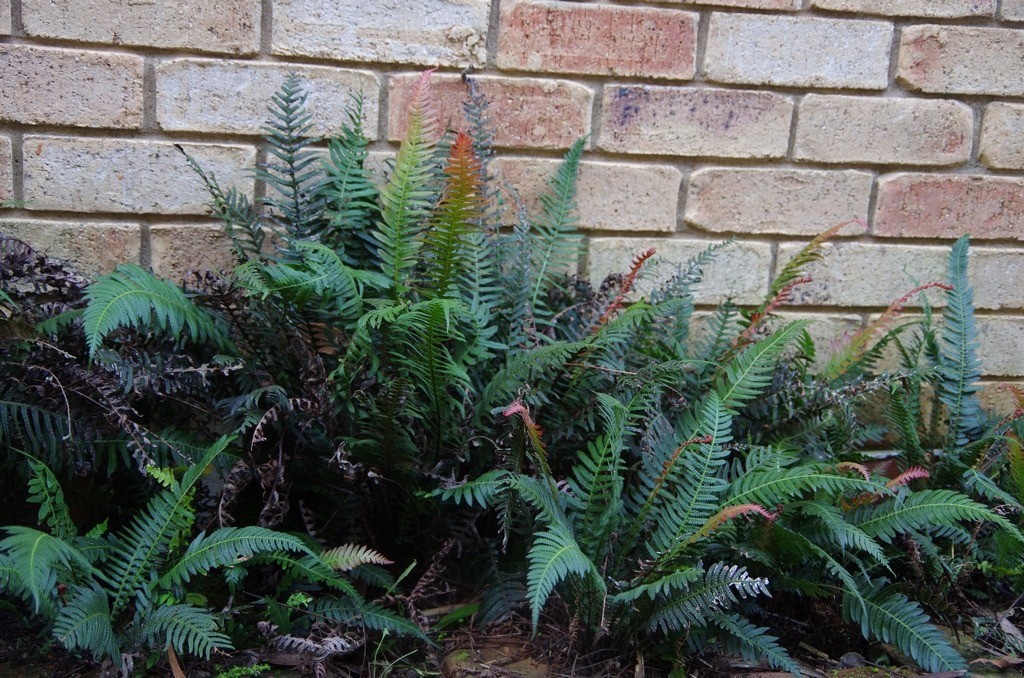
Author’s Garden The Pinnacles NSW
Blechnum neohollandicum
Classification
Class: Pteridospida
Order: Blechnales
Family: Blechnaceae
Subfamily:
Genus: From Blockhon, which is Ancient Greek for the ancient name given to ferns. It refers to a group of ferns, which have typical fishbone type fronds.
Species: From Neo, which is Ancient Greek for new or young, Holland, which is Latin for Holland and Ana, which is Latin for from. It refers to plants, which are originally from New Holland now known as Australia.
Common Name: Prickly Rasp Fern.
Distribution:
Blechnum neohollandicum is found south from Mareeba in north eastern Queensland to southern Victoria in the Cape Otway National Park. There is a disjunct population south of Cloncurry in north western Queensland.
https://avh.ala.org.au/occurrences/search?taxa=Blechnum+neohollandicum#tab_mapView
Habitat:
Aspect / Climate:
Blechnum neohollandicum prefers dense shade, light shade and dappled light. It grows in montane rainforests, littoral rainforests, riparian rainforests, or moist Eucalyptus forests. It can colonize large areas under favourable conditions. The altitude ranges from 10 meters ASL to 1200 meters ASL.
The temperatures range from minus 4 degrees in August to 36 degrees in January.
The rainfall ranges from lows of 650mm to 2400mm average per annum.
Soil Requirements:
Blechnum neohollandicum prefers sandy loams to heavy clays. The soils are derived from brown basalt, black basalt, metamorphic rocks, shale fatty sandstones and fatty granites and heavy silt alluviums. The soils pH ranges from 5.5pH to 7pH. It tolerates seasonal wet soils and does best on soils which have good moisture retention throughout the year. It also grows near waterfalls and seepages where iron bacteria prevail. Non saline soils to very saline soils are tolerated.
Height & Spread:
Wild Plants: 200mm to 350mm to 250mm x several hundred square meters.
Characteristics:
Blechnum neohollandicum grows as a small rasp fern with short slim creeping rhizome covered in large narrow black scales. The scales measure 2mm to 3mm in length by 3mm in width.
Blechnum neohollandicum fronds grow in flushes covering the ground in brilliant pink or red of the new fronds. The rigid erect fronds measure 200mm to 300mm in length by 70mm to 100mm in width. The stipes are black first emerging as a deep green. The fronds have wings along the base of the rachis. Pinnules are in fact a pinnatisect, deeply divided giving the appearance of being separate pinnules. The single pinnate frond’s lamina is tuberculate rough with the longest pinnules being half way along the rachis from the base to the apex with subsequent pinnae becoming smaller towards the ends. The fertile and sterile fronds are non-dimorphic. The alternate linear pinnules measure 40mm to 60mm in length by 5mm to 8mm in width. The margins are finely toothed. The 36 to 52 pinnules are a very deep green with the new growth varying from rose shades of pink to red or maroons.
The base of the pinnules is sessile and hastate. The hastate lamina connects to the rachis and extends to the mid vein of the next pinnae. The apex is a long tapered point. This is the easiest method to distinguish it from Blechnum neohollandicum where the pinnules are rounded and there is a short petiole.
The round sporangia are placed closely together in one or two rows either side of the mid vein. They are 0.5mm to 1mm in diameter and merge together as they age.
Wildlife:
Blechnum neohollandicum’s wildlife is unknown to the author.
Cultivation:
It would make an good fire retardant fern for shady moist areas.
* Fire retardant plants act as radiant heat screens and absorb more heat from an approaching fire without burning.
* Fire retardant trees are able reduce wind speed near a house or out buildings.
* Fire retardant also trap embers and sparks carried by the wind.
* Fire retardant ground covers are able to catch burning embers without catching fire themselves, and also slow the travel of a fire through debris and litter on the ground.
Blechnum neohollandicum is a beautiful small fern for courtyards, around swimming pools or in the garden where moist dark to lighter conditions prevail. Blechnum neohollandicum is excellent for around swimming pools where it can grow to its full potential. If used correctly it can make medium and small areas look larger. Some cleaning of spent fronds on a biannual base is necessary and moisture is required to keep it at its best. It is best mass planted in order to appreciate the carpet of red or pink when the flushes of new growth emerge.
It is drought tolerant once established so the occasional lapse in watering won’t affect them. If it happens to look dead after a long holiday or during a drought prune all the fronds off to a few centimetres of the rhizome and give it a good soaking. Apply a double strength dose of our recommended fertilizer two days later and again give a good soaking and within two weeks it will be back to their former glory. This drought tolerance makes it ideal for regeneration projects along creeks and gullies.
It often reaches its full potential of 200mm in just over 1 year with a spreading habit in full progress.
Propagation:
Spores: All ferns that are declared rare, vulnerable or endangered are protected by Federal and State Laws and must not be removed from the wild unless you are a land developer, mining company or main Roads department etc. This includes bulbs, roots, leaves and flowers. No part of any plant can be removed from Federal, State or Local Government land without the prior permission of the authority and this includes the spore.
Most people are put off at the thought of growing ferns from spore. Like all plants that produce their offspring from seed or spore the methods are basically the same. Remember nature has been doing this for millions of years and has been very successful. I have had excellent results growing over 200 different species of Australian ferns so don’t be afraid. Give it a go.
Step 1. Select spore from the fern fronds. Wait until the fern is just starting to release its spore. Rinse the fronds under clean running water and dry. This is to wash off any other spores from rogue ferns that may have settled onto the fronds. (There is nothing worse than having common brake or common soft bracken contaminating a prized tree fern or epiphyte.)
 Step 2. Place the dry fronds in a clean brown paper bag and keep them in a cool dark place like the linen closet for about a week to ten days before you are ready to sow the spore. The exception to this rule applies to ferns, which produce green spores. These must be sown immediately that they are released. Todea Barbara is a good example of a fern, which produces green spore.
Step 3. Take a large ice cream container, a small ice cream container and a clean clear plastic bag large enough to seal the large ice cream container and three or four milk bottle tops.
Step 4. Punch or drill 6 to 10 5mm holes in the bottom of the small ice cream container.
Step 5. Wash both containers, tops and plastic bag so that they are very clean and sterile.
Step 6. Use a clean fine seed raising mi. We used 30mm fine sand, 30mm peat and 30mm perlite and 10mm vermiculite. We used crushed basalt, crusher dust and peat in a 50:50 ratio for epiphytes. Moisten the mix enough that water does not run out when the mix is squeezed between the fingers.
Step 7. Place the moisten mix (Enough to half fill the small ice cream container) in the microwave oven with a large glass of water for 7 or 8 minutes, until the water is boiling. Allow them to cool in the oven. You will need the water later so do not tip it out.
Step 8. Take the brown paper bag out of the linen closet. Shake the bag and remove the fronds. You should have a yellow, brown, black or rarely greenish brown or ochre powder or very fine, small round pin head size spore depending on the specie involved.
Step 9. Remove the mixture from the oven once it has cooled and place it in the small ice cream container and level.
Step 10. Sprinkle the spore sparsely over the mixture in the small ice cream container.
Step 11. Place the milk bottle tops in the large ice cream container with the flat surface facing down. Place the small ice cream container in the large ice cream container so that it is sitting on the milk bottle tops.
Step 12. Remove the water from the microwave and pour it into the larger ice cream container so there is 25mm to 30mm of water in the bottom.
Step 13. Place the ice cream containers in the plastic bag and seal.
Step 14. Place the contents and bag in a warm shady place preferably 50mm to 70mm shade depending on the specie. Shade houses and some window sills are ideal.
Step 15. The surface should turn green within a week to two weeks. The prothallus will then develop. From the prthalus the first true fronds will appear. Wait until the ferns are 20mm to 35mm in height before you attempt to transplant them. Once they are ready open the bag up slightly and allow the air to flow around the little ferns. Every 3 to 5 days open the bag a little further so the ferns get use to their new environment. Allow them a week to two weeks to harden off before you transplant them following the removal of the plastic bag. Carefully prick them out into 50mm standard squat tubes as you would any seedling.
Do not try to transplant them as single plants as they are still a little delicate still.
Ground ferns like maiden Hair can be left in clumps.
Platycerium species and Asplenium species will have to be divided into single plants at a later stage. Once the first divisions have hardened off and the plants reach 50mm to 70mm in height. Be careful, as they are still fragile at this stage. Replace them close to their original position and water. After a few weeks, the ferns will power away without any setbacks. Here they can be further divided where necessary removing the smaller ferns leaving the largest one in place.
Once the smaller ones again reach 50mm to 70mm you may wish to divide the stronger and hardier individual plants into smaller clumps in 100mm squat pots.
Fertilize using Seaweed, fish emulsion or organic chicken pellets soaked in water on an alternate basis. Fertilize every two months until the plants are established then annually in early September to October to maintain health, vitality and better flowering.
Further Comments from Readers:
Hi reader, it seems you use The Bible of Botany a lot. That’s great as we have great pleasure in bringing it to you! It’s a little awkward for us to ask, but our first aim is to purchase land approximately 1,600 hectares to link several parcels of N.P. into one at The Pinnacles NSW Australia, but we need your help. We’re not salespeople. We’re amateur botanists who have dedicated over 30 years to saving the environment in a practical way. We depend on donations to reach our goal. If you donate just $5, the price of your coffee this Sunday, We can help to keep the planet alive in a real way and continue to bring you regular updates and features on Australian plants all in one Botanical Bible. Any support is greatly appreciated. Thank you.
In the spirit of reconciliation we acknowledge the Bundjalung, Gumbaynggirr and Yaegl and all aboriginal nations throughout Australia and their connections to land, sea and community. We pay our respect to their Elders past, present and future for the pleasures we have gained.
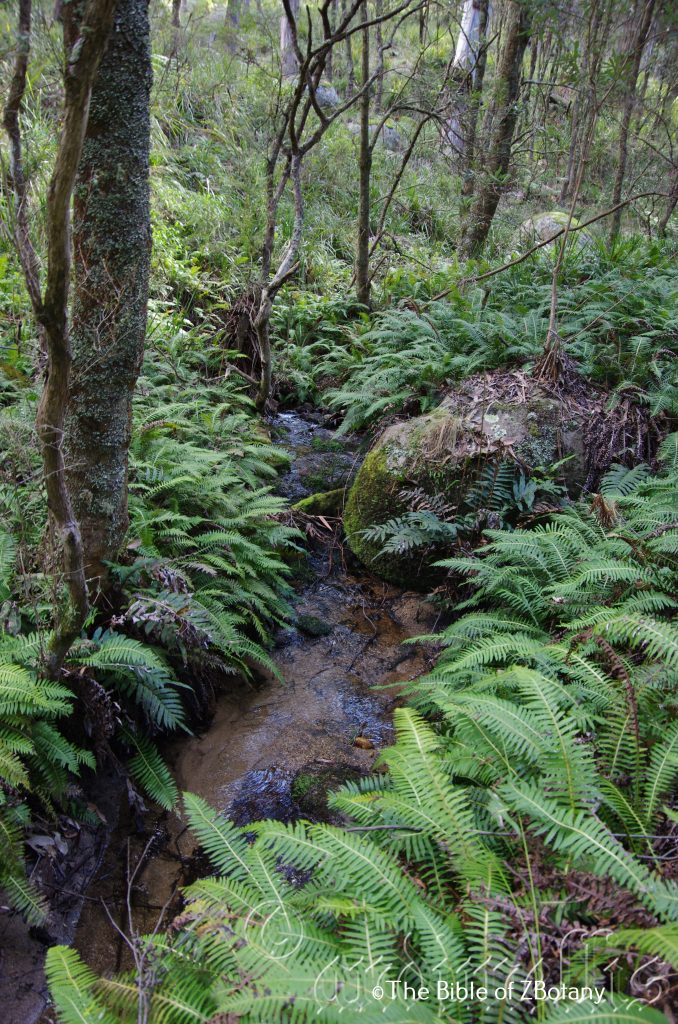
Cathedral Rocks National Park Ebor NSW
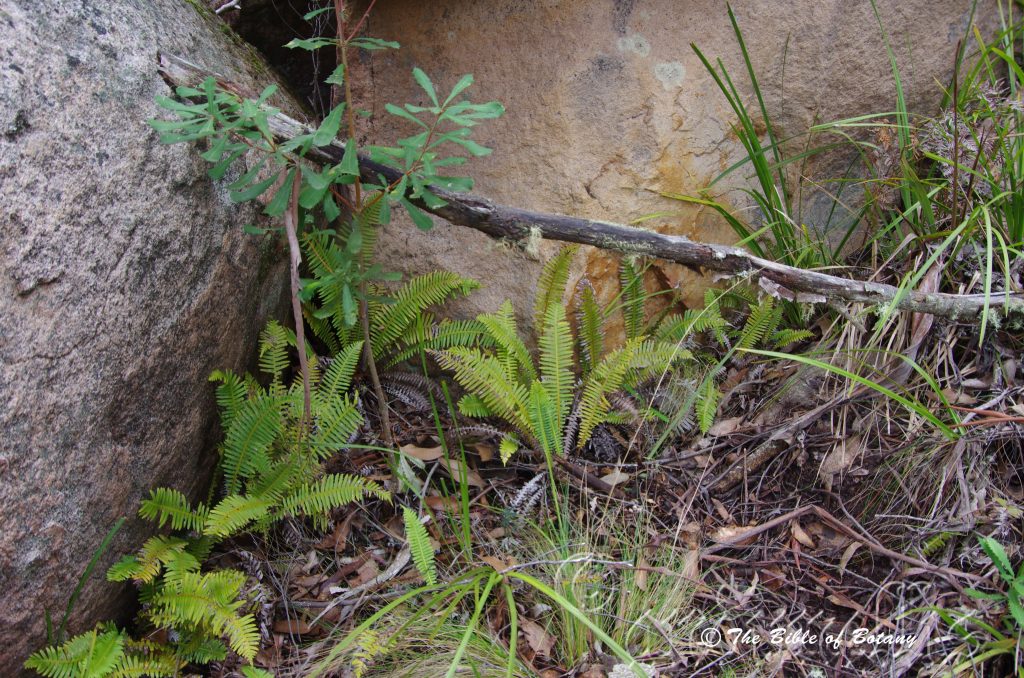
Cathedral Rocks National Park Ebor NSW
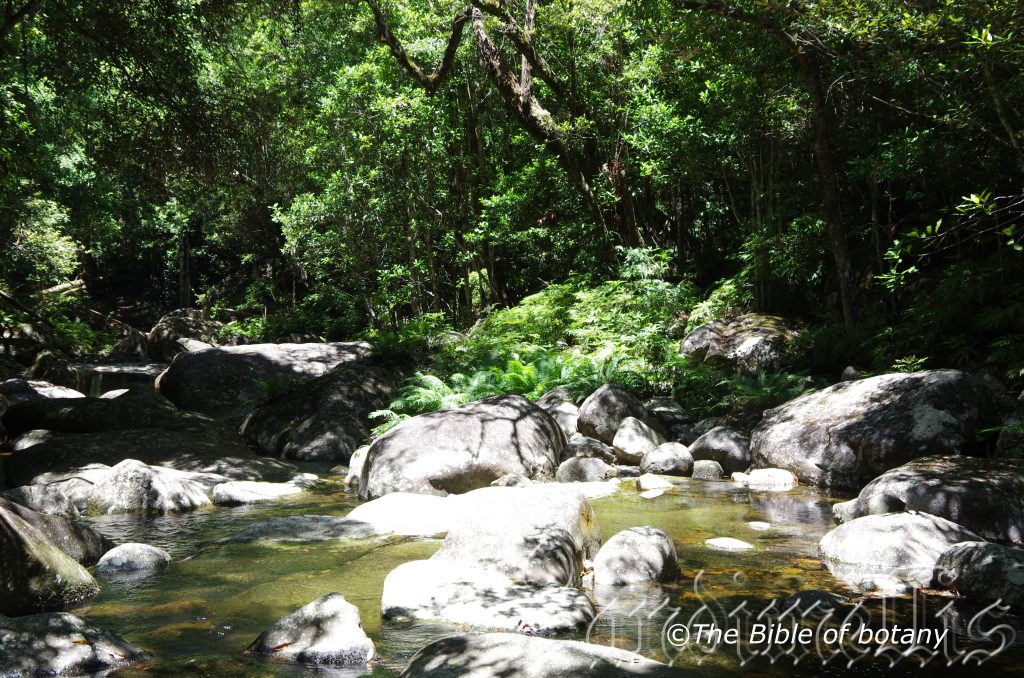
Washpool National Park NSW
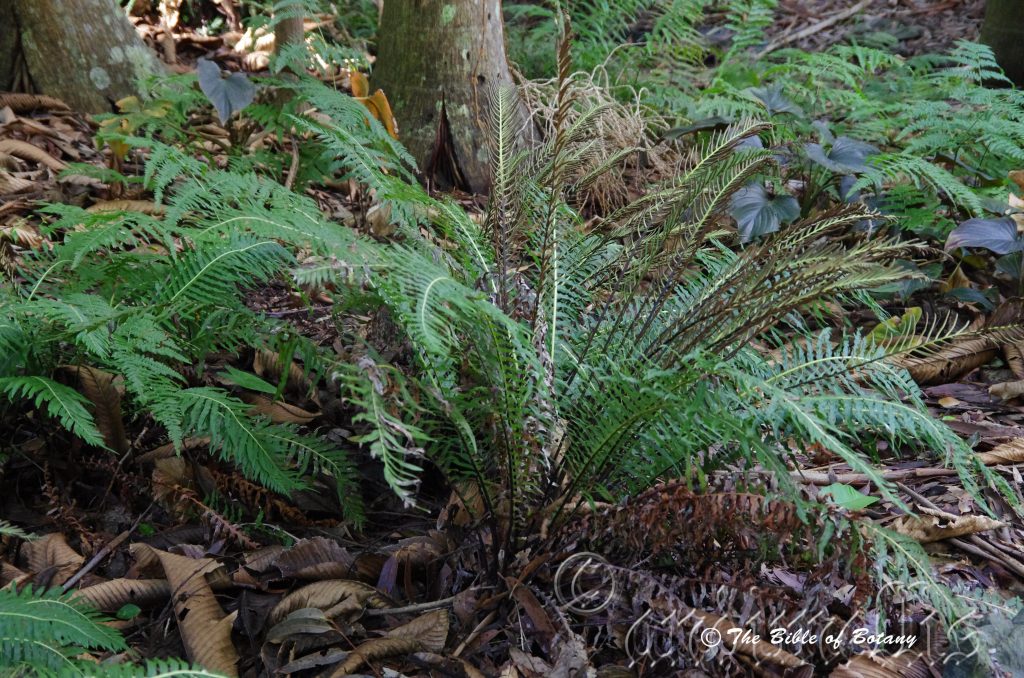
Cathedral Rocks National Park Ebor NSW
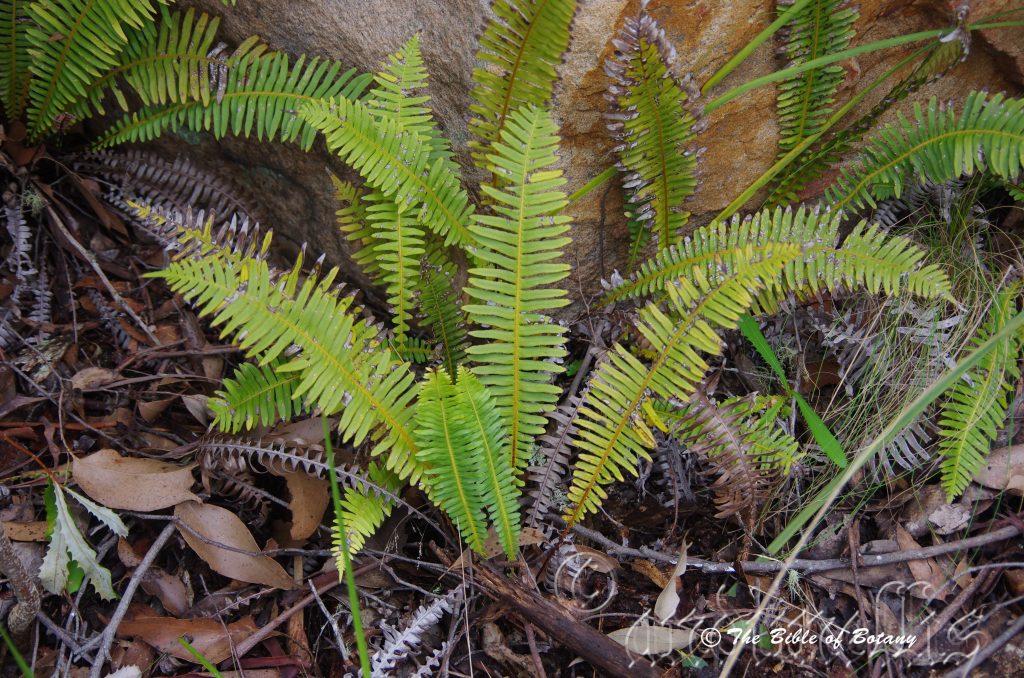
Cathedral Rocks National Park Ebor NSW
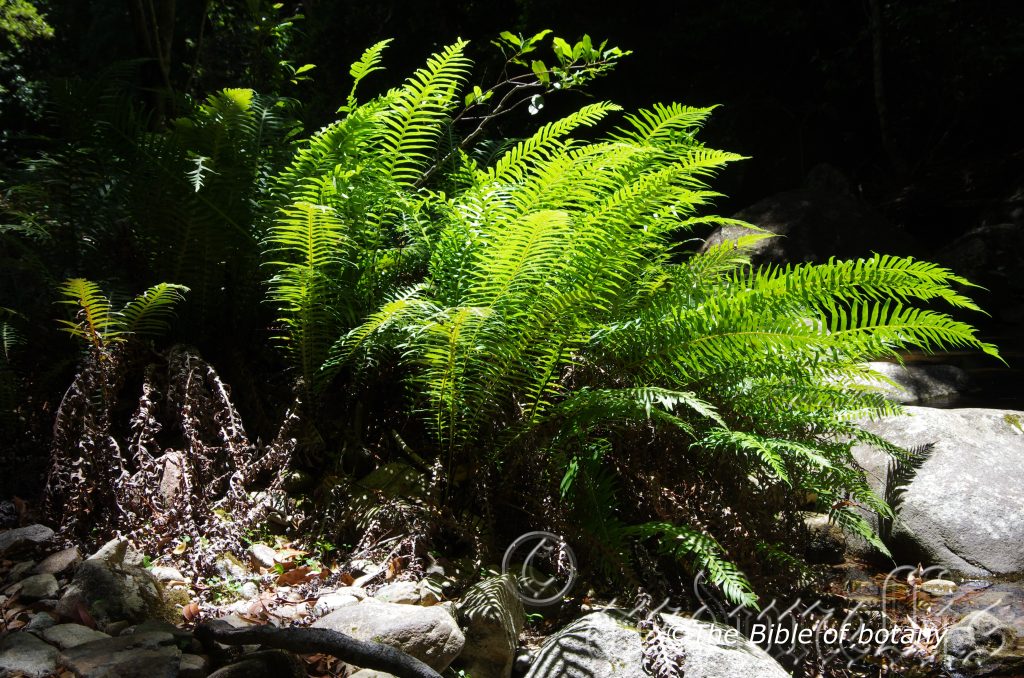
Washpool National Park NSW
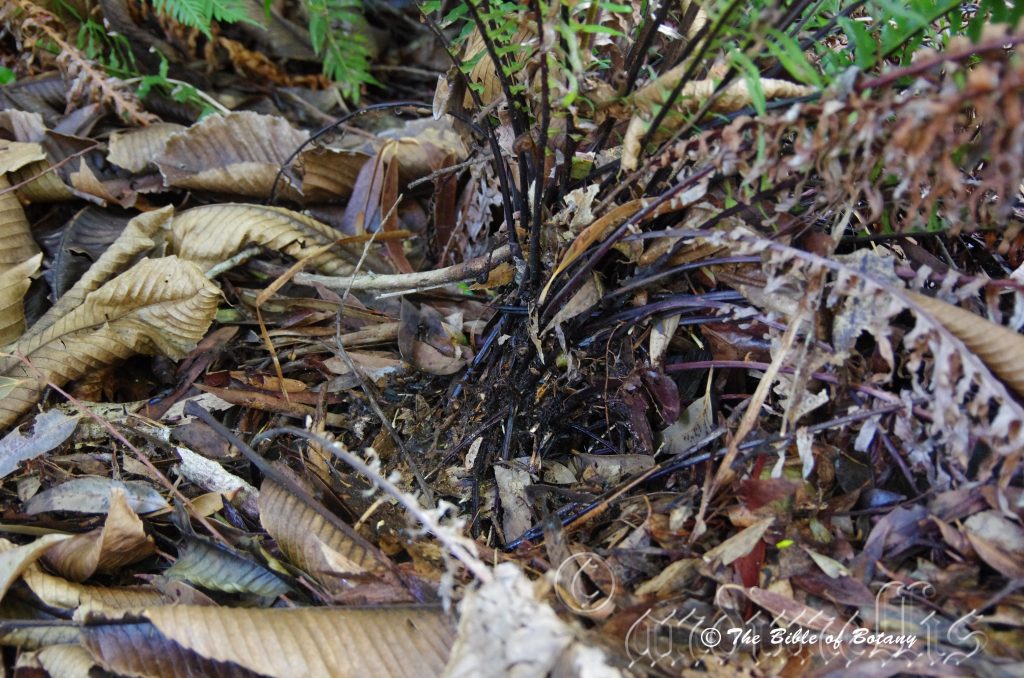
Coffs Harbour Botanic Gardens NSW
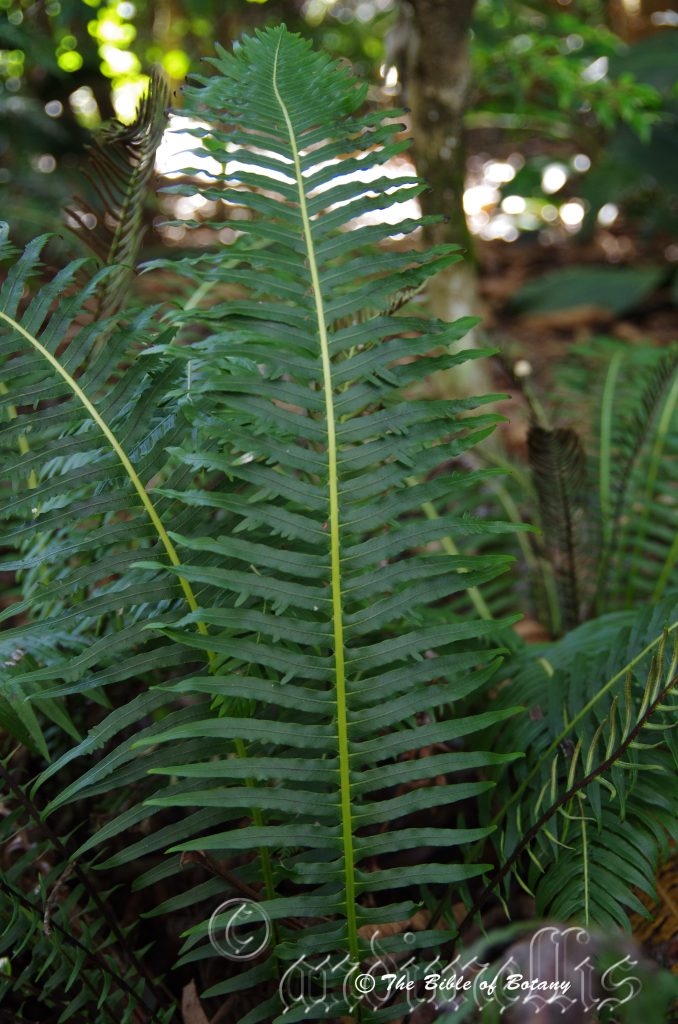
Coffs Harbour Botanic Gardens NSW
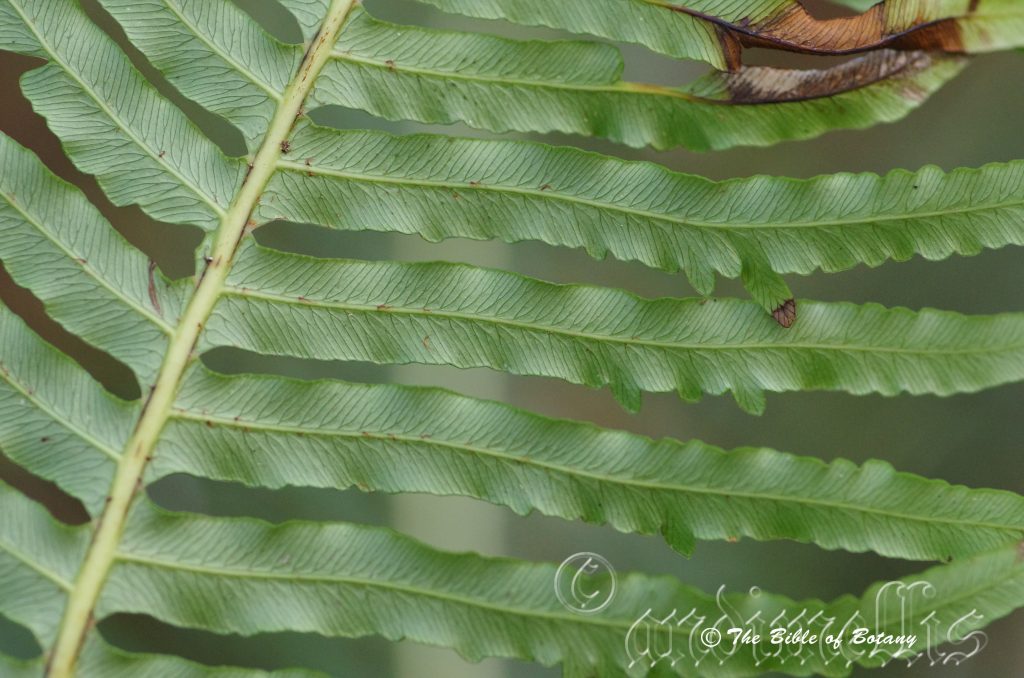
Cathedral Rocks National Park Ebor NSW
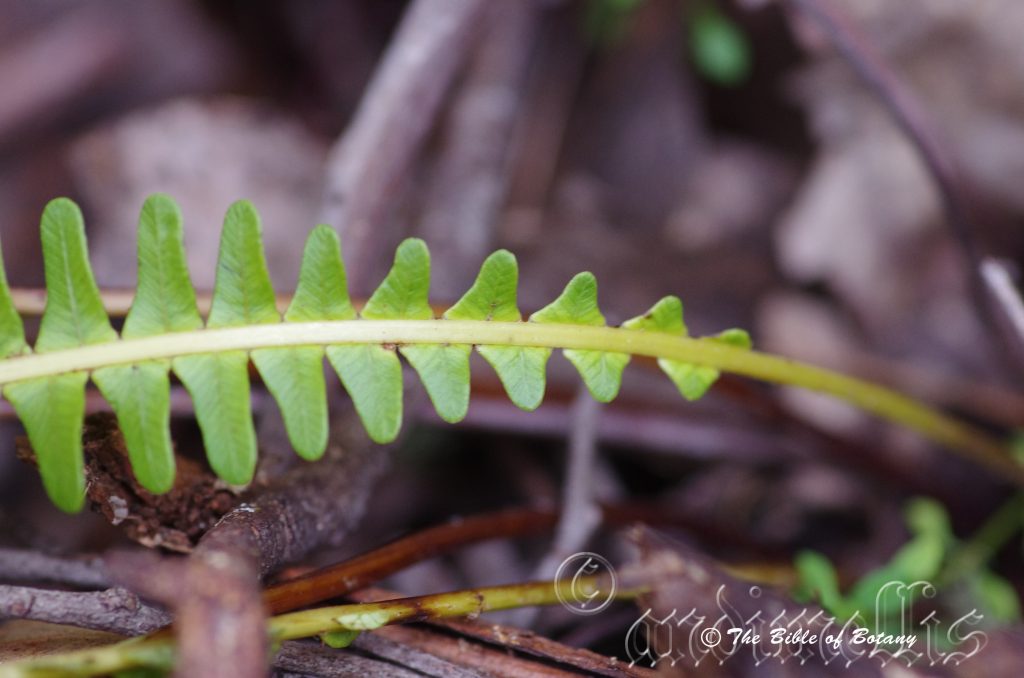
Cathedral Rocks National Park Ebor NSW
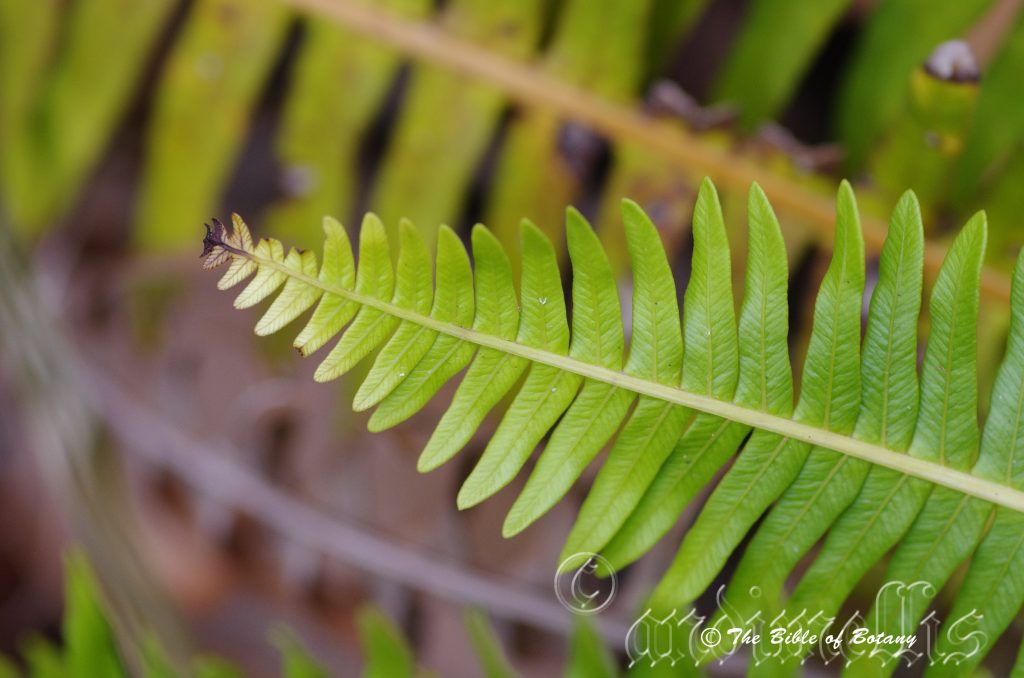
Cathedral Rocks National Park Ebor NSW
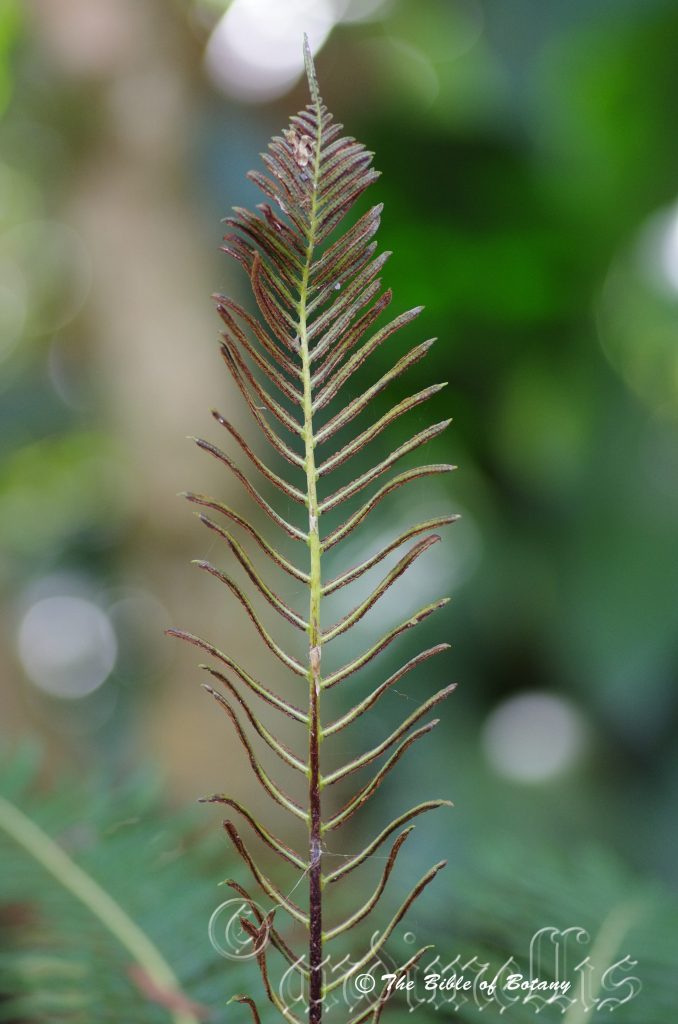
Cathedral Rocks National Park Ebor NSW
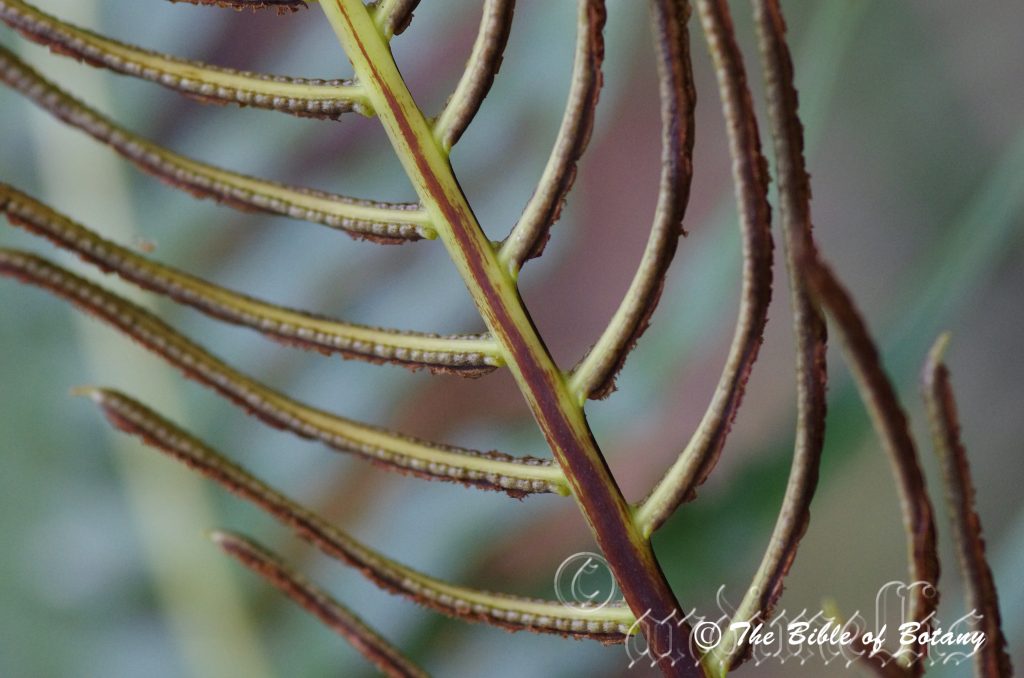
Cathedral Rocks National Park Ebor NSW
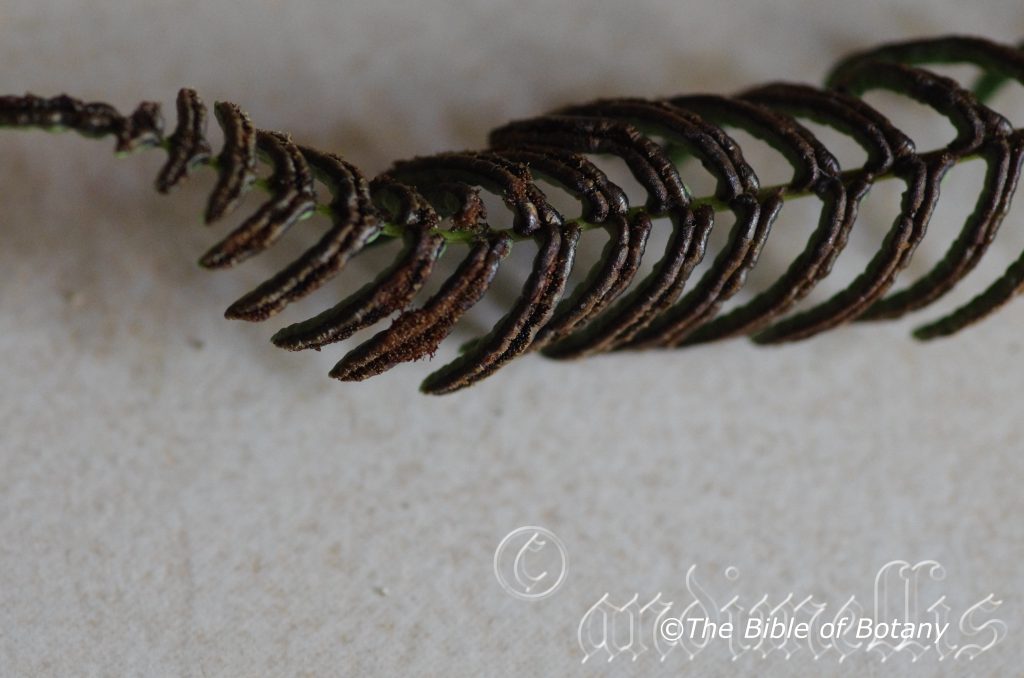
Coffs Harbour Botanic Gardens NSW
Blechnum nudum
Classification:
Class: Pteridospida
Order: Athyriales
Family: Blechnaceae
Genus: From Blockhon, which is Ancient Greek for the ancient name given to ferns. It refers to a group of ferns, which have typical fishbone type fronds.
Species: From Nudum, which is Latin for being naked. It refers to lacking a pericarp in certain conifers or lacking scales around a bud or spores.
Common Name: Gristle Tree Fern or Water Tree Fern.
Distribution:
Blechnum nudum is found south from Innisfail to Wilsons Promontory then west to Mount Gambier and the Naracoorte Coastal Plains and Kangaroo Island in south eastern South Australia.
It is found over most of Tasmania except the highest peaks on the north eastern highlands and the south western highlands.
https://avh.ala.org.au/occurrences/search?taxa=Blechnum+nudum+#tab_mapView
Habitat Aspect Climate:
Blechnum nudum grows in dense shaded positions in cool mountainous subtropical rainforests or temperate rainforests. It is found in cool, moist sheltered gullies especially along creek banks, near waterfalls and between rock crevices along seepage lines. It also grows in more open situations where adequate water is always available. The altitude ranges from 50 meters ASL to 1500 meters ASL
The temperatures range from minus 4 degrees in August to 28 degrees in January.
The rainfalls range from lows of 600mm to 2400mm average per annum.
Soil Requirements:
Blechnum nudum prefers better quality light clays to medium clays. The soils are usually derived from decomposed sandstones granites, brown basalts, black basalts, shales or metamorphic rocks. The soil’s pH ranges from 3.5pH to 7pH. It tolerates seasonal waterlogged soils and during downpours. None saline soils to moderately saline soils are tolerated.
Height & Spread:
Wild Plants: 300mm to 1800mm by 600mm to 1800mm in very large old plants.
Characteristics:
Blechnum nudum has a short thick erect rhizome is covered in long shiny black scales. The long scales measure 5mm to 6mm in length by 5mm in width. The black or dark grey fibrous rhizome can form a trunk 1.4 meters in height by 80mm in diameter in old well grown specimens. The old fronds are not self-cleaning and stipe bases will be present on old rhizomes.
Blechnum nudum has dimorphic fronds which grow in clusters at the end of the rhizome. The rachis is rather thick and a deeper green than the discolourous lamina. The erect to semi pendant light green pinnate fronds measure 250mm to 1000mm in length by 30mm to 210mm in width and are widest at the center point of the rachis tapering as they approach the base and apex. The pinnae are adnate at their base while the apex is more rounded at the base of the stipe and the tip of the rachis. The linear to narrow obtuse sterile pinnae measure 20mm to 100mm in length by 5mm to 10mm in width while the linear fertile pinnae are shorter and measure 35mm to 55mm in length by 1.5mm to 5mm in width. The spore is deep brown to Black.
Wildlife:
I have never seen anything attack Blechnum nudum in the wild as the fronds are always in an immaculate condition.
Cultivation:
This is a beautiful small fern for courtyards or in the garden from darker conditions through to bright shaded areas as long as adequate moisture prevails all year. The trunk as well as the fronds should be utilized in colour schemes around the home. The course short fibrous trunks give character where a lot of horizontal lines need to be broken up or a change of texture is needed from the already smooth textures in place.
Blechnum nudum is an excellent subject to place in nooks and crannies. Its height and bright green fronds give extra depth in small areas while mass plantings near swimming pools or shaded walls makes the area come to life and the pools look larger. Mass plantings in narrow beds make the beds look longer but be careful as such a planting also makes the background look taller.
It often reaches its full potential of 500mm in just 4 years from spore.
Not many of us can afford the type or size of a water feature where large tree ferns thrive and bring an air of romance to the garden. Most of the time, Cyathea species and Dickson species overwhelm the setting, over power it as they grow larger and larger. For this reason you become disenchanted with the feature but don’t know why? Then enter Blechnum nudum. It is the fern to place around larger pools, fish ponds and other water features. It will thrive getting wet from splashing and the cooling effect around water features without looking out of place.
A disadvantage is that when the plants reach a meter in height they may become top heavy and fall over. Staking plants can be done however stakes look ugly so it is better to carefully either remove them and replant or re position it in the garden. Either that or utilize the horizontal look to your advantage. Adiantum aethiopicum is compatible and will hide the trunks if you do not want to see it.
Propagation:
Spores: All ferns that are declared rare, vulnerable or endangered are protected by Federal and State Laws and must not be removed from the wild unless you are a land developer, mining company or main Roads department etc. This includes bulbs, roots, leaves and flowers. No part of any plant can be removed from Federal, State or Local Government land without the prior permission of the authority and this includes the spore.
Most people are put off at the thought of growing ferns from spore. Like all plants that produce their offspring from seed or spore the methods are basically the same. Remember nature has been doing this for millions of years and has been very successful. I have had excellent results growing over 200 different species of Australian ferns so don’t be afraid. Give it a go.
Step 1. Select spore from the fern fronds. Wait until the fern is just starting to release its spore. Rinse the fronds under clean running water and dry. This is to wash off any other spores from rogue ferns that may have settled onto the fronds. (There is nothing worse than having common brake or common soft bracken contaminating a prized tree fern or epiphyte.)
 Step 2. Place the dry fronds in a clean brown paper bag and keep them in a cool dark place like the linen closet for about a week to ten days before you are ready to sow the spore. The exception to this rule applies to ferns, which produce green spores. These must be sown immediately that they are released. Todea Barbara is a good example of a fern, which produces green spore.
Step 3. Take a large ice cream container, a small ice cream container and a clean clear plastic bag large enough to seal the large ice cream container and three or four milk bottle tops.
Step 4. Punch or drill 6 to 10 5mm holes in the bottom of the small ice cream container.
Step 5. Wash both containers, tops and plastic bag so that they are very clean and sterile.
Step 6. Use a clean fine seed raising mi. We used 30mm fine sand, 30mm peat and 30mm perlite and 10mm vermiculite. We used crushed basalt, crusher dust and peat in a 50:50 ratio for epiphytes. Moisten the mix enough that water does not run out when the mix is squeezed between the fingers.
Step 7. Place the moisten mix (Enough to half fill the small ice cream container) in the microwave oven with a large glass of water for 7 or 8 minutes, until the water is boiling. Allow them to cool in the oven. You will need the water later so do not tip it out.
Step 8. Take the brown paper bag out of the linen closet. Shake the bag and remove the fronds. You should have a yellow, brown, black or rarely greenish brown or ochre powder or very fine, small round pin head size spore depending on the specie involved.
Step 9. Remove the mixture from the oven once it has cooled and place it in the small ice cream container and level.
Step 10. Sprinkle the spore sparsely over the mixture in the small ice cream container.
Step 11. Place the milk bottle tops in the large ice cream container with the flat surface facing down. Place the small ice cream container in the large ice cream container so that it is sitting on the milk bottle tops.
Step 12. Remove the water from the microwave and pour it into the larger ice cream container so there is 25mm to 30mm of water in the bottom.
Step 13. Place the ice cream containers in the plastic bag and seal.
Step 14. Wait until the ferns are about 20 mm high before you attempt to transplant them. Once they are ready open the bag up and allow the air to flow around them. Every three days open the bag a little further so the ferns get use to their new environment. Be patient at this stage as Blechnum nudum is more sensitive than most ferns to disturbance. Allow them a week or two before you transplant them into 50mm standard tubes. Do not try to transplant them as single plants as they are a little delicate still.
Once they reach 50mm to 60mm you may start to separate the strongest ones and again do not move them far from their original position. After a few weeks the ferns will grow stronger. Once the fronds reach 80mm plant them into their permanent positions.
The spacing for mass plantings of Blechnum nudum will ultimately depend on the feature or look you wish to create. Two plants like the ones at the Mount Cootha Gardens in Brisbane are best achieved with a space between the two ferns of just 100mm to 250mm centers. Mass plantings around rocks or against walls in narrow beds can be achieved with 800mm to 900mm centers.
Fertilize using Seaweed, fish emulsion or organic chicken pellets soaked in water on an alternate basis. Fertilize every two months until the plants are established then annually in early September to October to maintain health, vitality and better flowering.
Further Comments from Readers:
Hi reader, it seems you use The Bible of Botany a lot. That’s great as we have great pleasure in bringing it to you! It’s a little awkward for us to ask, but our first aim is to purchase land approximately 1,600 hectares to link several parcels of N.P. into one at The Pinnacles NSW Australia, but we need your help. We’re not salespeople. We’re amateur botanists who have dedicated over 30 years to saving the environment in a practical way. We depend on donations to reach our goal. If you donate just $5, the price of your coffee this Sunday, We can help to keep the planet alive in a real way and continue to bring you regular updates and features on Australian plants all in one Botanical Bible. Any support is greatly appreciated. Thank you.
In the spirit of reconciliation we acknowledge the Bundjalung, Gumbaynggirr and Yaegl and all aboriginal nations throughout Australia and their connections to land, sea and community. We pay our respect to their Elders past, present and future for the pleasures we have gained.
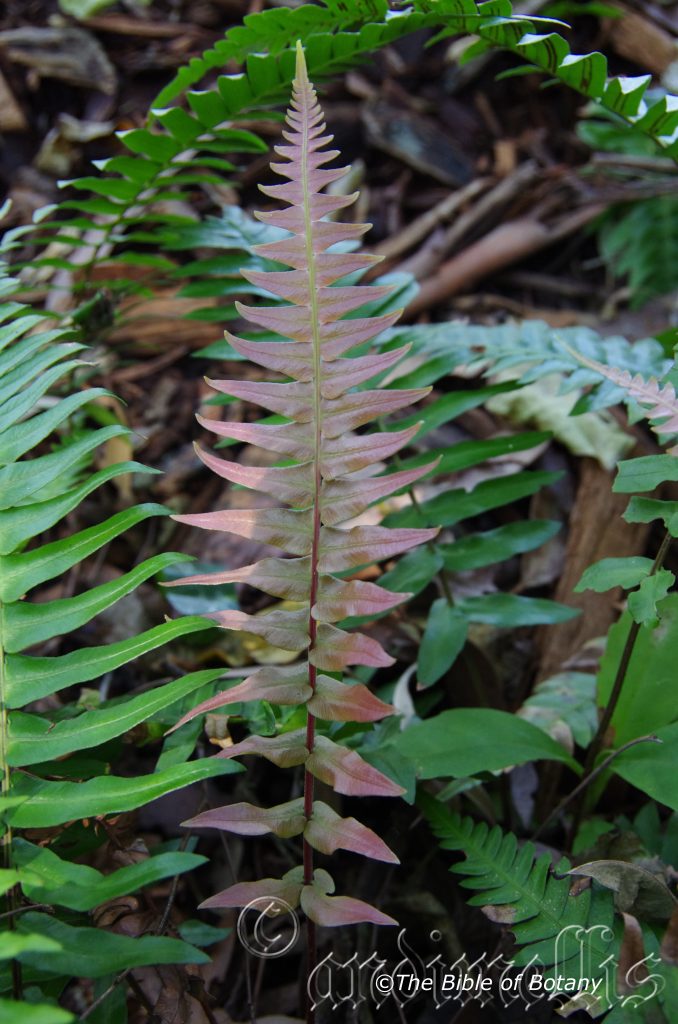
Coffs Harbour Botanic Gardens NSW
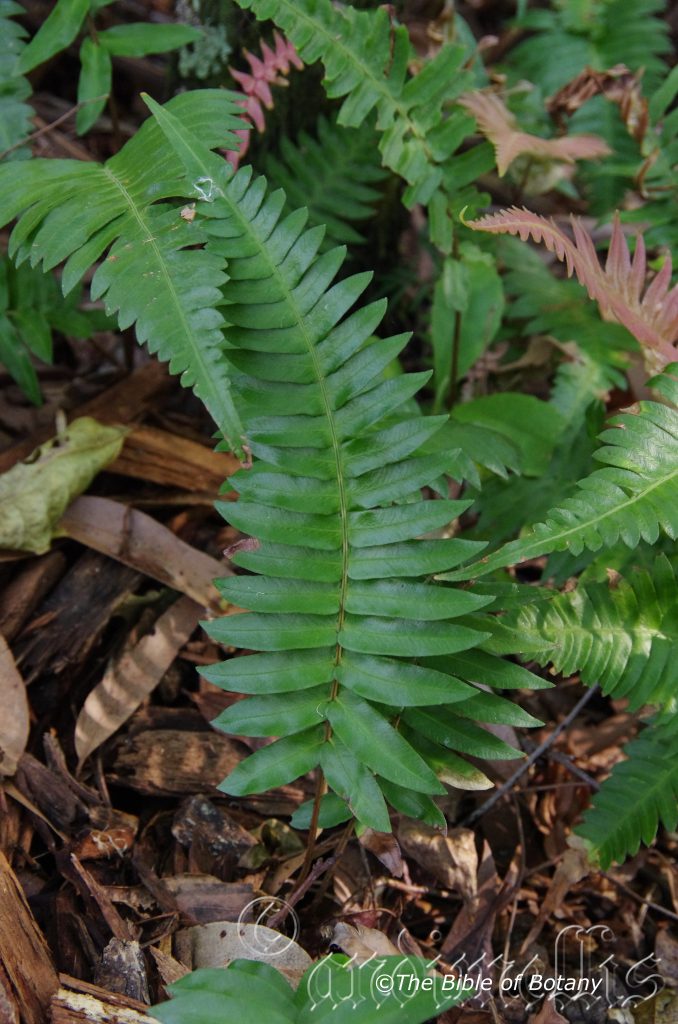
Coffs Harbour Botanic Gardens NSW
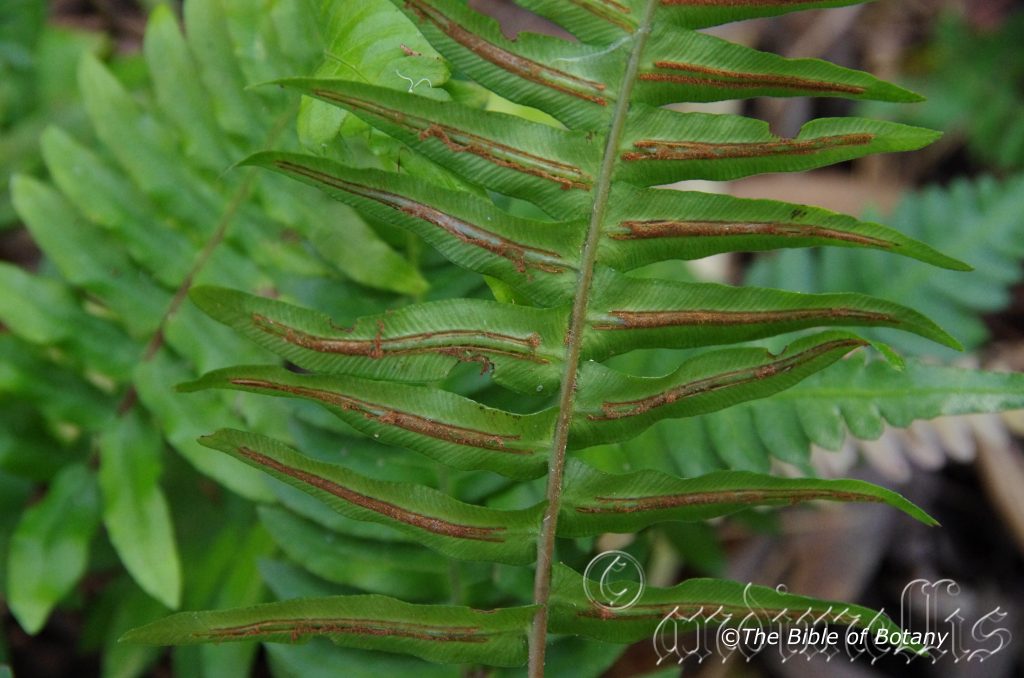
Coffs Harbour Botanic Gardens NSW
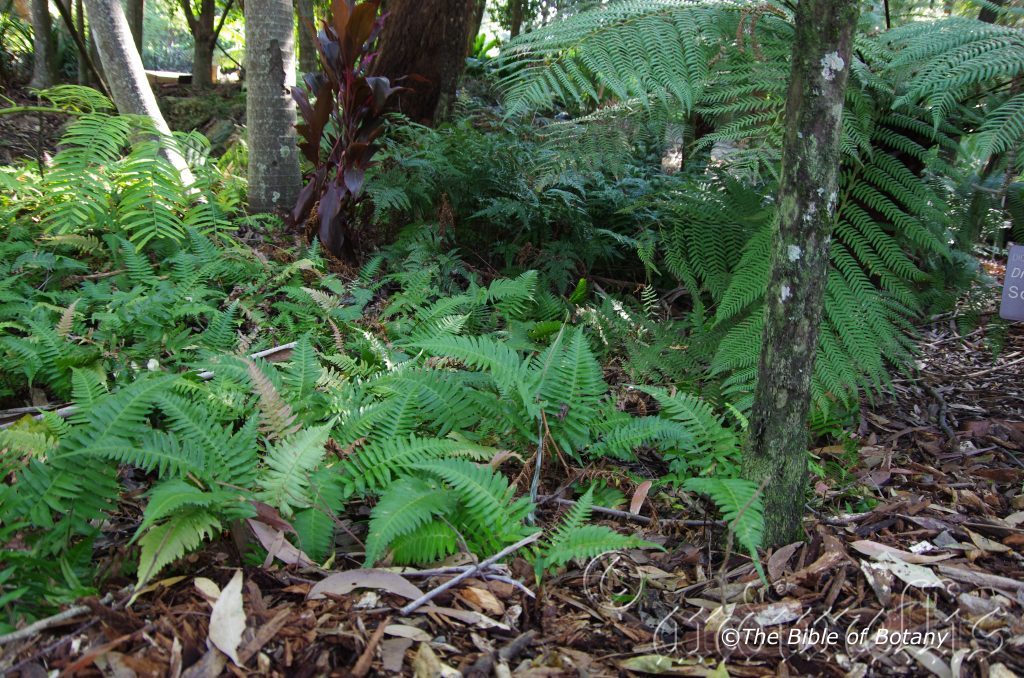
Coffs Harbour Botanic Gardens NSW
Blechnum parrisiae
Classification
Class: Pteridospida
Order: Blechnales
Family: Blechnaceae
Genus: From Blockhon, which is Ancient Greek for the ancient name given to ferns. It refers to a group of ferns, which have typical fishbone type fronds.
Species: From Parrisiae which is unknown.
Common Name: Common Rasp Fern.
Distribution:
Blechnum parrisiae is widespread south from Carnarvon National Park in central eastern Queensland to the Grampians in western Victoria. There are several isolated populations south from the Iron Range National Park to the Warrumbungle National Park. It is mainly found on the Western Slopes, on and east of the Great Dividing Range to the coast.
It is found on the larger Islands in Bass Strait and on the eastern half of Tasmania. It is also found on Norfolk Island, Lord Howe Island and New Zealand.
https://avh.ala.org.au/occurrences/search?taxa=Blechnum+parrisiae#tab_mapView
Habitat Aspect Climate:
Blechnum parrisiae prefers dense shade, light shade or dappled sunlight. It grows in montane rainforests, littoral rainforests or moist Eucalyptus forests. It can colonize large areas of the rainforest floor especially along creek and stream banks. The altitude ranges from 10 meters ASL to 900 meters ASL.
The temperatures range from minus 4 degrees in August to 36 degrees in January.
The rainfall ranges from lows of 600mm to 3200mm average per annum.
Soil Requirements:
Blechnum parrisiae prefers sandy loams to heavy clays. The soils are derived from brown basalt, black basalt, metamorphic rocks, shale fatty sandstones or fatty granites and heavy silt alluvial deposits. The soils pH ranges from 5pH to 7pH. It tolerates some waterlogged soils and does best on soils which have good moisture retention throughout the year. It also grows near waterfalls and seepages where iron bacteria prevail. Non saline soils to very saline soils are tolerated.
Height & Spread:
Wild Plants: 200mm to 600mm by 250mm to several hundred square meters.
Characteristics:
Blechnum parrisiae has a short slim to long slim creeping rhizome covered in large narrow black scales. The scales measure 2mm to 4mm in length by 3mm in width.
Blechnum parrisiae fronds grow in flushes covering the ground in brilliant pink or red of the new fronds. The new growth varies from rose pink to red and deep maroons. The rigid erect lanceolate fronds measure 200mm to 600mm in length by 80mm to 120mm in width. The stipes are deep brown first emerging deep pink or red similar to the colour of the fronds. The lanceolate have wings along the base of the rachis. The pinnatisect pinnules are deeply divided giving the appearance of being separate pinnules. The tuberculate fronds are rough with the longest pinnules being half way along the rachis from the base to the apex with subsequent pinnae becoming smaller towards the ends. The alternate linear pinnules measure 40mm to 60mm in length by 5mm to 8mm in width. The base of the pinnae on Blechnum parrisiae are free from the opposite pinnae where as they are extend to the opposite pinnae on the rachis above and below on Blechnum parrisiae. The margins are finely toothed. The 36 to 52 pinnules are deep sea green. The base of the pinnules is sessile except for the basal 1 to 3 pairs which have short petioles. The petioles measure 0.5mm to 1mm in length. The bases are hastate.
The fertile and sterile fronds are non-dimorphic. The oblong sporangia measure 0.7mm to 2.2mm in length by 0.5mm to 1mm in width. The 1 or 2 rows of reniform sori are on each side of the pinna midvein. The indusium is persistent and dehisces on the edge facing the midvein. The sori become confluent as they mature.
Wildlife:
Blechnum parrisiae’s wildlife is unknown to the author.
Cultivation:
Blechnum parrisiae is a beautiful medium fern for courtyards, around swimming pools or in the garden where moist dark to lighter conditions prevail. Blechnum parrisiae is excellent for around swimming pools where it can grow to its full potential. If used correctly it can make medium and small areas look larger. Some cleaning of spent fronds on a biannual base is necessary and moisture is required to keep it at its best. It is best mass planted in order to appreciate the carpet of red or pink when the flushes of new growth emerge.
It looks great beneath a rainforest setting where it can dominate what is usually barren ground. It can be used to great affect where a dry creek bed is the theme by using them to mark out the banks. It can be used to stabilize banks along creeks and streams or to help soak up water in wet areas below septic trenches.
Blechnum parrisiae has proven itself reliable as an indoor plant especially in the bathroom where the humidity is higher or around fish tanks and indoor fish ponds. Here there small size and robust growth adds interest and colour several times a year.
It is somewhat drought tolerant once established compared to many other ferns, so the occasional lapse in watering won’t affect them. If it happens to effect it after a long holiday or during a drought prune all the fronds off to a few centimetres of the rhizome and give them a good soaking. Apply a double strength dose of our recommended fertilizer two days later and again give a good soaking and within two weeks they will be back to their former glory. This drought tolerance makes them ideal for regeneration projects along creeks and gullies.
It often reaches its full potential of 200mm in just over 1 year with a spreading habit in full progress.
Blechnum parrisiae is an excellent plant for terrarium culture.
Propagation:
Spores: All ferns that are declared rare, vulnerable or endangered are protected by Federal and State Laws and must not be removed from the wild unless you are a land developer, mining company or main Roads department etc. This includes bulbs, roots, leaves and flowers. No part of any plant can be removed from Federal, State or Local Government land without the prior permission of the authority and this includes the spore.
Most people are put off at the thought of growing ferns from spore. Like all plants that produce their offspring from seed or spore the methods are basically the same. Remember nature has been doing this for millions of years and has been very successful. I have had excellent results growing over 200 different species of Australian ferns so don’t be afraid. Give it a go.
Step 1. Select spore from the fern fronds. Wait until the fern is just starting to release its spore. Rinse the fronds under clean running water and dry. This is to wash off any other spores from rogue ferns that may have settled onto the fronds. (There is nothing worse than having common brake or common soft bracken contaminating a prized tree fern or epiphyte.)
 Step 2. Place the dry fronds in a clean brown paper bag and keep them in a cool dark place like the linen closet for about a week to ten days before you are ready to sow the spore. The exception to this rule applies to ferns, which produce green spores. These must be sown immediately that they are released. Todea Barbara is a good example of a fern, which produces green spore.
Step 3. Take a large ice cream container, a small ice cream container and a clean clear plastic bag large enough to seal the large ice cream container and three or four milk bottle tops.
Step 4. Punch or drill 6 to 10 5mm holes in the bottom of the small ice cream container.
Step 5. Wash both containers, tops and plastic bag so that they are very clean and sterile.
Step 6. Use a clean fine seed raising mi. We used 30mm fine sand, 30mm peat and 30mm perlite and 10mm vermiculite. We used crushed basalt, crusher dust and peat in a 50:50 ratio for epiphytes. Moisten the mix enough that water does not run out when the mix is squeezed between the fingers.
Step 7. Place the moisten mix (Enough to half fill the small ice cream container) in the microwave oven with a large glass of water for 7 or 8 minutes, until the water is boiling. Allow them to cool in the oven. You will need the water later so do not tip it out.
Step 8. Take the brown paper bag out of the linen closet. Shake the bag and remove the fronds. You should have a yellow, brown, black or rarely greenish brown or ochre powder or very fine, small round pin head size spore depending on the specie involved.
Step 9. Remove the mixture from the oven once it has cooled and place it in the small ice cream container and level.
Step 10. Sprinkle the spore sparsely over the mixture in the small ice cream container.
Step 11. Place the milk bottle tops in the large ice cream container with the flat surface facing down. Place the small ice cream container in the large ice cream container so that it is sitting on the milk bottle tops.
Step 12. Remove the water from the microwave and pour it into the larger ice cream container so there is 25mm to 30mm of water in the bottom.
Step 13. Place the ice cream containers in the plastic bag and seal.
Step 14. Place the contents and bag in a warm shady place preferably 50mm to 70mm shade depending on the specie. Shade houses and some window sills are ideal.
Step 15. The surface should turn green within a week to two weeks. The prothallus will then develop. From the prthalus the first true fronds will appear. Wait until the ferns are 20mm to 35mm in height before you attempt to transplant them. Once they are ready open the bag up slightly and allow the air to flow around the little ferns. Every 3 to 5 days open the bag a little further so the ferns get use to their new environment. Allow them a week to two weeks to harden off before you transplant them following the removal of the plastic bag. Carefully prick them out into 50mm standard squat tubes as you would any seedling.
Do not try to transplant them as single plants as they are still a little delicate still.
Platycerium species and Asplenium species will have to be divided into single plants at a later stage. Once the first divisions have hardened off and the plants reach 50mm to 70mm in height. Be careful, as they are still fragile at this stage. Replace them close to their original position and water. After a few weeks, the ferns will power away without any setbacks. Here they can be further divided where necessary removing the smaller ferns leaving the largest one in place.
Once the smaller ones again reach 50mm to 70mm you may wish to divide the stronger and hardier individual plants into smaller clumps in 100mm squat pots.
Fertilize using Seaweed, fish emulsion or organic chicken pellets soaked in water on an alternate basis. Fertilize every two months until the plants are established then annually in early September to October to maintain health, vitality and better flowering.
Further Comments from Readers:
Hi reader, it seems you use The Bible of Botany a lot. That’s great as we have great pleasure in bringing it to you! It’s a little awkward for us to ask, but our first aim is to purchase land approximately 1,600 hectares to link several parcels of N.P. into one at The Pinnacles NSW Australia, but we need your help. We’re not salespeople. We’re amateur botanists who have dedicated over 30 years to saving the environment in a practical way. We depend on donations to reach our goal. If you donate just $5, the price of your coffee this Sunday, We can help to keep the planet alive in a real way and continue to bring you regular updates and features on Australian plants all in one Botanical Bible. Any support is greatly appreciated. Thank you.
In the spirit of reconciliation we acknowledge the Bundjalung, Gumbaynggirr and Yaegl and all aboriginal nations throughout Australia and their connections to land, sea and community. We pay our respect to their Elders past, present and future for the pleasures we have gained.
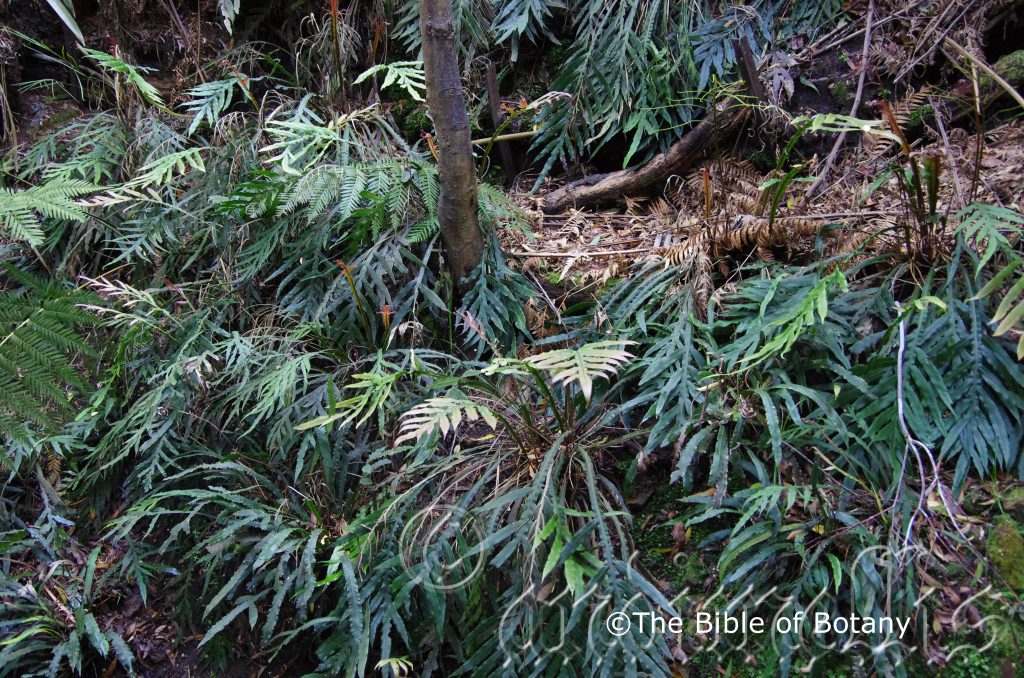
National Botanic Gardens ACT
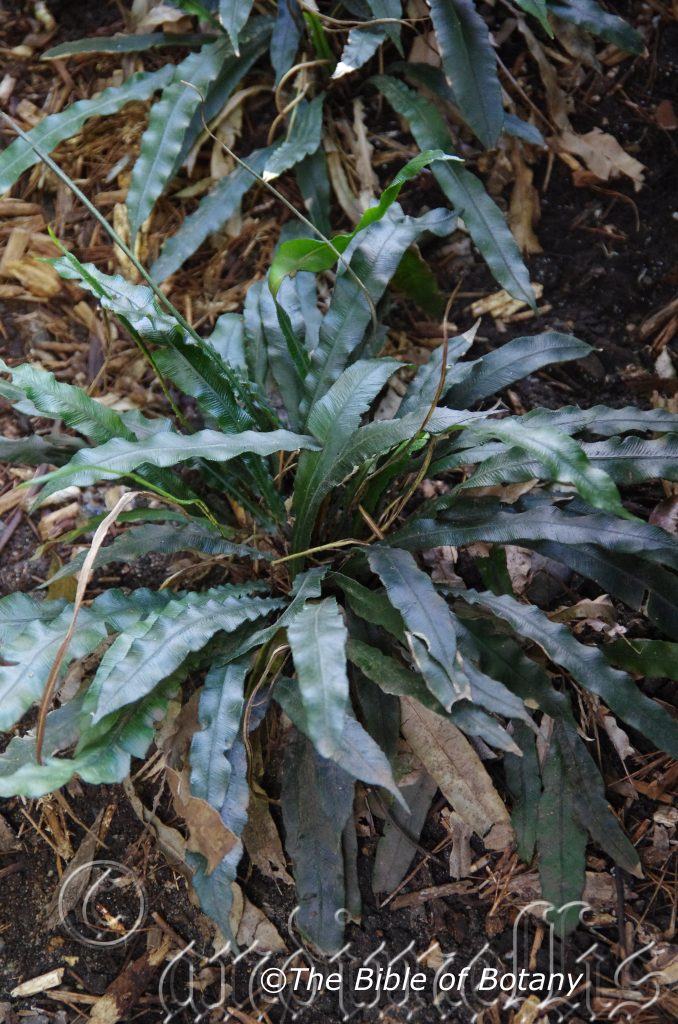
Mount Cootha Botanic Gardens Qld.
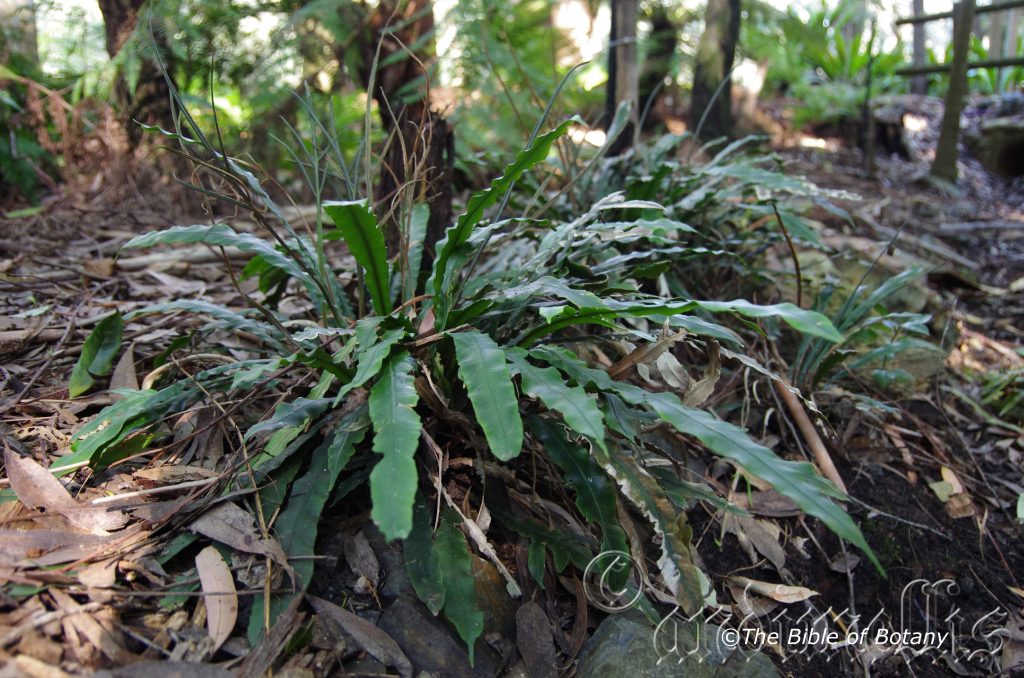
Coffs Harbour Botanic Gardens NSW
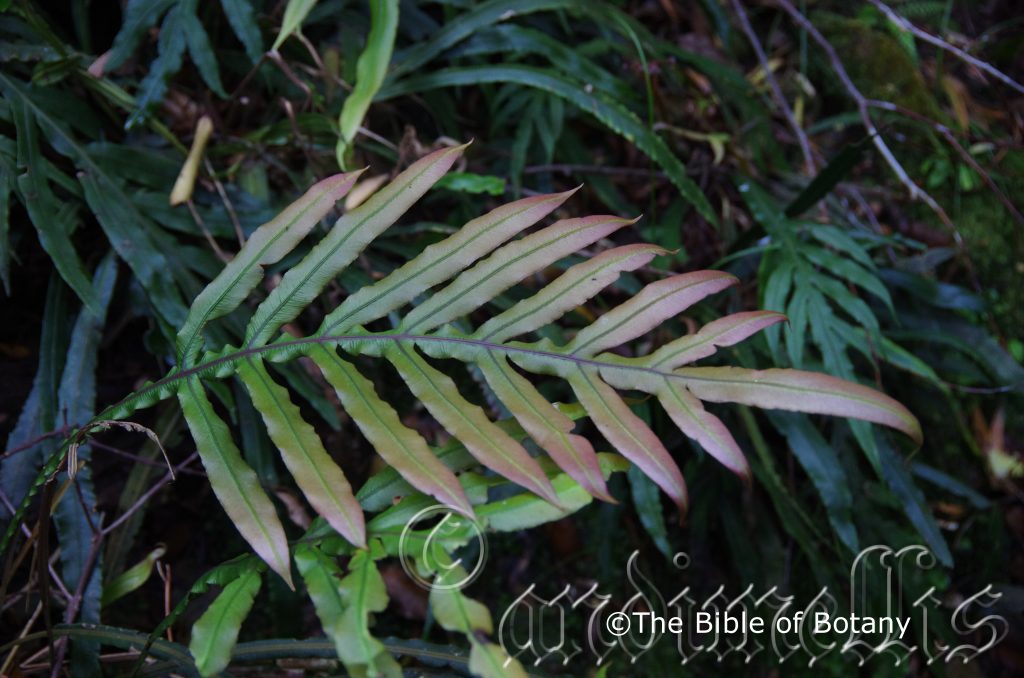
National Botanic Gardens ACT
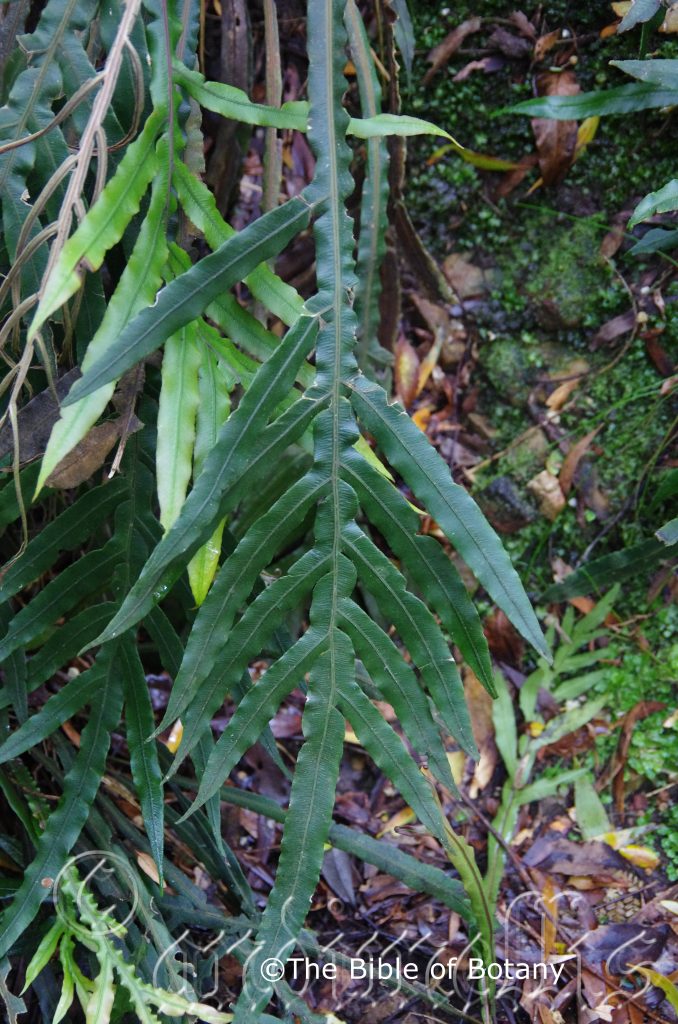
National Botanic Gardens ACT
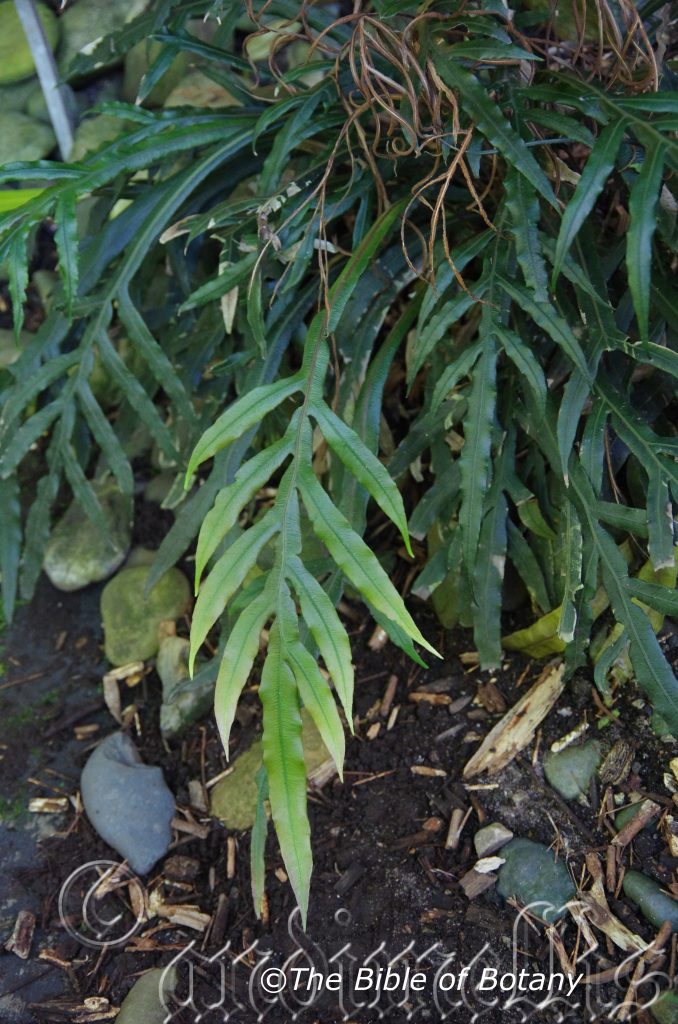
Mount Cootha Botanic Gardens Qld.
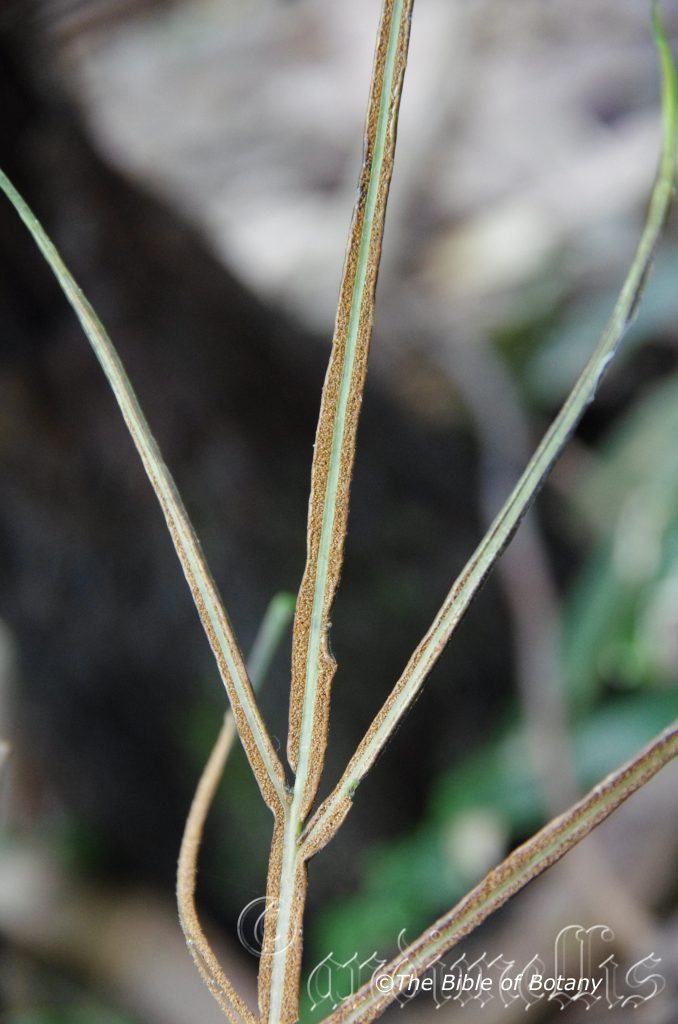
Coffs Harbour Botanic Gardens NSW
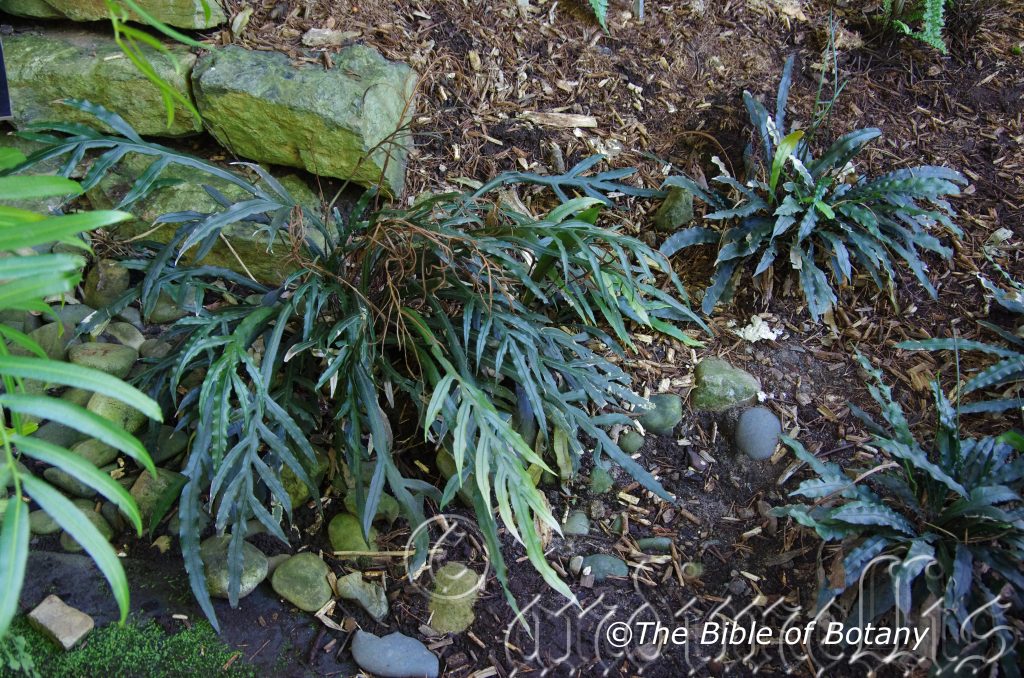
Mount Cootha Botanic Gardens Qld.
Blechnum patersonii
Classification:
Class: Pteridospida
Order: Athyriales
Family: Blechnaceae
Genus: From Blockhon, which is Ancient Greek for the ancient name given to ferns. It refers to a group of ferns, which have typical fishbone type fronds.
Species: Is named in honour of William Paterson; 1755-1810, who was a British governor and founder of Launceston and botanical collector.
Common Name: Strap Leaf Fern or Strap Leaf Blechnum.
Distribution:
Blechnum patersonii is found south from Cairns to Innisfail in north eastern Queensland and from the Carnarvon Gorge National Park southern Queensland to Wilsons Promontory and west to the Great Otway National Park in southern Victoria. It is mainly found east of the Great Dividing Range. There is an outlying population in the Grampians in Victoria.
https://avh.ala.org.au/occurrences/search?taxa=Blechnum+patersonii+#tab_mapView
Habitat Aspect Climate:
Blechnum patersonii grows in dense shaded areas of moisture retentive soils in mountain rainforests. It can be found in cool moist gullies, temperate rainforests, sub-tropical rainforests or cool tropical rainforests especially along creek banks, near water falls or between rock crevices along seepage lines. The altitude ranges from 50 meters ASL to 1380 meters ASL
The temperatures range from minus 4 degrees in August to 30 degrees in January.
The rainfall ranges from lows of 600mm to 3200mm average per annum.
Soil Requirements:
Blechnum pattersonii prefers better quality, deep sandy loams, light fatty clays to medium clays. The soils are usually derived from decomposed sandstones granites, brown basalts, black basalts, shales or metamorphic rocks. The soil’s pH ranges from 5.5pH to 7pH. It accepts periodically waterlogged soils . None saline soils to moderately saline soils are tolerated.
Height & Spread:
Wild Plants:200mm to 500mm by 200mm to 500mm.
Characteristics:
Blechnum patersonii has a short slim erect rhizome covered in large broad shiny deep brown to deep brown-black scales. The triangular scales measure 5mm to 6mmin length by 5mm in width.
This Blechnum is unusual in that its fronds are not usually divided but are strap like. The fronds are erect to pendant especially where it grows in vertical positions along creek the banks of creeks and streams. The dimorphic fronds are usually simple strap like or deeply lobed towards the apex. The deep green fronds measure 200mm to 500mm in length by 15mm to 25mm in width for the simple fronds while the divided fronds measure 200mm to 400mm in length by 50mm to 75mm in width for those fronds that are deeply lobed. The sterile frond’s lobes measure 10mm to 25mm apart while the fertile frond’s lobes measure 2mm to 20mm between the lobes. Fertile strap fronds are shorter and slimmer in dimensions measuring just 5mm to 8mm in width. The spore and sori when ripe are a rich golden honey colour. New growth varies from a deep pinkish-red to maroon.
Wildlife:
I have never seen anything attack Blechnum patersonii in the wild however it is very rare to find a plant that has not had fronds eaten in some way.
Cultivation:
This is a beautiful small fern for indoors, courtyards or in the garden where moist darker conditions prevail. Blechnum patersonii is an excellent basket plant when planted normally and on the sides of the basket. When the sterile and fertile fronds are on display together the rich golden honey colour of the spore and deep green fronds are displayed at its best.
It is an ideal fern for rainforest gardens once a dense shade has been established or on the southern side of buildings. This is a small fern that needs to be mass planted to see it at its absolute best.
It often reaches its full potential of 500mm in just 1 year.
Propagation:
Spores: All ferns that are declared rare, vulnerable or endangered are protected by Federal and State Laws and must not be removed from the wild unless you are a land developer, mining company or main Roads department etc. This includes bulbs, roots, leaves and flowers. No part of any plant can be removed from Federal, State or Local Government land without the prior permission of the authority and this includes the spore.
Most people are put off at the thought of growing ferns from spore. Like all plants that produce their offspring from seed or spore the methods are basically the same. Remember nature has been doing this for millions of years and has been very successful. I have had excellent results growing over 200 different species of Australian ferns so don’t be afraid. Give it a go.
Step 1. Select spore from the fern fronds. Wait until the fern is just starting to release its spore. Rinse the fronds under clean running water and dry. This is to wash off any other spores from rogue ferns that may have settled onto the fronds. (There is nothing worse than having common brake or common soft bracken contaminating a prized tree fern or epiphyte.)
 Step 2. Place the dry fronds in a clean brown paper bag and keep them in a cool dark place like the linen closet for about a week to ten days before you are ready to sow the spore. The exception to this rule applies to ferns, which produce green spores. These must be sown immediately that they are released. Todea Barbara is a good example of a fern, which produces green spore.
Step 3. Take a large ice cream container, a small ice cream container and a clean clear plastic bag large enough to seal the large ice cream container and three or four milk bottle tops.
Step 4. Punch or drill 6 to 10 5mm holes in the bottom of the small ice cream container.
Step 5. Wash both containers, tops and plastic bag so that they are very clean and sterile.
Step 6. Use a clean fine seed raising mi. We used 30mm fine sand, 30mm peat and 30mm perlite and 10mm vermiculite. We used crushed basalt, crusher dust and peat in a 50:50 ratio for epiphytes. Moisten the mix enough that water does not run out when the mix is squeezed between the fingers.
Step 7. Place the moisten mix (Enough to half fill the small ice cream container) in the microwave oven with a large glass of water for 7 or 8 minutes, until the water is boiling. Allow them to cool in the oven. You will need the water later so do not tip it out.
Step 8. Take the brown paper bag out of the linen closet. Shake the bag and remove the fronds. You should have a yellow, brown, black or rarely greenish brown or ochre powder or very fine, small round pin head size spore depending on the specie involved.
Step 9. Remove the mixture from the oven once it has cooled and place it in the small ice cream container and level.
Step 10. Sprinkle the spore sparsely over the mixture in the small ice cream container.
Step 11. Place the milk bottle tops in the large ice cream container with the flat surface facing down. Place the small ice cream container in the large ice cream container so that it is sitting on the milk bottle tops.
Step 12. Remove the water from the microwave and pour it into the larger ice cream container so there is 25mm to 30mm of water in the bottom.
Step 13. Place the ice cream containers in the plastic bag and seal.
Step 14. Place the contents and bag in a warm shady place preferably 50mm to 70mm shade depending on the specie. Shade houses and some window sills are ideal.
Step 15. The surface should turn green within a week to two weeks. The prothallus will then develop. From the prthalus the first true fronds will appear. Wait until the ferns are 20mm to 35mm in height before you attempt to transplant them. Once they are ready open the bag up slightly and allow the air to flow around the little ferns. Every 3 to 5 days open the bag a little further so the ferns get use to their new environment. Allow them a week to two weeks to harden off before you transplant them following the removal of the plastic bag. Carefully prick them out into 50mm standard squat tubes as you would any seedling.
Do not try to transplant them as single plants as they are still a little delicate still.
Platycerium species and Asplenium species will have to be divided into single plants at a later stage. Once the first divisions have hardened off and the plants reach 50mm to 70mm in height. Be careful, as they are still fragile at this stage. Replace them close to their original position and water. After a few weeks, the ferns will power away without any setbacks. Here they can be further divided where necessary removing the smaller ferns leaving the largest one in place.
Once the smaller ones again reach 50mm to 70mm you may wish to divide the stronger and hardier individual plants into smaller clumps in 100mm squat pots.
Step 16. We fertilized with seaweed, fish emulsion or organic chicken pellets soaked in water on an alternate basis until established. Fertilize every two months for one year even when in the ground.
Once they reach 50mm to 60mm you may start to separate the strongest ones and again do not move them far from their original position. After a few weeks the ferns will grow stronger. Once the fronds reach 80mm plant them into their permanent positions. If mass planting space the ferns at 400mm centers.
Fertilize using Seaweed, fish emulsion or organic chicken pellets soaked in water on an alternate basis. Fertilize every two months until the plants are established then annually in early September to October to maintain health, vitality and better flowering.
Further Comments from Readers:
Hi reader, it seems you use The Bible of Botany a lot. That’s great as we have great pleasure in bringing it to you! It’s a little awkward for us to ask, but our first aim is to purchase land approximately 1,600 hectares to link several parcels of N.P. into one at The Pinnacles NSW Australia, but we need your help. We’re not salespeople. We’re amateur botanists who have dedicated over 30 years to saving the environment in a practical way. We depend on donations to reach our goal. If you donate just $5, the price of your coffee this Sunday, We can help to keep the planet alive in a real way and continue to bring you regular updates and features on Australian plants all in one Botanical Bible. Any support is greatly appreciated. Thank you.
In the spirit of reconciliation we acknowledge the Bundjalung, Gumbaynggirr and Yaegl and all aboriginal nations throughout Australia and their connections to land, sea and community. We pay our respect to their Elders past, present and future for the pleasures we have gained.
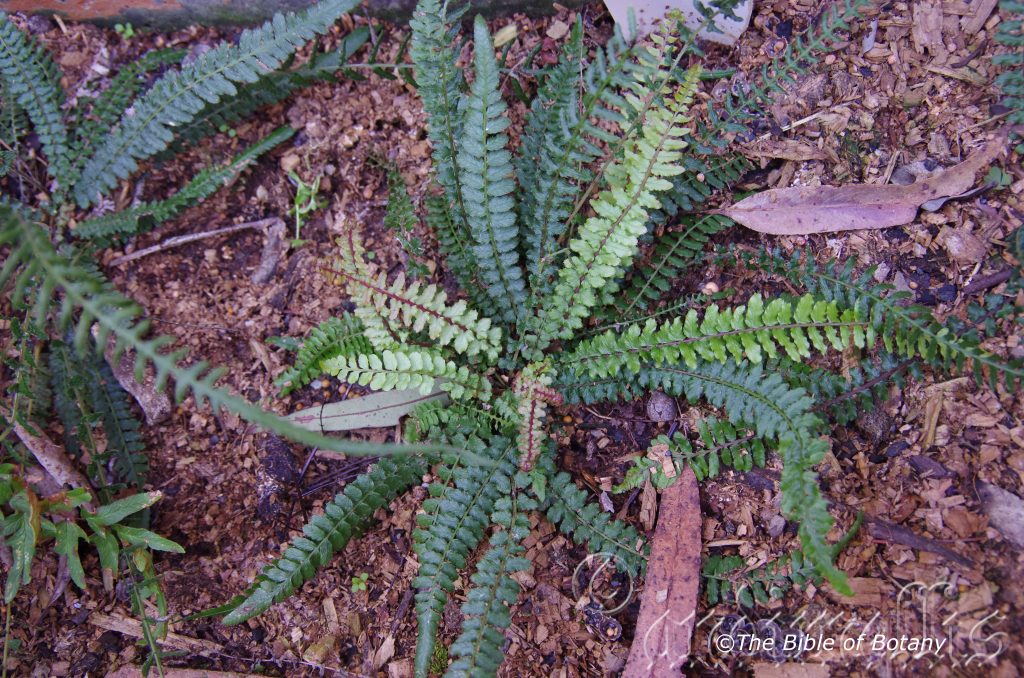
Author’s Garden The Pinnacles NSW
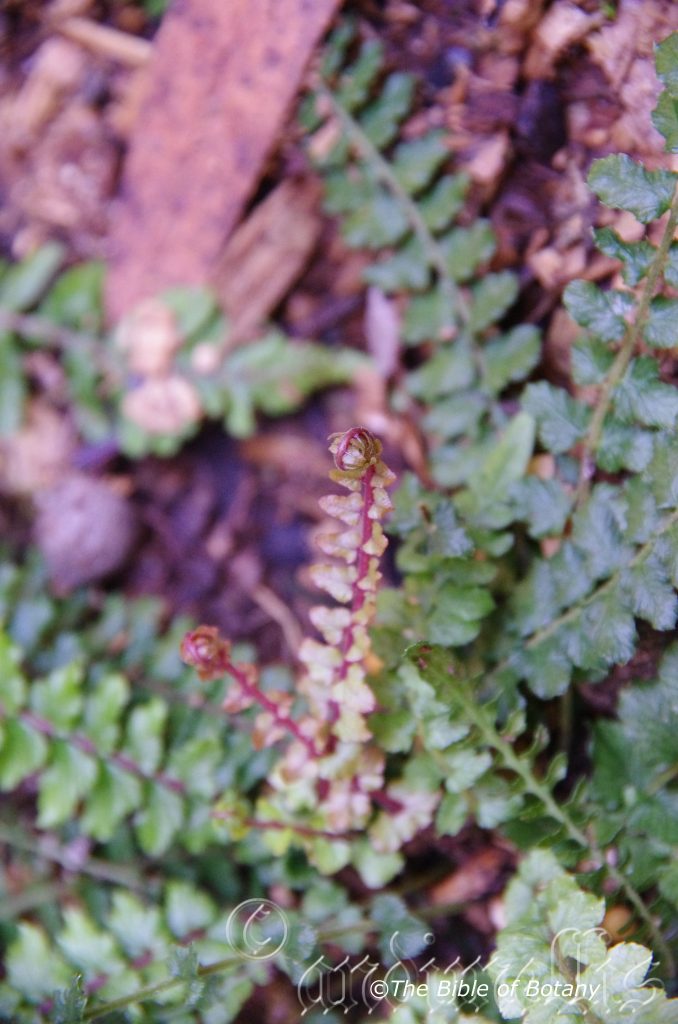
Author’s Garden The Pinnacles NSW
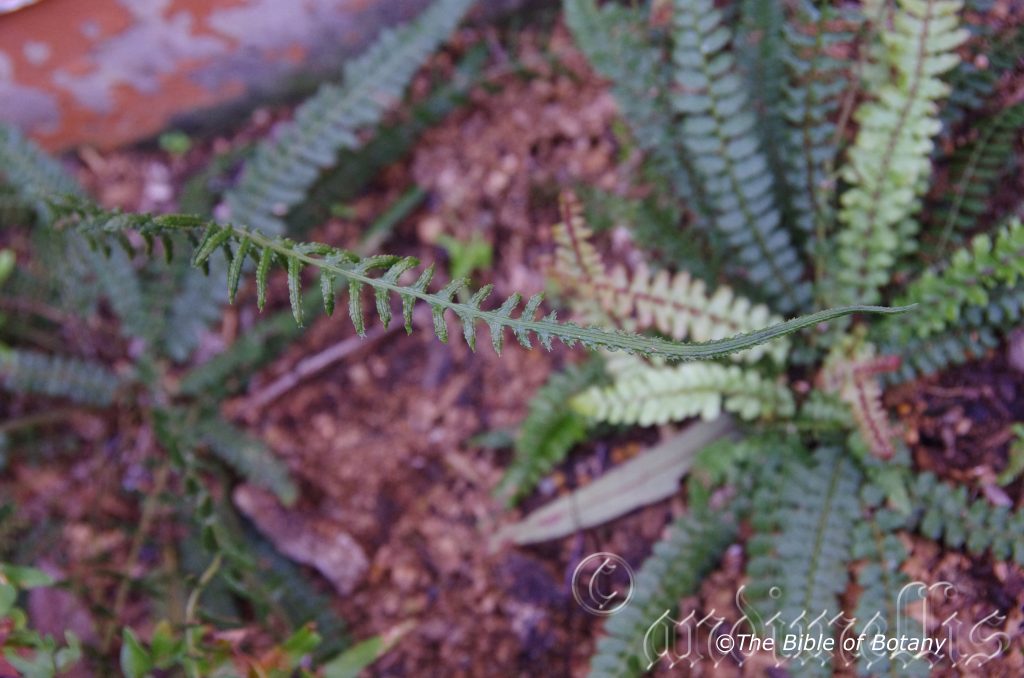
Author’s Garden The Pinnacles NSW
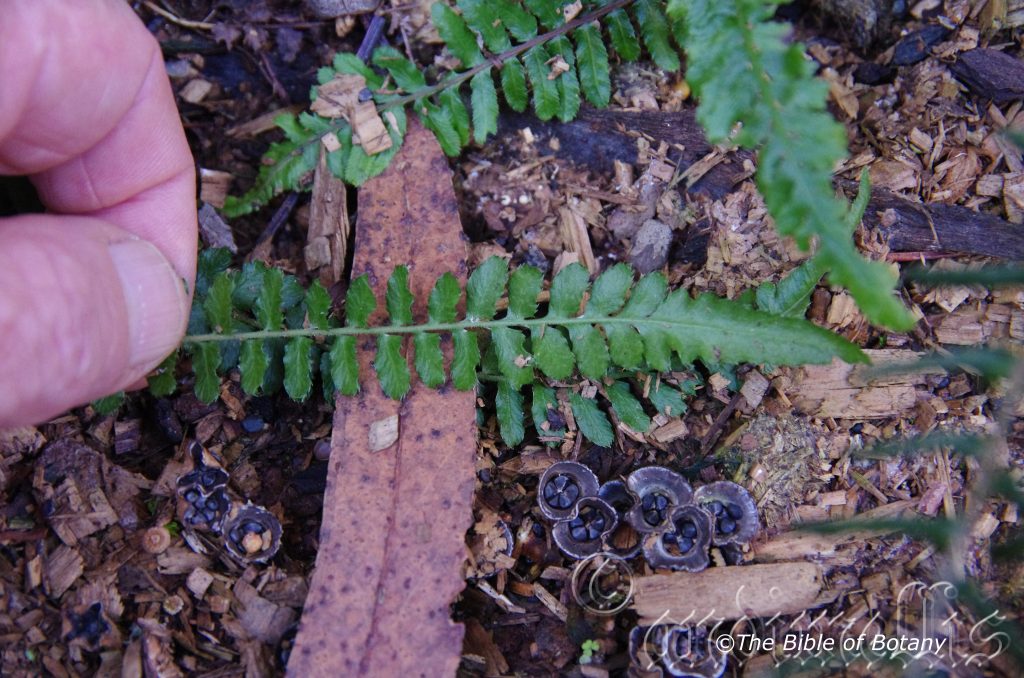

Author’s Garden The Pinnacles NSW
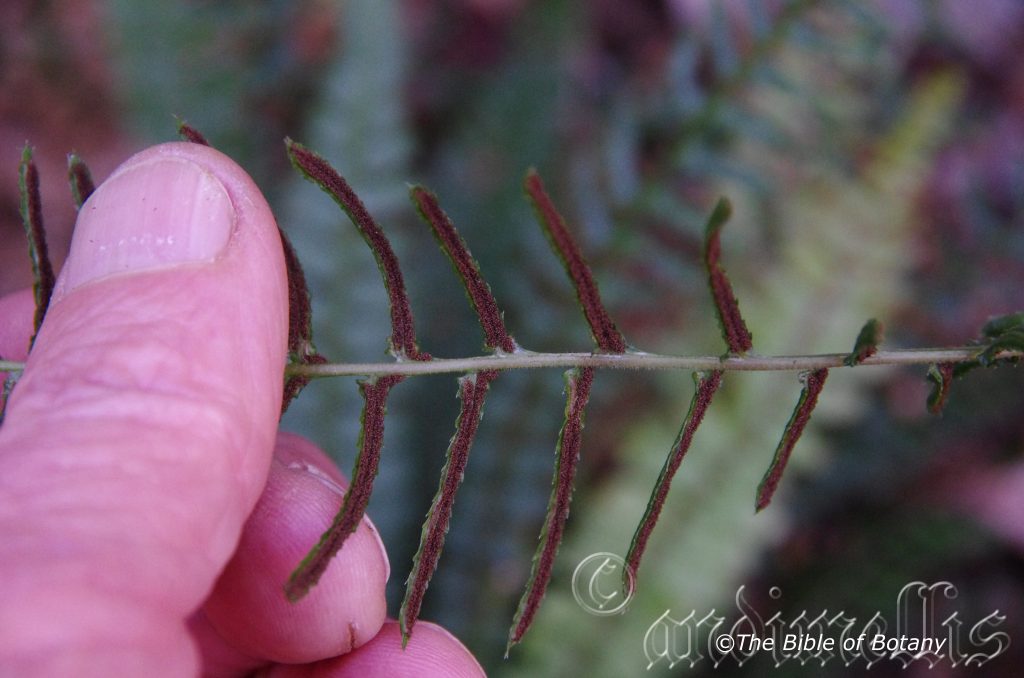
Author’s Garden The Pinnacles NSW
Blechnum rupestre
Classification
Class: Pteridospida
Order: Blechnales
Family: Blechnaceae
Genus: Is named in honour of Samuel Doody; 1656-1706, who was a British botanist and pharmacist and later curator of the Chelsea Physic Gardens.
Species: From Rupestre, which is Latin for a cliffs or rocks. It refers to plants which favour cliffs or rocky habitats.
Common Name: Small Rasp Fern.
Distribution:
Blechnum rupestre is one of a few ferns that have a presence in every state and Territory of Australia.
In Tasmania Blechnum rupestre is found along the North coast on 6 rivers and is considered threatened there.
It is mainly found east of the Great Dividing Range in Queensland from Cairns southwards to Wilsons Promontory in Victoria.
In New South Wales it is also found west of the Great Diving Range near Tenterfield on the Granite Belt.
Northern Territory has at least two confirmed populations at George Gill Canyon within the Kings Canyon National Park and at Haemasburgh National Park and Aboriginal Reserve. Several other gorges have similar habitats where the fern could exist.
It is also found on the Ord River in North eastern Western Australia.
https://avh.ala.org.au/occurrences/search?taxa=Blechnum+rupestre#tab_mapView
Habitat Aspect Climate:
Blechnum rupestre prefers dense shade, light shade to dappled sunlight. It grows in montane rainforests, littoral rainforests or moist Eucalyptus forests especially amongst rocks or on cliff faces. The altitude ranges from 100 meters ASL to 900 meters ASL.
The temperature ranges from minus 4 degrees in August to 36 degrees in January.
The rainfall ranges from lows of 300mm to 3200mm average per annum. Good moisture retentive soils are more important than the rainfall.
Soil Requirements:
Blechnum rupestre prefers sandy loams to heavy clays. The soils are derived from brown basalt, black basalt, metamorphic rocks, shale fatty sandstones, fatty granites or heavy silt alluvial deposits. The soils pH ranges from 5.5pH to 7pH. It tolerates some seasonal water logging but does best on soils which have good even moisture retention throughout the year. It often grows near waterfalls and seepages where iron bacteria prevail. Non saline soils to moderately saline soils are tolerated.
Height & Spread:
Wild Plants:150mm to 300mm by 200mm to 450mm.
Characteristics:
Blechnum rupestre has a very short thick creeping rhizome or tufted to 100mm. They are covered in large broad black scales measuring 2mm to 3mm long by 2mm wide.
Blechnum rupestre fronds grow in flushes with rainforest plants or those growing in dark places in large colonies covering the ground in brilliant pink or red of the new fronds. Pinnules are dimorphic. The rigid erect to decumbent fronds are narrow lanceolate on fertile fronds and measure 150mm to 300mm in length by 24mm to 50mm in width. The stipes are deep red brown to reddish brown on mature fronds. The single tuberculate pinnate fronds are rough with the shortest pinnules being a third of the distance from the apex with the subsequent pinnae becoming smaller towards the apex where they are sessile. The alternate pinnules measure 15mm to 20mm in length by 4mm to 6mm in width. The margins are finely toothed with the sterile fronds being linear to oblong while the sterile pinnules are elliptical to elliptical-oblong. The 22 to 26 pinnules are a very deep green with the new growth varying from rose shades of pink to red or maroons. The base of the fertile pinnules is hastate with the hastate section on the lower side of the petiole being longer than the side closer to the apex. The apex is long tapering.
The base of the sterile fronds is rounded and slightly oblique. The petiole measures 0.05mm to 1mm in length. This is the easiest method to distinguish it from Doodia aspera where the pinnules are joined to the rachis.
The round to oblong sporangia are placed closely together in one row either side of the mid vein. They are 1.5mm to 2mm long and merge together as they age.
Wildlife:
Blechnum rupestre’s wildlife is unknown to the author.
Cultivation:
It would make an good fire retardant fern for shady moist areas.
* Fire retardant plants act as radiant heat screens and absorb more heat from an approaching fire without burning.
* Fire retardant trees are able reduce wind speed near a house or out buildings.
* Fire retardant also trap embers and sparks carried by the wind.
* Fire retardant ground covers are able to catch burning embers without catching fire themselves, and also slow the travel of a fire through debris and litter on the ground.
Blechnum rupestre is a beautiful small fern for courtyards, around swimming pools or in the garden where moist dark to lighter conditions prevail. Blechnum rupestre is excellent for around swimming pools where it can grow to its full potential. If used with other small ferns it can make the pool edge look longer. Some cleaning of spent fronds on a biannual base is necessary and moisture is required to keep it at its best. It is best mass planted in order to appreciate the carpet of red or pink when the flushes of new growth emerge.
It is also ideal for planting around small fish ponds and frog ponds because of their small size. Leaves will become decumbent thus will bend over rocks and stark lines softening the edges and making the area look more natural particularly when they form a small trunk. It can also be used very effectively in dwarf gardens or indoor gardens.
Blechnum rupestre would make an interesting terrarium plant growing slowly under glass or inside bottles.
It is somewhat drought tolerant once established so the occasional lapse in watering won’t affect it. If it happens to look dead after a long holiday or during a prolonged drought prune all the fronds off to a few centimetres of the rhizome and give them a good soaking. Apply a double strength dose of our recommended fertilizer two days later and again give a good soaking and within two weeks it will be back to their former glory. This drought tolerance makes it ideal for regeneration projects along creeks and gullies.
It often reaches its full potential of 200mm in just over 1 year with a spreading habit in full progress.
Propagation:
Spores: All ferns that are declared rare, vulnerable or endangered are protected by Federal and State Laws and must not be removed from the wild unless you are a land developer, mining company or main Roads department etc. This includes bulbs, roots, leaves and flowers. No part of any plant can be removed from Federal, State or Local Government land without the prior permission of the authority and this includes the spore.
Most people are put off at the thought of growing ferns from spore. Like all plants that produce their offspring from seed or spore the methods are basically the same. Remember nature has been doing this for millions of years and has been very successful. I have had excellent results growing over 200 different species of Australian ferns so don’t be afraid. Give it a go.
Step 1. Select spore from the fern fronds. Wait until the fern is just starting to release its spore. Rinse the fronds under clean running water and dry. This is to wash off any other spores from rogue ferns that may have settled onto the fronds. (There is nothing worse than having common brake or common soft bracken contaminating a prized tree fern or epiphyte.)
 Step 2. Place the dry fronds in a clean brown paper bag and keep them in a cool dark place like the linen closet for about a week to ten days before you are ready to sow the spore. The exception to this rule applies to ferns, which produce green spores. These must be sown immediately that they are released. Todea Barbara is a good example of a fern, which produces green spore.
Step 3. Take a large ice cream container, a small ice cream container and a clean clear plastic bag large enough to seal the large ice cream container and three or four milk bottle tops.
Step 4. Punch or drill 6 to 10 5mm holes in the bottom of the small ice cream container.
Step 5. Wash both containers, tops and plastic bag so that they are very clean and sterile.
Step 6. Use a clean fine seed raising mi. We used 30mm fine sand, 30mm peat and 30mm perlite and 10mm vermiculite. We used crushed basalt, crusher dust and peat in a 50:50 ratio for epiphytes. Moisten the mix enough that water does not run out when the mix is squeezed between the fingers.
Step 7. Place the moisten mix (Enough to half fill the small ice cream container) in the microwave oven with a large glass of water for 7 or 8 minutes, until the water is boiling. Allow them to cool in the oven. You will need the water later so do not tip it out.
Step 8. Take the brown paper bag out of the linen closet. Shake the bag and remove the fronds. You should have a yellow, brown, black or rarely greenish brown or ochre powder or very fine, small round pin head size spore depending on the specie involved.
Step 9. Remove the mixture from the oven once it has cooled and place it in the small ice cream container and level.
Step 10. Sprinkle the spore sparsely over the mixture in the small ice cream container.
Step 11. Place the milk bottle tops in the large ice cream container with the flat surface facing down. Place the small ice cream container in the large ice cream container so that it is sitting on the milk bottle tops.
Step 12. Remove the water from the microwave and pour it into the larger ice cream container so there is 25mm to 30mm of water in the bottom.
Step 13. Place the ice cream containers in the plastic bag and seal.
Step 14. Place the contents and bag in a warm shady place preferably 50mm to 70mm shade depending on the specie. Shade houses and some window sills are ideal.
Step 15. The surface should turn green within a week to two weeks. The prothallus will then develop. From the prthalus the first true fronds will appear. Wait until the ferns are 20mm to 35mm in height before you attempt to transplant them. Once they are ready open the bag up slightly and allow the air to flow around the little ferns. Every 3 to 5 days open the bag a little further so the ferns get use to their new environment. Allow them a week to two weeks to harden off before you transplant them following the removal of the plastic bag. Carefully prick them out into 50mm standard squat tubes as you would any seedling.
Do not try to transplant them as single plants as they are still a little delicate still.
Ground ferns like Blechnum can be left in small clumps.
Once the first divisions have hardened off and the plants reach 50mm to 70mm in height they can be divided further but be careful, as they are still fragile at this stage. Replace them close to their original position and water. After a few weeks, the ferns will power away without any setbacks. Here they can be further divided where necessary removing the smaller ferns leaving the largest one in place.
Once the smaller ones again reach 50mm to 70mm you may wish to divide the stronger and hardier individual plants into smaller clumps in 100mm squat pots.
Fertilize using Seaweed, fish emulsion or organic chicken pellets soaked in water on an alternate basis. Fertilize every two months until the plants are established then annually in early September to October to maintain health, vitality and better flowering.
Further Comments from Readers:
Hi reader, it seems you use The Bible of Botany a lot. That’s great as we have great pleasure in bringing it to you! It’s a little awkward for us to ask, but our first aim is to purchase land approximately 1,600 hectares to link several parcels of N.P. into one at The Pinnacles NSW Australia, but we need your help. We’re not salespeople. We’re amateur botanists who have dedicated over 30 years to saving the environment in a practical way. We depend on donations to reach our goal. If you donate just $5, the price of your coffee this Sunday, We can help to keep the planet alive in a real way and continue to bring you regular updates and features on Australian plants all in one Botanical Bible. Any support is greatly appreciated. Thank you.
In the spirit of reconciliation we acknowledge the Bundjalung, Gumbaynggirr and Yaegl and all aboriginal nations throughout Australia and their connections to land, sea and community. We pay our respect to their Elders past, present and future for the pleasures we have gained.
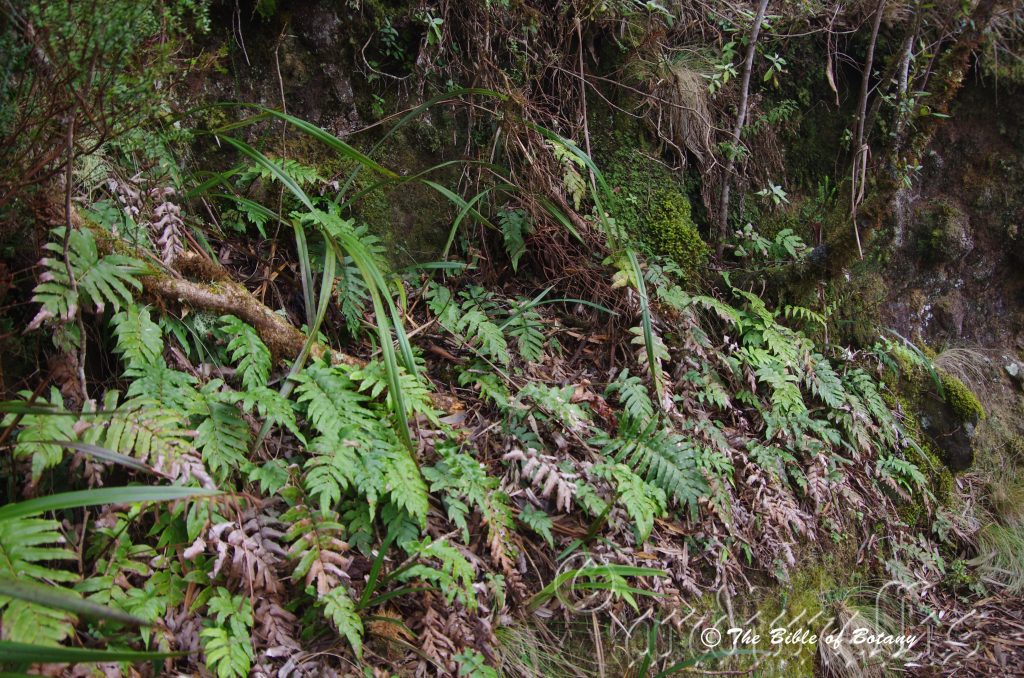
Below the Eagles Nest Ebor NSW

Below the Eagles Nest Ebor NSW
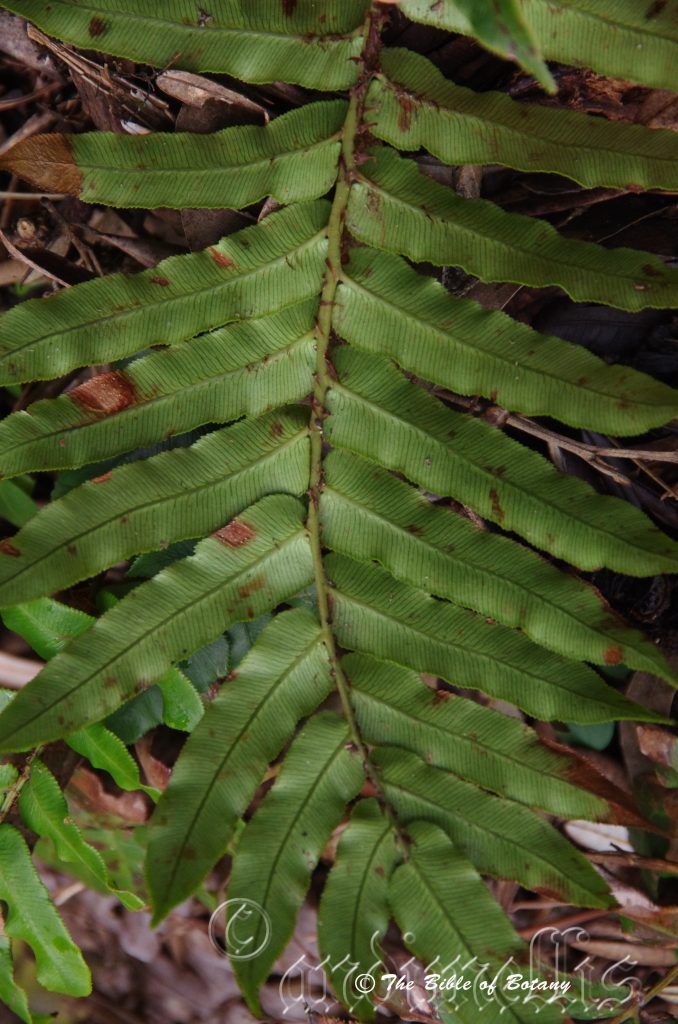
Below the Eagles Nest Ebor NSW
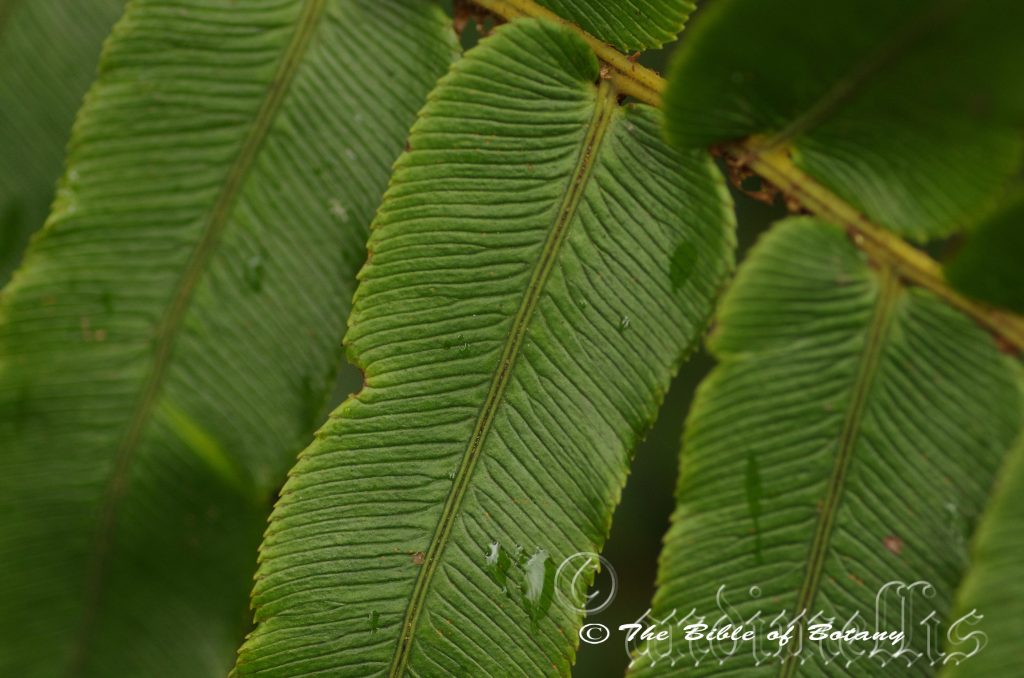
Below the Eagles Nest Ebor NSW
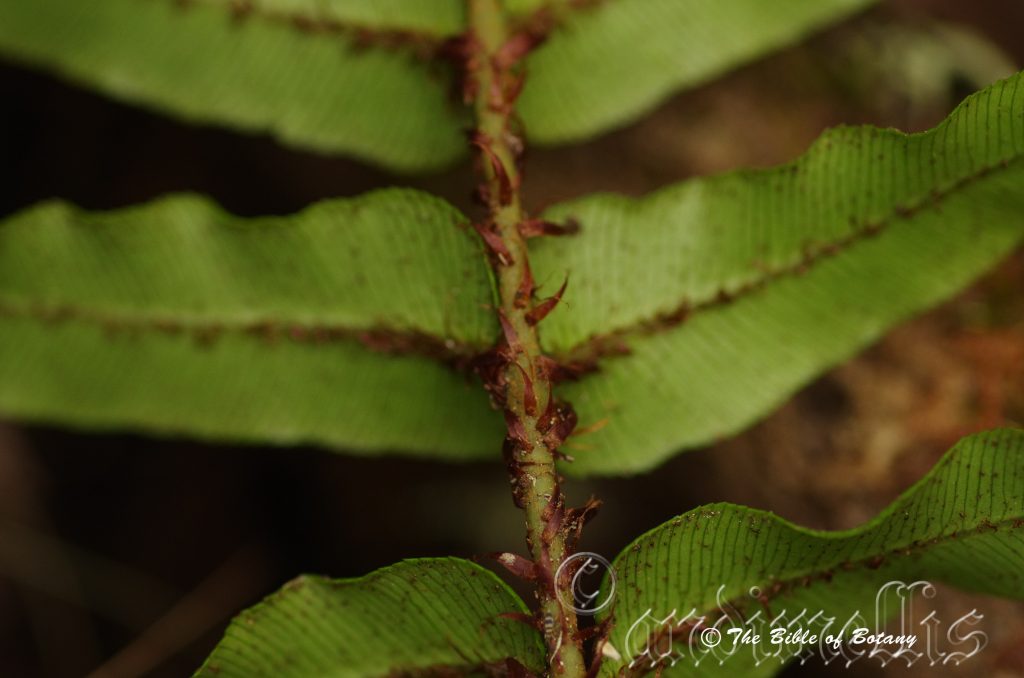
Below the Eagles Nest Ebor NSW
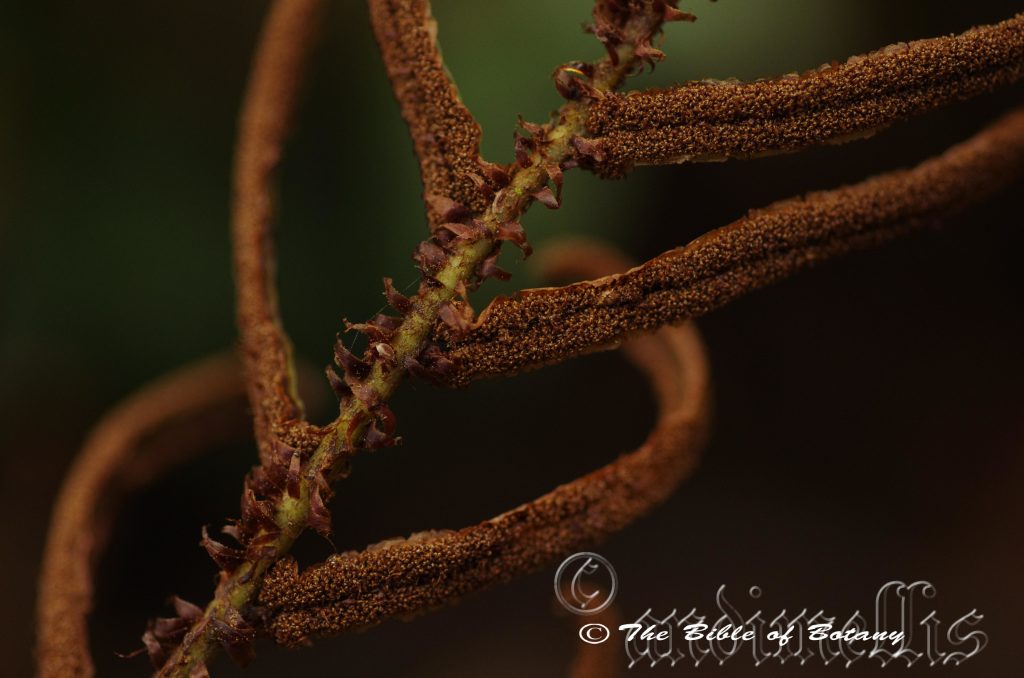
Below the Eagles Nest Ebor NSW
Blechnum wattsii
Classification:
Class: Pteridospida
Order: Athyriales
Family: Blechnaceae
Genus: From Blockhon, which is Ancient Greek for the ancient name given to ferns. It refers to a group of ferns, which have typical fishbone type fronds.
Species: Is probably named in honour of Rev. William Walter Watts; 1856-1920, who was an Australian botanist who specialized and is considered to be the most significant expert in the field of ferns & mosses in NSW.
Common Name: Hard Water Fern.
Distribution:
Blechnum wattsii is found south from Mapleton in southern Queensland to Mount Gambier in south eastern South Australia. It is also found south from the Mount Lofty ranges to the tip of Kangaroo Island in South Australia. There are several disjunct populations in coastal Queensland between Eungella National Park, Mirani and Kroombit National Park. It is mainly found on the Western Slopes, on and east of the Great Dividing Range to the coast.
It covers most of Tasmania except for the central highlands.
It is also found on Lord Howe Island and Norfolk Island.
https://avh.ala.org.au/occurrences/search?taxa=Blechnum+wattsii+#tab_mapView
Habitat Aspect Climate:
Blechnum wattsii grows in dense shade, light shade and dappled sunlight. It is found in higher rainfall areas in coastal wallums and mountainous marshes, wet open Eucalyptus forests, moist woodlands or adjacent to cool temperate rainforests, especially along creeks and streams, moist gallery forests as well as drainage lines. The altitude ranges from 5 meters ASL to 1400 meters ASL
The temperature ranges from minus 4 degrees in August to 38 degrees in January.
The rainfall ranges from lows of 450mm to 3000mm average per annum.
Soil Requirements:
Blechnum wattsii prefers deep, coarse sands, fine sands, sandy loams, light fatty clays, medium clays or light silts to heavy silts. The soils are usually derived from decomposed sandstones granites, brown basalts, black basalts, shales, metamorphic rocks, alluvial deposits or accumulated peaty beach sands. The soil’s pH ranges from 4.5pH to 7pH. It does not tolerate waterlogged soils. None saline soils to moderately saline soils are tolerated.
Height & Spread:
Wild Plants: 500mm to 700mm by 800mm to 1000mm.
Characteristics:
Blechnum wattsii has a medium to long slender creeping rhizome. The rhizomes are covered in deep brown to black large scales which have paler finely toothed margins.
This Blechnum wattsii’s fronds are singly pinnate on the apex two thirds. They usually measure 300mm to 700mm in length by 140mm to 300mm in width. The fronds are evenly spaced along the rhizome. The glossy, glabrous stipes are deep green and densely covered in brown scales. The broadly oblong fronds longest pinnae are towards the middle of the frond. The 11 to 35 leathery, concolourous pinnae’s laminas are deep green and semi glossy on the upper lamina while the lower laminas are dull. The young growth is bright pink. The margins are entire.
The fronds are dimorphic with the sterile fronds pinnae being pedicillate. The oblong pinnae are sub opposite and measure 70mm to 150mm in length by 10mm to 20mm in width. The lower most pinnae are only slightly reduced in size and measure 5mm to 15mm in length. The lower pinnae bases are rounded and the upper pinnae are slightly hastate.
The fertile frond’s pinnae measure 50mm to 120mm in length by 2mm to 3mm in width.
Wildlife:
Blechnum wattsii’s wildlife is unknown to the author.
Cultivation:
Blechnum wattsii is a lovely ground fern for courtyards, around semi shady salt swimming pools or in the garden where moist conditions prevail. Blechnum wattsii is excellent for around swimming pools where it can grow to its full potential. It breaks up hard fences and walls giving a pleasant vertical tropical look. If used correctly it can make medium size areas look larger. Gardens subjects grown in partial shade with adequate water supply usually grow 500mm to 600mm in height by about 1 square meter in diameter.
Some cleaning of spent fronds on an annual basis is necessary and moisture is required to keep it at its best.
It is drought tolerant so the occasional lapse in watering won’t affect it. If it happens to look worse for wear after a long holiday or during a prolonged drought prune all the fronds off to a few centimetres of the rhizome and give it a good soaking. Apply a double strength dose of our recommended fertilizer two days later and within two weeks it will be back to its former glory.
It often reaches its full potential of 1000mm in just over 1 year.
Propagation:
Spores: All ferns that are declared rare, vulnerable or endangered are protected by Federal and State Laws and must not be removed from the wild unless you are a land developer, mining company or main Roads department etc. This includes bulbs, roots, leaves and flowers. No part of any plant can be removed from Federal, State or Local Government land without the prior permission of the authority and this includes the spore.
Most people are put off at the thought of growing ferns from spore. Like all plants that produce their offspring from seed or spore the methods are basically the same. Remember nature has been doing this for millions of years and has been very successful. I have had excellent results growing over 200 different species of Australian ferns so don’t be afraid. Give it a go.
Step 1. Select spore from the fern fronds. Wait until the fern is just starting to release its spore. Rinse the fronds under clean running water and dry. This is to wash off any other spores from rogue ferns that may have settled onto the fronds. (There is nothing worse than having common brake or common soft bracken contaminating a prized tree fern or epiphyte.)
 Step 2. Place the dry fronds in a clean brown paper bag and keep them in a cool dark place like the linen closet for about a week to ten days before you are ready to sow the spore. The exception to this rule applies to ferns, which produce green spores. These must be sown immediately that they are released. Todea Barbara is a good example of a fern, which produces green spore.
Step 3. Take a large ice cream container, a small ice cream container and a clean clear plastic bag large enough to seal the large ice cream container and three or four milk bottle tops.
Step 4. Punch or drill 6 to 10 5mm holes in the bottom of the small ice cream container.
Step 5. Wash both containers, tops and plastic bag so that they are very clean and sterile.
Step 6. Use a clean fine seed raising mi. We used 30mm fine sand, 30mm peat and 30mm perlite and 10mm vermiculite. We used crushed basalt, crusher dust and peat in a 50:50 ratio for epiphytes. Moisten the mix enough that water does not run out when the mix is squeezed between the fingers.
Step 7. Place the moisten mix (Enough to half fill the small ice cream container) in the microwave oven with a large glass of water for 7 or 8 minutes, until the water is boiling. Allow them to cool in the oven. You will need the water later so do not tip it out.
Step 8. Take the brown paper bag out of the linen closet. Shake the bag and remove the fronds. You should have a yellow, brown, black or rarely greenish brown or ochre powder or very fine, small round pin head size spore depending on the specie involved.
Step 9. Remove the mixture from the oven once it has cooled and place it in the small ice cream container and level.
Step 10. Sprinkle the spore sparsely over the mixture in the small ice cream container.
Step 11. Place the milk bottle tops in the large ice cream container with the flat surface facing down. Place the small ice cream container in the large ice cream container so that it is sitting on the milk bottle tops.
Step 12. Remove the water from the microwave and pour it into the larger ice cream container so there is 25mm to 30mm of water in the bottom.
Step 13. Place the ice cream containers in the plastic bag and seal.
Step 14. Place the contents and bag in a warm shady place preferably 50mm to 70mm shade depending on the specie. Shade houses and some window sills are ideal.
Step 15. The surface should turn green within a week to two weeks. The prothallus will then develop. From the prothallus the first true fronds will appear. Wait until the ferns are 20mm to 35mm in height before you attempt to transplant them. Once they are ready open the bag up slightly and allow the air to flow around the little ferns. Every 3 to 5 days open the bag a little further so the ferns get use to their new environment. Allow them a week to two weeks to harden off before you transplant them following the removal of the plastic bag. Carefully prick them out into 50mm standard squat tubes as you would any seedling.
Do not try to transplant them as single plants as they are still a little delicate still.
Ground ferns like Blechnum can be left in small clumps.
Once the first divisions have hardened off and the plants reach 50mm to 70mm in height they can be divided further but be careful, as they are still fragile at this stage. Replace them close to their original position and water. After a few weeks, the ferns will power away without any setbacks. Here they can be further divided where necessary removing the smaller ferns leaving the largest one in place.
Once the smaller ones again reach 50mm to 70mm you may wish to divide the stronger and hardier individual plants into smaller clumps in 100mm squat pots.
Once they reach 50mm to 60mm you may start to separate the strongest ones and again do not move them far from their original position. After a few weeks the ferns will grow stronger. Once the fronds reach 80mm plant them into their permanent positions. If mass planting space the ferns at 1 meter centers in good growing positions or down to 500mm where conditions are not ideal.
Fertilize using Seaweed, fish emulsion or organic chicken pellets soaked in water on an alternate basis. Fertilize every two months until the plants are established then annually in early September to October to maintain health, vitality and better flowering.
Further Comments from Readers:
Hi reader, it seems you use The Bible of Botany a lot. That’s great as we have great pleasure in bringing it to you! It’s a little awkward for us to ask, but our first aim is to purchase land approximately 1,600 hectares to link several parcels of N.P. into one at The Pinnacles NSW Australia, but we need your help. We’re not salespeople. We’re amateur botanists who have dedicated over 30 years to saving the environment in a practical way. We depend on donations to reach our goal. If you donate just $5, the price of your coffee this Sunday, We can help to keep the planet alive in a real way and continue to bring you regular updates and features on Australian plants all in one Botanical Bible. Any support is greatly appreciated. Thank you.
In the spirit of reconciliation we acknowledge the Bundjalung, Gumbaynggirr and Yaegl and all aboriginal nations throughout Australia and their connections to land, sea and community. We pay our respect to their Elders past, present and future for the pleasures we have gained.
Blumea mollis
Classification:
Sub Kingdom: Tracheobionta
Division: Magnoliophyta
Class: Magnoliopsida
Sub Class: Asteridae
Order: Asterales
Family: Asteraceae
Subfamily: Asteroideae
Tribe: Inuleae
Genus: Is named in honour of Carl Blume; 1796-1862, who was the director of the Batavia Botanic Gardens now known as the Jakarta Botanic Gardens and the author of the book Flora of Java.
Species: From Mollis, which is Latin for softly hairy and supple to. It usually refers to leaves orphyllodes, which have short, soft white hairs on a supple lamina.
Common Name:
Distribution:
Blumea mollis is probably far more wide spread than any of the maps indicate due to its weedy appearance. I am almost certain that it would be found continuously throughout its range from the Kimberley Range in north western, Western Australia east to the Queensland coast and down to Dalmorton west of Grafton and the Bucca Valley between Grafton and Coffs Harbour.
https://avh.ala.org.au/occurrences/search?taxa=Blumea+mollis+#tab_mapView
Habitat Aspect Climate:
Blumea mollis grows in full sun or partial shade along roadsides, drainage channels, in pasture, open woodlands, adjacent to rainforests, open Eucalyptus forests, open woodlands, gardens and wasteland. The altitude ranges from 5 meters ASL to 480 meters ASL
The temperatures range from lows of 2 degrees in August to 40 degrees in February.
The rainfalls range from lows 400mm to an average of 2600mm per annum.
Soil Requirements:
Blumea mollis prefers better quality deep, sandy loams, light fatty clays to medium clays. The soils are usually derived from decomposed sandstones, granites, brown basalts or black basalts. The soil’s pH ranges from 4.5pH to 7pH. It does not tolerate waterlogged soils. None saline soils to very saline soils are tolerated.
Height & Spread:
Wild Plants: 0.5m to 1m by 0.1m to 0.25m
Characteristics:
Blumea mollis stems are strongly aromatic and somewhat viscid. The stems are erect, simple or branched from the base and covered in white glandular hirsute hairs.
The rosette leaves of Blumea mollis are ovate to oblong often with two deep lobes near the base. They measure 55mm to 95mm in length by 35mm to 55mm in width. The lobes measure 15mm to 18mm in length. The bases are sagittate, rounded to tapering and slightly attenuate while the apexes are apiculate. The concolourous laminas are dull mid green to mid blue-green and moderately to densely covered in silky, white, hirsute, hairs on the upper laminas while the lower laminas are moderately to densely covered in long, silky, white hirsute hairs. The mid vein is and the lateral veins are prominent on the lower laminas and are visible from above. The leaf margins are entire are irregularly toothed. The purple to grey-green petioles measure 15mm to 26mm in length. The leaves are strongly aromatic when crushed.
The scape leaves are ovate and measure 10mm to 20mm in length by 6mm to 16mm in width. The bases are tapering attenuate while the apexes are apiculate. The concolourous laminas are dull mid green to mid blue-green and moderately to densely covered in silky, white, hirsute, hairs on the upper laminas while the lower laminas are moderately to densely covered in long, silky, white hirsute hairs. The mid vein is and the lateral veins are prominent on the lower laminas and are visible from above. The leaf margins are entire are serrate. The grey-green to purple-green petiole measures 1mm to 6mm in length. The leaves are strongly aromatic when crushed.
The inflorescences of Blumea mollis are a long panicle born from the center of the rosette. The individual heads are hemispherical to campanulate on the 3mm to 4mm spike. The peduncles are covered in silky, white hirsute hairs. The 2 to 3 involucral bracts are seriate and linear. The bases are rounded while the apexes are acute to acuminate. They are pinkish-green to mid green tinged purple and are densely covered in white hirsute hairs. The florets are pale pink, pale purple to lilac. The flowers appear from August to March.
The fruits of Blumea mollis are oblong achenes which are sparsely to densely covered in white hirsute hairs. The white pappus measure 2mm to 4mm in length.
Wildlife:
Blumea mollis’s leaves are eaten by several species of unidentified butterfly or moth larvae, kangaroos and domestic stock.
Cultivation:
Blumea mollis is not worthy of horticultural merit though it is being studied for possible anti-inflammatory drugs in all green parts of the plant.
Propagation:
Seeds: Seed is easy to collect and has a nutty taste however one may starve in the meantime if sufficient quantities were needed to survive.
Fertilize using Seaweed, fish emulsion or organic chicken pellets soaked in water on an alternate basis. Fertilize every two months until the plants are established then annually in early September to October to maintain health, vitality and better flowering.
Further Comments from Readers:
Hi reader, it seems you use The Bible of Botany a lot. That’s great as we have great pleasure in bringing it to you! It’s a little awkward for us to ask, but our first aim is to purchase land approximately 1,600 hectares to link several parcels of N.P. into one at The Pinnacles NSW Australia, but we need your help. We’re not salespeople. We’re amateur botanists who have dedicated over 30 years to saving the environment in a practical way. We depend on donations to reach our goal. If you donate just $5, the price of your coffee this Sunday, We can help to keep the planet alive in a real way and continue to bring you regular updates and features on Australian plants all in one Botanical Bible. Any support is greatly appreciated. Thank you.
In the spirit of reconciliation we acknowledge the Bundjalung, Gumbaynggirr and Yaegl and all aboriginal nations throughout Australia and their connections to land, sea and community. We pay our respect to their Elders past, present and future for the pleasures we have gained.
Boehmeria macrophylla
Classification:
Unranked: Eudicots
Unranked: Core Eudicots
Unranked: Rosids
Order: Rosales
Family: Urticaceae
Genus: Is named in honour of George Boehmer; 1723-1803, who was a German professor of Botany.
Species: From Makros which is Ancient Greek for large and Phullon/Phyllon, which is Ancient Greek for a leaf. It refers to leaves, which are a lot larger than other species in the genus.
Common Name: Native Ramie.
Distribution: Boehmeria macrophylla is restricted to several small disjunct populations from the Bunya Mountains in south east Queensland to Dorrigo in north eastern New South Wales.
https://avh.ala.org.au/occurrences/search?taxa=Boehmeria+macrophylla+#tab_mapView
Habitat Aspect Climate:
Boehmeria macrophylla prefers dappled sunlight. It grows on flood plains, alluvial flats, creek, stream and river meanders and rocky riparian zones. The altitude ranges from 10 meters ASL to 1150 meters ASL
The temperatures range from 3 degrees in August to 35 degrees in January.
The rainfalls range from lows of 550mm to 2100mm average per annum, however high orographic precipitation is just as important as rainfall.
Soil Requirements:
Boehmeria macrophylla prefers better quality deep, sandy loams, light fatty clays to medium clays. The soils are usually derived from decomposed black basalts. The soil’s pH ranges from 5.5pH to 6.5pH. It does not tolerate waterlogged soils. None saline soils to moderately saline soils are tolerated.
Height & Spread:
Wild Plants: 0.5m to 2m by 0.5m to 1.5m
Characteristics:
Boehmeria macrophylla’s brown stems turn bright grass-green as they approach the apexes. Young and juvenile branchlets are pink to red-pink at the petioles nodes. The stems are covered in short, white puberulent to pulverulent hairs. The hairs on this species do not contain any stinging substances, like so many other species in this family.
Boehmeria macrophylla’s opposite leaves are broadly lanceolate to ovate in outline and measure 60mm to 140mm in length by 22mm to 80mm in width. The bases are rounded to broadly cuneate while the apexes are aristate. The discolourous laminas are a bright grass-green and slightly scabrous on the upper laminas while the lower laminas are slightly paler and covered in white puberulent to pulverulent hairs. The mid vein and main lateral veins are strongly prominent on the lower laminas while the secondary veins are slightly prominent. The mid vein, lateral veins and secondary veins are visible from the upper laminas. The upper laminas are convex between the lateral veins and the secondary veins. The laminas are flat or recurve slightly from the midvein to the margins. The leaf margins are regularly toothed often becoming more deeply toothed as they approach the apexes. The petioles are pale yellow-green to pinkish-green and are deep pink to pinkish-red at the base of the leaf and at the node’s junction to the stem. The petioles measure to 2mm to 8mm in length.
The inflorescences of Boehmeria macrophylla are spikes born from the leaf axils. The rachises measure 50mm to 200mm in length. I have never encountered rachises longer than 90mm in length within Australia. The individual, minute, flowers are arranged in interrupted clusters along the rachises. The clusters measure 5mm to 7mm in diameter. The calyxes, petals and ovary are grass-green while the stamens are white. The flowers appear throughout the warmer months.
The fruits of Boehmeria macrophylla are achenes surrounded by the perianth.
Wildlife:
There are a number of butterflies that rely on Boehmeria macrophylla. The Red Admiral Butterfly Vanessa atalanta, Question Mark Butterfly Polygonia interrogationis, Eastern Comma Butterfly Polygonia comma, and the Flowing-Line Bomolocha Moth Bomolocha manalis. The stems are prone to the Stem Gall Fly Neolasioptera boehmeriae.
The fibres from beneath the bark are used extensively in Asia and Africa for the manufacturing of bags and clothing similar to hemp. It makes a finer material than hemp but is just as durable.
Cultivation:
Boehmeria macrophylla will grow from 1.5 meters to 2.2 meters in height by 1 meter to 1.8 meters in diameter in the garden. It will need a good quality friable loam.
It would make a good contribution as an understory plant in a rainforest garden where it is grown for its foliage. The foliage contrasts beautifully with that of all the Cordyline species including Cordyline petiolaris and Cordyline terminalis. Boehmeria macrophylla offers a great contrast in leaf shape, size, colour and texture. It is responds admirably to watering, additional fertilizer a tick layer of organic mulch and tip pruning.
It needs to be surrounded by other plants as it will host other wildlife and will have the leaves severely chewed at least once a year. When this occurs simply wait for the invaders to disperse. Heavily prune the plants by cutting back 50mm of the stems and give them a good soaking with our recommended organic fertilizer programme.
Propagation:
Seeds: The seeds of Boehmeria macrophylla are very easy to collect. Once ripe cover the rachises with a dry paper bag and you will have sufficient seeds in the bag in a couple of days for personal use.
The seeds do not need to be treated so just sow the fresh seeds directly into a seed raising mix, keeping them moist not wet. When the seedlings are 20mm to 25mm in height, prick them out and plant them into 50mm native tubes using a good organic mix.
Fertilize using Seaweed, fish emulsion or organic chicken pellets soaked in water on an alternate basis. Fertilize every two months until the plants are established then annually in early September or March to maintain health, vitality and better flowering.
As the seedlings roots reach the bottom of the tubes plant them out into their permanent position. Do not delay.
For mass plantings, space the seedlings at 1.5 meters to 2 meter centers.
Cuttings: 1 prepare the cutting mix by adding one third sharp clean river sand, one third peat and one third perlite. These ingredients are sterile,
2 Select good material from non diseased plants that is 80mm to 120mm in length with at least two nodes,
3 Select semi green stems for cuttings. Look for a stem with two or three nodes,
4 Place the cutting on a flat, hard surface, and make a clean slice through the middle of the lower node on an angle towards the base, with a sterilized sharp knife or razor blade. – This scarification of the node will increase the chances of roots emerging from this spot. Now remove all but one or two the leaves, leaving the apex leaves in tact. If the leaves are very large in proportion to the stem, cut off the apical halves.
5 Some plants root easily, but a rooting hormone can help others by stimulating the cutting into sending out new roots. Fill a saucer with water, and place some rooting hormone into another container like a bottle top. Dip the node end of the cutting into the water and then into the rooting hormone. Tap off any excess hormone,
6 Use a small dipple stick or old pencil to poke a hole into the soilless potting mix. Ensure the hole is slightly larger than the stem diameter and be careful not to wipe the rooting hormone off the cuttings base, place the cuttings in a pattern ensuring the cuttings are not touching each other,
7 I like to place the pots in Plastic bags to help maintain temperature and moisture. Place in a semi shaded place like under 50mm shade cloth.
8 When the cuttings have struck, open the bag to allow air circulation for a few days to a week,
9 Once hardened off remove the cuttings from the bag and allow to further hardening for a few more days,
10 Transplant into a good potting mix to grow on.
Fertilize using Seaweed, fish emulsion or organic chicken pellets soaked in water on an alternate basis. Fertilize every two months until the plants are established then annually in early September to October to maintain health, vitality and better flowering.
Further Comments from Readers:
Hi reader, it seems you use The Bible of Botany a lot. That’s great as we have great pleasure in bringing it to you! It’s a little awkward for us to ask, but our first aim is to purchase land approximately 1,600 hectares to link several parcels of N.P. into one at The Pinnacles NSW Australia, but we need your help. We’re not salespeople. We’re amateur botanists who have dedicated over 30 years to saving the environment in a practical way. We depend on donations to reach our goal. If you donate just $5, the price of your coffee this Sunday, We can help to keep the planet alive in a real way and continue to bring you regular updates and features on Australian plants all in one Botanical Bible. Any support is greatly appreciated. Thank you.
In the spirit of reconciliation we acknowledge the Bundjalung, Gumbaynggirr and Yaegl and all aboriginal nations throughout Australia and their connections to land, sea and community. We pay our respect to their Elders past, present and future for the pleasures we have gained.
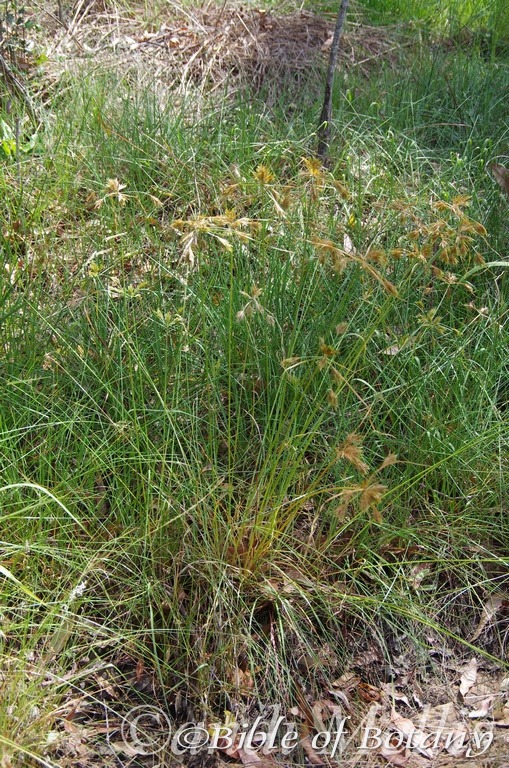
Clarence Way Mountain View NSW
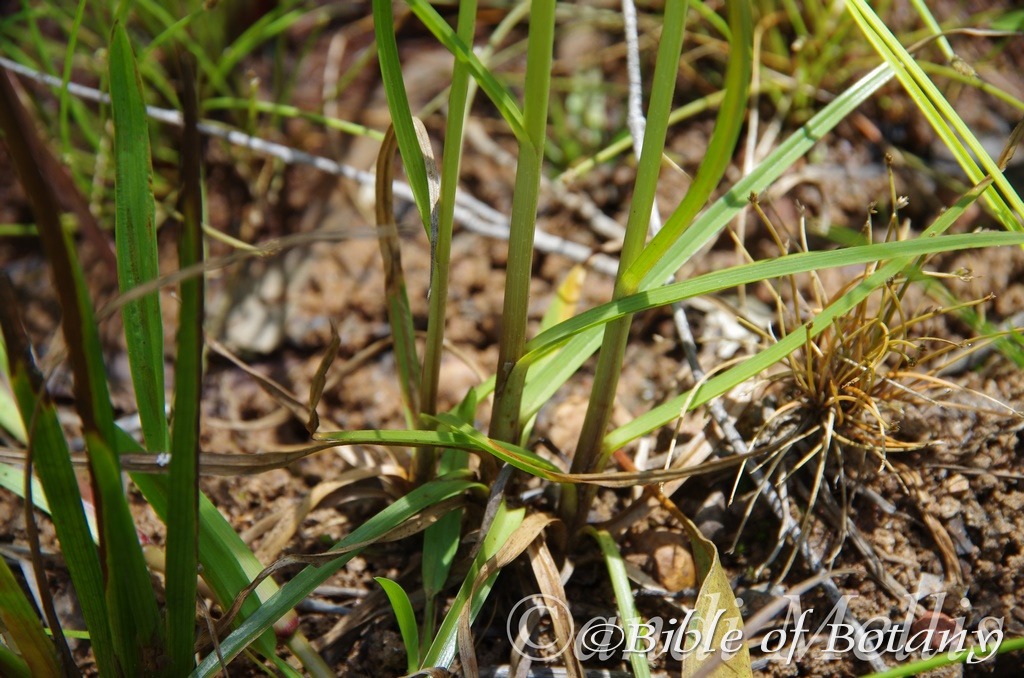
Clarence Way Mountain View NSW

Clarence Way Mountain View NSW
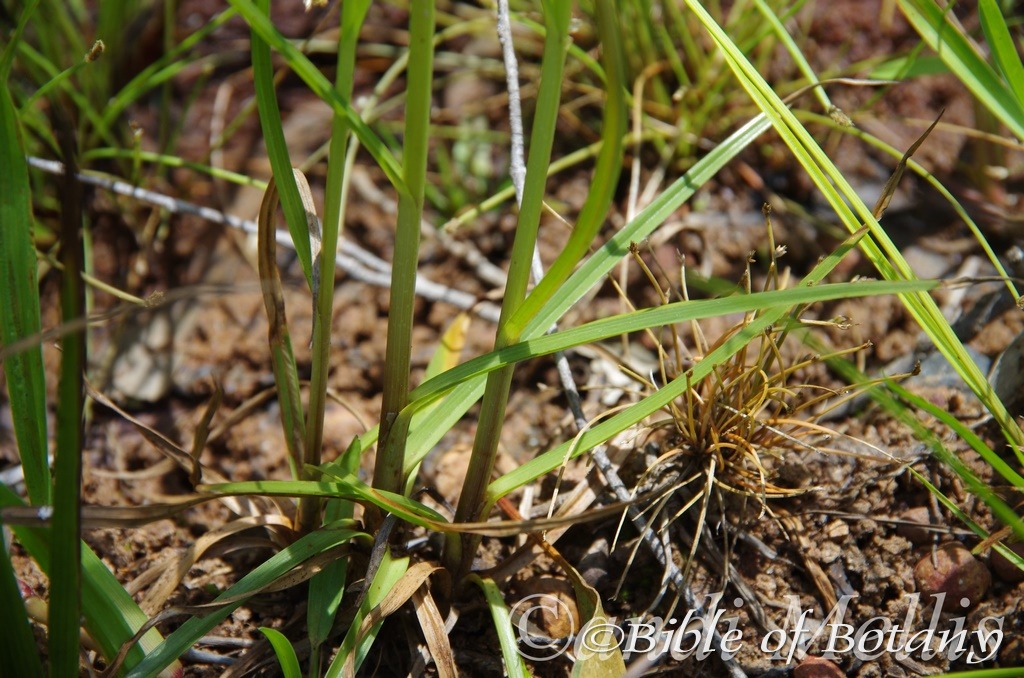
Clarence Way Mountain View NSW

Clarence Way Mountain View NSW
Bolboschoenus fluviatilis
Classification:
Unranked: Monocots
Unranked: Commelinids
Order: Poales
Family: Cyperaceae
Genus: From Bolbos, which is Ancient Greek for a bulb or tuber and Schoenus, which is Ancient Greek for a reed or rush. It refers to the rushes which resemble the Schoenus genus however they have bulbulous tubers.
Species: From Fluvius, which is Latin for a river. It refers to plants, which prefer to grow in or near flowing water.
Common Name: Marsh Club Rush.
In the Aboriginal language it is known as Belillah.
Distribution:
Bolboschoenus fluviatilis is found south from the Millstream falls near Ravenshoe in far north Queensland to the Werribee Gorge National Park in Victoria. It is mainly found on and east of the Great Dividing Range. There are several isolated populations including Bowen Downs near Aramac and the Carnarvon Gorge in Queensland, the Macquarrie marshes along the Macquarie River in New South Wales and Berrie and Murray Bridge along the Murray River in South Australia.
https://avh.ala.org.au/occurrences/search?taxa=Bolboschoenus+fluviatilis#tab_mapView
Habitat Aspect Climate:
Bolboschoenus fluviatilis prefers light dappled shade to full sun. It is usually found in swamps moist wallum heaths or along creeks and streams in open sclerophyll forests or open Eucalyptus forests. It is also found in fresh water to brackish water along estuaries and behind mangrove swamps. The altitude ranges from 5 meters ASL to 650 meters ASL.
The temperatures range from minus 2 degrees in August to 37 degrees in January.
The rainfall ranges from lows of 300mm to 2400mm average per annum however ground water is more important than actual rainfall.
Soil Requirements:
Bolboschoenus fluviatilis prefers deep, coarse muddy sands, fine muddy sands, and sandy loams, light fatty clays to heavy clays or light muddy silts to heavy muddy silts. The soils are usually derived from decomposed black basalts, alluvial muddy silts or at times heavy accumulated peaty beach sands. The soil’s pH ranges from 5pH to 6.5pH. It tolerates seasonal waterlogged soils. None saline soils to very saline soils are also tolerated.
Height & Spread:
Wild Plants: 1.5m to 2m by hundreds of square meters.
Characteristics:
Bolboschoenus fluviatilis is a tall erect densely tufted or spreading rhizomatous perennial rush. The rusty-orange rhizomes are long, stout and are often stained black due to the amount of rotting vegetation in the water.
The node less culms are erect and measure 1000mm to 2000mm in height by 5mm to 15mm diameter. The culms are glabrous and smooth while the culms themselves are terete to triangular.
The leaf sheaths completely surround the culms and reach to the middle of the culms. They are glabrous, smooth, dull and are straw coloured to pale green. The veins extend to the apex or rarely converge prior to the apex. They measure 200mm to 750mm in length by 7mm to 22mm in width. The concolourous laminas are grass-green. The margins are entire.
The compound inflorescences usually have 6 to 9 radiating branches however as few as 4 and as many as 12 have been recorded. The branches measure 20mm to 100mm in length by 1.5mm to 2.5mm in diameter.
The ovoid to lanceolate spikelets form at the ends of the branchlets and consist of 10 to 40 individual flowers. The involucral bracts measure 150mm to 250mm in length by 3mm to 12mm in width. The spikelets measure 10mm to 25mm in length by 6mm to 10mm in diameter. The scale like sepals are often loosely imbricate, orange-brown to stramineous, membranous or translucent and usually obscurely spotted. The scales measure 7mm to 10mm in length by 3mm to 4mm in width.
The acute to long acute similar glumes are yellow-brown with ciliate margins. The glumes measures 6mm to 7mm in length plus the mucronate apexes which measure 1.5mm to 3mm in length. The stout awns measure 2mm to 3mm in length by 0.5mm at the base.
The inflorescences have yellow 3 anthers. The anthers measure 3mm to 4mm in length overall including the 0.2mm to 0.3mm appendages.
The styles are trifid. The flowers appear from late September to February under ideal conditions.
The fruits of Bolboschoenus fluviatilis are trigonous achenes. The achenes are smooth, glabrous and yellow-orange to pale orange-brown. The apexes are covered in minute, white hispid hairs. The green achenes turn pale grey and glossy when ripe and measure 3.3mm to 5.5mm in length by 2mm to 2.9mm in diameter with an obtuse beak which measures 0.2mm to 0.8mm in length.
Wildlife:
Bolboschoenus fluviatilis’s appears not to have any predators though the leaves and culms are often used to make the nests of marsh inhabiting birds.
The seeds are edible but little else is known. The plants are low nutritional value for stock probably because of the tough hard fibrous culms and low volume of leaf material.
Bolboschoenus fluviatilis is an excellent rush for erosion control and for purifying stagnant water.
Cultivation:
Bolboschoenus fluviatilis is a medium perennial tufted or spreading rush for wet locations in very large gardens. It should be more widely grown in temperate, semi-arid and arid gardens as ornamental plants beside large water features. It is ideal at the edge of a forest to add a vertical dimension to the scene. In cultivation it will grow from 1 meter to 2 meters in height by 2 meters to 5 meters in diameter when grown in the open or smaller if adequately contained.
A single plant or small groups planted around swimming pools or a single plant in enclosed courtyards or foyers are really magnificent. The plants create a very strong contrast against hard walls and fences but must be used correctly as not to look weedy.
It grows exceptionally well on all soil types including pure sand and thrives on pindan soils provided deep watering is given on a regular basis to prevent excess cracking. The soils should never be allowed to dry out. It can cope with temperatures as low as minus 2 degrees and up to 40 degrees. It is drought resistant once established while at the same time can cope with long periods of flooding and wet feet.
Add to the above, if it is given a little native fertilizer on being planted out as a seedling will respond with good flowering and good seed set over a long period.
Large mass plantings look weedy so should be avoided. Scattered through an annual or perennial scene it adds a vertical dimension and colour throughout the year.
Potted plants placed in large fish ponds will enhance it and add a new dimension for attracting Damselflies and dragonflies.
Spent flowers should be removed to promote longer flowering and better quality flowers next time.
Propagation:
Seeds: Seeds of Bolboschoenus fluviatilis can be collected from the panicles as the majority of the seeds ripen. Once the flowers have died and the first seeds have appeared remove the panicle and place it in a brown paper bag. Seeds will remain viable for several years if kept cool and dry.
Sow the seeds directly into a seed raising mix, keeping them moist by standing the treys in water. When the seedlings are 40mm to 50mm tall, prick them out and plant them into 50mm native tubes using a good organic mix.
As the seedlings roots reach the bottom of the tubes plant them out into their permanent position. Do not delay as they will develop a large root system quickly and will be difficult to remove without some set back to the vigour or health of the plants.
Division: Bolboschoenus fluviatilis can also be divided, although getting large numbers is more successful from seed. It can be divided by digging up a clump and cutting the fibrous root clumps into two to four equal parts with a spade. Cut all the leaves and stems back to within 50mm to 70mm of the ground level and replant them in a prepared hole. I usually do this by making sure the old ground level is 10mm to 20mm below that of the new ground level where you want them to be at the same level when everything settles down or plant them at the same level if a small depression is required. Water in thoroughly with a weak solution of one of our fertilizer recommendations.
Fertilize using Seaweed, fish emulsion or organic chicken pellets soaked in water on an alternate basis. Fertilize every two months until the plants are established then annually in early September to October to maintain health, vitality and better flowering.
Further Comments from Readers:
Hi reader, it seems you use The Bible of Botany a lot. That’s great as we have great pleasure in bringing it to you! It’s a little awkward for us to ask, but our first aim is to purchase land approximately 1,600 hectares to link several parcels of N.P. into one at The Pinnacles NSW Australia, but we need your help. We’re not salespeople. We’re amateur botanists who have dedicated over 30 years to saving the environment in a practical way. We depend on donations to reach our goal. If you donate just $5, the price of your coffee this Sunday, We can help to keep the planet alive in a real way and continue to bring you regular updates and features on Australian plants all in one Botanical Bible. Any support is greatly appreciated. Thank you.
In the spirit of reconciliation we acknowledge the Bundjalung, Gumbaynggirr and Yaegl and all aboriginal nations throughout Australia and their connections to land, sea and community. We pay our respect to their Elders past, present and future for the pleasures we have gained.
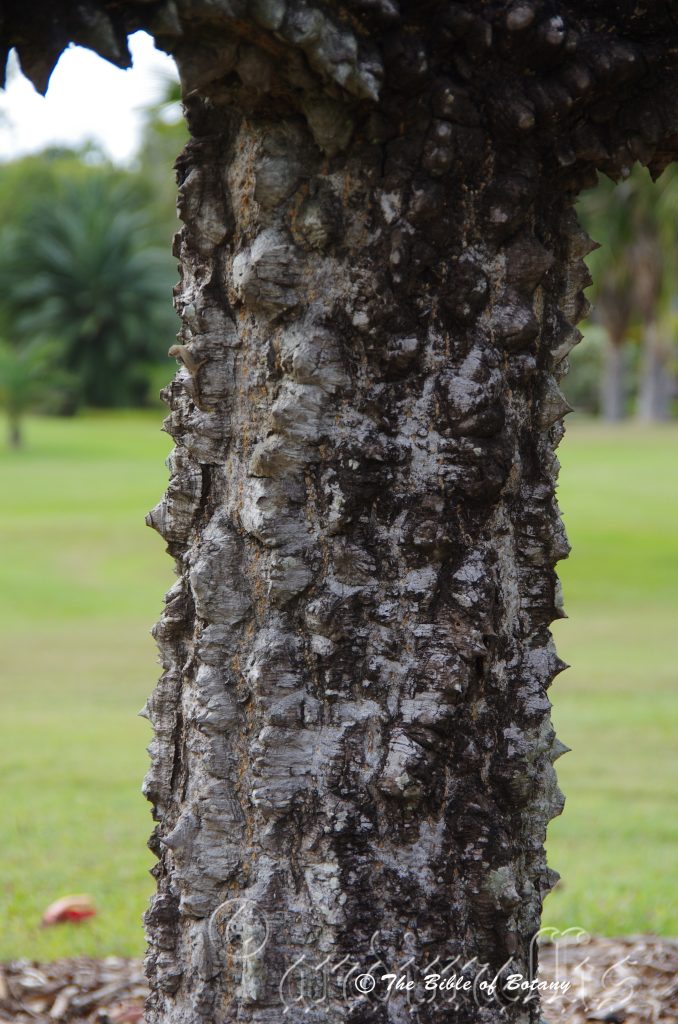
Townsville Qld.
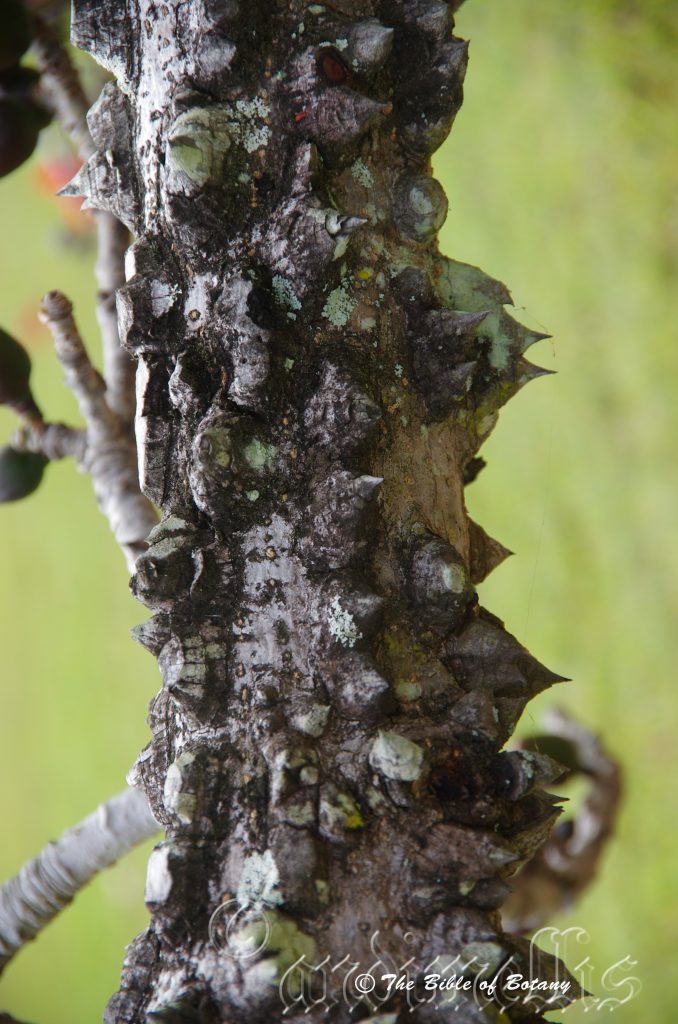
Townsville Qld.
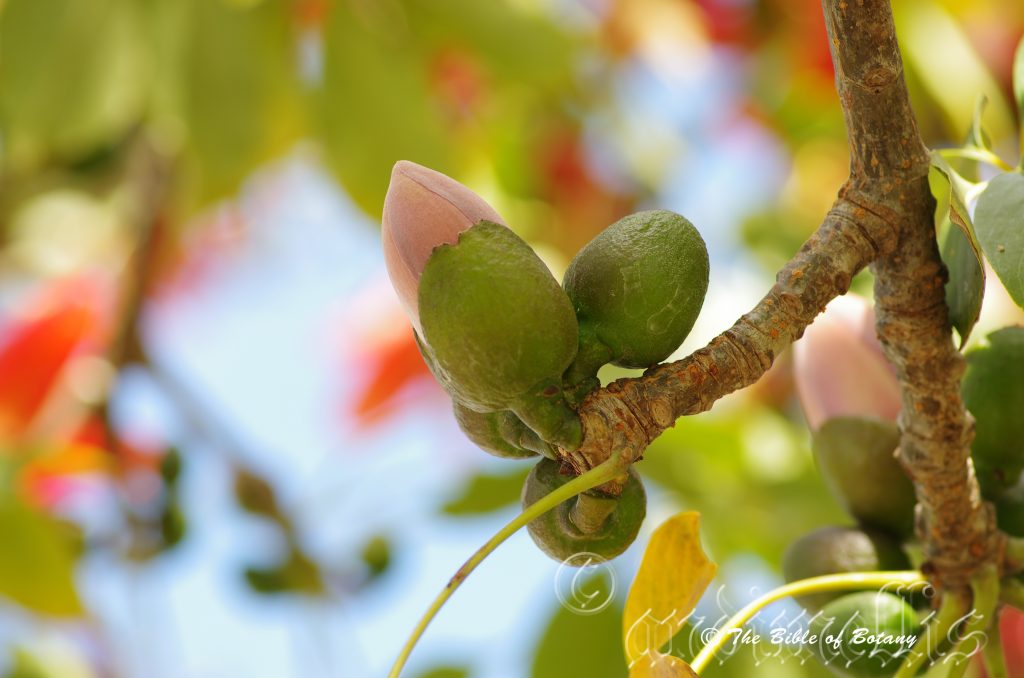
Townsville Qld.
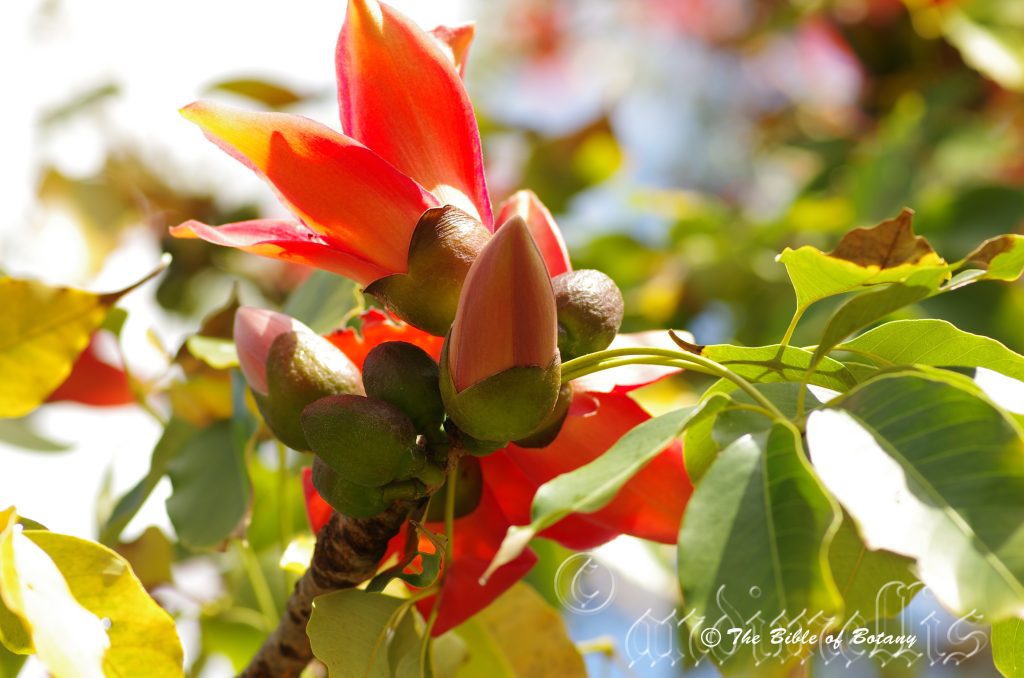
Townsville Qld.

Townsville Qld.
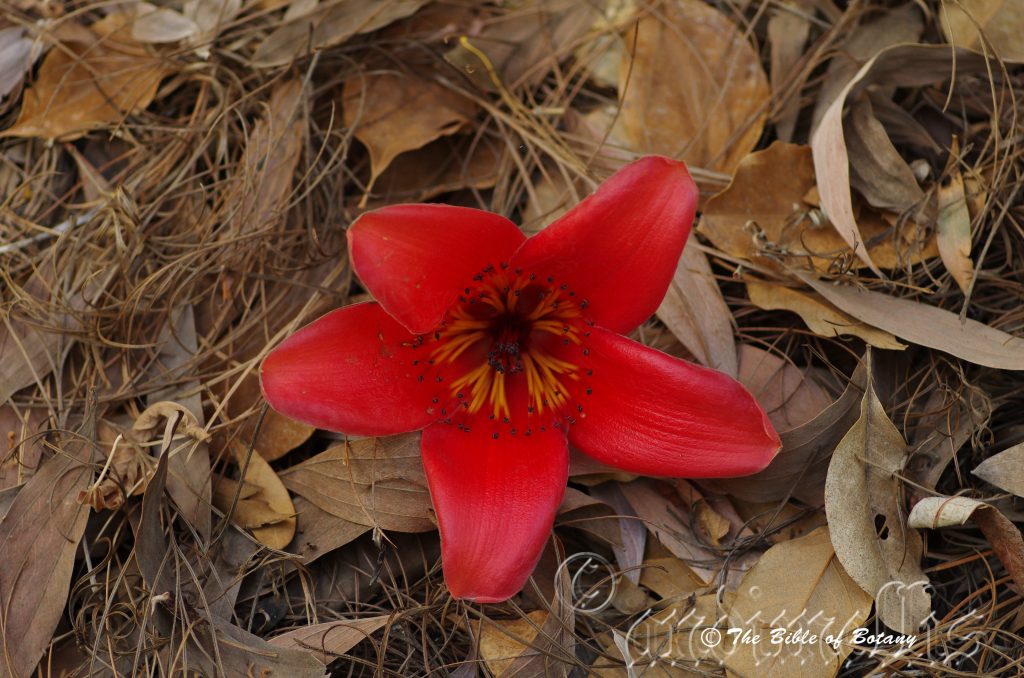
Townsville Qld.
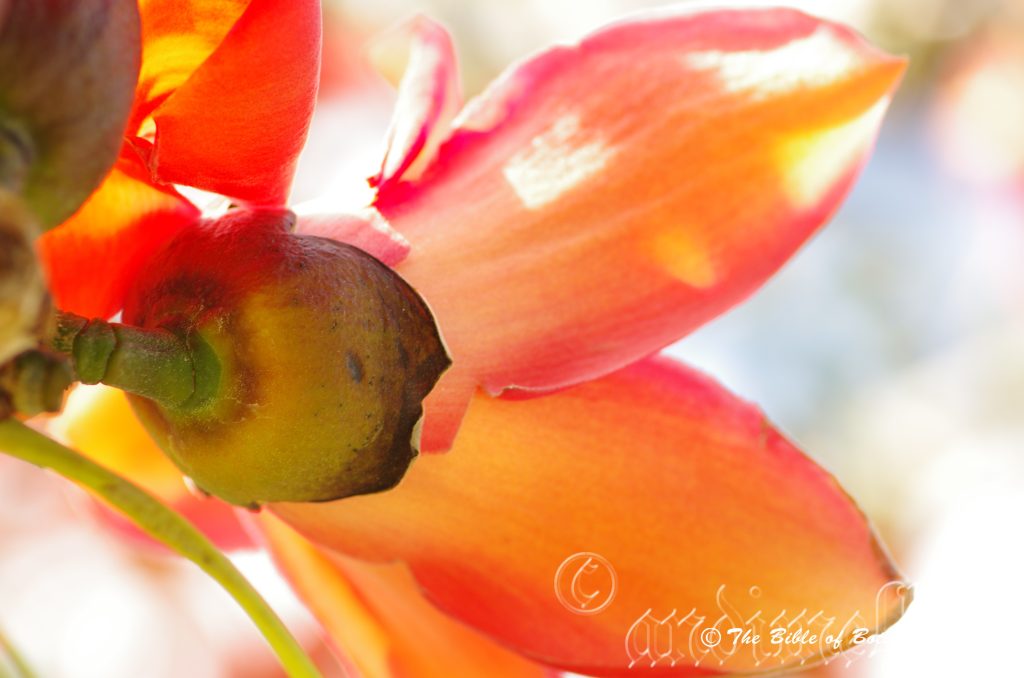
Townsville Qld.
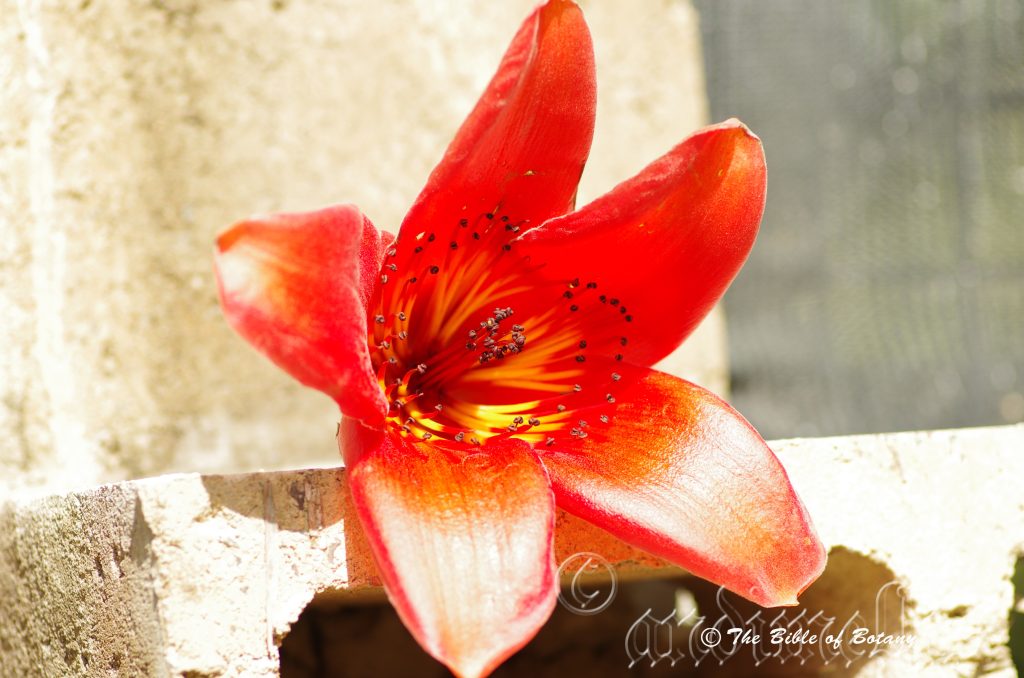
Townsville Qld.
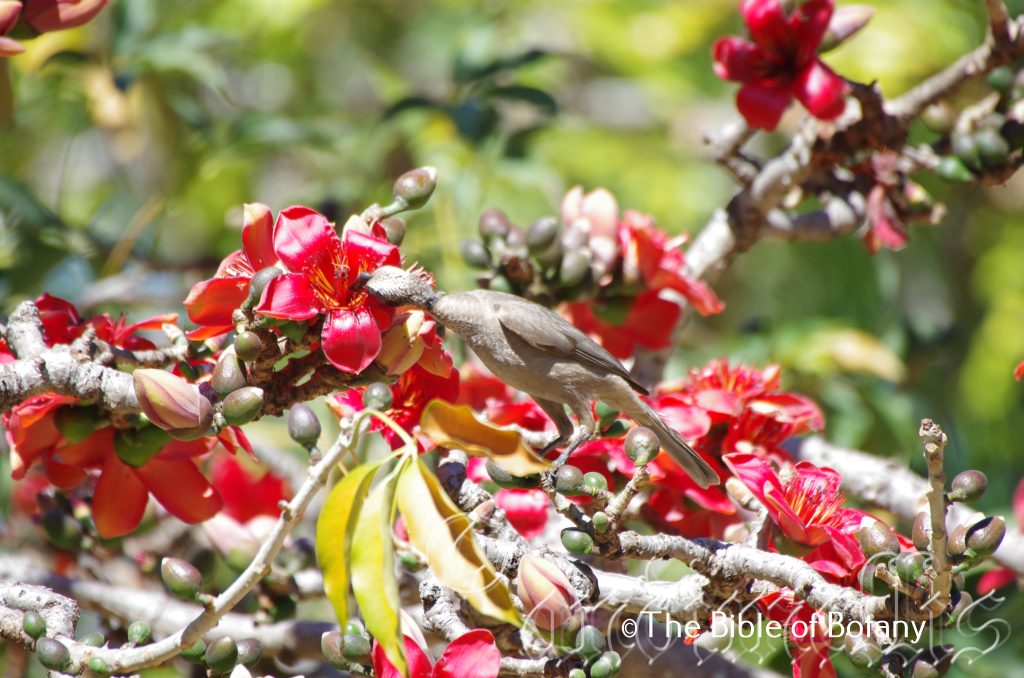
Philemon corniculatus Condon Qld.
Bombax ceiba
Classification:
Unranked: Eudicots
Class: Rosids
Order: Malvales
Family: Malvaceae
Genus: From Bombyx, which is Ancient Greek for raw silk. It refers to the long silk threads surrounding the seeds.
Species: From Ceiba which is Latinized from the South American name of a large tree in the Ceiba genus. It refers to plants, which have structures or organs that resemble the Ceiba Genus.
Subspecies: Bombax ceiba subsp. leiocarpum. From Leios, which is Ancient Greek or Leio, which is Latin for smooth or glabrous and Karpos, which is Ancient Greek for a fruit. It refers to the fruits, which are somewhat smooth and glossy. It is the only subspecies found in Australia.
Common Name: Silk Tree, Malabar silk-cotton tree, red silk-cotton, red cotton tree, silk-cotton or kapok.
Distribution:
Bombax ceiba is a widespread tree from India, Southern China, through Indonesia, new Guinea and to Australia.
In Australia it is found from the Kimberleys in Western Australia east to near Ingham and north to the tip of Cape York Peninsula and the Torres Strait Islands in far north Queensland.
It is also found in Indonesia, Malaysia, Myanmar, Malaysia, Philippines, Southern China, Thailand, Vietnam and Taiwan,
https://avh.ala.org.au/occurrences/search?taxa=Bombax+ceiba#tab_mapView
Habitat Aspect Climate:
Bombax ceiba prefers full sun. It grows on flood plains, alluvial flats and river plains surrounded by red sandstone cliffs. The altitude ranges from 5 meters ASL to 450 meters ASL
The temperatures range from 7 degrees in August to 42 degrees in February.
The rainfalls range from lows of 1500mm to 3200mm average per annum.
Soil Requirements:
Bombax ceiba prefers deep, coarse sands, fine sands, and sandy loams, light fatty clays to medium clays or light silts to heavy silts. The soils are usually derived from decomposed sandstones granites, brown basalts, black basalts or podzolic soils. The soil’s pH ranges from 4pH to 6pH. It does not tolerate waterlogged soils. None saline soils to high end of moderately saline soils are tolerated.
Height & Spread:
Wild Plants: 5m to 20m by 5m to 18m
Characteristics:
Bombax ceiba has a fawn to pale creamy grey-brown trunk that is covered in short stout conical prickles extending to the larger branches. The branchlets are fawn to pale creamy grey-brown and covered in short stout conical prickles. The juvenile branchlets with the terminal growing shoots are grass-green and covered in fawn silky and stellate hairs.
Bombax ceiba’s opposite palmately compound leaves measure 110mm to 220mm in length by 110mm to 280mm in width. The elliptical to broad elliptical leaflets measure 100mm to 200mm in length by 35mm to55mm in width. The bases are cuneate while the apexes are broad acuminate to apiculate-aristate. The discolourous laminas are a dull mid green to deep green and glabrous on the upper laminas while the lower laminas are slightly paler. The laminas recurve upwards from the mid vein to the margins and are flat or slightly undulating. The mid vein is slightly prominent on the upper lamina and is visible from the lower lamina. The leaf margins are entire. The petioles measure 11mm to 20mm in length. The trees are deciduous from July to November which is the traditional dry season.
The inflorescences of Bombax ceiba are born singly from the leaf axis or on short thick peduncles. The peduncles and pedicels are glabrous. The peduncles measure 20mm to 45mm in length by 8mm to 12mm in diameter. The copular calyx’s tubes are olive-green to mid green, glabrous and measure 10mm to 20mm in length by 16mm to 35mm in diameter. The 4 calyx lobes are shallowly obtuse. The 5 scarlet-red to scarlet-crimson contorted petals are oblong with an acuminate apex. The coriaceous petals are glabrous internally and measure 60mm to 90mm in length by 20mm to 30mm in width.
The 70 to 100 scarlet-red to scarlet-crimson stamens measure 30mm to 40mm in length. The stamens initially form a central column splitting away in basically 5 bundles alternating with the petals as the flower ages. Several shorter stamens will still form a column even after anthesis and at the death of the flower. The oval anthers are deep brown.
The pistil measures 45mm to 55mm in length. The scarlet-red to scarlet-crimson has a 6 lobed stigma. The rancid smelling flowers are produced in profusion from August to October.
The fruits of Bombax ceiba are oblong capsules. The capsules are slightly broader at the bases than the apexes. The capsules measure 70mm to 100mm in length by 30mm to 45mm in diameter near the base. The capsules are covered in fine fawn stellate hairs. The green capsules turn grey when ripe and split to reveal the fine, cream to white cottony material which the seeds are embedded. The deep brown oval seeds measure 3.6mm to4mm in diameter.
Wildlife:
Bombax ceiba’s have typical flowers which are fertilized by bats and larger nectar eating birds. Possums and possibly tree kangaroos also eat the flowers and nectar but are not involved in the fertilization of the flowers. The flowers are also support a rich variety of insects ranging from native flies, bees, beetles and pollen flies.
Cultivation:
It would make an good fire retardant small tree.
* Fire retardant plants act as radiant heat screens and absorb more heat from an approaching fire without burning.
* Fire retardant trees are able reduce wind speed near a house or out buildings.
* Fire retardant also trap embers and sparks carried by the wind.
* Fire retardant ground covers are able to catch burning embers without catching fire themselves, and also slow the travel of a fire through debris and litter on the ground.
Bombax ceiba is so revered in Southern China that it is the floral Emblem of China Southern Airlines. In China it is known as Mu Mian and like the Kangaroo in Australia it can be seen on the tail of their aircraft.
Bombax ceiba grows as a very variable tree depending on the amount of soil moisture and air temperatures It will grow from 5 meters to 20 meters in height by 8 meters to 12 meters in diameter in the garden when grown in an open situation. Bombax ceiba could be grown on the east coast as far south as Melbourne and Adelaide and as far south as Perth on the west coast where frosts are not severe. The trees make wonderful park exhibits and a few mature trees growing on a small allotment in Coffs Harbour grab the attention of every citizen every year when they commence flowering.
Bombax ceiba make beautiful garden subjects, but beware it does drop a lot of leaves half way through the dry season.
The trees would make very good accent trees in front of low set homes, commercial buildings, industrial sheds or school classrooms where they will break up hard rigid architectural lines and give warmth and breadth to a building.
Classrooms on the western slopes of the Great Dividing Range and the northern parts of Australia would benefit from the trees supplying shade in the hot summers through to autumn and still allow the northern sun through for warmth in the winter and and early spring.
It is relatively fast growing given a little attention and fertilizer.
Along nature strips on the non-services side of the road it would give western towns in arid areas great colour and character whether it are in flower or bare of leaves.
Propagation:
Seeds: The seeds of Bombax ceiba is easy to collect from fallen capsules. Sow fresh seeds directly into a seed raising mix, keeping them moist not wet. Place the trays in a sunny position or in a shade house beneath 30mm shade cloth. Germination is relatively fast. When the seedlings are 20mm to 25mm in height, prick them out and plant them into 50mm native tubes using a good organic mix.
As the seedlings roots reach the bottom of the tubes plant them out into their permanent position. Do not delay.
For mass plantings, space the seedlings at 1.5 meters to 2 meter centers.
Fertilize using Seaweed, fish emulsion or organic chicken pellets soaked in water on an alternate basis. Fertilize every two months until the plants are established then annually in early September to October to maintain health, vitality and better flowering.
Further Comments from Readers:
Hi reader, it seems you use The Bible of Botany a lot. That’s great as we have great pleasure in bringing it to you! It’s a little awkward for us to ask, but our first aim is to purchase land approximately 1,600 hectares to link several parcels of N.P. into one at The Pinnacles NSW Australia, but we need your help. We’re not salespeople. We’re amateur botanists who have dedicated over 30 years to saving the environment in a practical way. We depend on donations to reach our goal. If you donate just $5, the price of your coffee this Sunday, We can help to keep the planet alive in a real way and continue to bring you regular updates and features on Australian plants all in one Botanical Bible. Any support is greatly appreciated. Thank you.
In the spirit of reconciliation we acknowledge the Bundjalung, Gumbaynggirr and Yaegl and all aboriginal nations throughout Australia and their connections to land, sea and community. We pay our respect to their Elders past, present and future for the pleasures we have gained.
All information is included in good faith and has been thoroughly researched prior to printing. The website or the author does not warrant or guarantee the accuracy of any information on these pages, nor does the website or the author accept any responsibility for any loss arising from the use of the information found within. The views and opinions are strictly those of the author or those members who chose to actively participate in the contents herein.