INDOORS, OUTDOORS OR POTTED ON: Sawdust or sand mixes are too well draining unless the sawdust has been completely composted down where it exhibits a texture like plastacine to the touch. Moisture can be squeezed out between the fingers yet it remains moist. I find this a great basis to start with. Sawdust in this condition is difficult to obtain.
As a nurseryman we had to use one versatile mix for all the plants we grew. We were mainly fern growers but dappled in an array of rainforest plants, Eucalyptus, Grevillea, Protaceae and one of my favourites the native Malvaceae family.
Aged saw dust is common and more easily obtained but ensure that it is weed free. Often sawdust that has been stored for long periods outdoors is exposed to the elements and riddled with grass seeds. We had our sawdust aged and ensured it was under cover during the process so weed seeds were almost totally eliminated.
All aging methods come with problems. In our case because the mix was organic Stag beetles and Click beetles of many specie moved in so the mix had to be continually sifted prior to using it to remove the larvae. This became a favourite activity of our resident Rail (Gallirallus philippensis) as they would very quickly appear for the feast.
Stag beetles are those beetles that have large mandibles and belong to the family Lucanidae while Click beetles which are in the Elateridae family. There are over 85 specie of stag beetles and 800 of the 9300 specie of click beetles are found in Australia.
Many specie of Stag beetles lay their eggs in rotten wood with the larvae consuming the wood and the fungus associated with the decomposition of the wood. Different specie prefer the wood from different trees but moist rotting logs to moist dead standing timber. Adults of some species feed on nectar, young plant shoots and sap flows but most species are not known to feed as adults.
Males always have larger mandibles than the females and in some species the males have exceptionally large mandibles. The mandibles are used in battle against other males to ascertain their rights over territories and to lure females. The most common species the Golden-green Stag Beetle; Lamprima aurata, could be the culprit however I could easily have misdiagnosed the specie. The beetle larvae are probably edible and the ones I had tasted from our compost had a distinctively creamy yet gritty taste. Gritty as I could not remove all the sand particles from the gut despite purging. The beetles certainly have a future in cuisine if there are no long term affects and a suitable purging method can be found. They are obviously very easy to raise when conditions are favourable
Many specie of Click beetles lay their eggs in rotten wood with the larvae consuming the wood and the fungus associated with the decomposition of the wood. Different specie prefer the wood from different trees but moist rotting logs to moist dead standing timber some Click beetles are herbaceous eating plant rots while others are known to be carnivorous. Click Beetle larvae have long, narrow distinctly segmented worm like bodies. They are usually cream to pastel yellow in colour with deep reddish-brown, deep brown or black head. They live in rotting wood or in soil feed on plant roots, with some species are predators.
Mix 4 parts of the well decomposed saw dust with the above feel with 4 part sharp clean sand, 1 part compost and one part good crusher dust preferably basalt rock quarries. Preferably black basalt but both are good. Make sure the sand comes from a source that does not have salt. Water well with each of our recommended fertilizer at full strength and allow to stand for a 10 days to 14 prior to using.
Alternatively use 5 parts of the aged sawdust with two parts sharp sand and one part good crusher dust from basalt rock quarries. Preferably black basalt but both are good. Make sure the sand comes from a source that does not have salt. If possible replace the two parts sand with two parts fine crushed basalt of equal size. Water well with each of our recommended fertilizer at full strength and allow to stand for a 10 days to 14 prior to using.
To the above mixes add 10 kilograms of good 100mm blood and bone if you did not age the saw dust yourself and water well with each of our recommended fertilizer at full strength and allow the mix to stand for 10 to 14 days prior to using.
If really phosphate sensitive plants are used substitute the blood and bone with blood meal or use a combination of the two.
If the aged sawdust has been aged by a professional, find out exactly what has been added to the sawdust and adjust the formula to suit. Most professionals usually just add enough urea to turn the sawdust black, not to compensate the Carbon Nitrogen ratio that is really required for balance and healthy plants. This is a huge problem found in major brands on super market shelves.
The well decomposed Sawdust in this condition creates the moisture retention and retains nutrient in. Perlite and vermiculite can be added to the mix at a ratio of 1 part to bring the mix to a more neutral position and both have great water holding capacity with out shrinkage with age. This is recommended for indoor plants. The sand creates good drainage and is good for good healthy root development while the crusher dust adds vital minerals which the plants need.
The Mix:
It is far better to buy in bulk. A trailer will cost around $150.00 to $200.00 compared to buying in bags at $480.00 to $500.00. Most garden centers will mix your ingredients to your liking.
A level 1.8m x 1.2m x .35m trailer level is 1 cubic meter.
It is better to mix your own as you know what you are getting and the balance is correct for most plants. The above mix is the one I used in the Nursery for ferns and indoor plants. With outdoor plants we added the following to the above mix, one part sand and two aged saw dust. This gave us bulk but did not forgo nutrients or quality.
1 cubic meter will fill between 4200 to 4500 native tubes.
1 cubic meter will fill between 1000 to 1200, 100mm pots.
1 cubic meter will fill between 400 to 450, 150mm pots.
1 cubic meter will fill between 115 to 150, 200mm pots.
The above figures are the conversion rates potting normal squat tubes into the pots. Higher numbers will be achieved if pots are used at the potting up stage. I always filled the pots to the brim as some settling of the mix will occur in the short period and shrinkage occurs with age.
The ingredients:
MediaTexture:
Texture is all about getting a feel for the ingredients.
* Take a small amount of soil in your palm kneed it with a little water and discard any gravel that may be included.
* Mix just enough water to the soil so that it does not stick to your
fingers.
* Now, squeeze the sample so that any excess water is removed.
* Again, squeeze it and look to see if it can be rolled into a ball.
* Roll it so that you have a rod that measures 150mm in length without breaking or falling apart.
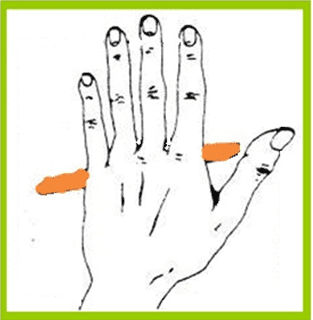
Sand – The soil remains loose and single grained and cannot be rolled into a rod.
Sandy loam – The soil contains sufficient silt and clay to become somewhat cohesive. The rod can be shaped but falls apart easily.
Silt loam – Same as for loamy sand but can be shaped by rolling into a short, thick cylinder. The rod is difficult to pick up in one piece.
Loam – About equal sand, silt, and clay means the soil can be rolled into a rod. It will quickly bend and break when held at less than 40mm from the end.
Light clay – As for loam, although soil can be bent into a U, but no further, without being broken. It will begin to bend when held at to 65mm from the end.
Medium clay – Soil can be bent into a circle that shows cracks. It will begin to bend when held at 70mm to 75mm from the end.
Heavy clay – Soil can be bent into a circle without showing cracks. It will begin to bend when held at 75mm or greater from the end.
Soil texture is a good starting point to understanding the general characteristics of your soil and potting media. Another broad method of analysing the texture is through mixing a small quantity of soil in water. The bottles are then allowed to remain still for two to five days for the soil to settle out. The heavier and larger particles will settle to the bottom while the very fine particles may remain suspended in the water for several days.
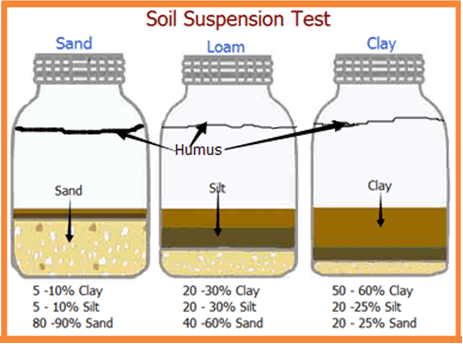
Gravel is generally defined as having particles greater than 2.5mm.
Course sand is defined as having particles 1.26mm to 2.45mm.
Sand is generally defined as having particles 0.781mm to 1.25mm.
Silt is generally defined as having particles 0.00244mm to 0.391mm.
Clay is generally defined as having particles 0.0012mm to
0.00000475mm.
Colloids:
Size makes a difference, ask any plant. Soil particles less than 0.002mm in diameter form what is known as “Colloid Fraction of Soils” So why is this so important? Colloidal refers to the ability to remain suspended in pure water.
If we consider a gram of sand and a gram of the finest clay you will see the differences very clearly when we consider the surface areas of each. The finest clay and humus particles would have a total surface area of 1250 square meters per cubic centimetre whereas even fine sand has a surface area of only 0.078 square meters per cubic centimetre and course sand even less at just 0.0006 square meters per cubic centimetre. This surface area is critical, as we will see below.
Mr. Cation & Miss Anion:
Looking at the surface area, the greater the surface area correlates to the greater the plants ability to remove nutrients from the potting media. But wait, while size is important there is more to the story in maintaining plant health. This is where transfer or the exchangeable cations and anions come into play.
To explain it simply, I often refer to this exchange of cations and anions as being similar to the dating game. Sometimes there is hectic activity and at other times, there are lulls but at any moment, there is activity. Here instead of having boys and girls falling in love we have male atoms passing electrons to female atoms who receive the electrons as gifts. Some atoms will readily share their electrons with one another; the boys and girls, while others atoms are just party poopas the teachers and parents. – One male Hydrogen atom will become friends with another Hydrogen atom who both fancy the same female oxygen atom and in doing so present or share one of their electrons with her. After a while, one of the hydrogen atoms may fall out in the relationship and dump his Oxygen girl friend or vice versa. Grumpy and possessive he now leaves taking his electron with him where he is seen going on his own merry way to find another cute Oxygen atom. After finding her, he quickly attaches himself again sharing his electron with her. Now happy again they may even enjoy another group for romance and join up with Miss Sulphur or Miss Nitrogen thus the party goes on and on. Yes like an orgy isn’t it? Remember there are dampeners called parents and teachers. Cold as they are they will slow the party down and will not share their electrons with anyone or at best a very few and just sit in a corner by themselves.
Now as many of these cations and anions are water-soluble the greater the surface area, as I said earlier, the more hectic it is to find and get a date. This correlates to the greater ability of a plant to secure the nutrients it requires to grow big strong. If there were no humus in the soil, the reactions can slow right down. It is the humus and microbes (party animals) that keep creating the position where the reactions; movement of electrons, keep moving along as though they were trying to avoid the teachers and parents, exchanging electrons and being totally absorbed by the plant’s roots. Thus, there is a strong need for clay particles and humus in the potting media for healthy growth.
Compost & Humus:
In a healthy balanced system the organic material in a soil remains relatively constant over time it is neither depleted nor augmented. The main ingredient of humus comprises of over 55mm carbon followed by over 25mm oxygen. The rest mainly consists of Hydrogen, Sulphur, Nitrogen, Potassium and trace elements.
In recent history, man has depleted the organic matter and humus in the soil through:
* Removing plant material, which breaks the carbon and decomposition cycle. This removes and is still removing billions of microbes and millions of macro-organisms from the soil as I write.
* Irrigation leaches humus from the soil.
* Excessive burning and wild fires removes organic matter from the soil transferring it to lethal unstable Carbon Monoxide and the more stable Carbon Dioxide and trace elements from the soil and transporting it to other areas usually the ocean. (Thus the oceans are becoming more polluted and acidic. Not conducive for coral growth or crustaceans.)
* Cultivation creates the most serious depletion of the soils transporting millions of years of microbial foods off the farms to where they are no longer beneficial to the soil ending up in sewage systems finding their way into rivers and oceans around the world.
The good news is that compost and humus can be replenished by:
* The use of fertilizers, organic fertilizers that is. While synthetic fertilizers add compost indirectly through promoting plant growth followed by death and decomposition it does not replenish the humus, which has previously been lost in the system, but more or less usually less increases the macronutrients. This does not augment the loss of micronutrients or increase the humus and micro or macro organisms and texture of the soils. Unfortunately, synthetic fertilizers are salt based and they increase the salinity of the soil and potting mix to its detriment.
Organic fertilizers add compost and humus in a direct manner by already being a composted or semi-composted material with the addition of many of the minerals and humus needed in a sustainable well-balanced system. Then directly by promoting plant growth followed by death and decomposition.
* The addition of compost to the soil requires a long time however, the effects are usually seen within a few years. Remember compost is not humus. Compost will take several years’ even decades to finally decompose into humus which may last in the soil for thousands of years unless removed by human activities. Healthy soils contain 2.5 to 6mm organic matter, by weight or from 5 -12mm by volume. Trials on a South Australian organic farm showed that it took 39 years to increase the humus level in the soil from 1.5mm to 5mm.
The Jenkinson, D.S. Johnston & A.E. Rothampsted Report conducted over 105 years found that 35 tonnes of stable manure added to a hectare of land each year increased the humus level from 2mm to 6mm.
* Adding clay to sandy soils will assist sandy soils to retain instead of leaching humus.
* Decreasing alkaline and neutral pH soils will aid in the retention of humus in the soil.
Some compost can be toxic while others may have no affect. Remember, that compost not humus can cause toxicity to plants or some plants and not others through Phototoxicity
Phytotoxicity as explained in another chapter in detail is a new science where plant toxins are being investigated, to suppress weed growth and seed germination rather than smothering weeds.
Phytotoxicity is more common when fresh material is dug directly into the soil, or layered over the surface as a mulch. Microbes can exude toxic chemicals into the soil while the living plants themselves can create toxic conditions surrounding their roots. One example I gave already is under Allocasuarina trees where, once a fine layer of leaves and articles are laid down very few plants can are able to grow.
Pedal Soils:
The move to good soil structure is essentially a move to a pedal soil where the compost and humus levels are between 5 and 12mm by volume. The soil structure will ultimately define the amount of humus the soil can hold.
Good pedal soils are crumbly, form small round balls of concentrated humus and have the ability to hold more water and more oxygen thus saving both time, water and pumping costs. Pedal soils also store 90 to 95mm of the nitrogen in the soil, 15 to 80mm of phosphorus and 5 to 20mm of sulphur in the soil. These little round crumbly balls also store significant amounts of cations, such as calcium, magnesium, potassium and all trace elements needed by plants. We found that our soils in the orchard took 8 to 9 years to be transferred from the decomposed, compacted, hard shale-clays to a friable pedal structure full of microbial activity.
The nursery often saw the potting media decompose into a beautiful structure full of little balls, crumbly balls that the plants thrived in prior to their sale.
Pedal soils are similar to worm castings to look at. Pedal soils increase the microbial activity, increase the speed or hasten decomposition of compost and mulches, enhance the water and oxygen levels of the soils, enhance the solubility and concentration of available minerals to the plants, lessen the leaching of minerals from the soil and greatly enhance the exchangeable cation within the soil and potting media.
At the different pH levels, different minerals are more readily available to plants as can be seen in the Nutrient availability chart above.
Earlier I mentioned the size of the particles were important factors which greatly increased the surface area for the roots in a pot to track over well the shape of the individual particles also make a big contribution. Imagine a smooth surfaced particle then a roughened particle. Which has the greatest surface area? The rough surface with sharp edges is far superior in surface area. Therefore, course sands and clays with rough surfaces are better than those with smooth particles.
Your garden soil is just like a gigantic pot of potting mix. Our block at The Pinnacles was course sand over sandstone. In six months the top 50mm to 100mm had changed substantially. To this day we still add 100mm to 200mm of mulch a year. Similarly at Nana Glen where the soil was decomposed white shale took several years of covering the orchard with various mulches the soil became one of the best and grew magnificent mandarins, oranges and lemons. The transition from sand to a pedal soil occurs slowly but it will happen.
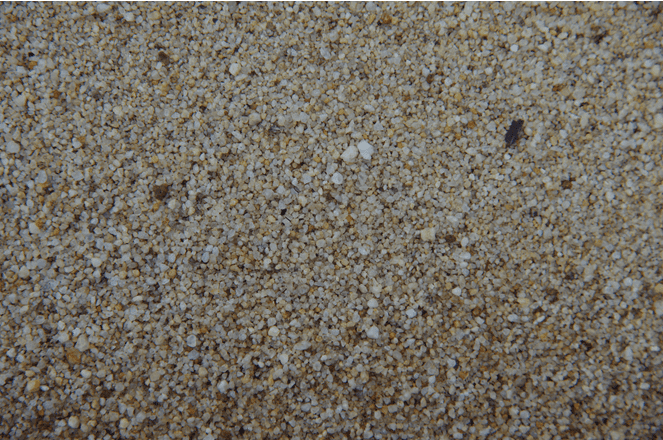
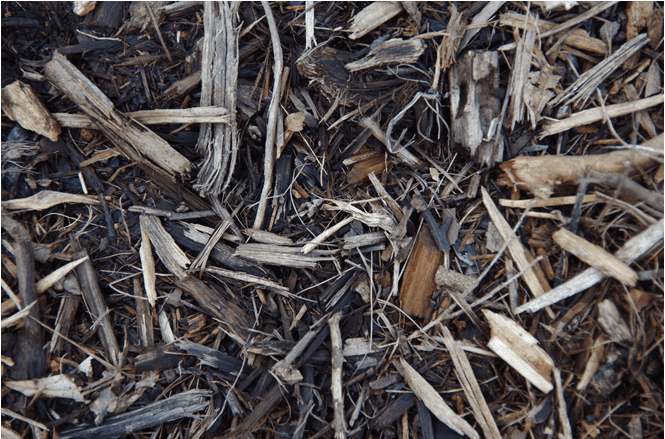
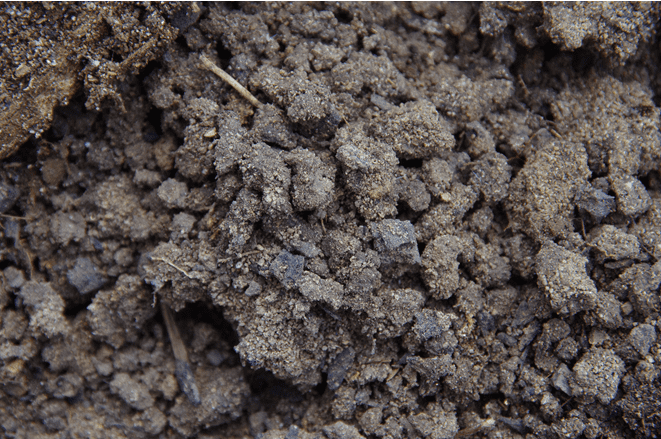
Compacted soils or compacted potting mixes reduce infiltration of water and displaces air, which starves the plants of these two vital elements for survival. A quick test is done by using a pencil and seeing how far it you can push it into moist soil using the palm of your hand. If the pencil cannot be pushed into the soil, root growth will be inhibited.
Never compress soils or potting medias around the plants at the time of potting.
Excess watering can increase the compaction of potting mixes. Avoid wet areas in the garden and farm until they have dried out. Avoid potting mixes that compact following planting, as they are too restrictive for good root development and consequently the overall health of the plant.
Excess clay or fine particles in the mix will often lead to severe compaction at some stage during the growing season.
Water infiltration:
This relates to the porosity of the media or soil and is crucial in defining mineral up take, watering and the ability of the roots to breathe adequately. When a plant is watered, the water in some instances is repelled. This is especially the case in very dry situations or do not allow the mix to dry out frequently. At other times, the water may sit on the surface, pass straight through the media or adhere to the individual particles.
In an ideal situation following the cessation or rain or irrigation there should be a mix of water and air between the particles with little to no leaching.
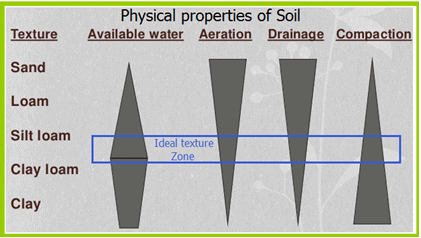
Too heavier a mix, water will not penetrate to the root zone and when it does is at the expense of oxygen while too light a mix the water will pass through leaching vital nutrients and drying the mix out too quickly. If we look at 4 glass or plastic tubes; with different diameters, placed a container of water something weird occurs the water defies gravity and moves up the inside of the tubes. The water is drawn higher in the smaller diameter tubes compared to the larger diameter tubes. If we consider the soil a series of tubes the water will adhere to the surface of the individual particles in a similar manner. The smaller the particles the smaller the pores and consequently the higher the water is drawn upwards or remains in the soil and pot following the cessation of rain or irrigation. This means the larger sand particles act like the large diameter tubes while the smaller clay particles act more like the small diameter tubes.
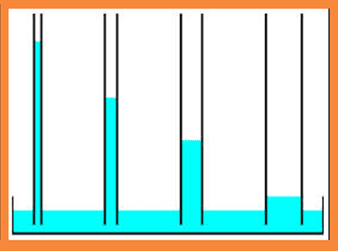
Conversely the water in the finer clay particles displaces more air/oxygen from the mixture while the larger sand particles allow more air/oxygen to remain within the soil. It is the same osmotic theory that moves water from the soil up to the highest leaves on the tallest trees.
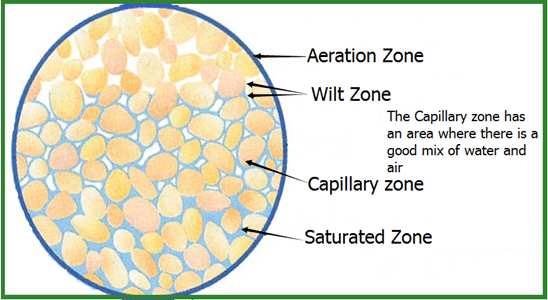
The ideal capillary size zone varies on the requirements of plants grown and the circumstances in which they are grown or are to be grown. These include:
* Wetland or bog plants require less than 5mm aeration.
* Large containers where slow growth rates are required 5 – 10mm aeration.
* Natives in native tubes 5 – 15mm aeration.
* General Nursery plantings 10 – 15mm aeration.
* Plants from arid zones and those that require frequent irrigation 10 – 15mm aeration.
* Plants required in low maintenance landscaping situations 10 -20mm aeration.
* Plants destined for sale in supermarkets 10 -15mm aeration.
* Seedlings 15 -20mm aeration.
* General Nursery plantings where high growth rates are required 10 – 25mm aeration.
* Propagation mixes in high rainfall locations 25 – 35mm aeration.
* Epiphytes and lithophytes 40 – 60mm aeration.
High organic mixes where decomposition is still taking place should have an allowance for shrinkage and decreased aeration as the mix ages.
So far, we have looked at the main chemical and physical properties of a good potting medium along with the variables of the physical qualities of a good mix.
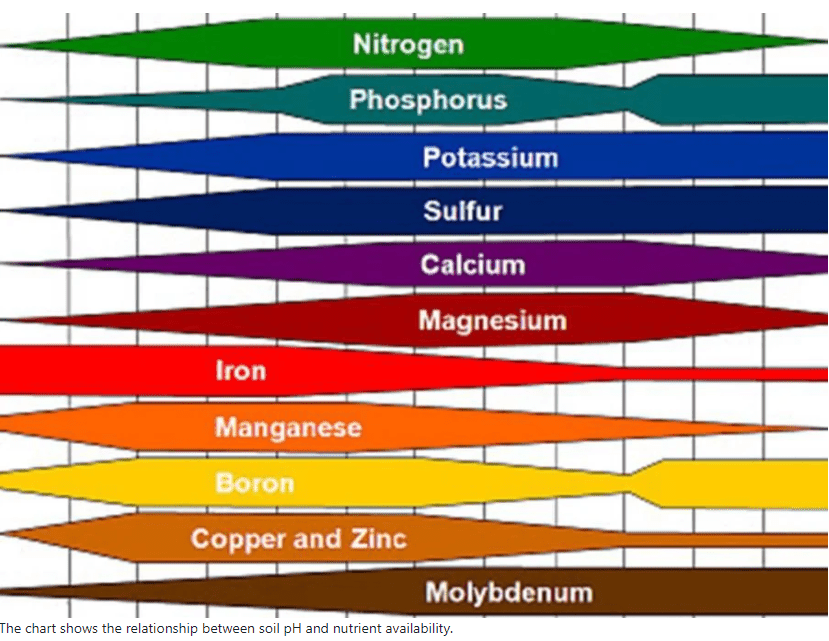
https://www.agupdate.com/relationship-between-soil-ph-and-nutrient availability/pdf_0e26de97-4724-54c5-ab44-2ca8d176137f.html
Therefore, in conclusion chemically we need to have:
* The correct balance of all nutrients preferably in the ratios the specific plants require them.
* A good freely available cation and anion exchange of 50 – 100m.e/l is great.
* A buffer capacity that is as high as possible is aided through the adding of good compost.
* A medium that is low in salts especially critical in salt sensitive species like Viola and Citrus species.
* The mix should contain high levels of beneficial microbes.
In addition, physically we need a mix that has:
* The correct aeration for the species and situation the plants are heading for.
* Has good water holding capacity in the capillary zone.
* Utilize organic materials that are stable and will fulfil the need of the plants life for the duration it is in the pots.
* The media needs to have good water infiltration without clogging.
* The media needs to have good flow without clogging when used in pot filling machines even when moist.
Remember to keep the mix simple by:
* Using the least number of different materials as possible but use different grades of that material, so that the desired aeration-water holding capacity is achieved.
* Pine bark and hardwood sawdust decompose quicker than rice hulls or peanut shells so the use of extra nitrogen maybe needed as they decompose. Ensure proper and correct aging, has been used with the correct quantities of additional nitrogen. Too little causes weak growth while too much can cause nitrite toxicity through the release of ammonium. * Where possible use different grades of material to satisfy the aeration and water holding capacity for the desired plants and to increase the surface area for the plants roots.
Before rushing into a medium premixed of your own there is a procedural sequence that, all good nurseries apply or at least should apply and it should be no different for the home enthusiast. This will vary from district to district on the availability of raw materials.
1. Make a list of the ingredients you consider important and want to use.
2. Find out what materials are available in your district based on – What is an acceptable price and reliability of long-term supply.
– These may include sugar cane bagasse, hardwood sawdust, pine sawdust, peanut shells, rice hulls, grape marc, cottonseed, peat moss etc.
3. Find out what inorganic materials are available in your district. – Check the screen sizes and salt contents of each. River sand, scoria, crushed basalt often makes a great addition with its extra mineral content but is likely to be more expensive like perlite and vermiculite.
4. Check sands and dusts for the grades and salinity levels.
5. Most quarries and landscape yards will allow you at a minimal charge to take 5 litre samples to test. Take enough for several samples and combinations.
6. Test the different combinations for water holding capacity, aeration, and adding fertilizer prior to mixing and after planting.
7. Check that the mix flows satisfactory and does not from lumps.
8. Check the pH after wetting and allowing settling for a week to 10 days and again in the tubes or pots. Mixes with a high organic humus content do best at 5pH to 5.5pH so do not be alarmed and race out to add additional lime not warranted and is normal.
9. Repeat the above steps using different fertilizing programs like seaweed or fish emulsion, pelletised chicken manure etc and check, which plants do best in each of the different mixes.
Most importantly do not get too enthusiastic and take short cuts as you may run into big problems.
Recently I had the chance to secure 25 to 40 kilograms of coffee grounds a week and thought that was terrific. The coffee acted like a sponge soaking up more water saving watering and labour. Adding the grounds to my standard fern mix I planted out a series of seedlings in the new mix and the results were superb. I followed the rainforest and fern test samples up with some very rare Acacia species and Casuarina species. The roots were in excellent condition with all plants having excellent nodulations for nitrogen fixing bacteria. A week later, the smile on my face was gone. Little be known to me; at the time, was the coffee grounds affected the nitrogen fixing bacteria on the roots (phytotoxicity) immediately killing them off which then affected the whole plant. About half died and the remaining plants struggled to stay alive until the toxicity affects had subsided. Therefore, what works well with one genus maybe toxic to another?
Coffee grounds in the compost heap with the other table scraps have proven successful once complete decomposition has taken place. The other method is to spread them thinly across the surface as a mulch where the results again have been very good.
Before I give you some basic recipes notate that Western Australian Jarrah – Eucalyptus marginata and the east coast Red Gum – Eucalyptus camaludensis can be used at 70mm where as other Eucalyptus species are better utilized at 40 to 60mm.
In each case the pine bark can be exchanged for other organic bulk lines.
Sawdust = various non treated hardwood sawdusts
Pine bark = Pinus radiate depending upon the situation Pine Bark can be course to fine.
sandc = Course grade sand.
sandm = Medium grade sand.
sandf = Fine grade sand.
Silt = medium to fine grade silt.
Seedling Blends Experiment with:
Peat/sandc 1:1
Course/perlite fine/peat moss 9:1
Perlite/vermiculite/Sandc 1:1:1
Perlite/sandm/Sandc 1:1:1
Perlite/peat/sandm 1:1:1
Sandc/peat 3:1
Course Pine bark/sandm 1:1
Course sand/Vermiculite 2:1
General Nursery blends to try:
decomposed Pine Bark 1
Pine Bark/sand 2:1 to 4:1
Pine Bark/sand/peat 1:1:1 or 2:1:1
Pine Bark/sandf/perlite 4:2:1
Pine Bark/brown/Coal/sandm 2:1:1 to 4:1:1
Pine Bark/sawdust/silt 2:2:1
Pine Bark/sandc/peatmoss 4:4:1
Pine Bark/grape marc/sandf/basaltf 3:1:2
Pine Bark/rice hulls/sandf 2:1:2
Pine Bark/sawdust/peat 1:1:1
Pine Bark/perlite/sandf 1:1:1
Pine Bark/sandf/scoria 1:2:1
Pine Bark/peanut shells/sandf/sandm 1:1:2:1
Pine Bark/sandc/peat 5:3:2
Pine Bark/sawdust/sandc/peat 3:3:2:2
Decomposed/sandc 1:1 to 3:1
Sawdust/sandc/peat 2:2:1
Sawdust/grape marc/sandm 3:3:2
Sawdust/sandf/scoria 1:1:1
Sawdust/basalt course/ Basalt fine 2:1:1
Sawdust/rice hulls/sandc 2:1:1
Our standardized personal mix for ferns basically was.
Well decomposed sawdust/sandc/sandm/sandf black, crushed basalt 10:2:3:1:1
The base fertilizers comprised of pure 100mm Hoods blood and bone a nursery mix of trace elements and dolomite. Use a mixture of seaweed and fish emulsion alternatively on a bimonthly basis.
Use freshly made mixes for Dicotyledon rainforest plants and use more decomposed older mixes for ground ferns and monocotyledon rain forest plants. Reduce the aged sawdust for dry schlerophyll plants to eight parts. As simple mix with fortified nutrients for healthy growth, adjusting the base mix to suit different genre and species is best.
When we moved the fresh sawdust, was naturally aged with the inclusion of a high percentage of offal from the local abattoir, had been introduced and allowed to sit until the heat had completely abated and following several turns. I cannot stress the importance in covering the mix with plastic sheeting so that the ammonium is trapped, which so that the nitrates remain in the mix and to eliminate the chance of weed seed infestation.
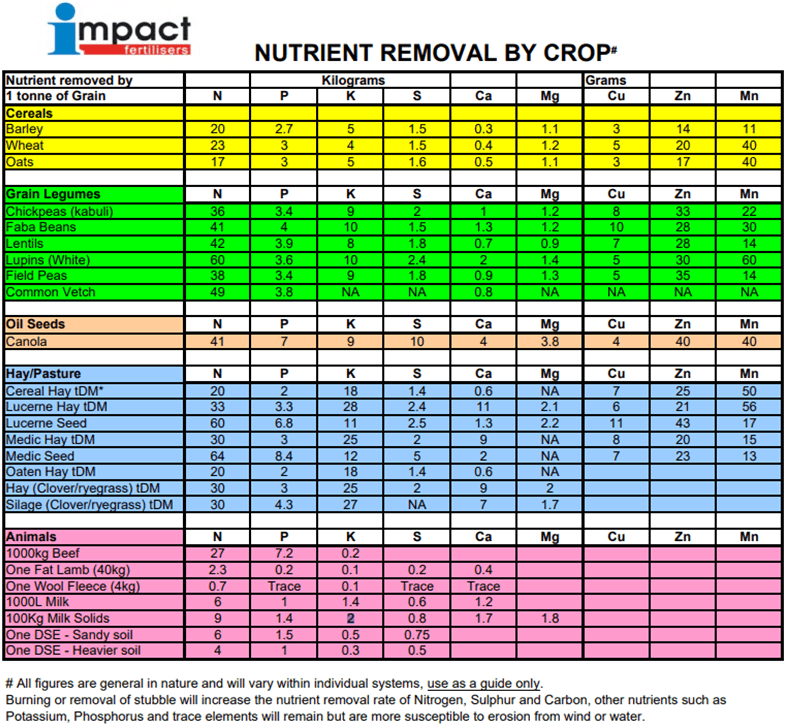
Removal rates of macronutrients per tonne of fruit in kilograms
Mandarins Oranges/Lemons
Nitrogen 2.5 2.0
Phosphorus 0.7 0.6
Potasium 4.0 3.0
Calcium 1.5 1.5
Magnesium 0.3 0.25
Looking at these figures and allowing an equal amount in the early years for growth and pasture improvement beneath it always puzzled me why farmers spread tonnes of urea (40mm nitrogen) per hectare when most was being leached, evaporated or accumulated in the soil.
150 to 200 tonnes of mandarins is produced per hectare on a well-managed orchard. When looking at the back yard gardener 1 mandarin tree at 8 years of age can produce 150 kilograms of fruit. Our 5 year old trees here; growing on sand and mulch of 90mm green material and 10mm stable manure produced 60 kilogrammes last year.
Further Comments from Members:
All information is included in good faith and has been thoroughly researched prior to printing. The website or the author does not warrant or guarantee the accuracy of any information on these pages, nor does the website or the author accept any responsibility for any loss arising from the use of the information found within. The views and opinions are strictly those of the author or those members who chose to actively participate in the contents herein.
“Hi reader, it seems you use The Bible of Botany a lot. That’s great as we have great pleasure in bringing it to you! It’s a little awkward for us to ask, but our first aim is to purchase land approximately 1,600 hectares to link several parcels of N.P. into one at The Pinnacles NSW Australia, but we need your help. We’re not salespeople. We’re amateur botanists who have dedicated over 30 years to saving the environment in a practical way. We depend on donations to reach our goal. If you donate just $5, the price of your coffee this Sunday, We can help to keep the planet alive in a real way and continue to bring you regular updates and features on Australian plants all in one Botanical Bible. Any support is greatly appreciated. Thank you.”
In the spirit of reconciliation we acknowledge the Bundjalung, Gumbaynggirr and Yaegl and all aboriginal nations throughout Australia and their connections to land, sea and community. We pay our respect to their Elders past, present and future for the pleasures we have gained.